110V SMART RV TV
FDHS24D3A[2022111214]; FDHS321DA[2022111215]
FDHS39T5A[2022111216]; FDFS43T5A[2022111217]
FDUS50F2A[2022111218]; FDUS55F9A[2022111219]
USER MANUAL
* Product picture for reference only

- 2 -
CCD-0006087
REV: 11.02.2023
Thank you and congratulations for purchasing this Furrion® product. Before operating
your new product, please read these instructions carefully. This user manual contains
information for safe use, installation and maintenance of the product.
Please keep this user manual in a safe place for future reference. This will ensure safe
use and reduce the risk of injury. Be sure to pass on this manual to new owners of this
product.
The manufacturer does not accept responsibility for any damages due to not
observing these instructions.

- 3 -
CCD-0006087
REV: 11.02.2023
CONTENTS
SAFETY WARNINGS �������������������������������������������������������������������������������������������������������������������4
IMPORTANT SAFETY INSTRUCTIONS ��������������������������������������������������������������������������������4
FUNCTION OVERVIEW �������������������������������������������������������������������������������������������������������������10
Control Panel ............................................................................................................................................. 10
Input & Output ports ................................................................................................................................ 11
REMOTE CONTROL ������������������������������������������������������������������������������������������������������������������12
ABOUT YOUR LED HD TV �������������������������������������������������������������������������������������������������������� 13
BEFORE OPERATION ���������������������������������������������������������������������������������������������������������������14
What’s in the Box ..................................................................................................................................... 14
Prepare your Remote Control ............................................................................................................ 14
INSTALL ������������������������������������������������������������������������������������������������������������������������������������������15
A. Use the supplied TV stands ........................................................................................................... 15
B. Wall Mount ............................................................................................................................................. 15
GETTING STARTED �������������������������������������������������������������������������������������������������������������������15
CONNECTION ������������������������������������������������������������������������������������������������������������������������������16
HDMI Device ..............................................................................................................................................16
Wired LAN ................................................................................................................................................... 17
Wireless .......................................................................................................................................................18
INPUTS ��������������������������������������������������������������������������������������������������������������������������������������������19
HOME �����������������������������������������������������������������������������������������������������������������������������������������������19
SETTINGS �������������������������������������������������������������������������������������������������������������������������������������20
Sound Menu ............................................................................................................................................... 21
Network Menu .......................................................................................................................................... 21
Channel Menu .......................................................................................................................................... 22
Accessibility Menu ................................................................................................................................. 22
System Menu ............................................................................................................................................ 23
Support ....................................................................................................................................................... 24
MULTI-SCREEN �������������������������������������������������������������������������������������������������������������������������� 25
Sharing (Mirroring) ................................................................................................................................. 25
Content Sharing ...................................................................................................................................... 25
TROUBLESHOOTING ��������������������������������������������������������������������������������������������������������������26
SPECIFICATIONS �����������������������������������������������������������������������������������������������������������������������28
- 4 -
CCD-0006087
REV: 11.02.2023
SAFETY WARNINGS
CAUTION
RISK OF ELECTRIC
SHOCK
DO NOT OPEN
CAUTION: TO REDUCE THE RISK OF ELECTRIC
SHOCK, DO NOT REMOVE COVER (OR BACK).
NO USER-SERVICEABLE PARTS INSIDE.
REFER SERVICING TO QUALIFIED SERVICE
PERSONNEL.
This ‘bolt of lightning’ indicates
uninsulated material within your
unit which may cause an
electrical shock. For the safety of
everyone in your household, please do
not remove product covering.
The ‘exclamation mark’ calls
attention to features within the
enclosed literature to prevent
operating and maintenance problems.
WARNING: To reduce the risk of fire or
electric shock, this apparatus should not
be exposed to rain, moisture placed in
the vicinity or objects filled with liquids
(such as vases).
CAUTION: To prevent electric shock,
fully insert the plug. For regions with
polarized plugs: Please match wide blade
to wide slot.
IMPORTANT SAFETY INSTRUCTIONS
1. Read these instructions.
2. Keep these instructions.
3. Heed all warnings.
4. Follow all instructions.
5. Do not use this apparatus near water.
6. Clean only with a dry cloth.
7. Do not block any of the ventilation
openings. Install in accordance with
the manufacturers instructions.
8. Do not install near any heat sources
such as radiators, heat registers,
stoves or other apparatus (including
amplifiers) that produce heat.
9. Do not defeat the safety purpose of
the polarized or grounding-type plug.
A polarized plug has two blades with
one wider than the other. A grounding
type plug has two blades and a third
grounding prong. The wide blade
or the third prong are provided for
your safety. When the provided plug
does not fit into your outlet, consult
an electrician for replacement of the
obsolete outlet.
10. Protect the power cord from being
walked on or pinched, particularly at
plugs, convenience receptacles and
the point where they exit from the
apparatus.
11. Only use attachments/accessories
specified by the manufacturer.
12. Use only with a cart, stand, tripod,
bracket or table specified
by the manufacturer or
sold with the apparatus.
When a cart is used, use
caution when moving the cart/
apparatus to avoid injury from
tip-over.
13. Unplug this apparatus during
lightning storms or when unused for
long periods of time.
14. Refer all servicing to qualified service
personnel. Servicing is required when
the apparatus has been damaged in
any way, such as if the power-supply
- 5 -
CCD-0006087
REV: 11.02.2023
cord or plug is damaged, liquid has
been spilled or objects have fallen
into the apparatus, or when the
apparatus has been exposed to
rain or moisture, does not operate
normally, or has been dropped.
15. Apparatus should not be exposed
to dripping or splashing, and
objects filled with liquids, such as
vases, should not be placed on the
apparatus.
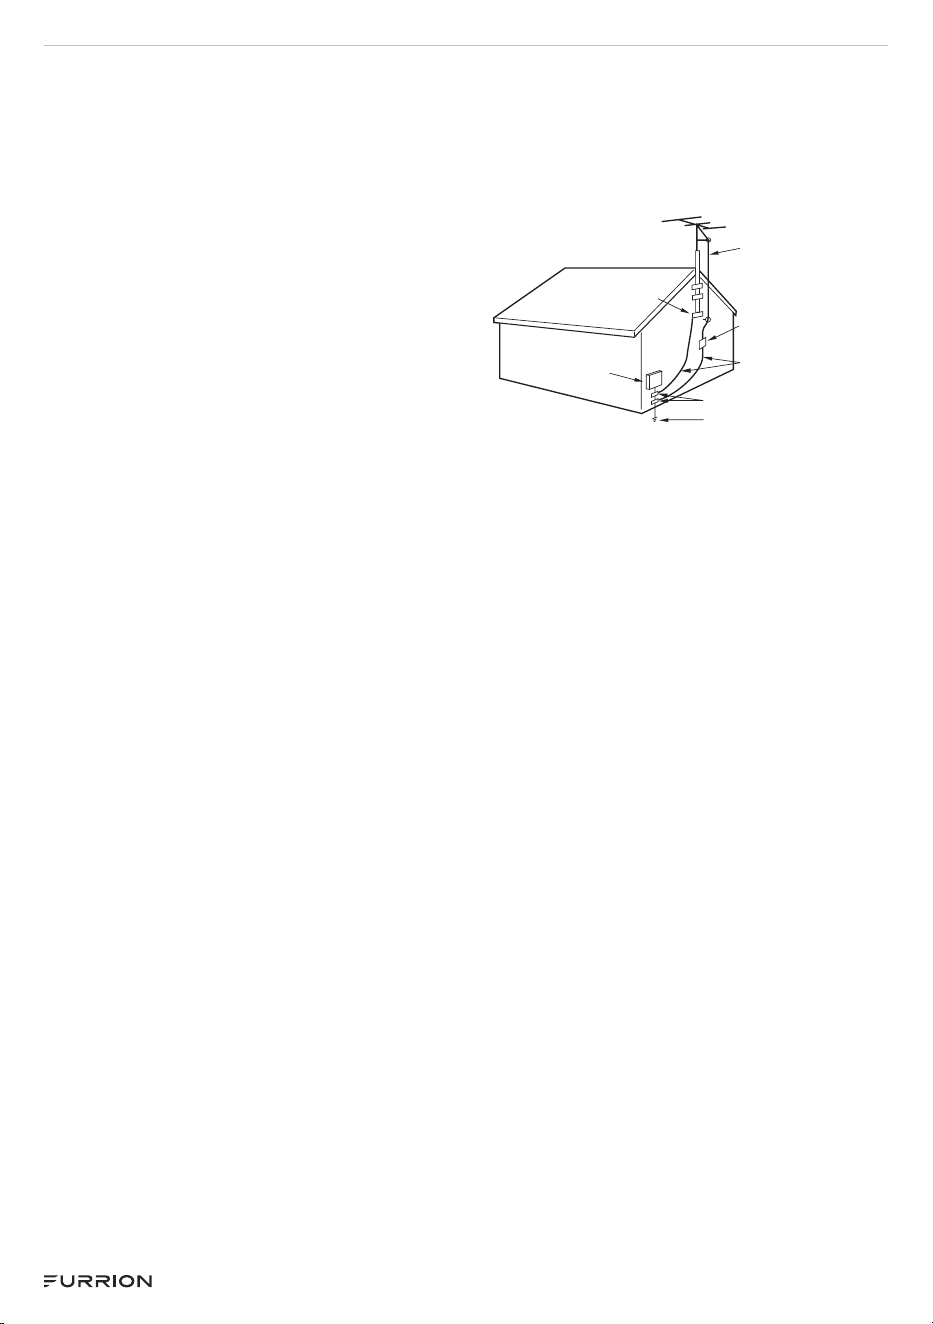
16. An outside antenna system should
not be located in the vicinity of
overhead power lines or other
electric light or power circuits, or
where it can fall into such power lines
or circuits. When installing an outside
antenna system, extreme care should
be taken to eliminate touching power
lines or circuits as contact might be
fatal.
17. Do not overload wall outlets,
extension cords, or integral
convenience receptacles as this can
result in a risk of fire or electric shock.
18. Never push objects of any kind into
this product through openings as
they may touch short-out parts or
dangerous voltage points that could
result in a fire or electric shock. Never
spill liquid of any kind on the product.
19. If an outside antenna or cable
system is connected to the unit, be
sure the antenna or cable system is
grounded to provide some protection
against voltage surges and built-up
static charges, Section 810 of the
National Electrical Code, ANSI/
NFPA 70, provides information with
respect to proper grounding of the
mast and supporting structure,
grounding of the lead-in wire to
an antenna discharge unit, size of
grounding conductors, location of
antenna discharge unit, connection
to grounding electrodes, and
requirements for the grounding
electrode.
NEC-NATIONAL
ELECTRICAL
CODE S2898A
POWER SERVICE GROUNDING
ELECTRODE SYSTEM
(NEC ART 250, PART H))
GROUND CLAMPS
GROUND CLAMP
ANTENNA
DISCHARGE UNIT
(NEC SECTION 810-20)
EXAMPLE OF ANTENNA GROUNDING AS PER THE
NATIONAL ELECTRICAL CODE
ANTENNA
LEAD IN WIRE
GROUNDING
CONDUCTORS (NEC
SECTION 810-21)
ELECTRIC SERVICE
EQUIPMENT
20. When replacement parts are
required, be sure the service
technician uses replacement parts
specified by the manufacturer
or those that have the same
characteristics as the original part.
Unauthorized substitutions may
result in fire, electric shock or other
hazards.
21. Upon completion of any service or
repairs to this unit, ask the service
technician to perform safety checks
to determine that the unit is in proper
operating condition.
22. When you connect the product to
other equipment, turn off the power
and unplug from the wall outlet.
Failure to do so may cause an
electric shock and serious personal
injury. Read the owner’s manual of
the other equipment carefully and
follow the instructions when making
any connections.
23. Sudden high volume may cause
hearing or speaker damage. When
you use headphones (if the unit is
equipped with a headphone jack),
keep the volume at a moderate level.
If you use headphones continuously
with high volume, you may suffer

- 6 -
CCD-0006087
REV: 11.02.2023
hearing damage.
24. Do not allow the product to output
distorted sound for extended periods
of time. This may cause speaker
overheating and fire.
25. This reminder is provided to call the
cable TV system installer’s attention
to Article 820-40 of the NEC that
provides guidelines for proper
grounding and, in particular, specifies
the cable ground shall be connected
to the grounding system of the
building, as close to the point of cable
entry as practical.
26. The socket-outlet must be installed
near the unit and easily accessible.
27. The main plug is used as the
disconnect and shall remain readily
operable.
CONDENSATION
Moisture will form in the operating
section of the unit if the unit is brought
from cool surroundings into a warm
room or if the temperature of the room
rises suddenly. When this happens the
unit’s performance will be impaired. To
prevent this, let the unit stand in its new
surroundings for about an hour before
switching on, or make sure the room
temperature rises gradually.
Condensation may also form during
the summer if the unit is exposed to the
breeze from an air conditioner. In such
cases, change the location of the unit.
HOW TO HANDLE THE LCD PANEL
● Do not press hard or jolt the LCD
panel. It may cause the LCD panel
glass to break and injury may occur.
● If the LCD panel is broken, make
absolutely sure you do not touch the
liquid in the panel. This may cause
skin inflammation.
● If the liquid gets in your mouth,
immediately gargle and consult with
your doctor. Also, if the liquid gets
in your eyes or touches your skin,
consult your doctor after rinsing for
at least 15 minutes in clean water.
Possible Adverse Effects on LCD
Panel: If a fixed (non-moving) pattern
remains on the LCD panel for long
periods of time, the image can become
permanently engrained and cause subtle
but permanent ghost images. This type
of damage is NOT COVERED BY YOUR
WARRANTY. Never leave your LCD
panel on for long periods of time while
it is displaying the following formats or
images:
● Fixed images, such as stock tickers,
video game patterns, TV station
logos and websites.
● Special formats that do not use the
entire screen. For example, viewing
letterbox style (16:9) media on a
normal (4:3) display (black bars at
top and bottom of screen); or viewing
normal style (4:3) media on a wide
screen (16:9) display (black bars on
left and right sides of screen).
The following symptoms are not signs
of malfunction but technical limitation.
Therefore we disclaim any responsibility
for these symptoms.
● LCD panels are manufactured
using an extremely high level of
precision technology, however
sometimes parts of the screen may
be missing picture elements or have
luminous spots. This is not a sign of a
malfunction.
● Do not install the LCD panel near
electronic equipment that produces
electromagnetic waves. Some
equipment placed too near this unit
may cause interference.
● Effect on infrared devices – there

- 7 -
CCD-0006087
REV: 11.02.2023
may be interference while using
infrared devices such as infrared
cordless headphones.
Power source: This LED TV is designed
to operate on 110~240 volt 50/60 Hz,
AC current. Insert the power cord into a
110~240 volt 50/60 Hz outlet.
To prevent electric shock, do not use
the LED TV’s (polarized) plug with an
extension cord, receptacle, or other
outlet unless the blades and ground
terminal can be fully inserted to prevent
blade exposure.
Warning: To reduce the risk of fire
or electric shock, do not expose this
apparatus to rain or moisture.
Caution: Never remove the back cover
of the LED TV as this can expose you to
very high voltages and other hazards. If
the TV does not operate properly, unplug
the LED TV and call your authorized
dealer or service center.
Adjust only those controls that are
covered in the instructions, as improper
changes or modifications not expressly
approved by Furrion could void the user’s
warranty.
Declaration of Conformity
WARNING: This equipment has been
tested and found to comply with the
limits for a Class B digital device,
pursuant to Part 15 of the FCC Rules.
These limits are designed to provide
reasonable protection against harmful
interference in a residential installation.
This equipment generates, uses and
can radiate radio frequency energy and,
if not installed and used in accordance
with the instructions, may cause harmful
interference to radio communications.
However, there is no guarantee that
interference will not occur in a particular
installation. If this equipment does cause
harmful interference to radio or television
reception, which can be determined by
turning the equipment off and on, the
user is encouraged to try to correct
the interference by one or more of the
following measures:
– Reorient or relocate the receiving
antenna.
– Increase the separation between the
equipment and receiver.
– Connect the equipment to an outlet on
a circuit different from that to which the
receiver is connected.
– Consult the dealer or an experienced
radio/TV technician for help.
CAUTION: Changes or modifications
not expressly approved by the party
responsible for compliance with the FCC
Rules could void the user’s authority to
operate this equipment.
Safety Precautions
WARNING: Never place a television set
in an unstable location. A television set
may fall, causing serious personal injury
or death. Many injuries, particularly to
children, can be avoided by taking simple
precautions such as:
– Using cabinets or stands recommended
by the manufacturer of the television set.
– Only using furniture that can safely
support the television set.
– Ensuring the television set is not
overhanging the edge of the supporting
furniture.
– Not placing the television set on tall
furniture (for example, cupboards or
bookcases) without anchoring both
the furniture and the television set to a
suitable support.
– Not placing the television set on
cloth or other materials that may be
located between the television set and
supporting furniture.
– Educating children about the dangers
of climbing on furniture to reach the
television set or its controls.
If your existing television set is being
- 8 -
CCD-0006087
REV: 11.02.2023
retained and relocated, the same
considerations as above should be
applied.
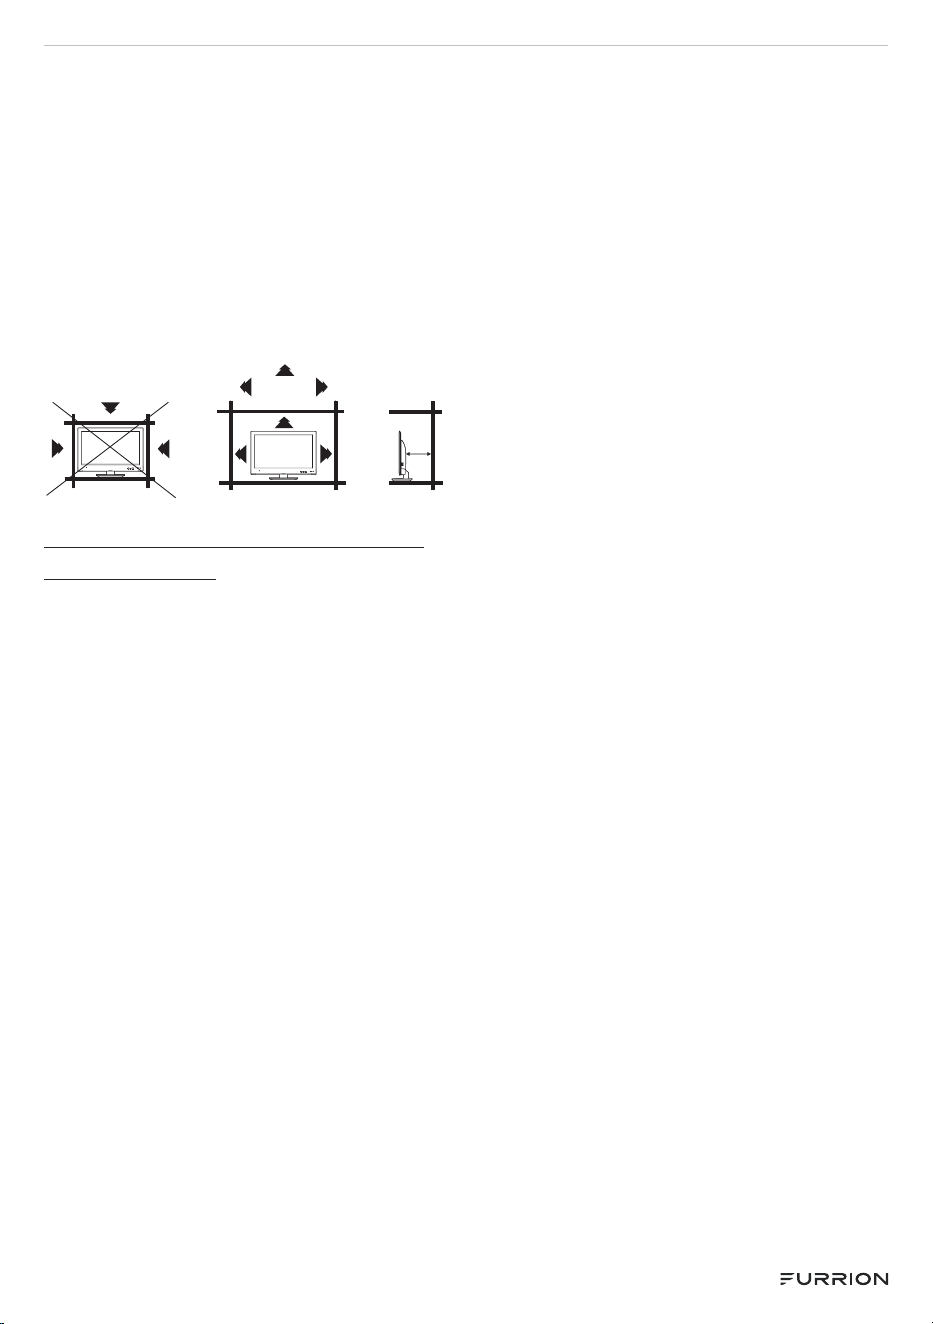
The unit emits heat when in operation.
Do not place any covers or blankets on
the unit, this may cause overheating. Do
not block ventilation holes, or set up near
radiators. Do not place in direct sunlight.
When placing on a shelf leave 4 inches
(10 cm) free space around the entire unit.
4 inches
4 inches
YES !!
NO !!
Wire
Clamp
Screw
Wire
4 inches
Wire
Notes when mounting the LED
TV on the wall
If the unit is to be mounted on the wall,
contact the retailer where you purchased
the LED TV for advice, and have the
equipment professionally installed.
Incomplete or improper installation may
cause injury to you and/or damage to the
LED TV.
Please refer to the table below to ensure
the correct VESA mounting is used for
the TV.
Notice for TV Cabinet
If the unit is to be mounted on a cabinet
smaller than the length of the unit, it
could result in an unstable location. The
unit may tumble over, making a risk of
personal, possibly fatal injury. This would
also damage the product seriously.
Accordingly, Furrion accepts no
responsibility or liability for any injuries
or property damage resulting from the
improper installation.
- 9 -
CCD-0006087
REV: 11.02.2023
Control Panel
1
2
3
4 5 6
7
Please note that the button layout of the controls may vary from model to model.
Control Panel
1
POWER Power on/off.
2
SOURCE Press to select the input source
3
MENU Press to enter the main menu
4
CH- Press to skip to the previous channel
5
CH+
Press to skip to the next channel
6
VOL- Decrease volume
7
VOL+ Increase volume
- 10 -
CCD-0006087
REV: 11.02.2023
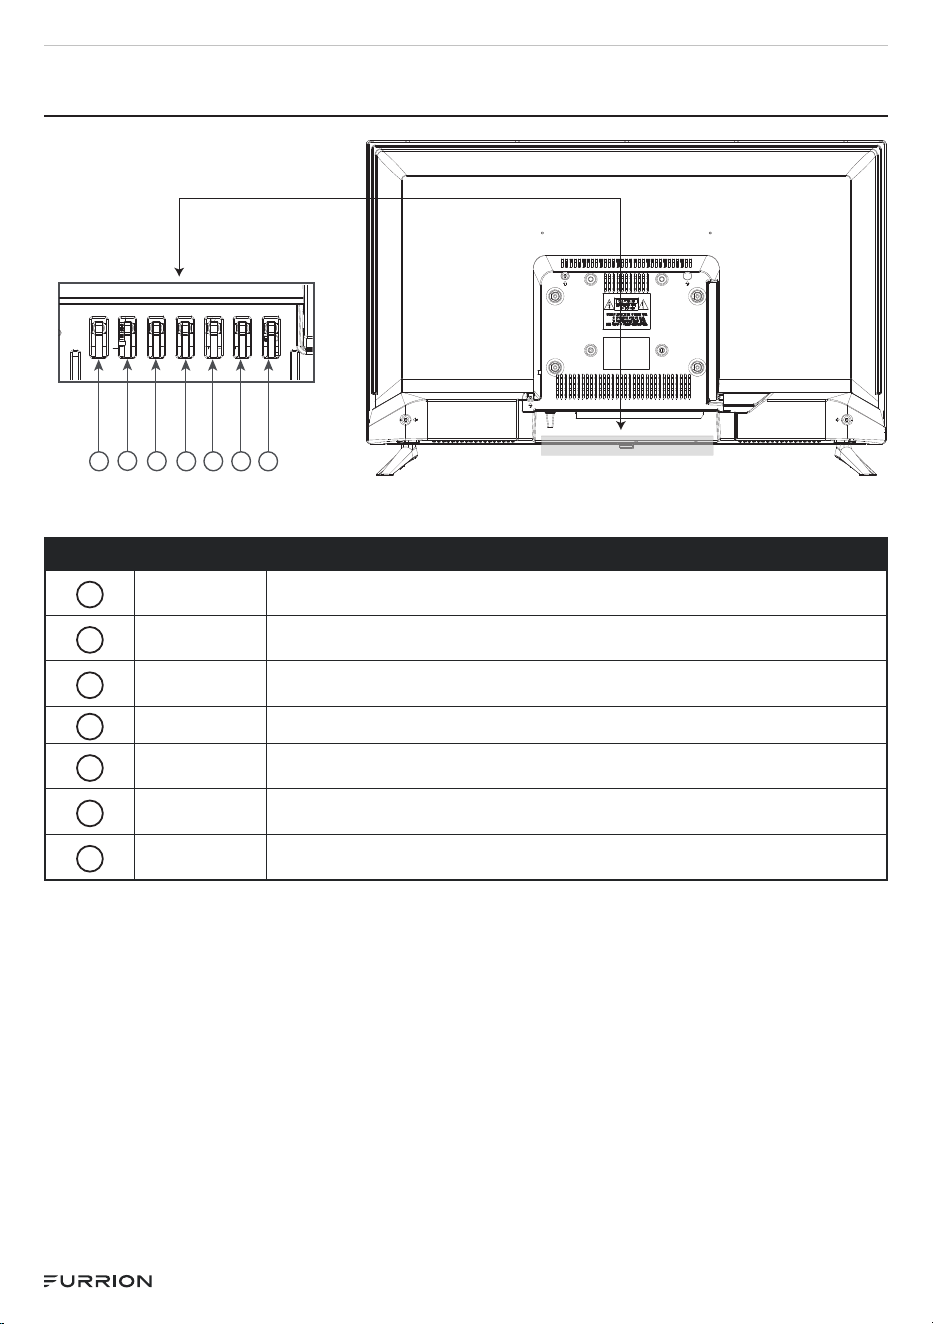
FUNCTION OVERVIEW
Control Panel
HDMI1
(ARC)
EARPHONE
USB2
USB1
HDMI2HDMI3
RJ45
IN
IN
* The configuration of the connection ports may vary from model to model.
- 11 -
CCD-0006087
REV: 11.02.2023
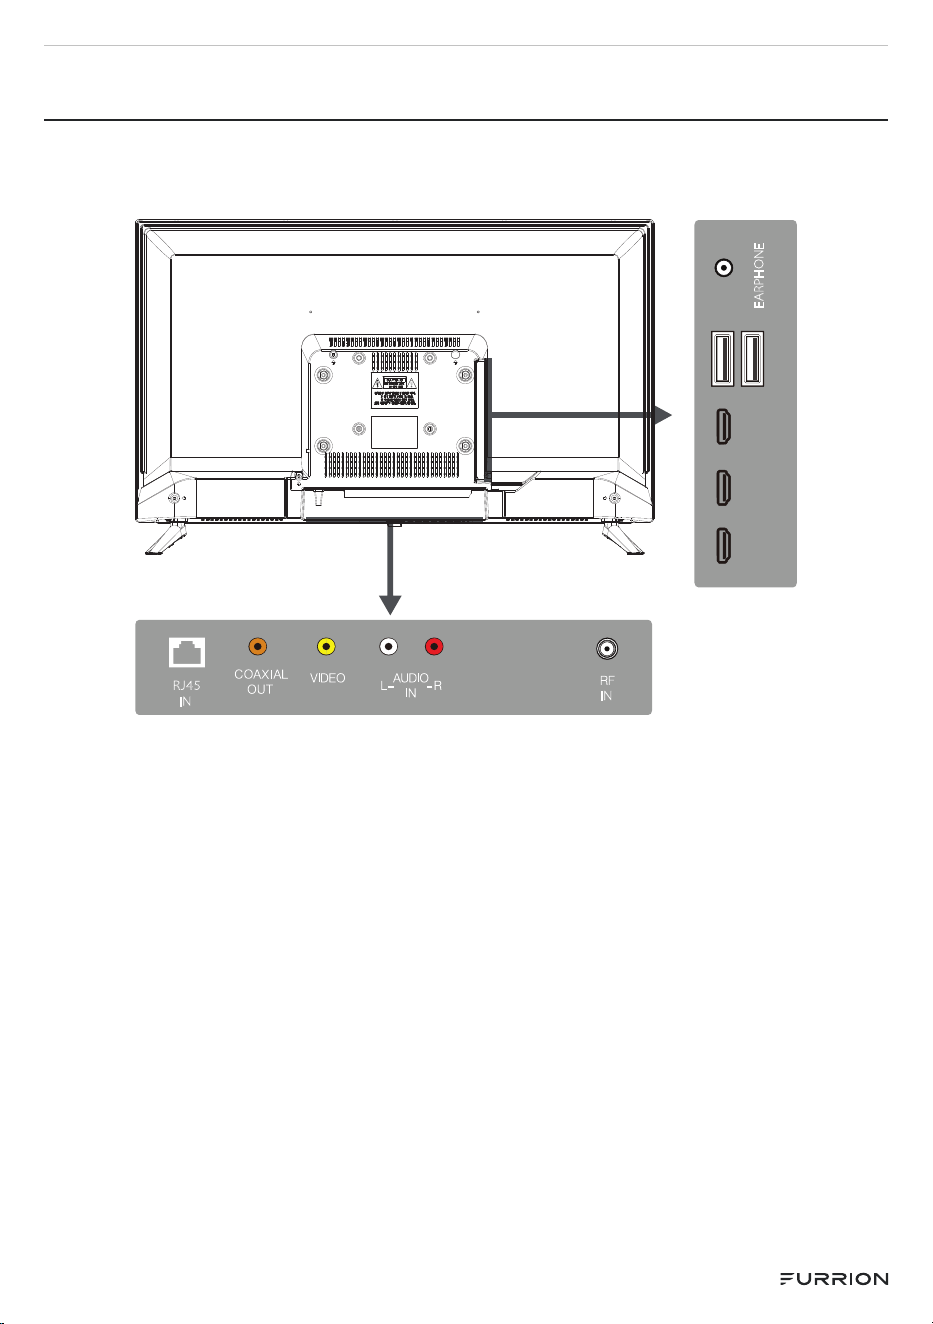
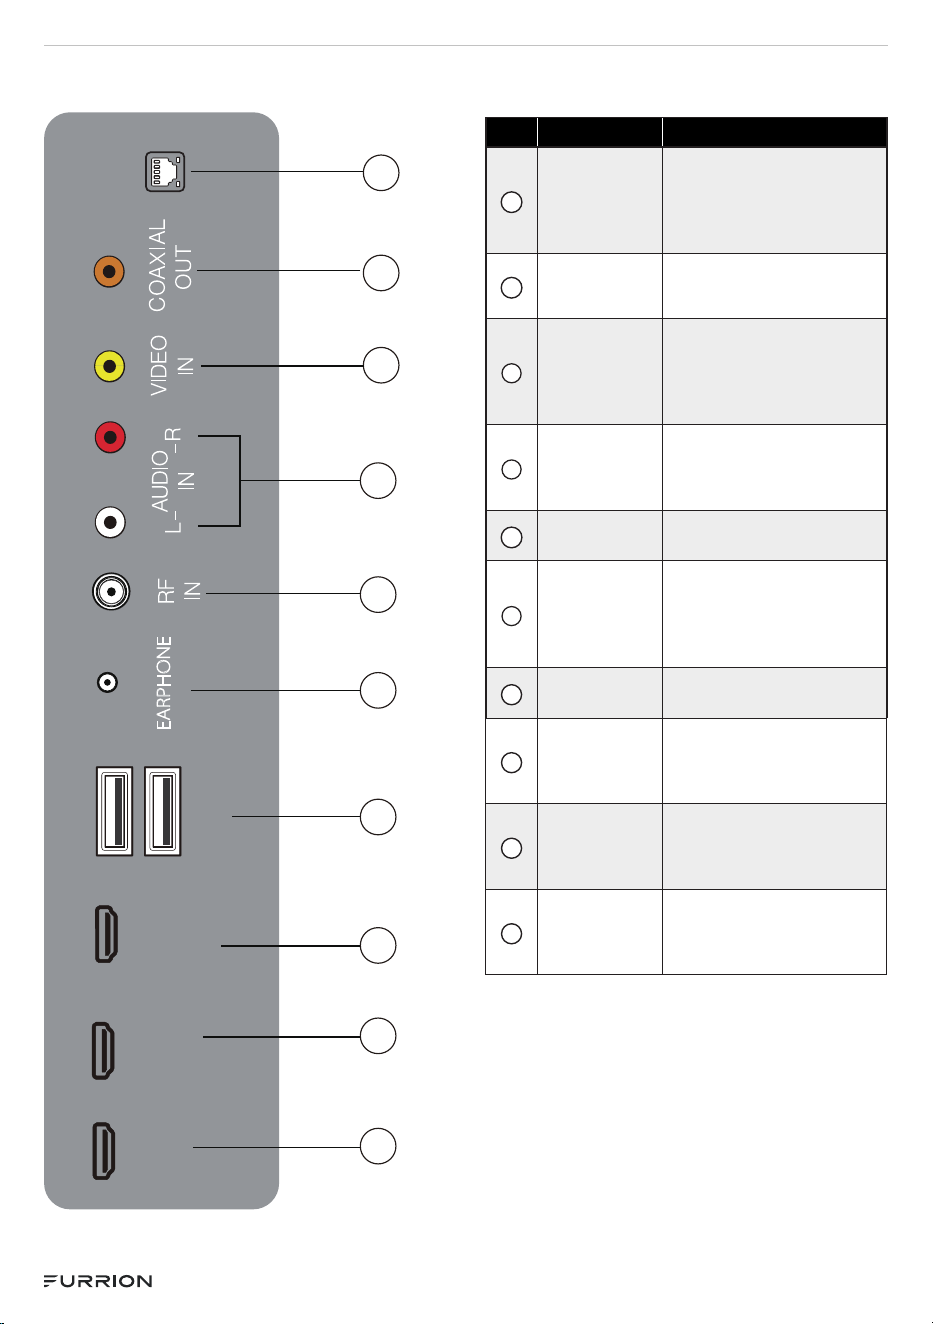
Input & Output ports
RJ45
1
2
3
5
EARPHONE
6
USB2
USB1
7
HDMI1
IN
(ARC)
8
HDMI2
IN
9
HDMI3
IN
10
4
Item Input/Output Function
1
RJ45
Connect an Ethernet cable
to access a network or the
Internet. The TV also has
a wireless connectivity
feature.
2
COAXIAL
OUT
Connect an Coaxial cable
from an external digital
audio system.
3
VIDEO IN
Connects to the
COMPOSITE VIDEO
OUT ports of a DVD
Player, Cable Box or other
compatible device
4
L-AUDIO IN-R
Connect a composite video
cable and left-right audio
cables from an external AV
device.
5
RF IN
Connect to TV ANTENNA,
CABLE, or CABLE BOX.
6
ERARPHONE
Connect headphones
to hear audio from the
TV. Headphones with
microphones are not
supported.
7
USB2
USB1
Front USB port: Connect a
USB storage device.
8
HDMI 1 IN
(ARC)
Connect to the HDMI OUT
port of a DVD Player,
Games Console, Cable Box
or other HDMI device.
9
HDMI 2 IN
Connect a High Definition
Multimedia Interface(HDMI)
cable from an external
device.
10
HDMI 1 IN
Connect a High Definition
Multimedia Interface(HDMI)
cable from an external
device.
- 12 -
CCD-0006087
REV: 11.02.2023
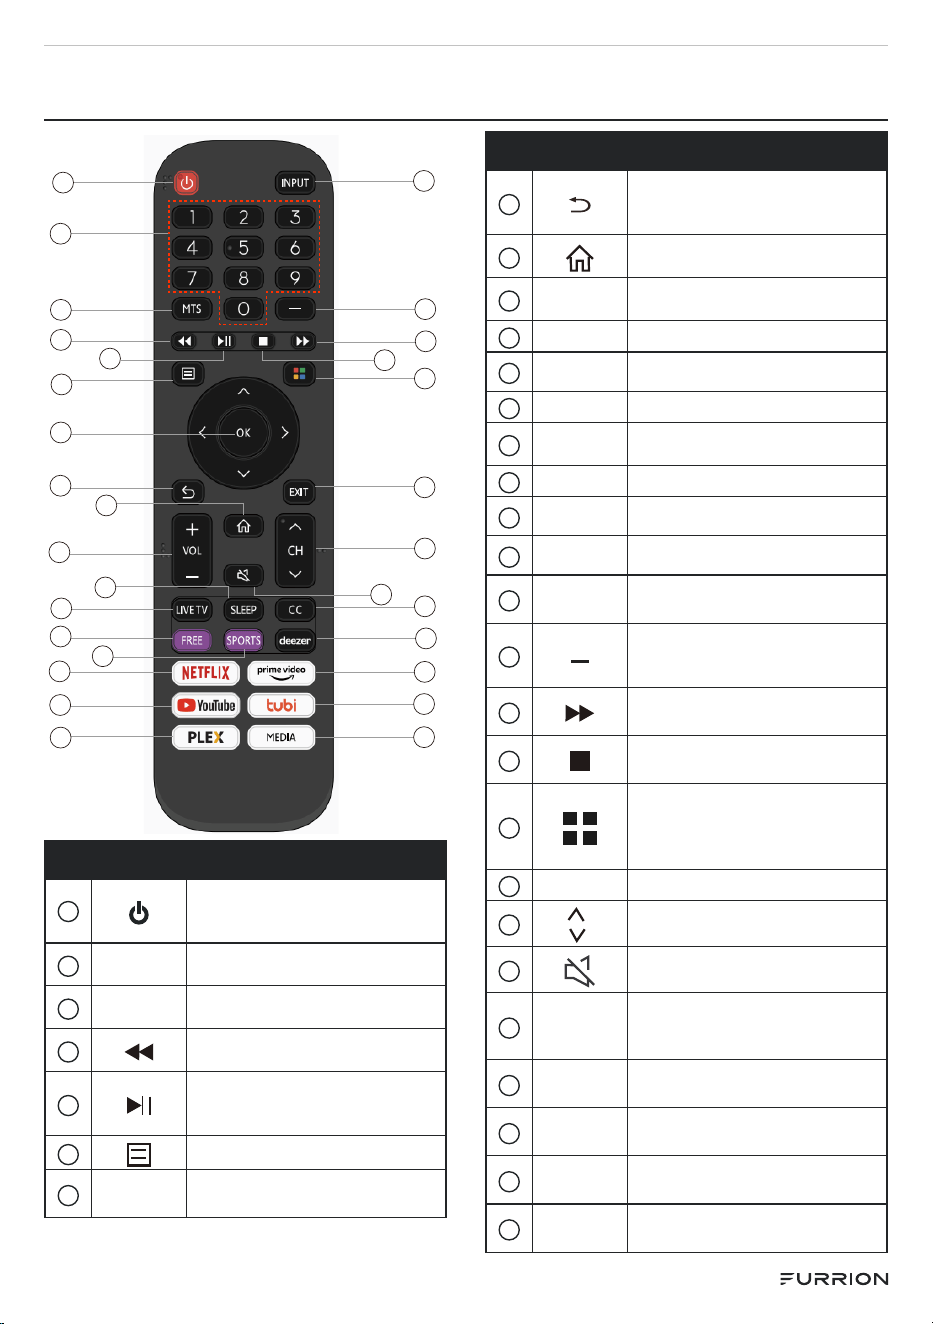
REMOTE CONTROL
1
18
19
2
3
4
6
7
8
10
11
12
13
5
20
21
22
23
24
26
27
28
29
30
9
15
16
14
17
25
No. Button Function
1
Power on/off button, press once
to turn the TV on and press
again to turn the TV off.
2
0-9
Select and switch to a channel
using 0-9.
3
MTS
Press to adjust between
available audio channel.
4
Press to play backward. (In USB
models)
5
Press to start playing/pause
playing the MEDIA.
(In USB models)
6
Displays the main TV menu.
7
OK
Enter the selected option or
execute the selected operation.
No. Button Function
8
Switch back and front between
the current and previous
channels.
9
This button takes you to the
HOME screen.
10
VOL-/
VOL+
Adjust the volume.
11
SLEEP Set the Sleep Timer.
12
LIVE TV Press to enter live TV.
13
FREE Press to enter FREE APP.
14
SPORTS
Press the button to change to
sports mode.
15
NETFLIX Press to enter Netflix APP.
16
YouTube Press to enter YouTube APP.
17
PLEX Press to enter PLEX APP.
18
INPUT Press to change signal source.
19
Press this button to enter a
program number for multiple
program channel such 2-1, ect.
20
Press to play forward. (In USB
models)
21
Stop playing the USB. (In USB
models)
22
COLOR BUTTONS
(RED,GREEN,YELLOW,BLUE)
Execute corresponding function
at that time.
23
EXIT Exit the main TV menu.
24
CH /CH
:
Change the channel up and
down.
25
Press this button to mute or
restore sound.
26
CC Press to set the closed caption.
27
deezer Press to enter deezer APP
28
prime
video
Press to enter prime video APP.
29
tubi Press to enter tubi APP.
30
MEDIA Press to enter MEDIA

- 13 -
CCD-0006087
REV: 11.02.2023
ABOUT YOUR LED HD TV
Features
Integrated Digital Tuner - You can view
digital broadcasts without using a Digital
TV Set-Top Box.
Closed Caption Decoder With Full
Text Mode - Displays text captions or
full screen text on the screen for hearing
impaired viewers.
Picture Adjustments Using The
Remote Control - The On-Screen
display allows precise remote
control adjustment of BRIGHTNESS,
CONTRAST, COLOR and SHARPNESS.
Programmable TV Sleep Timer -
Operable from the remote control, the
TV can be programmed for up to 180
minutes to turn off automatically.
On-Screen 5 Language
Display - You can select one
of 5 languages, English,French,
Spanish,Chinese,Deutsch for on-screen
programming.
HDMI/Component Video Jacks - A
VCR, DVD player, satellite receiver or
other audio/video component can be
connected to this unit.
Smarter Entertainment on the Go
● WIFI-enabled for streaming your
favorite apps, movies and shows.
● 110V HD Smart TV works on a
110-240V~ 50/60Hz range, using
appropriate plug into your caravan or
vehicle.
● Powered by from VIDAA OS.
● Download your favorite content
player apps from the app store.
● Vibrationsmart™ to protect your TV
from road movement.
● Climatesmart™ to protect against
temperature fluctuations.
Power Source
NOTE: Please make sure to insert the
cord securely at both the LED TV and the
wall outlet.
WARNING:
● DO NOT USE WITH A VOLTAGE
OTHER THAN THE POWER
VOLTAGE SPECIFIED. THIS COULD
CAUSE FIRE, ELECTRICAL SHOCK,
OR DAMAGE.
- 14 -
CCD-0006087
REV: 11.02.2023
BEFORE OPERATION
What’s in the Box
Thanks for purchasing this Furrion HD
LED TV. First, check the contents of your
box with the parts checklist below:
● Smart TV × 1
● Remote Control × 1
● Quick Start Guide × 1
● Warranty Manual x 1
● Warning Card x 1
● Wall Mount Screw x 4
● AAA battery × 2
● TV Stand with Screws x 4
32" (BB4*18mm)x 4
39" (BB4*16mm)x 4
43" (BB4*16mm)x 4
50" (BM4*18mm)x 4
55" (BB4*16mm)x 4
Now you can get started!
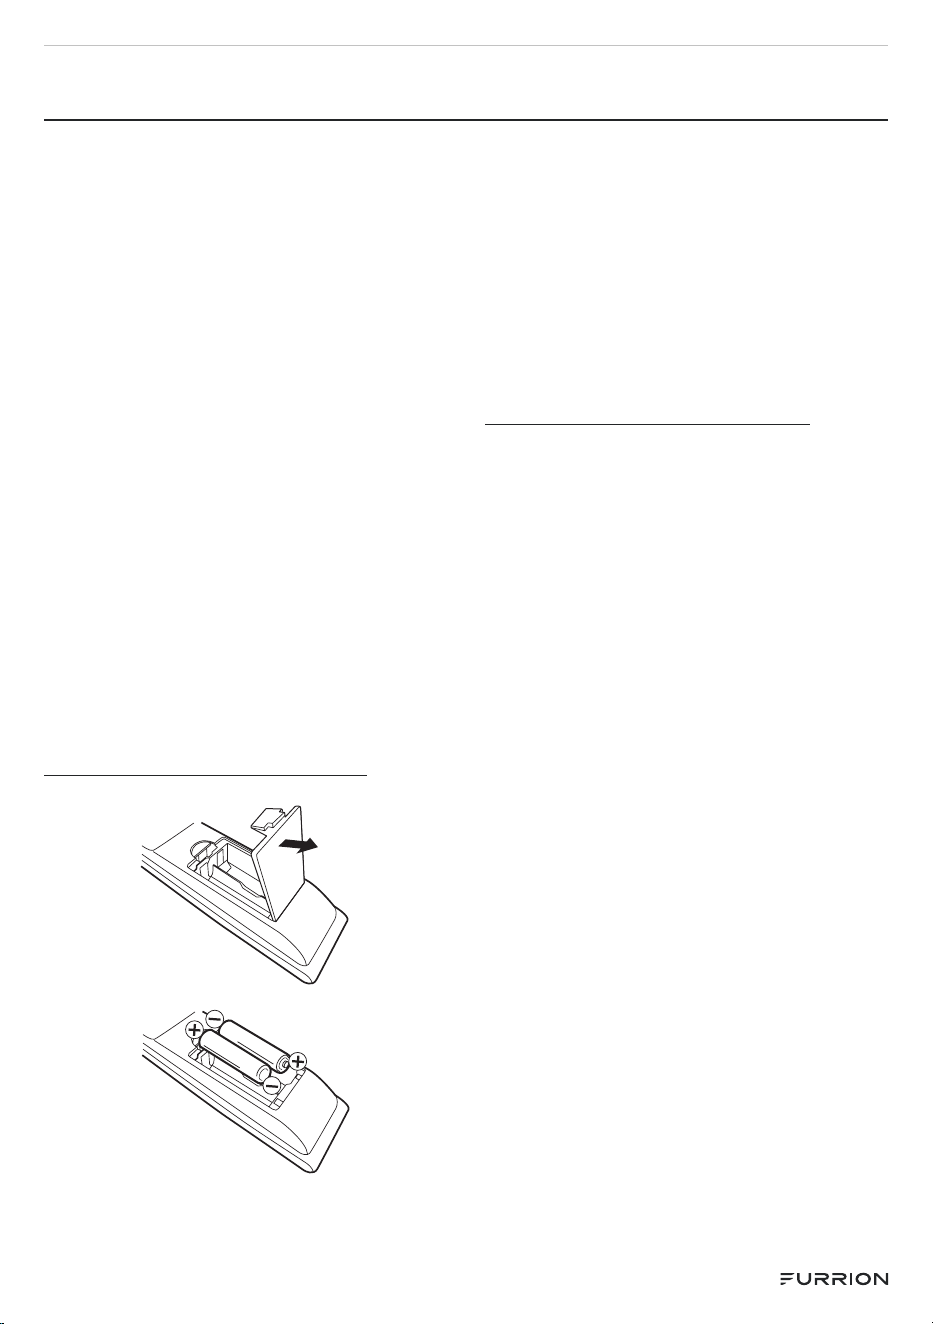
Prepare your Remote
Control
BATTERY INSTALLATION
1. Open battery compartment cover.
2. Install two AAA batteries.
3. Close the cover of the battery
compartment.
NOTE: Use two “AAA” size batteries.
Thebatteries may last approximately one
year depending on how much the remote
control is used. For best performance,
itis recommended that batteries should
be replaced on a yearly basis, or when
the remote operation becomes erratic.
Do not mix old and new batteries or
different types.
BATTERY PRECAUTIONS
These precautions should be followed
when using batteries in this device:
● Use only the size and type of
batteries specified.
● Be sure to follow the correct
polarity when installing the
batteries as indicated in the battery
compartment. Reversed batteries
may cause damage to the device.
● Do not mix different types of
batteries together (e.g. Alkaline and
Carbon-zinc) or old batteries with
fresh ones.
● If the device is not to be used for
a long period of time, remove the
batteries to prevent damage or injury
from possible battery leakage.
● Do not try to recharge batteries not
intended to be recharged; they can
overheat and rupture. (Follow battery
manufacturer’s directions.)
● Please use caution when inserting
batteries to avoid battery damage.
If the spring terminal in the remote
control remains in contact with a side
of a damaged battery it can cause
a short circuit. Never use damaged
batteries as they can become very
hot and are dangerous.
- 15 -
CCD-0006087
REV: 11.02.2023
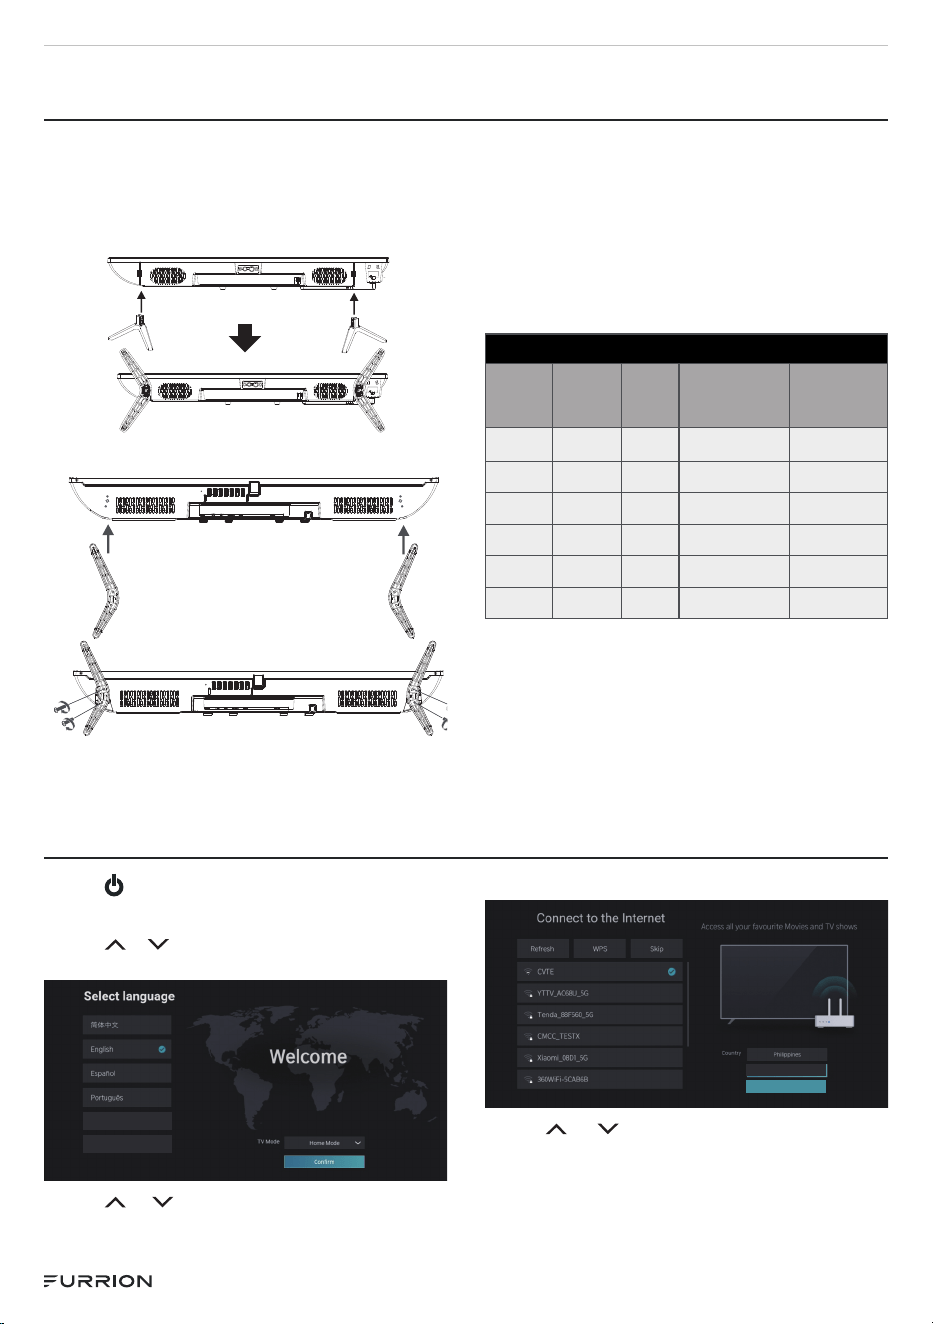
INSTALL
A. Use the supplied TV
stands
24"
32"-55″
B. Wall Mount
Follow the installation guide supplied
with the Wall-Mount Bracket when
installing the TV.
Choose an appropriate location and refer
to VESA pattern for mounting.
VESA MOUNTING PATTERN
Size
(Inch)
Width
(mm)
Height
(mm)
Screw Size
Screw
Quantity
(pcs)
24" 200 100 TM4x8mm 4
32" 100 100 BM6x10mm 4
39" 200 100 BM6x10mm 4
43" 200 100 BM6x10mm 4
50" 200 200 BM6x12mm 4
55" 400 200 BM6x10mm 4
GETTING STARTED
Press to power on and follow the on-
screen instructions to finish initial setup.
Press or button to select one
Language and choose the TV Mode.
繁体中文
Deutsch
Press or button to select one
Internet, then press Confirm to the next
step.
Eastern
Confirm
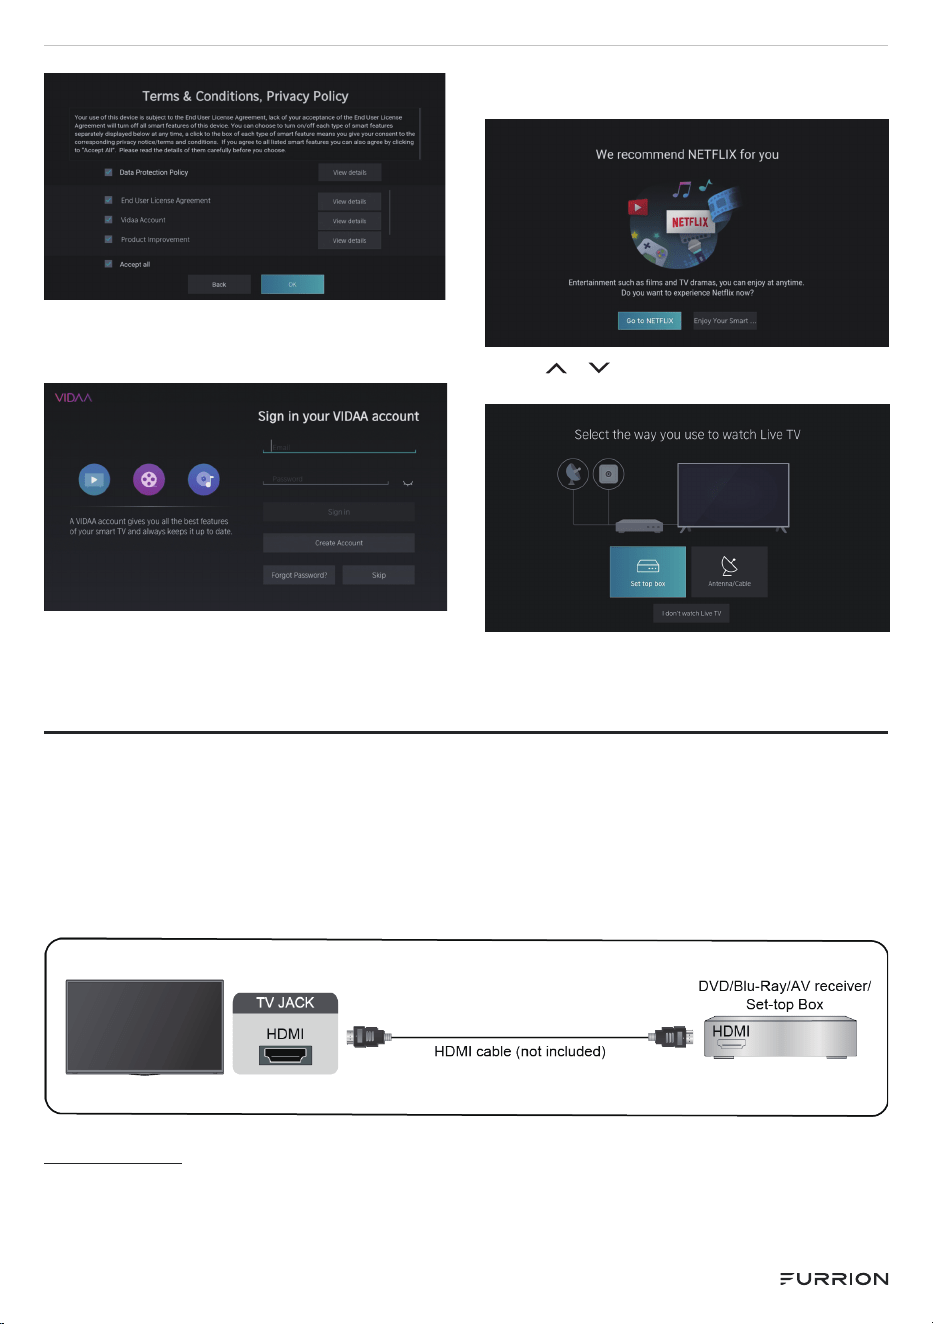
Press or button to select Accept
all, and press OK button to the next step.
- 16 -
CCD-0006087
REV: 11.02.2023
Sign in your vidaa account.
If no account has been created, create an
account and then sign in.
Select the NETFLIX or Enjoy the Smart
TV.
Press or button to select the Set top
box or Antenna/Cable.
CONNECTION
HDMI Device
Connect an HDMI cable from an external A/V equipment.
Some devices such as DVD player require HDMI signal to be set to output in the
device’s settings. Consult your device user manual for instructions.
NOTE: The HDMI connector provides both video and audio signals,it’s not necessary
to connect an audio cable.
HDMI-CEC
Use your TV remote to control the external devices that are connected to the TV by
HDMI cable. The external devices need to support HDMI & CEC Function (HDMI-CEC).
Connecting an external device through HDMI-CEC Function
- 17 -
CCD-0006087
REV: 11.02.2023
Press the button on your remote control, use the / button to navigate to
Settings->System->HDMI-CEC.
1. Set HDMI-CEC to on.
2. Connect an HDMI-CEC-compliant device to the TV.
3. Turn on the connected external device. The device is automatically connected to
the TV. After connection is finished, you can access the menu of the connected
device on your TV screen using your TV remote and control the device.
Note:
● HDMI cables must be used to connect HDMI CEC-compatible devices to your TV.
● The HDMI CEC feature of the connected device must be turned on.
● If you connect an HDMI device that is not HDMI CEC-compatible, all the HDMI-
CEC control features do not work.
● Depending on the connected HDMI device, the HDMI-CEC Control feature may
not work.
● The HDMI CEC feature are supported One Touch Play, Routing Control, System
Standby, Device OSD Name Transfer, Remote Control Pass Through, Give Device
Power Status, System Audio Control.
HDMI ARC
HDMI ARC transfers audio from a TV to an ARC enabled device. With HDMI ARC, you
can hear TV audio through an external device instead of the TV’s speaker without also
connecting analog or digital optical audio cables between the TV and external device.
To connect your TV with an external device, press the button on your remote
control, use the / button to navigate to Settings -> Sound -> Audio Output
Setting -> Audio Output -> ARC to enable the ARC function.
NOTE: The HDMI ARC works in conjunction with HDMI CEC. The HDMI ARC will not
pass audio when the HDMI CEC feature is disabled.
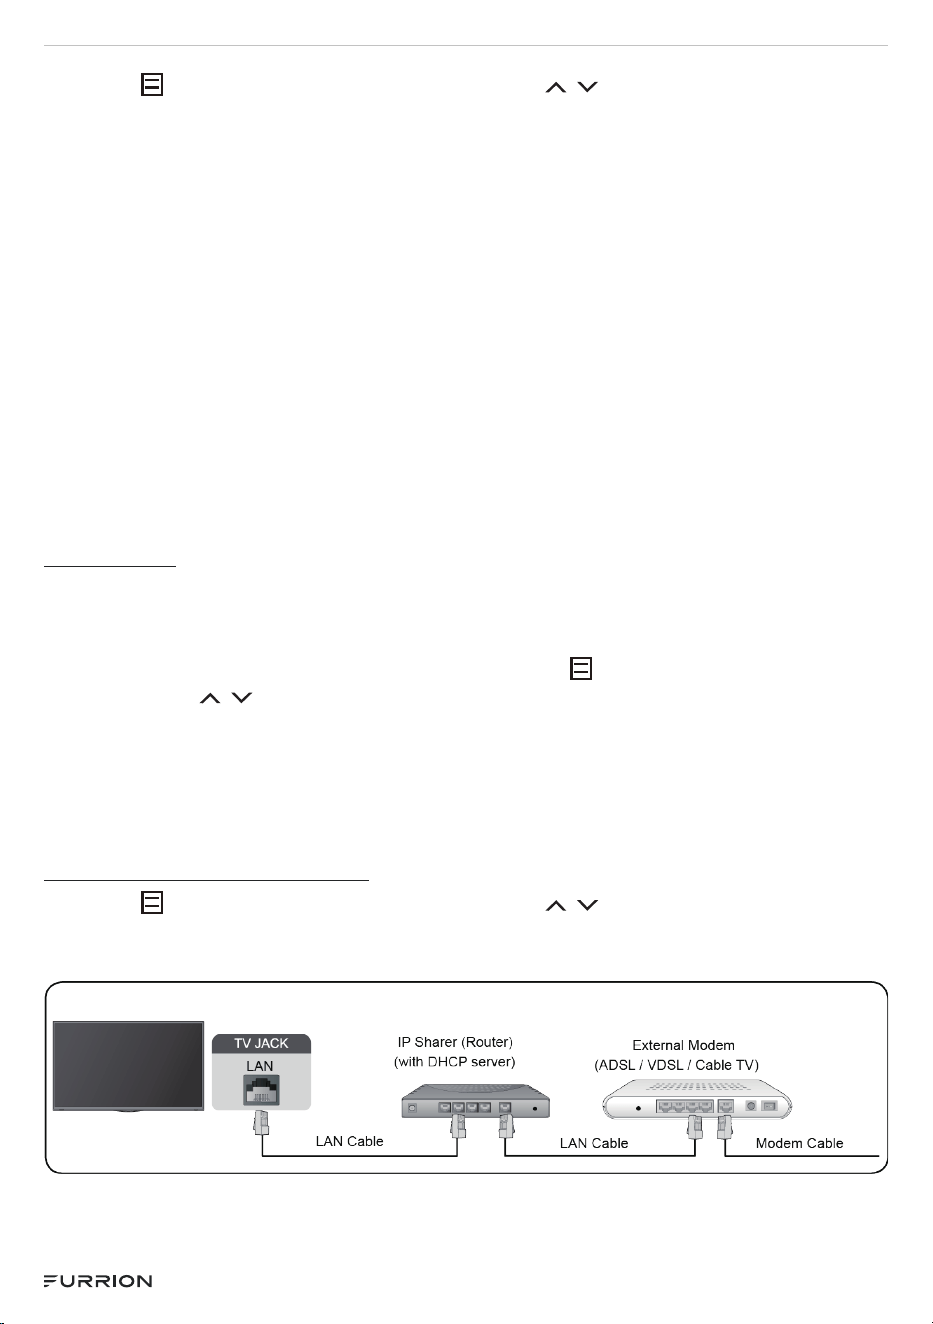
Wired LAN
Connecting to the Internet
Press the button on your remote control, use the / button to navigate to
Settings->Network-> Network Configuration.
Press OK button to enter then select Wired LAN.
- 18 -
CCD-0006087
REV: 11.02.2023
Automatically obtain an IP address
1. If you connect to the wired network, the TV will automatically obtain an IP address
and connect to the network.
2. If the connection fails, disconnected message will display for the internet status.
Retry or enter the IP settings, and select Manual to input the information again.
Manually enter the IP address
1. Enter the IP settings to select Manual.
2. Enter the IP Address, Net mask, Gateway, DNS Server 1 and DNS Server 2 in the
menu.
Note:
● This section is only for 4K models.
● You get access to the Internet through your TV.
● The default option of IP Settings Mode is DHCP.
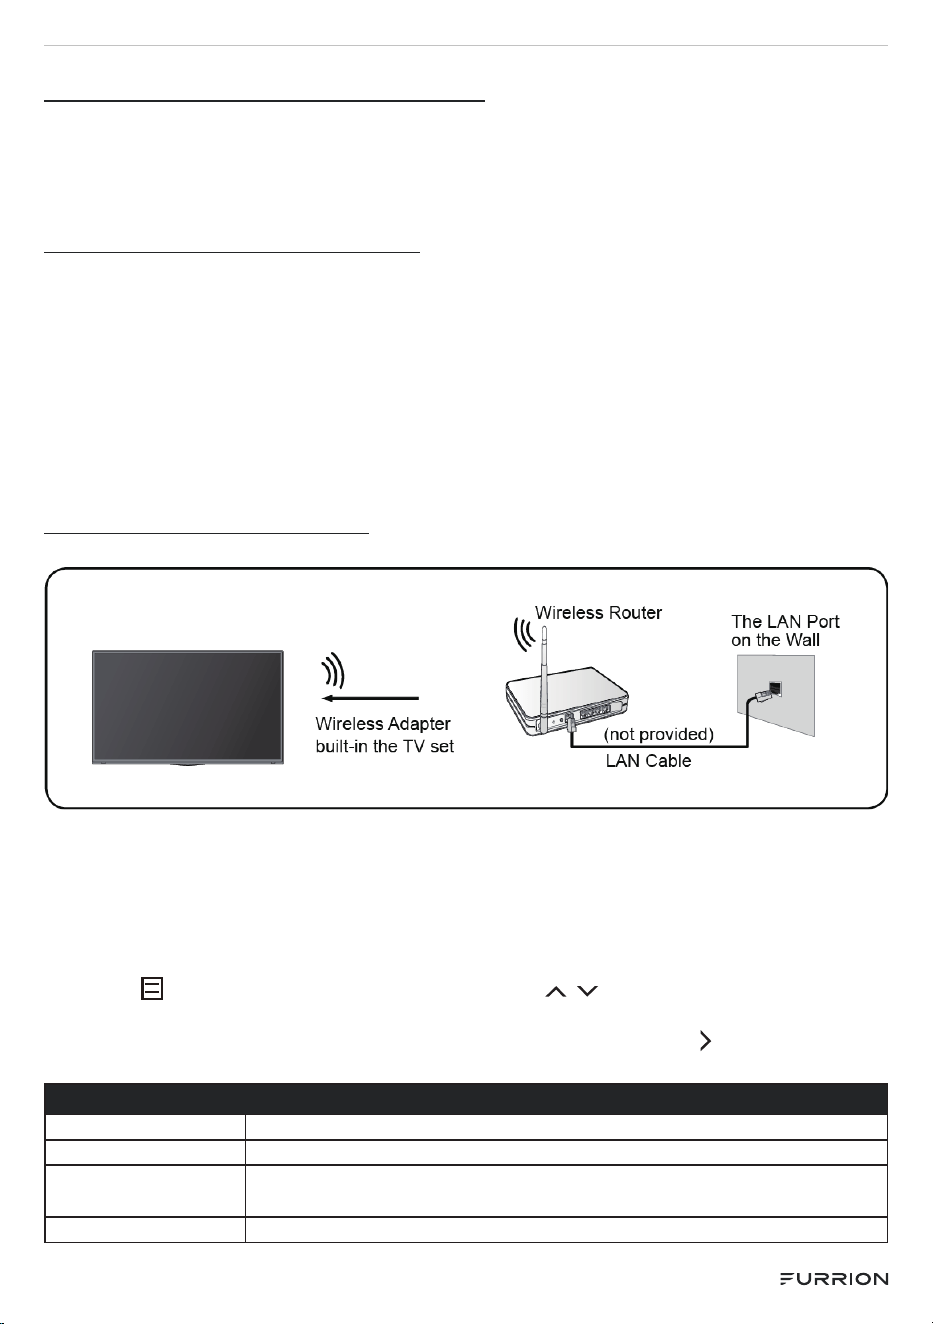
Wireless
Connecting to the Internet
Note:
● You get access to the Internet through your TV.
● Connect to an available wireless network.
● Make sure that you have the wireless router’s SSID and password before
attempting to connect.
Connecting to a Wireless Network
Press the button on your remote control, use the / button to navigate to
Settings->Network-> Network Configuration.
Set the TV network by selecting Configuration and press the OK or button to enter
the sub-menu.
Network Configuration
Connection Type Choose a wireless network connection to access the Internet.
Refresh Refresh wireless network.
Refresh wireless
network.
Configure the advanced wireless network settings for the TV.
Add You can add wireless network.
- 19 -
CCD-0006087
REV: 11.02.2023
Note:
If no wireless router is found, select Add and enter the network name in the SSID.
If no wireless router is found, select Refresh
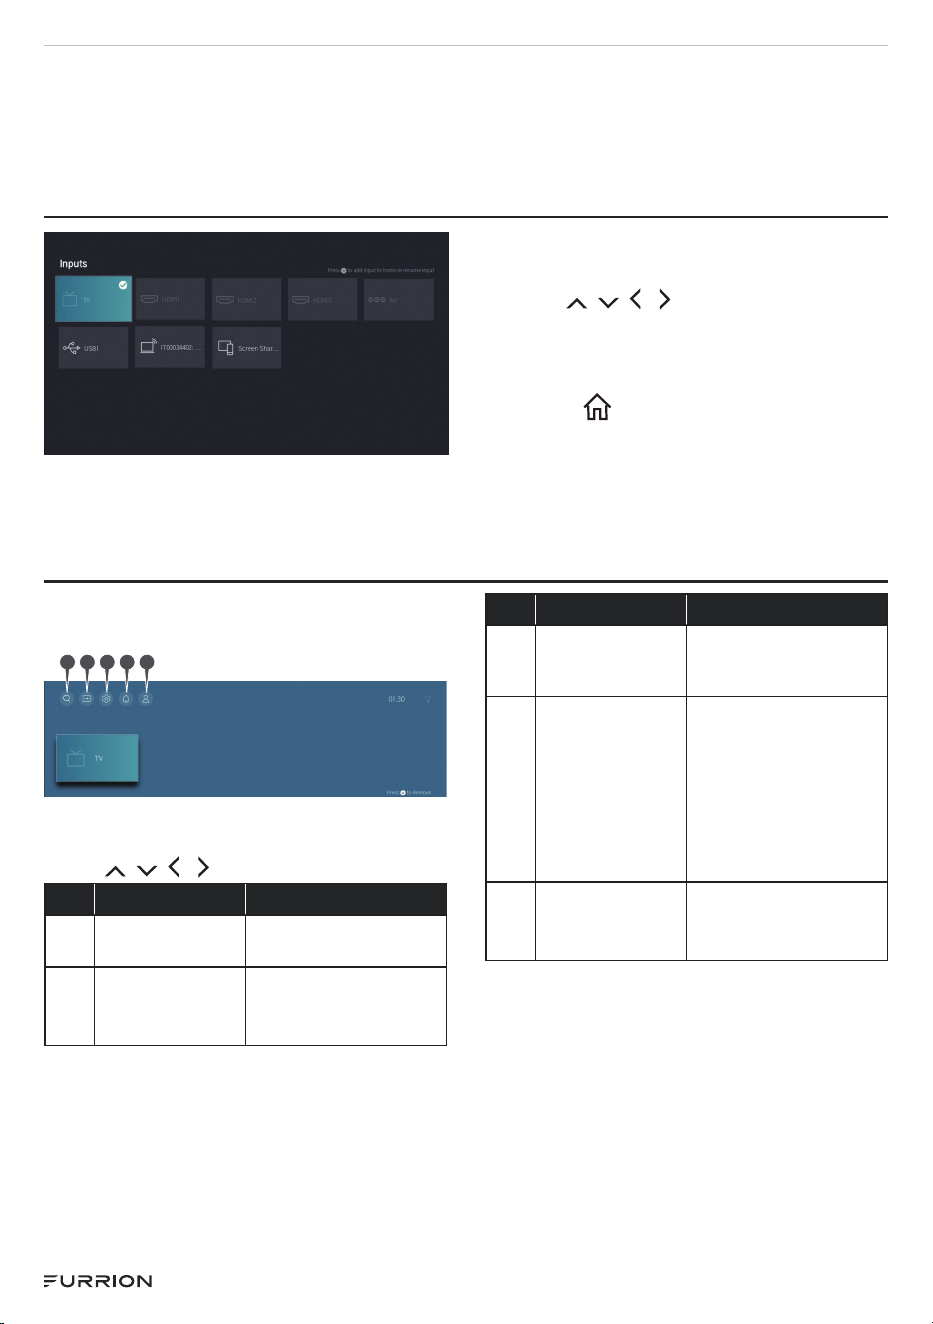
INPUTS
1. Press INPUT button to display the
main menu.
2. Choose the appropriate input source.
3. Use / / / button to highlight
your desired mode.
4. Press OK button to confirm your
selection.
5. Press button to return to the
previous menu or press EXIT at any
time to exit the setting.
HOME
When finish First Time setup,you can
enter HOME screen.
1
2 3
4 5
Press MENU button to select HOME
screen.
Press / / / button to select.
No. Button Function
①
SEARCH
Press to search the
videos or apps.
②
INPUTS
Icon for Input,
select an input
source.
No. Button Function
③
SETTING
Icon for Setting. Enter
to have operations on
Setting.
④
Notification
Settings
Icon for Notification
Settings, allow pop-
up notifications to
appear for useful
information and
events that occur
with your TV.
⑤
VIDAA
accout
Icon for VIDAA
accout, sign in your
account
- 20 -
CCD-0006087
REV: 11.02.2023
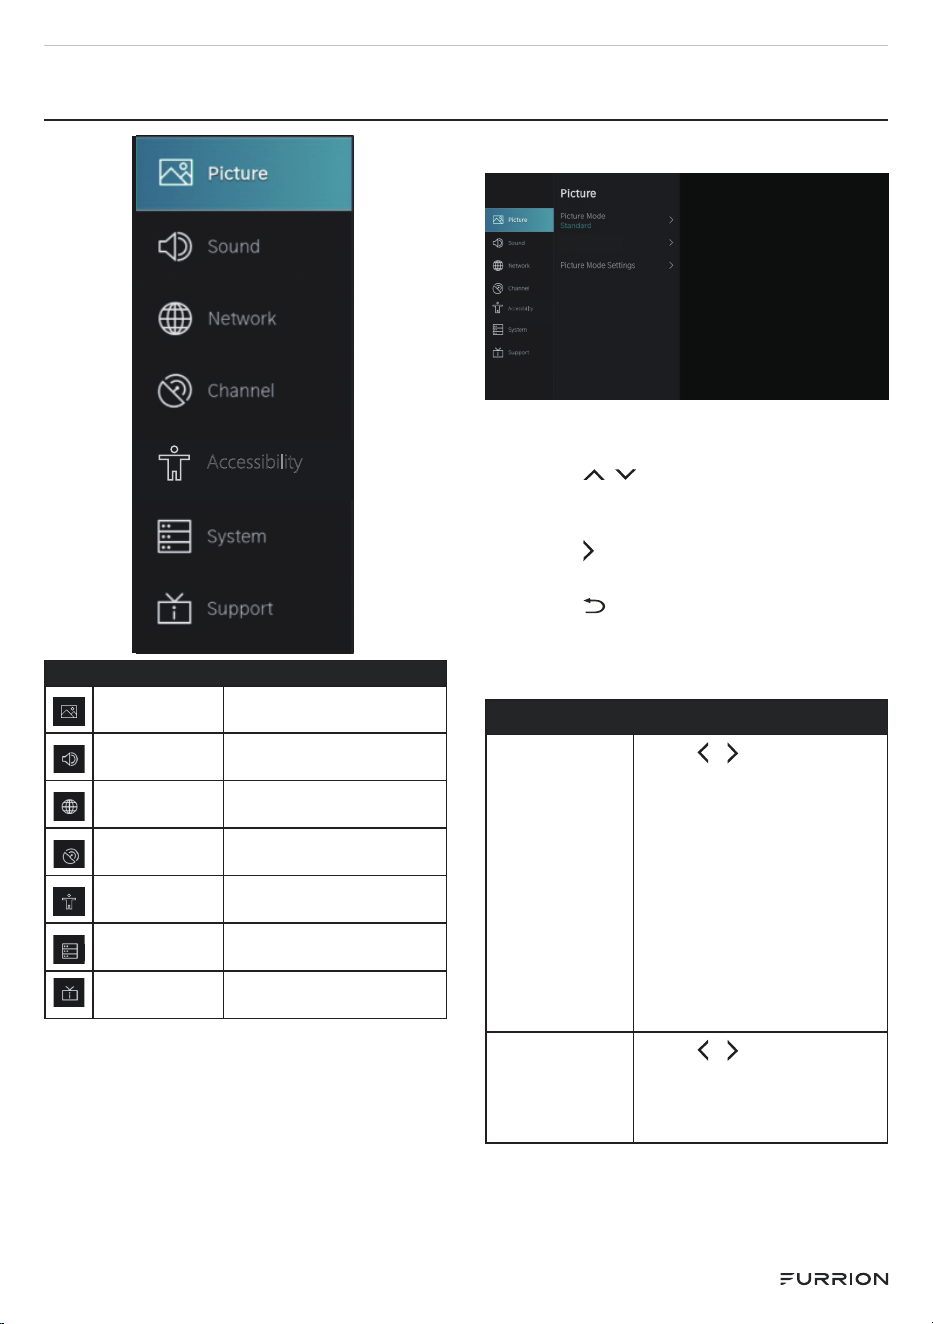
SETTINGS
Accessibility
MAIN MENU
Picture
Enter to have operations
on Picture.
Sound
Enter to have operations
on Sound.
Network
Enter to have operations
on Network.
Channel
Enter to have operations
on Channel.
Accessibility
Enter to have operations
on Accessibility.
System
Enter to have operations
on System.
Support
Enter to have operations
on Sound.
Picture Menu
Picture Size
Wide
Accessibility
1. Press Setting to enter the main
menu.
2. Press / to select Picture
Mode/Picture Size/Picture Mode
Settings.
3. Press or OK button to enter the
sub-menu.
4. Press button to return to the
previous menu.
5. Press EXIT at any time to exit the
setting.
Picture
Picture Mode
Press
/ button to
select Standard/
Vivid/Energy Saving/
Natural/Theater/
Game/Sport/
Calibrated.
NOTE: Theater and
Calibrated are designed
to reduce the level of
blue light to protect your
eyes.
Picture Size
Press
/ button
to select Wide/
Direct/Dot-By-Dot/
Panoramic/Cinema.
- 21 -
CCD-0006087
REV: 11.02.2023
Picture
Picture Mode
Settings
Press
/ button select
Backlight / Brightness/
Contrast /Color/Tint/
Sharpness ,then press
/ button to adjust it.
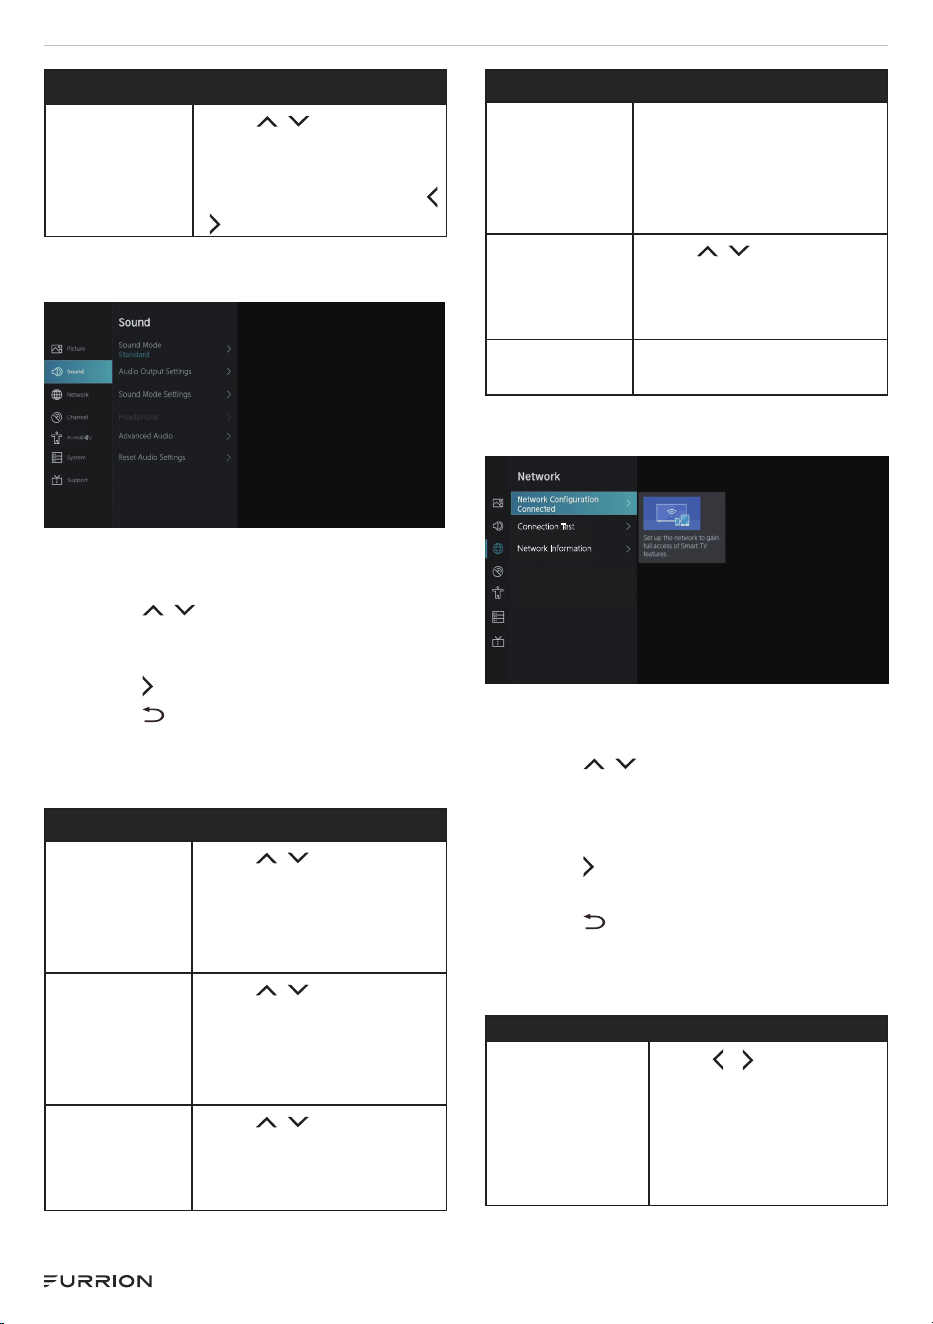
Sound Menu
Accessibility
Audio Output Settings
Advanced Audio
Reset Audio Settings
1. Press Setting to enter the main
menu,
1. Press / button to select Sound
Mode/Audio Output Settings/
Sound Mode Settings.
2. Press or OK to enter the sub-menu.
3. Press button to return to the
previous menu.
4. Press EXIT button at any time to exit
the setting.
Sound
Sound Mode Press
/ button
to select Standard/
Sports/Theater/Music/
Speech/Late Night
mode you desire.
Audio Output
Settings
Press
/ button to
select Audio Output/
Digital Audio Out/
Digital Audio Delay/ Lip
Sync/Balance.
Sound Mode
Settings
Press
/ button to
select Auto Volume
Control / Mounting
position.
Sound
Headphone It’s only available on
headphone is inserted.
It can set the sound
output mode through
headphones.
Advanced
Audio
Press
/ button
to select Equalizer/
Preferred Audio
Language.
Reset Audio
Setting
Press OK button to reset
to factor default.
Network Menu
Connection Test
Network Information
1. Press Setting to enter the main
menu.
1. Press / button to select
Network Configuration/
Connection Test/Network
Information Settings.
2. Press or OK button to enter the
sub-menu.
3. Press button to return to the
previous menu.
4. Press EXIT button at any time to exit
the setting.
Network
Network
Configuration
Press
/ button to
select Wiress/Off/
Wired LAN connection
type, Wiress: Connect
to an available network.
Wired LAN: IP Settings
- 22 -
CCD-0006087
REV: 11.02.2023
Network
Connection
Test
Press OK button to
test the status of your
network connection.
Network
Information
Press OK button view
information about your
network connection
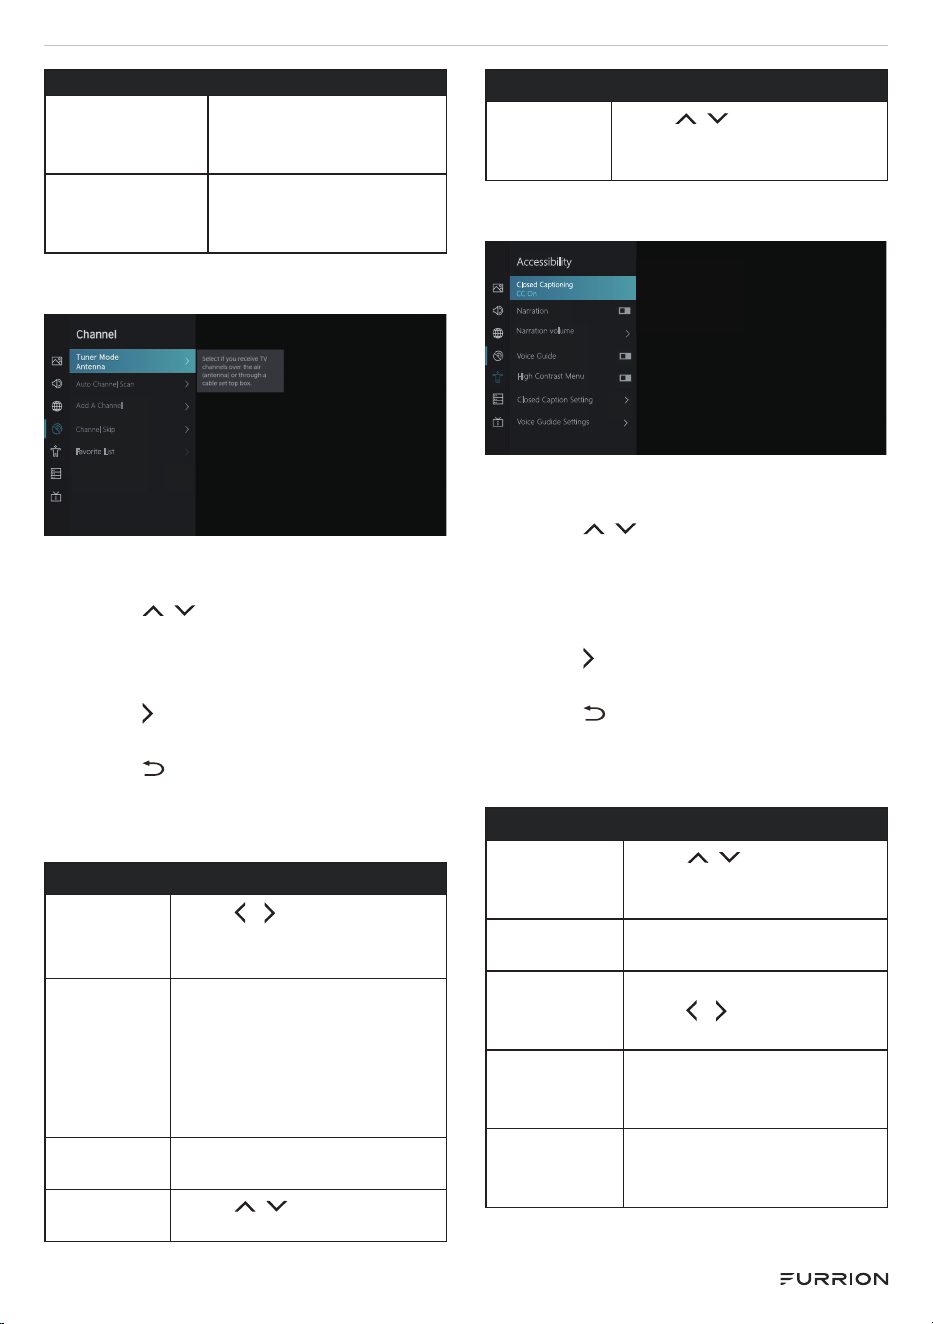
Channel Menu
Add A Channel
Channel Skip
Favorite List
Auto Channel Scan
1. Press Setting to enter the main
menu.
1. Press / button to select Tuner
Mode /Auto Channel Scan/Add A
Channel/ Channel Skip/ Favorite
List.
2. Press or OK button to enter the
sub-menu.
3. Press button to return to the
previous menu.
4. Press EXIT button at any time to exit
the setting.
Channel
Tuner
Mode
Press
/ button to
select Antenna/Cable
connection.
Auto
Channel
Scan
Select Skip to stop
scan the channel, select
complete that play the
channel be scan, select
rescan that will rescan all
the channel.
Add A
Channel
Input the channel number
to add it to channel list.
Channel
Skip
Press
/ button to
select a channel to skip.
Channel
Favorite
List
Press
/ button to
select the channel you like
in the list.
Accessibility Menu
Add A Channel
Channel Skip
Favorite List
Accessibility
Closed Captioning
CC On
Narration
Narration volume
50
Voice Guide
High Contrast Menu
Closed Caption Setting
Voice Gudide Settings
1. Press Setting to enter the main
menu.
2. Press / button to select Close
Captioning /Narration/ Narration
Volume /Voice Guide/ High
Contrast Menu / Closed Caption
Settings/ Voice Guide Settings.
3. Press or OK button to enter the
sub-menu.
4. Press button to return to the
previous menu.
5. Press EXIT button at any time to exit
the setting.
Accessibility
Close
Captioning
Press
/ button to
select CC On/Off/on
when Mute.
Narration Press OK button to select
turn on/off the narration.
Narration
volume
When Narration is on,
press
/ button to adjust
the volume.
Voice Guide Press OK button to
choose turn on/off the
voice guide.
High
Contrast
Menu
Press OK button to
select turn on/off the high
contrast menu.
- 23 -
CCD-0006087
REV: 11.02.2023
Accessibility
Closed
Caption
Settings
Press
/ button select
Analog caption/Digital
Caption/Digital Caption
Settings.
Voice Guide
Settings
When the Voice Guide is
on, press OK or button
to select the volume/
Language / Rate/ Pitch/
Focus Voice Guide.
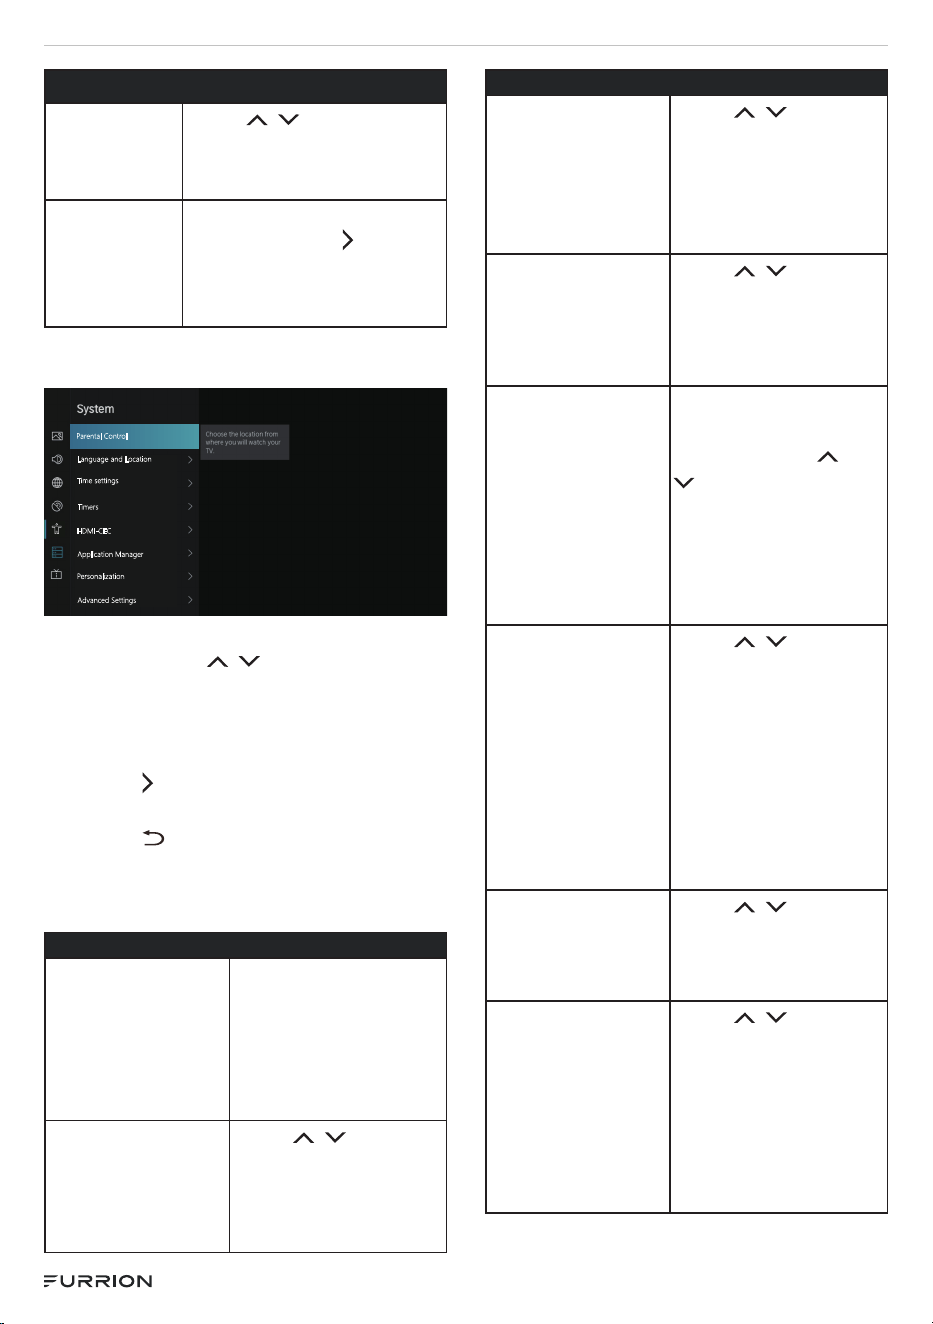
System Menu
Parental Control
Language and Location
Timers
HDMI-CEC
Application Manager
Personalization
Advanced Settings
Time settings
1. Press Setting to enter the main
menu, Press / button to select
Parental Control/ Time settings /
Language and Location/Timers/
HDMI-CEC / Application Manager/
Personalization/Advanced Settings
2. Press or OK button to enter the
sub-menu.
3. Press button to return to the
previous menu.
4. Press EXIT button at any time to exit
the setting.
System
Parental Control Create Pin number
to turn on parental
control to block
children from being
able to view certain
programs.
Language and
Location
Press
/
button to select
the Language/
Keyboard Layout/
Location.
System
Time settings Press
/ button
to select the Time
Zone/Time Format/
Date Format/
Daylight Savings/
Date and Time.
Timers Press
/ button to
select Sleep Time/
Power On Time /
Power Off Timer/
Menu Timeout
HDMI-CEC Press OK button
to turn on HDMI-
CEC, then use
/
button to select
Device Auto Power
Off/Device Auto
Power On/ TV Auto
Power on/ Avaliable
Device.
Application
Manager
Press
/ button
to select Content
sharing/Clear
Cache/Delete
Cookies /Do Not
Track/ Prime
Video/Netflix/
Vudu/Wake on
wireless Network/
Wake on Lan.
Personalization Press
/ button
to select the Menu
Scheme/Menu
Transparency.
Advanced
Settings
Press
/ button to
select the TV name/
Audio Only/Input
Names/ Live TV
Input/Screensaver/
Notifications Pop-
ups/Usage Mode/
Setup Assistant.
- 24 -
CCD-0006087
REV: 11.02.2023
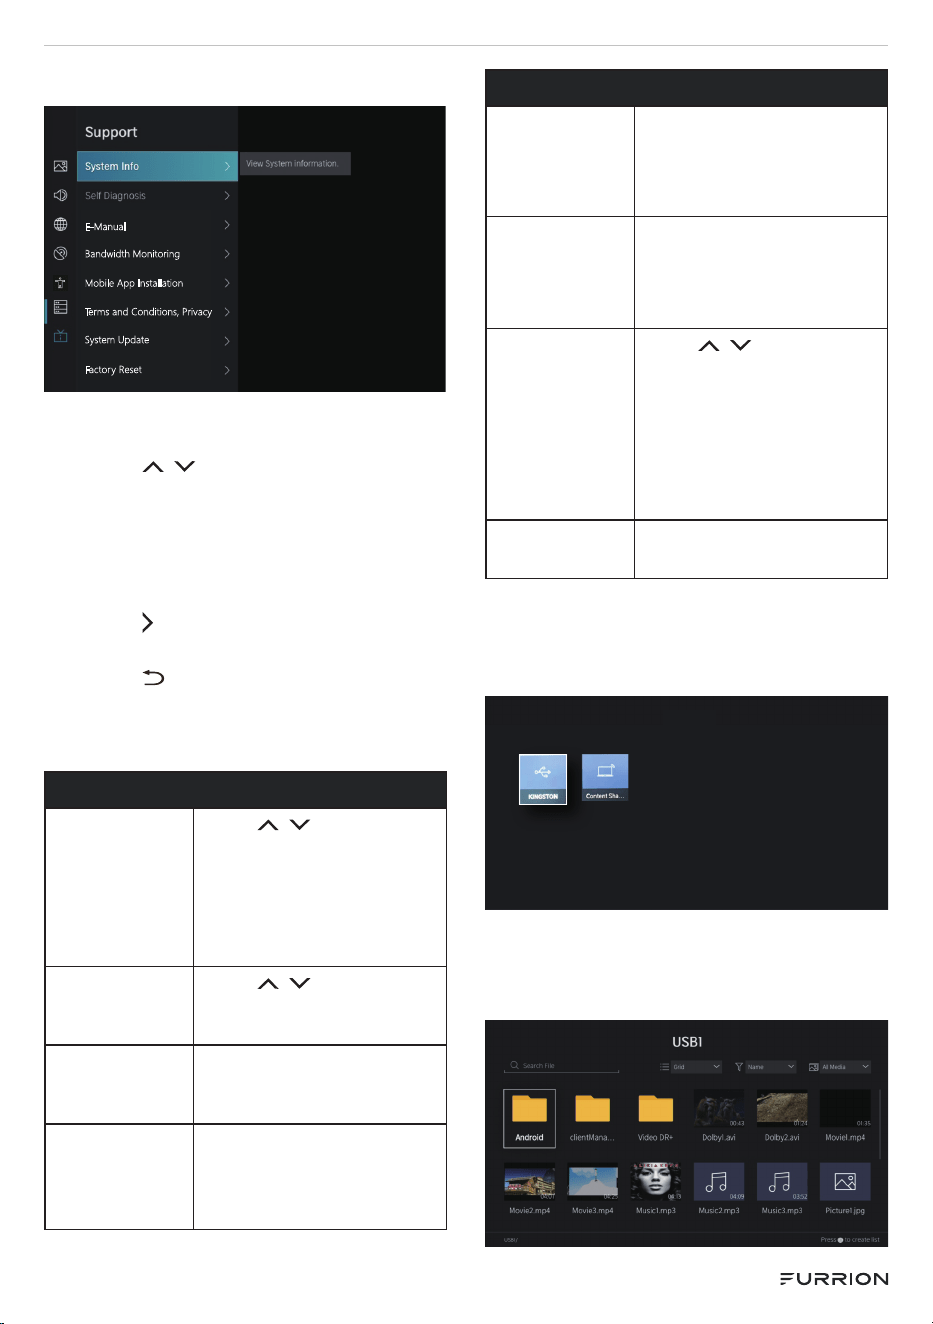
Support
E-Manual
Bandwidth Monitoring
Mobile App Installation
Terms and Conditions, Privacy
System Update
Factory Reset
1. Press Setting to enter the main
menu.
2. Press / button to select System
Info/ Self Diagnosis/ E-Manual/
Bandwidth Monitoring/Mobile App
Installation/Terms and Conditions
Privacy Policy/ System Update/
Factory Reset.
3. Press or OK button to enter the
sub-menu.
4. Press button to return to the
previous menu.
5. Press EXIT button at any time to exit
the setting.
Support
System Info Press
/ button to
select Signal Info/
Network Connection/
Input Connection/
About View System
info.
Self-
Diagnosis
Press
/ button to
select Network Test/
Input Connection Test.
E-Manual Launch E-manual and
get to know more about
your TV.
Bandwidth
Monitoring
Before start the test the
speed with third-party
website, make sure the
network available.
Support
Mobile App
Installation
Scan the QR code that
you can install mobile
app on your smartphone
to control your TV.
Terms and
Conditions
Privacy
Policy
Press OK button to read
TV terms and policy.
System
Update
Press
/ button
to select Auto Firm
Upgrade/Check
Firmware Upgrade/
System App Auto
Upgrade/Upgrade
from USB.
Factory
Reset
Reset your TV to the
factory settings.
Media
Press MEDIA button on the control
remote,and press OK button to enter the
Media Center.
All Devices
Press OK button enter the content
sharing, before the share the content,
make sure your device and the TV are
connected to the same network.
- 25 -
CCD-0006087
REV: 11.02.2023
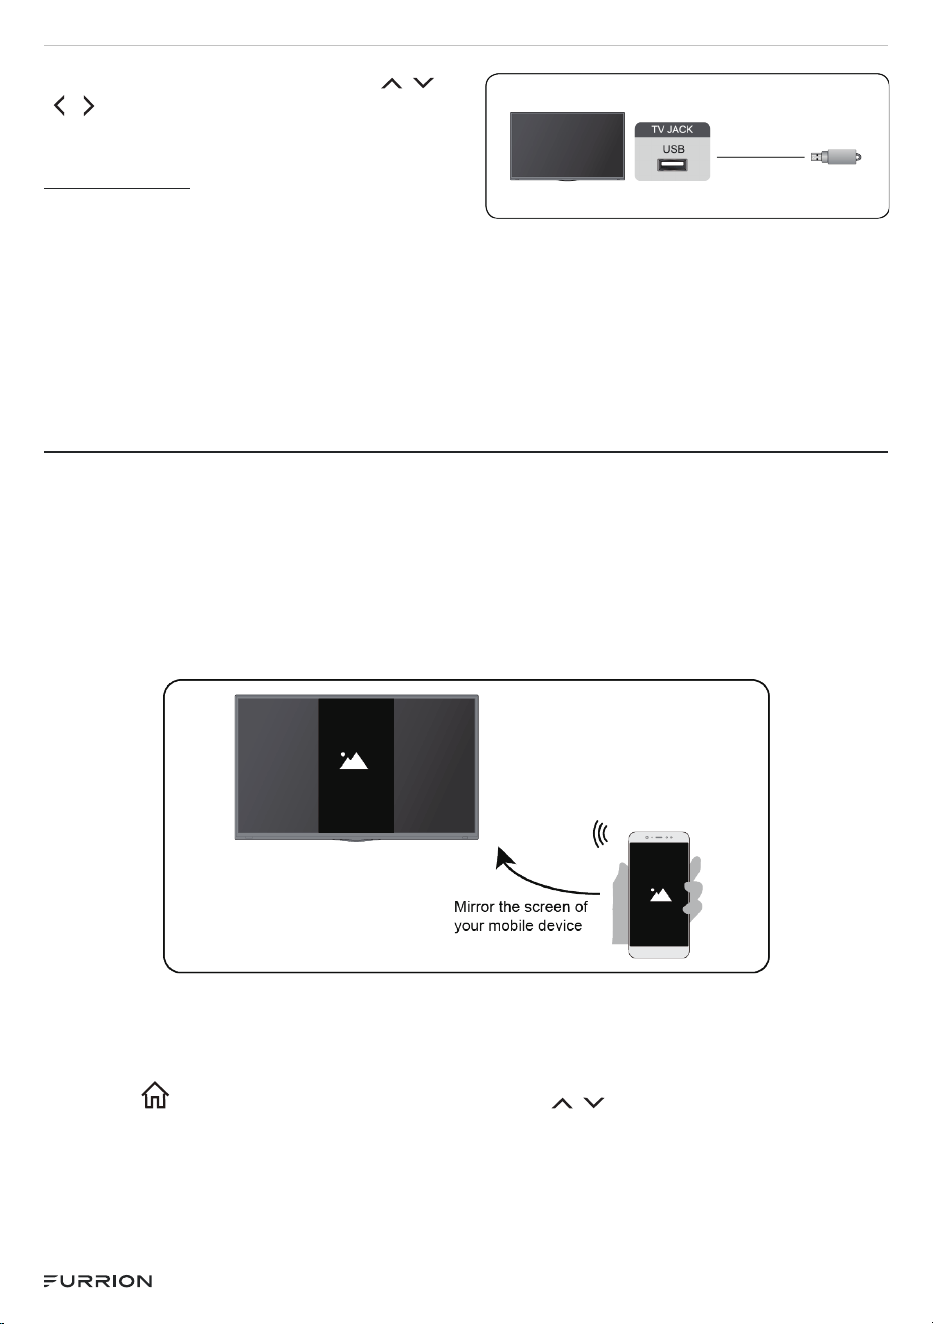
Press OK button enter USB, press /
/ / button to select the document or
music item.
USB Device
Connect the USB devices such as hard
drives, USB sticks and digital cameras for
browsing photos, listening to music.
1. Support the USB Storage 4G, 8G,
16G, 32G, 64G, 128G and other
common market sizes, 8T hard drive
is currently supported.
2. Supported format: NTFS, FAT32.
MULTI-SCREEN
Sharing (Mirroring)
Mirror content from your device to the TV.
Press INPUT button to display the main menu, then select Screen Sharing.
● Turn on the screen mirroring function of your Android/ Windows10 device.
● Find the TV name in the searching list of your device and select it. Wait for the
connection progress to complete and the content on your device will be displayed
on the TV.
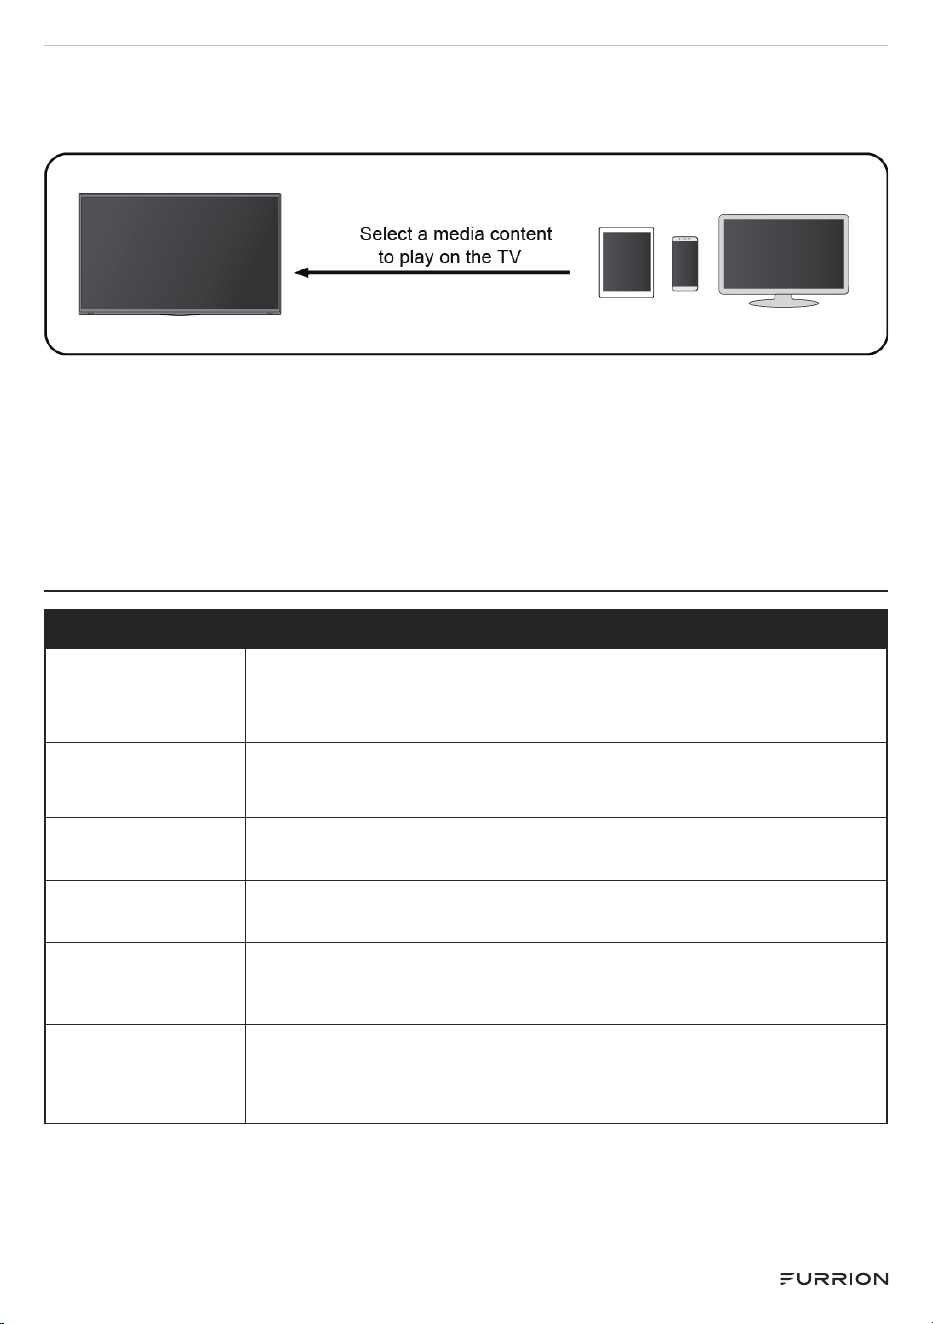
Content Sharing
Share media content, like videos, music or photos, from your Android/ PC device to the
TV screen.
Press the
button on your remote control, use the / button to navigate to
System->Application Manager-> Content Sharing.
Establishing Content Sharing connection between the TV and your device
1. Turn on the content sharing function of your Android /PC device.
2. Find the TV name in the searching list of your device and select it.
3. Wait for the connection progress to complete, and select the content you want to
- 26 -
CCD-0006087
REV: 11.02.2023
share.
Viewing media content of your device
Press INPUT button on your remote, and select a media content on the screen.
Note:
● Make sure your device and the TV are connected to the same network.
● Some devices may not support content sharing. If your device doesn’t support
content sharing, you can download an app that supports the function.
● If you want to mirror content from your device, Press INPUT button and select
Screen Sharing
TROUBLESHOOTING
Problem Solution/Issue
TV does not operate
● Make sure the power cord is plugged in.
● Try another AC outlet.
● Power is off, check fuse or circuit breaker.
● Unplug unit for an hour, then plug it back in.
● The batteries in the remote control may be exhausted, replace the batteries.
Normal picture, but no
sound
● Check the volume settings.
● Check if ‘Mute’ mode is set to on.
● Try another channel.
● Check audio cable connections.
The remote control
does not work
● Make the remote control is in range with no obstructions.
● Check the batteries.
● Correct operating mode set: TV, VCR etc.
Poor sound or no
sound
● Station or Cable TV experiencing problems, tune to another station.
● Check sound adjustments (Volume or Mute).
● Check for sources of possible interference.
The speakers are
making an odd sound
● Make sure that the audio cable is connected to the correct audio output connector on the
external device.
● For antenna or cable connections, check the signal information.
● A low signal level may cause sound distortions.
Poor picture or no
picture
● Station or Cable TV experiencing problems, tune to another station.
● Make sure channels are set into memory.
● Check antenna or Cable TV connections, adjust antenna.
● Check for sources of possible interference.
● Check picture control adjustments.
- 27 -
CCD-0006087
REV: 11.02.2023
Problem Solution/Issue
Poor TV reception
● Ensure the antenna amplifier is turned on for Antenna TV.
● Adjust the antenna position to a stronger signal receiving angle.
● Check the Antenna connection is tight to the TV.
● Check there is power supplied to the Antenna distribution box.
● Confirm your incoming cable is connected to the correct cable / antenna wall connection
inside the RV.
● Ensure the internal RV coax jump cable is connected to the correct port.
Poor Cable / Satellite
TV Reception
● Ensure antenna amp is turned off for able signal.
● Check incoming Cable is connected correctly to RV.
● Ensure cable splitter box has power.
● Confirm the incoming cable is connected to the correct cable / Satellite wall connection
inside your RV.
● Ensure the internal RV coax jump cable is connected to the correct port.
● Check Dish has not obstruction.
TV shuts off
● Sleep Timer is set.
● Power interrupted.
Black and white image
from the connected AV
device
● Check video connections on both the TV and connected AV device. Ensure the colors
match between the connectors and sockets: yellow (VIDEO) for CVBS connection.
● Ensure all video cables are connected firmly.
Audio noise
● Move any infrared equipment away from the TV.
The TV cannot
connect to your
network or apps.
● Make sure the TV has a network connection.
● Run Network Test
● Contact your Internet service provider.
The wireless network
connection failed.
● Make sure your wireless modem/router is on and connected to the Internet.
The wireless network
signal is too weak.
● Position your wireless router, modem router, or access point in a central location. Avoid
putting it in a corner.
Some files can’t be
played.
● This problem may occur with high-bitrate files. Most files can be played back, but you
might experience problems with high-bitrate files.
The TFT LED panel uses a panel consisting of sub pixels which requires sophisticated
technology to produce. However, there may be a small number of bright or dark pixels
on the screen. These pixels will have no impact on the performance of the product.
- 28 -
CCD-0006087
REV: 11.02.2023
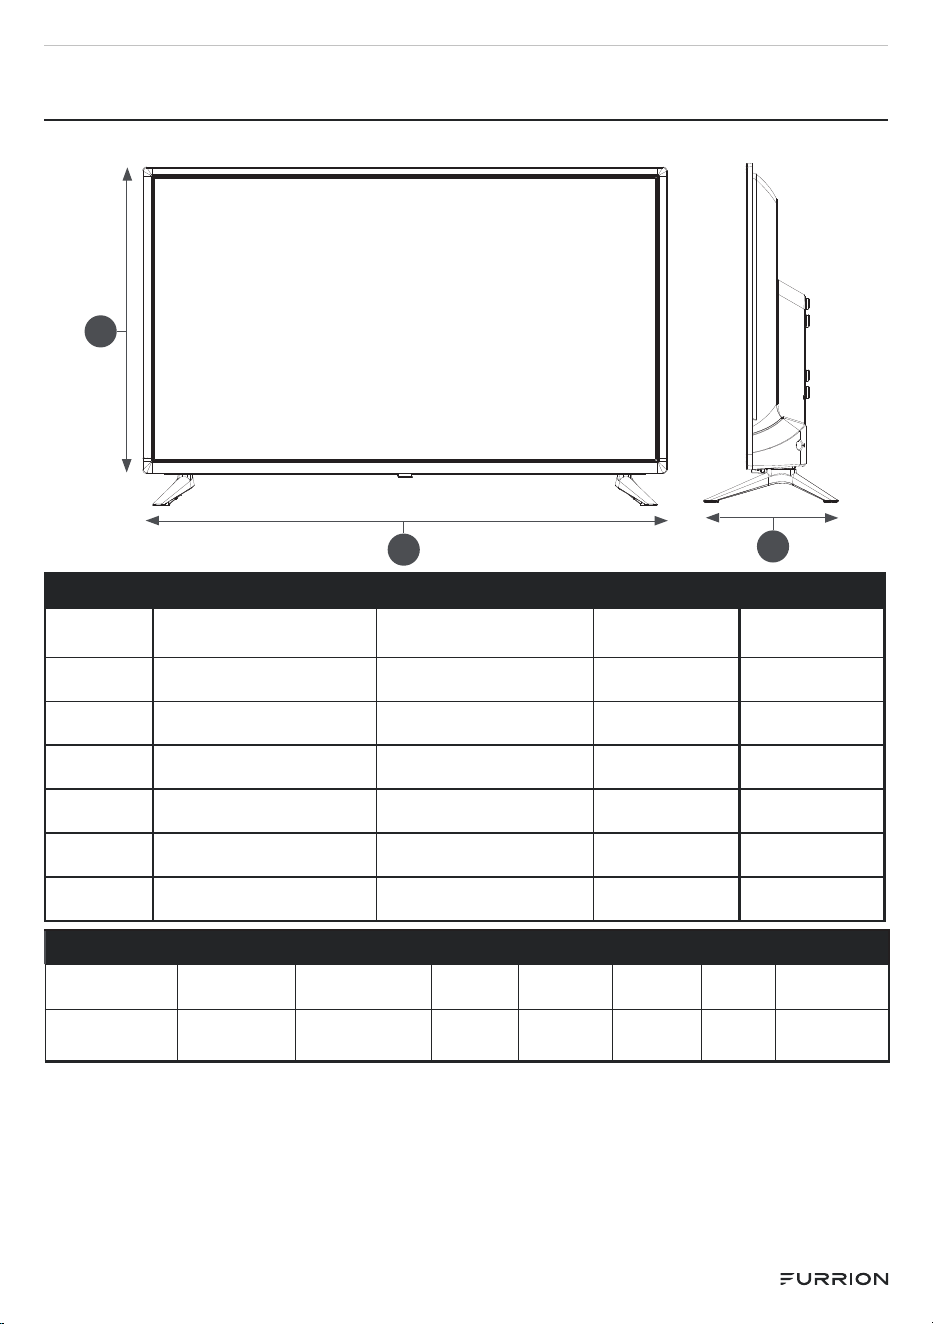
SPECIFICATIONS
D
W
H
DIMENSION & RESOLUTION
SIZE
Dimension without Stand
(L x H x D)
Dimension with Stand
(L x H x D)
Max Resolution
Weight lbs. (kg)
24"
21 11/16” x 12 15/16” x 2 ⅜”
551mm x 329mm x 61 mm
21 11/16” x 15” x 6 ¾”
551mm x 381mm x 171 mm
1366 x 768 HD 4.63 lbs (2.1 kg)
32"
28 ¾” x 16 13/16” x 3 ¼”
730mm x 427mm x 83mm
28 ¾” x 18 7/16” x 7 ⅜”
730mm x 469mm x 188mm
1366x768 HD 7.93 lbs.(3.6 kg)
39"
34 ⅞” x 20 1/16” x 2 11/16”
886mm x 509mm x 68 mm
34 ⅞” x 22 3/16” x 8 5/16”
886mm x 563mm x 211 mm
1366 x 768 HD 14.33 lbs. (6.5 kg)
43”
38 ⅛” x 22 3/16” x 2 ⅝”
968mm x 563mm x 67 mm
38 ⅛” x 24 ¼” x 8 5/16”
968mm x 616mm x 211 mm
1920 x 1080 HD 15 lbs. (6.8 kg)
50"
44 3/16” x 25 ½” x 3 ¼”
1122mm x 647mm x 83 mm
44 3/16” x 27 13/16” x 11 ¼”
1122mm x 706mm x 285 mm
3840 x 2160 HD 22.26 lbs. (10.1 kg)
55"
49 ⅛” x 28 9/16” x 2 13/16”
1248mm x 726mm x 71 mm
49 ⅛” x 30 15/16” x 10 1/16”
1248mm x 785mm x 255 mm
3840 x 2160 UD 23.72 lbs. (10.76 kg)
INPUT & OUTPUT CONNECTIONS
COAXIAL OUT VIDEO IN AUDIO IN RF IN RJ45 IN HDMI IN USB EARPHONE
1
1 x Video
(Yellow)
1 x Right (Red)
1 x Left (White)
1 1 3 2 1

IM-FAV00094 V1.0
Furrion, LLC (Furrion) are wholly owned subsidiaries of Lippert Components, Inc. (Lippert)
Furrion, LLC (Furrion) sont des filiales en propriété exclusive de Lippert Components, Inc. (Lippert)
Furrion, LLC: 52567 Independence Ct., Elkhart, IN, 46514
Furrion Innovation Center & Institute of Technology
Centre d’innovation et institut de technologie Furrion
22244 Innovation Drive, Elkhart, IN 46514-5514, USA
Toll free/Numéro gratuit/Línea telefónica gratuita:1-800-789-3341
Email/Courriel/Correo electrónico: [email protected]
©2007-2023 Furrion, LLC (Furrion). All rights reserved.
©2007-2023 Furrion, LLC (Furrion). Tous droits réservés.
For Patent Info: www.Lippert.com/patents
Pour des informations sur les brevets: www.Lippert.com/patents
FURRION.COM
The contents of this manual are proprietary and copyright protected by Lippert. Lippert prohibits
the copying or dissemination of portions of this manual unless prior written consent from
an authorized Lippert representative has been provided. Any unauthorized use shall void any
applicable warranty. The information contained in this manual is subject to change without
notice and at the sole discretion of Lippert. Revised editions are available for free download from
lippert.com.
Please recycle all obsolete materials.
Les renseignements contenus dans le présent manuel peuvent seulement être distribués
sous forme de document complet, à moins de recevoir l’approbation explicite
de Lippert Components pour distribuer desparties individuelles. Tous les renseignements
contenus dans le présent manuel peuvent être modifiés sans préavis. Les éditions révisées
pourront être téléchargées gratuitement sur le site lci1.com. Ces renseignements sont considérés
comme étant factuels jusqu’à ce qu’une version révisée les rende désuets.
Veuillez recycler tout le matériel désuet.
For all concerns or questions, please contact Lippert.
Communiquer avec Lippert Components si vous avez des questions ou des préoccupations.
Ph: 432-LIPPERT (432-547-7378) | Web: lippert.com | Email: [email protected]