THERMAXX
HEATSTREAM
Ölradiator
Oil radiator
Radiateur à huile
Radiador de aceite
Radiatore ad olio
Olie radiator
Hinweis: Dieses Produkt ist nur für gut isolierte Räume
oder für den gelegentlichen Gebrauch geeignet.
Note: This product is only suitable for well insulated
spaces or occasional use.
Advertencia: Este producto está indicado únicamente en
lugares abrigados o para una utilización punctual.
Remarque : Ce produit ne peut être utilisé que dans
des locaux bien isolés ou de manière occasionnelle.
Nota: Questo prodotto è adatto solo per spazi
ben isolati o uso occasionale.
Let op! Dit artikel is alleen geschikt voor goed geïsoleer-
de ruimtes en voor incidenteel gebruik.
www.klarstein.com
10035055 10035109


3
DE
Sehr geehrter Kunde,
wir gratulieren Ihnen zum Erwerb Ihres Gerätes. Lesen Sie
die folgenden Hinweise sorgfältig durch und befolgen Sie
diese, um möglichen Schäden vorzubeugen. Für Schäden,
die durch Missachtung der Hinweise und unsachgemäßen
Gebrauch entstehen, übernehmen wir keine Haftung. Scannen
Sie den folgenden QR-Code, um Zugriff auf die aktuellste
Bedienungsanleitung und weitere Informationen rund um das
Produkt zu erhalten.
INHALTSVERZEICHNIS
TECHNISCHE DATEN
Artikelnummer 10035055, 10035109
Stromversorgung 220-240 V~ 50 Hz
Leistung (Watt) max. 2500 W
Produktdatenblatt4
Sicherheitshinweise5
Geräteübersicht6
Installation7
Inbetriebnahme und Bedienung8
Reinigung und Pege10
Spezielle Entsorgungshinweise für Verbraucher in Deutschland11
Hinweise zur Entsorgung13
Hersteller & Importeur (UK)13
4
DE
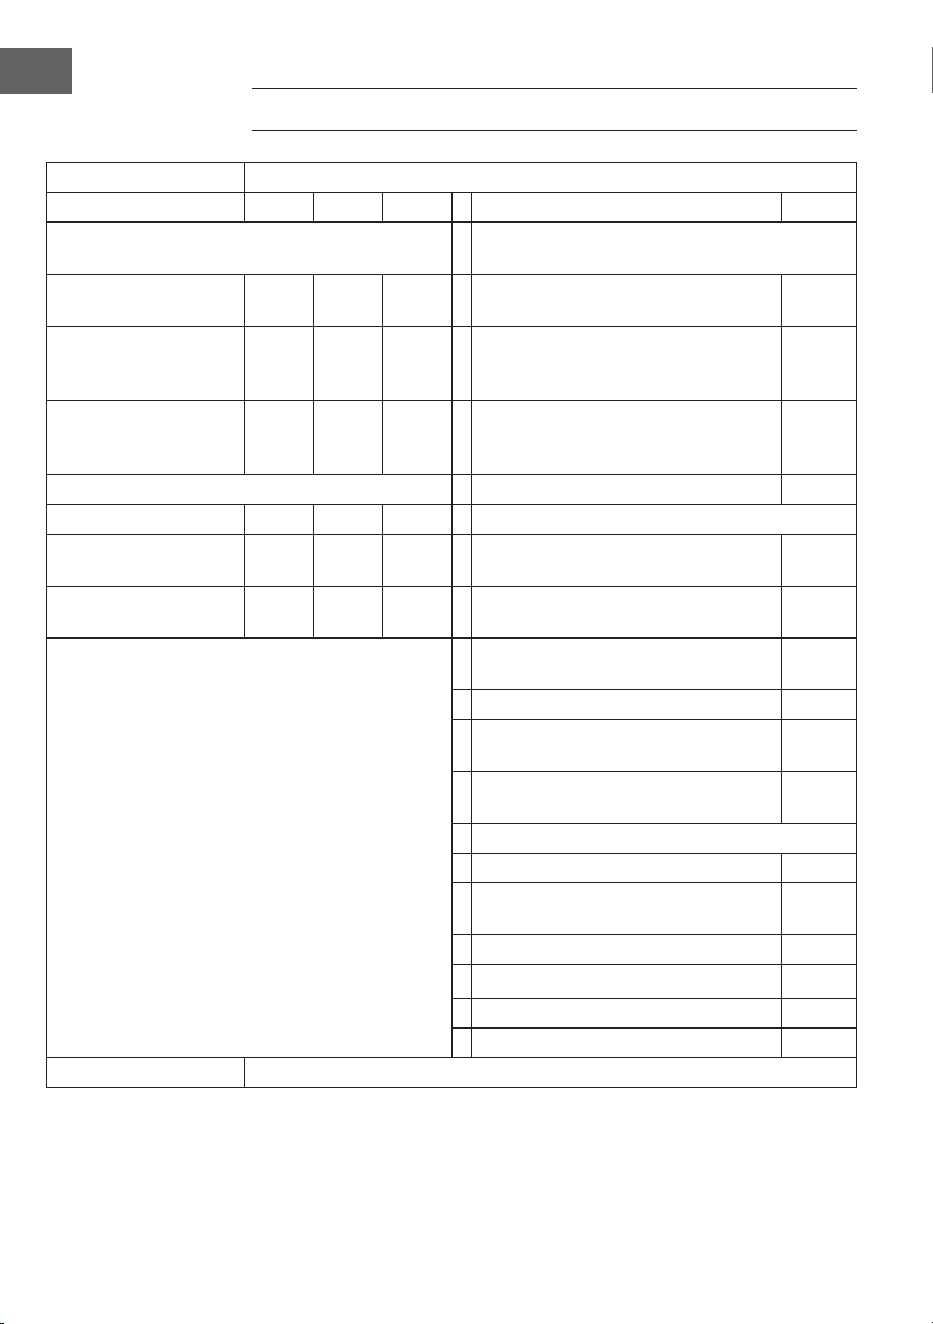
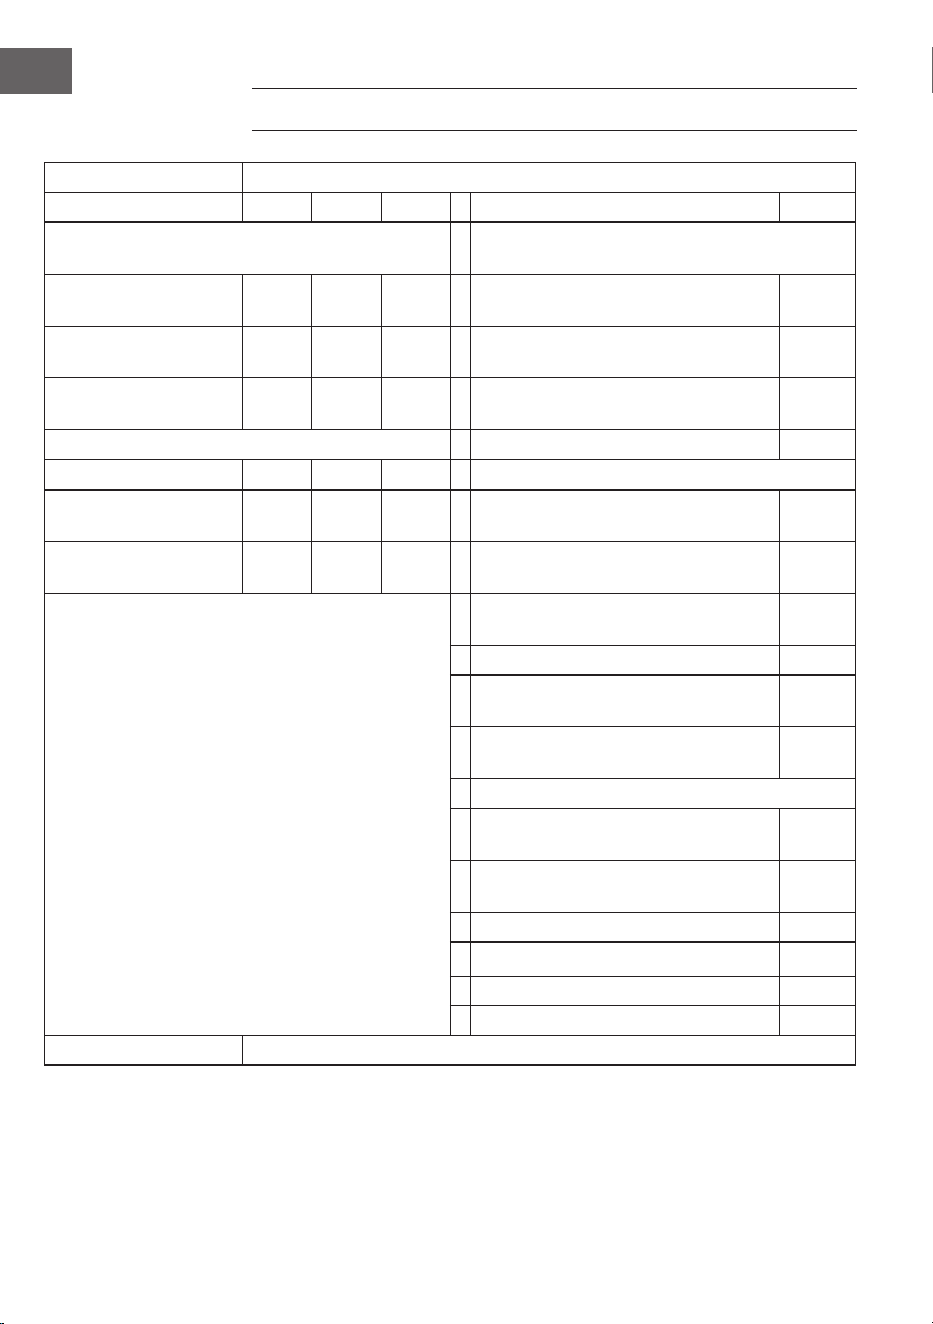
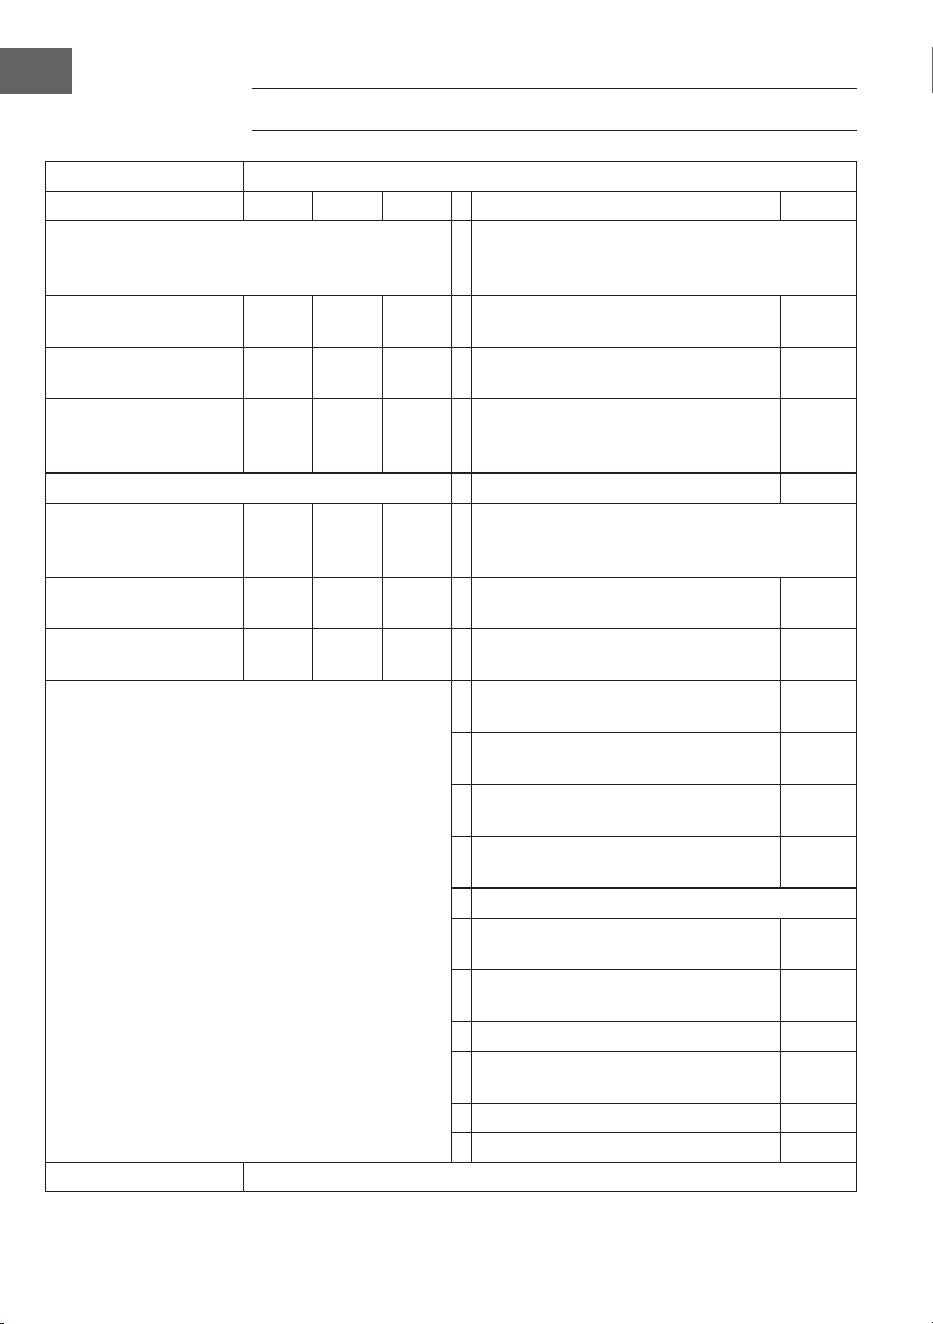
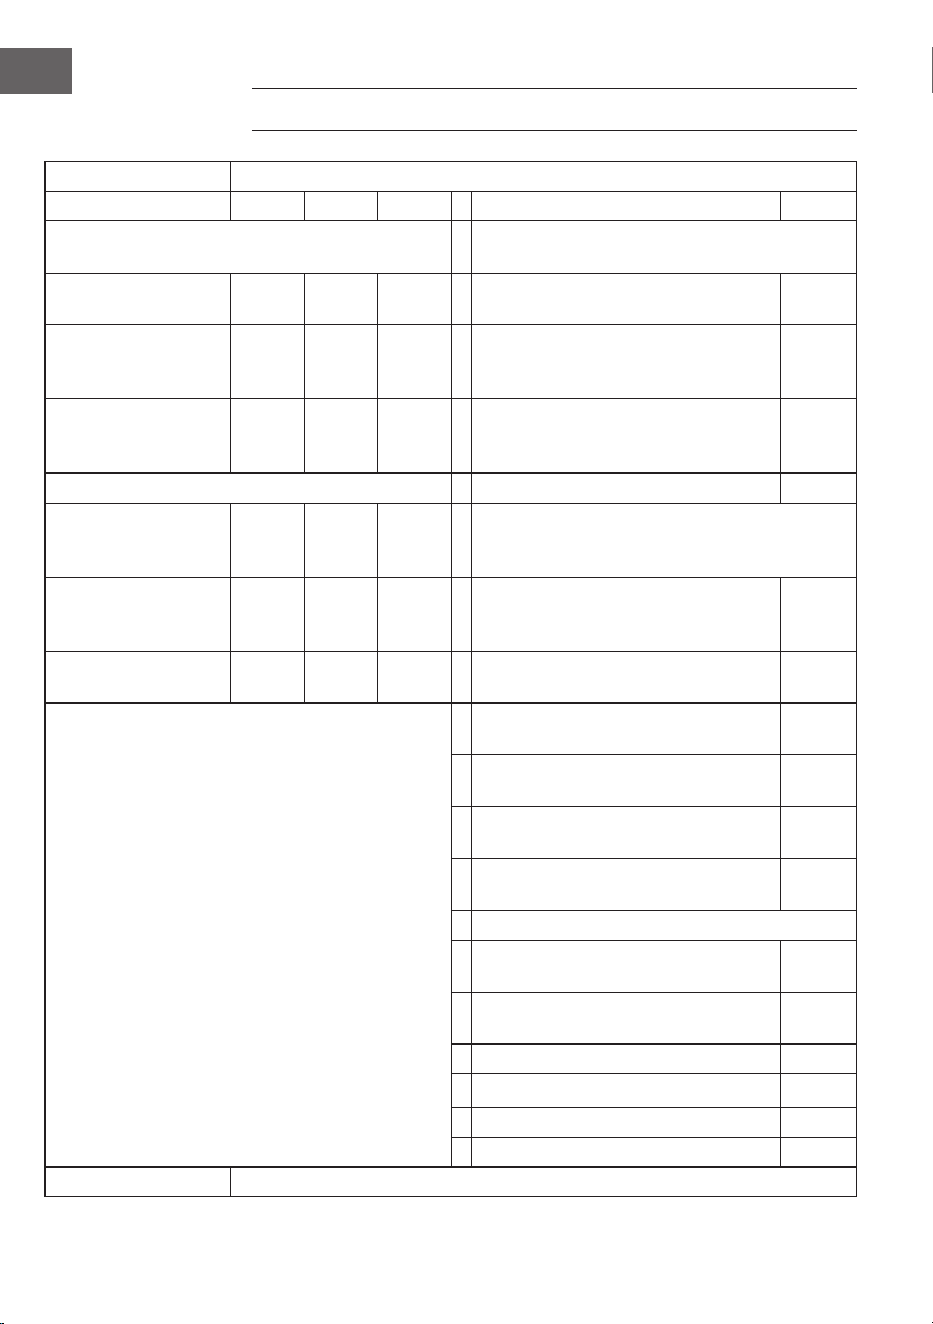
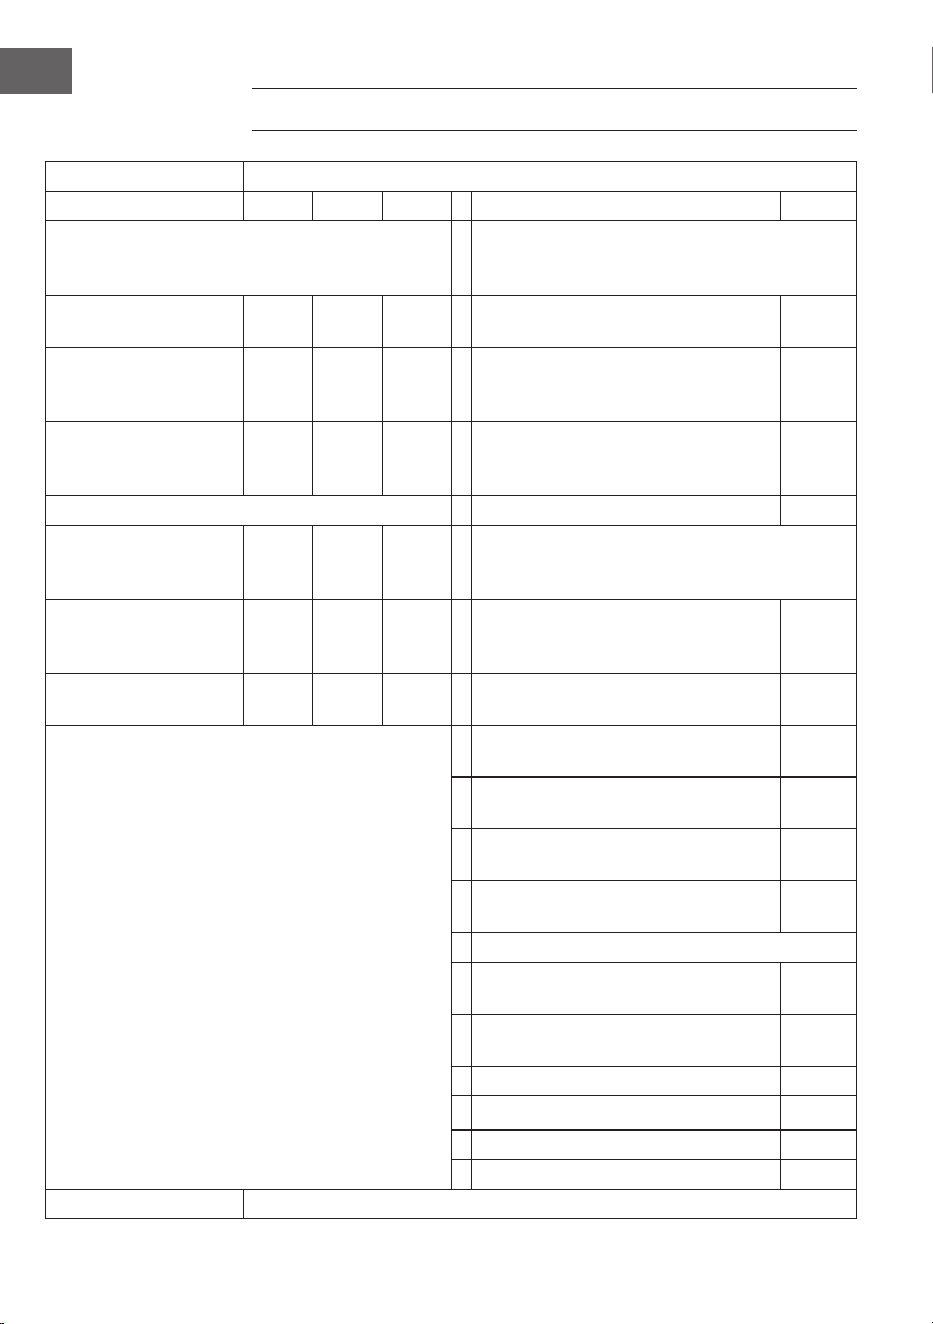
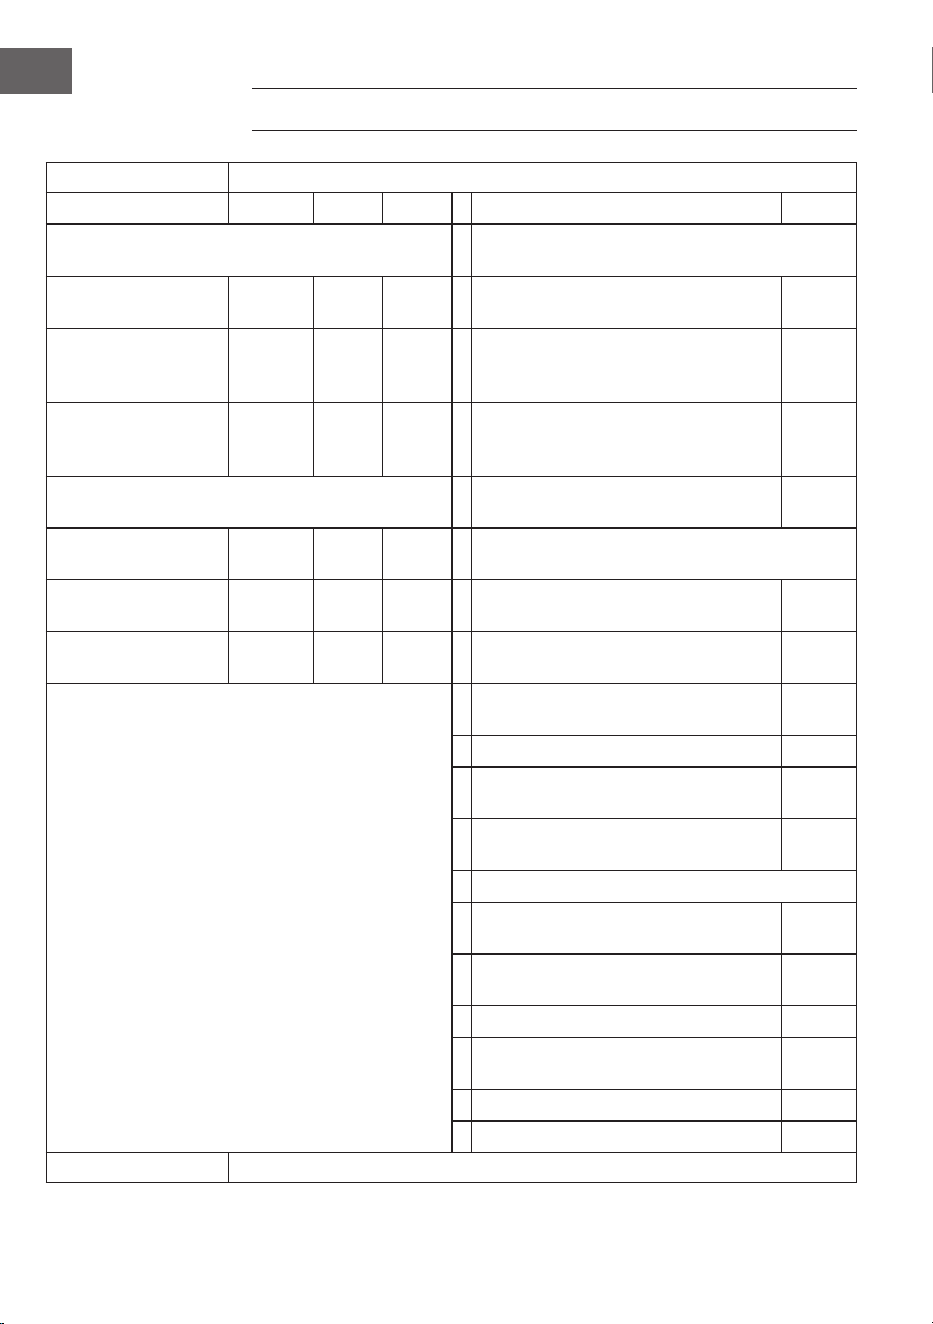
PRODUKTDATENBLATT
Modellkennungen 10035055, 10035109
Angabe Symbol Wert Einheit Angabe Einheit
Wärmeleistung Nur bei elektrischen Speicher-Einzelraumheizgeräten:
Art der Regelung der Wärmezufuhr
Nennwärmeleistung P
nom
1,2
kW Manuelle Regelung der Wärmezufuhr mit
integriertem Thermostat
nein
Mindestwärmeleistung
(Richtwert)
P
min
1,0
kW Manuelle Regelung der Wärmezufuhr
mit Rückmeldung der Raum- und/oder
Außentemperatur
nein
Maximale kontinuierliche
Wärmeleistung
P
max,c
1,2
kW Elektronische Regelung der Wärmezufuhr
mit Rückmeldung der Raum- und/oder
Außentemperatur
nein
Hilfsstromverbrauch
Wärmeabgabe mit Gebläseunterstützung nein
Bei Nennwärmeleistung el
max
0,000 kW
Art der Wärmeleistung/Raumtemperaturkontrolle
Bei Mindestwärmeleistung el
min
0,000 kW Einstuge Wärmeleistung, keine
Raumtemperaturkontrolle
nein
Im Bereitschaftszustand el
SB
0,225 W Zwei oder mehr manuell einstellbare Stufen,
keine Raumtemperaturkontrolle
nein
Raumtemperaturkontrolle mit mechanischem
Thermostat
nein
Mit elektronischer Raumtemperaturkontrolle ja
Mit elektronischer Raumtemperaturkontrolle und
Tageszeitregelung
nein
Mit elektronischer Raumtemperaturkontrolle und
Wochentagsregelung
nein
Sonstige Regelungsoptionen
Raumtemperaturkontrolle mit Präsenzerkennung nein
Raumtemperaturkontrolle mit Erkennung offener
Fenster
nein
Mit Fernbedienungsoption nein
Mit adaptiver Regelung des Heizbeginns nein
Mit Betriebszeitbegrenzung ja
Mit Schwarzkugelsensor nein
Kontaktangaben Chal-Tec GmbH, Wallstraße 16, 10179, Berlin, Deutschland
5
DE
SICHERHEITSHINWEISE
• Decken Sie das Gerät nicht ab, um ein Überhitzen zu vermeiden.
• Wenn das Netzkabel beschädigt ist, muss es vom Hersteller, dem Kundendienst
oder einer in ähnlicher Weise qualizierten Person ersetzt werden, um Schäden zu
vermeiden.
• Kinder ab 8 Jahren, psychisch, sensorisch und körperlich eingeschränkte Menschen
dürfen das Gerät nur benutzen, wenn sie vorher von einer für sie verantwortlichen
Aufsichtsperson ausführlich mit den Funktionen und den Sicherheitsvorkehrungen
vertraut gemacht wurden und die damit verbundenen Risiken verstehen.
• Das Gerät ist kein Spielzeug. Die Reinigung und Wartung des Geräts darf von
Kindern ab 8 Jahren ausschließlich unter Aufsicht durchgeführt werden.
• Kinder unter 3 Jahren sollten von dem Gerät ferngehalten werden, es sei denn, sie
werden ständig beaufsichtigt.
• Kinder zwischen 3 und 8 Jahren dürfen das Gerät nur dann ein- und ausschalten,
wenn es in seiner vorgesehenen normalen Betriebsposition aufgestellt oder
installiert wurde, sie von einer für sie verantwortlichen Person beaufsichtigt und in
den sicheren Gebrauch eingewiesen werden und die damit verbundenen Gefahren
verstehen. Kinder zwischen 3 und 8 Jahren dürfen den Stecker des Geräts nicht in
die Steckdose stecken, das Gerät nicht einstellen, reinigen oder Wartungsarbeiten
am Gerät durchführen.
• Stellen Sie das Gerät nicht direkt unterhalb einer Steckdose auf.
• Verwenden Sie das Gerät nicht in feuchter Umgebung, wie beispielsweise in der
Nähe von Badewannen, Duschen oder Swimmingpools.
VORSICHT
Verbrennungsgefahr! Einige Gerätebestandteile können während des
Gebrauchs sehr heiß werden und Verbrennungen verursachen. Lassen
Sie besondere Vorsicht walten, wenn sich Kinder oder gebrechliche
Personen in der Nähe des Geräts aufhalten.
• Dieses Gerät ist mit einer bestimmten Menge an Spezialöl befüllt. Reparaturen,
die das Öffnen des Ölbehälters erforderlich machen, dürfen ausschließlich
vom Hersteller oder dessen Kundendienst durchgeführt werden. Kontaktieren
Sie deshalb im Falle eines Öllecks den Hersteller oder Kundendienst. Bei der
Entsorgung des Geräts müssen die lokalen Bestimmungen zur Entsorgung von Altöl
berücksichtigt werden.
• Dieses Gerät lässt keine exakte Regulierung der Raumtemperatur zu und darf
deshalb nicht als Isoliergerät für Lagerräume, Gegenstände, Tiere und Panzen
verwendet werden.

6
DE
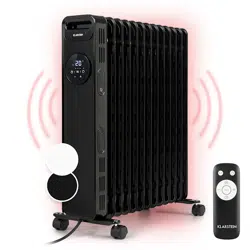
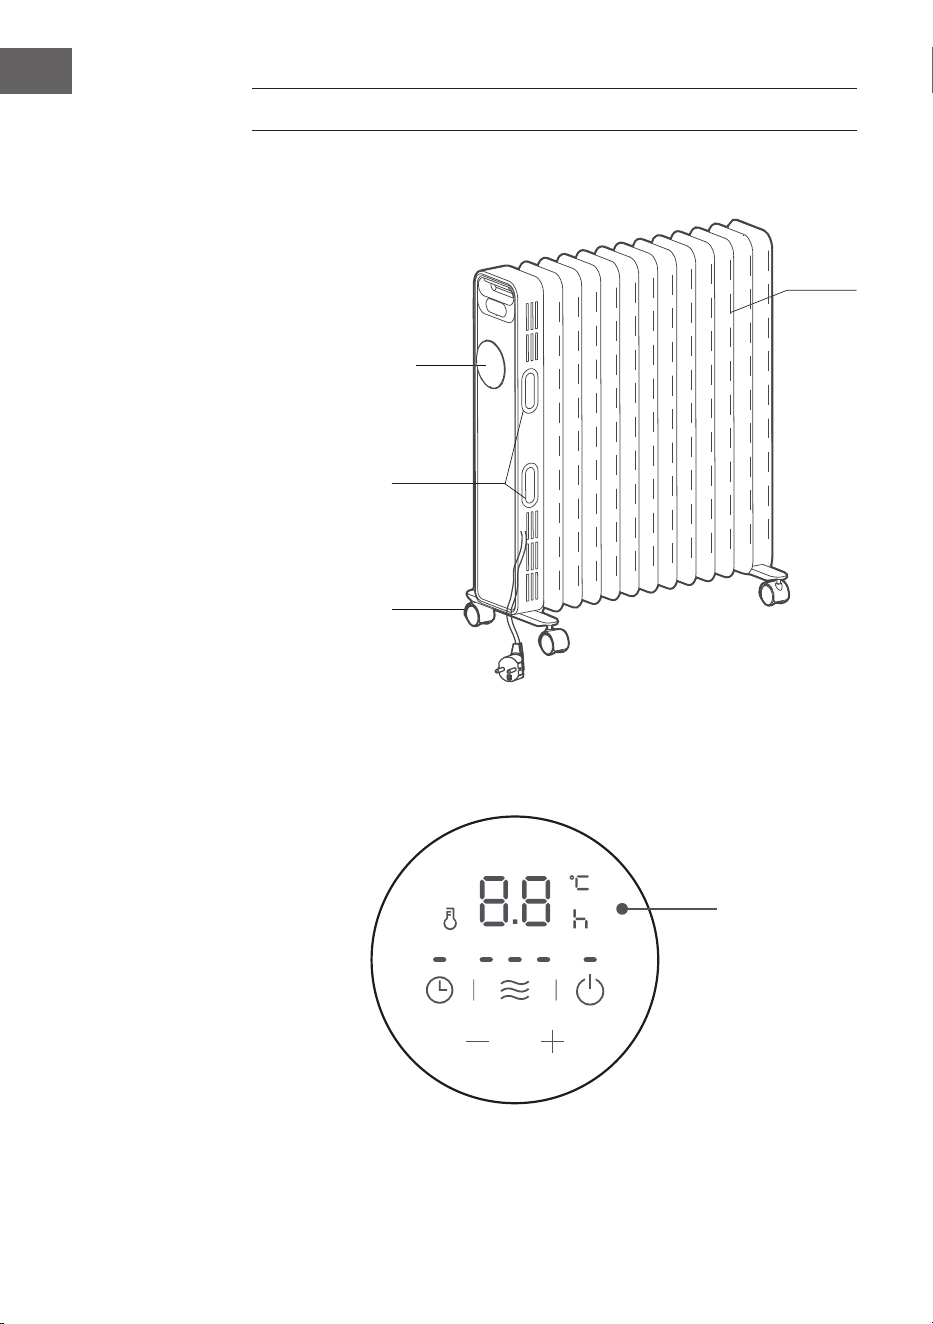
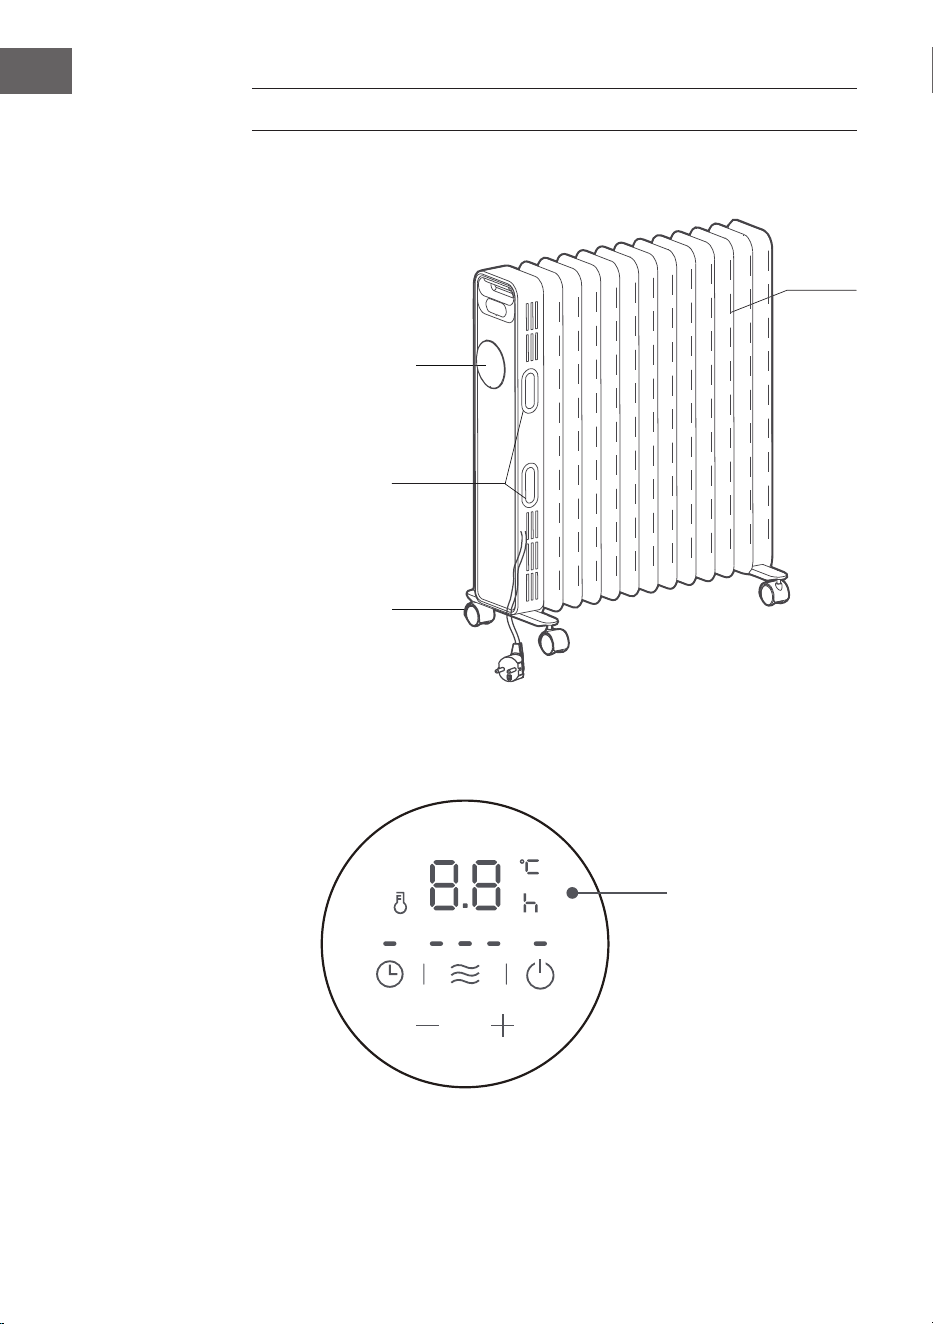
GERÄTEÜBERSICHT
Ölradiator
Bedienfeld
Anzeigefenster
Rippen
Kabelaufwicklung
Rollen
Bedienfeld
7
DE
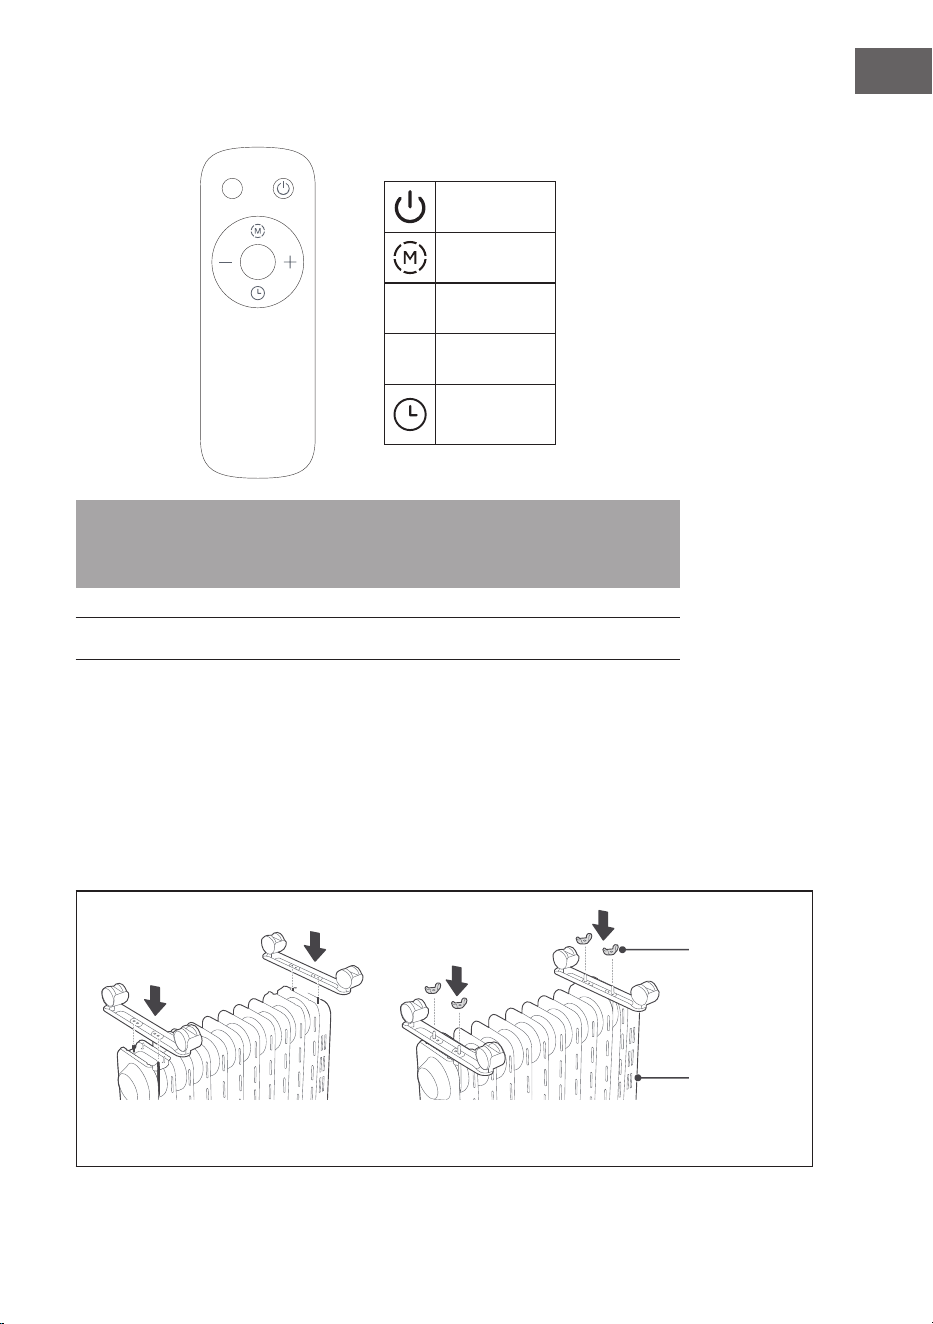
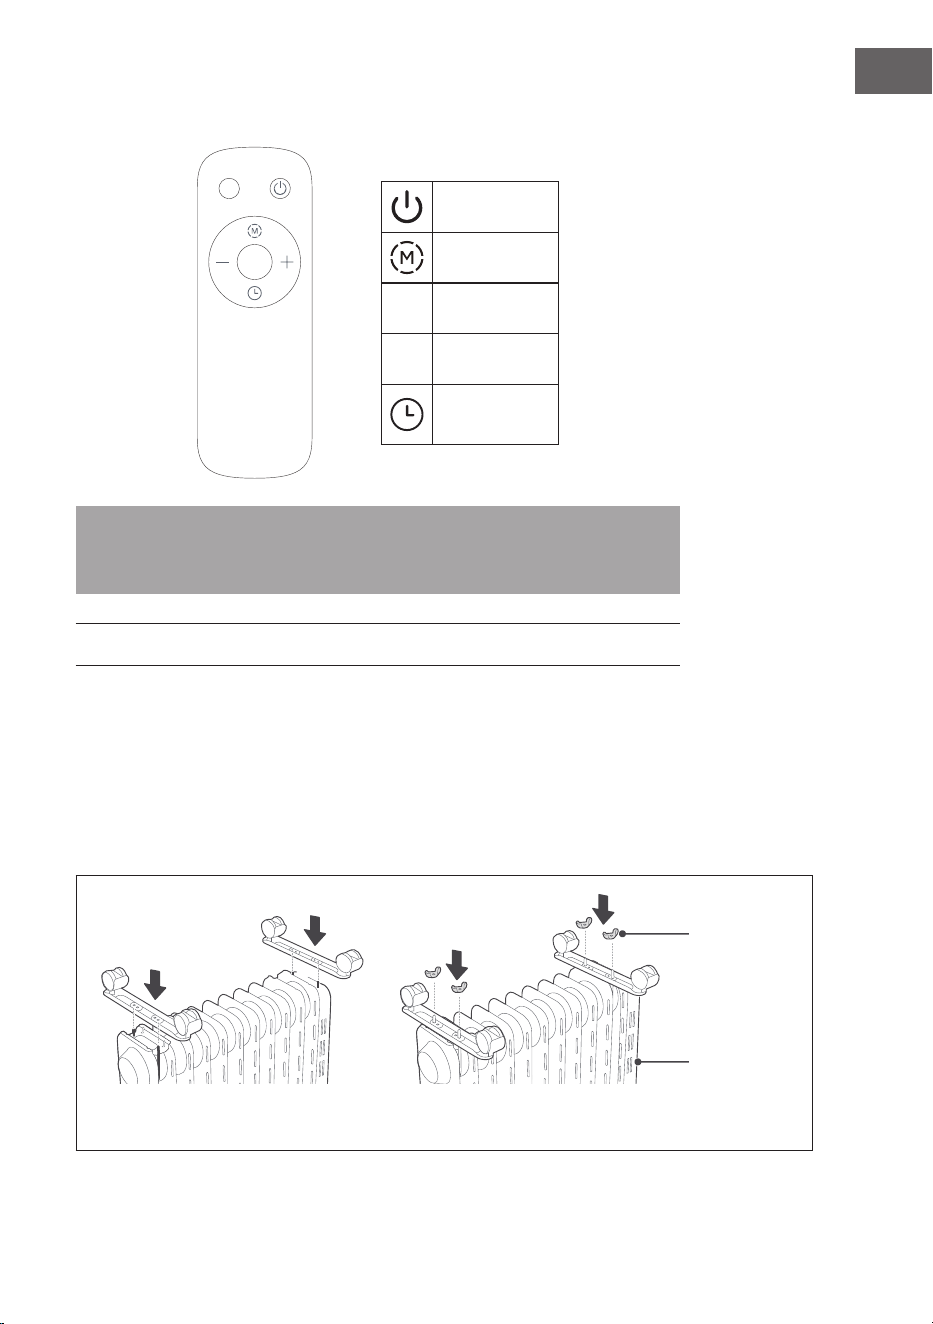
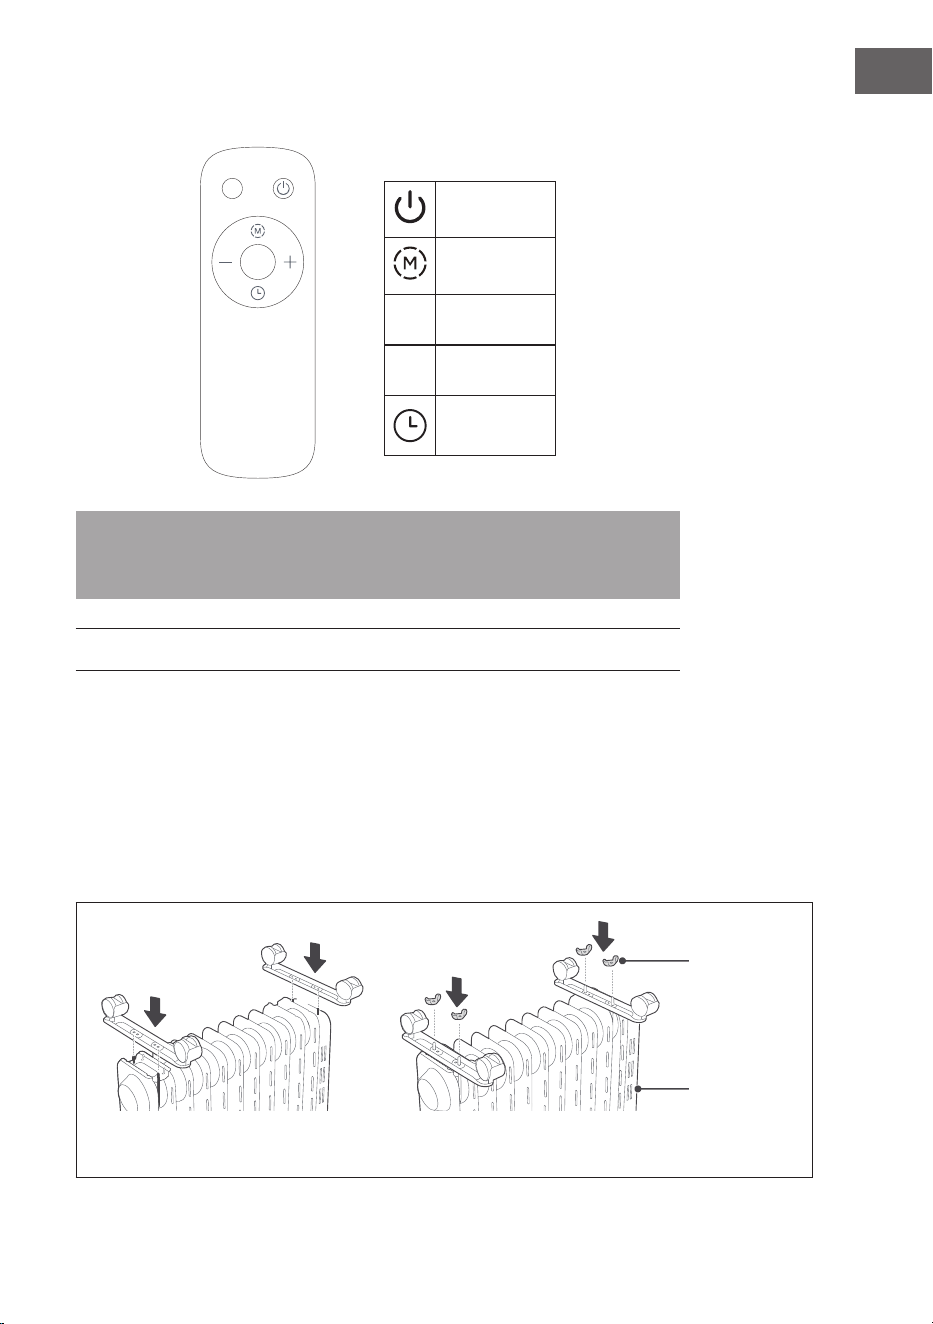
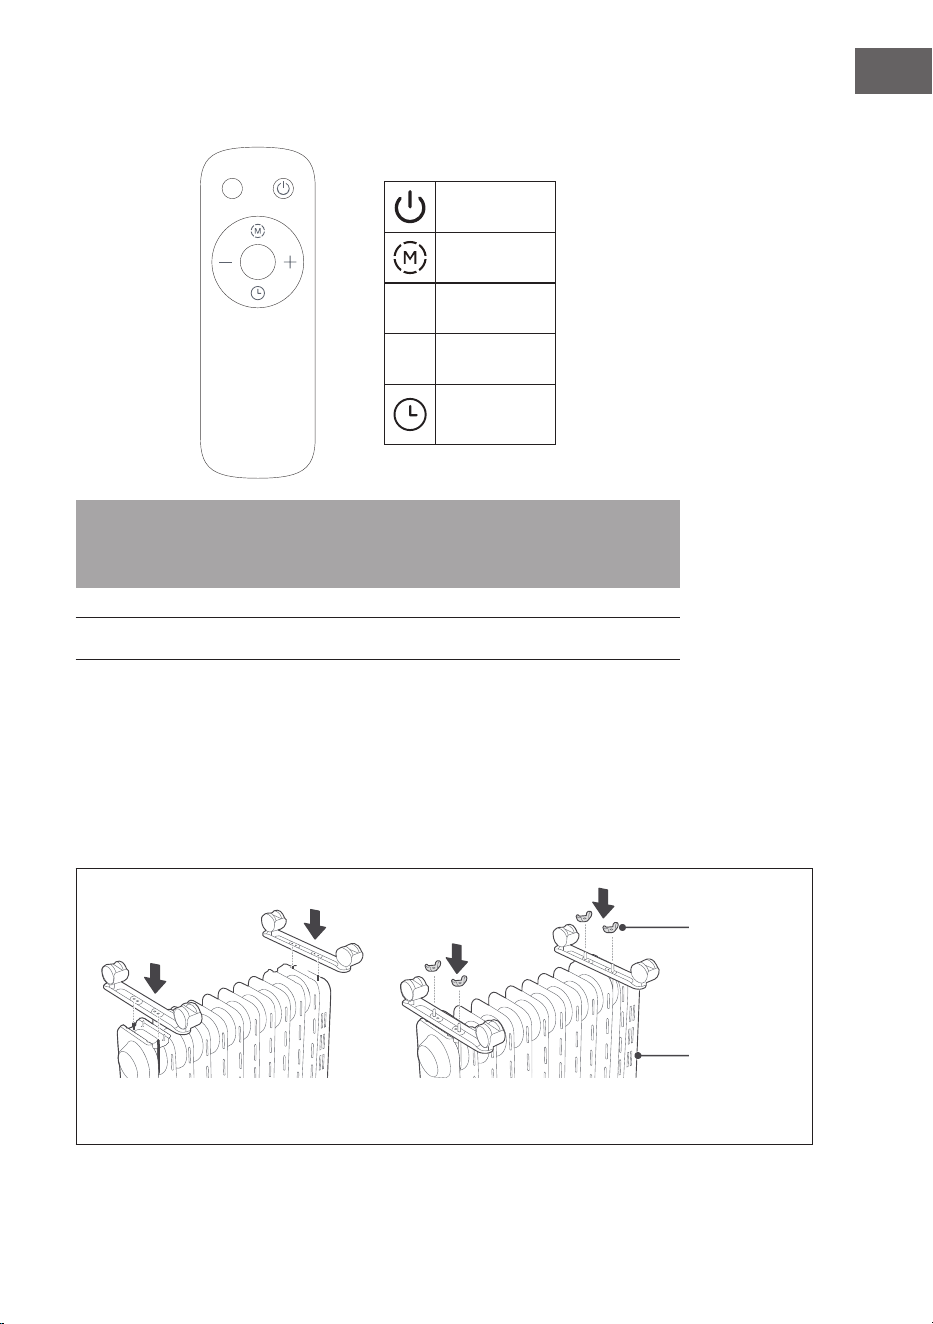
Fernbedienung
...
Standby-Taste
Modus-Taste
+
Erhöhen
-
Senken
Timer-Taste
Hinweis: Die Tastenfunktionen der Fernbedienung stimmen grundsätzlich mit den
Tastenfunktionen des Bedienfelds am Gerätegehäuse überein, mit der Fernbedienung
können aber keine Tastenkombination aufgerufen werden.
INSTALLATION
1. Drehen Sie den Radiator auf den Kopf.
2. Stecken Sie die Löcher der beiden Rollensätze auf die Schrauben, die sich jeweils
an der linken und rechten Unterseite des Radiators benden – links an der Rollen-
Auageplatte am Ende der Rippe und rechts am Steuerkasten (siehe Abbildung1).
3. Befestigen Sie die beiden Rollensätze mit vier Flügelmuttern und ziehen Sie diese
fest, damit die Rollensätze nicht verrutschen können (siehe Abbildung 2). Drehen
Sie das Gerät anschließend um und stellen Sie dieses mit den Rollen auf den
Boden.
Flügelmuttern
Steuerkasten
Abbildung 1 Abbildung 2
8
DE
INBETRIEBNAHME UND BEDIENUNG
Vor dem ersten Gebrauch
1. Überprüfen Sie das Gerät und das Netzkabel vor der Inbetriebnahme auf
Schäden.
2. Stellen Sie sicher, dass die Spannung der Steckdose der angegebenen Spannung
auf dem Typenschild des Geräts entspricht. Die Steckdose muss geerdet sein. Sollte
dies nicht der Fall sein, lassen Sie die Steckdose von einem Elektriker austauschen.
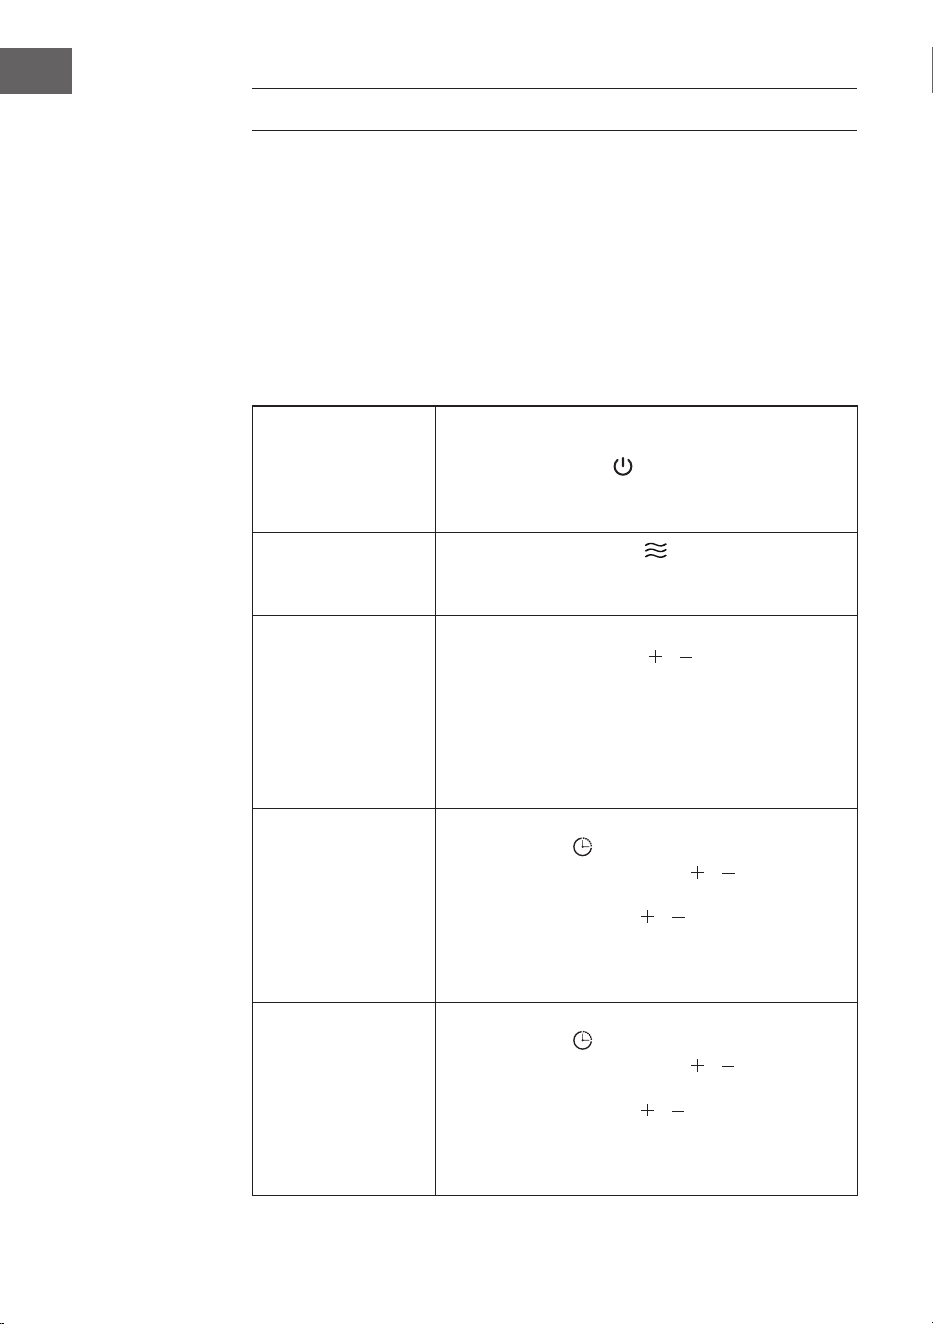
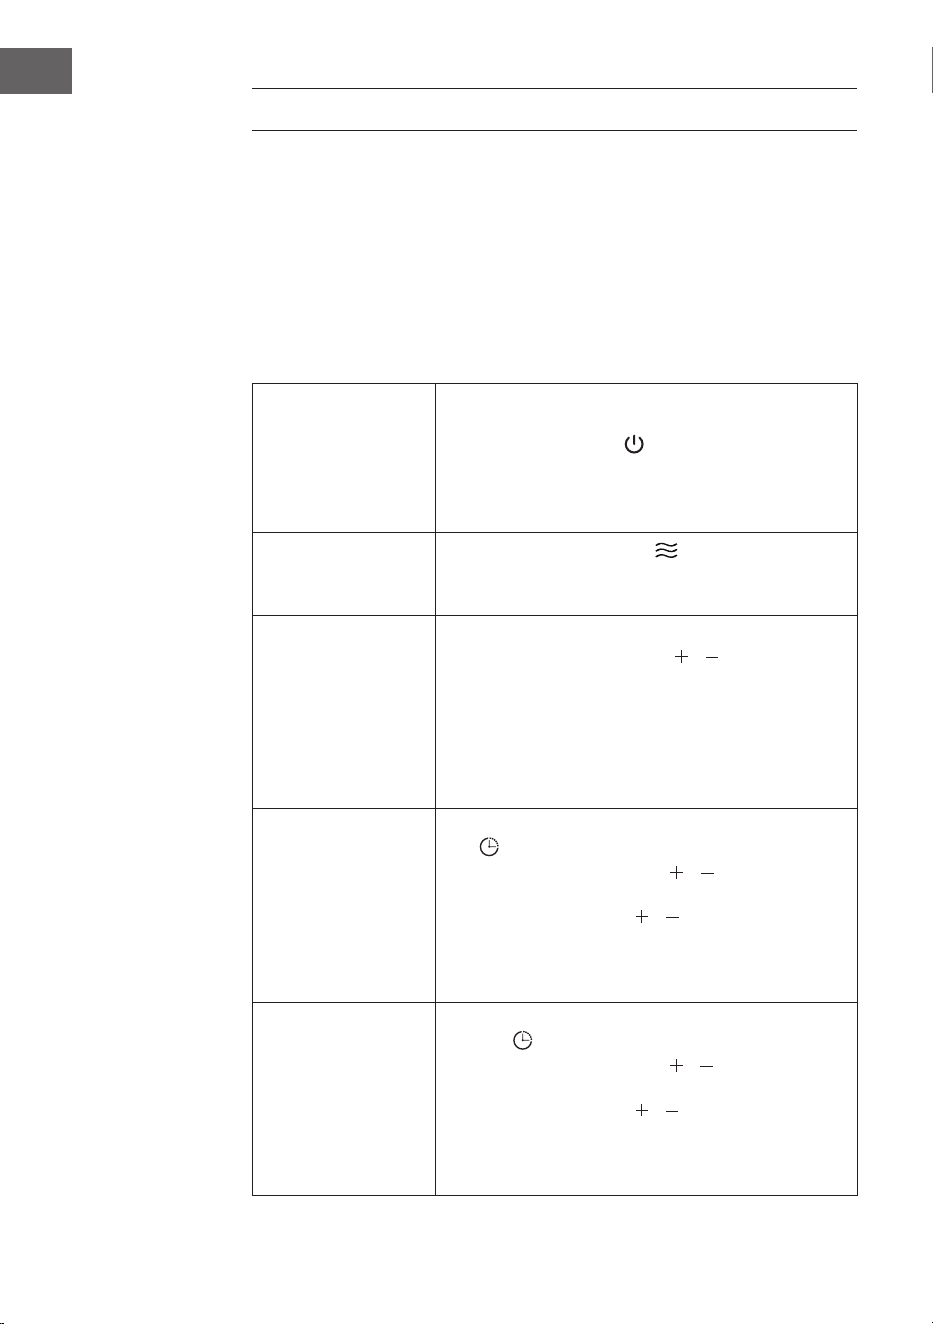
Bedienfunktionen
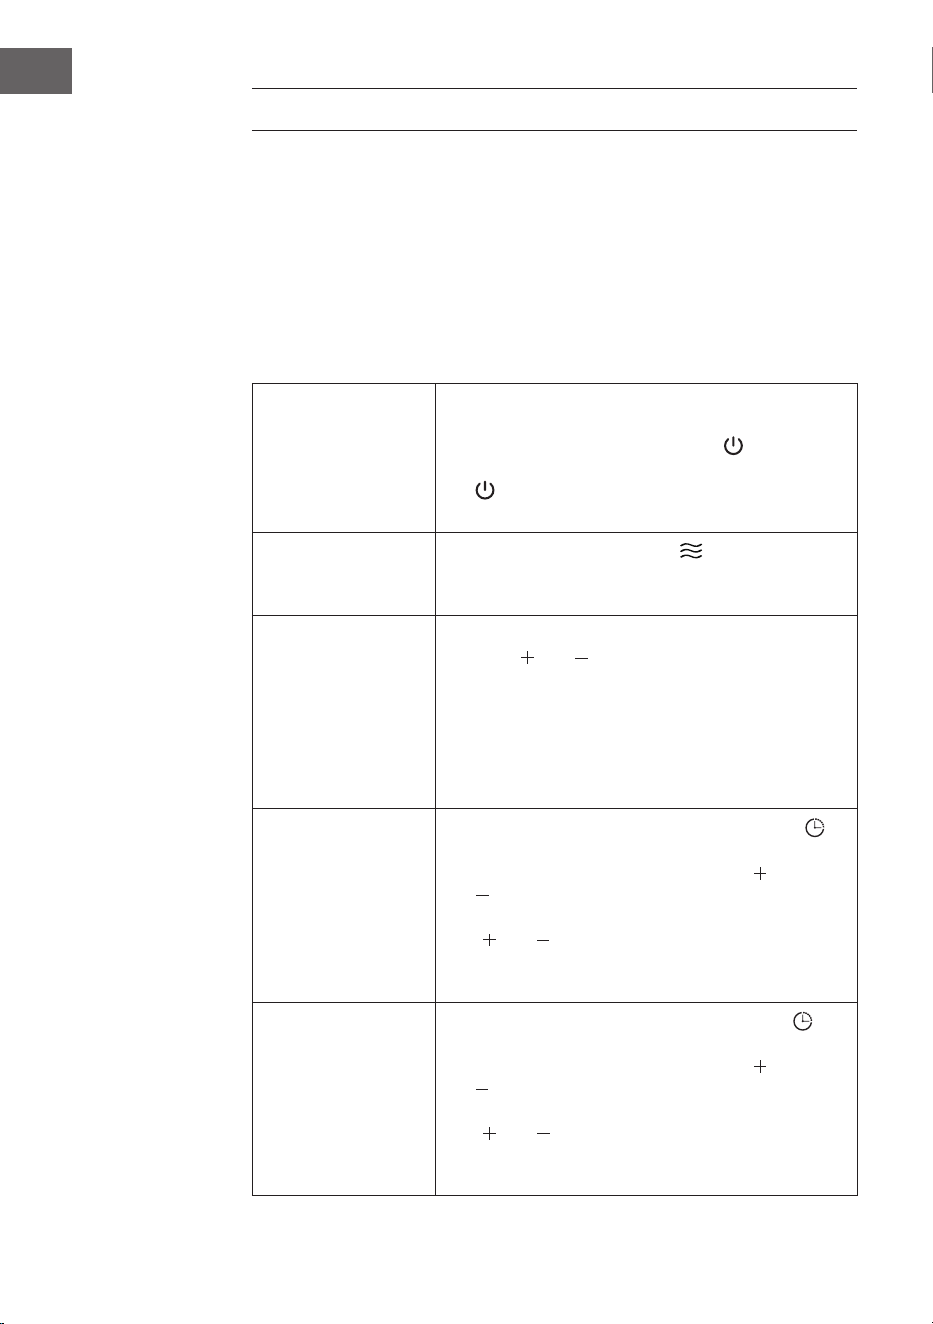
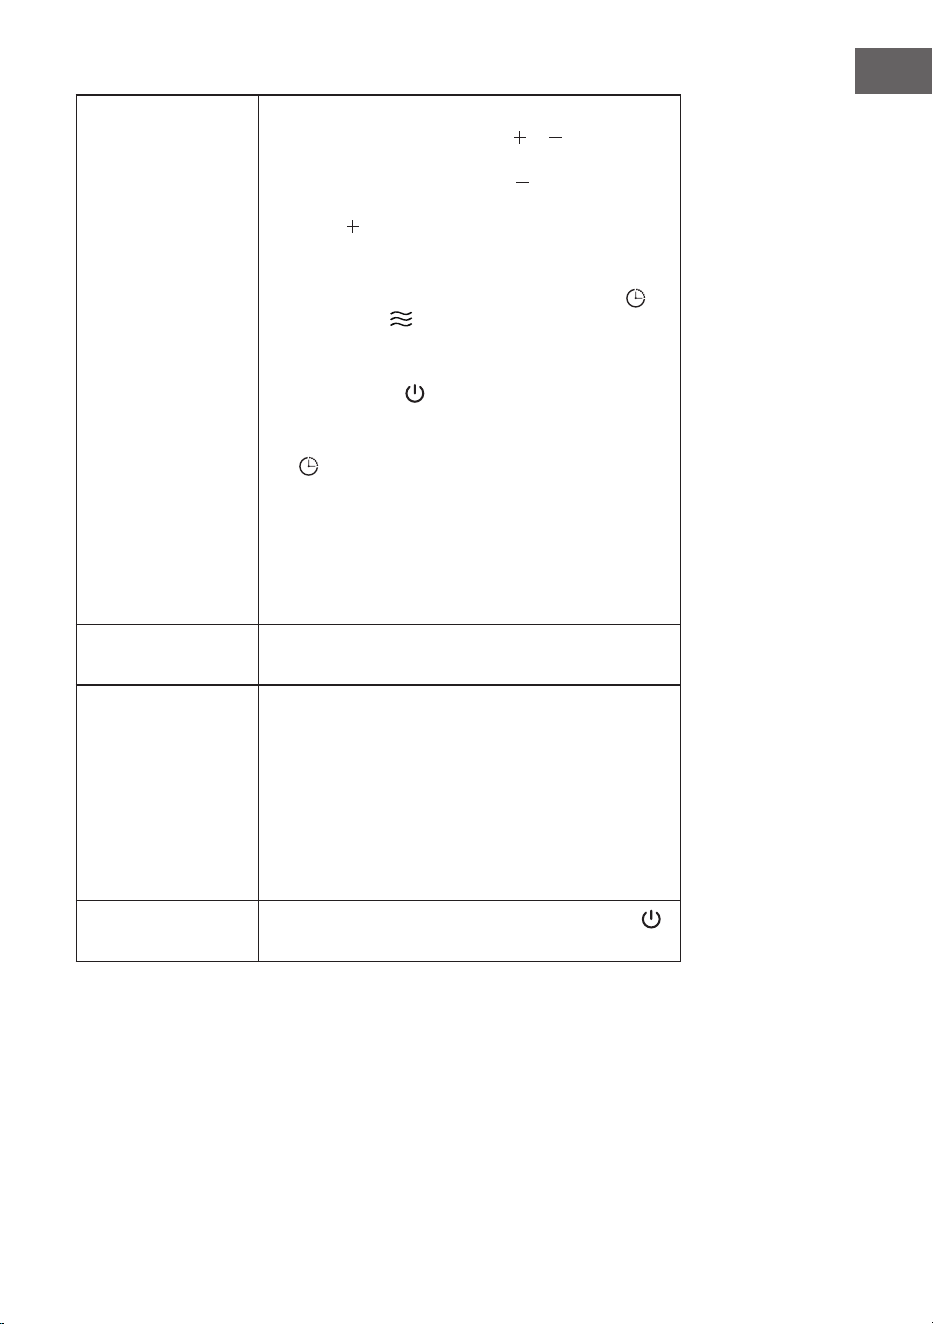
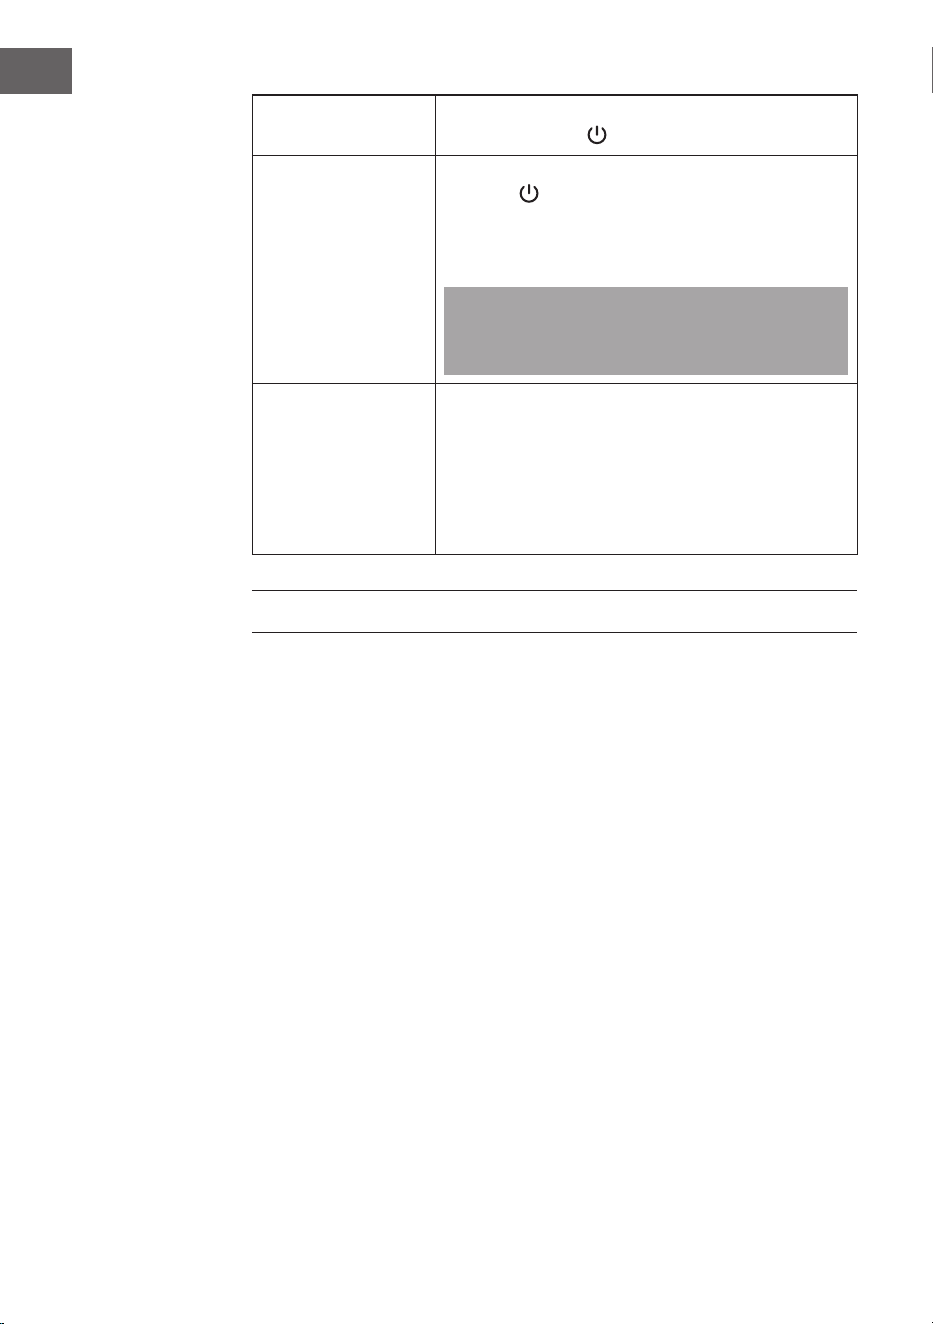
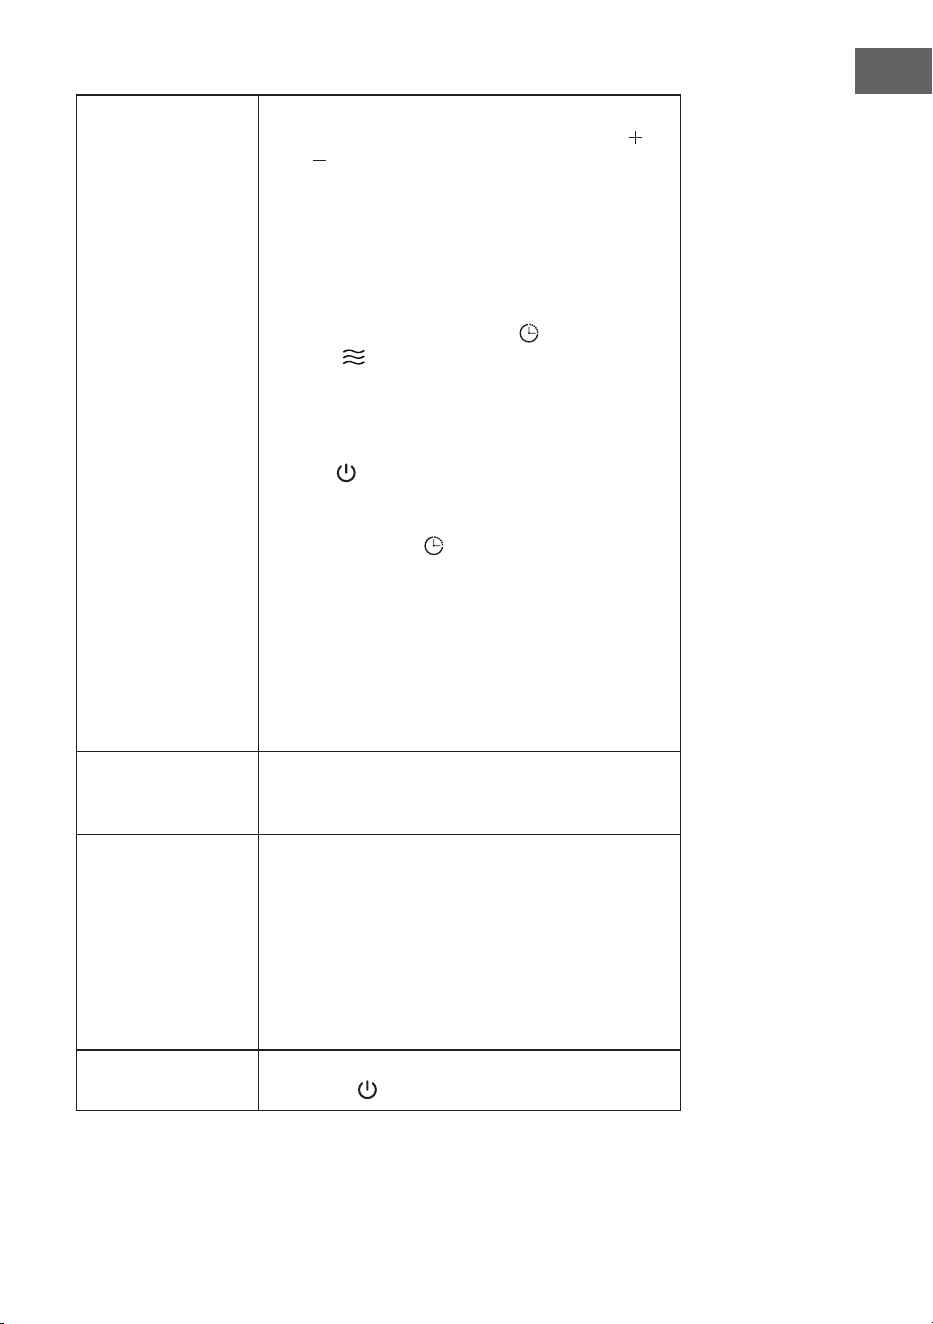
Einschalten /
Standby-Modus
• Stecken Sie den Netzstecker des Geräts in die
Steckdose. Das Gerät gibt einen langen Piepton von
sich. Drücken Sie die Standby-Taste , um in den
Heizmodus zu gelangen. Wenn Sie die Standby-Taste
erneut drücken, wird das Gerät in den Standby-
Modus versetzt.
Betreibsmodus
einstellen
• Drücken Sie die Modus-Taste , um einen der
verfügbaren Betriebsmodi einzustellen: Hoch > Mittel
> Niedrig > Energiesparmodus.
Temperatur einstellen
• Drücken Sie im Betriebszustand die Plus- oder Minus-
Taste ( oder ), um die Temperatur einzustellen.
Wenn Sie die jeweilige Taste gedrückt halten, wird
die Temperatur schneller nach unten oder oben
angepasst.
• Wenn innerhalb von 5 Sekunden keine Einstellung
vorgenommen wird, verlässt das Gerät automatisch
die Temperatureinstellung.
Timer
– Automatisches
Einschalten
• Drücken Sie im Standby-Modus die Timer-Taste ,
um in die Timer-Einstellungen zu gelangen.
• Drücken Sie die Plus- oder Minus-Taste ( oder
), um die Zeit bis zum automatischen Einschalten
einzustellen. Halten Sie die Plus- oder Minus-Taste
( oder ) gedrückt, um die Zeiteinstellung schneller
anzupassen. Nach Ablauf der eingestellten Timer-Zeit
schaltet das Gerät in den Betriebsmodus.
Timer
– Automatisches
Ausschalten
• Drücken Sie im Betriebsmodus die Timer-Taste , um
in die Timer-Einstellungen zu gelangen.
• Drücken Sie die Plus- oder Minus-Taste ( oder
), um die Zeit bis zum automatischen Ausschalten
einzustellen. Halten Sie die Plus- oder Minus-Taste
( oder ) gedrückt, um die Zeiteinstellung schneller
anzupassen. Nach Ablauf der eingestellten Timer-Zeit
schaltet das Gerät in den Standby-Modus.
9
DE
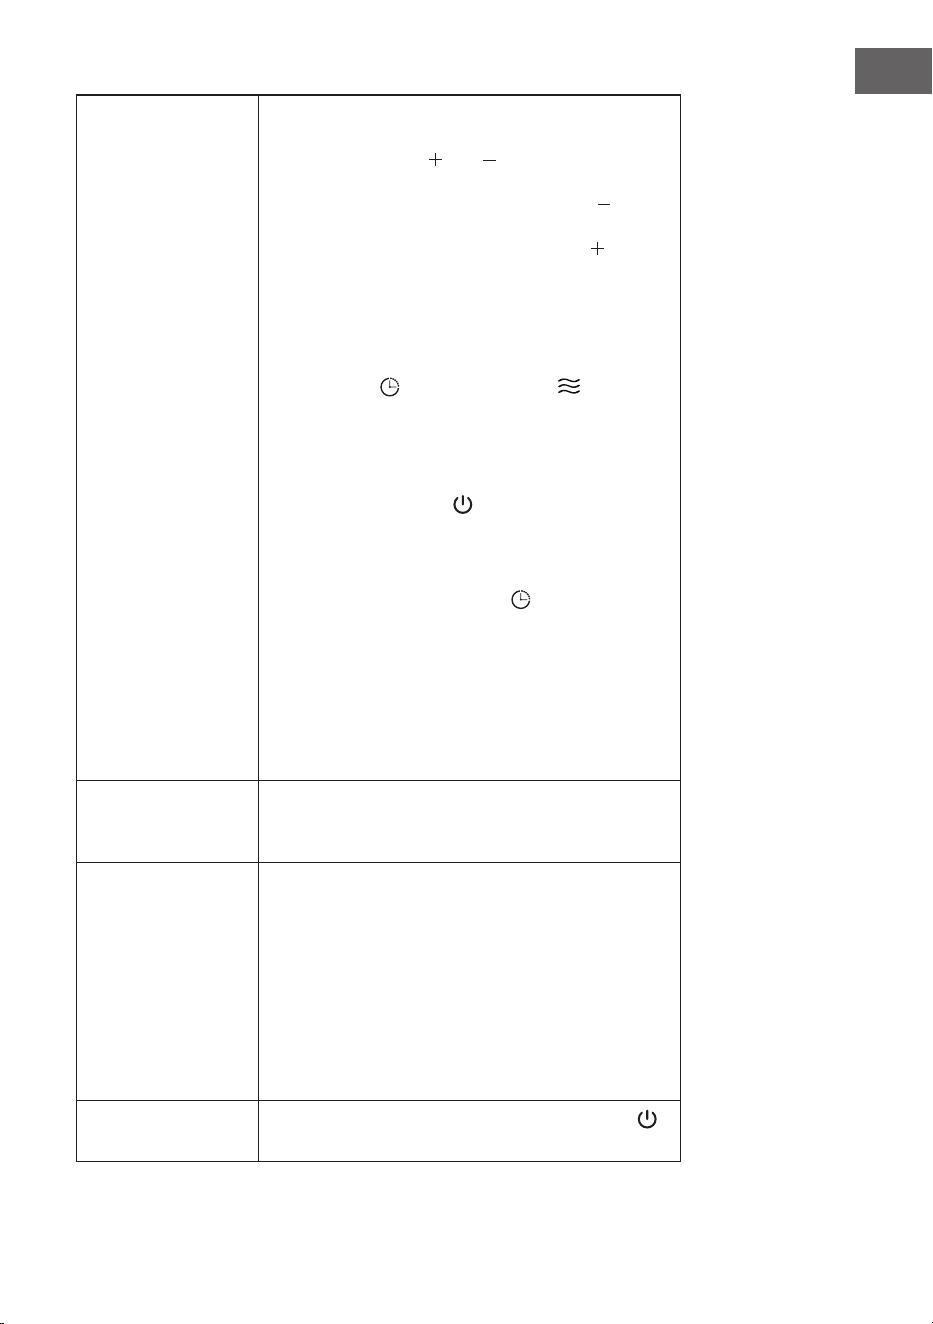
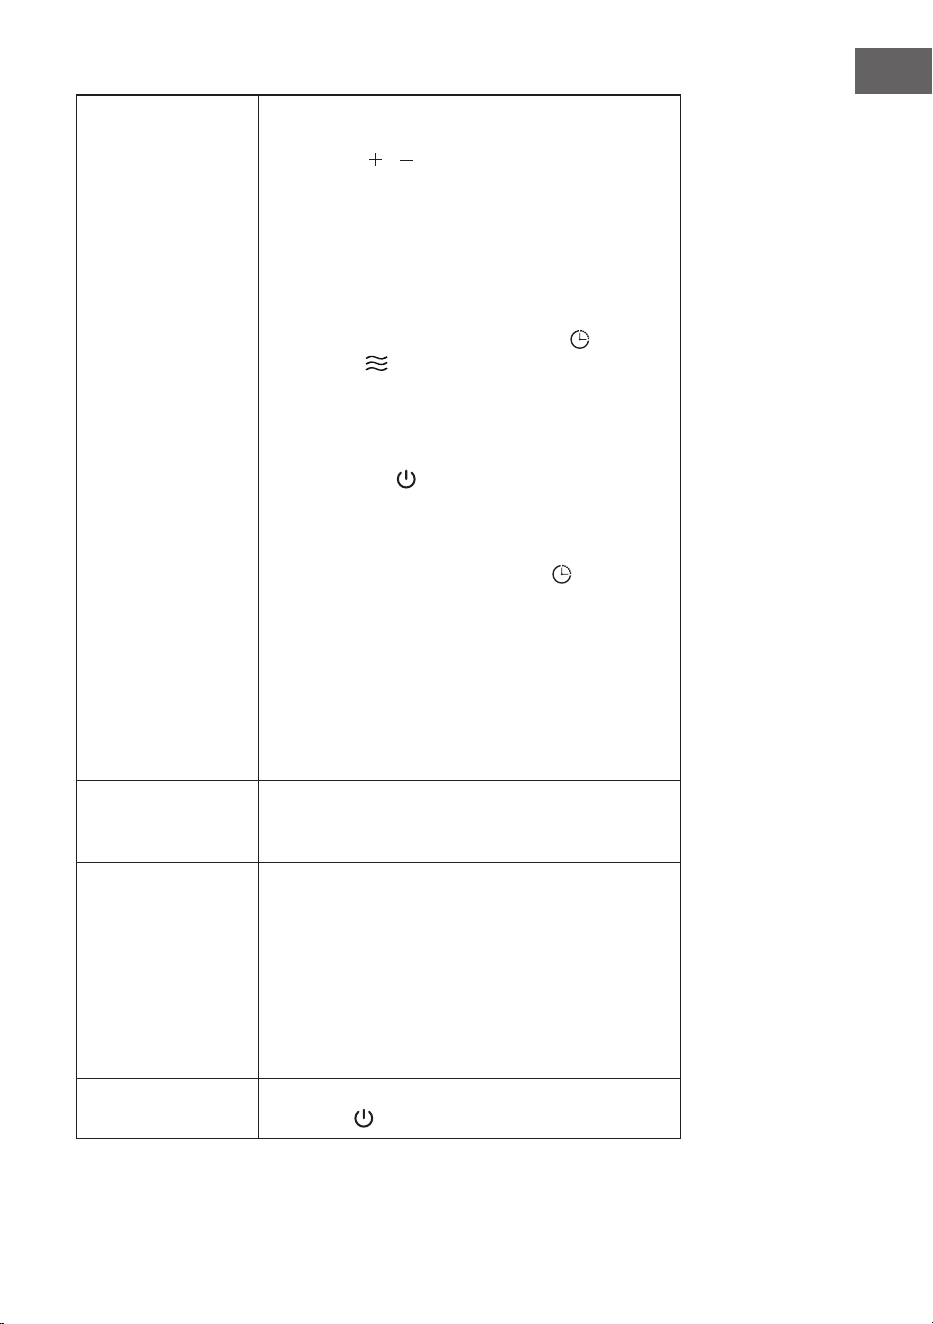
Timer verwenden
• Der Einstellungsbereich für den Timer ist
0-24Stunden. Mit jedem Tastendruck auf die Plus-
oder Minus-Taste ( oder ) erhöhen oder senken
Sie die Timer-Zeit um 1Stunde. Wenn der eingestellte
Wert „0H” ist, drücken Sie die Minus-Taste und die
Einstellung wechselt auf „24H“. Wenn der eingestellte
Wert „24H” ist, drücken Sie die Plus-Taste und
die Einstellung wechselt auf „0H”. Haben Sie „0H”
eingestellt, wird der Timer abgebrochen. Ist ein
höherer Wert als „0H“ eingestellt, startet der Timer
entsprechend den vorgenommenen Einstellungen.
• Wenn Sie nach dem Einstellen der Timer-Zeit die
Timer-Taste oder die Modus-Taste drücken
oder 5 Sekunden lang keine Eingabe vornehmen,
wird der Timer-Modus automatisch verlassen. Der
Timer ist aktiviert.
• Timer abbrechen: Wenn Sie nach dem Einstellen des
Timers die Timer-Taste drücken, um das Gerät in
den Standby-Modus zu versetzen, wird der Timer
automatisch deaktiviert.
• Wenn Sie den Timer gestartet haben, können Sie sich
durch Drücken der Timer-Taste die verbleibende
Zeit bis zum automatischen Ausschalten des Geräts
anzeigen lassen oder die Timer-Einstellung anpassen.
• Während der Timer läuft, schaltet der Thermostat
das Gerät je nach eingestellter Temperatur und
Umgebungstemperatur ein oder aus. Der Timer wird
automatisch zurückgesetzt, wenn die Stromversorgung
des Geräts unterbrochen wird.
Memory-Funktion
• Wenn das Gerät aus dem Standby-Modus gestartet
wird, läuft es mit den zuletzt vorgenommenen
Einstellungen.
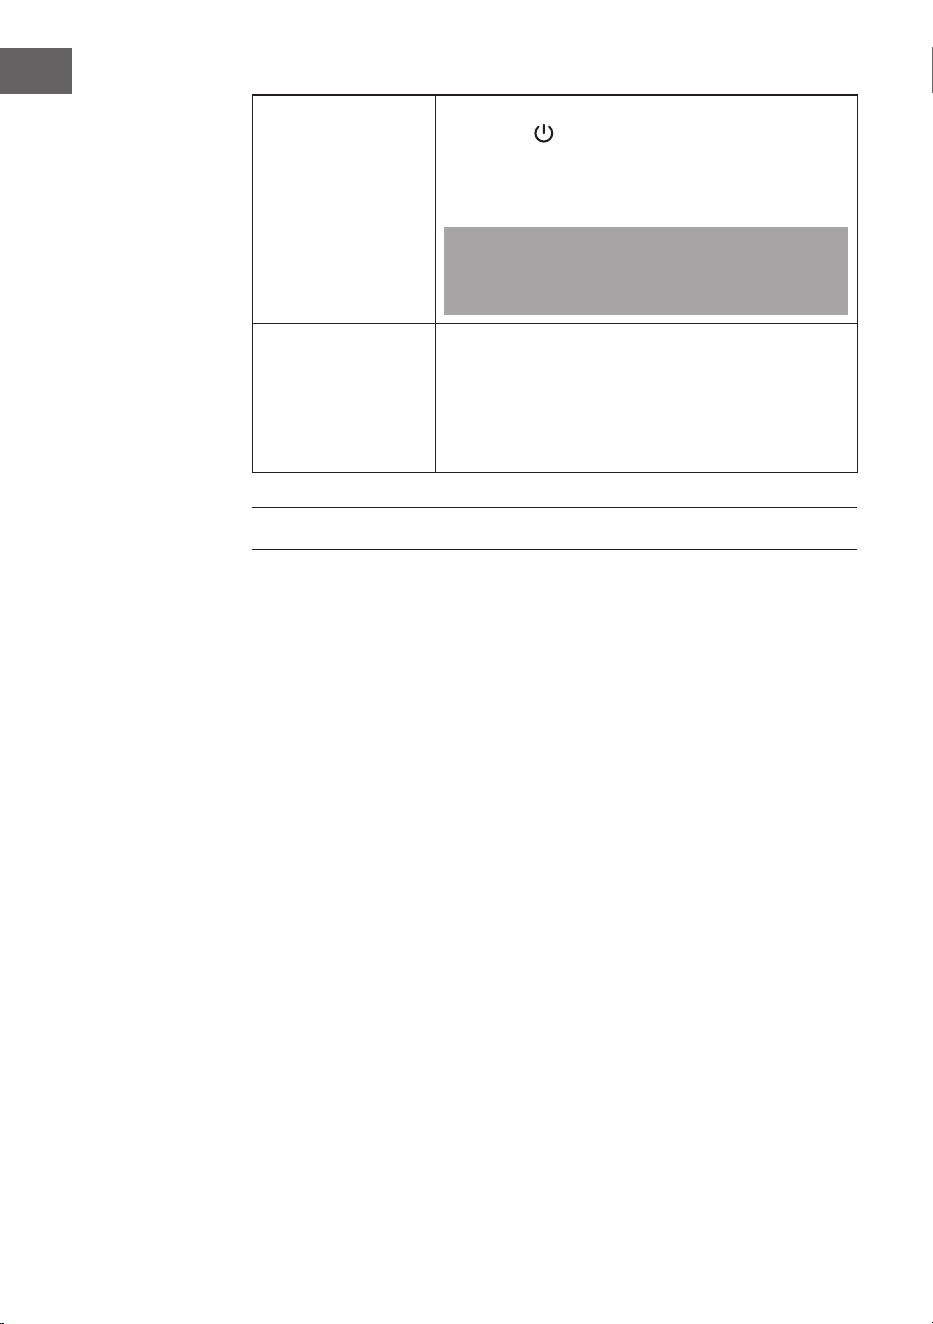
Schutzschalter
• Wenn die Raumtemperatur Th im Standby- oder
Betriebsmodus 50 °C übersteigt, schaltet das Gerät
sich aus, es ertönen 10 lange Pieptöne und die
Anzeige zeigt „FF“ an und blinkt 75Sekunden lang
auf 1 Hz. Nachdem der Schutzschalter ausgelöst
wurde, kann der Heizbetrieb nicht fortgesetzt werden,
auch wenn die Raumtemperatur wieder unter 50 °C
sinkt. Erst wenn Sie das Gerät vollständig aus- und
wieder einschalten, kann der Heizbetrieb fortgesetzt
werden.
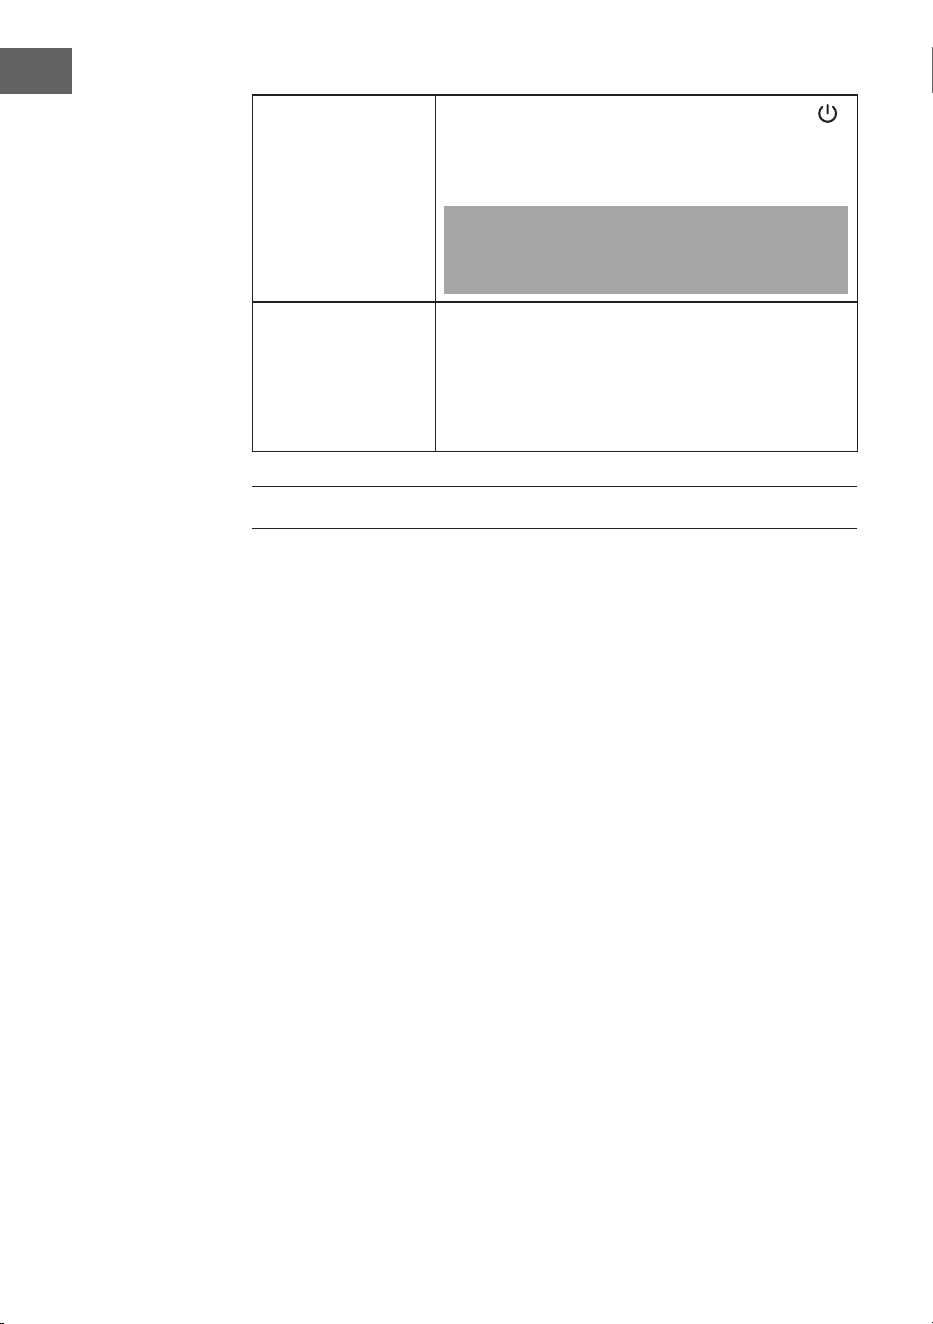
Ausschalten
(Standby-Modus)
• Drücken Sie im Betriebsmodus die Standby-Taste ,
um das Gerät in den Standby-Modus zu versetzen.

10
DE
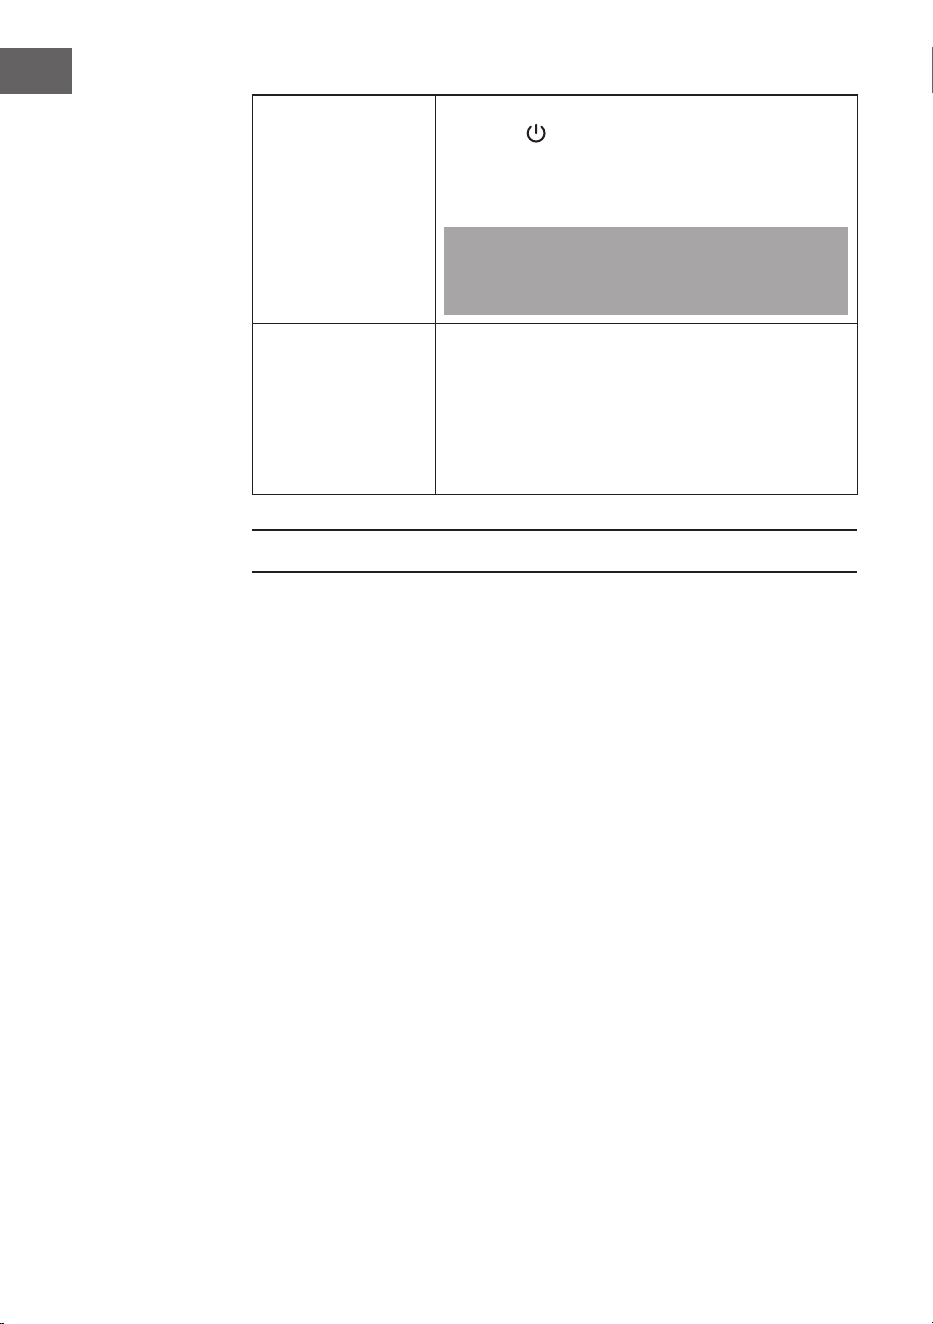
Ausschalten
• Drücken Sie im Betriebsmodus die Standby-Taste ,
um das Gerät in den Standby-Modus zu versetzen.
Ziehen Sie anschließend den Netzstecker aus der
Steckdose, um das Gerät vollständig auszuschalten.
Lassen Sie das Gerät abkühlen und bewahren Sie es
in einer stabilen Lage auf.
Hinweis: Wenn Sie das Gerät zum ersten Mal
benutzen oder den Netzstecker wieder in die Steckdose
stecken, achten Sie bitte darauf, dass der Stecker richtig
in der Steckdose sitzt.
Inspektion
• Stecken Sie den Netzstecker in eine Steckdose und
starten Sie den Betrieb. Schalten Sie das Gerät
nach einer halben Stunde aus und ziehen Sie den
Netzstecker. Überprüfen Sie, ob die Kontakte des
Steckers heiß sind (über 50 °C). Sollte dies der
Fall sein, lassen Sie die Steckdose austauschen,
um Verbrennungen am Stecker oder einen
Steckdosenbrand durch Überhitzung zu vermeiden.
REINIGUNG UND PFLEGE
• Reinigen Sie das Gerät regelmäßig und entfernen Sie den Staub von der
Oberäche, da die Hitzeabstrahlung durch Staub negativ beeinträchtigt werden
kann.
• Schalten Sie das Gerät vor der Reinigung aus und ziehen Sie den Netzstecker
aus der Steckdose. Lassen Sie das Gerät vor der Reinigung vollständig abkühlen.
Entfernen Sie den Staub mit einem weichen und feuchten Tuch. Verwenden Sie
keine aggressiven Reinigungs- oder Scheuermittel.
• Achten Sie darauf, dass Sie die Oberächen nicht durch scharfe, harte Werkzeuge
zerkratzen, da dadurch die Farbbeschichtung abblättern und das Gerät rosten
kann.
11
DE
SPEZIELLE ENTSORGUNGSHINWEISE FÜR
VERBRAUCHER IN DEUTSCHLAND
Entsorgen Sie Ihre Altgeräte fachgerecht. Dadurch wird gewährleistet, dass die
Altgeräte umweltgerecht verwertet und negative Auswirkungen auf die Umwelt und
menschliche Gesundheit vermieden werden. Bei der Entsorgung sind folgende Regeln
zu beachten:
• Jeder Verbraucher ist gesetzlich verpichtet, Elektro- und Elektro-
nikaltgeräte (Altgeräte) sowie Batterien und Akkus getrennt vom
Hausmüll zu entsorgen. Sie erkennen die entsprechenden Altgeräte
durch folgendes Symbol der durchgestrichenen Mülltonne (WEEE-
Symbol).
• Sie haben Altbatterien und Altakkumulatoren, die nicht vom Altgerät umschlossen
sind, sowie Lampen, die zerstörungsfrei aus dem Altgerät entnommen werden
können, vor der Abgabe an einer Entsorgungsstelle vom Altgerät zerstörungsfrei zu
trennen.
• Bestimmte Lampen und Leuchtmittel fallen ebenso unter das Elektro- und
Elektronikgesetz und sind dementsprechend wie Altgeräte zu behandeln.
Ausgenommen sind Glühbirnen und Halogenlampen. Entsorgen Sie Glühbirnen
und Halogenlampen bitte über den Hausmüll, sofern sie nicht das WEEE-Symbol
tragen.
• Jeder Verbraucher ist für das Löschen von personenbezogenen Daten auf dem
Elektro- bzw. Elektronikgerät selbst verantwortlich.
Rücknahmepicht der Vertreiber
Vertreiber mit einer Verkaufsäche für Elektro- und Elektronikgeräte von mindestens 400
Quadratmetern sowie Vertreiber von Lebensmitteln mit einer Gesamtverkaufsäche von
mindestens 800 Quadratmetern, die mehrmals im Kalenderjahr oder dauerhaft Elektro-
und Elektronikgeräte anbieten und auf dem Markt bereitstellen, sind verpichtet,
1 bei der Abgabe eines neuen Elektro- oder Elektronikgerätes an einen Endnutzer ein
Altgerät des Endnutzers der gleichen Geräteart, das im Wesentlichen die gleichen
Funktionen wie das neue Gerät erfüllt, am Ort der Abgabe oder in unmittelbarer
Nähe hierzu unentgeltlich zurückzunehmen und
2 auf Verlangen des Endnutzers Altgeräte, die in keiner äußeren Abmessung größer
als 25 Zentimeter sind, im Einzelhandelsgeschäft oder in unmittelbarer Nähe hierzu
unentgeltlich zurückzunehmen; die Rücknahme darf nicht an den Kauf eines Elektro-
oder Elektronikgerätes geknüpft werden und ist auf drei Altgeräte pro Geräteart
beschränkt.

12
DE
• Bei einem Vertrieb unter Verwendung von Fernkommunikationsmitteln ist die
unentgeltliche Abholung am Ort der Abgabe auf Elektro- und Elektronikgeräte der
Kategorien 1, 2 und 4 gemäß § 2 Abs. 1 ElektroG, nämlich „Wärmeüberträger“,
„Bildschirmgeräte“ (Oberäche von mehr als 100 cm²) oder „Großgeräte“
(letztere mit mindestens einer äußeren Abmessung über 50 Zentimeter) beschränkt.
Für andere Elektro- und Elektronikgeräte (Kategorien 3, 5 und 6) ist eine
Rückgabemöglichkeit in zumutbarer Entfernung zum jeweiligen Endnutzer zu
gewährleisten.
• Altgeräte dürfen kostenlos auf dem lokalen Wertstoffhof oder in folgenden
Sammelstellen in Ihrer Nähe abgegeben werden: www.take-e-back.de
• Für Elektro- und Elektronikgeräte der Kategorien 1, 2 und 4 bieten wir auch die
Möglichkeit einer unentgeltlichen Abholung am Ort der Abgabe an. Beim Kauf
eines Neugeräts haben Sie die Möglichkeit, eine Altgerätabholung über die
Webseite auszuwählen.
• Batterien können überall dort kostenfrei zurückgegeben werden, wo sie verkauft
werden (z. B. Super-, Bau-, Drogeriemarkt). Auch Wertstoff- und Recyclinghöfe
nehmen Batterien zurück. Sie können Batterien auch per Post an uns zurücksenden.
Altbatterien in haushaltsüblichen Mengen können Sie direkt bei uns von Montag bis
Freitag zwischen 08:00 und 16:00 Uhr unter der folgenden Adresse unentgeltlich
zurückgeben:
Chal-Tec Fulllment GmbH
Norddeutschlandstr. 3
47475 Kamp-Lintfort
• Wichtig zu beachten ist, dass Lithiumbatterien aus Sicherheitsgründen vor der
Rückgabe gegen Kurzschluss gesichert werden müssen (z. B. durch Abkleben der
Pole).
• Finden sich unter der durchgestrichenen Mülltonne auf der Batterie zusätzlich die
Zeichen Cd, Hg oder Pb ist das ein Hinweis darauf, dass die Batterie gefährliche
Schadstoffe enthält. (»Cd« steht für Cadmium, »Pb« für Blei und »Hg« für
Quecksilber.)
Hinweis zur Abfallvermeidung
Indem Sie die Lebensdauer Ihrer Altgeräte verlängern, tragen Sie dazu bei, Ressourcen
efzient zu nutzen und zusätzlichen Müll zu vermeiden. Die Lebensdauer Ihrer Altgeräte
können Sie verlängern, indem Sie defekte Altgeräte reparieren lassen. Wenn sich
Ihr Altgerät in gutem Zustand bendet, könnten Sie es spenden, verschenken oder
verkaufen.

13
DE
HINWEISE ZUR ENTSORGUNG
Wenn es in Ihrem Land eine gesetzliche Regelung zur
Entsorgung von elektrischen und elektronischen Geräten
gibt, weist dieses Symbol auf dem Produkt oder auf der
Verpackung darauf hin, dass dieses Produkt nicht im
Hausmüll entsorgt werden darf. Stattdessen muss es zu
einer Sammelstelle für das Recycling von elektrischen
und elektronischen Geräten gebracht werden. Durch
regelkonforme Entsorgung schützen Sie die Umwelt und die
Gesundheit Ihrer Mitmenschen vor negativen Konsequenzen.
Informationen zum Recycling und zur Entsorgung dieses
Produkts, erhalten Sie von Ihrer örtlichen Verwaltung oder
Ihrem Hausmüllentsorgungsdienst.
Dieses Produkt enthält Batterien. Wenn es in Ihrem Land
eine gesetzliche Regelung zur Entsorgung von Batterien
gibt, dürfen die Batterien nicht im Hausmüll entsorgt werden.
Informieren Sie sich über die örtlichen Bestimmungen zur
Entsorgung von Batterien. Durch regelkonforme Entsorgung
schützen Sie die Umwelt und die Gesundheit Ihrer
Mitmenschen vor negativen Konsequenzen.
HERSTELLER & IMPORTEUR (UK)
Hersteller:
Chal-Tec GmbH, Wallstraße 16, 10179 Berlin, Deutschland.
Importeur für Großbritannien:
Berlin Brands Group UK Limited
PO Box 42
272 Kensington High Street
London, W8 6ND
United Kingdom


15
EN
Dear Customer,
Congratulations on purchasing this device. Please read the
following instructions carefully and follow them to prevent
possible damages. We assume no liability for damage caused
by disregard of the instructions and improper use. Scan the QR
code to get access to the latest user manual and more product
information.
CONTENTS
TECHNICAL DATA
Item number 10035055, 10035109
Power supply 220-240 V~ 50 Hz
Power consumption (watt) max. 2500 W
Product Data Sheet16
Safety Instructions17
Device Overview18
Installation19
Commissioning and Operation20
Cleaning and Maintenance22
Disposal Considerations23
Manufacturer & Importer (UK)23
16
EN
PRODUCT DATA SHEET
Model identiers: 10035055, 10035109
Item Symbol Value Unit Item Unit
Heat output Type of heat input, for electric storage local space
heaters only
Nominal heat output P
nom
1.2
kW manual heat charge control, with integrated
thermostat
no
Minimum heat output
(indicative)
P
min
1.0
kW manual heat charge control with room and/or
outdoor temperature feedback
no
Maximum continuous heat
output
P
max,c
1.2
kW electronic heat charge control with room and/or
outdoor temperature feedback
no
Auxiliary electricity consumption
fan assisted heat output no
At nominal heat output el
max
0.000 kW
Type of heat output/room temperature control
At minimum heat output el
min
0.000 kW single stage heat output and no room
temperature control
no
In standby mode el
SB
0.225 W Two or more manual stages, no room
temperature control
no
with mechanic thermostat room temperature
control
no
with electronic room temperature control yes
electronic room temperature control plus day
timer
no
electronic room temperature control plus week
timer
no
Other control options (multiple selections possible)
room temperature control, with presence
detection
no
room temperature control, with open window
detection
no
with distance control option no
with adaptive start control no
with working time limitation yes
with black bulb sensor no
Contact details Chal-Tec GmbH, Wallstraße 16, 10179, Berlin, Germany
17
EN
SAFETY INSTRUCTIONS
• In order to avoid overheating, do not cover the appliance.
• If the supply cord is damaged, it must be replaced by the manufacturer or its service
agent or a similarly qualied person in order to avoid a hazard.
• Children over the age of 8 and persons with reduced physical, sensory or mental
capabilities or those with a lack of experience and knowledge may only use the
device if they are instructed on how to do so by a person responsible for their
safety, or if they are supervised and understand the hazards associated with the use
of the device.
• Children shall not play with the appliance. Cleaning and user maintenance shall not
be made by children without supervision.
• Children of less than 3 years should be kept away unless continuously supervised.
• Children aged from 3 years and less than 8 years shall only switch on/off the
appliance provided that it has been placed or installed in its intended normal
operating position and they have been given supervision or instruction concerning
use of the appliance in a safe way and understand the hazards involved. Children
aged from 3 years and less than 8 years shall not plug in, regulate and clean the
appliance or perform user maintenance.
• The appliance must not be located immediately below a socket outlet.
• Do not use this appliance in the immediate surroundings of a bath, a shower or a
swimming pool.
CAUTION
Risk of burns! Some parts of this appliance can become very hot and
cause burns. Particular attention has to be given where children and
vulnerable people are present.
• This appliance is lled with a precise quantity of special oil. Repairs requiring
opening of oil container are only to be made by the manufacturer or his service
agent who should be contacted if there is an oil leak. When scrapping the
appliance, follow the regulations concerning the disposal of oil.
• This appliance cannot achieve accurate temperature control of the environment,
and thus cannot be used as insulation device for storage environment, items,
animals and plants.
18
EN
DEVICE OVERVIEW
Oil radiator
Control panel
Display window
Fin
Crod wrap
Caster assembly
Controlpanel
19
EN
Remote control
...
Standby button
Mode button
+
increase
-
decrease
Timer button
Note: The button functions of the remote control basically correspond to the button
functions of the control panel on the device housing, but no key combination can be
called up with the remote control.
INSTALLATION
1. Turn the appliance upside down.
2. As shown in gure 1, align the mounting hole of a set of caster assembly and install
it on the screw of the caster pad plate at the end of the radiator n, and the other
caster assembly is aligned to the screws mounted at the bottom of the control box.
3. As shown in gure 2, two sets of caster components are tightened with four buttery
nuts. Install solid and then put the appliance in place, just put the wheels on the
ground.
Buttery nuts
Control box
Figure 1 Figure 2
20
EN
COMMISSIONING AND OPERATION
Before rst use
1. The power cord shall not be damaged or fractured.
2. Please verify the rated current of the power socket is in line with the requirements
of the appliance (see “Technical Data“) and is equipped with a safety grounding
device before use. Otherwise, have an electrician replace the socket.
Operating functions
Work / Standby
• Plug in the power plug of the appliance into the
socket. The buzzer will “beep” for a long time.
• Press the standby button to enter the high-grade
heating working state, then press the standby button
again to enter the standby state.
Gear selection
• For work status, press mode button to select one
of work modes such as high gear, medium gear, low
gear and energy saving gear.
Temperature settings
• Under the working status, press and hold the Plus or
Minus button ( or ) to set the temperature, press
and hold the Plus or Minus button ( or ) to quickly
set the temperature.
• After setting the temperature, have non-operation for
5seconds, exit the temperature setting screen.
Timer
– Scheduled work
• Tap the timer button in standby mode to enter the
scheduled work setting screen.
• Press the Plus or Minus button ( or ) to set the
scheduled time. Press the Plus or Minus button ( or
) for a long time to quickly set the scheduled time,
and the scheduled time will reach the working status
of the machine.
Timer
– Scheduling standby
• Under the working status, press the timer button to
enter the scheduling standby setting screen.
• Press the Plus or Minus button ( or ) to set the
scheduling time. Press the Plus or Minus button ( or
) for a long time to quickly set the scheduling time,
and the scheduling time is in the standby state to the
machine.
21
EN
Timer settings
• The scope of scheduling is for 0-24 hours, and
press the Plus or Minus button ( or ) each time
to increase or decrease 1 hour. When the set value
is “0H”, press the Minus button to set the time for
“24H”. When the set value is “24H”, press the Plus
button , and the setting time is “0H”. When the set
value is “0H”, the scheduling is canceled. When the
set value is not “0H”, the scheduling is started.
• Set the appointment time, press the timer button or
mode button , or without operation for 5 seconds,
exit scheduling mode.
• Cancel timer: If the scheduling time is set, press the
standby button to enter the standby state and
cancel the scheduling.
• After the scheduling is started, press the timer button
to check the remaining time of the appointment
and reset the scheduling time.
• During the scheduled time, the machine is shut down
or started up under temperature control, and the
scheduled time is always normal, and free from down
time. During the scheduled time, it is cleared in case of
power failure.
Memory function
• When started up the machine again and it will operate
according to the status before the last standby.
Safety protection
function
• When the indoor ambient temperature Th exceeds
50°C under the standby or working state, all outputs
are turned off, the buzzer prompts 10 long beeps, the
digital screen displays „FF“ and ashes at 1 Hz for
75 seconds. As long as there is protection, even if the
ambient temperature is less than 50 °C, the running or
operation cannot be resumed, and the operation can
only be performed after the power is turned off and
on again.
Shut down
• Under the working state, press the standby button
on the control panel to enter the standby state.
22
EN
Power-off
• Under the working state, press the standby button
on the control panel to enter the standby state. Unplug
the power cord, wait for the whole machine to cool,
and place the appliance stably.
Note: To use the machine for the rst time or to reinsert
the power plug into the socket, please pay attention to
check whether the plug and the socket are tted well.
Inspection method
• Insert the power plug into the socket and start for use.
After about half an hour, turn off and pull out the plug.
Check whether the plug pins are hot. Replace the
socket if so (more than about 50 °C) to avoid burning
the plug or even causing a re caused by overheating
of the socket due to poor contact.
CLEANING AND MAINTENANCE
• The appliance should be cleaned regularly to wipe out the dust on the surface of
anges. As this may inuence the radiating efciency.
• Disconnect electricity supply and allow radiator to cool, wipe out dust with a soft
damp cloth. Do not use detergent or abrasives.
• Do not scrap the surfaces of anges with sharp hard tools, to avoid surfaces getting
rusty, because of damage of the paint coat.

23
EN
DISPOSAL CONSIDERATIONS
If there is a legal regulation for the disposal of electrical
and electronic devices in your country, this symbol on the
product or on the packaging indicates that this product must
not be disposed of with household waste. Instead, it must be
taken to a collection point for the recycling of electrical and
electronic equipment. By disposing of it in accordance with
the rules, you are protecting the environment and the health of
your fellow human beings from negative consequences. For
information about the recycling and disposal of this product,
please contact your local authority or your household waste
disposal service.
This product contains batteries. If there is a legal regulation
for the disposal of batteries in your country, the batteries must
not be disposed of with household waste. Find out about local
regulations for disposing of batteries. By disposing of them in
accordance with the rules, you are protecting the environment
and the health of your fellow human beings from negative
consequences.
MANUFACTURER & IMPORTER (UK)
Manufacturer:
Chal-Tec GmbH, Wallstrasse 16, 10179 Berlin, Germany.
Importer for Great Britain:
Berlin Brands Group UK Limited
PO Box 42
272 Kensington High Street
London, W8 6ND
United Kingdom


25
ES
Estimado cliente:
Le felicitamos por la adquisición de este producto. Lea
atentamente las siguientes instrucciones y sígalas para evitar
posibles daños. No asumimos ninguna responsabilidad por los
daños causados por el incumplimiento de las instrucciones y el
uso inadecuado. Escanee el siguiente código QR para obtener
acceso a la última guía del usuario y más información sobre el
producto:
ÍNDICE
DATOS TÉCNICOS
Número del artículo 10035055, 10035109
Suministro eléctrico 220-240 V~ 50 Hz
Potencia (watts) máx. 2500 W
Hoja de datos del producto36
Instrucciones de seguridad 37
Descripción del producto38
Instalación39
Puesta en marcha y funcionamiento40
Limpieza y cuidado42
Indicaciones sobre la retirada del aparato43
Fabricante e importador (Reino Unido)43
26
ES
HOJA DE DATOS DEL PRODUCTO
Denominación del modelo 10035055, 10035109
Dato Símbolo Valor Unidad Dato Unidad
Potencia térmica Solo con disposítivos de acumulación de calor
eléctricos para abastecimiento local: Tipo de regulación
del abastecimiento de calor
Potencia térmica nominal Pnom
1,2
kW Regulación manual del abastecimiento de calor
con termostato integrado:
no
Potencia térmica mínima
(valor orientativo)
Pmin
1,0
kW Regulación manual de abastecimiento de calor
con aviso de temperatura ambiente y/o exterior
no
Potencia térmica continua
máxima
Pmax,c
1,2
kW Regulación electrónica de abastecimiento de
calor con aviso de temperatura ambiente y/o
exterior
no
Consumo de corriente auxiliar
Disípación de calor con ventilación auxiliar no
Con potencia térmica
nominal (Motor del
ventilador)
elmax 0,000 kW
Tipo de potencia térmica/control de temperatura
ambiente
Con potencia térmica mínima
(Motor del ventilador)
elmin 0,000 kW Potencia térmica de un solo nivel, sín control de
temperatura ambiente
no
En modo de espera elSB 0,225 kW Dos o más niveles regulables manualmente, sín
control de temperatura ambiente
no
Control de temperatura ambiente con termostato
mecánico
no
Con control electrónico de temperatura
ambiente
sí
Con control de temperatura ambiente y
regulación del momento del día
no
Con control de temperatura ambiente y
regulación del día de la semana
no
Otras opciones de regulación
Control de temperatura ambiente con detección
de presencia
no
Control de temperatura ambiente con detección
de ventanas abiertas
no
Con opción de control remoto no
Con regulación adaptable del comienzo de la
calefacción
no
Con limitación de tiempo de funcionamiento sí
Con sensor de bulbo negro no
Información de contacto Chal-Tec GmbH, Wallstraße 16, 10179, Berlín (Alemania)

27
ES
INSTRUCCIONES DE SEGURIDAD
• No cubra la unidad para evitar el sobrecalentamiento.
• Si el cable de alimentación está dañado, debe ser reemplazado por el fabricante,
el servicio de atención al cliente o por personal cualicado similar para evitar que
se dañe.
• Los niños de 8 años o más, así como las personas con capacidades físicas,
mentales o sensoriales reducidas, sólo deben utilizar el aparato después de que
una persona responsable de su seguridad se haya familiarizado con sus funciones
y medidas de seguridad y comprenda los riesgos asociados.
• El dispositivo no es un juguete. La limpieza y el mantenimiento del aparato sólo
pueden ser realizados por niños a partir de los 8 años de edad bajo supervisión.
• Los niños menores de 3 años deben mantenerse alejados del aparato a menos que
sean supervisados constantemente.
• Los niños de 3 a 8 años de edad sólo podrán encender y apagar el aparato si
éste se ha instalado o colocado en la posición de funcionamiento normal prevista,
si están supervisados por una persona responsable y han aprendido a utilizar
el aparato de forma segura y a comprender los peligros asociados. Los niños
de entre 3 y 8 años no deben enchufar el aparato en la toma de corriente, ni
ajustarlo, ni limpiarlo ni darle mantenimiento.
• No coloque el aparato directamente debajo de una toma de corriente.
• No utilice el aparato en un ambiente húmedo, como cerca de bañeras, duchas o
piscinas.
ATENCIÓN
¡Peligro de quemaduras! Algunos componentes del dispositivo pueden
calentarse mucho durante su funcionamiento y causar quemaduras.
Tenga especial cuidado cuando haya niños o personas sensibles cerca
de la unidad.
• Esta unidad contiene una cierta cantidad de aceite especial. Las reparaciones que
requieran la apertura del depósito de aceite sólo podrán ser realizadas por el
fabricante o su servicio de atención al cliente. Por lo tanto, en caso de una fuga de
aceite, póngase en contacto con el fabricante o el servicio de atención al cliente.
Al deshacerse de la unidad, deben observarse los reglamentos locales para el
reciclaje de aceite usado.
• Esta unidad no proporciona un control exacto de la temperatura ambiente y, por
lo tanto, no debe utilizarse como un dispositivo de aislamiento para almacenes,
objetos, animales y plantas.
28
ES
DESCRIPCIÓN DEL PRODUCTO
Radiador de aceite
Panel de control
Fenêtre
d‘afchage
Elementos
Rebobinado del
cable
Rollos
Panel de
control
29
ES
Mando a distancia
...
Botón de
espera
Botón de
modo
+
Aumentar
-
Disminuir
Botón del
temporizador
Nota: Las funciones de las teclas del mando a distancia son básicamente las mismas
que las del panel de control de la carcasa del dispositivo, pero no se puede activar
ninguna combinación de teclas con el mando a distancia.
INSTALACIÓN
1. Poner el radiador del revés
2. Encajar los agujeros de los dos juegos de rodillos en los tornillos que están en la
parte inferior izquierda y derecha del radiador - a la izquierda de las ruedas- la
bandeja de apoyo al nal del elemento y a la derecha de panel de control (ver
gura 1).
3. Asegure los dos juegos de ruedines con cuatro tuercas de mariposa y apriételas
para evitar que los juegos se salgan (ver gura 2). Entonces déle la vuelta al
aparato y colóquelo en el suelo sobre las ruedas.
Tuerca
mariposa
Caja de control
Figura 1 Figura 2
30
ES
PUESTA EN MARCHA Y FUNCIONAMIENTO
Antes del primer uso
1. Compruebe que la unidad y el cable de alimentación no estén dañados antes de
ponerlo en marcha.
2. Asegúrese de que el voltaje de la toma de corriente corresponde al voltaje
indicado en la placa de características del aparato. La toma de corriente debe
estar conectada a tierra. Si no es así, haga que un electricista sustituya la toma de
corriente.
Funciones de operación
Encendido / modo
de espera
• Inserte el enchufe del dispositivo en la toma de
corriente. La unidad emite un largo pitido. Pulse
el botón de espera para entrar en el modo de
calefacción. Cuando se presiona el botón de espera
de nuevo, el dispositivo se pone en modo de espera.
Establecer el modo
de operación
• Presione el botón Mode para establecer uno de
los modos de funcionamiento disponibles: Alto >
Medio > Bajo > Modo de ahorro de energía.
Ajustar la
temperatura
• Pulse el botón más o menos cuando la unidad
esté lista para funcionar ( o ) para ajustar la
temperatura. Si se mantiene pulsado el botón
correspondiente, la temperatura se ajustará más
rápidamente hacia arriba o hacia abajo.
• Si no se realiza ningún ajuste en 5 segundos,
la unidad sale automáticamente del ajuste de
temperatura.
"Temporizador
- Encendido
automático"
• En el modo de espera, pulse el botón del
temporizador para acceder a sus parámetros.
Presione la tecla más o menos ( o ) para jar la
hora hasta que se encienda el automático. Presione el
botón de más o menos ( o ) y mantenerlo pulsado
para ajustar el tiempo más rápidamente. Una vez
transcurrido el tiempo establecido, la unidad entrará
en el modo de funcionamiento.
"Temporizador
- Apagado
automático"
• En el modo de funcionamiento, pulse el botón del
temporizador para acceder a sus parámetros.
Presione la tecla más o menos ( o ) para jar
la hora hasta el apagado automático. Presione el
botón de más o menos ( o ) y mantenerlo pulsado
para ajustar el tiempo más rápidamente. Una vez
transcurrido el tiempo establecido, la unidad pasa al
modo de espera.
31
ES
Usar el temporizador
• El rango de ajuste del temporizador es de 0 a 24
horas. Cada vez que se presiona el botón de más
o menos ( o ), la duración del temporizador
aumenta o disminuye en una hora. Cuando el valor
ajustado sea «0H», pulse el botón para cambiar el
ajuste a «24H». Cuando el valor se ajusta a «24H»,
pulse el botón más para cambiar el ajuste a «0H».
Ponga el temporizador en «0H» para desactivarlo. Si
se ajusta un valor mayor que «0H», el temporizador
se iniciará según los ajustes.
• Si presionas el botón del temporizador o la tecla
de modo Después de ajustar el temporizador o
si no realiza ninguna entrada durante 5 segundos,
la unidad sale automáticamente del modo
temporizador. El temporizador está activado.
• Cancelar el temporizador: Si presionas el botón del
temporizador después de congurarlo para poner
la unidad en modo de espera, el temporizador se
desactiva automáticamente.
• Una vez que hayas iniciado el temporizador, puedes
presionar el botón del temporizador para mostrar
el tiempo restante antes de que la cámara se apague
automáticamente o ajustar la conguración del
temporizador.
• Mientras el temporizador está funcionando, el
termostato enciende o apaga la unidad según la
temperatura establecida y la temperatura ambiente. El
temporizador se reinicia automáticamente si la unidad
se desconecta de la fuente de alimentación.
Función de memoria
• Cuando la unidad se pone en marcha en el modo de
espera, funciona con los últimos ajustes realizados.
Interruptor de
protección
• Si la temperatura ambiente supera los 50 °C
en el modo de espera o de funcionamiento, la
unidad se apaga, se emiten 10 pitidos largos y la
pantalla muestra «FF» y parpadea a 1 Hz durante
75 segundos. Después de que se haya disparado
el interruptor, no se puede reanudar el modo de
calefacción aunque la temperatura ambiente baje de
50 °C. La calefacción sólo se puede reanudar si se
apaga y se vuelve a encender la unidad.
Apagar la unidad
(modo de espera)
• Mientras la unidad está encendida, pulse el botón de
espera. , para poner el dispositivo en espera.
32
ES
Apagar la unidad
• En el modo de funcionamiento, pulse el botón de
espera para poner la unidad en modo de espera.
Luego retire el enchufe de la toma para apagar la
unidad completamente. Deje que la unidad se enfríe y
manténgala en una posición estable.
Nota: Cuando utilice la unidad por primera vez o
vuelva a introducir el enchufe en la toma, asegúrese de
que el enchufe esté correctamente insertado en la toma.
Inspección
• Inserte el enchufe en una toma de corriente y
encienda el dispositivo. Apague el aparato después
de media hora y desconecte el enchufe de la red.
Comprueba si los contactos del enchufe están
calientes (más de 50 °C). Si este es el caso, haga
que le cambien el enchufe para evitar que se queme
o se incendie debido al sobrecalentamiento.
LIMPIEZA Y CUIDADO
• Limpie la unidad con regularidad y elimine el polvo de la supercie, ya que el
polvo puede afectar negativamente a la radiación de calor.
• Antes de limpiarla, apague la unidad y desenchúfela de la toma de corriente. Deje
que la unidad se enfríe completamente antes de limpiarla. Quite el polvo con un
paño suave y húmedo. No utilice agentes de limpieza agresivos o limpiadores
abrasivos.
• Tenga cuidado de no rayar las supercies con herramientas duras y aladas, ya
que esto puede causar que la capa de pintura se despegue y oxide la unidad.
33
ES
INDICACIONES SOBRE LA RETIRADA DEL
APARATO
Si en su país existe una disposición legal relativa a la
eliminación de aparatos eléctricos y electrónicos, este
símbolo estampado en el producto o en el embalaje
advierte que no debe eliminarse como residuo doméstico.
En lugar de ello, debe depositarse en un punto de recogida
de reciclaje de aparatos eléctricos y electrónicos. Una
gestión adecuada de estos residuos previene consecuencias
potencialmente negativas para el medio ambiente y la salud
de las personas. Puede consultar más información sobre el
reciclaje y la eliminación de este producto contactando con
su administración local o con su servicio de recogida de
residuos.
Este producto contiene baterías. Si en su país existe una
disposición legal relativa a la eliminación de baterías, estas
no deben eliminarse como residuo doméstico. Infórmese
sobre la normativa vigente relacionada con la eliminación de
baterías. Una gestión adecuada de estos residuos previene
consecuencias potencialmente negativas para el medio
ambiente y la salud de las personas.
FABRICANTE E IMPORTADOR (REINO UNIDO)
Fabricante:
Chal-Tec GmbH, Wallstraße 16, 10179 Berlín, Alemania.
Importador para Gran Bretaña:
Berlin Brands Group UK Limited
PO Box 42
272 Kensington High Street
London, W8 6ND
United Kingdom


35
FR
Chère cliente, cher client,
Toutes nos félicitations pour l’acquisition de ce nouvel appareil.
Veuillez lire attentivement et respecter les instructions de ce mode
d’emploi an d’éviter d’éventuels dommages. Nous ne saurions
être tenus pour responsables des dommages dus au non-respect
des consignes et à la mauvaise utilisation de l’appareil. Scannez
le QR-Code pour obtenir la dernière version du mode d‘emploi
et des informations supplémentaires concernant le produit :
SOMMAIRE
FICHE TECHNIQUE
Numéro d'article 10035055, 10035109
Alimentation 220-240 V~ 50 Hz
Puissance (watts) max. 2500 W
Fiche de données produit26
Consignes de sécurité 27
Aperçu de l‘appareil28
Installation29
Mise en marche et utilisation30
Nettoyage et entretien32
Informations sur le recyclage33
Fabricant et importateur (UK)33
36
FR
FICHE DE DONNÉES PRODUIT
Référence (s) du produit 10035055, 10035109
Donnée Symbole Valeur Unité Donnée Unité
Puissance calorique Uniquement pour les radiateurs électriques à
accumulation : Type de régulation de l'apport de chaleur
Puissance calorique
nominale
Pnom
1,2
kW Régulation manuelle de l'apport de chaleur
avec thermostat intégré
non
Puissance calorique
minimale (indicative)
Pmin
1,0
kW Régulation manuelle de l'apport de chaleur
avec indication de la température de la pièce
et/ou de l'extérieur
non
Puissance maximale
continue de chauffage
Pmax,c
1,2
kW Régulation électronique de l'apport de chaleur
avec indication de la température de la pièce
et/ou de l'extérieur
non
Consommation de courant auxiliaire
Apport de chaleur assisté par ventilateur non
A puissance calorique
nominale (moteur de
ventilateur)
elmax 0,000 kW
Type de chauffage/contrôle de la température de la
pièce
A puissance calorique
minimale (moteur de
ventilateur)
elmin 0,000 kW Chauffage à une seule vitesse, pas de contrôle
de la température ambiante
non
En mode veille elSB 0,225 kW Deux vitesses ou plus réglables manuellement,
pas de contrôle de la température ambiante
non
Contrôle de la température ambiante par
thermostat mécanique
non
Contrôle électronique de la température
ambiante
oui
Contrôle électronique de la température
ambiante et régulation par jour
non
Contrôle électronique de la température
ambiante et régulation par semaine
non
Autres options de régulation
Contrôle de la température ambiante avec
détection de présence
non
Contrôle de la température ambiante avec
détection de fenêtre ouverte
non
Avec option télécommande non
Avec contrôle du démarrage du chauffage non
Avec limitation de la durée de fonctionnement oui
Avec globe noir capteur de température non
Coordonnées de contact Chal-Tec GmbH, Wallstraße 16, 10179, Berlin, Allemagne
37
FR
CONSIGNES DE SÉCURITÉ
• Ne couvrez pas l‘appareil pour éviter une surchauffe.
• Si le cordon d‘alimentation est endommagé, il doit être remplacé par le fabricant,
le service client ou une personne de qualication similaire pour éviter tout
dommage.
• Les enfants à partir de 8 ans ainsi que les personnes aux capacités physiques,
mentales ou sensorielles réduites ne doivent utiliser l’appareil qu‘après avoir été
familiarisés par une personne responsable de leur sécurité aux fonctionnalités et
aux mesures de sécurité et qu‘ils comprennent les risques associés.
• L‘appareil n‘est pas un jouet. Le nettoyage et l‘entretien de l‘appareil ne peuvent
être effectués par des enfants à partir de 8 ans que sous surveillance.
• Les enfants de moins de 3 ans doivent être tenus à l‘écart de l‘appareil, sauf s‘ils
sont constamment surveillés.
• Les enfants âgés de 3 à 8 ans ne peuvent allumer et éteindre l‘appareil que s‘il
a été conguré ou installé dans sa position de fonctionnement normale prévue,
s‘ils sont surveillés par une personne responsable et ont appris comment utiliser
l‘appareil en toute sécurité et comprennent les dangers associés. Les enfants entre
3 et 8 ans ne doivent pas brancher l‘appareil dans la prise, régler, nettoyer ou
effectuer l‘entretien de l‘appareil.
• Ne placez pas l‘appareil directement sous une prise électrique.
• N‘utilisez pas l‘appareil dans un environnement humide, comme près de
baignoires, douches ou piscines.
ATTENTION
Risque de brûlures ! Certains composants de l‘appareil peuvent devenir
très chaud pendant le fonctionnement et provoquer des brûlures. Soyez
particulièrement prudent lorsque des enfants ou des personnes fragiles
se trouvent à proximité de l‘appareil.
• Cet appareil contient une certaine quantité d‘huile spéciale. Les réparations
nécessitant l‘ouverture du réservoir d‘huile ne peuvent être effectuées que par le
fabricant ou son service client. Par conséquent, en cas de fuite d‘huile, contactez le
fabricant ou le service client. Les réglementations locales relatives au recyclage de
l‘huile usée doivent être respectées lors de la mise au rebut de l‘appareil.
• Cet appareil ne permet pas une régulation exacte de la température ambiante et ne
doit donc pas être utilisé comme dispositif d‘isolation pour les locaux de stockage,
objets, animaux et plantes.

38
FR
APERÇU DE L‘APPAREIL
Radiateur à huile
Panneau de commande
Fenêtre
d‘afchage
Nervures
Enroulement du
câble
Roulettes
Panneau de
commande

39
FR
Télécommande
...
Touche de
veille
Touche Mode
+
Augmenter
-
Réduire
Touche
minuterie
Remarque : Les touches de fonctions de la télécommande correspondent
essentiellement à celles du panneau de commande sur le boîtier de l‘appareil, mais
aucune combinaison de touches ne peut être appelée avec la télécommande.
INSTALLATION
1. Retournez le radiateur.
2. Placer les trous des deux ensembles de roulettes sur les vis situées à gauche et
à droite sous le radiateur - à gauche de la plaque de support des roulettes à
l‘extrémité de la nervure et à droite sur le boîtier de commande (voir gure 1).
3. Fixez les deux ensembles de roulettes avec quatre écrous à oreilles et serrez-les
de sorte que les ensembles de roulettes ne glissent pas (voir gure 2). Retournez
ensuite l‘appareil et posez-le sur ses roulettes.
Ecrous à oreilles
Boîtier de
commande
Figure 1 Figure 2

40
FR
MISE EN MARCHE ET UTILISATION
Avant la première utilisation
1. Vériez que l‘appareil et le cordon d‘alimentation ne sont pas endommagés avant
de le mettre en marche.
2. Assurez-vous que la tension de la prise correspond à la tension indiquée sur la
plaque signalétique de l‘appareil. La prise doit être mise à la terre. Si ce n‘est pas le
cas, faites remplacer la prise par un électricien.
Fonctions
Mise en marche /
Mode veille
• Insérez la che de l‘appareil dans la prise. L‘appareil
émet un long bip. Appuyez sur la touche de veille
pour passer en mode chauffage. Appuyez à nouveau
sur la touche de veille pour mettre l‘appareil en mode
veille .
Réglage du mode de
fonctionnement
• Appuyez sur la touche de mode pour dénir l‘un
des modes de fonctionnement disponibles: Élevé>
Moyen> Faible> Mode d‘économie d‘énergie.
Réglage de la
température
• En état de marche, appuyez sur la touche plus ou
moins ( ou ) pour régler la température. Si vous
maintenez la touche correspondante, la température
s‘ajuste vers le haut ou vers le bas plus rapidement.
• Si aucun réglage n‘est effectué dans les 5 secondes,
l‘appareil quitte automatiquement le réglage de
température.
Minuterie de
démarrage
automatique
• En mode veille, appuyez sur la touche de la minuterie
pour accéder à ses paramètres.
• Appuyez sur la touche plus ou moins ( ou
) pour régler la durée jusqu‘à la mise en marche
automatique. Appuyez sur la touche plus ou moins (
ou ) et maintenez-la pour ajuster le réglage de la
durée plus rapidement. Une fois le temps programmé
écoulé, l‘appareil passe en mode de fonctionnement.
Minuterie d'arrêt
automatique
• En mode de fonctionnement, appuyez sur la touche
de la minuterie pour accéder à ses paramètres.
• Appuyez sur la touche plus ou moins ( ou ) pour
régler la durée jusqu‘à l‘arrêt automatique. Appuyez
sur la touche plus ou moins ( ou ) et maintenez-la
pour ajuster le réglage de la durée plus rapidement.
Une fois le délai programmé écoulé, l‘appareil passe
en mode veille.

41
FR
Utilisation de la
minuterie
• La plage de réglage de la minuterie est de 0 à 24
heures. Chaque fois que vous appuyez sur la touche
plus ou moins ( ou ), la durée de la minuterie
augmente ou diminue d‘une heure. Lorsque la valeur
dénie est „0H“, appuyez sur la touche pour faire
passer le réglage à „24H“. Lorsque la valeur dénie
est “24H”, appuyez sur la touche plus pour faire
passer le réglage à “0H”. Réglez la minuterie sur
„0H“ pour la désactiver. Si une valeur supérieure à
„0H“ est dénie, la minuterie démarre en fonction des
réglages effectués.
• Si vous appuyez sur la touche de la minuterie
ou sur la touche de mode après avoir
réglé la minuterie ou si vous n‘effectuez aucune
entrée pendant 5 secondes, l‘appareil quitte
automatiquement le mode minuterie. La minuterie est
activée.
• Annulation de la minuterie : si vous appuyez sur la
touche de la minuterie après l‘avoir réglé pour
mettre l‘appareil en mode veille, la minuterie est
automatiquement désactivée.
• Lorsque vous avez démarré la minuterie, vous
pouvez appuyer sur la touche de la minuterie
pour afcher le temps restant avant que l‘appareil ne
s‘éteigne automatiquement ou ajuster le réglage de
la minuterie.
• Pendant que la minuterie fonctionne, le thermostat
allume ou éteint l‘appareil en fonction de la
température réglée et de la température ambiante. La
minuterie est automatiquement réinitialisée si l‘appareil
est déconnecté de l‘alimentation.
Fonction de mémoire
• Lorsque l‘appareil est démarré en mode veille, il
fonctionne avec les derniers réglages effectués.
Disjoncteur
• Si la température ambiante dépasse 50 °C en mode
veille ou en fonctionnement, l‘appareil s‘éteint,
10 bips longs retentissent et l‘écran afche „FF“
et clignote à 1 Hz pendant 75 secondes. Après le
déclenchement du disjoncteur, le mode de chauffage
ne peut pas reprendre même si la température
ambiante redescend en dessous de 50 °C. Le
chauffage ne peut reprendre que si vous éteignez et
rallumez l‘appareil.
42
FR
Arrêt de l‘appareil
(mode veille)
• Pendant que l‘appareil est en marche, appuyez sur la
touche de veille , pour mettre l‘appareil en veille.
Arrêt de l'appareil
• En mode de fonctionnement, appuyez sur la touche
veille pour mettre l‘appareil en mode veille.
Retirez ensuite la che de la prise pour éteindre
complètement l‘appareil. Laissez l‘appareil refroidir et
gardez-le dans une position stable.
Remarque : Lorsque vous utilisez l‘appareil pour la
première fois ou remettez la che dans la prise, assurez-
vous que la che est correctement insérée dans la prise.
Inspection
• Insérez la che secteur dans une prise et démarrez
l‘appareil. Éteignez l‘appareil au bout d‘une demi-
heure et débranchez la che secteur. Vériez si les
contacts du connecteur sont chauds (plus de 50 °C).
Si tel est le cas, faites remplacer la prise pour éviter
qu‘elle ne brûle ou ne prenne feu à cause d‘une
surchauffe.
NETTOYAGE ET ENTRETIEN
• Nettoyez régulièrement l‘appareil et retirez la poussière de la surface, car les
performances du radiateur peuvent être réduites par la poussière.
• Éteignez l‘appareil avant le nettoyage et retirez la che de la prise. Laissez
l‘appareil refroidir complètement avant de le nettoyer. Retirez la poussière avec
un chiffon doux et humide. N‘utilisez pas d‘agents de nettoyage agressifs ou
d‘abrasifs.
• Veillez à ne pas rayer les surfaces avec des outils durs et tranchants, car cela
pourrait décoller le revêtement de peinture et faire rouiller l‘appareil.
43
FR
INFORMATIONS SUR LE RECYCLAGE
S‘il existe une réglementation pour l‘élimination ou le
recyclage des appareils électriques et électroniques dans
votre pays, ce symbole sur le produit ou sur l‘emballage
indique que cet appareil ne doit pas être jeté avec les
ordures ménagères. Vous devez le déposer dans un point
de collecte pour le recyclage des équipements électriques
et électroniques. La mise au rebut conforme aux règles
protège l‘environnement et la santé de vos semblables des
conséquences négatives. Pour plus d‘informations sur le
recyclage et l‘élimination de ce produit, veuillez contacter
votre autorité locale ou votre service de recyclage des
déchets ménagers.
Ce produit contient des piles. S‘il existe une réglementation
pour l‘élimination ou le recyclage des piles dans votre pays,
vous ne devez pas les jeter avec les ordures ménagères.
Renseignez-vous sur les dispositions locales relatives à la
collecte des piles usagées. La mise au rebut conforme aux
règles protège l‘environnement et la santé de vos semblables
des conséquences négatives.
FABRICANT ET IMPORTATEUR (UK)
Fabricant :
Chal-Tec GmbH, Wallstraße 16, 10179 Berlin, Allemagne.
Importateur pour la Grande Bretagne :
Berlin Brands Group UK Limited
PO Box 42
272 Kensington High Street
London, W8 6ND
United Kingdom


45
IT
Gentile cliente,
La ringraziamo per aver acquistato il dispositivo. La preghiamo
di leggere attentamente le seguenti istruzioni per l’uso e di
seguirle per evitare possibili danni. Non ci assumiamo alcuna
responsabilità per danni scaturiti da una mancata osservazione
delle avvertenze di sicurezza e da un uso improprio del
dispositivo. Scansionare il codice QR seguente, per accedere
al manuale d’uso più attuale e per ricevere informazioni sul
prodotto:
INDICE
DATI TECNICI
Numero articolo 10035055, 10035109
Alimentazione 220-240 V~ 50 Hz
Potenza (watts) max. 2500 W
Scheda informativa del prodotto46
Avvertenze di sicurezza47
Descrizione del prodotto48
Installazione49
Messa in funzione e utilizzo50
Pulizia e manutenzione52
Avviso di smaltimento53
Produttore e importatore (UK)53
46
IT
SCHEDA INFORMATIVA DEL PRODOTTO
Identicazione del modello (i) 10035055, 10035109
Indicazione Simbolo Valore Unità Indicazione Unità
Potenza termica Solo per gli apparecchi per il riscaldamento d'ambiente
locale elettrici ad accumulo: Tipo di controllo
dell´apporto termico
Potenza termica nominale Pnom
1,2
kW Controllo manuale del carico termico con
termostato integrato
no
Potenza termica minima
(valore indicativo)
Pmin
1,0
kW Controllo manuale del carico termico con
riscontro della temperatura ambiente e/o
esterna
no
Potenza termica massima
continua
Pmax,c
1,2
kW Controllo elettronico del carico termico con
riscontro della temperatura ambiente e/o
esterna
no
Consumo di elettricità ausiliaria
Potenza termica con supporto del ventilatore no
Per la potenza termica
nominale (Motore del
ventilatore)
elmax 0,000 kW
Tipo di potenza termica / controllo della temperatura
ambiente
Per la potenza termica
minima (Motore del
ventilatore)
elmin 0,000 kW Potenza termica di un solo livello, senza
controllo della temperatura ambiente
no
In modalità di attesa elSB 0,225 kW Due o più livelli impostabili manualmente, senza
controllo della temperatura ambiente
no
Con controllo della temperatura ambiente
tramite termostato meccanico
no
Con controllo elettronico della temperatura
ambiente
si
Controllo elettronico della temperatura
ambiente e timer giornaliero
no
Controllo elettronico della temperatura
ambiente e timer settimanale
no
Altre opzioni di controllo
Controllo della temperatura ambiente con
rilevamento di presenza
no
Controllo della temperatura ambiente con
rilevamento di nestre aperte
no
Con opzione telecomando no
Con controllo di avvio adattabile no
Con limitazione del tempo di funzionamento no
Con sensore lampada nero no
Informazioni di contatto Chal-Tec GmbH, Wallstraße 16, 10179, Berlino, Germania

47
IT
AVVERTENZE DI SICUREZZA
• Non coprire il dispositivo per evitare il surriscaldamento.
• Se il cavo d’alimentazione è danneggiato va sostituito dal produttore, da
un’azienda autorizzata o da una persona qualicata al ne di evitare rischi per la
sicurezza.
• Questo dispositivo può essere utilizzato dai bambini maggiori di 8 anni e dalle
persone con limitate capacità siche, sensoriali o mentali o da persone con
esperienza e conoscenze insufcienti, solo se sono stati informati sulle funzioni del
dispositivo e sono consapevoli dei rischi e dei pericoli connessi.
• Il dispositivo non è un giocattolo. I bambini maggiori di 8 anni possono pulire e
utilizzare il dispositivo solo sotto la supervisione di un adulto.
• I bambini minori di 3 anni devono essere tenuti lontano dal dispositivo, a meno che
non siano controllati.
• I bambini dai 3 agli 8 anni possono accendere e spegnere il dispositivo solo se
è stato installato in una posizione di utilizzo normale, se vengono sorvegliati da
un adulto, se sono stati informati sulle funzioni del dispositivo e sono consapevoli
dei rischi e dei pericoli connessi. I bambini dai 3 agli 8 anni non possono inserire
la spina del dispositivo nella presa, disattivarlo, pulirlo o eseguire operazioni di
manutenzione.
• Non posizionare il dispositivo nelle immediate vicinanze di una presa elettrica.
• Non utilizzare il dispositivo in ambienti umidi come vasche, docce o piscine.
ATTENZIONE
Pericolo di ustioni! Alcuni componenti possono diventare estremamente
caldi e provocare ustioni. Prestare particolare attenzione in presenza di
bambini o persone vulnerabili che potrebbero essere in pericolo.
• Questo dispositivo è riempito con una quantità precisa di olio speciale. Riparazioni
che richiedono l’apertura del contenitore dell’olio devono essere realizzate solo dal
produttore o dal suo servizio di assistenza, da contattare in caso di fuoriuscita di
olio. Smaltire il dispositivo nel rispetto delle normative relative all’olio esausto.
• Il dispositivo non permette la regolazione precisa della temperatura ambiente.
Per questo motivo non lo si può utilizzare come dispositivo di isolamento per
magazzini, oggetti, animali e piante.

48
IT
DESCRIZIONE DEL PRODOTTO
Radiatore a olio
Pannello di controllo
Display
Elementi
Avvolgicavo
Rotelline
Panello di
controllo
49
IT
Telecomando
...
Tasto standby
Tasto modalitá
+
Aumentare
-
Diminuire
Tasto timer
Nota: I tasti funzione del telecomando coincidono principalmente con quelli del
pannello di controllo del dispositivo. Con il telecomando non è però possibile
accedere a nessuna combinazione dei tasti.
INSTALLAZIONE
1. Capovolgere il radiatore.
2. Inserire i fori dei set di ruote nelle viti che si trovano sul lato inferiore destro e sinistro
del radiatore – a sinistra sulla piastra di supporto all’estremità dell’elemento e a
destra sulla scatola di comando (vedi gura 1).
3. Stringere entrambi i set di ruote con quattro dadi a farfalla, in modo tale che non
possano scivolare (vedi gura 2). Inne capovolgere il dispositivo e posizionarlo
con le ruote a terra.
Dado a farfalla
Scatola di
comando
Figura 1 Figura 2
50
IT
MESSA IN FUNZIONE E UTILIZZO
Prima del primo utilizzo
1. Prima della messa in funzione vericare che il dispositivo e il cavo d’alimentazione
non siano danneggiati.
2. Assicurarsi che il voltaggio della presa corrisponda a quello indicato sulla targhetta
del dispositivo. La presa deve essere messa a terra. In caso contrario farla sostituire
da un elettricista.
Funzioni operative
Accensione /
Modalità standby
• Inserire la spina del dispositivo nella presa di corrente.
L’unità emette un lungo segnale acustico. Premere
il pulsante di standby per entrare in modalità
riscaldamento. Quando il pulsante di standby viene
premuto di nuovo, l’apparecchio entra in modalità
standby.
Impostazione
operativa
• Premere il pulsante Mode pper impostare una
delle modalità operative disponibili: Alto > Medio >
Basso > Modalità di risparmio energetico.
Impostazione della
temperatura
• Premere il pulsante più o meno quando l’unità è
pronta per il funzionamento ( o ) per regolare
la temperatura. Se si tiene premuto il tasto
corrispondente, la temperatura viene regolata più
rapidamente verso l’alto o verso il basso.
Se non viene effettuata alcuna regolazione entro
5 secondi, l’apparecchio esce automaticamente
dall’impostazione della temperatura.
Timer - accensione
automatica
• In modalità standby, premere il pulsante timer
per accedere ai suoi parametri.
Premere il tasto più o meno ( o ) per impostare
l’ora no all’accensione dell’automatico. Premere
il pulsante più o meno ( o ) e tenerlo premuto
per regolare il tempo più velocemente. Una volta
trascorso il tempo impostato, l’unità entrerà in
modalità operativa.
Timer - spegnimento
automatico
• In modalità di funzionamento, premere il pulsante del
timer para acceder a sus parámetros.
Premere il tasto più o meno ( o ) per impostare
il tempo no allo spegnimento automatico. Premere
il pulsante più o meno ( o ) e tenerlo premuto
per regolare il tempo più velocemente. Una volta
trascorso il tempo impostato, l’unità entra in modalità
standby.
51
IT
Uso del timer
• Il campo di impostazione del timer va da 0 a 24 ore.
Ogni volta che si preme il pulsante più o meno (
o ), la durata del timer aumenta o diminuisce di
un’ora. Quando il valore impostato è «0H», premere
il tasto per modicare l’impostazione su «24H».
Quando il valore è impostato su «24H», premere il
pulsante più per modicare l’impostazione su «0H».
Impostare il timer su «0H» per spegnerlo. Se viene
impostato un valore superiore a «0H», il timer si avvia
secondo le impostazioni.
Se si preme il pulsante del timer o il tasto
mode dopo aver impostato il timer o se non si
effettua un’immissione per 5 secondi, l’unità esce
automaticamente dalla modalità timer. Il timer è
impostato.
• Annullamento del timer: Se si preme il pulsante del
timer Dopo averlo impostato per mettere l’unità in
modalità standby, il timer si spegne automaticamente.
• Una volta avviato il timer, è possibile premere il
pulsante del timer per visualizzare il tempo
rimanente prima che la telecamera si spenga
automaticamente o per regolare le impostazioni del
timer.
• Mentre il timer è in funzione, il termostato accende
o spegne l’unità a seconda della temperatura
impostata e della temperatura ambiente. Il timer si
resetta automaticamente se l’unità viene scollegata
dall’alimentazione elettrica.
Funzione Memory
• Quando l’unità viene avviata in modalità standby,
funziona con le ultime impostazioni effettuate.
Interruttore
automatico
• Se la temperatura ambiente supera i 50 °C in
modalità standby o di funzionamento, l’unità si
spegne, emette 10 lunghi segnali acustici e il display
mostra «FF» e lampeggia a 1 Hz per 75 secondi.
Dopo l’intervento dell’interruttore, la modalità di
riscaldamento non può essere ripristinata anche
se la temperatura ambiente scende sotto i 50
°C. Il riscaldamento può essere ripreso solo se
l’apparecchio viene spento e riacceso.
Spegnere l’unità
(modalità standby)
• Mentre l’unità è accesa, premere il pulsante di
standby , per mettere il dispositivo in attesa.
52
IT
Spegnere il
dispositivo
• In modalità di funzionamento, premere il pulsante di
standby per mettere l’unità in modalità standby.
Quindi rimuovere la spina dalla presa per spegnere
completamente l’unità. Lasciare raffreddare l’unità e
mantenerla in una posizione stabile.
Nota: Quando si utilizza l’unità per la prima volta o si
reinserisce la spina nella presa, assicurarsi che la spina
sia inserita correttamente nella presa.
Ispezione
• Inserire la spina in una presa di corrente e accendere
il dispositivo. Spegnere l’apparecchio dopo mezz’ora
e staccare la spina dalla rete elettrica. Controllare se
i contatti della spina sono caldi (più di 50 °C). In tal
caso, far sostituire la spina per evitare che si bruci o
prenda fuoco a causa del surriscaldamento.
PULIZIA E MANUTENZIONE
• Pulire il dispositivo regolarmente e rimuovere la polvere dalle superci, perché può
ridurre l’efcacia del riscaldamento.
• Spegnere il dispositivo prima di pulirlo e staccare la spina dalla presa. Lasciare
che il dispositivo si raffreddi completamente. Rimuovere la polvere con un panno
morbido umido. Non utilizzare detergenti aggressivi o abrasivi.
• Assicurarsi di non grafare le superci con utensili taglienti per evitare che si
arrugginiscano a causa dei danni alla vernice.

53
IT
AVVISO DI SMALTIMENTO
Se nel proprio paese si applicano le regolamentazioni
inerenti lo smaltimento di dispositivi elettrici ed elettronici,
questo simbolo sul prodotto o sulla confezione segnala che
questi prodotti non possono essere smaltiti con i riuti normali
e devono essere portati a un punto di raccolta di dispositivi
elettrici ed elettronici. Grazie al corretto smaltimento dei
vecchi dispositivi si tutela il pianeta e la salute delle persone
da possibili conseguenze negative. Informazioni riguardanti il
riciclo e lo smaltimento di questi prodotti si ottengono presso
l’amministrazione locale oppure il servizio di gestione dei
riuti domestici.
Il prodotto contiene batterie. Se nel proprio paese si
applicano le regolamentazioni inerenti lo smaltimento di
batterie, non possono essere smaltite con i normali riuti
domestici. Preghiamo di informarvi sulle regolamentazioni
vigenti sullo smaltimento delle batterie. Grazie al corretto
smaltimento dei vecchi dispositivi si tutela l’ambiente e la
salute delle persone da conseguenze negative.
PRODUTTORE E IMPORTATORE (UK)
Produttore:
Chal-Tec GmbH, Wallstraße 16, 10179 Berlino, Germania.
Importatore per la Gran Bretagna:
Berlin Brands Group UK Limited
PO Box 42
272 Kensington High Street
London, W8 6ND
United Kingdom


55
NL
Geachte klant,
Gefeliciteerd met de aanschaf van dit apparaat. Lees de hierna
volgende handleiding aandachtig door en volg de instructies
op om schade te voorkomen. Voor schade veroorzaakt door
het niet in acht nemen van de instructies of door onjuist gebruik
nemen wij geen verantwoordelijkheid. Scan de QR code voor
toegang tot de meest actuele gebruikershandleiding en voor
meer informatie over het artikel.
INHOUDSOPGAVE
TECHNISCHE GEGEVENS
Artikelnummer 10035055, 10035109
Stroomvoorziening 220-240 V ~ 50 Hz
Vermogen (watt) max. 2500 W
Productinformatieblad56
Veiligheidsinstructies57
Overzicht apparaat58
Installatie59
Ingebruikname en bediening60
Reiniging en onderhoud62
Instructies voor afvoer63
Fabrikant & importeur (UK)63
56
NL
PRODUCTINFORMATIEBLAD
Identicatie model(len) 10035055, 10035109
Specicatie Symbool Waarde Eenheid Specicatie Eenheid
Warmtevermogen Alleen voor individuele elektrische accumulatiekachels:
regulering van de warmtetoevoer
Nominaal
warmtevermogen
P
nom
1,2
kW Handmatige regeling van de warmtetoevoer
met ingebouwde thermostaat
nee
Minimaal
warmtevermogen
(richtwaarde)
P
min
1,0
kW Handmatige regeling van de warmtetoevoer
met terugmelding van de kamer- en/ of externe
temperatuur
nee
Doorgaand maximaal
warmtevermogen
P
max,c
1,2
kW Elektronische regeling van de warmtetoevoer
met terugmelding van de kamer- en/ of externe
temperatuur
nee
Hulpenergieverbruik
Warmteafgifte met ondersteuning van een
ventilator
nee
Bij nominaal
warmtevermogen
el
max
0,000 kW
Soort warmte / Kamertemperatuurcontrole
Bij minimaal
warmtevermogen
el
min
0,000 kW Enkele warmtestand, geen
kamertemperatuurcontrole
nee
In stand-by modus el
sb
0,225 W Twee of meer handmatig in te stellen standen,
geen kamertemperatuurcontrole
nee
Controle kamertemperatuur met mechanische
thermostaat
nee
Met elektronische kamertemperatuurcontrole ja
Met elektronische kamertemperatuurcontrole en
tijdregulering
nee
Met elektronische kamertemperatuurcontrole en
weekdagregulering
nee
Overige regelopties
Kamertemperatuurcontrole met
aanwezigheidsherkenning
nee
Kamertemperatuurcontrole met open raam
detectie
nee
Met afstandsbediening nee
Met adaptieve regeling van het begin van de
verwarming
nee
Met bedrijfstijdbegrenzing ja
Met black bulb sensor nee
Contactgegevens Chal-Tec GmbH, Wallstraße 16, 10179 Berlijn, Duitsland

57
NL
VEILIGHEIDSINSTRUCTIES
• Bedek het apparaat niet om oververhitting te voorkomen.
• Wanneer de stroomkabel beschadigd is moet deze door de fabrikant, diens
klantenservice of een gelijkwaardig gekwaliceerd persoon worden vervangen om
schade aan eigendommen en/of persoonlijk letsel te voorkomen.
• Kinderen vanaf 8 jaar en personen met een beperkte lichamelijke, sensorische en/
of geestelijke gezondheid mogen het apparaat alleen gebruiken wanneer ze van
tevoren door een voor hen verantwoordelijke persoon uitvoerig met de functies
en veiligheidsinstructies vertrouwd zijn gemaakt en de hieraan verbonden risico's
begrijpen.
• Dit apparaat is geen speelgoed. Reiniging en onderhoud van het apparaat mag
door kinderen vanaf 8 jaar uitsluitend onder toezicht worden uitgevoerd.
• Kinderen onder de 3 jaar moeten op afstand van het apparaat blijven, tenzij ze
voortdurend onder toezicht staan.
• Kinderen in de leeftijd van 3 tot 8 jaar mogen de verwarming alleen aan- en
uitzetten, wanneer het in de normale gebruiksstand is geplaatst of geïnstalleerd
en zij onder toezicht staan van een voor hen verantwoordelijke persoon of
geïnstrueerd zijn in het veilige gebruik van het apparaat en de daarmee verbonden
risico's begrijpen. Kinderen in de leeftijd van 3 tot 8 jaar mogen de stekker van
het apparaat niet in het stopcontact steken, het apparaat niet programmeren,
schoonmaken of onderhoudswerkzaamheden aan het apparaat uitvoeren.
• Plaats het apparaat niet direct onder een stopcontact.
• Gebruik het apparaat niet in een vochtige omgeving, bijvoorbeeld vlakbij een
badkuip, douche of zwembad.
LET OP!
Gevaar voor brandwonden! Sommige onderdelen kunnen tijdens
gebruik heel heet worden en brandwonden veroorzaken. Uiterste
voorzichtigheid is geboden wanneer kinderen, huisdieren of kwetsbare
personen zich in de nabij van het apparaat bevinden.
• Dit apparaat is met een bepaalde hoeveelheid speciale olie gevuld. Reparaties,
waarvoor het oliereservoir geopend moet worden, mogen uitsluitend door de
fabrikant of diens servicepersoneel worden uitgevoerd. Neem in geval van een
olielek contact op met de fabrikant of diens klantenservice. Bij de afvoer van het
apparaat moeten de lokale voorschriften voor de afvoer van oude olie in acht
worden genomen.
• Dit apparaat maakt geen exacte regeling van de kamertemperatuur mogelijk en
mag daarom niet als verwarming voor opslagruimte, objecten, dieren en planten
worden gebruikt.
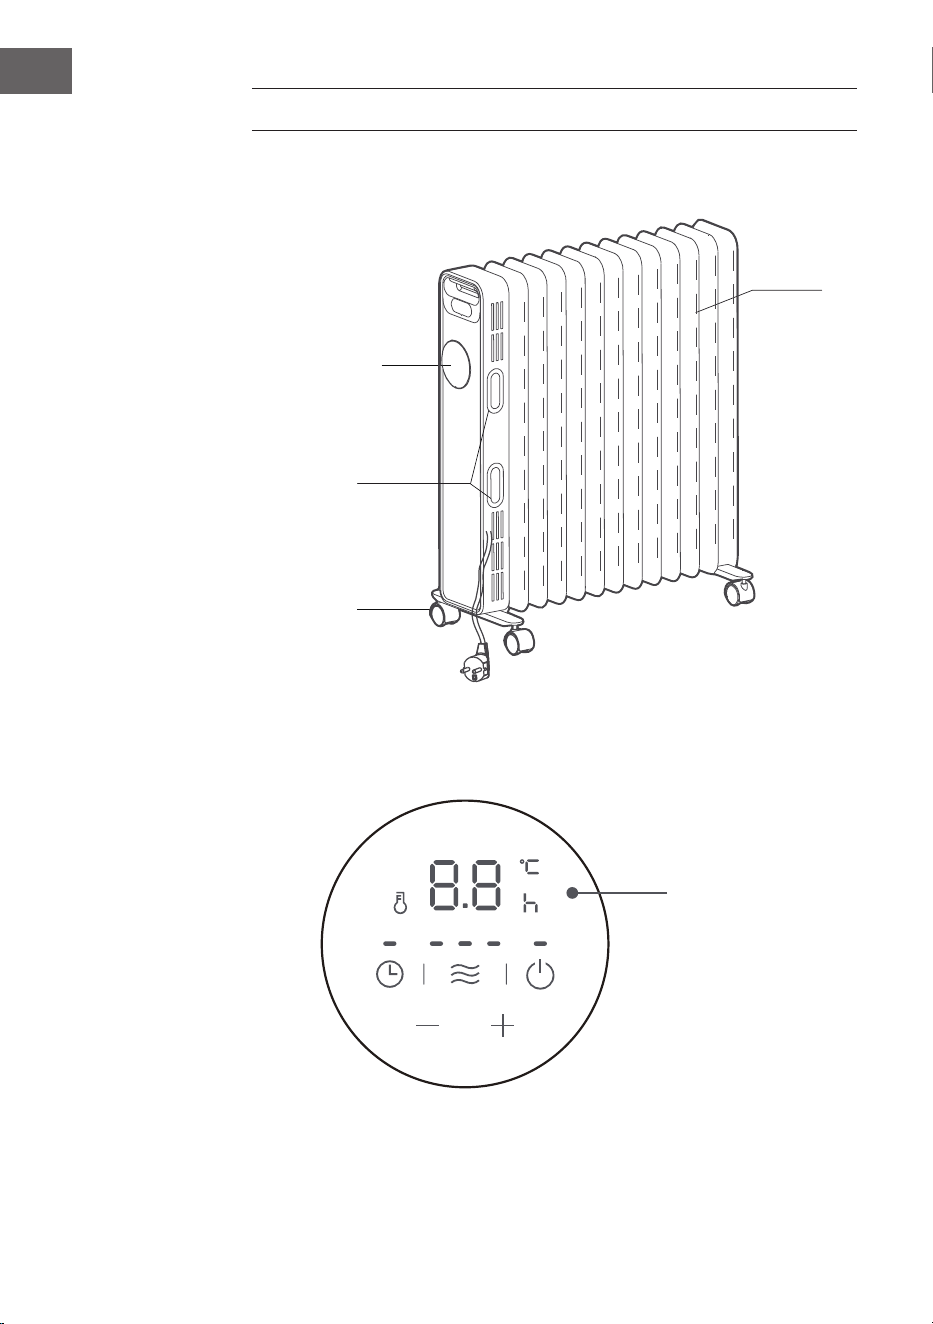
58
NL
OVERZICHT APPARAAT
Olieradiator
Controlepaneel
Display
Ribbels
Kabelspoel
Wieltjes
Controlepaneel
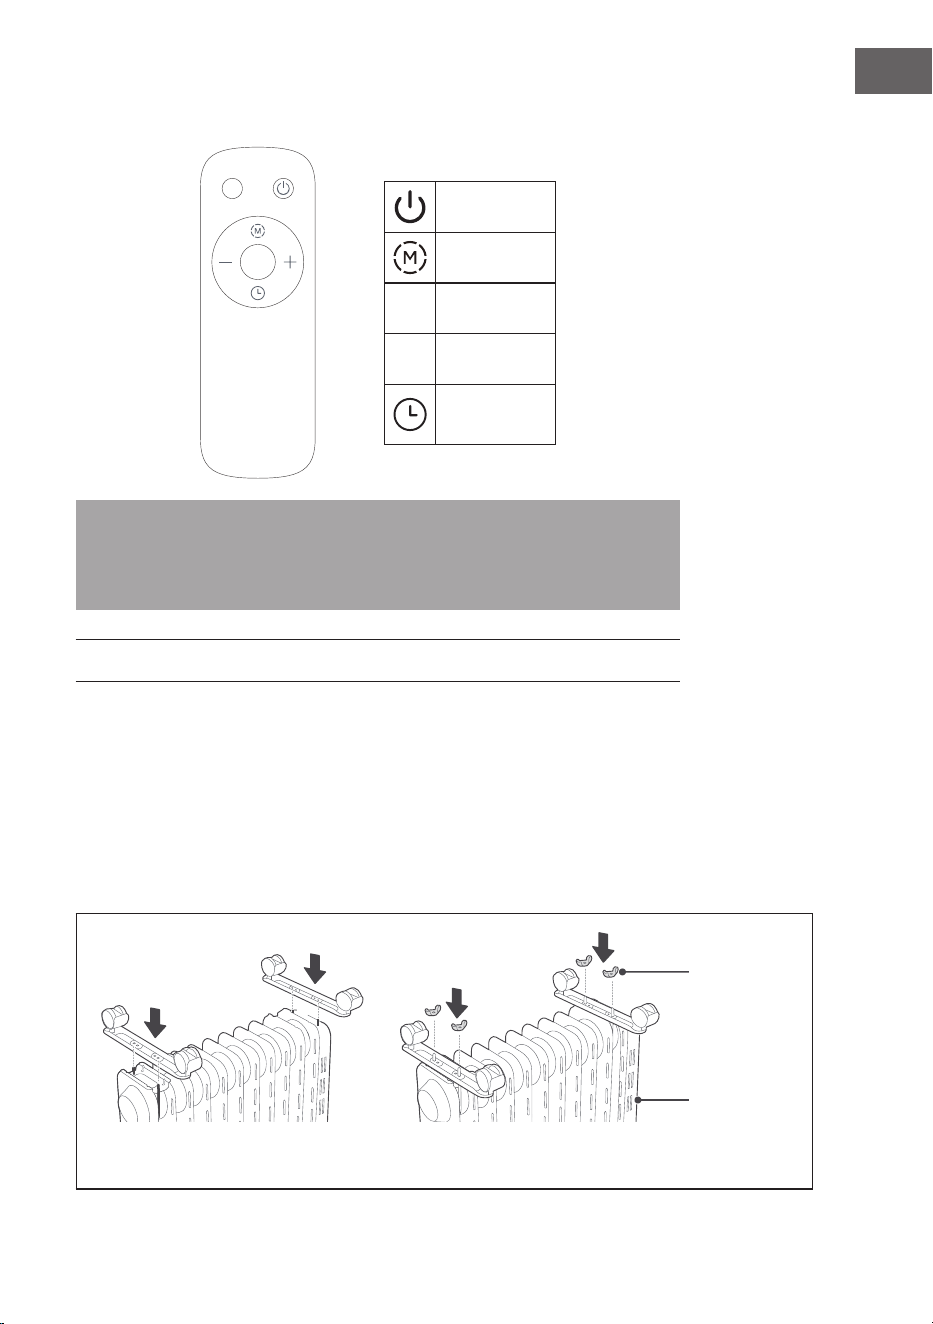
59
NL
Afstandsbediening
...
Stand-by toets
Modus toets
+
Verhogen
-
Verlagen
Timer toets
Let op! De toetsenfuncties van de afstandsbediening komen over het algemeen
overeen met de toetsenfuncties op het controlepaneel op de behuizing van het
apparaat. Met de afstandsbediening kunnen achter geen toetscombinaties worden
opgeroepen:
INSTALLATIE
1. Zet de radiator ondersteboven.
2. Steek de schroeven, die zich links en rechts aan de onderzijde van de radiator
bevinden, in de gaten van de beide wieltjes - links aan de steunplaat van de
wieltjes an het einde van de ribbel en rechts aan het controlekastje (zie afbeelding
1).
3. Bevestig de wieltjes met vier vleugelmoeren en draai deze vast om te voorkomen
dat de wieltjes wegglijden (zie afbeelding 2). Draai het apparaat vervolgens om
en plaats het met de wieltjes op de vloer.
Vleugelmoeren
Controlekastje
Afbeelding 1 Afbeelding 2

60
NL
INGEBRUIKNAME EN BEDIENING
Voor de eerste ingebruikname
1. Controleer het apparaat en de stroomkabel op beschadiging voordat u het
apparaat in gebruik neemt.
2. Verzeker uzelf ervan dat de stroomspanning van het stopcontact overeen komt met
de op het typeplaatje van het apparaat aangegeven spanning. Het stopcontact
moet geaard zijn. Wanneer dit niet het geval is, laat u het stopcontact door een
elektricien vervangen.
Functietoetsen
Inschakelen/ Stand-
by modus
• Steek de stekker in het stopcontact. Het apparaat
laat een lange pieptoon horen. Druk op de stand-by
toets , om in de verwarmende modus te komen.
Wanneer u de stand-by toets opnieuw indrukt,
gaat het apparaat in stand-by modus.
Bedrijfsmodus
instellen
• Druk op de modus toets om een van de
beschikbare bedrijfsmodi in te stellen: hoog >
gemiddeld > laag > energiespaarmodus.
Temperatuur instellen
• Druk in de bedrijfstoestand op de plus of minus toets
( of ), om de temperatuur in te stellen. Wanneer
u de betreffende toets ingedrukt houdt, wordt de
temperatuur sneller naar boven of onder aangepast.
• Wanneer binnen 5 seconden geen instelling wordt
uitgevoerd, verlaat het apparaat automatisch de
temperatuurinstelling.
Timer
- Automatisch
inschakelen
• Druk in stand-by modus op de timer toets om het
timer menu te openen.
• Druk op de plus of minus toets ( of ) om de tijd
tot het automatisch inschakelen in te stellen. Houdt de
plus of minus toets
( of ) ingedrukt om de tijdinstelling sneller aan
te passen. Na aoop van de ingestelde tijd gaat het
apparaat automatisch in de bedrijfsmodus.
Timer
- Automatisch
uitschakelen
• Druk in bedrijfsmodus op de timer toets om het
timer menu te openen.
• Druk op de plus of minus toets ( of ) om de tijd tot
het automatisch uitschakelen in te stellen. Houdt de
plus of minus toets
( of ) ingedrukt om de tijdinstelling sneller aan
te passen. Na aoop van de ingestelde tijd gaat het
apparaat automatisch in de stand-by modus.

61
NL
Timer inzetten
• De timer kan tussen 0-24 uur worden ingesteld. Met
elke druk op de plus of minus toets ( of ) verhoogt
of verlaagt u de timer-tijd met 1 uur. Wanneer de
ingestelde waarde '0H' is, drukt u de minus toets
in en de instelling gaat naar '24H'. Wanneer de
ingestelde waarde '24H' is, drukt u de plus toets in
en de instelling gaat naar '0H'. Wanneer u '0H' hebt
ingesteld wordt de timer afgebroken. Wanneer u een
hogere waarde dan '0H' hebt ingesteld, start de timer
overeenkomstig de ingevoerde instelling.
• Wanneer u na het instellen van de timer-tijd de timer
toets of de modus toets drukt of 5 seconden
geen enkele handeling uitvoert, wordt de timer modus
automatisch afgesloten. De timer is geactiveerd
• Timer afbreken: Wanneer u na het instellen van de
timer op de timer toets drukt om het apparaat in
stand-by modus te zetten, wordt de timer automatisch
gedeactiveerd.
• Wanneer u de timer heeft ingesteld, kunt u door op
de timer toets te drukken de resterende tijd tot het
automatisch uitschakelen zien of de instellingen van
de timer wijzigen.
• Terwijl de timer loopt schakelt de thermostaat
het apparaat, afhankelijk van de ingestelde
temperatuur en omringende temperatuur in of uit.
De timer wordt automatisch teruggezet wanneer de
stroomvoorziening van het apparaat onderbroken
wordt.
Memory functie
• Wanneer het apparaat vanuit de stand-by modus
wordt aangezet, zal het de laatst uitgevoerde
instellingen weer opnemen.
Veiligheidsschake-
laar
• Wanneer de kamertemperatuur, in stand-by of
bedrijfsmodus, meer dan 50 °C is, schakelt het
apparaat zichzelf automatisch uit, klinken 10
lange pieptonen, toont het display 'FF' en knippert
vervolgens gedurende 75 seconden op 1 Hz.
Nadat de veiligheidsschakelaar is geactiveerd, kan
het verwarmen niet verder gaan, ook wanneer de
kamertemperatuur weer tot onder de 50°C daalt. Pas
wanneer het apparaat helemaal uit en weer aangezet
is, kan het verwarmen doorgaan.
Uitschakelen (stand-
by modus)
• Druk in de bedrijfsmodus op de stand-by toets om
het apparaat in stand-by modus te zetten.
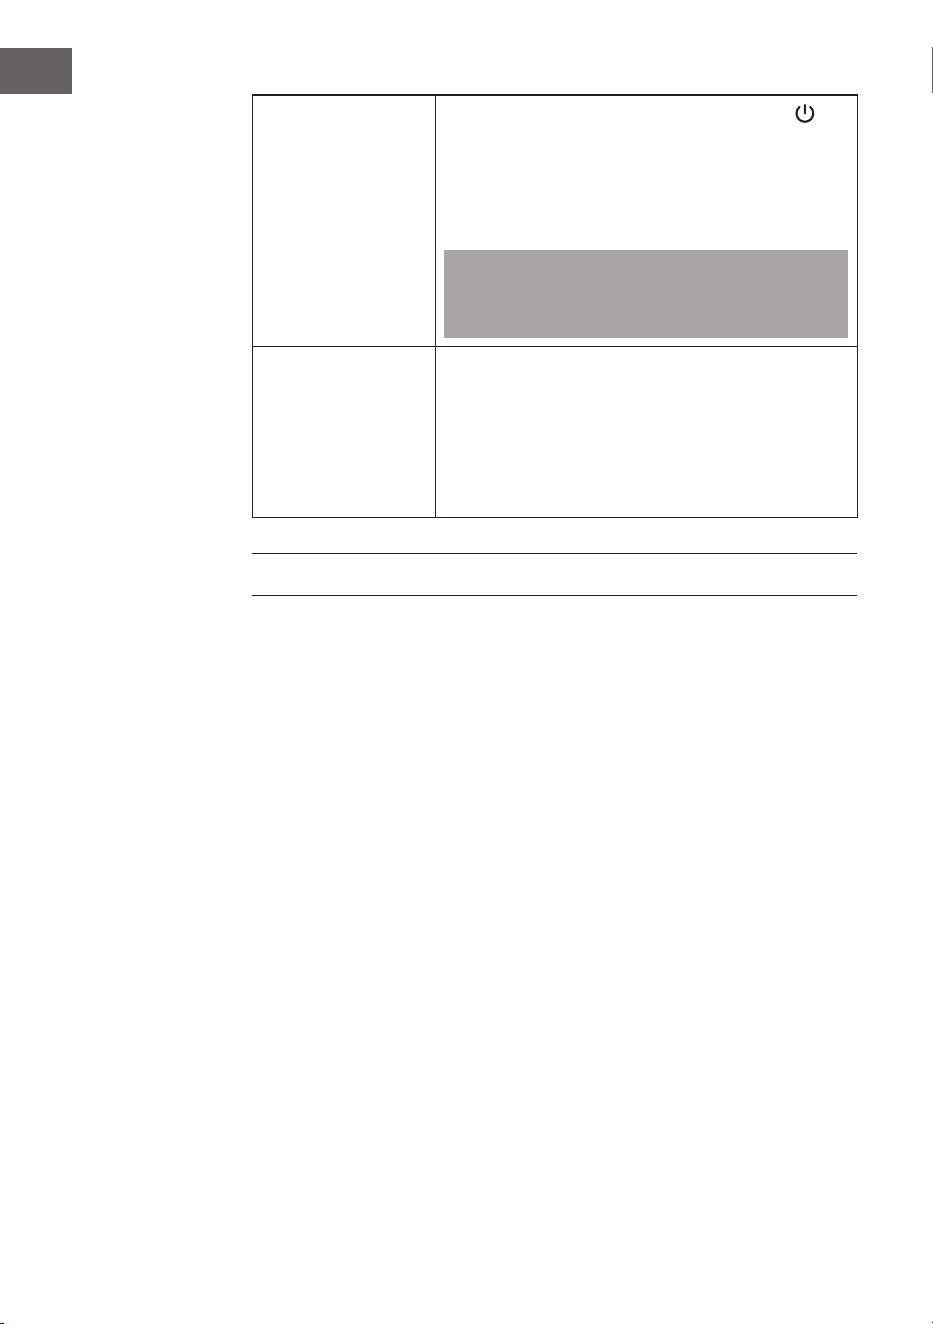
62
NL
Uitschakelen
• Druk in de bedrijfsmodus op de stand-by toets om
het apparaat in stand-by modus te zetten. Neem
vervolgens de stekker uit het stopcontact om het
apparaat volledig uit te schakelen. Laat het apparaat
volledig afkoelen en bewaar het in een stabiele
positie.
Tip: Als u het apparaat voor de eerste keer gebruikt of
de stekker weer in het stopcontact steekt, let u er dan
a.u.b. op dat de stekker correct in het stopcontact zit.
Inspectie
• Steek de stekker in het stopcontact en zet het
apparaat aan. Schakel het apparaat na een half uur
uit en neem de stekker uit het stopcontact. Controleer
of de contactpunten van de stekker heet zijn (meer
dan 50 °C). Als dit het geval is, laat u het stopcontact
vervangen om verbranding van de stekker of brand
door oververhitting te voorkomen.
REINIGING EN ONDERHOUD
• Maak het apparaat regelmatig schoon en verwijder stof van het oppervlakte,
aangezien warmtestraling negatief kan worden beïnvloed door stof.
• Schakel het apparaat uit en neem de stekker uit het stofcontact voordat u het
apparaat schoonmaakt. Laat het apparaat volledig afkoelen voordat u met
schoonmaken begint. Verwijder stof met een zachte, vochtige doek. Gebruik geen
agressieve reinigings- of schuurmiddelen.
• Let erop dat u de oppervlaktes niet door scherpe of harde objecten beschadigd
aangezien de veraag hierdoor kan afbladeren en het apparaat kan gaan roesten.

63
NL
INSTRUCTIES VOOR AFVOER
Wanneer in uw land een wettelijke regeling geldt voor het
afvoeren van elektrische en elektronische apparaten, wijst dit
symbool, op het product zelf of op de verpakking, erop dat
het betreffende product niet met het huisvuil afgevoerd mag
worden. In plaats daarvan dient het naar een centraal depot
voor het recyclen van elektrische en elektronische apparaten
te worden gebracht Door het afval volgens de voorschriften
weg te gooien beschermt u het milieu en de gezondheid van
uw medemensen tegen negatieve consequenties. Informatie
over recycling en het afvoeren van dit product ontvangt u
van uw gemeente of van uw plaatselijke grondstoffen- en
afvaldienst.
Dit artikel bevat batterijen. Wanneer in uw land een wettelijke
regeling is voor het afvoeren van batterijen, mogen batterijen
niet met het huisvuil worden afgevoerd. Informeer naar de
plaatselijke regelgeving inzake de afvoer van batterijen. Door
het afval volgens de voorschriften af te voeren beschermt
u het milieu en de gezondheid van uw medemensen tegen
negatieve consequenties.
FABRIKANT & IMPORTEUR (UK)
Fabrikant:
Chal-Tec GmbH, Wallstraße 16, 10179 Berlijn, Duitsland.
Importeur voor Groot-Brittannië:
Berlin Brands Group UK Limited
PO Box 42
272 Kensington High Street
London, W8 6ND
United Kingdom