3.5qt Stand Mixer
Batidora de pedestal de 3.5 cuartos de galón
Instruction Manual
Manual de instrucciones
®
19409_19469_19468_19467_19470_19471_19587_19602_BTFL_WMUS_3.5qt_StandMixer_V8_R4.indd 119409_19469_19468_19467_19470_19471_19587_19602_BTFL_WMUS_3.5qt_StandMixer_V8_R4.indd 1 2024-04-12 5:56 PM2024-04-12 5:56 PM
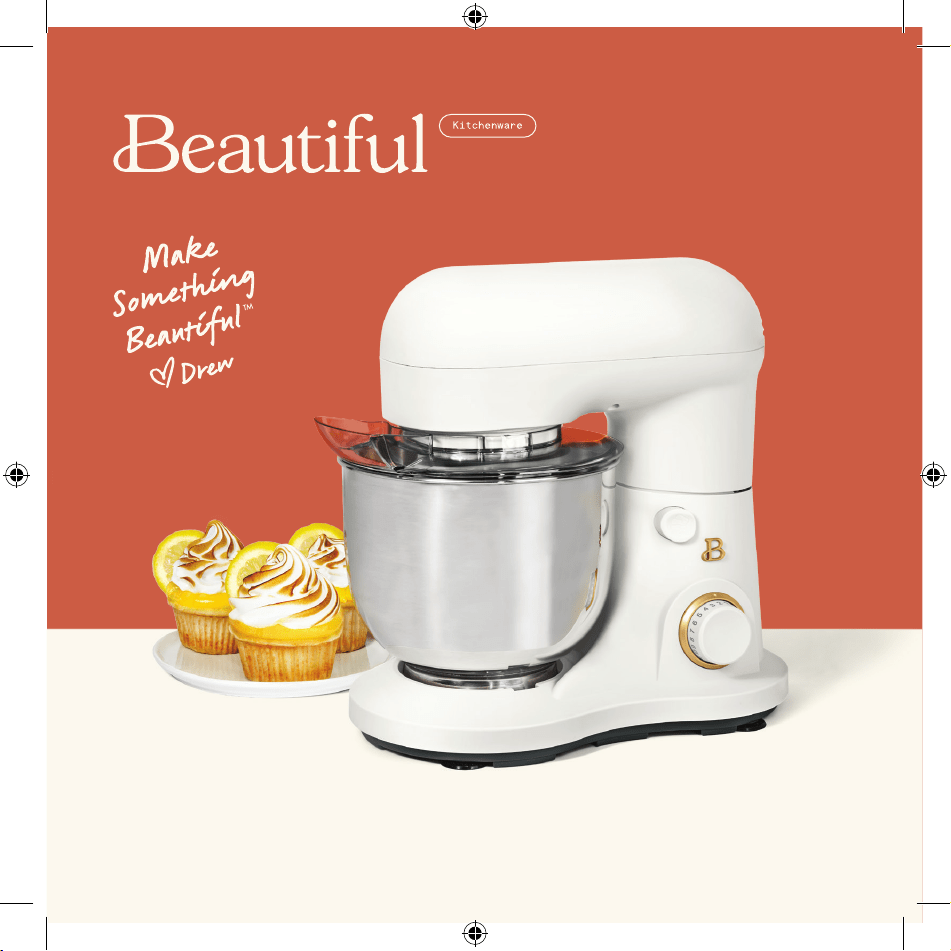
The kitchen is my family’s happy
place. It’s where we cook and eat
and bake and laugh and share our
most beautiful moments together.
That’s what inspired the creation
of Beautiful, my new collection
of easy-to-use kitchenware that
you’ll want to keep out on your
kitchen counter. So whether
your kitchen has flour all over
the place from a kid's baking
session or you’re throwing an adult
dinner party, I hope every step will
be simple, delicious and beautiful!
www.beautifulbydrew.com
19409_19469_19468_19467_19470_19471_19587_19602_BTFL_WMUS_3.5qt_StandMixer_V8_R4.indd 219409_19469_19468_19467_19470_19471_19587_19602_BTFL_WMUS_3.5qt_StandMixer_V8_R4.indd 2 2024-04-12 5:56 PM2024-04-12 5:56 PM

Table of Contents
Section 1: Safety
Important Safeguards ............................................ 4-6
Additional Important Safeguards ................................. 6-7
Notes on the Plug ................................................ 7
Notes on the Cord ................................................ 8
Plasticizer Warning ............................................... 8
Electric Power .................................................... 9
Manual Thermal Protector .......................................... 9
Section 2: Instructions
Getting to Know Your Beautiful 5.3 Qt. Stand Mixer ............... 11
Before Using for the First Time .................................. 12
Operation ..................................................... 12-13
Beautiful Mixing Guide ........................................... 14
Beautiful Mixing Tips ............................................ 15
Beater Tips ...................................................... 16
Balloon Whisk Tips ............................................... 16
Dough Hook Tips ................................................. 17
User Maintenance Instructions .................................... 17
Care & Cleaning Instructions ..................................... 17
Storing Instructions ............................................. 18
Troubleshooting ............................................... 18-19
Warranty ...................................................... 20-21
19409_19469_19468_19467_19470_19471_19587_19602_BTFL_WMUS_3.5qt_StandMixer_V8_R4.indd 119409_19469_19468_19467_19470_19471_19587_19602_BTFL_WMUS_3.5qt_StandMixer_V8_R4.indd 1 2024-04-12 5:56 PM2024-04-12 5:56 PM

Índice
Sección 1: Seguridad
Medidas de seguridad importantes ............................. 23-25
Medidas de seguridad importantes adicionales .................. 26-27
Notas sobre el enchufe .......................................... 27
Notas sobre el cable ......................................... 27-28
Advertencia sobre plasticados ................................... 28
Potencia eléctrica ............................................... 28
Protector térmico manual ......................................... 29
Sección 2: Instrucciones
Conozca su batidora de pedestal Beautiful de 5.3 cuartos de galón . 31
Antes del primer uso ............................................ 32
Funcionamiento ................................................... 33
Guía para usar la batidora Beautiful ............................. 35
Consejos para usar la batidora Beautiful ......................... 36
Consejos para usar los batidores ................................. 37
Consejos para usar el batidor de globo .......................... 37
Consejos para usar el gancho de amasar .......................... 38
Instrucciones de mantenimiento para el usuario ................... 38
Instrucciones de limpieza y cuidado .............................. 38
Instrucciones de almacenamiento .................................. 39
Solución de problemas ........................................ 39-40
Garantía ...................................................... 41-42
19409_19469_19468_19467_19470_19471_19587_19602_BTFL_WMUS_3.5qt_StandMixer_V8_R4.indd 219409_19469_19468_19467_19470_19471_19587_19602_BTFL_WMUS_3.5qt_StandMixer_V8_R4.indd 2 2024-04-12 5:56 PM2024-04-12 5:56 PM
Section 1
Safety
1
19409_19469_19468_19467_19470_19471_19587_19602_BTFL_WMUS_3.5qt_StandMixer_V8_R4.indd 319409_19469_19468_19467_19470_19471_19587_19602_BTFL_WMUS_3.5qt_StandMixer_V8_R4.indd 3 2024-04-12 5:56 PM2024-04-12 5:56 PM

4
IMPORTANT SAFEGUARDS
When using electrical appliances, basic safety precautions
should always be followed to reduce the risk of re,
electric shock, and/or injury to persons, including the
following:
1. READ ALL INSTRUCTIONS.
2. This appliance is not intended for use by persons with
reduced physical, sensory, or mental capabilities,
or lack of experience and knowledge, unless they are
closely supervised and instructed concerning use of
the appliance by a person responsible for their safety.
3. This appliance shall not be used by children. Keep the
appliance and its cord out of reach of children.
4. Close supervision is necessary when any appliance is
used near children. Children should be supervised to
ensure that they do not play with the appliance.
5. To protect against risk of electrical shock,
do not put cord, plug, or Stand Mixer body in water
or other liquid.
6. To disconnect, turn the speed control dial counter-
clockwise to the ( 0 ) OFF position; then remove plug
from wall outlet. Always make sure the Stand Mixer
is OFF before putting on or taking off parts, before
cleaning and when not in use. To unplug, grasp the
plug and pull from the outlet. Never pull from the
power cord.
19409_19469_19468_19467_19470_19471_19587_19602_BTFL_WMUS_3.5qt_StandMixer_V8_R4.indd 419409_19469_19468_19467_19470_19471_19587_19602_BTFL_WMUS_3.5qt_StandMixer_V8_R4.indd 4 2024-04-12 5:56 PM2024-04-12 5:56 PM

5
7. Check to be sure the speed control dial is in the ( 0 )
OFF position before plugging cord into wall outlet.
8. Avoid contacting moving parts. Keep hands, hair, and
clothing, as well as spatulas and other utensils, away
from attachments during operation to reduce risk of
injury to persons and/or damage to Stand Mixer. Do not
attempt to defeat any safety interlock mechanisms.
9. Remove all attachments from the Stand Mixer before
cleaning.
10. Do not let cord hang over edge of table or counter
or touch hot surfaces, including the stove.
11. Do not place on or near a hot gas or electric burner,
or in a heated oven.
12. Do not operate any appliance with a damaged cord or
plug or after the appliance malfunctions, or has been
damaged in any manner. Contact Consumer Service.
NOTE: DO NOT ATTEMPT TO REPAIR THE UNIT YOURSELF.
THIS WILL VOID THE WARRANTY.
13. The use of attachments not recommended or sold by the
appliance manufacturer for use with this Stand Mixer
may cause re, electric shock, or injury.
IMPORTANT: Use ONLY the mixing bowl included with this
Stand Mixer. The use of any other non-tting bowl may
cause spills or damage to property or damage to the
appliance.
19409_19469_19468_19467_19470_19471_19587_19602_BTFL_WMUS_3.5qt_StandMixer_V8_R4.indd 519409_19469_19468_19467_19470_19471_19587_19602_BTFL_WMUS_3.5qt_StandMixer_V8_R4.indd 5 2024-04-12 5:56 PM2024-04-12 5:56 PM

6
14. Do not use outdoors.
15. Do not use appliance for other than intended purpose.
WARNING: Do not overll the mixing bowl. Do not ll
more than half full. Maximum bowl capacity is 7 cups.
16. Container must be properly in place before operating
appliance.
17. Remove beaters from mixer before washing.
SAVE THESE
INSTRUCTIONS
FOR HOUSEHOLD USE
ONLY
ADDITIONAL IMPORTANT
SAFEGUARDS
1. All users of this appliance must read and understand
this instruction manual before operating or cleaning
this appliance.
2. The cord to this appliance should be plugged into
a 120V AC electrical outlet only.
19409_19469_19468_19467_19470_19471_19587_19602_BTFL_WMUS_3.5qt_StandMixer_V8_R4.indd 619409_19469_19468_19467_19470_19471_19587_19602_BTFL_WMUS_3.5qt_StandMixer_V8_R4.indd 6 2024-04-12 5:56 PM2024-04-12 5:56 PM

7
3. If this appliance begins to malfunction during use,
immediately turn the speed control dial counter-
clockwise to the ( 0 ) OFF position and unplug the cord.
Do not use or attempt to repair the malfunctioning
appliance.
4. If this appliance falls or accidentally becomes
immersed in water, unplug it immediately. Do not reach
into the water!
5. Do not use this appliance after it has fallen into or
becomes immersed in water.
6. To reduce the risk of injury to persons or property,
never use this Stand Mixer in an unstable position
WARNING: To avoid spills, make sure the stainless steel
bowl is properly locked in place on the base and the
splash shield is centered over the bowl before turning
the speed control dial.
NOTES ON THE PLUG
This appliance has a polarized plug (one blade is wider
than the other). To reduce the risk of electric shock,
this plug will t in a polarized outlet only one way.
If the plug does not t fully into the outlet, reverse
the plug. If it still does not t, contact a qualied
electrician. Do not modify the plug in any way.
19409_19469_19468_19467_19470_19471_19587_19602_BTFL_WMUS_3.5qt_StandMixer_V8_R4.indd 719409_19469_19468_19467_19470_19471_19587_19602_BTFL_WMUS_3.5qt_StandMixer_V8_R4.indd 7 2024-04-12 5:56 PM2024-04-12 5:56 PM

8
NOTES ON THE CORD
a) A short power-supply cord (or detachable power-supply
cord) is to be provided to reduce risks resulting from
becoming entangled in or tripping over a longer cord.
b) Longer detachable power-supply cords or extension cords
are available and may be used if care is exercised in
their use.
c) If a long detachable power-supply cord or extension
cord is used:
1) The marked electrical rating of the detachable
power-supply cord or extension cord should be
at least as great as the electrical rating of the
appliance;
2) If the appliance is of the grounded type, the
extension cord should be a grounding-type 3-wire
cord; and
3) The longer cord should be arranged so that it will
not drape over the countertop or table top where it
can be pulled on by children or tripped over.
PLASTICIZER WARNING
CAUTION: To prevent Plasticizers from migrating from
the nish of the counter upper or table upper or other
furniture, place NON-PLASTIC coasters or place mats between
the appliance and the nish of the counter upper or table
upper. Failure to do so may cause the nish to darken;
permanent blemishes may occur, or stains can appear.
19409_19469_19468_19467_19470_19471_19587_19602_BTFL_WMUS_3.5qt_StandMixer_V8_R4.indd 819409_19469_19468_19467_19470_19471_19587_19602_BTFL_WMUS_3.5qt_StandMixer_V8_R4.indd 8 2024-04-12 5:56 PM2024-04-12 5:56 PM

9
ELECTRIC POWER
If the electrical circuit is overloaded with other
appliances, your appliance may not operate properly.
It should be operated on a separate electrical circuit
from other appliances.
MANUAL THERMAL PROTECTOR
This product is equipped with a Manual Resettable Thermal
protector to protect the motor. If the motor shuts down,
turn the Speed Control Dial to the (0) OFF position,
and then unplug the stand mixer. Let the unit rest for
approximately half an hour . Once the resetting period has
elapsed, plug the power cord back into the outlet and turn
the Speed Control Knob to the desired setting to continue.
19409_19469_19468_19467_19470_19471_19587_19602_BTFL_WMUS_3.5qt_StandMixer_V8_R4.indd 919409_19469_19468_19467_19470_19471_19587_19602_BTFL_WMUS_3.5qt_StandMixer_V8_R4.indd 9 2024-04-12 5:56 PM2024-04-12 5:56 PM

Section 2
Instructions
2
19409_19469_19468_19467_19470_19471_19587_19602_BTFL_WMUS_3.5qt_StandMixer_V8_R4.indd 1019409_19469_19468_19467_19470_19471_19587_19602_BTFL_WMUS_3.5qt_StandMixer_V8_R4.indd 10 2024-04-12 5:56 PM2024-04-12 5:56 PM
11
2
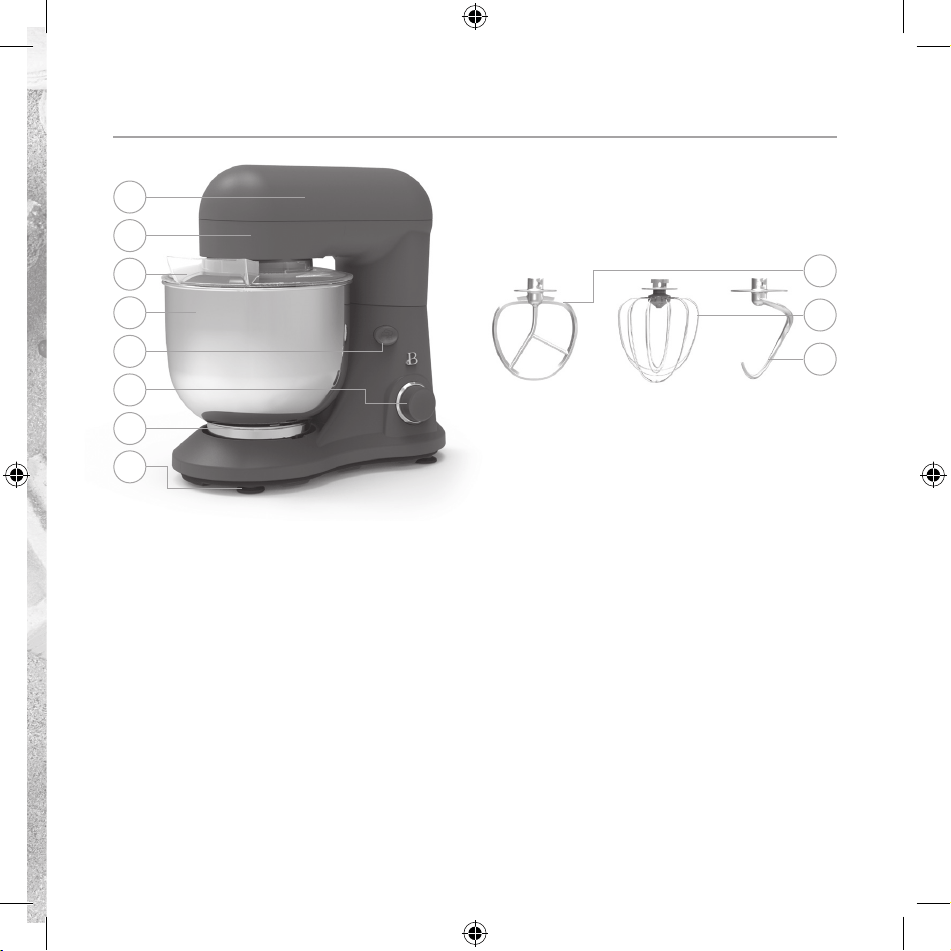
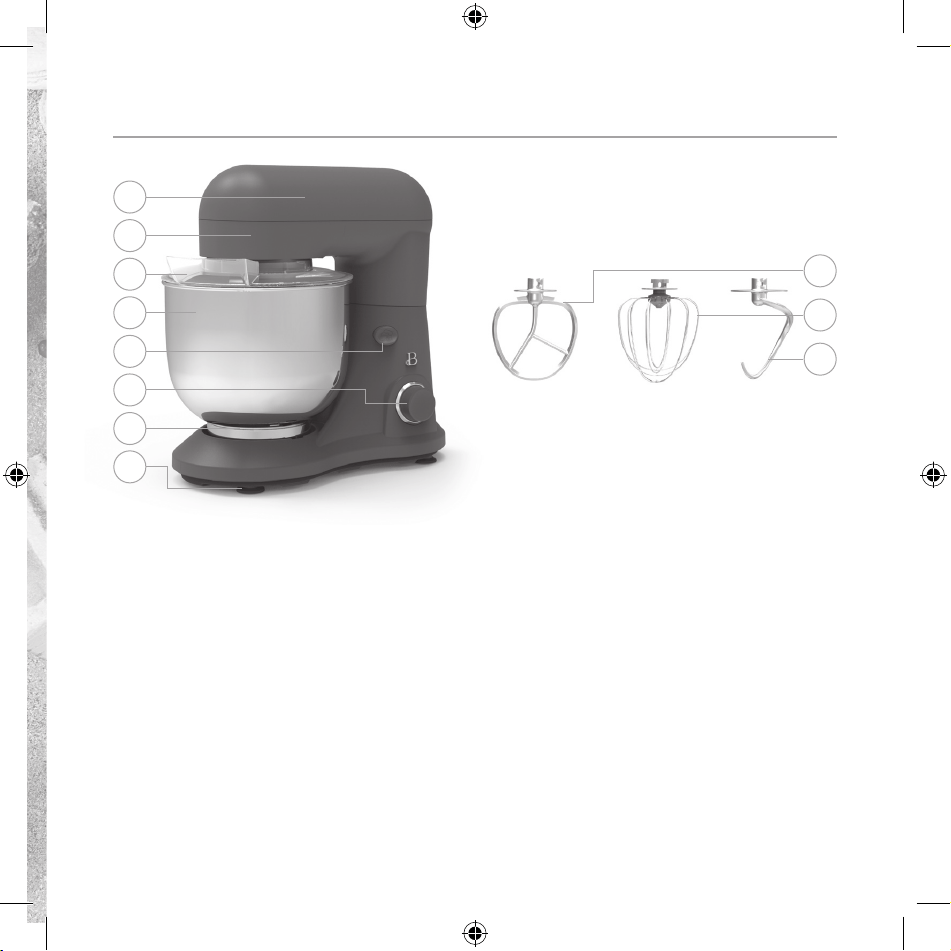
Getting to Know Your Beautiful 3.5 Qt. Stand Mixer
1. Stand Mixer Head
2. Splash Shield with Filler Hole
3. 3.5 Qt. Stainless Steel Mixing Bowl
4. Mixing Bowl Base
5. Motor Base
6. Non-Skid Feet
7. Speed Control Dial with ( 0 ) OFF,
Speeds 1-12
8. Head Tilt Button
9. Polarized Plug (not shown)
Attachments
10. Beater
11. Balloon Whisk
12. Dough Hook
1
5
2
3
8
7
4
6
10
11
12
19409_19469_19468_19467_19470_19471_19587_19602_BTFL_WMUS_3.5qt_StandMixer_V8_R4.indd 1119409_19469_19468_19467_19470_19471_19587_19602_BTFL_WMUS_3.5qt_StandMixer_V8_R4.indd 11 2024-04-12 5:56 PM2024-04-12 5:56 PM

12
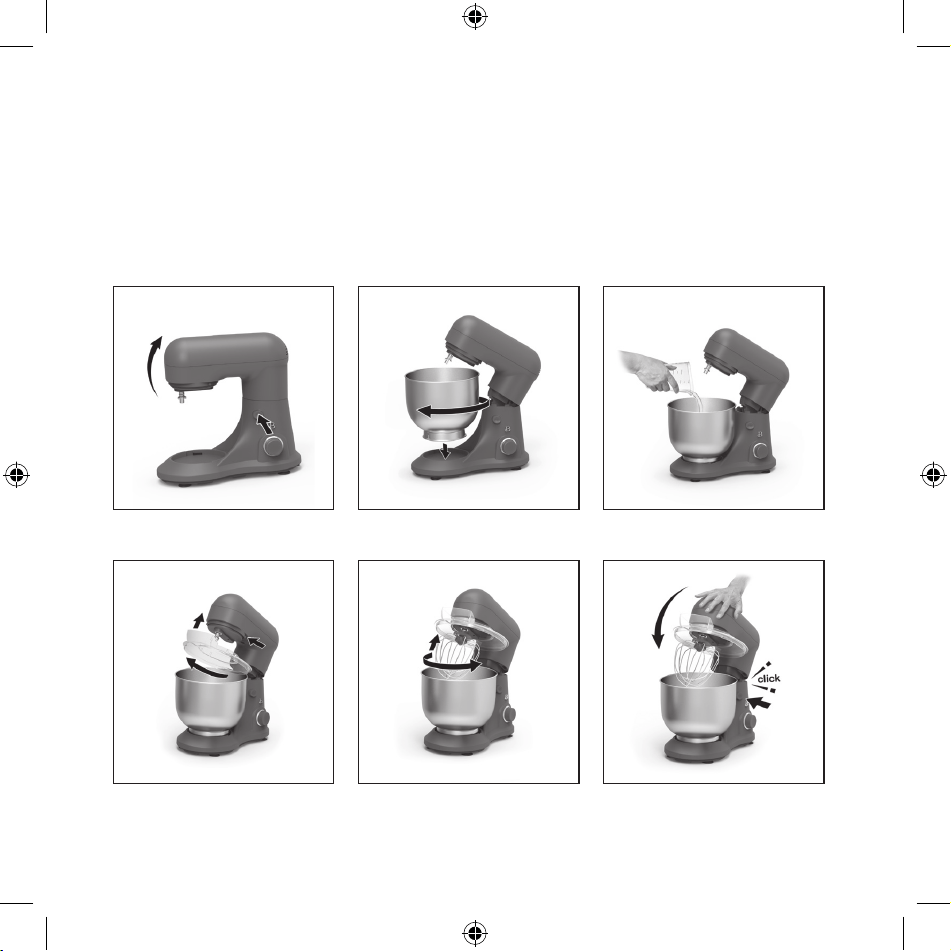
Before Using for the First Time
1. Always unplug Stand Mixer and check to make sure the speed control dial
is in the ( 0 ) OFF position before inserting or removing attachments.
2. Wash mixing bowl and attachments in warm, sudsy water, rinse and dry.
3. Raise the mixer head. Firmly press the head tilt button to release and
lift the Stand Mixer head. (Fig. 1)
4. Lock mixing bowl onto the base. Insert the base of the mixing bowl into
the bowl rest and turn clockwise until it is locked securely in place.
(Fig. 2)
5. Add ingredients to the mixing bowl. (Fig. 3)
6. Attach the splash shield. Grasp the splash shield (use the ller hole
as a handle) and t the opening over the locking pin on the mixer head.
Turn the splash shield clockwise until it locks into place. (Fig. 4)
7. Lock attachment onto the attachment shaft. Push attachment up onto
attachment shaft and turn counter-clockwise until securely locked.
(Fig. 5)
8. Lock mixer head down into working position. Press the head tilt button
while pressing the Stand Mixer head down into the bowl until it locks
securely into working position. (Fig. 6)
9. Your Beautiful Stand Mixer is now ready for use.
CAUTION: Hazard. To avoid injury, do not place ngers in hinge area.
Operation
1. Make sure the speed control dial is in the ( 0 ) OFF position; with the
mixing bowl, selected attachment (see Mixing Guide) and splash shield
locked into position.
2. Plug the cord into a 120V AC electrical outlet.
3. Turn the speed control dial from 0 to 1 to 4 to begin mixing
at low speeds. Gradually turn the speed control dial to higher speeds
as needed.
4. When mixing is complete, turn the speed control dial to ( 0 ) OFF.
5. Unplug the Stand Mixer when not in use and before cleaning.
19409_19469_19468_19467_19470_19471_19587_19602_BTFL_WMUS_3.5qt_StandMixer_V8_R4.indd 1219409_19469_19468_19467_19470_19471_19587_19602_BTFL_WMUS_3.5qt_StandMixer_V8_R4.indd 12 2024-04-12 5:56 PM2024-04-12 5:56 PM
13
6. Firmly press the head tilt button to raise Stand Mixer head .
7. To remove any attachment, push the attachment shaft up into the mixer
head, then turn the attachment clockwise to unlock and release.
Pull the attachment straight down and off the shaft.
8. To remove the splash shield, rmly grasp and turn the shield
counter-clockwise to unlock and remove from the motor head.
Figure 1 Figure 2 Figure 3
Figure 4 Figure 5 Figure 6
19409_19469_19468_19467_19470_19471_19587_19602_BTFL_WMUS_3.5qt_StandMixer_V8_R4.indd 1319409_19469_19468_19467_19470_19471_19587_19602_BTFL_WMUS_3.5qt_StandMixer_V8_R4.indd 13 2024-04-12 5:56 PM2024-04-12 5:56 PM
14
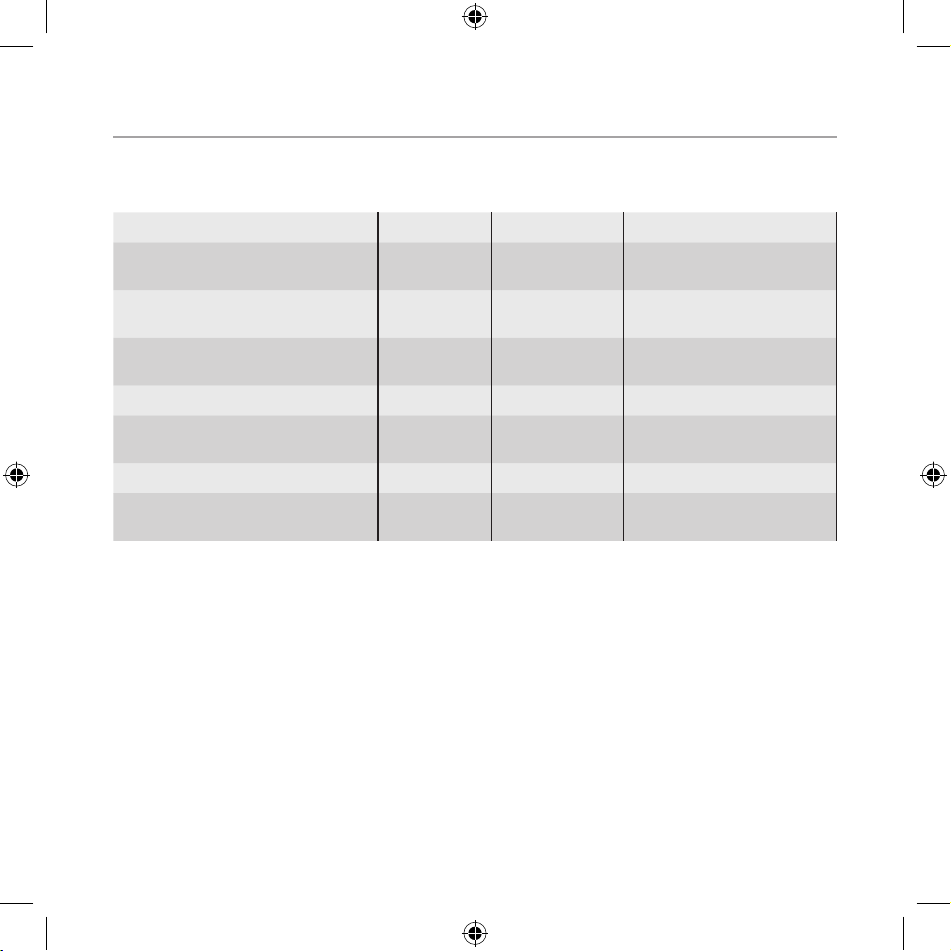
Beautiful Mixing Guide
The following mixing guide is a suggestion for selecting attachments and mixing
speeds. Begin mixing on Speed 1 and increase to desired speed, depending on the
desired consistency.
Attachment Speed Operation Food
Beater 1 - 6 Stir Instant Pudding,
Mousse
1 - 8 Fold Cakes (boxed mixes or
scratch)
1 - 12 Mix Dough (medium weight
dough), Pancake Batter
Balloon Whisk 8 - 12 Cream Frosting
8 - 12 Beat Whipped Cream, Eggs
(whole, yolks, whites)
8 - 12 Whip Egg Whites
Dough Hook 1 - 3 Knead Bread, Short Crust
Pastry, Pasta
19409_19469_19468_19467_19470_19471_19587_19602_BTFL_WMUS_3.5qt_StandMixer_V8_R4.indd 1419409_19469_19468_19467_19470_19471_19587_19602_BTFL_WMUS_3.5qt_StandMixer_V8_R4.indd 14 2024-04-12 5:56 PM2024-04-12 5:56 PM

15
Beautiful Mixing Tips
• When mixing most batters, especially cake and cookie batters, add:
1/3 dry ingredients
1/2 liquid ingredients
1/3 dry ingredients
1/2 liquid ingredients
1/3 dry ingredients
Use slow stirring speeds until ingredients are blended. Gradually
increase speeds until the desired consistency is achieved.
• When using add-in’s (chips, chunks, nuts, raisins) fold in during the
last stages of mixing. Check to be sure the batter is thick enough to
prevent fruits and nuts from sinking to the bottom of the bake pan.
• Dust sticky fruits or fresh fruits in our or confectioner’s sugar
for better distribution in the batter.
• Always begin mixing using the lower speeds until the ingredients are
thoroughly combined.
• Use the ller hole in the splash shield to add liquid or smaller
ingredients while the Stand Mixer is in operation.
• Mixtures containing large amounts of liquid ingredients should be mixed
at lower speeds to avoid splashing. Increase speed only after the
mixture has thickened.
• When mixing thin batters, use medium speeds.
• Stop the Stand Mixer periodically to scrape down the sides of the mixing
bowl with a spatula.
19409_19469_19468_19467_19470_19471_19587_19602_BTFL_WMUS_3.5qt_StandMixer_V8_R4.indd 1519409_19469_19468_19467_19470_19471_19587_19602_BTFL_WMUS_3.5qt_StandMixer_V8_R4.indd 15 2024-04-12 5:56 PM2024-04-12 5:56 PM

16
Beater Tips
Use the Beater for normal to heavy mixtures.
• Cakes & Cookies
• Biscuits
• Creamed Frostings
• Mashed Potatoes
• Pie Pastry
• When preparing thick batters, butter or margarine should be at room
temperature.
• Add ingredients one at a time, thoroughly mixing after each addition.
• Add our one cup at a time.
• If the Stand Mixer seems to struggle, increase the speed setting.
Balloon Whisk Tips
Use the Balloon Whisk to incorporate air.
• Sponge Cakes
• Egg Whites
• Mayonnaise
• Heavy Cream
• Boiled Frostings
• Do not use the whisk for mixing thick mixtures, such as dough, fudge,
or mashed potatoes.
• Your Stand Mixer is designed to whisk a minimum of 3 large eggs, 6 large
egg whites or yolks and a maximum of 10 large eggs, 10 large egg whites
or yolks.
19409_19469_19468_19467_19470_19471_19587_19602_BTFL_WMUS_3.5qt_StandMixer_V8_R4.indd 1619409_19469_19468_19467_19470_19471_19587_19602_BTFL_WMUS_3.5qt_StandMixer_V8_R4.indd 16 2024-04-12 5:56 PM2024-04-12 5:56 PM

17
Dough Hook Tips
Use the Dough Hook to mix & knead yeast doughs.
• Breads & Rolls
• Pizza Dough
• Pastry
• Pasta
• Stop the Stand Mixer periodically to scrape down the sides of the mixing
bowl with a spatula.
• Add our one cup at a time.
• For making dough (bread, pizza), maximum 4 cups our.
User Maintenance Instructions
This appliance requires little maintenance. It contains no user serviceable
parts. Do not try to repair it yourself. Contact a qualied appliance repair
technician if the product requires servicing.
Care & Cleaning Instructions
CAUTION: Never immerse the motor base, plug or cord in water or any
other liquid.
1. Before cleaning, turn the speed control dial to ( 0 ) OFF, then unplug
from outlet
2. The Stand Mixer mixing bowl, splash shield, beater, balloon whisk
and dough hook are top rack dishwasher-safe.
3. Wipe the mixer head, motor base and body of the Stand Mixer with
a damp cloth or sponge and dry thoroughly.
CAUTION: To avoid surface damage, never use rough scouring pads or abrasive
cleansers on any plastic or metal parts.
WARNING: DO NOT IMMERSE THE MOTOR BASE IN WATER.
19409_19469_19468_19467_19470_19471_19587_19602_BTFL_WMUS_3.5qt_StandMixer_V8_R4.indd 1719409_19469_19468_19467_19470_19471_19587_19602_BTFL_WMUS_3.5qt_StandMixer_V8_R4.indd 17 2024-04-12 5:56 PM2024-04-12 5:56 PM

18
Storing Instructions
1. Unplug and clean unit.
2. Store in original box or in a clean, dry place.
3. Never store the Stand Mixer while it is hot or plugged in.
4. Never wrap cord tightly around the appliance. Never place any stress
on cord, especially where the cord enters the motor base, as this could
cause the cord to fray and break.
Troubleshooting
A utensil is accidentally caught in an attachment.
• Quickly turn the speed control dial to ( 0 ) OFF, then unplug
from outlet.
• Clear the obstruction
• Allow the motor to cool for 5 minutes before continuing.
The Stand Mixer motor stalls.
• Quickly turn the speed control dial to ( 0 ) OFF, then unplug
from outlet.
• Reduce the amount of mixture in the bowl
• Allow the motor to cool for 5 minutes before continuing.
Food is not mixed.
• Place liquid ingredients into the mixing bowl before adding dry
ingredients.
• Stop the Stand Mixer periodically to scrape down the sides of the
mixing bowl with a spatula.
• Increase speed.
19409_19469_19468_19467_19470_19471_19587_19602_BTFL_WMUS_3.5qt_StandMixer_V8_R4.indd 1819409_19469_19468_19467_19470_19471_19587_19602_BTFL_WMUS_3.5qt_StandMixer_V8_R4.indd 18 2024-04-12 5:56 PM2024-04-12 5:56 PM

19
Food splatters during mixing.
• Mixtures containing large amounts of liquid ingredients should be mixed
at lower speeds to avoid splashing. Increase speed only after the
mixture has thickened.
• Splash shield is not in place. Make sure splash shield is properly
attached before turning the speed control dial.
Stand Mixer travels on the counter top during mixing.
• Reduce mixing speed.
• Reduce quantity of ingredients in the mixing bowl.
• Make sure countertop is clean to allow the non-skid feet to grip the
countertop and reduce or eliminate any Stand Mixer movement.
The Stand Mixer stop working during mixing.
• Turn the Speed Control Dial to the (0) OFF position, and then unplug the
stand mixer
• Let the unit rest for approximately half an hour
• plug the power cord back into the outlet and turn the Speed Control Knob
to the desired setting to continue
19409_19469_19468_19467_19470_19471_19587_19602_BTFL_WMUS_3.5qt_StandMixer_V8_R4.indd 1919409_19469_19468_19467_19470_19471_19587_19602_BTFL_WMUS_3.5qt_StandMixer_V8_R4.indd 19 2024-04-12 5:56 PM2024-04-12 5:56 PM

20
Limited Two-Year Warranty
Sensio Inc. dba Made by Gather™
hereby warrants that for a period
of TWO YEARS from the date of
purchase, this product will be free
from mechanical defects in material
and workmanship, and for 90 days in
respect to non-mechanical parts. At
its sole discretion, Sensio Inc. dba
Made by Gather™ will either repair
or replace the product found to be
defective, or issue a refund on the
product during the warranty period.
The warranty is only valid for
the original retail purchaser from
the date of initial retail purchase
and is not transferable.
Keep the original sales receipt,
as proof of purchase isrequired
to obtain warranty validation.
Retail stores selling this product
do not have the right to alter,
modify, or in any way revise the
terms and conditions of the warranty.
Exclusions:
The warranty does not cover normal
wear of parts or damage resulting
from any of thefollowing: negligent
use of the product, use of improper
voltage or current, improper routine
maintenance, use contrary to the
operating instructions, disassembly,
repair, or alteration by anyone
other than qualied Sensio Inc.
dba Made by Gather™ personnel.
Also, the warranty does not cover
Acts of God such as re, oods,
hurricanes, or tornadoes.
Sensio Inc. dba Made by Gather™ shall
not be liable for any incidental or
consequential damages caused by the
breach of any express or implied
warranty. Apart from the extent
prohibited by applicable law, any
implied warranty of merchantability
or tness for a particular purpose
is limited in time to the duration
of the warranty. Some states,
provinces or jurisdictions do not
allow the exclusion or limitation
of incidental or consequential
damages, or limitations on how
long an implied warranty lasts,
and therefore, the above exclusions
or limitations may not apply to you.
The warranty covers specic legal
rights which may vary by state,
province and/or jurisdiction.
19409_19469_19468_19467_19470_19471_19587_19602_BTFL_WMUS_3.5qt_StandMixer_V8_R4.indd 2019409_19469_19468_19467_19470_19471_19587_19602_BTFL_WMUS_3.5qt_StandMixer_V8_R4.indd 20 2024-04-12 5:56 PM2024-04-12 5:56 PM

21
How To Obtain Warranty Service:
You must contact Customer Service at
our toll-free number: 1-877-775-3564.
A Customer Service Representative
will attempt to resolve warranty
issues over thephone. If the
Customer Service Representative is
unable to resolve the problem, you
will be provided with a case number
and asked to return the product to
Made by Gather Attach a tag to the
product that includes: your name,
address, daytime contact telephone
number, case number, and description
of the problem.
Also, include a copy of the original
sales receipt. Carefully package
the tagged product with the sales
receipt, and send it (with shipping
and insurance prepaid) to SENSIO
Inc.’s address. Made by Gather shall
bear no responsibility or liability
for the returned product while in
transit to SENSIO Inc.’s Customer
Service Center.
®
19409_19469_19468_19467_19470_19471_19587_19602_BTFL_WMUS_3.5qt_StandMixer_V8_R4.indd 2119409_19469_19468_19467_19470_19471_19587_19602_BTFL_WMUS_3.5qt_StandMixer_V8_R4.indd 21 2024-04-12 5:56 PM2024-04-12 5:56 PM
Sección 1
Seguridad
1
19409_19469_19468_19467_19470_19471_19587_19602_BTFL_WMUS_3.5qt_StandMixer_V8_R4.indd 2219409_19469_19468_19467_19470_19471_19587_19602_BTFL_WMUS_3.5qt_StandMixer_V8_R4.indd 22 2024-04-12 5:56 PM2024-04-12 5:56 PM

23
1
MEDIDAS DE SEGURIDAD
IMPORTANTES
Al usar aparatos eléctricos, siempre se deben seguir las
precauciones básicas de seguridad para reducir el riesgo
de incendio, descarga eléctrica y/o lesiones personales,
incluidas las siguientes:
1. LEER TODAS LAS INSTRUCCIONES.
2. Este aparato no está diseñado para que lo utilicen
personas con capacidades físicas, sensoriales
o mentales reducidas, o falta de experiencia y
conocimiento, a menos que las personas responsables de
su seguridad las supervisen de cerca o hayan instruido
al respecto sobre el uso de este aparato.
3. Este aparato no debe ser utilizado por niños. Mantenga
el aparato y el cable fuera del alcance de los niños.
4. Es necesaria una estrecha supervisión cuando cualquier
aparato es utilizado por niños o cerca de ellos. Los
niños deben ser supervisados para asegurarse de que no
jueguen con el aparato.
5. Para protegerse de descargas eléctricas, no sumerja
el cable, los enchufes o el cuerpo de la batidora de
pedestal en agua u otro líquido.
6. Para desconectar, gire el dial de control de velocidad
en sentido antihorario a la posición (0) APAGADO;
19409_19469_19468_19467_19470_19471_19587_19602_BTFL_WMUS_3.5qt_StandMixer_V8_R4.indd 2319409_19469_19468_19467_19470_19471_19587_19602_BTFL_WMUS_3.5qt_StandMixer_V8_R4.indd 23 2024-04-12 5:56 PM2024-04-12 5:56 PM

24
luego quite el enchufe del tomacorriente de pared.
Siempre asegúrese de que la batidora de pedestal esté
apagada antes de ponerle o quitarle piezas, antes de
limpiarla y cuando no esté en uso. Para desenchufarla,
agarre el enchufe y tire del tomacorriente. Nunca tire
del cable de alimentación.
7. Verique que el dial de control de velocidad esté en
la posición (0) APAGADO antes de enchufar el cable al
tomacorriente de la pared.
8. Evite el contacto con piezas en movimiento. Mantenga
las manos, cabellos, ropa, así como las espátulas y
otros utensilios alejados de los accesorios durante
el funcionamiento para reducir el riesgo de lesiones
personales o daños a la batidora de pedestal. No
intente eliminar ningún mecanismo de bloqueo de
seguridad.
9. Retire todos los accesorios de la batidora de pedestal
antes de limpiarla.
10. No deje que el cable cuelgue sobre el borde de una mesa o
mostrador, ni que toque supercies calientes como la estufa.
11. No colocar el electrodoméstico sobre un quemador a gas
o eléctrico caliente, o cerca de este, ni dentro de un
horno caliente.
12. No utilice ningún aparato que tenga un cable o enchufe
dañados, o después de que el aparato funcione de manera
incorrecta o se haya dañado de alguna manera. Para
ponerse en contacto con el Servicio al Cliente.
19409_19469_19468_19467_19470_19471_19587_19602_BTFL_WMUS_3.5qt_StandMixer_V8_R4.indd 2419409_19469_19468_19467_19470_19471_19587_19602_BTFL_WMUS_3.5qt_StandMixer_V8_R4.indd 24 2024-04-12 5:56 PM2024-04-12 5:56 PM

25
NOTA: NO INTENTAR REPARAR LA UNIDAD POR CUENTA PROPIA.
ESTO ANULARÁ LA GARANTÍA.
13. El uso de accesorios no recomendados o vendidos por el
fabricante de esta batidora de pedestal puede causar
incendios, descargas eléctricas o lesiones.
IMPORTANTE: Use SOLAMENTE el recipiente para mezclar
incluido con esta batidora de pedestal. El uso de
cualquier otro recipiente que no encaje puede causar
derrames o daños a la propiedad o al aparato.
14. No utilizar el electrodoméstico en exteriores.
15. No use el aparato con otros nes para los que no está diseñado.
ADVERTENCIA: : No llene en exceso el recipiente para
mezclar. No lo llene por encima de la mitad.
La capacidad máxima del recipiente es de 7 tazas.
16. El contenedor debe estar correctamente colocado antes
de poner en funcionamiento el aparato.
17. Retire los batidores de la batidora antes de lavarlos.
GUARDAR ESTAS
INSTRUCCIONES
SOLO PARA USO
DOMÉSTICO
19409_19469_19468_19467_19470_19471_19587_19602_BTFL_WMUS_3.5qt_StandMixer_V8_R4.indd 2519409_19469_19468_19467_19470_19471_19587_19602_BTFL_WMUS_3.5qt_StandMixer_V8_R4.indd 25 2024-04-12 5:56 PM2024-04-12 5:56 PM

26
MEDIDAS DE SEGURIDAD
IMPORTANTES
ADICIONALES
1. Todos los usuarios de esta aparato deben leer y
comprender este Manual de instrucciones antes de poner
en funcionamiento o limpiar la unidad.
2. El cable de esta aparato debe enchufarse únicamente en
un tomacorriente eléctrico de 120 V CA.
3. Si este aparato comienza a fallar durante el uso,
gire inmediatamente el dial de control de velocidad
en sentido antihorario a la posición (0) APAGADO y
desenchufe el cable. No use ni intente reparar el
aparato si no funciona correctamente.
4. Si este aparato cae al agua o por accidente se sumerge
en agua, desenchúfelo inmediatamente. ¡No meta la mano
en el agua!
5. No utilice este aparato después de que se haya caído o
sumergido en agua.
6. Para reducir el riesgo de lesiones personales o a la
propiedad, nunca use esta batidora de pedestal en una
posición inestable.
ADVERTENCIA: Para evitar derrames, asegúrese de que
el recipiente de acero inoxidable esté correctamente
19409_19469_19468_19467_19470_19471_19587_19602_BTFL_WMUS_3.5qt_StandMixer_V8_R4.indd 2619409_19469_19468_19467_19470_19471_19587_19602_BTFL_WMUS_3.5qt_StandMixer_V8_R4.indd 26 2024-04-12 5:56 PM2024-04-12 5:56 PM

27
bloqueado en su lugar en la base y que el protector
contra salpicaduras esté centrado sobre el mismo antes
de encender el dial de control de velocidad.
NOTAS SOBRE EL ENCHUFE
Este electrodoméstico tiene un enchufe polarizado (una
pata es más ancha que la otra). Para reducir el riesgo
de descargas eléctricas, este enchufe encaja de una sola
manera en un tomacorriente polarizado. Si el enchufe no
encaja bien en el tomacorriente, darlo vuelta. Si aun así
no encaja, comunicarse con un electricista calicado.
No realizar ningún tipo de modicación al enchufe.
NOTAS SOBRE EL CABLE
a) Se debe utilizar un cable de alimentación corto
(o un cable de alimentación desconectable) para reducir
el riesgo de enredarse o tropezar con uno más largo.
b) Existen cables de alimentación desconectables más
largos o prolongadores y pueden usarse si se hace con
precaución.
c) Si se utiliza un cable de alimentación desconectable
más largo o un prolongador, tenga en cuenta lo
siguiente:
1) La capacidad eléctrica nominal del cable de
alimentación desconectable o prolongador debe
ser al menos igual a la capacidad eléctrica del
electrodoméstico.
19409_19469_19468_19467_19470_19471_19587_19602_BTFL_WMUS_3.5qt_StandMixer_V8_R4.indd 2719409_19469_19468_19467_19470_19471_19587_19602_BTFL_WMUS_3.5qt_StandMixer_V8_R4.indd 27 2024-04-12 5:56 PM2024-04-12 5:56 PM

28
2) Si el electrodoméstico cuenta con conexión a tierra,
el prolongador debe ser del tipo con conexión a
tierra de 3 alambres.
3) El cable más largo debe estar dispuesto de manera
que no cuelgue de la encimera o de la mesa, ya que
puede ser jalado por niños, o cualquier persona
podría tropezarse.
ADVERTENCIA SOBRE PLASTIFICADOS
ATENCIÓN: A n de evitar que los plasticados se adhieran
al acabado de la encimera, la mesa u otro mueble, colocar
un posafuentes o salvamanteles que NO SEAN DE PLÁSTICO
entre el electrodoméstico y el acabado de la supercie
de la encimera o mesa. Si no se hace esto, es posible que
el acabado se oscurezca, se formen marcas permanentes o
aparezcan manchas.
POTENCIA ELÉCTRICA
Si el circuito eléctrico está sobrecargado por el uso
de otros electrodomésticos, es posible que no funcione
correctamente.
Esta unidad debe funcionar en un circuito eléctrico
separado de otros electrodomésticos.
19409_19469_19468_19467_19470_19471_19587_19602_BTFL_WMUS_3.5qt_StandMixer_V8_R4.indd 2819409_19469_19468_19467_19470_19471_19587_19602_BTFL_WMUS_3.5qt_StandMixer_V8_R4.indd 28 2024-04-12 5:56 PM2024-04-12 5:56 PM

29
PROTECTOR TÉRMICO MANUAL
Este producto está equipado con un protector térmico manual
reajustable para proteger el motor. Si el motor se apaga,
girar la perilla del control de velocidad a la posición (0)
OFF (Apagado) y desenchufar la batidora de pie. Dejar que
la unidad descanse durante media hora aproximadamente. Una
vez transcurrido el periodo de reajuste, volver a enchufar
el cable de alimentación en un tomacorriente y girar la
perilla del control de velocidad hasta el ajuste deseado
para continuar.
19409_19469_19468_19467_19470_19471_19587_19602_BTFL_WMUS_3.5qt_StandMixer_V8_R4.indd 2919409_19469_19468_19467_19470_19471_19587_19602_BTFL_WMUS_3.5qt_StandMixer_V8_R4.indd 29 2024-04-12 5:56 PM2024-04-12 5:56 PM
Sección 2
Instrucciones
2
19409_19469_19468_19467_19470_19471_19587_19602_BTFL_WMUS_3.5qt_StandMixer_V8_R4.indd 3019409_19469_19468_19467_19470_19471_19587_19602_BTFL_WMUS_3.5qt_StandMixer_V8_R4.indd 30 2024-04-12 5:56 PM2024-04-12 5:56 PM
31
2
Conozca su batidora de pedestal Beautiful de 3.5 cuartos de galón
1
5
2
3
8
7
4
6
1. Cabezal de la batidora de pedestal
2. Cubierta contra salpicaduras con
oricio de llenado
3. Recipiente para mezclar de acero
inoxidable con capacidad de
3.5 cuartos de galón
4. Base del recipiente
5. Base del motor
6. Patas antideslizantes
7. Dial de control de velocidad con
(0) APAGADO y velocidades de la
1 a la 12
8. Botón de inclinación del cabezal
9. Enchufe polarizado ( no se muestra)
Attachments
10. Batidor
11. Batidor de globo
12. Gancho de amasar
10
11
12
19409_19469_19468_19467_19470_19471_19587_19602_BTFL_WMUS_3.5qt_StandMixer_V8_R4.indd 3119409_19469_19468_19467_19470_19471_19587_19602_BTFL_WMUS_3.5qt_StandMixer_V8_R4.indd 31 2024-04-12 5:56 PM2024-04-12 5:56 PM

32
Antes del primer uso
1. Siempre desenchufe la batidora de pedestal y verique que el selector
de control de velocidad esté en la posición (0) APAGADO antes de
insertar o quitar los accesorios.
2. Lave el recipiente y los accesorios en agua tibia jabonosa, enjuague
y seque.
3. Levantar el cabezal de la batidora. Presione rmemente el botón de
inclinación del cabezal para soltar y levantar el cabezal de la batidora
de pedestal. (Figura 1)
4. Bloquear el recipiente de la batidora en la base. Inserte la base del
recipiente para mezclar en el soporte del mismo y gírelo en el sentido
de las agujas del reloj hasta que quede jo en su lugar. (Figura 2)
5. Agregar los ingredientes al recipiente para mezclar. (Figura 3)
6. Colocar el protector contra salpicaduras. Sujete el protector contra
salpicaduras (use el oricio de llenado como agarradera) y encaje la
abertura sobre el pasador de bloqueo en el cabezal de la batidora.
Gire el protector contra salpicaduras en el sentido de las agujas del
reloj hasta que se bloquee en su lugar. (Figura 4)
7. Bloquear el accesorio en el eje del accesorio. Empuje el accesorio hacia
arriba en el eje del mismo y gírelo en sentido contrario a las agujas
del reloj hasta que quede bloqueado de forma segura. (Figura 5)
8. Bloquear el cabezal de la batidora hacia abajo en la posición de
funcionamiento. Presione el botón de inclinación del cabezal al bajar el
cabezal de la batidora de pedestal hacia el recipiente hasta que
se trabe de manera segura en la posición de funcionamiento. (Figura 6)
9. Su batidora de pedestal Beautiful está lista para usar.
PRECAUCIÓN: Peligro. Para evitar lesiones, no coloque los dedos
en el área de la articulación.
19409_19469_19468_19467_19470_19471_19587_19602_BTFL_WMUS_3.5qt_StandMixer_V8_R4.indd 3219409_19469_19468_19467_19470_19471_19587_19602_BTFL_WMUS_3.5qt_StandMixer_V8_R4.indd 32 2024-04-12 5:56 PM2024-04-12 5:56 PM

33
Funcionamiento
1. Asegúrese de que el dial de control de velocidad esté en la posición
(0) APAGADO; con el recipiente, el accesorio seleccionado (consulte la
Guía para mezclar) y el protector contra salpicaduras bloqueados en su
posición.
2. Enchufe el cable en un tomacorriente de 120 V CA.
3. Gire el dial de control de velocidad de 0 a 1 a 4 para comenzar
a mezclar a bajas velocidades. Gire gradualmente el dial de control
de velocidad a velocidades más altas según sea necesario.
4. Cuando se complete la mezcla, gire el dial de control de velocidad
a (0) APAGADO.
5. Desenchufe la batidora de pedestal del tomacorriente cuando no la
utilice y antes de limpiarla.
6. Presione rmemente el botón de inclinación del cabezal para levantar
el cabezal de la batidora de pedestal.
7. Para quitar cualquier accesorio, empuje el eje del accesorio hacia
arriba en el cabezal de la batidora, luego gire el accesorio en el
sentido de las agujas del reloj para desbloquearlo y soltarlo.
Tire del accesorio hacia abajo y sáquelo del eje.
8. Para quitar el protector contra salpicaduras, agárrelo rmemente y gírelo
en sentido antihorario para desbloquearlo y quitarlo del cabezal del
motor.
19409_19469_19468_19467_19470_19471_19587_19602_BTFL_WMUS_3.5qt_StandMixer_V8_R4.indd 3319409_19469_19468_19467_19470_19471_19587_19602_BTFL_WMUS_3.5qt_StandMixer_V8_R4.indd 33 2024-04-12 5:56 PM2024-04-12 5:56 PM

34
Figura 1 Figura 2 Figura 3
Figura 4 Figura 5 Figura 6
19409_19469_19468_19467_19470_19471_19587_19602_BTFL_WMUS_3.5qt_StandMixer_V8_R4.indd 3419409_19469_19468_19467_19470_19471_19587_19602_BTFL_WMUS_3.5qt_StandMixer_V8_R4.indd 34 2024-04-12 5:56 PM2024-04-12 5:56 PM

35
Guía para usar la batidora Beautiful
La siguiente guía de uso de la batidora es una sugerencia para seleccionar los
accesorios y velocidades para mezclar. Comience a mezclar en la velocidad 1 y
aumente a la velocidad deseada, dependiendo de la consistencia deseada.
Attachment Speed Operation Food
Batidor 1 - 6 Batir Pudín instantáneo,
crema batida
1 - 8 Doblar Tortas (mezclas en
cajas o preparadas
desde el principio)
1 - 12 Amasar Masa (masa mediana),
masa de panqueques
Batidor de globo 8 - 12 Crema Glasear
8 - 12 Batir Nata montada, huevos
(enteros, yemas,
claras)
8 - 12 Batir rápido Claras de huevos
Gancho de amasar 1 - 3 Amasar Pan, masa de
pastelería, pasta
19409_19469_19468_19467_19470_19471_19587_19602_BTFL_WMUS_3.5qt_StandMixer_V8_R4.indd 3519409_19469_19468_19467_19470_19471_19587_19602_BTFL_WMUS_3.5qt_StandMixer_V8_R4.indd 35 2024-04-12 5:56 PM2024-04-12 5:56 PM

36
Consejos para usar la batidora Beautiful
• Por lo general al mezclar la mayoría de las masas, especialmente las
masas para tortas y galletas, agregue:
1/3 de ingredientes secos
1/2 de ingredientes líquidos
1/3 de ingredientes secos
1/2 de ingredientes líquidos
1/3 de ingredientes secos
Use la velocidad más baja hasta que se mezclen los ingredientes.
Aumente gradualmente las velocidades hasta lograr la consistencia
deseada.
• Cuando use complementos (chips o trozos de chocolate, nueces, pasas)
aplique la técnica de doblar durante las últimas etapas del mezclado.
Compruebe que la masa sea lo sucientemente espesa para evitar que las
frutas y nueces se hundan en el fondo del molde para hornear.
• Espolvoree las frutas maduras o frescas en harina o azúcar de repostería
para que se distribuyan mejor en la masa.
• Siempre comience a mezclar usando las velocidades más bajas hasta que
los ingredientes estén bien combinados.
• Use el oricio de llenado del protector contra salpicaduras para agregar
líquidos o ingredientes más pequeños mientras la batidora de pedestal
está en funcionamiento.
• Las mezclas que contienen grandes cantidades de ingredientes líquidos
deben batirse a velocidades más bajas para evitar salpicaduras.
Aumente la velocidad solo después de que la mezcla se haya espesado.
• Cuando mezcle masas ligeras, use velocidades medias.
• Detenga la batidora de pedestal periódicamente para raspar los lados
del recipiente con una espátula.
19409_19469_19468_19467_19470_19471_19587_19602_BTFL_WMUS_3.5qt_StandMixer_V8_R4.indd 3619409_19469_19468_19467_19470_19471_19587_19602_BTFL_WMUS_3.5qt_StandMixer_V8_R4.indd 36 2024-04-12 5:56 PM2024-04-12 5:56 PM

37
Consejos para usar los batidores
Utilice el batidor para mezclas que van de normal a espesas.
• Tortas y galletas
• Bizcochos
• Glaseados cremosos
• Puré de patatas
• Masa de pastel
• Al preparar masas espesas, la mantequilla o la margarina debe estar
a temperatura ambiente.
• Agregue los ingredientes uno a la vez, mezclando bien después
de cada adición.
• Agregue la harina una taza a la vez.
• Si la batidora de pedestal parece que bate con esfuerzo, aumente
la velocidad.
• Para hacer masa (pan, pizza), usar como máximo 4 tazas de harina.
Consejos para usar el batidor de globo
Use el batidor de globos para incorporar aire.
• Bizcocho esponjoso
• Claras de huevos
• Mayonesa
• Crema espesa
• Glaseado acaramelado
• No use el batidor para mezclas espesas, como las masas, dulce de azúcar
o puré de patatas.
• Su batidora de pedestal está diseñada para batir un mínimo de 3 huevos
grandes, 6 claras o yemas de huevo grandes y un máximo de 10 huevos
grandes, 10 claras o yemas de huevo grandes.
19409_19469_19468_19467_19470_19471_19587_19602_BTFL_WMUS_3.5qt_StandMixer_V8_R4.indd 3719409_19469_19468_19467_19470_19471_19587_19602_BTFL_WMUS_3.5qt_StandMixer_V8_R4.indd 37 2024-04-12 5:56 PM2024-04-12 5:56 PM

38
Consejos para usar el gancho de amasar
Use el gancho de amasar para mezclar y amasar la masa de levadura.
• Panes y rosquillas
• Masa de pizza
• Pastelería
• Masa
• Detenga la batidora de pedestal periódicamente para raspar los lados del
recipiente con una espátula.
• Agregue la harina una taza a la vez.
Instrucciones de mantenimiento para el usuario
Este aparato requiere poco mantenimiento. No contiene piezas que el usuario
pueda reparar. No intente repararla por cuenta propia. Comuníquese con un
técnico calicado en reparación de electrodomésticos si el producto requiere
reparación.
Instrucciones de limpieza y cuidado
PRECAUCIÓN: Nunca sumerja la base del motor, el enchufe o el cable en agua
o cualquier otro líquido.
1. Antes de limpiar, gire el dial de control de velocidad a (0) APAGADO,
luego desenchufe del tomacorriente
2. El recipiente para mezclar de la batidora de pedestal, el protector
contra salpicaduras, el batidor, el batidor de globo y el gancho de
amasar son aptos para el lavavajillas en la rejilla superior.
3. Limpie el cabezal de la batidora, la base del motor y el cuerpo de la
batidora de pedestal con un paño húmedo o una esponja y seque bien.
PRECAUCIÓN: Para evitar daños en la supercie, nunca use estropajos ásperos
o limpiadores abrasivos en ninguna pieza de plástico o metal.
ADVERTENCIA: NO SUMERJA LA BASE DEL MOTOR EN AGUA.
19409_19469_19468_19467_19470_19471_19587_19602_BTFL_WMUS_3.5qt_StandMixer_V8_R4.indd 3819409_19469_19468_19467_19470_19471_19587_19602_BTFL_WMUS_3.5qt_StandMixer_V8_R4.indd 38 2024-04-12 5:56 PM2024-04-12 5:56 PM

39
Instrucciones de almacenamiento
1. Desenchufe y limpie la unidad.
2. Guarde en su caja original o en un lugar limpio y seco.
3. Nunca guarde la batidora de pedestal si está caliente o conectada
al tomacorriente.
4. Nunca enrolle el cable de forma que quede apretado alrededor del
aparato. Nunca aplique ninguna fuerza sobre el cable, especialmente
donde ingresa a la base del motor, pues esto podría hacer que se
deshilache y rompa.
Solución de problemas
Un utensilio queda atrapado accidentalmente en un accesorio.
• Gire rápidamente el dial de control de velocidad a (0) APAGADO,
luego desconectar la batidora del tomacorriente.
• Desbloquear la obstrucción
• Deje que el motor se enfríe durante 5 minutos antes de continuar.
El motor de la batidora de pedestal se atasca.
• Gire rápidamente el dial de control de velocidad a (0) APAGADO,
luego desconectar la batidora del tomacorriente.
• Reduzca la cantidad de ingredientes en el recipiente.
• Deje que el motor se enfríe durante 5 minutos antes de continuar.
Los ingredientes no se mezclan.
• Coloque los ingredientes líquidos en el recipiente para mezclar antes
de agregar los ingredientes secos.
• Detenga la batidora de pedestal periódicamente para raspar los lados del
recipiente con una espátula.
• Aumente la velocidad.
19409_19469_19468_19467_19470_19471_19587_19602_BTFL_WMUS_3.5qt_StandMixer_V8_R4.indd 3919409_19469_19468_19467_19470_19471_19587_19602_BTFL_WMUS_3.5qt_StandMixer_V8_R4.indd 39 2024-04-12 5:56 PM2024-04-12 5:56 PM

40
Los ingredientes se salpican al mezclarse.
• Las mezclas que contienen grandes cantidades de ingredientes
líquidos deben batirse a velocidades más bajas para evitar salpicaduras.
Aumente la velocidad solo después de que la mezcla se haya espesado.
• El protector contra salpicaduras no está en su lugar. Asegúrese de que
el protector contra salpicaduras esté colocado correctamente antes de
girar el dial de control de velocidad.
La batidora de pedestal se desplaza sobre la encimera durante el funcionamiento.
• Reduzca la velocidad de mezclar.
• Reduzca la cantidad de ingredientes en el recipiente para mezclar.
• Asegúrese de que la encimera esté limpia para permitir que las patas
antideslizantes se sujeten a la encimera y reduzcan o eliminen el
desplazamiento de la batidora.
La batidora de pie deja de funcionar durante la mezcla.
• Girar la perilla del control de velocidad a la posición (0) OFF
(Apagado) y desenchufar la batidora de pie.
• Dejar que la unidad descanse durante media hora aproximadamente.
• Enchufar nuevamente el cable de alimentación en un tomacorriente
y girar la perilla del control de velocidad hasta el ajuste deseado
para continuar.
19409_19469_19468_19467_19470_19471_19587_19602_BTFL_WMUS_3.5qt_StandMixer_V8_R4.indd 4019409_19469_19468_19467_19470_19471_19587_19602_BTFL_WMUS_3.5qt_StandMixer_V8_R4.indd 40 2024-04-12 5:56 PM2024-04-12 5:56 PM

41
Garantía limitada de dos años
Mediante la presente, Sensio Inc.
dba Made by Gather™. garantiza que,
durante el plazo de DOS AÑOS a partir
de la fecha de compra, este producto
no presentará defectos mecánicos en
el material ni en la mano de obra, y
durante 90 días, no los presentará en
las piezas no mecánicas. A su entera
discreción, Sensio Inc. dba Made by
Gather™ que resulte defectuoso, o
emitirá un reembolso por el producto
durante el plazo de garantía.
Esta garantía es válida únicamente
para el comprador minorista
original a partir de la fecha de
compra minorista inicial y no es
transferible. Conserve el recibo
de compra original, ya que se exige
una prueba de compra para obtener
la validación de la garantía. Las
tiendas minoristas no tienen derecho
a alterar, modicar ni corregir
de ninguna manera los términos y
condiciones de la garantía.
Exclusiones:
La garantía no cubre el desgaste
normal de las piezas ni el daño
ocasionado por cualquiera de las
siguientes causas: uso negligente
del producto, uso de un voltaje o
corriente incorrectos, mantenimiento
de rutina inadecuado, uso
contrario al de las instrucciones
de funcionamiento, desarmado,
reparación o alteración a cargo
de personas que no sean miembros
del personal calicado de Sensio
Inc. dba Made by Gather™ Asimismo,
la garantía no cubre actos de
la naturaleza, como incendios,
inundaciones, huracanes o tornados.
Sensio Inc. dba Made by Gather™
no asumirá responsabilidad por
daños incidentales o resultantes
ocasionados por la violación
de cualquier garantía expresa
o implícita. Salvo en la medida
en que lo prohíban las leyes
aplicables, cualquier garantía
implícita de comerciabilidad o
aptitud para un propósito particular
se limita temporalmente a la
duración de la garantía. Algunos
estados, provincias o jurisdicciones
no permiten la exclusión ni la
limitación de daños incidentales
o resultantes, o limitaciones
sobre la duración de una garantía
implícita y, por lo tanto, es posible
que las exclusiones o limitaciones
mencionadas no le correspondan.
La garantía cubre derechos legales
especícos que pueden variar de
un estado, una provincia o una
jurisdicción a otros.
19409_19469_19468_19467_19470_19471_19587_19602_BTFL_WMUS_3.5qt_StandMixer_V8_R4.indd 4119409_19469_19468_19467_19470_19471_19587_19602_BTFL_WMUS_3.5qt_StandMixer_V8_R4.indd 41 2024-04-12 5:56 PM2024-04-12 5:56 PM

INSIDE back cover
42
Cómo obtener el servicio de garantía
Debe comunicarse con el Servicio
de atención al cliente a nuestro
número telefónico gratuito:
1-877-775-3564. Un representante
del Servicio de atención al cliente
intentará resolver los problemas
referidos a la garantía por
teléfono. Si este no puede resolver
el problema, le proporcionarán un
número de caso y le solicitarán que
devuelva el producto a Sensio Inc.
dba Made by Gather™ Adhiera una
etiqueta al producto que incluya:
su nombre, dirección, número
telefónico de contacto durante el
día, número de caso y descripción
del problema. Además, incluya una
copia del recibo de compra original.
Envuelva cuidadosamente el producto
etiquetado con el recibo de compra,
y envíelo (con el envío y el seguro
prepagados) a la dirección de Sensio
Inc. dba Made by Gather™. Sensio
Inc. dba Made by Gather™ no asumirá
obligación ni responsabilidad alguna
por el producto devuelto que esté
en el trayecto hacia el Centro de
servicio al cliente de Sensio Inc.
dba Made by Gather™
19409_19469_19468_19467_19470_19471_19587_19602_BTFL_WMUS_3.5qt_StandMixer_V8_R4.indd 4219409_19469_19468_19467_19470_19471_19587_19602_BTFL_WMUS_3.5qt_StandMixer_V8_R4.indd 42 2024-04-12 5:56 PM2024-04-12 5:56 PM

INSIDE back cover
19409_19469_19468_19467_19470_19471_19587_19602_BTFL_WMUS_3.5qt_StandMixer_V8_R4.indd 4319409_19469_19468_19467_19470_19471_19587_19602_BTFL_WMUS_3.5qt_StandMixer_V8_R4.indd 43 2024-04-12 5:56 PM2024-04-12 5:56 PM
BACK CoverBACK Cover
19409, 19469, 19468, 19467, 19470, 19471, 19602, 19587 R4
Sensio Inc.
dba Made by Gather™
New York, NY 10016/USA
www.beautifulbydrew.com
19409_19469_19468_19467_19470_19471_19587_19602_BTFL_WMUS_3.5qt_StandMixer_V8_R4.indd 4419409_19469_19468_19467_19470_19471_19587_19602_BTFL_WMUS_3.5qt_StandMixer_V8_R4.indd 44 2024-04-12 5:56 PM2024-04-12 5:56 PM