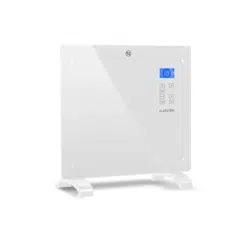
NORDERNEY
Konvektions-Heizung
Convection Heater
Radiador de convección
Radiateur convecteur
Radiatore a convezione
Convectieverwarming
Hinweis: Dieses Produkt ist nur für gut isolierte Räume
oder für den gelegentlichen Gebrauch geeignet.
Note: This product is only suitable for well insulated
spaces or occasional use.
Nota: Este producto está indicado únicamente en
lugares abrigados o para una utilización punctual.
Remarque : Ce produit ne peut être utilisé que dans
des locaux bien isolés ou de manière occasionnelle.
Advertencia: Questo prodotto è adatto solo per spazi
ben isolati o uso occasionale.
Let op! Dit artikel is alleen geschikt voor goed geïsoleer-
de ruimtes en voor incidenteel gebruik.
www.klarstein.com
10032787 10032788 10032789 10032790

3
DE
Sehr geehrter Kunde,
wir gratulieren Ihnen zum Erwerb Ihres Gerätes. Lesen Sie
die folgenden Hinweise sorgfältig durch und befolgen Sie
diese, um möglichen Schäden vorzubeugen. Für Schäden,
die durch Missachtung der Hinweise und unsachgemäßen
Gebrauch entstehen, übernehmen wir keine Haftung.
Scannen Sie den folgenden QR-Code, um Zugriff auf die
aktuellste Bedienungsanleitung und weitere Informationen
rund um das Produkt zu erhalten.
INHALTSVERZEICHNIS
Sicherheitshinweise 4
Produktdatenblatt 5
Geräteübersicht 7
Displayanzeigen 7
Bedienfeld 8
Montage 8
Inbetriebnahme und Bedienung 10
Reinigung und Pege 13
Spezielle Entsorgungshinweise für Verbraucher in Deutschland 14
Hinweise zur Entsorgung 16
Hersteller & Importeur (UK) 16
TECHNISCHE DATEN
Artikelnummer 10032787, 10032788 10032789, 10032790
Stromversorgung 220-240 V~ 50/60 Hz
Leistung 1000 W 2000 W
English 17
Español 29
Français 41
Italiano 53
Nederlands 65

4
DE
SICHERHEITSHINWEISE
• Prüfen Sie vor der Benutzung die Spannung auf der Geräteplakette und
schließen Sie das Gerät nur an Steckdosen an, die der Spannung des Geräts
entsprechen.
• Falls das Netzkabel beschädigt ist, lassen Sie es von einer ausgebildeten
Fachkraft ersetzen.
• Stellen Sie die Heizung nicht direkt unter der Steckdose auf.
• Halten Sie einen Meter Abstand zu brennbaren Materialien wie Möbeln,
Vorhängen oder Ähnlichem.
• Benutzen Sie das Gerät außerhalb der Reichweite von Kindern. Kinder dürfen
das Gerät nur unter Aufsicht bedienen.
• Das Gerät ist nicht für den kommerziellen Gebrauch, sondern nur für
Gebrauch im Haushalt und in ähnlichen Umgebungen vorgesehen.
• Benutzen Sie das Gerät nicht wenn es Fehlfunktionen aufweist oder in
irgendeiner Form beschädigt wurde.
• Reparaturen dürfen nur von ausgebildeten Fachkräften durchgeführt werden.
• Falsch oder eigenständig ausgeführte Reparaturen stellen ein
Verletzungsrisiko dar.
• Verlegen Sie das Netzkabel nicht unter Teppichen oder Läufern.
• Achten Sie darauf, dass das Netzkabel nicht über scharfe Kanten oder heiße
Ober ächen verläuft.
• Decken Sie die Heizung nicht ab, um Überhitzen zu vermieden.
• Benutzen Sie das Gerät nicht mit einem externen Timer, einer ferngesteuerten
Steckdose oder einem anderen Gerät, das die Heizung automatisch ein- und
ausschaltet.
• Tauchen Sie das Gerät nicht in Wasser oder andere Flüssigkeiten.
• Benutzen Sie das Gerät nicht in der Nähe von Badewannen, Duschen oder
Swimmingpools.
• Benutzen Sie das Gerät nicht im Freien.
• Benutzen Sie das Gerät nicht mit nassen Händen.
• Benutzen Sie das Gerät nicht auf oder in der Nähe heißer Ober ächen.
• Benutzen Sie das Gerät nicht mit beschädigtem Netzkabel.
• Ziehen Sie vor der Reinigung den Stecker aus der Steckdose und lassen Sie
das Gerät vollständig abkühlen.
• Benutzen Sie zur Reinigung keine Scheuermittel.
• Verwenden Sie nur Zubehör, das vom Hersteller ausdrücklich dafür
zugelassen ist.
• Kinder ab 8 Jahren, psychisch, sensorisch und körperlich eingeschränkte
Menschen dürfen das Gerät nur benutzen, wenn sie vorher von einer für
sie verantwortlichen Aufsichtsperson ausführlich mit den Funktionen und
den Sicherheitsvorkehrungen vertraut gemacht wurden und die damit
verbundenen Risiken verstehen.
• Achten Sie darauf, dass Kinder nicht mit dem Gerät spielen.
VORSICHT
Verbrennungsgefahr! Einige Geräteteile können sehr heiß werden.
Achten Sie darauf, dass Sie oder Ihre Kinder sich nicht daran
verbrennen.
5
DE
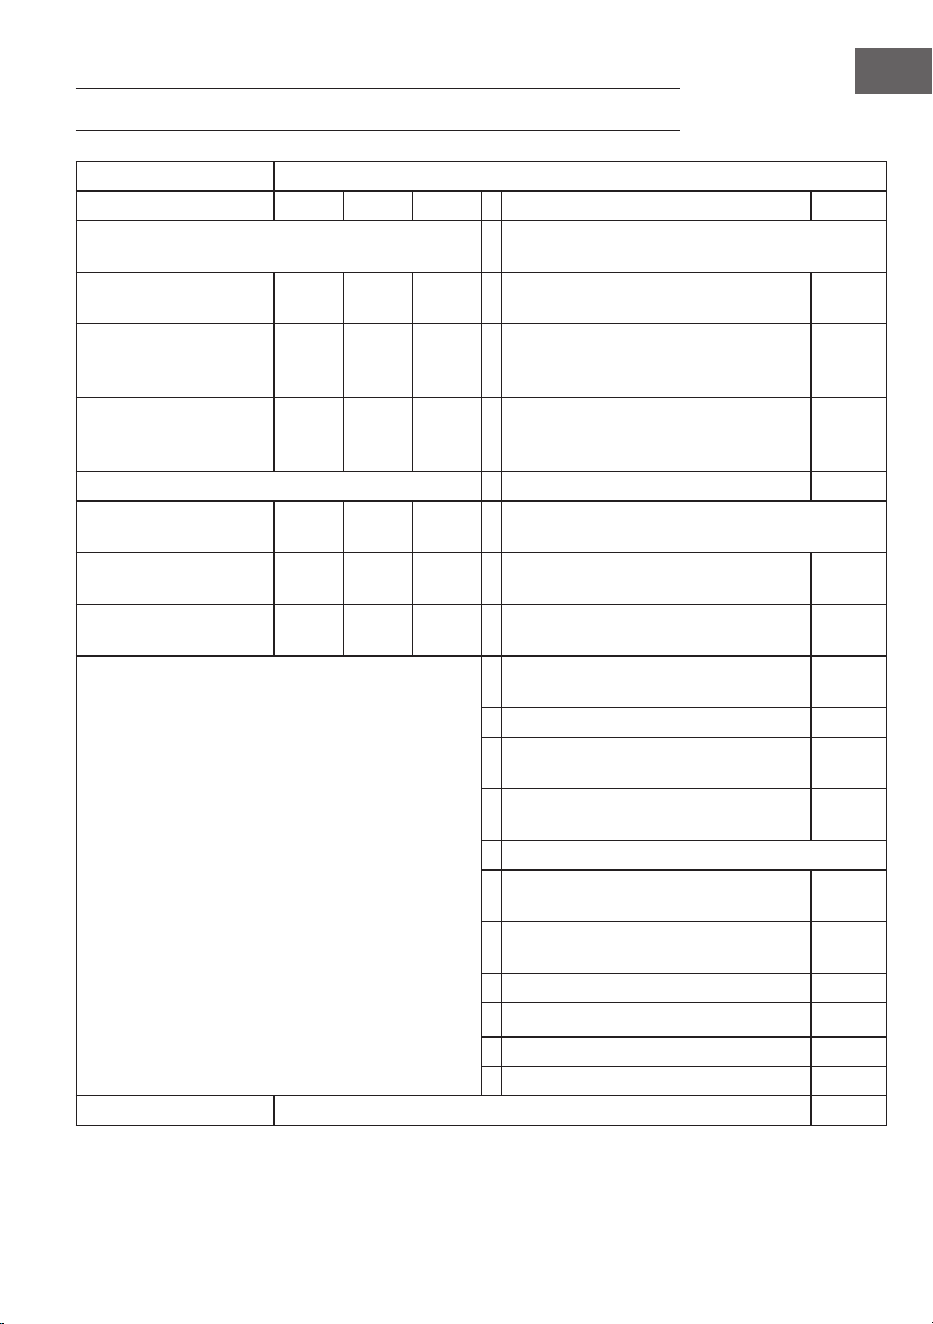
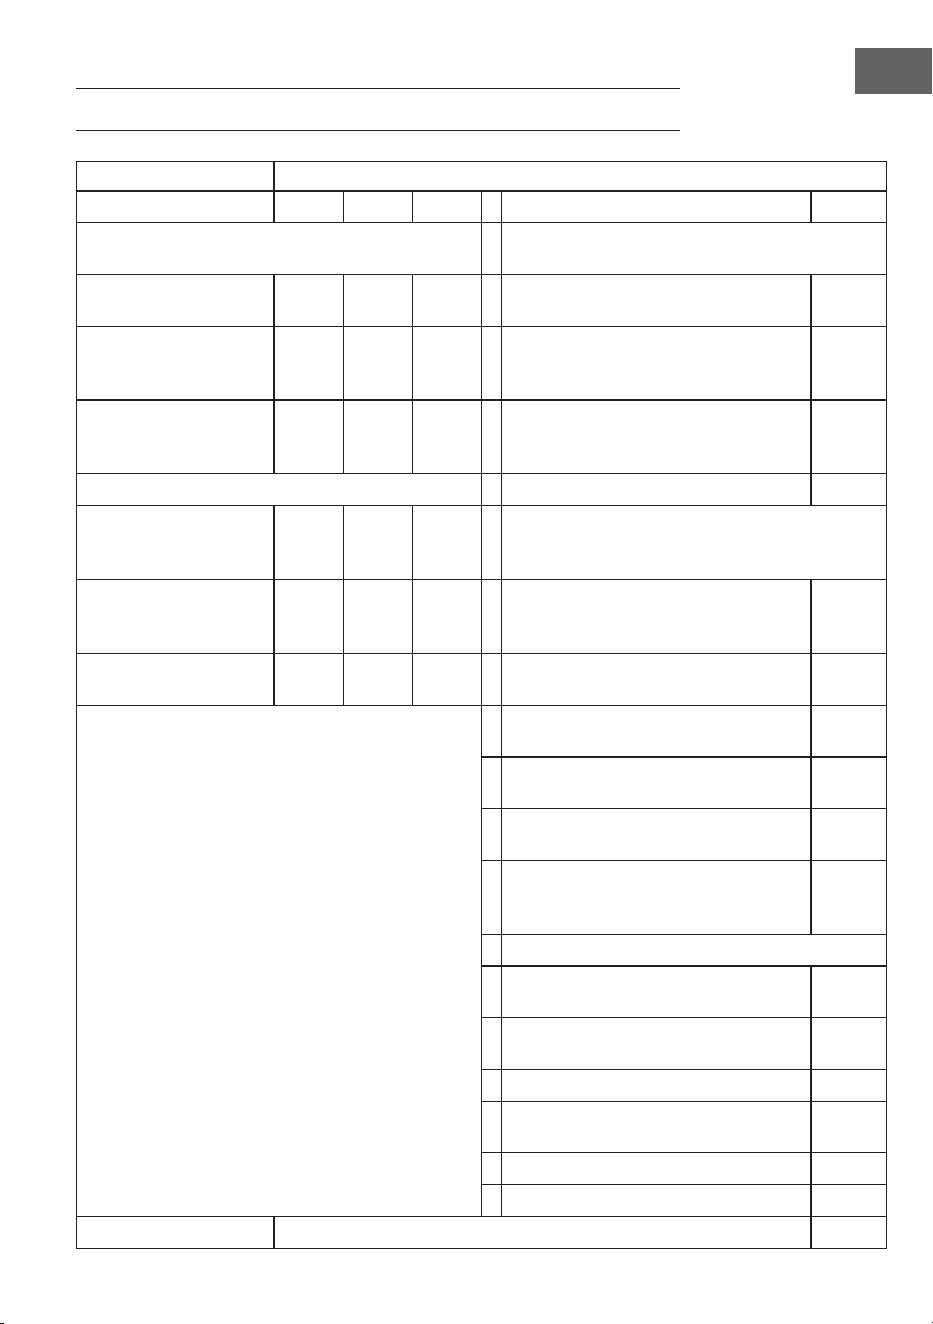
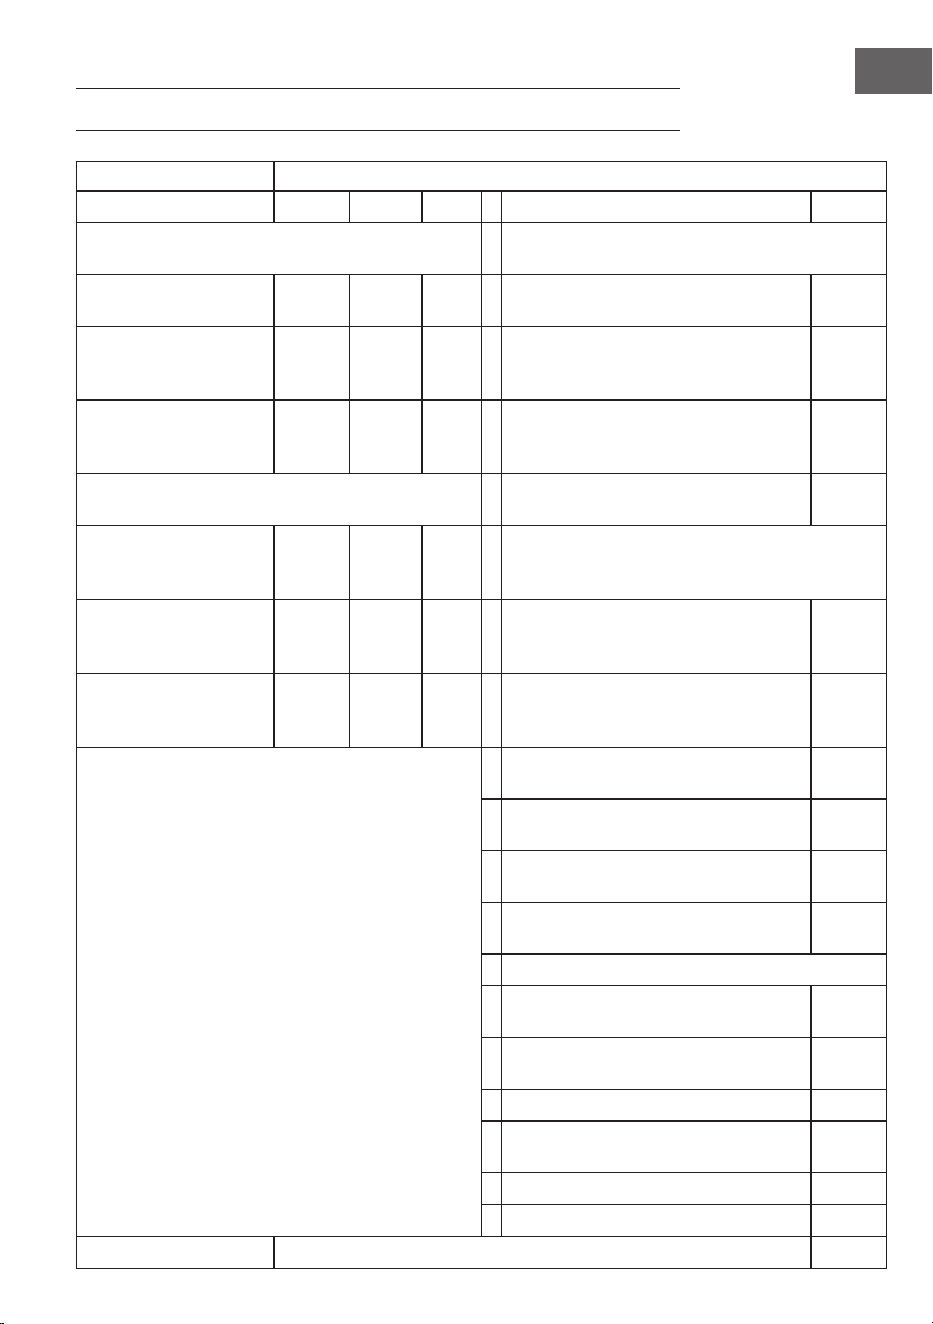
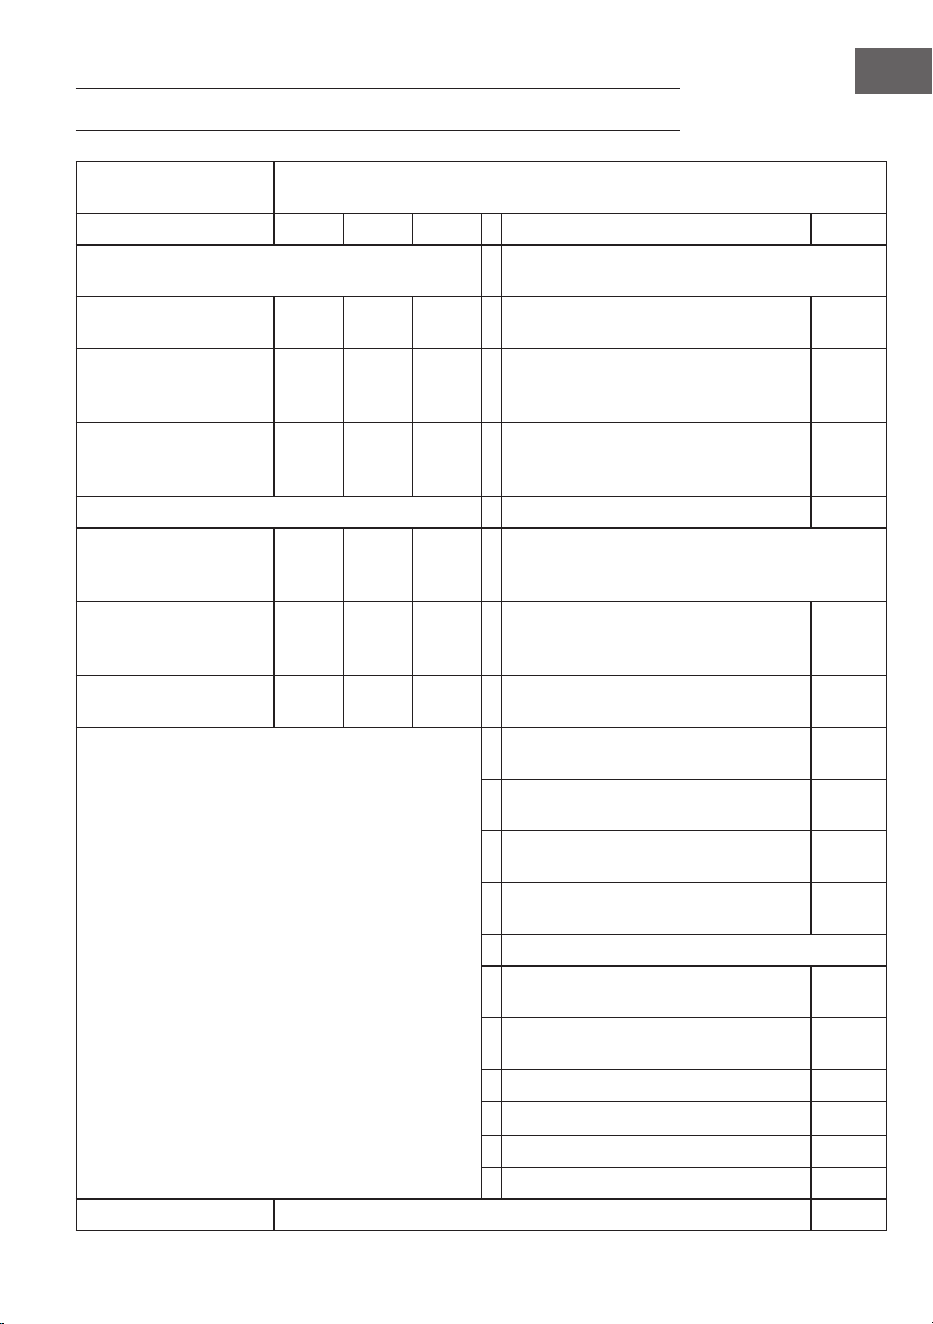
PRODUKTDATENBLATT
Modellkennung(en) 10032787, 10032788
Angabe Symbol Wert Einheit Angabe Einheit
Wärmeleistung Nur bei elektrischen Speicher-Einzelraumheizgeräten:
Art der Regelung der Wärmezufuhr
Nennwärmeleistung P
nom
1,0 kW Manuelle Regelung der Wärmezufuhr mit
integriertem Thermostat
k.A.
Mindestwärmeleistung
(Richtwert)
P
min
1,0 kW Manuelle Regelung der Wärmezufuhr
mit Rückmeldung der Raum- und/oder
Außentemperatur
k.A.
Maximale kontinuierliche
Wärmeleistung
P
max
1,0 kW Elektronische Regelung der Wärmezufuhr
mit Rückmeldung der Raum- und/oder
Außentemperatur
k.A.
Hilfsstromverbrauch Wärmeabgabe mit Gebläseunterstützung k.A.
Bei Nennwärmeleistung
(Ventilator-Motor)
el
max
k.A. kW Art der Wärmeleistung/Raumtemperaturkontrolle
Bei Mindestwärmeleistung
(Ventilator-Motor)
el
min
k.A. kW Einstuge Wärmeleistung, keine
Raumtemperaturkontrolle
nein
Im Bereitschaftszustand el
SB
0,00124 W Zwei oder mehr manuell einstellbare Stufen,
keine Raumtemperaturkontrolle
nein
Raumtemperaturkontrolle mit mechanischem
Thermostat
nein
Mit elektronischer Raumtemperaturkontrolle nein
Mit elektronischer Raumtemperaturkontrolle
und Tageszeitregelung
nein
Mit elektronischer Raumtemperaturkontrolle
und Wochentagsregelung
ja
Sonstige Regelungsoptionen
Raumtemperaturkontrolle mit
Präsenzerkennung
nein
Raumtemperaturkontrolle mit Erkennung
offener Fenster
nein
Mit Fernbedienungsoption nein
Mit adaptiver Regelung des Heizbeginns nein
Mit Betriebszeitbegrenzung nein
Mit Schwarzkugelsensor nein
Kontaktangaben Chal-Tec GmbH, Wallstraße 16, 10179, Berlin, Deutschland

6
DE
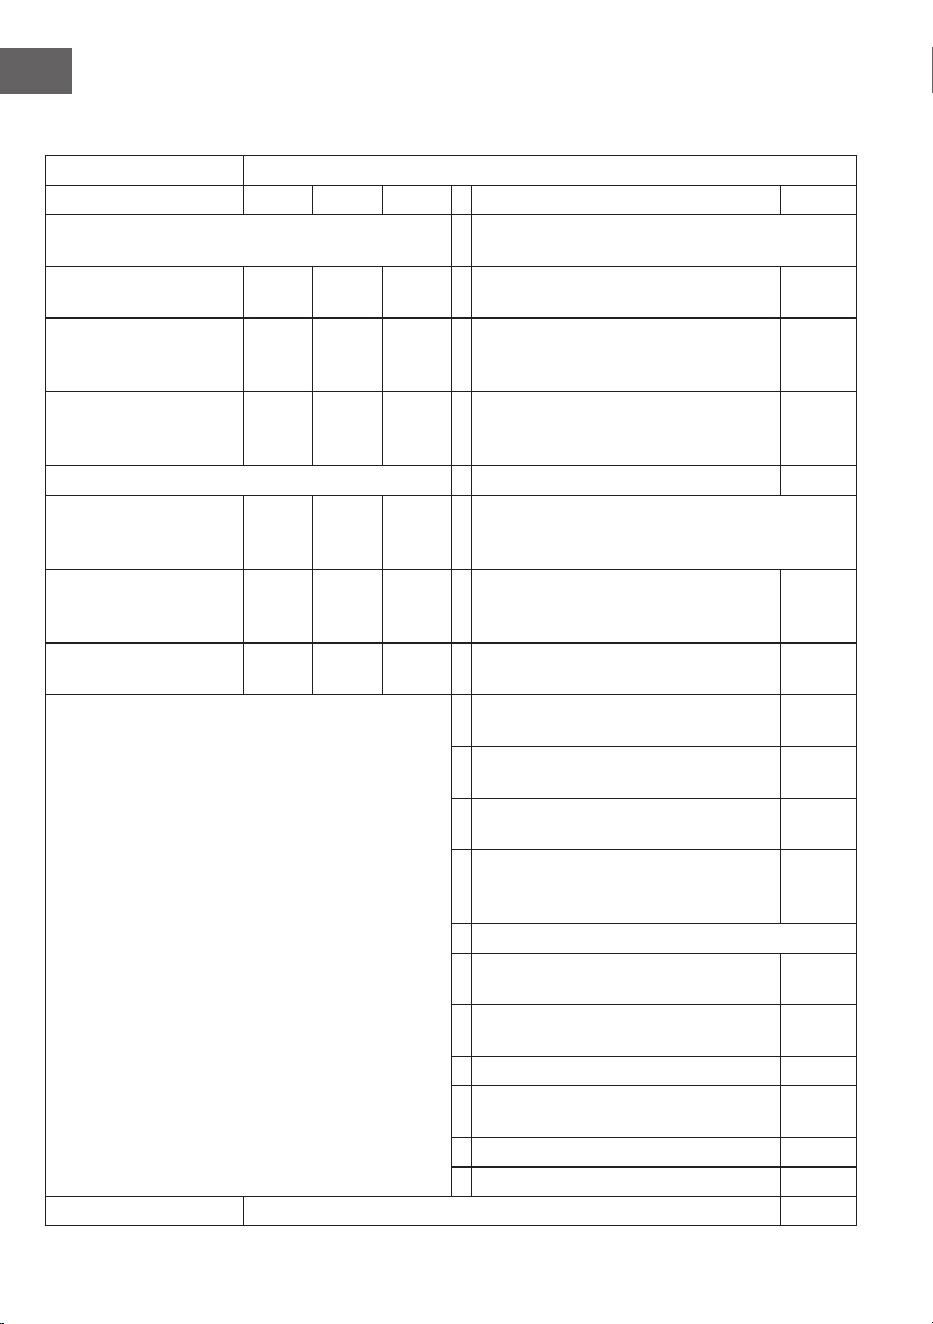
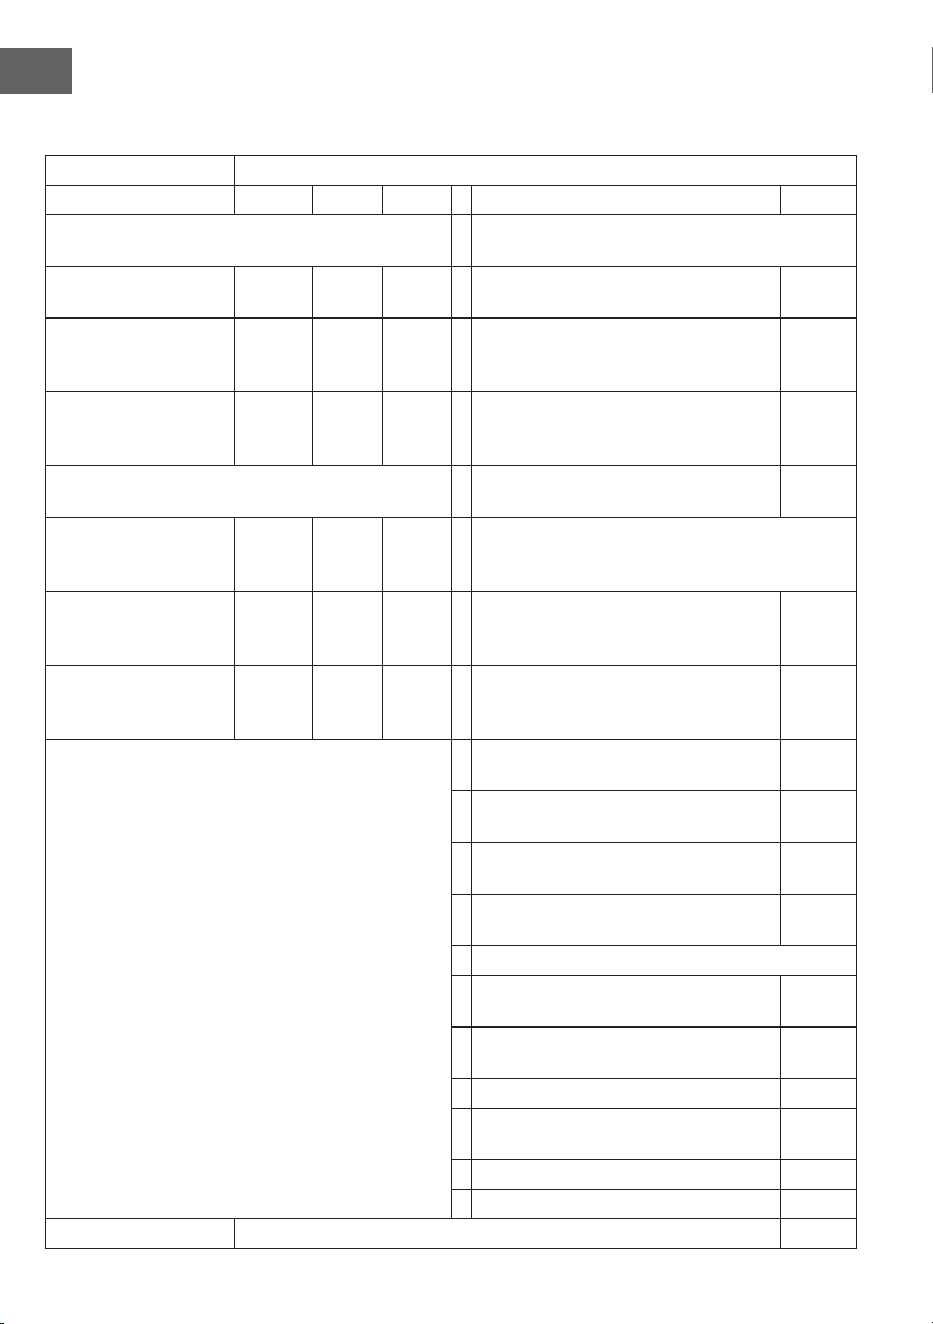
Modellkennung(en) 10032789, 10032790
Angabe Symbol Wert Einheit Angabe Einheit
Wärmeleistung Nur bei elektrischen Speicher-Einzelraumheizgeräten:
Art der Regelung der Wärmezufuhr
Nennwärmeleistung P
nom
2,0 kW Manuelle Regelung der Wärmezufuhr mit
integriertem Thermostat
k.A.
Mindestwärmeleistung
(Richtwert)
P
min
2,0 kW Manuelle Regelung der Wärmezufuhr
mit Rückmeldung der Raum- und/oder
Außentemperatur
k.A.
Maximale kontinuierliche
Wärmeleistung
P
max
2,0 kW Elektronische Regelung der Wärmezufuhr
mit Rückmeldung der Raum- und/oder
Außentemperatur
k.A.
Hilfsstromverbrauch Wärmeabgabe mit Gebläseunterstützung k.A.
Bei Nennwärmeleistung
(Ventilator-Motor)
el
max
k.A. kW Art der Wärmeleistung/Raumtemperaturkontrolle
Bei Mindestwärmeleistung
(Ventilator-Motor)
el
min
k.A. kW Einstuge Wärmeleistung, keine
Raumtemperaturkontrolle
nein
Im Bereitschaftszustand el
SB
0,00124 W Zwei oder mehr manuell einstellbare Stufen,
keine Raumtemperaturkontrolle
nein
Raumtemperaturkontrolle mit mechanischem
Thermostat
nein
Mit elektronischer Raumtemperaturkontrolle nein
Mit elektronischer Raumtemperaturkontrolle
und Tageszeitregelung
nein
Mit elektronischer Raumtemperaturkontrolle
und Wochentagsregelung
ja
Sonstige Regelungsoptionen
Raumtemperaturkontrolle mit
Präsenzerkennung
nein
Raumtemperaturkontrolle mit Erkennung
offener Fenster
nein
Mit Fernbedienungsoption nein
Mit adaptiver Regelung des Heizbeginns nein
Mit Betriebszeitbegrenzung nein
Mit Schwarzkugelsensor nein
Kontaktangaben Chal-Tec GmbH, Wallstraße 16, 10179, Berlin, Deutschland

7
DE
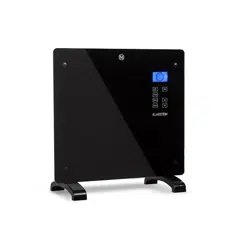
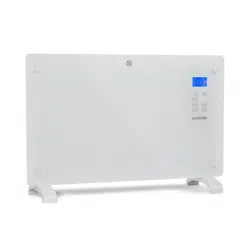
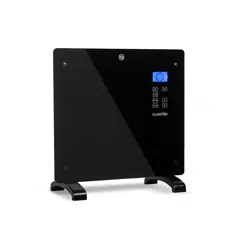
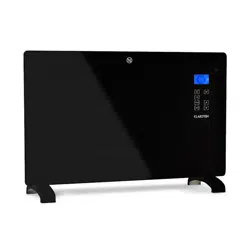
GERÄTEÜBERSICHT
1 Zierblende Glas
2 LCD-Anzeige
3 Bedienfeld
4 Standfüße
DISPLAYANZEIGEN

8
DE
BEDIENFELD
Standby-Taste:
Gerät ein-/ausschalten
Temperatur-
einstellungen
Wert erhöhen
Uhrzeit einstellen
Eingabe bestätigen /
Menü aufrufen
Wert verringern
Programmeinstellungen
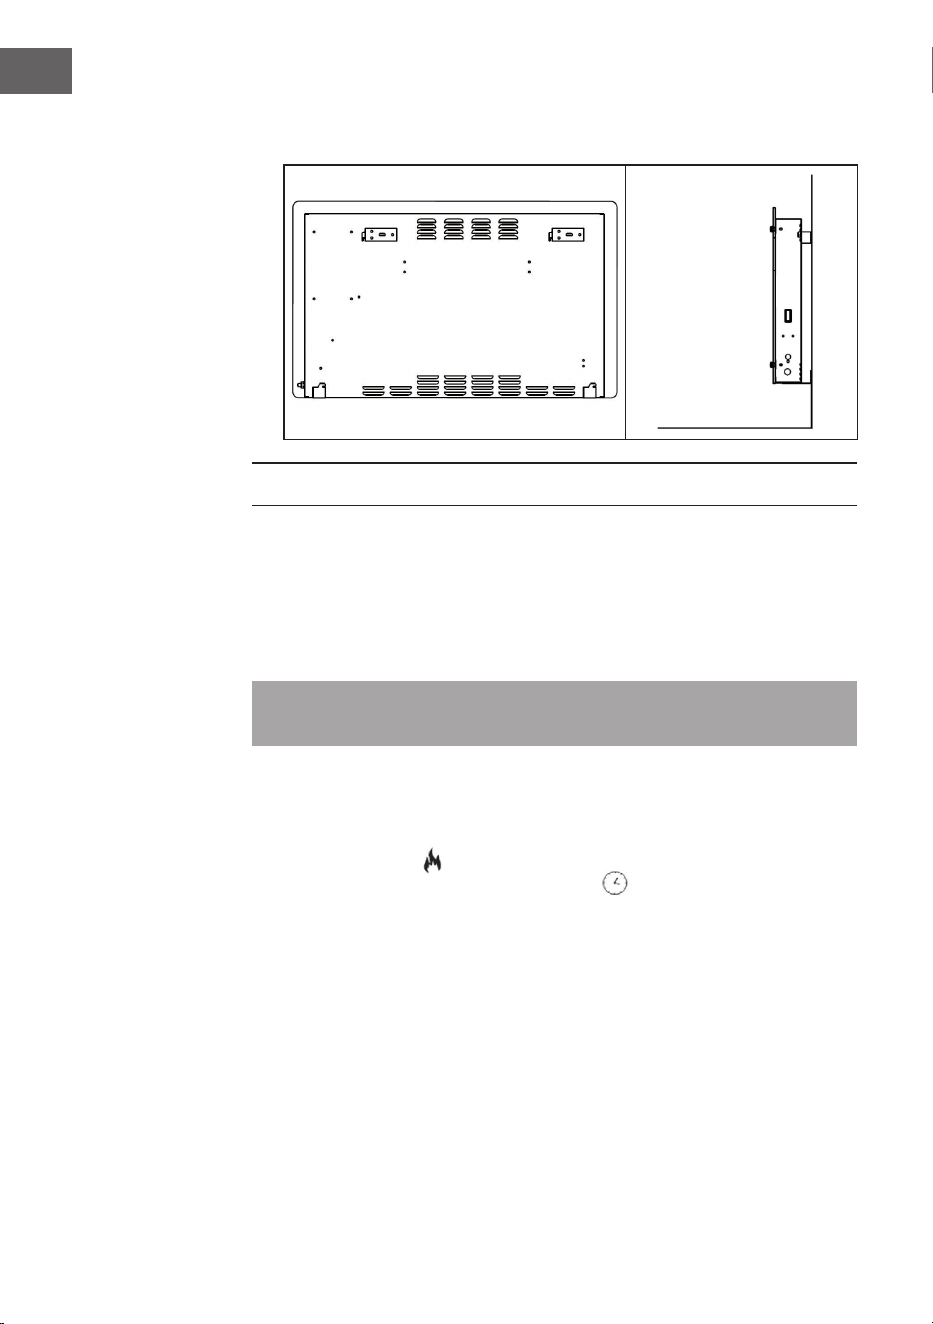
MONTAGE
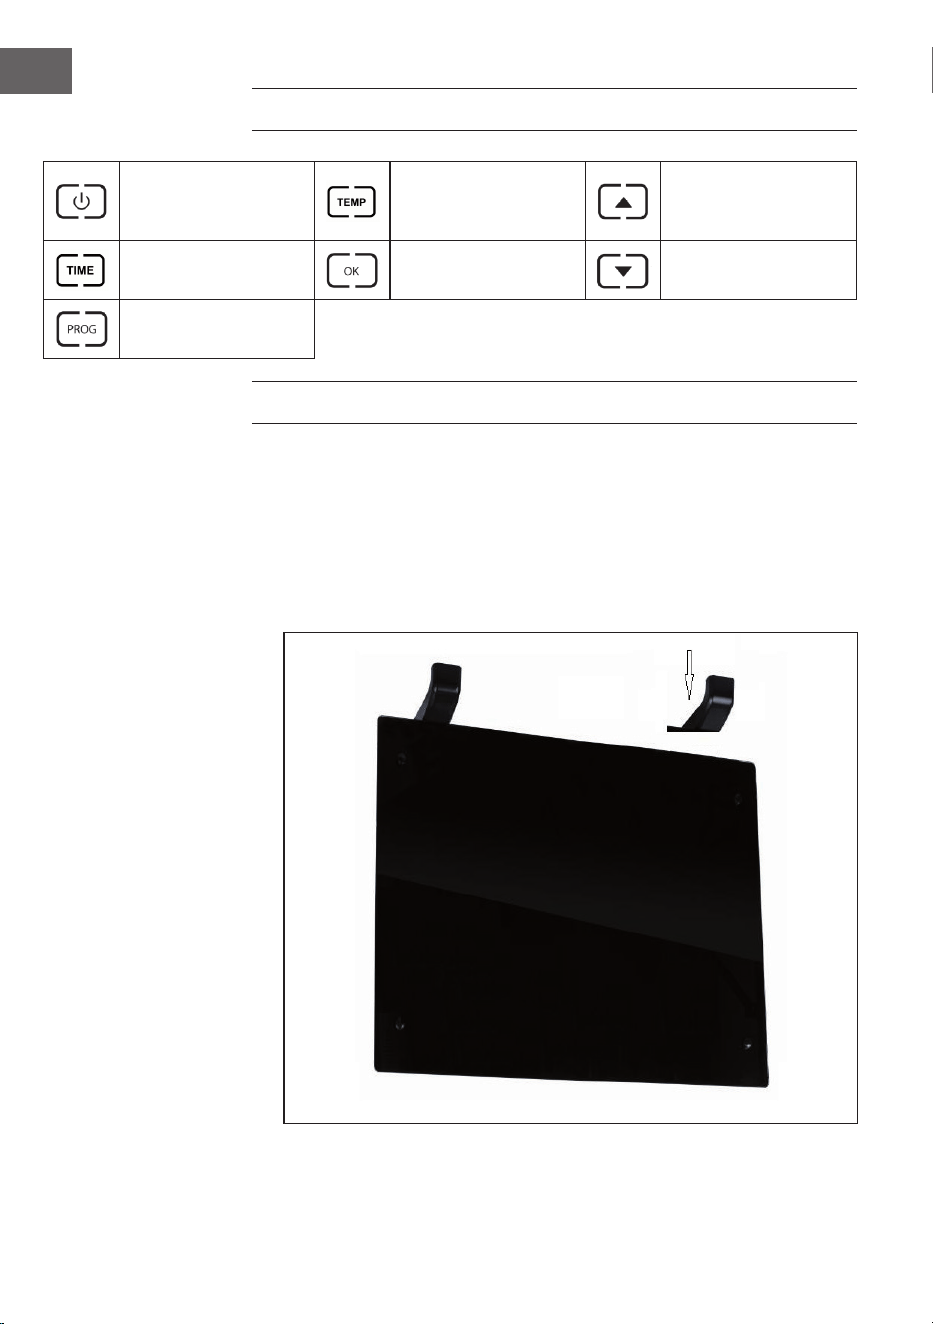
Standmontage
1. Drehen Sie das Gerät auf den Kopf. Setzen Sie es auf einem weichen Tuch oder
Teppich ab.
2. Bringen Sie den Fuß an der richtigen Stelle auf der Unterseite des Geräts an
(siehe Bild unten). Verwenden Sie dazu die beiliegenden Schrauben. Ziehen Sie
die Schrauben mit einem Schraubenzieher fest.

9
DE
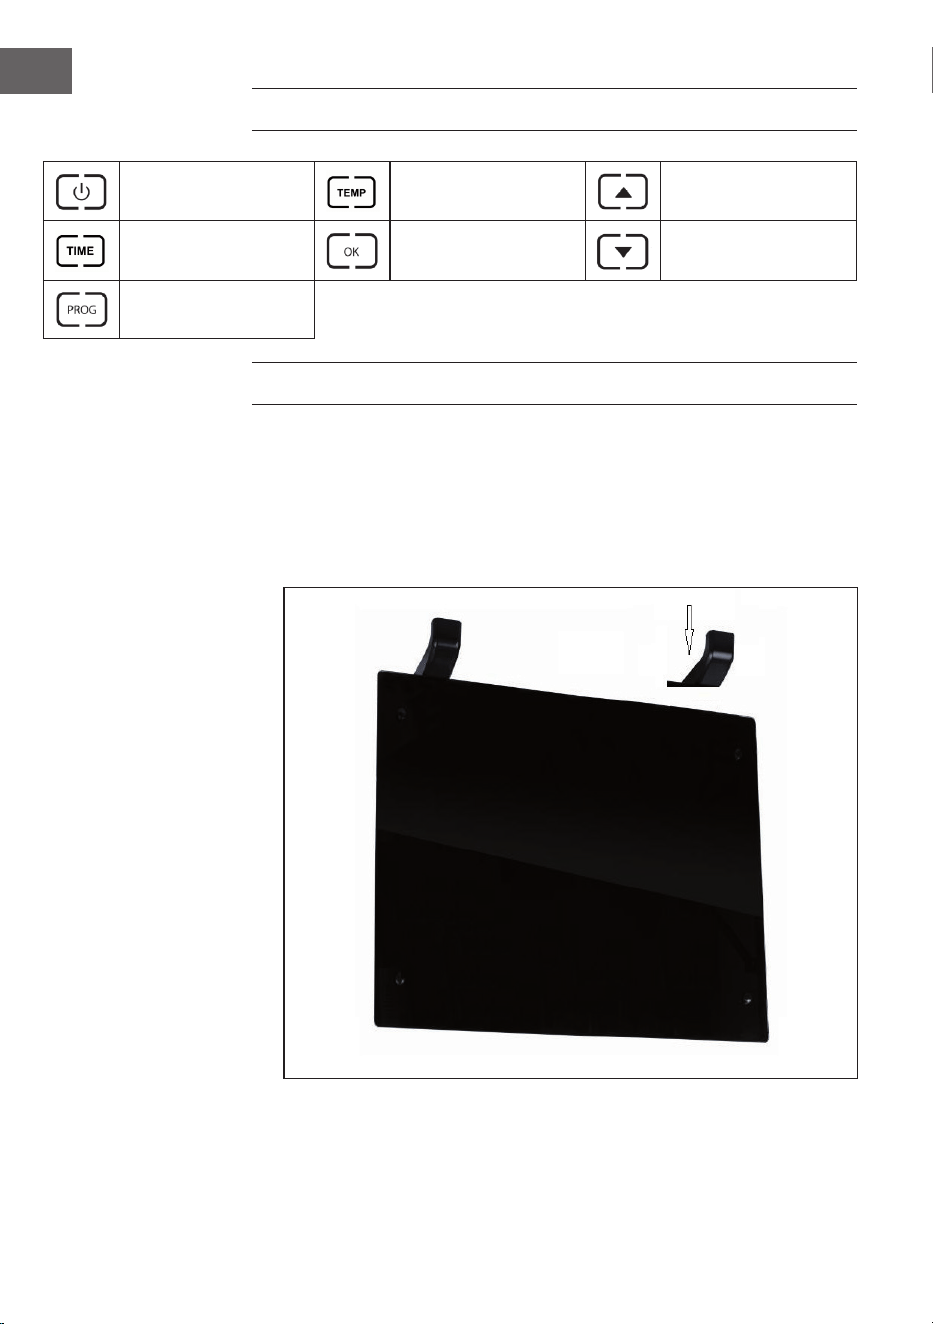
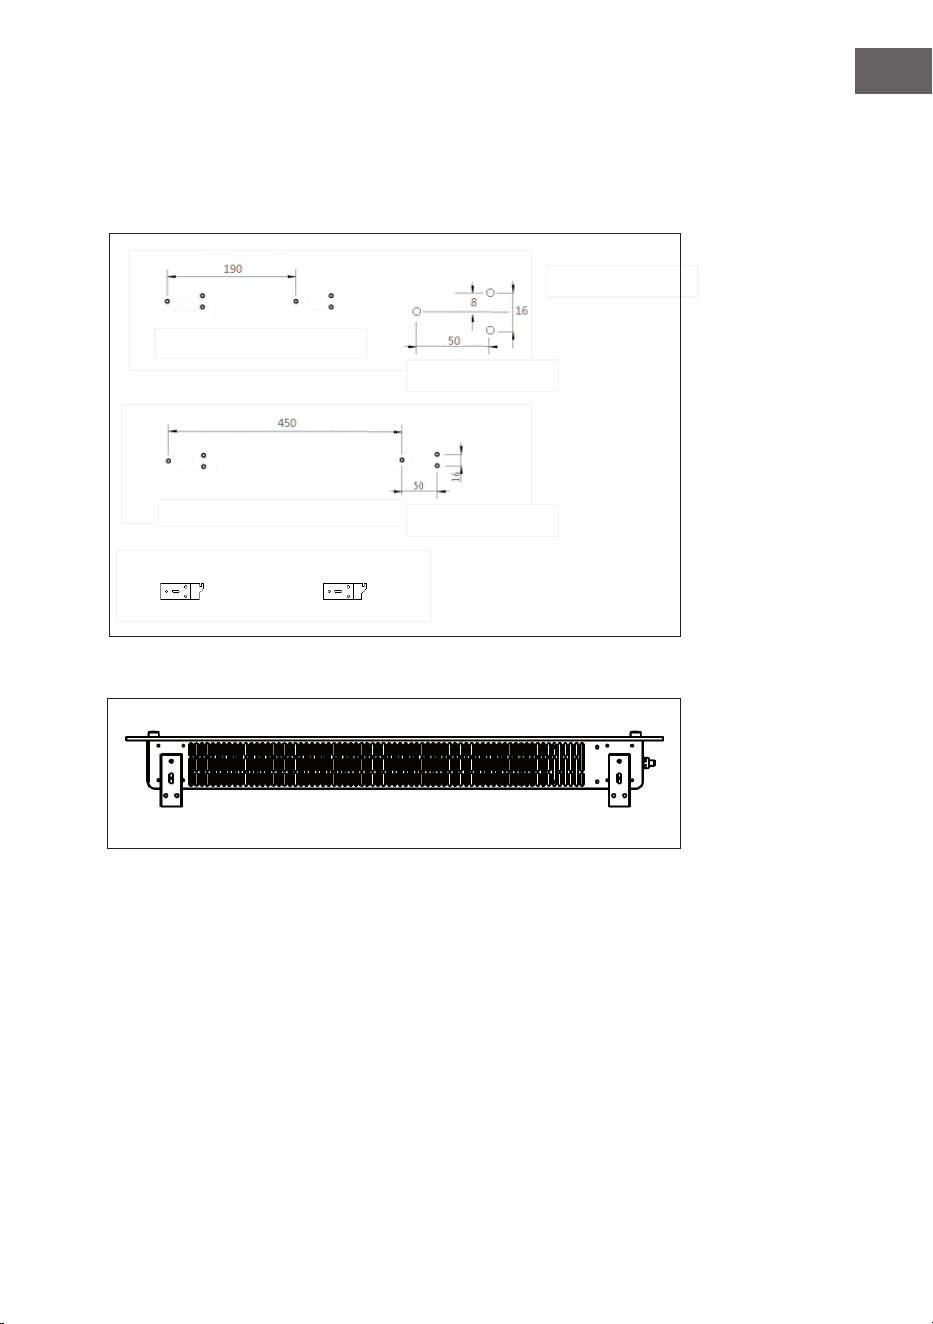
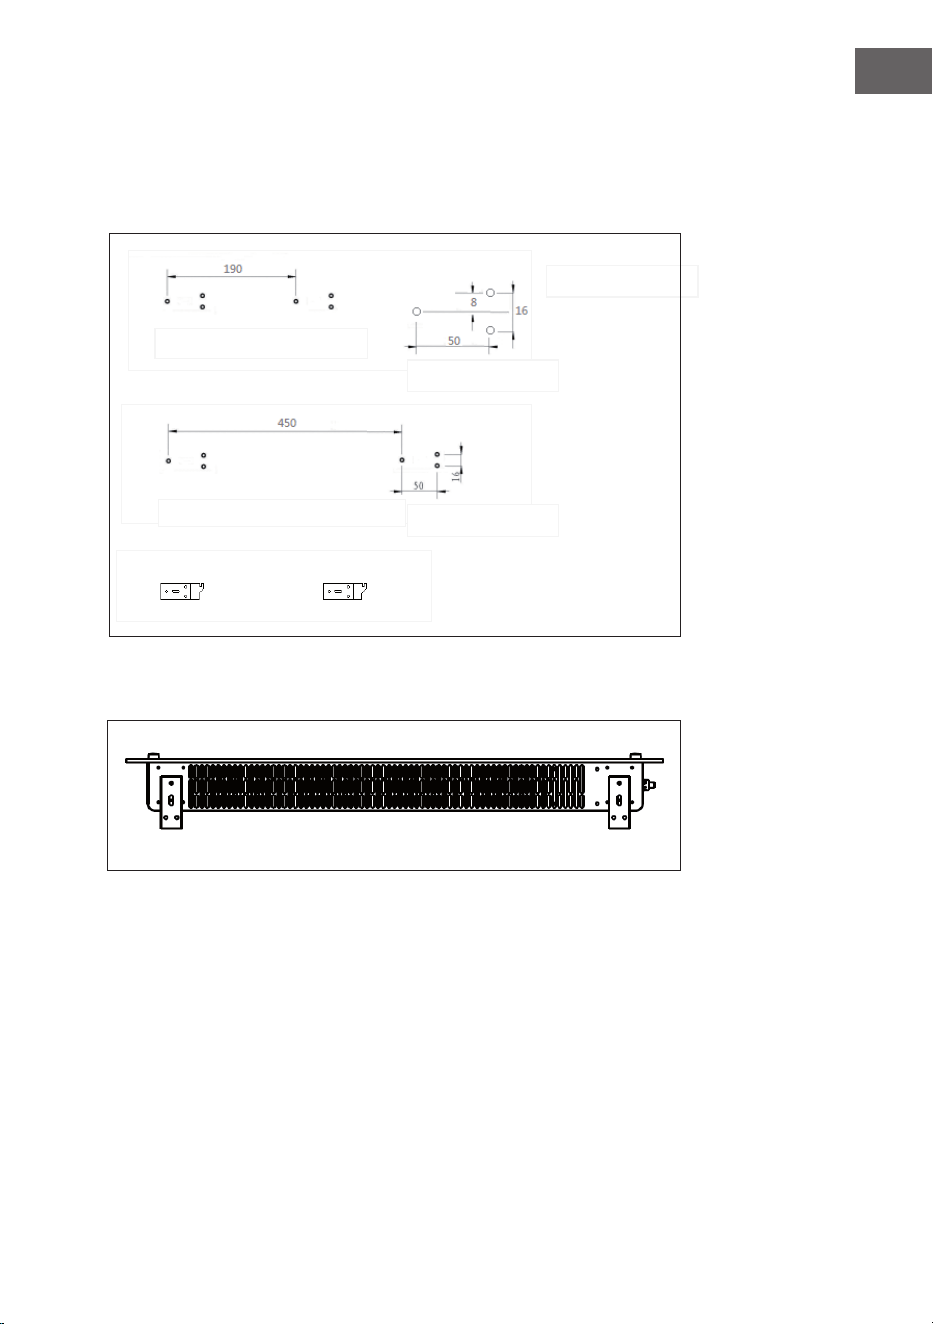
Wandmontage
1. Sie benötigen 4 Halterungen, 6 Dübelschrauben und 6 weitere Schrauben
aus der Box. Befestigen Sie 2 Halterungen an der Wand. Zeichnen Sie die
Bohrungen an (siehe Bild unten).
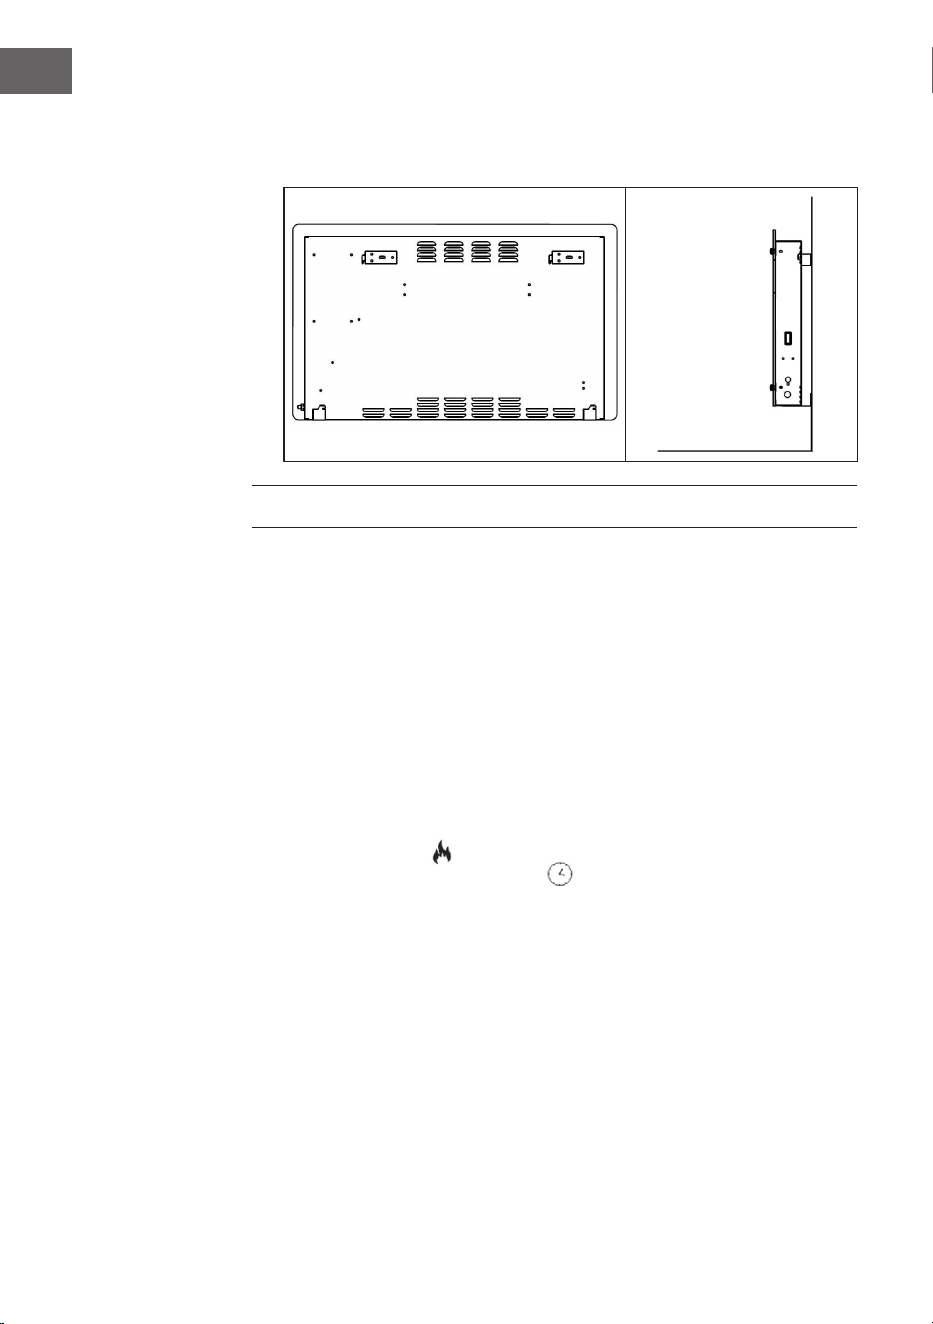
2. Bringen Sie auf der Unterseite des Geräts 2 Halterungen an.
Einheit: mm
Gesamtbild
Gesamtbild
Montagebohrung 1000 W
Montagebohrung 2000 W
10
DE
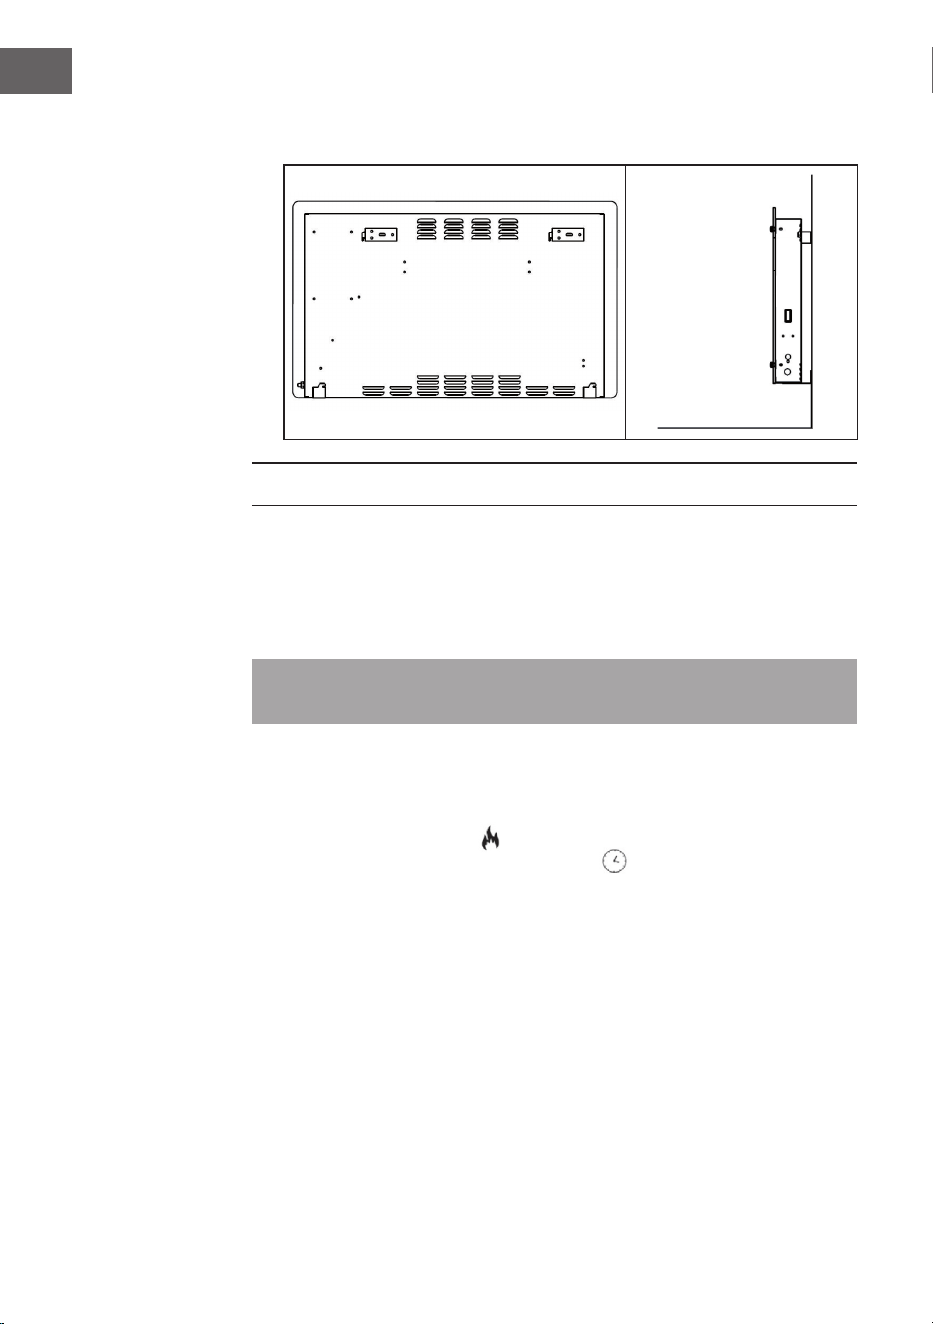
3. Halten Sie das Gerät seitlich. Sehen Sie auf die Position der Bohrungen auf der
Gehäuse-Rückseite. Setzen Sie das Gerät auf die Halterungen.
INBETRIEBNAHME UND BEDIENUNG
Ein-/Ausschalten
Drücken Sie die Standby-Taste, um den Standby-Modus zu verlassen. Die LCD-
Anzeige (2) zeigt die aktuelle Raumtemperatur und die Uhrzeit (Voreinstellung
00:00) an. Durch erneutes Drücken dieser Taste wechselt das Gerät zurück in den
Standby-Modus.
Hinweis: Wenn Sie den Netzstecker ziehen, wird nur die Timer-Einstellung
gelöscht. Alle anderen Funktionseinstellungen bleiben erhalten.
Betriebsmodus wählen
Die Heizung verfügt über zwei verschiedene Heizmodi:
• Freier Heizmodus
• Programmierter wöchentlicher Heizmodus
Drücken Sie „PROG” und wählen Sie mit den Pfeiltasten den gewünschten Modus.
Das entsprechende Symbol blinkt auf der Anzeige. Bestätigen Sie die Wahl mit
„OK”.
11
DE
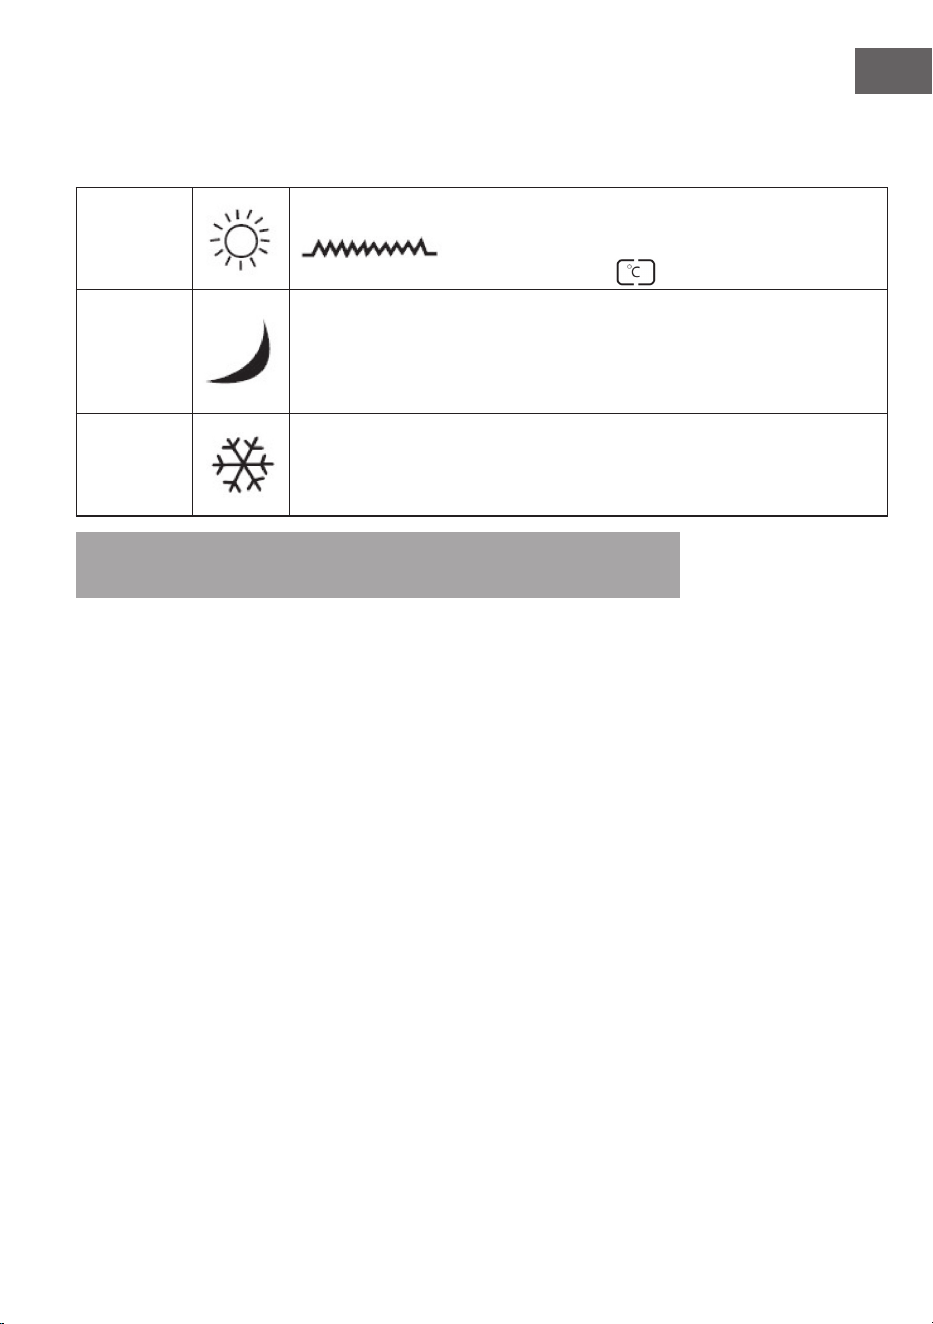
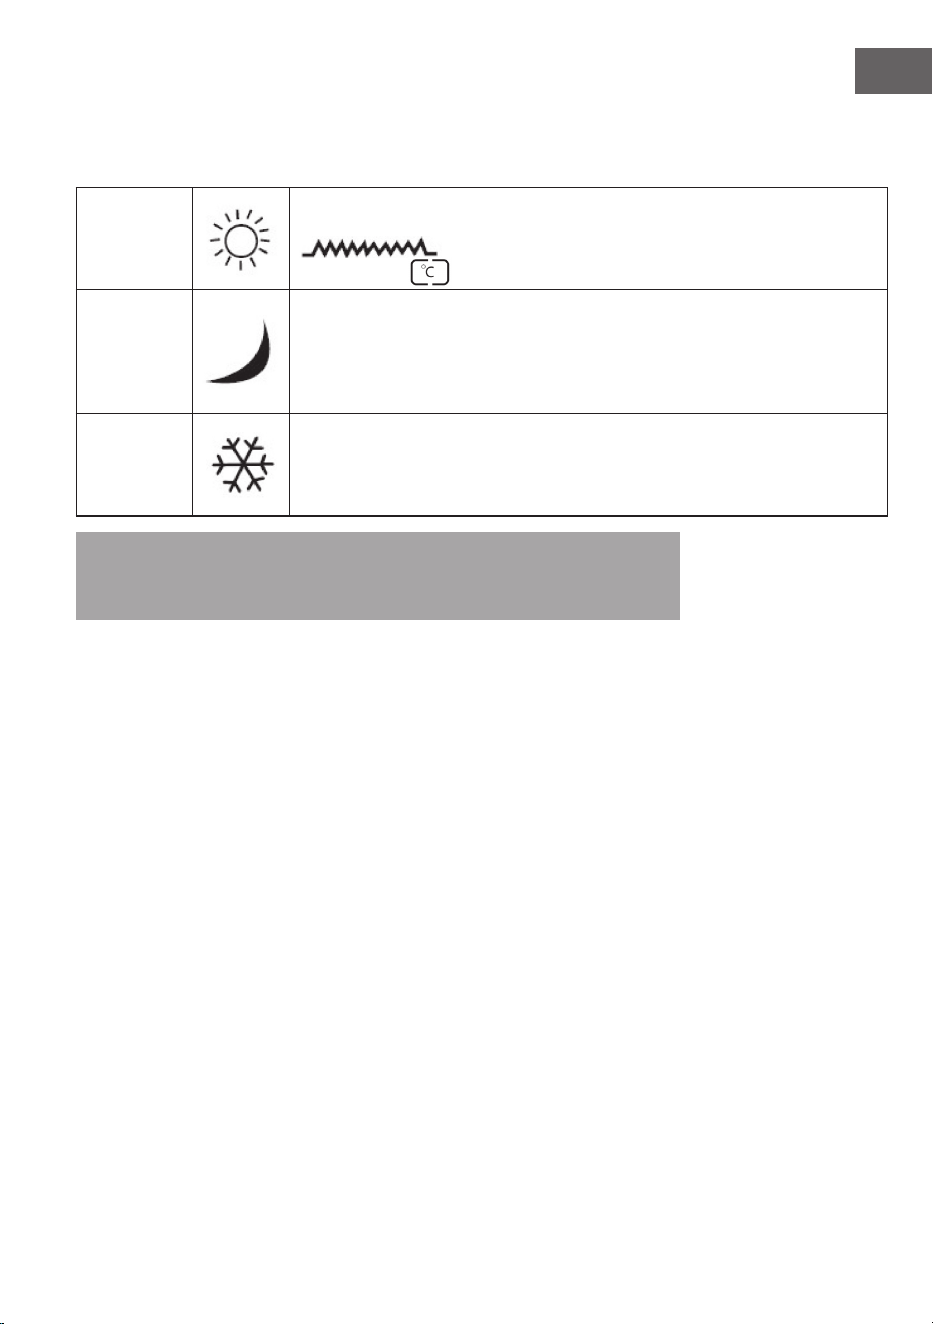
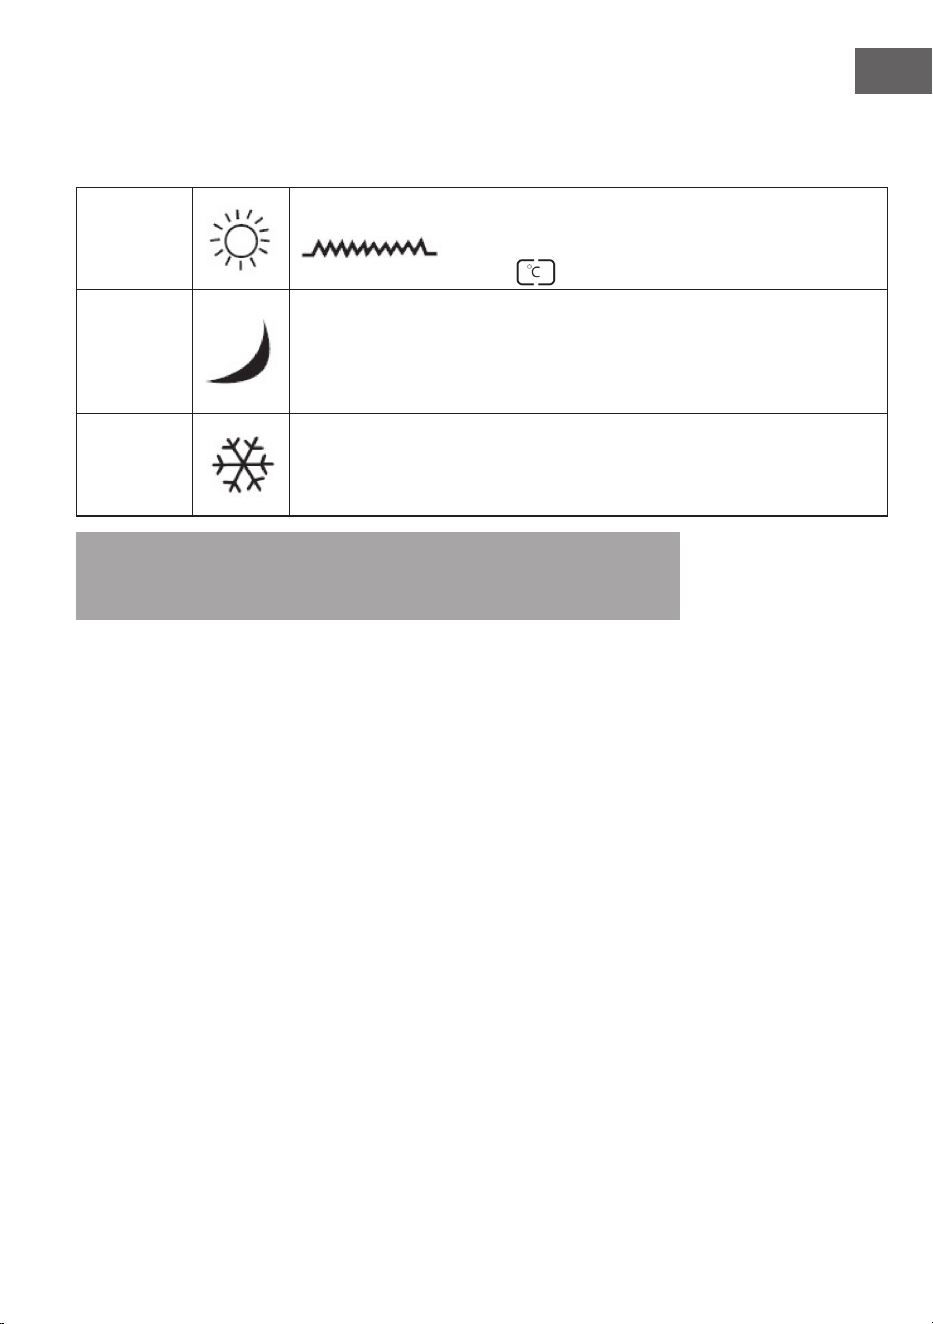
Freier Heizmodus
Dieser Modus umfasst mehrere Heizfunktionen:
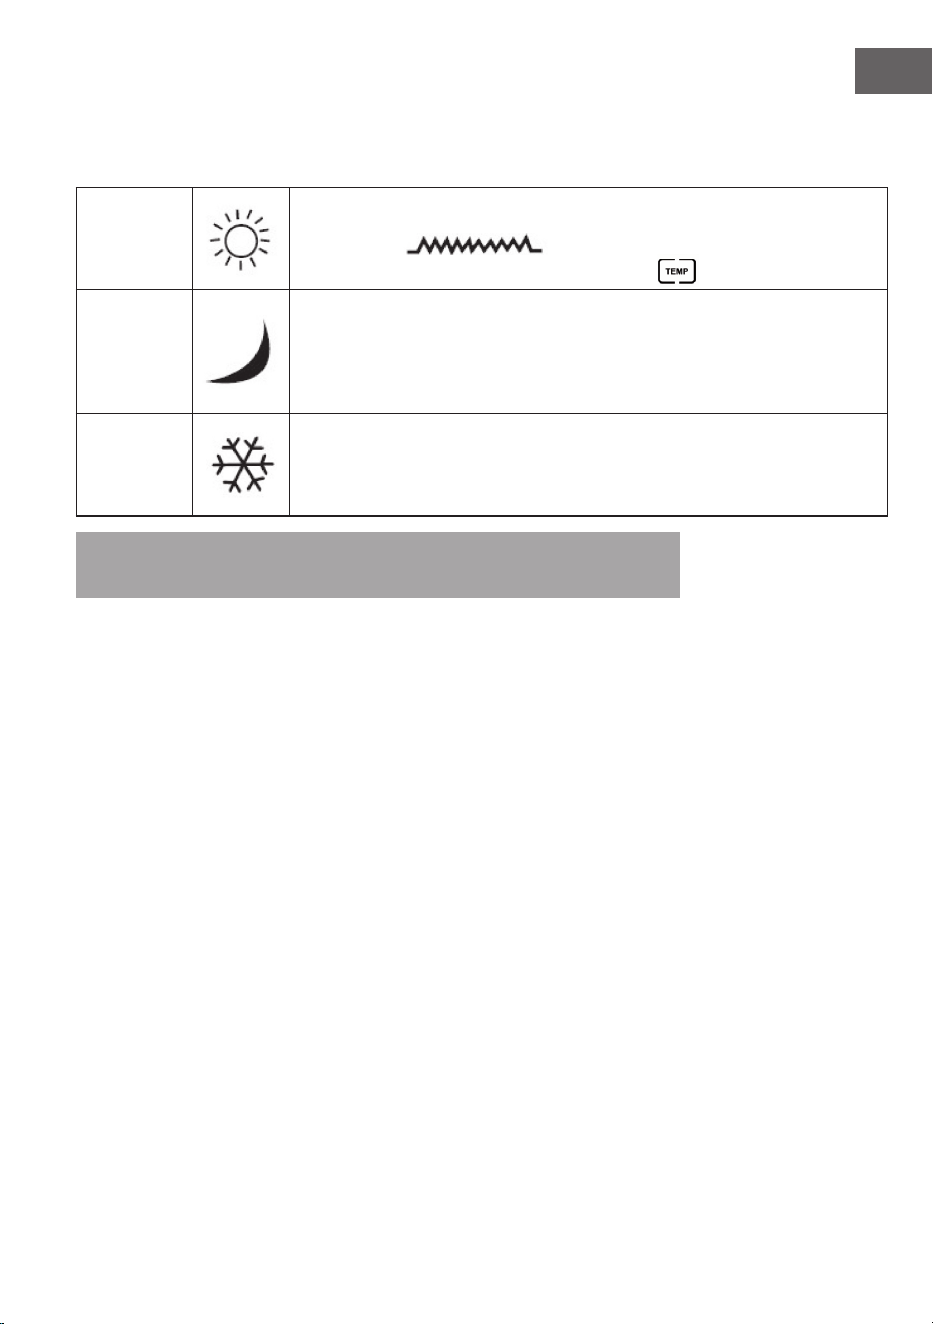
Komfort
Mit der Komfort-Funktion wird der Raum auf eine gewünschte Temperatur
aufgeheizt. Zum Aktivieren drücken Sie die Pfeiltasten, bis das Symbol
angezeigt wird. Die voreingestellte Temperatur beträgt
35 °C. Drücken Sie zum Einstellen die Taste
.
Spar
Mit der Spar-Funktion wird die eingestellte Temperatur gehalten. Ist die
eingestellte Temperatur die Umgebungstemperatur, wechselt das Gerät
automatisch von Komfort zu Spar. Ist die Umgebungstemperatur 5 °C niedriger
als die eingestellte Temperatur, wechselt das Gerät automatisch zurück zu
Komfort.
Frostfrei
Die Frost frei-Funktion ist dafür geeignet, eine Mindesttemperatur vom 5 °C
zu halten (diese Temperatur ist nicht einstellbar). Dies ist die voreingestellte
Funktion im freien Heizmodus. Die Funktion wird nach dem Aktivieren des
freien Heizmodus gestartet.
Hinweis: Wenn die Umgebungstemperatur der eingestellten Temperatur
einspricht, kann man mit den Pfeiltasten von Spar zu Frostfrei wechseln.
Programmierter wöchentlicher Heizmodus
1. Um in den Wochenheizmodus zu gelangen, drücken Sie „PROG” und bewegen
Sie den Cursor über das Uhrensymbol unten links auf dem Display und
drücken Sie „OK“.
2. Nun blinkt der Cursor über die Wochentage (linke Seite des Menüs).
3. Verwenden Sie die Pfeiltasten HOCH/RUNTER, um Ihren Tag für die
Programme 1 bis 7 auszuwählen.
4. Drücken Sie die PROG-Taste, um den Tag zu bestätigen.
5. Verwenden Sie die OK-Pfeile, um die Heizfunktion zwischen Comfort
(Komfort), Economy (Strommsparen) und Frost-free (Frostfrei) auszuwählen.
Sie sehen den Cursor auf der rechten Seite des Menü-Scroll zwischen den
Modi.
6. Damit haben Sie den ersten 30-Minuten-Zyklus gewählt. Der Cursor bewegt
sich zum nächsten 30-Minuten Zyklus.
7. Drücken Sie die Pfeiltasten HOCH/RUNTER, um die Uhrzeit auszuwählen.
8. Programmieren Sie jeden Wochentag separat nach den obigen Schritten.

12
DE
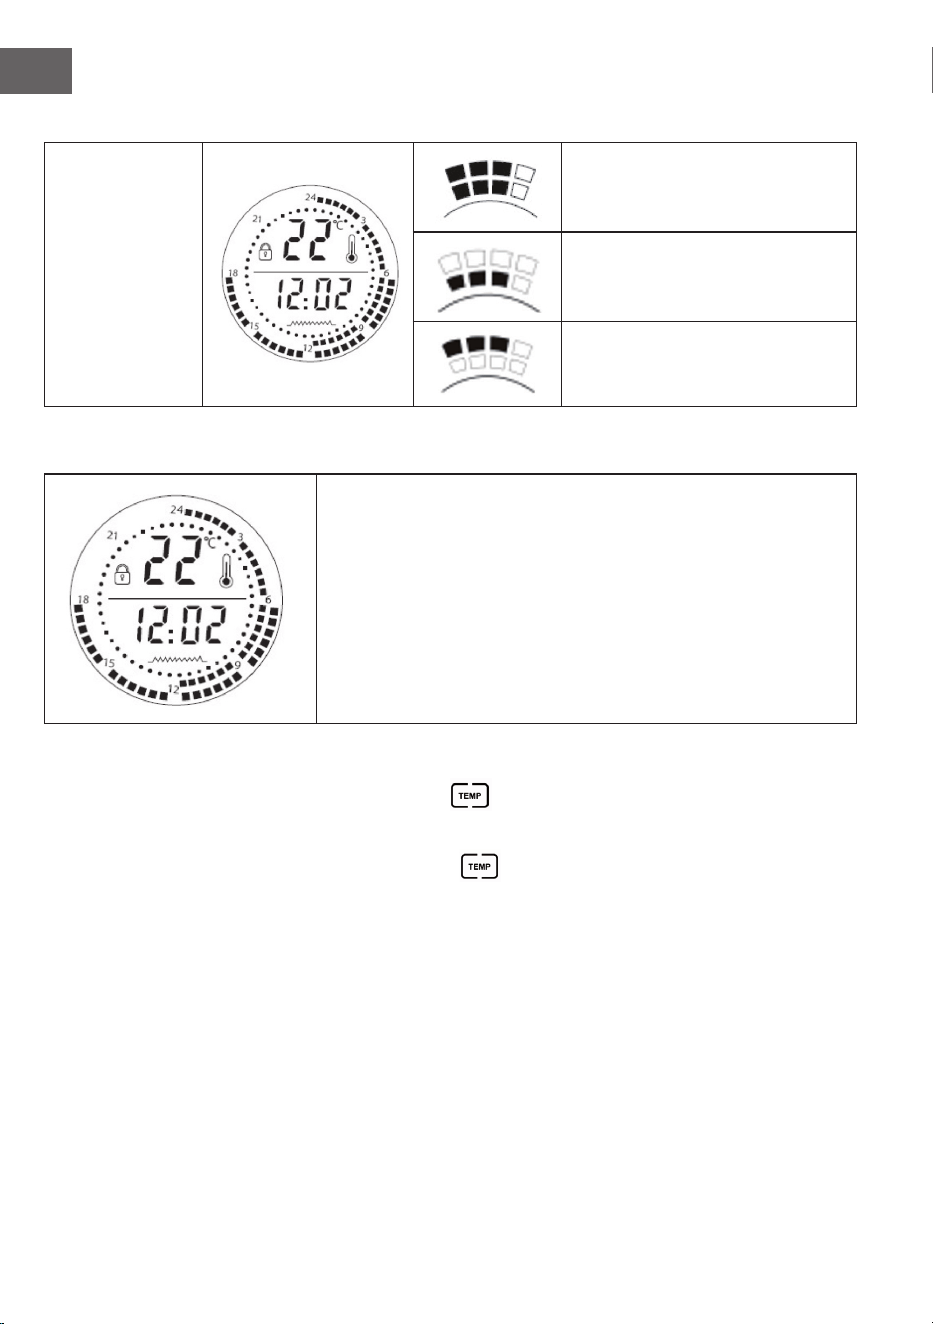
24-Stunden-Skala
24-Stunden-Skala:
Jedes Viereck
entspricht
30 Minuten.
Vierecke innen und außen zeigen die
Komfort-Funktion.
Vierecke innen zeigen die
Frostfrei-Funktion.
Vierecke außen zeigen die Spar-
Funktion.
Das Beispielbild zeigt folgende Einstellungen:
0 - 6 Uhr: Frost frei-Funktion
6 - 12 Uhr: Komfort-Funktion
12 - 18 Uhr: Spar-Funktion
Hinweis:
1. Die Funktion können nicht gleichzeitig eingestellt werden.
2. Wenn Sie den Netzstecker ziehen, wird nur die Timer-Einstellung
gelöscht. Alle anderen Funktions einstellungen bleiben erhalten.
Temperatur einstellen
1. Drücken Sie die Taste
. Die Temperaturanzeige beginnt zu blinken.
2. Wählen Sie mit dem Pfeiltasten die gewünschte Temperatur.
3. Drücken Sie zur Bestätigung erneut
Wählen Sie mit dem Pfeiltasten die gewünschte Temperatur.
.

13
DE
Verriegelung / Kindersicherung
1. Um die Heizung in den Standby-Modus mit aktivierter Kindersicherung zu
schalten, drücken und halten Sie die OK-Taste für 5 Sekunden. Im Display
erscheint das Schloss-Symbol.
2. Zum Entsperren halten Sie zuerst „OK“ 5 Sekunden lang gedrückt.
Uhrzeit einstellen
Drücken Sie zum Stellen der Uhrzeit die TIME-Taste und die Stunden beginnen zu
blinken. Stellen Sie mit den Pfeiltasten die Stunden ein und bestätigen dieses mit
der Uhr-Taste. Nun blinken die Minuten. Stellen Sie mit den Pfeiltasten die Minuten
ein und bestätigen die Eingabe erneut mit der Uhr-Taste.
Funktion „Offenes Fenster“
1. Die Heizung ist mit moderner energiesparender Technik ausgestattet, wie z. B.
der Funktion „Offenes Fenster“.
2. Um diese Funktion zu aktivieren, halten Sie die TEMP-Taste 5 Sekunden lang
gedrückt. Das Fenster-Modus- Symbol wird im Display angezeigt.
3. Wenn das Fenster-Modus-Symbol angezeigt wird und die Raumtemperatur
innerhalb von 20 Minuten um 4 °C sinkt, hört das Gerät auf zu heizen und das
Fenster-Modus-Symbol blinkt im Display, Wenn Sie mit dem Heizen fortfahren
möchten und die Funktion „Offenes Fenster“ nicht blinkt, drücken Sie die
TEMP- Taste und halten Sie diese 5 Sekunden lang gedrückt.
4. Um die Funktion zu deaktivieren, drücken und halten Sie die TEMP-Taste
erneut 5 Sekunden lang gedrückt, dann verschwindet das Fenster-Modus-
Symbol.
REINIGUNG UND PFLEGE
Hinweis: Schalten Sie das Gerät aus und ziehen Sie den Stecker aus der
Steckdose. Warten Sie, bis das Gerät vollständig abgekühlt ist, bevor Sie sie
reinigen.
• Benutzen Sie zur Reinigung der Lüftungsschlitze und Gitter einen
Staubsauger.
• Entfernen Sie Staub auf den Außenächen mit einem feuchten (nicht nassen)
Tuch.
• Verwenden Sie keine scharfen Reinigungsmittel oder Scheuermittel.
• Besprühen Sie das Gerät nicht mit Flüssigkeiten und tauchen Sie es nicht in
Wasser oder andere Flüssigkeiten.
• Öffnen Sie niemals das Gehäuse der Heizung.
14
DE
SPEZIELLE ENTSORGUNGSHINWEISE FÜR
VERBRAUCHER IN DEUTSCHLAND
Entsorgen Sie Ihre Altgeräte fachgerecht. Dadurch wird gewährleistet, dass die
Altgeräte umweltgerecht verwertet und negative Auswirkungen auf die Umwelt
und menschliche Gesundheit vermieden werden. Bei der Entsorgung sind
folgende Regeln zu beachten:
• Jeder Verbraucher ist gesetzlich verpichtet, Elektro- und Elek-
tronikaltgeräte (Altgeräte) sowie Batterien und Akkus getrennt
vom Hausmüll zu entsorgen. Sie erkennen die entsprechenden
Altgeräte durch folgendes Symbol der durchgestrichenen
Mülltonne (WEEE-Symbol).
• Sie haben Altbatterien und Altakkumulatoren, die nicht vom Altgerät
umschlossen sind, sowie Lampen, die zerstörungsfrei aus dem Altgerät
entnommen werden können, vor der Abgabe an einer Entsorgungsstelle vom
Altgerät zerstörungsfrei zu trennen.
• Bestimmte Lampen und Leuchtmittel fallen ebenso unter das Elektro- und
Elektronikgesetz und sind dementsprechend wie Altgeräte zu behandeln.
Ausgenommen sind Glühbirnen und Halogenlampen. Entsorgen Sie
Glühbirnen und Halogenlampen bitte über den Hausmüll, sofern sie nicht das
WEEE-Symbol tragen.
• Jeder Verbraucher ist für das Löschen von personenbezogenen Daten auf dem
Elektro- bzw. Elektronikgerät selbst verantwortlich.
Rücknahmepicht der Vertreiber
Vertreiber mit einer Verkaufsäche für Elektro- und Elektronikgeräte von
mindestens 400 Quadratmetern sowie Vertreiber von Lebensmitteln mit einer
Gesamtverkaufsäche von mindestens 800 Quadratmetern, die mehrmals im
Kalenderjahr oder dauerhaft Elektro- und Elektronikgeräte anbieten und auf dem
Markt bereitstellen, sind verpichtet,
1. bei der Abgabe eines neuen Elektro- oder Elektronikgerätes an einen Endnutzer
ein Altgerät des Endnutzers der gleichen Geräteart, das im Wesentlichen die
gleichen Funktionen wie das neue Gerät erfüllt, am Ort der Abgabe oder in
unmittelbarer Nähe hierzu unentgeltlich zurückzunehmen und
2. auf Verlangen des Endnutzers Altgeräte, die in keiner äußeren Abmessung
größer als 25 Zentimeter sind, im Einzelhandelsgeschäft oder in unmittelbarer
Nähe hierzu unentgeltlich zurückzunehmen; die Rücknahme darf nicht an den
Kauf eines Elektro- oder Elektronikgerätes geknüpft werden und ist auf drei
Altgeräte pro Geräteart beschränkt.

15
DE
• Bei einem Vertrieb unter Verwendung von Fernkommunikationsmitteln
ist die unentgeltliche Abholung am Ort der Abgabe auf Elektro- und
Elektronikgeräte der Kategorien 1, 2 und 4 gemäß § 2 Abs. 1 ElektroG, nämlich
„Wärmeüberträger“, „Bildschirmgeräte“ (Oberäche von mehr als 100 cm²)
oder „Großgeräte“ (letztere mit mindestens einer äußeren Abmessung
über 50 Zentimeter) beschränkt. Für andere Elektro- und Elektronikgeräte
(Kategorien 3, 5 und 6) ist eine Rückgabemöglichkeit in zumutbarer
Entfernung zum jeweiligen Endnutzer zu gewährleisten.
• Altgeräte dürfen kostenlos auf dem lokalen Wertstoffhof oder in folgenden
Sammelstellen in Ihrer Nähe abgegeben werden: www.take-e-back.de
• Für Elektro- und Elektronikgeräte der Kategorien 1, 2 und 4 bieten wir auch
die Möglichkeit einer unentgeltlichen Abholung am Ort der Abgabe an. Beim
Kauf eines Neugeräts haben Sie die Möglichkeit, eine Altgerätabholung über
die Webseite auszuwählen.
• Batterien können überall dort kostenfrei zurückgegeben werden, wo sie
verkauft werden (z. B. Super-, Bau-, Drogeriemarkt). Auch Wertstoff- und
Recyclinghöfe nehmen Batterien zurück. Sie können Batterien auch per Post
an uns zurücksenden. Altbatterien in haushaltsüblichen Mengen können Sie
direkt bei uns von Montag bis Freitag zwischen 08:00 und 16:00 Uhr unter der
folgenden Adresse unentgeltlich zurückgeben:
Chal-Tec Fulllment GmbH
Norddeutschlandstr. 3
47475 Kamp-Lintfort
• Wichtig zu beachten ist, dass Lithiumbatterien aus Sicherheitsgründen vor der
Rückgabe gegen Kurzschluss gesichert werden müssen (z. B. durch Abkleben
der Pole).
• Finden sich unter der durchgestrichenen Mülltonne auf der Batterie zusätzlich
die Zeichen Cd, Hg oder Pb ist das ein Hinweis darauf, dass die Batterie
gefährliche Schadstoffe enthält. (»Cd« steht für Cadmium, »Pb« für Blei und
»Hg« für Quecksilber.)
Hinweis zur Abfallvermeidung
Indem Sie die Lebensdauer Ihrer Altgeräte verlängern, tragen Sie dazu bei,
Ressourcen ezient zu nutzen und zusätzlichen Müll zu vermeiden. Die
Lebensdauer Ihrer Altgeräte können Sie verlängern, indem Sie defekte Altgeräte
reparieren lassen. Wenn sich Ihr Altgerät in gutem Zustand bendet, könnten Sie
es spenden, verschenken oder verkaufen.

16
DE
HINWEISE ZUR ENTSORGUNG
Wenn es in Ihrem Land eine gesetzliche Regelung
zur Entsorgung von elektrischen und elektronischen
Geräten gibt, weist dieses Symbol auf dem Produkt oder
auf der Verpackung darauf hin, dass dieses Produkt
nicht im Hausmüll entsorgt werden darf. Stattdessen
muss es zu einer Sammelstelle für das Recycling von
elektrischen und elektronischen Geräten gebracht
werden. Durch regelkonforme Entsorgung schützen
Sie die Umwelt und die Gesundheit Ihrer Mitmenschen
vor negativen Konsequenzen. Informationen zum
Recycling und zur Entsorgung dieses Produkts,
erhalten Sie von Ihrer örtlichen Verwaltung oder Ihrem
Hausmüllentsorgungsdienst.
HERSTELLER & IMPORTEUR (UK)
Hersteller:
Chal-Tec GmbH, Wallstraße 16, 10179 Berlin, Deutschland.
Importeur für Großbritannien:
Berlin Brands Group UK Limited
PO Box 42
272 Kensington High Street
London, W8 6ND
United Kingdom

17
EN
Dear Customer,
Congratulations on purchasing this device. Please read the
following instructions carefully and follow them to prevent
possible damages. We assume no liability for damage
caused by disregard of the instructions and improper use.
Scan the QR code to get access to the latest user manual
and more product information.
CONTENTS
Safety Instructions 18
Product Data Sheet 19
Product Description 21
Display 21
Control Panel 22
Installation 22
Use and Operation 24
Cleaning and Care 27
Disposal Considerations 28
Manufacturer & Importer (UK) 28
TECHNICAL DATA
Item number 10032787, 10032788 10032789, 10032790
Power supply 220-240 V~ 50/60 Hz
Power consumption 1000 W 2000 W
18
EN
SAFETY INSTRUCTIONS
• Check that the voltage indicates on the data plate corresponds with that of the
local network before connecting the appliance to the mains power supply.
• If the supply cord is damaged, it must be replaced by a quali ed engineer in
order to avoid a hazard.
• The heater must not be positioned directly under the power socket.
• Keep furniture, curtains and other ammable material at least 1 meter away
from the appliance.
• Keep out of reach of children and do not allow them to operate this appliance.
• This appliance is intended for household use only and should not be used for
industrial purposes.
• Do not operate this appliance after a malfunction or after being damaged in
any way.
• Repairs to electrical appliances should only be performed by a quali ed
electrician.
• Improper repairs may place user at serious risk.
• Do not run the mains cable under carpets, rugs, etc.
• Do not allow the mains cable to hang over sharp edges or come in contact
with hot surfaces.
• In order to avoid overheating, do not cover the heater.
• Do not use this heater with a programmer, timer, separate remote control
system or any other device that switches the heater on automatically, since a
re risk exists if the heater is covered or positioned incorrectly.
• Never immerse the product in water or any other liquid for any reasons.
• Do not use this heater in the immediate surroundings of a bath, a shower or a
swimming pool.
• Do not use the appliance outdoors.
• Do not use if you have wet hands.
• Never use the appliance on or near hot surfaces.
• Do not operate with a damaged cord.
• Before cleaning the appliance, make sure it is unplugged from the power and
that it is completely cooled.
• Do not clean the appliance with abrasive chemicals.
• Never use accessories that are not recommended or supplied by the
manufacturer. It could cause danger to the user or damage to the appliance.
• This device may be only used by children 8 years old or older and persons with
limited physical, sensory and mental capabilities and / or lack of experience
and knowledge, provided that they have been instructed in use of the device
by a responsible person who understands the associated risks.
• Children should be supervised to ensure that they do not play with the
appliance.
CAUTION
Risk of burns! Some parts of this product can become very hot and
cause burns. Particular attention has to be given where children
and vulnerable people are present.
19
EN
PRODUCT DATA SHEET
Model identier(s): 10032787, 10032788
Item Symbol Value Unit Item Unit
Heat output Type of heat input, for electric storage local space heaters
only
Nominal heat output P
nom
1.0 kW manual heat charge control, with integrated
thermostat
N/A
Minimum heat output
(indicative)
P
min
1.0 kW manual heat charge control with room and/or
outdoor temperature feedback
N/A
Maximum continuous heat
output
P
max,c
1.0 kW electronic heat charge control with room and/
or outdoor temperature feedback
N/A
Auxiliary electricity consumption fan assisted heat output N/A
At nominal heat output
(fan motor)
el
max
N/A kW Type of heat output/room temperature control (select one)
At minimum heat output
(fan motor)
el
min
N/A kW single stage heat output and no room
temperature control
no
In standby mode el
SB
0.00124 W Two or more manual stages, no room
temperature control
no
with mechanic thermostat room temperature
control
no
with electronic room temperature control no
electronic room temperature control plus
day timer
no
electronic room temperature control plus
week timer
yes
Other control options (multiple selections possible)
room temperature control, with presence
detection
no
room temperature control, with open window
detection
no
with distance control option no
with adaptive start control no
with working time limitation no
with black bulb sensor no
Contact details Chal-Tec GmbH, Wallstraße 16, 10179, Berlin, Germany
20
EN
Model identier(s): 10032789, 10032790
Item Symbol Value Unit Item Unit
Heat output Type of heat input, for electric storage local space heaters
only
Nominal heat output P
nom
2.0 kW manual heat charge control, with integrated
thermostat
N/A
Minimum heat output
(indicative)
P
min
2.0 kW manual heat charge control with room and/or
outdoor temperature feedback
N/A
Maximum continuous heat
output
P
max,c
2.0 kW electronic heat charge control with room and/
or outdoor temperature feedback
N/A
Auxiliary electricity consumption fan assisted heat output N/A
At nominal heat output
(fan motor)
el
max
N/A kW Type of heat output/room temperature control (select one)
At minimum heat output
(fan motor)
el
min
N/A kW single stage heat output and no room
temperature control
no
In standby mode el
SB
0.00124 W Two or more manual stages, no room
temperature control
no
with mechanic thermostat room temperature
control
no
with electronic room temperature control no
electronic room temperature control plus
day timer
no
electronic room temperature control plus
week timer
yes
Other control options (multiple selections possible)
room temperature control, with presence
detection
no
room temperature control, with open window
detection
no
with distance control option no
with adaptive start control no
with working time limitation no
with black bulb sensor no
Contact details Chal-Tec GmbH, Wallstraße 16, 10179, Berlin, Germany

21
EN
PRODUCT DESCRIPTION
1 Decoration glass
2 LCD screen
3 Operation board
4 Standing feet
DISPLAY
22
EN
CONTROL PANEL
Standby key: Switching
the appliance on/off
Setting temperature
level
Adjusting value up
Setting the time
Con rming an input /
entering menu
Adjusting value down
Setting the program
mode
INSTALLATION
Free-standing installation
1. Put the product upside down on a soft cotton cloth or carpet.
2. Mount the stand in the corresponding location of the lower part of the
product as shown above, and then x the randomly supplied screw at the
bottom of the product with a screwdriver and tighten the screw.

23
EN
Wall mount
1. Take out 4 brackets, 6 expansion screws and 6 screws out from the box, and
x 2 brackets onto the wall ccording to the distances between holes of the
bracket, as depicted in the picture below.
2. Fix 2 brackets onto the bottom of product, as depicted in the picture below.
Unit: mm
General view
General view
Mounting hole 1000 W
Mounting hole 2000 W
24
EN
3. Hold the side of the product, look at the position of the wall hole of the rear
cover, and slide the wall to the top of the slot, that is, the installation of the
wall is completed, as depicted in the picture below.
USE AND OPERATION
Switching the appliance on/off
Press the Standby key to exit the standby mode, the LCD display (2) shows current
ambient temperature and set time (default 00:00). Press the standby key again to
activate the standby mode.
Note: When pull out the plug, deletes the timer setting only and other function
settings remain unchanged.
Choosing operation mode
This heater provides two different operation modes:
• Free heating mode
• Programmed weekly heating mode
Press the “PROG” key and use up and down key to select the desired mode. Icon of
the selected mode starts to ash on the LCD display (2). Con rm the selection with
“OK” key.
25
EN
Free heating mode
Free heating mode provides three additional heating functions:
Comfort
Comfortable function is intended to heat the room to the set temperature.
To activate or deactivate Comfortable function, press the up or down key, if
activated icon
appears on the LCD display. Default heating
temperature is set to 35 °C, to adjust use the key
appears on the LCD display. Default heating
to set temperature.
Economy
Economy function is intended to maintain the set temperature. When the
ambient temperature is equal to the set temperature, heater automatically
switches from Comfortable to Economy mode. When the ambient temperature
is 5 °C lower than the set temperature, heater automatically switches from
Economy to Comfortable mode.
Frost-free
Frost-free function is intended to keep the minimum temperature of 5 °C
inside the room (this temperature cannot be adjusted). This function is set as a
default function for free heating mode. It activated automatically after entering
the free heating mode.
Note: When the ambient temperature is equal to the set temperature use the
up and down keys to toggle between Economy and Frost-free function.
Programmed weekly heating mode
1. To enter the weekly heating mode press PROG and move the cursor over the
clock icon at the bottom left hand side of the LCD screen and press OK.
2. Now the cursor is ashing over the days of the week (left side of menu).
3. Use the UP and DOWN arrows to choose your day to program 1 to 7.
4. Press the PROG key to con rm the day.
5. Use the OK arrows to select the heating function between Comfort, Economy
and Frost-free. You will see the cursor on the right side of the menu scroll
between the modes.
6. That is the rst 30 minute period selected and it moves on to the next 30
minute period.
7. Press the UP and DOWN arrow to choose the time.
8. Program each day of the week separately following the steps above.

26
EN
24-hour scale
24-hour scale:
Each square
represents
30 minutes
Squares on the outside and inside
of the scale indicate Comfortable
function.
Squares on the inside of the scale
indicate Frost-free function.
Squares on the outside of the scale
indicate Economy function.
The drawing illustrates the following setting:
0 - 6 am: Frost-free function
6 - 12 pm: Comfortable function
12 - 18 pm: Economy function.
Note:
1. The functions can’t be set simultaneously.
2. When pull out the plug, deletes the time setting only and other
function settings remain unchanged.
Setting temperature
1. To adjust the temperature press the
key. The temperature starts to ash
on the LCD display.
2. Use up and down keys to select the desired temperature.
3. Press the
Use up and down keys to select the desired temperature.
key again to con rm.

27
EN
Child lock function
1. To set the heater to a standby mode and apply the child lock function, simply
hold the OK key and wait for 5 seconds. You will see the padlock image lock on
the LCD screen.
2. To unlock, press the OK key for 5 seconds.
Setting time
To set the time press the TIME key, when the hour digits “12” starts to blink, use
up and down keys to set the hour and conrm by pressing TIME key. Now minute
digits “00” to blink, use up and down keys to set the minute and conrm the
minute by pressing TIME key again.
Open window function
1. The heater is tted with state of the art energy saving technology such as the
open window function.
2. To activate this function, press and hold the TEMP button for 5 seconds. The
window icon appears on the LCD screen.
3. When the open window icon appears, the heater will stop heating and window
icon ashes, as long as the room temperature drops by 4 °C in 20 minutes. If
want to heating and the open window function does not ash, please press
and hold the TEMP button for 5 seconds.
4. To deactivate the function, press and hold the TEMP key for 5 seconds
again,then the window icon will disappear.
CLEANING AND CARE
Note: Turn off the unit and unplug it from the power outlet. Wait until the unit
has completely cooled down before cleaning it.
• Use a vacuum cleaner to clean the ventilation slots and grilles.
• Remove dust on the outside surfaces with a damp (not wet) cloth.
• Do not use strong cleaning agents or abrasives.
• Do not spray the device with liquids or immerse it in water or other liquids.
• Never open the heater housing.
28
EN
DISPOSAL CONSIDERATIONS
If there is a legal regulation for the disposal of electrical
and electronic devices in your country, this symbol on the
product or on the packaging indicates that this product
must not be disposed of with household waste. Instead,
it must be taken to a collection point for the recycling
of electrical and electronic equipment. By disposing of
it in accordance with the rules, you are protecting the
environment and the health of your fellow human beings
from negative consequences. For information about the
recycling and disposal of this product, please contact your
local authority or your household waste disposal service.
MANUFACTURER & IMPORTER (UK)
Manufacturer:
Chal-Tec GmbH, Wallstrasse 16, 10179 Berlin, Germany.
Importer for Great Britain:
Berlin Brands Group UK Limited
PO Box 42
272 Kensington High Street
London, W8 6ND
United Kingdom

29
ES
Estimado cliente:
Le felicitamos por la adquisición de este producto. Lea
atentamente el siguiente manual y siga cuidadosamente las
instrucciones de uso con el n de evitar posibles daños. La
empresa no se responsabiliza de los daños ocasionados por
un uso indebido del producto o por haber desatendido las
indicaciones de seguridad. Escanee el siguiente código QR
para obtener acceso al manual de usuario más reciente y
otra información sobre el producto.
ÍNDICE
Indicaciones de seguridad 30
Ficha técnica del producto 31
Vista general del aparato 33
Pantalla de visualización 33
Panel de control 34
Montaje 34
Puesta en funcionamiento y manejo 36
Limpieza y cuidado 39
Indicaciones sobre la retirada del aparato 40
Fabricante e importador (Reino Unido) 40
DATOS TÉCNICOS
Número de artículo 10032787, 10032788 10032789, 10032790
Alimentación 220-240 V~ 50/60 Hz
Potencia 1000 W 2000 W

30
ES
INDICACIONES DE SEGURIDAD
• Antes de su utilización, compruebe la tensión indicada en la placa técnica del
aparato y conéctelo solamente a tomas de corriente con la misma tensión.
• Si el cable de alimentación está dañado, contacte con un técnico cuali cado
para su sustitución.
• No coloque el calefactor justo bajo la toma de corriente.
• Mantenga un metro de distancia con materiales in amables como muebles,
cortinas o similares.
• Utilice el aparato exclusivamente fuera del alcance de los niños. Los niños solo
podrán utilizar el aparato bajo supervisión.
• Este aparato no es indicado para uso comercial, sino para uso doméstico o
entornos similares.
• No utilice el aparato si presenta fallos en el funcionamiento o si ha sufrido
cualquier tipo de daño.
• Las reparaciones deberán ser realizadas unicamente por personal formado.
• Las reparaciones erróneas o por cuenta propia suponen un riesgo de lesiones.
• No pase el cable de alimentación por debajo de alfombras o felpudos.
• Asegúrese de que el cable de alimentación no pase por bordes a lados o
super cies calientes.
• No cubra el aparato de calefacción para evitar sobrecalentamientos.
• No utilice el aparato con un temporizador externo, una toma de corriente con
control remoto u otro aparato que encienda y apague automáticamente la
calefacción.
• Nunca sumerja el aparato en agua ni en ningún otro líquido.
• No utilice el aparato cerca de bañeras, duchas o piscinas.
• No utilice el aparato al aire libre.
• No utilice el aparato con las manos mojadas.
• No utilice el aparato encima o cerca de super cies calientes.
• No utilice el aparato con un cable de alimentación dañado.
• Desenchufe el aparato y deje que se enfríe totalmente antes de limpiarlo.
• No utilice productos abrasivos para la limpieza.
• Utilice solamente accesorios que hayan sido expresamente autorizados por el
fabricante.
• Los niños mayores de 8 años y las personas con discapacidad física, sensorial
o psíquica pueden utilizar el aparato si han sido previamente instruidos por
una persona responsable sobre el funcionamiento del mismo y conocen las
funciones, las indicaciones de seguridad y los riesgos asociados.
• No permita que niños jueguen con el aparato.
ATENCIÓN
¡Peligro de quemaduras! Algunos componentes del aparato
pueden alcanzar temperaturas muy elevadas. Asegúrese de que ni
usted ni los niños se quemen.
31
ES
FICHA TÉCNICA DEL PRODUCTO
Denominación del modelo 10032787, 10032788
Datos Símbolo Valor Unidad Datos Unidad
Potencia caloríca Solo en calefactores eléctricos para habitaciones
individuales: tipo de regulación del suministro de calor
Potencia caloríca nominal P
nom
1,0 kW Regulación manual del suministro caloríco
con termostato integrado
N/A
Potencia caloríca mínima
(Valor orientativo)
P
mín.
1,0 kW Regulación manual del suministro caloríco
con reacción de la temperatura ambiente y/o
exterior
N/A
Potencia caloríca
continuada máxima
P
máx
1,0 kW Regulación electrónica del suministro
caloríco con reacción de la temperatura
ambiente y/o exterior
N/A
Consumo de corriente auxiliar Emisión de calor con soporte de ventilador N/A
Con potencia caloríca
nominal
(motor del ventilador)
el
máx
N/A kW Tipo de potencia caloríca/controles de temperatura
ambiente
Con potencia caloríca
mínima
(motor del ventilador)
el
mín
N/A kW Potencia caloríca de nivel único, sin control
de temperatura ambiente
no
En modo de espera el
SB
0,00124 W Dos o más niveles ajustables manualmente,
sin control de temperatura ambiente
no
Controles de temperatura ambiente con
termostato mecánico
no
Con control de temperatura ambiente
electrónico
no
Con control de temperatura ambiente
electrónico y regulación de las horas del día
no
Con control de temperatura ambiente
electrónico y regulación de los días de la
semana
sí
Otras opciones de regulación
Controles de temperatura ambiente con
detección de presencia
no
Controles de temperatura ambiente con
detección de ventana abierta
no
Con opción de mando a distancia no
Con regulación adaptativa del inicio de la
calefacción
no
Con limitación de tiempo de funcionamiento no
Con sensor de bola negra no
Datos de contacto Chal-Tec GmbH, Wallstraße 16, 10179 Berlín, Alemania.
32
ES
Denominación del modelo 10032789, 10032790
Datos Símbolo Valor Unidad Datos Unidad
Potencia caloríca Solo en calefactores eléctricos para habitaciones
individuales: tipo de regulación del suministro de calor
Potencia caloríca nominal P
nom
2,0 kW Regulación manual del suministro caloríco
con termostato integrado
N/A
Potencia caloríca mínima
(valor de referencia)
P
mín.
2,0 kW Regulación manual del suministro caloríco
con reacción de la temperatura ambiente y/o
exterior
N/A
Potencia caloríca
continuada máxima
P
máx
2,0 kW Regulación electrónica del suministro
caloríco con reacción de la temperatura
ambiente y/o exterior
N/A
Consumo de corriente auxiliar Emisión de calor con soporte de ventilador N/A
Con potencia caloríca
nominal
(motor del ventilador)
el
máx
N/A kW Tipo de potencia caloríca/controles de temperatura
ambiente
Con potencia caloríca
mínima
(motor del ventilador)
el
mín
N/A kW Potencia caloríca de nivel único, sin control
de temperatura ambiente
no
En modo de espera el
SB
0,00124 W Dos o más niveles ajustables manualmente,
sin control de temperatura ambiente
no
Controles de temperatura ambiente con
termostato mecánico
no
Con control de temperatura ambiente
electrónico
no
Con control de temperatura ambiente
electrónico y regulación de las horas del día
no
Con control de temperatura ambiente
electrónico y regulación de los días de la
semana
sí
Otras opciones de regulación
Controles de temperatura ambiente con
detección de presencia
no
Controles de temperatura ambiente con
detección de ventana abierta
no
Con opción de mando a distancia no
Con regulación adaptativa del inicio de la
calefacción
no
Con limitación de tiempo de funcionamiento no
Con sensor de bola negra no
Datos de contacto Chal-Tec GmbH, Wallstraße 16, 10179 Berlín, Alemania.

33
ES
VISTA GENERAL DEL APARATO
1 Panel decorativo de
cristal
2 Pantalla LCD
3 Panel de control
4 Patas
PANTALLA DE VISUALIZACIÓN
34
ES
PANEL DE CONTROL
Tecla Standby:
Encender/apagar el
aparato
Ajustes de temperatura Aumentar el valor
Ajustar la hora
Con rmar entrada de
datos / Llamar a menú
Disminuir valor
Ajustes de programa
MONTAJE
Montaje del soporte
1. Ponga el aparato boca abajo. Ponga el aparato sobre un trapo suave o
alfombra.
2. Ponga la pata en el lugar correcto en el lado inferior del aparato (véase
imágen abajo). Use para esto los tornillos incluidos. Apriete los tornillos con
un destornillador.
35
ES
Montaje en pared
1. Usted necesita 4 soportes, 6 tornillos para espigas y 6 tornillos más de la caja.
Fije dos soportes en la pared. Marque los agujeros (véase imagen abajo)
2. Coloque 2 soportes en el lado inferior del aparato.
Unidad: mm
Imagen completa
Imagen completa
Agujero de montaje 1000 W
Agujero de montaje 2000 W
36
ES
3. Sujete el aparato en el lateral. Mire la posición de los agujeros en el lado
trasero de la carcasa. Coloque el aparato sobre los soportes.
PUESTA EN FUNCIONAMIENTO Y MANEJO
Encender/apagar
Pulse la tecla Standby para abandonar el modo Standby. El indicador LCD (2)
muestra la temperatura de ambiente actual y la hora (preajuste 00:00). Pulsando
de nuevo esta tecla, el aparato regresa al modo Standby.
Nota: si extrae la clavija de red, se borra solamente el ajuste del temporizador.
Todos los demás ajustes de funcionamiento permanecen.
Seleccionar el modo de servicio
La calefacción dispone de dos modos de calefacción diferentes:
• Modo de calefacción libre
• Modo de calefacción semanal programado
Pulse el botón "PROG" y seleccione el modo deseado con los botones de dirección.
El símbolo correspondiente parpadea en el indicador. Con rme la selección con
"OK".
37
ES
Modo de calefacción libre
Este modo incluye varias funciones de calefacción:
Confort
Con la función de confort la habitación se calienta a la temperatura deseada.
Para activar pulse los botones de dirección hasta que se visualice el símbolo
. La temperatura predetermimada es de 35 °C. Pulse para
ajustar la tecla
.
Ahorro
Con la función ahorro se mantiene la temperatura deseada. Si la temperatura
ajustada es la temperatura ambiente, el aparato cambia de forma automática
de confort a ahorro. Si la temperatura ambiente es 5 °C más baja que la
temperatura ajustada, el aparato cambia de forma automática otra vez a
confort.
Libre de
escarcha
La función de libre de escarcha es adecuada para mantener una temperatura
mínima de 5 °C (esta temperatura no es ajustable). Esta es la función
preajustada en modo de calefacción libre. La función se inicia después de
activar el modo de calefacción libre.
Indicaciones: si la temperatura ambiente corresponde a la temperatura
ajustada, con los botones de dirección se puede cambiar de ahorro a libre de
escarcha.
Modo de calefacción semanal programado
1. Para acceder al modo de calefacción semanal pulse "PROG" y mueva el cursor
sobre el símbolo de reloj abajo a la izquierda en la pantalla y pulse "OK".
2. Ahora parpadea el cursor sobre los días de la semana (lado izquierdo del
menú).
3. Utilice los botones de dirección ARRIBA/ABAJO para seleccionar su día para los
programas 1 hasta 7.
4. Pulse la tecla PROG para conrmar el día.
5. Utilice las echas de OK para seleccionar la función de calefacción entre
Comfort (confort), Economy (ahorro de energía) y Frostfree (libre de escarcha).
Usted verá el cursor en el lado derecho del menú entre los modos.
6. Con ello ha seleccionado los primeros ciclos de 30 minutos. El cursor se mueve
al siguiente ciclo de 30 minutos.
7. Pulse los botones de dirección ARRIBA/ABAJO para seleccionar el reloj.
8. Programe cada día de la semana por separado siguiendo los pasos de arriba.

38
ES
Escala de 24 horas
Escala de 24
horas:
Cada cuadrado
corresponde a
30 minutos.
Los cuadrados interiores y exteriores
muestran la función confort.
Los cuadrados interiores muestran
la función de libre de escarcha.
Los cuadrados exteriores muestran
la función ahorro.
La imagen de ejemplo muestra los siguientes ajustes:
0 - 6 horas: función libre de escarcha
6 - 12 horas: función de confort
12 - 18 horas: función ahorro
Nota:
1. Las funciones no se pueden ajustar al mismo tiempo.
2. Si extrae la clavija de red solo se borra el ajuste del temporizador.
Todos los demás ajustes de funciones se mantienen.
Ajustar la temperatura
1. Pulse la tecla
. La indicación de temperatura comienza a parpadear.
2. Seleccione la temperatura deseada con los botones de dirección.
3. Pulse de nuevo para con rmar
Seleccione la temperatura deseada con los botones de dirección.
.

39
ES
Cierre / seguro para niños
1. Para conmutar la calefacción en el modo Standby con seguro para niños
activado, pulse y mantenga la tecla OK durante 5 segundos. En la pantalla
aparecerá el símbolo de cerradura.
2. Para desbloquear pulse primero la tecla "OK" durante 5 segundos.
Ajustar la hora
Para ajustar la hora pulse la tecla TIME y las horas comienzan a parpadear. Ajuste
las horas con los botones de dirección y conrme esto con la tecla de reloj.
Ahora parpadean los minutos. Ajuste los minutos con los botones de dirección y
conrme la entrada de datos de nuevo con la tecla de reloj.
Función "ventana abierta"
1. La calefacción está equipada con tecnología moderna de ahorro energético,
como p.ej. la función de "ventana abierta".
2. Para activar esta función, mantenga pulsada la tecla TEMP durante 5
segundos. El símbolo de ventana se visualiza en la pantalla.
3. Si se visualiza el símbolo del modo ventana y la temperatura ambiente cae
a 4 ºC en un periodo de 20 minutos, el aparato termina de calentar y en la
pantalla parpadea el símbolo de modo ventana. Si desea continuar con el
calentamiento y la función "ventana abierta" no parpadea, pulse la tecla TEMP
durante 5 segundos.
4. Para desactivar la función pulse de nuevo la tecla TEMP durante 5 segundos,
entonces desaparece el símbolo de modo ventana.
LIMPIEZA Y CUIDADO
Nota: apague el aparato y desconecte el enchufe de la toma de corriente.
Espere hasta que el aparato se haya enfriado completamente antes de
limpiarlo.
• Para la limpieza de las ranuras de ventilación y rejillas, utilice una aspiradora.
• Retire el polvo de las supercies exteriores con un paño húmedo (no mojado).
• No utilice productos de limpieza agresivos ni abrasivos.
• Nunca sumerja el aparato en agua ni en ningún otro líquido ni lo pulverice con
líquidos.
• Nunca abra la carcasa de la calefacción.
40
ES
INDICACIONES SOBRE LA RETIRADA DEL APARATO
Si en su país existe una disposición legal relativa a la
eliminación de aparatos eléctricos y electrónicos, este
símbolo estampado en el producto o en el embalaje
advierte que no debe eliminarse como residuo doméstico.
En lugar de ello, debe depositarse en un punto de
recogida de reciclaje de aparatos eléctricos y electrónicos.
Una retirada de aparatos conforme a las leyes contribuye
a proteger el medio ambiente y a las personas a su
alrededor frente a posibles consecuencias perjudiciales
para la salud. Para obtener información más detallada
sobre el reciclaje de este producto, póngase en contacto
con su ayuntamiento o con el servicio de eliminación de
residuos domésticos.
FABRICANTE E IMPORTADOR (REINO UNIDO)
Fabricante:
Chal-Tec GmbH, Wallstraße 16, 10179 Berlín, Alemania.
Importador para Gran Bretaña:
Berlin Brands Group UK Limited
PO Box 42
272 Kensington High Street
London, W8 6ND
United Kingdom

41
FR
Cher client, chère cliente,
Toutes nos félicitations pour l’acquisition de ce nouvel
appareil. Lisez attentivement les indications suivantes et
suivez-les pour éviter d'éventuels dommages. Nous ne
saurions être tenus pour responsables des dommages dus
au non-respect des consignes et à la mauvaise utilisation
de l’appareil. Scannez le QR-Code pour obtenir la dernière
version du mode d'emploi ainsi que d'autres informations
concernant le produit.
SOMMAIRE
Consignes de sécurité 42
Fiche de données produit 43
Aperçu de l‘appareil 45
Achage 45
Panneau de commande 46
Montage 46
Mise en marche et utilisation 48
Nettoyage et entretien 51
Informations sur le recyclage 52
Fabricant et importateur (UK) 52
FICHE TECHNIQUE
Numéro d'article 10032787, 10032788 10032789, 10032790
Alimentation 220-240 V~ 50/60 Hz
Puissance 1000 W 2000 W

42
FR
CONSIGNES DE SÉCURITÉ
• Avant toute utilisation, véri ez la tension sur l'étiquette de l'appareil et
connectez l'appareil uniquement à des prises qui correspondent à sa tension.
• Si le cordon d'alimentation est endommagé, faites-le remplacer par un
spécialiste quali é.
• Ne placez pas le radiateur directement sous la prise.
• Gardez une distance d'un mètre avec des matériaux in ammables tels que des
meubles, des rideaux ou tout autre objet similaire.
• Utilisez l'appareil hors de portée des enfants. Les enfants ne sont autorisés à
utiliser l'appareil que sous surveillance.
• L'appareil n'est pas destiné à un usage commercial, mais uniquement à un
usage domestique et à des environnements similaires.
• N'utilisez pas l'appareil en cas de dysfonctionnement ou endommagement de
quelque façon que ce soit.
• Les réparations ne peuvent être effectuées que par des spécialistes quali és.
• Les réparations effectuées de manière incorrecte ou de manière indépendante
représentent un risque de blessure.
• Ne faites pas passer le câble secteur sous une moquette ou un tapis.
• Assurez-vous que le cordon d'alimentation ne passe pas sur des bords
tranchants ou des surfaces chaudes.
• Ne recouvrez pas le radiateur pour éviter toute surchauffe.
• N'utilisez pas l'appareil avec une minuterie externe, une prise télécommandée
ou tout autre dispositif permettant d'allumer et d'éteindre automatiquement
le radiateur.
• Ne plongez pas non plus l'appareil dans l'eau ou dans d'autres liquides.
• N'utilisez pas l'appareil à proximité d'une baignoire, d'une douche ou d'une
piscine.
• N'utilisez pas l'appareil à l'extérieur.
• N'utilisez pas l'appareil avec les mains mouillées.
• N'utilisez pas l'appareil sur ou à proximité de surfaces chaudes.
• N'utilisez pas l'appareil si le câble est endommagé.
• Avant le nettoyage, débranchez la che de la prise et laissez l'appareil refroidir
complètement.
• N'utilisez pas de produits abrasifs pour le nettoyage.
• N'utilisez que des accessoires expressément approuvés par le fabricant.
• Les enfants à partir de 8 ans et les personnes souffrant de handicaps
mentaux, sensoriels et physiques ne peuvent utiliser l'appareil que s'ils ont été
parfaitement familiarisés avec les fonctions et les précautions de sécurité par
une personne responsable et s'ils comprennent les risques associés.
• Veillez à ce que les enfants ne jouent pas avec l'appareil.
ATTENTION
Risque de brûlure ! Certaines parties de l'appareil peuvent être très
chaudes. Faites attention à ne pas vous brûler vous-même ni vos
enfants.
43
FR
FICHE DE DONNÉES PRODUIT
Référence du modèle 10032787, 10032788
Donnée Symbole Valeur Unité Donnée Unité
Puissance thermique Uniquement pour les radiateurs électriques à
accumulation : type de contrôle de l'apport de chaleur
Puissance thermique
nominale
P
nom
1,0 kW Contrôle manuel de l'apport de chaleur avec
un thermostat intégré
n.c.
Puissance thermique
minimale
(valeur de référence)
P
min
1,0 kW Contrôle manuel de l'apport de chaleur avec
retour de la température ambiante et/ou
extérieure
n.c.
Puissance thermique
continue maximale
P
max
1,0 kW Régulation électronique de l'apport de chaleur
avec retour de la température ambiante et/
ou extérieure
n.c.
Consommation d'énergie auxiliaire Dissipation thermique avec assistance par
ventilateur
n.c.
À puissance thermique
nominale
(moteur ventilateur)
el
max
n.c. kW Type de puissance thermique / régulation de la
température ambiante
À puissance thermique
minimale
(moteur ventilateur)
el
min
n.c. kW Puissance thermique à une vitesse, pas de
contrôle de la température ambiante
non
En veille el
SB
0,00124 W Deux vitesses ou plus réglables
manuellement, pas de contrôle de la
température ambiante
non
Contrôle de la température ambiante par
thermostat mécanique
non
Contrôle électronique de la température
ambiante
non
Contrôle électronique de la température
ambiante et réglage de l'heure de la journée
non
Contrôle électronique de la température
ambiante et réglage des jours de la semaine
oui
Autres options de réglage
Régulation de la température ambiante avec
détection de présence
non
Régulation de la température ambiante avec
détection de fenêtre ouverte
non
Avec option télécommande non
Avec contrôle adaptatif du démarrage du
chauffage
non
Avec limite de durée de fonctionnement non
Avec capteur à boule noire non
Coordonnées de contact Chal-Tec GmbH, Wallstraße 16, 10179, Berlin, Allemagne
44
FR
Référence du modèle 10032789, 10032790
Donnée Symbole Valeur Unité Donnée Unité
Puissance thermique Uniquement pour les radiateurs électriques à
accumulation : type de contrôle de l'apport de chaleur
Puissance thermique
nominale
P
nom
2,0 kW Contrôle manuel de l'apport de chaleur avec
un thermostat intégré
n.c.
Puissance thermique
minimale (valeur
indicative)
P
min
2,0 kW Contrôle manuel de l'apport de chaleur avec
retour de la température ambiante et/ou
extérieure
n.c.
Puissance thermique
continue maximale
P
max
2,0 kW Régulation électronique de l'apport de chaleur
avec retour de la température ambiante et/
ou extérieure
n.c.
Consommation d'énergie auxiliaire Dissipation thermique avec assistance par
ventilateur
n.c.
À puissance thermique
nominale
(moteur ventilateur)
el
max
n.c. kW Type de puissance thermique / régulation de la
température ambiante
À puissance thermique
minimale
(moteur ventilateur)
el
min
n.c. kW Puissance thermique à une vitesse, pas de
contrôle de la température ambiante
non
En veille el
SB
0,00124 W Deux vitesses ou plus réglables
manuellement, pas de contrôle de la
température ambiante
non
Contrôle de la température ambiante par
thermostat mécanique
non
Contrôle électronique de la température
ambiante
non
Contrôle électronique de la température
ambiante et réglage de l'heure de la journée
non
Contrôle électronique de la température
ambiante et réglage des jours de la semaine
oui
Autres options de réglage
Régulation de la température ambiante avec
détection de présence
non
Régulation de la température ambiante avec
détection de fenêtre ouverte
non
Avec option télécommande non
Avec contrôle adaptatif du démarrage du
chauffage
non
Avec limite de durée de fonctionnement non
Avec capteur à boule noire non
Coordonnées de contact Chal-Tec GmbH, Wallstraße 16, 10179, Berlin, Allemagne
45
FR
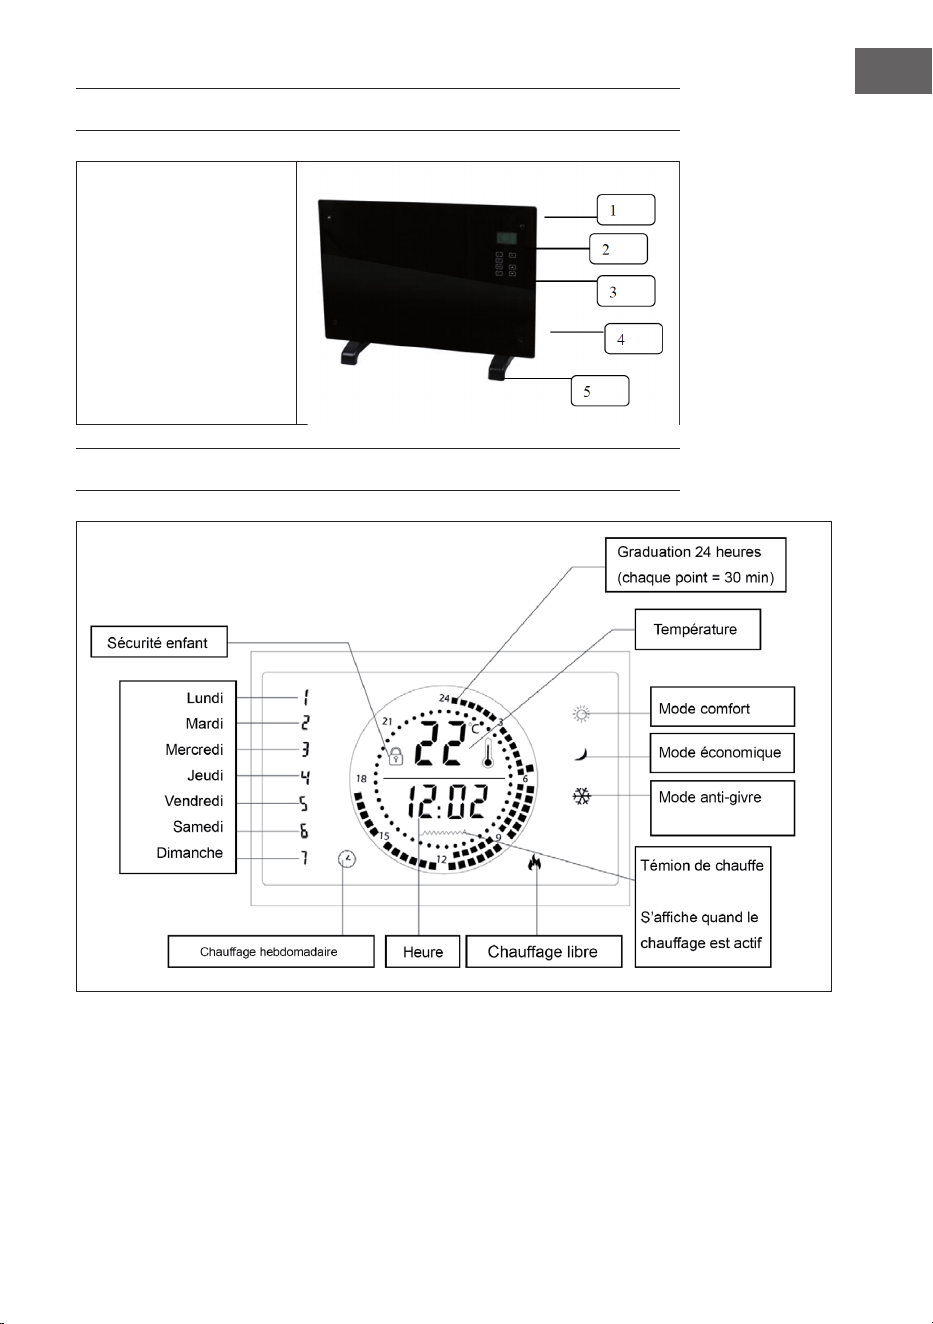
APERÇU DE L'APPAREIL
1 Verre décoratif
2 Achage LCD
3 Panneau de
commande
4 Pieds de support
AFFICHAGE

46
FR
PANNEAU DE COMMANDE
Touche de veille :
Allumer / éteindre
l'appareil
Réglage de la
température
Augmenter la valeur
Réglage de l'heure
Con rmer la saisie /
Accéder au menu
Diminuer la valeur
Paramètres du pro-
gramme
MONTAGE
Montage en position debout
1. Retournez l'appareil. Placez-le sur une serviette douce ou un tapis.
2. Placez les pieds aux endroits prévus sur la face intérieure de l'appareil (voir
illustration ci-dessous). Pour ce faire, utilisez les vis fournies. Serrez les vis avec
un tournevis.
47
FR
Montage mural
1. Vous avez besoin de 4 xations, 6 vis à cheville et 6 autres vis de la boîte. Fixez
2 xations au mur. Marquez les points de vissage requis (voir illustration ci-
dessous)
2. Fixez 2 xations sur la face intérieure de l'appareil.
Unité : mm
Aperçu général
Aperçu général
Forage 1000 W
Forage 2000 W

48
FR
3. Placez l'appareil sur le côté. Repérez la position des trous à l'arrière du boîtier.
Posez l'appareil sur les xations.
MISE EN MARCHE ET UTILISATION
Allumer / éteindre
Appuyez sur la touche de veille pour quitter le mode de veille. L'écran LCD (2)
a che la température ambiante actuelle et l'heure (par défaut 00:00). En appuyant
à nouveau sur cette touche, l'appareil passe à nouveau en mode de veille.
Remarque : Si vous retirez la che secteur, seuls les réglages de la minuterie
seront supprimés. Tous les réglages des autres fonctions sont conservés.
Choisir le mode de fonctionnement
Le radiateur dispose de deux modes de chauffage différents :
• Mode de chauffage libre
• Mode de chauffage hebdomadaire programmable
Appuyez sur " PROG " et choisissez le mode souhaité avec les touches échées. Le
symbole correspondant clignote sur l'écran. Con rmez votre choix avec la touche
" OK ".
49
FR
Mode de chauffage libre
Ce mode comporte plusieurs fonctions de chauffage :
Confort
Avec la fonction Confort, la pièce est chauffée à la température souhaitée.
Pour l’activer, appuyez sur les touches échées jusqu'à ce que le symbole
s'ache. La température par défaut est de 35 °C. Pour
régler, appuyez sur la touche
.
Économique
La fonction Économique permet de maintenir la température préréglée. Si
la température préréglée correspond à la température ambiante, l'appareil
passe automatiquement du mode Confort à Économique. Si la température
ambiante est inférieure de 5 °C à la température préréglée, l'appareil repasse
automatiquement en mode Confort.
Hors gel
La fonction Hors gel permet de maintenir une température minimale de 5 °C
(cette température ne peut être modiée). Il s'agit de la fonction par défaut
dans le mode de chauffage libre. Cette fonction se lance par défaut après
l'activation du mode de chauffage libre.
Remarque : si la température ambiante correspond à la température préréglée,
il est possible de passer de la fonction Économique à la fonction Hors gel à l'aide
des touches échées.
Mode de chauffage hebdomadaire programmable
1. Pour passer en mode de chauffage hebdomadaire, appuyez sur la touche
" PROG " et déplacez le curseur sur le symbole de l'heure dans le coin inférieur
gauche de l'écran et appuyez sur la touche " OK ".
2. Le curseur glignote au-dessus du jour de la semaine (côté gauche du menu).
3. Utilisez les touches échées BAS/HAUT pour choisir le jour pour les
programmes 1 à 7.
4. Appuyez sur la touche PROG pour conrmer le jour.
5. Utilisez la èche OK pour choisir entre les fonctions Comfort (confort),
Economy (économique) et Frost-free (hors gel). Le curseur apparait à droite du
menu déroulant entre les modes.
6. De cette manière vous avez sélectionné le premier cycle de 30 minutes. Le
curseur se déplace ensuite sur le prochain cycle de 30 minutes.
7. Appuyez sur les touches échées HAUT/BAS pour sélectionner l'heure.
8. Suivez les étapes ci-dessus pour programmer individuellement chaque jour de
la semaine.
50
FR
Échelle de 24 heures
Échelle de
24 heures :
chaque case
correspond à
30 minutes.
Les cases intérieures et extérieures
indiquent la fonction Confort.
Les cases intérieures indiquent la
fonction Hors gel.
Les cases exétrieures indiquent la
fonction économique.
L'illustration d'exemple indique les réglages suivants :
0 - 6 heures: fonction Hors gel
6 - 12 heures : fonction Confort
12 - 18 heures: fonction Économique
Remarque :
1. Il n'est pas possible de régler plusieurs fonctions en même temps.
2. Lorsque vous retirez la che, seuls les réglages de la minuterie
seront supprimés. Tous les réglages des autres fonctions sont
conservés.
Réglage de la température
1. Appuyez sur la touche
. L'a chage de la température commence à
clignoter.
2. Réglez la température souhaitée à l'aide des touches échées.
3. Appuyez à nouveau sur
Réglez la température souhaitée à l'aide des touches échées.
pour con rmer.

51
FR
Verrouillage / Sécurité enfant
1. Pour faire passer le radiateur en mode veille avec la sécurité enfant activée,
maintenez enfoncée la touche OK pendant 5 secondes. Le symbole de
verrouillage apparaît à l'écran.
2. Pour déverrouiller, maintenez d'abord la touche " OK " enfoncée pendant
5 secondes.
Réglage de l'heure
Pour régler l'heure, appuyez sur la touche TIME. L'achage de l'heure commence
à clignoter. Réglez l'heure avec les touches échées et conrmez avec la touche
d'heure. À présent, l'achage des minutes clignote. Réglez les minutes avec les
touches échées et conrmez à nouveau avec la touche d'heure.
Fonction " Fenêtre ouverte "
1. Le radiateur est équipé d'une technologie moderne permettant des
économies d'énergie, comme la fonction " Fenêtre ouverte ".
2. Pour activer cette fonction, maintenez enfoncée la touche TEMP pendant
5 secondes. Le symbole du mode Fenêtre apparaît à l'écran.
3. Lorsque le symbole du mode Fenêtre est aché à l'écran et que la
température ambiante chute de 4 °C en 20 minutes, l'appareil arrête de
chauffer et le symbole du mode Fenêtre clignote à l'écran. Si vous souhaitez
que le radiateur continue à chauffer et que la fonction " Fenêtre ouverte " ne
clignote pas, maintenez la touche TEMP enfoncée pendant 5 secondes.
4. Pour désactiver la fonction, maintenez la touche TEMP enfoncée pendant
5 secondes. Le symbole du mode Fenêtre disparaît.
NETTOYAGE ET ENTRETIEN
Remarque : Éteignez l'appareil et débranchez la che de la prise. Attendez que
l'appareil refroidisse complètement avant de le nettoyer.
• Utilisez un aspirateur pour nettoyer les fentes d'aération et la grille.
• Enlevez la poussière sur les surfaces extérieures avec un chiffon humide (non
mouillé).
• N'utilisez pas de nettoyants chimiques ou de produits abrasifs agressifs.
• Ne vaporisez ou n'immergez pas l'appareil dans l'eau ou tout autre liquide.
• N'ouvrez jamais le boîtier du radiateur.

52
FR
INFORMATIONS SUR LE RECYCLAGE
Si l'élimination des appareils électriques et électroniques
est réglementée dans votre pays, ce symbole sur le
produit ou sur l'emballage indique qu'il ne doit pas être
mis au rebut avec les ordures ménagères. Vous devez
l'acheminer vers un point de collecte pour le recyclage
des appareils électriques et électroniques. En respectant
des règles de recyclage, vous protégez l'environnement et
la santé de vos semblables des conséquences négatives.
Pour plus d'informations sur le recyclage et la mise au
rebut de ce produit, contactez votre autorité locale ou
votre service d'élimination des déchets ménagers.
FABRICANT ET IMPORTATEUR (UK)
Fabricant :
Chal-Tec GmbH, Wallstraße 16, 10179 Berlin, Allemagne.
Importateur pour la Grande Bretagne :
Berlin Brands Group UK Limited
PO Box 42
272 Kensington High Street
London, W8 6ND
United Kingdom

53
IT
Gentile cliente,
la ringraziamo per l'acquisto del dispositivo. La preghiamo
di leggere attentamente le seguenti istruzioni per l’uso e
di seguirle per evitare possibili danni. Non ci assumiamo
alcuna responsabilità per danni scaturiti da una mancata
osservanza delle avvertenze di sicurezza e da un uso
improprio del dispositivo. Scansionare il seguente codice
QR per accedere al manuale d’uso più recente e ricevere
informazioni sul prodotto.
INDICE
Avvertenze di sicurezza 54
Scheda informativa del prodotto 55
Descrizione del dispositivo 57
Indicazioni del display 57
Pannello di controllo 58
Montaggio 58
Messa in funzione e utilizzo 60
Pulizia e manutenzione 63
Avviso di smaltimento 64
Produttore e importatore (UK) 64
DATI TECNICI
Numero articolo 10032787, 10032788 10032789, 10032790
Alimentazione 220-240 V~ 50/60 Hz
Potenza 1000 W 2000 W
54
IT
AVVERTENZE DI SICUREZZA
• Prima dell'utilizzo, veri care la tensione sulla targhetta del dispositivo e
collegarlo solo a prese con tensione equivalente.
• Se il cavo d'alimentazione è danneggiato, farlo sostituire da un tecnico
quali cato.
• Non posizionare la stufa direttamente sotto a una presa elettrica.
• Tenere almeno un metro di distanza da materiali in ammabili come mobili,
tende o similari.
• Utilizzare il dispositivo fuori dalla portata dei bambini. I bambini possono
usare il dispositivo solo con la dovuta supervisione.
• Il dispositivo non è adatto a uso commerciale, ma solo domestico e in contesti
simili.
• Non utilizzare il dispositivo se presenta malfunzionamenti o se è stato
danneggiato in qualche modo.
• Eventuali riparazioni devono essere eseguite solo da personale quali cato.
• Riparazioni errate o realizzate autonomamente possono rappresentare un
rischio di lesione.
• Non far passare il cavo di alimentazione sotto a tappeti o passatoie.
• Assicurarsi che il cavo d'alimentazione non passi su bordi taglienti o super ci
bollenti.
• Per evitare il surriscaldamento, non coprire la stufa.
• Non utilizzare il dispositivo con un timer esterno, una presa di corrente con
comando a distanza o un altro dispositivo che accende e spegne la stufa
automaticamente.
• Non immergere il dispositivo in acqua o altri liquidi.
• Non utilizzare il dispositivo vicino a vasche, docce o piscine.
• Non utilizzare il dispositivo all’aperto.
• Non toccare il dispositivo con le mani bagnate.
• Non utilizzare il dispositivo sopra o vicino a super ci bollenti.
• Non utilizzare il dispositivo con cavo di alimentazione danneggiato.
• Prima della pulizia, staccare la spina e lasciar raffreddare completamente il
dispositivo.
• Non utilizzare prodotti abrasivi per la pulizia.
• Utilizzare solo accessori espressamente autorizzati dal produttore.
• Bambini a partire da 8 anni e persone con limitate capacità siche, psichiche
e sensoriali possono utilizzare il dispositivo solo se sono stati istruiti da una
persona responsabile della loro supervisione sulle modalità d'uso e sulle
procedure di sicurezza e comprendono i rischi associati.
• Assicurarsi che i bambini non giochino con il dispositivo.
ATTENZIONE
Pericolo di ustioni! Alcuni componenti possono diventare
estremamente caldi. Assicurarsi che nessuno si ustioni. Prestare
particolare attenzione ai bambini.
55
IT
SCHEDA INFORMATIVA DEL PRODOTTO
Contrassegno/i del
modello
10032787, 10032788
Indicazione Simbolo Valore Unità Indicazione Unità
Potenza termica Solo per dispositivi elettrici di accumulo di calore per
locali singoli: tipo di regolazione dell'ausso di calore
Potenza termica nominale P
nom
1,0 kW Controllo manuale dell'apporto termico con
termostato integrato
n.d.
Potenza termica minima
(valore di riferimento)
P
min
1,0 kW Controllo manuale dell'apporto termico con
riscontro della temperatura ambiente e/o
esterna
n.d.
Potenza termica massima
continua
P
max
1,0 kW Controllo elettronico dell'apporto termico
con riscontro della temperatura ambiente e/o
esterna
n.d.
Consumo di elettricità ausiliaria Emissione termica con supporto della ventola n.d.
Per la potenza termica
nominale
(Motore ventola)
el
max
n.d. kW Tipo di potenza termica/controllo della temperatura
ambiente
Per la potenza termica
minima
(Motore ventola)
el
min
n.d. kW Potenza termica di un solo livello, senza
controllo della temperatura ambiente
no
In modalità stand-by el
SB
0,00124 W Due o più livelli impostabili manualmente,
senza controllo della temperatura ambiente
no
Controllo della temperatura ambiente con
termostato meccanico
no
Con controllo elettronico della temperatura
ambiente
no
Con controllo elettronico della temperatura
ambiente e timer giornaliero
no
Con controllo elettronico della temperatura
ambiente e timer settimanale
sì
Altre opzioni di controllo
Controllo della temperatura ambiente con
rilevamento di presenza
no
Controllo della temperatura ambiente con
rilevamento di nestre aperte
no
Con opzione telecomando no
Con controllo di avvio adattabile no
Con limitazione del tempo di funzionamento no
Con sensore a sfera nera no
Contatti Chal-Tec GmbH, Wallstraße 16, 10179, Berlino, Germania

56
IT
Contrassegno/i del
modello
10032789, 10032790
Indicazione Simbolo Valore Unità Indicazione Unità
Potenza termica Solo per dispositivi elettrici di accumulo di calore per
locali singoli: tipo di regolazione dell'ausso di calore
Potenza termica nominale P
nom
2,0 kW Controllo manuale dell'apporto termico con
termostato integrato
n.d.
Potenza termica minima
(valore indicativo)
P
min
2,0 kW Controllo manuale dell'apporto termico con
riscontro della temperatura ambiente e/o
esterna
n.d.
Potenza termica massima
continua
P
max
2,0 kW Controllo elettronico dell'apporto termico
con riscontro della temperatura ambiente e/o
esterna
n.d.
Consumo di elettricità ausiliaria Emissione termica con supporto della ventola n.d.
Per la potenza termica
nominale
(Motore ventola)
el
max
n.d. kW Tipo di potenza termica/controllo della temperatura
ambiente
Per la potenza termica
minima
(Motore ventola)
el
min
n.d. kW Potenza termica di un solo livello, senza
controllo della temperatura ambiente
no
In modalità stand-by el
SB
0,00124 W Due o più livelli impostabili manualmente,
senza controllo della temperatura ambiente
no
Controllo della temperatura ambiente con
termostato meccanico
no
Con controllo elettronico della temperatura
ambiente
no
Con controllo elettronico della temperatura
ambiente e timer giornaliero
no
Con controllo elettronico della temperatura
ambiente e timer settimanale
sì
Altre opzioni di controllo
Controllo della temperatura ambiente con
rilevamento di presenza
no
Controllo della temperatura ambiente con
rilevamento di nestre aperte
no
Con opzione telecomando no
Con controllo di avvio adattabile no
Con limitazione del tempo di funzionamento no
Con sensore a sfera nera no
Contatti Chal-Tec GmbH, Wallstraße 16, 10179, Berlino, Germania
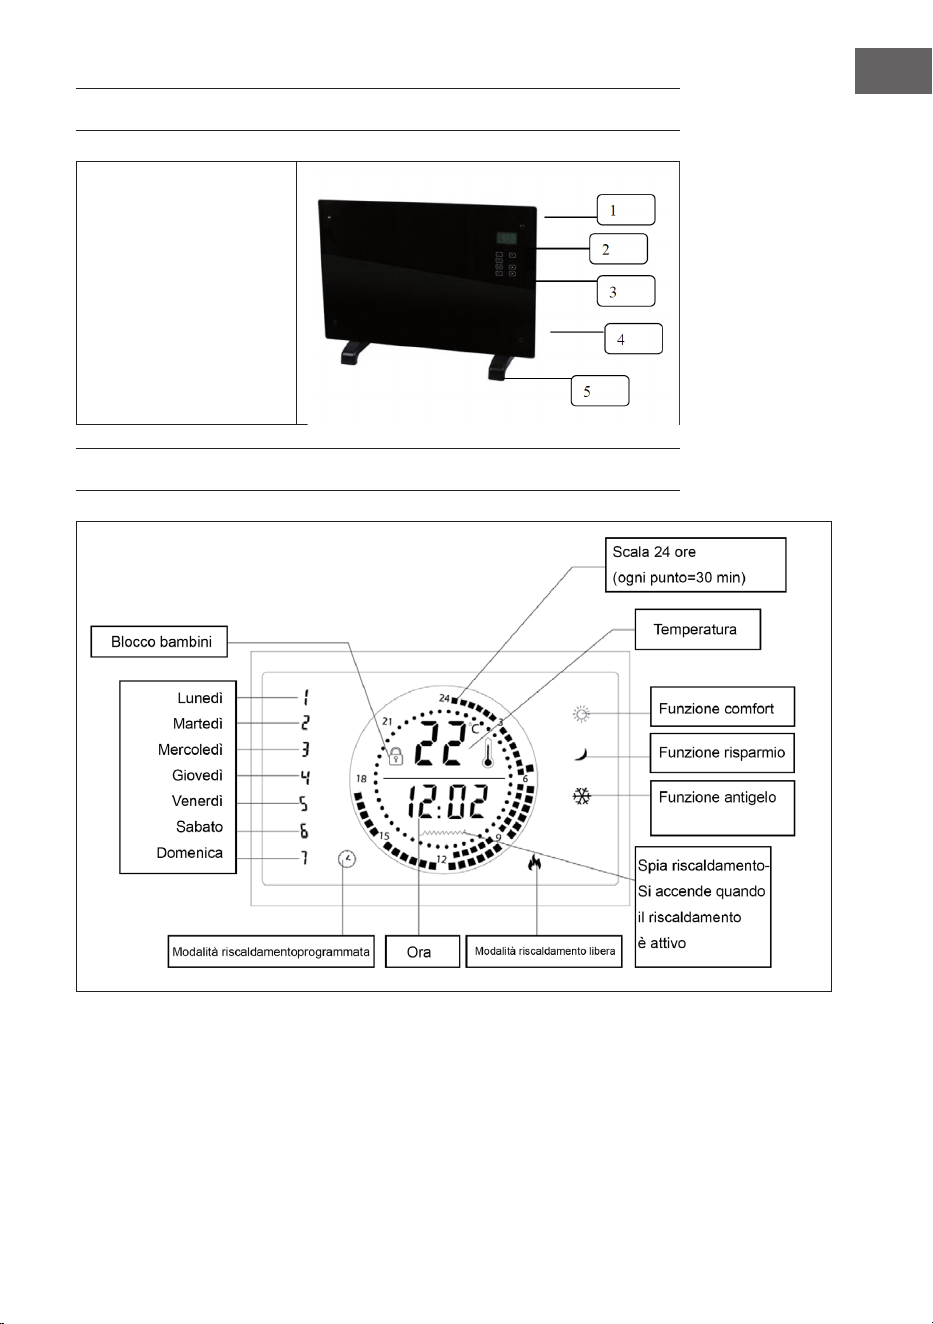
57
IT
DESCRIZIONE DEL DISPOSITIVO
1 Pannello decorativo
in vetro
2 Schermo LCD
3 Pannello di controllo
4 Piedi d'appoggio
INDICAZIONI DEL DISPLAY

58
IT
PANNELLO DI CONTROLLO
Tasto standby:
Accendere/spegnere il
dispositivo
Impostazioni della
temperatura
Aumentare il valore
Impostare l'ora
Confermare
l'inserimento/aprire il
menu
Diminuire il valore
Impostazioni di pro-
grammazione
MONTAGGIO
Montaggio a posizionamento libero
1. Rovesciare il dispositivo. Poggiarlo su un panno morbido o su un tappeto.
2. Montare il piede d'appoggio nel punto corretto sul lato inferiore del
dispositivo (v. immagine sotto). Utilizzare le viti in dotazione. Stringere
saldamente le viti con un cacciavite.

59
IT
Montaggio a parete
1. Sono necessari 4 supporti, 6 viti per tasselli e 6 viti aggiuntive dalla confezione.
Fissare 2 supporti alla parete. Segnare i punti in cui realizzare i fori (v.
immagine sotto).
2. Montare 2 supporti sul lato inferiore del dispositivo.
Unità: mm
Schema completo
Schema completo
Fori per il montaggio 1000 W
Fori per il montaggio 2000 W

60
IT
3. Tenere il dispositivo lateralmente. Fare attenzione alla posizione dei fori sul
lato posteriore dell'alloggiamento. Poggiare il dispositivo sui supporti.
MESSA IN FUNZIONE E UTILIZZO
Accensione/spegnimento
Premere Standby per abbandonare la modalità standby. Lo schermo LCD (2)
mostra la temperatura attuale della stanza e l'ora (impostazione prede nita 00:00).
Premendo di nuovo questo tasto, il dispositivo torna in standby.
Nota: se si stacca la spina, viene cancellata solo l'impostazione del timer. Tutte
le altre impostazioni vengono mantenute.
Selezionare la modalità operativa
Il dispositivo è dotato di due modalità riscaldanti:
• Modalità riscaldante libera
• Modalità riscaldante settimanale programmata
Premere PROG e selezionare la modalità desiderata con i tasti freccia. Il simbolo
corrispondente lampeggia sullo schermo. Confermare la selezione con OK.

61
IT
Modalità riscaldante libera
Questa modalità include diverse funzioni riscaldanti:
Comfort
Con la funzione Comfort, la stanza viene scaldata a una temperatura a scelta.
Per attivarla, premere i tasti freccia no a quando sullo schermo compare il
simbolo
. La temperatura predenita è di 35 °C. Premere
per impostare.
Risparmio
Con la funzione Risparmio viene mantenuta la temperatura impostata.
Se la temperatura impostata corrisponde alla temperatura ambiente, il
dispositivo passa automaticamente da Comfort a Risparmio. Se la temperatura
ambiente è inferiore di 5 °C rispetto a quella impostata, il dispositivo torna
automaticamente a Comfort.
Antigelo
La funzione Antigelo serve a tenere la temperatura minima di 5 °C (questa
temperatura non è impostabile). Questa è la funzione predenita in modalità
di riscaldamento libero. La funzione inizia dopo l'attivazione della modalità di
riscaldamento libero.
Nota: se la temperatura ambiente corrisponde a quella impostata, è possibile
passare da Risparmio ad Antigelo con i tasti freccia.
Modalità riscaldante settimanale programmata
1. Per raggiungere la modalità di riscaldamento settimanale, premere PROG,
muovere il cursore sopra al simbolo dell'orologio in basso a sinistra sul display
e premere OK.
2. Il cursore lampeggia ora sopra ai giorni della settimana (lato sinistro del
menu).
3. Utilizzare i tasti freccia IN ALTO/IN BASSO per selezionare il giorno per i
programmi da 1 a 7.
4. Premere PROG per confermare il giorno.
5. Utilizzare la freccia OK per selezionare tra le funzioni riscaldanti Comfort,
Economy (Risparmio) e Frost-free (Antigelo). Il cursore è visibile sul lato destro
del menu a scorrimento tra le modalità.
6. Così è stato selezionato il primo ciclo di 30 minuti. Il cursore si sposta sul ciclo
di 30 minuti successivo.
7. Premere i tasti freccia IN ALTO/IN BASSO per scegliere l'ora.
8. Programmare separatamente ogni giorno della settimana seguendo i
passaggi precedenti.

62
IT
Scala da 24 ore
Scala da 24 ore:
ogni quadrato
corrisponde a
30 minuti.
Quadrati all'interno e all'esterno
indicano la funzione Comfort.
Quadrati all'interno indicano la
funzione Antigelo.
Quadrati all'esterno indicano la
funzione Risparmio.
L'immagine esempli cativa mostra le seguenti impostazioni:
Ore 0-6: funzione Antigelo
Ore 6-12: funzione Comfort
Ore 12-18: funzione Risparmio
Nota:
1. Le funzioni non possono essere impostate contemporaneamente.
2. Se si stacca la spina, viene cancellata solo l'impostazione del timer.
Tutte le altre impostazioni vengono mantenute.
Impostare la temperatura
1. Premere il tasto
. L'indicazione della tempertura inizia a lampeggiare.
2. Selezionare la temperatura desiderata con i tasti freccia.
3. Premere di nuovo
Selezionare la temperatura desiderata con i tasti freccia.
per confermare.

63
IT
Blocco/sicura per i bambini
1. Per far passare il dispositivo in standby con sicura per i bambini attivata,
tenere premuto OK per 5 secondi. Sullo schermo compare il simbolo del
lucchetto.
2. Per sbloccare il dispositivo, tenere premuto OK per 5 secondi.
Impostare l'ora
Per impostare l'ora, premere TIME. Le ore iniziano a lampeggiare. Impostare le ore
con i tasti freccia e confermare con il tasto Orologio. Ora lampeggiano i minuti.
Impostare i minuti con i tasti freccia e confermare di nuovo con il tasto Orologio.
Funzione "Finestra aperta"
1. Il dispositivo è equipaggiato con moderne soluzioni tecnologiche per
risparmiare energia, come ad es. la funzione "Finestra aperta".
2. Per attivare questa funzione, tenere premuto TEMP per 5 secondi. Il simbolo
della funzione "Finestra aperta" compare sul display.
3. Quando viene mostrato il simbolo della modalità "Fnestra aperta" e la
temperatura della stanza scende di 4 °C entro 20 minuti, il dispositivo smette
di scaldare e il simbolo lampeggia sul display. Se si desidera continuare con il
riscaldamento e la funzione "Finestra aperta" non lampeggia, tenere premuto
TEMP per 5 secondi.
4. Per disattivare la funzione, tenere premuto TEMP per 5 secondi e il relativo
simbolo scompare.
PULIZIA E MANUTENZIONE
Nota: spegnere il dispositivo e staccare la spina dalla presa. Attendere che il
dispositivo si sia completamente raffreddato prima di pulirlo.
• Usare un aspirapolvere per pulire fessure di ventilazione e griglia.
• Rimuovere la polvere dalle superci esterne con un panno umido (non
bagnato).
• Non utilizzare detergenti aggressivi o prodotti abrasivi.
• Non spruzzare liquidi sul dispositivo e non immergerlo in acqua o altri liquidi.
• Non aprire mai l'alloggiamento della stufa.
64
IT
AVVISO DI SMALTIMENTO
Se nel vostro Paese sono vigenti regolamenti legislativi
relativi allo smaltimento di dispositivi elettrici ed
elettronici, questo simbolo sul prodotto o sull'imballaggio
indica che non è consentito smaltire questo prodotto nei
riuti casalinghi. Il dispositivo deve invece essere portato
in un centro di raccolta per il riciclaggio di dispositivi
elettrici ed elettronici. Lo smaltimento conforme tutela
l'ambiente e salvaguarda la salute del prossimo da
conseguenze negative. Informazioni riguardanti il
riciclaggio e lo smaltimento di questo prodotto sono
disponibili presso l'amministrazione locale o il servizio di
smaltimento dei riuti.
PRODUTTORE E IMPORTATORE (UK)
Produttore:
Chal-Tec GmbH, Wallstraße 16, 10179 Berlino, Germania.
Importatore per la Gran Bretagna:
Berlin Brands Group UK Limited
PO Box 42
272 Kensington High Street
London, W8 6ND
United Kingdom

65
NL
Geachte klant,
gefeliciteerd met de aanschaf van dit apparaat. Lees de
hierna volgende handleiding aandachtig door en volg
de instructies op om schade te voorkomen. Voor schade
veroorzaakt door het niet in acht nemen van de instructies of
door onjuist gebruik nemen wij geen verantwoordelijkheid.
Scan de QR code voor toegang tot de meest actuele
gebruikershandleiding en voor meer informatie over het
artikel.
INHOUDSOPGAVE
Veiligheidsinstructies 66
Productinformatieblad 67
Overzicht apparaat 69
Weergave display 69
Controlepaneel 70
Montage 70
Ingebruikname en bediening 72
Reiniging en onderhoud 75
Instructies voor afvoer 76
Fabrikant & importeur (UK) 76
TECHNISCHE GEGEVENS
Artikelnummer 10032787, 10032788 10032789, 10032790
Stroomvoorziening 220-240 V~ 50/60 Hz
Vermogen 1000 W 2000 W
66
NL
VEILIGHEIDSINSTRUCTIES
• Controleer voor gebruik de spanning op het typeplaatje en sluit het apparaat
alleen aan als deze overeenkomt met de spanning van het stopcontact.
• Wanneer de stroomkabel of stekker beschadigd is laat u deze vervangen door
een gediplomeerde vakman.
• Plaats de verwarming niet direct onder een stopcontact.
• Houdt een meter afstand tot brandbare materialen, zoals meubels, gordijnen
e.d.
• Gebruik het apparaat buiten bereik van kinderen. Kinderen mogen het
apparaat alleen onder toezicht bedienen.
• Het apparaat is niet bestemd voor commercieel gebruik, maar voor gebruik in
een conventioneel huishouden en gelijkwaardige omgevingen.
• Gebruik het apparaat niet wanneer het een foutmelding geeft of in welke
vorm dan beschadigd is.
• Reparaties mogen alleen door gekwali ceerde personen worden uitgevoerd.
• Verkeerde en eigenhandig uitgevoerde reparaties vormen een risico.
• Leg de stroomkabel niet onder tapijten of lopers.
• Leg de stroomkabel niet langs scherpe hoeken of hete oppervlaktes.
• Bedek de verwarming niet om oververhitting te voorkomen.
• Gebruik het apparaat niet met een externe timer, tijdschakelaar of ander
apparaat dat de verwarming automatisch aanzet en uitschakelt.
• Dompel het apparaat niet in water of andere vloeistof(fen) onder.
• Gebruik het apparaat niet nabij bad, douche of zwembad.
• Gebruik het apparaat niet buitenshuis.
• Gebruik het apparaat niet met natte handen.
• Gebruik het apparaat niet op of nabij hete oppervlaktes.
• Gebruik het apparaat niet wanneer de stekker of stroomkabel beschadigd is.
• Neem voor het reinigen de stekker uit het stopcontact en laat het apparaat,
indien nodig, volledig afkoelen.
• Gebruik geen schuurmiddel voor het schoonmaken.
• Gebruik alleen accessoires die nadrukkelijk door de fabrikant zijn
goedgekeurd.
• Kinderen vanaf 8 jaar en personen met een beperkte lichamelijke, sensorische
en/of geestelijke gezondheid mogen het apparaat alleen gebruiken wanneer
ze van tevoren door een voor hen verantwoordelijke persoon uitvoerig met
de functies en veiligheidsinstructies vertrouwd zijn gemaakt en de hieraan
verbonden risico's begrijpen.
• Let erop dat kinderen niet met het apparaat spelen.
LET OP!
Verbrandingsgevaar! Sommige onderdelen kunnen heel heet
worden. Let erop dat u, uw kinderen of uw huisdieren zich niet
verbranden.
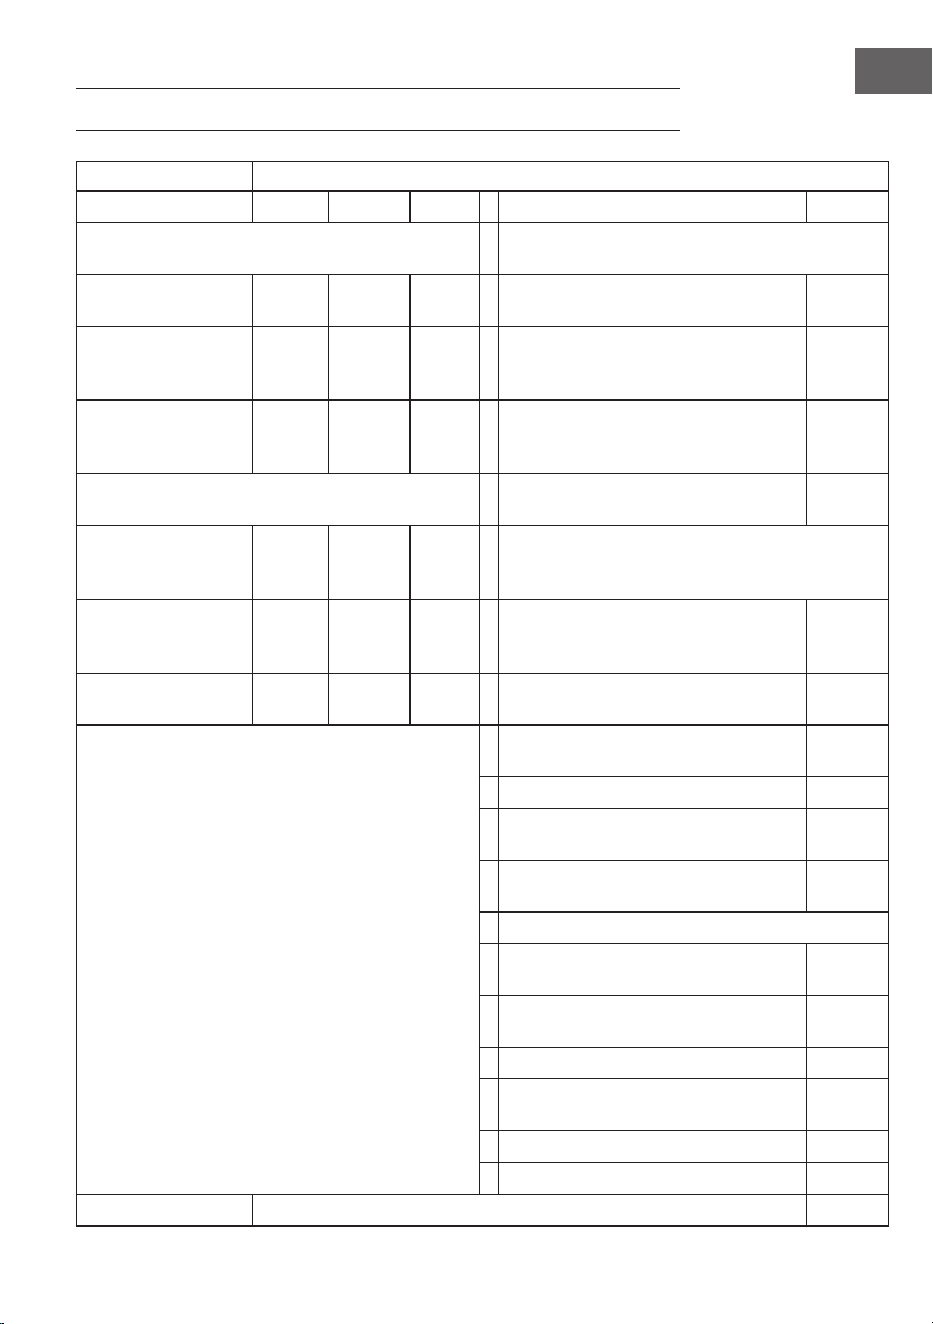
67
NL
PRODUCTINFORMATIEBLAD
Identicatie model(len) 10032787, 10032788
Aanduiding Symbool Waarde Eenheid Aanduiding Eenheid
Warmtevermogen Alleen voor individuele elektrische accumulatiekachels:
regulering van de warmtetoevoer
Nominaal
warmtevermogen
P
nom
1,0 kW Handmatige regeling van de warmtetoevoer
met ingebouwde thermostaat
onbekend
Minimaal
warmtevermogen
(richtwaarde)
P
min
1,0 kW Handmatige regeling van de warmtetoevoer
met terugmelding van de kamer- en/ of
externe temperatuur
onbekend
Maximaal continue
warmtevermogen
P
max
1,0 kW Elektronische regeling van de warmtetoevoer
met terugmelding van de kamer- en/ of
externe temperatuur
onbekend
Hulpstroomverbruik Warmteafgifte met ondersteuning van een
ventilator
onbekend
Bij nominaal
warmtevermogen
(ventilatormotor)
el
max
onbekend kW Type warmtevermogen / Kamertemperatuurcontrole
Bij minimaal
warmtevermogen
(ventilatormotor)
el
min
onbekend kW Enkele warmtestand, geen
kamertemperatuurcontrole
nee
In stand-by modus el
sb
0,00124 W Twee of meer handmatig in te stellen standen,
geen kamertemperatuurcontrole
nee
Controle kamertemperatuur met mechanische
thermostaat
nee
Met elektronische kamertemperatuurcontrole nee
Met elektronische kamertemperatuurcontrole
en tijdregulering
nee
Met elektronische kamertemperatuurcontrole
en weekdagregulering
ja
Overige regelopties
Kamertemperatuurcontrole met
aanwezigheidsherkenning
nee
Kamertemperatuurcontrole met open raam
detectie
nee
Met afstandsbediening nee
Met adaptieve regeling van het begin van het
verwarmingsproces
nee
Met bedrijfstijdbegrenzing nee
Met elektronische sensor nee
Contactgegevens Chal-Tec GmbH, Wallstraße 16, 10179 Berlijn, Duitsland
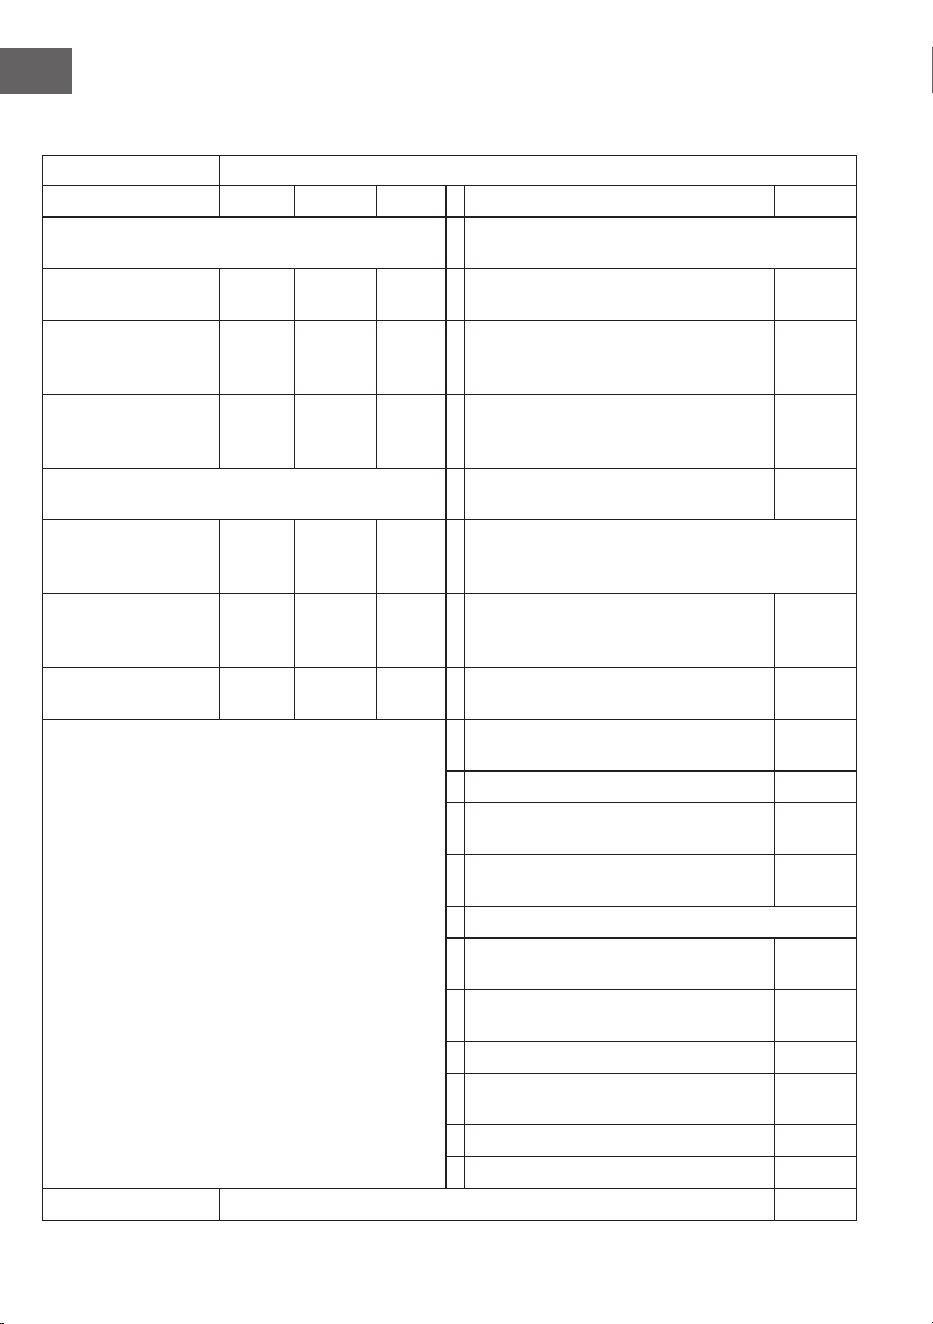
68
NL
Identicatie model(len) 10032789, 10032790
Aanduiding Symbool Waarde Eenheid Aanduiding Eenheid
Warmtevermogen Alleen voor individuele elektrische accumulatiekachels:
regulering van de warmtetoevoer
Nominaal
warmtevermogen
P
nom
2,0 kW Handmatige regeling van de warmtetoevoer
met ingebouwde thermostaat
onbekend
Minimaal
warmtevermogen
(richtwaarde)
P
min
2,0 kW Handmatige regeling van de warmtetoevoer
met terugmelding van de kamer- en/ of
externe temperatuur
onbekend
Maximaal continue
warmtevermogen
P
max
2,0 kW Elektronische regeling van de warmtetoevoer
met terugmelding van de kamer- en/ of
externe temperatuur
onbekend
Hulpstroomverbruik Warmteafgifte met ondersteuning van een
ventilator
onbekend
Bij nominaal
warmtevermogen
(ventilatormotor)
el
max
onbekend kW Type warmtevermogen / Kamertemperatuurcontrole
Bij minimaal
warmtevermogen
(ventilatormotor)
el
min
onbekend kW Enkele warmtestand, geen
kamertemperatuurcontrole
nee
In stand-by modus el
sb
0,00124 W Twee of meer handmatig in te stellen standen,
geen kamertemperatuurcontrole
nee
Controle kamertemperatuur met mechanische
thermostaat
nee
Met elektronische kamertemperatuurcontrole nee
Met elektronische kamertemperatuurcontrole
en tijdregulering
nee
Met elektronische kamertemperatuurcontrole
en weekdagregulering
ja
Overige regelopties
Kamertemperatuurcontrole met
aanwezigheidsherkenning
nee
Kamertemperatuurcontrole met open raam
detectie
nee
Met afstandsbediening nee
Met adaptieve regeling van het begin van het
verwarmingsproces
nee
Met bedrijfstijdbegrenzing nee
Met elektronische sensor nee
Contactgegevens Chal-Tec GmbH, Wallstraße 16, 10179 Berlijn, Duitsland
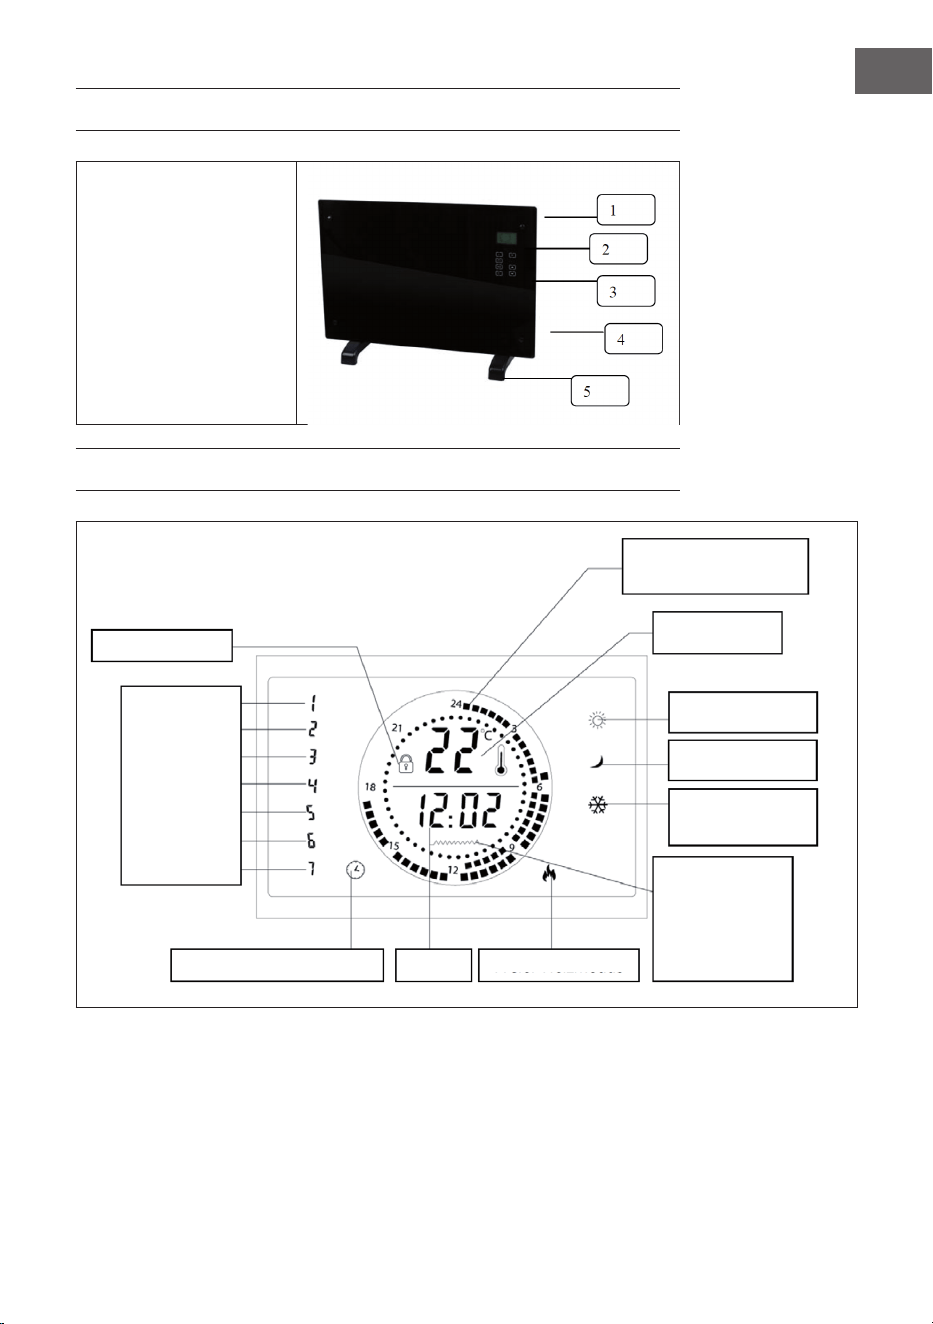
69
NL
OVERZICHT APPARAAT
1 Glazen sierstrook
2 LC display
3 Controlepaneel
4 Standvoeten
WEERGAVE DISPLAY
Kinderslot
Wekelijkse verwarmingsmodus
Tijd Vrije verwarmingsmodus
24-uurs scala
(elke punt = 30 min.)
Temperatuur
Comfort functie
Bespaar functie
Vorstvrij functie
Warmteweergave
Licht op als de
verwarming
actief is.
Maandag
Dinsdag
Woensdag
Donderdag
Vrijdag
Zaterdag
Zondag

70
NL
CONTROLEPANEEL
Stand-by toets
Toestel aan-/uitzetten
Temperatuurinstellingen Waarde verhogen
Tijd instellen
Invoer bevestigen /
Menu oproepen
Waarde verminderen
Programma-instellingen
MONTAGE
Staande montage
1. Draai het apparaat ondersteboven. Plaats het op een zachte doek of kleed.
2. Zet de voet op de juiste plaats aan de onderkant van het apparaat (zie
afbeelding hieronder). Gebruik hiervoor de meegeleverde schroeven. Draai de
schroeven met een schroevendraaier vast.

71
NL
Wandmontage
1. U heeft 4 beugels, 6 pluggen en 6 schroeven uit de doos nodig. Bevestig 2
beugels aan de muur. Markeer de boorgaten (zie afbeelding hieronder).
2. Bevestig 2 beugels aan de onderkant van het apparaat.
Eenheid: mm
Totaalbeeld
Totaalbeeld
Montagegat 1000 W
Montagegat 2000 W

72
NL
3. Houdt het toestel zijwaarts. Kijk naar de positie van de gaten aan de
achterkant van de behuizing. Zet het apparaat op de beugels.
INGEBRUIKNAME EN BEDIENING
Aan- / uitzetten
Druk op de stand-by toets om de stand-by modus te verlaten. Het LC display (2)
geeft de actuele kamertemperatuur en de tijd (fabrieksinstelling 00:00) weer. Door
opnieuw op deze toets te drukken gaat het apparaat terug in de stand-by modus.
Info: Wanneer u de stekker eruit haalt, wordt alleen de timerinstelling gewist.
Alle andere functie-instellingen blijven behouden.
Bedrijfsmodus kiezen
De verwarming beschikt over twee verschillende modi:
• Vrije verwarmingsmodus
• Geprogrammeerde wekelijkse verwarmingsmodus
Druk op 'PROG' en kies met de pijltjestoetsen de gewenste modus. Het
bijbehorende symbool knippert op het display. Bevestig uw keuze met 'OK'.
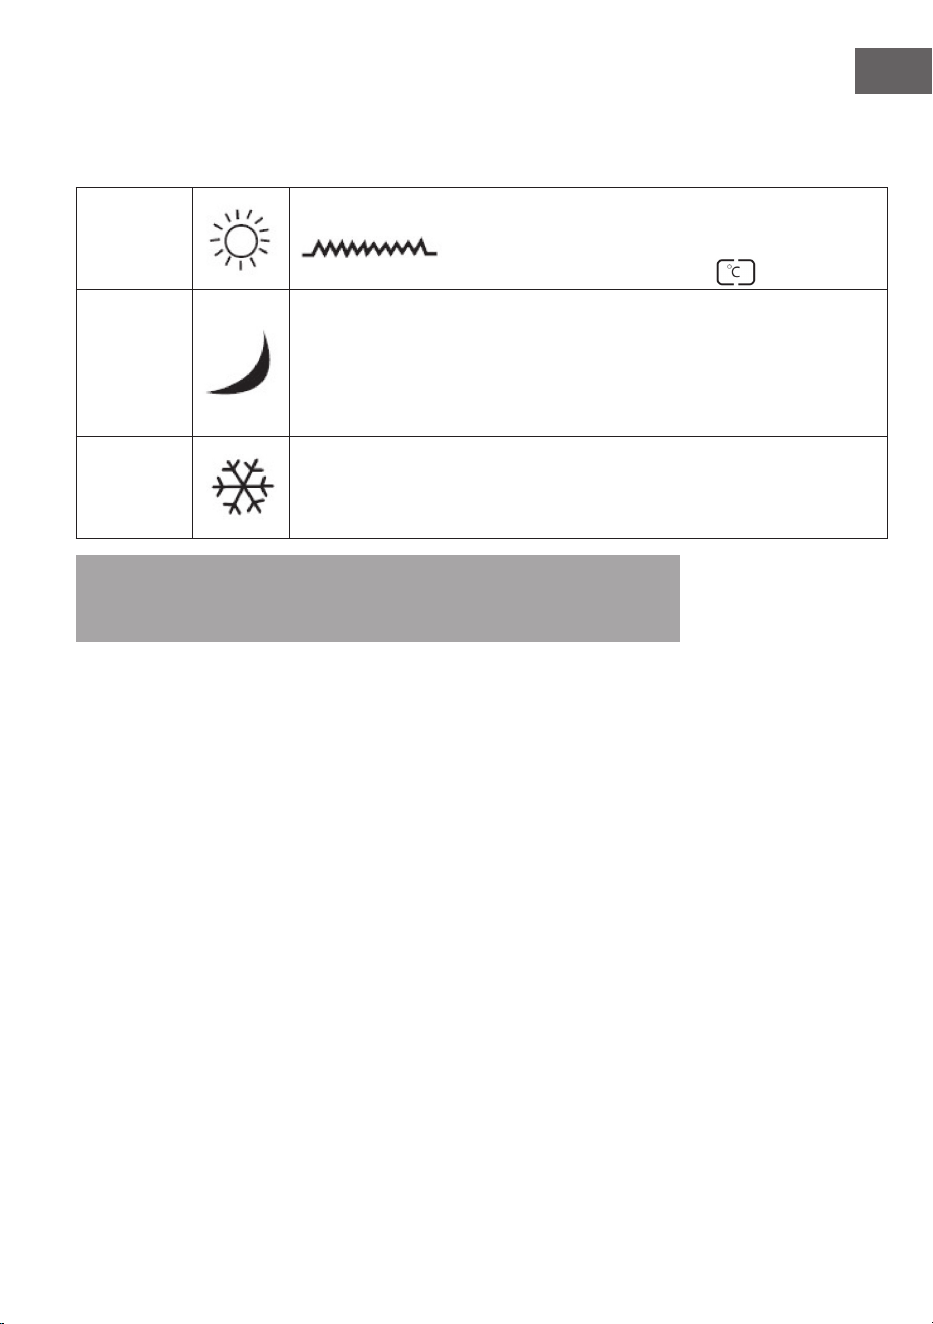
73
NL
Vrije verwarmingsmodus
Deze modus omvat meerdere verwarmingsfuncties:
Comfort
Met de comfort functie wordt de kamer tot een gewenste temperatuur
verwarmd. Voor het activeren drukt op de pijltjestoetsen tot het symbool
wordt weergegeven. De voorgeprogrammeerde
temperatuur is 35 °C. Druk voor het instellen op de toets
.
Bespaar
Met de bespaar functie wordt de geprogrammeerde temperatuur
aangehouden. Wanneer de geprogrammeerde temperatuur gelijk is aan
de omgevingstemperatuur, gaat het apparaat automatisch van comfort
naar spaar functie. Wanneer de omgevingstemperatuur 5°C lager is dan de
geprogrammeerde temperatuur, gaat het apparaat automatisch terug naar
comfort.
Vorstvrij
De vorstvrij functie is zorgt ervoor dat een minimum temperatuur van
5°C aangehouden wordt (deze temperatuur is niet regelbaar). Dit is de
voorgeprogrammeerde functie in de vrije verwarmingsmodus. De functie
wordt na het activeren in de vrije verwarmingsmodus opgestart.
Tip: Wanneer de omgevingstemperatuur overeenkomst met de ingestelde
temperatuur, kan met de pijltjestoetsen van bespaar overgeschakeld worden
naar vorstvrij.
Geprogrammeerde wekelijkse verwarmingsmodus
1. Om in de weekmodus te komen, drukt u op 'PROG', beweegt u de cursor over
het urensymbool links onder in het display en drukt vervolgens op 'OK'.
2. Nu knippert de cursor over de weekdagen (linkerkant van het menu).
3. Gebruik de pijltjestoetsen OMHOOG/OMLAAG om uw dag voor de
programmering te kiezen (1 tot 7).
4. Druk op de PROG toets om de dag te bevestigen.
5. Gebruik de OK pijl om tussen comfort, economy (bespaar) en frost-free
(vorstvrij) te kiezen. U ziet de cursor aan de rechterkant van het menu - scroll
tussen de modi.
6. Hiermee heeft u de eerste 30 minuten cyclus geselecteerd. De cursor beweegt
zich naar de volgende 30 minuten cyclus.
7. Druk op de pijltjestoetsen OMHOOG/OMLAAG om de uren te selecteren.
8. Programmeer elke gewenste weekdag afzonderlijk volgens bovenstaande
stappen.

74
NL
24-uurs scala
24-uurs scala:
Ieder vakje
komt overeen met
30 minuten.
Interne en externe vakjes geven de
comfort functie weer.
Interne vakjes tonen de
vorstvrij functie.
Externe vakjes tonen de bespaar
functie.
Het voorbeeld laat de volgende instellingen zien:
0 - 6 uur: vorstvrij functie
6 - 12 uur: comfort functie
12 - 18 uur: bespaar functie
Let op!
1. De functies kunnen niet tegelijkertijd worden ingesteld.
2. Wanneer u de stekker eruit haalt, wordt alleen de timerinstelling
gewist. Alle andere functie-instellingen blijven behouden.
Temperatuur instellen
1. Druk op de
toets. De temperatuurweergave knippert.
2. Kies de gewenste temperatuur met de pijltjestoetsen.
3. Druk om te bevestigen opnieuw op
Kies de gewenste temperatuur met de pijltjestoetsen.
.

75
NL
Vergrendeling / Kinderslot
1. Om de verwarming in stand-by modus te zetten terwijl het kinderslot
geactiveerd is, houdt u de OK-toets gedurende 5 seconden ingedrukt. In het
display verschijnt het slot-symbool.
2. Voor het ontgrendelen houdt u 'OK' gedurende 5 seconden ingedrukt.
Tijd instellen
Druk om de tijd in te stellen op de TIME toets, de urenpositie begint te knipperen.
Kies met de pijltjestoetsen het aantal uur en bevestig met de TIME toets. De
minuten knipperen nu. Kies met de pijltjestoetsen het aantal minuten en bevestig
met de TIME toets.
'Open raam' functie
1. De verwarming is voorzien van moderne, energiebesparende techniek, zoals
de 'open raam' functie.
2. Om deze functie te activeren, houdt u de TEMP toets 5 seconden ingedrukt.
Het symbool voor de venstermodus wordt in het display weergegeven.
3. Wanner het symbool voor de venstermodus wordt weergegeven en de
kamertemperatuur binnen 20 minuten met 4°C daalt, stopt het apparaat
met verwarmen en het symbool voor de venstermodus begint te knipperen
in het display. Wanneer u door wilt gaan met verwarmen en de 'open raam'
functie niet knippert, drukt u de TEMP toets in en houdt deze 5 seconden lang
ingedrukt.
4. Om de functie te deactiveren, houdt u de TEMP toets opnieuw 5 seconden
ingedrukt. Het venstersymbool verdwijnt.
REINIGING EN ONDERHOUD
Info: schakel het apparaat uit en neem de stekker uit het stopcontact. Wacht tot
het apparaat volledig is afgekoeld voordat u het schoonmaakt.
• Gebruik de stofzuiger voor het reinigen van de ventilatieopeningen en het
rooster.
• Verwijder stof aan de buitenkant met een vochtige (niet natte) doek.
• Gebruik geen agressieve reinigingsmiddelen of schuurmiddel.
• Besproei het apparaat niet met vloeistof(fen) en dompel het niet in water of
andere vloeistof(fen) onder.
• Open nooit de behuizing.

76
NL
INSTRUCTIES VOOR AFVOER
Wanneer in uw land een wettelijke regeling geldt voor
het afvoeren van elektrische en elektronische apparaten,
wijst dit symbool, op het product zelf of op de verpakking,
erop dat het betreffende product niet met het huisvuil
afgevoerd mag worden. In plaats daarvan dient het naar
een centraal depot voor het recyclen van elektrische en
elektronische apparaten te worden gebracht Door het
afval volgens de voorschriften weg te gooien beschermt u
het milieu en de gezondheid van uw medemensen tegen
negatieve consequenties. Informatie over recycling en het
wegdoen van dit product ontvangt u van uw gemeente of
van uw plaatselijke grondstoffen- en afvaldienst.
FABRIKANT & IMPORTEUR (UK)
Fabrikant:
Chal-Tec GmbH, Wallstraße 16, 10179 Berlijn, Duitsland.
Importeur voor Groot-Brittannië:
Berlin Brands Group UK Limited
PO Box 42
272 Kensington High Street
London, W8 6ND
United Kingdom