
ELECTRIC RANGE
®
Transform SR Brands Management LLC
Hoffman Estates, IL, U.S.A. 60179 U.S.A
www.kenmore.com
Use & Care Guide
#,* = olor number
Models
:405.9222#
C

TABLE OF CONTENTS
Important Instructions
............................................
5
Specification
.................................................................. 8-9
Product Overview
....................................................... 10
Cleaning and Maintenance
............................. 24
Troubleshooting Guide
..............................................25
Safety Definition.......................................................
5
Range Parts Diagram ...............................................
10
Review of Controls .....................................................
11
EN-2
Customer Care and Service ............................. 26
Electronic Oven Controls
....................................
13
Limited Warranty
..........................................................
4
Product Record
............................................................ 3
-8
11
-
Ov
en Use ..................................................................14-
21
22
-
Steam Clean ........................................................
21
20
-
...
PRODUCT RECORD
i
Date of Purchase ___________________Model No.___________________
o.___________________
e these instructions and attach your sales receipt for future reference.
Range
EN-3

Kenmore Limited Warranty
Kenmore products are sold and distributed by Kenmore and Kenmore authorized distributors and
licensees in various countries.
For information on the limited warranty and authorized provider applicable to your product and
country please visit: https://www.kenmore.com/warranty-information/
For a printed copy please contact us at 1-844-553-6667 or at the address below:
ATTN: Kenmore Warranty Request
5407 Trillium Suite B120
Hoffman Estates, IL 60192
EN-4
IMPORTANT INSTRUCTIONS
Safety Definitions
WARNING
CAUTION
• Warnings and safety instructions in this manual do not cover all possible conditions and situations that may occur. It
is your responsibility to use common sense, caution, and care when installing, maintaining, and operating your oven.
Known hazards and their severity are identified in this manual with the following symbols:
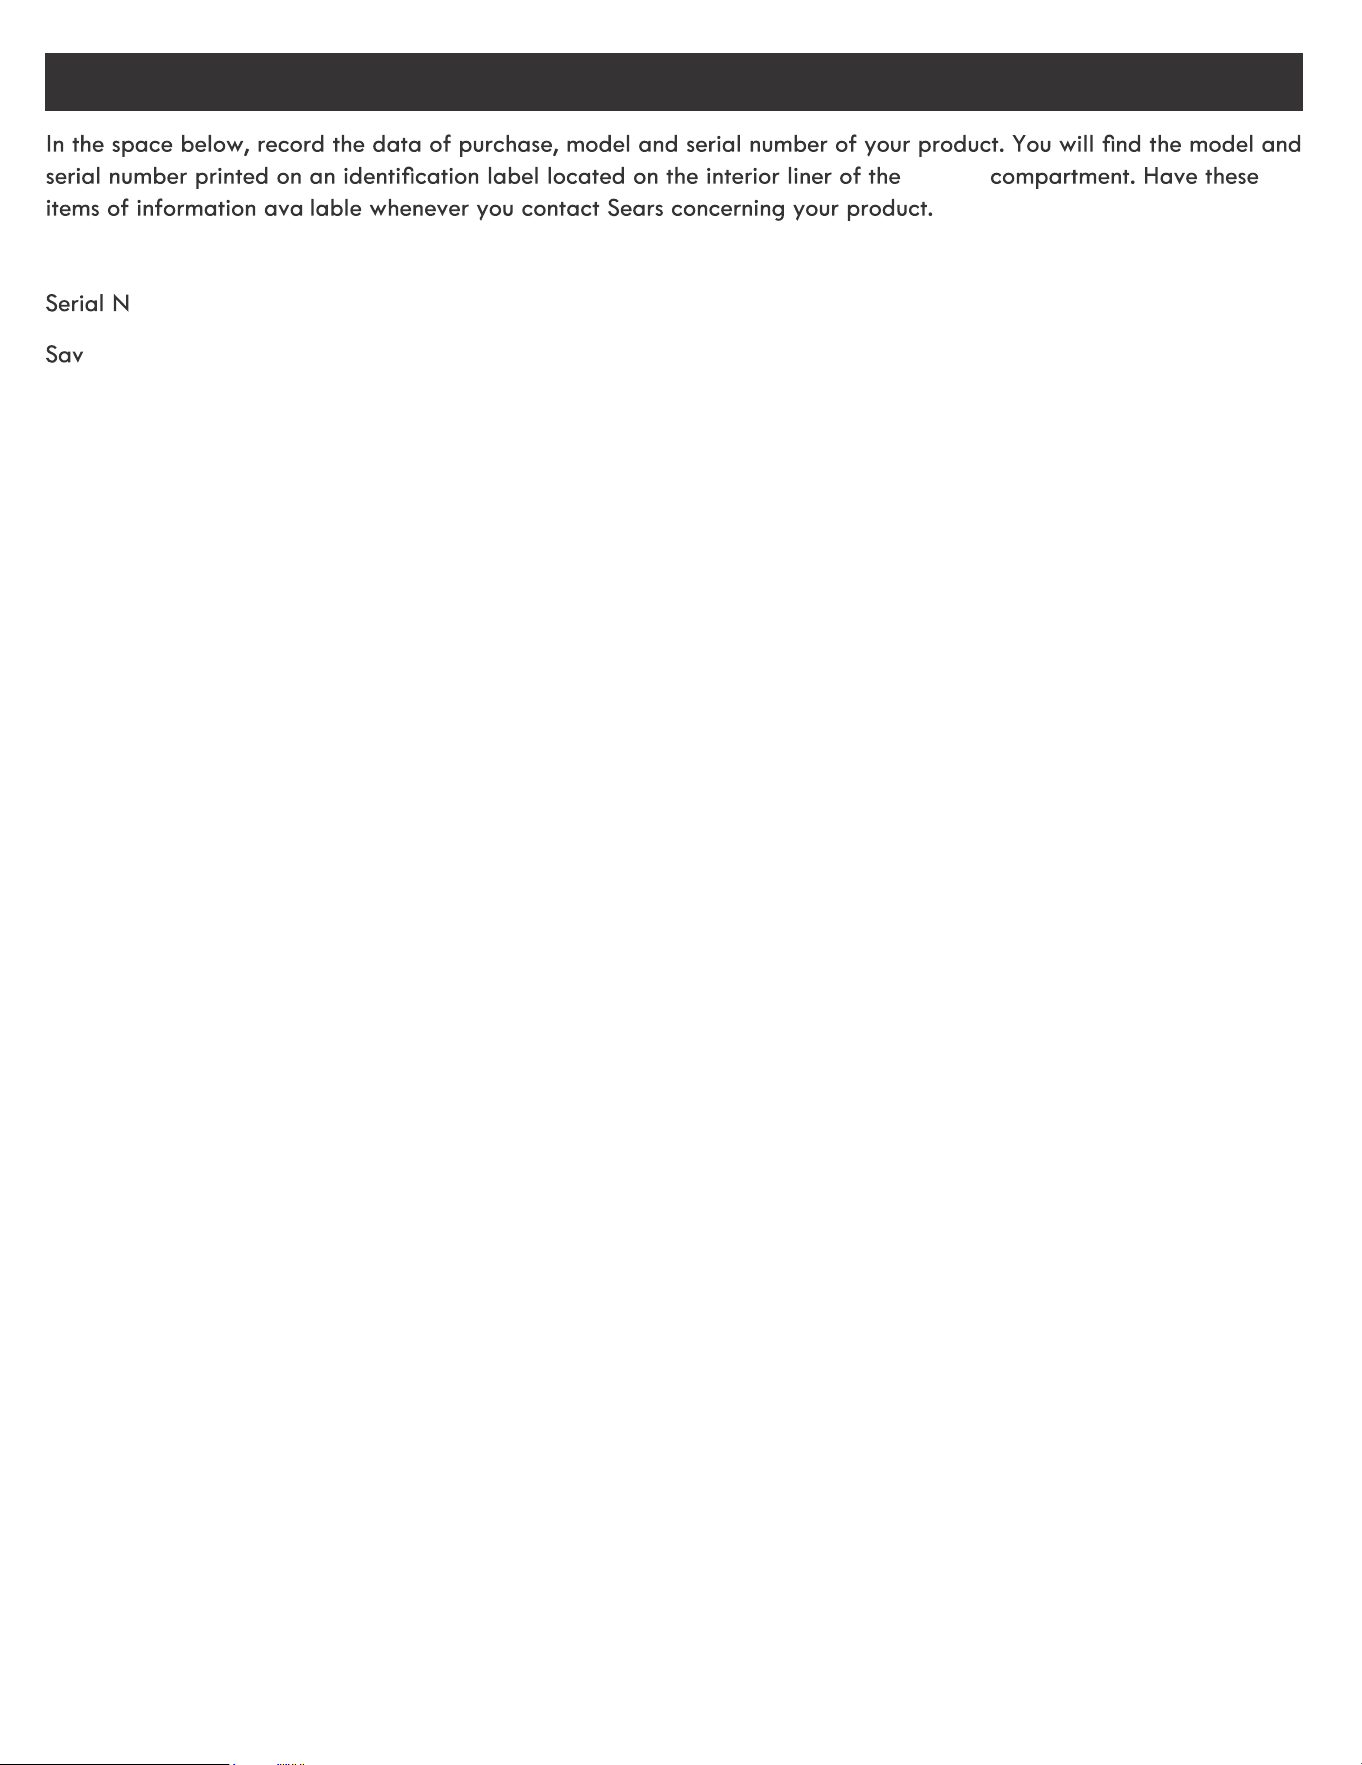
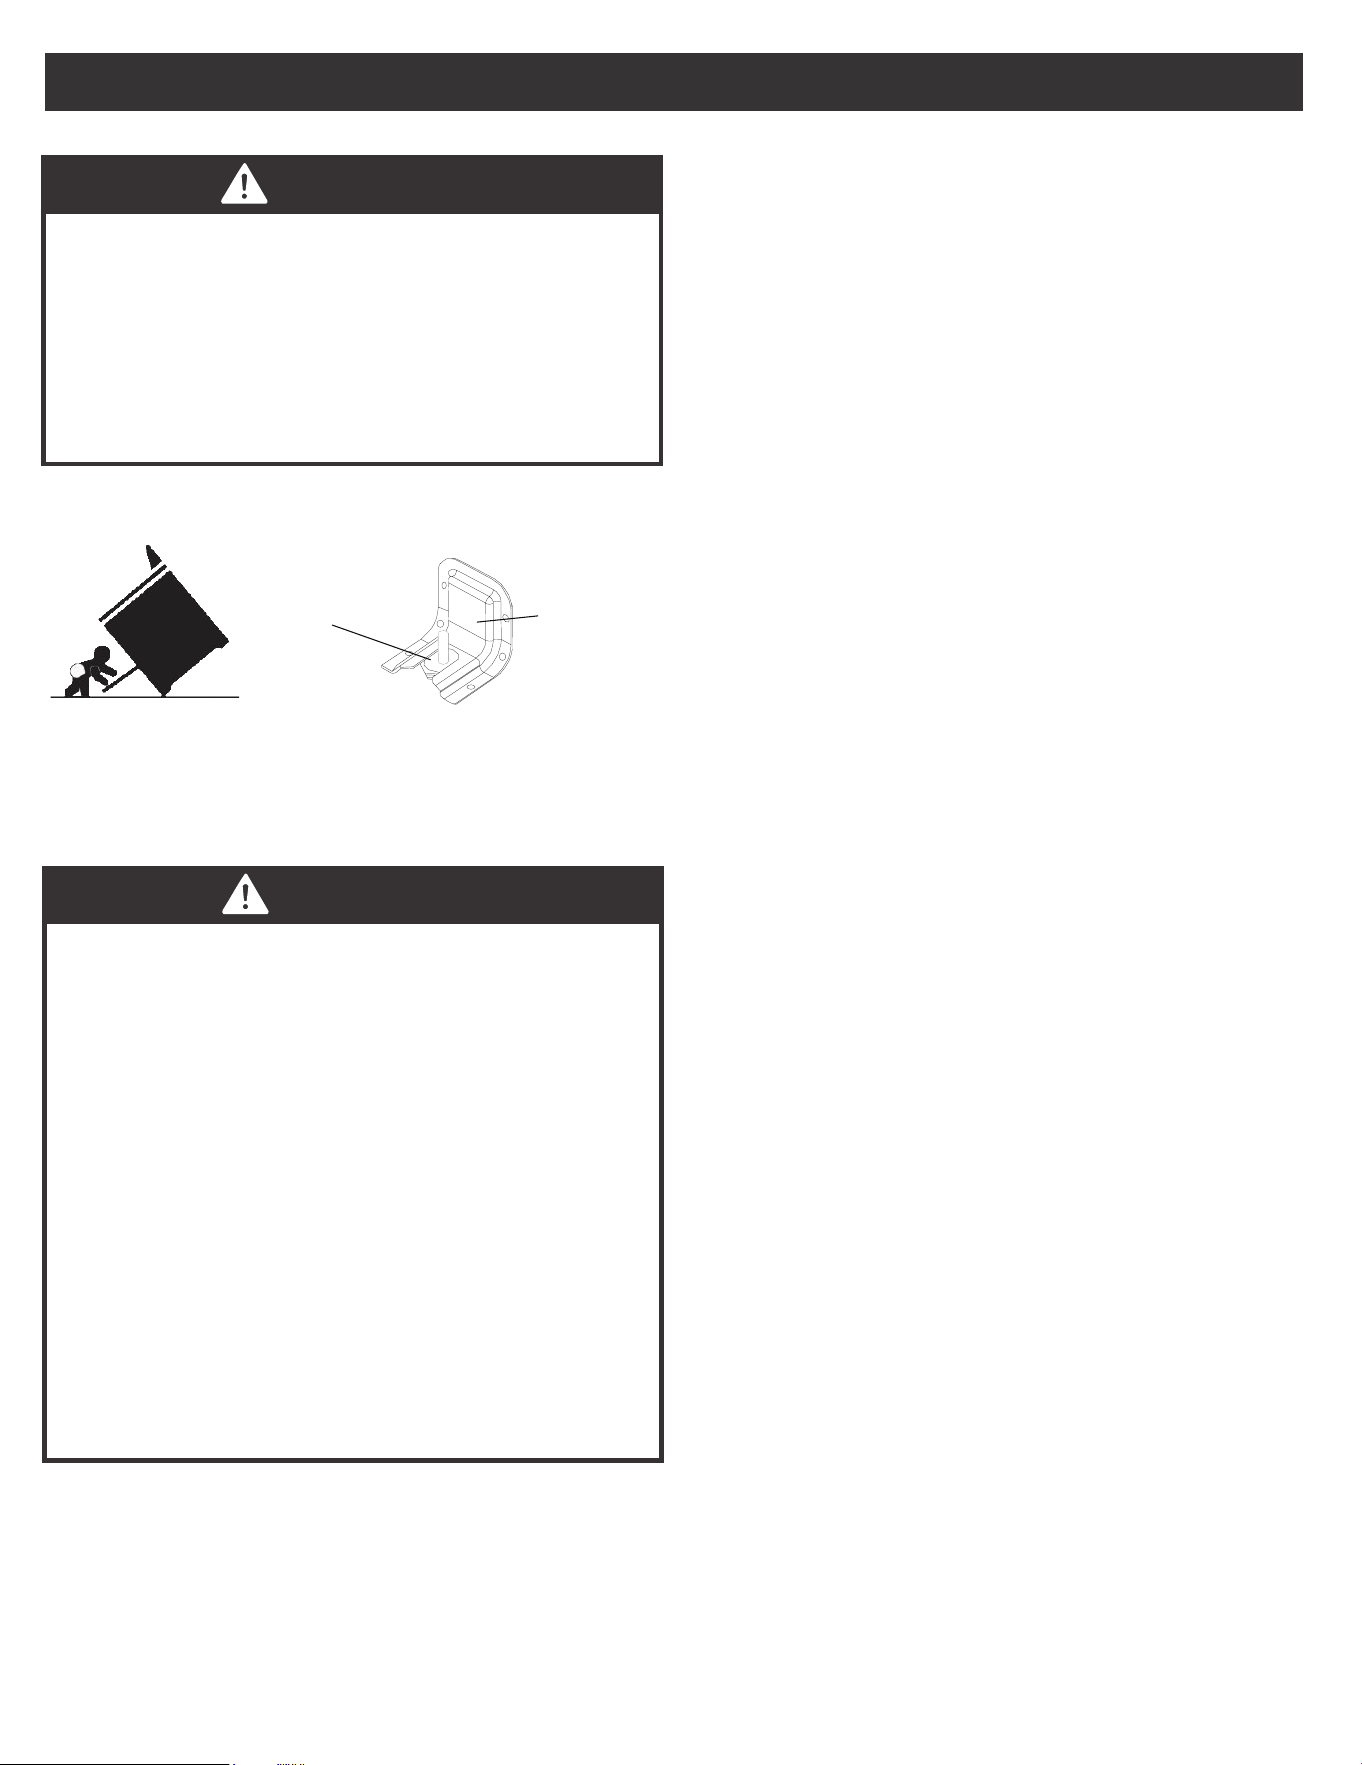
Tip Over Hazard
• A child or adult can tip the range and be killed. Verify
the anti-tip device has been properly installed and
engaged per installation instructions.
• Ensure the anti-tip device is re-engaged when the range
is moved. Do not operate the range without the anti-tip
device in place and engaged. Failure to do so can
result in death or serious burns to children or adults. Do
not remove the leveling legs. Doing so will prevent the
range from being secured by the anti-tip device.
• To confirm the anti-tip bracket is properly installed,
look underneath the range to confirm rear leveling leg
is engaged in bracket. If visual inspection is not
possible:
This symbol indicates the presence of a hazard which may result in death or serious
injury if not avoided.
Read all safety instructions before using this product.
Failure to follow these instructions may result in fire,
electrical shock, serious injury, or death. It is the
owner's responsibility to ensure that anyone using the
appliance knows how to operate it safely.
This symbol indicates the presence of a hazard which may result in minor or moder-
ate personal injury if not avoided.
NOTICE
This symbol indicates the presence of a hazard which may result in minor property
damage if not avoided.
NOTE
This alerts the user to information that will help avoid confusion or common cooking
mistakes and obtain the best possible user experience.
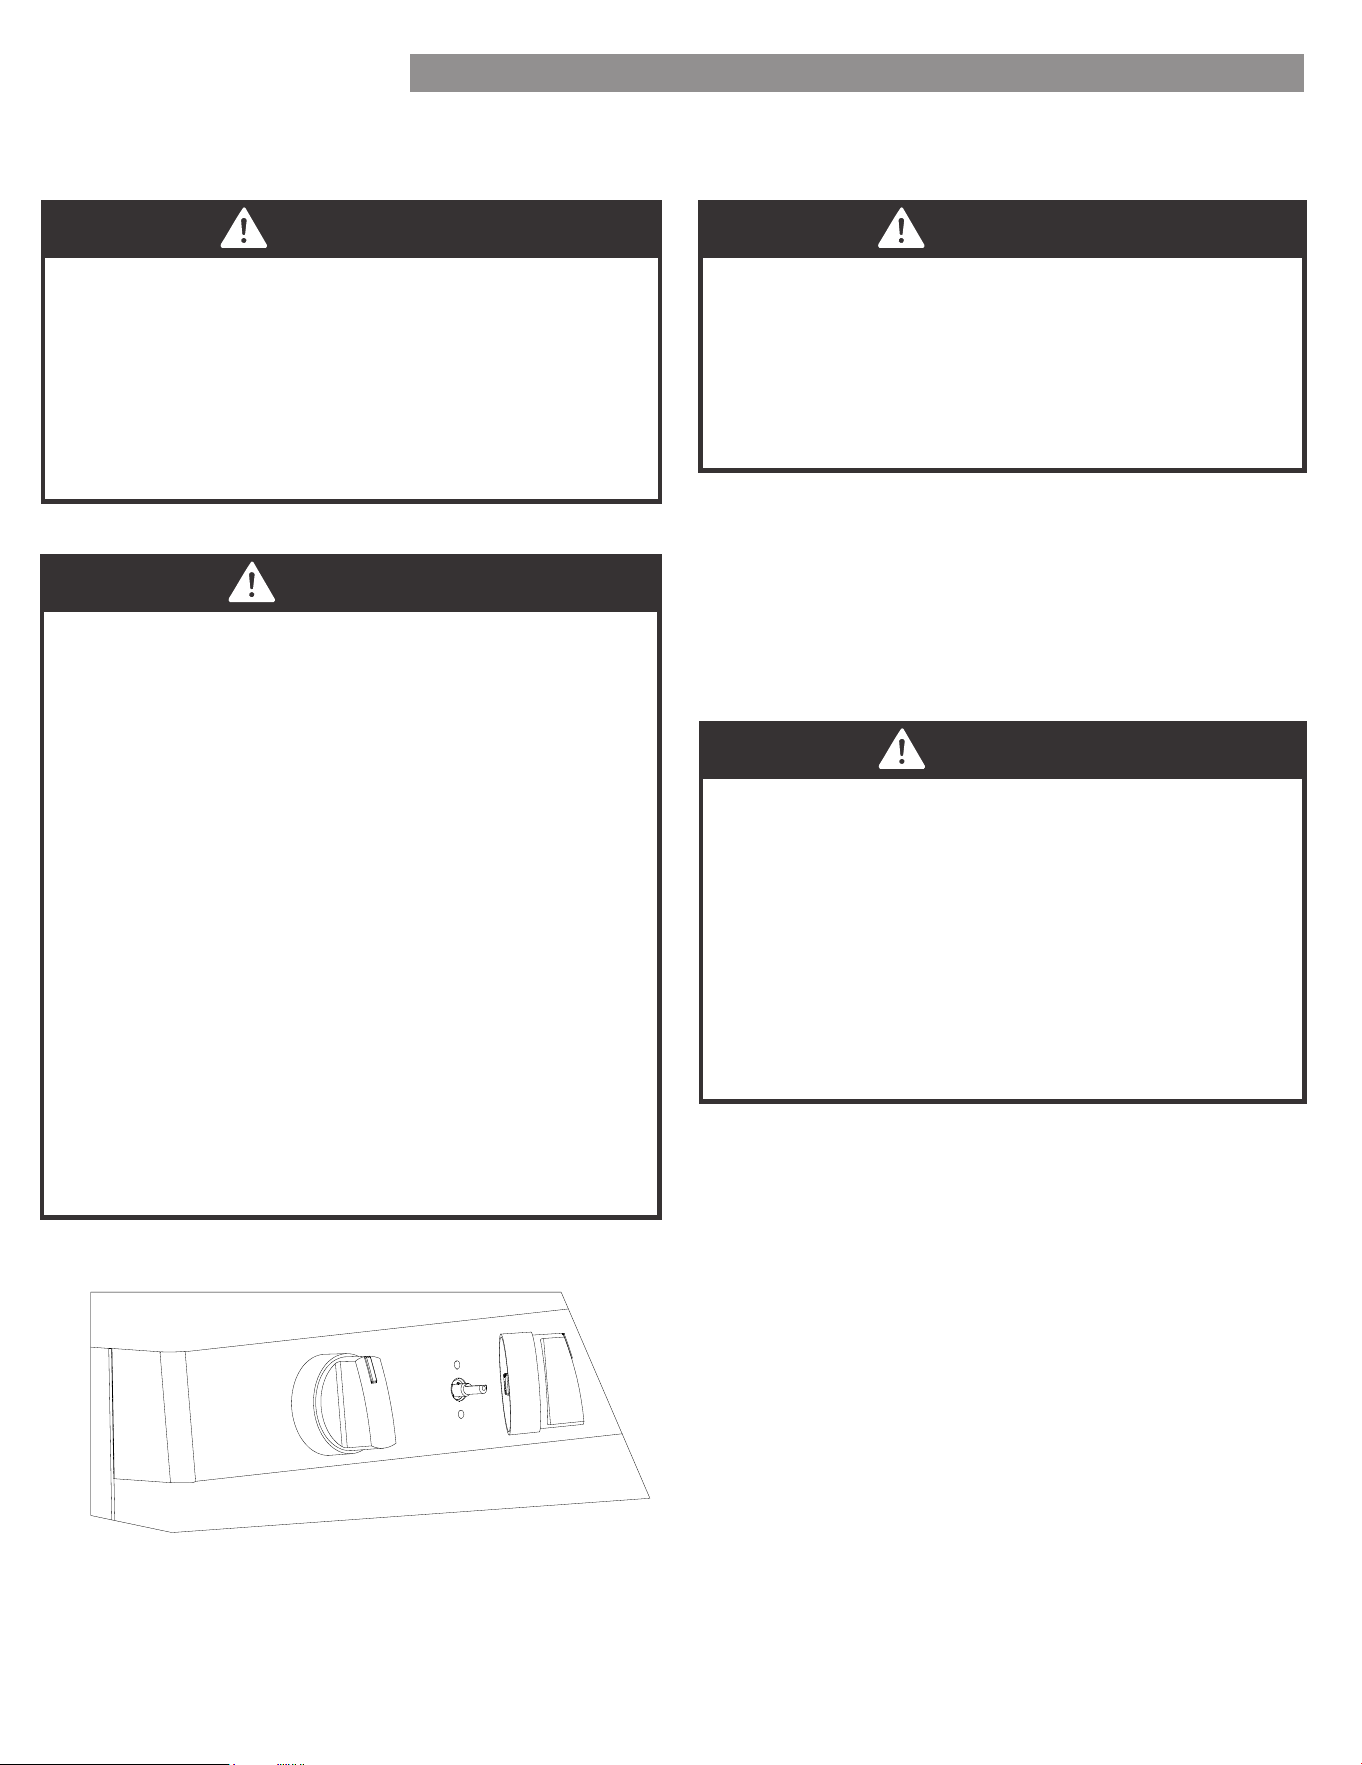
Anti-Tip Bracket
LevelingLeg
- Slide range forward
- Confirm anti-tip bracket is securely attached to
floor or wall in correct position according to instal-
lation
instructions.
- Fully slide the range back against the wall so that
leveling leg engages with anti-tip bracket.
• If range is removed from service, secure door closed
or remove door to minimize tip over risk. (See "Door"
section under "Cleaning and Maintenance" in this
manual for instructions on how to remove door.)
WARNING
EN-5

Installation and Maintenance
• This appliance is intended for normal residential use.
It is not approved for commercial use, outdoor
installation, or any other application not specifically
allowed by this manual.
• Be sure your appliance is properly installed and
grounded by a qualified service provider.
• DO NOT operate this appliance if it has been
damaged or is not working properly. Contact a
qualified service provider for repairs.
• DO NOT repair or replace any part of the appliance
unless specifically recommended in the manual. All
other servicing should be referred to a qualified
service provider.
• This appliance requires connection to a 3-prong or
4- prong, 240VAC split phase, 60 Hz grounded
electrical source. When installed, appliance must be
electrically grounded in accordance with local codes
or, in the absence of local codes, with the National
Electrical Code, NFPA 70 or the Canadian Electric
Code, CSA C21.1-02.
• DO NOT allow cooking grease or other flammable
materials accumulate in or on the range. Grease in
the oven or on the cooktop may ignite.
• Clean kitchen ventilating hoods frequently. Grease
should not be allowed to accumulate on hood or
filter.
• Clean cook-top with caution – To avoid steam burns,
do not use wet sponge or cloth while cooking area is
hot. Some cleaners can produce noxious fumes if
applied to a hot surface.
• DO NOT use oven cleaners. No commercial oven
cleaner or oven liner protective coating of any kind
should be used with any part of this appliance.
• DO NOT clean door gasket. The door gasket is
essential for a good seal. Care should be taken not
to rub, damage, or move the gasket.
• Clean only parts and areas listed in the "Cleaning
and Maintenance" section of this manual.
General Usage
• DO NOT store any flammable materials or
temperature sensitive items inside oven, in storage
drawer, or on top or near surface cooking units of
the appliance.
• Never use your appliance for warming or heating the
room.
• Children should not be left alone or unattended in
the area where appliance is in use.
• DO NOT allow anyone to climb, stand, lean, sit, or
hang on any part of an appliance,especially a door,
drawer or operation panel.
• CAUTION - DO NOT store items of interest to
children in cabinets above a range or on the
backguard of a range – children climbing on the
range to reach items could be seriously injured.
• Loose-fitting or hanging garments should never be
worn while using the appliance.
• This appliance has not been evaluated for use with
any 3rd party after-market systems. Do not attempt
to use this appliance with a working or any other
after-market device.
Ceramic Glass Cooktop
• The Hot Surface Indicator Light will glow if any
surface cooking area is too hot to touch, even after
the surface cooking area is turned off. Use caution as
the cooktop surface may still be warm after the hot
surface indicator light has shut off.
FIRE HAZARD
• Never leave the range unattended
• Turn off controls when not cooking
• Failure to follow these instructions can result in
death or fire
• When range is in use, the entire cooktop may
become hot!
WARNING
IMPORTANT INSTRUCTIONS
EN-6

• The surface cooking area will glow red when an
element is on. Some parts of the surface cooking
area may not glow red when an element is on. This is
normal operation. It will also randomly cycle off and
back on again, even while on High, to keep the
cooktop from extreme temperatures.
• To avoid damage to the cooktop, do not leave a hot
lid on the cooktop. As the cooktop cools, air can
become trapped between the lid and the cooktop,
and the ceramic glass could break when the lid is
removed.
• For foods containing sugar in any form, clean up all
spills and soils as soon as possible. Allow the cooktop
to cool down slightly. Then, while wearing oven mitts,
remove the spills using a scraper while the surface is
still warm. If sugary spills are allowed to cool down,
they can adhere to the cooktop and can cause
pitting and permanent marks.
• DO NOT USE WATER ON GREASE FIRES. Smother
fire or flame with a close-fitting lid or metal tray.
Never pick up a flaming pan. Dry chemical or
foam-type extinguisher may be used if it is CLASS
ABC or CLASS K and you already know how to use
it.
• DO NOT Cook on Broken Cook-Top – If cook-top
should break, cleaning solutions and spillovers may
penetrate the broken cook-top and create a risk of
electric shock. Contact a qualified technician
immediately.
• Clean Cook-Top With Caution – If a wet sponge or
cloth is used to wipe spills on a hot cooking area, be
careful to avoid steam burn. Some cleaners can
produce noxious fumes if applied to a hot surface.
• It is strongly recommended that a CLASS ABC or
CLASS K fire extinguisher be kept near the range in
an easily accessible location, and that household
members are familiarized in advance with its
operating instructions.
• Only certain types of glass, glass/ceramic, ceramic,
earthenware, or other glazed utensils are suitable for
range-top service without breaking due to the
sudden change in temperature.
• To reduce the risk of burns, ignition of flammable
materials, and spillage due to unintentional contact
with the utensil, the handle of a utensil should be
positioned so that it is turned inward, and does not
extend over the front of the counter top or over
adjacent surface cooking units.
IMPORTANT INSTRUCTIONS
• DO NOT TOUCH SURFACE COOKING UNITS OR
AREAS NEAR ELEMENTS – surface cooking units
may be hot even though they are dark in color.
Areas near surface cooking units may become hot
enough to cause burns. During and after use, do not
touch, or let clothing or other flammable materials
contact surface cooking units or areas near elements
until they have had sufficient time to cool. Among
these areas are the cook-top and surfaces facing the
cook-top.
• Use proper pan size. This appliance is equipped with
surface cooking units of different size. Select utensils
having flat bottoms large enough to cover the entire
surface cooking unit. The use of undersized utensils
will expose a portion of the surface cooking unit to
direct contact and may result in ignition of clothing.
Proper relationship of utensil to burner will also
improve efficiency.
• In the event that personal clothing or hair catches
fire, drop and roll immediately to extinguish flames.
• Always turn hood ON when cooking at high heat or
when flambéing food (i.e. Crepes Suzette, Cherries
Jubilee, Peppercorn Beef Flambé).
• Hot oil is capable of causing severe burns. Never
move cooking utensils containing hot grease. Wait
until it has cooled before disposing of grease.
• Use high heat settings only when necessary. To avoid
splattering, heat oil slowly on medium-low settings.
• In the event of house power failure, turn off any
cooktop elements that were in use. This will prevent
the cooktop from unexpectedly turning back on
when power is restored.
EN-7
IMPORTANT INSTRUCTIONS
SPECIFICATION
Oven Hazards
• Never place anything (aluminum foil, spill mat, baking stone, cookware, etc.) on the bottom of the oven cavity. These
items can trap heat or melt, resulting in damage to the appliance and risk of electric shock, smoke, or fire.
• Use care when opening the door. Let hot air or steam escape before removing or replacing food.
• Use only dry pot holders. Moist or damp pot holders on hot surfaces may result in burns from steam. DO NOT let
pot holder touch hot grates or flames. Do not use a towel or other bulky cloth.
• DO NOT heat unopened food containers – Build-up of pressure may cause container to burst and result in injury.
• DO NOT obstruct oven vents.
• Always place oven racks in the desired location while oven is cool. If rack must be moved while oven is hot, do not
let pot holder contact hot heating element in oven.
• DO NOT TOUCH OVEN HEATING ELEMENTS OR INTERIOR SURFACES OF OVEN –Heating elements may be hot
even though they are dark in color. Interior surfaces of an oven become hot enough to cause burns. During and after
use, do not touch, or let clothing or other flammable materials contact heating elements or interior surfaces of oven
until they have had sufficient time to cool. Other surfaces of the appliance may become hot enough to cause burns
- among these surfaces are oven vent openings and surfaces near these openings, oven doors, and windows of
oven doors.
• DO NOT use a broiler pan without its insert. Do not cover the broiler insert with aluminum foil, as exposed fat and
grease could ignite.
• If materials inside the oven should ignite, keep door closed and turn off power at the fuse or breaker box. Wait for
the oven to cool before removing contents, cleaning the oven, and restoring power.
• DO NOT obstruct oven vents or any other slots or openings on the unit.
Model
Rated Voltage
Power Supply
Oven Capacity 5.2cf
Net Weight 167.2 Lbs
405.9222#
120/208VAC~ 60Hz 120/240VAC~60Hz
7.238 kW 9.65kW
Oven Vent
EN-8
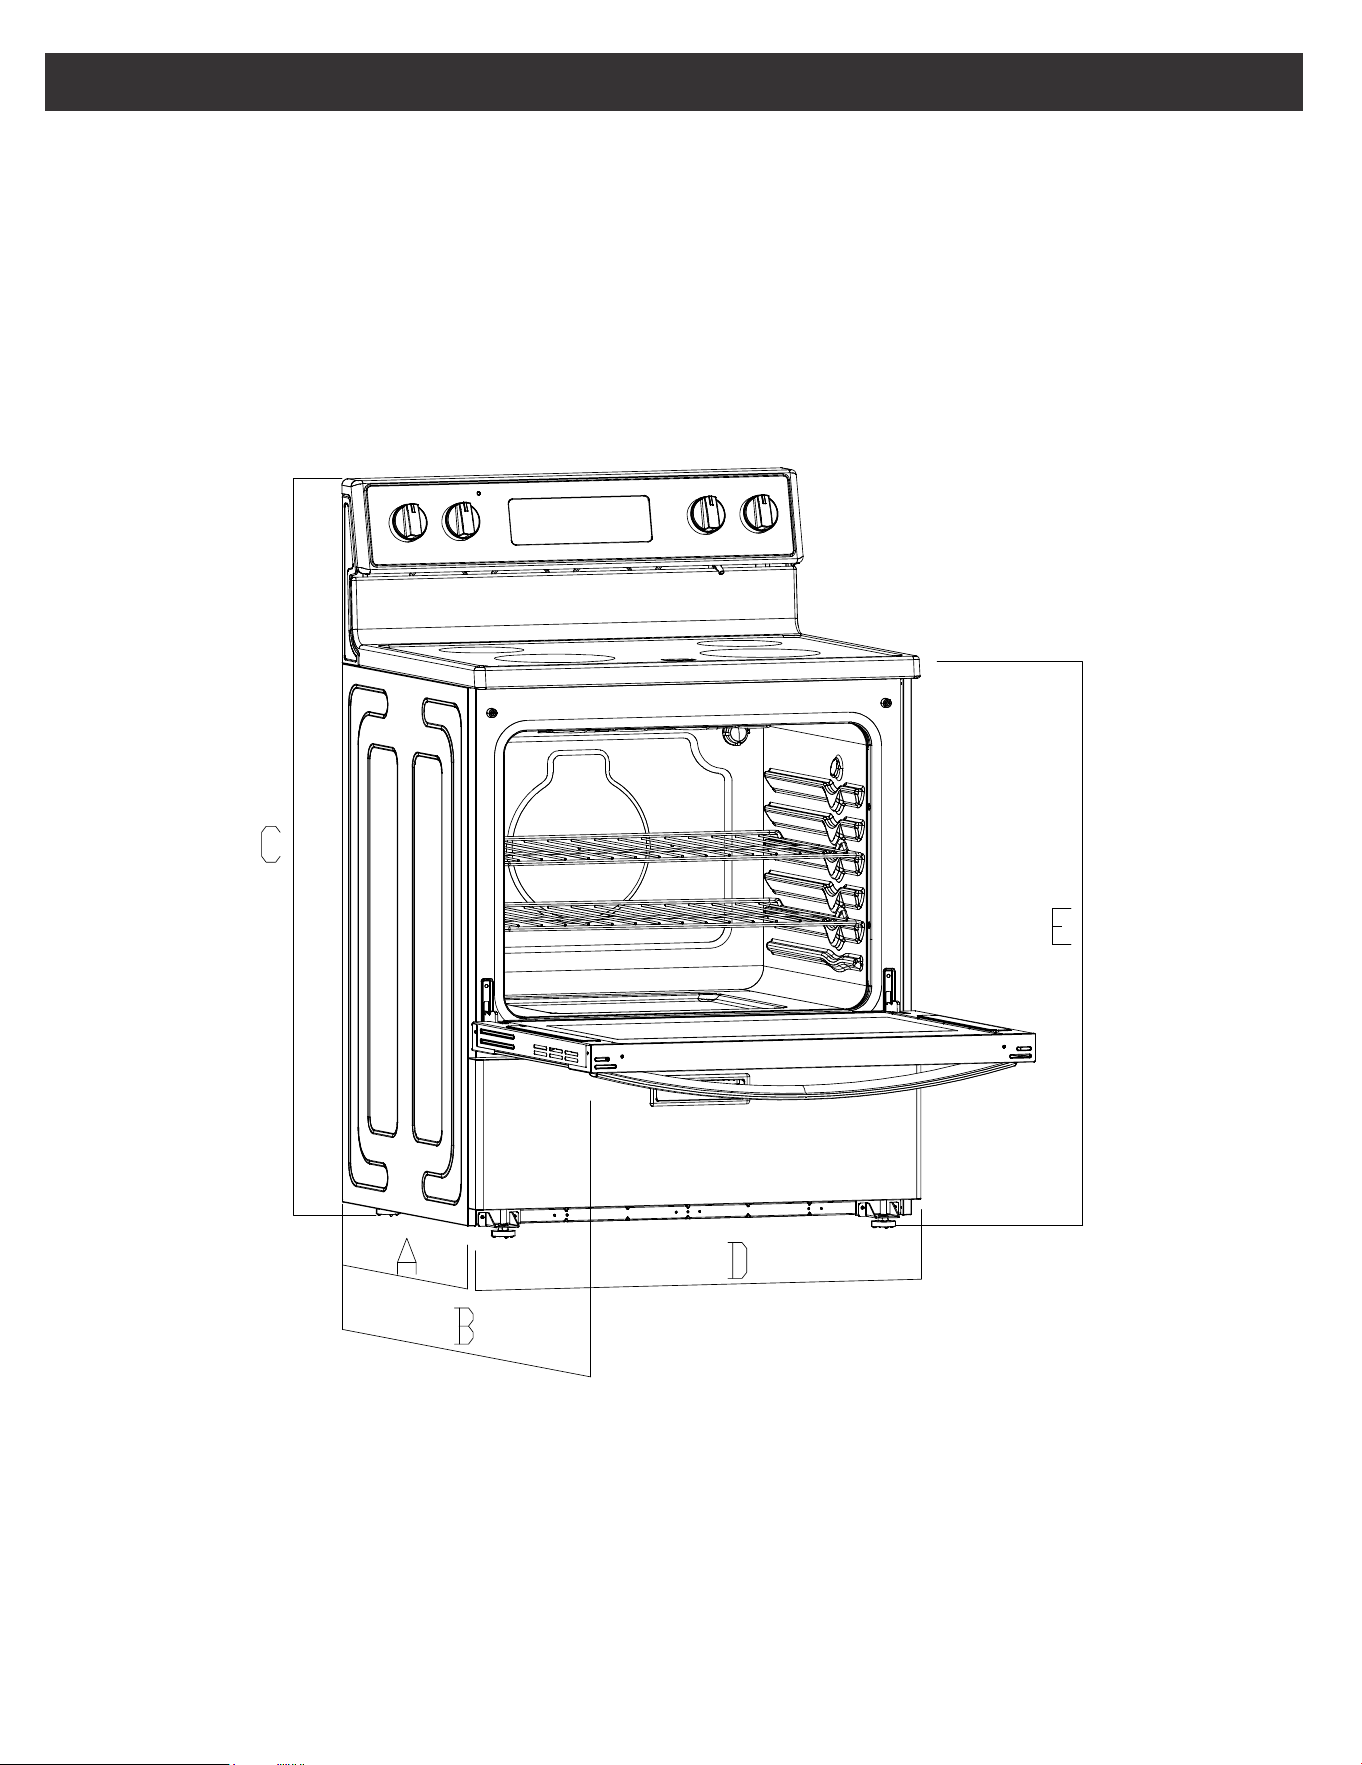
Product Dimensions
A. 25.63” (65.1 cm) depth. Back of range to front of cooktop
B. 46.4” (117.9 cm) max. depth. Back of range to the top with the door opened
C. 46.38” (117.8 cm) overall height (max.) with leveling legs
D. 29.87”(75.9 cm) width
E. 35.9” (91.2 cm) cooktop height (max.) with leveling legs
SPECIFICATION
EN-9
CHOKING HAZARD
SMALL PARTS. NOT FOR CHILDREN UNDER 3 YEARS
OLD.
WARNING
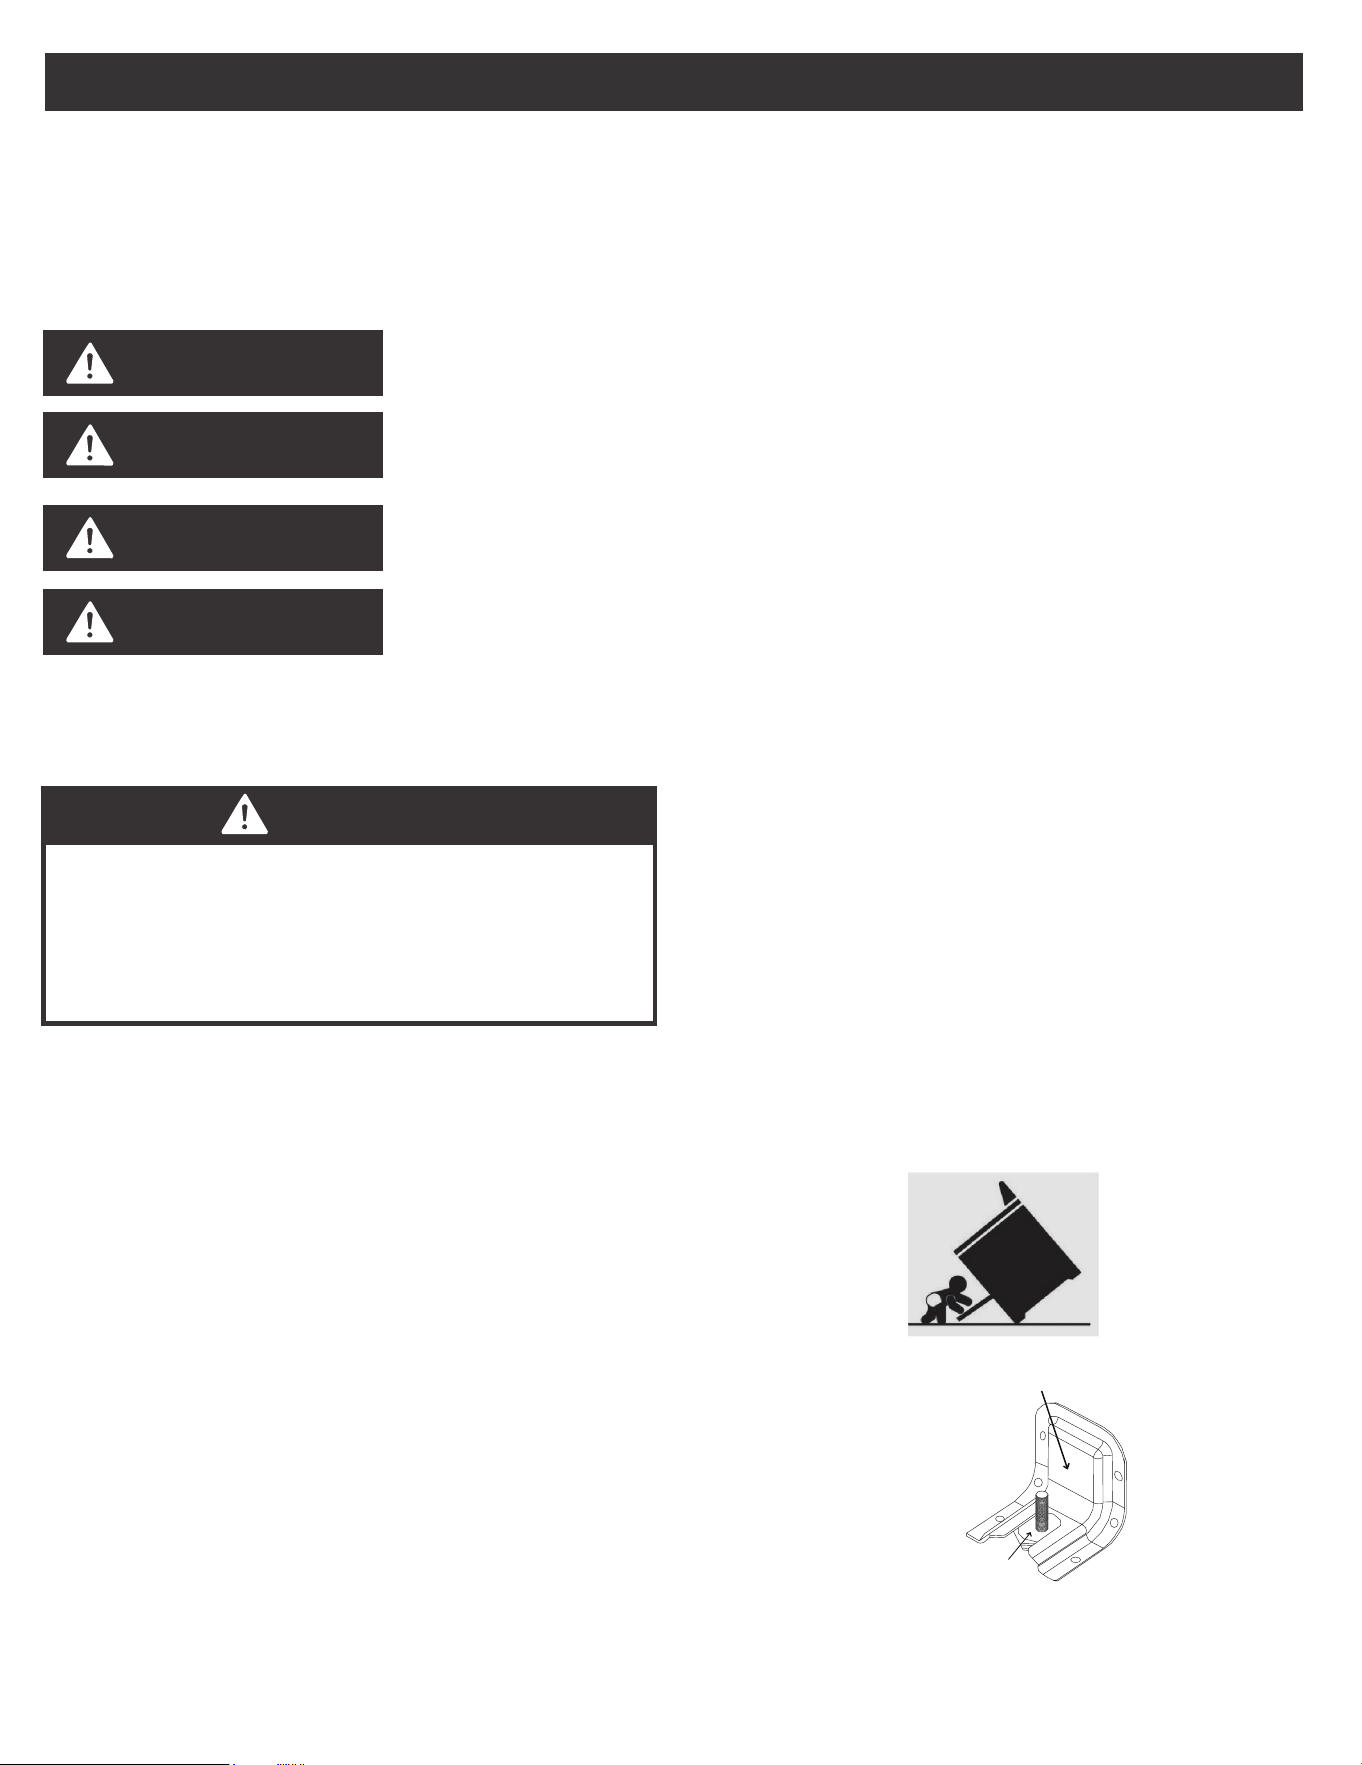
Rating Plate Label Location:
• The rating plate label contains appliance certification, rating, and identification information. The model and serial
number from the rating plate label is needed to register the product, order replacement parts, or when contacting
customer service. The rating plate label is located in the left side of the front frame.
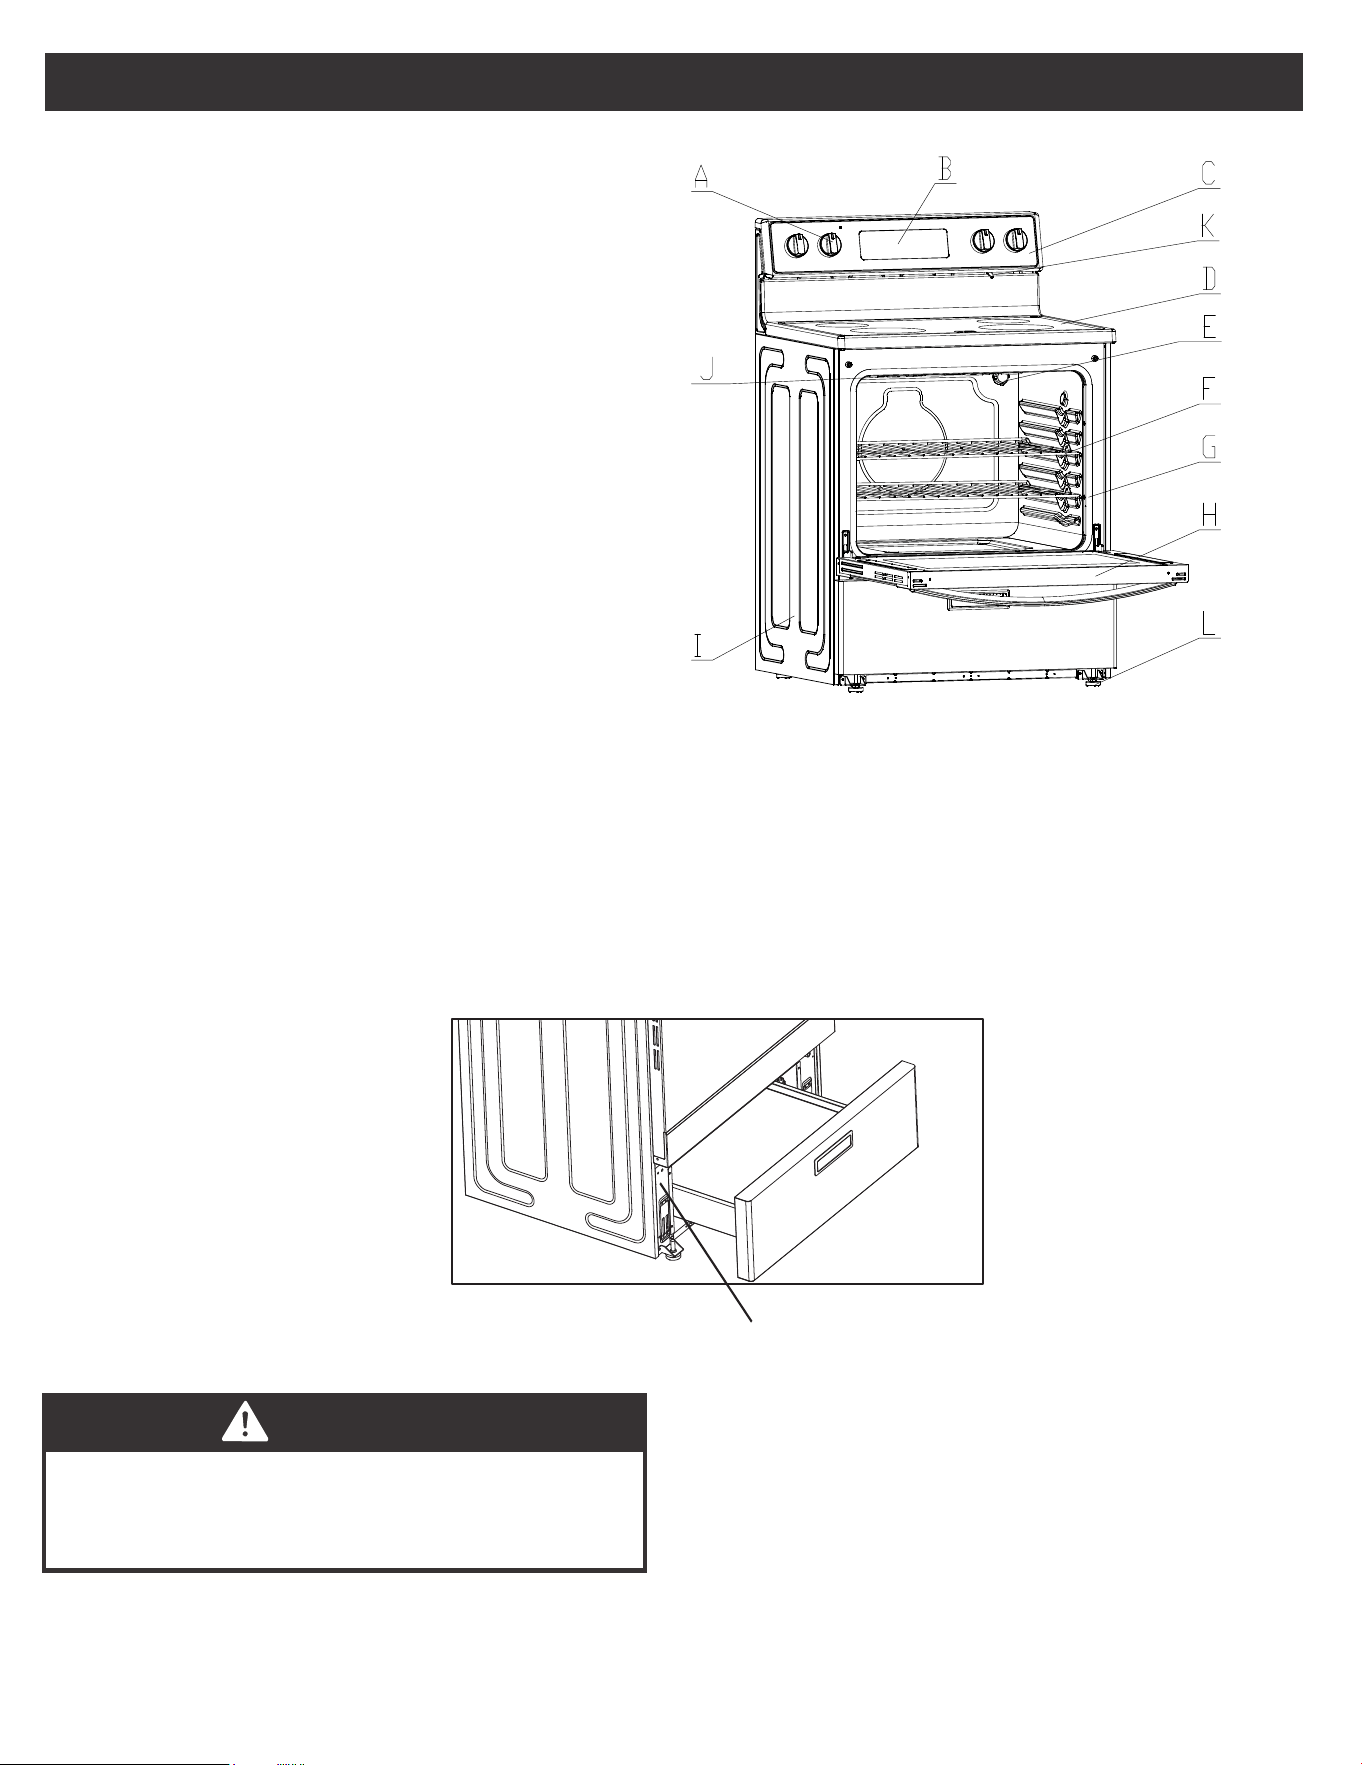
Range Parts Diagram
A. Cooktop Knob
B. Control Panel
C. Cooktop Knob
D. Ceramic Glass Surface
E. Oven Light
F. Oven Racks
G. Gasket
H. Oven Door with Handle
I. Storage Drawer
J. Broiler
K. Oven Vent
L. Adjustable Feet x 4
Rating Label Position
PRODUCT OVERVIEW
EN-10
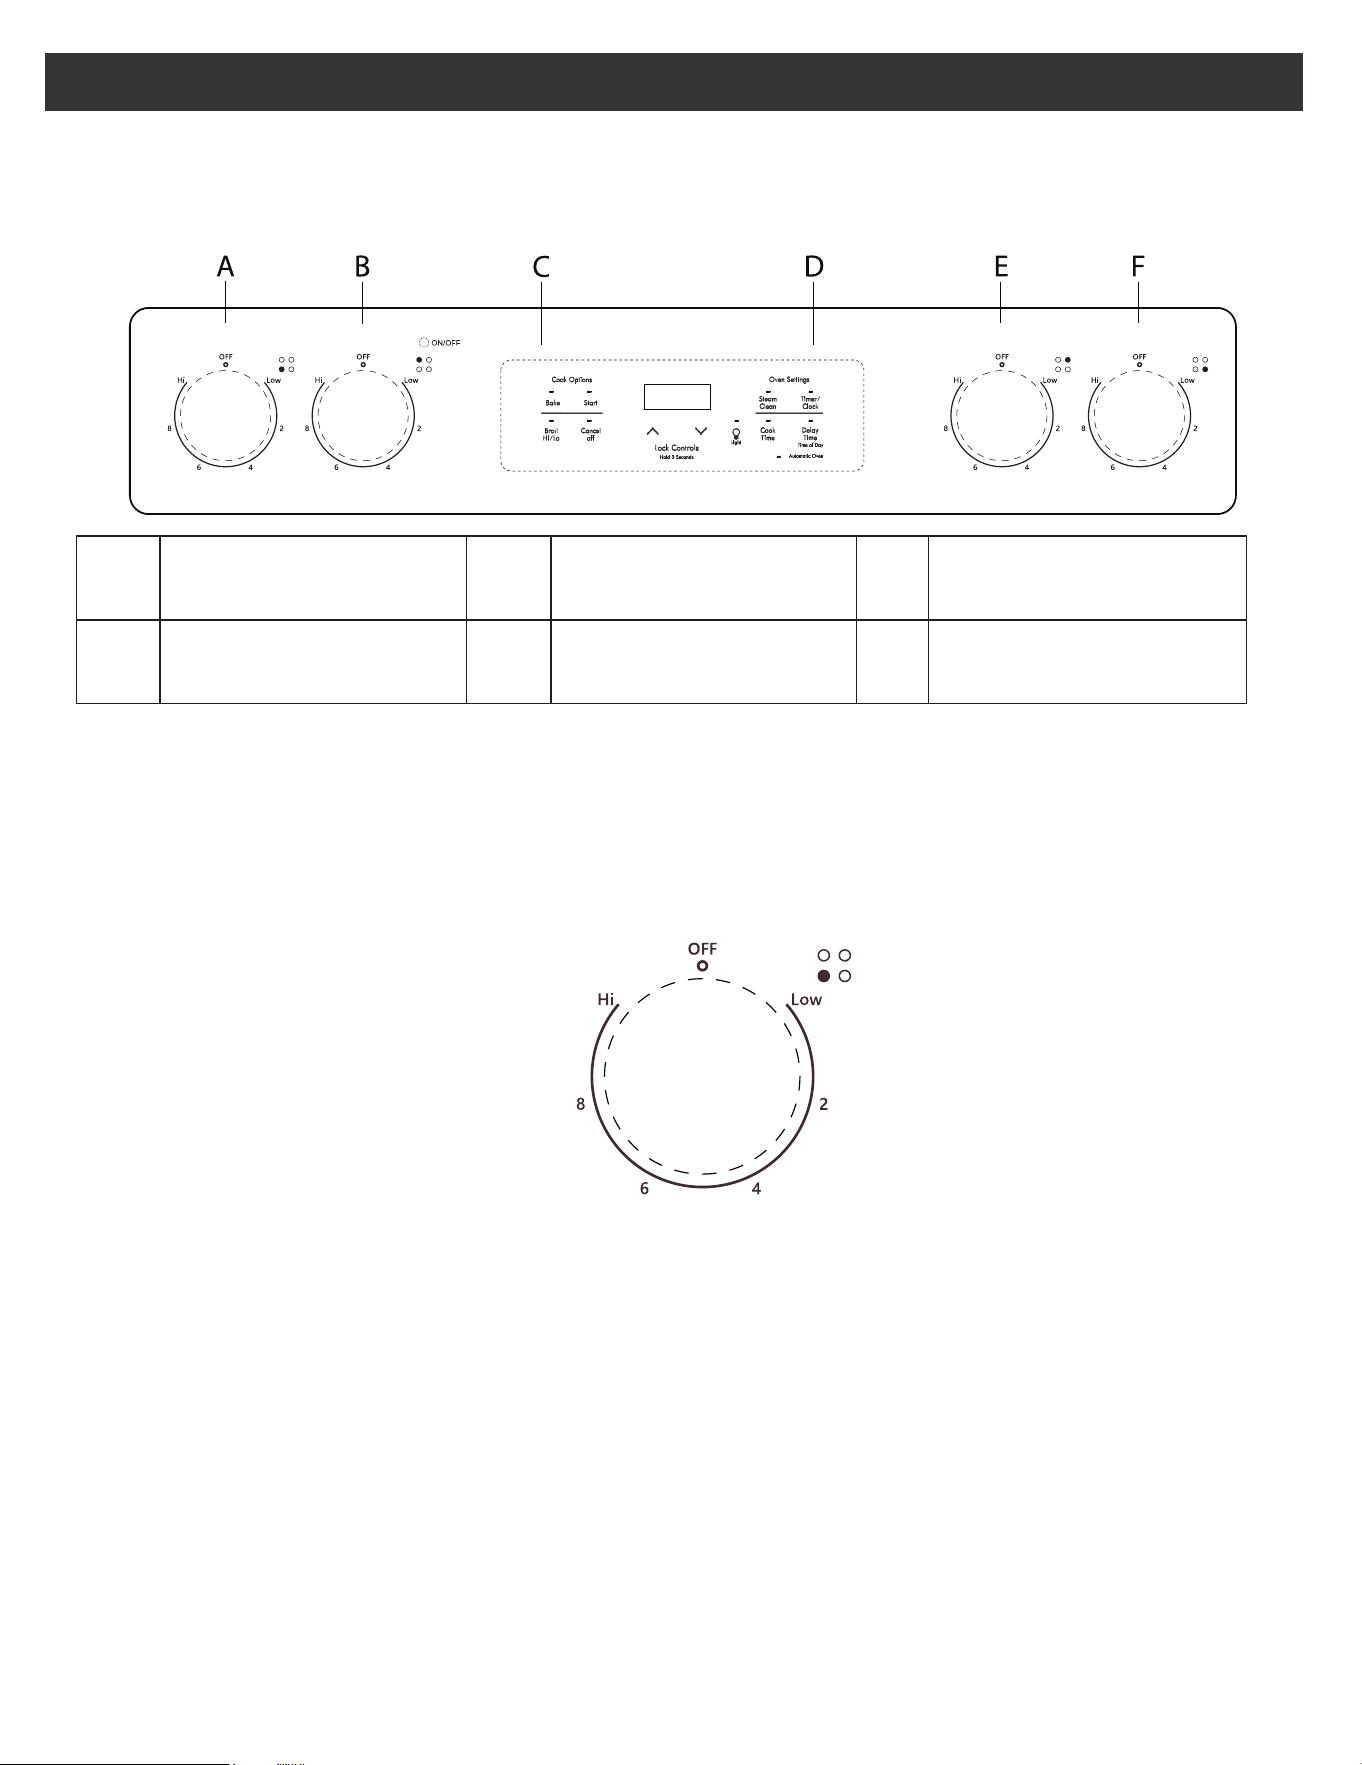
Review of Controls
CONTROL PANEL DIAGRAM
CONTROL KNOB
• The control knobs can be set to anywhere between “HI” to “LOW”.
• Push in and turn to activate.
When the unit is powered for the first time or in case of a power outage, the control will display “12:00” and will be
flashing until the time is set. When the oven is OFF, the control will display the daytime.
A FRONT LEFT BURNER C
OVEN COOKING
OPTIONS
E REAR RIGHT BURNER
B REAR LEFT BURNER D OVEN SETTINGS F
FRONT RIGHT
BURNER
EN-11
ELECTRONIC OVEN CONTROLS
HOW TO SELECT THE 12-HOUR OR
24-HOUR TIME SETTING:
1. To switch the clock mode from 12-hour or 24-hour
time, press the “COOK TIME" pad, and hold for 3
seconds.
2. After 3 seconds, 12 or 24 will appear on the display.
- If the display shows “12” you are switching the
time mode to 12-hour time.
- If the display shows “24” you are switching the
time mode to 24-hour time.
3. Once your desired time mode appears, the display
will automatically switch back to the clock display
indicating that your time mode has been updated.
HOW TO SET THE CLOCK
After the desired time setting mode has been selected
you can now set the clock time on the range.
1. To set the clock, press the “TIMER/CLOCK” pad for 3
second, and the hours will begin to flash, press the “+
or –” pad to adjust the hour. To lock in the hour, press
the "TIMER/CLOCK" pad.
2. Once the hour is locked in, the minutes will begin to
flash on the display, next press the “+ or –” pad to
adjust the minutes. To lock in the minutes, press the
“TIMER/CLOCK” pad.
3. The clock time on your range is now set.
CANCEL/OFF
The CANCEL/OFF pad stops any function except the
Control Lock.
OVEN LIGHT
Press the “OVEN LIGHT” pad to turn the lights on or off.
If there are no other operations, the oven light will switch
off automatically after 5 minutes .
1. The clock function on this range has two available
time settings. 12-hour or 24-hour time.
2. The range is programed with the 12-hour time
mode set as the default setting.
3. Before setting the clock, make sure the oven and
timer are off.
4. If you would like to change the time mode from
the default setting, you must change it before
setting the clock.
NOTE
EN-12
BEFORE USING YOUR NEW RANGE FOR
THE FIRST TIME:
1. Ensure all packaging, literature, removable labels, and
protective plastic film are removed. Check inside oven,
inside drawer, and around door and trim edges
carefully.
2. While cool, wipe down all surfaces, including inside
oven and drawer, with a damp cloth to remove dust
that may have settled during shipping and storage.
3. Familiarize yourself with the controls and features
described in this manual.
4. Confirm that surface elements and oven operate as
intended.
5. Start the oven in BAKE mode at the highest available
temperature setting. Allow oven to run for 1 hour to
remove any dust or impurities. There will be a distinctive
odor - this is normal. Ensure your kitchen is well
ventilated during this conditioning period.
ELECTRONIC OVEN CONTROLS
START
The “START” Pad begins the oven function. If the
“START” pad is not pressed within 30 seconds after
pressing a function pad, the display will begin to flash
for 30 seconds, then 5 reminder tones will sound, and
“PUSH" icon and “On” icon will begin to flash
alternately on the display for 30 seconds. If the “START”
pad is not pressed the oven function will be canceled
and the display will return to showing the clock time.
TIMER
The timer can be set in hours or minutes up to 11 hours
and 59 minutes (in the 12-hour time mode; 23-hours and
59 minutes in the 24-hour time mode), and counts down
the set time programmed into the system. The timer does
not start or stop the oven.
LOCK CONTROLS
The Lock Controls function locks the control panel pads
from being used to avoid any unintended use of the cook
functions. When the control panel is locked, only the
Oven Light will function.
HOW TO SET THE TIMER
1. To set the Timer, press the “TIMER/CLOCK” pad. The
Timer indicator light will light up.
2. Next, the display will begin to flash, to set the desired
hour or minutes, press the “+ or –” pad.
3. Then press the “TIMER/CLOCK” pad to begin the
Timer.
4. When the set time ends, the end-of-cycle tones will
sound.
5. Press the “TIMER/CLOCK” pad to stop the timer and
the reminder tones.
OVEN TEMPERATURE FORMAT
1. The default temperature scale setting for the oven is
set to Fahrenheit.
2. When using the oven, the oven temperature on the
display will appear in Fahrenheit (F).
3. However, if you would like to change the temperature
scale to Celsius (C), please see directions below.
HOW TO CHANGE THE OVEN
TEMPERATURE SCALE TO CELSIUS:
1. To change the oven temperature scale to Celsius (C),
press the “BAKE” pad and hold for 3 seconds.
2. Next, the letter “C” will appear on the display for a
few seconds.
3. The “C” will disappear from the display, and the
clock time will reappear on the display indicating the
oven temperature scale has been switched.
4. When using the Bake function, the oven temperature
will now display the letter “C” next to the tempera-
ture.
To Lock/Unlock Control Panel:
1. To lock the control panel, press both the “+ and –”
pads at the same time and hold for three seconds,
then “LOC” icon will appear on the display and begin
to flash. Once “LOC” stops flashing, your control
panel is now locked.
2. To unlock the control panel, press both the “+ and –”
pads at the same time and hold for three seconds,
then “OPN” icon will appear on the display and begin
to flash. Once “OPN” icon stops flashing, your control
panel is now unlocked.
HOW TO CHANGE THE OVEN
TEMPERATURE SCALE BACK TO
FAHRENHEIT:
• To change the oven temperature scale back to Fahr-
enheit (F), repeat above steps 1-3. However, during
the adjustment the letter “F” will appear on the
display instead of a “C”.
If you would like to stop the Timer at any time, press
the “TIMER/CLOCK” pad twice.
NOTE
LOCK CONTROLS
LOCK CONTROLS FUNCTION DOES NOT LOCK
THE OVEN DOOR.
WARNING
EN-13
ELECTRONIC OVEN CONTROLS
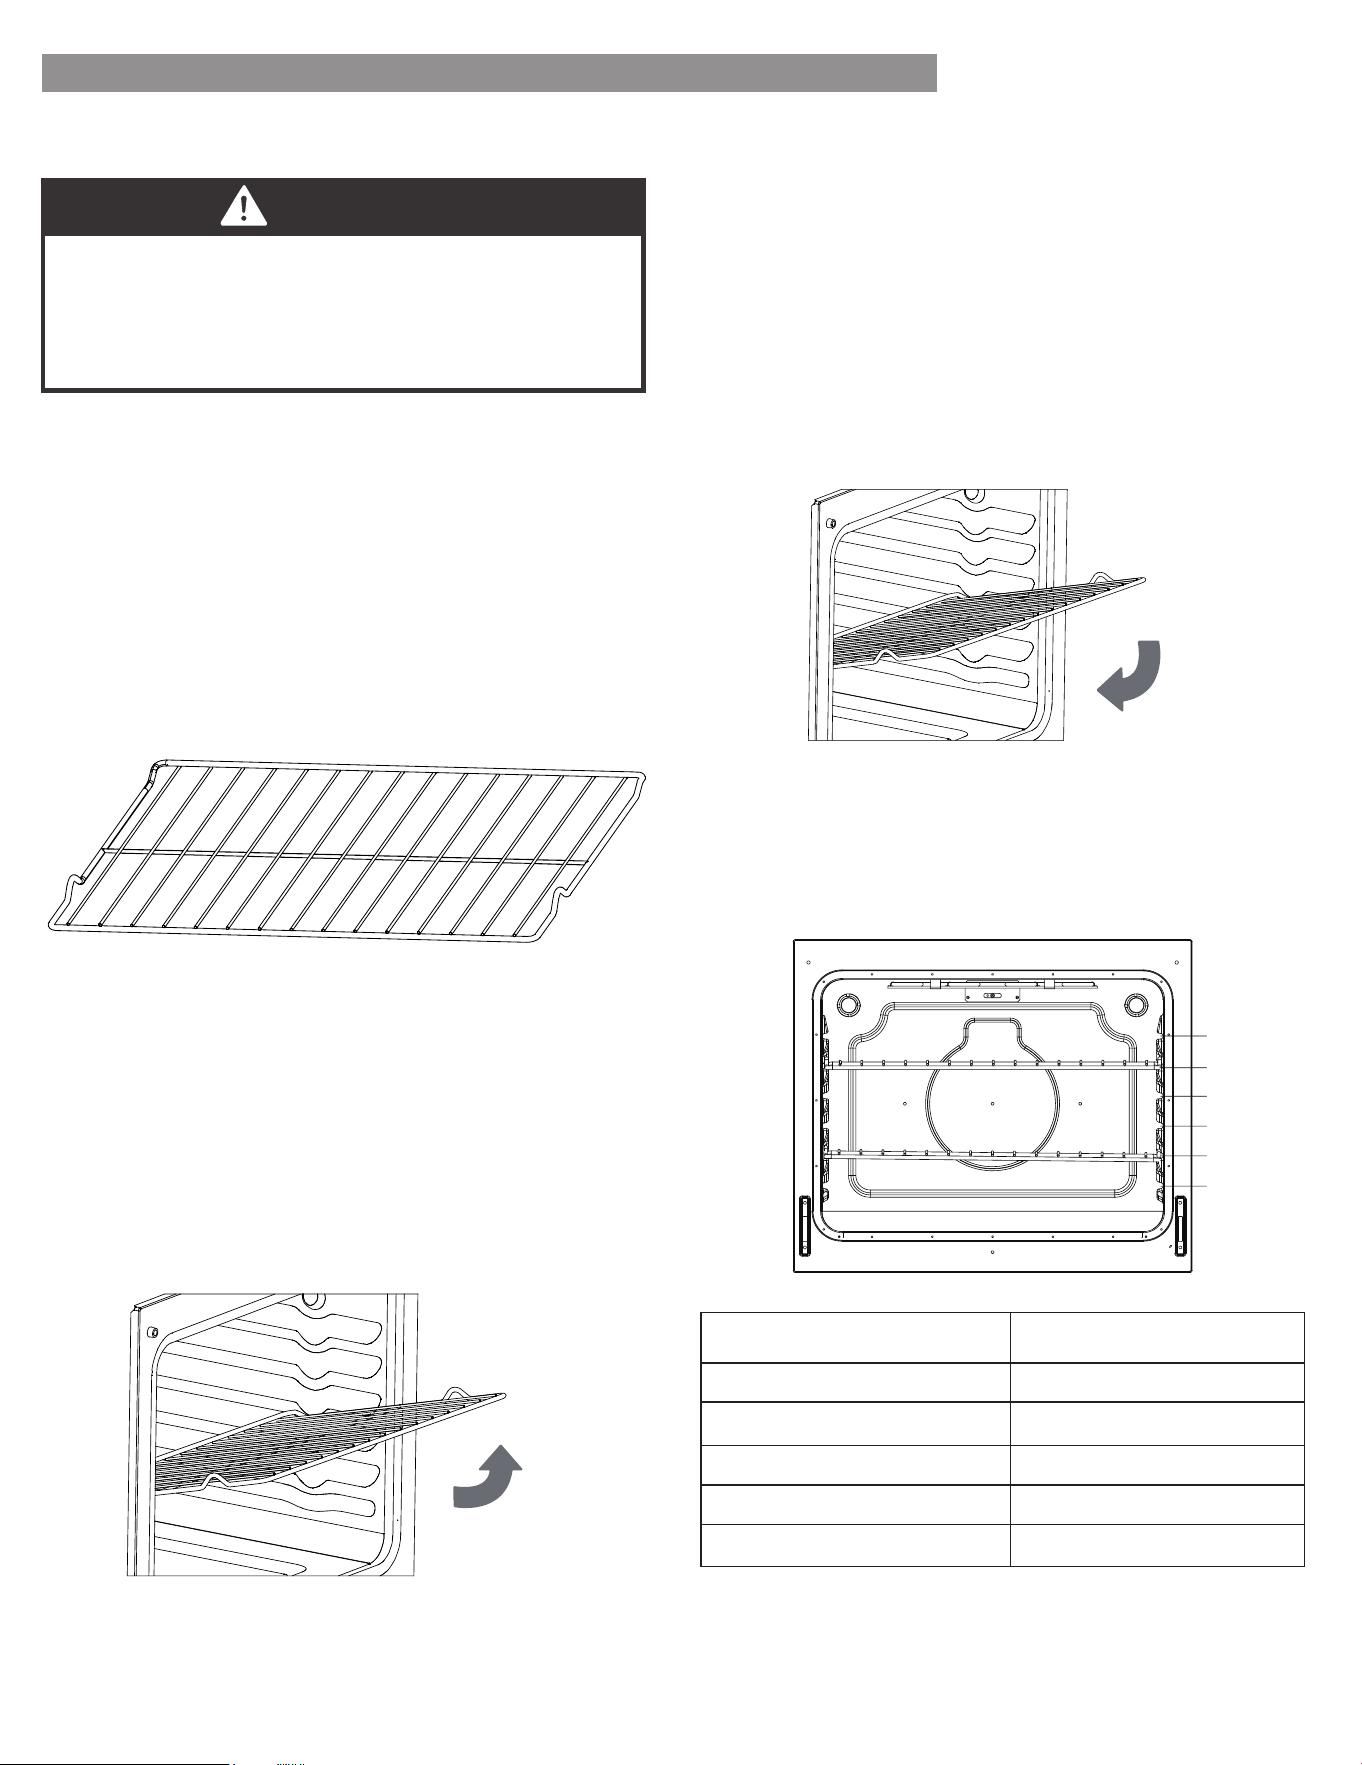
Oven Racks:
Flat Rack: Versatile and low profile, each range is
supplied with one or more flat oven racks. Flat racks
slide in and out of oven on rack guides formed into side
of oven wall. Multiple racks can be used simultaneously,
if desired. If racks do not move smoothly, use the corner
of a paper towel to apply a thin layer of vegetable oil to
reduce friction. Wipe off any excess before use.
Rack Positions
For best performance, adjust rack so food is placed at
the center of the oven. For most foods this will be rack
position #3
Removing Rack: Racks are designed to stop before
coming completely out of the oven to reduce the risk of
dropped or spilled foods. To remove the rack:
1. Remove all food and utensils from rack.
2. Grasp firmly from both sides.
3. Pull rack out until it contacts the stop position.
4. Lift up on the front of the rack and continue pulling
outward.
Inserting Rack: The rack can be installed in only one
direction. To insert the rack:
1. Orient the rack so that the handle is towards the front
and the interlock features are on the top side.
2. Tip rack so that the front is several inches higher than
the back.
3. Slip the interlock features under the stop position on
the rack guides formed in the oven walls.
4. Rotate rack down while pushing back to complete the
insertion process.
OPERATION INSTRUCTIONS
BURN HAZARD
Always place oven racks in the desired location while
oven is cool. If rack must be moved while oven is hot,
do not let pot holder contact hot oven surfaces.
CAUTION
REMOVING/INSERTING RACKS:
6
5
4
3
1
2
OVEN FUNCTION RACK POSITION
BAKING
Large Roast/Turkey Use Rack 1
Meat/Poultry Use Rack 2
Cake/Cookies Use Rack 3
Batch Baking Use Rack 2 and 5
EN-14

For best results when baking layer cakes on 2 racks, use
racks 2 and 5 in the lower and upper section of the oven.
For an even bake, stagger the cake pans on the bottom
rack so that it is not positioned directly below the pans
on the top rack. Place the cake pans on the racks as
shown in the illustration below. (Diagram A)
For best results when baking layer cakes on 2 racks in
the middle section of the oven, use racks 3 and 5. For an
even bake, stagger the cake pans on the bottom rack so
that it is not positioned directly below the cake pans on
the top rack. Place the cake pans on the racks as shown
in the illustration below. (Diagram B)
OPERATION INSTRUCTIONS
Diagram A
Diagram B
1. Please wear an oven mitt when touching the oven
racks or placing food in/removing food from the
oven!
2. During cooking, if you want to change the
temperature, you must first press the
“CANCEL/OFF” pad then repeat the setting steps
to reset the temperature.
NOTE
During cooking, if you want to change the
temperature, you must first press the “CANCEL/OFF”
button and repeat the setting steps to select a new
temperature.
NOTE
PREHEATING
Preheating is generally desirable, although not absolutely
necessary in all circumstances. Some foods are more
robust and may have acceptable results without
preheating. These foods include large pieces of meat
(whole roasts, hams, or poultry) where the total cooking
time is much longer than the time required to preheat.
These foods also include frozen potato products and
frozen processed dinners that, by their nature and
design, are more robust to baking variations. More
delicate foods, such as breads (including cakes, cookies,
pastries, and pizzas), desserts, soufflés, etc. will likely not
have acceptable results without proper preheating.
BAKE
Designed for general baking recipes, BAKE applies heat
from both above and below to achieve exceptional
baking performance. Works best for small- and medi-
um-sized foods that require only one rack position at the
center of the oven, such as casseroles, frozen dinners,
single-layer cakes, and individual racks of cookies.
1. For oven modes that require preheating, the control
will automatically enter preheat mode after START is
pressed. “PrE” will appear on the display and 3
beeps will be heard when preheating is done.
2. The oven will take approximately 11 to 15 minutes to
reach 350 F (177 C). Higher temperatures will take
longer preheating times.
3. DO NOT open the door, until preheating is done.
EN-15
OPERATION INSTRUCTIONS
FOR BEST EXPERIENCE
• The broil heating element is very powerful. Follow
recipe directions and monitor food closely to
reduce risk of burning food.
• For broiling meat, it is recommended to use a
broiling pan to allow grease and juices to drain
away from the meat. Do not line broiling pan with
aluminum foil, as this will prevent greases from
draining properly.
NOTE
If you would like to set a cooking time first, press the
“COOK TIME” pad, and use the “+ or –” pad to enter
the desired cooking time, then press the “COOK
TIME” pad again to begin the set cooking time. Next,
select to press the “BAKE” , and use the “+ or –”
pad to adjust to the desired oven temperature, then
press the “START” pad to begin the oven heating
process to cooking, and the Automatic Oven indicator
will light up.
NOTE
COOK TIME
The cook time function is available in the Bake or Broil
Hi/Lo mode.
Directions:
1. Press the BAKE button.
2. The control will default to 350 F (175 F).
3. Use “+ or –” buttons to adjust to the desired
temperature. Note: Oven temperature can be selected
from 170F (77 C) to 550 F (288 C).
4. Press the START button, “PrE” will be displayed
indicating the preheating process has started.
5. Once the oven has reached the specified
temperature, three beepings will be heard and the set
temperature will appear on the display.
6. Press CANCEL/OFF to exit.
1. Press the BROIL HI/LO button.
2. Press “START”, the display will show HI and is set to
the highest temperature setting of 550°F.
BROIL
Directions:
High Setting:
1. Press “BROIL HI/LO” button twice.
2. Press “START”. The display will show LO and is set to
the lowest temperature setting of 450°F.
3. The oven will be ready when 3 beeping tones sound.
4. Place food in the oven and close the door to ensure
proper oven temperature.
5. Press CANCEL/OFF to exit.
Low Setting:
1. When you’re cooking with “Bake, If a set cooking
time is desired, press the “COOK TIME” button.
2. Use the “+ or –” pad to enter the desired cooking
time.
3. Once you have set your cooking time, press the
“COOK TIME” pad again to begin the set cooking
time, and the Automatic Oven indicator will light up.
4. At the end of the set time, the oven will automatically
turn off, and the “OFF” icon appear on the display
and begin to flash and the end of cycle tone will
sound. You can press any pad on the control panel to
stop the “OFF” icon.
HOW TO SET THE COOK TIME FUNCTION
Cook food thoroughly to help protect against any food
borne illnesses. Use a food thermometer to take food
temperatures and check in different locations.
FOOD SAFETY
The delay time function is available in the Bake mode.
DELAY TIME
EN-16
FOOD POISONING HAZARD
DO NOT LET FOOD SIT IN THE OVEN MORE THAN
ONE HOUR BEFORE OR AFTER COOKING. DOING
SO CAN RESULT IN FOOD POISONING OR
SICKNESS.
WARNING
CAUTION
WARNING FIRE HAZARD
• DO NOT USE WATER ON GREASE FIRES. Smother
fire or flame with a close-fitting lid or metal tray.
Never pick up a flaming pan.
• Never leave surface cooking units unattended.
Boil-over causes smoking and greasy spillovers that
may ignite. Turn off all controls when done
cooking.
• DO NOT place items that can melt or burn on the
cooktop, even when it is not being used.
BURN, CUT, ELECTRIC SHOCK HAZARDS
• DO NOT use if cooktop is broken. Cleaning
solutions and spillovers may penetrate the broken
cook-top and create a risk of electric shock.
Contact a qualified service provider immediately
for repairs.
• To prevent cooktop glass breakage, do not slide
cookware across cooking surface or otherwise
scratch cooktop glass. DO NOT use the glass
cooktop as a cutting board.
• DO NOT store heavy items above the cooktop.
They could fall and break the glass.
• To minimize burn risk and maximize cooking
efficiency, cookware should completely cover the
outlined area of the cooking element.
• Until the cooktop has completely cooled after use,
the surface may still be hot and burns may occur
after the cooking element has been turned off. To
avoid steam burns, do not use wet sponge or cloth
while cooking area is hot.
WARNING
OPERATION INSTRUCTIONS
1. To set the Delay Time, press the “DELAY TIME” pad,
and the display will begin to flash.
2. Next, press the “+ or –” pad to set the time to when
you would like your cooking time to begin.
3. Once you have set your desired delay time, press the
“DELAY TIME” pad again to lock in the set time.
4. Next, press the “BAKE” pad.
- If the “BAKE” pad has been pressed, press the
“+ or –” pad to adjust to the desired oven
temperature.
5. Next, press the “START” pad to begin the delay time
and the set time will appear on the display indicating
that your Delay Time mode has been started.
6. When your delay time has been programmed, the
Automatic Oven indicator will light up.
7. If you would like to cancel the Delay Time function,
press the “CANCEL/OFF” pad.
HOW TO SET THE DELAY TIME
COOKTOP OPERATION
PREVENTING DAMAGE
• DO NOT allow cookware to boil dry or otherwise
overheat.
• DO NOT cook foods packaged in aluminum foil
directly on the cooktop. DO NOT otherwise use
aluminum foil, or any material that could melt,
directly on the cooktop.
• Never cook directly on cooktop. Always use
appropriate cookware.
NOTE
EN-17
OPERATION INSTRUCTIONS
Cookware
STORAGE DRAWER
WHEN THE OVEN IS IN USE, THE DRAWER MAY
BECOME HOT. DO NOT STORE PLASTICS, CLOTH,
OR OTHER ITEMS THAT COULD MELT OR BURN IN
THE DRAWER.
WARNING
OVEN VENT
THE OVEN VENT RELEASES HOT AIR AND
MOISTURE FROM THE OVEN, IT SHOULD NOT BE
BLOCKED OR COVERED. DO NOT SET PLASTICS,
PAPER OR OTHER ITEMS THAT COULD MELT OR
BURN NEAR THE OVEN VENT.
WARNING
CLEANING COOKTOP
TO AVOID PERMANENT DAMAGE TO THE
COOKTOP SURFACE AND TO MAKE SPILLS EASIER
TO REMOVE, CLEAN THE COOKTOP AFTER EACH
USE.
WARNING
All Seasons ranges are provided with 4 cooking elements
(capable of raising foods to safe cooking temperatures).
As the cooking elements operate, they will automatically
cycle on and off - even at the highest setting - to
maintain power levels. NOTE: Higher powered elements
are placed towards the front for higher temperature or
shorter duration cooking, such as boiling, searing, and
pan frying. Lower powered elements are placed towards
the rear for lower temperature or longer duration
cooking, such as simmer or melting chocolate.
Types of Cooking Elements:
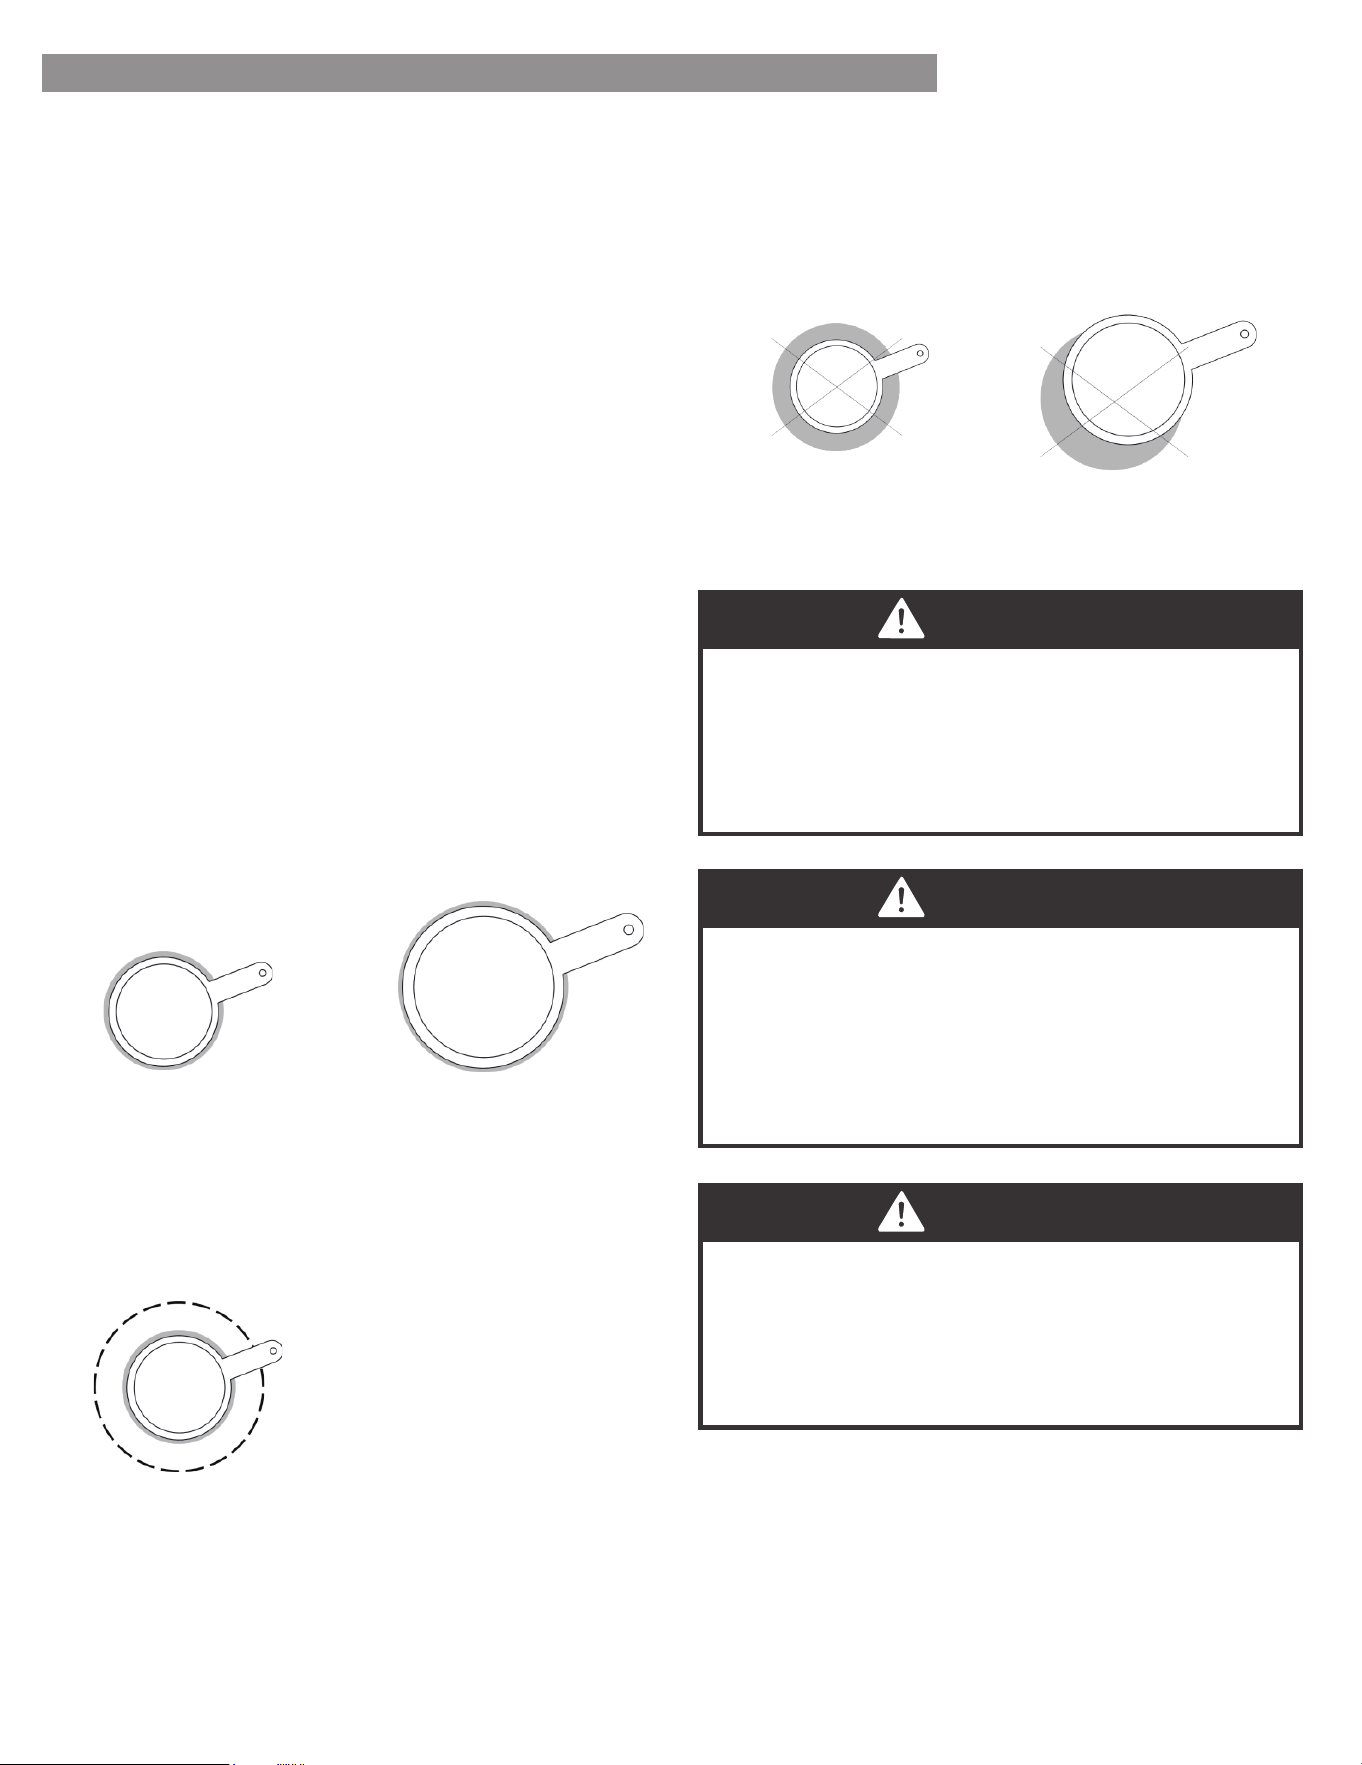
To minimize burn risk and maximize cooking efficiency,
cookware should completely cover the outlined area of
the cooking element as indicated below:
Correct Selection:
Incorrect Selection:
Pan Size/Element Size Selection:
Small Pan on
Small Element
Large Pan on
Large Element
Small Pan on
Large Element
(with only inner
ring of activated )
Small Pan on
Large Element
Pan Off -Center
on Element
EN-18
OPERATION INSTRUCTIONS
• Rough finishes may scratch the cooktop or grates.
Aluminum and copper may be used as a core or base
in cookware.
• Cookware material is a factor in how quickly and
evenly heat is transferred, which affects cooking results.
• Cookware with nonstick surfaces should not be used
under the broiler.
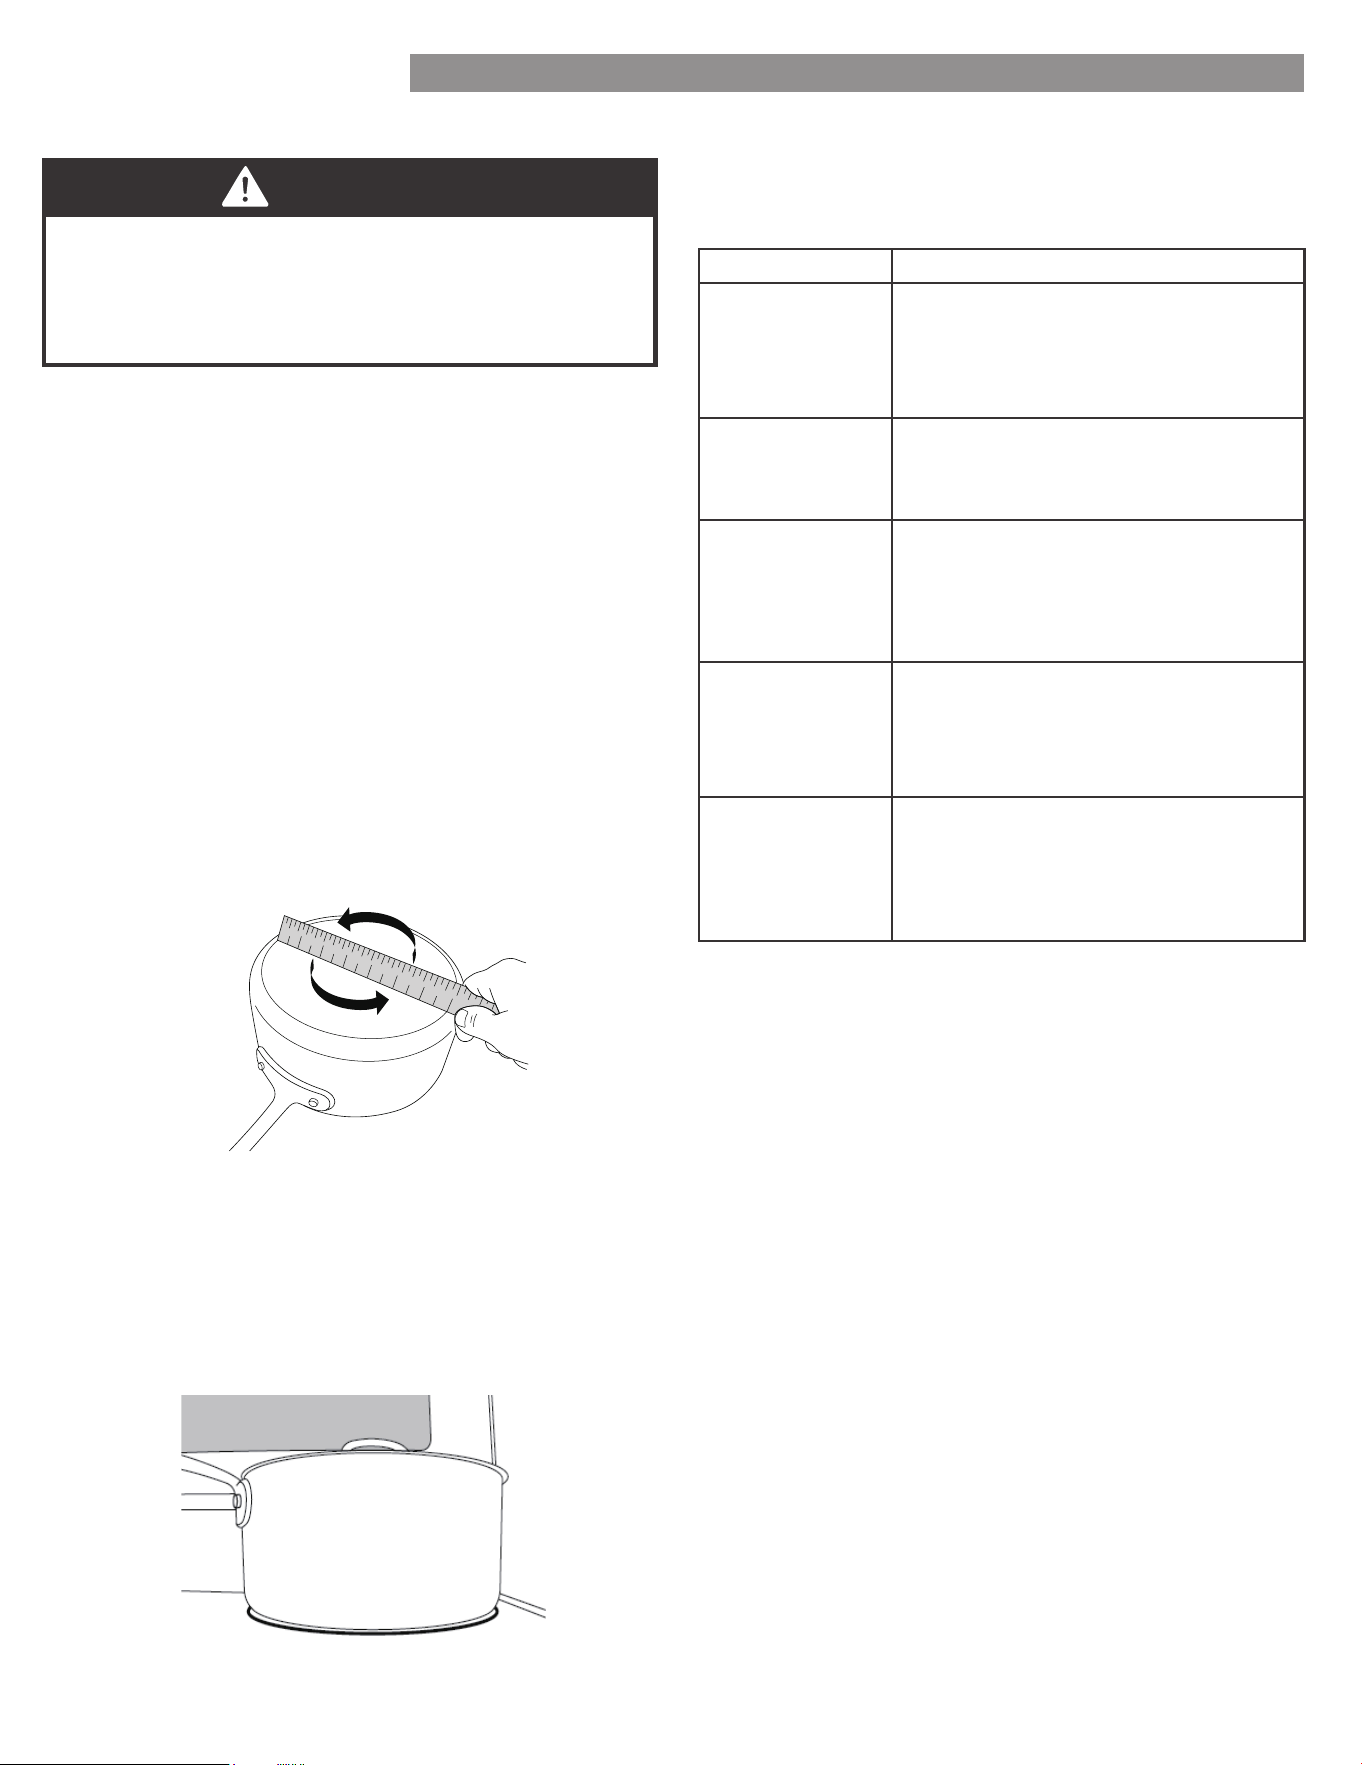
• Check for flatness by placing the straight edge of a
ruler across the bottom of the cookware. While you
rotate the ruler, no space or light should be visible
between it and the cookware.
Ideal cookware should have a flat bottom, straight sides
and a well fitted lid, and the material should be of
medium-to-heavy thickness.
Use flat-bottomed cookware for best cooking results and
energy efficiency. The cookware should be about the same
size as the cooking area outlined on the cooktop.
Cookware should not extend more than 1/2" (1.3 cm)
outside the area.
Use the following chart as a general guide for cookware
material characteristics. Individual results may vary.
Heats quickly and evenly Suitable for
all types of cooking.
Medium or heavy thickness is best for
most cooking tasks.
Aluminum
Heats slowly and evenly.
Good for browning and frying.
Maintains heat for slow cooking.
Cast iron
Follow manufacturer’s instructions.
Heats slowly, but unevenly. Ideal
results on low to medium heat
settings. May scratch the cooktop.
Ceramic or
Ceramic Glass
See stainless steel or cast iron.
Porcelain
Enamel-On
Steel or Cast
Iron
Heats quickly, but unevenly.
A core/base of aluminum or copper
on stainless steel provides even
heating.
Stainless Steel
All Seasons ranges are provided with separate indicators
alerting the user that the cooktop is in use and that the
cooktop surface is hot.
Surface-On Indicator: Some models will indicate that a
cooktop element is on using a single light on the control
panel.
Cooktop Indicators:
Hot Surface Indicator: Some models will have individual
indicators for each element under the cooktop glass.
Alternatively, other models may only have a single light
under the cooktop glass indicating that one or more
elements are still hot. The Hot Surface Indicator will
illuminate shortly after turning an element on, and it will
remain illuminated after the element has been turned off.
Cooktop Indicators (continued):
EMPTY COOKWARE
DO NOT LEAVE EMPTY COOKWARE ON A HOT
SURFACE COOKING AREA, ELEMENT, OR SURFACE
BURNER.
WARNING
1
2
3
4
5
6
7
8
9
1 0
1 1
1
2
1
3
1
4
1
5
1
6
1
7
1
8
1
2
1
9
3
4
2
0
5
6
7
COOKWARE CHARACTERISTICS
EN-19
FIRE HAZARD
• Never place anything (aluminum foil, spill mat,
baking stone, cookware, etc.) on the bottom of the
oven cavity. These items can trap heat or melt,
resulting in damage to the appliance and risk of
electric shock, smoke, or fire.
• If materials inside the oven should ignite, keep door
closed, turn off the appliance, and disconnect the
circuit at the circuit breaker box. Wait for the oven
to cool before removing contents, cleaning oven, and
restoring power.
WARNING
OPERATION INSTRUCTIONS
To turn a cooking element on, push in on the control
knob and turn in either direction. The small icon above
the control knob indicates the location of the element
being controlled. Adjust to the desired heat setting by
aligning the power level on the knob to the indicator
mark on the control panel. To turn an element off, simply
rotate the control knob to the OFF position.
Controlling the Cooking Elements:
Steam Clean
OVEN OPERATION
When the Hot Surface Indicator turns off, the glass
surface may still feel slightly hot to the touch. Avoid
touching or placing anything on the cooktop until it
has completely cooled. The Hot Surface Indicator may
illuminate when the cooktop heats up during long
baking cycles. This is normal.
NOTE
CAUTION
BURN HAZARD
• Use only dry pot holders or oven mitts when using
the oven.
• The oven is vented along the rear of the cooktop
and below the control panel.
When the oven is in use, this area may get very hot.
DO NOT block or cover the oven vent.
CAUTION
• Oven surfaces-especially oven bottom-may be hot.
Use caution to avoid contact with hot surface.
• Hot surface may create hot steam in wet sponge or
cloth while cleaning If steam is evident when
wiping out oven,wait until oven has cooled.
Designed to generate steam and gently warm the
oven surface to grease and light soils.
FOR BEST EXPERIENCE
• Proper preheating is important for good results.
Unless the recipe specifically instructs differently,
place food in the oven only after preheating is
complete.
• For best results, place food in immediately after
preheat beep is sounded.
• Steam or moisture may appear at the oven
vent - this is normal.
• If your model is equipped with a convection fan, it
is normal for fan to operate during preheat, even if
not in convection baking mode.
• DO NOT leave the door open any longer than
necessary.
• If in operation, the convection fan will
automatically shut off any time door is opened.
• If oven is left in operation for extended periods, it
will automatically shut off. Bake modes shut off
after 12 hours, Broil will shut off after 12 hour.
NOTE
EN-20

OPERATION INSTRUCTIONS
1. Ensure oven is at room temperature before beginning.
2. Remove all items from oven, including oven racks.
3. Wipe out any large spills or excess debris prior to
starting a steam clean cycle. Scrape off and remove
any burnt-on debris with a stiff plastic utensil (hard
plastic spatula, plastic paint scraper, old credit card,
etc).
4. For improved softening of stains, spray inside surfaces
with water spray bottle or wipe surfaces with a wet
sponge before starting.
5. Pour 1-1/4 cups (10 oz) of water in the center cavity
of the oven and close the door.
6. Press "STEAM CLEAN" button to enter steam cleaning
mode.
7. Once in steam cleaning mode, press "START" button
to begin.
8. After "STEAM CLEAN" ends, the prompt tone will
beep 6 times, and then beep once every 9 seconds.
OFF will appear on the display and begin flashing.
9. Press the "CANCEL/OFF" button to exit at any time.
10. Once the steam cleaning cycle is complete, wipe the
inside of the oven to remove dirt.
Directions:
EN-21
OVEN CLEANING
CAUTION
BURN HAZARD
• If range is moved for cleaning, servicing, or any
other reason, confirm the Anti-Tip device is
engaged per the installation instructions.
• A child or adult can tip the range and be killed.
• Failure to follow these instructions can result in
death or serious burns to children and adults.
CAUTION
LACERATION, SHOCK, BURN,
INHALATION HAZARDS
• Glass cooktop is durable, but may break when
heated if scratched or otherwise damaged during
cleaning. Clean only as described below to avoid
glass breakage.
• Clean cook-top with caution - To avoid steam burns,
do not use wet sponge or cloth while
cooking area is hot. Wear oven mitt if cleaning with
razor while cooktop is hot (see special
instructions below for sugary spills and melted
plastic).
• Some cleaners can produce noxious fumes if applied
to a hot surface. Allow cooktop to cool completely
before applying any cleaning
chemicals.
Glass Cooktop:
See installation instructions
for details
Anti-Tip
Bracket
Confirm leveling leg is
engaged with anti-tip bracket
Leveling
Leg
For best results and prolonged cooktop life, it is
recommended to clean the cooktop after each use.
Sugary spills/plastic - Sugary spills and melted plastics
may cause damage the cooktop not covered by warranty
if not removed immediately.
• Clean with general purpose kitchen cleaner, followed
by glass cleaner to remove streaks.
Light soiling:
• Commercially available glass cooktop cleaners may
be used. Follow instructions on product packaging.
Moderate soiling:
• Clean using commercially available glass cooktop
cleaner. Follow instructions on product packaging.
• Use a razor blade scraper designed for cleaning
glass surfaces. Ensure razor is clean and new to
minimize risk of scratching cooktop.
• Hold razor at approximately 45° angle, apply firm
pressure, and smoothly press razor through residue.
• After heavy residue is removed, clean again using
glass cooktop cleaner compound.
• Turn off all surface cooking units and remove all
cookware from cooktop.
• As described above, use a clean, new razor blade
scrape and wear oven mitt for protection to quickly
remove sugary spills or melted plastic from cooktop
glass while cooktop is hot.
• Quickly wipe removed material away from hot
surface cooking unit using dry paper towel.
• Wait until the cooktop glass has completely cooled
before attempting a more thorough cleaning as
described above.
Heavily burned on residue:
CLEANING AND MAINTENANCE
EN-22
CLEANING AND MAINTENANCE
CAUTION
ELECTRIC SHOCK HAZARD
• DO NOT use excessive amounts of water or
cleaners to clean knob areas. If moisture is forced
into openings behind knobs, there is a potential for
electric shocks.
• Avoid spraying kitchen cleaners directly into the
openings behind knobs.
Check oven after each use to determine if any spills or
splattering occurred that require cleaning. Wipe out oven
interior with a lightly damp soft cloth using mild soap and
water to remove light spills.
The ovens light is a standard 25-watt (G9 Halogen)
appliance bulb. Before replacing, make sure the oven
and cooktop are cool and the control knobs are off.
Control Panel:
CAUTION
SHOCK, BURN, AND LACERATION
HAZARDS
• Disconnect power to oven and wait until oven is
cool before attempting to service light bulbs.
• Handle glass cover carefully to reduce risk of
breakage. If lamp cover is difficult to remove, do
not force. Contact a qualified service provider for
repairs.
• DO NOT operate oven without glass cover in place.
Oven Lights:
CAUTION
BURN HAZARD
• Oven surfaces - especially oven bottom - may be
hot. Use caution to avoid contact with hot surfaces.
• Hot surfaces may create hot steam in wet sponge
or cloth while cleaning. If steam is evident when
wiping out oven, wait until oven has cooled.
Oven Interior:
TO PREVENT COSMETIC DAMAGE
DO NOT use scouring pads, abrasive cleaners, strong
liquid chemicals, steel wool, or oven cleaners, as these
may damage the control panel finish.
For best results, it is recommended to clean the user
interface and control panel after each use. Control
knobs can be removed for easier cleaning. Ensure
knobs are in the "OFF" position before removing. Pull
straight back with a firm pressure to remove knob
from stem. Clean entire panel with a lightly damp soft
cloth using mild soap and water. Glass cleaner can be
used on oven control to remove streaks. Stainless steel
cleaner can be used on the exposed metal to remove
streaks. Knobs should be washed by hand in warm
soapy water - do not wash in dishwasher. Wait until
knobs are dry before placing back on stem. Be sure to
align profile in knob to stem shape to ensure smooth
fit and avoid damage to knob or control.
NOTE
EN-23
CLEANING AND MAINTENANCE
CAUTION
Ensure the range is powered off and all functions are
turned off. Unplugging range or turning power off at
the breaker is recommended.
1. Disconnect the power supply.
2. Turn the glass cover counter clockwise to remove.
3. Pull out the bulb straight out of the socket.
4. Replace bulb by pushing in, then reinsert glass cover
clockwise
5. Reconnect power.
HOW TO REPLACE OVEN LIGHT
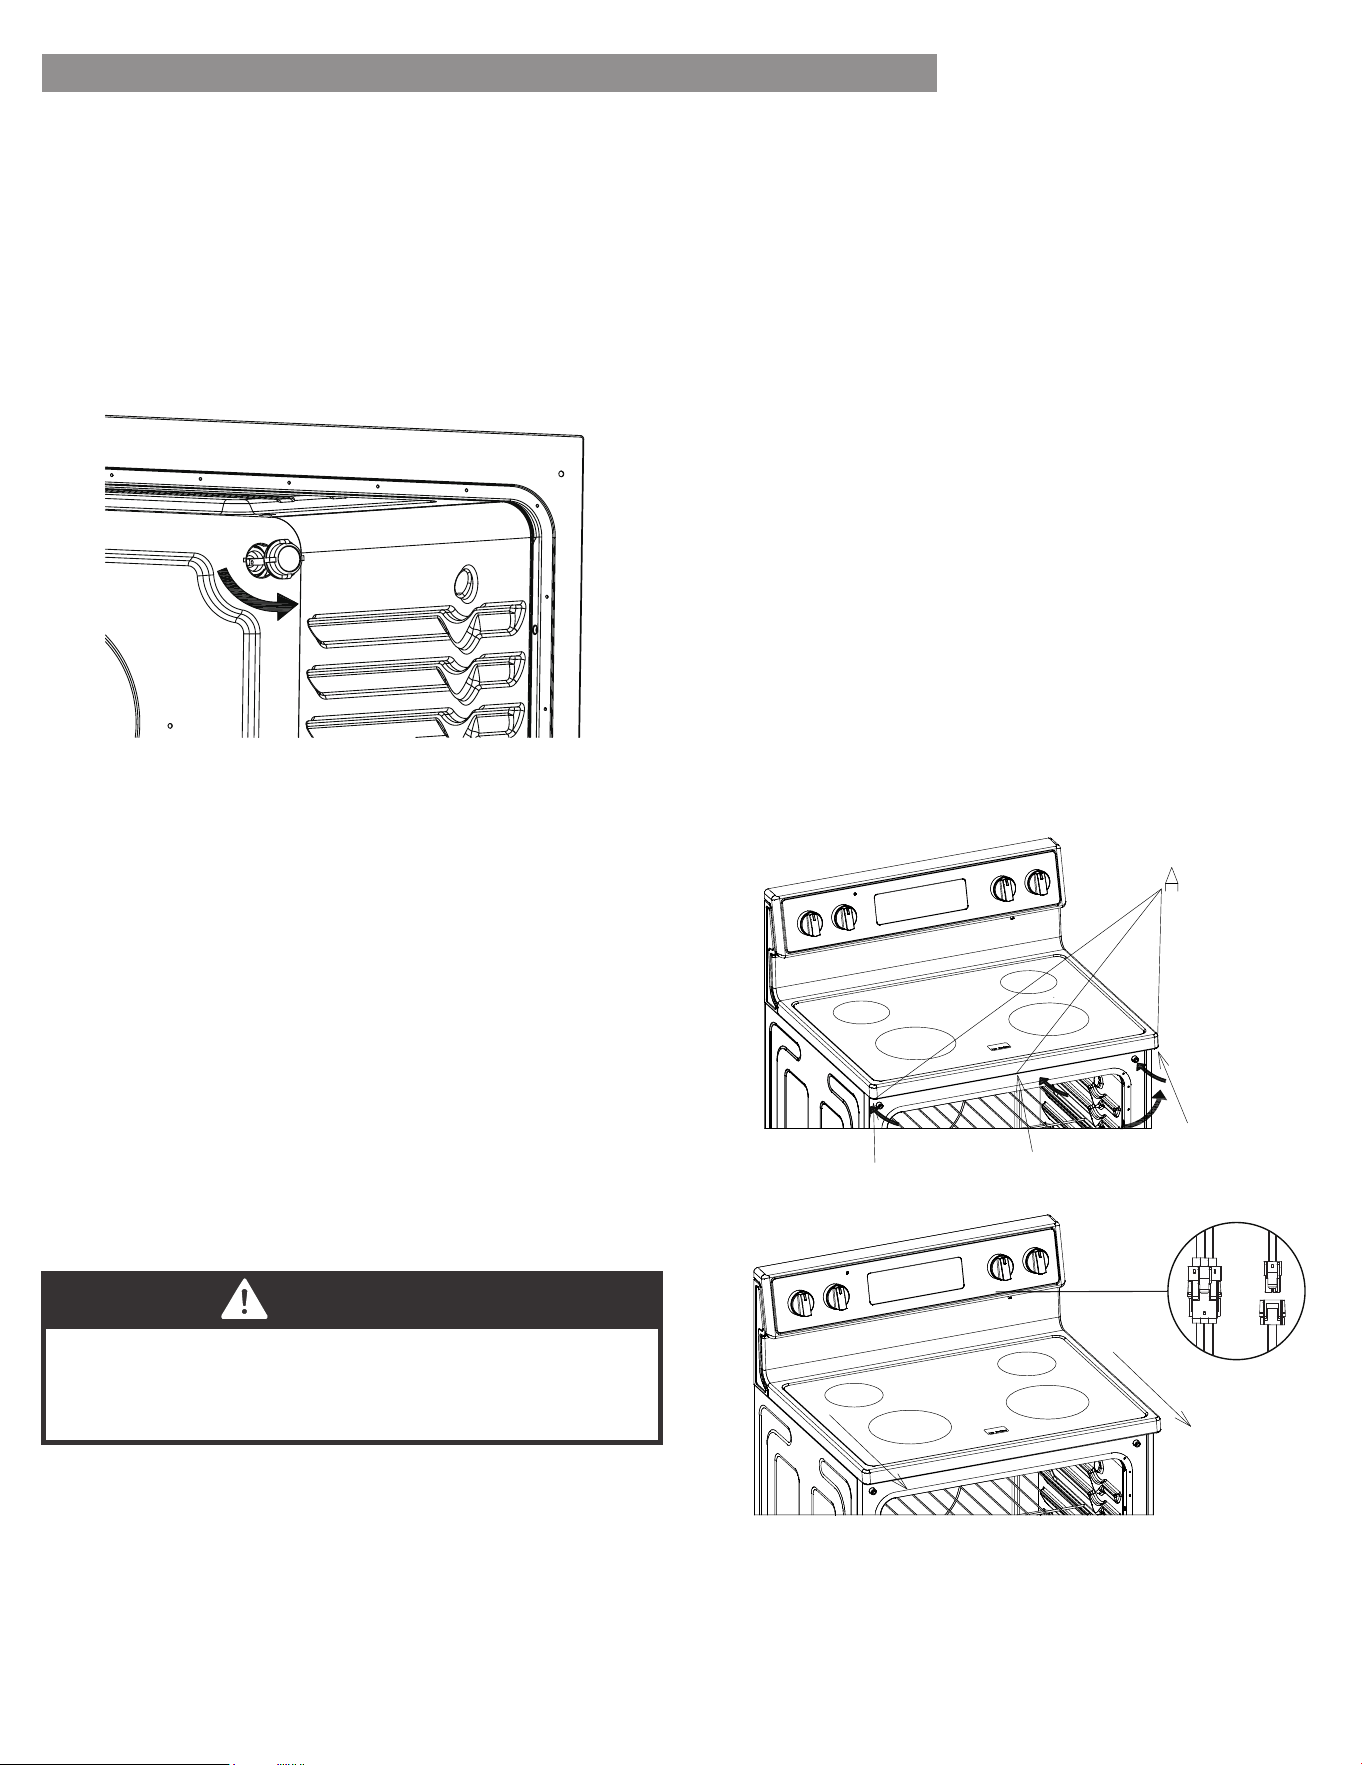
1. Open the oven door and remove the three screws and
washers at the bottom of the panel using a Phillips
screwdriver (See image A).
2. Once the screws are removed, slide the cooktop
towards you while lifting upwards slightly in order to
expose the wire connectors at the back of the
cooktop.
3. Locate the two wire connectors behind the cooktop
(See image B). To release the connectors, depress the
tab and pull.
4. Once the wires are disconnected, the cooktop can
now be removed.
Removal:
• Use a stainless-steel cleaner or a mild cleaner
recommended on stainless-steel surfaces.
• Wipe cleaner with a soft cloth in the direction of the
grain to avoid damage.
• Remove any excess with a clean and dry, lint-free
cloth.
CLEANING METHOD FOR STAINLESS STEEL
• Clean with a mild soap and warm water.
• Wipe clean with a dry soft cloth.
CLEANING THE OVEN DOOR EXTERIOR
Service panel:
Follow the removal steps in reverse order by connecting
the two wires, sliding the cooktop into place, and
securing the three screws and washers into the bottom
of the panel.
Installation:
B
EN-24
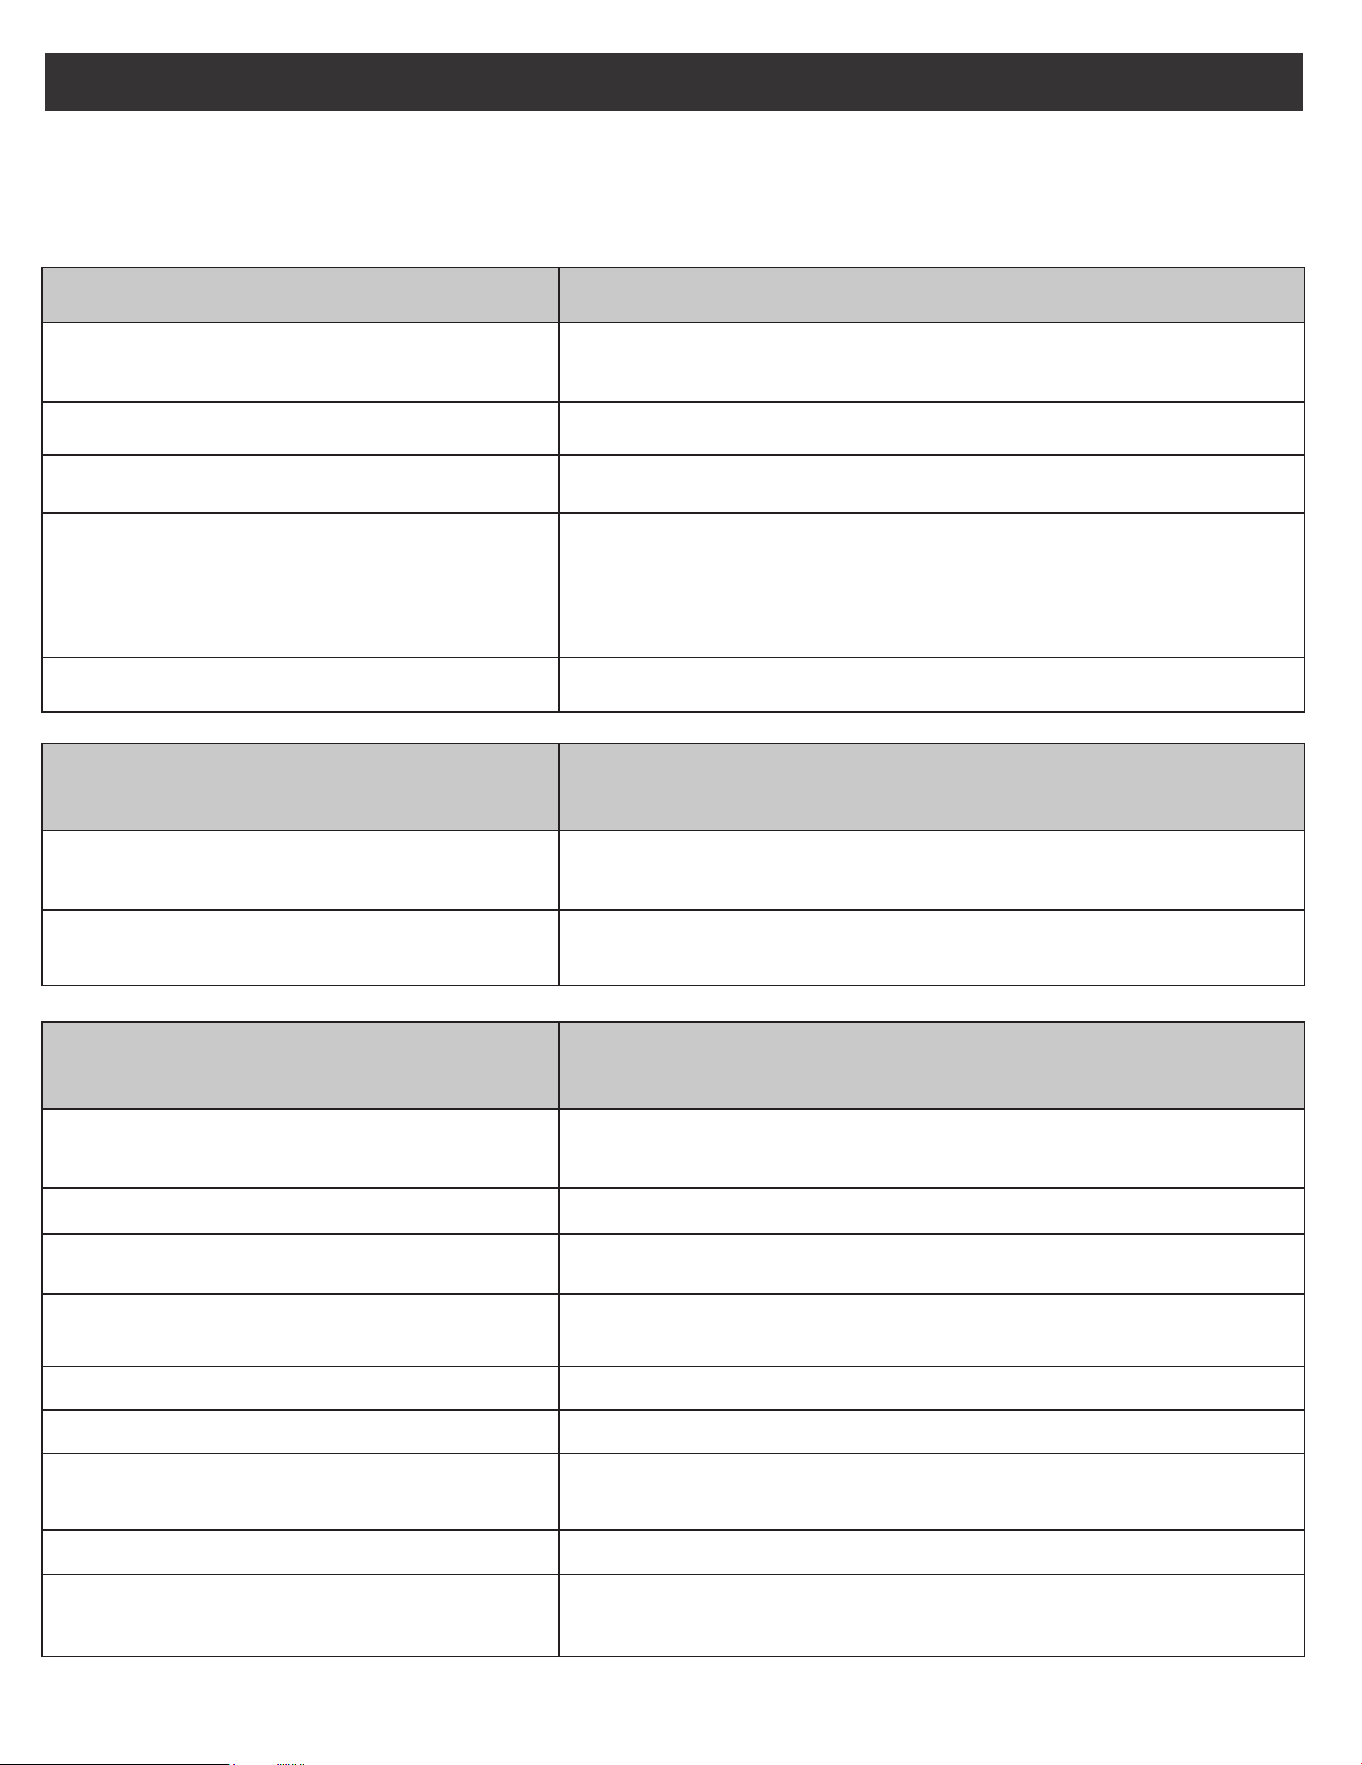
Read before calling for service
If you find something that is not working as anticipated, check the table below for helpful hints and advice that might
save you the time and expense of calling for repair.
OVEN WILL NOT OPERATE POSSIBLE SOLUTIONS
Has a household fuse blown, or has a circuit
breaker tripped?
TROUBLESHOOTING GUIDE
• Replace the fuse or reset the circuit breaker. If the problem
continues, call an electrician.
Display shows “E02” • Temperature sensor error. Call Customer Service.
Display shows “E03”
• High temperature warning. Oven function will shut off
automatically. Allow oven to cool for 30 minutes and resume
using oven functions. If error continues to occur call Customer
Service.
Is the Electronic Oven Control set correctly? • See “Electronic Oven Controls” section.
Is the Oven Control Lockout set? • See “Control Lockout” section.
OVEN TEMPERATURE TOO HIGH OR
TOO LOW
POSSIBLE SOLUTIONS
Does the Oven Temperature Calibration
need adjustment?
• See “Oven Temperature Control” section.
Do the Oven Indicator Lights flash?
• See the “Display” and/or the “Oven Lights” section. If the
indicator light(s) keeps flashing, call for service.
OVEN COOKING RESULTS NOT WHAT
EXPECTED
POSSIBLE SOLUTIONS
Is the proper oven temperature calibration
set?
• See “Oven Temperature Control” section.
Was the Oven preheated? • See “Baking” section.
Are the racks positioned properly? • See “Positioning Racks and Bakeware” section.
Is there proper air circulation around
bakeware?
Is the batter evenly distributed in the pan?
• See “Positioning Racks and Bakeware” section.
Are baked items too brown on the bottom? • Move rack to higher position in the oven.
Are pie crust edges browning early?
• Use aluminum foil to cover the edge of the crust and/or reduce
backing temperature.
Has the oven door been opened while
cooking?
• Oven peeking releases oven heat and can result in longer
cooking times.
• Check that batter is level in the pan.
Is the proper length of time being used? • Adjust cooking time.
EN-25
For Customer Care go to:
www.kenmore.com/contact-us/
to select your local area or retailer where this appliance
was purchased for contact information on scheduling in-
home repair service or ordering replacement parts.


