
Table of Contents
Before Using the Calculator
................................................... 6
Read This First ........................................................................................6
About This Manual ......................................................................................... 6
Key Operations .............................................................................................. 6
Menu Operations ............................................................................................7
Key and Key ........................................................................................8
Examples
....................................................................................................... 8
Initializing the Calculator .........................................................................8
Calculator "Get Started" Screen ............................................................. 8
Precautions .............................................................................................9
Safety Precautions .........................................................................................9
Handling Precautions ...................................................................................12
Getting Started ......................................................................................12
Attaching and Removing the Front Cover ....................................................12
Turning Power On and Off ........................................................................... 14
HOME Screen ..............................................................................................15
Adjusting Display Contrast ...........................................................................15
Key Markings ............................................................................................... 15
Indicators ......................................................................................................16
Using Menus ................................................................................................ 17
Calculator Apps and Menus ................................................. 21
Calculator Apps .....................................................................................21
Selecting a Calculator App ...........................................................................21
Installed Calculator App List .........................................................................21
Using the SETTINGS Menu ..................................................................23
Changing Calculator Settings .......................................................................24
Items and Available Setting Options ............................................................ 24
Using the CATALOG Menu and CATALOG List ....................................30
CATALOG Menu .......................................................................................... 30
CATALOG List ..............................................................................................30
Example Operations .....................................................................................30
Using the TOOLS Menu ........................................................................31
Inputting Expressions and Values .......................................33
Basic Input Rules ..................................................................................33
Inputting an Expression Using Natural Textbook Format (MathI/MathO or
MathI/DecimalO Only) ...........................................................................34
Undo Operations ..........................................................................................35
Using Values and Expressions as Arguments ............................................. 35
Overwrite Input Mode (LineI/LineO or LineI/DecimalO Only) ................35
Basic Calculations .................................................................36
Arithmetic Calculations ......................................................................... 36
1
Fraction Calculations ............................................................................ 36
Powers, Power Roots, and Reciprocals
................................................38
Pi, Natural Logarithm Base e ................................................................ 41
Pi ..................................................................................................................41
Natural Logarithm Base e .............................................................................41
Calculation History and Replay .............................................................42
Calculation History ....................................................................................... 42
Replay ..........................................................................................................42
Using Memory Functions ...................................................................... 43
Answer Memory (Ans) ..................................................................................43
Variables (A, B, C, D, E, F, x, y, z) ................................................................ 43
Clearing the Contents of All Memories .........................................................45
Changing Calculation Result Format .................................. 47
Toggling Calculation Results between Standard (Fraction, π, √
Form)
and Decimal
..........................................................................................47
Changing the Display Format of Calculation Results (FORMAT Menu) ...
...............................................................................................................48
FORMAT Menu List ......................................................................................48
Conversion Sample Operation .....................................................................49
Standard and Decimal Conversion ....................................................... 49
Prime Factorization ...............................................................................50
Recurring Decimal Conversion (Recurring Decimal Calculations) ........51
Converting a Calculation Result to a Recurring Decimal Value ................... 51
Inputting a Recurring Decimal ......................................................................51
Recurring Decimal Calculation Example ......................................................52
Rectangular and Polar Coordinate Conversion .................................... 53
Improper Fraction and Mixed Number Conversion ...............................53
Standard Form (a×10
n
) ......................................................................... 54
Sexagesimal Conversion (Degree, Minute, Second Calculations)
....... 54
Converting a Decimal Value Calculation Result to a Sexagesimal Value .... 54
Inputting and Calculating with a Sexagesimal Value ....................................54
Advanced Calculations .........................................................56
Function Analysis ..................................................................................56
Derivative(d/dx) ............................................................................................ 56
Integration(∫) .................................................................................................57
Summation(Σ) .............................................................................................. 59
Logarithm(logab), Logarithm(log) .................................................................60
Natural Logarithm .........................................................................................60
Probability ............................................................................................. 60
% ..................................................................................................................61
Factorial(!) ....................................................................................................61
Permutation(P), Combination(C) ..................................................................61
Random Number ..........................................................................................62
Random Integer ........................................................................................... 62
Numeric Calculations ............................................................................63
2
GCD, LCM ....................................................................................................63
Absolute V
alue ............................................................................................. 63
Recurring Decimal ........................................................................................63
Round Off .....................................................................................................64
Angle Unit, Polar/Rectangular Coordinate, Sexagesimal ..................... 64
Degrees, Radians, Gradians ........................................................................64
Rect to Polar, Polar to Rect ..........................................................................65
Degrees, Minutes, Seconds .........................................................................65
Hyperbolic, Trigonometric ..................................................................... 66
Hyperbolic Functions ....................................................................................66
Trigonometric Functions ...............................................................................66
Scientific Constants .............................................................................. 67
Unit Conversions ...................................................................................68
Others ................................................................................................... 69
Registering and Using Defining Equations for f(x) and g(x)
..................................................................................................71
Registering and Using Defining Equations for f(x) and g(x) .................. 71
Registering a Defining Equation ...................................................................71
Performing a Calculation by Assigning a Value to the Registered Defining
Equation .......................................................................................................72
Registering a Composite Function ...............................................................72
Data Retention ............................................................................................. 73
Using QR Code Functions ....................................................74
Using QR Code Functions .................................................................... 74
Displaying a QR Code ..................................................................................74
If You Experience Difficulty Scanning a QR Code ........................................75
Using Calculator Apps ..........................................................76
Statistical Calculations ..........................................................................76
General Procedure for Performing a Statistical Calculation .........................76
Inputting Data with Statistics Editor ..............................................................77
Displaying Statistical Calculation Results .................................................... 80
Using Statistical Calculation Screen ............................................................ 84
Statistical Calculation Formula .....................................................................90
Creating a Number Table ......................................................................93
General Procedure for Creating a Number Table .........................................93
Maximum Number of Rows in a Number Table According to Table Type .... 94
Defining Equation Registration .....................................................................95
Editing Number Table Screen Data ..............................................................95
f(x) and g(x) Update Timing .......................................................................... 96
Data Retention ............................................................................................. 96
Equation Calculations ........................................................................... 97
Simultaneous Linear Equations ................................................................... 97
High-order Equations from 2nd to 4th Degree ............................................. 99
Using Solver ...............................................................................................103
3
Inequality Calculations ........................................................................105
General Procedure for Performing an Inequality Calculation
.....................105
Distribution Calculations ..................................................................... 106
General Procedure for Performing a Distribution Calculation .................... 107
Parameter List ............................................................................................108
List Screen ................................................................................................. 109
Editing the List Screen Contents ................................................................110
Calculation Example ...................................................................................111
Complex Number Calculations ............................................................111
Inputting Complex Numbers ....................................................................... 111
Complex App Calculation Examples .......................................................... 112
Matrix Calculations ..............................................................................114
General Procedure for Performing a Matrix Calculation .............................114
Matrix Variable List Screen .........................................................................116
Matrix Answer Memory (MatAns) ...............................................................118
Matrix Calculation Examples ......................................................................119
Vector Calculations ............................................................................. 121
General Procedure for Performing a Vector Calculation ............................121
Vector Variable List Screen ........................................................................123
Vector Answer Memory (VctAns) ............................................................... 125
Vector Calculation Examples ..................................................................... 126
Using Spreadsheet ............................................................................. 127
Inputting and Editing Cell Contents ............................................................128
Inputting a Constant and Formula into a Cell .............................................128
Cell Relative and Absolute References ......................................................130
Using Spreadsheet App Special Commands .............................................131
Batch Inputting the Same Formula or Constant into Multiple Cells ............132
Spreadsheet App Setting Items ................................................................. 134
Auto Calc and Recalculate .........................................................................134
Ratio Calculations ...............................................................................134
General Procedure for Performing a Ratio Calculation ..............................135
Calculation Example .................................................................................. 135
Using Math Box ...................................................................................136
Dice Roll .....................................................................................................136
Coin Toss ................................................................................................... 140
Number Line ...............................................................................................143
Circle ..........................................................................................................147
Base-n Calculations ............................................................................ 150
Specifying the Number Mode of a Particular Input Value ...........................152
Converting a Calculation Result to Another Type of Value ........................ 152
Logical and Negation Operations ...............................................................153
Technical Information ......................................................... 154
Errors .................................................................................................. 154
Displaying the Location of an Error ............................................................154
Error Messages ..........................................................................................154
Before Assuming Malfunction of the Calculator... ............................... 158
4

Replacing the Battery ..........................................................................159
Calculation Priority Sequence
.............................................................159
Calculation Ranges, Number of Digits, and Precision ........................ 161
Calculation Range and Precision ...............................................................161
Function Calculation Input Ranges and Precision ..................................... 162
Specifications ......................................................................................164
Frequently Asked Questions ..............................................165
Frequently Asked Questions ...............................................................165
5
Before Using the Calculator
Read This First
About This Manual
• In no event shall CASIO Computer Co., Ltd. be liable to anyone for
special, collateral, incidental, or consequential damages in connection
with or arising out of the purchase or use of this product and items that
come with it. Moreover
, CASIO Computer Co., Ltd. shall not be liable for
any claim of any kind whatsoever by any other party arising out of the
use of this product and the items that come with it.
• The contents of this manual are subject to change without notice.
• The displays and illustrations (such as key markings) shown in this
manual are for illustrative purposes only, and may differ somewhat from
the actual items they represent.
• QR Code is a registered trademark of DENSO WAVE INCORPORATED
in Japan and in other countries.
• Company and product names used in this manual may be registered
trademarks or trademarks of their respective owners.
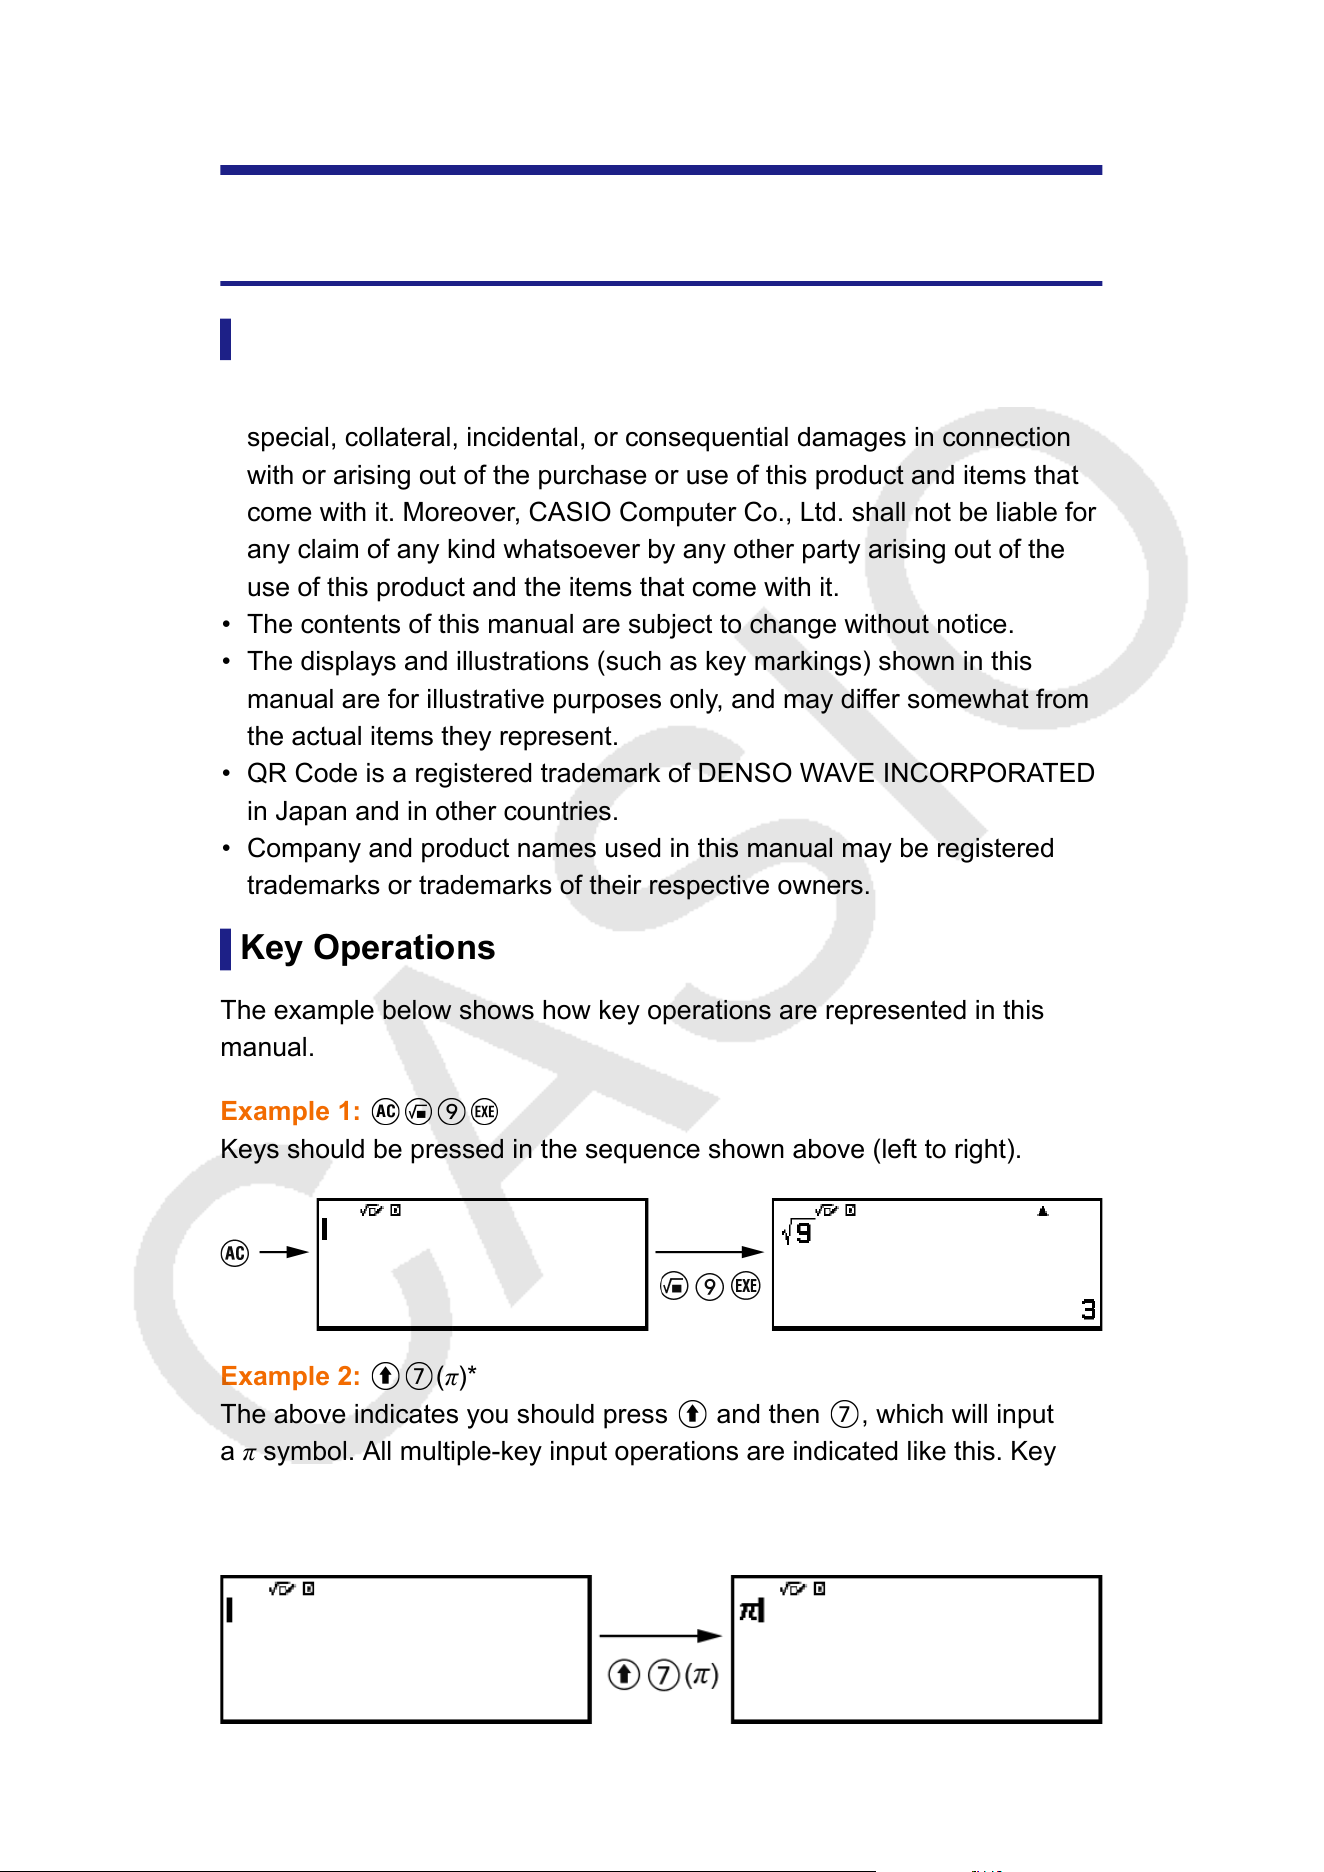
Key Operations
The example below shows how key operations are represented in this
manual.
Example 1:
Keys should be pressed in the sequence shown above (left to right).
Example 2: (π)*
The above indicates you should press and then , which will input
a π symbol. All multiple-key input operations are indicated like this. Key
cap markings are shown, followed by the input character or command in
parentheses.
6
* Refer to "Key Markings"
(page 15) for more information about the key
symbols used in this example.
Example 3:
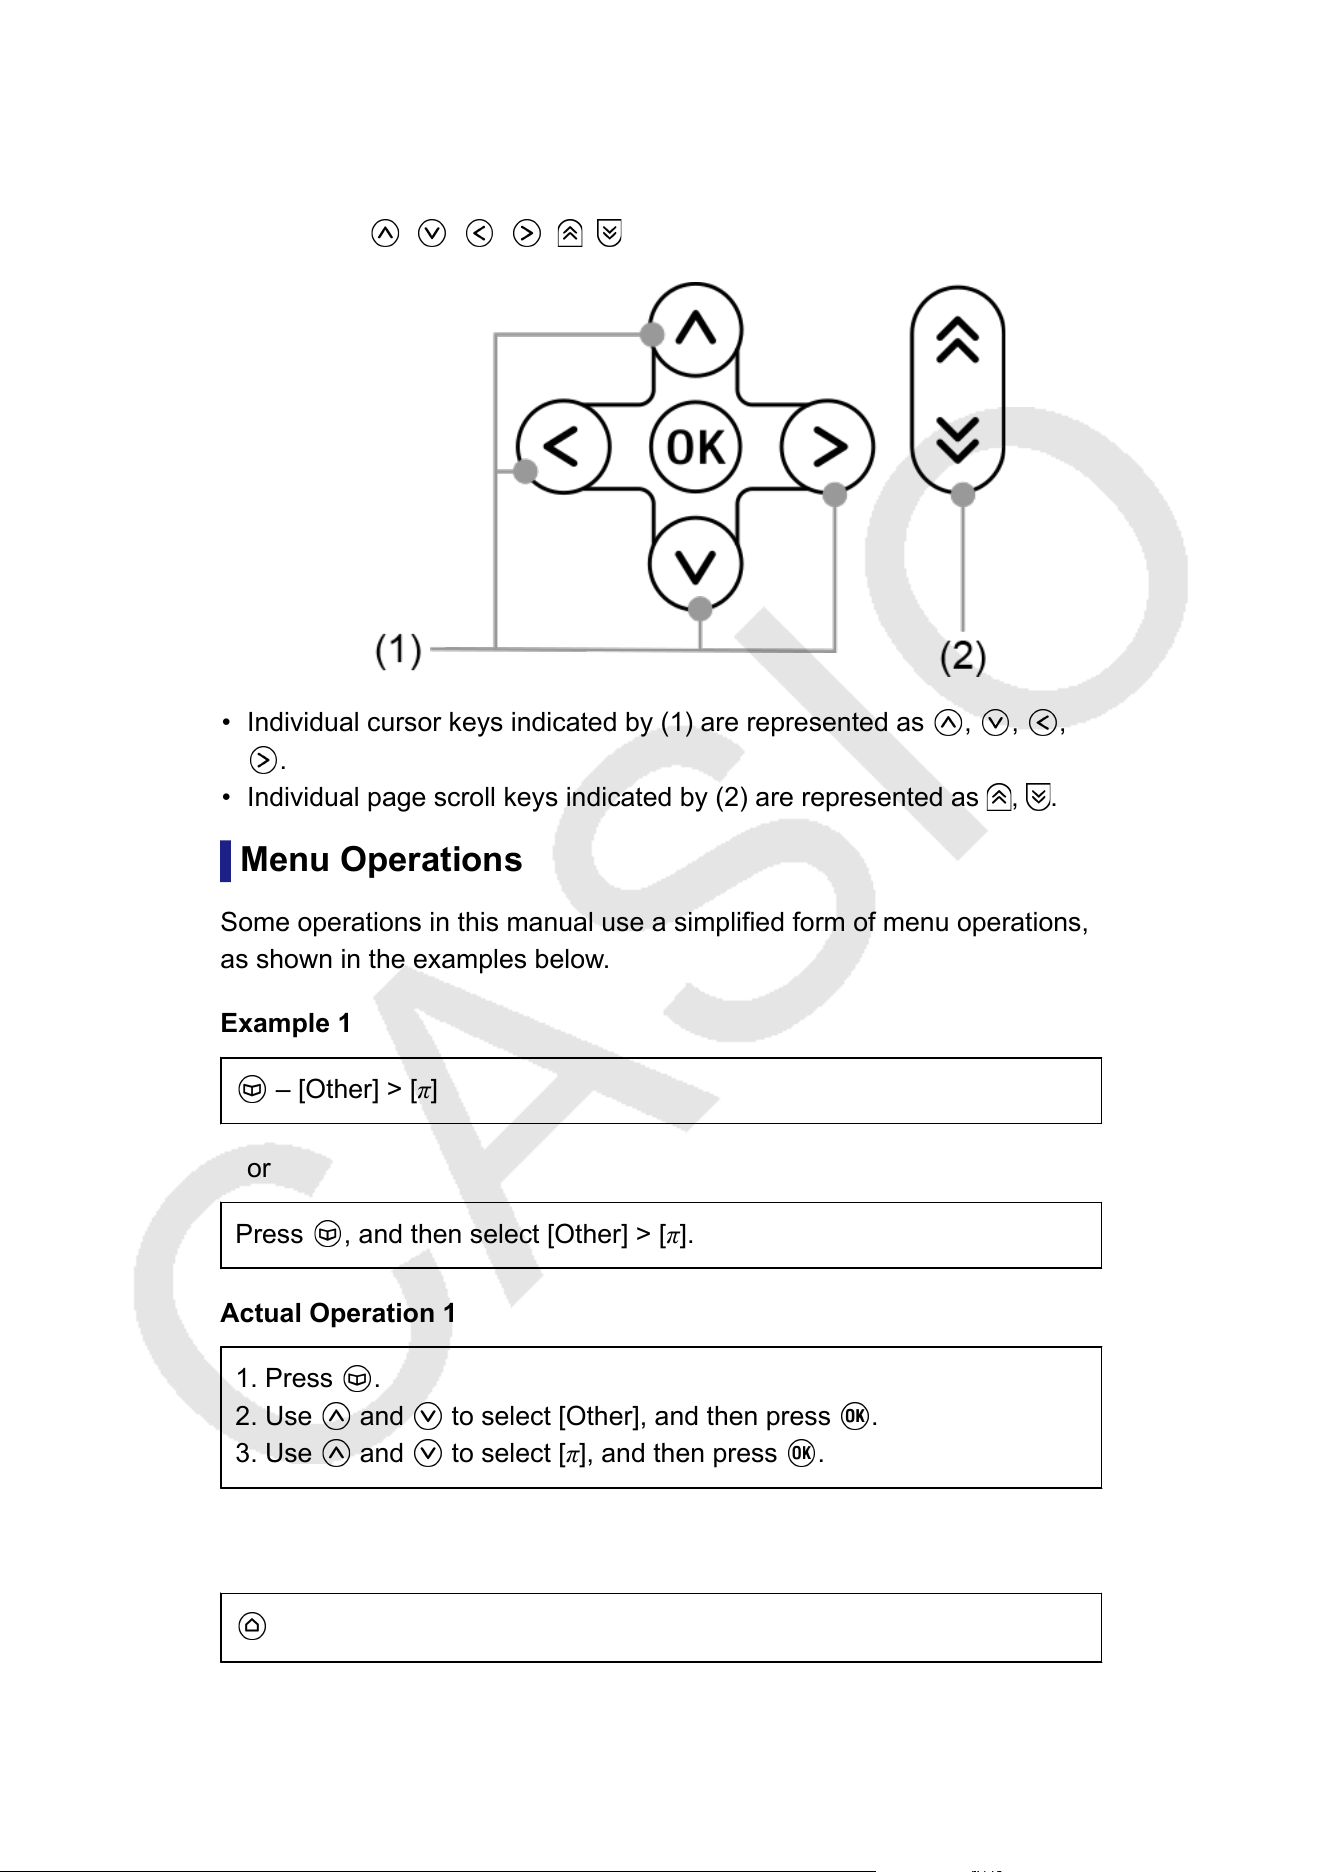
, , , , ,
• Individual cursor keys indicated by (1) are represented as , , ,
.
• Individual page scroll keys indicated by (2) are represented as , .
Menu Operations
Some operations in this manual use a simplified form of menu operations,
as shown in the examples below
.
Example 1
– [Other] > [π]
or
Press , and then select [Other] > [π].
Actual Operation 1
1. Press .
2. Use and to select [Other], and then press .
3. Use and to select [π], and then press .
Example 2
– Calculate
or
7
Press , select the Calculate app icon, and then press .
Actual Operation 2
1. Press .
2. Use the cursor keys ( , , , ) to select the Calculate app icon,
and then press .
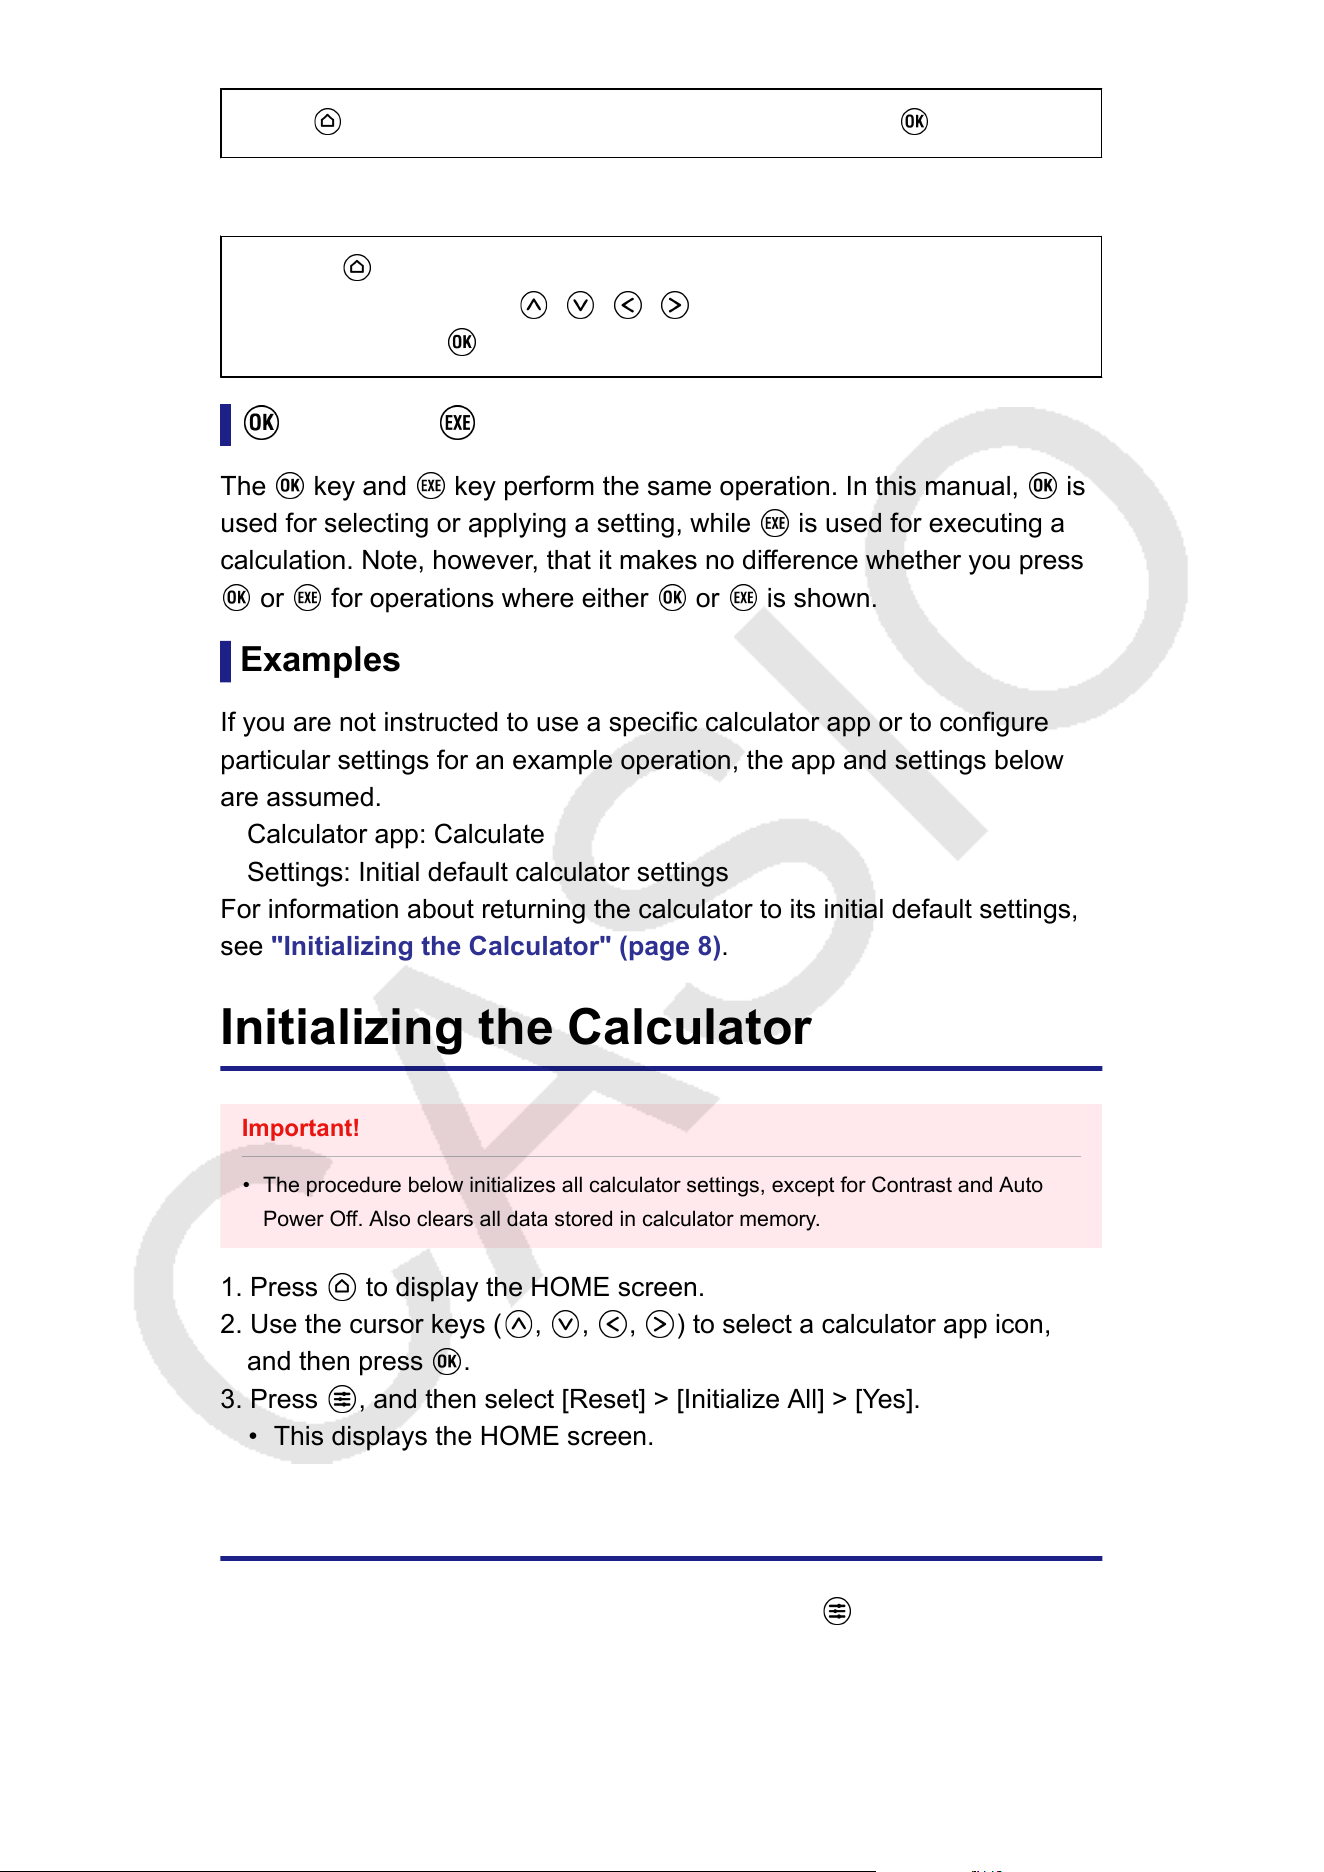
Key and Key
The key and key perform the same operation. In this manual, is
used for selecting or applying a setting, while is used for executing a
calculation. Note, however
, that it makes no difference whether you press
or for operations where either or is shown.
Examples
If you are not instructed to use a specific calculator app or to configure
particular settings for an example operation, the app and settings below
are assumed.
Calculator app: Calculate
Settings: Initial default calculator settings
For information about returning the calculator to its initial default settings,
see "Initializing the Calculator"
(page 8).
Initializing the Calculator
Important!
• The procedure below initializes all calculator settings, except for Contrast and Auto
Power Of
f. Also clears all data stored in calculator memory.
1. Press
to display the HOME screen.
2. Use the cursor keys ( , , , ) to select a calculator app icon,
and then press .
3. Press , and then select [Reset] > [Initialize All] > [Yes].
• This displays the HOME screen.
Calculator "Get Started" Screen
While the HOME screen is displayed, pressing the key will display the
"Get Started" screen, which includes the information below.
8

• QR Code for accessing the "Get Started" webpage of the Worldwide
Education Service (https://wes.casio.com/calc/cw/)
The Get Started webpage gives you access to the User
’s Guide and
other related information to help you get started with your calculator.
• Calculator ID number (24-character string)
Press
to return to the HOME screen.
Note
• You can also display the Get Started screen, by selecting it from the SETTINGS menu.
See "Using the SETTINGS Menu"
(page 23).
Precautions
Safety Precautions
Thank you for purchasing this CASIO product.
Be sure to read the "Safety Precautions" before using this product to
ensure that you use it correctly. Be sure to keep all user documentation
handy for future reference.
Symbol Examples
The symbol indicates something you should not do.
The symbol indicates something you must do.
9

Danger
Indicates something that creates the major risk of death or
serious personal injury.
Button Type and Coin Type Battery Precautions
Take care to ensure that a battery will not be swallowed
accidentally
.
Particular care is required to keep batteries away from
children.
Should a battery be swallowed accidentally or if there is a possibility
that a battery has been swallowed, immediately contact a physician.
Swallowing a battery can result in chemical burns, mucosal tissue
penetration, and other serious problems that create the risk of death.
Warning
Indicates something that creates the risk of death or serious
personal injury.
Display Screen
Do not press the LCD or subject it to strong impact.
Doing so can cause the LCD glass to crack, creating the risk of
personal injury
.
Should the LCD become cracked, never touch any of the
liquid inside.
LCD liquid getting on the skin creates the risk of skin irritation.
Should LCD liquid get into your mouth, immediately rinse your mouth
out and contact your physician.
Should LCD liquid get in your eyes or on your skin, rinse with clean
water and then contact your physician.
Battery Precautions
Should fluid leaking from a battery get on your skin or
clothing, immediately rinse it off with clean water
.
Battery fluid getting into the eyes creates the risk of eyesight loss, etc.
Rinse the eyes and then immediately contact a physician.
10

Caution
Indicates something that creates the risk of minor personal injury
or physical damage.
Observe the precautions below. Failure to do so can cause a
battery to rupture, creating the risk of fire, personal injury
, and
soiling of nearby objects by leaking fluid.
• Do not try to take a battery apart and never allow a battery to
become shorted.
• Do not charge a non-rechargeable battery.
• Do not expose a battery to heat or throw it into fire.
• Use only the specified type of battery.
• Load a battery with its poles (plus (+) and minus (–)) facing
correctly
.
• Replace the battery as soon as possible after it goes dead.
Battery Precautions
Observe the precautions below. Failure to do so can cause the
battery to explode or leak flammable liquid or gas.
• Remove and immediately recycle or dispose of used batteries
according to local regulations and keep away from children. Do not
dispose of batteries in household trash or incinerate.
• Even used batteries may cause severe injury or death.
• Call a local poison control center for treatment information.
• Use only the type of battery that is specified for this product.
• Do not burn a battery or dispose of it in an incinerator, or by
mechanical crushing or cutting.
• Do not subject a battery to excessively high or low temperatures
during use, storage, or transport.
• Do not subject a battery to excessively low barometric pressure
during use, storage, or transport.
• Remove and immediately recycle or dispose of batteries from
equipment not used for an extended period of time according to
local regulations.
• Always completely secure the battery compartment.
If the battery compartment does not close securely
, stop using the
product, remove the batteries, and keep them away from children.
11

Handling Precautions
• Even if the calculator is operating normally, replace the battery at least
once every two years (LR44).
A dead battery can leak, causing damage to and malfunction of the
calculator
. Never leave a dead battery in the calculator. Do not try using
the calculator while the battery is completely dead.
• You will be charged for malfunction or damage due to battery leakage,
which is not covered by the warranty.
• The battery that comes with the calculator discharges slightly during
shipment and storage. Because of this, it may require replacement
sooner than the normal expected battery life.
• Avoid use and storage of the calculator in areas subjected to
temperature extremes, and large amounts of humidity and dust.
• Do not subject the calculator to excessive impact, pressure, or bending.
• Never try to take the calculator apart.
• Use a soft, dry cloth to clean the exterior of the calculator.
• Whenever discarding the calculator or batteries, be sure to do so in
accordance with the laws and regulations in your particular area.
Getting Started
Attaching and Removing the Front Cover
To remove the front cover
Before using the calculator, remove the front cover (①) and attach it to the
back (②).
12

To attach the front cover
When you are not using the calculator
, remove the front cover (①) and
attach it to the front (②).
13
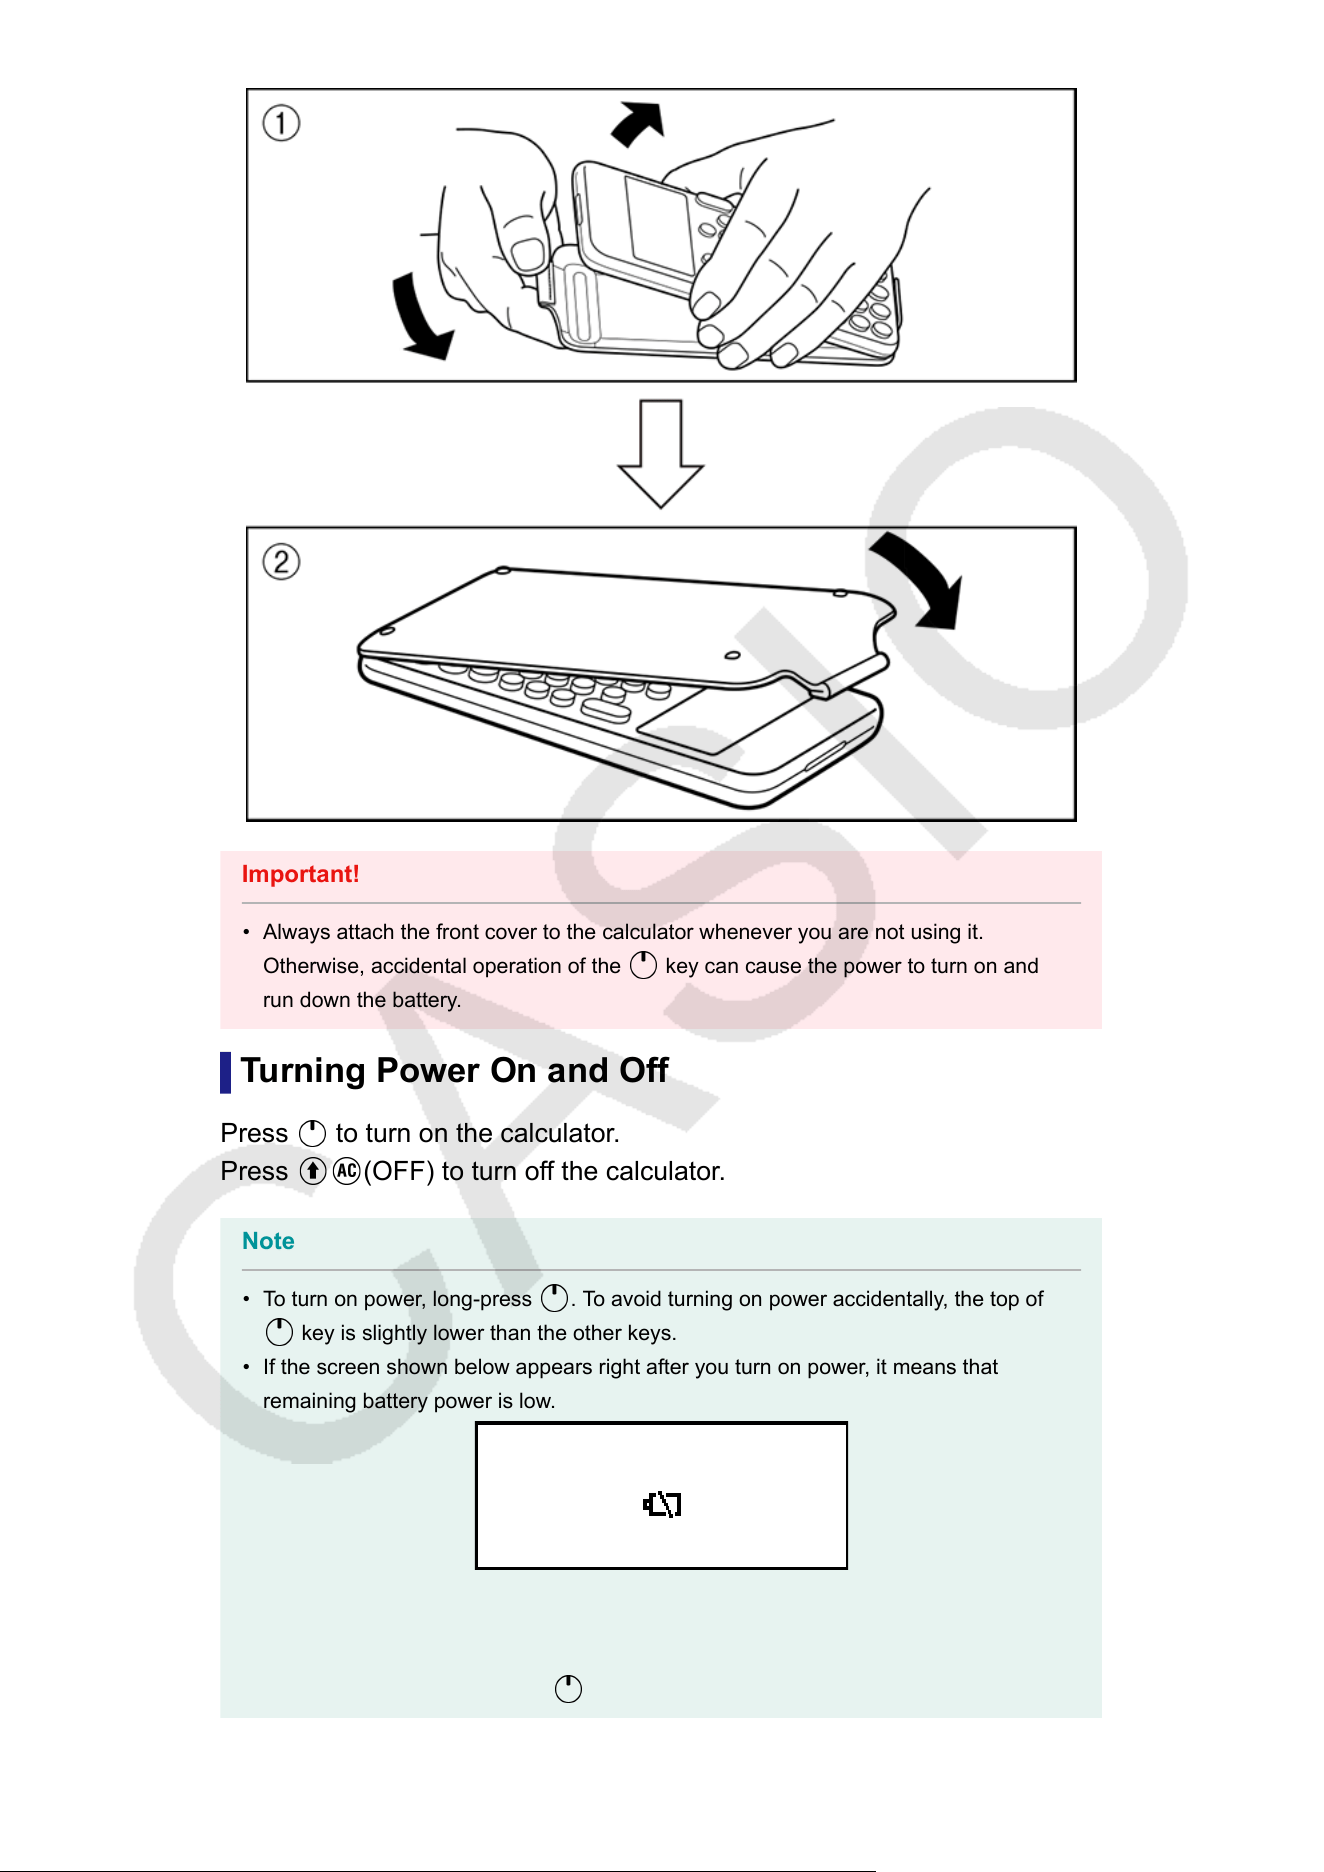
Important!
• Always attach the front cover to the calculator whenever you are not using it.
Otherwise, accidental operation of the key can cause the power to turn on and
run down the battery
.
Turning Power On and Off
Press
to turn on the calculator.
Press (OFF) to turn off the calculator.
Note
• To turn on power, long-press
. To avoid turning on power accidentally, the top of
key is slightly lower than the other keys.
• If the screen shown below appears right after you turn on power, it means that
remaining battery power is low
.
If this screen appears, replace the battery as soon as possible. For details about
battery replacement, see "Replacing the Battery" (page 159).
• The calculator also will turn off automatically after approximately 10 minutes or 60
minutes of non-use. Press the key to turn the calculator back on.
14
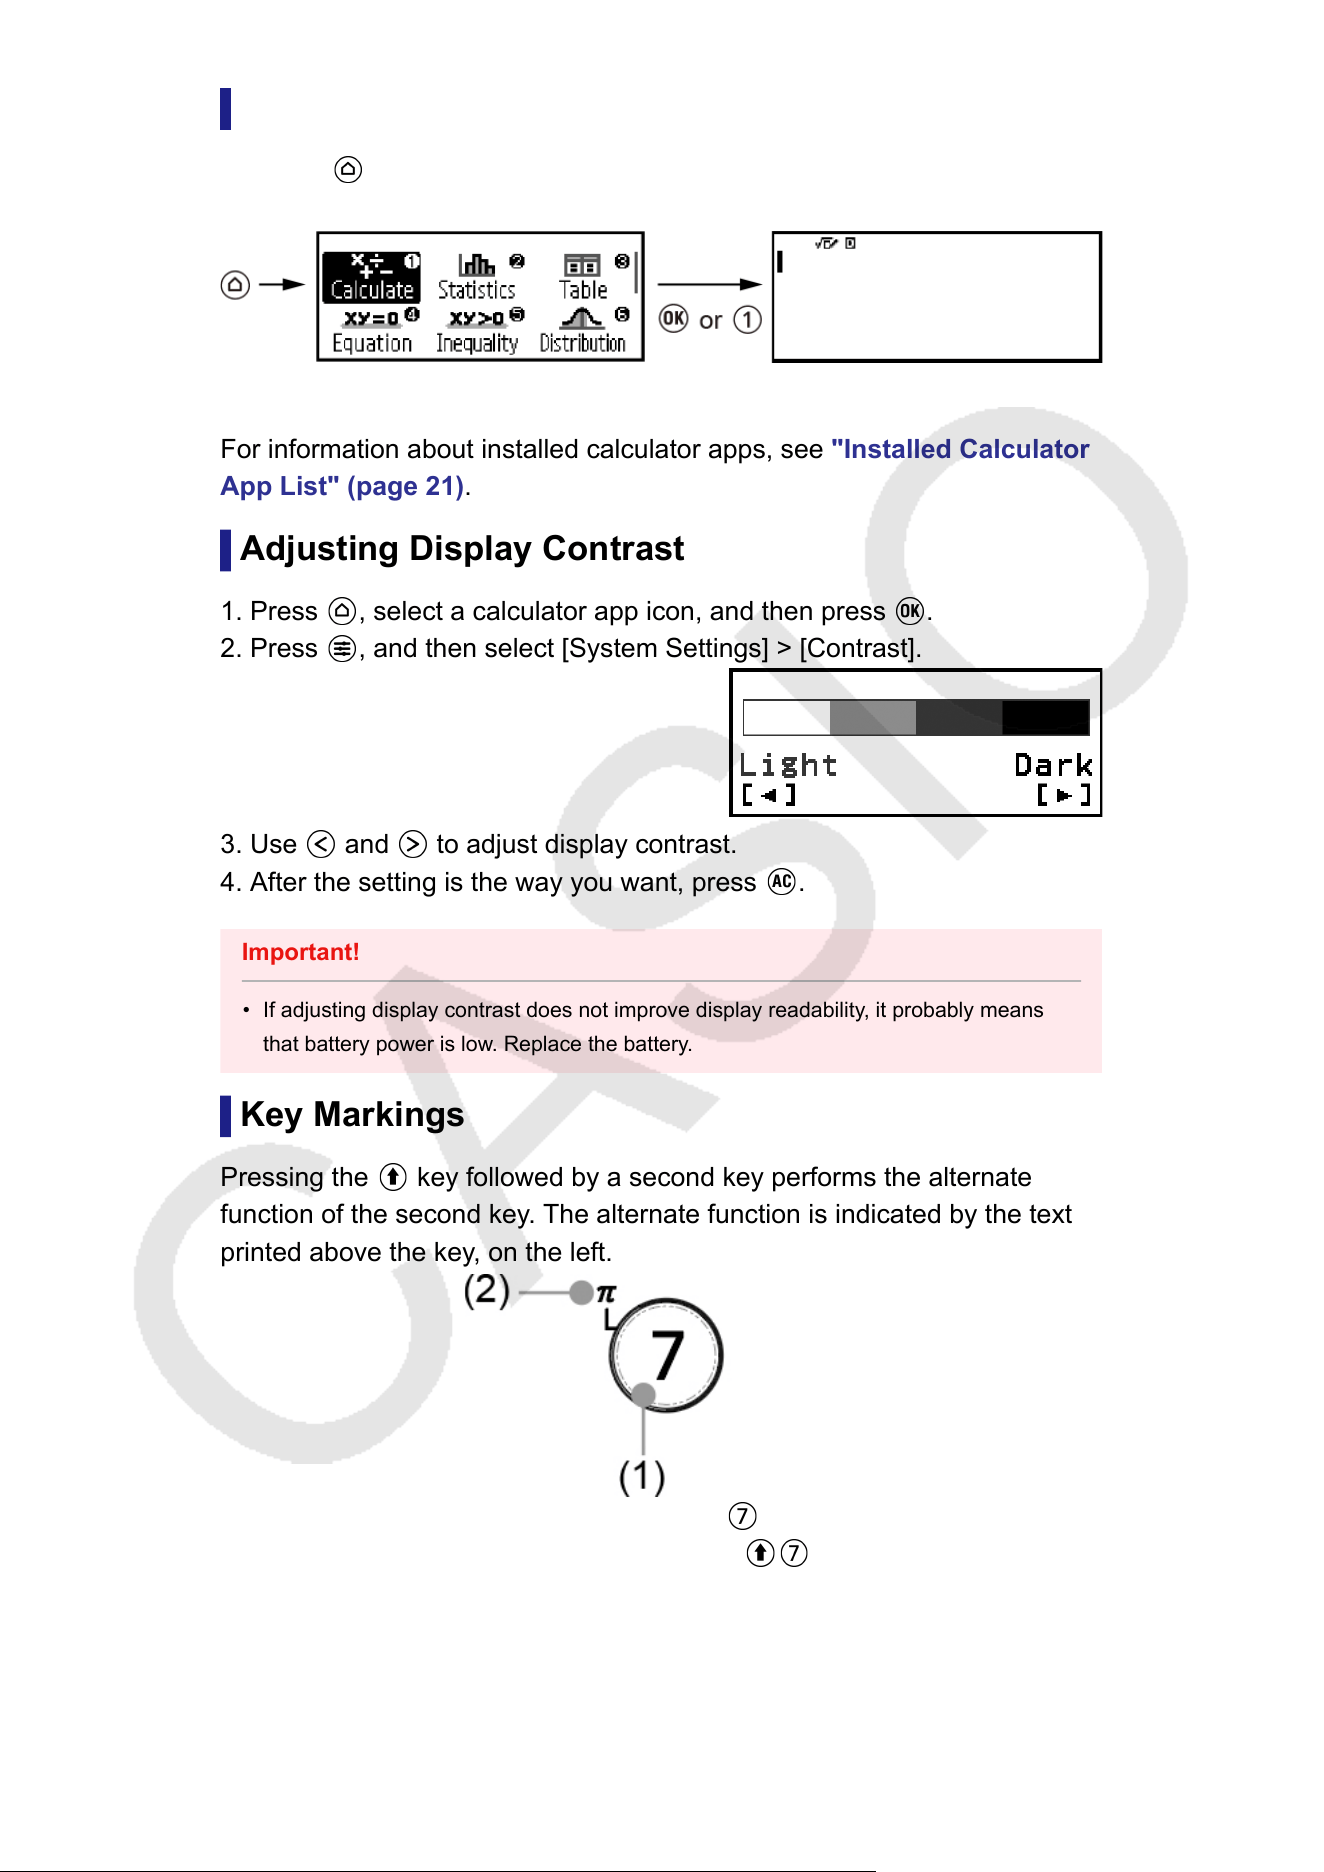
HOME Screen
Pressing displays the HOME screen. The HOME screen shows a list of
installed calculator apps.
HOME Screen Calculate App Screen
For information about installed calculator apps, see "Installed Calculator
App List" (page
21).
Adjusting Display Contrast
1. Press
, select a calculator app icon, and then press .
2. Press , and then select [System Settings] > [Contrast].
3. Use and to adjust display contrast.
4. After the setting is the way you want, press .
Important!
• If adjusting display contrast does not improve display readability, it probably means
that battery power is low
. Replace the battery.
Key Markings
Pressing the
key followed by a second key performs the alternate
function of the second key
. The alternate function is indicated by the text
printed above the key, on the left.
(1) Keycap function:
(2) Alternate function: (π)
15
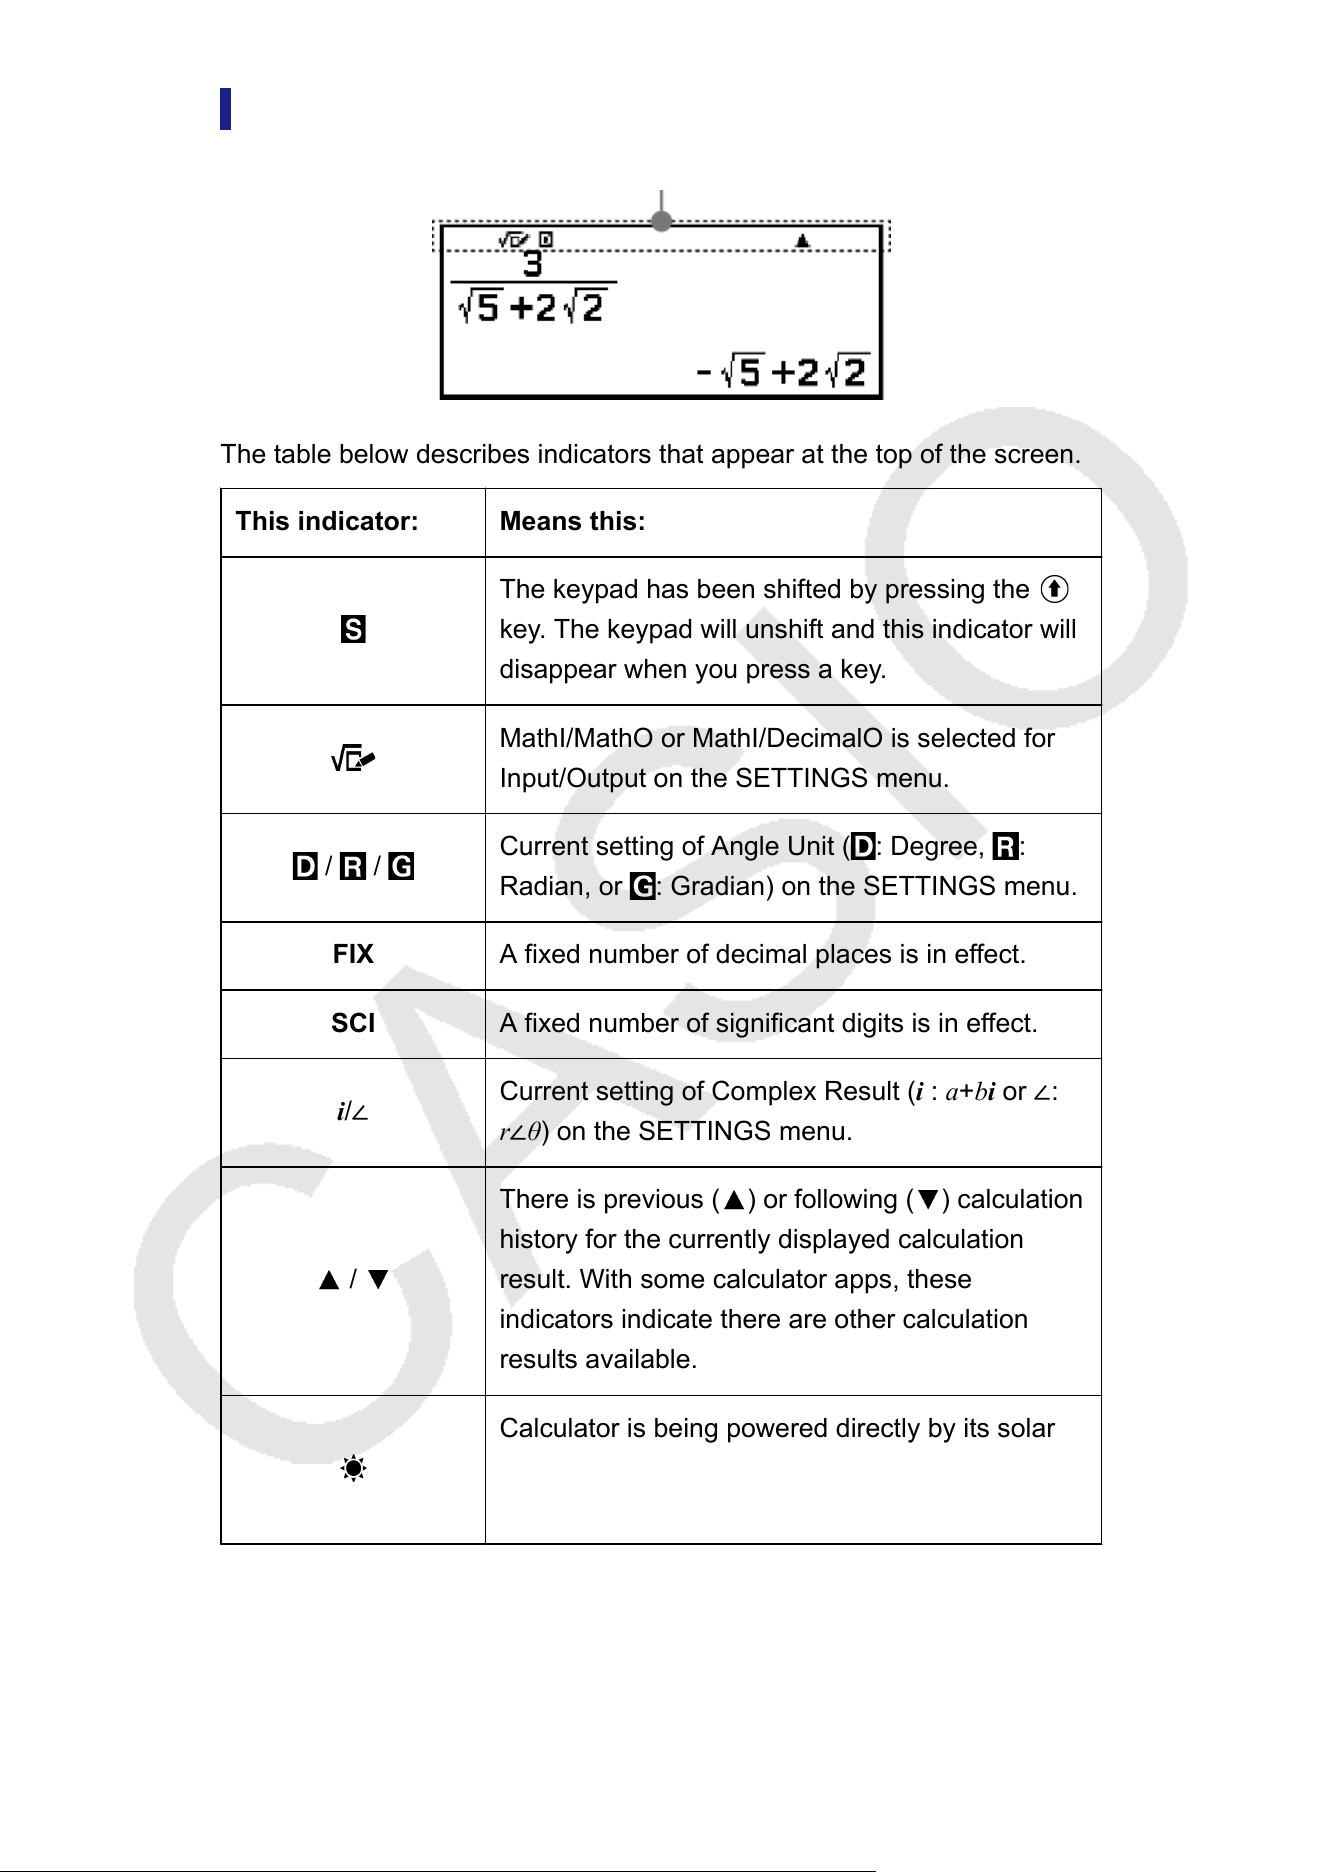
Indicators
Indicators
The table below describes indicators that appear at the top of the screen.
This indicator: Means this:
The keypad has been shifted by pressing the
key. The keypad will unshift and this indicator will
disappear when you press a key
.
MathI/MathO or MathI/DecimalO is selected for
Input/Output on the SETTINGS menu.
/ /
Current setting of Angle Unit ( : Degree, :
Radian, or : Gradian) on the SETTINGS menu.
FIX A fixed number of decimal places is in effect.
SCI A fixed number of significant digits is in effect.
i/∠
Current setting of Complex Result (i : a+bi
or ∠:
r∠θ) on the SETTINGS menu.
/
There is previous ( ) or following ( ) calculation
history for the currently displayed calculation
result. With some calculator apps, these
indicators indicate there are other calculation
results available.
Calculator is being powered directly by its solar
cells, either entirely or in some combination with
the battery
.
16
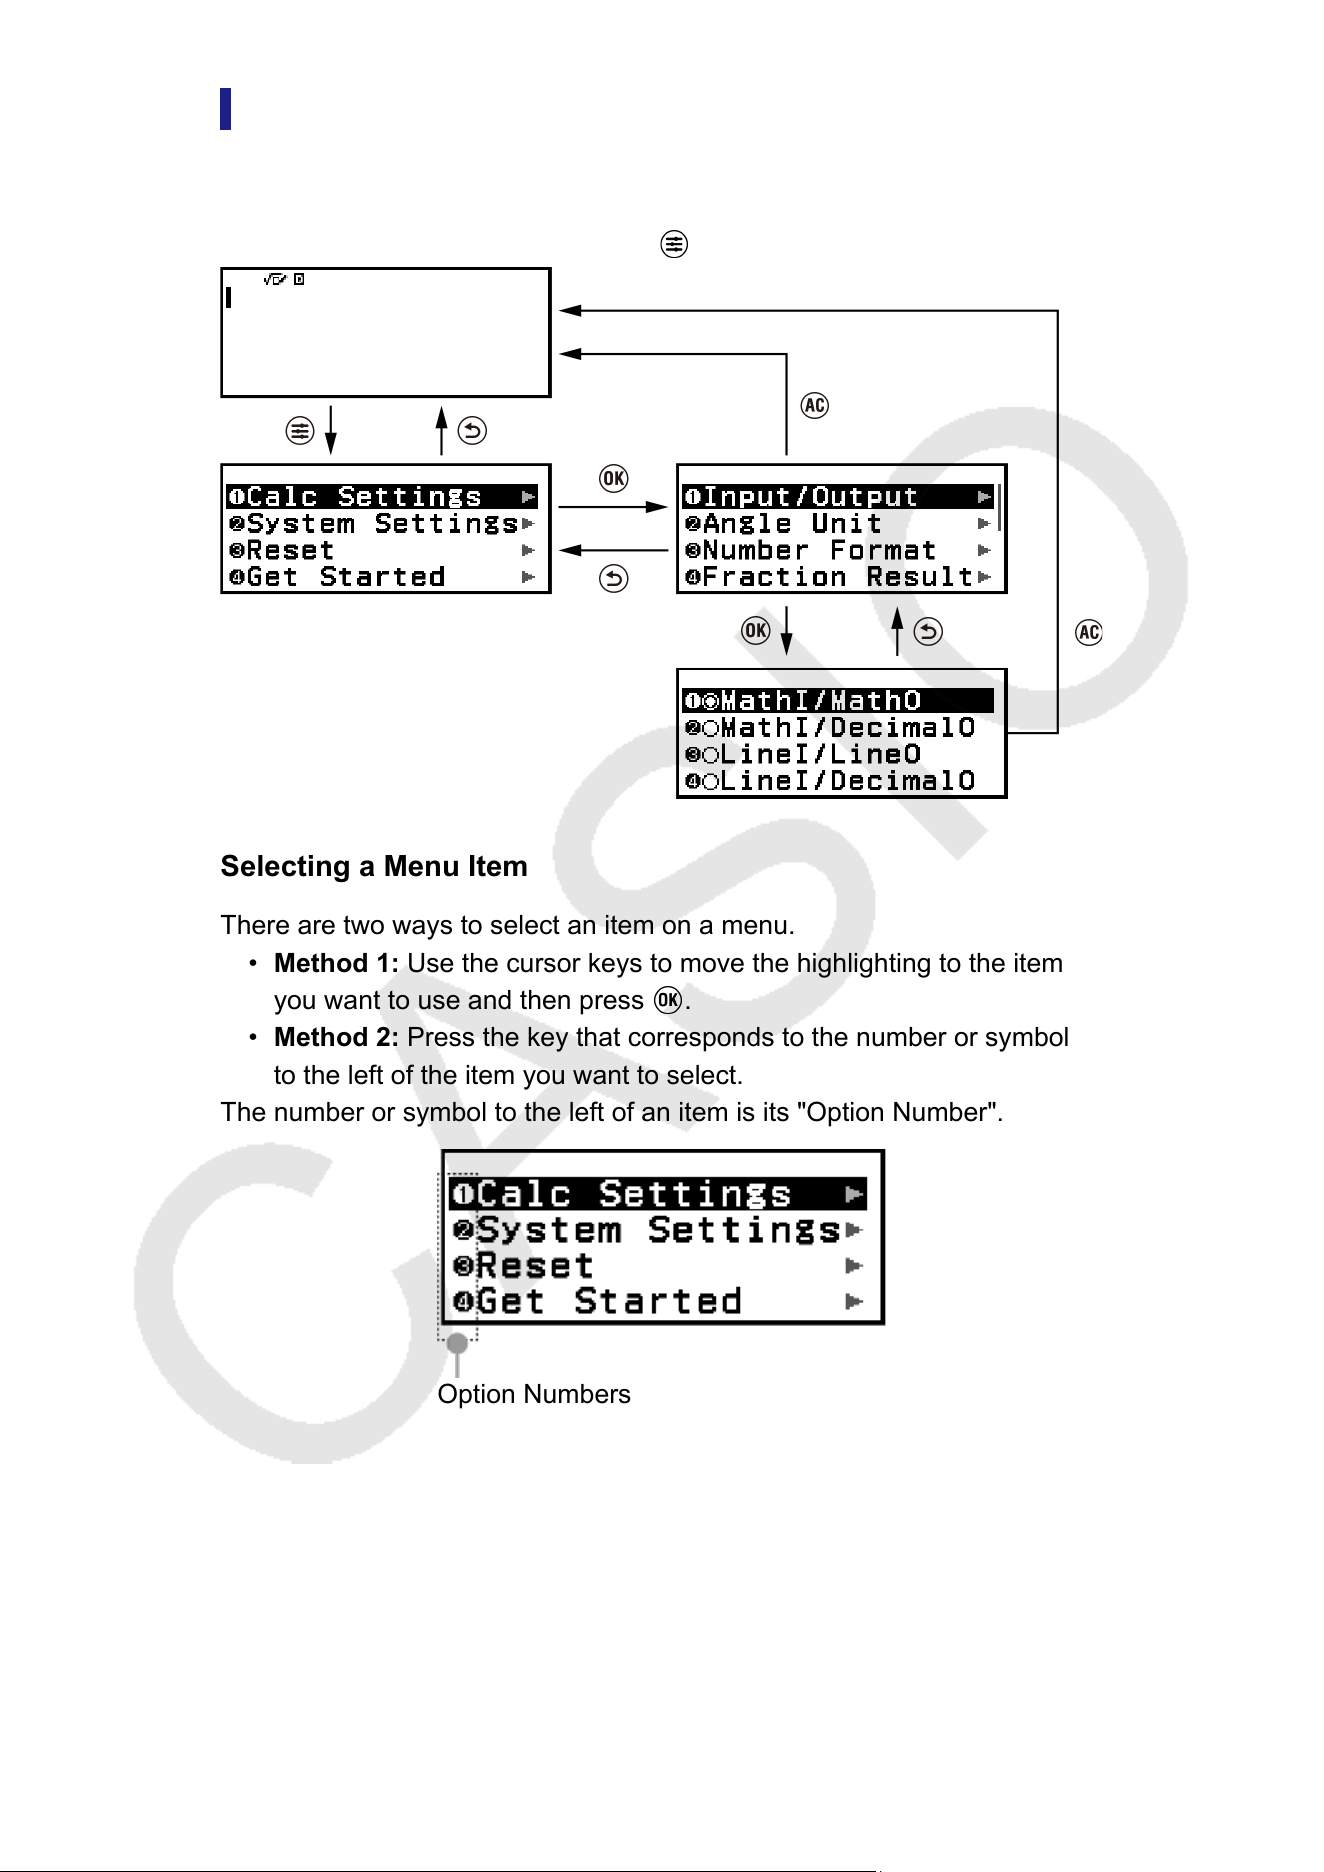
Using Menus
Many of the operations of your calculator are performed using menu
screens. The example below shows operations starting from the menu
screen that appears when you press .
Selecting a Menu Item
There are two ways to select an item on a menu.
• Method 1: Use the cursor keys to move the highlighting to the item
you want to use and then press .
• Method 2: Press the key that corresponds to the number or symbol
to the left of the item you want to select.
The number or symbol to the left of an item is its "Option Number".
Option Numbers
• You can use Option Numbers to select a menu by pressing its
corresponding number or symbol key even if its menu is not currently
displayed.
• Option Numbers are displayed when "On" is selected for the Show
Option Num (page 29)
setting on the SETTINGS menu and not
displayed when "Off" is selected. The default setting is On. Note that
menu operations you execute by pressing number and symbol keys
17
remain in effect even when "Off" is selected for the Show Option Num
setting.
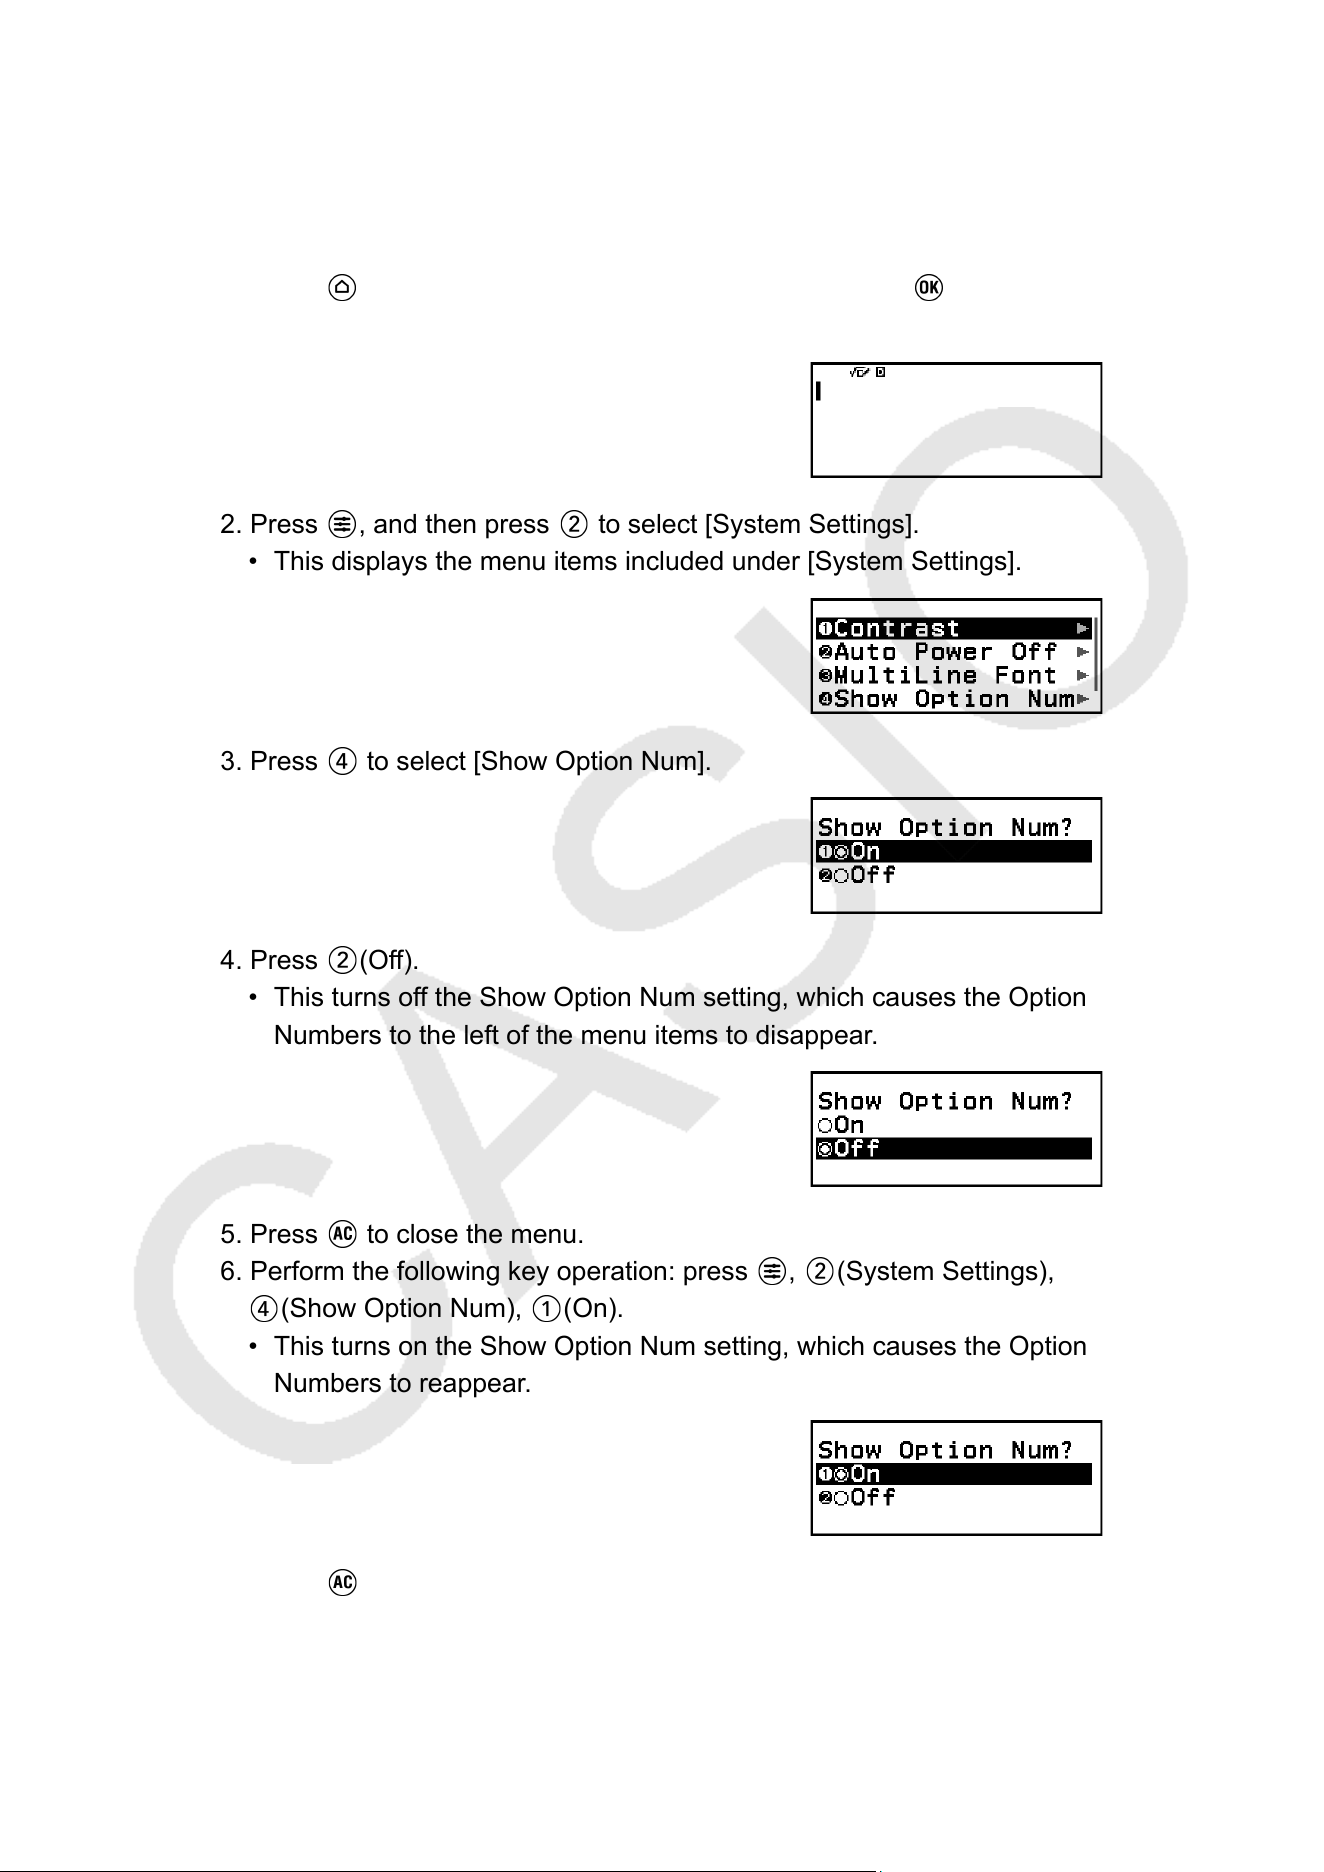
Example of Menu Operations Using Option Numbers
1. Press , select the Calculate app icon, and then press .
• This displays the Calculate app’s initial screen.
2. Press , and then press to select [System Settings].
• This displays the menu items included under [System Settings].
3. Press to select [Show Option Num].
4. Press (Off).
• This turns off the Show Option Num setting, which causes the Option
Numbers to the left of the menu items to disappear
.
5. Press to close the menu.
6. Perform the following key operation: press , (System Settings),
(Show Option Num), (On).
• This turns on the Show Option Num setting, which causes the Option
Numbers to reappear
.
7. Press to close the menu.
18
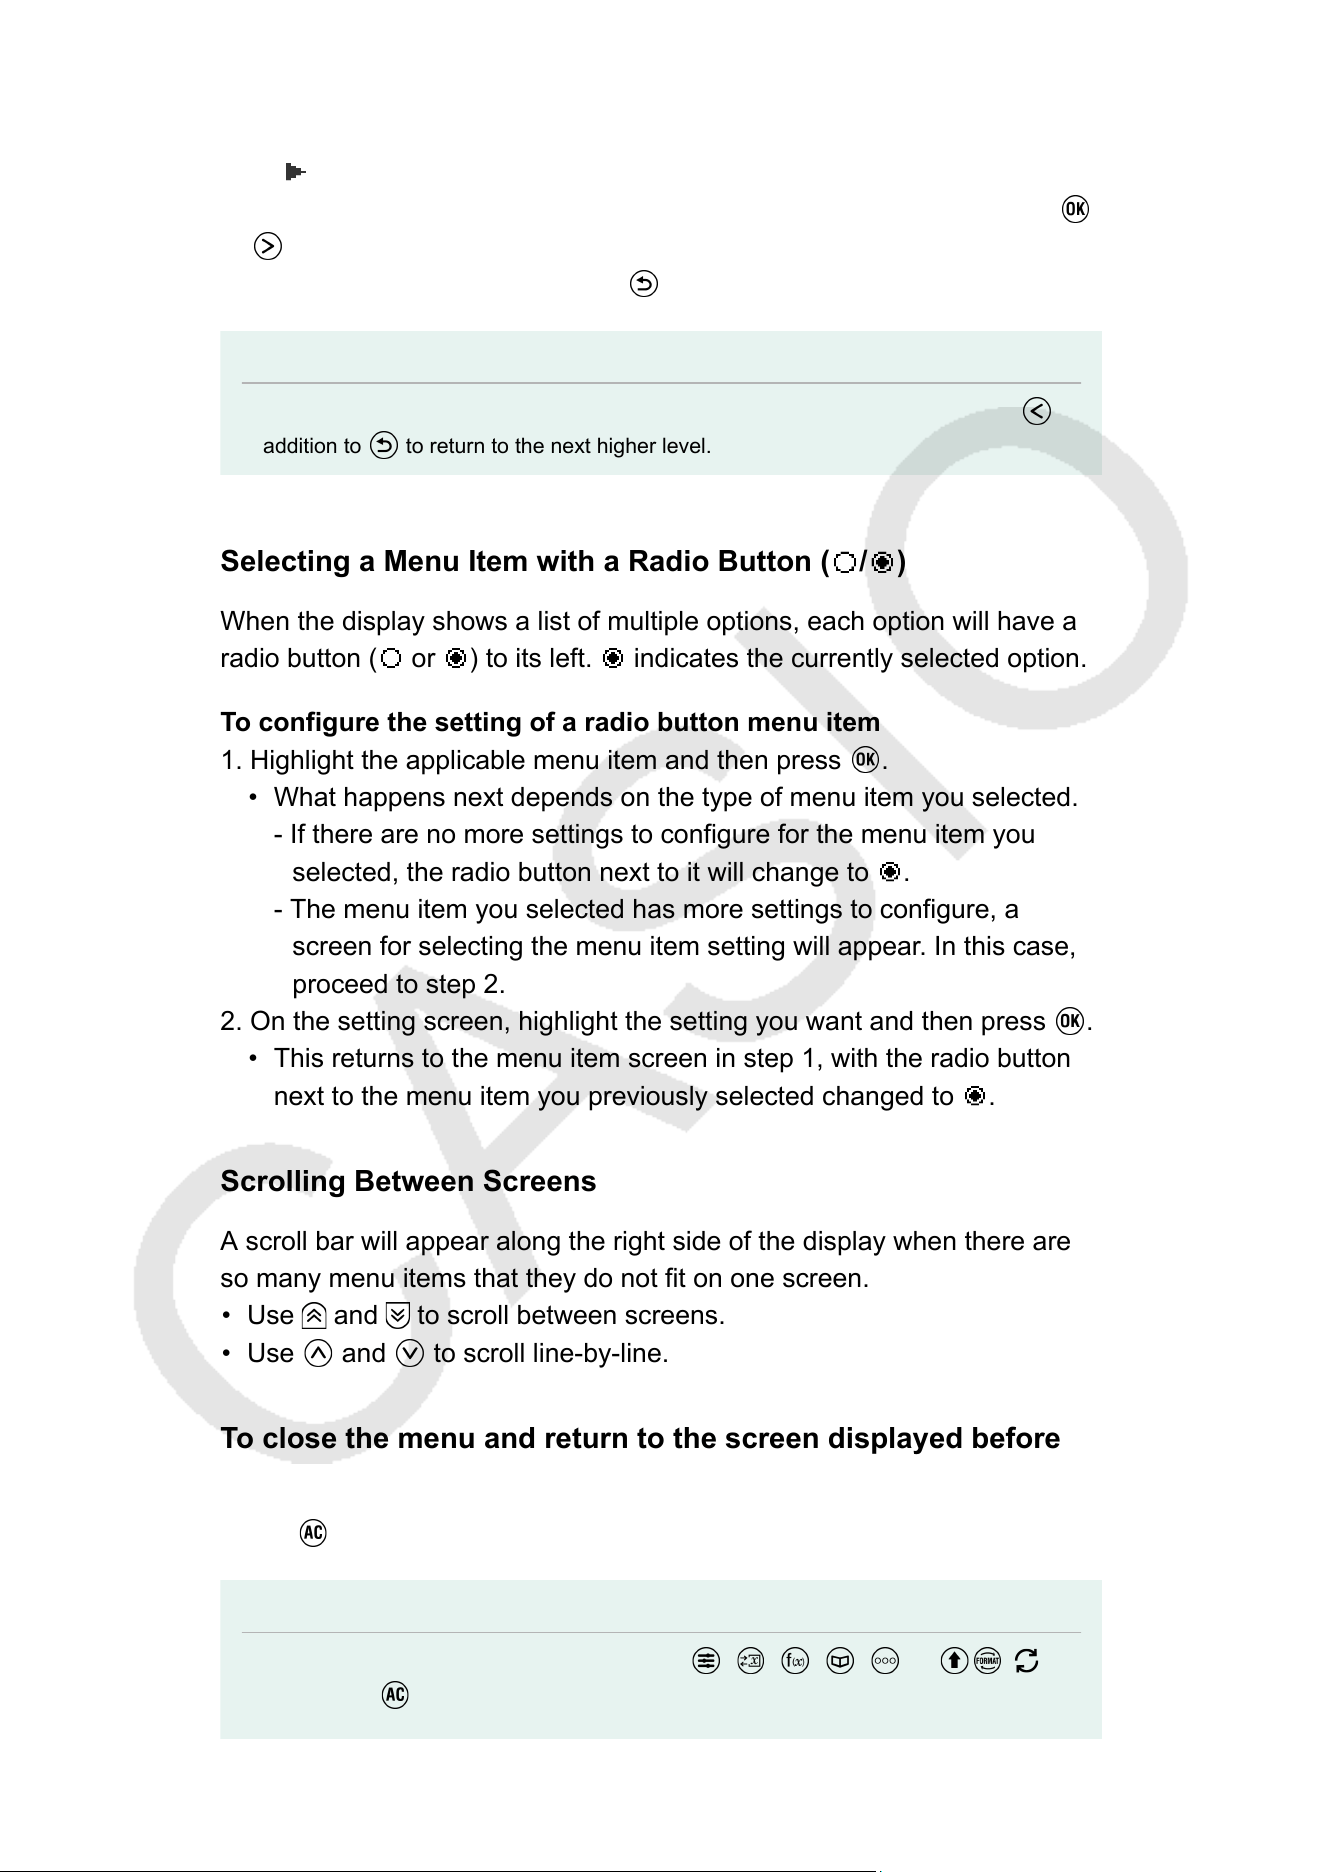
Navigating Between Menu Hierarchies
The " " indicator to the right of a menu item means that there are lower
hierarchy levels under that item. Selecting the menu item and pressing
or navigates the next lower level of the hierarchy. To return to the next
upper level of the hierarchy
, press
.
Note
• If you are in a lower level of the hierarchy of a one-column menu, you can press
in
addition to to return to the next higher level.
Selecting a Menu Item with a Radio Button ( / )
When the display shows a list of multiple options, each option will have a
radio button ( or ) to its left. indicates the currently selected option.
T
o configure the setting of a radio button menu item
1. Highlight the applicable menu item and then press
.
• What happens next depends on the type of menu item you selected.
- If there are no more settings to configure for the menu item you
selected, the radio button next to it will change to .
- The menu item you selected has more settings to configure, a
screen for selecting the menu item setting will appear
. In this case,
proceed to step 2.
2. On the setting screen, highlight the setting you want and then press
.
• This returns to the menu item screen in step 1, with the radio button
next to the menu item you previously selected changed to .
Scrolling Between Screens
A scroll bar will appear along the right side of the display when there are
so many menu items that they do not fit on one screen.
• Use and to scroll between screens.
• Use and to scroll line-by-line.
T
o close the menu and return to the screen displayed before
the menu
Press
.
Note
• You can close a menu displayed by pressing
, , , , , or ( )
by pressing . If the displayed menu is one that appears immediately after launching
19

a particular calculator app or if it is an app-specific menu, you cannot close it by
pressing . In that case, you must press to close the menu.
20
Calculator Apps and Menus
Calculator Apps
Selecting a Calculator App
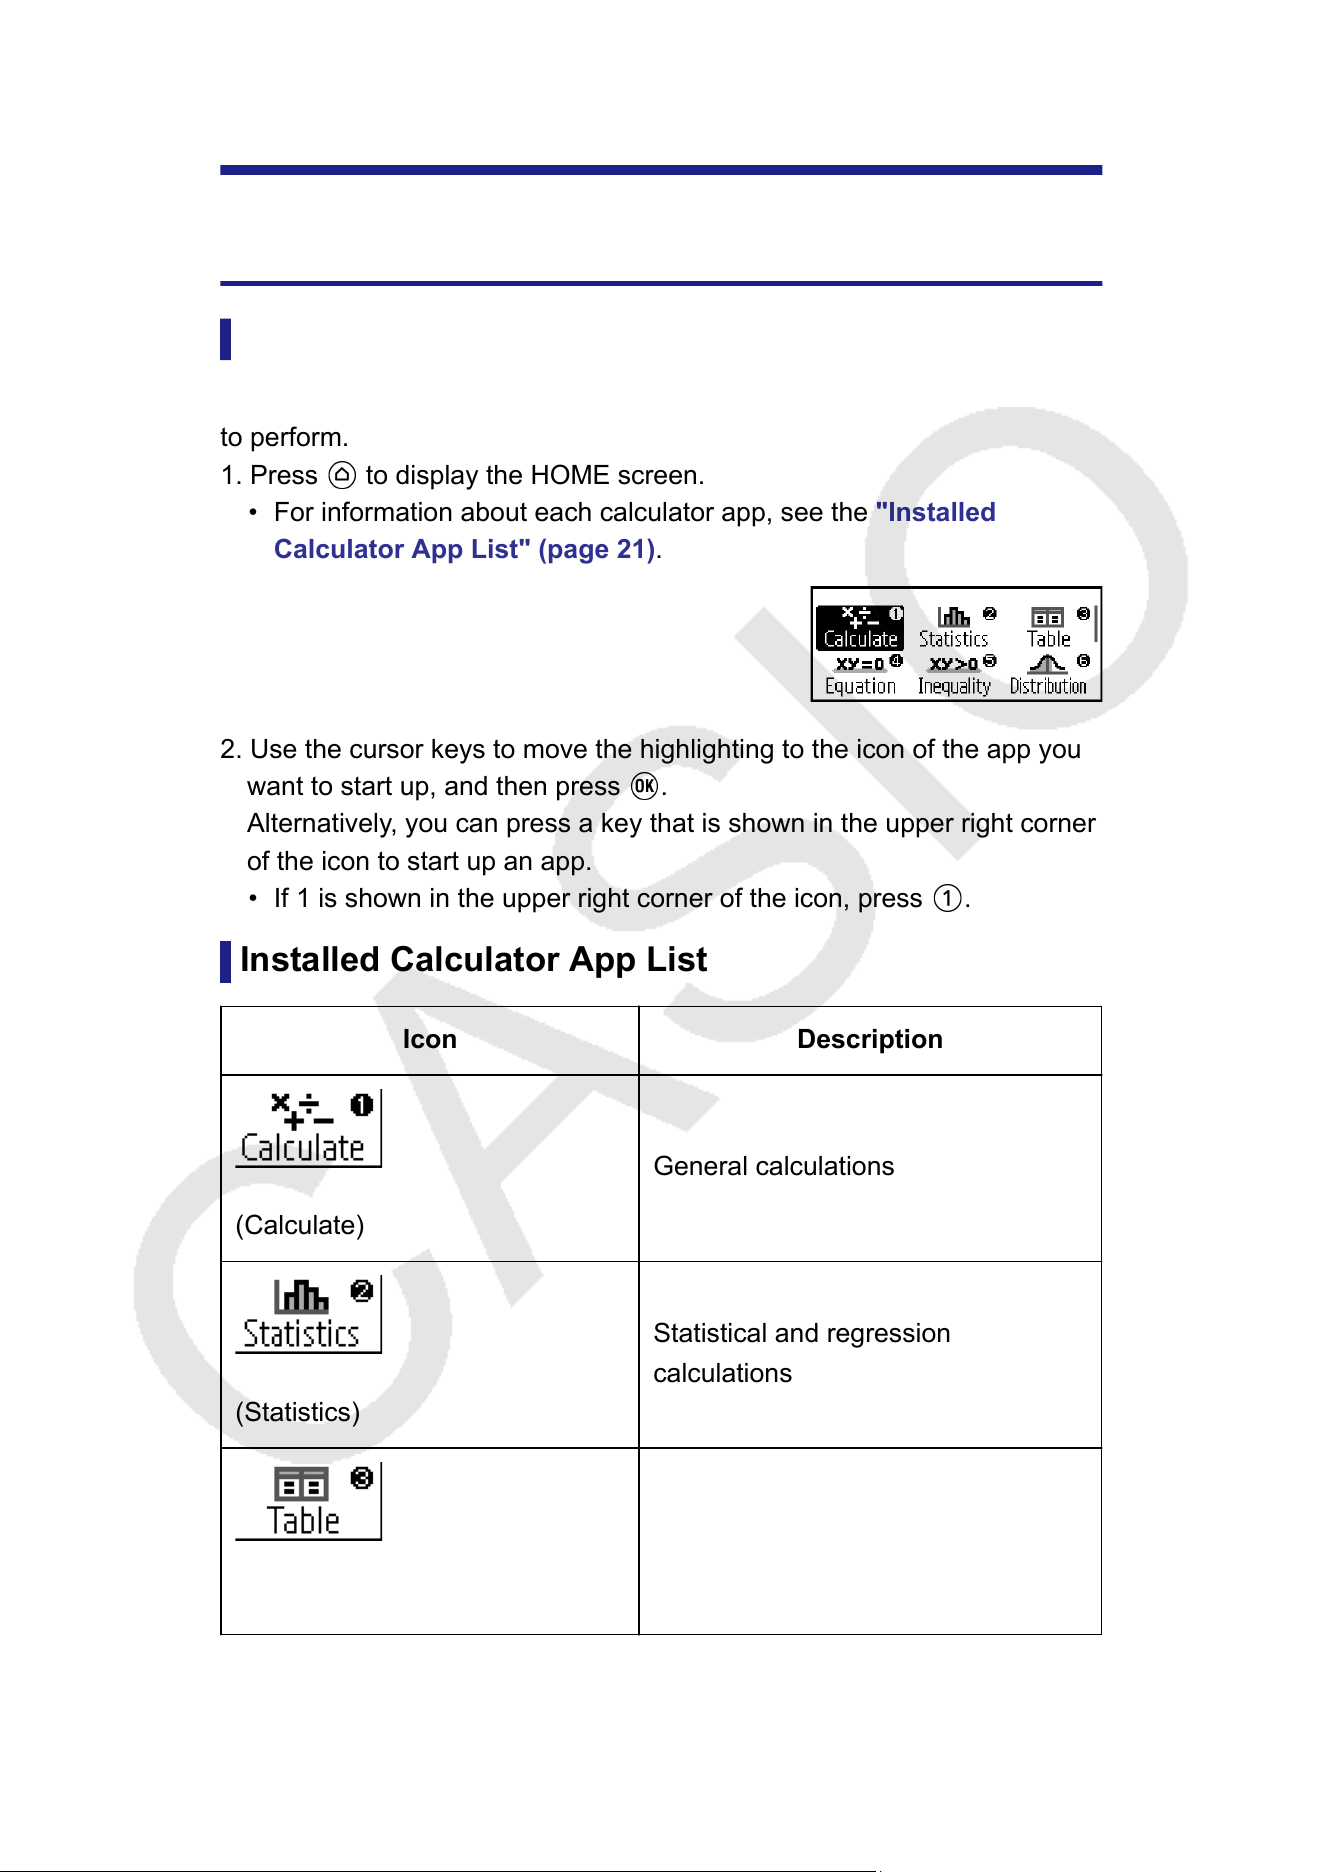
Select a calculator app that is suitable for the type of calculation you want
to perform.
1. Press to display the HOME screen.
• For information about each calculator app, see the "Installed
Calculator App List"
(page 21).
2. Use the cursor keys to move the highlighting to the icon of the app you
want to start up, and then press .
Alternatively, you can press a key that is shown in the upper right corner
of the icon to start up an app.
• If 1 is shown in the upper right corner of the icon, press .
Installed Calculator App List
Icon Description
(Calculate)
General calculations
(Statistics)
Statistical and regression
calculations
(Table)
Generates a number table based on
one or two functions
21

(Equation)
Simultaneous equations, higher-
order equations, and Solver
(function to find the value of any
variable contained in an input
equation)
(Inequality)
Inequality calculations
(Distribution)
Distribution calculations
(Complex)
Complex number calculations
(Matrix)
Matrix calculations
(Vector)
Vector calculations
(Spreadsheet)
Spreadsheet calculations
(Ratio)
Ratio calculations
22
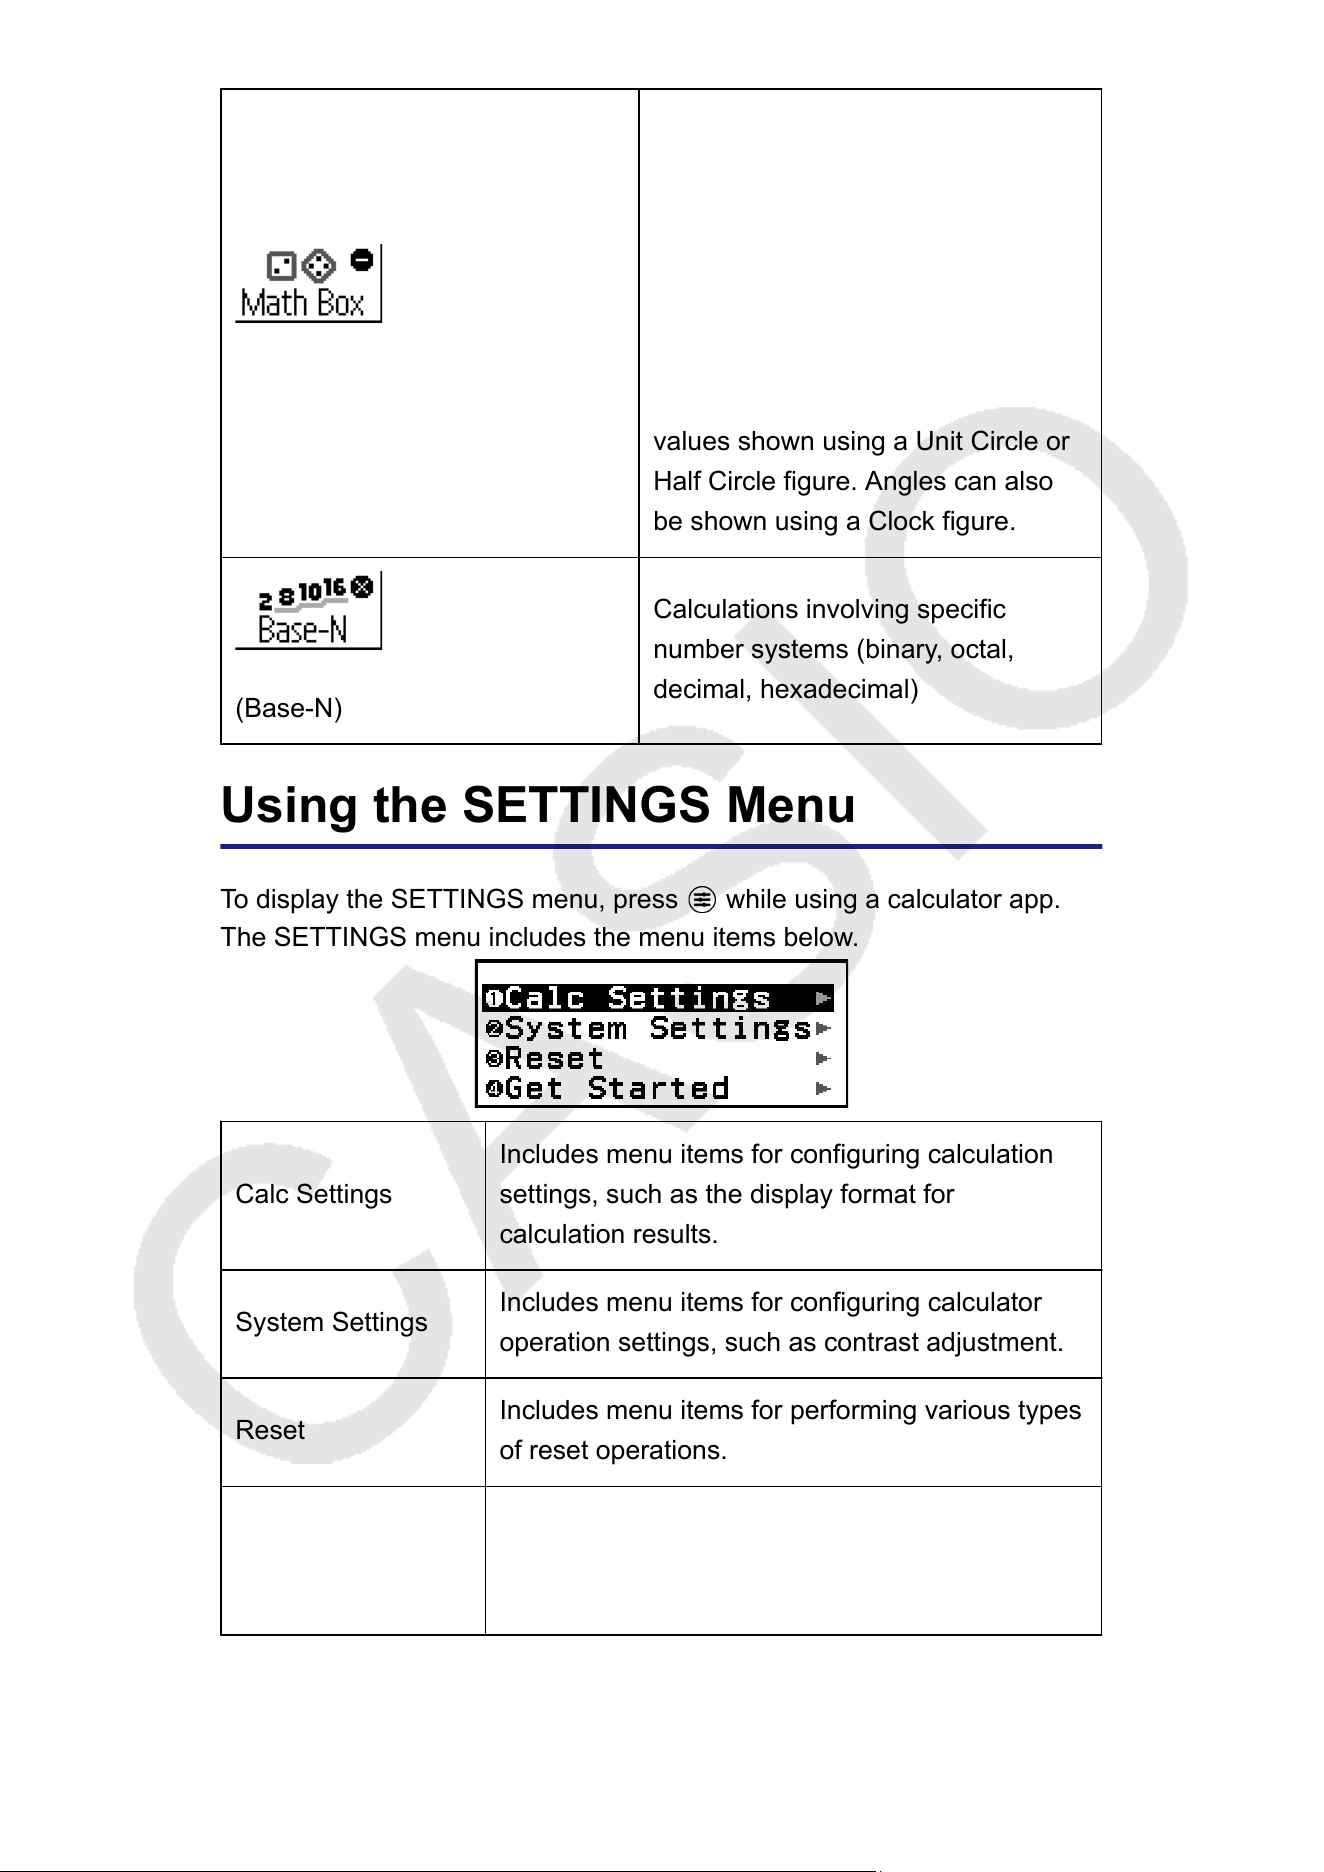
(Math Box)
The following functions to support
math learning.
Dice Roll, Coin T
oss: Probability
simulation
Number Line: Number line graphs
for up to three equalities or
inequalities
Circle: Angles and trigonometric
values shown using a Unit Circle or
Half Circle figure. Angles can also
be shown using a Clock figure.
(Base-N)
Calculations involving specific
number systems (binary
, octal,
decimal, hexadecimal)
Using the SETTINGS Menu
T
o display the SETTINGS menu, press
while using a calculator app.
The SETTINGS menu includes the menu items below
.
Calc Settings
Includes menu items for configuring calculation
settings, such as the display format for
calculation results.
System Settings
Includes menu items for configuring calculator
operation settings, such as contrast adjustment.
Reset
Includes menu items for performing various types
of reset operations.
Get Started
Displays the Get Started screen. For more
information, see "Calculator "Get Started"
Screen"
(page 8).
23
Note
• Pressing while the HOME screen is displayed will display the Get Started screen
instead of the SETTINGS menu.
• Depending on the screen displayed by the calculator app, pressing may not
display the SETTINGS menu.
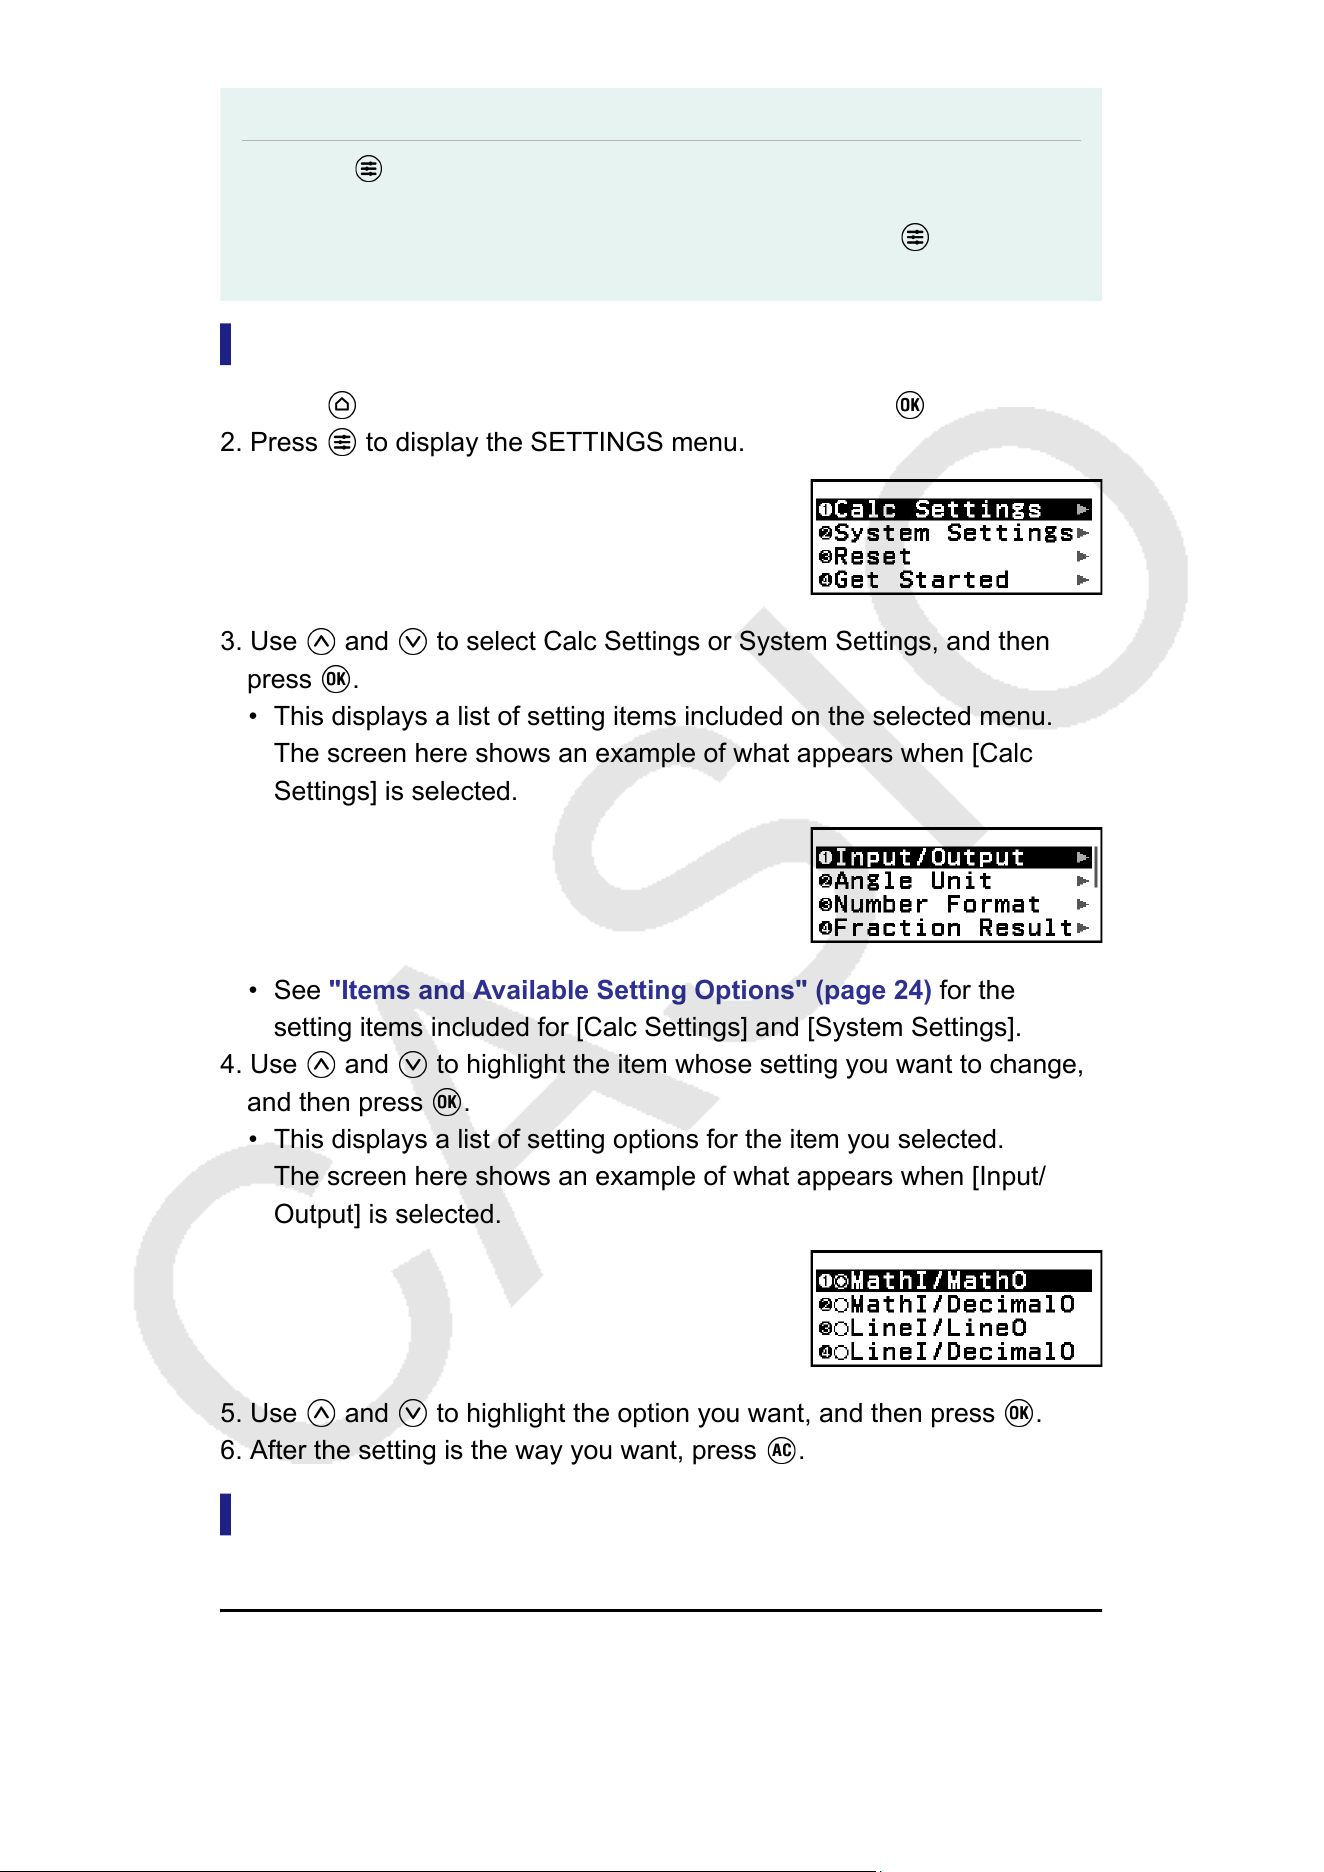
Changing Calculator Settings
1. Press
, select a calculator app icon, and then press .
2. Press to display the SETTINGS menu.
3. Use and to select Calc Settings or System Settings, and then
press .
• This displays a list of setting items included on the selected menu.
The screen here shows an example of what appears when [Calc
Settings] is selected.
• See "Items and A
vailable Setting Options" (page 24) for the
setting items included for [Calc Settings] and [System Settings].
4. Use
and to highlight the item whose setting you want to change,
and then press .
• This displays a list of setting options for the item you selected.
The screen here shows an example of what appears when [Input/
Output] is selected.
5. Use and to highlight the option you want, and then press .
6. After the setting is the way you want, press .
Items and A
vailable Setting Options
"◆" indicates the initial default setting.
24
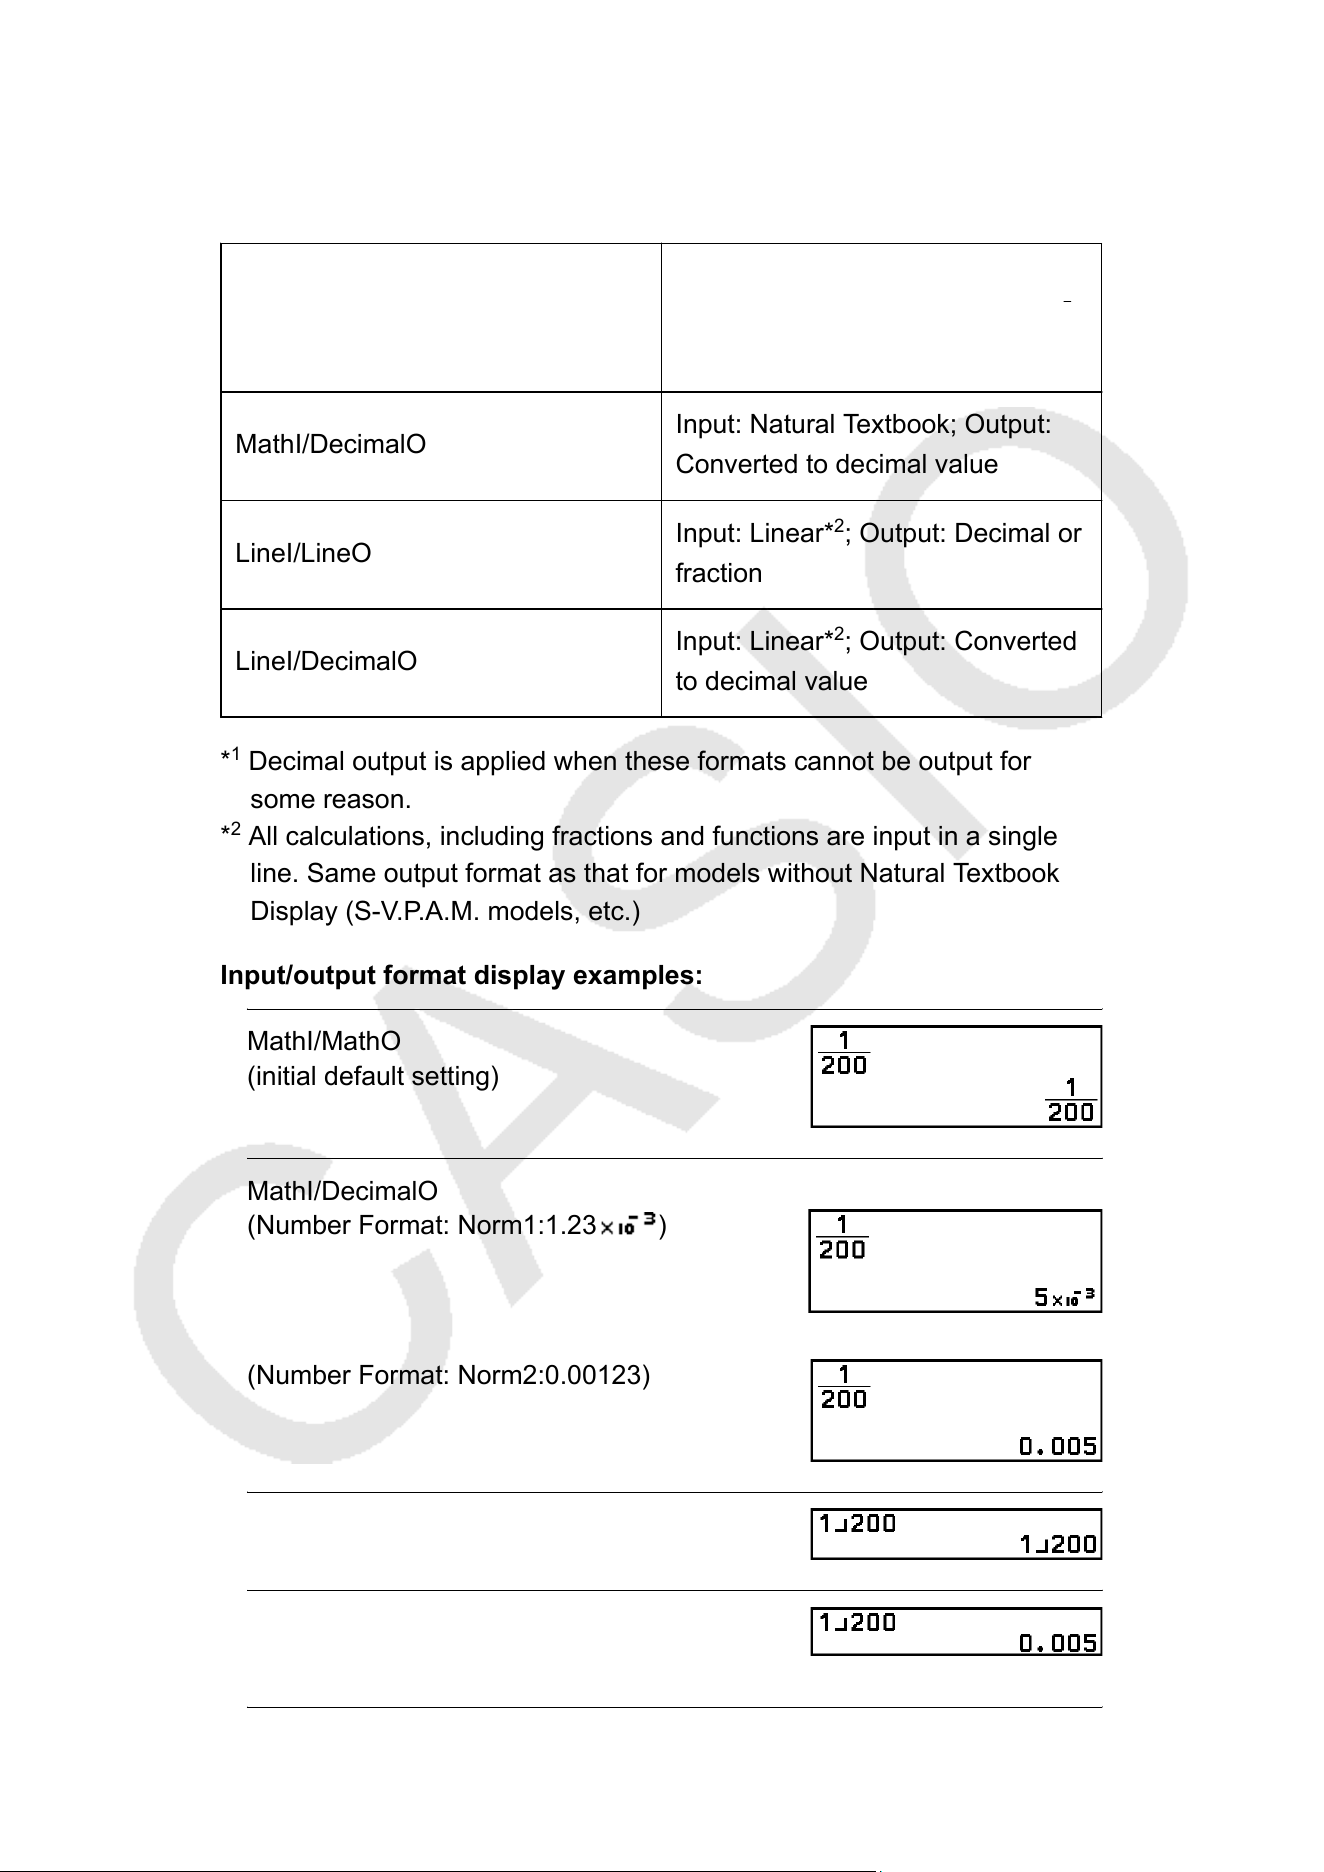
Calc Settings > Input/Output
Specifies the format to be used by the calculator for expression input and
calculation result output.
MathI/MathO
◆
Input: Natural Textbook; Output:
Format that includes a fraction, √ ,
and/or π*
1
MathI/DecimalO
Input: Natural Textbook; Output:
Converted to decimal value
LineI/LineO
Input: Linear*
2
; Output: Decimal or
fraction
LineI/DecimalO
Input: Linear*
2
; Output: Converted
to decimal value
*
1
Decimal output is applied when these formats cannot be output for
some reason.
*
2
All calculations, including fractions and functions are input in a single
line. Same output format as that for models without Natural Textbook
Display (S-V.P.A.M. models, etc.)
Input/output format display examples:
MathI/MathO
(initial default setting)
MathI/DecimalO
(Number Format: Norm1:1.23 )
(Number Format: Norm2:0.00123)
LineI/LineO
LineI/DecimalO
(Number Format: Norm2:0.00123)
25
Calc Settings > Angle Unit
Degree
◆
; Radian; Gradian
Specifies degree, radian or gradian as the angle unit for value input and
calculation result display
.
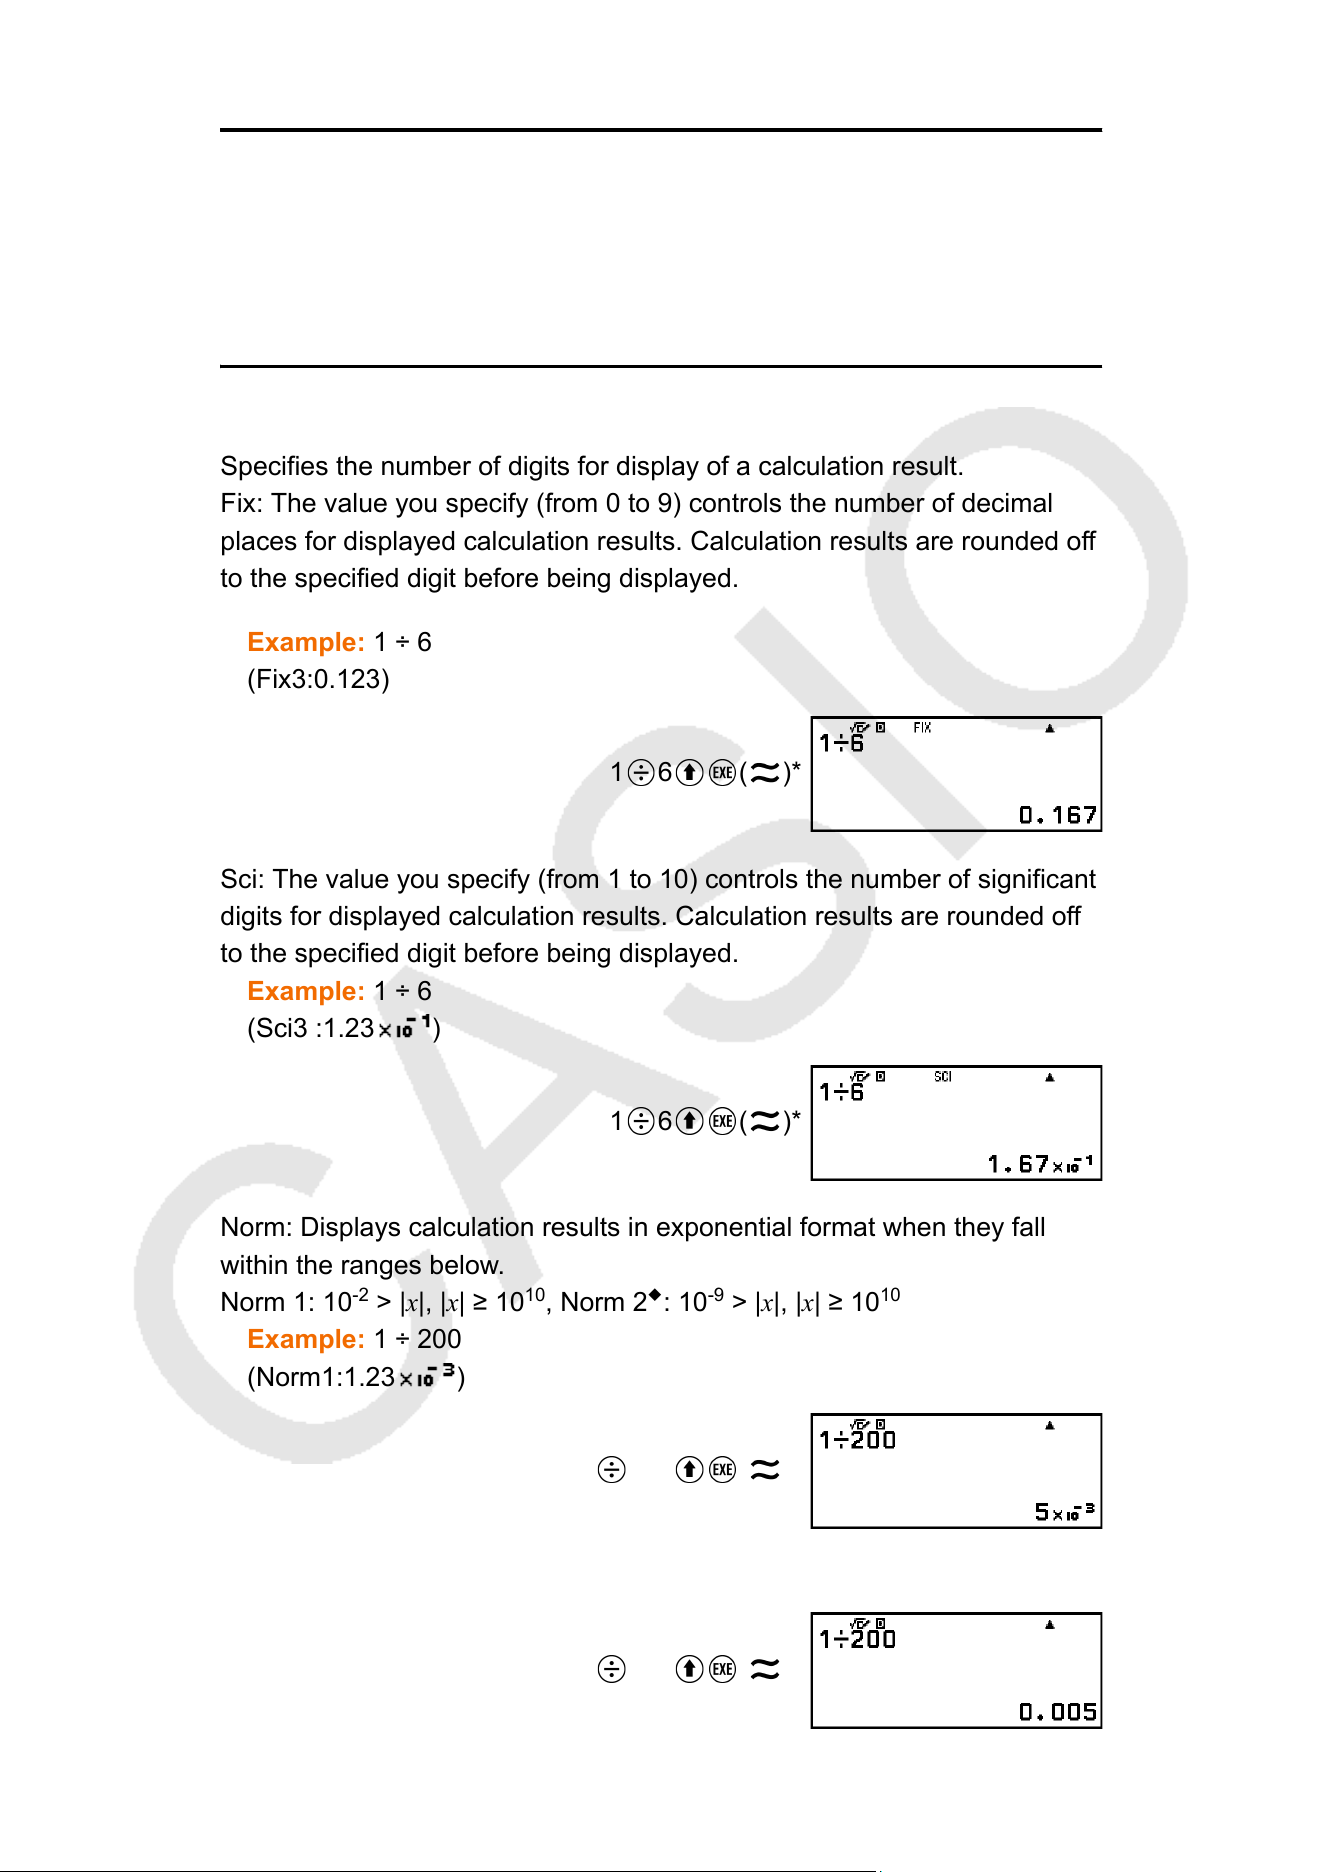
Calc Settings > Number Format
Specifies the number of digits for display of a calculation result.
Fix: The value you specify (from 0 to 9) controls the number of decimal
places for displayed calculation results. Calculation results are rounded off
to the specified digit before being displayed.
Example: 1 ÷ 6
(Fix3:0.123)
1
6 ( )*
Sci: The value you specify (from 1 to 10) controls the number of significant
digits for displayed calculation results. Calculation results are rounded off
to the specified digit before being displayed.
Example: 1 ÷ 6
(Sci3 :1.23 )
1 6 ( )*
Norm: Displays calculation results in exponential format when they fall
within the ranges below
.
Norm 1: 10
-2
> |x|, |x|
≥ 10
10
, Norm 2
◆
: 10
-9
> |x|, |x| ≥ 10
10
Example: 1 ÷ 200
(Norm1:1.23
)
1 200 ( )*
(Norm2:0.00123)
1 200 ( )*
26
* Pressing ( ) instead of after inputting a calculation will display
the calculation result in decimal form.
Calc Settings > Fraction Result
Mixed Number; Improp Fraction
◆
Specifies either mixed number or improper fraction for display of fractions
in calculation results.
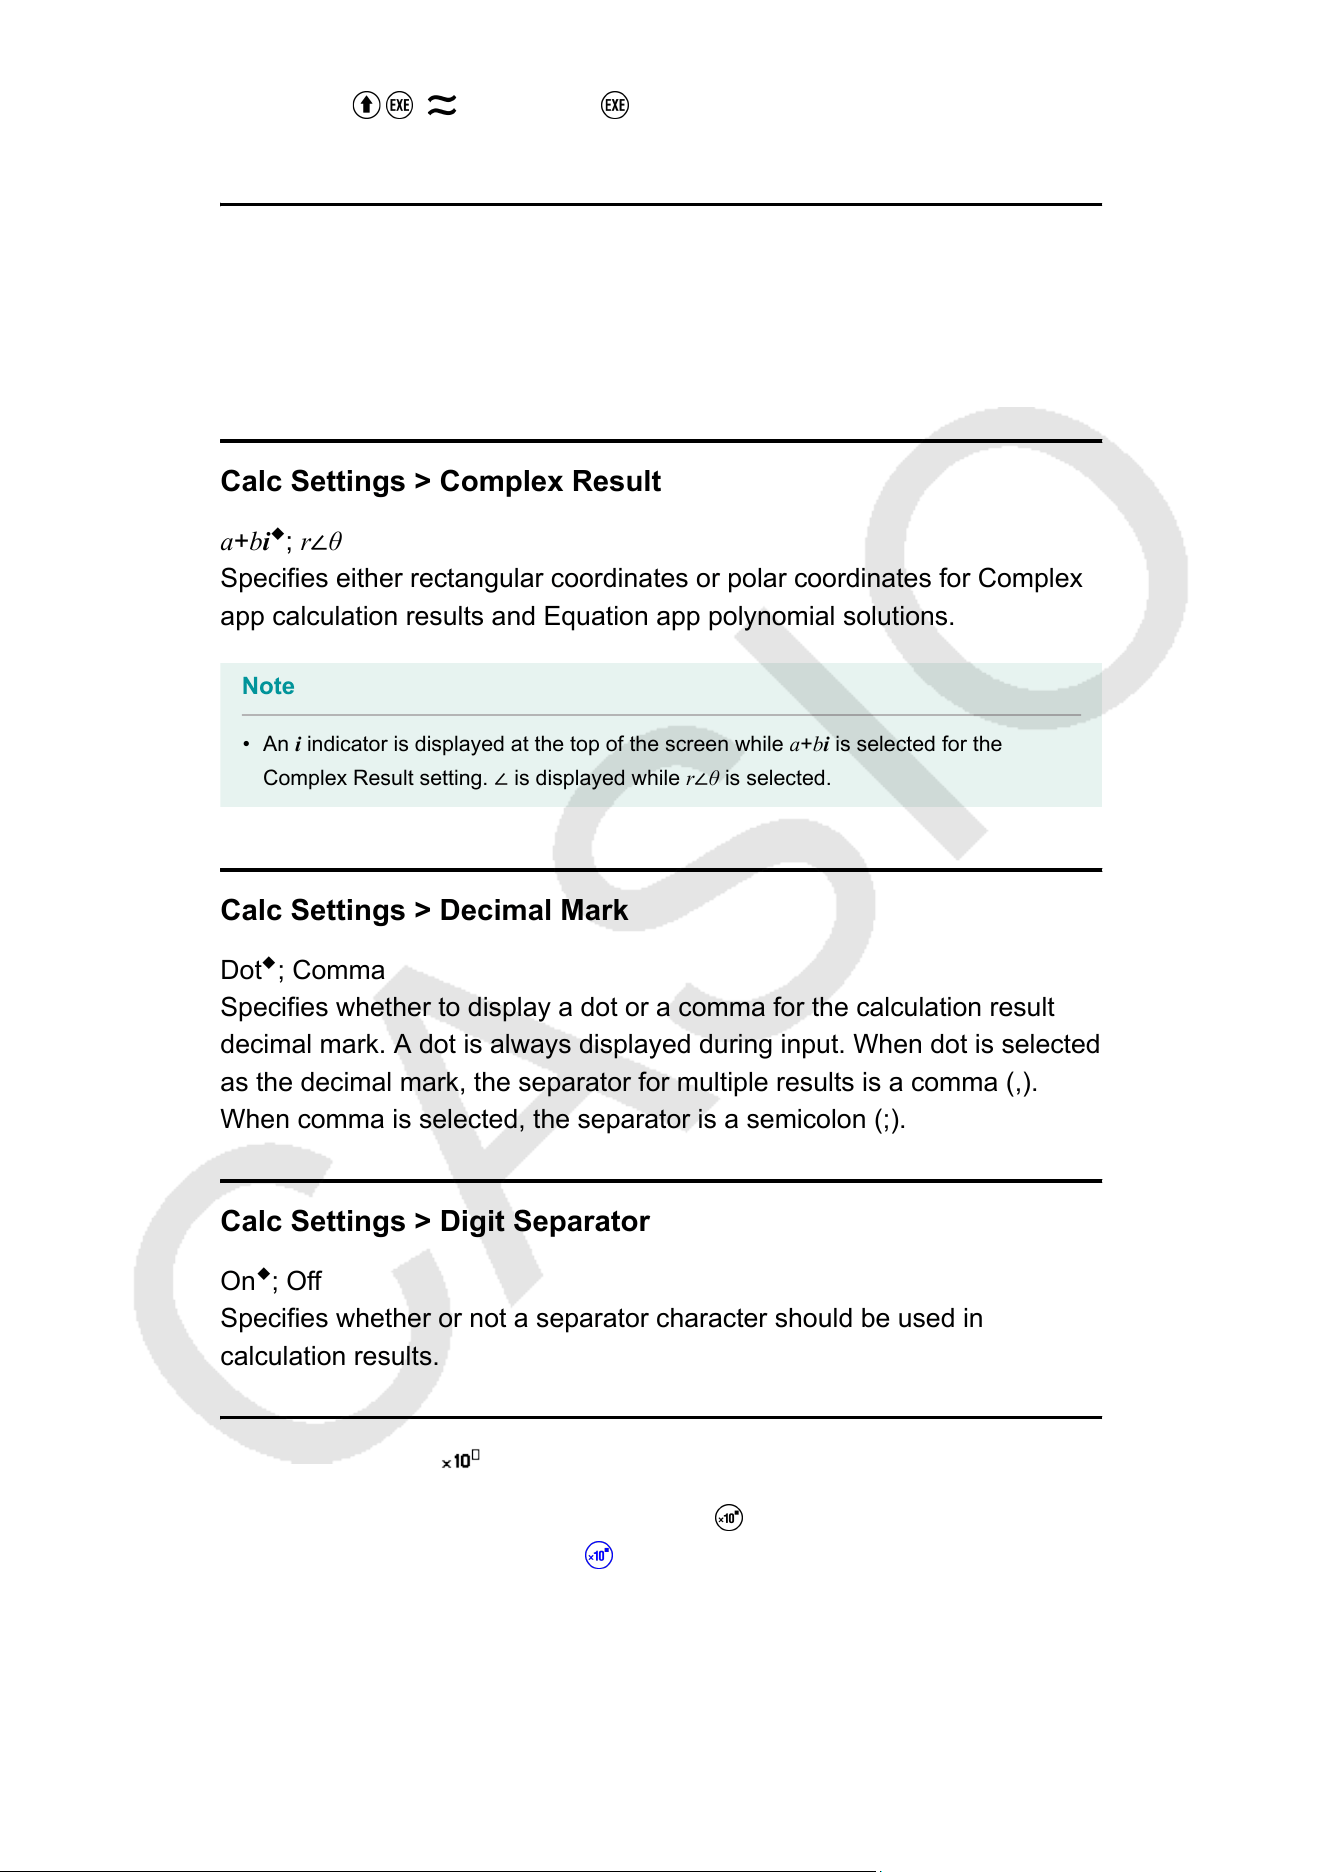
Calc Settings > Complex Result
a+bi
◆
; r∠θ
Specifies either rectangular coordinates or polar coordinates for Complex
app calculation results and Equation app polynomial solutions.
Note
• An i
indicator is displayed at the top of the screen while a+bi is selected for the
Complex Result setting. ∠ is displayed while r∠θ is selected.
Calc Settings > Decimal Mark
Dot
◆
; Comma
Specifies whether to display a dot or a comma for the calculation result
decimal mark. A dot is always displayed during input. When dot is selected
as the decimal mark, the separator for multiple results is a comma (,).
When comma is selected, the separator is a semicolon (;).
Calc Settings > Digit Separator
On
◆
; Off
Specifies whether or not a separator character should be used in
calculation results.
Calc Settings >
Key
This setting specifies the operation of the key. For more information
and example operations, see " Key (Power of 10)" (page 39).
27
(Power)
Pressing produces the same input
result as pressing .
(Sci Notat)
◆
Pressing
inputs the function . This
function takes arguments before and after
it with the form a
n
(n is an integer) and
returns the result of 10
n
multiplied by a.
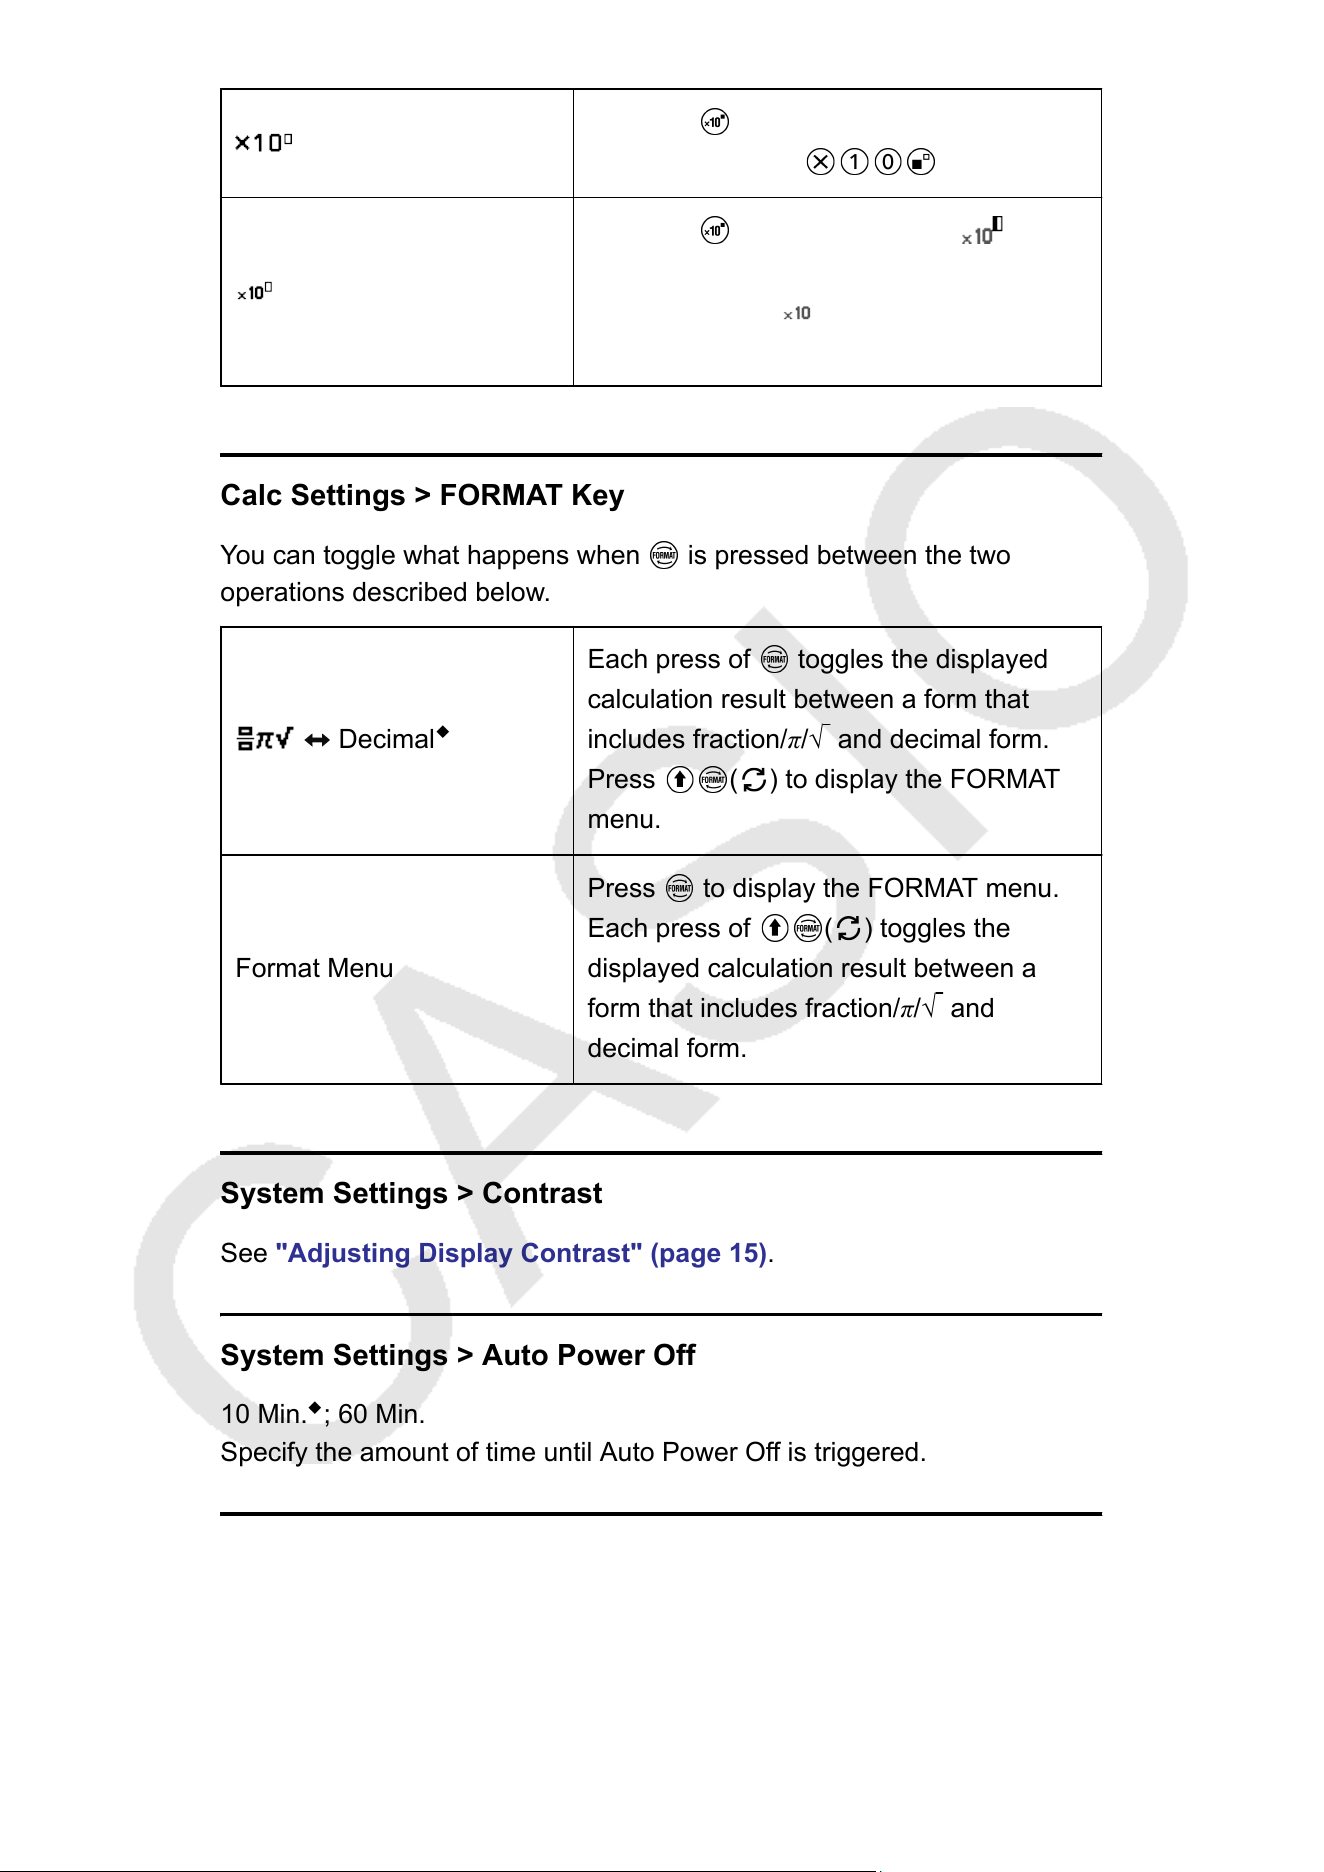
Calc Settings > FORMAT Key
Y
ou can toggle what happens when
is pressed between the two
operations described below
.
Decimal
◆
Each press of toggles the displayed
calculation result between a form that
includes fraction/π/√ and decimal form.
Press ( ) to display the FORMAT
menu.
Format Menu
Press to display the FORMAT menu.
Each press of ( ) toggles the
displayed calculation result between a
form that includes fraction/π/√ and
decimal form.
System Settings > Contrast
See "Adjusting Display Contrast"
(page 15).
System Settings > Auto Power Off
10 Min.
◆
; 60 Min.
Specify the amount of time until Auto Power Of
f is triggered.
System Settings > MultiLine Font
Normal Font
◆
; Small Font
28
Specifies the display font size when LineI/LineO or LineI/DecimalO is
selected for Input/Output. Up to four lines can be displayed while Normal
Font is selected, and up to six lines can be displayed with Small Font.
System Settings > Show Option Num
On
◆
; Off
Specifies whether to show Option Numbers (numbers and symbols to
the left of menu items) on menus and dialogs. For details about Option
Numbers, see "Selecting a Menu Item"
(page 17).
System Settings > QR Code
Specifies the version of the QR Code displayed when
(QR) is
pressed.
V
ersion 3: Indicates QR Code Version 3.
Version 11
◆
: Indicates QR Code Version 11.
Reset > Settings & Data
See "To initialize calculator settings" (page 29).
Reset > Variable Memory
See "Clearing the Contents of All Memories" (page 45).
Reset > Initialize All
See "Initializing the Calculator" (page 8).
Get Started
See "Calculator "Get Started" Screen" (page 8).
To initialize calculator settings
Important!
• The procedure below initializes all calculator settings, except for Contrast and Auto
Power Of
f. Also clears all data except for variable memory and Ans data.
1. Press
, select a calculator app icon, and then press .
29
2. Press , and then select [Reset] > [Settings & Data] > [Yes].
• This displays the HOME screen.
Using the CA
TALOG Menu and
CATALOG List
CATALOG Menu
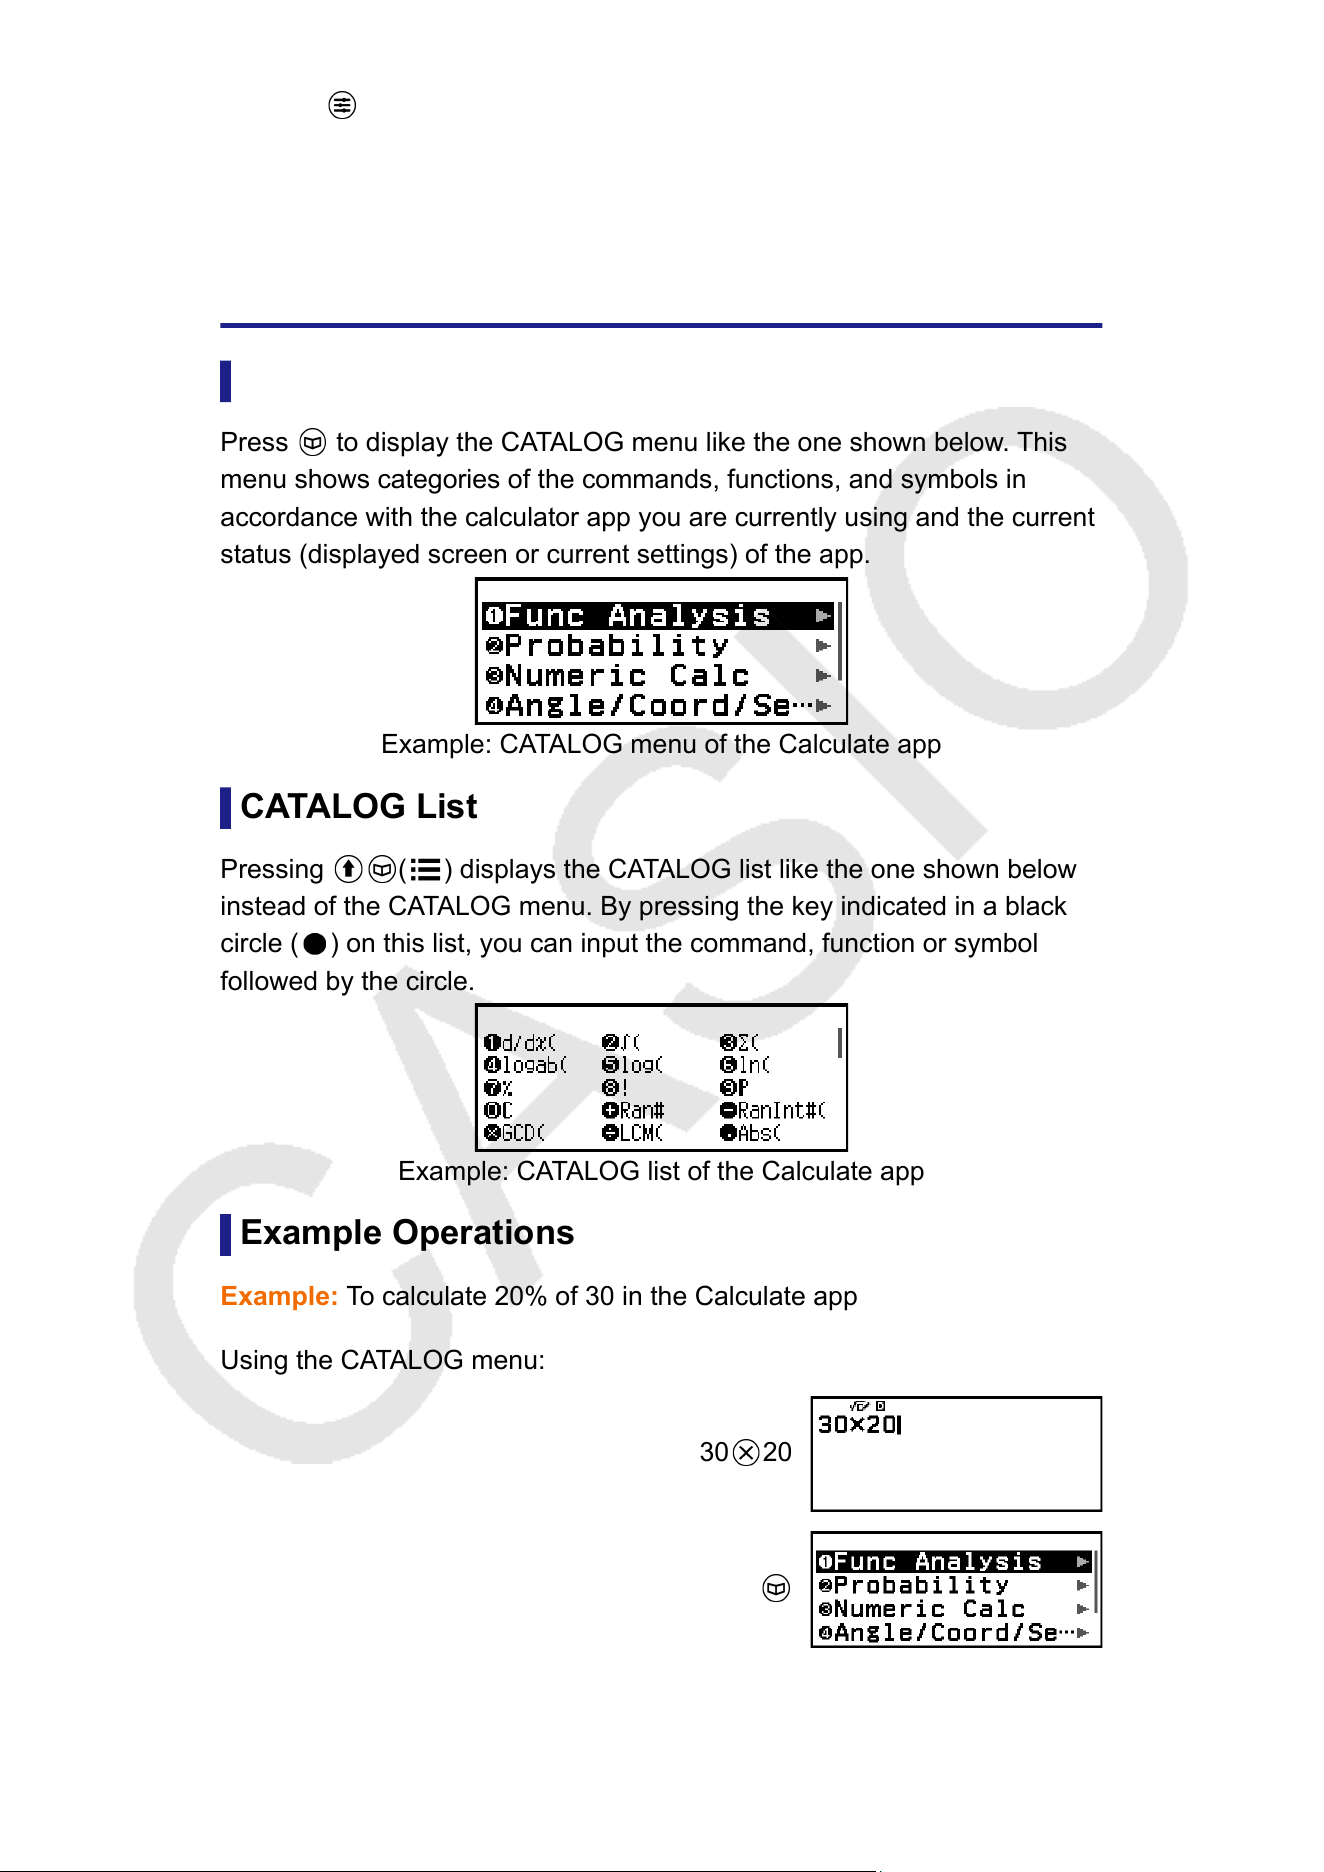
Press
to display the CATALOG menu like the one shown below. This
menu shows categories of the commands, functions, and symbols in
accordance with the calculator app you are currently using and the current
status (displayed screen or current settings) of the app.
Example: CATALOG menu of the Calculate app
CATALOG List
Pressing ( ) displays the CATALOG list like the one shown below
instead of the CA
TALOG menu. By pressing the key indicated in a black
circle (
) on this list, you can input the command, function or symbol
followed by the circle.
Example: CATALOG list of the Calculate app
Example Operations
Example: T
o calculate 20% of 30 in the Calculate app
Using the CATALOG menu:
30
20
30
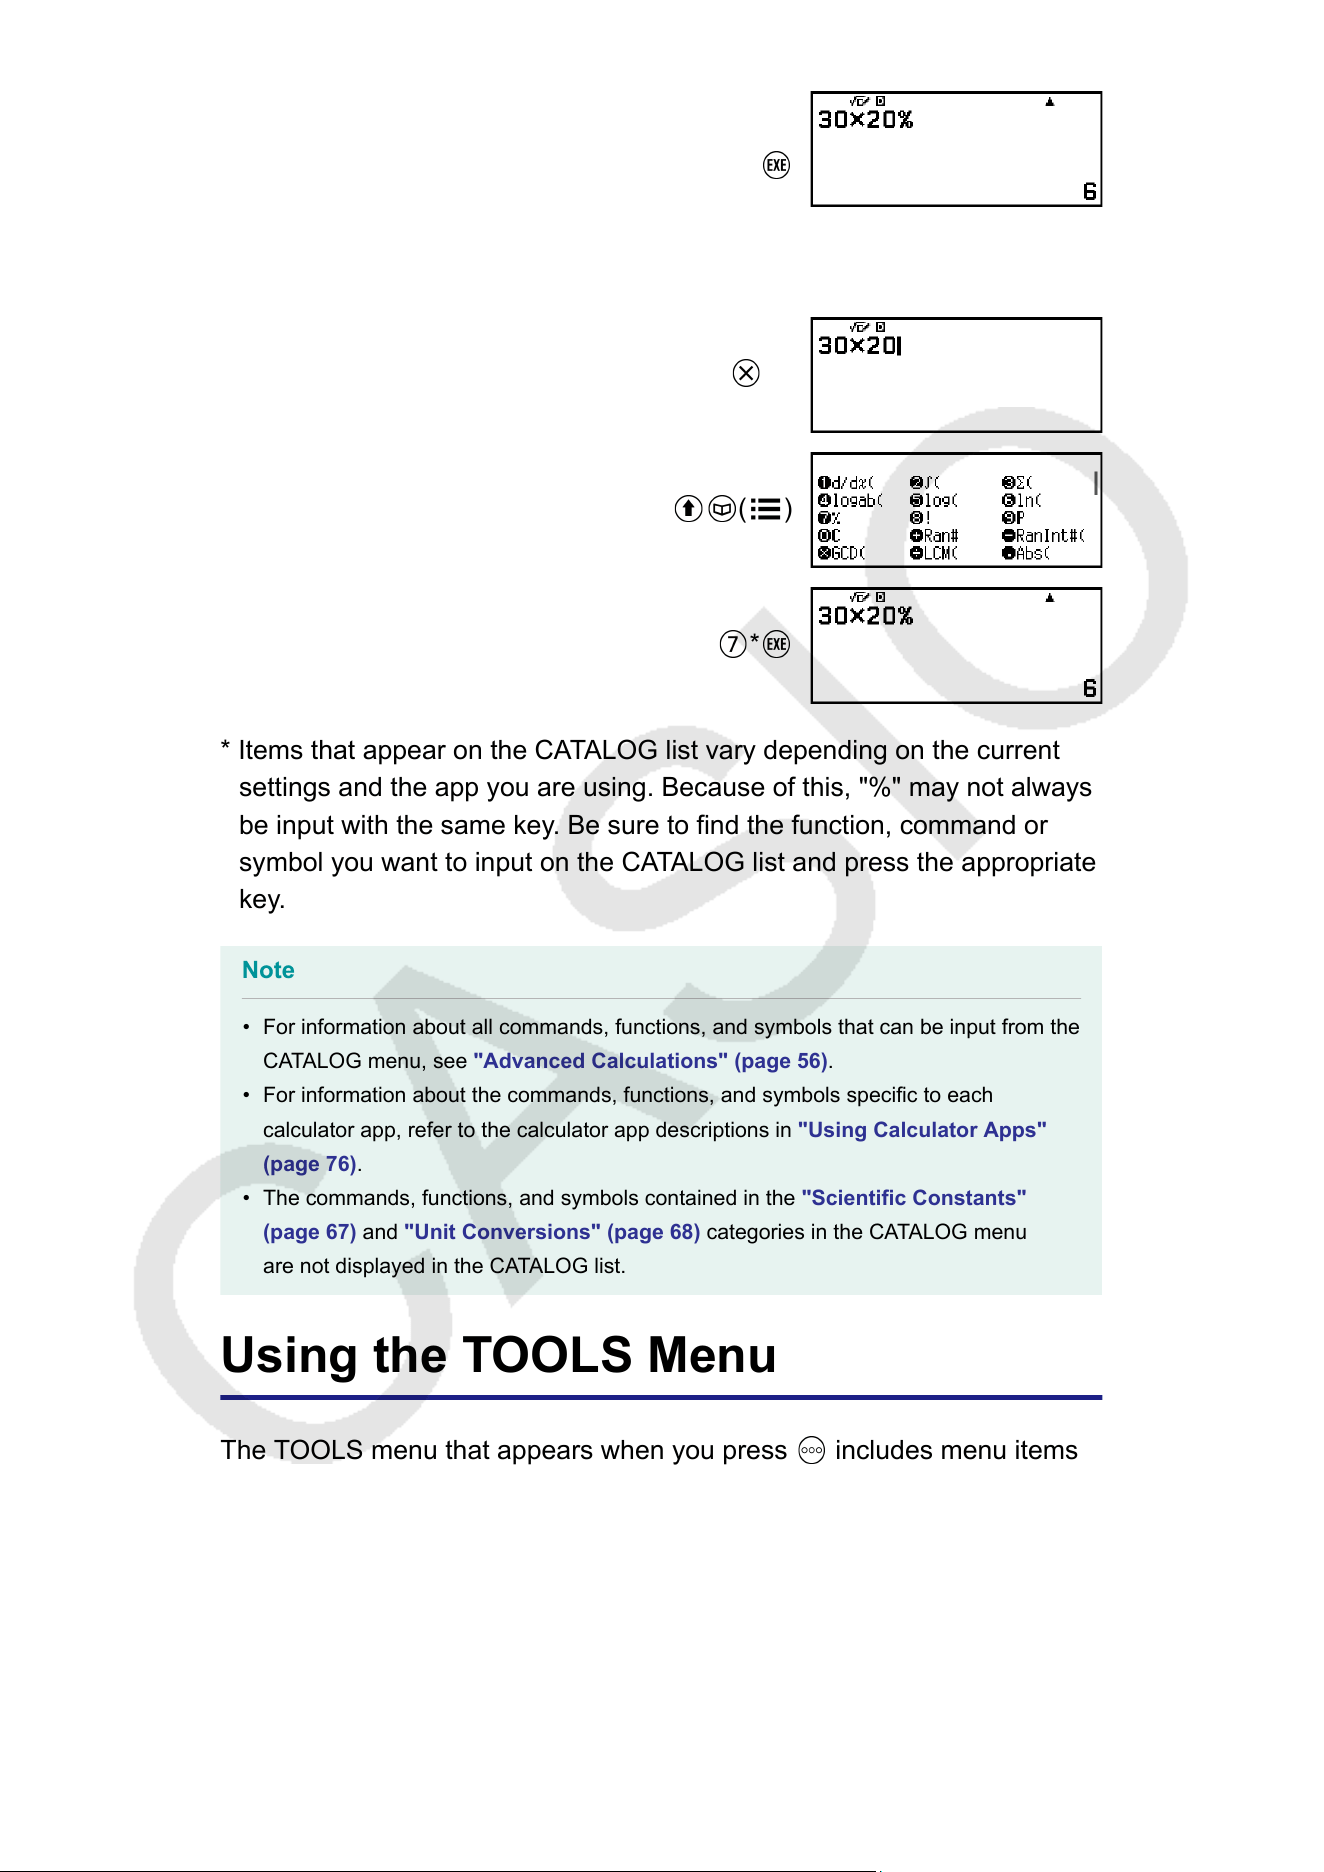
[Probability] > [%]
Using the CATALOG list:
30 20
( )
*
* Items that appear on the CATALOG list vary depending on the current
settings and the app you are using. Because of this, "%" may not always
be input with the same key
. Be sure to find the function, command or
symbol you want to input on the CATALOG list and press the appropriate
key.
Note
• For information about all commands, functions, and symbols that can be input from the
CA
TALOG menu, see "Advanced Calculations" (page 56).
• For information about the commands, functions, and symbols specific to each
calculator app, refer to the calculator app descriptions in "Using Calculator Apps"
(page 76).
• The commands, functions, and symbols contained in the "Scientific Constants"
(page 67) and "Unit Conversions" (page 68) categories in the CA
TALOG menu
are not displayed in the CATALOG list.
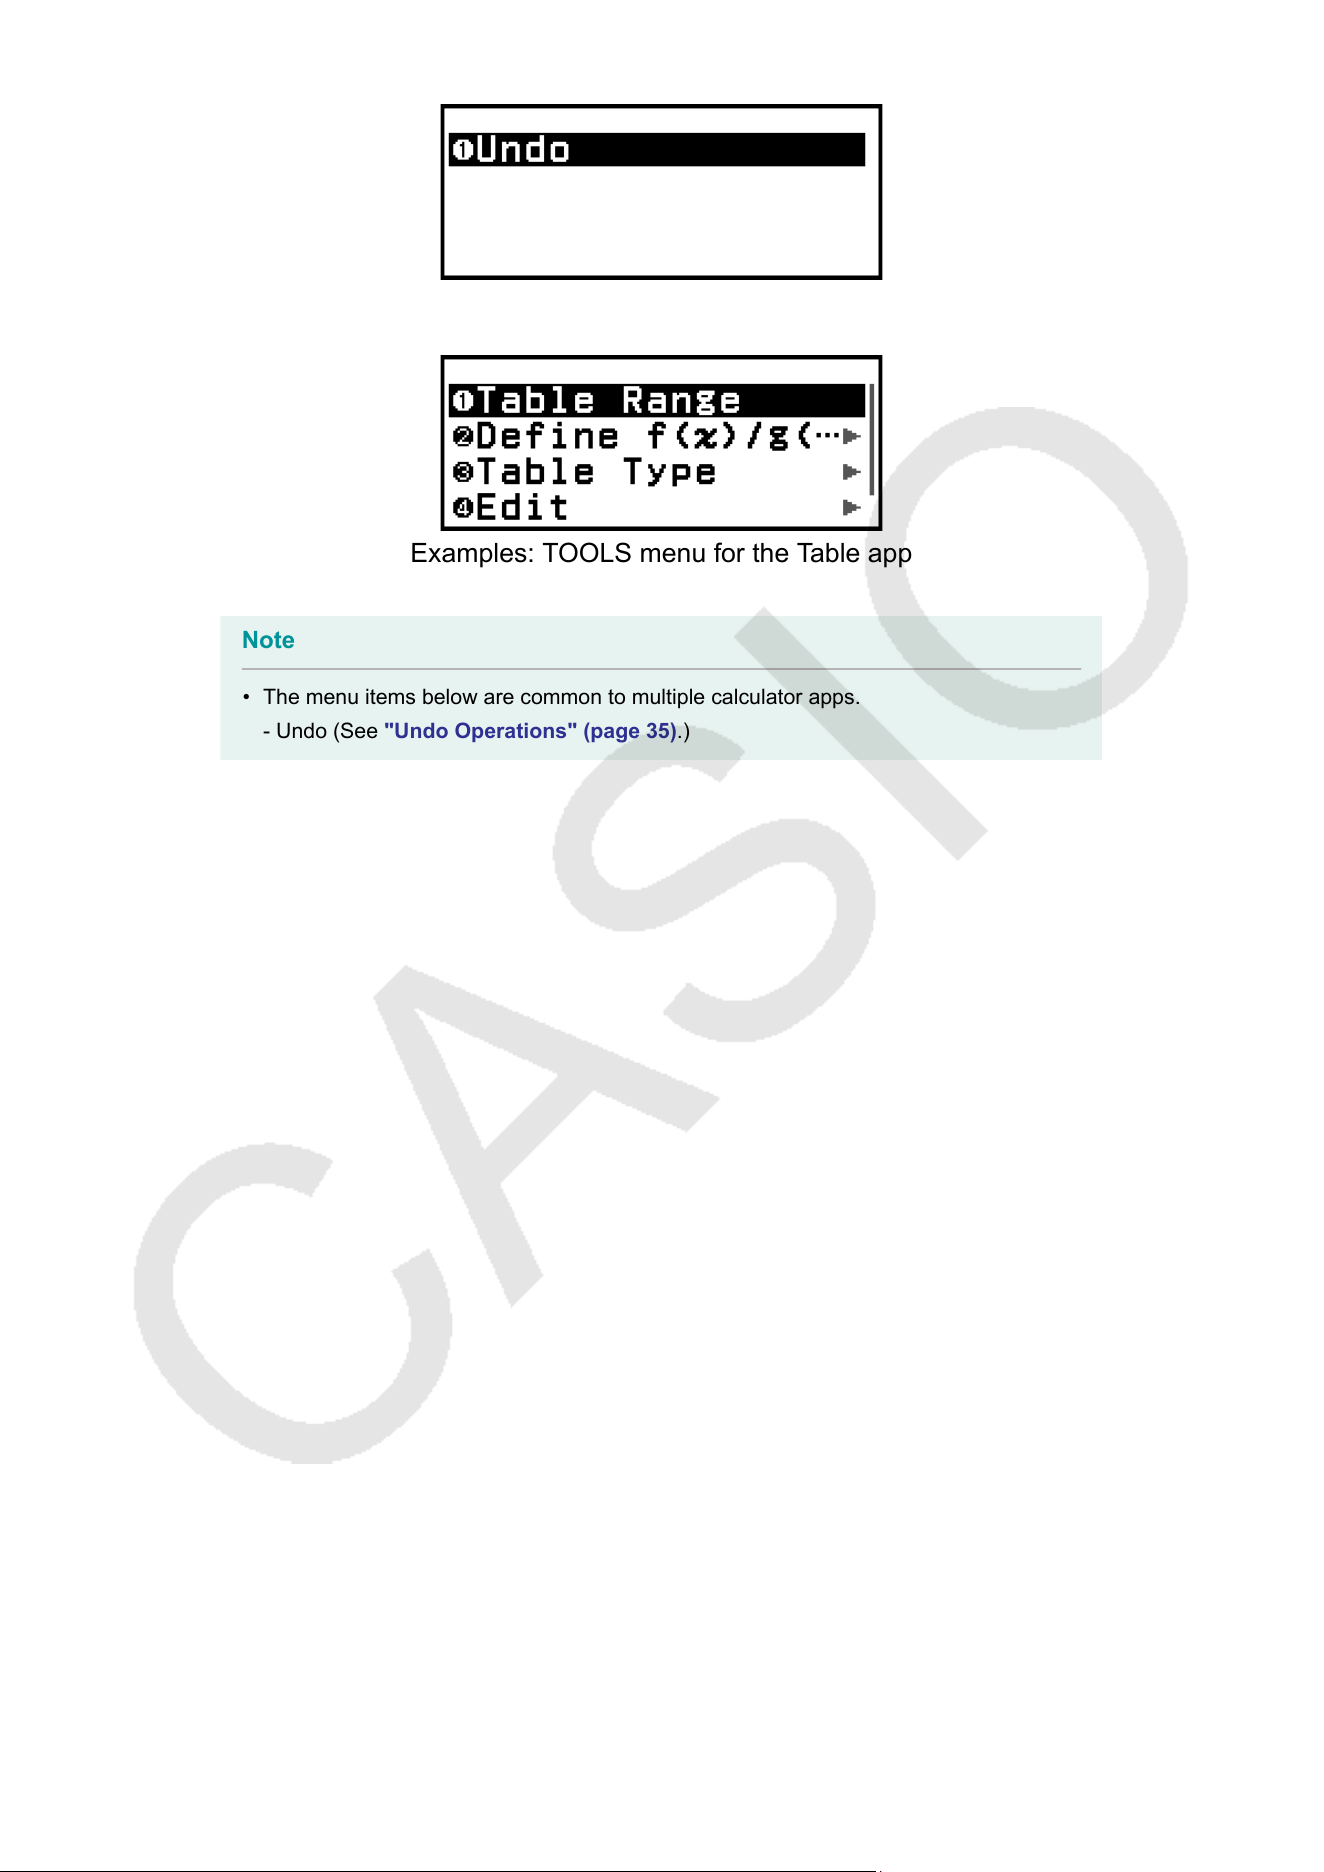
Using the TOOLS Menu
The TOOLS menu that appears when you press
includes menu items
for performing functions specific to each calculator app and for configuring
settings.
31
Inputting Expressions and
V
alues
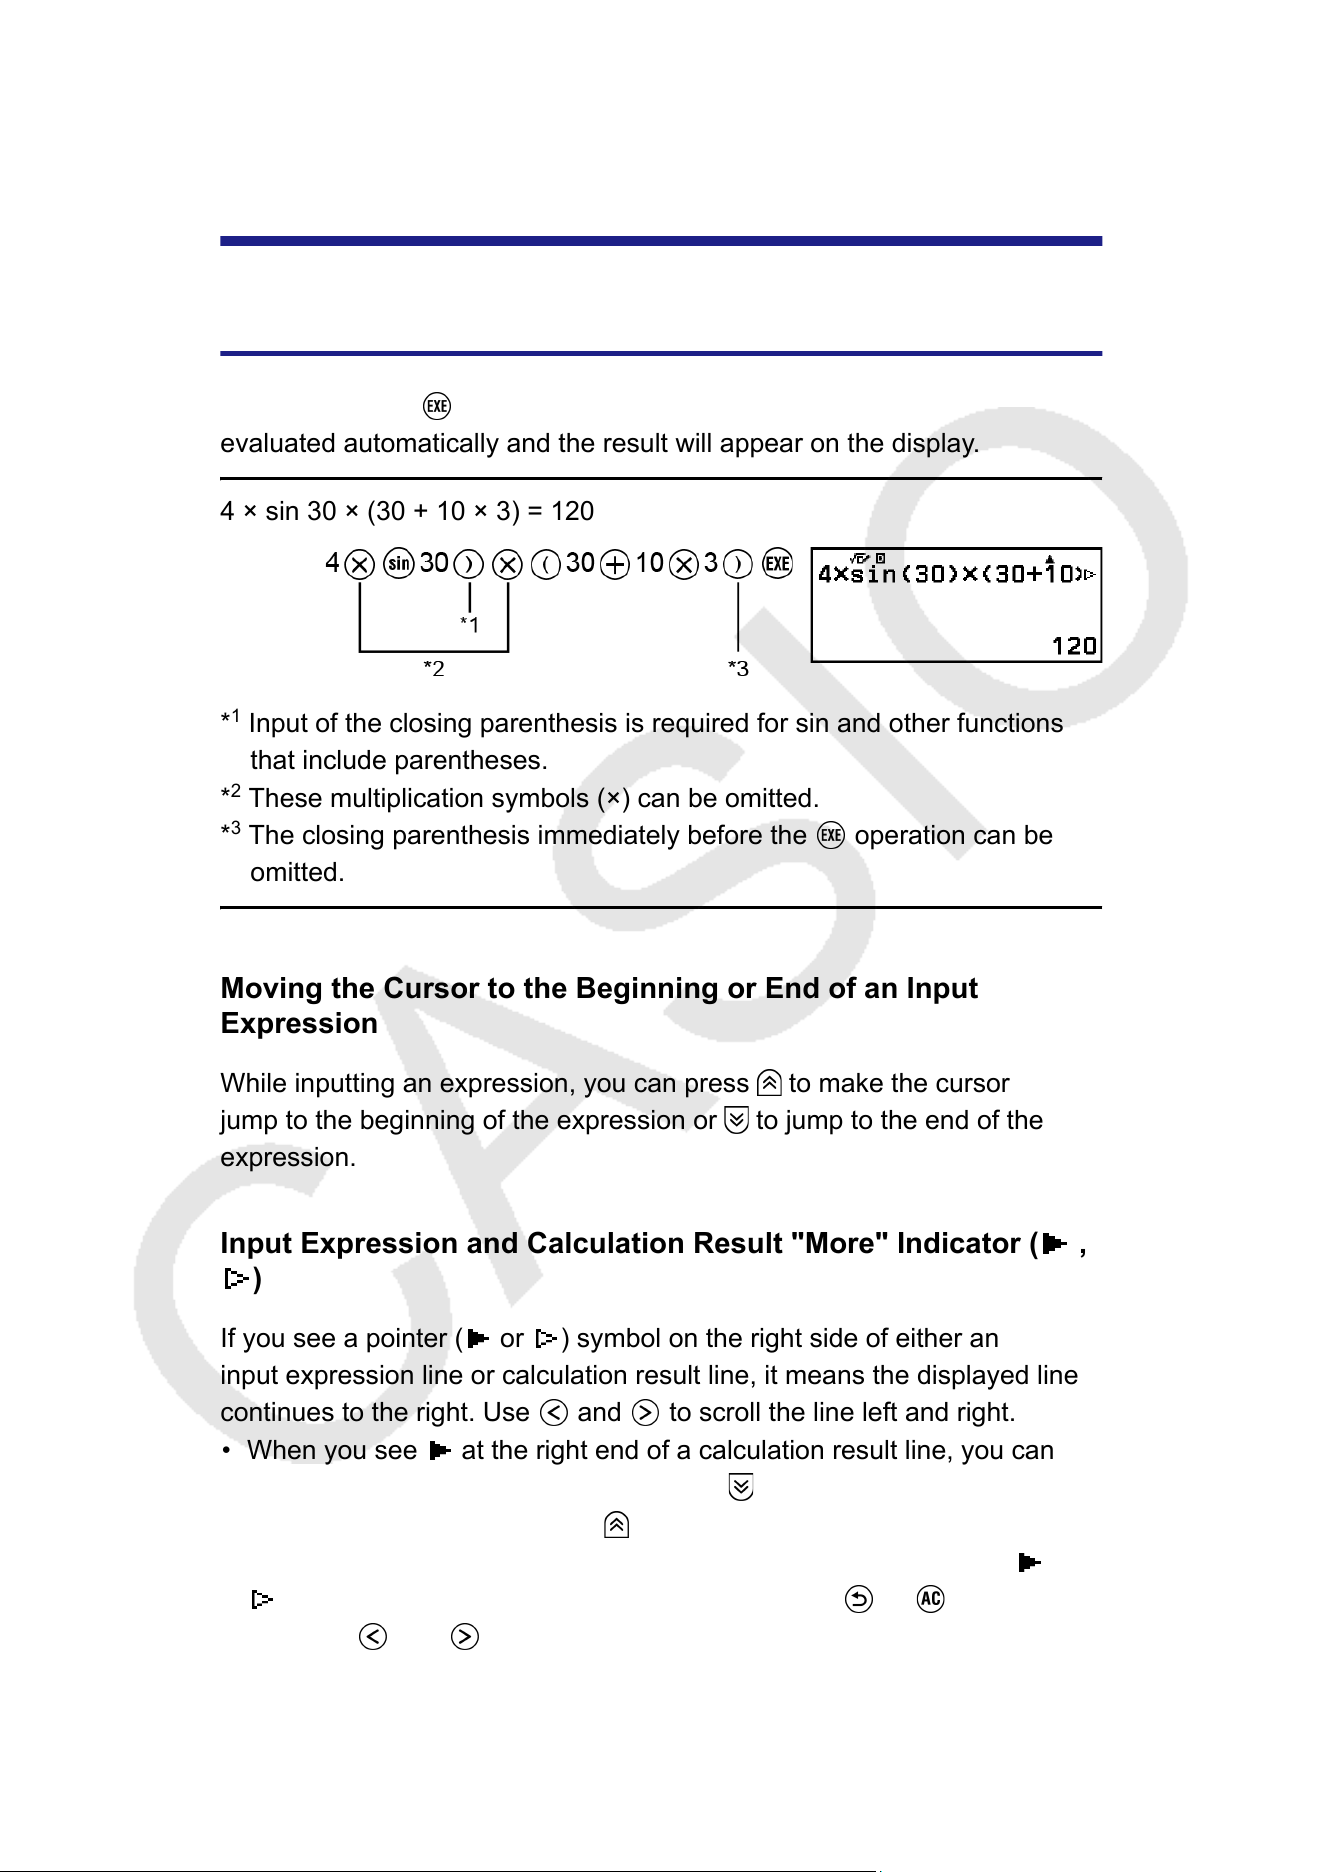
Basic Input Rules
When you press
the priority sequence of the input calculation will be
evaluated automatically and the result will appear on the display
.
4 × sin 30 × (30 + 10 × 3) = 120
*
1
Input of the closing parenthesis is required for sin and other functions
that include parentheses.
*
2
These multiplication symbols (×) can be omitted.
*
3
The closing parenthesis immediately before the operation can be
omitted.
Moving the Cursor to the Beginning or End of an Input
Expression
While inputting an expression, you can press to make the cursor
jump to the beginning of the expression or to jump to the end of the
expression.
Input Expression and Calculation Result "More" Indicator ( ,
)
If you see a pointer ( or ) symbol on the right side of either an
input expression line or calculation result line, it means the displayed line
continues to the right. Use and to scroll the line left and right.
• When you see at the right end of a calculation result line, you can
jump to the end of the result by pressing . To jump to the beginning of
a calculation result line, press .
• Note that if you want to scroll the input expression while both the and
indicators are displayed, you will need to press or first and
then use and to scroll.
33
Parentheses Auto Complete
If you execute a calculation that includes both division and multiplication
operations in which a multiplication sign has been omitted, parentheses
will be inserted automatically as shown in the examples below.
- When a multiplication sign is omitted immediately before an open
parenthesis or after a closing parenthesis.
Example: 6 ÷ 2(1 + 2) → 6 ÷ (2(1 + 2))
- When a multiplication sign is omitted immediately before a variable, a
constant, etc.
Example: 6 ÷ 2π → 6 ÷ (2π)
Input Limit Indication
The cursor will change shape to
when there are 10 bytes or less of
allowed input remaining. If this happens, end calculation input and then
press .
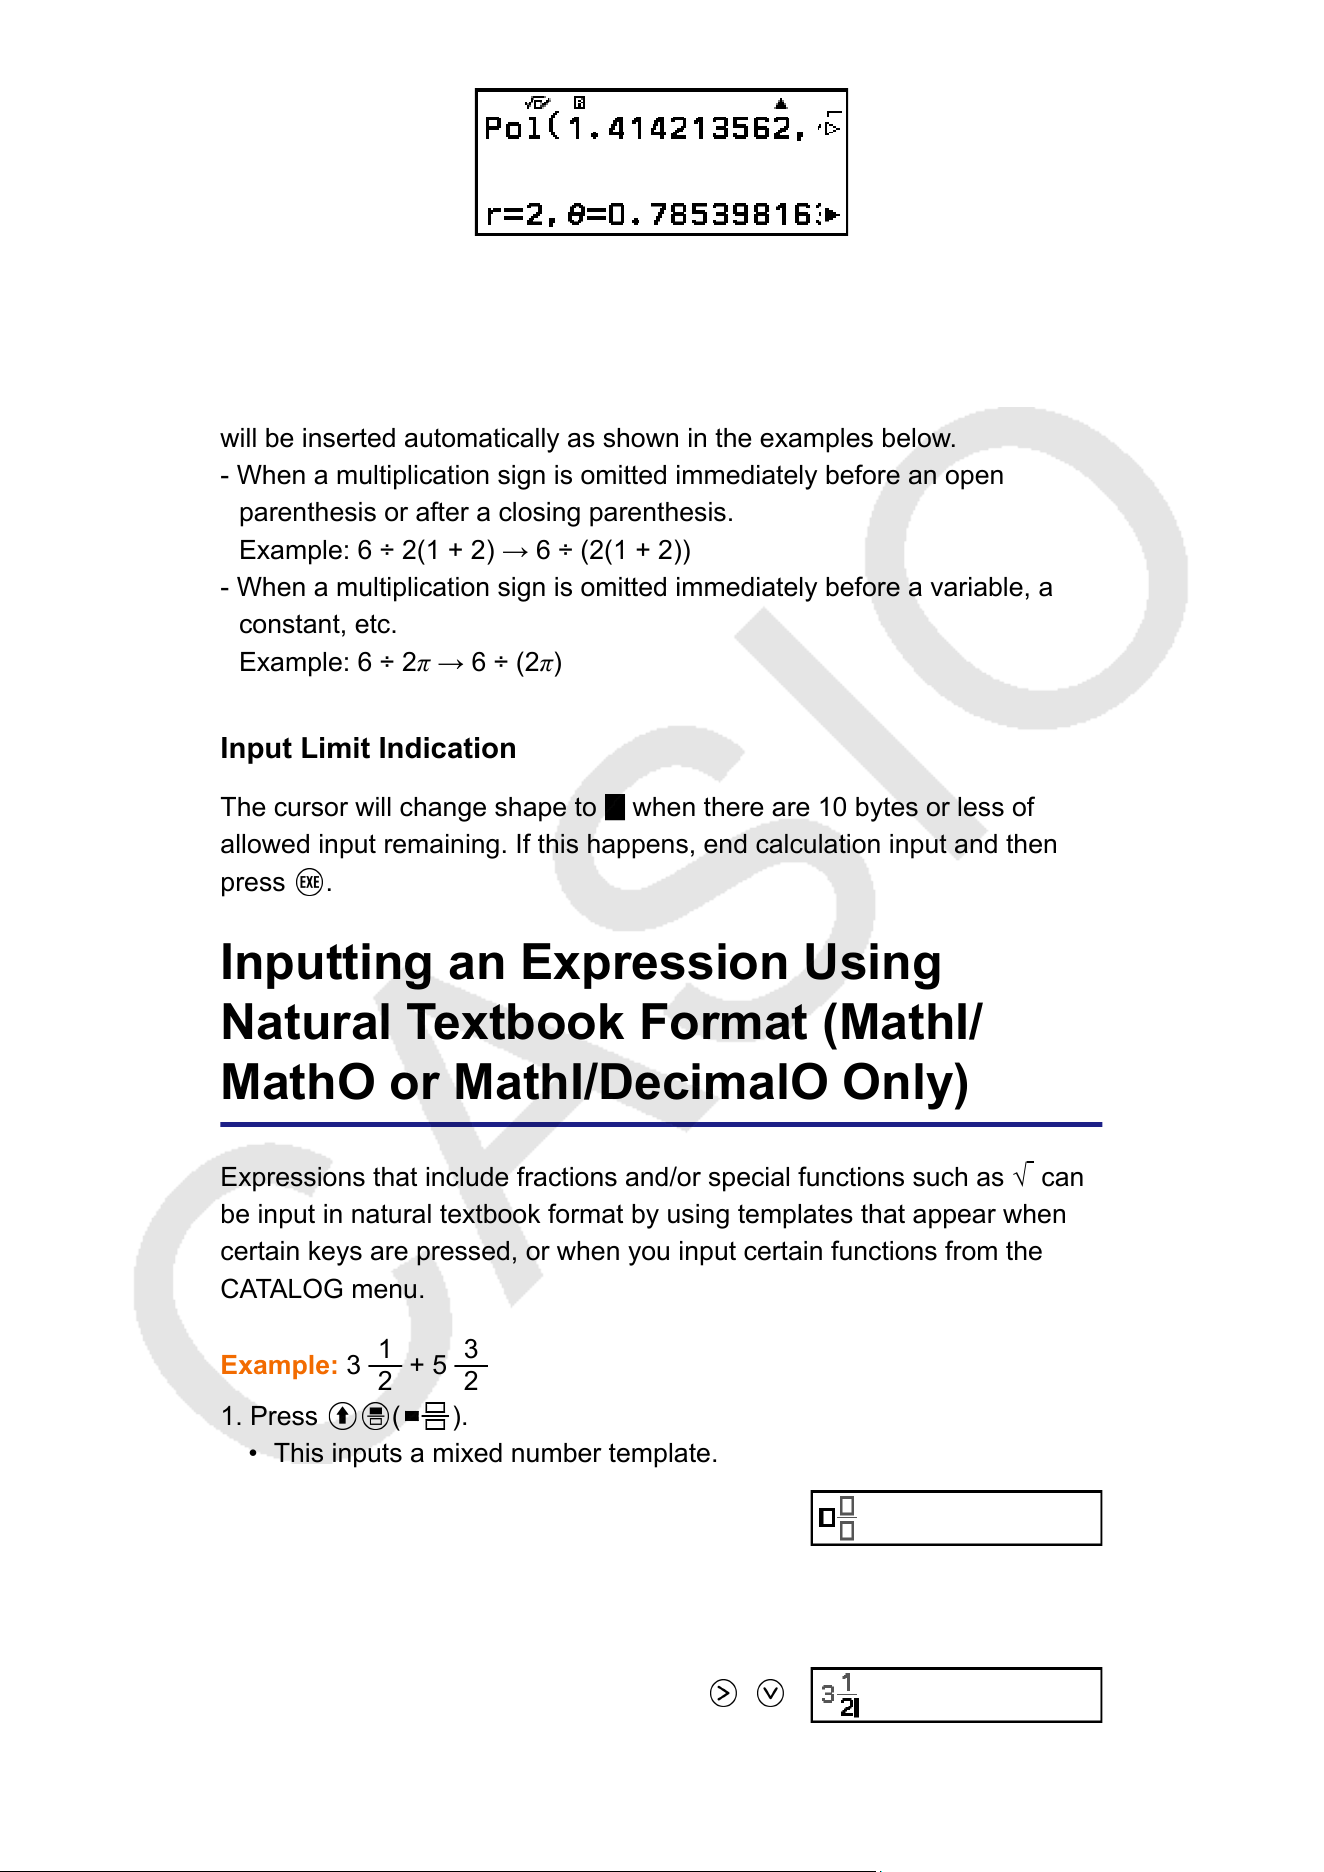
Inputting an Expression Using
Natural Textbook Format (MathI/
MathO or MathI/DecimalO Only)
Expressions that include fractions and/or special functions such as √ can
be input in natural textbook format by using templates that appear when
certain keys are pressed, or when you input certain functions from the
CATALOG menu.
Example: 3
1
2
+ 5
3
2
1. Press ( ).
• This inputs a mixed number template.
2. Input values into the integer, numerator, and denominator areas of the
template.
3 1 2
34
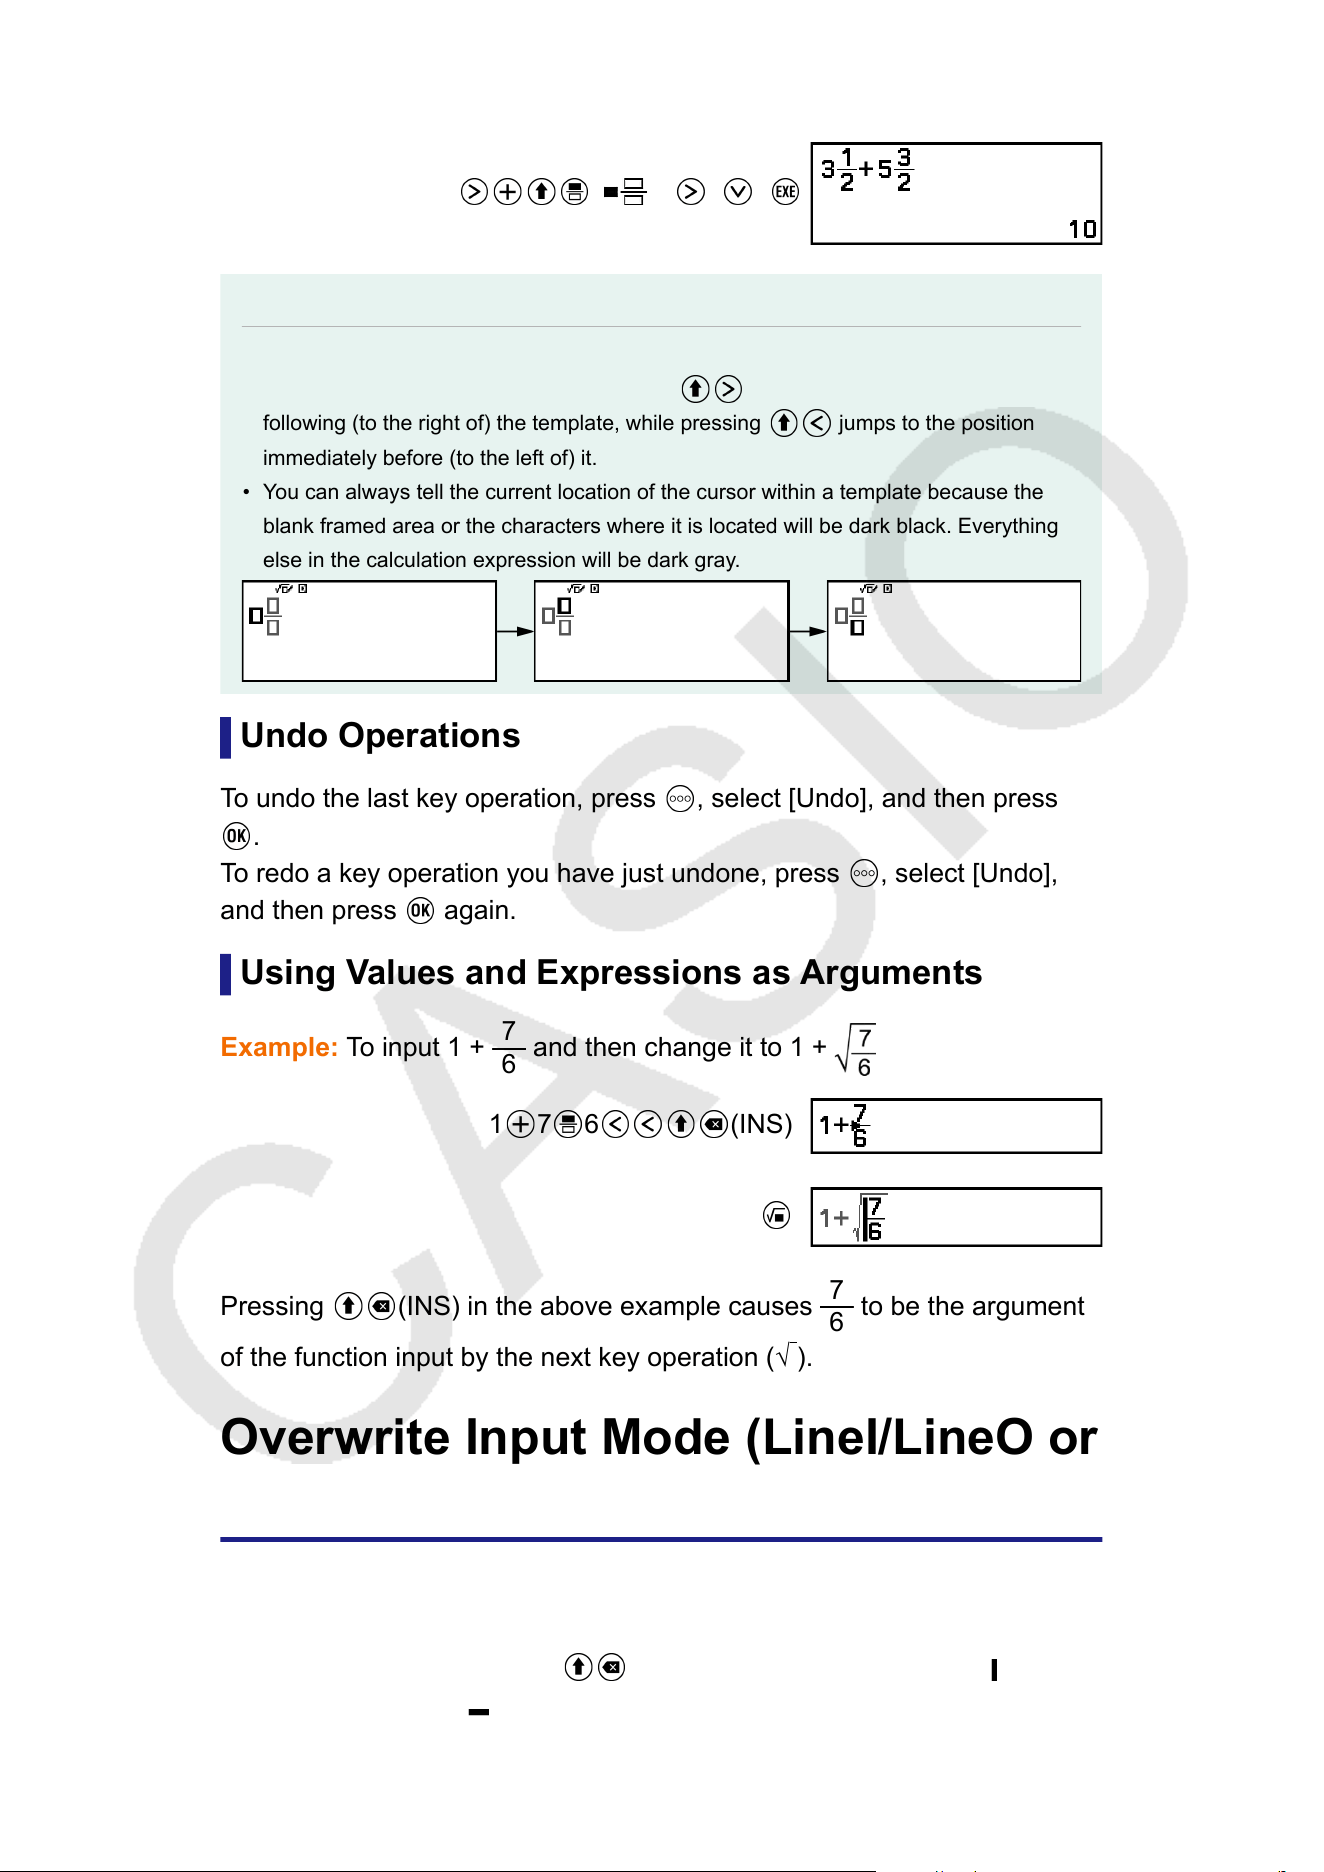
3. Do the same to input the remainder of the expression.
( )5 3 2
Note
• While the input cursor is located within the input area of a template (mixed numbers,
integration (
∫) and summation (Σ)), pressing
jumps to the position immediately
following (to the right of) the template, while pressing
jumps to the position
immediately before (to the left of) it.
• You can always tell the current location of the cursor within a template because the
blank framed area or the characters where it is located will be dark black. Everything
else in the calculation expression will be dark gray
.
Undo Operations
To undo the last key operation, press , select [Undo], and then press
.
T
o redo a key operation you have just undone, press
, select [Undo],
and then press again.
Using V
alues and Expressions as Arguments
Example: To input 1 +
7
6
and then change it to 1 +
1 7 6 (INS)
Pressing (INS) in the above example causes
7
6
to be the argument
of the function input by the next key operation (
√
).
Overwrite Input Mode (LineI/LineO or
LineI/DecimalO Only)
In the overwrite mode, text you input replaces the text at the current
cursor location. Y
ou can toggle between the insert and overwrite modes
by performing the operation:
(INS). The cursor appears as " " in the
insert mode and as " " in the overwrite mode.
35
Basic Calculations
Arithmetic Calculations
Use the , , , and keys to perform arithmetic calculations.
Example: 7 × 8 −
4 × 5 = 36
7
8 4 5
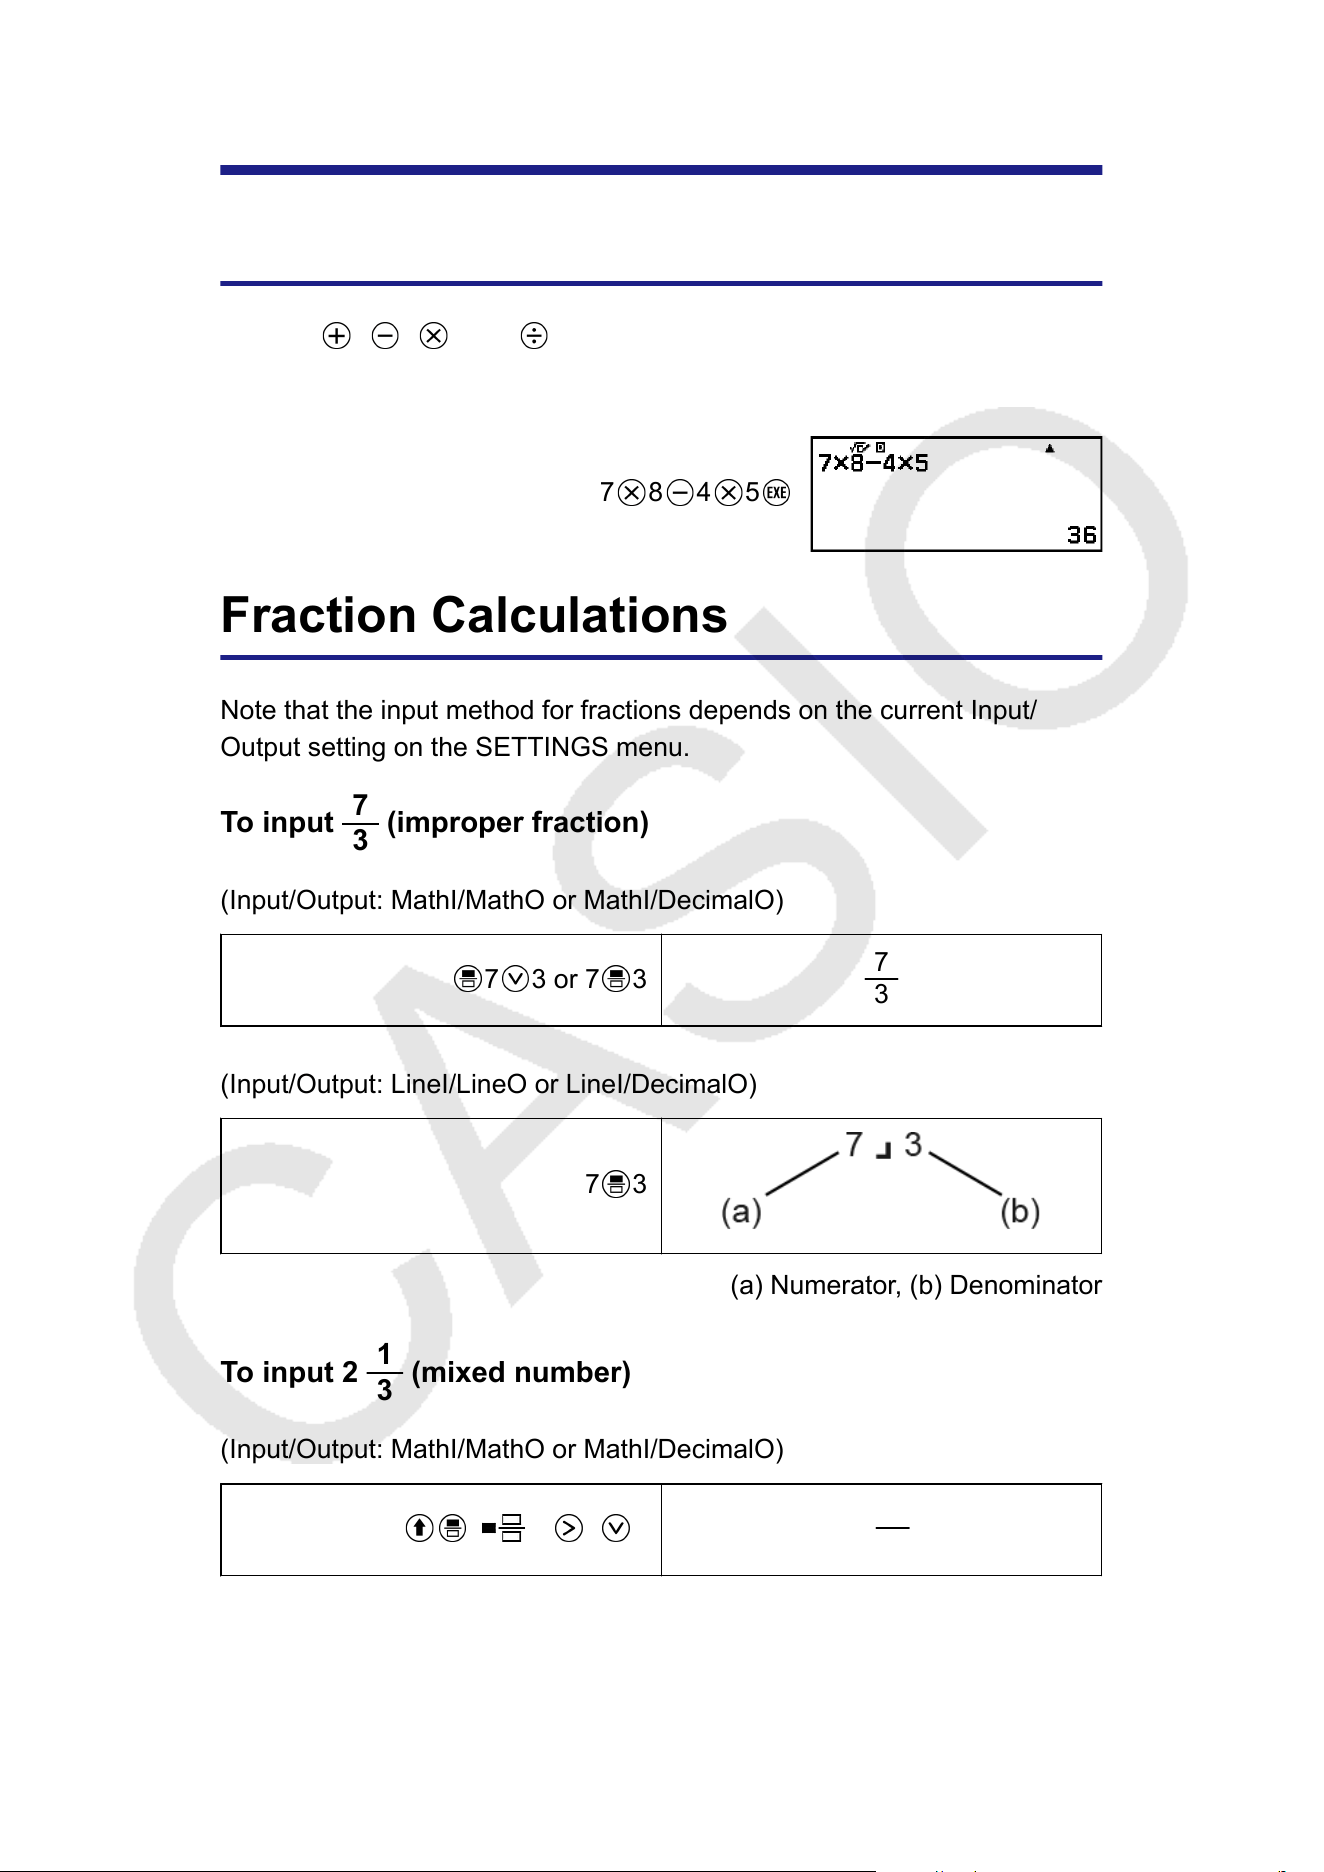
Fraction Calculations
Note that the input method for fractions depends on the current Input/
Output setting on the SETTINGS menu.
T
o input
7
3
(improper fraction)
(Input/Output: MathI/MathO or MathI/DecimalO)
7 3 or 7 3
7
3
(Input/Output: LineI/LineO or LineI/DecimalO)
7 3
(a) Numerator, (b) Denominator
To input 2
1
3
(mixed number)
(Input/Output: MathI/MathO or MathI/DecimalO)
( )2 1 3
2
1
3
(Input/Output: LineI/LineO or LineI/DecimalO)
36
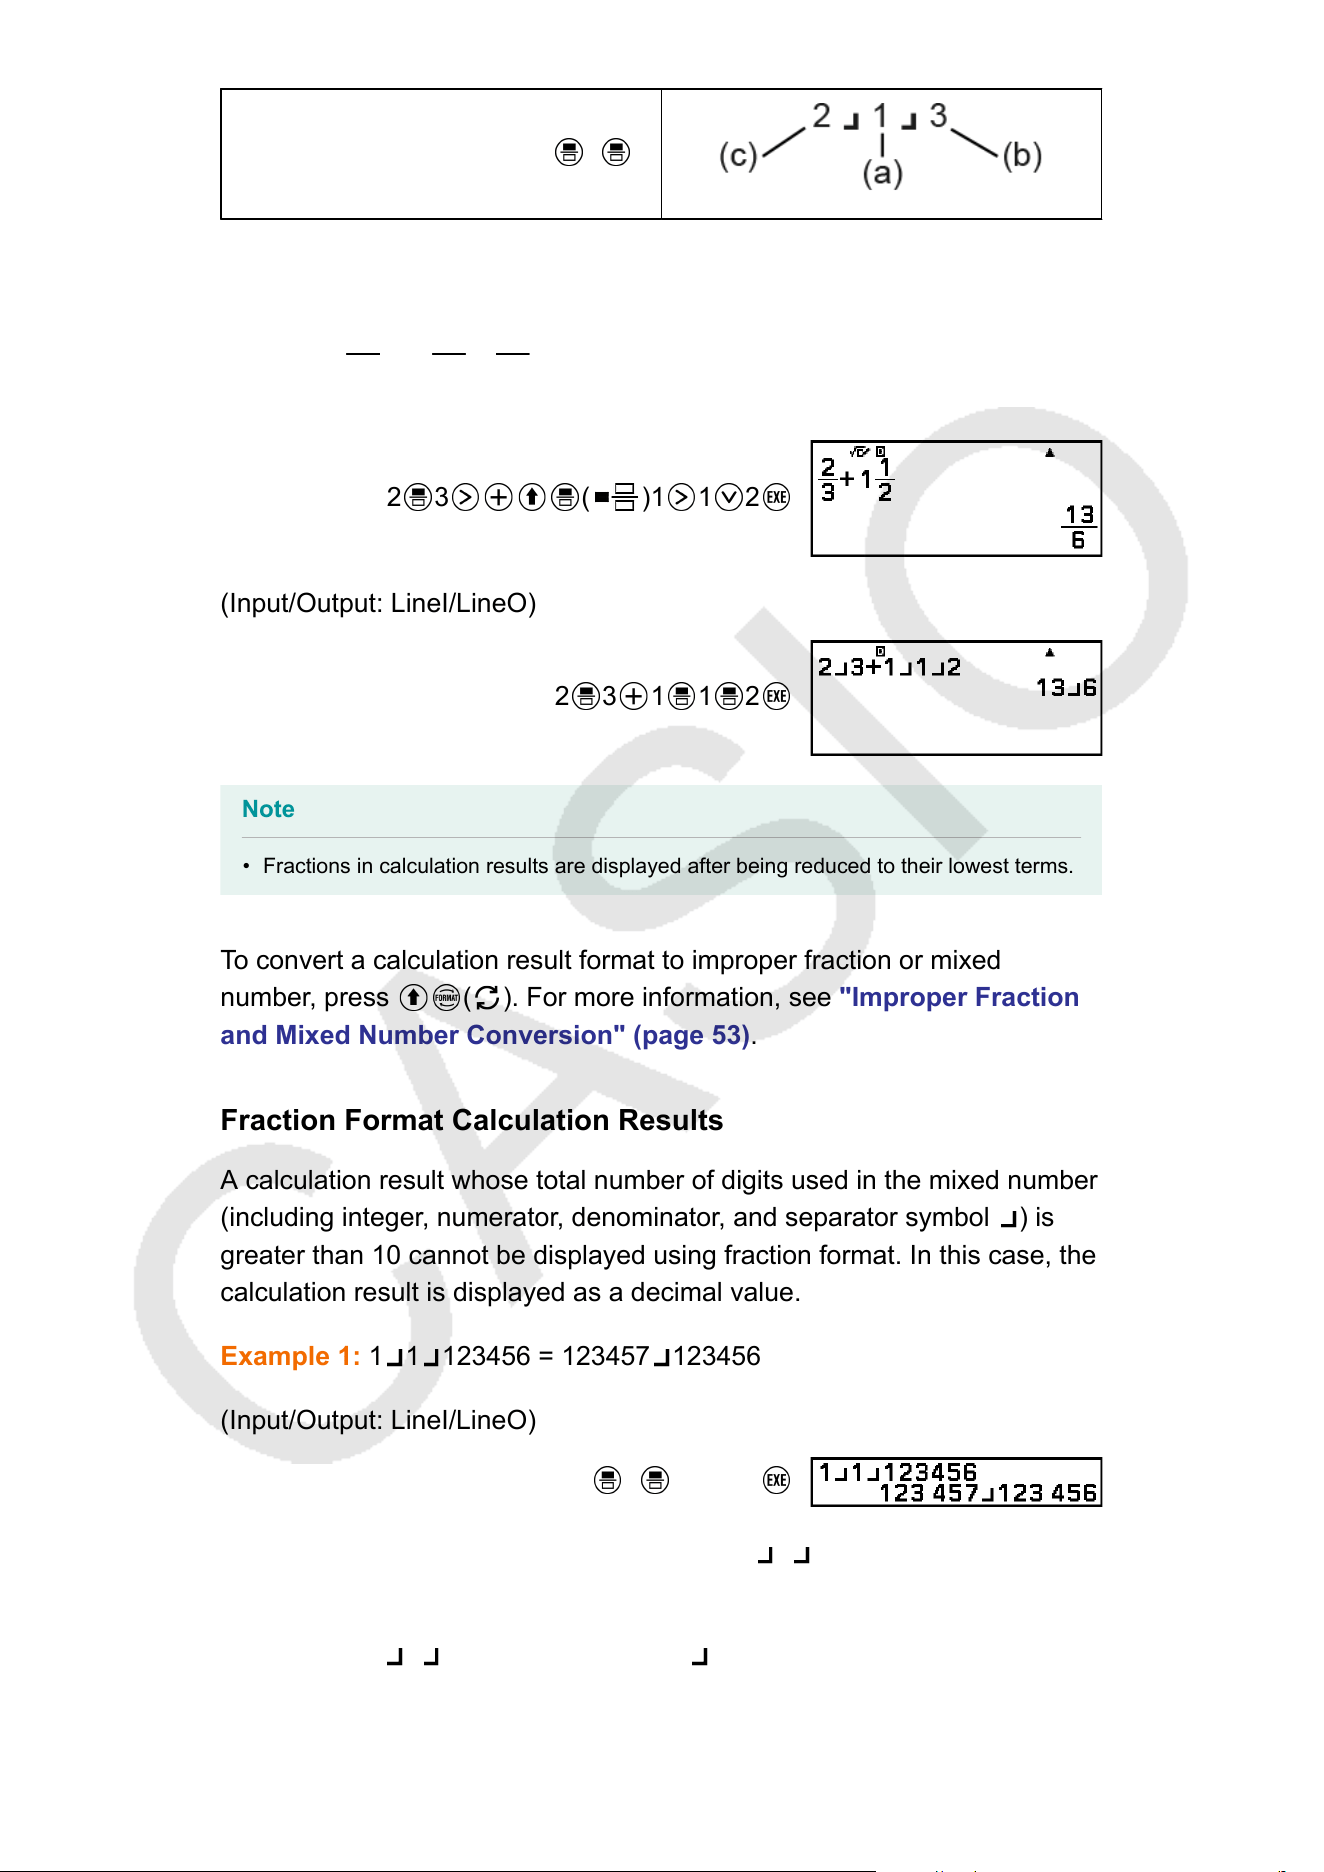
2 1 3
(a) Numerator, (b) Denominator, (c) Integer Part
Example:
2
3
+ 1
1
2
=
13
6
(Input/Output: MathI/MathO)
2 3 ( )1 1 2
(Input/Output: LineI/LineO)
2 3 1 1 2
Note
• Fractions in calculation results are displayed after being reduced to their lowest terms.
T
o convert a calculation result format to improper fraction or mixed
number, press
( ). For more information, see "Improper Fraction
and Mixed Number Conversion"
(page 53).
Fraction Format Calculation Results
A calculation result whose total number of digits used in the mixed number
(including integer, numerator, denominator, and separator symbol
) is
greater than 10 cannot be displayed using fraction format. In this case, the
calculation result is displayed as a decimal value.
Example 1:
1
1 123456 = 123457 123456
(Input/Output: LineI/LineO)
1 1 123456
Since the total number of digits of the value 1 1 123456 is 10, the result
is displayed as a fraction value.
Example 2:
1
1 1234567 (= 1234568 1234567) = 1.00000081
37
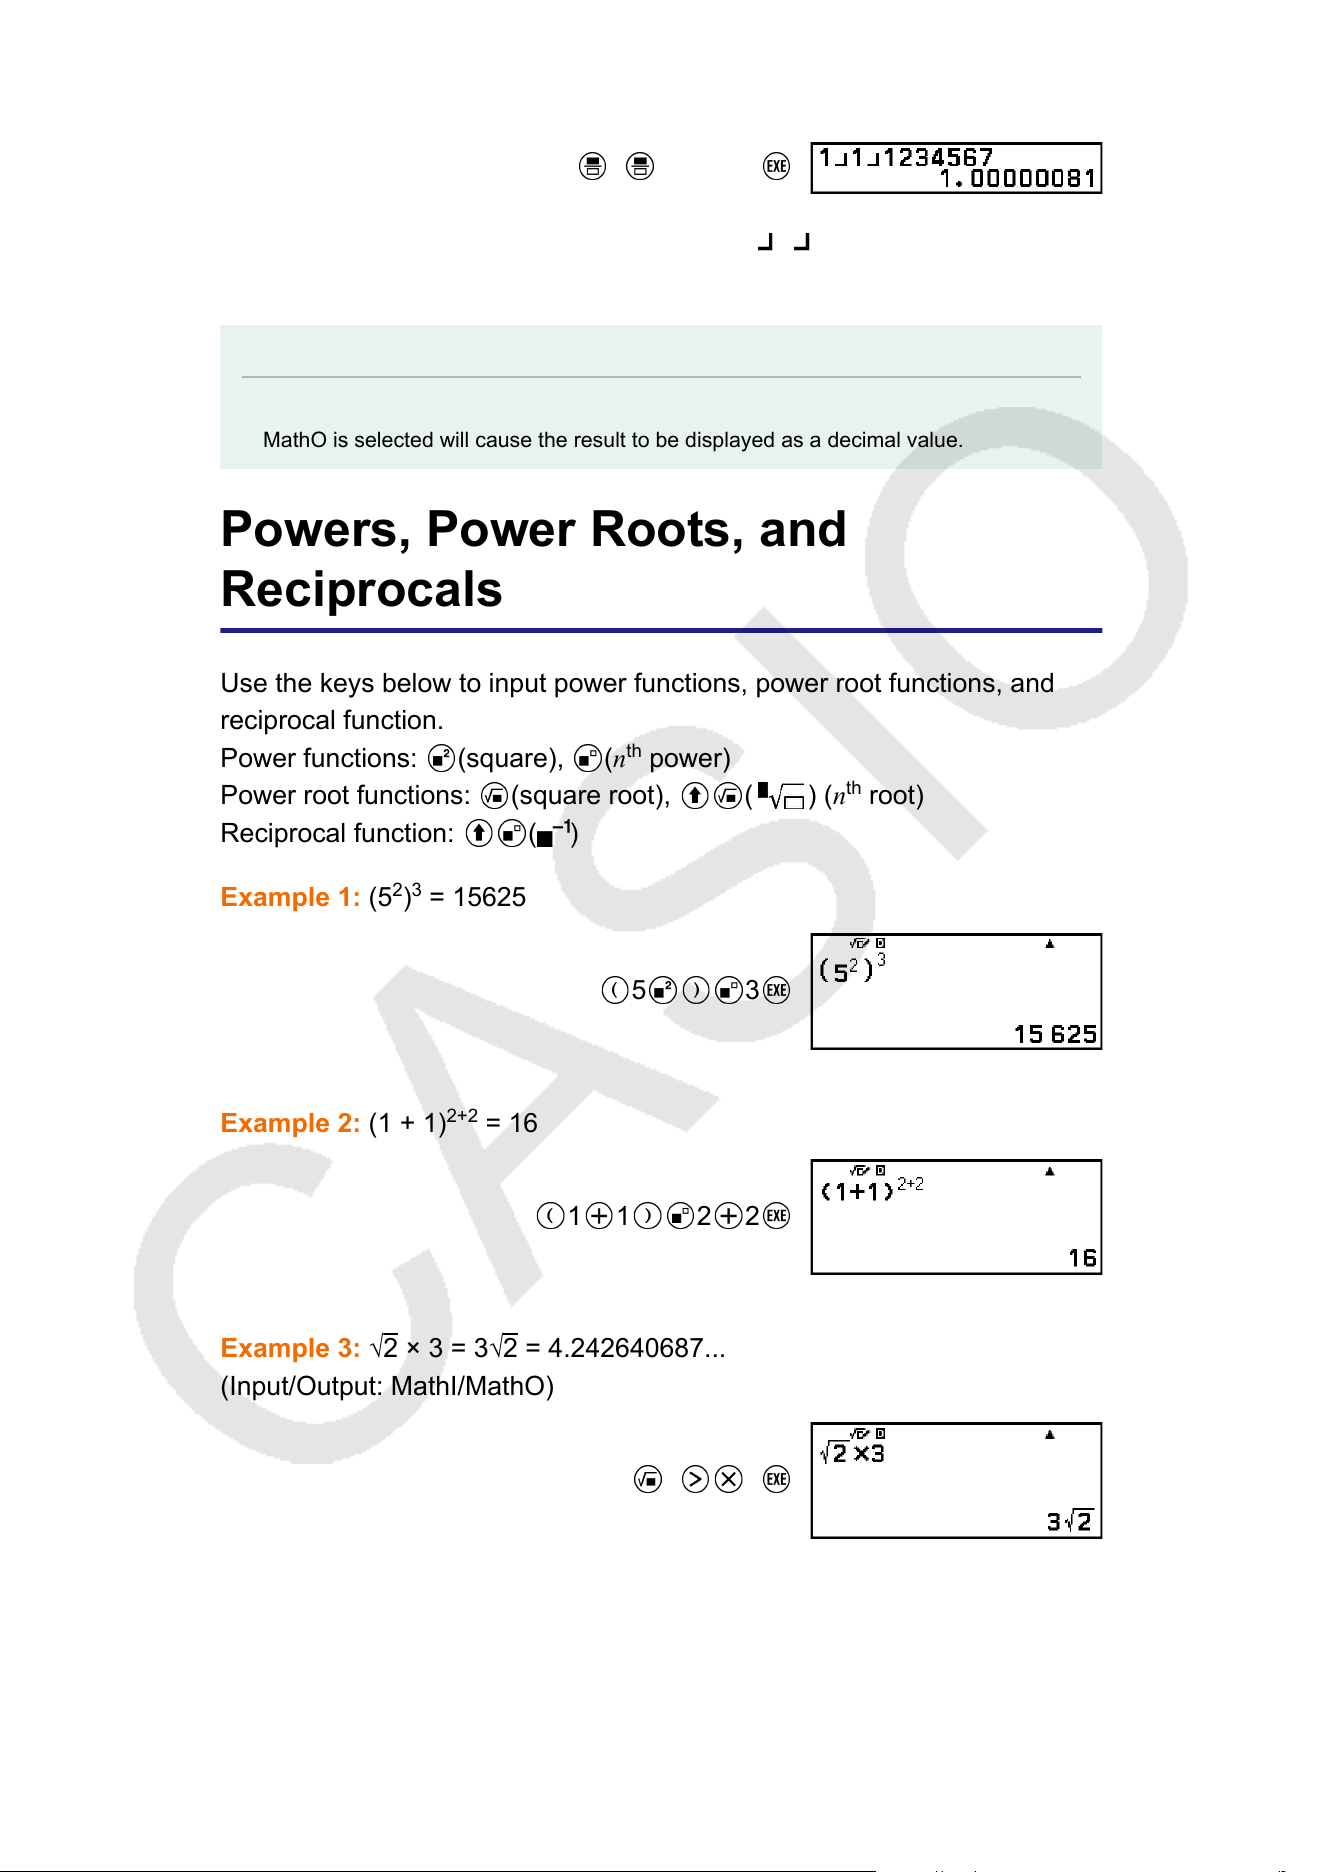
(Input/Output: LineI/LineO)
1
1 1234567
Since the total number of digits of the value 1 1 1234567 is 11, the
result is displayed as a decimal value.
Note
• Mixing fractions and decimal values in a calculation while something other than MathI/
MathO is selected will cause the result to be displayed as a decimal value.
Powers, Power Roots, and
Reciprocals
Use the keys below to input power functions, power root functions, and
reciprocal function.
Power functions:
(square), (n
th
power)
Power root functions: (square root), ( ) (n
th
root)
Reciprocal function:
( )
Example 1: (5
2
)
3
= 15625
5 3
Example 2: (1 + 1)
2+2
= 16
1 1 2 2
Example 3: √2 × 3 = 3√2 = 4.242640687...
(Input/Output: MathI/MathO)
2 3
(Input/Output: LineI/LineO)
38
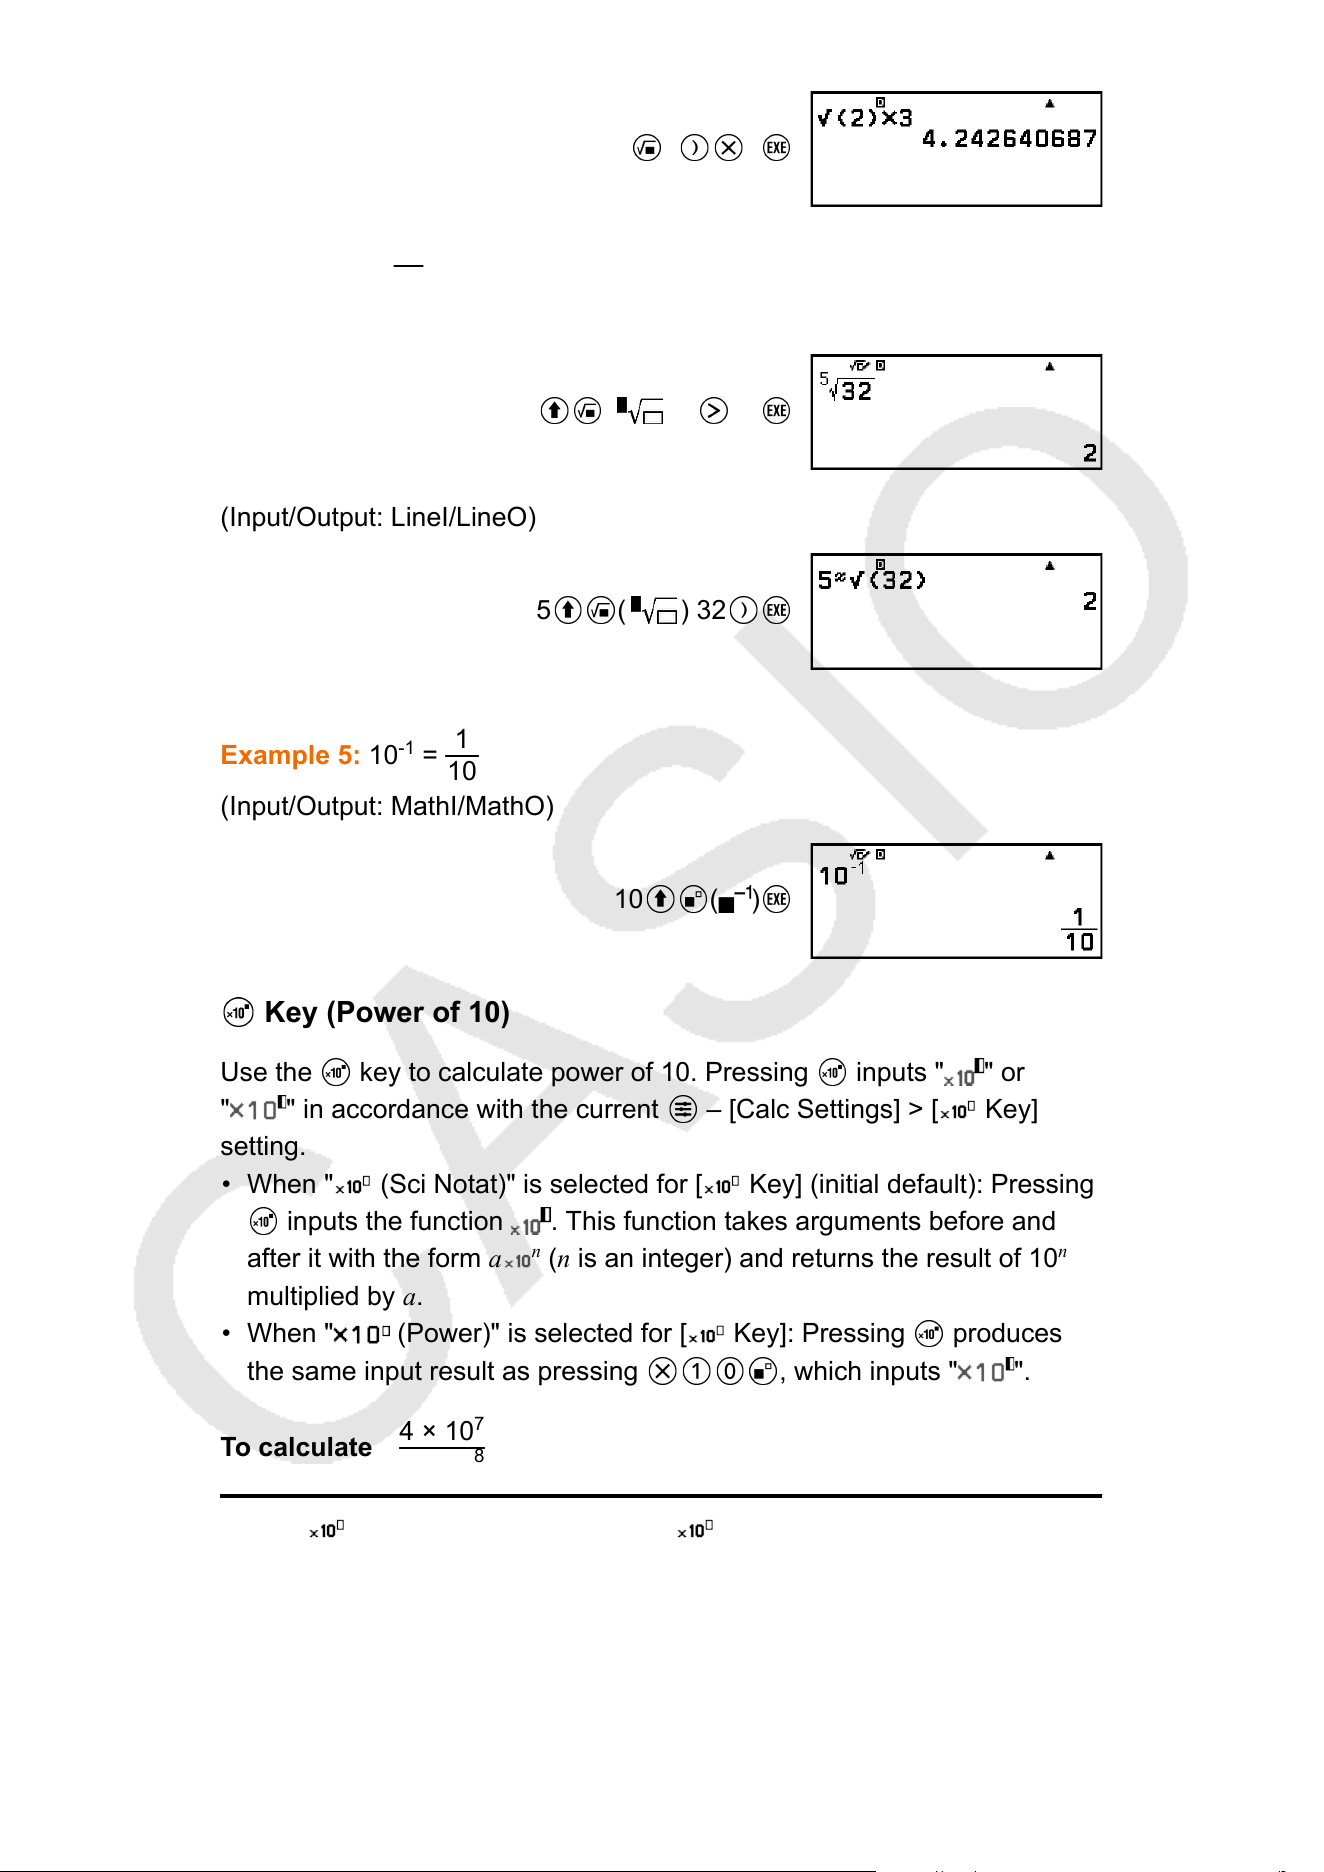
2 3
Example 4:
5
√32 = 2
(Input/Output: MathI/MathO)
( ) 5 32
(Input/Output: LineI/LineO)
5 ( ) 32
Example 5: 10
-1
=
1
10
(Input/Output: MathI/MathO)
10
( )
Key (Power of 10)
Use the key to calculate power of 10. Pressing inputs " " or
" " in accordance with the current – [Calc Settings] > [ Key]
setting.
• When " (Sci Notat)" is selected for [ Key] (initial default): Pressing
inputs the function . This function takes arguments before and
after it with the form a
n
(n is an integer) and returns the result of 10
n
multiplied by a.
• When " (Power)" is selected for [ Key]: Pressing produces
the same input result as pressing , which inputs " ".
T
o calculate
4 × 10
7
3 × 10
8
When " (Sci Notat)" is selected for [ Key] (initial default):
Example 1: (Input/Output: MathI/MathO)
39
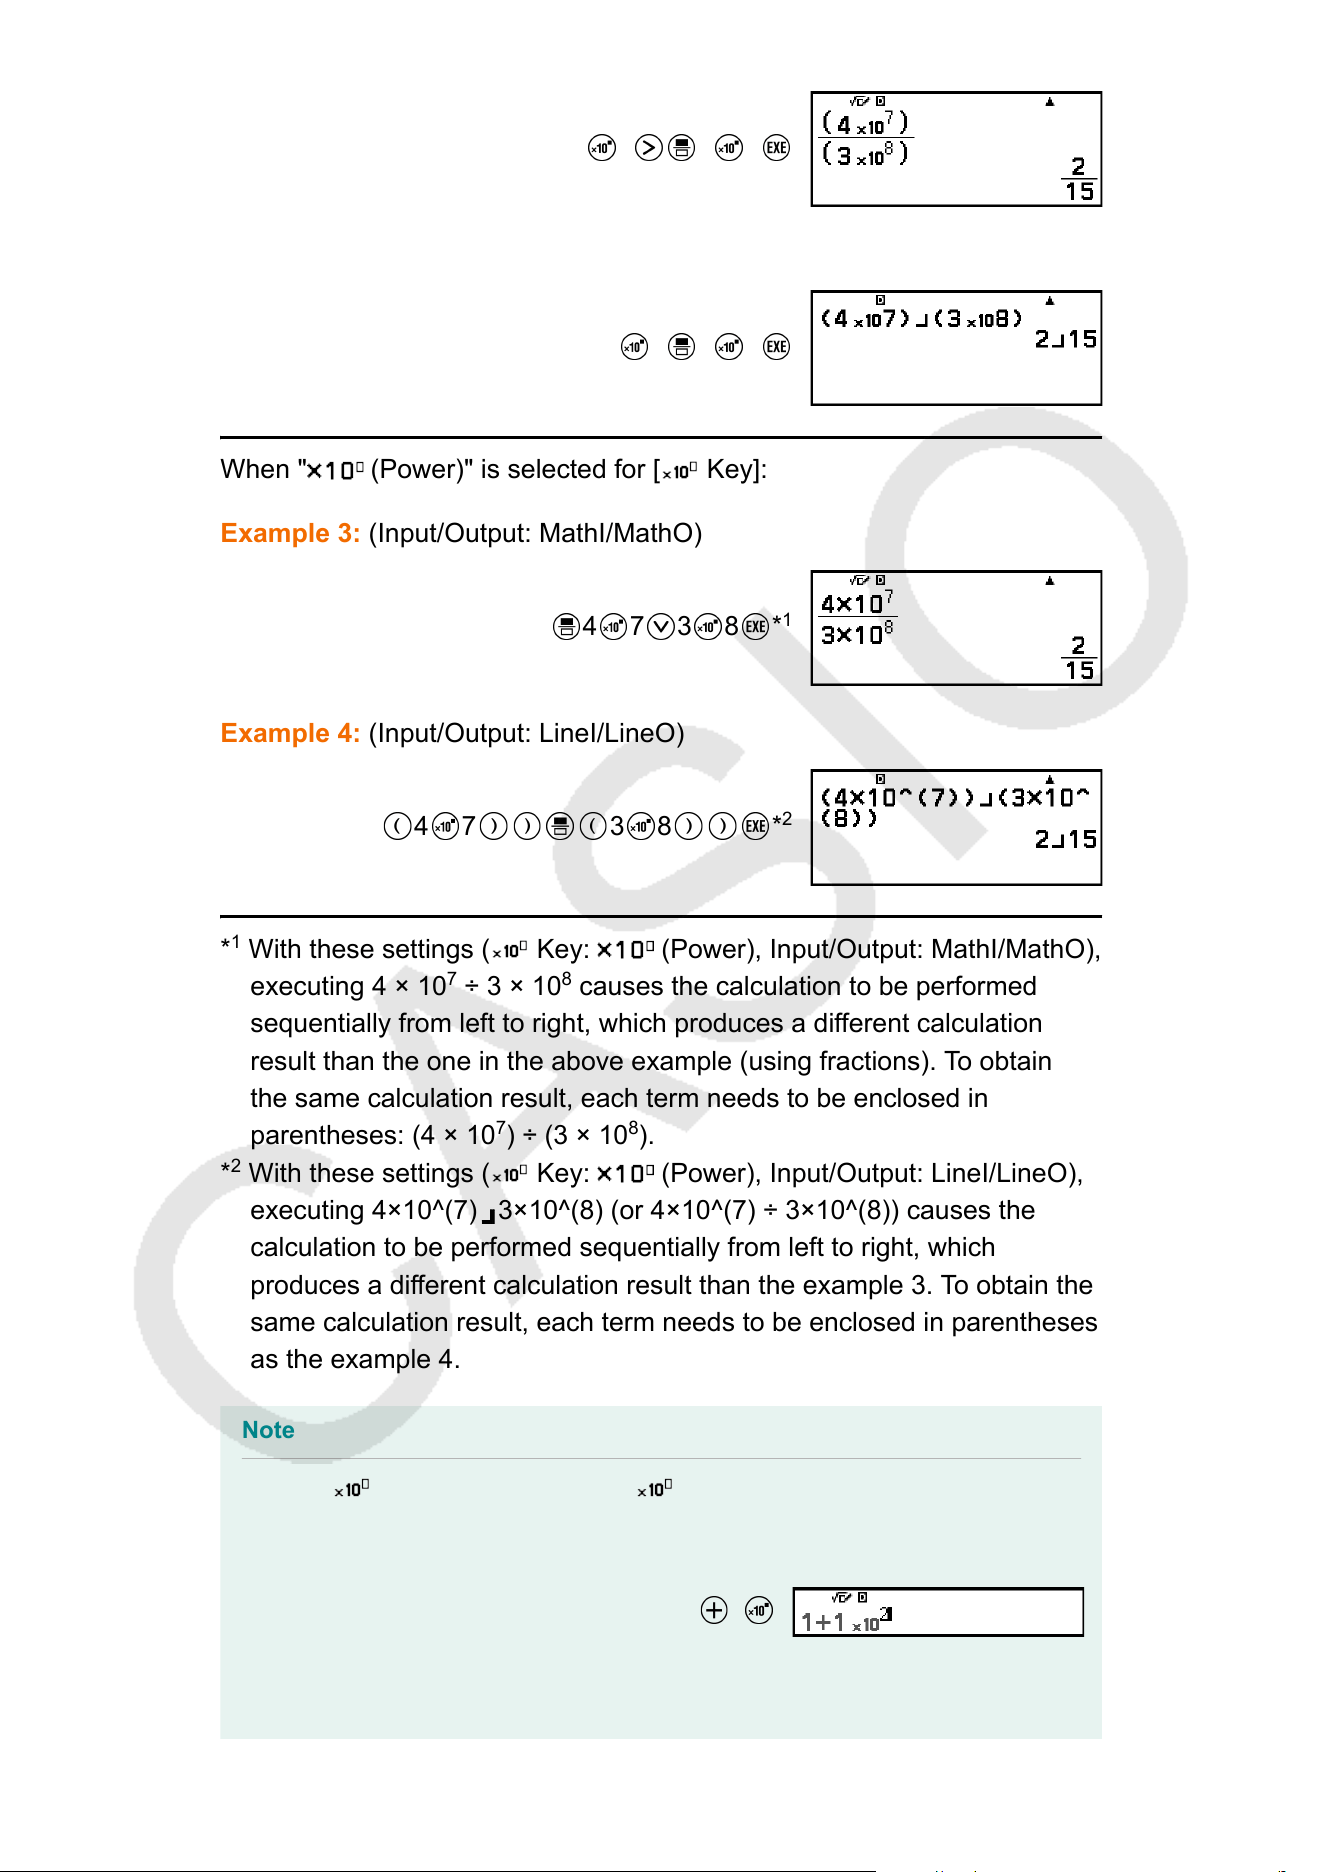
4 7 3 8
Example 2: (Input/Output: LineI/LineO)
4 7 3 8
When " (Power)" is selected for [ Key]:
Example 3: (Input/Output: MathI/MathO)
4 7 3 8 *
1
Example 4: (Input/Output: LineI/LineO)
4 7 3 8 *
2
*
1
With these settings ( Key: (Power), Input/Output: MathI/MathO),
executing 4 × 10
7
÷ 3 × 10
8
causes the calculation to be performed
sequentially from left to right, which produces a dif
ferent calculation
result than the one in the above example (using fractions). To obtain
the same calculation result, each term needs to be enclosed in
parentheses: (4 × 10
7
) ÷ (3 × 10
8
).
*
2
With these settings (
Key: (Power), Input/Output: LineI/LineO),
executing 4×10^(7) 3×10^(8) (or 4×10^(7) ÷ 3×10^(8)) causes the
calculation to be performed sequentially from left to right, which
produces a dif
ferent calculation result than the example 3. To obtain the
same calculation result, each term needs to be enclosed in parentheses
as the example 4.
Note
• When "
(Sci Notat)" is selected for [ Key], parentheses will be inserted
automatically as shown in the example below (The same applies to Example 1 and
Example 2 above).
1 1 2
40
Note, however, that parentheses will not be inserted automatically if you input the
sexagesimal symbol ( ) immediately after .
1 2 ( )2 2 ( )
3 2 ( )
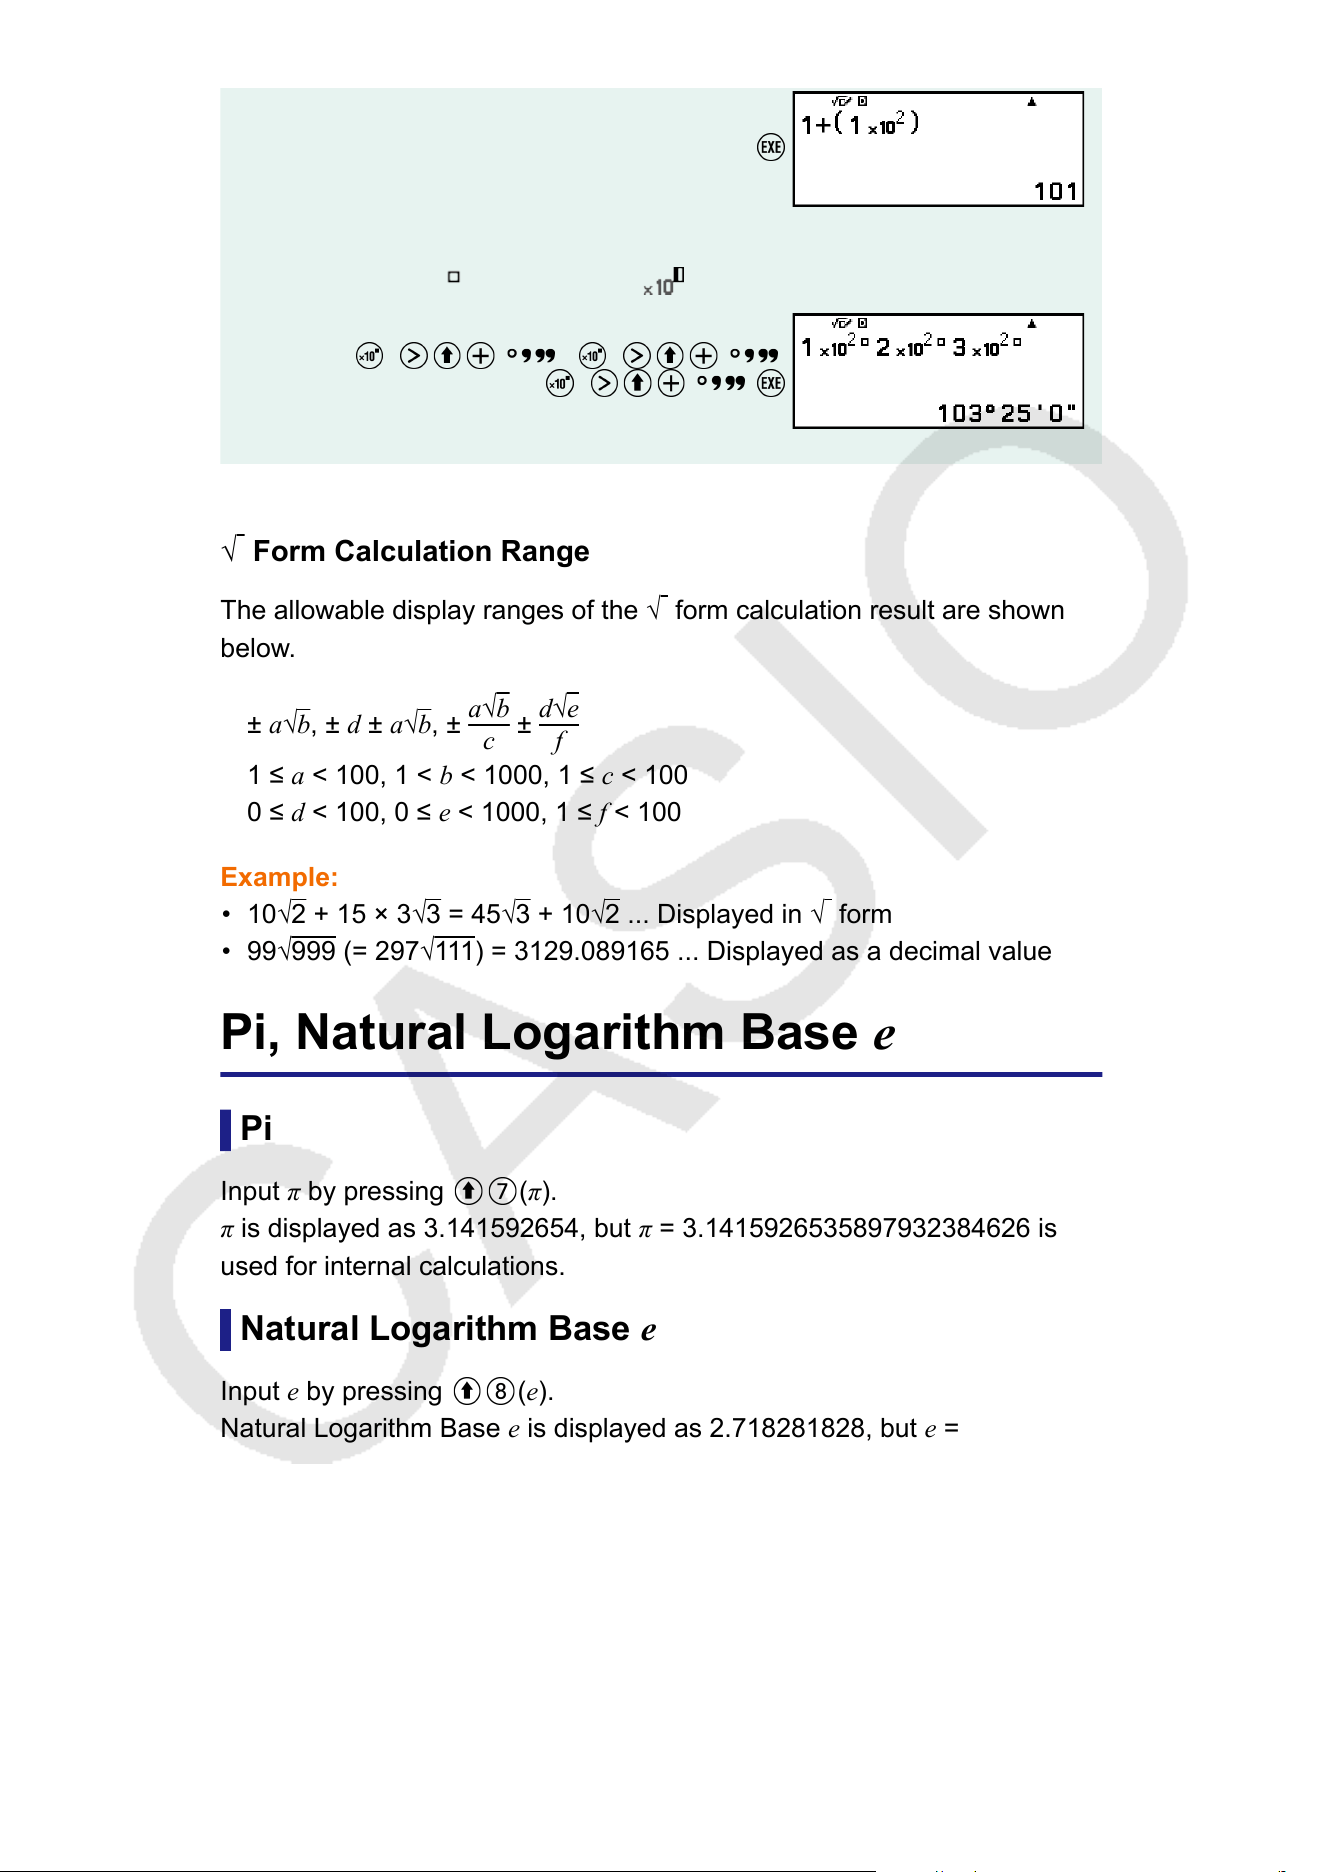
√ Form Calculation Range
The allowable display ranges of the
√
form calculation result are shown
below
.
± a√
b, ± d ± a√b, ±
a√b
c
±
d√e
f
1 ≤ a < 100, 1 < b < 1000, 1 ≤
c < 100
0 ≤ d < 100, 0 ≤ e < 1000, 1 ≤ f < 100
Example:
• 10√
2 + 15 × 3√3 = 45√3 + 10√2 ... Displayed in √ form
• 99√999 (= 297√111) = 3129.089165 ... Displayed as a decimal value
Pi, Natural Logarithm Base e
Pi
Input π by pressing (π).
π is displayed as 3.141592654, but π = 3.1415926535897932384626 is
used for internal calculations.
Natural Logarithm Base e
Input e by pressing
(e).
Natural Logarithm Base e is displayed as 2.718281828, but e =
2.7182818284590452353602 is used for internal calculations.
41
Calculation History and Replay
Calculation History
An and/or at the top of the screen indicates more calculation history
content above and/or below
. You can scroll through calculation history
contents using
and .
Apps that support calculation history:
Calculate, Complex, Base-N
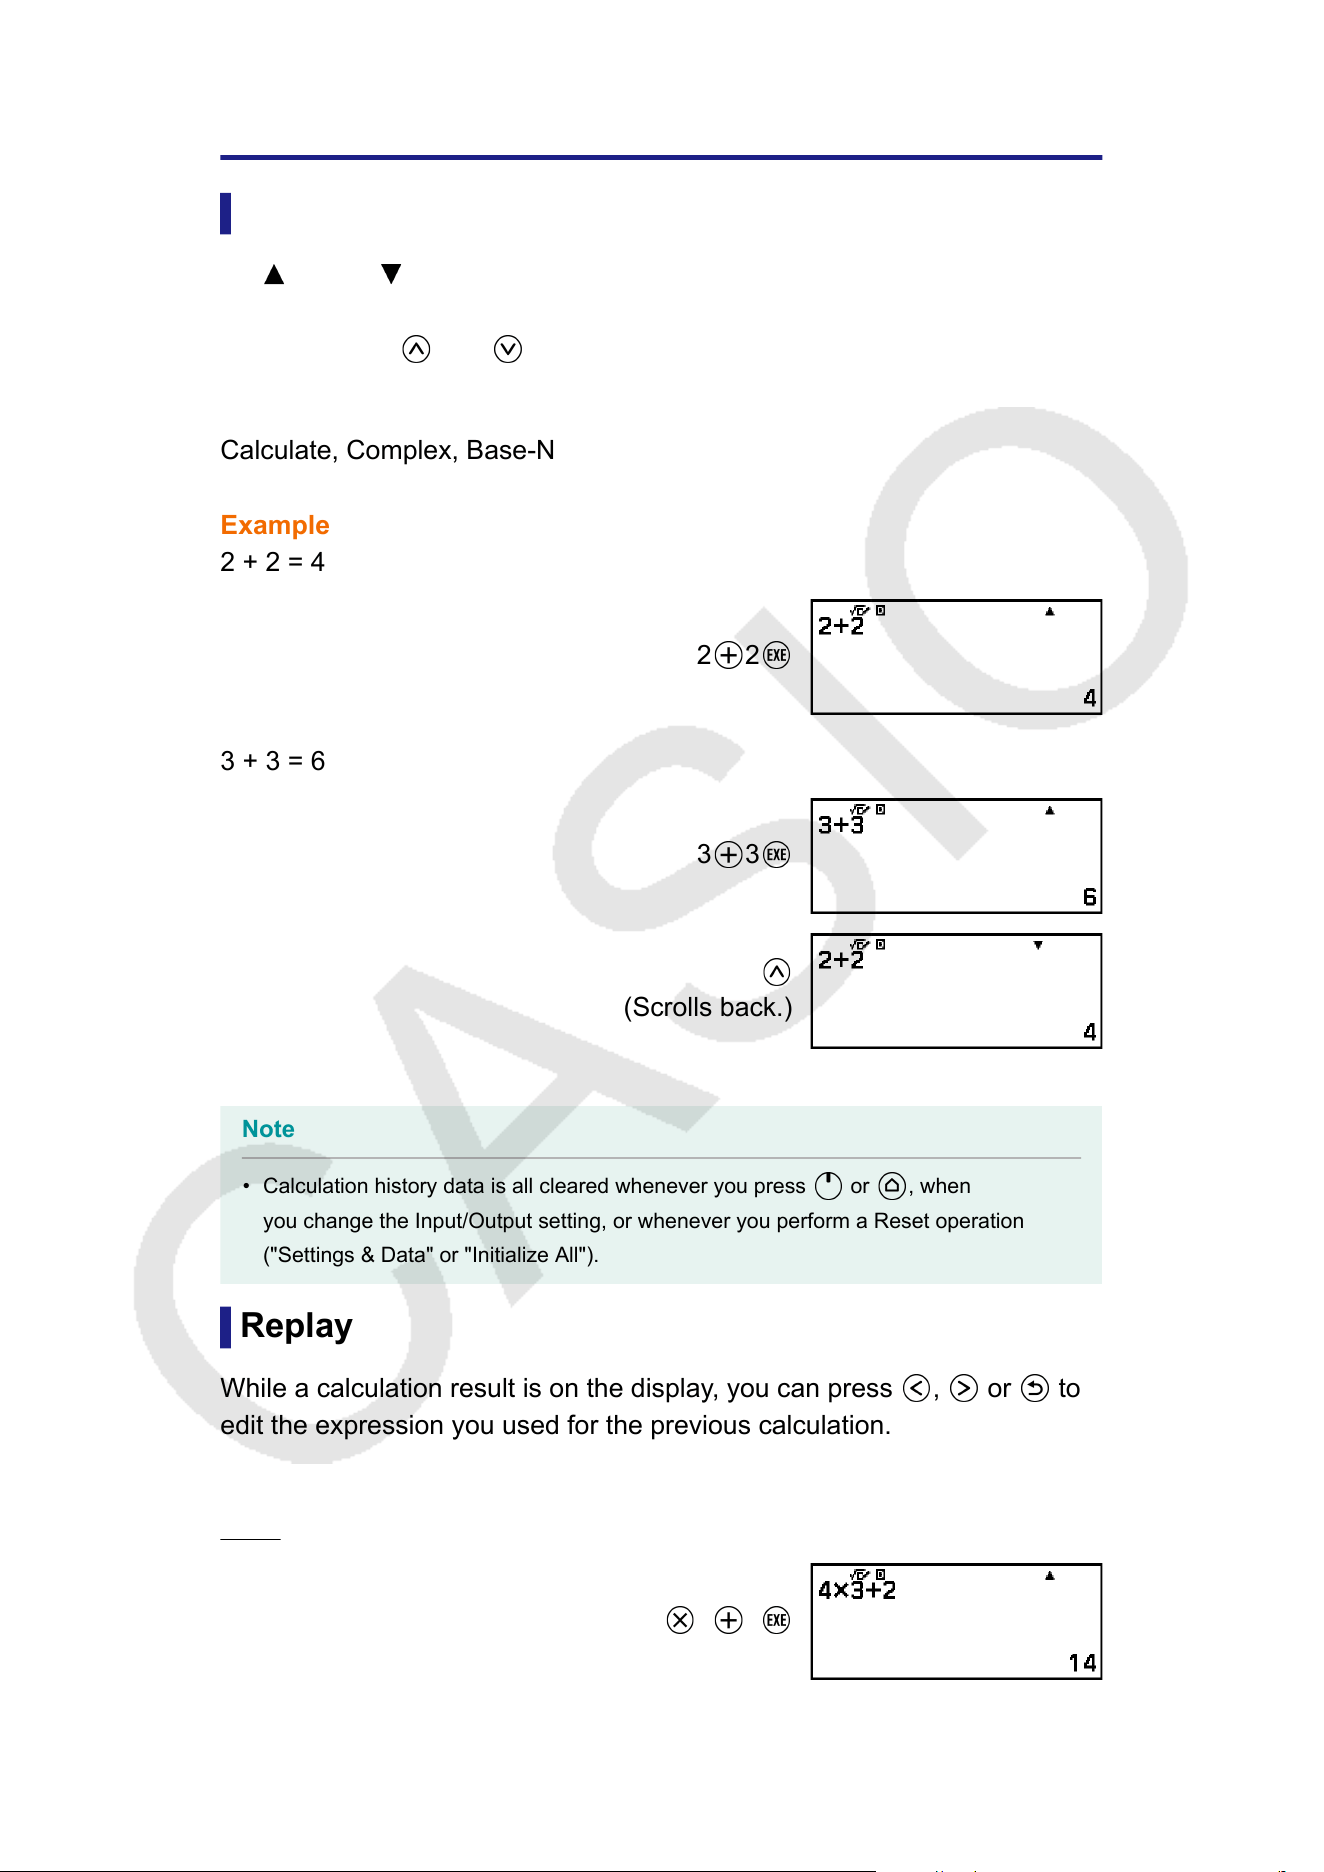
Example
2 + 2 = 4
2 2
3 + 3 = 6
3 3
(Scrolls back.)
Note
• Calculation history data is all cleared whenever you press or , when
you change the Input/Output setting, or whenever you perform a Reset operation
("Settings & Data" or "Initialize All").
Replay
While a calculation result is on the display
, you can press
, or to
edit the expression you used for the previous calculation.
Example
4 × 3 + 2 = 14
4 3 2
42
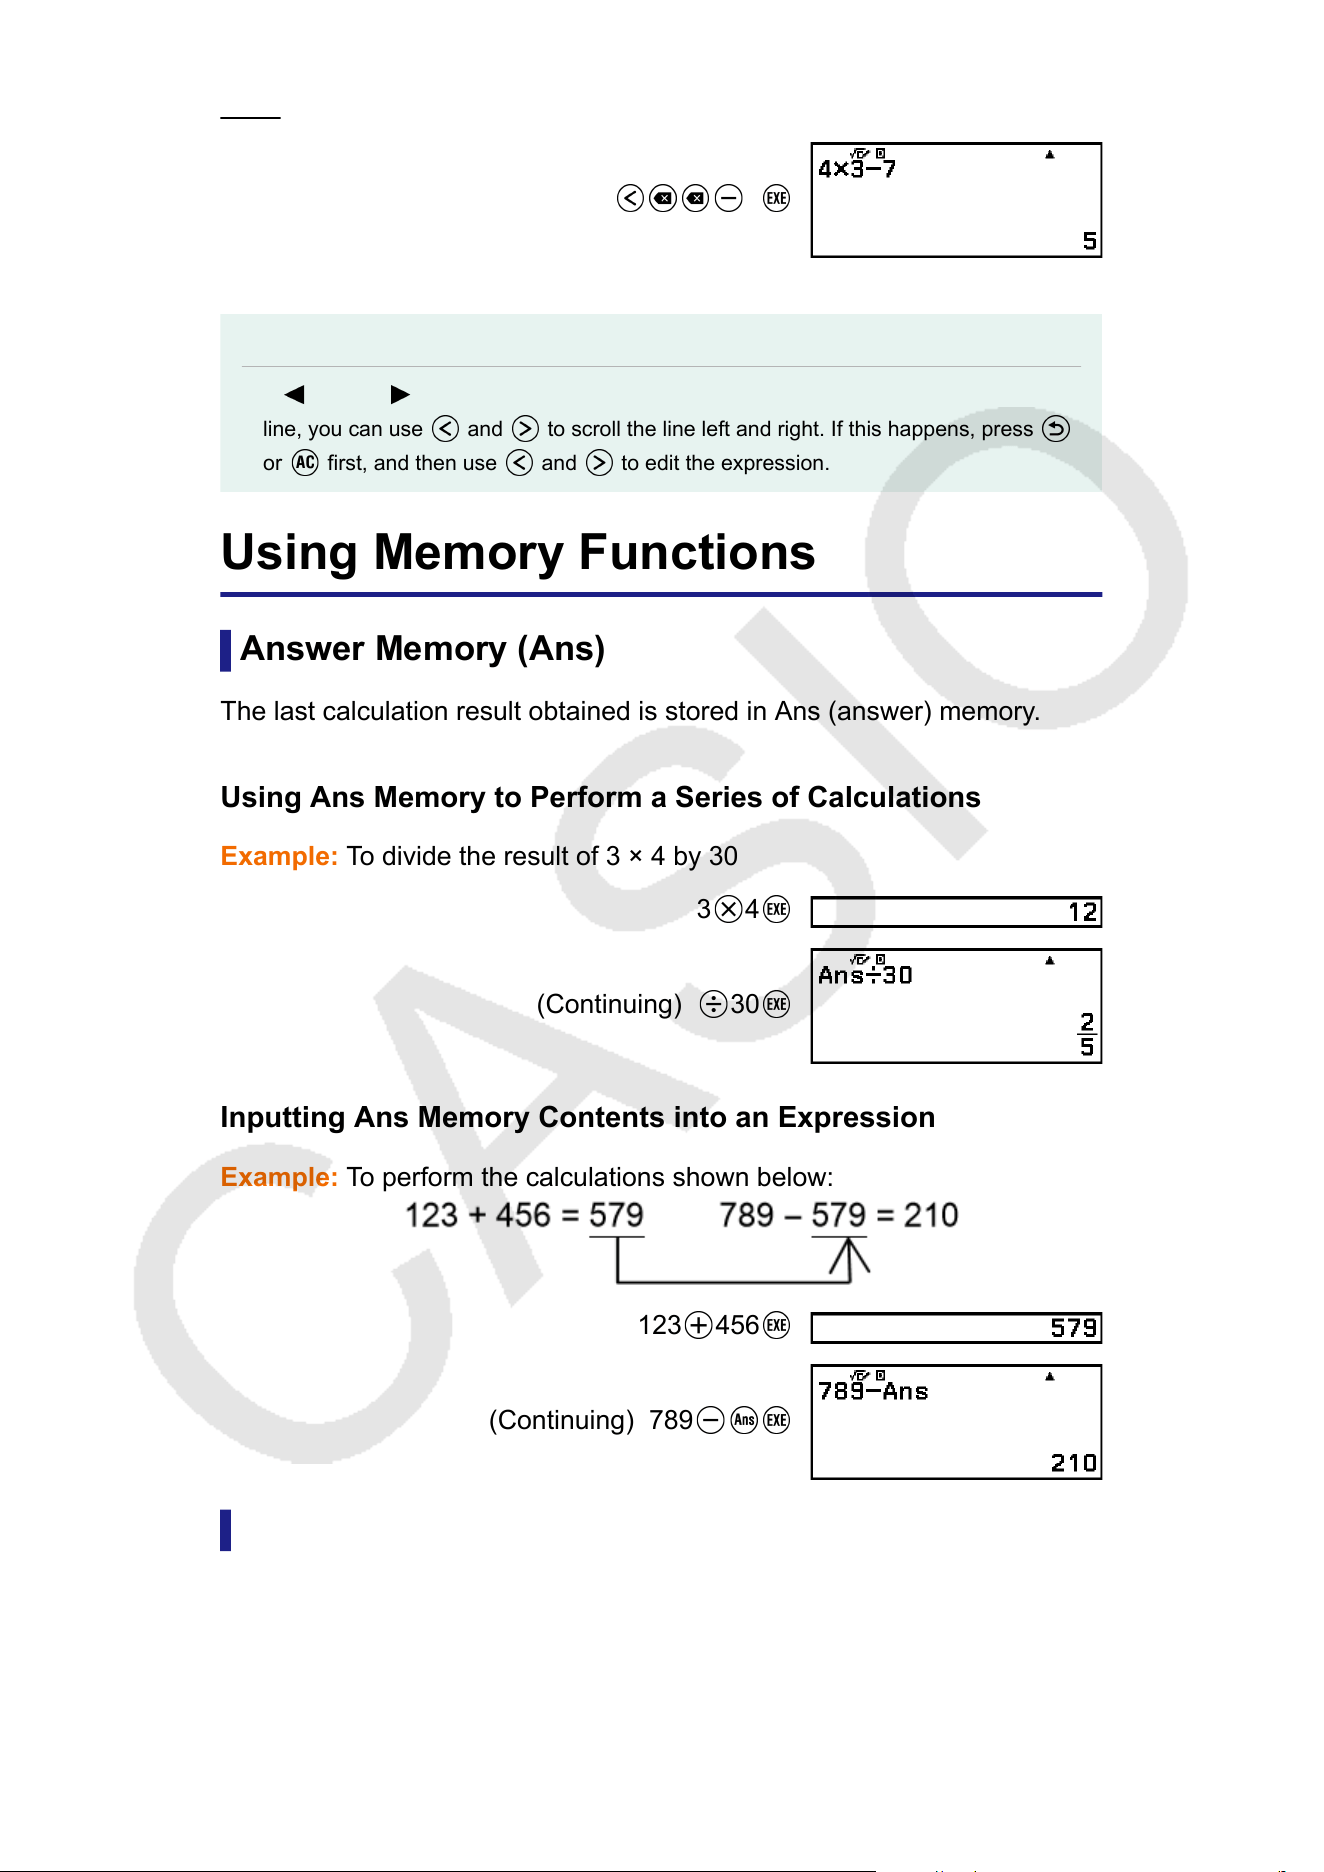
4 × 3 − 7 = 5
(Continuing) 7
Note
• If
(left) or (right) is displayed on either end or both ends of a calculation result
line, you can use and to scroll the line left and right. If this happens, press
or first, and then use and to edit the expression.
Using Memory Functions
Answer Memory (Ans)
The last calculation result obtained is stored in Ans (answer) memory
.
Using Ans Memory to Perform a Series of Calculations
Example: To divide the result of 3 × 4 by 30
3
4
(Continuing) 30
Inputting Ans Memory Contents into an Expression
Example:
To perform the calculations shown below:
123 456
(Continuing) 789
Variables (A, B, C, D, E, F, x, y, z)
Y
ou can store values to variables and use the variables in calculations.
43
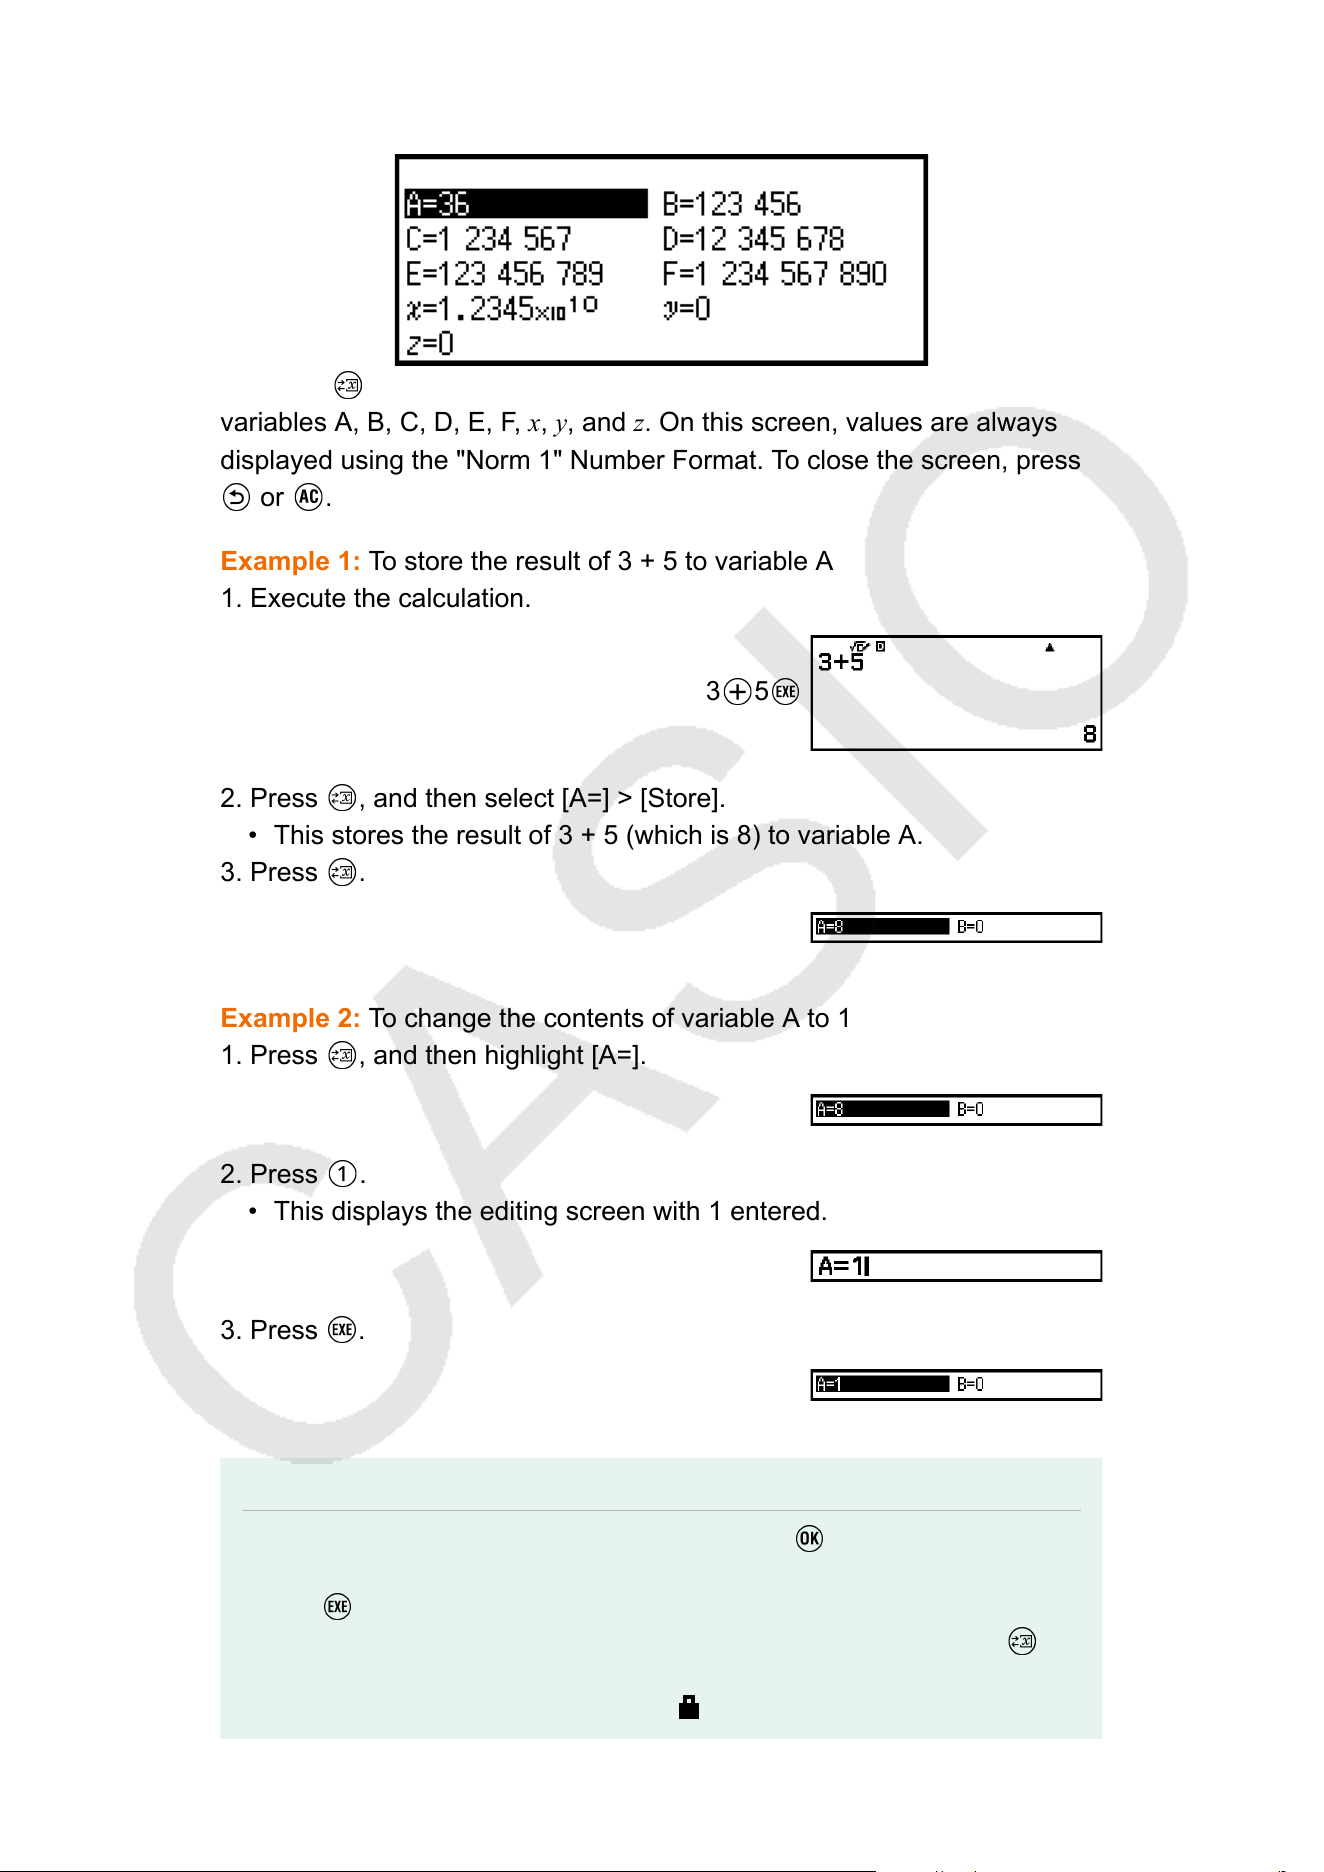
Variable List Screen
Pressing displays a screen that shows the values currently stored to
variables A, B, C, D, E, F
, x, y, and z. On this screen, values are always
displayed using the "Norm 1" Number Format. To close the screen, press
or .
Example 1: To store the result of 3 + 5 to variable A
1. Execute the calculation.
3 5
2. Press , and then select [A=] > [Store].
• This stores the result of 3 + 5 (which is 8) to variable A.
3. Press .
Example 2: T
o change the contents of variable A to 1
1. Press
, and then highlight [A=].
2. Press .
• This displays the editing screen with 1 entered.
3. Press .
Note
• In place of the operation in step 2 above, you can press and then select [Edit].
This displays the editing screen with nothing input. Input the value you want and then
press .
• Depending on the operation you were performing immediately before pressing to
display the variable list screen, you cannot change the contents of a variable from
the variable list screen. In this case, a lock ( ) icon appears when you highlight a
44
variable on the variable list screen, indicating that the highlighted variable cannot be
edited.
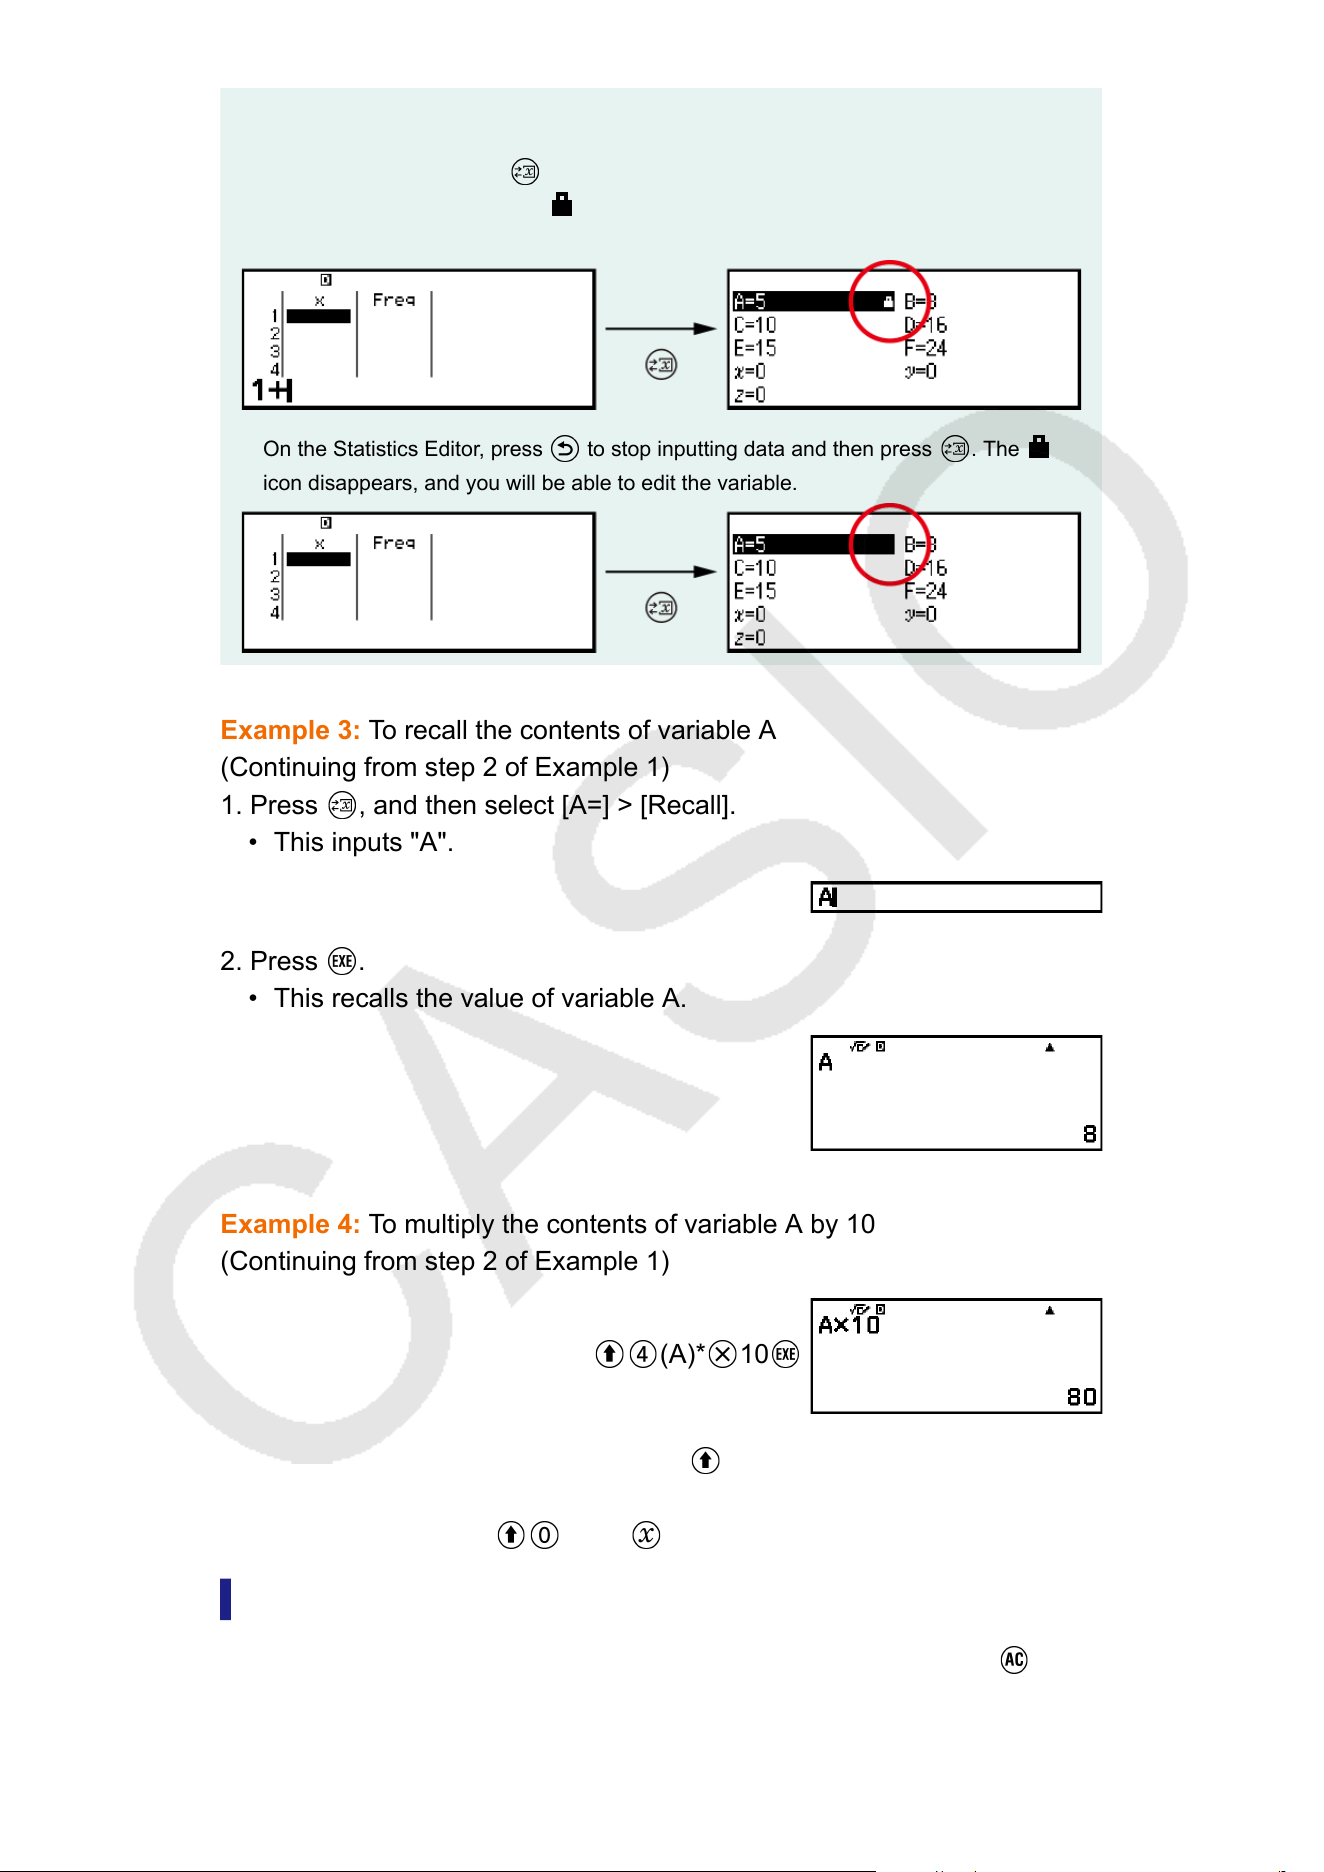
For example, if you press while inputting data in the Statistics Editor of the
Statistics app (page 76), the icon appears on the right of the highlighted
variable, which means the variable cannot be edited.
On the Statistics Editor, press to stop inputting data and then press . The
icon disappears, and you will be able to edit the variable.
Example 3: T
o recall the contents of variable A
(Continuing from step 2 of Example 1)
1. Press
, and then select [A=] > [Recall].
• This inputs "A".
2. Press .
• This recalls the value of variable A.
Example 4: T
o multiply the contents of variable A by 10
(Continuing from step 2 of Example 1)
(A)* 10
* Input a variable as shown here: press and then press the key that
corresponds to the desired variable name. T
o input x as the variable
name, you can press
(x) or .
Clearing the Contents of All Memories
Ans memory and variable contents are retained even if you press ,
change the calculator app, or turn off the calculator.
45

Perform the procedure below when you want to clear the contents of all
memories.
1. Press , select a calculator app icon, and then press .
2. Press , and then select [Reset] > [Variable Memory] > [Yes].
46

Changing Calculation Result
Format
T
oggling Calculation Results
between Standard (Fraction, π,
√
Form) and Decimal
Each press of while a calculation result is displayed toggles the result
between the following two forms:
- a form that includes fraction, π, or
√
(standard format)
- decimal form
Note
• Toggling calculation result display formats by pressing only is supported when
" Decimal" (initial default) is selected for the FORMAT Key setting on the
SETTINGS menu. If "Format Menu" is selected for the FORMA
T Key setting, press
( ).
• Conversion to standard format that includes √ or π is possible when MathI/MathO or
MathI/DecimalO is selected for the Input/Output setting on the SETTINGS menu.
Example: 2√
2 = 2.828427125 (Input/Output: MathI/MathO)
2 2
To obtain a decimal value calculation result while MathI/MathO
or LineI/LineO is selected
Press ( ) instead of after inputting a calculation.
47
Changing the Display Format of
Calculation Results (FORMA
T Menu)
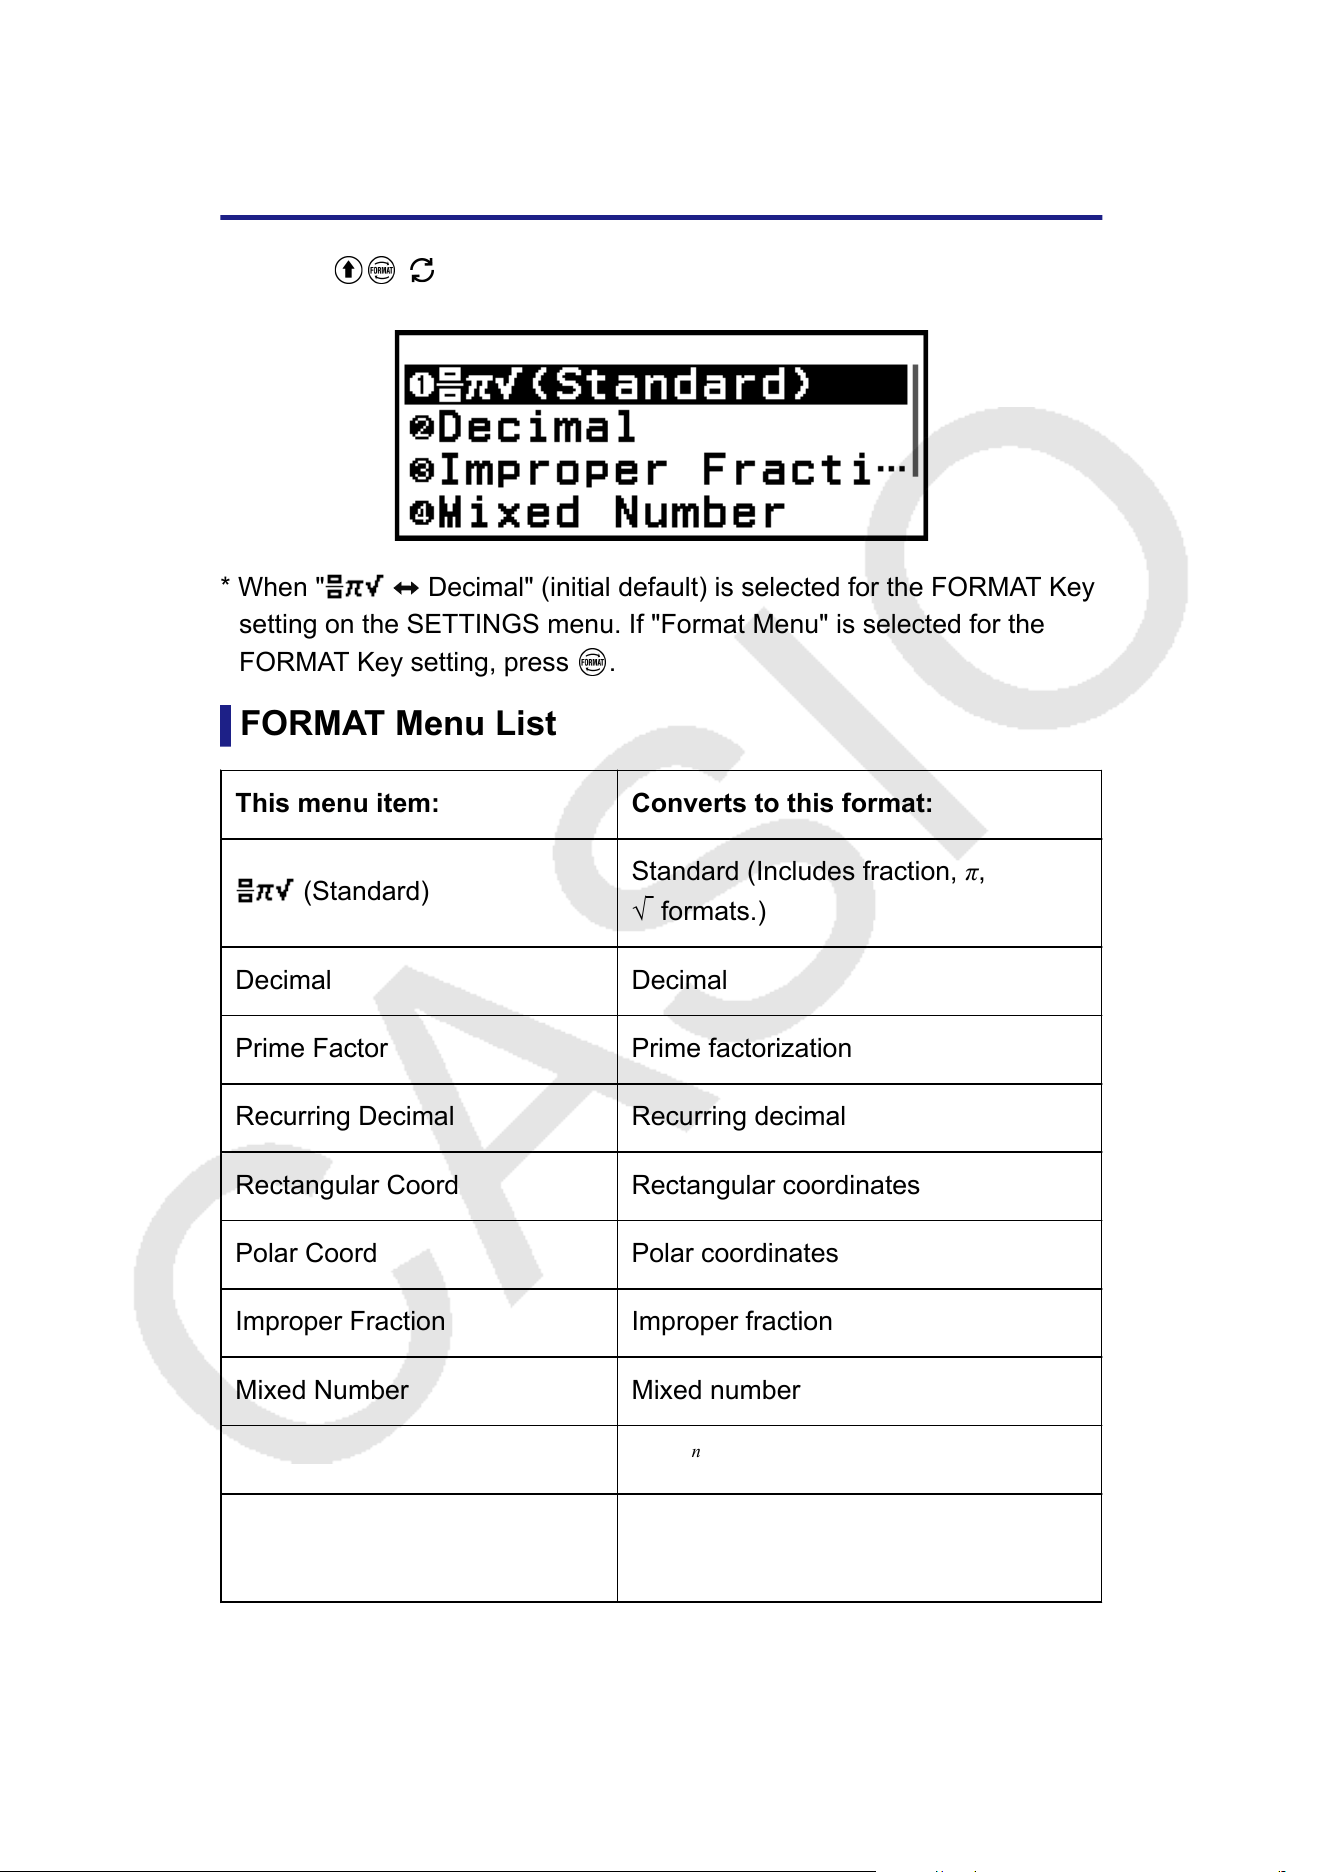
Pressing
( )* displays the FORMAT menu, which you can use to
change the display format of calculation results.
* When " Decimal" (initial default) is selected for the FORMAT Key
setting on the SETTINGS menu. If "Format Menu" is selected for the
FORMA
T Key setting, press
.
FORMA
T Menu List
This menu item: Converts to this format:
(Standard)
Standard (Includes fraction, π,
√
formats.)
Decimal Decimal
Prime Factor Prime factorization
Recurring Decimal Recurring decimal
Rectangular Coord Rectangular coordinates
Polar Coord Polar coordinates
Improper Fraction Improper fraction
Mixed Number Mixed number
Standard Form a×10
n
Sexagesimal
Degree, minute, second
(Sexagesimal)
48
Note
• The menu items that appear when ( ) is pressed depend on the currently
displayed calculation result. Also, if a calculation result that cannot be converted is
displayed, the menu will not appear when you press ( ).
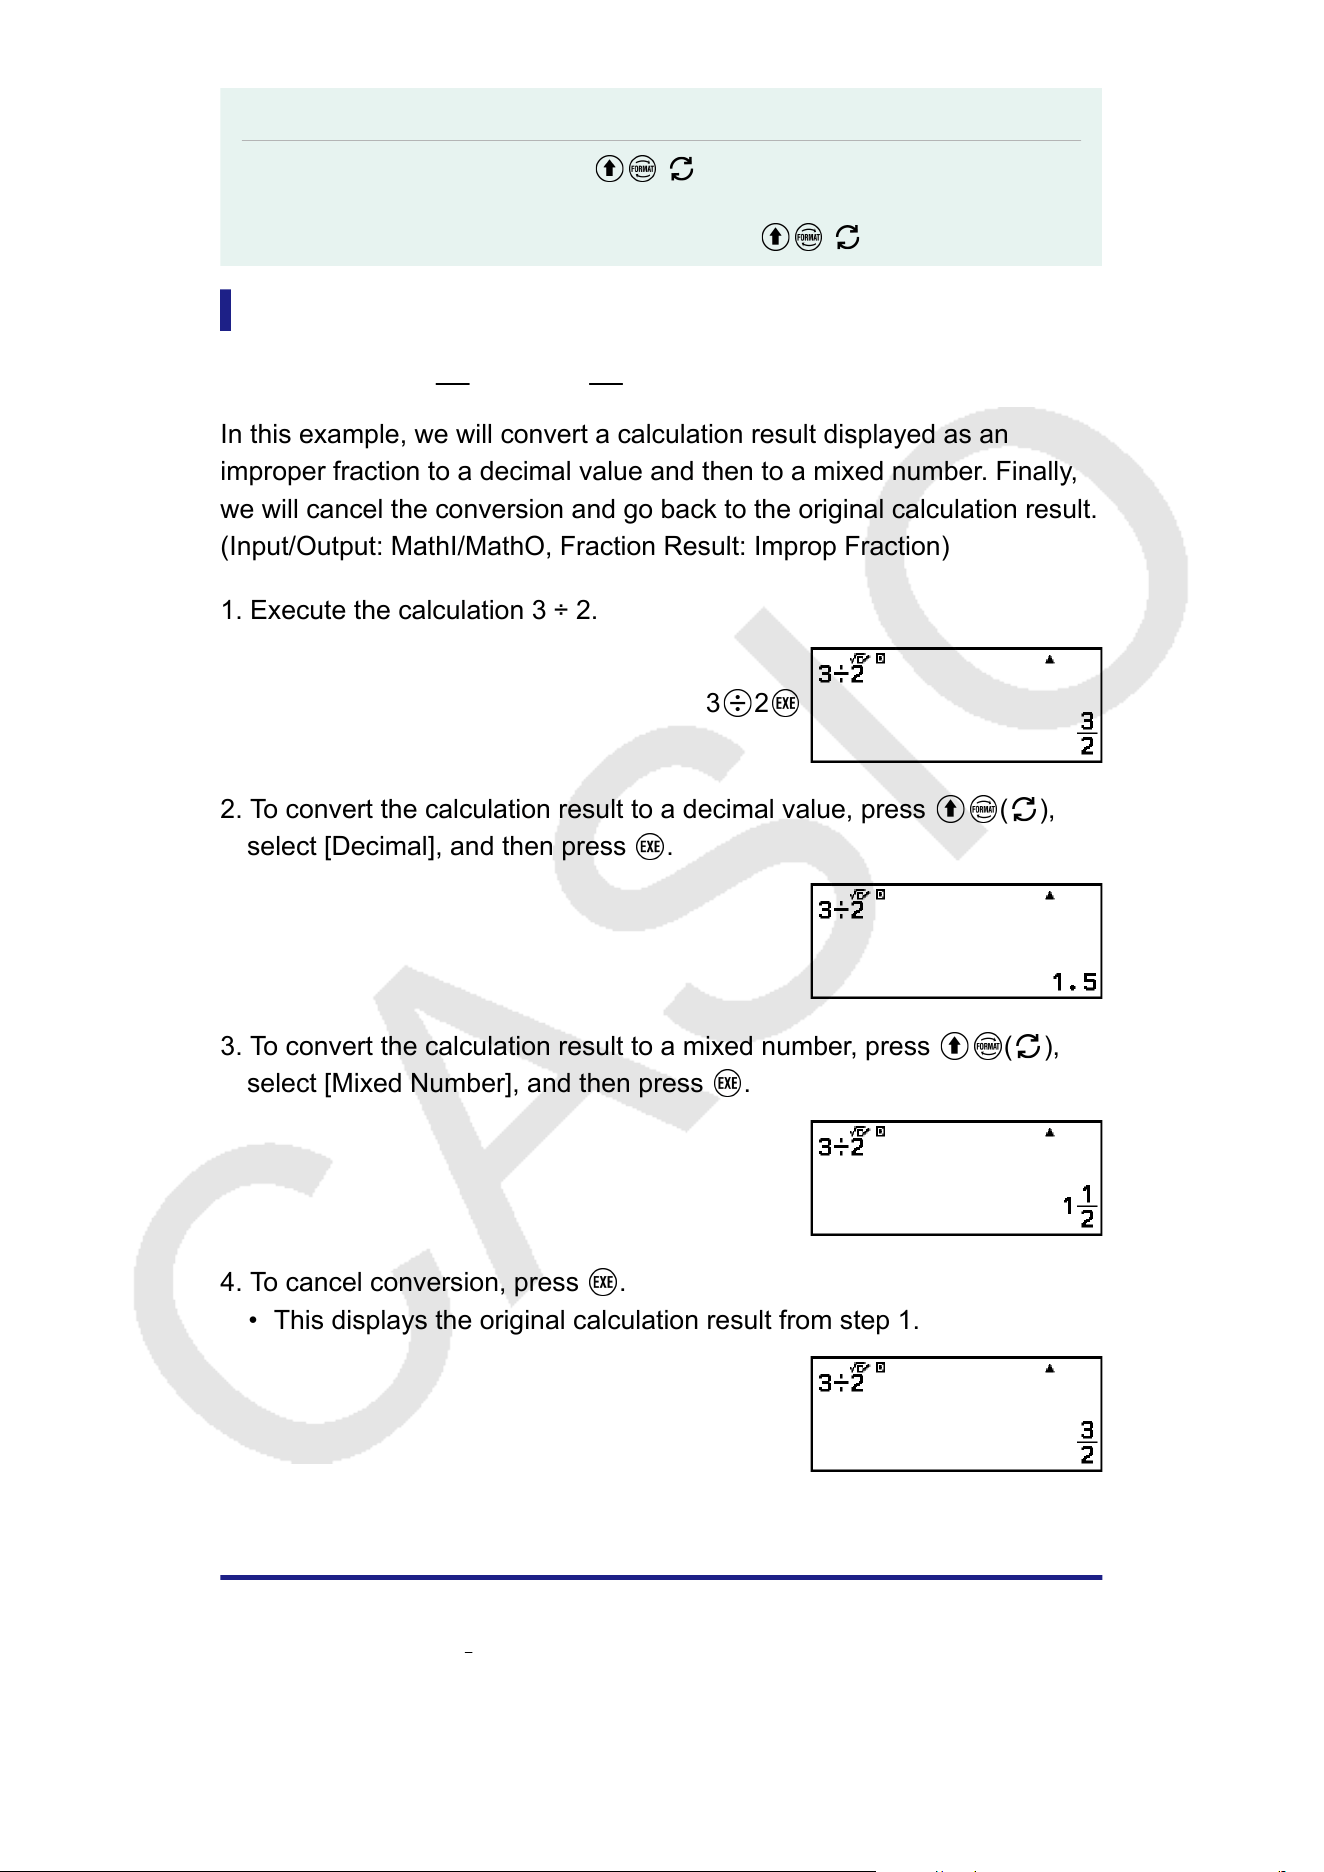
Conversion Sample Operation
Example: 3 ÷ 2 =
3
2
= 1.5 = 1
1
2
In this example, we will convert a calculation result displayed as an
improper fraction to a decimal value and then to a mixed number
. Finally,
we will cancel the conversion and go back to the original calculation result.
(Input/Output: MathI/MathO, Fraction Result: Improp Fraction)
1. Execute the calculation 3 ÷ 2.
3
2
2. To convert the calculation result to a decimal value, press ( ),
select [Decimal], and then press .
3. To convert the calculation result to a mixed number, press ( ),
select [Mixed Number], and then press .
4. To cancel conversion, press .
• This displays the original calculation result from step 1.
Standard and Decimal Conversion
Standard is a format that displays a calculation result in a form that
includes a fraction,
√
, or π when possible. Decimal is a format that
displays the calculation result as a decimal value.
49
Note
• Conversion to standard format that includes √ or π is possible when MathI/MathO or
MathI/DecimalO is selected for the Input/Output setting on the SETTINGS menu.
Y
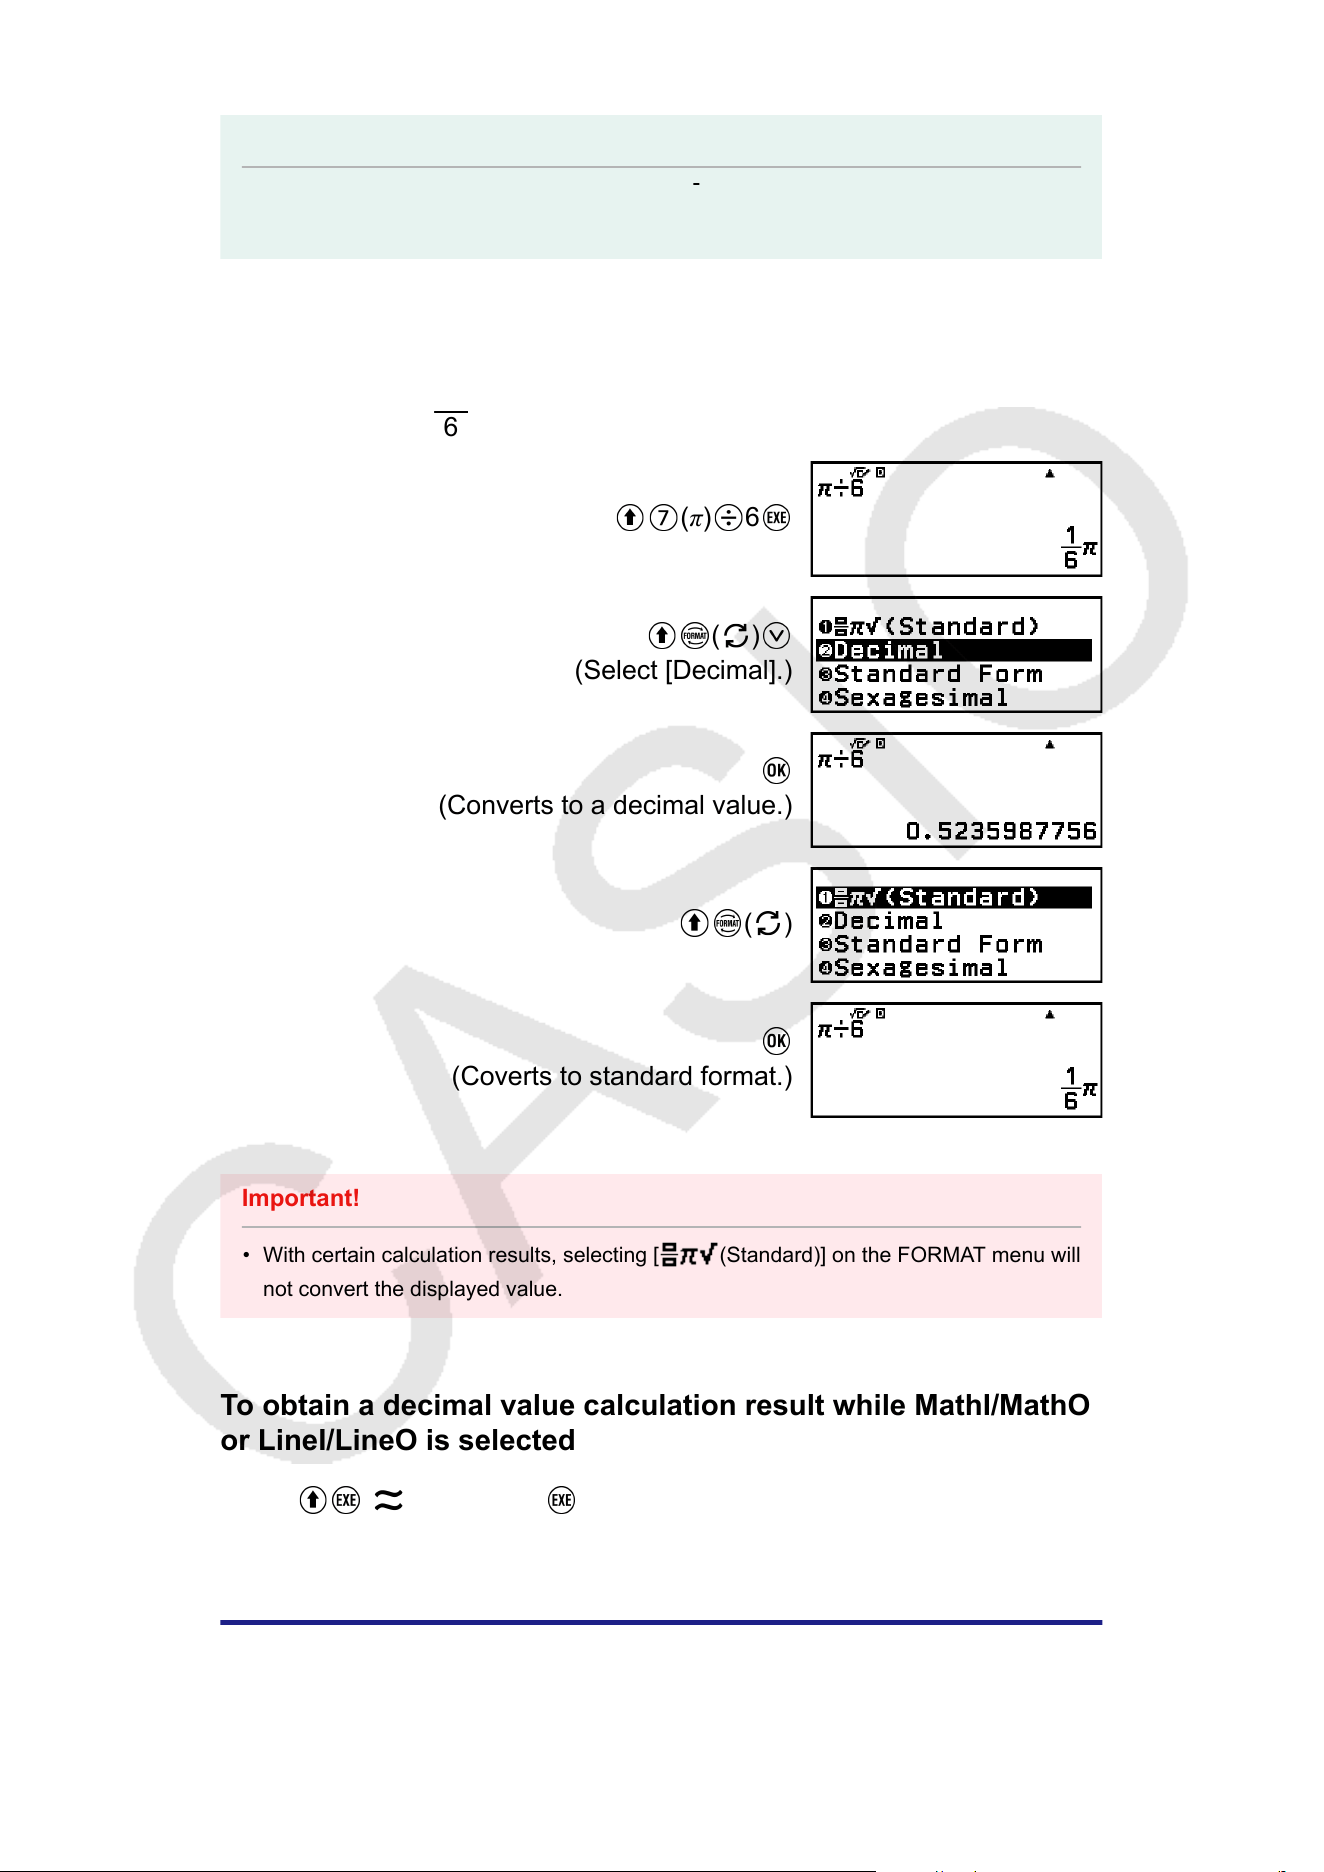
ou can use the operation below to convert a calculation result to the
standard or decimal format.
Example: π ÷ 6 =
1
6
π = 0.5235987756 (Input/Output: MathI/MathO)
(π) 6
( )
(Select [Decimal].)
(Converts to a decimal value.)
( )
(Coverts to standard format.)
Important!
• With certain calculation results, selecting [ (Standard)] on the FORMAT menu will
not convert the displayed value.
T
o obtain a decimal value calculation result while MathI/MathO
or LineI/LineO is selected
Press
( ) instead of after inputting a calculation.
Prime Factorization
In the Calculate app, a positive integer no more than 10 digits long can be
factored to prime factors.
50
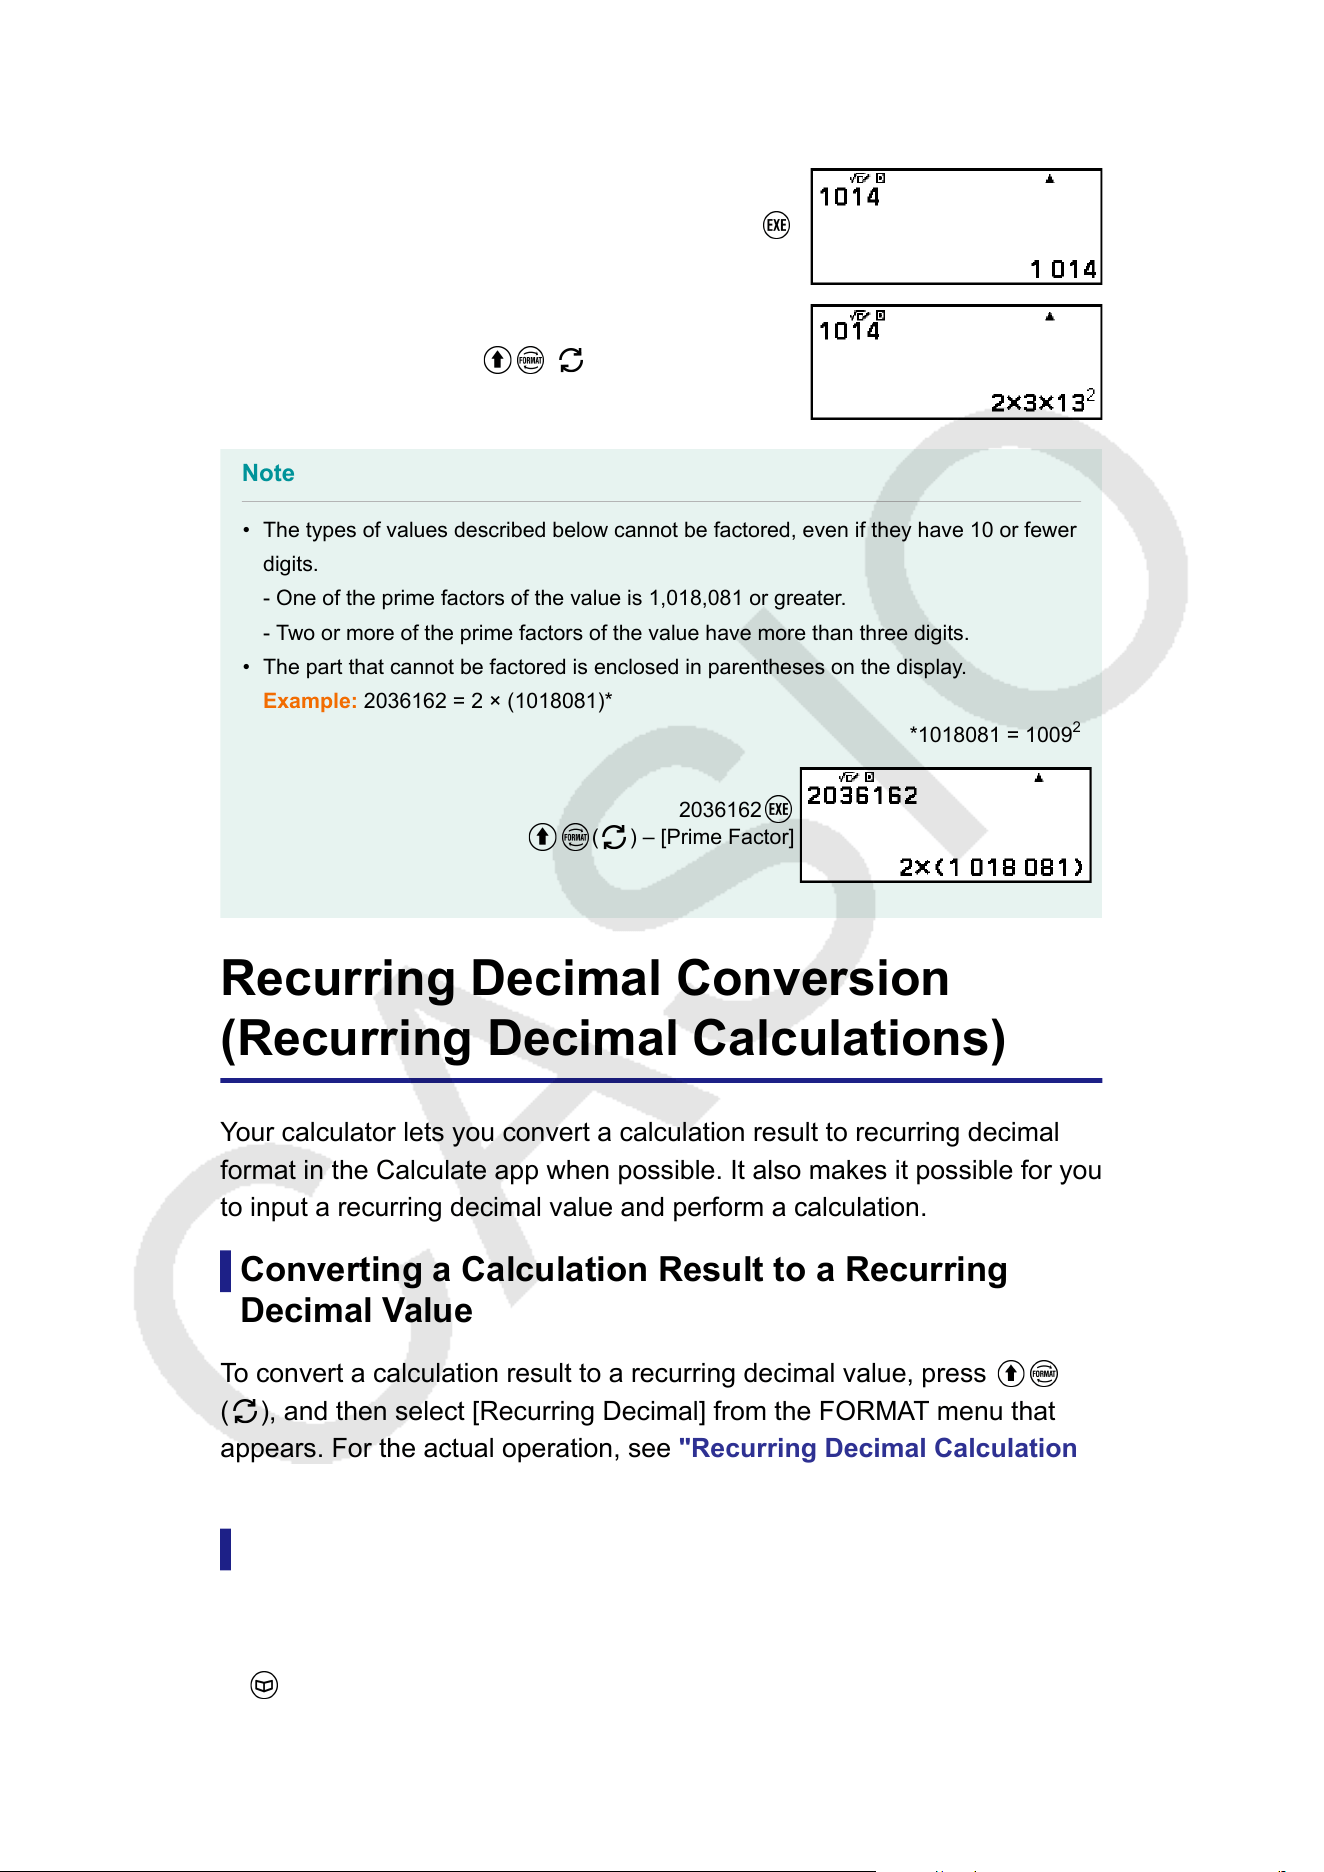
Example: T
o perform prime factorization on 1014
1014
( ) – [Prime Factor]
Note
• The types of values described below cannot be factored, even if they have 10 or fewer
digits.
- One of the prime factors of the value is 1,018,081 or greater
.
- Two or more of the prime factors of the value have more than three digits.
• The part that cannot be factored is enclosed in parentheses on the display.
Example: 2036162 = 2 × (1018081)*
*1018081 = 1009
2
2036162
( ) – [Prime Factor]
Recurring Decimal Conversion
(Recurring Decimal Calculations)
Y
our calculator lets you convert a calculation result to recurring decimal
format in the Calculate app when possible. It also makes it possible for you
to input a recurring decimal value and perform a calculation.
Converting a Calculation Result to a Recurring
Decimal Value
To convert a calculation result to a recurring decimal value, press
( ), and then select [Recurring Decimal] from the FORMAT menu that
appears. For the actual operation, see "Recurring Decimal Calculation
Example"
(page 52).
Inputting a Recurring Decimal
To input a recurring decimal value, use the CATALOG menu item shown
below.
– [Numeric Calc] > [Recurring Decimal]
51

For the actual operation, see "Recurring Decimal Calculation Example"
(page 52).
Important!
• If the value starts with an integer part (like: 12.3123123...), do not include the integer
part when inputting the period (12.
312).
• Recurring decimal input is possible only when MathI/MathO or MathI/DecimalO is
selected for Input/Output on the SETTINGS menu.
Recurring Decimal Calculation Example
T
o calculate 3.
021 + 0.312 (Input/Output: MathI/MathO)
1. Use the following operation to input the calculation expression.
3
– [Numeric Calc] > [Recurring Decimal]
021
0
– [Numeric Calc] > [Recurring Decimal]
312
• This displays the calculation result as a fraction.
2. Press ( ), and then select [Recurring Decimal].
• This changes the result format to recurring decimal.
• To return the calculation result to a fraction, select ( ) – [
(Standard)].
Note
• Only a calculation result that satisfies the conditions below can be displayed as a
recurring decimal.
- The total number of digits used in the mixed number (including integer
, numerator,
denominator, and separator symbol) must be no more than 10.
- The data size of the value when displayed as a recurring decimal must be no larger
than 99 bytes, calculated as: [number of digits (1 byte each)] + [1 byte for the
decimal point] + [3 bytes for recurring decimal management code]. For example, the
data size of 0.
123 would be 4 bytes for digits, 1 byte for the decimal point, and 3
bytes for recurring decimal management code, for a total of 8 bytes.
52
Rectangular and Polar Coordinate
Conversion
Y
ou can convert a complex number calculation result to rectangular
coordinates (
( ) – [Rectangular Coord]) or polar coordinates (
( ) – [Polar Coord]). This conversion operation can be performed in
either of the following cases.
• While an Equation app higher-order equation solution is displayed
(provided that On is selected for the – [Complex Roots] setting of
the Equation app)
• While a Complex app calculation result is displayed
For an actual sample conversion operation, see the sections below
.
"Converting a Complex Number Solution to Rectangular or Polar
Coordinates" (page 102)
"Converting a Complex Number Calculation Result to Rectangular or
Polar Coordinates" (page 113)
Improper Fraction and Mixed
Number Conversion
You can convert the currently displayed fraction or decimal value (decimal
value that is convertible to a fraction by this calculator) calculation result to
a mixed number or an improper fraction.
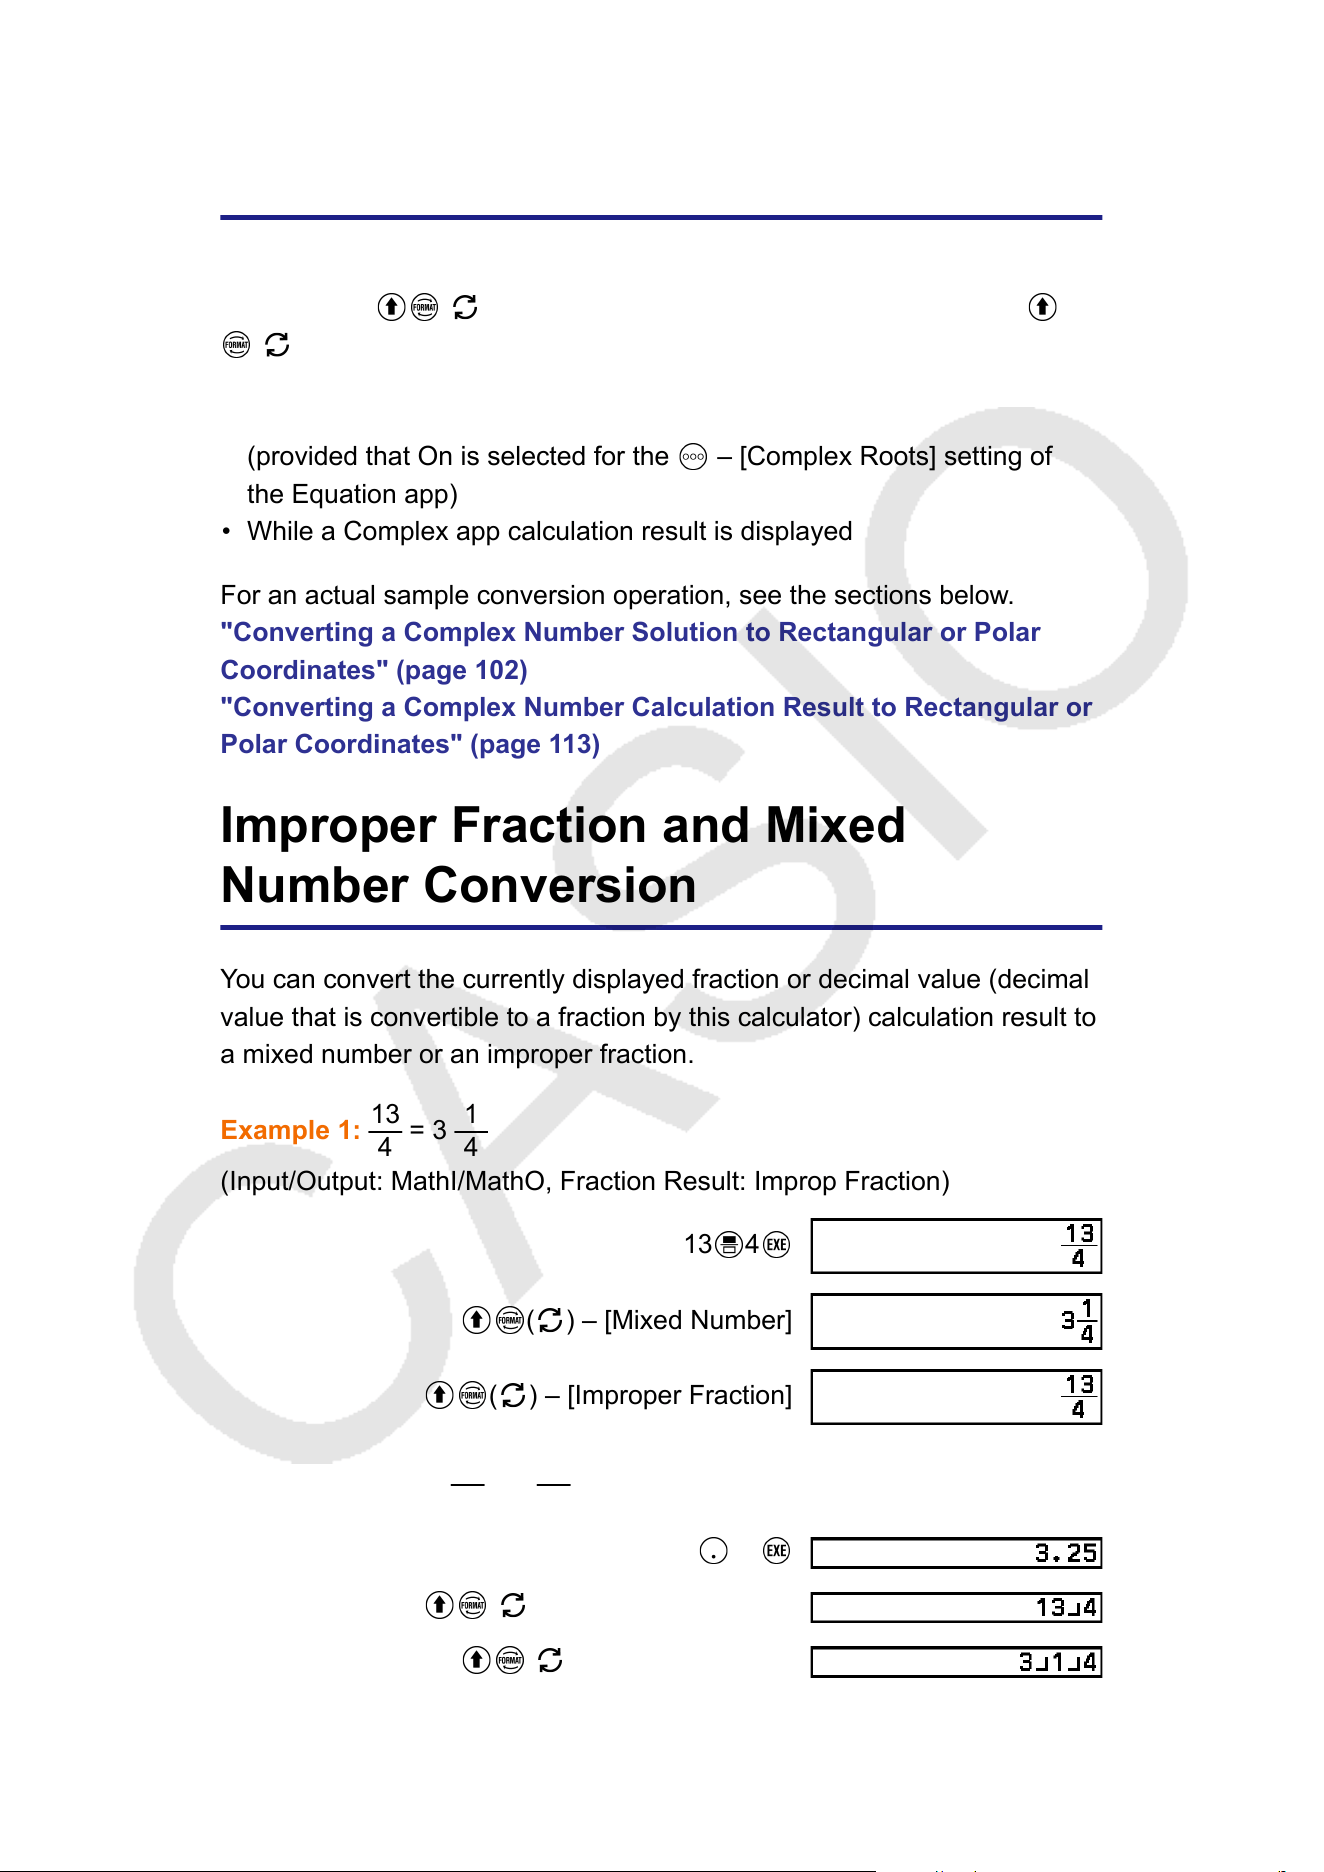
Example 1:
13
4
= 3
1
4
(Input/Output: MathI/MathO, Fraction Result: Improp Fraction)
13 4
( ) – [Mixed Number]
( ) – [Improper Fraction]
Example 2: 3.25 =
13
4
= 3
1
4
(Input/Output: LineI/LineO)
3 25
( ) – [Improper Fraction]
( ) – [Mixed Number]
53
Standard Form (a×10
n
)
Y
ou can convert the currently displayed calculation result to a ×10
n
format.
Example: 123456 = 1.23456×10
5
123456
( ) – [Standard Form]
Sexagesimal Conversion (Degree,
Minute, Second Calculations)
Y
ou can convert a decimal value calculation result to a sexagesimal value.
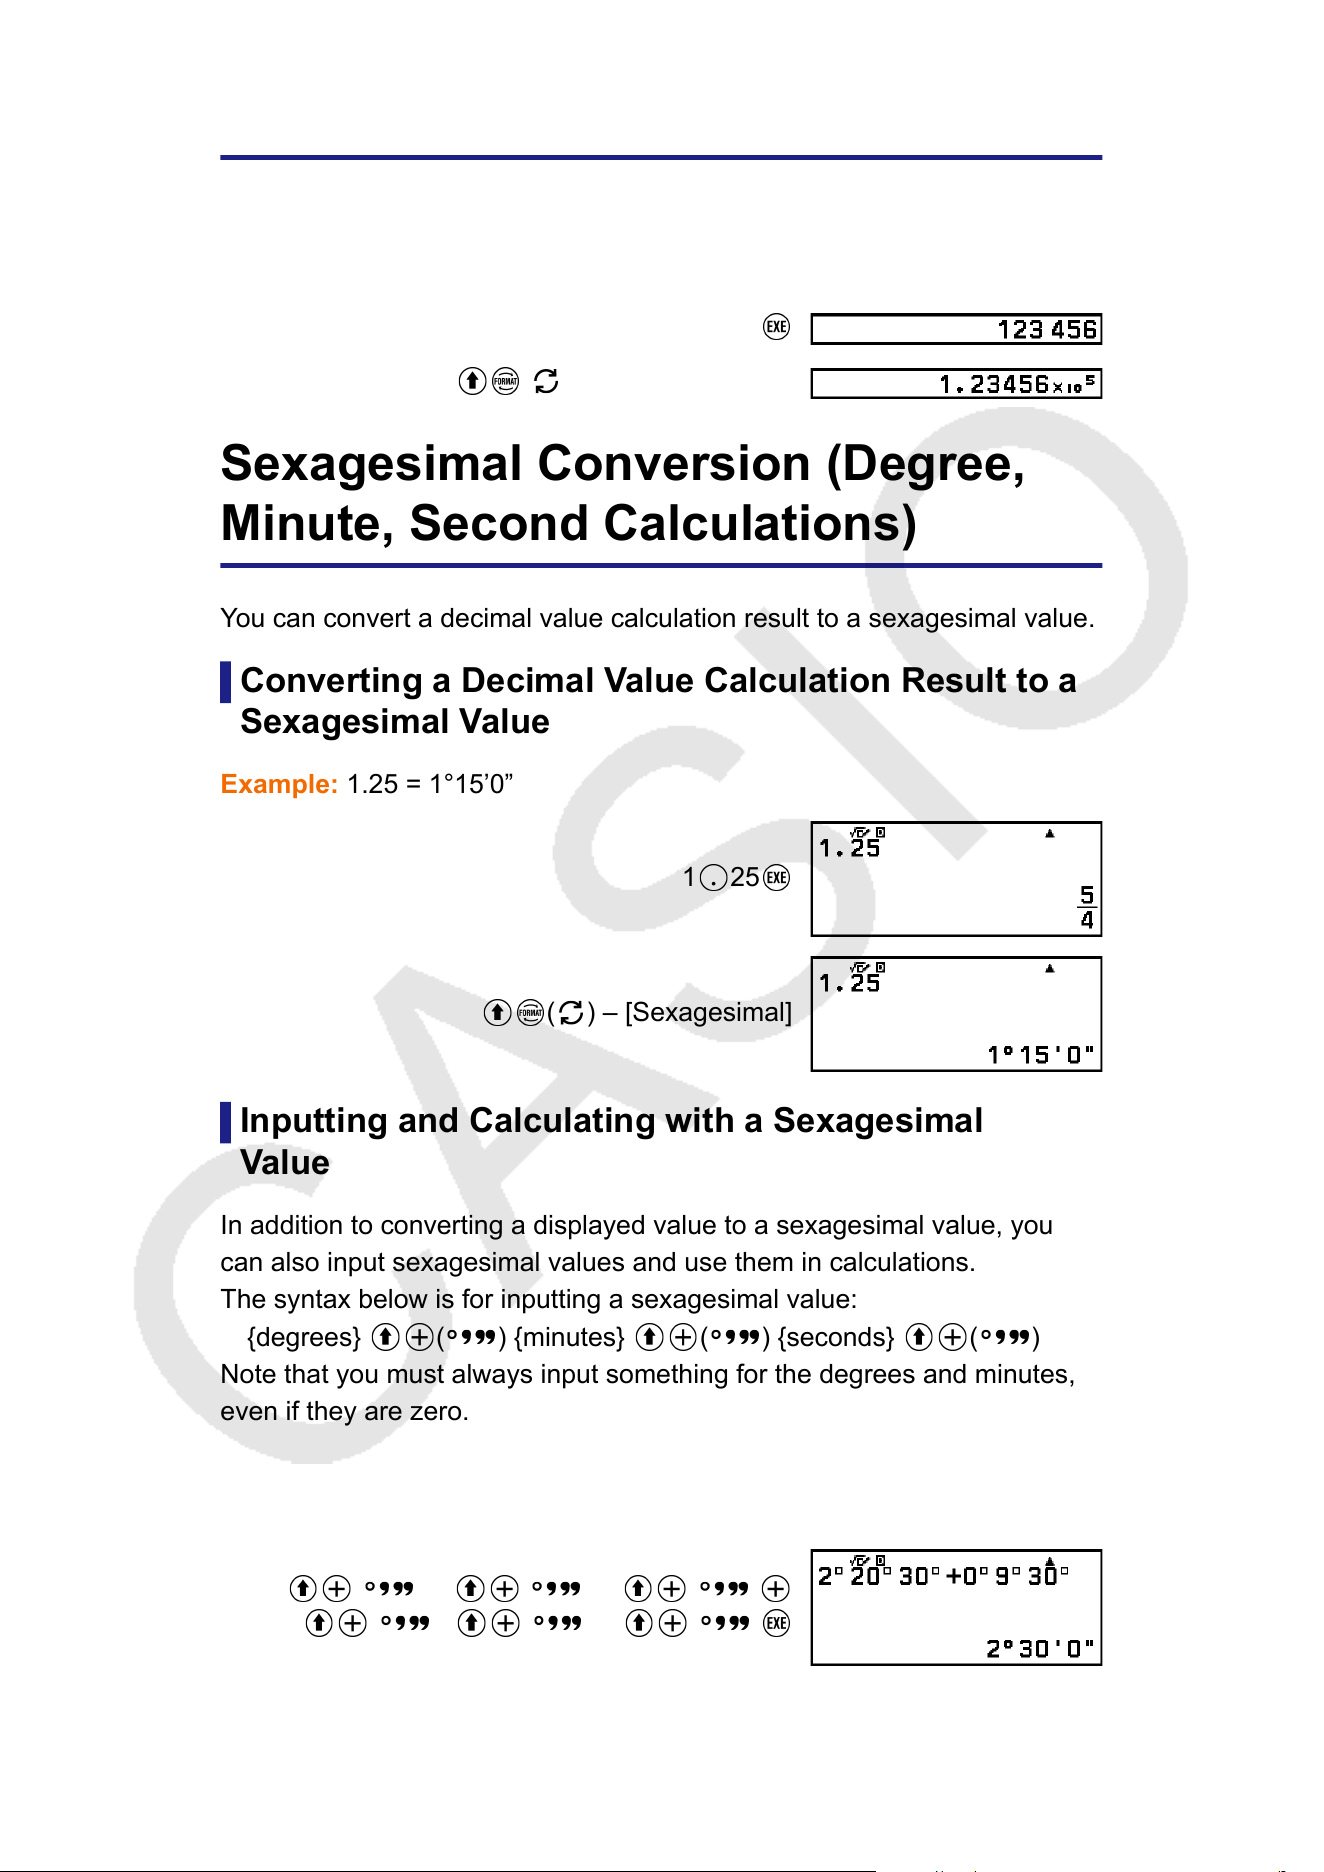
Converting a Decimal Value Calculation Result to a
Sexagesimal Value
Example: 1.25 = 1°15’0”
1
25
( ) – [Sexagesimal]
Inputting and Calculating with a Sexagesimal
V
alue
In addition to converting a displayed value to a sexagesimal value, you
can also input sexagesimal values and use them in calculations.
The syntax below is for inputting a sexagesimal value:
{degrees}
( ) {minutes} ( ) {seconds} ( )
Note that you must always input something for the degrees and minutes,
even if they are zero.
Example: T
o perform the calculation 2°20’30” + 9’30”. Next, convert the
calculation result to a decimal value.
2
( )20 ( )30 ( )
0 ( )9 ( )30 ( )
54

(Convert to a decimal value.)
( ) – [Decimal]
(Return to sexagesimal display.)
( ) – [Sexagesimal]
55
Advanced Calculations
This section describes commands, functions, and symbols that are
common to all of the calculator apps. The order used here to present
commands, functions, and symbols is the same order in which they are
displayed on the CA
TALOG menu that appears when you press
.
Note
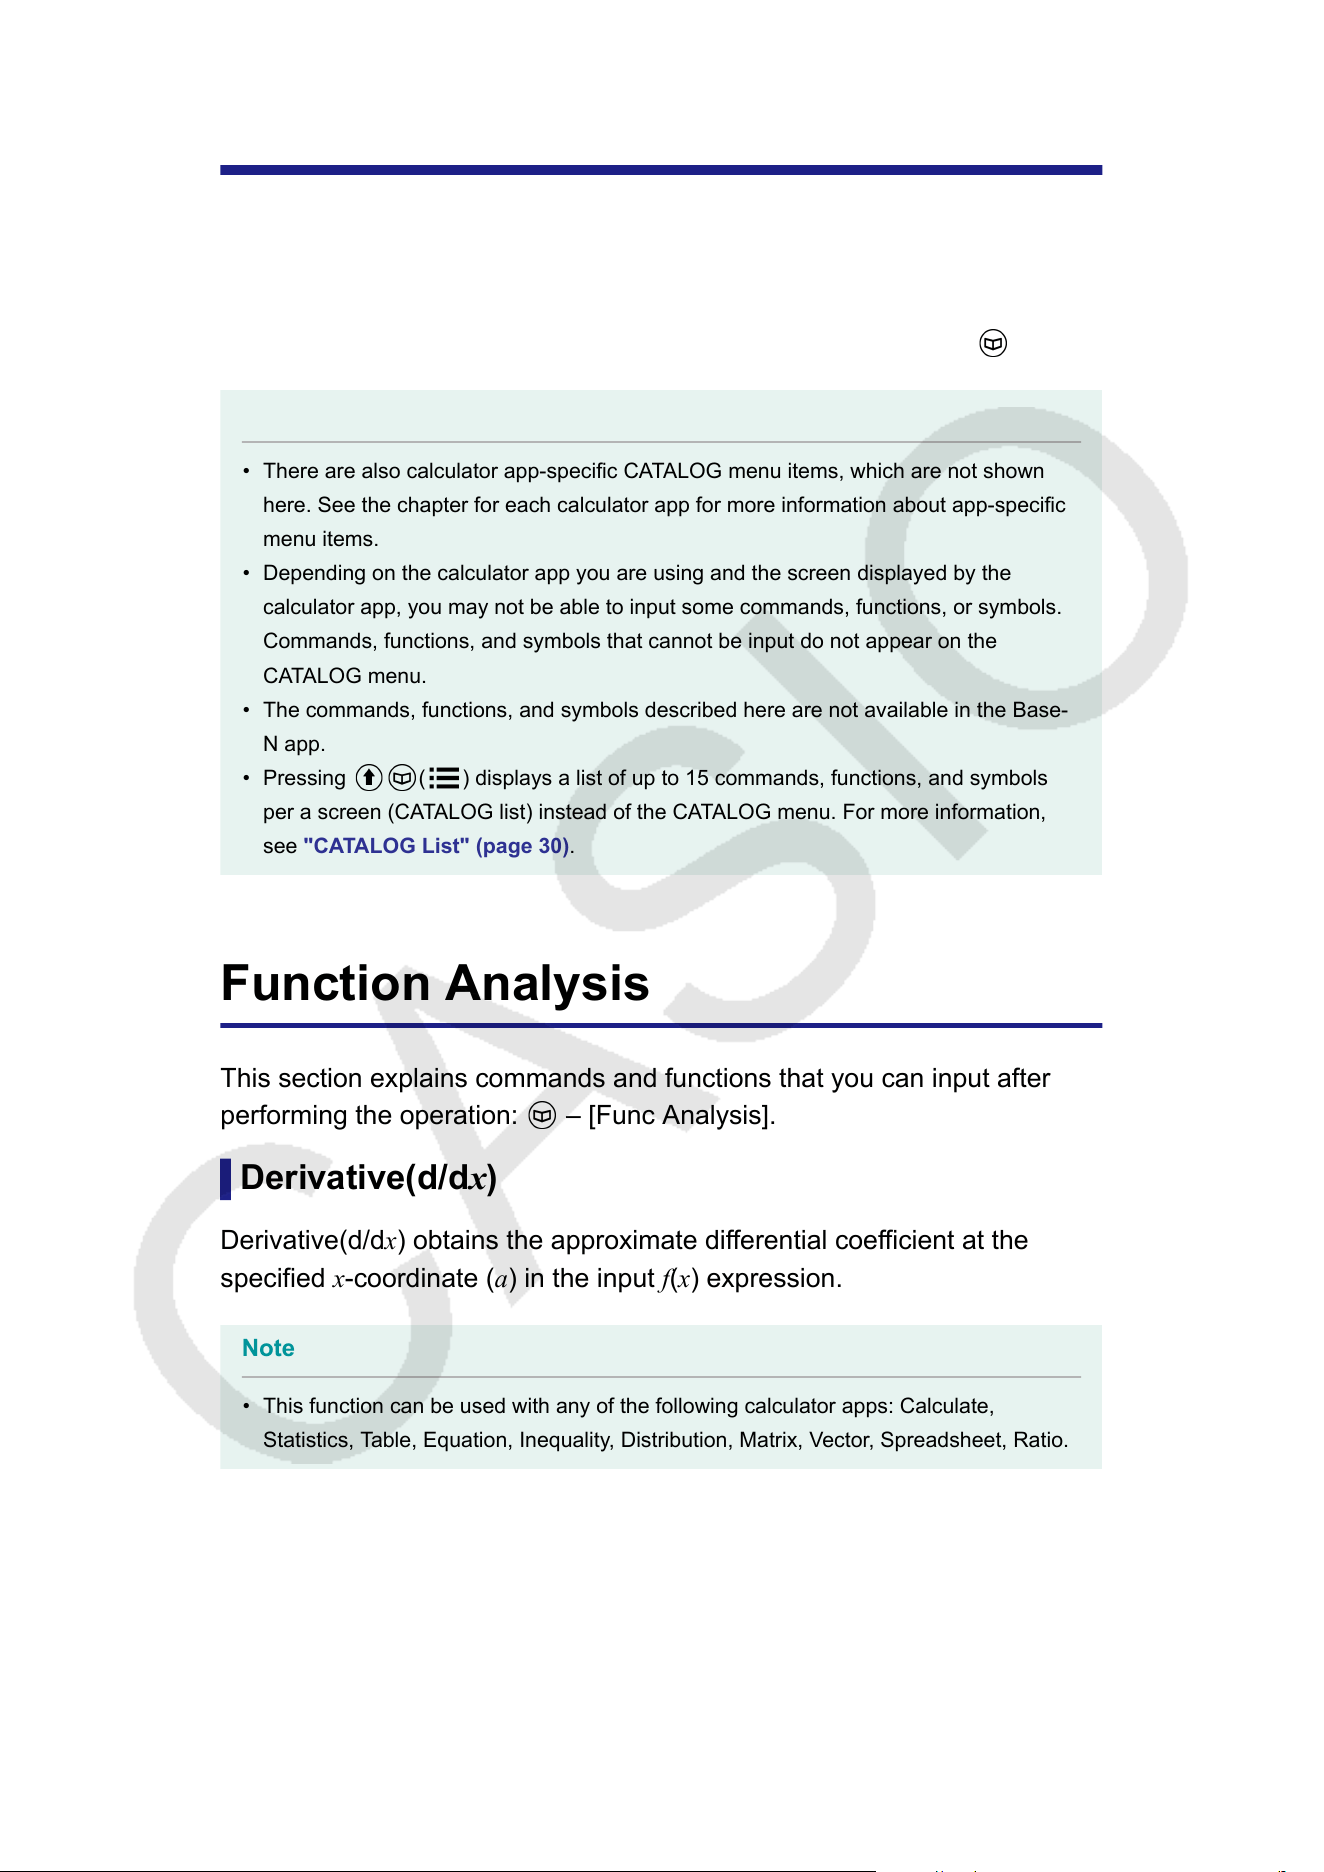
• There are also calculator app-specific CATALOG menu items, which are not shown
here. See the chapter for each calculator app for more information about app-specific
menu items.
• Depending on the calculator app you are using and the screen displayed by the
calculator app, you may not be able to input some commands, functions, or symbols.
Commands, functions, and symbols that cannot be input do not appear on the
CA
TALOG menu.
• The commands, functions, and symbols described here are not available in the Base-
N app.
• Pressing
( ) displays a list of up to 15 commands, functions, and symbols
per a screen (CA
TALOG list) instead of the CATALOG menu. For more information,
see "CATALOG List" (page 30).
Function Analysis
This section explains commands and functions that you can input after
performing the operation:
– [Func Analysis].
Derivative(d/dx)
Derivative(d/dx) obtains the approximate dif
ferential coefficient at the
specified x-coordinate (a) in the input f(x) expression.
Note
• This function can be used with any of the following calculator apps: Calculate,
Statistics, T
able, Equation, Inequality, Distribution, Matrix, Vector, Spreadsheet, Ratio.
Input Syntax
The input syntax depends on the Input/Output setting on the SETTINGS
menu, as shown in the table below.
56
Input/Output setting Input Syntax
MathI/MathO or MathI/DecimalO
d
dx
(f(x))|
x=a
LineI/LineO or LineI/DecimalO
d
dx
(f(x), a, tol)*
* tol specifies tolerance, which becomes 1 × 10
-16
when nothing is input for
tol.
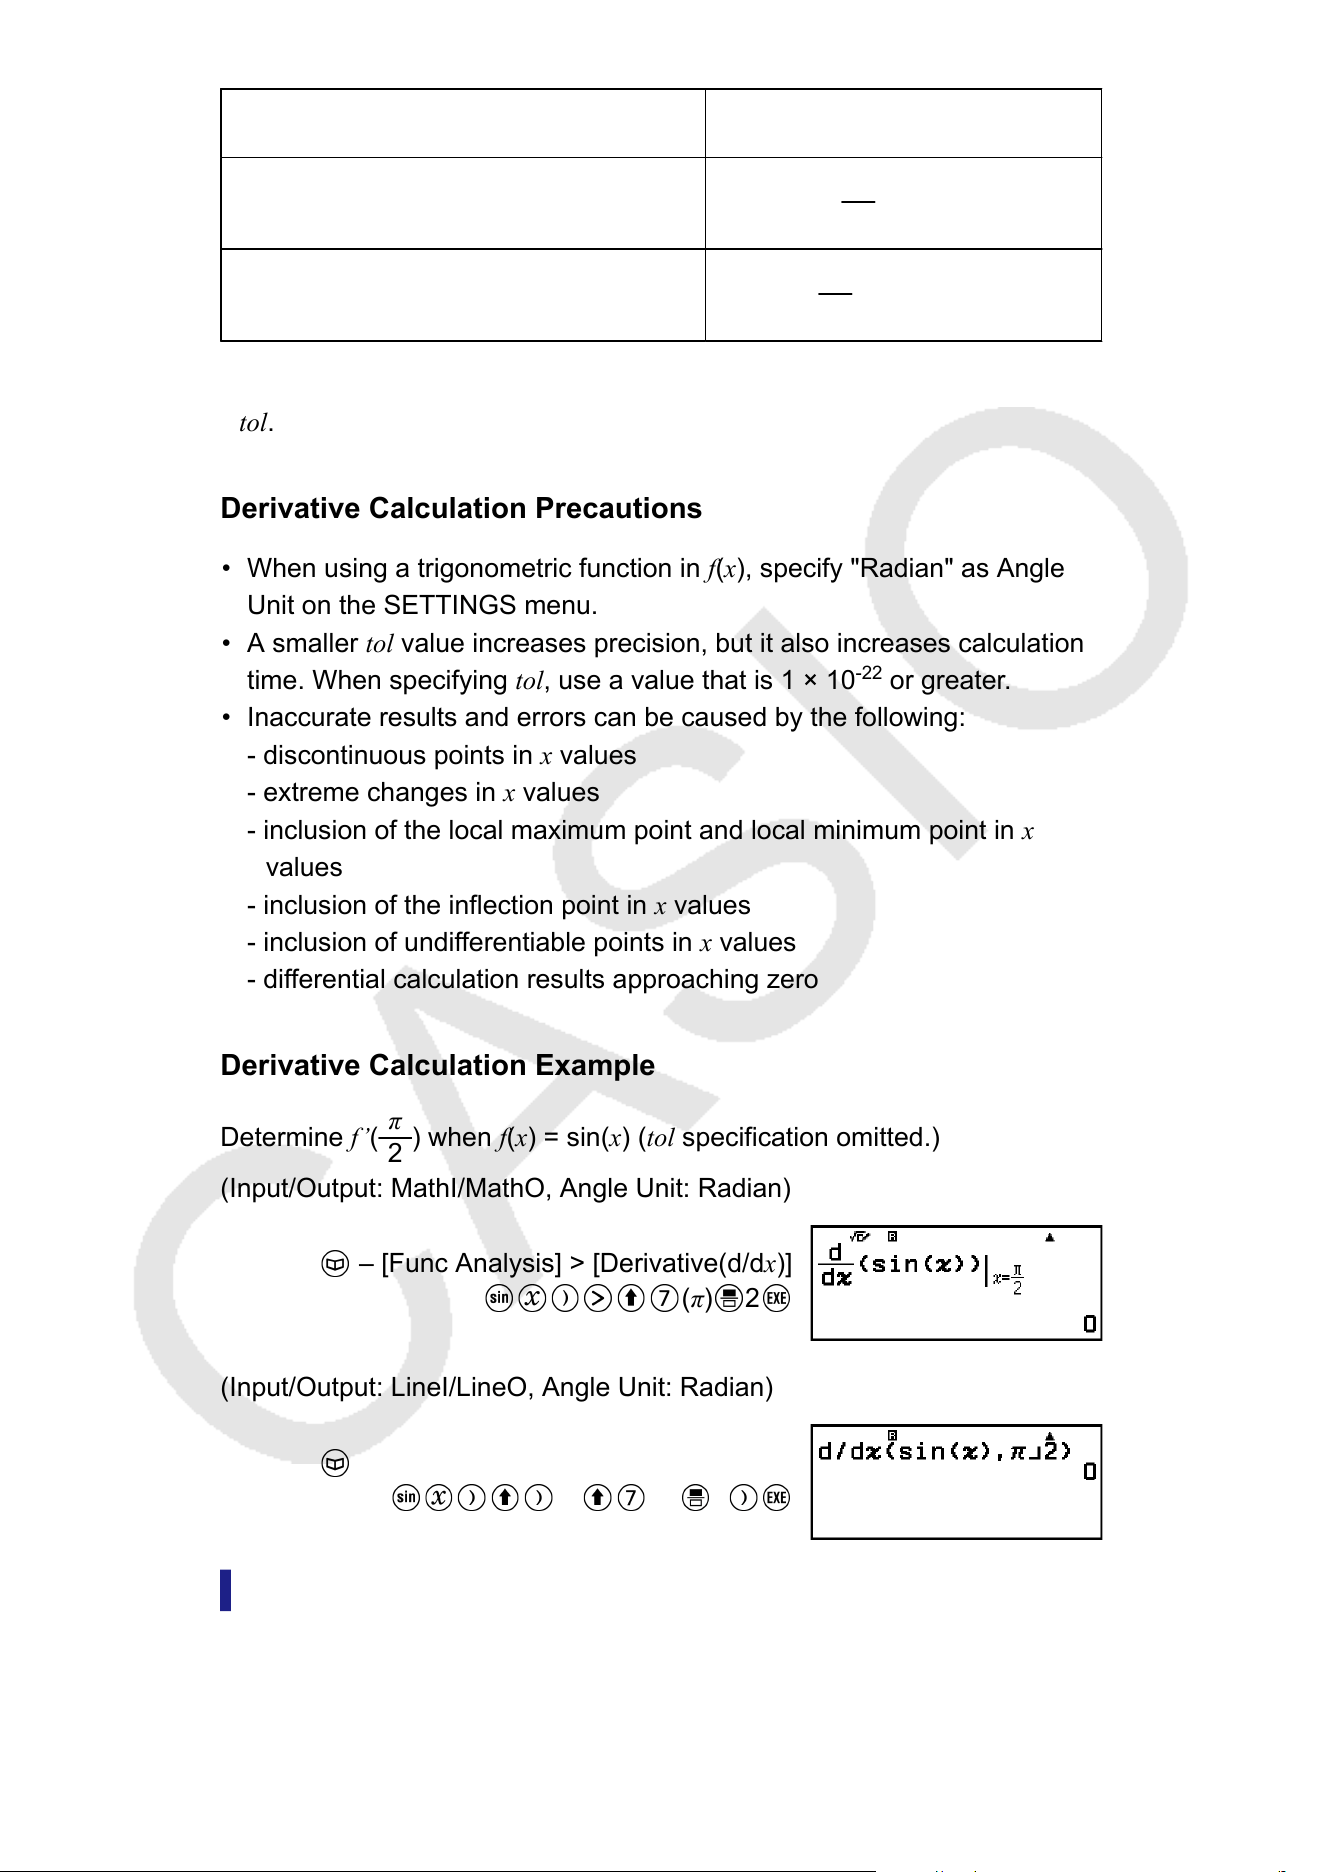
Derivative Calculation Precautions
• When using a trigonometric function in f(x), specify "Radian" as Angle
Unit on the SETTINGS menu.
• A smaller tol value increases precision, but it also increases calculation
time. When specifying tol, use a value that is 1 × 10
-22
or greater.
• Inaccurate results and errors can be caused by the following:
- discontinuous points in x
values
- extreme changes in x values
- inclusion of the local maximum point and local minimum point in x
values
- inclusion of the inflection point in x values
- inclusion of undifferentiable points in x values
- differential calculation results approaching zero
Derivative Calculation Example
Determine f’(
π
2
) when f(x) = sin(x) (tol
specification omitted.)
(Input/Output: MathI/MathO, Angle Unit: Radian)
– [Func Analysis] > [Derivative(d/dx)]
(π) 2
(Input/Output: LineI/LineO, Angle Unit: Radian)
– [Func Analysis] > [Derivative(d/dx)]
(,) (π) 2
Integration(∫)
This calculator performs integration using the Gauss-Kronrod method of
numerical integration.
57
Note
• This function can be used with any of the following calculator apps: Calculate,
Statistics, T
able, Equation, Inequality, Distribution, Matrix, Vector, Spreadsheet, Ratio.
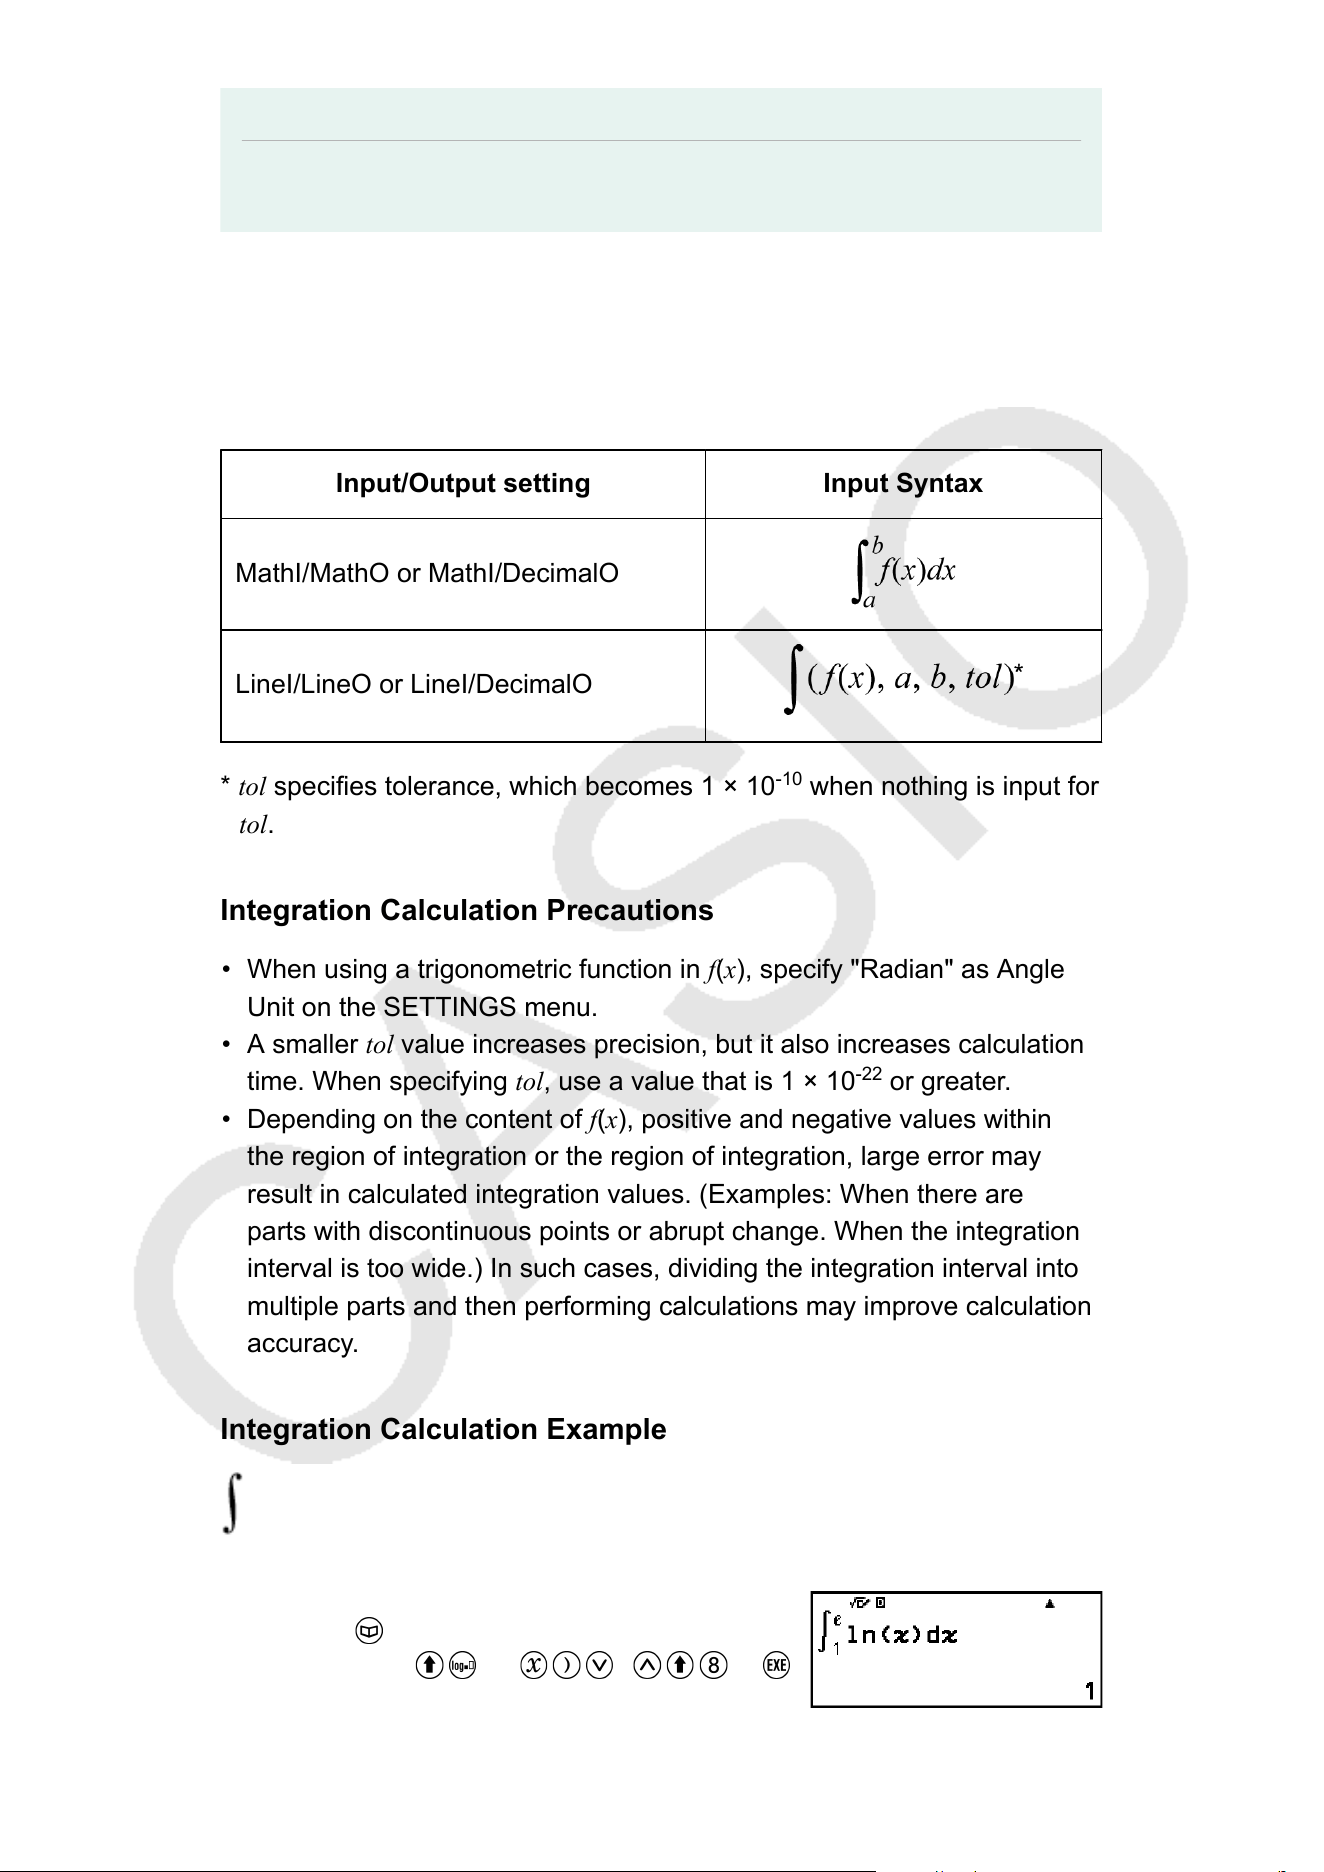
Input Syntax
The input syntax depends on the Input/Output setting on the SETTINGS
menu, as shown in the table below.
Input/Output setting Input Syntax
MathI/MathO or MathI/DecimalO
LineI/LineO or LineI/DecimalO
* tol specifies tolerance, which becomes 1 × 10
-10
when nothing is input for
tol.
Integration Calculation Precautions
• When using a trigonometric function in f(x), specify "Radian" as Angle
Unit on the SETTINGS menu.
• A smaller tol value increases precision, but it also increases calculation
time. When specifying tol, use a value that is 1 × 10
-22
or greater.
• Depending on the content of f(x), positive and negative values within
the region of integration or the region of integration, large error may
result in calculated integration values. (Examples: When there are
parts with discontinuous points or abrupt change. When the integration
interval is too wide.) In such cases, dividing the integration interval into
multiple parts and then performing calculations may improve calculation
accuracy
.
Integration Calculation Example
(ln(x), 1, e) = 1 (tol specification omitted.)
(Input/Output: MathI/MathO)
– [Func Analysis] > [Integration(∫)]
(ln) 1 (e)
58

(Input/Output: LineI/LineO)
– [Func Analysis] > [Integration(∫)]
(ln) (,)1 (,) (e)
Summation(Σ)
With Σ(, you can obtain the sum of an input f(x) expression for a specific
range.
Note
• This function can be used with any of the following calculator apps: Calculate,
Statistics, T
able, Equation (except for Solver), Inequality, Distribution, Matrix, Vector,
Spreadsheet, Ratio.
Input Syntax
The input syntax depends on the Input/Output setting on the SETTINGS
menu, as shown in the table below.
Input/Output setting Input Syntax
MathI/MathO or MathI/DecimalO
LineI/LineO or LineI/DecimalO
* a and b are integers that can be specified within the range of -1 × 10
10
<
a
≤ b < 1 × 10
10
.
Σ Calculation Example
(x + 1) = 20
(Input/Output: MathI/MathO)
– [Func Analysis] > [Summation(Σ)]
1 1 5
(Input/Output: LineI/LineO)
59

– [Func Analysis] > [Summation(Σ)]
1 (,)1 (,)5
Logarithm(logab), Logarithm(log)
Use (log) or – [Func Analysis] > [Logarithm(log)] to input log
a
b as
log (a, b). Base 10 is the initial default setting if you do not input anything
for a.
Example 1: log
10
1000 = log 1000 = 3
(log)1000
Example 2:
log
2
16 = 4
(log)2 (,)16
The key (or – [Func Analysis] > [Logarithm(logab)]) also can be
used for input, but only while MathI/MathO or MathI/DecimalO is selected
for Input/Output on the SETTINGS menu. In this case, you must input a
value for the base.
Example 3: log
2
16 = 4
2 16
Natural Logarithm
Use (ln) or – [Func Analysis] > [Natural Logarithm] to input "ln".
Example: ln 90 (= log
e
90) = 4.49980967
(ln)90
Probability
This section explains commands and functions that you can input after
performing the operation: – [Probability].
60
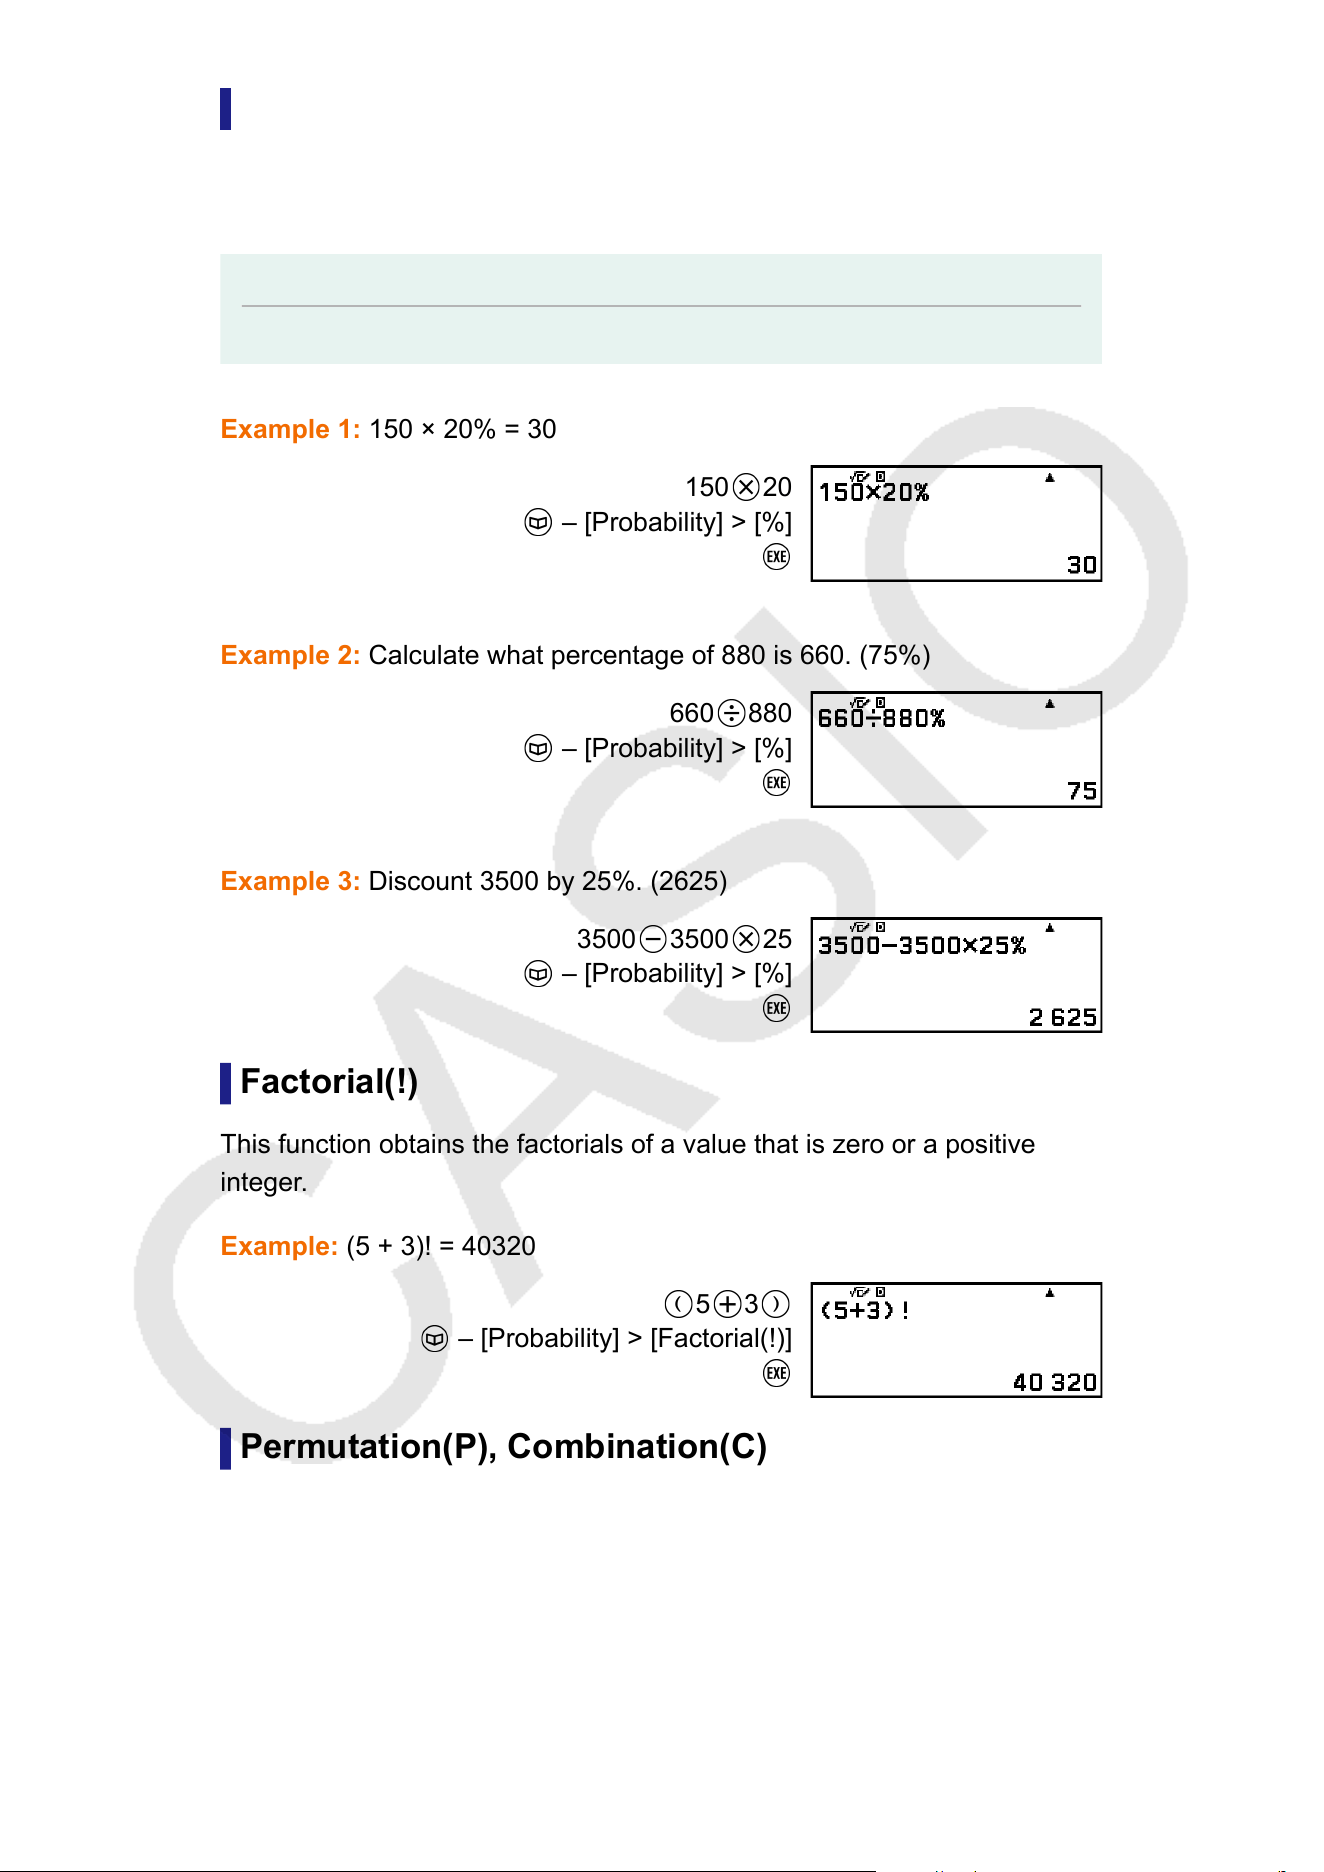
%
Inputting a value followed by % command causes the input value to
become a percent.
Note
• You cannot input % with the Complex app.
Example 1:
150 × 20% = 30
150
20
– [Probability] > [%]
Example 2:
Calculate what percentage of 880 is 660. (75%)
660
880
– [Probability] > [%]
Example 3:
Discount 3500 by 25%. (2625)
3500
3500 25
– [Probability] > [%]
Factorial(!)
This function obtains the factorials of a value that is zero or a positive
integer
.
Example: (5 + 3)! = 40320
5 3
– [Probability] > [Factorial(!)]
Permutation(P), Combination(C)
Permutation (nPr) and combination (nCr) functions.
Example: T
o determine the number of permutations and combinations
possible when selecting four people from a group of 10
61
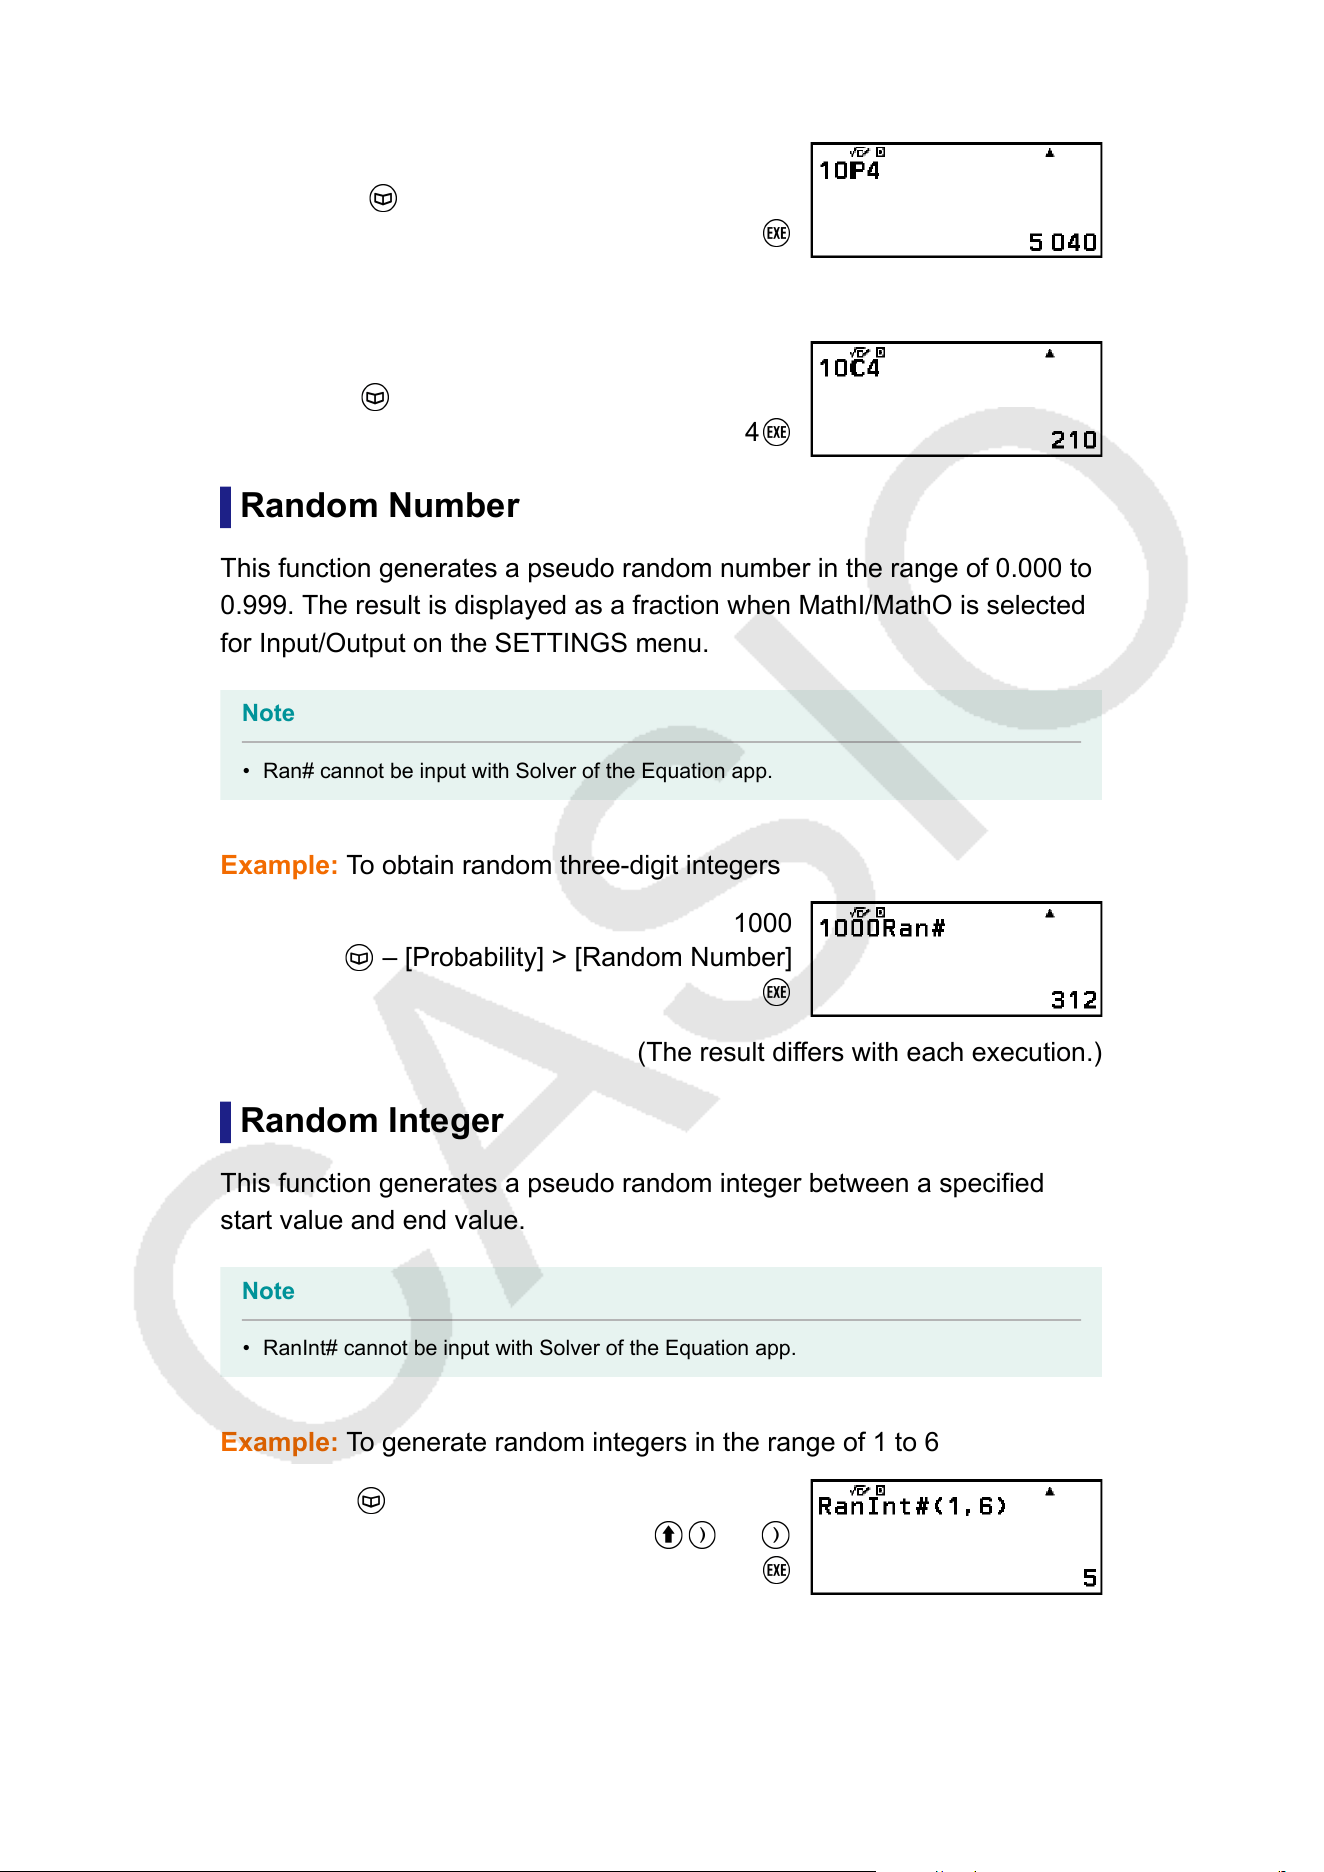
Permutations:
10
– [Probability] > [Permutation(P)]
4
Combinations:
10
– [Probability] > [Combination(C)]
4
Random Number
This function generates a pseudo random number in the range of 0.000 to
0.999. The result is displayed as a fraction when MathI/MathO is selected
for Input/Output on the SETTINGS menu.
Note
• Ran# cannot be input with Solver of the Equation app.
Example: T
o obtain random three-digit integers
1000
– [Probability] > [Random Number]
(The result differs with each execution.)
Random Integer
This function generates a pseudo random integer between a specified
start value and end value.
Note
• RanInt# cannot be input with Solver of the Equation app.
Example: T
o generate random integers in the range of 1 to 6
– [Probability] > [Random Integer]
1 (,)6
(The result differs with each execution.)
62
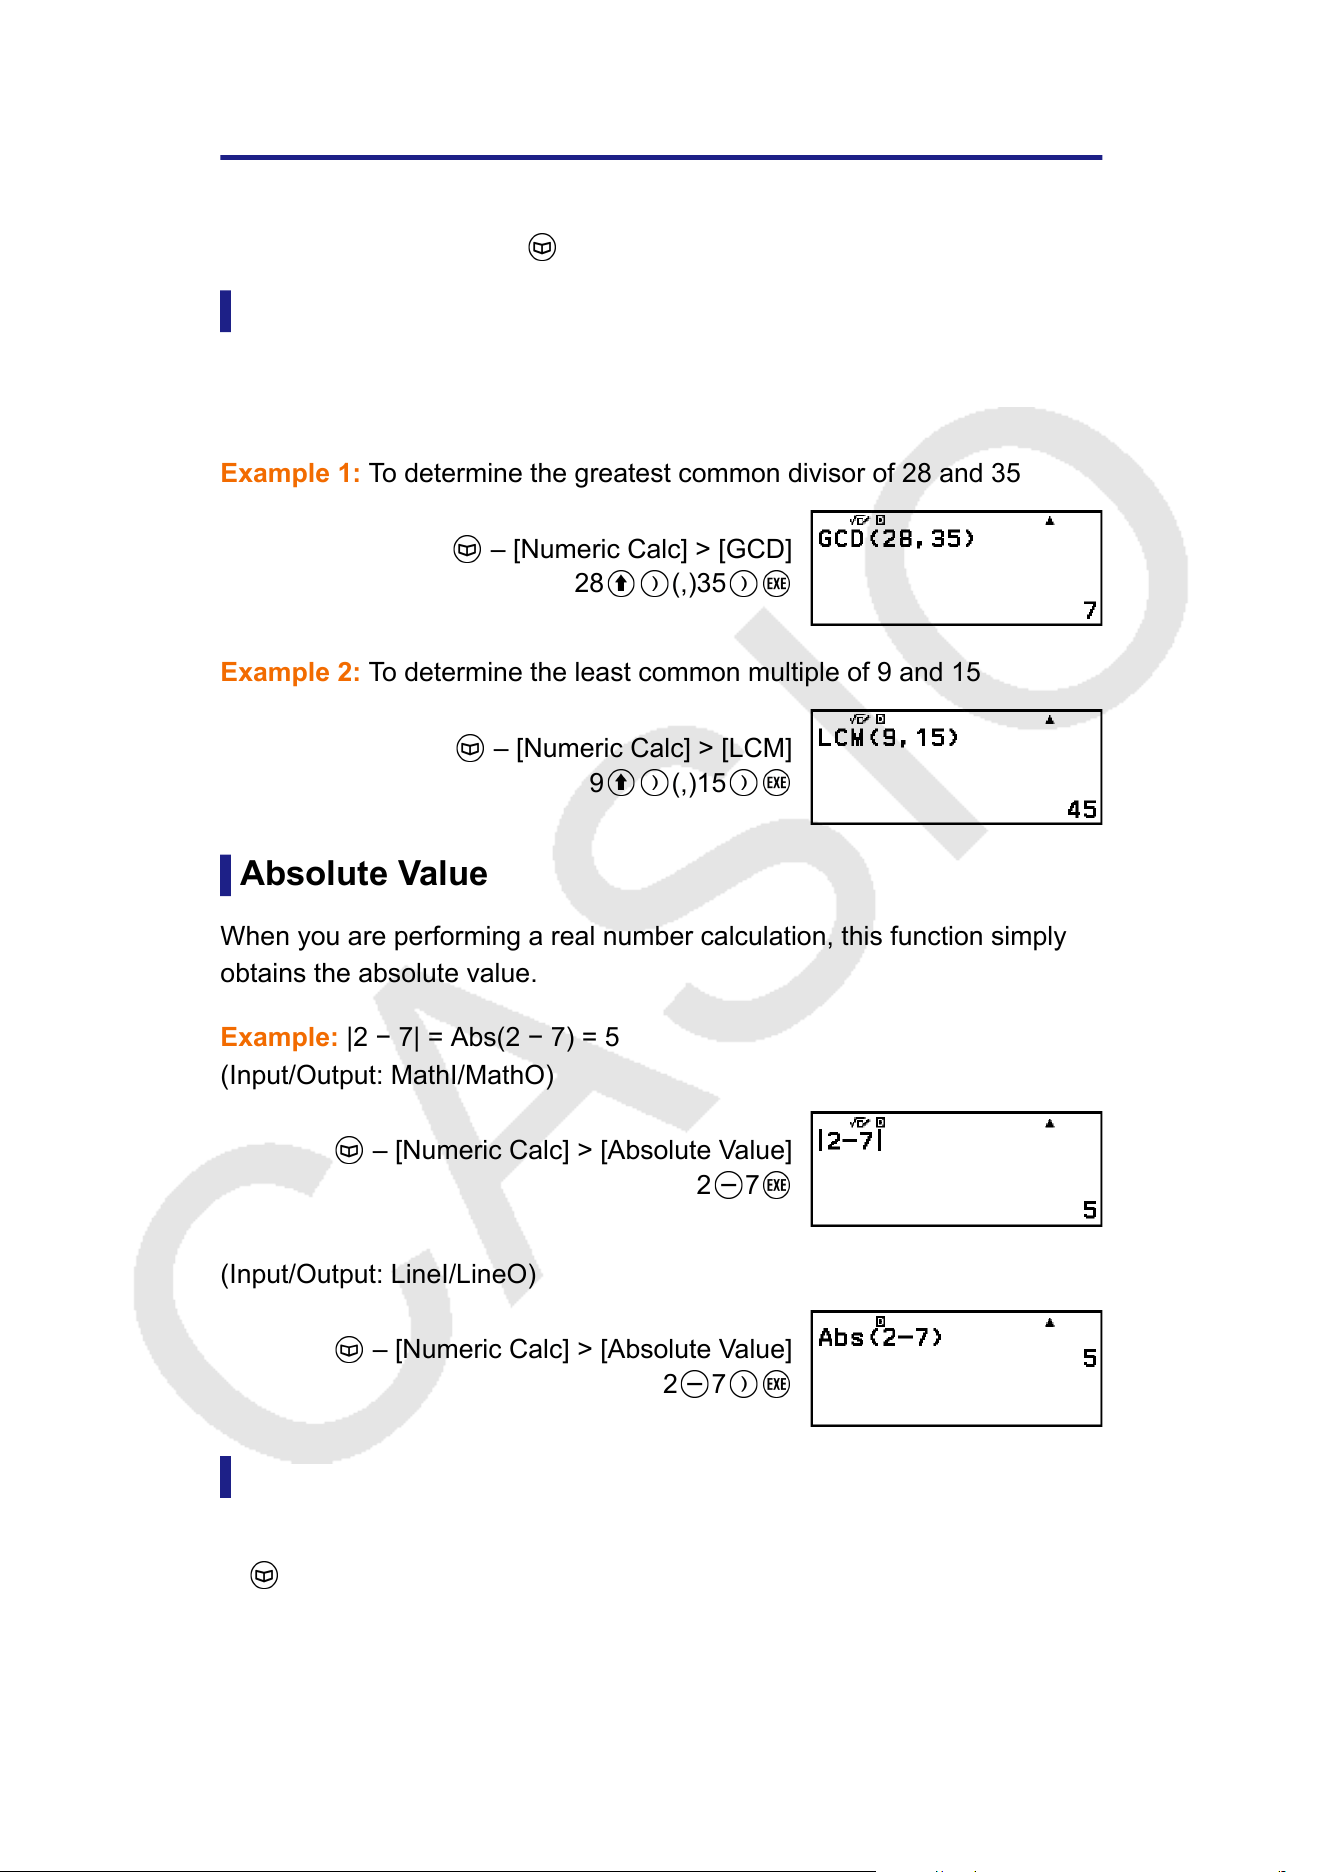
Numeric Calculations
This section explains commands and functions that you can input after
performing the operation: – [Numeric Calc].
GCD, LCM
GCD determines the greatest common divisor of two values, while LCM
determines the least common multiple.
Example 1: T
o determine the greatest common divisor of 28 and 35
– [Numeric Calc] > [GCD]
28 (,)35
Example 2: To determine the least common multiple of 9 and 15
– [Numeric Calc] > [LCM]
9 (,)15
Absolute Value
When you are performing a real number calculation, this function simply
obtains the absolute value.
Example: |2 − 7| = Abs(2
− 7) = 5
(Input/Output: MathI/MathO)
– [Numeric Calc] > [Absolute Value]
2 7
(Input/Output: LineI/LineO)
– [Numeric Calc] > [Absolute Value]
2 7
Recurring Decimal
Y
ou can use the menu item below to input a recurring decimal.
– [Numeric Calc] > [Recurring Decimal]
For details, see "Recurring Decimal Conversion (Recurring Decimal
Calculations)" (page 51).
63
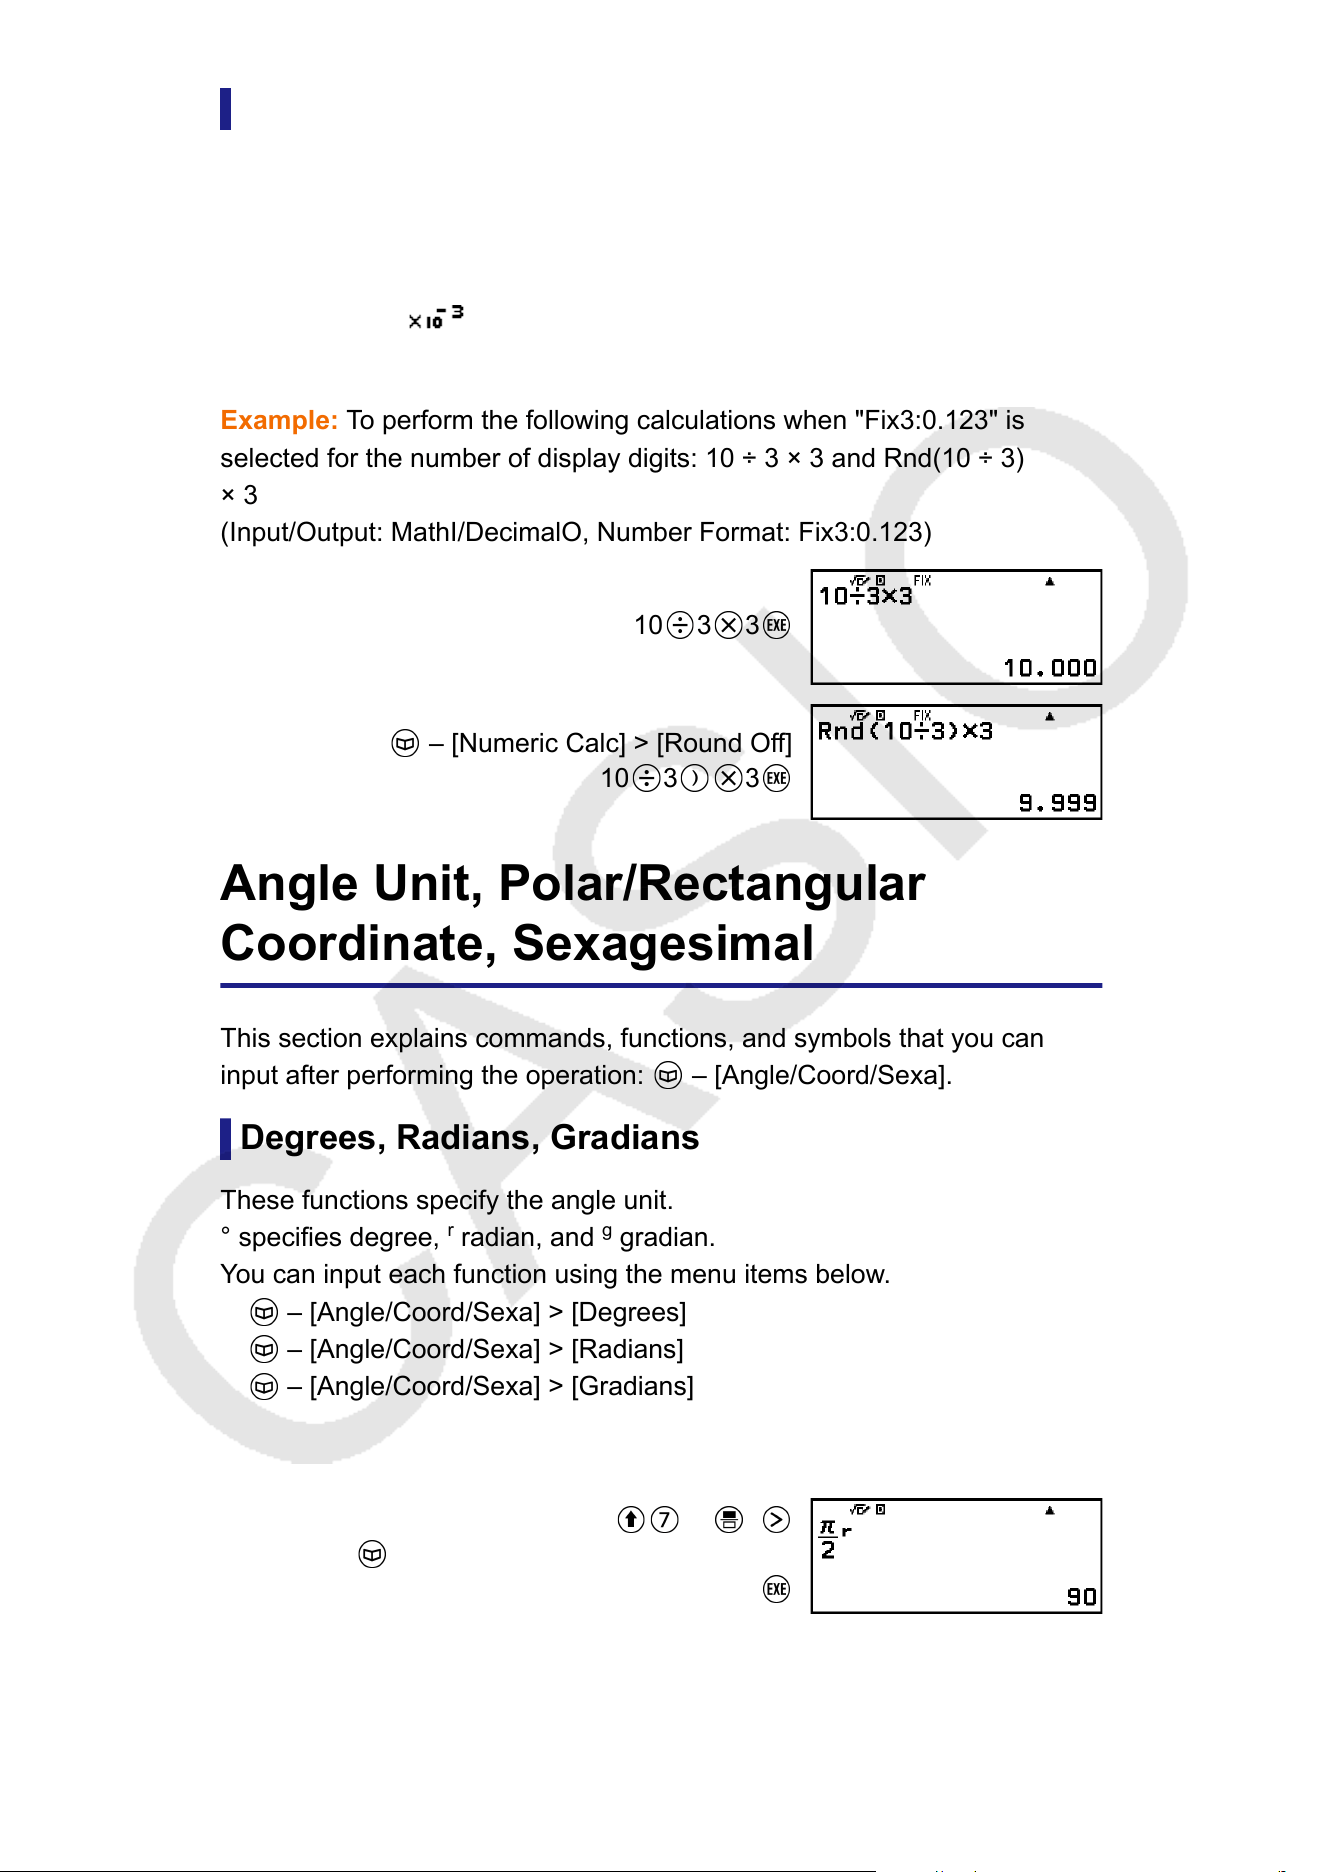
Round Off
Using the Round Of
f function (Rnd) causes decimal fraction values of
the argument to be rounded in accordance with the current Number
Format setting. For example, the internal and displayed result of Rnd(10
÷ 3) is 3.333 when the Number Format setting is "Fix3:0.123". Using
the Norm1:1.23
or Norm2:0.00123 setting cause the argument to be
rounded of
f at the 11th digit of the mantissa part.
Example: To perform the following calculations when "Fix3:0.123" is
selected for the number of display digits: 10 ÷ 3 × 3 and Rnd(10 ÷ 3)
× 3
(Input/Output: MathI/DecimalO, Number Format: Fix3:0.123)
10
3 3
– [Numeric Calc] > [Round Off]
10 3 3
Angle Unit, Polar/Rectangular
Coordinate, Sexagesimal
This section explains commands, functions, and symbols that you can
input after performing the operation: – [Angle/Coord/Sexa].
Degrees, Radians, Gradians
These functions specify the angle unit.
° specifies degree,
r
radian, and
g
gradian.
Y
ou can input each function using the menu items below.
– [Angle/Coord/Sexa] > [Degrees]
– [Angle/Coord/Sexa] > [Radians]
– [Angle/Coord/Sexa] > [Gradians]
Example: π/2 radians = 90° (Angle Unit: Degree)
(π) 2
– [Angle/Coord/Sexa] > [Radians]
64
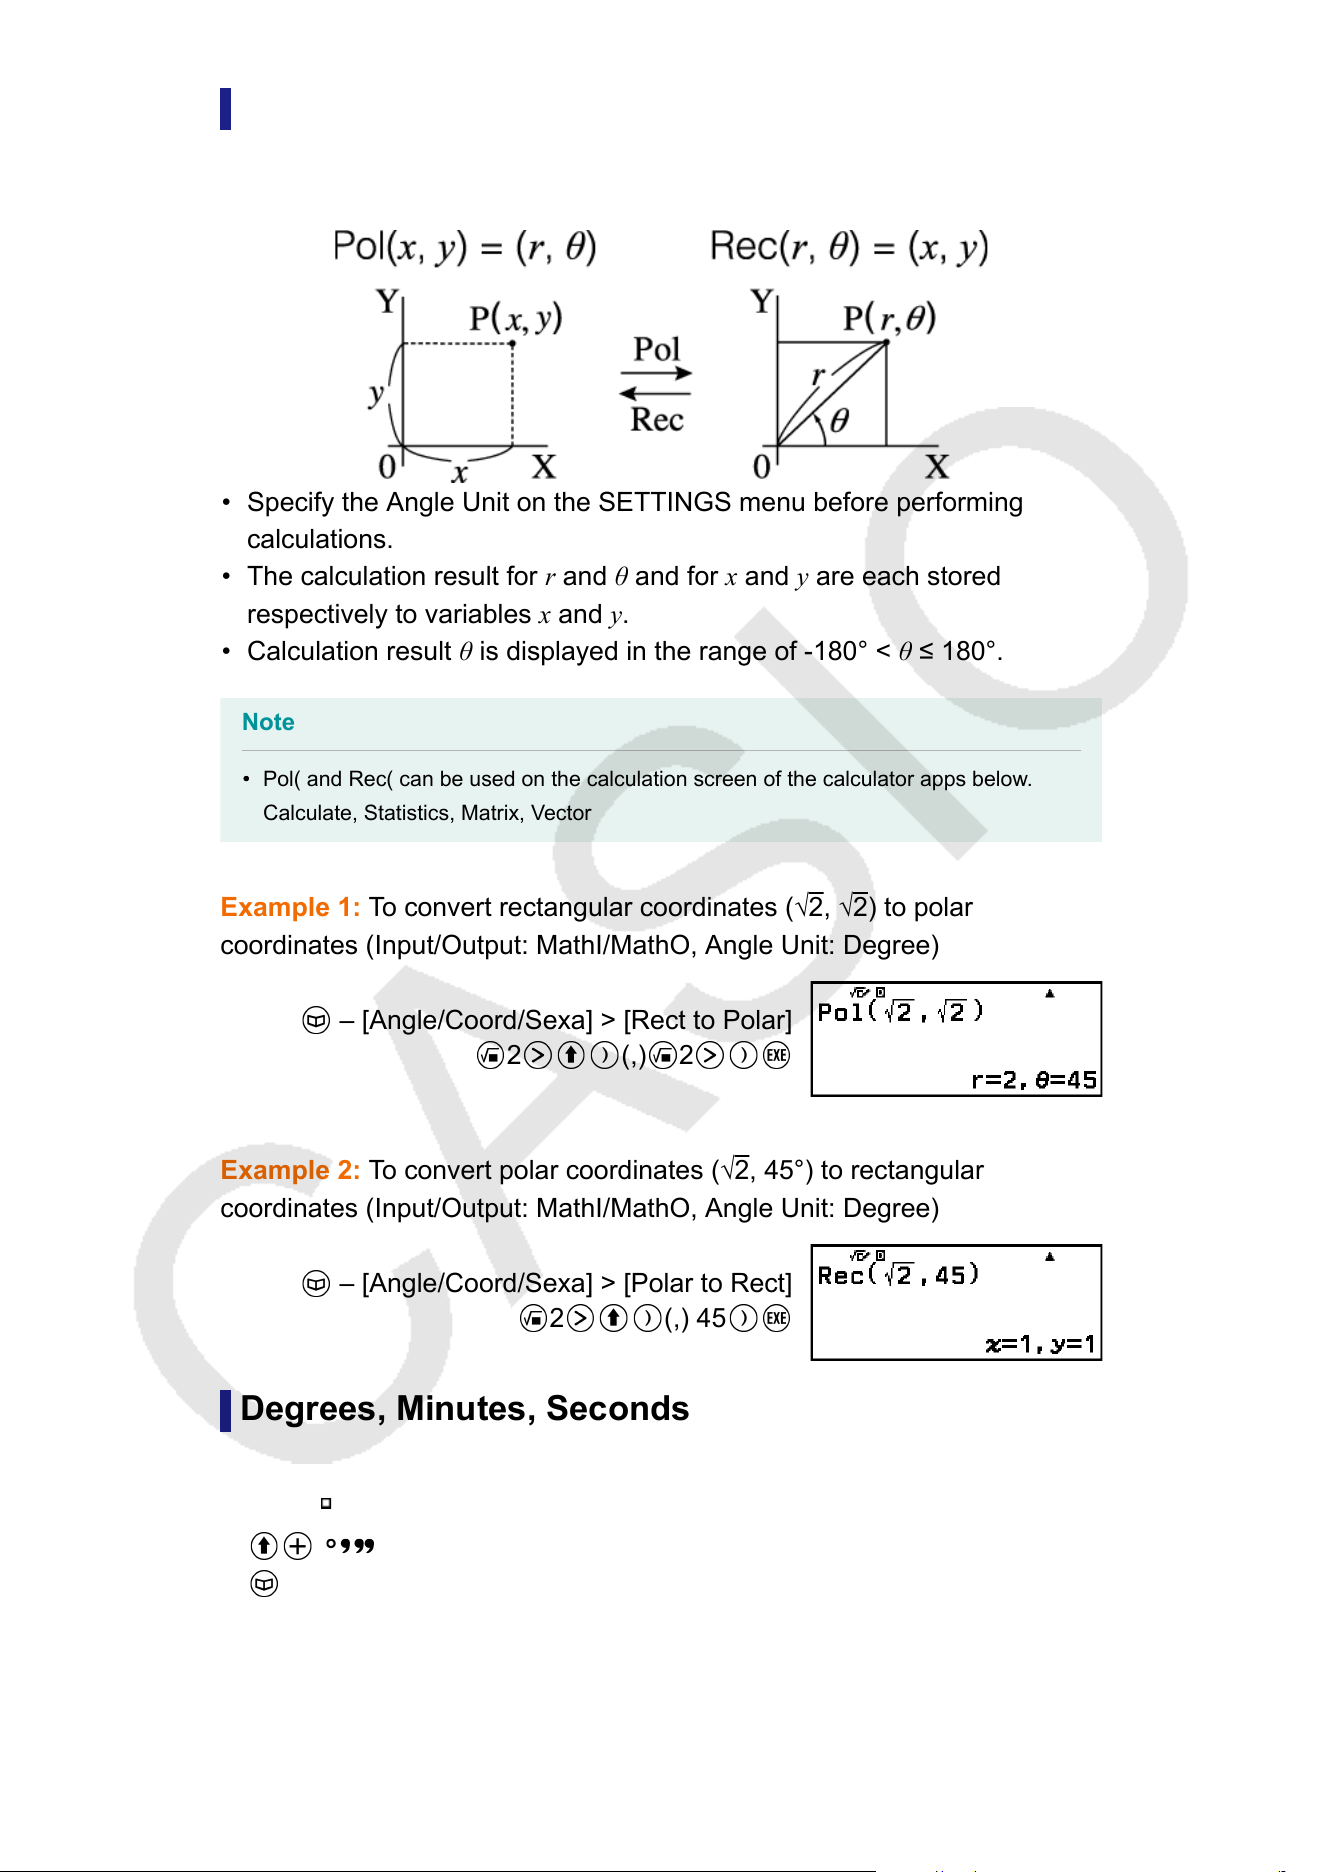
Rect to Polar, Polar to Rect
"Pol(" converts rectangular coordinates to polar coordinates, while "Rec("
converts polar coordinates to rectangular coordinates.
• Specify the Angle Unit on the SETTINGS menu before performing
calculations.
• The calculation result for r and θ and for x and y are each stored
respectively to variables x and y.
• Calculation result θ is displayed in the range of -180° < θ ≤
180°.
Note
• Pol( and Rec( can be used on the calculation screen of the calculator apps below.•
Calculate, Statistics, Matrix, Vector
Example 1: T
o convert rectangular coordinates (√
2, √2) to polar
coordinates (Input/Output: MathI/MathO, Angle Unit: Degree)
– [Angle/Coord/Sexa] > [Rect to Polar]
2 (,) 2
Example 2: T
o convert polar coordinates (√
2, 45°) to rectangular
coordinates (Input/Output: MathI/MathO, Angle Unit: Degree)
– [Angle/Coord/Sexa] > [Polar to Rect]
2 (,) 45
Degrees, Minutes, Seconds
Y
ou can use the keys or the menu item below to input the sexagesimal
symbol (
).
( )
– [Angle/Coord/Sexa] > [Degs Mins Secs]
For details, see "Sexagesimal Conversion (Degree, Minute, Second
Calculations)" (page 54).
65
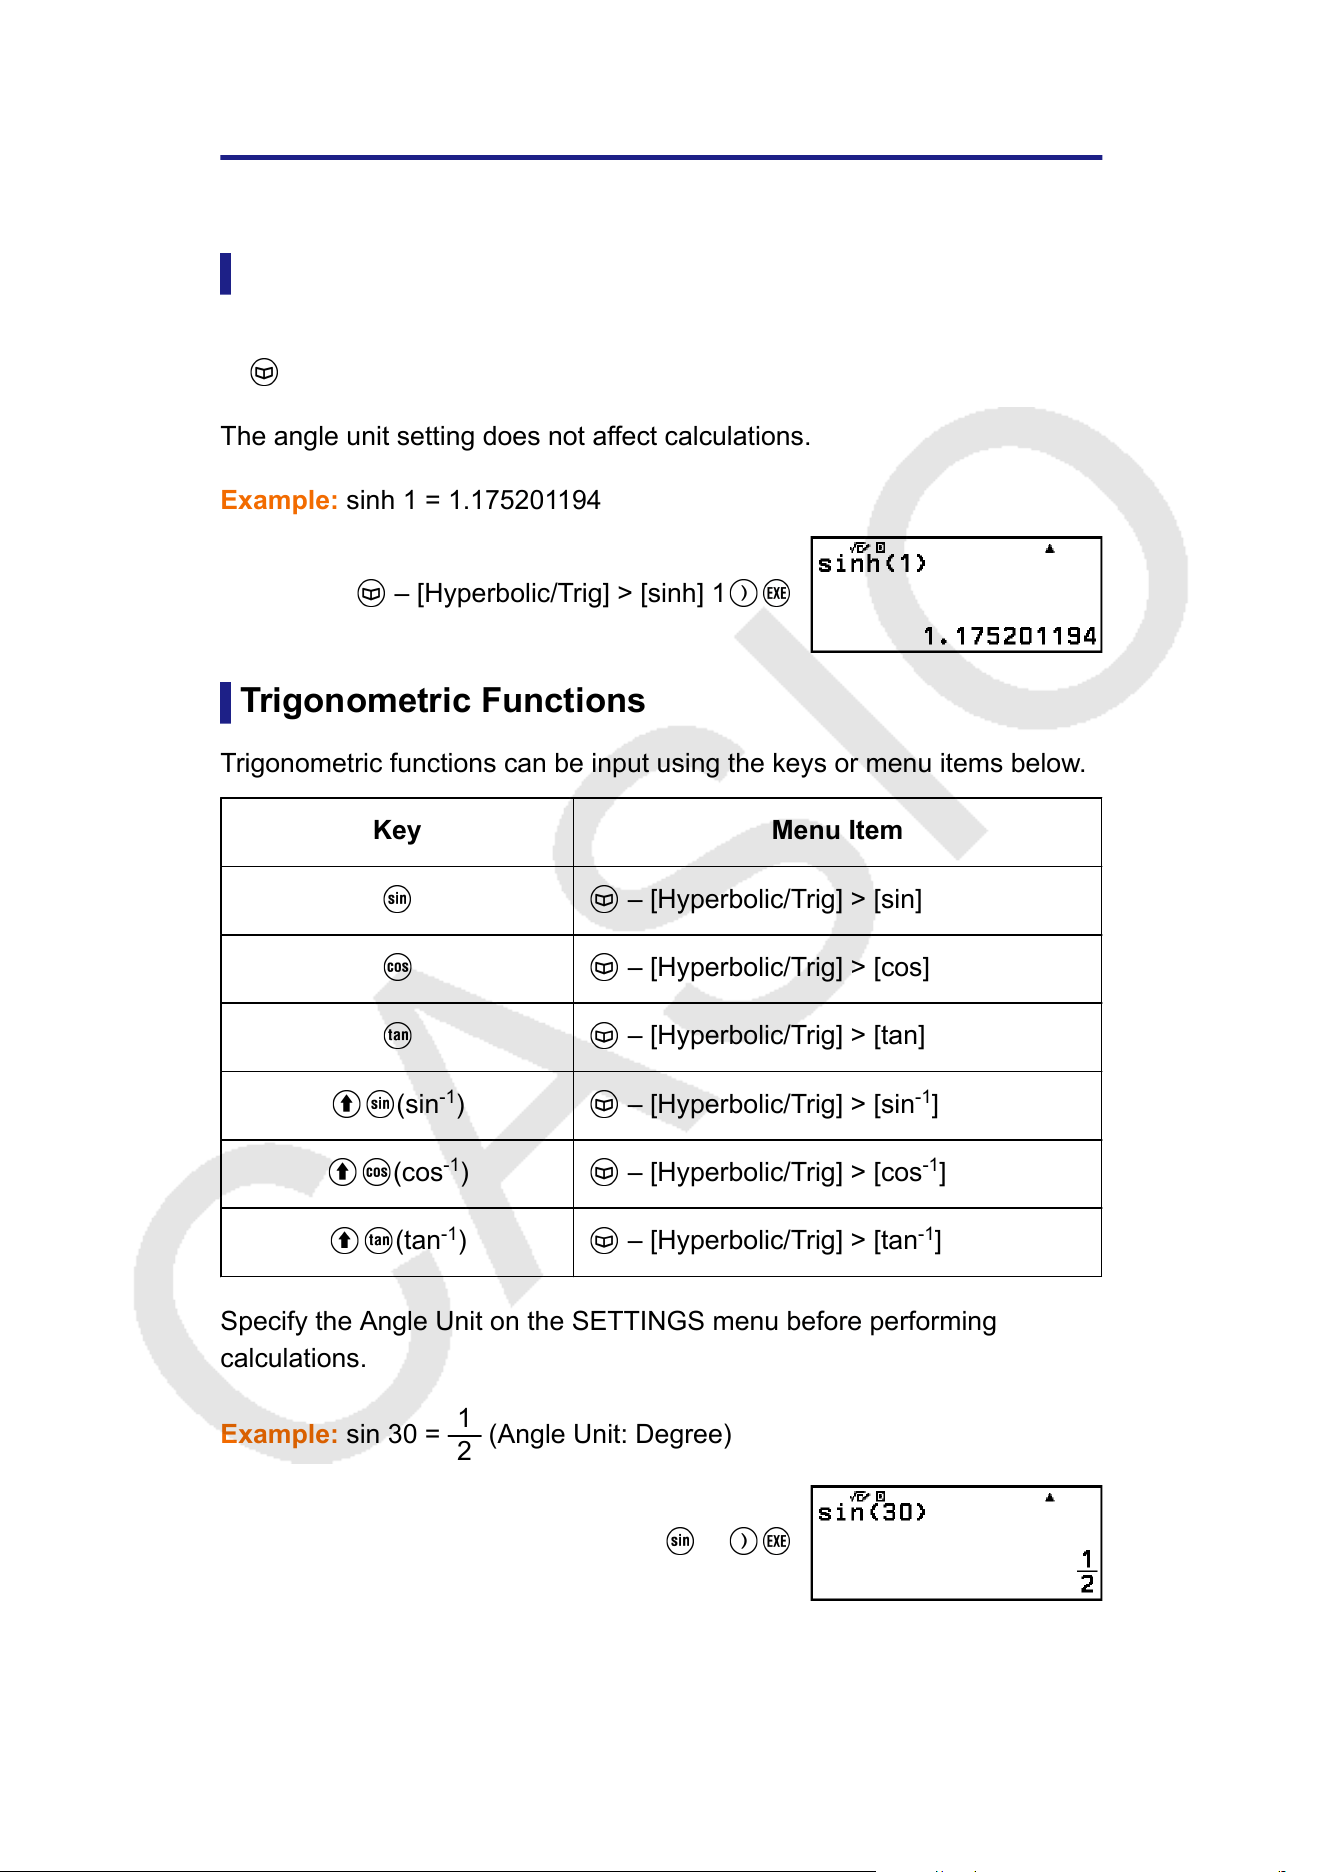
Hyperbolic, Trigonometric
This section explains hyperbolic and trigonometric functions.
Hyperbolic Functions
Hyperbolic functions can be input using the menu items below
.
– [Hyperbolic/Trig] > [sinh], [cosh], [tanh], [sinh
-1
], [cosh
-1
], or [tanh
-1
]
The angle unit setting does not af
fect calculations.
Example: sinh 1 = 1.175201194
– [Hyperbolic/Trig] > [sinh] 1
Trigonometric Functions
T
rigonometric functions can be input using the keys or menu items below.
Key Menu Item
– [Hyperbolic/Trig] > [sin]
– [Hyperbolic/Trig] > [cos]
– [Hyperbolic/Trig] > [tan]
(sin
-1
) – [Hyperbolic/Trig] > [sin
-1
]
(cos
-1
) – [Hyperbolic/Trig] > [cos
-1
]
(tan
-1
) – [Hyperbolic/Trig] > [tan
-1
]
Specify the Angle Unit on the SETTINGS menu before performing
calculations.
Example: sin 30 =
1
2
(Angle Unit: Degree)
30
66
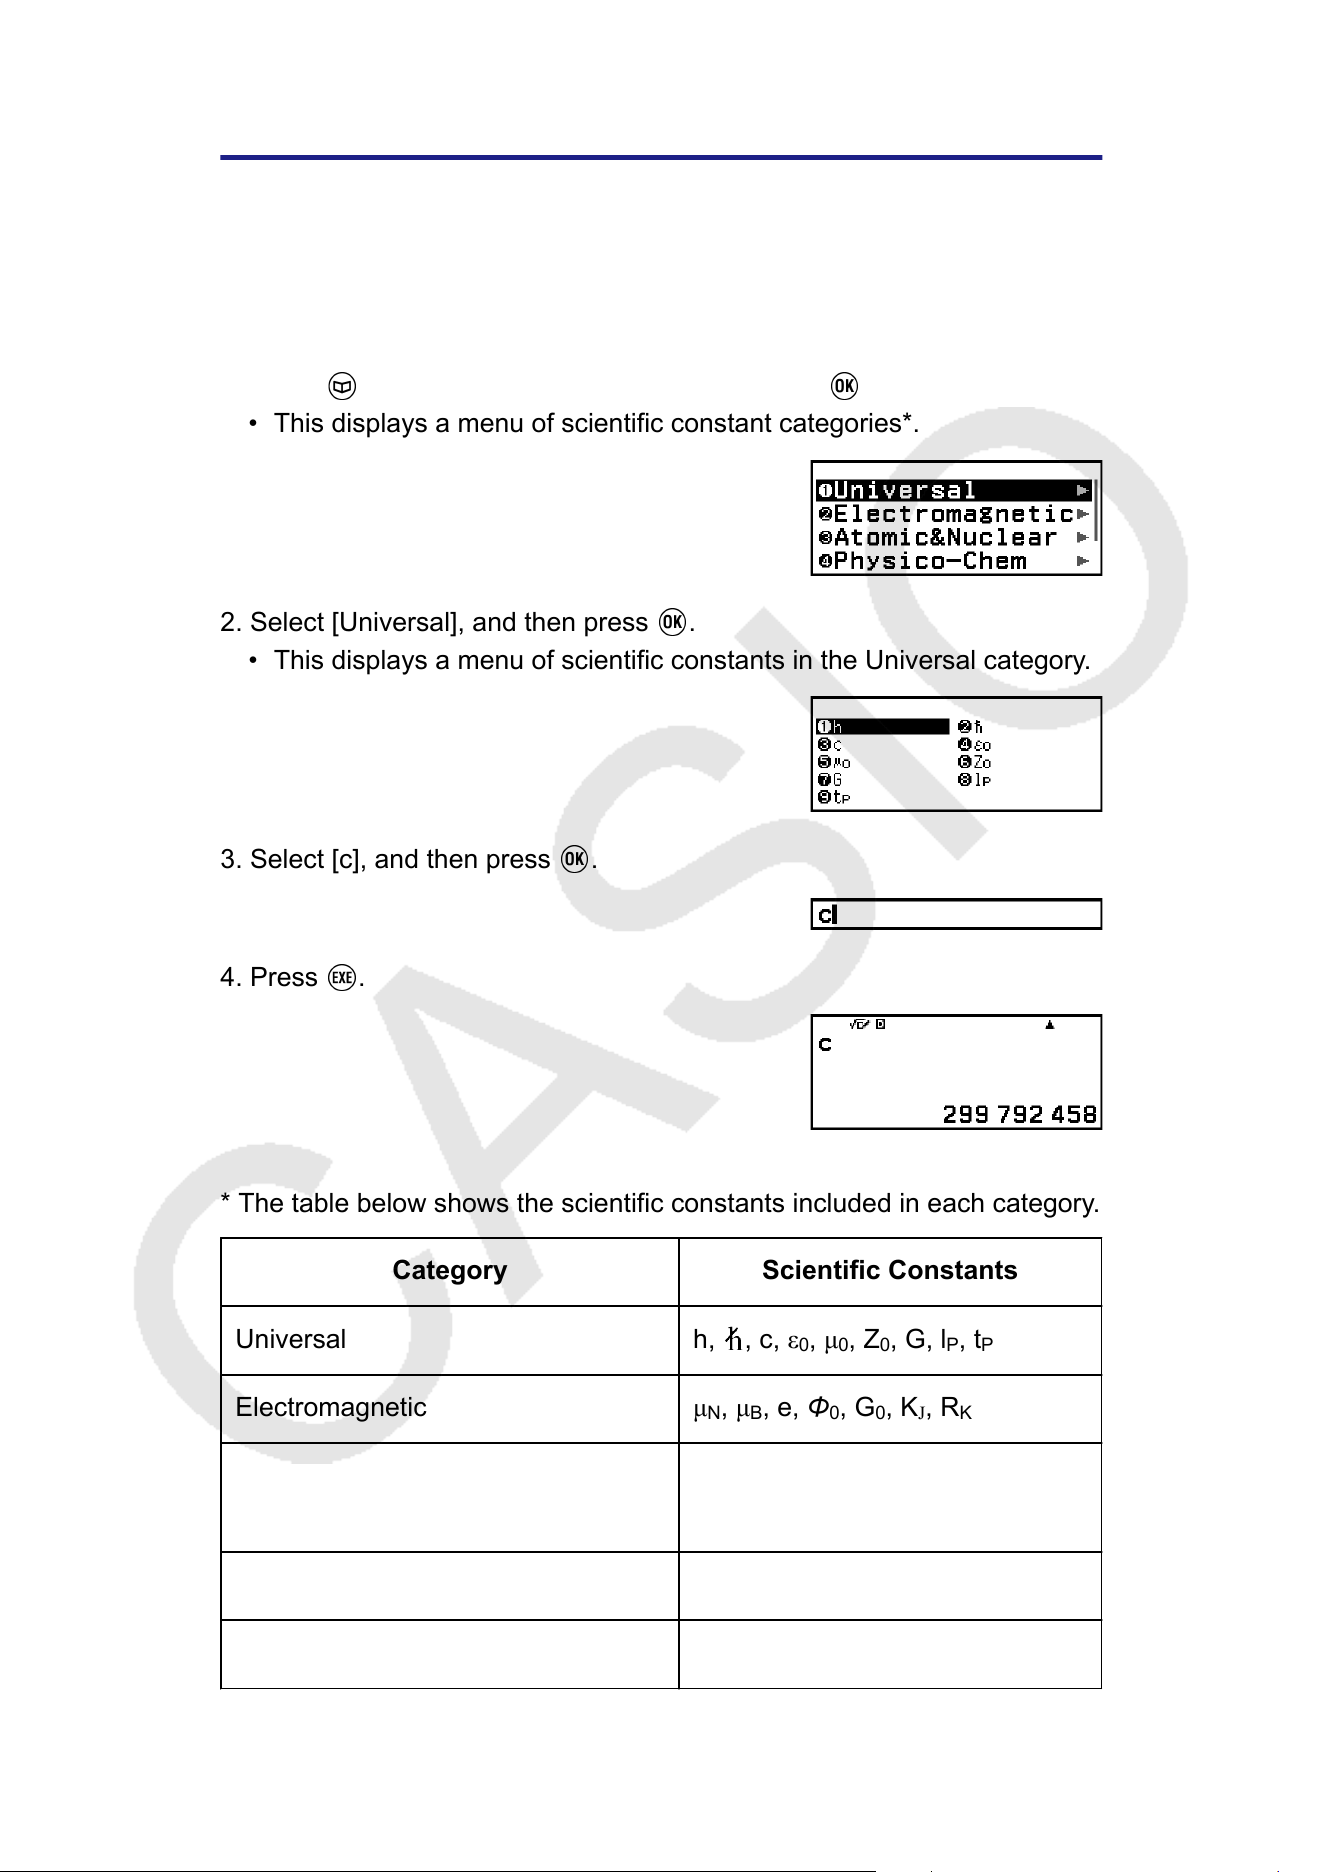
Scientific Constants
Y
our calculator comes with 47 built-in scientific constants. The values are
based on CODATA (2022) recommended values.
Example: To input the scientific constant c (speed of light in vacuum), and
display its value
1. Press
, select [Sci Constants], and then press .
• This displays a menu of scientific constant categories*.
2. Select [Universal], and then press .
• This displays a menu of scientific constants in the Universal category.
3. Select [c], and then press .
4. Press .
* The table below shows the scientific constants included in each category.
Category Scientific Constants
Universal
h, , c, ε
0
, μ
0
, Z
0
, G, l
P
, t
P
Electromagnetic
μ
N
, μ
B
, e, Φ
0
, G
0
, K
J
, R
K
Atomic&Nuclear
m
p
, m
n
, m
e
, m
μ
, a
0
, α, r
e
, λ
C
, γ
p
,
λ
Cp
, λ
Cn
, R
∞
, μ
p
, μ
e
, μ
n
, μ
μ
, m
τ
Physico-Chem
m
u
, F, N
A
, k, V
m
, R, c
1
, c
2
, σ
Adopted Values g
n
, atm, R
K-90
, K
J-90
67
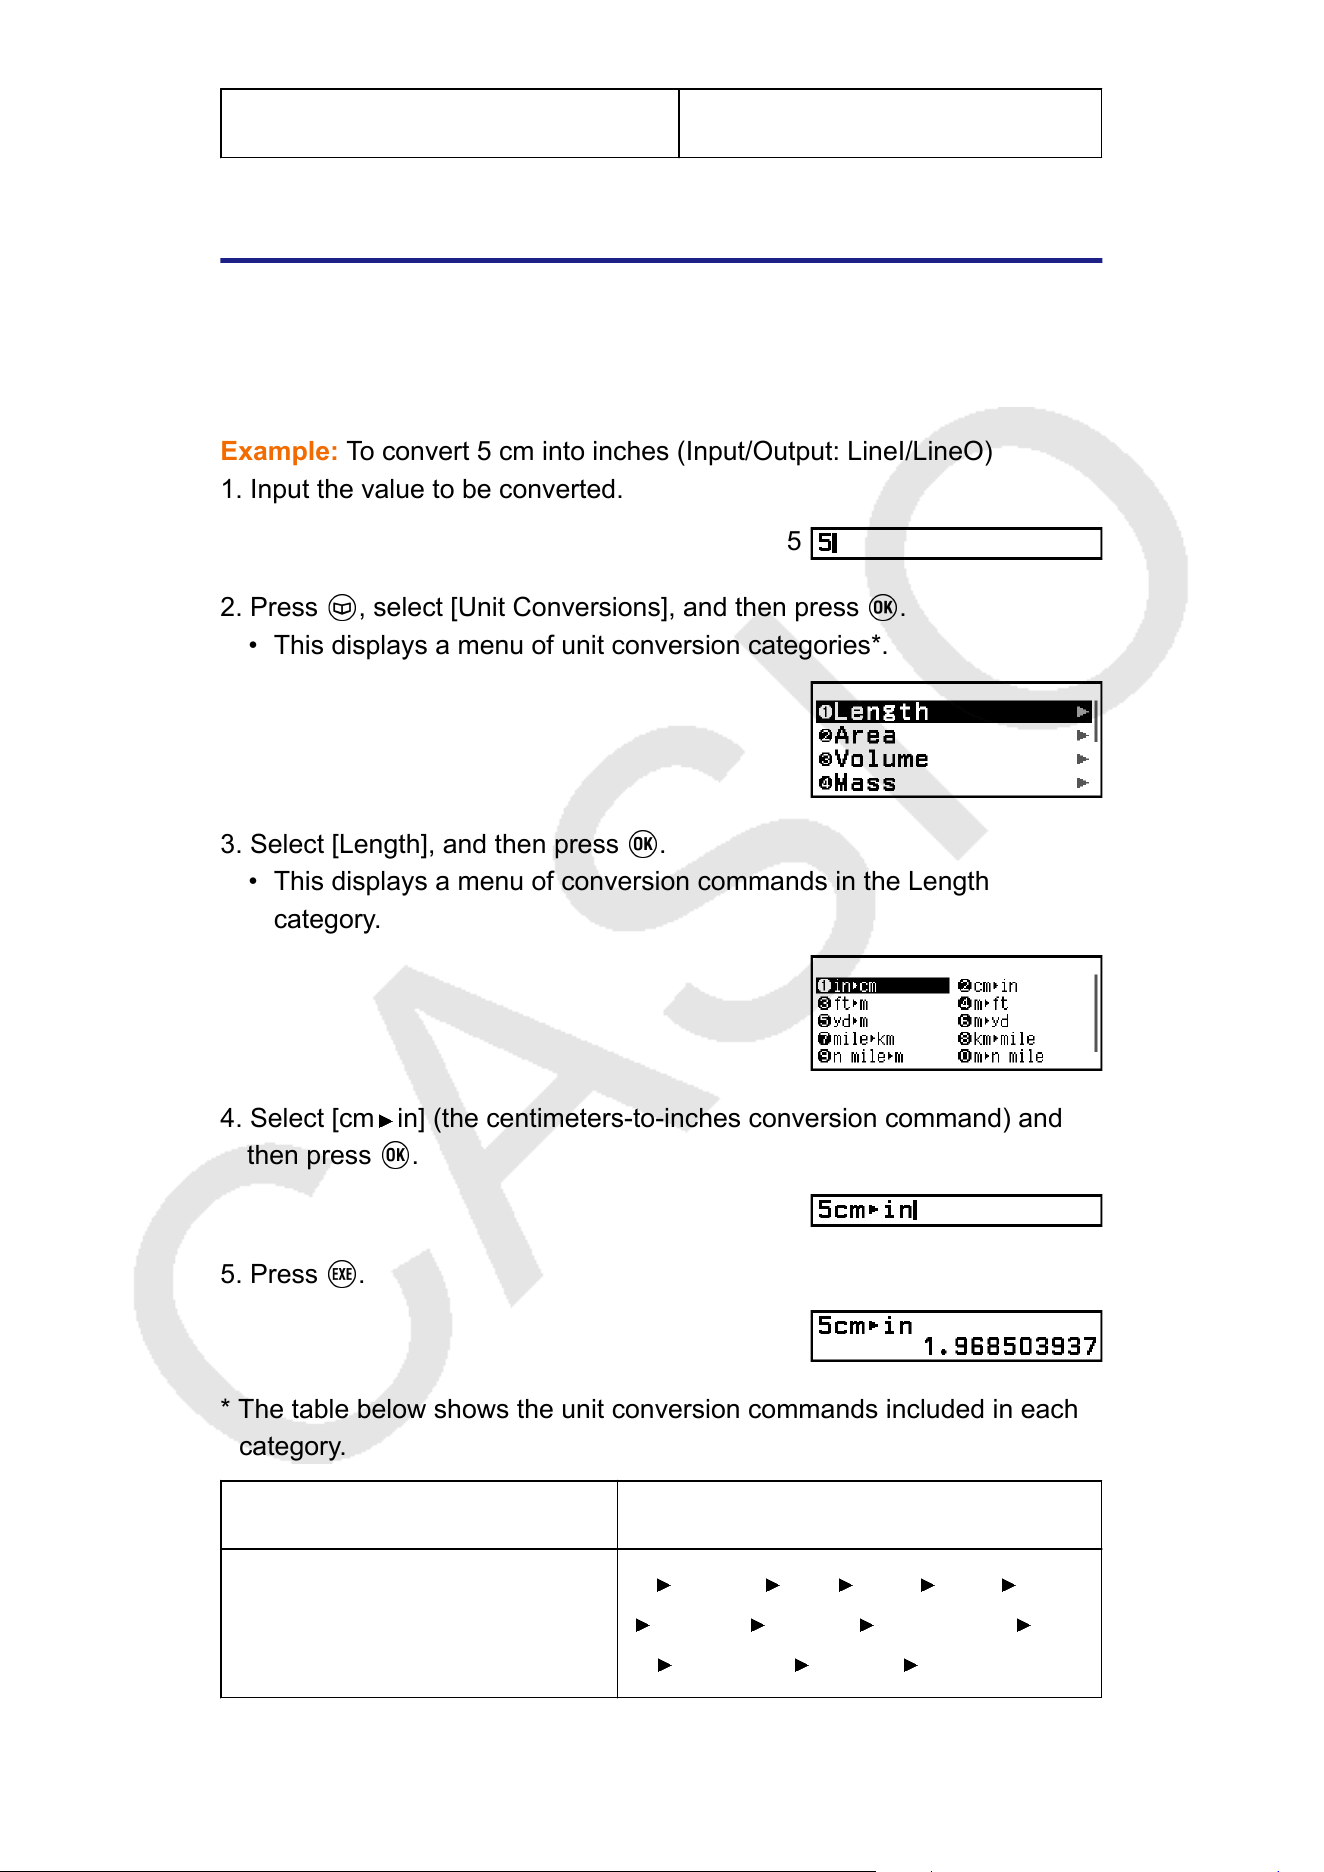
Other t
Unit Conversions
Y
ou can use the unit conversion commands to convert from one unit of
measurement to another. Conversion formula data is based on the "NIST
Special Publication 811 (2008)".
Example: To convert 5 cm into inches (Input/Output: LineI/LineO)
1. Input the value to be converted.
5
2. Press , select [Unit Conversions], and then press .
• This displays a menu of unit conversion categories*.
3. Select [Length], and then press .
• This displays a menu of conversion commands in the Length
category
.
4. Select [cm in] (the centimeters-to-inches conversion command) and
then press .
5. Press .
* The table below shows the unit conversion commands included in each
category
.
Category Unit Conversion Commands
Length
in
cm, cm in, ft m, m ft, yd m, m
yd, mile km, km mile, n mile m,
m n mile, pc km, km pc
68
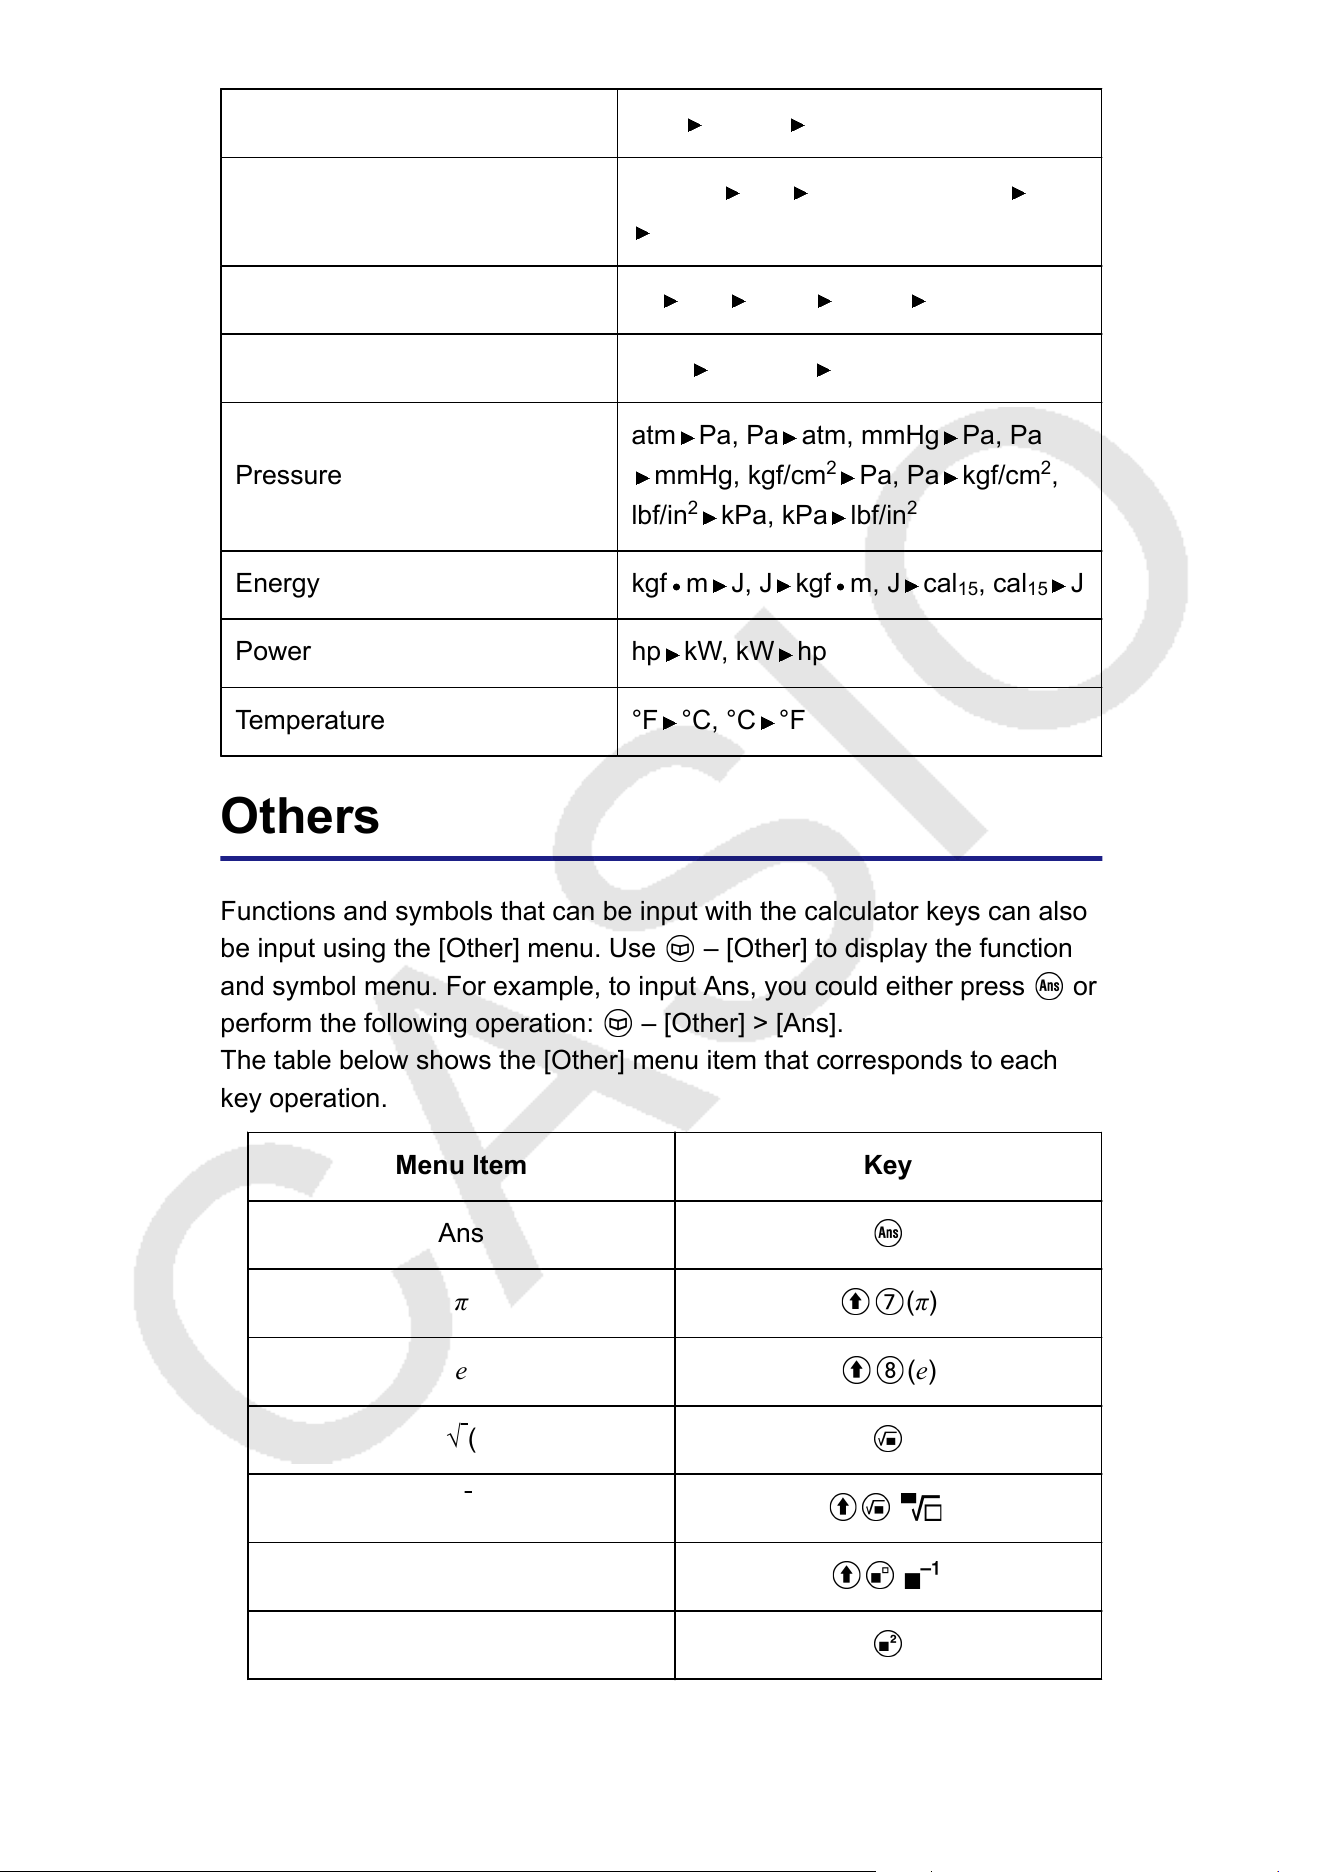
*
1
*
2
Area acre
m
2
, m
2
acre
Volume
gal(US) L, L gal(US), gal(UK) L, L
gal(UK)
Mass oz g, g oz, lb kg, kg lb
Velocity km/h m/s, m/s km/h
Pressure
atm Pa, Pa atm, mmHg Pa, Pa
mmHg, kgf/cm
2
Pa, Pa kgf/cm
2
,
lbf/in
2
kPa, kPa lbf/in
2
Energy kgf m J, J kgf m, J cal
15
, cal
15
J
Power hp kW, kW hp
Temperature °F °C, °C °F
Others
Functions and symbols that can be input with the calculator keys can also
be input using the [Other] menu. Use – [Other] to display the function
and symbol menu. For example, to input Ans, you could either press or
perform the following operation: – [Other] > [Ans].
The table below shows the [Other] menu item that corresponds to each
key operation.
Menu Item Key
Ans
π
(π)
e
(e)
√ (
x
√
( ( )
-1
( )
2
69

*
3
^(
- ((-))
, (,)
(
)
*
1
Reciprocal
*
2
Square
*
3
Minus sign
70
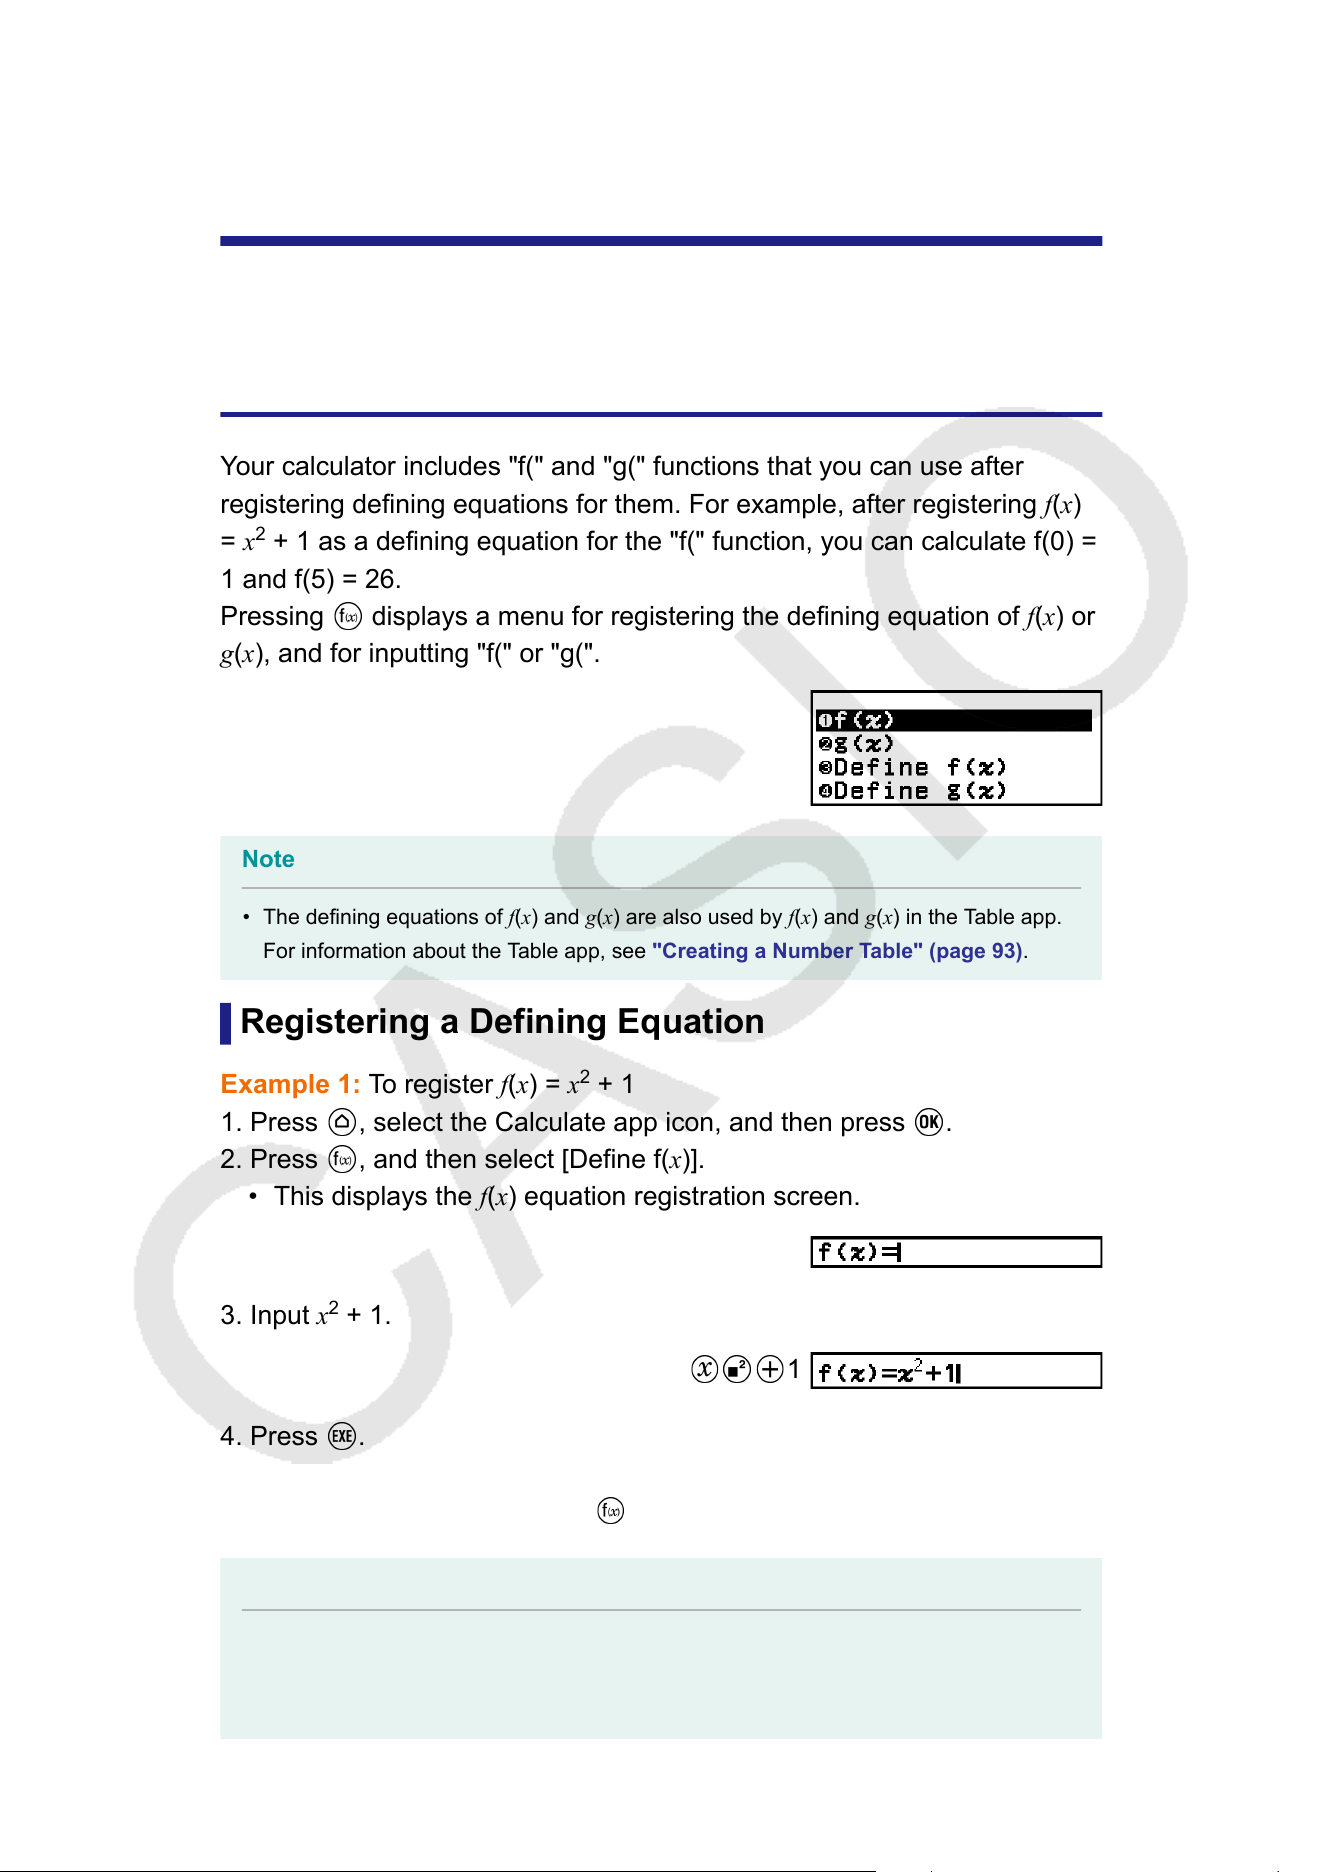
Registering and Using Defining
Equations for f(x) and g(x)
Registering and Using Defining
Equations for f(x) and g(x)
Y
our calculator includes "f(" and "g(" functions that you can use after
registering defining equations for them. For example, after registering f(x)
= x
2
+ 1 as a defining equation for the "f(" function, you can calculate f(0) =
1 and f(5) = 26.
Pressing
displays a menu for registering the defining equation of f(x) or
g(x), and for inputting "f(" or "g(".
Note
• The defining equations of f(x) and g(x) are also used by f(x) and g(x) in the T
able app.
For information about the Table app, see "Creating a Number Table" (page 93).
Registering a Defining Equation
Example 1: To register f(x) = x
2
+ 1
1. Press
, select the Calculate app icon, and then press .
2. Press , and then select [Define f(x)].
• This displays the f(x) equation registration screen.
3. Input x
2
+ 1.
1
4. Press .
• This registers the expression you input, and the screen that was
shown before you pressed in step 2 of this procedure re-appears.
Note
• A defining equation can be registered from any calculator app except Equation (Simul
Equation / Polynomial), Inequality
, Distribution, Ratio, Math Box and Base-N. However,
71
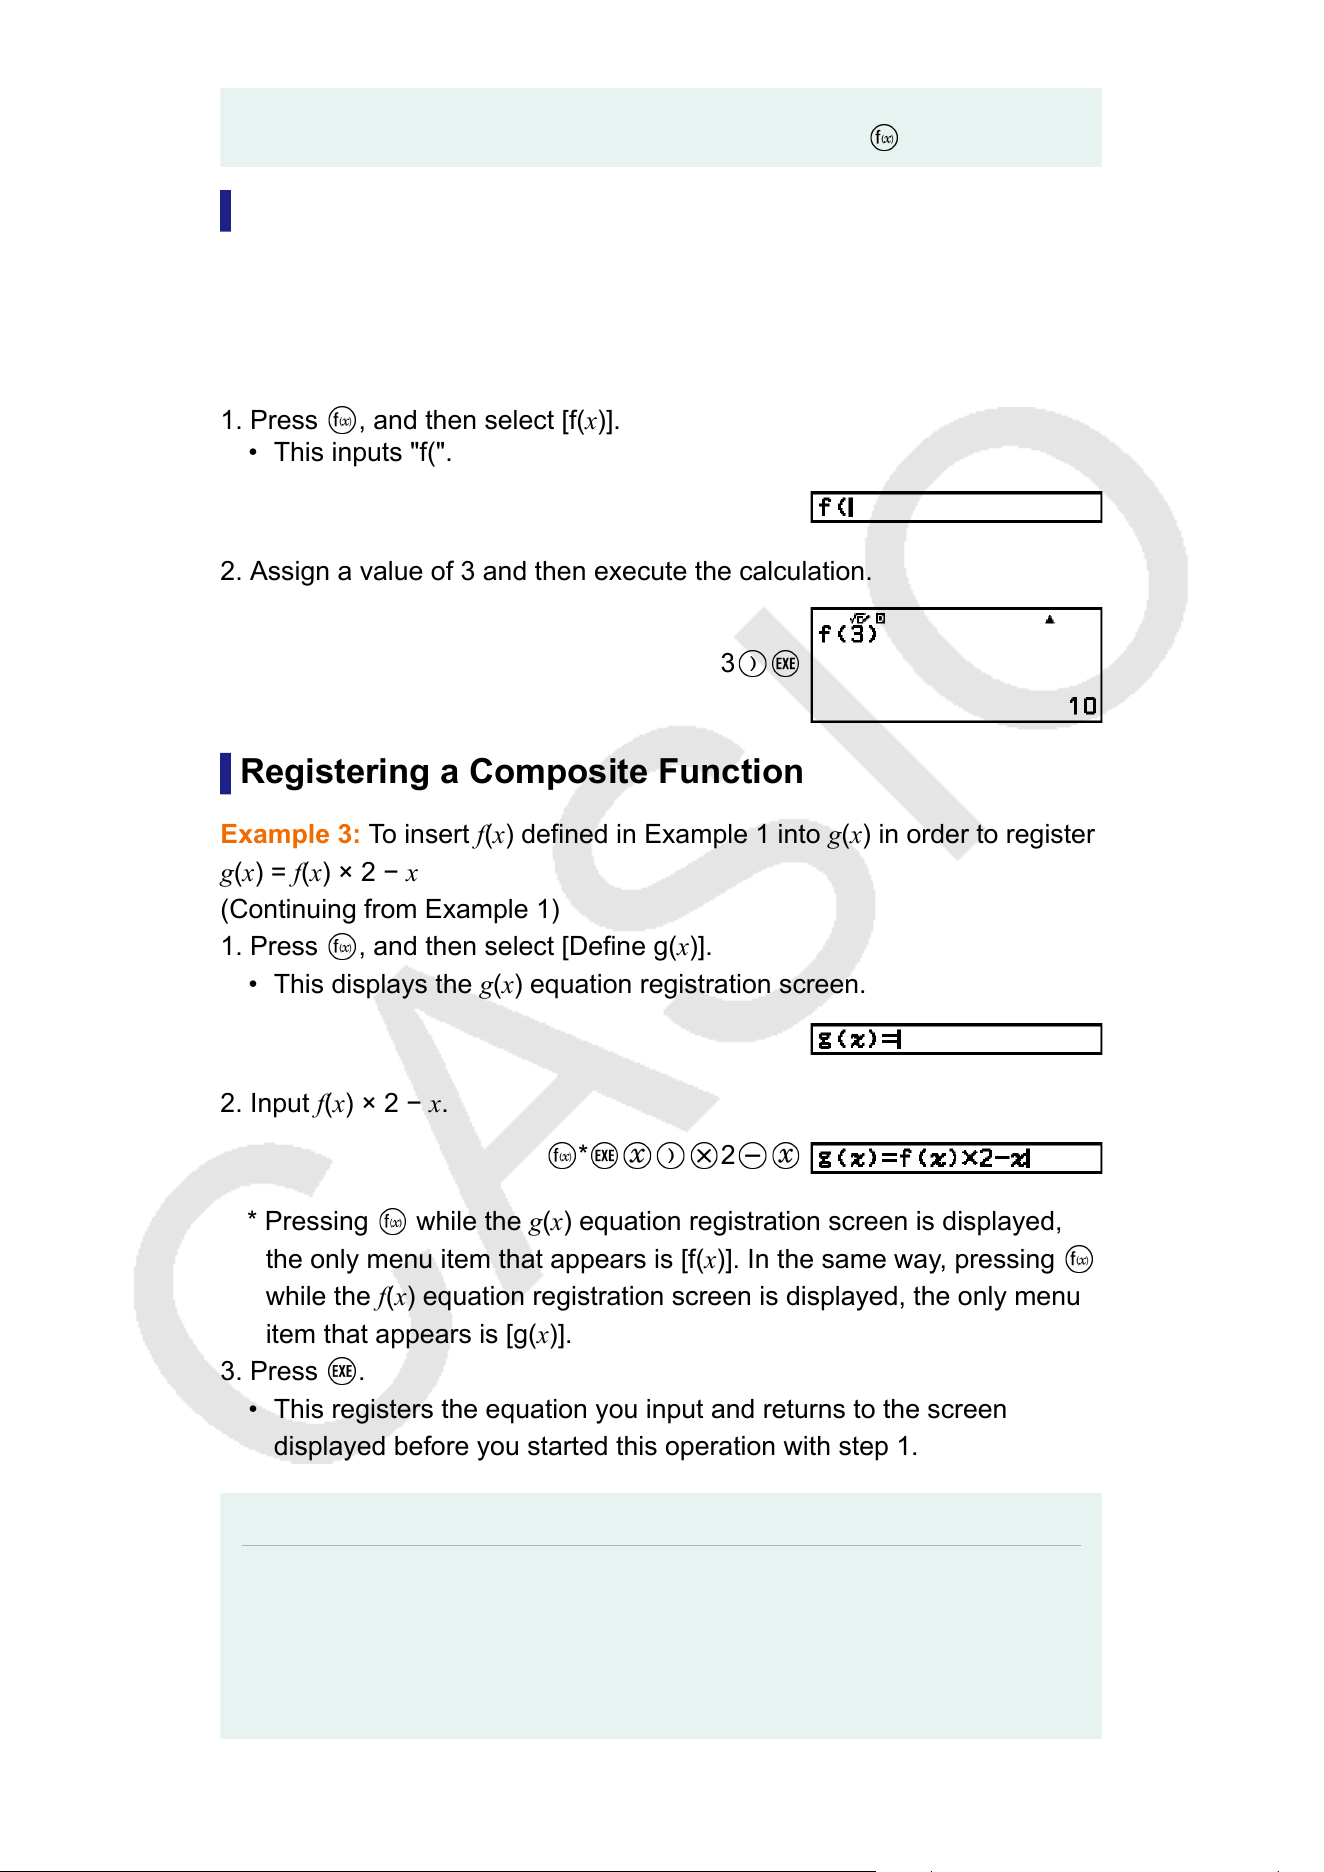
depending on the screen displayed by the calculator app (for example, if a menu
screen is displayed), the menu may not appear when you press .
Performing a Calculation by Assigning a V
alue to
the Registered Defining Equation
Example 2: To assign the value x = 3 to f(x), which you registered in
Example 1
(Continuing from Example 1)
1. Press
, and then select [f(x)].
• This inputs "f(".
2. Assign a value of 3 and then execute the calculation.
3
Registering a Composite Function
Example 3: T
o insert f(x) defined in Example 1 into g(x) in order to register
g(x) = f(x) × 2 − x
(Continuing from Example 1)
1. Press
, and then select [Define g(x)].
• This displays the g(x) equation registration screen.
2. Input f(x) × 2 − x.
* 2
* Pressing while the g(x) equation registration screen is displayed,
the only menu item that appears is [f(x)]. In the same way
, pressing
while the f(x) equation registration screen is displayed, the only menu
item that appears is [g(x)].
3. Press
.
• This registers the equation you input and returns to the screen
displayed before you started this operation with step 1.
Note
• The operation for assigning a value to x of g(x) and calculating the result is the same
as that under "Performing a Calculation by Assigning a V
alue to the Registered
Defining Equation" (page 72). However, note that instead of selecting [f(x)] in step 1,
you should select [g(x)].
72

• In the operation of Example 3, you input f(x) into the defining equation of g(x).
Conversely
, you can also input g(x) into the f(x) defining equation. However, do not
have g(x) input into f(x), and f(x) input into g(x) at the same time. If you do, a Circular
ERROR will occur when you perform a calculation using f(x) or g(x).
Data Retention
Performing any one of the operations below causes the defining equations
registered to f(x) and g(x) to be deleted.
• Pressing
• Using the SETTINGS menu to switch the Input/Output setting
between MathI*
1
and LineI*
2
.
*
1
MathI/MathO or MathI/DecimalO
*
2
LineI/LineO or LineI/DecimalO
• Executing – [Reset] > [Settings & Data] or – [Reset] > [Initialize
All]
73

Using QR Code Functions
Using QR Code Functions
Y
our calculator can display QR Code symbols that can be read by a smart
device.
Important!
• The operations in this section assume that the smart device being used has a QR
Code reader that can read multiple QR Code symbols, and it can connect to the
Internet.
• Scanning a QR Code displayed by this calculator with a smart device will cause the
smart device to access the CASIO website.
Note
• QR Code appears on the display whenever you press
(QR) while any one of
the screens below is displayed.
- HOME screen
- SETTINGS menu screen
- Error screens
- Calculation result screens in any calculator app
- T
able screens in any calculator app
- Spreadsheet app screen
For details, visit the CASIO website (https://wes.casio.com).
Displaying a QR Code
Example: To display the QR Code for a calculation result in the
calculator’s Calculate app and scan it with a smart device
1. In the Calculate app, perform some calculation.
2. Press
(QR) to display the QR Code.
• The numbers in the lower right corner of the display show the current
QR Code number and the total number of QR Code symbols. T
o
display the next QR Code, press
or .
Note
• To return to a previous QR Code, press
or as many times as required to
scroll forward until it appears.
3. Use a smart device to scan the QR Code on the calculator display
.
• For information about how to scan a QR Code, refer to the user
documentation of the QR Code reader you are using.
74
If You Experience Difficulty Scanning a QR Code
While the QR Code is displayed, use and to adjust the display
contrast of the QR Code. This contrast adjustment af
fects QR Code
displays only.
Important!
• Depending on the smart device and/or QR Code reader app being used, you may
experience problems scanning the QR Code symbols produced by this calculator
.
• When the "QR Code" setting on the SETTINGS menu is "Version 3", the calculator
apps that can display QR Code symbols are limited. If you try to display a QR Code in
an app that does not support QR Code display, the message "Not Supported (Version
3)" will appear. However, the QR Code produced by this setting is easier to scan with a
smart device.
• For more information, visit the CASIO website (https://wes.casio.com).
75
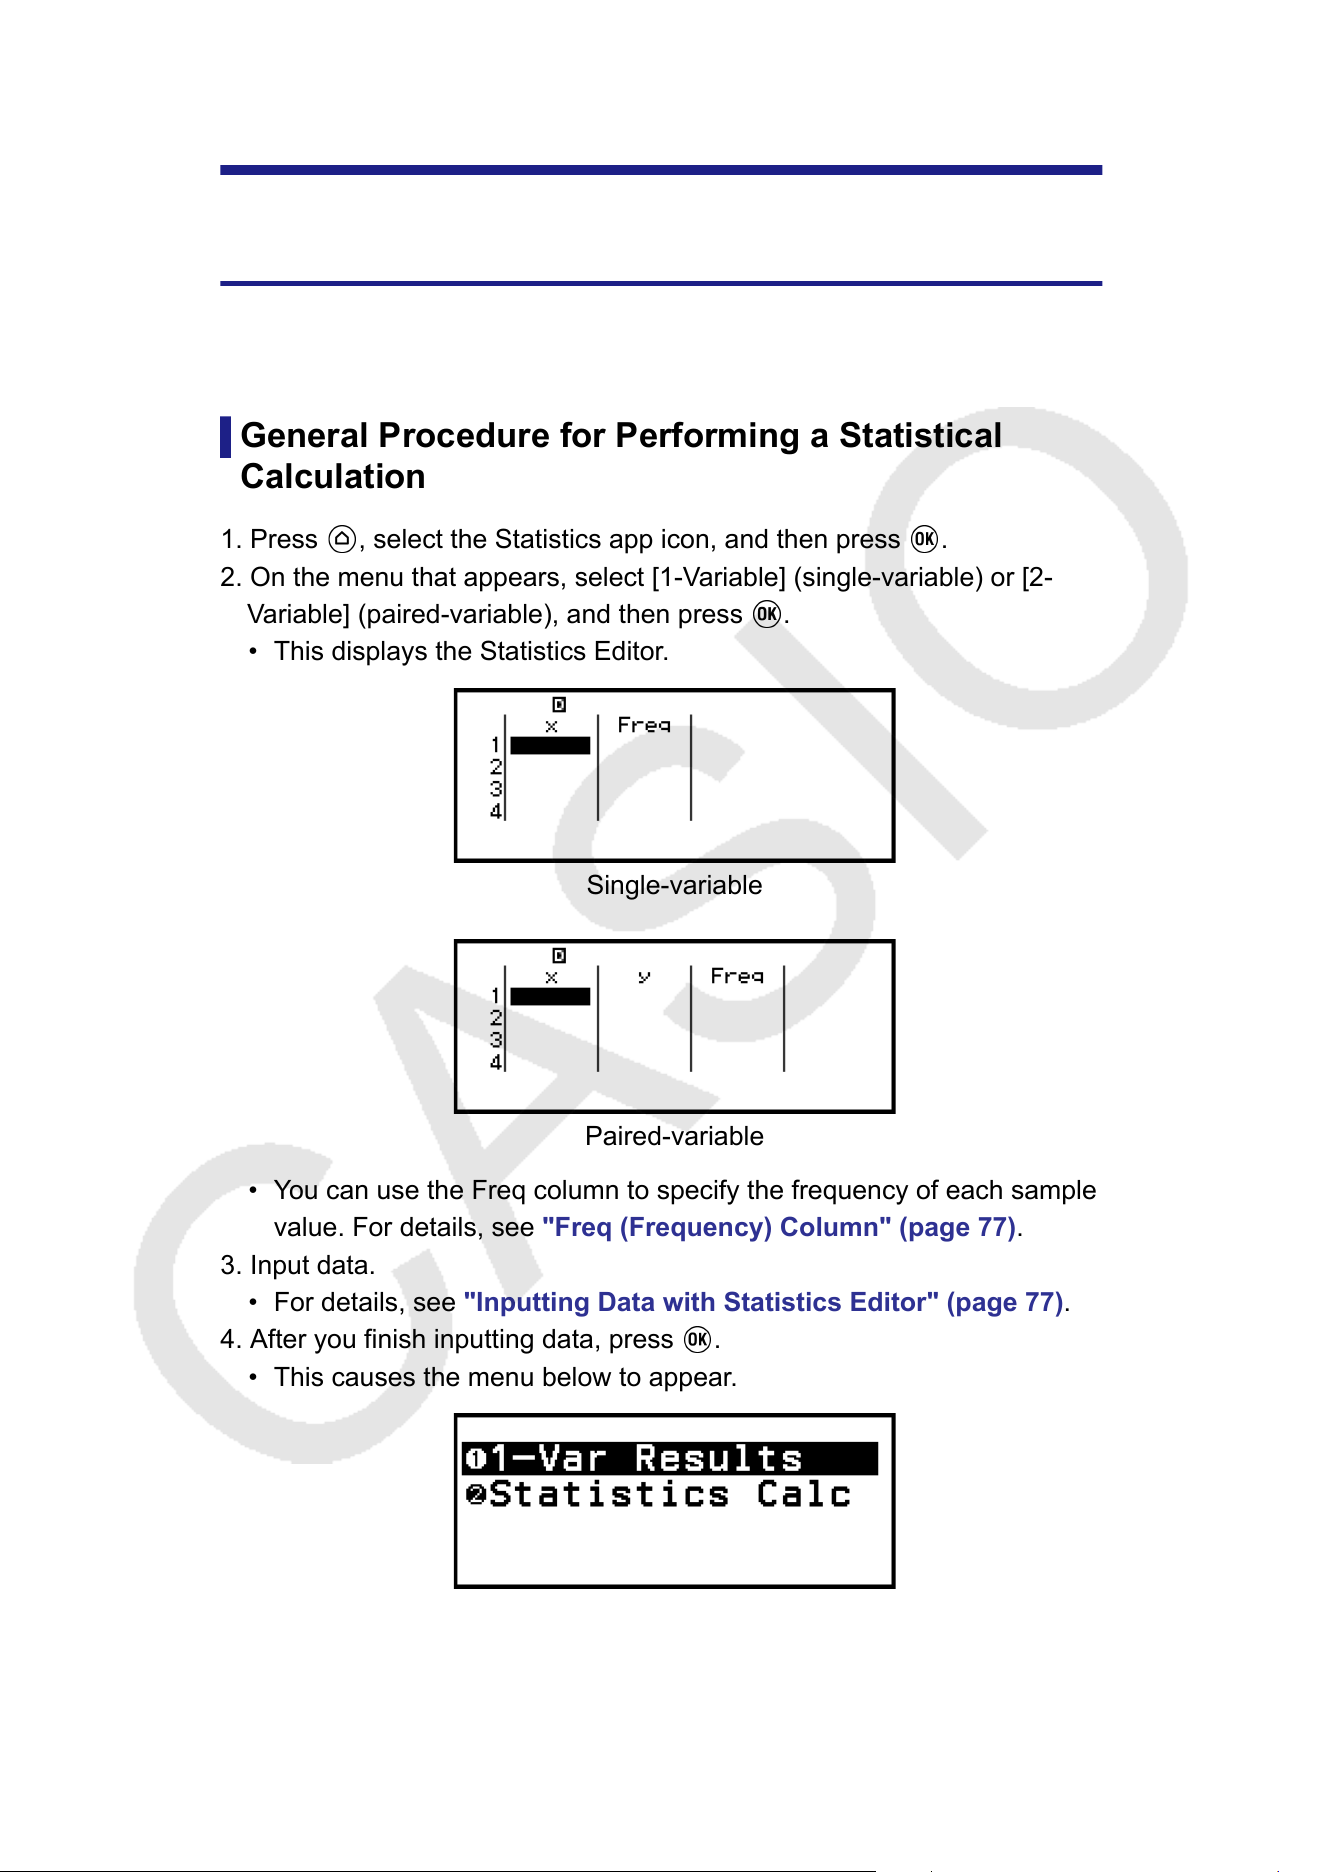
Using Calculator Apps
Statistical Calculations
The Statistics app calculates various statistical values based on single-
variable (x) or paired-variable (x, y) data.
General Procedure for Performing a Statistical
Calculation
1. Press , select the Statistics app icon, and then press .
2. On the menu that appears, select [1-Variable] (single-variable) or [2-
Variable] (paired-variable), and then press .
• This displays the Statistics Editor.
Single-variable
Paired-variable
• You can use the Freq column to specify the frequency of each sample
value. For details, see "Freq (Frequency) Column"
(page 77).
3. Input data.
• For details, see "Inputting Data with Statistics Editor" (page 77).
4. After you finish inputting data, press
.
• This causes the menu below to appear.
Single-variable
76
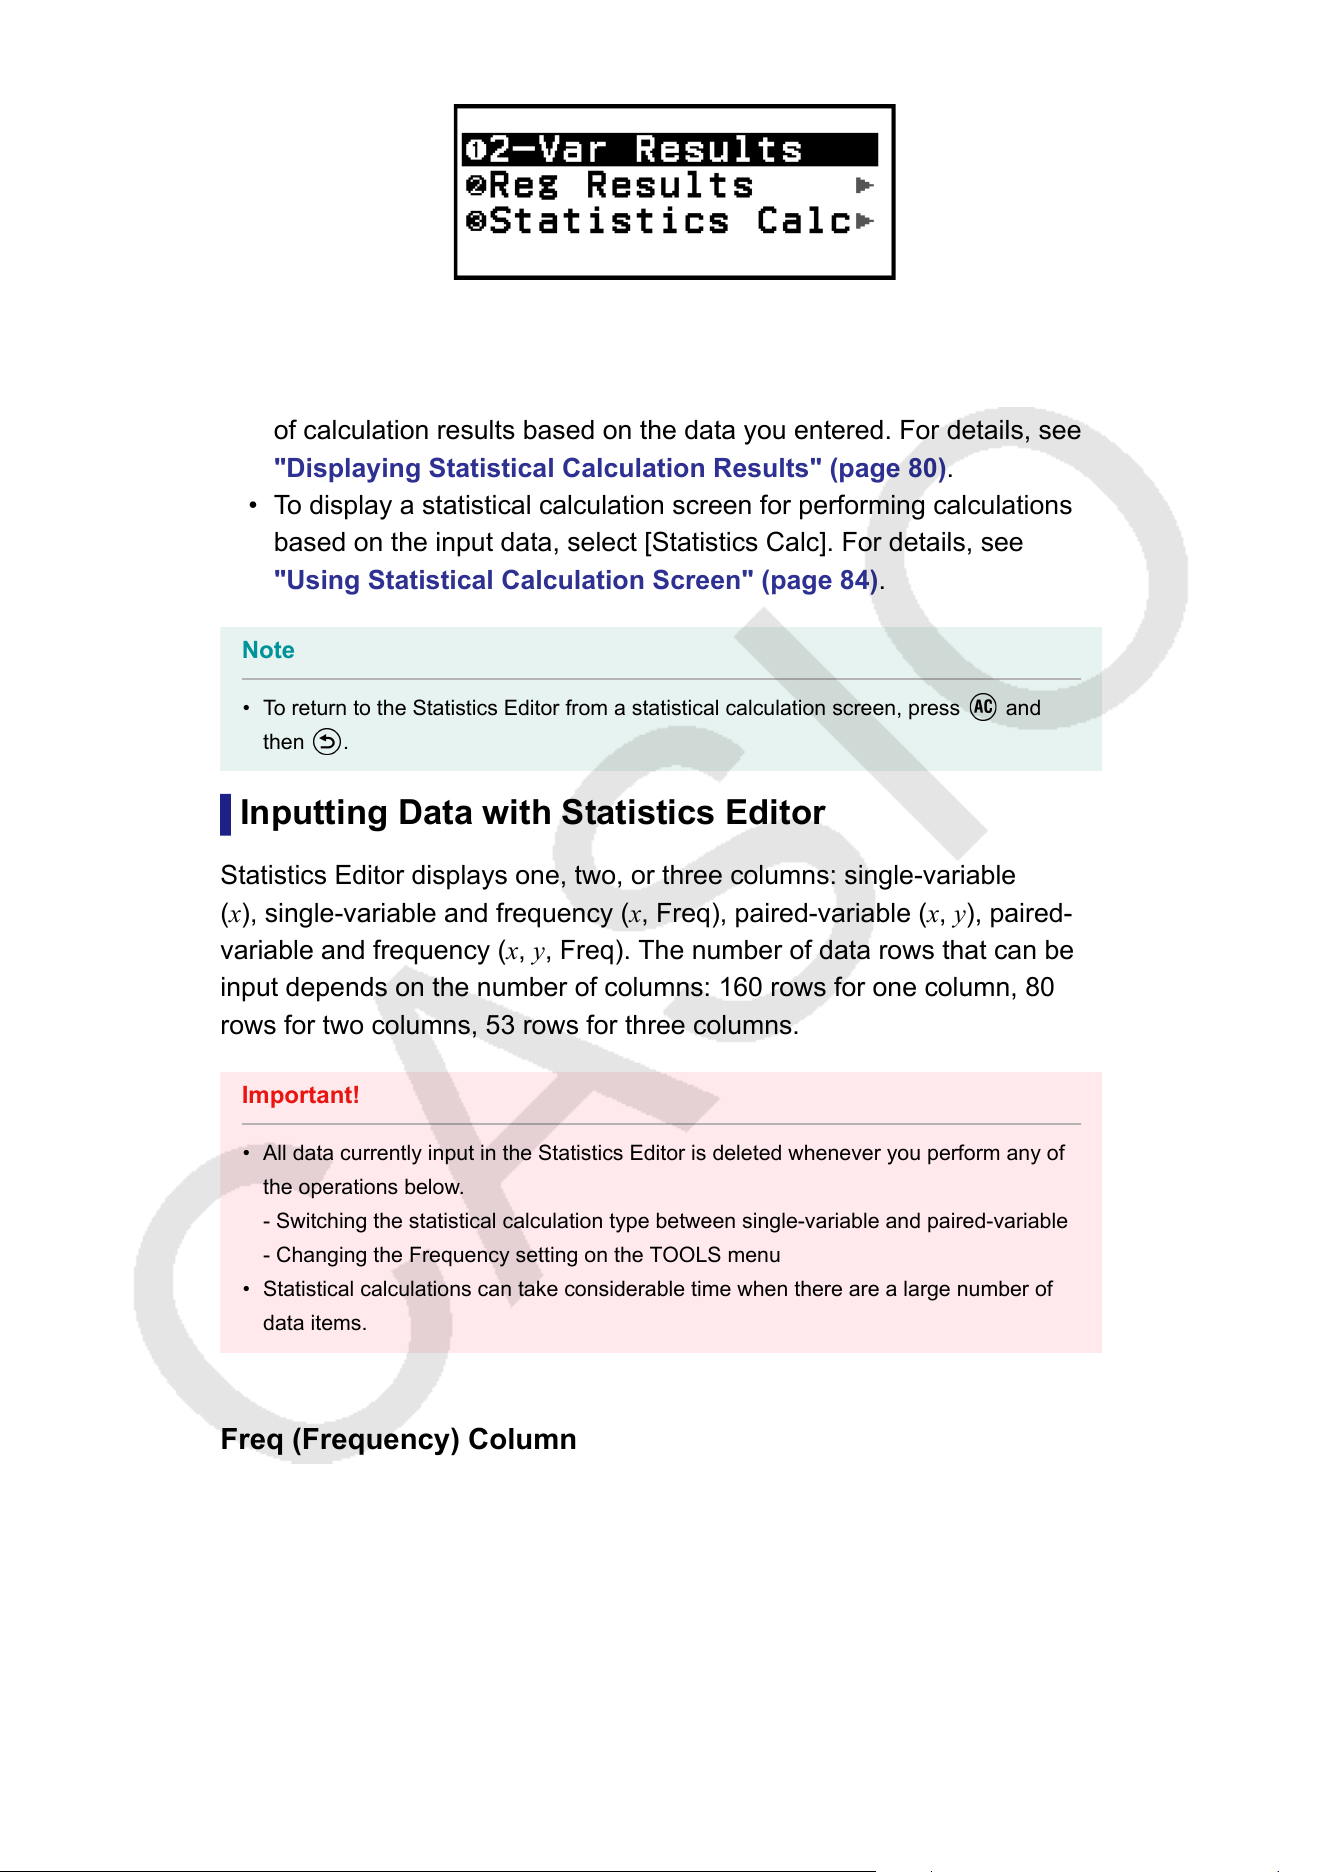
Paired-variable
5. Select the menu item for the operation you want to perform.
• Select [1-Var Results], [2-Var Results], or [Reg Results] to see a list
of calculation results based on the data you entered. For details, see
"Displaying Statistical Calculation Results"
(page 80).
• To display a statistical calculation screen for performing calculations
based on the input data, select [Statistics Calc]. For details, see
"Using Statistical Calculation Screen" (page 84).
Note
• To return to the Statistics Editor from a statistical calculation screen, press
and
then .
Inputting Data with Statistics Editor
Statistics Editor displays one, two, or three columns: single-variable
(x), single-variable and frequency (x, Freq), paired-variable (x, y), paired-
variable and frequency (x, y, Freq). The number of data rows that can be
input depends on the number of columns: 160 rows for one column, 80
rows for two columns, 53 rows for three columns.
Important!
• All data currently input in the Statistics Editor is deleted whenever you perform any of
the operations below
.
- Switching the statistical calculation type between single-variable and paired-variable
- Changing the Frequency setting on the TOOLS menu
• Statistical calculations can take considerable time when there are a large number of
data items.
Freq (Frequency) Column
If you turn on the Frequency setting on the TOOLS menu, a column
labeled "Freq" will also be included on the Statistics Editor. You can use
the Freq column to specify the frequency (the number of times the same
sample appears in the data group) of each sample value.
77
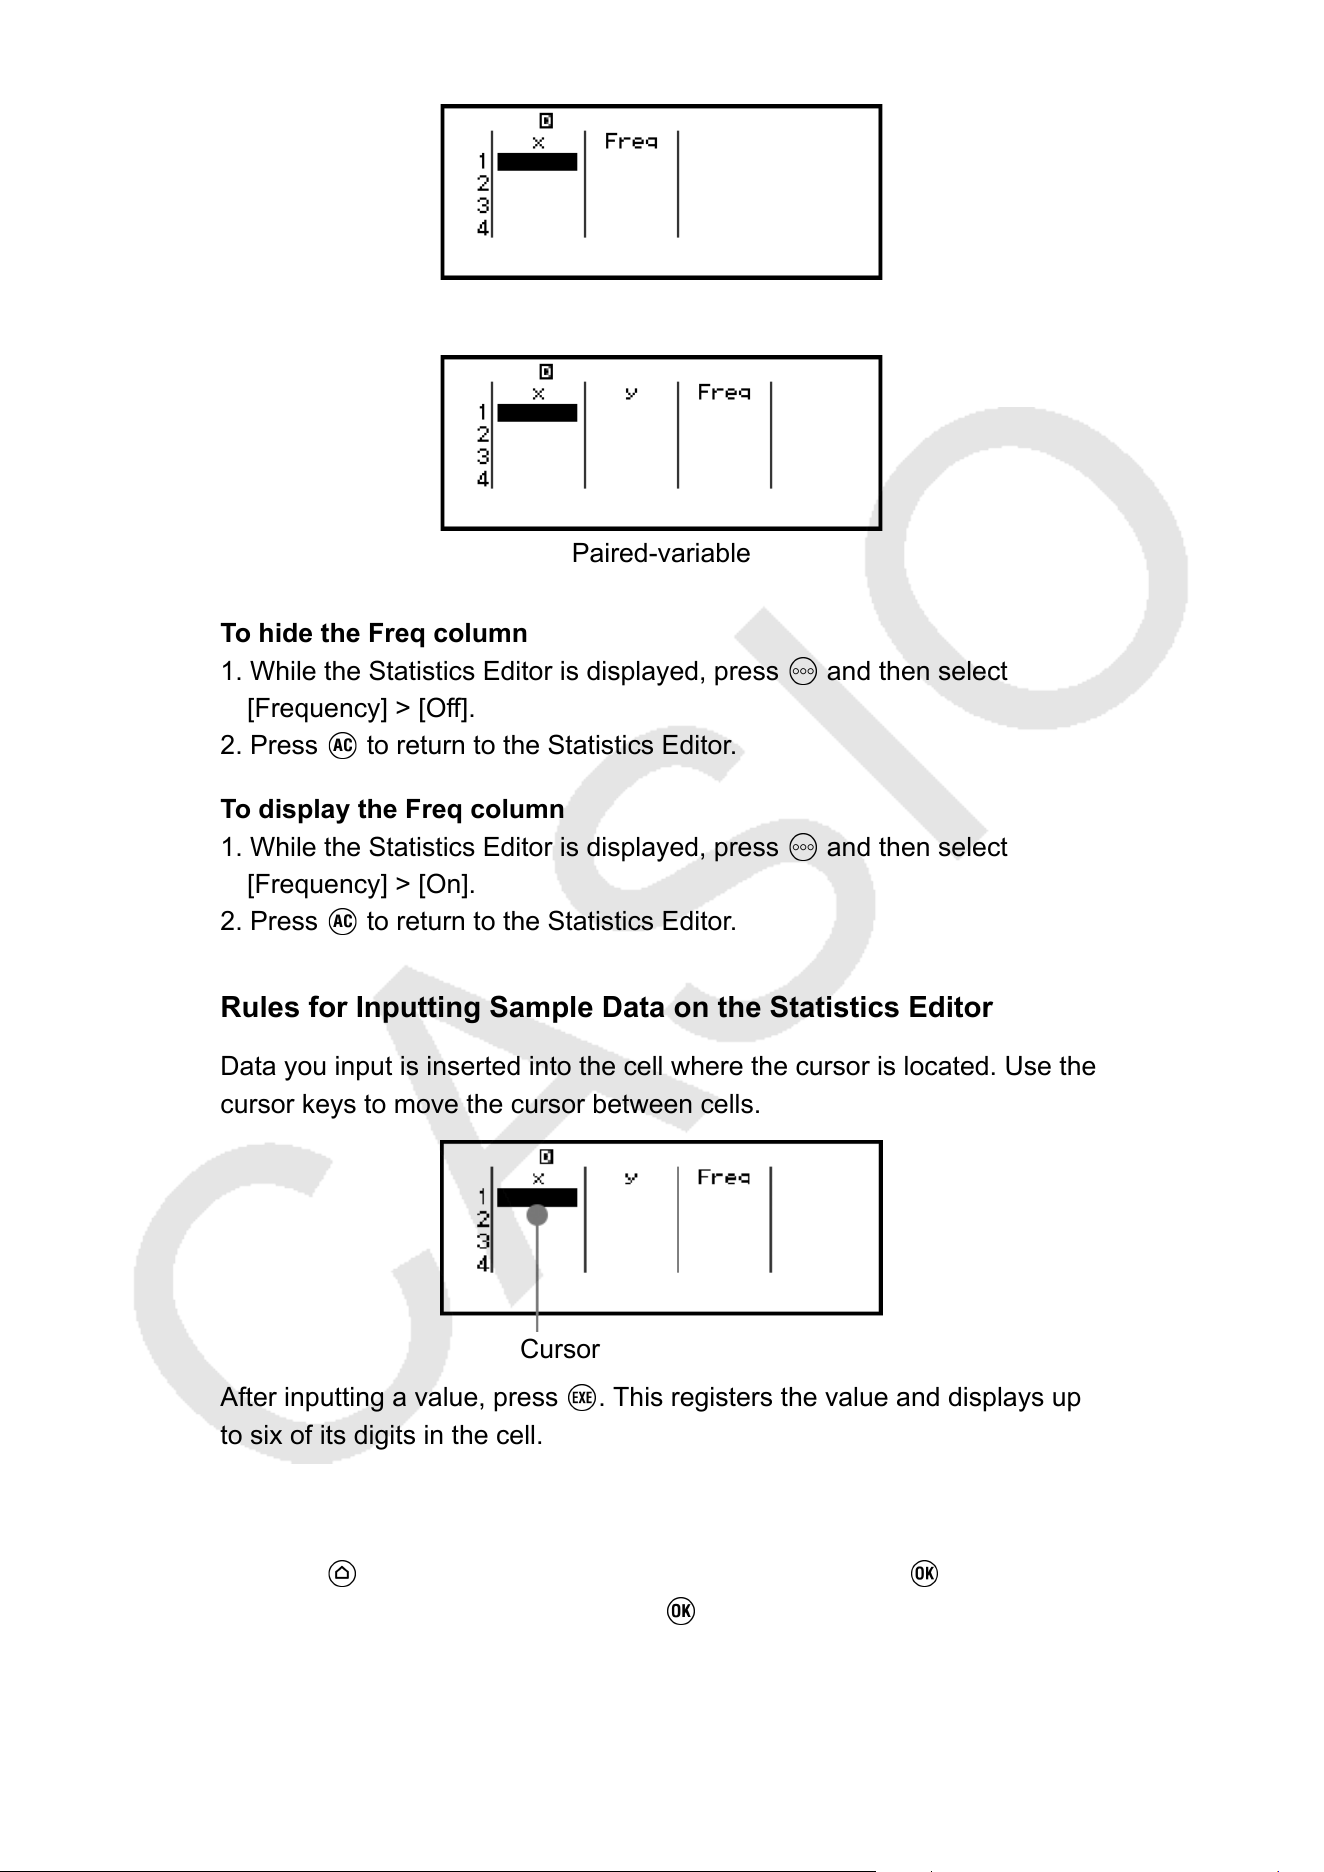
Single-variable
Paired-variable
T
o hide the Freq column
1. While the Statistics Editor is displayed, press
and then select
[Frequency] > [Of
f].
2. Press
to return to the Statistics Editor.
T
o display the Freq column
1. While the Statistics Editor is displayed, press
and then select
[Frequency] > [On].
2. Press to return to the Statistics Editor.
Rules for Inputting Sample Data on the Statistics Editor
Data you input is inserted into the cell where the cursor is located. Use the
cursor keys to move the cursor between cells.
Cursor
After inputting a value, press . This registers the value and displays up
to six of its digits in the cell.
Example 1: T
o select paired-variable and input the following data: (170,
66), (179, 75), (173, 68)
1. Press
, select the Statistics app icon, and then press .
2. Select [2-V
ariable], and then press
.
78
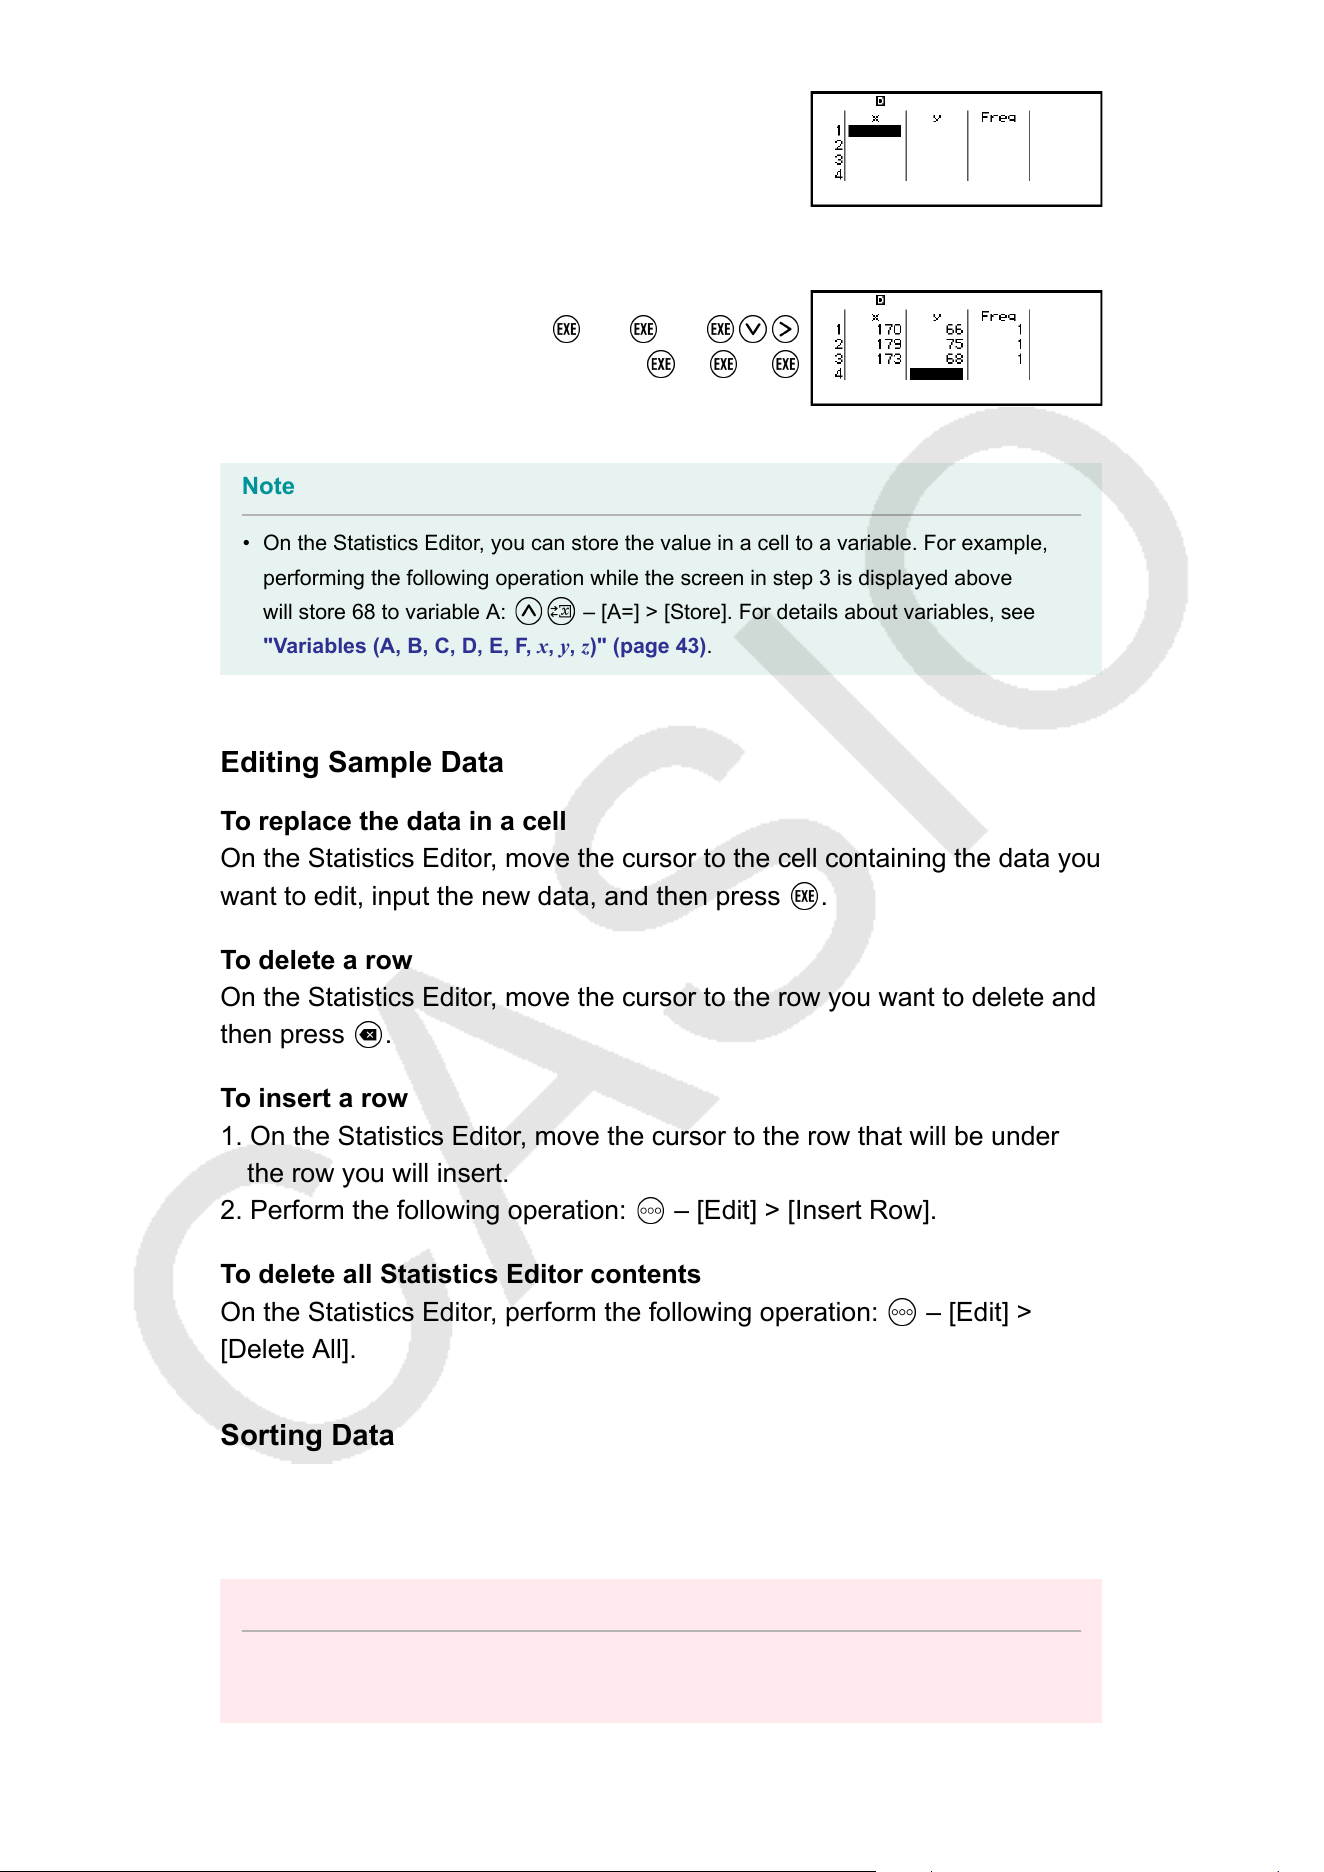
3. Use the operation below to input data.
170 179 173
66 75 68
Note
• On the Statistics Editor, you can store the value in a cell to a variable. For example,
performing the following operation while the screen in step 3 is displayed above
will store 68 to variable A: – [A=] > [Store]. For details about variables, see
"V
ariables (A, B, C, D, E, F, x, y, z)" (page 43).
Editing Sample Data
To replace the data in a cell
On the Statistics Editor, move the cursor to the cell containing the data you
want to edit, input the new data, and then press
.
To delete a row
On the Statistics Editor, move the cursor to the row you want to delete and
then press .
T
o insert a row
1. On the Statistics Editor, move the cursor to the row that will be under
the row you will insert.
2. Perform the following operation:
– [Edit] > [Insert Row].
T
o delete all Statistics Editor contents
On the Statistics Editor, perform the following operation:
– [Edit] >
[Delete All].
Sorting Data
Y
ou can sort Statistics Editor data in ascending or descending order on its
x, y, or Freq-column values.
Important!
• Note that after you change the data sort sequence, you will not be able to return it to
its original sequence.
79
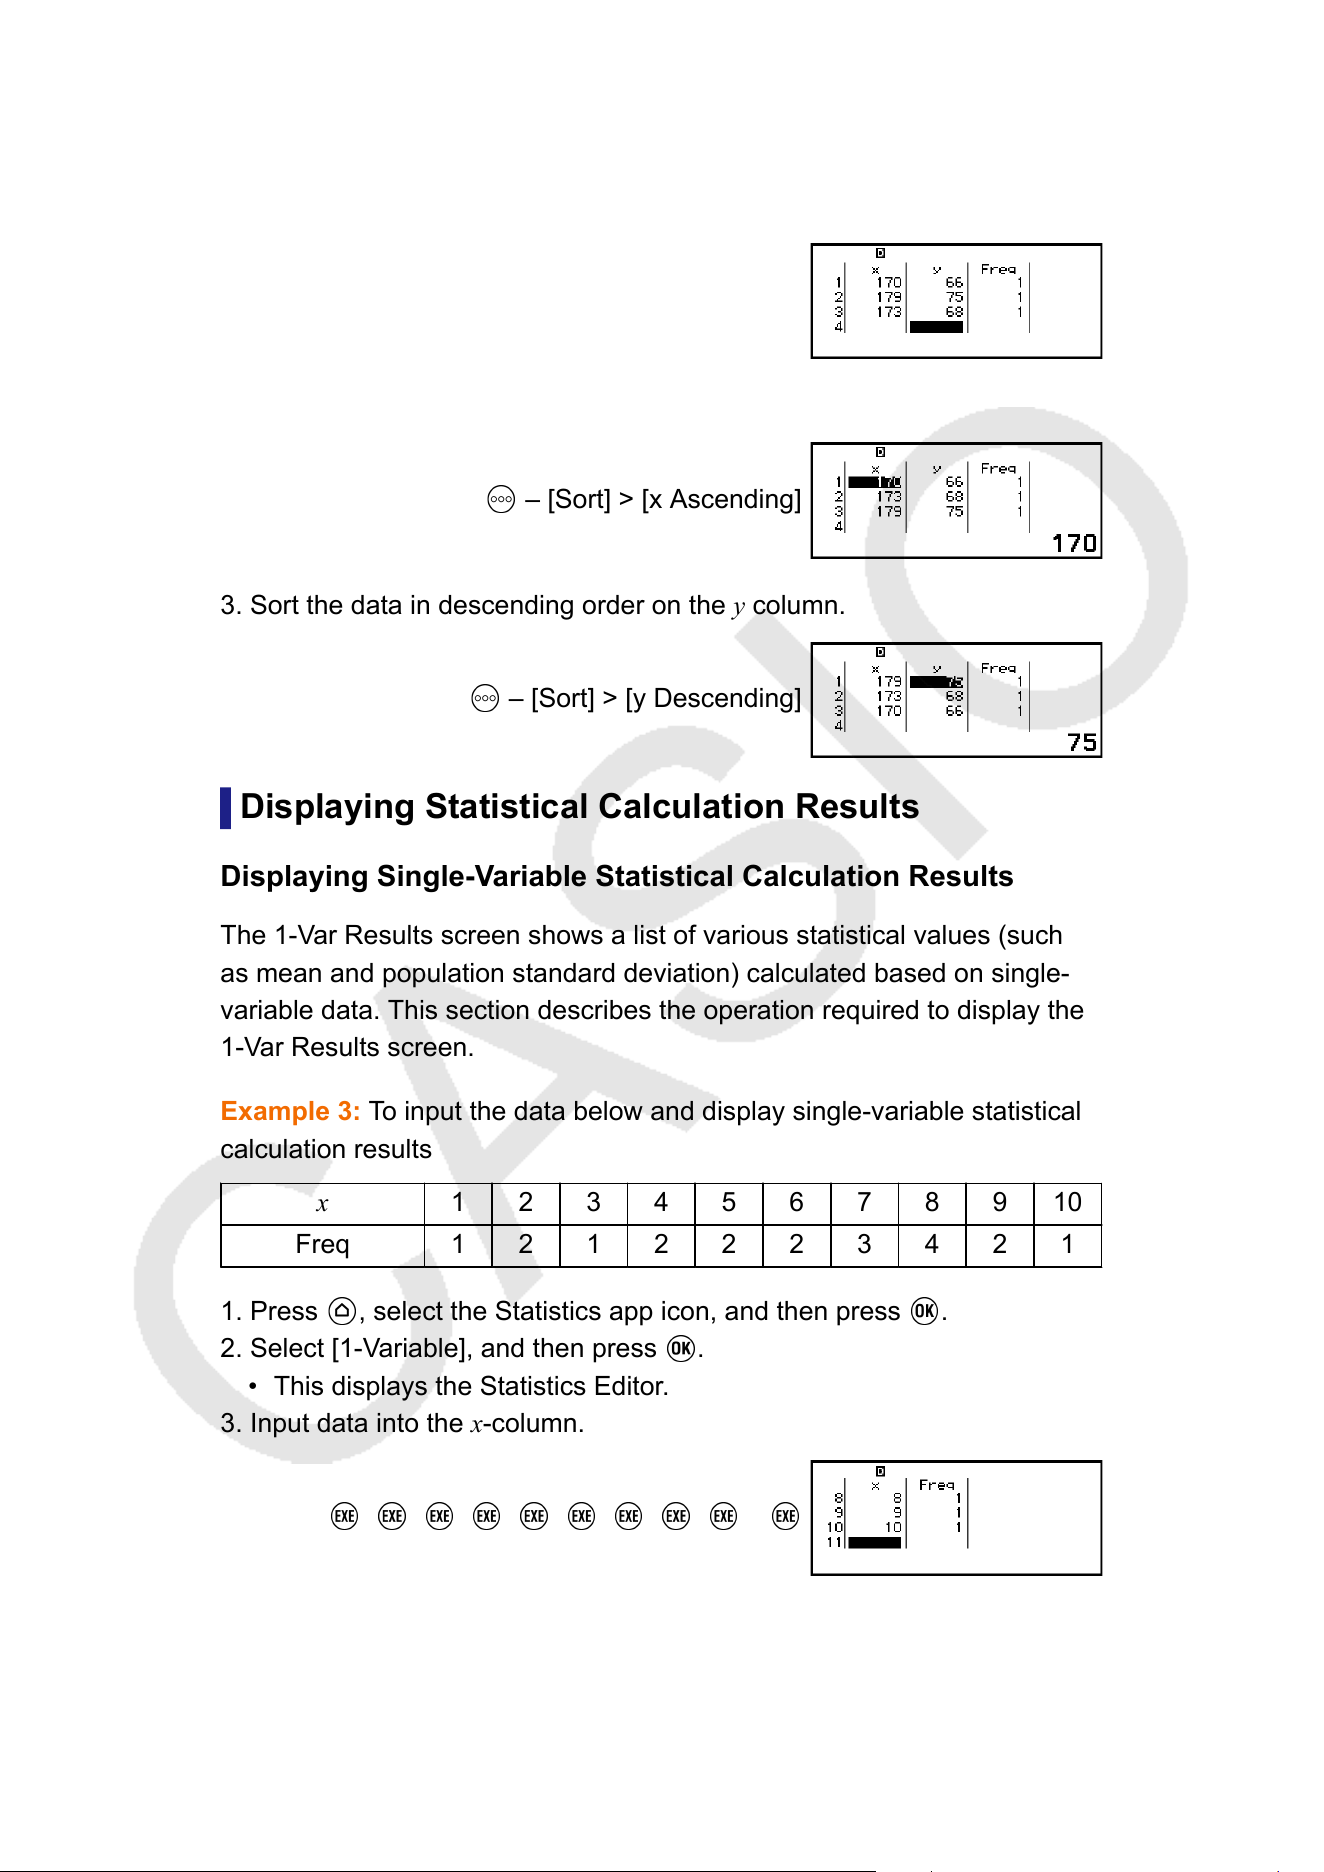
Example 2: T
o sort the data input in Example 1 (page 78) in ascending
order on the x column, and then in descending order on the y column
1. Use the procedure in Example 1 to input the data.
2. Sort the data in ascending order on the x column.
– [Sort] > [x Ascending]
3. Sort the data in descending order on the y column.
– [Sort] > [y Descending]
Displaying Statistical Calculation Results
Displaying Single-V
ariable Statistical Calculation Results
The 1-Var Results screen shows a list of various statistical values (such
as mean and population standard deviation) calculated based on single-
variable data. This section describes the operation required to display the
1-Var Results screen.
Example 3: To input the data below and display single-variable statistical
calculation results
x
1 2 3 4 5 6 7 8 9 10
Freq 1 2 1 2 2 2 3 4 2 1
1. Press
, select the Statistics app icon, and then press .
2. Select [1-V
ariable], and then press
.
• This displays the Statistics Editor.
3. Input data into the x-column.
1
2 3 4 5 6 7 8 9 10
4. Input data into the Freq column.
80
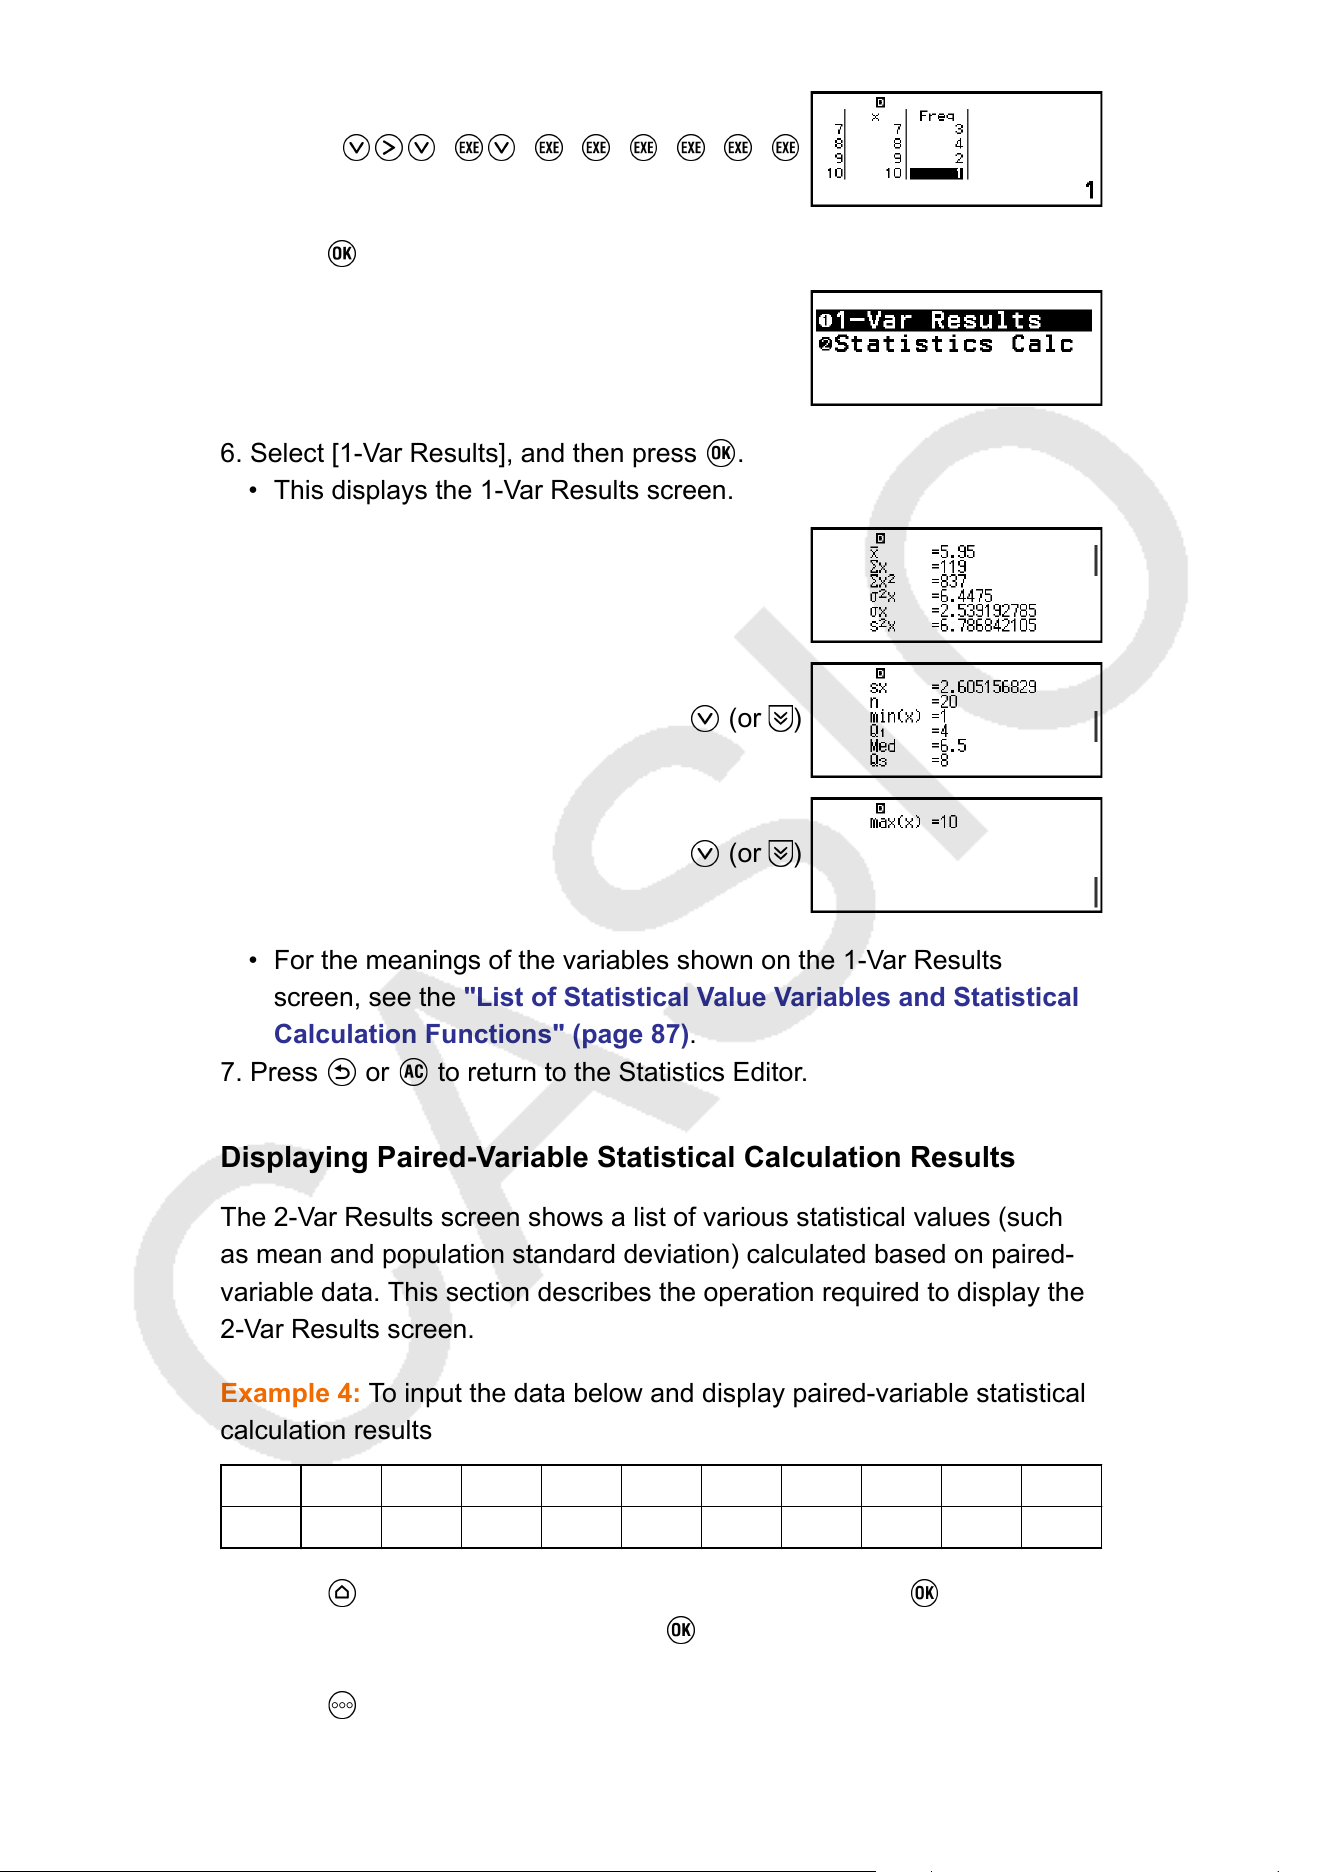
2 2 2 2 3 4 2
5. Press .
6. Select [1-Var Results], and then press .
• This displays the 1-Var Results screen.
(or )
(or )
• For the meanings of the variables shown on the 1-Var Results
screen, see the "List of Statistical V
alue Variables and Statistical
Calculation Functions" (page 87).
7. Press
or to return to the Statistics Editor.
Displaying Paired-Variable Statistical Calculation Results
The 2-Var Results screen shows a list of various statistical values (such
as mean and population standard deviation) calculated based on paired-
variable data. This section describes the operation required to display the
2-Var Results screen.
Example 4: To input the data below and display paired-variable statistical
calculation results
x
1.0 1.2 1.5 1.6 1.9 2.1 2.4 2.5 2.7 3.0
y
1.0 1.1 1.2 1.3 1.4 1.5 1.6 1.7 1.8 2.0
1. Press , select the Statistics app icon, and then press .
2. Select [2-Variable], and then press .
• This displays the Statistics Editor.
3. Press and then select [Frequency] > [Off].
81

• Press to return to the Statistics Editor.
4. Input data into the x-column.
1 1 2 1 5 1 6 1 9
2 1 2 4 2 5 2 7 3
5. Input data into the y-column.
1 1 1 1 2 1 3 1 4
1 5 1 6 1 7 1 8 2
6. Press .
7. Select [2-Var Results], and then press .
• This displays the 2-Var Results screen.
(or )
(or )
(or )
• For the meanings of the variables shown on the 2-Var Results
screen, see the "List of Statistical Value Variables and Statistical
Calculation Functions" (page 87).
8. Press or to return to the Statistics Editor.
Displaying Regression Calculation Results
The Reg Results screen displays a list of regression calculation results
(coef
ficients of regression equations) based on paired-variable data. This
82
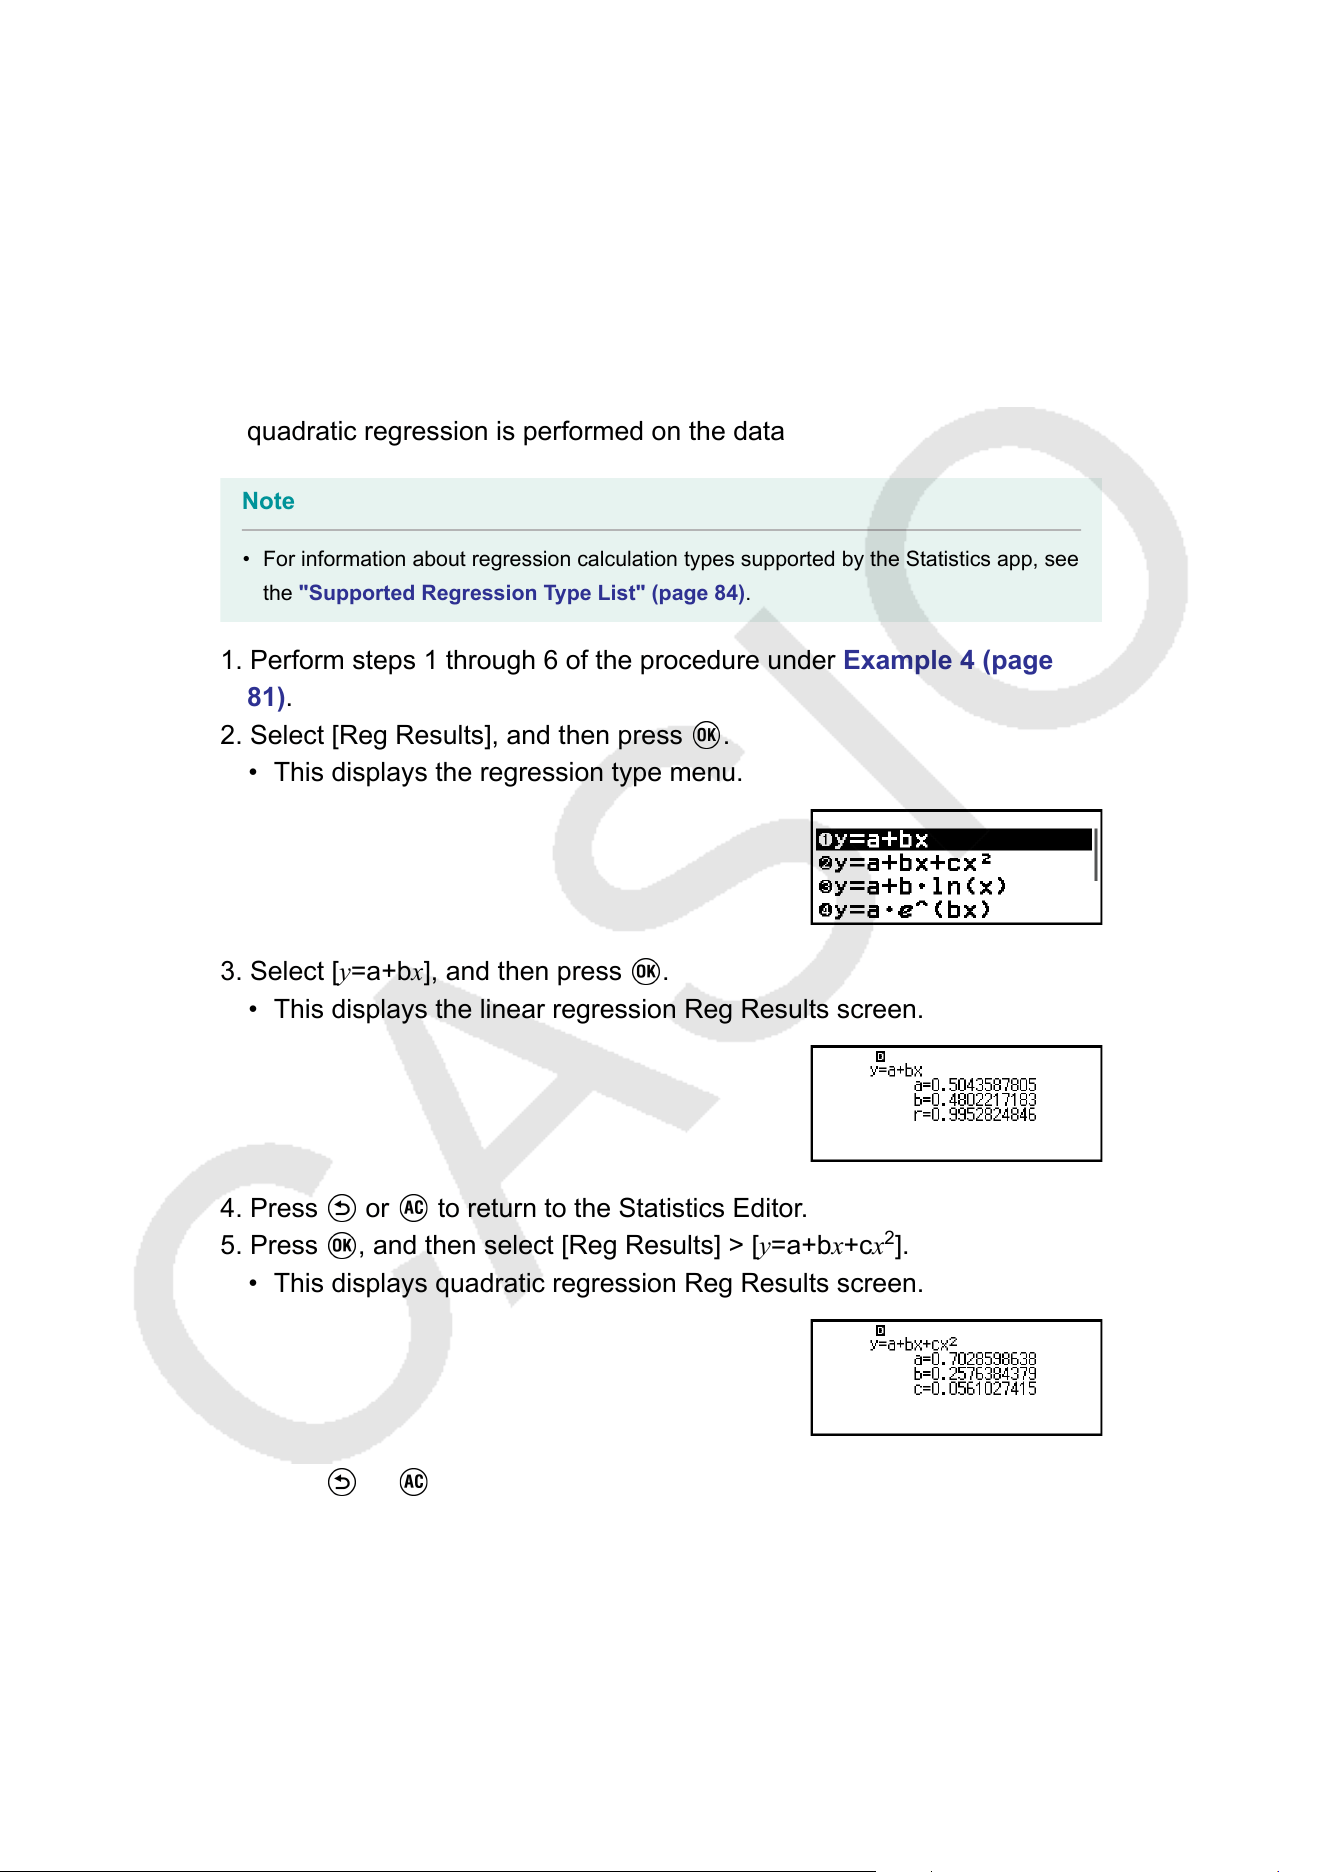
section describes the operation required to display the Reg Results
screen.
Example 5: T
o use the paired-variable data input in Example 4 (page 81)
and display the results of the two regression calculations shown below
• The regression equation "y = a + bx" coefficients (a, b), and the
correlation coefficient (r) when linear regression is performed on the
data
• The regression equation "y = a + bx + cx
2
" coefficients (a, b, c) when
quadratic regression is performed on the data
Note
• For information about regression calculation types supported by the Statistics app, see
the "Supported Regression T
ype List" (page 84).
1. Perform steps 1 through 6 of the procedure under Example 4 (page
81).
2. Select [Reg Results], and then press
.
• This displays the regression type menu.
3. Select [y=a+bx], and then press .
• This displays the linear regression Reg Results screen.
4. Press or to return to the Statistics Editor.
5. Press , and then select [Reg Results] > [y=a+bx+cx
2
].
• This displays quadratic regression Reg Results screen.
6. Press or to return to the Statistics Editor.
• For the meanings of the variables shown on the Reg Results
screen, see the "List of Statistical V
alue Variables and Statistical
Calculation Functions" (page 87).
83
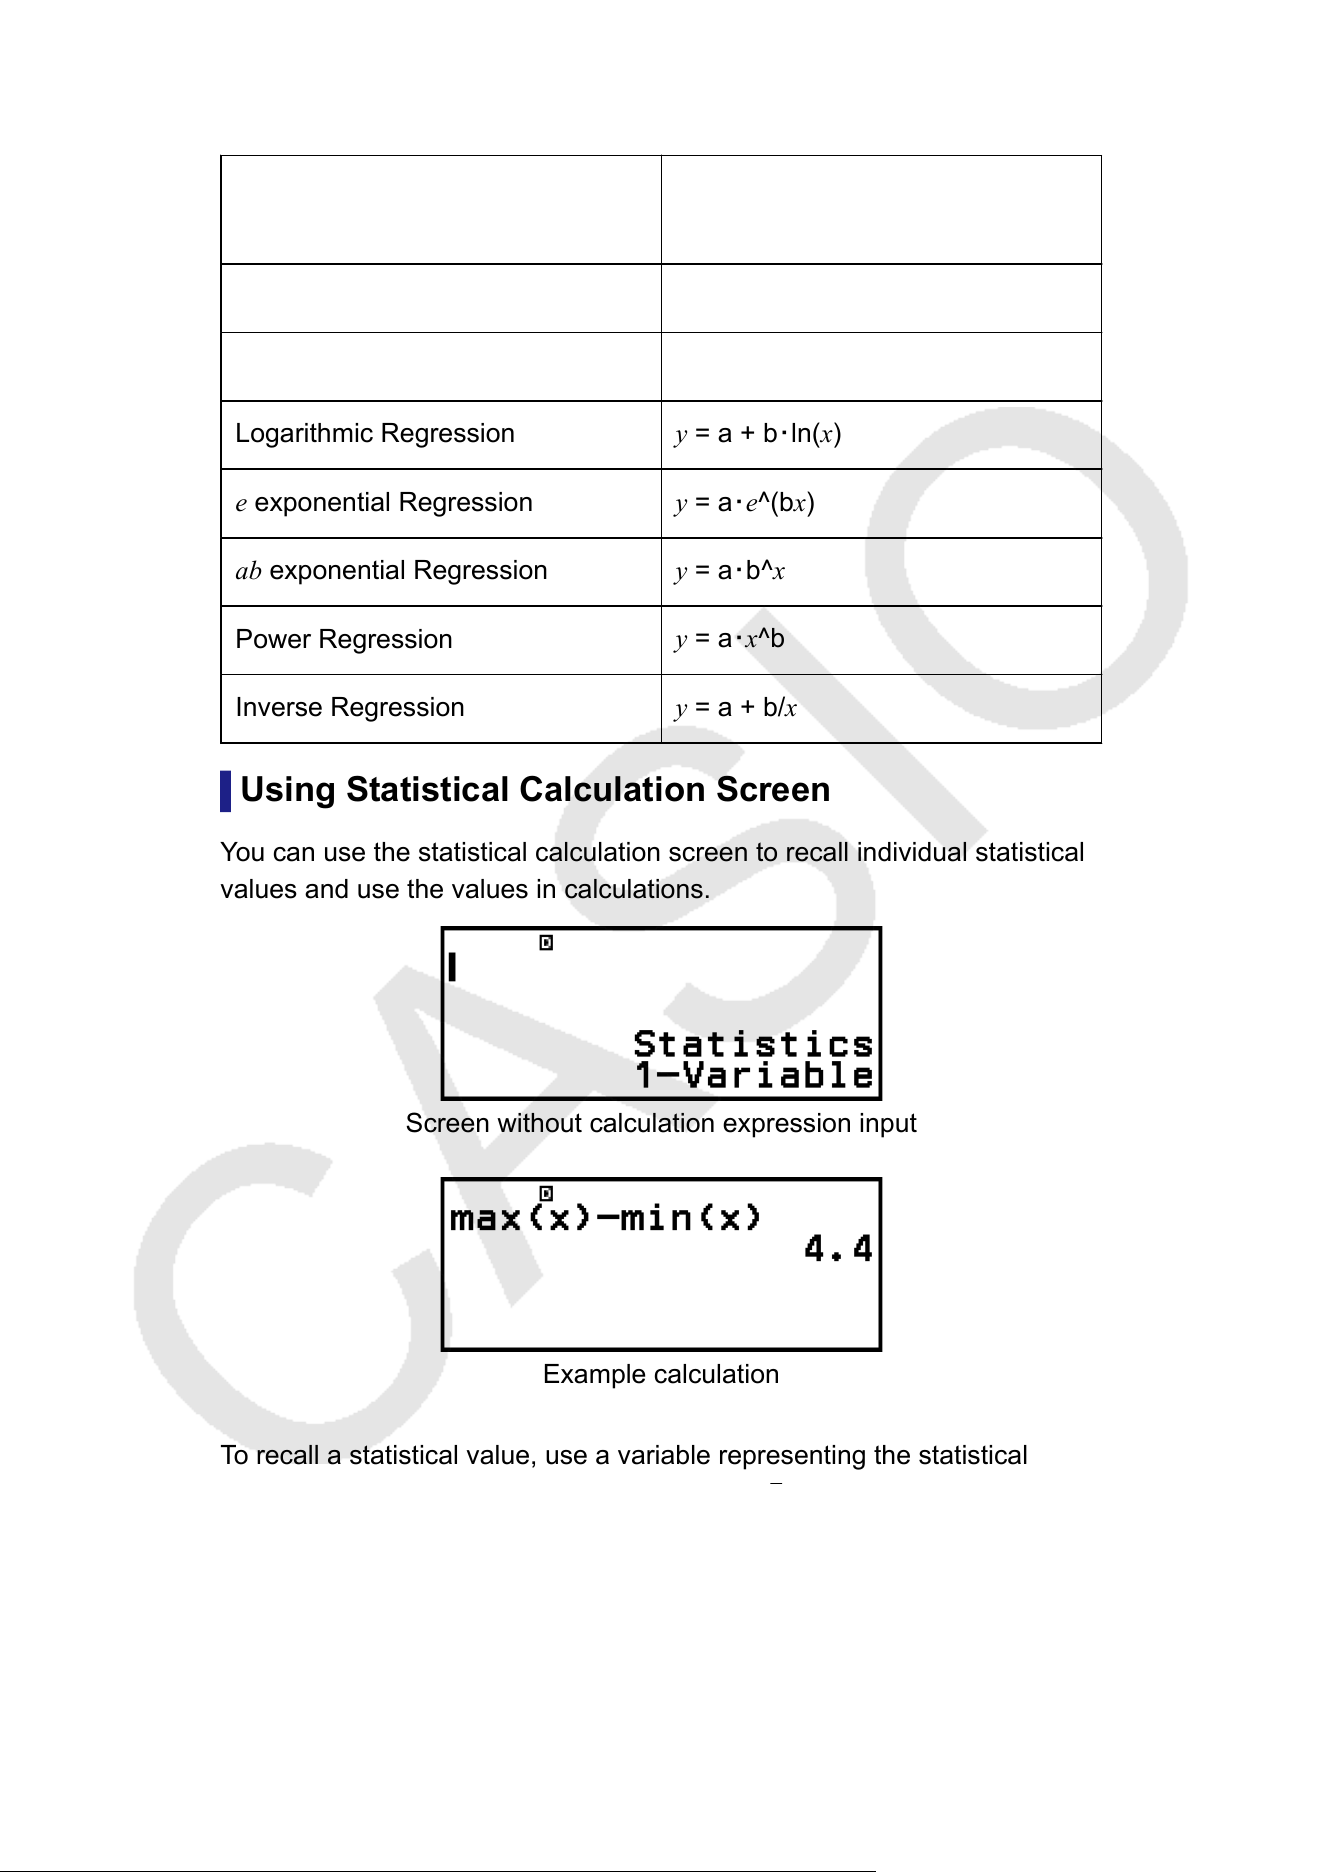
Supported Regression Type List
Regression Type
Regression Equation
(regression type menu item)
Linear Regression
y = a + bx
Quadratic Regression
y = a + bx + cx
2
Logarithmic Regression
y = a + b・ln(x)
e exponential Regression y = a・e^(bx)
ab exponential Regression y = a・b^x
Power Regression
y = a・x^b
Inverse Regression
y = a + b/x
Using Statistical Calculation Screen
Y
ou can use the statistical calculation screen to recall individual statistical
values and use the values in calculations.
Screen without calculation expression input
Example calculation
T
o recall a statistical value, use a variable representing the statistical
value you want to recall (for example, x mean:
x, x
population standard
deviation: σ
x
, x maximum value: max(x), and so on). For more information
about these variables, see the "List of Statistical V
alue Variables and
Statistical Calculation Functions" (page 87).
84
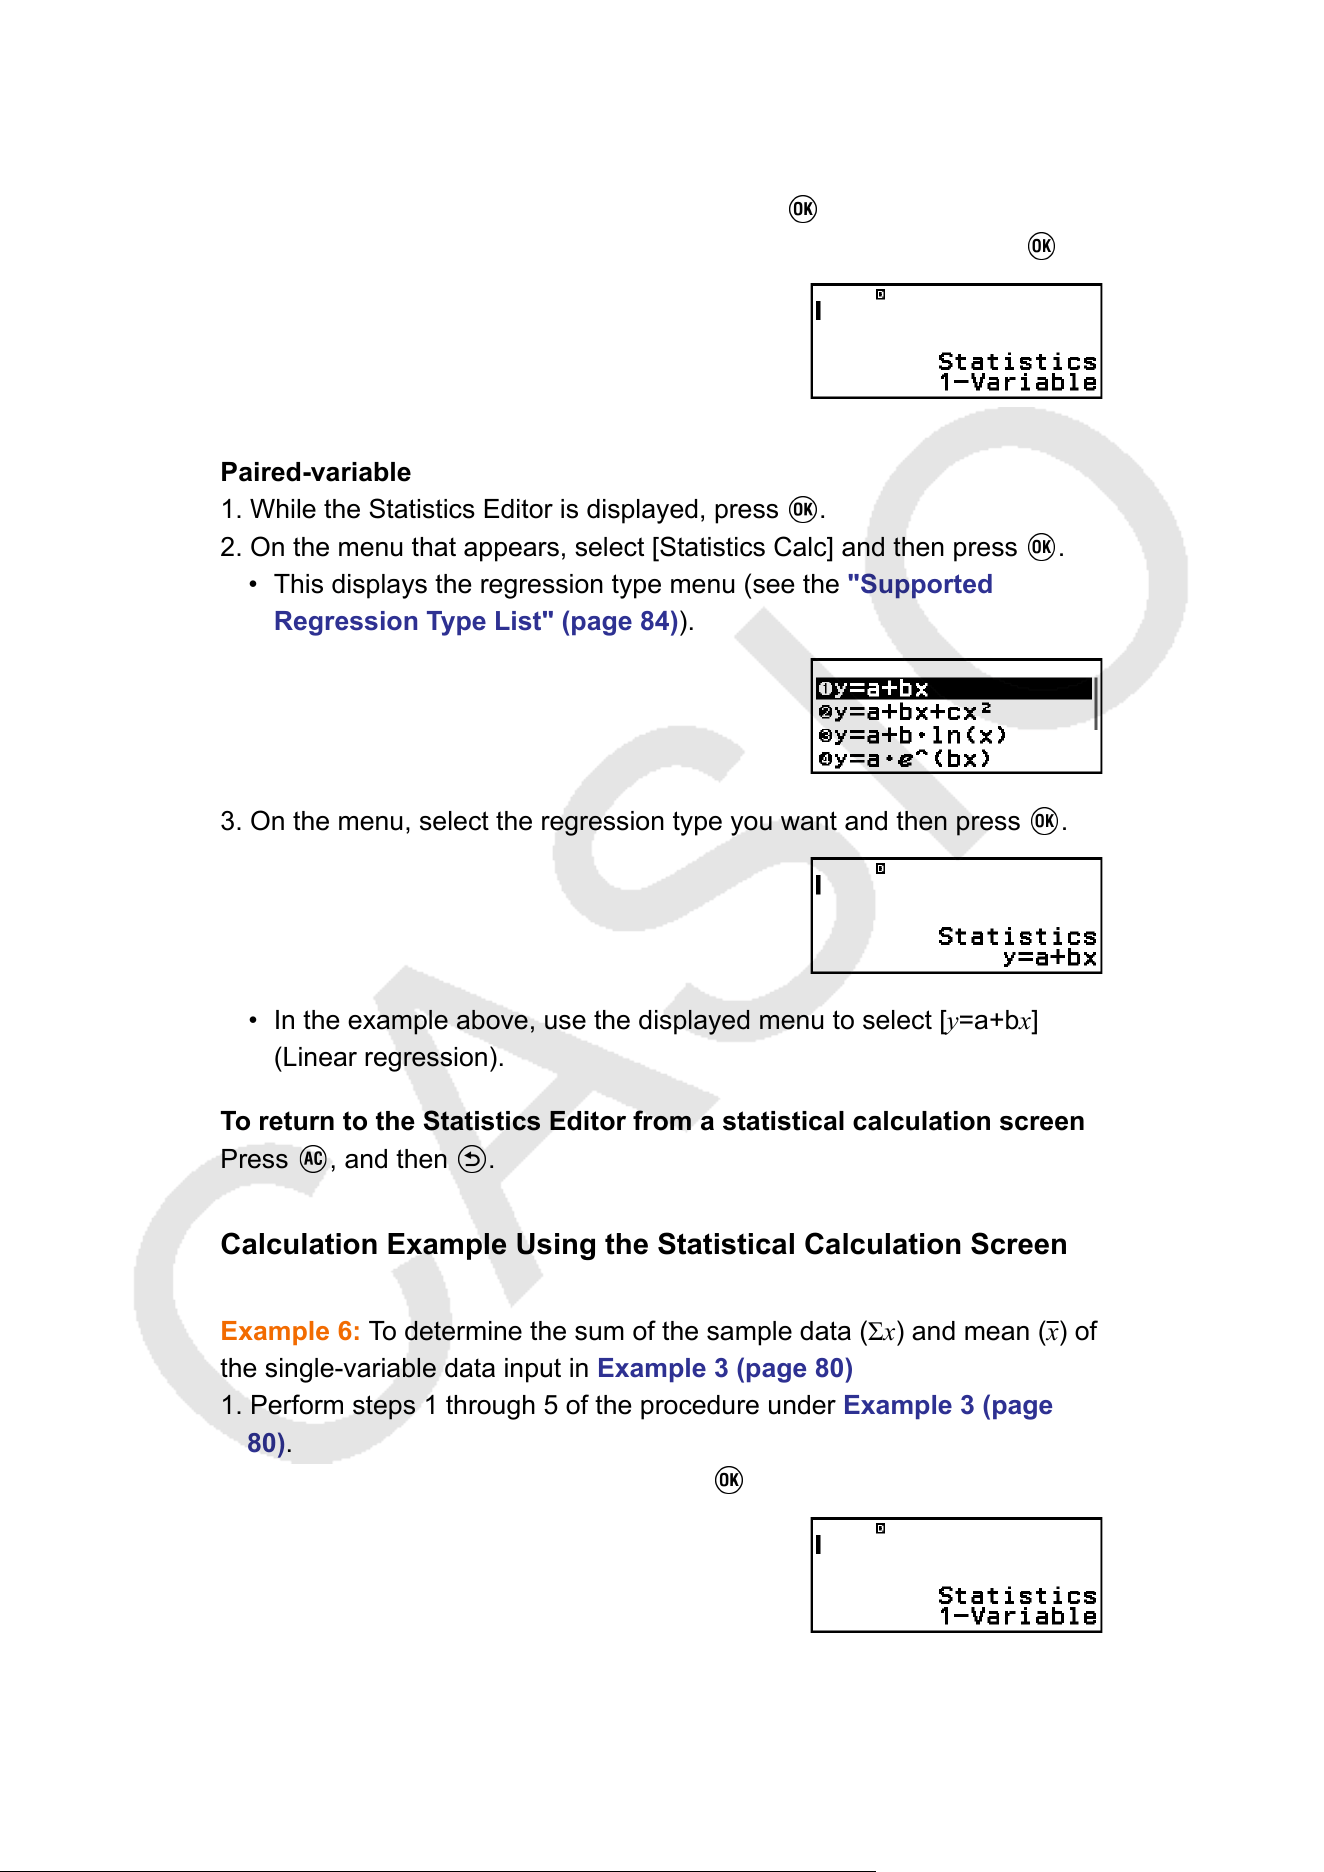
Displaying a Statistical Calculation Screen
Single-variable
1. While the Statistics Editor is displayed, press .
2. On the menu that appears, select [Statistics Calc] and then press .
Paired-variable
1. While the Statistics Editor is displayed, press .
2. On the menu that appears, select [Statistics Calc] and then press .
• This displays the regression type menu (see the "Supported
Regression Type List" (page 84)).
3. On the menu, select the regression type you want and then press .
• In the example above, use the displayed menu to select [y=a+bx]
(Linear regression).
T
o return to the Statistics Editor from a statistical calculation screen
Press
, and then .
Calculation Example Using the Statistical Calculation Screen
Example 6: T
o determine the sum of the sample data (Σx) and mean (
x) of
the single-variable data input in Example 3 (page 80)
1. Perform steps 1 through 5 of the procedure under Example 3 (page
80).
2. Select [Statistics Calc], and then press .
3. Calculate the sum of the sample data (Σx).
85
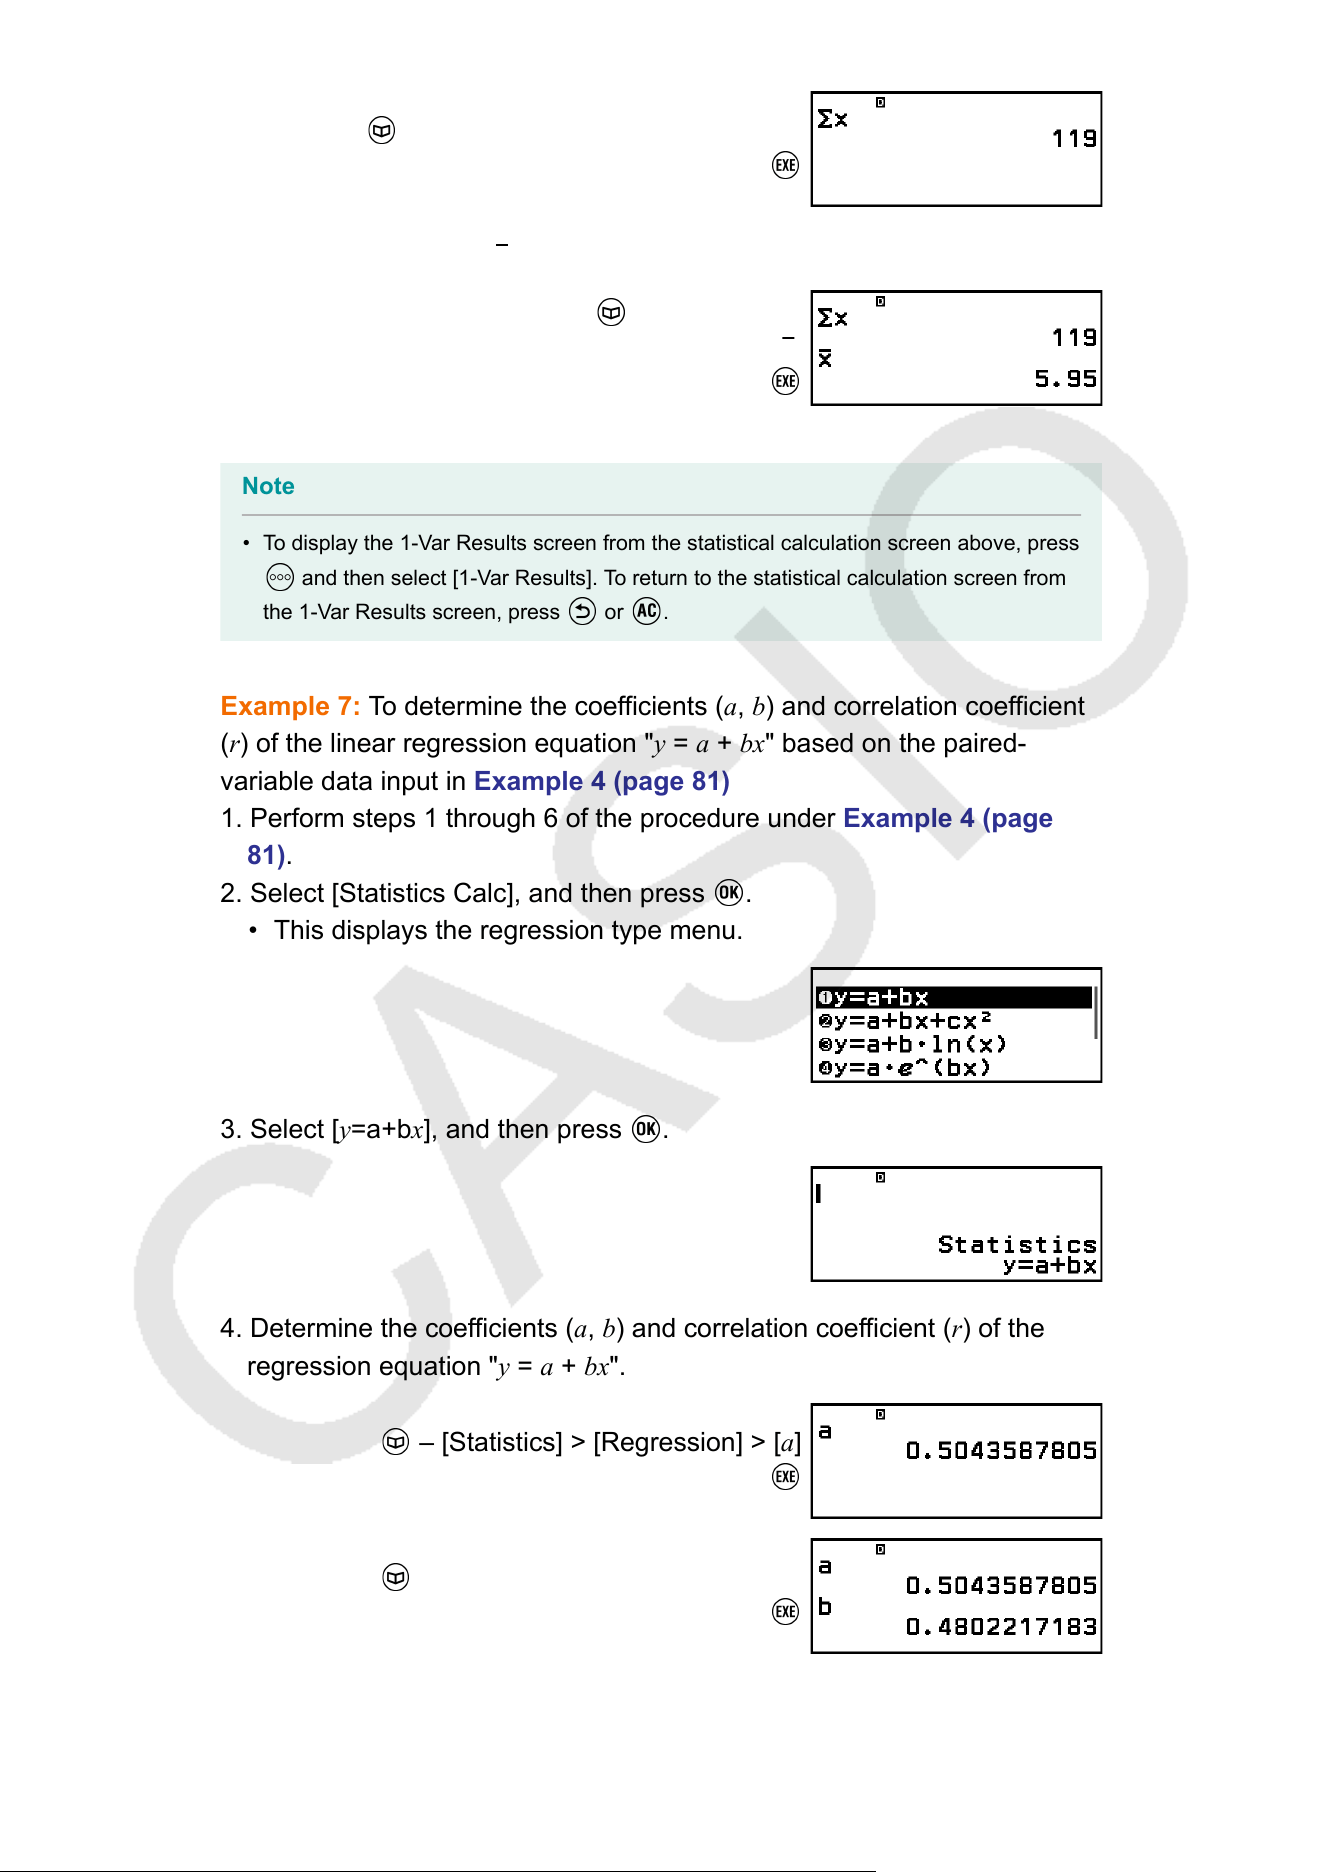
– [Statistics] > [Summation] > [Σx]
4. Calculate the mean (x).
– [Statistics] >
[Mean/V
ar/Dev
...
] > [
x]
Note
• To display the 1-Var Results screen from the statistical calculation screen above, press
and then select [1-Var Results]. To return to the statistical calculation screen from
the 1-V
ar Results screen, press
or .
Example 7: T
o determine the coefficients (a, b) and correlation coefficient
(r) of the linear regression equation "y = a + bx" based on the paired-
variable data input in Example 4 (page 81)
1. Perform steps 1 through 6 of the procedure under Example 4 (page
81).
2. Select [Statistics Calc], and then press
.
• This displays the regression type menu.
3. Select [y=a+bx], and then press .
4. Determine the coefficients (a, b) and correlation coef
ficient (r) of the
regression equation "y = a + bx".
– [Statistics] > [Regression] > [a]
– [Statistics] > [Regression] > [b]
86
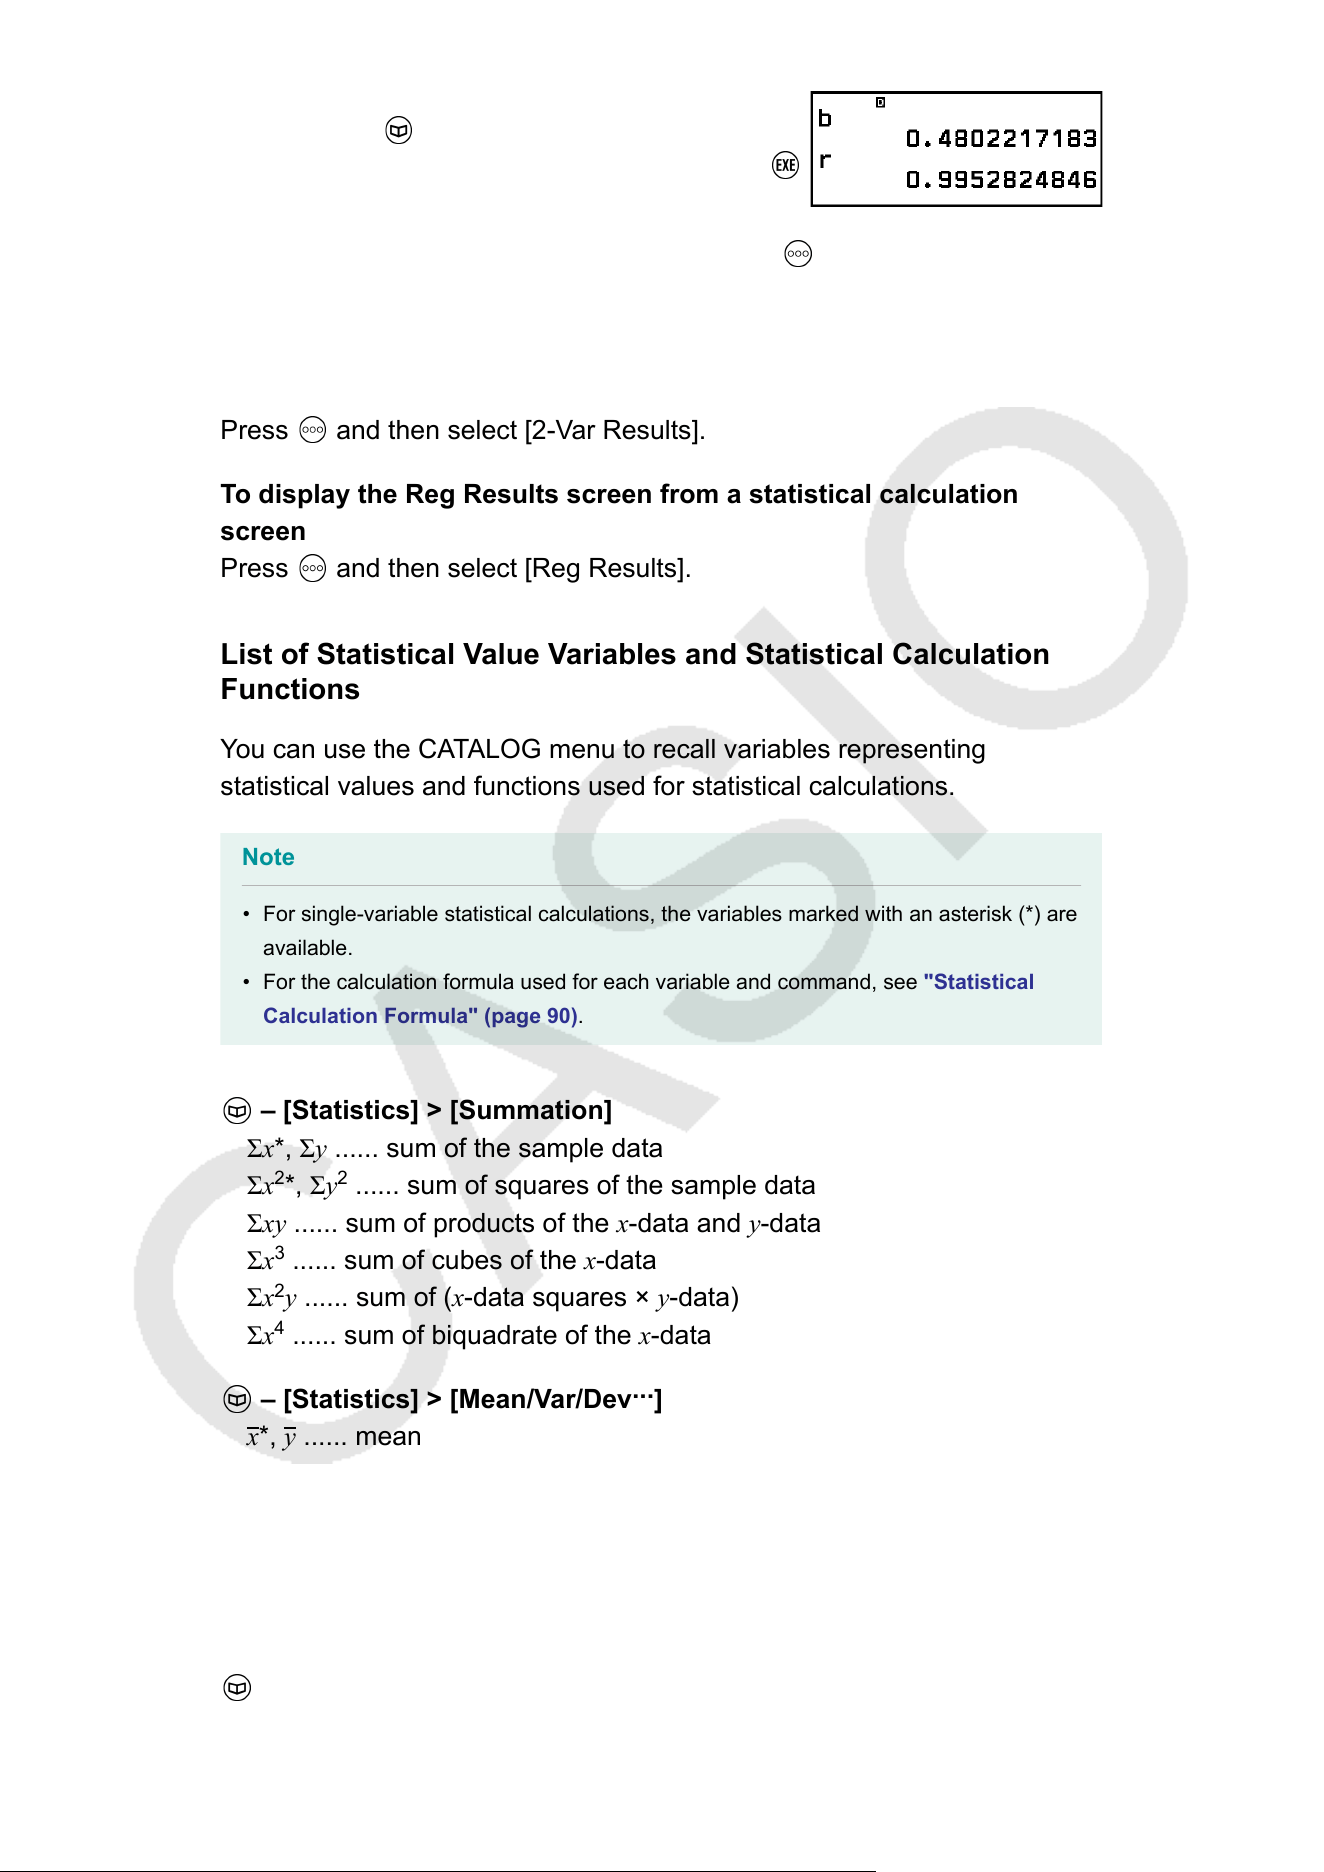
– [Statistics] > [Regression] > [r]
• To select a different regression type, press and then select [Select
Reg Type]. This displays the regression type menu from step 2.
To display the 2-Var Results screen from a statistical calculation
screen
Press and then select [2-Var Results].
T
o display the Reg Results screen from a statistical calculation
screen
Press
and then select [Reg Results].
List of Statistical V
alue Variables and Statistical Calculation
Functions
You can use the CATALOG menu to recall variables representing
statistical values and functions used for statistical calculations.
Note
• For single-variable statistical calculations, the variables marked with an asterisk (*) are
available.
• For the calculation formula used for each variable and command, see "Statistical
Calculation Formula"
(page 90).
– [Statistics] > [Summation]
Σx*, Σy ...... sum of the sample data
Σx
2
*, Σy
2
...... sum of squares of the sample data
Σxy
...... sum of products of the x-data and y-data
Σx
3
...... sum of cubes of the x-data
Σx
2
y ...... sum of (x-data squares × y-data)
Σx
4
...... sum of biquadrate of the x-data
– [Statistics] > [Mean/Var/Dev
...
]
x*, y ...... mean
σ
2
x
*, σ
2
y
...... population variance
σ
x
*, σ
y
...... population standard deviation
s
2
x
*, s
2
y
...... sample variance
s
x
*, s
y
...... sample standard deviation
n* ...... number of items
– [Statistics] > [Min/Max/Quartile] (Single-V
ariable Data Only)
87
min(x)* ...... minimum value
Q
1
* ...... first quartile
Med* ...... median
Q
3
* ...... third quartile
max(x)* ...... maximum value
– [Statistics] > [Norm Dist] (Single-V
ariable Data Only)
P(*, Q(*, R(*,
t* ...... Functions for executing normal distribution
calculations. For more information about these functions, see
"Performing Normal Distribution Calculations (Single-V
ariable Data
Only)" (page 88).
– [Statistics] > [Min/Max] (Paired-V
ariable Data Only)
min(x), min(y) ...... minimum value
max(x), max(y) ...... maximum value
– [Statistics] > [Regression] (Paired-Variable Data Only)
For quadratic regression
a, b, c ...... regression coefficients for quadratic regression
xˆ
1
, xˆ
2
...... Functions for determining x
1
and x
2
estimated values for an
input y-value. For the argument, input the value of y immediately before
the xˆ
1
or xˆ
2
function.
yˆ ...... Function for determining the y estimated value for an input x-
value. For the argument, input the value of x immediately before this
function.
For non-quadratic regression
a, b ...... regression coef
ficients
r ...... correlation coefficient
xˆ ...... Function for determining x estimated value for an input y-value.
For the argument, input the value of y immediately before this function.
yˆ ...... Function for determining the y estimated value for an input x-
value. For the argument, input the value of x immediately before this
function.
For an example of the operation to determine estimated values, see
"Calculating Estimated V
alues (Paired-Variable Data Only)" (page
89).
Performing Normal Distribution Calculations (Single-Variable
Data Only)
While single-variable statistical calculation is selected, you can perform
normal distribution calculation using the functions shown below from the
88
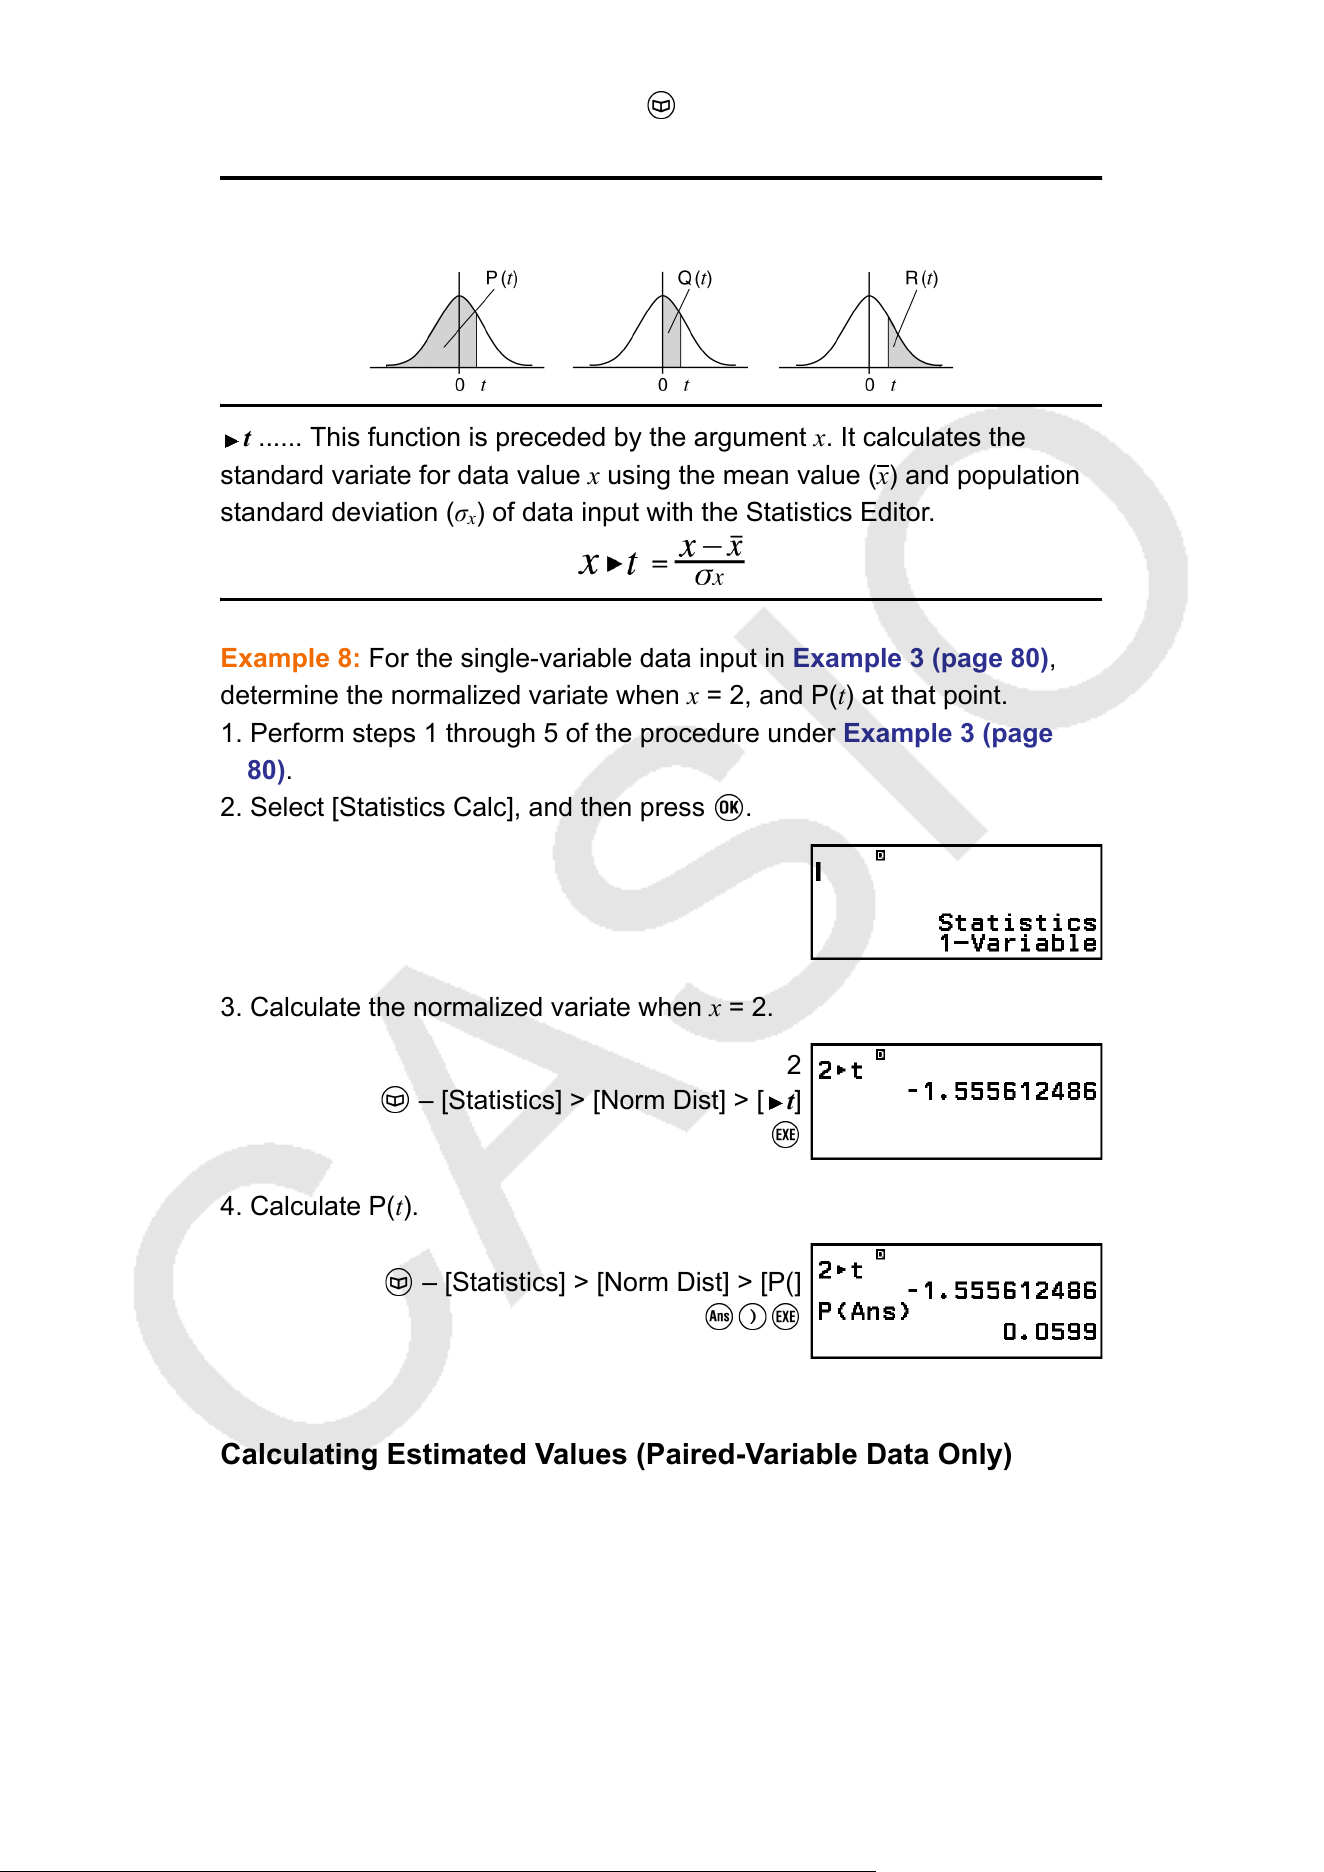
menu that appears when you press and then select [Statistics] > [Norm
Dist].
P(, Q(, R( ... These functions take the argument t and determine a
probability of standard normal distribution as illustrated below
.
t ...... This function is preceded by the argument x. It calculates the
standard variate for data value x using the mean value (x) and population
standard deviation (σ
x
) of data input with the Statistics Editor.
Example 8: For the single-variable data input in Example 3 (page 80),
determine the normalized variate when x = 2, and P(t) at that point.
1. Perform steps 1 through 5 of the procedure under Example 3 (page
80).
2. Select [Statistics Calc], and then press .
3. Calculate the normalized variate when x = 2.
2
– [Statistics] > [Norm Dist] > [ t]
4. Calculate P(t).
– [Statistics] > [Norm Dist] > [P(]
Calculating Estimated Values (Paired-Variable Data Only)
Based on the regression equation obtained by paired-variable statistical
calculation, the estimated value of y can be calculated for a given x-value.
The corresponding x-value (two values, x
1
and x
2
, in the case of quadratic
regression) also can be calculated for a value of y in the regression
equation.
89
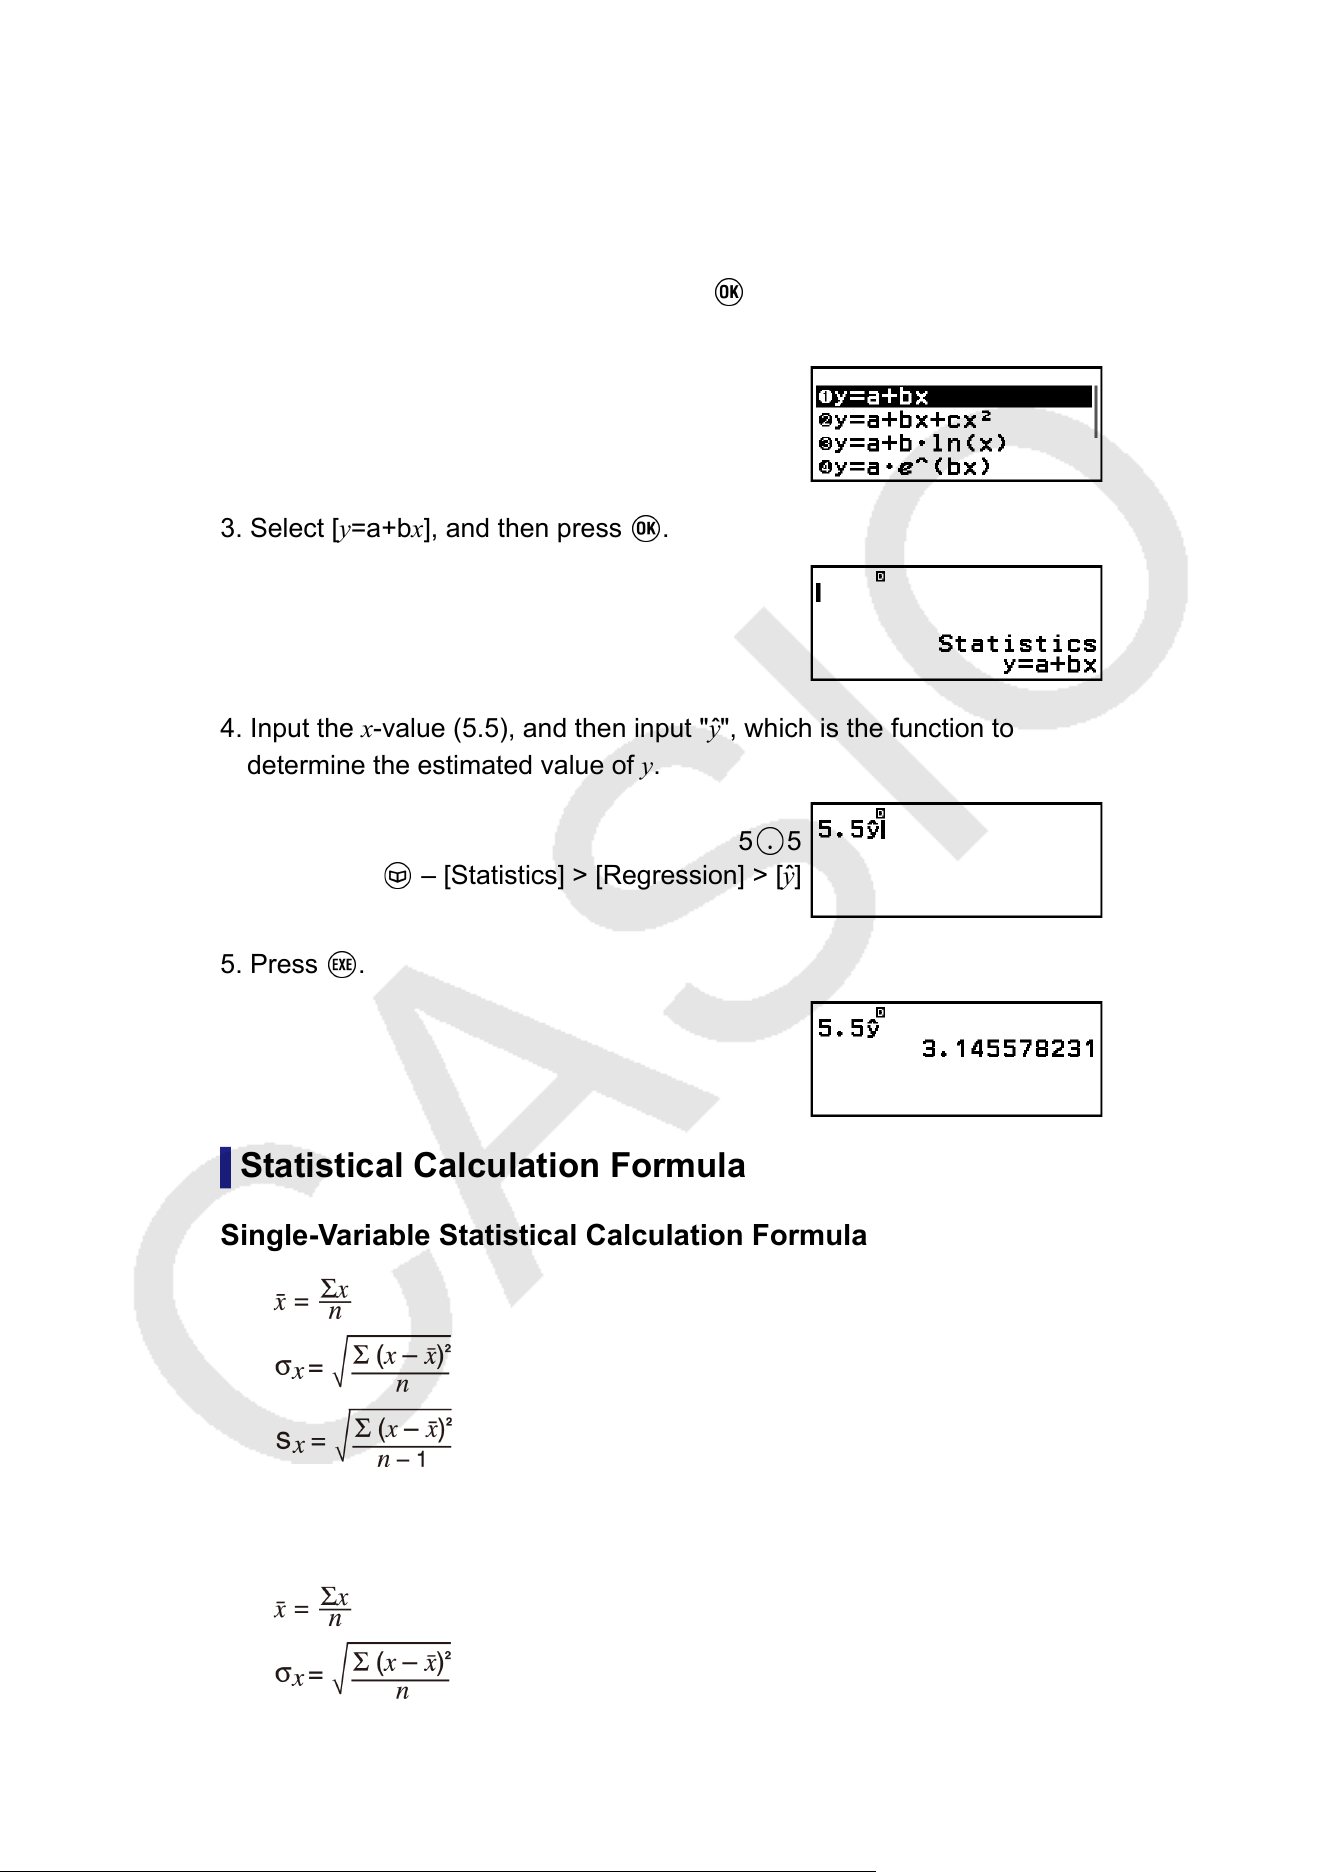
Example 9: T
o determine the estimated value for y when x = 5.5 in the
regression equation produced by linear regression of the data input in
Example 4 (page 81)
1. Perform steps 1 through 6 of the procedure under Example 4 (page
81).
2. Select [Statistics Calc], and then press
.
• This displays the regression type menu.
3. Select [y=a+bx], and then press .
4. Input the x-value (5.5), and then input "y
ˆ
", which is the function to
determine the estimated value of y.
5 5
– [Statistics] > [Regression] > [yˆ]
5. Press .
Statistical Calculation Formula
Single-V
ariable Statistical Calculation Formula
Paired-Variable Statistical Calculation Formula
90

Regression Calculation Formula
Linear Regression (y = a + bx)
Quadratic Regression (y = a + bx + cx
2
)
91
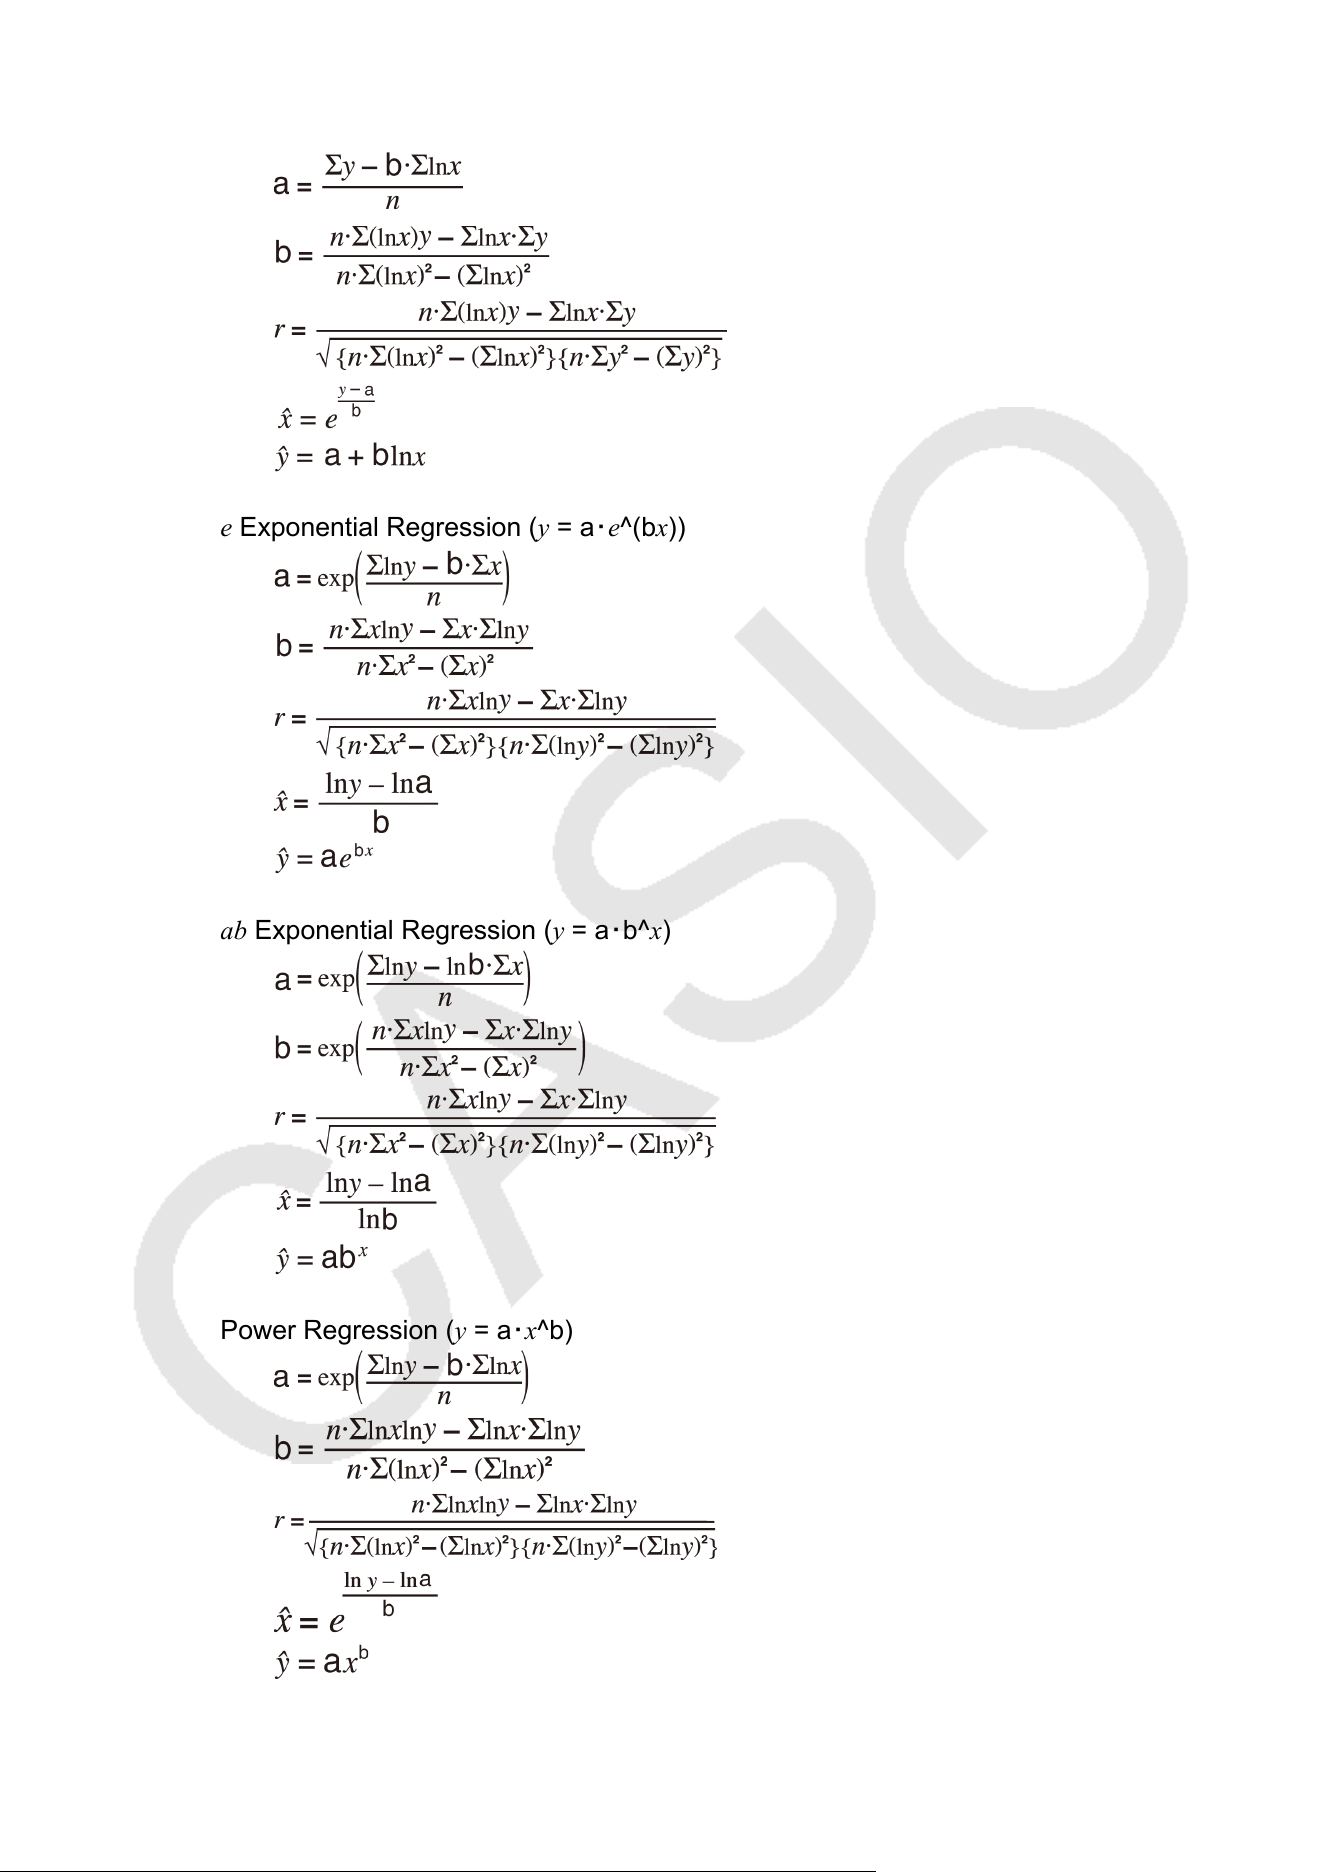
Logarithmic Regression (y
= a + b・ln(x))
e Exponential Regression (y = a・e^(bx))
ab Exponential Regression (y
= a・b^x)
Power Regression (y = a・x^b)
92
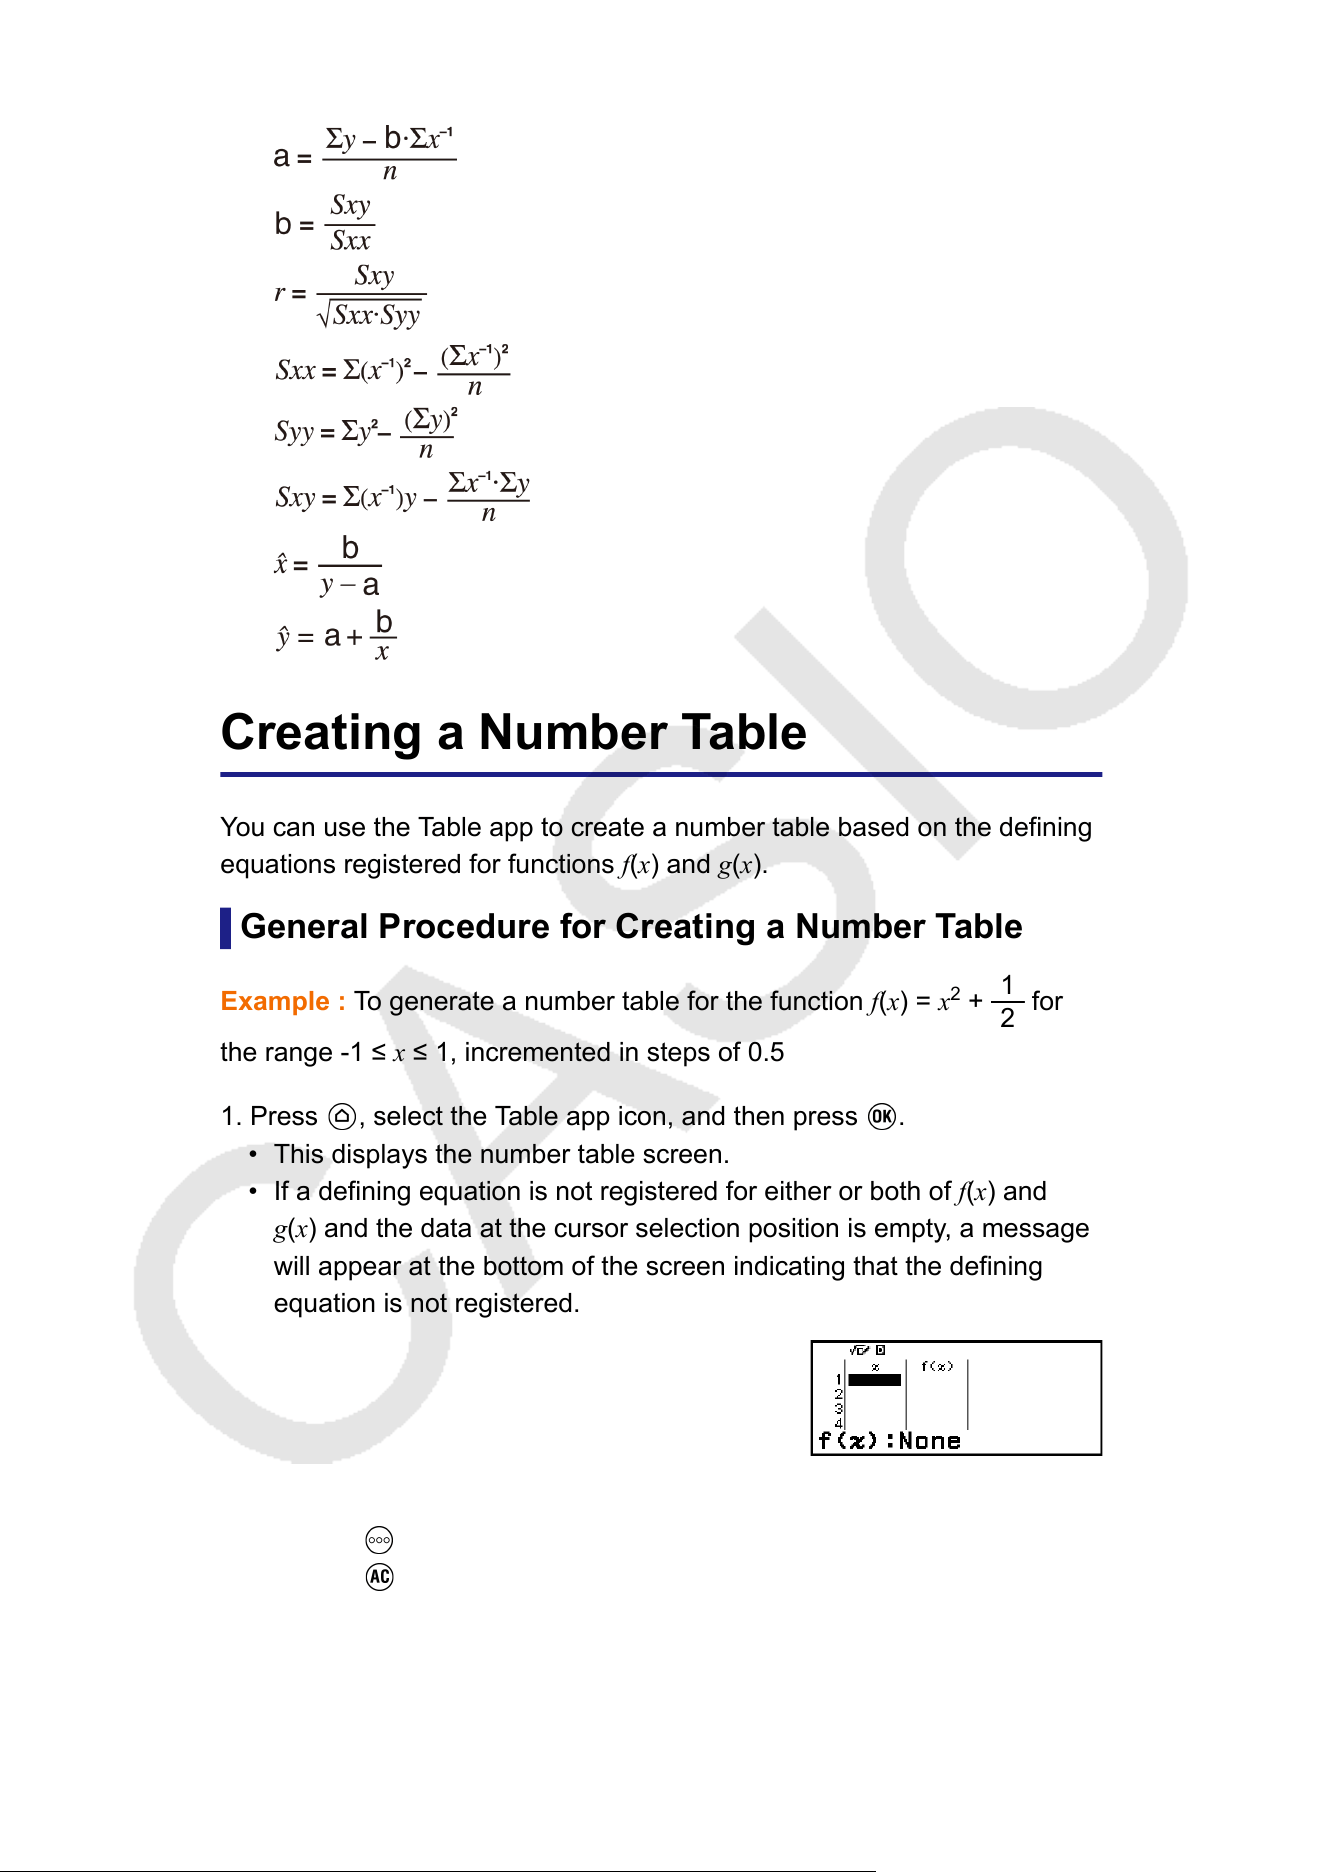
Inverse Regression (y = a + b/x)
Creating a Number Table
Y
ou can use the Table app to create a number table based on the defining
equations registered for functions f(x) and g(x).
General Procedure for Creating a Number Table
Example : To generate a number table for the function f(x) = x
2
+
1
2
for
the range -1 ≤ x ≤
1, incremented in steps of 0.5
1. Press
, select the Table app icon, and then press .
• This displays the number table screen.
• If a defining equation is not registered for either or both of f(x) and
g(x) and the data at the cursor selection position is empty
, a message
will appear at the bottom of the screen indicating that the defining
equation is not registered.
2. Configure settings to generate a number table from the function.
(1) Press , and then select [Table Type] > [f(x)].
(2) Press .
• For information about settings, see "Maximum Number of Rows in a
Number T
able According to Table Type" (page 94).
3. Register a defining equation for f(x).
93
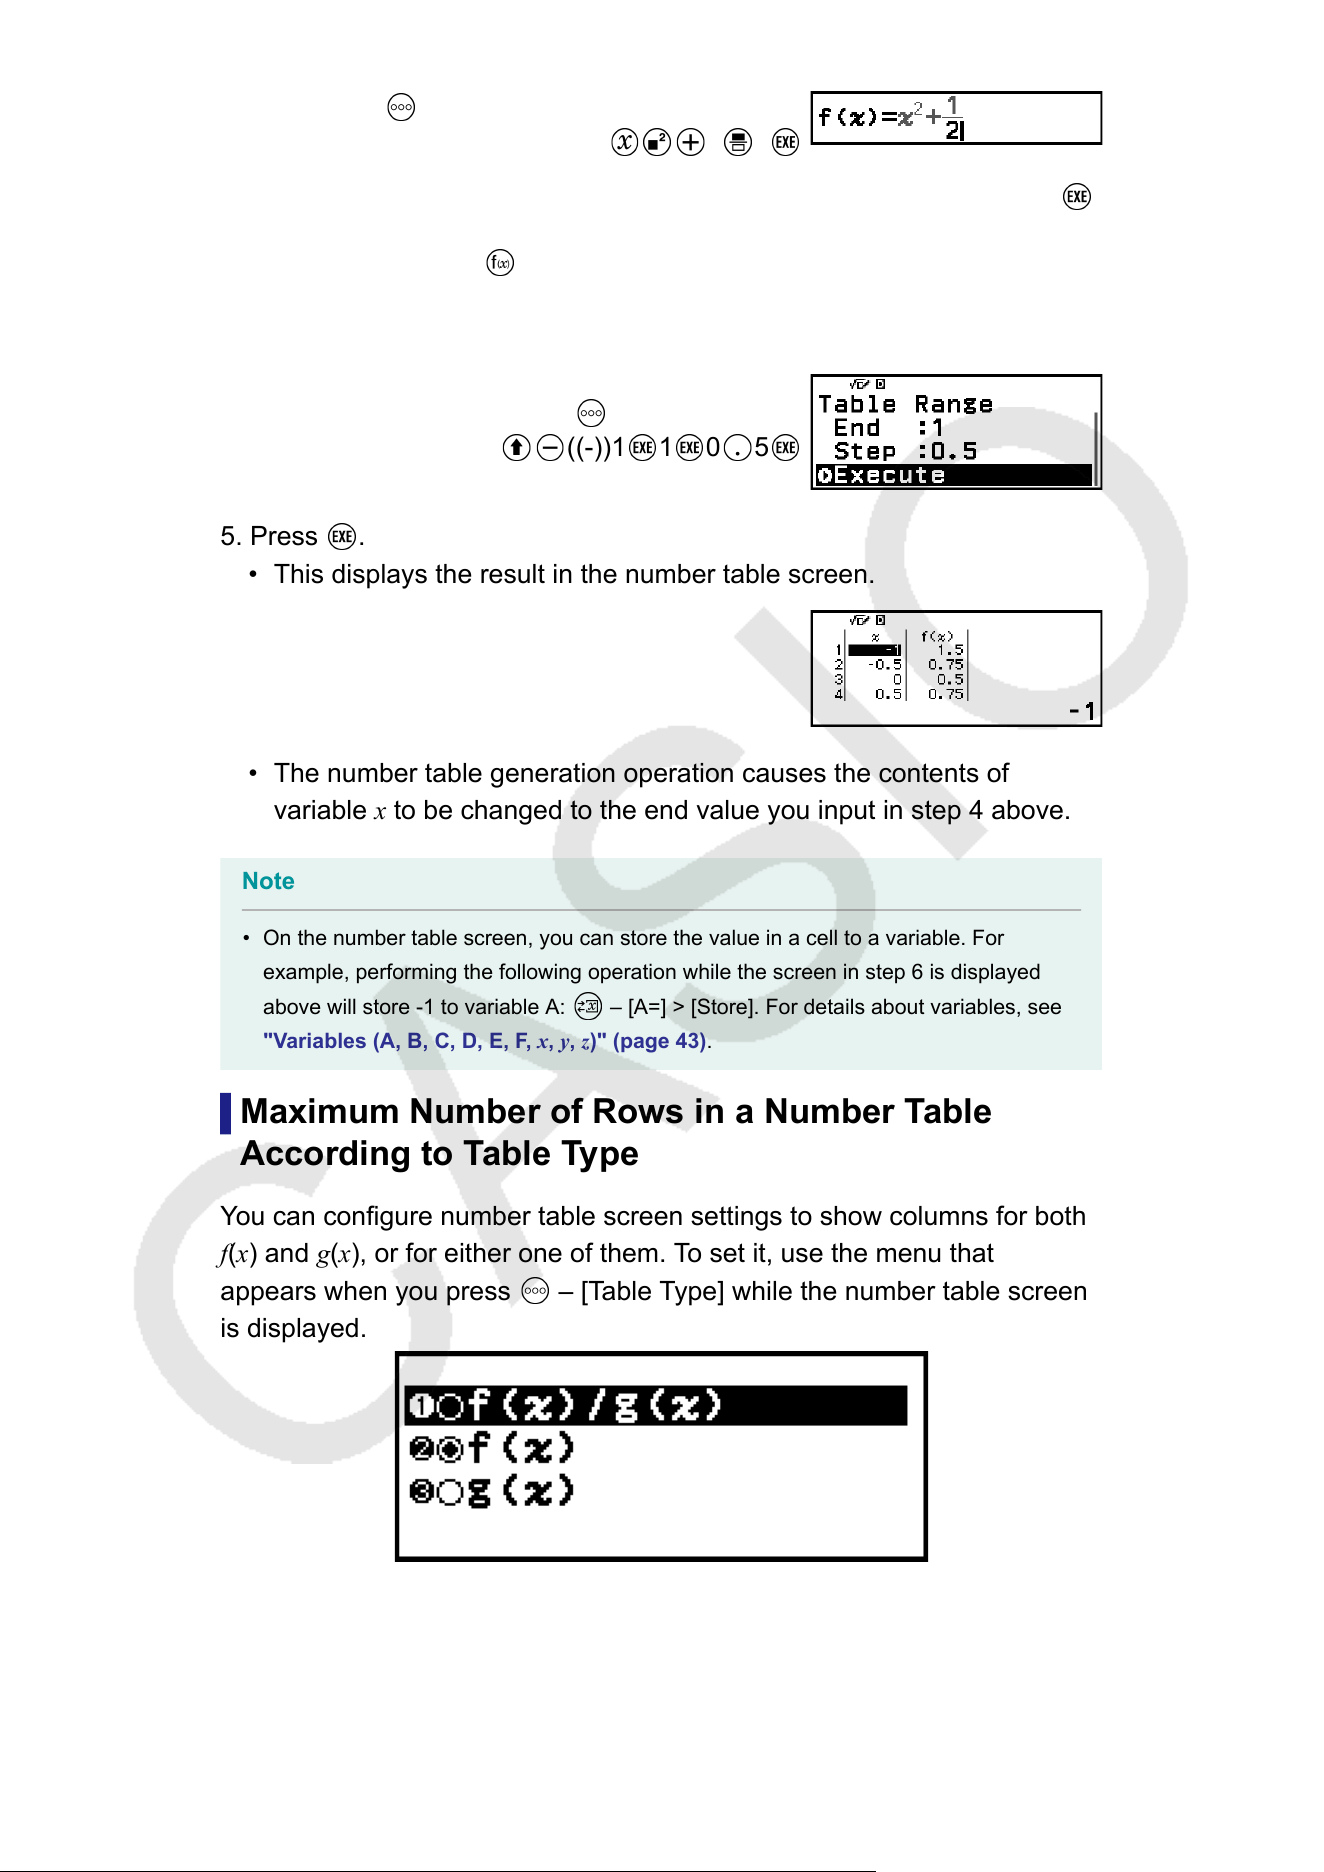
– [Define f(x)/g(x)] > [Define f(x)]
1 2
(Screen immediately before you pressed )
• You can also use to register a defining expression. For more
information, see "Defining Equation Registration" (page 95).
4. Configure the number table range setting.
– [Table Range]
((-))1 1 0 5
5. Press .
• This displays the result in the number table screen.
• The number table generation operation causes the contents of
variable x
to be changed to the end value you input in step 4 above.
Note
• On the number table screen, you can store the value in a cell to a variable. For
example, performing the following operation while the screen in step 6 is displayed
above will store -1 to variable A:
– [A=] > [Store]. For details about variables, see
"V
ariables (A, B, C, D, E, F, x, y, z)" (page 43).
Maximum Number of Rows in a Number Table
According to Table Type
You can configure number table screen settings to show columns for both
f(x) and g(x), or for either one of them. To set it, use the menu that
appears when you press
– [Table Type] while the number table screen
is displayed.
f(x)/g(x) ... Show both f(x)- and g(x)-columns
f(x) ... Show only f(x)-column (initial default setting)
g(x) ... Show only g(x)-column
94
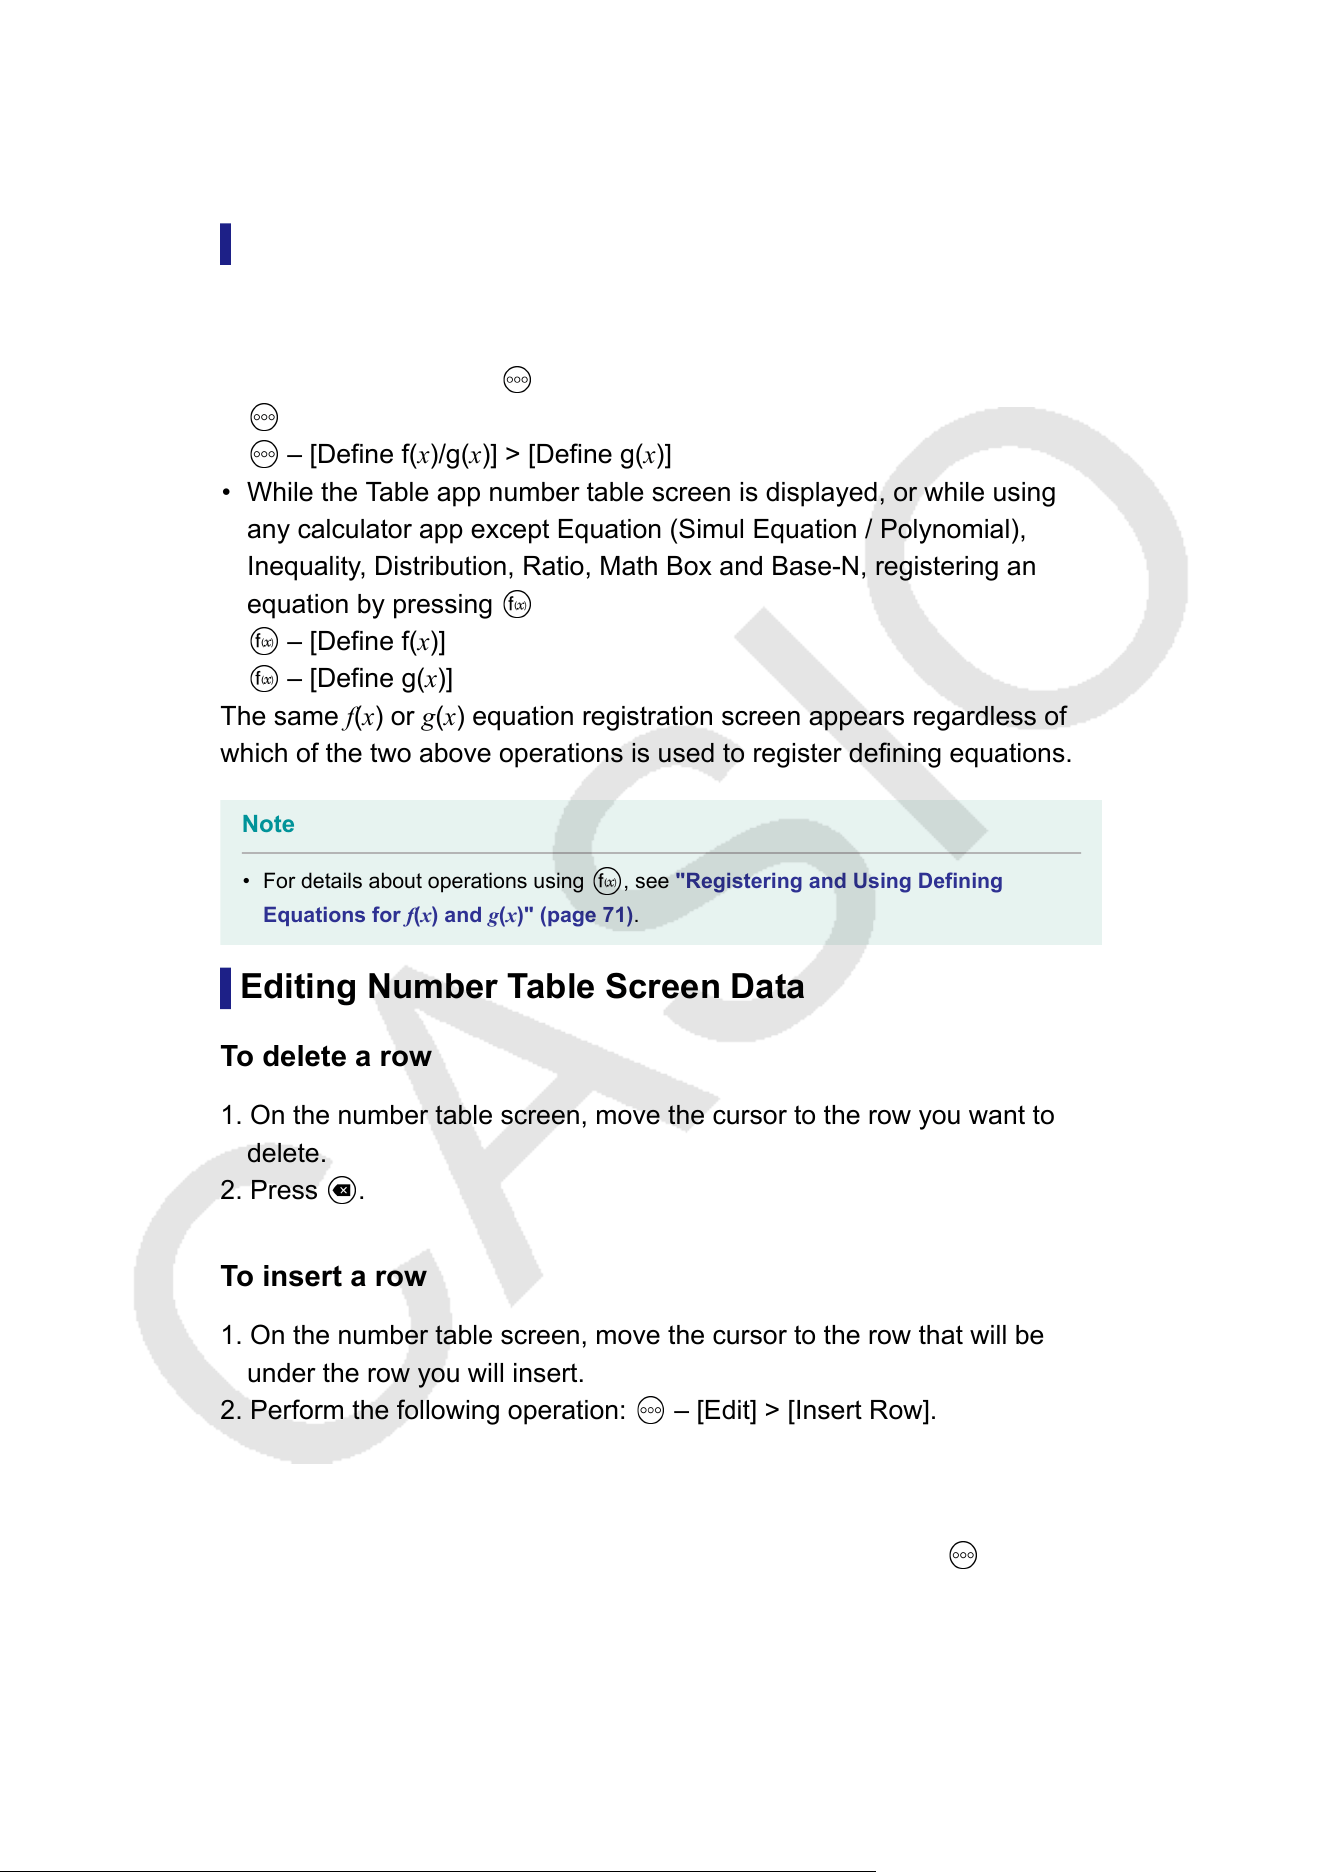
The maximum number of rows in the generated number table depends on
the T
able Type setting. Up to 45 rows are supported for the "f(x)" or "g(x)"
setting, while 30 rows are supported for the "f(x)/g(x)" setting.
Defining Equation Registration
There are two ways to register defining equations for f(x) and g(x).
• While the Table app number table screen is displayed, registering an
equation by pressing
– [Define f(x)/g(x)] > [Define f(x)]
– [Define f(x)/g(x)] > [Define g(x)]
• While the Table app number table screen is displayed, or while using
any calculator app except Equation (Simul Equation / Polynomial),
Inequality, Distribution, Ratio, Math Box and Base-N, registering an
equation by pressing
– [Define f(x)]
– [Define g(x)]
The same f(x) or g(x) equation registration screen appears regardless of
which of the two above operations is used to register defining equations.
Note
• For details about operations using , see "Registering and Using Defining
Equations for f(x) and g(x)" (page
71).
Editing Number Table Screen Data
To delete a row
1. On the number table screen, move the cursor to the row you want to
delete.
2. Press
.
T
o insert a row
1. On the number table screen, move the cursor to the row that will be
under the row you will insert.
2. Perform the following operation:
– [Edit] > [Insert Row].
T
o delete all number table screen contents
On the number table screen, perform the following operation:
– [Edit] >
[Delete All].
95
To change the value input in a cell in column x
You can change the value in the currently highlighted x cell. Changing the
x value causes the f(x) and g(x) values in the same row to be updated
accordingly.
To enter a value into the highlighted x-column cell using:
{value of the cell above} +/− {step value}
If there is value in the x cell above the currently highlighted x cell, pressing
or automatically inputs into the highlighted cell the value equal to
the value of the cell above it plus the step value. So also, pressing
automatically inputs the value equal to the value of the cell above less
the step value. The f(x) and g(x) values in the same row are also updated
accordingly
.
f(x) and g(x) Update Timing
f(x) and g(x) values displayed on the number table screen are updated
when any of the following occurs.
• When
is pressed while [Execute] is selected on the Table Range
screen.
• When the defining equations for f(x) and g(x) are updated (except when
a defining equation is a composite function).
• When a number is input into column x (including pressing
, , in
column x).
Note, however
, that values are not updated automatically after the
following operations.
• When the SETTINGS menu is used to change the Angle Unit setting.
• When the variable of a defining equation is updated (new numeric value
stored) when a defining equation that contains a variable (example: f(x)
= 2x + A) is registered.
• When the defining equation of a composite function (Example: g(x) = f(x)
× 2 − x) is registered, and the defining equation of the reference function
(Example: f(x) of g(x) = f(x) × 2
− x) is updated (new defining equation
registered).
In these cases, execute
– [Recalculate] while the number table screen
is displayed to update values.
Data Retention
Doing the following will discard some data and clear some settings of the
T
able app.
① Returning to the HOME screen and launching another calculator
app.
96
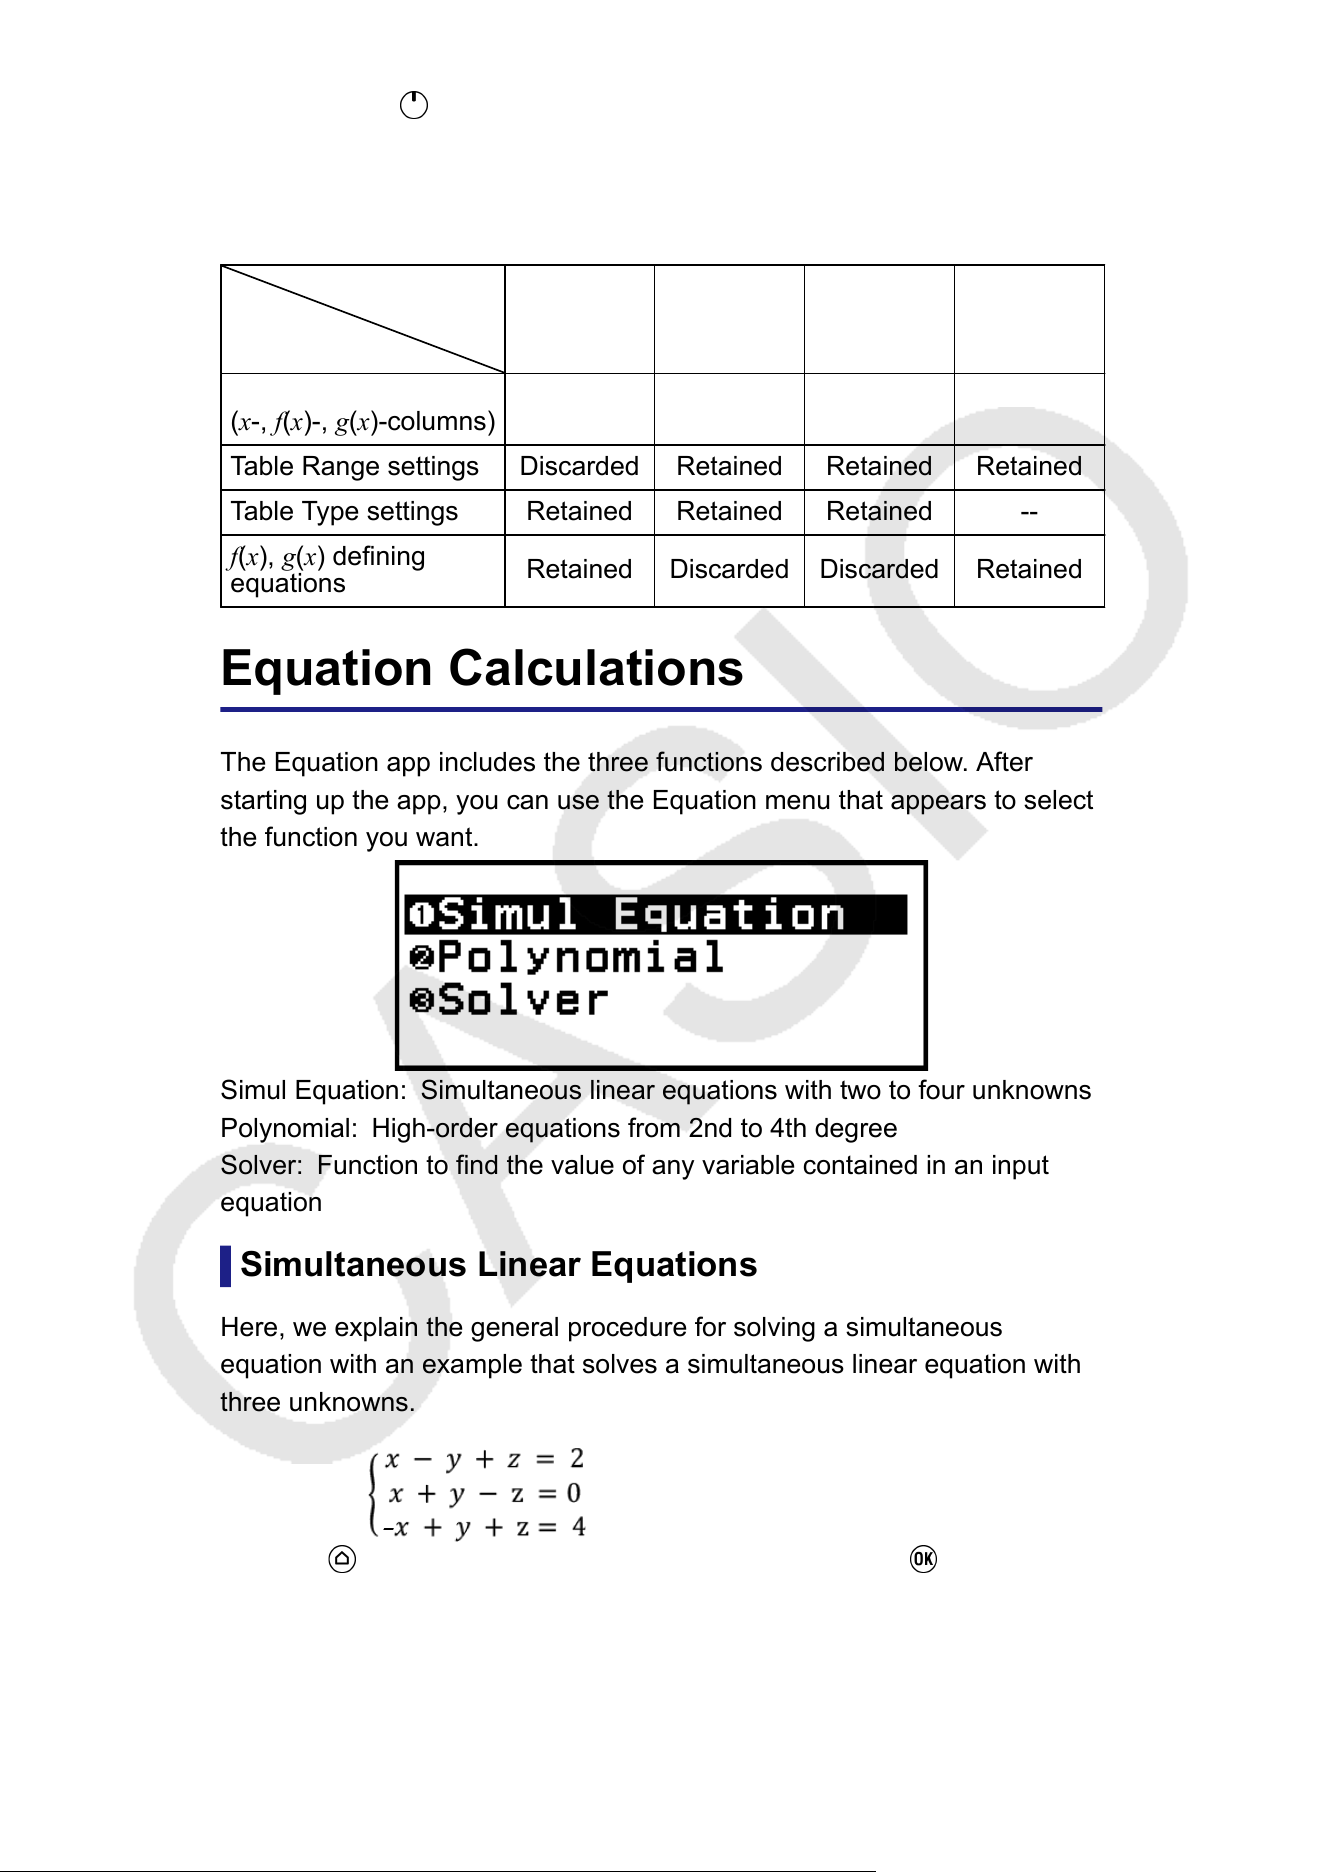
② Pressing .
③ Changing the Input/Output setting with the SETTINGS menu.
④ Changing the T
able Type setting with the TOOLS menu.
The table below shows which data is discarded and which data is retained.
Operation
Data, Setting
① ② ③ ④
Number table data
(x-, f(x)-, g(x)-columns)
Discarded Discarded Discarded Discarded
Table Range settings Discarded Retained Retained Retained
Table Type settings Retained Retained Retained --
f(x), g(x) defining
equations
Retained Discarded Discarded Retained
Equation Calculations
The Equation app includes the three functions described below
. After
starting up the app, you can use the Equation menu that appears to select
the function you want.
Simul Equation: Simultaneous linear equations with two to four unknowns
Polynomial:
High-order equations from 2nd to 4th degree
Solver: Function to find the value of any variable contained in an input
equation
Simultaneous Linear Equations
Here, we explain the general procedure for solving a simultaneous
equation with an example that solves a simultaneous linear equation with
three unknowns.
Example 1:
1. Press , select the Equation app icon, and then press .
• This displays the Equation menu.
97
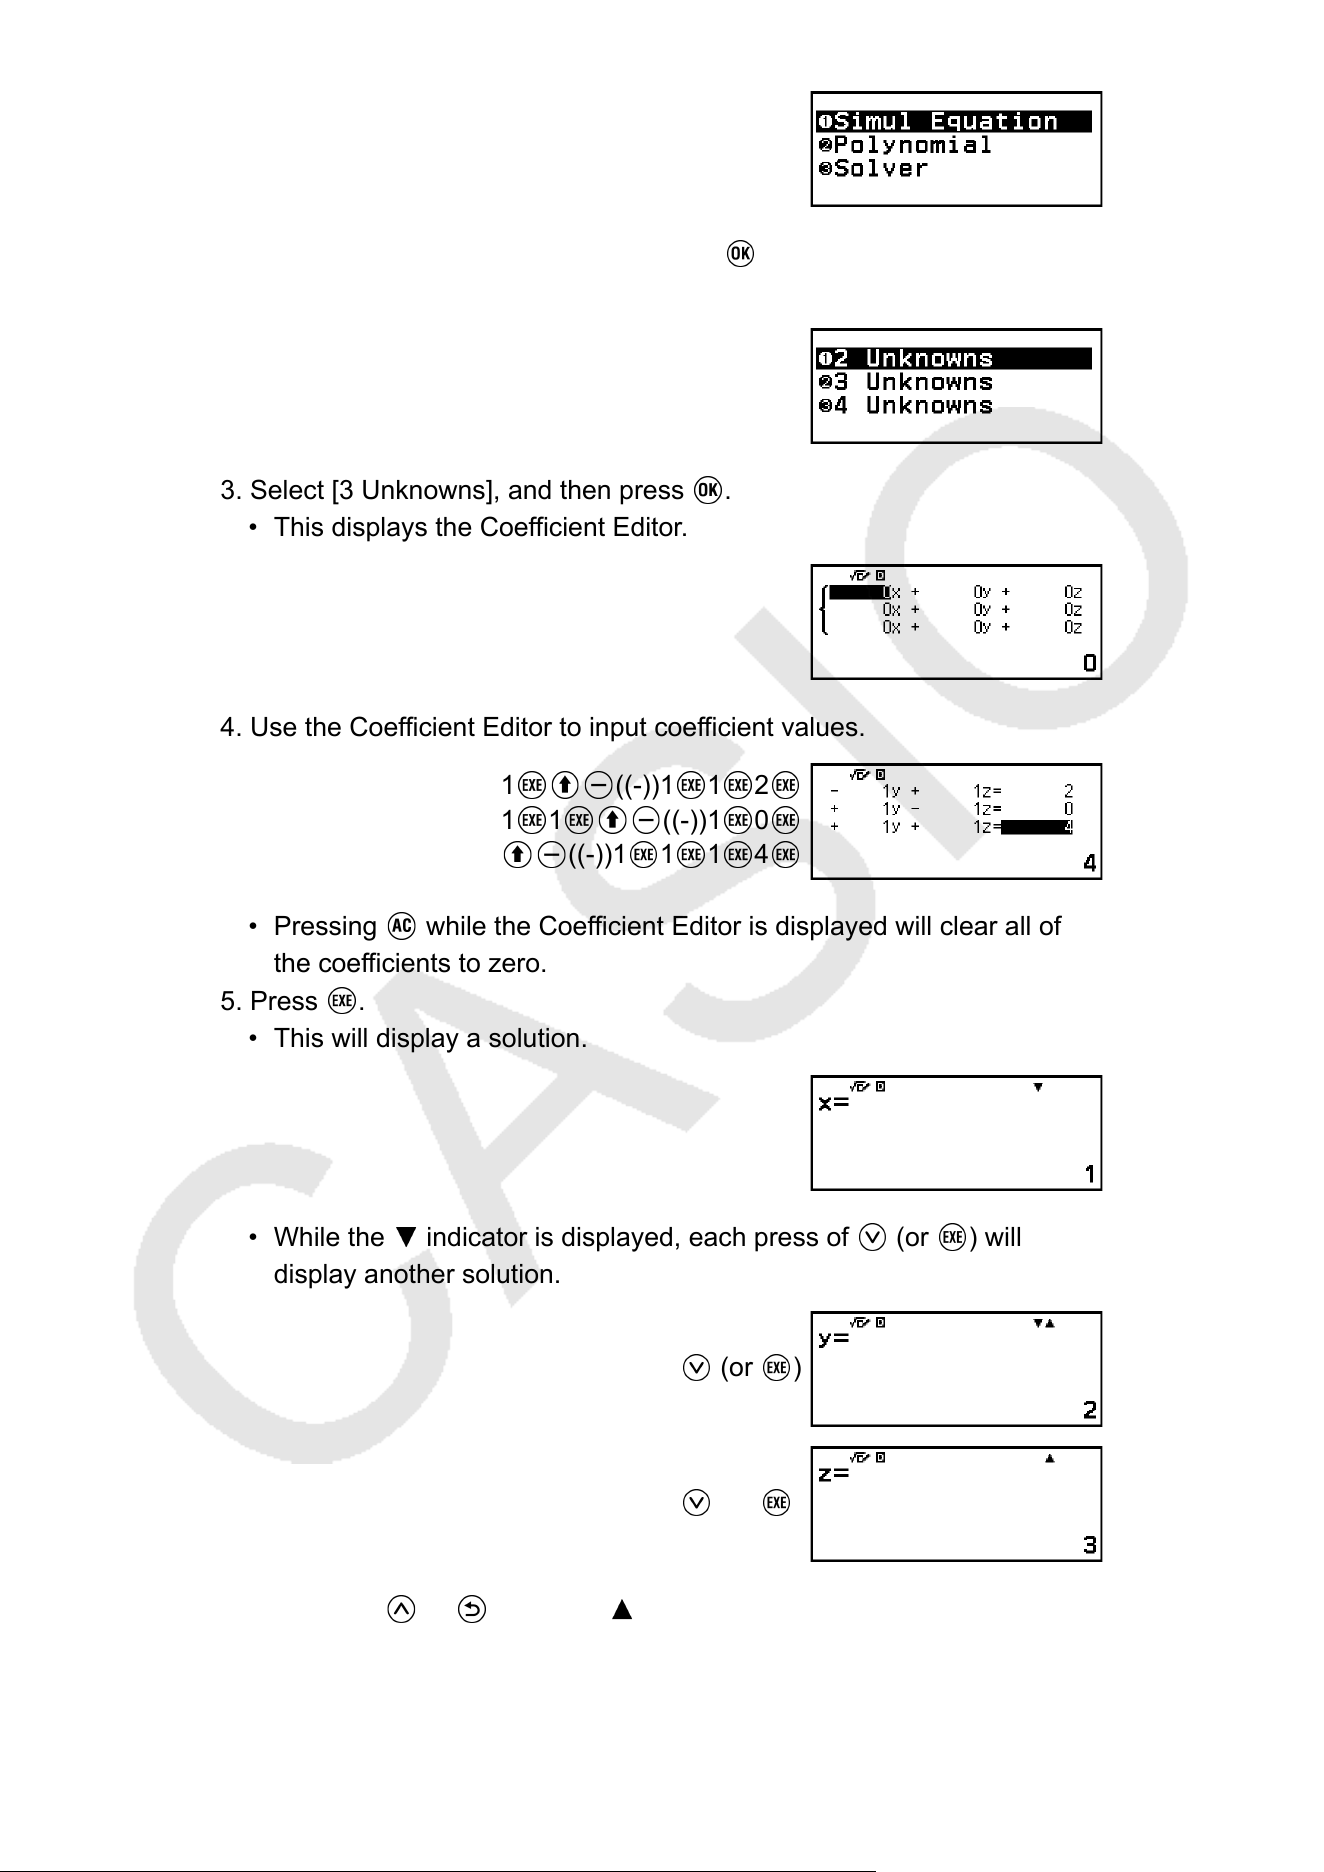
2. Select [Simul Equation], and then press .
• This displays the number of unknowns menu.
3. Select [3 Unknowns], and then press .
• This displays the Coefficient Editor.
4. Use the Coefficient Editor to input coefficient values.
1
((-))1 1 2
1 1 ((-))1 0
((-))1 1 1 4
• Pressing while the Coefficient Editor is displayed will clear all of
the coef
ficients to zero.
5. Press
.
• This will display a solution.
• While the indicator is displayed, each press of (or ) will
display another solution.
(or )
(or )
• Pressing or while the indicator is displayed causes the
previously displayed solution to reappear
.
98
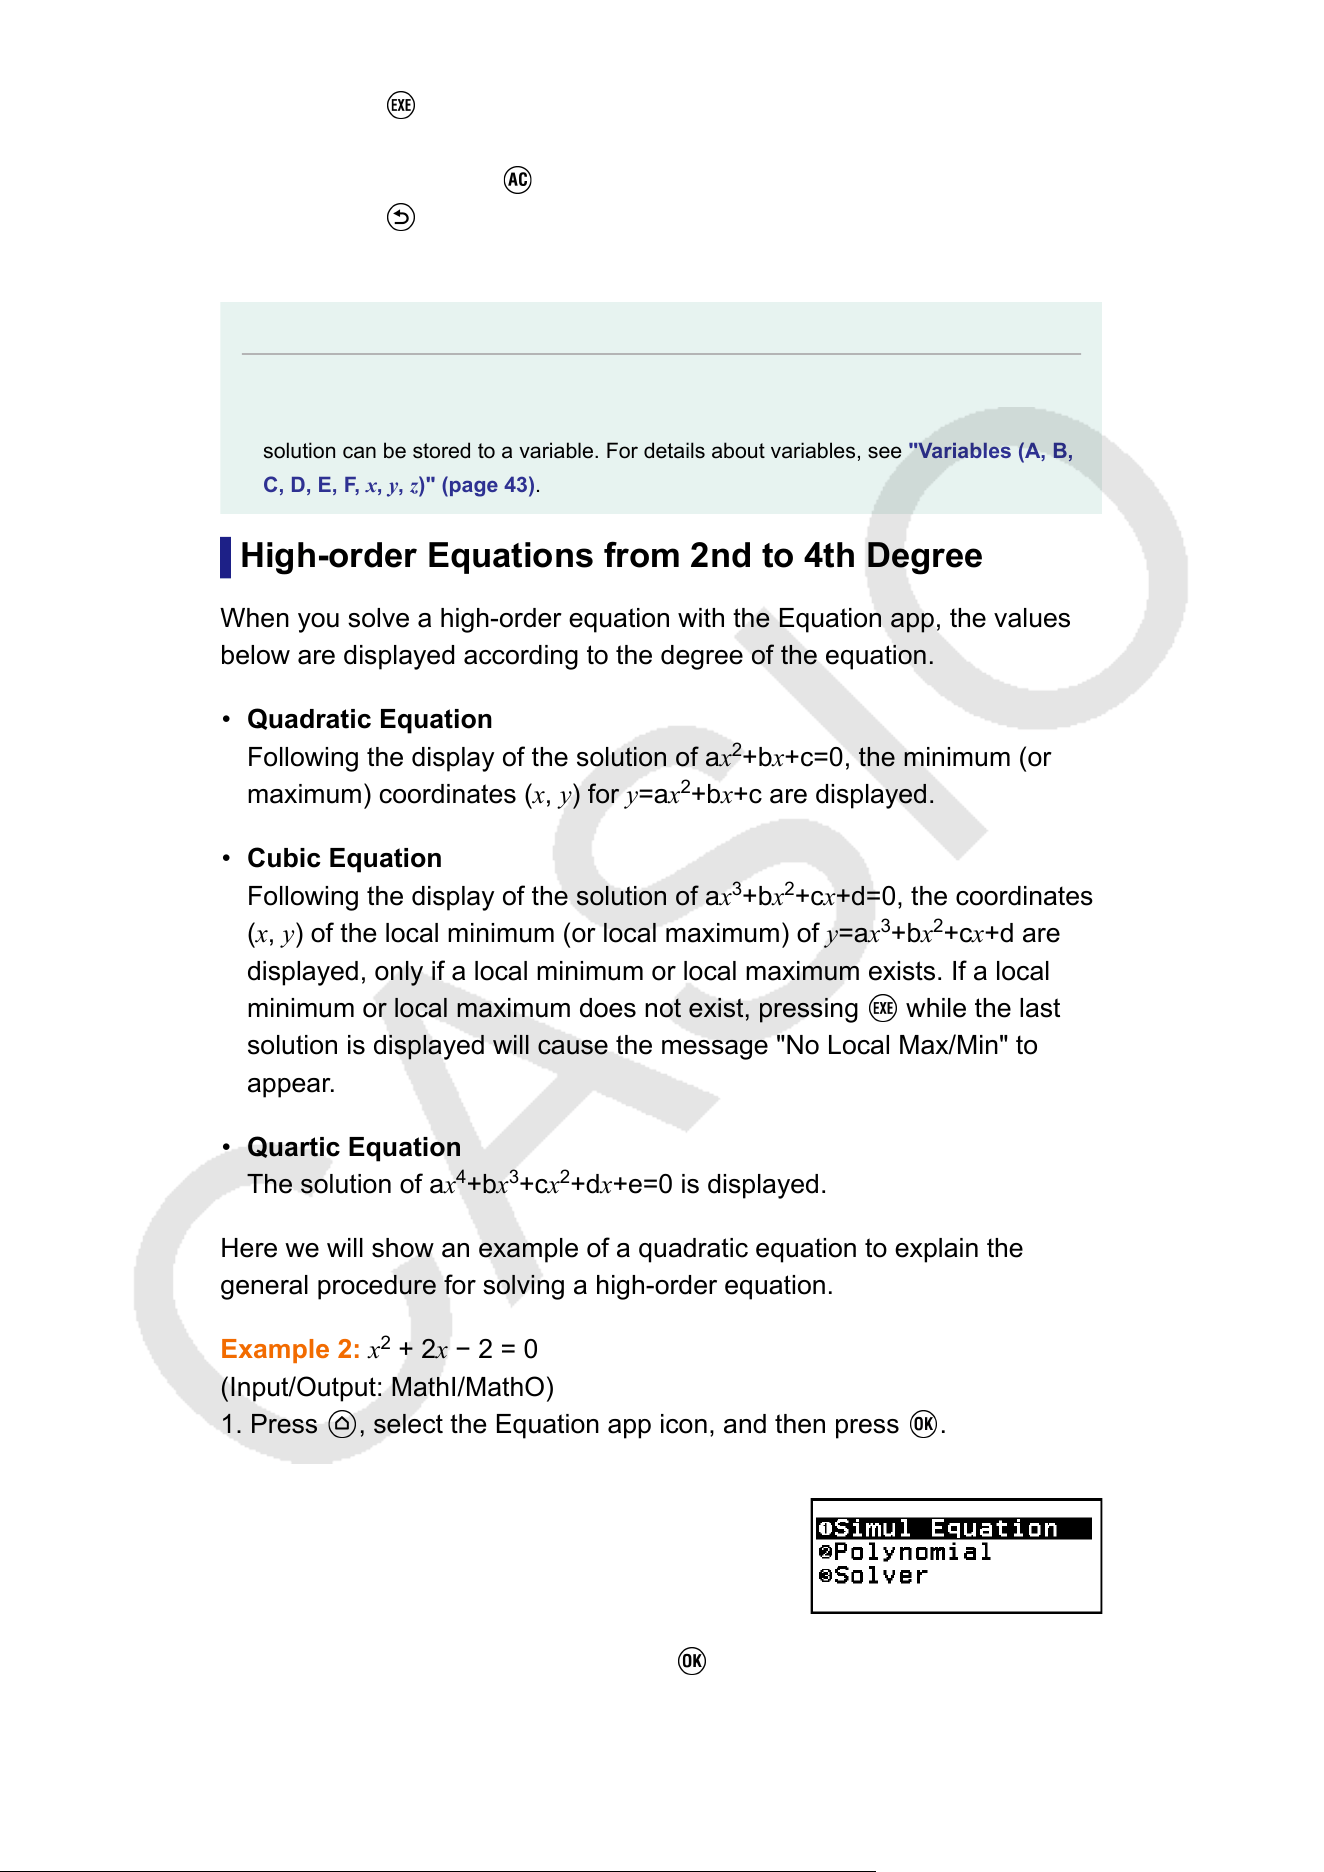
• Pressing while the final solution is displayed returns to the
Coef
ficient Editor. To return to the Coefficient Editor while any solution
is displayed, press
.
• Pressing while the Coefficient Editor is displayed returns to the
number of unknowns menu.
Note
• While the Coefficient Editor is displayed, you can store the currently highlighted value
to a variable. Also, while the solution is being displayed, the currently displayed
solution can be stored to a variable. For details about variables, see "V
ariables (A, B,
C, D, E, F, x, y, z)" (page 43).
High-order Equations from 2nd to 4th Degree
When you solve a high-order equation with the Equation app, the values
below are displayed according to the degree of the equation.
• Quadratic Equation
Following the display of the solution of ax
2
+bx+c=0, the minimum (or
maximum) coordinates (x, y) for y=ax
2
+bx+c are displayed.
• Cubic Equation
Following the display of the solution of ax
3
+bx
2
+cx+d=0, the coordinates
(x, y) of the local minimum (or local maximum) of y=ax
3
+bx
2
+cx+d are
displayed, only if a local minimum or local maximum exists. If a local
minimum or local maximum does not exist, pressing
while the last
solution is displayed will cause the message "No Local Max/Min" to
appear
.
• Quartic Equation
The solution of ax
4
+bx
3
+cx
2
+dx+e=0 is displayed.
Here we will show an example of a quadratic equation to explain the
general procedure for solving a high-order equation.
Example 2: x
2
+ 2x − 2 = 0
(Input/Output: MathI/MathO)
1. Press
, select the Equation app icon, and then press .
• This displays the Equation menu.
2. Select [Polynomial], and then press .
• This displays the number of degrees menu.
99
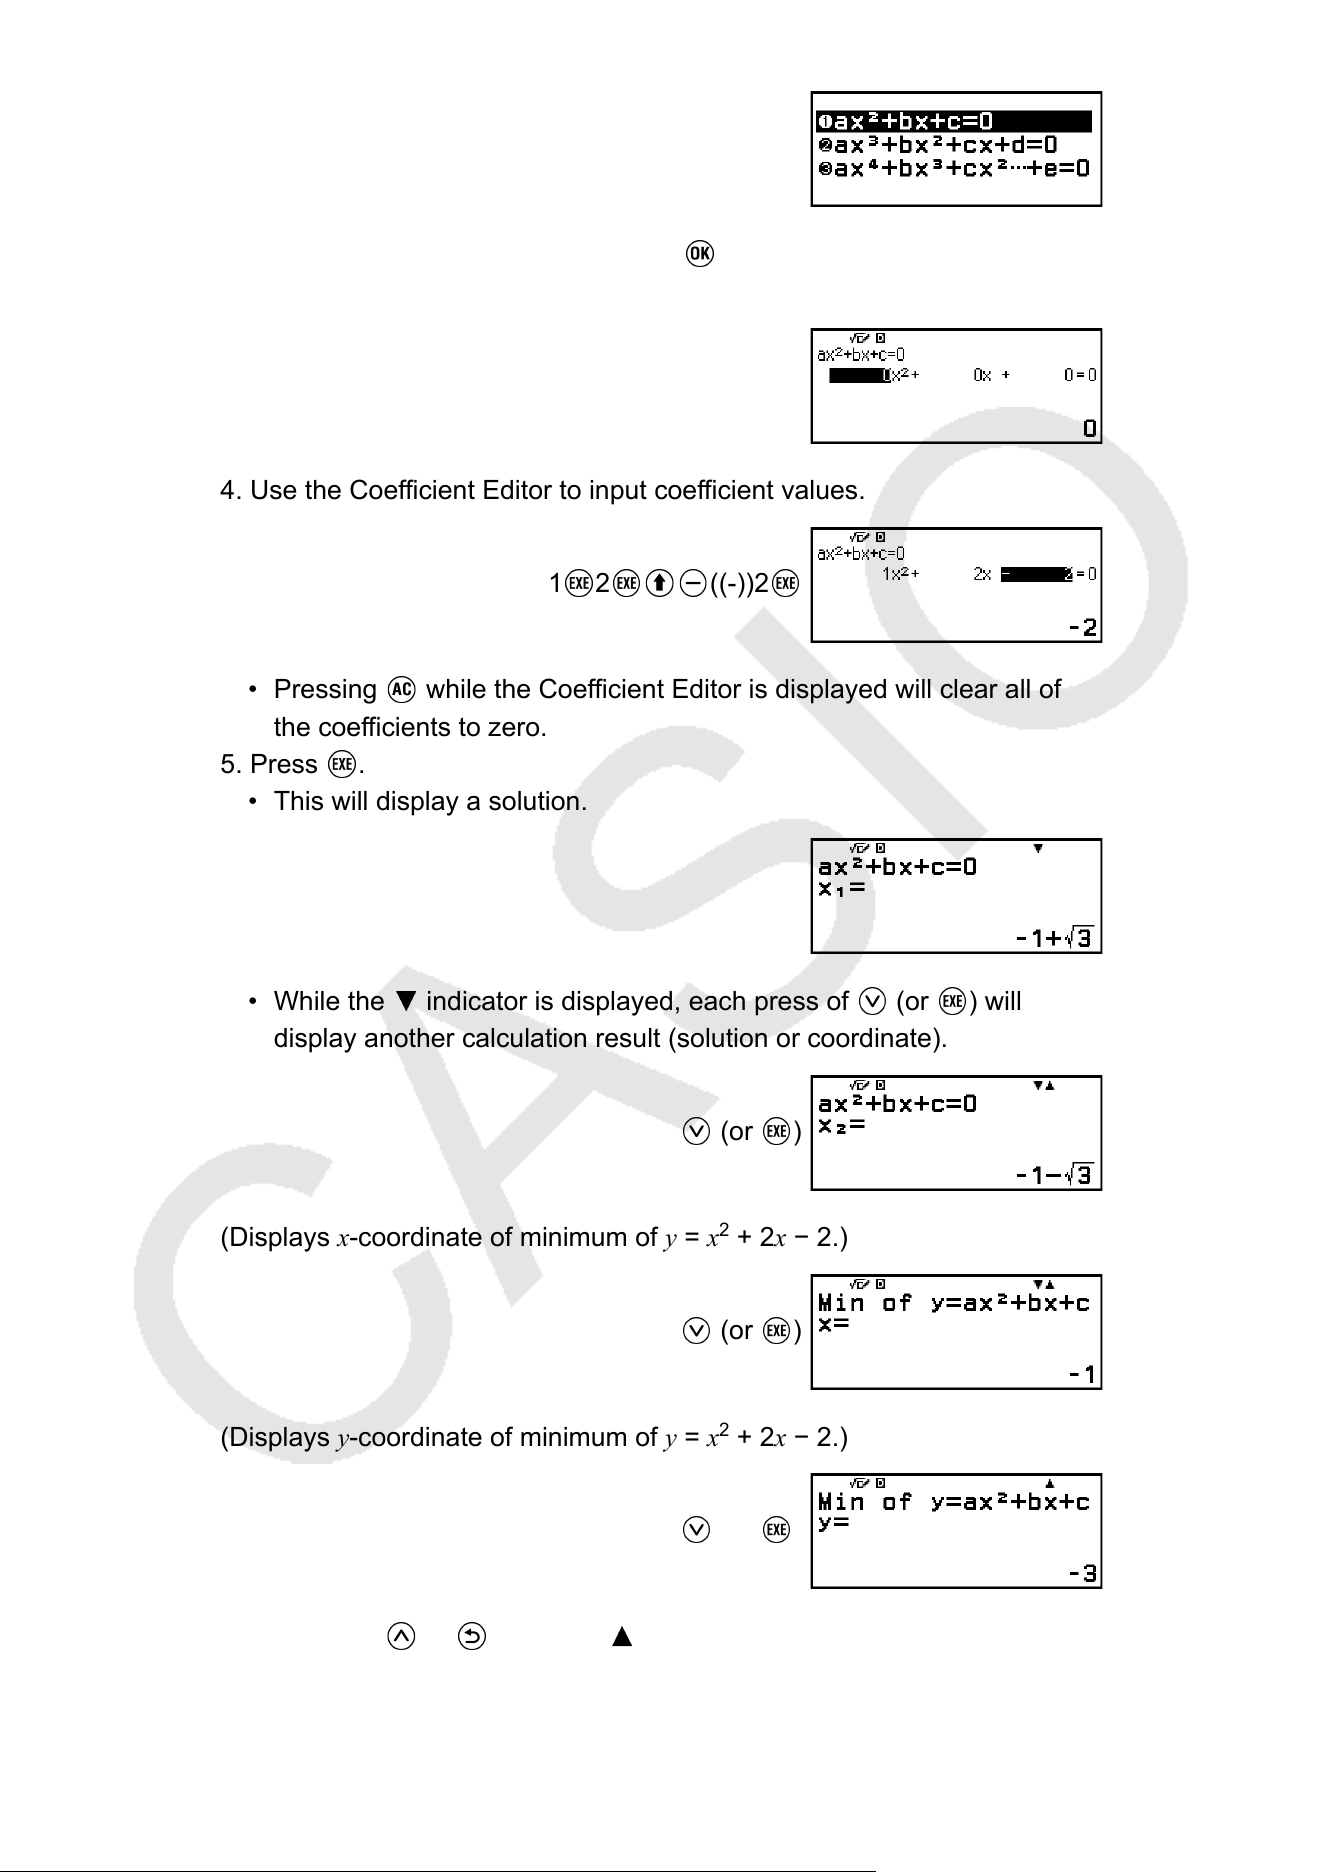
3. Select [ax
2
+bx+c=0], and then press .
• This displays the Coefficient Editor.
4. Use the Coefficient Editor to input coefficient values.
1
2 ((-))2
• Pressing while the Coefficient Editor is displayed will clear all of
the coef
ficients to zero.
5. Press
.
• This will display a solution.
• While the indicator is displayed, each press of (or ) will
display another calculation result (solution or coordinate).
(or )
(Displays x-coordinate of minimum of y = x
2
+ 2x − 2.)
(or )
(Displays y-coordinate of minimum of y = x
2
+ 2x − 2.)
(or )
• Pressing or while the indicator is displayed causes the
previously displayed calculation result to appear again.
100
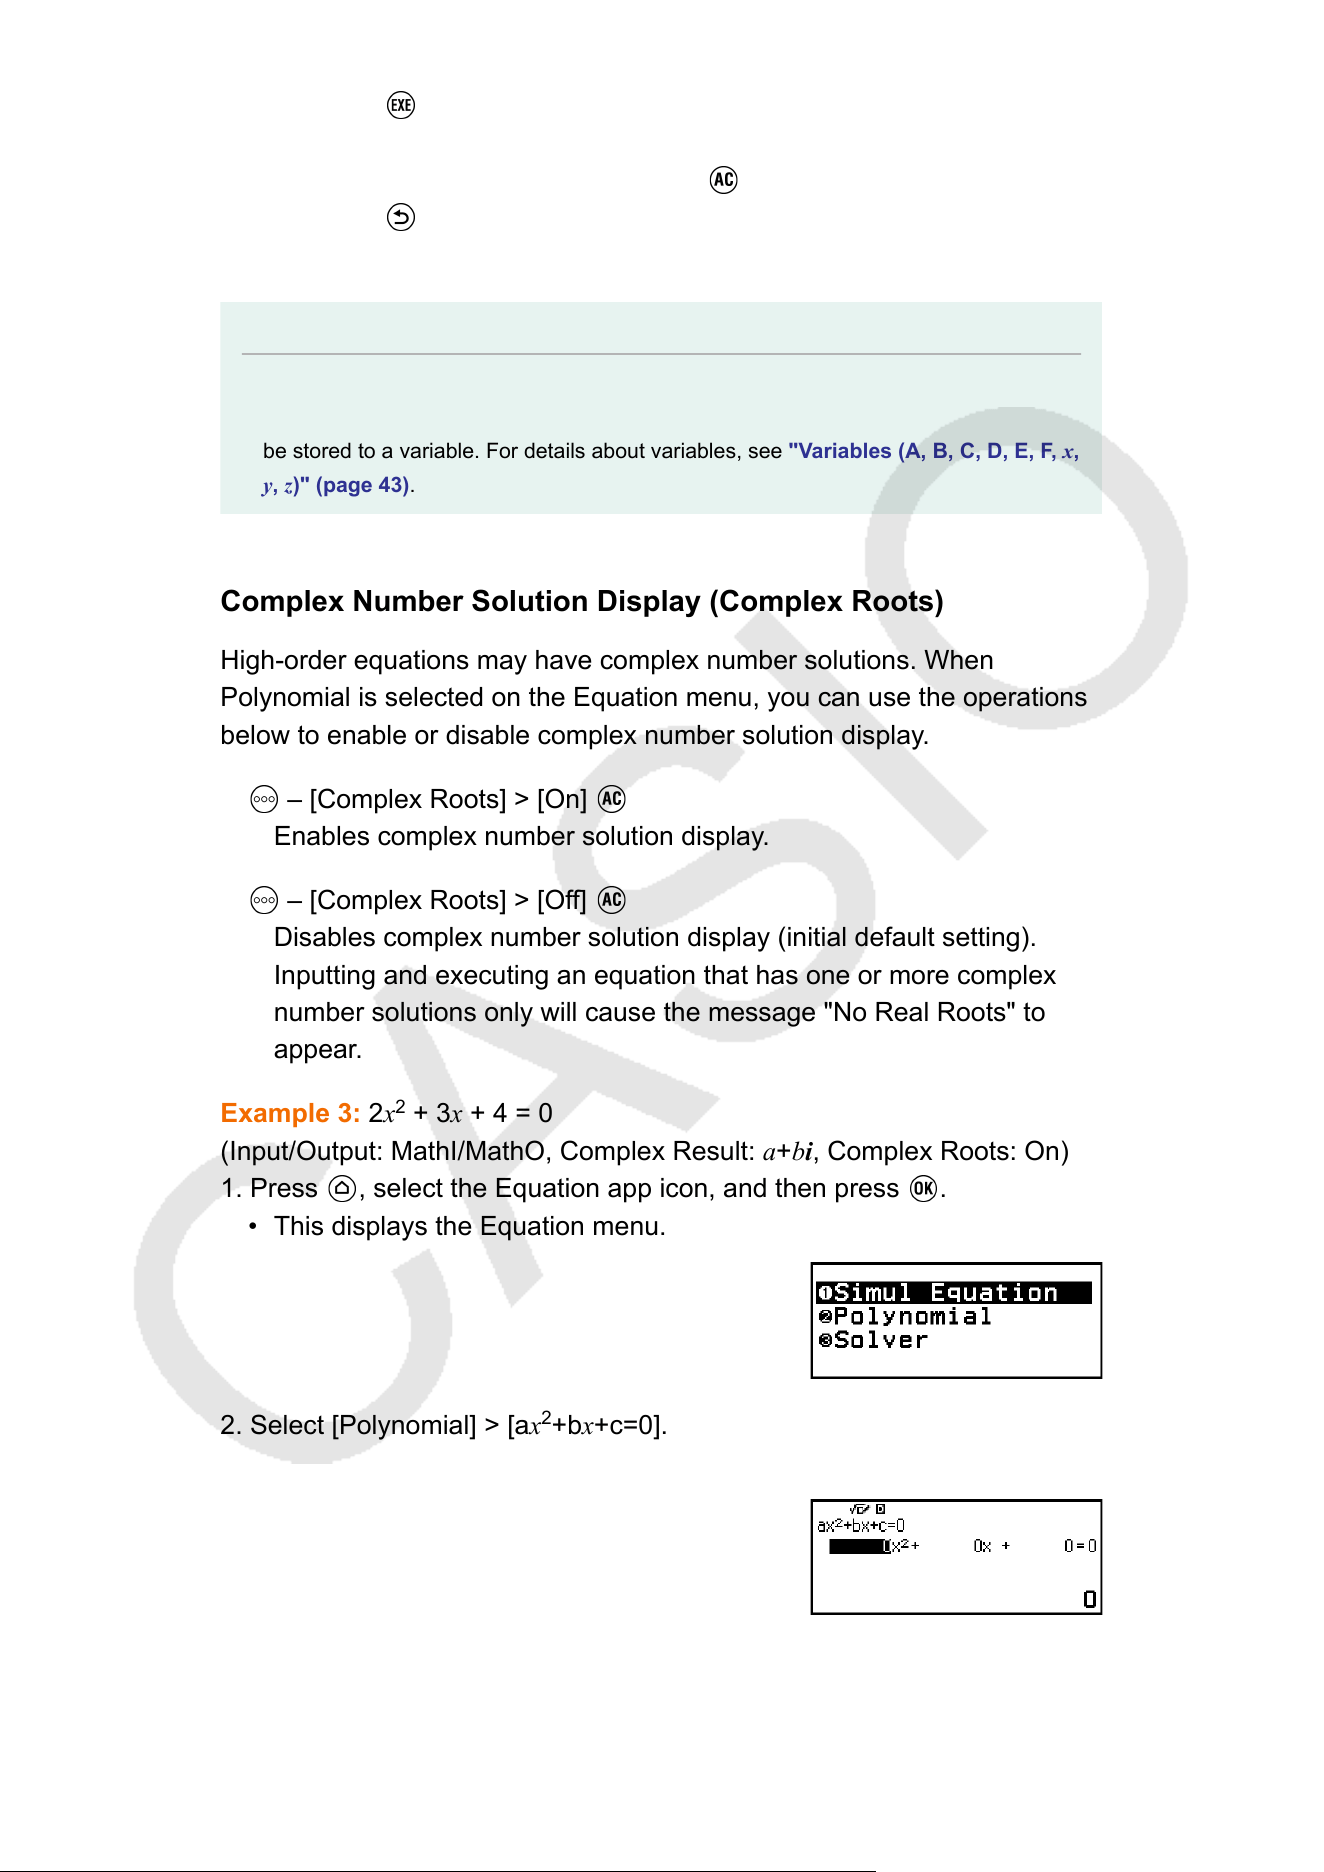
• Pressing while the final calculation result is displayed returns to
the Coef
ficient Editor. To return to the Coefficient Editor while any
calculation result is displayed, press
.
• Pressing while the Coefficient Editor is displayed returns to the
number of degrees menu.
Note
• While the Coefficient Editor is displayed, you can store the currently highlighted value
to a variable. Also, while a calculation result (solution or coordinate) is displayed, it can
be stored to a variable. For details about variables, see "V
ariables (A, B, C, D, E, F, x,
y, z)" (page 43).
Complex Number Solution Display (Complex Roots)
High-order equations may have complex number solutions. When
Polynomial is selected on the Equation menu, you can use the operations
below to enable or disable complex number solution display.
– [Complex Roots] > [On]
Enables complex number solution display.
– [Complex Roots] > [Off]
Disables complex number solution display (initial default setting).
Inputting and executing an equation that has one or more complex
number solutions only will cause the message "No Real Roots" to
appear
.
Example 3: 2x
2
+ 3x + 4 = 0
(Input/Output: MathI/MathO, Complex Result: a+bi, Complex Roots: On)
1. Press
, select the Equation app icon, and then press .
• This displays the Equation menu.
2. Select [Polynomial] > [ax
2
+bx+c=0].
• This displays the Coefficient Editor.
3. Use the Coefficient Editor to input coefficient values.
101
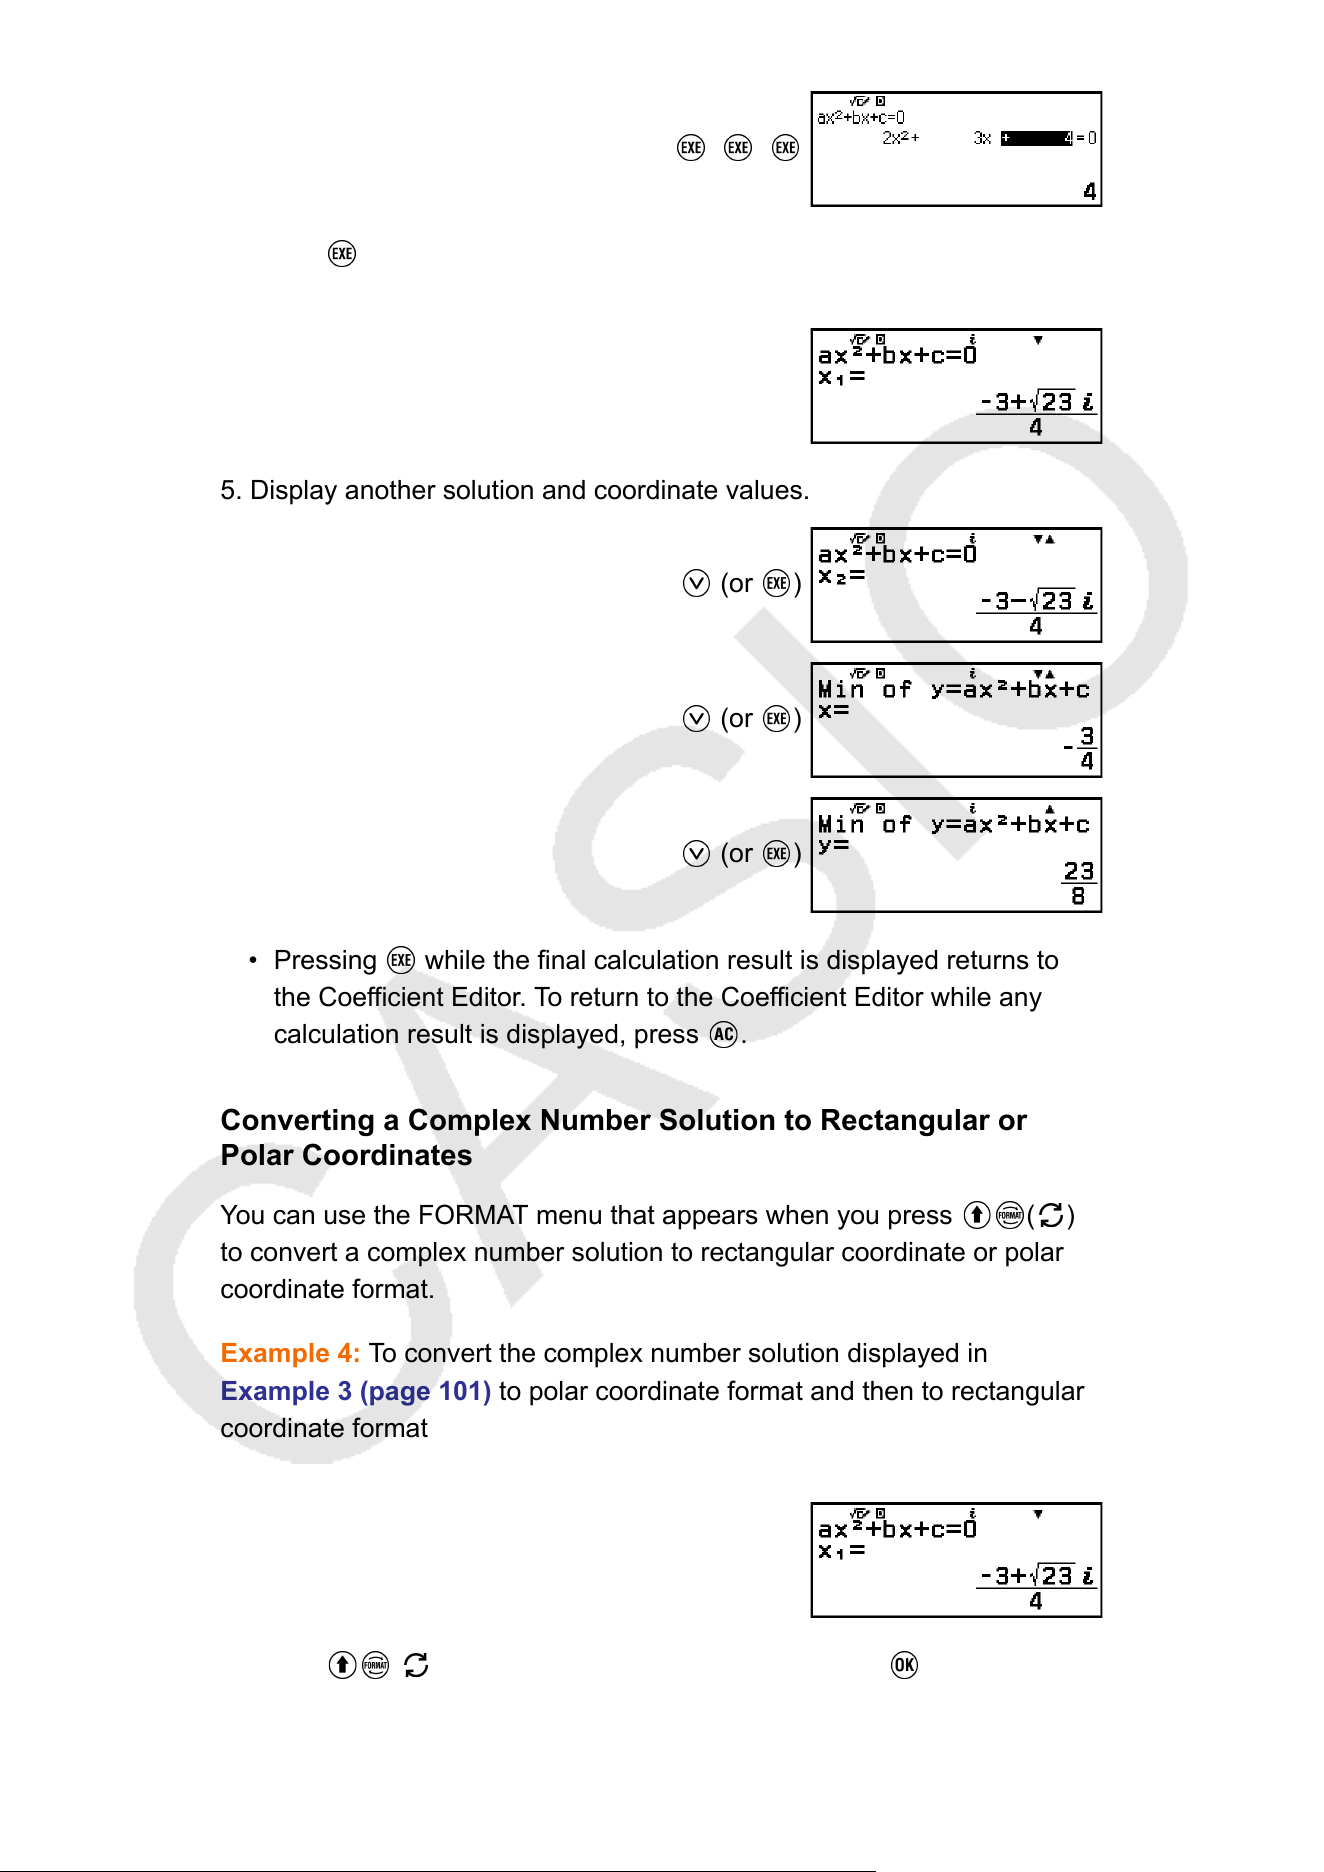
2 3 4
4. Press .
• This will display a solution.
5. Display another solution and coordinate values.
(or )
(or )
(or )
• Pressing while the final calculation result is displayed returns to
the Coef
ficient Editor. To return to the Coefficient Editor while any
calculation result is displayed, press
.
Converting a Complex Number Solution to Rectangular or
Polar Coordinates
You can use the FORMAT menu that appears when you press ( )
to convert a complex number solution to rectangular coordinate or polar
coordinate format.
Example 4: To convert the complex number solution displayed in
Example 3 (page 101) to polar coordinate format and then to rectangular
coordinate format
1. Perform steps 1 to 4 of Example 3 (page 101).
2. Press ( ), select [Polar Coord], and then press .
• This converts the solution to polar coordinate format.
102
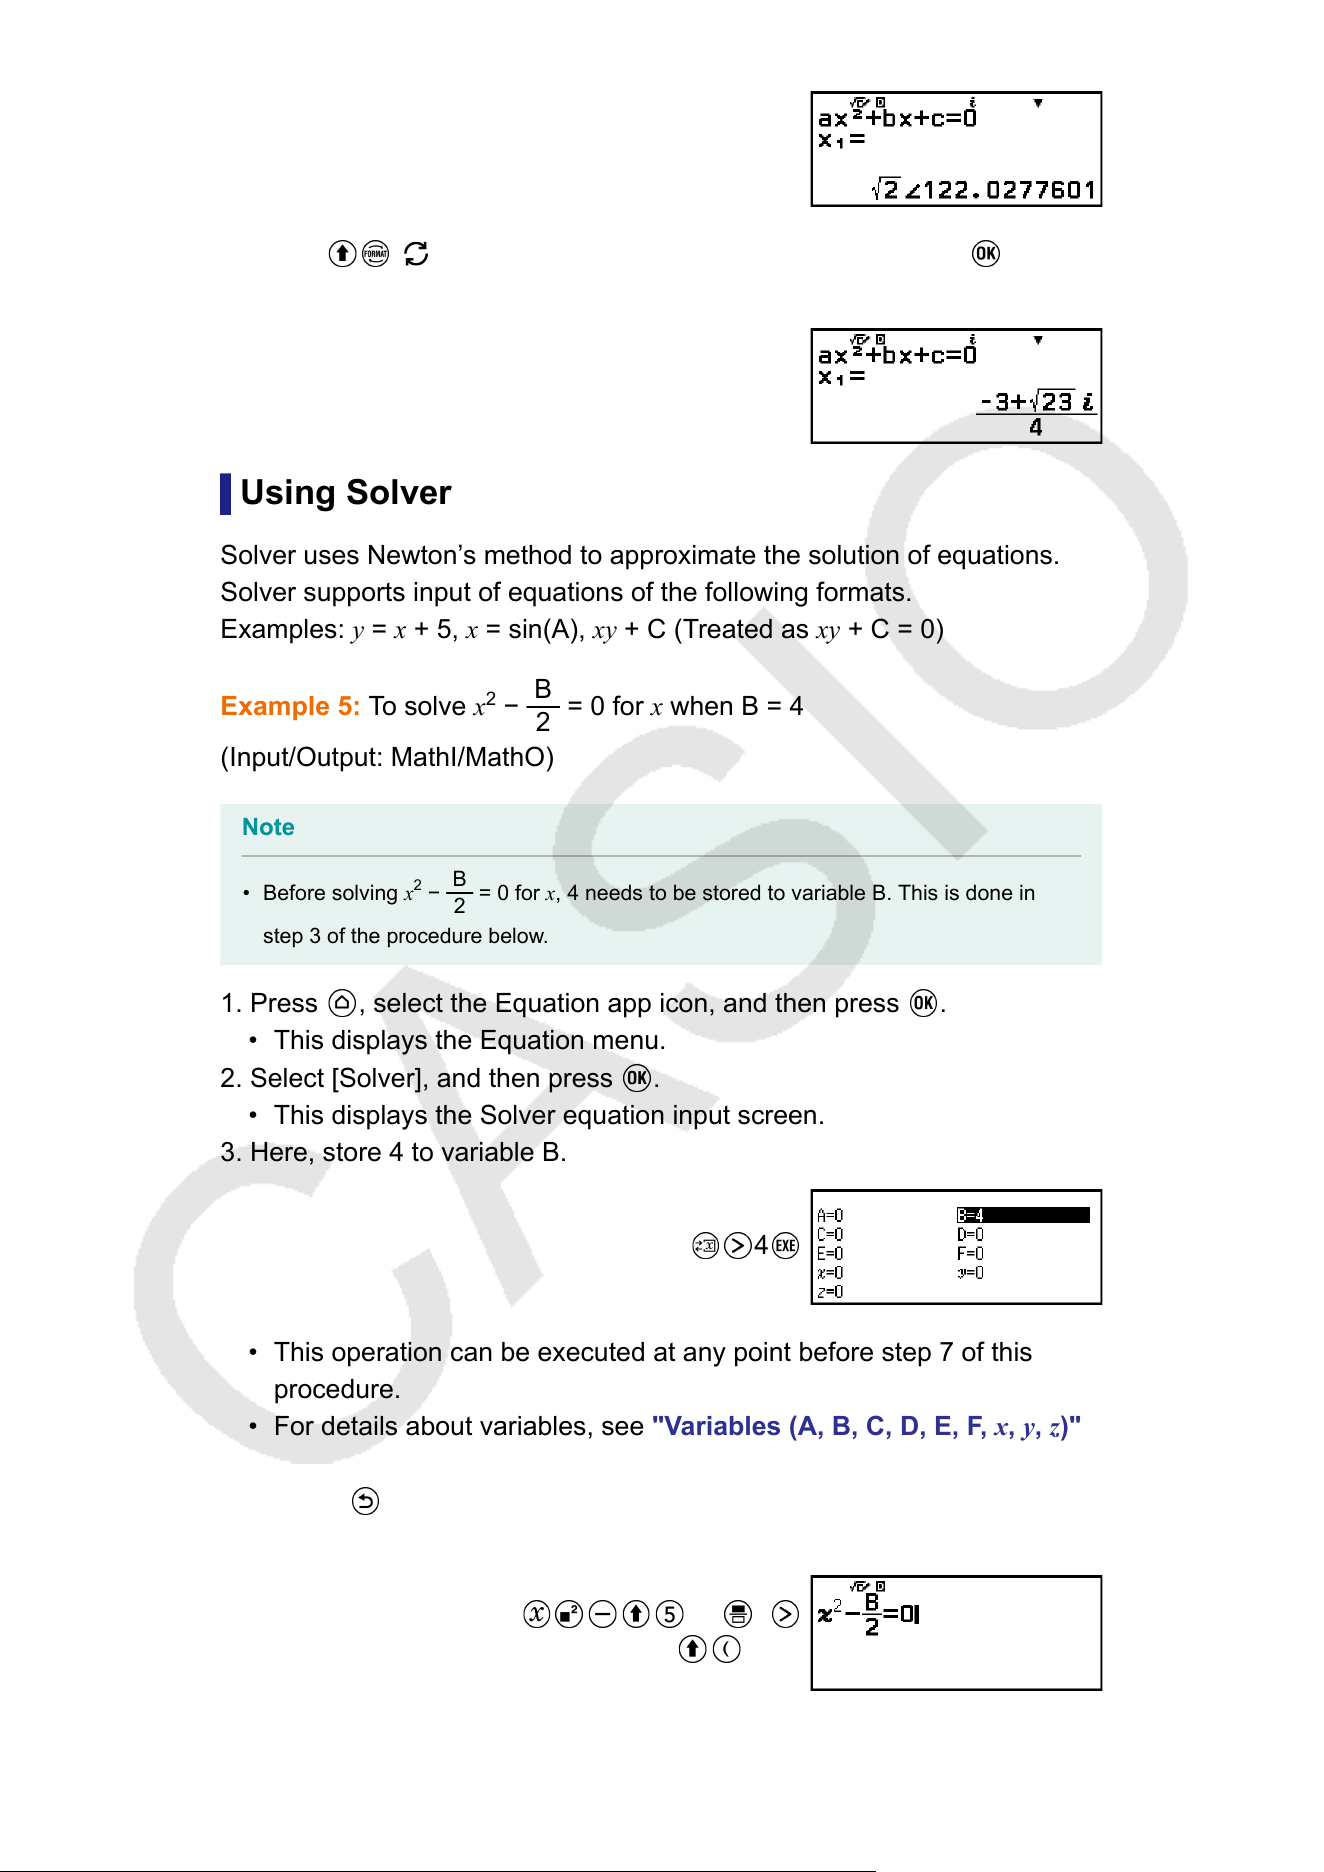
3. Press ( ), select [Rectangular Coord], and then press .
• This converts the solution to rectangular coordinate format.
Using Solver
Solver uses Newton’
s method to approximate the solution of equations.
Solver supports input of equations of the following formats.
Examples: y = x + 5, x = sin(A), xy + C (Treated as xy + C = 0)
Example 5: To solve x
2
−
B
2
= 0 for x when B = 4
(Input/Output: MathI/MathO)
Note
• Before solving x
2
−
B
2
= 0 for x, 4 needs to be stored to variable B. This is done in
step 3 of the procedure below
.
1. Press
, select the Equation app icon, and then press .
• This displays the Equation menu.
2. Select [Solver], and then press .
• This displays the Solver equation input screen.
3. Here, store 4 to variable B.
4
• This operation can be executed at any point before step 7 of this
procedure.
• For details about variables, see "V
ariables (A, B, C, D, E, F, x, y, z)"
(page 43).
• Press
to return to the Solver equation input screen.
4. Input the equation.
(B) 2
(=)*0
103
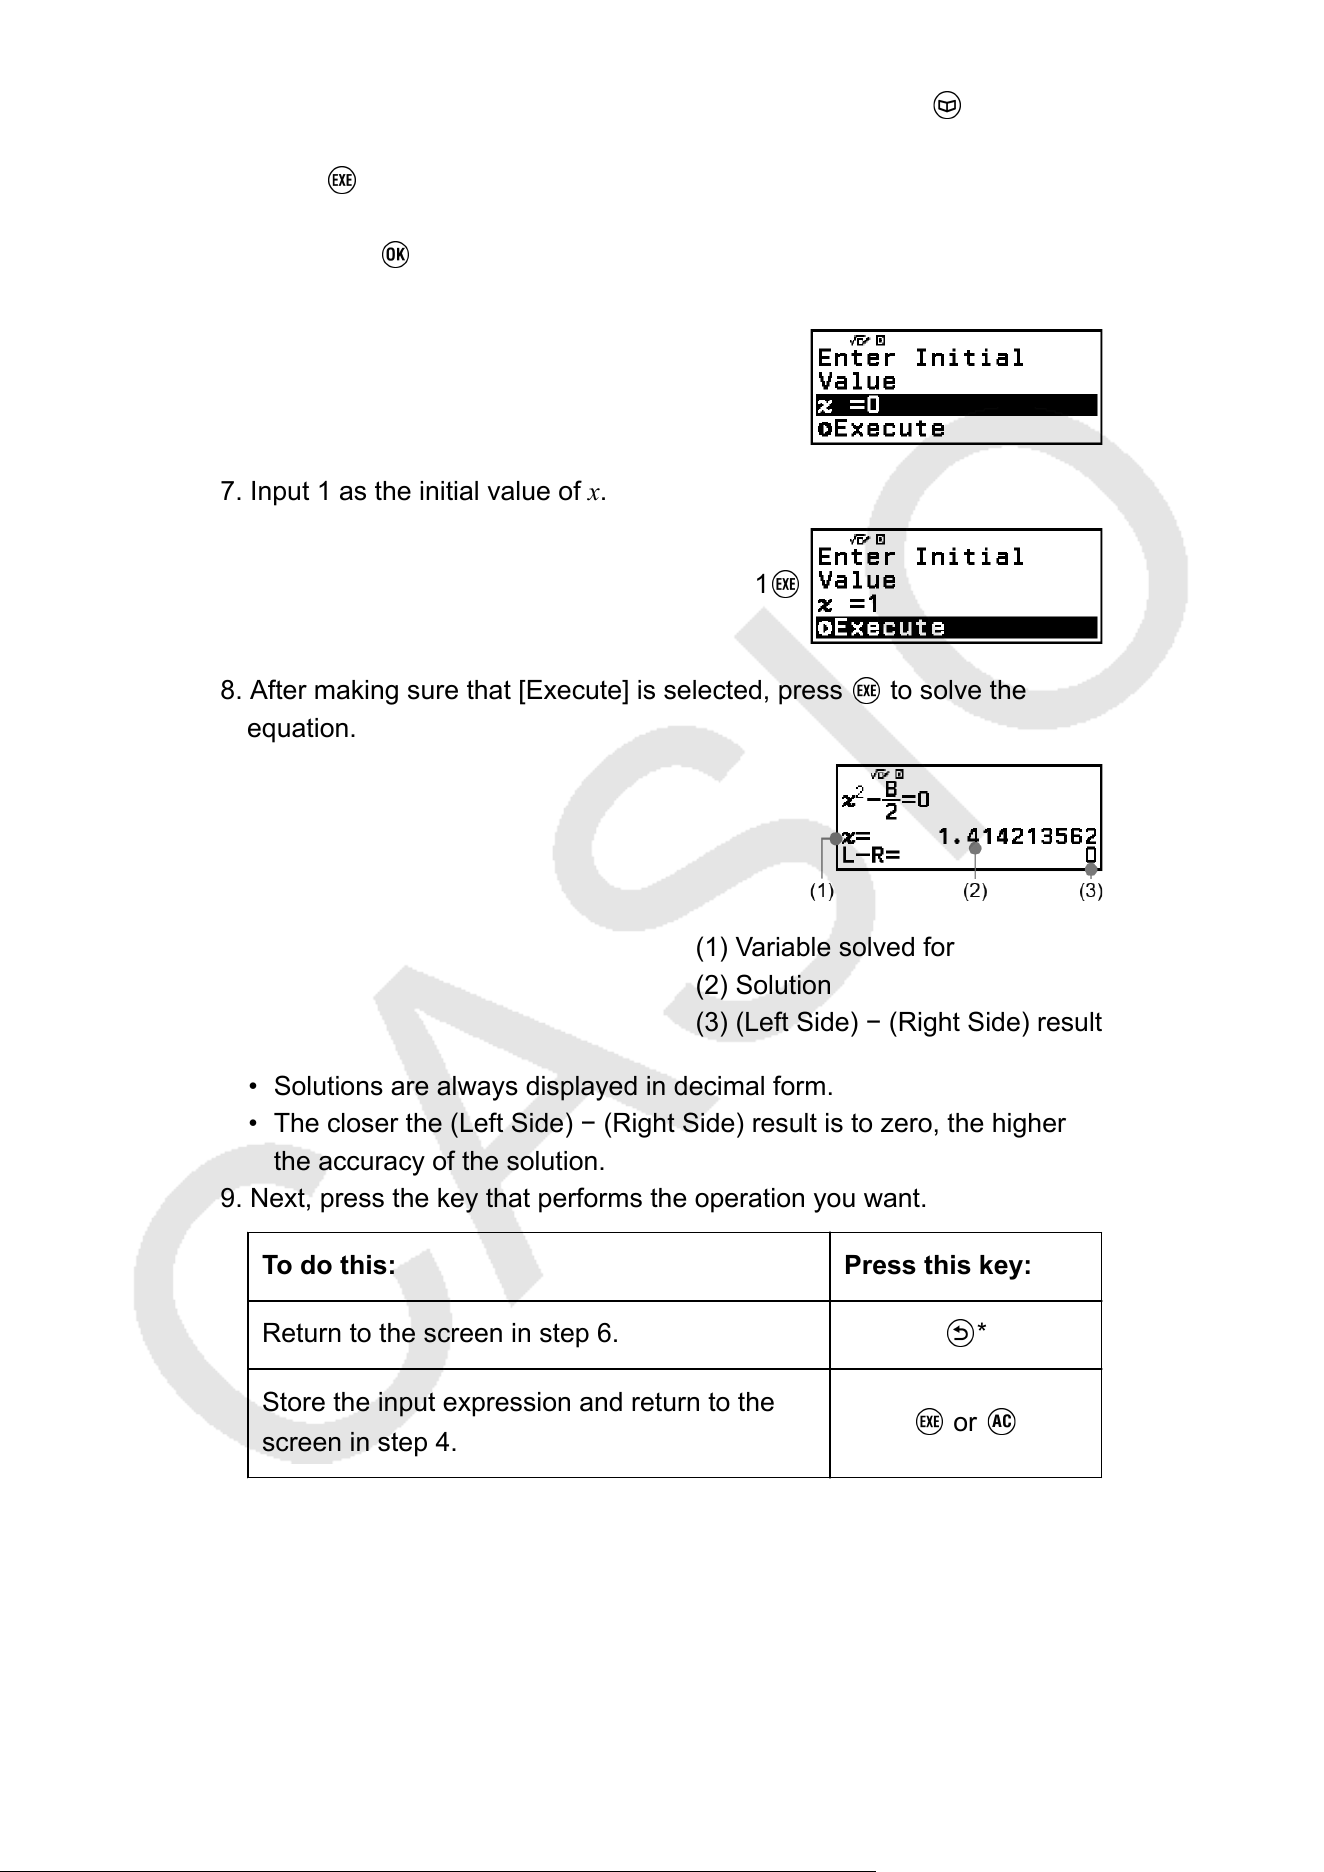
* You can also use the following operation to input = sign: –
[Equation] > [=].
5. Press to register the input equation.
6. On the Solve T
arget screen that appears, confirm that [x] is selected and
then press
.
• This displays a screen with the initial value of x.
7. Input 1 as the initial value of x.
1
8. After making sure that [Execute] is selected, press to solve the
equation.
(1) Variable solved for
(2) Solution
(3) (Left Side) − (Right Side) result
• Solutions are always displayed in decimal form.
• The closer the (Left Side) − (Right Side) result is to zero, the higher
the accuracy of the solution.
9. Next, press the key that performs the operation you want.
To do this: Press this key:
Return to the screen in step 6. *
Store the input expression and return to the
screen in step 4.
or
* The initial value when you press this key becomes the initial value you
last used for the calculation.
104
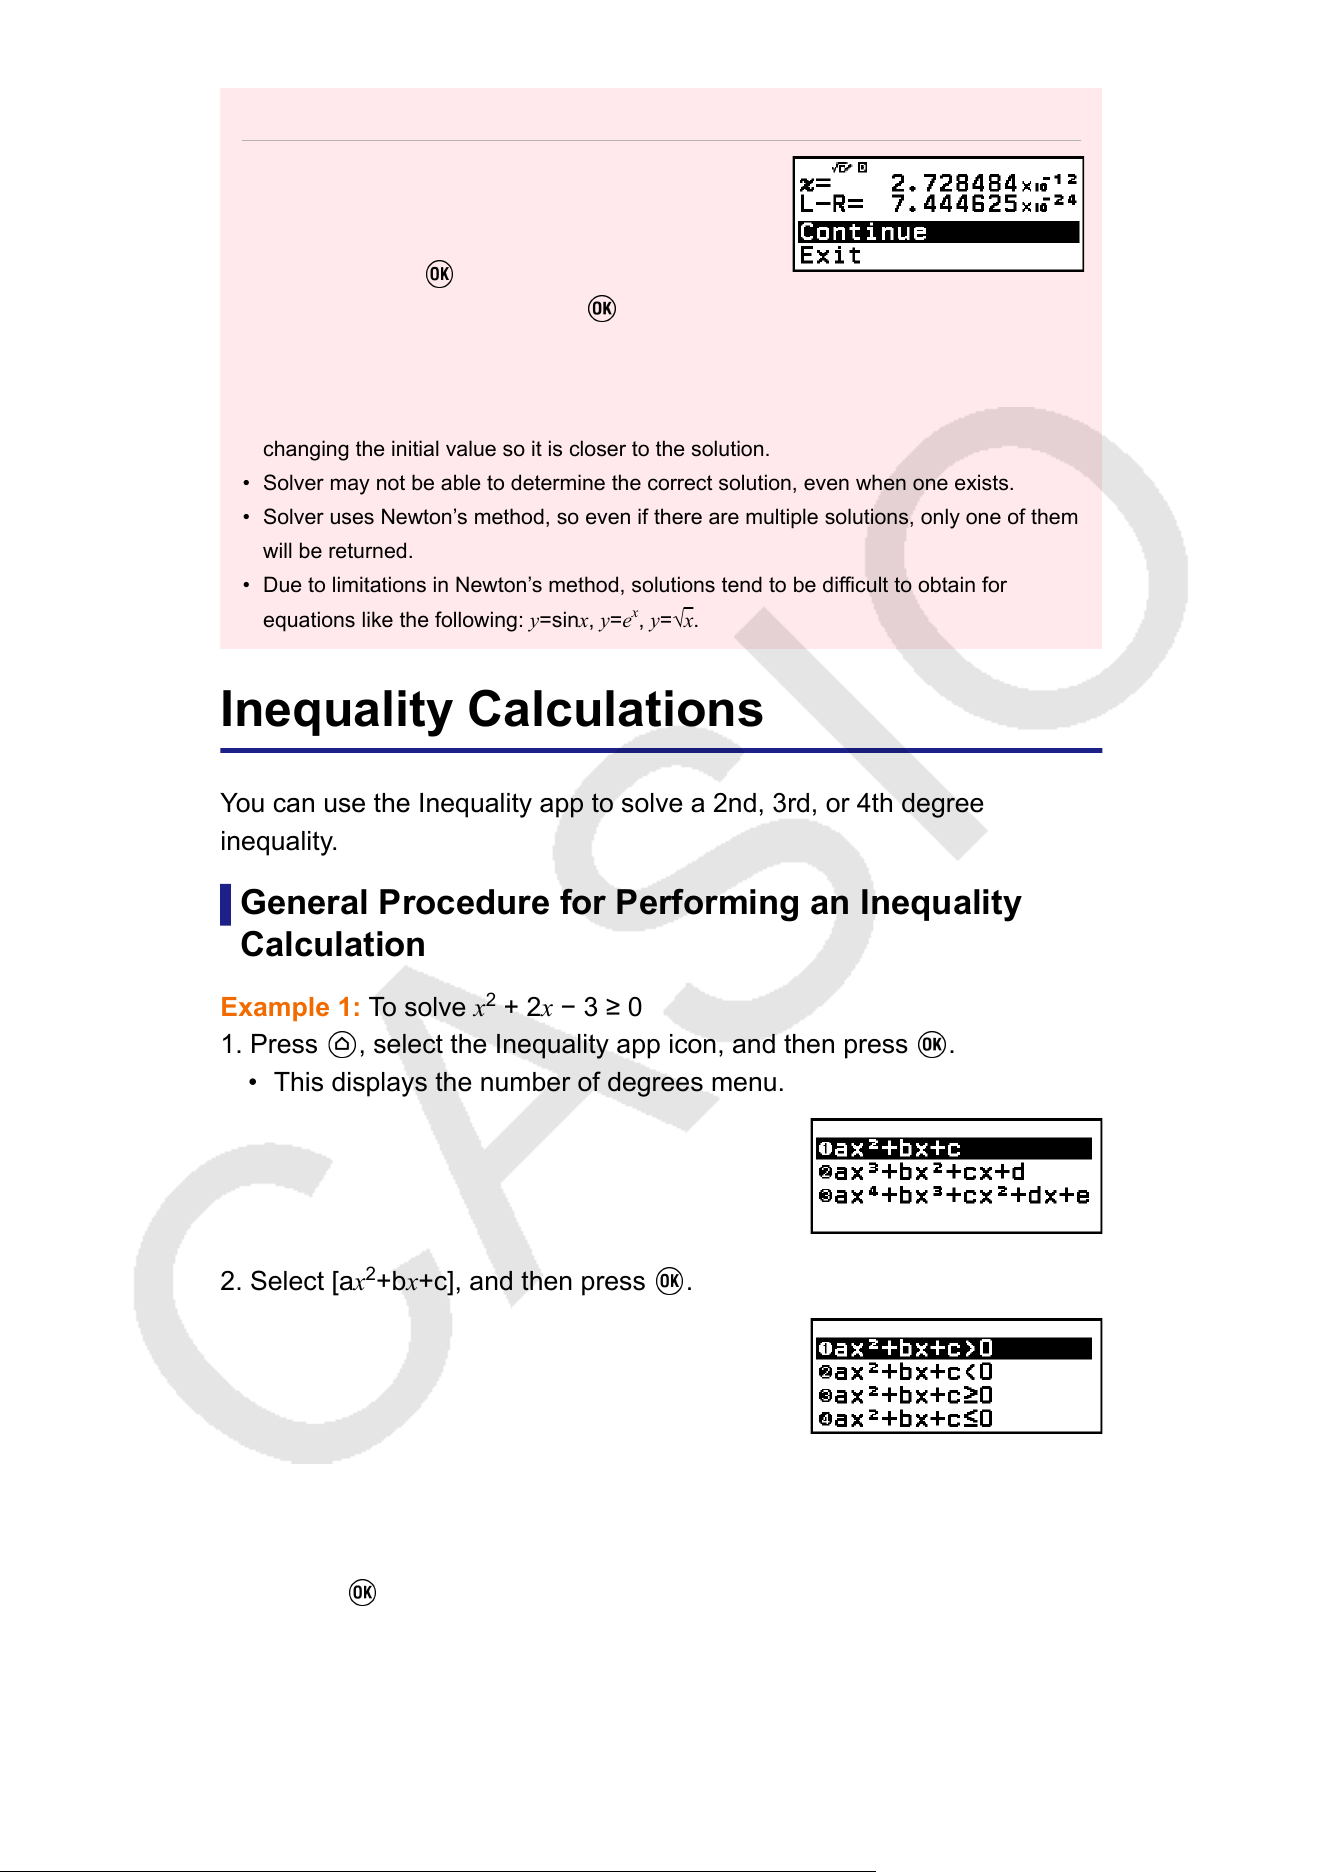
Important!
• Solver performs convergence a preset number of times.
If it cannot find a solution, it displays a confirmation
screen like the one nearby
, asking if you want to
continue. Press
while [Continue] is selected to
continue or select [Exit] and then to cancel the
Solver operation.
• Depending on what you input for the initial value for the solution variable (x in the
above example), Solver may not be able to obtain a solution. If this happens, try
changing the initial value so it is closer to the solution.
• Solver may not be able to determine the correct solution, even when one exists.
• Solver uses Newton’s method, so even if there are multiple solutions, only one of them
will be returned.
• Due to limitations in Newton’s method, solutions tend to be difficult to obtain for
equations like the following: y=sinx, y=e
x
, y=√x.
Inequality Calculations
Y
ou can use the Inequality app to solve a 2nd, 3rd, or 4th degree
inequality.
General Procedure for Performing an Inequality
Calculation
Example 1: To solve x
2
+ 2x − 3
≥ 0
1. Press
, select the Inequality app icon, and then press .
• This displays the number of degrees menu.
2. Select [ax
2
+bx+c], and then press .
3. On the menu that appears, select the inequality symbol type and
orientation (>, <, ≥, ≤
).
• Here we want to solve x
2
+ 2x − 3 ≥ 0, select [ax
2
+bx+c≥0] and then
press
.
4. On the Coef
ficient Editor that appears, input coefficient values.
105
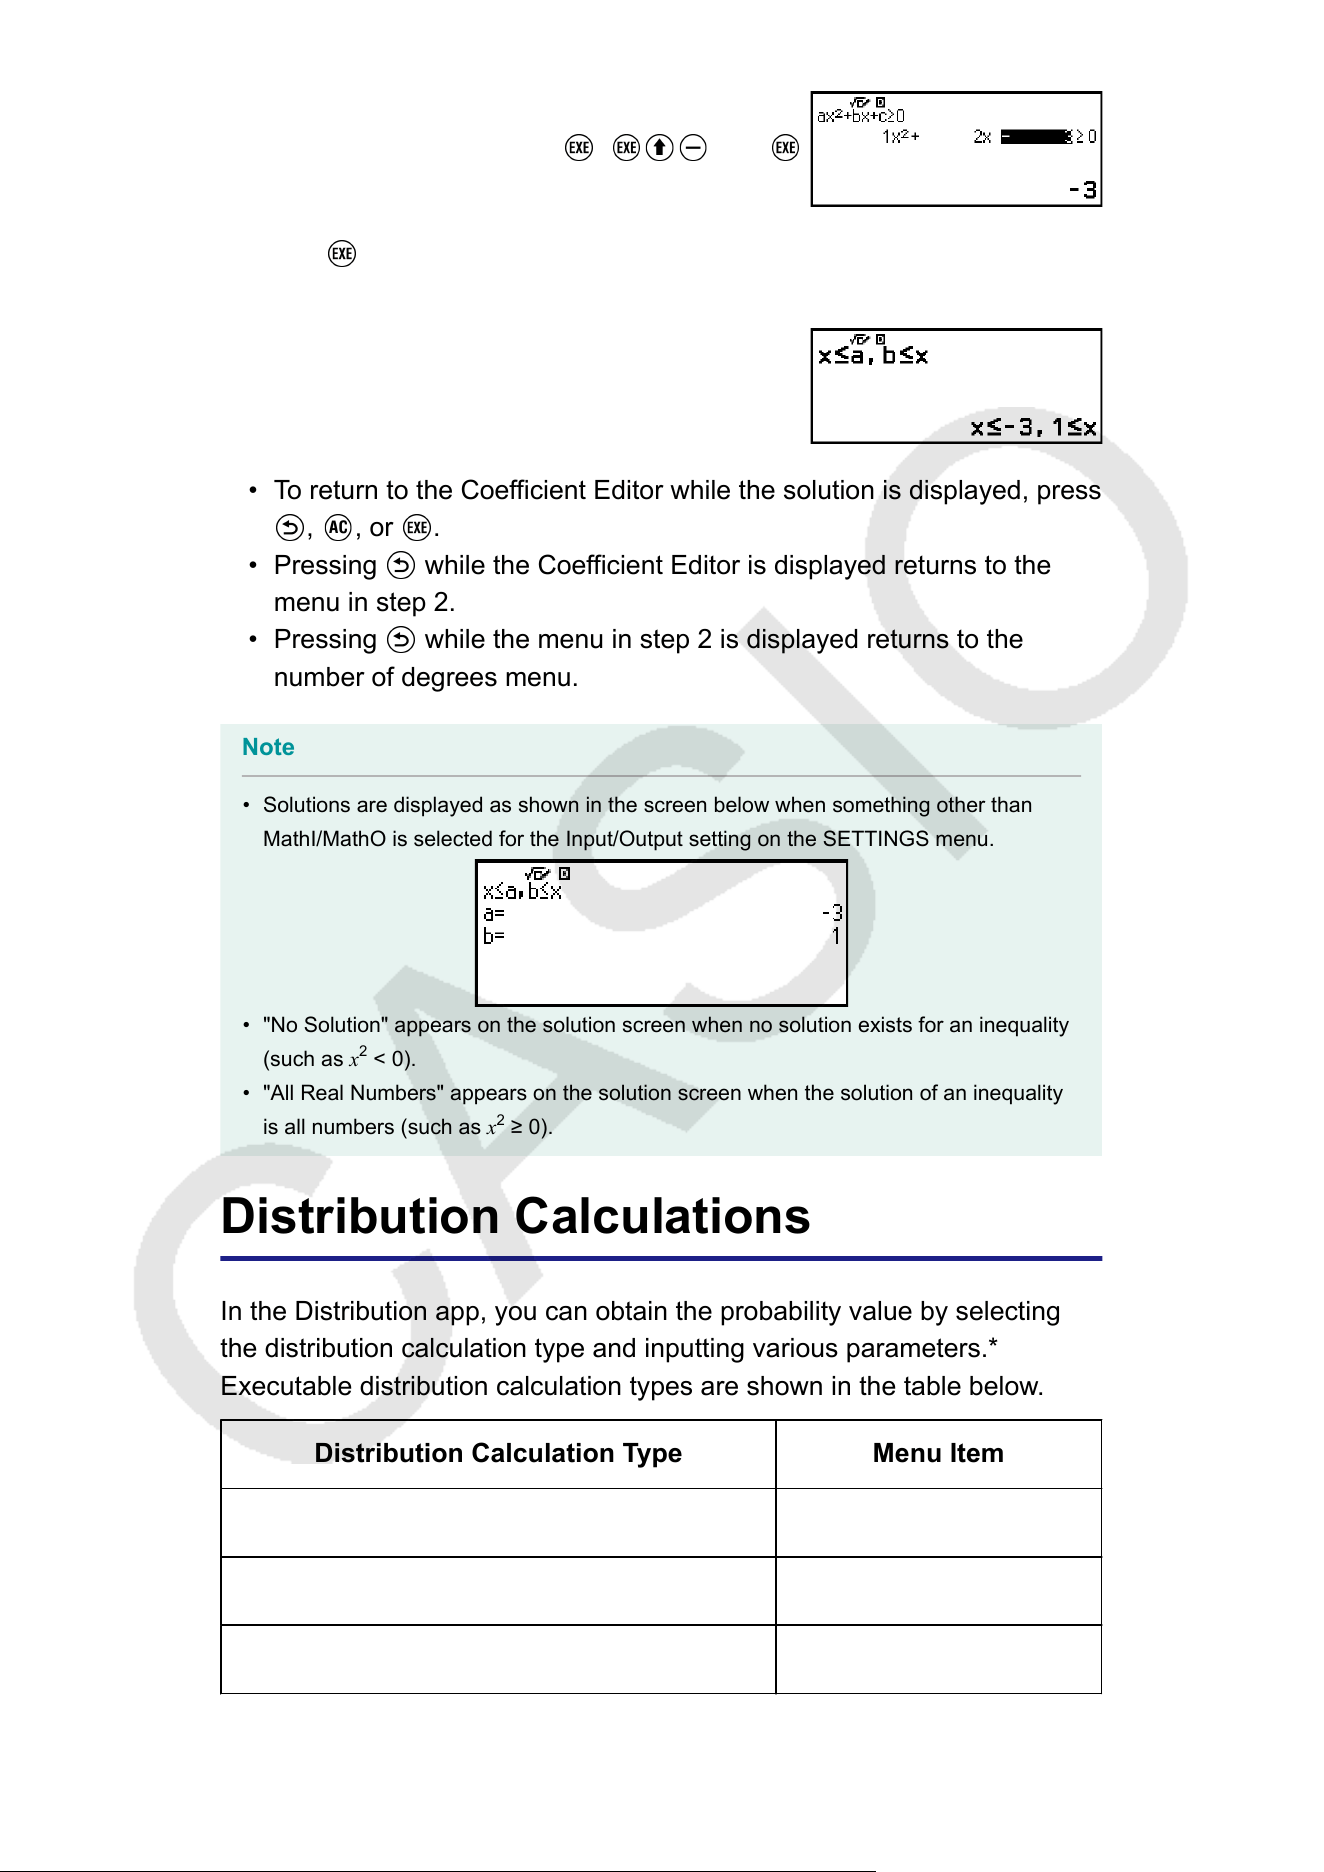
1 2 ((-))3
5. Press .
• This will display the solution.
• To return to the Coefficient Editor while the solution is displayed, press
, , or .
• Pressing while the Coefficient Editor is displayed returns to the
menu in step 2.
• Pressing while the menu in step 2 is displayed returns to the
number of degrees menu.
Note
• Solutions are displayed as shown in the screen below when something other than
MathI/MathO is selected for the Input/Output setting on the SETTINGS menu.
• "No Solution" appears on the solution screen when no solution exists for an inequality
(such as x
2
< 0).
• "All Real Numbers" appears on the solution screen when the solution of an inequality
is all numbers (such as x
2
≥ 0).
Distribution Calculations
In the Distribution app, you can obtain the probability value by selecting
the distribution calculation type and inputting various parameters.*
Executable distribution calculation types are shown in the table below
.
Distribution Calculation Type Menu Item
Binomial probability Binomial PD
Binomial cumulative probability Binomial CD
Normal probability density Normal PD
106

Normal cumulative probability Normal CD
Inverse normal cumulative distribution* Inverse Normal
Poisson probability Poisson PD
Poisson cumulative probability Poisson CD
* "Inverse Normal" performs inverse calculation to determine the data
value (xInv) from a probability value (Area).
General Procedure for Performing a Distribution
Calculation
Example:
To calculate binomial cumulative probability for the x data {2, 3,
4, 5} when N (number of trials) = 5 and p (probability of success) = 0.5
1. Press
, select the Distribution app icon, and then press .
• This displays the distribution calculation type menu.
2. On the menu, select a distribution calculation type.
• Here we want to calculate binomial cumulative probability. Select
[Binomial CD], and then press .
3. On the menu that appears, select a data (x) input method.
[List] ... Select to input multiple x-data items at the same time. Selecting
this menu item causes the list screen to appear
.
[Variable] ... Select to input a single x-data item. Selecting this menu
item causes a parameter input screen to appear.
• Here we want to input multiple x-data items at the same time, select
[List] and then press
.
4. On the list screen, input x data {2, 3, 4, 5}.
2
3 4 5
5. Press .
• This displays the Binomial CD parameter input screen.
107
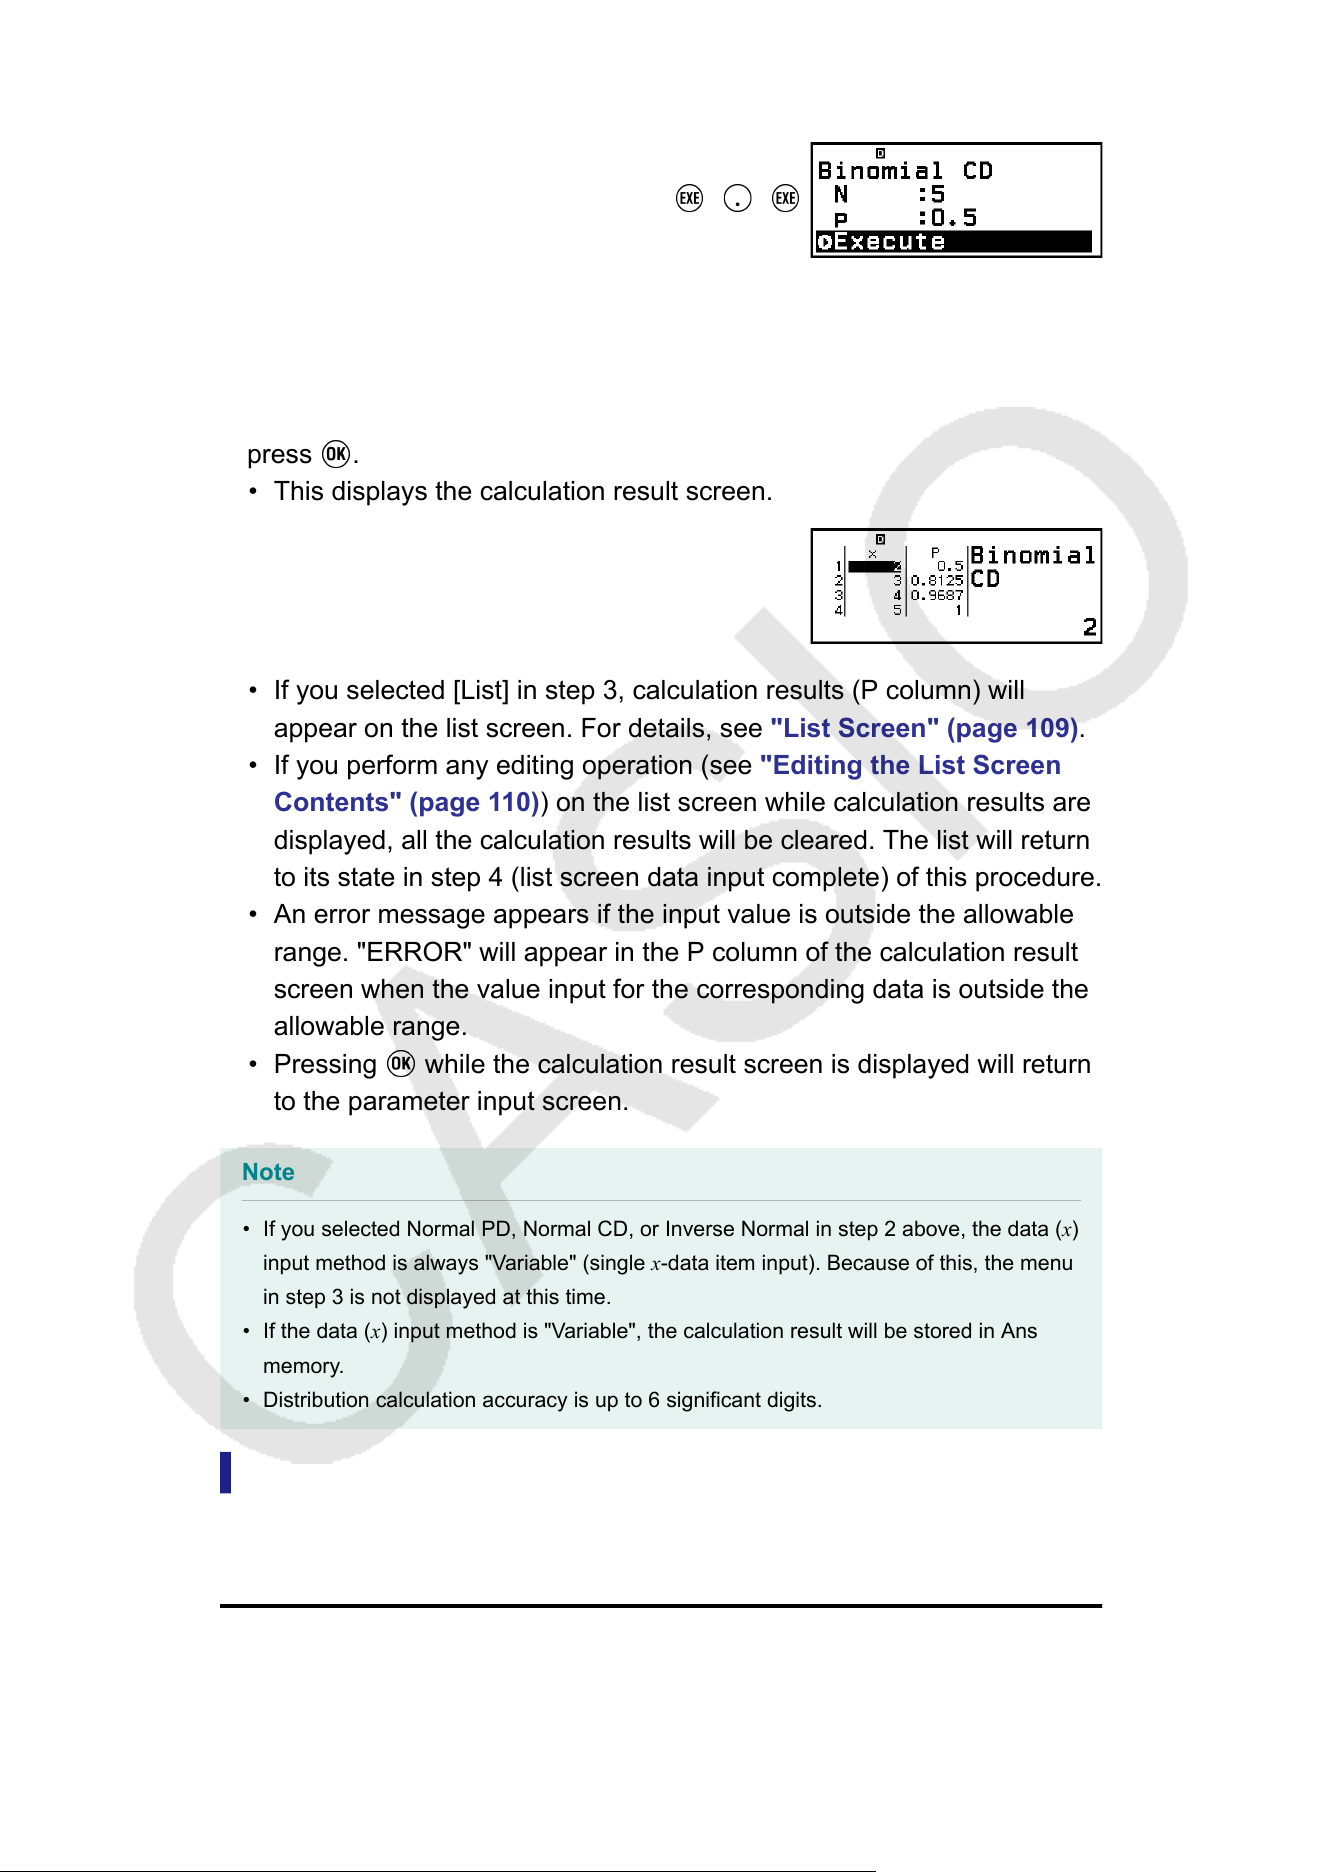
6. Input values for the parameters (N
= 5, p = 0.5).
5
0 5
• The parameters that require data input depend on the calculation
type you selected in step 2 of this procedure. For details, see the
"Parameter List"
(page 108).
7. After inputting values for all of the parameters, select [Execute] and then
press
.
• This displays the calculation result screen.
• If you selected [List] in step 3, calculation results (P column) will
appear on the list screen. For details, see "List Screen" (page 109
).
• If you perform any editing operation (see "Editing the List Screen
Contents" (page 110)) on the list screen while calculation results are
displayed, all the calculation results will be cleared. The list will return
to its state in step 4 (list screen data input complete) of this procedure.
• An error message appears if the input value is outside the allowable
range. "ERROR" will appear in the P column of the calculation result
screen when the value input for the corresponding data is outside the
allowable range.
• Pressing
while the calculation result screen is displayed will return
to the parameter input screen.
Note
• If you selected Normal PD, Normal CD, or Inverse Normal in step 2 above, the data (x)
input method is always "V
ariable" (single x-data item input). Because of this, the menu
in step 3 is not displayed at this time.
• If the data (x) input method is "V
ariable", the calculation result will be stored in Ans
memory.
• Distribution calculation accuracy is up to 6 significant digits.
Parameter List
The list below shows the meanings of the symbols that appear on the
parameter input screen.
Binomial PD, Binomial CD
x … data
N … number of trials
108
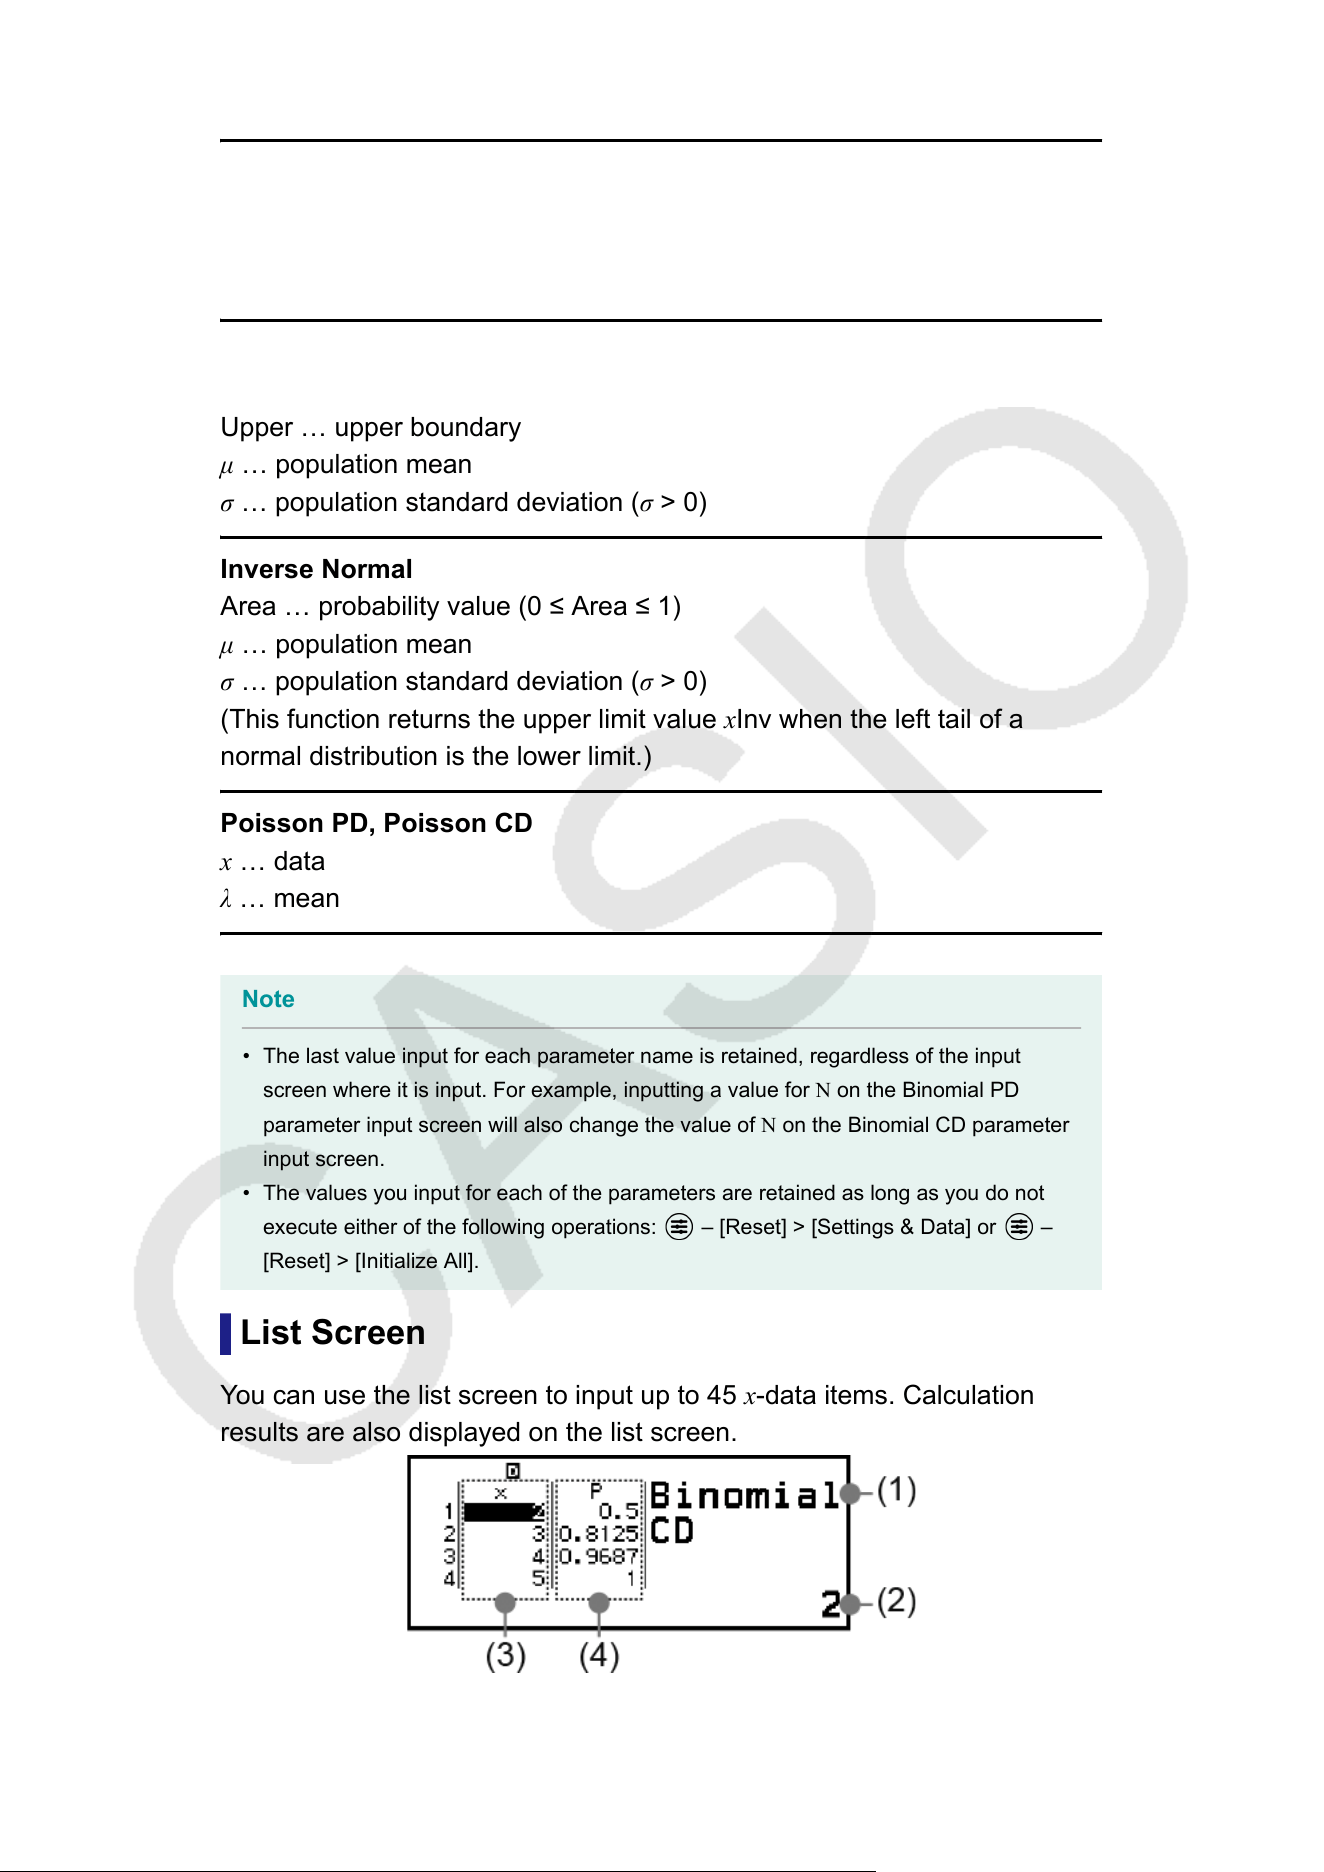
p … probability of success (0
≤ p ≤ 1)
Normal PD
x … data
μ … population mean
σ … population standard deviation (σ > 0)
Normal CD
Lower … lower boundary
Upper … upper boundary
μ … population mean
σ … population standard deviation (σ > 0)
Inverse Normal
Area … probability value (0 ≤ Area ≤ 1)
μ … population mean
σ … population standard deviation (σ > 0)
(This function returns the upper limit value xInv when the left tail of a
normal distribution is the lower limit.)
Poisson PD, Poisson CD
x … data
λ … mean
Note
• The last value input for each parameter name is retained, regardless of the input
screen where it is input. For example, inputting a value for N on the Binomial PD
parameter input screen will also change the value of N on the Binomial CD parameter
input screen.
• The values you input for each of the parameters are retained as long as you do not
execute either of the following operations:
– [Reset] > [Settings & Data] or –
[Reset] > [Initialize All].
List Screen
Y
ou can use the list screen to input up to 45 x-data items. Calculation
results are also displayed on the list screen.
(1) Distribution calculation type
109
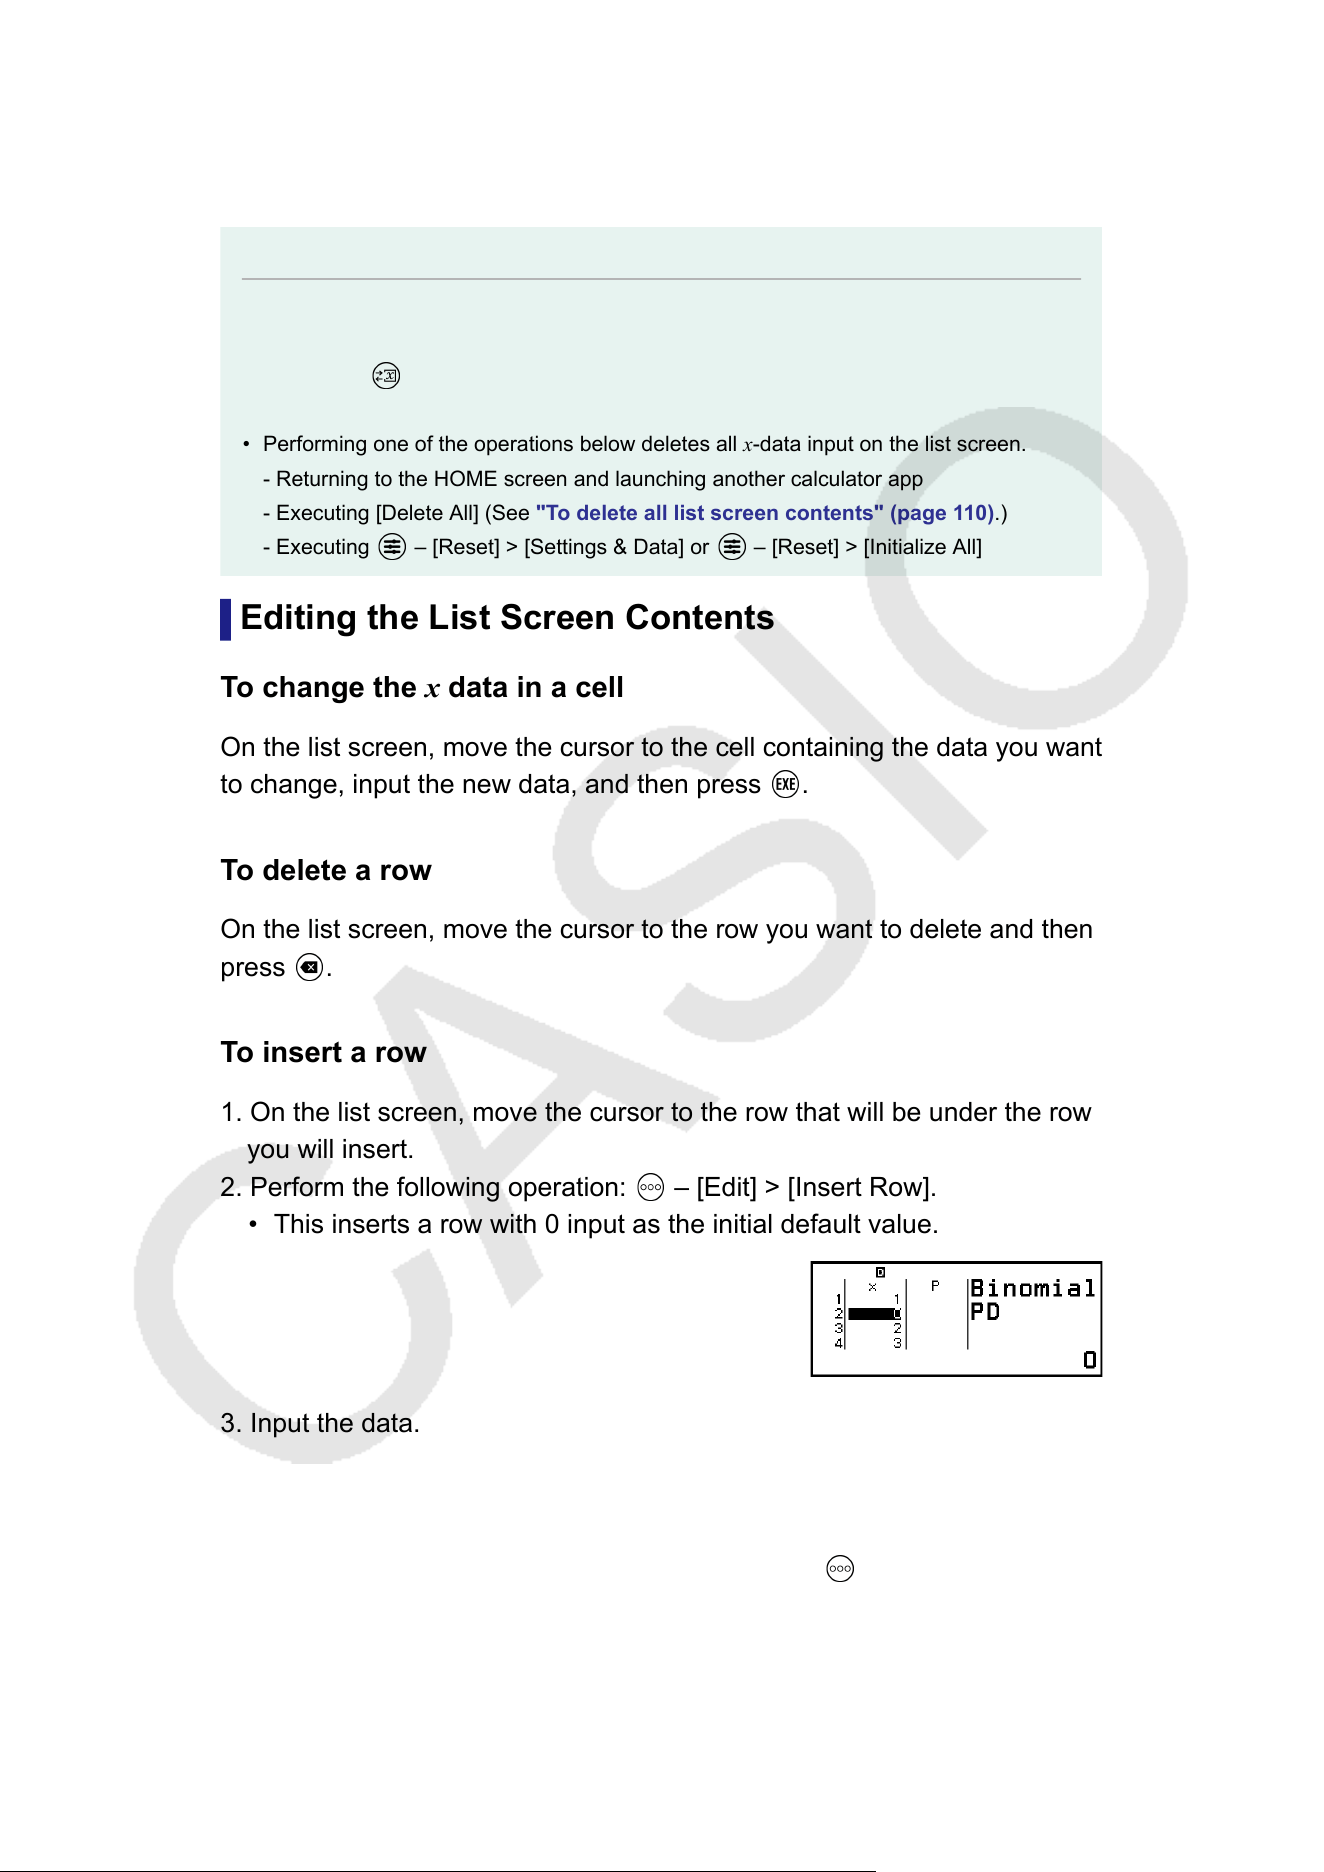
(2) Value at current cursor position
(3) Data (x)
(4) Calculation results (P)
Note
• On the list screen, you can store the value in a cell to a variable. For example,
performing the following operation while the above screen is displayed will store 1 to
variable A:
– [A=] > [Store]. For details about variables, see "V
ariables (A, B, C,
D, E, F, x, y, z)" (page 43).
• Performing one of the operations below deletes all x-data input on the list screen.
- Returning to the HOME screen and launching another calculator app
- Executing [Delete All] (See "T
o delete all list screen contents" (page 110).)
- Executing
– [Reset] > [Settings & Data] or – [Reset] > [Initialize All]
Editing the List Screen Contents
T
o change the x data in a cell
On the list screen, move the cursor to the cell containing the data you want
to change, input the new data, and then press .
T
o delete a row
On the list screen, move the cursor to the row you want to delete and then
press
.
T
o insert a row
1. On the list screen, move the cursor to the row that will be under the row
you will insert.
2. Perform the following operation:
– [Edit] > [Insert Row].
• This inserts a row with 0 input as the initial default value.
3. Input the data.
T
o delete all list screen contents
On the list screen, perform the following operation:
– [Edit] > [Delete
All].
110
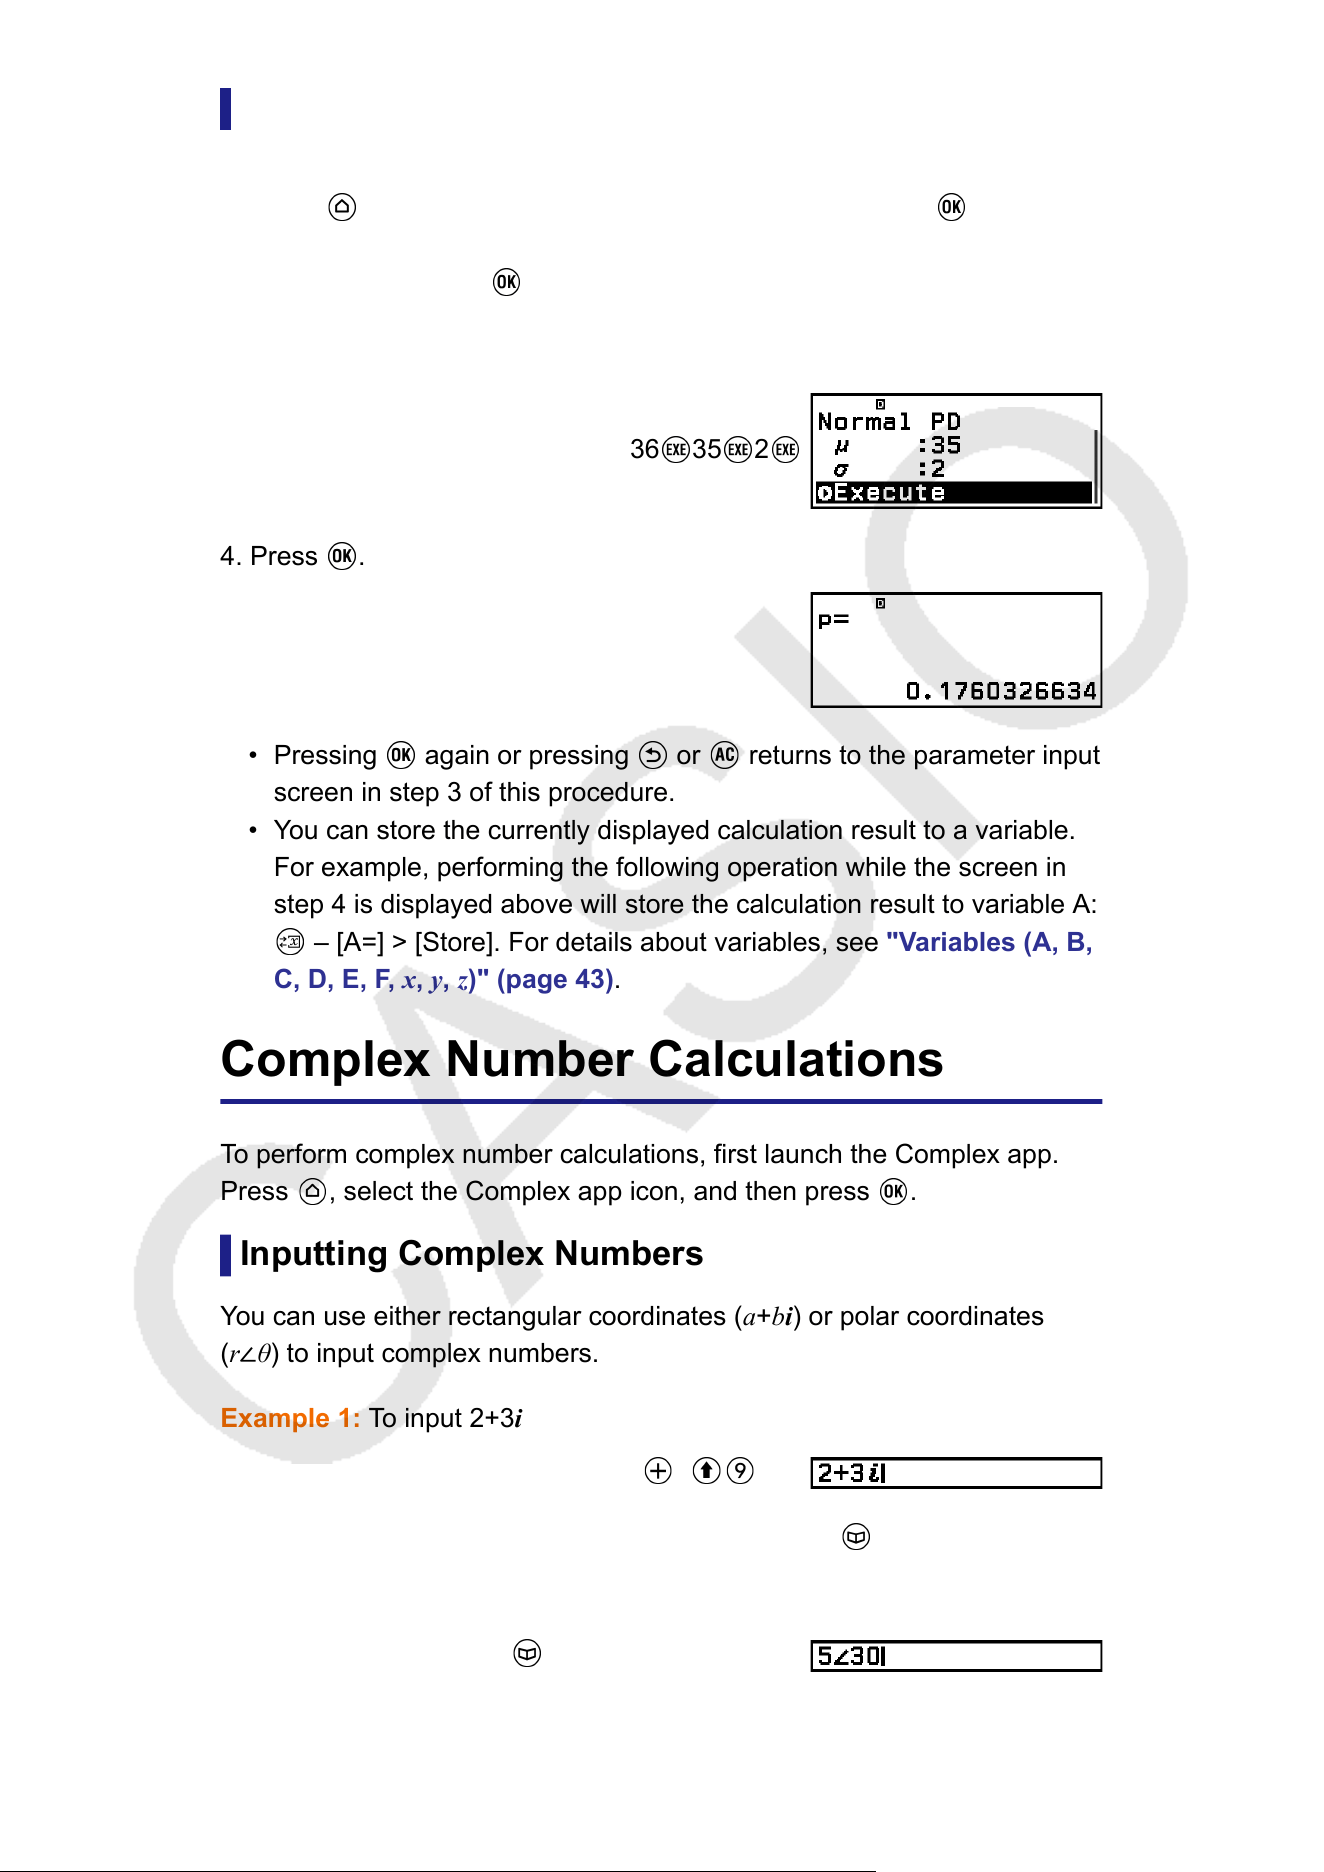
Calculation Example
T
o calculate the normal probability density when x = 36, μ = 35, σ = 2
1. Press
, select the Distribution app icon, and then press .
2. On the distribution calculation type menu that appears, select [Normal
PD], and then press .
• This displays the Normal PD parameter input screen.
3. Input values for the parameters (x = 36, μ = 35, σ = 2).
36 35 2
4. Press .
• Pressing again or pressing or returns to the parameter input
screen in step 3 of this procedure.
• You can store the currently displayed calculation result to a variable.
For example, performing the following operation while the screen in
step 4 is displayed above will store the calculation result to variable A:
– [A=] > [Store]. For details about variables, see "V
ariables (A, B,
C, D, E, F, x, y, z)" (page 43).
Complex Number Calculations
To perform complex number calculations, first launch the Complex app.
Press
, select the Complex app icon, and then press .
Inputting Complex Numbers
Y
ou can use either rectangular coordinates (a+bi) or polar coordinates
(r∠θ) to input complex numbers.
Example 1: To input 2+3i
2
3 (i)*
* You can also use the following operation to input i: – [Complex] > [i].
Example 2: T
o input 5∠30
5
– [Complex] > [∠] 30
111
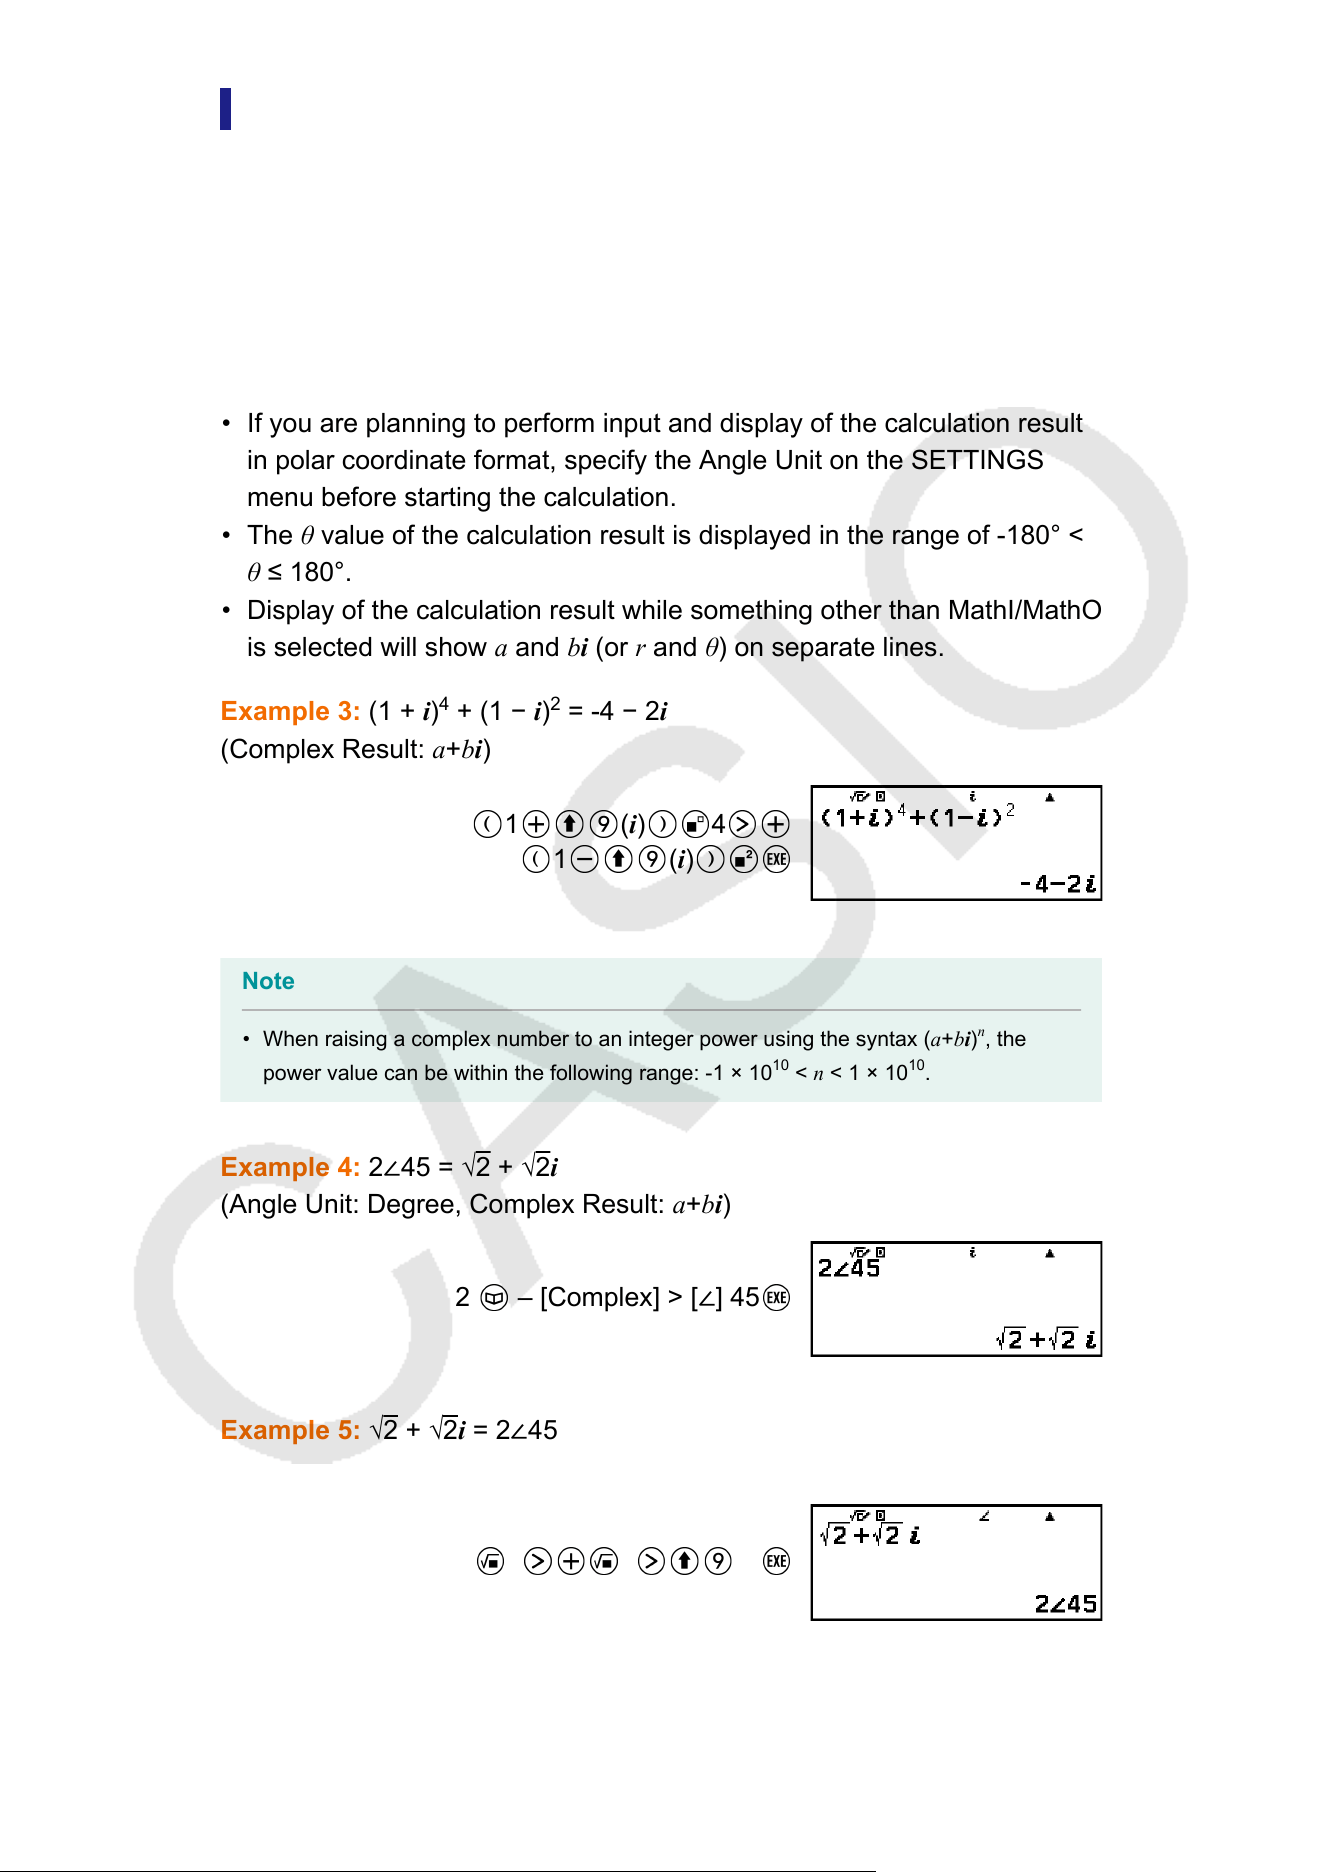
Complex App Calculation Examples
Before Performing the Example Operations
• For the examples in this section, use the SETTINGS menu to select
MathI/MathO for the Input/Output setting. Configure other settings as
shown for each example.
• Complex number calculation results are displayed in accordance with
the Complex Result setting on the SETTINGS menu.
• If you are planning to perform input and display of the calculation result
in polar coordinate format, specify the Angle Unit on the SETTINGS
menu before starting the calculation.
• The θ value of the calculation result is displayed in the range of -180° <
θ ≤ 180°.
• Display of the calculation result while something other than MathI/MathO
is selected will show a and bi (or r and θ) on separate lines.
Example 3: (1 + i)
4
+ (1 − i)
2
= -4 − 2i
(Complex Result: a+bi)
1 (i) 4
1 (i)
Note
• When raising a complex number to an integer power using the syntax (a+bi)
n
, the
power value can be within the following range: -1 × 10
10
< n
< 1 × 10
10
.
Example 4: 2∠45 = √
2 + √2i
(Angle Unit: Degree, Complex Result: a+bi)
2
– [Complex] > [∠] 45
Example 5: √2 + √2i
= 2∠45
(Angle Unit: Degree, Complex Result: r∠θ)
2 2 (i)
Example 6: T
o obtain the conjugate complex number of 2 + 3i
112
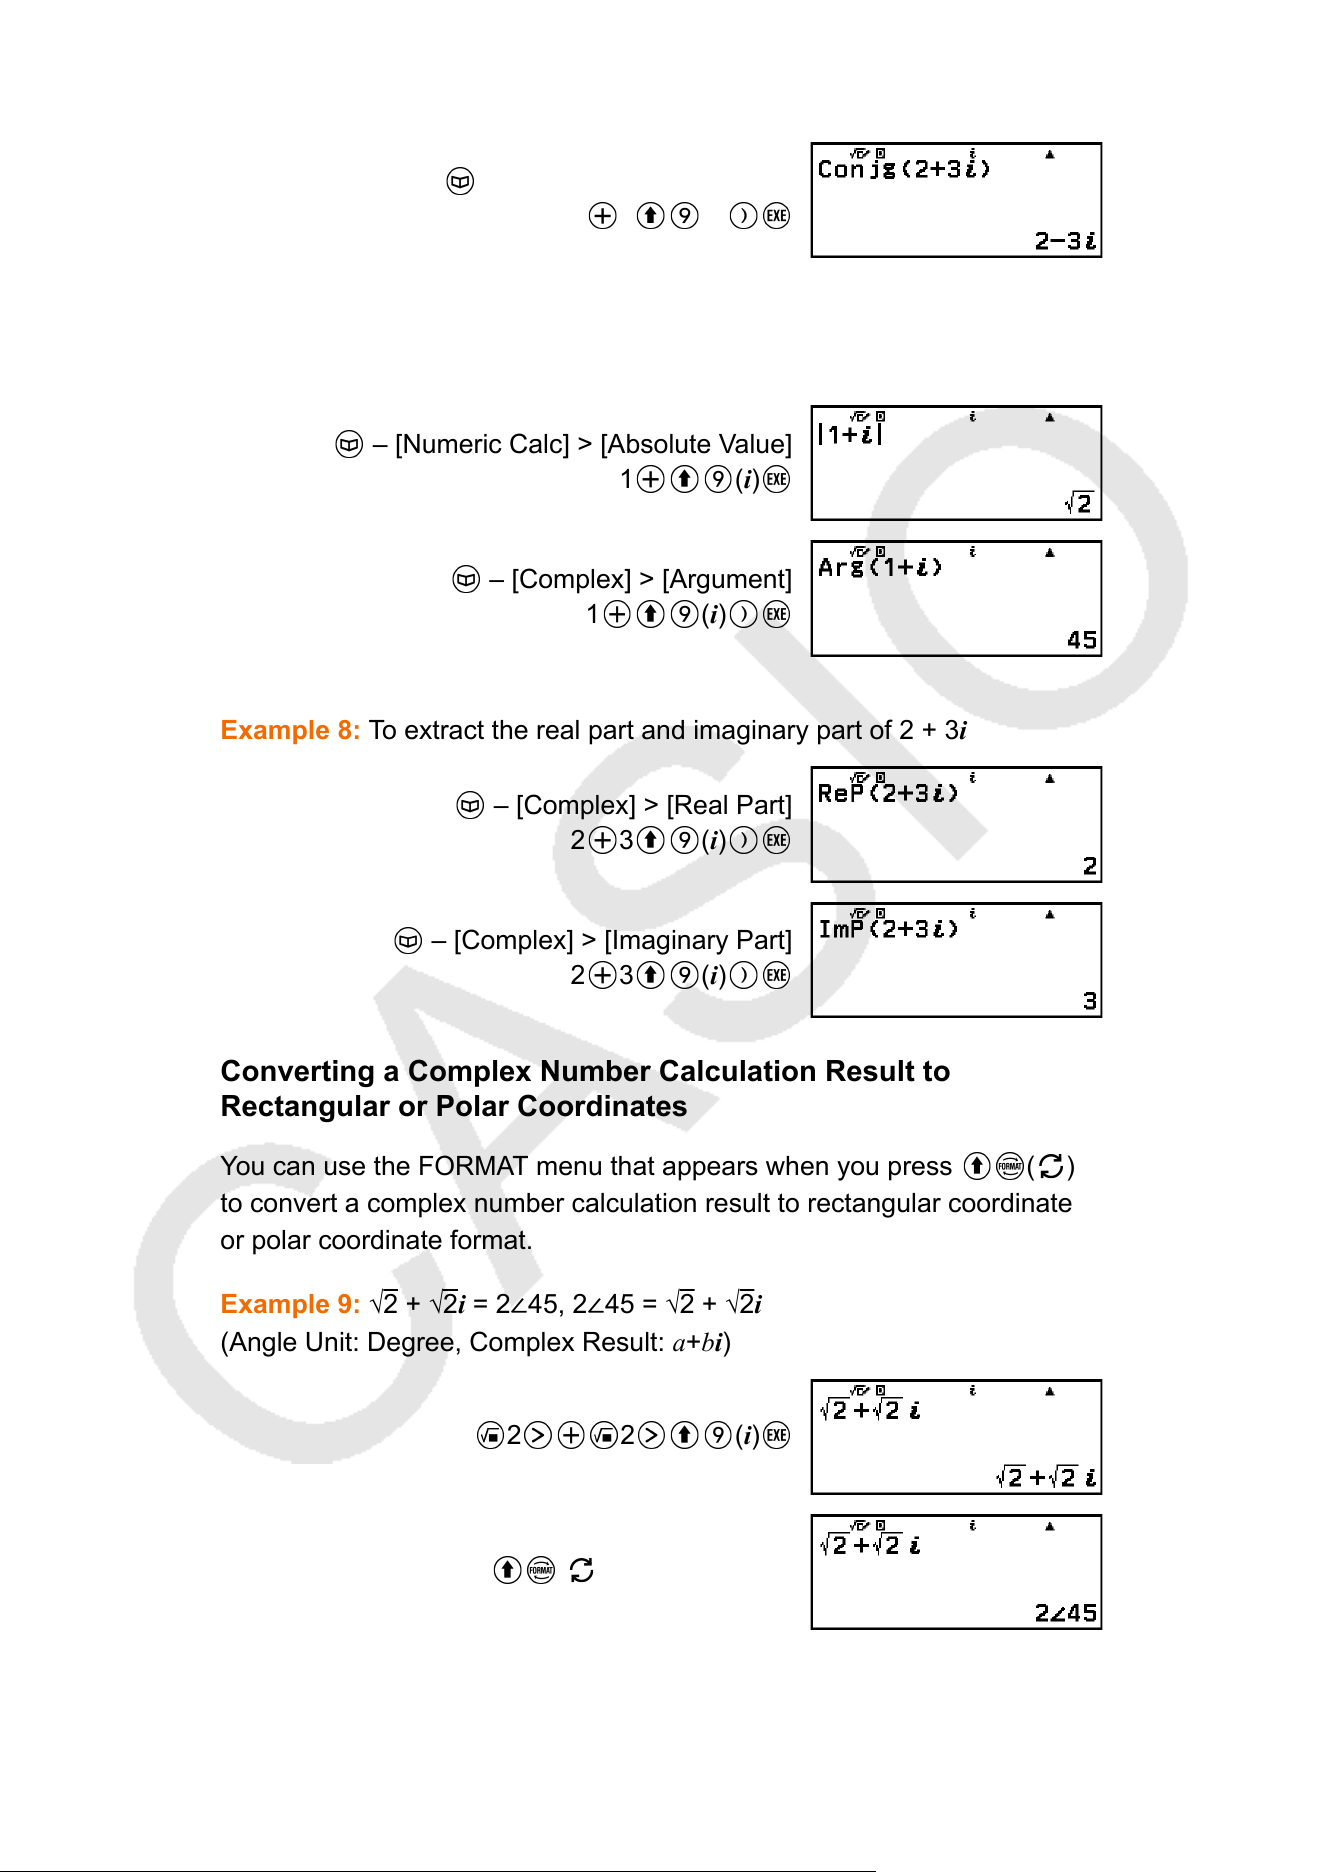
(Complex Result: a+bi)
– [Complex] > [Conjugate]
2 3 (i)
Example 7: T
o obtain the absolute value and argument of 1 + i
(Angle Unit: Degree)
– [Numeric Calc] > [Absolute Value]
1 (i)
– [Complex] > [Argument]
1 (i)
Example 8: To extract the real part and imaginary part of 2 + 3i
– [Complex] > [Real Part]
2 3 (i)
– [Complex] > [Imaginary Part]
2 3 (i)
Converting a Complex Number Calculation Result to
Rectangular or Polar Coordinates
Y
ou can use the FORMAT menu that appears when you press
( )
to convert a complex number calculation result to rectangular coordinate
or polar coordinate format.
Example 9: √2 + √2i = 2∠45, 2∠45 = √2 + √2i
(Angle Unit: Degree, Complex Result: a+bi)
2 2 (i)
( ) – [Polar Coord]
113
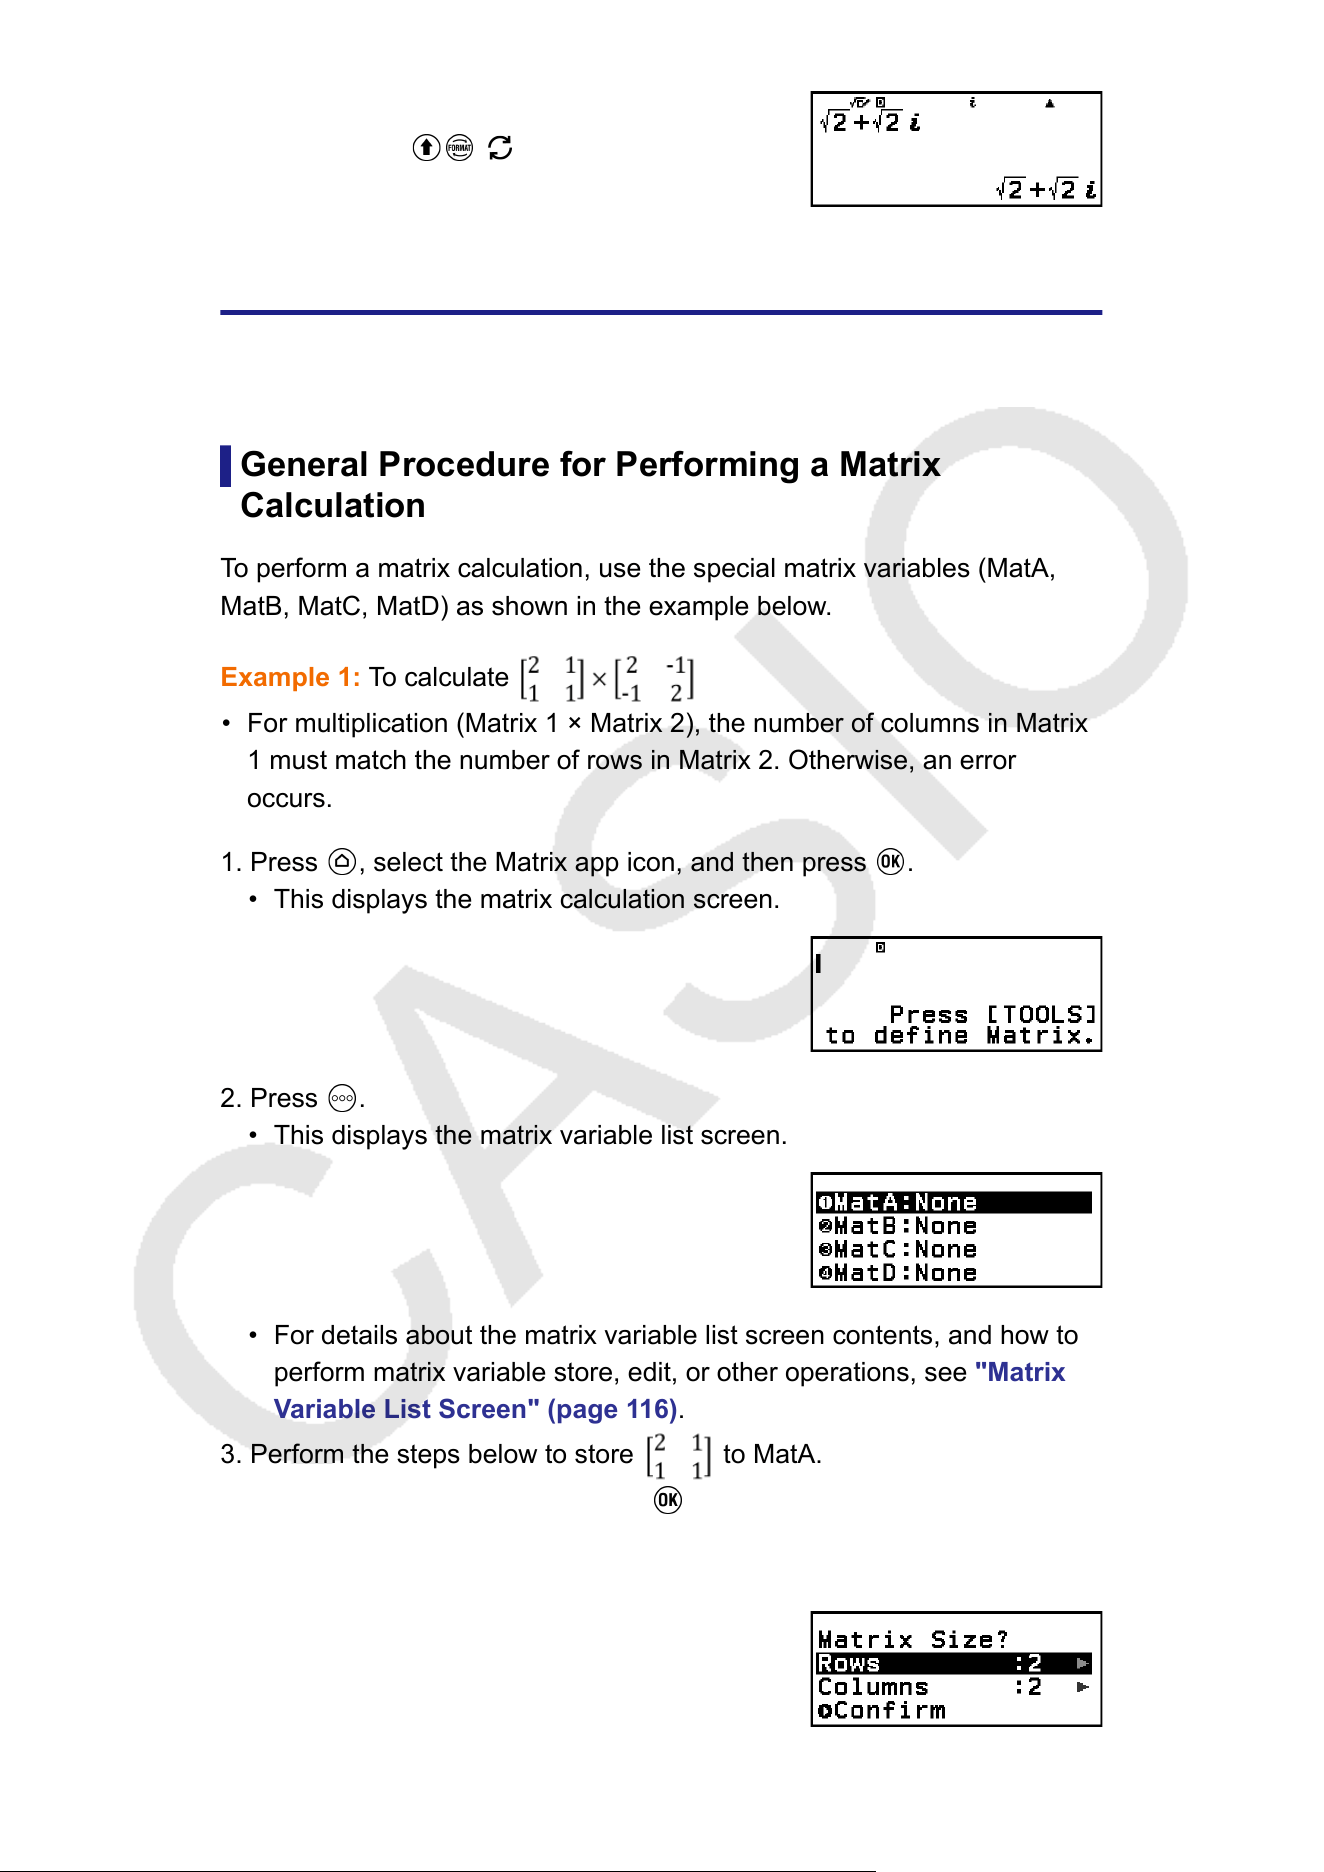
( ) – [Rectangular Coord]
Matrix Calculations
Use the Matrix app to perform calculations involving matrices of up to 4
rows by 4 columns.
General Procedure for Performing a Matrix
Calculation
T
o perform a matrix calculation, use the special matrix variables (MatA,
MatB, MatC, MatD) as shown in the example below.
Example 1: To calculate
• For multiplication (Matrix 1 × Matrix 2), the number of columns in Matrix
1 must match the number of rows in Matrix 2. Otherwise, an error
occurs.
1. Press , select the Matrix app icon, and then press .
• This displays the matrix calculation screen.
2. Press .
• This displays the matrix variable list screen.
• For details about the matrix variable list screen contents, and how to
perform matrix variable store, edit, or other operations, see "Matrix
V
ariable List Screen" (page 116).
3. Perform the steps below to store
to MatA.
(1) Select [MatA:], and then press
.
• This displays the matrix size setting screen (initial default setting: 2
rows, 2 columns).
114
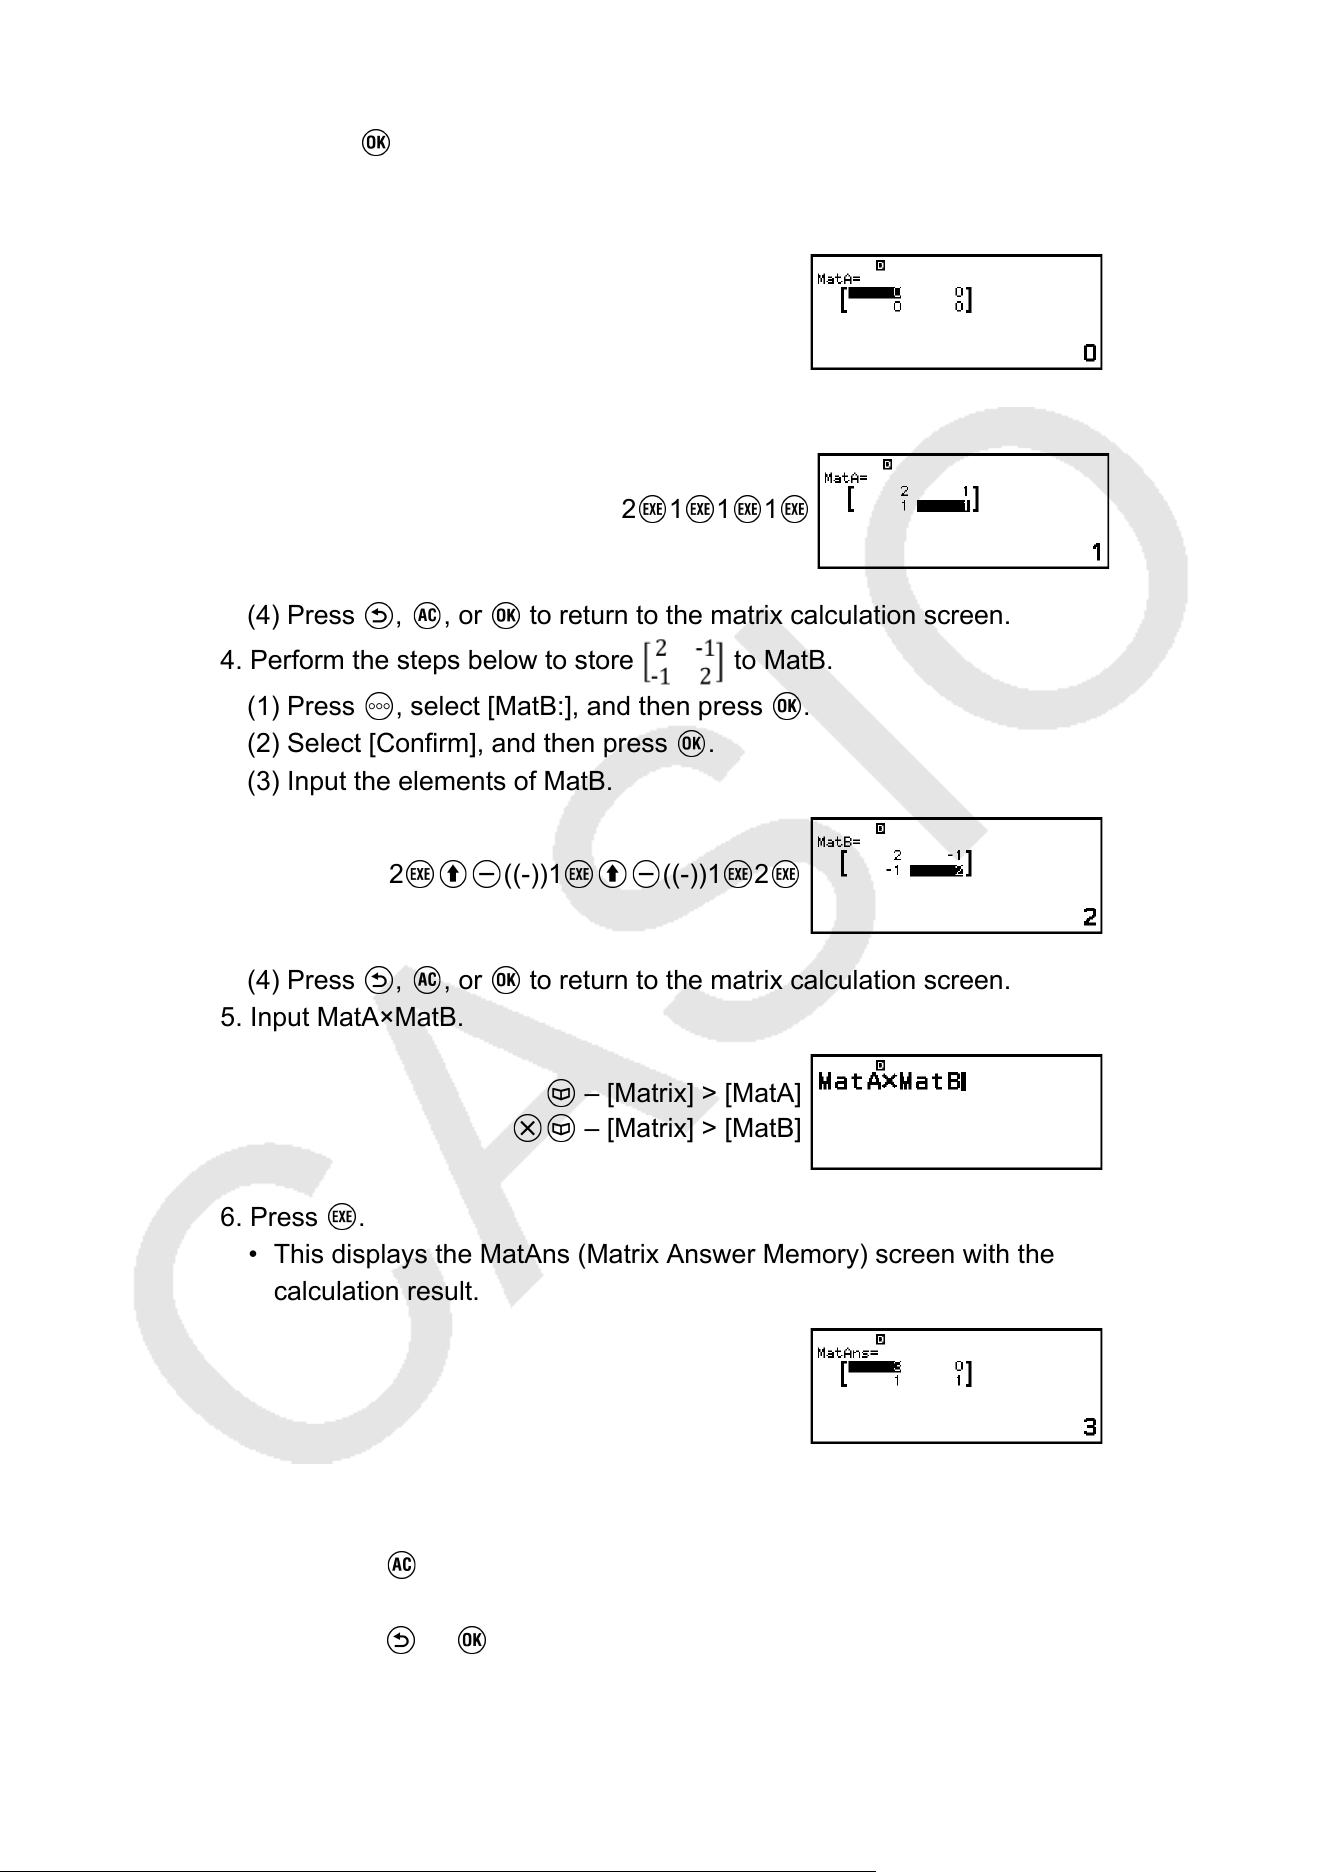
(2) Here, we want to store a 2×2 matrix, so select [Confirm] and then
press .
• This displays the Matrix Editor for input of the elements of the 2×2
matrix for MatA.
(3) Input the elements of MatA.
2 1 1 1
(4) Press , , or to return to the matrix calculation screen.
4. Perform the steps below to store to MatB.
(1) Press , select [MatB:], and then press .
(2) Select [Confirm], and then press .
(3) Input the elements of MatB.
2 ((-))1 ((-))1 2
(4) Press , , or to return to the matrix calculation screen.
5. Input MatA×MatB.
– [Matrix] > [MatA]
– [Matrix] > [MatB]
6. Press .
• This displays the MatAns (Matrix Answer Memory) screen with the
calculation result.
• For details about MatAns, see "Matrix Answer Memory (MatAns)"
(page 118).
• Pressing while the MatAns screen is displayed returns to the
matrix calculation screen and clears the calculation expression.
Pressing or returns to the calculation expression input
complete state in step 5 of this procedure.
115
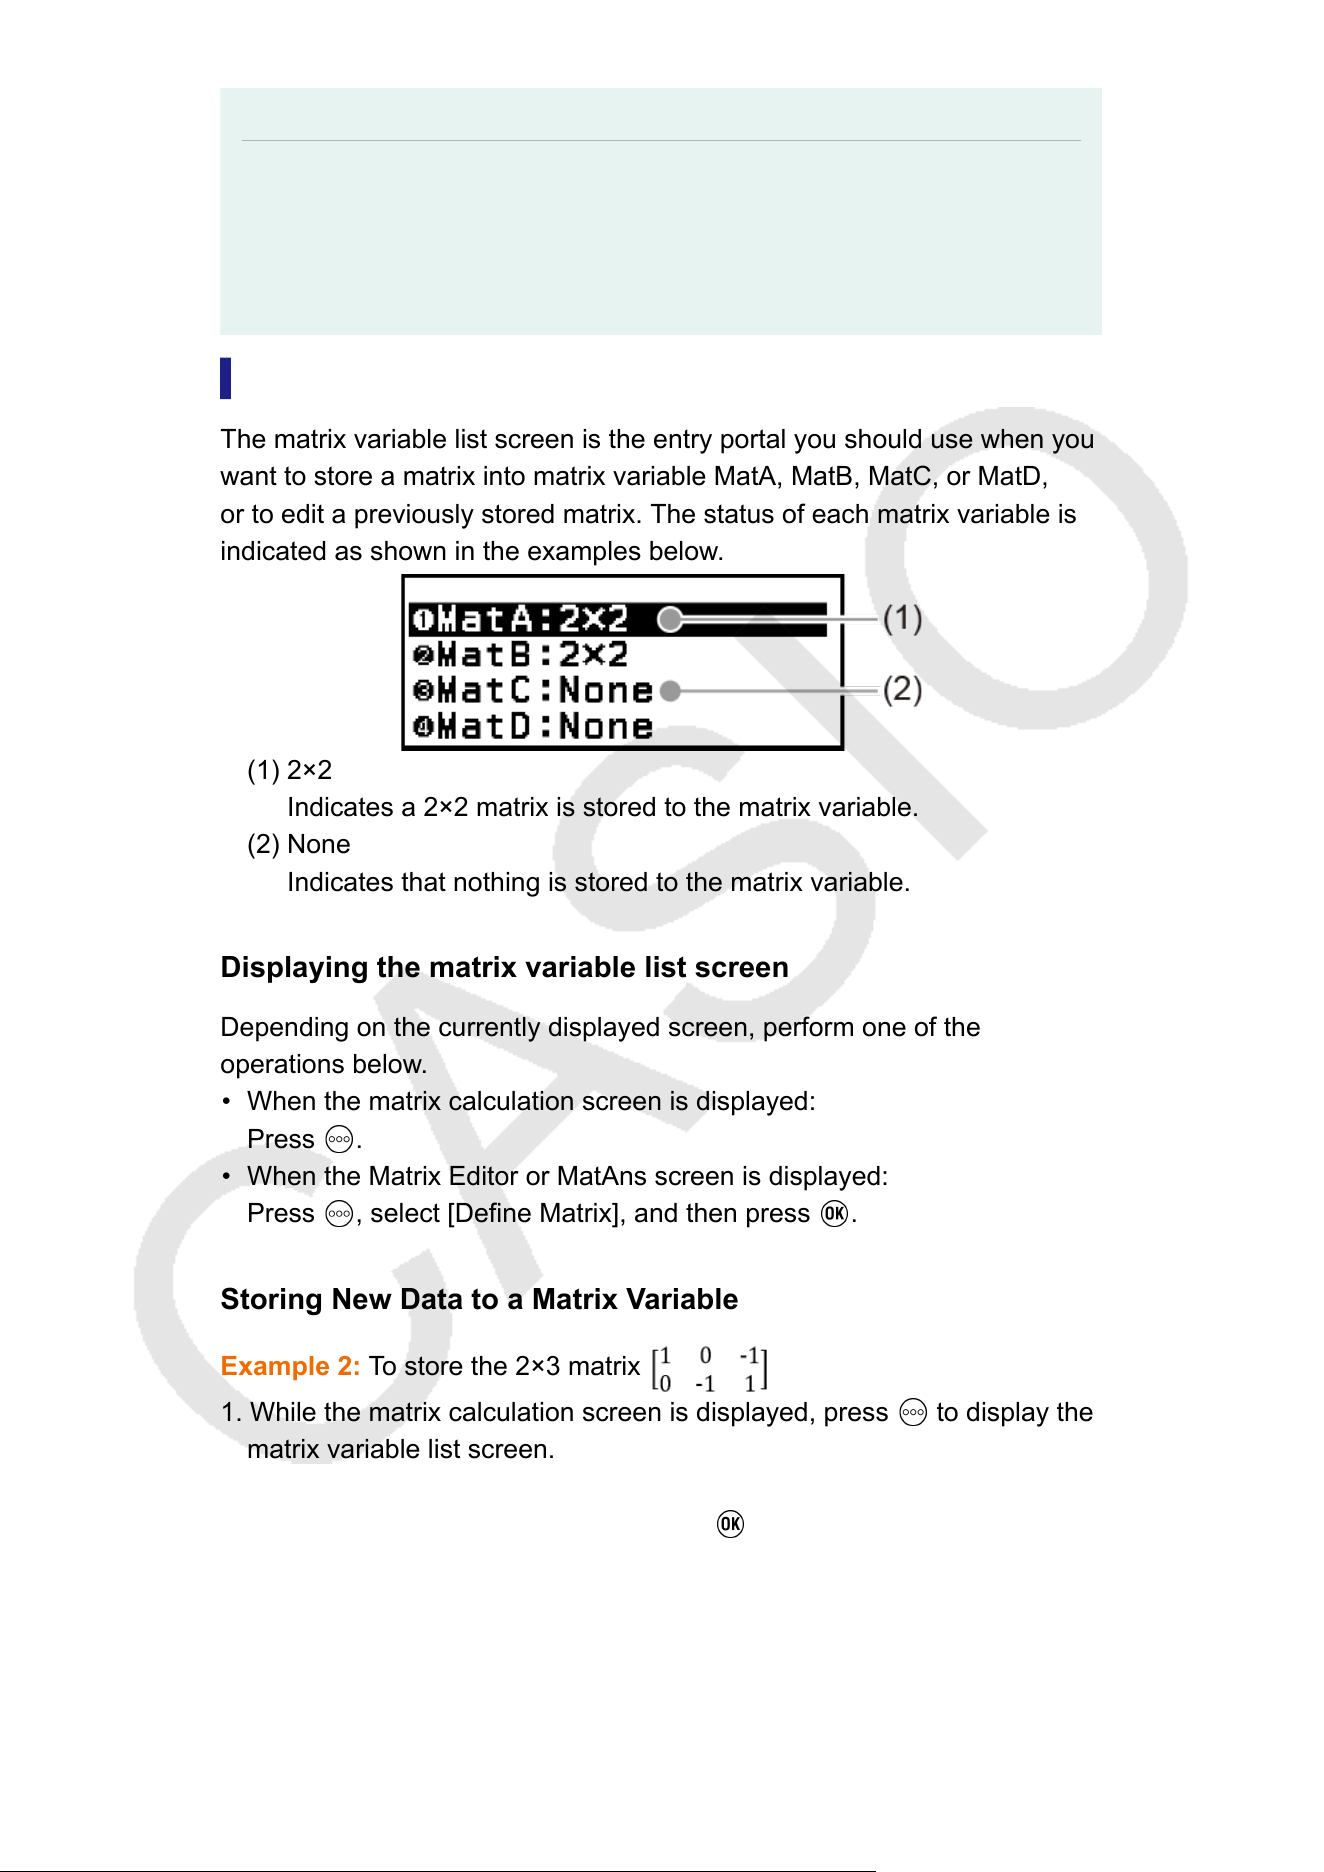
Note
• While the Matrix Editor or the MatAns screen is displayed, you can store the currently
highlighted value to a variable. While the matrix calculation screen is displayed and a
calculation result value is on the screen, you can store the displayed calculation result
to a variable. For details about variables, see "V
ariables (A, B, C, D, E, F, x, y, z)"
(page 43).
Matrix Variable List Screen
The matrix variable list screen is the entry portal you should use when you
want to store a matrix into matrix variable MatA, MatB, MatC, or MatD,
or to edit a previously stored matrix. The status of each matrix variable is
indicated as shown in the examples below.
(1) 2×2
Indicates a 2×2 matrix is stored to the matrix variable.
(2) None
Indicates that nothing is stored to the matrix variable.
Displaying the matrix variable list screen
Depending on the currently displayed screen, perform one of the
operations below
.
• When the matrix calculation screen is displayed:
Press
.
• When the Matrix Editor or MatAns screen is displayed:
Press , select [Define Matrix], and then press .
Storing New Data to a Matrix V
ariable
Example 2: To store the 2×3 matrix
1. While the matrix calculation screen is displayed, press to display the
matrix variable list screen.
2. Select the matrix variable (MatA, MatB, MatC, or MatD) to which you
want to store new data, and then press .
• If you selected a matrix variable whose status is "None", advance to
step 4 of this procedure.
• If you selected a matrix variable that already has a matrix stored to it,
a menu screen will appear
. Advance to step 3.
116
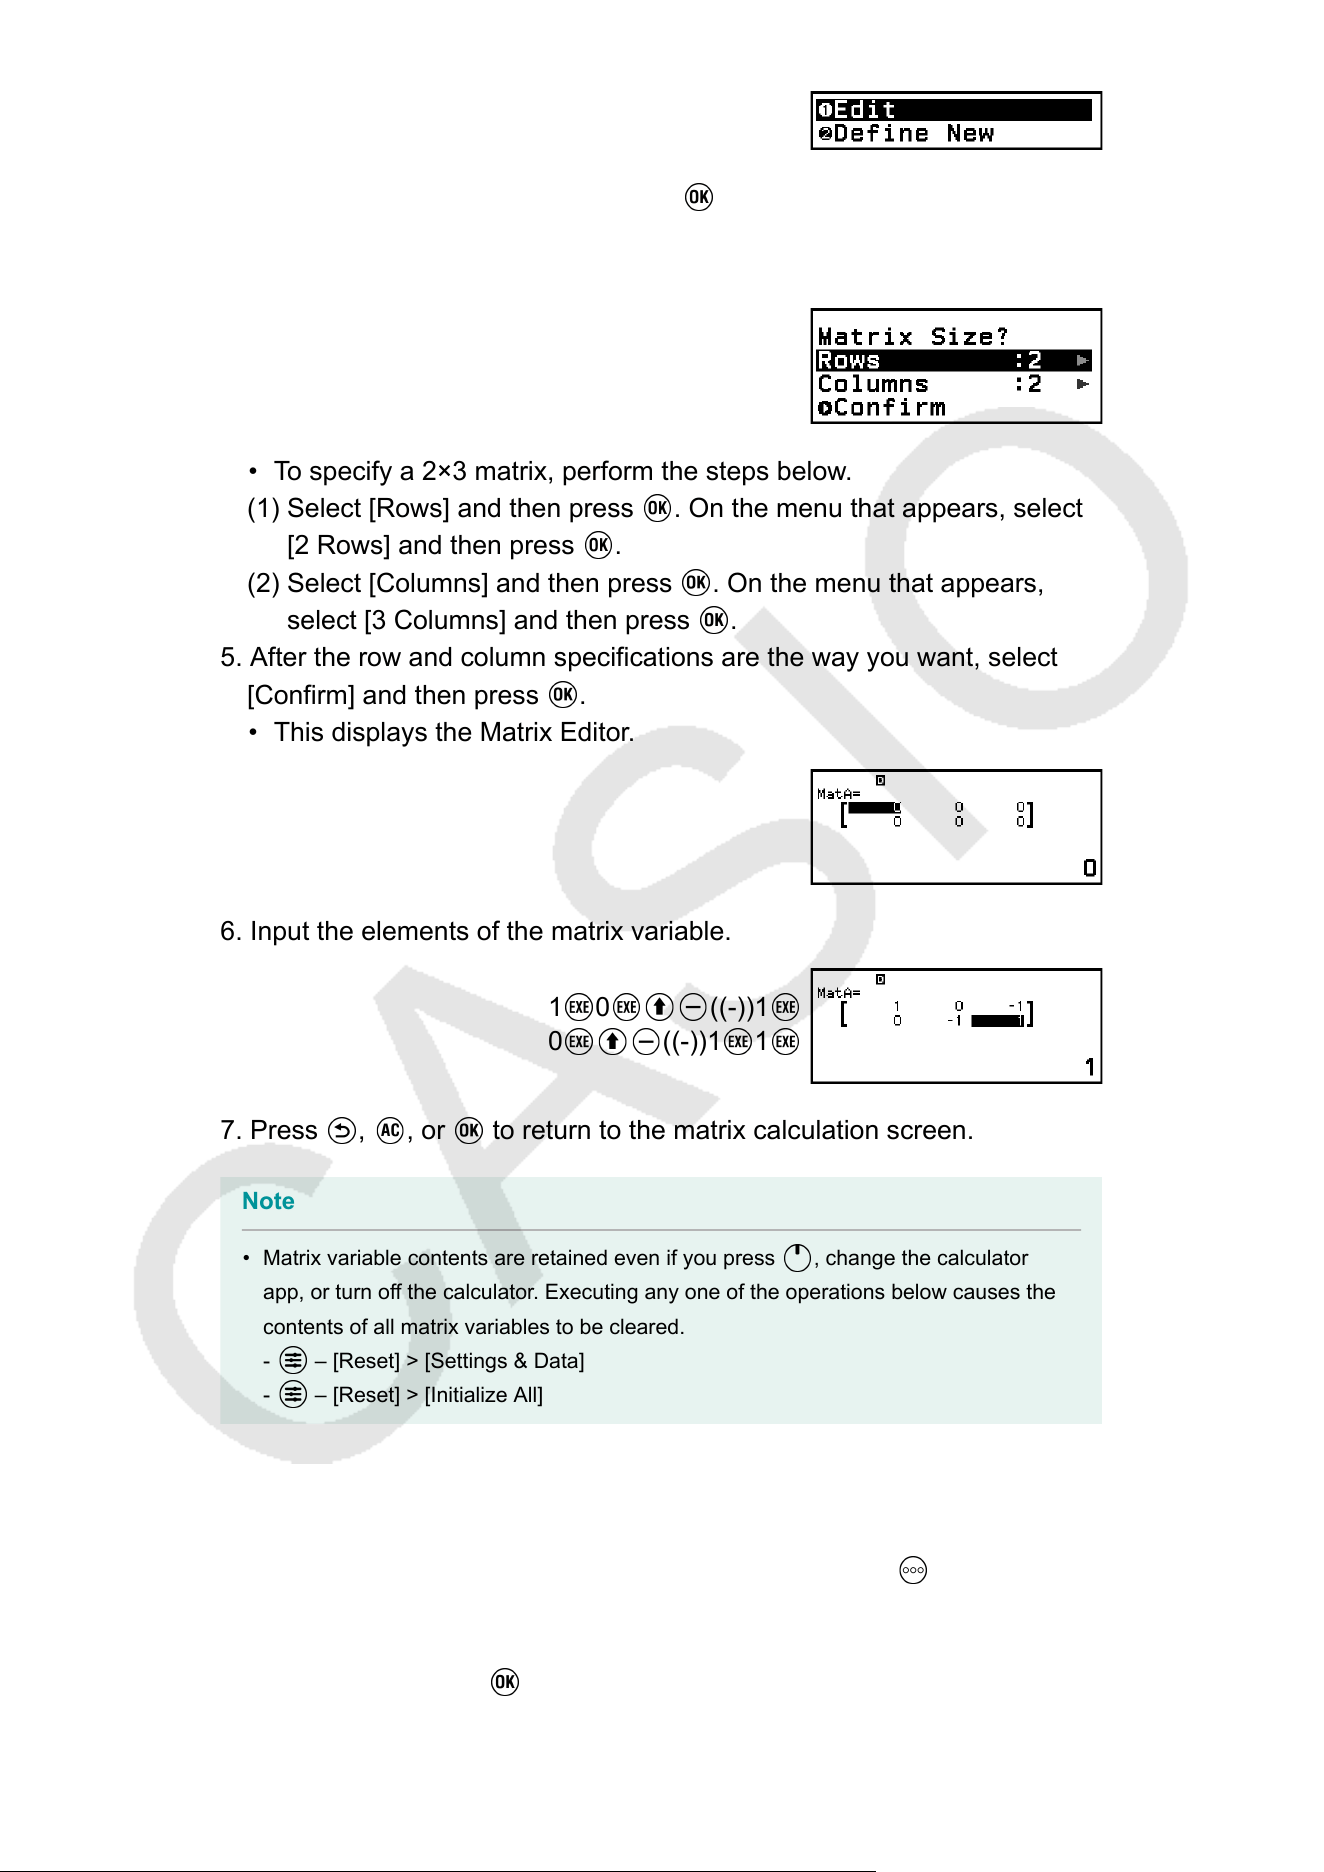
3. Select [Define New], and then press .
4. On the "Matrix Size?" screen that appears, specify the number of rows
and columns in the matrix.
• To specify a 2×3 matrix, perform the steps below.
(1) Select [Rows] and then press . On the menu that appears, select
[2 Rows] and then press .
(2) Select [Columns] and then press . On the menu that appears,
select [3 Columns] and then press .
5. After the row and column specifications are the way you want, select
[Confirm] and then press .
• This displays the Matrix Editor.
6. Input the elements of the matrix variable.
1 0 ((-))1
0 ((-))1 1
7. Press , , or to return to the matrix calculation screen.
Note
• Matrix variable contents are retained even if you press , change the calculator
app, or turn of
f the calculator. Executing any one of the operations below causes the
contents of all matrix variables to be cleared.
-
– [Reset] > [Settings & Data]
- – [Reset] > [Initialize All]
Editing Matrix Variable Data
1. While the matrix calculation screen is displayed, press to display the
matrix variable list screen.
2. Select the matrix variable (MatA, MatB, MatC, or MatD) you want to
edit, and then press .
117

3. On the menu that appears, select [Edit] and then press .
• This displays the Matrix Editor.
4. Use the Matrix Editor to edit the elements of the matrix.
• Move the cursor to the cell that contains the element you want to
change, input the new value, and then press .
5. Press , , or to return to the matrix calculation screen.
Copying Matrix V
ariable (or MatAns) Contents
1. Display the Matrix Editor or MatAns screen of the matrix variable you
want to use as the copy source.
• To display the Matrix Editor, perform steps 1, 2, and 3 under "Editing
Matrix Variable Data" (page 117).
• To display the MatAns screen, perform the steps below while the
matrix calculation screen is displayed.
– [Matrix] > [MatAns]
2. Select the matrix variable copy destination.
• For example, to copy to MatD, perform the following operation: –
[Store] > [MatD].
• This displays the Matrix Editor with the contents of the copy
destination.
3. Press , , or to return to the matrix calculation screen.
Matrix Answer Memory (MatAns)
Whenever the result of a calculation executed in the Matrix app is a matrix,
the MatAns screen will appear with the result. The result also will be stored
to a variable named "MatAns".
The MatAns variable can be used in calculations as described below
.
• To insert the MatAns variable into a calculation, perform the following
operation:
– [Matrix] > [MatAns].
• Pressing any one of the following keys while the MatAns screen is
displayed switches automatically to the matrix calculation screen, with
"MatAns" followed by the operator or function of the key you pressed:
, , , , , , , ( ), ( ).
Note
• MatAns contents are retained even if you press
or turn off the calculator.
Performing any one of the operations below causes the MatAns contents to be
cleared.
- Returning to the HOME screen and launching another calculator app
- Executing – [Reset] > [Settings & Data]
- Executing – [Reset] > [Initialize All]
118
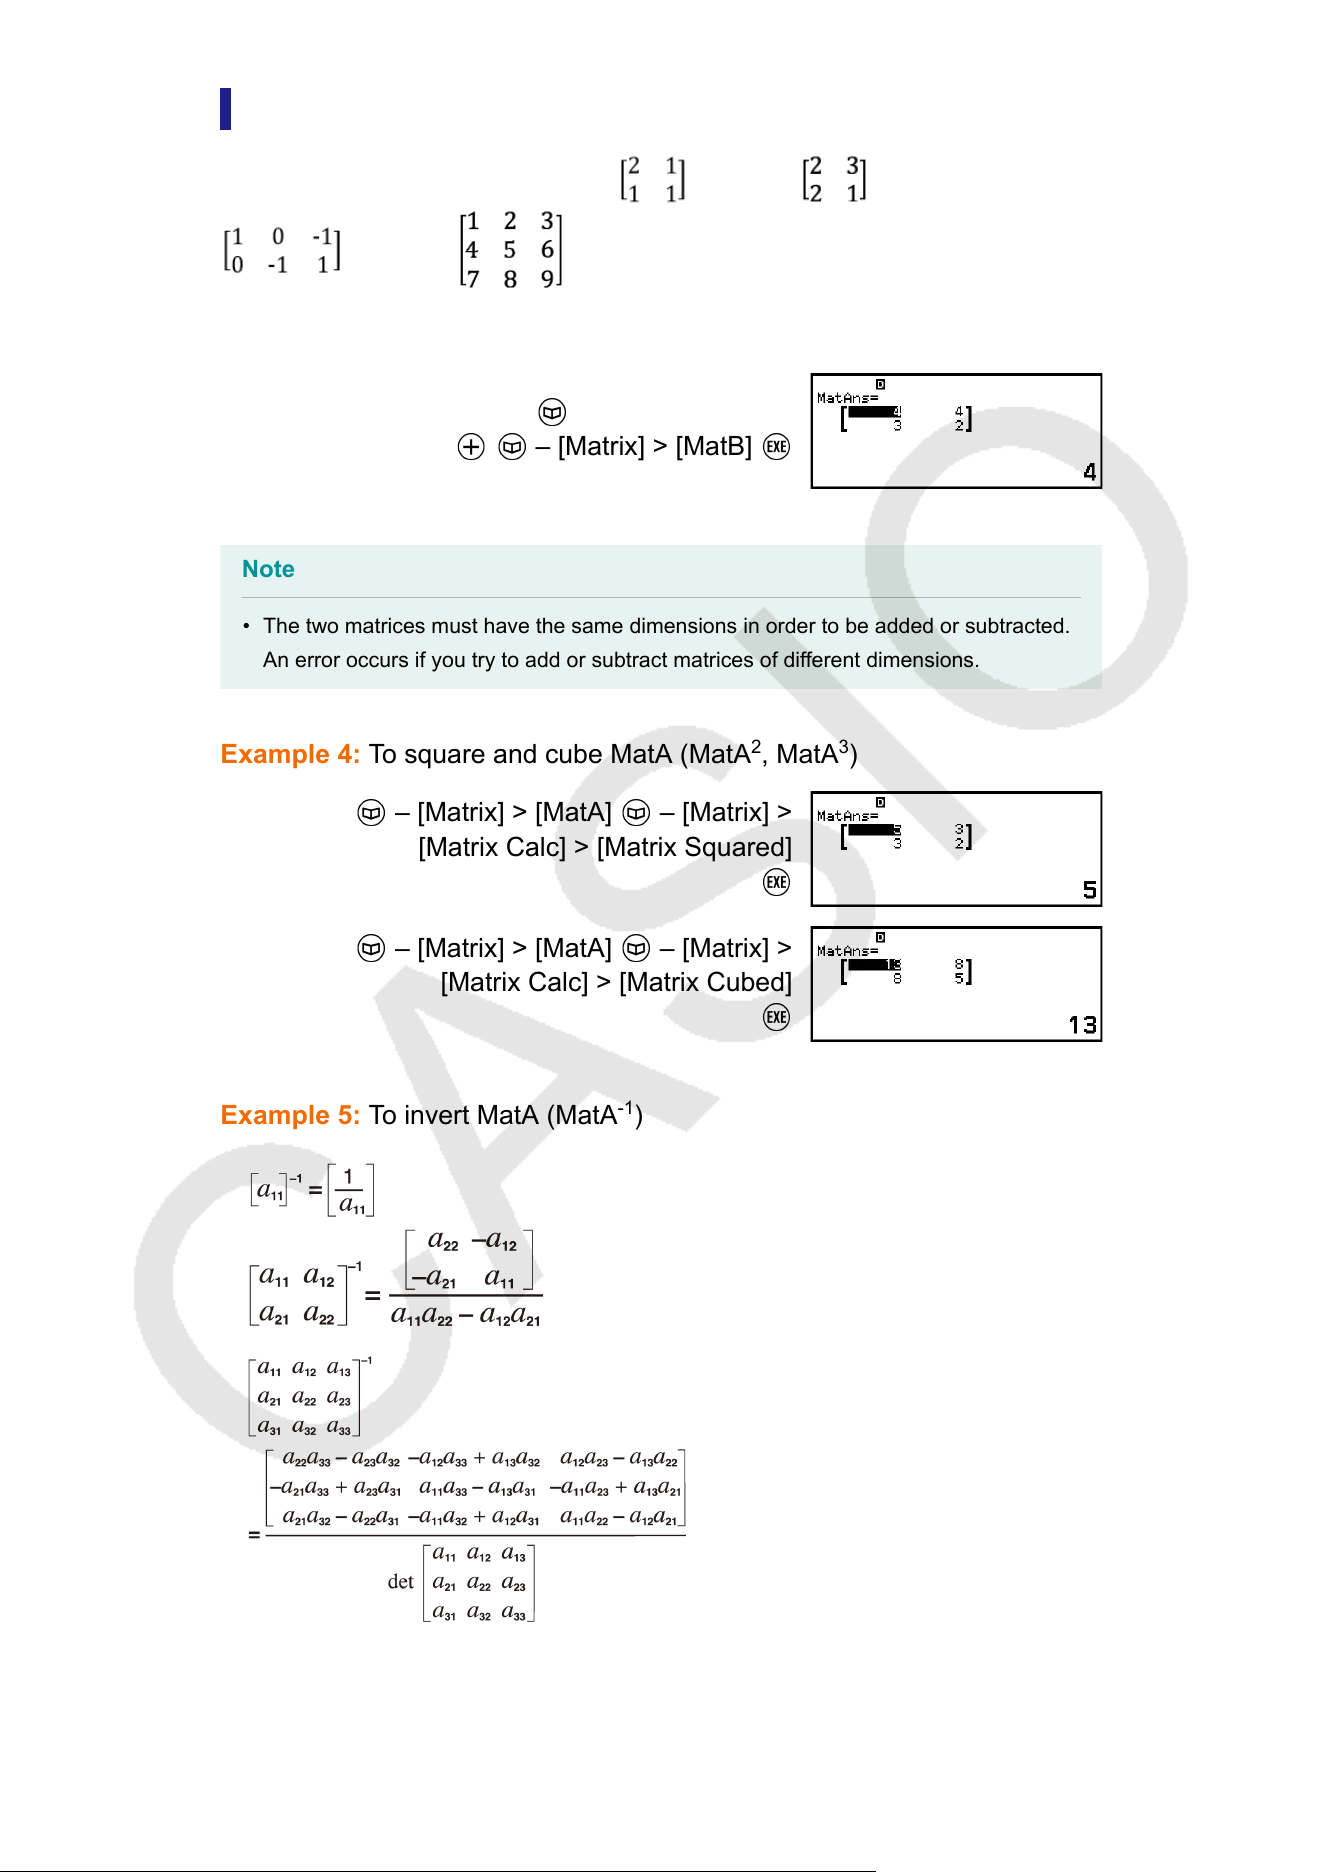
Matrix Calculation Examples
The examples below use MatA =
, MatB = , MatC =
, MatD = .
Example 3: T
o add two matrices (MatA + MatB)
– [Matrix] > [MatA]
– [Matrix] > [MatB]
Note
• The two matrices must have the same dimensions in order to be added or subtracted.
An error occurs if you try to add or subtract matrices of dif
ferent dimensions.
Example 4: To square and cube MatA (MatA
2
, MatA
3
)
– [Matrix] > [MatA] – [Matrix] >
[Matrix Calc] > [Matrix Squared]
– [Matrix] > [MatA] – [Matrix] >
[Matrix Calc] > [Matrix Cubed]
Example 5: T
o invert MatA (MatA
-1
)
119
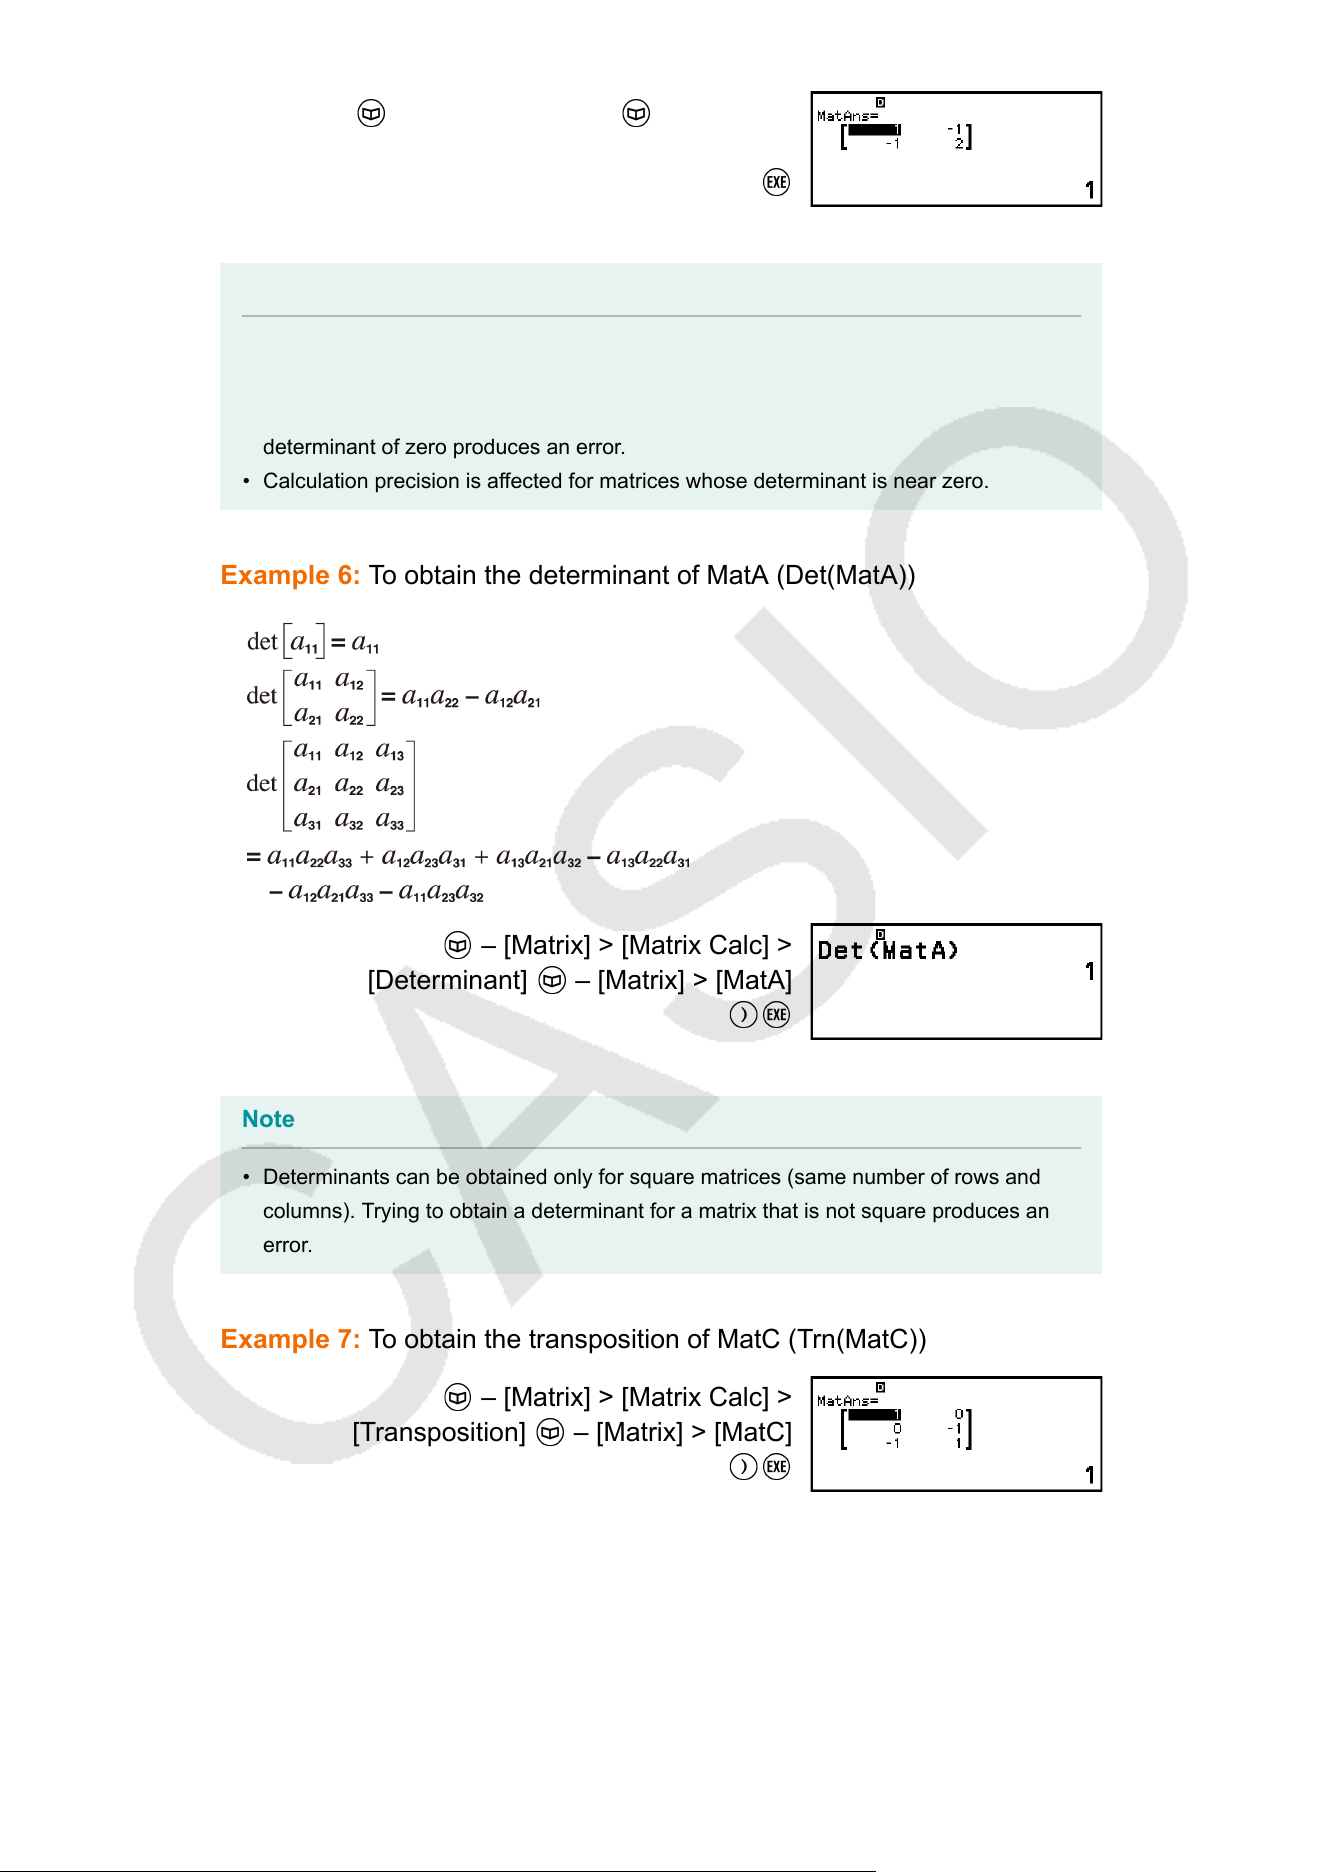
– [Matrix] > [MatA] – [Matrix] >
[Matrix Calc] > [Inverse Matrix]
Note
• Only square matrices (same number of rows and columns) can be inverted. Trying to
invert a matrix that is not square produces an error
.
• A matrix with a determinant of zero cannot be inverted. Trying to invert a matrix with a
determinant of zero produces an error.
• Calculation precision is affected for matrices whose determinant is near zero.
Example 6: To obtain the determinant of MatA (Det(MatA))
– [Matrix] > [Matrix Calc] >
[Determinant] – [Matrix] > [MatA]
Note
• Determinants can be obtained only for square matrices (same number of rows and
columns). T
rying to obtain a determinant for a matrix that is not square produces an
error.
Example 7: To obtain the transposition of MatC (Trn(MatC))
– [Matrix] > [Matrix Calc] >
[T
ransposition]
– [Matrix] > [MatC]
Example 8: To create a 2 × 2 identity matrix and add it to MatA (Identity(2)
+ MatA)
120
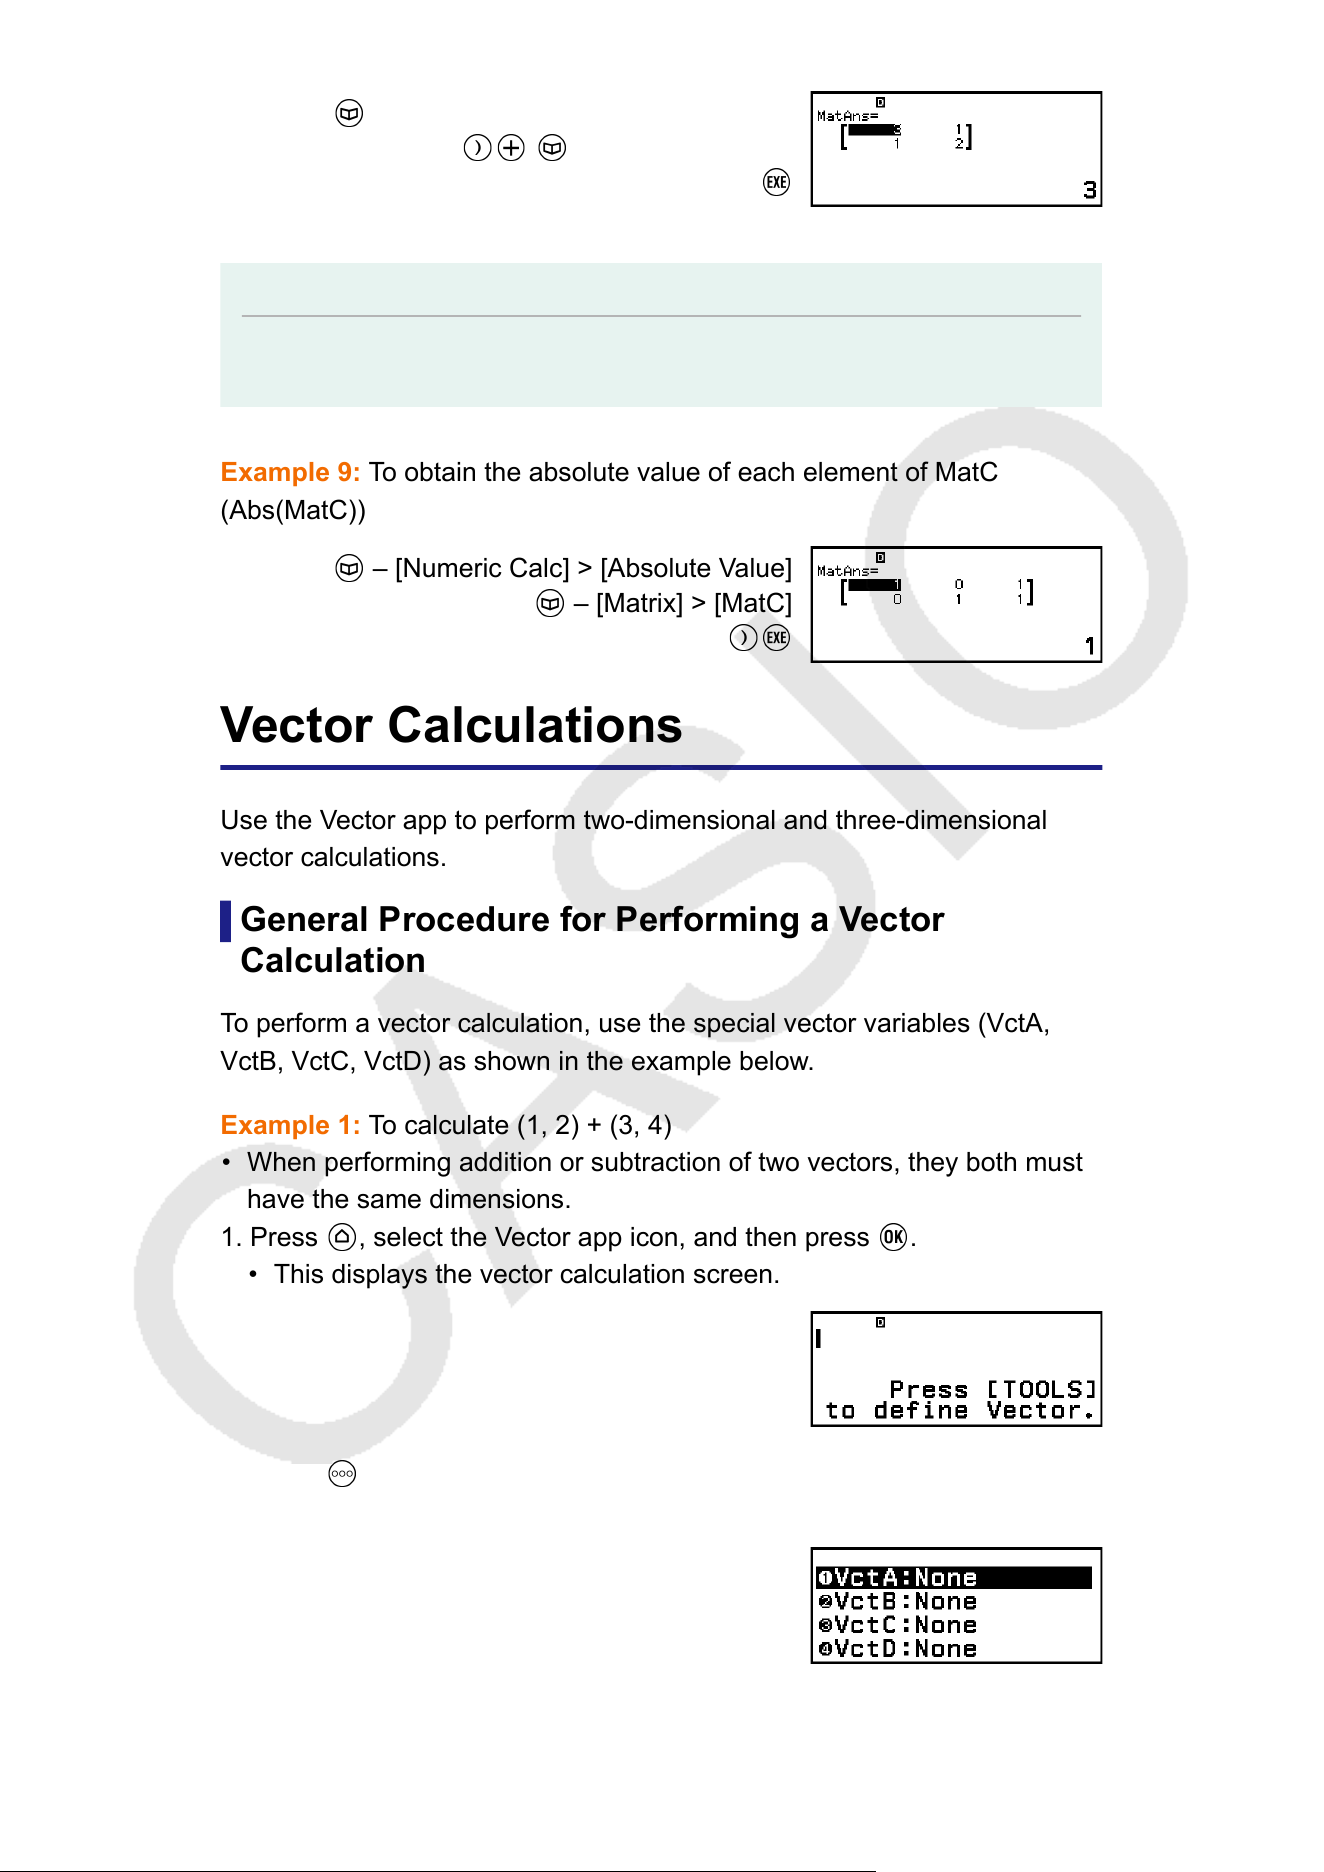
– [Matrix] > [Matrix Calc] > [Identity]
2 – [Matrix] > [MatA]
Note
• You can specify a value from 1 to 4 as the Identity command argument (number of
dimensions).
Example 9: T
o obtain the absolute value of each element of MatC
(Abs(MatC))
– [Numeric Calc] > [Absolute Value]
– [Matrix] > [MatC]
Vector Calculations
Use the V
ector app to perform two-dimensional and three-dimensional
vector calculations.
General Procedure for Performing a Vector
Calculation
To perform a vector calculation, use the special vector variables (VctA,
VctB, VctC, VctD) as shown in the example below.
Example 1: To calculate (1, 2) + (3, 4)
• When performing addition or subtraction of two vectors, they both must
have the same dimensions.
1. Press
, select the Vector app icon, and then press .
• This displays the vector calculation screen.
2. Press .
• This displays the vector variable list screen.
121
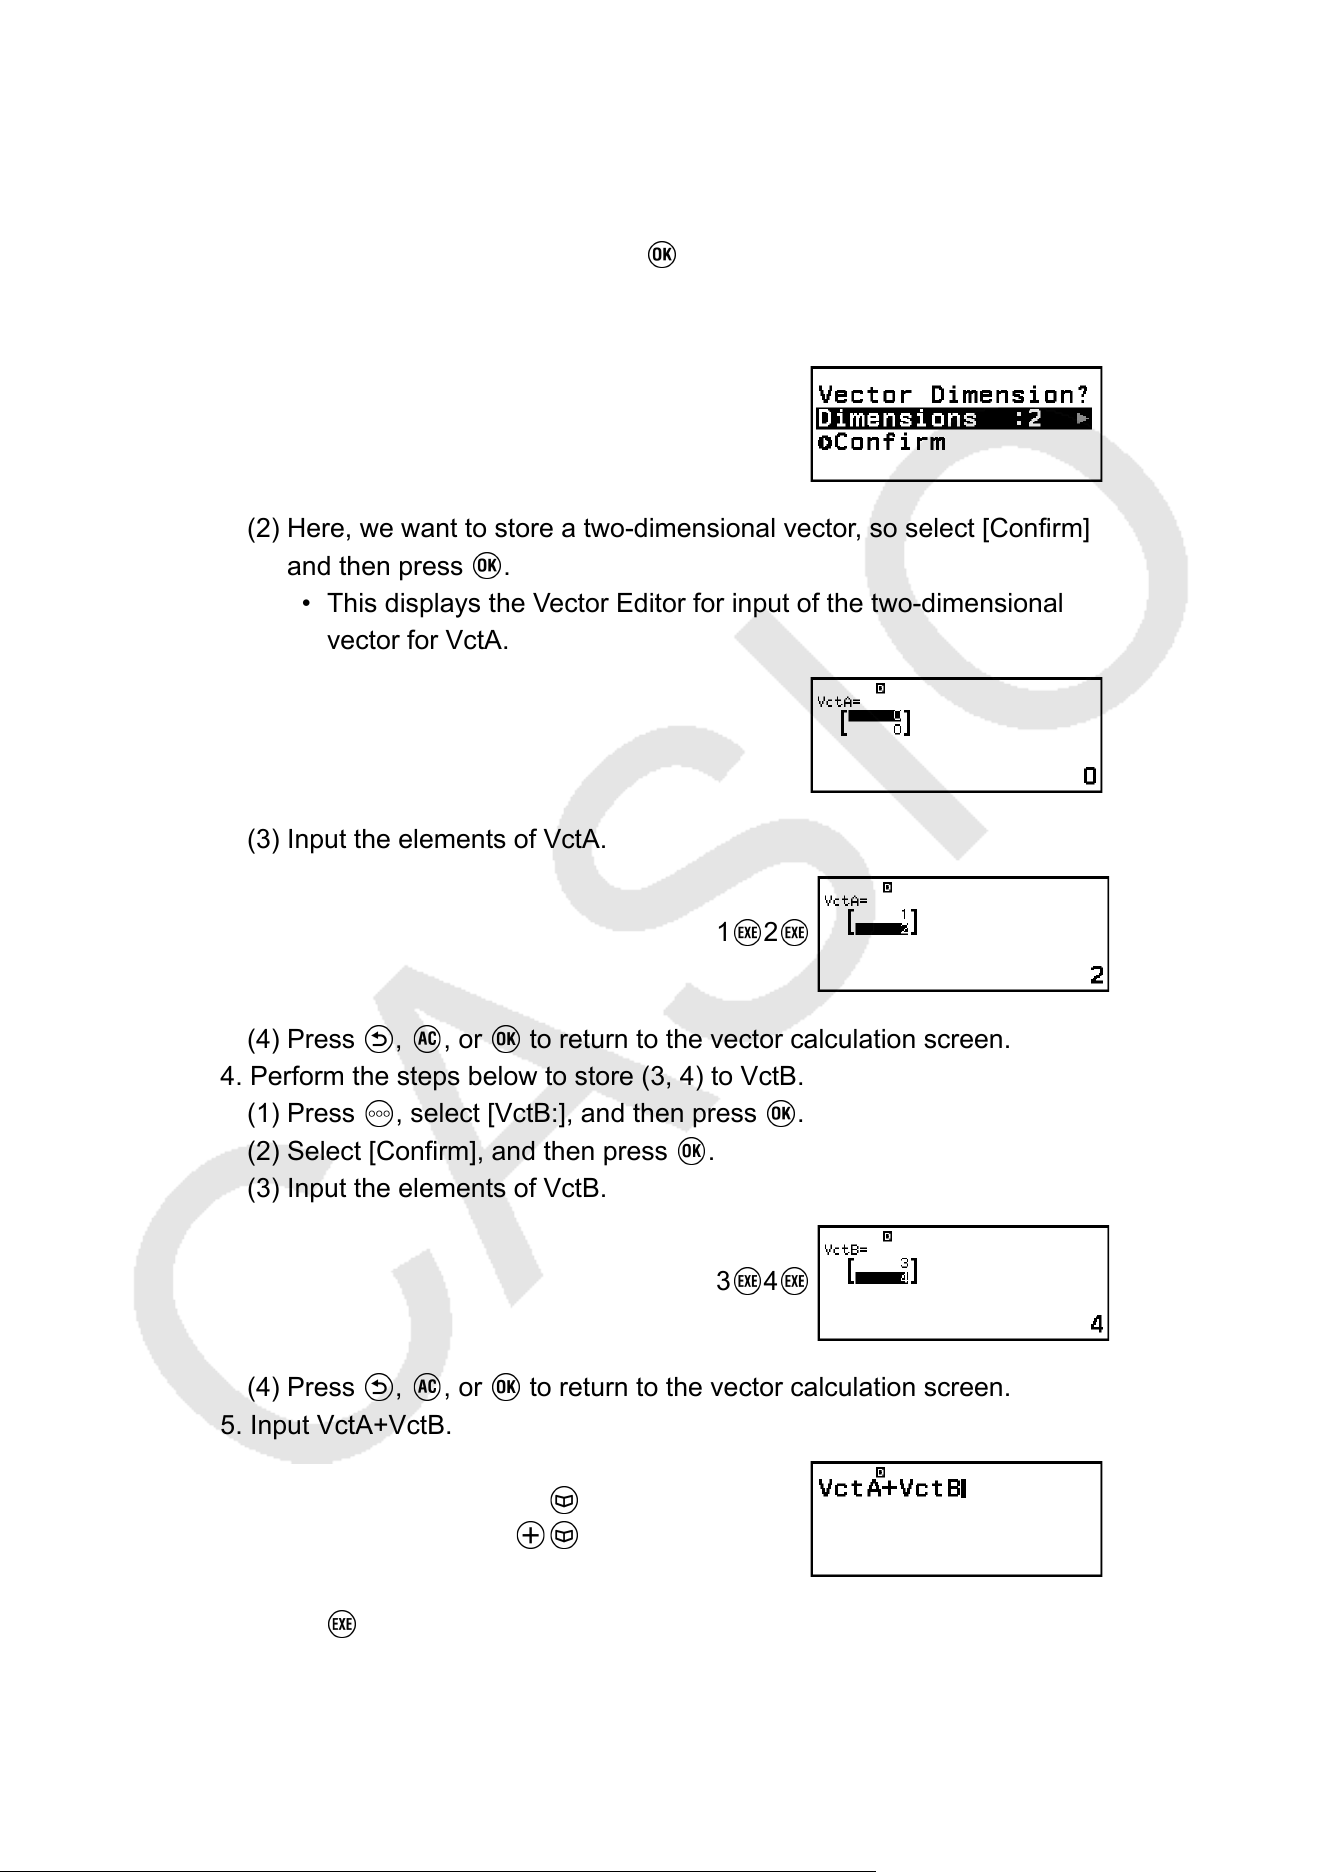
• For details about the vector variable list screen contents, and how to
perform vector variable store, edit, or other operations, see "V
ector
Variable List Screen" (page 123).
3. Perform the steps below to store (1, 2) to VctA.
(1) Select [VctA:], and then press
.
• This displays the vector dimension setting screen (initial default
setting: 2 dimensions).
(2) Here, we want to store a two-dimensional vector, so select [Confirm]
and then press .
• This displays the Vector Editor for input of the two-dimensional
vector for VctA.
(3) Input the elements of VctA.
1 2
(4) Press , , or to return to the vector calculation screen.
4. Perform the steps below to store (3, 4) to VctB.
(1) Press , select [VctB:], and then press .
(2) Select [Confirm], and then press .
(3) Input the elements of VctB.
3
4
(4) Press , , or to return to the vector calculation screen.
5. Input VctA+VctB.
– [Vector] > [VctA]
– [Vector] > [VctB]
6. Press .
• This displays the VctAns (Vector Answer Memory) screen with the
calculation result.
122
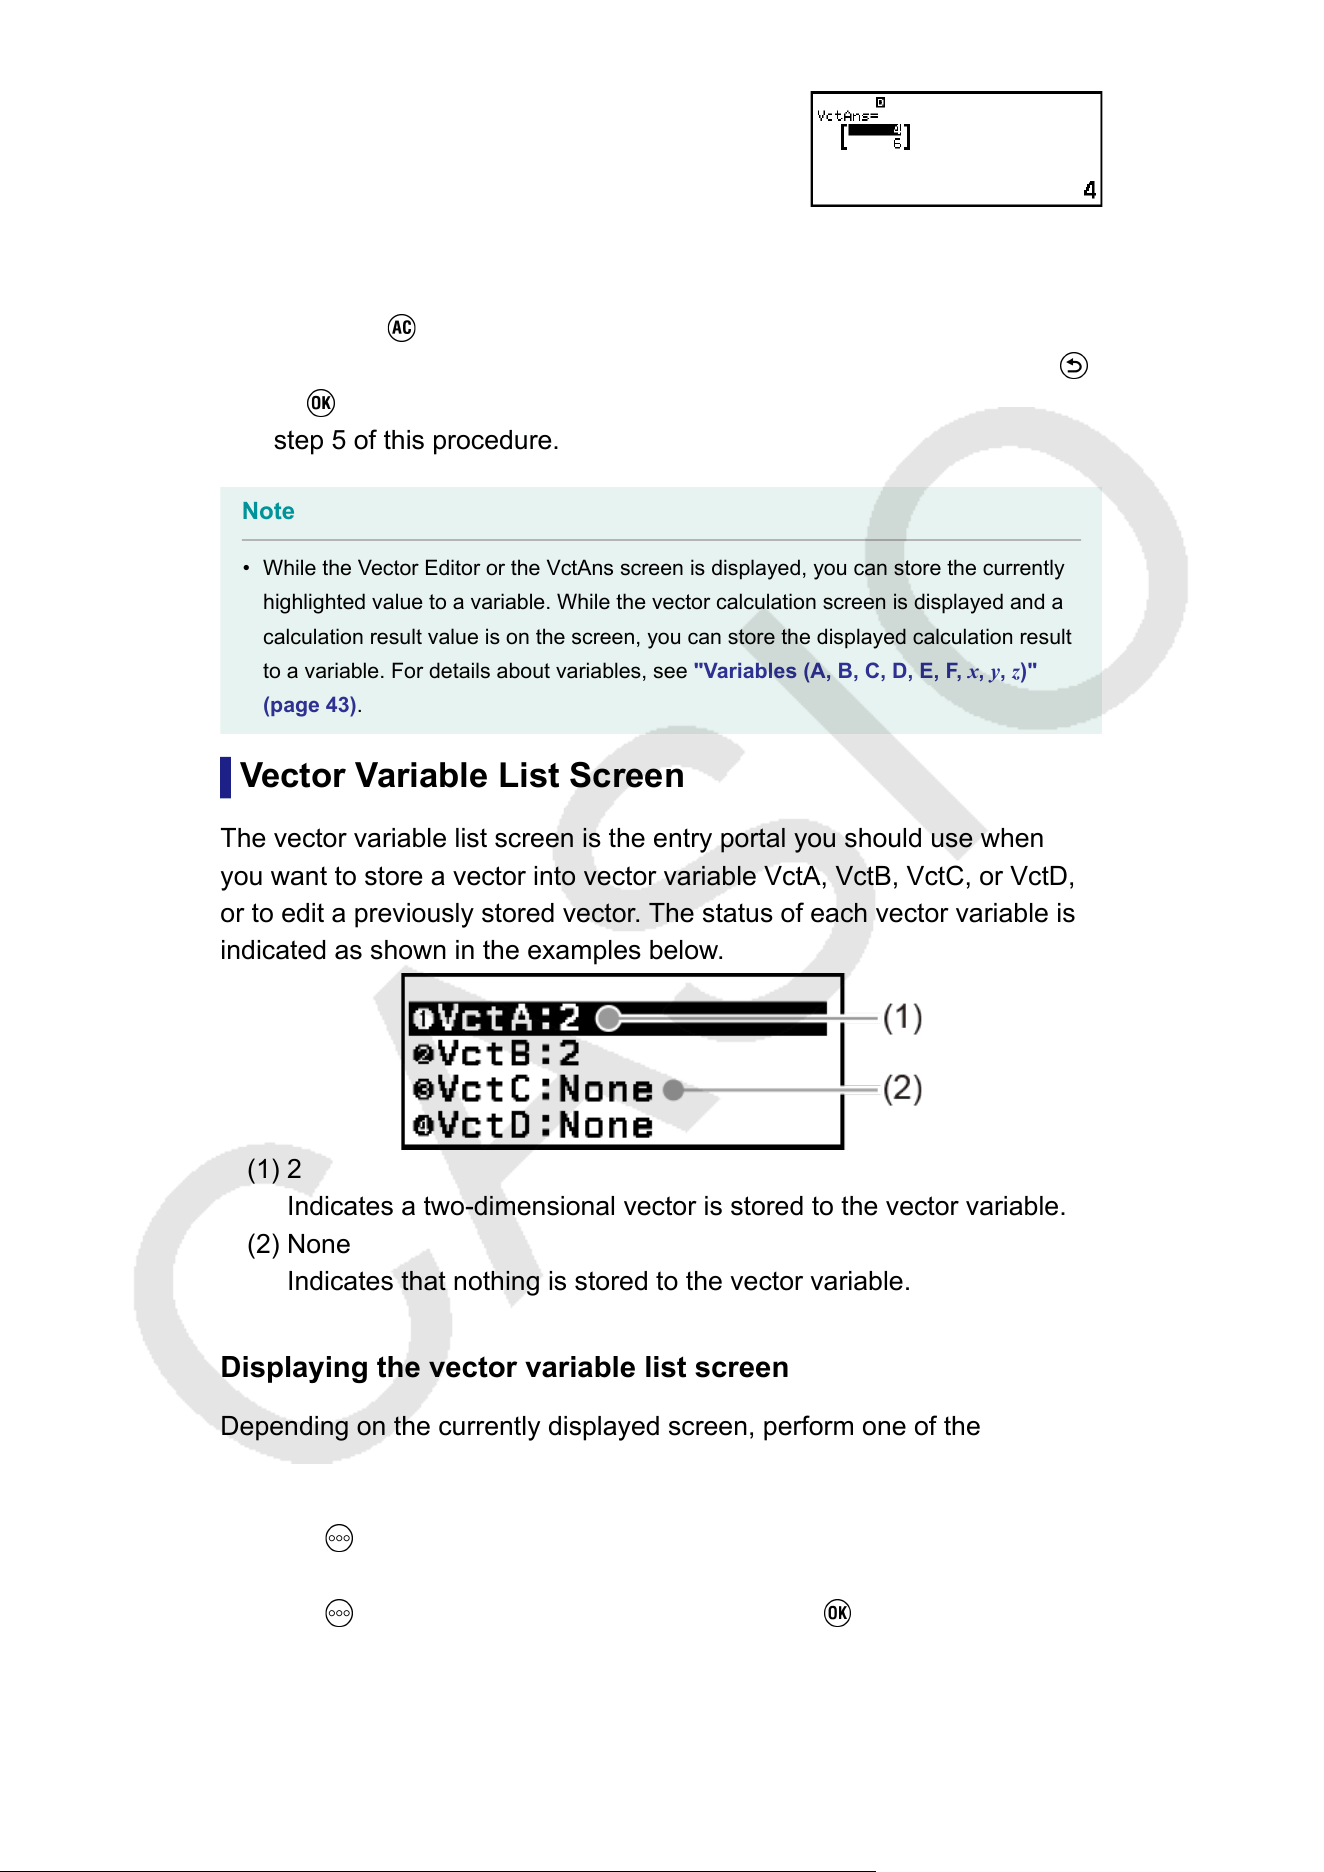
• For details about VctAns, see "Vector Answer Memory (VctAns)"
(page 125).
• Pressing while the VctAns screen is displayed returns to the vector
calculation screen and clears the calculation expression. Pressing
or returns to the calculation expression input complete state in
step 5 of this procedure.
Note
• While the Vector Editor or the VctAns screen is displayed, you can store the currently
highlighted value to a variable. While the vector calculation screen is displayed and a
calculation result value is on the screen, you can store the displayed calculation result
to a variable. For details about variables, see "V
ariables (A, B, C, D, E, F, x, y, z)"
(page 43).
Vector Variable List Screen
The vector variable list screen is the entry portal you should use when
you want to store a vector into vector variable VctA, VctB, VctC, or VctD,
or to edit a previously stored vector. The status of each vector variable is
indicated as shown in the examples below.
(1) 2
Indicates a two-dimensional vector is stored to the vector variable.
(2) None
Indicates that nothing is stored to the vector variable.
Displaying the vector variable list screen
Depending on the currently displayed screen, perform one of the
operations below
.
• When the vector calculation screen is displayed:
Press
.
• When the Vector Editor or VctAns screen is displayed:
Press , select [Define Vector], and then press .
123
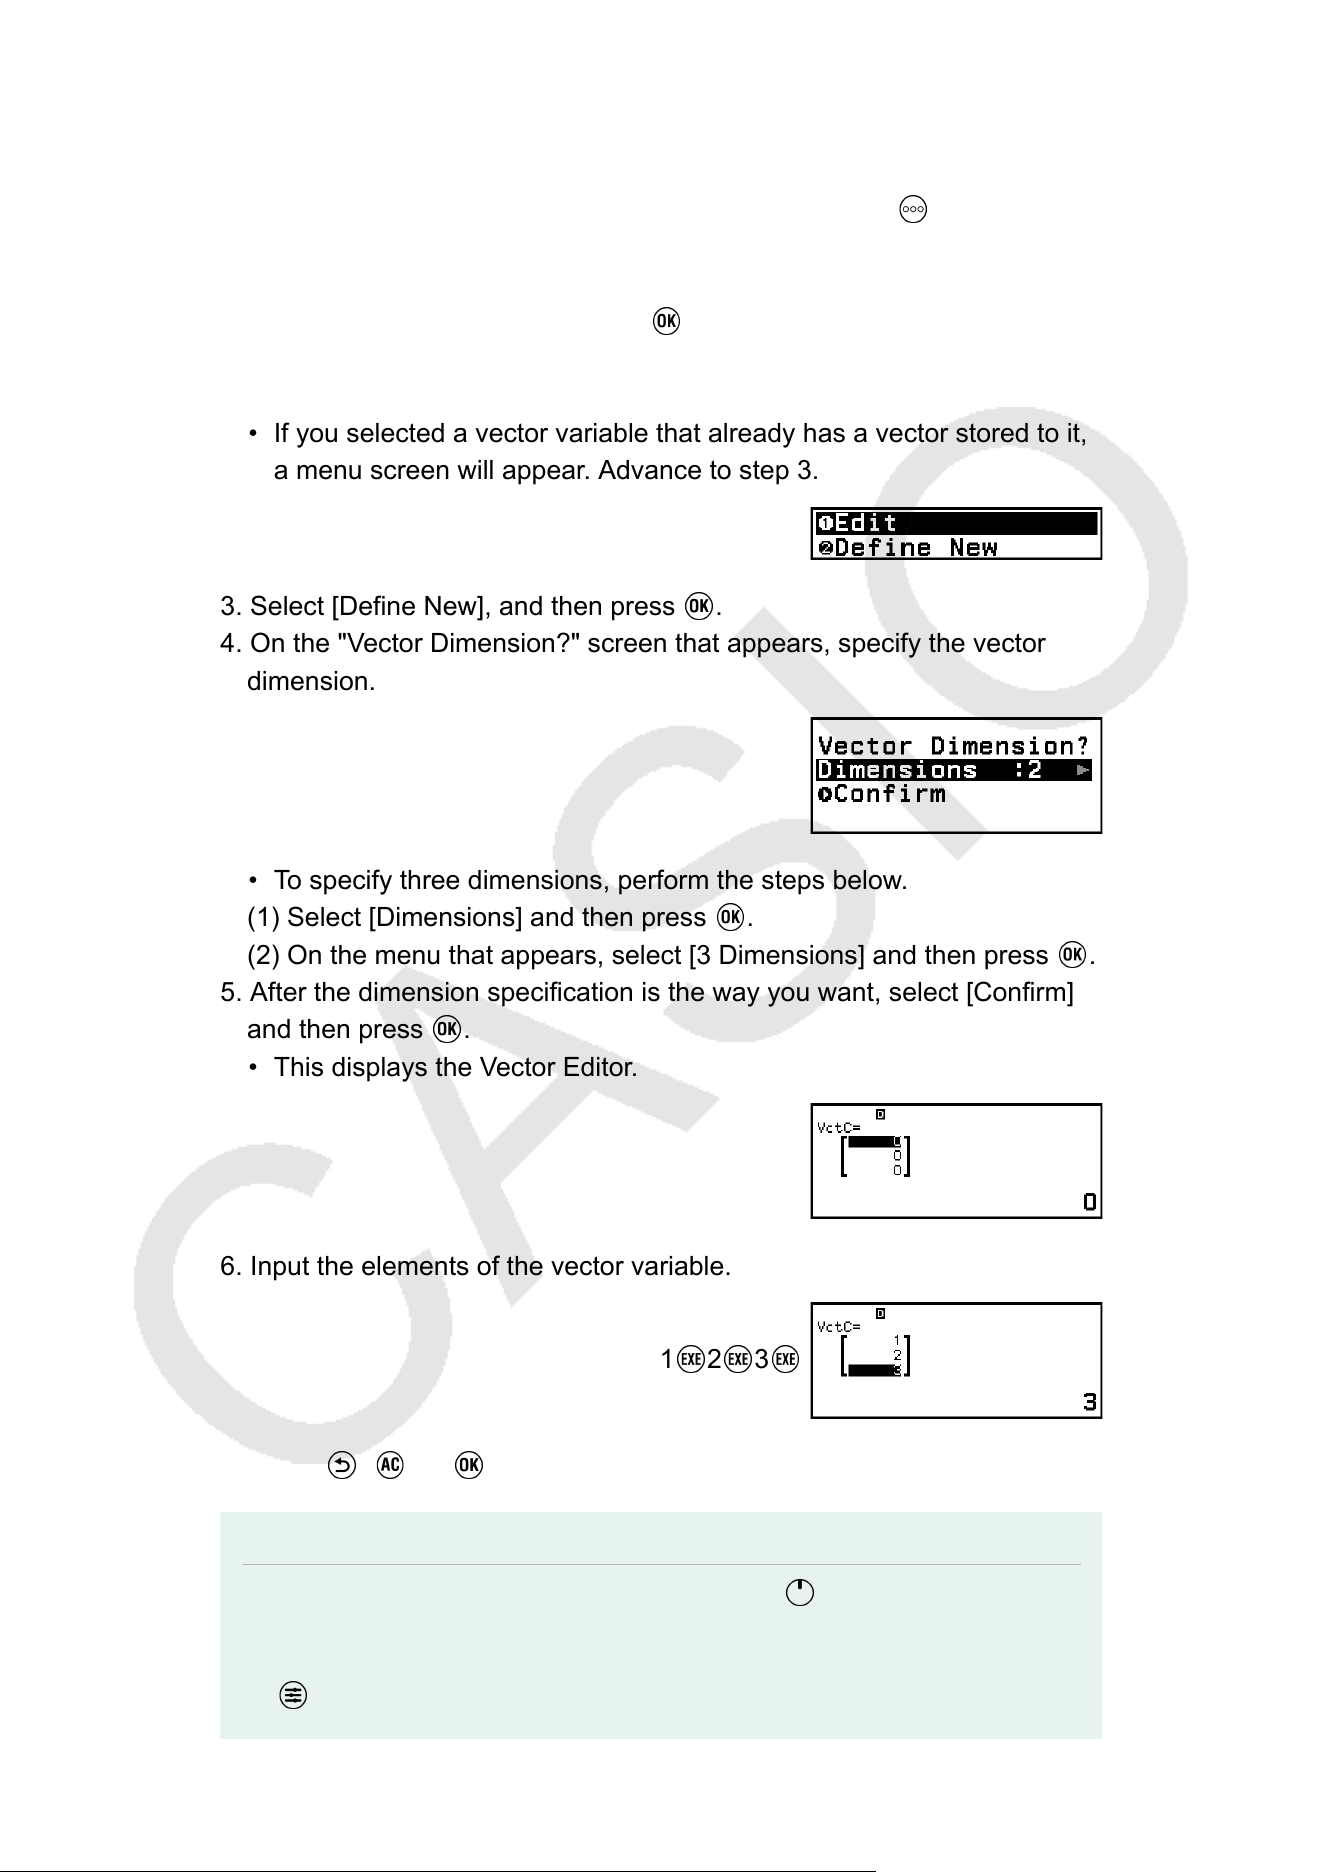
Storing New Data to a Vector Variable
Example 2: To store the three-dimensional vector (1, 2, 3)
1. While the vector calculation screen is displayed, press to display the
vector variable list screen.
2. Select the vector variable (VctA, VctB, VctC, or VctD) to which you want
to store new data, and then press .
• If you selected a vector variable whose status is "None", advance to
step 4 of this procedure.
• If you selected a vector variable that already has a vector stored to it,
a menu screen will appear
. Advance to step 3.
3. Select [Define New], and then press .
4. On the "V
ector Dimension?" screen that appears, specify the vector
dimension.
• To specify three dimensions, perform the steps below.
(1) Select [Dimensions] and then press .
(2) On the menu that appears, select [3 Dimensions] and then press .
5. After the dimension specification is the way you want, select [Confirm]
and then press .
• This displays the Vector Editor.
6. Input the elements of the vector variable.
1 2 3
7. Press , , or to return to the vector calculation screen.
Note
• Vector variable contents are retained even if you press
, change the calculator
app, or turn off the calculator. Executing any one of the operations below causes the
contents of all vector variables to be cleared.
- – [Reset] > [Settings & Data]
124

- – [Reset] > [Initialize All]
Editing V
ector Variable Data
1. While the vector calculation screen is displayed, press
to display the
vector variable list screen.
2. Select the vector variable (VctA, VctB, VctC, or VctD) you want to edit,
and then press .
3. On the menu that appears, select [Edit] and then press .
• This displays the Vector Editor.
4. Use the V
ector Editor to edit the elements of the vector.
• Move the cursor to the cell that contains the element you want to
change, input the new value, and then press
.
5. Press , , or to return to the vector calculation screen.
Copying V
ector Variable (or VctAns) Contents
1. Display the Vector Editor or VctAns screen of the vector variable you
want to use as the copy source.
• To display the Vector Editor, perform steps 1, 2, and 3 under "Editing
Vector Variable Data" (page 125).
• To display the VctAns screen, perform the steps below while the
vector calculation screen is displayed.
– [Vector] > [VctAns]
2. Select the vector variable copy destination.
• For example, to copy to VctD, perform the following operation: –
[Store] > [VctD].
• This displays the Vector Editor with the contents of the copy
destination.
3. Press , , or to return to the vector calculation screen.
V
ector Answer Memory (VctAns)
Whenever the result of a calculation executed in the Vector app is a
vector, the VctAns screen will appear with the result. The result also will be
stored to a variable named "VctAns".
The VctAns variable can be used in calculations as described below.
• To insert the VctAns variable into a calculation, perform the following
operation:
– [Vector] > [VctAns].
• Pressing any one of the following keys while the VctAns screen is
displayed switches automatically to the vector calculation screen, with
"VctAns" followed by the operator or function of the key you pressed:
, , , , , , , ( ), ( ).
125
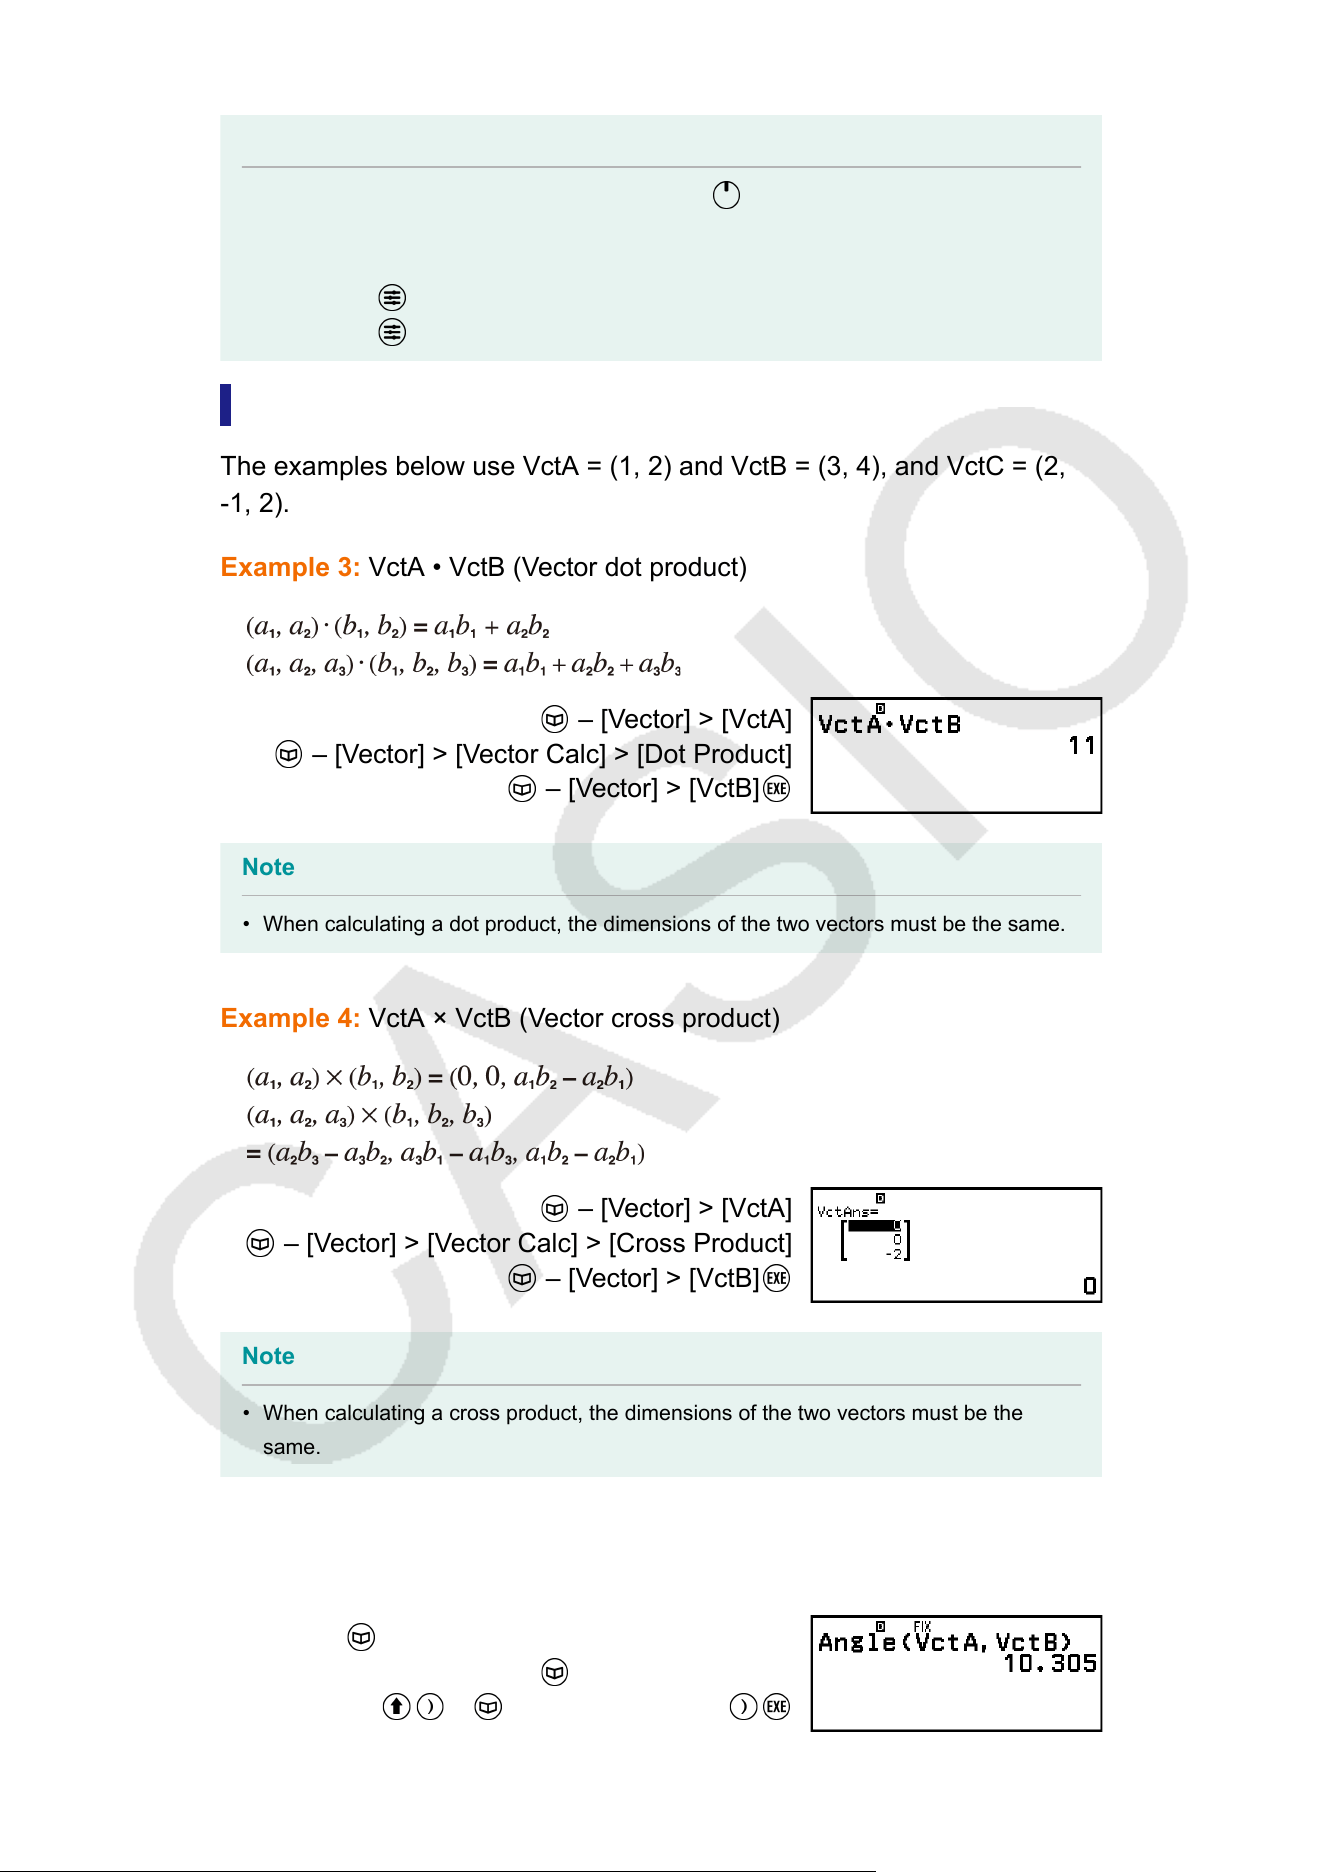
Note
• VctAns contents are retained even if you press or turn off the calculator.
Performing any one of the operations below causes the VctAns contents to be cleared.
- Returning to the HOME screen and launching another calculator app
- Executing – [Reset] > [Settings & Data]
- Executing – [Reset] > [Initialize All]
V
ector Calculation Examples
The examples below use VctA = (1, 2) and VctB = (3, 4), and VctC = (2,
-1, 2).
Example 3: VctA • VctB (Vector dot product)
– [Vector] > [VctA]
– [Vector] > [Vector Calc] > [Dot Product]
– [Vector] > [VctB]
Note
• When calculating a dot product, the dimensions of the two vectors must be the same.
Example 4: VctA × VctB (V
ector cross product)
– [Vector] > [VctA]
– [Vector] > [Vector Calc] > [Cross Product]
– [Vector] > [VctB]
Note
• When calculating a cross product, the dimensions of the two vectors must be the
same.
Example 5: T
o determine the angle formed by VctA and VctB to three
decimal places. (Number Format: Fix 3, Angle Unit: Degree)
– [Vector] > [Vector Calc] > [Angle]
– [Vector] > [VctA]
(,) – [Vector] > [VctB]
126
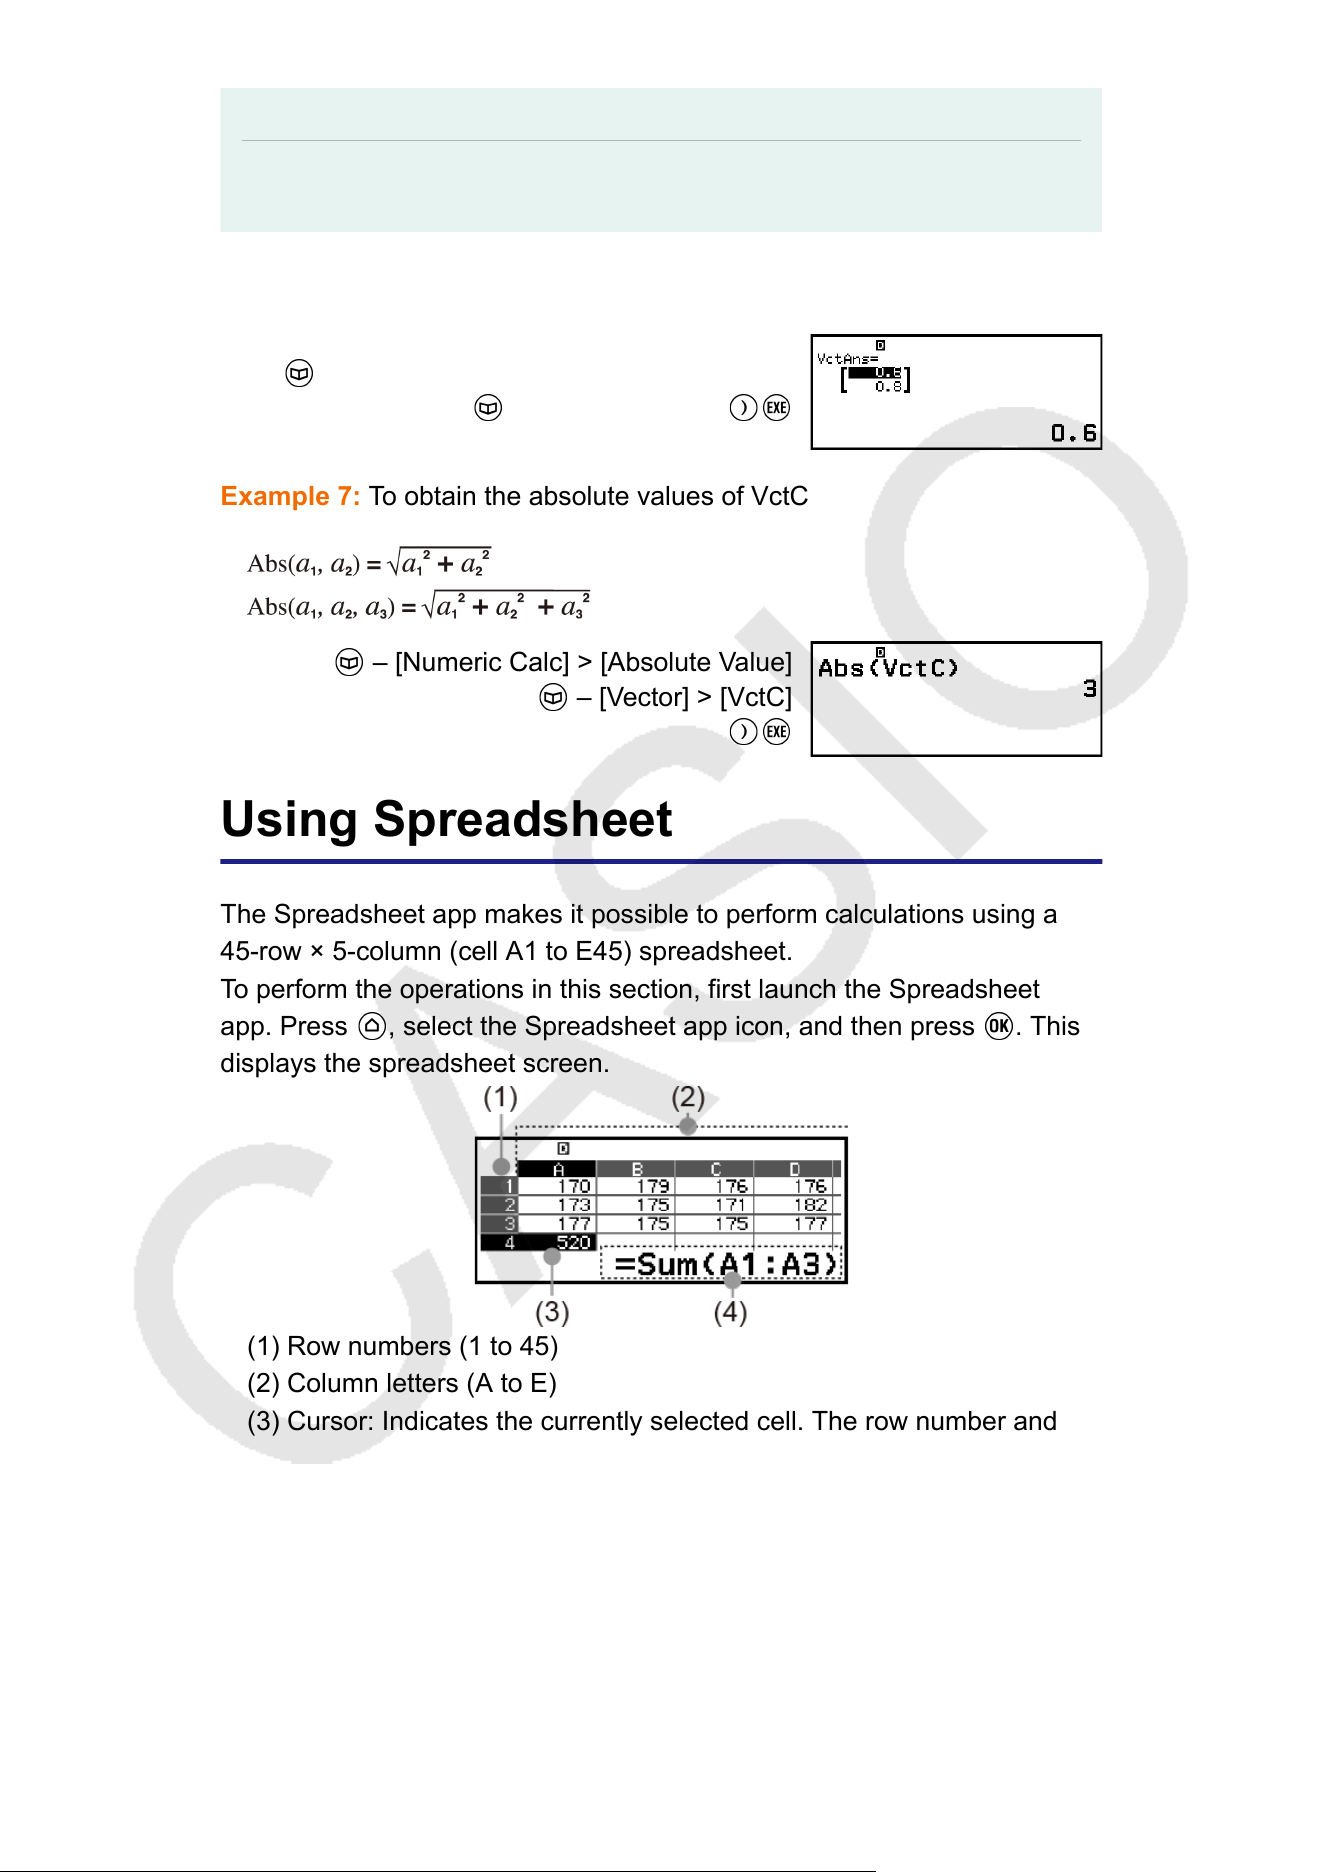
Note
• When calculating an angle formed by two vectors, the dimensions of the two vectors
must be the same.
Example 6: T
o normalize VctB
– [Vector] > [Vector Calc] > [Unit Vector]
– [Vector] > [VctB]
Example 7: To obtain the absolute values of VctC
– [Numeric Calc] > [Absolute Value]
– [Vector] > [VctC]
Using Spreadsheet
The Spreadsheet app makes it possible to perform calculations using a
45-row × 5-column (cell A1 to E45) spreadsheet.
T
o perform the operations in this section, first launch the Spreadsheet
app. Press
, select the Spreadsheet app icon, and then press . This
displays the spreadsheet screen.
(1) Row numbers (1 to 45)
(2) Column letters (A to E)
(3) Cursor: Indicates the currently selected cell. The row number and
column letter of the currently selected cell are displayed in black, and
the other cell row numbers and column letters are displayed in dark
gray
.
(4) Edit box: Shows the contents of the cell where the cursor is currently
located.
127
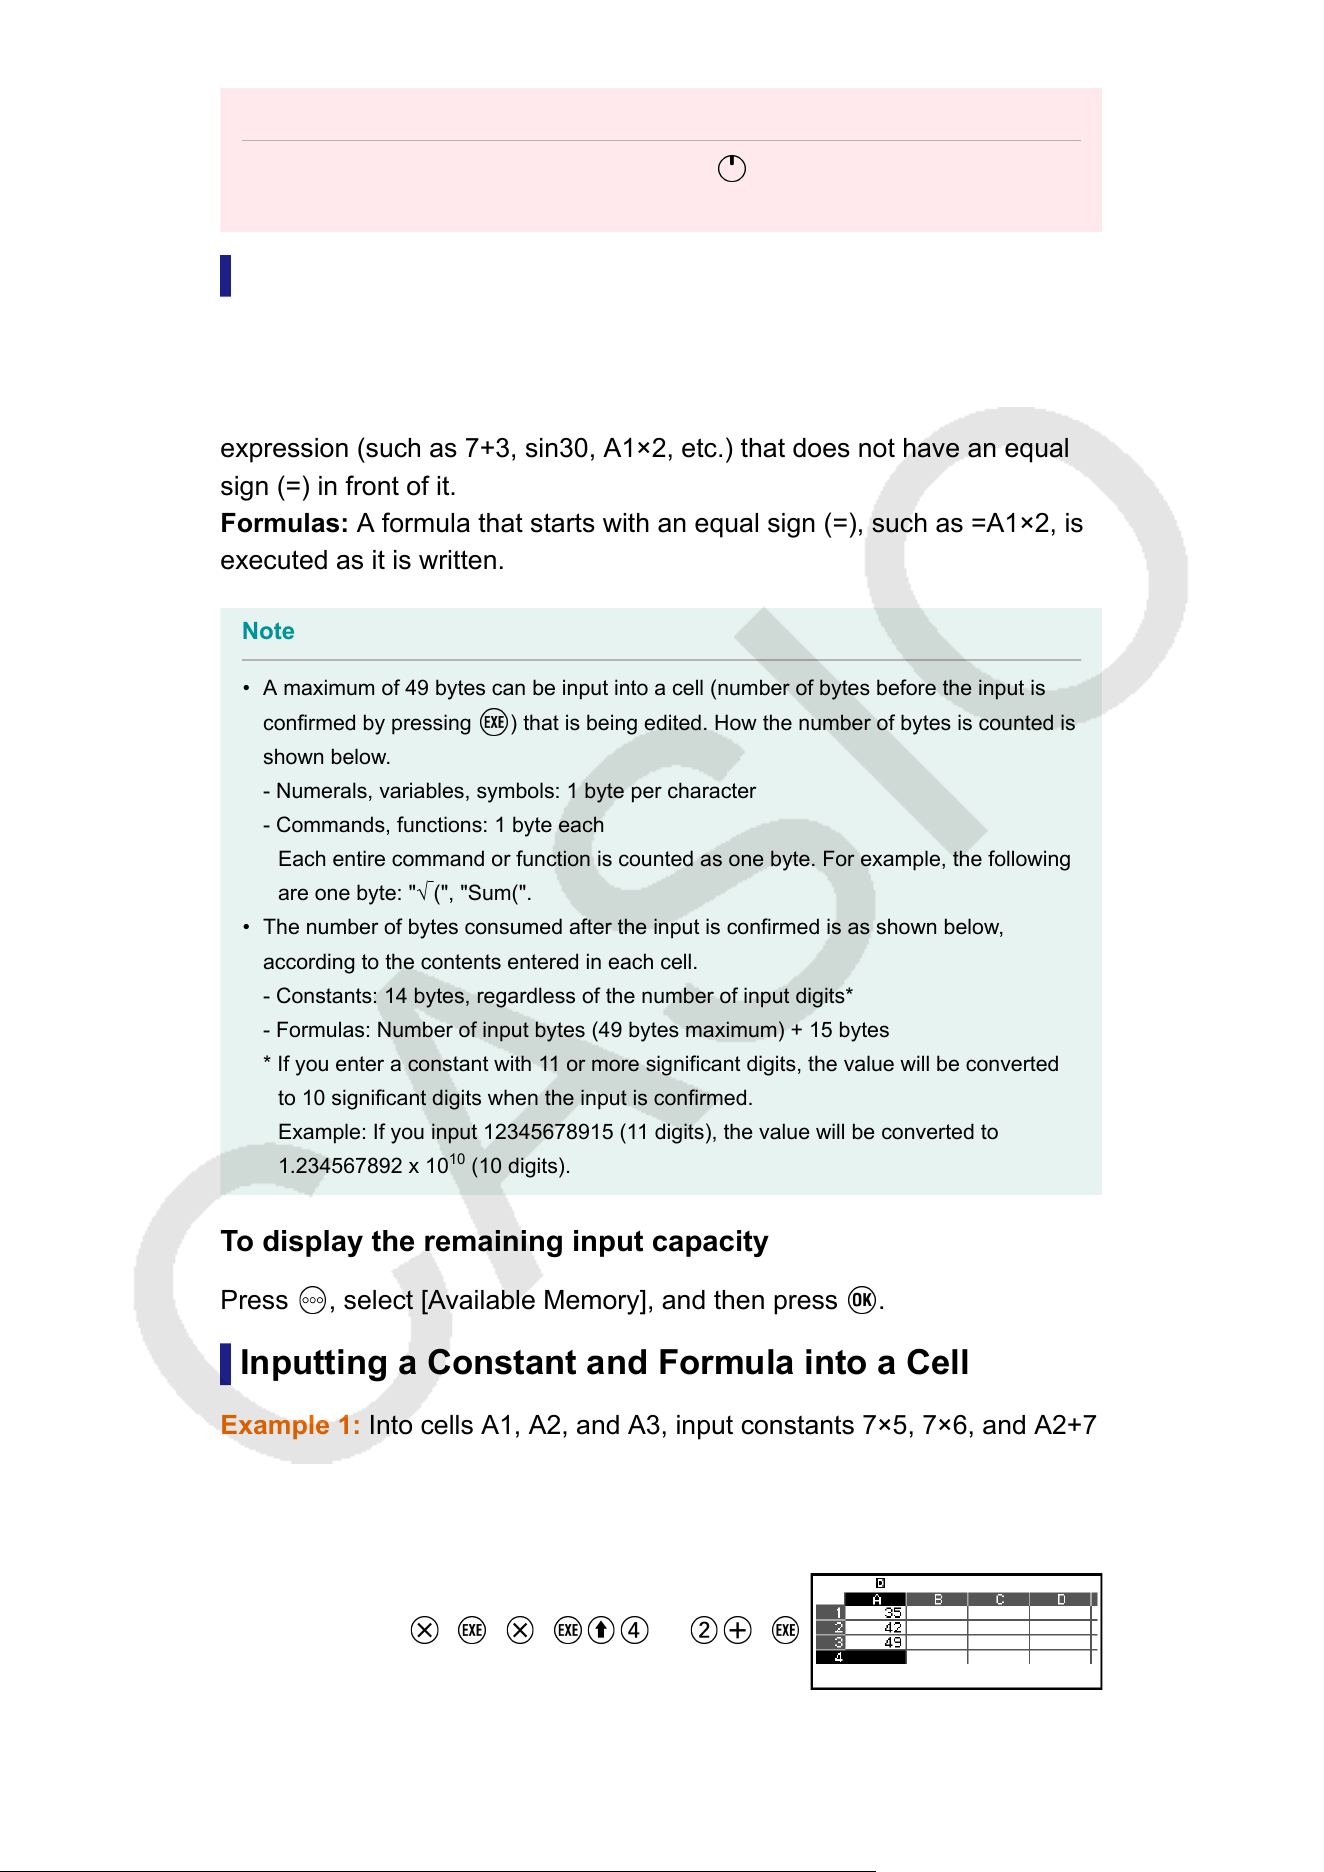
Important!
• Any time you turn off the calculator or press the key, every input into the
spreadsheet is cleared.
Inputting and Editing Cell Contents
Y
ou can input a constant or a formula into each cell.
Constants: A constant is something whose value is fixed as soon as you
finalize its input. A constant can be either a numeric value, or a calculation
expression (such as 7+3, sin30, A1×2, etc.) that does not have an equal
sign (=) in front of it.
Formulas: A formula that starts with an equal sign (=), such as =A1×2, is
executed as it is written.
Note
• A maximum of 49 bytes can be input into a cell (number of bytes before the input is
confirmed by pressing
) that is being edited. How the number of bytes is counted is
shown below
.
- Numerals, variables, symbols: 1 byte per character
- Commands, functions: 1 byte each
Each entire command or function is counted as one byte. For example, the following
are one byte: "√
(", "Sum(".
• The number of bytes consumed after the input is confirmed is as shown below,
according to the contents entered in each cell.
- Constants: 14 bytes, regardless of the number of input digits*
- Formulas: Number of input bytes (49 bytes maximum) + 15 bytes
* If you enter a constant with 1
1 or more significant digits, the value will be converted
to 10 significant digits when the input is confirmed.
Example: If you input 12345678915 (11 digits), the value will be converted to
1.234567892 x 10
10
(10 digits).
T
o display the remaining input capacity
Press
, select [Available Memory], and then press .
Inputting a Constant and Formula into a Cell
Example 1: Into cells A1, A2, and A3, input constants 7×5, 7×6, and A2+7
respectively
. And then, input the following formula into cell B1: =A1+7.
1. Move the cursor to cell A1.
2. Perform the key operation below.
7
5 7 6 (A) 7
128
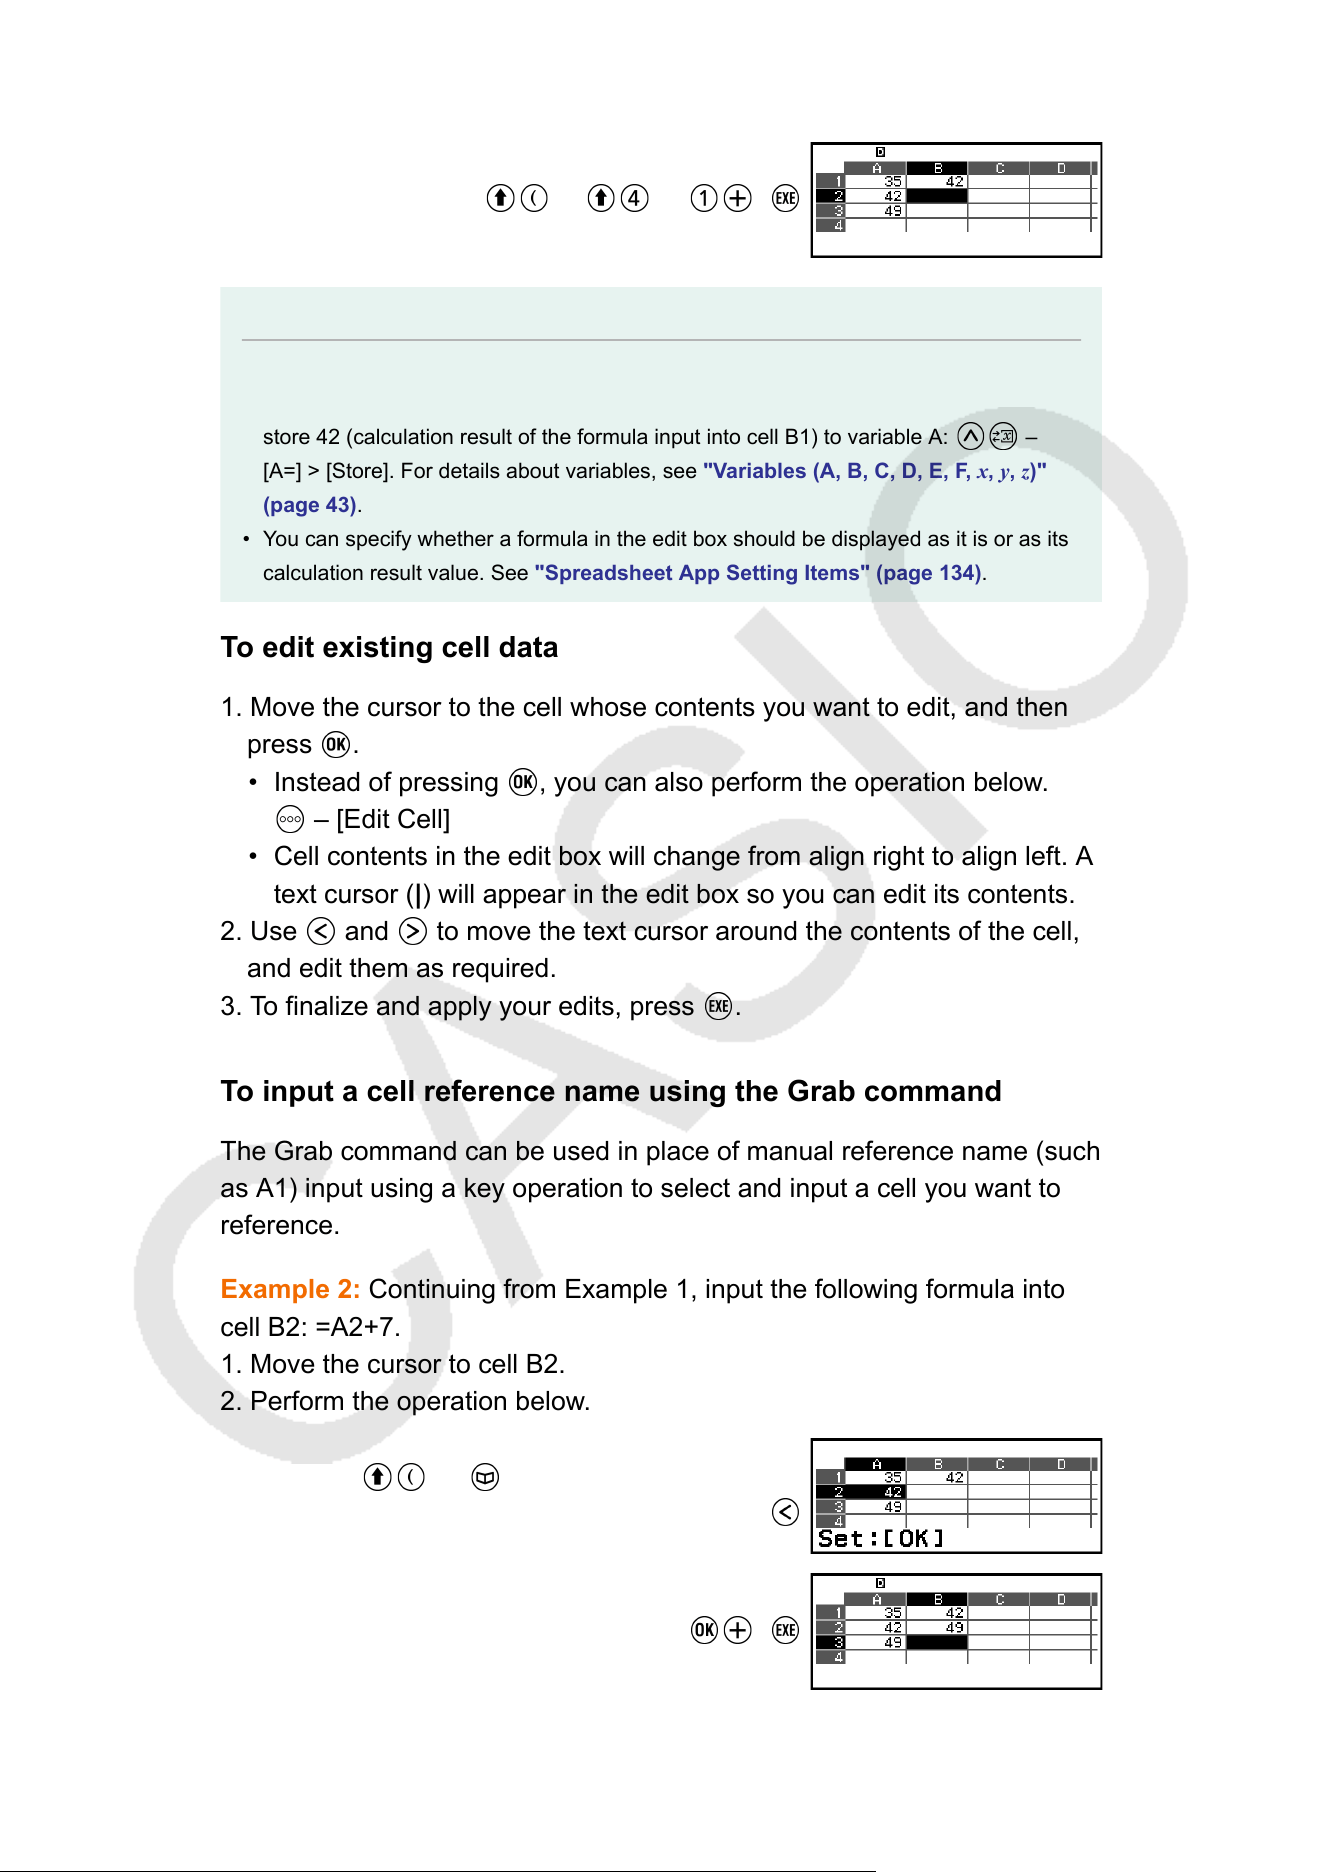
3. Move the cursor to cell B1, and then perform the key operation below.
(=) (A) 7
Note
• On the spreadsheet screen, you can store the value in a cell to a variable. For
example, performing the following operation while the screen in step 3 is displayed will
store 42 (calculation result of the formula input into cell B1) to variable A:
–
[A=] > [Store]. For details about variables, see "V
ariables (A, B, C, D, E, F, x, y, z)"
(page 43).
• You can specify whether a formula in the edit box should be displayed as it is or as its
calculation result value. See "Spreadsheet App Setting Items" (page 134).
T
o edit existing cell data
1. Move the cursor to the cell whose contents you want to edit, and then
press
.
• Instead of pressing , you can also perform the operation below.
– [Edit Cell]
• Cell contents in the edit box will change from align right to align left. A
text cursor (|) will appear in the edit box so you can edit its contents.
2. Use and to move the text cursor around the contents of the cell,
and edit them as required.
3. T
o finalize and apply your edits, press
.
T
o input a cell reference name using the Grab command
The Grab command can be used in place of manual reference name (such
as A1) input using a key operation to select and input a cell you want to
reference.
Example 2: Continuing from Example 1, input the following formula into
cell B2: =A2+7.
1. Move the cursor to cell B2.
2. Perform the operation below.
(=) – [Spreadsheet] > [Grab]
7
129
Cell Relative and Absolute References
There are two types of cell reference: relative and absolute.
Relative cell reference
The cell reference (A1) in a formula like =A1+7 is a relative reference,
which means that it changes depending on the cell where the formula is
located. If the formula =A1+7 is originally located in cell B1, for example,
copying and then pasting to cell C3 will result in =B3+7 being input into
cell C3. Since the copy and paste operation moves the formula one
column (B to C) and two rows (1 to 3) the A1 relative cell reference
in the formula is moved one column and two rows to B3. If the result
of a copy and paste operation causes a relative cell reference name to
change to something that is outside the range of the spreadsheet cells, the
applicable column letter and/or row number will be replaced by a question
mark (?), and "ERROR" will be displayed as the cell’
s data.
Absolute cell reference
If you want the row or the column, or both the row and the column parts
of a cell reference name to remain the same no matter where you paste
them, you need to create an absolute cell reference name. To create
an absolute cell reference, put a dollar sign (
) in front of the column
name and/or row number
. You can use one of three different absolute cell
references: absolute column with relative row (
A1), relative column with
absolute row (A 1), or absolute row and column ( A 1).
T
o input the absolute cell reference symbol (
)
While inputting a formula into a cell, press and then select
[Spreadsheet] > [ ].
T
o cut and paste spreadsheet data
1. Move the cursor to the cell whose data you want to cut.
2. Press
, select [Cut & Paste], and then press .
• This enters paste standby. To cancel paste standby, press or .
3. Move the cursor to the cell into which you want to paste the data you
just cut, and then press .
• Pasting data simultaneously deletes the data from the cell where you
performed the cut operation, and automatically cancels paste standby
.
130
Note
• In the case of a cut and paste operation, cell references do not change when pasted,
regardless of whether they are relative or absolute.
T
o copy and paste spreadsheet data
1. Move the cursor to the cell whose data you want to copy.
2. Press
, select [Copy & Paste], and then press .
• This causes "Paste:[OK]" to appear at the bottom of the screen. You
can continue to paste while this message is displayed.
3. Move the cursor to the cell into which you want to paste the data you
just copied.
4. Press .
• The contents of the cell you copied are pasted and the cursor moves
down to the next cell.
5. If you want to paste the same contents to another cell, repeat steps 3
and 4.
• If you want to continue pasting to the cell to which the cursor has
been moved, just repeat the operation in step 4.
6. T
o end the paste operation, press
or .
Note
• When you copy the contents of a cell containing a formula with a relative reference,
the relative reference will change in accordance with the location of the cell where the
contents are pasted.
T
o delete input data from a specific cell
Move the cursor to the cell whose contents you want to delete and then
press
.
T
o delete the contents of all the cells in a spreadsheet
Press
, select [Delete All], and then press .
Using Spreadsheet App Special Commands
In the Spreadsheet app, the commands below can be used inside
formulas or constants. These commands are on the menu that appears
when you press and then select [Spreadsheet].
Min(
Returns the minimum of the values in a specified range of cells.
Syntax: Min(start cell:end cell)
131
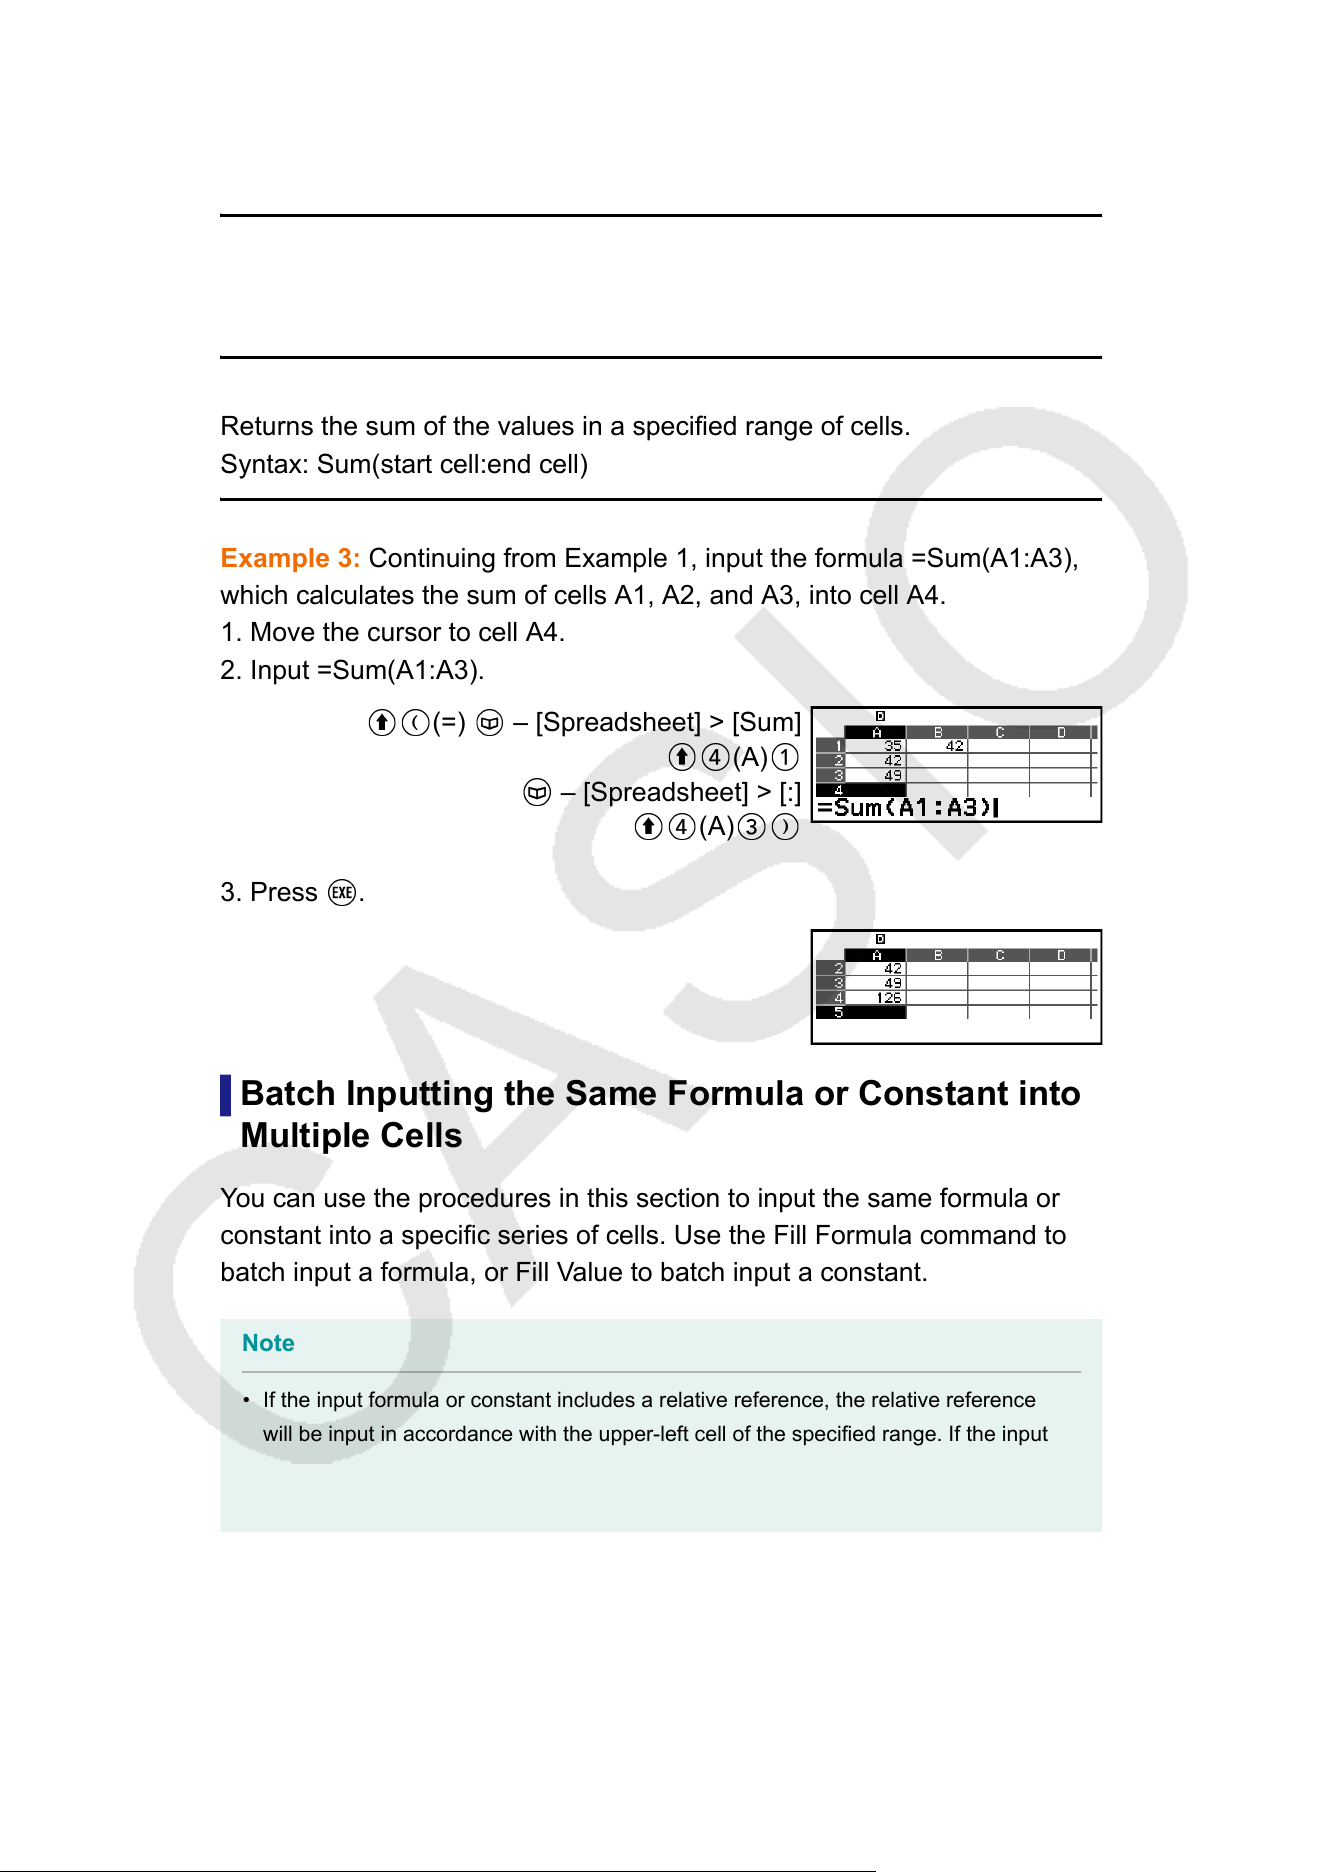
Max(
Returns the maximum of the values in a specified range of cells.
Syntax: Max(start cell:end cell)
Mean(
Returns the mean of the values in a specified range of cells.
Syntax: Mean(start cell:end cell)
Sum(
Returns the sum of the values in a specified range of cells.
Syntax: Sum(start cell:end cell)
Example 3: Continuing from Example 1, input the formula =Sum(A1:A3),
which calculates the sum of cells A1, A2, and A3, into cell A4.
1. Move the cursor to cell A4.
2. Input =Sum(A1:A3).
(=) – [Spreadsheet] > [Sum]
(A)
– [Spreadsheet] > [:]
(A)
3. Press .
Batch Inputting the Same Formula or Constant into
Multiple Cells
Y
ou can use the procedures in this section to input the same formula or
constant into a specific series of cells. Use the Fill Formula command to
batch input a formula, or Fill Value to batch input a constant.
Note
• If the input formula or constant includes a relative reference, the relative reference
will be input in accordance with the upper-left cell of the specified range. If the input
formula or constant includes an absolute reference, the absolute reference will be
input into all of the cells in the specified range.
132
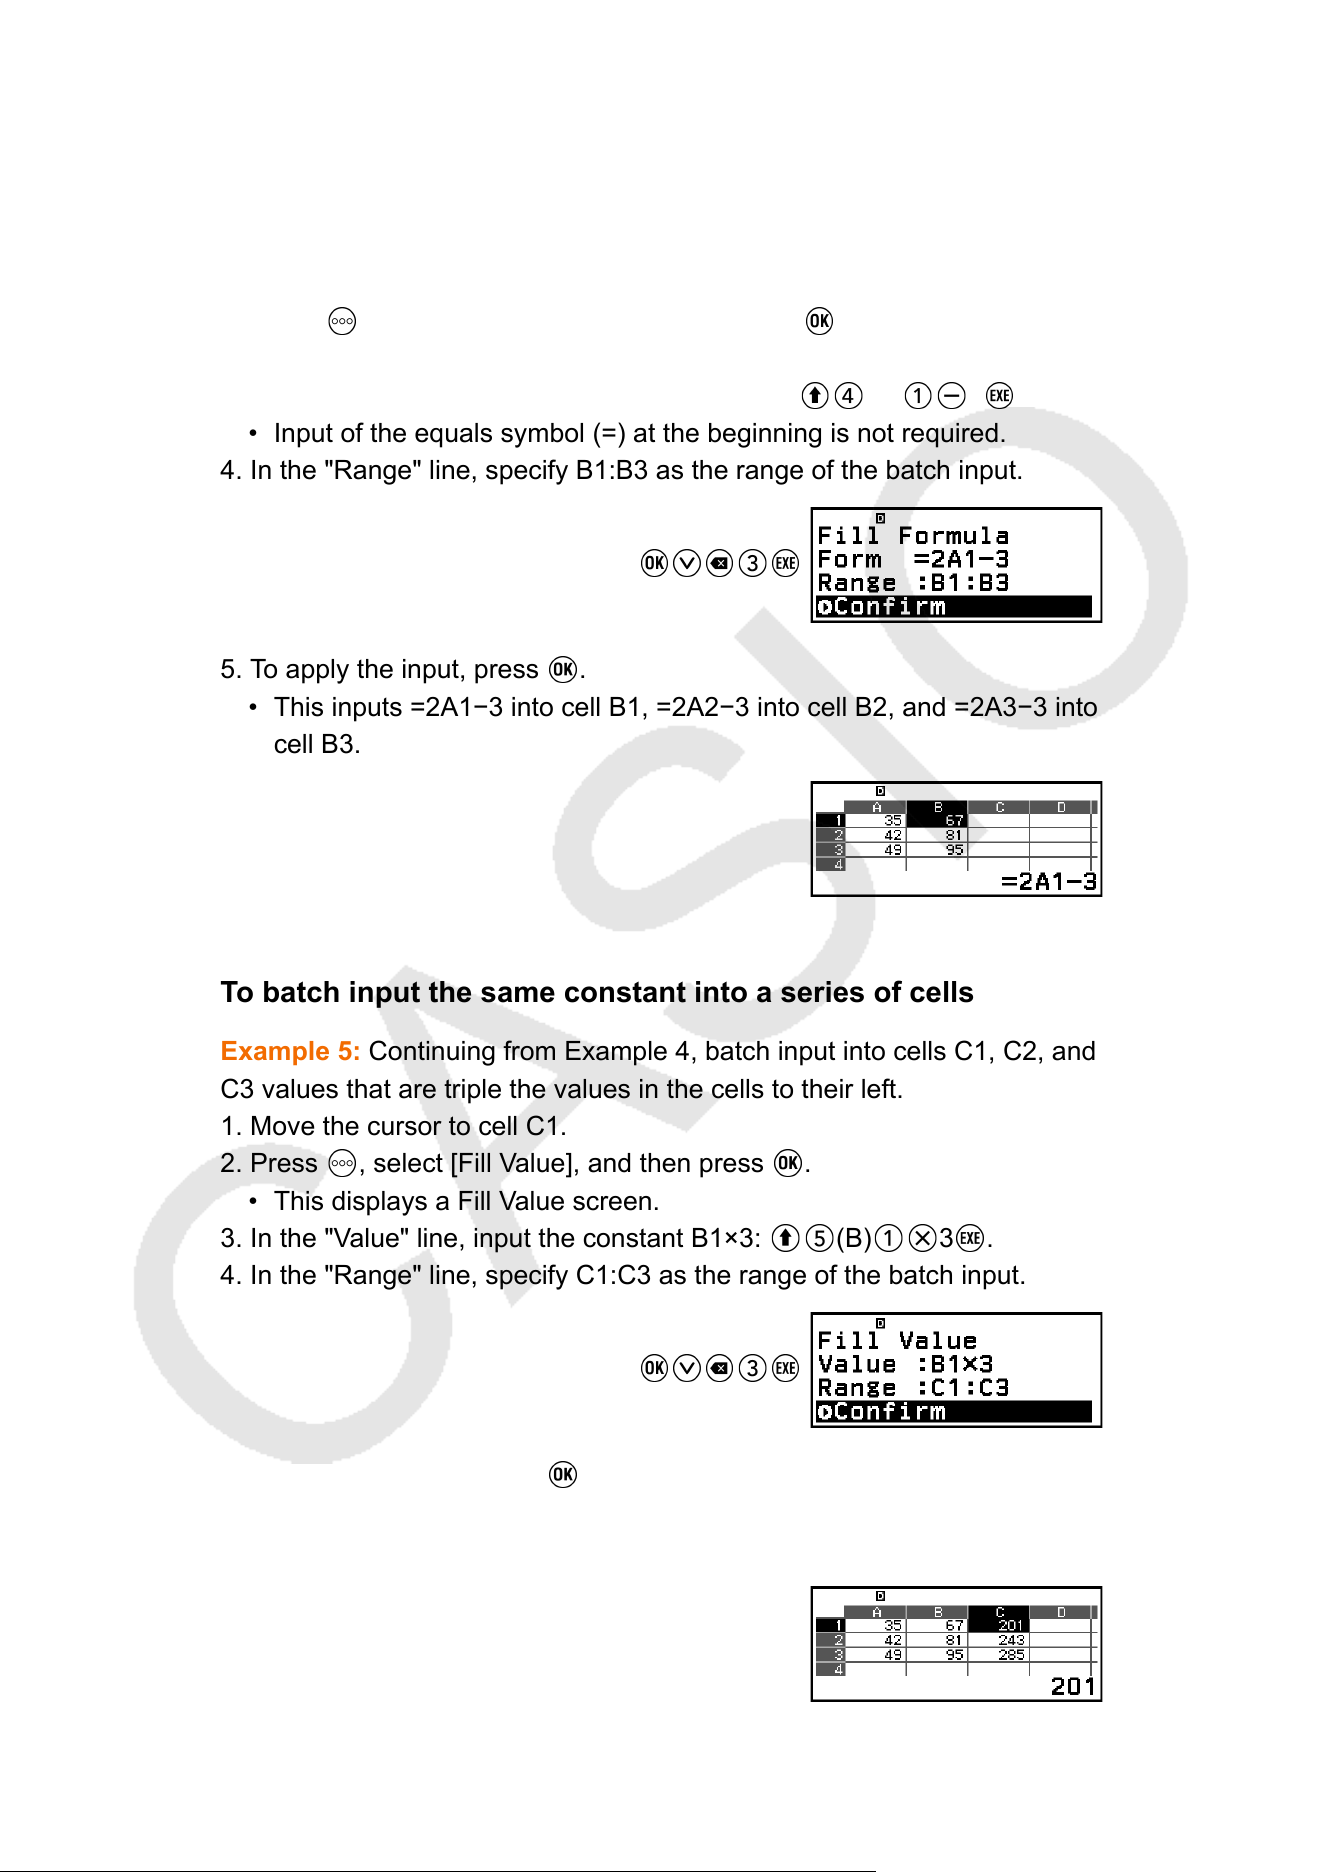
To batch input the same formula into a series of cells
Example 4: Continuing from Example 1, batch input into cells B1, B2,
and B3 a formula that doubles the value of the cell to the left and then
subtracts 3.
1. Move the cursor to cell B1.
2. Press , select [Fill Formula], and then press .
• This displays a Fill Formula screen.
3. In the "Form" line, input the formula =2A1−3: 2 (A) 3 .
• Input of the equals symbol (=) at the beginning is not required.
4. In the "Range" line, specify B1:B3 as the range of the batch input.
5. To apply the input, press .
• This inputs =2A1−3 into cell B1, =2A2−3 into cell B2, and =2A3−3 into
cell B3.
To batch input the same constant into a series of cells
Example 5: Continuing from Example 4, batch input into cells C1, C2, and
C3 values that are triple the values in the cells to their left.
1. Move the cursor to cell C1.
2. Press , select [Fill Value], and then press .
• This displays a Fill Value screen.
3. In the "V
alue" line, input the constant B1×3:
(B) 3 .
4. In the "Range" line, specify C1:C3 as the range of the batch input.
5. To apply the input, press .
• This inputs the values of each calculation result into cells C1, C2, and
C3.
133
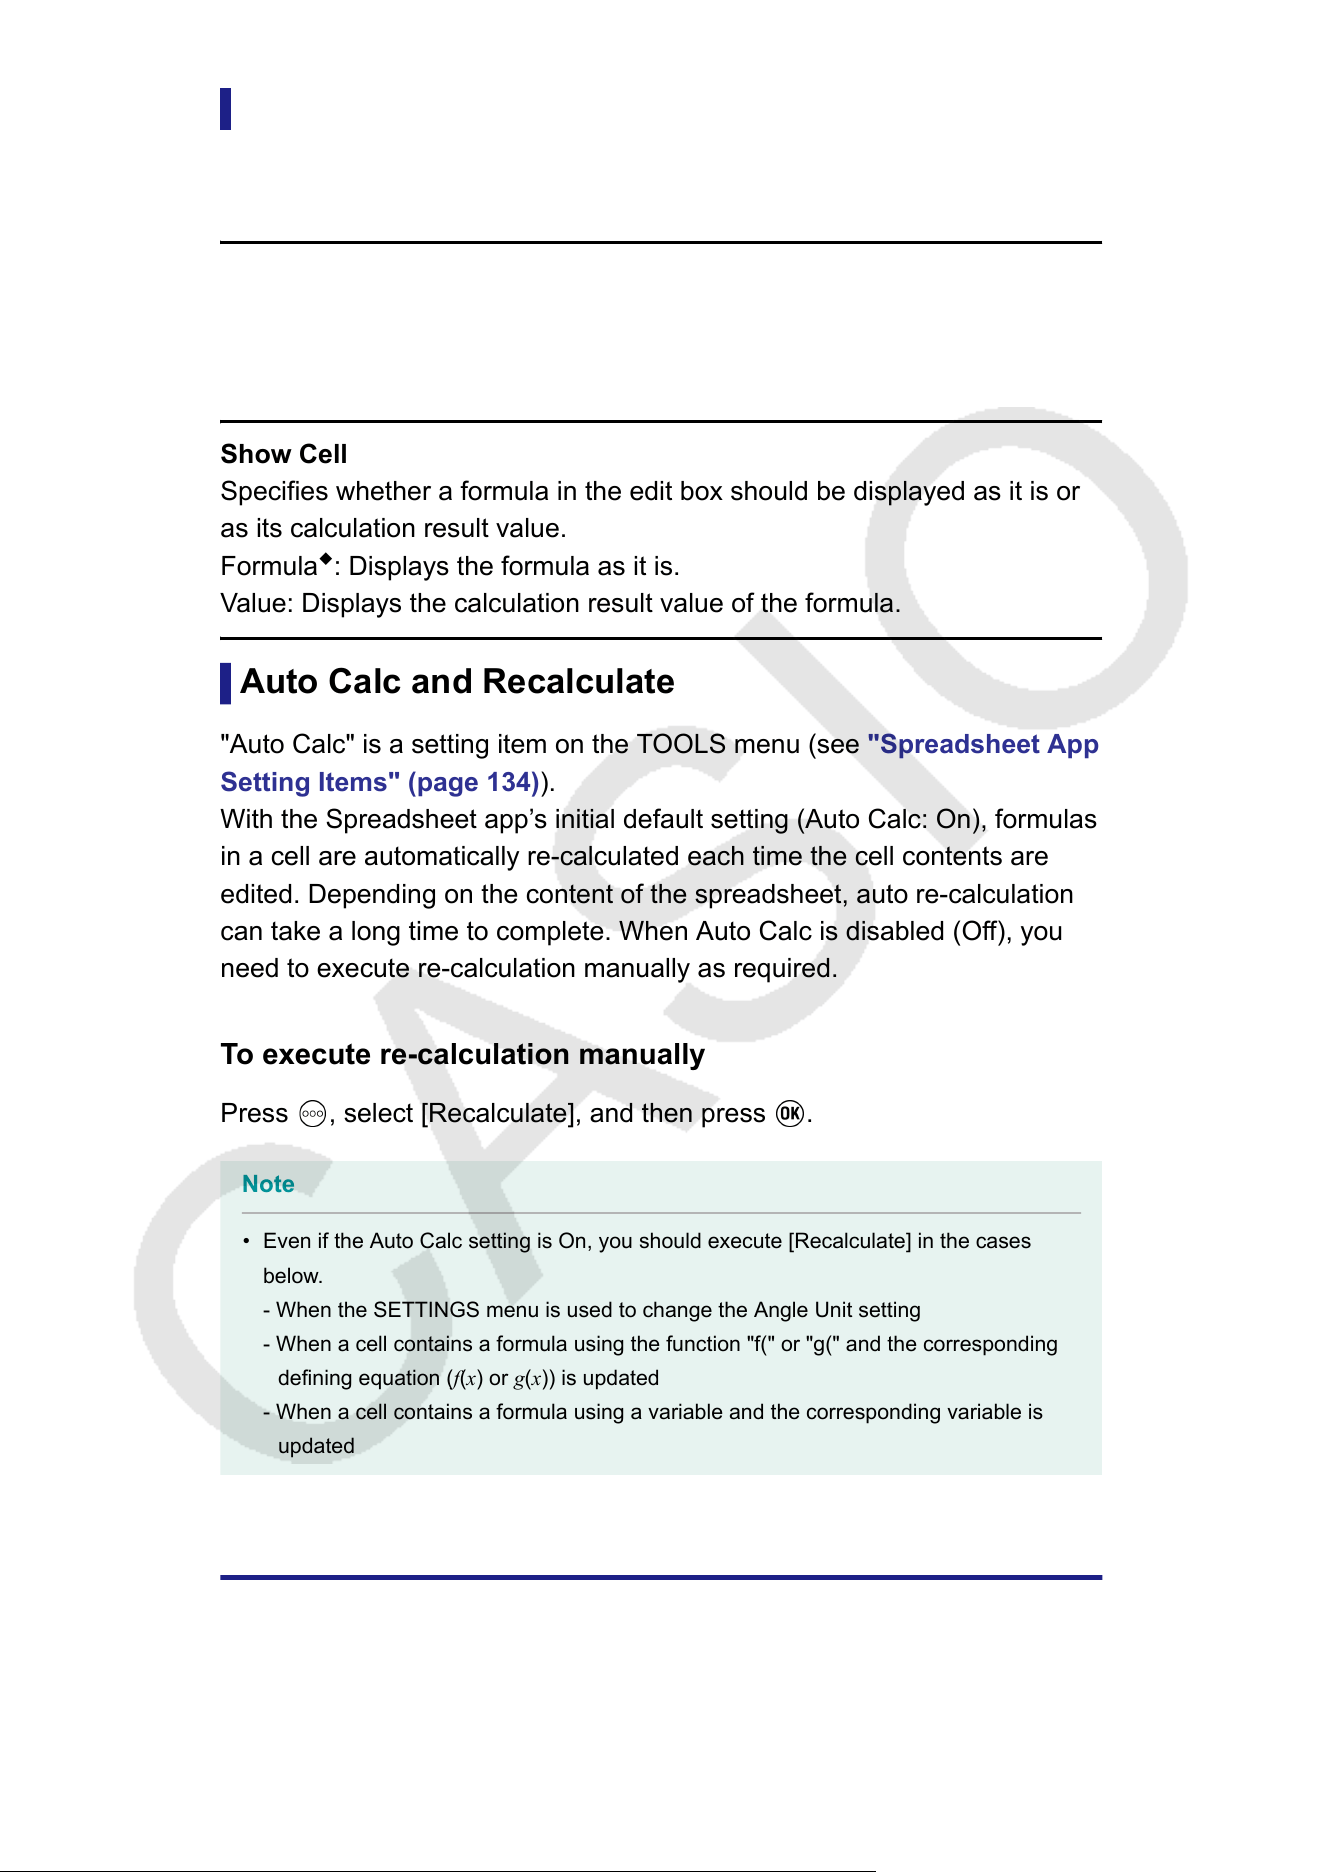
Spreadsheet App Setting Items
The setting items below are included on the T
OOLS menu.
"◆" indicates the initial default setting.
Auto Calc
Specifies whether or not formulas should be re-calculated automatically.
On
◆
: Enables auto re-calculation.
Of
f: Disables auto re-calculation.
Show Cell
Specifies whether a formula in the edit box should be displayed as it is or
as its calculation result value.
Formula
◆
: Displays the formula as it is.
Value: Displays the calculation result value of the formula.
Auto Calc and Recalculate
"Auto Calc" is a setting item on the TOOLS menu (see "Spreadsheet App
Setting Items" (page 134)).
With the Spreadsheet app’s initial default setting (Auto Calc: On), formulas
in a cell are automatically re-calculated each time the cell contents are
edited. Depending on the content of the spreadsheet, auto re-calculation
can take a long time to complete. When Auto Calc is disabled (Off), you
need to execute re-calculation manually as required.
To execute re-calculation manually
Press
, select [Recalculate], and then press .
Note
• Even if the Auto Calc setting is On, you should execute [Recalculate] in the cases
below
.
- When the SETTINGS menu is used to change the Angle Unit setting
- When a cell contains a formula using the function "f(" or "g(" and the corresponding
defining equation (f(x) or g(x)) is updated
- When a cell contains a formula using a variable and the corresponding variable is
updated
Ratio Calculations
The Ratio app lets you determine the value of X in the ratio expression A :
B = X : D (or A : B = C : X) when the values of A, B, C and D are known.
134
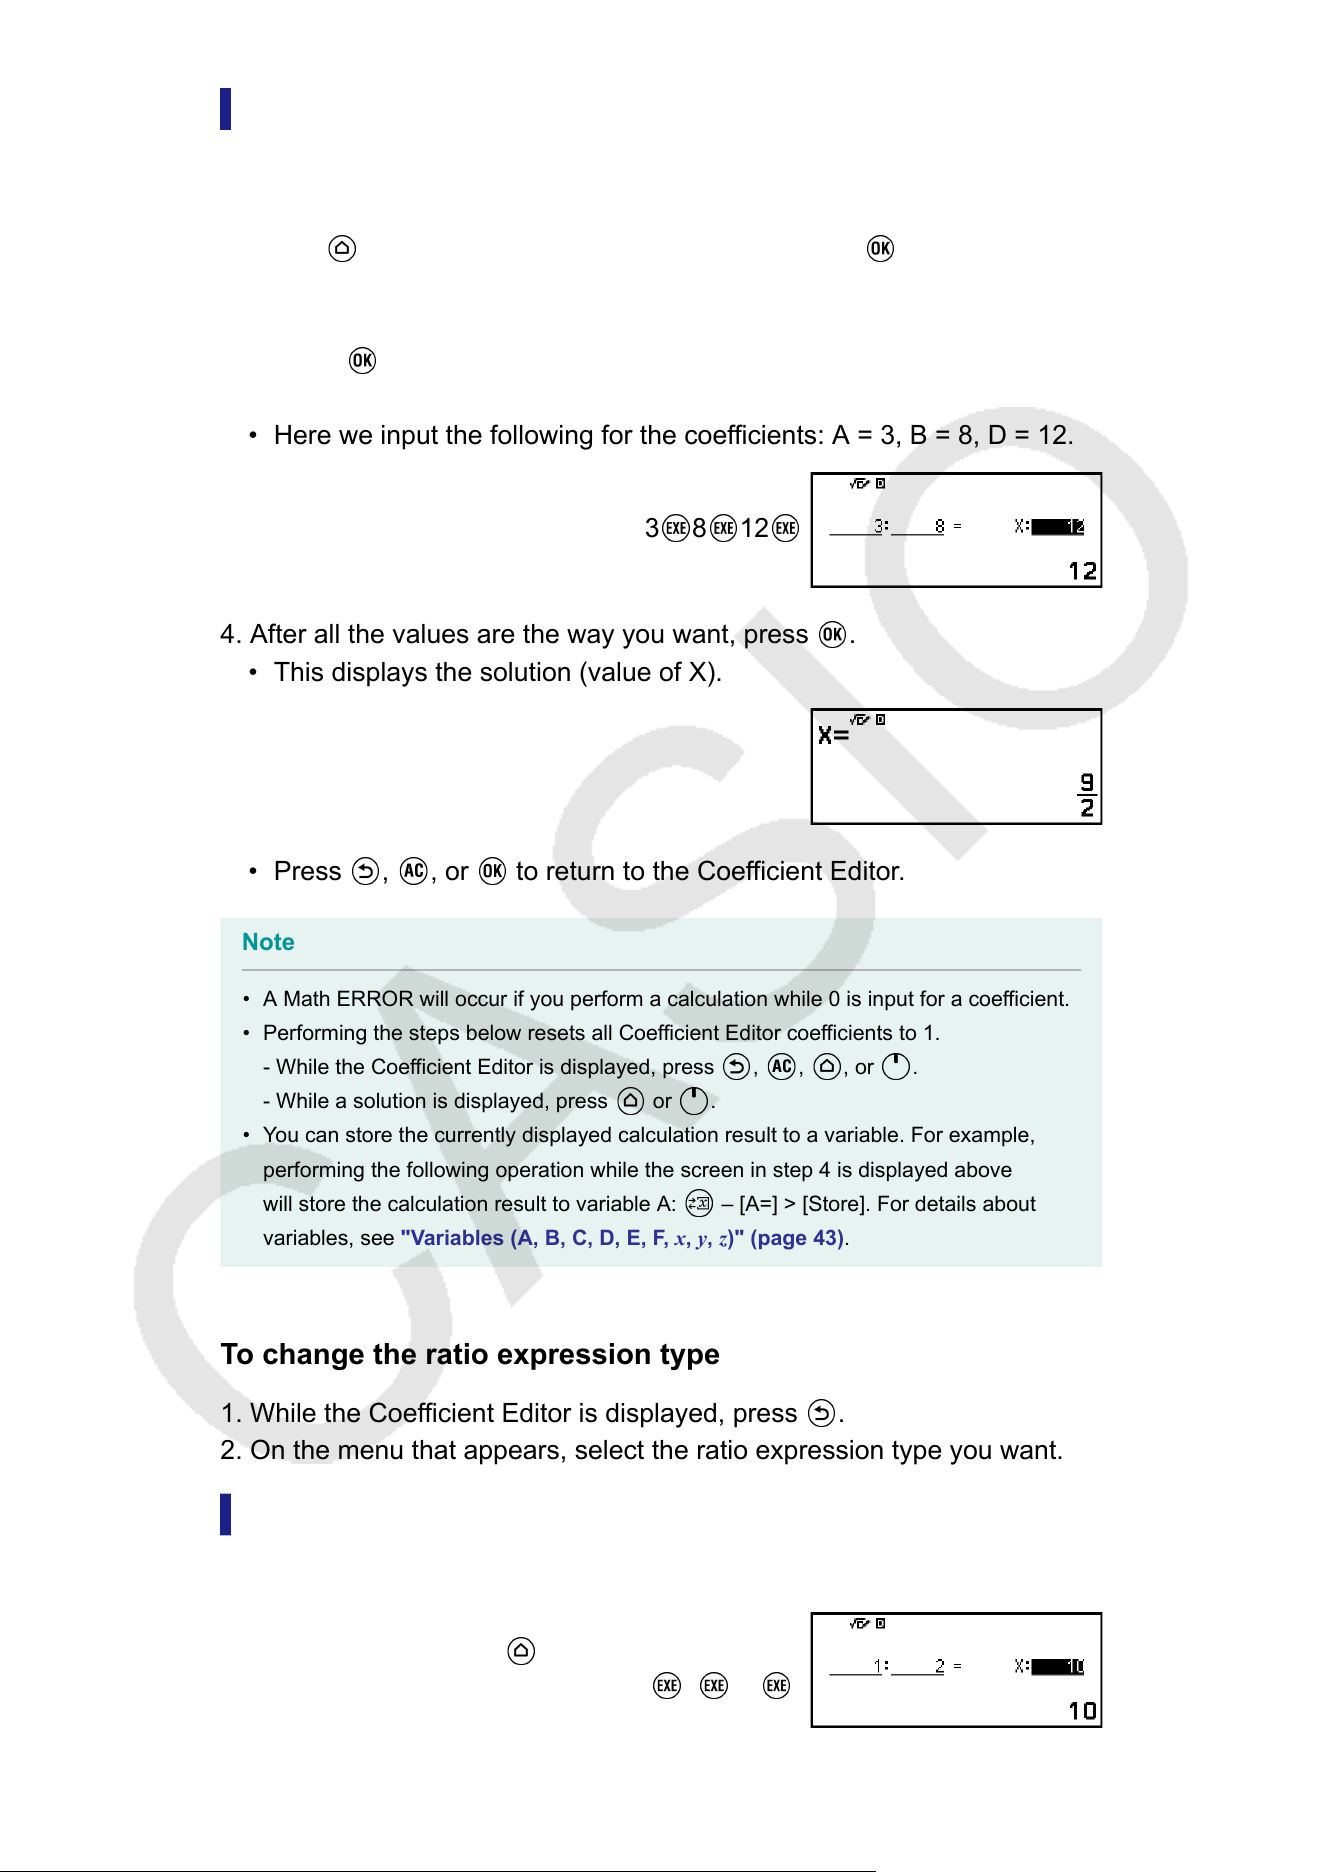
General Procedure for Performing a Ratio
Calculation
Example 1: T
o solve 3 : 8 = X : 12 for X
1. Press
, select the Ratio app icon, and then press .
2. On the menu that appears, select [A:B=X:D] or [A:B=C:X].
• Here we want to solve 3 : 8 = X : 12 for X, select [A:B=X:D], and then
press .
3. On the Coef
ficient Editor that appears, input coefficient values.
• Here we input the following for the coefficients: A = 3, B = 8, D = 12.
3
8 12
4. After all the values are the way you want, press .
• This displays the solution (value of X).
• Press , , or to return to the Coefficient Editor.
Note
• A Math ERROR will occur if you perform a calculation while 0 is input for a coefficient.
• Performing the steps below resets all Coefficient Editor coefficients to 1.
- While the Coef
ficient Editor is displayed, press
, , , or .
- While a solution is displayed, press or .
• You can store the currently displayed calculation result to a variable. For example,
performing the following operation while the screen in step 4 is displayed above
will store the calculation result to variable A: – [A=] > [Store]. For details about
variables, see "V
ariables (A, B, C, D, E, F, x, y, z)" (page 43).
To change the ratio expression type
1. While the Coefficient Editor is displayed, press
.
2. On the menu that appears, select the ratio expression type you want.
Calculation Example
Example 2: T
o calculate X in the ratio 1 : 2 = X : 10
– [Ratio] > [A:B=X:D]
1 2 10
135
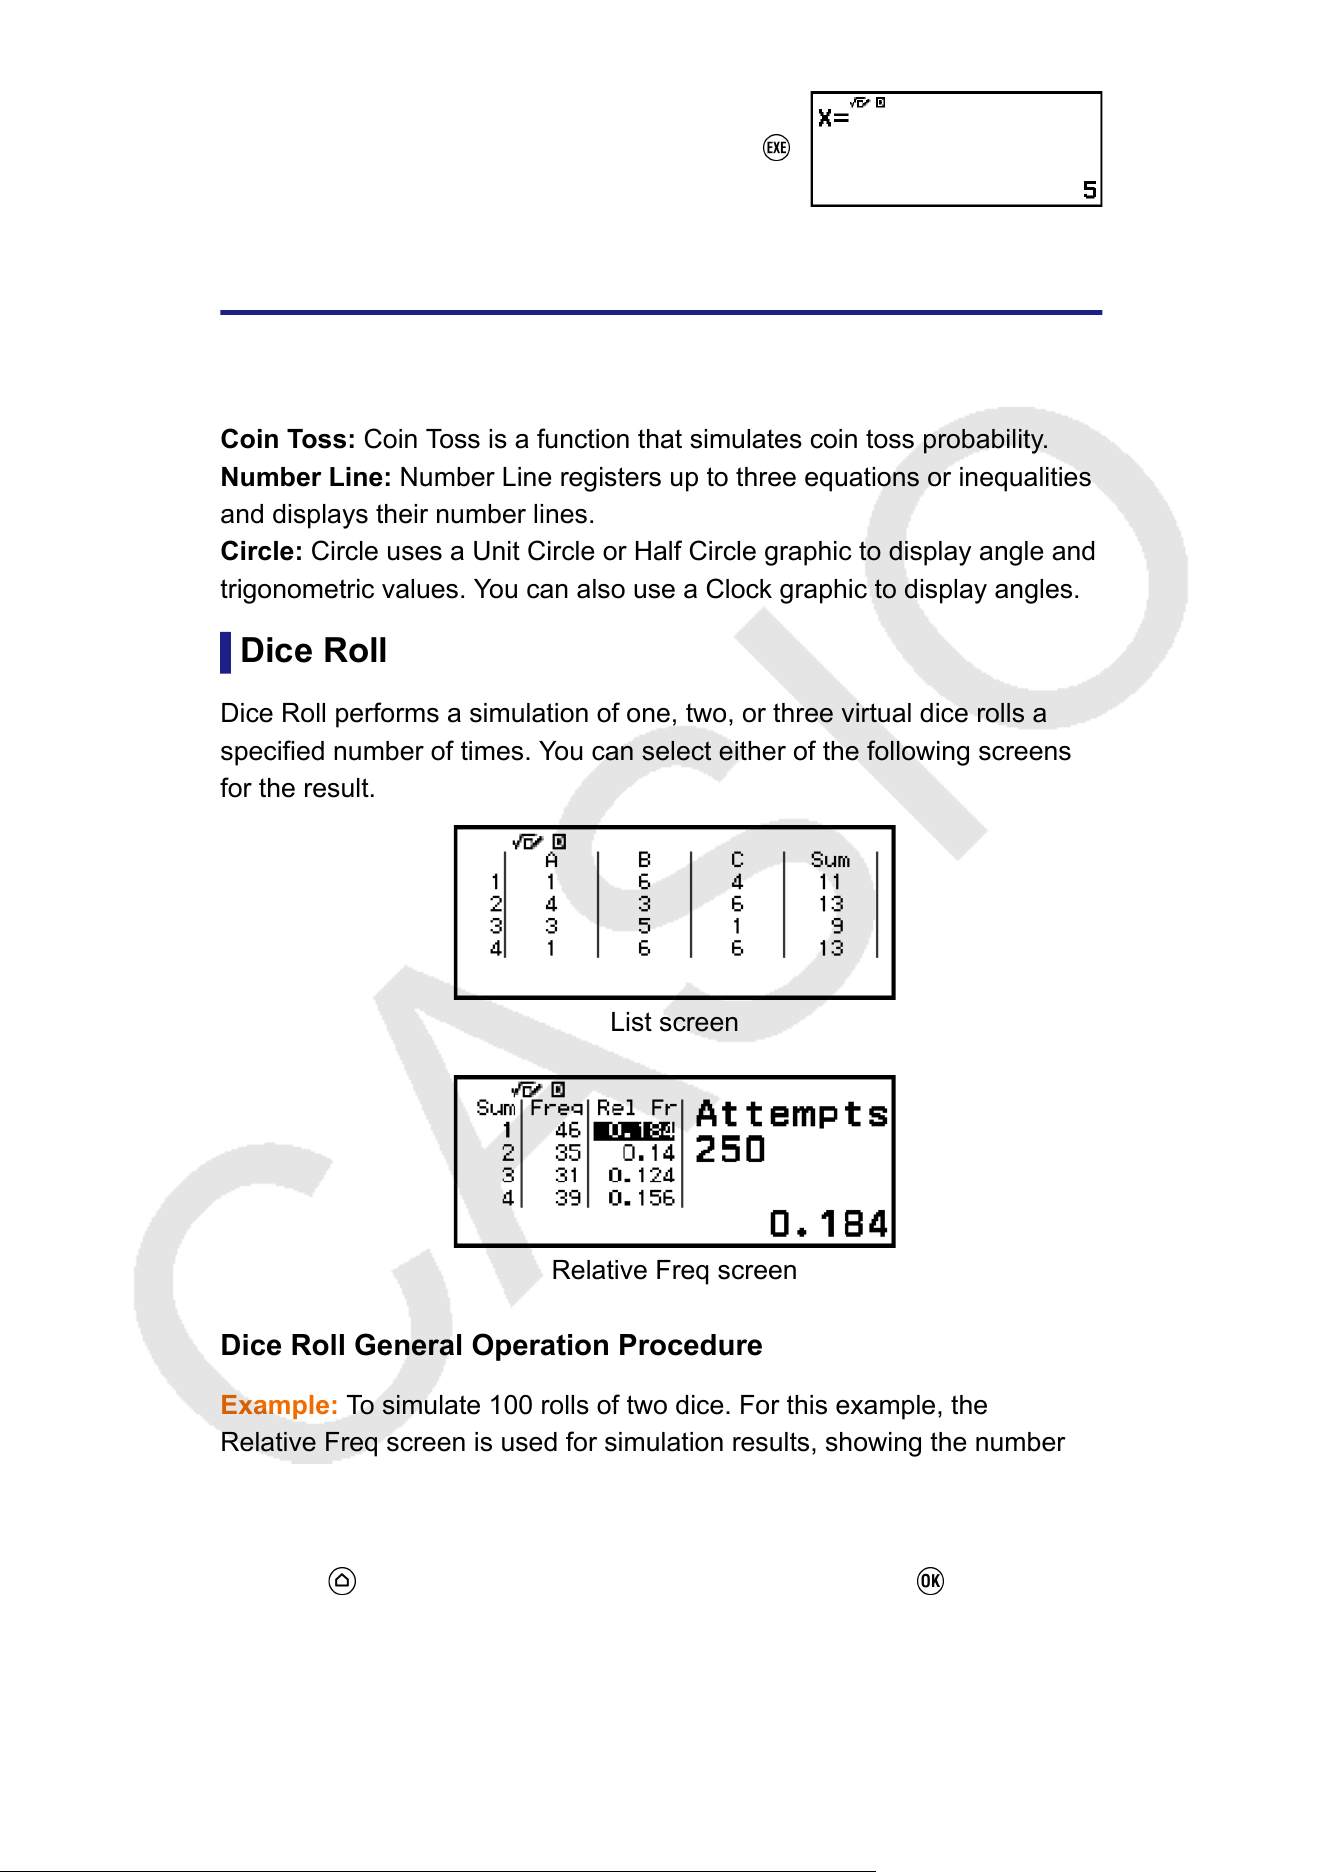
Using Math Box
The Math Box app has the following learning support functions.
Dice Roll: Dice Roll is function that simulates dice probability
.
Coin Toss: Coin Toss is a function that simulates coin toss probability.
Number Line: Number Line registers up to three equations or inequalities
and displays their number lines.
Circle: Circle uses a Unit Circle or Half Circle graphic to display angle and
trigonometric values. You can also use a Clock graphic to display angles.
Dice Roll
Dice Roll performs a simulation of one, two, or three virtual dice rolls a
specified number of times. You can select either of the following screens
for the result.
List screen
Relative Freq screen
Dice Roll General Operation Procedure
Example: T
o simulate 100 rolls of two dice. For this example, the
Relative Freq screen is used for simulation results, showing the number
of occurrences (frequencies) and relative frequencies of the numeric
difference (0, 1, 2, 3, 4, 5) between the two dice each roll.
1. Press
, select the Math Box app icon, and then press .
• This displays the Math Box menu.
136
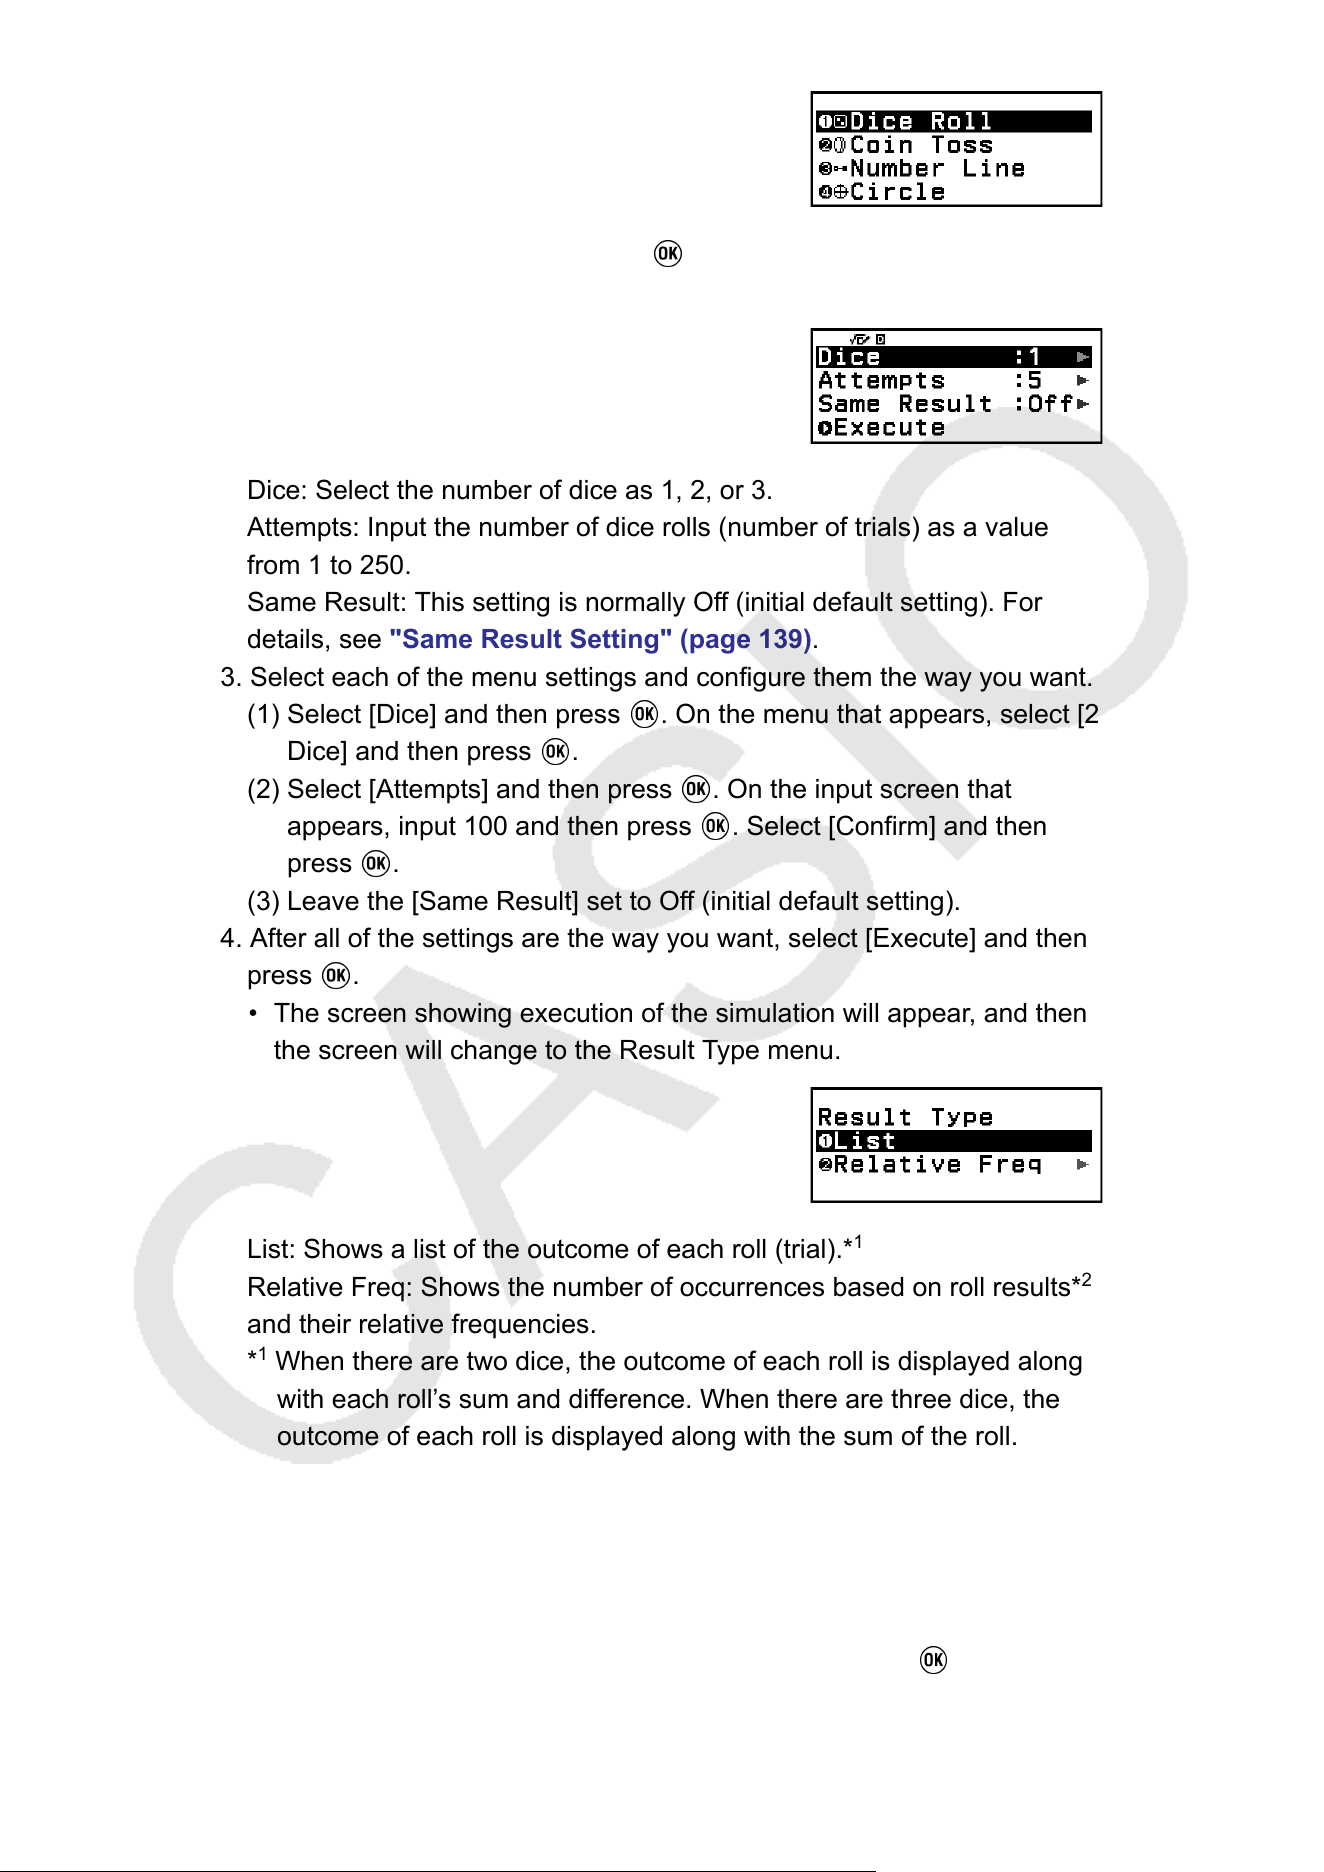
2. Select [Dice Roll], and then press .
• This displays the parameter input screen.
Dice: Select the number of dice as 1, 2, or 3.
Attempts: Input the number of dice rolls (number of trials) as a value
from 1 to 250.
Same Result: This setting is normally Of
f (initial default setting). For
details, see "Same Result Setting" (page 139).
3. Select each of the menu settings and configure them the way you want.
(1) Select [Dice] and then press
. On the menu that appears, select [2
Dice] and then press .
(2) Select [Attempts] and then press . On the input screen that
appears, input 100 and then press . Select [Confirm] and then
press .
(3) Leave the [Same Result] set to Of
f (initial default setting).
4. After all of the settings are the way you want, select [Execute] and then
press
.
• The screen showing execution of the simulation will appear, and then
the screen will change to the Result T
ype menu.
List: Shows a list of the outcome of each roll (trial).*
1
Relative Freq: Shows the number of occurrences based on roll results*
2
and their relative frequencies.
*
1
When there are two dice, the outcome of each roll is displayed along
with each roll’
s sum and difference. When there are three dice, the
outcome of each roll is displayed along with the sum of the roll.
*
2
Outcome (1 through 6) in the case of one die, sum (2 through 12) or
difference (0 through 5) of the outcomes in the case of two dice, and
sum (3 through 18) of the outcomes in the case of three dice.
5. Use the Result Type menu to select a result display format.
(1) Here, we want to display the number of occurrences and relative
frequencies, so select [Relative Freq] and then press
.
• This displays the [Sum] or [Difference] selection menu.
137
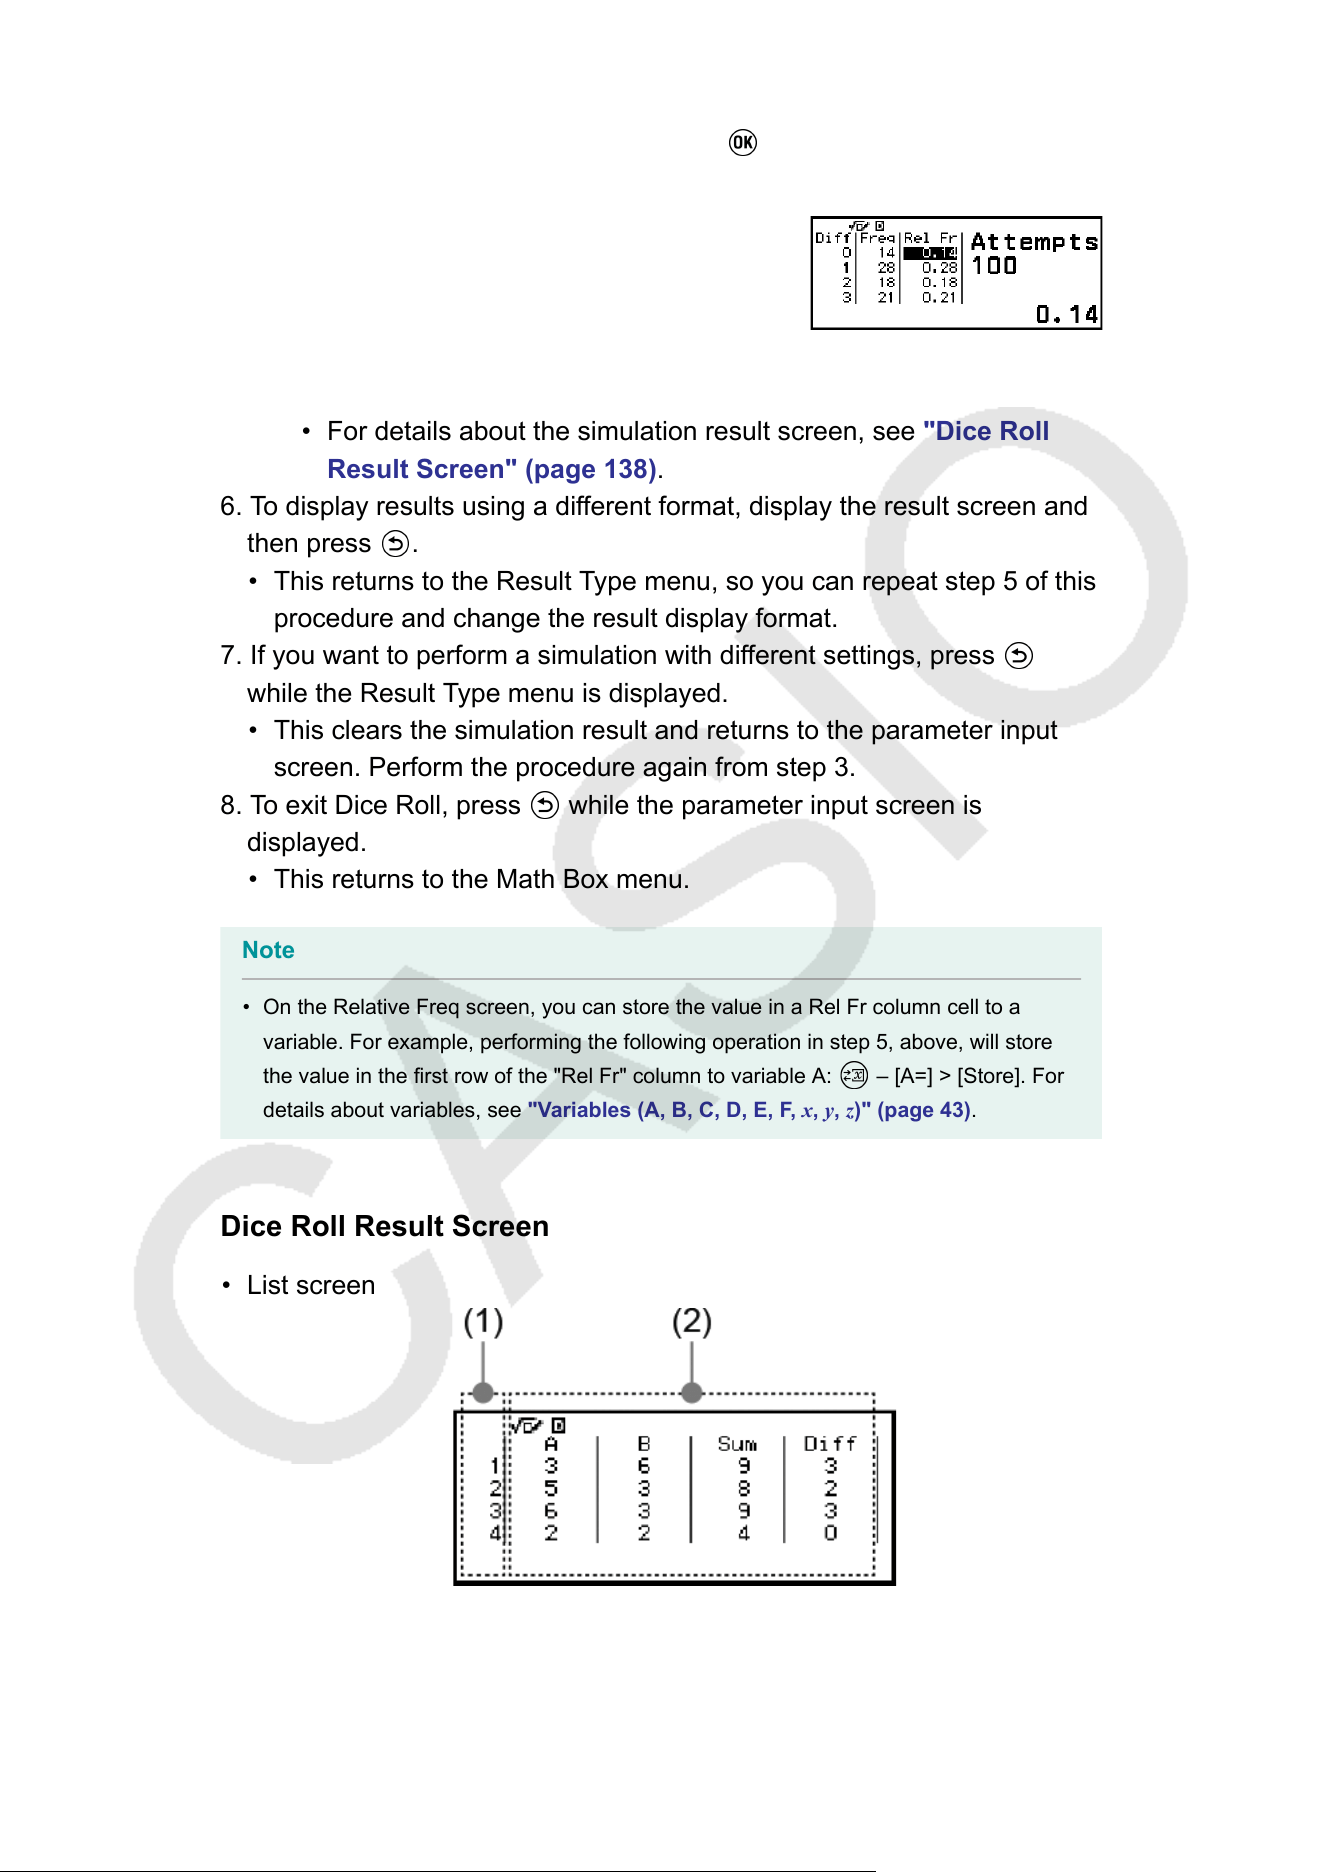
(2) Here, we want to display the difference in the outcome of each roll,
so select [Dif
ference] and then press
.
• The simulation result is displayed on the Relative Freq screen.
(The result differs with each execution.)
• For details about the simulation result screen, see "Dice Roll
Result Screen"
(page 138).
6. To display results using a different format, display the result screen and
then press
.
• This returns to the Result Type menu, so you can repeat step 5 of this
procedure and change the result display format.
7. If you want to perform a simulation with dif
ferent settings, press
while the Result Type menu is displayed.
• This clears the simulation result and returns to the parameter input
screen. Perform the procedure again from step 3.
8. T
o exit Dice Roll, press
while the parameter input screen is
displayed.
• This returns to the Math Box menu.
Note
• On the Relative Freq screen, you can store the value in a Rel Fr column cell to a
variable. For example, performing the following operation in step 5, above, will store
the value in the first row of the "Rel Fr" column to variable A: – [A=] > [Store]. For
details about variables, see "V
ariables (A, B, C, D, E, F, x, y, z)" (page 43).
Dice Roll Result Screen
• List screen
(1) Each row shows a sequential roll number. For example, 1 is the first
roll, 2 is the second roll, and so on.
(2) A, B, and C indicate each of the die being used. "Sum" is for the
outcome total, and "Dif
f" is for the difference between the outcomes
138
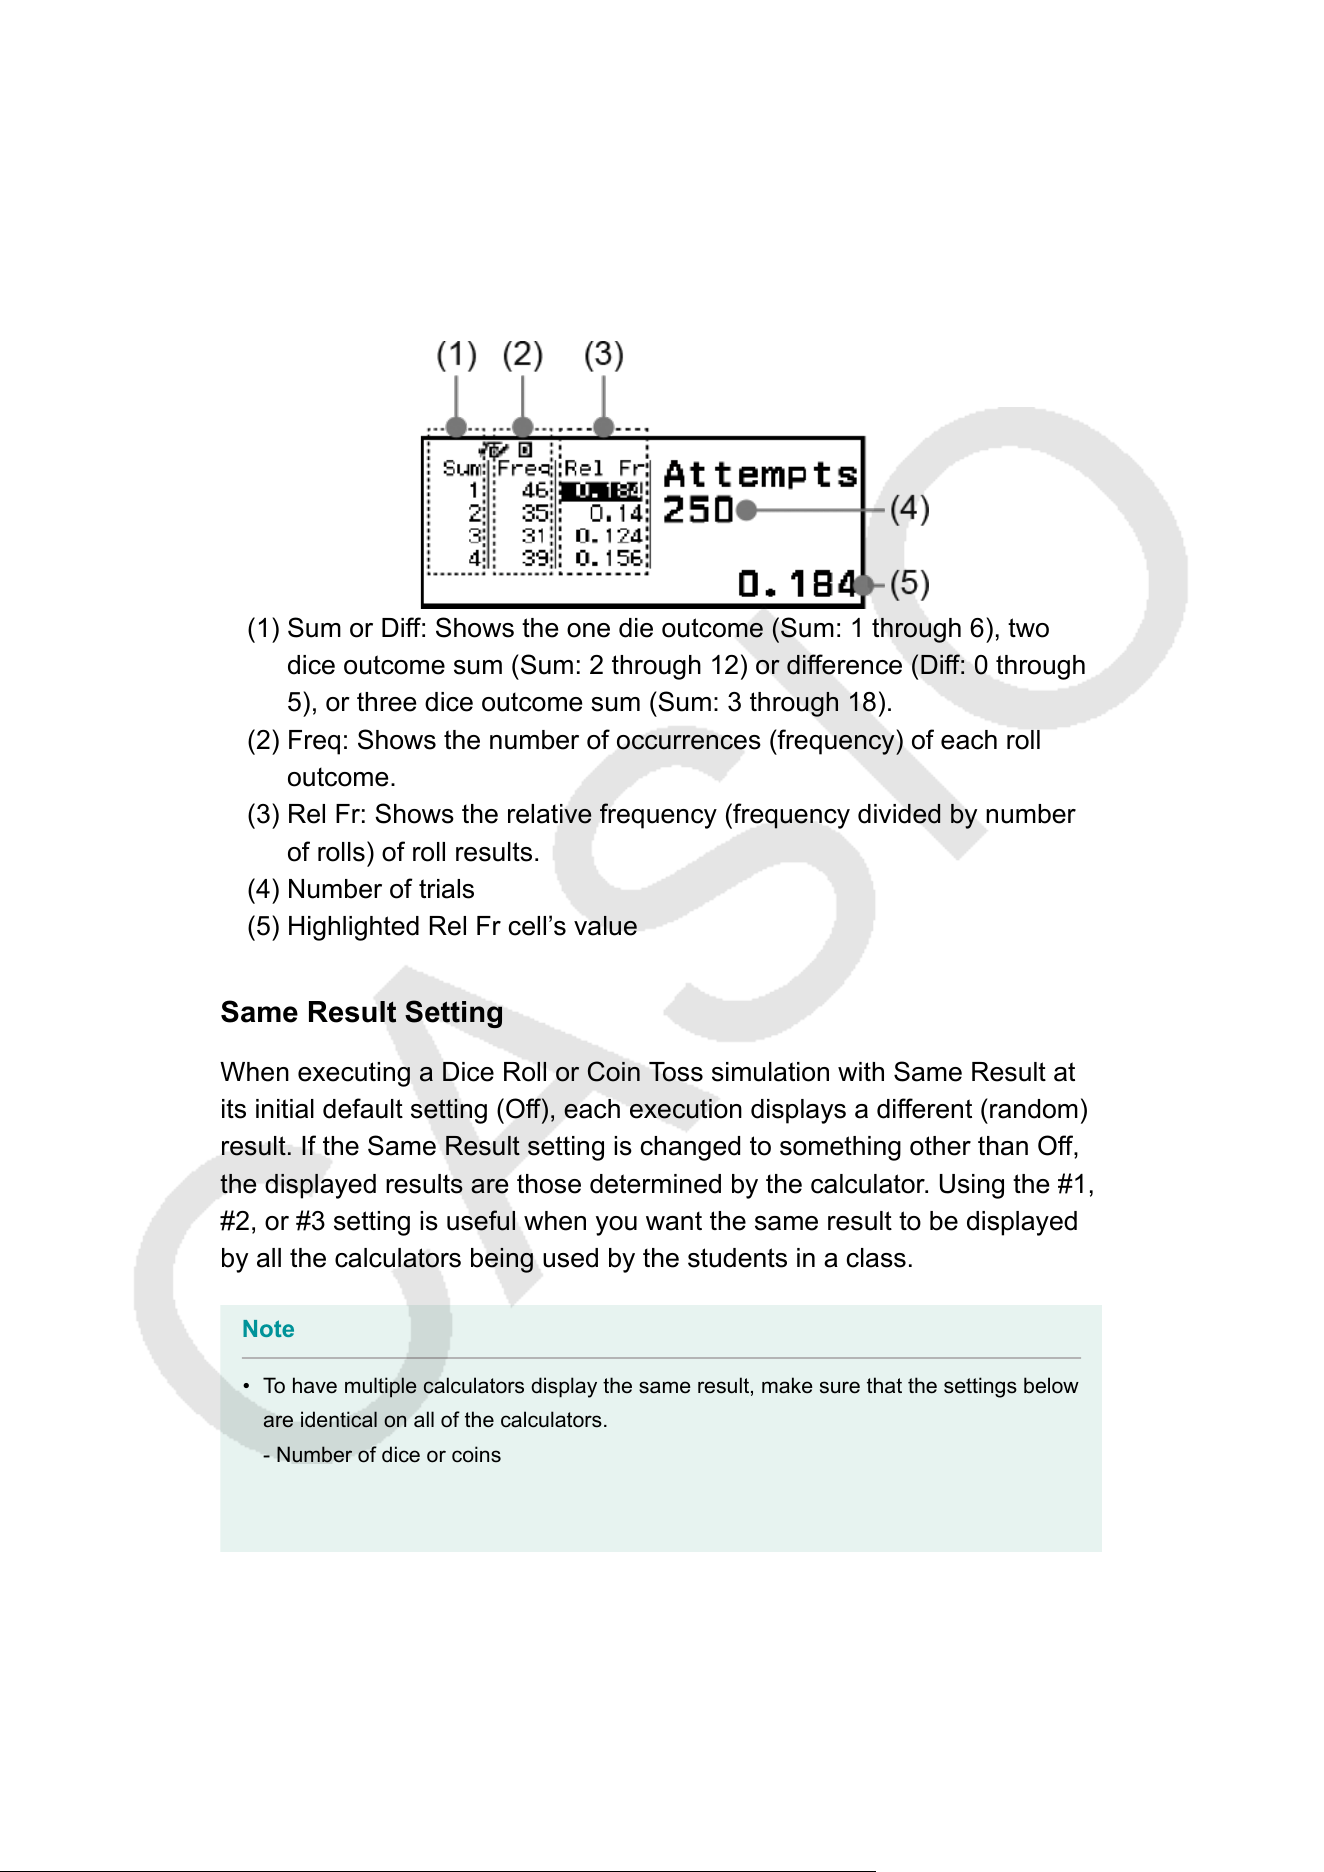
of two dice. The columns that appear on the display depend on how
many dice are being used.
1 die: A-column only
.
2 dice: A, B, Sum, and Diff columns.
3 dice: A, B, C, and Sum columns.
• Relative Freq screen
(1) Sum or Diff: Shows the one die outcome (Sum: 1 through 6), two
dice outcome sum (Sum: 2 through 12) or dif
ference (Diff: 0 through
5), or three dice outcome sum (Sum: 3 through 18).
(2) Freq: Shows the number of occurrences (frequency) of each roll
outcome.
(3) Rel Fr: Shows the relative frequency (frequency divided by number
of rolls) of roll results.
(4) Number of trials
(5) Highlighted Rel Fr cell’s value
Same Result Setting
When executing a Dice Roll or Coin Toss simulation with Same Result at
its initial default setting (Off), each execution displays a different (random)
result. If the Same Result setting is changed to something other than Off,
the displayed results are those determined by the calculator. Using the #1,
#2, or #3 setting is useful when you want the same result to be displayed
by all the calculators being used by the students in a class.
Note
• To have multiple calculators display the same result, make sure that the settings below
are identical on all of the calculators.
- Number of dice or coins
- Number of trials (rolls or tosses)
- Same Result setting (#1, #2, or #3)
139
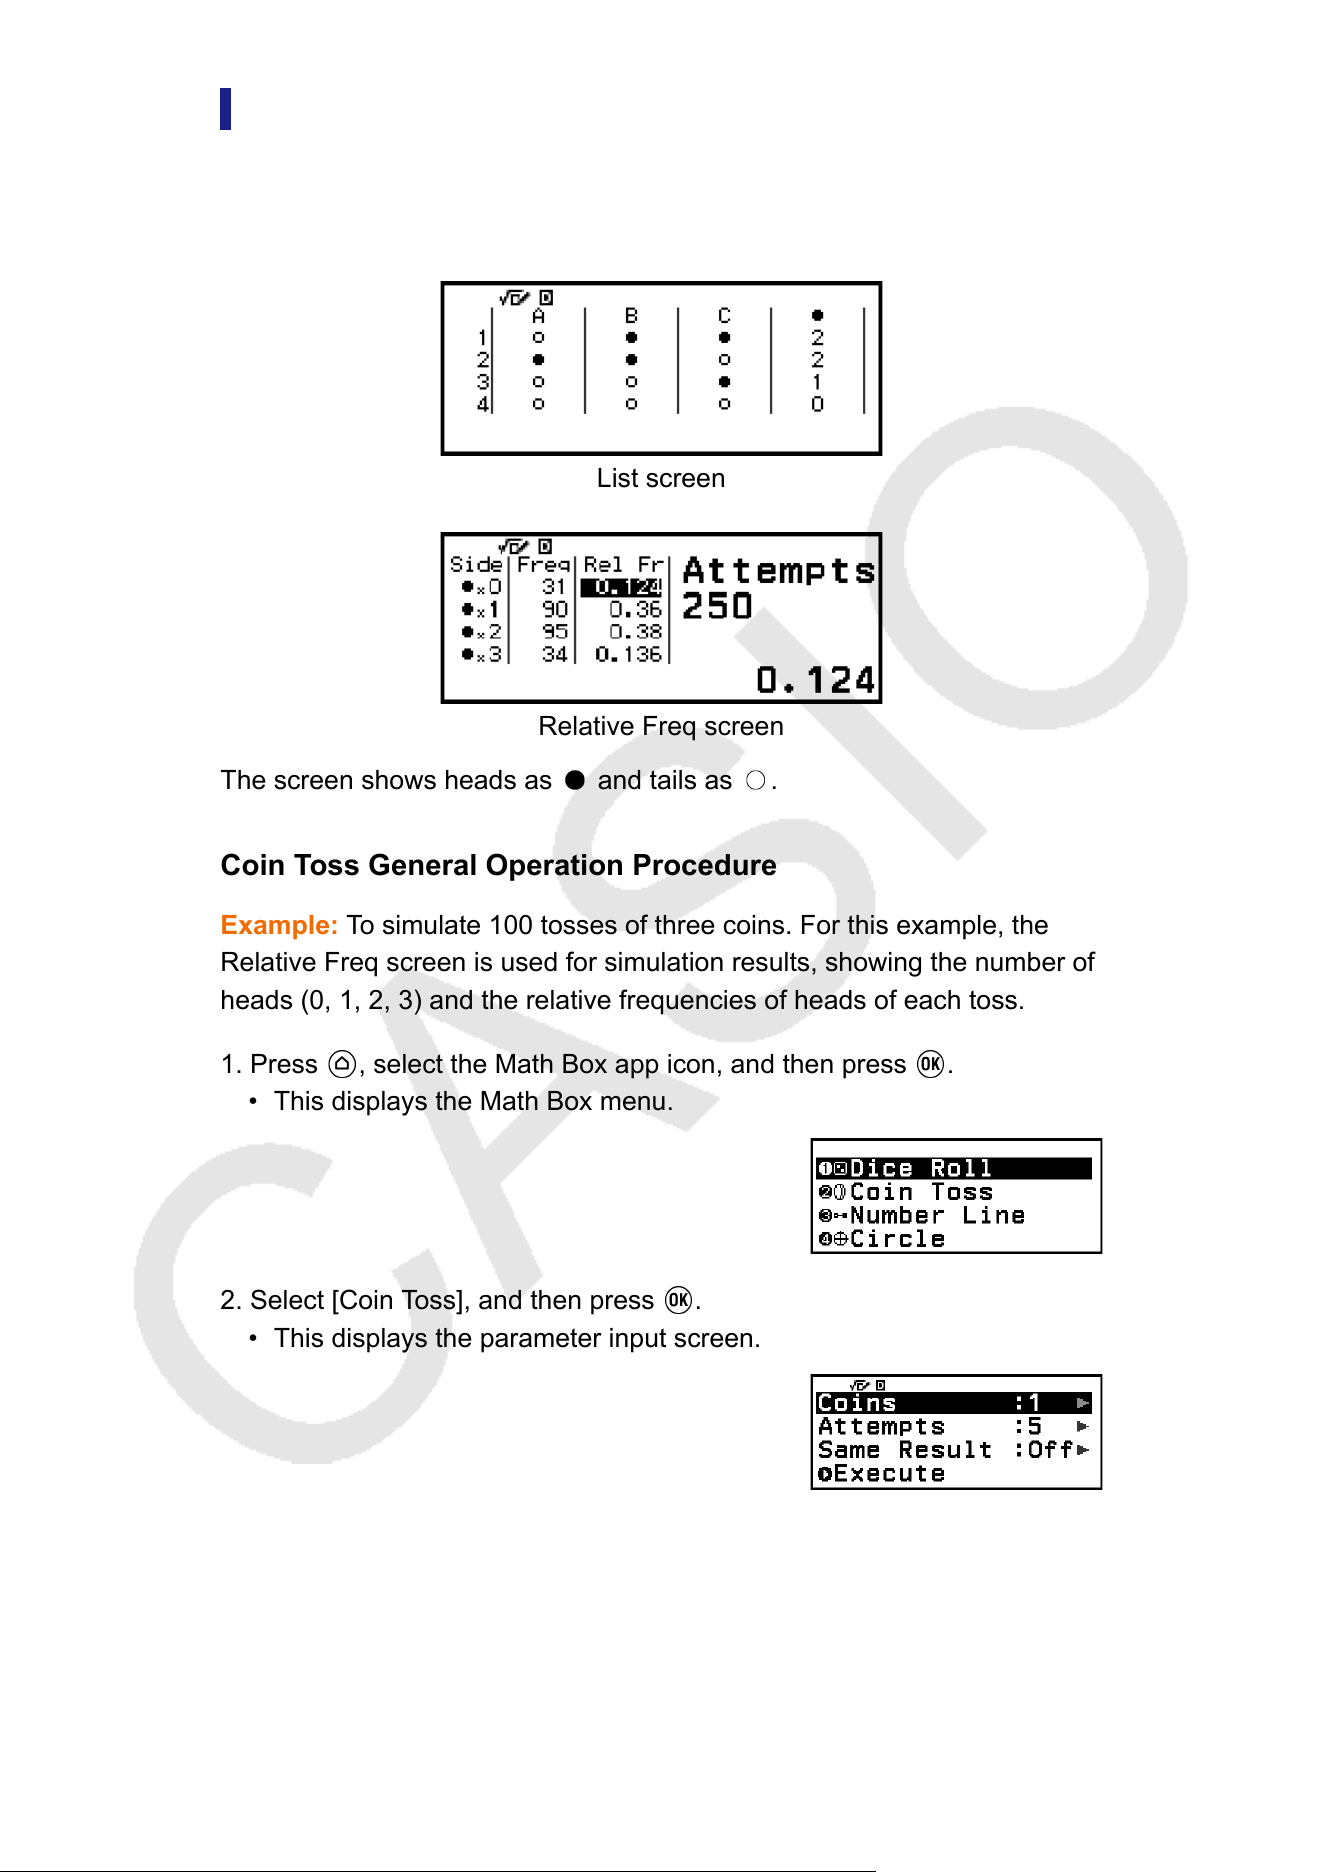
Coin Toss
Coin T
oss performs a simulation of one, two, or three virtual coin tosses a
specified number of times. You can select either of the following screens
for the result.
List screen
Relative Freq screen
The screen shows heads as and tails as .
Coin T
oss General Operation Procedure
Example: To simulate 100 tosses of three coins. For this example, the
Relative Freq screen is used for simulation results, showing the number of
heads (0, 1, 2, 3) and the relative frequencies of heads of each toss.
1. Press
, select the Math Box app icon, and then press .
• This displays the Math Box menu.
2. Select [Coin Toss], and then press .
• This displays the parameter input screen.
Coins: Select the number of coins as 1, 2, or 3.
Attempts: Input the number of coin tosses (number of trials) as a value
from 1 to 250.
Same Result: This setting is normally Of
f (initial default setting). For
details, see "Same Result Setting" (page 139).
140
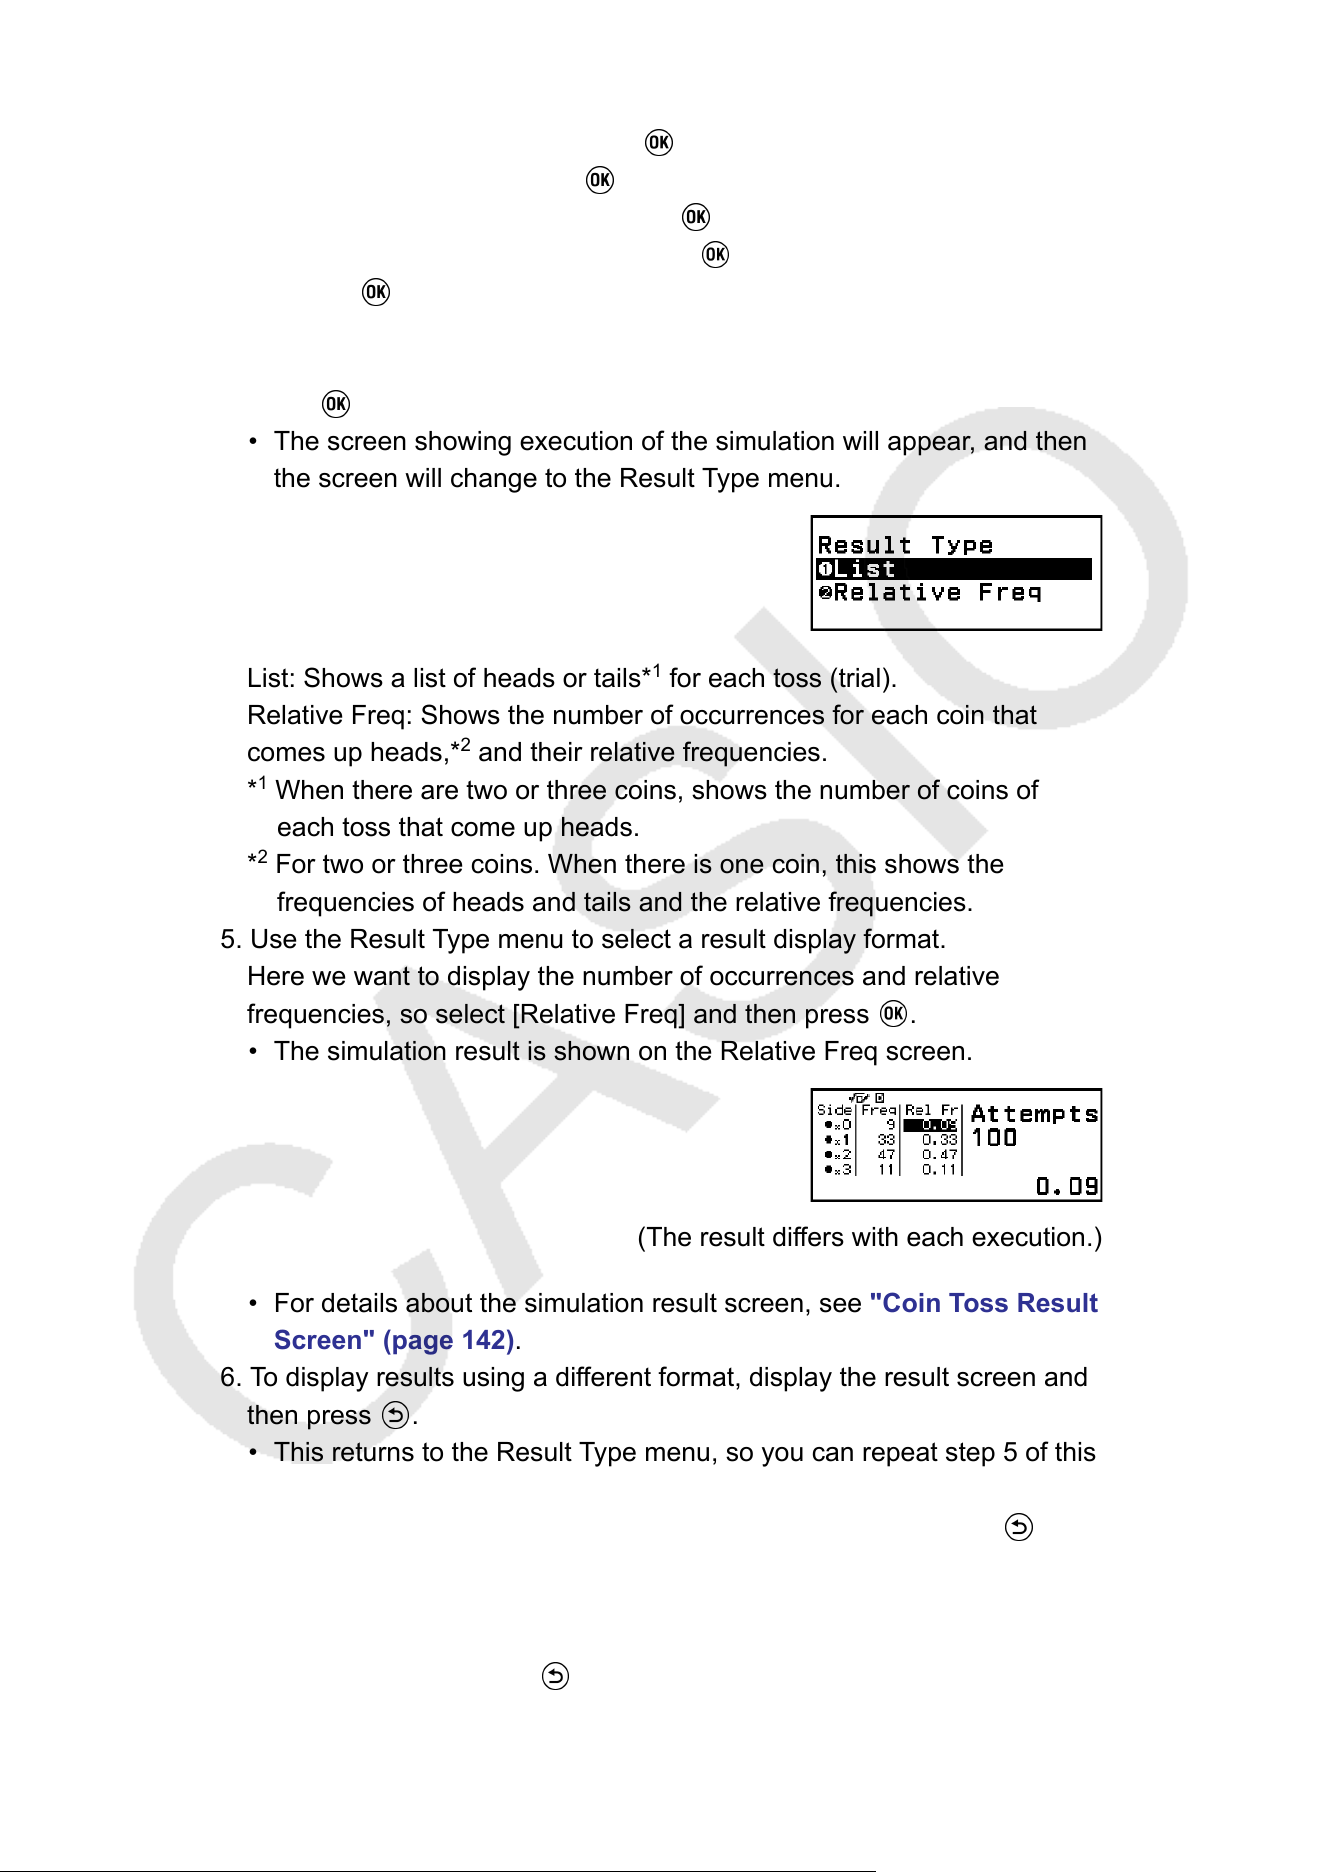
3. Select each of the menu settings and configure them the way you want.
(1) Select [Coins] and then press . On the menu that appears, select
[3 Coins] and then press .
(2) Select [Attempts] and then press . When the input screen
appears, input 100 and then press . Select [Confirm] and then
press .
(3) Leave the [Same Result] set to Of
f (initial default setting).
4. After all of the settings are the way you want, select [Execute] and then
press
.
• The screen showing execution of the simulation will appear, and then
the screen will change to the Result T
ype menu.
List: Shows a list of heads or tails*
1
for each toss (trial).
Relative Freq: Shows the number of occurrences for each coin that
comes up heads,*
2
and their relative frequencies.
*
1
When there are two or three coins, shows the number of coins of
each toss that come up heads.
*
2
For two or three coins. When there is one coin, this shows the
frequencies of heads and tails and the relative frequencies.
5. Use the Result Type menu to select a result display format.
Here we want to display the number of occurrences and relative
frequencies, so select [Relative Freq] and then press .
• The simulation result is shown on the Relative Freq screen.
(The result differs with each execution.)
• For details about the simulation result screen, see "Coin T
oss Result
Screen" (page 142).
6. To display results using a different format, display the result screen and
then press
.
• This returns to the Result Type menu, so you can repeat step 5 of this
procedure and change the result display format.
7. If you want to perform a simulation with dif
ferent settings, press
while the Result Type menu is displayed.
• This clears the simulation result and returns to the parameter input
screen. Perform the procedure again from step 3.
8. T
o exit Coin Toss, press
while the parameter input screen is
displayed.
141
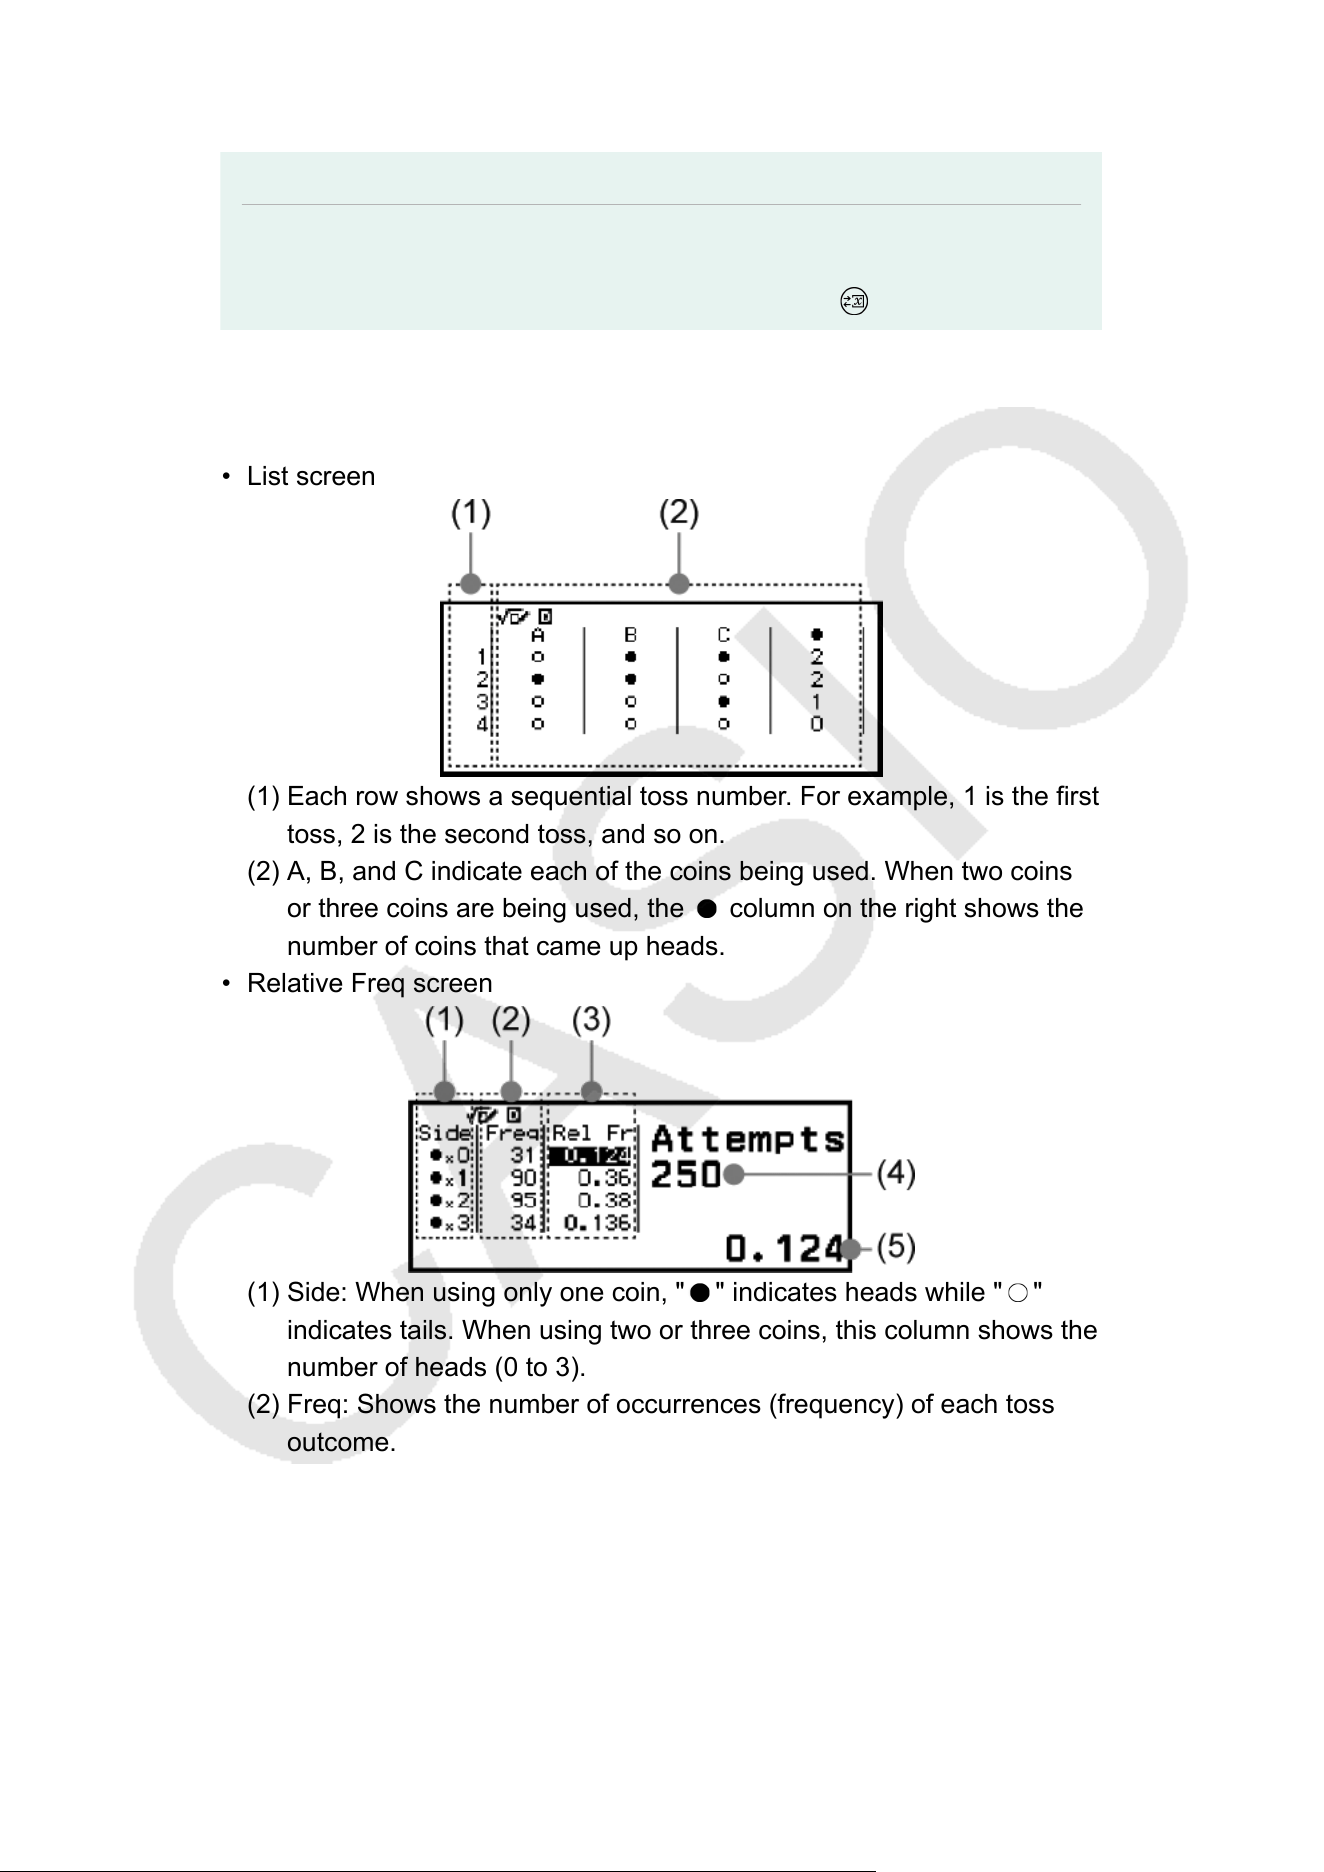
• This returns to the Math Box menu.
Note
• On the Relative Freq screen, you can store the value in a Rel Fr column cell to a
variable. For example, performing the following operation in step 5, above, will store
the value in the first row of the "Rel Fr" column to variable A:
– [A=] > [Store].
Coin T
oss Result Screen
• List screen
(1) Each row shows a sequential toss number. For example, 1 is the first
toss, 2 is the second toss, and so on.
(2) A, B, and C indicate each of the coins being used. When two coins
or three coins are being used, the column on the right shows the
number of coins that came up heads.
• Relative Freq screen
(1) Side: When using only one coin, " " indicates heads while " "
indicates tails. When using two or three coins, this column shows the
number of heads (0 to 3).
(2) Freq: Shows the number of occurrences (frequency) of each toss
outcome.
(3) Rel Fr: Shows the relative frequency (frequency divided by number
of tosses) of toss results.
(4) Number of trials
(5) Highlighted Rel Fr cell’
s value
142
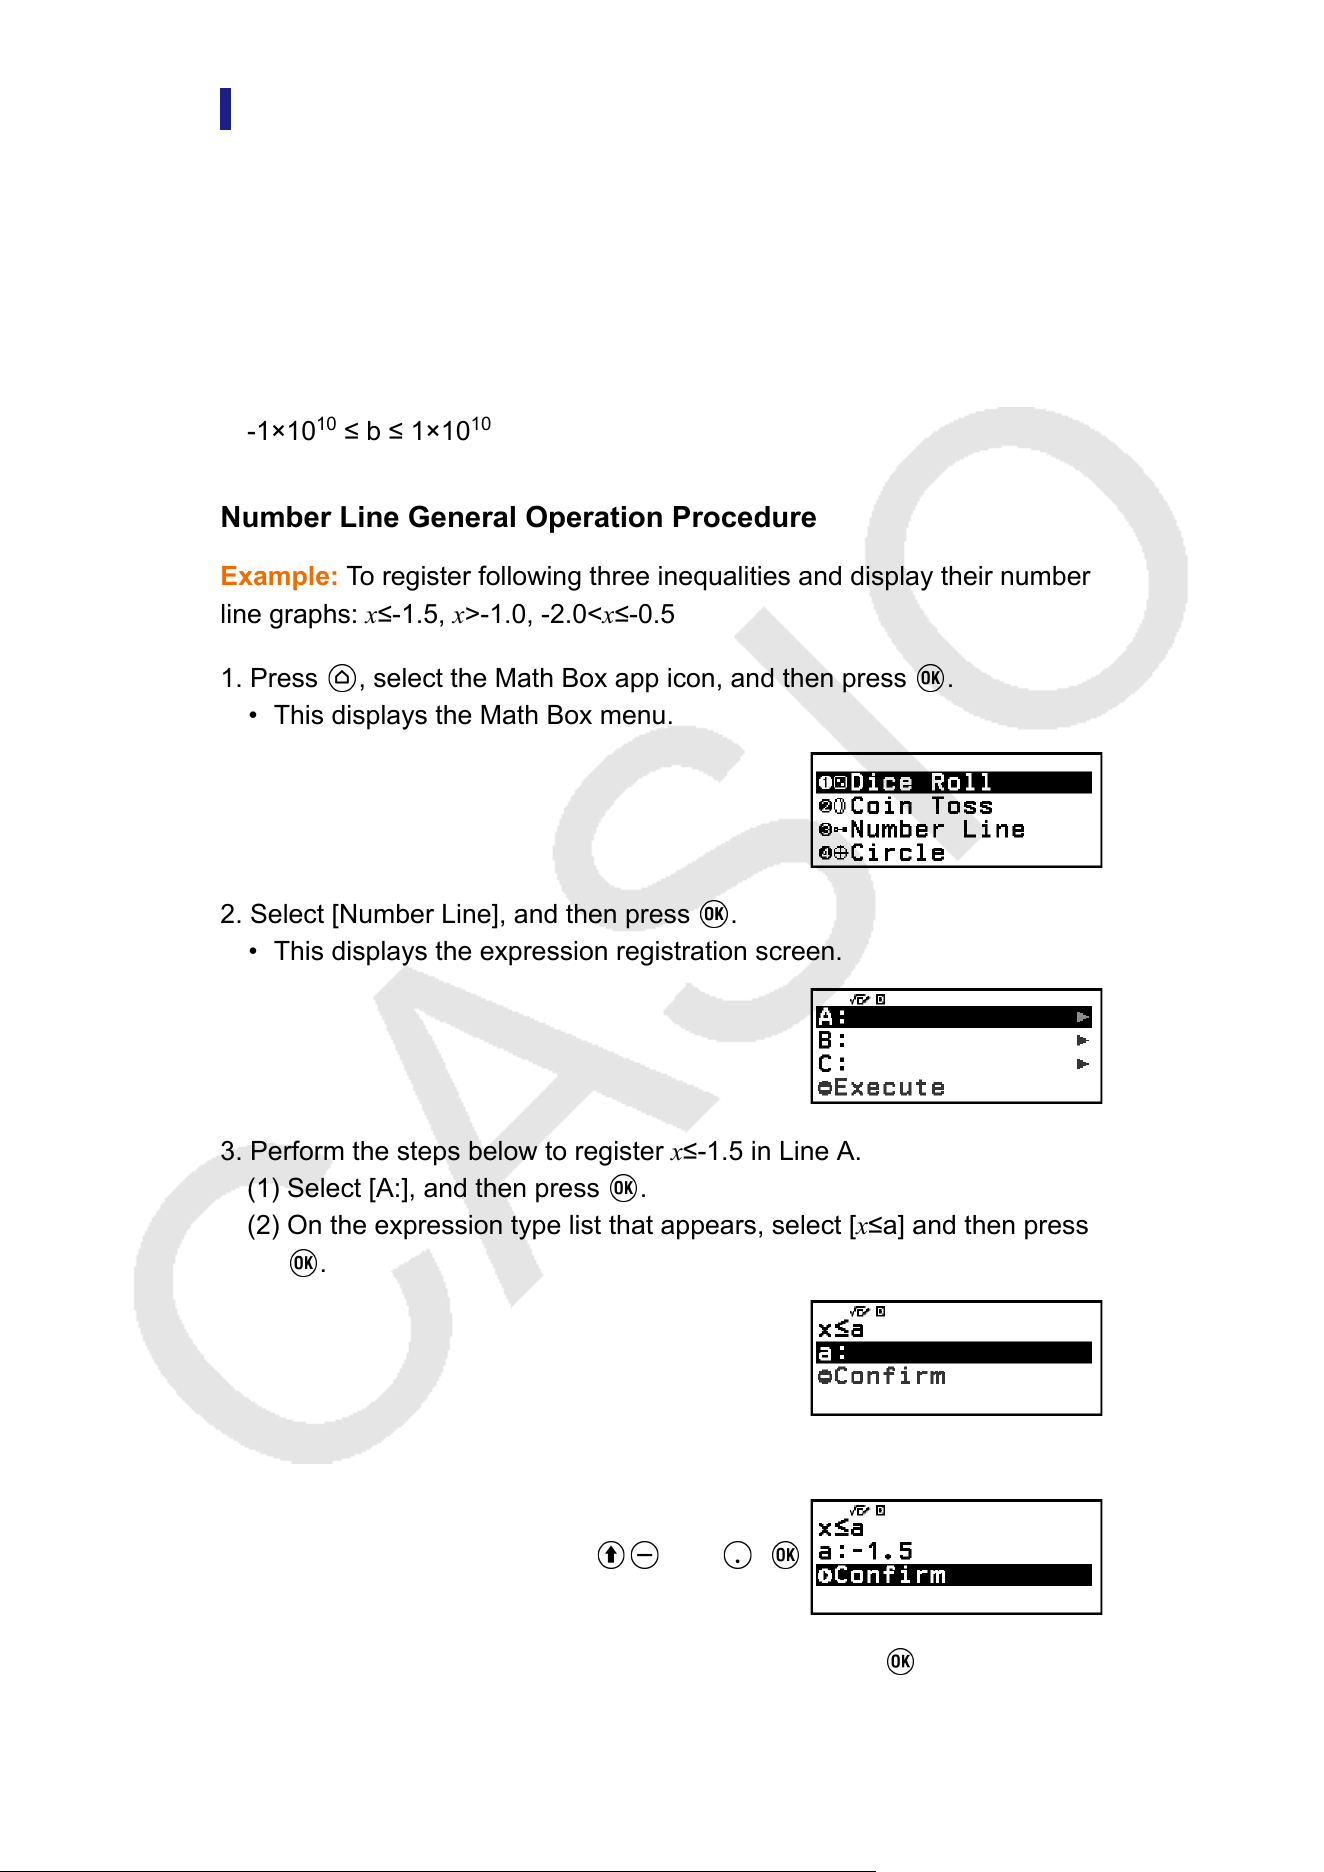
Number Line
Number Line registers up to three equations or inequalities and displays
their number line graphs. The expression types that can be selected are
shown below
.
x<a, x≤a, x=a, x>a, x≥a, a<x<b, a≤x<b, a<x≤b, a≤x≤b
The values that you input for a and b in the above expressions must be
within the ranges defined below.
-1×10
10
≤ a ≤ 1×10
10
-1×10
10
≤ b ≤ 1×10
10
Number Line General Operation Procedure
Example: T
o register following three inequalities and display their number
line graphs: x≤-1.5, x>-1.0, -2.0<x≤-0.5
1. Press
, select the Math Box app icon, and then press .
• This displays the Math Box menu.
2. Select [Number Line], and then press .
• This displays the expression registration screen.
3. Perform the steps below to register x≤-1.5 in Line A.
(1) Select [A:], and then press .
(2) On the expression type list that appears, select [x≤a] and then press
.
(3) Input -1.5 for a.
((-))1 5
(4) After making sure that [Confirm] is selected, press .
143
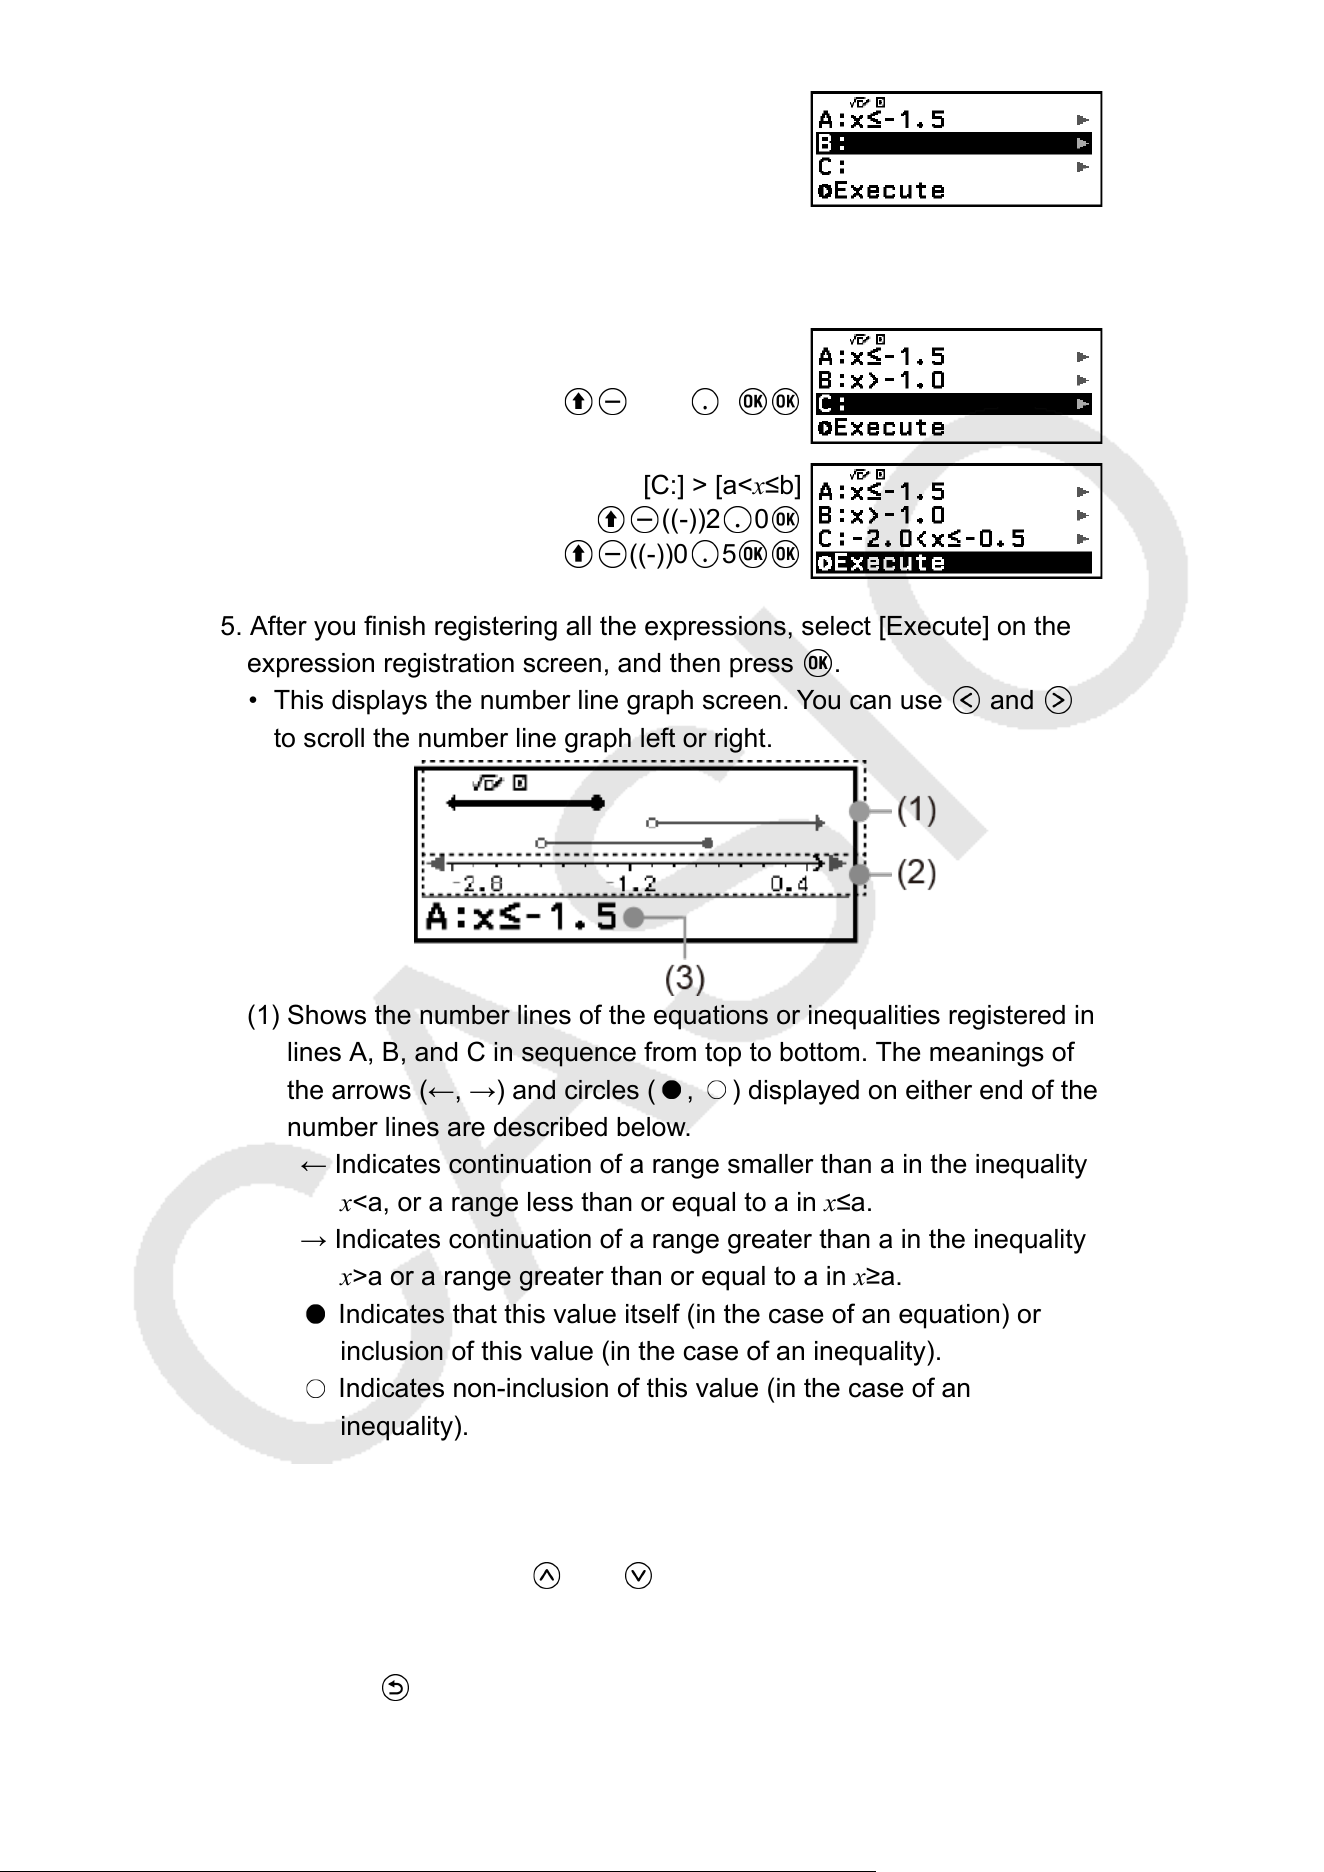
4. Use the steps shown in step 3 to register x>-1.0 in Line B and
-2.0<x≤-0.5 in Line C.
[B:] > [x>a]
((-))1 0
[C:] > [a<x≤b]
((-))2 0
((-))0 5
5. After you finish registering all the expressions, select [Execute] on the
expression registration screen, and then press .
• This displays the number line graph screen. You can use and
to scroll the number line graph left or right.
(1) Shows the number lines of the equations or inequalities registered in
lines A, B, and C in sequence from top to bottom. The meanings of
the arrows (←, →) and circles ( , ) displayed on either end of the
number lines are described below.
← Indicates continuation of a range smaller than a in the inequality
x<a, or a range less than or equal to a in x≤a.
→ Indicates continuation of a range greater than a in the inequality
x>a or a range greater than or equal to a in x≥a.
Indicates that this value itself (in the case of an equation) or
inclusion of this value (in the case of an inequality).
Indicates non-inclusion of this value (in the case of an
inequality).
(2) x-axis. This shows the center and either end values.
(3) Shows the equations or inequalities of the currently selected number
line (the number line displayed in bold). T
o display a different number
line expression, use
and to move the bolding to the number
line whose expression you want to view
.
6. To change the expression, display the number line graph screen and
then press
.
144
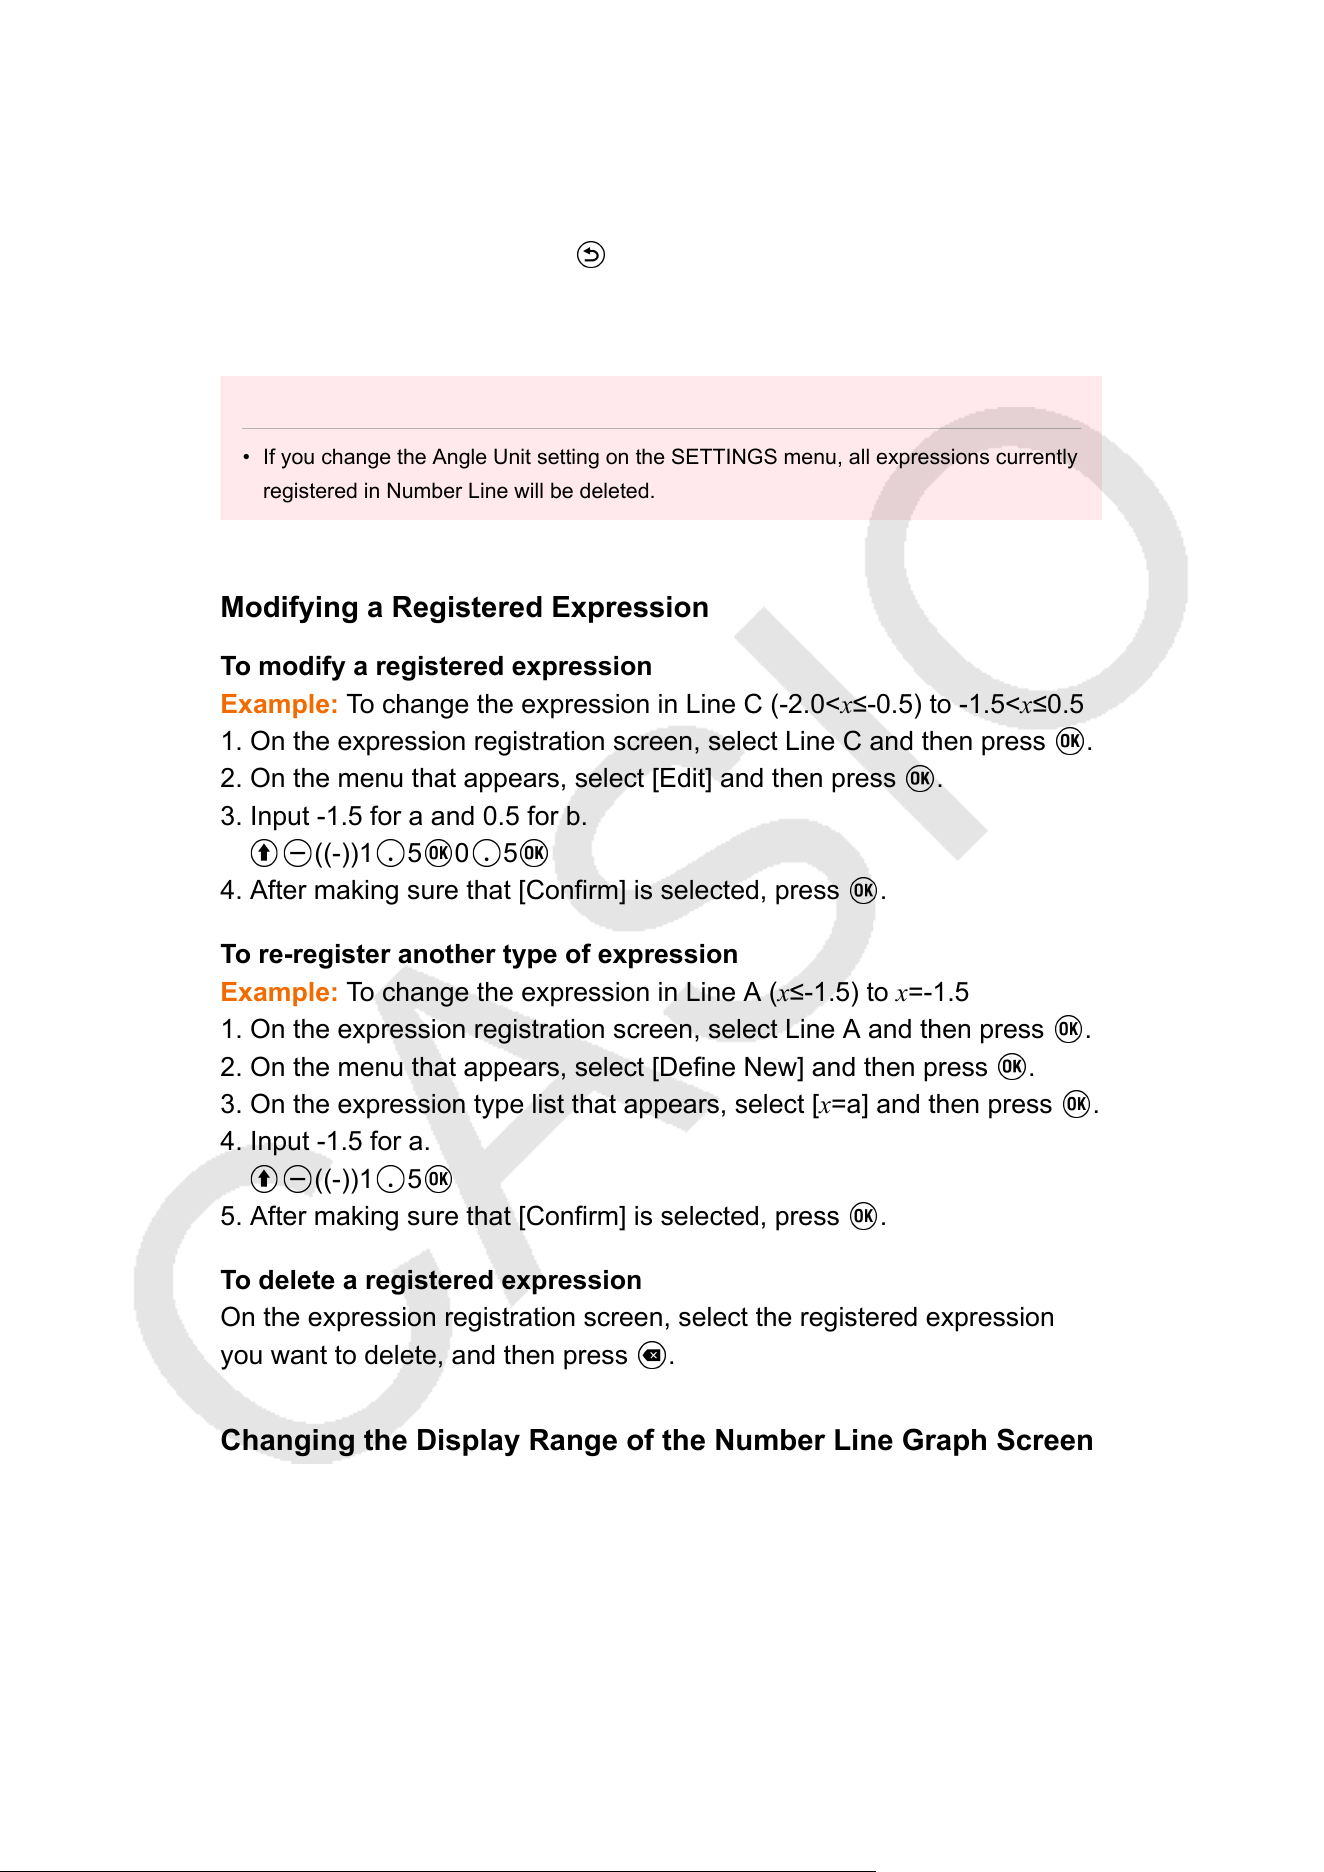
• This returns to the expression registration screen. You can change
only the values of a registered expression, or you can re-register
another type of expression. For information about how to do this, see
"Modifying a Registered Expression"
(page 145).
7. To exit Number Line, press
on the expression registration screen.
• This clears the registered expression and returns to the Math Box
menu.
Important!
• If you change the Angle Unit setting on the SETTINGS menu, all expressions currently
registered in Number Line will be deleted.
Modifying a Registered Expression
T
o modify a registered expression
Example: To change the expression in Line C (-2.0<x≤-0.5) to -1.5<x≤0.5
1. On the expression registration screen, select Line C and then press
.
2. On the menu that appears, select [Edit] and then press .
3. Input -1.5 for a and 0.5 for b.
((-))1 5 0 5
4. After making sure that [Confirm] is selected, press .
To re-register another type of expression
Example: To change the expression in Line A (x≤-1.5) to x=-1.5
1. On the expression registration screen, select Line A and then press .
2. On the menu that appears, select [Define New] and then press .
3. On the expression type list that appears, select [x=a] and then press .
4. Input -1.5 for a.
((-))1 5
5. After making sure that [Confirm] is selected, press .
T
o delete a registered expression
On the expression registration screen, select the registered expression
you want to delete, and then press
.
Changing the Display Range of the Number Line Graph Screen
(V
iew-Window)
When you register an expression and display the number line graph
screen, optimal display range settings are configured automatically. You
can change the display range by changing Center (1) and Scale (2)
settings of the x-axis. Use the View-Window screen to change display
range settings.
145
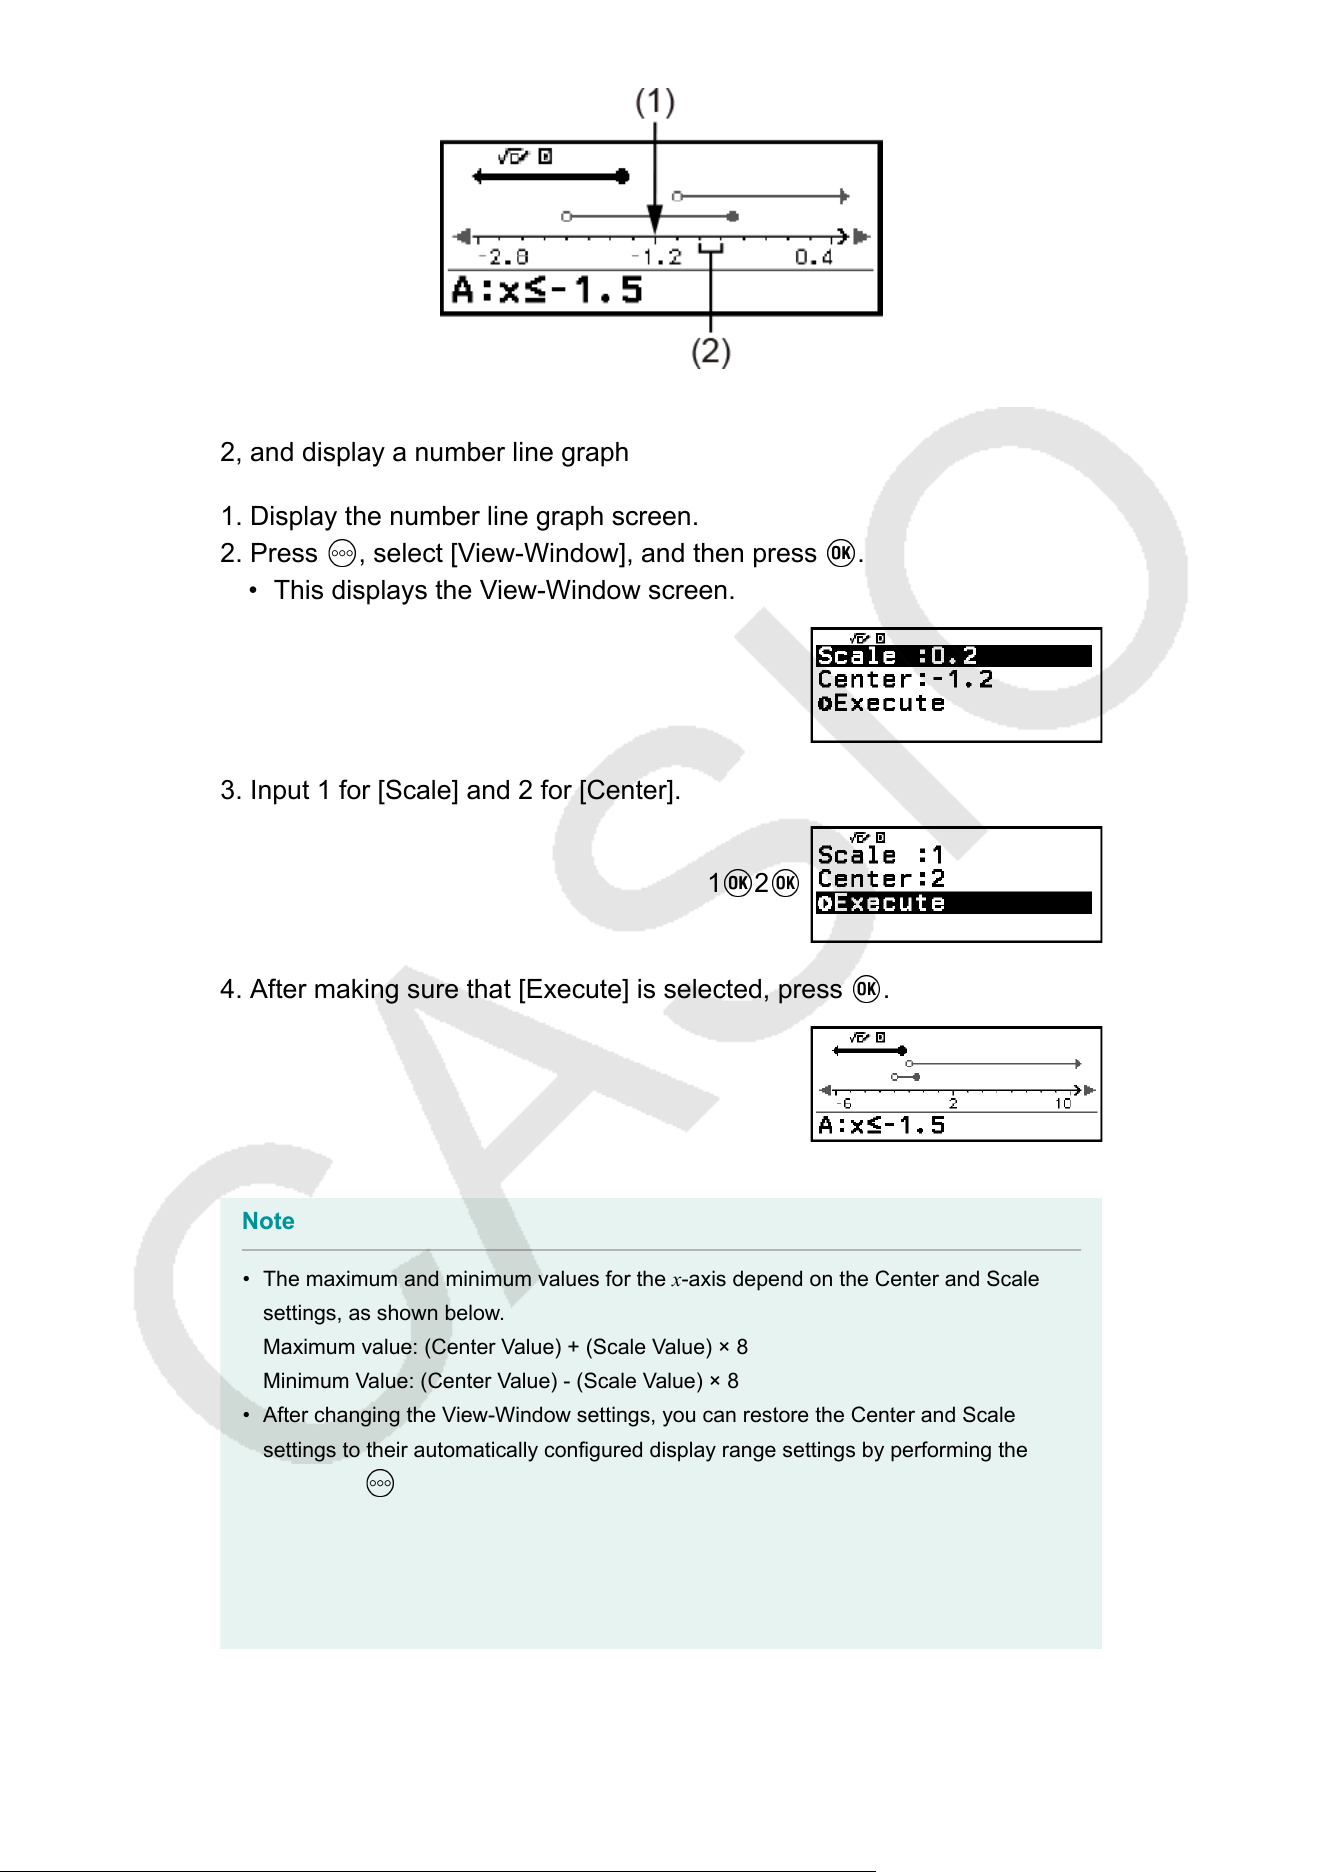
Example: T
o change the x-axis Scale setting to 1 and the Center setting to
2, and display a number line graph
1. Display the number line graph screen.
2. Press
, select [View-Window], and then press .
• This displays the View-Window screen.
3. Input 1 for [Scale] and 2 for [Center].
1 2
4. After making sure that [Execute] is selected, press .
Note
• The maximum and minimum values for the x-axis depend on the Center and Scale
settings, as shown below
.
Maximum value: (Center Value) + (Scale Value) × 8
Minimum Value: (Center Value) - (Scale Value) × 8
• After changing the View-Window settings, you can restore the Center and Scale
settings to their automatically configured display range settings by performing the
operation:
– [View-Reset].
• The values that you input for Scale and Center must be within the ranges defined
below.
1×10
-10
≤ Scale ≤ 1×10
10
-1×10
10
≤ Center ≤ 1×10
10
146
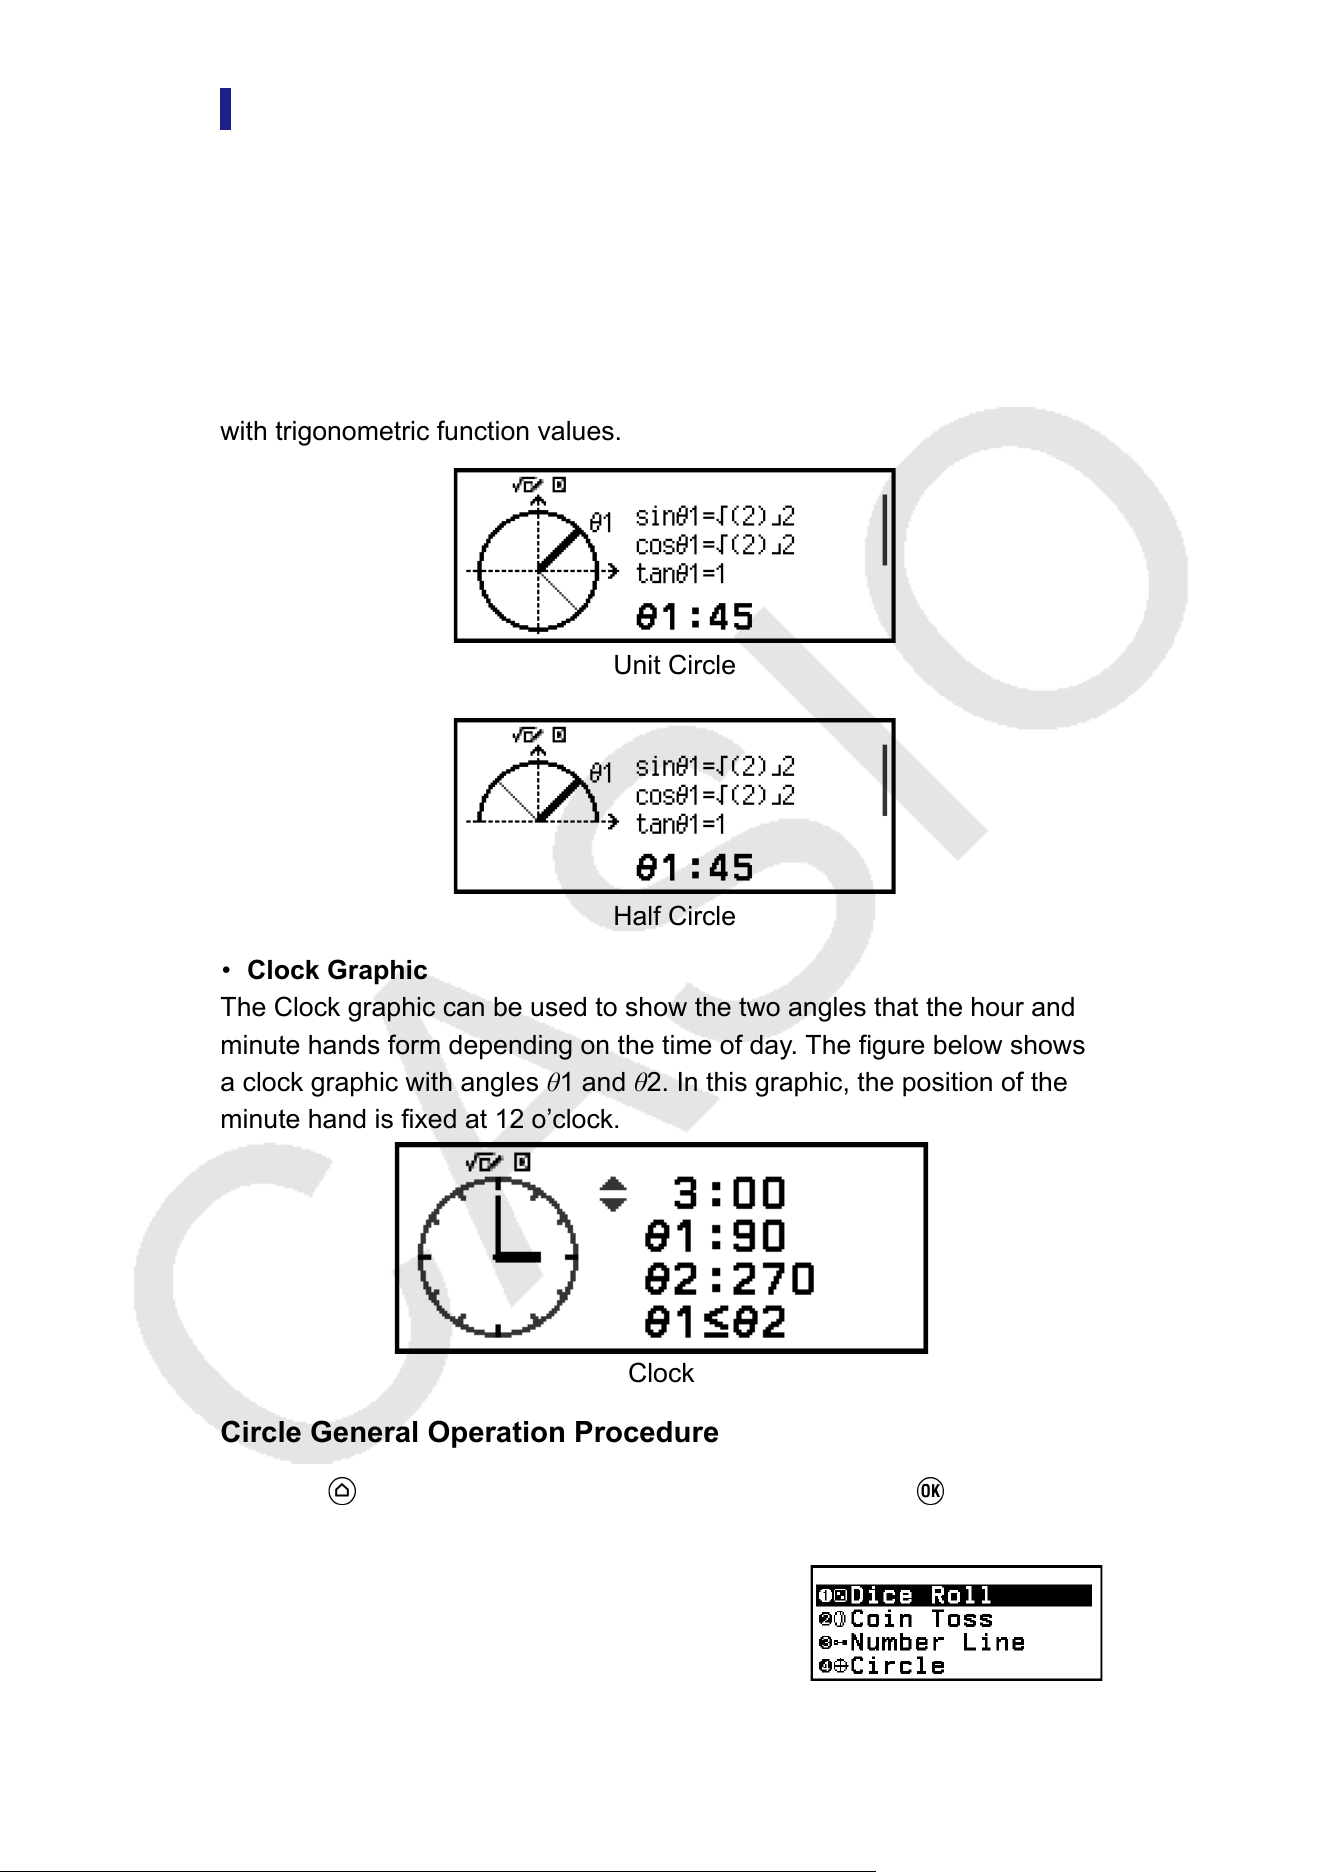
Circle
Circle provides the functions described below
, which can be used to learn
about angles and trigonometric functions.
• Unit Circle and Half Circle Graphics
The Unit Circle graphic shows the unit circle with a radius of 1, while the
Half Circle graphic shows a half circle with a radius of 1. Both the unit
circle and half circle are centered on the origin of rectangular coordinates.
The figures below show each type of circle with angles of θ1 and θ2, along
with trigonometric function values.
Unit Circle
Half Circle
• Clock Graphic
The Clock graphic can be used to show the two angles that the hour and
minute hands form depending on the time of day
. The figure below shows
a clock graphic with angles θ1 and θ2. In this graphic, the position of the
minute hand is fixed at 12 o’clock.
Clock
Circle General Operation Procedure
1. Press , select the Math Box app icon, and then press .
• This displays the Math Box menu.
147
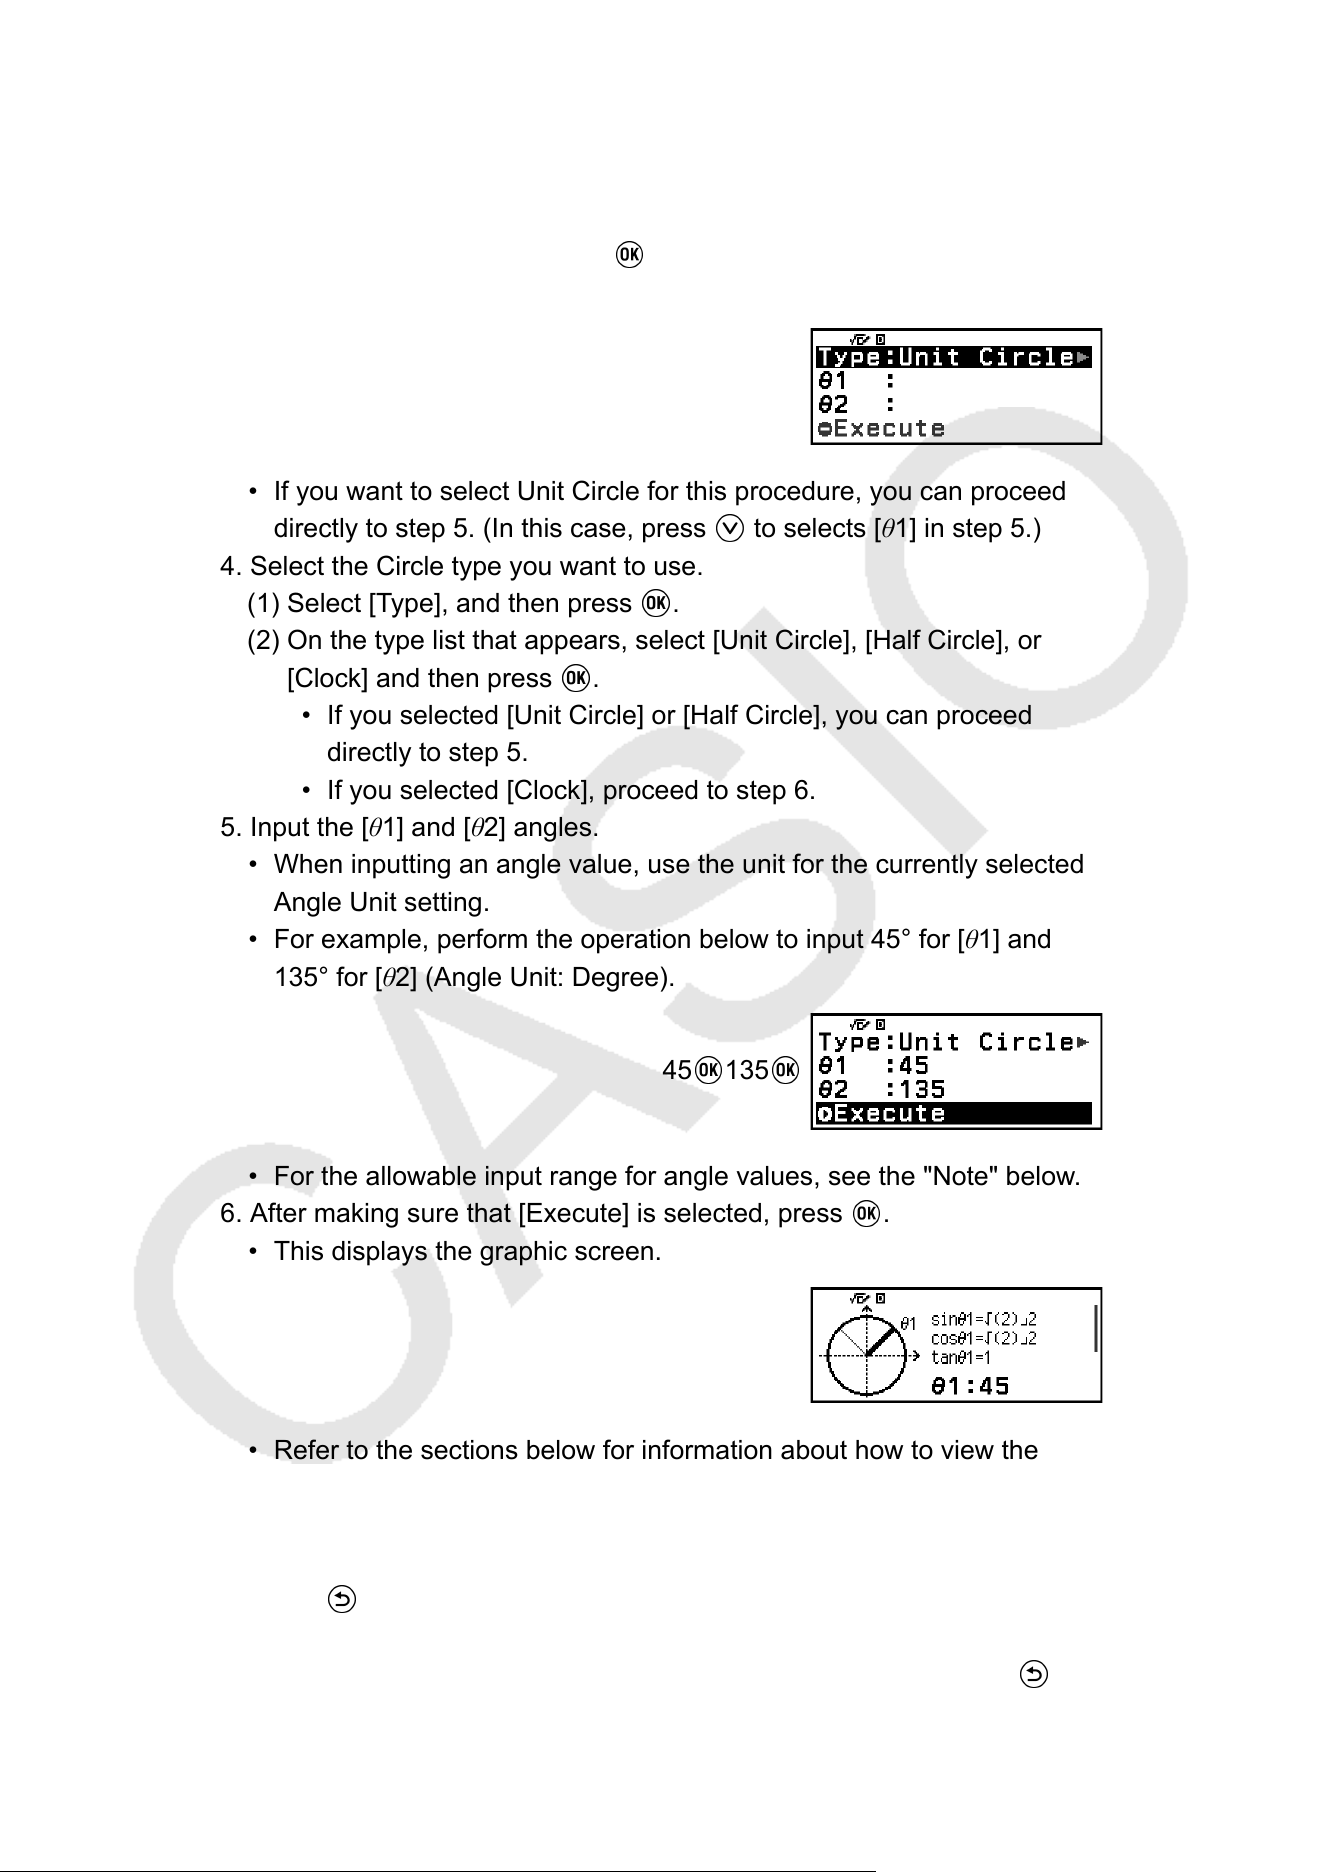
2. Configure the Angle Unit setting as required.
• You can select any one of the following units for angle value input:
Degree, Radian, Gradian. See "Changing Calculator Settings"
(page 24).
3. Select [Circle], and then press .
• This displays the parameter input screen.
• If you want to select Unit Circle for this procedure, you can proceed
directly to step 5. (In this case, press to selects [θ1] in step 5.)
4. Select the Circle type you want to use.
(1) Select [Type], and then press .
(2) On the type list that appears, select [Unit Circle], [Half Circle], or
[Clock] and then press .
• If you selected [Unit Circle] or [Half Circle], you can proceed
directly to step 5.
• If you selected [Clock], proceed to step 6.
5. Input the [θ1] and [θ2] angles.
• When inputting an angle value, use the unit for the currently selected
Angle Unit setting.
• For example, perform the operation below to input 45° for [θ1] and
135° for [θ2] (Angle Unit: Degree).
45
135
• For the allowable input range for angle values, see the "Note" below.
6. After making sure that [Execute] is selected, press .
• This displays the graphic screen.
• Refer to the sections below for information about how to view the
graphic screen and perform its operations.
"Unit Circle and Half Circle Graphic Screens" (page 149)
"Clock Graphic Screen" (page 150)
7. Press to return to the parameter input screen from the graphic
screen.
8. T
o exit Circle, display the parameter input screen and then press
.
• This returns to the Math Box menu.
148
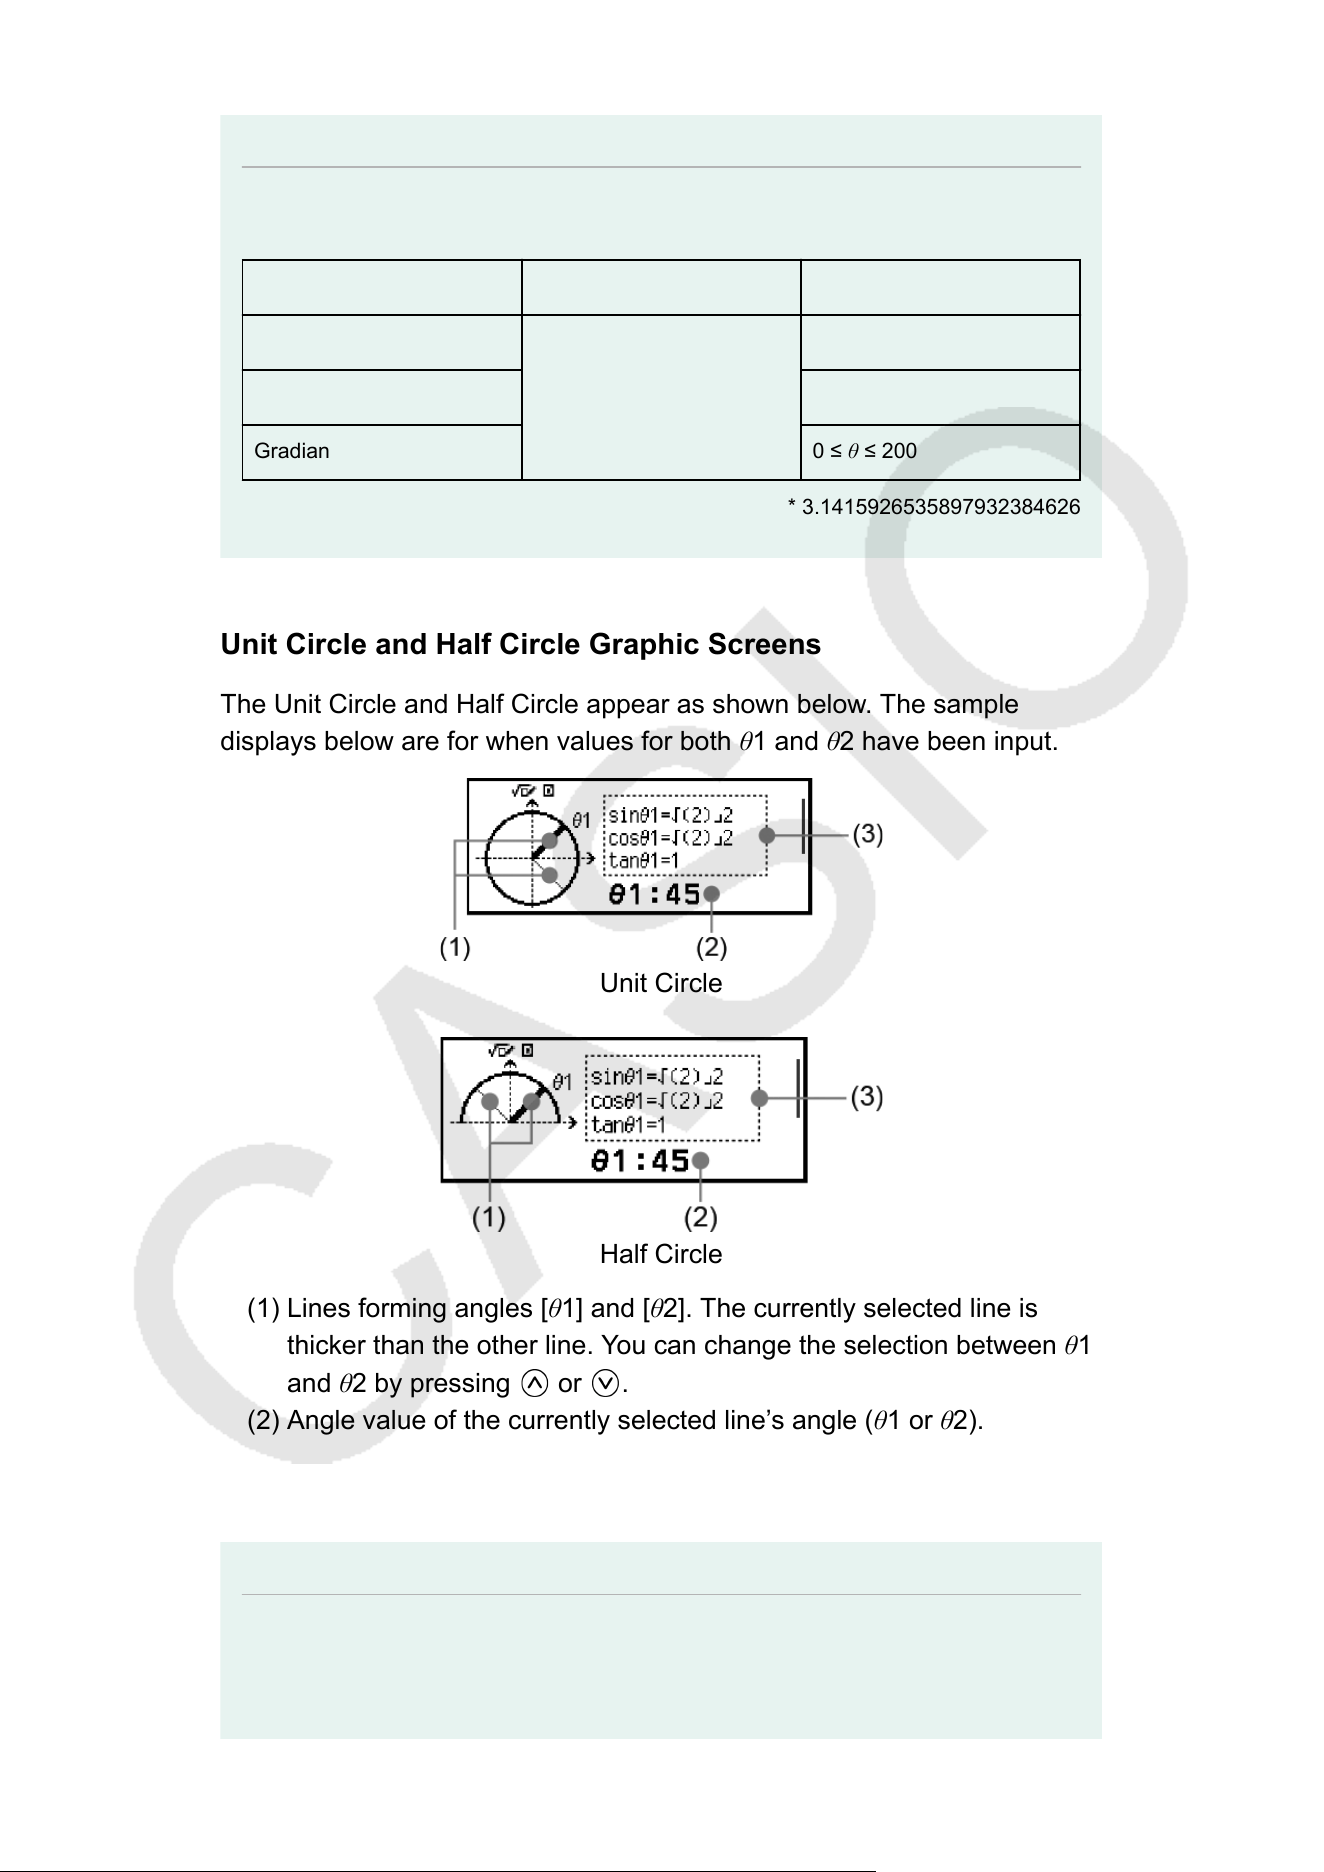
Note
• The table below shows the allowable input ranges for values you input in step 5
above.
Angle Unit setting Unit Circle Half Circle
Degree
-10000 < θ < 10000
0 ≤ θ ≤ 180
Radian
0 ≤ θ ≤ π*
Gradian
0 ≤ θ ≤ 200
* 3.1415926535897932384626
Unit Circle and Half Circle Graphic Screens
The Unit Circle and Half Circle appear as shown below
. The sample
displays below are for when values for both θ1 and θ2 have been input.
Unit Circle
Half Circle
(1) Lines forming angles [θ1] and [θ2]. The currently selected line is
thicker than the other line. Y
ou can change the selection between θ1
and θ2 by pressing
or .
(2) Angle value of the currently selected line’
s angle (θ1 or θ2).
(3) Trigonometric function values of the currently selected line’s angle
(θ1 or θ2).
Note
• When only a single angle (θ1 or θ2) is input, a single thick line will be displayed to
form the angle. In this case, the angle value of the single angle is shown for (2), and
trigonometric function values for the angle are shown for (3).
149
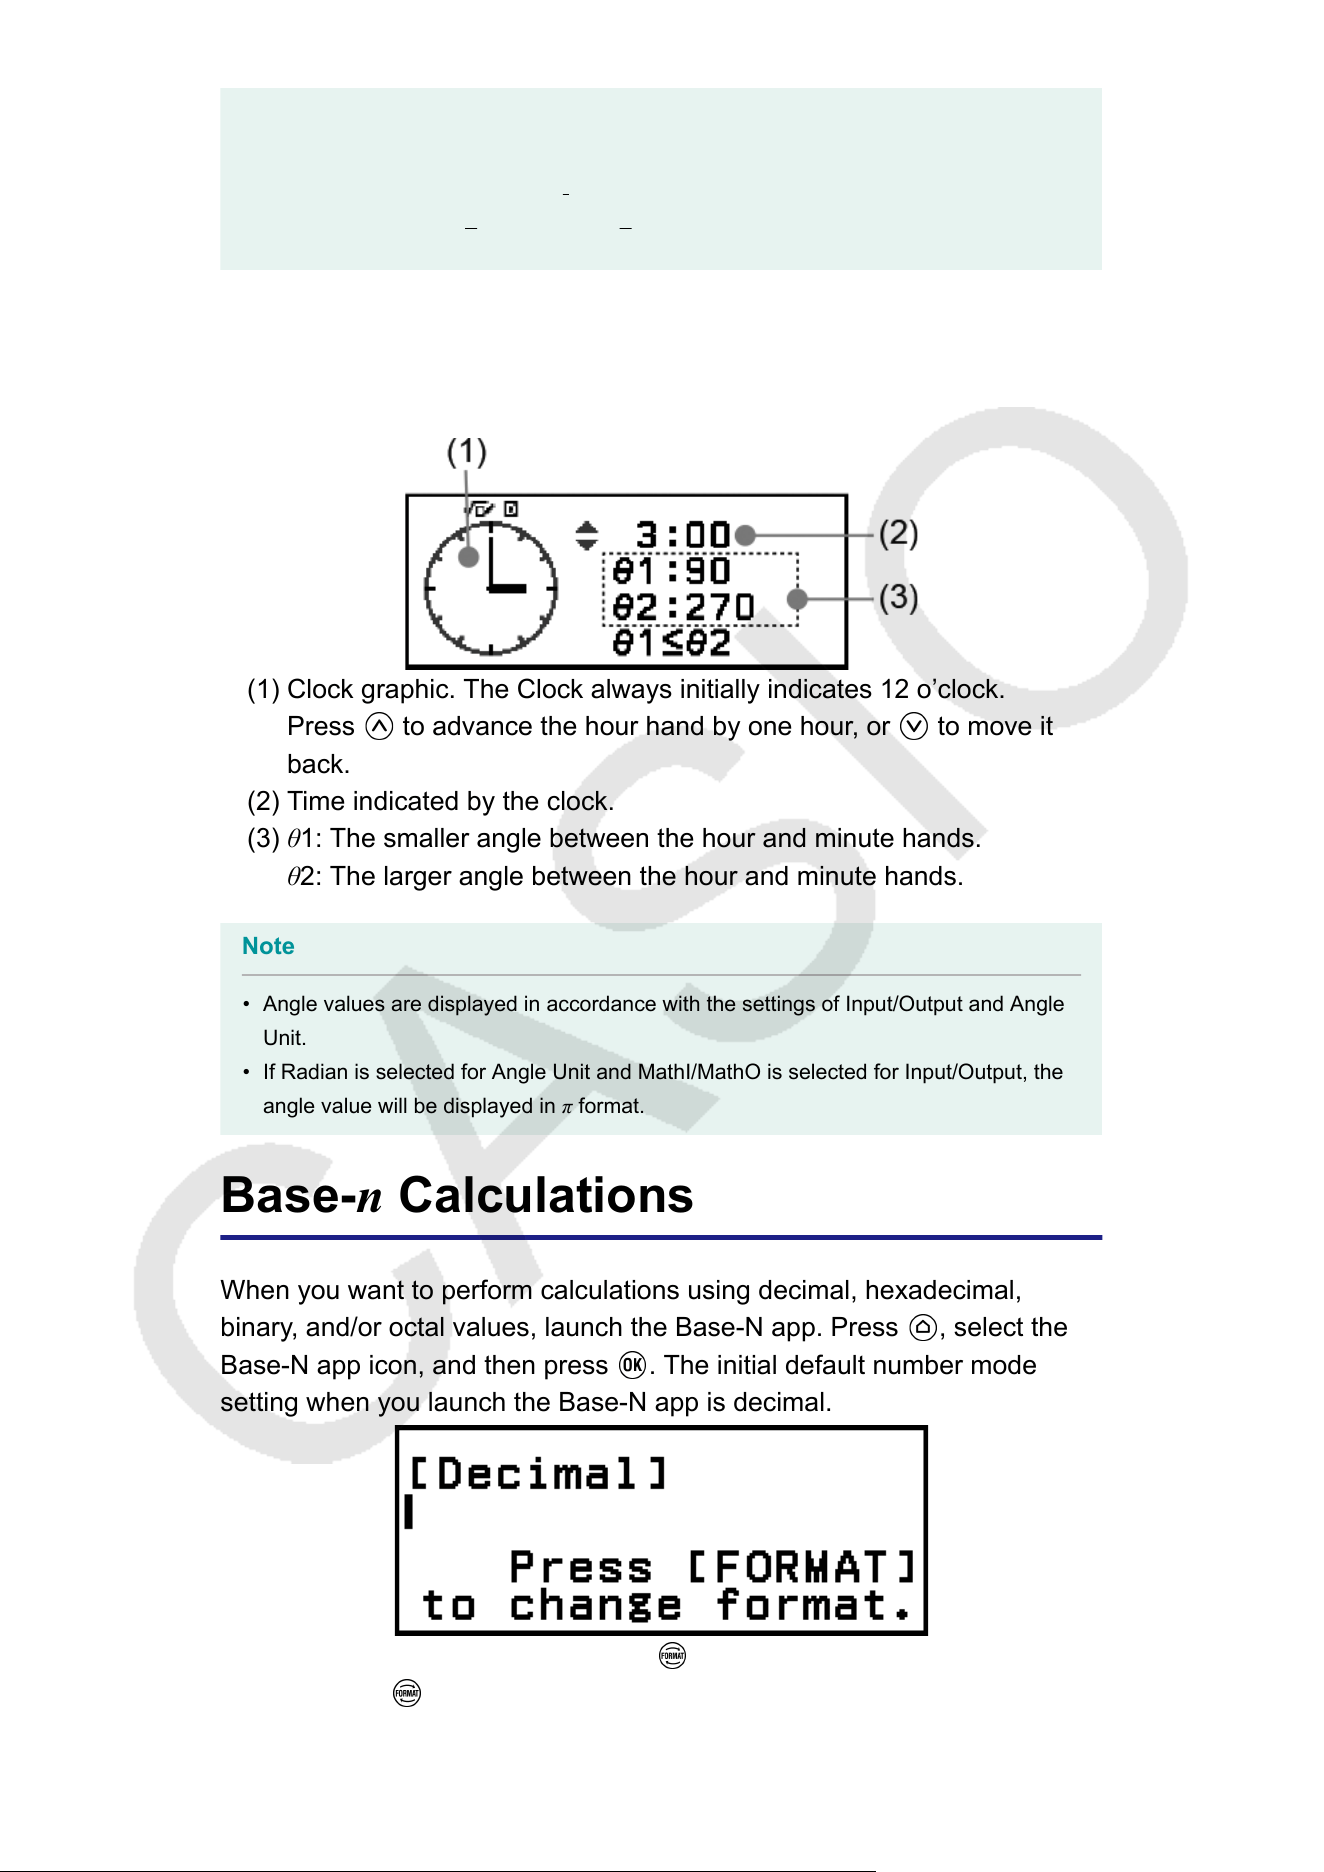
• On the graphic screen, the values of the trigonometric functions are displayed in
accordance with the settings of Input/Output and Angle Unit.
• When MathI/MathO or MathI/DecimalO is selected for Input/Output, trigonometric
values may include fraction or
√
values as applicable.
Example: sin (45) = √2/2, cos (30) = √3/2 (Angle Unit: Degree)
Clock Graphic Screen
The example below shows a typical Clock graphic screen.
(1) Clock graphic. The Clock always initially indicates 12 o’clock.
Press to advance the hour hand by one hour, or to move it
back.
(2) T
ime indicated by the clock.
(3) θ1: The smaller angle between the hour and minute hands.
θ2: The larger angle between the hour and minute hands.
Note
• Angle values are displayed in accordance with the settings of Input/Output and Angle
Unit.
• If Radian is selected for Angle Unit and MathI/MathO is selected for Input/Output, the
angle value will be displayed in π format.
Base-n Calculations
When you want to perform calculations using decimal, hexadecimal,
binary
, and/or octal values, launch the Base-N app. Press
, select the
Base-N app icon, and then press . The initial default number mode
setting when you launch the Base-N app is decimal.
After launching the Base-N app, use to switch number modes.
Each press of cycles through the number modes as shown below.
150
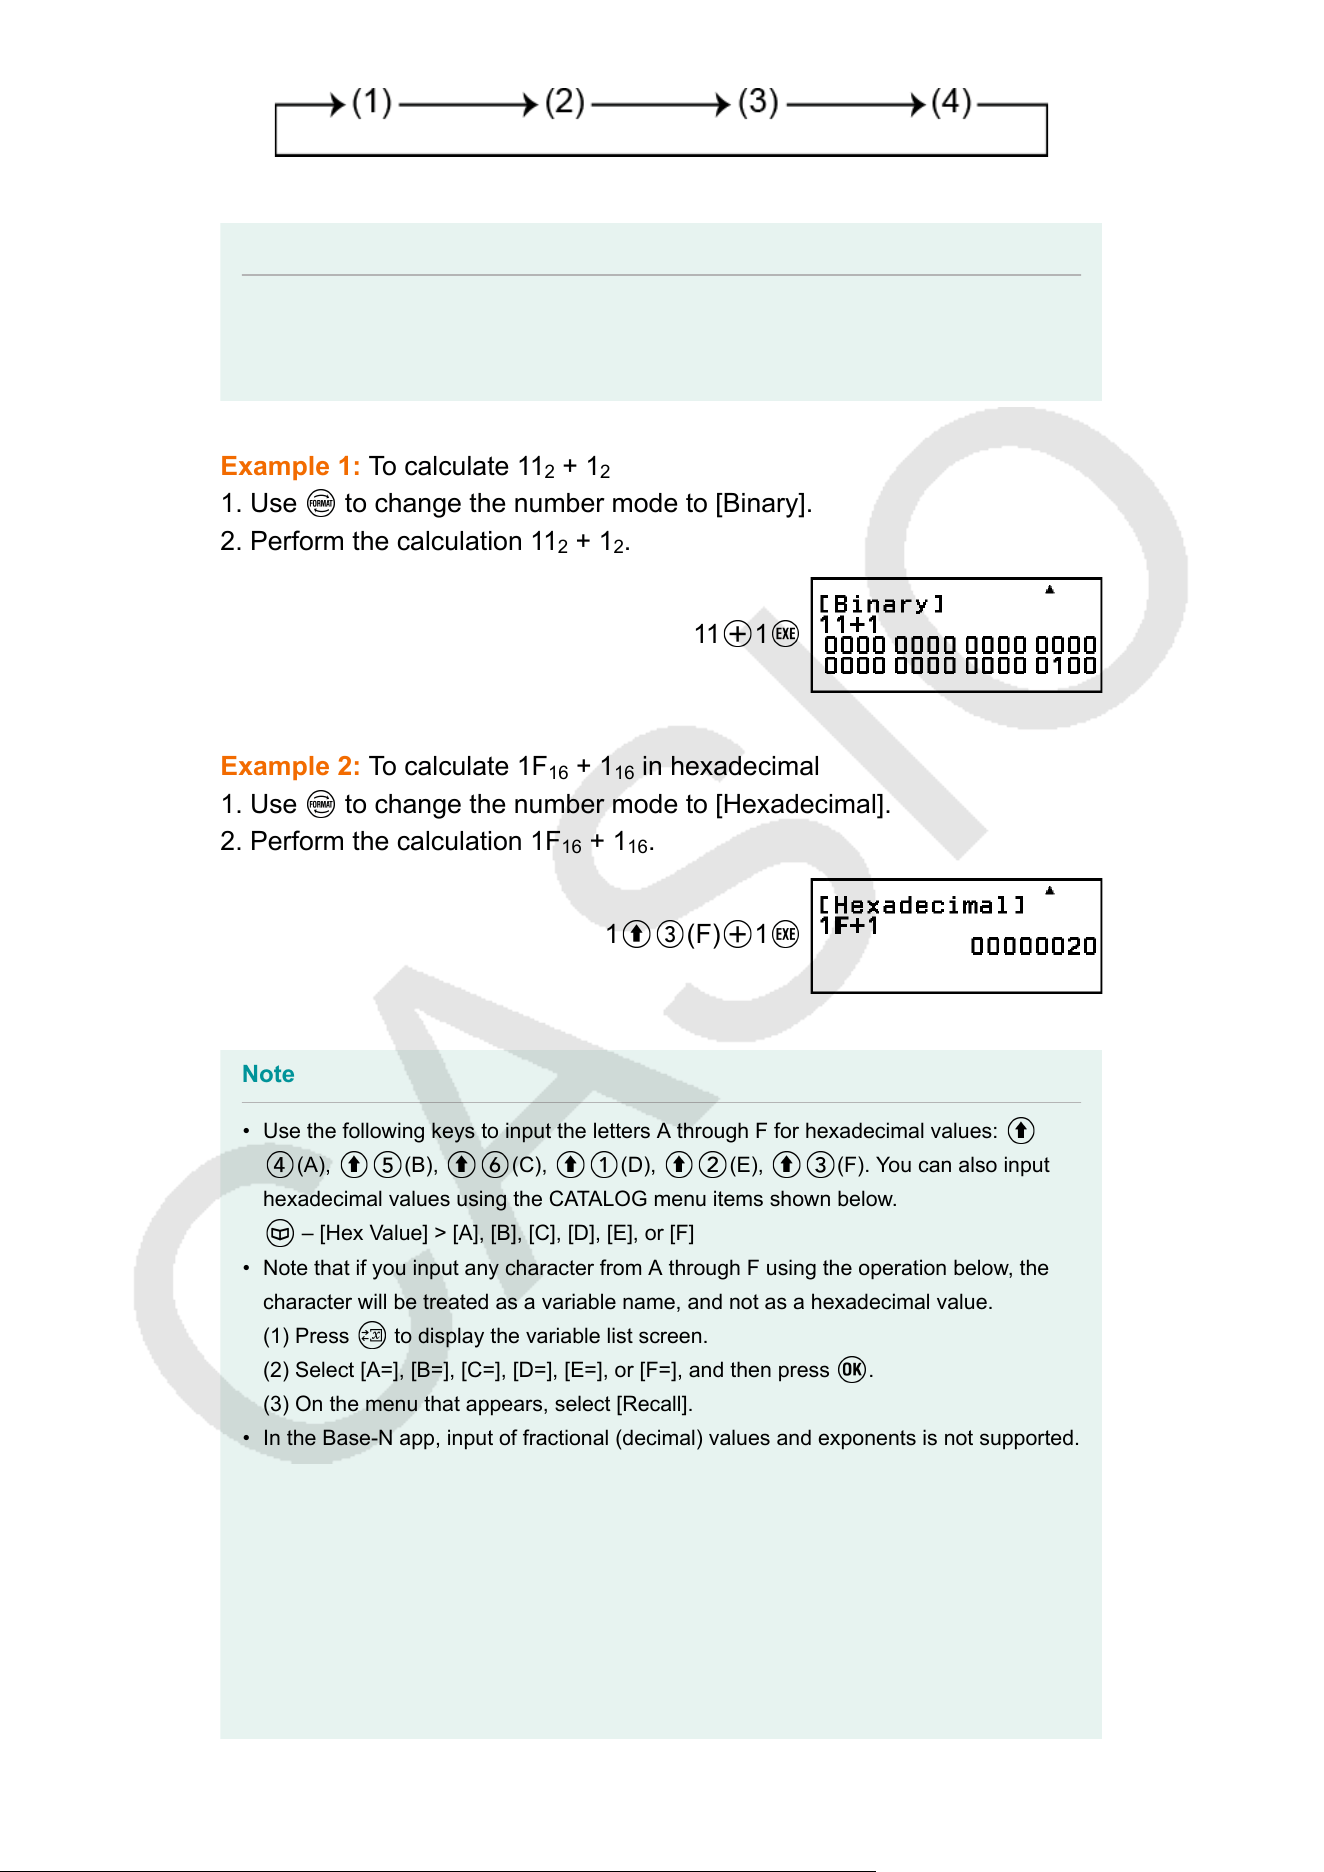
(1) [Decimal] (2) [Hexadecimal] (3) [Binary] (4) [Octal]
Note
• The subscripts appended to the values shown in the examples indicate the base
(number mode) of each value.
Example: 1
2
... Binary 1; 1
16
... Hexadecimal 1
Example 1: T
o calculate 11
2
+ 1
2
1. Use
to change the number mode to [Binary].
2. Perform the calculation 1
1
2
+ 1
2
.
11
1
Example 2: To calculate 1F
16
+ 1
16
in hexadecimal
1. Use to change the number mode to [Hexadecimal].
2. Perform the calculation 1F
16
+ 1
16
.
1 (F) 1
Note
• Use the following keys to input the letters A through F for hexadecimal values:
(A), (B), (C), (D), (E), (F). You can also input
hexadecimal values using the CA
TALOG menu items shown below.
– [Hex Value] > [A], [B], [C], [D], [E], or [F]
• Note that if you input any character from A through F using the operation below, the
character will be treated as a variable name, and not as a hexadecimal value.
(1) Press to display the variable list screen.
(2) Select [A=], [B=], [C=], [D=], [E=], or [F=], and then press .
(3) On the menu that appears, select [Recall].
• In the Base-N app, input of fractional (decimal) values and exponents is not supported.
If a calculation result has a fractional part, it is cut of
f.
• Details about input and output ranges (32 bits) are shown below.•
151
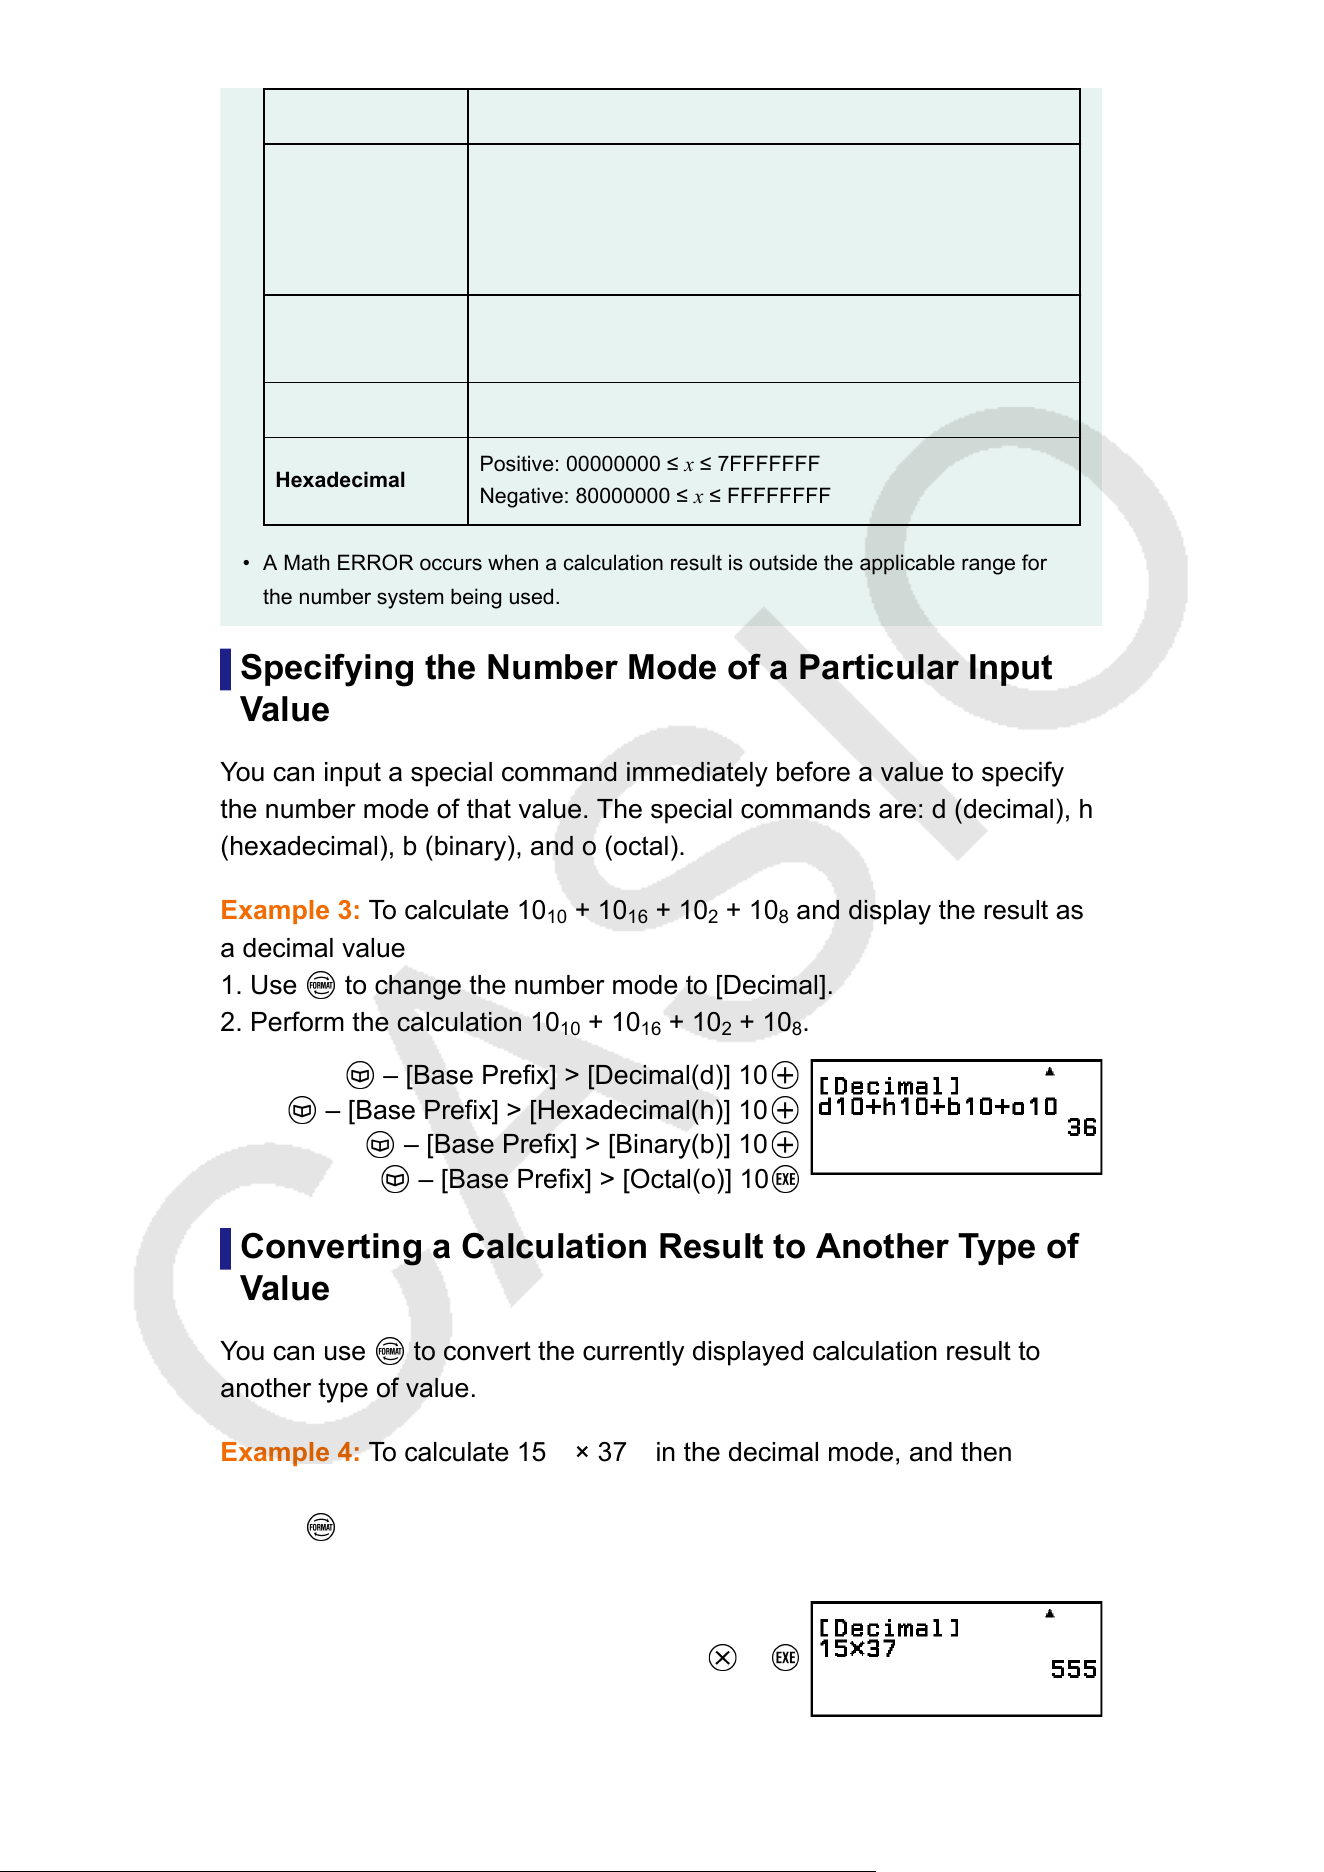
Base Range
Binary
Positive: 00000000000000000000000000000000 ≤ x ≤
01
111111111111111111111111111111
Negative: 10000000000000000000000000000000 ≤ x ≤
11111111111111111111111111111111
Octal
Positive: 00000000000 ≤ x ≤ 17777777777
Negative: 20000000000
≤ x ≤ 37777777777
Decimal
-2147483648 ≤ x ≤ 2147483647
Hexadecimal
Positive: 00000000 ≤ x ≤
7FFFFFFF
Negative: 80000000 ≤ x ≤ FFFFFFFF
• A Math ERROR occurs when a calculation result is outside the applicable range for
the number system being used.
Specifying the Number Mode of a Particular Input
V
alue
You can input a special command immediately before a value to specify
the number mode of that value. The special commands are: d (decimal), h
(hexadecimal), b (binary), and o (octal).
Example 3: To calculate 10
10
+ 10
16
+ 10
2
+ 10
8
and display the result as
a decimal value
1. Use
to change the number mode to [Decimal].
2. Perform the calculation 10
10
+ 10
16
+ 10
2
+ 10
8
.
– [Base Prefix] > [Decimal(d)] 10
– [Base Prefix] > [Hexadecimal(h)] 10
– [Base Prefix] > [Binary(b)] 10
– [Base Prefix] > [Octal(o)] 10
Converting a Calculation Result to Another Type of
V
alue
You can use
to convert the currently displayed calculation result to
another type of value.
Example 4: T
o calculate 15
10
× 37
10
in the decimal mode, and then
convert the result to hexadecimal
1. Use
to change the number mode to [Decimal].
2. Perform the calculation 15
10
× 37
10
.
15
37
152
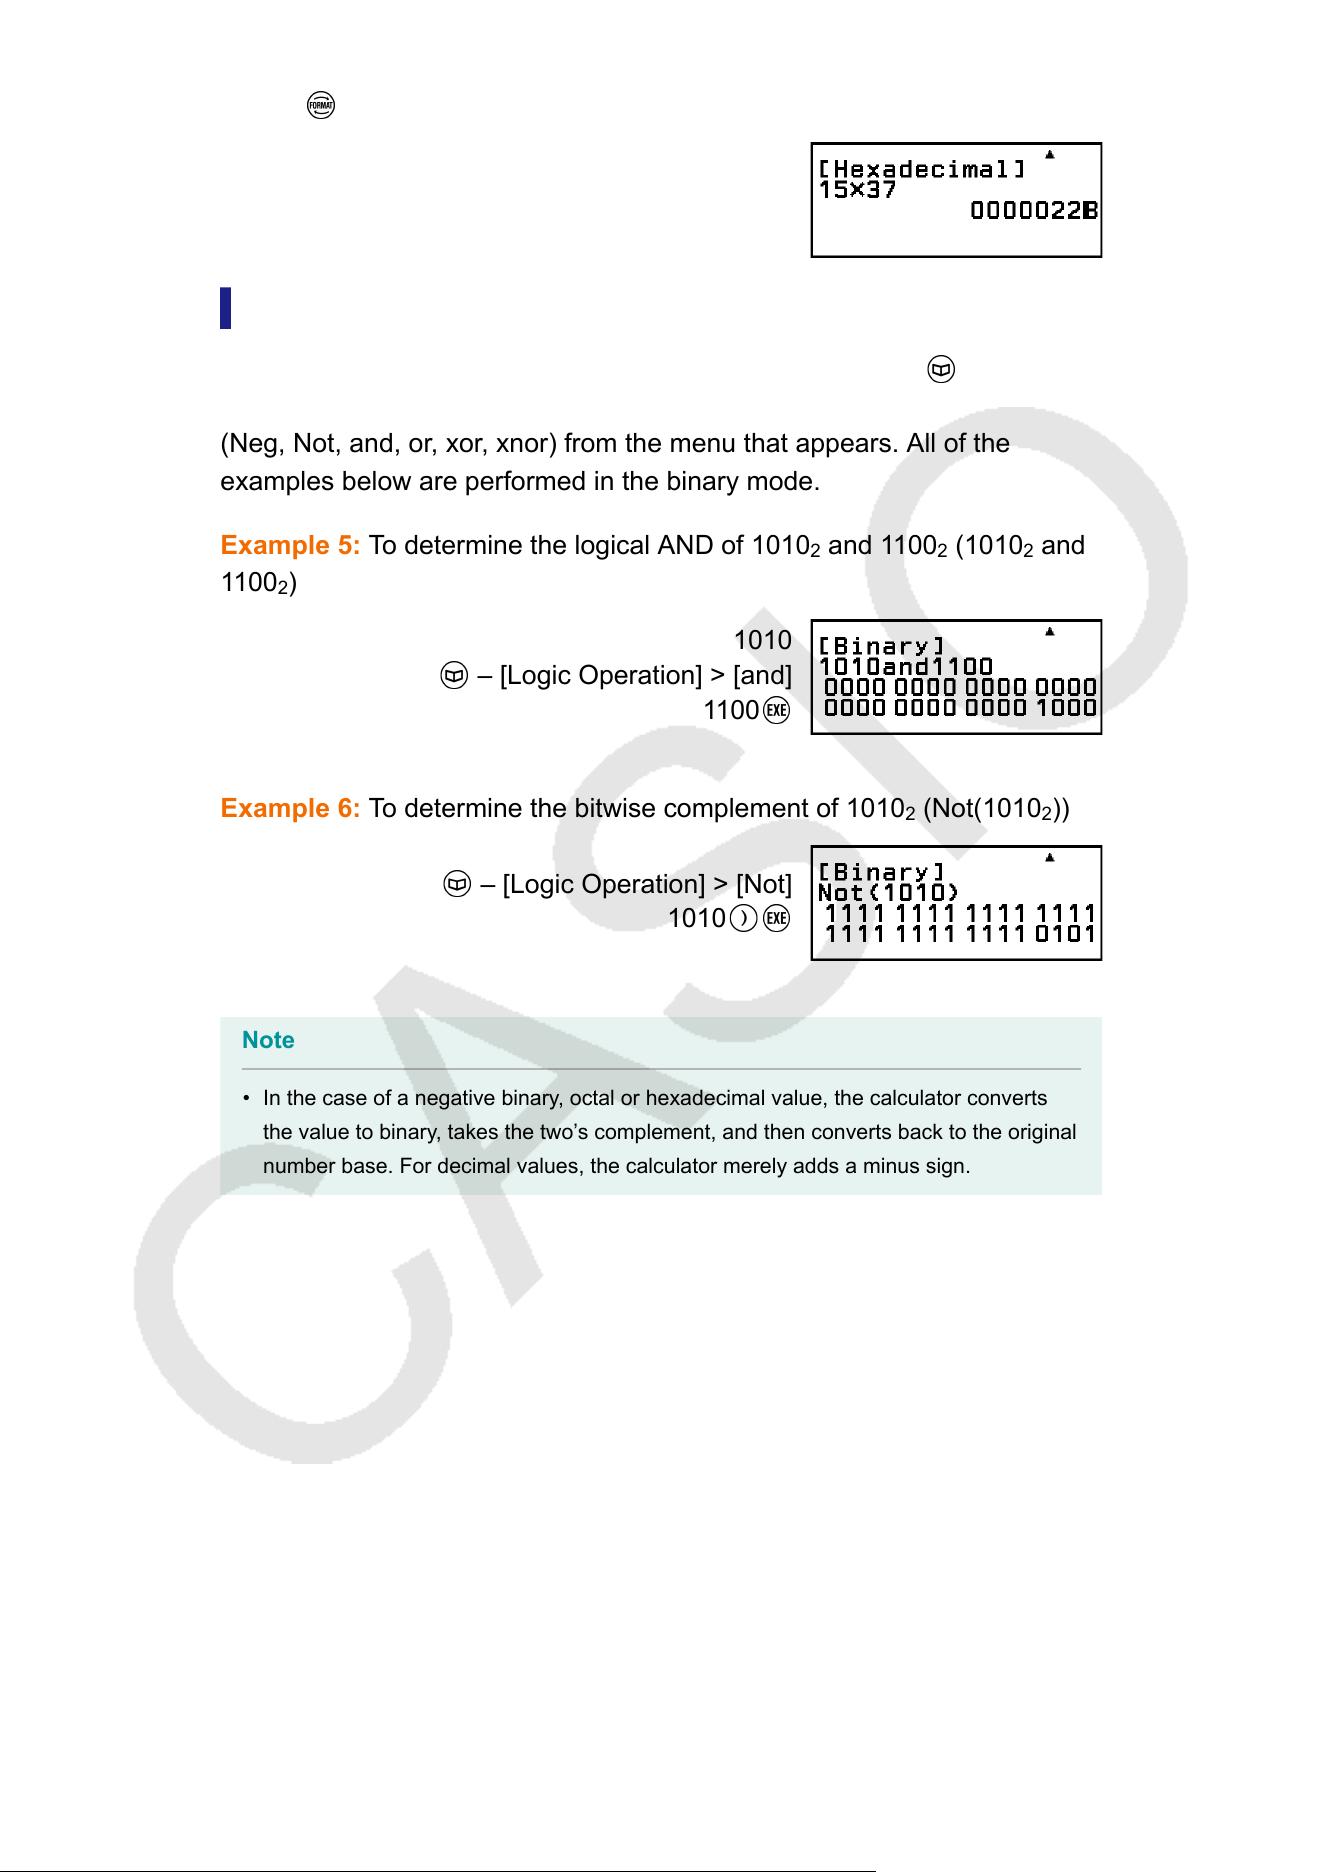
3. Use to change the number mode to [Hexadecimal].
Logical and Negation Operations
Logical and negation operations are performed by pressing and
selecting [Logic Operation], and then selecting the desired command
(Neg, Not, and, or, xor, xnor) from the menu that appears. All of the
examples below are performed in the binary mode.
Example 5: To determine the logical AND of 1010
2
and 1100
2
(1010
2
and
1100
2
)
1010
– [Logic Operation] > [and]
1
100
Example 6: T
o determine the bitwise complement of 1010
2
(Not(1010
2
))
– [Logic Operation] > [Not]
1010
Note
• In the case of a negative binary, octal or hexadecimal value, the calculator converts
the value to binary
, takes the two’s complement, and then converts back to the original
number base. For decimal values, the calculator merely adds a minus sign.
153
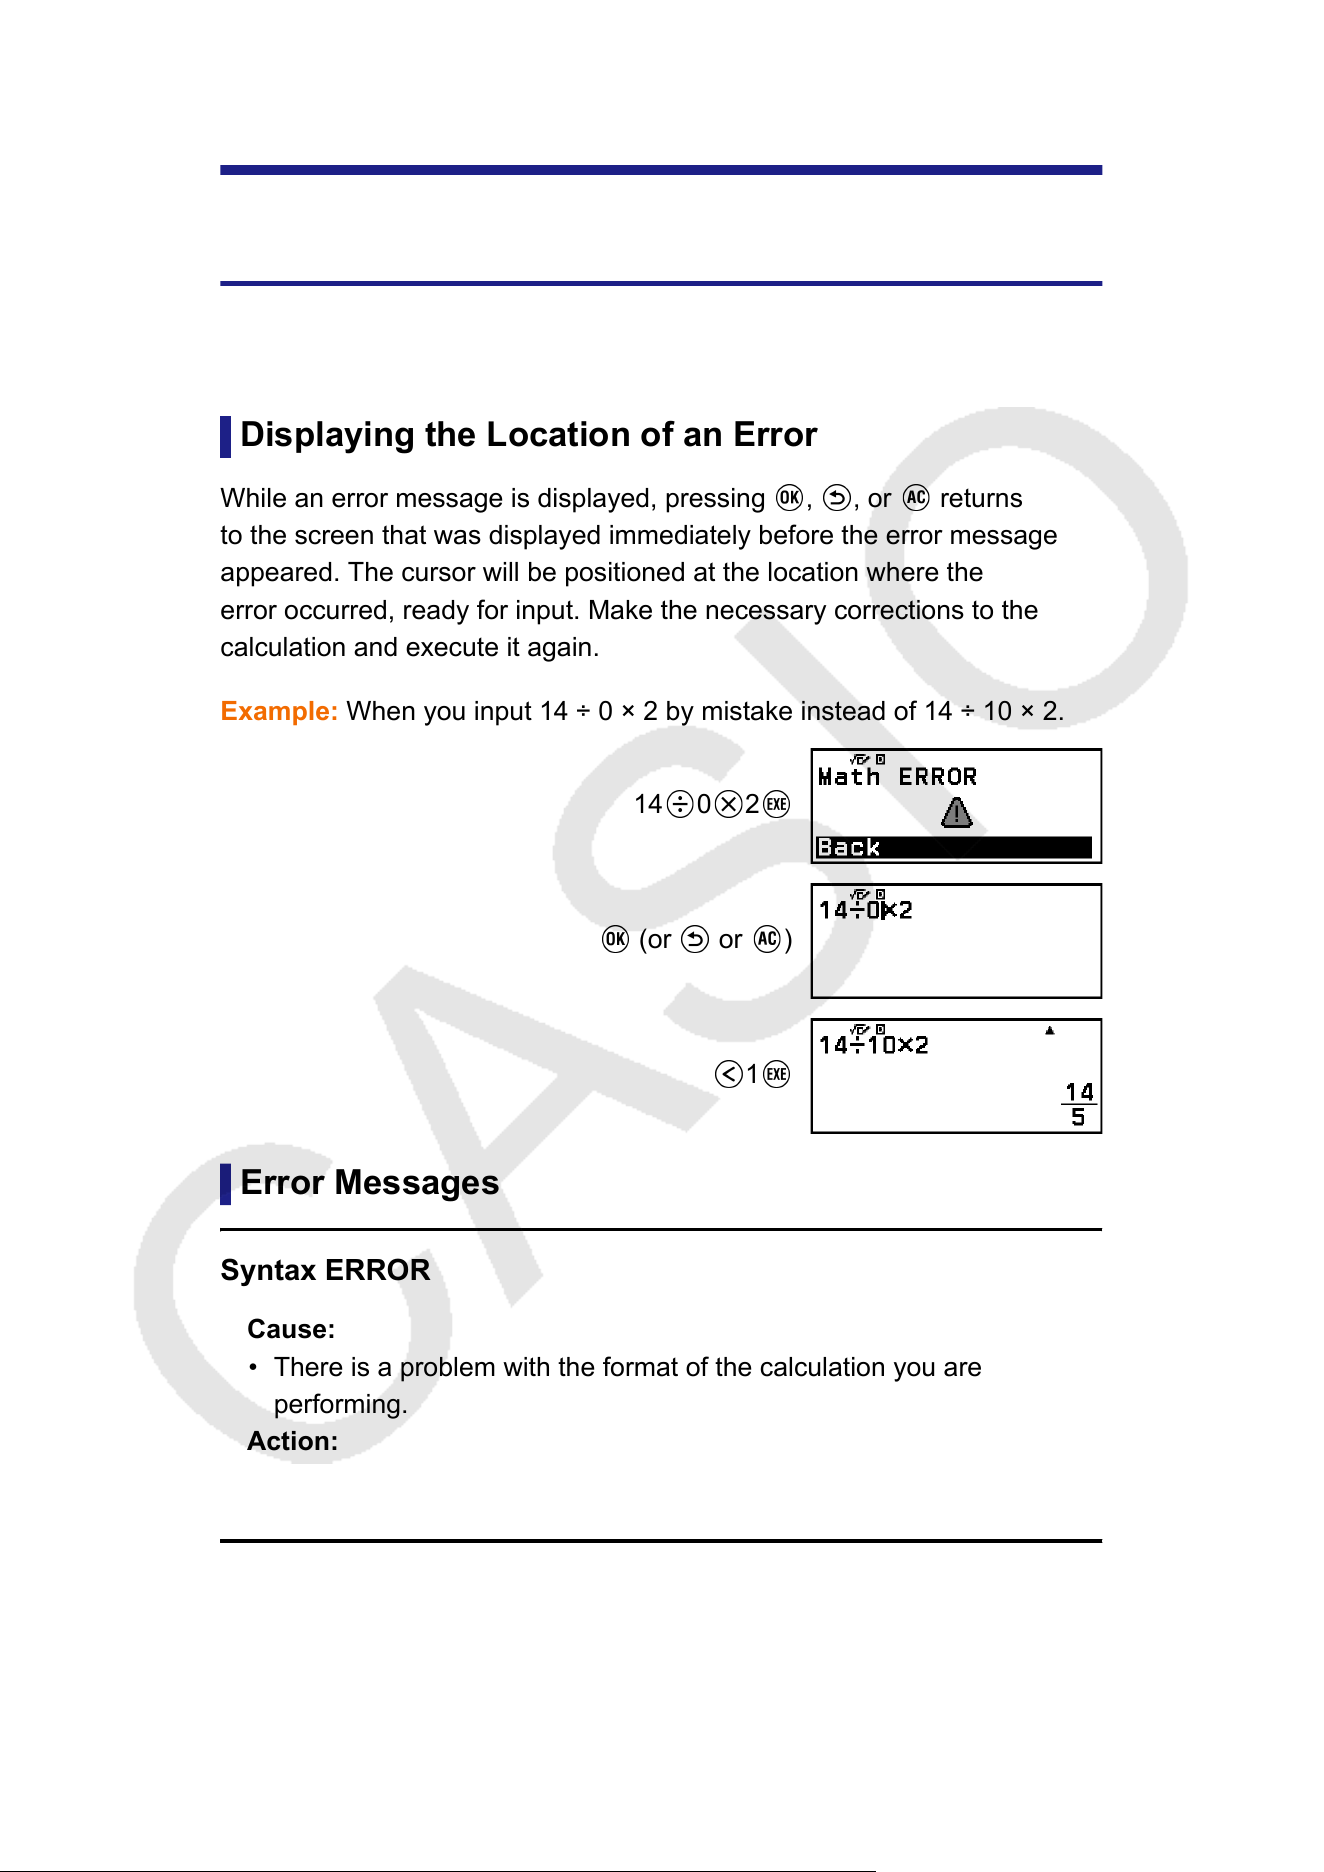
Technical Information
Errors
The calculator will display an error message whenever an error occurs for
any reason during a calculation.
Displaying the Location of an Error
While an error message is displayed, pressing , , or returns
to the screen that was displayed immediately before the error message
appeared. The cursor will be positioned at the location where the
error occurred, ready for input. Make the necessary corrections to the
calculation and execute it again.
Example: When you input 14 ÷ 0 × 2 by mistake instead of 14 ÷ 10 × 2.
14 0 2
(or or )
1
Error Messages
Syntax ERROR
Cause:
• There is a problem with the format of the calculation you are
performing.
Action:
• Make necessary corrections.
Math ERROR
Cause:
• The intermediate or final result of the calculation you are performing
exceeds the allowable calculation range.
154
• Your input exceeds the allowable input range (particularly when using
functions).
• The calculation you are performing contains an illegal mathematical
operation (such as division by zero).
• While using an app that does not support complex numbers or while
a screen that does not accept input of complex numbers is displayed,
you attempted to execute a calculation that includes a variable where
a complex number is stored.
Action:
• Check the input values, reduce the number of digits, and try again.
• When using a variable as the argument of a function, make sure that
the variable value is within the allowable range for the function.
• To execute a calculation that includes a variable where a complex
number is stored, while using an app that does not support complex
numbers or while a screen that does not accept input of complex
numbers is displayed, change the value stored to the variable to a
real number
.
Stack ERROR
Cause:
• The calculation you are performing has caused the capacity of the
numeric stack or the command stack to be exceeded.
• The calculation you are performing has caused the capacity of the
matrix or vector stack to be exceeded.
Action:
• Simplify the calculation expression so it does not exceed the capacity
of the stack.
• Try splitting the calculation into two or more parts.
Argument ERROR
Cause:
• There is a problem with the argument of the calculation you are
performing.
Action:
• Make necessary corrections.
Dimension ERROR (Matrix and V
ector apps only)
Cause:
• You are trying to perform a calculation with matrices or vectors whose
dimensions do not allow that type of calculation.
155
Action:
• Check the dimensions specified for the matrices or vectors to see if
they are compatible with the calculation.
V
ariable ERROR (Equation app’s Solver feature only)
Cause:
• An attempt to execute Solver for an expression input without any
variable included.
Action:
• Input an expression that includes a variable.
Cannot Solve (Equation app’s Solver feature only)
Cause:
• The calculator could not obtain a solution.
Action:
• Check for errors in the equation that you input.
• Input a value for the solution variable that is close to the expected
solution and try again.
Range ERROR
Cause (Table app):
• An attempt to generate a number table in the Table app whose
conditions cause it to exceed the maximum number of allowable rows.
Action:
• Narrow the table calculation range by changing the Start, End, and
Step values, and try again.
Cause (Spreadsheet app):
• During batch input in the Spreadsheet app, input for Range is outside
the allowable range or is a cell name that does not exist.
Action:
• For Range, input a cell name within the range of A1 through E45,
using the syntax: "A1:A1".
Cause (Math Box app):
• The value input as the Attempts (number of trials) for Dice Roll or
Coin T
oss is outside the allowable range or is a non-integer value.
• The value input on the expression registration screen of Number Line
is outside the allowable range, or you entered an inequality with an
invalid maximum-minimum relationship (like 10 < x ≤ 5).
• A value input on the View-Window screen of Number Line is outside
the allowable range.
156
Action:
• For Attempts, input an integer value that is within the allowable range.
• On the expression registration screen, input a value that is within
the allowable range. In the case of an invalid maximum-minimum
relationship for an entered inequality
, edit the inequality to correct the
maximum-minimum relationship.
• On the View-Window screen, input values that are within the
allowable range.
Time Out
Cause (differential or integration calculation):
• The current differential or integration calculation ends without the
ending condition being fulfilled.
Action:
• Try increasing the tol value. Note that this also decreases solution
precision.
Cause (Distribution app):
• The current distribution calculation ends without the ending condition
being fulfilled.
Action:
• Change the value of each parameter.
Circular ERROR
Cause (f(x) and g(x) feature):
• Circular reference is occurring in a registered composite function
("Registering a Composite Function"
(page 72)).
Action:
• Do not have g(x) input into f(x), and f(x) input into g(x) at the same
time.
Cause (Spreadsheet app):
• There is a circular reference (such as "=A1" in cell A1) in the
spreadsheet.
Action:
• Change cell contents to remove the circular references.
Memory ERROR (Spreadsheet app only)
Cause:
• You are attempting to input data that exceeds the allowable input
capacity (2,380 bytes).
157
• You are attempting to input data that results in a chain of consecutive
cell references (such as cell A2 referenced from cell A1, cell A3
referenced from cell A2…, etc.) This type of input always causes this
error to be generated, even if memory capacity (2,380 bytes) is not
exceeded.
Action:
• Delete unneeded data and input data again.
• Minimize input that results in a chain of consecutive cell references.
Not Defined
Cause (f(x) and g(x) feature):
• You attempted to calculate f(x) or g(x) with f(x)/g(x) undefined.
Action:
• Define f(x) or g(x) before calculating f(x)/g(x).
Cause (Matrix and V
ector apps):
• The matrix or vector you are trying to use in a calculation was input
without specifying its dimension.
Action:
• Specify the dimension of the matrix or vector and then perform the
calculation again.
Before Assuming Malfunction of the
Calculator
...
Note that you should make separate copies of important data before
performing these steps.
1. Check the calculation expression to make sure that it does not contain
any errors.
2. Make sure that you are using the correct calculator app for the type of
calculation you are trying to perform.
• To check which calculator app you are currently using, press
. This
highlights the icon of the calculator app currently in use.
3. If the above steps do not correct your problem, press the key.
• This causes the calculator to perform a routine that checks whether
calculation functions are operating correctly
. If the calculator discovers
any abnormality, it automatically initializes the calculator app and
clears memory contents.
4. Return the calculator settings (except for Contrast and Auto Power Off)
to their initial default settings by performing the procedure below.
(1) Press
, select a calculator app icon, and then press .
(2) Press , and then select [Reset] > [Settings & Data] > [Yes].
158
Replacing the Battery
Important!
• fx-991CW+ UK sold in EU countries: For safety reasons, please do not replace the
battery yourself. Always leave battery replacement up to an authorized CASIO service
center
.
If the screen shown below appears right after you turn on power, it means
that remaining battery power is low.
A low battery is also indicated by a dim display, even if contrast is
adjusted, or by failure of figures to appear on the display immediately after
you turn on the calculator
.
If this happens or the above screen appears, contact an authorized CASIO
Service Center to have the battery replaced.
Important!
• Removing the battery causes all of the calculator’s memory contents to be cleared.
Calculation Priority Sequence
The calculator performs calculations according to a calculation priority
sequence.
• Basically, calculations are performed from left to right.
• Expressions within parentheses have the highest priority.
• The following shows the priority sequence for each individual command.
1 Parenthetical expressions
2
Functions that have parentheses (sin(, log(, f(, g(, etc.,
functions that take an argument to the right, functions that
require a closing parenthesis after the argument)
3
Functions that come after the input value (x
2
, x
3
, x
-1
, x!, °’ ”, °,
r
,
g
, %,
t), powers ( ), roots ( )
159
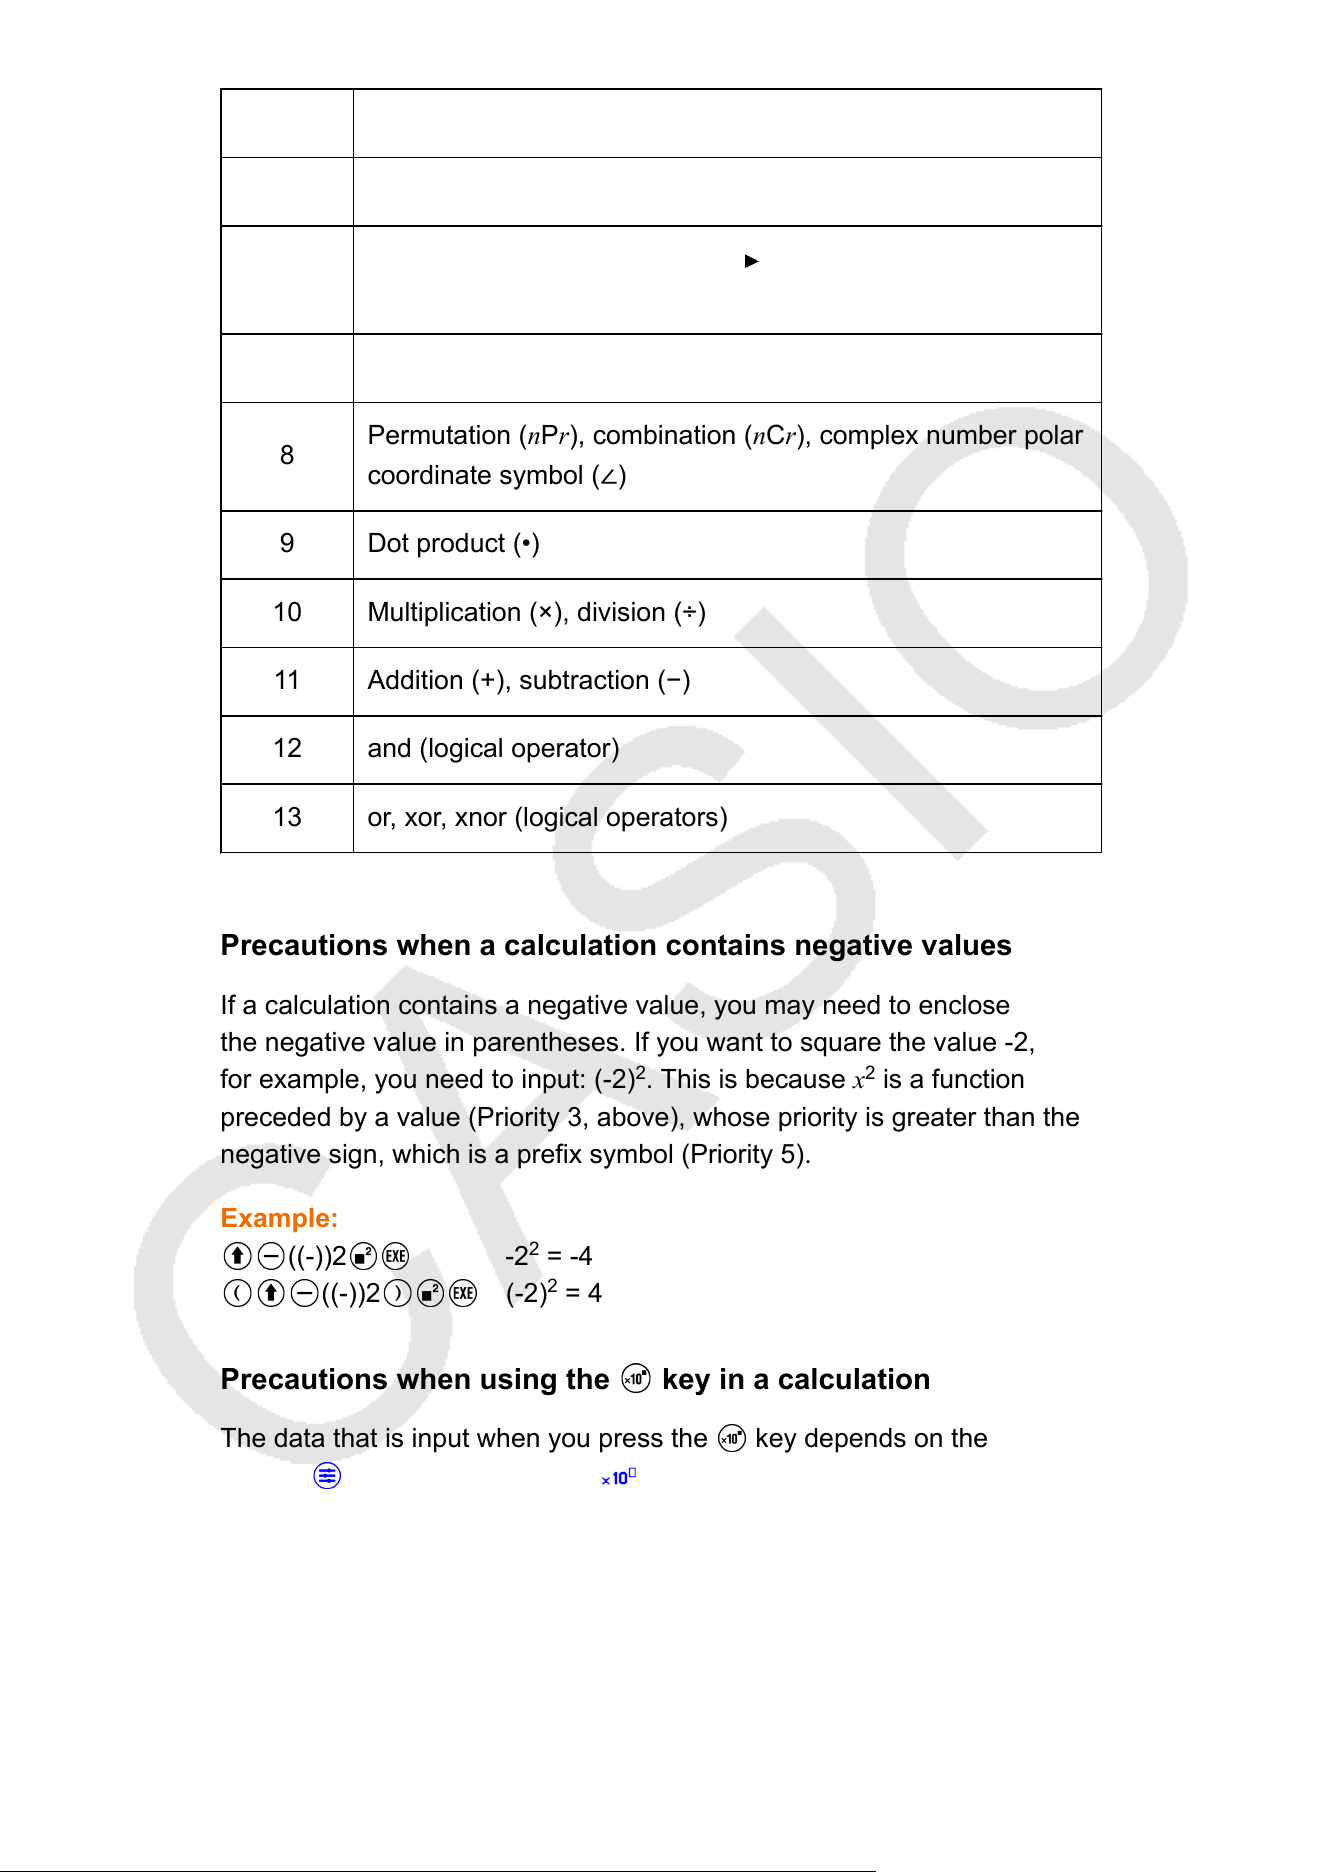
4 Fractions
5 Negative sign ((-)), Base Prefix (d, h, b, o)
6
Unit conversion commands (cm in, etc.), Statistics app
estimated values (xˆ, yˆ, xˆ
1
, xˆ
2
)
7 Multiplication where the multiplication sign is omitted
8
Permutation (nPr), combination (nCr), complex number polar
coordinate symbol (∠)
9 Dot product (•)
10 Multiplication (×), division (÷)
11 Addition (+), subtraction (−)
12 and (logical operator)
13 or, xor, xnor (logical operators)
Precautions when a calculation contains negative values
If a calculation contains a negative value, you may need to enclose
the negative value in parentheses. If you want to square the value -2,
for example, you need to input: (-2)
2
. This is because x
2
is a function
preceded by a value (Priority 3, above), whose priority is greater than the
negative sign, which is a prefix symbol (Priority 5).
Example:
((-))2 -2
2
= -4
((-))2 (-2)
2
= 4
Precautions when using the key in a calculation
The data that is input when you press the key depends on the
current – [Calc Settings] > [ Key] (page 27) setting. Calculation
priority depends on the syntax of the formula that is input. Because of
this, changing the above setting may af
fect calculation results even if the
formula is input using identical key operations.
160
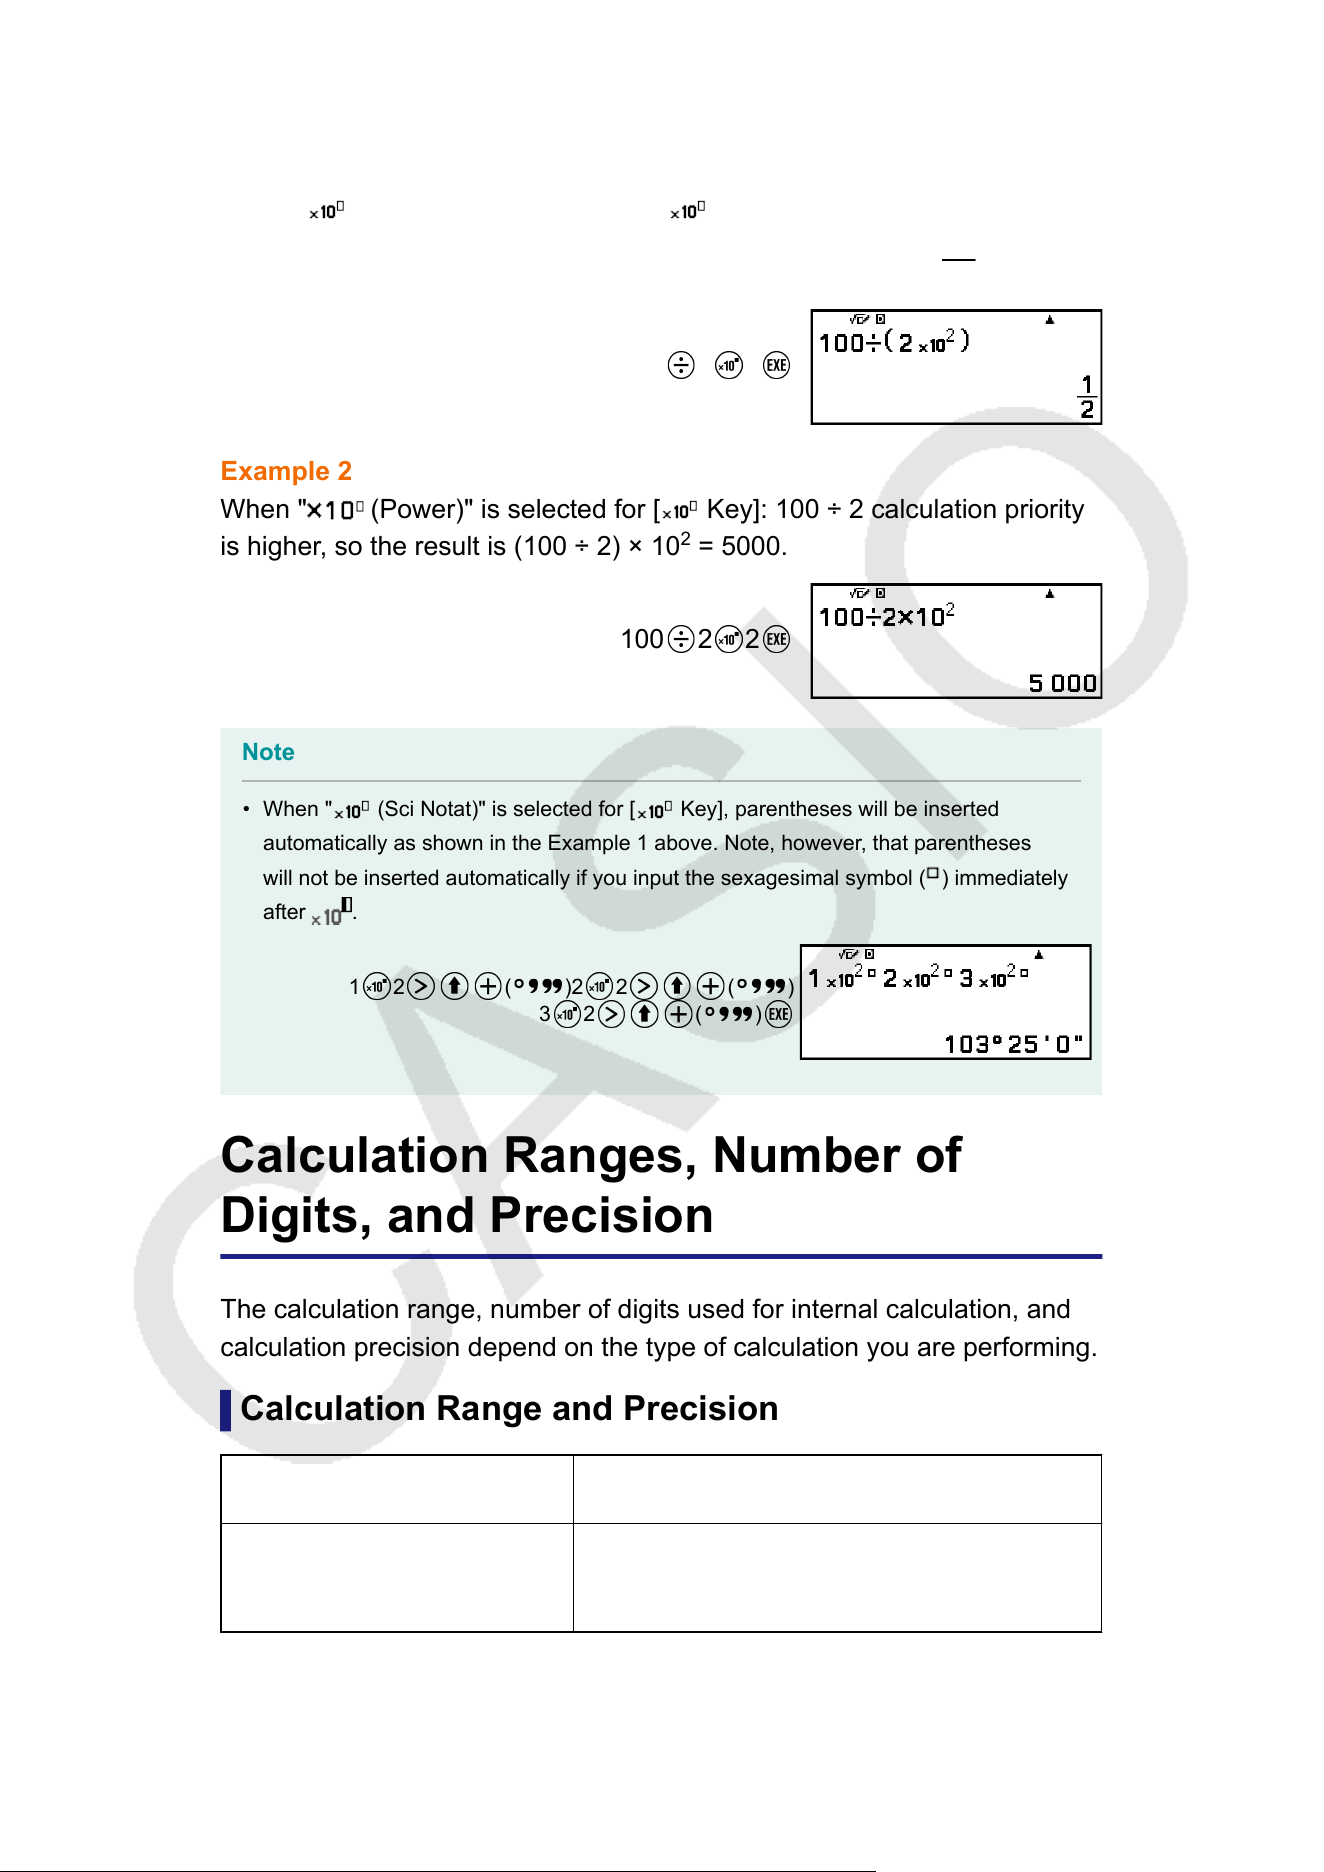
To calculate 100 ÷ 2 × 10
2
Example 1
When " (Sci Notat)" is selected for [ Key] (initial default): 2 × 10
2
calculation priority is higher, so the result is 100 ÷ (2 × 10
2
) =
1
2
.
100 2 2
Example 2
When " (Power)" is selected for [ Key]: 100 ÷ 2 calculation priority
is higher, so the result is (100 ÷ 2) × 10
2
= 5000.
100 2 2
Note
• When " (Sci Notat)" is selected for [ Key], parentheses will be inserted
automatically as shown in the Example 1 above. Note, however
, that parentheses
will not be inserted automatically if you input the sexagesimal symbol (
) immediately
after .
1 2 ( )2 2 ( )
3 2 ( )
Calculation Ranges, Number of
Digits, and Precision
The calculation range, number of digits used for internal calculation, and
calculation precision depend on the type of calculation you are performing.
Calculation Range and Precision
Calculation Range ±1 × 10
-99
to ±9.999999999 × 10
99
or 0
Number of Digits for
Internal Calculation
23 digits
161
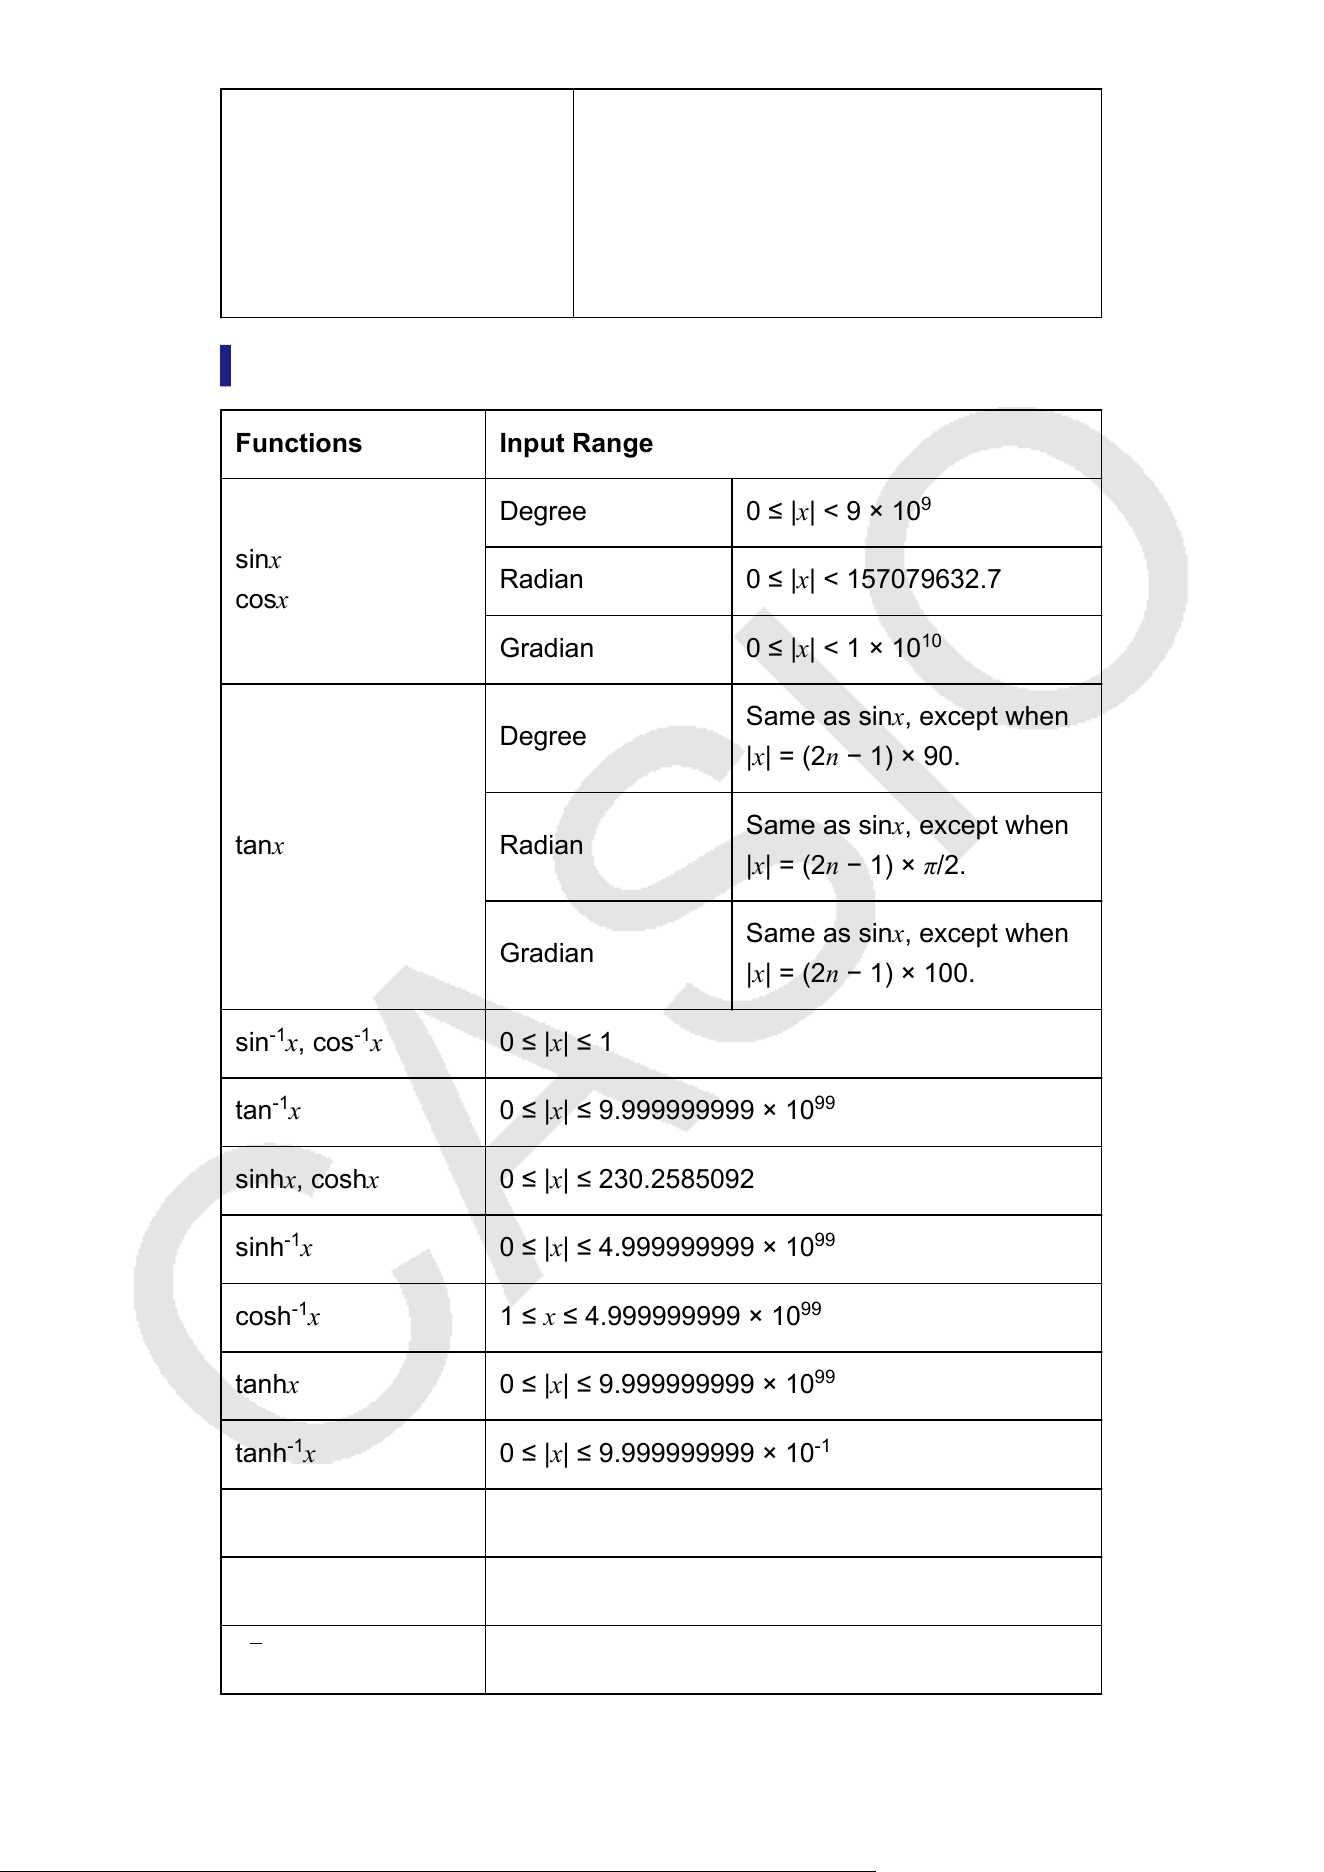
Precision
In general, ±1 at the 10th digit for a single
calculation. Precision for exponential
display is ±1 at the least significant digit.
Errors are cumulative in the case of
consecutive calculations.
Function Calculation Input Ranges and Precision
Functions Input Range
sinx
cosx
Degree
0 ≤ |x| < 9 × 10
9
Radian
0 ≤ |x| < 157079632.7
Gradian
0 ≤ |x| < 1 × 10
10
tanx
Degree
Same as sinx, except when
|x| = (2n − 1) × 90.
Radian
Same as sinx, except when
|x| = (2n − 1) × π/2.
Gradian
Same as sinx, except when
|x| = (2n − 1) × 100.
sin
-1
x, cos
-1
x 0 ≤ |x| ≤ 1
tan
-1
x 0 ≤ |x|
≤ 9.999999999 × 10
99
sinhx, coshx 0 ≤ |x| ≤
230.2585092
sinh
-1
x 0 ≤ |x|
≤ 4.999999999 × 10
99
cosh
-1
x 1 ≤ x ≤ 4.999999999 × 10
99
tanhx 0 ≤ |x| ≤
9.999999999 × 10
99
tanh
-1
x 0 ≤ |x|
≤ 9.999999999 × 10
-1
logx, lnx 0 < x ≤ 9.999999999 × 10
99
10
x
-9.999999999 × 10
99
≤ x ≤ 99.99999999
√
x 0 ≤ x < 1 × 10
100
162
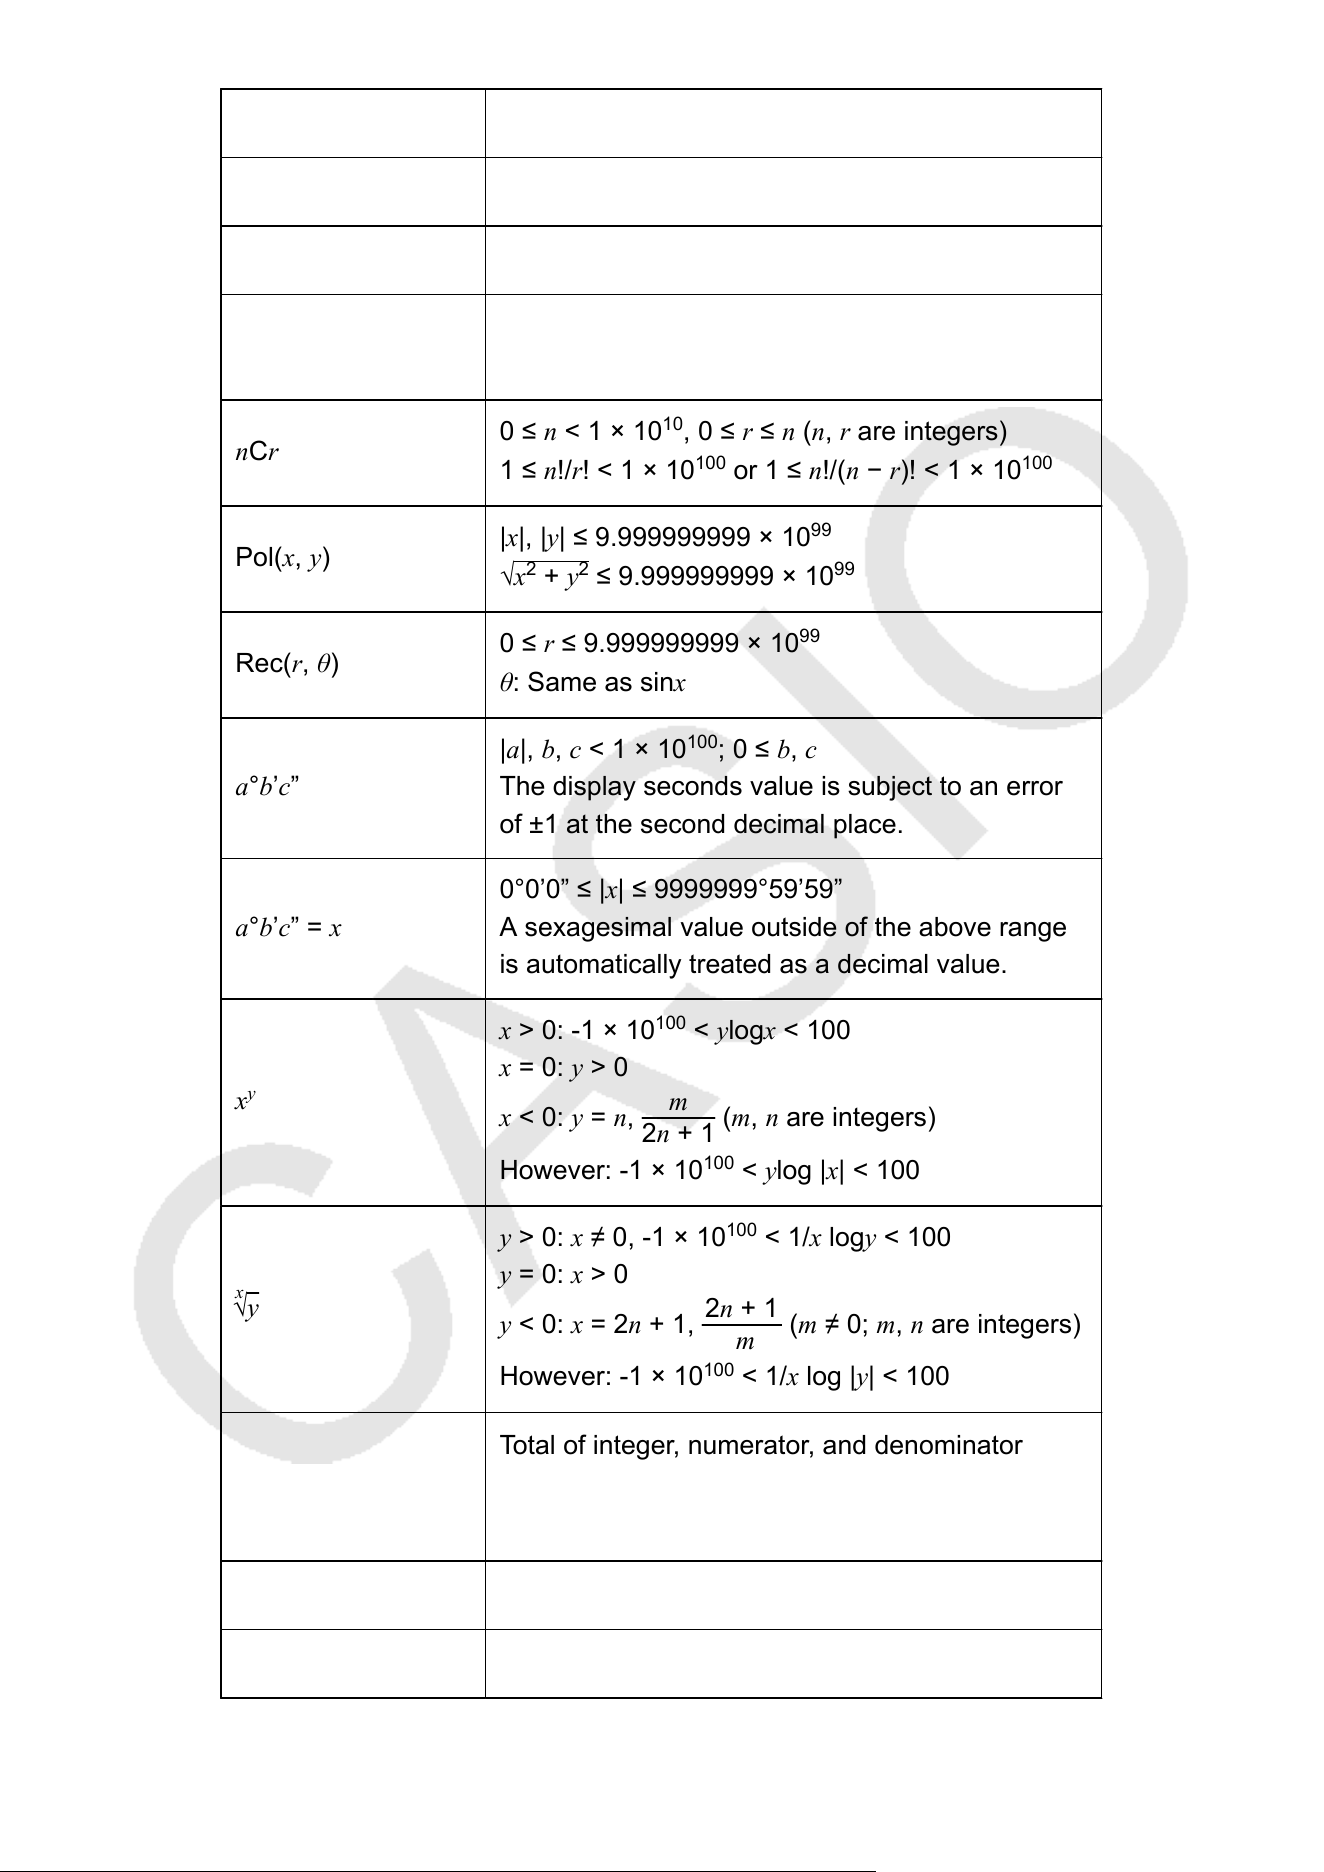
x
2
|x| < 1 × 10
50
x
-1
|x| < 1 × 10
100
; x ≠ 0
x! 0 ≤ x ≤
69 (x is an integer)
nPr
0 ≤ n < 1 × 10
10
, 0 ≤ r ≤ n (n, r are integers)
1 ≤ {n!/(n − r)!} < 1 × 10
100
nCr
0 ≤ n < 1 × 10
10
, 0 ≤ r ≤
n (n, r are integers)
1 ≤ n!/r! < 1 × 10
100
or 1 ≤ n!/(n
− r)! < 1 × 10
100
Pol(x, y)
|x|, |y| ≤ 9.999999999 × 10
99
√
x
2
+ y
2
≤ 9.999999999 × 10
99
Rec(r, θ)
0 ≤ r ≤ 9.999999999 × 10
99
θ: Same as sinx
a°b’c”
|a|, b, c < 1 × 10
100
; 0 ≤ b, c
The display seconds value is subject to an error
of ±1 at the second decimal place.
a°b’c” = x
0°0’0” ≤ |x| ≤
9999999°59’59”
A sexagesimal value outside of the above range
is automatically treated as a decimal value.
x
y
x > 0: -1 × 10
100
< ylogx
< 100
x = 0: y > 0
x < 0: y = n,
m
2n
+ 1
(m, n are integers)
However: -1 × 10
100
< ylog |x| < 100
x
√
y
y > 0: x ≠ 0, -1 × 10
100
< 1/x
logy < 100
y = 0: x > 0
y < 0: x = 2n + 1,
2n + 1
m
(m ≠ 0; m, n are integers)
However: -1 × 10
100
< 1/x
log |y| < 100
a
b
/
c
Total of integer, numerator, and denominator
must be 10 digits or less (including separator
symbol).
RanInt#(a, b) a < b; |a|, |b| < 1 × 10
10
; b − a < 1 × 10
10
GCD(a, b) |a|, |b| < 1 × 10
10
(a, b are integers)
163
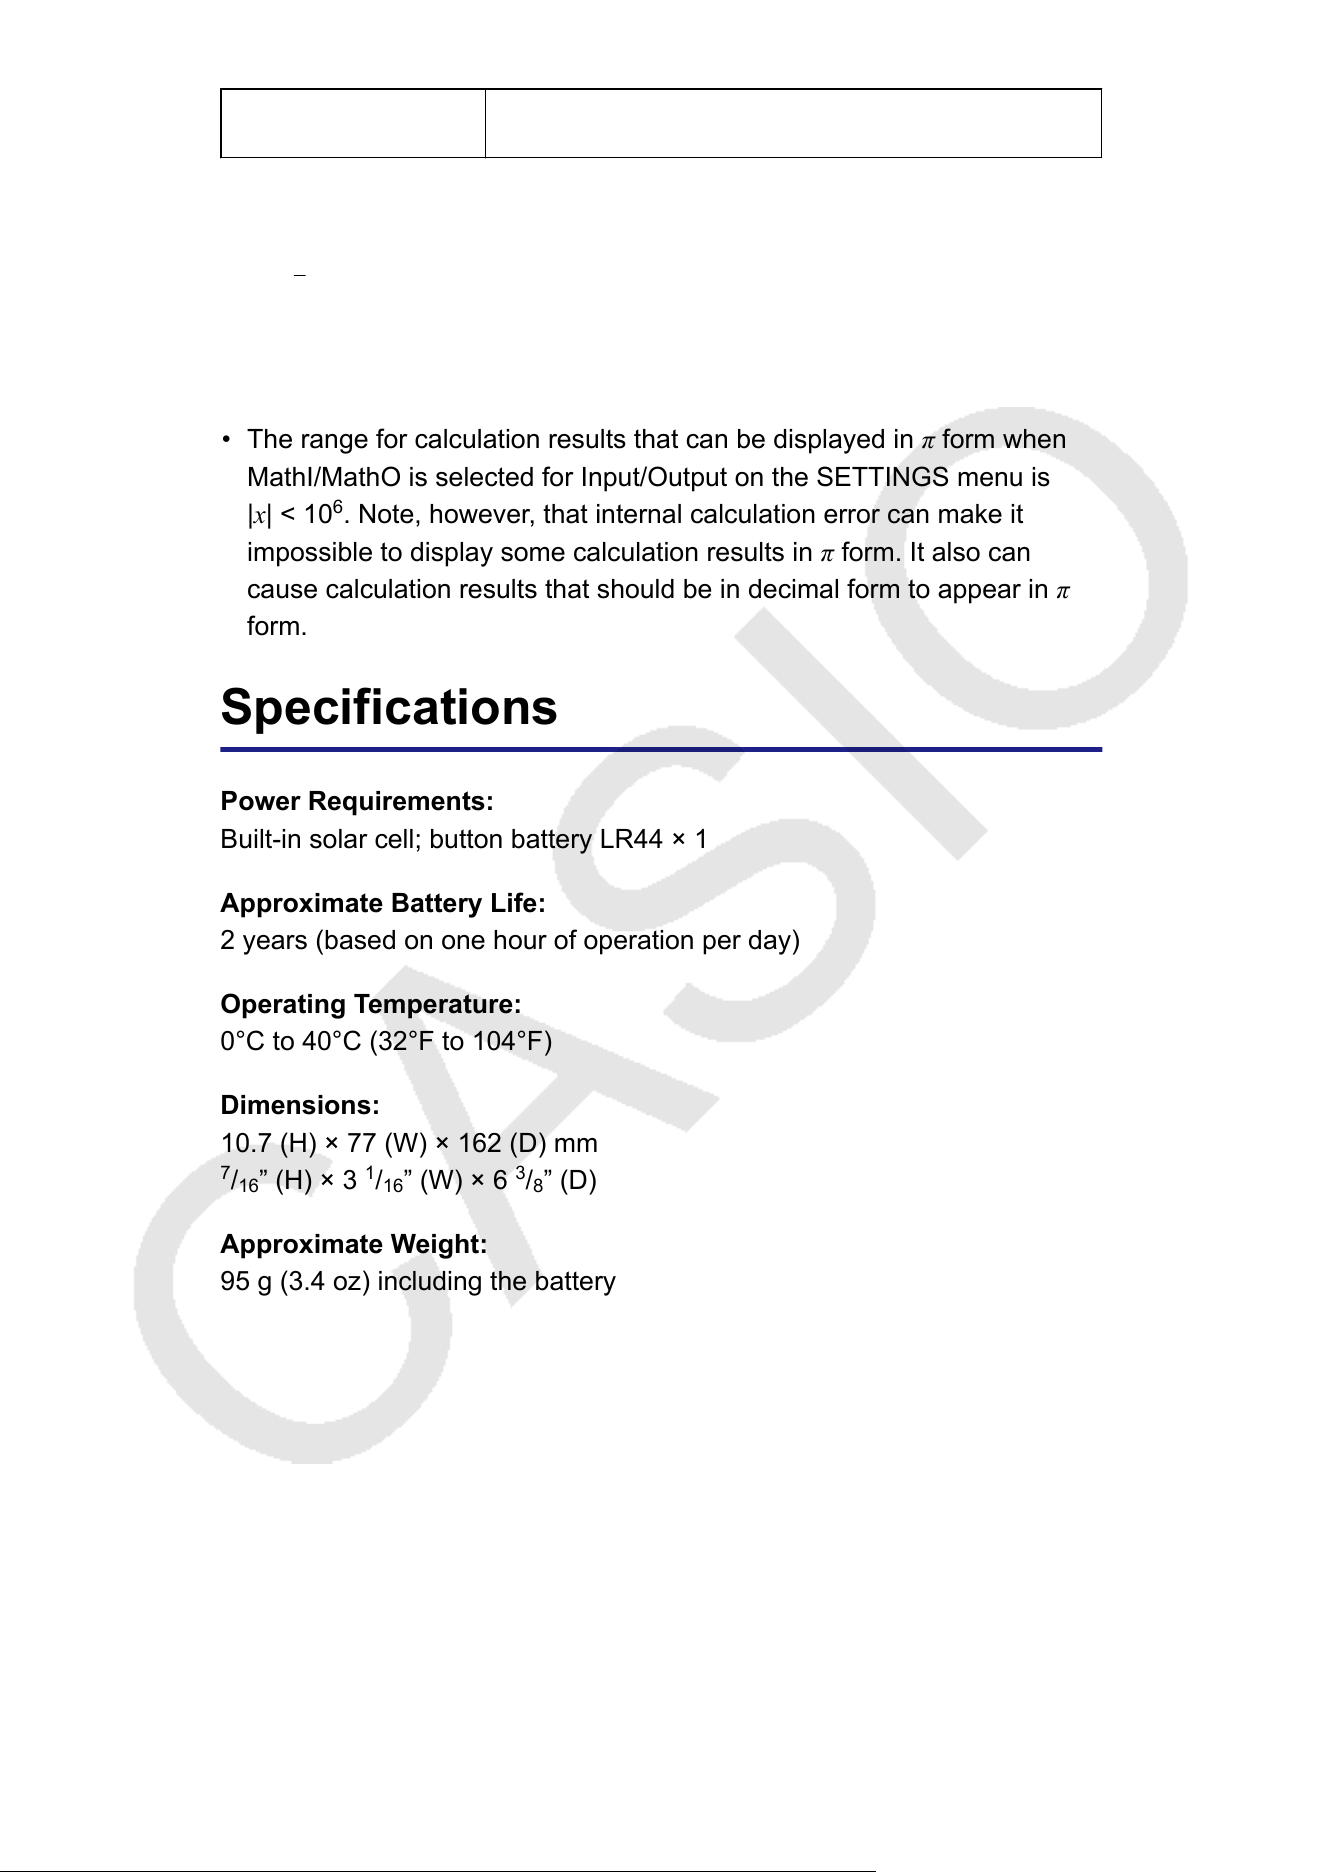
LCM(a, b) 0 ≤ a, b < 1 × 10
10
(a, b
are integers)
• Precision is basically the same as that described under "Calculation
Range and Precision" (page 161), above.
• x
y
,
x
√
y, x!, nPr, nCr type functions require consecutive internal calculation,
which can cause accumulation of errors that occur with each calculation.
• Error is cumulative and tends to be large in the vicinity of a function’s
singular point and inflection point.
• The range for calculation results that can be displayed in π form when
MathI/MathO is selected for Input/Output on the SETTINGS menu is
|x| < 10
6
. Note, however, that internal calculation error can make it
impossible to display some calculation results in π form. It also can
cause calculation results that should be in decimal form to appear in π
form.
Specifications
Power Requirements:
Built-in solar cell; button battery LR44 × 1
Approximate Battery Life:
2 years (based on one hour of operation per day)
Operating T
emperature:
0°C to 40°C (32°F to 104°F)
Dimensions:
10.7 (H) × 77 (W) × 162 (D) mm
7
/
16
” (H) × 3
1
/
16
” (W) × 6
3
/
8
” (D)
Approximate W
eight:
95 g (3.4 oz) including the battery
164

Frequently Asked Questions
Frequently Asked Questions
■ How can I change a fraction form result produced by a division
operation to decimal form?
→ While a fraction calculation result is displayed, press , or press
( ). For more information, see "T
oggling Calculation Results
between Standard (Fraction, π, √
Form) and Decimal" (page 47). T
o
have calculation results initially appear as decimal values, change the
Input/Output setting on the SETTINGS menu to MathI/DecimalO.
■ What is the difference between Ans memory and variable memory?
→ Each of these types of memory acts like "containers" for temporary
storage of a single value.
Ans Memory: Stores the result of the last calculation performed. Use
this memory to carry the result of one calculation on to the next.
Variables: This memory is helpful when you need to use the same
value multiple times in one or more calculations.
■ How can I find a function I was using with an older CASIO
calculator model on this calculator?
→ This calculator’s functions can be accessed from the CATALOG menu
that appears when you press
or the CATALOG list that appears
when you press ( ). For details, see the sections below.
"Using the CA
TALOG Menu and CATALOG List" (page 30)
"Advanced Calculations" (page 56)
■ With an older CASIO calculator model, I pressed
to change
the calculation result display format. What should I do with this
calculator?
→ Use to change the calculation result display format. For details, see
"Changing Calculation Result Format"
(page 47).
■ How can I find out which calculator app I am currently using?
→ Press
. This causes the icon of the calculator app you are currently
using to become highlighted.
■ How do I calculate sin
2
x
→ For example, to calculate sin
2
30 =
1
4
, enter the calculation below.
165

30
■ Why can’t I input (i) or calculate a complex number?
→ You cannot use the Calculate app to input i or to perform complex
number calculations. Use the Complex app for such calculations.
■ Why does the battery icon ( ) appear right after the calculator is
turned on?
→ The battery icon indicates that battery power is low
. If you see this
icon, replace the battery as soon as possible. For details about battery
replacement, see "Replacing the Battery" (page 159).
■ How can I return the calculator to its initial default settings?
→ Perform the procedure below to initialize calculator settings (except for
Contrast and Auto Power Off).
(1) Press
, select a calculator app icon, and then press .
(2) Press , and then select [Reset] > [Settings & Data] > [Yes].
166

CASIO COMPUTER CO., LTD.
6-2, Hon-machi 1-chome
Shibuya-ku, Tokyo 151-8543, Japan

