
GHC
™
50
Owner’s Manual

© 2022 Garmin Ltd. or its subsidiaries
All rights reserved. Under the copyright laws, this manual may not be copied, in whole or in part, without the written consent of Garmin. Garmin reserves the right to change
or improve its products and to make changes in the content of this manual without obligation to notify any person or organization of such changes or improvements. Go to
www.garmin.com for current updates and supplemental information concerning the use of this product.
Garmin
®
and the Garmin logo are trademarks of Garmin Ltd. or its subsidiaries, registered in the USA and other countries. GHC
™
and Shadow Drive
™
are trademarks of Garmin Ltd. or
its subsidiaries. These trademarks may not be used without the express permission of Garmin.
NMEA 2000
®
and the NMEA 2000
®
logo are registered trademarks of the National Marine Electronics Association.
Garmin Corporation
M/N: E3545

Table of Contents
Introduction......................................1
Basic Autopilot Operation................. 1
Heading Screen....................................... 1
Standby Mode......................................... 2
Engaging the Autopilot........................2
Disengaging the Autopilot.................. 2
Heading Hold........................................... 2
Heading Adjustment........................... 3
Powerboat Autopilot Operation.........3
Steering Patterns.....................................3
Following the U-Turn Pattern.............. 3
Setting Up and Following the Circles
Pattern..................................................3
Setting Up and Following the Zigzag
Pattern..................................................4
Following the Williamson Turn
Pattern..................................................4
Following an Orbit Pattern.................. 4
Setting Up and Following the
Cloverleaf Pattern................................4
Setting Up and Following a Search
Pattern..................................................4
Cancelling a Steering Pattern............. 5
Sailboat Autopilot Operation.............5
Wind Hold................................................ 5
Engaging Wind Hold............................ 5
Engaging Wind Hold from Heading
Hold...................................................... 6
Adjusting the Wind Hold Angle........... 6
Tack and Gybe......................................... 6
Tacking and Gybing from Heading
Hold...................................................... 6
Tacking and Gybing from Wind
Hold...................................................... 6
Setting a Tack Delay............................6
Enabling the Gybe Inhibitor................. 7
Adjusting the Heading Tack Angle..... 7
Adjusting the Autopilot Response..........7
Autopilot Settings and
Configuration................................... 7
Autopilot Configuration.......................... 7
Adjusting the Step Steering
Increment............................................. 7
Selecting the Preferred Heading
Source.................................................. 8
Enabling the Shadow Drive
Feature................................................. 8
Reactor™ Autopilot Remote Control.......8
Pairing a Reactor Autopilot Remote
Control..................................................9
Changing the Functions of the Reactor
Autopilot Remote Control Action
Keys...................................................... 9
Enabling the Autopilot Controls on a
Garmin Watch.......................................... 9
Customizing the Autopilot Button
Actions................................................. 9
Viewing Autopilot Diagnostics............... 9
Device Settings and Preferences...... 9
System Settings.................................... 10
Sounds and Display Settings............ 10
Satellite Positioning (GPS)
Settings.............................................. 10
Viewing System Software
Information........................................ 10
Viewing E-label Regulatory and
Compliance Information................... 11
Preferences Settings............................ 11
Communications Settings.................... 11
NMEA 2000 Settings......................... 11
Wi‑Fi® Network................................. 11
Garmin Marine Network.................... 12
Setting Alarms....................................... 12
System Alarms.................................. 12
NMEA 2000 Alarms........................... 12
Software Update................................... 12
Specifications................................ 13
連絡地址................................................ 13
联系信息................................................ 13
物質宣言................................................ 14
中国微功率无线电发射设备合规.......... 14
Table of Contents i

Introduction
WARNING
See the Important Safety and Product Information guide in the product box for product warnings and other
important information.
You are responsible for the safe and prudent operation of your vessel. The autopilot is a tool that enhances your
capability to operate your boat. It does not relieve you of the responsibility of safely operating your boat. Avoid
navigational hazards and never leave the helm unattended.
Learn to operate the autopilot on calm and hazard-free open water.
Use caution when operating the autopilot near hazards in the water, such as docks, pilings, and other boats.
The autopilot system continuously adjusts the steering of your boat to maintain a constant heading. In addition
to the basic heading-hold functionality, the system allows manual steering and several modes of automatic-
steering functions and patterns.
You can operate the autopilot system using the helm control device. Using the helm control, you engage and
steer, set up, and customize the autopilot system.
For information about installing the helm control or other components of the autopilot system, see the
installation instructions provided with the helm control and the autopilot system.
Basic Autopilot Operation
Heading Screen
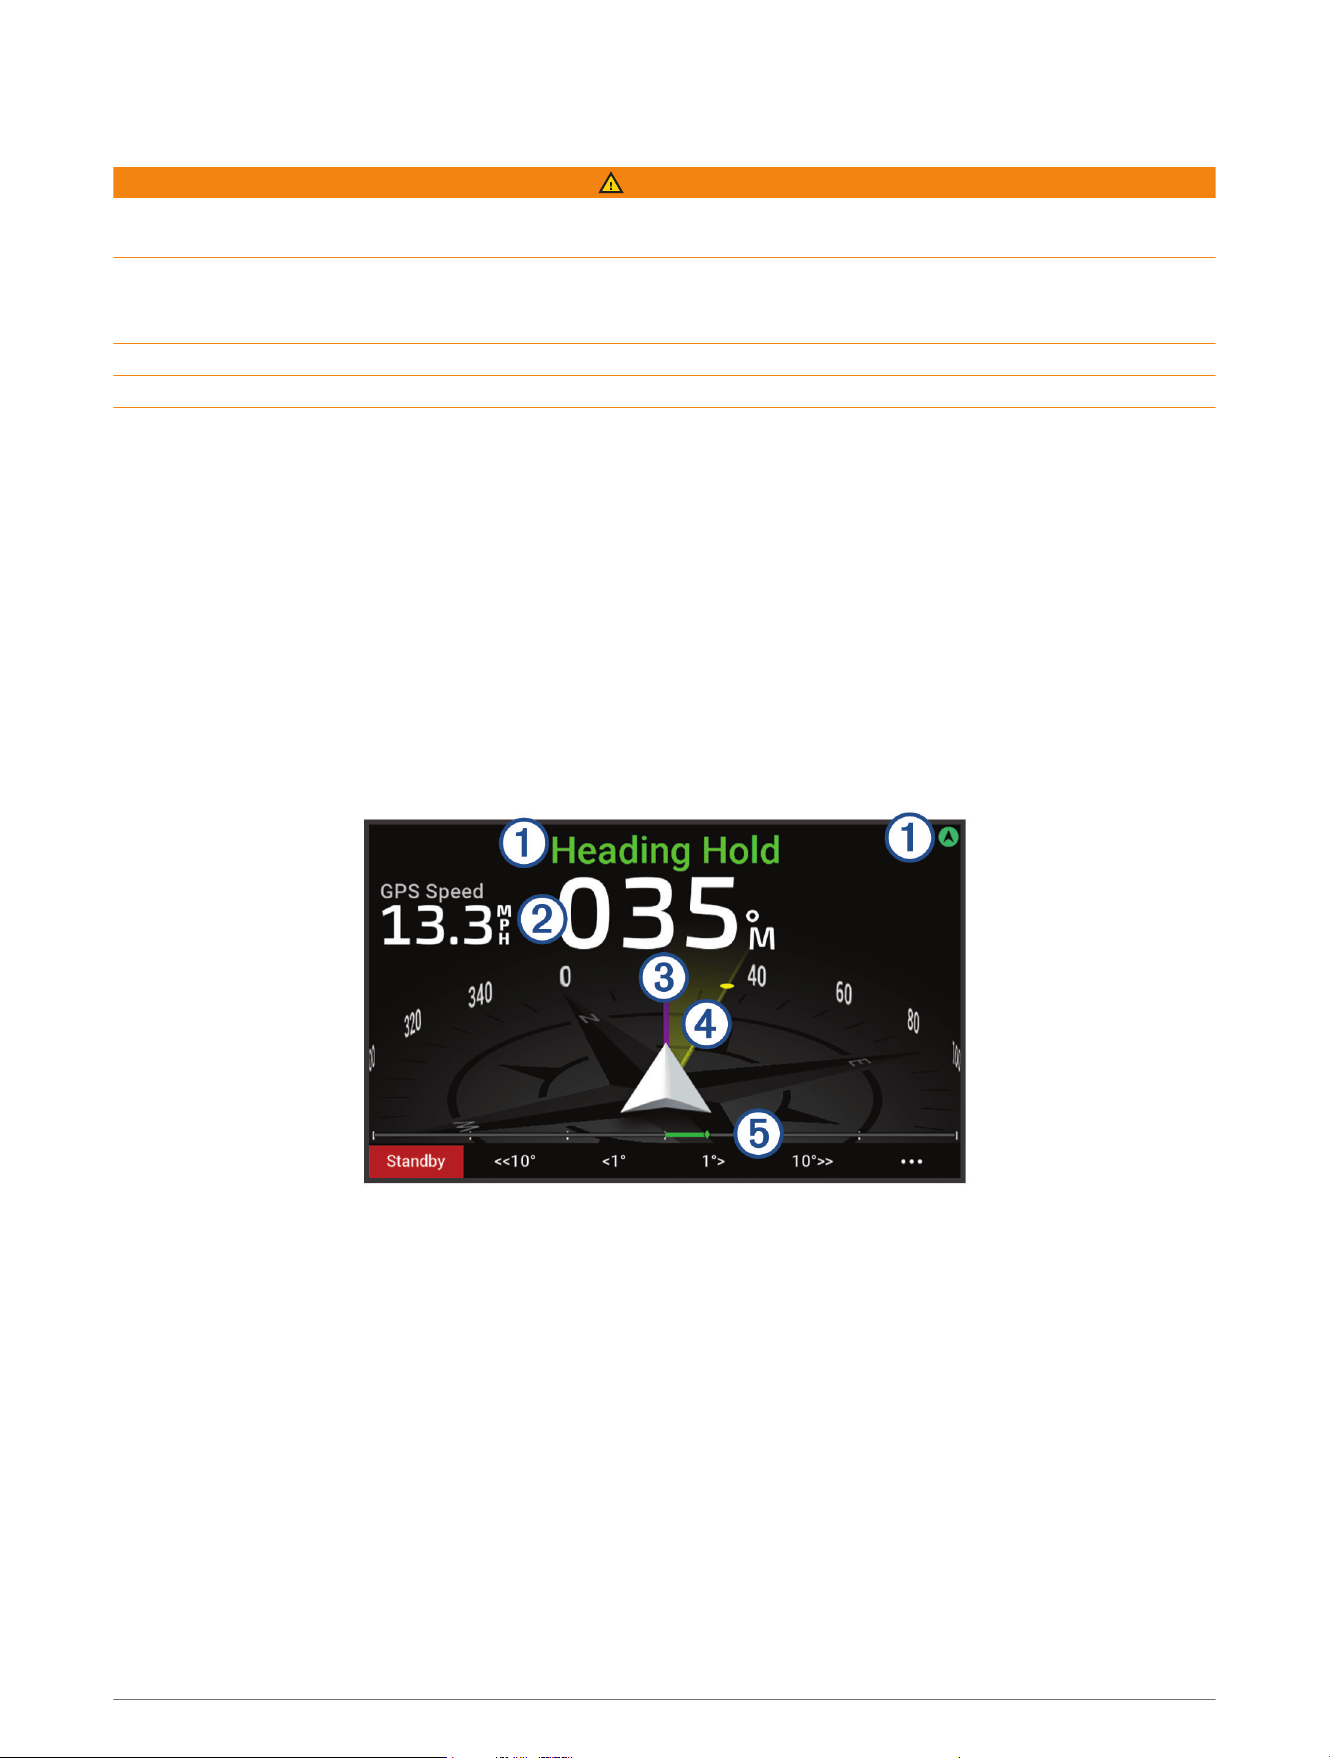
The heading screen displays the status of the autopilot.
Introduction 1
Autopilot status information and icon.
Standby and appear in gray when the autopilot is in standby mode.
Heading Hold and appear in green when the autopilot is engaged.
Numeric heading information.
Shows the actual heading when the autopilot is in standby mode.
Shows the intended heading when the autopilot is engaged.
Actual heading (when the autopilot is engaged).
The magenta line shows the actual heading on the compass rose.
Intended heading (when the autopilot is engaged).
The yellow line is shown when using the helm control to adjust the heading. The autopilot steers the
vessel until the actual heading aligns with the intended heading.
Rudder position indicator.
NOTE: This functionality is available only when a rudder sensor is connected
Standby Mode
CAUTION
The autopilot does not steer the boat in standby mode. You are responsible for controlling the helm when the
autopilot is in standby mode.
In standby mode, you can engage the autopilot and adjust settings.
Standby and at the top of the heading screen appear in gray when the autopilot is in standby mode.
Engaging the Autopilot
When you engage the autopilot, the autopilot takes control of the helm and steers the boat to maintain your
heading.
From the heading screen in standby mode, select Engage.
Heading Hold and at the top of the heading screen appear in green when the autopilot is engaged. Your
actual and intended heading information shows in the center of the heading screen.
NOTE: When installed on a sailboat, you can engage either the standard heading hold or engage a wind hold
when a compatible wind sensor is connected to the same NMEA 2000
®
network (Wind Hold, page5).
Disengaging the Autopilot
When you disengage the autopilot, the autopilot stops controlling the helm and you must steer the boat to
maintain your heading.
From the heading screen, while in heading hold, select Standby.
Standby and at the top of the heading screen appear in gray when the autopilot is in standby mode.
CAUTION
The autopilot does not steer the boat while it is in standby mode. You are responsible for controlling the helm
when the autopilot is in standby mode.
Heading Hold
You can engage the autopilot heading hold function to maintain your current heading without steering the helm
or the rudder.
2 Basic Autopilot Operation
Heading Adjustment
When the autopilot is engaged, you can adjust the heading using the keys on the helm control or using the helm
if your autopilot is equipped with Shadow Drive
™
technology.
Adjusting the Heading Using the Helm Control Device
Before you can steer your boat using the helm control device, you must engage the autopilot.
• Select <1° or 1°> to adjust the heading in 1° increments.
NOTE: Holding <1° or 1°> initiates rudder steering (power planing hull or power displacement hull boats only).
NOTE: You can adjust the settings to change step- and rudder-steering behavior.
• Select <<10° or 10°>> to adjust the heading in 10° increments.
NOTE: You can adjust the settings so that the step turn size is smaller or larger than 10°.
Adjusting the Heading Using the Helm
NOTE: You must enable the Shadow Drive feature before you can adjust the heading using the helm while the
autopilot is engaged .
With the autopilot engaged, manually steer the boat using the helm.
Shadow Drive and at the top of the heading screen appear in yellow, and you have full steering control
using the helm.
When you release the helm and maintain a specific heading for a few seconds, the autopilot resumes a
heading hold at the new heading.
Powerboat Autopilot Operation
Steering Patterns
WARNING
You are responsible for the safe operation of your boat. Do not begin a pattern until you are certain the water is
clear of obstacles.
The autopilot can steer the boat in preset patterns for fishing, and it can perform other specialty maneuvers
such as U-turns and Williamson turns.
Where noted, some pattern steering is based on GPS, and cannot be used without a GPS antenna or device
connected to the same NMEA 2000 network as the helm control.
Following the U-Turn Pattern
You can use the u-turn pattern to turn the boat around 180 degrees and maintain the new heading.
1 From the autopilot screen, select > Pattern Steering > U-Turn.
2 Select Engage Port or Engage Starboard.
Setting Up and Following the Circles Pattern
You can use the circles pattern to steer the boat in a continuous circle, in a specified direction, and at a
specified time interval.
1 From the autopilot screen, select > Pattern Steering > Circles.
2 If necessary, select Time, and select a time for the autopilot to steer one complete circle.
3 Select Engage Port or Engage Starboard.
Powerboat Autopilot Operation 3

Setting Up and Following the Zigzag Pattern
You can use the zigzag pattern to steer the boat from port to starboard and back, over a specified time and
angle, across your present heading.
1 From the autopilot screen, select > Pattern Steering > Zigzag.
2 If necessary, select Amplitude, and select a degree.
3 If necessary, select Period, and select a length of time.
4 Select Engage Zigzag.
Following the Williamson Turn Pattern
You can use the Williamson turn pattern to steer the boat around with the intent of running alongside the
location where the Williamson turn pattern was initiated. The Williamson turn pattern can be used in man
overboard situations.
1 From the autopilot screen, select > Pattern Steering > Williamson Turn.
2 Select Engage Port or Engage Starboard.
Following an Orbit Pattern
Before you can use this steering pattern, the helm control must be connected to the same NMEA 2000 network
as a compatible Garmin
®
chartplotter and a GPS source.
You can use the orbit pattern to steer the boat in a continuous circle around the active waypoint. The size of the
circle is defined by your distance from the active waypoint when you begin the orbit pattern.
See the owner's manual for your Garmin chartplotter for more information about setting and using waypoints.
1 From the autopilot screen, select > Pattern Steering > Orbit.
2 Select Engage Port or Engage Starboard.
Setting Up and Following the Cloverleaf Pattern
Before you can use this steering pattern, the helm control must be connected to the same NMEA 2000 network
as a compatible Garmin chartplotter and a GPS source.
You can use the cloverleaf pattern to steer the boat to repeatedly pass over an active waypoint. When you begin
the cloverleaf pattern, the autopilot drives the boat toward the active waypoint and begins the cloverleaf pattern.
You can adjust the distance between the waypoint and the location where the autopilot turns the boat for
another pass over the waypoint. The default setting turns the boat at a range of 1000ft. (300m) from the active
waypoint.
See the owner's manual for your Garmin chartplotter for more information about setting and using waypoints.
1 From the autopilot screen, select > Pattern Steering > Cloverleaf.
2 If necessary, select Length, and select a distance.
3 Select Engage Port or Engage Starboard.
Setting Up and Following a Search Pattern
Before you can use this steering pattern, the helm control must be connected to the same NMEA 2000 network
as a compatible Garmin chartplotter and a GPS source.
You can use the search pattern to steer the boat in increasingly larger circles outward from the active waypoint,
forming a spiral pattern. When you begin the search pattern, the autopilot immediately drives the boat in a circle
centered on the active waypoint and expands the spiral as it completes each circle.
See the owner's manual for your Garmin chartplotter for more information about setting and using waypoints.
You can adjust the distance between each circle in the spiral. The default distance between circles is 50ft.
(20m).
1 From the autopilot screen, select > Pattern Steering > Search.
2 If necessary, select Search Spacing, and select a distance.
3 Select Engage Port or Engage Starboard.
4 Powerboat Autopilot Operation
Cancelling a Steering Pattern
• Physically steer the boat.
NOTE: Shadow Drive feature must be enabled to cancel a steering pattern by physically steering the boat.
• Select Standby.
Sailboat Autopilot Operation
CAUTION
When engaged, the autopilot controls only the rudder. You and your crew remain responsible for the sails while
the autopilot is engaged.
In addition to heading hold, you can use the autopilot to maintain a wind hold. You can also use the autopilot to
control the rudder while tacking and gybing.
Wind Hold
You can set the autopilot to maintain a specific bearing relative to the apparent or true wind angle. You must
connect a compatible wind sensor the same NMEA 2000 network as the autopilot system to perform a wind
hold or wind-based steering maneuvers.
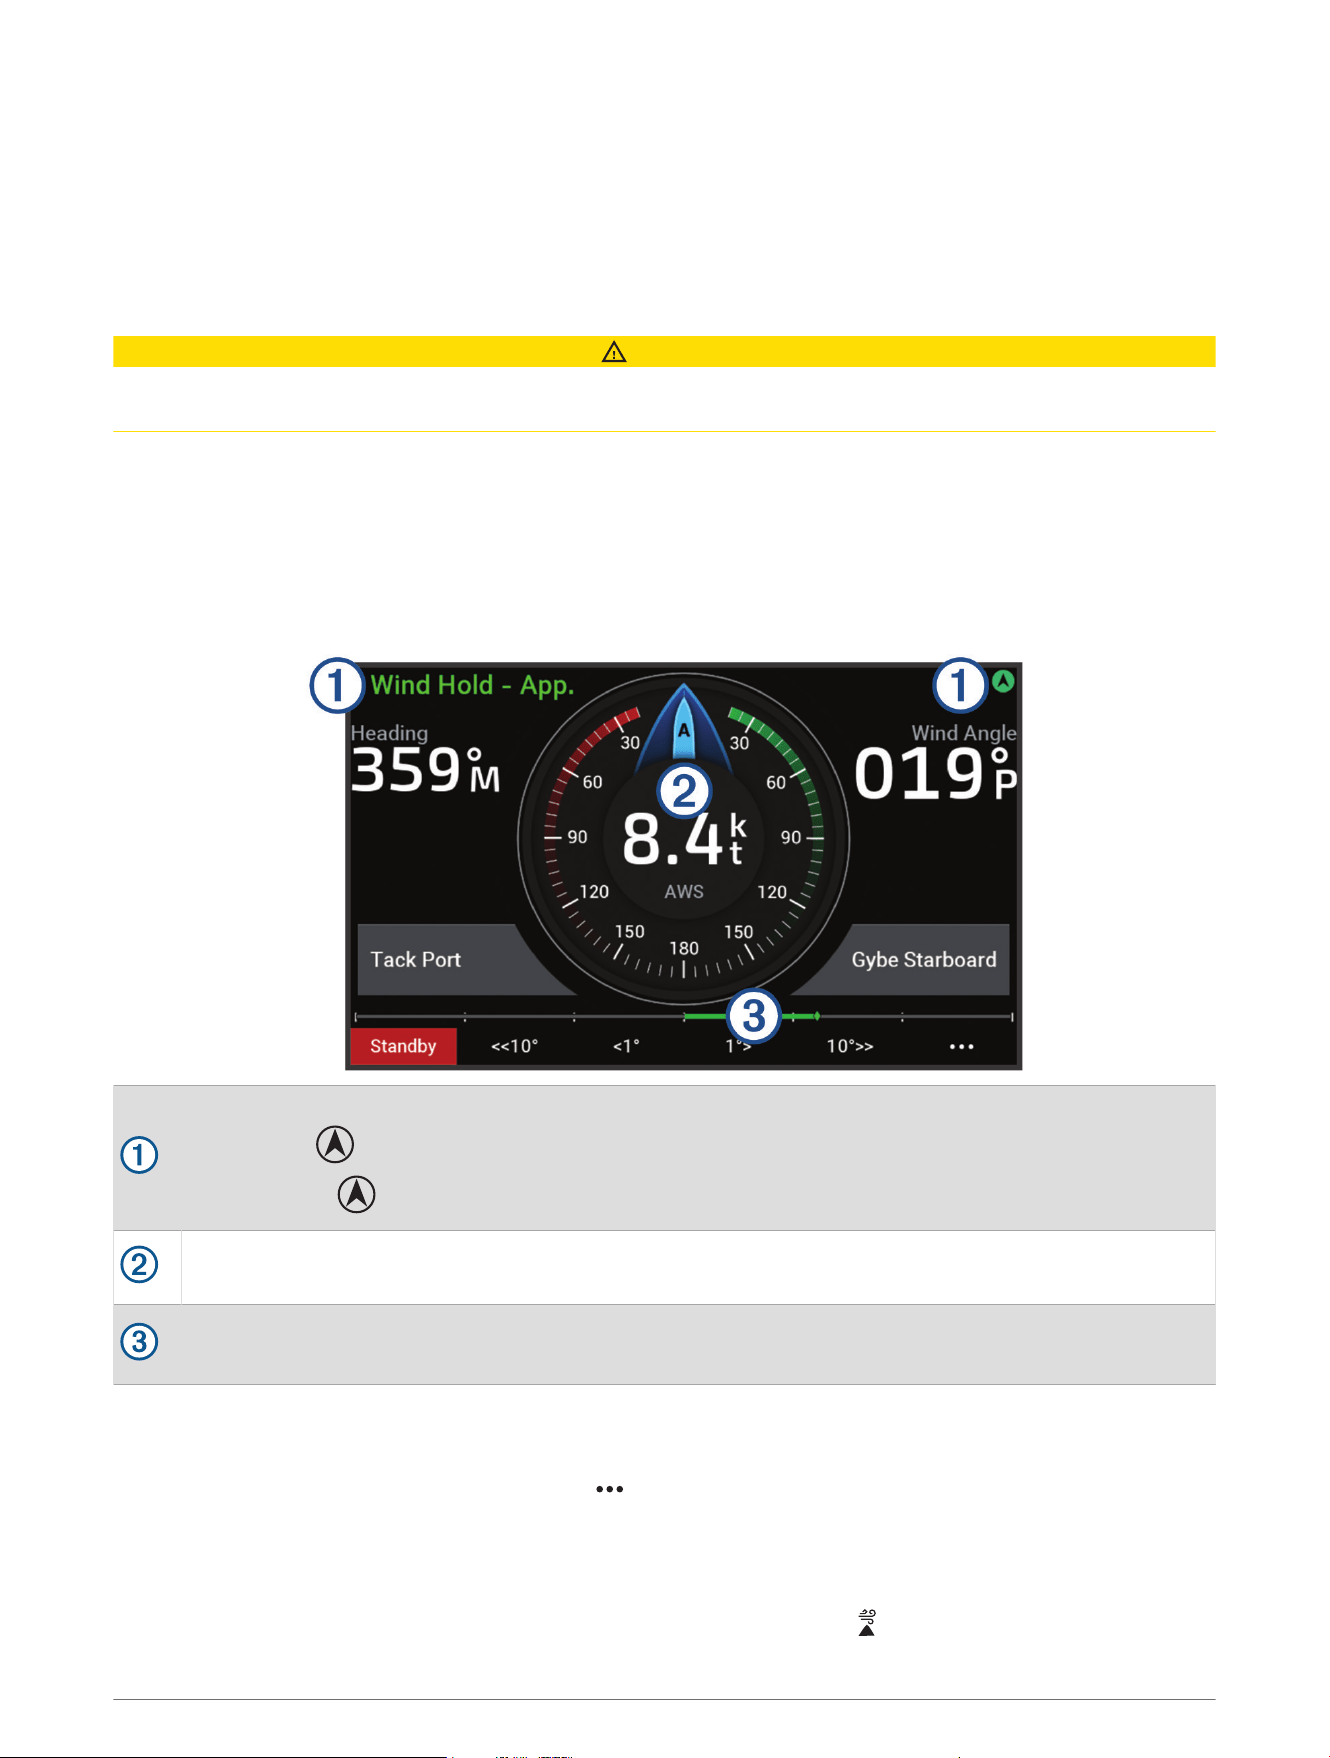
Autopilot status information and icon.
Standby and appear in gray when the autopilot is in standby mode.
Wind Hold and appear in green when the autopilot is engaged in wind hold.
Wind gauge
Shows the true wind speed (TWS) or apparent wind speed (AWS).
Rudder position indicator.
NOTE: This functionality is available only when a rudder sensor is connected
Engaging Wind Hold
Before you can engage wind hold, you must connect a NMEA 2000 wind sensor to the autopilot.
1 When the autopilot is in standby mode, select .
2 Select an option:
• To engage an apparent wind hold, select Engage App. Wind Hold.
• To engage a true wind hold, select Engage True Wind Hold.
TIP: You can quickly engage the last type of wind hold used by selecting from standby mode.
Sailboat Autopilot Operation 5

Changing the Wind Hold Type
With the wind hold engaged, select > Wind Hold Type.
The wind hold type changes from Apparent to True, or vice versa.
Engaging Wind Hold from Heading Hold
Before you can engage wind hold, you must connect a NMEA 2000 wind sensor to the autopilot.
1 With heading hold engaged, select .
2 Select an option:
• To change from heading hold to apparent wind hold, select Engage App. Wind Hold.
• To change from heading hold to true wind hold, select Engage True Wind Hold.
Adjusting the Wind Hold Angle
You can adjust the wind hold angle on the autopilot when wind hold is engaged.
• To adjust the wind hold angle in increments of 1°, select <1° or 1°>.
NOTE: Holding <1° or 1°> for a few seconds automatically transitions the autopilot from Wind Hold to
Heading Hold and initiates rudder steering (Heading Hold, page2).
• To adjust the wind hold angle in increments of 10°, select <<10° or 10°>>.
NOTE: You can adjust the settings so that the step turn size is smaller or larger than 10°.
Tack and Gybe
You can set the autopilot to perform a tack or gybe while heading hold or wind hold is engaged.
Tacking and Gybing from Heading Hold
1 Engage a heading hold (Engaging the Autopilot, page2).
2 Select .
3 Select an option.
The autopilot steers your boat through a tack or gybe.
Tacking and Gybing from Wind Hold
Before you can engage wind hold, you must have a wind sensor installed.
1 Engage wind hold (Engaging Wind Hold, page5).
2 Select .
3 Select an option.
TIP: You can begin a tack or gybe maneuver directly from wind hold by using the dedicated on-screen
buttons.
The autopilot steers your boat through a tack or gybe, and information about the progress of the tack or gybe
appears on the screen.
Setting a Tack Delay
The tack delay allows you to delay steering a tack after you initiate the maneuver.
1 From the autopilot screen, select > Autopilot Setup > Sailing Setup > Tack Delay.
2 Select the length of the delay.
3 If necessary, select Done.
6 Sailboat Autopilot Operation
Enabling the Gybe Inhibitor
NOTE: The gybe inhibitor does not prevent you from manually performing a gybe using the helm or step
steering.
The gybe inhibitor prevents the autopilot from performing a gybe.
1 From the autopilot screen, select > Autopilot Setup > Sailing Setup > Gybe Inhibitor.
2 Select Enabled.
Adjusting the Heading Tack Angle
By default, the heading angle when performing a tack maneuver is 45 degrees. You can adjust this angle.
1 From the autopilot screen, select > Autopilot Setup > Sailing Setup > Hdg. Tack Ang..
2 Adjust the angle.
3 If necessary, select Done.
Adjusting the Autopilot Response
The Response setting allows you to adjust the autopilot responsiveness for varying sea and wind conditions.
For advanced autopilot configuration, see the configuration guide included with your autopilot system.
1 From the autopilot screen, select > Response.
2 Adjust the rudder response.
If you want the rudder to be more responsive and move more quickly, increase the value. If the rudder is too
responsive and moving too quickly, decrease the value.
Autopilot Settings and Configuration
The autopilot system should be commissioned by a professional at the time of installation, and further
configuration is not necessary.
You can adjust certain preferences and settings on the helm control device if needed.
Autopilot Configuration
NOTICE
To avoid damage to your boat, the autopilot system should be installed and configured by a qualified marine
installer. Specific knowledge of marine steering and electrical systems is required for proper installation and
configuration.
The autopilot system must be configured to work properly with your boat. You can configure the autopilot using
a chartplotter on the same NMEA 2000 network as the autopilot. For configuration instructions, go to support
.garmin.com, and download the configuration guide for your specific autopilot model.
Adjusting the Step Steering Increment
1 From the autopilot screen, select > Autopilot Setup > Step Turn Size.
2 Select an increment.
Autopilot Settings and Configuration 7
Selecting the Preferred Heading Source
NOTICE
For best results, use the autopilot CCU internal compass for the heading source. Using a third-party GPS
compass can cause the data to be delivered erratically and may result in excessive delays. The autopilot needs
timely information, and therefore cannot often use third-party GPS compass data for GPS location or speed.
If a third-party GPS compass is used, the autopilot will likely report loss of navigation data and speed source
periodically.
If you have more than one heading source on the network, you can select a your preferred source. The source
could be a compatible GPS compass or a magnetic heading sensor.
1 From the autopilot screen, select > Autopilot Setup > Preferred Sources
2 Select a source.
If the selected heading source is unavailable, the autopilot screen does not display any data.
Enabling the Shadow Drive Feature
WARNING
If the Shadow Drive feature is disabled, steering the boat manually will not disengage the autopilot system. You
must use the helm control or connected chartplotter to disengage the autopilot system.
NOTE: The Shadow Drive feature is not available on all autopilot models.
If the Shadow Drive feature has been disabled, you must enable it again before you can steer the boat manually
to disengage the autopilot system.
1 From the autopilot screen, select > Autopilot Setup > Shadow Drive Setup.
2 If Disabled is shown, select Shadow Drive to enable the Shadow Drive feature.
The Shadow Drive feature is enabled. You can repeat these steps to disable the feature again.
Adjusting the Sensitivity of the Shadow Drive Feature
You can adjust the sensitivity of the Shadow Drive feature to change how much manual helm activity it takes to
disengage the autopilot. A higher sensitivity setting will disengage the autopilot with less manual movement of
the helm.
NOTE: The Shadow Drive feature is not available on all autopilot models.
1 From the autopilot screen, select > Autopilot Setup > Shadow Drive > Sensitivity.
2 Adjust the sensitivity higher or lower.
Reactor
™
Autopilot Remote Control
WARNING
You are responsible for the safe and prudent operation of your vessel. The autopilot is a tool that enhances your
capability to operate your boat. It does not relieve you of the responsibility of safely operating your boat. Avoid
navigational hazards and never leave the helm unattended.
You can wirelessly connect a Reactor autopilot remote control to the chartplotter to control the compatible
Reactor autopilot system.
For more information about using the remote, see the Reactor autopilot remote control instructions at garmin
.com
8 Autopilot Settings and Configuration

Pairing a Reactor Autopilot Remote Control
1 On the helm control, select > Global Settings > Communications > Wireless Devices > Wireless Remotes
> Autopilot Remote.
2 If necessary, select Enable.
3 Select New Connection.
4 On the remote control, select > Pair with MFD.
The helm control beeps and shows a confirmation message.
5 On the helm control, select Yes to complete the pairing process.
Changing the Functions of the Reactor Autopilot Remote Control Action Keys
You can change the patterns or actions assigned to the Reactor autopilot remote control action keys.
1 Select > Global Settings > Communications > Wireless Devices > Wireless Remotes > Autopilot Remote
> Button Actions.
2 Select an action key to change.
3 Select a pattern or action to assign to the action key.
Enabling the Autopilot Controls on a Garmin Watch
You can control the Garmin autopilot with a compatible Garmin watch. Go to garmin.com for a list of compatible
Garmin watches.
NOTE: Smart notifications are not available on your watch when the autopilot remote control is enabled.
1 Select > Global Settings > Communications > Wireless Devices > Connect IQ™ Apps > Autopilot Control >
Enable > New Connection.
2 Follow the on-screen instructions.
Customizing the Autopilot Button Actions
Before you can set the autopilot button actions, you must install and configure a compatible Garmin autopilot.
You can select up to three autopilot actions for your Garmin watch to perform.
NOTE: Available autopilot actions depend on the autopilot installed.
1 On the chartplotter, select Communications > Wireless Devices > Connect IQ™ Apps > Autopilot Control >
Button Actions.
2 Select a button.
3 Select an action.
Viewing Autopilot Diagnostics
You can view a diagnostics report of the autopilot system to help with configuration and troubleshooting.
1 From the autopilot screen, select > Autopilot Setup > Diagnostics.
2 Select and to view the diagnostics pages.
TIP: You can select Save to Card to save the diagnostic information to a memory card in a connected
chartplotter or card reader.
Device Settings and Preferences
You can adjust settings and preferences specific to this helm control device, such as sounds and units of
measure.
Device Settings and Preferences 9

System Settings
Select > Global Settings > System.
Sounds and Display: Adjusts the display settings and the audio settings (if available).
Satellite Positioning: Provides information about the GPS satellites and settings.
System Information: Provides information about the devices on the network and the software version.
Auto Power Up: Controls which devices turn on automatically when power is applied.
Auto Power Off: Automatically turns off the system after it has been asleep for the selected length of time.
Simulator: Turns the simulator on or off and allows you to set the time, date, speed, and simulated location.
Sounds and Display Settings
Select > Global Settings > System > Sounds and Display.
Beeper: Turns on and off the tone that sounds for alarms and selections.
Backlight: Sets the backlight brightness.
Backlight Sync: Synchronizes the backlight brightness of other chartplotters and instruments in the station.
Color Mode: Sets the device to display day or night colors. You can select the Auto option to allow the device to
set day or night colors automatically based on the time of day.
Startup Image: Sets the image that appears when you turn on the device.
Satellite Positioning (GPS) Settings
NOTE: GPS settings and information are available only when the helm control device is connected to a GPS
antenna or a device with GPS capability.
Select > Global Settings > System > Satellite Positioning.
Skyview: Shows the relative position of GPS satellites in the sky.
GLONASS: Turns on or off GLONASS data (Russia satellite system). When the system is used in situations with
poor sky visibility, GLONASS data can be used in combination with GPS to provide more accurate position
information.
WAAS/EGNOS: Turns on or off WAAS data (in North America) or EGNOS data (in Europe), which can provide
more-accurate GPS position information. When using WAAS or EGNOS data, the device may take longer to
acquire satellites.
Galileo: Turns on or off Galileo data (European Union satellite system). When the system is used in situations
with poor sky visibility, Galileo data can be used in combination with GPS to provide more accurate position
information.
Speed Filter: Averages the speed of your vessel over a short period of time for smoother speed values.
Source: Allows you to select the preferred source for GPS data.
Viewing System Software Information
You can view the software version and the unit ID number. You may need this information to update the system
software or for troubleshooting purposes.
Select > Global Settings > System > System Information > Software Information.
Viewing the Event Log
The event log shows a list of system events.
Select > Global Settings > System > System Information > Event Log.
10 Device Settings and Preferences

Viewing E-label Regulatory and Compliance Information
The label for this device is provided electronically. The e-label may provide regulatory information, such as
identification numbers provided by the FCC or regional compliance markings, as well as applicable product and
licensing information. Not available on all models.
1 Select > Global Settings.
2 Select System.
3 Select Regulatory Information.
Preferences Settings
Select > Global Settings > Preferences.
Units: Sets units of measure.
Language: Sets the on-screen text language.
Filters: Smooths out the values shown in the data fields, which can decrease the noise or show longer term
trends. Increasing the filter setting increases the smoothing and decreasing it reduces the smoothing. A filter
setting of 0 will disable the filter and the value shown will be the raw value from the source. You can also
synchronize these settings across all devices that enable the Sync Filters setting.
Keyboard Layout: Arranges the keys on the on-screen keyboard.
Screenshot Capture: Allows the device to save images of the screen.
Communications Settings
NMEA 2000 Settings
Select > Global Settings > Communications > NMEA 2000 Setup.
Device List: Displays the devices connected to the network and allows you to set options for some transducers
connected using the NMEA 2000 network.
Label Devices: Changes the labels for available connected devices.
Naming Devices and Sensors on the Network
You can name devices and sensors connected to the Garmin Marine Network and the NMEA 2000 network.
1 Select > Global Settings > Communications.
2 Select Marine Network or NMEA 2000 Setup > Device List.
3 Select a device from the list on the left.
4 Select Change Name.
5 Enter the name, and select Done.
Wi‑Fi
®
Network
Setting Up the Wi‑Fi Network
This device can host a Wi‑Fi network to which you can connect wireless devices such as another chartplotter or
your phone. The first time you access the wireless network settings, you are prompted to set up the network.
NOTE: You do not have the option to set up a Wi‑Fi network if the helm control device is connected to the same
Garmin Marine Network as a chartplotter that has Wi‑Fi capabilities. On a Garmin Marine Network, a chartplotter
must host the Wi‑Fi network.
1 Select > Global Settings > Communications > Wi-Fi Network > Wi-Fi > On > OK.
2 If necessary, enter a name for this wireless network.
3 Enter a password.
You will need this password to access the wireless network from a wireless device, such as your phone. The
password is case-sensitive.
Device Settings and Preferences 11

Connecting a Wireless Device to the Helm Control
Before you can connect a wireless device to the helm control wireless network, you must configure the wireless
network on the helm control (Setting Up the Wi‑Fi Network, page11).
You can connect multiple wireless devices to the helm control to share data.
1 From the wireless device, turn on Wi‑Fi technology, and search for wireless networks.
2 Select the name of your helm control wireless network (Setting Up the Wi‑Fi Network, page11).
3 Enter the wireless network password.
Changing the Wireless Channel
You can change the wireless channel if you have trouble finding or connecting to a device, or if you experience
interference.
1 Select > Global Settings > Communications > Wi-Fi Network > Advanced > Channel.
2 Enter a new channel.
You do not need to change the wireless channel of devices connected to this network.
Garmin Marine Network
The Garmin Marine Network allows you to share data from Garmin peripheral devices with chartplotters quickly
and easily. You can connect a device to the Garmin Marine Network to receive data from and share data with
other devices and chartplotters that are compatible with the Garmin Marine Network.
Select > Global Settings > Communications > Marine Network.
Setting Alarms
CAUTION
The Beeper setting must be turned on to make alarms audible (Sounds and Display Settings, page10). Failure to
set audible alarms could lead to injury or property damage.
System Alarms
Select > Global Settings > Alarms > System.
Unit Voltage: Sets an alarm to sound when the battery reaches a specified low voltage.
GPS Accuracy: Sets an alarm to sound when the GPS location accuracy falls outside the user-defined value.
NMEA 2000 Alarms
Select > Global Settings > Alarms > Network.
NMEA 2000 Alerts: Enables and disables alerts regarding the NMEA 2000 network and connected devices.
Software Update
You may need to update the device software when you install the device or add an accessory to the device.
The software update requires either a Garmin memory card reader accessory or another Garmin chartplotter
connected over the Garmin Marine Network.
Go to garmin.com/support/software/marine.html for more information.
12 Device Settings and Preferences

Specifications
Dimensions without sun cover (H × W × D) 105 x 140 x 51mm (4.13 x 4.51 x 2.01in.)
Dimensions with sun cover (H × W × D) 113 x 144 x 56mm (4.45 x 5.67x 2.20in.)
Weight without sun cover 328g (11.57oz.)
Weight with sun cover 375g (13.23oz.)
Temperature range From 5° to 131°F (from -15° to 55°C)
Compass-safe distance 20cm (7.87in.)
Case material Fully-gasketed polycarbonate
Lens material Glass with an anti-glare and anti-fingerprint finish
Water rating IEC 60529 IPX7
1
Brightness 1200 cd/m
2
(NIT)
Typical current draw at 12Vdc 220mA
Max. current draw at 12Vdc 400mA
Power usage 5.85W max
NMEA 2000 input voltage 9 to 16Vdc
NMEA 2000 LEN @ 9Vdc 13 (650mA)
連絡地址
製造銷售:台灣國際航電股份有限公司
聯絡地址:新北市汐止區樟樹二路 68 號
電 話:(02)2642-8999
客服專線:(02)2642-9199
联系信息
制造厂商 : 台湾国际航电股份有限公司
销售厂商 : 上海佳明航电企业管理有限公司
联络地址 : 上海市徐汇区桂平路 391 号 ( 新漕河泾国际商务中心 A 座 37 层 )
电 话 : 021-60737675
客服专线 : 400-819-1899
1
The device withstands incidental exposure to water of up to 1m for up to 30min. For more information, go to www.garmin.com/waterrating.
Specifications 13
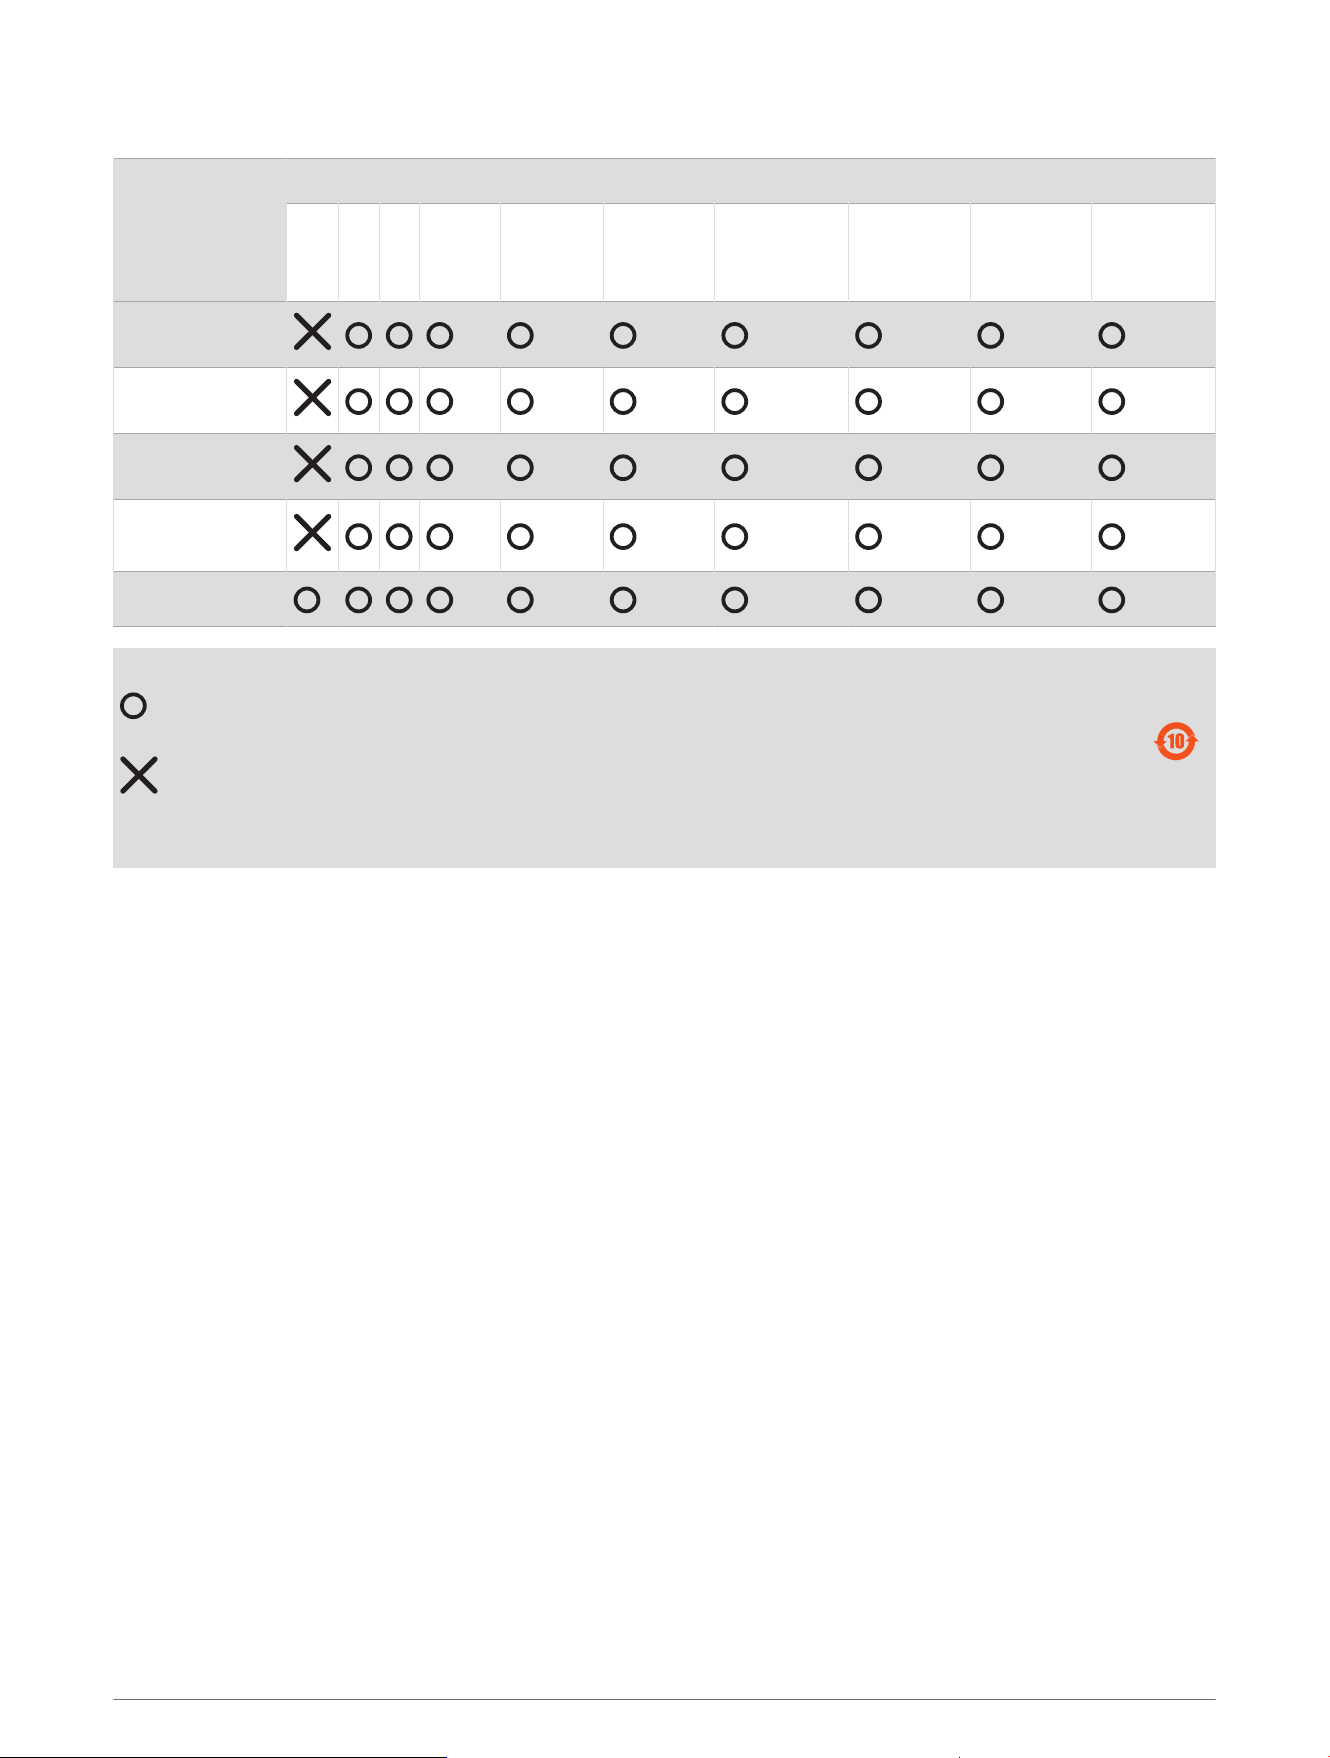
物質宣言
部件名称
有毒有害物质或元素
铅 汞 镉 六价铬 多溴联苯
多溴二苯
醚
邻苯二甲酸
二(2-乙基
己)酯
邻苯二甲
酸丁苄酯
邻苯二甲
酸二丁酯
邻苯二甲
酸二异丁
酯
印刷电路板组件
屏幕/背光
金属零件
电缆 电缆组件
连接器
塑料和橡胶零件
本表格依据 SJ/T11364 的规定编制。
: 代表此种部件的所有均质材料中所含的该种有害物质均低于
(GB/T26572) 规定的限量
: 代表此种部件所用的均质材料中, 至少有一类材料其所含的有害物质高于
(GB/T26572) 规定的限量
* 该产品说明书应提供在环保使用期限和特殊标记的部分详细讲解产品的担保使用条件。
产品
中国微功率无线电发射设备合规
一 ) 工作于 2403–2480MHz 频段的 ANT 技术无线遥控设备 , 使用频率 : 2403–2480MHz, 发射功率限值 :
10mW(e.i.r.p), 频率容限 : 170 kHz
二) 不得擅自改变使用场景或使用条件、扩大发射频率范围、加大发射功率(包括额外加装射频功率放大器),
不得擅自更改发射天线;
三) 不得对其他合法的无线电台(站)产生有害干扰,也不得提出免受有害干扰保护;
四) 应当承受辐射射频能量的工业、科学及医疗( ISM )应用设备的干扰或其他合法的无线电台(站)干扰;
五) 如对其他合法的无线电台(站)产生有害干扰时,应立即停止使用,并采取措施消除干扰后方可继续使用;
六) 在航空器内和依据法律法规、国家有关规定、标准划设的射电天文台、气象雷达站、卫星地球站(含测控、
测距、接收、导航站)等军民用无线电台(站)、机场等的电磁环境保护 区域内使用微功率设备,应当遵守电磁
环境保护及相关行业主管部门的规定;
七) 禁止在以机场跑道中心点为圆心、半径 5000 米的区域内使用各类模型遥控器;
八) 微功率设备使用时温度 -15–55°C 直流电压 9–32 Vdc 。
14 Specifications


support.garmin.com
GUID-BD39FCBD-2F6F-4A48-8A61-1FE1F349792B v2January 2023