
Technical Support and E-Warranty Certificate
www.vevor.com/support
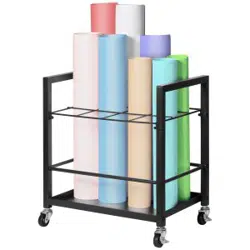
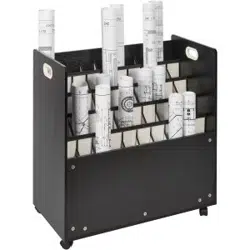
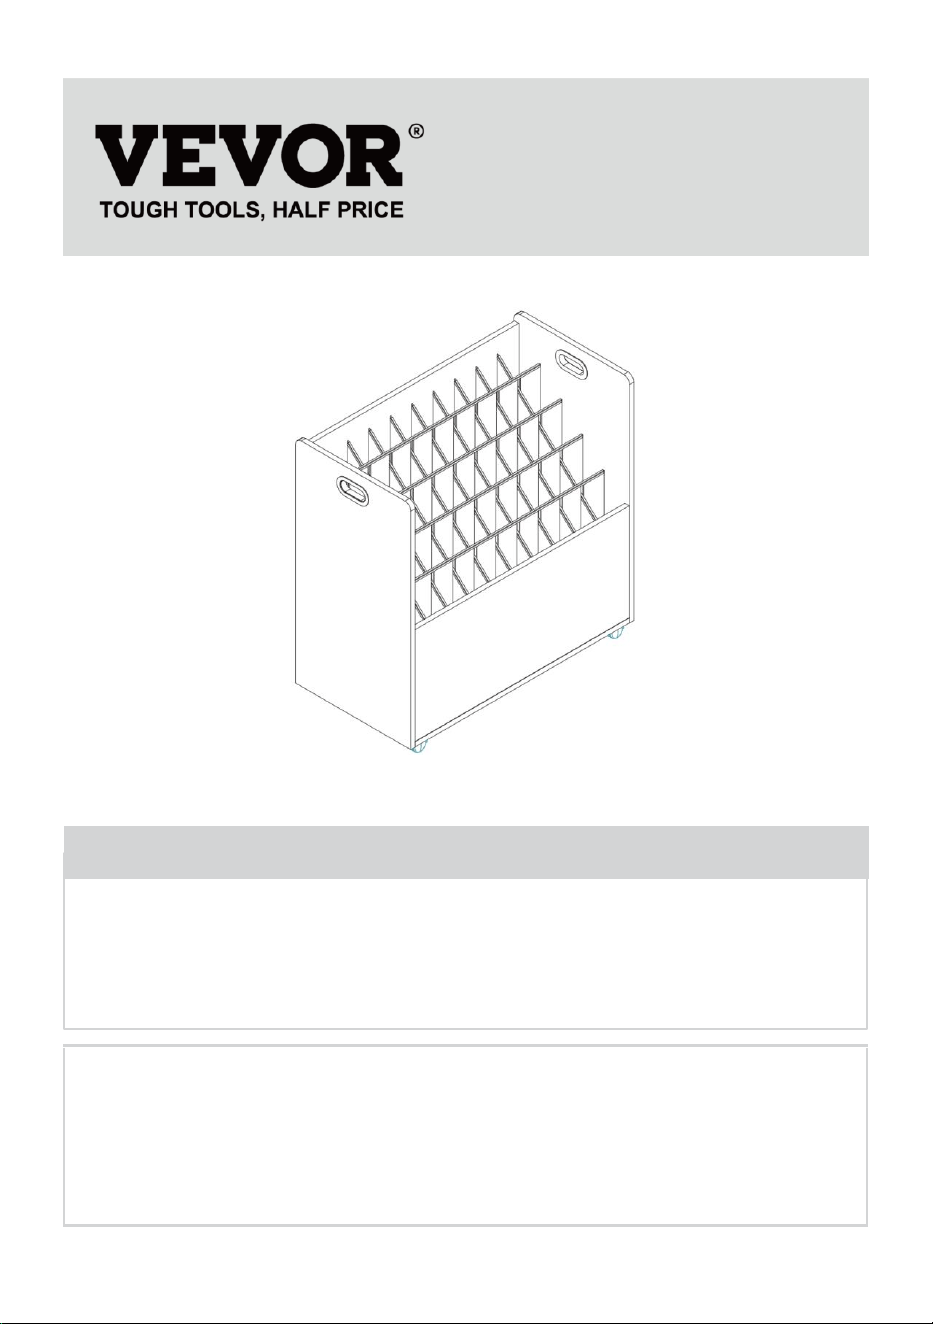
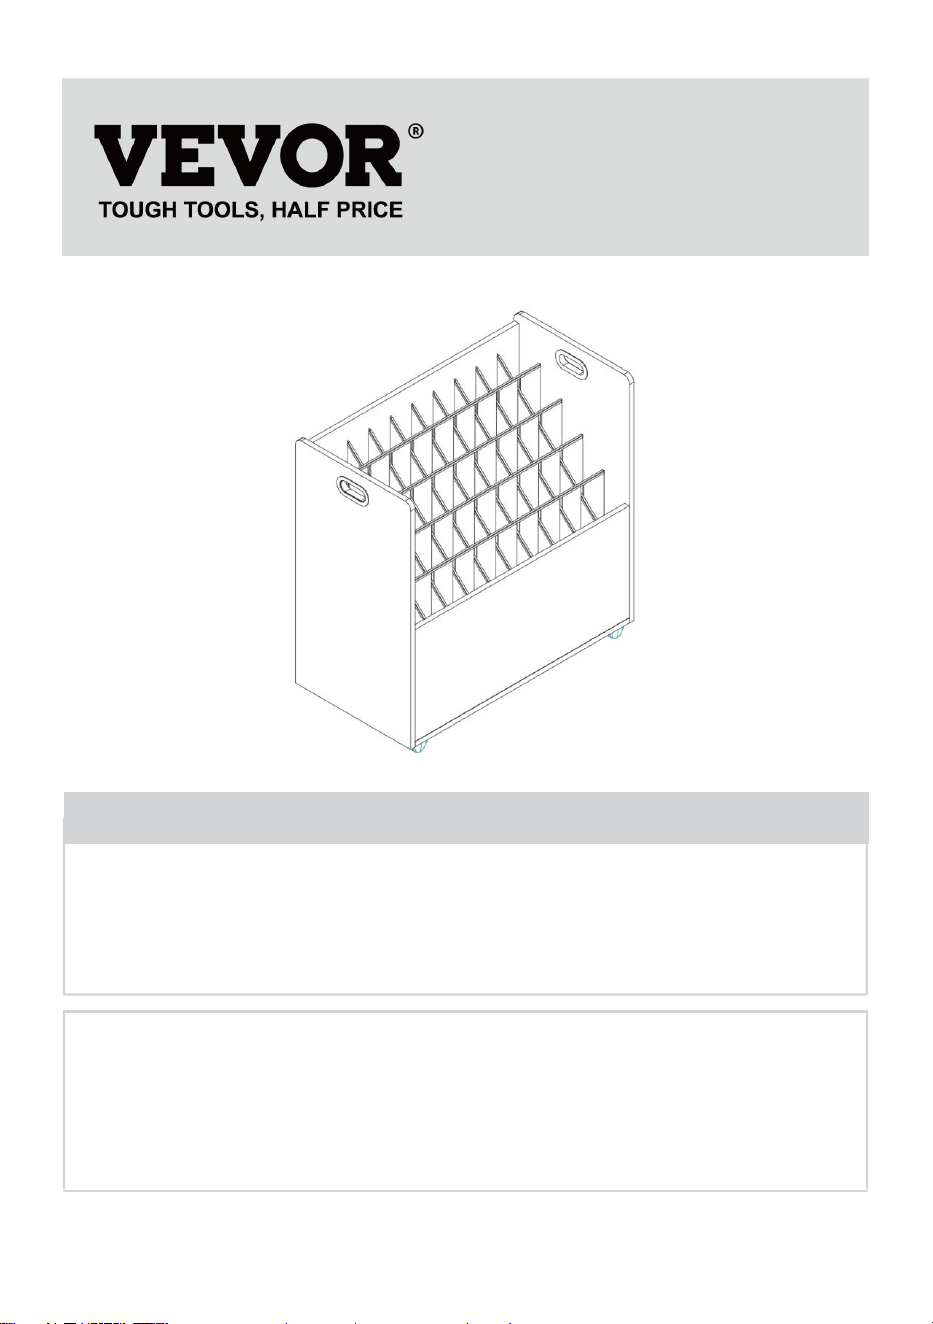
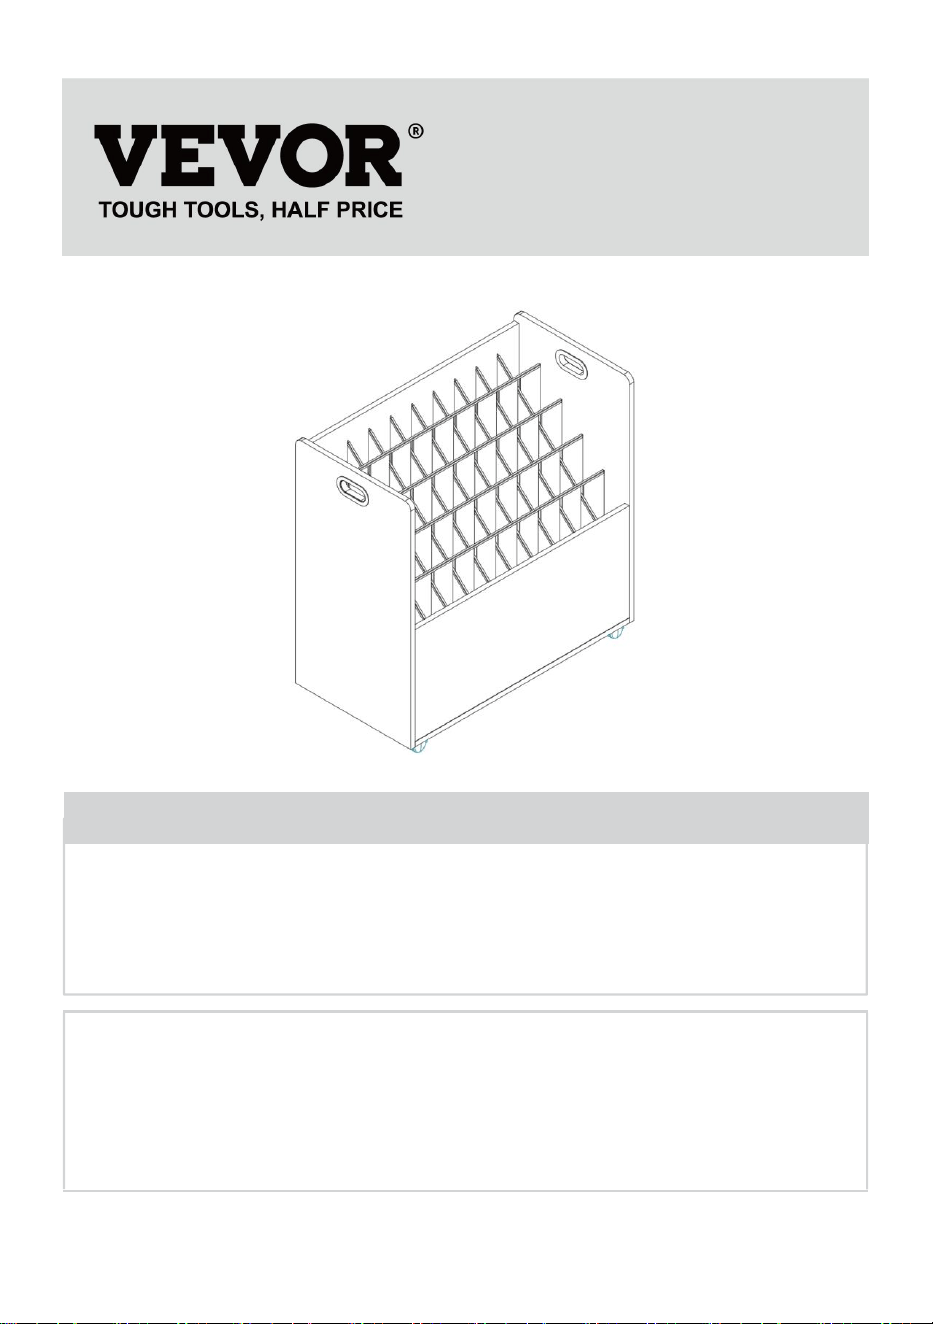
BLUEPRINT STORAGE
MODEL: KLLT-01
We continue to be committed to provide you tools with competitive price.
"Save Half", "Half Price" or any other similar expressions used by us only represents an
estimate of savings you might benefit from buying certain tools with us compared to the
major top brands and does not necessarily mean to cover all categories of tools offered by
us. You are kindly reminded to verify carefully when you are placing an order with us if you
are actually saving half in comparison with the top major brands.
- 1 -
MODEL: KLLT-01
Have product questions? Need technical support? Please feel free to
contact us:
Technical Support and E-Warranty Certificate
www.vevor.com/support
NEED HELP? CONTACT US!
This is the original instruction, please read all manual instructions
carefully before operating. VEVOR reserves a clear interpretation of our
user manual. The appearance of the product shall be subject to the
product you received. Please forgive us that we won't inform you again if
there are any technology or software updates on our product.
BLUEPRINT STORAGE
- 2 -
WARNING:
1、Wear protective gloves when using tools to install fixed signposts, or
use two people to assist with the installation.
2、When using, please read this manual first, and it is recommended to
keep it well for subsequent use to view.
Model
KLLT-01
Color
Black & White
Material
Chipboard & MDF Board
Number of slots
50 slots
Slots size
70mm*70mm
Packing size
840*795*145mm
Warning-To reduce the risk of injury, user must read instructions
manual carefully.
- 3 -
- 4 -
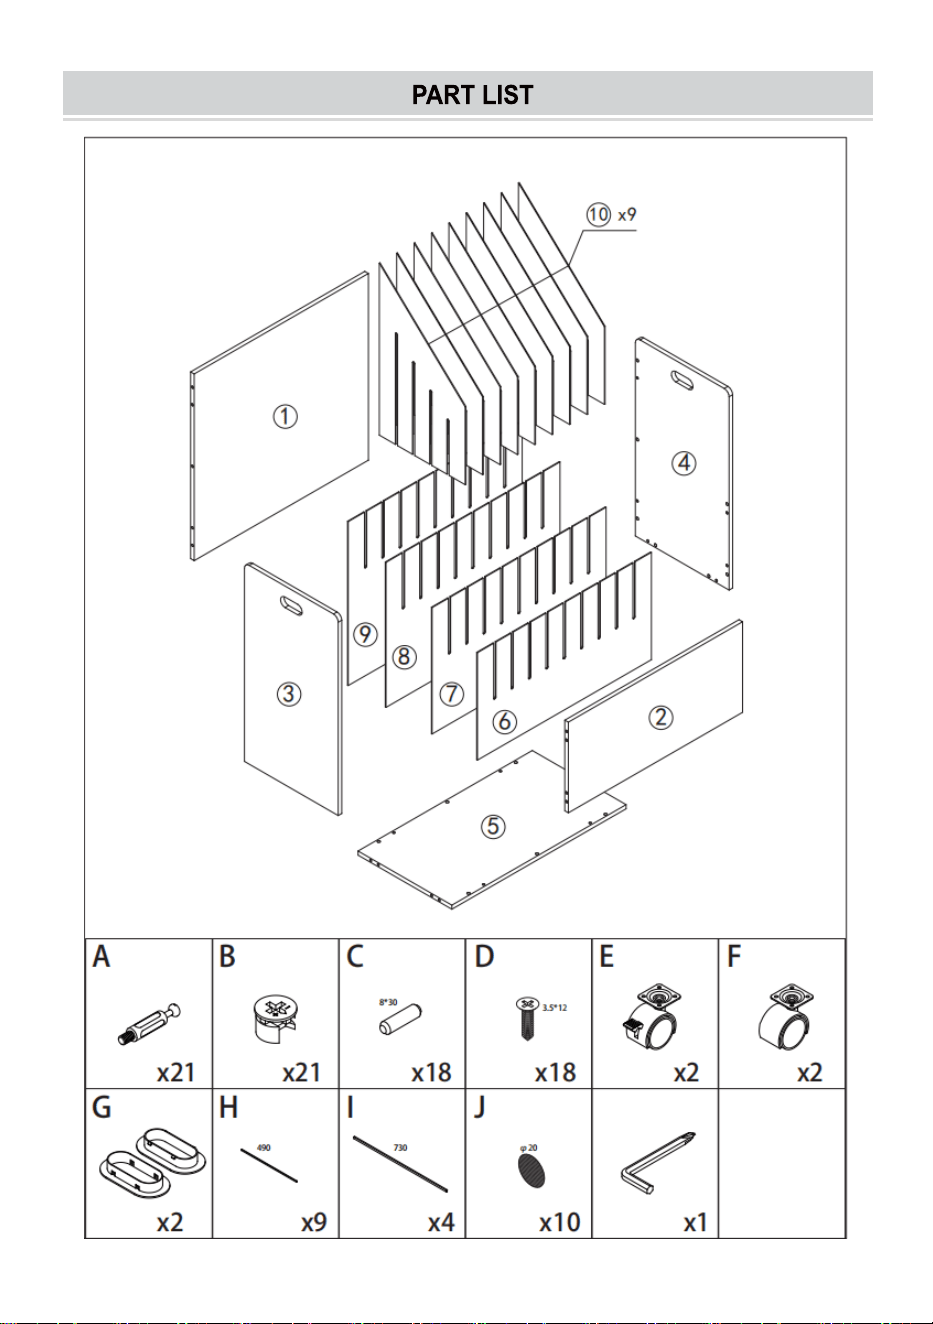
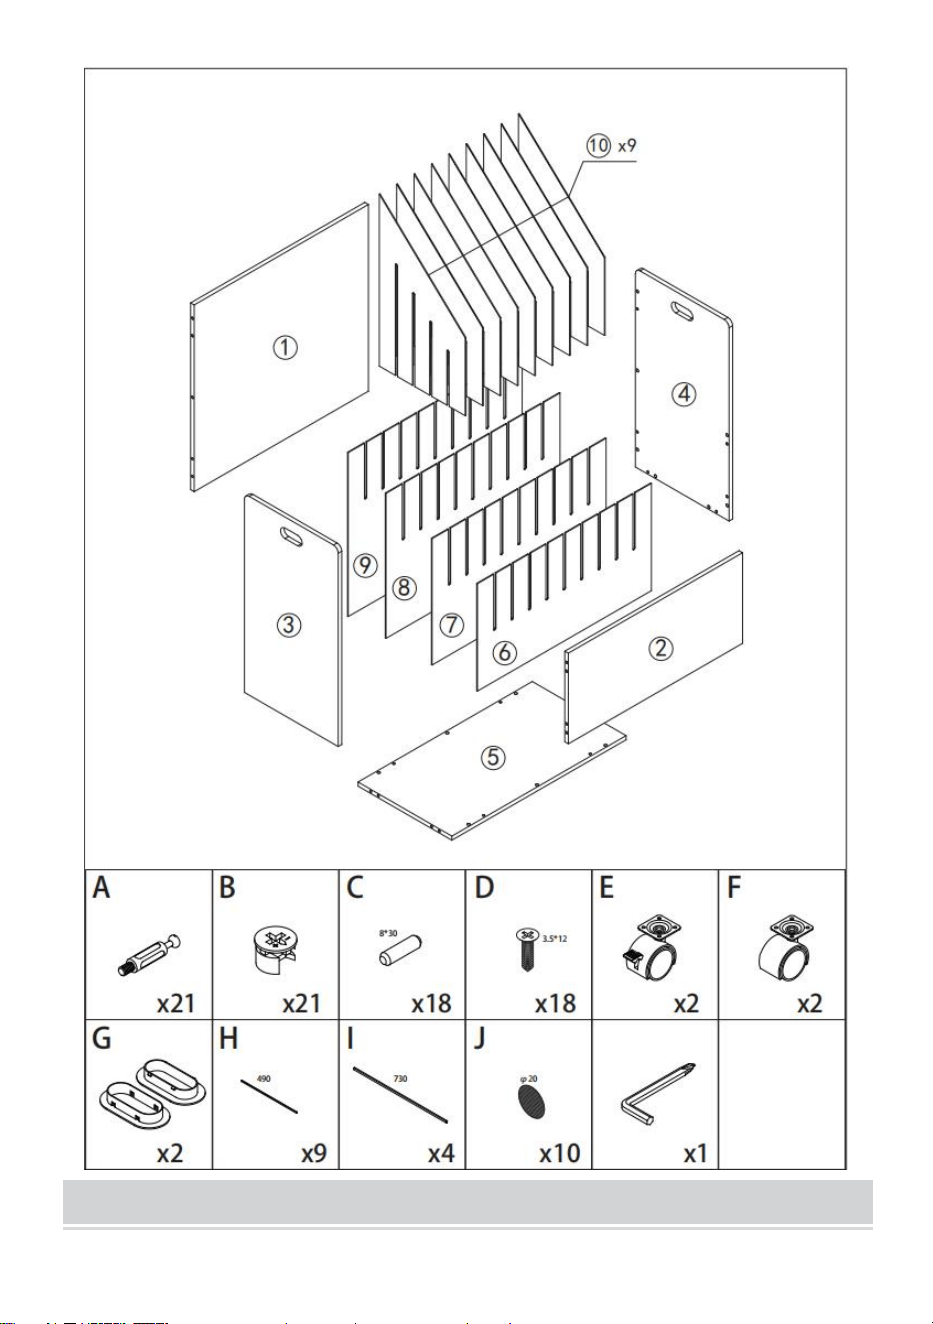
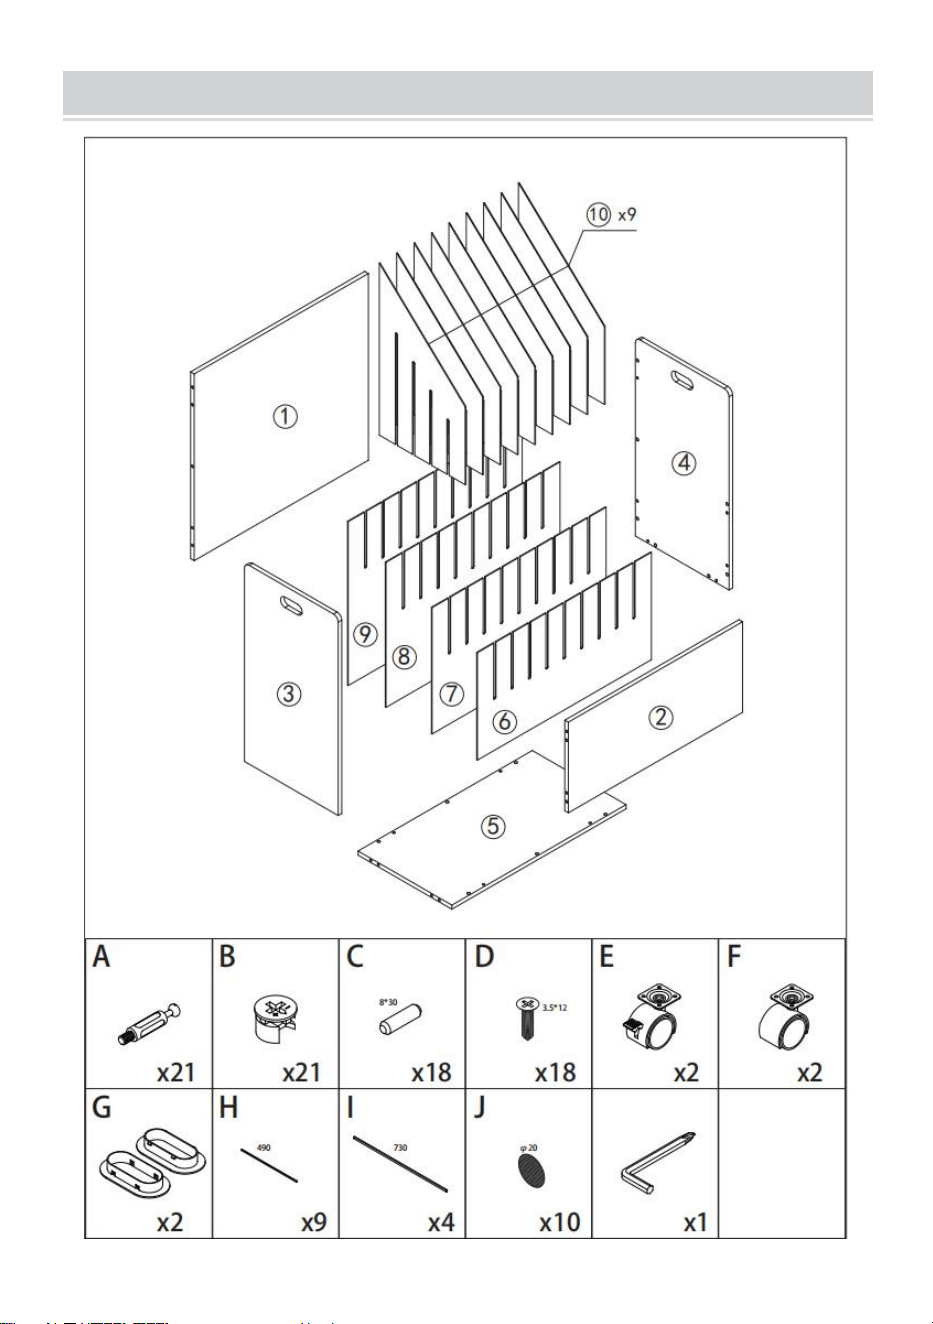
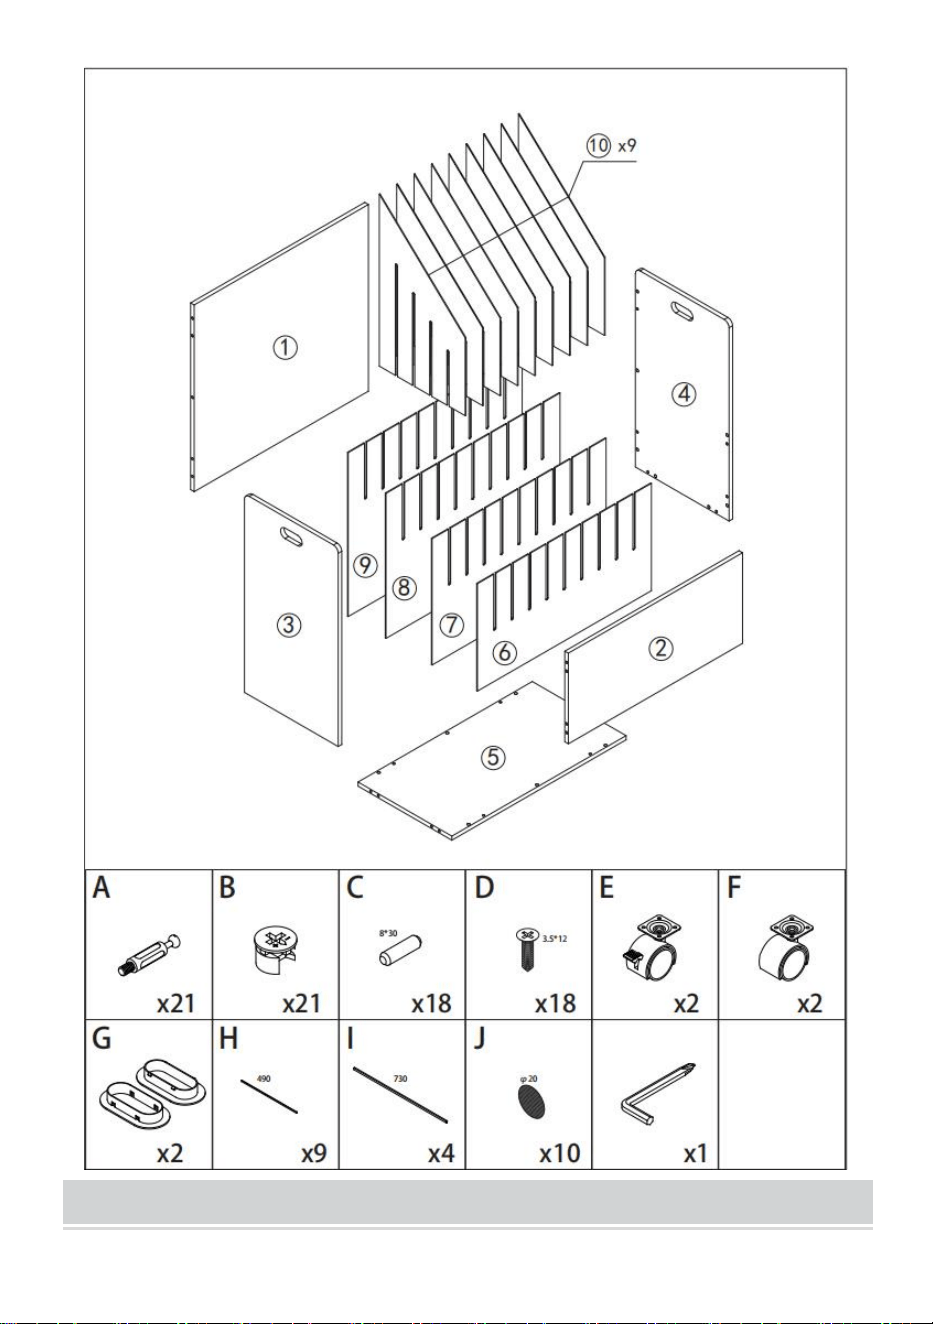
Unpack and take out the part of blueprint storage and a bundle of
Screw accessories.
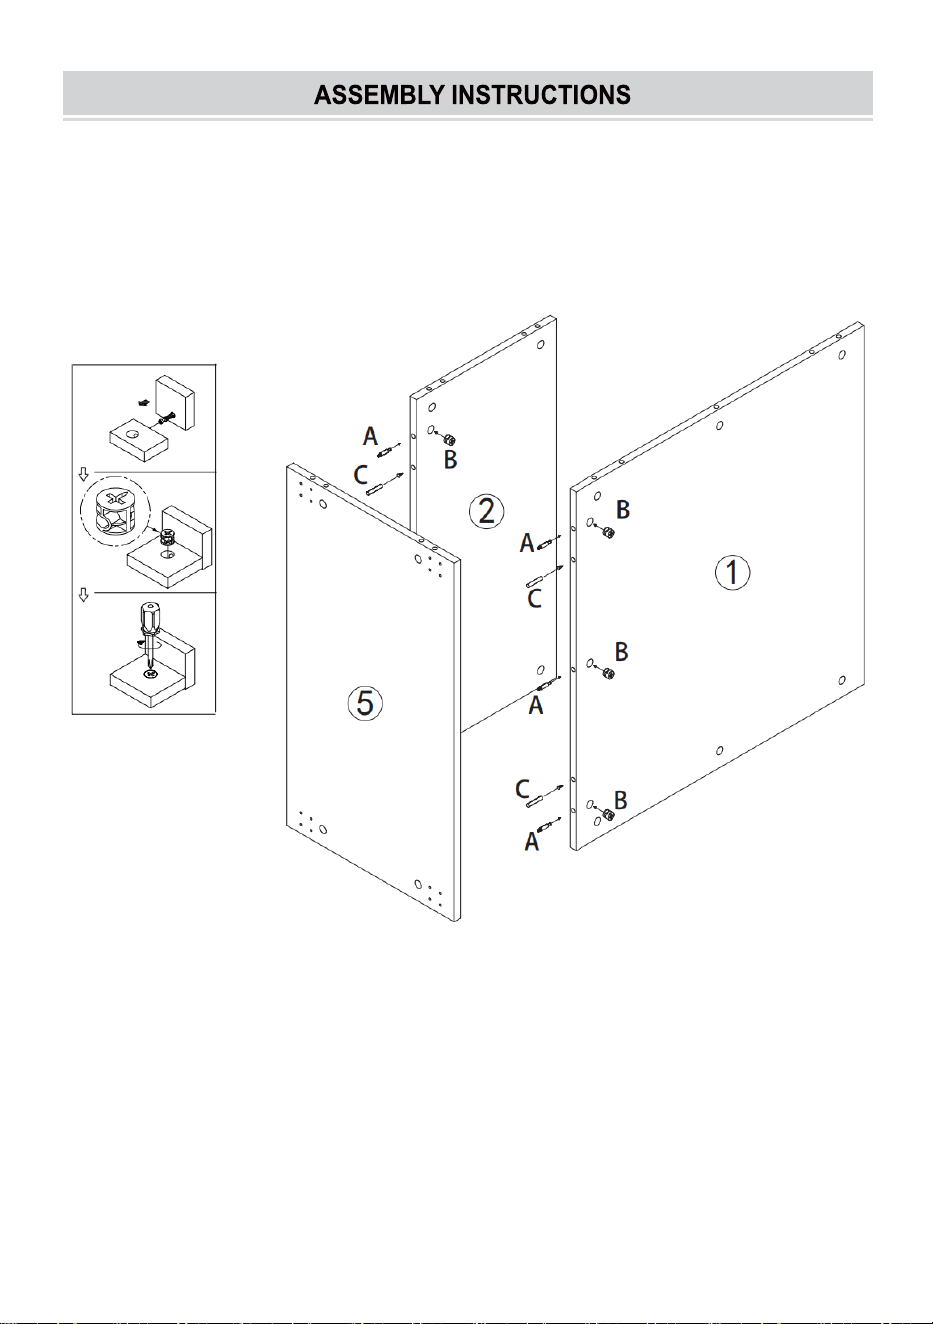
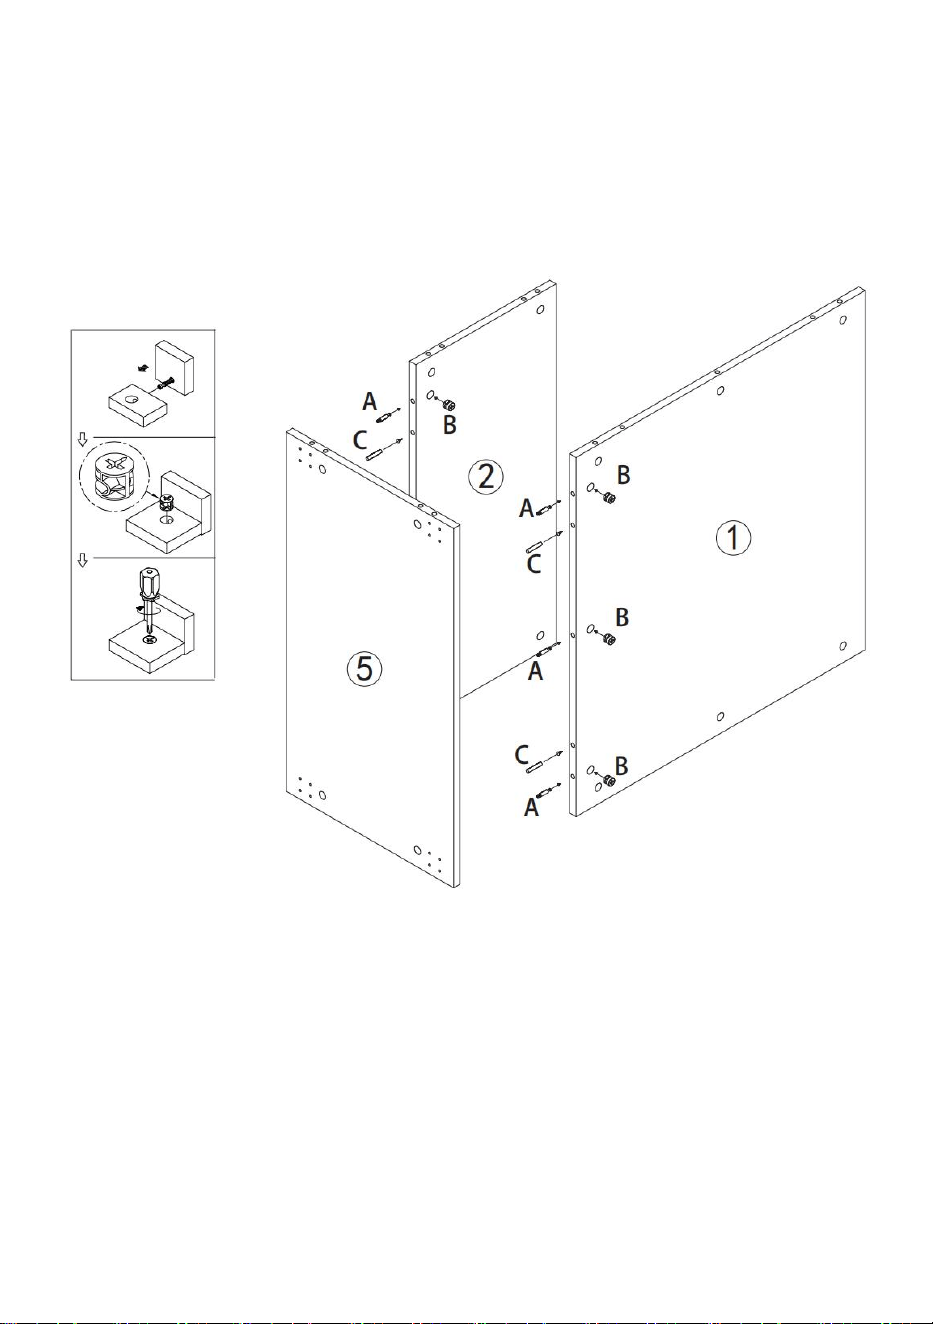
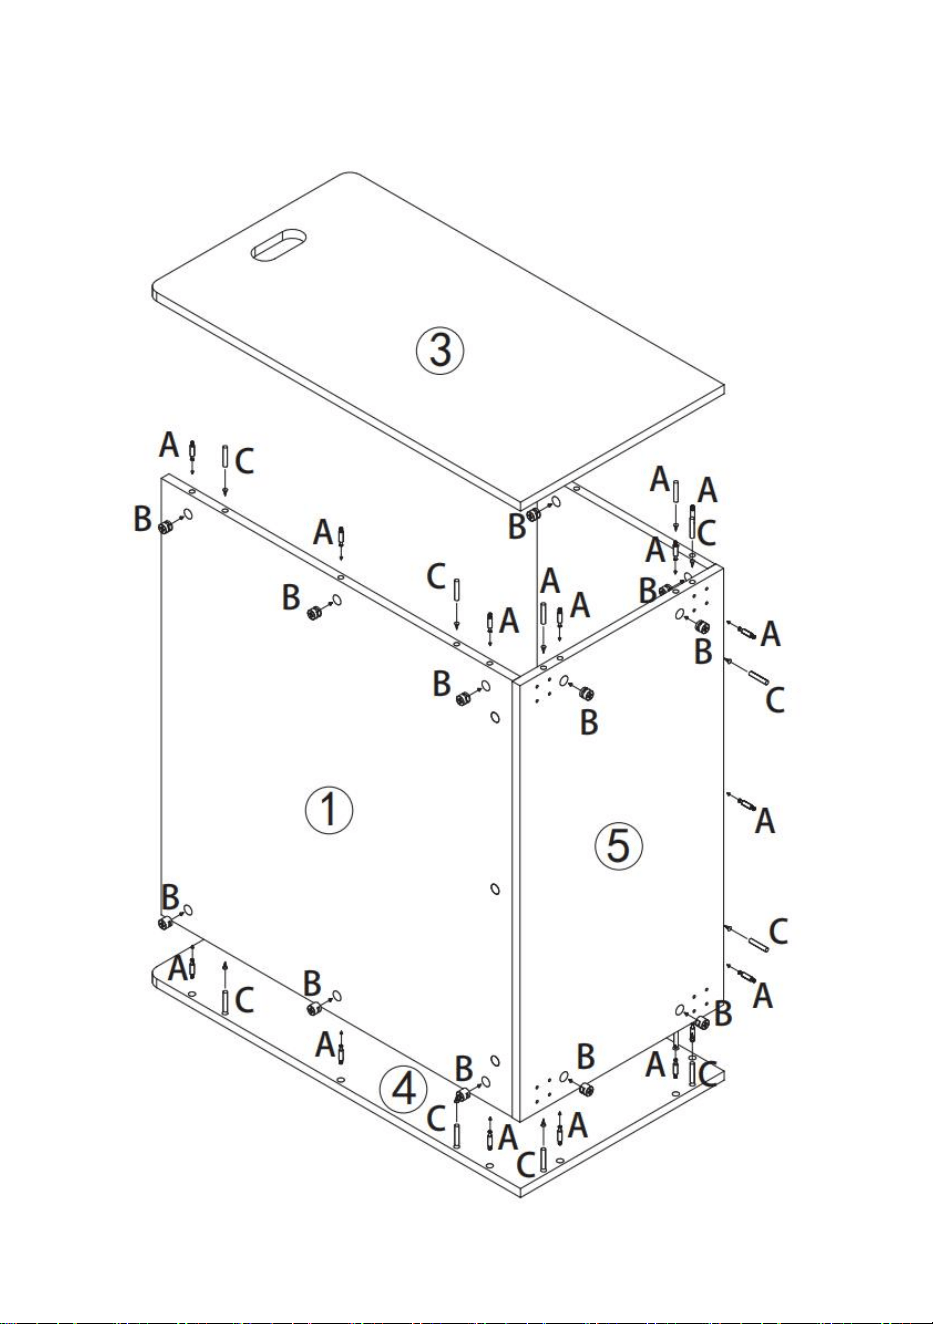
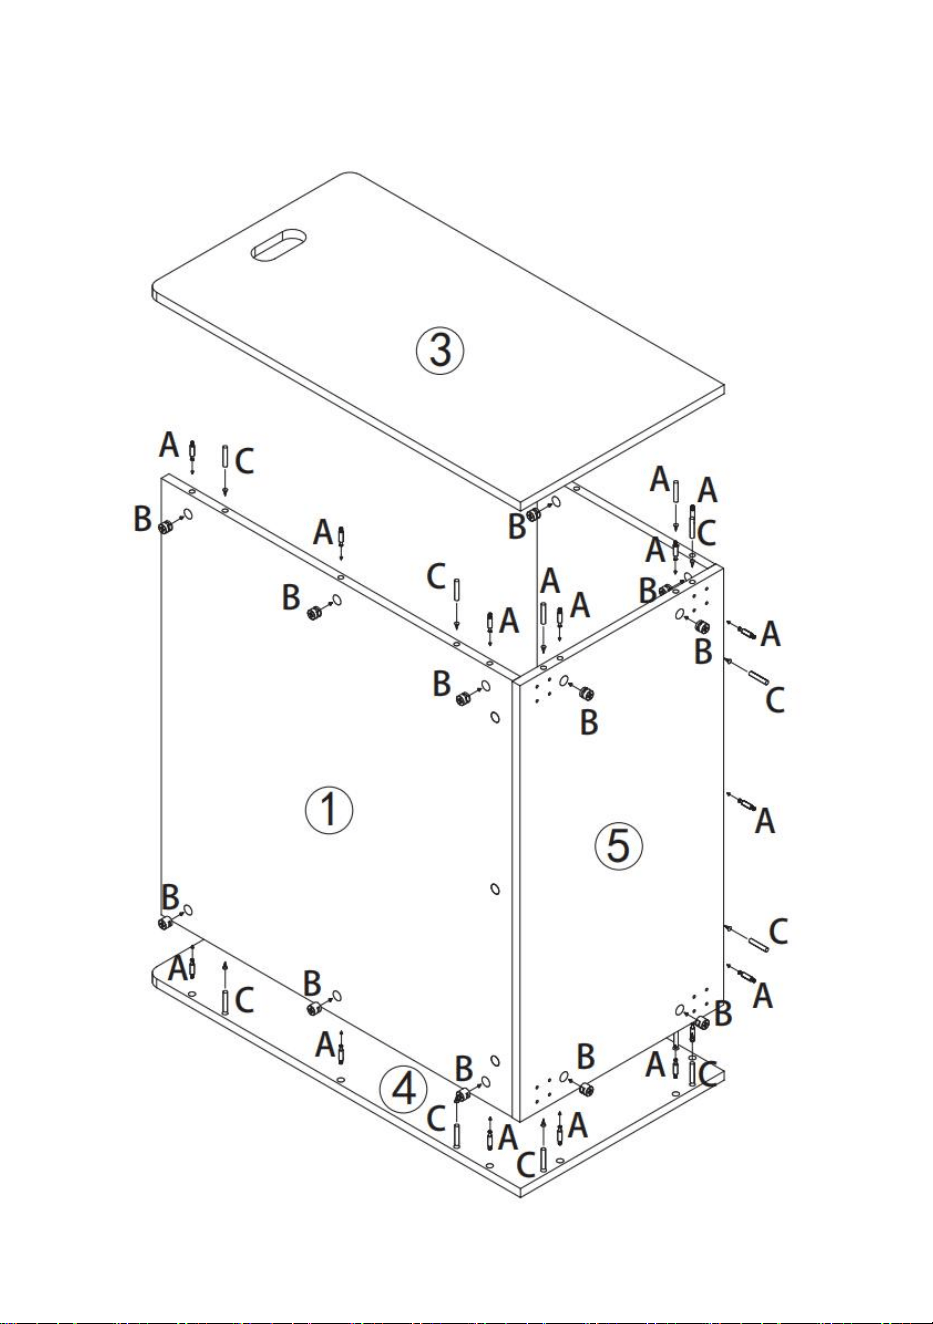
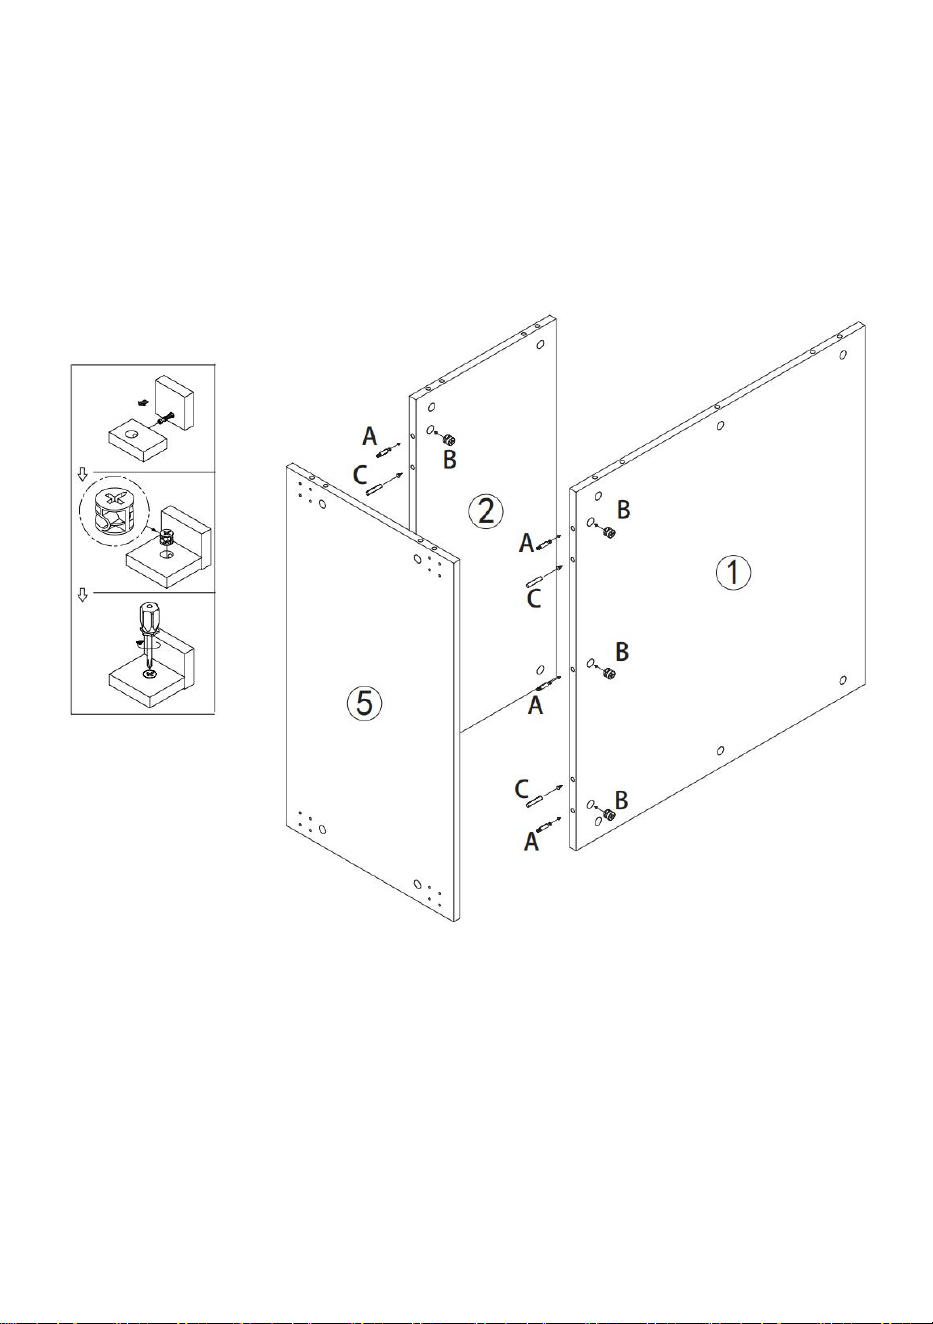
Step 1: Firstly, put front plate(②) and back plate(①) on baseplate(⑤) with
Three-in-one screws(A\B) and batten(C).

- 5 -
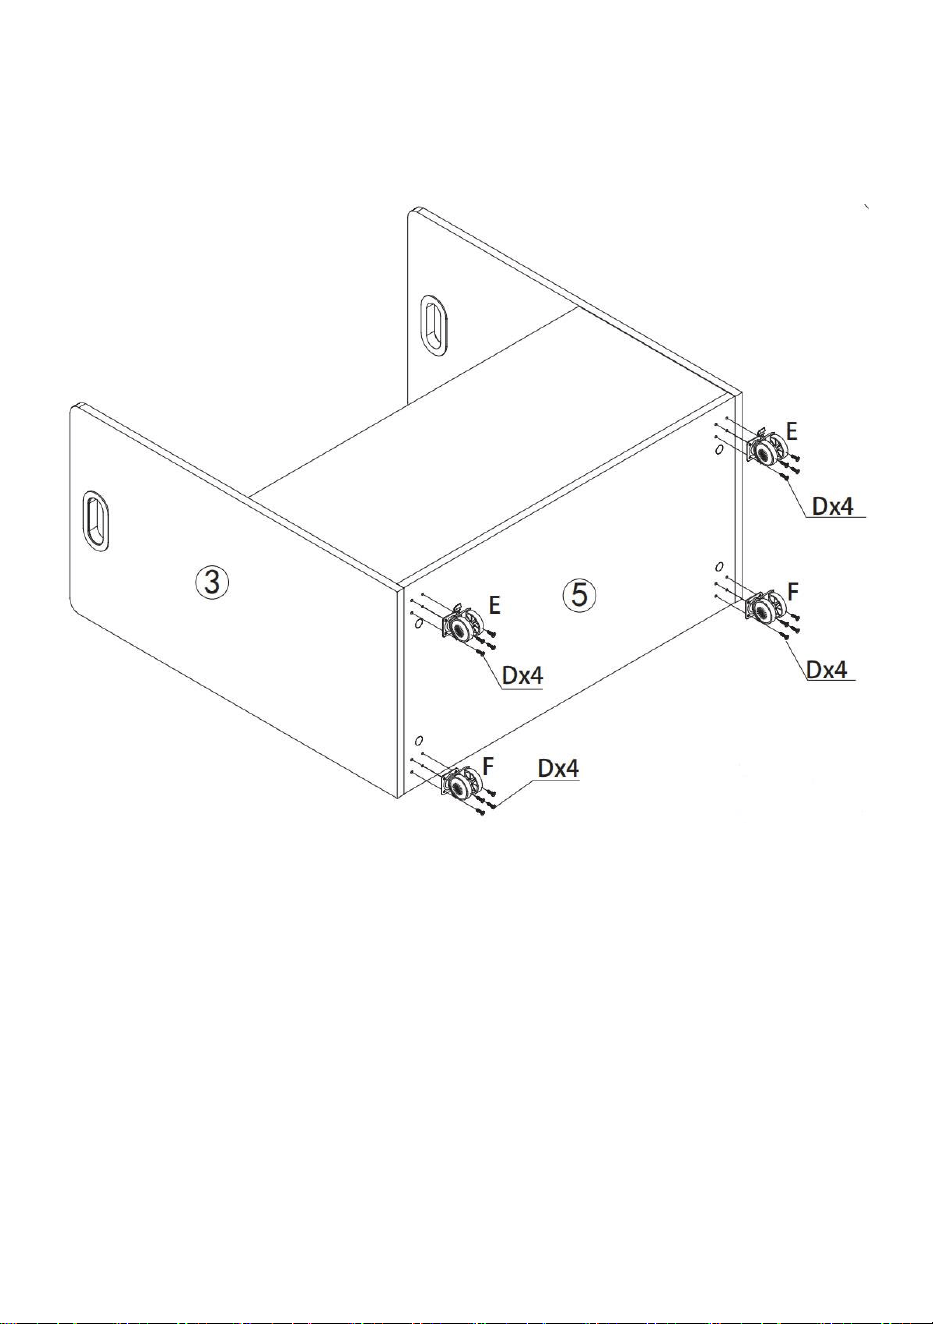
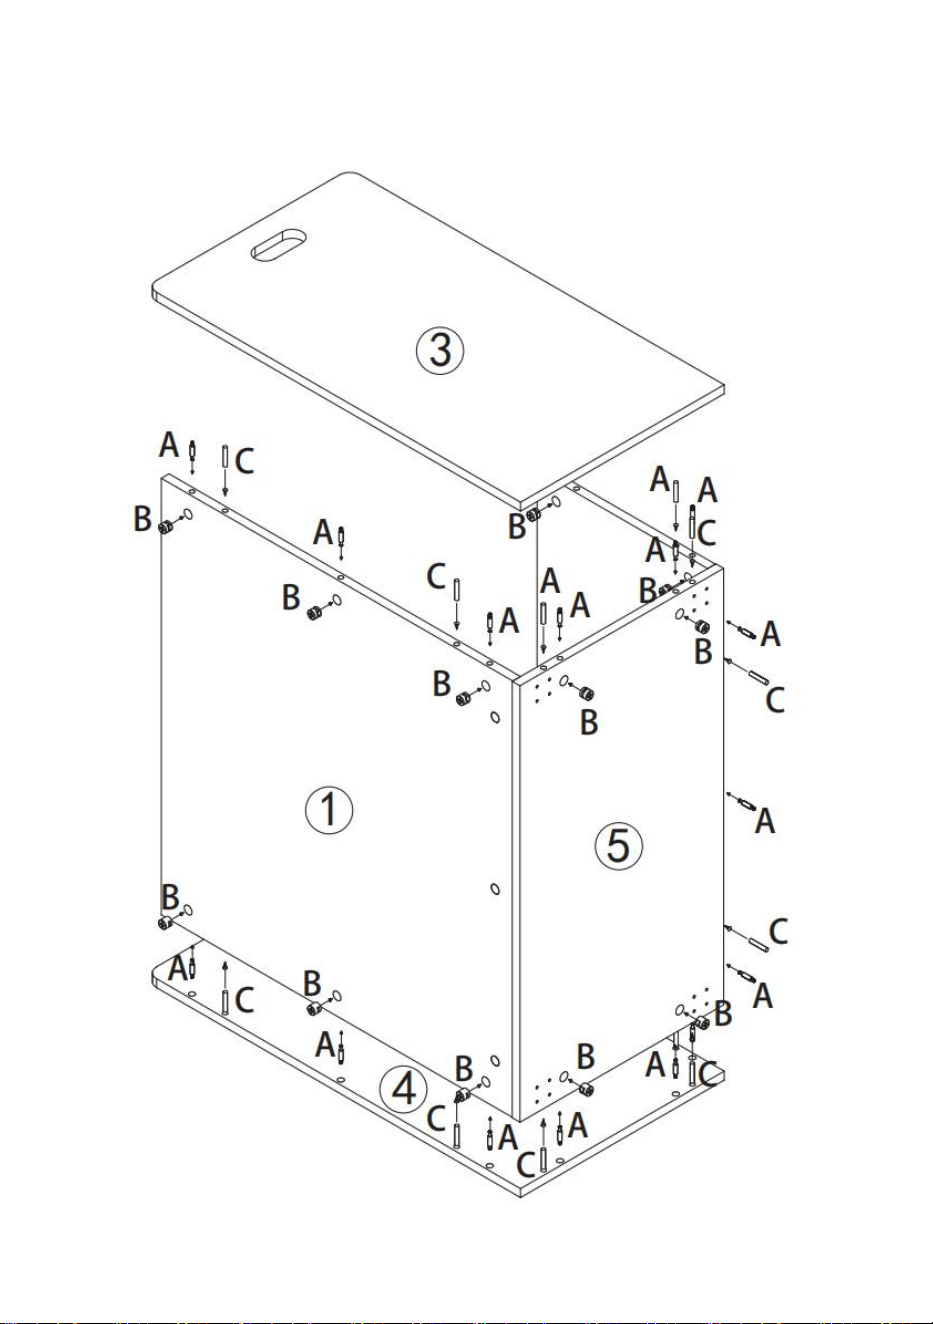
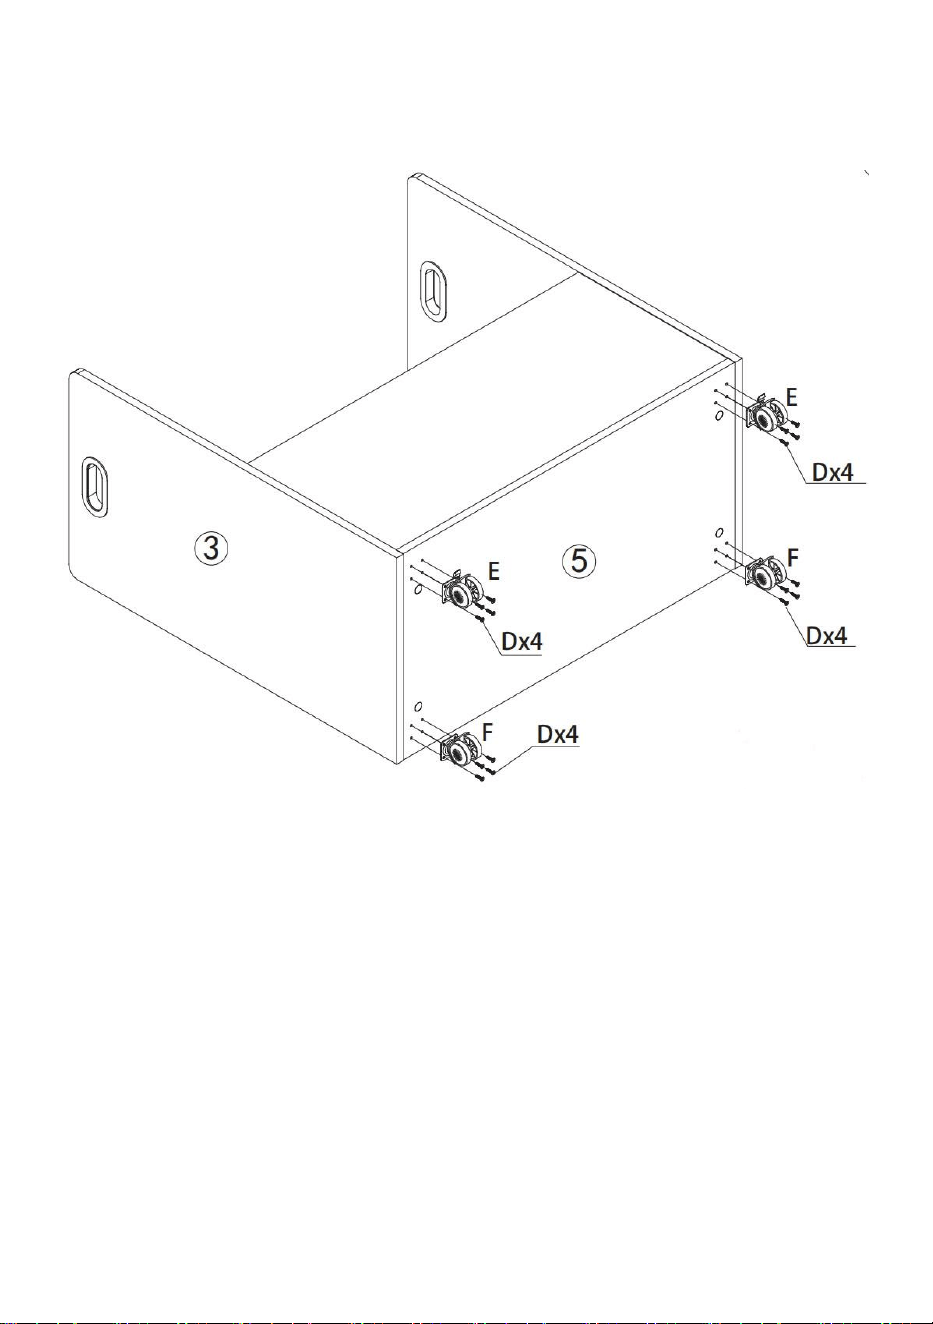
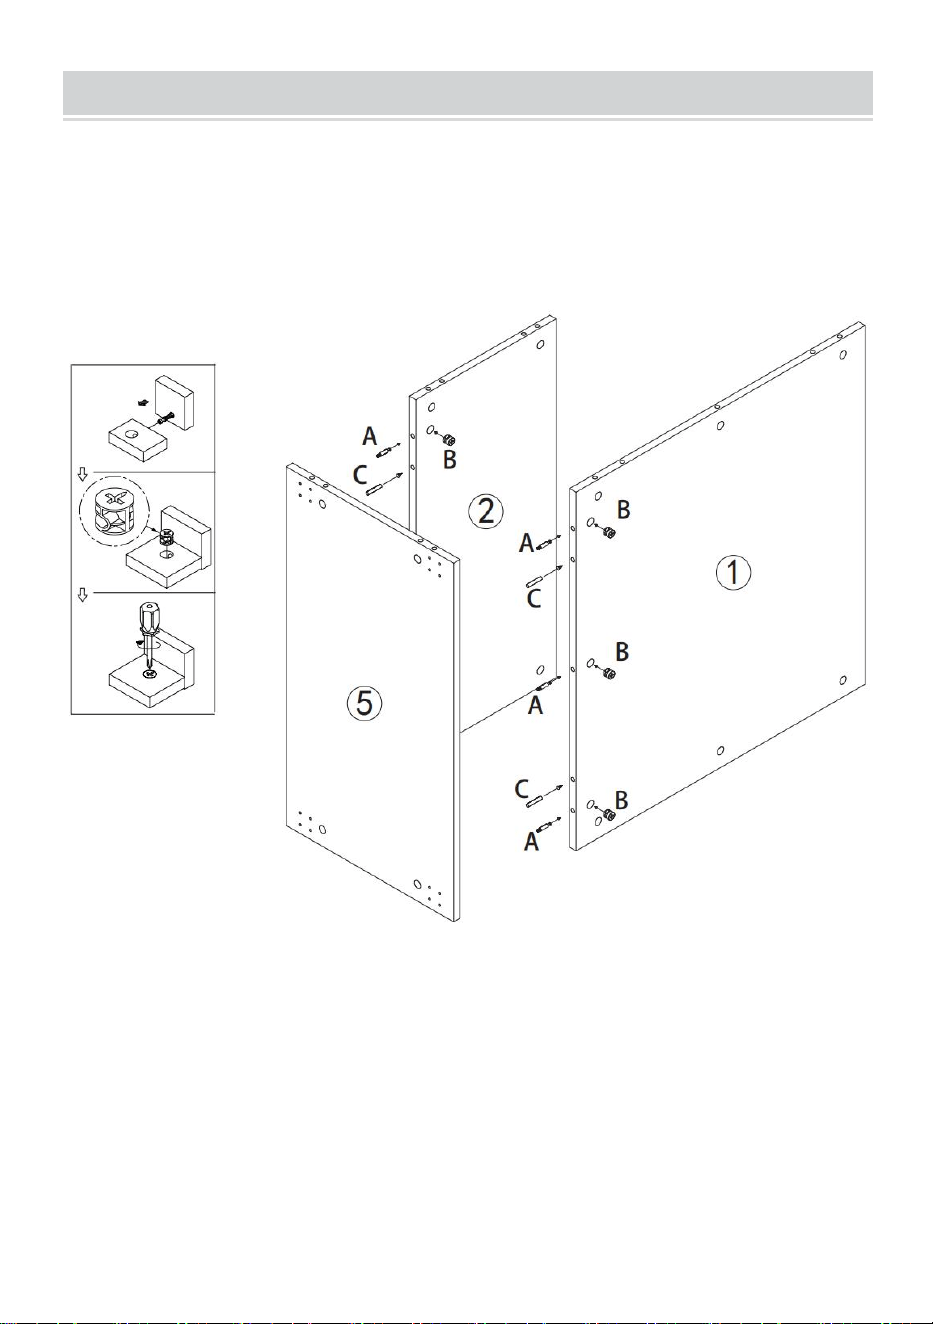
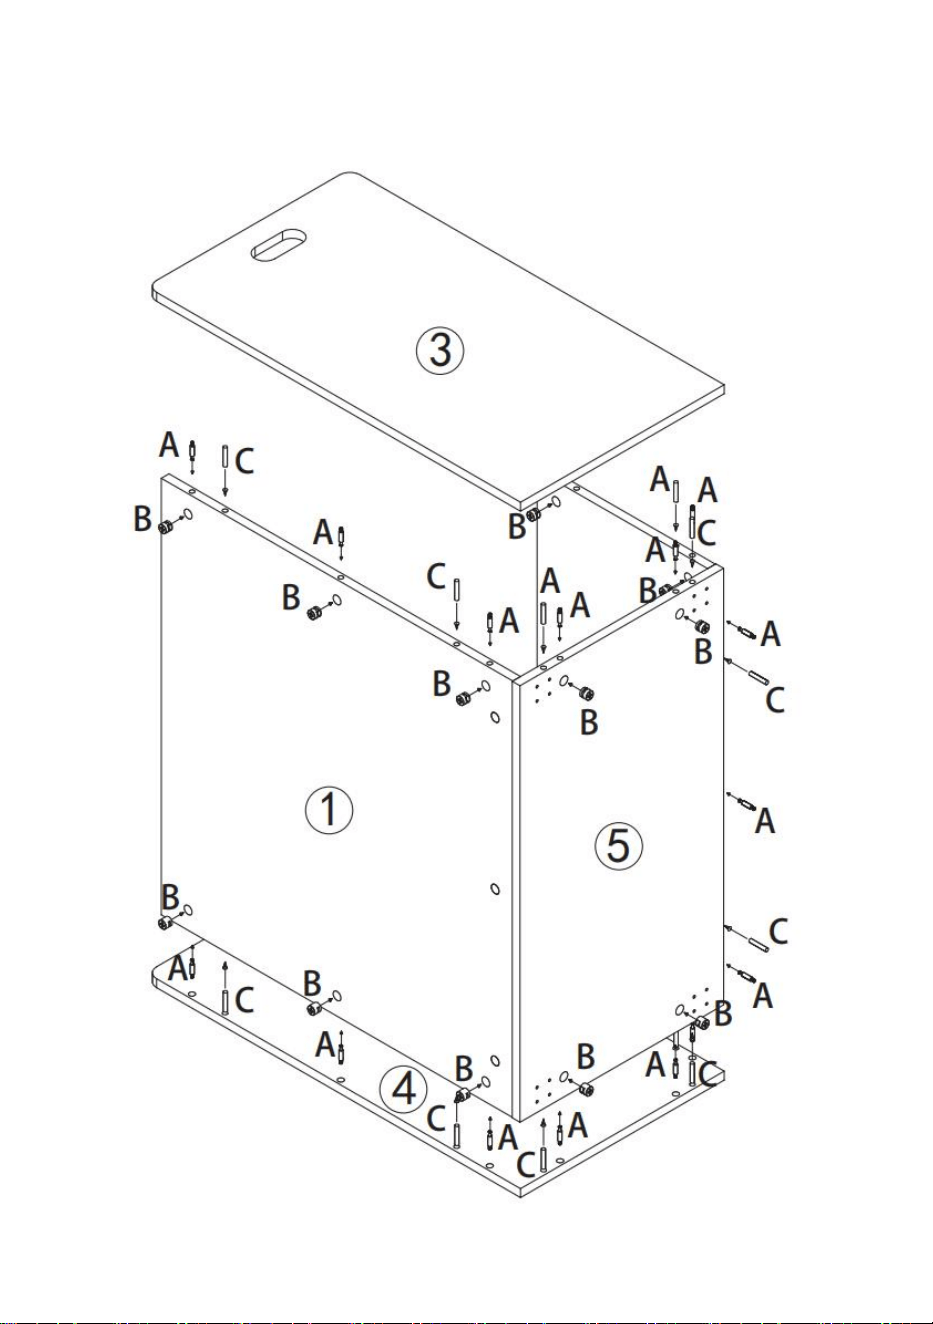
Step 2: Put side panel(③\④) on two sides with Three-in-one screws(A\B)
and batten(C).

- 6 -
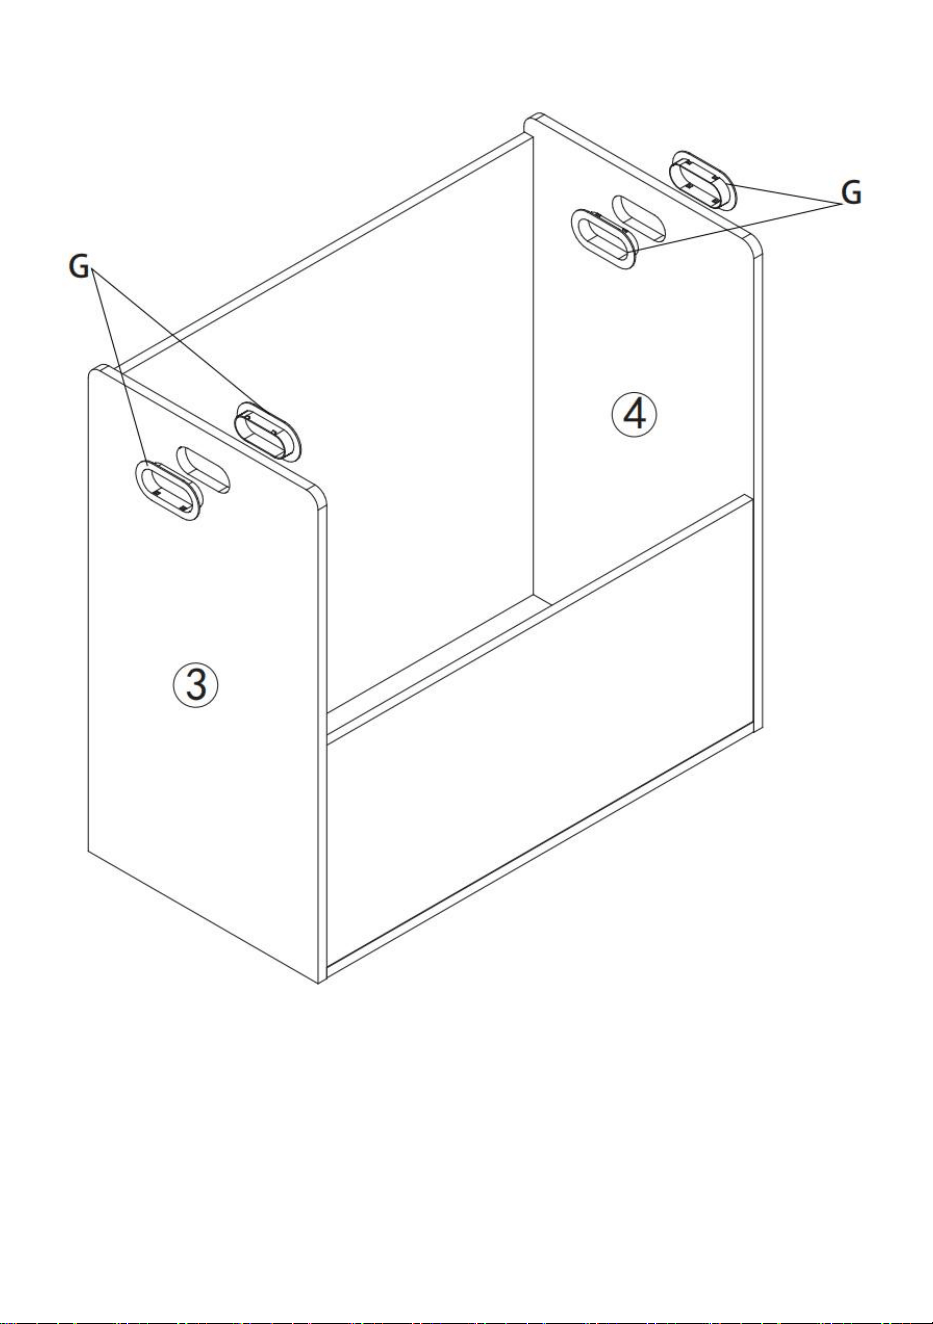
Step 3: Put handle(G) on two sides.
- 7 -
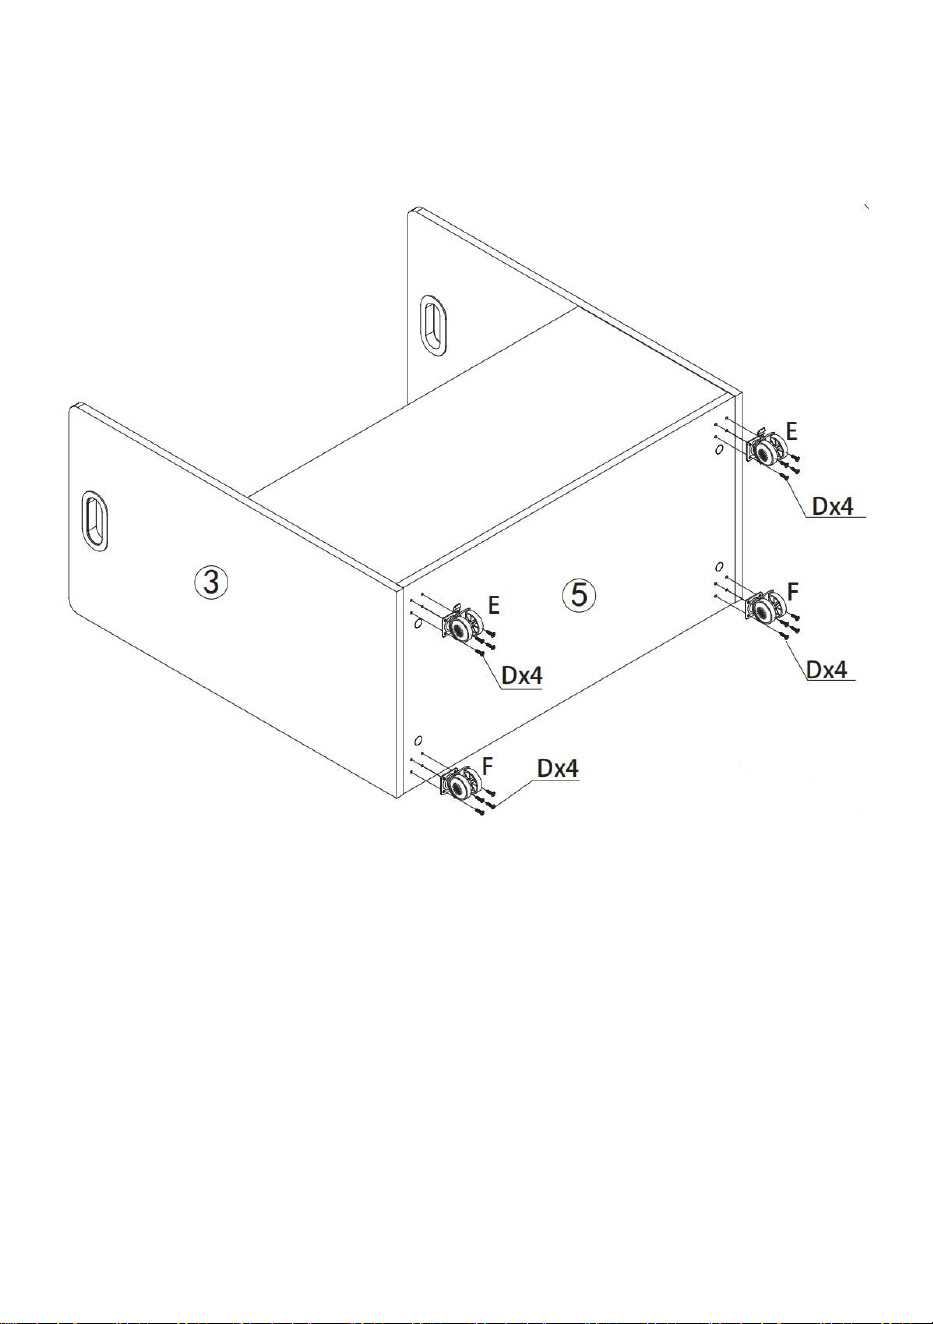
Step 4: Place the product on its side along the back panel(①) and install
the wheels(E/F) on the baseplate(⑤) with screws(D).
- 8 -
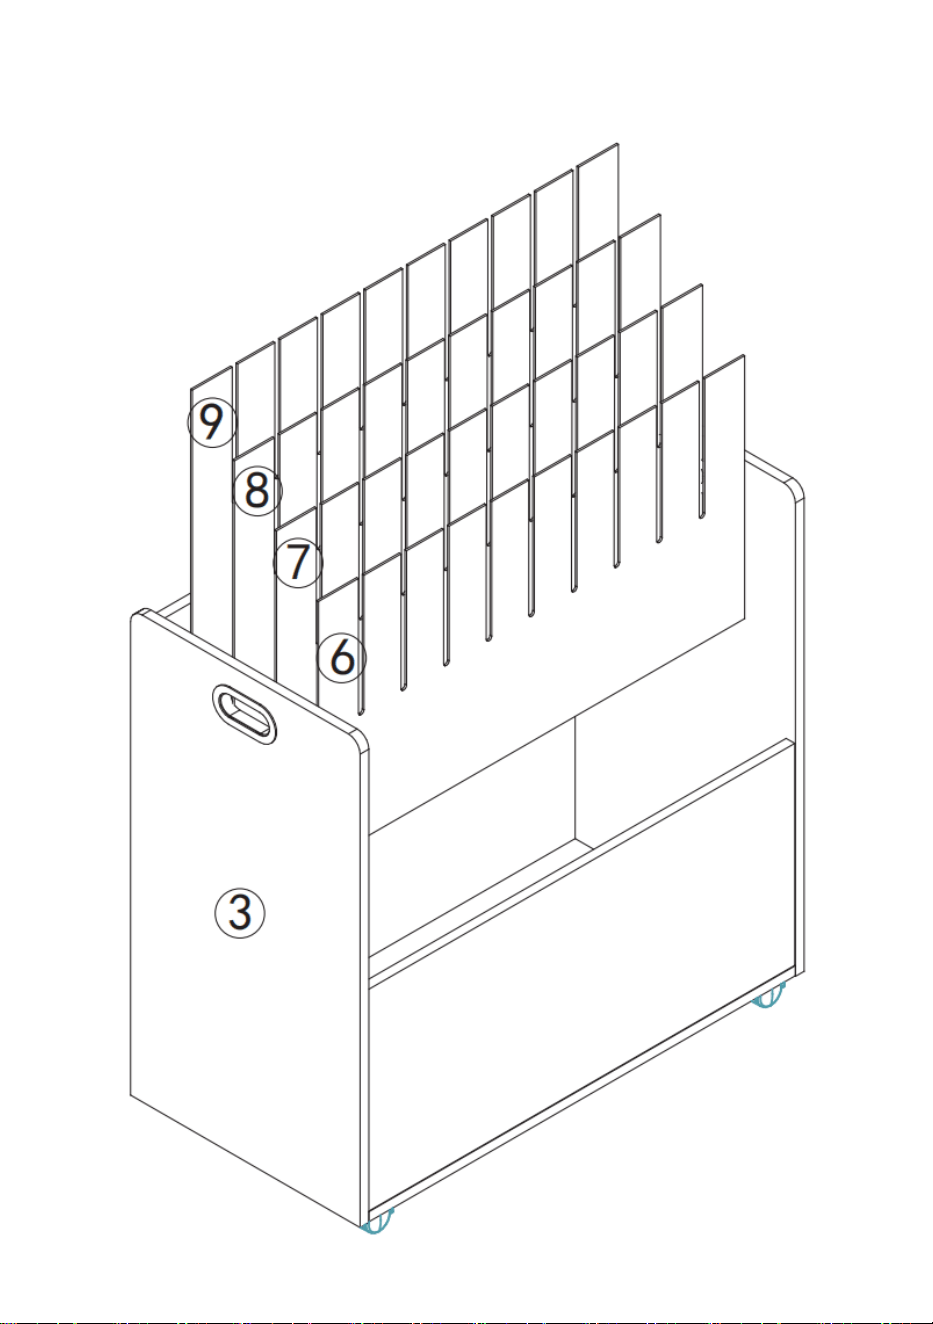
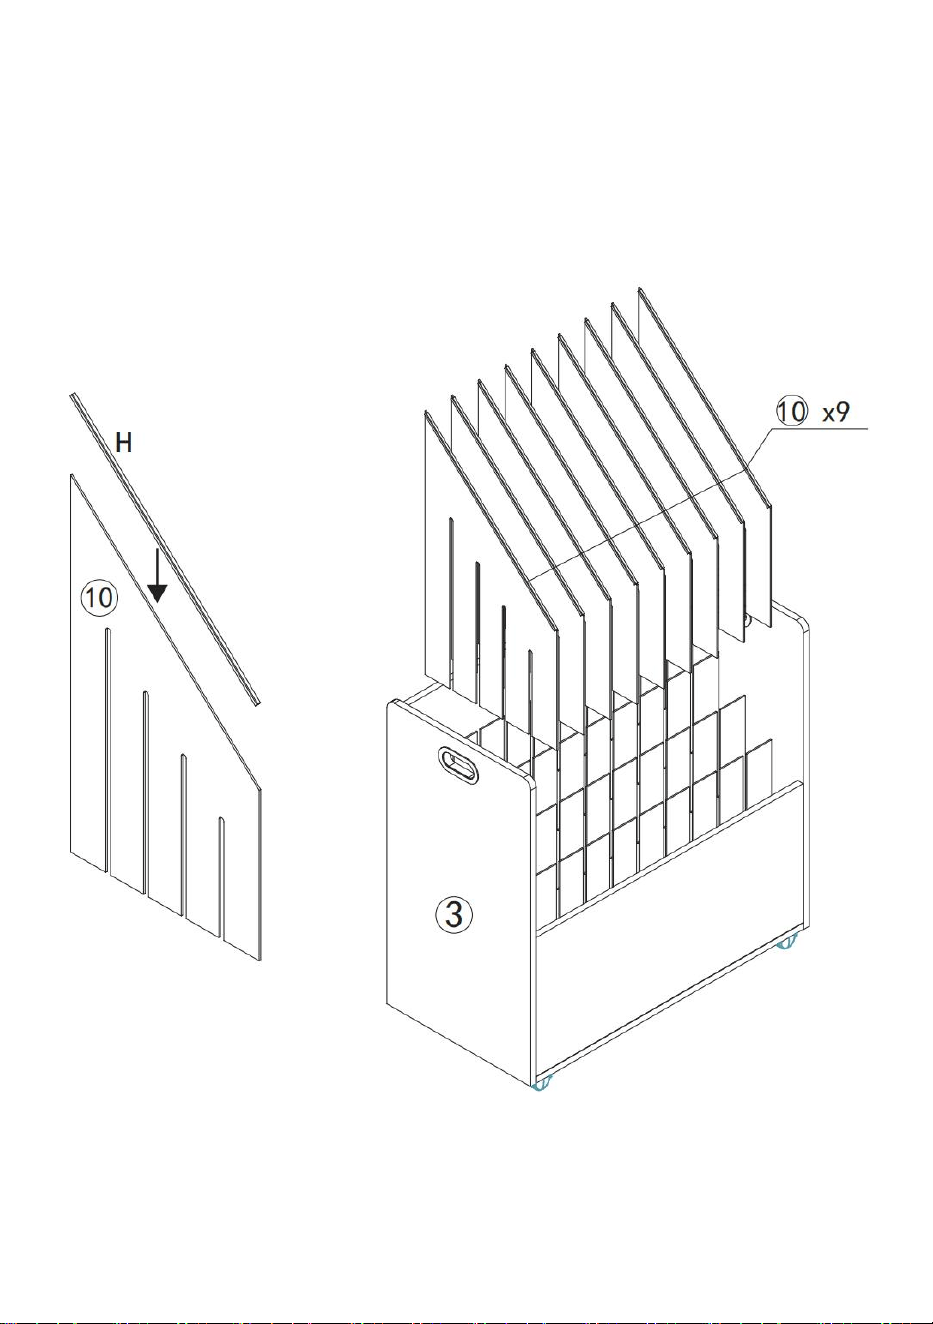
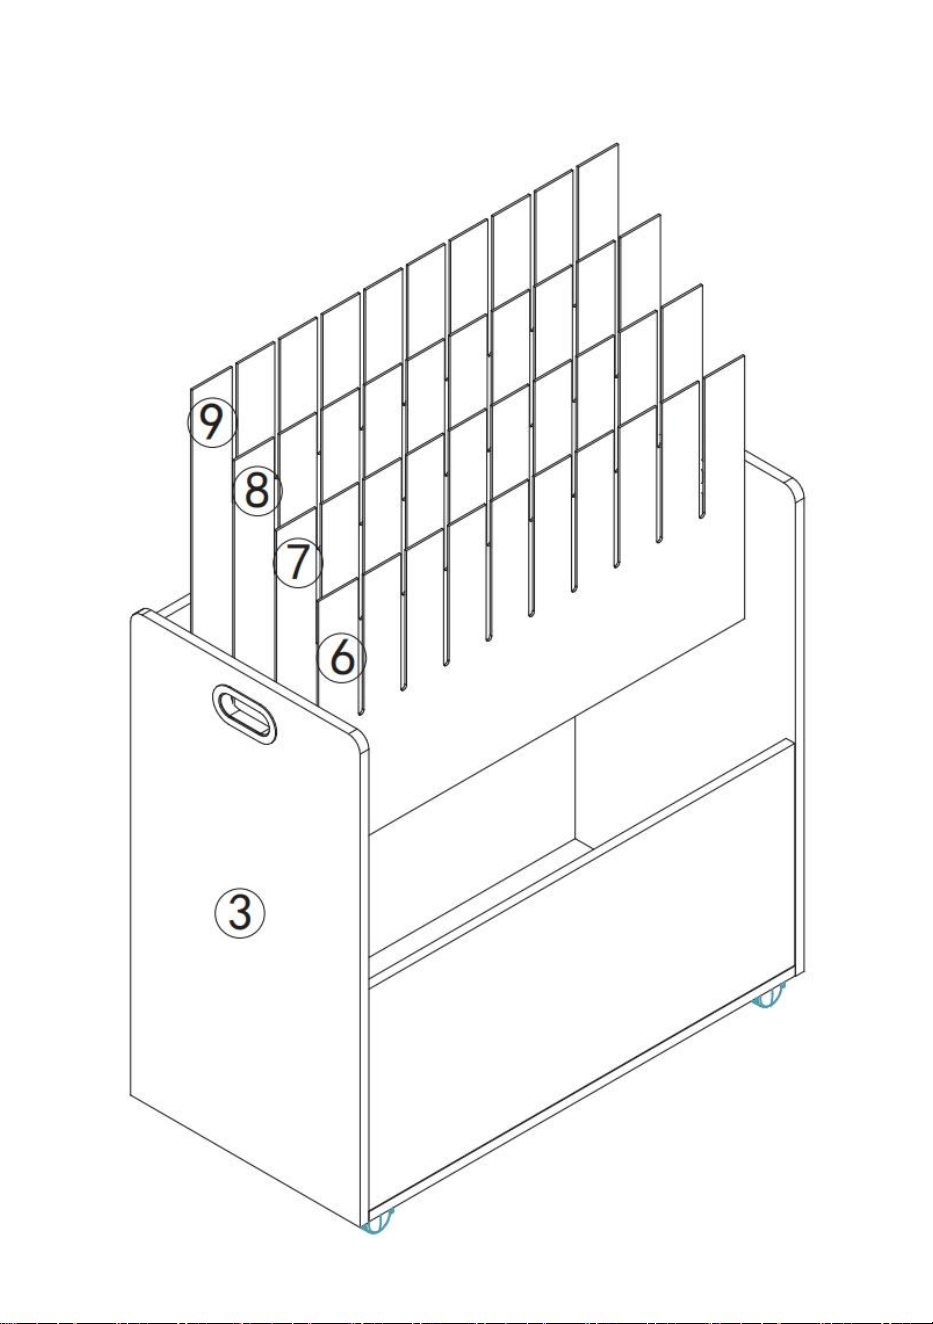
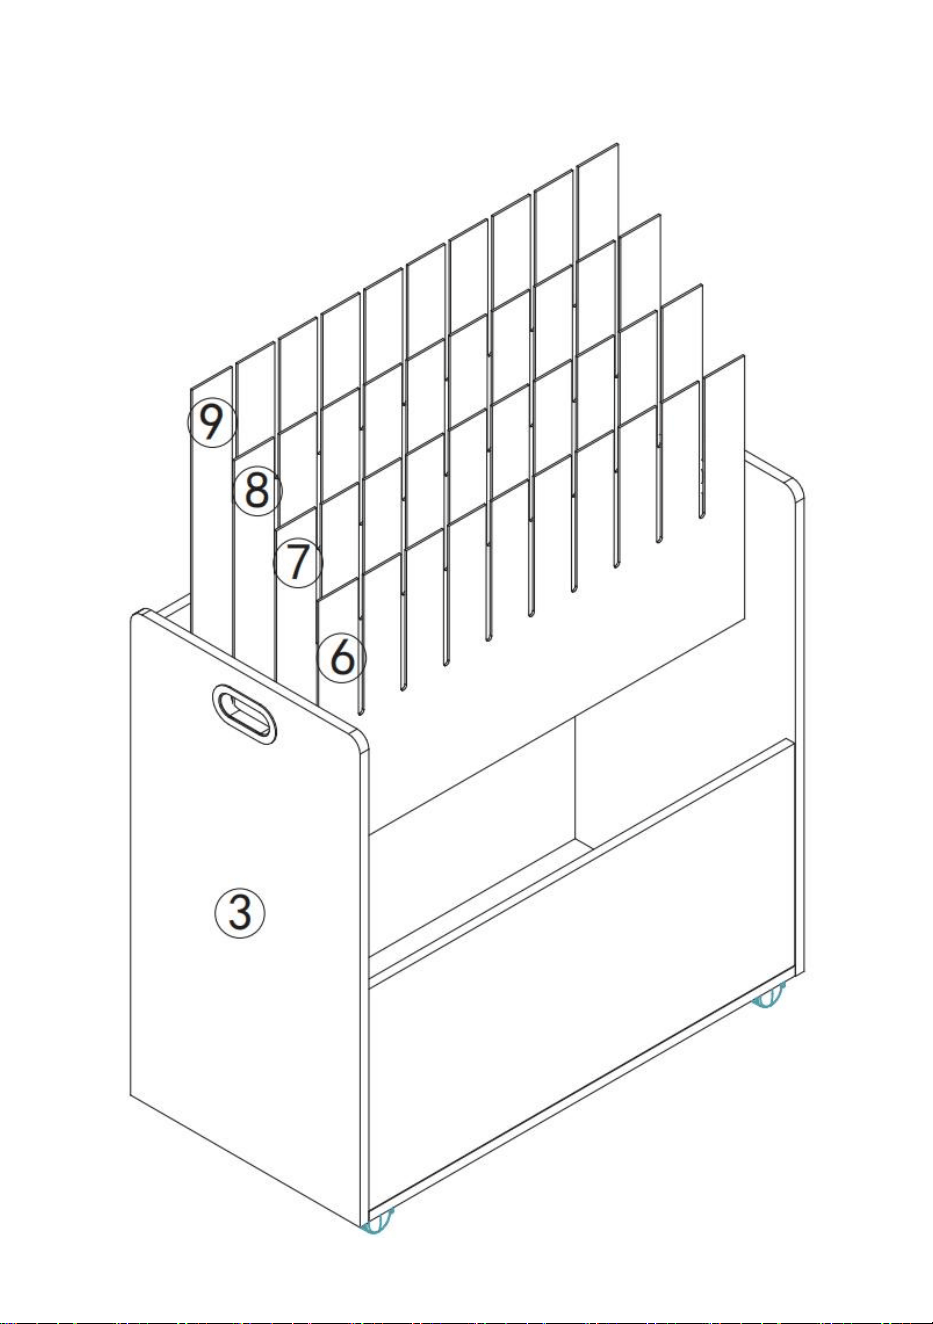
Step 5: Place the partition(⑥~⑨) inwards.
- 9 -
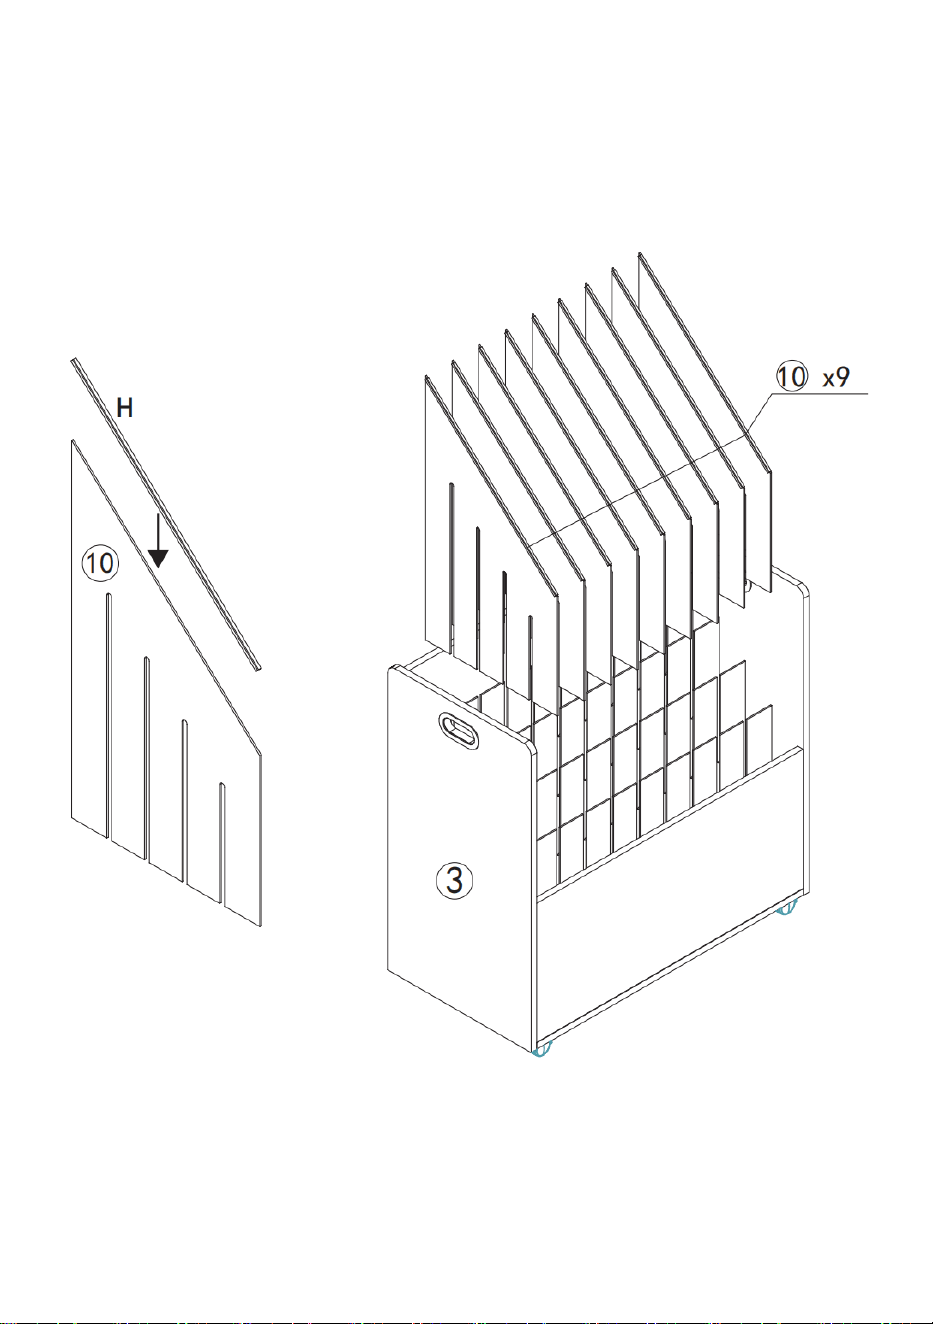
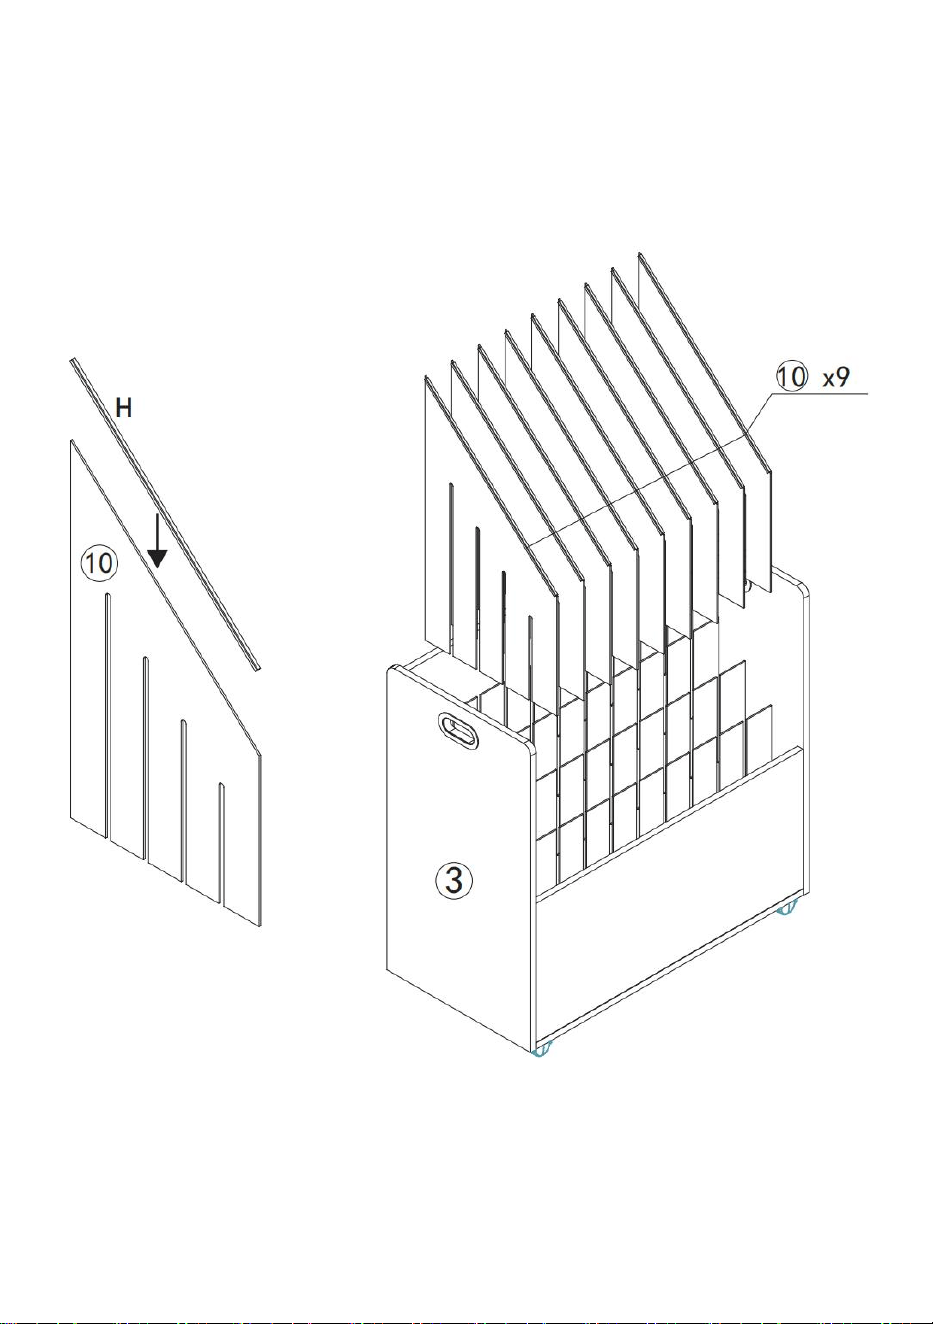
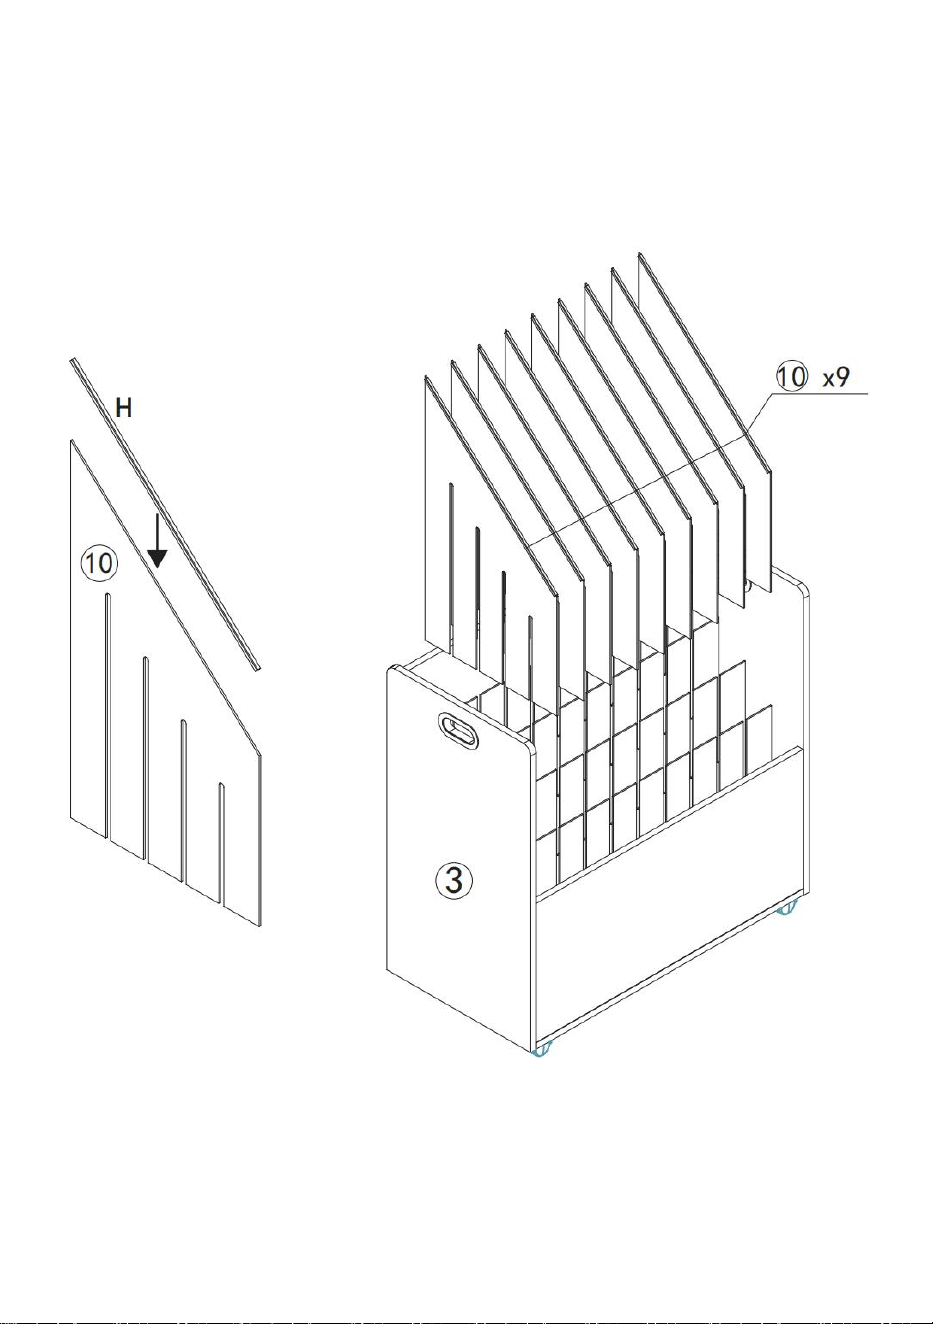
Step 5: Install the decorative strip(H) on the partition(⑩x9), and then Put
them on the shelf.(NOTE: you must install the decorative strip(H) on the
partition(⑩) before putting it into the shelf.)
- 10 -
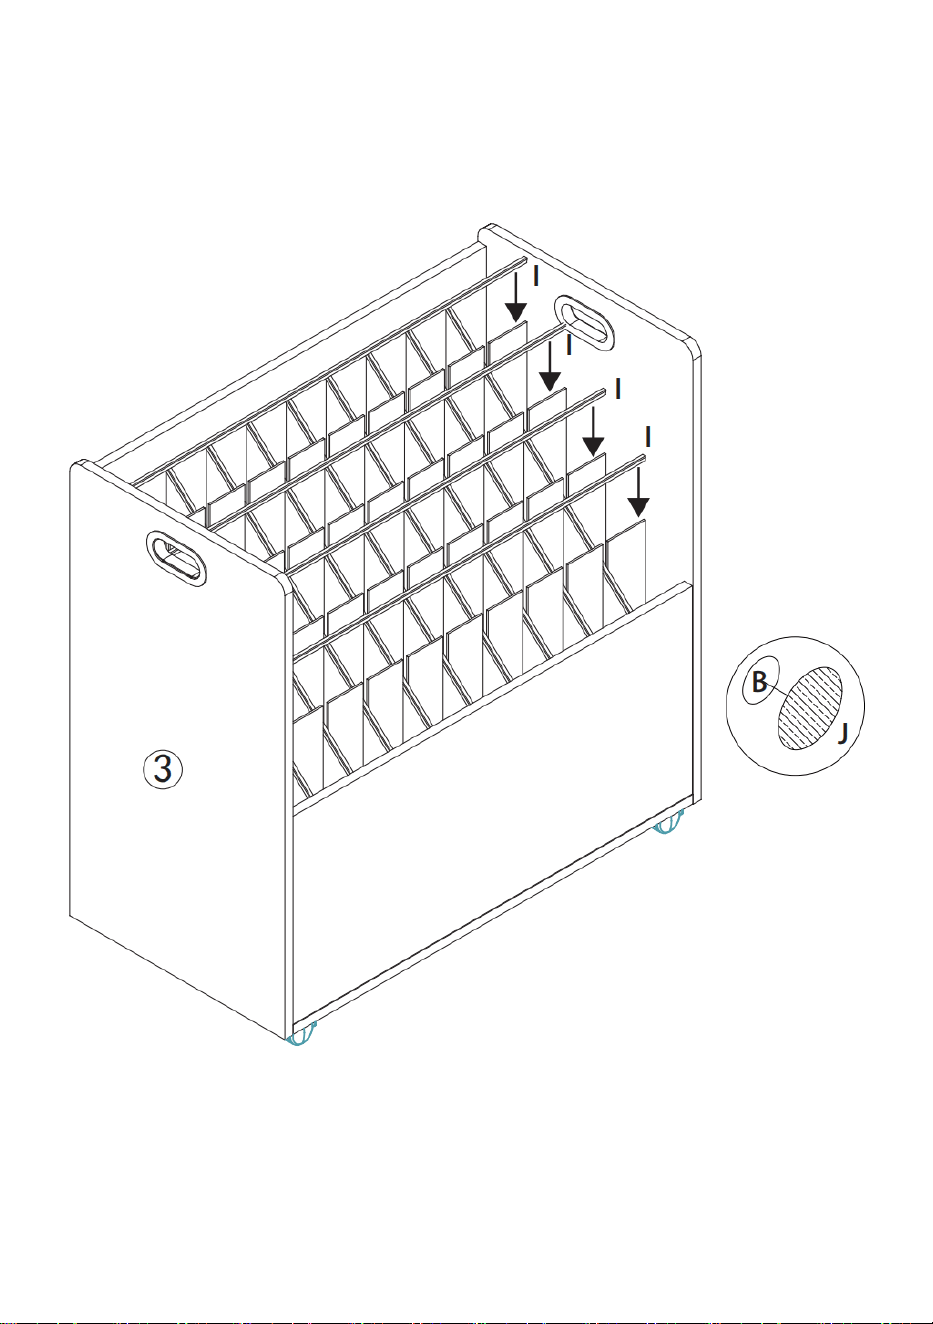
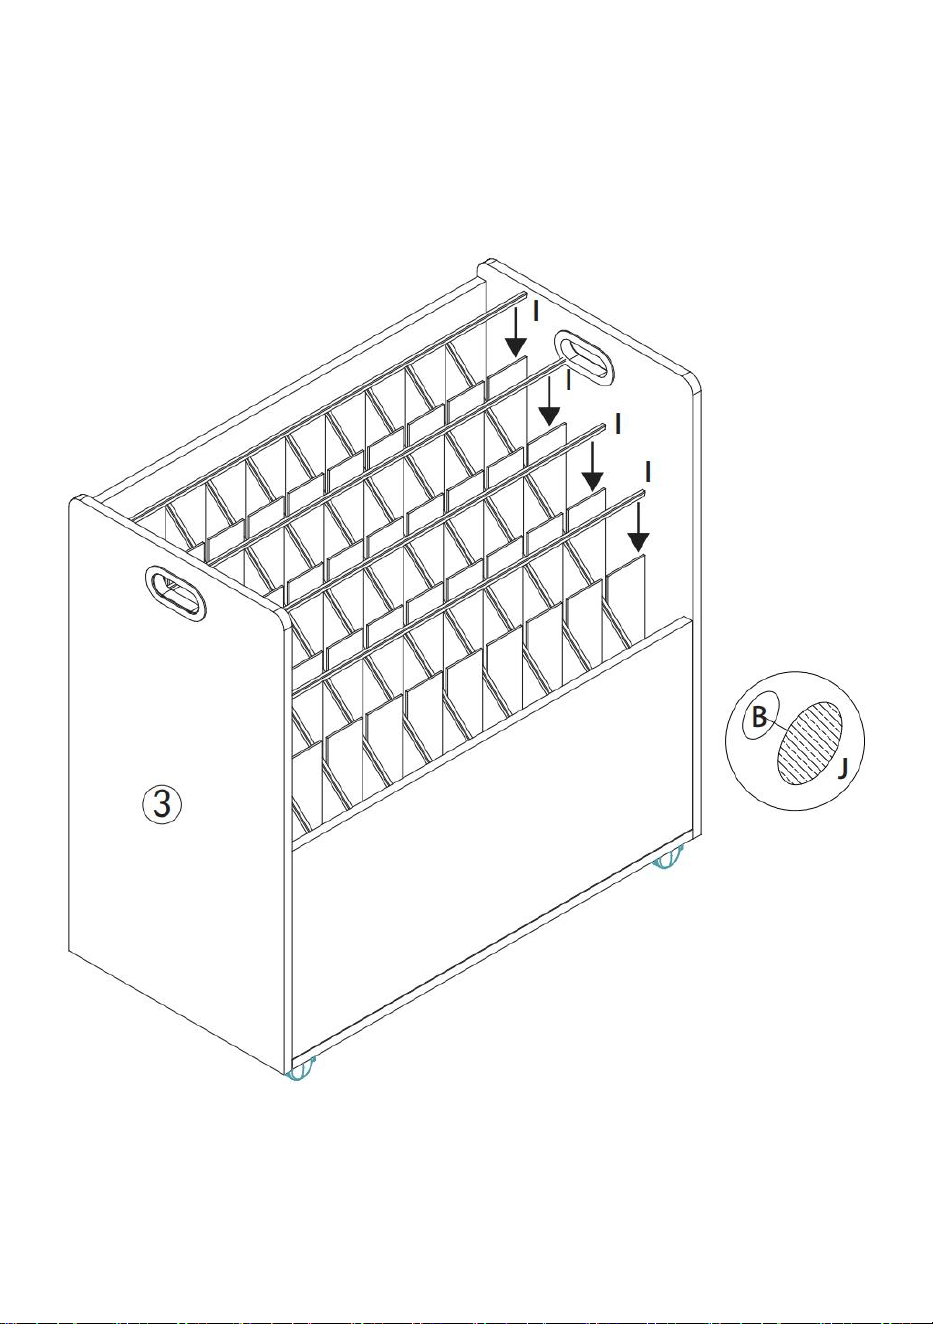
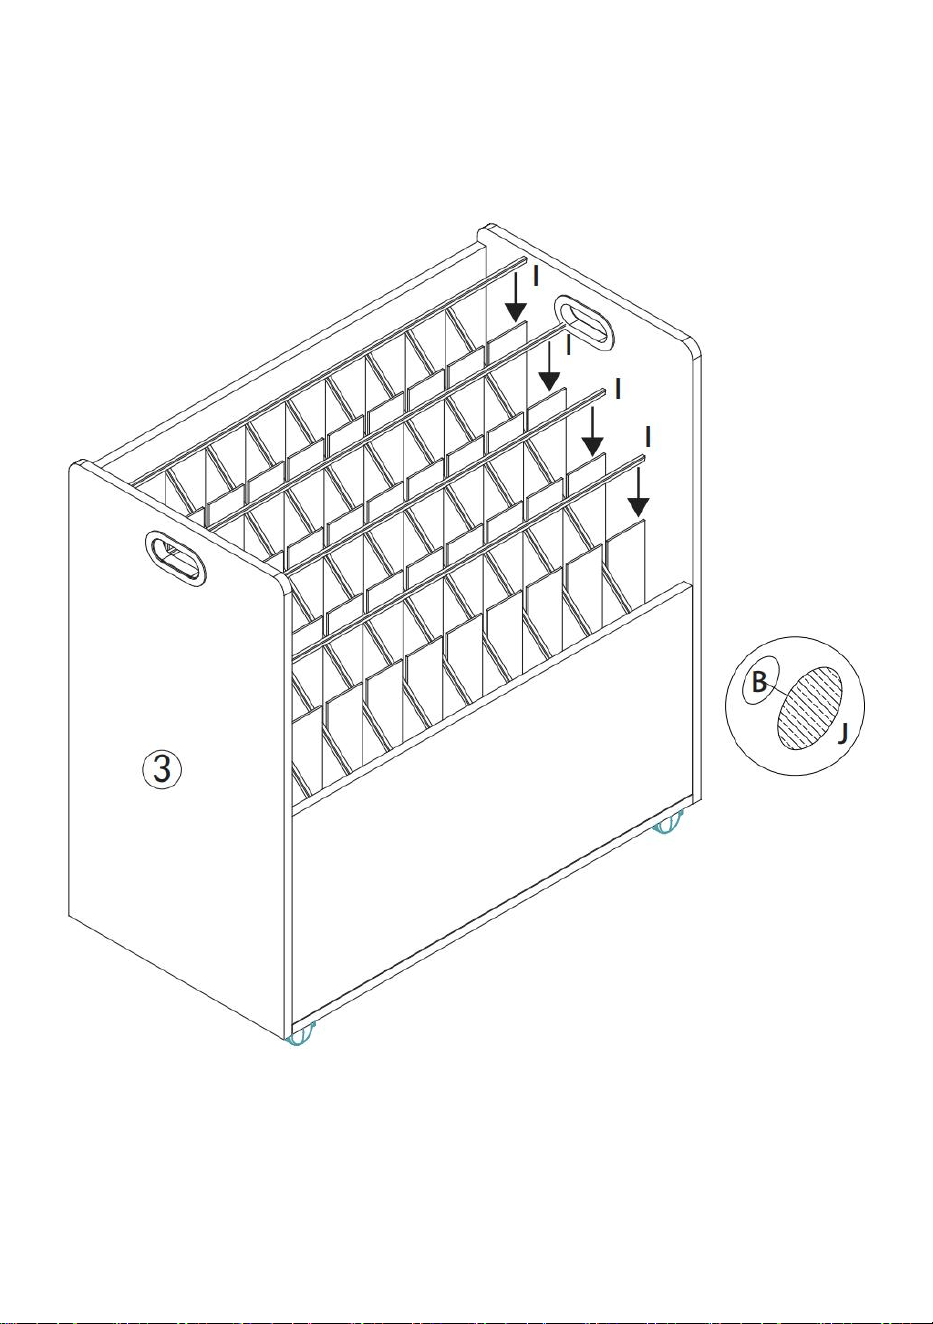
Step 5: Install the decorative strip(I) on the partition(⑥~⑨), and, finally,
stick the stickers(J) on the screw holes(B).
Manufacturer: Shanghaimuxinmuyeyouxiangongsi
Address: Shuangchenglu 803nong11hao1602A-1609shi, baoshanqu,
shanghai 200000 CN.
Imported to AUS: SIHAO PTY LTD. 1 ROKEVA STREETEASTWOOD
NSW 2122 Australia
Imported to USA: Sanven Technology Ltd. Suite 250, 9166 Anaheim
Place, Rancho Cucamonga, CA 91730
Technical Support and E-Warranty Certificate
www.vevor.com/support
E-CrossStu GmbH
Mainzer Landstr.69, 60329 Frankfurt am Main.
YH CONSULTING LIMITED.
C/0 YH Consulting Limited Office 147, Centurion
House, London Road, Staines-upon-Thames,
Surrey, TW18 4AX

Techniczny Wsparcie i certyfikat e-gwarancji
www.vevor.com/support
PRZECHOWYWANIE PLANÓW
MODEL: KLLT-01
We continue to be committed to provide you tools with competitive price.
"Save Half", "Half Price" or any other similar expressions used by us only represents an
estimate of savings you might benefit from buying certain tools with us compared to the major
top brands and does not necessarily mean to cover all categories of tools offered by us. You
are kindly reminded to verify carefully when you are placing an order with us if you are
actually saving half in comparison with the top major brands.
- 1 -
MODEL: KLLT-01
Have product questions? Need technical support? Please feel free to
contact us:
Technical Support and E-Warranty Certificate
www.vevor.com/support
NEED HELP? CONTACT US!
This is the original instruction, please read all manual instructions
carefully before operating. VEVOR reserves a clear interpretation of our
user manual. The appearance of the product shall be subject to the
product you received. Please forgive us that we won't inform you again if
there are any technology or software updates on our product.
BLUEPRINT STORAGE
- 2 -
WARNING & PRECAUTIONS
OSTRZEŻENIE :
1. Używając narzędzi do montażu stałych znaków drogowych, należy nosić
rękawice ochronne lub skorzystać z pomocy dwóch osób przy montażu.
2. Przed użyciem należy najpierw przeczytać tę instrukcję i zachować ją do
późniejszego wykorzystania.
PRODUCT DESCRIPTION
Model
KLLT-01
Kolor
Czarno - biały
Tworzywo
Płyta wiórowa i MDF Tablica
Liczba gniazd
50 slotów
Wielkość partii S
70mm*70mm
Rozmiar
opakowania
840*795*145mm
PART LIST
Ostrzeżenie: Aby zminimalizować ryzyko obrażeń, użytkownik
powinien uważnie przeczytać instrukcję obsługi.
- 3 -
ASSEMBLY INSTRUCTIONS
- 4 -
Rozpakuj i wyjmij część do przechowywania planów oraz pakiet
akcesoriów śrubowych .
Krok 1: Najpierw zamontuj płytę przednią ( ②) i płytę tylną (
①
) na płycie
bazowej (⑤) za pomocą śrub trzy w jednym (A\B) i listwy (C).
- 5 -
Krok 2: Załóż panel boczny (③\④) NA dwie strony ze śrubami trzy w
jednym (A\B) i listwą (C).

- 6 -
Krok 3: Umieść uchwyt (G) NA dwie strony.

- 7 -
Krok 4: Umieść produkt na boku wzdłuż tylnego panelu (①) i zamontuj
koła (E/F) na płycie bazowej (⑤) za pomocą śrub (D).

- 8 -
Krok 5: Umieść przegrodę (⑥~⑨) do wewnątrz .

- 9 -
Krok 5: Zamontuj listwę dekoracyjną (H) na przegrodzie (⑩x9), a
następnie połóż ją na półce . ( UWAGA: musisz zamontować listwę
dekoracyjną (H) na przegrodzie (⑩) przed umieszczeniem jej na półce .)

- 10 -
Krok 5: Zamontuj listwę dekoracyjną (I) na przegrodzie (⑥~⑨), a
następnie przyklej naklejki (J) do otworów na śruby (B).

Producent: Shanghaimuxinmuyeyouxiangongsi
Adres: Shuangchenglu 803nong11hao1602A-1609shi, baoshanqu ,
szanghaj 200000 CN.
Importowane do AUS: SIHAO PTY LTD. 1 ROKEVA STREETEASTWOOD
NSW 2122 Australia
Importowane do USA: Sanven Technology Ltd. Suite 250, 9166 Anaheim
Place, Rancho Cucamonga, CA 91730
Techniczny Wsparcie i certyfikat e-gwarancji
www.vevor.com/support
REP
EC
E-CrossStu GmbH
Mainzer Landstr.69, 60329 Frankfurt am Main.
REP
UK
YH CONSULTING LIMITED.
C/0 YH Consulting Limited Office 147, Centurion
House, London Road, Staines-upon-Thames,
Surrey, TW18 4AX

Technisch Support und E-Garantie-Zertifikat
www.vevor.com/support
BLUEPRINT-SPEICHER
MODELL: KLLT-01
We continue to be committed to provide you tools with competitive price.
"Save Half", "Half Price" or any other similar expressions used by us only represents an
estimate of savings you might benefit from buying certain tools with us compared to the major
top brands and does not necessarily mean to cover all categories of tools offered by us. You
are kindly reminded to verify carefully when you are placing an order with us if you are
actually saving half in comparison with the top major brands.

- 1 -
MODELL: KLLT-01
Have product questions? Need technical support? Please feel free to
contact us:
Technical Support and E-Warranty Certificate
www.vevor.com/support
NEED HELP? CONTACT US!
This is the original instruction, please read all manual instructions
carefully before operating. VEVOR reserves a clear interpretation of our
user manual. The appearance of the product shall be subject to the
product you received. Please forgive us that we won't inform you again if
there are any technology or software updates on our product.
BLUEPRINT STORAGE
- 2 -
WARNING & PRECAUTIONS
WARNUNG :
1. Tragen Sie beim Installieren von festen Wegweisern Schutzhandschuhe,
oder lassen Sie sich von zwei Personen bei der Installation helfen.
2. Lesen Sie vor der Verwendung zunächst dieses Handbuch durch. Es
wird empfohlen, es für die spätere Verwendung gut aufzubewahren.
PRODUCT DESCRIPTION
Modell
KLLT-01
Farbe
Schwarzweiß
Material
Spanplatte & MDF Planke
Anzahl der
Steckplätze
50 Steckplätze
S- Lot -Größe
70 mm x 70 mm
Verpackungsgrö
ße
840 x 795 x 145 mm
Warnung: Um das Verletzungsrisiko zu verringern, muss der
Benutzer die Bedienungsanleitung sorgfältig lesen.
- 3 -
PART LIST

- 4 -
ASSEMBLY INSTRUCTIONS
den Teil zur Blaupausenaufbewahrung und ein Bündel
Schraubenzubehör aus und nehmen Sie ihn heraus .
Schritt 1: Setzen Sie zunächst die Frontplatte (②) und die Rückplatte ( ①)
mit Drei-in-Eins-Schrauben (A\B) und der Latte (C) auf die Grundplatte
(⑤ ).

- 5 -
Schritt 2: Seitenteil anbringen (③\④) An zwei Seiten mit 3-in-1-Schrauben
(A\B) und Latte (C).

- 6 -
Schritt 3: Griff (G) anbringen An zwei Seiten.
- 7 -
Schritt 4: Legen Sie das Produkt seitlich entlang der Rückwand (①) und
montieren Sie die Räder (E/F) mit Schrauben (D) an der Grundplatte (⑤) .

- 8 -
Schritt 5: Platzieren Sie die Trennwand (⑥~⑨) nach innen .
- 9 -
Schritt 5: Befestigen Sie den Zierstreifen (H) an der Trennwand (⑩x9) und
legen Sie diese dann in das Regal . ( HINWEIS: Sie müssen den
Zierstreifen (H) an der Trennwand (⑩) befestigen, bevor Sie diese in das
Regal legen .)
- 10 -
Schritt 5: Installieren Sie den Zierstreifen (I) an der Trennwand (⑥~⑨)
und kleben Sie abschließend die Aufkleber (J) auf die Schraubenlöcher
(B).

- 11 -
Hersteller: Shanghaimuxinmuyeyouxiangongsi
Adresse: Shuangchenglu 803nong11hao1602A-1609shi, baoshanqu ,
Shanghai 200000 CN.
Nach AUS importiert: SIHAO PTY LTD. 1 ROKEVA STREETEASTWOOD
NSW 2122 Australien
Importiert in die USA: Sanven Technology Ltd. Suite 250, 9166 Anaheim
Place, Rancho Cucamonga, CA 91730
Technisch Support und E-Garantie-Zertifikat
www.vevor.com/support
REP
EC
E-CrossStu GmbH
Mainzer Landstr.69, 60329 Frankfurt am Main.
REP
UK
YH CONSULTING LIMITED.
C/0 YH Consulting Limited Office 147, Centurion
House, London Road, Staines-upon-Thames,
Surrey, TW18 4AX

Technique Certificat d'assistance et de garantie électronique
www.vevor.com/support
STOCKAGE DES PLANS
MODÈLE: KLLT-01
We continue to be committed to provide you tools with competitive price.
"Save Half", "Half Price" or any other similar expressions used by us only represents an
estimate of savings you might benefit from buying certain tools with us compared to the major
top brands and does not necessarily mean to cover all categories of tools offered by us. You
are kindly reminded to verify carefully when you are placing an order with us if you are
actually saving half in comparison with the top major brands.

- 1 -
MODÈLE: KLLT-01
Have product questions? Need technical support? Please feel free to
contact us:
Technical Support and E-Warranty Certificate
www.vevor.com/support
NEED HELP? CONTACT US!
This is the original instruction, please read all manual instructions
carefully before operating. VEVOR reserves a clear interpretation of our
user manual. The appearance of the product shall be subject to the
product you received. Please forgive us that we won't inform you again if
there are any technology or software updates on our product.
BLUEPRINT STORAGE
- 2 -
WARNING & PRECAUTIONS
AVERTISSEMENT :
1. Portez des gants de protection lorsque vous utilisez des outils pour
installer des poteaux de signalisation fixes, ou faites appel à deux
personnes pour vous aider lors de l'installation.
2. Lors de l'utilisation, veuillez d'abord lire ce manuel et il est recommandé
de le conserver soigneusement pour une utilisation ultérieure.
PRODUCT DESCRIPTION
Modèle
KLLT-01
Couleur
Noir et blanc
Matériel
Panneau de particules et MDF Conseil
Nombre
d'emplacements
50 emplacements
Taille des lots S
70mm*70mm
Taille de l'
emballage
840*795*145mm
Avertissement - Pour réduire le risque de blessure, l'utilisateur
doit lire attentivement le manuel d'instructions.

- 3 -
PART LIST

- 4 -
ASSEMBLY INSTRUCTIONS
Déballez et sortez la partie de stockage des plans et un ensemble d'
accessoires de vis .
Étape 1 : Tout d'abord, placez la plaque avant ( ②) et la plaque arrière
(
①
) sur la plaque de base (⑤) avec des vis trois en un (A\B) et des lattes
(C).

- 5 -
Étape 2 : Placez le panneau latéral (③\④) sur deux côtés avec vis trois en
un (A\B) et tasseaux (C).

- 6 -
Étape 3 : Placez la poignée (G) sur deux côtés.

- 7 -
Étape 4 : Placez le produit sur le côté le long du panneau arrière (①) et
installez les roues (E/F) sur la plaque de base (⑤) avec des vis (D).
- 8 -
Étape 5 : Placez la cloison (⑥~⑨) vers l'intérieur .
- 9 -
Étape 5 : Installez la bande décorative (H) sur la cloison (⑩x9), puis
placez-la sur l'étagère . ( REMARQUE : vous devez installer la bande
décorative (H) sur la cloison (⑩) avant de la placer dans l' étagère .)

- 10 -
Étape 5 : Installez la bande décorative (I) sur la cloison (⑥~⑨) et, enfin,
collez les autocollants (J) sur les trous de vis (B).

Fabricant : Shanghaimuxinmuyeyouxiangongsi
Adresse : Shuangchenglu 803nong11hao1602A-1609shi, baoshanqu ,
Shanghai 200000 CN.
Importé en Australie : SIHAO PTY LTD. 1 ROKEVA STREETEASTWOOD
NSW 2122 Australie
Importé aux États-Unis : Sanven Technology Ltd. Suite 250, 9166 Anaheim
Place, Rancho Cucamonga, CA 91730
Technique Certificat d'assistance et de garantie électronique
www.vevor.com/support
REP
EC
E-CrossStu GmbH
Mainzer Landstr.69, 60329 Frankfurt am Main.
REP
UK
YH CONSULTING LIMITED.
C/0 YH Consulting Limited Office 147, Centurion
House, London Road, Staines-upon-Thames,
Surrey, TW18 4AX

Technisch Ondersteuning en E-garantiecertificaat
www.vevor.com/support
BLAUWDRUKOPSLAG
MODEL: KLLT-01
We continue to be committed to provide you tools with competitive price.
"Save Half", "Half Price" or any other similar expressions used by us only represents an
estimate of savings you might benefit from buying certain tools with us compared to the major
top brands and does not necessarily mean to cover all categories of tools offered by us. You
are kindly reminded to verify carefully when you are placing an order with us if you are
actually saving half in comparison with the top major brands.

- 1 -
MODEL: KLLT-01
Have product questions? Need technical support? Please feel free to
contact us:
Technical Support and E-Warranty Certificate
www.vevor.com/support
NEED HELP? CONTACT US!
This is the original instruction, please read all manual instructions
carefully before operating. VEVOR reserves a clear interpretation of our
user manual. The appearance of the product shall be subject to the
product you received. Please forgive us that we won't inform you again if
there are any technology or software updates on our product.
BLUEPRINT STORAGE

- 2 -
WARNING & PRECAUTIONS
WAARSCHUWING :
1. Draag beschermende handschoenen wanneer u gereedschap gebruikt
om vaste borden te installeren, of schakel twee personen in om te helpen
bij de installatie.
2. Lees voor gebruik eerst deze handleiding door. Wij raden u aan deze
goed te bewaren voor later gebruik.
PRODUCT DESCRIPTION
Model
KLLT-01
Kleur
Zwart & Wit
Materiaal
Chipboard & MDF Bord
Aantal slots
50 plaatsen
S lotgrootte
70mm*70mm
Verpakkingsgro
otte
840*795*145mm
Waarschuwing: om het risico op letsel te verkleinen, moet de
gebruiker de gebruiksaanwijzing zorgvuldig lezen.

- 3 -
PART LIST

- 4 -
ASSEMBLY INSTRUCTIONS
Pak het opberggedeelte voor de blauwdruk uit en haal er een bundel
schroefaccessoires uit .
Stap 1: Plaats eerst de voorplaat (②) en de achterplaat (①) op de
grondplaat (⑤) met de drie-in-één schroeven (A\B) en de lat (C).
- 5 -
Stap 2: Plaats het zijpaneel (③\④) op twee kanten met drie-in-één
schroeven (A\B) en lat (C).

- 6 -
Stap 3: Plaats handvat (G) op twee kanten.

- 7 -
Stap 4: Leg het product op zijn kant langs het achterpaneel (①) en
monteer de wielen (E/F) op de grondplaat (⑤) met schroeven (D).

- 8 -
Stap 5: Plaats de partitie (⑥~⑨) naar binnen .

- 9 -
Stap 5: Installeer de decoratieve strip (H) op de scheidingswand (⑩x9) en
leg ze vervolgens op de plank . ( LET OP: u moet de decoratieve strip (H)
op de scheidingswand (⑩) installeren voordat u deze in de plank plaatst .)

- 10 -
Stap 5: Plaats de decoratieve strip (I) op de scheidingswand (⑥~⑨) en
plak tot slot de stickers (J) op de schroefgaten (B).

Fabrikant: Shanghaimuxinmuyeyouxiangongsi
Adres: Shuangchenglu 803nong11hao1602A-1609shi, baoshanqu ,
shanghai 200000 CN.
Geïmporteerd naar AUS: SIHAO PTY LTD. 1 ROKEVA
STREETEASTWOOD NSW 2122 Australië
Geïmporteerd naar de VS: Sanven Technology Ltd. Suite 250, 9166
Anaheim Place, Rancho Cucamonga, CA 91730
Technisch Ondersteuning en E-garantiecertificaat
www.vevor.com/support
REP
EC
E-CrossStu GmbH
Mainzer Landstr.69, 60329 Frankfurt am Main.
REP
UK
YH CONSULTING LIMITED.
C/0 YH Consulting Limited Office 147, Centurion
House, London Road, Staines-upon-Thames,
Surrey, TW18 4AX

Teknisk Support och e-garanticertifikat
www.vevor.com/support
BLUEPRINT LAGRING
MODELL: KLLT-01
We continue to be committed to provide you tools with competitive price.
"Save Half", "Half Price" or any other similar expressions used by us only represents an
estimate of savings you might benefit from buying certain tools with us compared to the major
top brands and does not necessarily mean to cover all categories of tools offered by us. You
are kindly reminded to verify carefully when you are placing an order with us if you are
actually saving half in comparison with the top major brands.

- 1 -
MODELL: KLLT-01
Have product questions? Need technical support? Please feel free to
contact us:
Technical Support and E-Warranty Certificate
www.vevor.com/support
NEED HELP? CONTACT US!
This is the original instruction, please read all manual instructions
carefully before operating. VEVOR reserves a clear interpretation of our
user manual. The appearance of the product shall be subject to the
product you received. Please forgive us that we won't inform you again if
there are any technology or software updates on our product.
BLUEPRINT STORAGE

- 2 -
WARNING & PRECAUTIONS
VARNING :
1、 Bär skyddshandskar när du använder verktyg för att installera fasta
skyltar, eller använd två personer för att hjälpa till med installationen.
2、 När du använder, läs den här bruksanvisningen först, och det
rekommenderas att du förvarar den väl för efterföljande användning.
PRODUCT DESCRIPTION
Modell
KLLT-01
Färg
Svart & vitt
Material
C hipboard & MDF Styrelse
Antal slots
50 platser
S massor storlek
70mm*70mm
Förpackningssto
rlek
840*795*145mm
Varning - För att minska risken för skada måste användaren
läsa instruktionerna noggrant.

- 3 -
PART LIST
- 4 -
ASSEMBLY INSTRUCTIONS
Packa upp och ta ut delen av ritningsförvaringen och ett paket med
skruvtillbehör .
Steg 1: Sätt först framplåten (②) och bakplåten (①) på bottenplattan (⑤)
med tre-i-ett-skruvar ( A\B) och läkt ( C ).

- 5 -
Steg 2: Sätt på sidopanelen (③\④) på två sidor med tre-i-ett-skruvar (A\B)
och läkt (C).

- 6 -
Steg 3: Sätt på handtaget (G) på två sidor.
- 7 -
Steg 4: Placera produkten på sidan längs bakpanelen (①) och installera
hjulen (E/F) på bottenplattan (⑤) med skruvar (D).

- 8 -
Steg 5: Placera partitionen (⑥~⑨) inåt .
- 9 -
Steg 5: Installera den dekorativa remsan (H) på mellanväggen (⑩x9), och
lägg dem sedan på hyllan . ( OBS: du måste installera den dekorativa
remsan (H) på mellanväggen (⑩) innan du lägger den i hyllan .)
- 10 -
Steg 5: Montera den dekorativa remsan (I) på skiljeväggen (⑥~⑨), och,
slutligen, fäst klistermärkena (J) på skruvhålen (B).

Tillverkare: Shanghaimuxinmuyeyouxiangongsi
Adress: Shuangchenglu 803nong11hao1602A-1609shi, baoshanqu ,
shanghai 200000 CN.
Importerad till AUS: SIHAO PTY LTD. 1 ROKEVA STREETEASTWOOD
NSW 2122 Australien
Importerad till USA: Sanven Technology Ltd. Suite 250, 9166 Anaheim
Place, Rancho Cucamonga, CA 91730
Teknisk Support och e-garanticertifikat
www.vevor.com/support
REP
EC
E-CrossStu GmbH
Mainzer Landstr.69, 60329 Frankfurt am Main.
REP
UK
YH CONSULTING LIMITED.
C/0 YH Consulting Limited Office 147, Centurion
House, London Road, Staines-upon-Thames,
Surrey, TW18 4AX

Técnico Certificado de soporte y garantía electrónica
www.vevor.com/support
ALMACENAMIENTO DE PLANOS
MODELO: KLLT-01
We continue to be committed to provide you tools with competitive price.
"Save Half", "Half Price" or any other similar expressions used by us only represents an
estimate of savings you might benefit from buying certain tools with us compared to the major
top brands and does not necessarily mean to cover all categories of tools offered by us. You
are kindly reminded to verify carefully when you are placing an order with us if you are
actually saving half in comparison with the top major brands.
- 1 -
MODELO: KLLT-01
Have product questions? Need technical support? Please feel free to
contact us:
Technical Support and E-Warranty Certificate
www.vevor.com/support
NEED HELP? CONTACT US!
This is the original instruction, please read all manual instructions
carefully before operating. VEVOR reserves a clear interpretation of our
user manual. The appearance of the product shall be subject to the
product you received. Please forgive us that we won't inform you again if
there are any technology or software updates on our product.
BLUEPRINT STORAGE

- 2 -
WARNING & PRECAUTIONS
ADVERTENCIA :
1、 Use guantes protectores cuando utilice herramientas para instalar
señales fijas, o utilice dos personas para ayudar con la instalación.
2、 Al utilizarlo, lea primero este manual y se recomienda conservarlo en
un lugar seguro para poder consultarlo en el futuro.
PRODUCT DESCRIPTION
Modelo
KLLT-01
Color
Blanco y negro
Material
Tablero de fibra de densidad media y MDF Junta
Número de
ranuras
50 ranuras
Tamaño de lotes
S
70 mm x 70 mm
Tamaño del
embalaje
840*795*145 mm
Advertencia: Para reducir el riesgo de lesiones, el usuario
debe leer atentamente el manual de instrucciones.

- 3 -
PART LIST

- 4 -
ASSEMBLY INSTRUCTIONS

- 5 -
Desempaque y saque la parte de almacenamiento de planos y un
paquete de accesorios de tornillos .
Paso 1: En primer lugar, coloque la placa frontal ( ②) y la placa posterior
( ①) en la placa base (⑤) con tornillos tres en uno (A\B) y listones (C).
- 6 -
Paso 2: Coloque el panel lateral (③\④) en dos lados con tornillos tres en
uno (A\B) y listón (C).
- 7 -
Paso 3: Coloque el mango (G) en Dos lados.

- 8 -
Paso 4: Coloque el producto de lado a lo largo del panel posterior (①) e
instale las ruedas (E/F) en la placa base (⑤) con tornillos (D).

- 9 -
Paso 5: Coloque la partición (⑥~⑨) hacia adentro .

- 10 -
Paso 5: Instale la tira decorativa (H) en la partición (⑩x9) y luego
colóquela en el estante . ( NOTA: debe instalar la tira decorativa (H) en la
partición (⑩) antes de colocarla en el estante ).

- 11 -
Paso 5: Instale la tira decorativa (I) en la partición (⑥~⑨) y, finalmente,
pegue las pegatinas (J) en los orificios de los tornillos (B).

Fabricante: Shanghaimuxinmuyeyouxiangongsi
Dirección: Shuangchenglu 803nong11hao1602A-1609shi, baoshanqu ,
shanghai 200000 CN.
Importado a AUS: SIHAO PTY LTD. 1 ROKEVA STREETEASTWOOD
NSW 2122 Australia
Importado a EE. UU.: Sanven Technology Ltd. Suite 250, 9166 Anaheim
Place, Rancho Cucamonga, CA 91730
Técnico Certificado de soporte y garantía electrónica
www.vevor.com/support
REP
EC
E-CrossStu GmbH
Mainzer Landstr.69, 60329 Frankfurt am Main.
REP
UK
YH CONSULTING LIMITED.
C/0 YH Consulting Limited Office 147, Centurion
House, London Road, Staines-upon-Thames,
Surrey, TW18 4AX

Tecnico Supporto e certificato di garanzia elettronica
www.vevor.com/support
ARCHIVIAZIONE DI PROGETTI
MODELLO: KLLT-01
We continue to be committed to provide you tools with competitive price.
"Save Half", "Half Price" or any other similar expressions used by us only represents an
estimate of savings you might benefit from buying certain tools with us compared to the major
top brands and does not necessarily mean to cover all categories of tools offered by us. You
are kindly reminded to verify carefully when you are placing an order with us if you are
actually saving half in comparison with the top major brands.

- 1 -
MODELLO: KLLT-01
Have product questions? Need technical support? Please feel free to
contact us:
Technical Support and E-Warranty Certificate
www.vevor.com/support
NEED HELP? CONTACT US!
This is the original instruction, please read all manual instructions
carefully before operating. VEVOR reserves a clear interpretation of our
user manual. The appearance of the product shall be subject to the
product you received. Please forgive us that we won't inform you again if
there are any technology or software updates on our product.
BLUEPRINT STORAGE

- 2 -
WARNING & PRECAUTIONS
AVVERTIMENTO :
1. Indossare guanti protettivi quando si utilizzano utensili per installare
cartelli stradali fissi oppure farsi assistere da due persone durante
l'installazione.
2. Durante l'utilizzo, leggere prima questo manuale e si consiglia di
conservarlo con cura per poterlo consultare in seguito.
PRODUCT DESCRIPTION
Modello
Modello KLLT-01
Colore
Bianco e nero
Materiale
Truciolato e MDF Asse
Numero di slot
50 posti
S lotti di
dimensioni
70mm*70mm
Dimensioni
dell'imballaggio
840*795*145mm
Attenzione: per ridurre il rischio di lesioni, l'utente deve leggere
attentamente il manuale di istruzioni.

- 3 -
PART LIST
- 4 -
ASSEMBLY INSTRUCTIONS
- 5 -
Disimballare e togliere la parte di stoccaggio dei progetti e un fascio di
accessori per viti .
Fase 1: Innanzitutto, posizionare la piastra anteriore (②) e la piastra
posteriore ( ①) sulla piastra di base (⑤) con viti tre in uno (A\B) e listello
(C).
- 6 -
Passaggio 2: posizionare il pannello laterale (③\④) SU due lati con viti tre
in uno (A\B) e listello (C).

- 7 -
Fase 3: Posizionare la maniglia (G) SU due lati.

- 8 -
Fase 4: Posizionare il prodotto su un lato lungo il pannello posteriore (①) e
installare le ruote (E/F) sulla piastra di base (⑤) con le viti (D).
- 9 -
Passaggio 5: posizionare la partizione (⑥~⑨) verso l'interno .

- 10 -
Fase 5: Installare la striscia decorativa (H) sulla partizione (⑩x9), quindi
posizionarla sullo scaffale . ( NOTA: è necessario installare la striscia
decorativa (H) sulla partizione (⑩) prima di posizionarla sullo scaffale .)

- 11 -
Fase 5: Installare la striscia decorativa (I) sulla partizione (⑥~⑨) e, infine,
attaccare gli adesivi (J) sui fori delle viti (B).

Produttore: Shanghaimuxinmuyeyouxiangongsi
Indirizzo: Shuangchenglu 803nong11hao1602A-1609shi, baoshanqu ,
shanghai 200000 CN.
Importato in AUS: SIHAO PTY LTD. 1 ROKEVA STREETEASTWOOD
NSW 2122 Australia
Importato negli USA: Sanven Technology Ltd. Suite 250, 9166 Anaheim
Place, Rancho Cucamonga, CA 91730
Tecnico Supporto e certificato di garanzia elettronica
www.vevor.com/support
REP
EC
E-CrossStu GmbH
Mainzer Landstr.69, 60329 Frankfurt am Main.
REP
UK
YH CONSULTING LIMITED.
C/0 YH Consulting Limited Office 147, Centurion
House, London Road, Staines-upon-Thames,
Surrey, TW18 4AX