Instruction
Manual
ROBOT
VACUUM
CLEANER
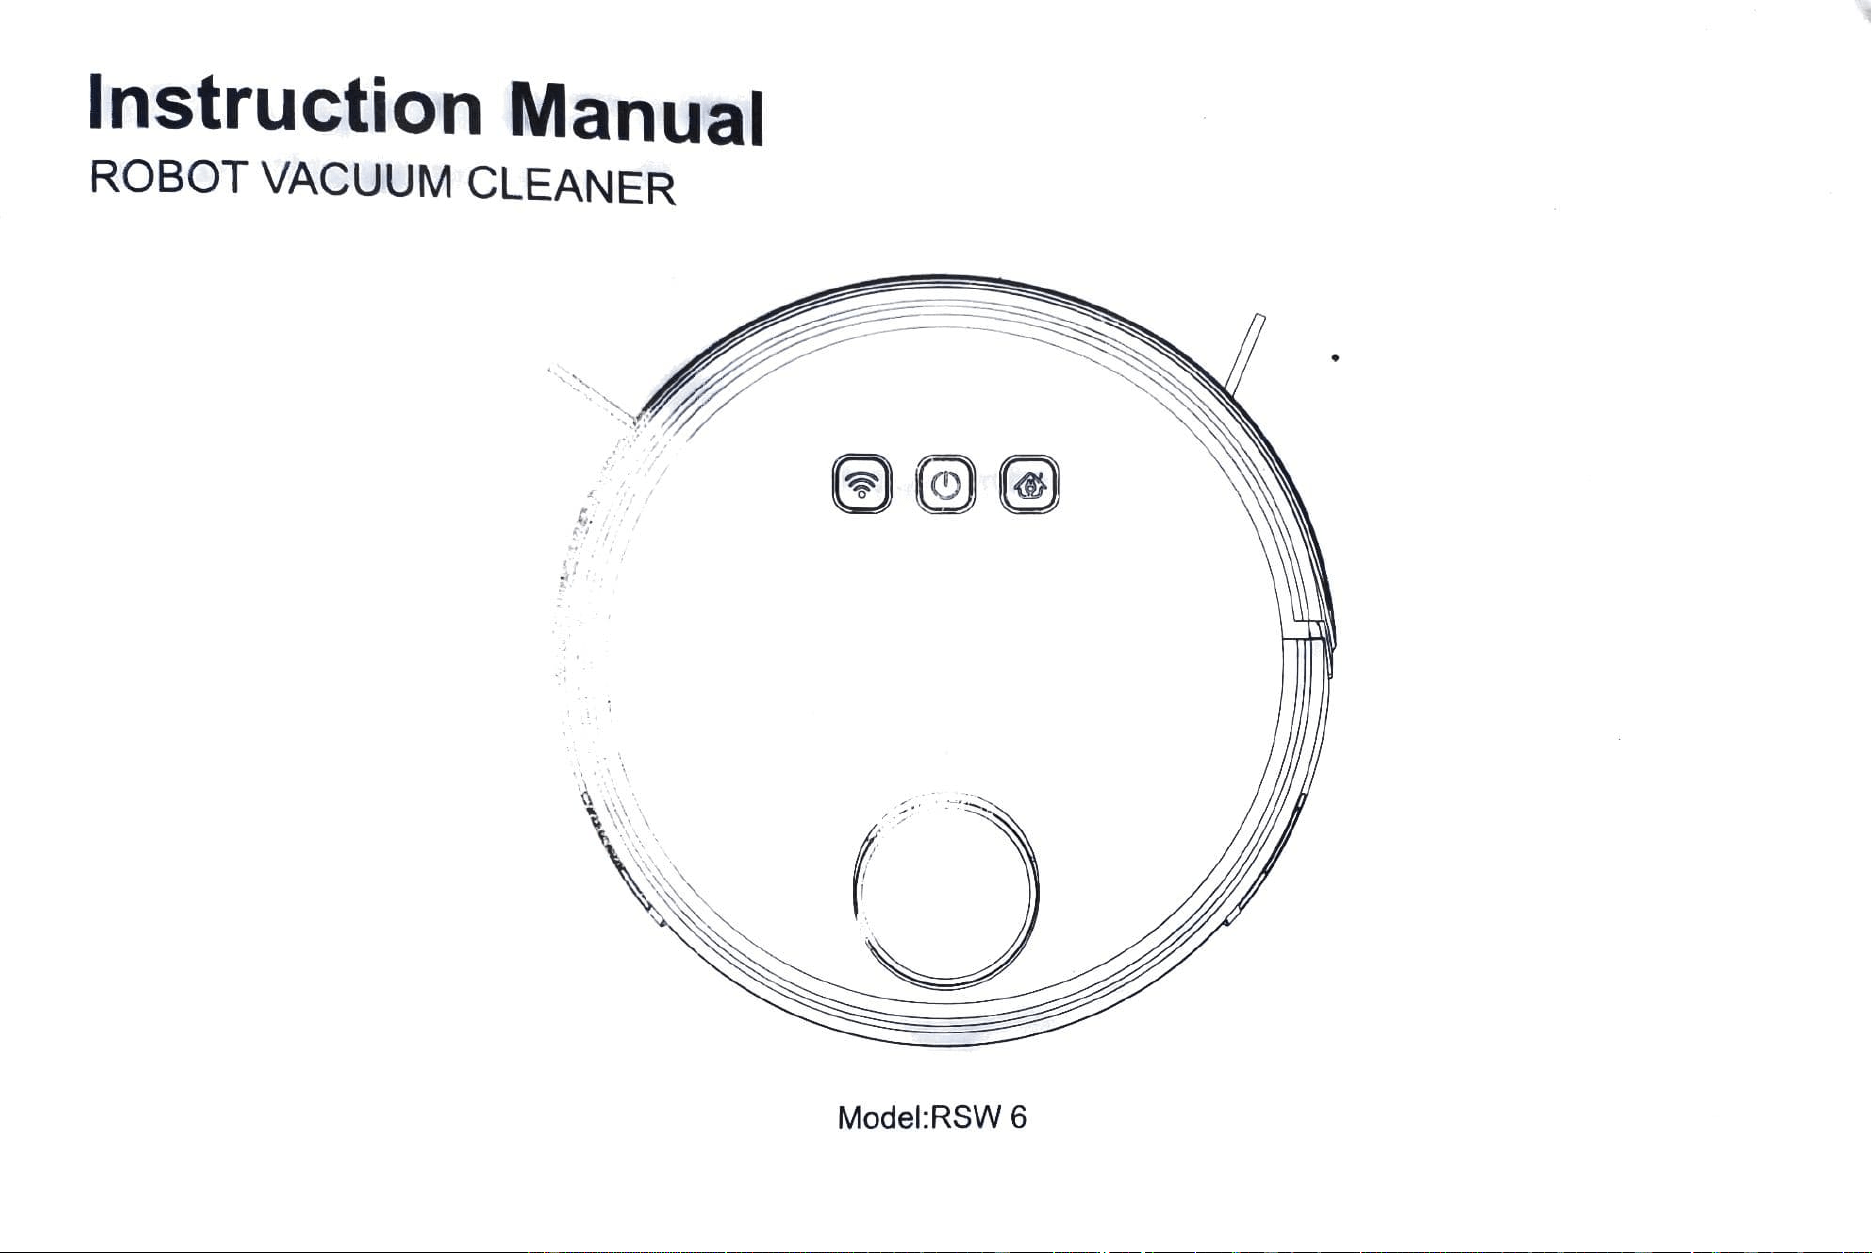
Model:RSW
6
Instruction Manual
01
--
1.
Safety Regulations
03
2.
Product
Instruction
07
3.
Parameter
08
4.
Use
Instri s
19
5.
Mainte
23
6.
Alarm
Tips
24
7.
FAQ
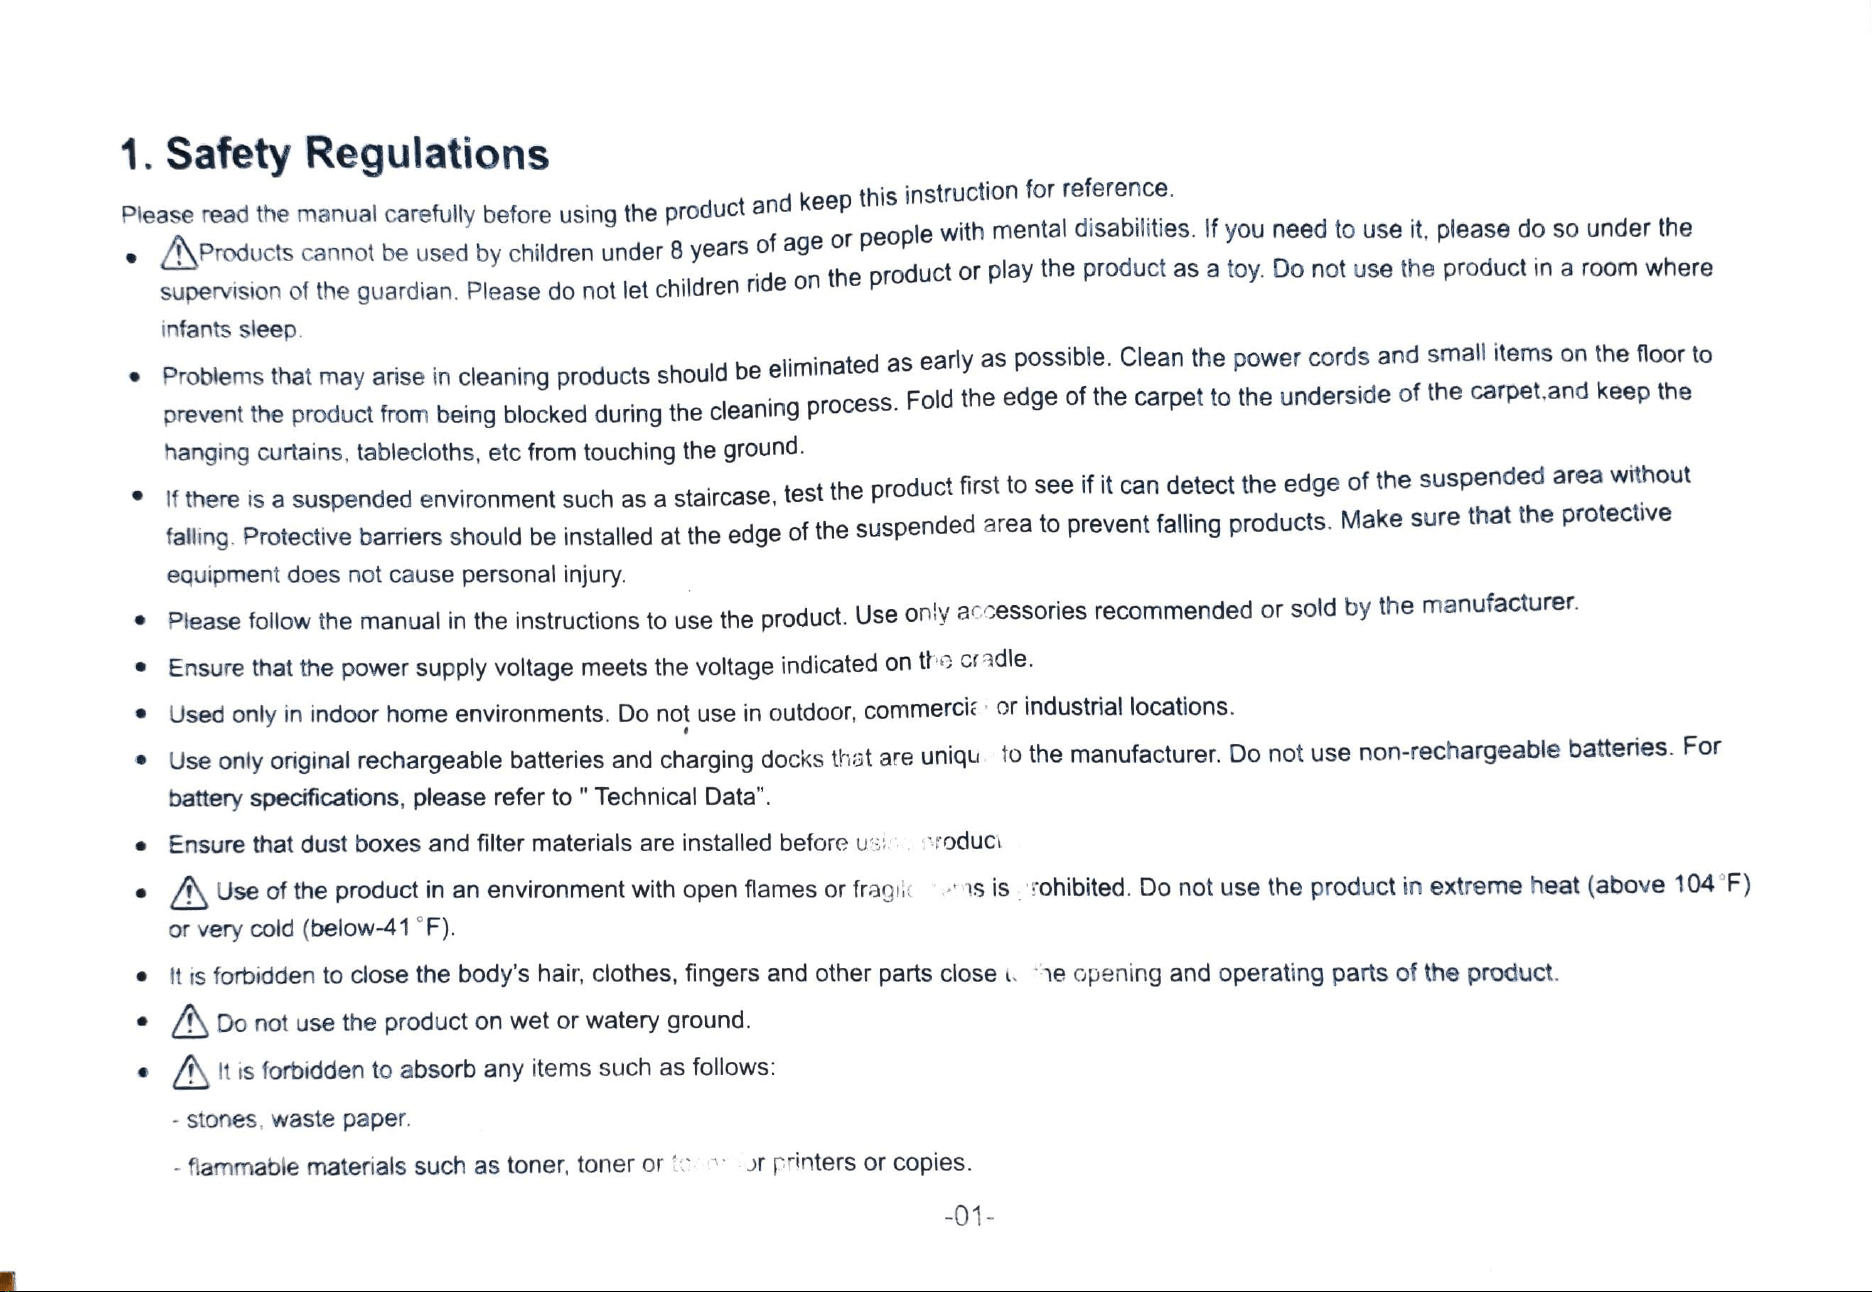
1.
Safety
Regulations
Please
read
the
manual
carefully
before
using
the
product
and
keep
this
instruction
for
reference.
Products
cannot
be
used
by
children
under
8
years
of
age
or
people
witn
mental
aisaoities.
if
you
need
to
use
it,
please
do
so
under
the
supervision
of
the
guardian.
Please
do
not
let
children
ride
on
the
product
or
play
tne
proauct
as
a
toy.
Do
not
use
the
product
in
a
room
where
infants
sleep
Problems
that
may
arise
in
clea
ing
products
should
be
eliminated
as
early
as
possible.
Clean
the
power
cords
and
small
items
on
the
floor
to
prevent
the
product
from
being
blocked
during
the
cleaning
process.
Fold
the
edge
of
the
carpet
to
the
underside
of
the
carpet.and
keep
the
hanging
curtains, tablecloths, etc
from
touching the ground.
t
there
is
a
suspended
environment
such
as
a
staircase,
test
the
product
first
to
see
if
it
can
detect
the
edge
of
the
suspended
area
without
talling.
Protective
barriers
should
be
installed
at
the
edge
of
the
suspended
area
to
prevent
falling
products.
Make
sure
that
the
protective
equipment
does
not
cause
personal
injury.
Piease
follow
the
manual
in
the
instructions
to
use
the
product.
Use
only
accessories
recommended
or
sold
by
the
manufacturer
Ensure
that
the
power
supply
voltage
meets
the
voltage
indicated
on
the
cradle.
Used
only
in
indoor
home
environments.
Do
not
use
in
outdoor,
commercik
or
industrial
locations.
Use
only original rechargeable
batteries
and
charging
docks
thst
are
uniqu
to
the
manufacturer.
Do
not
use
non-rechargeable
batteries.
For
battery
specifications,
please
refer
to
"
Technical
Data".
.Ensure
that dust boxes and filter materials are installed before
usi
Foduci
A
Use
of
the
product
in
an
environment
with
open
fames
or
fragi
s
is
rohibited.
Do
not
use
the
product
in
extreme
heat
(above
104F)
or
very coid (below-41
F).
.It
is
forbidden to
close
the
body's hair, clothes, fingers
and
other parts close
he
opening
and
operating
parts
of
the
product.
Do
not
use
the
product
on
wet
or
watery
ground.
At
is forbidden
to
absorb any items such
as
follows:
stones,
waste
paper.
fiammable
materials
such
as
toner,
toner
or
tn
r
printers
or
copies.
-01

-cigarettes,
matches,
ash,
or
other
items
that
may
cause
a
fire.
not
take
any
product
that
is
buming.
such
as
Do
not
place
items
at
the
suction
outlet.
Do
not
use
products
when
suction
is
blocked.
Clean
dust,
cotton
wool,
hair,
etc.
at
the
suction
port
to
ensure
smooth
air
circulation
at
the
suction
port.
OSe
ne
power
cord
carefully
to
avoid
damage.
Do
not
use
the
power
cord
to
drag
or
pull
the
product
and
the
product
charging
stand.
Do
not
uSe
ne
power
cord
as
a
handle.
Do
not
clamp
the
power
cord
into
the
door
seam.
Do
not
pull
the
power
cord
at
sharp
corners
and
corners.
D
use
the
product
if
the
power
cord,
power
outlet
or
charging
stand
are
damaged.
Do
not
use
the
product
when
it
is
not
working
property
due
to
dropping.
damage,
outdoor
use
or
water
ingress.
To
avoid
injury,
the
product
should
be
repaired
by
the
manufacturer
or
its
after-sales
service.
Turn
off
the
product
switch
before
cleaning
and
maintaining
the
product.
Before
discard
of
the
product,
remove
the
product
from
the
charge
stand,
turn
off
the
product
power
switch,
and
remove
the
battery.
Even
if
the
product
has
been
severely
damaged,
it
is
forbidden
to
incinerate
the
product,
and
the
product
battery
may
cause
an
explosion.
Please
dispose
of
used
batteries
in
accordance
with
local
laws
and
regulations.
If
you
do
not
use
the
product
for
a
long
time,
please
turn
off
the
product.
-02-
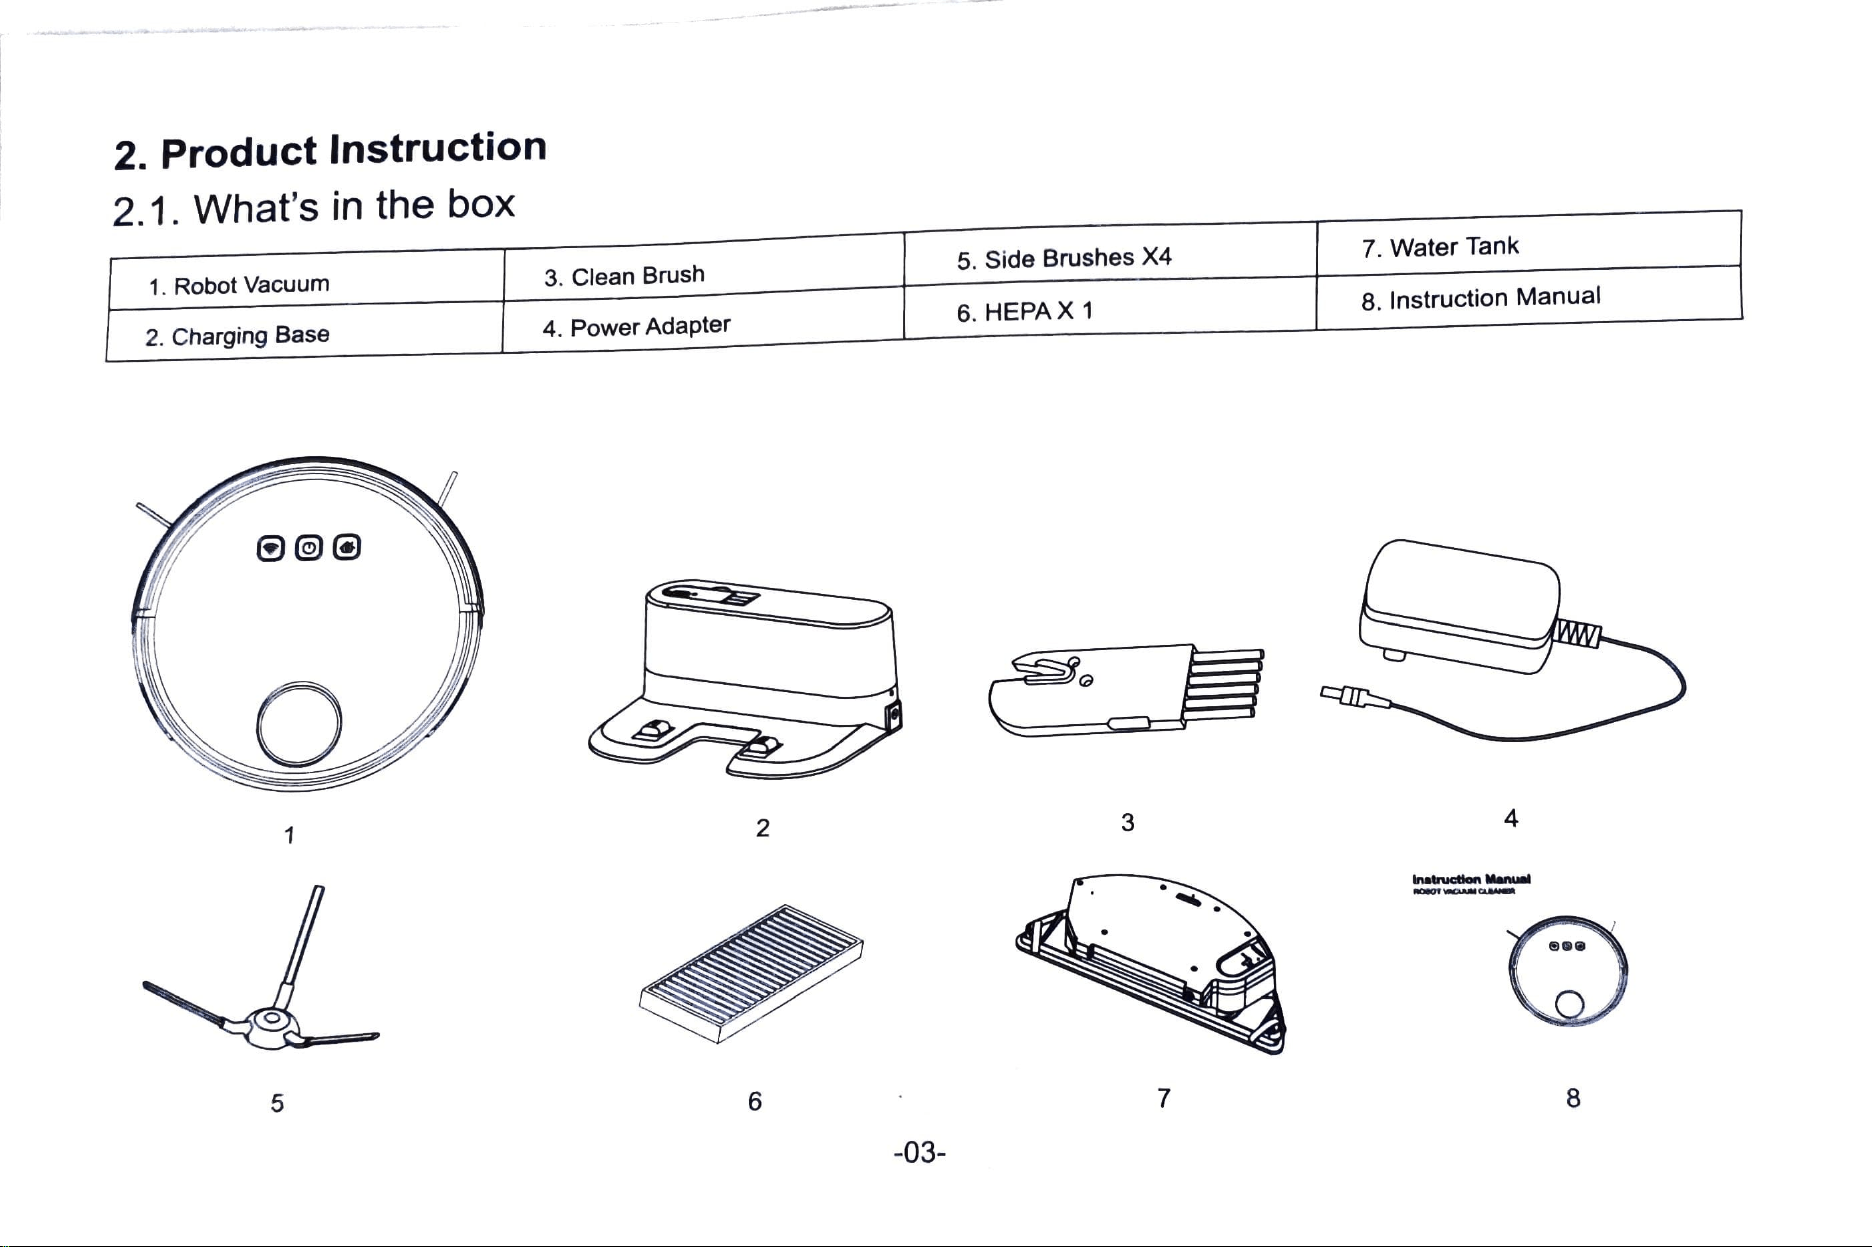
2.
Product
Instruction
7.
Water
Tank
2.1.
What's
in
the
box
5.
Side
Brushes
X4
8.
Instruction
Manual
3.
Clean
Brush
6.
HEPA
X 1
1.
Robot
Vacuum
4.
Power
Adapter
2.
Charging
Base
A
3
2
nstrutlon
Manusl
8
6
5
-03-
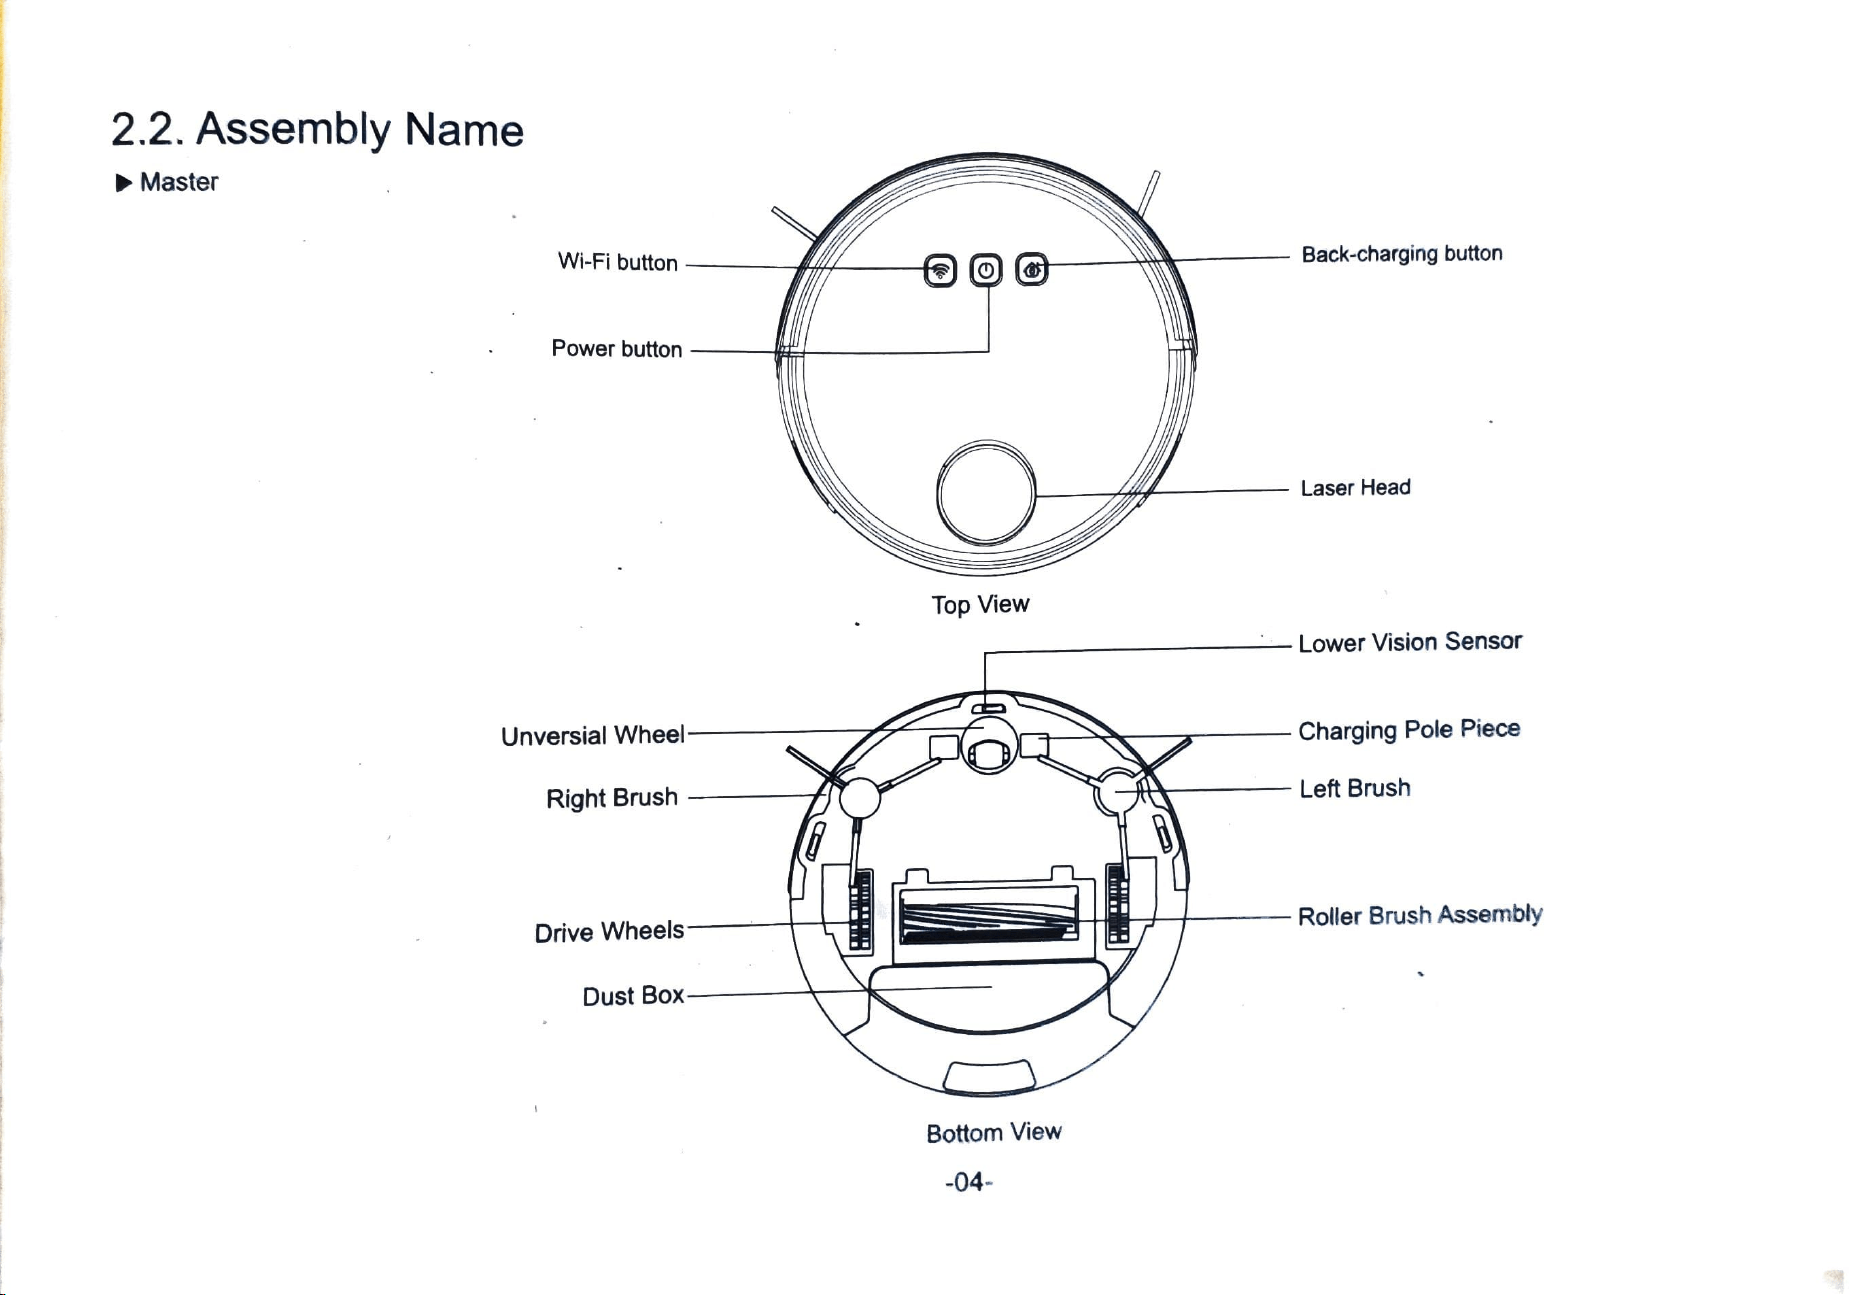
2.2. Assembly
Name
Master
Wi-Fi
button
Back-charging
button
Power
button
Laser
Head
Top
Viewv
-Lower
Vision
Sensor
Unversial
Wheel-
Charging
Pole
Piece
Left Brush
Right
Brush
Roller Brush Assembly
Drive
Wheels
Dust
Box
Bottom
View
-04
-
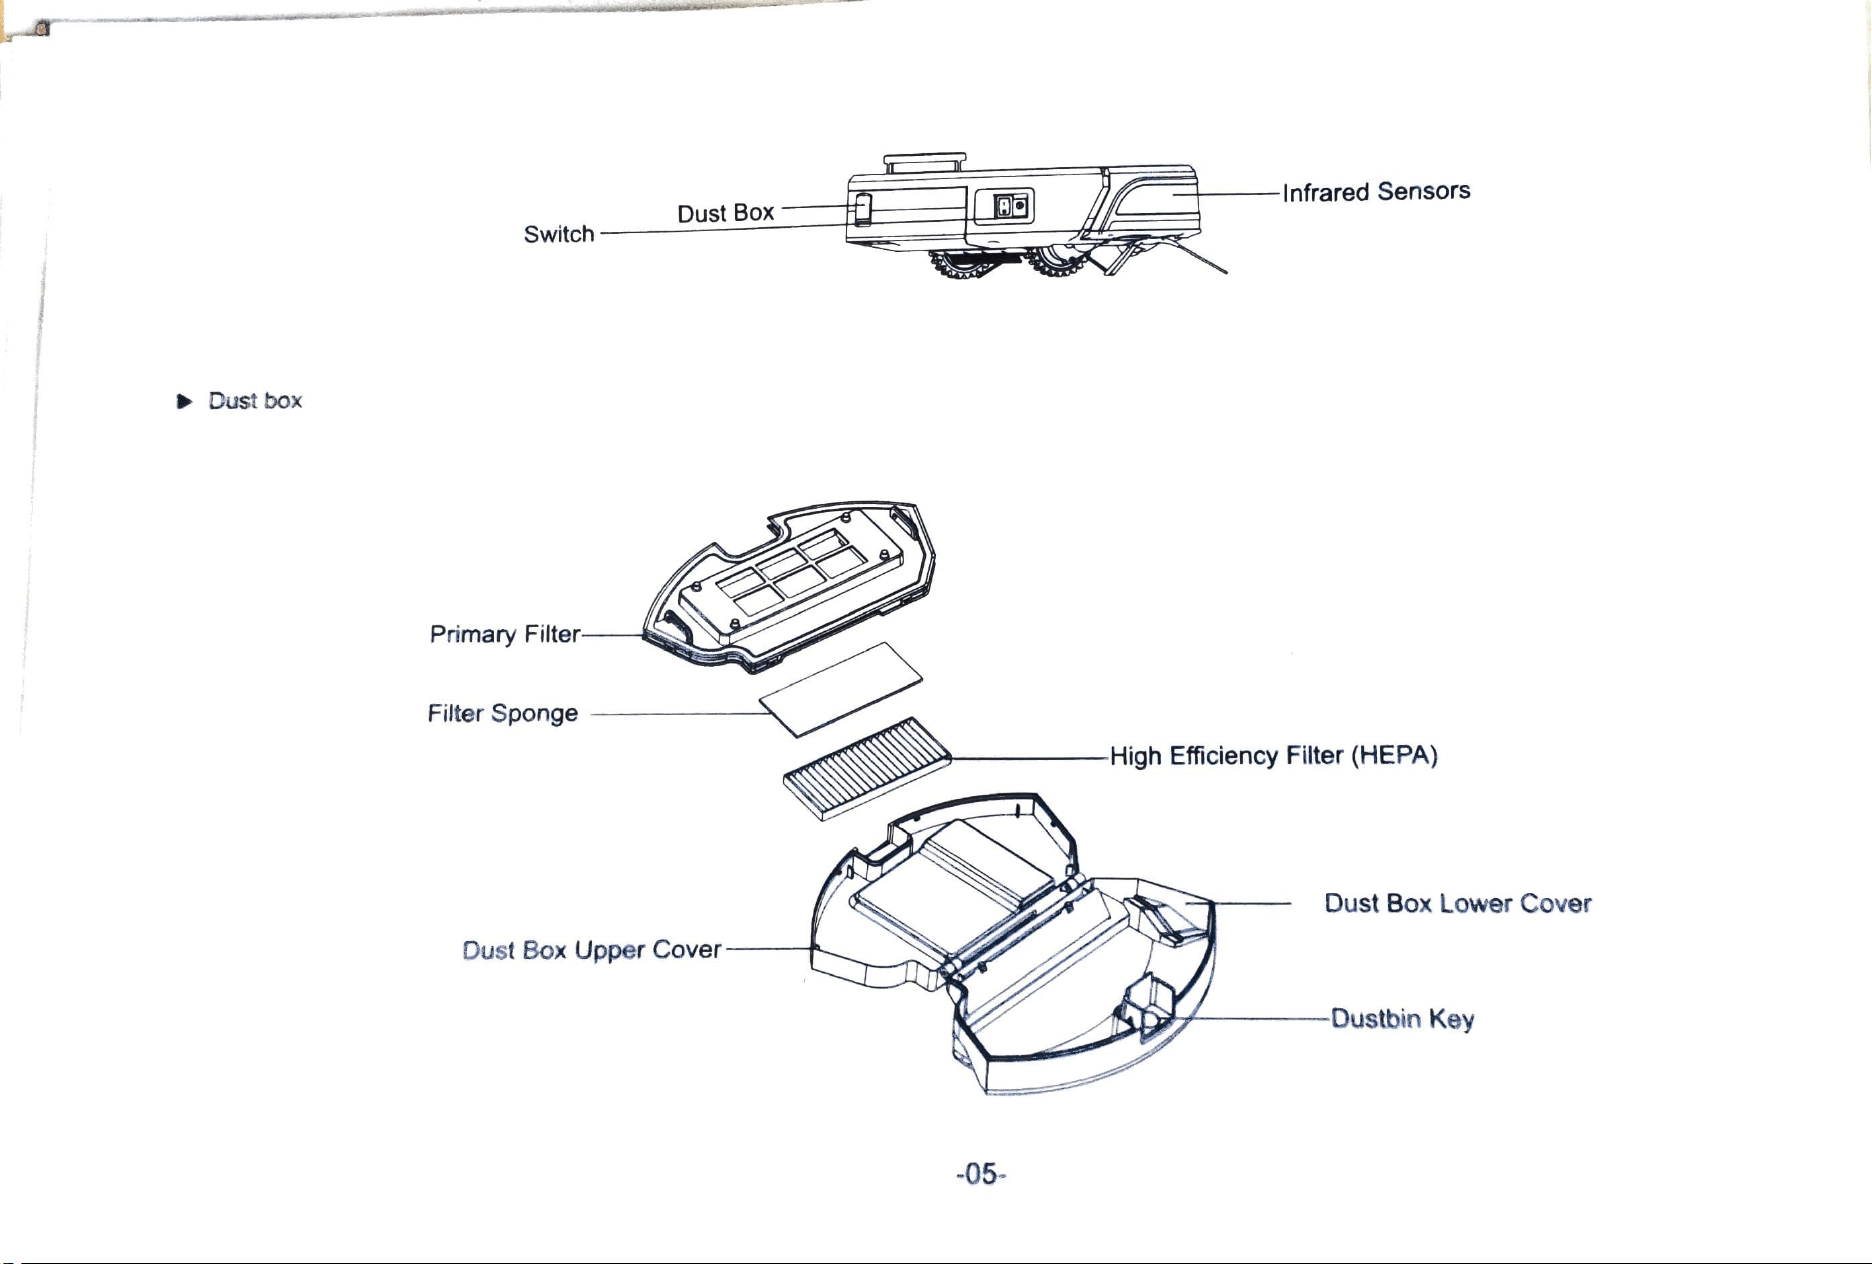
Infrared
Sensors
Dust
Box
Switch-
Dust
box
Primary
Filter-
Filter
Sponge
-High
Efficiency Filter (HEPA)
Dust
Box
Lower
Cover
Dust Box
Upper
Cover
K
-Dustbin
Key
-05-
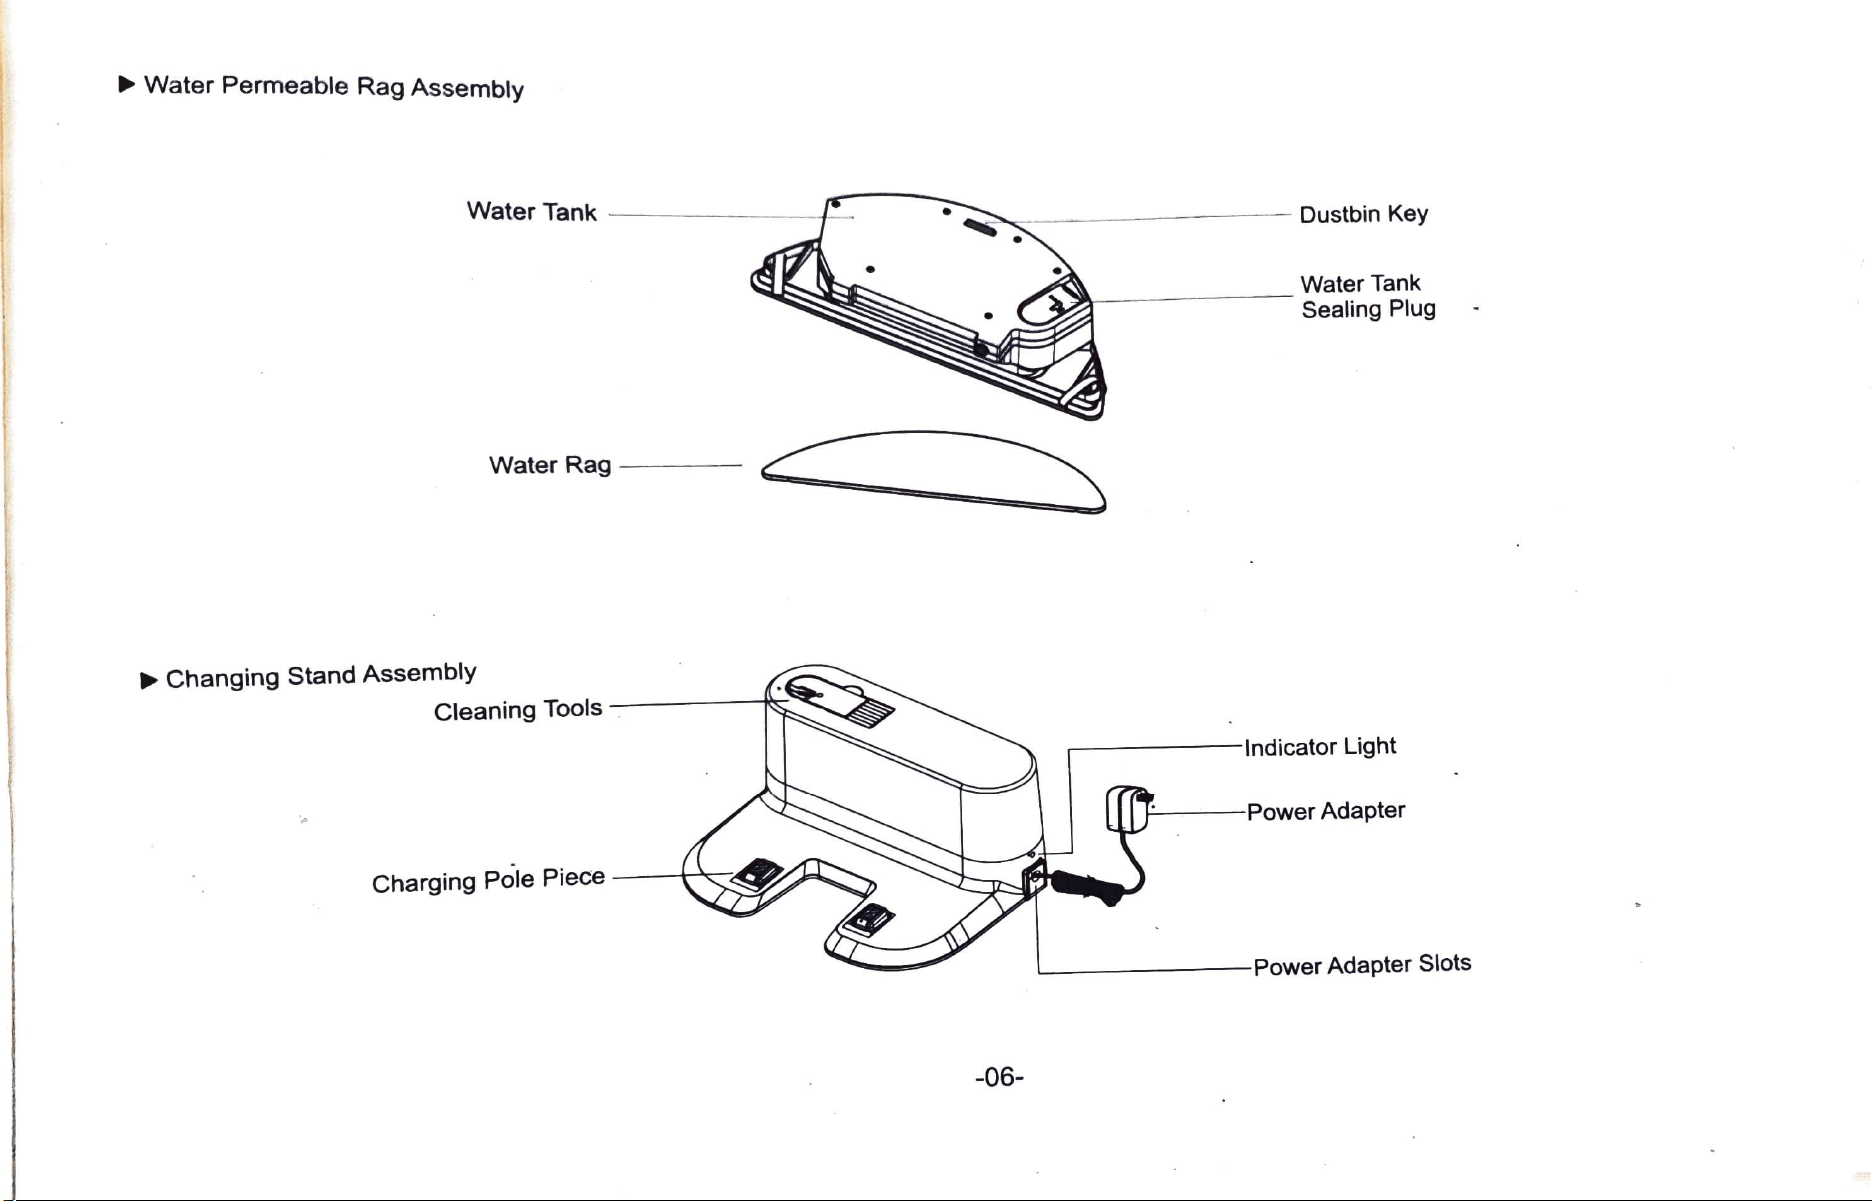
Water
Permeable
Rag
Assembly
Water
Tank
Dustbin
Key
Water
Tank
Sealing Plug
Water
Rag
Changing
Stand
Assembly
Cleaning
Tools
Indicator
Light
-Power
Adapter
Charging
Pole
Piece-
-Power
Adapter
Slots
-06
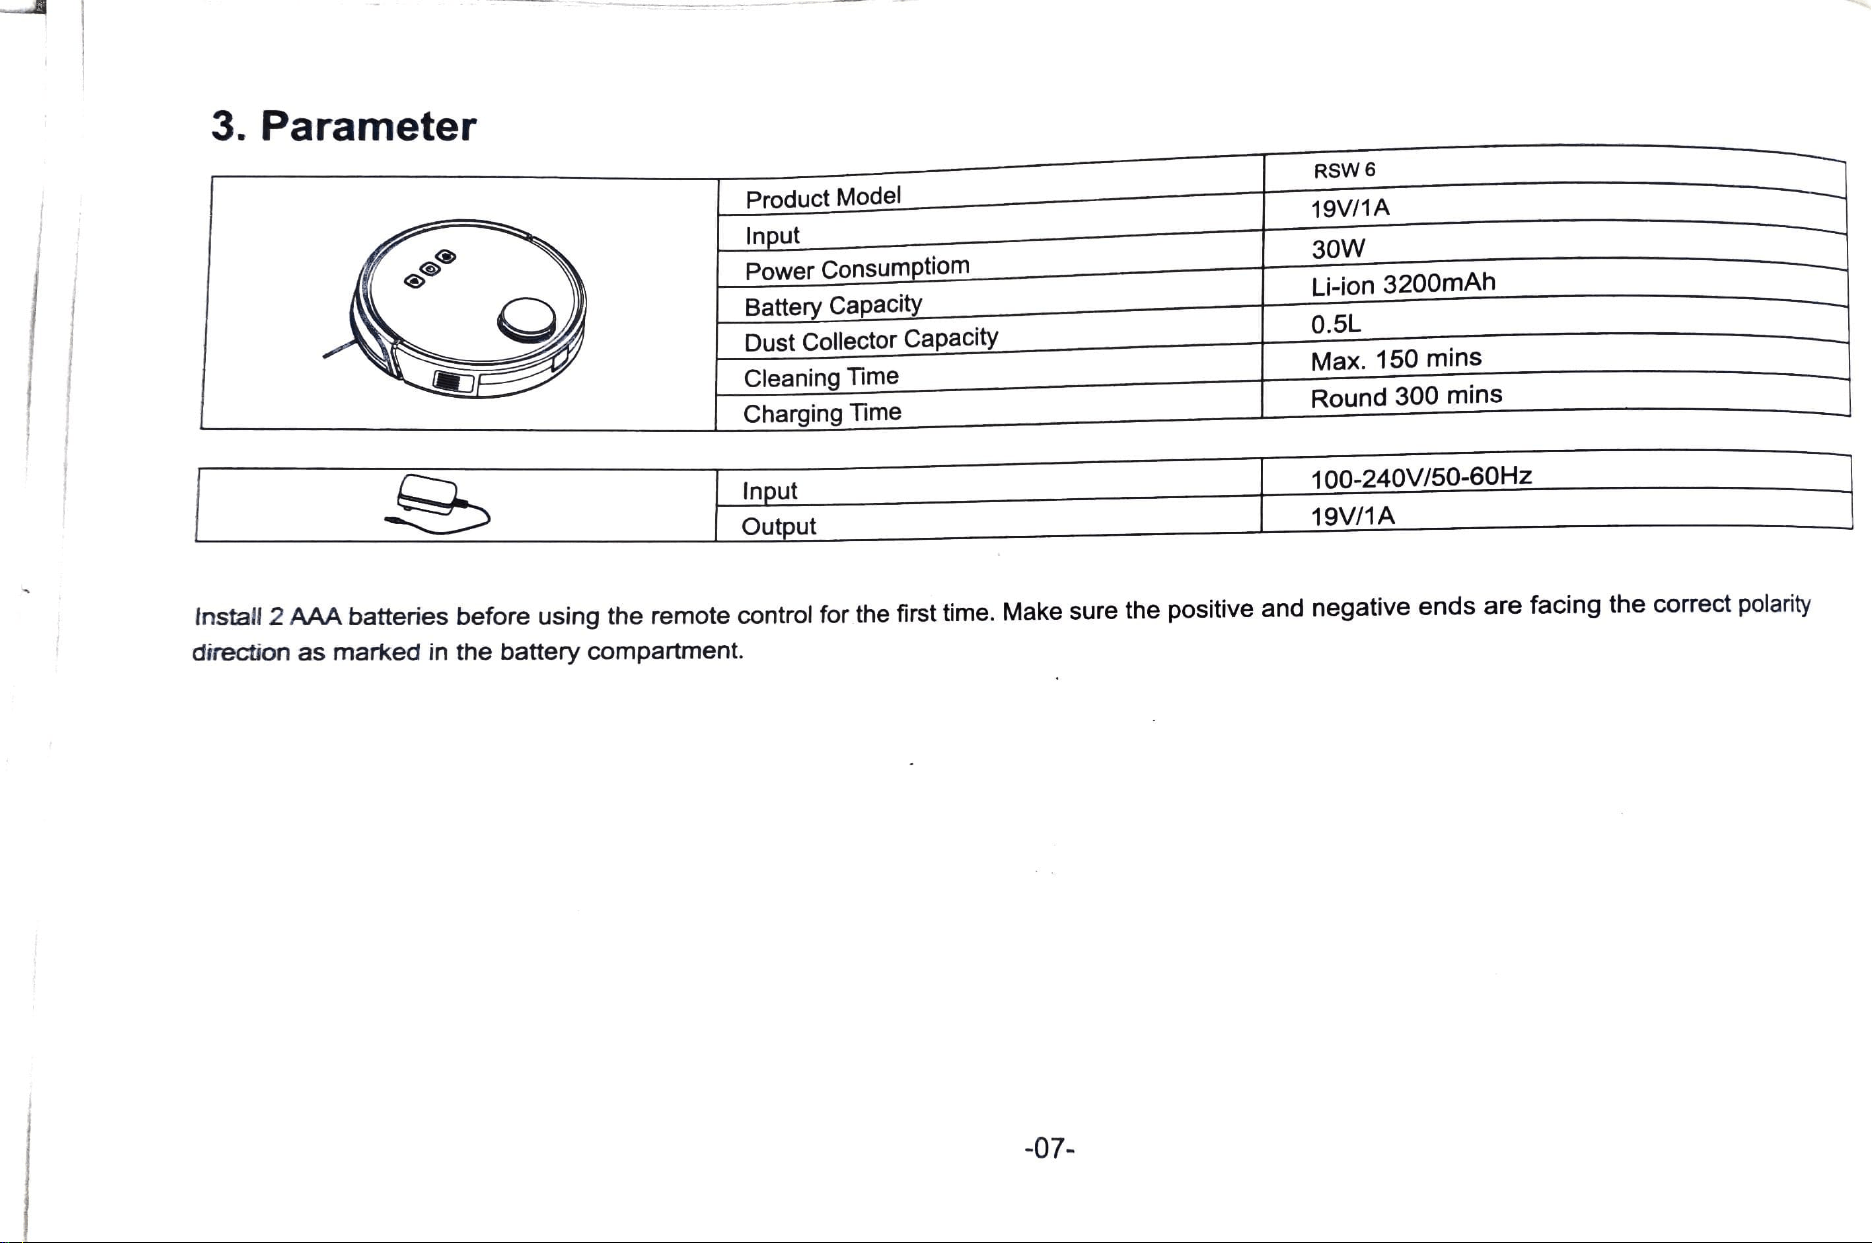
3.
Parameter
RSW
6
Product
Model
Input
Power Consumptiom
Battery
Capacity
Dust
Collector
Capacity
Cleaning
Time
Charging
Time
19V/1A
30W
Li-ion
3200mAh
0.5L
Max.
150
mins
Round
300
mins
100-240V/50-60Hz
19V/1A
Input
Output
Instal
2
AAA
batteries
before
using
the
remote
control
for
the
frst
time.
Make
sure
the
positive
and
negative
ends
are
facing
the
corect
polarily
direction
as
marked
in
the
battery
compartment.
-07-

4.
Use
Instructions
4.1
Considerations
Please
refer
to
the
following
guidelines
to
check
the
cleaning
area
before
the
cleaner
worKS.
2.
Please
roll
the
carpet
tassels
or
work
on
short-hair rugs
1.
Power
lines
and
other
debris
scattered
on
the
ground
may
trip
up
product
must
be
removed.
4.
A
guardrail
should
be
placed
at
the
edge
of
the
duplex
to
ensure
safe
operation
of
the
product.
3.
A
gap
of
less
than
8
cm
on
the
bottom
of
the
furniture
may
catch
the
product.
if
you
need
to
clean
it,
please
remove
the
furniture.
-08-
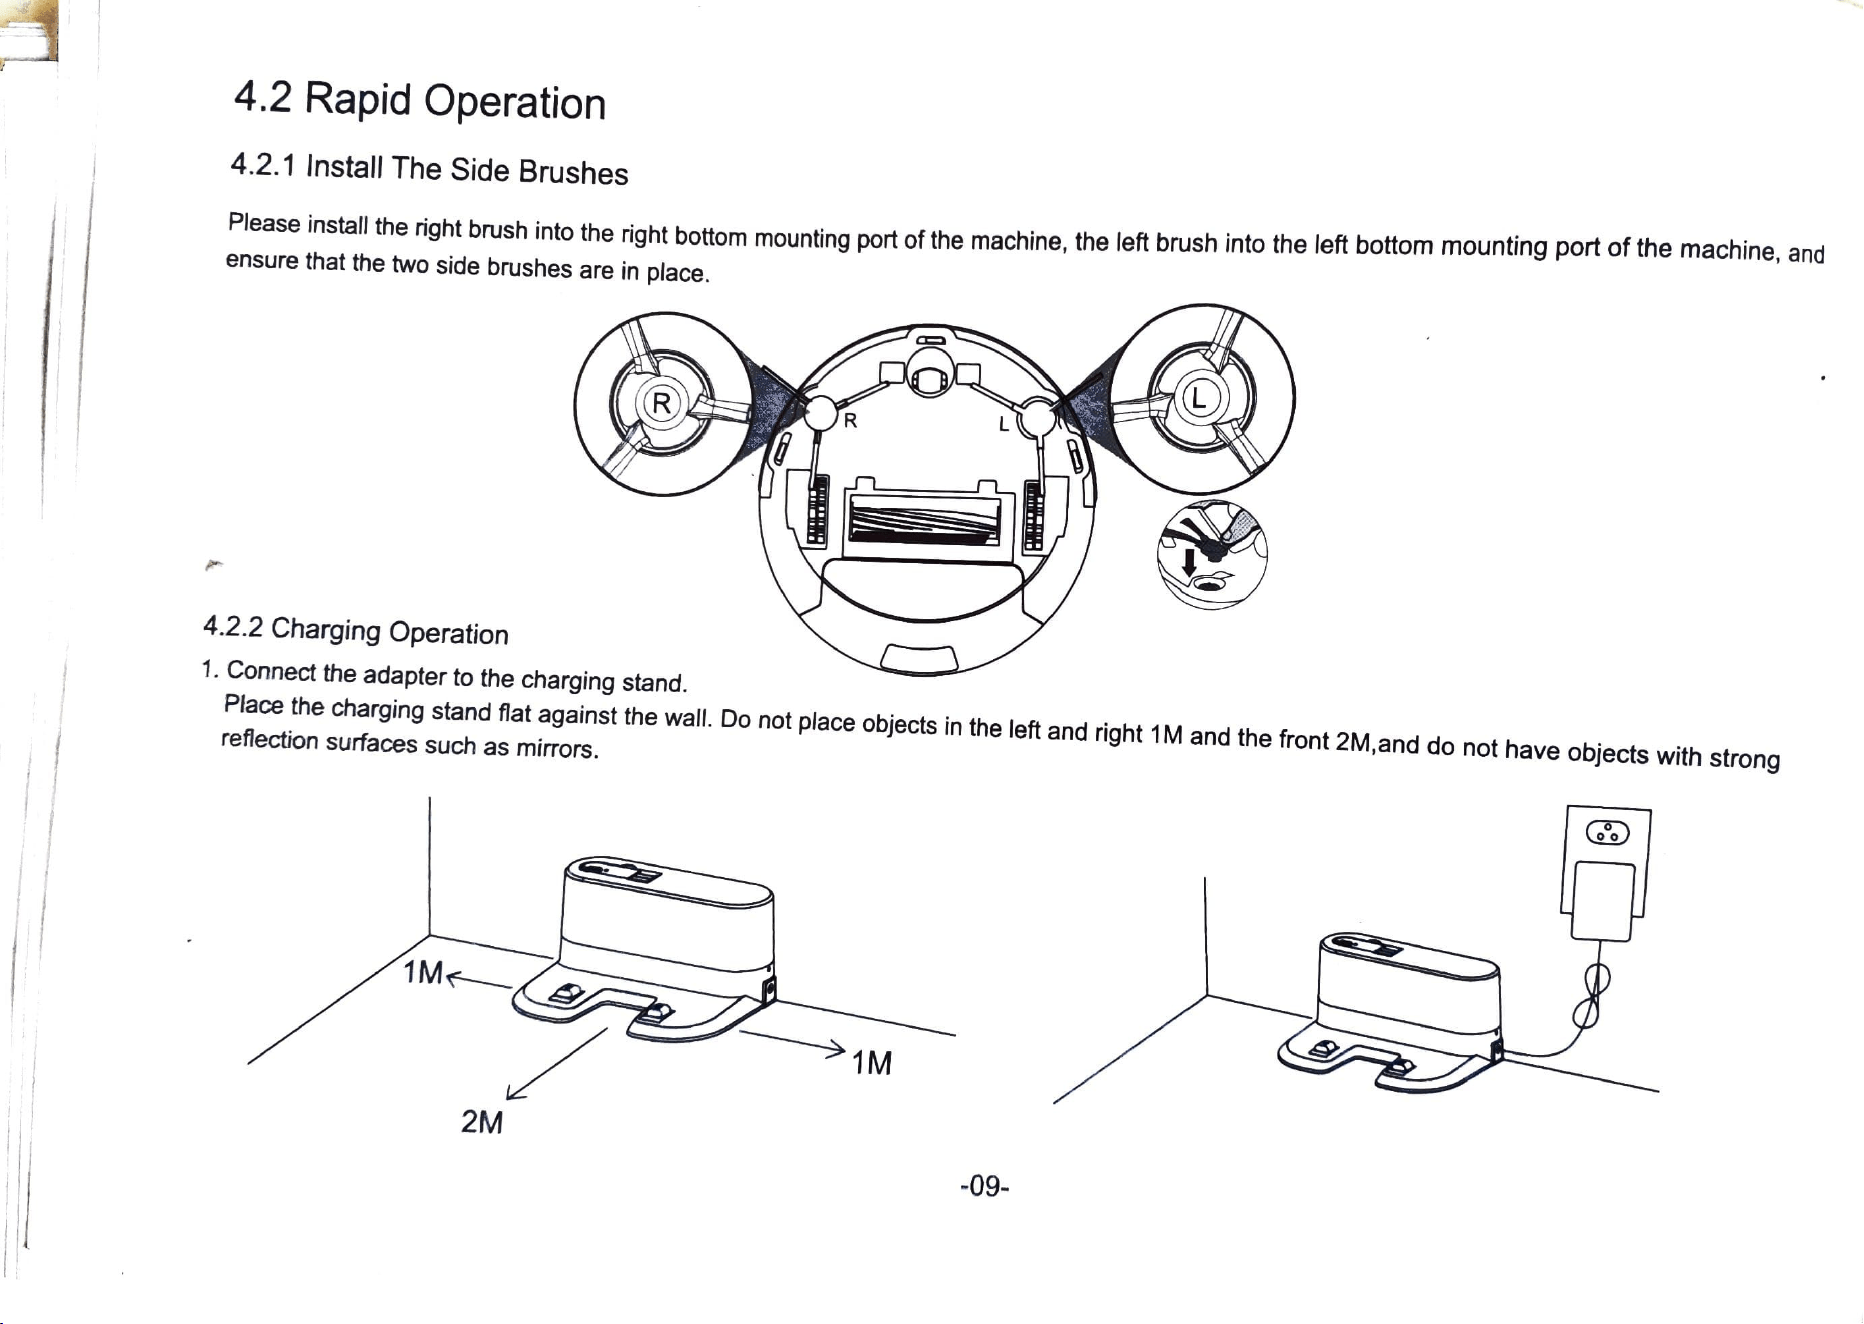
4.2
Rapid Operation
4.2.1
Install
The
Side
Brushes
Please
install
the
right
brush
into
the
right
bottom
mounting
port
of
the
machine,
the
left
brush
into the
left
bottom
mounting
port
of
the
machine,
and
ensure
that
the
two
side
brushes
are
in
place.
4.2.2 Charging Operation
1.
Connect
the
adapter
to
the
charging
stand.
Place
the
charging
stand
flat
against
the
wall.
Do
not
place
objects
in
the
left
and
right
1M
and
the
front
2M,and
do
not
have
objects
with
strong
reflection
surfaces
such
as
mirrors.
1M
M
2M
-09
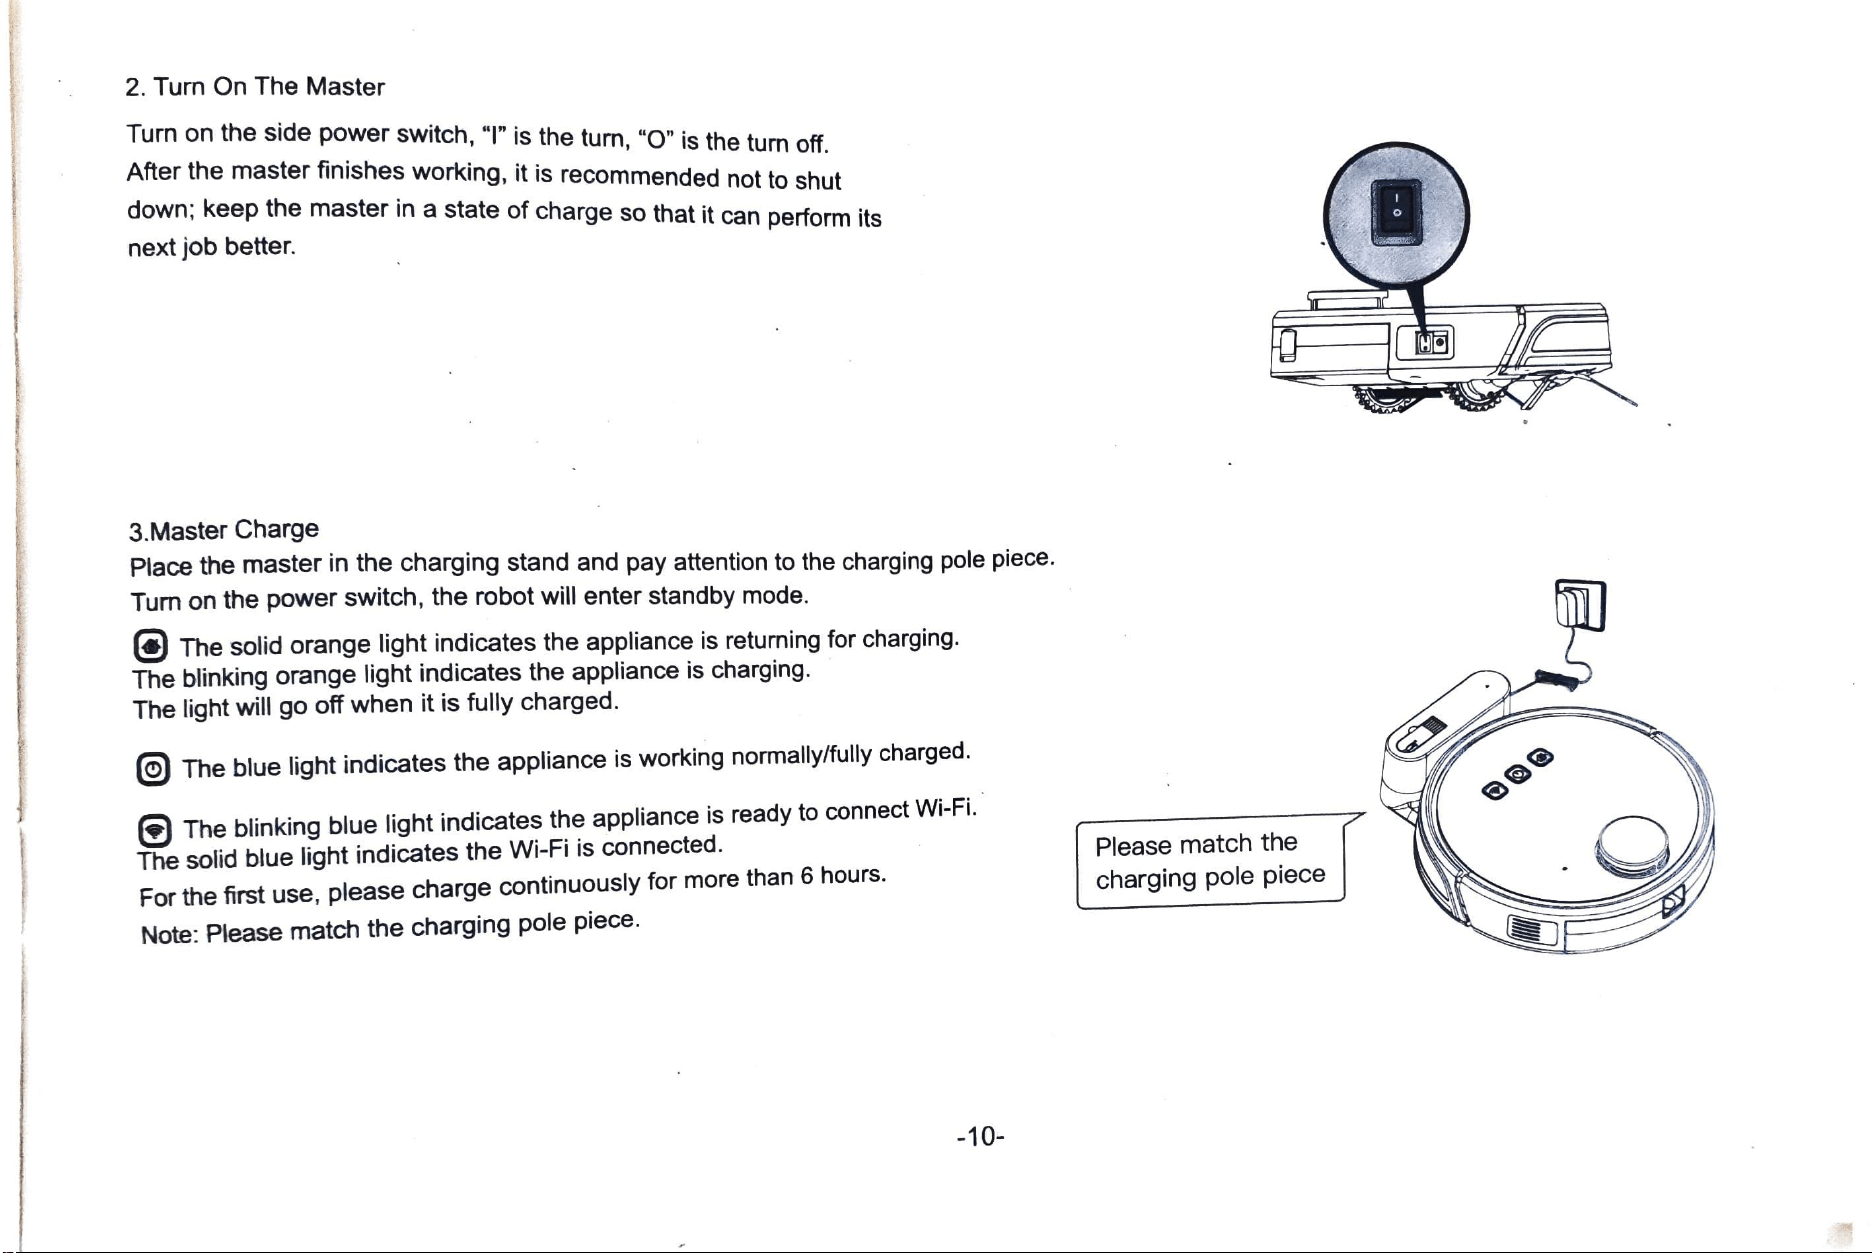
2. Turn
On
The
Master
Turn
on
the
side
power
switch,
""
is
the
turn,
"O"
is
the
turn
off.
After
the
master
finishes
working,
it
is
recommended
not
to
shut
down;
keep
the
master
in
a
state
of
charge
so
that
it
can
perform
its
next
job
better.
3.Master Charge
Place the master
in
the charging stand and pay attention
to
the charging
pole
piece.
Turn
on
the
power
switch,
the
robot
will
enter
standby
mode.
The
solid
orange
light
indicates
the
appliance
is
retuming
for
charging.
The
blinking
orange
light
indicates
the
appliance
is
charging.
The
light
will
go
off
when
it
is
fully
charged.
The
blue
light
indicates
the
appliance
is
working
normally/fully
charged.
The
blinking
blue
light
indicates
the
appliance
is
ready
to
connect
Wi-Fi.
The
solid
blue
light
indicates
the
Wi-Fi
is
connected.
Please
match
the
charging
pole
piece
For
the
first
use,
please
charge
continuously
for
more
than
6
hours.
Note:
Please
match
the
charging
pole
piece
-10
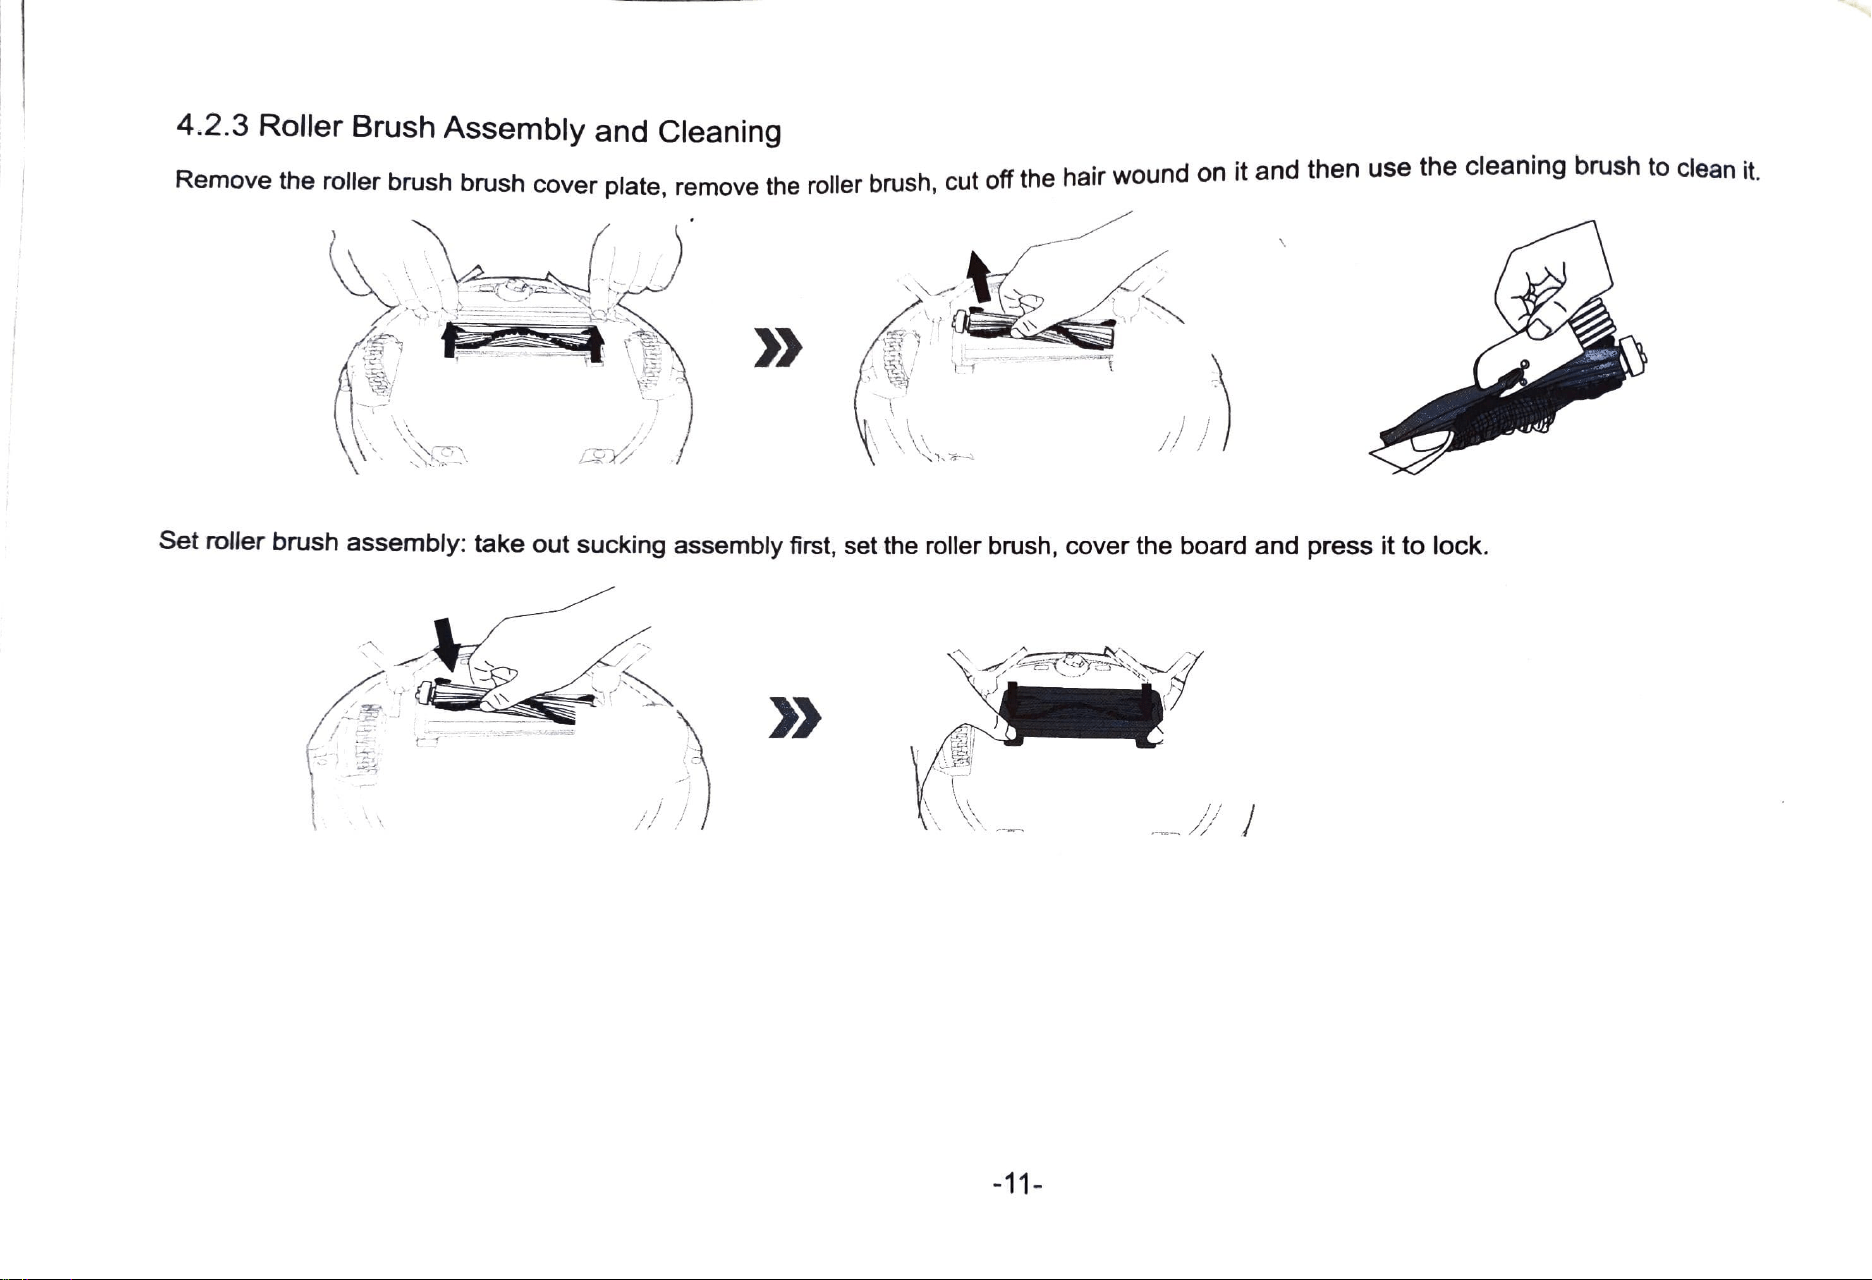
4.2.3
Roller
Brush
Assembly
and
Cleaning
NGmove
he
roller
brush brush
cover
plate,
remove
the roller brush, cut off
the
hair
wound
on
it
and
then
use
the
cleaning
brush
to cleanit.
Set
roller
brush
assembly:
take
out
sucking
assembly
first,
set
the
roller brush,
cover
the
board
and
press
it
to
lock.
_
-11
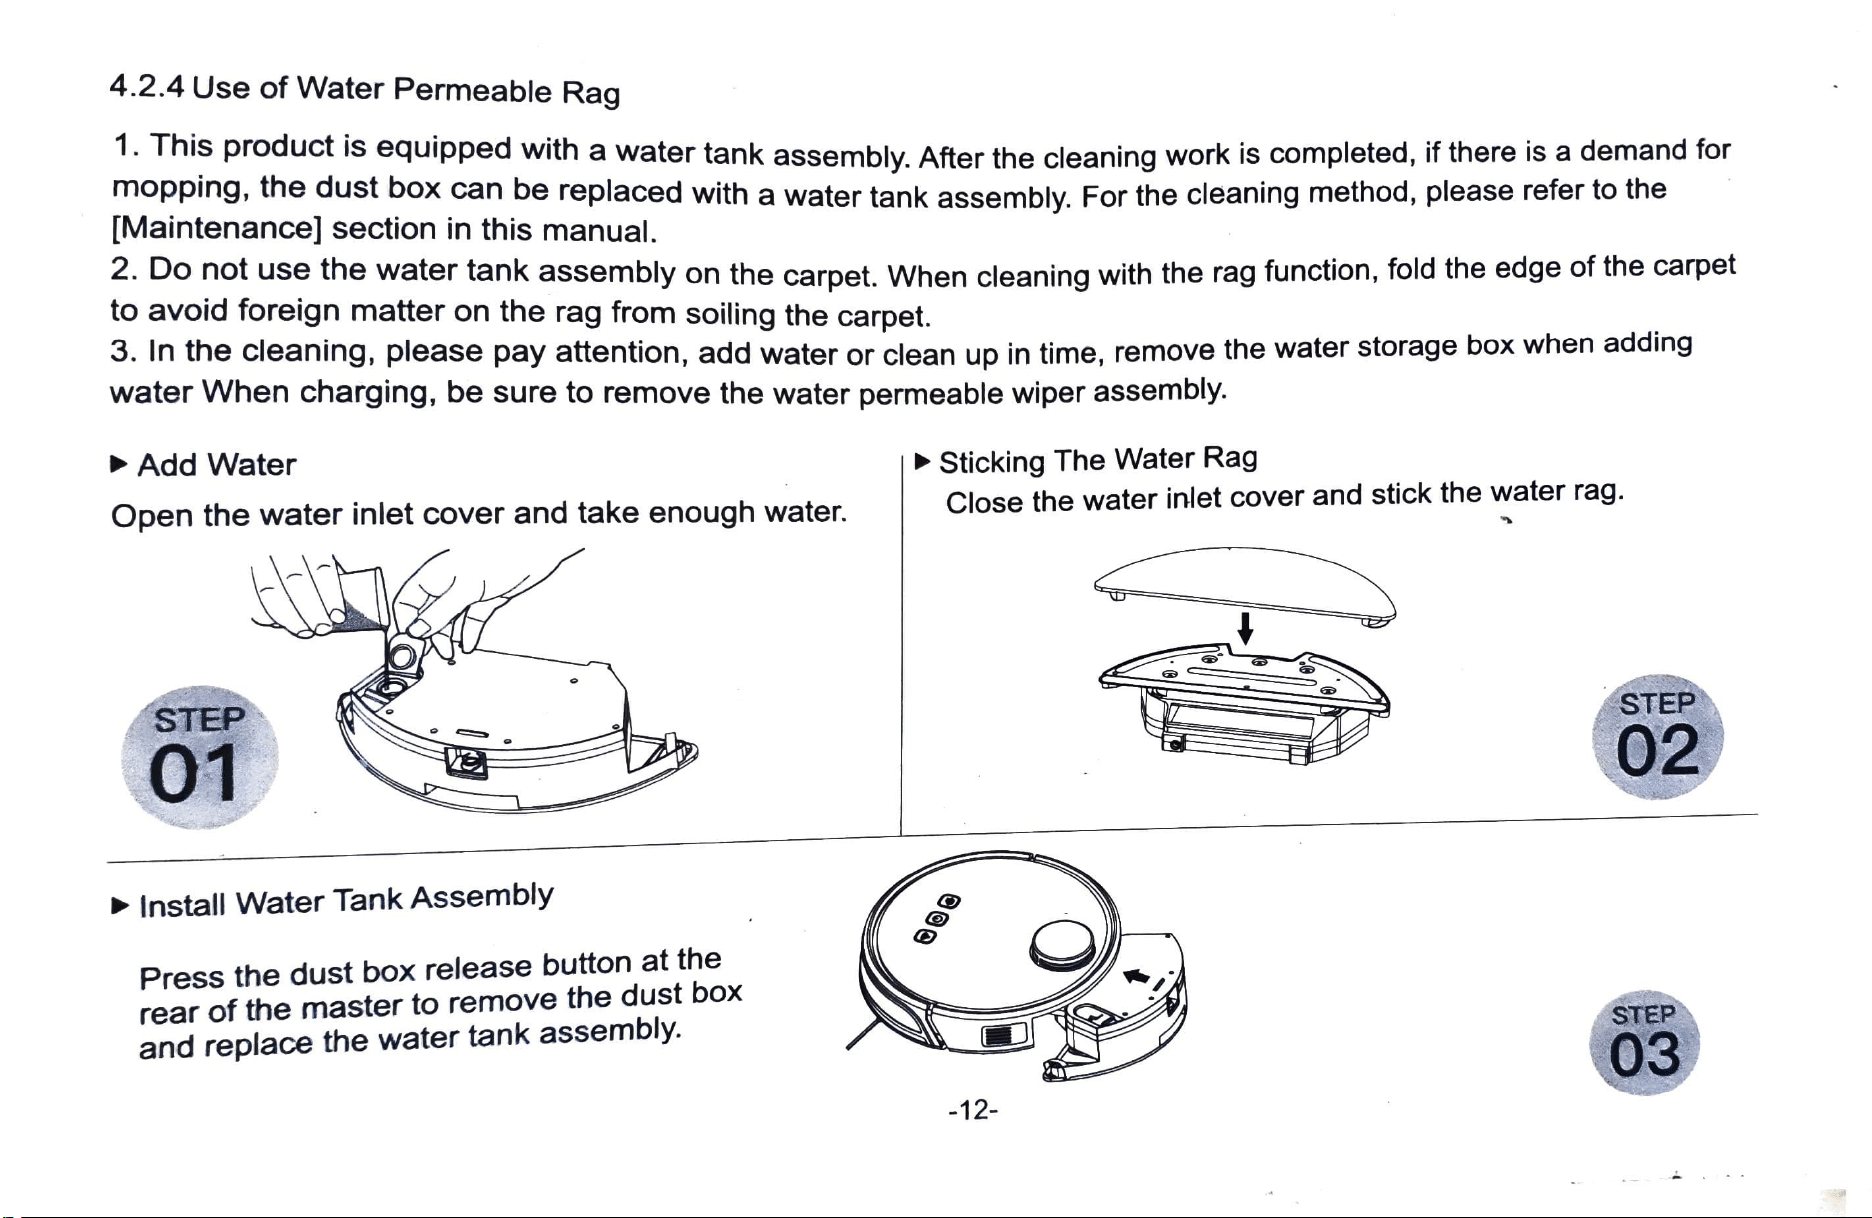
4.2.4
Use
of
Water
Permeable
Rag
1.
This
product
is
equipped
with
a
water
tank
assembly.
After
the
cleaning
work
is
completed,
if
there
is a
demand
for
mopping,
the
dust
box
can
be
replaced
with a
water
tank
assembly.
For
the
cleaning
method,
please
refer
to
the
[Maintenance]
section
in
this
manual.
2.
Do
not
use
the
water
tank
assembly
on
the
carpet.
When
cleaning
with
the
rag
function,
fold
the
edge
of
the
carpet
to
avoid
foreign
matter
on
the
rag
from
soiling
the
carpet.
3.
In
the
cleaning,
please
pay
attention,
add
water
or
clean
up
in
time,
remove
the
water
storage
box
when
adding
water
When
charging,
be
sure
to
remove
the
water
permeable
wiper assembly.
Sticking
The Water
Rag
Close
the
water
inlet
cover
and
stick
the
water
rag.
Add
Water
Open
the
water
inlet
cover
and
take
enough
water
STEP
STEP
01
02
Install
Water
Tank
Assembly
Press
the
dust
box
release
button
at
the
rear
of
the
master
to
remove
the
dust
box
and
replace
the
water
tank
assembly.
STEP
03
-12-
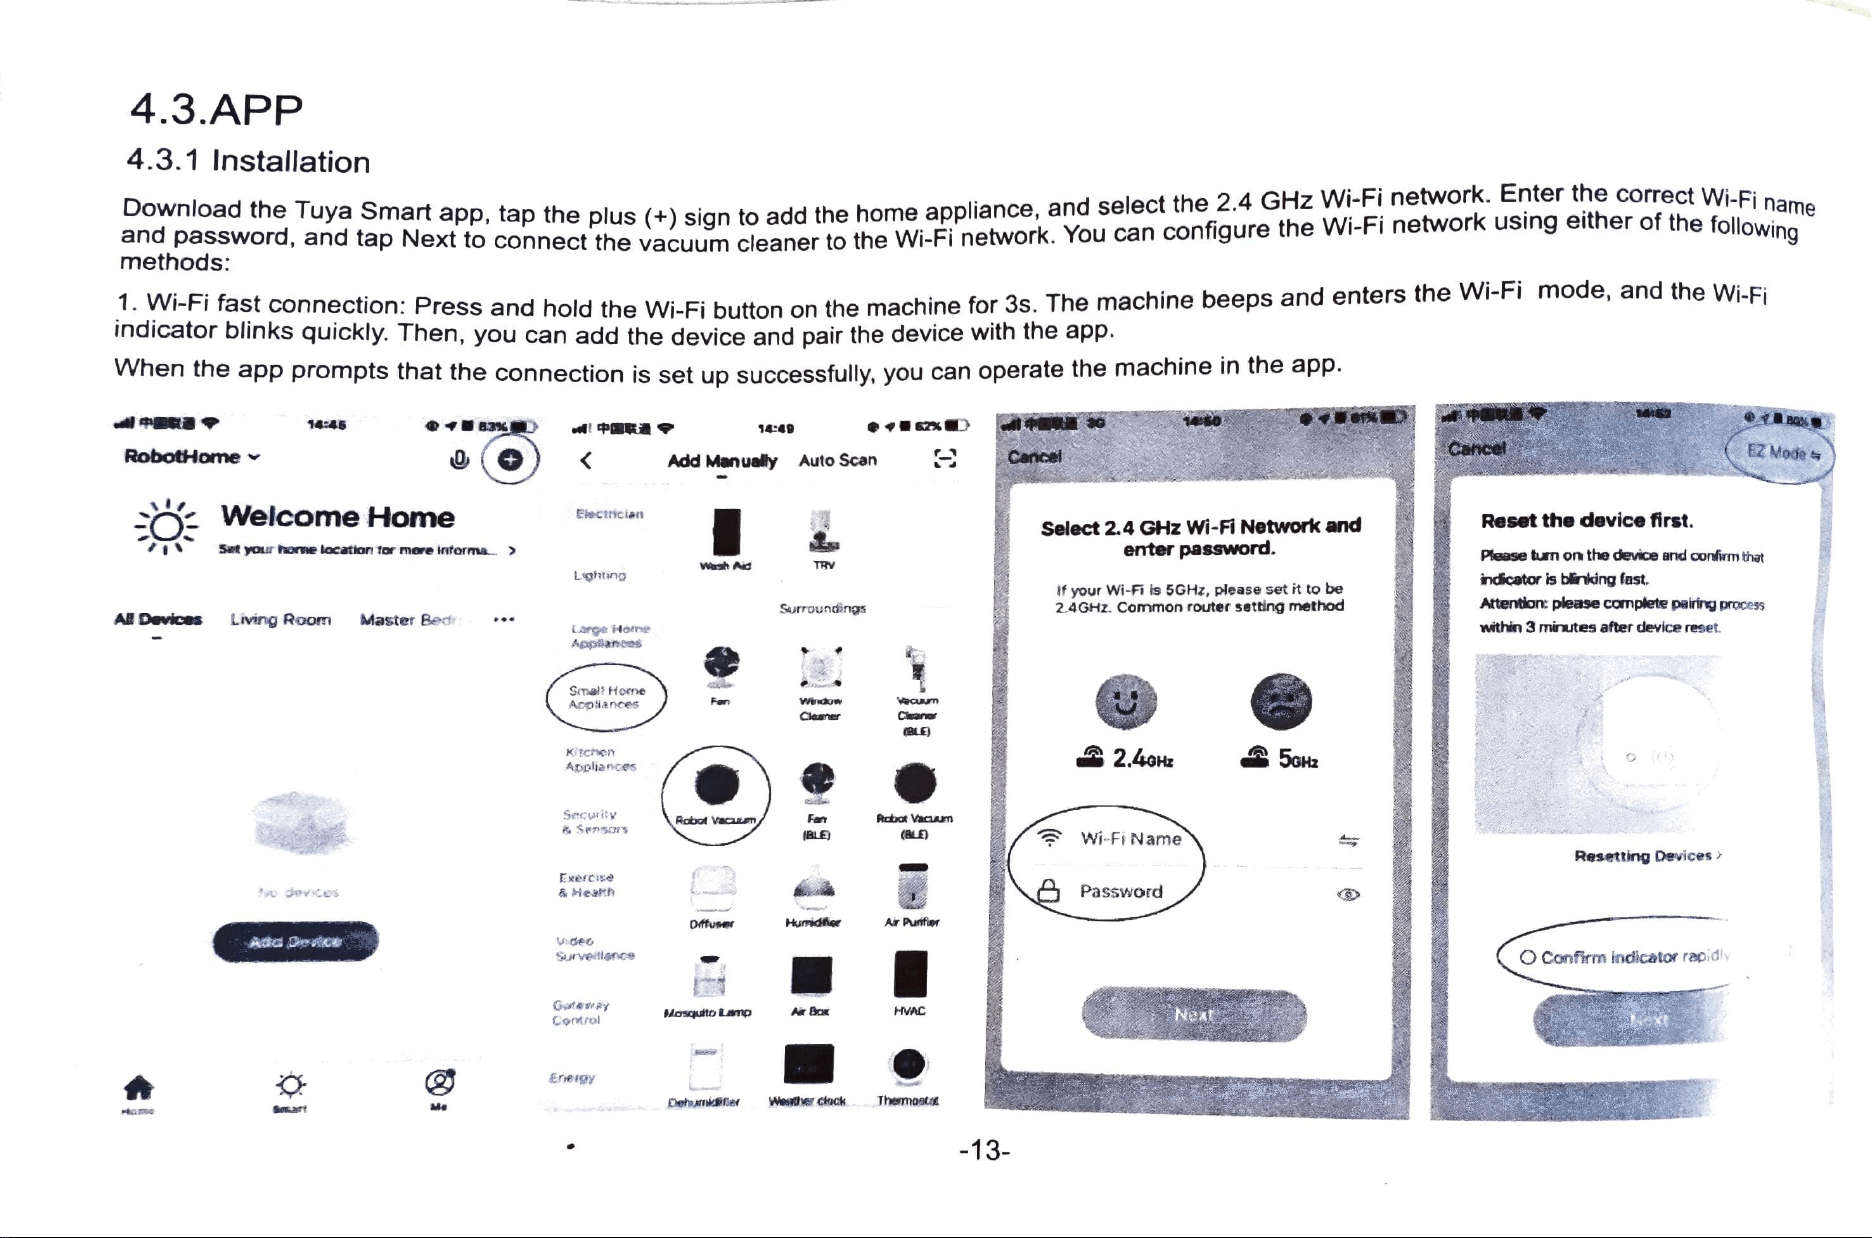
4.3.APP
4.3.1
Installation
ame
d
tne
uya
smart
app,
tap
the
plus
(+)
sian
to
add
the
home
appliance,
and
select
the
2.4
GHz
Wi-Fi
network.
Enter
the
correct
Wi-Fi
namo
na
password,
and
tap
Next
to
connect
the
vacuum
cleaner
to
the
Wi-Fi
network.
You
can
configure
the
Wi-Fi
network
usIng
eltner
of
the
following
Dov
methods:
-Tast
connection:
Press
and
hold
the
Wi-Fi
button
on
the
machine
for
3s.
The
machine
beeps
and
enters
the
Wi-Fl
mode,
and
the
Wi-Fi
indicator
blinks
quickly.
Then,
you
can
add
the
device
and
pair
the
device
with
the
app.
When
the
app
prompts
that
the
connection
is
set
up
successfully,
you
can
operate
the
machine
in
the
aPp
83
1445
14:49
RobotHome
EZ
Mode
Add
Manually
Auto
Scan
Welcome
Home
Electician
Reset
the
device
first.
Select
2.4
GHz
Wi-Fi
Network
and
enter
password.
Set
your
home
locatton
tor
mere
intarma.
Ptease
tum
on
the
device
and
confim
that
TRV
Lghting
indicator is blinking fast.
If
your
Wi-Fi
is
5GHz,
please
set
it
to
be
24GHz.
Common
router
setting
method
Saurroundings
Atention
please
complete peiring proces
AB
Devices
Living
Room
Master Bedr
within
3
mirutes
after
devlce
reset.
Lerge
iHom
Agitace
Smelt
Horne
ApDHANCeS
an
VAindow
Vecuum
Cleaner
Cleana
2.4o
Kichen
5oHz
ADpiances
Secui
Sens73
Rcbot
Vacau
Rctot
Vacam
(BLE
Wi-Fi
Name
BLEJ
Resetting
Devices
Exercise
o
gevces
Password
Humidle
Ar
Pntie
Adkd
evce
yde
O
Confirm
indicator
racidly
Surveillarce
Masquito
Lanp
HVAC
Cortrol
Ereigy
DehamRfier
esder
ckuck
Themost
-13-
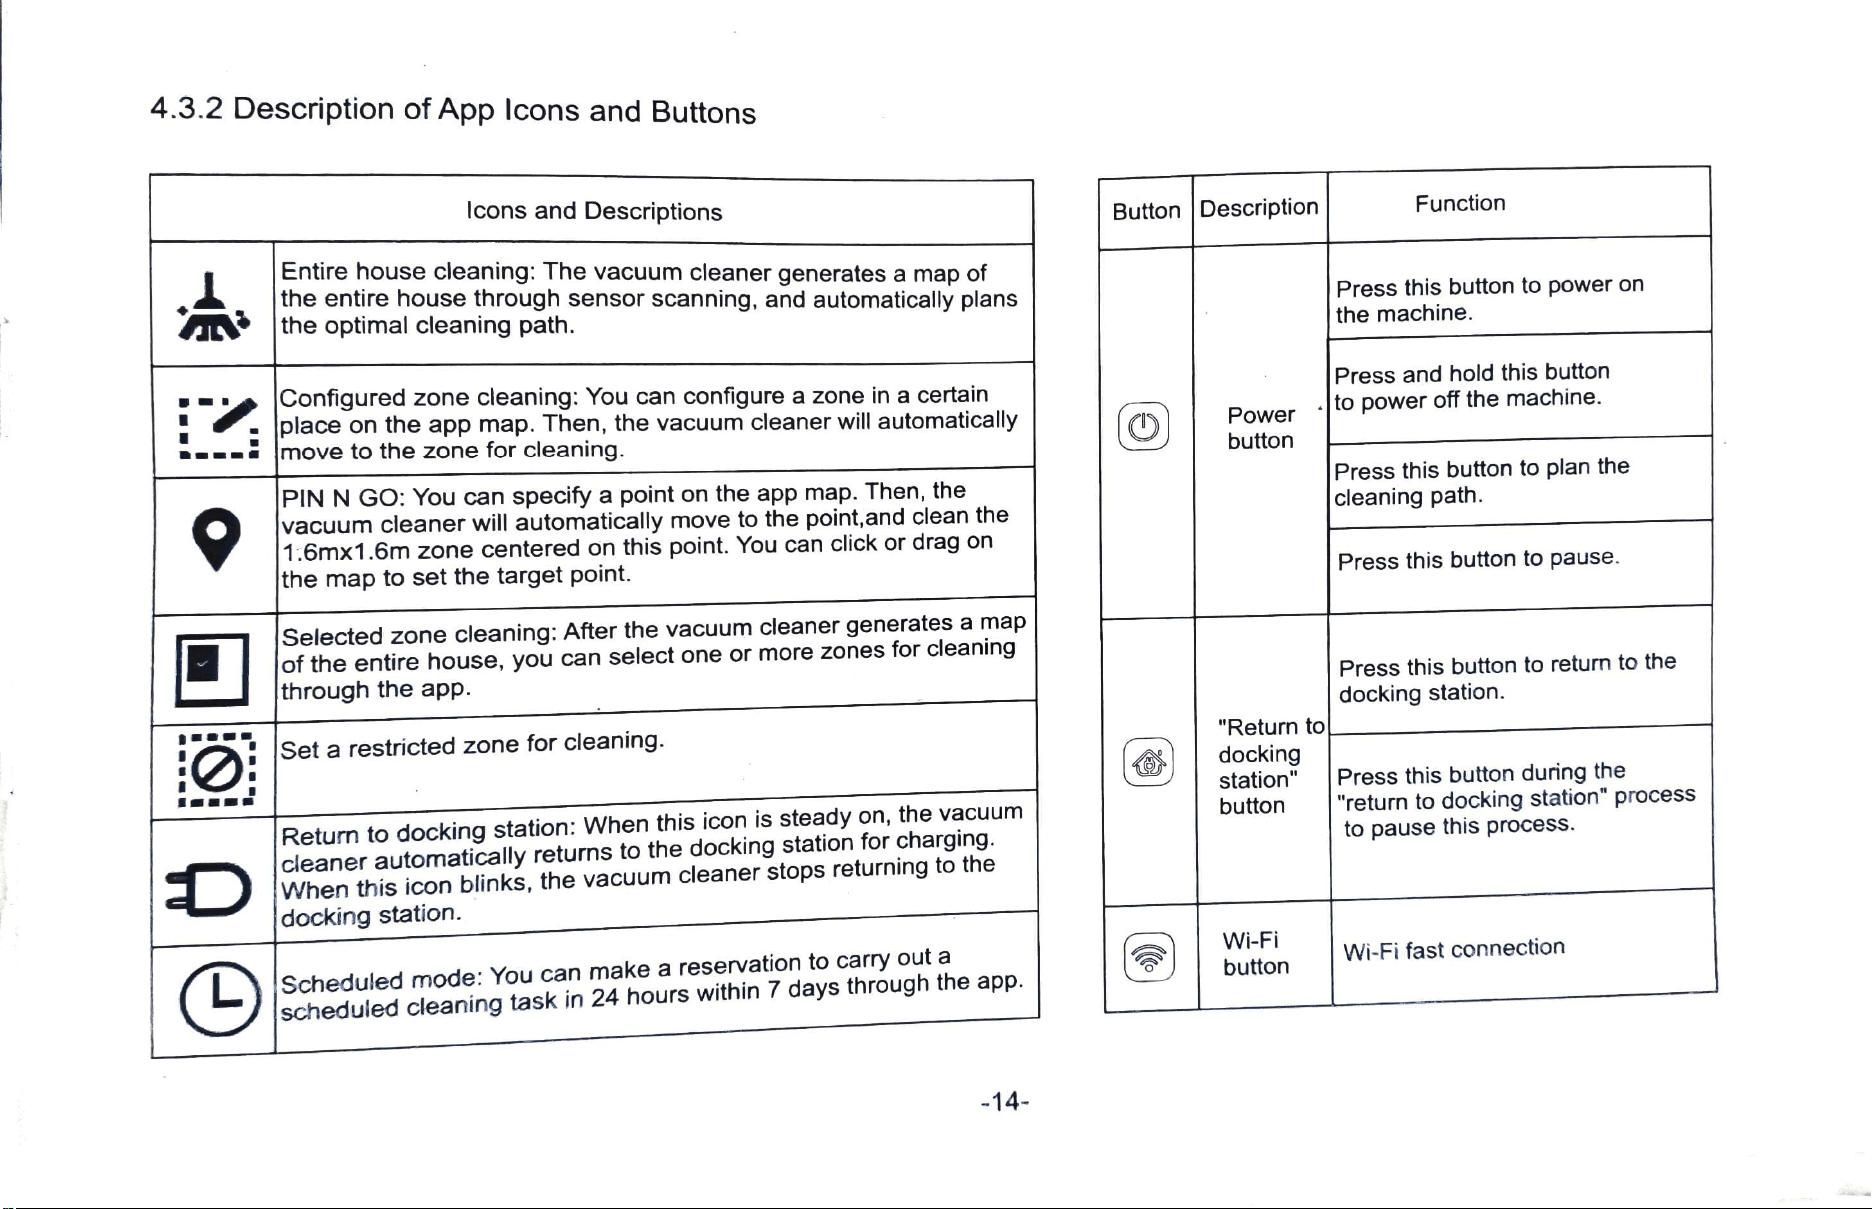
4.3.2
Description
of
App
lcons
and
Buttons
Function
Icons
and
Descriptions
Button Description
Entire
house
cleaning:
The
vacuum
cleaner
generates
a
map
of
the
entire
house
through
sensor
scanning,
and
automatically
plans
the
optimal
cleaning
path.
Press
this
button
to
power
on
the
machine.
Press
and
hold
this
button
to
power
off
the
machine.
Configured
zone
cleaning:
You
can
configure
a
zone
in
a
certain
place
on
the
app
map.
Then,
the
vacuum
cleaner
will
automatically
move
to
the
zone
for
cleaning.
Power
button
Press
this
button
to
plan
the
cleaning
path.
PIN
N
GO:
You
can
specify
a
point
on
the
appP
map.
Then,
the
|vacuum
cleaner
will
automatically
move
to
the
point,and
clean
the
1.6mx1.6m
zone
centered
on
this
point.
You
can
click
or
drag
on
the
map
to
set
the
target
point.
Press
this
button
t
pause.
Selected
zone
cleaning:
After
the
vacuum
cleaner
generates
a
map
of
the
entire
house,
you
can
select
one
or
more
zones
for
cleaning
|through
the
app.
Press
this
button
to
return
to
the
docking
station.
"Return
to
docking
station"
Set
a
restricted
zone
for
cleaning.
Press
this
button
during
the
"return
to
docking
station"
process
to
pause
this
process.
button
Return
to
docking
station:
When
this
icon
is
steady
on,
the
vacuum
cleaner
automatically
returns
to
the
docking
station
for
charging.
When
this
icon
blinks,
the
vacuum
cleaner
stops
returning
to
the
docking
station.
Wi-Fi
Wi-Fi
fast
connection
Scheduled
mode:
You
can
make
a
reservation
to
carry
out
a
scheduled
cleaning
task
in
24
hours
within
7
days
through
the
app.
button
-14
4.3.3
Use
Instructions
Tips:
If
the
power
is
too
low,
the
vacuum
cleaner
cannot
start
cleaning.
Therefore,
charge
the
vacuum
cleaner
before
starting
it.
Before
cleaning,
tidy
up
all
kinds
of
wires
on
the
ground
(including
the
power
cord
of
the
docking
station).
Otherwise,
the
vacuum
cleaner
may
drag
the
wires
while
cleaning,
which
may
cause
power
failures
of
other
electric
appliance
or
damage
to
items
or
wires.
If
the
cleaning
area
is
less
than
2
square
meters,
the
vacuum
cleaner
will
clean
the
area
twice
by
default.
If
the
power
is
insufficient
in
the
cleaning
process,
the
main
unit
will
automatically
return
to
the
docking
station
for
charging.
After
the
power
is
sufficient,
the
main
unit
will
automatically
return
to
the
interrupted
point
to
continue
cleaning
(ensure
that
you
have
enabled
the
resumable
cleaning
function).
Power
on
and
off
the
machine
Tap
and
hold
the
O
button
to
power
on
the
machine.
Then,
the
power
indicator
is
on,
and
the
vacuum
cleaner
enters
the
standby
state.
When
the
vacuum
cleaner
is
in a
static
state,
press
and
hold
the
button
to
power
off
the
machine
and
stop
the
current
cleaning
task.
Tip:
The
vacuum
cleaner
in
charging
state
cannot
be
powered
off.
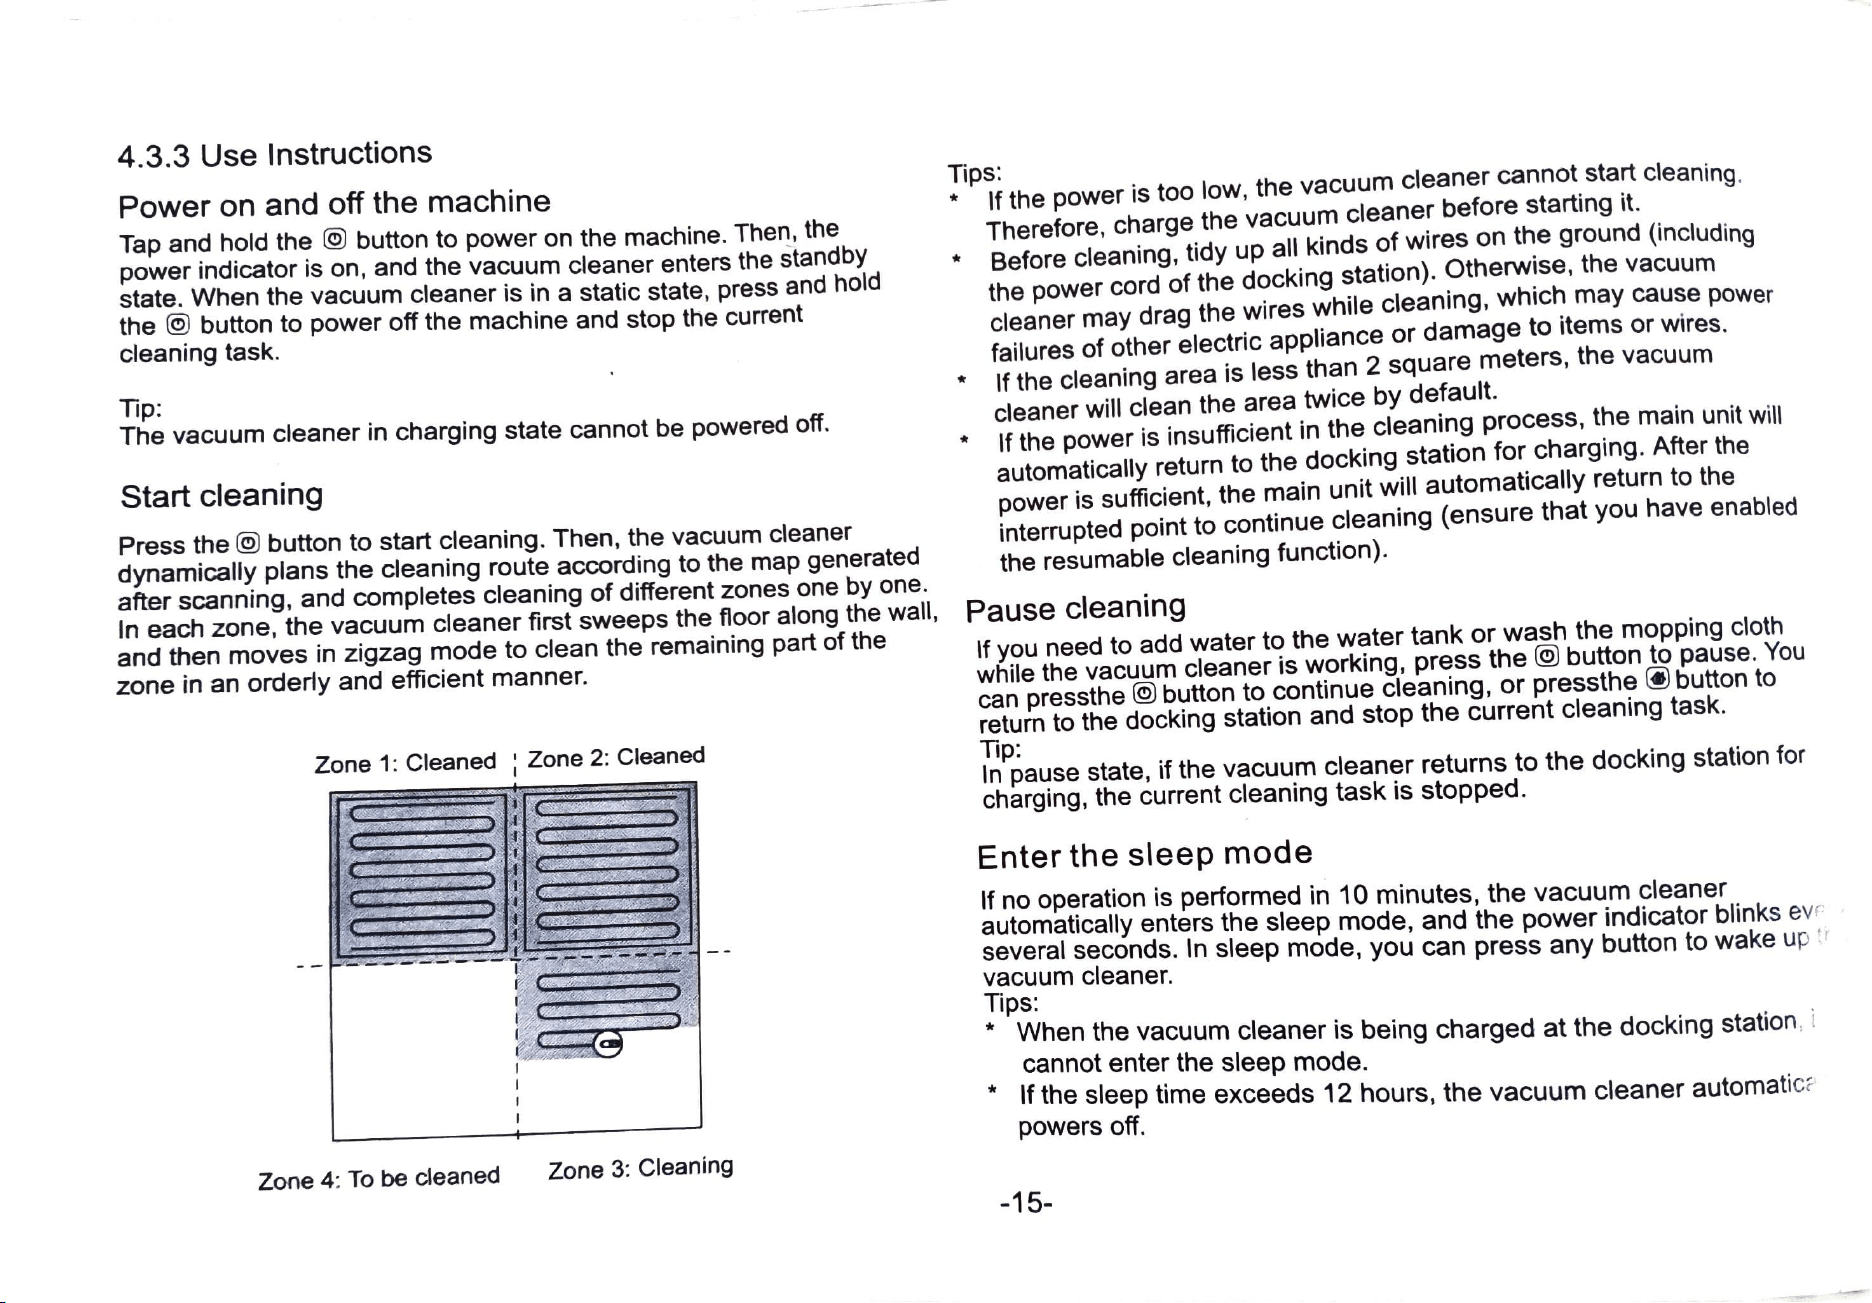
Start
cleaning
Press
the
button
to
start
cleaning.
Then,
the
vacuum
cleaner
dynamically
plans
the
cleaning
route
according
to
the
map
generated
after
scanning,
and
completes
cleaning
of
different
zones
one
by
one.
In
each
zone,
the
vacuum
cleaner
first
sweeps
the
floor
along
the
wall,
and
then
moves
in
zigzag
mode
to
clean
the
remaining
part
of
the
zone
in
an
orderly
and
efficient
manner.
Pause
cleaning
If
you
need
to
add
water
to
the
water
tank
or
wash
the
mopping
cloth
while
the
vacuum
cleaner
is
working,
press
the
0
button
to
pause.
You
can
pressthe
0
button
to
continue
cleaning,
or
pressthe
button
to
return
to
the
docking
station
and
stop
the
current
cleaning
task.
Tip:
In
pause
state,
if
the
vacuum
cleaner
returns
to
the
docking
station
for
charging,
the
current
cleaning
task
is
stopped.
Zone
1:
Cleaned
Zone
2:
Cleaned
Enter
the
sleep
mode
If
no
operation
is
performed
in
10
minutes,
the
vacuum
cleaner
automatically
enters
the
sleep
mode,
and
the
power
indicator
blinks
ev
several
seconds.
In
sleep
mode,
you
can
press
any
button
to
wake
up
vacuum
cleaner.
Tips:
When
the
vacuum cleaner
is
being charged at the
docking
station
cannot
enter
the
sleep
mode.
If
the
sleep
time
exceeds
12
hours,
the
vacuum
cleaner
automatic
powers
off.
Zone
4:
To
be
cleaned
Zone
3:
Cleaning
-15-
Charge
the
vacuum
cleaner
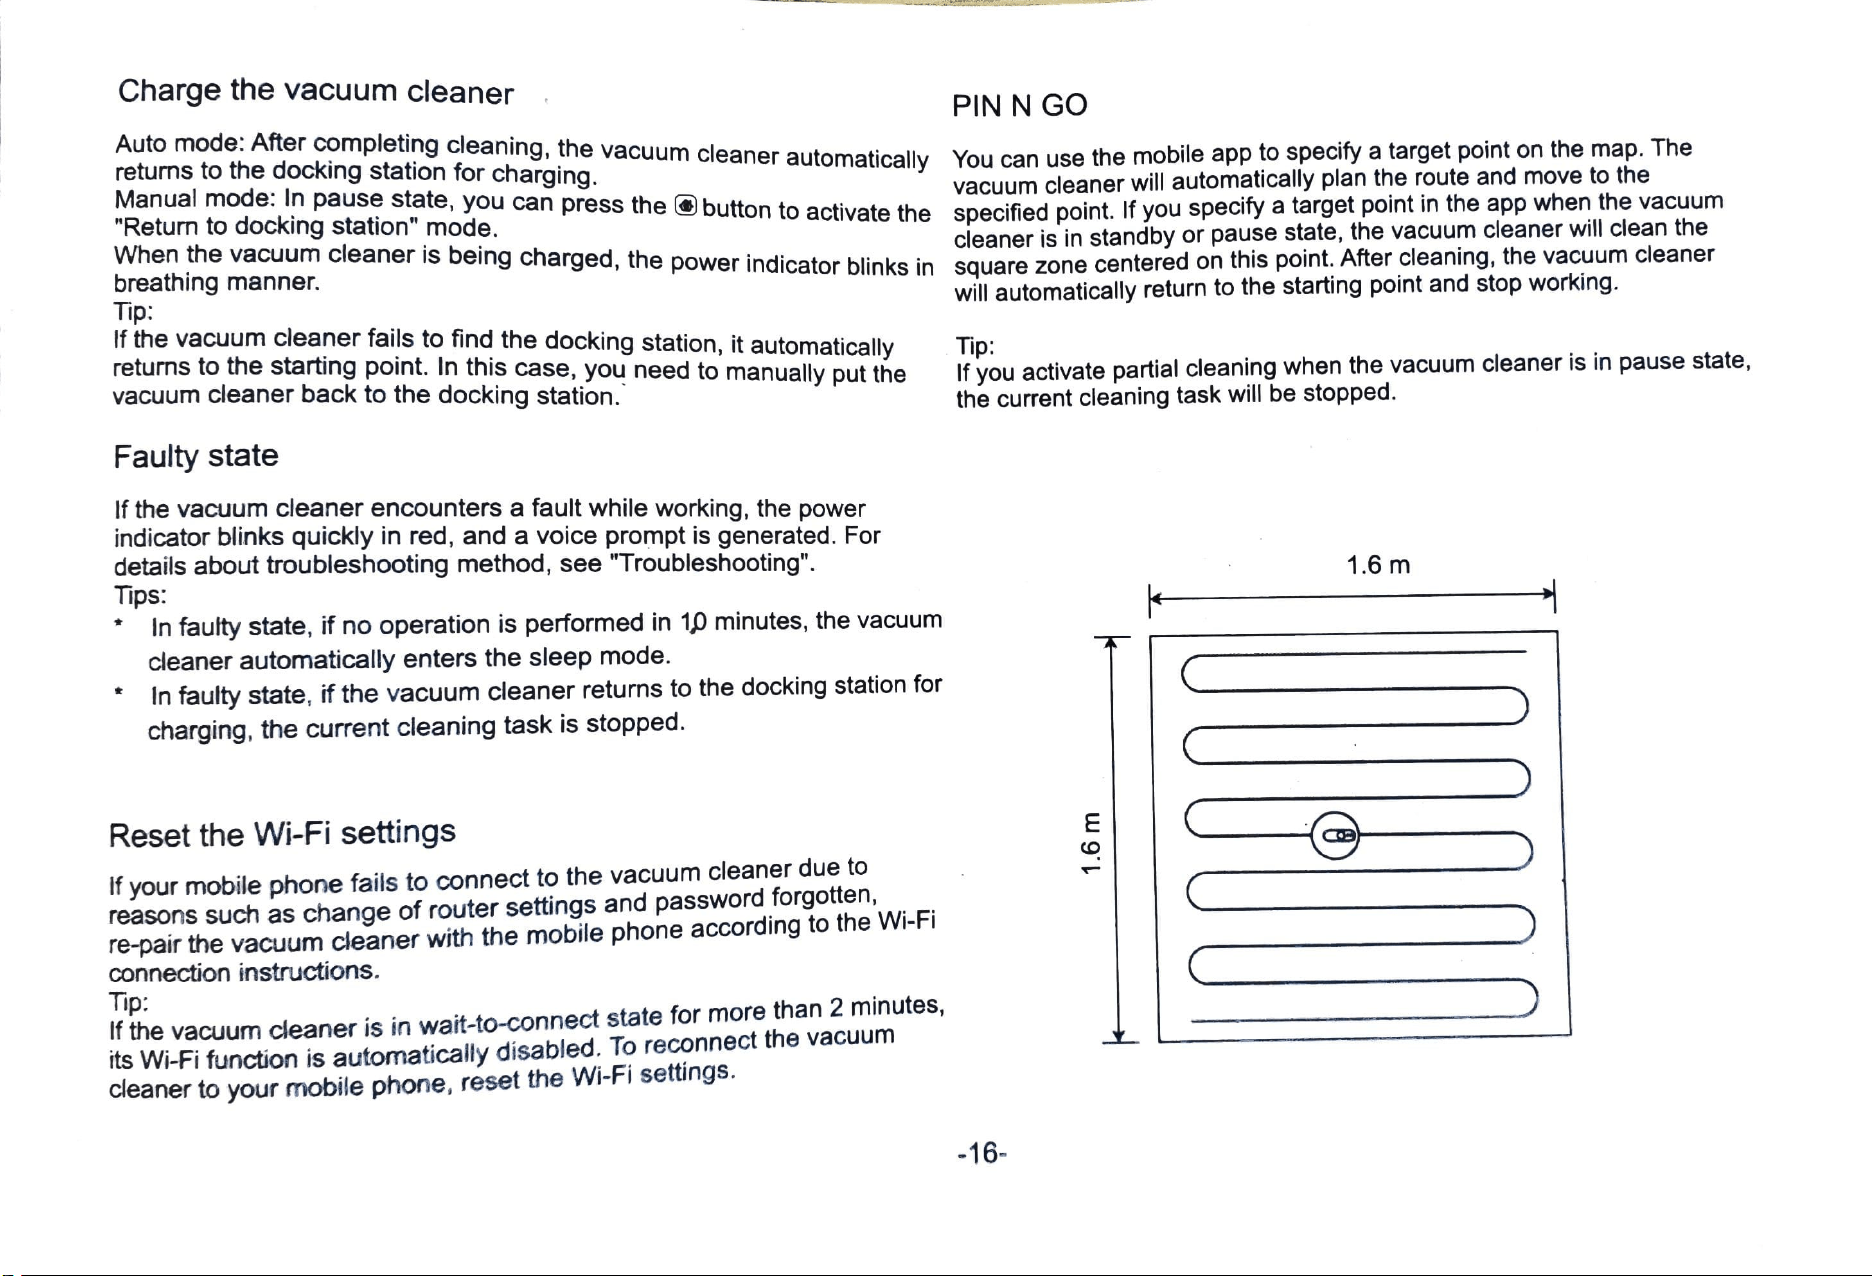
PIN
N GO
Auto
moderATer
completing
cleaning.
the
vacuum
cleaner
automatically
You
can
use
the
mobile
app
to
specity
a
target
point
on
the
map.
The
returns
to
the
docking
station
for
charging.
Manual
m00e
pause
state,
you
can
press
the
button
to
activate
the
specified
point.
If
you
specify
a
target
point
in
the
app
when
the
vacuum
"Return to
docking
station"
mode.
when
the
vacuum
cleaner
is
being
charged,
the
power
indicator
blinks
in
square
zone
centered
on
this
point.
After
cleaning,
the
vacuum
cleaner
breathing
manner.
Tip:
f the
vacuum
cleaner
fails
to
find
the
docking
station,
it
automatically
returns
to
the
starting
point.
In
this
case,
you
need
to
manually
put
the
vacuum
cleaner
back
to
the
docking
station.
vacuum
cleaner
wll
automatically
plan
the
route
and
move
to
the
cleaner
is
in
standby
or
pause
state,
the
vacuum
cleaner
will
clean
the
will
automatically
return
to
the
starting
point
and
stop
working.
Tip:
If
you
activate
partial
cleaning
when
the
vacuum
cleaner
is
in
pause
state,
the
current
cleaning
task
will
be
stopped.
Faulty
state
If
the
vacuum
cleaner
encounters
a
fault
while
working,
the
power
indicator
blinks
quickly
in
red,
and
a
voice
prompt
is
generated.
For
details
about
troubleshooting
method,
see
"Troubleshooting".
Tips:
In
faulty
state,
if
no
operation
is
performed
in
10
minutes,
the
vacuum
cleaner
automatically
enters
the
sleep
mode.
In
faulty
state,
if
the
vacuum
cleaner
returns
to
the
docking
station
for
charging,
the
current
cleaning
task
is
stopped.
1.6
m
Reset
the
Wi-Fi
settings
f
your
mobile
phone
fails
to
connect
to
the
vacuum
cleaner
due
to
reasons
uch
as
change
of
router
settings
and
password
forgotten,
re-pair
the
vacuum
cleaner
with
the
mobile
phone
according
to
the
Wi-Fi
connection
instructions.
Tip
If
the
vacuum
cleaner
is
in
wait-to-connect
state
for
more
than
2
minutes,
ts
Wi-Fi
function
is
automatically
disabled.
To
reconnect
the
vacuum
cleaner
to
your
mobile
phone,
reset
the
Wi-Fi
settings.
16
More
app
functionns
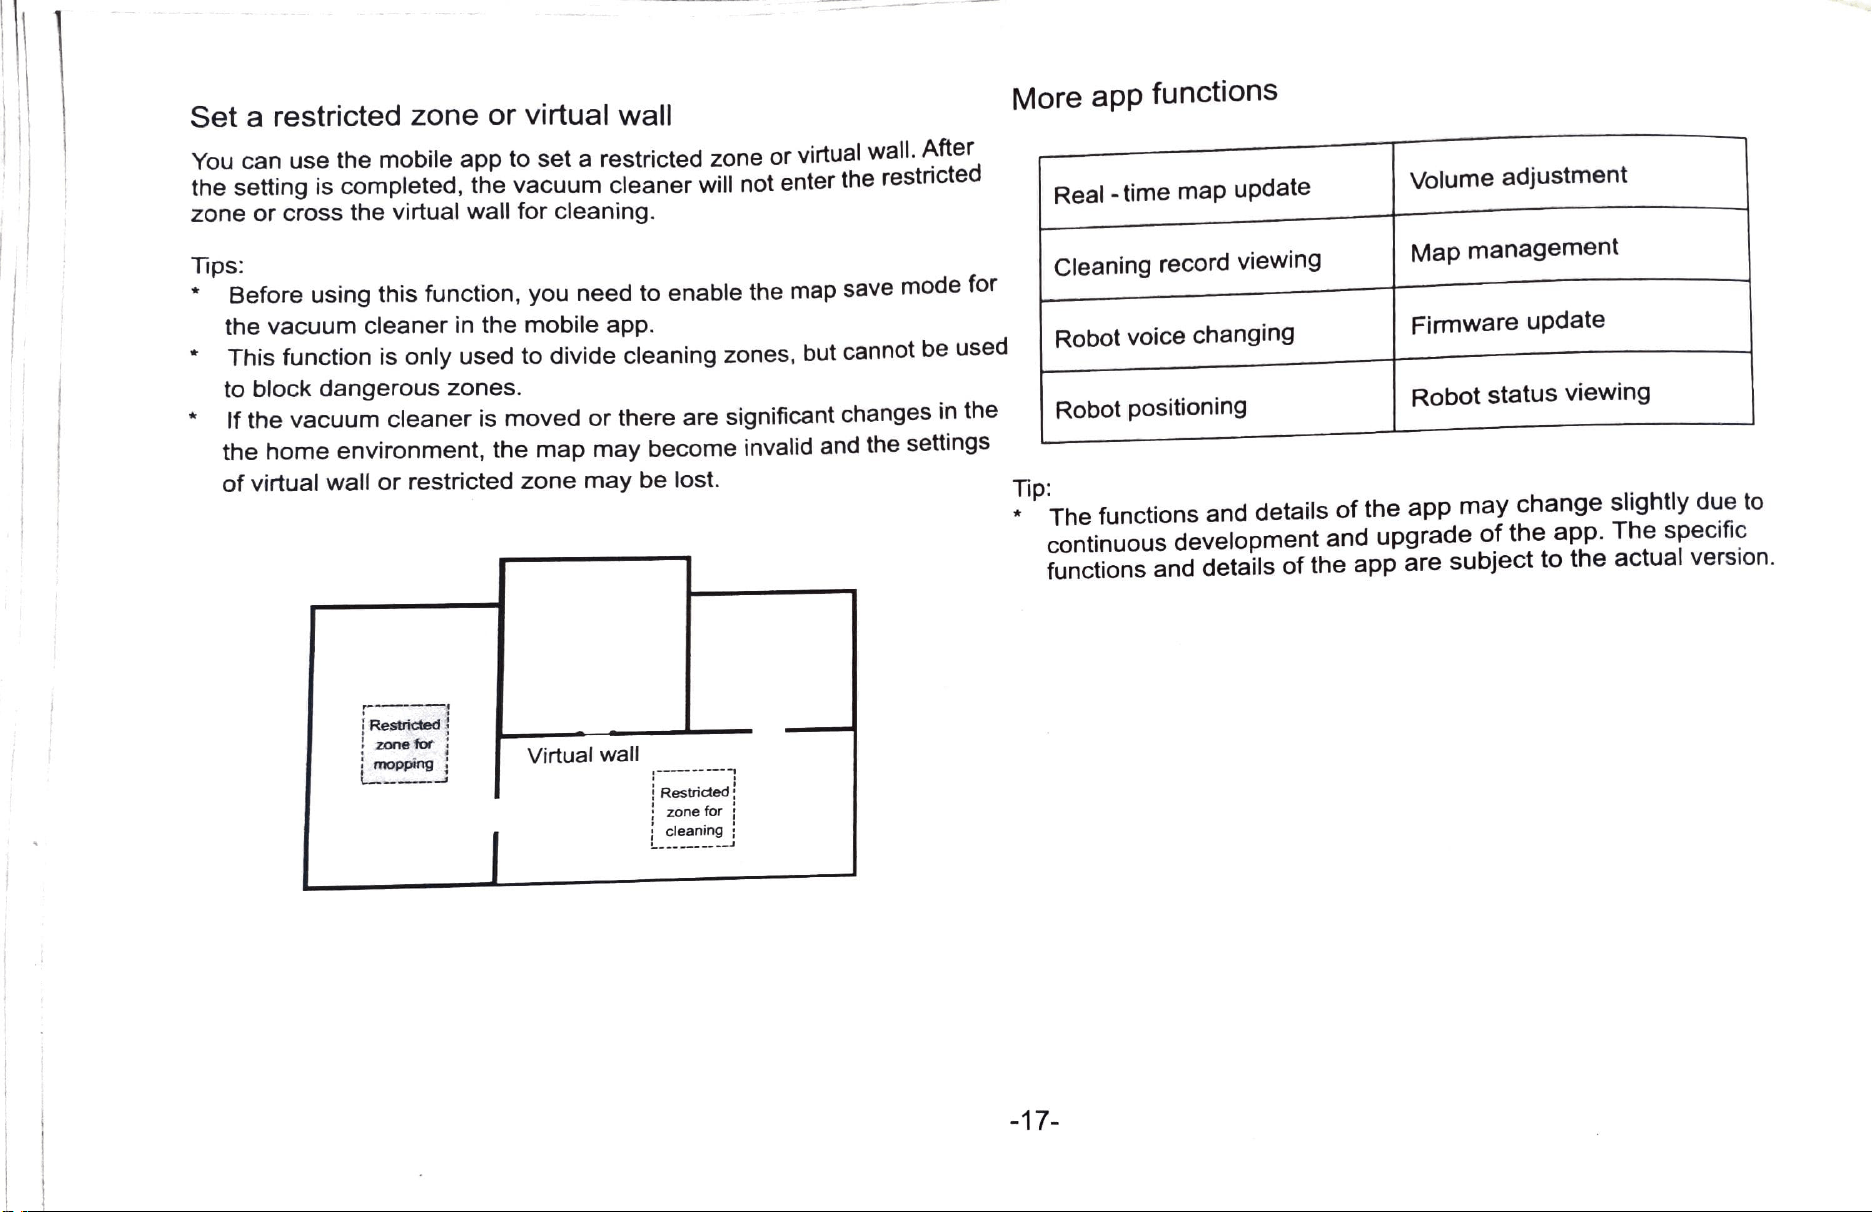
Set
a
restricted
zone
or
virtual
wall
You
can
use
the
mobile
app
to
set
a
restricted
zone
or
virtual wall.
After
the
setting
is
completed,
the
vacuum
cleaner
will
not
enter
the
restricted
zone
or
cross
the
virtual
wall
for
cleaning.
Volume
adjustment
Real
-time
map
update
Map
management
Tips:
Before
using
this
function,
you
need
to
enable
the
map
save
mode
for
the
vacuum
cleaner
in
the
mobile
app.
Cleaning
record
viewing
Fimware
update
Robot voice changing9
This
function
is
only
used
to
divide
cleaning
zones,
but
cannot
be
used
to
block
dangerous
zones.
Robot
status
viewing
If
the
vacuum
cleaner
is
moved
or
there
are
significant
changes
in
the
the
home
environment,
the
map
may
become
invalid
and
the
settings
of
virtual
wall
or
restricted
zone
may
be
lost.
Robot
positioning
Tip:
The
functions
and
details
of
the
app
may
change
slightly
due
to
continuous
development
and
upgrade
of
the
app.
The
specific
functions
and
details
of
the
app
are
subject
to
the
actual
version.
Restricteds
Zone
for
mopping
Virtual
wall
Restricted
zone
for
cleaning
----
-17-
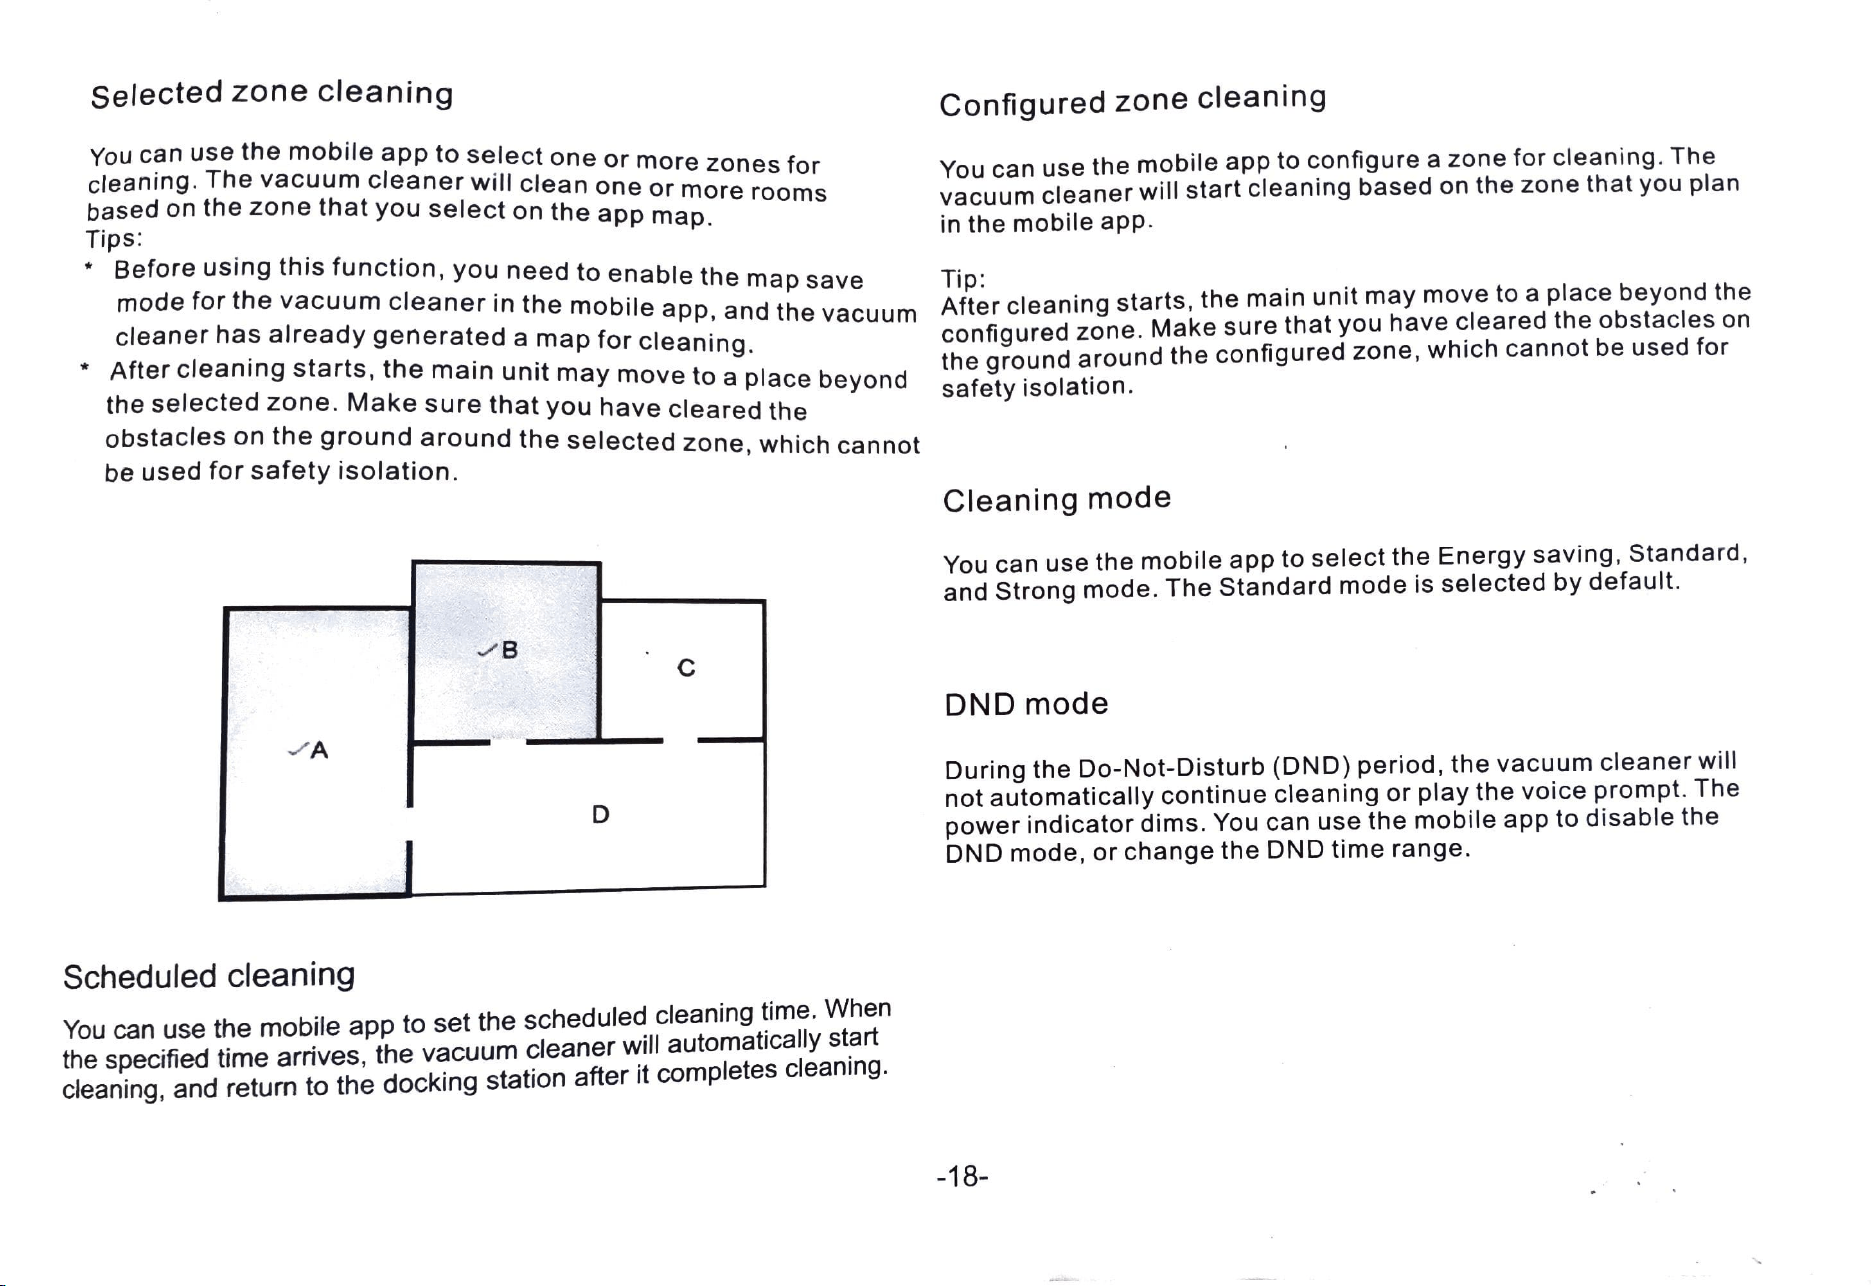
Selected
zone
cleaning
Configured
zone
cleaning
You
can
use
the
mobile
app
to
select
one
or
more
zones
for
cleaning.
The
vacuum
cleaner
will
clean
one
or
more
roomns
based
on
the
zone
that
yu
select
on
the
app
map.
Tips
Before
using
this
function,
you
need
to
enable
the
map
save
You
can
use
the
mobile
app
to
configure
a
zone
for
cleaning.
The
vacuum
cleaner
will
start
cleaning
based
on
the
zone
that
you
plan
in
the
mobile
app.
Tip:
mode
ror
the
vacuum
cleaner
in
the
mobile
app,
and
the
vacuuim
After
cleaning
starts,
the
main
unit
may
move
to
a
place
beyond
the
cleaner
has
already
generated
a
map
for
cleaning.
After
cleaning
starts,
the
main
unit
may
move
to
a
place
beyond
the
selected
zone.
Make
sure
that
you
have
cleared
the
obstacles
on
the
ground
around
the
selected
zone,
which
cannot
be
used
for
safety
isolation.
configured
zone.
Make
sure
that
you
have
cleared
the
obstacles
on
the
ground
around
the
configured
zone,
which
cannot
be
used
for
safety
isolation.
Cleaning
mode
You
can
use
the
mobile
app
to
select
the
Energy
saving,
Standard,
and
Strong
mode.
The
Standard
mode
is
selected
by
default.
B
DND
mode
A
During
the
Do-Not-Disturb
(DND)
period,
the
vacuum
cleaner
will
not
automatically
continue
cleaning
or
play
the
voice
prompt.
The
power
indicator
dims.
You
can
use
the
mobile
app
to
disable
the
DND
mode,
or
change
the
DND
time
range.
D
Scheduled
cleaning
You
can
use
the
mobile
app
to
set
the
scheduled
cleaning
time.
When
the
specified
time
arrives,
the
vacuum
cleaner
will
automatically
start
cleaning,
and
return
to
the
docking
station
after
it
completes
cleaning.
-18-
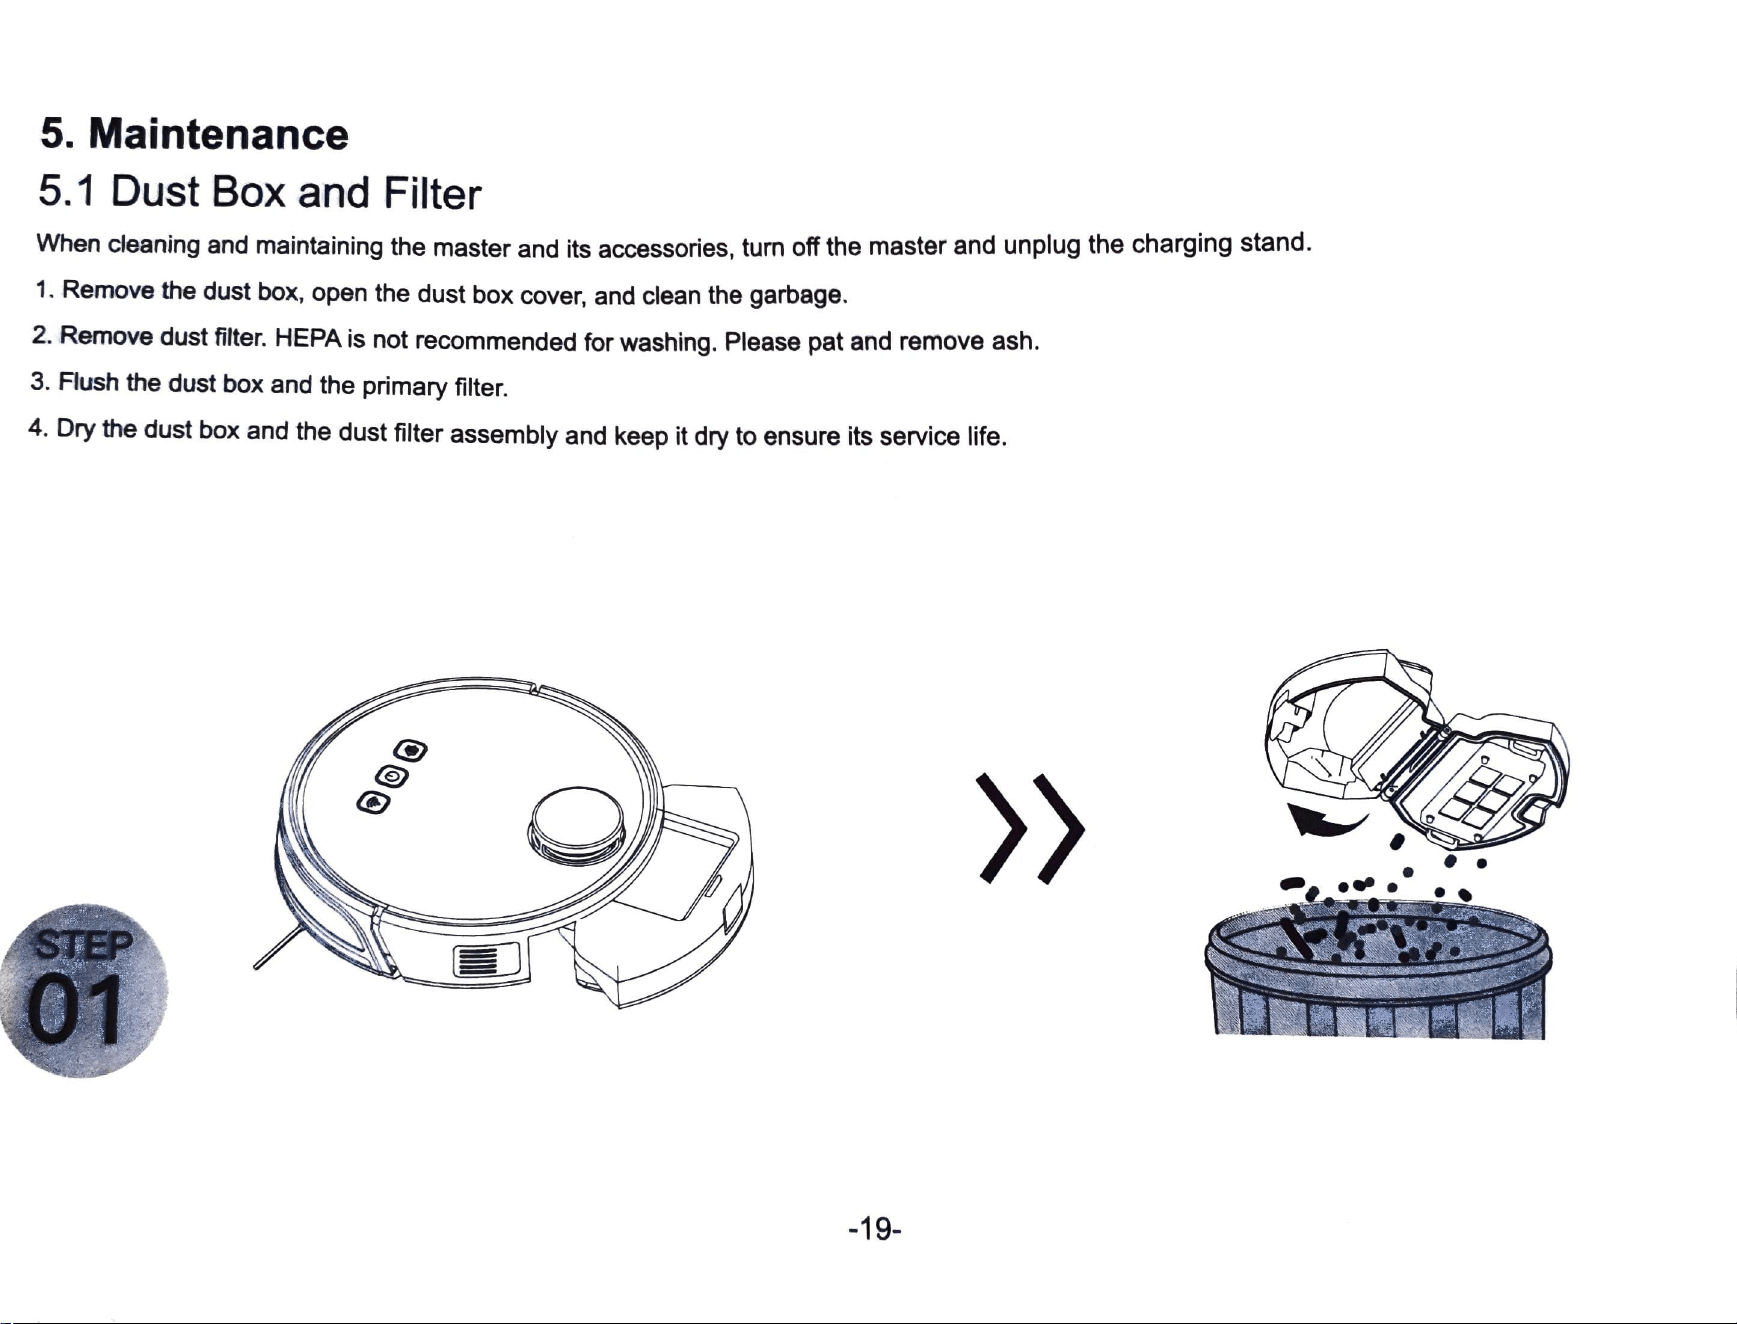
5.
Maintenance
5.1
Dust
Box
and
Filter
When cleaning
and
maintaining
the
master
and
its
accessories,
turn off
the
master
and
unplug
the
charging
stand.
1.
Remove
the
dust
box,
open
the
dust
box
cover,
and
clean
the
garbage.
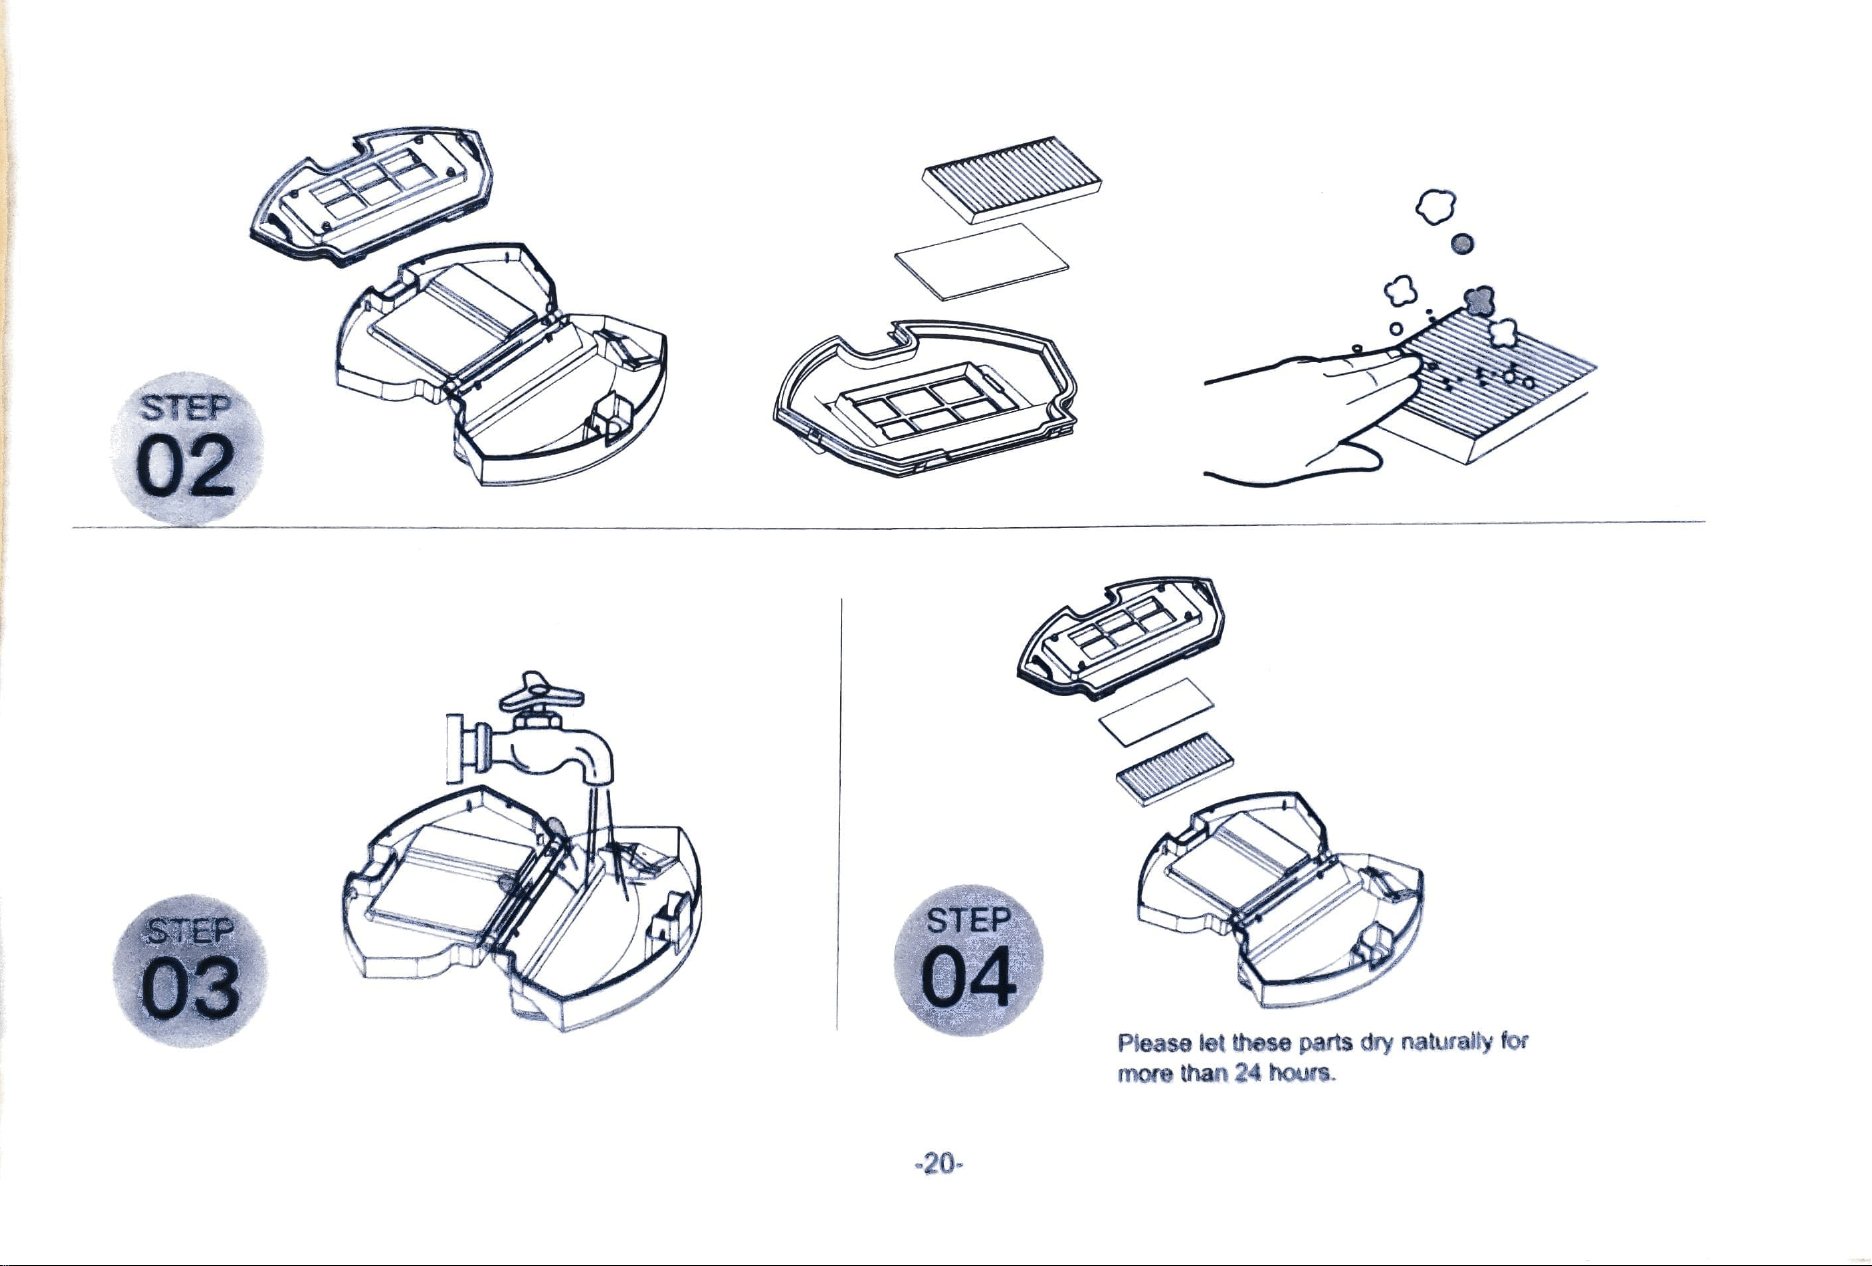
2.
Remove
dust
filter.
HEPA
is
not
recommended
for
washing.
Please
pat
and
remove
ash.
3.
Flush
the
dust
box
and
the
primary
filter.
4.
Dry
the
dust
box
and
the
dust
filter
assembly
and
keep
it
dry
to
ensure
its
service
life.
EP
1
-19
STEP
02
STEP
STEP
03
04
Please
let
these
parts dry naturally for
more
than
24
hours.
-20-
A
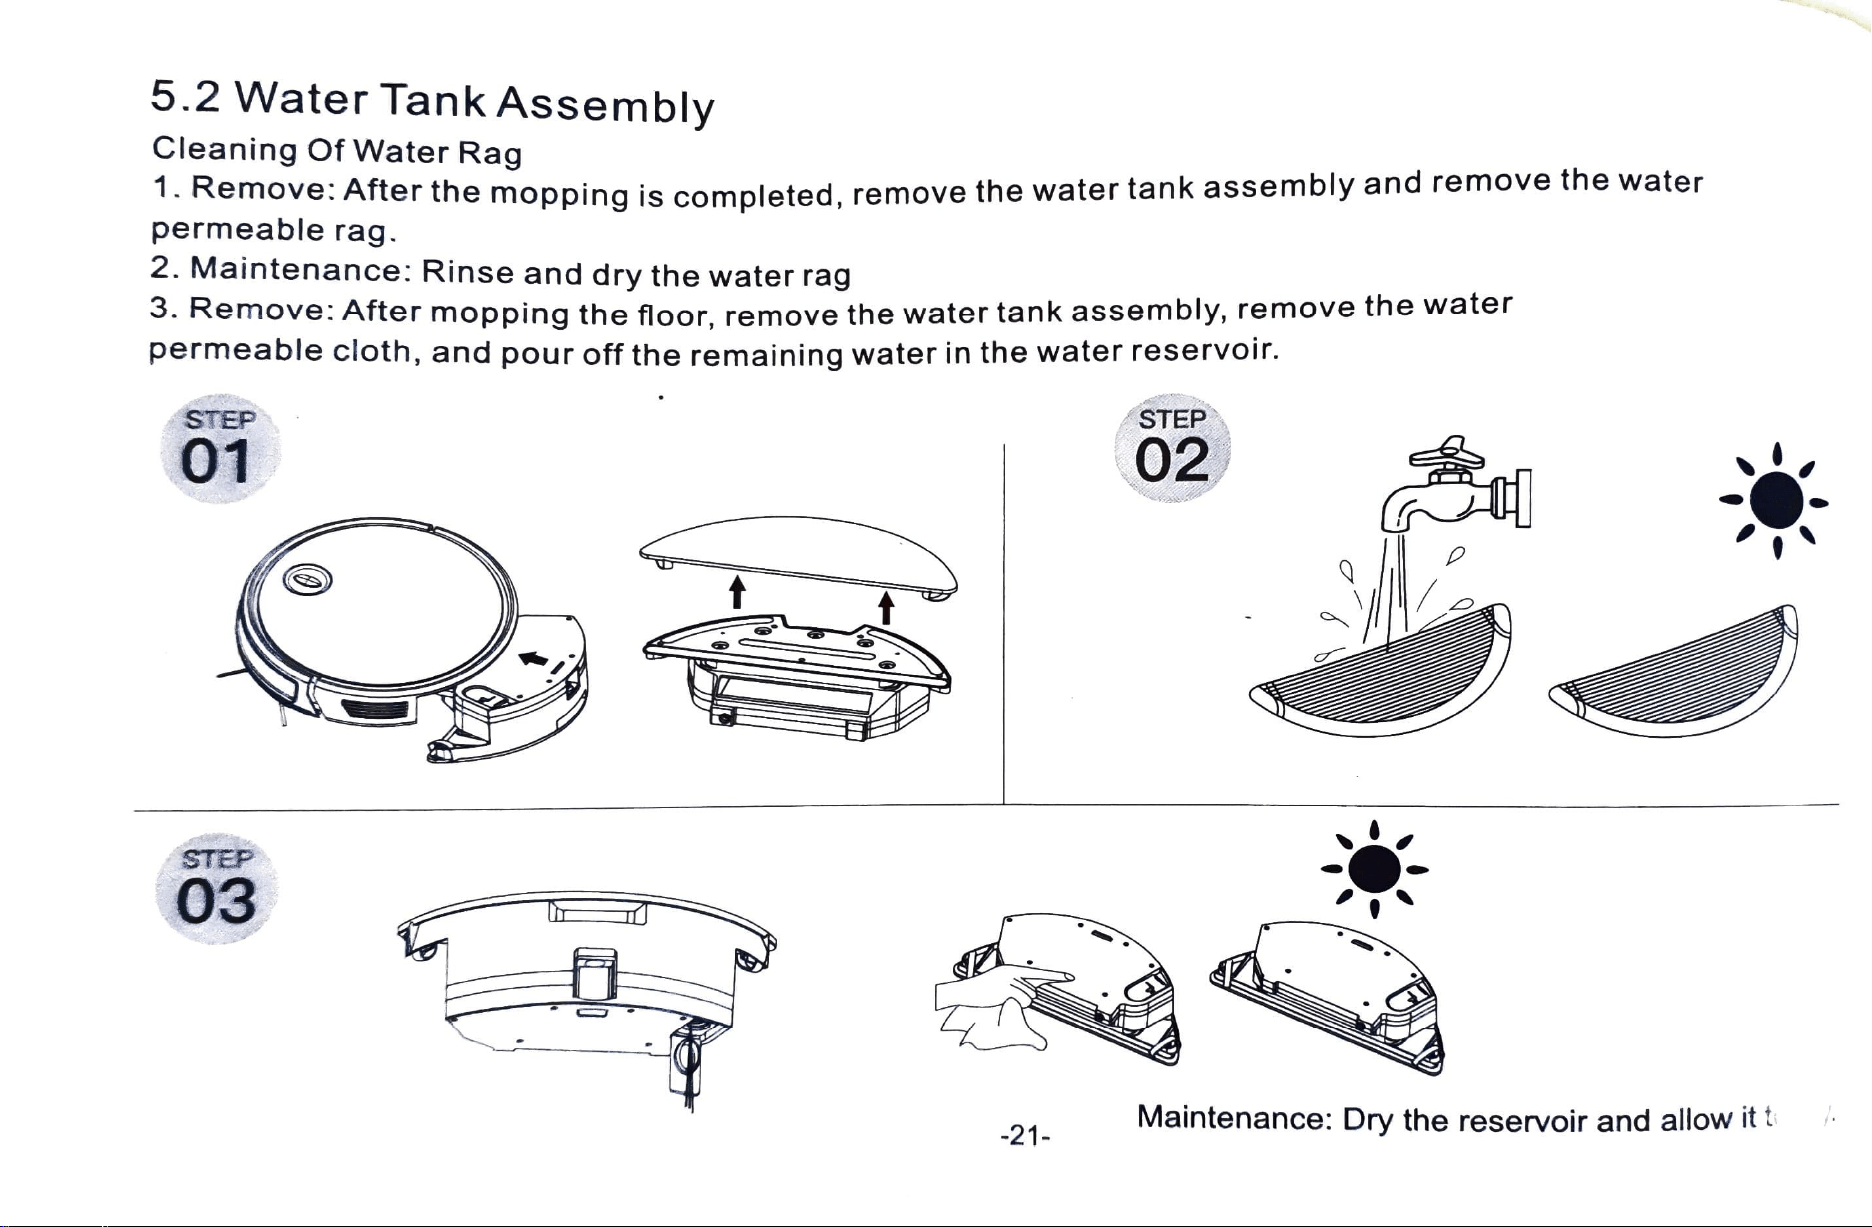
5.2
Water
Tank
Assembly
Cleaning
Of
Water
Rag
Remove:
After
the
mopping
is
completed,
remove
the
water
tank
assembly
and
remove
the
water
permeable rag
2.
Maintenance:
Rinse
and
dry
the
water
rag
3.
Remove:
After
mopping
the
floor,
remove
the
water
tank
assembly,
remove
the
water
permeable
cloth,
and
pour
off
the
remaining
water
in
the
water
reservoir.
STEP
STEP
01
02
STEP
03
-21
Maintenance:
Dry
the
reservoir
and
allow
it
t
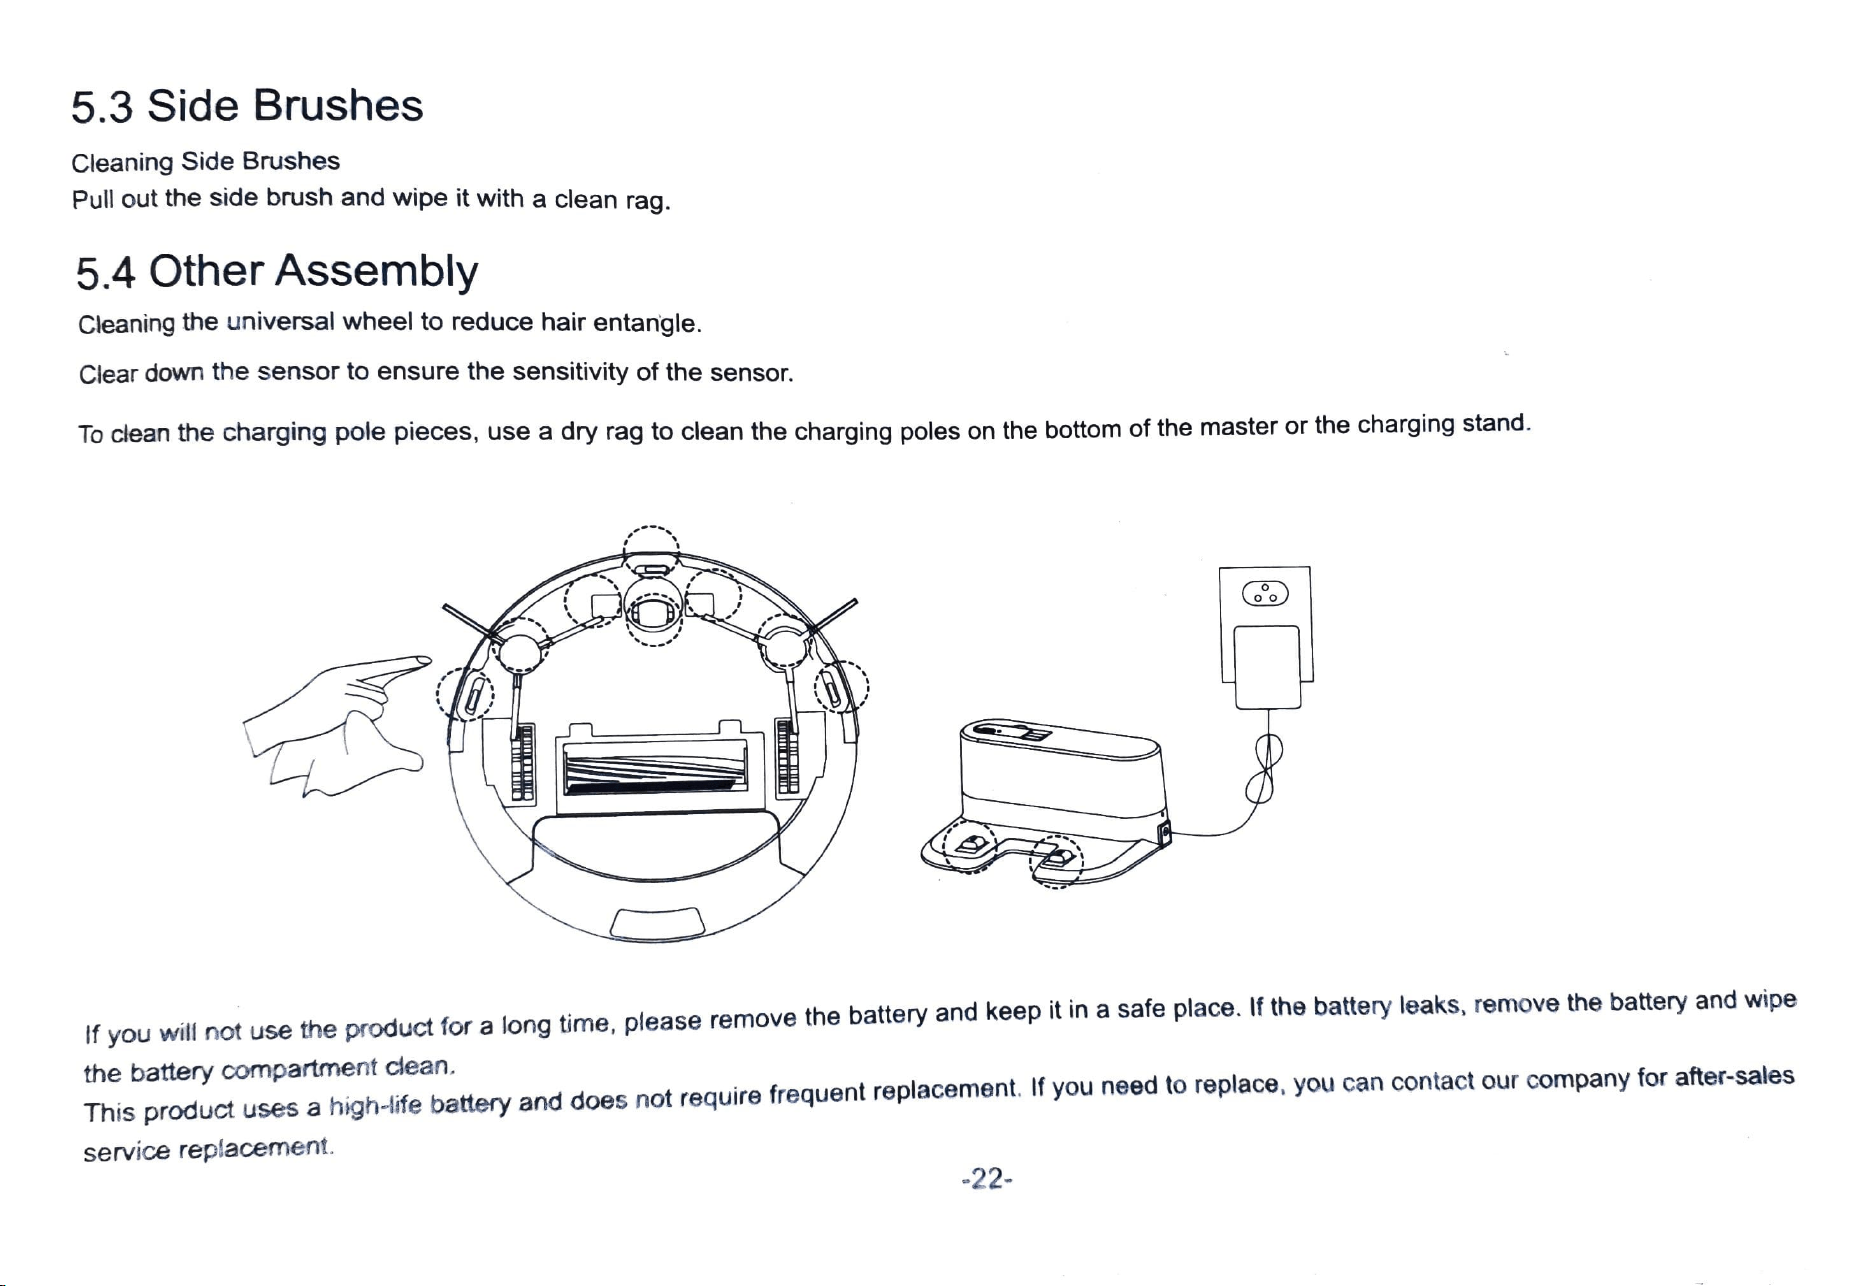
5.3
Side
Brushess
Cleaning
Side
Brushes
Pull
out
the
side
brush
and
wipe
it
with
a
clean
rag.
5.4
Other
Assembly
Cleaning
the
universal
wheel
to
reduce
hair
entangle.
Clear
down
the
sensor
to
ensure
the
sensitivity
of
the
sensor.
To
clean
the
charging
pole pieces,
use
a
dry
rag
to
clean
the
charging
poles
on
the
bottom
of
the
master
or
the
charging
stand.
()
If
you
will
not
use
the
product
for
a
long
time,
please
remove
the
battery
and
keep
it
in a
safe
place.
If
the
battery
leaks,
remove
the
battery
and
wipe
the
battery
compartment
clean.
This
product
uses
a
high-life
battery
and
does
not
require
frequent
replacement.
If
you
need
to
replace,
you
can
contact
our
company
for
after-sales
service
replacement.
22
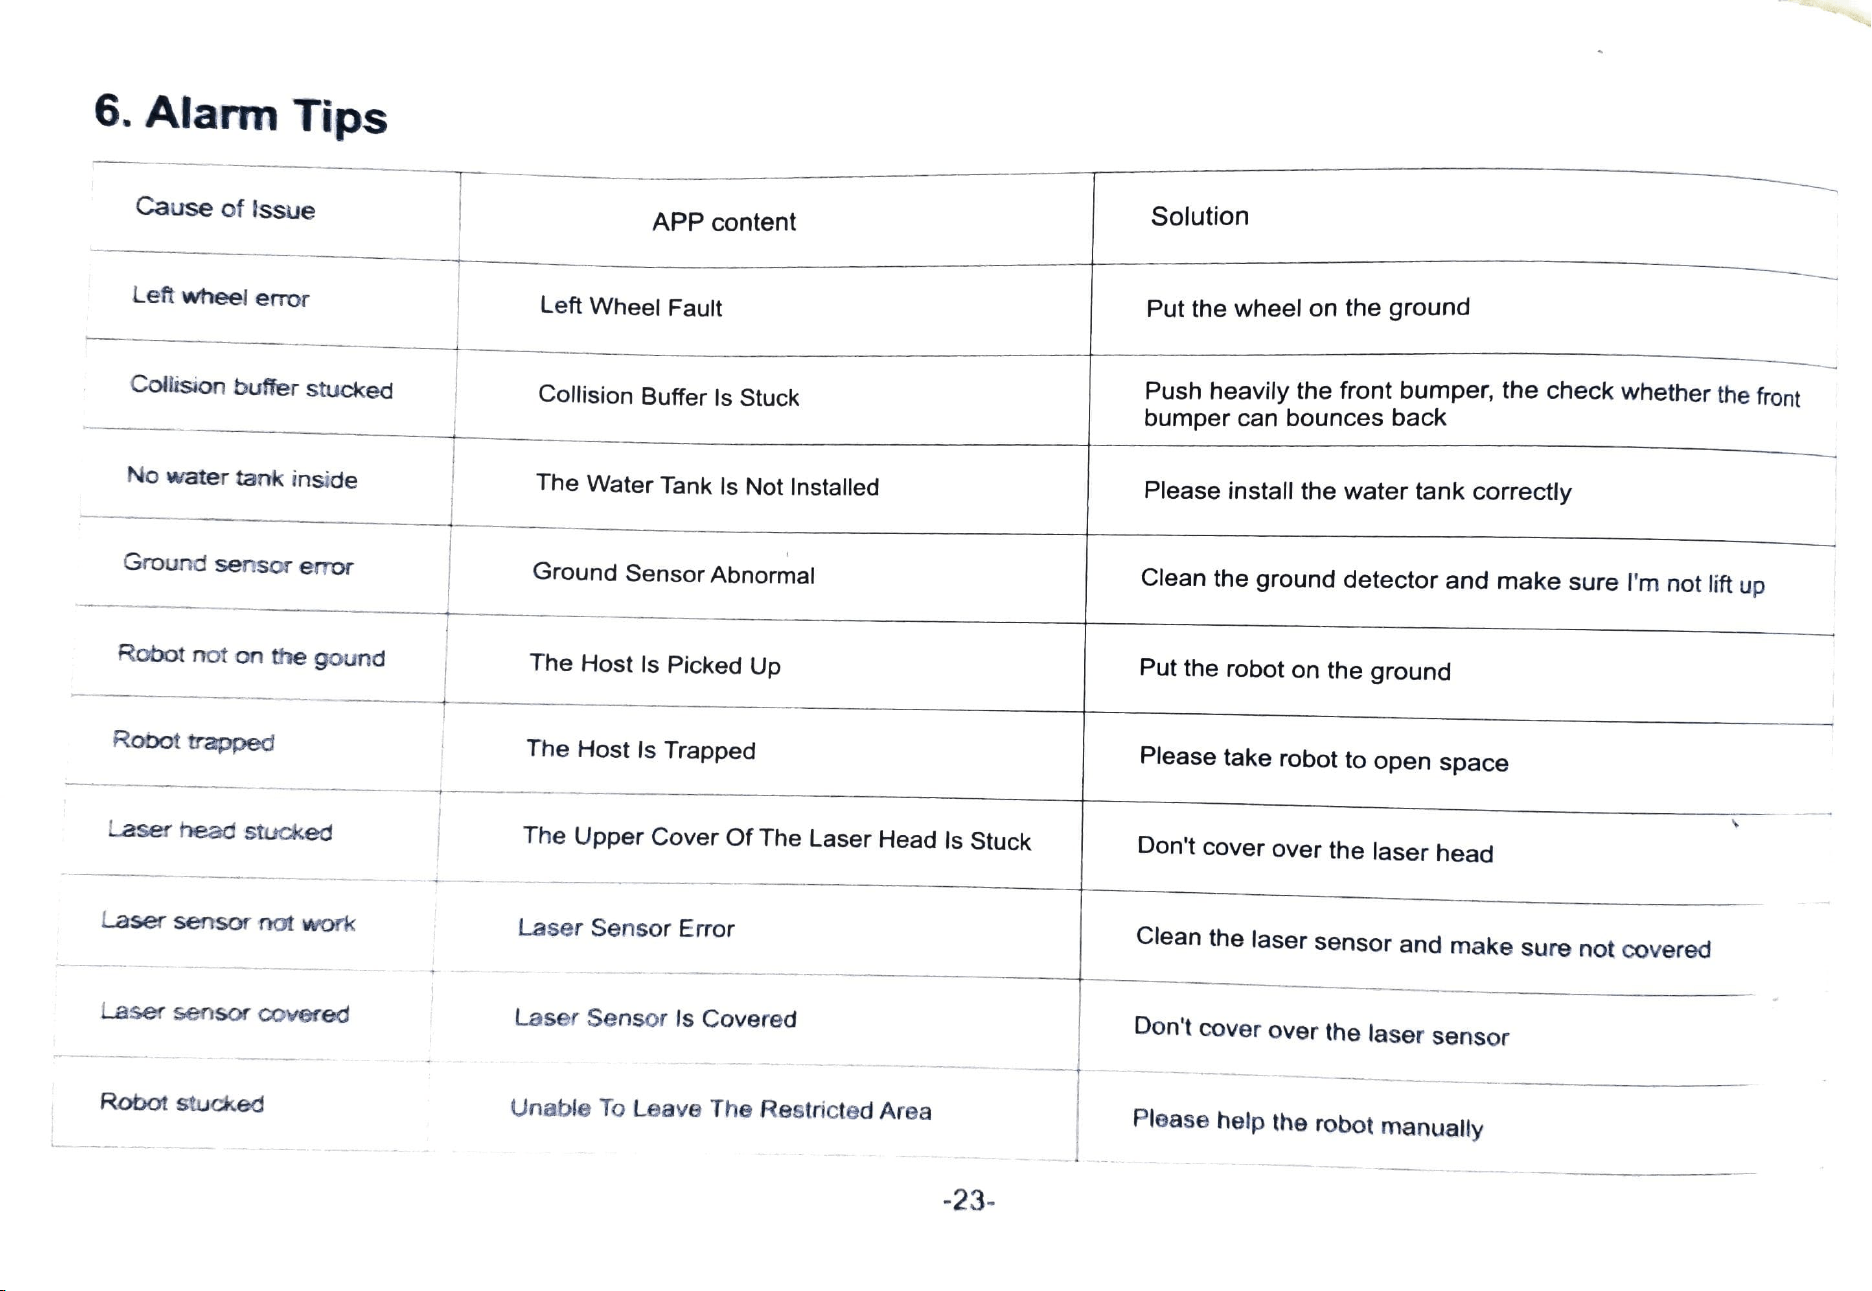
6.
Alarm
Tips
Cause
of
Issue
Solution
APP
content
Left wheel error
Left
Wheel
Fault
Put
the
wheel
on
the
ground
Push
heavily
the
front
bumper,
the
check
whether
the
front
bumper
can
bounces
back
Colision
buffer
stucked
Collision Buffer
Is
Stuck
No
water
tank
inside
The
Water
Tank
Is
Not
Installed
Please
install
the
water
tank
correctly
Ground
sensor
emor
Ground
Sensor
Abrnormal
Clean
the
ground
detector
and
make
sure
lI'm
not
lift
up
Robot
not
on
the
gound
The
Host
Is
Picked
Up
Put
the
robot
on
the
ground
Robot
trapped
The
Host
Is
Trapped
Please
take
robot
to
open
space
Laser
head
stucked
The
Upper
Cover
Of
The
Laser
Head
Is
Stuck
Don't
cover
over
the
laser
head
Laser
sensor
not
work
Laser
Sensor
Error
Clean
the
laser
sensor
and
make
sure
not
covered
Laser
sensor
cOvered
Laser
Sensor
Is
Covered
Don't
cover
over
the
laser
sensor
Robot
stucked
Unable
To
Leave
The
Restricted
Area
Please
help
the
robot
manually
23