Please give us a chance to make it right and do better !
Contact our friendly customer service department for help first.
Replacements for missing or damaged parts will be shipped ASAP !
Contact Us!
Do NOT return this item.
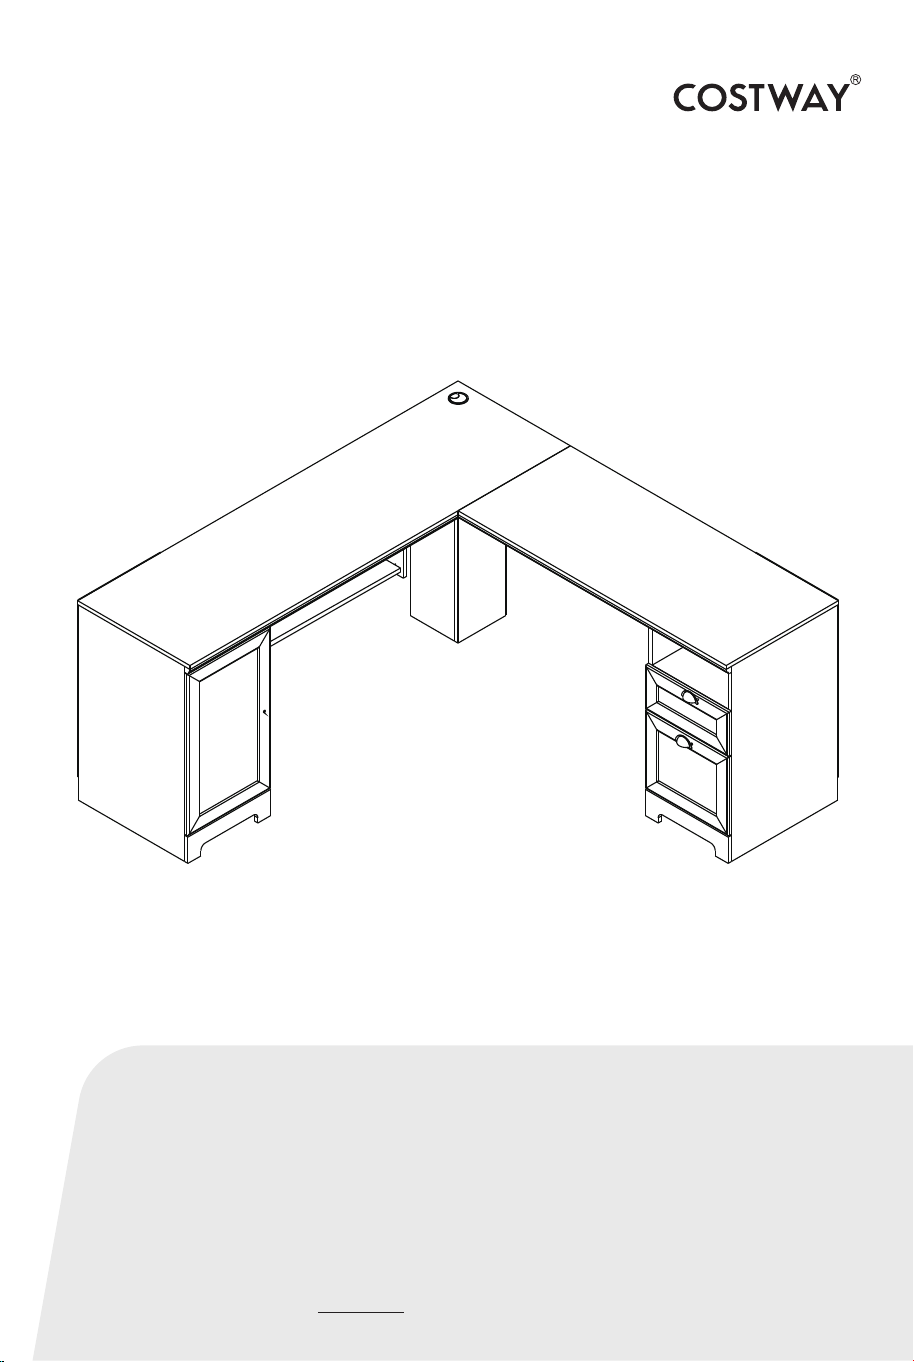
USER’S MANUAL
THIS INSTRUCTION BOOKLET CONTAINS IMPORTANT SAFETY INFORMATION. PLEASE READ AND KEEP FOR FUTURE REFERENCE.
US office: Fontana UK office: Ipswich AU office: Truganina
DE office: Hamburg
FR office: Saint Vigor d'Ymonville
PL office: Gdańsk
US:cs.us@costway.com
UK:cs.uk@costway.com
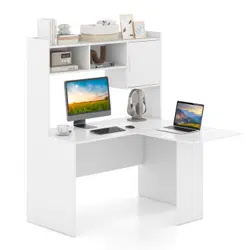
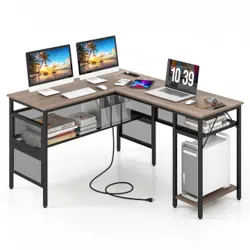
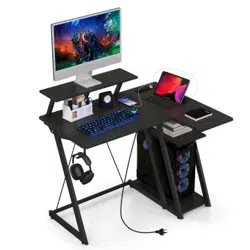
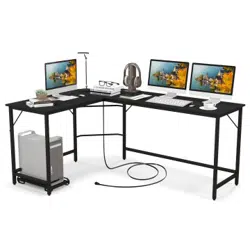
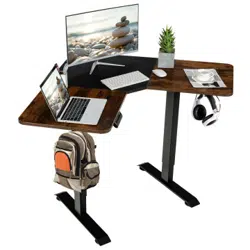
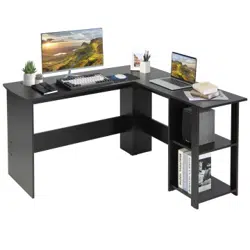
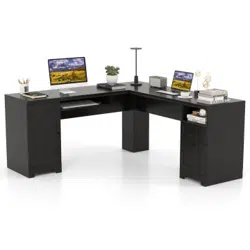
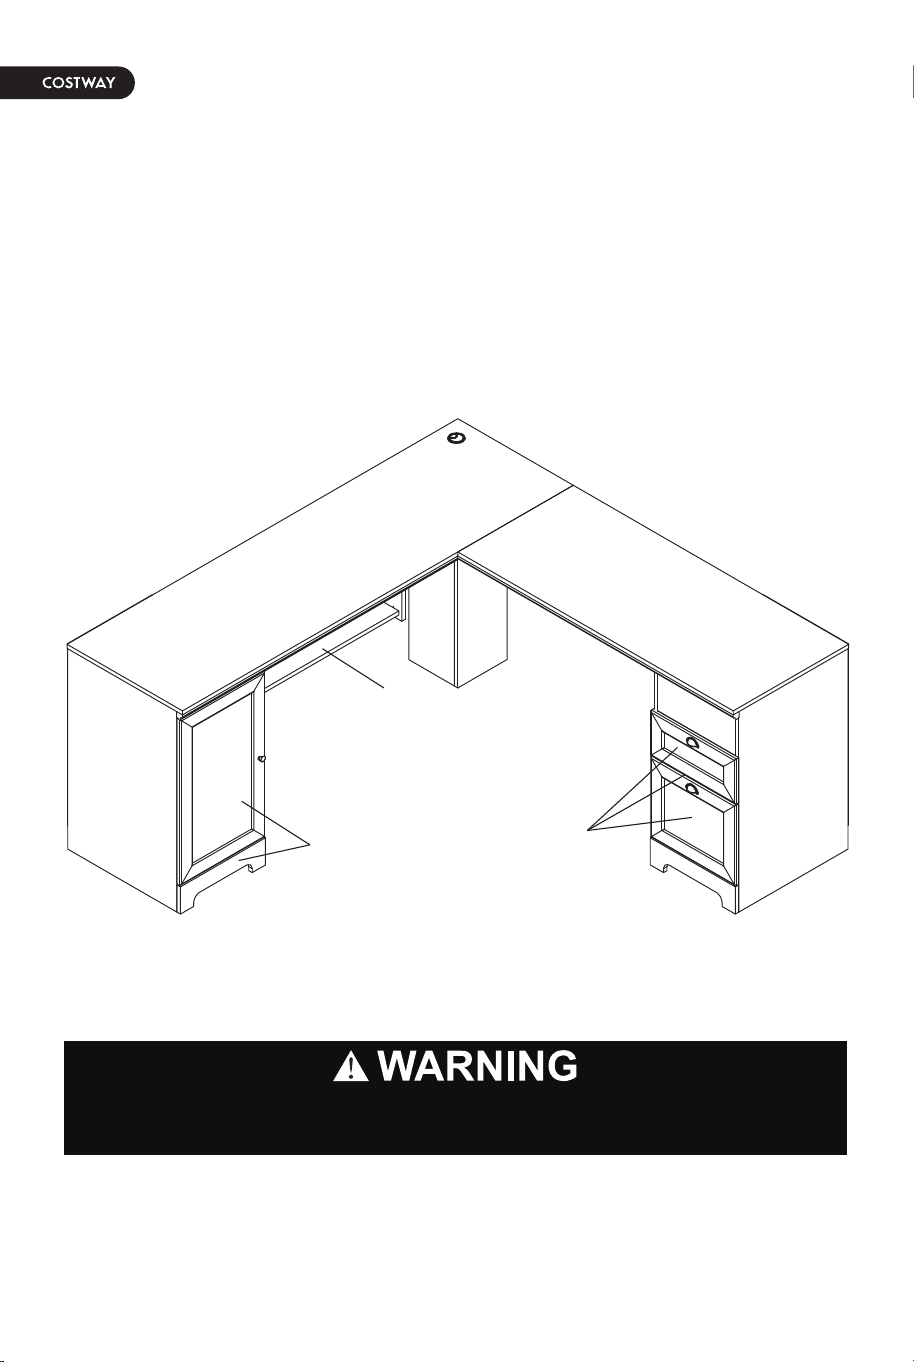
L-Shaped Desk
CB10392BK/CB10392GR
/CB10392CF
Before You Start
Please read all instructions carefully.
Retain instructions for future reference.
Separate and count all parts and hardware.
Read through each step carefully and follow the proper order.
We recommend that, where possible, all items are assembled
near to the area in which they will be placed in use, to avoid
moving the product unnecessarily once assembled.
Always place the product on a flat, steady and stable surface.
Keep all small parts and packaging materials for this product
away from babies and children as they potentially pose a serious
choking hazard.
02 03
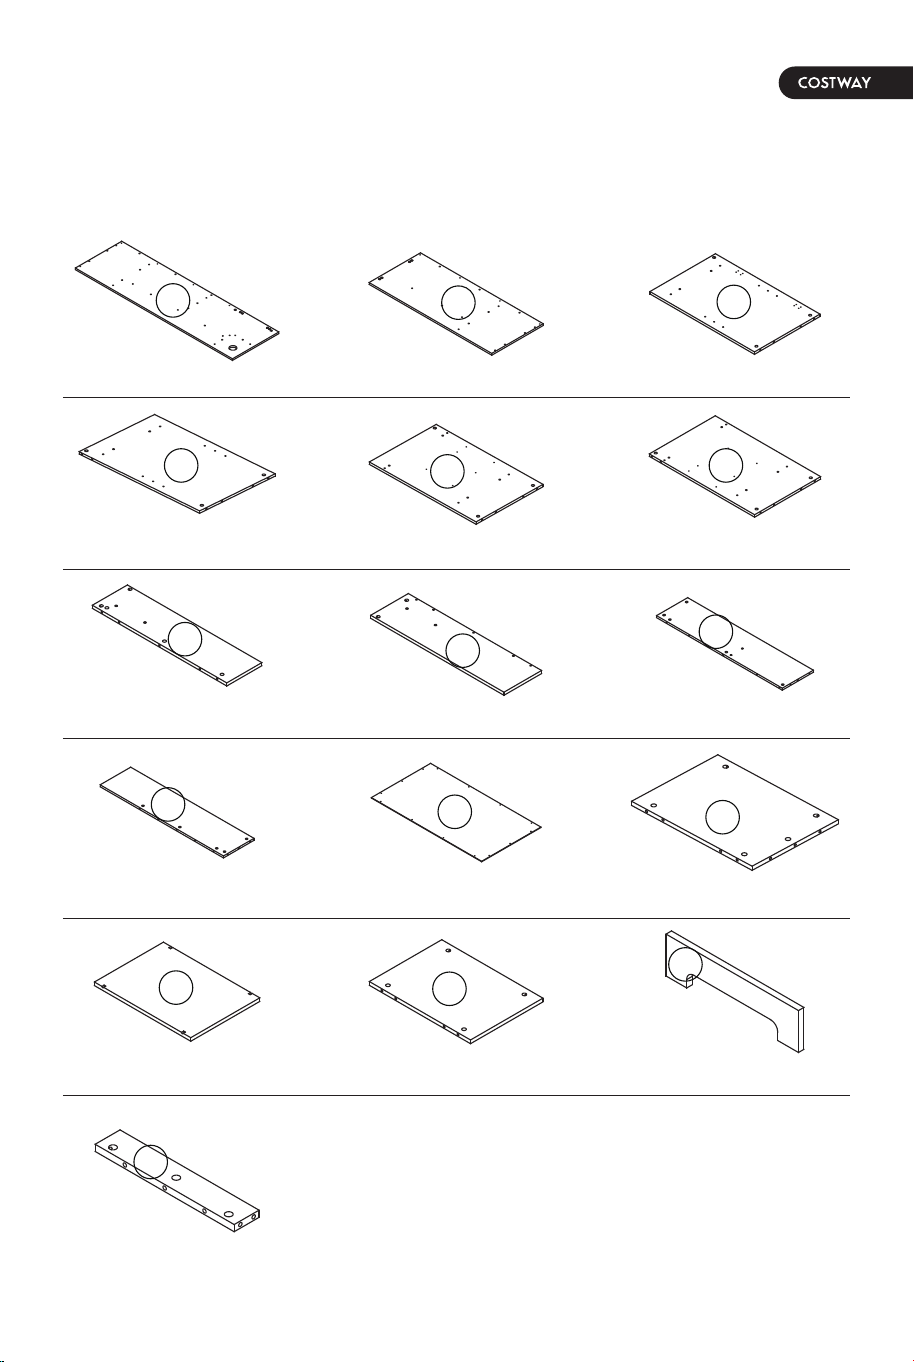
Not actual size
Board x1 Left side board x1 Right side board x1
Left vertical board x1 Right vertical board x1 Left door board x1
Right door board x1 Lower apron x1 Side board trim strip x1
Vertical board
trim strip x1
Bottom board x2
Small layer board x1
Large layer board x1 Back boardx1
Back boardx1
Back boardx2
A
B
C
D
E
F
G
H
I
J
K
L
M
N
O
P
Board Identification
Before You Start
Please read all instructions carefully.
Retain instructions for future reference.
Separate and count all parts and hardware.
Read through each step carefully and follow the proper order.
We recommend that, where possible, all items are assembled
near to the area in which they will be placed in use, to avoid
moving the product unnecessarily once assembled.
Always place the product on a flat, steady and stable surface.
Keep all small parts and packaging materials for this product
away from babies and children as they potentially pose a serious
choking hazard.
02 03
Not actual size
Board x1 Left side board x1 Right side board x1
Left vertical board x1 Right vertical board x1 Left door board x1
Right door board x1 Lower apron x1 Side board trim strip x1
Vertical board
trim strip x1
Bottom board x2
Small layer board x1
Large layer board x1 Back boardx1
Back boardx1
Back boardx2
A
B
C
D
E
F
G
H
I
J
K
L
M
N
O
P
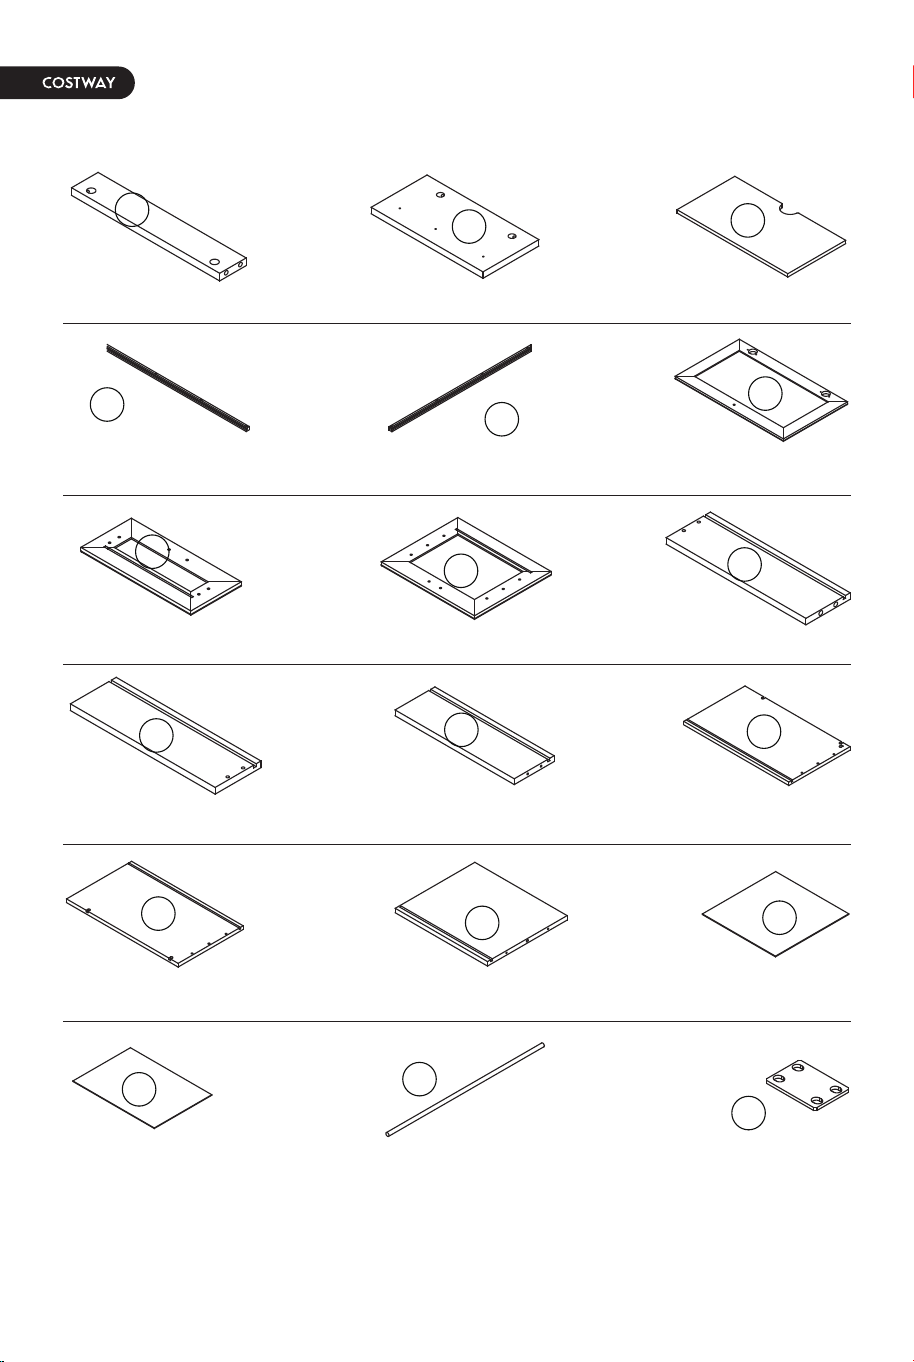
Board Identification
04 05
Board x1 Left side board x1 Right side board x1
Left vertical board x1 Right vertical board x1
Left door board x1 Right door board x1 Lower apron x1
Side board trim strip x1 Vertical board trim strip x1 Bottom board x1
Small layer board x1 Large layer board x1 Back board x1
Metal File Holder x2
Back board x1
Q
R
S
T
T1
U
V
W
X
Y
Z
Z1
Z2
Z3
Z4
Z5
Z6
Z7
Metal Plate x2
Right vertical board x1
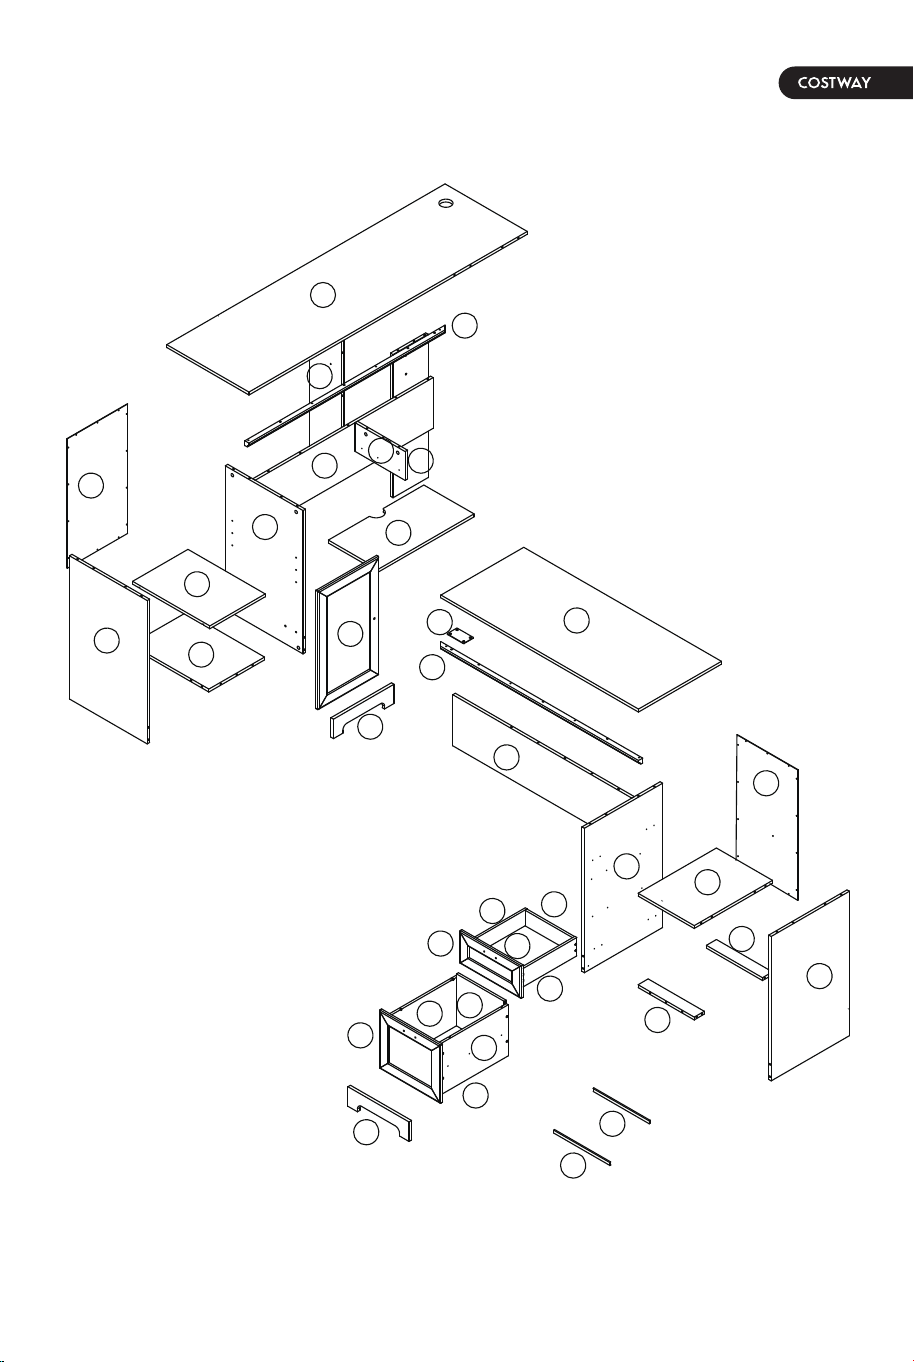
A
K
D
C
M
L
S
I
U
O
R
H
G
T
B
z7
T1
J
K
N
F
P
E
V
W
O
Z2
Z1
Z3
Z5
X
Z4
Z
Y
Q
Z6
Z6
04 05
Board x1 Left side board x1 Right side board x1
Left vertical board x1 Right vertical board x1
Left door board x1 Right door board x1 Lower apron x1
Side board trim strip x1 Vertical board trim strip x1 Bottom board x1
Small layer board x1 Large layer board x1 Back board x1
Metal File Holder x2
Back board x1
Q
R
S
T
T1
U
V
W
X
Y
Z
Z1
Z2
Z3
Z4
Z5
Z6
Z7
Metal Plate x2
Right vertical board x1
A
K
D
C
M
L
S
I
U
O
R
H
G
T
B
z7
T1
J
K
N
F
P
E
V
W
O
Z2
Z1
Z3
Z5
X
Z4
Z
Y
Q
Z6
Z6
06 07
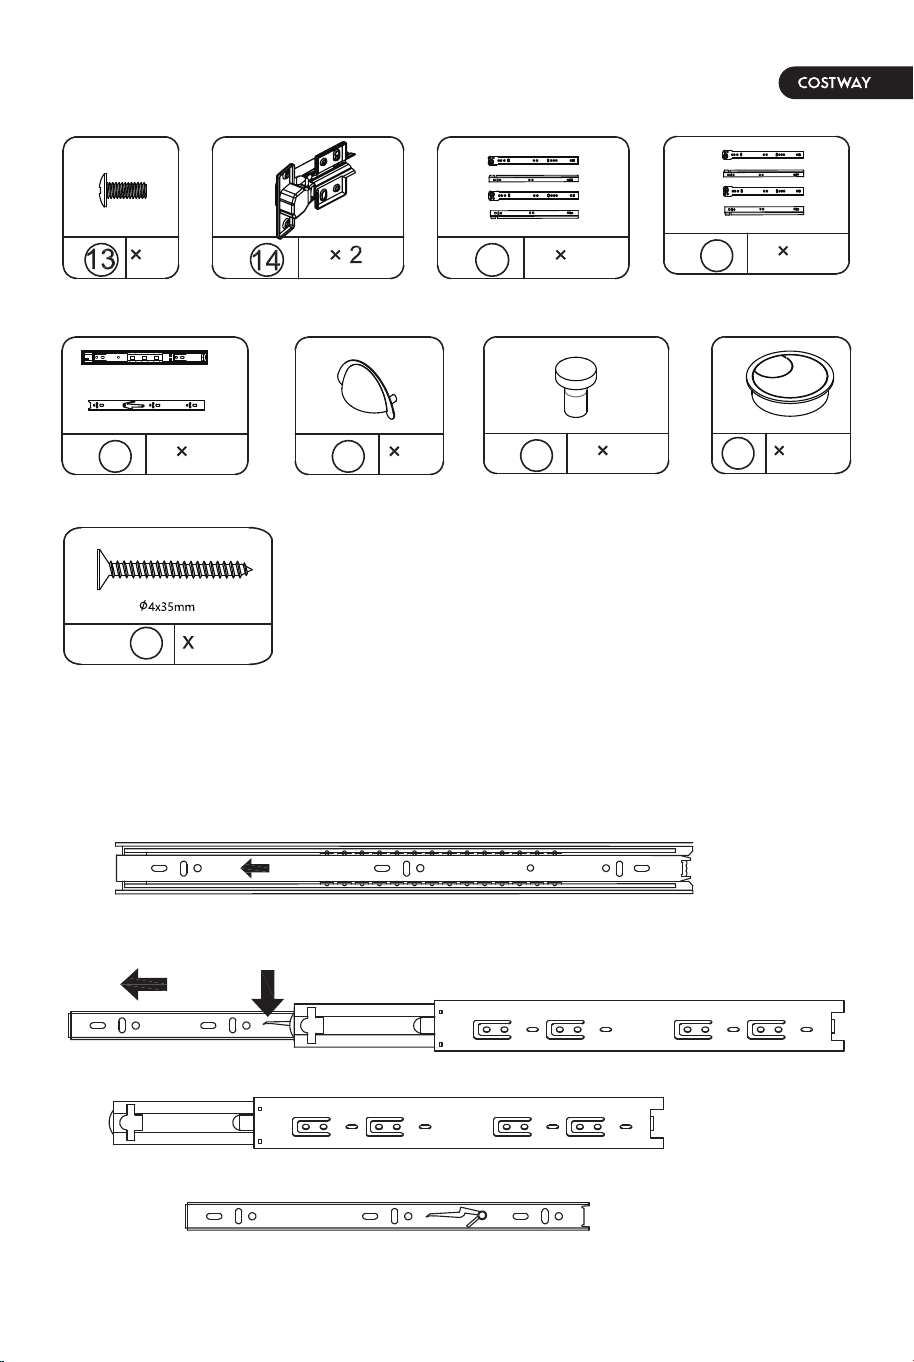
How To SEPARATE BALL BEARING SLIDE.
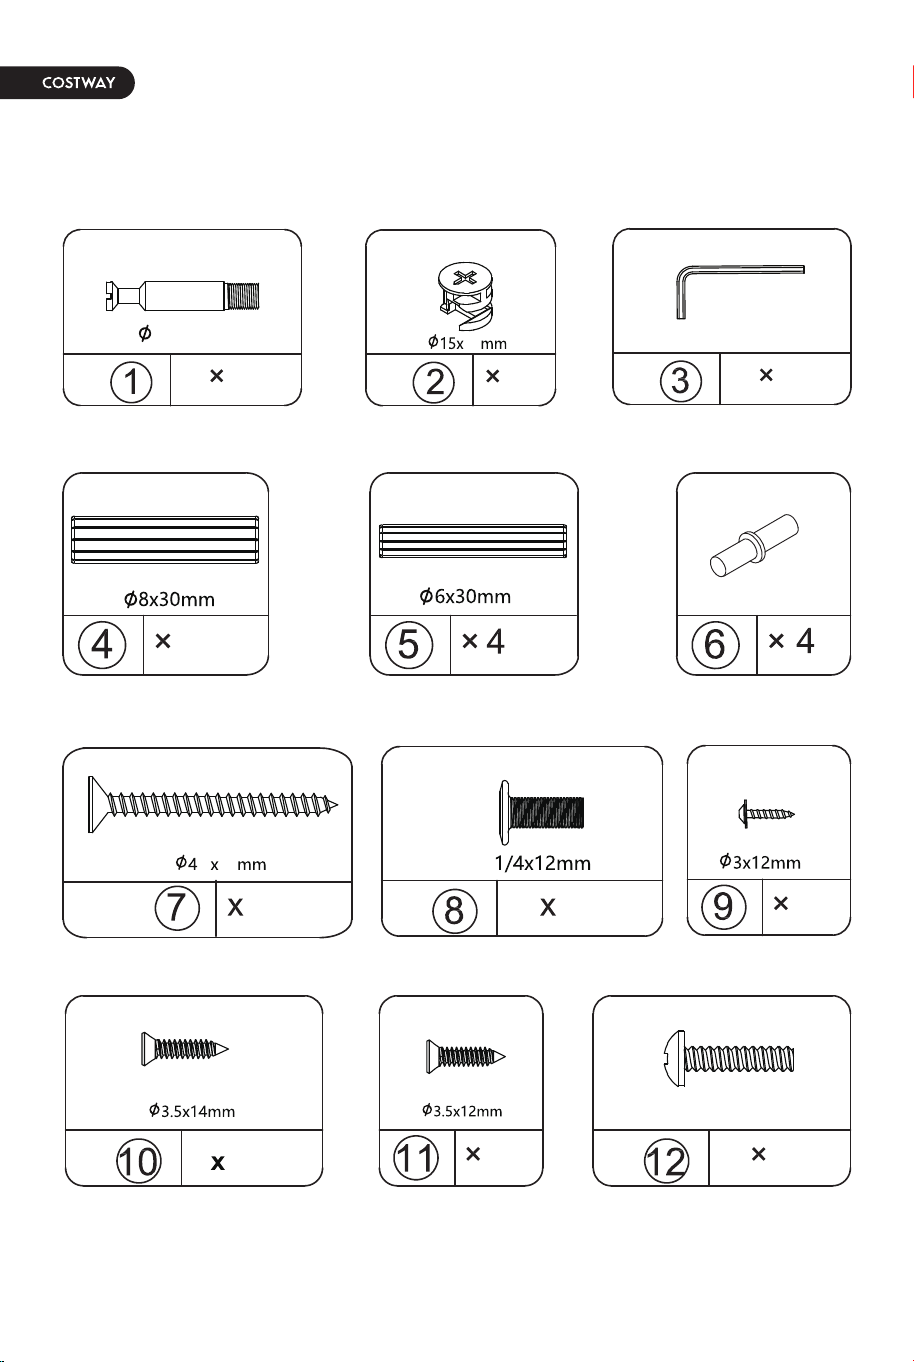
Hardware List
Actual size
METAL SLIDE METAL SLIDE
SCREW
SCREW HINGESCREW
SCREWBOLT
BOLT
WOOD DOWELWOOD DOWEL WOOD DOWEL
52
8
28
36
4
M4 X 12mm
1
M4 X 22mm
X
12
55
6x34mm
55
9
1
METAL SLIDE HANDLE HANDLE WIRE GROMMET
SCREW
HEX KEYCAM BOLT CAM LOCK
16
21
19
1
20
1
18
2
17-1
17-2
17
1
6
45
CR
DR
CL
DL
15
1
CR
DR
CL
DL
16
1
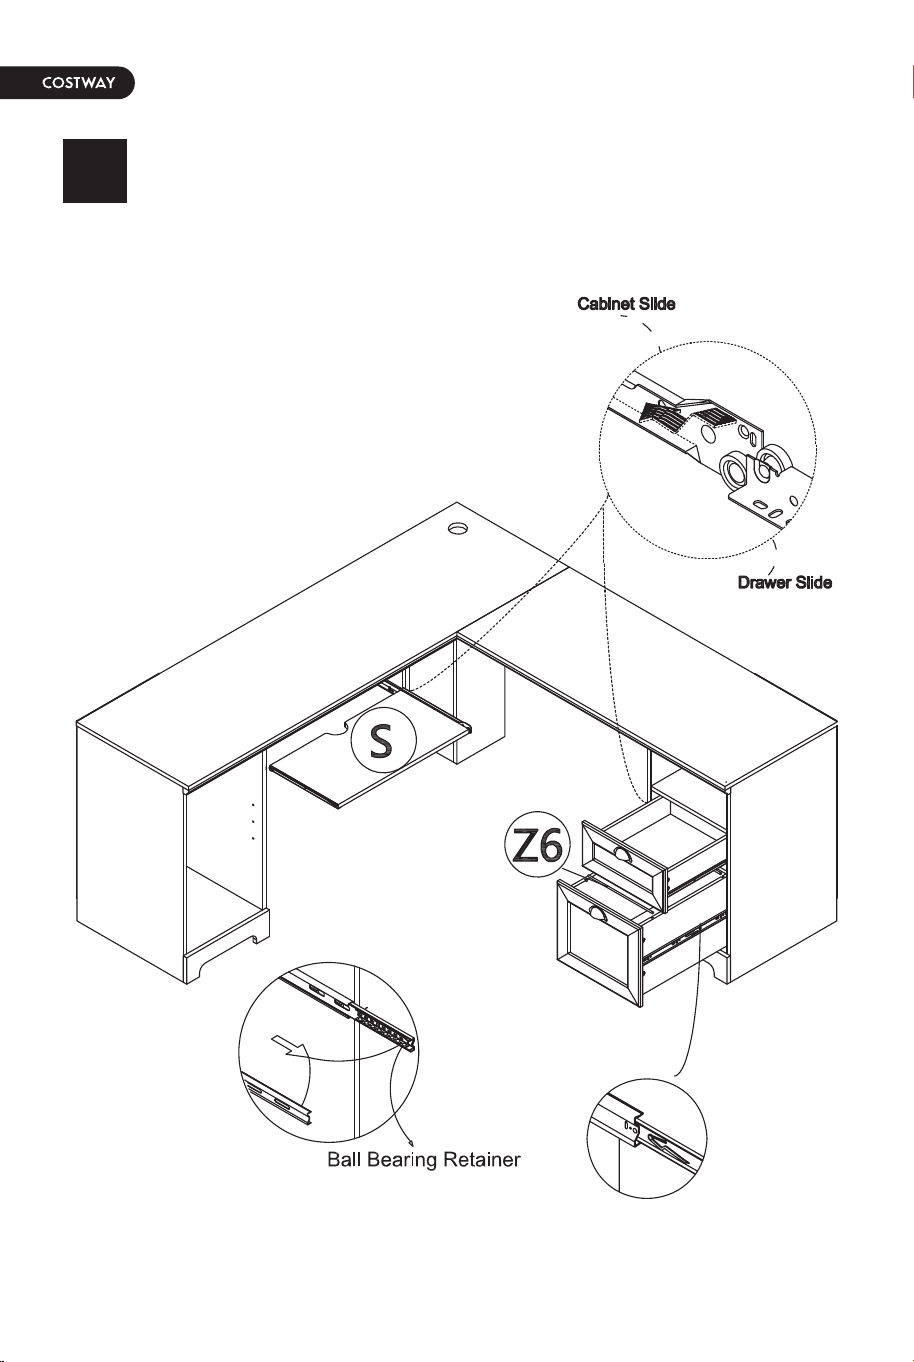
1. Pull toward arrow to open the slide until its stops and then filip it over.
2. Push plastic lever down and pull apart.
Gabinet member
Drawer member
06 07
How To SEPARATE BALL BEARING SLIDE.
Hardware List
Actual size
METAL SLIDE METAL SLIDE
SCREW
SCREW HINGESCREW
SCREWBOLT
BOLT
WOOD DOWELWOOD DOWEL WOOD DOWEL
52
8
28
36
4
M4 X 12mm
1
M4 X 22mm
X
12
55
6x34mm
55
9
1
METAL SLIDE HANDLE HANDLE WIRE GROMMET
SCREW
HEX KEYCAM BOLT CAM LOCK
16
21
19
1
20
1
18
2
17-1
17-2
17
1
6
45
CR
DR
CL
DL
15
1
CR
DR
CL
DL
16
1
1. Pull toward arrow to open the slide until its stops and then filip it over.
2. Push plastic lever down and pull apart.
Gabinet member
Drawer member
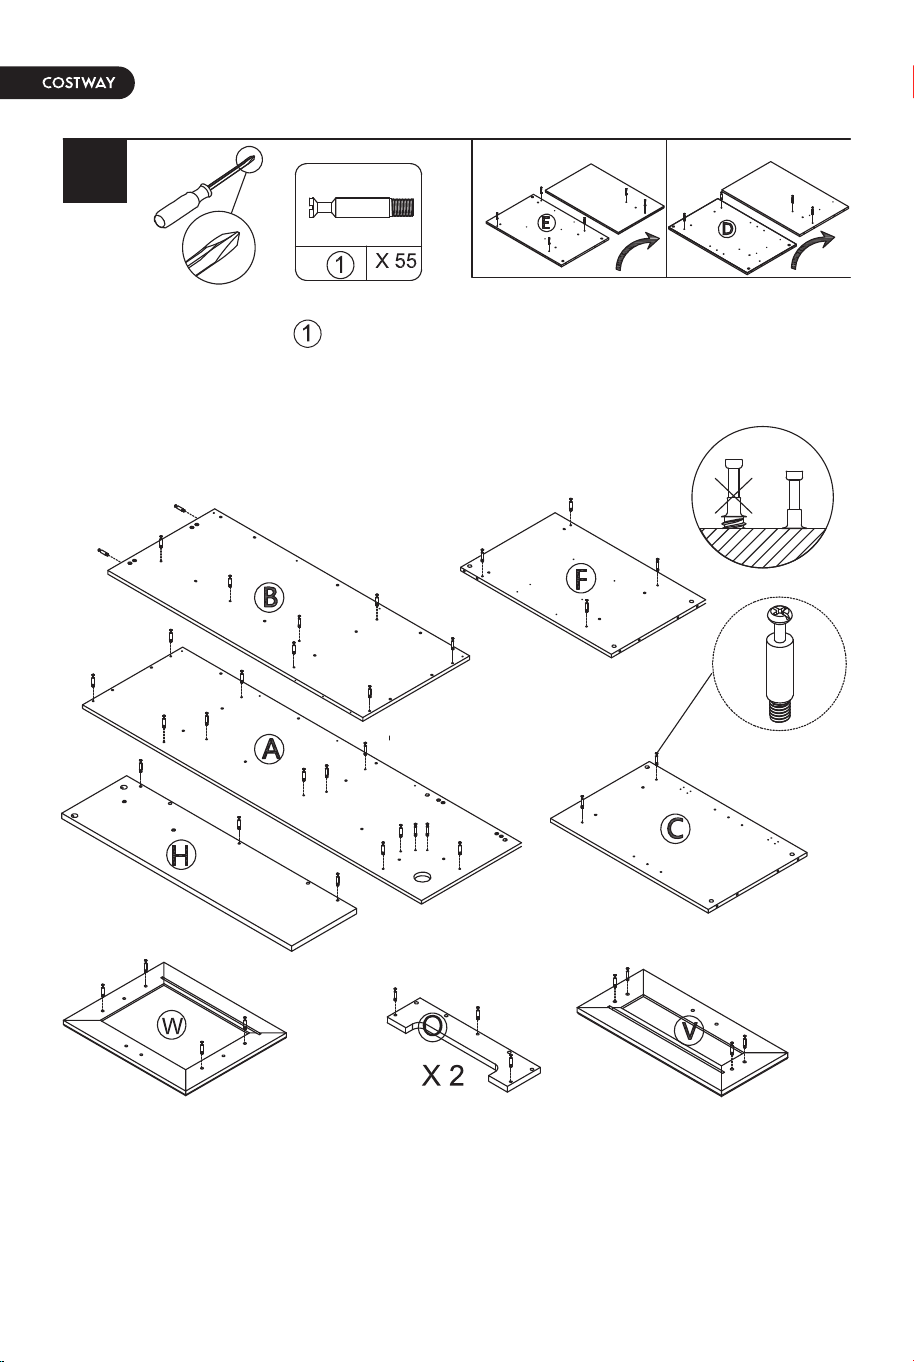
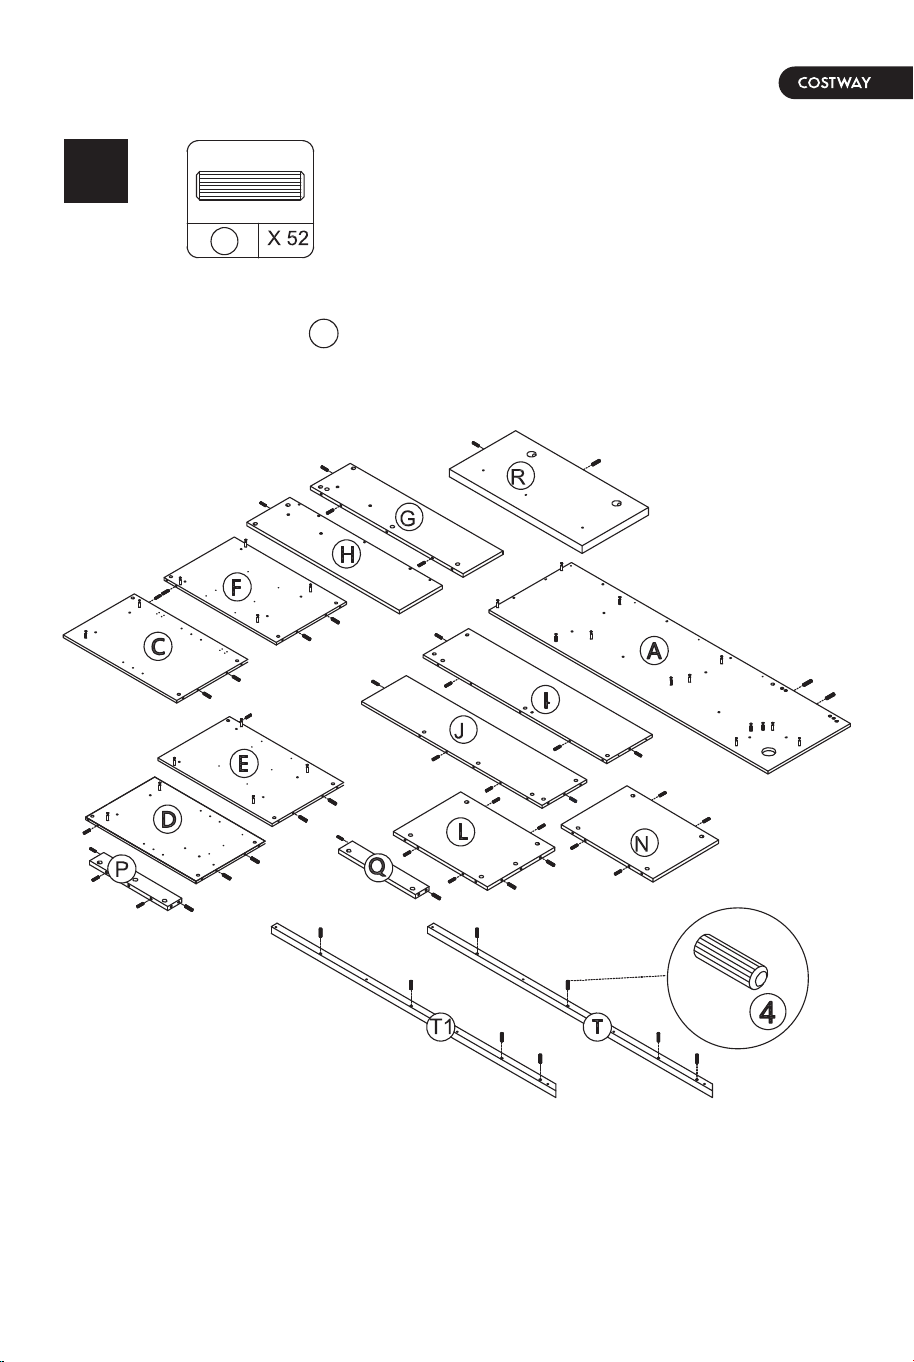
08 09
Screw the hardware to A\B\C\F\H\O\V\W part
Insert the hardware to A\C\D\E\F\G\H\I\J\L\N\P\Q\R\T1\T part
1 2
4
4
08 09
Screw the hardware to A\B\C\F\H\O\V\W part
Insert the hardware to A\C\D\E\F\G\H\I\J\L\N\P\Q\R\T1\T part
1 2
4
4
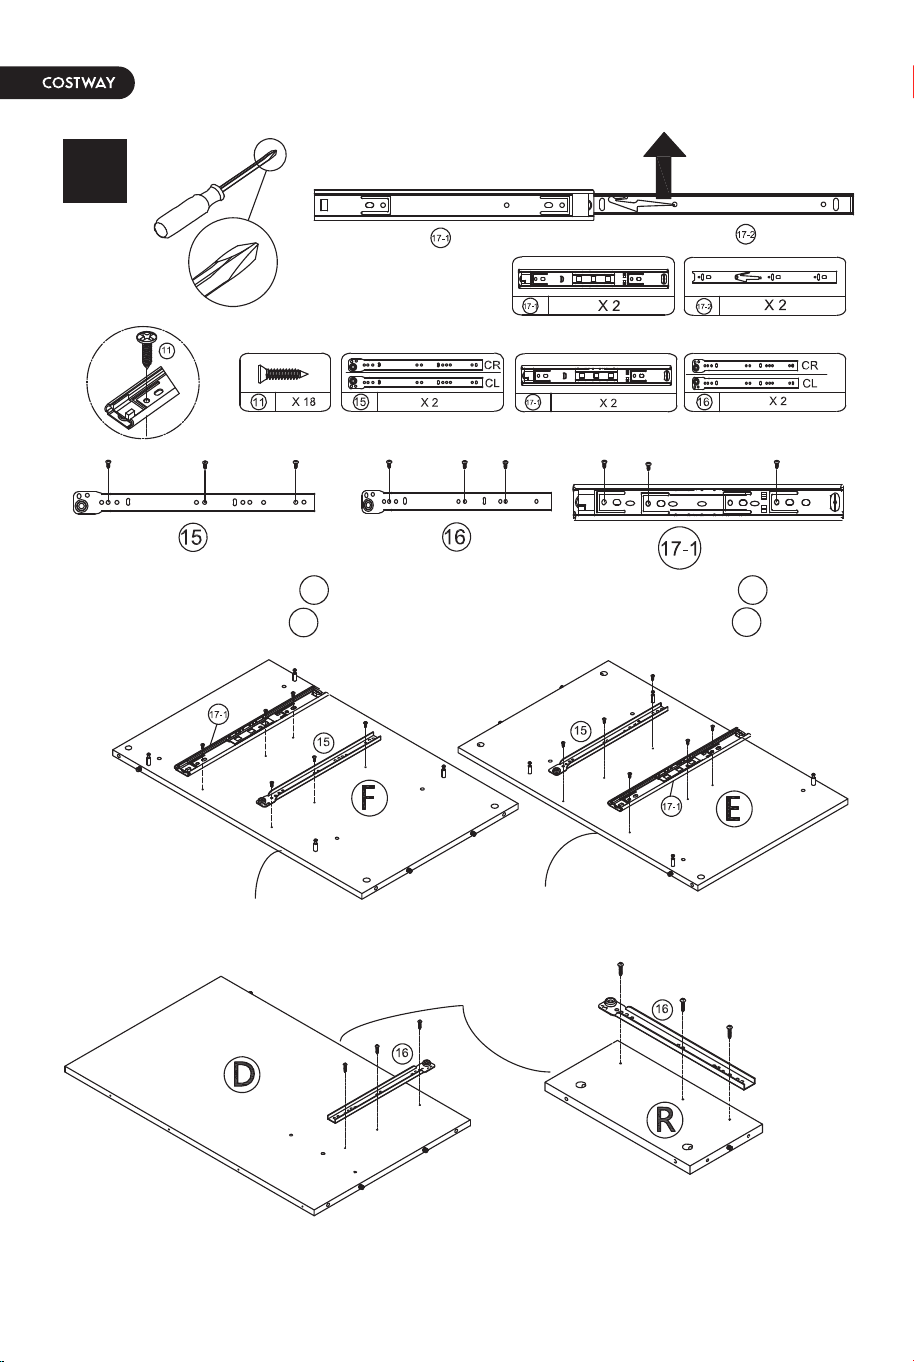
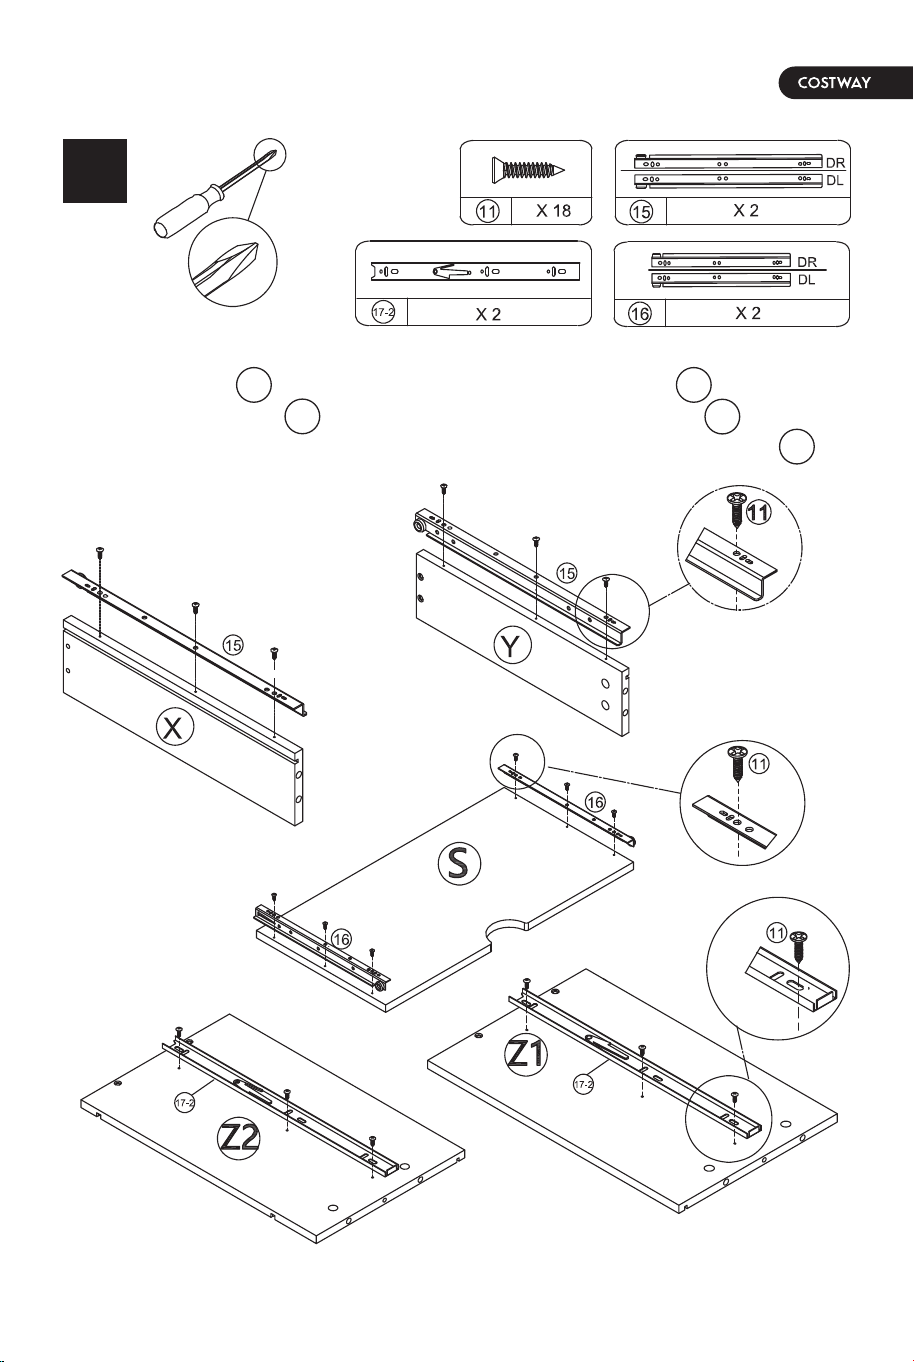
10 11
Install the part 17-1 to the F\E board with the hardware .
and Install the part to the D\R board with the hardware .
Install the part to the XiY board with the hardware .
and Install the part to the S board with the hardware .
and Install the part 17-2 to the Z1\Z2 board with the hardware .
3 4
FINISHED EDGE
FINISHED EDGE
FINISHED EDGE
15 11
11
16
15 11
11
11
16
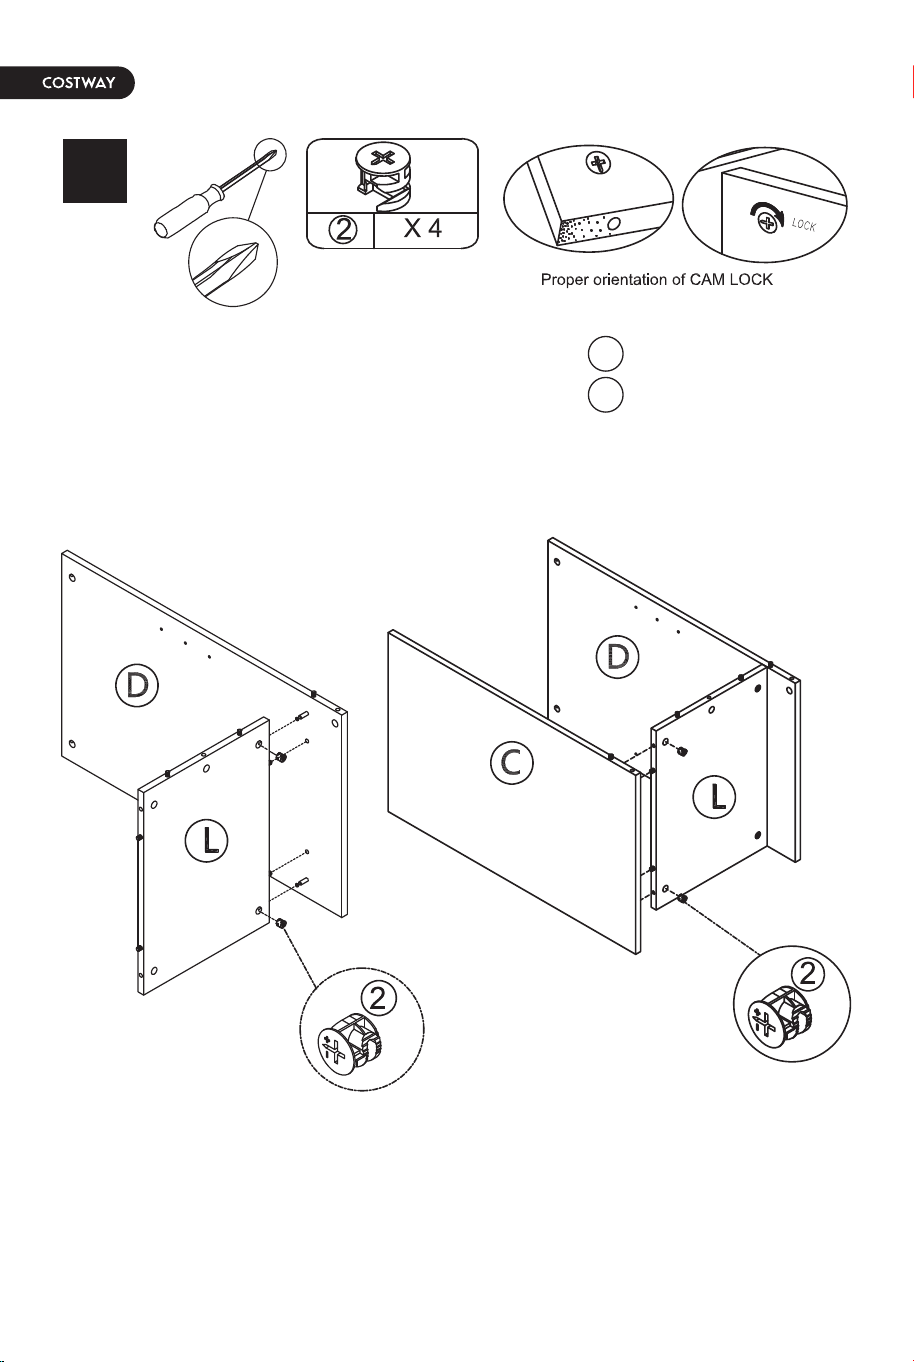
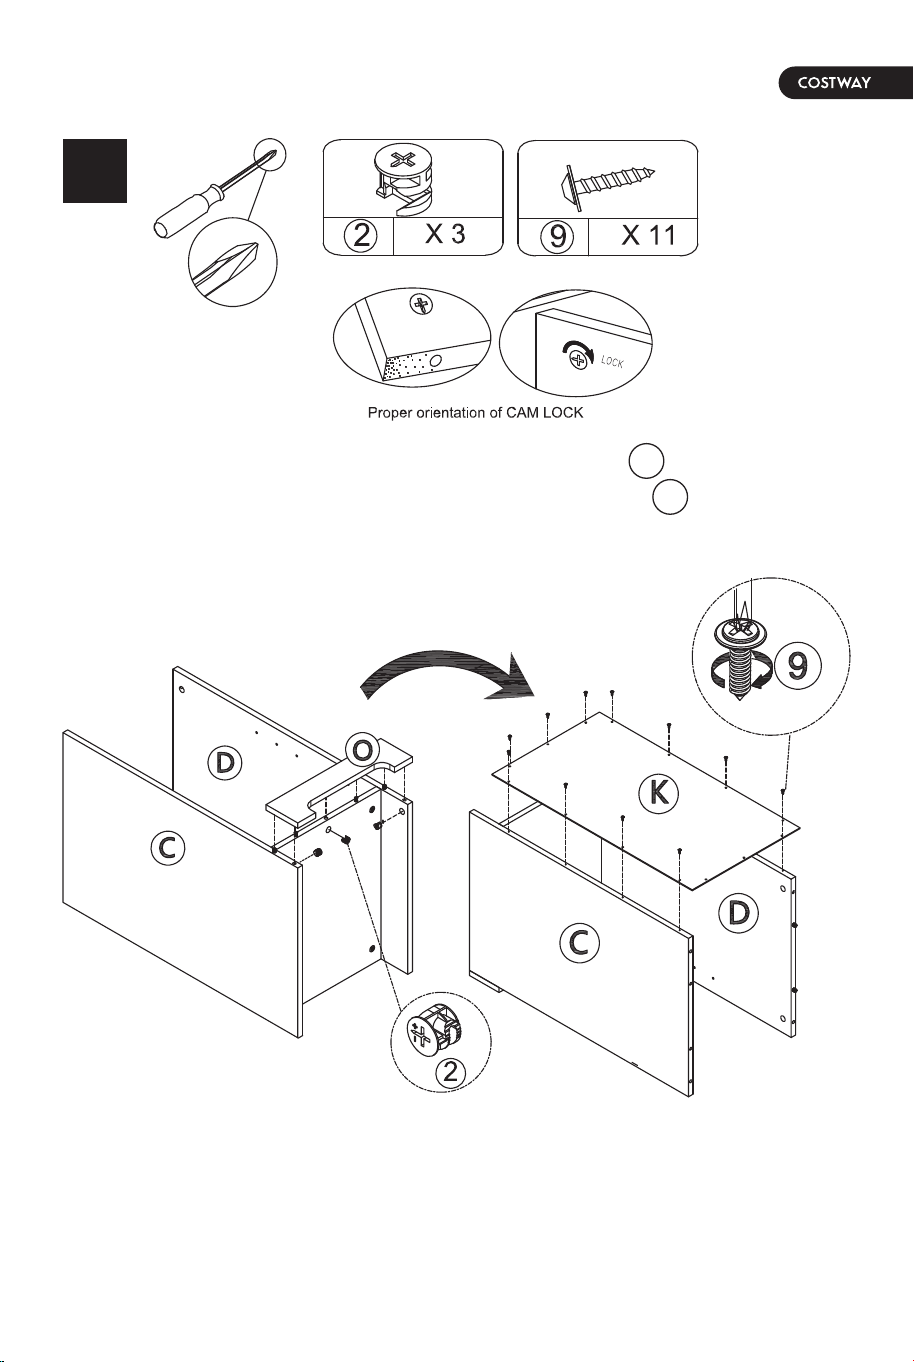
12 13
Fix the L part to the D part with the hardware .
Fix the C part to the L part with the hardware .
Fix the C\D part to the O part with the hardware .
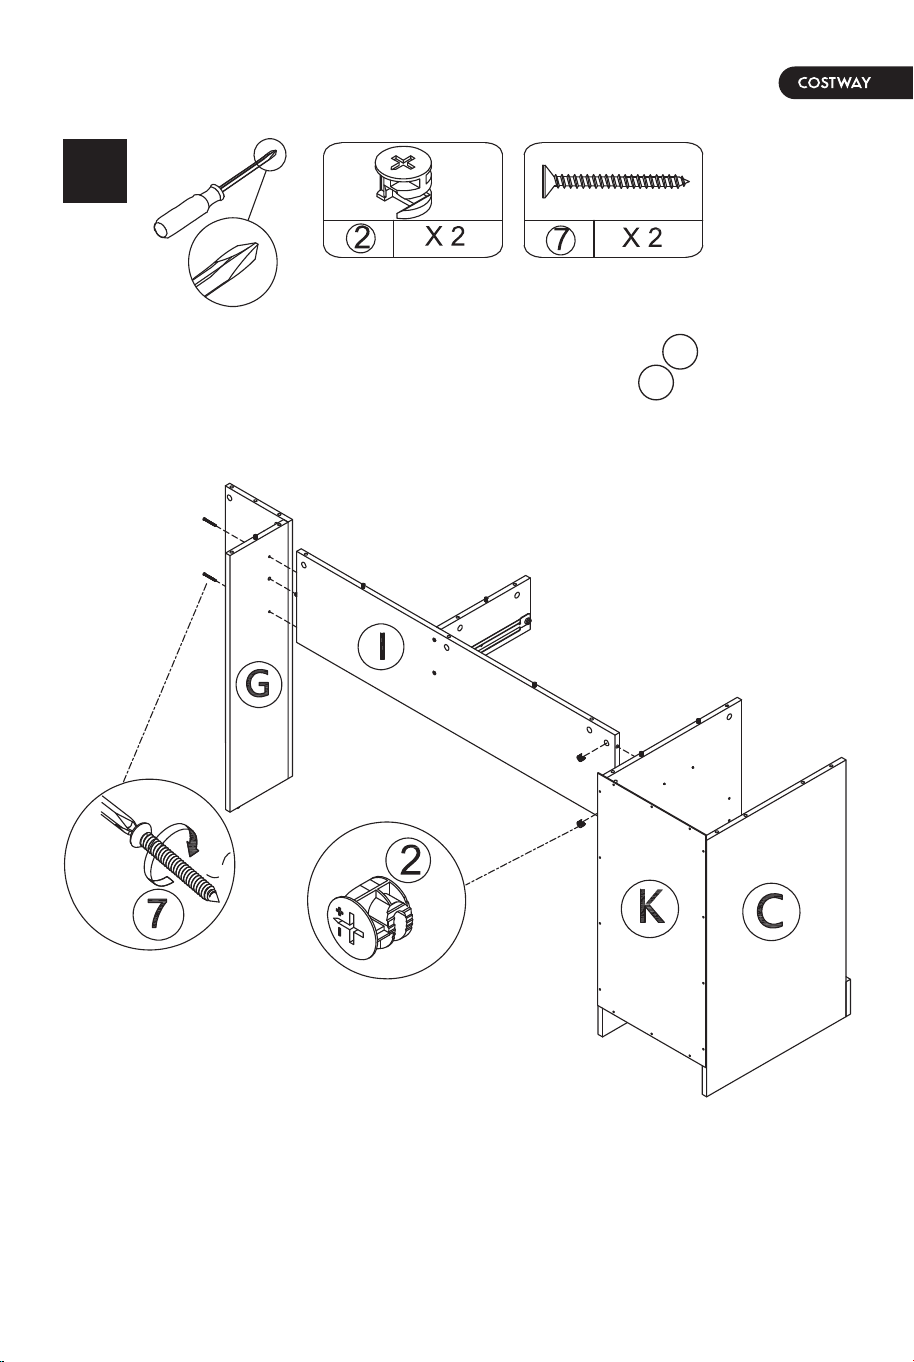
Fix the C\D\O part to the K part with the hardware .
5 6
2
2
9
2
12 13
Fix the L part to the D part with the hardware .
Fix the C part to the L part with the hardware .
Fix the C\D part to the O part with the hardware .
Fix the C\D\O part to the K part with the hardware .
5 6
2
2
9
2
14 15
Fix the C\D\K part to the I\R part with the hardware .
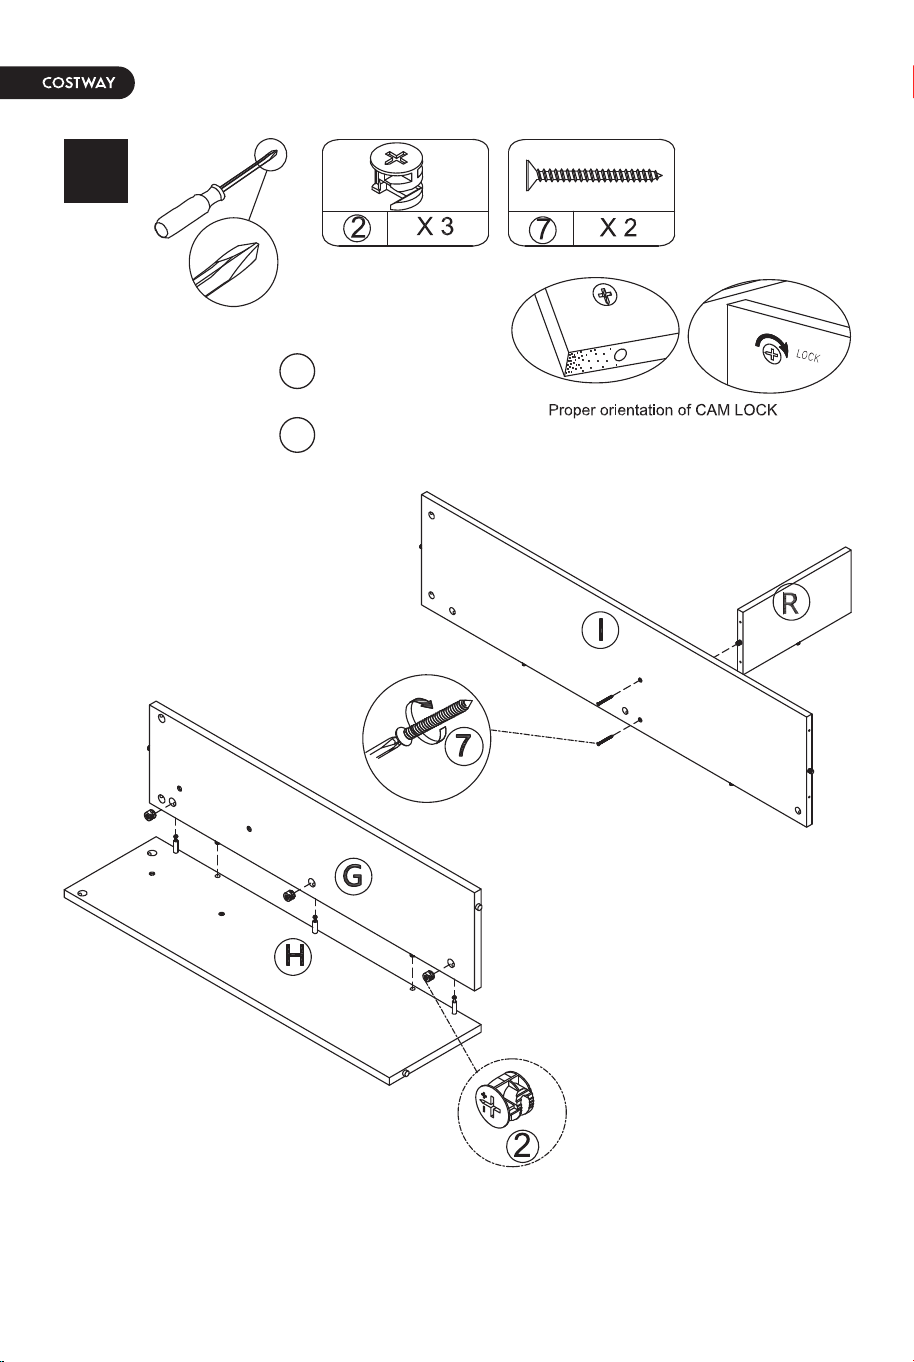
Fix the G\H part to the I\R part with the hardware .
Fix the H part to the G part
with the hardware .
Fix the l part to the R part
with the hardware .
7 8
2
7
2
7
14 15
Fix the C\D\K part to the I\R part with the hardware .
Fix the G\H part to the I\R part with the hardware .
Fix the H part to the G part
with the hardware .
Fix the l part to the R part
with the hardware .
7 8
2
7
2
7
16 17
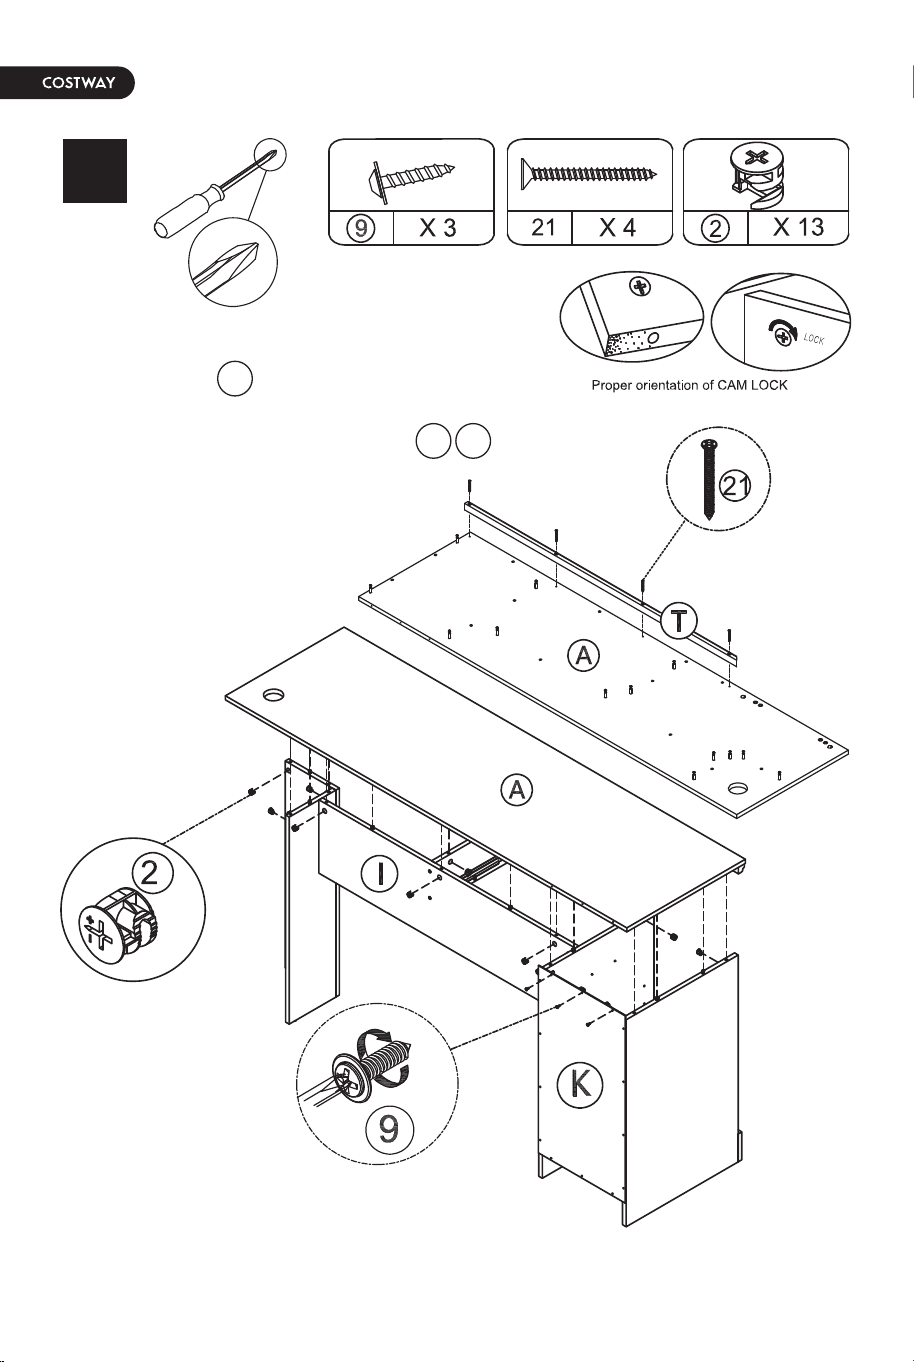
Fix the A part to the T part with
the hardware .
Fix the G\H\I\R\C\D\K part to
the A\T part with the hardware .
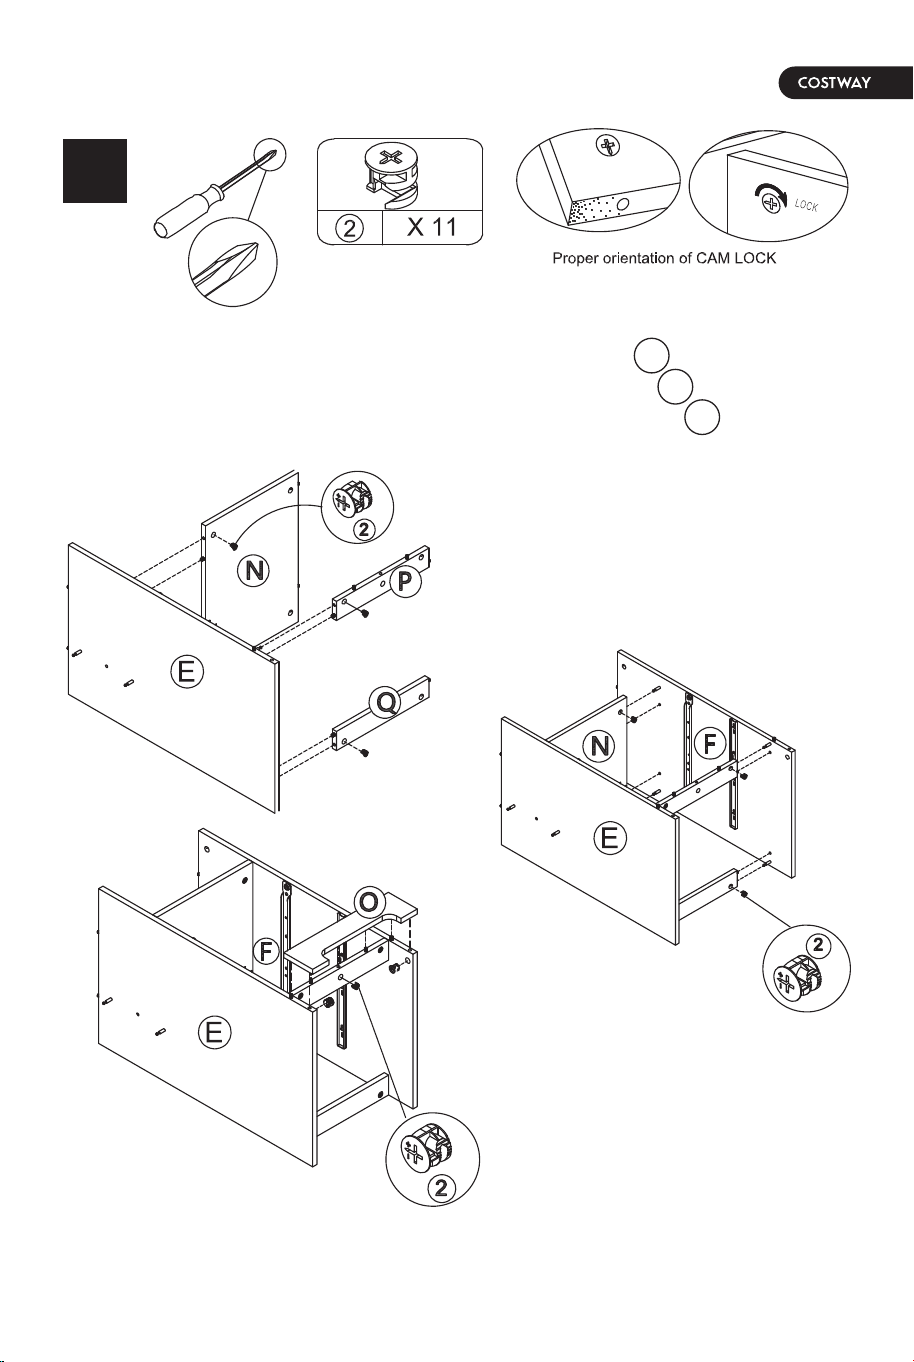
Fix the E part to the N\P\Q part with the hardware .
Fix the E\N\P\Q part to the F part with the hardware .
Fix the E\N\P\Q\F part to the O part with the hardware .
9
10
2
2
2
92
21
16 17
Fix the A part to the T part with
the hardware .
Fix the G\H\I\R\C\D\K part to
the A\T part with the hardware .
Fix the E part to the N\P\Q part with the hardware .
Fix the E\N\P\Q part to the F part with the hardware .
Fix the E\N\P\Q\F part to the O part with the hardware .
9
10
2
2
2
92
21
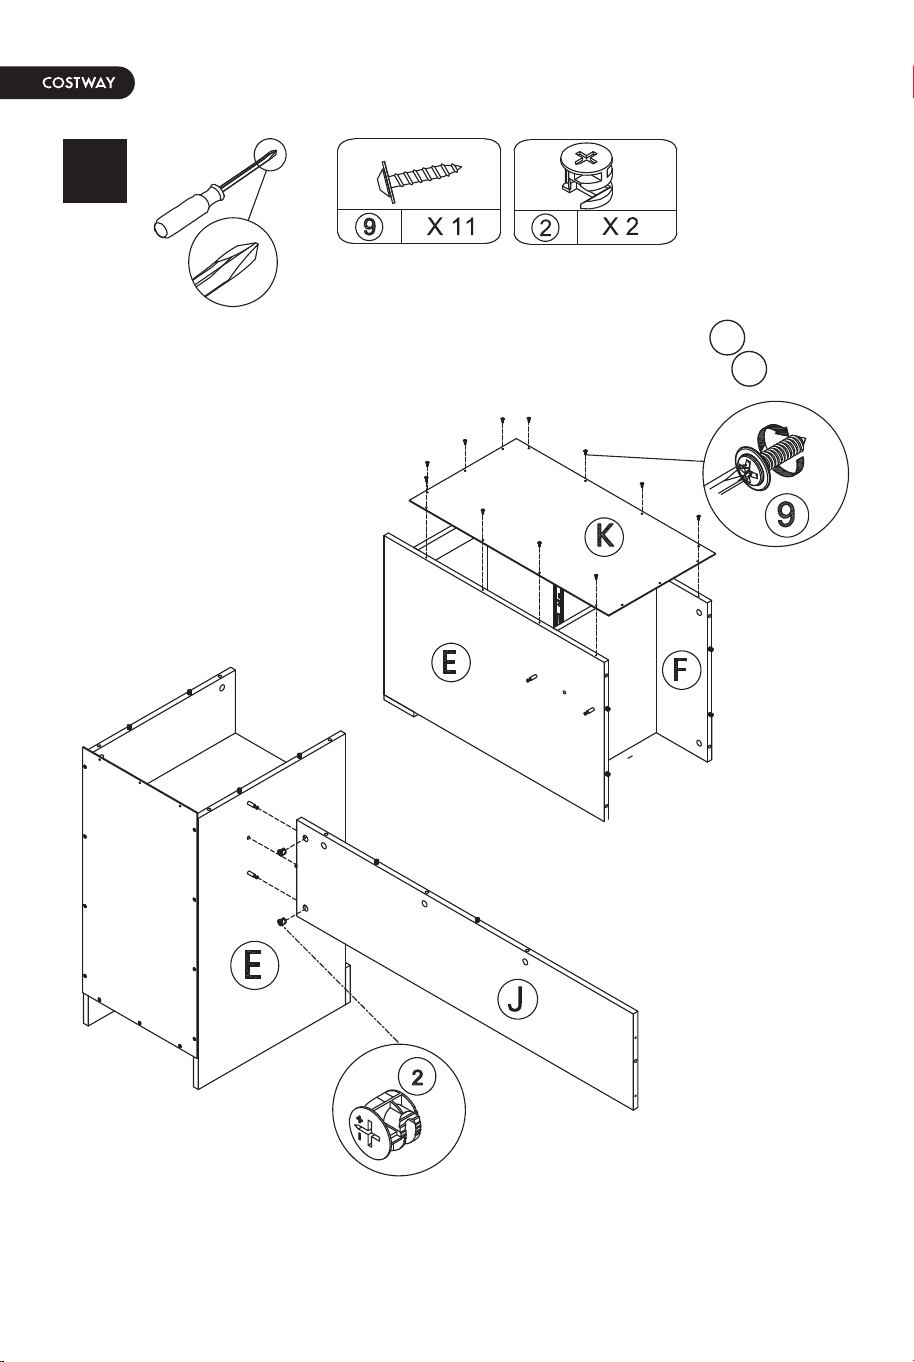
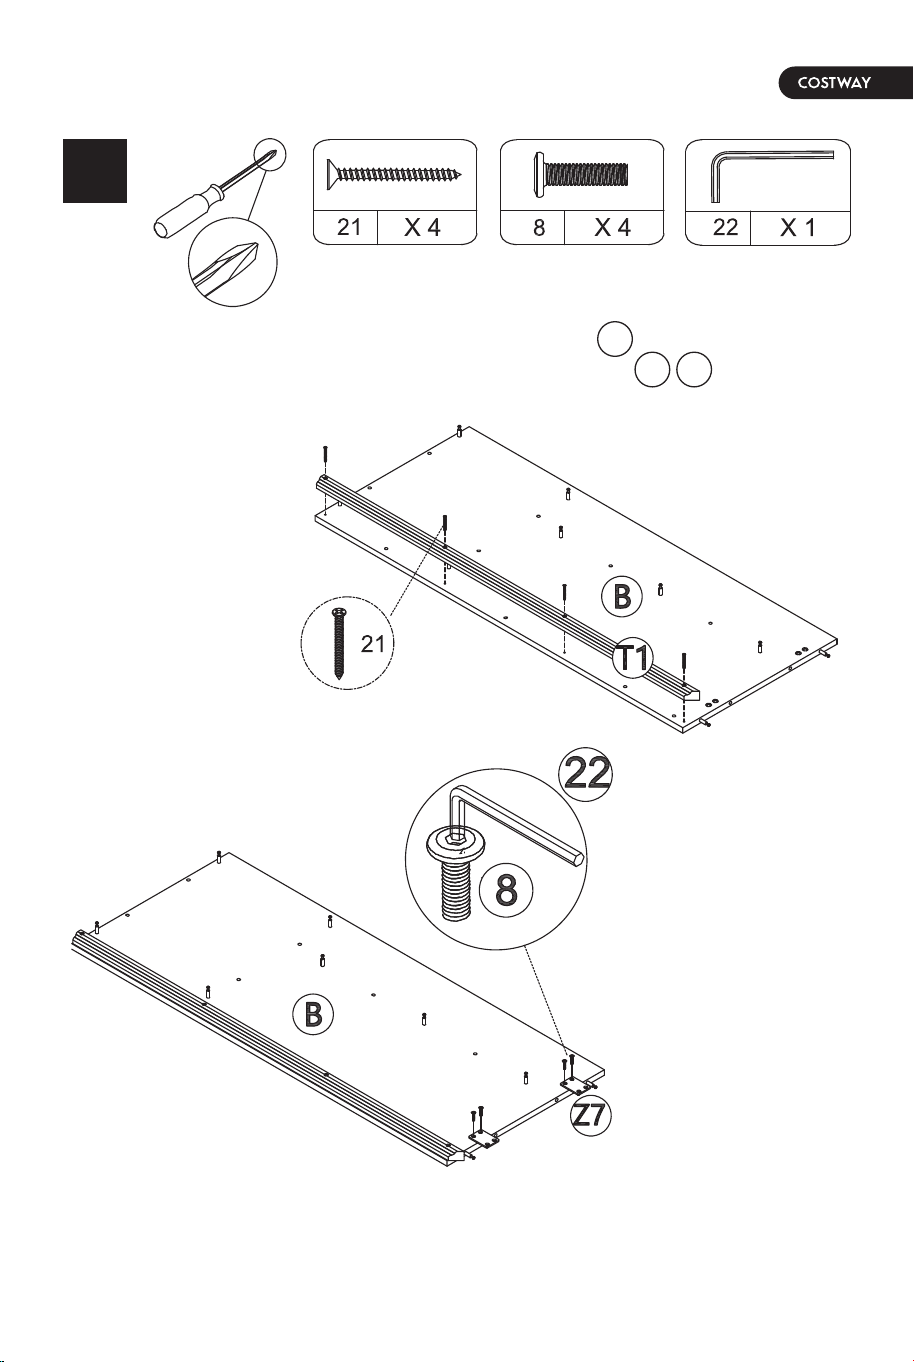
18 19
Fix the E\N\P\Q\F\O part to the K part with the hardware .
Fix the E\N\P\Q\F\O\K part to the J part with the hardware .
Fix the B part to the T1 part with the hardware .
Fix the B\T1 part to the Z7 part with the hardware .
11 12
21
8 22
9
2
18 19
Fix the E\N\P\Q\F\O part to the K part with the hardware .
Fix the E\N\P\Q\F\O\K part to the J part with the hardware .
Fix the B part to the T1 part with the hardware .
Fix the B\T1 part to the Z7 part with the hardware .
11 12
21
8 22
9
2
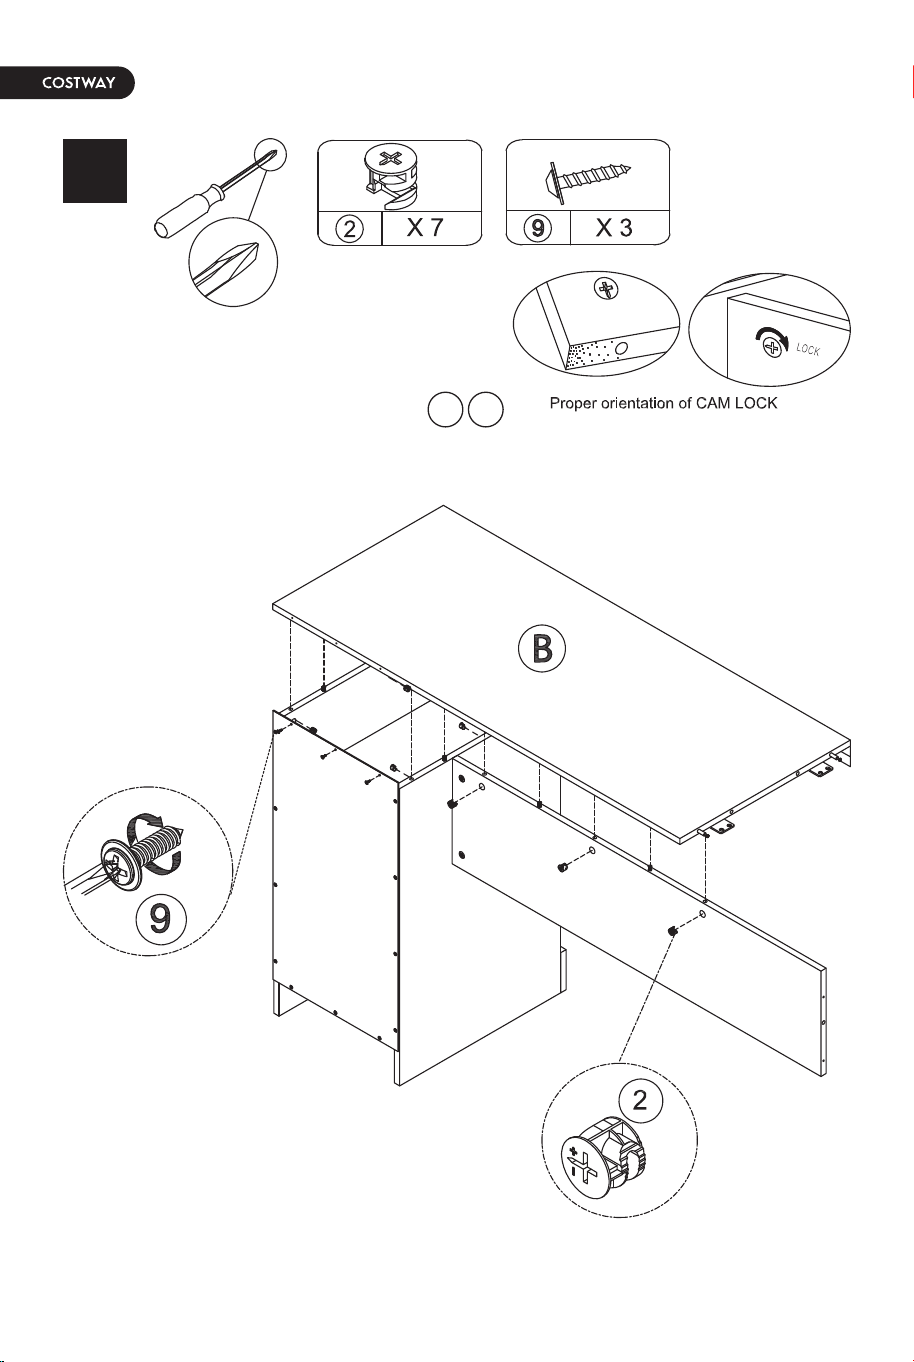
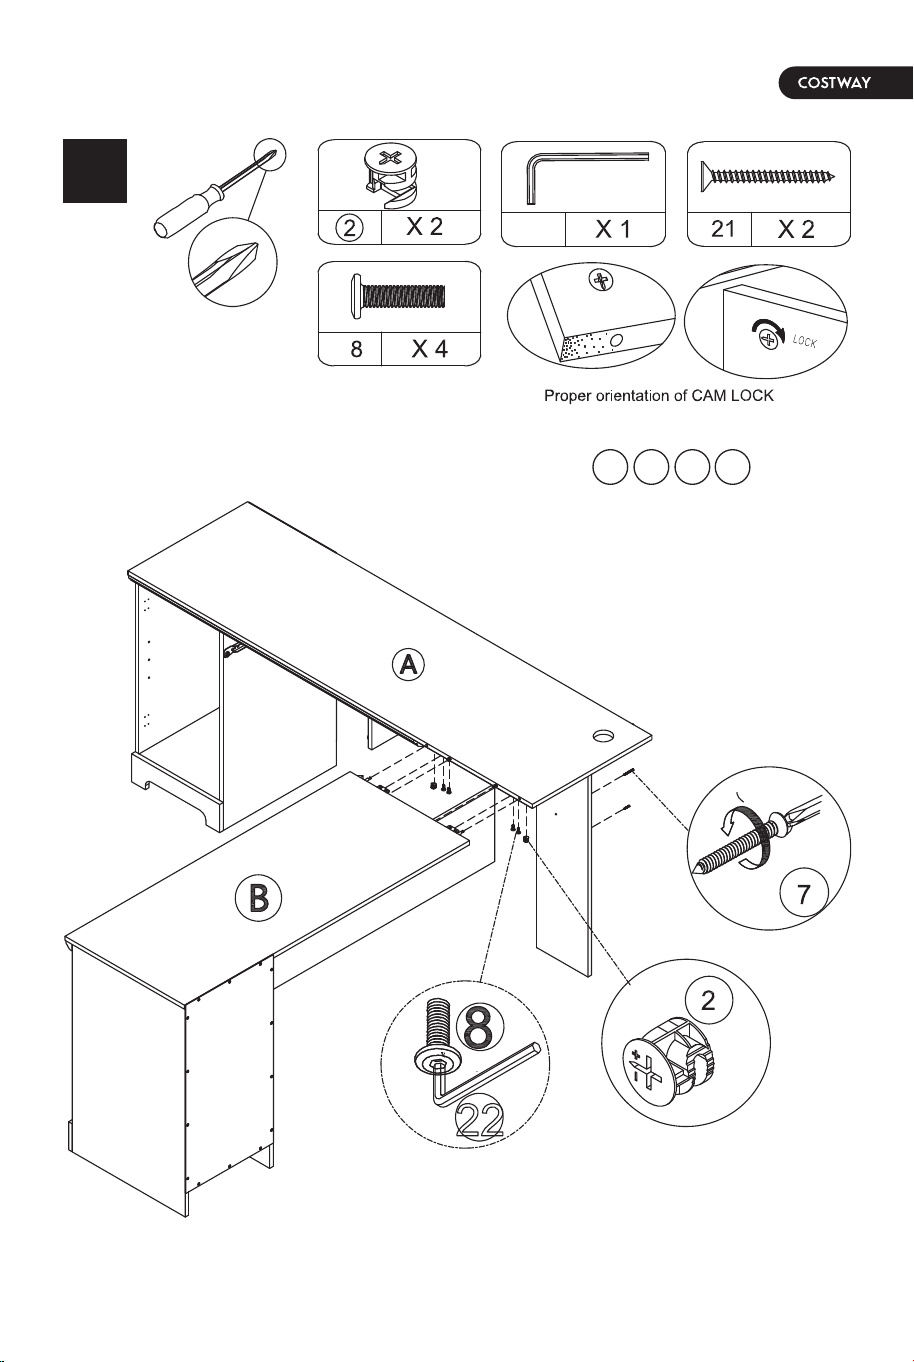
20 21
Fix the E\N\P\Q\F\O\K\J part to
the B\T1 part with the hardware .
Fix the E\N\P\Q\F\O\K\J\B\T1 part to
the G\H\I\R\C\D\K\A\T part with the hardware .
13 14
3
3
2 8 21 22
2 9
20 21
Fix the E\N\P\Q\F\O\K\J part to
the B\T1 part with the hardware .
Fix the E\N\P\Q\F\O\K\J\B\T1 part to
the G\H\I\R\C\D\K\A\T part with the hardware .
13 14
3
3
2 8 21 22
2 9
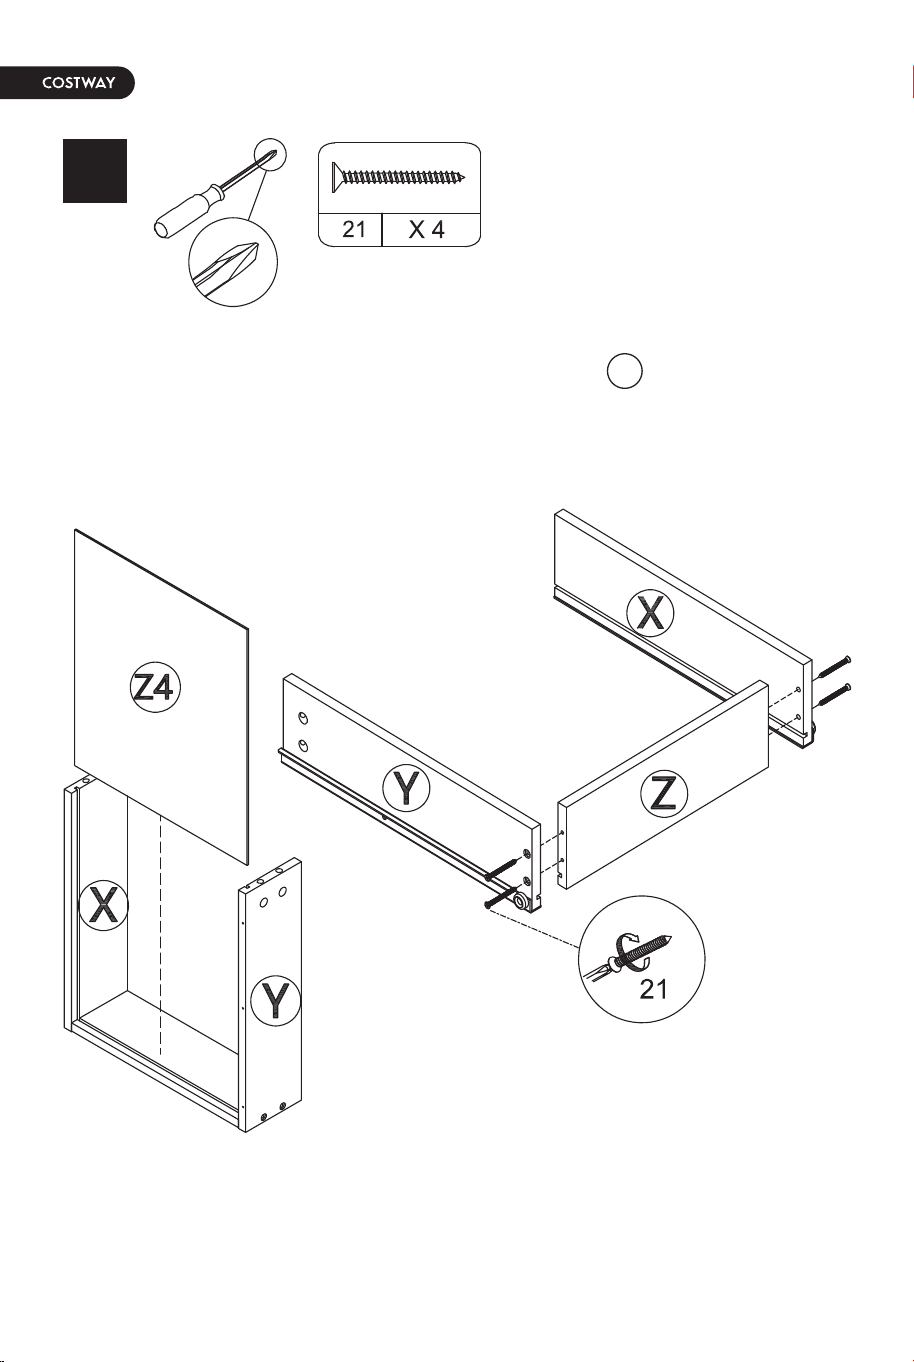
22 23
Fix the Z part to the X\Y part with the hardware .
Fix the Z\X\Y part to the Z4 part.
Fix the ZXXIY\Z4 part to the V part with the hardware .
Install the part 18 to the V board with the hardware .
15 16
2
2
3
13
21
22 23
Fix the Z part to the X\Y part with the hardware .
Fix the Z\X\Y part to the Z4 part.
Fix the ZXXIY\Z4 part to the V part with the hardware .
Install the part 18 to the V board with the hardware .
15 16
2
2
3
13
21
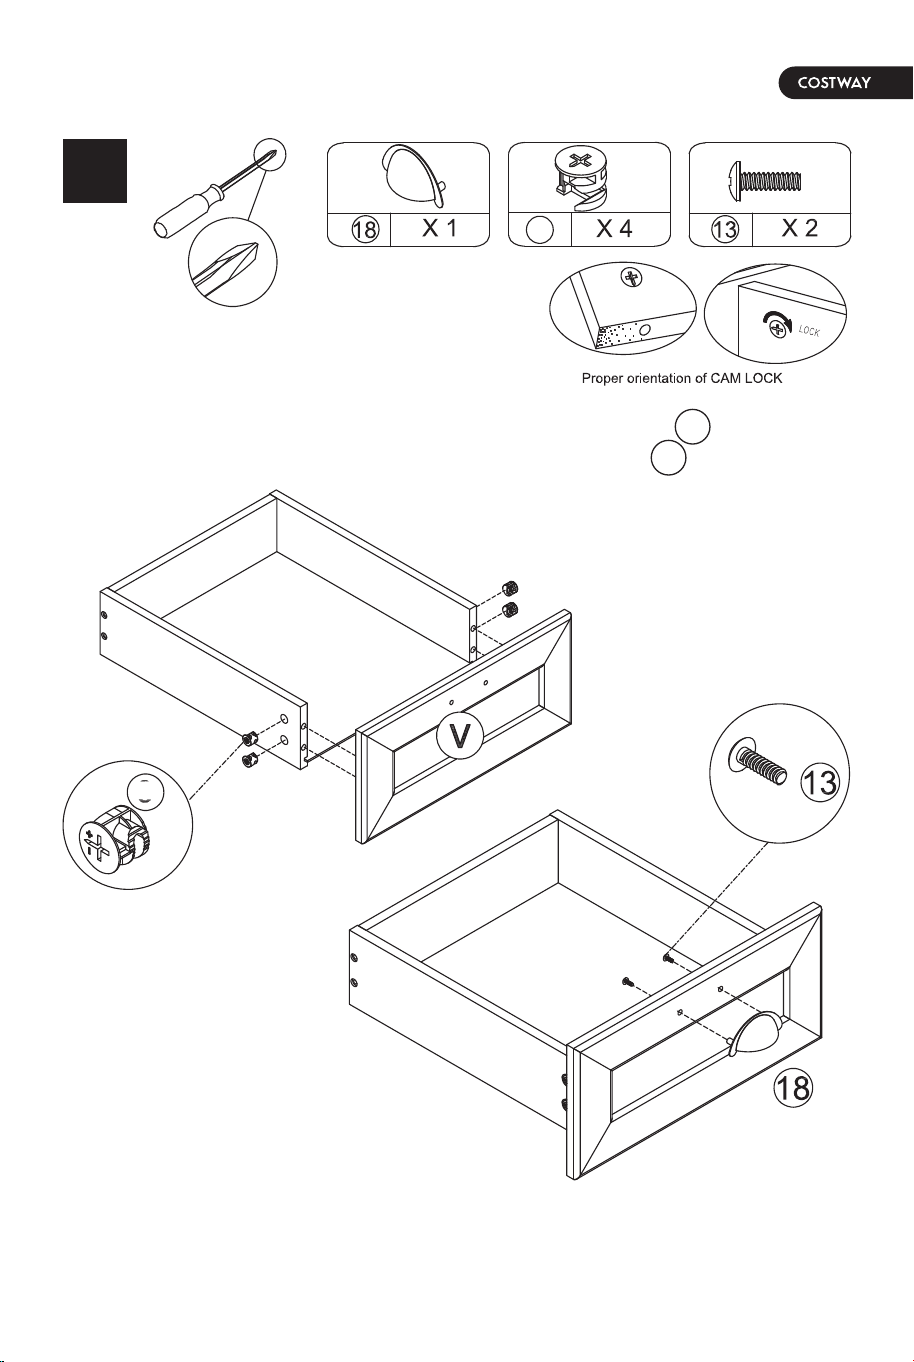
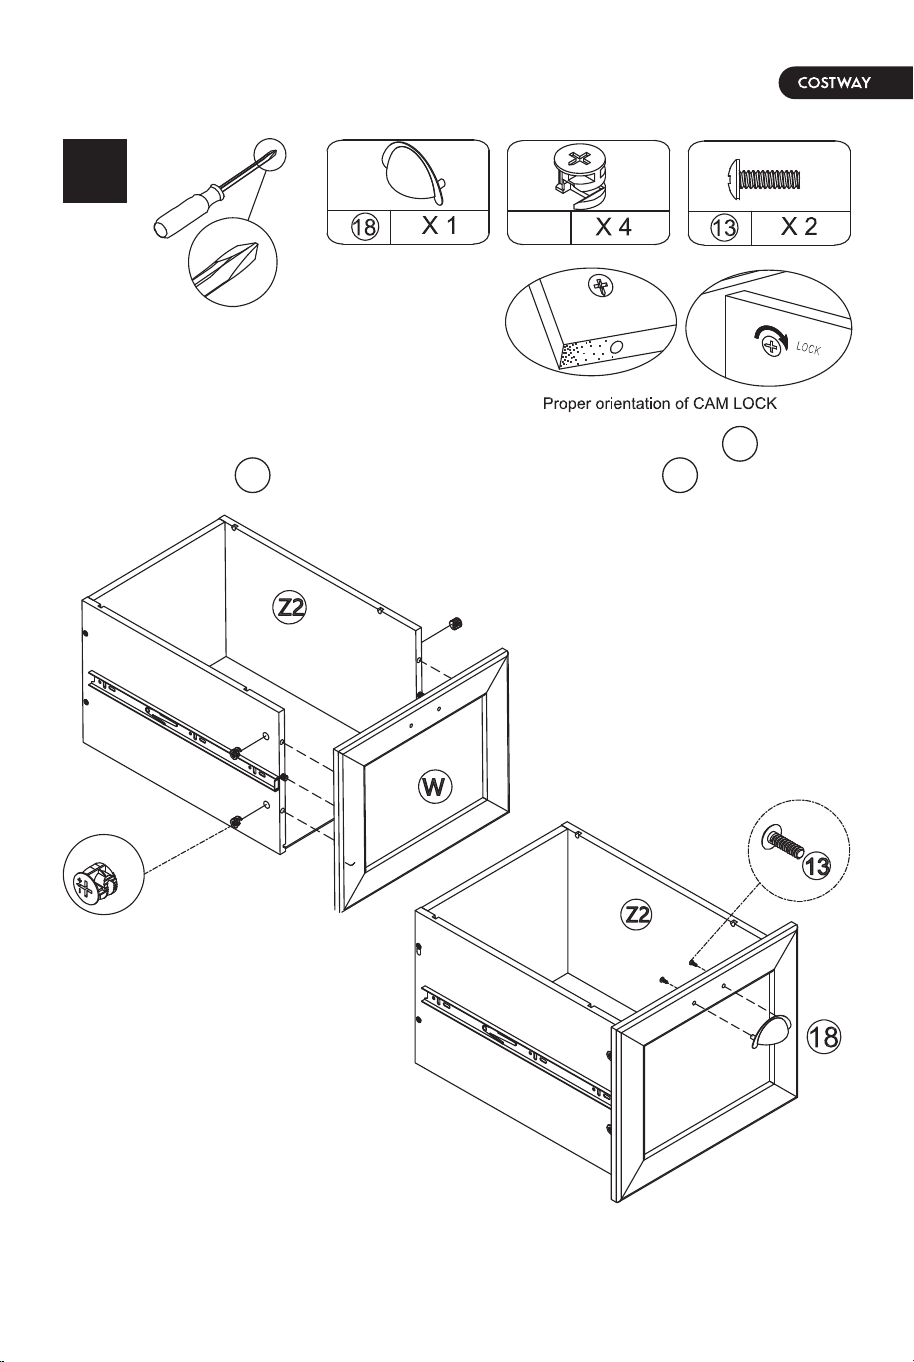
24 25
17 18
2
2
Insert the hardware to Z1\Z2\Z3 part.
Fix the Z3 part to the Z1\Z2 part with the hardware .
Fix the Z1\Z2\Z3 part to the Z5 part.
Fix the Z1\Z2\Z3\Z5 part to the W part with the hardware .
Install the part to the W board with the hardware .
18 13
2
5
21
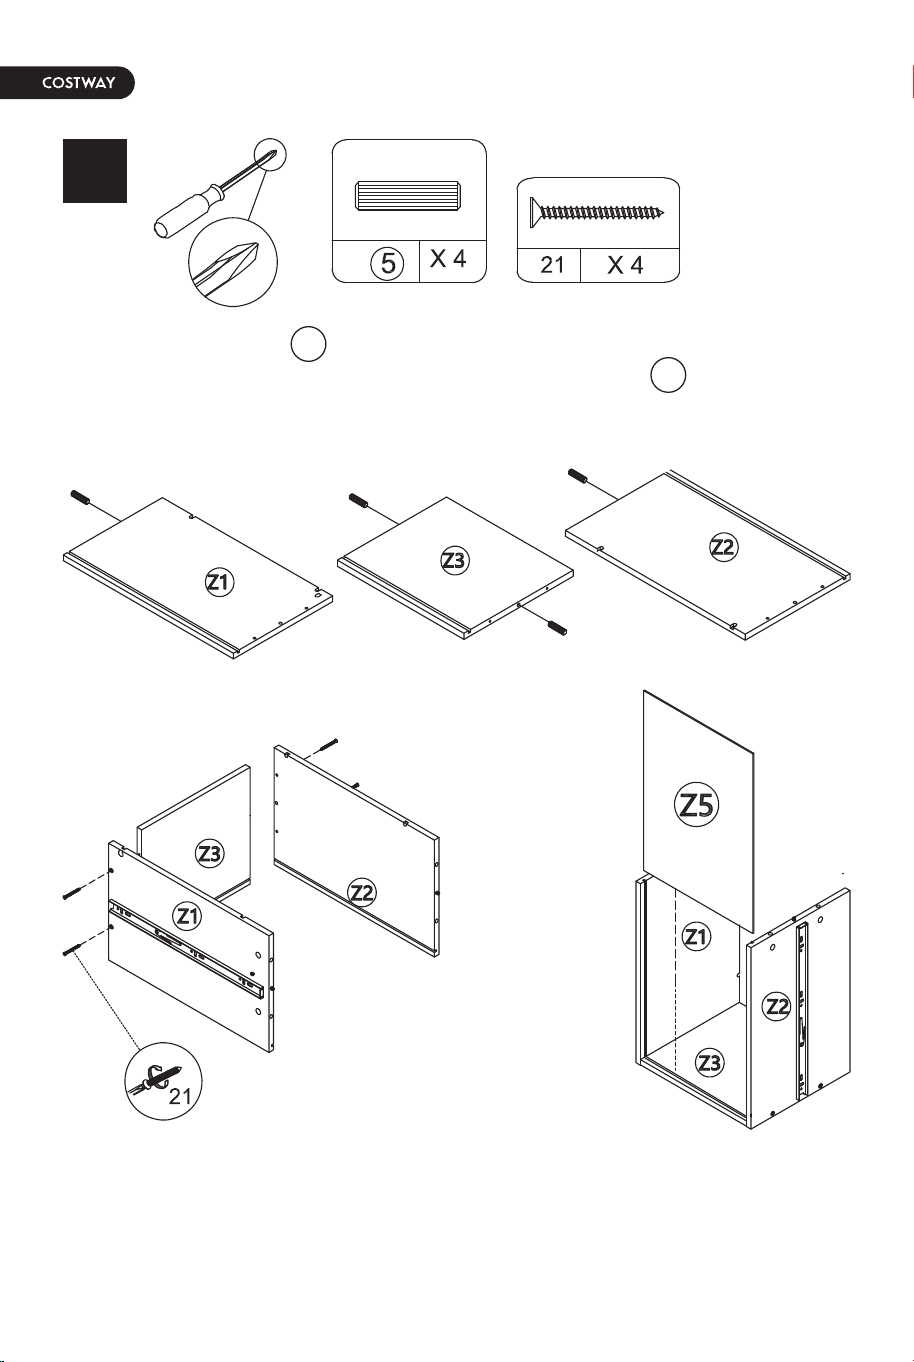
24 25
17 18
2
2
Insert the hardware to Z1\Z2\Z3 part.
Fix the Z3 part to the Z1\Z2 part with the hardware .
Fix the Z1\Z2\Z3 part to the Z5 part.
Fix the Z1\Z2\Z3\Z5 part to the W part with the hardware .
Install the part to the W board with the hardware .
18 13
2
5
21
26 27
2019
Fix the D/R part to the S part .
Fix the E/F part to the Z1\Z2\Z3\Z5\W\Z\X\Y\Z4\V part .
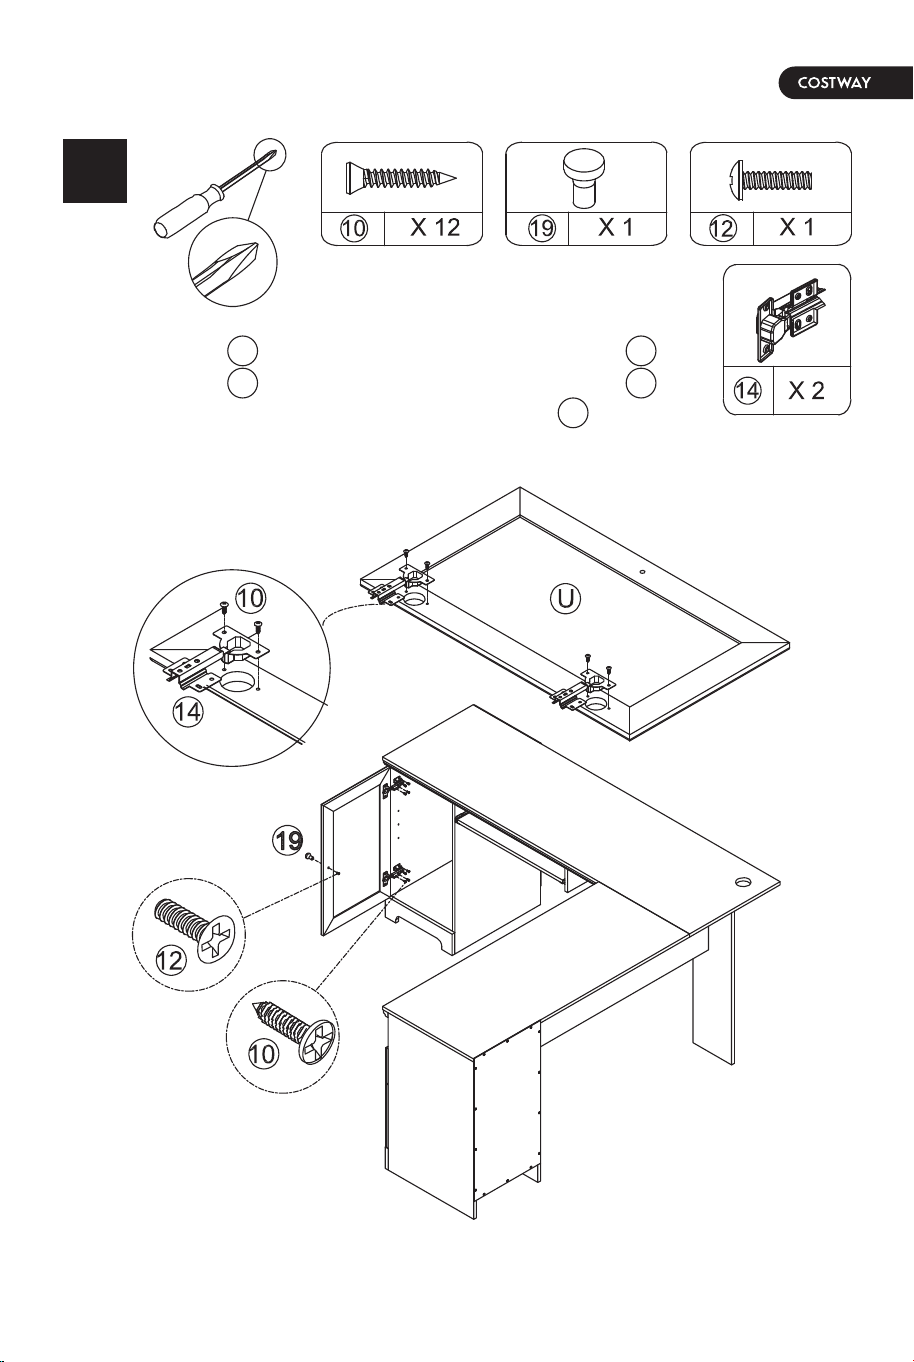
Install the part to the U board with the hardware and
Install the part to the U board with the hardware .
Fix the U part to the C part with the hardware .
14
19 12
10
10
26 27
2019
Fix the D/R part to the S part .
Fix the E/F part to the Z1\Z2\Z3\Z5\W\Z\X\Y\Z4\V part .
Install the part to the U board with the hardware and
Install the part to the U board with the hardware .
Fix the U part to the C part with the hardware .
14
19 12
10
10
28 29
2221
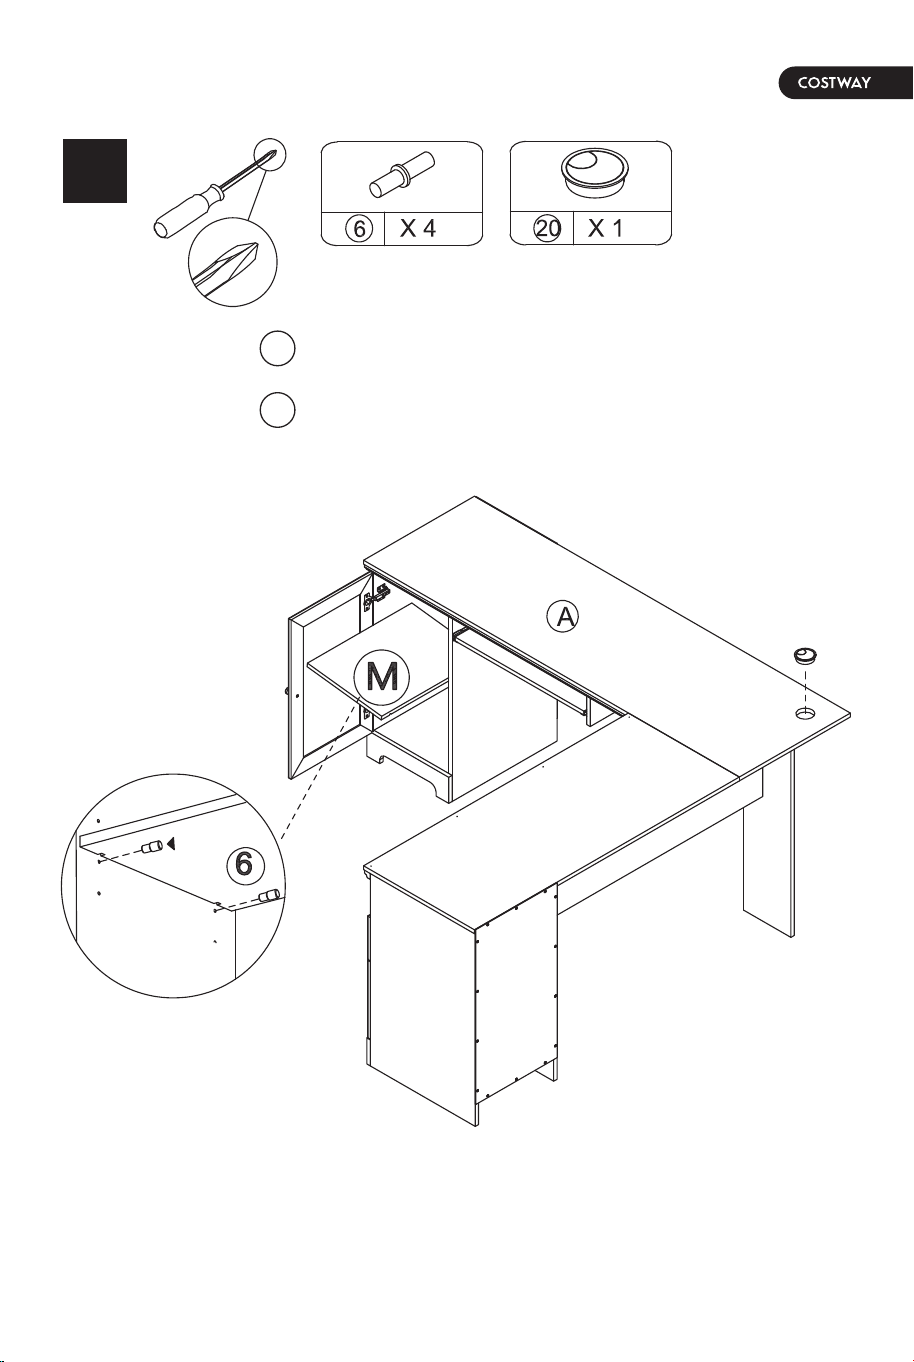
6
20
Plug the hardware into the C\D part and then install M part inside t
he middle.
plug the hardware into the A pare.
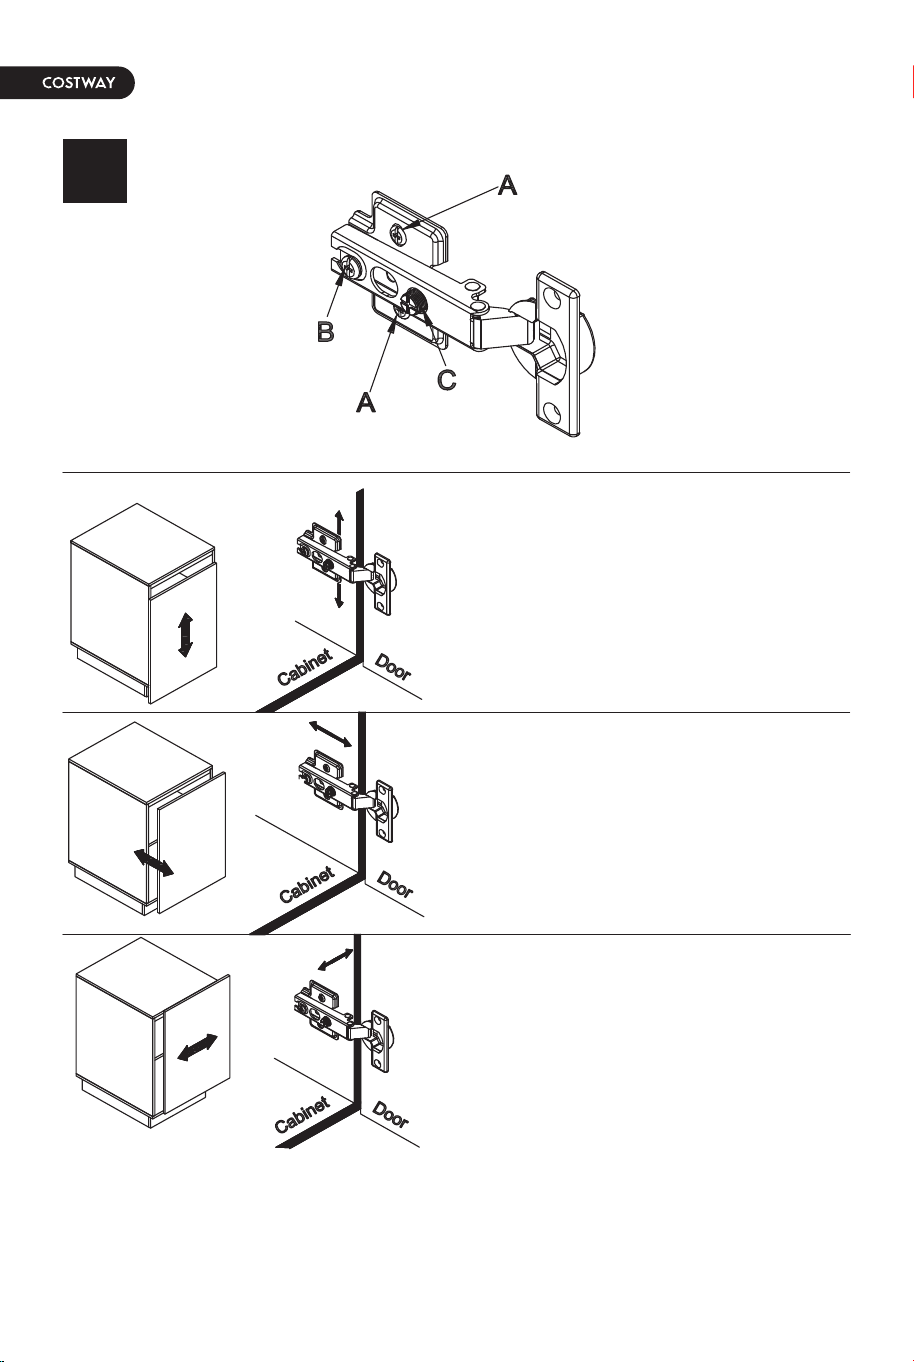
To adjust the vertical helght.
Loosen the four screws "A" on both
hinges. Two of them are usually in
slotted holes which allows you to adjust
up or down by a few mm. Then tighten
back up.
To adjust depth.
Loosen screw "B" and adjust door, ifthe
door can no be adjusted, please loosen
screw "C", then try again. Tighten
screw "B" and "C".
To adjust slde ways.
Tuming the screw "C" on BOTH hinges
on each door.
28 29
2221
6
20
Plug the hardware into the C\D part and then install M part inside t
he middle.
plug the hardware into the A pare.
To adjust the vertical helght.
Loosen the four screws "A" on both
hinges. Two of them are usually in
slotted holes which allows you to adjust
up or down by a few mm. Then tighten
back up.
To adjust depth.
Loosen screw "B" and adjust door, ifthe
door can no be adjusted, please loosen
screw "C", then try again. Tighten
screw "B" and "C".
To adjust slde ways.
Tuming the screw "C" on BOTH hinges
on each door.
30 31
Care and Maintenance
It is best to keep your furniture in a climate-controlled environment. Extreme
temperature and humidity changes can cause fading, warping, shrinking and
splitting of wood.
It is advised to keep furniture away from direct sunlight as sun may damage the
finish.
Proper care and cleaning at home will extend the life of your purchase.
Following these important and helpful tips will enhance your furniture as it ages.
Use a soft, clean cloth that will not scratch the surface when dusting.
Use of furniture polish is not necessary.
Should you choose to use polish, test first in an inconspicuous area.
Using solvents of any kind on your furniture may damage the finish.
Never use water to clean your furniture as it may cause damage to the finish.
Liquid spills should be removed immediately. Using a soft clean cloth, blot the
spill gently. Avoid rubbing.
Check bolts/screws periodically and tighten them if necessary.
Further advice about wood furniture care
Maximum Loads
This item is only suitable within the specified maximum load-bearing. Heavier loads than
the indicated load capacity may cause instability, resulting in possible injuries.
80 LBS
25 LBS
40 LBS 25 LBS
80 LBS

Please give us a chance to make it right and do better !
Contact our friendly customer service department for help first.
Replacements for missing or damaged parts will be shipped ASAP !
Contact Us!
Do NOT return this item.
USER’S MANUAL
THIS INSTRUCTION BOOKLET CONTAINS IMPORTANT SAFETY INFORMATION. PLEASE READ AND KEEP FOR FUTURE REFERENCE.
US office: Fontana UK office: Ipswich AU office: Truganina
DE office: Hamburg
FR office: Saint Vigor d'Ymonville
PL office: Gdańsk
US:cs.us@costway.com
UK:cs.uk@costway.com
L-Shaped Desk
CB10392BK/CB10392GR
/CB10392CF