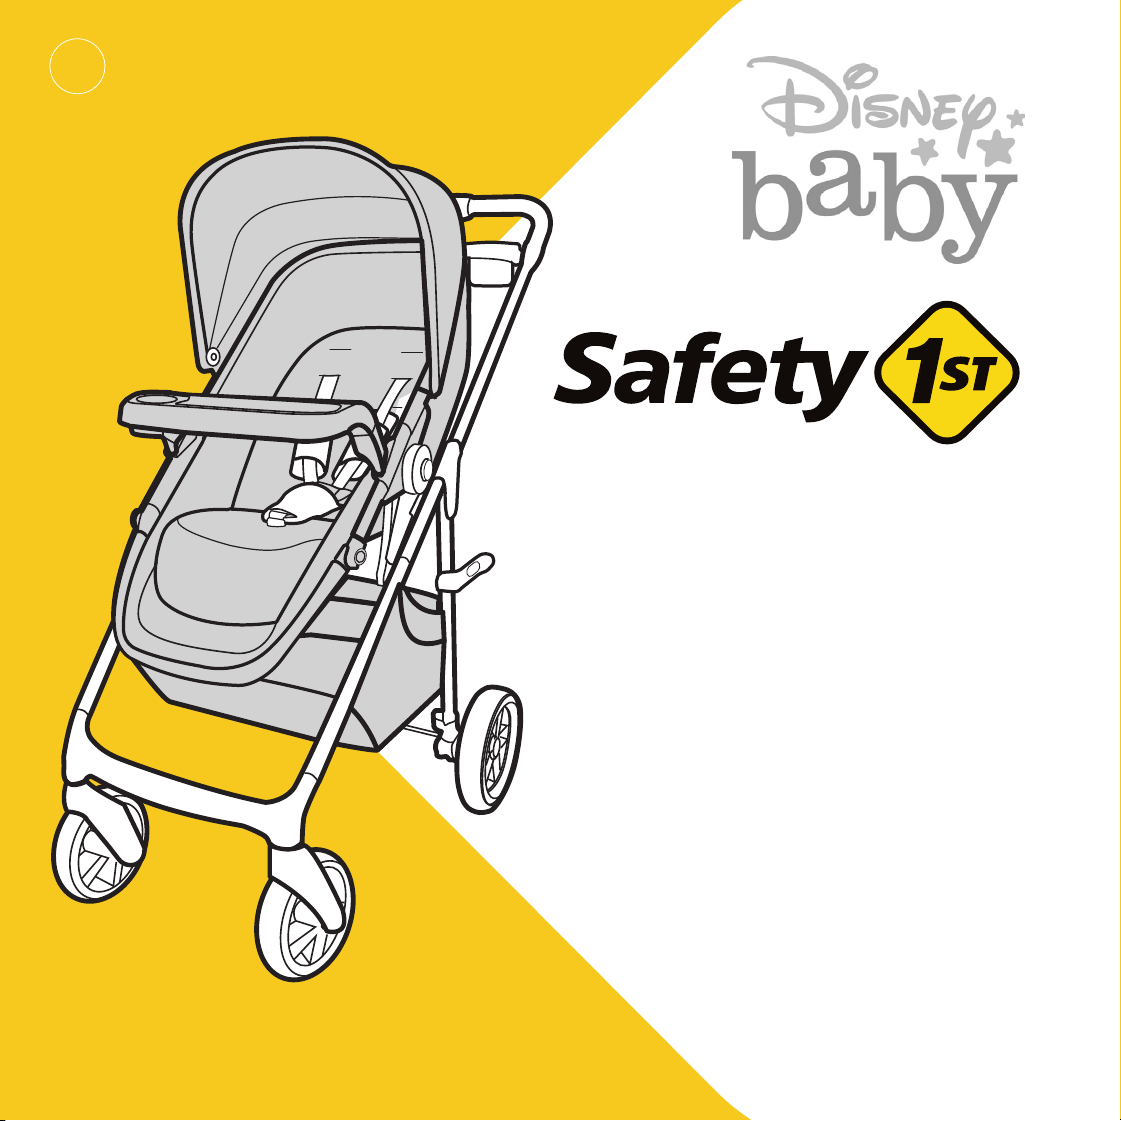
Grow and Go
TM
Modular Stroller
Max 50 lb (22.7 kg)
Read all instructions BEFORE USING this product.
KEEP INSTRUCTIONS FOR FUTURE USE.
4358-8272A 06/09/22
NOTE: Styles vary.
TR450
Safety Information
FOR THE SAFETY OF YOUR CHILD, PLEASE READ THE FOLLOWING WARNINGS
AND ASSEMBLY INSTRUCTIONS AND KEEP FOR FUTURE REFERENCE.
• Adult assembly required.
• NEVER LEAVE CHILD UNATTENDED. ALWAYS keep child in view when in stroller.
• AVOID SERIOUS INJURY from falling or sliding out. ALWAYS use the harness system.
Check frequently to make sure it is secure.
• ALWAYS keep fingers away from moving parts, when folding, unfolding or adjusting stroller to
prevent finger entrapment.
• ALWAYS make sure stroller is FULLY OPEN AND LOCKED before using.
• ALWAYS use the brakes when stroller is stopped.
• ALWAYS remove protective material and poly bags and dispose before assembly.
• NEVER put hot liquids in the cup holder.
• Parent tray, including the cup holders, CANNOT exceed 3 lbs (1.4 kg) total.
• NEVER use stroller on stairs or escalators.
• NEVER rollerblade with stroller.
• NEVER allow children to play with or hang onto the stroller.
• NEVER allow children to climb into the stroller unassisted. Stroller may tip over and injure child.
WARNING:

• NEVER place or hang parcels, bags, or accessories on the handle or canopy. The stroller may
tip over or the canopy may collapse.
• This product will become unstable if a parcel bag or rack is used when there is no
provision for one.
• This product may become unstable if a parcel bag, other than the one recommended by the
manufacturer is used.
• This product will become unstable if the manufacturer’s recommended load is exceeded.
• Care must be taken when folding and unfolding the stroller to prevent finger entrapment.
• Child may slip into leg openings and strangle, unless you disengage buckle under the foot rest
and press down the foot area to create safe enclosure.
• DO NOT carry additional children, goods, or accessories in or on this product except as
recommended in the manufacturer’s instructions.
• NEVER place more than 10 lb (4.5 kg) in the storage basket. If weight is exceeded,
hazardous unstable conditions may exist.
• STROLLER is only for use with children up to 50 lb (22.7 kg), and WHEN SEATED, the
midpoint of your child’s head is at or below the top of the stroller seat.
• ONLY use this stroller with ONE child at a time.
• STROLLER mode is for use with children who can sit up unassisted and is NOT
recommended for newborns.
• Failure to follow the steps and warnings on the labels and in the instruction manual can result in
serious injury or death to your child.

Contents
Parts of Stroller ........................................ 1
Installing Wheels ...................................... 2
Using Parking Brake ................................. 4
Removing Wheels .................................... 4
Modes of Use ......................................... 5
Car Seat Carrier Mode ............................. 6
Removing Car Seat from Stroller Frame
or Stroller Seat ......................................... 6
Stroller Seat Mode .................................. 7
Removing Stroller Seat
from Stroller Frame .................................. 7
Carriage Mode ........................................ 8
Travel System Mode ................................ 9
Adjusting Stroller Seat Backrest ................ 10
Adjusting Stroller Seat Positions ................ 11
Attaching & Removing Canopy .................. 12
Adjusting Canopy .................................... 12
Adjusting Footrest .................................... 13
Attaching & Removing Child Tray .............. 14
Parent Tray & Storage Basket Use ............. 15
Securing Child in Stroller Seat ................... 16
Changing Stroller Seat Harness
Strap Height ............................................ 18
Adjusting Harness System Length ............. 19
Folding Stroller ........................................ 20
Unfolding Stroller ..................................... 21
Wash & Care of Stroller Parts.................... 22
Dorel Juvenile Group Information .............. 23
Replacement Parts ................................... 23
Warranty ................................................. 23
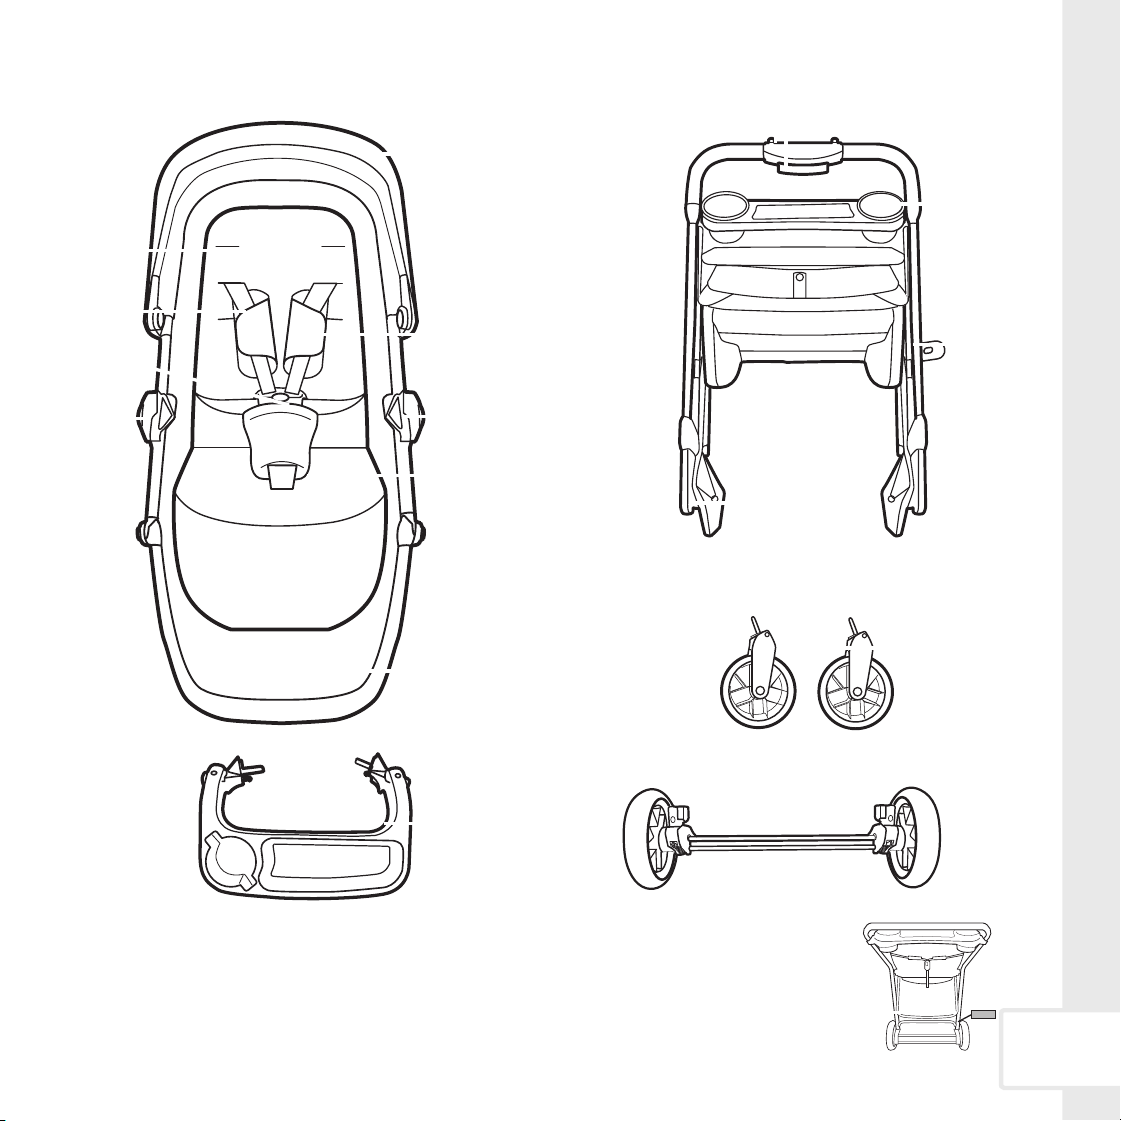
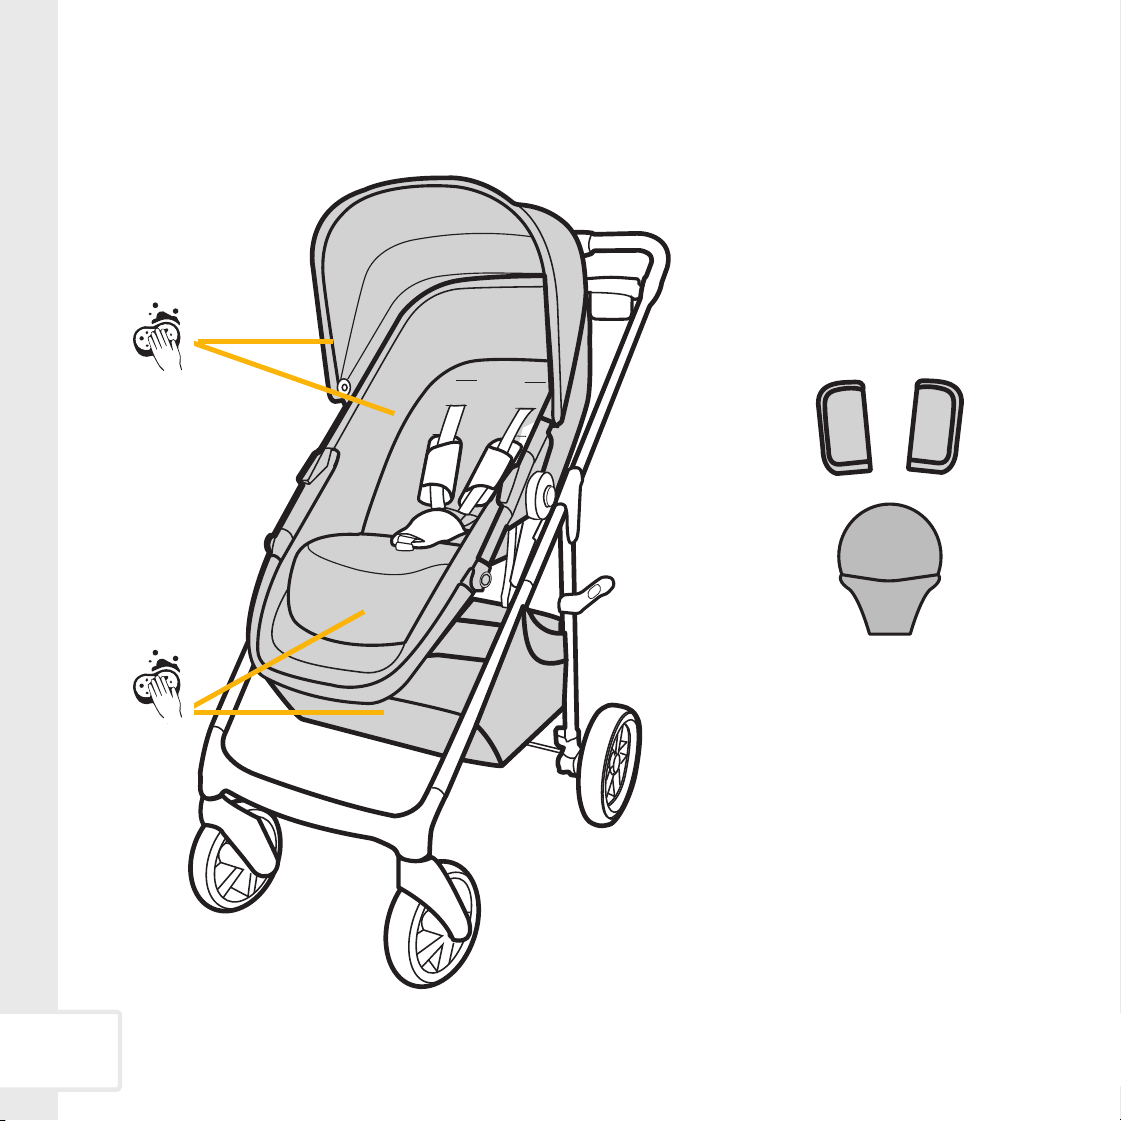
Parts of Stroller
1
Lay out and identify all of the
parts.
If any parts are missing, do not
return this product to the
place of purchase.
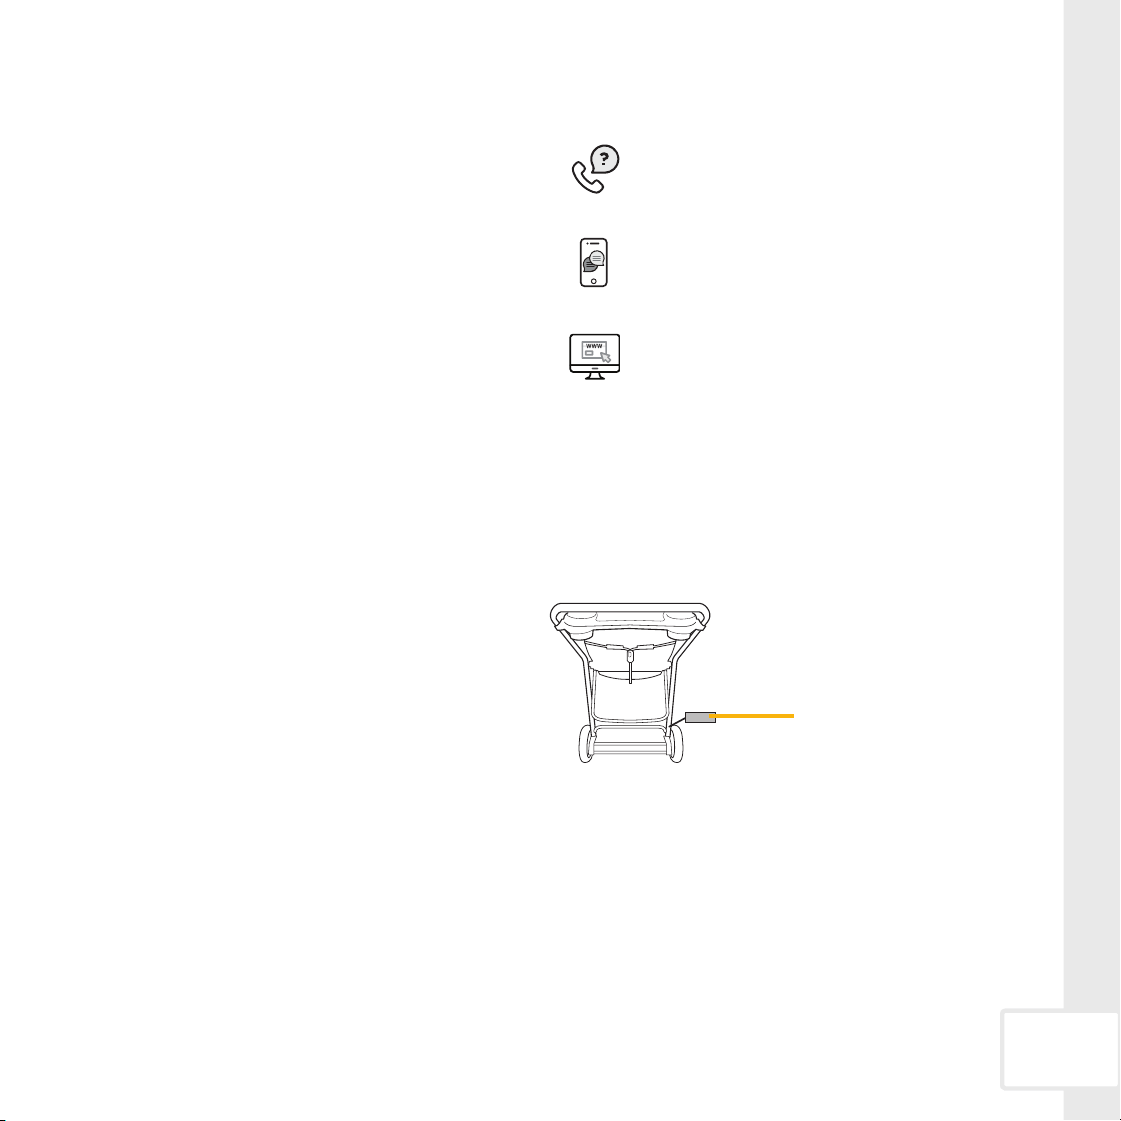
Please contact Consumer
Care via:
• Phone: 1-800-544-1108
• Text: 1-812-652-2525
• Chat: www.safety1st.com
You will need to know the model
number (TR450) and manufac-
ture date.
It is located on a label on the
stroller frame.
Parent
Tray
Harness
Straps
Shoulder
Harness
Slots
Harness
Covers
Adjustable
Footrest
Footrest
Adjustment
Buttons
Child Tray
Attachment
Hubs
Front Swivel
Wheels
Rear
Wheel
Assembly
Buckle
Buckle
Cover
Removable
Canopy with
Peek-a-Boo
Window
Child Tray
Frame
Lock
Car Seat &
Stroller Seat
Attachments
Frame Release
Buttons
Seat
Adjustment
and
Release
Buttons

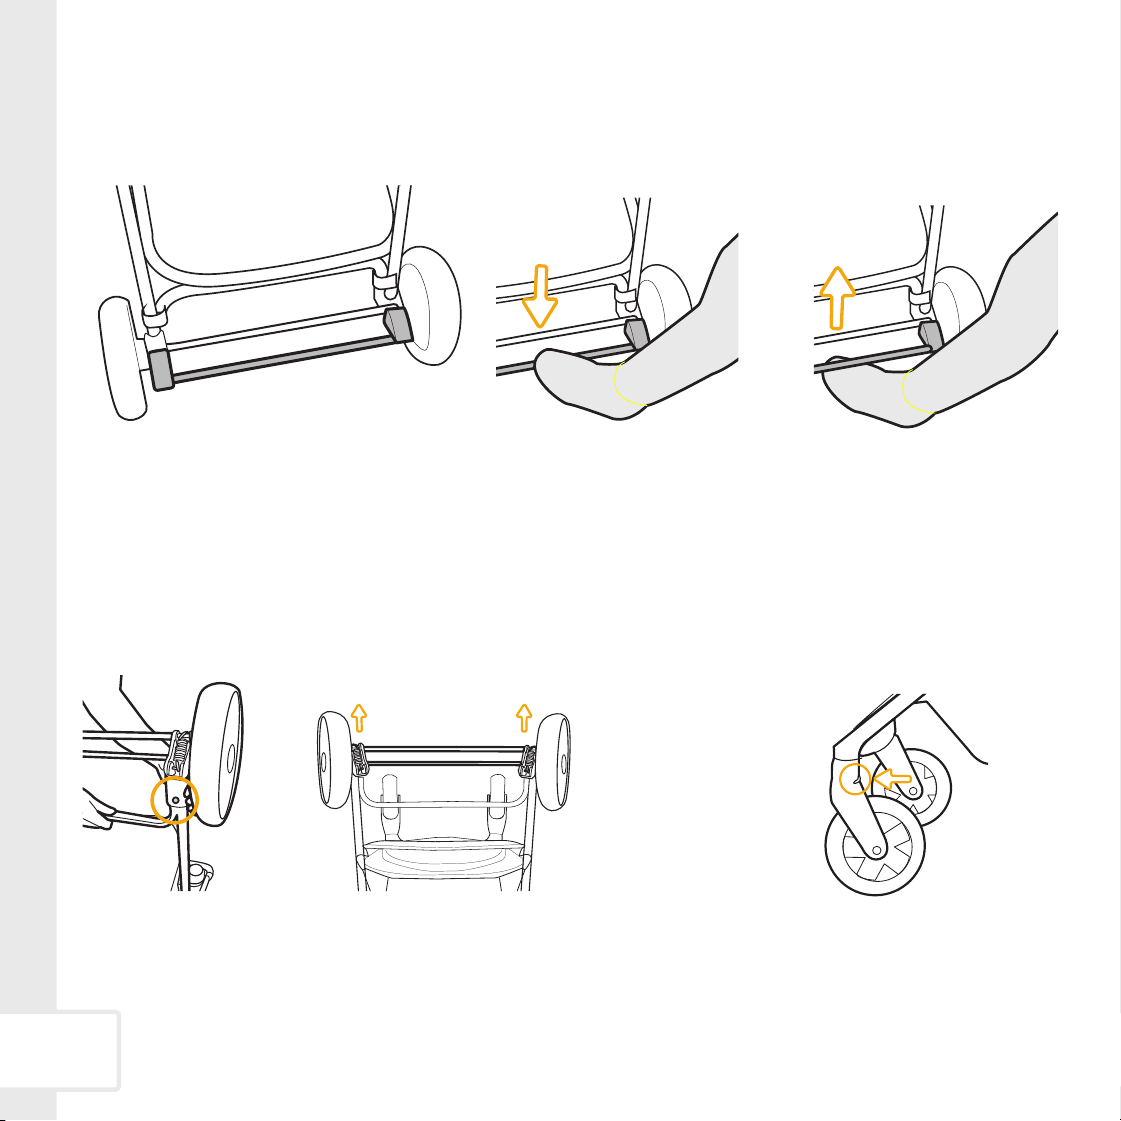
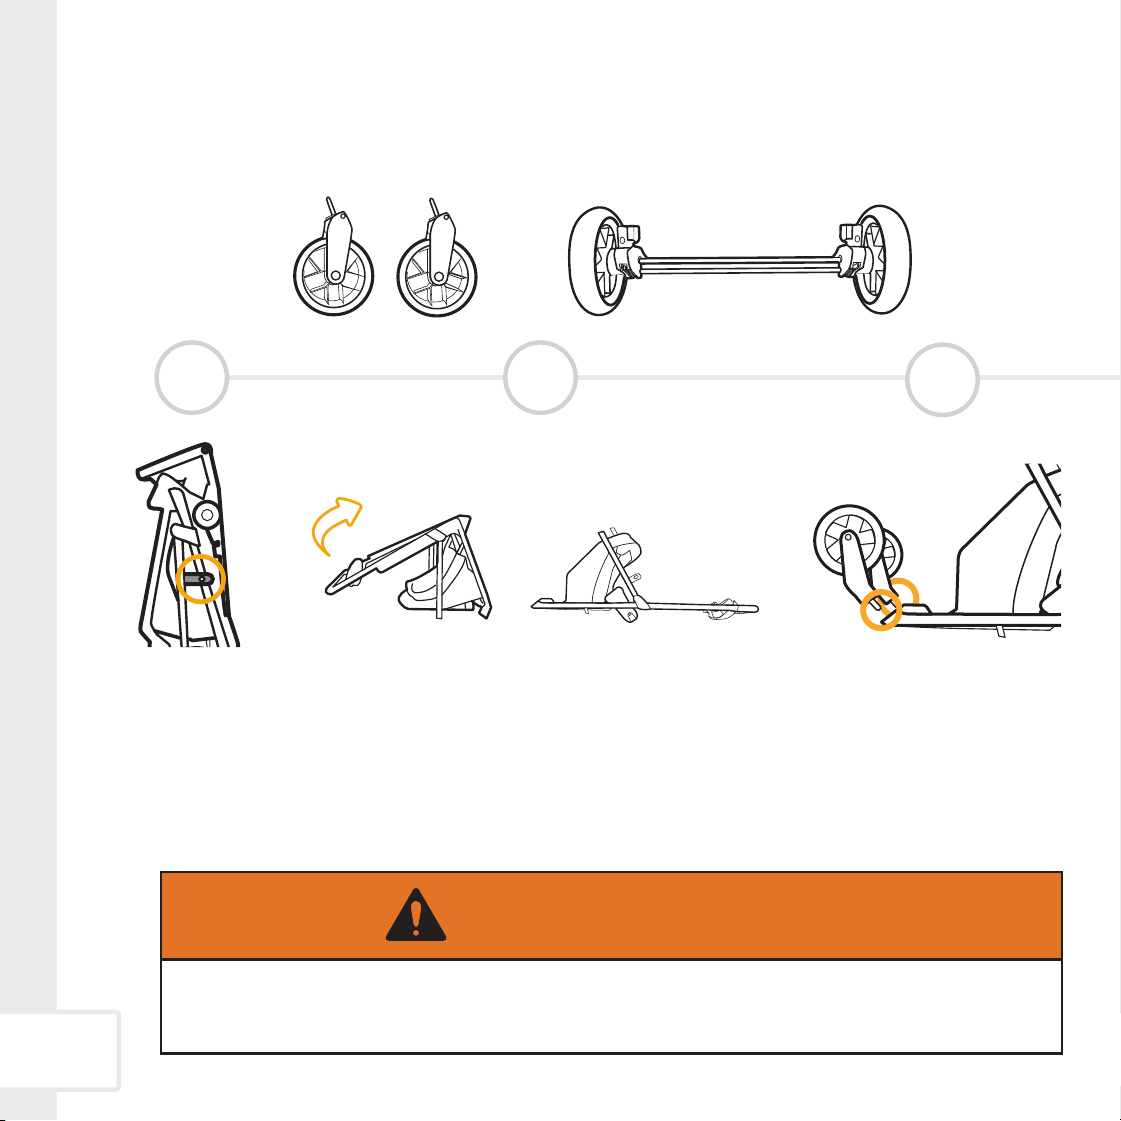
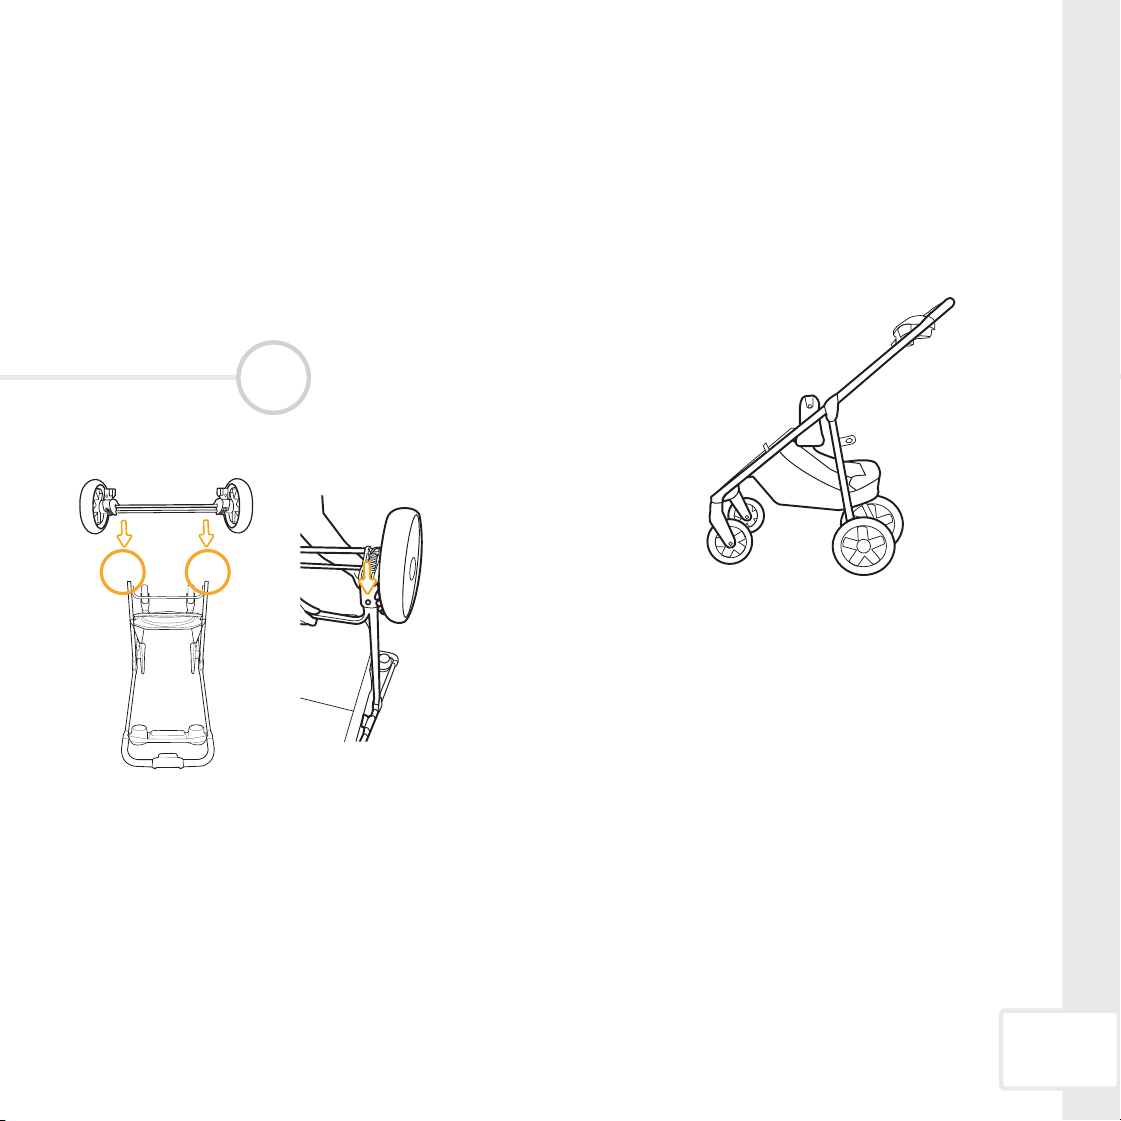
Installing Wheels
2
• Unfold the stroller until you hear it click and
lock into fully the open position.
• Lay the stroller down on the floor as shown.
1 2
Unfasten frame lock.
Front Swivel Wheels
Rear Wheel Assemby
ALWAYS keep fingers away from moving parts, when folding, unfolding, or adjusting
stroller to prevent finger entrapment.
WARNING:
click!
3
Attach the front swivel
wheels as shown.

3
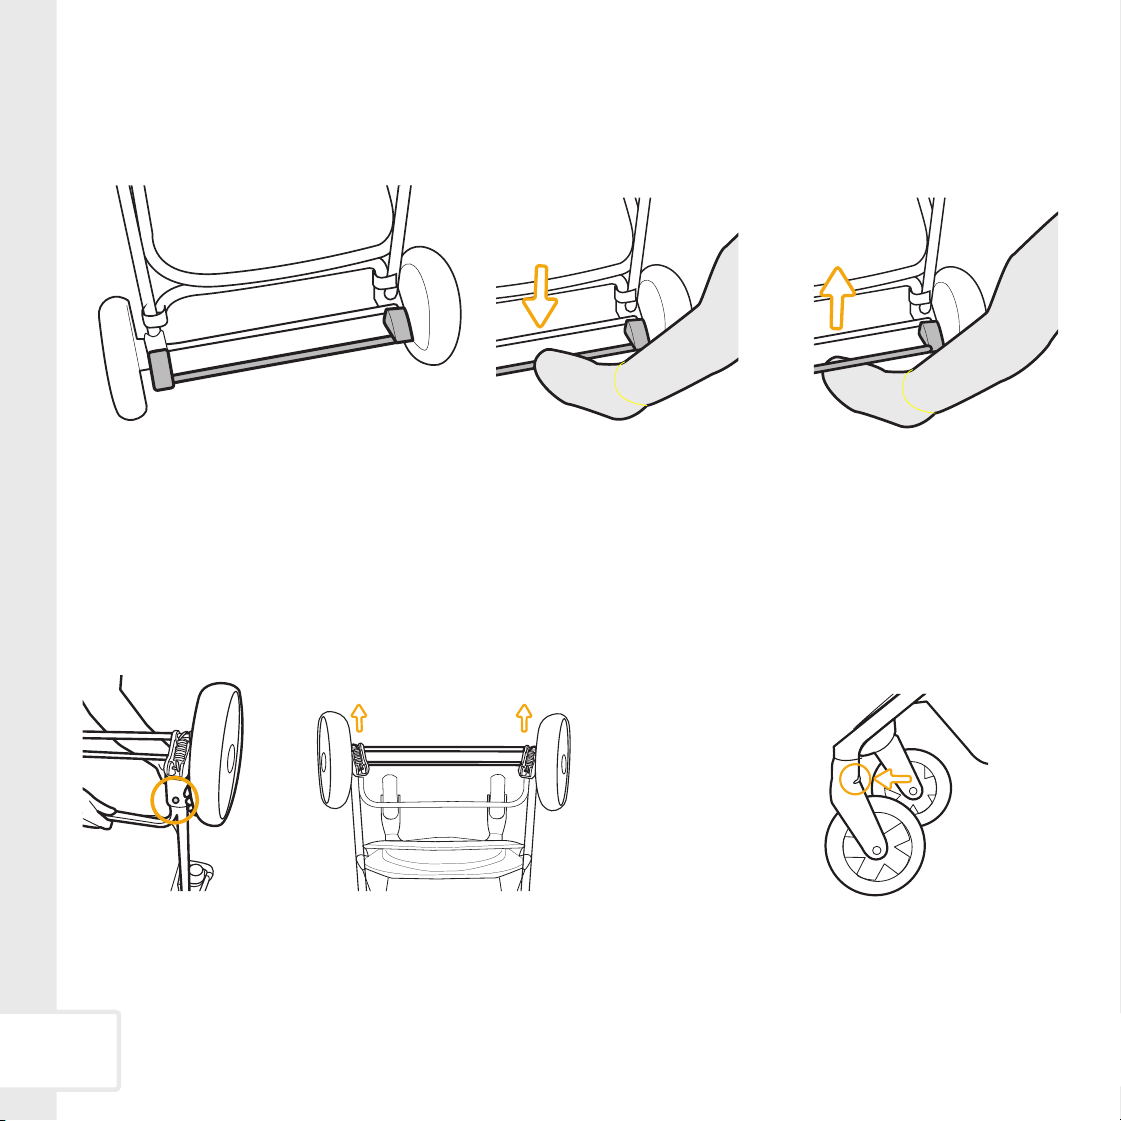
4
• Align the rear wheel assembly hubs with the rear leg
posts on the stroller frame.
• The pin on the stroller frame will go into the slot in the
wheel assembly hubs as shown.
• Then set the stroller upright.
Finished!
NOTE: Pull down on the front wheels and rear
wheel assembly to make sure they
are attached securely.
To use parking brake, see page 4.
For Car Seat Carrier Mode, see page 6.
For Stroller Seat Mode, see page 7.
For Carriage Mode, see page 8.
For Travel System Mode, see page 9.
To fold and unfold stroller, see pages 20-21.
click!
4
Using Parking Brake
Removing Wheels
To Lock Parking Brake To Release Parking Brake
Brake Bar
Turn stroller upside down.
Locate the rear wheel
release buttons.
Press the release buttons while
pulling the rear wheel assembly
up and pull it away from the
stroller.
Locate the front wheel
release button.
Press the release button in while
pulling the front wheel down.
Repeat for other side.
Rear Wheel Assemby
Front Swivel Wheels
Step on the brake bar to lock. Pull the brake bar up to release.

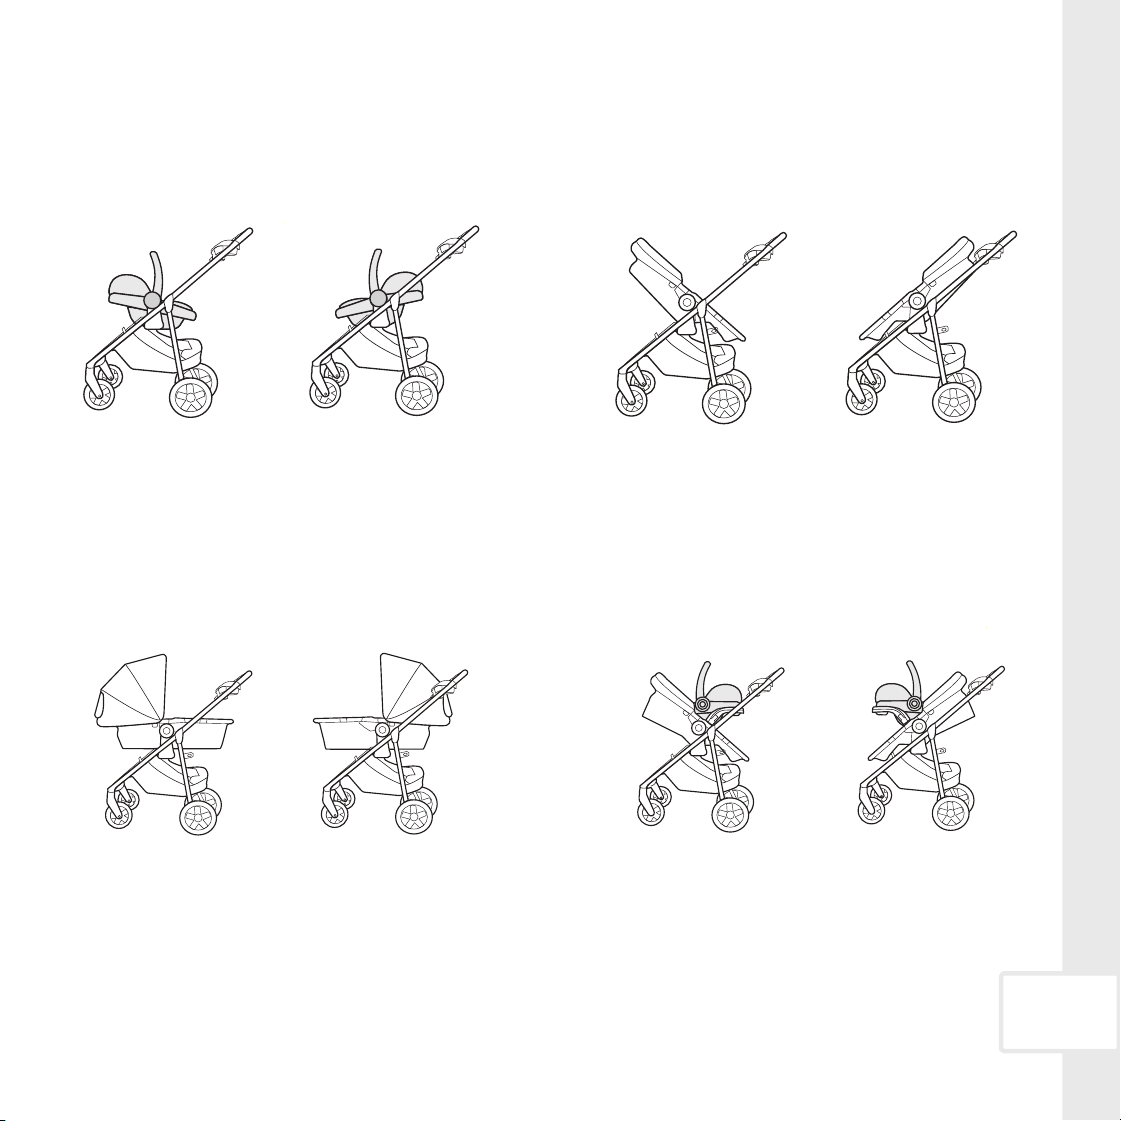
Modes of Use
Car Seat Carrier Mode
See page 6.
Stroller Seat Mode
See page 7.
Travel System Mode
See page 9.
Carriage Mode
See page 8.
5
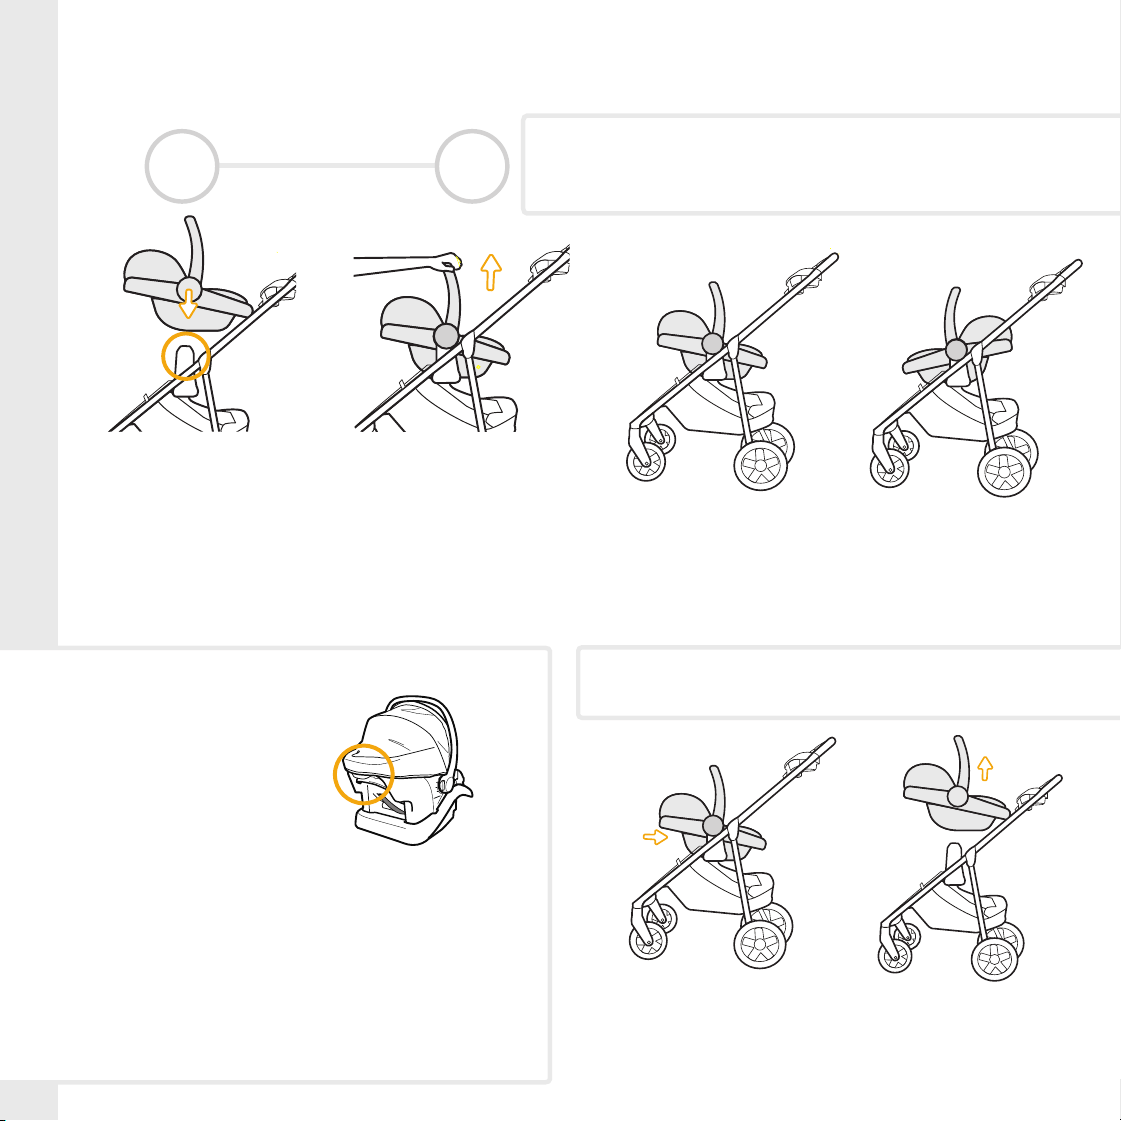
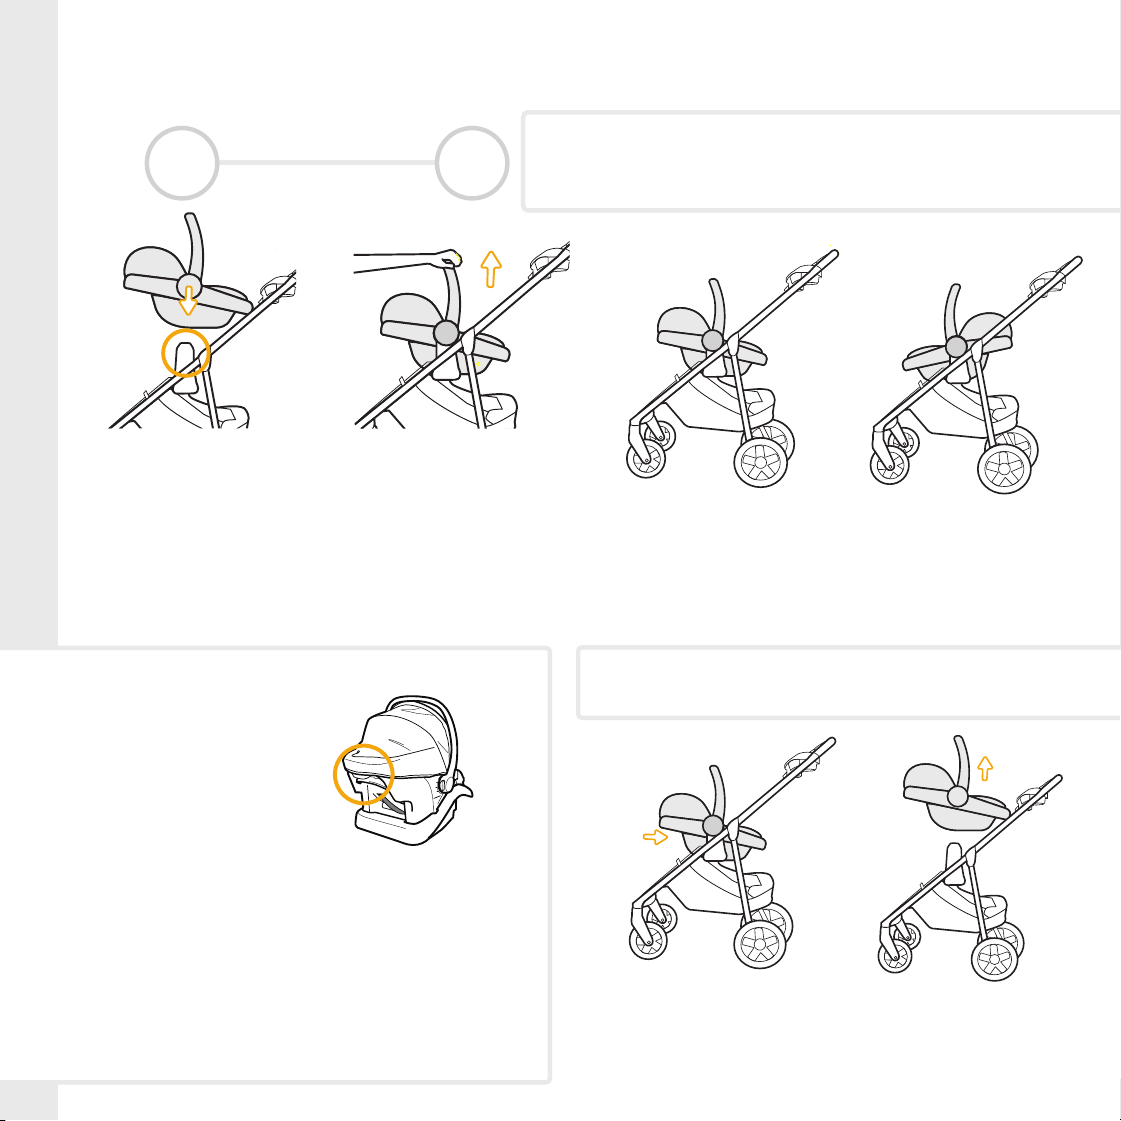
Car Seat Carrier Mode
Removing Car Seat from Stroller Frame or Stroller Seat
Attach the car seat rear-facing
or forward-facing to the
attachments on the
stroller frame.
Pull the car seat up either at
the carry handle or
handle hubs to check if it is
attached securely.
1 2
While engaging your car seat’s stroller release
mechanism, lift the car seat off of the stroller frame.
Illustrations show a generic car seat icon.
OR
click!
Finished!
Car seat can be used rear-facing or forward-facing.
See car seat instruction manual for how to
secure your child in the car seat.
Car seat stroller release mechanisms &
locations vary by car seat model.
Review your car seat’s instruction manual
to locate the stroller release mechanism on
your car seat.
Example shown
of an onBoard
Model’s Stroller
Release Handle
6
7
Stroller Seat Mode
Attach the stroller seat rear-
facing or forward-facing
to the attachments on the
stroller frame.
click!
Finished!
To adjust the stroller seat backrest, see page 10.
To adjust positions of the stroller seat, see page 11.
To secure child in stroller seat, see page 16.
Stroller seat can be used rear-facing or forward-facing.
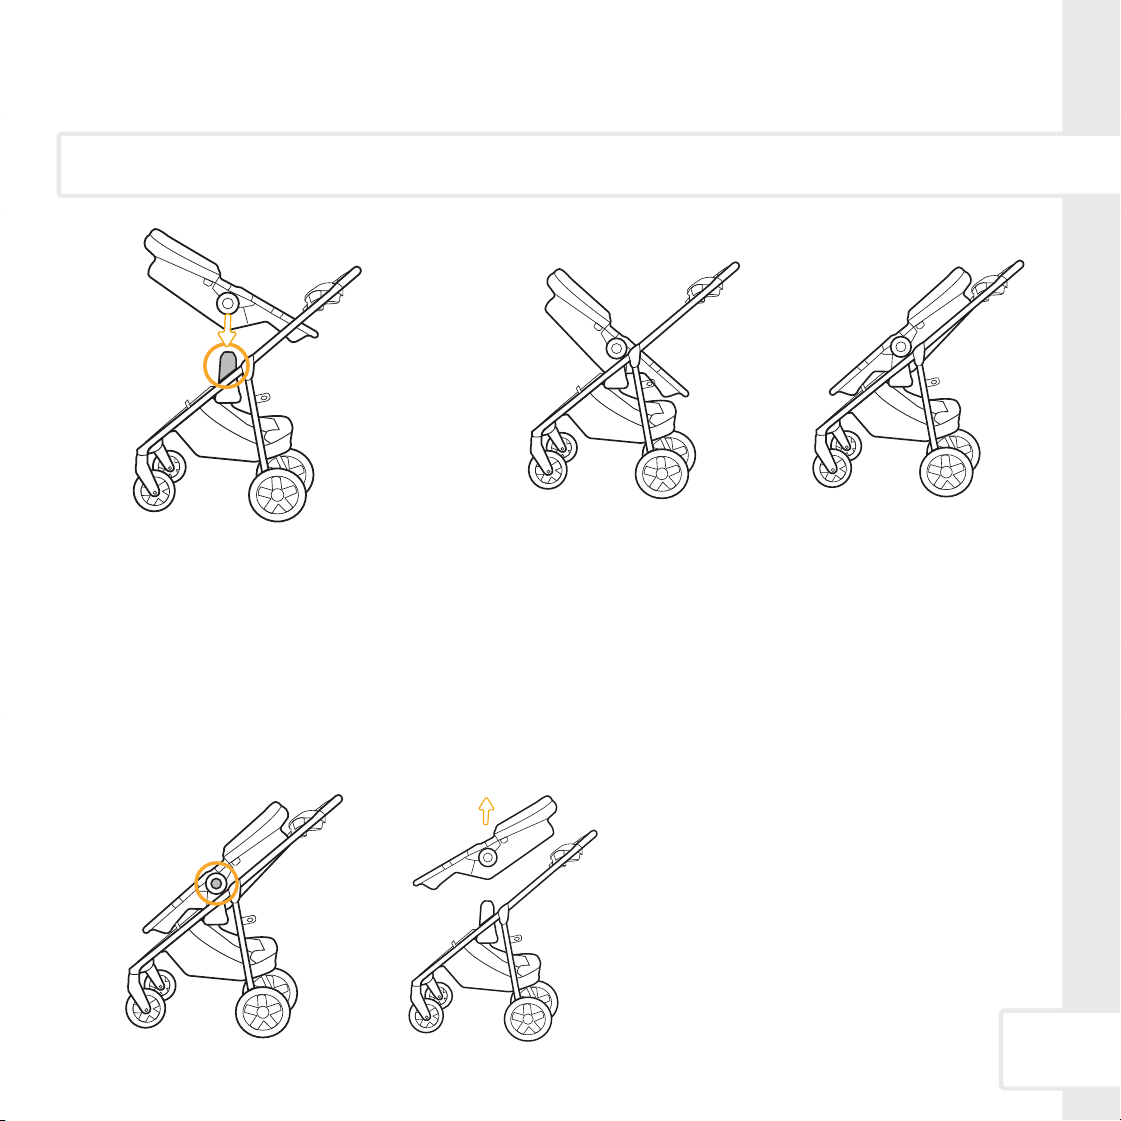
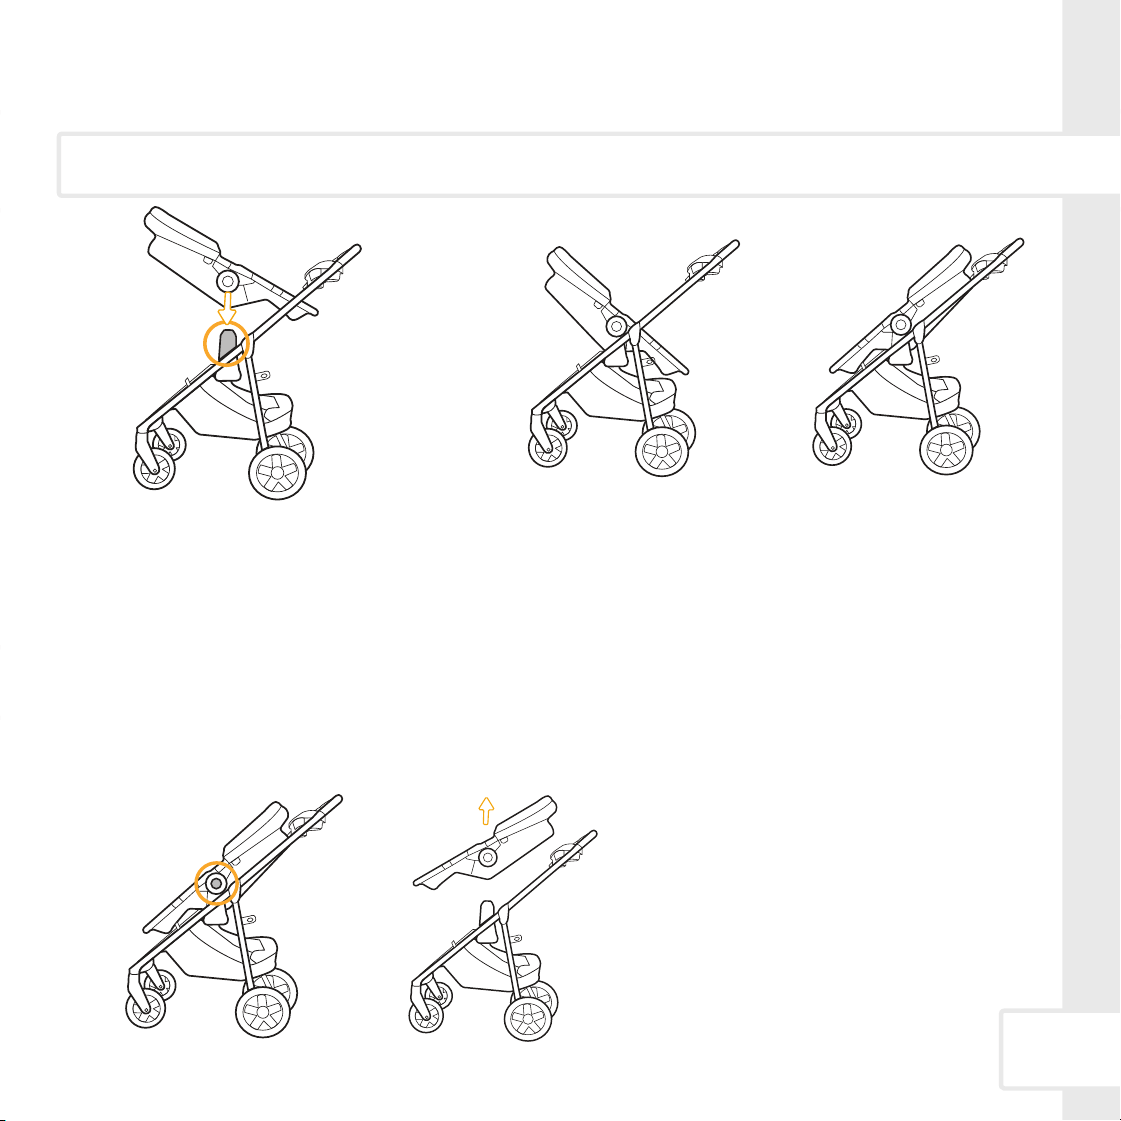
Removing Stroller Seat from Stroller Frame
Press the release buttons on each
side of the seat all the way in and
lift the stroller seat up and off of the
stroller frame.
OR
Attach the stroller seat either
rear-facing or forward-facing to
the attachments on
the stroller frame.
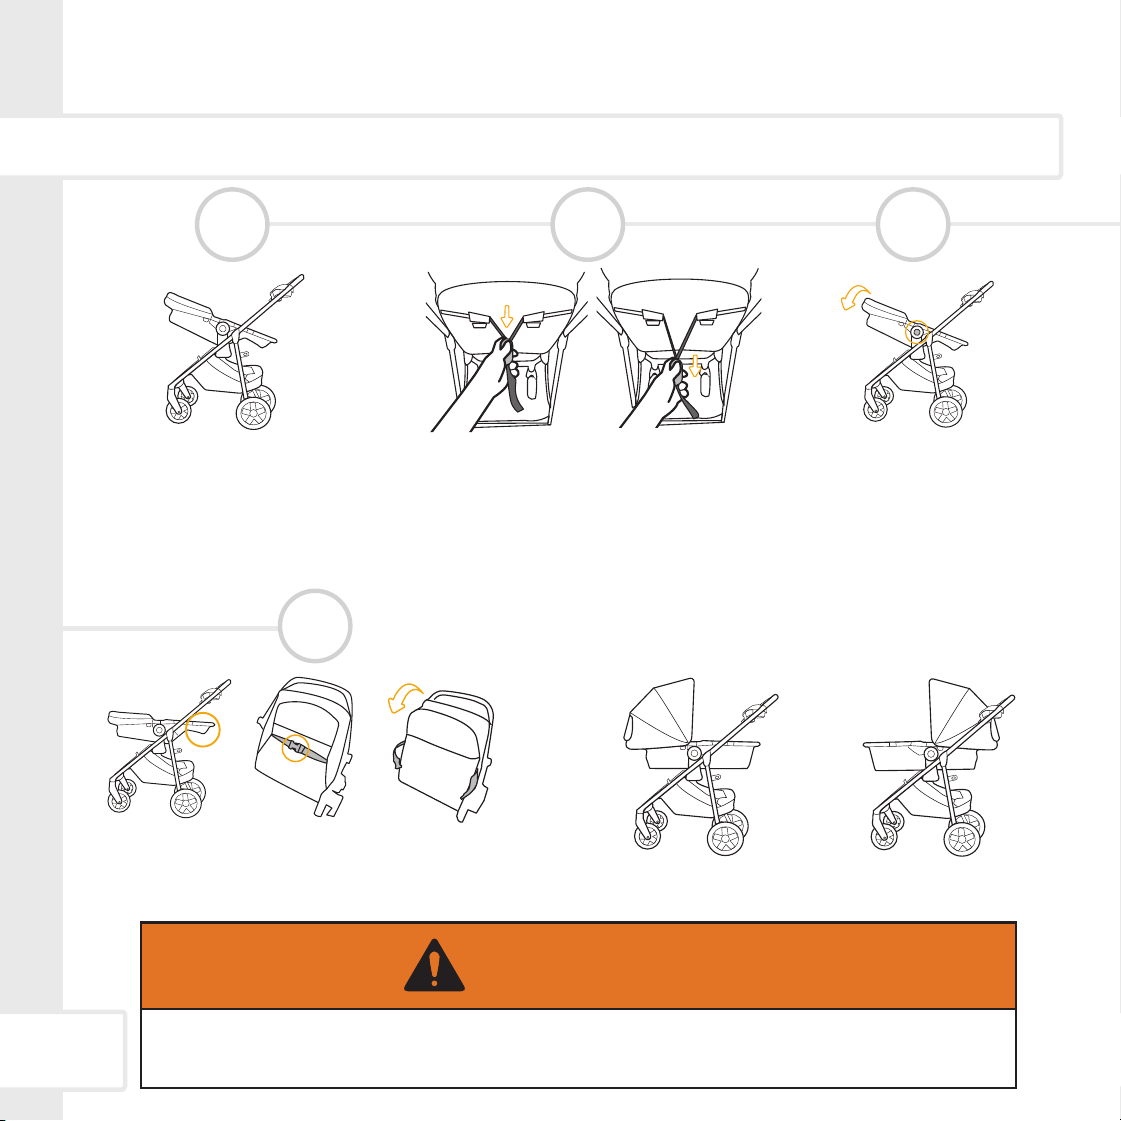
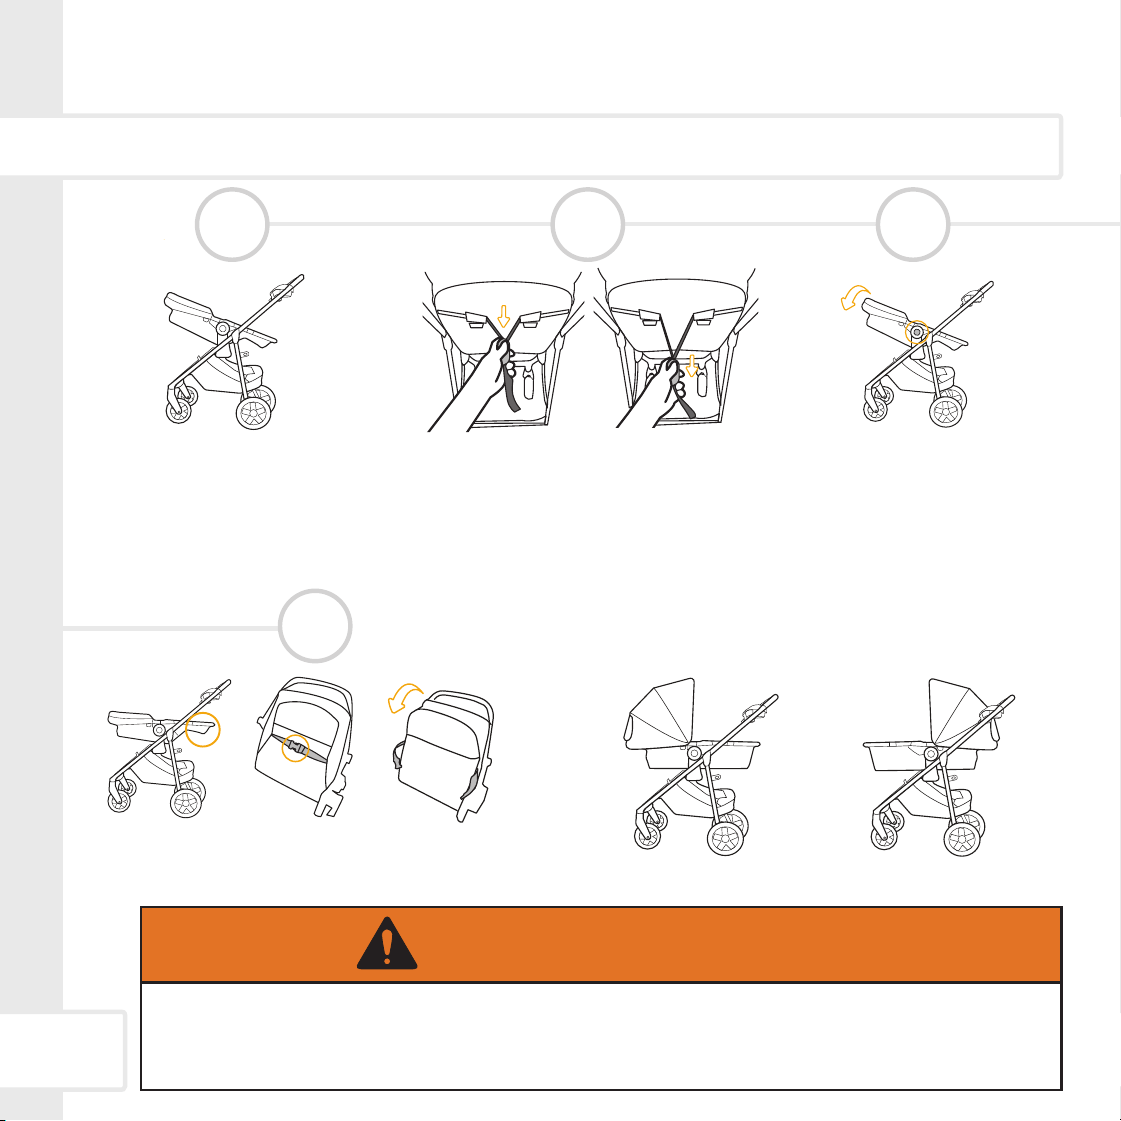
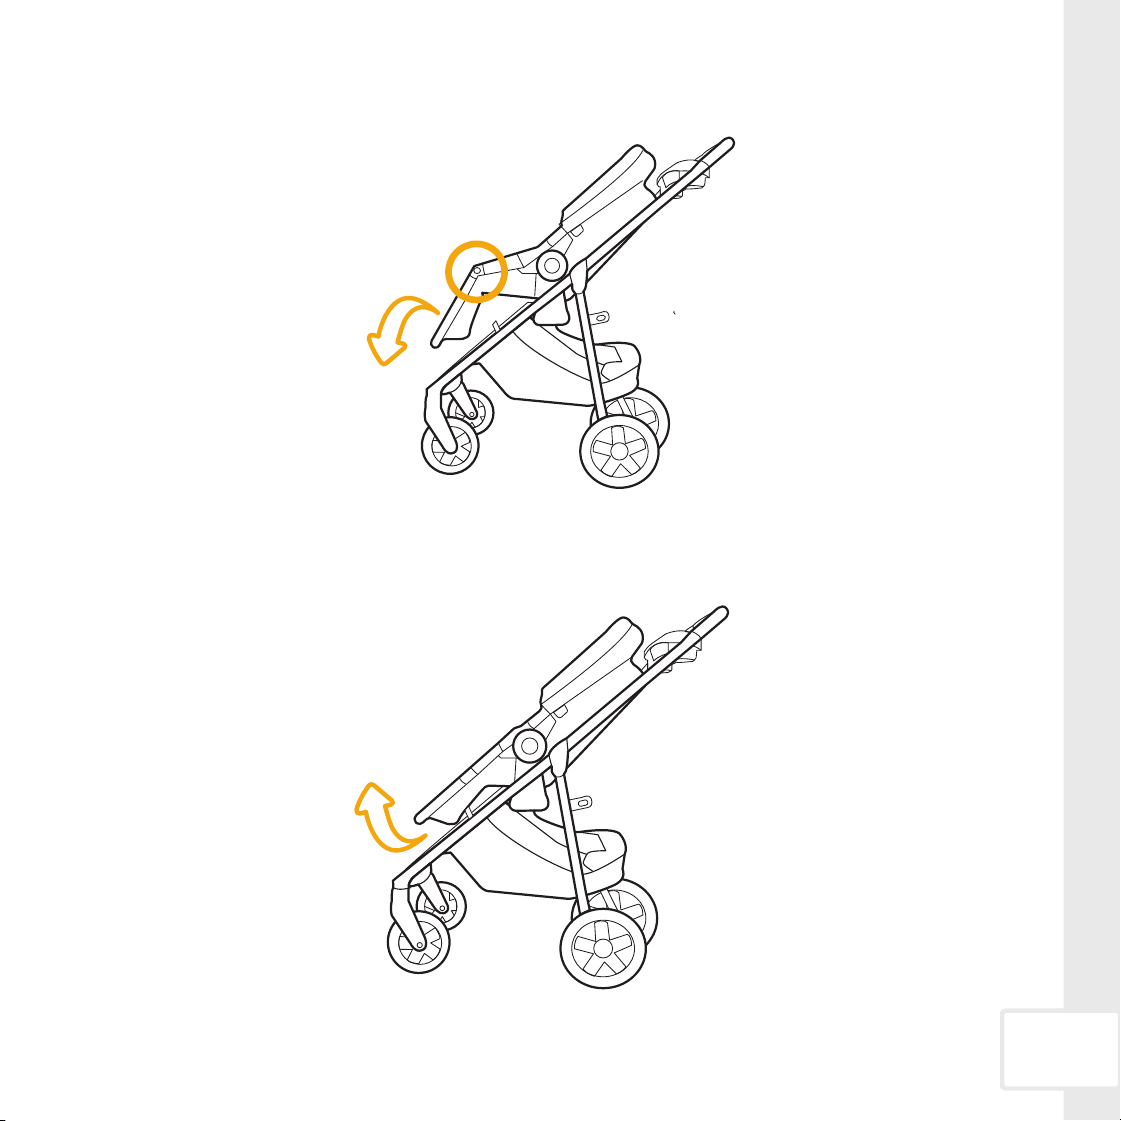
Carriage Mode
Push the seat stroller
adjustment buttons and rotate
the seat all the way back.
For more information about
stroller seat positions,
see page 11.
Fully recline the stroller seat backrest.
At the back of the stroller seat, press
the button on the backrest adjuster all
the way and pull it towards you.
For more information about
adjusting the backrest, see page 10.
Finished!
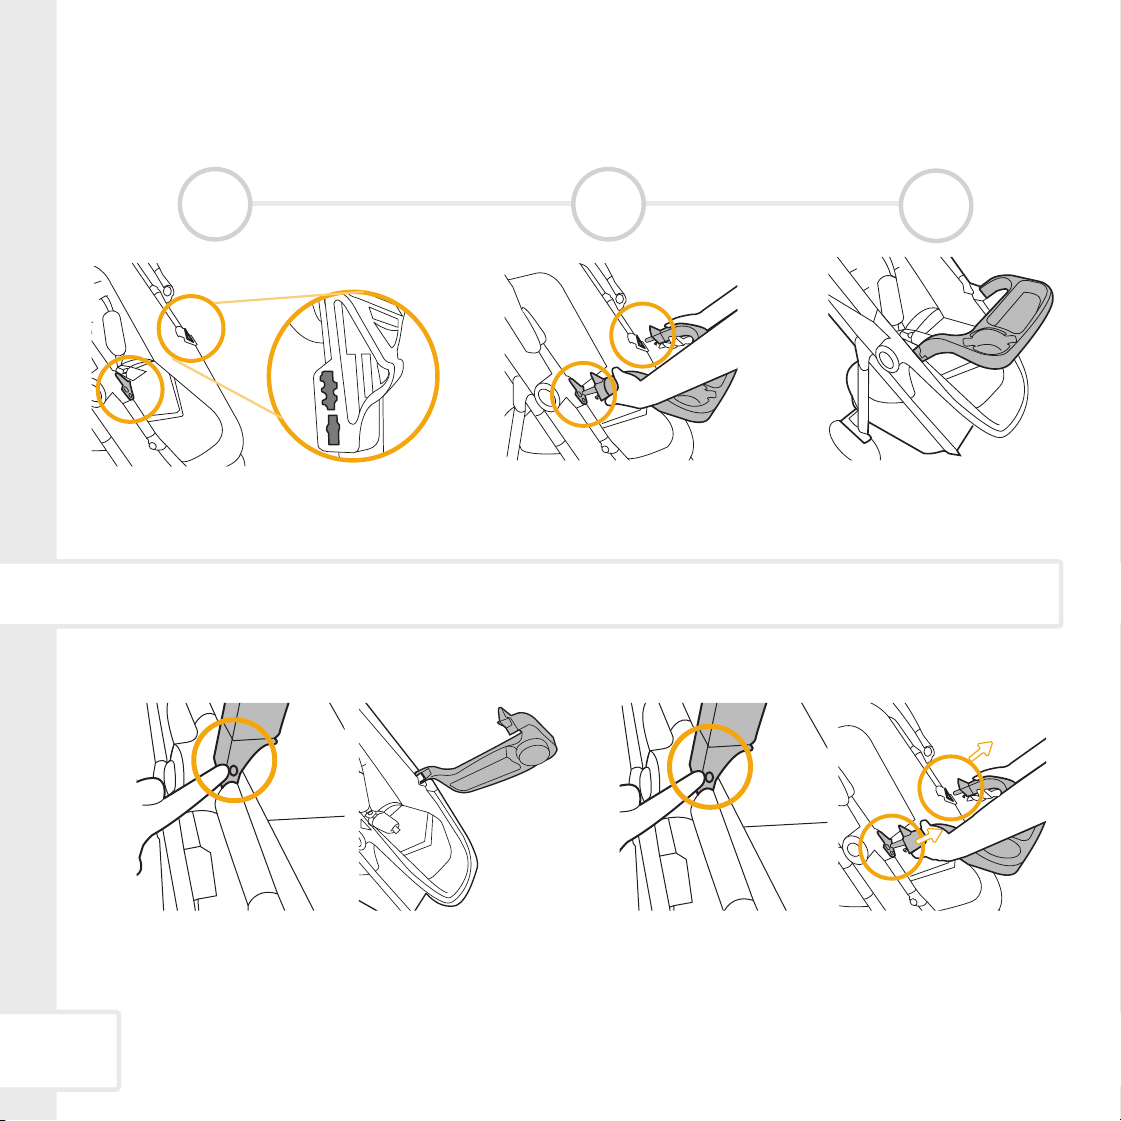
1 2 3
Locate the strap under the footrest.
Undo the buckle on the strap as shown.
4
OR
8
Carriage mode can be used rear-facing or forward-facing.
Child may slip into leg openings and strangle, unless you disengage buckle under
the foot rest and press down the foot area to create safe enclosure.
WARNING:
9
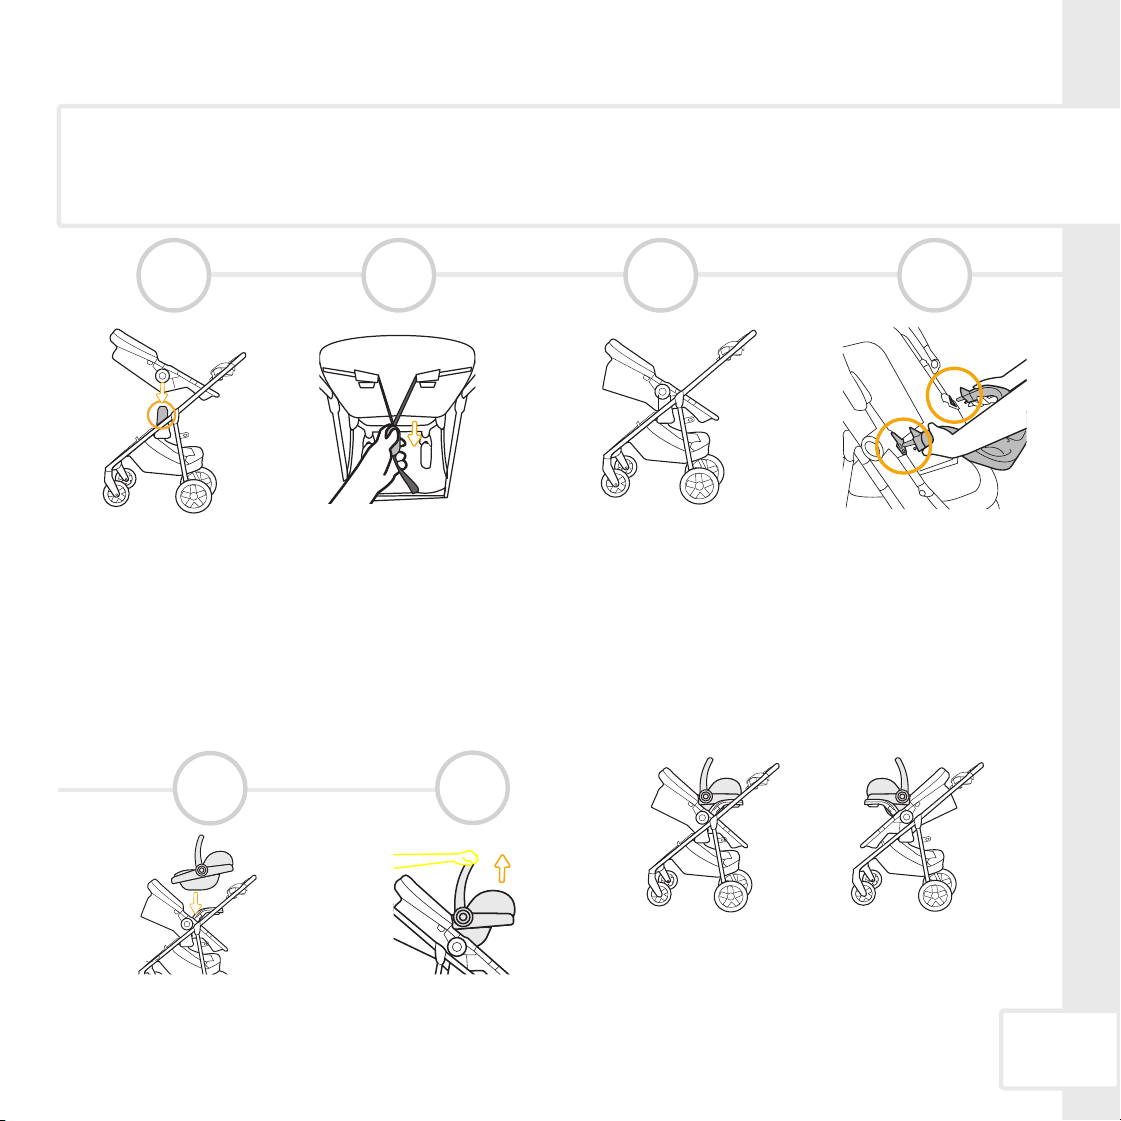
Travel System Mode
Stroller seat can be installed rear-facing or forward-facing.
Car seat MUST ALWAYS face the stroller seat when in travel system mode.
Child tray MUST ALWAYS be used in travel system mode.
Install the car seat to the
attachments on the stroller
seat. You will hear each side
“click” when it is secure.
OR
click!
Finished!
To remove car seat from stroller seat,
see page 6: Removing Car Seat from
Stroller Frame or Stroller Seat.
Attach the child tray.
For more information
about the child tray,
see page 14.
1 2 3 4
5
6
Install the stroller seat
either rear-facing or
forward-facng to the
attachments on the
stroller frame. You will
hear each side“click”
when it is locked
into place.
Fully recline the
stroller seat backrest.
For more information
about adjusting
the backrest,
see page 10.
Fold the canopy back.
Adjust the stroller seat to the
most upright position.
For more information about
stroller seat positions,
see page 11.
Pull the car seat up either at
the carry handle or
handle hubs to check if it is
attached securely.
10
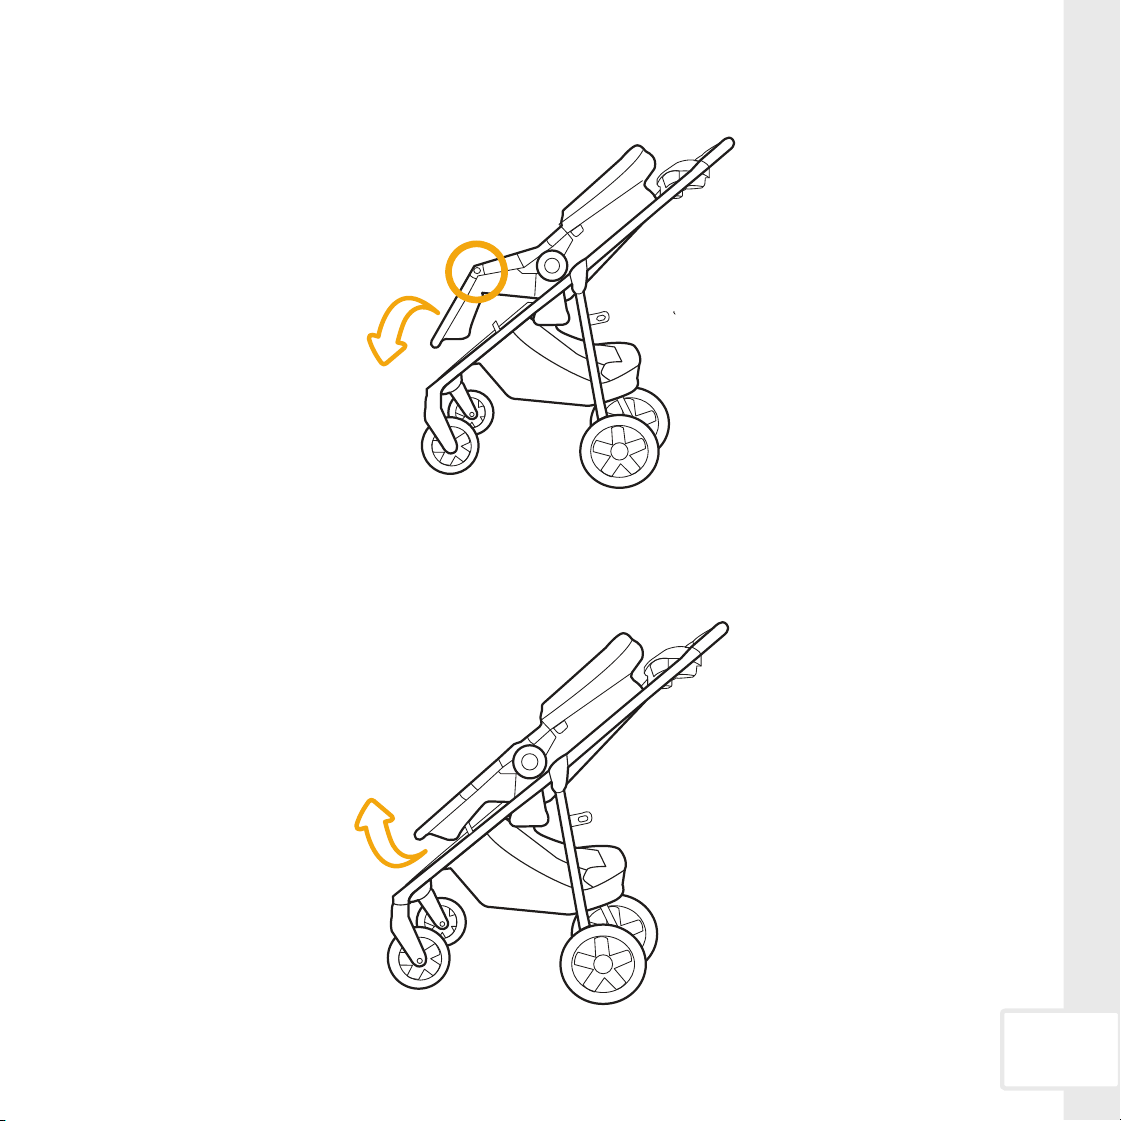
Adjusting Stroller Seat Backrest
To Recline Backrest To Make Backrest Upright
At the back of the stroller seat, hold the loose end
of the strap and slide the backrest adjuster up the
strap toward the back of the seat.
At the back of the stroller seat, slide and hold the
button on the backrest adjuster and pull the adjuster
away from the seat.
Illustrations show the stroller seat backrest upright and reclined; however there are multiple recline positions.

11
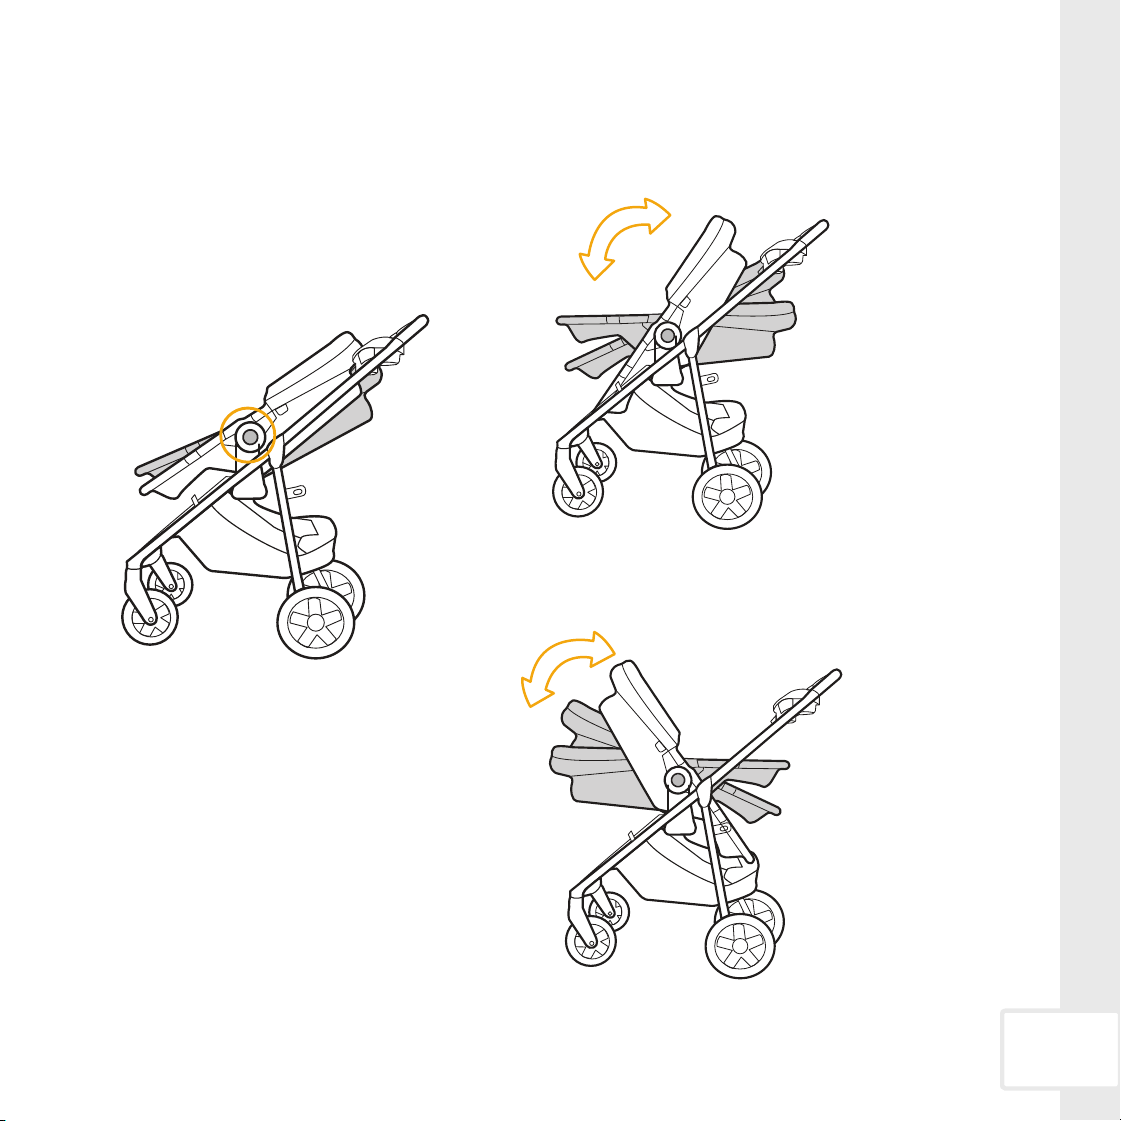
Adjusting Stroller Seat Positions
Locate the stroller seat adjustment
buttons on each side of the stroller seat.
Press and hold in both of the
adjustment buttons until you can rotate
the seat backward or forward to the
desired position.
Rear-Facing
Forward-Facing

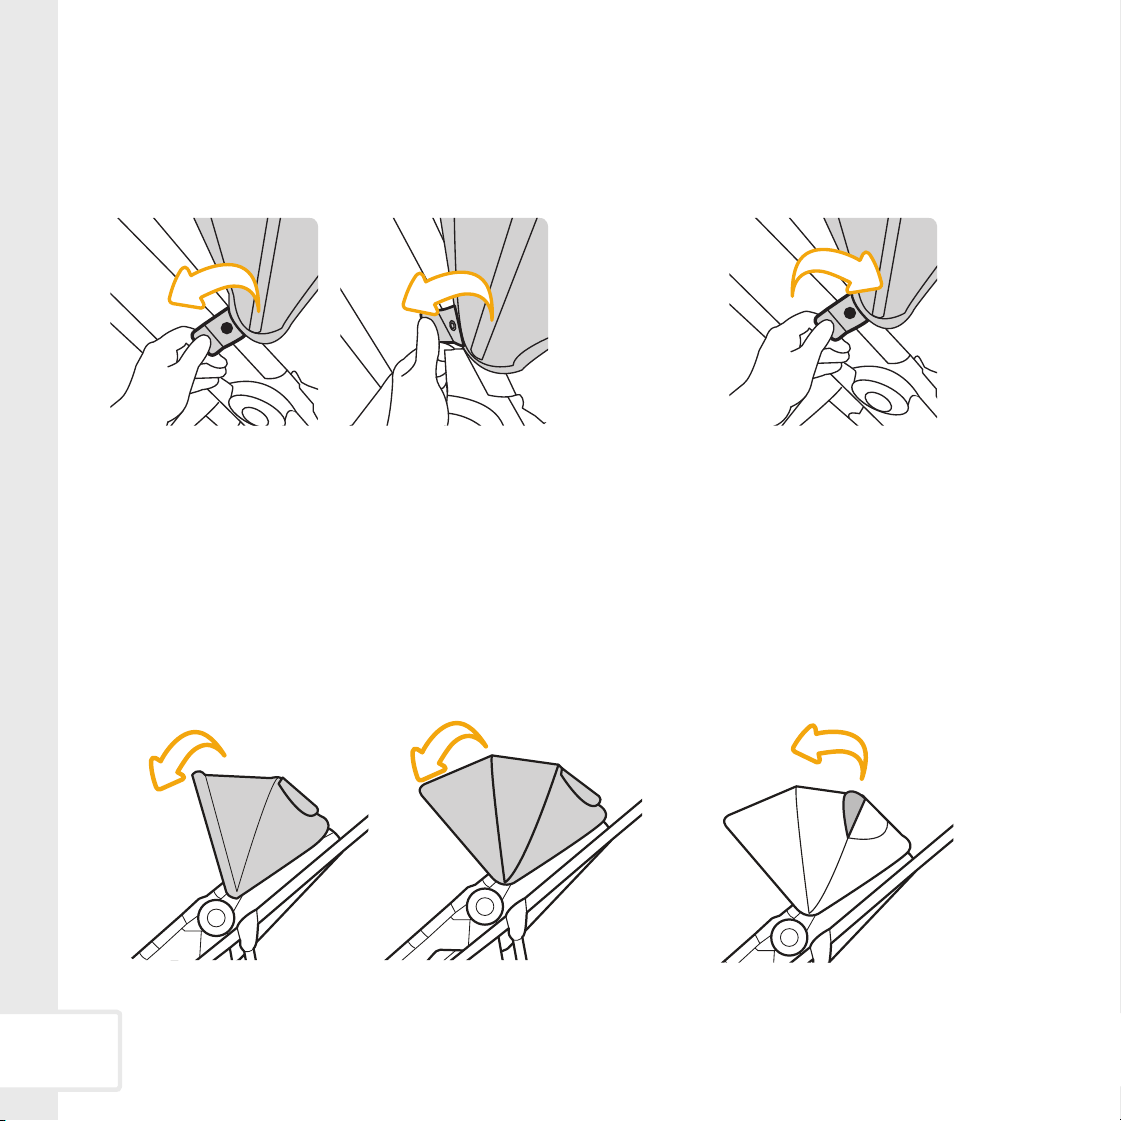
Attaching & Removing Canopy
To Attach Canopy
Align the canopy tabs with the attachment on the
stroller frame and push the canopy tabs down to
snap them to the stroller frame.
Locate the canopy tabs and pull
them forward to remove the
canopy from the stroller frame.
To Remove Canopy
Adjusting Canopy
Pull the canopy forward, and pull more to extend
it farther.
Lift the fabric to access
the Peek-a-Boo window.
12
13
Adjusting Footrest
To lower footrest, press the footrest adjustment buttons
and push down on the footrest.
To raise footrest, pull the footrest up until it locks into place.

14
Locate one of the buttons underneath
each side of child tray.
Press one button and push the child tray
to the side of the stroller frame.
To Attach Child Tray
To Remove Child TrayTo Swivel Open
Attaching & Removing Child Tray
Gently pull out on tray to
make sure it is attached
securely.
Locate the buttons underneath
each side of child tray.
Press both buttons and pull the child tray away
from the stroller frame.
The child tray can also swivel open to make it easier to put in or remove your child.
Locate the child tray attachment hubs
on each side of the stroller frame.
Align the posts on the
child tray with the slots in
the attachment hubs.
1 2
3
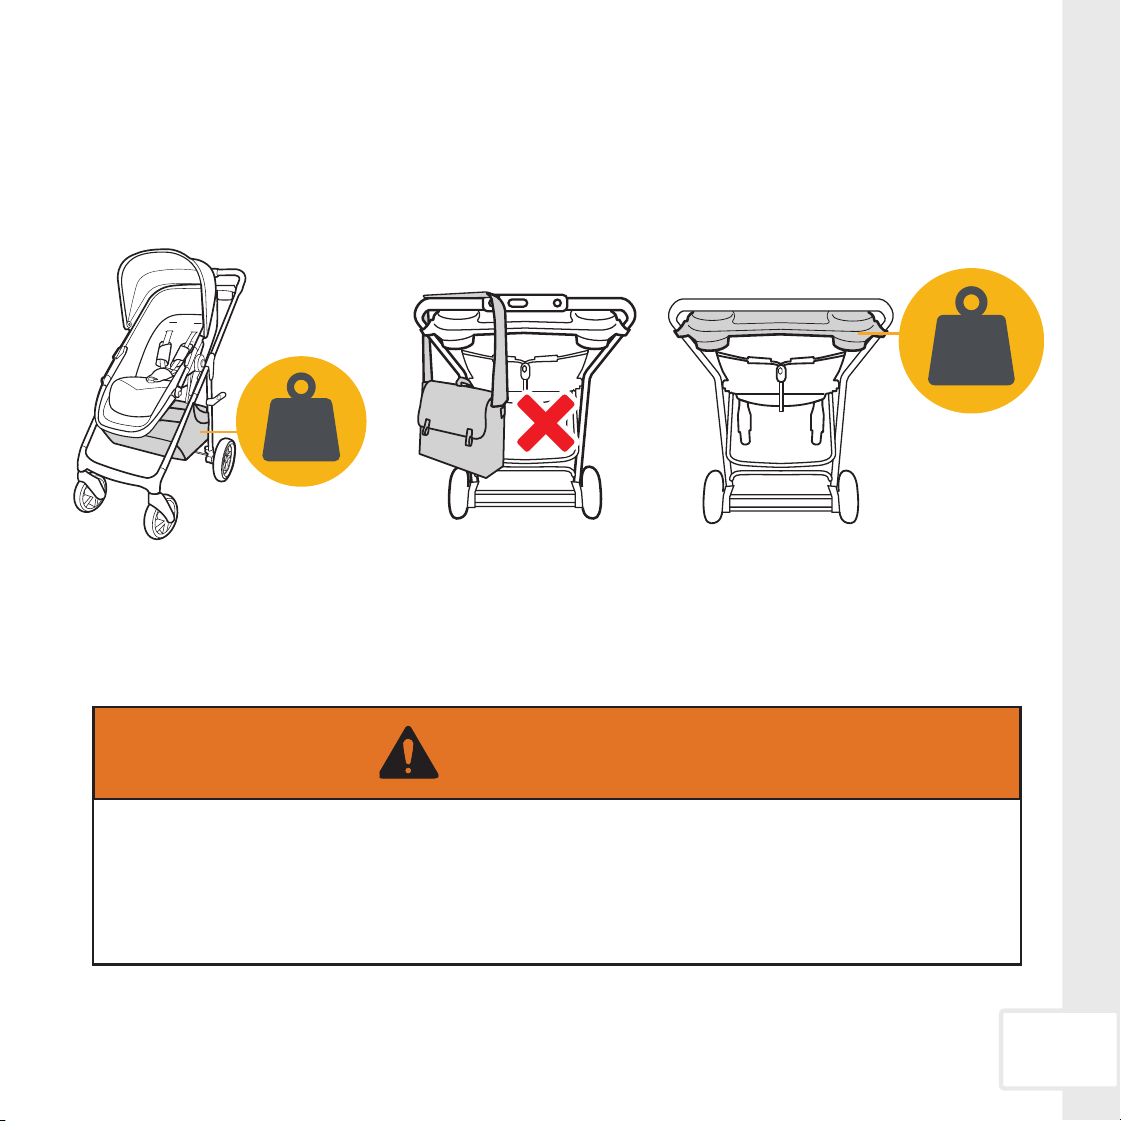
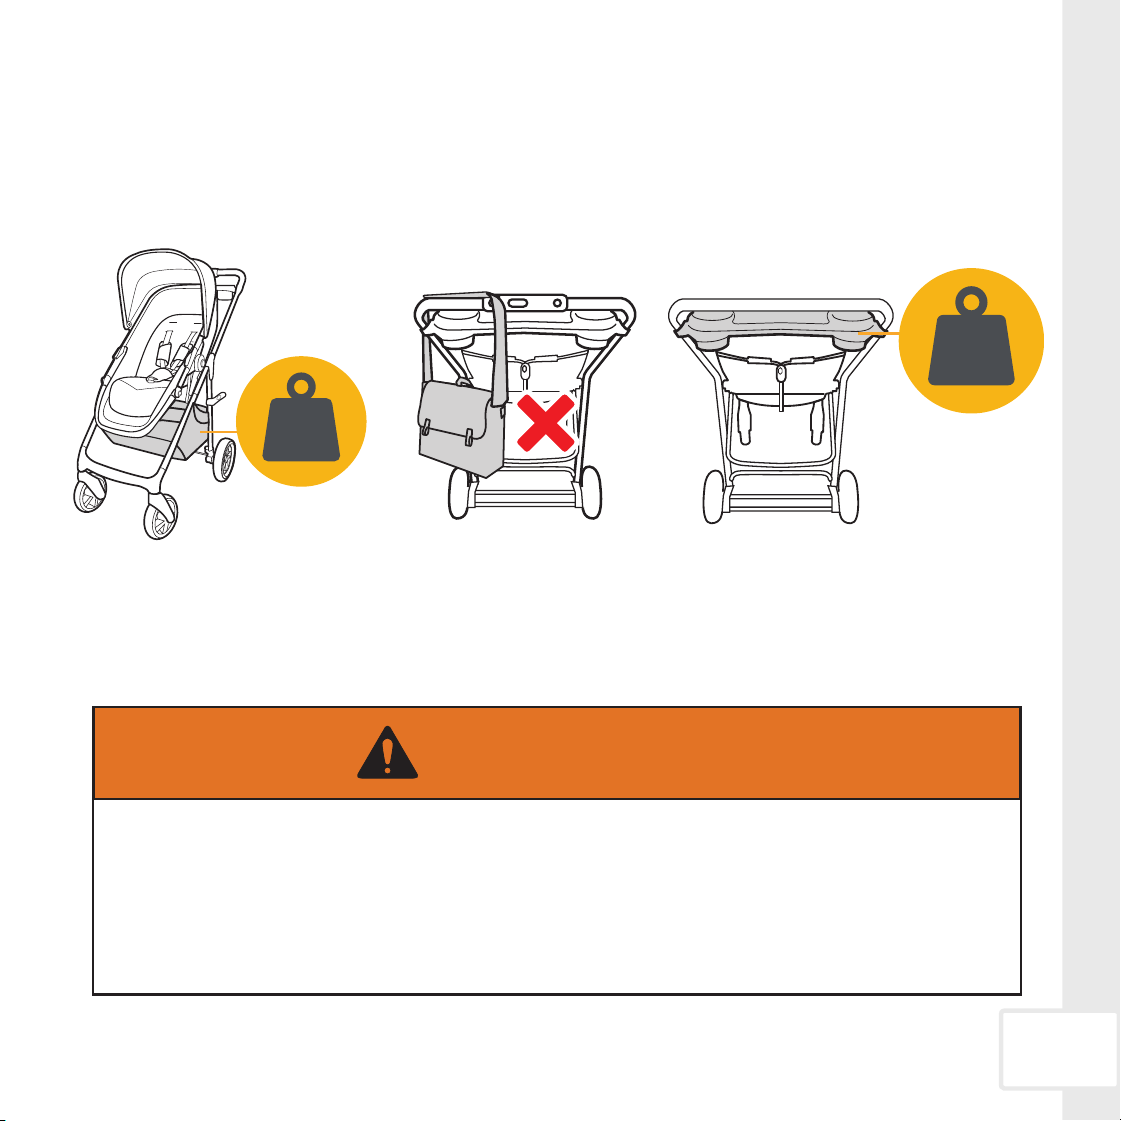
Parent Tray & Storage Basket Use
max
10 lb
4,5 kg
max
3 lbs
1,4 kg
15
WARNING:
• NEVER place more than 10 lb (4.5 kg) in the storage basket. If weight is exceeded,
hazardous unstable conditions may exist.
• Parent tray, including the cup holders, CANNOT exceed 3 lbs (1.4 kg) total.

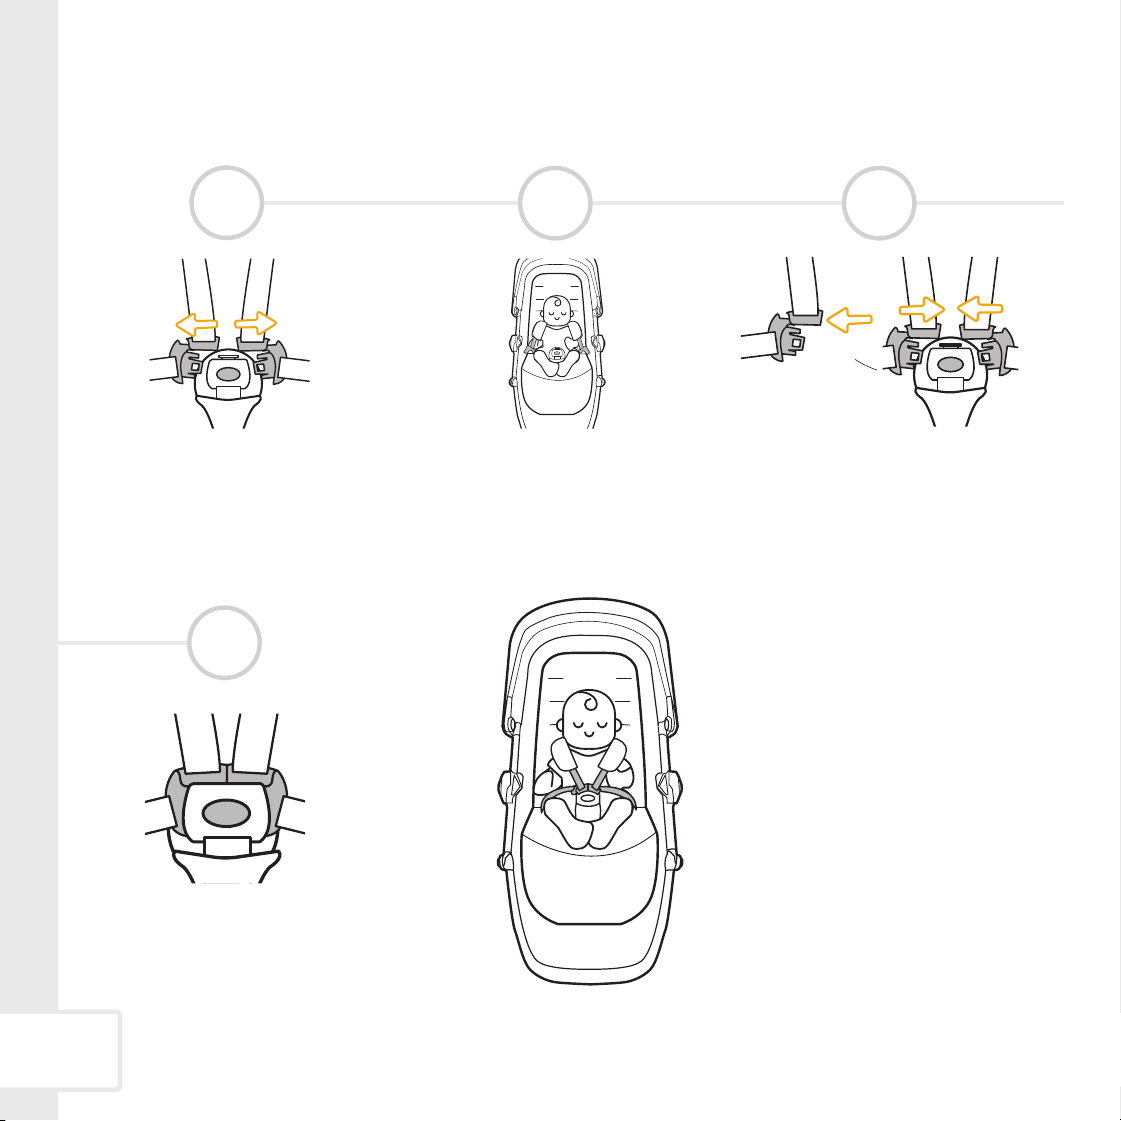
Securing Child in Stroller Seat
16
Unbuckle. Place your child in
the stroller seat.
Buckle.
Finished!
Align the buckle tongue with the tab on
top of the buckle. Slide into place.
Repeat for the other side.
1
2 3
4

17
• NEVER LEAVE CHILD UNATTENDED. ALWAYS keep child in view when in stroller.
• AVOID SERIOUS INJURY from falling or sliding out. ALWAYS use the harness system.
Check frequently to make sure it is secure.
• STROLLER is only for use with children up to 50 lb (22.7 kg), and WHEN SEATED, the
midpoint of your child’s head is at or below the top of the stroller seat.
• ONLY use this stroller with ONE child at a time.
• STROLLER MODE is for use with children who can sit up unassisted and is NOT
recommended for newborns.
• Failure to follow these instructions could result in serious injury or death of your child.
WARNING:
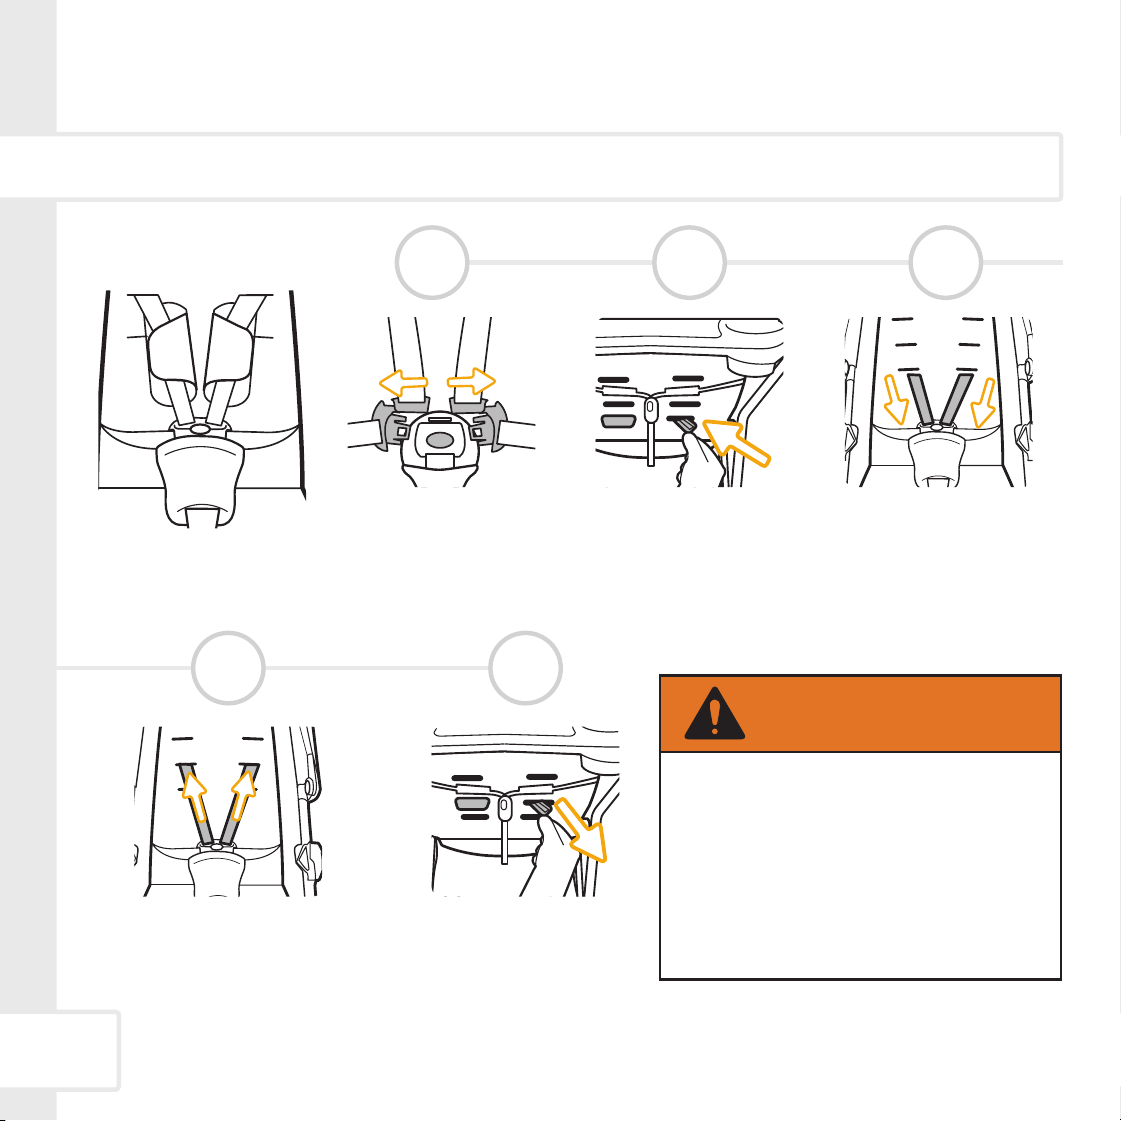
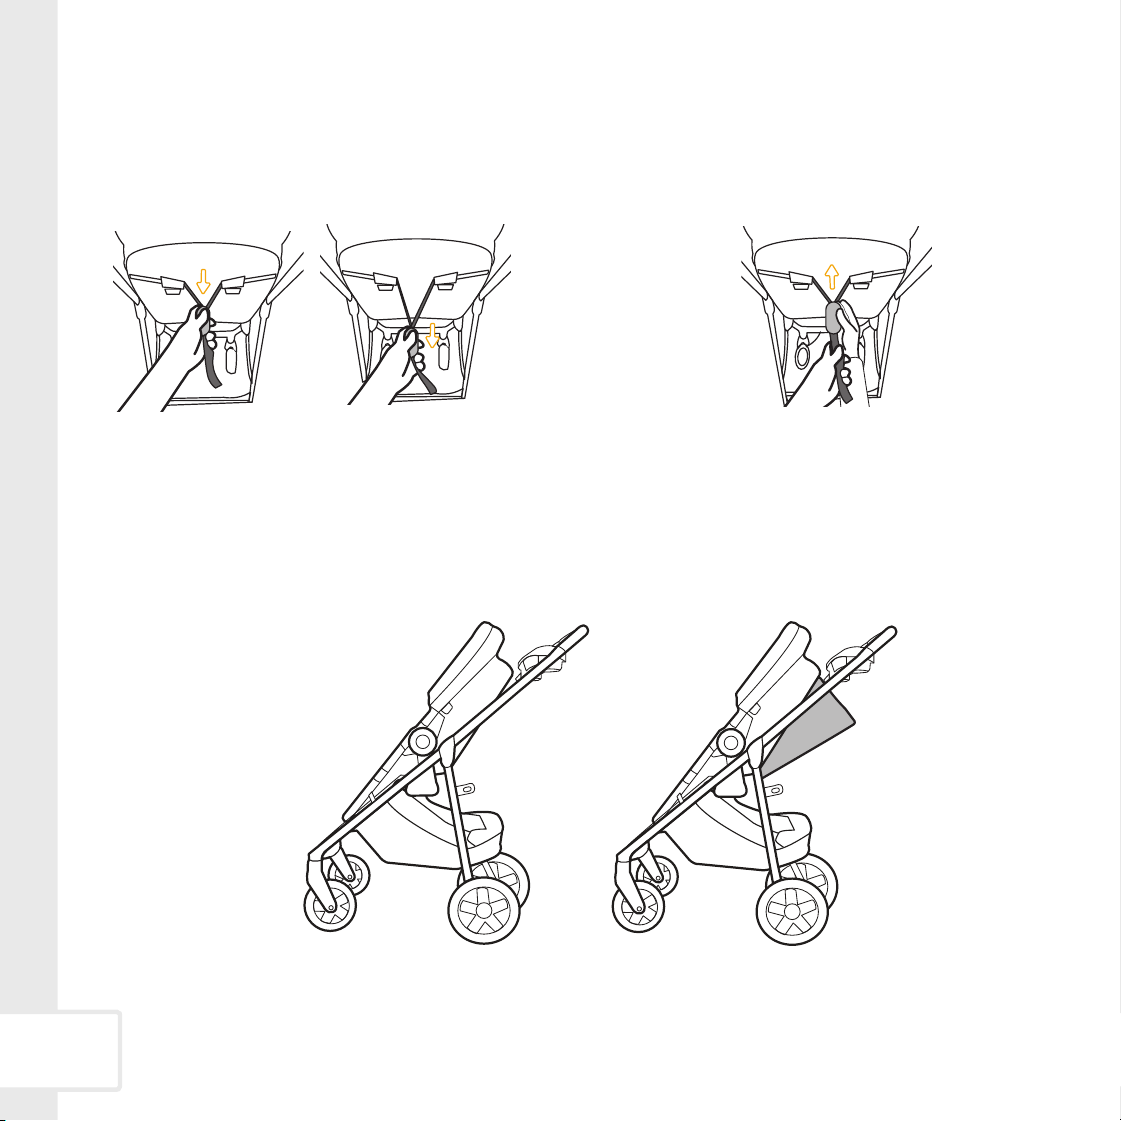
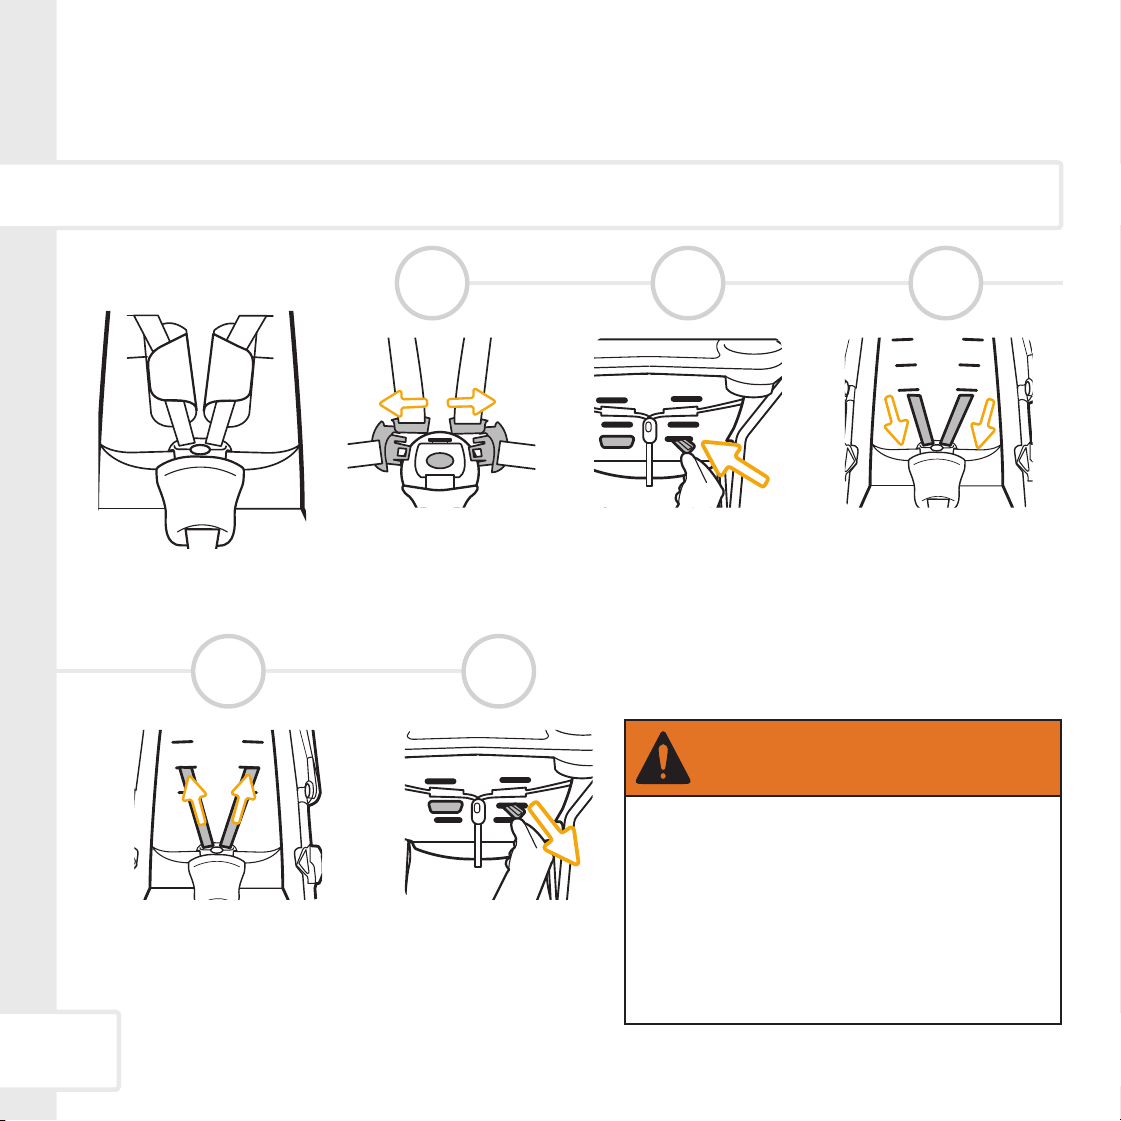
Changing Stroller Seat Harness Strap Height
Unbuckle.
Harness System
1 2 3
From the back of the
stroller seat, push the
harness strap retainers
through the harness slots.
From the front of the
stroller seat, pull the
harness straps out of
the harness slots.
Pull the harness strap
retainers through the har-
ness slots.
Push the the harness straps
into the harness slots closest
to your child’s shoulders.
4 5
•
Belts must be threaded exactly as
shown.
•
Failure to follow these instructions
could result in serious injury or death
of your child.
WARNING:
18
As your child grows, you will need to adjust the harness strap height.
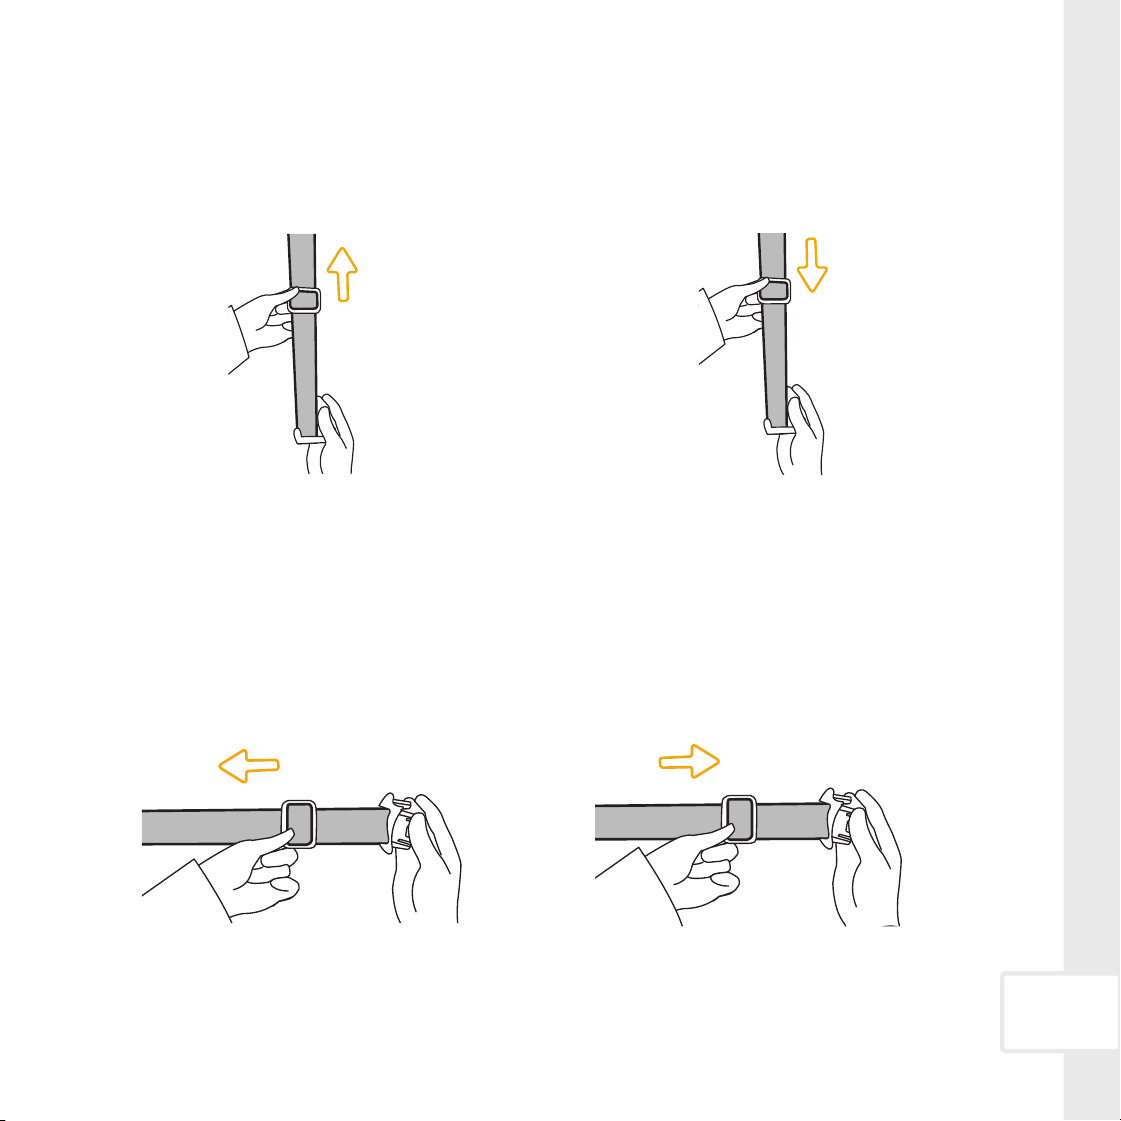
To Adjust Harness Strap
To Adjust Waist Strap
Hold the slide ring in one hand and hold the buckle clip
in the other. Slide the ring away from the buckle clip.
Hold the slide ring in one hand and hold the buckle clip
in the other. Slide the ring towards the buckle clip.
Hold the slide ring in one hand and hold the
buckle clip in the other. Slide the ring up.
Hold the slide ring in one hand and hold the buckle clip
in other. Slide the ring down.
19
To Shorten To Lengthen
To Shorten To Lengthen
Adjusting Harness System Length
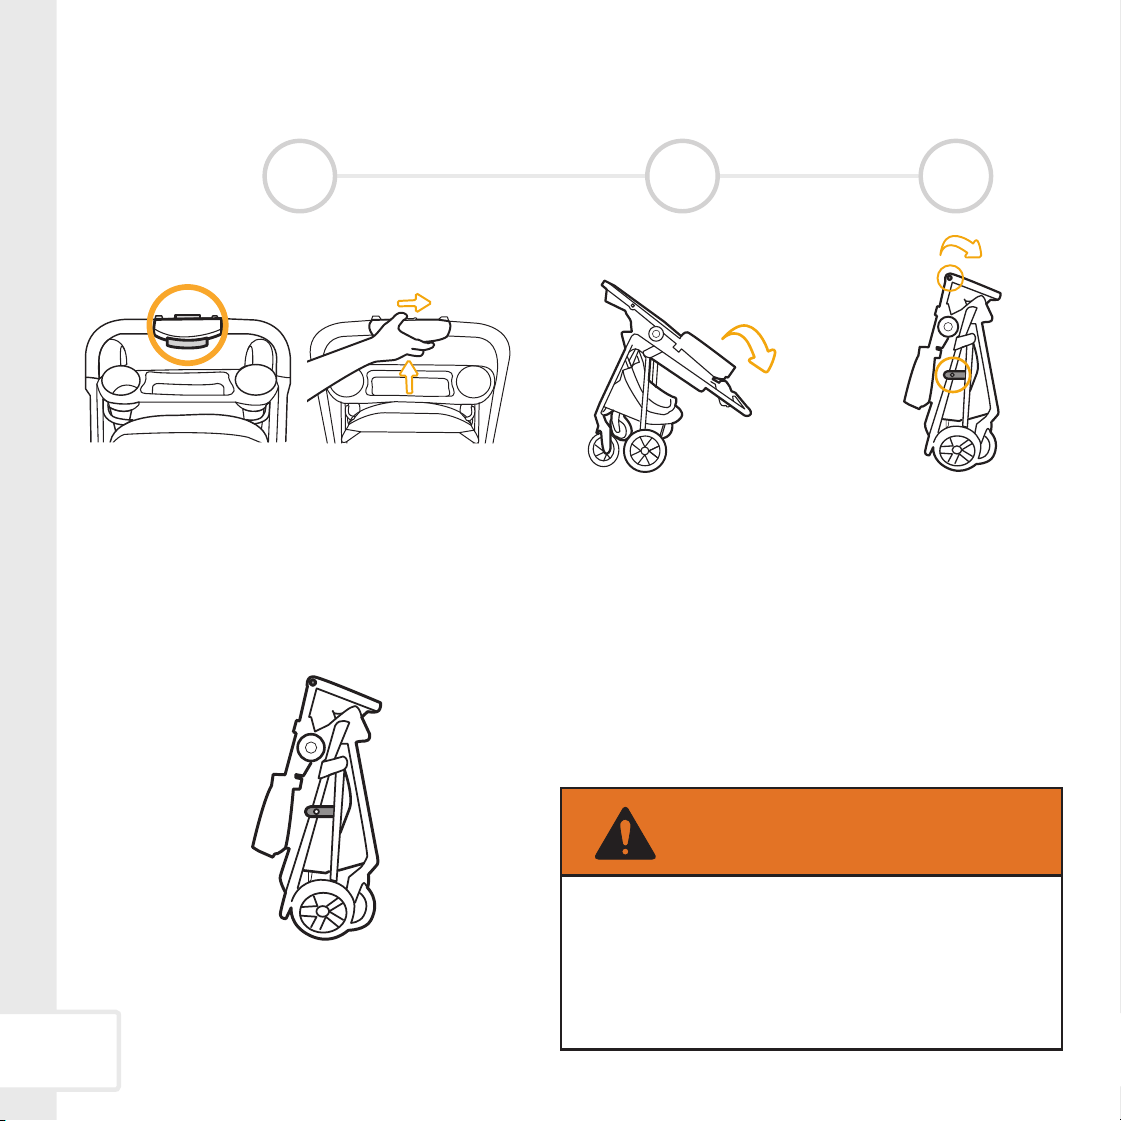
20
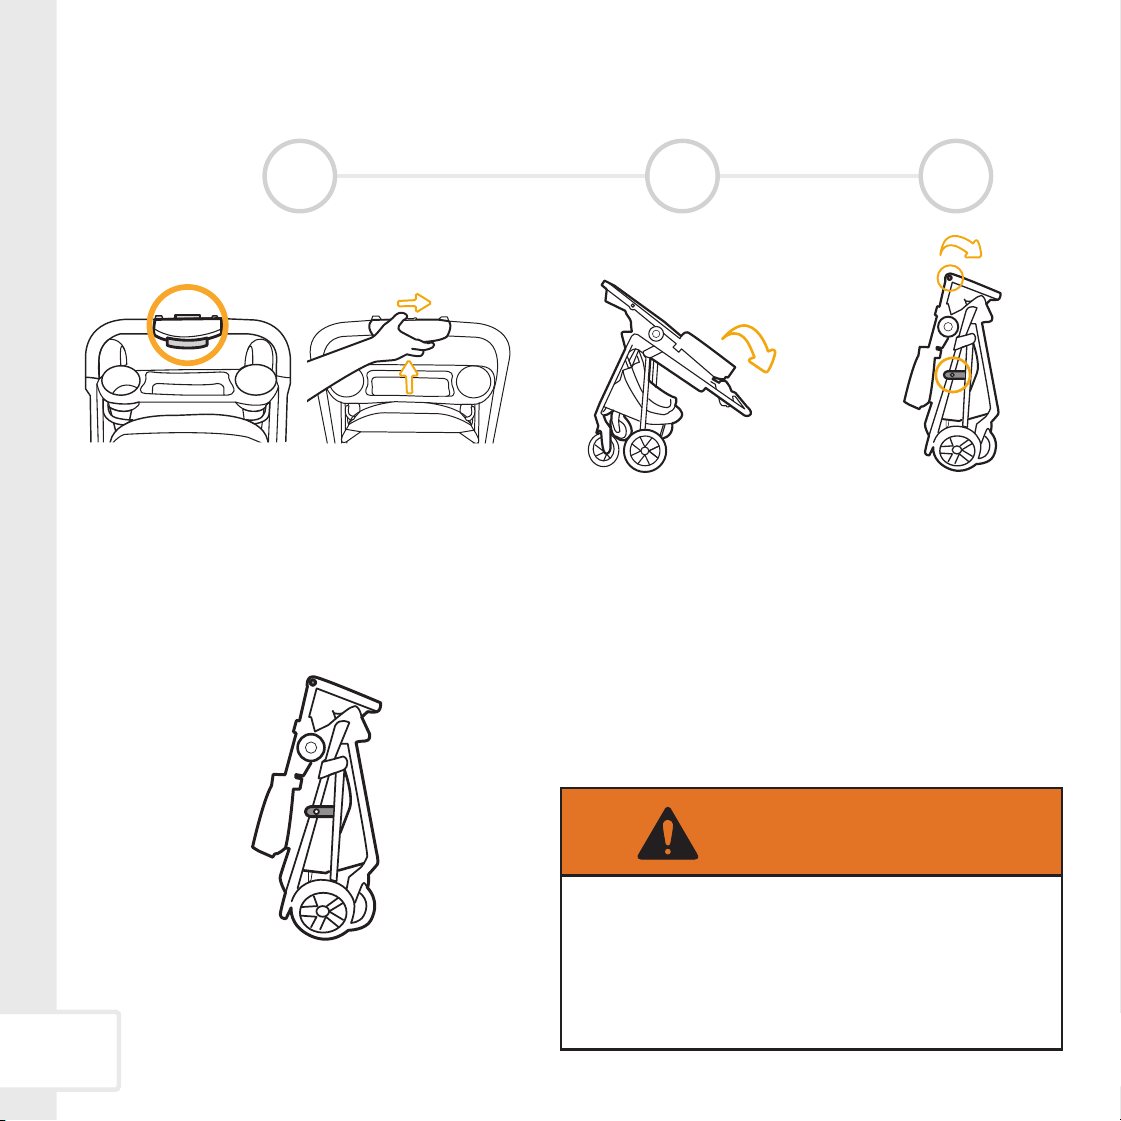
Folding Stroller
Finished!
NOTE: The stroller
can self stand.
ALWAYS keep fingers away from moving
parts, when folding, unfolding, or adjusting
stroller to prevent finger entrapment.
WARNING:
Fold the stroller down
as shown.
1 2 3
Slide and squeeze the stroller frame
release buttons as shown.
Hold them together.
Fasten the frame lock.
Optional: Fold the
footrest down.
21
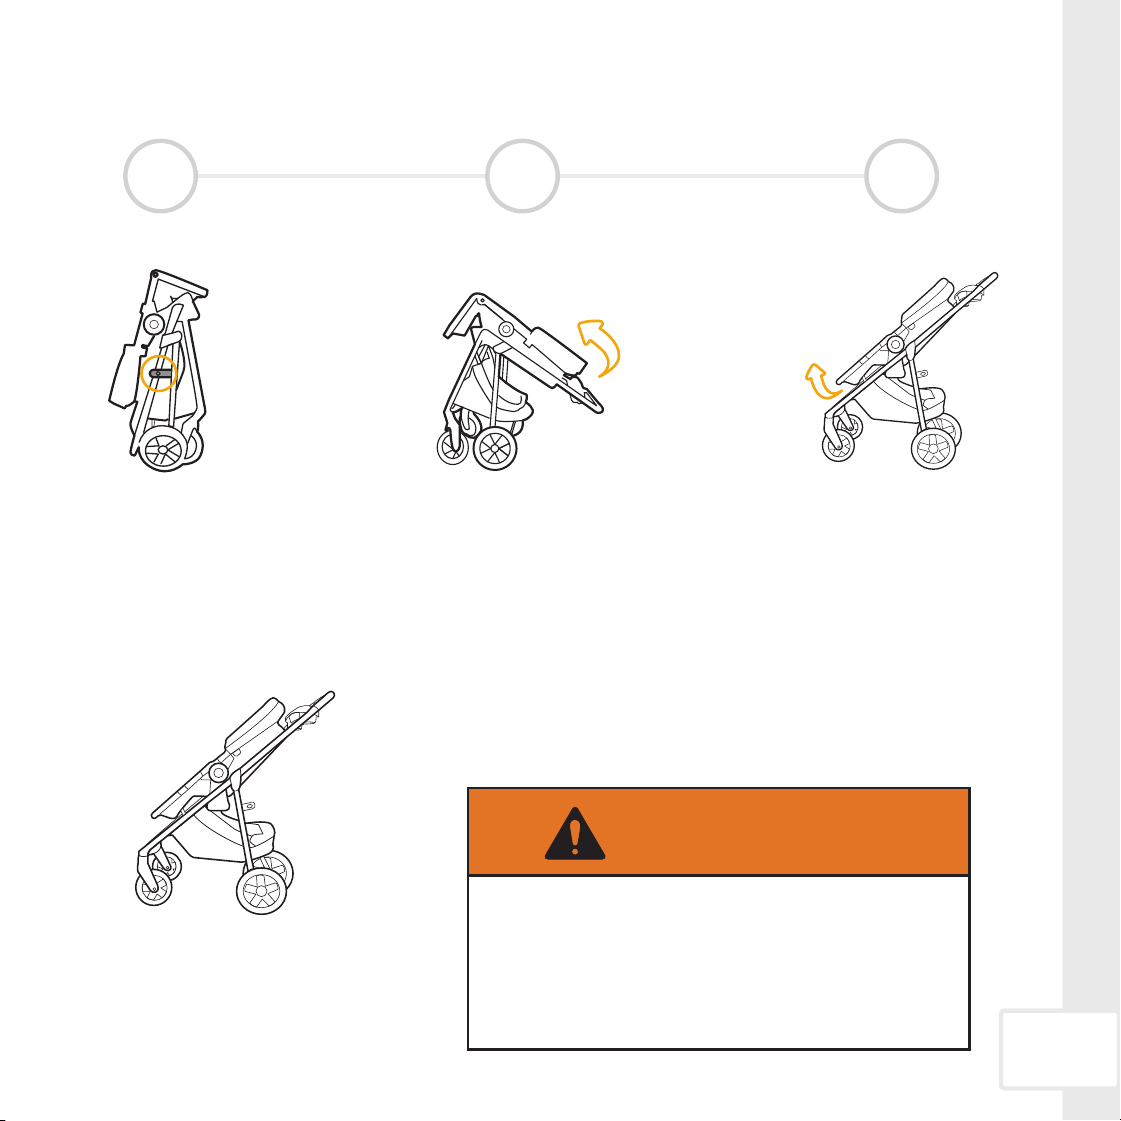
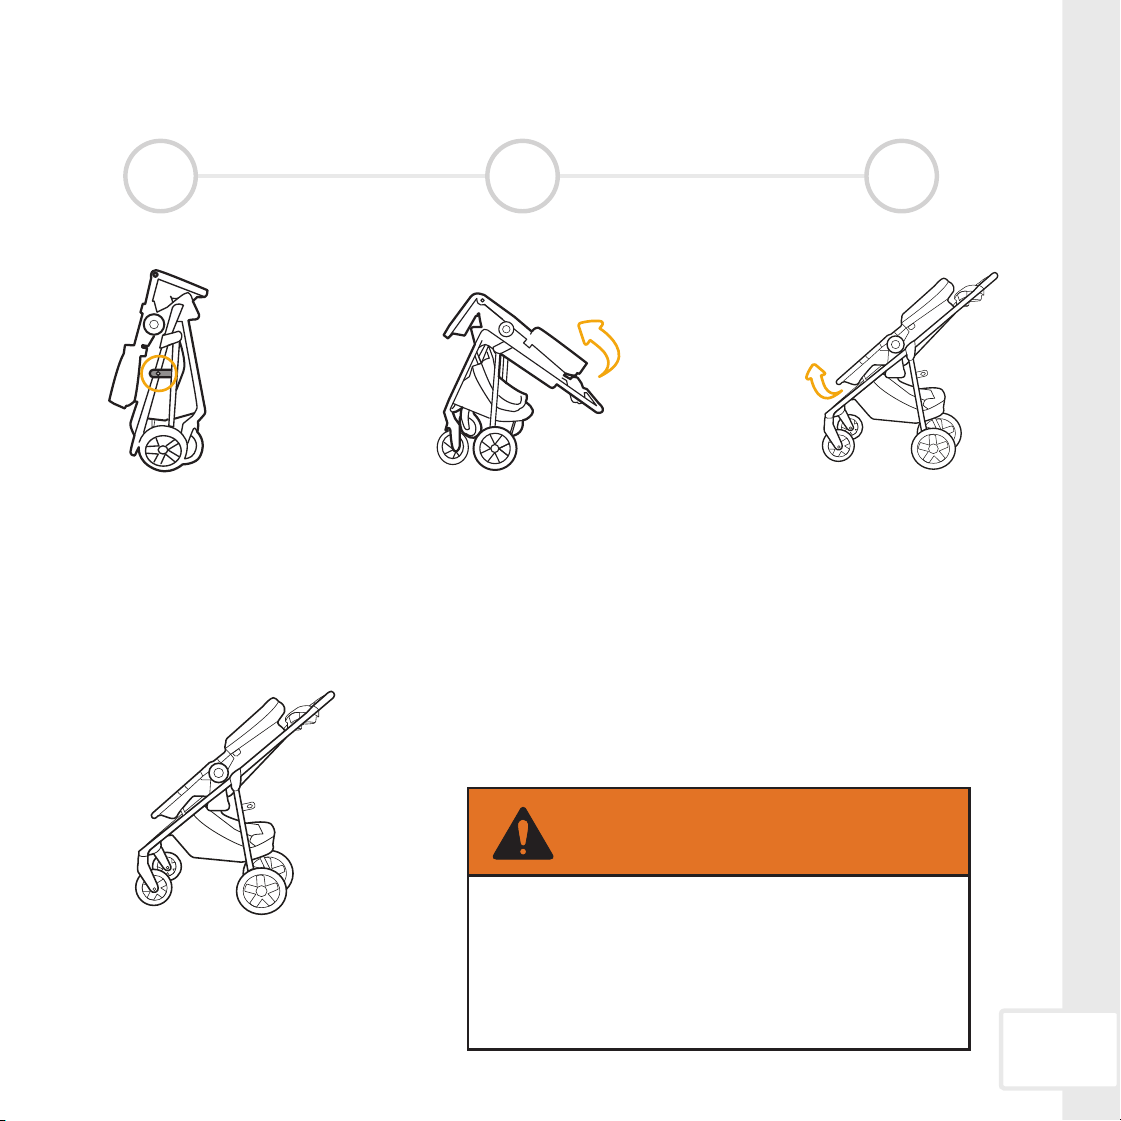
Unfolding Stroller
Finished!
ALWAYS keep fingers away from moving
parts, when folding, unfolding, or adjusting
stroller to prevent finger entrapment.
WARNING:
Fold the stroller out
as shown.
You will hear both sides
click when it is fully
locked open.
1 2 3
Unfasten the
frame lock.
Adjust the footrest to
desired position.

Wash & Care of Stroller Parts
22
Spot
Clean
Spot
Clean
Cleaning Harness Covers &
Buckle Cover
• Machine wash separately with
cold water on a gentle cycle.
• Do not use bleach.
• Tumble dry separately for 10-
12 minutes on low heat.
• Remove immediately.

Dorel Juvenile Group Information
Two-Year Limited Warranty
Dorel Juvenile Group, Inc. warrants to the original purchaser that this product (Grow and Go Modular Stroller), is free from material and workmanship defects when used
under normal conditions for a period of two (2) years from the date of purchase. Should the product contain defects in material or workmanship Dorel Juvenile Group,
Inc., will repair or replace the product, at our option, free of charge. Purchaser will be responsible for all costs associated with packaging and shipping the product to
Dorel Juvenile Group Consumer Care Department at the address noted on the back of this document and all other freight or insurance costs associated with the return.
Dorel Juvenile Group will bear the cost of shipping the repaired or replaced product to the purchaser. Product should be returned in its original package accompanied by
a proof of purchase, either a sales receipt or other proof that the product is within the warranty period. This warranty is void if the owner repairs or modifies the product
or the product has been damaged as a result of misuse. This warranty excludes any liability other than that expressly stated previously, including but not limited to, any
incidental or inconsequential damages.
SOME STATES DO NOT ALLOW THE EXCLUSION OR LIMITATION OF INCIDENTAL OR CONSEQUENTIAL DAMAGES, SO THE ABOVE
LIMITATION OR EXCLUSION MAY NOT APPLY TO YOU. THIS WARRANTY GIVES YOU SPECIFIC LEGAL RIGHTS, AND YOU MAY ALSO HAVE OTHER RIGHTS THAT MAY VARY
FROM STATE TO STATE.
Thank you for choosing this stroller.
The DJG family is committed to creating strollers with
the most comfort and convenience available today.
If you have questions or any concerns with this
stroller, please contact our Consumer Care
Department.
For parts availability and questions, please
contact us via phone, text, or chat.
Include the model number and manufacture date
(found on a sticker on the stroller frame) and a brief
description of the part.
• Rear Wheel Assembly
• Front Swivel Wheels (2)
• Harness Covers (2)
• Child Tray
• Buckle Cover
Call: 1-800-544-1108
Text:
1-812-652-2525
Chat:
www.safety1st.com
Hours of Operation:
M-TH: 8:00 AM - 6:00 PM EST
FRI: 8:00 AM - 4:30 PM EST
Date of
Manufacture Label
23

Grow and Go
TM
Modular Stroller
Max 50 lb (22.7 kg)
©Disney
www.disney.com
©2022 Dorel Juvenile Group, Inc. (800) 544-1108 www.safety1st.com. Styles and colors may
vary. Los estilos y los colores pueden variar. Les styles et les couleurs peuvent varier. Made
in CHINA. Fabriqué en CHINE. Hecho en CHINA. Distributed by (distribuido por) (distribrué par)
Dorel Juvenile Group, Inc., 2525 State St., Columbus, IN 47201-7494. Dorel Juvenile Canada,
2233 Argentia Road, Suite 110, Mississauga, ON L5N 2X7. Importado y Distribuido en Chile
por: Comercial e Industrial Silfa S.A. - San Ignacio 0201 / Parque Industrial Portezuelo Quilicura,
Santiago Chile. Fono (562) 2339 9000. En Perú por: Comexa S.A. - Los Libertadores 455 – San
Isidro, Lima – Perú. Fono (511) 4469014. En Centro América, Caribe y Ecuador por: Best Brands
Group S.A. – Av. Balboa, Bay Mall Plaza, Planta Baja, local 9, Panamá. - Fono: (507) 300 2884.
En Colombia por: Baby Universe S.A.S. - Vía 40 No. 77-29, Barranquilla, Colombia - Fono: (575)
353 1110 Importador: DJGM, S.A. DE C.V. Gabriel Mancera No. 1041 Col. Del Valle, Benito Juárez
C.P. 03100 México, Ciudad de México R.F.C. DJG140305GN9 Tel. (55) 67199202
4358-8272A 06/09/22

Grow and Go
TM
Carriola modular
Máx 50 lb (22.7 kg)
Lea todas las instrucciones ANTES DE USAR este producto.
GUARDE LAS INSTRUCCIONES PARA USO FUTURO.
4358-8272A 06/09/22
NOTA: Los estilos varían.
TR450
Información de seguridad
POR LA SEGURIDAD DE SU HIJO, POR FAVOR LEA LAS SIGUIENTES ADVERTENCIAS
E INSTRUCCIONES DE ENSAMBLE, Y GUÁRDELAS PARA CONSULTA FUTURA.
• El armado debe ser realizado por un adulto.
• NUNCA DEJE AL NIÑO SIN SUPERVISIÓN. SIEMPRE mantenga al niño a la vista cuando esté en la
carriola.
• EVITE UNA LESIÓN GRAVE por caída o resbalamiento. Siempre use el cinturón de seguridad. Revise
con frecuencia para asegurarse que esté asegurado.
• SIEMPRE mantenga los dedos alejados de las piezas movibles, al plegar, desplegar o ajustar la car-
riola, con el fin de evitar que se atrapen los dedos.
• SIEMPRE asegúrese de que la carriola esté COMPLETAMENTE ABIERTA Y BLOQUEADA antes de
usarla.
• SIEMPRE use los frenos cuando la carriola esté parada.
• SIEMPRE quite el material de protección y las bolsas de plástico y deséchelos antes de ensamblar.
• NEVER ponga líquidos calientes en el apoyavasos.
• La charola de los padres, incluidos los portavasos, NO PUEDE exceder las 1,4 kg en total.
• NUNCA use la carriola en escaleras ni escaleras eléctricas.
• NUNCA patine junto con la carriola.
• NUNCA
deje que los niños jueguen con ni se cuelguen de la carriola
.
• NUNCA deje que los niños se suban a la carriola sin ayuda. La carriola podría volcarse y lesionar al
niño.
ADVERTENCIA:
•
•

• NUNCA coloque ni cuelgue paquetes, bolsas ni accesorios en el asa ni en la capota. La carriola podría
volcarse o la capota podría colapsarse.
• Este producto se volverá inestable si se usa una bolsa de paquetes o una rejilla cuando no hay provisión
para ello.
• Este producto puede volverse inestable si se usa una bolsa de paquetes diferente a la recomendada por
el fabricante.
• Este producto se volverá inestable si se excede la carga recomendada por el fabricante.
• Se debe tener cuidado al plegar y desplegar la carriola para evitar atrapar los dedos.
• El niño podría resbalarse hacia los orificios de las piernas y estrangularse, a menos que libere la hebilla
que se encuentra debajo del apoyapiés y presione hacia abajo el área para los pies de manera de crear
un cerramiento seguro.
• NO cargue a otros niños, artículos ni accesorios dentro o sobre este producto excepto lo recomendado
en las instrucciones del fabricante.
• NUNCA coloque más de 4.5 kg en el cesto de almacenamiento. Si el peso se excede, podrían existir
condiciones inestables peligrosas.
• La CARRIOLA es sólo para niños que pesen hasta 22.7-kg, y que AL ESTAR SENTADOS, el punto
medio de la cabeza del niño está al nivel o más abajo que el borde superior del asiento de la carriola
• SÓLO use esta carriola con UN niño a la vez.
• STROLLER mode is for use with children who can sit up unassisted and is NOT recommended for
newborns.
• Modo de la CARRIOLA debe usarse con niños que pueden sentarsesin asistencia, NO se recomienda
para recién nacidos.
• No seguir los pasos y las advertencias en las etiquetas y en el manual de instrucciones puede resultar
en lesiones graves o la muerte de su hijo.
•
•

Contenido
Piezas de la carriola........................................... 1
Cómo instalar las ruedas ................................... 2
Cómo usar el freno de estacionamiento ............. 4
Cómo quitar las ruedas ...................................... 4
Modos de uso .................................................. 5
Modo Autoasiento ............................................ 6
Cómo quitar el autoasiento del armazón de la
carriola o del asiento de la carriola ..................... 6
Modo Asiento de la carriola ............................... 7
Cómo quitar el asiento de la carriola
del armazón de la carriola .................................. 7
Modo Coche .................................................... 8
Modo Sistema de viaje ..................................... 9
Cómo ajustar el respaldo del asiento
de la carriola ..................................................... 10
Cómo ajustar las posiciones del asiento
de la carriola ..................................................... 11
Cómo colocar y quitar la capota ......................... 12
Cómo ajustar la capota ..................................... 12
Cómo ajustar el apoyapiés ................................. 13
Cómo colocar y quitar la charola para el niño .... 14
Uso de la charola para padres y canasta
para guardado................................................... 15
Cómo asegurar al niño en el asiento
de la carriola ..................................................... 16
Cómo cambiar la altura de las correas del arnés
del asiento de la carriola ................................... 18
Cómo ajustar el largo del sistema de arnés ........ 19
Cómo plegar la carriola ...................................... 20
Cómo desplegar la carriola ................................ 21
Lavado y mantenimiento de las piezas
de la carriola ..................................................... 22
Información sobre Dorel Juvenile Group ............. 23
Repuestos ......................................................... 23
Garantía ............................................................ 23

Piezas de la carriola
1
Diseñe e identifique todas las
partes.
Si falta alguna pieza, no devuelva
el producto al lugar donde lo
compró.
Contacte al Servicio de Atención al
Cliente por:
• Teléfono: 1-800-544-1108
• Mensaje de texto: 1-812-652-2525
• Chat: www.safety1st.com
Necesitará tener a mano el número
del modelo (TR450) y la fecha de
fabricación
Estos se encuentran en una
etiqueta ubicada en el armazón de
la carriola.
Charolapara
padres
Correas del
arnés
Ranuras para
el arnés de
hombros
Cubrearnés
Apoyapiés
ajustable
Botones de
ajuste del
apoyapiés
Ejes del dispositivo
de sujeción de la
charola para el niño
Ruedas
delanteras
giratorias
Conjunto
de ruedas
traseras
Hebilla
Cubrehebilla
Capota
desmontable
con ventanita
Charola para el niño
Traba del
armazón
Accesorios
para Autoasiento
y asiento de la
carriola
Botones para liberar
el armazón
Botones
de ajuste y
liberación
del asiento
Cómo instalar las ruedas
2
• Despliegue la carriola hasta escuchar un clic y
que se trabe en la posición abierta.
• Recueste la carriola en el piso como se
muestra.
1 2
Libere la traba del
armazón.
Conjunto de ruedas delanteras
Conjunto de ruedas traseras
SIEMPRE mantenga los dedos alejados de las piezas movibles, al plegar, desplegar o
ajustar la carriola, con el fin de evitar que se atrapen los dedos.
¡Clic!
3
Coloque las ruedas del-
anteras giratorias como se
muestra.
ADVERTENCIA:
3
4
• Alinee los ejes del conjunto de ruedas traseras
con los montantes de patas traseras en el
armazón de la carriola.
• Las clavijas en el armazón de la carriola se
insertarán en las ranuras que se encuentran
en los ejes del conjunto de ruedas como se
muestra.
• Luego, de vuelta la carriola.
¡Listo!
NOTA: Tire hacia abajo de las ruedas delanteras y del
conjunto de ruedas traseras para asegurarse de que
estén bien colocadas.
Para usar el freno de estacionamiento, consulte la
página 4.
Para el modo Autoasiento, consulte la página 6.
Para el modo Asiento de carriola, consulte la página 7.
Para el modo Coche, consulte la página 8.
Para el modo Sistema de viaje, consulte la página 9.
Para plegar y desplegar la carriola, consulte las páginas
20-21.
¡Clic!
4
Cómo usar el freno de estacionamiento
Cómo quitar las ruedas
Cómo bloquear el freno
de estacionamiento
Cómo liberar el freno de
estacionamiento
Barra de freno
De vuelta la carriola.
Ubique los botones de
liberación de las ruedas
traseras.
Presione los botones de liberación
y al mismo tiempo tire del
conjunto de ruedas traseras hacia
ar riba y afuera de la carriola.
Ubique el botón de liberación de la
rueda delantera.
Presione el botón de liberación y
al mismo tiempo tire de la rueda
delantera hacia abajo.
Repita del otro lado.
Conjunto de ruedas traseras
Ruedas delanteras giratorias
Pise sobre la barra de freno
para bloquearlo.
Tire de la barra de freno hacia
arriba para liberarlo.
Modos de uso
Modo Autoasiento
Consulte la página 6.
Modo Asiento de carriola
Consulte la página 7.
Modo Sistema de viaje
Consulte la página 9.
Modo Coche
Consulte la página 8.
5
Modo Autoasiento
Cómo quitar el autoasiento del armazón de la carriola o
del asiento de la carriola
Coloque el autoasiento orientado
hacia atrás o hacia adelante en
los dispositivos de sujeción en el
armazón de la carriola.
Tire del autoasiento hacia arriba
de la manija para traslado o de
los ejes de la manija para verifi-
car que esté bien colocado
1 2
Con el mecanismo de liberación del autoasiento en la
carriola presionado, levante hasta quitar el autoasiento
del armazón de la carriola.
Las imágenes muestran un
ícono de autoasiento genérico.
O
¡Clic!
¡Listo!
El autoasiento se puede usar orientado hacia atrás o
hacia adelante. Consulte el manual de instrucciones
del autoasiento para ver cómo asegurar al niño.
Los mecanismos de liberación del
autoasiento, así como la ubicación, varían
según el modelo.
Revise el manual de instrucciones del
autoasiento para ubicar el mecanismo de
liberación de la carriola en el autoasiento.
Ejemplo de manija
de liberación de la
carriola del modelo
onBoard
6
7
Modo Asiento de la carriola
Attach the stroller seat rear-
facing or forward-facing
to the attachments on the
stroller frame.
¡Clic!
¡Listo!
Para ajustar el respaldo del asiento de la carriola,
consulte la página 10.
Para ajustar las posiciones del asiento de la carriola,
consulte la página 11.
Para asegurar al niño en el asiento de la carriola,
consulte la página 16.
El asiento de la carriola se puede usar orientado hacia atrás o hacia adelante.
Cómo quitar el asiento de la carriola
del armazón de la carriola
Presione al máximo los botones de
liberación a ambos lados del asiento y
levántelo de la carriola hasta quitarlo
del armazón.
O
Coloque el asiento del carriola
orientado hacia atrás o hacia
adelante en los dispositivos de
sujeción en el armazón de la
carriola.
Modo Coche
Presione los botones de ajuste
del asiento de la carriola y lleve
el asiento bien hacia atrás.
Para más información sobre
las posiciones del asiento de
la carriola, consulte la página
11.
Recline el respaldo del asiento de la
carriola en su totalidad. En la parte
posterior del asiento de la carriola,
presione al máximo el botón de ajuste del
respaldo y tire hacia usted.
Para más información sobre cómo ajustar
el respaldo, consulte la página 10.
¡Listo!
1 2 3
Ubique la correa debajo del apoyapiés.
Desabroche la hebilla de la correa como se muestra.
4
O
8
El modo Coche se puede usar orientado hacia atrás o hacia adelante.
El niño podría resbalarse hacia los orificios de las piernas y estrangularse, a menos que libere la hebilla
que se encuentra debajo del apoyapiés y presione hacia abajo el área para los pies de manera de
crear un cerramiento seguro.
ADVERTENCIA:

9
Modo Sistema de viaje
El asiento de la carriola se puede usar orientado hacia atrás o hacia adelante.
El autoasiento SIEMPRE DEBE enfrentar el asiento de la carriola en el modo Sistema de viaje.
La charola para el niño SIEMPRE DEBE usarse en el modo Sistema de viaje.
Coloque el autoasiento en los
dispositivos de sujeción en el asiento
de la carriola. Escuchará un “clic” a
cada lado cuando se encaje bien.
O
¡Clic!
¡Listo!
Para quitar el autoasiento del asiento de
la carriola, consulte la página 6: Cómo
quitar el autoasiento del armazón de la
carriola o del asiento de la carriola.
Coloque la charola para
el niño.
Para más información
sobre la charola para
el niño, consulte la
página 14.
1 2 3 4
5
6
Coloque el asiento de la
carriola orientado hacia
atrás o hacia adelante
en los dispositivos de
sujeción en el armazón de
la carriola.Escuchará un
“clic” a cada lado cuando
se encaje en el lugar.
Recline el respaldo del
asiento de la carriola en
su totalidad.
Para más información
sobre cómo ajustar el
respaldo, consulte la
página, 10.
Pliegue la capota hacia atrás.
Ajuste el asiento de la carriola a
la posición más erguida.
Para más información sobre
las posiciones del asiento de
la carriola, consulte la página
11.
Tire del autoasiento hacia arriba
de la manija para traslado o de
los ejes de la manija para verifi-
car que esté bien colocado.

10
Cómo ajustar el respaldo del asiento de la carriola
Cómo reclinar el respaldo Cómo volver el respaldo a la posición erguida
En la parte posterior del asiento de la carriola,
sostenga el extremo suelto de la correa y deslice
el botón de ajuste del respaldo hacia arriba por la
correa acercándolo al asiento.
En la parte posterior del asiento de la carriola,
deslice y mantenga presionado el botón de ajuste
del respaldo y tire alejándolo del asiento.
Las imágenes muestran el respaldo del asiento de la carriola en posición erguida y reclinada;
sin embargo, hay varias posiciones de reclinado.
11
Cómo ajustar las posiciones del asiento de la carriola
Ubique los botones de ajuste del asiento
de la carriola a cada lado del asiento.
Presione y mantenga presionado los
botones de ajuste hasta rotar el asiento
hacia adelante o hacia atrás a la
posición deseada.
Orientado hacia
adelante
Orientado hacia atrás
Cómo colocar y quitar la capota
Cómo colocar la capota
Alinee las lengüetas de la capota con los dispositi-
vos correspondientes en el armazón de la carriola y
llévelas hacia abajo para encajarlas en el armazón.
Ubique las lengüetas de la capota y
tire de ellas hacia afuera para quitar
la capota del armazón de la carriola.
Para quitar la capota
Cómo ajustar la capota
Tire de la capota hacia adelante, tire más para
extenderla más.
Levante la tela para ac-
ceder a la ventanita.
12
13
Cómo ajustar el apoyapiés
Para bajar el apoyapiés, presione los botones de ajuste
del apoyapiés y empuje el apoyapiés hacia abajo.
Para levantar el apoyapiés, tire del apoyapiés hacia
arriba hasta que se encaje en el lugar.
14
Ubique uno de los botones que se encuentran debajo
de cada lado de la charola para el niño.
Presione uno de los botones y lleve la charola para el
niño hacia el costado del armazón de la carriola.
Cómo colocar la charola para el niño
Cómo quitar la charola para el niñoCómo abrirla y girarla
Cómo colocar y quitar la charola para el niño
Tire suavemente de la cha-
rola para asegurarse de que
esté bien colocada.
Ubique los botones que se encuentran debajo
de cada lado de la charola para el niño.
Presiones los dos botones y tire de la charola para el
niño hacia afuera del armazón de la carriola.
La charola para el niño también se puede abrir y girar para que sea más fácil poner o sacar al niño.
Ubique los ejes del dispositivo de
sujeción de la charola para el niño a
cada lado del armazón de la carriola.
Alinee los montantes de la charola
con las ranuras en los ejes del
dispositivo de sujeción.
1 2
3
Uso de la charola para padres
y canasta para guardado
max
10 lb
4,5 kg
max
3 lbs
1,4 kg
15
• NUNCA coloque más de 10 lbs. (4.5 kg) en el cesto de almacenamiento. Si el peso se
excede, podrían existir condiciones inestables peligrosas.
• La charola de los padres, incluidos los portavasos, NO PUEDE exceder las 1,4 kg en
total.
ADVERTENCIA:
Cómo asegurar al niño en el asiento de la carriola
16
Desabroche. Ponga al niño en
el asiento de la
carriola.
Abroche.
¡Listo!
Alinee la lengüeta de la hebilla con la
lengüeta que se encuentra sobre la
hebilla.
Deslice hasta encajar en el lugar.
Repita del otro lado.
1
2 3
4
17
• NUNCA DEJE AL NIÑO SIN SUPERVISIÓN. Siempre mantenga al niño a la vista cuando
esté en la carriola.
• EVITE UNA LESIÓN GRAVE por caída o resbalamiento. Siempre use el cinturón de
seguridad. Revise con frecuencia para asegurarse que esté asegurado.
• La carriola es sólo para niños que pesen hasta 50 libras (22.7-Kg), y que AL ESTAR
SENTADOS, el punto medio de la cabeza del niño está al nivel o más abajo que el borde
superior del asiento de la carriola.
• SÓLO use esta carriola con UN niño a la vez.
• LA CARRIOLA debe usarse con niños que pueden sentarsesin asistencia, NO se
recomienda para recién nacidos.
ADVERTENCIA:
Cómo cambiar la altura de las correas del arnés
del asiento de la carriola
Desabroche.
Sistema de arnés
1 2 3
Desde la parte posterior del
asiento de la carriola, empuje
el dispositivo de sujeción de
la correa del arnés a través de
las ranuras para el arnés.
Desde la parte de
adelante del asiento de
la carriola, tire de las
correas del arnés hasta
que pasen por las ranuras
para el arnés.
Tire de los dispositivos
de sujeción de la correa
del arnés a través de las
ranuras para el arnés.
Empuje las correas del arnés
a través de las ranuras para
el arnés más cercanas a los
hombros del niño.
4 5
• Los cinturones deben pasarse exactamente
como se muestra.
• El no seguir estas instrucciones podría
resultar en lesiones graves o la muerte del
niño.
18
A medida que el niño crece, tendrá que ajustar la altura de la correa del arnés.
ADVERTENCIA:

Cómo ajustar la correa del arnés
Cómo ajustar la correa de la cintura
Sostenga el anillo deslizante con una mano y el clip de
la hebilla con la otra. Deslice el anillo alejándolo del clip
de la hebilla.
Sostenga el anillo deslizante con una mano y el clip de
la hebilla con la otra. Deslice el anillo hacia del clip de
la hebilla.
Sostenga el anillo deslizante con una mano y el clip
de la hebilla con la otra. Deslice el anillo hacia arriba.
Sostenga el anillo deslizante con una mano y el clip de
la hebilla con la otra. Deslice el anillo hacia abajo.
19
Cómo acortarla Para alargarla
Cómo acortarla Para alargarla
Cómo ajustar el largo del sistema de arnés
20
Cómo plegar la carriola
¡Listo!
NOTA: La carriola
queda parada.
SIEMPRE mantenga los dedos alejados de
las piezas movibles, al plegar, desplegar o
ajustar la carriola, con el fin de evitar que se
atrapen los dedos
ADVERTENCIA:
Pliegue la carriola hacia
abajo como se muestra.
1 2 3
Deslice y presione los botones de liberación del
armazón de la carriola como se muestra.
Manténgalos presionados juntos.
Enganche la traba del
armazón.
Opcional: pliegue el
apoyapiés hacia abajo.
21
Cómo desplegar la carriola
¡Listo!
SIEMPRE mantenga los dedos alejados de
las piezas movibles, al plegar, desplegar o
ajustar la carriola, con el fin de evitar que se
atrapen los dedos
Lleve la carriola hacia
arriba
como se muestra.
Escuchará un clic a ambos
lados de la carriola cuando
está abierta del todo.
1 2 3
Desenganche la traba
del armazón.
Ajuste el apoyapiés a la
posición deseada.
ADVERTENCIA:
Lavado y mantenimiento de las piezas
de la carriola
22
Lugar
limpio
Lugar
limpio
Cómo limpiar los cubrearnés y el
cubrehebilla
• Lave a máquina por separado
con agua fría en ciclo suave.
• No use blanqueador.
• Seque a máquina por separado
durante 10-12 minutos con poco
calor.
• Saque enseguida.
Información sobre Dorel Juvenile Group
Garantía limitada de dos años
Dorel Juvenile Group, Inc. warrants to the original purchaser that this product (Grow and Go Carriola modular), is free from material and workmanship defects when used
under normal conditions for a period of two (2) years from the date of purchase. Should the product contain defects in material or workmanship Dorel Juvenile Group,
Inc., will repair or replace the product, at our option, free of charge. Purchaser will be responsible for all costs associated with packaging and shipping the product to
Dorel Juvenile Group Consumer Care Department at the address noted on the back of this document and all other freight or insurance costs associated with the return.
Dorel Juvenile Group will bear the cost of shipping the repaired or replaced product to the purchaser. Product should be returned in its original package accompanied by
a proof of purchase, either a sales receipt or other proof that the product is within the warranty period. This warranty is void if the owner repairs or modifies the product
or the product has been damaged as a result of misuse. This warranty excludes any liability other than that expressly stated previously, including but not limited to, any
incidental or inconsequential damages.
SOME STATES DO NOT ALLOW THE EXCLUSION OR LIMITATION OF INCIDENTAL OR CONSEQUENTIAL DAMAGES, SO THE ABOVE
LIMITATION OR EXCLUSION MAY NOT APPLY TO YOU. THIS WARRANTY GIVES YOU SPECIFIC LEGAL RIGHTS, AND YOU MAY ALSO HAVE OTHER RIGHTS THAT MAY VARY
FROM STATE TO STATE.
Gracias por elegir esta carriola.
La familia DJG está comprometida con la fabricación
de carriolas con la mayor comodidad y conveniencia
disponibles hoy.
Si tiene alguna duda o algún problema con la
carriola, póngase en contacto con el Departamento
de Atención al Cliente
Para consultar por disponibilidad de repuestos
o hacer alguna pregunta, póngase en contacto
por teléfono, mensaje de texto o chat.
Incluya el número del modelo y la fecha de
fabricación (se encuentran en una etiqueta en el
armazón de la carriola) y una breve descripción de
la pieza.
• Conjunto de ruedas traseras
• Ruedas delanteras giratorias (2)
• Cubrearnés (2)
• Charola para el niño
• Cubrehebilla
Teléfono: 1-800-544-1108
Mensaje de texto:
1-812-652-2525
Chat:
www.safety1st.com
Horas de operación:
De lunes a jueves: 8:00 AM - 6:00 PM EST
Viernes: 8:00 AM - 4:30 PM EST
Etiqueta de fecha de
fabricación
23

Grow and Go
TM
Carriola modular
Max 50 lb (22.7 kg)
©Disney
www.disney.com
©2022 Dorel Juvenile Group, Inc. (800) 544-1108 www.safety1st.com. Styles and colors may
vary. Los estilos y los colores pueden variar. Les styles et les couleurs peuvent varier. Made
in CHINA. Fabriqué en CHINE. Hecho en CHINA. Distributed by (distribuido por) (distribrué par)
Dorel Juvenile Group, Inc., 2525 State St., Columbus, IN 47201-7494. Dorel Juvenile Canada,
2233 Argentia Road, Suite 110, Mississauga, ON L5N 2X7. Importado y Distribuido en Chile
por: Comercial e Industrial Silfa S.A. - San Ignacio 0201 / Parque Industrial Portezuelo Quilicura,
Santiago Chile. Fono (562) 2339 9000. En Perú por: Comexa S.A. - Los Libertadores 455 – San
Isidro, Lima – Perú. Fono (511) 4469014. En Centro América, Caribe y Ecuador por: Best Brands
Group S.A. – Av. Balboa, Bay Mall Plaza, Planta Baja, local 9, Panamá. - Fono: (507) 300 2884.
En Colombia por: Baby Universe S.A.S. - Vía 40 No. 77-29, Barranquilla, Colombia - Fono: (575)
353 1110 Importador: DJGM, S.A. DE C.V. Gabriel Mancera No. 1041 Col. Del Valle, Benito Juárez
C.P. 03100 México, Ciudad de México R.F.C. DJG140305GN9 Tel. (55) 67199202
4358-8272A 06/09/22