
November 2019
©2019 Fluke Corporation. All rights reserved.
All product names are trademarks of their respective companies.
TiS60+
Thermal Imager
Users Manual
1.888.610.7664 sales@GlobalTestSupply.com
Fluke-Direct
.com

LIMITED WARRANTY AND LIMITATION OF LIABILITY
This Fluke product will be free from defects in material and workmanship for two years from the date of purchase. This warranty does not cover
fuses, disposable batteries, or damage from accident, neglect, misuse, alteration, contamination, or abnormal conditions of operation or handling.
Resellers are not authorized to extend any other warranty on Fluke’s behalf. To obtain service during the warranty period, contact your nearest
Fluke authorized service center to obtain return authorization information, then send the product to that Service Center with a description of the
problem.
THIS WARRANTY IS YOUR ONLY REMEDY. NO OTHER WARRANTIES, SUCH AS FITNESS FOR A PARTICULAR PURPOSE, ARE
EXPRESSED OR IMPLIED. FLUKE IS NOT LIABLE FOR ANY SPECIAL, INDIRECT, INCIDENTAL OR CONSEQUENTIAL DAMAGES OR
LOSSES, ARISING FROM ANY CAUSE OR THEORY. Since some states or countries do not allow the exclusion or limitation of an implied
warranty or of incidental or consequential damages, this limitation of liability may not apply to you.
11/99
1.888.610.7664 sales@GlobalTestSupply.com
Fluke-Direct
.com

i
Title Page
Introduction . . . . . . . . . . . . . . . . . . . . . . . . . . . . . . . . . . . . . . . . . . . . . . . . . . . . . . . . . . . . . . . . . . . . . . . . . . . . . . . . . . . . . . 1
How to Contact Fluke . . . . . . . . . . . . . . . . . . . . . . . . . . . . . . . . . . . . . . . . . . . . . . . . . . . . . . . . . . . . . . . . . . . . . . . . . . . . . . 1
Safety Information. . . . . . . . . . . . . . . . . . . . . . . . . . . . . . . . . . . . . . . . . . . . . . . . . . . . . . . . . . . . . . . . . . . . . . . . . . . . . . . . . 1
Specifications . . . . . . . . . . . . . . . . . . . . . . . . . . . . . . . . . . . . . . . . . . . . . . . . . . . . . . . . . . . . . . . . . . . . . . . . . . . . . . . . . . . . 2
Operation in Extreme Conditions. . . . . . . . . . . . . . . . . . . . . . . . . . . . . . . . . . . . . . . . . . . . . . . . . . . . . . . . . . . . . . . . . . 2
Radio Frequency Data. . . . . . . . . . . . . . . . . . . . . . . . . . . . . . . . . . . . . . . . . . . . . . . . . . . . . . . . . . . . . . . . . . . . . . . . . . 2
Accessories. . . . . . . . . . . . . . . . . . . . . . . . . . . . . . . . . . . . . . . . . . . . . . . . . . . . . . . . . . . . . . . . . . . . . . . . . . . . . . . . . . . . . . 2
Before You Start . . . . . . . . . . . . . . . . . . . . . . . . . . . . . . . . . . . . . . . . . . . . . . . . . . . . . . . . . . . . . . . . . . . . . . . . . . . . . . . . . . 3
Battery . . . . . . . . . . . . . . . . . . . . . . . . . . . . . . . . . . . . . . . . . . . . . . . . . . . . . . . . . . . . . . . . . . . . . . . . . . . . . . . . . . . . . . 3
Two-Bay Battery Charger Base . . . . . . . . . . . . . . . . . . . . . . . . . . . . . . . . . . . . . . . . . . . . . . . . . . . . . . . . . . . . . . . 4
On-Imager AC Power Socket . . . . . . . . . . . . . . . . . . . . . . . . . . . . . . . . . . . . . . . . . . . . . . . . . . . . . . . . . . . . . . . . . 4
Optional 12 V Vehicle Charger. . . . . . . . . . . . . . . . . . . . . . . . . . . . . . . . . . . . . . . . . . . . . . . . . . . . . . . . . . . . . . . . 4
Features and Controls . . . . . . . . . . . . . . . . . . . . . . . . . . . . . . . . . . . . . . . . . . . . . . . . . . . . . . . . . . . . . . . . . . . . . . . . . . 5
Power On and Off . . . . . . . . . . . . . . . . . . . . . . . . . . . . . . . . . . . . . . . . . . . . . . . . . . . . . . . . . . . . . . . . . . . . . . . . . . . . . 6
Controls for Image Capture . . . . . . . . . . . . . . . . . . . . . . . . . . . . . . . . . . . . . . . . . . . . . . . . . . . . . . . . . . . . . . . . . . . . . . 6
Laser Pointer . . . . . . . . . . . . . . . . . . . . . . . . . . . . . . . . . . . . . . . . . . . . . . . . . . . . . . . . . . . . . . . . . . . . . . . . . . . . . . . . . 6
Control Buttons . . . . . . . . . . . . . . . . . . . . . . . . . . . . . . . . . . . . . . . . . . . . . . . . . . . . . . . . . . . . . . . . . . . . . . . . . . . . . . . 7
Memory . . . . . . . . . . . . . . . . . . . . . . . . . . . . . . . . . . . . . . . . . . . . . . . . . . . . . . . . . . . . . . . . . . . . . . . . . . . . . . . . . . . . . 7
How to Use the Menus . . . . . . . . . . . . . . . . . . . . . . . . . . . . . . . . . . . . . . . . . . . . . . . . . . . . . . . . . . . . . . . . . . . . . . . . . 7
Image Capture . . . . . . . . . . . . . . . . . . . . . . . . . . . . . . . . . . . . . . . . . . . . . . . . . . . . . . . . . . . . . . . . . . . . . . . . . . . . . . . . . . . 8
IR-PhotoNotes™ . . . . . . . . . . . . . . . . . . . . . . . . . . . . . . . . . . . . . . . . . . . . . . . . . . . . . . . . . . . . . . . . . . . . . . . . . . . . . . 8
Voice Annotation (Recording) . . . . . . . . . . . . . . . . . . . . . . . . . . . . . . . . . . . . . . . . . . . . . . . . . . . . . . . . . . . . . . . . . . . . 8
Edit Captured Infrared Image . . . . . . . . . . . . . . . . . . . . . . . . . . . . . . . . . . . . . . . . . . . . . . . . . . . . . . . . . . . . . . . . . . . . 9
Save Captured Infrared Image . . . . . . . . . . . . . . . . . . . . . . . . . . . . . . . . . . . . . . . . . . . . . . . . . . . . . . . . . . . . . . . . . . . 9
Table of Contents
1.888.610.7664 sales@GlobalTestSupply.com
Fluke-Direct
.com

TiS60+
Users Manual
ii
Micro SD Memory Card. . . . . . . . . . . . . . . . . . . . . . . . . . . . . . . . . . . . . . . . . . . . . . . . . . . . . . . . . . . . . . . . . . . . . . . . . . . . . 9
Temperature Measurement. . . . . . . . . . . . . . . . . . . . . . . . . . . . . . . . . . . . . . . . . . . . . . . . . . . . . . . . . . . . . . . . . . . . . . . . . . 9
Menus . . . . . . . . . . . . . . . . . . . . . . . . . . . . . . . . . . . . . . . . . . . . . . . . . . . . . . . . . . . . . . . . . . . . . . . . . . . . . . . . . . . . . . . . . 10
Measurement Menu . . . . . . . . . . . . . . . . . . . . . . . . . . . . . . . . . . . . . . . . . . . . . . . . . . . . . . . . . . . . . . . . . . . . . . . . . . . 10
Range . . . . . . . . . . . . . . . . . . . . . . . . . . . . . . . . . . . . . . . . . . . . . . . . . . . . . . . . . . . . . . . . . . . . . . . . . . . . . . . . . . 10
Emissivity Adjustment. . . . . . . . . . . . . . . . . . . . . . . . . . . . . . . . . . . . . . . . . . . . . . . . . . . . . . . . . . . . . . . . . . . . . . 11
Background (Reflected Background Temperature Compensation) . . . . . . . . . . . . . . . . . . . . . . . . . . . . . . . . . . . 12
Spot Temperatures . . . . . . . . . . . . . . . . . . . . . . . . . . . . . . . . . . . . . . . . . . . . . . . . . . . . . . . . . . . . . . . . . . . . . . . . 12
User-Definable Spot Markers . . . . . . . . . . . . . . . . . . . . . . . . . . . . . . . . . . . . . . . . . . . . . . . . . . . . . . . . . . . . . . . . 12
Center Box . . . . . . . . . . . . . . . . . . . . . . . . . . . . . . . . . . . . . . . . . . . . . . . . . . . . . . . . . . . . . . . . . . . . . . . . . . . . . . 13
Image Menu . . . . . . . . . . . . . . . . . . . . . . . . . . . . . . . . . . . . . . . . . . . . . . . . . . . . . . . . . . . . . . . . . . . . . . . . . . . . . . . . . 13
Palettes. . . . . . . . . . . . . . . . . . . . . . . . . . . . . . . . . . . . . . . . . . . . . . . . . . . . . . . . . . . . . . . . . . . . . . . . . . . . . . . . . 13
IR-Fusion™ Technology . . . . . . . . . . . . . . . . . . . . . . . . . . . . . . . . . . . . . . . . . . . . . . . . . . . . . . . . . . . . . . . . . . . . 14
Color Alarms . . . . . . . . . . . . . . . . . . . . . . . . . . . . . . . . . . . . . . . . . . . . . . . . . . . . . . . . . . . . . . . . . . . . . . . . . . . . . 14
Display Graphics Presentation . . . . . . . . . . . . . . . . . . . . . . . . . . . . . . . . . . . . . . . . . . . . . . . . . . . . . . . . . . . . . . . 15
Logo . . . . . . . . . . . . . . . . . . . . . . . . . . . . . . . . . . . . . . . . . . . . . . . . . . . . . . . . . . . . . . . . . . . . . . . . . . . . . . . . . . . 16
Camera Menu . . . . . . . . . . . . . . . . . . . . . . . . . . . . . . . . . . . . . . . . . . . . . . . . . . . . . . . . . . . . . . . . . . . . . . . . . . . . . . . 16
Backlight . . . . . . . . . . . . . . . . . . . . . . . . . . . . . . . . . . . . . . . . . . . . . . . . . . . . . . . . . . . . . . . . . . . . . . . . . . . . . . . . 16
Auto Capture. . . . . . . . . . . . . . . . . . . . . . . . . . . . . . . . . . . . . . . . . . . . . . . . . . . . . . . . . . . . . . . . . . . . . . . . . . . . . 16
Memory Menu . . . . . . . . . . . . . . . . . . . . . . . . . . . . . . . . . . . . . . . . . . . . . . . . . . . . . . . . . . . . . . . . . . . . . . . . . . . . . . . 17
Review Image Files. . . . . . . . . . . . . . . . . . . . . . . . . . . . . . . . . . . . . . . . . . . . . . . . . . . . . . . . . . . . . . . . . . . . . . . . 17
Edit Image Files . . . . . . . . . . . . . . . . . . . . . . . . . . . . . . . . . . . . . . . . . . . . . . . . . . . . . . . . . . . . . . . . . . . . . . . . . . 17
Delete Image Files . . . . . . . . . . . . . . . . . . . . . . . . . . . . . . . . . . . . . . . . . . . . . . . . . . . . . . . . . . . . . . . . . . . . . . . . 17
Settings Menu . . . . . . . . . . . . . . . . . . . . . . . . . . . . . . . . . . . . . . . . . . . . . . . . . . . . . . . . . . . . . . . . . . . . . . . . . . . . . . . 18
Units . . . . . . . . . . . . . . . . . . . . . . . . . . . . . . . . . . . . . . . . . . . . . . . . . . . . . . . . . . . . . . . . . . . . . . . . . . . . . . . . . . . 18
File Format . . . . . . . . . . . . . . . . . . . . . . . . . . . . . . . . . . . . . . . . . . . . . . . . . . . . . . . . . . . . . . . . . . . . . . . . . . . . . . 18
Auto Off. . . . . . . . . . . . . . . . . . . . . . . . . . . . . . . . . . . . . . . . . . . . . . . . . . . . . . . . . . . . . . . . . . . . . . . . . . . . . . . . . 18
Localization. . . . . . . . . . . . . . . . . . . . . . . . . . . . . . . . . . . . . . . . . . . . . . . . . . . . . . . . . . . . . . . . . . . . . . . . . . . . . . 18
Language . . . . . . . . . . . . . . . . . . . . . . . . . . . . . . . . . . . . . . . . . . . . . . . . . . . . . . . . . . . . . . . . . . . . . . . . . . . . . . . 19
Wireless Connectivity . . . . . . . . . . . . . . . . . . . . . . . . . . . . . . . . . . . . . . . . . . . . . . . . . . . . . . . . . . . . . . . . . . . . . . 19
Image Storage . . . . . . . . . . . . . . . . . . . . . . . . . . . . . . . . . . . . . . . . . . . . . . . . . . . . . . . . . . . . . . . . . . . . . . . . . . . 20
Fluke Connect™ . . . . . . . . . . . . . . . . . . . . . . . . . . . . . . . . . . . . . . . . . . . . . . . . . . . . . . . . . . . . . . . . . . . . . . . . . . 20
Advanced Settings . . . . . . . . . . . . . . . . . . . . . . . . . . . . . . . . . . . . . . . . . . . . . . . . . . . . . . . . . . . . . . . . . . . . . . . . . . . . 22
Filename Prefix. . . . . . . . . . . . . . . . . . . . . . . . . . . . . . . . . . . . . . . . . . . . . . . . . . . . . . . . . . . . . . . . . . . . . . . . . . . 22
Reset Filename. . . . . . . . . . . . . . . . . . . . . . . . . . . . . . . . . . . . . . . . . . . . . . . . . . . . . . . . . . . . . . . . . . . . . . . . . . . 22
Factory Defaults . . . . . . . . . . . . . . . . . . . . . . . . . . . . . . . . . . . . . . . . . . . . . . . . . . . . . . . . . . . . . . . . . . . . . . . . . . 22
Imager Information . . . . . . . . . . . . . . . . . . . . . . . . . . . . . . . . . . . . . . . . . . . . . . . . . . . . . . . . . . . . . . . . . . . . . . . . 22
Adjust Parallax . . . . . . . . . . . . . . . . . . . . . . . . . . . . . . . . . . . . . . . . . . . . . . . . . . . . . . . . . . . . . . . . . . . . . . . . . . . 22
1.888.610.7664 sales@GlobalTestSupply.com
Fluke-Direct
.com

Contents (cont.)
iii
Maintenance . . . . . . . . . . . . . . . . . . . . . . . . . . . . . . . . . . . . . . . . . . . . . . . . . . . . . . . . . . . . . . . . . . . . . . . . . . . . . . . . . . . . 23
How to Clean the Case. . . . . . . . . . . . . . . . . . . . . . . . . . . . . . . . . . . . . . . . . . . . . . . . . . . . . . . . . . . . . . . . . . . . . . . . . 23
Lens Care . . . . . . . . . . . . . . . . . . . . . . . . . . . . . . . . . . . . . . . . . . . . . . . . . . . . . . . . . . . . . . . . . . . . . . . . . . . . . . . . . . . 23
Battery Care . . . . . . . . . . . . . . . . . . . . . . . . . . . . . . . . . . . . . . . . . . . . . . . . . . . . . . . . . . . . . . . . . . . . . . . . . . . . . . . . . 23
1.888.610.7664 sales@GlobalTestSupply.com
Fluke-Direct
.com

1
Introduction
The Fluke TiS60+ Thermal Imager (the Product or Imager) is a
handheld, infrared imaging cameras for use in multiple
applications. These applications include equipment
troubleshooting, preventive and predictive maintenance, building
diagnostics, and research and development.
Productivity Features
• IR-PhotoNotes™
• Fluke Connect™ / WiFi connectivity
• Streaming video
Image Presentation
• Standard Palettes and Ultra Contrast™ Palettes (availability
varies by model)
IR-Fusion
™
Technology
Automatically aligned (parallax corrected) visual and infrared
• Picture-In-Picture (PIP) infrared
• Full screen infrared
• AutoBlend mode
• Full screen visible
• Color alarms (temperature alarms) for user-selectable high
temperature and low temperature (availability varies by
model)
1.888.610.7664 sales@GlobalTestSupply.com
Fluke-Direct
.com

TiS60+
Users Manual
2
Operation in Extreme Conditions
Storage and/or continual operation of the Imager in extreme
ambient temperature conditions can result in temporary
interruption of operation. If this occurs, let the Imager stabilize
(cool down or warm up) before you resume operation.
W Caution
To prevent permanent damage to the Imager,
never point the Imager at the sun, a laser, or other
extreme radiation source. Close the dust cover
when not in use.
Radio Frequency Data
The Imager ships with the radio disabled. See Wireless
Connectivity for instructions on how to enable the radio. See
Imager Information for instructions on how to access digital copies
of the radio licenses on the Imager.
SIMPLIFIED EU DECLARAT
ION OF CONFORMITY
Hereby, Fluke declares that the radio equipment contained in this
Product is in compliance with Directive 2014/53/EU. The full text of
the EU declaration is available
Accessories
Table 1 is a list of the accessories available for the Imager.
Table 1. Accessories
Model Description Part Number
FLK-TI-SBP3 Smart Battery Pack 3440365
FLK-TI-SBC3B Charging Base/Power Supply with Adapters 4354922
TI-CAR-CHARGER 12 V Vehicle Charger Adapter 3039779
FLK-TI-TRIPOD Tripod Mounting Accessory 4335389
FLK-Bluetooth Bluetooth Headset 4603258
BOOK-ITP Introduction to Thermography Principles 3413459
1.888.610.7664 sales@GlobalTestSupply.com
Fluke-Direct
.com

Thermal Imager
Before You Start
3
Before You Start
Carefully unpack the items in the shipment box:
• Two-Bay Battery Charge Base
• Lithium-ion Smart Battery (x2)
• Hard Carrying Case
•Soft Case
• Micro SD Card and Adapter
• AC Power Supply with Mains Adapters
• Mini USB-to-USB Cable
• Quick Reference Guide
• Safety Information
Fluke recommends the removable memory card that is supplied
with the Imager or available from Fluke. Fluke does not warrant the
use or reliability of aftermarket memory cards of different brands or
capacities.
Battery
A Li-ion battery powers the Imager. The Imager includes two
batteries for a quick-change during operation.
The battery charges on the 2-bay charging base. The power
supply powers the charging base. Country-specific adapters are
included.
Before you use the Imager for the first time, charge the battery for
a minimum of 2.5 hours. The battery status shows on the
five-segment charge indicator.
W Caution
To prevent damage to the battery:
• Do not expose battery to heat sources or high-
temperature environments such as an
unattended vehicle in the sun.
• Do not store the battery on the charger for more
than 24 hours as reduced battery life may result.
• Charge the battery for a two-hour minimum at
six-month intervals for maximum battery life.
Without use, the battery will self-discharge in
approximately six months.
• Always operate in the specified temperature
range.
• Do not incinerate the Product and/or battery.
• Remove the Imager from the 12 V vehicle
charger before you start or jump start the
vehicle.
1.888.610.7664 sales@GlobalTestSupply.com
Fluke-Direct
.com

TiS60+
Users Manual
4
The battery is tested in accordance with and complies to:
• UN Manual of Tests and Criteria Part III Subsection 38.3
(ST/SG/AC.10/11/Rev.5) – also known as the
UN T19.T8 tests
• EN55022 and EN55024
•FCC part 15B
• IEC62133
•ROHS
Note
New batteries are not fully charged. Two to ten charge/
discharge cycles are necessary before the battery
charges to its maximum capacity.
To charge the battery, use one of the options that follow:
Two-Bay Battery Charger Base
1. Connect the ac power supply to the ac wall outlet and connect
the dc output to the charger base.
2. Put one or two smart batteries into bays of charger base.
3. Charge batteries until charge indicators show “full.”
4. Remove smart batteries and disconnect the power supply
when batteries are fully charged.
On-Imager AC Power Socket
1. Connect the ac power adapter into an ac wall outlet and
connect the dc output to the Imager external power socket.
2. Disconnect ac power adapter when the smart battery is fully
charged.
Note
Make sure that the Imager is near room temperature
before you connect it to the charger. See the charging
temperature specification. Do not charge in hot or cold
areas. When you charge the battery in extreme
temperatures, battery capacity may be decreased.
shows in the lower left-hand corner of the display when the
Imager is connected to external power.
Note
When the battery is connected to ac power or the unit
is in video mode, the Sleep Mode/Auto Off feature is
disabled automatically.
Optional 12 V Vehicle Charger
1. Connect the 12 V adapter into the 12 V accessory socket of
the vehicle.
2. Connect the output to the external power socket of the
Imager.
3. Disconnect the 12 V adapter and Imager when battery is fully
charged.
1.888.610.7664 sales@GlobalTestSupply.com
Fluke-Direct
.com

Thermal Imager
Before You Start
5
Features and Controls
Table 2 is a list of the Imager features and controls.
Table 2. Feature/Control Descriptions
Item Description Item Description
Arrow Buttons
Retractable Lens Cover
Function Buttons (F1, F2, F3)
Infrared Camera Lens
Display
Visual Light Camera Lens
Memory View Button
Laser Pointer
Power On/Off
Calibration-On-Demand
Secondary Trigger
Hand Strap Anchor
Primary Trigger
USB Cable Connection
Lithium-ion Smart Battery
Removable Micro SD Memory Card Slot
AC Power Supply with Mains Adapters
AC Adapter/External Power Socket
2-Bay Battery Charge Base
7
8
9
5
4
6
1
3
2
17
16
18
13
1 5
14
11
12
10
1.888.610.7664 sales@GlobalTestSupply.com
Fluke-Direct
.com

TiS60+
Users Manual
6
Power On and Off
To turn on or turn off the Imager, push and hold
O
for >3
seconds. The Imager has Power Save and Auto Off features. For
more information about how to set these features, see Settings
Menu.
Note
All thermal imagers need sufficient warm-up time for
the most accurate temperature measurements and
best image quality. This time can often vary by model
and by environmental conditions. Although most
imagers are fully warmed up in 3-5 minutes, it is
always best to wait a minimum of 10 minutes if the
most accurate temperature measurement is important
to your application. When you move the Imager
between environments with large differences in
ambient temperature, more adjustment time can be
required.
The Imager includes a calibration on-demand feature that causes
a calibration event to occur when you press
O
once briefly
during operation. This feature provides the best accuracy and
avoids disruption of a timing-sensitive image capture by the next
automatic calibration.
Controls for Image Capture
The two-part trigger is located in the standard trigger position for a
pistol-grip device. The larger, green trigger is the primary trigger.
The smaller, black trigger is the secondary trigger.
In normal operation (video is off), the function of the primary trigger
is to capture a thermal image for possible storage to memory by
the user. When video is on, the primary trigger is the start/stop for
video recording.
The secondary trigger operates the laser on supported models.
Laser Pointer
W* Warning
To prevent eye damage and personal injury, do
not look into the laser. Do not point the laser
directly at persons or animals or indirectly off
reflective surfaces.
The laser warning symbol (*) shows in the Header zone of the
display when the laser is turned on and you pull the secondary
trigger.
The Imager includes a laser pointer. The laser pointer is a sighting
aid and is offset from the infrared camera. As a result, it may not
always represent the exact center of the infrared or visible image.
The laser dot does not appear on an infrared-only image, but does
on visible-only or AutoBlend images. The laser dot cannot be seen
in the visible channel of the IR-Fusion image if obscured by the
center point marker graphic.
Pull the secondary trigger to turn on laser pointer, release the
secondary trigger to turn off the laser pointer.
1.888.610.7664 sales@GlobalTestSupply.com
Fluke-Direct
.com

Thermal Imager
Before You Start
7
Control Buttons
The function and cursor buttons are the primary controls. These
buttons move the cursor through the menu structure to set the
features.
Controls and Adjustments
• User-selectable temperature scale
• Language/localization selection
• Time and date settings
• Emissivity selection
• Reflected background temperature compensation
• Transmission correction
• User-selectable hot spot and cold spot, and center point on
the image
• Expand/contract measurement box with MIN-AVG-MAX
• Color alarms
• User-selectable backlight setting
• Graphic information display (selectable)
In general, push:
1 to set the change and go back to the live view.
2 to set the change and go back to the previous menu.
3 to cancel the change and go back to the live view.
WXYZ to move the cursor and highlight an
option.
In live Manual Mode, the arrow buttons are always active to adjust
Level and Span.
Memory
Push M to go directly to the preview images of stored files. See
Memory Menu for more information.
How to Use the Menus
The menus, coupled with the function buttons and arrow buttons,
are the access point for:
• Thermal image display
• Camera features
• Measurement
• Advanced functions
• Memory review
• Settings for date, time, language, units, file format
• Information about the Imager
To open the primary menu, push
2. The primary menu shows.
A secondary menu shows for each option. The text labels on the
bottom edge of the screen correspond to the
1, 2, 3
buttons. You can use the buttons for these functions:
•Push
2 to open the primary menu.
•Push
WXYZ to cycle through the secondary
menus. Each secondary menu lists an options menu.
•Push
WXYZ to cycle through the options.
The primary and secondary menus close 10 seconds after the last
push of a function button. The option selection menu stays open
until you make the selection, go up a menu level, or cancel the
action.
1.888.610.7664 sales@GlobalTestSupply.com
Fluke-Direct
.com

TiS60+
Users Manual
8
Image Capture
Point the Imager at the target object. Pull and release the primary
trigger. This will capture and freeze the image. To cancel the
captured image, pull the primary trigger again or
3 to return to
the Live view.
Depending on the selected file format settings, the Imager shows
the captured image and a menu bar. The menu bar lets you save
the image, edit some image settings, and add voice annotation or
IR-PhotoNotes™ digital photos. To change the file format, see File
Format.
IR-PhotoNotes™
Use the IR-PhotoNotes™ photo annotation system to capture and
add up to three visible (digital) images of various objects.
You can include text or other information that is related to the
analysis and reporting of the infrared image. Examples of possible
annotations include motor name plates, printed information or
warning signs, larger views of the environment or room, and
related equipment or objects. Up to three images can be captured
with the visible image that is stored in addition to the aligned
infrared and visible images used in IR-Fusion™ technology. These
visible images are only available in the .is2 file format and are
stored in the file so you do not need to collate multiple files at a
later time.
To add photos using the IR-PhotoNotes annotation system:
1. With an infrared image in the buffer, push to open the
EDIT IMAGE menu.
2. Push
W/X to highlight IR-PhotoNotes.
3. Push
1 to enter the Picture mode.
4. Focus the Imager on the object and push the Image Capture
button.
5. Push
2 when done.
6. Push the Image Capture button to capture additional pictures.
7. Push
1 save the pictures with the image.
i
Voice Annotation (Recording)
A Bluetooth headset (sold separately) is required and the radio
must be enabled for voice (audio) recording. This feature may not
be available in all regions.
To record:
1. With an infrared image in the buffer, push
2 to open the
EDIT IMAGE menu.
2. Push
W/X to highlight Add Audio.
3. Push
1 to record up to 60 seconds of audio. The display
updates to show the recorded time.
4. Push
1 to pause the recorder.
5. Push 2 when done.
6. Push
1 to review the audio file or 2 to save the audio
with the image.
Voice annotation is only available in the .is2 file format and is
stored in the file so you do not need to collate multiple files at a
later time.
1.888.610.7664 sales@GlobalTestSupply.com
Fluke-Direct
.com

Thermal Imager
Micro SD Memory Card
9
Edit Captured Infrared Image
Before you save a file, use the Imager to edit or modify the image.
You can add IR-PhotoNotes and voice annotation, as well as
change the palette and IR Fusion mode.
A Bluetooth headset is required and the radio must be enabled for
voice (audio) annotation. This feature may not be available in all
regions.
To edit:
1. With an image in the buffer, push
2 to open the EDIT
IMAGE menu.
2. Push
W/X to highlight Edit Image.
3. Push
Z to open the EDIT IMAGE menu.
4. Push
W/X to highlight an option.
5. Push
1 to save the changes with the file.
Save Captured Infrared Image
To save an image as a data file:
1. Point the Imager to the object of interest or inspection area.
2. Pull the trigger to capture the image. The image is now in the
buffer and you can save or edit.
3. Push
1 to save the image as a file and go back to the live
view.
Micro SD Memory Card
To eject a Micro SD memory card, push in on the exposed edge of
the card and then release. The card should pop partially out after
you release it. Carefully pull the card out of the slot.
To insert the Micro SD memory card, push the card in until it
catches.
The Micro SD memory card includes an SD adapter for insertion
into a PC or multi-function card reader.
For information about how to save data, see Save Captured
Infrared Image. For information about how to view or erase a
stored image, see Delete Image Files.
Temperature Measurement
All objects radiate infrared energy. The quantity of energy radiated
is based on the actual surface temperature and the surface
emissivity of the object. The Imager senses the infrared energy
from the surface of the object and uses this data to calculate an
estimated temperature value. Many common objects and materials
such as painted metal, wood, water, skin, and cloth are very good
at radiating energy and it is easy to get relatively accurate
measurements. For surfaces that are good at radiating energy
(high emissivity), the emissivity factor is ≥90 % (or 0.90). This
simplification does not work well on shiny surfaces or unpainted
metals as they have an emissivity of <0.60. These materials are
not good at radiating energy and are classified as low emissivity.
To more accurately measure materials with a low emissivity, an
emissivity correction is necessary. Adjustment to the emissivity
setting will usually allow the Imager to calculate a more accurate
estimate of the actual temperature.
W Warning
To prevent personal injury, see emissivity
information for actual temperatures. Reflective
objects result in lower than actual temperature
measurements. These objects pose a burn
hazard.
1.888.610.7664 sales@GlobalTestSupply.com
Fluke-Direct
.com

TiS60+
Users Manual
10
Menus
The menus are the access points for thermal image display,
camera features, memory setup, and settings for date, time,
language, units, file format, and Imager information.
Measurement Menu
The Measurement Menu has settings for the calculation and
display of radiometric temperature measurement data related to
the thermal images. These settings include the Temperature
Range selection through Level/Span adjustment, Emissivity,
Background, Transmission, Spot Temperatures, Center Box, and
Markers.
Range
Range (level and span) is set to automatically adjust or is set for
manual adjustment. To choose between automatic or manual level
and span, do the following:
1. Push
2.
2. Push
W/X to highlight Measurement.
3. Push 1 or Z to view the menu.
4. Push
W/X to highlight Set Level/Span.
5. Push
1 or Z to view the menu.
6. Push W/X to toggle between the Auto and Manual
ranging.
7. Push
1 to set.
8. Push:
1 to set the change and go back to the live view.
2 or Y to set the change and go back to the previous
menu.
3 to cancel the change and go back to the live view.
Fast Auto/Manual Range Toggle
When NOT in a menu mode, push
1 for 3 seconds to toggle
between Auto Range and Manual Range.
Fast Auto Rescale
When in Manual Range and NOT in a menu mode, push
3 for
<½ second to automatically rescale the level and span range for
objects in the thermal field of view. This feature operates the
Imager in a semi-automatic mode if manual fine re-adjustment of
level and span with the arrow buttons is not necessary. Rescaling
can be done as often, or as little, as needed.
Note
The Imager always powers up in the same Range
mode, Auto or Manual, as when it was powered down.
Level for Manual Operation Mode
When put into manual ranging, the level setting moves the thermal
span up or down within the total temperature range. See Table 3.
In the live manual mode, the arrow buttons are always available to
adjust the level and span.
To set the level:
1. Push
W to move the range to a higher temperature level.
2. Push X to move the range to a lower temperature level.
1.888.610.7664 sales@GlobalTestSupply.com
Fluke-Direct
.com
Thermal Imager
Menus
11
While you adjust the manual level, the scale along the right side of
the display shows the thermal span as it moves to different levels
within the total range.
Temperature Span for Manual Operation Mode
When in manual mode, the span setting contracts or expands in a
selected palette in a temperature range within the total range. See
Table 3. In the live manual mode, the arrow buttons are always
available to adjust the level and span.
To adjust the temperature span:
1. Push
Z to increase or widen the temperature span.
2. Push
Y to decrease or narrow the temperature span.
While you adjust the manual span, the scale along the right side of
the display shows the thermal span increasing or decreasing in
size.
Emissivity Adjustment
The correct emissivity values are important for the Imager to make
the most accurate temperature measurement calculations.
Emissivity of a surface can have a large effect on the apparent
temperatures that the Imager observes. Understanding the
emissivity of the surface being inspected can, but not always,
allow you to obtain more accurate temperature measurements.
Note
Surfaces with an emissivity of
<
0.60 make reliable and
consistent determination of actual temperatures
problematic. The lower the emissivity, the more
potential error is associated with the Imager's
temperature measurement calculations. This is also
true even when adjustments to the emissivity and
reflected background adjustments are performed
properly.
Emissivity is set directly as a value, or from a list of emissivity
values for some common materials.
Note
If the Display is set to Display All, you see the
information about current emissivity as ε = x.xx.
Adjust by Number
To set the emissivity value:
1. Go to Measurement > Emissivity > Adjust Number.
2. Push
W/X to change the value.
A custom emissivity value is indicated when any value not in the
standard emissivity table is selected.
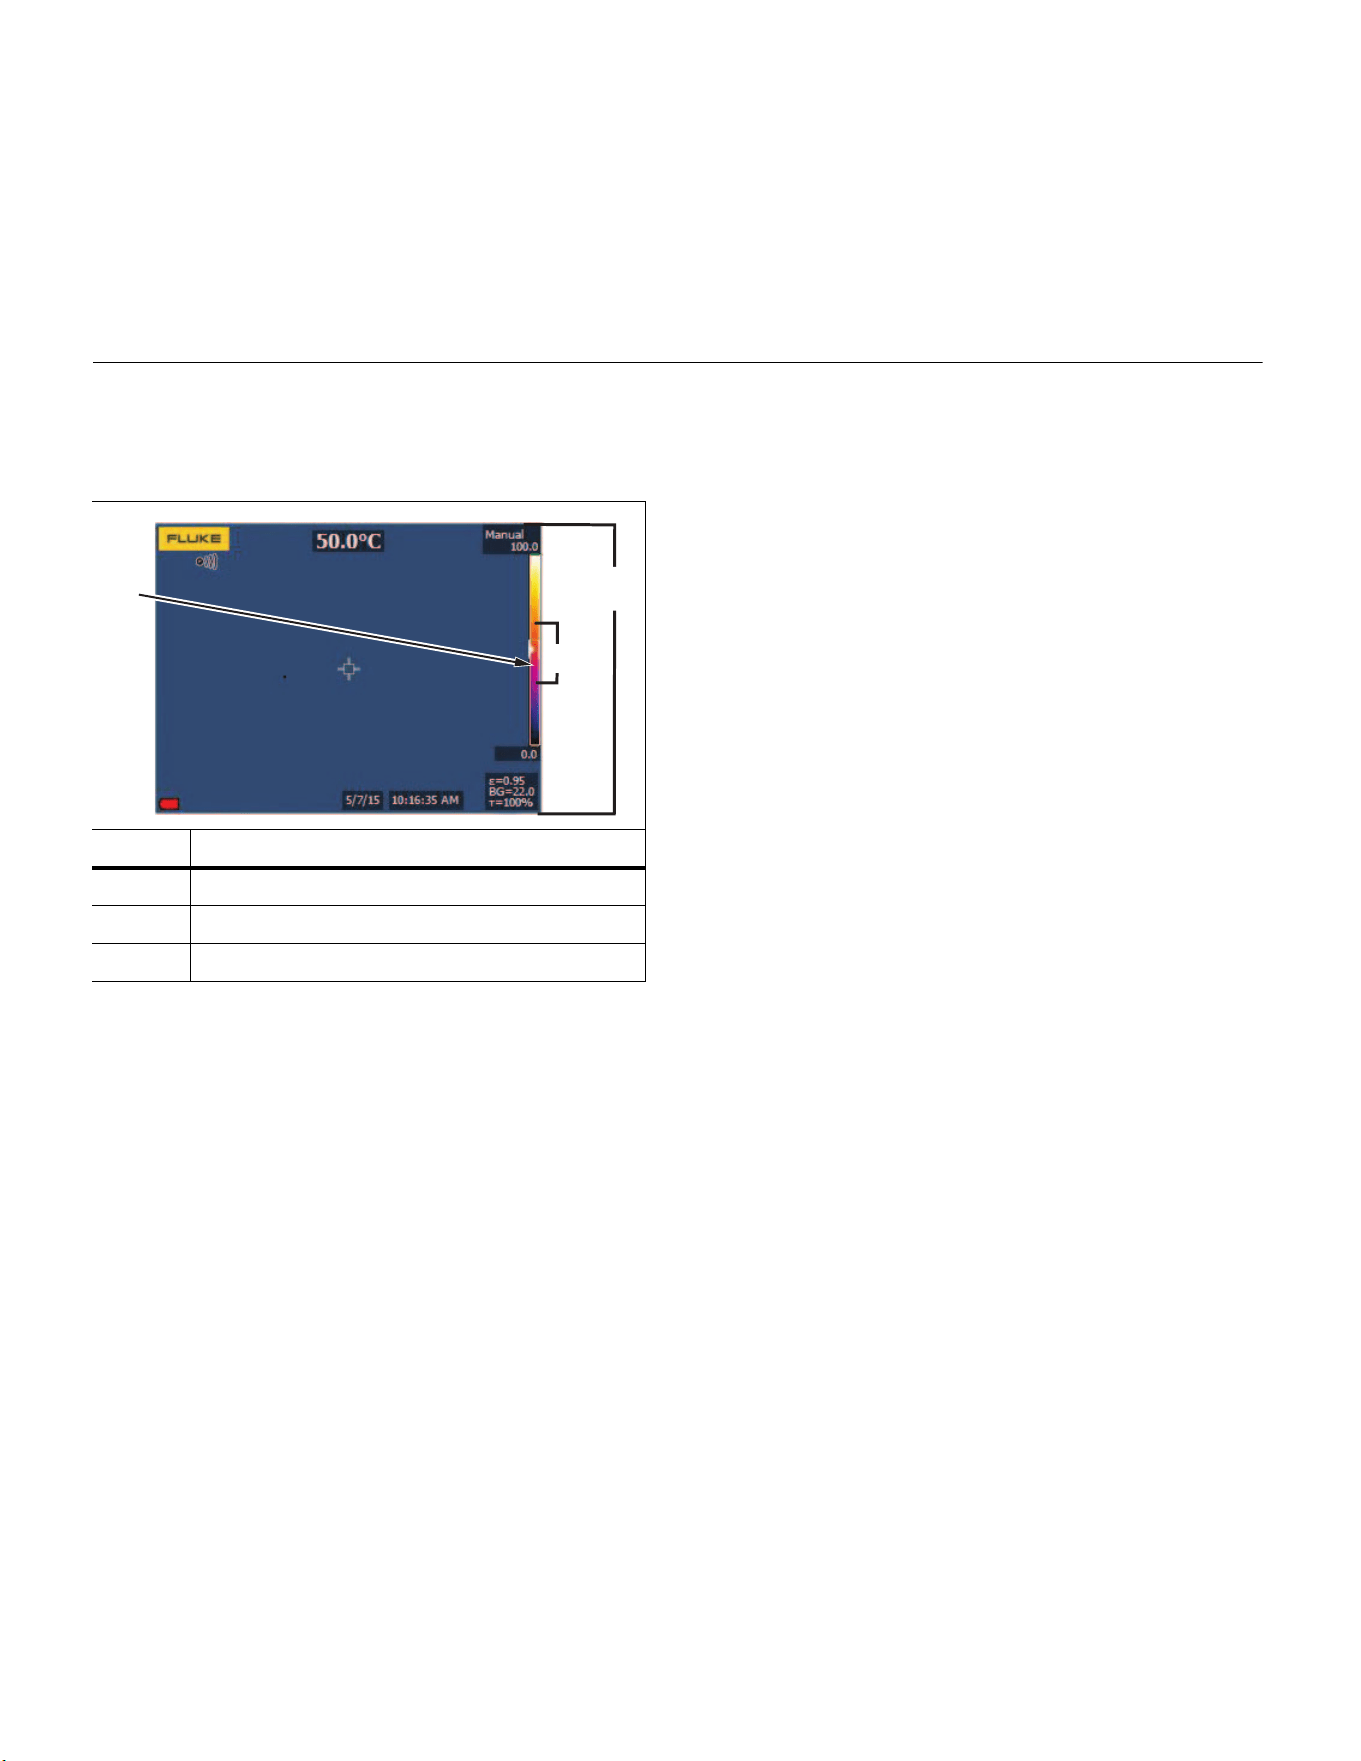
Table 3. Level and Span Settings
Item Description
Level
Total Imager Range
Span
A
B
C
1.888.610.7664 sales@GlobalTestSupply.com
Fluke-Direct
.com

TiS60+
Users Manual
12
Select by Table
To select from a list of common materials:
1. Go to Measurement > Emissivity > Select Table.
2. Push
W/X to highlight the material.
3. Push
1 to select the material.
If you set a value that is <0.60, W shows on the Imager display
with this caution:
Push
1 to clear the message.
Background (Reflected Background Temperature
Compensation)
Compensation for reflected background temperature is set in the
Background tab. Very hot objects or very cold objects can affect
the apparent temperature and measurement accuracy of the target
or object of interest, especially when surface emissivity is low.
Adjustment of the reflected background temperature can make the
temperature measurement better in many situations. For more
information, see Emissivity Adjustment.
To adjust the background temperature:
1. Go to Measurement > Background.
2. Push
W/X to change the value.
3. Push
1 or 2 when done.
Note
If the Display is set to Display All, you see the
information about current reflected background
temperature as BG = xx.x.
Spot Temperatures
The Spot Temperatures are floating HI and LO temperature
indicators that move on the display as the temperature
measurements of the image fluctuate.
To turn on/off the hot and cold spot indicators:
1. Go to Measurement > Spot Temp.
2. Push
W/X to highlight ON or OFF.
3. Push
1 or 2 to set the new value.
User-Definable Spot Markers
Up to three adjustable, fixed-temperature spot markers are
available on the display. You can use these markers to highlight a
region before you save the image. The marker selection is set as
All Off, One Marker, Two Markers, or Three Markers.
To set a Marker:
1. Push
2.
2. Push
W/X to highlight Measurement.
3. Push
1 or Z to view the menu.
4. Push
W/X to highlight Markers.
5. Push
1 or Z to view the menu.
6. Push
W/X to highlight the function between All OFF,
One Marker, Two Markers, and Three Markers.
7. Push
1 or Z to set the marker option and go to the
“Move Marker” display. You will see the Move Marker icon and
the labels on the function buttons change to Done, Next, and
Cancel.
W
Caution:
Emissivity <0.6
(see Manual)
1.888.610.7664 sales@GlobalTestSupply.com
Fluke-Direct
.com

Thermal Imager
Menus
13
To change the Marker position on the display:
1. Push
W X Z Y to move the Marker location on
the image.
2. Push
2 to highlight the next marker. Do Step 1 again.
3. Do Step 2 for a third marker.
4. Push
1 when done.
Center Box
The Center Box feature is an adjustable temperature
measurement zone (box) that you can center on the infrared
image. This zone (box) expands and contracts to different levels
within the infrared image. The zone lets the user see an
approximate maximum (MAX), average (AVG), and minimum
(MIN) temperature measurement in that area.When in AUTO Level
and Span mode, the Imager automatically sets the level and span
according to the infrared scene within the parameters of the
Center Box.
To enable or disable the Center Box feature:
1. Push
2.
2. Push
W/X to highlight Measurement.
3. Push
1 or Z to view the menu.
4. Push W/X to highlight Center Box.
5. Push
1 or Z to view the menu.
6. Push
W/X to toggle the function ON or OFF.
To set the size of the Center Box when enabled:
1. Push
W/X to highlight Set Size.
2. Push 1 or Z to view the display.
3. Push
Z to increase the size of the Center Box.
4. Push Y to reduce the size of the Center Box.
5. When satisfied with the size of the Center Box, push:
•
2 to set the change and go back to the previous menu.
•
3 to cancel the change and go back to the live view.
Image Menu
The Image menu has controls for different features used in the
presentation of the infrared image on the Imager's LCD and some
saved image files.
Note
Data saved as .is2 format can easily be modified within
FlukeConnect Desktop software. Still images saved in
.bmp or .jpg format, as well as video saved in .avi
format will retain image settings at the time of capture
and save.
Palettes
The Palette menu lets you change the false-color presentation of
the infrared images on the display (availability varies by model).
Some palettes are more suitable for specific applications and can
be set as required. Two different palette presentation modes are
available. The Standard Palettes offer an equal, linear
presentation of colors that allow for best presentation of detail. The
Ultra Contrast™ Palettes offer a weighted presentation of colors.
These palettes work best in situations with high thermal contrast
for extra color contrast between the high temperatures and low
temperatures.
Available Palettes:
• Grayscale • Hot Metal
• Grayscale Inverted • Ironbow
• Blue-Red • Amber
• High Contrast • Amber Inverted
1.888.610.7664 sales@GlobalTestSupply.com
Fluke-Direct
.com

TiS60+
Users Manual
14
To set a palette:
1. Push
2.
2. Push W/X to highlight Image.
3. Push?
1 or Z to view the menu.
4. Push
W/X to highlight Palette.
5. Push 1 or Z to view the menu.
6. Push
W/Xto highlight Standard or Ultra Contrast.
7. Push
W/X to select a palette.
8. Push:
•
1 to set the change and go back to the live view.
•
2 or Y to set the change and go back to the
previous menu.
•
3 to cancel the change and go back to the live view.
IR-Fusion™ Technology
IR-Fusion™ technology makes it easier to understand, analyze,
and communicate infrared images through the use of an aligned
visible image and infrared image. The Imager automatically
captures a visible image with every infrared image to show you
precisely where a potential problem might be, and then allows you
to more effectively communicate it to others.
Auto Blending Level:
• 5 presets: 0, 25, 50, 75, 100
• Picture-in-Picture (PIP): 25, 50, 75, 100
To set the IR-Fusion
mode:
1. Push
2.
2. Push
W/X to highlight Image.
3. Push
1 or Z to view the menu.
4. Push
W/X to highlight IR-Fusion.
5. Push 1 or Z to view the menu.
6. Push
W/X to highlight an option.
7. Push:
•
1? to set the change and go back to the live view.
• 2 or Y to set the change and go back to the
previous menu.
•
3 to cancel the change and go back to the live view.
Color Alarms
The Imager has apparent temperature color alarms.
Available alarm types:
• Hi-Lo Alarm
• Isotherm Alarm
The high-temperature color alarm shows a full visible image and
only shows infrared information on objects or areas that are above
the set apparent temperature alarm level. The low-temperature (or
dew point) color alarm shows a full visible image and only shows
infrared information on objects or areas that are below the set
apparent temperature (or set dew point) color alarm level. The
user must manually determine and set these parameters.
Note
The Imager does not sense ambient or surface dew
point level automatically. To use the low-temperature
color alarm function as a dew point color alarm,
manual determination and input of surface dew point
temperature will yield the best results. Depending on
the situation, the colors presented may help identify
areas of concern with possible dew point
condensation.
1.888.610.7664 sales@GlobalTestSupply.com
Fluke-Direct
.com

Thermal Imager
Menus
15
To view the Color Alarm menu:
1. Push
2.
2. Push W/X to highlight Image.
3. Push
1 or Z to view the menu.
4. Push
W/X to highlight Color Alarm.
5. Push 1 or Z to view the menu.
Set High-Temperature Color Alarm
To set a high-temperature color alarm:
1. From the Color Alarm menu, push W/X to highlight
the option: Set High Alarm.
2. Push
Z to open the Color Alarm menu.
3. Push W/X to adjust the temperature setting.
4. Push:
•
1? to set the change and go back to the live view.
•
2 or Y to set change and go back to the previous
menu.
•
3?to cancel the change and go back to the live view.
Set Low-Temperature/Dew Point Color Alarm
To set a low-temperature/dew point color alarm:
1. From the Color Alarm menu, push
W/X to highlight
Set Low Alarm.
2. Push
Z to open the Color Alarm menu.
3. Push
W/X to adjust the temperature setting.
4. Push:
•
1 to set the change and go back to the live view.
• 2 or Y to set the change and go back to the
previous menu.
•
3?to cancel the change and go back to the live view.
Outside/Inside Alarm
If you set values for the high-temperature color alarm and a
low-temperature color alarm, the Imager will have the options for
inside or outside isotherm color alarms.
To set an outside/inside isotherm color alarm:
1. From the Color Alarm menu, push
W/X to highlight
Outside or Inside.
2. Push:
•
1 to set the change and go back to the live view.
•
2 or Y?to set the change and go back to the
previous menu.
•
3?to cancel the change and go back to the live view.
Display Graphics Presentation
The options for how you view the on-screen graphics are in the
Display menu. These options are Display All, Details and Scale,
Scale Only, and Image Only.
1. Push
2.?.
2. Push
W/X to highlight Image.
3. Push
1 or Z to view the menu.
4. Push W/X to highlight Display.
5. Push
1 or Z to view the menu.
6. Push
W/X to highlight an option.
1.888.610.7664 sales@GlobalTestSupply.com
Fluke-Direct
.com

TiS60+
Users Manual
16
7. Push:
•
1 to set the change and go back to the live view.
• 2 or Y to set the change and go back to the
previous menu.
•
3 to cancel the change and go back to the live view.
Note
Features that have ON/OFF controls must be turned
on and turned off with those controls.
Logo
A Fluke logo shows on the display and captured images. You can
choose to turn on or turn off the logo:
1. Go to Image > Logo.
2. Push
W/X to highlight on or off.
3. Push
1 to set.
Camera Menu
The Camera menu has controls and options for secondary camera
features such as auto focus, backlight level, and laser pointer.
Backlight
The backlight level control is set to low, medium, and high. To set
the backlight:
1. Push
2.
2. Push
W/X to highlight Camera.
3. Push
1 or Z to view the menu.
4. Push W/X to highlight Backlight.
5. Push
1 or Z to view the menu.
6. Push
W/X to highlight an option.
7. Push:
•
1 to set the change and go back to the live view.
•
2 or Y to set the change and go back to the
previous menu.
•
3?to cancel the change and go back to the live view.
Auto Capture
The Auto Capture feature allows you to set the Imager to capture
and save an infrared image, or series of images, automatically.
Image capture can be triggered manually or with an “apparent
temperature” trigger. The temperature trigger is set to start when a
value is above or below a set limit. Regardless of how the capture
starts, you can set the interval for when successive images are
captured and saved. You also can set the number of images that
are captured and saved. The upper limit on how many images is
dependent on the amount of storage memory available.
To set and operate the Auto Capture feature:
1. Go to Camera > Auto Capture.
2. Push
1 to start the capture sequence.
1.888.610.7664 sales@GlobalTestSupply.com
Fluke-Direct
.com

Thermal Imager
Menus
17
In the Auto Capture sub-menu, you will see these options:
• Start Capture: Executes the Auto Capture settings in camera
memory.
• Interval: Push W/X to select the number of hours,
minutes, or seconds as an interval between images.
• Image Count: Push
W/X to manually select a number
of images. Or, push the Maximum Memory button to select
the option that will continue capturing and saving images until
the chosen storage memory is filled or battery power is
depleted.
• Manual Trigger: When Manual Trigger is selected, push
1 to start the automatic capture of a series of images.
• Temp Trigger: Select Temp Trigger and then select Set
Temp Trigger to open the adjustment menu.
Note
The minimum interval available can be affected by the
file type and visible light camera settings chosen by
the user. Some combinations create larger file sizes
that take longer to capture and save and create a
higher minimum interval compared to others.
Memory Menu
The Memory Menu allows you to review captured images, audio
and text annotations, and IR-PhotoNotes™. Files in memory are
shown in a large preview format. You can scroll through long lists
and open a full-size image.
Change the setting for visible and thermal image and then view all
images in the same format.
An icon shows to indicate any additional items saved with the
infrared image or IR-Fusion technology image:
IR-PhotoNotes photos
Voice annotation
Review Image Files
To view stored images on the memory card:
1. Go to
M.
2. Push
W/X to highlight the preview image of the file for
review.
3. Push
2 to review the file.
Edit Image Files
The Fluke Connect™ desktop software allows you to edit .is2
image files that are stored in memory.
Delete Image Files
To erase one image from the memory card:
1. Push
M.
2. Push
W/X to highlight the preview image of the file to
delete.
3. Push
2 to open the Delete menu.
4. Highlight Selected Image and push 1.
The Imager prompts you to continue or cancel.
5. Push
1 again to delete the file.
To erase all the images from memory:
1. Go to Memory.
2. Push 2.
3. Highlight All Images and push
1. The Imager prompts
you to continue or cancel.
4. Push
1 to delete all files in memory.
1.888.610.7664 sales@GlobalTestSupply.com
Fluke-Direct
.com

TiS60+
Users Manual
18
Settings Menu
The Settings menu has adjustments for user preferences such as
units of temperature measurement, file format of stored data,
“save to” location choice, auto off settings, WiFi and Bluetooth
settings, date, time, localization, and language. This menu also
has a section that displays information about the Imager such as
model number, serial number, and firmware versions. Certificates
and licenses are available from this menu.
Units
To change the temperature units:
1. Go to Settings > Units.
2. Push
W/X to highlight an option.
3. Push
1 to set an option.
File Format
Data can be saved to the internal memory or a micro SD memory
card in different file formats. Image format selections are .bmp,
.jpg, and .is2. These selections remain valid when you turn the
Imager off or on.
To change the file format:
1. Go to Settings > File Format.
2. Push
W/X to highlight an option.
3. Push
1 to set the option.
Images saved in the .is2 file format have the consolidation of all
data into a single file and are more flexible for analysis and
modification in the included Fluke Connect™ desktop software.
This file format consolidates the infrared image, radiometric
temperature data, visible image, voice annotation, and photos from
the IR-PhotoNotes™ photo annotation system into one location.
For situations where a smaller file size with maximum resolution is
needed and modification is not, choose the .bmp file format. For
the smallest file size where modification is not needed and image
quality and resolution are not as important, choose the .jpg file
format.
The .bmp and .jpg files can be emailed and then opened on most
PC and MAC systems without special software. These formats do
not allow full analysis capabilities or modification.
The .is2 file format can be emailed and then opened with
Fluke Connect™ desktop software. This format has the maximum
versatility.
Auto Off
The Auto Off timer is user-defined separately for the LCD and
power.
Note
Auto Off is automatically disabled when the Imager is
connected to ac power.
To set the Auto Off feature:
1. Go to Settings > Auto Off.
2. Push
Y/Z to highlight LCD Time Out or Power Off.
3. Push
W/X to set the timer between 1 minute and
120 minutes.
4. Push
1 to set.
Localization
The Imager has several settings for localization:
•Date
•Time
• Language
• Decimal Separator
1.888.610.7664 sales@GlobalTestSupply.com
Fluke-Direct
.com

Thermal Imager
Menus
19
Date
The date can be displayed in one of two formats: MM/DD/YY or
DD/MM/YY.
To set the date:
1. Go to Settings > Date.
2. Push
W/X to highlight the date format.
3. Push 1 to set a new format.
4. Push
W/X to highlight Set Date.
5. Push
1 to open the Set Date menu.
6. Push Y/Z to select highlight day, month, or year.
7. Push
W/X to change the settings.
8. Push
1 to set the date and exit the menu.
Time
To set the time:
1. Go to Settings > Time.
Time displays in two different formats: 24 hour or 12 hour. To
set the time format:
2. Push
W/X to highlight time format.
3. Push
1 to select.
4. Highlight Set Time.
5. Push
1 to open the Set Time menu.
6. Push
Y/Zto highlight hours or minutes.
The 12 hour format has a selection to set the time as AM or
PM.
7. Push
W or X to change the setting.
8. Push 1 to set the change.
Language
To change the display to a different language:
1. Go to Settings > Language.
2. Push W or X to highlight the setting.
3. Push
1 to set a new language.
Wireless Connectivity
The Imager is equipped with wireless connectivity options.
Wireless connectivity enhances your ability to work more efficiently
and better communicate results. The Imager ships with the radio
disabled. For first-time use, you must enable the radio to use
wireless connectivity.
Bluetooth
®
Bluetooth
®
technology is available to connect a wireless headset to
the Imager. When on,
shows on the display (upper left corner).
WiFi™ Hotspot
Note
WiFi is for indoor use only in Kuwait, Chile, and United
Arab Emirates.
You can wirelessly send a picture from the Imager to a PC, an
iPhone, and an iPad through the WiFi connection. A transferred
image is viewed with Fluke Connect™ desktop software.
1.888.610.7664 sales@GlobalTestSupply.com
Fluke-Direct
.com

TiS60+
Users Manual
20
WiFi™ Network
Infrastructure WiFi is a wireless local area network (WLAN) that
links your Imager to other wireless devices using its radio and
providing a connection through an access point to the wider
Internet. This gives you the ability to move around within a local
coverage area and still be connected to the network.
To turn on the WiFi Network feature:
1. Go to Settings > Wireless > WiFi > WiFi Network.
2. Push
W/X to highlight ON.
3. Push Select to scan for available networks within range of the
camera.
4. Push
W/X to select a network.
5. Push 1 to connect/disconnect.
6. Enter a password if you are prompted.
Image Storage
The storage setting allows you to choose to save images to the
internal memory or micro SD memory card.
1. Go to Settings > Image Storage.
2. Push W or X to change the setting.
3. Push
to select the new storage setting.
Fluke Connect™
The Imager supports Fluke Connect™ (may not be available in all
regions). Fluke Connect™ wirelessly connects your Fluke test
tools with an app on your smartphone or tablet. It can show images
from your infrared camera on your smartphone or tablet screen,
save images to Fluke Cloud™ storage, and share images with
your team.
More information about how to enable the Imager radio is in
Wireless Connectivity.
Fluke Connect App
The Fluke Connect app works with Apple and Android mobile
products. The app is available for download from the Apple App
Store and Google play.
Check that the WiFi™ radio on the Imager is ready to operate. See
Enable the Radio.
To setup:
1. On the Imager, go to Settings > Wireless.
2. Select WiFi Hotspot.
3. If the “On” selection is checked, select “Off” before you check
the network settings to connect the iOS mobile device to the
Imager.
4. Choose the Settings menu option and review the SSID and
Password values.
For a new Imager, the default value is “Fluke-Camera” for the
SSID and the password is disabled.
Note
To enable WiFi Hotspot protection, change the SSID
and password values to your organization’s
preference.
5. Push
2 (Back) until you reach the Off/On settings menu.
6. Select On option and wait a few seconds while the WiFi radio
activates.
On the mobile device:
1. Go to Settings > Wi-Fi.
The network name for your camera shows in the list (also
known as “SSID”). Select this SSID and enter your password
when prompted by your mobile device.
2. Open the Fluke Connect app.
3. In the list of Fluke products, connect to Thermal Imager.
1.888.610.7664 sales@GlobalTestSupply.com
Fluke-Direct
.com

Thermal Imager
Menus
21
4. When the connection is set, the app prompts:
Push Save on the Imager to view the image here
On the Imager:
1. Aim the Imager at something thermally interesting and pull the
trigger.
2. Push
1 (Save).
After a few seconds, the image you captured shows on your
mobile device for review.
Fluke Connect Tools
To discover an Imager with Fluke Connect:
1. Turn on the Imager.
2. On the Imager, go to Menu > Fluke Connect.
3. Push /? or On to select.
The Imager starts to scan and presents a list with the ID and
name of available tools found within the 20 m distance. You
can expect several minutes in delay before the scan is
complete.
4. Push
W/X to select a tool name.
5. Push
(Done) to select the tool.
The labels change to include an Edit function. By default, the
Imager shows and saves the data for the selected tools.
Fluke Cloud™ Storage
To upload images to the Fluke Cloud™ storage:
1. Turn on the Imager and connect to a WiFi network (see
WiFi™ Network).
2. When the Imager is connected to a WiFi network, go to
Settings > Wi-Fi > Sign In.
3. Enter a Fluke Connect user ID with the onscreen keyboard. If
you have previously logged in, the history drop down box at
the top of the keyboard shows a list of previously used IDs.
4. Enter the password with the onscreen keyboard.
All .is2, .jpg, and .bmp images automatically upload to the
Fluke Cloud™ storage when you save the image after
capture. Screen icons show you the progress:
T = image upload in progress
N = image upload done
S = error
To turn off the upload feature:
1. Go to Settings > Wi-Fi > Sign Out.
2. Or, turn off the WiFi network.
To edit the selection:
1. Push
W/X to highlight the tool name.
2. Push
to open the Edit menu. The Edit menu gives you a
choice to display the measurement data and/or save it to the
SD memory card.
The display updates to show the wireless icon and live
measurement for each selected wireless tool.
1.888.610.7664 sales@GlobalTestSupply.com
Fluke-Direct
.com

TiS60+
Users Manual
22
Advanced Settings
Filename Prefix
The default filename starts with IR_. You have the option to
change this prefix to a different 3-character name with the
keyboard.
Reset Filename
You can reset the file number to 00001.
Factory Defaults
Erases all user-set preferences and restores all of the factory
default settings.
Imager Information
You can access information about the version, certifications, and
licenses for the Imager from the Settings Menu.
This includes:
• Model
• Camera serial number
• Refresh rate
• Engine serial number
• Firmware version
• FPGA #
To show the Imager Info:
1. Go to Settings > Advanced > Imager Info.
2. Push
W/X to scroll through the menu.
3. Push:
•
W/X to set the change and go back to the live view.
•
2 or Y to set the change and go back to the
previous menu.
•
3?to cancel the change and go back to the live view.
To display the electronic certifications:
1. Go to Settings > Advanced > Imager Info.
2. Push
W/X to highlight Certificates.
3. Push
to view the information screen with the Imager
certifications.
4. Push
to close the information screen.
To show the license information:
1. Go to Settings > Advanced > Imager Info.
2. Push
W/X to highlight Licenses.
3. Push to view the information screen with a list of Open
Source Software Licenses.
4. Push
W/X to scroll to a specific license.
5. Push to view the information screen with the specific
license agreement.
6. Push to close the information screen.
Adjust Parallax
You can fine-tune the parallax adjustment to precisely align the
image.
1. Go to Settings > Advanced > Adjust Parallax.
2. Follow the on-screen prompts to adjust.
1.888.610.7664 sales@GlobalTestSupply.com
Fluke-Direct
.com

Thermal Imager
Maintenance
23
Maintenance
The Imager requires minimal maintenance.
W* Warning
To prevent eye damage and personal injury, do
not open the Product. The laser beam is
dangerous to eyes. Have the Product repaired
only through an approved technical site.
How to Clean the Case
Clean the case with a damp cloth and a weak soap solution. Do
not use abrasives, isopropyl alcohol, or solvents to clean the case
or lens/window.
Lens Care
W Caution
To prevent damage to the infrared lens:
• Carefully clean the infrared lens. The lens has a
delicate anti-reflective coating.
• Do not clean too vigorously as this can damage
the anti-reflective coating.
For lens care you will need a cleansing liquid such as a
commercial lens cleaning liquid with alcohol, ethyl alcohol, or
isopropyl alcohol and a lint-free cloth or tissue. A pressurized air
can is used to remove loose particulates.
To clean the lens:
1. Blow off particulates from the lens surface with pressurized air
can or dry nitrogen-ion gun if available.
2. Soak the lint-free cloth in the alcohol liquid.
3. Squeeze the cloth to remove excess liquid or dab on dry cloth.
4. Wipe the lens surface in one circular motion and discard the
cloth.
5. Use a new cloth with liquid if you need to repeat the
procedure.
Battery Care
W Warning
To prevent personal injury and for safe operation
of the Product:
• Do not put battery cells and battery packs near
heat or fire. Do not put in sunlight.
• Do not disassemble or crush battery cells and
battery packs.
• Remove batteries to prevent battery leakage and
damage to the Product if it is not used for an
extended period.
• Connect the battery charger to the mains power
outlet before the Product or battery.
• Use only Fluke approved power adapters to
charge the battery.
• Keep cells and battery packs clean and dry.
Clean dirty connectors with a dry, clean cloth.
W Caution
To prevent damage, do not expose Product to
heat sources or high-temperature environments
such as an unattended vehicle in the sun.
1.888.610.7664 sales@GlobalTestSupply.com
Fluke-Direct
.com

TiS60+
Users Manual
24
To get the best performance from the lithium-ion battery:
• Do not store the battery on the charger for more than
24 hours.
• Charge the Imager for a two-hour minimum at three-month
intervals for maximum battery life.
• The battery will discharge in about three months if installed in
the Imager and powered off. It will discharge in about six
months if stored disconnected from the Imager.
• Batteries stored for long periods will need two to ten charging
cycles for full capacity.
• Always operate in the specified temperature range.
• Do not store the batteries in extreme cold environments.
• Do not attempt to charge the batteries in extreme cold
environments.
• These guidelines apply whether you charge the battery with
external power or the charger base.
~ W Caution
Do not incinerate the Product and/or battery.
1.888.610.7664 sales@GlobalTestSupply.com
Fluke-Direct
.com