1
Introduction 2
Important Safety Instructions 3
Package Contents 4
Product Features 4
Product Overview 5
Pre-Installation Checklist 8
Mounting the Unit 9
Hardware Installation 10
Operation 13
Specications 14
Warranty 16
Owner's Manual
Español 17
Français 33
Deutsch 49
Italiano 65
Models:
BHDBT3-TR
BHDBT3-TRX2
HDBaseT 3.0 Transmitter/Receiver
HDMI 4K 60 Hz (4:4:4), RS-232 & IR Control
Purchased product
may differ from image.

2
Introduction
The BHDBT3-TR / BHDBT-TRX2 is a video transceiver that integrates the functions of a
transmitter and a receiver into one unit. This combination allows users to easily configure the
unit to be a transmitter or receiver depending on their AV solution, and to enjoy more flexible
deployment and effective use with video matrix switches, video splitters, etc.
Designed with HDBaseT 3.0 technology, the BHDBT3-TR / BHDBT-TRX2 not only extends True
4K uncompressed signals up to 328 ft. (100 m) over a single Cat6a cable (HDBaseT3-certified)
with zero latency, but also transmits IR, RS-232, Ethernet, independent audio, and USB signals
with the latest HDBaseT standards. For stable HDMI signal transmission, the BHDBT3-TR /
BHDBT-TRX2 ensures high-quality visuals and reliable extension by supporting HDCP 2.2, 3D,
Deep Color and HDR. In addition, the BHDBT3-TR / BHDBT-TRX2 is equipped with HDMI audio
embedded / de-embedded functions, enabling users to flexibly adapt suitable audio / video
combinations based on different environments. To ensure nonstop operations, the fanless fin
heat sink design prevents overheating and thus elevates its reliability.
The BHDBT3-TR / BHDBT-TRX2 increases the potential of AV applications while also
streamlining complex installations. This makes the BHDBT3-TR / BHDBT-TRX2 an ideal solution
for conference halls, auditoriums, lecture halls, museums, exhibition rooms, and anywhere
else that requires high-quality transmission and an easy-to-use application.

3
Important Safety Instructions
• This product is for indoor use only.
• Read all of these instructions. Save them for future reference.
• Follow all warnings and instructions marked on the device.
• Do not place the device on any unstable surface (cart, stand, table, etc.). If the device falls,
serious damage will result.
• Do not use the device near water.
• Do not place the device near, or over, radiators or heat registers.
• The device cabinet is provided with slots and openings to allow for adequate ventilation. To
ensure reliable operation, and to protect against overheating, these openings must never
be blocked or covered.
• The device should never be placed on a soft surface (bed, sofa, rug, etc.), as this will block its
ventilation openings. Likewise, the device should not be placed in a built-in enclosure unless
adequate ventilation has been provided.
• Never spill liquid of any kind on the device.
• Unplug the device from the wall outlet before cleaning. Do not use liquid or aerosol
cleaners. Use a damp cloth for cleaning.
• The device should be operated from the type of power source indicated on the marking
label. If you are not sure of the type of power available, consult your dealer or local power
company.
• To prevent damage to your installation, it is important that all devices are properly
grounded.
• Do not allow anything to rest on the power cord or cables. Route the power cord and cables
so that they cannot be stepped on or tripped over.
• Position system cables and power cables carefully; make sure nothing rests on any cables.
• Never push objects of any kind into or through cabinet slots. They may touch dangerous
voltage points or cause parts to short out, resulting in a risk of fire or electrical shock.
• Do not attempt to service the device yourself. Refer all servicing to qualified service
personnel.
• If the following conditions occur, unplug the device from the wall outlet and bring it to
qualified service personnel for repair.
o The power cord or plug has become damaged or frayed.
o Liquid has been spilled into the device.
o The device has been exposed to rain or water.
o The device has been dropped, or the cabinet has been damaged.
o The device exhibits a distinct change in performance, indicating a need for service.
o The device does not operate normally when the operating instructions are followed.
• Only adjust those controls that are covered in the operating instructions. Improper
adjustment of other controls may result in damage that will require extensive work by a
qualified technician to repair.

4
Package Contents
Product Features
• BHDBT3-TR or BHDBT3-TRX2 HDBaseT 3.0 Transceiver
• RS-232 terminal block
• Wall-mount bracket (2 pcs.)
• Foot pad set (4 pcs.)
• USB-B to USB-A cable
• Power adapter
• C13 to NEMA 5-15P power cord
• C13 to BS1363 power cord
• C13 to Schuko power cord
• IR emitter
• IR receiver
• Owner’s Manual and Quick Start Guide
• Extends uncompressed True 4K HDMI signals up to 100 m over a single Cat6a cable
(HDBaseT3-certified Cat6a cable) with zero latency.
• Flexible for deployment — can be configured as a transmitter or receiver, depending on the
AV solution.
• Compliant with HDBaseT 3.0 standards — transmits high-quality video, full-range IR,
bi-directional RS-232, Gigabit Ethernet, independent stereo audio and USB 2.0 signals
channel bypass.
• HDMI (3D, Deep Color, 4K/60Hz); HDCP 2.2 compliant.
• Superior video quality — up to 4096 x 2160 @ 60 Hz (4:4:4); HDR supported.
• Supports HDMI audio embedding / de-embedding functions.
• Supports HDMI local output.
• Compliant with the USB 2.0 standard for a wide range of USB peripherals.
• LED indication of HDBaseT and HDMI signal status for easier recognition.
• Fanless fin heatsink enclosure elevates durability and reliability by preventing overheating,
fan malfunctions and excessive noise.
• Supports refresh rates up to 240 Hz for the connected display.
• Firmware upgradable.
• Built-in 8KV / 15KV ESD protection.
• Plug-and-play.
• Rack-mountable.
5
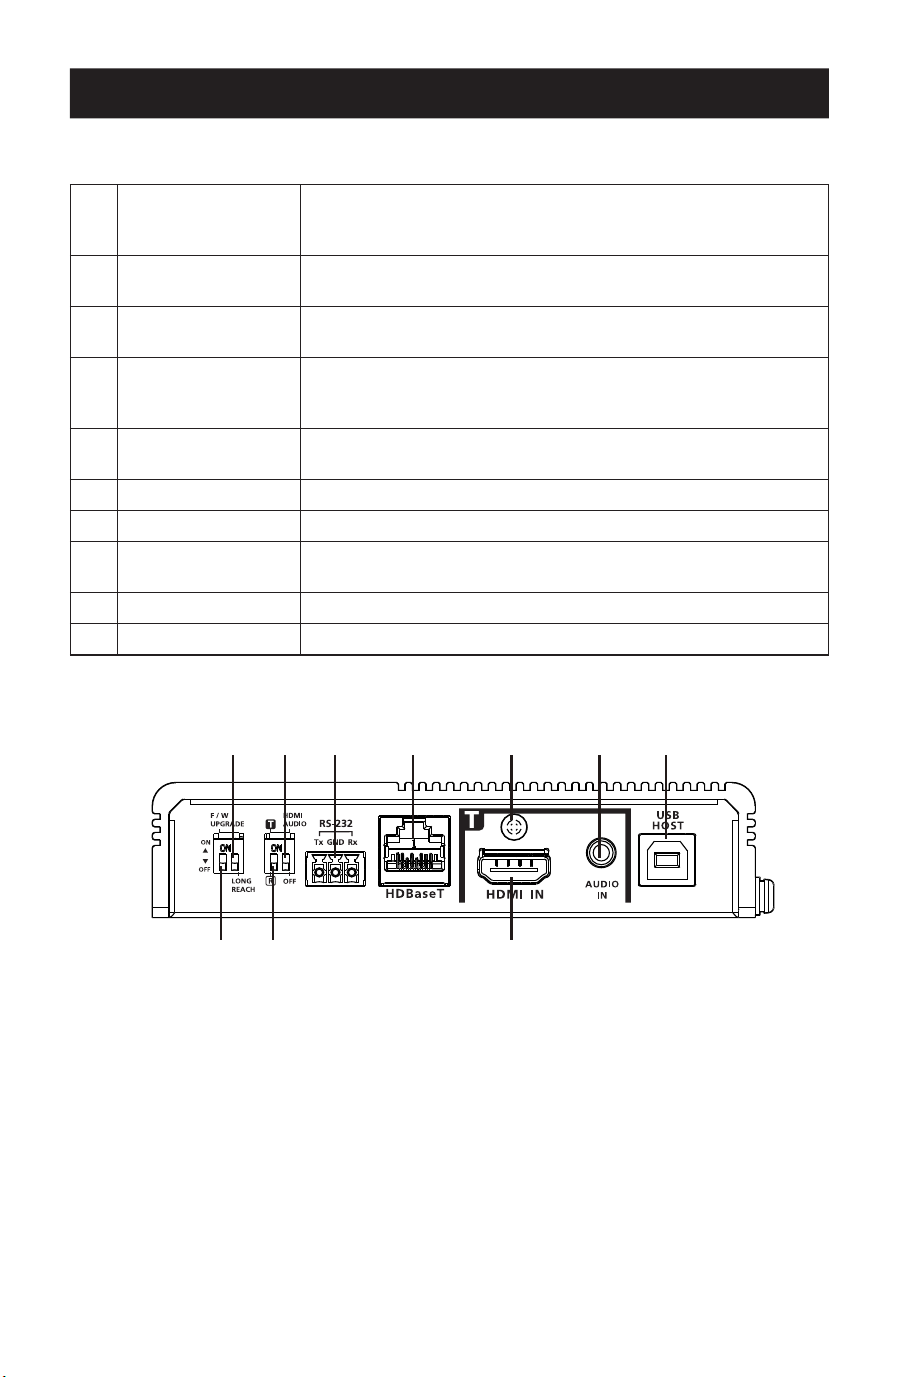
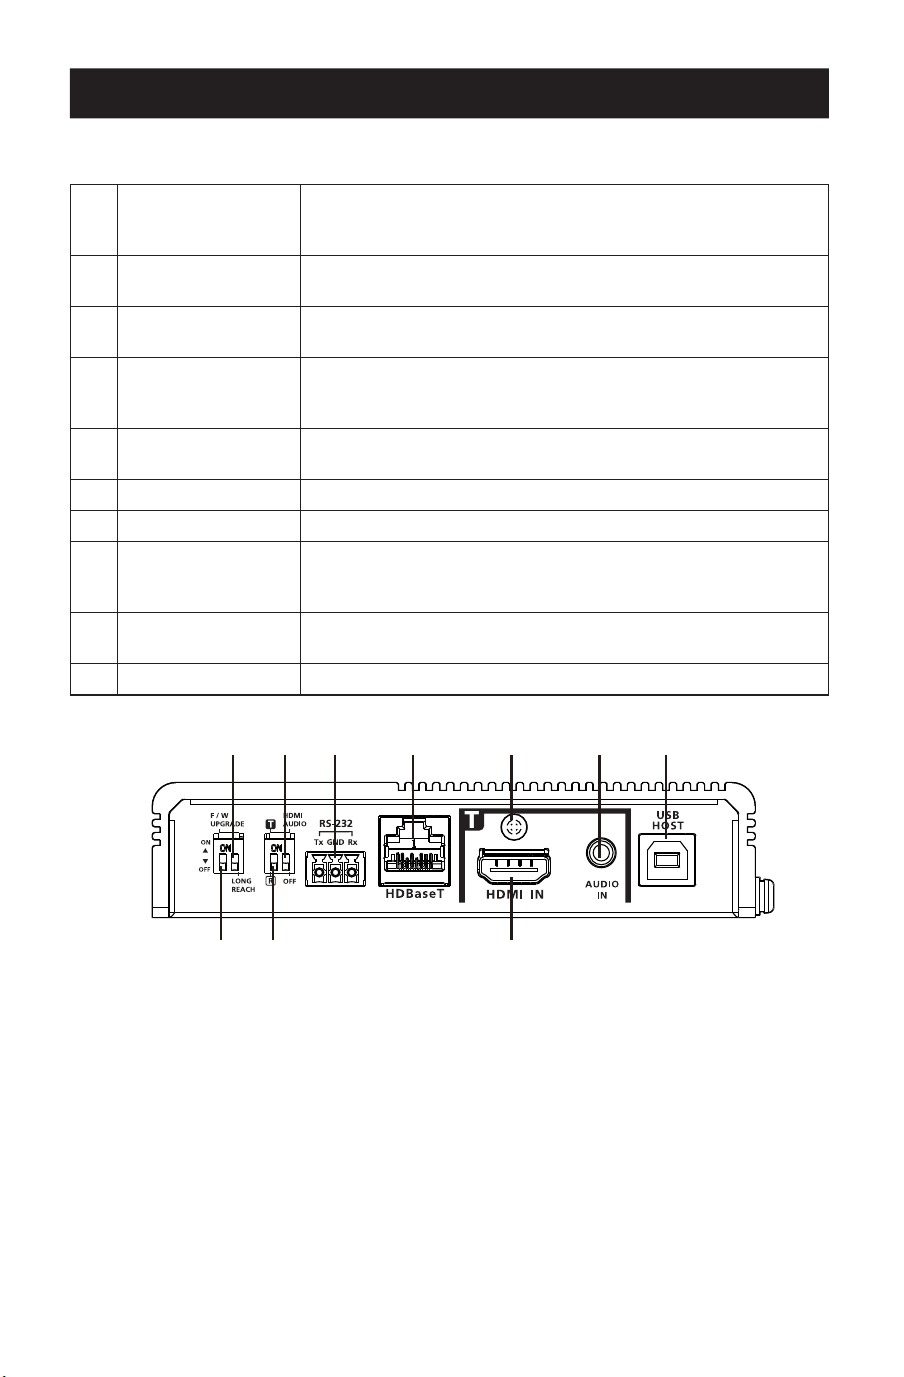
Product Overview
Front View
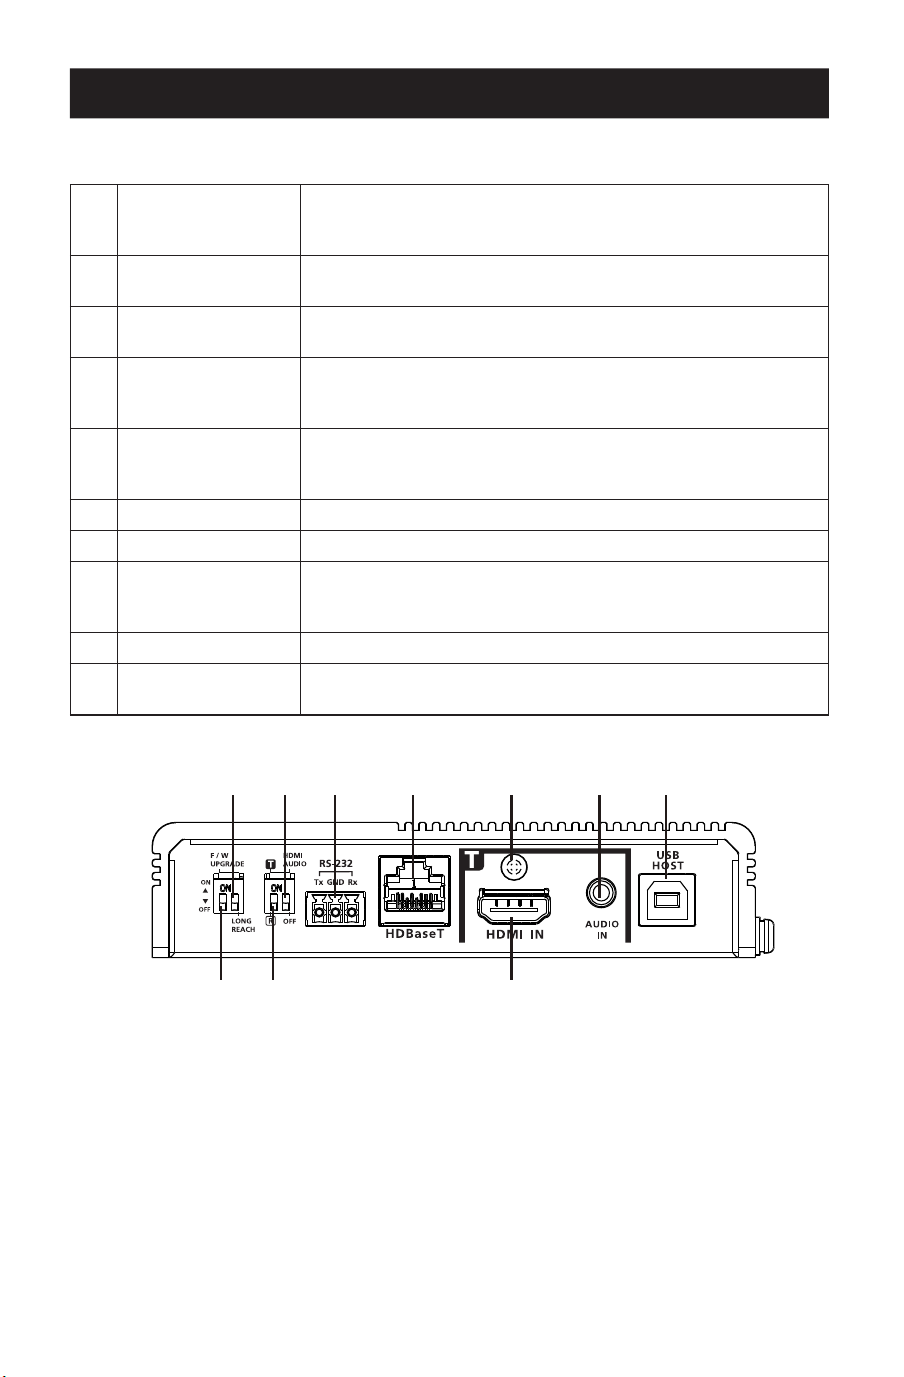
1
HDBaseT long
reach mode switch
(reserved)
Sets to enable the long reach mode. This switch is currently
reserved for future expansion.
2
HDMI audio switch
Sets to enable the embed and de-embed functions. See Tx and
Rx Switch.
3
RS-232 port
Connects to an RS-232 serial controller, such as a PC or a
control system.
4
HDBaseT port
Connects to an HDBaseT3-certied Cat6a cable with zero
latency to transmit HDMI and control signals to the connected
receiver if the unit is set to a transmitter.
5
Cable lock screw
Universal HDMI cable lock that provides the easiest way to
secure an HDMI cable to most HDMI devices.
6
Audio-in Connects to an audio source device, such as a PC.
7
USB-B port Connects to source device, such as a PC.
8
Firmware upgrade
switch (reserved)
This switch is reserved for Technical Support. To perform a
rmware upgrade, rst contact your dealer.
9
Tx / Rx switch Sets to dene the unit as a transmitter or a receiver.
J
HDMI-in Connects to an HDMI video source device using an HDMI cable.
11
88 99 JJ
22 33 44 55 66 77
6
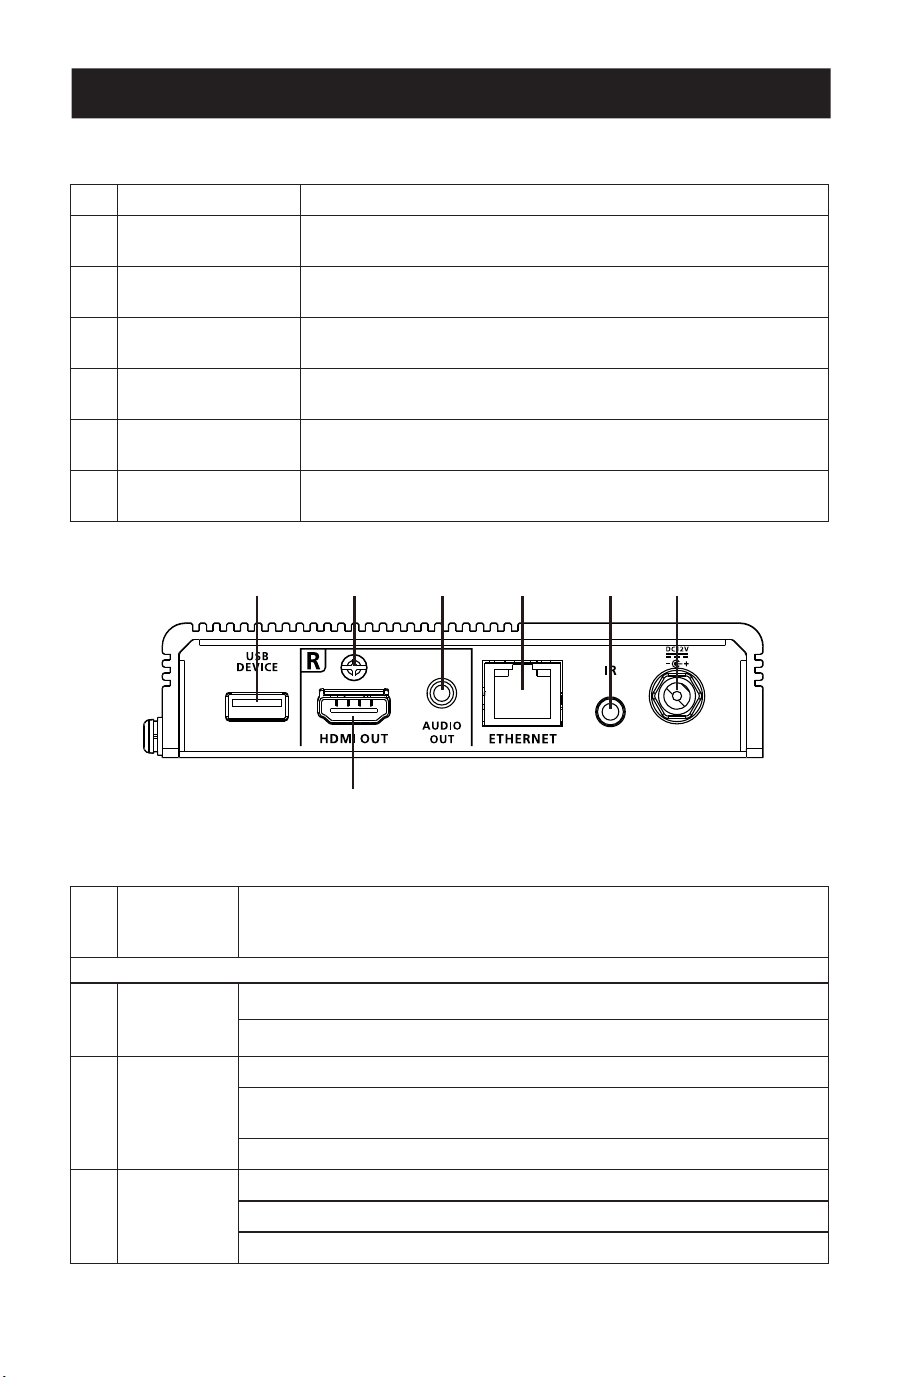
Product Overview
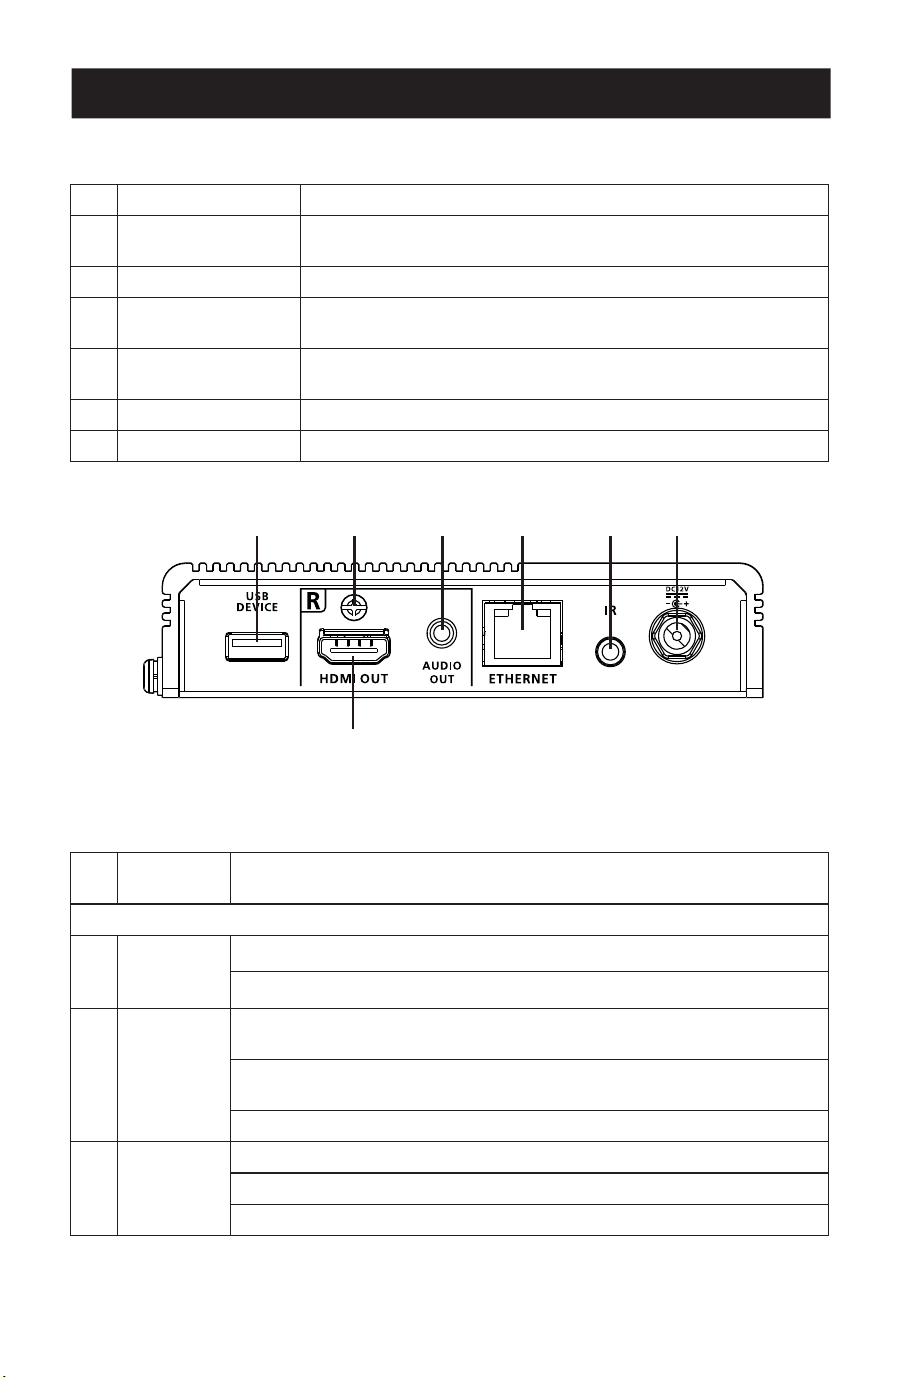
Rear View
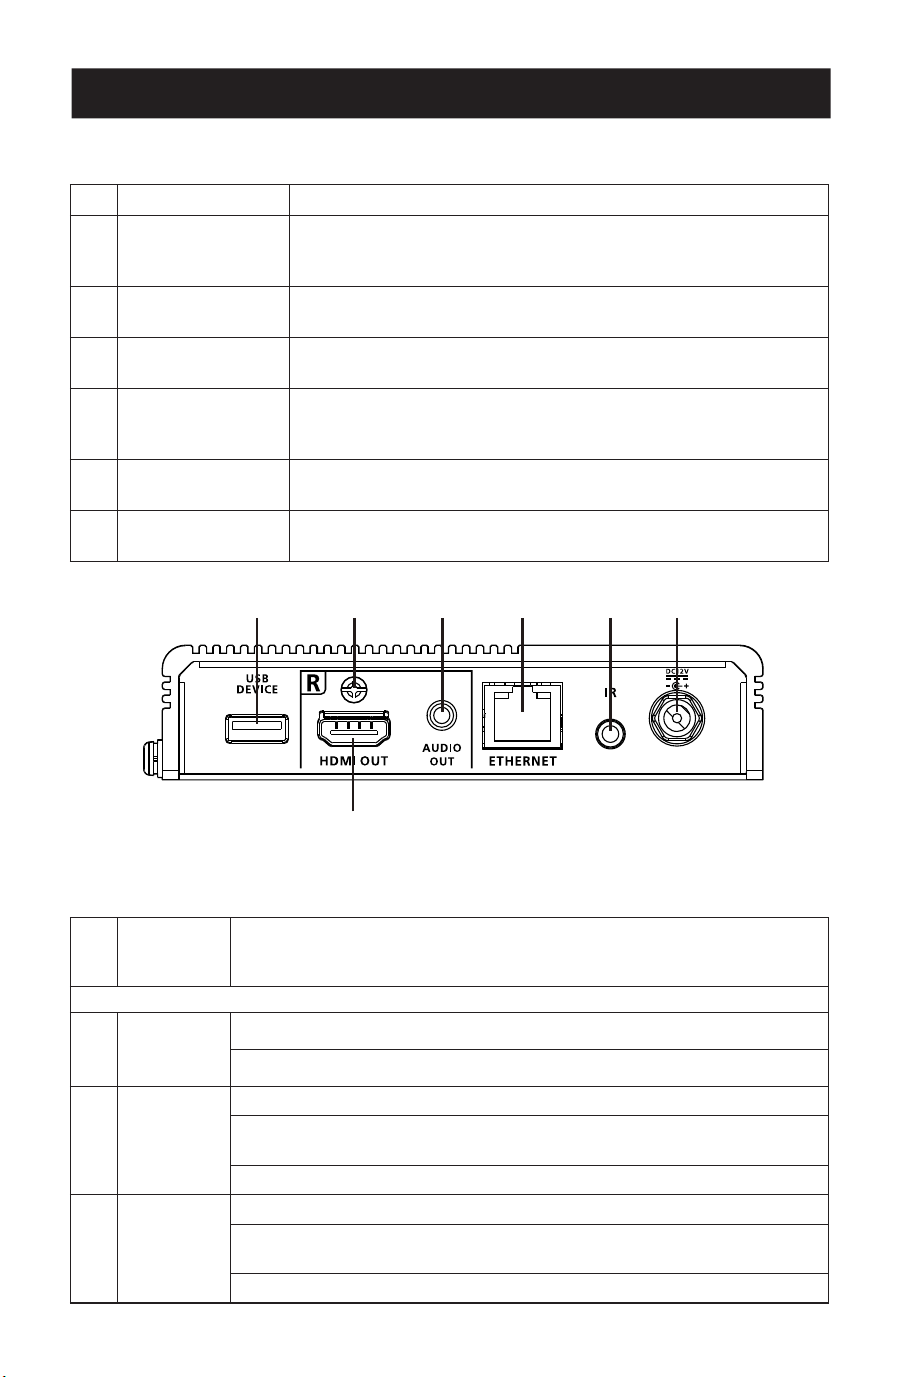
1
USB-A port Connects to a peripheral device, such as a keyboard or mouse.
2
Cable lock screw
Universal HDMI cable lock that provides the easiest way to
secure an HDMI cable to most HDMI devices.
3
Audio out Connects to an audio output device, such as a set of speakers.
4
Ethernet port
Connects to a network switch to provide Internet access for the
connected source device using an RJ-45 cable.
5
IR port
Connects to an IR emitter or IR receiver for remotely control
using an IR remote control.
6
Power jack Connects to a power adapter for power supply.
7
HDMI-out Connects to an HDMI display device using an HDMI cable.
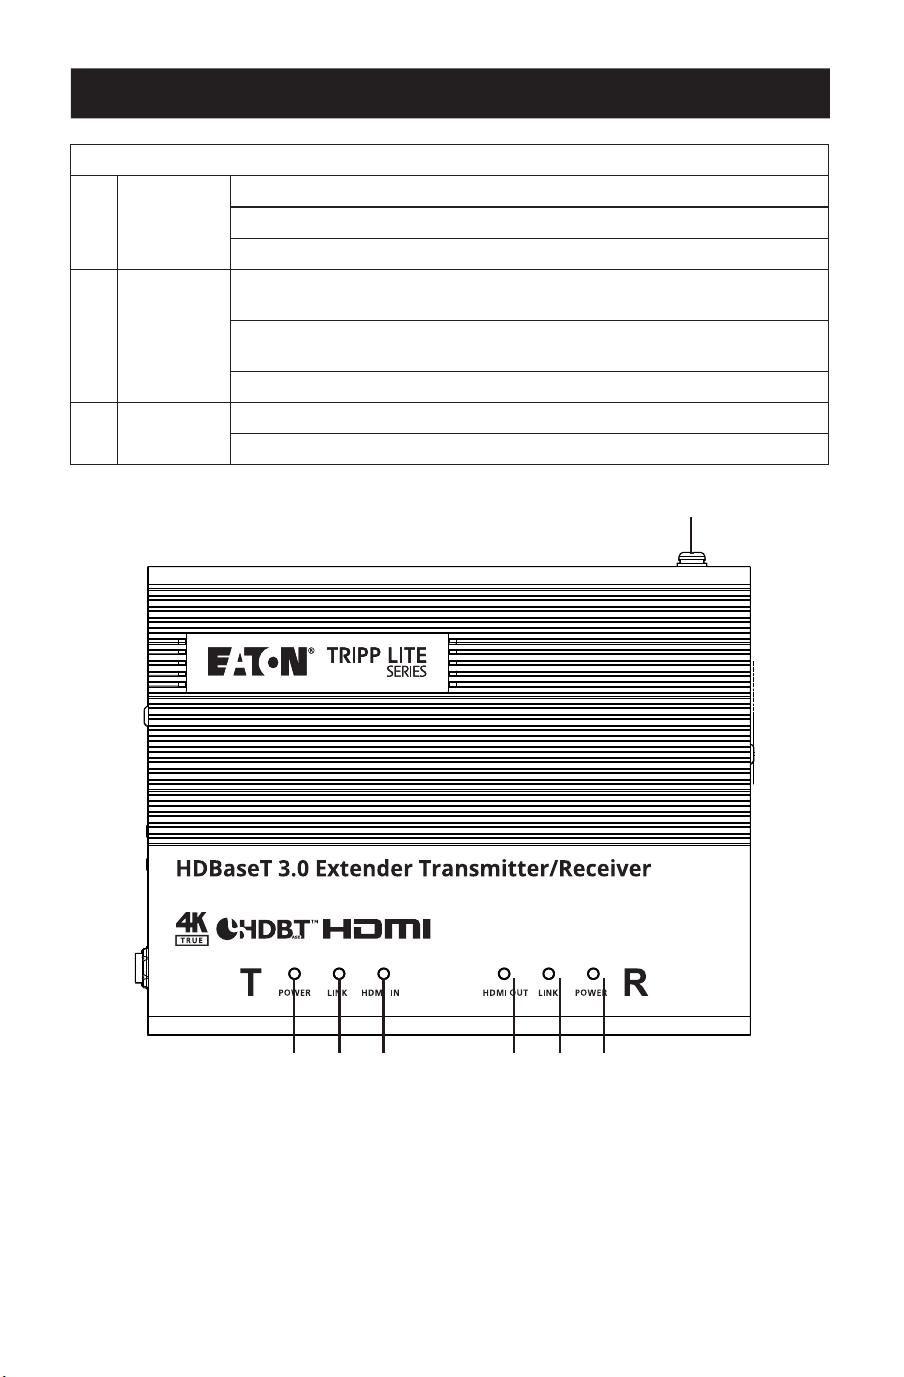
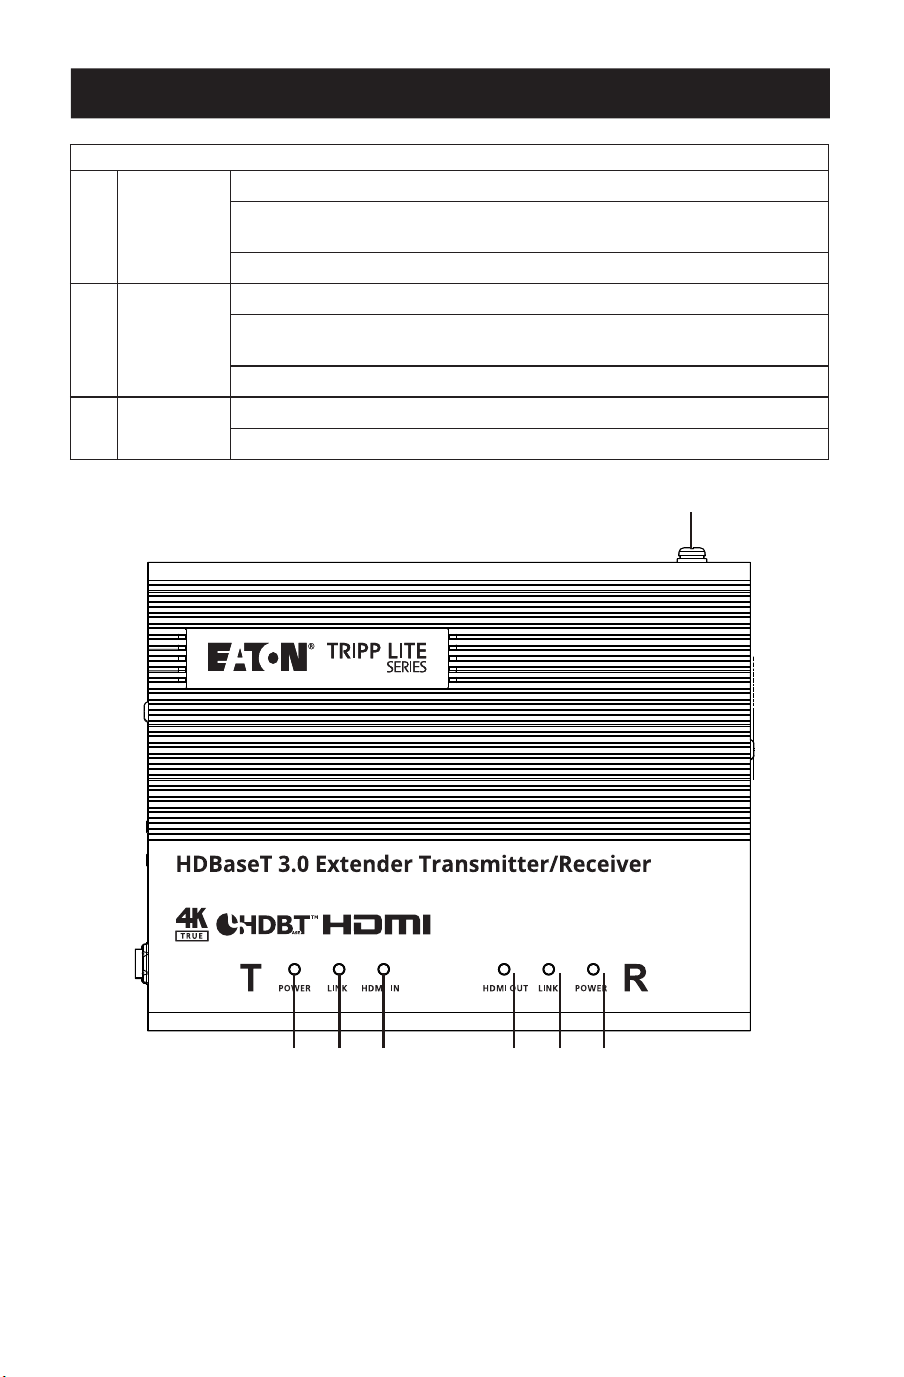
Top View
1
Grounding
terminal
Grounds the unit to a suitable grounded object.
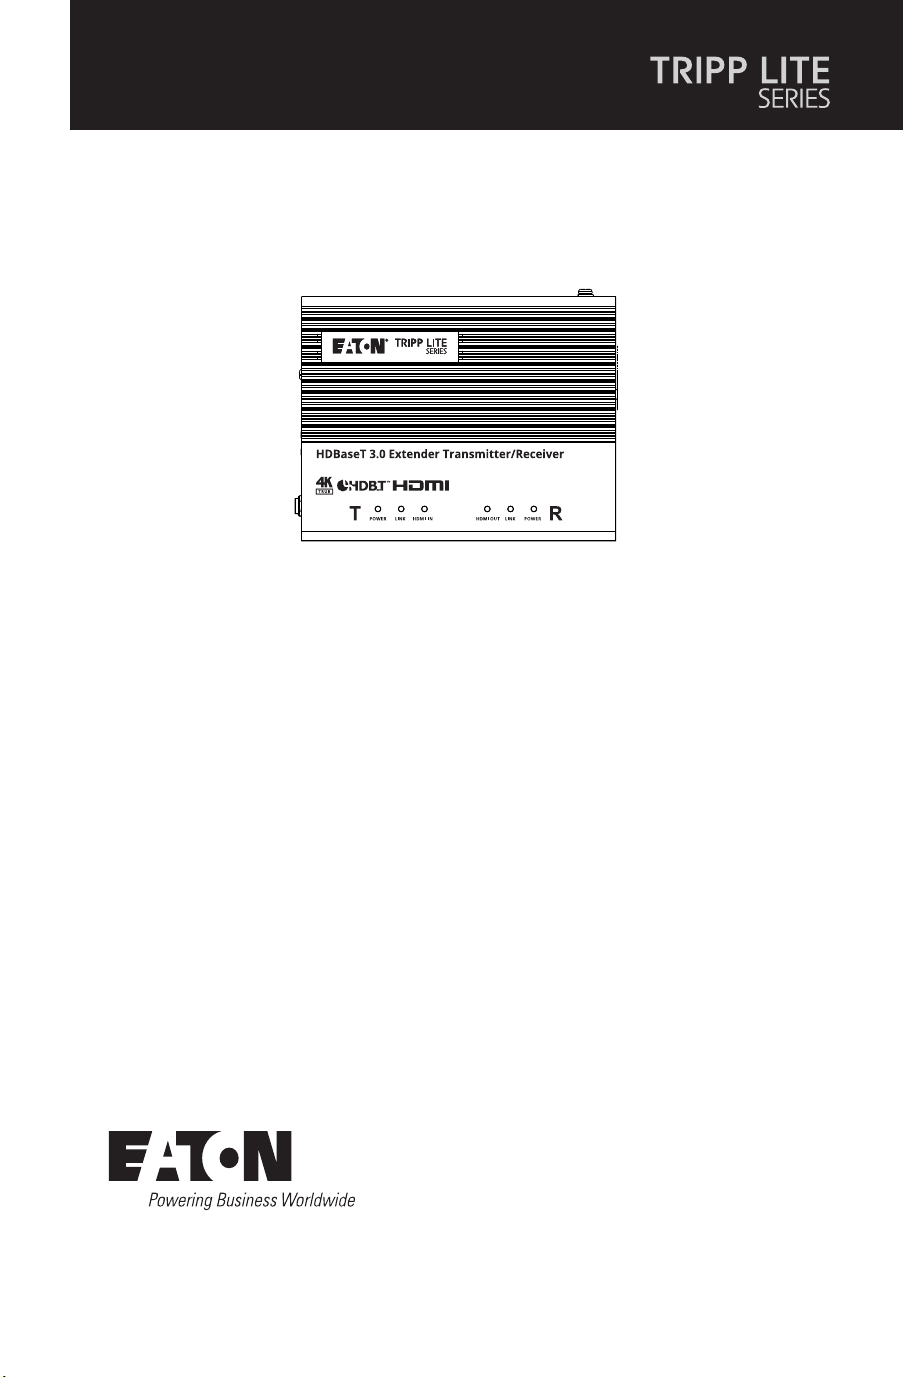
Transmitter LEDs
2
Power
Yellow Green: The unit is receiving power.
O: The unit is powered o.
3
Link
Solid Orange: The transmission between the transmitter and receiver is
stable.
Blinks Orange: The transmission between the transmitter and receiver is
unstable.
O: There is no transmission between the transmitter and receiver.
4
HDMI-in
Solid Orange: The video display is normal with the HDCP key.
Blinks Orange: The video display is normal without the HDCP key.
O: There is no video signal.
11 22 33 44 55 66
77
7
Product Overview
Receiver LEDs
5
HDMI-out
Solid Orange: The video display is normal with the HDCP key.
Blinks Orange: The video display is normal without the HDCP key.
O: There is no video signal.
6
Link
Solid Orange: The transmission between the transmitter and receiver is
stable.
Blinks Orange: The transmission between the transmitter and receiver is
unstable.
O: There is no transmission between the transmitter and receiver.
7
Power
Solid Green: The unit is receiving power.
O: The unit is powered o.
11
22 33 44 55 66 77

8
Pre-Installation Checklist
Display
• Up to two HDMI displays capable of the highest required resolution.
Source Device
• A source device with an HDMI port.
Cables
• 2 HDMI cables
• To connect the transmitter and receiver units, using HDBaseT3-certified Cat6a cable is
recommended to ensure video quality.
• For better video quality, using HDBaseT3-certified Cat6a cable with zero latency is highly
recommended.
Considerations
• The maximum transmission distance varies at different parts of the transmission:
Connection Interface Resolution Distance
Computer to Transmitter HDMI True 4K 16 ft. (5 m)
Transmitter to a Receiver
(R) or a compatible Eaton
Tripp Lite series HDBaseT
Receiver
HDBaseT3-certied Cat6a
cable with zero latency
True 4K 328 ft. (100 m)
Receiver to a Display HDMI True 4K 16 ft. (5 m)

9
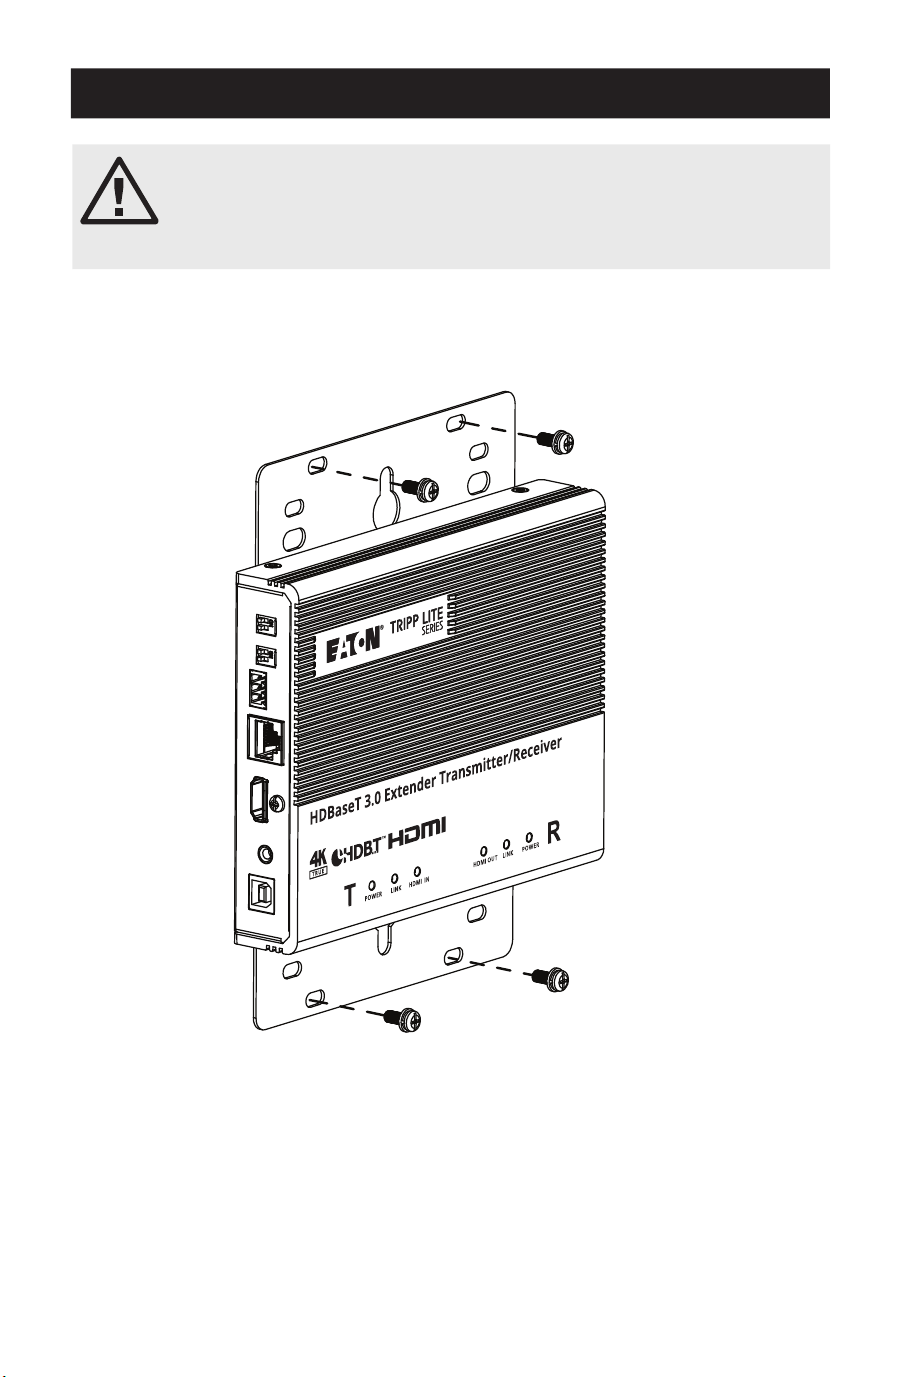
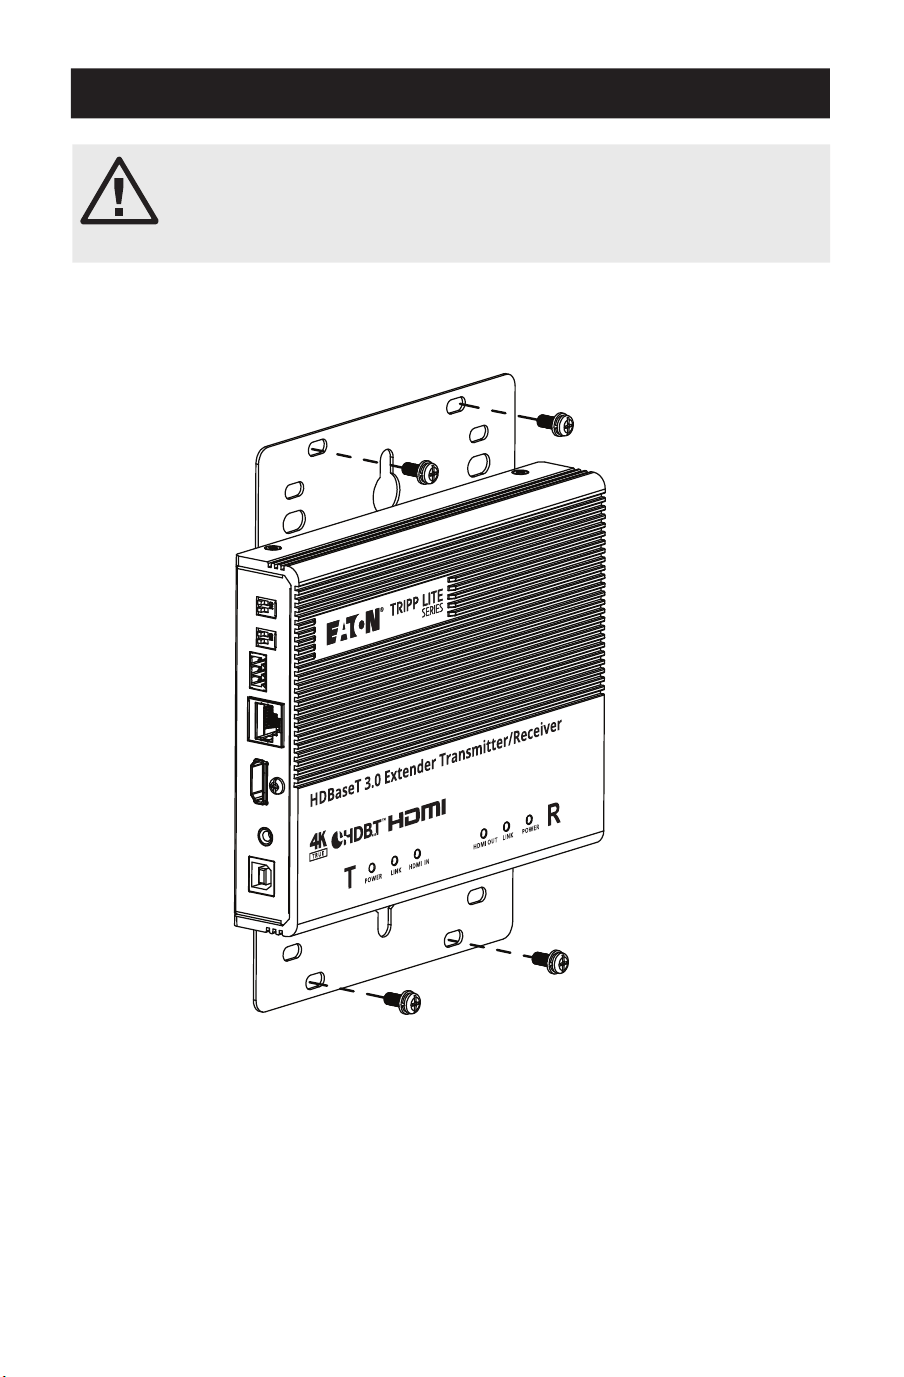
Mounting the Unit
Wall Mounting
Using the built-in mounting brackets, secure or hang the unit to the wall.
Please review the Important Safety Instructions section before
proceeding with mounting and installation.
Do not power on the unit until all the necessary hardware is connected.

10
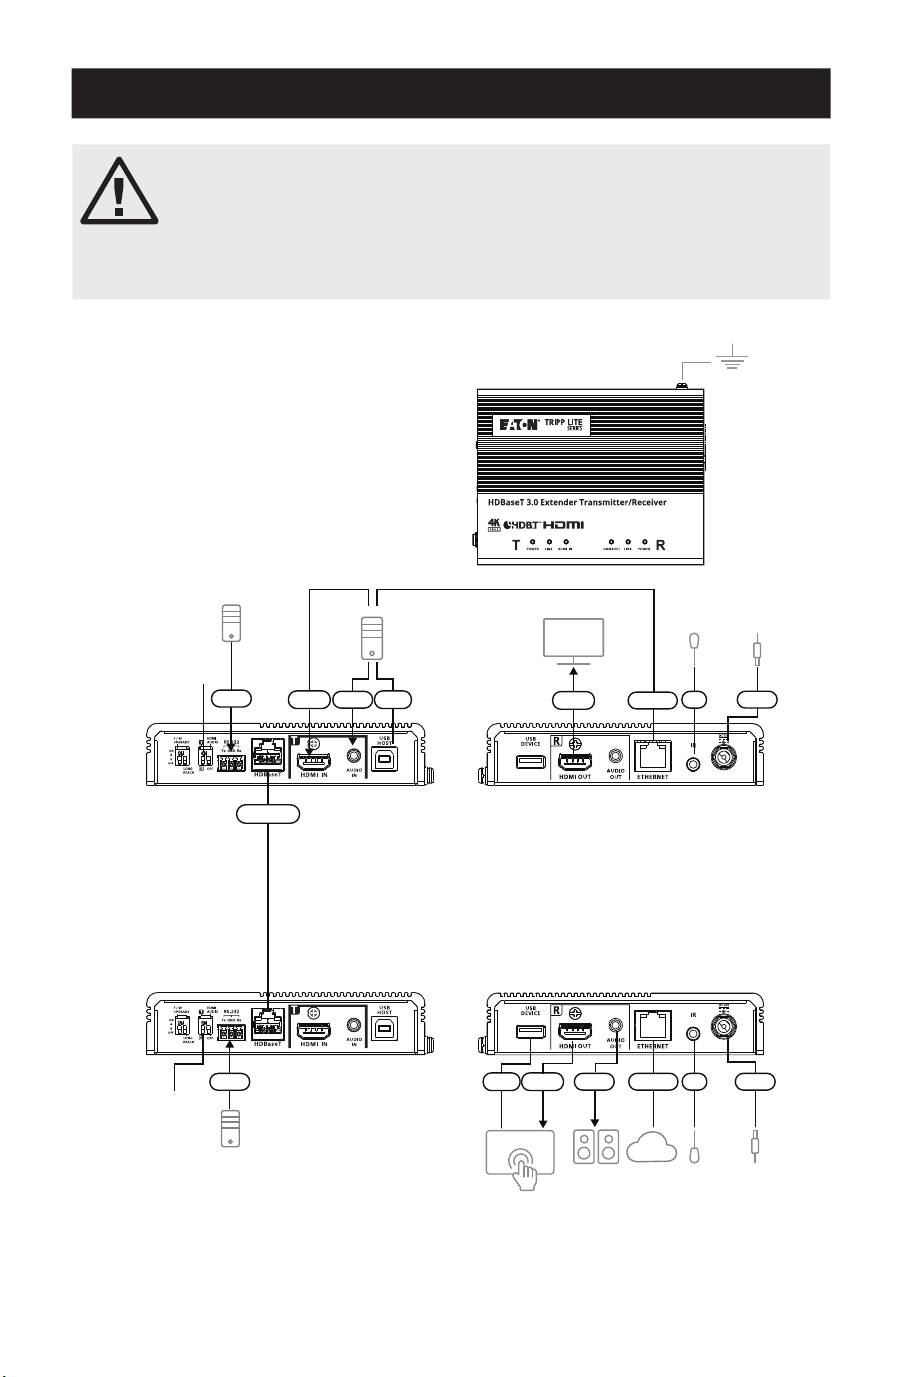
Hardware Installation
The BHDBT3-TRX2 is a kit version of the BDHBT3-TR model. The two units
are otherwise identical. Each transceiver has the ability to transmit or
receive an HDBaseT audio/video signal.
The units can easily change from a transmitter to a receiver (or vice
versa) by switching the HDMI input to output on the source end, and
output to input on the display end.
Note: The installation shown here is based on
two units.
Transmitter
Receiver
Front
View
Speakers
VK Control System
Monitor
PC
IR Emitter /
Receiver
IR Emitter /
Receiver
Power
Adapter
Power
Adapter
Network
RS-232
RS-232
HDMI
HDBaseT
HDMI
HDMI Power
Power
Ethernet
Ethernet
Audio
Audio
USB
USB
IR
IR
Front
View
Rear
View
Rear
View
11
22
22
77
MM
MM
33 44 55
66 NN
NN
JJ
JJLL 88KK
99
99

11
Hardware Installation
1
Ground the unit by connecting one end of a grounding wire to the grounding terminal and
the other end to a suitable grounded object.
Note: Do not skip this step. Proper grounding helps to prevent damage to the unit from power surges or
static electricity.
2
Important: Before connecting the unit, set the Tx / Rx switch to define the unit. The unit
will be a transmitter if the Tx / Rx switch is set to Tx, or will be a receiver if the Tx / Rx
switch is set to Rx.
3
Connect an HDMI-enabled PC to the transmitter using an HDMI cable. You can connect
other HDMI-enabled source devices here (e.g., Blu-ray player).
4
(Optional) Connect an audio source device to the transmitter. To embed this audio input
to the HDMI output, set the HDMI audio switch (on Tx) to ON.
5
Connect the USB Type-B port of the transmitter to a USB host (e.g., PC).
6
Connect an HDMI-enabled display device to the transmitter using an HDMI cable.
7
Connect the HDBaseT ports of the transmitter and receiver with a HDBaseT3-certified
Cat6a cable (or above).
8
(Optional) Connect your speakers or audio amplifier to the receiver. To de-embed this
HDMI audio from the HDMI output, set the HDMI audio switch (on Rx) to ON.
9
(Optional) To remotely control a device connected to the receiver (e.g., TV), connect the IR
emitter to the IR port of the receiver, and the IR receiver to the IR port of the transmitter.
Note: The unit supports bi-directional IR transmission.
J
(Optional) To provide network connectivity for your PC, connect the receiver to a network
switch, then connect the Ethernet port of the transmitter to your PC.
Note: The unit supports bi-directional bypass transmission.
K
(Optional) Connect the USB-A port to a USB-enabled touchscreen.
L
Connect an HDMI-enabled touchscreen to the receiver using an HDMI cable.
M
(Optional) To remotely control a PC through serial controller, connect the RS-232 port of
the transmitter to a serial controller, then connect the RS-232 port of the receiver to a PC.
Note: The unit supports bi-directional bypass transmission.
N
Connect the power cord and the power adapter, then plug the power adapter cables into
the power jack on the units.
O
Power on all connected devices.
12
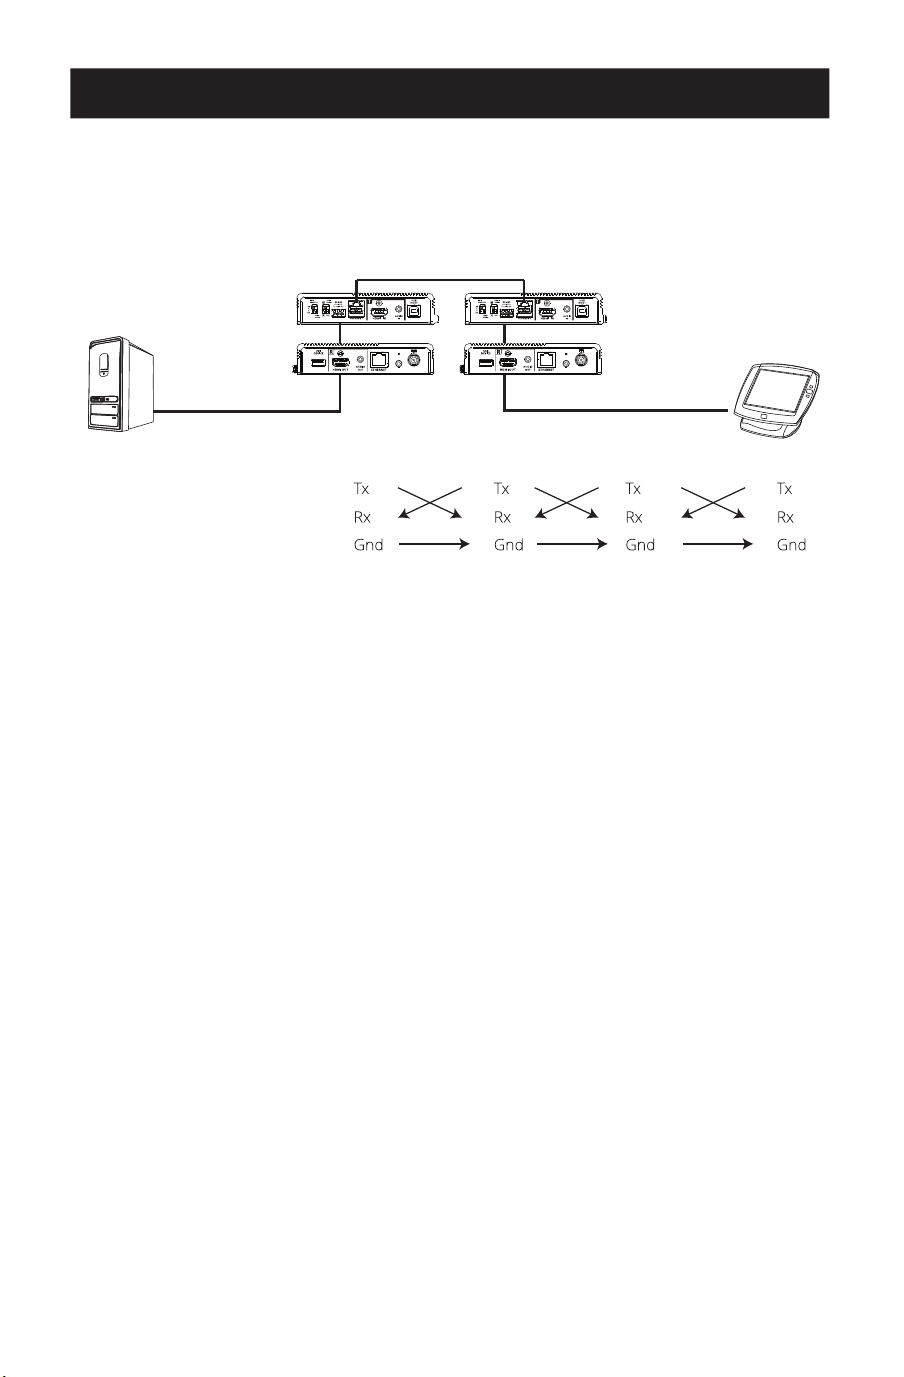
Hardware Installation
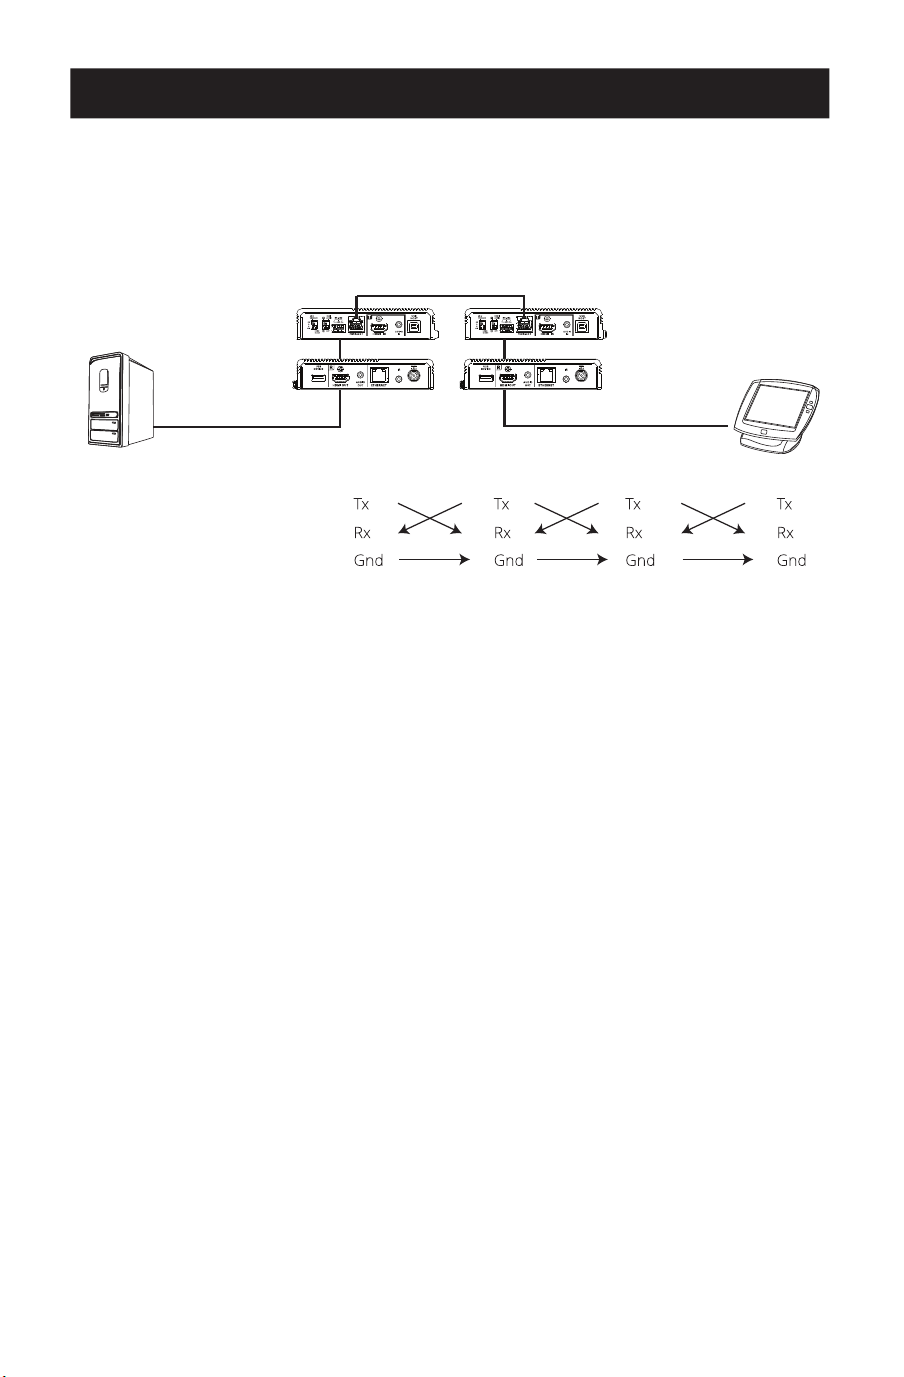
RS-232 Channel Transmission
You can connect an RS-232 serial device to the RS-232 port on the units for RS-232 bypass
channel, such as a touchscreen or a barcode scanner. The RS-232 signal transmission flow can
be illustrated as follows:
Receiver Transmitter
Cat5e/6/6a/7 Cable
PIN
CONFIGURATION
(Captive screw
connectors)
The general concept here is that an RS-232 signal can be transmitted (Tx) to the receiving (Rx)
end of a unit. The received signal can then be transmitted (Tx) to the receiving (Rx) end of
another unit. The RS-232 signals can be transmitted back the other way.
13
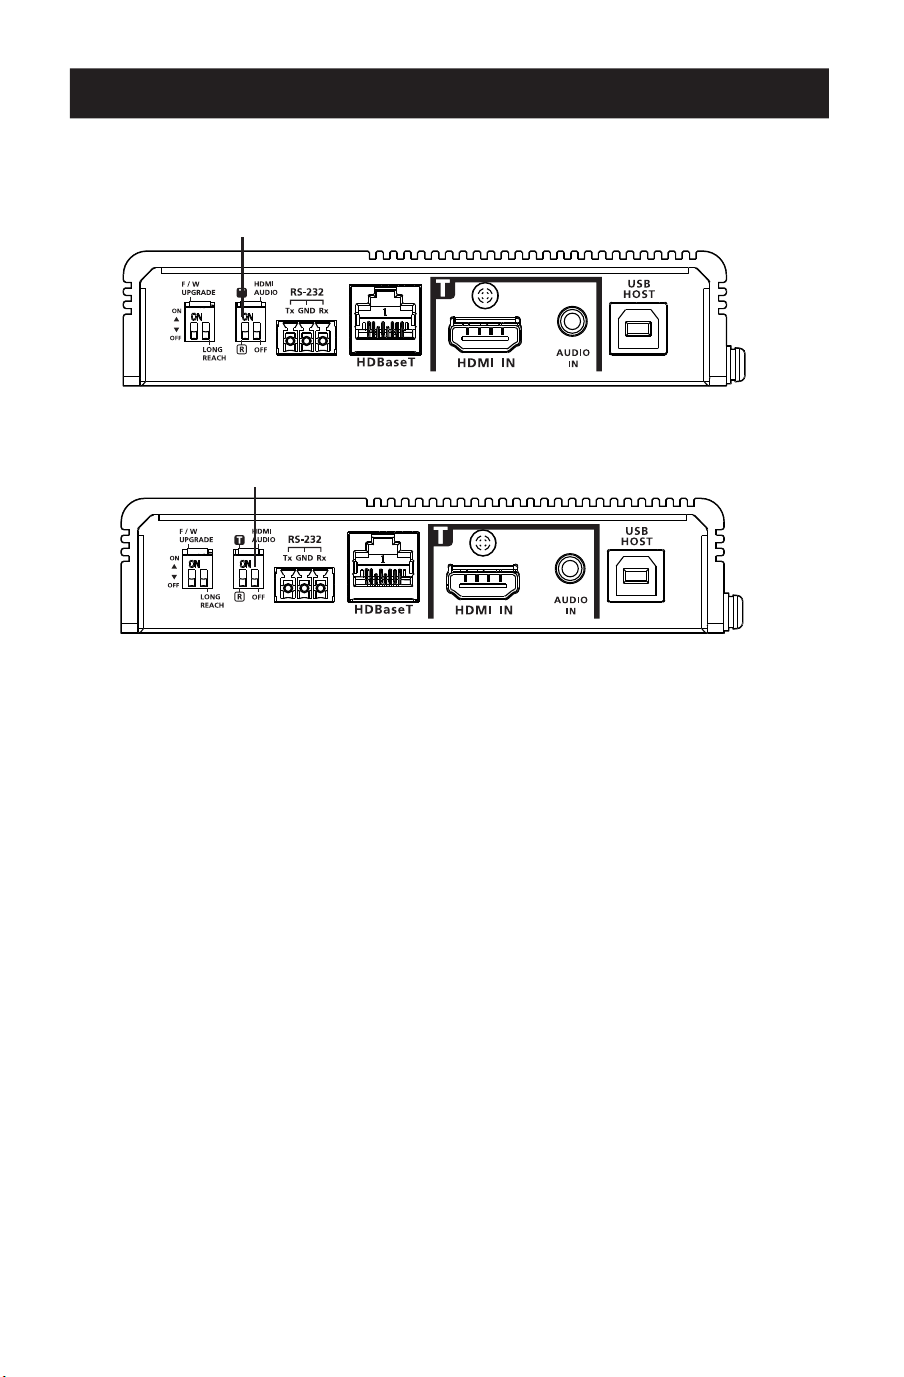
Operation
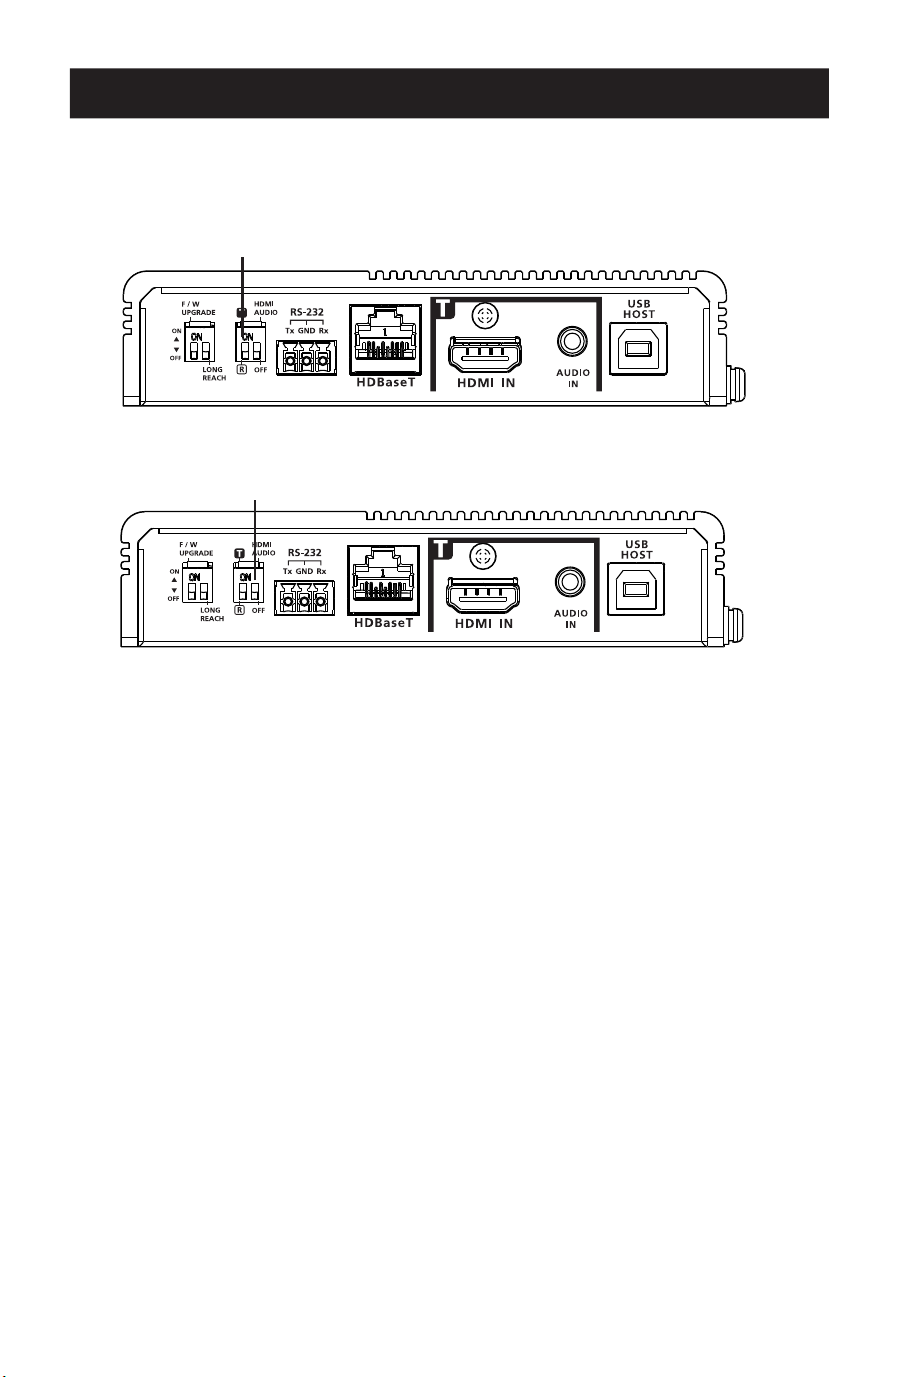
Tx and Rx Switch
Use the Tx / Rx switch to set the unit as a transmitter or receiver, as needed.
HDMI Audio Switch
Audio Embedding
1. Set the HDMI audio switch on the transmitter to On.
2. Set the HDMI audio switch on the receiver to Off.
Audio De-embedding
1. Set the HDMI audio switch on the transmitter to Off.
2. Set the HDMI audio switch on the receiver to On.
Bypassing Audio Signals
1. Set the HDMI audio switch on the transmitter to Off.
2. Set the HDMI audio switch on the receiver to Off.
Note: By default, the HDMI audio switch on the unit is set to Off.
Tx / Rx Switch
HDMI Audio Switch

14
Specifications
Video Input
Interfaces 1 x HDMI Type-A Female (Black)
Impedance 100 Ώ
Max. Distance 16 ft. (5 m)
Video Output
Interfaces 1 x HDMI Type-A Female (Black)
Impedance 100 Ώ
Max. Distance 16 ft. (5 m)
Video
Max. Data Rate 18 Gbps (6 Gbps per Lane)
Max. Pixel Clock 600 MHz
Compliance HDMI (3D, Deep Color, 4K / 60Hz); 4K HDR HDCP
2.3 Compatible
Consumer Electronics Control (CEC)
Note: The CEC signals are only bypassed from the transmit-
ter unit to the receiver unit and do not support local output.
Max. Resolutions 4096 x 2160 @ 60 Hz (4:4:4)
3840 x 2160 @ 60 Hz (4:4:4)
Max. Resolutions / Distances Up to 4K x 2K @ 60 Hz (4:4:4) @ 328 ft. (100 m)
with HDBaseT3-certied Cat6a cable
Audio
Input 1 x HDMI Type-A Female (Black)
1 x 3.5 mm Mini Stereo Female (Green)
Output 1 x HDMI Type-A Female (Black)
1 x 3.5 mm Mini Stereo Female (Green)
Connectors
Unit to Unit 1 x RJ-45 Female
Power 1 x DC Jack with locking (Black)
Control
RS-232 Channel Connector: 1 x Terminal Block, 3 Pole
Baud Rate: 19200
Data Bits: 8
Stop Bits: 1
No parity and ow control
IR Channel 1 x Mini Stereo Jack Female (Black, Bi-directional)
30K ~ 56 KHz full-range transmission
Ethernet Channel 1 x GbE RJ-45 Female
USB Channel 1 x USB 2.0 Type-B Female (White, Host)
1 x USB 2.0 Type-A Female (White, Device)
Transmission data bandwidth: Up to 3000Mbps
Power Consumption DC12V: 6.45W: 40 BTU

15
Specifications
Switches
Selection 1 x Slide Switch – Tx (Transmitter) / Rx (Receiver)
Mode Selection 1 x Slide Switch – HDMI Audio Embedding or
De-embedding ON/OFF selection
Firmware Upgrade 1 x Slide Switch - ON/OFF
Long Reach Mode 1 x Slide Switch - ON/OFF (Reserved)
LEDs
Power 1 x Tx (Yellow Green, Transmitter)
1 x Rx (Yellow Green, Receiver)
Note: The Tx or Rx LED lights to indicate which role the unit
is set to.
Link 1 x Tx (Orange, Transmitter)
1 x Rx (Orange, Receiver
Video Output 1 x Rx HDMI Out (Orange, Receiver)
Video Input 1 x Tx HDMI In (Orange, Transmitter)
Environmental
Operating Temperature 32 to 104°F (0 to 40°C)
Storage Temperature -4 to 140°F (-20 to 60°C)
Humidity 0 x 80% RH, Non-Condensing
Physical
Housing Metal
Weight 1.41 lb. (0.64 kg)
Dimensions [L x W x H]
Without Bracket
With Bracket
6.54 x 5.27 x 1.13 in. (166 x 134 x 29 mm)
6.75 x 5.94 x 1.18 in. (172 x 151 x 30 mm)
Input Resolutions 6460 x 480 @ 60/67/72/75 Hz
720 x 400 @ 70 Hz
800 x 600 @ 56/60/72/75 Hz
1024 x 768 @ 60/70/75 Hz
1280 x 800 @ 60 Hz
1280 x 1024 @ 60/75 Hz
1400 x 1050 @ 60 Hz
1400 x 900 @ 60 Hz
1600 x 1200 @ 60 Hz
1680 x 1050 @ 60 Hz
1920 x 1080/1200 @ 60 Hz
1920 x 1200 @ 60 Hz (Reduced Blanking)
1080p 60 Hz
480p 60 Hz (4:3)/(16:9)
720p 60 Hz
1080i 60 Hz
640 x 480 60 Hz (4:3)
576p 50 Hz (4:3)/(16:9)
720p 50 Hz
1080i/1080p 50 Hz
1080p 24/25/30 Hz
3840 x 2160p 24/25/30/50/60 Hz
4096 x 2160p 24/25/30/50/60 Hz
3840 x 2160p 50/60 Hz 4:2:0
4096 x 2160p 50/60 Hz 4:2:0
7680 x 4320 30 Hz 4:2:0

16
Warranty
Eaton
1000 Eaton Boulevard
Cleveland, OH 44122
United States
Eaton.com
© 2023 Eaton
All Rights Reserved
Publication No. 23-05-320 / 93-47D3_RevA
August 2023
Eaton is a registered trademark.
All trademarks are property
of their respective owners.
1-Year Limited Warranty
We warrant our products to be free from defects in materials and workmanship for a period of one (1) year
from the date of initial purchase. Our obligation under this warranty is limited to repairing or replacing (at its
sole option) any such defective products. Visit Tripplite.Eaton.com/support/product-returns before sending
any equipment back for repair. This warranty does not apply to equipment which has been damaged by
accident, negligence or misapplication or has been altered or modied in any way.
EXCEPT AS PROVIDED HEREIN, WE MAKE NO WARRANTIES, EXPRESS OR IMPLIED, INCLUDING WARRANTIES
OF MERCHANTABILITY AND FITNESS FOR A PARTICULAR PURPOSE. Some states do not permit limitation or
exclusion of implied warranties; therefore, the aforesaid limitation(s) or exclusion(s) may not apply to the
purchaser.
FCC Notice, Class A
This device complies with part 15 of the FCC Rules. Operation is subject to the following two conditions: (1)
This device may not cause harmful interference, and (2) this device must accept any interference received,
including interference that may cause undesired operation.
Note: This equipment has been tested and found to comply with the limits for a Class A digital device,
pursuant to part 15 of the FCC Rules. These limits are designed to provide reasonable protection against
harmful interference when the equipment is operated in a commercial environment. This equipment
generates, uses, and can radiate radio frequency energy and, if not installed and used in accordance with the
instruction manual, may cause harmful interference to radio communications. Operation of this equipment
in a residential area is likely to cause harmful interference in which case the user will be required to correct
the interference at his own expense. The user must use shielded cables and connectors with this equipment.
Any changes or modications to this equipment not expressly approved by Eaton could void the user's
authority to operate this equipment.
WEEE Compliance Information for Customers and Recyclers (European Union)
Under the Waste Electrical and Electronic Equipment (WEEE) Directive and implementing regulations,
when customers buy new electrical and electronic equipment from Eaton they are entitled to:
• Send old equipment for recycling on a one-for-one, like-for-like basis (this varies depending on the
country)
• Send the new equipment back for recycling when this ultimately becomes waste
Eaton has a policy of continuous improvement. Specications are subject to change without notice. Photos
and illustrations may dier slightly from actual products.

17
Introducción 18
Instrucciones de Seguridad Importantes 19
Contenido del Empaque 20
Características del Producto 20
Descripción General del Producto 21
Lista de Comprobación Previa a la Instalación 24
Instalación de la Unidad 25
Instalación del Hardware 26
Operación 29
Especicaciones 30
Garantía 32
Manual del Propietario
English 1
Françaís 33
Deutsch 49
Italiano 65
Modelos:
BHDBT3-TR
BHDBT3-TRX2
Transmisor Receptor HDBaseT 3.0
HDMI 4K @ 60Hz (4:4:4), RS-232 y Control
Remoto IR
El producto comprado
puede ser diferente al de la imagen.

18
Introducción
El BHDBT3-TR / BHDBT-TRX2 es un transceptor de vídeo que integra las funciones de un
transmisor y un receptor en una sola unidad. Esta combinación permite a los usuarios
configurar fácilmente la unidad para que sea un transmisor o un receptor en función de su
solución de audio y video, y disfrutar de un despliegue más flexible y un uso más eficaz con
switches de matriz de vídeo, divisores de vídeo, etc.
Diseñado con tecnología HDBaseT 3.0, el BHDBT3-TR y el BHDBT-TRX2 no sólo extienden las
señales True 4K sin comprimir hasta 100 m [328 pies] sobre un único cable Cat6a (certificado
HDBaseT3) con cero latencia, sino que también transmite señales IR, RS-232, Ethernet, audio
independiente y USB con los últimos estándares HDBaseT. Para una transmisión estable de
señal HDMI, el BHDBT3-TR/BHDBT-TRX2 garantiza imágenes de alta calidad y una extensión
fiable al admitir HDCP 2.2, 3D, Color Verdadero y HDR. Además, el BHDBT3-TR y el BHDBT-
TRX2 están equipados con funciones de audio HDMI incrustadas y desincrustadas, lo que
permite a los usuarios adaptar de forma flexible las combinaciones de audio y vídeo
adecuadas en función de los diferentes entornos. Para garantizar un funcionamiento
ininterrumpido, el diseño del disipador térmico de aletas sin ventilador evita el
sobrecalentamiento y eleva así su confiabilidad.
El BHDBT3-TR y el BHDBT-TRX2 aumentan el potencial de las aplicaciones de audio y video al
mismo tiempo que agilizan las instalaciones complejas. Esto convierte al BHDBT3-TR/BHDBT-
TRX2 en una solución ideal para salas de conferencias, auditorios, salones de clase, museos,
sala s de exposiciones y cualquier otro lugar que requiera una transmisión de alta calidad y
una aplicación fácil de usar.

19
Instrucciones de Seguridad Importantes
• Este producto es únicamente para uso en interiores.
• Lea todas estas instrucciones. Guárdelas para referencia futura.
• Siga todas las advertencias e instrucciones indicadas en el dispositivo.
• No coloque el dispositivo sobre superficies inestables (carro, soporte, mesa, etc.). Si se cae
el dispositivo, resultarán daños severos.
• No utilice el dispositivo cerca del agua.
• No coloque el equipo cerca o sobre radiadores o rejillas de calefacción.
• El gabinete del dispositivo está provisto de ranuras y aberturas para permitir una ventilación
adecuada. Para garantizar un funcionamiento confiable y para proteger contra el
sobrecalentamiento, estas aberturas nunca deben ser bloqueadas o cubiertas.
• El dispositivo nunca debe colocarse sobre una superficie blanda (cama, sofá, alfombra, etc.),
ya que esto bloqueará sus aberturas de ventilación. Del mismo modo, el dispositivo no
debe colocarse en un recinto incorporado a menos que se le haya proporcionado una
ventilación adecuada.
• Nunca derrame líquido de ninguna clase en el dispositivo.
• Desenchufe el dispositivo del tomacorrientes en la pared antes de limpiarlo. No use
limpiadores líquidos o en aerosol. Utilice un paño húmedo para limpiarlo.
• El dispositivo debe funcionar con el tipo de fuente de energía indicada en la etiqueta de
marcado. Si no está seguro del tipo de energía disponible, consulte a su distribuidor o a la
compañía eléctrica local.
• Para evitar daños en su instalación, es importante que todos los dispositivos estén
correctamente conectado a tierra.
• No permita que algún objeto descanse sobre el cable de alimentación o el cableado.
Conduzca el cable de alimentación y el cableado de modo que no se puedan pisar o
tropezar con ellos.
• Coloque los cables del sistema y los cables de alimentación con cuidado; asegúrese de que
no haya nada sobre ningún cable.
• Nunca introduzca ningún tipo de objeto por las ranuras del gabinete. Podrían tocar puntos
con voltajes peligrosos o provocar un cortocircuito entre las partes, con el consiguiente
riesgo de incendio o descarga eléctrica.
• No intente reparar el dispositivo usted mismo. Solicite todo servicio al personal de servicio
calificado.
• Si se dan las siguientes condiciones, desenchufe el dispositivo del tomacorriente en la
pared y llévelo a un servicio técnico cualificado para su reparación.
o El cable de alimentación o clavija se ha dañado o deshilachado.
o Se ha derramado líquido en el dispositivo.
o El dispositivo ha estado expuesto a la lluvia o al agua.
o El dispositivo se ha caído o el gabinete se ha dañado.
o El dispositivo muestra un cambio evidente en el rendimiento, lo que indica la necesidad
de servicio.
o El dispositivo no funciona normalmente cuando se siguen las instrucciones de
funcionamiento.
• Ajuste sólo los controles que figuran en el manual de instrucciones. Un ajuste incorrecto de
otros controles puede provocar daños que requerirán un trabajo extenso por un técnico
calificado para repararlos.

20
Contenido del Empaque
Características del Producto
• Transceptor HDBaseT 3.0 BHDBT3-TR o BHDBT3-TRX2
• Bloque de Terminales RS-232
• Soporte de pared (2 piezas)
• Juego de almohadillas para las patas (4 piezas)
• Cable USB-B a USB-A
• Adaptador de corriente
• Cable de alimentación C13 a NEMA 5-15P
• Cable de alimentación C13 a BS1363
• Cable de alimentación C13 a Schuko
• Transmisor IR
• Receptor IR
• Manual del Propietario y Guía de Inicio Rápido
• Extiende señales HDMI True 4K sin comprimir hasta 100 m a través de un único cable Cat6a
(cable Cat6a con certificación HDBaseT3) con cero latencia.
• Flexible para el despliegue — puede configurarse como transmisor o receptor, en función
de la solución de audio y video.
• Cumple con los estándares HDBaseT 3.0 — transmite vídeo de alta calidad, IR de rango
completo, RS-232 bidireccional, Gigabit Ethernet, audio estéreo independiente y derivación
de canal de señales USB 2.0.]
• HDMI (3D, Color Verdadero, 4K @ 60Hz); compatible con HDCP 2.2.
• Calidad de vídeo superior: hasta 4096 x 2160 @ 60 Hz (4:4:4); soporta HDR.
• Soporta funciones de incrustación y desincrustación de audio HDMI.
• Soporta salida local HDMI.
• Cumple con el estándar USB 2.0 para una amplia gama de periféricos USB.
• Indicación LED del estado de la señal HDBaseT y HDMI para facilitar su reconocimiento.
• El disipador térmico de aletas sin ventiladores aumenta la durabilidad y confiabilidad al
evitar el sobrecalentamiento, el mal funcionamiento del ventilador y el ruido excesivo.
• Soporta frecuencias de actualización de hasta 240 Hz para la pantalla conectada.
• Firmware actualizable.
• Protección ESD 8KV y 15KV incorporada.
• Conectar y Usar.
• Instalación en rack.
21
Vista General del Producto
Vista Frontal
1
Switch de modo
HDBaseT de largo
alcance (reservado)
Permite activar el modo de largo alcance. Este switch está
actualmente reservado para futuras ampliaciones.
2
Switch de audio
HDMI
Permite activar las funciones de incrustación y desincrustación.
Consulte el switch Tx y Rx.
3
Puerto RS-232
Se conecta a un controlador serie RS-232, como un PC o un
sistema de control.
4
Puerto HDBaseT
Se conecta a un cable Cat6a HDBaseT3 certicado con cero
latencia para transmitir señales HDMI y de control al receptor
conectado si la unidad está congurada como transmisor.
5
Tornillo de bloqueo
del cable
Bloqueo de cable HDMI universal que ofrece la forma más
sencilla de asegurar un cable HDMI a la mayoría de los
dispositivos HDMI.
6
Entrada de audio Se conecta a un dispositivo fuente de audio, como una PC.
7
Puerto USB-B Se conecta a un dispositivo fuente, como una PC.
8
Switch para
Actualización de
Firmware
Este switch está reservado para el servicio de asistencia técnica.
Para realizar una actualización del Firmware, póngase primero
en contacto con su distribuidor.
9
Switch Tx / Rx Permite denir la unidad como transmisor o receptor.
J
Entrada HDMI
Se conecta a un dispositivo fuente de vídeo HDMI mediante un
cable HDMI.
11
88 99 JJ
22 33 44 55 66 77
22
Vista General del Producto
Vista Posterior
1
Puerto USB A Se conecta a un dispositivo periférico, como un teclado o mouse.
2
Tornillo de bloqueo
del cable
Bloqueo de cable HDMI universal que ofrece la forma más
sencilla de asegurar un cable HDMI a la mayoría de los
dispositivos HDMI.
3
Salida de audio
Se conecta a un dispositivo de salida de audio, como unas
bocinas.
4
Puerto Ethernet
Se conecta a un switch de red para proporcionar acceso a
Internet al dispositivo fuente conectado mediante un cable RJ-45.
5
Puerto IR
Se conecta a un transmisor o receptor de infrarrojos para
controlarlo a distancia mediante un control remoto por
infrarrojos.
6
Enchufe de
alimentación
Se conecta a un adaptador de corriente para proporcionar
alimentación.
7
Salida HDMI
Se conecta a un dispositivo de visualización HDMI mediante un
cable HDMI.
Vista Superior
1
Terminal de
conexión a
tierra
Conecta a tierra la unidad a un objeto conectado a tierra adecuado.
LED del transmisor
2
Encendido
Amarillo Verde: La unidad está recibiendo alimentación.
Apagado: La unidad está apagada.
3
Liga
Naranja Fijo: La transmisión entre el transmisor y el receptor es estable.
Parpadea en Naranja: La transmisión entre el transmisor y el receptor es
inestable.
Apagado: No hay transmisión entre el transmisor y el receptor.
4
Entrada de
HDMI
Naranja Fijo: La visualización de vídeo es normal con la tecla HDCP.
Parpadea en Naranja: La visualización de vídeo es normal sin la tecla
HDCP.
Apagado: No hay señal de vídeo.
11 22 33 44 55 66
77
23
Vista General del Producto
LED del receptor
5
Salida de
HDMI
Naranja Fijo: La visualización de vídeo es normal con la tecla HDCP.
Parpadea en Naranja: La visualización de vídeo es normal sin la tecla
HDCP.
Apagado: No hay señal de vídeo.
6
Liga
Naranja Fijo: La transmisión entre el transmisor y el receptor es estable.
Parpadea en Naranja: La transmisión entre el transmisor y el receptor es
inestable.
Apagado: No hay transmisión entre el transmisor y el receptor.
7
Encendido
Verde Fijo: La unidad está recibiendo alimentación.
Apagado: La unidad está apagada.
11
22 33 44 55 66 77

24
Lista de Comprobación Previa a la Instalación
Pantalla
• Hasta dos pantallas HDMI capaces de la resolución más alta requerida.
Dispositivo Fuente
• Un dispositivo fuente con un puerto HDMI.
Cables
• 2 cables HDMI
• Para conectar la unidad transmisora y receptora, se recomienda utilizar un cable Cat6a
certificado HDBaseT3 para garantizar la calidad de vídeo.
• Para obtener una mejor calidad de vídeo, es altamente recomendable utilizar el cable Cat6a
certificado HDBaseT3 con cero latencia.
Consideraciones
• La distancia máxima de transmisión varía en las distintas partes de la transmisión:
Conexión Interfaz Resolución Distancia
Computadora al transmisor HDMI 100% 4K 5 m [16 pies]
Transmisor a un receptor
(R) o a un receptor HDBaseT
compatible de Eaton
Tripp Lite series
Cable Cat6a certicado
HDBaseT3 con cero latencia
100% 4K 100 m
[328 pies]
Receptor a una Pantalla HDMI 100% 4K 5 m [16 pies]
25
Instalación de la Unidad
Instalación en Pared
Utilizando los soportes de instalación incorporados, fije o cuelgue la unidad a la pared.
Por favor, revise la sección Instrucciones de Seguridad Importantes
antes de proceder con la instalación.
No encienda la unidad hasta que todo el hardware necesario esté
conectado.
26
Instalación del hardware
El BHDBT3-TRX2 es una versión en juego del modelo BDHBT3-TR. Por lo
demás, las dos unidades son idénticas. Cada transceptor tiene capacidad
para transmitir o recibir una señal de audio y vídeo HDBaseT.
Las unidades pueden cambiar fácilmente de transmisor a receptor (o
viceversa) si se alterna la entrada HDMI a salida en el extremo de la
fuente, y la salida a entrada en el extremo de la pantalla.
Nota: la instalación mostrada aquí se basa en
dos unidades.
Transmisor
Receptor
Vista
Frontal
Bocinas
Sistema de Control VK
Monitoreo
PC
Transmisor
Receptor IR
Transmisor
Receptor IR
Adaptador de
Corriente
Adaptador de
Corriente
Red
RS-232
RS-232
HDMI
HDBaseT
HDMI
HDMI
Encendido
Ethernet
Ethernet
Audio
Audio
USB
USB
IR
IR
Vista
Frontal
Vista
Posterior
Vista
Posterior
11
22
22
77
MM
MM
33 44 55
66 NN
NN
JJ
JJLL 88KK
99
99
Encendido

27
Instalación del hardware
1
Conecte a tierra la unidad conectando un extremo de un cable de tierra al terminal de
tierra y el otro extremo a un objeto adecuado conectado a tierra.
Nota: No omita este paso. Una conexión a tierra adecuada ayuda a evitar daños en la unidad por
sobretensiones o electricidad estática.
2
Importante: Antes de conectar la unidad, ajuste el Switch Tx / Rx para definir la unidad.
La unidad será un transmisor si el switch Tx / Rx está puesto Tx, o será un receptor si el
switch Tx / Rx está colocado en Rx.
3
Conecte una PC con HDMI al transmisor mediante un cable HDMI. Aquí puede conectar
otros dispositivos fuente compatibles con HDMI (por ejemplo, un reproductor de Blu-ray).
4
(Opcional) Conecte un dispositivo fuente de audio al transmisor. Para conectar esta
entrada de audio en la salida HDMI, ajuste el switch de audio HDMI (en Tx) a Encendido.
5
Conecte el puerto USB Tipo B del transmisor a un anfitrión USB (por ejemplo, una PC).
6
Conecte un dispositivo de visualización compatible con HDMI al transmisor mediante un
cable HDMI.
7
Conecte los puertos del transmisor HDBaseT y del receptor con un cable Cat6a certificado
HDBaseT3 (o superior)
8
(Opcional) Conecte sus bocinas o amplificador de audio al receptor. Para desconectar
este audio HDMI de la salida HDMI, ponga el switch de audio HDMI (en Rx) en Encendido.
9
(Opcional) Para controlar a distancia un dispositivo conectado al receptor (por ejemplo,
un televisor), conecte el transmisor IR al puerto IR del receptor y el receptor IR al puerto IR
del transmisor.
Nota: La unidad admite la transmisión IR bidireccional.
J
(Opcional) Para proporcionar conectividad de Red a su PC, conecte el receptor a un
Switch de Red, después conecte el puerto Ethernet del transmisor a su PC.
Nota: La unidad admite la transmisión de derivación bidireccional.
K
(Opcional) Conecte el puerto USB-A a una pantalla táctil habilitada para USB.
L
Conecte una pantalla táctil compatible con HDMI al receptor mediante un cable HDMI.
M
(Opcional) Para controlar a distancia una PC a través de un controlador serial, conecte el
puerto RS-232 del transmisor a un controlador serial y a continuación, conecte el puerto
RS-232 del receptor a una PC.
Nota: La unidad admite la transmisión de derivación bidireccional.
N
Conecte el cable de alimentación y el adaptador de corriente, después enchufe los cables
del adaptador de corriente en el enchufe de alimentación de las unidades.
O
Encienda todos los dispositivos conectados.
28
Instalación del hardware
Transmisión por Canal RS-232
Puede conectar un dispositivo serial RS-232 al puerto RS-232 de las unidades para el canal de
derivación RS-232, como una pantalla táctil o un escáner de códigos de barras. El flujo de
transmisión de la señal RS-232 se puede ilustrar de la siguiente manera:
Receptor Transmisor
Cable Cat5e, Cat6, Cat6a o Cat7
CONFIGURACIÓN
DE PIN (Conectores
de tornillo cautivo)
El concepto general aquí es que se puede transmitir una señal RS-232 (Tx) al extremo
receptor (Rx) de una unidad. La señal recibida puede luego transmitirse (Tx ) al extremo
receptor (Rx ) de otra unidad. Las señales RS-232 pueden transmitirse en sentido contrario.

29
Operación
Switch Tx y Rx
Utilice el Switch Tx / Rx para configurar la unidad como transmisor o receptor, según sea
necesario.
Switch de Audio HDMI
Incrustación de Audio
1. Ponga el Switch de audio HDMI del transmisor en Encendido.
2. Ponga el Switch de audio HDMI del receptor en Apagado.
Desincrustación de Audio
1. Ponga el switch de audio HDMI del transmisor en Apagado.
2. Ponga el switch de audio HDMI del receptor en Encendido.
Omitir las Señales de Audio
1. Ponga el switch de audio HDMI del transmisor en Apagado.
2. Ponga el Switch de audio HDMI del receptor en Apagado.
Nota: Predeterminado, el Switch de audio HDMI de la unidad está ajustado a Apagado.
Switch Tx / Rx
Switch de Audio HDMI

30
Especificaciones
Entrada de Video
Interfaces 1 x HDMI Tipo-A Hembra (Negro)
Impedancia 100 Ώ
Distancia Máxima 5 m [16 pies]
Salida de Video
Interfaces 1 x HDMI Tipo-A Hembra (Negro)
Impedancia 100 Ώ
Distancia Máxima 5 m [16 pies]
Video
Máxima Tasa de Datos 18 Gbps (6 Gbps por carril)
Reloj de Píxeles Máximo 600 MHz
Cumplimiento HDMI (3D, Color Verdadero, 4K @ 60Hz); Compatible con
4K HDR HDCP 2.3
Consumer Electronics Control [CEC]
Nota: Las señales de CEC sólo se desvían de la unidad transmisora
a la receptora y no admiten salida local.
Corriente máx. Resoluciones 4096 x 2160 @ 60 Hz (4:4:4)
3840 x 2160 @ 60 Hz (4:4:4)
Máximas Resoluciones y Distancias Hasta 4K x 2K @ 60 Hz (4:4:4) @ 100 m [328 pies] con
cable Cat6a certicado HDBaseT3
Audio
Entrada 1 x HDMI Tipo-A Hembra (Negro)
1 x 3.5 mm Mini Estéreo Hembra (Verde)
Salida 1 x HDMI Tipo-A Hembra (Negro)
1 x 3.5 mm Mini Estéreo Hembra (Verde)
Conectores
Unidad a Unidad 1 x RJ-45 Hembra
Encendido 1 x Enchufe CD con bloqueo (Negro)
Control
Canal RS-232 Conector: 1 x Bloque de Terminales, 3 polos
Velocidad de Transmisión: 19200
Bits de Datos: 8
Bits de Parada: 1
Sin paridad ni control de ujo
Canal IR 1 x Mini Enchufe Estéreo Hembra (Negro, Bidireccional)
30K ~ 56 KHz transmisión de rango completo
Canal Ethernet 1 x GbE RJ-45 Hembra
Canal USB 1 x USB 2.0 Tipo-B Hembra (Blanco, Antrión)
1 x USB 2.0 Tipo-A Hembra (Blanco, Dispositivo)
Ancho de banda de transmisión de datos: Hasta 3000 Mbps
Consumo de Energía DC12V: 6.45W: 40 BTU

31
Especificaciones
Switches
Selección 1 x Switch Deslizante - Tx ( Transmisor) / Rx ( Receptor)
Selección de Modo 1 x Switch Deslizante - Selección
de Encendido o Apagado de la Incrustación de Audio HDMI
Actualización de Firmware 1 x Switch deslizante - Encendido y Apagado
Modo de Largo Alcance 1 x Switch Deslizante - Encendido y Apagado (Reservado)
LED
Encendido 1 x Tx (Amarillo Verde, Transmisor)
1 x Rx (Amarillo Verde, Receptor)
Nota: las luces LED Tx o Rx se iluminan para indicar en qué
función está congurada la unidad.
Liga 1 x Tx (Naranja, Transmisor)
1 x Rx (Naranja, Receptor
Salida de Video 1 x Salida HDMI Rx (Naranja, Receptor)
Entrada de Video 1 x Entrada HDMI Tx (Naranja, Transmisor)
Ambiental
Temperatura de Operación 0 °C a 40 °C [32 °F a 104 °F]
Temperatura de Almacenamiento -20 °C a 60 °C [-4 °F a 140 °F]
Humedad 0 x 80% HR, Sin Condensación
Físicas
Gabinete Metal
Peso 640 g [1.41 lb]
Dimensiones [L x An x Al]
Sin Soporte
Con Soporte
166 x 134 x 29 mm [6.54" x 5.27" x 1.13"]
172 x 151 x 30 mm [6.75" x 5.94" x 1.18"]
Resoluciones de Entrada
6460 x 480 @ 60Hz / 67Hz / 72Hz / 75Hz
720 x 400 @ 70 Hz
800 x 600 @ 56Hz / 60 Hz / 72Hz / 75Hz
1024 x 768 @ 60 Hz / 70Hz / 75Hz
1280 x 800 a 60 Hz
1280 x 1024 @ 60Hz / 75Hz
1400 x 1050 @ 60 Hz
1400 x 900 @ 60 Hz
1600 x 1200 @ 60 Hz
1680 x 1050 @ 60 Hz
1920 x 1080/1200 @ 60 Hz
1920 x 1200 @ 60 Hz ( Blanqueo reducido)
1080p @ 60 Hz
480p @ 60 Hz (4:3)/(16:9)
720p 60 Hz
1080i 60 Hz
640 x 480 @ 60 Hz (4:3)
576p @ 50 Hz (4:3)/(16:9)
720p @ 50 Hz
1080i / 1080p @ 50 Hz
1080p @ 24Hz / 25Hz / 30Hz
3840 x 2160p @ 24Hz / 25Hz / 30Hz / 50Hz / 60Hz
4096 x 2160p @ 24Hz / 25Hz / 30Hz / 50Hz / 60Hz
3840 x 2160p @ 50Hz / 60Hz 4:2:0
4096 x 2160p @ 50Hz / 60Hz 4:2:0
7680 x 4320 @ 30 Hz 4:2:0

32
Garantía
Eaton
1000 Eaton Boulevard
Cleveland, OH 44122
Estados Unidos
Eaton.com
© 2023 Eaton
Todos los derechos reservados
Publicación Nº 23-05-320 / 93-47D3_RevA
Agosto 2023
Eaton es una marca registrada.
Todas las marcas registradas
pertenecen a sus respectivos
propietarios.
Garantía Limitada por 1 Año
Garantizamos por un (1) año a partir de la fecha de compra inicial que nuestros productos no presentan
defectos de materiales ni de mano de obra. Nuestra obligación bajo esta garantía está limitada a la
reparación o reemplazo (a su entera discreción) de cualquier producto defectuoso. Antes de devolver
cualquier equipo para reparación, visite Tripplite.Eaton.com/support/product-returns. Esta garantía no se
aplica a equipos que hayan sido dañados por accidente, negligencia o mal uso, o hayan sido alterados o
modicados de alguna manera.
EXCEPTO POR LO QUE AQUÍ SE INDICA, NO OTORGAMOS GARANTÍAS EXPRESAS O IMPLÍCITAS, INCLUIDAS
GARANTÍAS DE COMERCIABILIDAD Y ADECUACIÓN PARA UN PROPÓSITO PARTICULAR. Algunos estados no
permiten la limitación o exclusión de garantías implícitas; por lo tanto, las limitaciones o exclusiones antes
mencionadas pueden no aplicarse al comprador.
Información de Cumplimiento de la Directiva WEEE para Clientes y Recicladores (Unión Europea)
Conforme a la Directiva de Residuos de Equipos Eléctricos y Electrónicos [WEEE] y regulaciones
aplicables, al adquirir un equipo eléctrico y electrónico nuevo de Eaton, los clientes están obligados a:
• Enviar los equipos viejos para su reciclaje en razón de uno por uno, igual por igual (esto varía según
el país).
• Devolver el equipo nuevo para nes de reciclaje una vez que nalmente se convierta en residuo
Eaton tiene una política de mejora continua. Las especicaciones están sujetas a cambio sin previo aviso. Las
fotografías e ilustraciones pueden diferir ligeramente de los productos reales.

33
Introduction 34
Consignes de sécurité importantes 35
Contenu du paquet 36
Caractéristiques du produit 36
Vue d'ensemble du produit 37
Liste de contrôle avant installation 40
Montage de l'unité 41
Installation du matériel 42
Fonctionnement 45
Caractéristiques techniques 46
Garantie 48
Manuel de l’utilisateur
English 1
Español 17
Deutsch 49
Italiano 65
Modèles:
BHDBT3-TR
BHDBT3-TRX2
Émetteur/récepteur HDBaseT 3.0
HDMI 4 K 60 Hz (4:4:4), RS-232 et contrôle IR
Le produit acheté
peut différer de l'image.

34
Introduction
Le BHDBT3-TR / BHDBT-TRX2 est un émetteur-récepteur vidéo qui intègre les fonctions d'un
émetteur et d'un récepteur en un seul appareil. Cette combinaison permet aux utilisateurs de
configurer facilement l'appareil en tant qu'émetteur ou récepteur en fonction de leur solution
audiovisuelle et de bénéficier d'un déploiement plus flexible et d'une utilisation efficace avec
des matrices de commutation vidéo, des séparateurs vidéo, etc.
Conçu avec la technologie HDBaseT 3.0, le BHDBT3-TR / BHDBT-TRX2 ne se contente pas
d'étendre les signaux True 4 K non compressés jusqu'à 100 mètres (328 pieds) sur un seul
câble Cat6a (certifié HDBaseT3) sans latence, mais transmet également les signaux IR, RS-232,
Ethernet, audio indépendant et USB en respectant les dernières normes HDBaseT. Pour une
transmission stable du signal HDMI, le BHDBT3-TR / BHDBT-TRX2 garantit des images de haute
qualité et une extension fiable en prenant en charge HDCP 2.2, 3D, couleur profonde et HDR.
En outre, le BHDBT3-TR / BHDBT-TRX2 est équipé de fonctions d'intégration et de d'extraction
de l'audio HDMI, ce qui permet aux utilisateurs d'adapter de manière flexible les combinaisons
audio/vidéo appropriées en fonction des différents environnements. Pour garantir un
fonctionnement sans interruption, la conception du dissipateur thermique à ailettes sans
ventilateur empêche la surchauffe et augmente ainsi sa fiabilité.
Le BHDBT3-TR / BHDBT-TRX2 augmente le potentiel des applications audiovisuelles tout en
rationalisant les installations complexes. Cela fait du BHDBT3-TR / BHDBT-TRX2 une solution
idéale pour les salles de conférence, auditoriums, amphithéâtres, musées, salles d' exposition
et partout où une transmission de haute qualité et une application facile à utiliser sont
nécessaires.

35
Importantes consignes de sécurité
• Ce produit peut seulement être utilisé à l'intérieur.
• Lisez toutes ces instructions. Conservez-les pour vous y référer ultérieurement.
• Respectez tous les avertissements et toutes les instructions figurant sur l'appareil.
• Ne placez pas l'appareil sur une surface instable (chariot, support, table, etc.). Si l'appareil
tombe, il risque d'être sérieusement endommagé.
• N'utilisez pas l'appareil à proximité d'un point d'eau.
• Ne placez pas l'appareil près ou au-dessus de radiateurs ou de bouches de chaleur.
• Le boîtier de l'appareil est pourvu de fentes et d'ouvertures permettant une ventilation
adéquate. Pour garantir un fonctionnement fiable et éviter toute surchauffe, ces ouvertures
ne doivent jamais être obstruées ou couvertes.
• L'appareil ne doit jamais être placé sur une surface souple (lit, canapé, tapis, etc.), car cela
bloquera les voies de ventilation. De même, l'appareil ne doit pas être placé dans un boîtier
intégré à moins qu'une ventilation adéquate n'ait été prévue.
• Ne renversez jamais de liquide sur l'appareil.
• Débranchez l'appareil de la prise murale avant de le nettoyer. N'utilisez pas de nettoyants
liquides ou en aérosol. Utilisez un chiffon humide pour le nettoyage.
• L'appareil doit être alimenté par le type de source d'alimentation indiqué sur l'étiquette. Si
vous n'êtes pas sûr du type d'alimentation disponible, consultez votre revendeur ou la
compagnie d'électricité locale.
• Pour éviter d'endommager votre installation, il est important que tous les appareils soient
correctement mis à la terre.
• Ne laissez rien reposer sur le cordon d'alimentation ou les câbles. Placez le cordon
d'alimentation et les câbles de manière à ce qu'on ne puisse pas marcher ou trébucher
dessus.
• Positionnez les câbles du système et les câbles d'alimentation avec précaution ; assurez-
vous que rien ne repose sur les câbles.
• N'introduisez jamais d'objets de quelque nature que ce soit dans ou à travers les fentes du
boîtier. Ils pourraient toucher des points de contacts dangereux ou provoquer un court-
circuit,entraînant un risque d'incendie ou de choc électrique.
• N'essayez pas de réparer l'appareil vous-même. Confiez toute réparation à une personne
qualifiée.
• Si les conditions suivantes se présentent, débranchez l'appareil de la prise murale et
apportez-le à un technicien qualifié pour le faire réparer.
o Le cordon d'alimentation ou la fiche est endommagé ou effiloché(e).
o Un liquide a été renversé dans l'appareil.
o L'appareil a été exposé à la pluie ou à l'eau.
o L'appareil est tombé ou le boîtier a été endommagé.
o L'appareil présente une modification distincte de ses performances, ce qui indique qu'il
doit être réparé.
o L'appareil ne fonctionne pas normalement lorsque les instructions d'utilisation sont
respectées.
• Ne réglez que les commandes mentionnées dans le mode d'emploi. Un mauvais réglage
des autres commandes peut entraîner des dommages dont la réparation nécessitera un
travail important de la part d'un technicien qualifié.

36
Contenu du paquet
Caractéristiques du produit
• Émetteur-récepteur BHDBT3-TR ou BHDBT3-TRX2 HDBaseT 3.0
• Bornier RS-232
• Support de montage mural (2 pcs.)
• Jeu de repose-pieds (4 pcs.)
• Câble USB-B vers USB-A
• Adaptateur d'alimentation
• Cordon d'alimentation C13 vers NEMA 5-15P
• Cordon d'alimentation C13 vers BS1363
• Cordon d'alimentation C13 vers Schuko
• Émetteur IR
• Récepteur IR
• Manuel utilisateur et Guide de démarrage rapide
• Prolonge les signaux HDMI True 4K non compressés jusqu'à 100 m sur un seul câble Cat6a
(câble Cat6a certifié HDBaseT3) avec une latence nulle.
• Déploiement plus flexible — peut être configuré comme un émetteur ou un récepteur,
en fonction de la solution audiovisuelle.
• Conforme aux normes HDBaseT 3.0 — transmet des signaux vidéo de haute qualité, IR
pleine portée, RS-232 bidirectionnel, Gigabit Ethernet, audio stéréo indépendant et USB 2.0
en dérivation.
• HDMI (3D, Couleur profonde, 4K/60 Hz) ; conforme à HDCP 2.2.
• Qualitévidéosupérieure—jusqu'à4096x2160à60Hz(4:4:4);HDRsupporté
• Supporte fonctions audio HDMI d'intégration et d'extraction.
• Supporte sortie locale HDMI.
• Conforme à la norme USB 2.0 pour une large gamme de périphériques USB.
• Indication par LED de l'état des signaux HDBaseT et HDMI pour une reconnaissance plus
facile.
• Le boîtier dissipateur thermique à ailettes sans ventilateur augmente la durabilité et la
fiabilité en évitant la surchauffe, les dysfonctionnements du ventilateur et le bruit excessif.
• Supporte un taux de rafraîchissement jusqu'à 240 Hz pour l'écran connecté.
• Firmware évolutif.
• Protection ESD 8 KV / 15 KV intégrée.
• Plug-and-Play.
• Montage en rack.
37
Vue d'ensemble du produit
Vue avant
1
Commutateur du
mode longue portée
HDBaseT (réservé)
Permet d'activer le mode longue portée. Ce commutateur est
actuellement réservé pour une expansion future.
2
Commutateur audio
HDMI
Permet d'activer les fonctions d'intégration et d'extraction. Voir
commutateur Tx et Rx.
3
Port RS-232
Se connecte à un contrôleur série RS-232, tel qu'un PC ou un
système de contrôle.
4
Port HDBaseT
SeconnecteàuncâbleCat6acertiéHDBaseT3sanslatence
pour transmettre les signaux HDMI et de contrôle au récepteur
connectésil'appareilestconguréentantqu'émetteur.
5
Vis de verrou de
câble
VerroudecâbleHDMIuniverselquipermetdexerfacilement
un câble HDMI à la plupart des appareils HDMI.
6
Entrée audio Se connecte à une source audio telle qu'un PC.
7
Port USB-B Se connecte à l'appareil source, tel qu'un PC.
8
Commutateur de
mise à niveau du
rmware(réservé)
Ce commutateur est réservé au support technique. Pour
eectuerunemiseàniveaudurmware,contactezd'abord
votre revendeur
9
Commutateur
Tx / Rx
Permetdedénirl'unitécommeunémetteurouunrécepteur.
J
HDMI-in Se connecte à une source vidéo HDMI à l'aide d'un câble HDMI.
11
88 99 JJ
22 33 44 55 66 77
38
Vue d'ensemble du produit
Vue arrière
1
Port USB-A Se connecte à un périphérique, tel qu'un clavier ou une souris.
2
Vis de verrou de
câble
VerroudecâbleHDMIuniverselquipermetdexerfacilement
un câble HDMI à la plupart des appareils HDMI.
3
Sortie audio
Se connecte à un périphérique de sortie audio, tel qu'un
ensemble de haut-parleurs.
4
Port Ethernet
Se connecte à un commutateur réseau pour fournir un accès
Internet à l'appareil source connecté à l'aide d'un câble RJ-45.
5
Port IR
Se connecte à un émetteur IR ou à un récepteur IR pour le
contrôle à distance à l'aide d'une télécommande IR.
6
Prise de courant
Se connecte à un adaptateur secteur pour fournir de
l'électricité.
7
HDMI-out
Seconnecteàundispositifd'achageHDMIavecuncâble
HDMI.
Vue supérieure
1
Borne de
mise à la
terre
Permet de relier l'appareil à un objet approprié mis à la terre.
LED émetteur
2
Alimentation
JauneVert:l'unitéestalimentée.
O:l'appareilesthorstension.
3
Liaison
Orangexe:latransmissionentrel'émetteuretlerécepteureststable.
Clignoteenorange:latransmissionentrel'émetteuretlerécepteurest
instable.
O:aucunetransmissionentreémetteuretrécepteur.
4
HDMI-in
Orangexe:l'achagevidéoestnormalaveclacléHDCP.
Clignoteenorange:l'achagevidéoestnormalsanslacléHDCP.n
O:aucunsignalvidéo.
11 22 33 44 55 66
77

39
Vue d'ensemble du produit
LED récepteur
5
HDMI-out
Orangexe:l'achagevidéoestnormalaveclacléHDCP.
Clignoteenorange:l'achagevidéoestnormalsanslacléHDCP.
O:aucunsignalvidéo.
6
Liaison
Orangexe:latransmissionentrel'émetteuretlerécepteureststable.
Clignoteenorange:latransmissionentrel'émetteuretlerécepteurest
instable.
O:aucunetransmissionentreémetteuretrécepteur.
7
Alimentation
Vertxe:l'appareilestalimenté.
O:l'appareilesthorstension.
11
22 33 44 55 66 77
40
Liste de contrôle avant installation
Affichage
• Jusqu'à deux écrans HDMI capables de la plus haute résolution requise.
Dispositif source
• Un appareil source doté d'un port HDMI.
Câbles
• 2 câbles HDMI
• Pour connecter l'émetteur et le récepteur, il est recommandé d'utiliser un câble HD Base T3
certifié Cat6a afin de garantir la qualité vidéo.
• Pour une meilleure qualité vidéo, il est fortement recommandé d'utiliser un câble HD Base
3 certifié Cat6a sans latence.
Considérations
• Ladistancemaximaledetransmissionvarieàdifférentsmomentsdelatransmission:
Connexion Interface Résolution Distance
Ordinateur à émetteur HDMI True 4K 5 m (16 pi)
Émetteur vers récepteur
(R) ou récepteur HDBaseT
compatible Eaton Tripp Lite
series
CâbleHDBaseT3certié
Cat6a sans latence
True 4K 100 m (328 pi)
Récepteur vers un écran HDMI True 4K 5 m (16 pi)
41
Montage de l'unité
Montage mural
A l'aide des supports de montage intégrés, fixez ou accrochez l'appareil au mur.
Veuillez lire la section Instructions de sécurité importantes avant de
procéder au montage et à l'installation.
Ne mettez pas l'appareil en marche avant que tout le matériel
nécessaire soit connecté.

42
Installation du matériel
Le modèle BHDBT3-TRX2 est une version en kit du modèle BDHBT3-TR.
Les deux unités sont par ailleurs identiques. Chaque émetteur-récepteur
peut transmettre ou recevoir un signal audio/vidéo HDBaseT.
Les appareils peuvent facilement passer d'un émetteur à un récepteur
(ou vice versa) en commutant l'entrée HDMI à la sortie du côté de la
source, et la sortie à l'entrée du côté de l'écran.
Remarque : l'installation présentée ici est basée
sur deux unités.
Émetteur
Récepteur
Vue
avant
Haut-
parleurs
Système de contrôle du VK
Moniteur
PC
Émetteur/
récepteur IR
Émetteur/
récepteur IR
Adaptateur
électrique
Adaptateur
d'alimentation
Réseau
RS-232
RS-232
HDMI
HDBaseT
HDMI
HDMI
Alimen-
tation
Ethernet
Ethernet
Audio
Audio
USB
USB
IR
IR
Vue
avant
Vue
arrière
Vue
arrière
11
22
22
77
MM
MM
33 44 55
66 NN
NN
JJ
JJLL 88KK
99
99
Alimen-
tation

43
Installation du matériel
1
Mettez l'appareil à la terre en connectant une extrémité d'un câble de mise à la terre à la
borne de mise à la terre et l'autre extrémité à un objet approprié mis à la terre.
Remarque : ne sautez pas cette étape. Une mise à la terre correcte permet d'éviter que l'appareil soit
endommagé par des surtensions ou de l'électricité statique.
2
Important : avant de connecter l'appareil, réglez le commutateur Tx / Rx pour définir
l'appareil. L'appareil sera un émetteur si le commutateur Tx / Rx est réglé sur Tx, ou un
récepteur si le commutateur Tx / Rx est réglé sur Rx.
3
Connectez un PC compatible HDMI au transmetteur à l'aide d'un câble HDMI. Vous
pouvez y connecter d'autres appareils sources compatibles HDMI (par exemple, un lecteur
Blu-ray).
4
(Facultatif) Connectez une source audio à l'émetteur. Pour incorporer cette entrée audio
à la sortie HDMI, réglez le commutateur audio HDMI (sur Tx) sur Marche.
5
Connectez le port USB de type B du transmetteur à un hôte USB (par exemple, un PC).
6
Connectez un dispositif d'affichage compatible HDMI au transmetteur à l'aide d'un câble
HDMI.
7
Connectez les ports HDBaseT de l'émetteur et du récepteur avec un câble HDBaseT3
certifié Cat6a (ou supérieur).
8
(Facultatif) Connectez vos enceintes ou votre amplificateur audio au récepteur. Pour
extraire l'audio HDMI de la sortie HDMI, réglez le commutateur audio HDMI (sur Rx) sur
Marche.
9
(Facultatif) Pour contrôler à distance un appareil connecté au récepteur (par exemple, un
téléviseur), connectez l'émetteur IR au port IR du récepteur et le récepteur IR au port IR de
l'émetteur.
Remarque : l'appareil prend en charge la transmission IR bidirectionnelle.
J
(Facultatif) Pour assurer la connectivité réseau de votre PC, connectez le récepteur à un
commutateur réseau, puis connectez le port Ethernet de l'émetteur à votre PC.
Remarque : l'appareil prend en charge la transmission en dérivation bidirectionnelle.
K
(Facultatif) Connectez le port USB-A à un écran tactile compatible USB. Facull
L
Connectez un écran tactile compatible HDMI au récepteur à l'aide d'un câble HDMI.
M
(Facultatif) Pour contrôler à distance un PC par l'intermédiaire d'un contrôleur série,
connectez le port RS-232 de l'émetteur à un contrôleur série, puis connectez le port
RS-232 du récepteur à un PC.
Remarque : l'appareil prend en charge la transmission en dérivation bidirectionnelle.
N
Connectez le cordon d'alimentation et l'adaptateur d'alimentation, puis branchez les câbles
de l'adaptateur d'alimentation dans les prises des unités.
O
Mettez sous tension tous les appareils connectés.

44
Installation du matériel
Transmission du canal RS-232
Vous pouvez connecter un périphérique série RS-232 au port RS-232 des unités pour des
canaux en dérivation RS-232, tel qu'un écran tactile ou un lecteur de codes-barres. Le flux de
transmissiondusignalRS-232peutêtreillustrécommesuit:
Récepteur Émetteur
Câble Cat5e/6/6a/7
CONFIGURATION
DE LA BROCHE
(Connecteurs à vis
imperdable)
Le concept général ici est qu' un signal RS-232 peut être transmis (Tx) à l'extrémité réceptrice
(Rx) d'un appareil. Le signal reçu peut alors être transmis (Tx) à l'extrémité réceptrice (Rx) d'un
autre appareil. Les signaux RS-232 peuvent être transmis dans l'autre sens
45
Fonctionnement
Commutateur Tx et Rx
Utilisez le commutateur Tx / Rx pour configurer l'appareil en tant qu'émetteur ou récepteur,
selon les besoins.
Commutateur audio HDMI
Intégration audio
1. Réglez le commutateur audio HDMI de l'émetteur sur ON.
2. Réglez le commutateur audio HDMI du récepteur sur OFF.
Extraction audio
1. Réglez le commutateur audio HDMI de l'émetteur sur OFF.
2. Réglez le commutateur audio HDMI du récepteur sur ON.
Dérivation des signaux audio
1. Réglez le commutateur audio HDMI de l'émetteur sur OFF.
2. Réglez le commutateur audio HDMI du récepteur sur OFF.
Remarque : par défaut, le commutateur audio HDMI de l'appareil est réglé sur OFF.
Commutateur Tx / Rx
Commutateur audio HDMI

46
Caractéristiques
Entrée vidéo
Interfaces 1 x HDMI Type-A femelle (noir)
Impédance 100Ώ
Distance maximale 5 m (16 pi)
Sortie vidéo
Interfaces 1 x HDMI Type-A femelle (noir)
Impédance 100Ώ
Distance maximale 5 m (16 pi)
Vidéo
Taux max. de données 18 Gbit/s (6 Gbit/s par voie)
Horloge de pixel max. 600 MHz
Conformité HDMI (3D, Couleur profonde, 4 K / 60 Hz) ; compatible 4 K
HDR HDCP 2.3
Consumer Electronics Control (CEC)
Remarque : Les signaux CEC sont uniquement contournés de l'unité
émettrice vers l'unité réceptrice et ne sont pas pris en charge par la
sortie locale.
Résolutions max. 4096x2160à60Hz(4:4:4)
3840x2160à60Hz(4:4:4)
Résolutions / Distances max. Jusqu'à4Kx2Kà60Hz(4:4:4)à100m(328pi)avecun
câbleCat6acertiéHDBaseT3
Audio
Entrée 1 x HDMI Type-A femelle (noir)
1 x 3,5 mm Mini stéréo femelle (vert)
Sortie 1 x HDMI Type-A femelle (noir)
1 x 3,5 mm Mini stéréo femelle (vert)
Connecteurs
D'unité à unité 1 x RJ-45 femelle
Alimentation 1 x prise CC avec verrouillage (noire)
Contrôle
Canal RS-232 Connecteur:1xblocterminal,3broches
Vitessedetransmission:19200bauds
Bitsdedonnées:8
Bitsd'arrêt:1
Pasdepariténidecontrôledeux
Canal IR 1 x prise mini stéréo femelle (noire, bidirectionnel)
30 K ~ 56 KHz transmission à large bande
Canal Ethernet 1 x GbE RJ-45 Femelle
Canal USB 1 x USB 2.0 Type-B femelle (blanc, hôte)
1 x USB 2.0 Type-A femelle (blanc, dispositif)
Largeurdebandedetransmissiondesdonnées:jusqu'à
3000 Mbit/s
Consommation électrique 12VCC:6,45W:40BTU

47
Caractéristiques
Commutateurs
Sélection 1 x commutateur à glissement — Tx (émetteur) /
Rx (récepteur)
Sélection du mode 1 x Commutateur à glissement — Sélection
d'intégration(ON) ou d'extraction (OFF) d'audio HDMI
Miseàniveaudurmware 1 x Commutateur à glissement — ON/OFF
Mode longue portée 1 x Commutateur à glissement — ON/OFF (Réservé)
LED
Alimentation 1 x Tx (jaune vert, émetteur)
1 x Rx (jaune vert, récepteur)
Remarque : Le voyant LED Tx ou Rx s'allume pour indiquer le rôle
de l'appareil.
Liaison 1 x Tx (orange, émetteur)
1 x Rx (orange, récepteur)
Sortie vidéo 1 x R x HDMI Out (Orange, Récepteur)
Entrée vidéo 1 x Tx HDMI In (orange, émetteur)
Environnement
Température de fonctionnement 0 à 40 °C (32 à 104 °F)
Température de stockage -20 à 60 °C (-4 à 140 °F)
Humidité 0 x 80 % RH, Non-Condensing
CARACTÉRISTIQUES PHYSIQUES
Boîtier Métal
Poids 0,64 kg (1,41 lb.)
Dimensions [L x L x H]
Sans support
Avec support
166 x 134 x 29 mm (6,54 x 5,27 x 1,13 po.)
172 x 151 x 30 mm (6,75 x 5,94 x 1,18 po.)
Résolutions d'entrée 6460 x 480 à 60/67/72/75 Hz
720 x 400 à 70 Hz
800 x 600 à 56/60/72/75 Hz
1024 x 768 à 60/70/75 Hz
1280 x 800 à 60 Hz
1280 x 1024 à 60/75 Hz
1400 x 1050 à 60 Hz
1400 x 900 à 60 Hz
1600 x 1200 à 60 Hz
1680 x 1050 à 60 Hz
1920 x 1080/1200 à 60 Hz
1920 x 1200 à 60 Hz (blanking réduit)
1080p 60 Hz
480p60Hz(4:3)/(16:9)
720p 60 Hz
1080i 60 Hz
640x48060Hz(4:3)
576p50Hz(4:3)/(16:9)
720p 50 Hz
1080i/1080p 50 Hz
1080p 24/25/30 Hz
3840 x 2160p 24/25/30/50/60 Hz
4096 x 2160p 24/25/30/50/60 Hz
3840x2160p50/60Hz4:2:0
4096x2160p50/60Hz4:2:0
7680x432030Hz4:2:0

48
Garantie
Eaton
1000 Eaton Boulevard
Cleveland, OH 44122
États-Unis
Eaton.com
© 2023 Eaton
Tous droits réservés.
Publication n° 23-05-320 / 93-47D3_RevA
Août 2023
Eaton est une marque déposée.
Toutes les marques commerciales
appartiennent à leurs
propriétaires respectifs.
Garantie limitée d'un an
Nous garantissons que nos produits sont exempts de défauts matériels et de fabrication pendant une
période d'un (1) an à compter de la date d'achat initiale. Notre obligation au titre de cette garantie est limitée
à la réparation ou au remplacement (à notre seule discrétion) de tout produit défectueux. Veuillez consulter
le site Tripplite.Eaton.com/support/product-returns avant d'envoyer un produit pour le faire réparer. Cette
garantie ne s'applique pas aux équipements qui ont été endommagés par accident, négligence ou par
mauvaiseutilisation,niàceuxquiontétéaltérésoumodiésd'unefaçonquelconque.
SAUF MENTION CONTRAIRE DANS LE PRÉSENT DOCUMENT, NOUS NE FOURNISSONS AUCUNE GARANTIE,
EXPLICITE OU IMPLICITE, Y COMPRIS LES GARANTIES DE QUALITÉ MARCHANDE ET DE VOCATION À UN BUT
PARTICULIER.CertainsÉtatsnepermettentnilalimitationnil'exclusiondegarantiesimplicites;ainsi,la/les
limitation(s) ou exclusion(s) mentionnée(s) ci-dessus peut/peuvent ne pas s'appliquer à l'acquéreur.
Informations de conformité DEEE pour les clients et les recycleurs (Union européenne)
Dans le cadre de la directive sur les Déchets d'équipements électriques et électroniques (DEEE) et
des réglementations d'application, lorsqu'un consommateur achète un équipement électrique ou
électroniqueneufauprèsEaton,ilaledroitde:
• Envoyer l'équipement usagé pour recyclage sur la base d'un équipement équivalent en nombre et
en type (cela varie d'un pays à l'autre)
•Renvoyerlenouveléquipementpourrecyclagelorsqu'ildevientundéchetenndevie
Eatonaunepolitiqued'améliorationcontinue.Lescaractéristiquespeuventêtremodiéessanspréavis.Les
photosetillustrationspeuventlégèrementdiérerdesproduitsréels.
49
Einführung 50
Wichtige Sicherheitshinweise 51
Lieferumfang 52
Produktmerkmale 52
Produktübersicht 53
Checkliste vor der Installation 56
Montage der Einheit 57
Hardware-Installation 58
Betrieb 61
Technische Daten 62
Garantie 64
Bedienungsanleitung
English 1
Español 17
Français 33
Italiano 65
Modelle:
BHDBT3-TR
BHDBT3-TRX2
HDBaseT3.0Sender/Empfänger
HDMI4K60Hz(4:4:4),RS-232&
IR-Steuerung
Das gekaufte Produkt
kann von der Abbildung abweichen.

50
Einführung
Der BHDBT3-TR / BHDBT-TRX2 ist ein Video-Transceiver, der die Funktionen eines Senders
und eines Empfängers in einem Gerät vereint. Diese Kombination ermöglicht es dem Benutzer,
das Gerät je nach AV-Lösung als Sender oder Empfänger zu konfigurieren und eine flexiblere
Bereitstellung und effektive Nutzung mit Videomatrix-Switches, Videosplittern usw. zu
genießen.
Der BHDBT3-TR / BHDBT-TRX2 wurde mit der HDBaseT3.0-Technologie entwickelt und
überträgt nicht nur unkomprimierte True 4K-Signale bis zu 100m (328ft.) über ein einziges
Cat6a-Kabel (HDBaseT3-zertifiziert) mit null Latenz, sondern auch IR-, RS-232-, Ethernet-,
unabhängige Audio- und USB-Signale mit den neuesten HDBaseT-Standards. Für eine stabile
HDMI-Signalübertragung sorgt der BHDBT3-TR / BHDBT-TRX2 durch die Unterstützung von
HDCP2.2, 3D, Deep Color und HDR für eine hohe Bildqualität und zuverlässige Erweiterung.
Darüber hinaus ist der BHDBT3-TR / BHDBT-TRX2 mit HDMI-Audio-Embedded / De-Embedded-
Funktionen ausgestattet, die es dem Benutzer ermöglichen, geeignete Audio-/Video-
Kombinationen flexibel an unterschiedliche Umgebungen anzupassen. Um einen
unterbrechungsfreien Betrieb zu gewährleisten, verhindert das lüfterlose Kühlrippendesign
eine Überhitzung und erhöht so die Zuverlässigkeit.
Der BHDBT3-TR / BHDBT-TRX2 erweitert das Potenzial von AV-Anwendungen und vereinfacht
gleichzeitig komplexe Installationen. Das macht den BHDBT3-TR / BHDBT-TRX2 zu einer
idealen Lösung für Konferenzsäle, Auditorien, Hörsäle, Museen, Ausstellungsräume und
überall dort, wo eine qualitativ hochwertige Übertragung und eine einfach zu bedienende
Anwendung erforderlich sind.

51
Wichtige Sicherheitshinweise
• Dieses Produkt ist nur für den Innenbereich bestimmt.
• Lesen Sie alle diese Anweisungen durch. Speichern Sie sie zum späteren Nachschlagen.
• Befolgen Sie alle auf dem Gerät angebrachten Warnungen und Anweisungen.
• Stellen Sie das Gerät nicht auf eine instabile Oberfläche (Wagen, Ständer, Tisch usw.). Wenn
das Gerät herunterfällt, führt dies zu schweren Schäden.
• Benutzen Sie das Gerät nicht in der Nähe von Wasser.
• Platzieren Sie das Gerät nicht in der Nähe von oder über Heizkörpern oder
Wärmespeichern.
• Der Geräteschrank ist mit Schlitzen und Öffnungen ausgestattet, um eine ausreichende
Belüftung zu ermöglichen. Um einen zuverlässigen Betrieb zu gewährleisten und vor
Überhitzung zu schützen, dürfen diese Öffnungen niemals blockiert oder abgedeckt
werden.
• Stellen Sie das Gerät niemals auf eine weiche Oberfläche (Bett, Sofa, Teppich usw.), da dies
die Belüftungsöffnungen blockiert. Ebenso sollte das Gerät nicht in ein Gehäuse eingebaut
werden, es sei denn, dass eine ausreichende Belüftung gewährleistet ist.
• Verschütten Sie niemals Flüssigkeiten jeglicher Art auf dem Gerät.
• Ziehen Sie vor der Reinigung den Stecker aus der Steckdose. Verwenden Sie keine Flüssig-
oder Aerosolreiniger. Verwenden Sie zum Reinigen ein feuchtes Tuch.
• Das Gerät sollte von der auf dem Kennzeichnungsetikett angegebenen Art der Stromquelle
betrieben werden. Wenn Sie sich über die verfügbare Stromart nicht sicher sind, wenden
Sie sich an Ihren Händler oder das örtliche Energieversorgungsunternehmen.
• Um Schäden an Ihrer Installation zu vermeiden, ist es wichtig, dass alle Geräte
ordnungsgemäß geerdet sind.
• Lassen Sie nichts auf dem Netzkabel oder den Kabeln liegen. Verlegen Sie das Netzkabel
und die Kabel, damit nicht darauf getreten oder darüber gestolpert werden kann.
• Systemkabel und Stromkabel sorgfältig verlegen. Stellen Sie sicher, dass nichts auf den
Kabeln liegt.
• Schieben Sie niemals Gegenstände jeglicher Art in oder durch Schrankschlitze. Sie können
gefährliche Spannungspunkte berühren oder Teile kurzschließen, was zu einem Brand oder
Stromschlag führen kann.
• Versuchen Sie nicht, das Gerät selbst zu warten. Die Wartung muss von qualifiziertem
Bedienungspersonal durchgeführt werden.
• Wenn die folgenden Bedingungen auftreten, trennen Sie das Gerät von der Steckdose und
bringen Sie es zur Reparatur zu qualifiziertem Servicepersonal.
o Das Netzkabel oder der Stecker ist beschädigt oder ausgefranst.
o Flüssigkeit ist in das Gerät gelangt.
o Das Gerät war Regen oder Wasser ausgesetzt.
o Das Gerät wurde fallengelassen oder das Gehäuse wurde beschädigt.
o Das Gerät weist eine deutliche Leistungsveränderung auf, was darauf hindeutet, dass
eine Wartung erforderlich ist.
o Das Gerät funktioniert nicht normal, wenn die Bedienungsanleitung befolgt wird.
• Stellen Sie nur die Bedienelemente ein, die in der Bedienungsanleitung beschrieben sind.
Eine unsachgemäße Einstellung anderer Bedienelemente kann zu Schäden führen, deren
Reparatur umfangreiche Arbeiten durch einen qualifizierten Techniker erfordert.

52
Lieferumfang
Produktmerkmale
• BHDBT3-TR oder BHDBT3-TRX2 HDBaseT3.0 Transceiver
• RS-232 Klemmleiste
• Wandhalterung (2Stk.)
• Fuß-Pad-Set (4St.)
• USB-B zu USB-A Kabel
• Netzteil
• Netzkabel C13-auf-NEMA-5-15P
• C13-zu-BS1363-Netzkabel
• C13 auf Schuko-Netzkabel
• IR-Sender
• IR-Empfänger
• Bedienungsanleitung und Kurzanleitung
• Verlängert unkomprimierte True 4K HDMI-Signale bis zu 100 m über ein einziges Cat6a-
Kabel (HDBaseT3-zertifiziertes Cat6a-Kabel) ohne Latenz.
• Flexibel einsetzbar – kann je nach AV-Lösung als Sender oder Empfänger konfiguriert
werden.
• Entspricht den HDBaseT 3.0-Standards – überträgt hochwertiges Video, Full-Range-IR,
bidirektionales RS-232, Gigabit-Ethernet, unabhängiges Stereo-Audio und
USB2.0-Signalkanalumgehung.
• HDMI (3D, Dunkle Farbe, 4K/60Hz); HDCP2.2- kompatibel.
• Überragende Videoqualität – bis zu 4096 x 2160 bei 60Hz (4:4:4); HDR wird unterstützt.
• Unterstützt HDMI-Audio-Embedding- / De-Embedding-Funktionen.
• Unterstützt die lokale HDMI-Ausgabe.
• Konform mit dem USB2.0-Standard für eine Vielzahl von USB-Peripheriegeräten.
• LED-Anzeige des HDBaseT- und HDMI-Signal-Status zur leichteren Erkennung.
• Das lüfterlose Lamellen-Kühlkörpergehäuse erhöht die Haltbarkeit und Zuverlässigkeit,
indem es Überhitzung, Lüfterfehlfunktionen und übermäßigen Lärm verhindert.
• Unterstützt Bildwiederholfrequenzen bis zu 240Hz für das angeschlossene Display.
• Firmware aktualisierbar.
• Eingebauter 8KV/ 15KV ESD-Schutz.
• Plug-and-Play.
• Rackmontierbar.
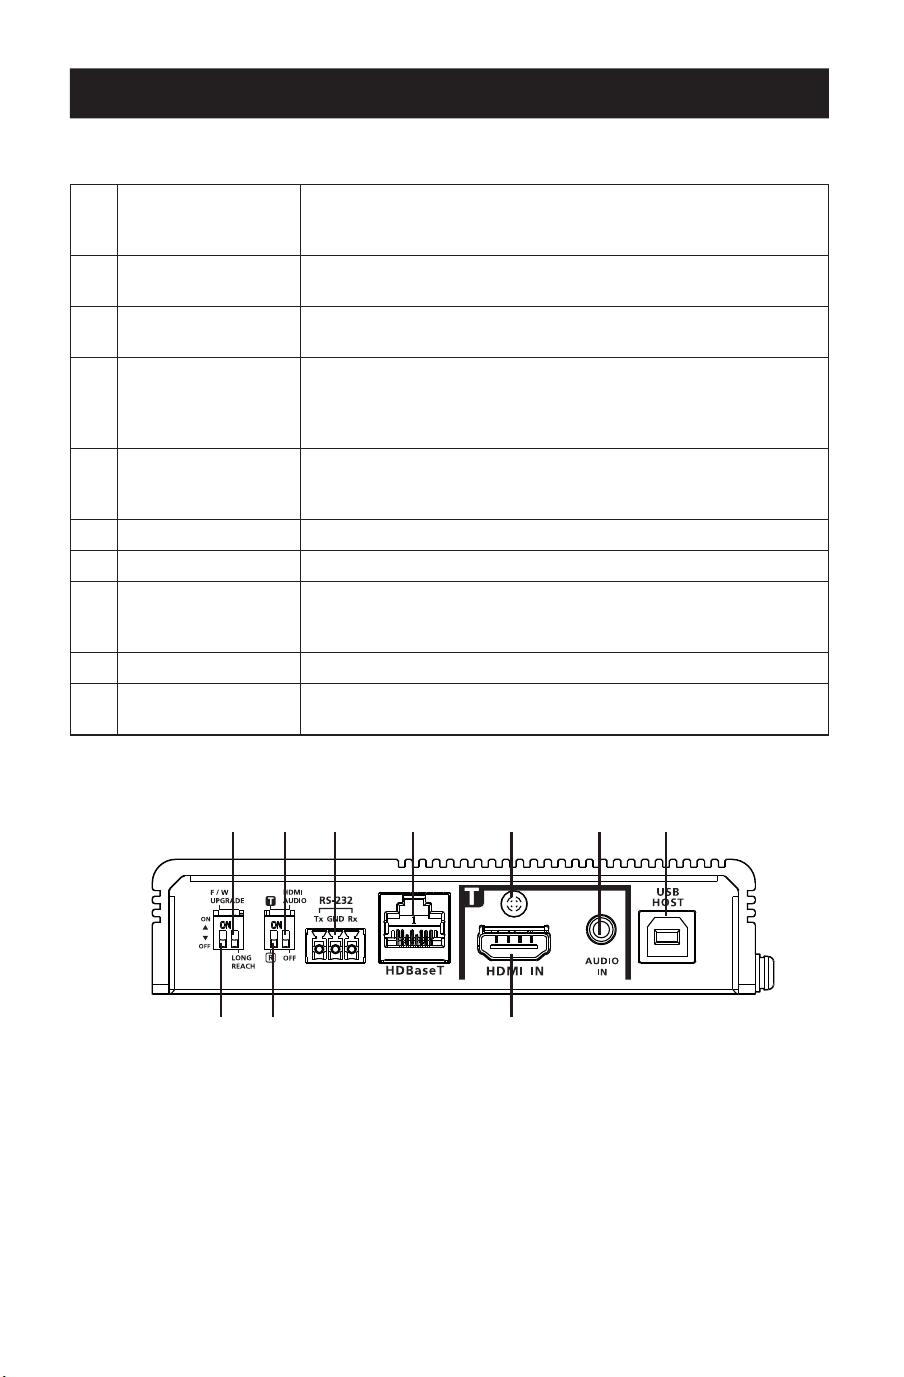
53
Produktübersicht
Vorderansicht
1
HDBaseT-Schalter
für große Reichweite
(reserviert)
Legt fest, dass der Modus mit großer Reichweite aktiviert wird.
Dieser Schalter ist derzeit für zukünftige Erweiterungen reser-
viert.
2
HDMI-Audioschalter
Legt fest, dass die Funktionen zum Embedding und De-Embed-
ding aktiviert werden. Siehe Tx-/Rx-Schalter.
3
RS-232-Anschluss
Verbindet sich mit einem seriellen RS-232-Controller, z.B.
einem PC oder einem Steuerungssystem.
4
HDBaseT-Port
Wird an ein HDBaseT3-zertiziertes Cat6a-Kabel ohne Latenz
angeschlossen, um HDMI- und Steuersignale an den ange-
schlossenen Empfänger zu übertragen, wenn das Gerät auf
einen Sender eingestellt ist.
5
Kabelsicherungs-
schraube
Universelles HDMI-Kabel-Schloss, das die einfachste Möglich-
keit bietet, ein HDMI-Kabel an den meisten HDMI-Geräten zu
befestigen.
6
Audioeingang Zum Anschluss an ein Audio-Quellgerät, z.B. einen PC
7
USB-B-Anschluss Stellt eine Verbindung zu einem Quellgerät, z.B. einem PC, her.
8
Firmware-Upgrade-
Schalter (Reserviert)
Dieser Schalter ist für den technischen Support reserviert. Um
ein Firmware-Upgrade durchzuführen, wenden Sie sich zuerst
an Ihren Händler.
9
Tx-/Rx-Schalter Legt fest, ob das Gerät ein Sender oder ein Empfänger ist.
J
HDMI-Eingang
Zum Anschluss an ein HDMI-Video-Quellgerät über ein HDMI-
Kabel.
11
88 99 JJ
22 33 44 55 66 77
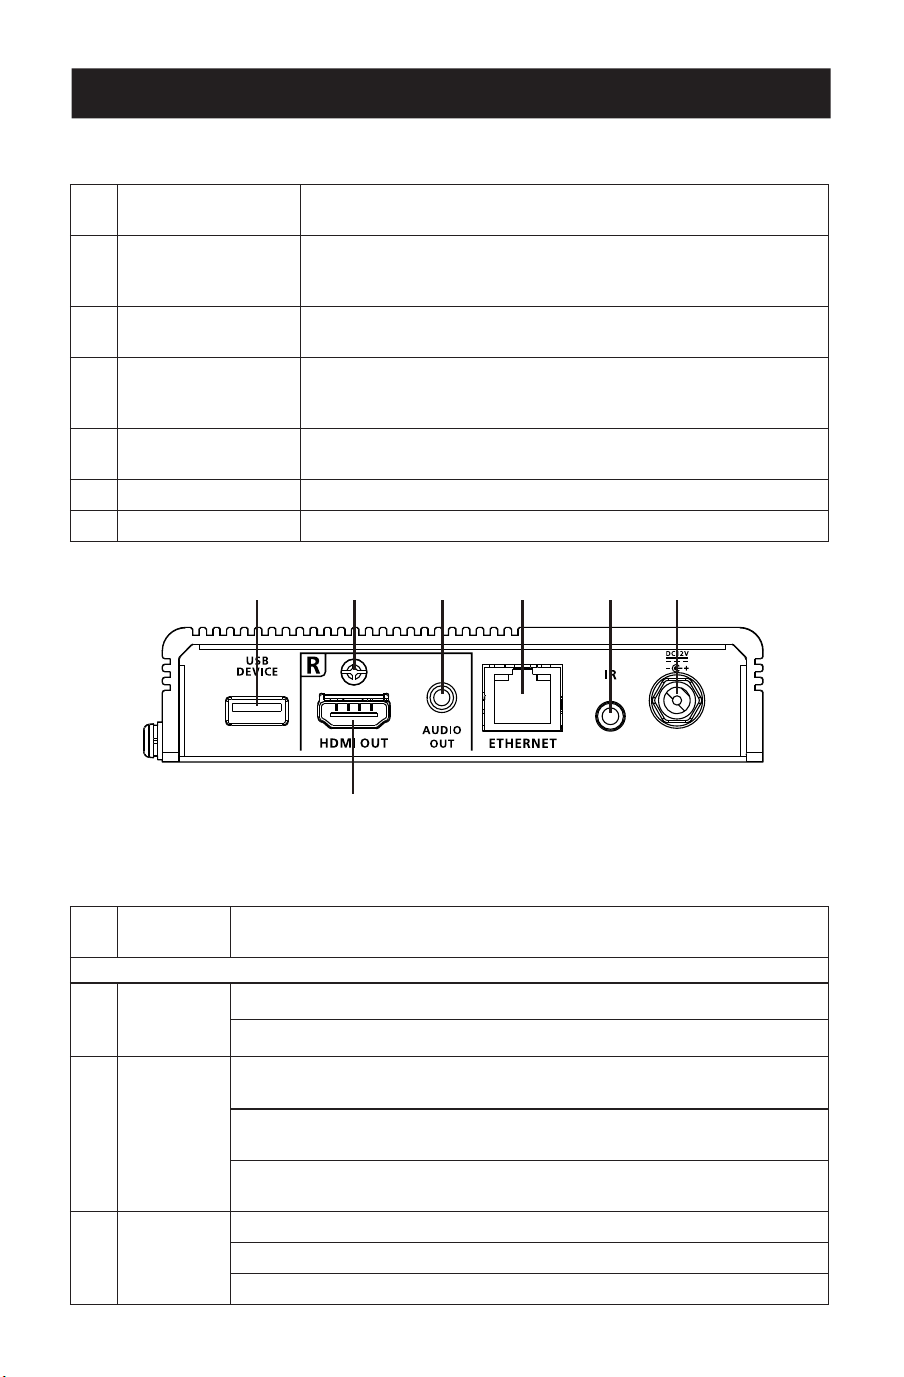
54
Produktübersicht
Rückansicht
1
USB-A-Anschluss
Zum Anschluss eines Peripheriegeräts, z.B. einer Tastatur oder
Maus.
2
Kabelsicherungs-
schraube
Universelles HDMI-Kabel-Schloss, das die einfachste Möglich-
keit bietet, ein HDMI-Kabel an den meisten HDMI-Geräten zu
befestigen.
3
Audioausgang
Zum Anschluss an ein Audio-Ausgabegerät, wie z.B. einen Satz
Lautsprecher.
4
Ethernet-Anschluss
Stellt die Verbindung zu einem Netzwerkschalter her, um dem
angeschlossenen Quellgerät über ein RJ-45 Kabel einen Inter-
netzugang zu ermöglichen.
5
IR-Anschluss
Verbindet sich mit einem IR-Sender oder IR-Empfänger zur
Fernsteuerung mit einer IR-Fernbedienung.
6
Steckdose Zum Anschluss an ein Netzteil zur Stromversorgung.
7
HDMI-Ausgang Zum Anschluss an ein HDMI-Anzeigegerät über ein HDMI-Kabel.
Ansicht von oben
1
Erdungs-
klemme
Erdet das Gerät an einem geeigneten geerdeten Objekt.
Transmitter-LEDs
2
Stromver-
sorgung
Gelb Grün: Das Gerät empfängt Leistung.
Aus: Das Gerät wird mit Strom versorgt.
3
Link
Orange leuchtend: Die Übertragung zwischen Sender und Empfänger ist
stabil
Orange blinkend : Die Übertragung zwischen Sender und Empfänger ist
instabil.
Aus: Es ndet keine Übertragung zwischen dem Sender und dem
Empfänger statt.
4
HDMI-
Eingang
Orange leuchtend: Die Videoanzeige mit der HDCP-Taste ist normal.
Orange blinkend: Die Videoanzeige ohne HDCP-Taste ist normal.
Aus: Es liegt kein Videosignal vor.
11 22 33 44 55 66
77
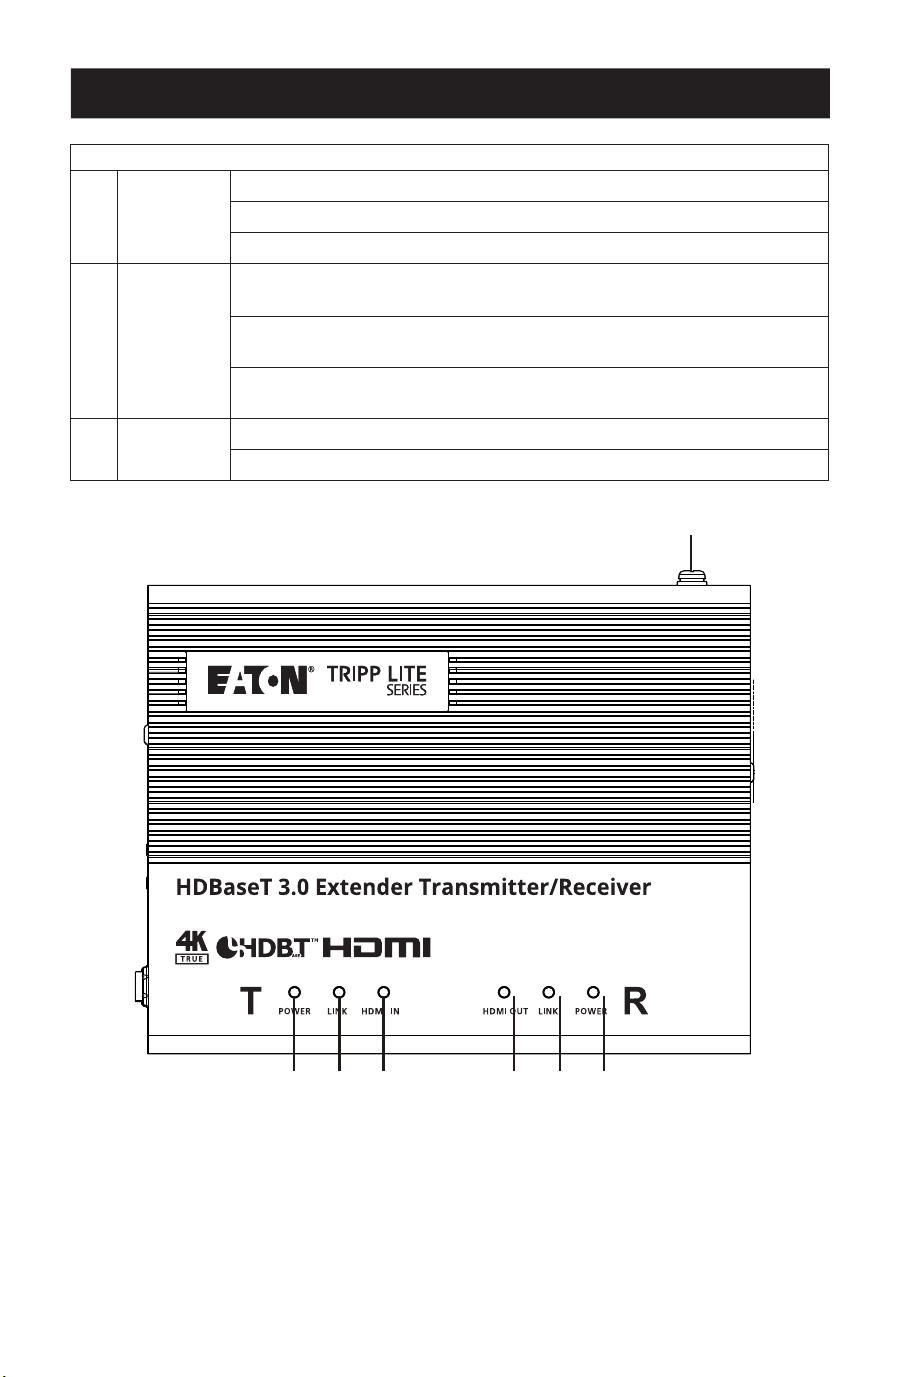
55
Produktübersicht
Receiver LEDs
5
HDMI-
Ausgang
Orange leuchtend: Die Videoanzeige mit der HDCP-Taste ist normal.
Orange blinkend: Die Videoanzeige ohne HDCP-Taste ist normal.
Aus: Es liegt kein Videosignal vor.
6
Link
Orange leuchtend: Die Übertragung zwischen Sender und Empfänger ist
stabil
Orange blinkend : Die Übertragung zwischen Sender und Empfänger ist
instabil.
Aus: Es ndet keine Übertragung zwischen dem Sender und dem
Empfänger statt.
7
Stromver-
sorgung
Grün leuchtend: Das Gerät empfängt Leistung.
Aus: Das Gerät wird mit Strom versorgt.
11
22 33 44 55 66 77

56
Checkliste vor der Installation
Display
• Bis zu zwei HDMI-Bildschirme mit der höchsten erforderlichen Auflösung.
Quellgerät
• Ein Quellgerät mit einem HDMI-Anschluss.
Kabel
• 2HDMI-Kabel
• Für die Verbindung von Sender- und Empfänger-Einheiten wird ein HDBaseT3-zertifiziertes
Cat6a-Kabel empfohlen, um die Videoqualität zu gewährleisten.
• Für eine bessere Videoqualität ist die Verwendung von HDBaseT3-zertifizierten Cat6a-
Kabeln mit null Latenz sehr empfehlenswert.
Überlegungen
• Die maximale Übertragungsreichweite variiert an verschiedenen Stellen der Übertragung:
Verbindung Schnittstelle Auösung Entfernung
Computer an Sender HDMI Echtes 4K 5m
Sender zu einem Empfänger
(R) oder einem kompatiblen
HDBaseT-Empfänger der
EatonTrippLite-Serie
HDBaseT3-zertiziertes
Cat6a-Kabel mit null Latenz
Echtes 4K 100m
Empfänger an ein Display HDMI Echtes 4K 5m

57
Montage der Einheit
Wandmontage
Befestigen oder hängen Sie das Gerät mit den integrierten Montagehalterungen an der Wand.
Bitte lesen Sie den Abschnitt „Wichtige Sicherheitshinweise“, bevor Sie
mit der Montage und Installation fortfahren.
SchaltenSiedasGeräterstdannein,wennalleerforderlichenGeräte
angeschlossen sind.

58
Hardware-Installation
Der BHDBT3-TRX2 ist eine Bausatzversion des Modells BDHBT3-TR
Ansonsten sind die beiden Einheiten identisch. Jeder Transceiver kann
ein ein HDBaseT-Audio-/Videosignal senden oder empfangen.
DieGerätekönnenganzeinfachvoneinemSenderzueinemEmpfänger
umfunktioniert werden (oder umgekehrt), indem der HDMI-Eingang auf
der Seite Quelle in einen Ausgang und der Ausgang in einen Eingang auf
der Seite des Displays umgeschaltet wird.
Hinweis: Die hier gezeigte Installation
basiert auf zwei Einheiten.
Sender
Empfänger
Vorder-
ansicht
Lautsprecher
VK-Kontrollsystem
Monitor
PC
IR-Sender /
-Empfänger
IR-Sender /
-Empfänger
Netzteil
Netzteil
Netzwerk
RS-232
RS-232
HDMI
HDBaseT
HDMI
HDMI
Strom-
versorgung
Ethernet
Ethernet
Audio
Audio
USB
USB
IR
IR
Vorder-
ansicht
Rück-
ansicht
Rück-
ansicht
11
22
22
77
MM
MM
33 44 55
66 NN
NN
JJ
JJLL 88KK
99
99
Strom-
versorgung

59
Hardware-Installation
1
Erden Sie das Gerät, indem Sie ein Ende des Erdungsdrahtes an die Erdungsklemme und
das andere Ende des Drahtes an einen geeigneten geerdeten Gegenstand anschließen.
Hinweis: Überspringen Sie diesen Schritt nicht. Eine ordnungsgemäße Erdung hilft, Schäden am Gerät
durch Stromstöße oder statische Elektrizität zu vermeiden.
2
Wichtig: Bevor Sie das Gerät anschließen, stellen Sie den Tx/Rx-Schalter so ein, dass das
Gerät definiert ist. Das Gerät ist ein Sender, wenn der Tx-/Rx-Schalter auf Tx eingestellt ist,
oder ein Empfänger, wenn der Tx-/Rx-Schalter auf Rx eingestellt ist.
3
Schließen Sie einen HDMI-fähigen PC mit einem HDMI-Kabel an den Sender an. Hier
können Sie andere HDMI-fähige Quellgeräte (z.B. einen Blu-ray-Player) anschließen.
4
(Optional) Schließen Sie ein Audio-Quellgerät an den Sender an. Um diesen Audioeingang
in den HDMI-Ausgang einzubetten, stellen Sie den HDMI-audio Schalter (auf Tx) auf EIN.
5
Verbinden Sie den USB-Typ-B-Anschluss des Senders mit einem USB-Host (z.B. einem PC).
6
Schließen Sie ein HDMI- fähiges Anzeigegerät über ein HDMI-Kabel an den Sender an.
7
Verbinden Sie die HDBaseT-Anschlüsse des Senders und Empfängers mit einem
HDBaseT3-zertifizierten Cat6a-Kabel (oder höher).
8
(Optional) Schließen Sie Ihre Lautsprecher oder Audioverstärker an den Empfänger an.
Um das HDMI-Audio vom HDMI-Ausgang zu trennen, stellen Sie den HDMI-Audio-Schalter
(auf Rx) auf EIN.
9
(Optional) Um ein an den Empfänger angeschlossenes Gerät aus der Ferne zu steuern
(z.B. einen Fernseher), schließen Sie den IR-Sender an den IR-Anschluss des Empfängers
und den IR-Empfänger an den IR-Anschluss des Senders an.
Hinweis: Das Gerät unterstützt die bidirektionale IR-Übertragung.
J
(Optional) Um eine Netzwerkverbindung für Ihren PC herzustellen, schließen Sie den
Empfänger an einen Netzwerk-Schalter an und verbinden Sie dann den Ethernet-Anschluss
des Senders mit Ihrem PC.
Hinweis: Das Gerät unterstützt die bidirektionale Bypass-Übertragung.
K
(Optional) Schließen Sie den USB-A-Anschluss an einen USB-fähigen Touchscreen an.
L
Schließen Sie einen HDMI-fähigen Touchscreen mit einem HDMI-Kabel an den Receiver an.
M
(Optional) Um einen PC über einen seriellen Controller aus der Ferne zu steuern,
schließen Sie den RS-232-Anschluss des Senders an einen seriellen Controller an und
verbinden Sie dann den RS-232-Anschluss des Empfängers mit einem PC.
Hinweis: Das Gerät unterstützt die bidirektionale Bypass-Übertragung.
N
Schließen Sie das Netzkabel und den Netzadapter an und stecken Sie dann die
Netzadapterkabel in die Netzteilbuchse der Geräte.
O
Leistung auf allen verbundenen Geräten.
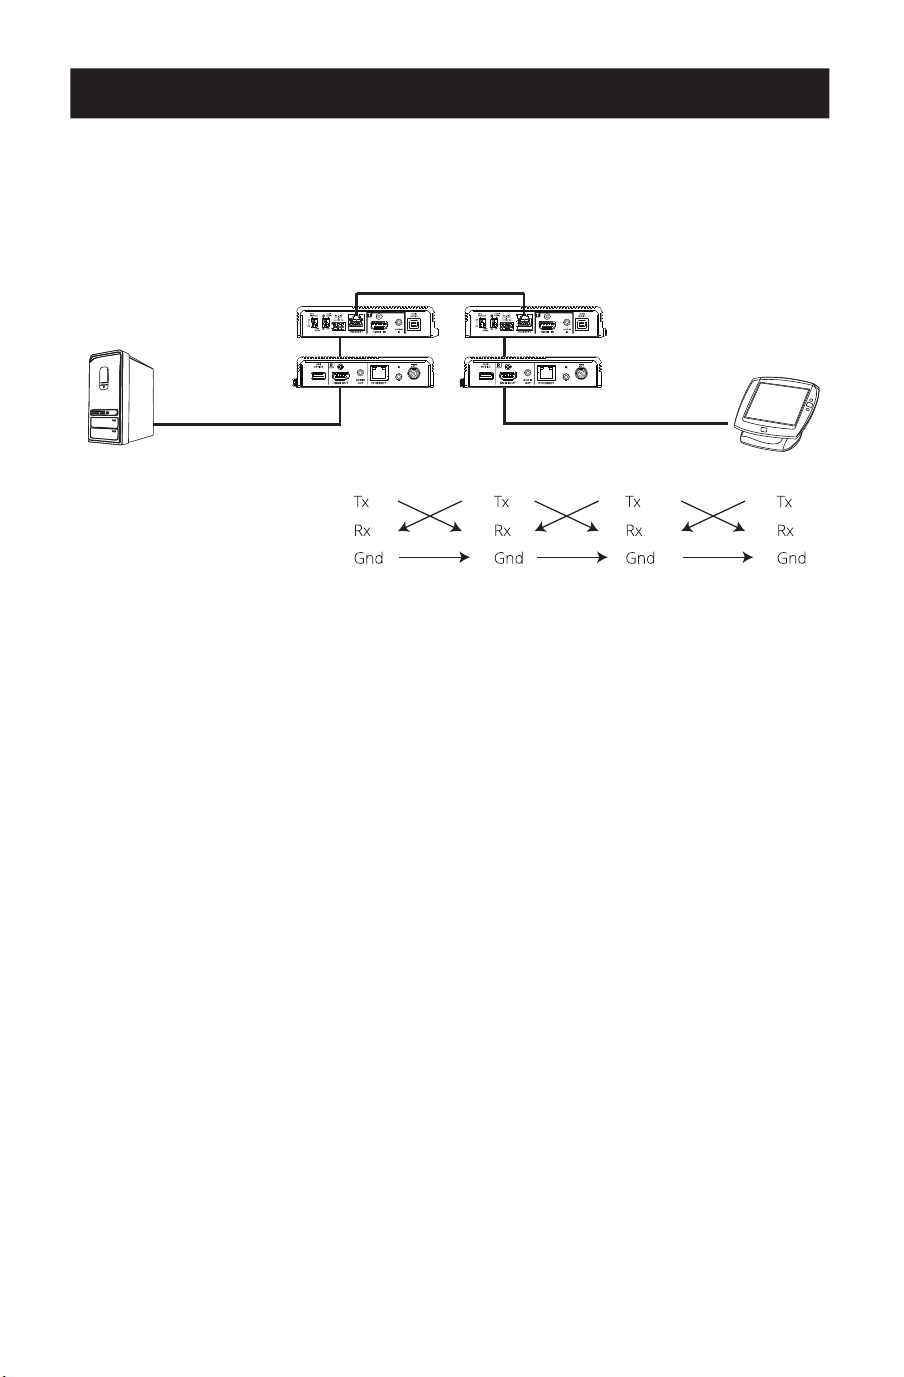
60
Hardware-Installation
RS-232 Kanal-Übertragung
Sie können ein serielles RS-232-Gerät an den RS-232-Anschluss der Geräte für den RS-232-
Bypass-Kanal anschließen, beispielsweise einen Touchscreen-Monitor oder einen Barcode-
Scanner. Der Fluss der RS-232-Signalübertragung kann wie folgt dargestellt werden:
Empfänger Sender
Cat5e/6/6a/7-Kabel
PIN-KONFIGURATION
(Unverlierbare
Schraubverbindungen)
Das allgemeine Konzept besteht darin, dass ein RS-232-Signal an das empfangende Ende (Rx)
eines Geräts übertragen werden kann (Tx). Das empfangene Signal kann dann an die
Empfangsseite (Rx) eines anderen Geräts übertragen werden (Tx). Die RS-232-Signale können
in die andere Richtung übertragen werden.

61
Betrieb
Tx- und Rx-Schalter
Verwenden Sie den Tx-/Rx-Schalter, um das Gerät je nach Bedarf als Sender oder Empfänger
einzustellen.
HDMI-Audio-Schalter
Audio-Einbettung
1. Stellen Sie den HDMI-Audio-Schalter am Sender auf EIN.
2. Stellen Sie den HDMI-Audio-Schalter am Empfänger auf AUS.
Audio-Embedding
1. Stellen Sie den HDMI-Audio-Schalter am Sender auf AUS.
2. Stellen Sie den HDMI-Audio-Schalter am Empfänger auf EIN.
Umgehung von Audiosignalen
1. Stellen Sie den HDMI-Audio-Schalter am Sender auf AUS.
2. Stellen Sie den HDMI-Audio-Schalter am Empfänger auf AUS.
Hinweis: Standardmäßig ist der HDMI-Audio-Schalter am Gerät auf AUS eingestellt.
Tx-/Rx-Schalter
HDMI-Audio-Schalter

62
Technische Daten
Video-Eingang
Schnittstellen 1 x HDMI Typ-A-Buchse (Schwarz)
Impedanz 100Ώ
Max. Entfernung 5m
Videoausgang
Schnittstellen 1 x HDMI Typ-A-Buchse (Schwarz)
Impedanz 100Ώ
Max. Entfernung 5m
Video
Max. Datenrate 18Gbps (6Gbps pro Spur)
Max. Pixel-Takt 600MHz
Einhaltung HDMI (3D, Deep Color, 4K / 60Hz); 4K HDR HDCP2.3
kompatibel
Consumer Electronics Control (CEC)
Hinweis: Die CEC-Signale werden nur von der Sendereinheit
an die Empfängereinheit umgeleitet und unterstützen keine
lokale Ausgabe.
Max. Auösungen 4096x2160 @ 60Hz (4:4:4)
3840x2160 @ 60Hz (4:4:4)
Max. Auösungen / Abstände Bis zu 4Kx2K bei 60Hz (4:4:4) bei 100m mit HDBa-
seT3-zertiziertem Cat6a-Kabel
Audio
Eingang 1 x HDMI Typ-A-Buchse (Schwarz)
1 x 3,5mm Mini-Stereo-Buchse (Grün)
Ausgang 1 x HDMI Typ-A-Buchse (Schwarz)
1 x 3,5mm Mini-Stereo-Buchse (Grün)
Steckverbinder
Von Einheit zu Einheit 1 x RJ-45 Buchse
Stromversorgung 1 x DC-Buchse mit Verriegelung (Schwarz)
Steuerung
RS-232-Kanal Anschluss: 1 x Klemmleiste, 3Pole
Baud-Rate: 19200
Datenbits: 8
Stopp-Bits: 1
Keine Parität und Flusskontrolle
IR-Kanal 1 x Mini-Stereo-Jack-Buchse (Schwarz, bi-direktional)
30K ~ 56KHz Vollbereichsübertragung
Ethernet-Kanal 1 x GbE RJ-45-Buchse
USB-Kanal 1 x USB2.0 Typ-B-Buchse (Weiß, Host)
1 x USB2.0 Typ-A-Buchse (Weiß, Gerät)
Datenübertragungsbandbreite: Bis zu 3.000Mbits/s
Stromverbrauch DC12V: 6,45W: 40BTU

63
Technische Daten
Schalter
Auswahl Datenübertragungsbandbreite: Bis zu1 x Schiebeschal-
ter – Tx (Transmitter) / Rx (Receiver)
Modus-Auswahl 1 x Schiebeschalter – HDMI-Audio-Embedding oder
De-Embedding EIN/AUS Auswahl
Firmwareaktualisierung 1 x Schiebeschalter – ON/AUS
Modus für große Reichweite 1 x Schiebeschalter – EIN/AUS (reserviert)
LEDs
Stromversorgung 1 x Tx (Gelb Grün, Sender)
1 x Rx (Gelb Grün, Empfänger)
Hinweis: Die Tx- oder Rx-LED leuchtet, um anzuzeigen, auf
welche Rolle das Gerät eingestellt ist.
Link 1 x Tx (Orange, Sender)
1 x Rx (Orange, Empfänger
Videoausgang 1 x Rx HDMI-Ausgang (Orange, Empfänger)
Video-Eingang 1 x Tx HDMI-Eingang (Orange, Transmitter)
Umgebungsinformationen
Betriebstemperatur 0 bis 40°C
Lagertemperatur -20bis 60°C
Luftfeuchtigkeit 0 x 80% RH, nicht kondensierend
Physisches
Gehäuse Metall
Gewicht 0,64kg
Abmessungen [LxBxH]
ohne Halterung
Mit Halterung
166x134x29mm
172x151x30mm
Eingabe-Auösungen
6460x480 @ 60/67/72/75Hz
720x 400 @ 70Hz
800x{sp}600 @ 56/60/72/75Hz
1024x768 @ 60/70/75Hz
1280 x 800 @ 60Hz
1280x1024 @60/75 Hz
1400x1050 bei 60Hz
1400x 900 @ 60Hz
1600x1200 bei 60Hz
1680x1050 bei 60Hz
1920x1080/1200 @ 60Hz
1920x1200 @ 60Hz (reduzierte Ausblendung)
1080p 60Hz
480p 60Hz (4:3)/(16:9)
720p 60Hz
1080i 60Hz
640x480 60Hz (4:3)
576p 50Hz (4:3)/(16:9)
720p 50Hz
1080i/1080p 50Hz
1080p 24/25/30Hz
3840x2160p 24/25/30/50/60Hz
4096x2160p 24/25/30/50/60Hz
3840x2160p 50/60Hz 4:2:0
4096x2160p 50/60Hz 4:2:0
7680x4320 30Hz 4:2:0

64
Garantie
Eaton
1000Eaton Boulevard
Cleveland, OH44122
USA
Eaton.com
© 2023 Eaton
Alle Rechte vorbehalten.
Veröffentlichung Nr. 23-05-320 / 93-47D3_RevA
August2023
Eaton ist eine eingetragene
Handelsmarke.
Alle Marken sind Eigentum
der jeweiligen Inhaber.
1JahreingeschränkteGarantie
Wir garantieren, dass unsere Produkte für einen Zeitraum von einem (1)Jahr ab dem Datum des Erstkaufs
frei von Material- und Verarbeitungsfehlern sind. Unsere Verpichtung im Rahmen dieser Garantie
beschränkt sich auf die Reparatur oder den Ersatz (nach eigenem Ermessen) der fehlerhaften Produkte.
Besuchen Sie Tripplite.Eaton.com/support/product-returns, bevor Sie Geräte zur Reparatur zurücksenden.
Diese Garantie gilt nicht für Geräte, die durch Unfall, Fahrlässigkeit oder falsche Anwendung beschädigt
wurden oder in irgendeiner Weise geändert oder modiziert wurden.
MIT AUSNAHME DER HIERIN ENTHALTENEN BESTIMMUNGEN GEBEN WIR KEINE GARANTIEN, WEDER
AUSDRÜCKLICH NOCH STILLSCHWEIGEND, EINSCHLIESSLICH GARANTIEN DER MARKTGÄNGIGKEIT
UND EIGNUNG FÜR EINEN BESTIMMTEN ZWECK. Einige Staaten gestatten keine Beschränkung oder
keinen Ausschluss stillschweigender Gewährleistungen; daher kann es sein, dass die oben genannten
Beschränkungen oder Ausschlüsse auf den Käufer nicht zutreen.
WEEE-Compliance-InformationenfürKundenundRecycler(EuropäischeUnion)
Die WEEE-Richtlinie und deren Ausführungsbestimmungen besagen, dass Kunden, die neue Elektro-
oder Elektronikgeräte von Eaton kaufen, ein Anrecht auf Folgendes haben:
• Rücksendung von Altgeräten zum Recycling beim Kauf eines neuen, gleichwertigen Geräts (dies
variiert je nach Land)
• Rücksendung der neuen Geräte zum Recyling, wenn ihr Lebenszyklus abgelaufen ist
Eaton hat den Grundsatz, sich kontinuierlich zu verbessern. Spezikationen können ohne Ankündigung
geändert werden. Fotos und Illustrationen können von den tatsächlichen Produkten leicht abweichen.

65
Introduzione 66
Istruzioni importanti per la sicurezza 67
Contenuto della confezione 68
Caratteristiche del prodotto 68
Panoramica del prodotto 69
Lista di controllo pre-installazione 72
Montaggio dell'unità 73
Installazione dell'hardware 74
Funzionamento 77
Speciche 78
Garanzia 80
Manuale d'uso
English 1
Español 17
Français 33
Deutsch 49
Modelli:
BHDBT3-TR
BHDBT3-TRX2
Trasmettitore/ricevitore HDBaseT 3.0
HDMI 4 K 60 Hz (4:4:4), RS-232 &
telecomando a infrarossi
Il prodotto acquistato
può differire dall'immagine.

66
Introduzione
Il BHDBT3-TR/BHDBT-TRX2 è un ricetrasmettitore video che integra le funzioni di un
trasmettitore e di un ricevitore in un'unica unità. Questa combinazione consente agli utenti di
configurare facilmente l'unità come trasmettitore o ricevitore, a seconda della soluzione AV, e
di avere un'implementazione più flessibile e un utilizzo efficace con matrici di commutazione
segnali video, splitter video, ecc.
Progettato con la tecnologia HDBaseT 3.0, il BHDBT3-TR/BHDBT-TRX2 non solo estende segnali
True 4K non compressi fino a 328 piedi (100 m) su un singolo cavo Cat6a (certificato
HDBaseT3) con latenza zero, ma trasmette anche segnali IR, RS-232, Ethernet, audio
indipendente e USB con gli ultimi standard HDBaseT. Per una trasmissione stabile del segnale
HDMI, il BHDBT3-TR/BHDBT-TRX2 assicura immagini di alta qualità e un'estensione affidabile,
supportando HDCP 2.2, 3D, Deep Color e HDR. Inoltre, il BHDBT3-TR/BHDBT-TRX2 è dotato di
funzioni per integrare/rimuovere l'integrazione dell'audio HDMI, che consentono agli utenti di
adattare in modo flessibile le combinazioni audio/video più adatte in base ai diversi ambienti.
Per garantire un funzionamento ininterrotto, il design del dissipatore ad alette senza ventola
impedisce il surriscaldamento e quindi aumenta l'affidabilità.
Il BHDBT3-TR/BHDBT-TRX2 aumenta il potenziale delle applicazioni AV e semplifica le
installazioni complesse. Questo rende il BHDBT3-TR / BHDBT-TRX2 una soluzione ideale per
sale conferenze, auditorium, aule didattiche, musei, ambienti espositivi e qualsiasi altro luogo
che richieda una trasmissione di alta qualità e un'applicazione facile da usare.

67
Istruzioni di sicurezza importanti
• Questo prodotto è solo per uso interno.
• Leggere tutte le istruzioni. Salvarle per riferimento futuro.
• Seguire tutte le avvertenze e le istruzioni riportate sul dispositivo.
• Non posizionare il dispositivo su alcuna superficie instabile (carrello, supporto, tavolo, ecc.).
Se il dispositivo cade, si verificheranno gravi danni.
• Non utilizzare il dispositivo vicino all’acqua.
• Non collocare il dispositivo vicino o sopra radiatori o termosifoni.
• L'armadio del dispositivo è dotato di fessure e aperture per consentire una ventilazione
adeguata. Per garantire un funzionamento affidabile e per proteggere dal surriscaldamento,
queste aperture non devono mai essere bloccate o coperte.
• Il dispositivo non deve mai essere appoggiato su una superficie morbida (letto, divano,
tappeto, ecc.), così facendo si bloccano le aperture di ventilazione. Allo stesso modo, il
dispositivo non deve essere collocato in un alloggiamento incorporato, a meno che non sia
provvisto di ventilazione adeguata.
• Non versare mai liquidi di alcun tipo sul dispositivo.
• Scolleghare il dispositivo dalla presa a muro prima della pulizia. Non utilizzi pulitori liquidi o
Aerosol. Limitarsi a un panno umido per la pulizia.
• Il dispositivo deve essere utilizzato col tipo di fonte di alimentazione indicato sull'etichetta di
marcatura. Se non si è sicuri del tipo di alimentazione disponibile, rivolgersi al rivenditore o
all'azienda elettrica locale.
• Per evitare danni all'installazione, è importante che tutti i dispositivi siano correttamente
collegati con la messa a terra.
• Non appoggiare nulla sul cavo di alimentazione o altri cavi. Installare il cavo di alimentazione
e i cavi in modo che non possano essere calpestati o che siano causa di inciampo.
• Posizionare attentamente i cavi del sistema e i cavi di alimentazione assicurandosi che nulla
poggi sui cavi.
• Non spingere mai oggetti di alcun tipo dentro o attraverso le fessure dell'armadio.
Potrebbero toccare punti di tensione pericolosi o causare un cortocircuito delle parti, con
conseguente rischio di incendio o scossa elettrica.
• Non cercare di riparare il dispositivo autonomamente. Rivolgersi a tecnici qualificati per tutti
gli interventi di manutenzione.
• Se si verificano le seguenti condizioni, scollegare il dispositivo dalla presa a muro e portarlo
al personale di assistenza competente per la riparazione.
o Il cavo di alimentazione o la spina si sono danneggiati o sfilacciati.
o Nel dispositivo è stato versato del liquido.
o Il dispositivo è stato esposto a pioggia o acqua.
o Il dispositivo è caduto o l'armadio è stato danneggiato.
o Il dispositivo presenta un cambiamento evidente in termini di prestazioni, che indica la
necessità di un intervento di manutenzione.
o Il dispositivo non funziona normalmente quando vengono seguite le istruzioni di
funzionamento.
• Regolare solo quei controlli che sono indicati nelle istruzioni di funzionamento. La
regolazione impropria di altri controlli potrebbe provocare danni che richiederanno un
intervento approfondito da parte di un tecnico qualificato per essere riparati.

68
Contenuto della confezione
Caratteristiche del prodotto
• Ricetrasmettitore BHDBT3-TR o BHDBT3-TRX2 HDBaseT 3.0
• Morsettiera RS-232
• Staffa per montaggio a parete (2 pz.)
• Set di piedini tampone (4 pz.)
• Cavo da USB-B a USB-A
• Adattatore
• Cavo di alimentazione da C13 a NEMA 5-15P
• Cavo di alimentazione da C13 a BS1363
• Cavo di alimentazione da C13 a Schuko
• Emettitore IR
• Ricevitore ITR
• Manuale d'uso e Guida rapida
• Estende segnali HDMI True 4 K non compressi fino a 100 m su un singolo cavo Cat6a (cavo
certificato HDBaseT3 Cat6a) con latenza zero;
• Flessibile per l'implementazione, può essere configurato come trasmettitore o ricevitore, a
seconda della soluzione AV.
• Conforme agli standard HDBaseT 3.0 - trasmette video di alta qualità, IR a tutto campo,
RS-232bidirezionale, Gigabit Ethernet, audio stereo indipendente e segnali USB 2.0 Bypass
dei canali.
• HDMI (3D, Deep Color, 4K/60Hz); HDCP 2.2 compatibile.
• Qualità video superiore: fino a 4096 x 2160 @ 60 Hz (4:4:4); HDR supportato.
• Supporta le funzioni di integrazione/rimozione dell'integrazione dell'audio HDMI.
• Supporta l'uscita locale HDMI.
• Conforme allo standard USB 2.0 per un'ampia gamma di periferiche USB.
• Indicazione a LED dello stato dei segnali HDBaseT e HDMI per un più facile riconoscimento.
• L'involucro del dissipatore di calore ad alette senza ventola aumenta la durata e l'affidabilità
prevenendo il surriscaldamento, il malfunzionamento della ventola e il rumore eccessivo.
• Supporta frequenze di aggiornamento fino a 240 Hz per il display collegato.
• Firmware aggiornabile.
• Protezione ESD incorporata da 8 KV/15 KV.
• Plug-and-play.
• Installabile su armadio.
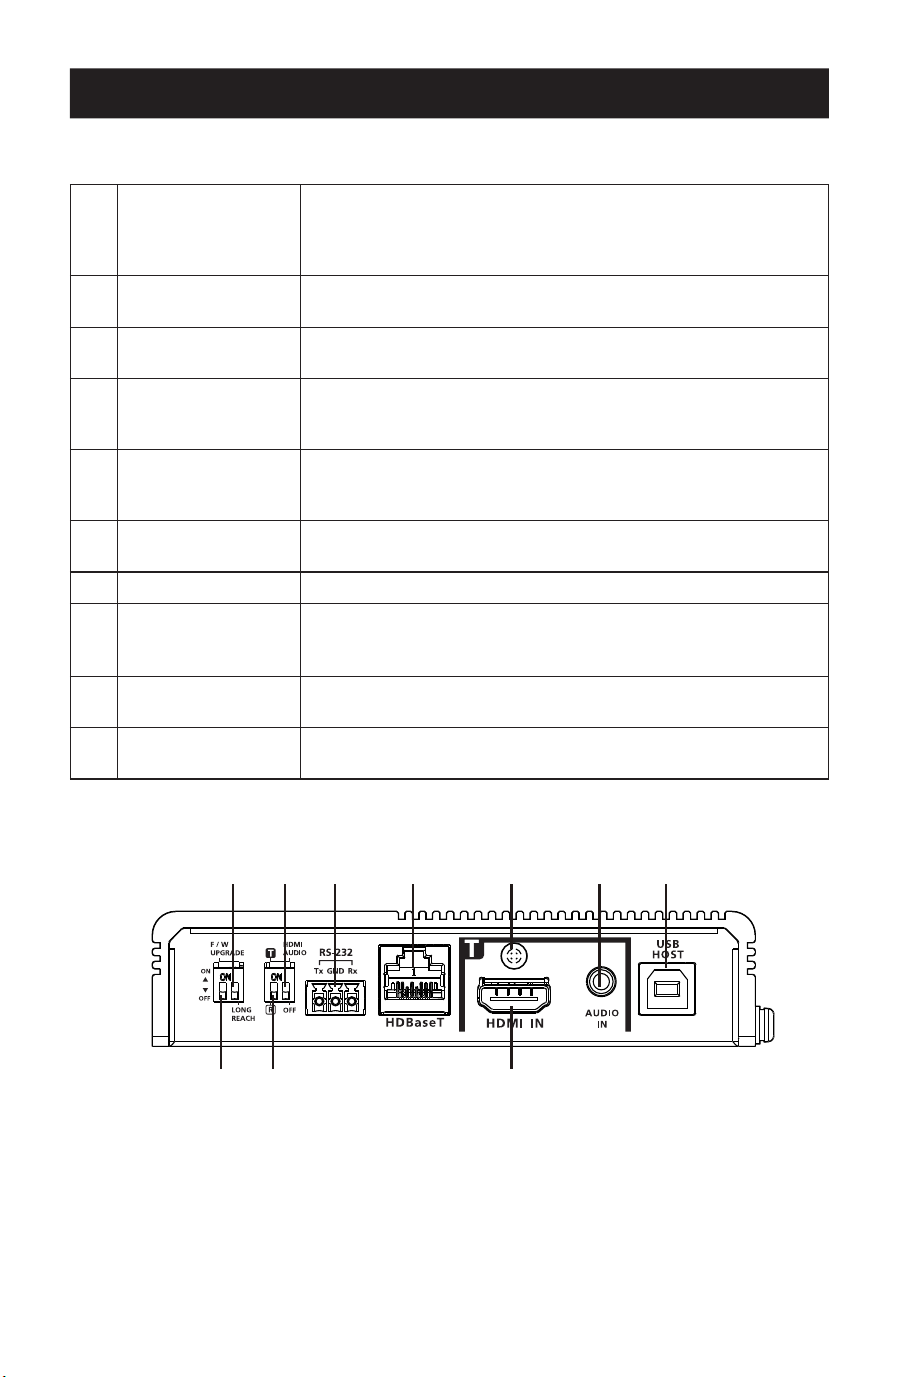
69
Panoramica del prodotto
Vista frontale
1
Commutatore
modalità lungo
raggio HDBaseT
(riservato)
Impostandolo si abilitano per abilitare la modalità a lungo
raggio. Questo commutatore è attualmente riservato per
un'espansione futura.
2
Commutatore audio
HDMI
Impostandolo si abilitano le funzioni di integrazione e rimozione
dell'integrazione. Vedere i commutatori Tx e Rx.
3
Porta RS-232
Si collega a un controller seriale RS-232, come un PC o un
sistema di controllo.
4
Porta HDBaseT
Si collega a un cavo certicato HDBaseT3 Cat 6 con latenza
zero per trasmettere i segnali HDMI e di controllo al ricevitore
collegato, se l'unità è impostata come trasmettitore.
5
Vite di blocco del
cavo
Il blocco del cavo HDMI universale permette di ssare
facilmente un cavo HDMI alla maggior parte dei dispositivi
HDMI.
6
Ingresso audio
Si collega a un dispositivo che funge da fonte audio, come per
esempio un PC.
7
Porta USB-B Si collega al dispositivo fonte, come per esempio un PC.
8
Commutatore di
aggiornamento del
rmware (riservato)
Questo commutatore è riservato al Supporto. Per eseguire
un aggiornamento del rmware, contattare prima il proprio
rivenditore.
9
Commutatore
Tx / Rx
Impostandolo si denisce l'unità come trasmettitore o
ricevitore.
J
Ingresso HDMI
Si collega a un dispositivo video HDMI fonte utilizzando un cavo
HDMI.
11
88 99 JJ
22 33 44 55 66 77
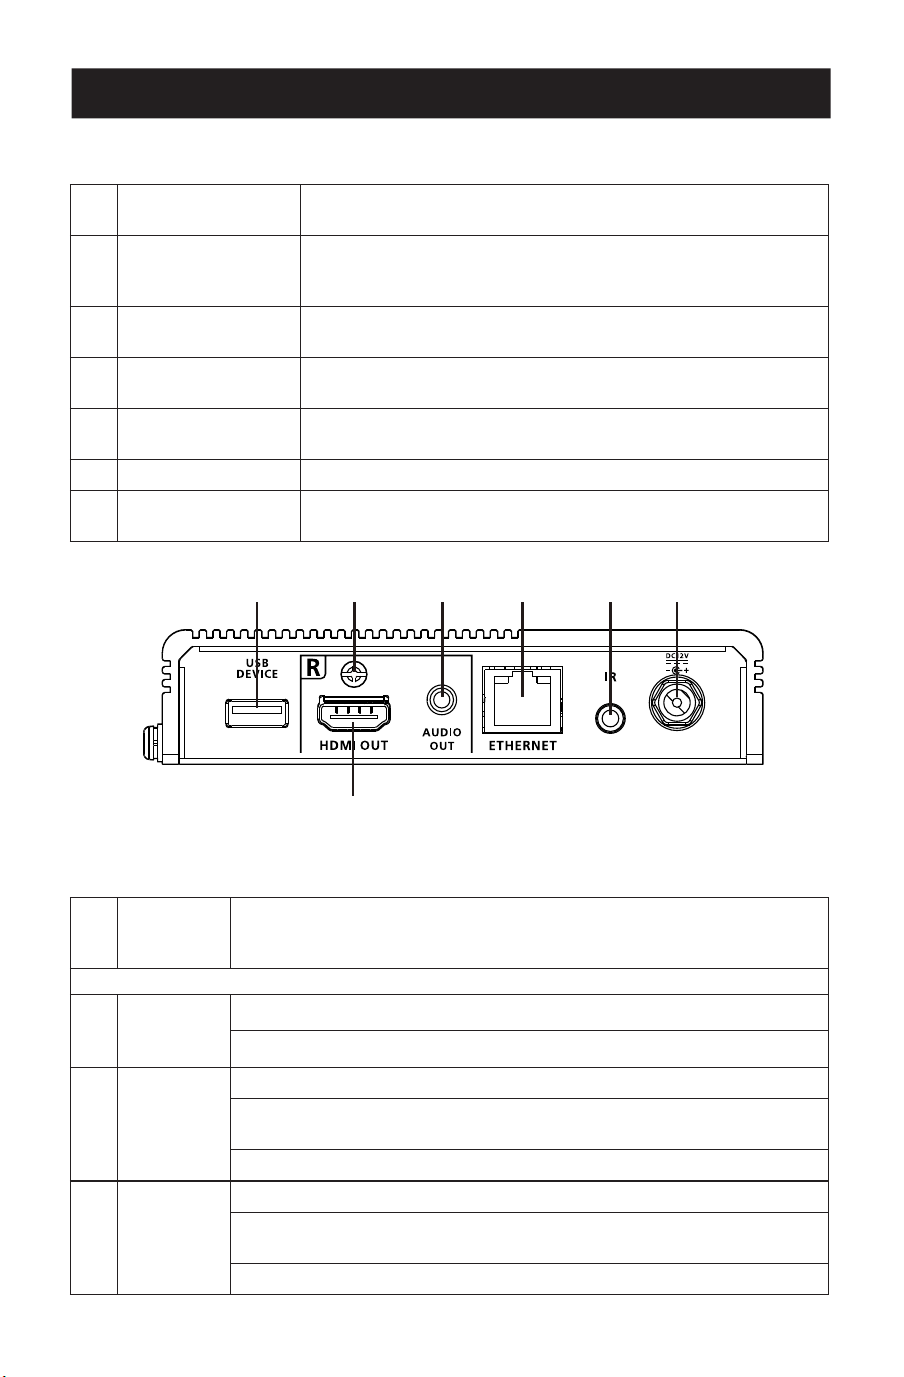
70
Panoramica del prodotto
Vista posteriore
1
Porta USB-A
Si collega a un dispositivo periferico, come una tastiera o un
mouse.
2
Vite di blocco del
cavo.
Blocco universale per cavo HDMI che fornisce il modo più
semplice per ssare un cavo HDMI alla maggior parte dei
dispositivi HDMI.
3
Uscita audio
Si collega a un dispositivo di uscita audio, come un set di
altoparlanti.
4
Porta Ethernet
Si collega a uno switch di rete per fornire l'accesso a Internet
per il dispositivo fonte collegato utilizzando un cavo RJ-45.
5
Porta IR
Si collega a un emettitore o ricevitore IR per il controllo a
distanza tramite un telecomando IR.
6
Jack di alimentazione Si collega a un adattatore per l'alimentazione.
7
HDMI-out
Si collega a un dispositivo di visualizzazione HDMI tramite un
cavo HDMI.
Vista dall'alto
1
Terminale
di messa a
terra
Collega l'unità a un oggetto con messa a terra adeguato.
LED del trasmettitore
2
Potenza
Giallo Verde: l'unità sta ricevendo alimentazione.
O: l'unità è spenta.
3
Collega-
mento
Arancione sso: la trasmissione tra il trasmettitore e il ricevitore è stabile.
Arancione intermittente: la trasmissione tra il trasmettitore e il ricevitore
è instabile.
O: non c'è trasmissione tra il trasmettitore e il ricevitore.
4
HDMI-in
Arancione sso: la visualizzazione video è normale con il tasto HDCP.
Arancione intermittente: la visualizzazione video è normale senza il tasto
HDCP.
O: non c'è alcun segnale video.
11 22 33 44 55 66
77
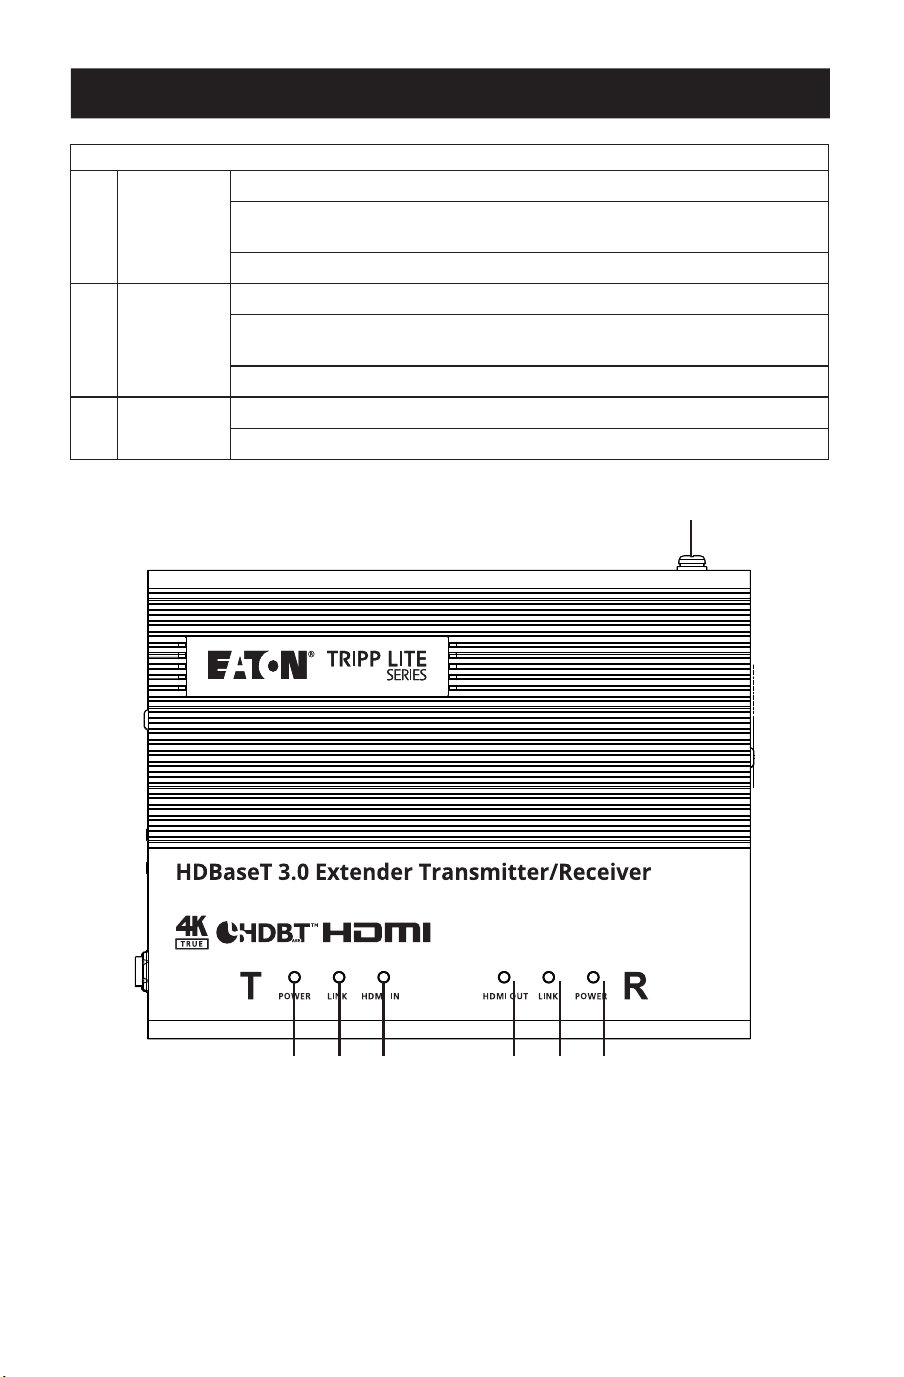
71
Panoramica del prodotto
Receiver LEDs
5
HDMI-out
Arancione sso: la visualizzazione video è normale con il tasto HDCP.
Arancione intermittente: la visualizzazione video è normale senza il tasto
HDCP.
O: non c'è alcun segnale video.
6
Collega-
mento
Arancione sso: la trasmissione tra il trasmettitore e il ricevitore è stabile.
Arancione intermittente: la trasmissione tra il trasmettitore e il ricevitore
è instabile.
O: non c'è trasmissione tra il trasmettitore e il ricevitore.
7
Potenza
Verde sso: l'unità sta ricevendo alimentazione.
O: l'unità è spenta.
11
22 33 44 55 66 77

72
Lista di controllo pre-installazione
Display
• Fino a due display HDMI con la massima risoluzione richiesta.
Dispositivo fonte
• Un dispositivo fonte con una porta HDMI.
Cavi
• 2 cavi HDMI
• Per collegare il trasmettitore e il ricevitore, si consiglia di utilizzare il cavo certificato
HDBaseT3 Cat6a per garantire la qualità video.
• Per una migliore qualità video, si consiglia di utilizzare il cavo certificato
HDBaseT3HDBaseT3-certified Cat6a con latenza zero.
Considerazioni
• La distanza massima di trasmissione varia in diversi punti della trasmissione:
Connessione Interfaccia Risoluzione Distanza
Dal computer al
trasmettitore
HDMI True 4 K 16 piedi (5 m)
Il trasmettitore a un
ricevitore (R) o a un
ricevitore HDBaseT
compatibile della serie
Tripp Lite di Eaton.
Cavo certicato HDBaseT3
Cat6a con latenza zero
True 4 K 328 ft (100 m)
Ricevitore a un display HDMI True 4 K 16 piedi (5 m)

73
Montaggio dell'unità
Montaggio a parete
Utilizzando le staffe di montaggio incorporate, fissare o appendere l'unità alla parete.
Prima di procedere al montaggio e all'installazione, consultare la sezione
Importanti istruzioni di sicurezza.
Non accendere l'unità prima di aver collegato tutto l'hardware necessario.

74
Installazione dell'hardware
Il modello BHDBT3-TRX2 è una versione in kit del modello BDHBT3-TR.
Per il resto, le due unità sono identiche. Ogni ricetrasmettitore è in
grado di trasmettere o ricevere un segnale audio/video HDBaseT.
Le unità possono facilmente passare da trasmettitore a ricevitore (o
viceversa) commutando l'ingresso HDMI in uscita sul lato fonte e l'uscita
in ingresso sul lato display.
Nota: l'installazione qui illustrata si basa su
due unità.
Trasmettitore
Ricevitore
Vista
frontale
Altoparlanti
Sistema di controllo VK
Monitor
PC
Emettitore/
ricevitore IR
Emettitore/
ricevitore IR
Adattatore
Adattatore
Rete
RS-232
RS-232
HDMI
HDBaseT
HDMI
HDMI Potenza
Potenza
Ethernet
Ethernet
Audio
Audio
USB
USB
IR
IR
Vista
frontale
Vista
posteriore
Vista
posteriore
11
22
22
77
MM
MM
33 44 55
66 NN
NN
JJ
JJLL 88KK
99
99

75
Installazione dell'hardware
1
Mettere a terra l'unità collegando un'estremità di un filo di messa a terra al terminale di
messa a terra e l'altra estremità a un oggetto adeguato collegato a terra.
Nota: non salti questo passaggio. Una messa a terra adeguata aiuta a prevenire danni all'unità dovuti a
sbalzi di tensione o elettricità statica.
2
Importante: prima di collegare l'unità, impostare il commutatore Tx / Rx per definire
l'unità. L'unità sarà un trasmettitore se il commutatore Tx / Rx è impostato su Tx, o sarà un
ricevitore se il commutatore Tx / Rx è impostato su Rx.
3
Colleghi un PC abilitato HDMI al trasmettitore utilizzando un cavo HDMI. Qui può collegare
altri dispositivi fonte abilitati all'HDMI (ad esempio, lettore Blu-ray).
4
(Opzionale) Collegare un dispositivo audio fonte al trasmettitore. Per integrare questo
ingresso audio nell'uscita HDMI, impostare il commutatore audio HDMI (su Tx) su ON.
5
Collegare la porta USB Tipo-B del trasmettitore a un host USB (ad esempio, un PC).
6
Collegare un dispositivo di visualizzazione abilitato HDMI al trasmettitore utilizzando un
cavo HDMI.
7
Collegare le porte HDBaseT del trasmettitore e del ricevitore a un cavo certificato
HDBaseT3 Cat6a (o superiore).
8
(Opzionale) Collegare gli altoparlanti o l'amplificatore audio al ricevitore. Per rimuovere
l'integrazione di questo audio HDMI dall'uscita HDMI, impostare il commutatore audio
HDMI (su Rx) su ON.
9
(Opzionale) Per controllare a distanza un dispositivo collegato al ricevitore (ad esempio, la
TV), collegare l'emettitore IR alla porta IR del ricevitore e il ricevitore IR alla porta IR del
trasmettitore.
Nota: l'unità supporta la trasmissione IR bidirezionale.
J
(Opzionale) Per fornire la connettività di rete al PC, collegare il ricevitore a uno switch di
rete, quindi collegare la porta Ethernet del trasmettitore al PC.
Nota: l'unità supporta la trasmissione bypass bidirezionale.
K
(Opzionale) Collegare la porta USB-A a un touchscreen abilitato a USB;
L
Collegare un touchscreen abilitato HDMI al ricevitore utilizzando un cavo HDMI;
M
(Opzionale) Per controllare a distanza un PC tramite un controller seriale, collegare la
porta RS-232 del trasmettitore a un controller seriale, quindi a un PC;
Nota: l'unità supporta la trasmissione bypass bidirezionale;
N
Collegare il cavo di alimentazione e l'adattatore, quindi inserire il cavo dell'adattatore nel
jack delle unità;
O
Accendere tutti i dispositivi collegati.
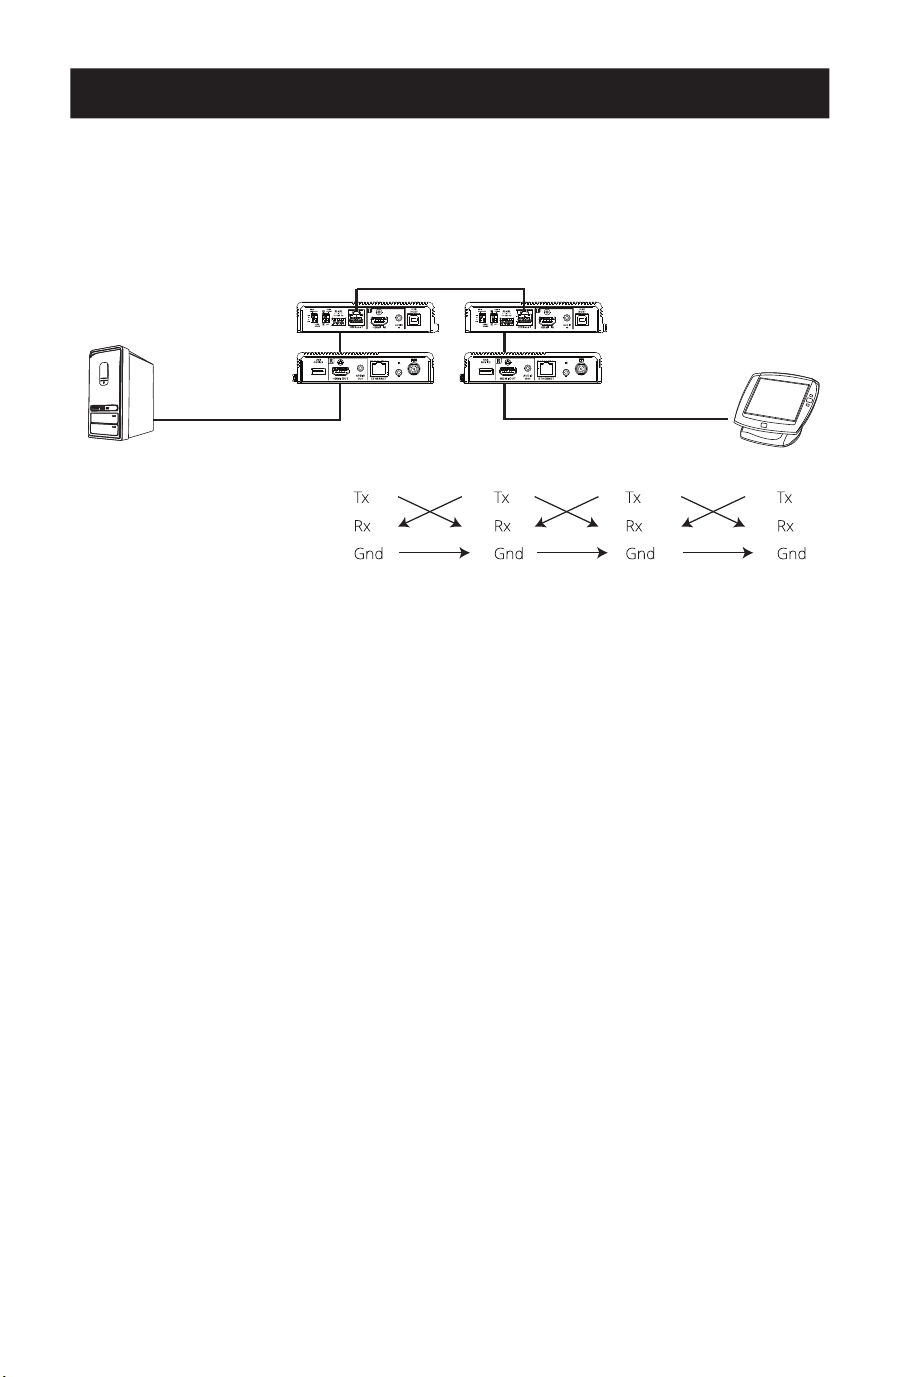
76
Installazione dell'hardware
Trasmissione del canale RS-232
È possibile collegare un dispositivo seriale RS-232 alla porta RS-232 delle unità per il canale di
Bypass RS-232, come un touchscreen o uno scanner di codici a barre. Il flusso di trasmissione
del segnale RS-232 può essere illustrato come segue:
Ricevitore Trasmettitore
Cavo Cat5e/6/6a/7
CONFIGURAZIONE
DEI PIN (connettori
a viti imperdibili)
Il concetto generale è che un segnale RS-232 può essere trasmesso (Tx) all'estremità ricevente
(Rx) di un'unità. Il segnale ricevuto può quindi essere trasmesso (Tx) all'estremità ricevente (Rx)
di un'altra unità. I segnali di RS-232 si possono ritrasmettere nell'altro senso.

77
Operazione
Commutatore Tx e Rx
Utilizzare il commutatore Tx/Rx per impostare l'unità come trasmettitore o ricevitore, a
seconda delle necessità.
Commutatore audio HDMI
Integrazione audio
1. Impostare il commutatore audio HDMI sul trasmettitore su On;
2. Impostare il commutatore audio HDMI sul ricevitore su Off.
Rimozione integrazione audio
1. Impostare il commutatore audio HDMI sul trasmettitore su Off.
2. Impostare il commutatore audio HDMI sul ricevitore su On.
Bypassare i segnali audio
1. Impostare il commutatore audio HDMI sul trasmettitore su Off.
2. Impostare il commutatore audio HDMI sul ricevitore su Off.
Nota: per impostazione predefinita, il commutatore audio HDMI sull'unità è impostato su Off.
Commutatore Tx/Rx
Commutatore audio HDMI

78
Specifiche
Ingresso video
Interfacce 1 HDMI Tipo-A femmina (nero)
Impedenza 100 Ώ
Valore massimo distanza 16 ft (5 m)
Uscita video
Interfacce 1 HDMI Tipo-A femmina (nero)
Impedenza 100 Ώ
Valore massimo distanza 16 ft (5 m)
Video
Valore massimo velocità dei dati 18 Gbps (6 Gbps per corsia)
Valore massimo Pixel Clock 600 MHz
Conformità HDMI (3D, Deep Color, 4K / 60 Hz); compatibile 4K HDR
HDCP 2.3
Consumer Electronics Control (CEC)
Nota: segnali CEC vengono bypassati solo dall'unità trasmit-
tente all'unità ricevente e non supportano l'uscita locale.
Valore massimo risoluzioni 4096 x 2160 @ 60 Hz (4:4:4)
3840 x 2160 @ 60 Hz (4:4:4)
Valore massimo risoluzioni/distanze Fino a 4K x 2K @ 60 Hz (4:4:4) a 328 piedi (100 m) con cavo
Cat6a certicato HDBaseT3
Audio
Ingresso 1 HDMI Tipo-A femmina (nero)
1 x 3,5 mm Mini Stereo femmina (verde)
Uscita 1 HDMI Tipo-A femmina (nero)
1 x 3,5 mm Mini Stereo femmina (verde)
Connettori
Da unità a unità 1 RJ-45 femmina
Alimentazione 1 Jack CC con blocco (nero)
Controllo
Canale RS-232 Connettore: 1 morsettiera, 3 poli
Velocità di trasmissione: 19200
Bit di dati: 8
Bit di stop: 1
Nessun controllo di parità e di usso
Canale IR 1 mini jack stereo femmina (nero, bidirezionale), trasmissio-
ne a gamma completa 30K ~ 56 KHz
Canale Ethernet 1 GbE RJ-45 femmina
Canale USB 1 USB 2.0 Tipo-B femmina (bianco, host)
1 USB 2.0 Tipo-A femmina (bianco, dispositivo)
Larghezza di banda dati di trasmissione: no a 3000 Mbps
Consumo di energia 12 V CC: 6,45 W: 40 BTU

79
Specifiche
Commutatori
Selezione 1 Commutatore a scorrimento - Tx (trasmettitore) / Rx
(ricevitore)
Selezione della modalità 1 commutatore a scorrimento - integrazione audio HDMI o
Rimozione dell'integrazione della selezione ON/OFF
Aggiornamento del rmware 1 commutatore a scorrimento - ON/OFF
Modalità a lunga portata 1 commutatore a scorrimento - ON/OFF (riservato)
LED
Potenza 1 Tx (giallo verde, trasmettitore)
1 Rx (giallo verde, ricevitore)
Nota: il LED Tx o Rx si accende per indicare il ruolo su cui è
impostata l'unità.
Collegamento 1 Tx (arancione, trasmettitore)
1 Rx (arancione, ricevitore)
Uscita video 1 uscita HDMI Rx (arancione, ricevitore)
Ingresso video 1 ingresso Tx HDMI (arancione, trasmettitore)
Condizioni ambientali
Temperatura di esercizio da 32 a 104°F (da 0°C a 40°C)
Temperatura di conservazione Da -4 a 140°F (da -20 a 60°C)
Umidità 0 x umidità relativa 80%, senza condensa
Fisico
Alloggiamento Metallo
Peso 1,41 lb. (0,64 kg)
Dimensioni [L x P x A]
Senza staa
Con Staa
6,54 x 5,27 x 1,13 in. (166 x 134 x 29 mm)
6,75 x 5,94 x 1,18 in. (172 x 151 x 30 mm)
Risoluzioni di ingresso
6460 x 480 @ 60/67/72/75 Hz
720 x 400 @ 70 Hz
800 x 600 @ 56/60/72/75 Hz
1024 x 768 @ 60/70/75 Hz
1280 x 800 @ 60 Hz
1280 x 1024 @ 60/75 Hz
1400 x 1050 @ 60 Hz
1400 x 900 @ 60 Hz
1600 x 1200 @ 60 Hz
1680 x 1050 @ 60 Hz
1920 x 1080/1200 @ 60 Hz
1920 x 1200 @ 60 Hz (Blanking ridotto)
1080p 60 Hz
480p 60 Hz (4:3)/(16:9)
720p 60 Hz
1080i 60 Hz
640 x 480 60 Hz (4:3)
576p 50 Hz (4:3)/(16:9)
720p 50 Hz
1080i/1080p 50 Hz
1080p 24/25/30 Hz
3840 x 2160p 24/25/30/50/60 Hz
4096 x 2160p 24/25/30/50/60 Hz
3840 x 2160p 50/60 Hz 4:2:0
4096 x 2160p 50/60 Hz 4:2:0
7680 x 4320 30 Hz 4:2:0

80
Garanzia
Eaton
1000 Eaton Boulevard
Cleveland, OH 44122
Stati Uniti
Eaton.com
© 2023 Eaton
Tutti i diritti riservati
Pubblicazione n. 23-05-320 / 93-47D3_RevA
Agosto 2023
Eaton è un marchio registrato.
Tutti i marchi sono di proprietà
dei rispettivi titolari.
Garanzia limitata di 1 anno
Garantiamo che i nostri prodotti siano privi di difetti nei materiali e nella lavorazione per un periodo di un (1)
anno a decorrere dalla data di acquisto iniziale. I nostri obblighi ai sensi della presente garanzia sono limitati
alla riparazione o sostituzione (a nostra esclusiva discrezione) di eventuali prodotti che presentino tali difetti.
Si visiti tripplite.eaton.com/support/product-returns prima di spedire qualsiasi apparecchiatura all'assistenza.
La presente garanzia non si applica alle apparecchiature che sono state danneggiate da incidenti, negligenza
o uso improprio o che sono state alterate o modicate in qualsiasi modo.
AD ECCEZIONE DI QUANTO PREVISTO NEL PRESENTE DOCUMENTO, NON FORNIAMO ALCUNA GARANZIA,
ESPRESSA O IMPLICITA, INCLUSE LE GARANZIE DI COMMERCIABILITÀ E DI IDONEITÀ PER UNO SCOPO
PARTICOLARE. In alcuni Stati non sono consentite la limitazione o l'esclusione di garanzie implicite; pertanto,
in tali casi, le limitazioni o esclusioni di cui sopra potrebbero non applicarsi all'acquirente.
Informazioni sulla conformità a RAEE per i clienti e i riciclatori (Unione Europea)
Ai sensi della Direttiva Riuti di apparecchiature elettriche ed elettroniche (RAEE) e dei regolamenti
attuativi, quando i clienti acquistano nuove apparecchiature elettriche ed elettroniche da Eaton
hanno diritto a:
- Inviare le vecchie apparecchiature per il riciclo sulla base di uno per uno, a parità di condizioni
(questo varia a seconda del Paese)
- Inviare la nuova apparecchiatura per il riciclo quando questa diventa un riuto.
Eaton ha una politica di miglioramento continuo. Le speciche tecniche sono soggette a modiche senza
alcun preavviso. Le foto e le illustrazioni potrebbero dierire leggermente dai prodotti reali.