CSBCV8020T
Tumble Dryer / User Manual
EN
Thank you for choosing this product.
This User Manual contains important safety information and instructions on the
operation and maintenance of your appliance.
Please take the time to read this User Manual before using your appliance and keep
this book for future reference.
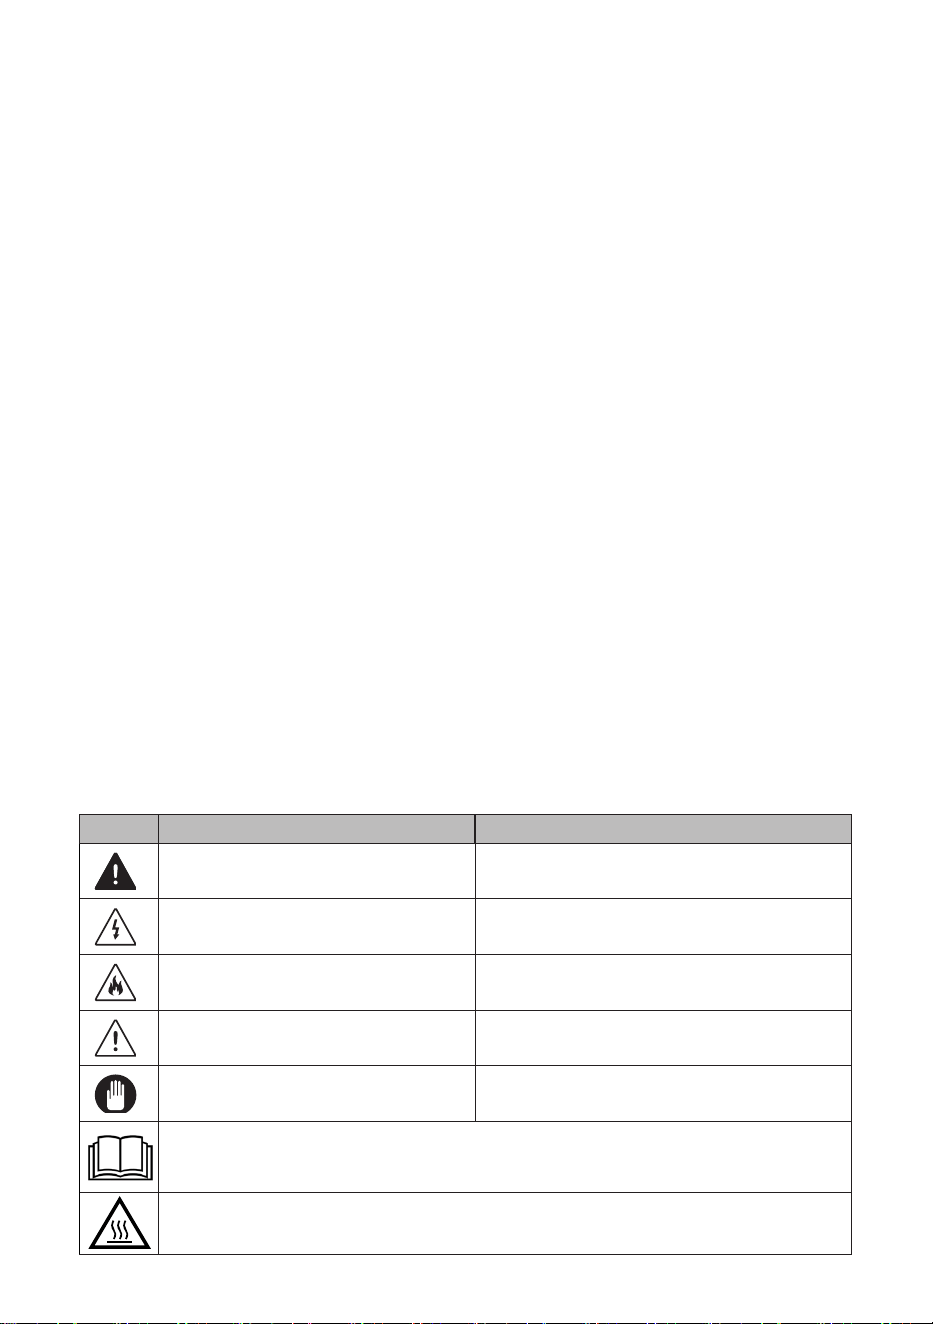
Icon Caption Description
WARNING Risk of serious injury or death
RISK OF ELECTRIC SHOCK Dangerous voltage
FIRE Risk of re
ATTENTION Risk of injury or material damage
IMPORTANT/NOTE Information on correct operation of the system
Read the instructions.
Hot surface

EN - III
CONTENTS
1. SAFETY INSTRUCTIONS ................................................................................. 5
1.1. Electrical Safety ............................................................................................... 5
1.2. Children's Safety ............................................................................................. 6
1.3. Product Safety ................................................................................................. 7
1.4. Correct Use ..................................................................................................... 8
1.5. Installing On Top Of a Washing Machine......................................................... 9
2. INSTALLATION ................................................................................................ 11
2.1. Connection to Water Outlet (with optional drain hose) .................................. 11
2.1.1. Connecting the Water Discharge Hose ...................................................... 11
2.2. Adjusting the Feet .......................................................................................... 11
2.3. Electrical Connection ..................................................................................... 11
2.4. Under Counter Installation ............................................................................. 11
3. OVERVIEW ...................................................................................................... 12
4. PREPARING THE LAUNDRY .......................................................................... 13
4.1. Sorting the Laundry to be Dried..................................................................... 13
4.2. Preparing the Laundry to be Dried ................................................................ 14
4.3. Load Capacity................................................................................................ 14
5. USING THE TUMBLE DRYER ........................................................................ 15
5.1. Control Panel ................................................................................................. 15
5.1.1. Programme Selection Knob........................................................................ 15
5.1.2. Electronic Indicator and Additional Functions ............................................. 15
5.2. Programme Selection and Consumption Table ............................................. 16
5.2.1. Auxiliary Functions...................................................................................... 17
5.2.2. Starting the Programme ............................................................................. 18
5.2.3. Programme Progress ................................................................................ 19
5.3. Drum Light Information .................................................................................. 19
6. CLEANING AND CARE ................................................................................... 21
6.1. Cleaning the Lint Filters ................................................................................. 21
6.2. Emptying the Water Tank............................................................................... 21
6.3. Cleaning the Heat Exchanger........................................................................ 22
6.4. Cleaning the Humidity Sensor ....................................................................... 22
6.5. Cleaning the Inner Surface of the Loading Door ........................................... 23
7. TECHNICAL SPECIFICATIONS ...................................................................... 24
8. TROUBLESHOOTING ..................................................................................... 25

EN - IV
9. AUTOMATIC FAULT WARNINGS AND WHAT TO DO ................................... 27
10. ENVIRONMENTAL PROTECTION AND PACKAGING INFORMATION ...... 28
10.1. Packaging Information ................................................................................. 28
11. DESCRIBING THE ENERGY LABEL AND SAVING ENERGY..................... 28
11.1. Energy Labelling .......................................................................................... 28
11.2. Energy Efficiency ......................................................................................... 29

EN - 1
PRIMARY CONSIDERATIONS
• This appliance can be used by children aged from
8 years and above and persons with reduced
physical, sensory or mental capabilities or lack
of experience and knowledge if they have been
given supervision or instruction concerning use of
the appliance in a safe way and understand the
hazards involved. Children must not play with the
appliance. Cleaning and user maintenance must not
be made by children without supervision.
• This tumble dryer is intended only for household
and indoor use. The warranty will be void in case of
commercial use.
• Use this product only for laundry with a label that
indicates it is suitable for drying.
• The manufacturer will not accept responsibility for
damages resulting from incorrect use or transport.
• The service life time of your tumble dryer is 10
years. This is the period during which the spare
parts required for the tumble dryer to operate
properly will be commercially available.
• Do not allow oor coverings to obstruct the
ventilation openings.
• Installation and repair of the machine should
only be made by an authorised repair agent.
The manufacturer cannot be held responsible for
damages resulting from un-authorised repairs.
WARNING: Never spray or pour water onto the
dryer to wash it! There is risk of electric shock!
• Leave at least 3 cm of space between the side and
rear walls of the product and above if you plan on
placing your appliance under a worktop.
• Assembly / disassembly for under-counter
installation if neccessary must be done by an
authorised service agent.

EN - 2
• Before installation, check the product for visible
damage. Never install or operate a damaged
product.
• Keep pets away from the dryer.
• Fabric softeners or similar products should be used
in accordance with the manufacturers instructions.
• Remove all objects from pockets such as lighters
and matches.
• The appliance must not be installed behind a
lockable door, a sliding door or a door with a hinge
on the opposite side to that of the tumble dryer, if it
prevents the door from being fully opened.
WARNING: In the appliance enclosure or in the
built-in structure, keep ventilation openings clear of
obstruction.
• Before contacting the local Authorised Service
Provider for the installation of the dryer, check the
information in the user manual to make sure that
the electrical installation and water outlet is suitable.
If they are not, call a qualied electrician and a
plumber to have the necessary adjustments made.
• It is the customer’s responsibility to prepare the
dryer’s installation place, as well as the electricity
and waste water installation. Before installation,
check the dryer for damage. If damaged, do not
have it installed. Damaged products may endanger
your health.
• Install the dryer on a stable and at surface.
• Run the dryer in a dust-free environment where the
air ventilation is good.
• The clearance between the dryer and the oor
should not be reduced with objects such as
carpets, wood or tape.

EN - 3
• Do not block the ventilation grills found on the
plinth of the tumble dryer.
• The appliance must not be installed behind a
lockable door, a sliding door or a door with a hinge
on the opposite side of the tumble dryer, in such a
way that blocks the full opening of the tumble dryer
door.
• Once the dryer has been installed, the connections
must remain stable. When installing the dryer, make
sure that the rear surface is not leaning on anything
(e.g. tap, socket).
• The operating temperature of the dryer is +5°C to
+35°C. If operated out of this temperature range,
the performance of the dryer will be aected
negatively and the product will be damaged.
• Be careful when carrying the product since it is
heavy. Always wear safety gloves.
• Always install the product should be placed against
a wall.
• The rear surface of the product should be placed
against the wall.
• When the product is placed on a stable surface,
use a water level to check if it is fully stable. If not,
adjust the feet until it becomes steady. Repeat this
process every time you relocate the product.
• Do not place the dryer onto the power cable.

EN - 4
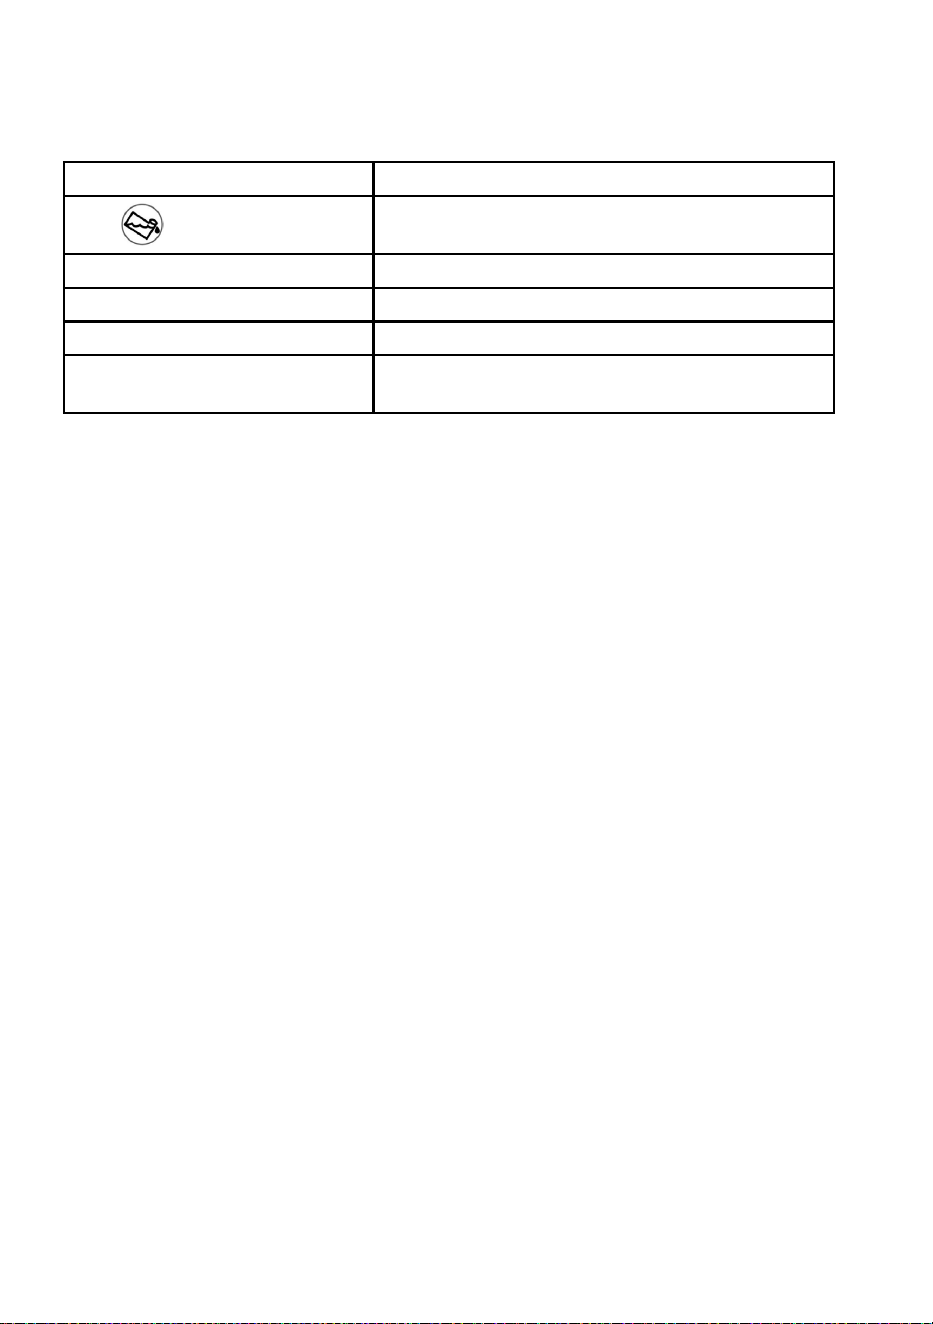
Disposing the Old Product
This product complies with EU WEEE Directive
(2013/19/EU). This product bears a
classication symbol for waste electrical and
electronic equipment (WEEE).
This symbol, which is found on the product or
information label, indicates that this product must
not be disposed together with other household
waste at the end of its service life. To prevent the
potential harms of uncontrolled waste disposal on
the environment and human health, please keep this
product separate from other types of waste, and to
prevent sustainable reuse of material resources, make
sure that it is recycled responsibly. Contact your dealer
or local authorities to get information on how and
where you can take the product for environmentally-
safe recycling. This product cannot be mixed with
other commercial wastes for recycling.

EN - 5
1. SAFETY INSTRUCTIONS
This section contains safety instructions that will help
protect you from risk of personal injury or property
damage. Failure to follow these instructions will void
any warranty.
1.1. Electrical Safety
• The appliance must not be supplied through an
external switching device, such as a timer, or
connected to a circuit that is regularly switched on
and o by a utility.
• Do not touch the power plug with wet hands. Always
pull the plug to unplug the product, otherwise, there
will be risk of an electric shock.
• Connect the dryer to a grounded socket with fuse
protection. The earth connection must be installed
by a qualied electrician. Our company cannot be
held responsible for damages/losses resulting from
using the dryer without an earth connection as
required by local regulations.
• The voltage and the allowable fuse protection are
indicated on the type plate.(For the type plate,
please see Overview)
• Voltage and frequency values indicated on the
type plate must be equal to the mains voltage and
frequency value in your house.
• Unplug the dryer when it is not used for an
extended period, and before installation,
maintenance, cleaning and repair, otherwise, the
dryer may get damaged.
• The plug socket must be freely accessible at all
times after installation.
A damaged power cord/plug can cause re or
give you an electric shock. When damaged it must
be replaced, this should only be done by qualied
personnel.

EN - 6
To avoid the risk or re or electric shock, do not
use extension cords, multi sockets or adapters to
connect the dryer to mains power.
1.2. Children's Safety
• This appliance is not intended for use by people
(including children) with reduced physical, sensory
or mental capabilities, or lack of experience
and knowledge, unless they have been given
supervision or instruction concerning use of the
appliance by a person responsible for their safety.
• This appliance can be used by children aged from
8 years and above, and persons with reduced
physical, sensory or mental capabilities or lack
of experience and knowledge if they have been
given supervision or instruction concerning use of
the appliance in a safe way and understand the
hazards involved. Children must not play with the
appliance. Cleaning and user maintenance must not
be made by children without supervision.
• Do not leave children unattended near the machine.
• Children might lock themselves in the machine
resulting in risk of death.
• Do not allow children to touch the glass door during
operation. The surface becomes extremely hot and
may cause skin damage.
• Keep packaging material away from children.
• Poisoning and irritation may occur if detergent and
cleaning materials are consumed or come into
contact with the skin and eyes.
• Keep cleaning materials out of the reach of children
Electrical products are dangerous for children.
• Keep children away from the product while it is
running.
• To prevent children from interrupting the dryer cycle,
you can use the child lock to avoid any changes in

EN - 7
the running programme.
• Do not allow children to sit/climb on or climb inside
the product.
1.3. Product Safety
Due to risk of re, the following laundry items
and products should NEVER be dried in the dryer:
• Do not dry unwashed items in the tumble dryer.
• Items that have been soiled with substances such
as cooking oil, acetone, alcohol, petrol, kerosene,
spot removers, turpentine, waxes and wax
removers should be washed in hot water with an
extra amount of detergent before being dried in the
tumble dryer.
• Cleaning cloths and mats that have residues
of ammable cleaning agents or acetone, gas,
patrol, stain remover, turpentine, candle, wax, wax
remover or chemicals.
• Laundry that has residues of hair sprays, nail polish
remover and similar substances.
• Laundry on which industrial chemicals have been
used for cleaning (such as chemical cleaning).
• Laundry that has any kind of foam, sponge, rubber
or rubber-like parts or accessories. These include
latex foam sponge, shower caps, waterproof
fabrics, tted clothes, and foam pillows.
• Items with lling and damaged (parts or jackets).
Foam protruding from these items might catch re
during the drying process.
• Operating the dryer in environments that contain
our or coal dust may cause explosion.
ATTENTION: Underwear that contains metal
reinforcements should not be put in the dryer. The
dryer may be damaged if metal reinforcements come
loose and break o during drying.

EN - 8
FIRE:R290
Risk of re and damage!
This product contains enviromental friendly but
ammable R290 gas. Keep open ame and re
sources away from the product.
1.4. Correct Use
ATTENTION: Never stop a tumble dryer before
the end of the drying cycle unless all items are quickly
removed and spread out so that the heat is dissipated.
ATTENTION: Make sure that pets do not enter
the dryer. Check the inside of the dryer before
using it.
ATTENTION: Superheating of clothes inside the
dryer can occur if you cancel the programme or in the
event of a power failure whilst the dryer is running.
This concentration of heat can cause self-combustion
so always activate the Refresh programme to cool
down or quickly remove all laundry from the dryer in
order to hang them up and dissipate the heat.
• Use the dryer only for household drying and to dry
fabrics with a label that indicates they are suitable
for drying. All other uses are out of the scope of
intended use and are prohibited.
• The warranty will be void in case of any commercial
use.
• This appliance is designed to be used inside
domestic residences only, and should be placed on
a straight and stable surface.
• Do not lean against or sit on the door of the dryer.
The dryer may tip over.
EN - 9
• To maintain a temperature that will not harm the
laundry (e.g. to prevent the laundry from catching
re), a cooling process starts after the heating
process. After this, the programme ends. At the
end of the programme, always remove the laundry
promptly.
ATTENTION: Never use the dryer without a lint
lter or with a damaged lint lter.
• Lint lters must be cleaned after each use as
indicated in Cleaning the Lint Filter.
• Lint lters must be dried after wet cleaning. Wet
lters might cause malfunction during the drying
process.
• Lint accumulation must not to be allowed around
the tumble dryer (not applicable for appliances
intended to be vented to the exterior of the building)
IMPORTANT: The clearance between the dryer
and the oor should not be reduced with objects such
as carpets, wood or panel, otherwise, sucient air
intake cannot be ensured for the machine.
• Do not install the dryer in rooms where there is risk
of freezing. Freezing temperatures negatively aect
the dryers performance.Condensed water that
freezes in the pump and hose may cause damage.
1.5. Installing On Top Of a Washing Machine
ATTENTION: A washing machine cannot be placed
on the dryer. Pay attention to the warnings below
when installing the dryer on a washing machine.
ATTENTION: The dryer can only be placed on
washing machines that have a same capacity and
above.
EN - 10
• To use the dryer on the washing machine, a xing
part must be used between the two products. The
xing part must be attached by an Authorised
Service Provider.
• When the dryer is placed on the washing machine,
the total weight of these products may reach almost
150 kilograms (when loaded). Place the products on
a solid oor that has a load bearing capacity!
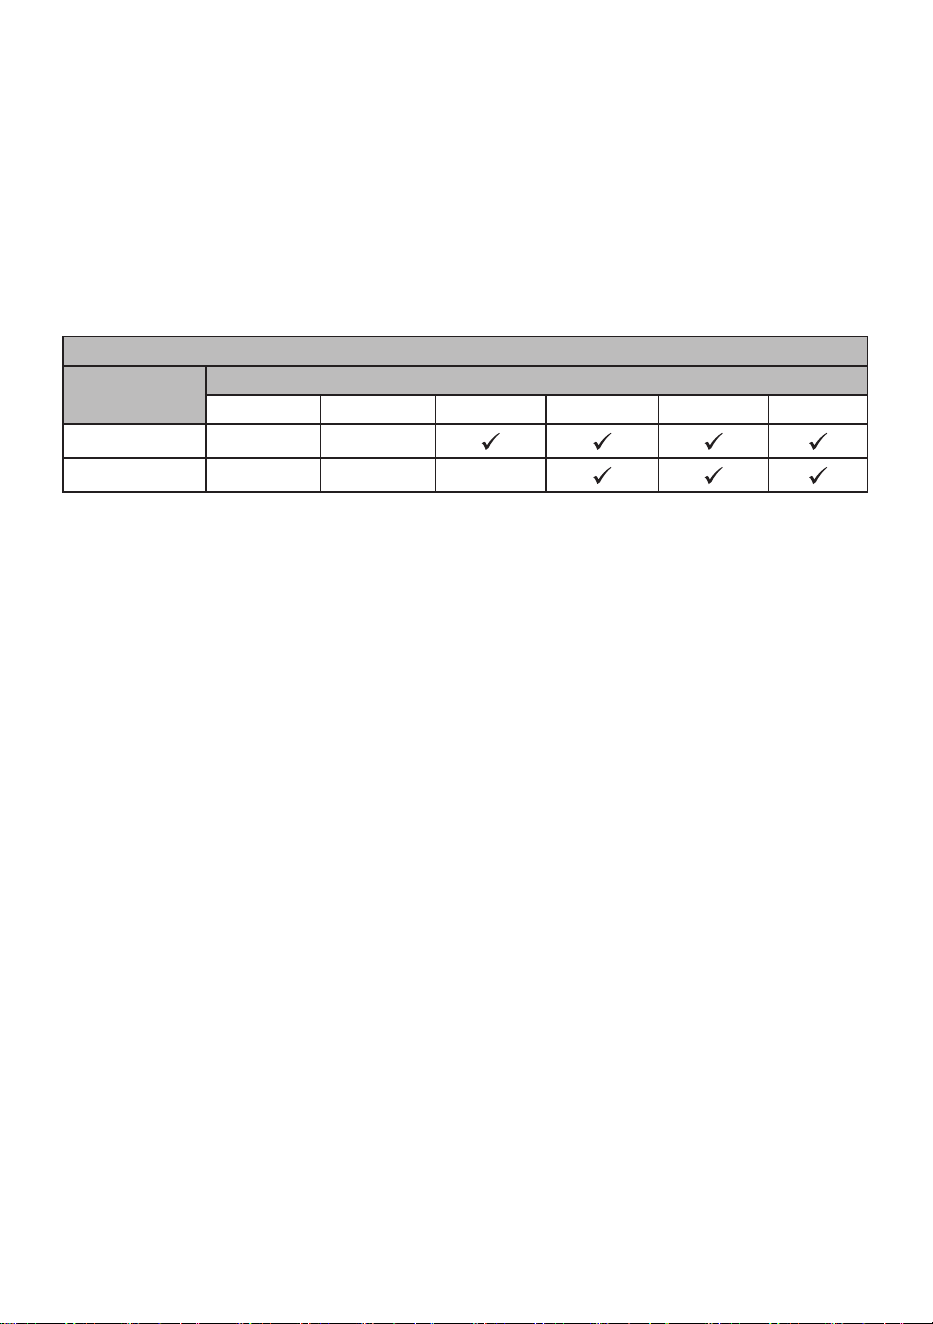
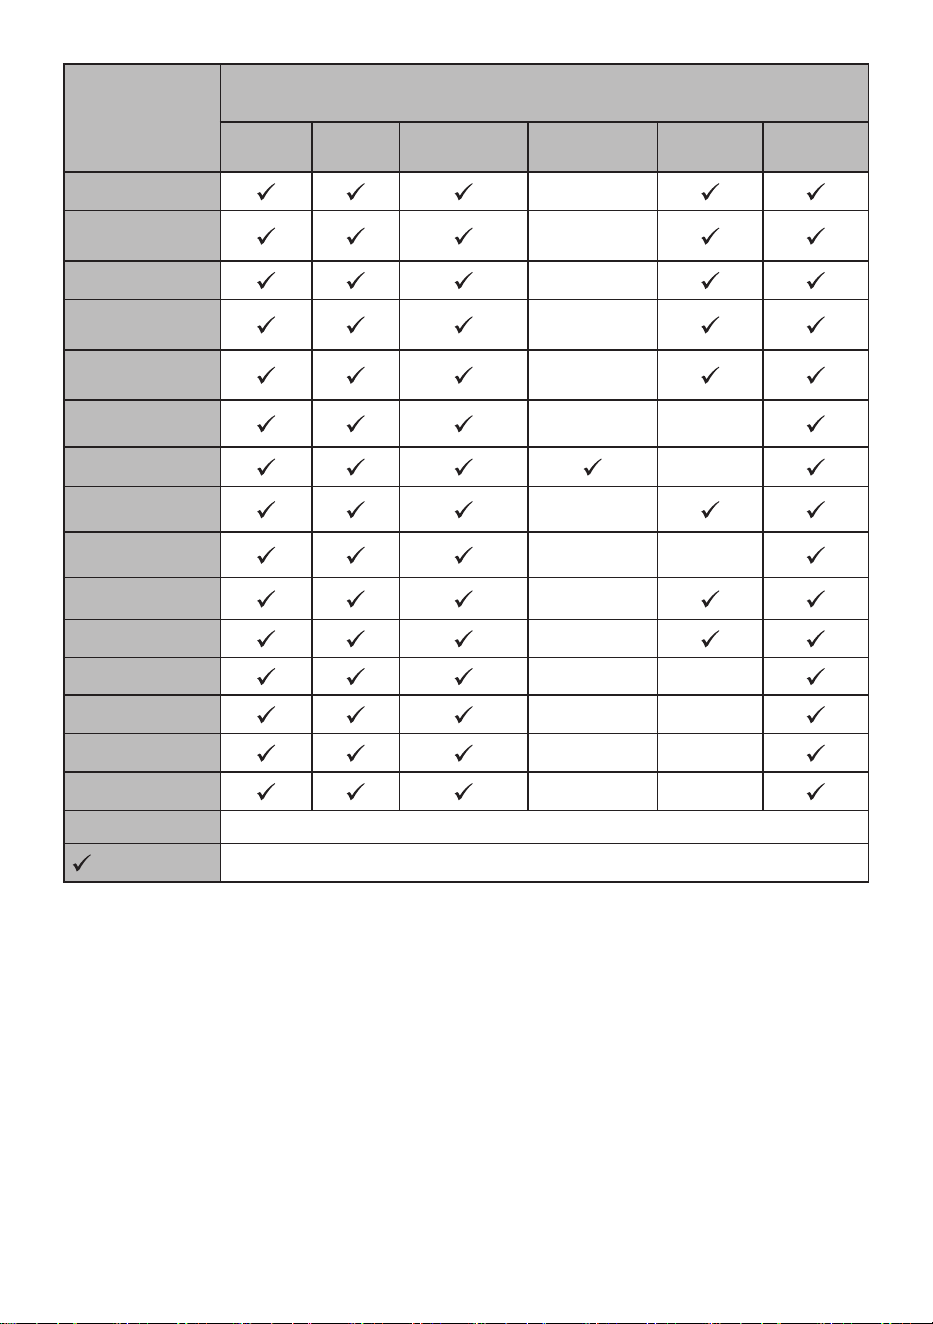
Appropriate Installation Table for Washing Machine and Tumble Dryer
Tumble Dryer
(Depth)
Washing Machine
37 cm 42 cm 53 cm 56 cm 59 cm 85 cm
56 cm X X
61 cm X X X
(For the depth information, please see 7. Technical Specications)
In order to put the dryer machine onto the washing
machine, a special stacking kit is required as an
optional extra. Please contact customer service to
acquire. The assembly instruction will be served
together with the stacking kit.
CE Declaration of conformity
We declare that our products meet the applicable European Directives, Decisions and
Regulations and the requirements listed in the standards referenced.
EN - 11
2. INSTALLATION
2.1. Connection to Water Outlet (with
optional drain hose)
In products with a heat pump unit, water
accumulates in the water tank during
the drying process. You must empty the
accumulated water after each drying
process. Instead of periodically emptying
the water tank, you can also use the water
drain hose provided with the product to
directly drain the water outside.
2.1.1. Connecting the Water Discharge
Hose
1. Pull and take out the end of the hose at the
back of the dryer. Do not use any tools to
take out the hose.
2. Fit one end of the water discharge hose,
which is provided with the product, to the slot
from which you have removed the hose.
3. Fix the other end of the water discharge hose
directly to the water outlet or sink.
ATTENTION: The hose must be
connected in a manner that it cannot be
displaced. If the hose comes out during
water discharge, there might be ooding in
your house.
IMPORTANT: The water discharge
house must be installed at a height of 80
cm maximum.
IMPORTANT: The water discharge
hose must not be bent between the outlet
and the product, folded or stepped over.
2
1
3
2.2. Adjusting the Feet
• For the dryer to work with less noise
and vibration, it must be stable and
balanced on its feet. Adjust the feed to
ensure that the product is balanced.
• Rotate the feet to the right and to the
left until the dryer is even and stable.
IMPORTANT: Never remove the
adjustable feet.
2.3. Electrical Connection
ATTENTION: There is risk of re and
electric shock.
• Your dryer is set to 220-240 V and 50
Hz.
• The mains cable of the dryer is
equipped with a special plug. This
plug must be connected to an earthed
socket protected by a fuse of 16
Amperes as indicated on the type plate.
The fuse current rating of the power
line where the outlet is connected must
also be 16 amperes. Consult a qualied
electrician if you do not have such an
outlet or fuse.
• Our company cannot be held
responsible for damages resulting from
usage without earthing.
IMPORTANT: Operating your machine
at low voltage values will shorten the
service life and decrease the performance
of your machine.
2.4. Under Counter Installation
• Leave at least 3 cm of space between
the side and rear walls of the product
and the underside of the worktop when
installing your product under a counter.
• Assembly / disassembly under the
counter if neccessary must be done by
authorized service.
EN - 12
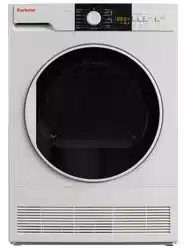
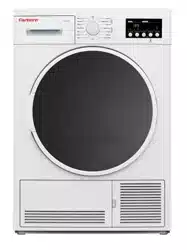
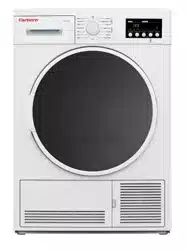
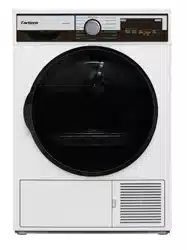
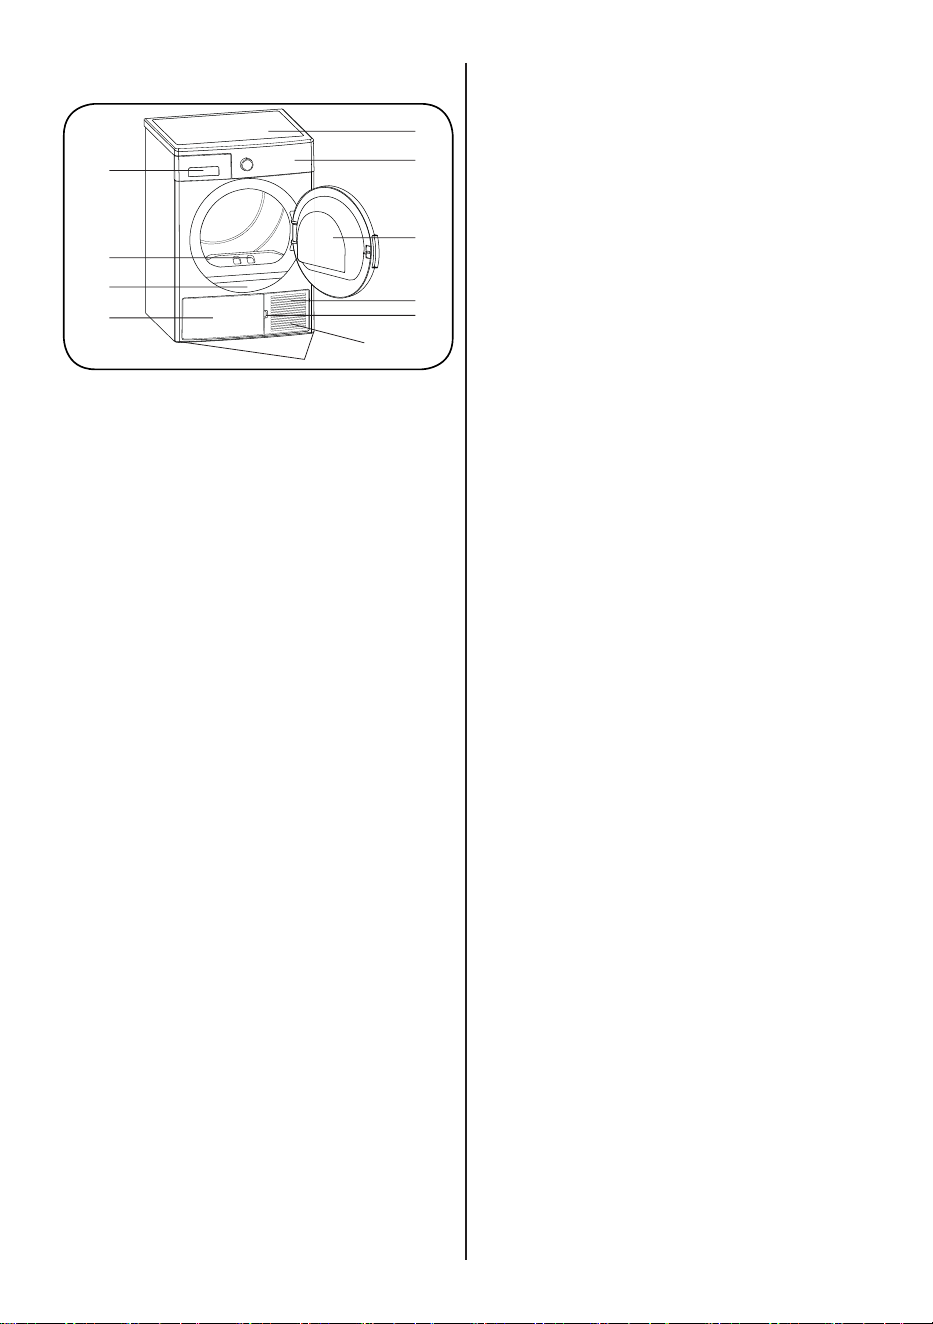
3. OVERVIEW
1
2
3
4
5
6
7
8
9
10
11
1. Upper tray
2. Control panel
3. Loading door
4. Plinth
5. Plinth opening slot
6. Ventilation grills
7. Adjustable feet
8. Plinth cover
9. Type plate
10. Lint lter
11. Drawer Cover
EN - 13
4. PREPARING THE LAUNDRY
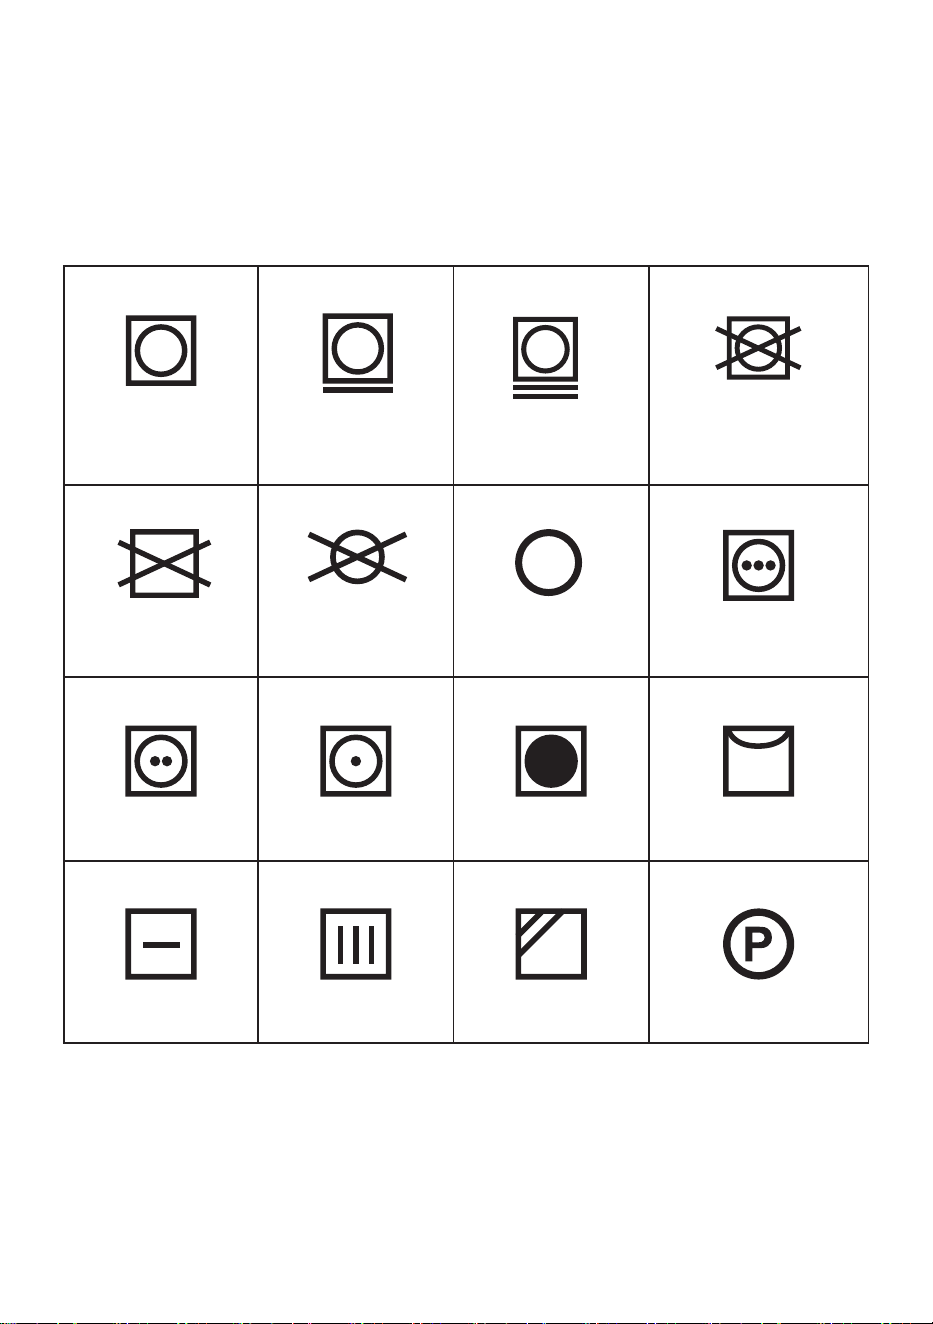
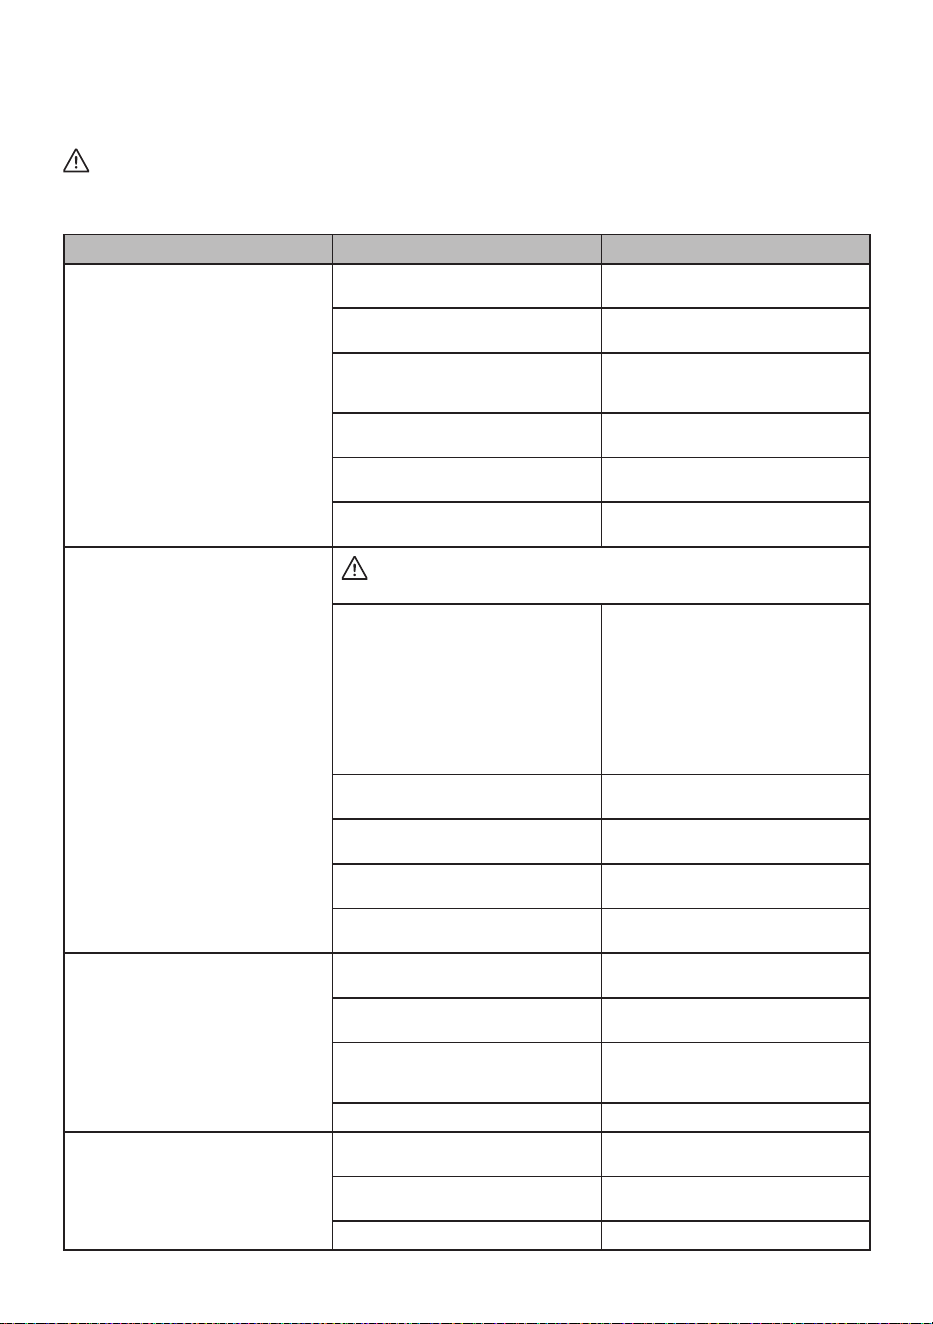
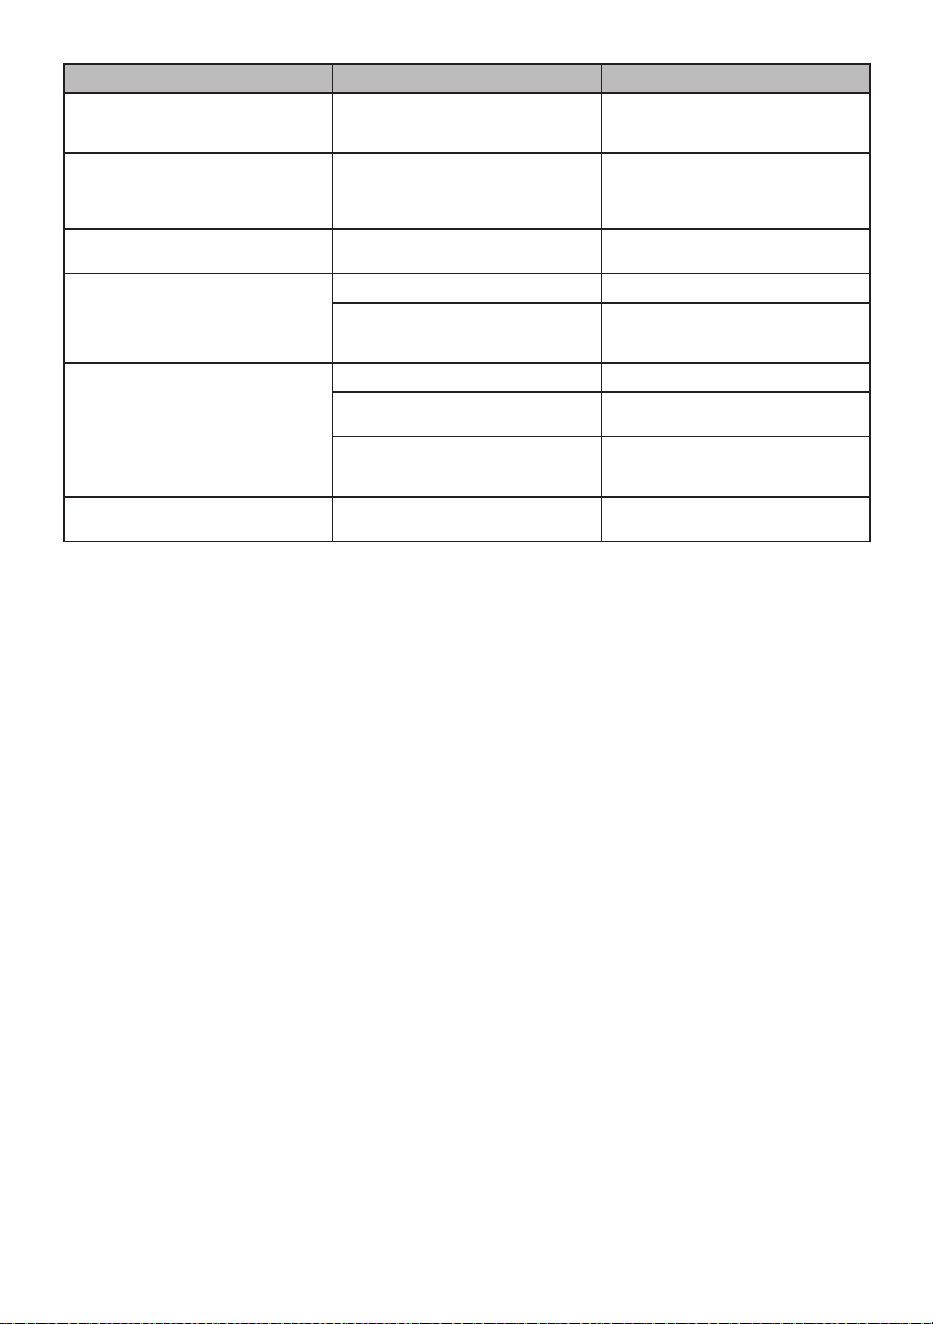
4.1. Sorting the Laundry to be Dried
Follow the instructions on the labels of the laundry to be dried. Only dry items that have a
statement/symbol that indicates "they can be dried in a dryer".
• Do not operate the product with load amounts and laundry types other than those
given in 4.3. Load Capacity.
Suitable for drying in a
dryer
Does not need ironing
Sensitive/Delicate drying
Not suitable for drying in a
dryer
No drying
Do not dry-clean
At any temperature
At high temperatures
At medium temperatures At low temperatures Heatless Hang to dry
Spread to dry Hang wet to dry Spread in shadow to dry Suitable for dry cleaning
Do not dry thin, multi-layer or thick-layer fabrics together as they dry at dierent levels. For
this reason, dry clothes together that have the same structure and fabric type. This way,
you can get an even drying result. If you think that the laundry is still wet, you can select a
time programme for additional drying.
Please dry your big (like duvets) and small sizes of laundries seperately in order to not to
have a damp laundries.
EN - 14
IMPORTANT: Delicate fabrics,
embroided fabrics, woolen/silk fabrics,
clothes made of delicate and expensive
fabrics, airtight clothes and tulle curtains
are not suitable for drying in the dryer.
4.2. Preparing the Laundry to be Dried
Risk of explosion and re!
Remove all objects from pockets such as
lighters and matches.
ATTENTION: The drum of the dryer and
the fabrics may get damaged.
• The clothes may have become
entangled during the washing process.
Separate them from each other before
placing them in the dryer.
• Remove all objects in the pockets of the
clothes and apply the following:
• Tie fabric belts, apron laces etc. to each
other or use a laundry bag.
• Lock the zips, clasps and fasteners, do
up the buttons of covers.
• To get the best drying result, sort the
laundry according to the textile type and
drying programme.
• Remove clips and similar metal parts
from the clothes.
• Woven goods such as t-shirts and knit
clothes generally shrink in the rst
drying. Use a protective programme.
• Do not over-dry synthetics. This will
cause creases.
• When washing the laundry to be dried,
adjust the amount of softener according
to the data from the manufacturer of the
washing machine.
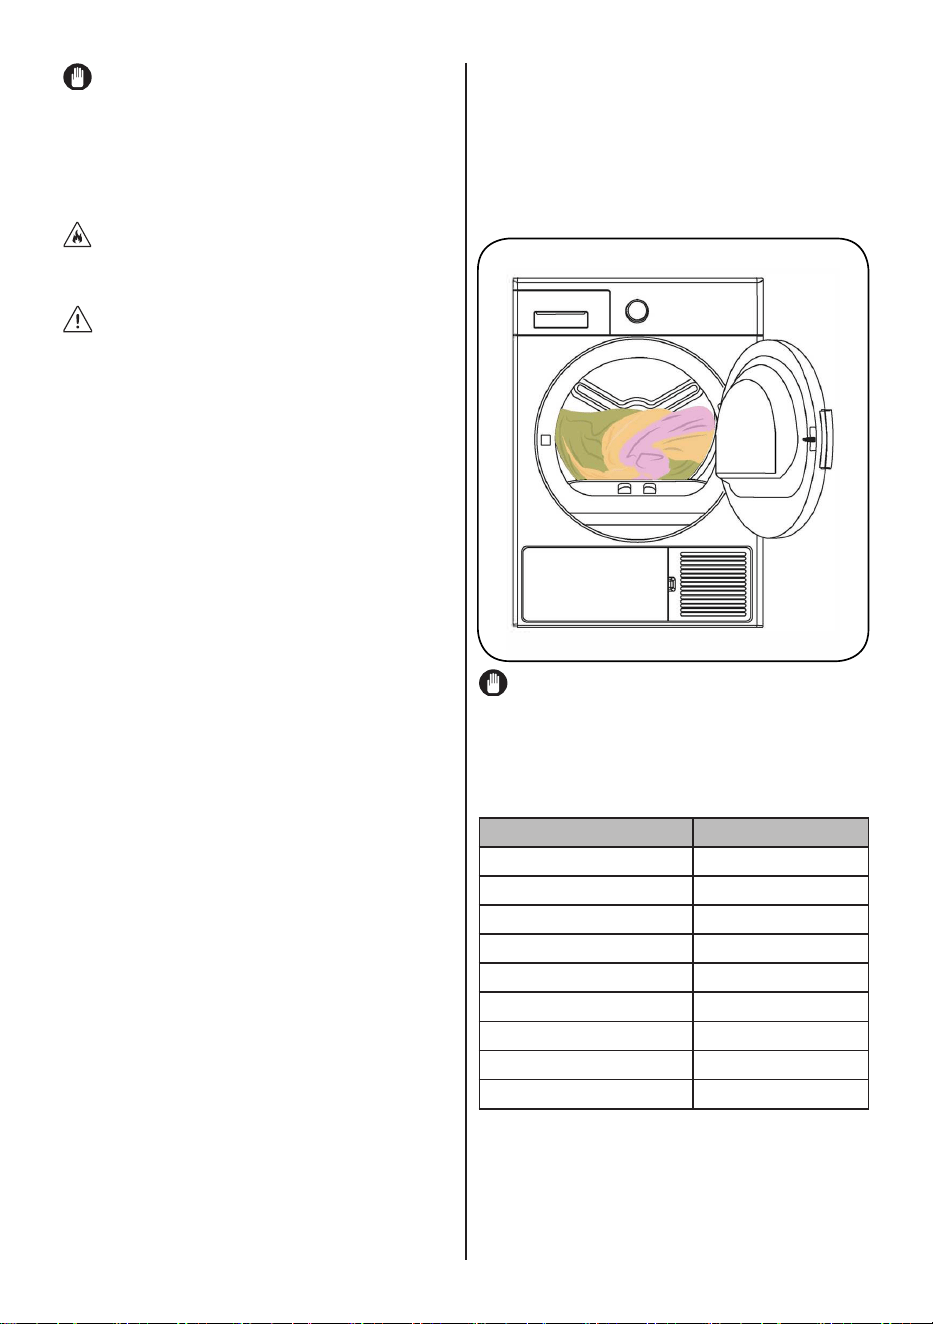
4.3. Load Capacity
Follow the instructions in the "Programme
selection and consumption table". (See: 5.2
Programme selection and consumption
table). Do not load the product with more
laundry than the capacity values specied
in the table.
IMPORTANT: It is not recommended
to load the dryer with more laundry than
the amount shown in the gure. When
overloaded, the drying performance of
the dryer will decrease and the dryer and
laundry might be damaged.
Laundry Dry load weight (gr)
Bedsheet (double) 725
Pillowcase 240
Bath Towel 700
Hand Towel 225
Shirt 190
Cotton Shirt 200
Jean 650
Fabric - Gabardine Trousers 400
T-shirt 120
EN - 15
5. USING THE TUMBLE DRYER
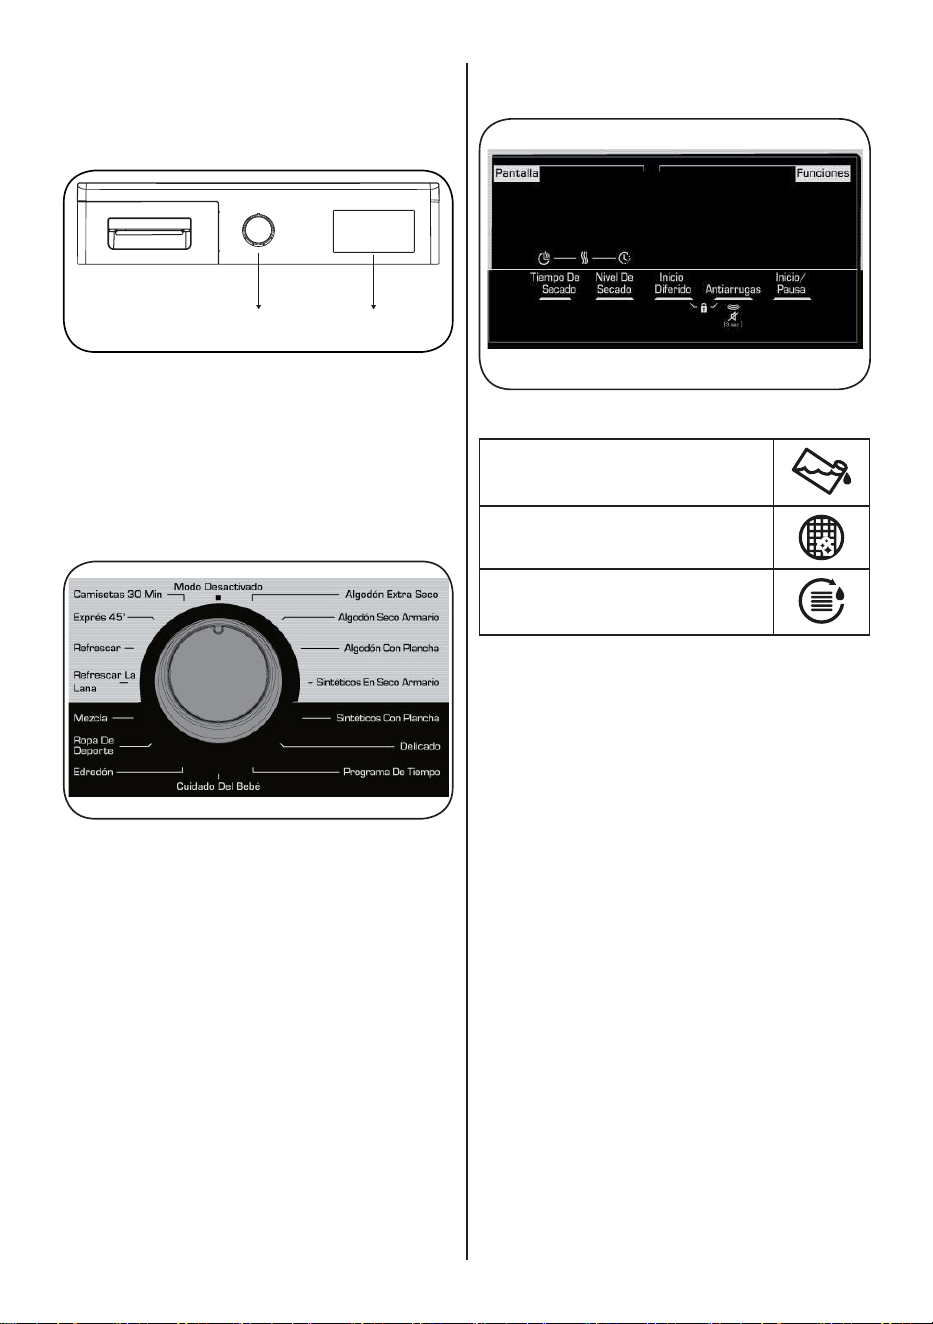
5.1. Control Panel
1. Programme Selection Knob
2. Electronic indicator and additional
functions
5.1.1. Programme Selection Knob
Use the programme selection knob to select
the desired drying programme
1
2
5.1.2. Electronic Indicator and Additional
Functions
Display symbols:
Water tank warning indicator
Lint lter cleaning warning indicator
Heat exchanger cleaning warning
indicator
EN - 16
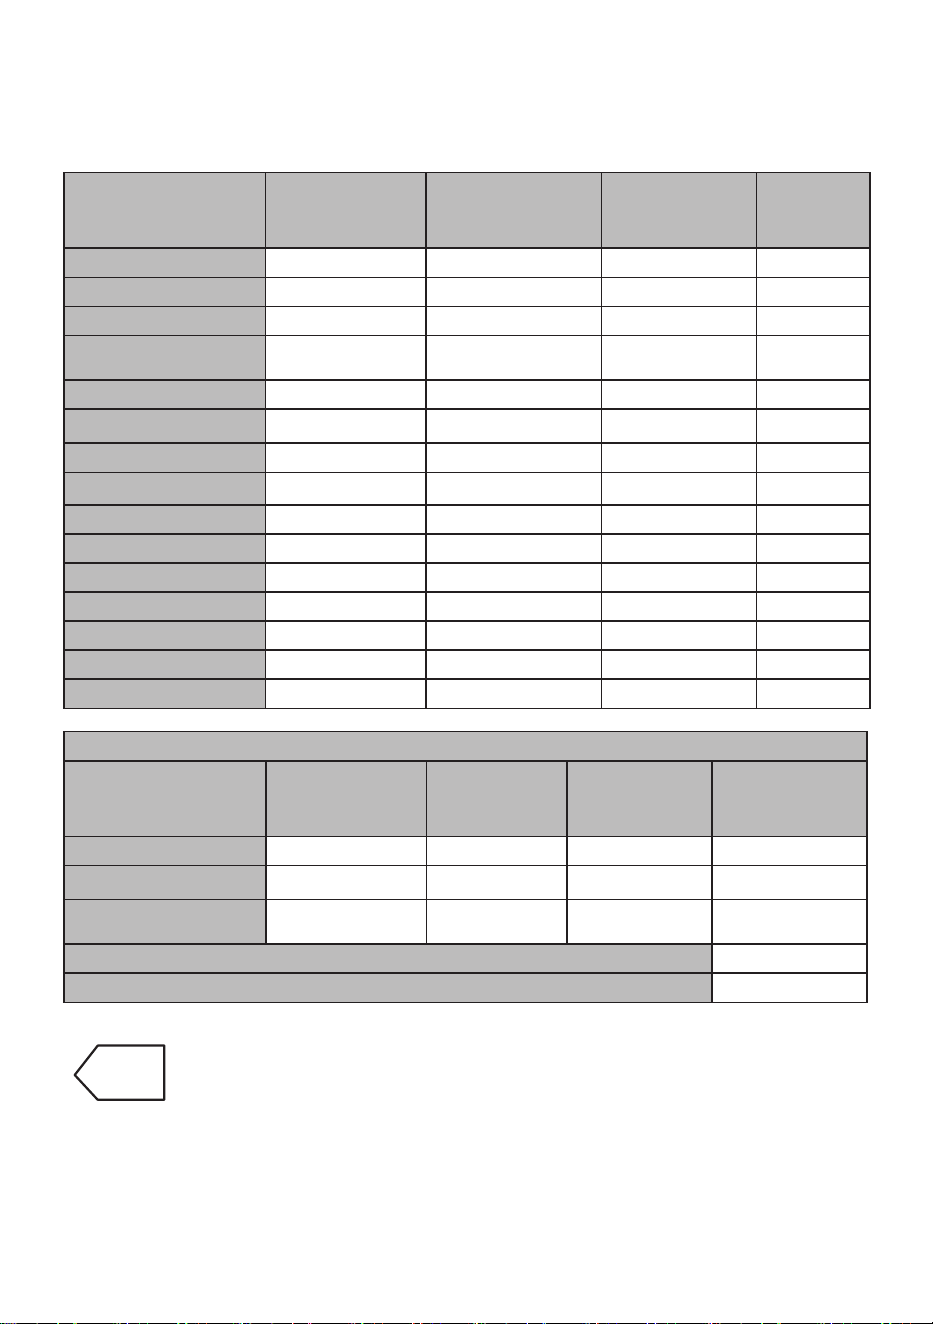
5.2. Programme Selection and Consumption Table
Press the Start/Pause button to start the programme. The Start/Pause LED that indicates
that the programme has started and the remaining the of the program is seen on the
display.
Programme Load (kg)
Washing
machine
spin speed
Approximate
amount of
remaining
humidity
Duration
(minutes)
Cotton Extra Dry 8 1000 60% 179
Cotton Cupboard Dry 8 1000 60% 174
Cotton Iron Dry 8 1000 60% 148
Synthetics Cupboard
Dry
4 800 40% 74
Synthetics Iron Dry 4 800 40% 64
Delicate 2 600 50% 55
Time drying - - - -
Baby Care 3 1000 60% 78
Duvet 2,5 800 60% 140
Sport 4 800 40% 103
Mix 4 1000 60% 112
Wool Refresh - - - 5
Refresh - - - 10
Express 45' 2 1200 50% 45
Shirts 30' 0.5 1200 50% 30
Energy consumption values
Programme Load (kg)
Washing
machine
spin speed
Approximate
amount of
remaining
humidity
Energy
consumption
values (kWh)
Cotton Cupboard Dry 8 1000 60% 1,88
Cotton Iron Dry 8 1000 60% 1,55
Synthetics Cupboard
Dry
4 800 40% 0,93
Power consumption in the "o mode" P
O
(W) 0,5
Power consumption in the "on mode" P
L
(W) 1
The Cotton Cupboard Dry programme is the standard drying programme
that can be run with a full or half load and for which the information is
given on the label and product receipt. This programme is the most energy
ecient programme to dry normal wet cotton clothes.
*Energy labelling standard programme (EN 61121:2013)
All values in the table were determined in accordance with the EN 61121:2013 standard.
Consumption values may vary from the values in the table depending on the fabric type,
spin speed, environment conditions and voltage values.
EN - 17
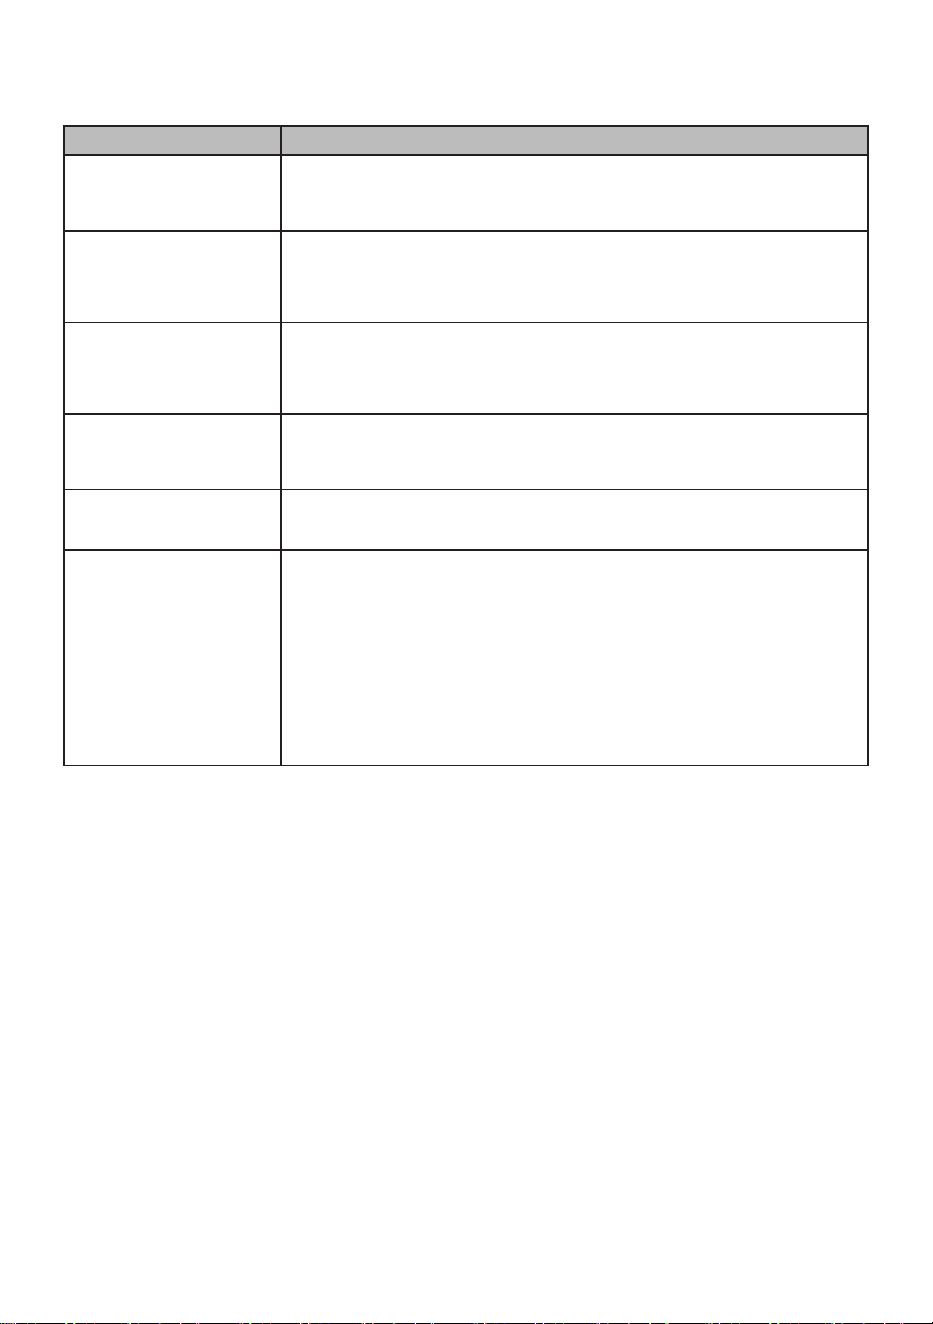
5.2.1. Auxiliary Functions
The table that summarises the options that can be selected in programmes is given below.
Option Description
Drying Level
The humidity level obtained after drying can be increased by 3 levels. This way,
level of required dryness can be selected. The levels that can be selected other
than the standard setting: 1, 2, 3. After selection, the LED of the relevant drying
level will turn on.
Anti-Crease
If you select the "Anti-Crease" option and do not open the door of the dryer at the
end of the programme, the 1-hour anti-crease phase will extend to 2 hours. After
selecting the Anti Crease option, you will hear an audible warning. You can press
the same button again to cancel the option. If you open the door or press the Start/
Pause key while the anti-crease step is in progress, the said step will be cancelled.
Delay Start
You can delay the start time of the programme by selecting the 1-hour to 23-hour
option. You can activate the desired delay time by pressing the Start/Pause button.
When the time is up, the selected programme will start automatically. During the
delay time, options compatible with the programme can be activated/deactivated.
Long pressing on Delayed Start button changes delay time continuously.
Buzzer Cancel
The dryer gives an audible warning when program selection knob is turned,
buttons are pressed and at the end of programme. To cancel the warnings, press
and hold the "Anti-Crease Option" button for 3 seconds. When you press the
button, you will hear an audible warning that the option has been cancelled.
Time Drying
When knob is positioned to Time Drying programme, option can be selected by
pressing Time Drying option button and program starts by pressing Start/Pause
button. Long pressing on tme dyring button changes time continuously.
Child Lock
There is a child lock option to avoid changes in the programme ow when keys
are pressed during the programme. To activate the child lock, press and hold
the "Delay Start" and "Anti-Crease" keys simultaneously for 3 seconds. When
the child lock is active, all keys will be deactivated. Child lock will be deactivated
automatically at the end of the programme. When activating/deactivating the child
lock, ‘‘CL’’ will visualize on display for 2 sec and then becomes o; and an audible
warning will be heard. Warning; when the product is running or the child lock is
active, if you turn the programme selection knob, you will hear an audible warning
and ‘‘CL’’ will visualize on display for 2 sec and then becomes o. Even if you set
the programme knob to another programme, the previous programme will continue
running. To select a new programme, you need to deactivate the child lock and
then set the programme selection knob to ‘‘O’’ position. Then, you can select and
start the desired programme.
EN - 18
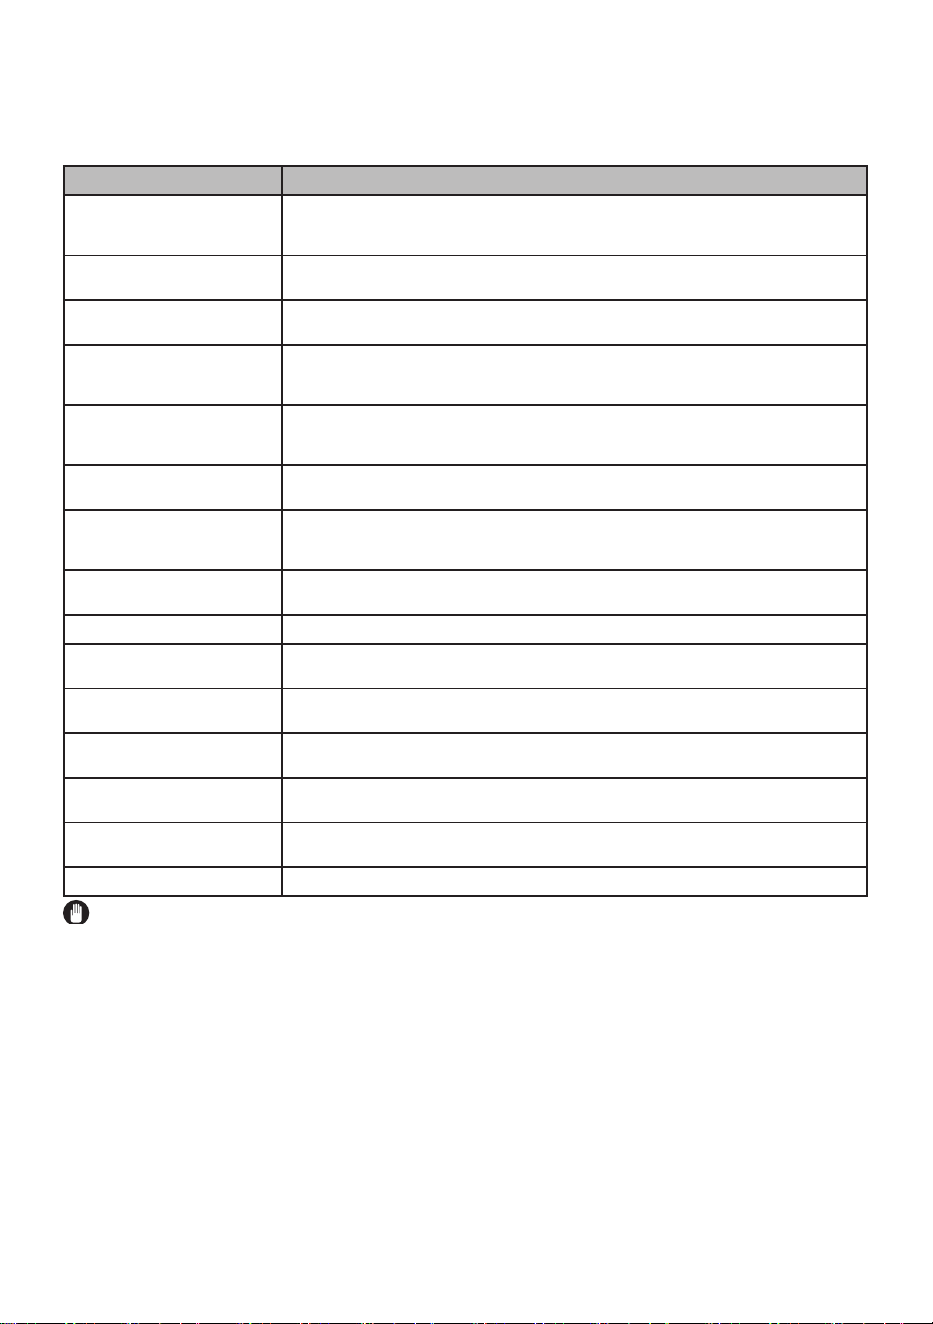
5.2.2. Starting the Programme
The Start/Pause LED will ash during programme selection.Press the Start/Pause button
to start the programme. The Start/Pause LED that indicates that the programme has
started and the drying LED will come on.
Programme Description
Cotton Extra Dry
This programme dries thick and multi-layer fabrics, such as cotton towels,
bedsheets, pillowcases, bathrobes, at a high temperature to allow you to place
them in a closet.
Cotton Cupboard Dry
This programme dries cotton pyjamas, underwear, tablecloths etc. to allow you to
place them in a closet.
Cotton Iron Dry
This programme dries cotton laundry to prepare it for ironing. Laundry removed
from the machine will be damp.
Synthetics Cupboard Dry
This programme dries synthetics, such as shirts, t-shirts, blouses, at a lower
temperature compared to the cottons programme to allow you to place them in a
closet.
Synthetics Iron Dry
This programme dries synthetics, such as shirts, t-shirts, blouses, at a lower
temperature compared to the cottons programme to prepare them for ironing.
Laundry removed from the machine will be damp.
Delicate
This programme dries thin clothes like shirts, blouses and silk garments at a low
temperature to make them ready to wear.
Time Drying
To reach the required drying level at a low temperature, you can use the time
programmes of 20 min. to 200 min. Regardless of the drying level, the programme
stops at the desired time.
Baby Care
This programme dries delicate infant clothes at a low temperature to make them
ready to wear.
Duvet This programme is used to dry duvet.
Sport
Sport program is used for synthetic sport laundries like shorts, t-shirts at low
temperature.
Mix
This programme dries cotton-synthetic mixed garments that do not discolour to
make them ready to wear.
Wool Refresh
Wool refresh helps wool textiles to remove excess water after washing by applying
low temperature and gentle movements of drum.
Refresh
This programme provides ventilation for 10 minutes without applying heat to help
freshen up your garments.
Express 45'
2 kg of cotton shirts spun at a high speed in the washing machine are dried in 45
minutes.
Shirts 30' 2 to 3 shirts are ready for to be ironed in 30 minutes.
IMPORTANT: Do not open the loading door while the programme is running. If you
have to open the door, do not keep it open for a long time.

EN - 19
5.2.3. Programme Progress
During the Programme
If you open the door when the programme
is running, the product will switch to standby
mode. Once the door has been closed,
press the Start/Pause key to resume the
programme.
Do not open the loading door when the
programme is running. If you have to open
the door, do not keep it open for a long
time.
Programme End
Once the programme is over, the warning
LEDs for Start/Pause, water tank level, lter
cleaning and heat exchanger cleaning will
turn on. Additionally, an audible warning
will be given at the end of the programme.
You can remove the laundry to make the
machine ready for a new load.
IMPORTANT: Clean the lint lter after
every programme. Empty the water tank
after every programme.
IMPORTANT: If you do not take out the
laundry after the programme has ended, the
1-hour Anti Crease phase will automatically
be activated. This programme rotates the
drum at regular intervals to prevent creases.
5.3. Drum Light Information
• This product includes LED Drum Light.
• The light works automatically when you
open the door. And closes itself after a while
automatically.
• It is not an adjustable option for user to
open or close it.
• Please do not try to replace or modify the
LED Light.
EN - 20
PROGRAMMES
OPTIONS
Delay
Start
Buzzer
Cancel
Child Lock Time Drying
Drying
Level
Anticrease
Cotton Extra Dry
X
Cotton Cupboard
Dry
X
Cotton Iron Dry X
Synthetics
Cupboard Dry
X
Synthetics Iron
Dry
X
Delicate X X
Time drying X
Baby Care X
Duvet X X
Sport X
Mix X
Wool Refres X X
Refresh X X
Express 45' X X
Shirts 30' X X
X Not selectable
Selectable
EN - 21
6. CLEANING AND CARE
IMPORTANT: Do not use industrial
chemicals to clean your dryer. Do not use a
dryer that has been cleaned with industrial
chemicals.
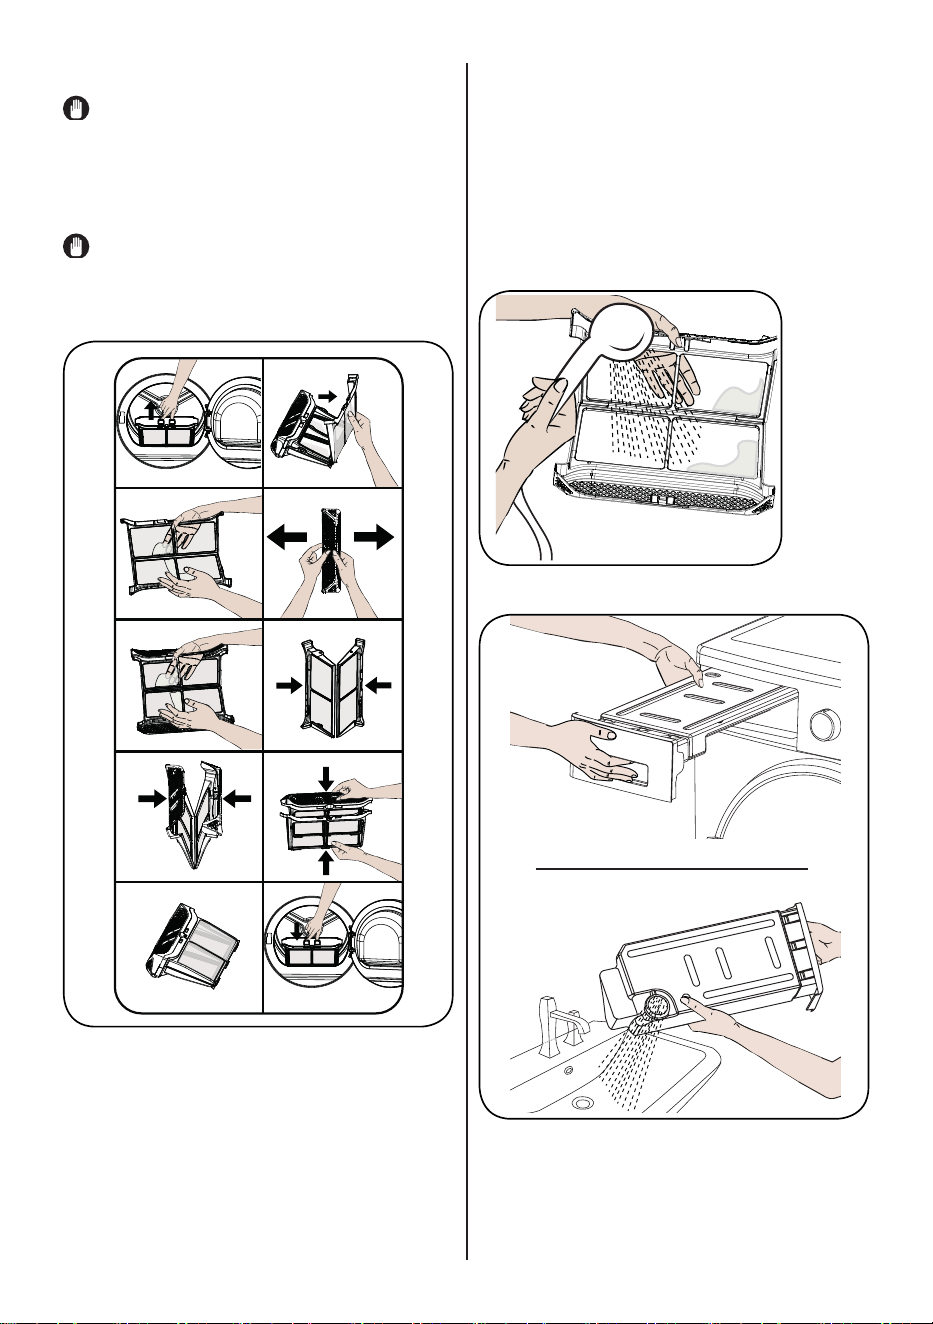
6.1. Cleaning the Lint Filters
IMPORTANT: DO NOT FORGET TO
CLEAN THE LINT FILTERS AFTER EACH
USE.
To clean the lint lters:
1. Open the loading door.
2. Pull up the lint lters to remove it.
3. Open the outer lter
4. Clean the outer lter by your hands or
using a soft cloth.
5. Open the inner lter
6. Clean the inner lter by your hands or
using a soft cloth
7. Close the lters and t the hooks
8. Place inner lter inside of outer lter
9. Ret the Lint lter
After the dryer has been used for a certain
period of time, if you encounter a layer that
will cause obstruction on the lter surface,
wash the lter with warm water to clean the
layer. Dry the lter thoroughly before
reinstalling it again.
6.2. Emptying the Water Tank
1. Pull the drawer cover and carefully take
out the tank.
2. Empty the water in the tank.
1
2
EN - 22
3. If there is lint accumulated on the
discharge cap in the tank, clean it with
water.
4. Ret the water tank.
IMPORTANT: Never remove the water
tank when the programme is running. The
water condensed in the water tank is not
suitable for human consumption.
IMPORTANT: DO NOT FORGET TO
EMPTY THE WATER TANK AFTER EACH
USE.
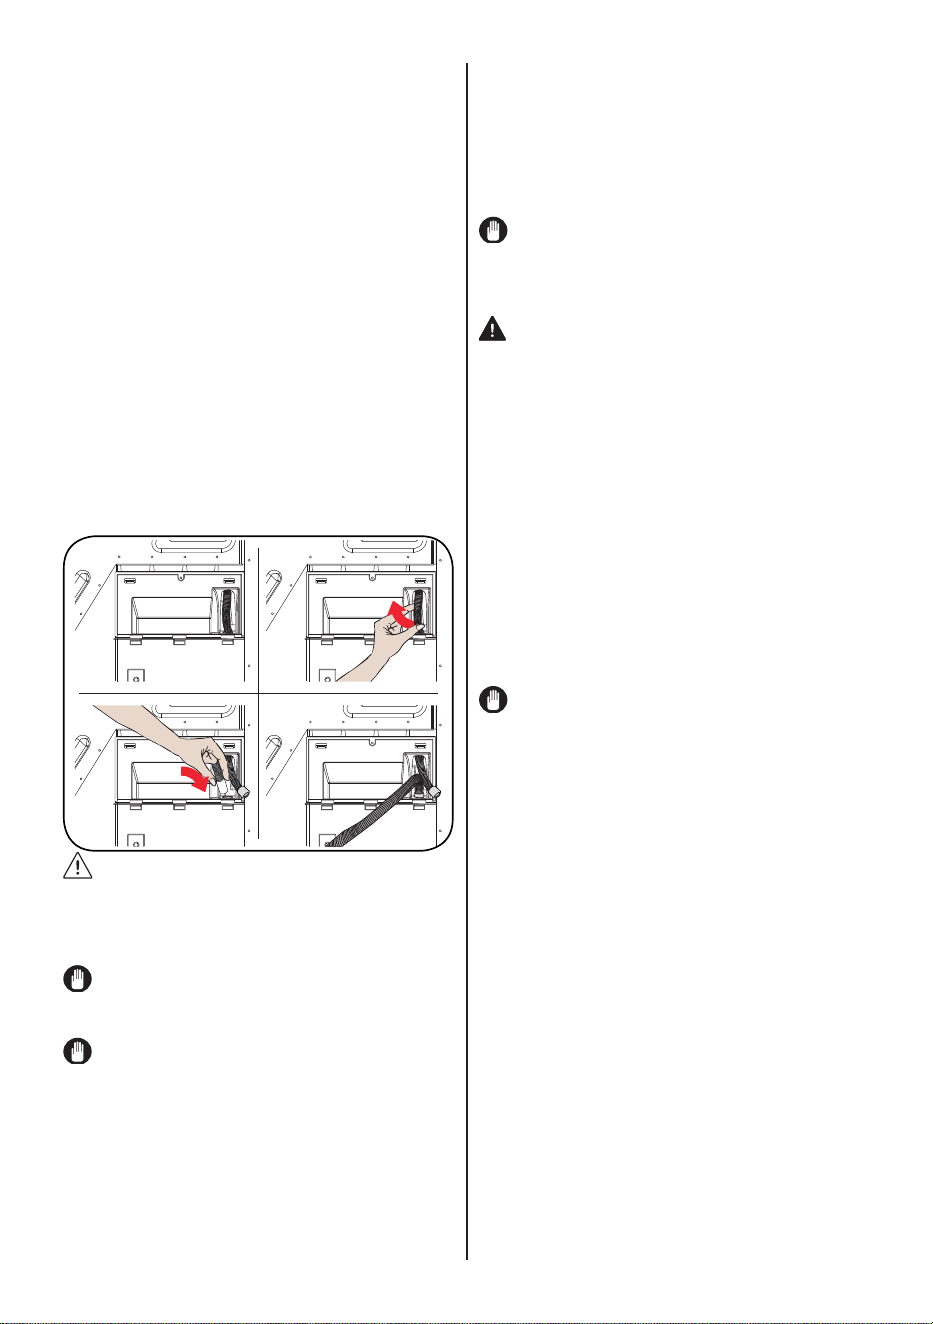
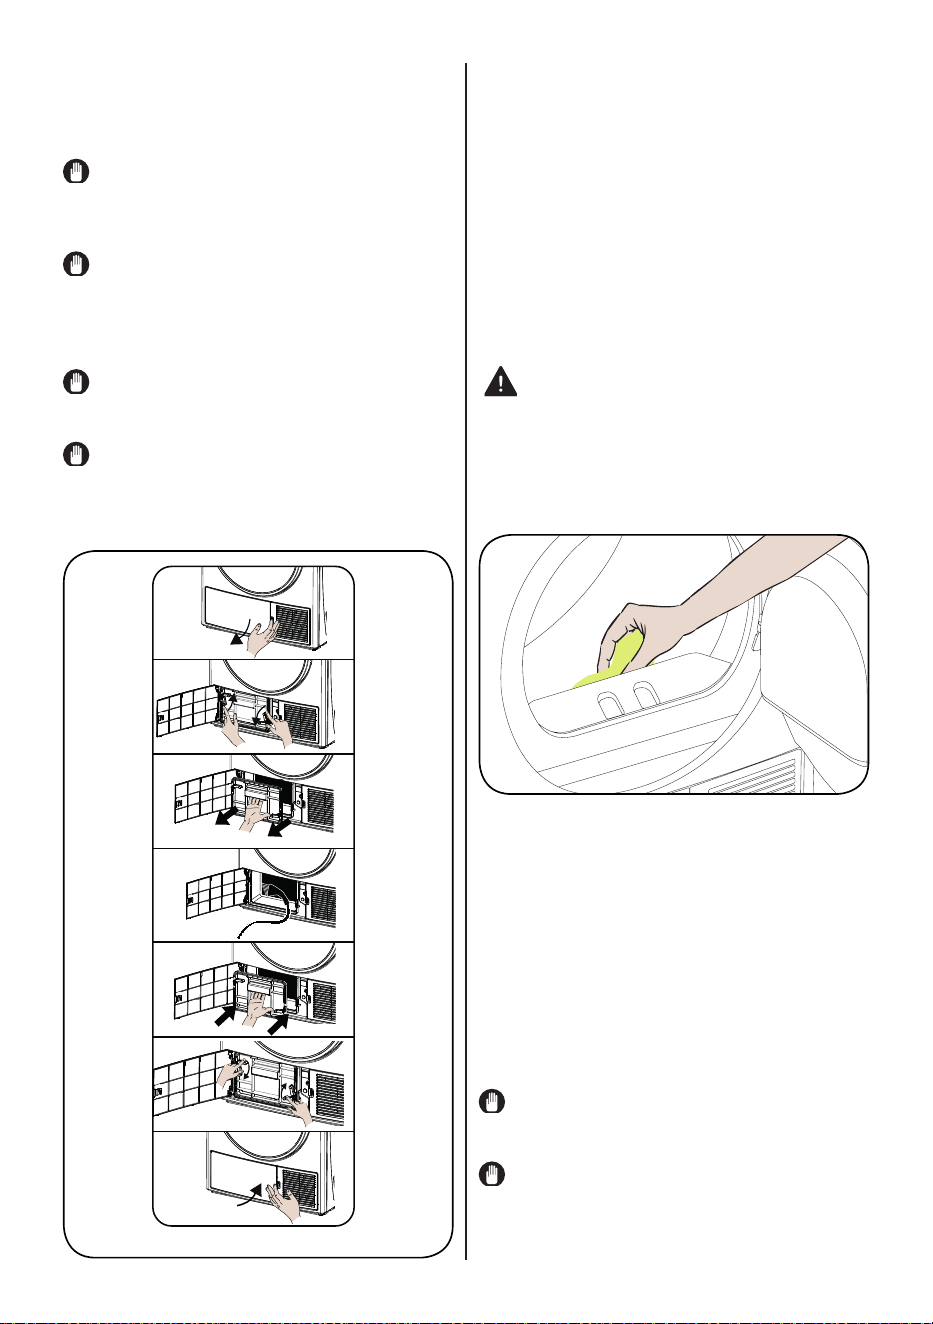
6.3. Cleaning the Heat Exchanger
IMPORTANT: Clean the heat exchanger
when you see the warning “Heat Exchanger
cleaning”.
IMPORTANT: EVEN IF THE “HEAT
EXCHANGER CLEANING WARNING
LED” IS NOT ON: CLEAN THE HEAT
EXCHANGER AFTER EVERY 30 DRYING
PROCESSES OR ONCE A MONTH.
If the drying process is completed, open the
loading door and wait for it to cool down.
1. Open the kick plate cover as shown.
2. Unlock the exchanger cover by turning
in the direction shown with arrows.
3. Take out the exchanger cover as shown.
4. Clean the front surface of the exchanger
as shown.
5. Fit the exchanger cover as shown.
6. Lock the exchanger cover by turning in
the direction shown with arrows.
7. Close the kick plate cover as shown.
WARNING: DO NOT CLEAN
WITH BARE HANDS SINCE THE
EXCHANGER FINS ARE SHARP.
THEY MAY HURT YOUR HANDS
6.4. Cleaning the Humidity Sensor
Inside the machine, there are humidity
sensors that detect whether the laundry is
dry or not.
To clean the sensors:
1. Open the loading door of the machine.
2. If the machine is still hot due to the drying
process, wait for it to cool down.
3. Using a soft cloth soaked in vinegar, wipe
the metal surfaces of the sensor and dry
them.
IMPORTANT: CLEAN THE METAL
SURFACES OF THE SENSOR 4 TIMES A
YEAR.
IMPORTANT: Do not use metal tools to
clean the metal surfaces of the sensor.

EN - 23
WARNING: Due to the risk or re and
explosion, do not use solution agents,
cleaning agents or similar products when
cleaning the sensors.
6.5. Cleaning the Inner Surface of the
Loading Door
IMPORTANT: DO NOT FORGET TO
CLEAN THE INNER SURFACE OF THE
LOADING DOOR AFTER EACH DRYING
PROCESS.
Open the loading door of the dryer and
clean all of the inner surfaces and the
gasket with a soft, damp cloth.
EN - 24
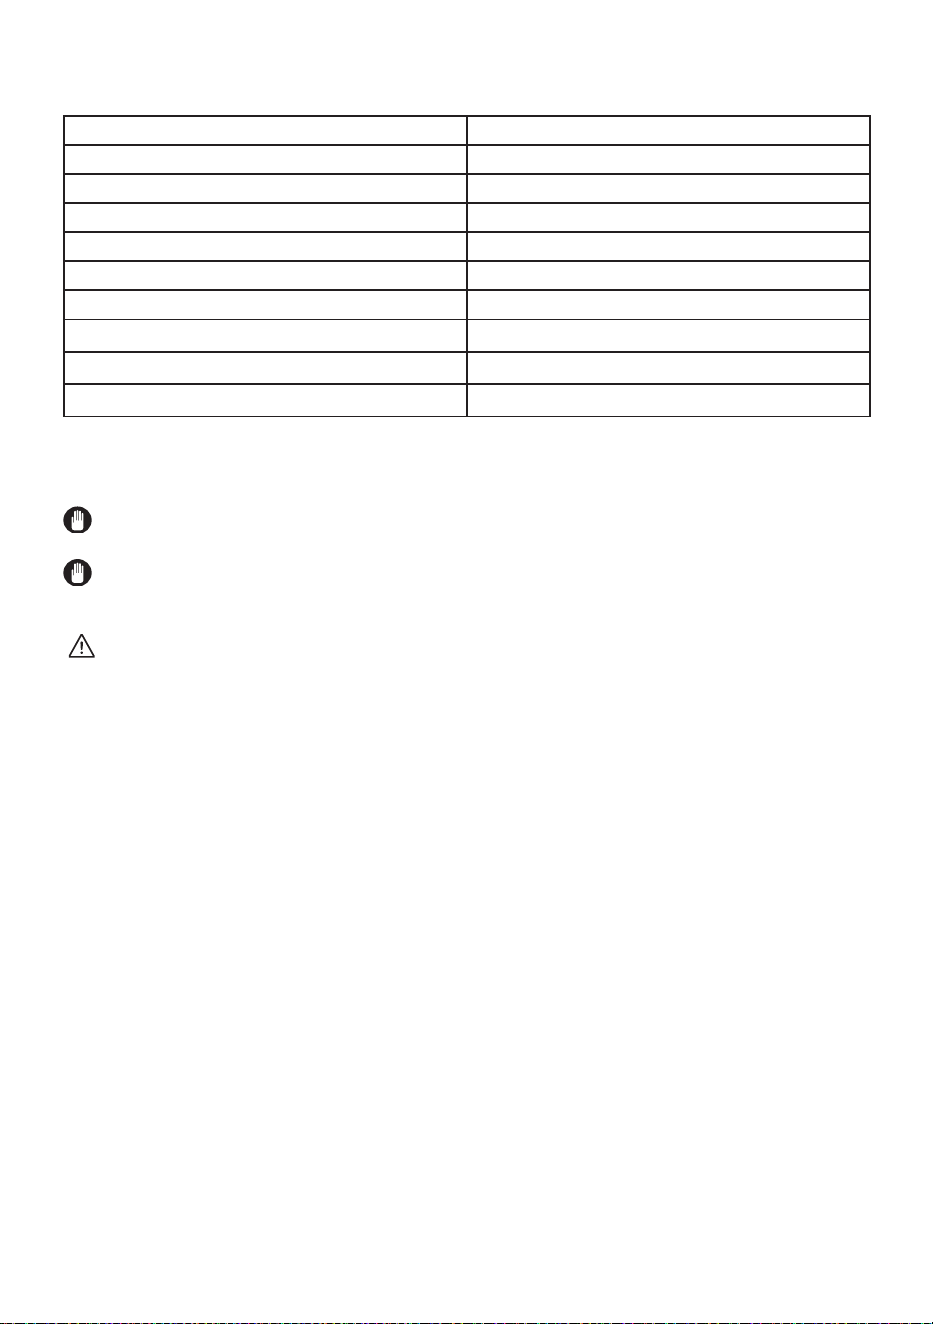
7. TECHNICAL SPECIFICATIONS
Brand CORBERÓ
Model name CSBCV8020T
Height Min: 845 mm / Max: 855 mm*
Width 596 mm
Depth 609 mm
Capacity (max.) 8 kg**
Net weight (with plastic door) 46,8 kg
Net weight (with glass door) 48,8 kg
Voltage
220-240 V
Power
1000 W
*Min. height: Height with the adjustable feet not used. Max. height: Height with the
adjustable feet extended to the maximum.
**Dry laundry weight before washing.
IMPORTANT: To improve the quality of the dryer, technical specications are subject to
change without prior notice.
IMPORTANT: The values declared have been obtained in a laboratory environment
according to the relevant standards. These values may change depending on the
environmental conditions and use of the dryer.
ATTENTION:
1. Due to safety reasons, legislation forces a room of at least 1 m³ per 8 g refrigerant for
such equipment. For 150 g propane, the minimum allowed room size would be 18.75 m³.
2. Coolant :Risk of re/risk of poisoning/risk of material damage and damage to the
appliance. The appliance contains refrigerant which, although it is environmentally friendly,
is ammable R290. Failure to dispose of it properly may result in a re or poisoning.
Dispose of the appliance properly and do not damage the pipes in the refrigerant circuit.
• Type of refrigerant : R290
• Quantity of gas : 150 g
• ODP (Ozone Depletion Potential) : 0
• GWP (Global Warning Potential) : 3
3. Risk of explosion or re. Remove any cigarette lighters and matches from pockets.
4. Do not place the dryer near open res and ignition sources.
EN - 25
8. TROUBLESHOOTING
Your dryer is tted with systems that continuously perform checks during the drying
process to take the necessary measures and warn you in case of any malfunction.
WARNING: If the problem persists even if you have applied the steps in this section,
please contact the your dealer or an Authorised Service Provider. Never try to repair a
nonfunctional product.
PROBLEM REASON SOLUTION
The drying process takes a long
time.
The surface of the lint lter might be
clogged.
Wash the lter with lukewarm water.
The heat exchanger might be
clogged.
Clean the heat exchanger
The ventilation grills in front of the
machine might be closed.
Open the doors/windows to prevent
the room temperature from rising
too much.
There might be a layer of limescale
on the humidity sensor.
Clean the humidity sensor.
The dryer might be overloaded with
laundry.
Do not overload the dryer.
The laundry might be insuciently
spun.
Select a higher spin speed on your
washing machine.
Laundry comes out damp at the end
of the drying process.
The laundry that comes out hot at the end of the drying process
generally feels more humid.
The programme used might not be
suitable for the type of laundry.
Check the care labels on the
laundry items, select a suitable
programme for the type of laundry
and additionally, use the time
programmes.
The surface of the lint lter might be
clogged.
Wash the lter with lukewarm water.
The heat exchanger might be
clogged.
Clean the heat exchanger
The dryer might be overloaded with
laundry.
Do not overload the dryer.
The laundry might be insuciently
spun.
Select a higher spin speed on your
washing machine.
The dryer cannot be opened or the
programme cannot be started. The
dryer does not get activated when
adjusted.
The dryer might not be plugged in. Make sure that the plug is tted in
the socket.
The loading door might be open. Make sure that the loading door is
properly closed.
You might not have set a
programme or pressed the Start/
Pause key.
Make sure that the programme has
been set and the dryer is not in the
Standby (Pause) mode.
Child lock might be active. Deactivate the child lock.
The programme has been
interrupted for no reason.
The loading door might not be
closed properly.
Make sure that the loading door is
properly closed.
There might have been a power
failure.
Press the Start/Pause key to start
the programme.
The water tank might be full. Empty the water tank.
EN - 26
PROBLEM REASON SOLUTION
Clothes have shrunk, felted or
deteriorated.
The programme used might not be
suitable for the type of laundry.
Check the care labels on the
laundry items, select a suitable
programme for the type of laundry.
Water leaking from the loading door.
There might be lint accumulated on
the inner surfaces of the loading
door and on the surfaces of the
gasket of the loading door.
Clean the inner surfaces of the
loading door and the surfaces of the
gasket of the loading door.
The loading door opens on its own.
The loading door might not be
closed properly.
Push the loading door until you hear
the closing sound.
The water tank warning symbol is
on/ashing.
The water tank might be full. Empty the water tank.
The water discharge hose might
be bent.
If the product is connected directly
to the water outlet, check the water
discharge hose.
The lter cleaning warning symbol
is on.
The lint lter might be unclean. Clean the lter.
The lter seat might be clogged
by lint.
Clean the lter seat.
There might be a layer that causes
obstruction on the surface of the
lint lter.
Wash the lter with lukewarm water.
The heat exchanger cleaning
warning symbol is on.
The heat exchanger might be
unclean.
Clean the heat exchanger.
EN - 27
9. AUTOMATIC FAULT WARNINGS AND WHAT TO DO
Your tumble dryer is equipped with a built-in fault detection system, indicated by a
combination of ashing operation lights. The most common failure codes are shown below.
ERROR CODE SOLUTION
E03 /
Empty the water tank, if problem does not solved, contact
the nearest authorised service agent.
E04 Contact the nearest authorised service agent.
E05 Contact the nearest authorised service agent.
E06 Contact the nearest authorised service agent.
E08
There may be voltage fluctuation in mains.Wait until
voltage is appropriate for working range.
EN - 28
10. ENVIRONMENTAL
PROTECTION AND PACKAGING
INFORMATION
10.1. Packaging Information
The packaging of this product is made
of recyclable materials. Do not dispose
of the packaging, waste together with
household or other waste. Instead, take it to
a packaging collection point dened by your
local authority.
11. DESCRIBING THE ENERGY
LABEL AND SAVING ENERGY
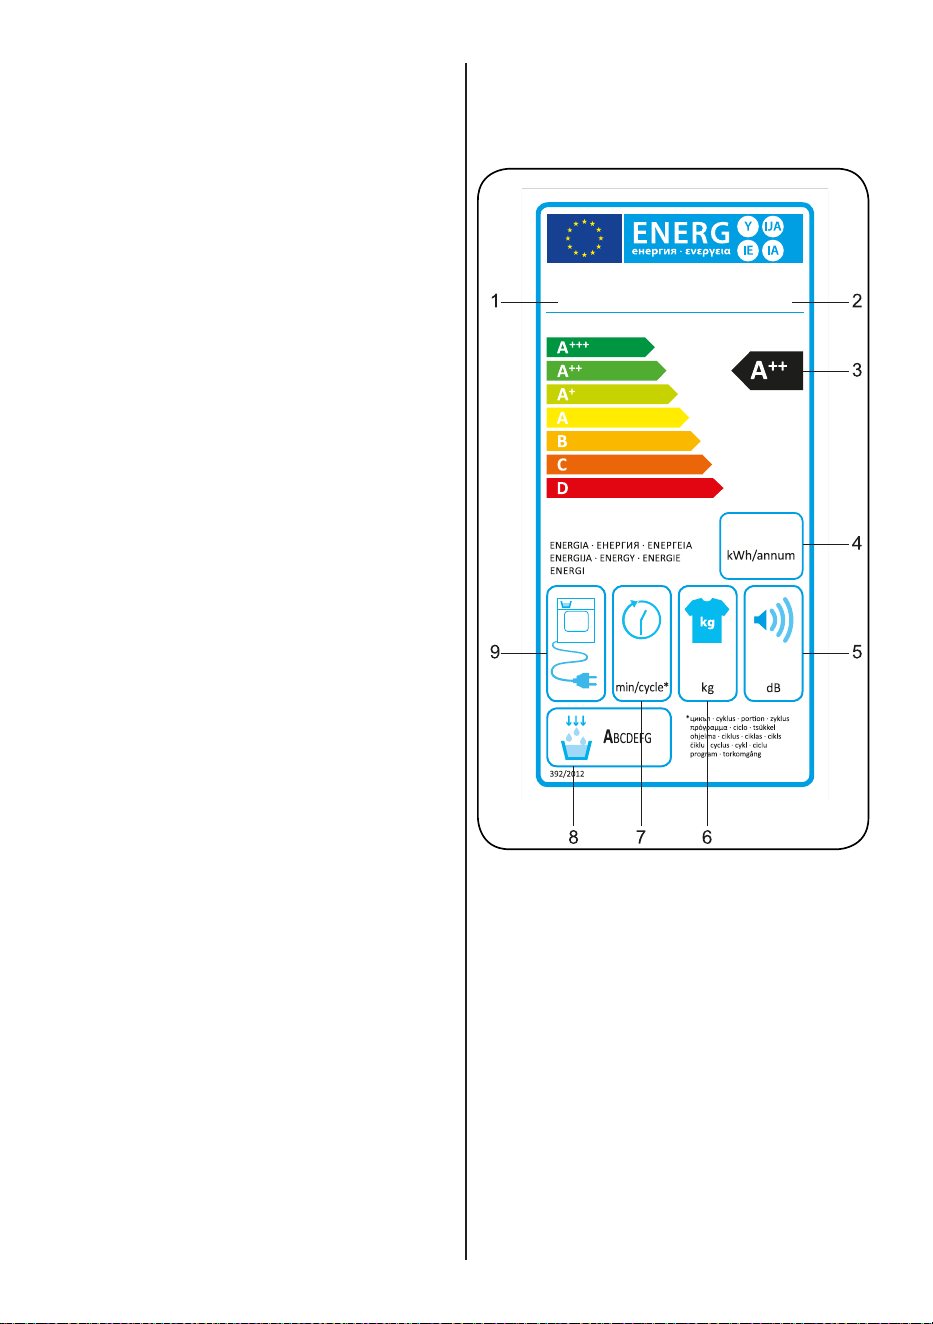
11.1. Energy Labelling
1. Trademark
2. Model
3. Energy Class
4. Annual Power Consumption
5. Noise During Drying
6. Dry Laundry Capacity
7. Cotton Cupboard Dry Cycle Time
8. Condensing Eciency Class
9. Machine Technology

EN - 29
11.2. Energy Eciency
• You should operate the dryer to full
capacity, but make sure that it is not
overloaded.
• When the laundry is being washed,
the spin speed should be at the
highest level possible. This will shorten
the drying time and reduce energy
consumption.
• Make sure that the same kinds of
laundry are dried together.
• Please follow the recommendations
in the user manual for programme
selection.
• For air circulation, leave an appropriate
clearance on the front and back sides
of the dryer. Do not cover the grills on
the front side of the machine.
• Unless necessary, do not open the
door of the machine when drying. If you
have to open it, do not keep it open for
a long time.
• Do not add new (wet) laundry during
the drying process.
• Hairs and lint that detach from the
laundry and merge in the air are
collected by the "Lint Filters". Please
make sure that the lters are cleaned
before and after each use.
• For models with a heat pump, make
sure that the heat exchanger is cleaned
at least once a month or after each 30
uses.
• During the drying process, the
environment where the dryer is installed
must be well ventilated.
EN - 30
PRODUCT FICHE
Complying Commission Delegated Regulation (EU) No 392/2012
Supplier name or trademark CORBERÓ
Model name CSBCV8020T
Rated capacity (kg) 8
Type of Tumble Dryer Heat Pump
Energy eciency class
(1)
A++
Annual Energy Consumption (kWh)
(2)
235
Automatic of Non-automatic Automatic
Energy Consumption of the standard cotton programme at full load (kWh) 1,88
Energy Consumption of the standard cotton programme at partial load (kWh) 1,1
Power consumption of the o-mode for the standard cotton programme at full load P
O
(W)
0,5
Power consumption of the left-on mode for the standard cotton programme at full load
P
L
(W)
1
The duration of the left mode on (min) n/a
Standard cotton programme
(3)
Programme time of the standard cotton programme at full load , T
dry
(min.) 174
Programme time of the standard cotton programme at partial load , T
dry1/2
(min.) 103
Weighted programme time of the standard cotton programme at full and partial load
(T
t
)
133
Condensation eciency class
(4)
B
Average condensation eciency of the standard cotton programme at full load C
dry
81%
Average condensation eciency of the standard cotton programme at partial load
C
dry1/2
81%
Weighted condensation eciency of the standard cotton programme at full load and
partial load C
t
81%
Sound power level for the standard cotton programme at full load
(5)
65
Built-in No
(1) Scale from A+++ (most ecient) to D (least ecient)
(2)Energyconsumption based on 160 drying cycles of the standard cotton programme
at full and partial load,and the consumption of the low-power modes. Actual energy
consumption per cycle will depend on how the appliance is used.
(3) “Cotton cupboard dry programme” used at full and partial load is the standard drying
programme to which the information in the label and the che relates, that this programme
is suitable for drying normal wet cotton laundry and that it is the most ecient programme
in terms of energyconsumption for cotton
(4) Scale from G (least ecient) to A (most ecient)
(5) Weighted average value - L wA expressed in dB(A) re 1 pW

52287184-190711-00

CERTIFICADO DE GARANTÍA
Imprescindible la presentación de la factura de compra acompañada del presente certificado de garantía.
Riesgos cubiertos.
Este aparato está garantizado contra cualquier defecto de funcionamiento, siempre que se destine a uso doméstico,
procediéndose a su reparación dentro del plazo de garantía y sólo por la red de SAT autorizados.
Nuestros electrodomésticos Corberó cuentan con la garantía legal del fabricante que cubre cualquier avería o defecto durante36
meses, desde su fecha factura de 1 de enero del 2022. En caso de que fuera necesario, nosotros nos ocupamos de cualquier posible
incidencia siempre que se deba a un componente defectuoso o fallo de fabricación.
Excepciones de garantía.
• Que la fecha del certificado no coincida con la fecha de venta de la factura original.
• Averías producidas por golpe, por caída o cualquier otra causa de fuerza mayor.
• Si el apa
rato ha sido manipulado por personal no autorizado.
• Las averías producidas o derivadas como consecuencia de un uso inadecuado, por defectos de instalación,
por introducir modificaciones en el aparato que alteren su funcionamiento.
• Puestas en marcha, mantenimiento, limpiezas, componentes sujetos a desgaste, lámparas, piezas estéticas,
oxidaciones, plásticos, gomas, carcasas y cristales.
“ESTAS EXCEPCIONES ANULAN LA GARANTÍA, SIENDO LA REPARACIÓN CON CARGO AL CLIENTE”
Periodo amparado en aparatos según ley de garantias en la venta de bienes de consumo Ley vigente es “RD 7/2021”
Horario de atención Lunes a Viernes de 9h00 a 19h00. Teléfono de contacto_ 911 08 08 08 Mail de contacto_ [email protected] web_ www.corbero.es
Dirección de Servicio técnico oficial_Vidal i Ribes 8-10 08950 Esplugues de Llobregat Barcelona
Sevicio Técnico Oficial: 911 08 08 08
Los hornos microondas (a excepción de los integrables) y los hornos sobremesa en el caso de cualquier incidencia de
funcionamiento, deben de llevarse al servicio técnico más próximo por parte del cliente. No se recojen ni reparan en el
domicilio.
•
Garantía termos eléctricos. Garantía de 3 años incluyendo los costes de desplazamiento y mano de obra que
correspondan de la reparación del producto, teniendo que tener un mantenimiento una vez cada 12 meses.
Especialmente si Ud. ha instalado un aparato a gas, tenga presente como titular de la instalación, la obligatoriedad de
realizar una revisión completa de los equipos, (según Real Decreto 238 / 2013, del 5 Abril. RITE. IT3, M. Lo termos
eléctricos y calderas que incluyen depósitos acumuladores de agua caliente, para que se aplique la prestación de la
Garantía, es obligatorio que el ánodo de magnesio esté operativo y que realice la función de protección
adecuadamente. Para ello es recomendable que el ánodo se revise bianualmente por el Servicio Oficial y sea renovado
cuando fuera necesario. Periodicidad que deberá ser anual en aquellas zonas con aguas críticas (contenido de CaCO3
superiores a 200mg/L, es decir a partir de 20ºfH de dureza). Depósitos sin el correcto estado del ánodo de protección, no
tienen la cobertura de la garantía. Independientemente del tipo de depósito o producto, todas las válvulas de
sobrepresión de calefacción o a.c.s., deberán ser canalizadas para evitar daños en Ia vivienda por descargas de agua. La
garantía del producto no asume los daños causados por Ia no canalización del agua derramada por esta válvula.
•

CERTIFICATE OF GUARANTEE
The presentation of the purchase invoice accompanied by this guarantee certificate is essential.
Covered Risks.
This appliance is guaranteed against any malfunction, provided that it is intended for domestic use, proceeding to its repair within
the warranty period and only by the authorized SAT network.
Our Corberó appliances have the manufacturer's legal warranty that covers any breakdown or defect for 36 months, from the
invoice date of January 1, 2022. If necessary, we take care of any possible incident whenever it is due to a defective component or
manufacturing fault. Warranty Exceptions
Warranty Exceptions
•
That the date of the certificate does not coincide with the date of sale of the original invoice.
•
Faults produced by blow, by fall or any other cause of force majeure.
•
If the device has been manipulated by unauthorized personnel.
•
Faults produced or derived as a consequence of improper use, installation defects, or modifications to the device that
alter its operation.
•
Start-up, maintenance, cleaning, components subject to wear, lamps, aesthetic parts,
oxidation, plastics, rubbers, housings and crystals.
“THESE EXCEPTIONS VOID THE WARRANTY, THE REPAIR BEING CHARGED TO THE CUSTOMER”
Period covered in devices according to the law of guarantees in the sale of consumer goods Current law is “RD 7/2021”
Hours of operation Monday to Friday from9h00 a 19h00. Telephone contact_ 911 08 08 08 Contact email_ [email protected] web_ www.corbero.es
Official Technical Service Address_Vidal i Ribes 8-10 08950 Esplugues de Llobregat Barcelona
Official Technical Service: 911 08 08 08
Microwave ovens (with the exception of built-in ones) and tabletop ovens in the event of any incident of
operation, they must be taken to the nearest technical service by the customer. They are not collected or repaired at
home.
•
Electric thermos guarantee. 3-year warranty including travel and labor costs that correspond to the repair of the
product, having to have maintenance once every 12 months. Especially if you have installed a gas appliance, keep in
mind as the owner of the installation, the obligation to carry out a complete review of the equipment, (according to
Royal Decree 238 / 2013, of April 5. RITE. IT3, M. Lo thermos electrical and boilers that include hot water storage tanks,
for the benefit of the Guarantee to apply, it is mandatory that the magnesium anode is operational and that it performs
the protection function adequately.For this, it is recommended that the anode be checked biannually by the Official
Service and is renewed when necessary Periodicity that must be annual in those areas with critical waters (CaCO3
content greater than 200mg/L, that is, from 20ºfH of hardness) Deposits without the correct state of the protection
anode are not covered by the warranty Regardless of the type of tank or product, all heating or DHW overpressure
valves must be channeled to avoid damage and n the house due to water discharges. The product warranty does not
cover damages caused by not channeling the water spilled by this valve.
•