1
IMPORTANT – RETAIN THESE INSTRUCTIONS FOR FUTURE REFERENCE
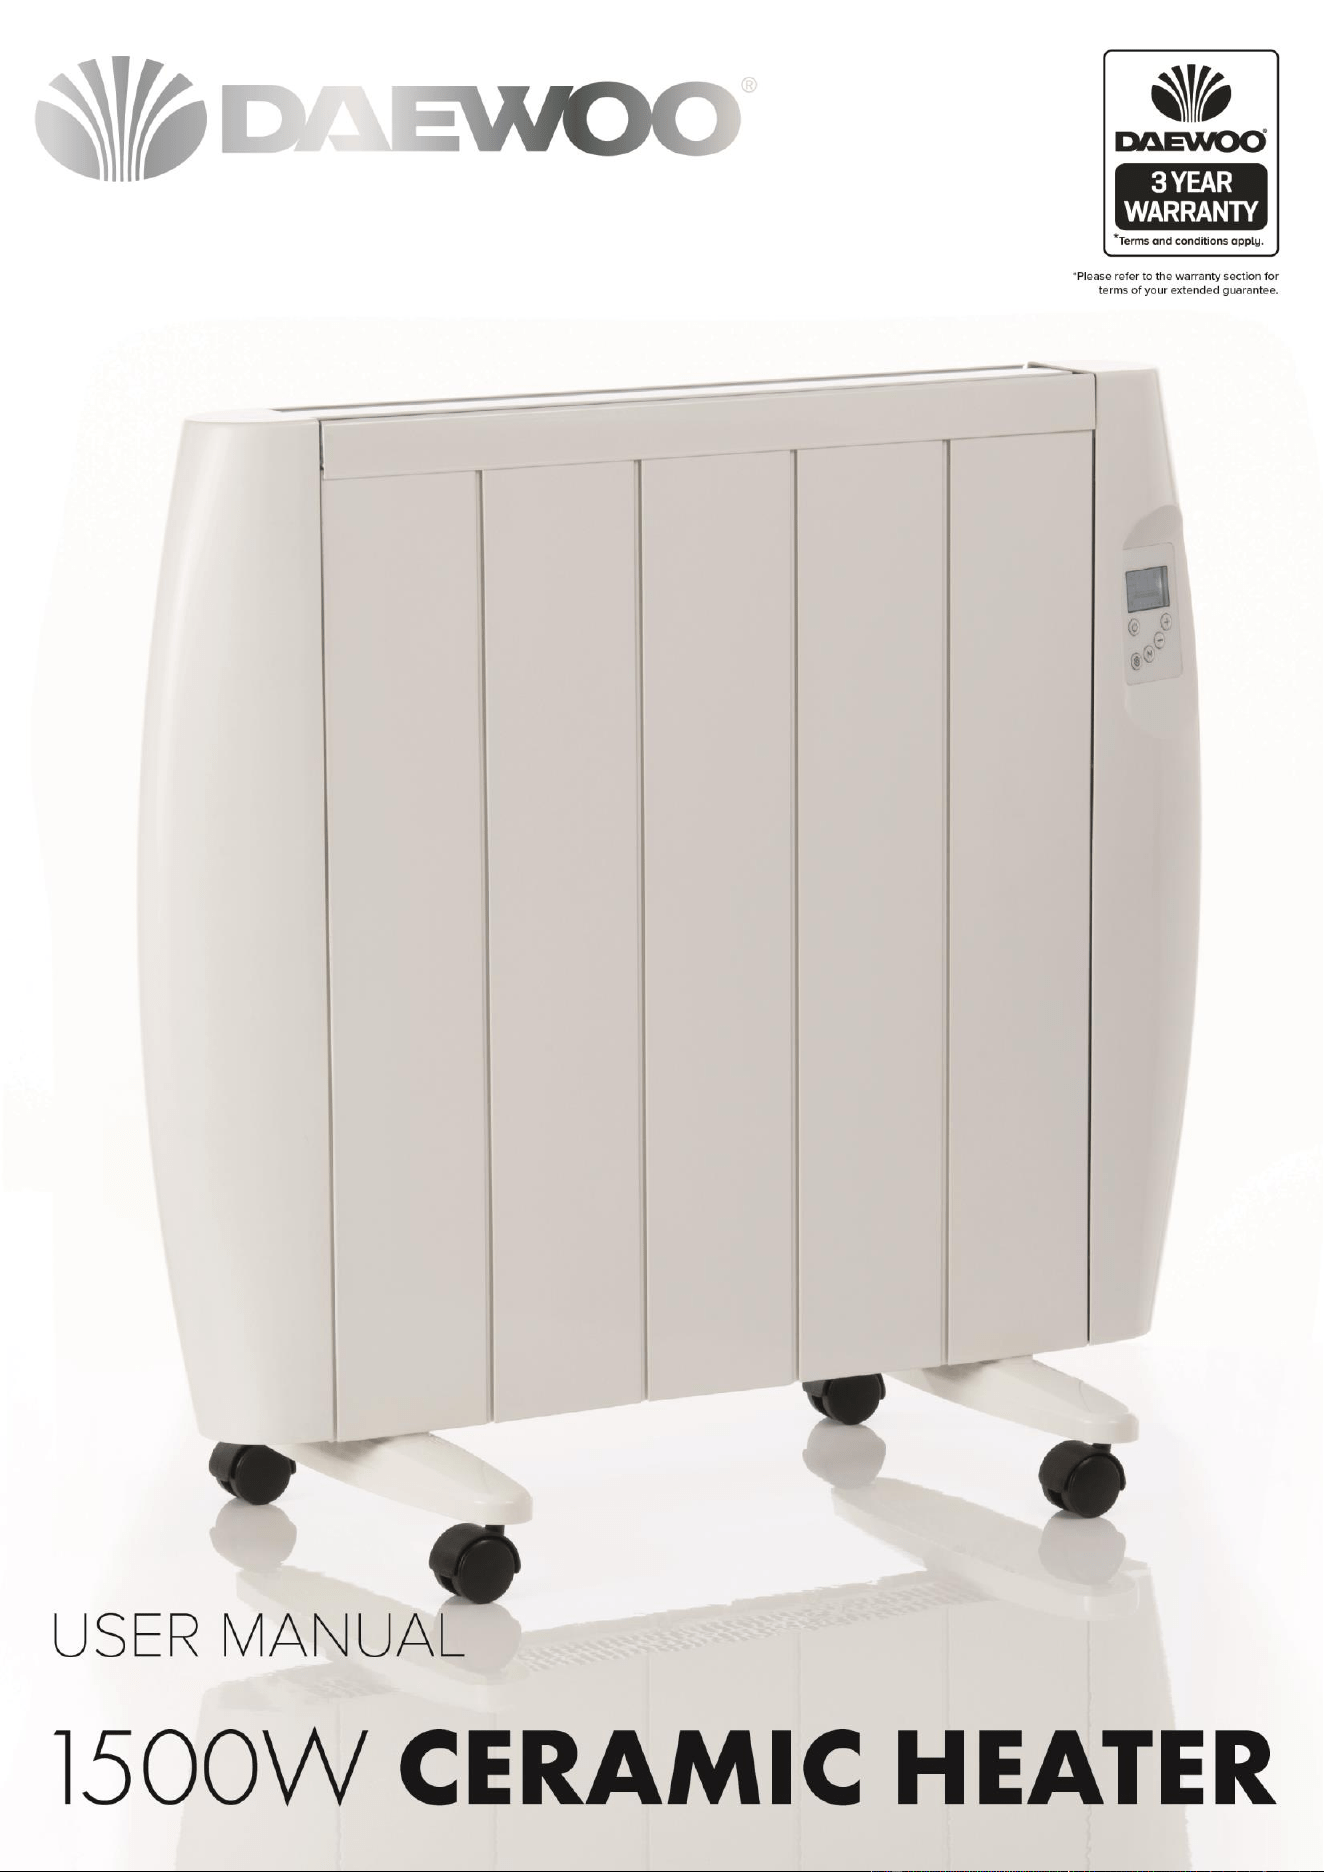
1500W 5 Fin Ceramic Radiator
Model No. HEA1899
User Manual
2
IMPORTANT – RETAIN THESE INSTRUCTIONS FOR FUTURE REFERENCE
1500W 5 Fin Ceramic Radiator
Model No. HEA1899
User Manual
READING AND STORING THE USER MANUAL
Before using this product, please read through this manual
carefully paying particular attention to the safety instructions.
Failure to do so may result in personal injury or damage to the
product.
Carefully save this instruction manual for future reference. Ensure the
user manual is included when passing the product on to any third
parties.
IMPORTANT SAFETY INSTRUCTIONS FOR PROPER USE
When using electrical appliances, basic safety precautions should
always be followed.
Only use the product as described in this user manual. Any other use is
considered improper and may result in damage to property or persons.
The manufacturer or vendor cannot be held liable for damages or injury
incurred through improper or incorrect use.
• Read and familiarise yourself with all operating
instructions before using this Heater.
• Before plugging your unit into the mains, visually check
that the unit is intact and has not suffered any transit
damage.
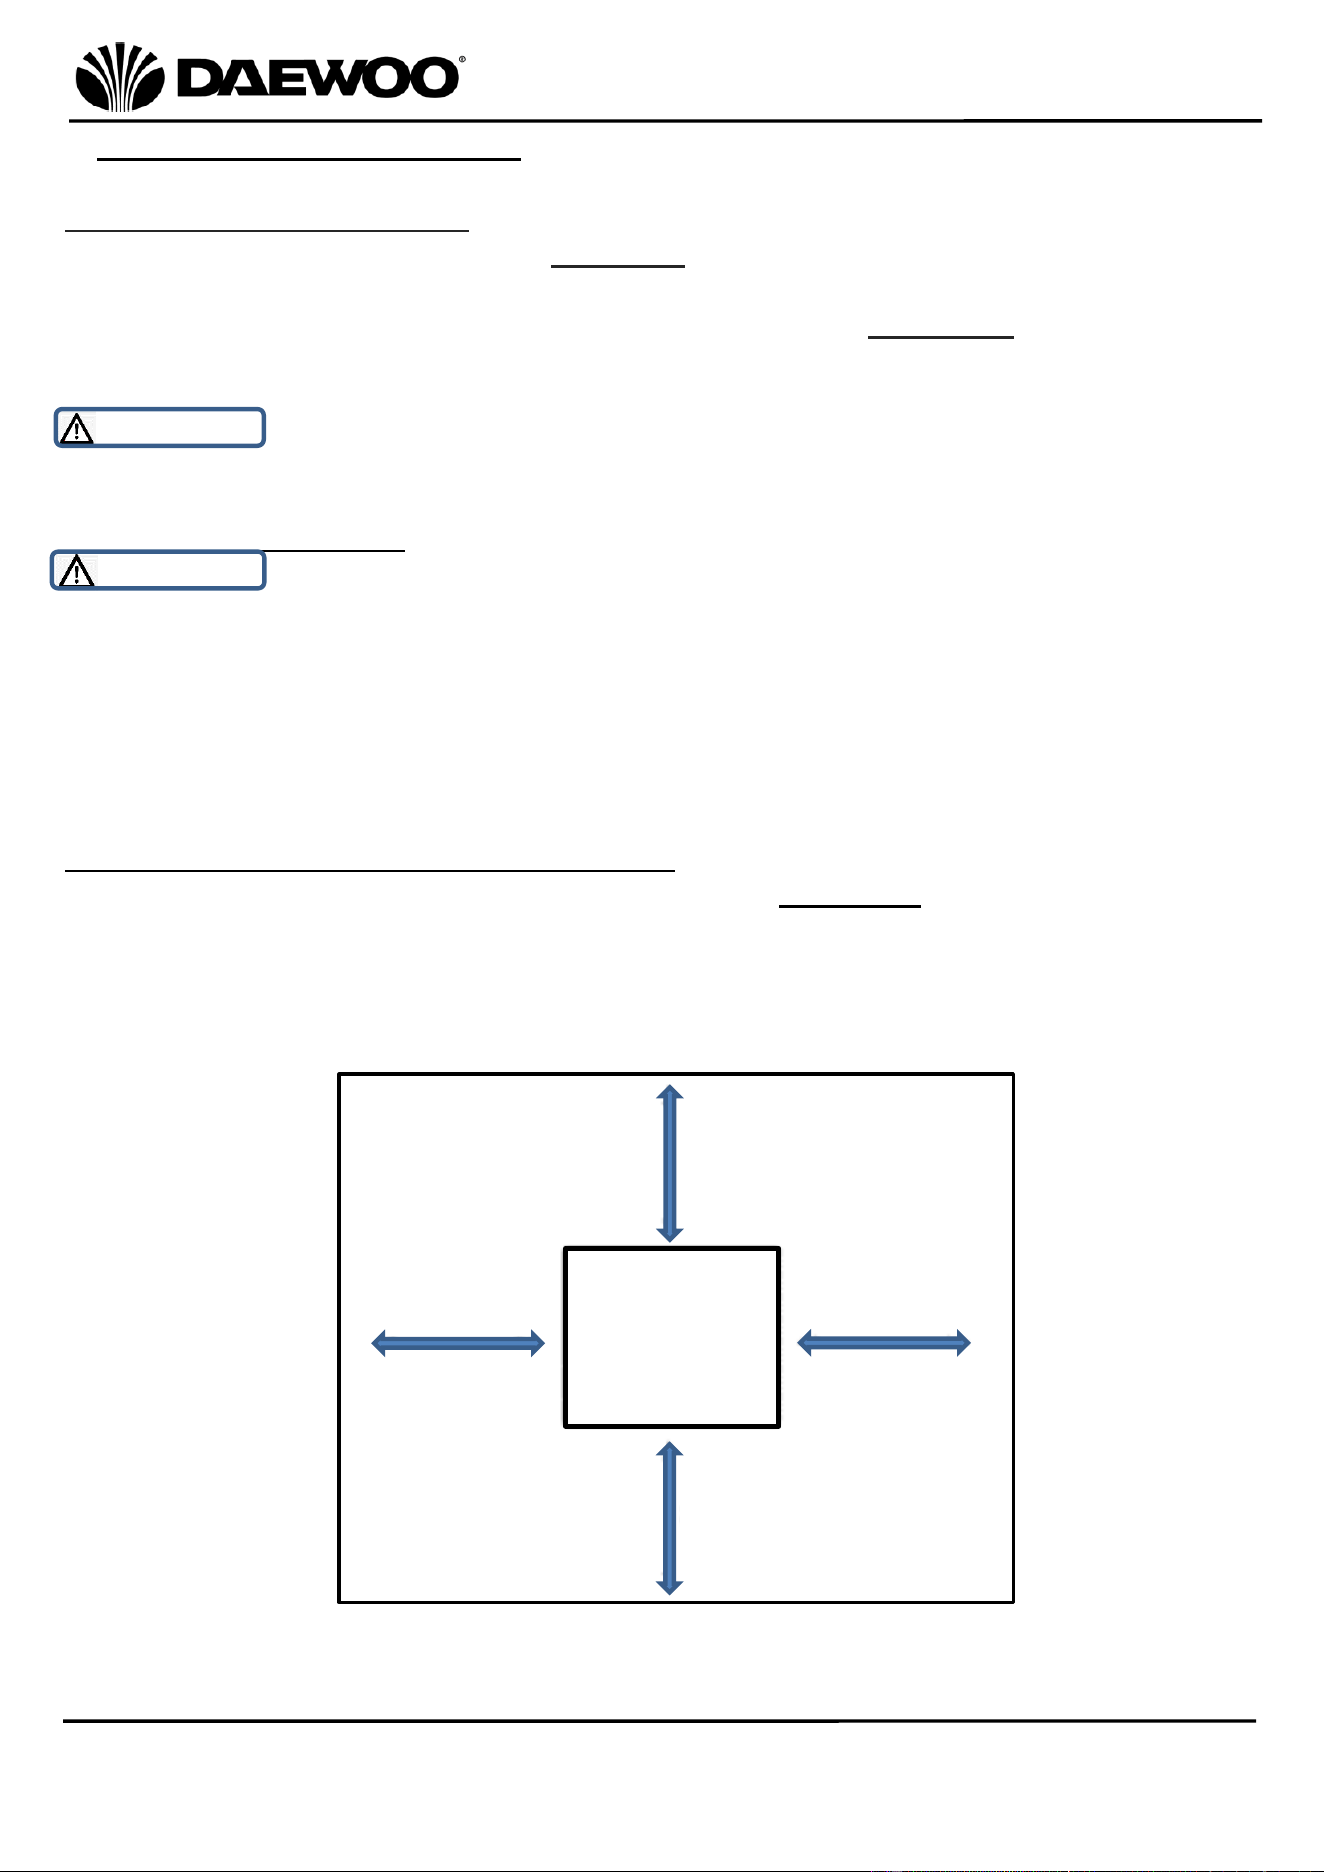
• WARNING! In order to avoid overheating, DO NOT
COVER the heater.
• Ensure appliance is situated in an open area, DO NOT
allow it to come in contact with Cupboards, Curtains, wall
coverings, clothing or other flammable materials at a
minimum distance of 1 metre from the air outlet.
• DO NOT install the appliance directly below an electrical
socket.
• DO NOT use this heater with a programmer, timer,
separate remote-control system or any other device that
switches the heater on automatically, since a fire risk
exists if the heater is covered or positioned incorrectly.
• DO NOT use this heater with an extension cable.
• Check that the voltage indicated on the data plate
corresponds with that of the local network before
connecting the appliance to the mains power supply.
3
IMPORTANT – RETAIN THESE INSTRUCTIONS FOR FUTURE REFERENCE
1500W 5 Fin Ceramic Radiator
Model No. HEA1899
User Manual
• Close supervision is required when using this appliance
near children.
• DO NOT leave this appliance within reach of children.
• This appliance can be used by children aged from 8 years
and above and persons with reduced physical, sensory or
mental capabilities or lack of experience and knowledge if
they have been given supervision or instruction
concerning use of the appliance in a safe way and
understand the hazards involved. Children shall not play
with the appliance. Cleaning and user maintenance shall
not be made by children without supervision.
• Children of less than 3 years should be kept away unless
continuously supervised.
• Children aged from 3 years and less than 8 years shall only
switch on/off the appliance provided that it has been
placed or installed in its intended normal operating
position and they have been given supervision or
instruction concerning use of the appliance in a safe way
and understand the hazards involved. Children aged from
3 years and less than 8 years shall not plug in, regulate
and clean the appliance or perform user maintenance.
• WARNING! Some parts of this product can become very
hot and cause burns. Particular attention has to be given
where children and vulnerable people are present.
• DO NOT use this heater in the immediate surroundings of
a bath, a shower or a swimming pool.
WARNING! use this heater in small rooms when they are
occupied by persons not capable of leaving the room on
their own, unless constant supervision is provided.
• DO NOT immerse the appliance or its cord in water or any
other liquids.
• DO NOT leave the appliance unattended during use.
• DO NOT leave the appliance unattended whilst connected
to the mains supply.
• Always use this appliance on a solid, level, non-flammable

4
IMPORTANT – RETAIN THESE INSTRUCTIONS FOR FUTURE REFERENCE
1500W 5 Fin Ceramic Radiator
Model No. HEA1899
User Manual
surface or fixed to the wall as described in this manual.
• DO NOT use this appliance outdoors.
• It is imperative to unplug the power cord after the
appliance has been used, before it is cleaned and whilst
being repaired.
• Repairs to electrical appliances should only be performed
by a qualified electrician. Improper repairs may place user
at serious risk.
• DO NOT operate this appliance with a damaged plug or
cord, after a malfunction or after being dropped or
damaged in any way.
• Regular, periodic checks should be carried out on the
mains cable to ensure no damage is evident. Should there
be any signs of damage the appliance should not be used.
• If the power cable is damaged, it should only be replaced
by the manufacturer or a suitable qualified after-sales-
service in order to avoid a hazard
• DO NOT allow the mains cable to hang over sharp edges
or come in contact with hot surfaces.
• DO NOT run the mains cable under carpets, rugs, etc.
• Allow the unit to cool before storage.
• Before cleaning, disconnect the appliance from the mains
supply and allow to cool.
• DO NOT place the appliance near to flammable material
or high pressure containers. (e.g., Paper, wood, petrol,
solvents, spray canisters etc.)
• This appliance is intended for household use only and
should not be used for industrial purposes.
• DO NOT use any accessories or attachments with this
appliance other than those supplied or recommended by
supplier.
• DO NOT use this appliance for anything other than its
intended use.
• DO NOT push objects into any openings as damage to the
appliance and/or electric shock may occur.
5
IMPORTANT – RETAIN THESE INSTRUCTIONS FOR FUTURE REFERENCE
1500W 5 Fin Ceramic Radiator
Model No. HEA1899
User Manual
• The appliance should not be installed in areas which have
a fire-risk, such as garages, stables or wooden sheds; this
is applicable also for rooms in which highly inflammable
gasses or dust can develop. Danger of fire!!
• Unplug after each use. Grasp the plug, not the cord.
THIS RADIATOR MUST ONLY BE OPERATED IN THE UPRIGHT
POSITION ON A HORIZONTAL STABLE SURFACE WITH THE
CASTORS FITTED OR FIXED TO THE WALL AS DESCRIBED IN THIS
MANUAL.
THIS APPLIANCE MUST BE EARTHED
This appliance has been ERP classified as a portable space heater and should
only be used for supplementary, secondary or temporary heating. It should not
be considered for primary permanent heating in a room or dwelling.
During the first few minutes of initial use, you may notice a slight odour
and a little smoke. This is normal and will quickly disappear, It is the coating
applied to the heating elements to prevent any corrosion during transit.
6
IMPORTANT – RETAIN THESE INSTRUCTIONS FOR FUTURE REFERENCE
1500W 5 Fin Ceramic Radiator
Model No. HEA1899
User Manual
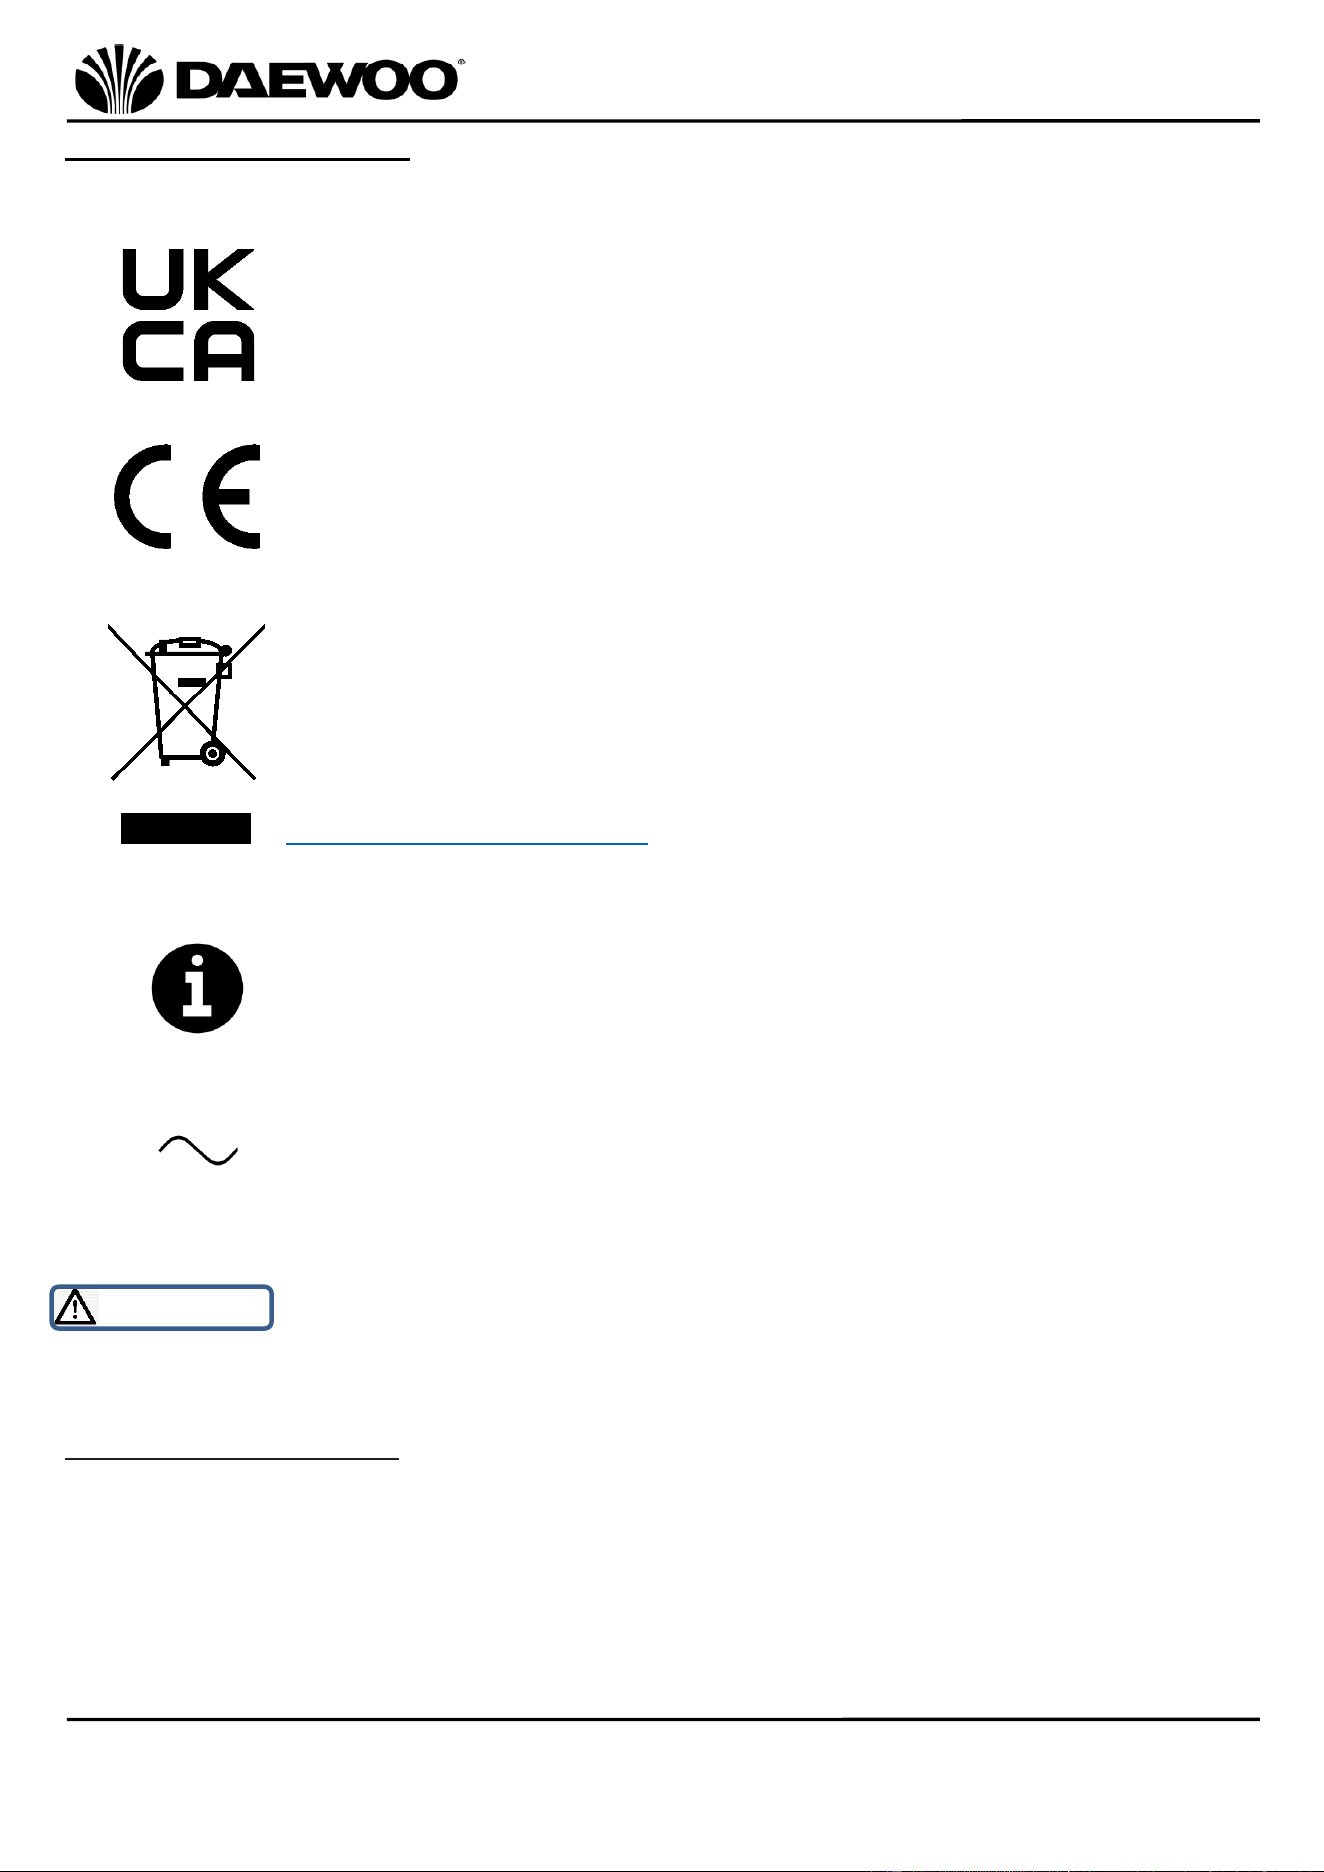
Explanation of Symbols
The following warning symbols or words are used in this instruction manual:
Products labelled with UK Conformity Assessment identifies
products conforming to UK statutory requirements.
Products labelled with this symbol conform to applicable
provisions of the European Economic Area.
You should now recycle your waste electrical goods and in doing
so help the environment. This symbol means waste electrical
products at the end of their useful life should not be disposed of
with normal household waste and not sent to landfill. Please
ensure it is taken to a suitable facility for disposal. Check with
your Local Authority or retailer for recycling advice or visit
www.recycle-more.co.uk enter your postcode to find out your
nearest recycling site.
This symbol provides useful additional information on the use of
this product.
This symbol indicates that the supply uses an alternating current
mains supply.
WARNING!
Safety Tip-Over Switch
This Ceramic Radiator is fitted with built in safety Tip-Over Switch. If the radiator
is knocked over or not placed on a level surface the appliance will automatically
switch off.
Should the Safety Tip-Over Switch activate, remove the plug from the mains
socket and check for any damage before reusing the heater.
This designates a hazard with moderate risk, which may result in
severe injury if not adhered to.
7
IMPORTANT – RETAIN THESE INSTRUCTIONS FOR FUTURE REFERENCE
1500W 5 Fin Ceramic Radiator
Model No. HEA1899
User Manual
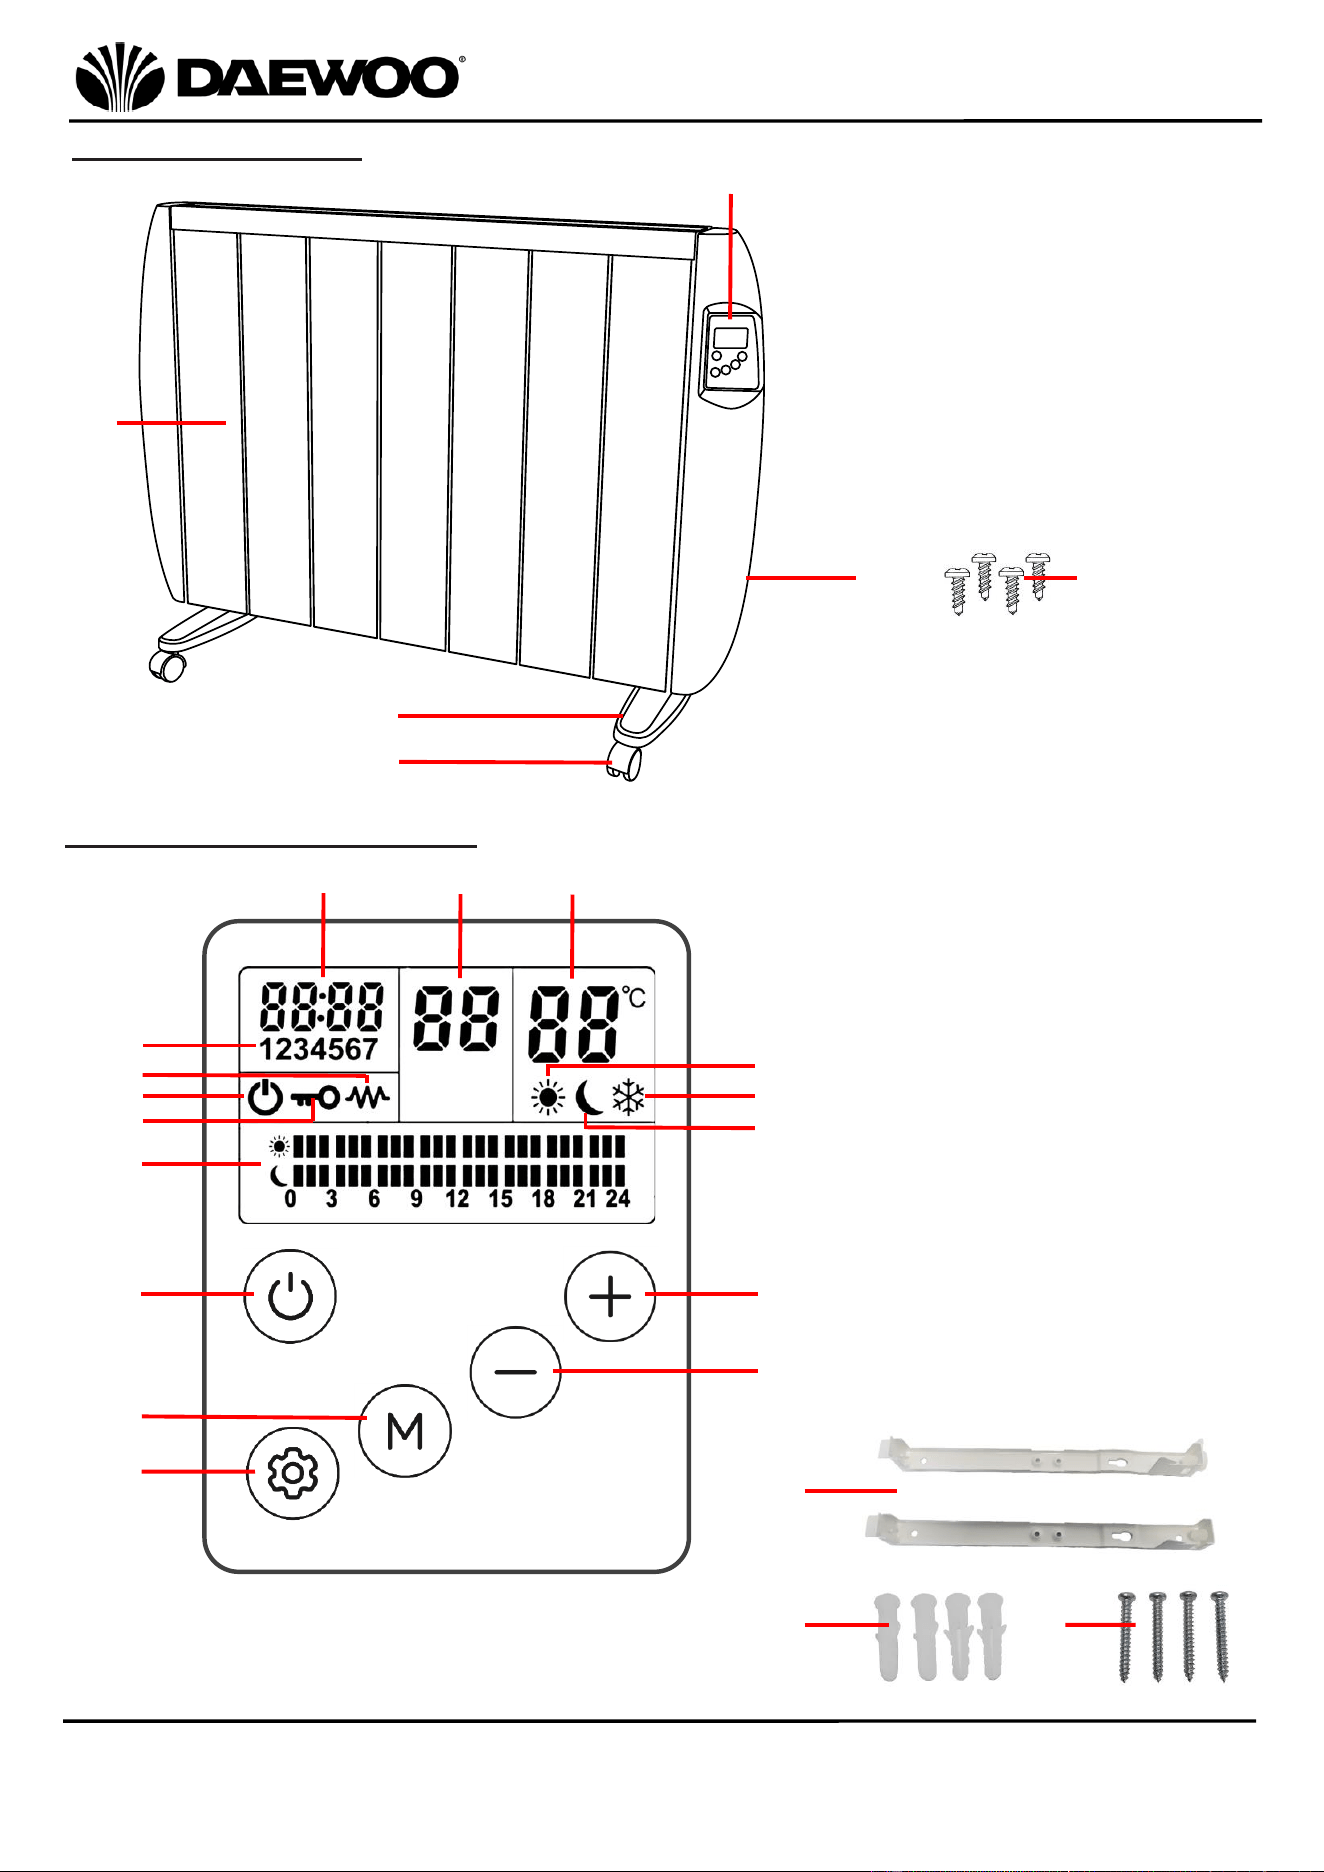
Description of Parts
Description of Control Panel
1. Control Panel
2. Radiator Fins
3. Wheel Plates (x2)
4. Castors (x4)
5. Power Switch (rear)
6. Small Screws (x4)
3
2
1
4
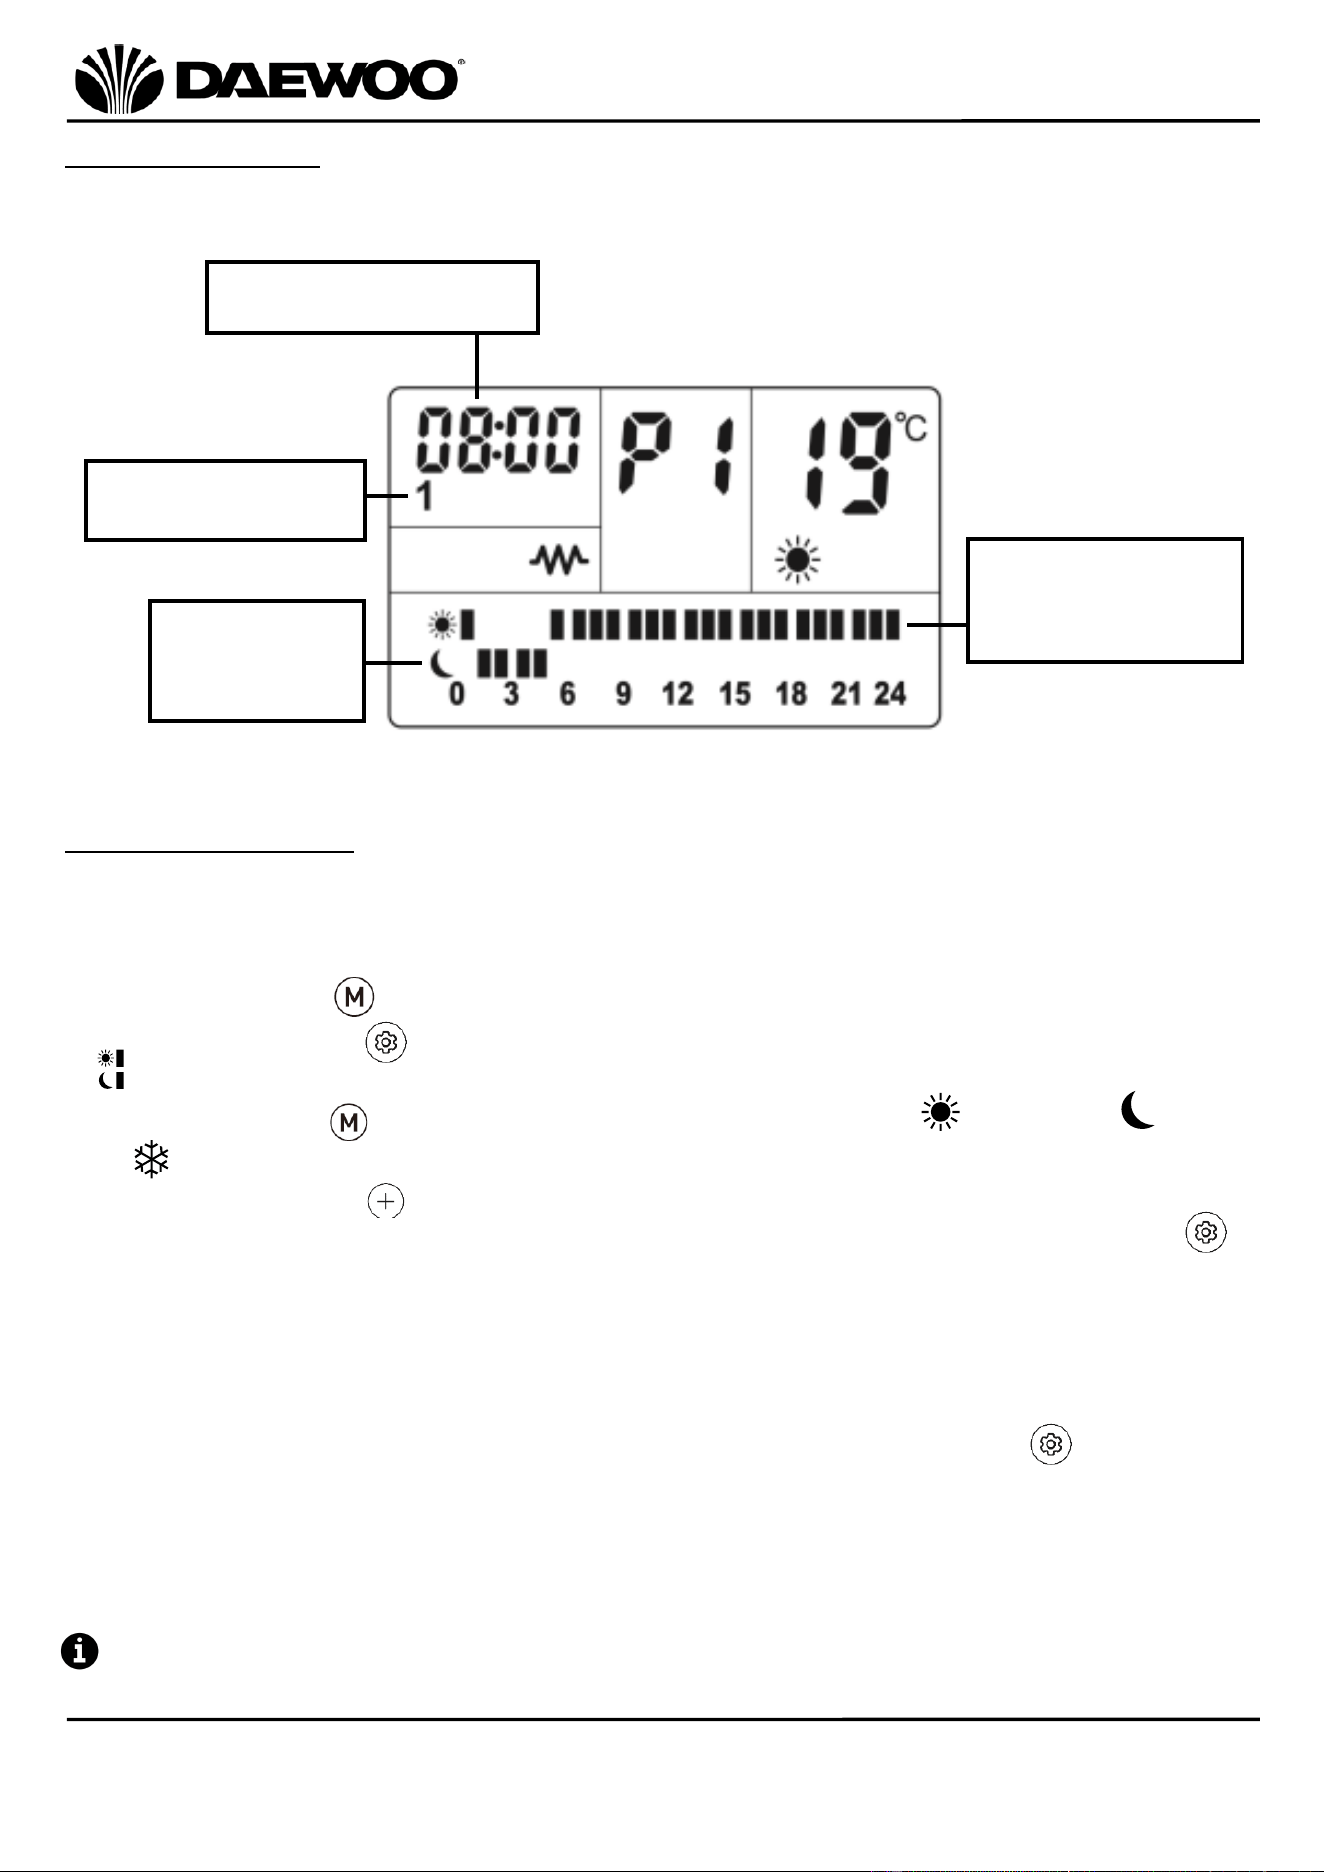
7. Clock
8. Program Selection
9. Temperature
10. Day of the Week
11. Heat Indicator
12. Power Indicator
13. Child Lock Indicator
14. Program Settings
15. Power On/Off
16. Mode
17. Settings
18. Comfort Indicator
19. Anti-Frost Indicator
20. Eco Indicator
21. Increase
22. Decrease
23. Wall Brackets (x2)
24. Wall Plugs (x4)
25. Wall Screws (x4)
6
7
10
8
9
18
19
20
12
14
21
22
15
16
17
5
13
11
23
24
25
8
IMPORTANT – RETAIN THESE INSTRUCTIONS FOR FUTURE REFERENCE
1500W 5 Fin Ceramic Radiator
Model No. HEA1899
User Manual
Before Using Your Ceramic Radiator
Before fitting, retain all packaging until all the parts are present by checking
against the parts list – see Description of Parts above.
Discard packaging responsibly.
Assembling Your Ceramic Radiator
This Ceramic Radiator can be used either with its Castors fitted or wall mounted
using the brackets supplied.
To use your radiator with Castors fitted continue to section ‘A’ below.
To wall mount your radiator go to section ‘B’.
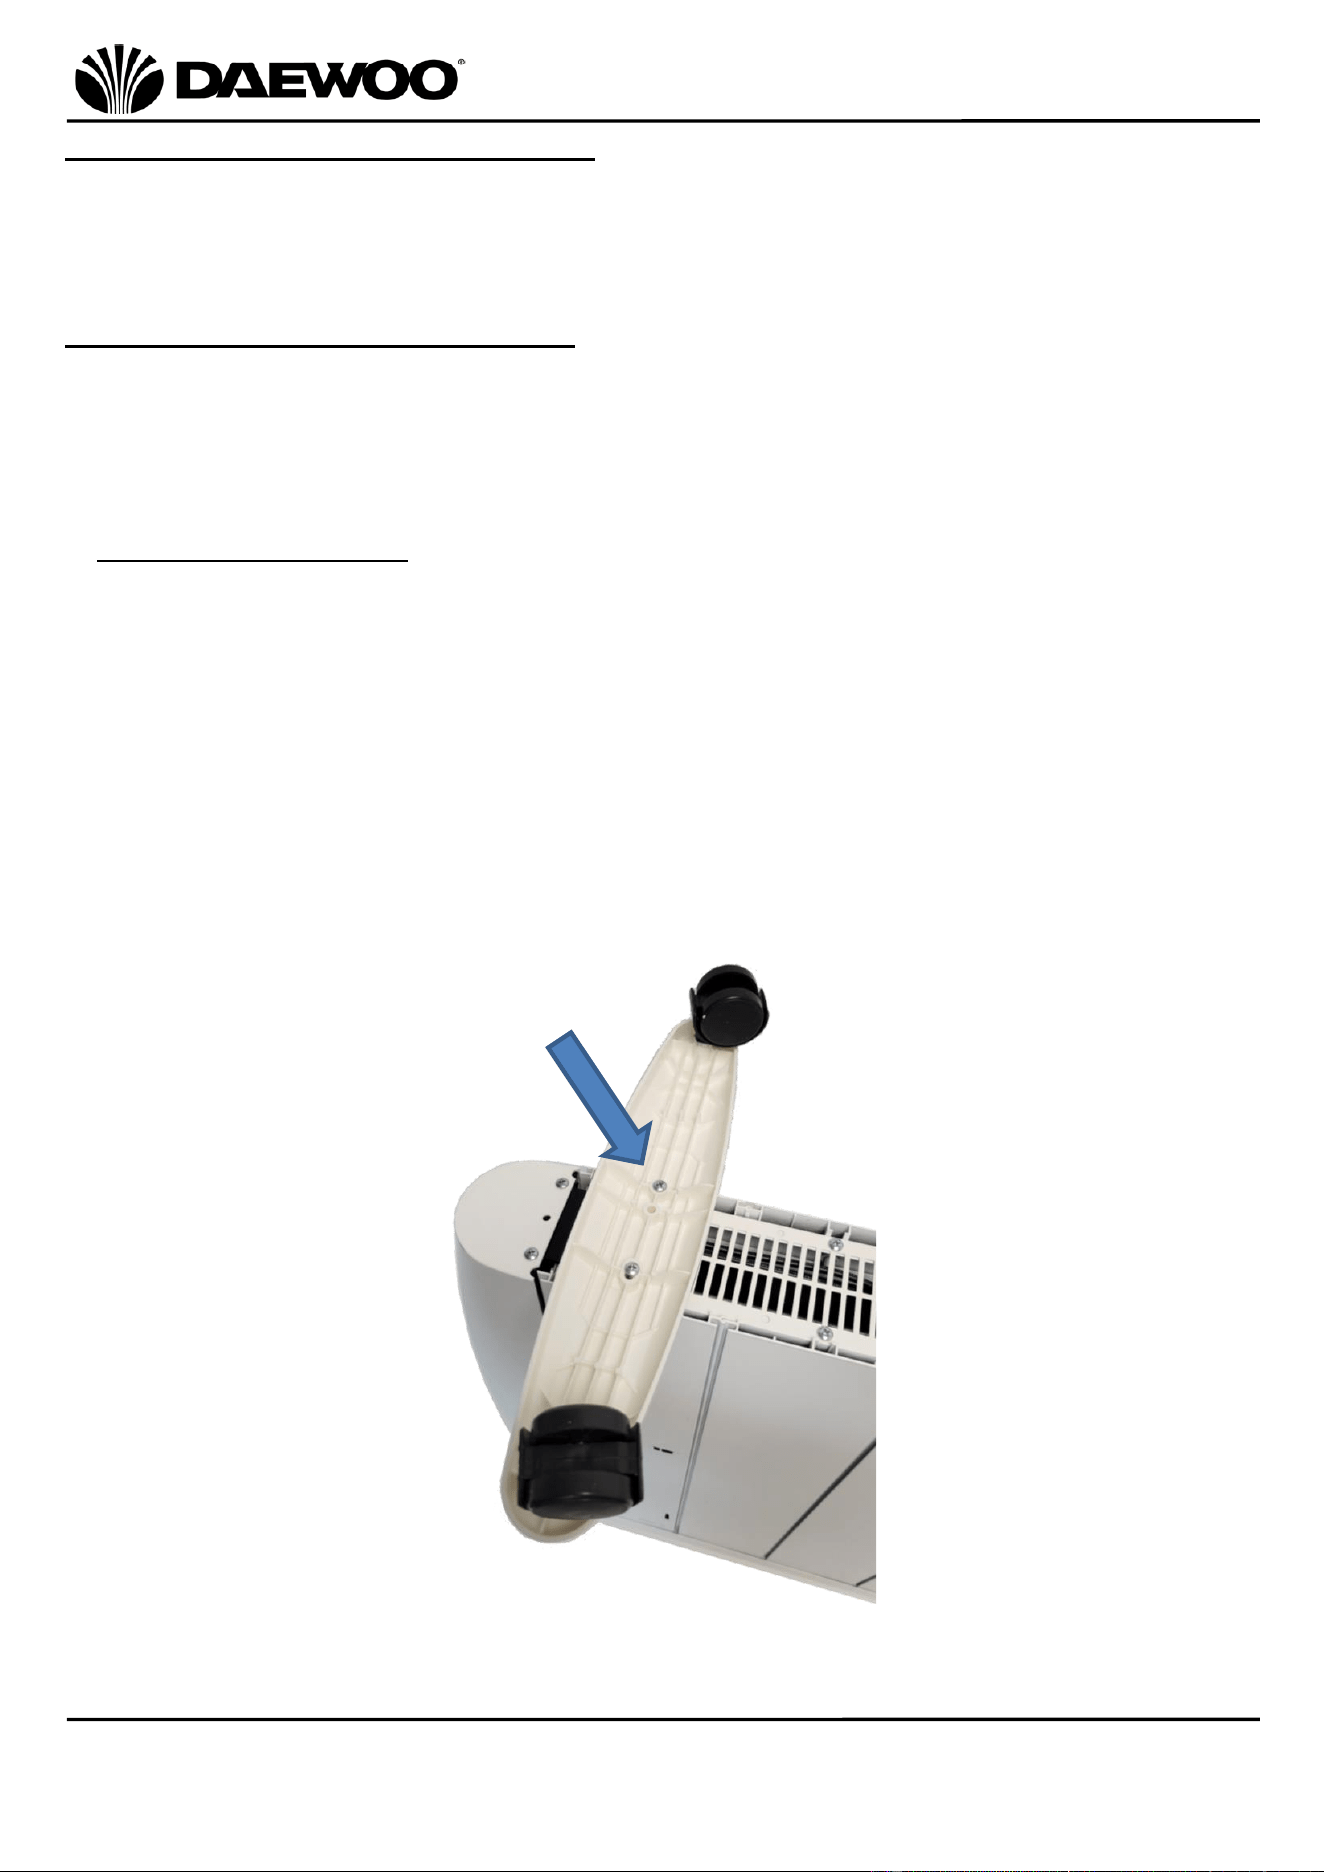
A. Fitting the Castors (4)
1. Place protective material (such as cardboard) on the floor to prevent
scratching or damage to the appliance.
2. Turn the radiator upside down onto the material ensuring that it is stable,
support the appliance to ensure it does not topple over.
3. Attach the Wheel Plates (3) securing in place on both sides using the Small
Screws (6) provided as in the image below, tighten with a screwdriver (not
supplied).
9
IMPORTANT – RETAIN THESE INSTRUCTIONS FOR FUTURE REFERENCE
1500W 5 Fin Ceramic Radiator
Model No. HEA1899
User Manual
B. Wall-mounting Your Radiator
Positioning of Your Radiator
Mount the radiator securely on a solid wall using the supplied mounting brackets
following the instructions below, ensure that the wall is stable and not subject to
vibrations. Choose a mounting position that is near but not below a suitable mains
socket.
WARNING! The fixing pack contains small items which should be kept away
from young children.
Installing Your Radiator
WARNING! DO NOT connect the radiator to the mains until it is properly fixed
to the wall.
Whilst installing the radiator, care must be taken whilst drilling the holes not to
damage concealed cables and pipes. If in doubt, obtain the services of a qualified
tradesperson.
DO NOT permanently connect the radiator to the mains – always use the mains
plug provided.
Fitting Your Radiator at the Correct Height
This radiator is designed to be fixed to a wall at a minimum height of 300mm from
the bottom of the radiator to the floor. The wall brackets must be fitted to the
wall securely and accurately level. Also note the minimum clearance distances
from the sides and top of the radiator as shown in Fig (a) below:
Fig. (a)
≥300mm
≥150mm
≥150mm
≥300mm

10
IMPORTANT – RETAIN THESE INSTRUCTIONS FOR FUTURE REFERENCE
1500W 5 Fin Ceramic Radiator
Model No. HEA1899
User Manual
1. Using a pencil, mark the four hole in the positions on the wall as shown in the
diagram Fig (b) below. Ensure the positions on the wall follow the
recommended clearances around the heater as shown in Fig. (a) above.
2. Drill the four holes in the wall using a 10mm Masonry drill bit (not supplied) as
shown below:
3. Insert the Wall Plugs (24) into the drilled holes and secure the two Wall
Brackets (23) to the wall with the Wall Screws (25) provided as shown below:
Ensure whilst attaching the Wall Brackets (23) to the wall that the locking
screws are at the top – see step 4 below:
240mm
400mm
Fig. (b)
11
IMPORTANT – RETAIN THESE INSTRUCTIONS FOR FUTURE REFERENCE
1500W 5 Fin Ceramic Radiator
Model No. HEA1899
User Manual
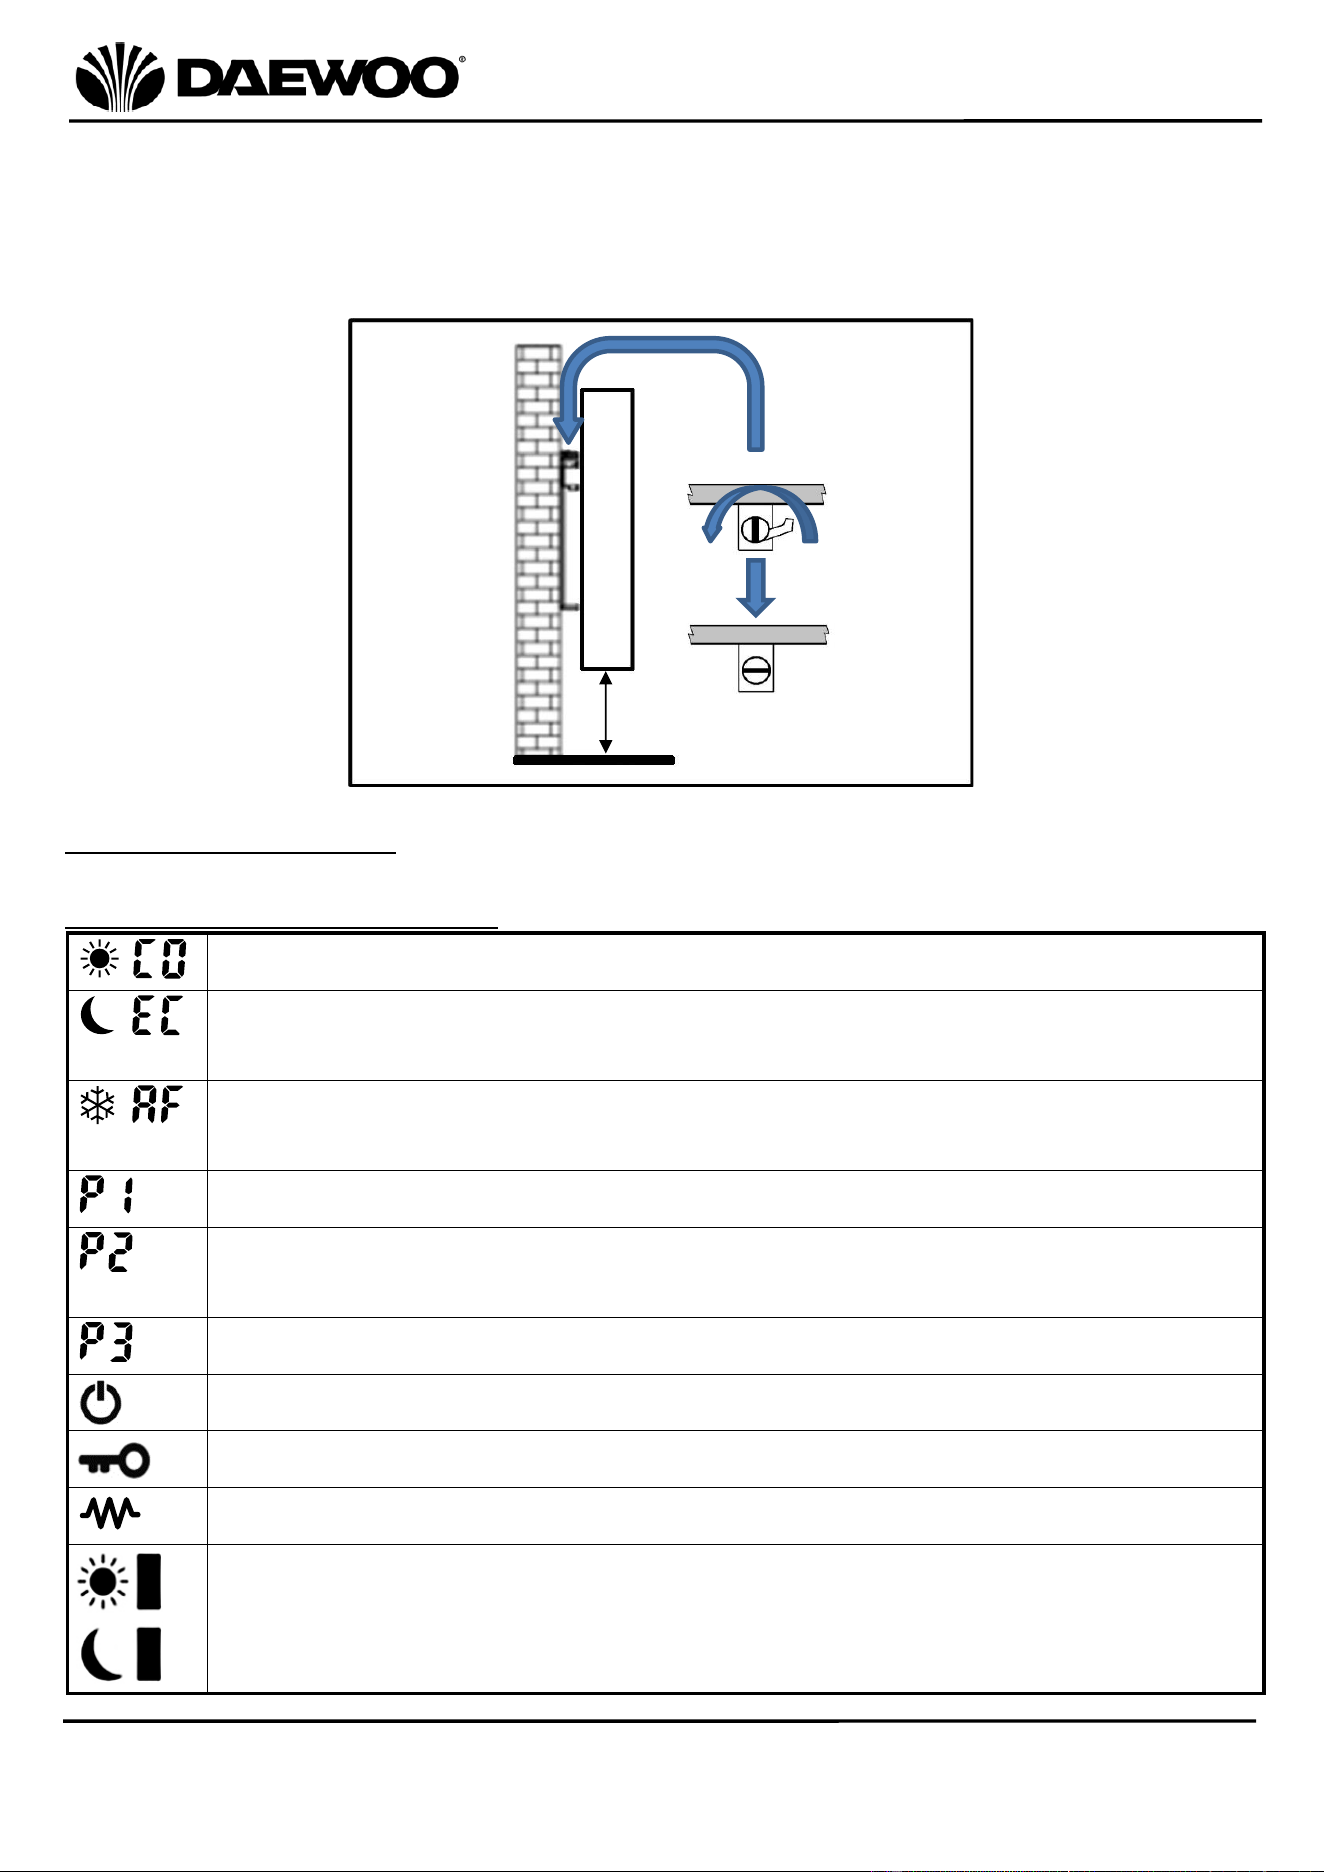
4. Hang the radiator by the lower holes in the back of the radiator onto the lower
support of the brackets, once the unit is secure, push the radiator up against the
upper support of the brackets. Hold the radiator in place whilst rotating the
locking screws at the top of the brackets to lock the radiator in place as shown
below:
Operating Instructions
Function Indicator Description
,
Comfort mode:
Temperature can be set from 10°C to 35°C
,
ECO mode: Temperature can be set from 6°C to 31°C
(Recommended)
,
Anti-Frost mode: The heater will start working at 7°C or below to
prevent freezing, this temperature cannot be changed
This program operates the same setting every day (Day 1-7)
This Program operates 2 different settings on Monday to Friday
(Day 1-5) and Saturday to Sunday (Day 6-7)
This program operates different settings on each day individually
Power Indicator
Child Safety lock
Heat Indicator
Top bar showing – Comfort mode is selected.
Bottom bar showing – ECO mode is selected.
No bar showing – Anti-Frost mode is selected.
≥300mm
Unlocked
Locked
12
IMPORTANT – RETAIN THESE INSTRUCTIONS FOR FUTURE REFERENCE
1500W 5 Fin Ceramic Radiator
Model No. HEA1899
User Manual
Child Safety lock
If the unit controls are not used for 1 minute, the display will dim and go into
child lock mode. Press the Increase (21) and Decrease (22) buttons
together to unlock the control panel.
Setting the Clock
1. Ensure that the Power Switch (5) on the rear of the unit is in the
“O” off position.
2. Insert the mains plug into the nearest socket.
3. Press the Power Switch (5) to the “I” on position as shown right,
the appliance will go into standby mode.
4. Press the Power On/Off (15) button to power up the heater.
5. Press and hold the Settings (17) button for 3 seconds then the Clock (7) hour
setting will flash.
6. Press the Increase (21) or Decrease (22) buttons to set the hour (0-23),
then press the Settings (17) button to set the minutes (0-59) in the same way.
7. Press the Settings (17) button and the day setting will flash.
8. Press the Increase (21) or Decrease (22) buttons to set the Day of the
Week (10) from 1-7 (1=Monday, 2=Tuesday and so on).
9. Press the Settings (17) button to complete the time and day setting.
The clock setting is required for using the P1/P2/P3 programs.
Unplugging from the mains or switching off the
Power Switch
(5) would
require resetting the time and day.
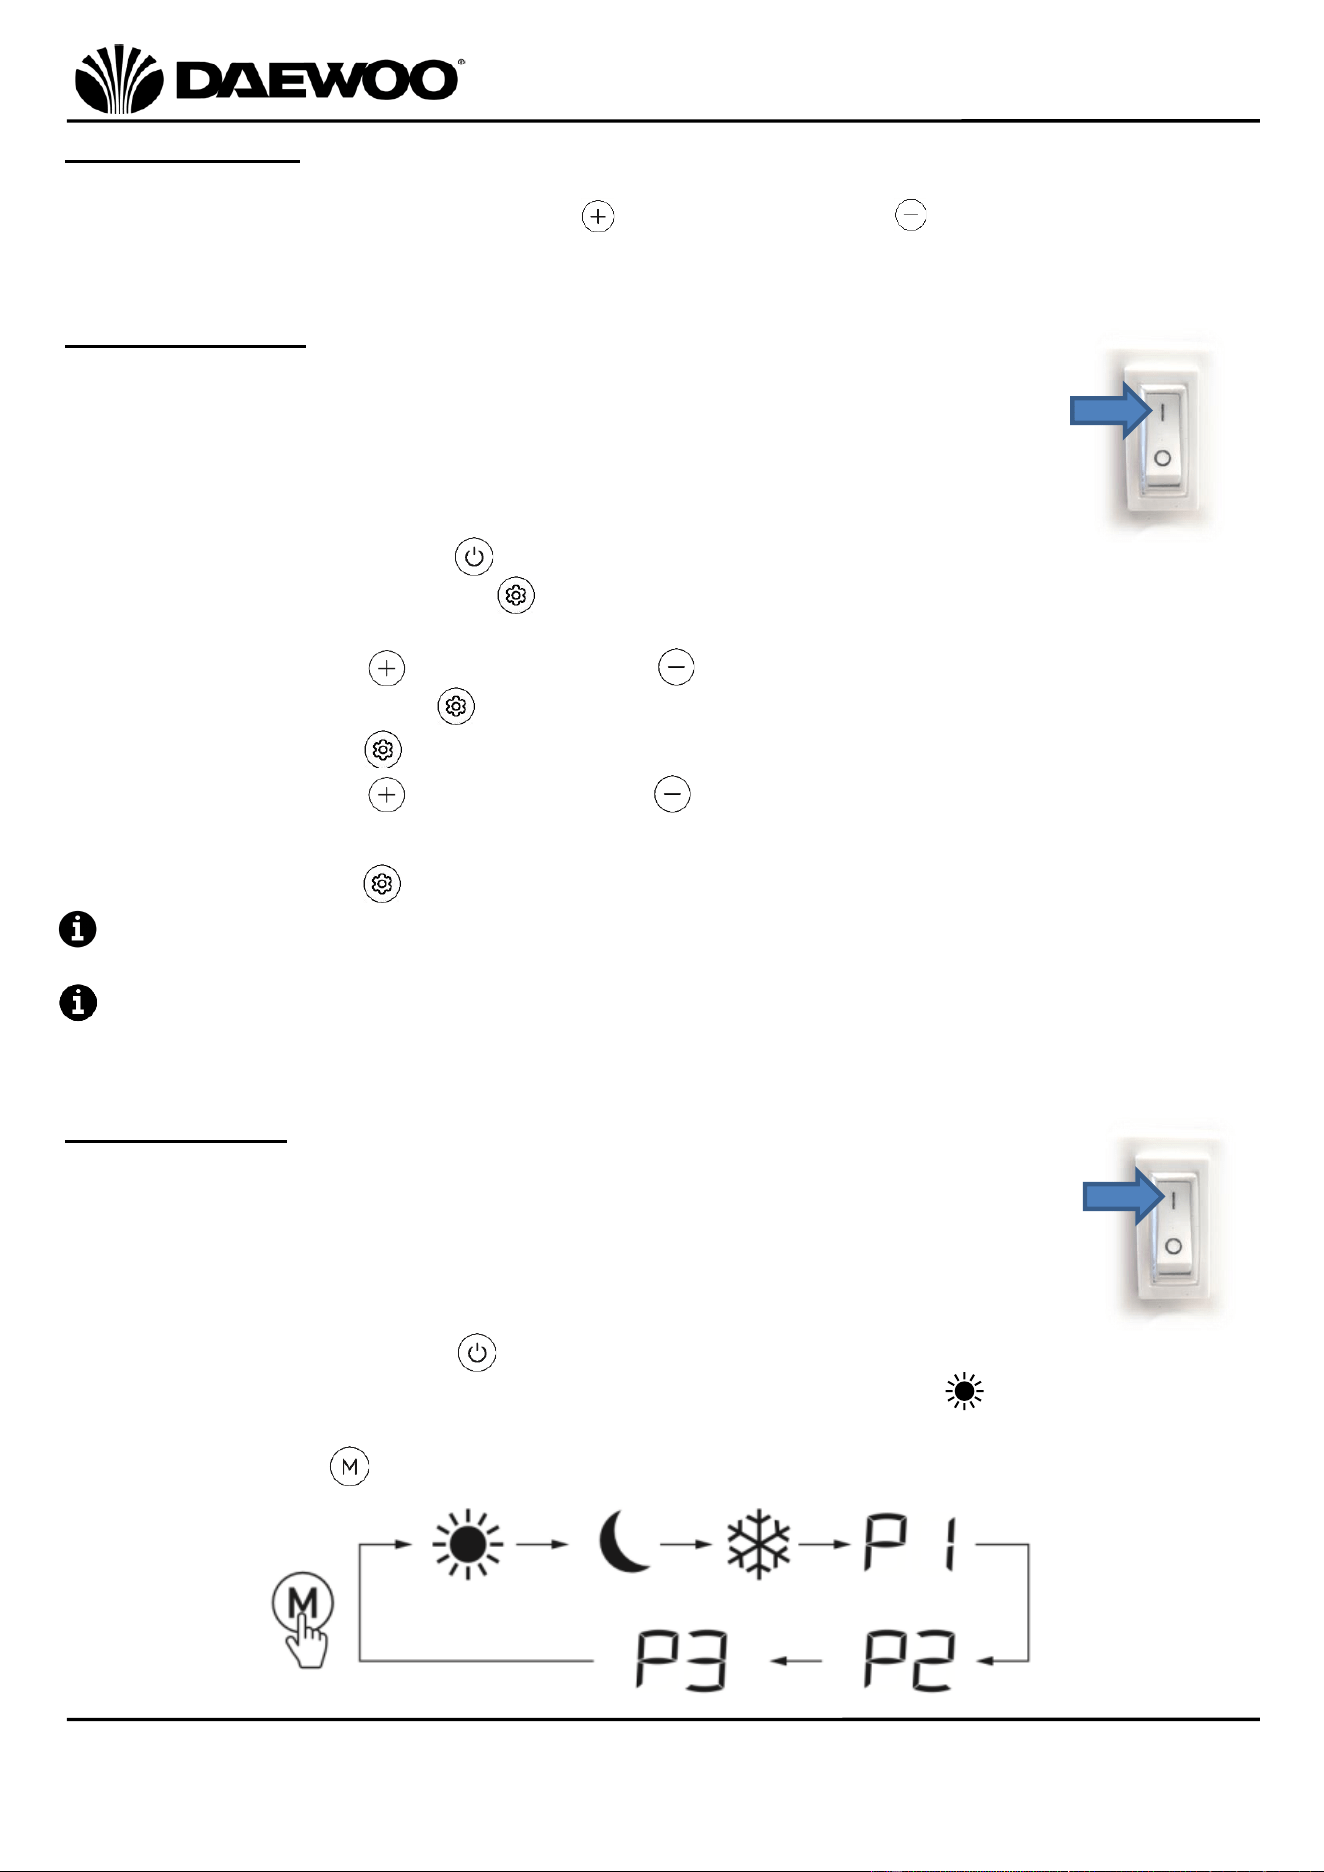
Mode Selection
1. Ensure that the Power Switch (5) on the rear of the unit is in the
“O” Off position.
2. Insert the mains plug into the nearest socket.
3. Press the Power Switch (5) to “I” On position as shown right, the
appliance will go into standby mode.
4. Press the Power On/Off (15) button to power up the heater which
will power up in Comfort Mode and the Comfort Indicator (18) will
be shown on the display.
5. Press the Mode (16) button to select the mode or the program in below
sequence:
13
IMPORTANT – RETAIN THESE INSTRUCTIONS FOR FUTURE REFERENCE
1500W 5 Fin Ceramic Radiator
Model No. HEA1899
User Manual
Setting the Temperature
6. Press Increase (21) and Decrease (22) to set the desired Temperature (9),
the Heat Indicator (11) will illuminate whilst heating and go out when the
set temperature has been is reached. The Heat Indicator (11) will go on
and off to show the set temperature is being maintained, this is quite normal.
Program Settings
The unit has three programs P1, P2 and P3 which can be modified and will repeat
every week.
To use the programs the clock must be set correctly otherwise the programs
(P1/P2/P3) will not work correctly – see Setting the Clock above.
Pre-set Program
P1
:
Use the P1 program for the same timer setting every day of the week (Day 1-7).
1. Press the Mode (16) button until program P1 is displayed.
2. Press the Settings (17) button to modify the program P1, the first hour bar
will flash.
3. Press the Mode (16) button to choose the mode from (Comfort), (Eco),
or (Anti-Frost).
4. Press the Increase (21) button to move to the next hour.
5. Repeat the above process until all 24 hours are set, then press the Settings
(17) button to confirm.
6. Program P1 will now operate every day, the bar on the current hour will keep
flashing.
The program settings will be lost if the unit is either disconnected from the
mains or switched off.
14
IMPORTANT – RETAIN THESE INSTRUCTIONS FOR FUTURE REFERENCE
1500W 5 Fin Ceramic Radiator
Model No. HEA1899
User Manual
Setting example:
Pre-set Program P2:
This program has 2 different settings one on Monday to Friday (Day 1-5) and the
other Saturday to Sunday (Day 6-7).
1. Press the Mode (16) button until program P2 is displayed.
2. Press the Settings (17) button to modify the program P2, the first hour bar
and modes will flash, and Days 1-5 will illuminate.
3. Press the Mode (16) button to choose the mode from (Comfort), (Eco),
or (Anti-Frost).
4. Press the Increase (21) button to move to the next hour.
5. Repeat the above process until all 24 hours are set, then press the Settings
(17) button to confirm. The unit is now set for Monday-Friday (Day 1-5). The
display will then move to Saturday (Day 6).
6. Repeat the above process until all 24 hours are set for Saturday-Sunday (Day 6-
7).
7. Once all the settings have been programmed, press the Settings (17) button
to confirm.
8. Program P2 will now operate, the current hour and mode symbol will keep
flashing.
The program settings will be lost if the unit is either disconnected from the
mains or switched off.
ECO mode:
0100-0500
Current time: 0800
Day 1 (Monday)
Comfort mode:
0500-0100
15
IMPORTANT – RETAIN THESE INSTRUCTIONS FOR FUTURE REFERENCE
1500W 5 Fin Ceramic Radiator
Model No. HEA1899
User Manual
Pre-set Program P3:
This program allows you to set different setting on each day individually.
1. Press the Mode (16) button until program P3 is displayed.
2. Press the Settings (17) button to modify the program P3, the first hour bar
and modes will flash, and Day 1 will illuminate.
3. Press the Mode (16) button to choose the mode from (Comfort), (Eco),
or (Anti-Frost).
4. Press the Increase (21) button to move to the next hour or the Decrease
(22) button to move back to the previous hour to change the mode.
5. Repeat this process until all 24 hours are set, then press the Settings (17)
button to confirm. The unit is now set for Monday (Day 1). The display will then
move to Tuesday (Day 2).
6. Repeat the process above until all 24 hours are set for every day (Day 1-7).
7. Once all the settings have been programmed, press Settings (17) button to
confirm.
8. Program P3 will now operate, the current hour and mode symbol will keep
flashing.
The program settings will be lost if the unit is either disconnected from the
mains or switched off.
Whilst using the radiator in timer mode, due consideration must be given to
the fact that the heater may come on whilst unattended.
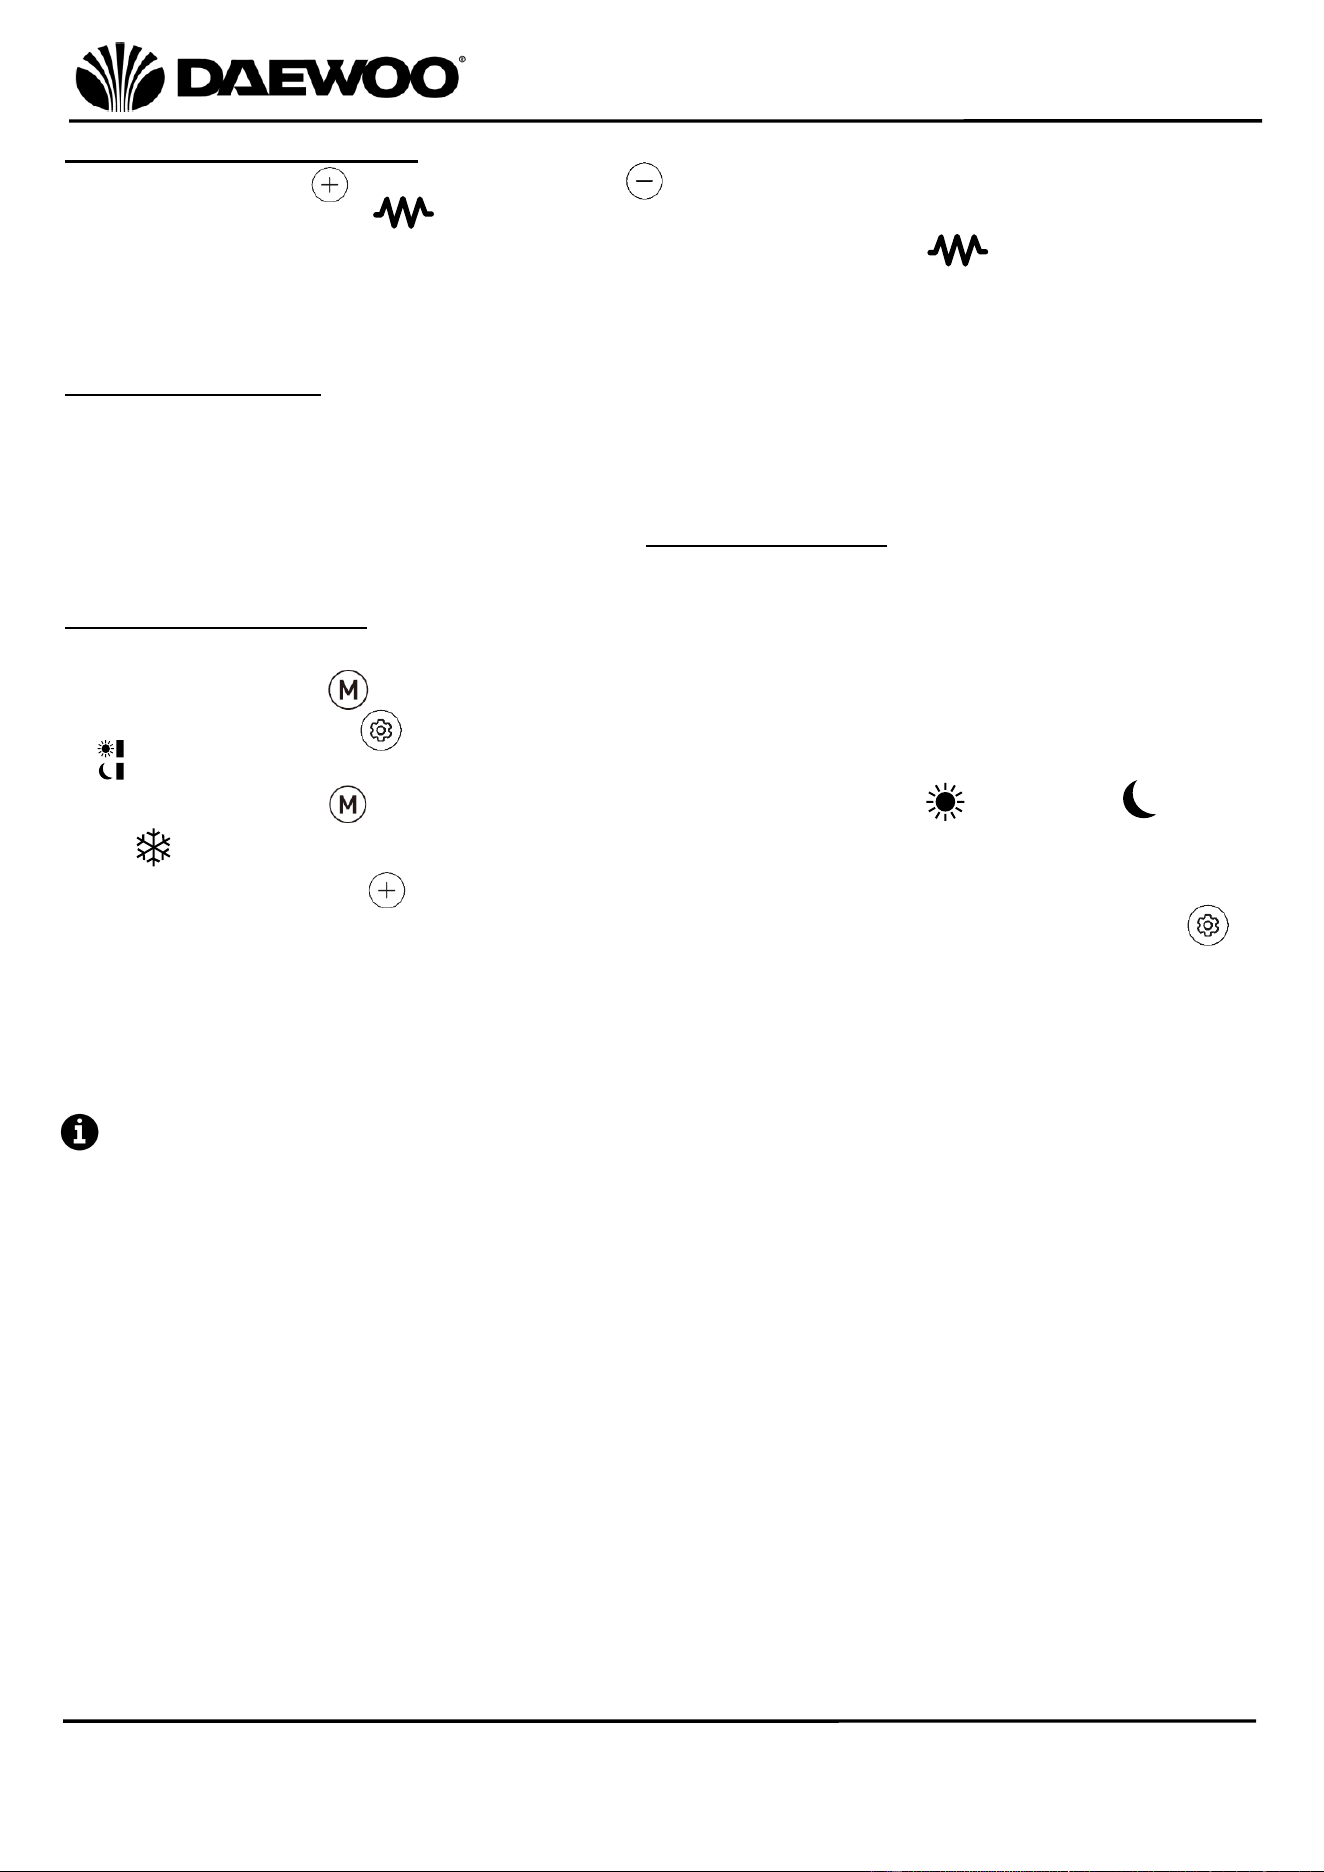
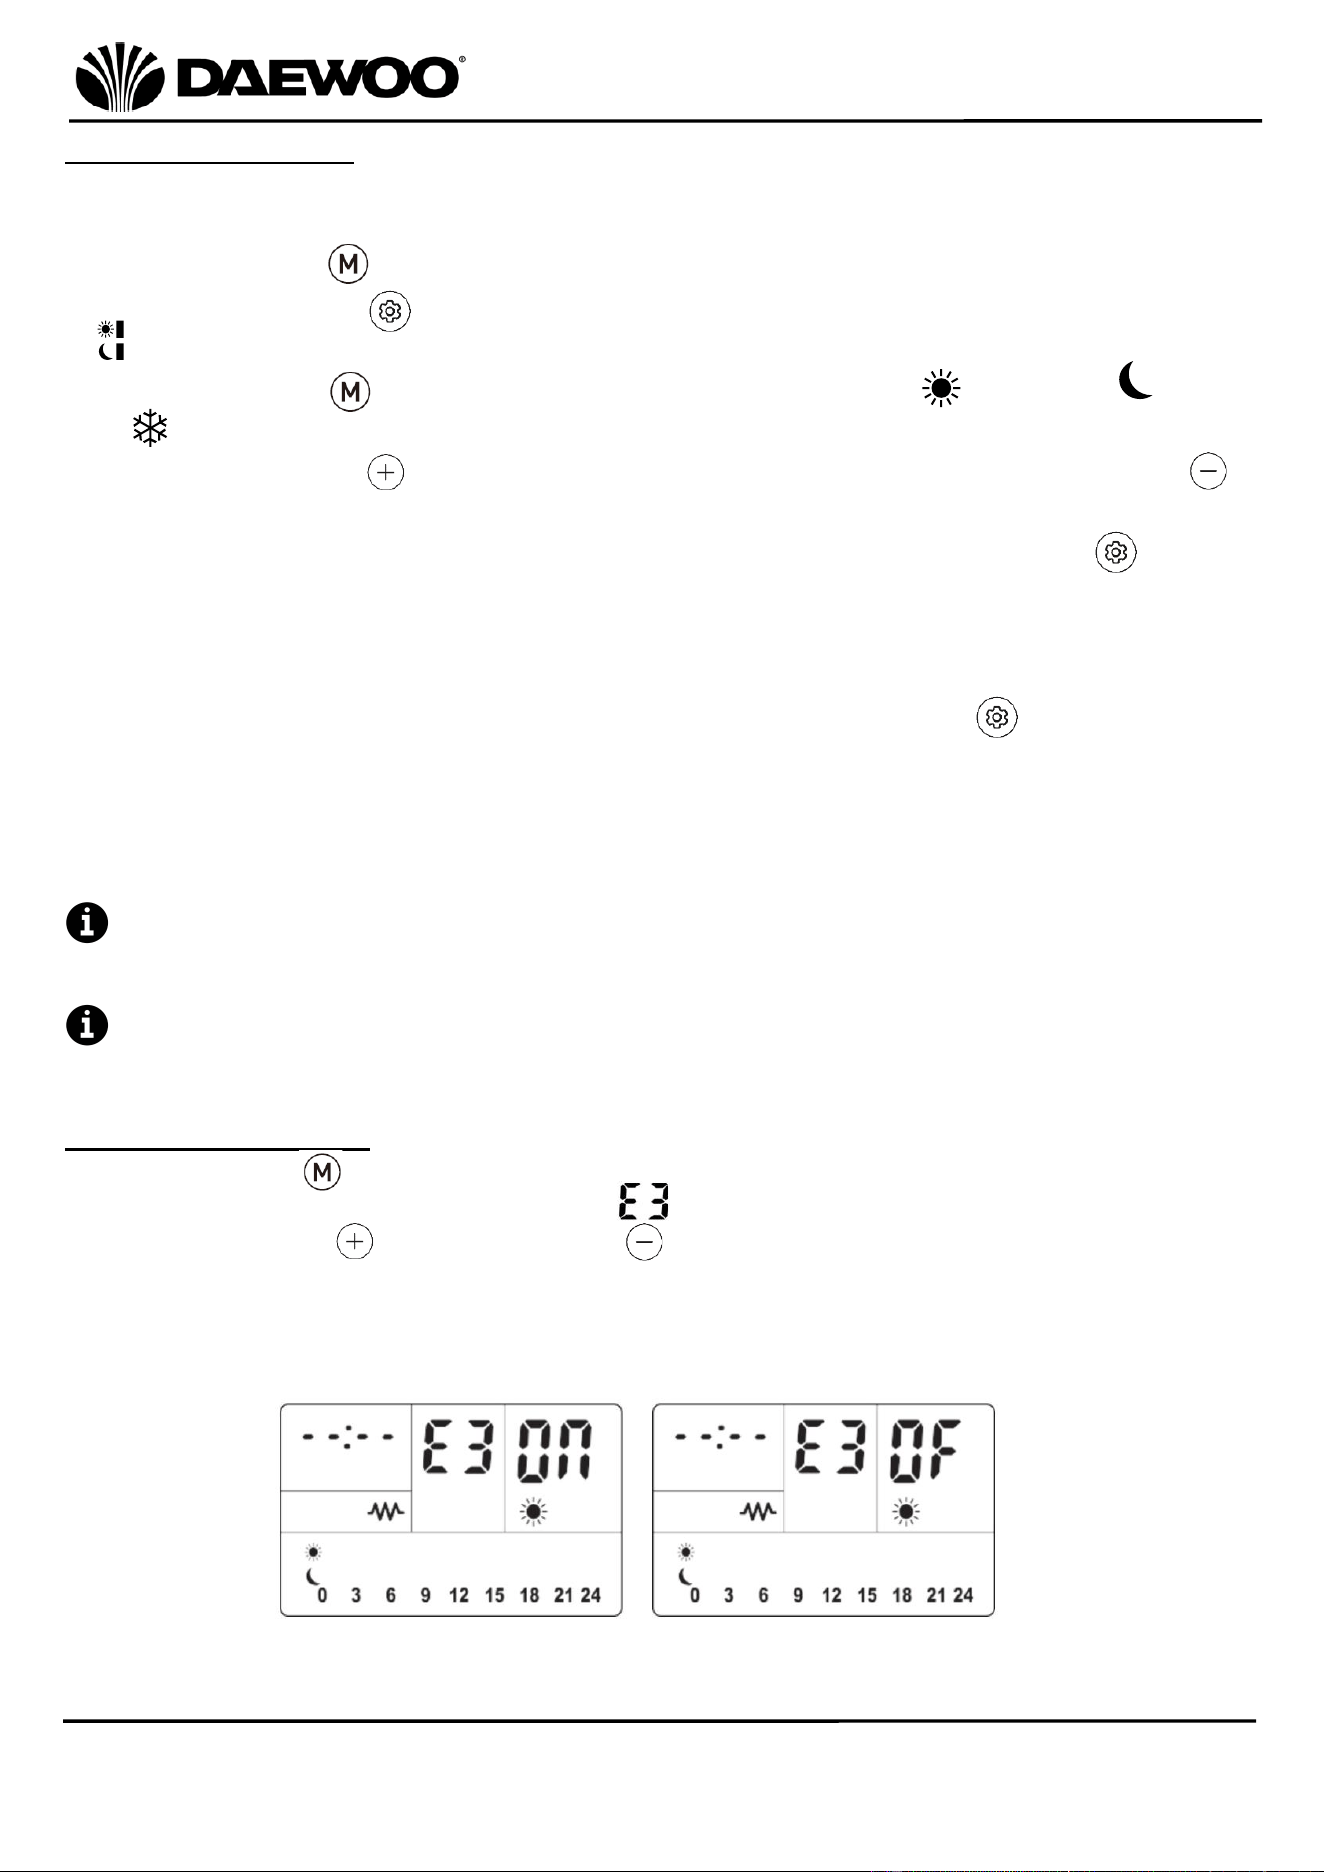
Window Open Mode
Press the Mode (16) button for 3 seconds to activate the open window
detection mode, the display will show .
Press the Increase (21) or Decrease (22) buttons to set the mode on or off.
After 5 seconds the display will return to the normal display.
Below the Windows Open Mode is shown on the display as below:
Windows Open Mode On
Windows Open Mode Off
16
IMPORTANT – RETAIN THESE INSTRUCTIONS FOR FUTURE REFERENCE
1500W 5 Fin Ceramic Radiator
Model No. HEA1899
User Manual
Care and Use of Your Ceramic Radiator
• Always disconnect the heater from the mains power supply and allow it to cool
before cleaning.
• Clean the outside of the heater with a clean damp cloth. Never clean with harsh
or abrasive cleaners.
• DO NOT submerge any part of the heater in water or any other liquids.
Technical Specification
Rated Voltage
220-240V~ 50-60Hz
Rated Power
1500W
Model Number
HEA1899
Protection Class
I (This appliance must be earthed)
Non-Rewireable Mains Plug
If your appliance is supplied with a non-rewireable plug fitted to the mains lead
and should the fuse needed replacing, you must use an ASTA approved one
(conforming to BS 1362 of the same rating). Never use a plug with the fuse cover
missing. If in doubt, consult a qualified electrician.
If you need to remove the plug -DISCONNECT FROM THE MAINS- and then cut it
off the mains lead and immediately dispose of it safely. Never attempt to reuse
the plug or insert it into a socket outlet as there is a danger of electric shock.
Recycling Information
Disposal of the Packaging
Dispose of paper and cardboard in appropriate paper re-cycling facilities.
Dispose of recyclable plastics in appropriate plastic re-cycling facilities.
Dispose of non-recyclable plastics in the appropriate plastics collection service.
Disposal of the Product
You should now recycle your waste electrical goods and in doing so
help the environment. This symbol means waste electrical products
at the end of their useful life should not be disposed of with normal
household waste and not sent to landfill. Please ensure it is taken to
a suitable facility for disposal. Check with your Local Authority or
retailer for recycling advice or visit www.recycle-more.co.uk to find
your nearest recycling point.

17
IMPORTANT – RETAIN THESE INSTRUCTIONS FOR FUTURE REFERENCE
1500W 5 Fin Ceramic Radiator
Model No. HEA1899
User Manual
18
IMPORTANT – RETAIN THESE INSTRUCTIONS FOR FUTURE REFERENCE
1500W 5 Fin Ceramic Radiator
Model No. HEA1899
User Manual
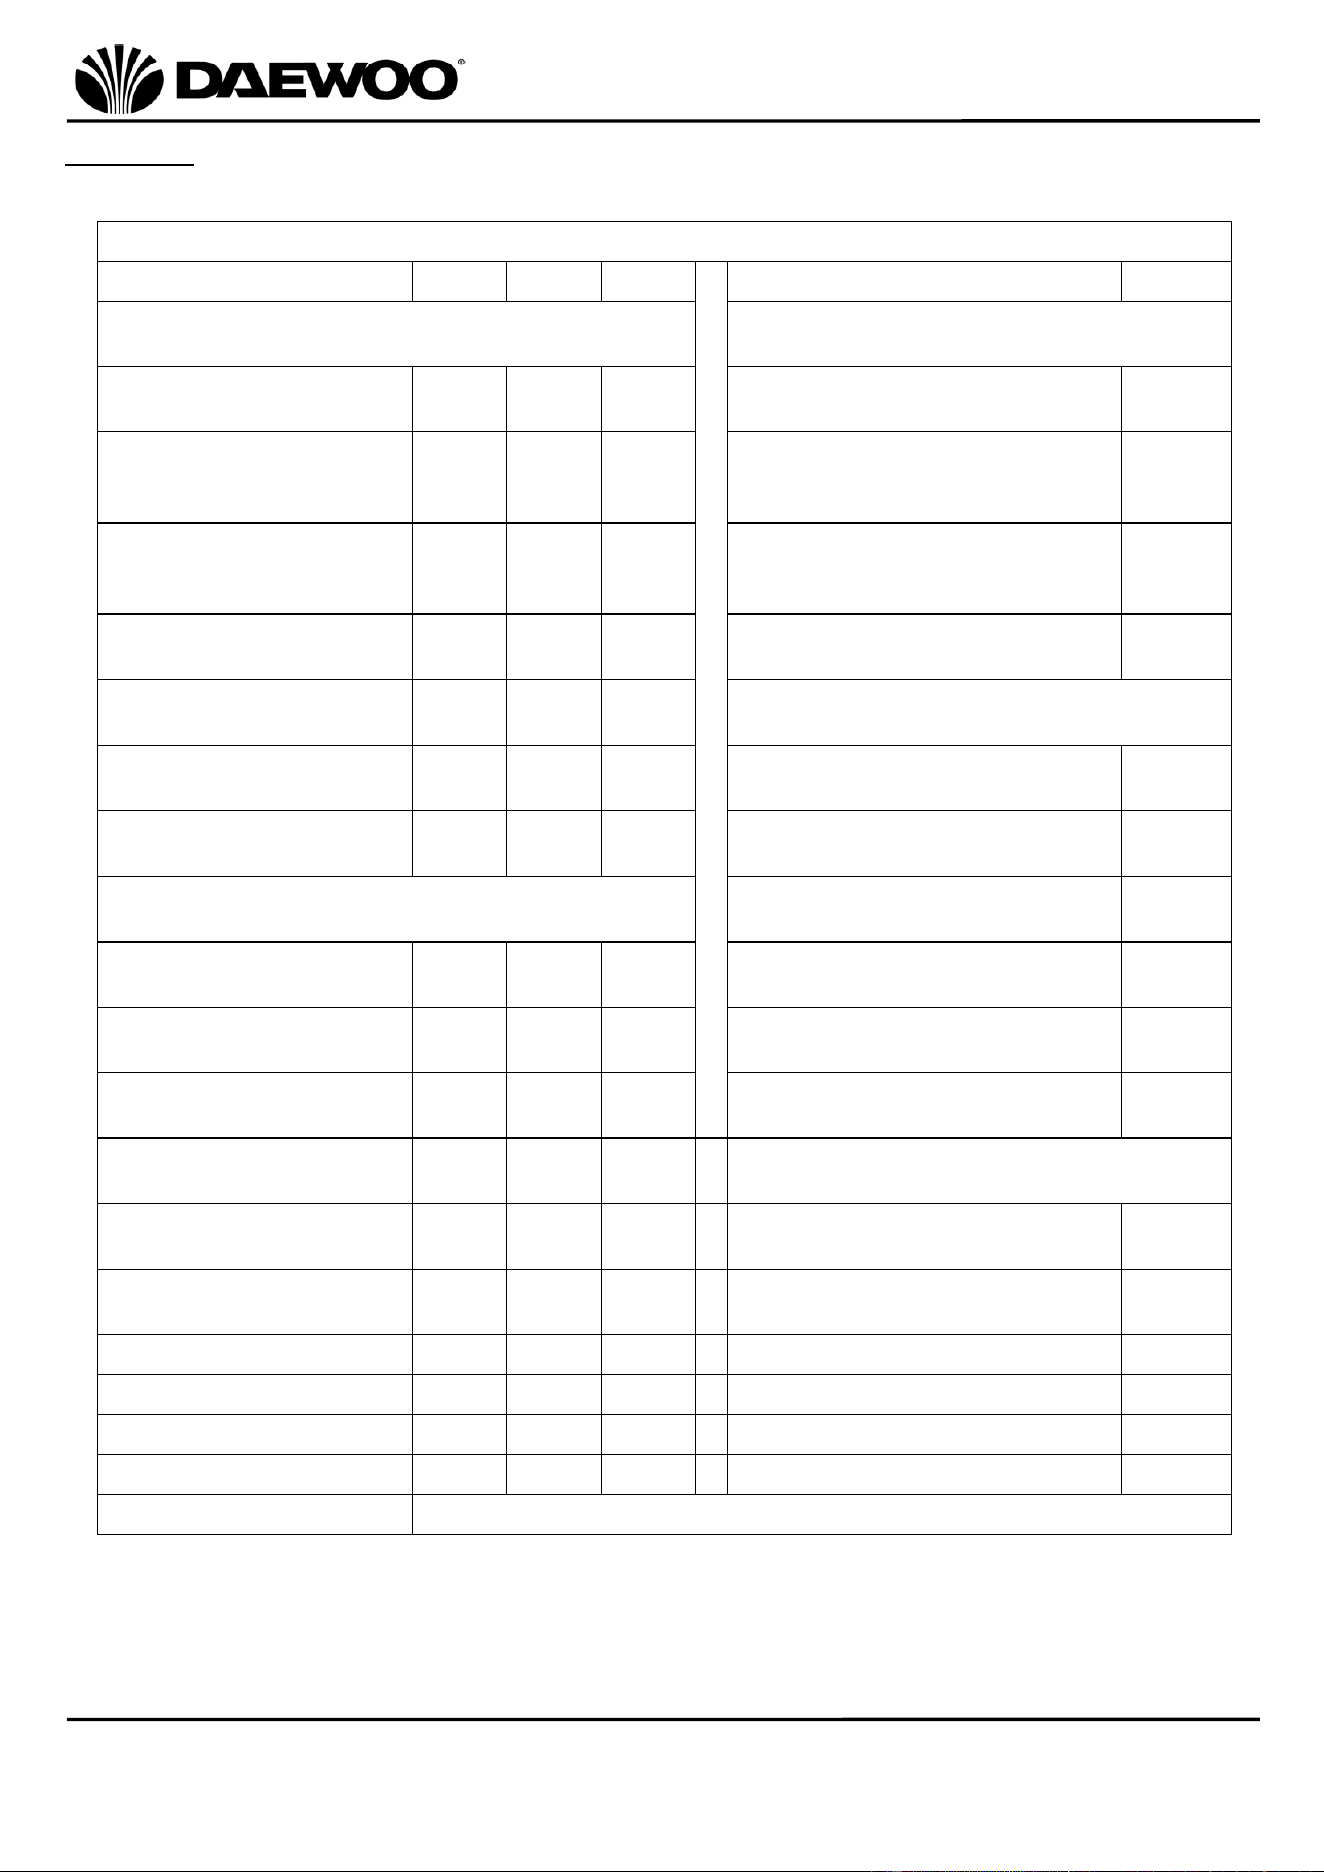
ErP Data
Model identifier(s): HEA1899
Item
Symbol
Value
unit
Item
unit
Heat output
Type of heat input, for electric storage local
space heaters only (select one)
Nominal heat output
P
nom
1.5
kW
manual heat charge control, with
integrated thermostat
[no]
Minimum heat output
(indicative)
P
min
1.5
kW
manual heat charge control with
room and/or outdoor temperature
feedback
[no]
Maximum continuous heat
output
P
max,c
1.5
kW
electronic heat charge control with
room and/or outdoor temperature
feedback
[no]
Auxiliary electricity
consumption
fan assisted heat output
[no]
At nominal heat output
el
max
N/A
kW
Type of heat output/room temperature
control (select one)
At minimum heat output
el
min
N/A
kW
single stage heat output and no room
temperature control
[no]
In standby mode
el
sb
0.00014
kW
Two or more manual stages, no room
temperature control
[no]
with mechanic thermostat room
temperature control
[no]
with electronic room temperature
control
[no]
electronic room temperature control
plus day timer
[no]
electronic room temperature control
plus week timer
[Yes]
Other control options (multiple selections
possible)
room temperature control, with
presence detection
[no]
room temperature control, with open
window detection
[Yes]
with distance control option
[no]
with adaptive start control
[no]
with working time limitation
[Yes]
with black bulb sensor
[no]
Contact details:
19
IMPORTANT – RETAIN THESE INSTRUCTIONS FOR FUTURE REFERENCE
1500W 5 Fin Ceramic Radiator
Model No. HEA1899
User Manual
Notes

20
IMPORTANT – RETAIN THESE INSTRUCTIONS FOR FUTURE REFERENCE
1500W 5 Fin Ceramic Radiator
Model No. HEA1899
User Manual
Daewoo® is a registered trademark.
Produced and imported under license by
Eurosonic Group Limited
Brightgate House
1 Brightgate Way
Manchester M32 0TB UK
EU Rep: EuroSonic Magppie (ESM) Ltd. Ireland D05 X006
www.esgltd.com
WARRANTY
Thank you for purchasing your Daewoo product.
As part of our commitment to quality, we are offering you an extra 2 years warranty in
addition to your 1 year guarantee
Your Daewoo product is guaranteed for 1 year from the date of original purchase, with proof
of purchase or receipt. If any defect should occur due to faulty workmanship or material, your
faulty product should be returned to the place of purchase, replacement or refund is at the
discretion of the retailer.
The guarantee is subject to the following provisions:
•
The product must be correctly installed and operated in accordance with the
requirements contained in the instruction manual.
•
The product must be used solely for domestic purposes.
•
It does not cover general wear and tear, damage, misuse or any consumable parts.
•
The guarantee will be rendered invalid if the product is re-sold or has been damaged through
inexpert repair.
•
The guarantee is only valid within the UK and Eire.
Your standard 1 year guarantee will only be extended to the maximum available for your
individual product upon registration. (Note: products must be registered individually and
covers the main body and housing). If you do not register your product within 28 days of the
original purchase date, your product will only be guaranteed for 1 year.
To validate your extended 2 year warranty*please register your purchase online within
28 days of the original purchase date by registering at:
https://help.daewooelectricals.com
or
Contact Us (daewooelectricals.com)
*Your extended warranty is only valid with proof of purchase receipt and subject to the
conditions outlined above.