English/Deutsch/Français/Polski
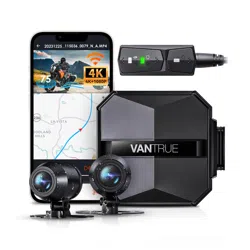
4K+1080P Dual Dashcam for Motorcycle
User Guide
Model No.: F1
Falcon 1
78mmX120mm
70g
2023.3.1
更新内容
封面产品机器

English/Deutsch/Français/Polski
4K+1080P Dual Dashcam for Motorcycle
User Guide
Model No.: F1
Falcon 1
78mmX120mm
70g
2023.3.1
更新内容
封面产品机器

Hey, find us here:
www.vantrue.net/contact
facebook.com/vantrue.live
Skontaktuj się z nami:

CONTENTS
VERZEICHNIS
CONTENU
SPIS TREŚCI
Installation Guide
Installationsanleitung
Installation
Instrukcja instalacji
1.
Structure Diagram
Installationsdiagramm
Schémadecombinaisond'installation
Schemat strukturalny
2.
Basic operation
Betrieb
Opération
Podstawowa obsługa
3.
Troubleshooting
Allgemeine Fehlerbehebung
Dépannagecourant
Rozwiązywanie problemów
4.
Specifications
Parameter
Paramètresduproduit
Dane techniczne
5.
Warranty & Support
Kundendienst
Serviceaprès-vente
Gwarancja & wsparcie
6.
1
28
55
82
7
34
61
88
9
36
63
90
22
50
77
104
24
52
79
106
26
53
80
108

Please read this User Manual carefully before using
the camera.
This product is a motorcycle-specific recorder and
is limited to connecting to a 12V battery.
Please turn off the power of the motorcycle before
installation, and turn on the power after installation
is completed.
The Wi-Fi name is F1_VANTRUE_XXXX and the initial
Wi-Fi password is 12345678.
It is strictly forbidden to use high-pressure water gun
to flush the machine to avoid water in the body.
This product supports up to 512GB SD card storage.
To ensure normal video recording, please use Class
10/U3 and above standard high-speed cards.
The F1 front and rear cameras are fully sealed and
waterproof, but you still need to avoid using
solvents such as grease, alcohol and tar cleaner to
contact the camera to avoid damaging the
waterproof layer.
Note: For normal storage of video files, please
format the SD card regularly.
Warm tips:
1.
2.
3.
4.
5.
6.
7.
EN
- 1 -
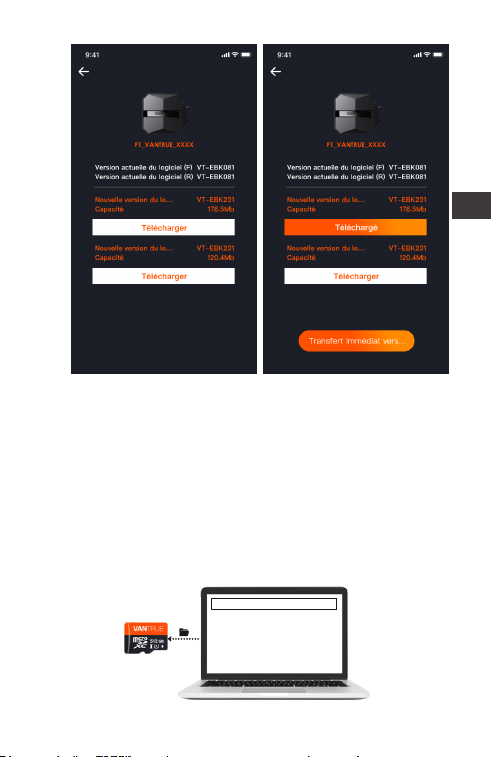
1.1 Inserting a Memory Card (Recommended: Vantrue
U3 high-speed microSD card).
1. Installation Guide
After inserting the SD card for the first time, please
press and hold the remote control record button
for 10 seconds to start formatting the card.
Note:
After removing the cover of the SD card slot, put
the screw in place to avoid losing it.
Use the matching screwdriver to
remove the slot sealing cover
Insert an Memory Card
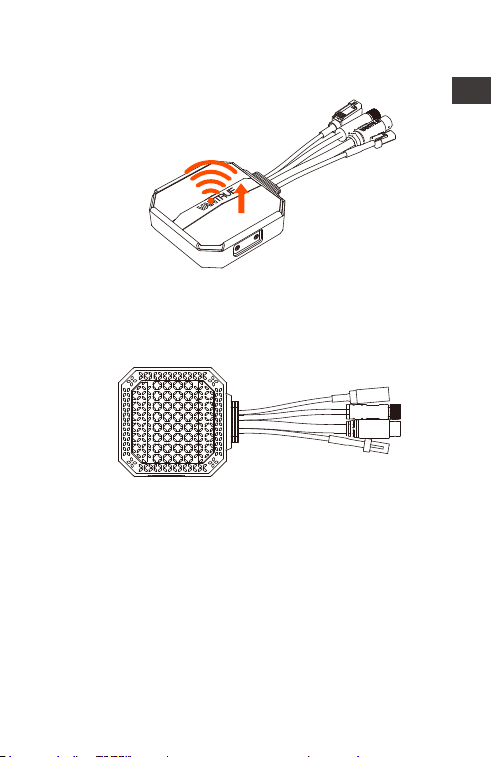
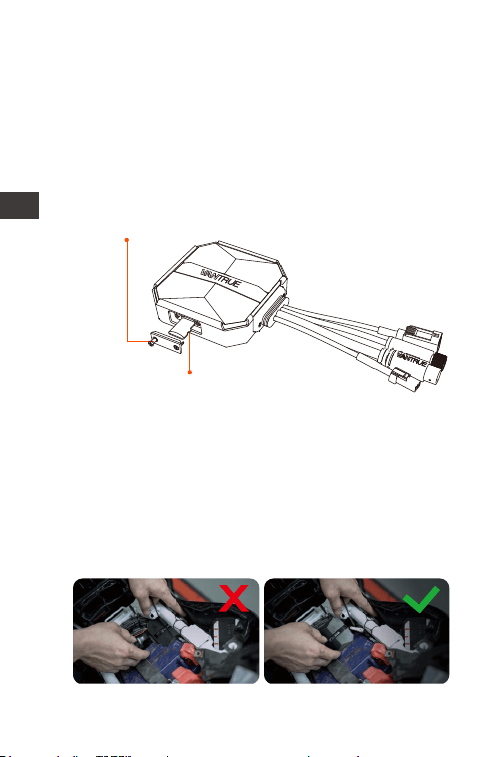
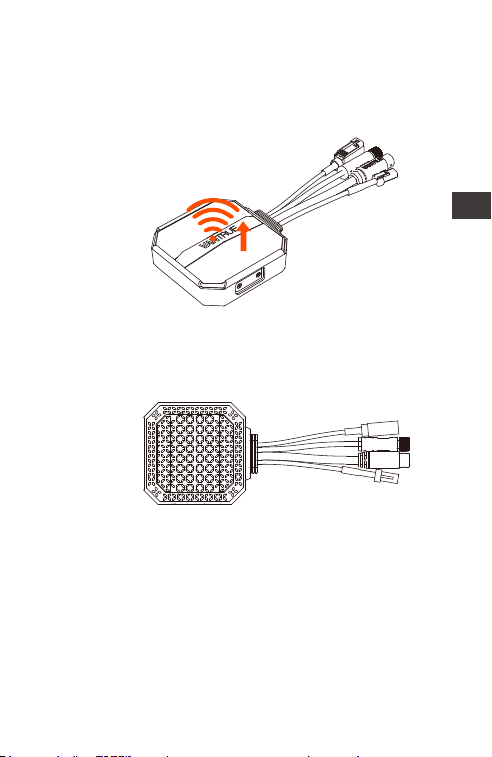
1.2 Installing the Dash Cam Main Unit
Please install the main unit in a location without
metal cover, such as under the seat, determine
the location and tear off the 3M adhesive to fix it.
Note:
<1>The Wi-Fi signal transmitting part is on the front
EN
- 2 -
of the main unit. Please do not install it facing
down when installing the logo side of the main
unit or under the metal parts of the motorcycle.
<2>. F1 dash cam main unit needs to be fixed with
3M adhesive (shipped as standard). Please fix the
3M adhesive in the recess of the F1 main body
protective case and then paste it to the motorcy-
cle.
<3>. In order to improve the cooling efficiency of
F1 mainframe, you can remove the protective
case before installation.
<4>. If installed on the curved surface, we
recommend using cable ties for fixing.
Wi-Fi signal
transmitting direction
EN
- 3 -
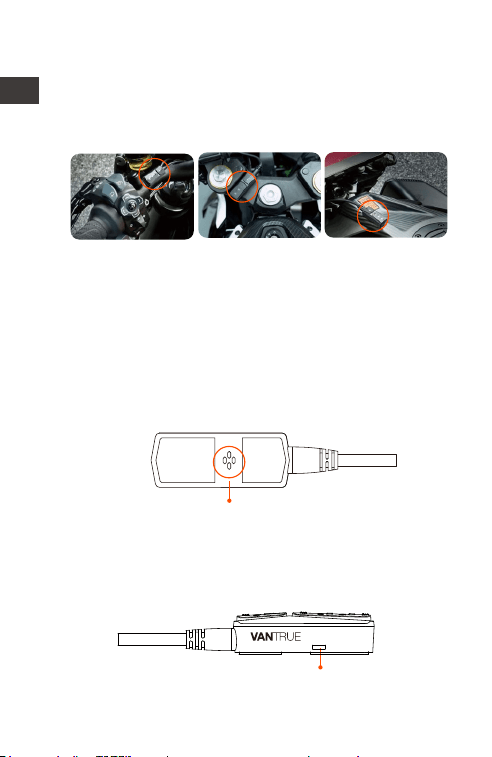
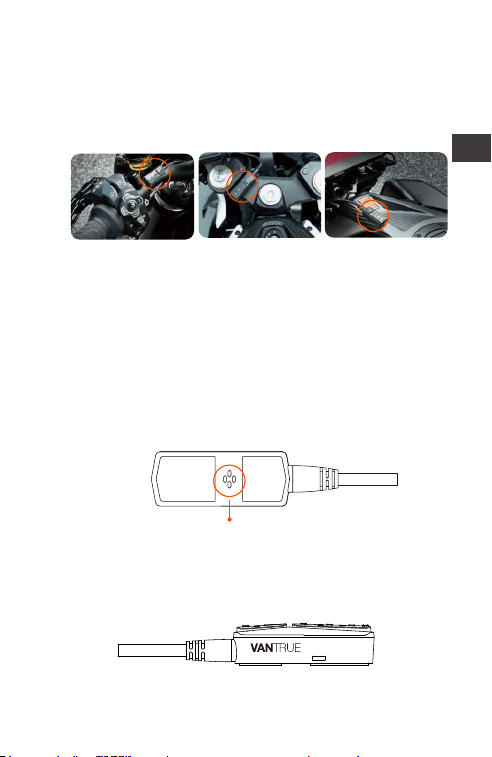
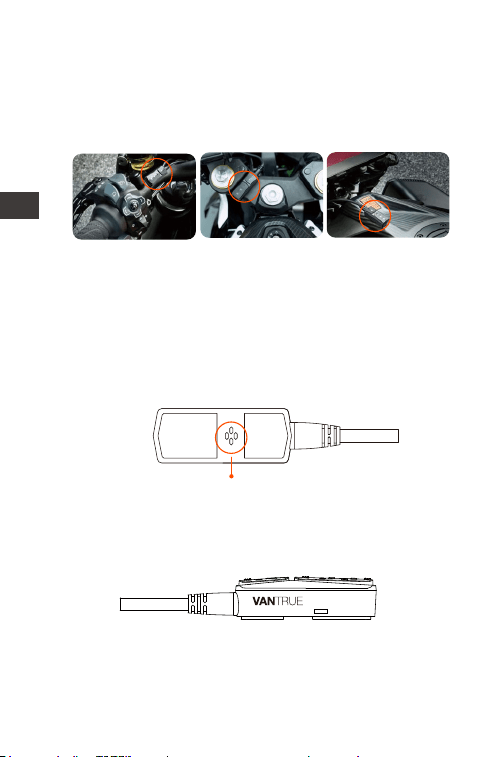
1.3 Installing the remote control
You can choose a suitable installation position
according to your own usage habits and install
the remote control on the handlebars, the front
part of the car, the side of the fuel tank, etc.
Note :
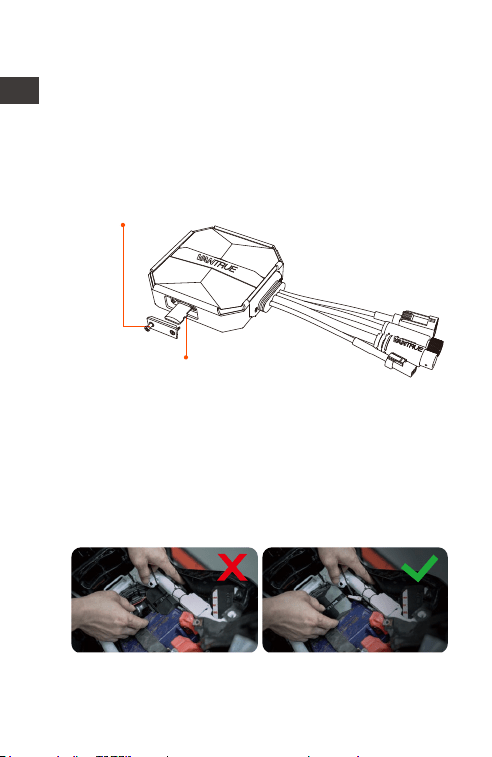
<1>. When installing the motorcycle dash camera,
you need to face up the button side to avoid
affecting the GPS signal reception.
<2>. Please do not use 3M adhesive to cover the
speaker hole on the back of the remote control in
order to increase the stability of the remote control.
Speaker hole
Motorcycle
handlebars
Motorcycle
front end position
Fuel tank side
Microphone receiving hole
<3>. The side is the microphone receiving hole,
please do not put the receiving hole directly in
front to avoid serious wind noise.
EN
REMINDER:
- 4 -
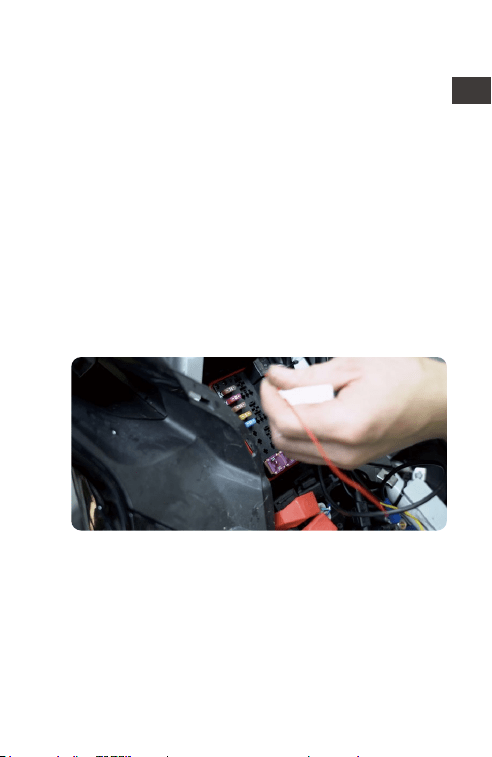
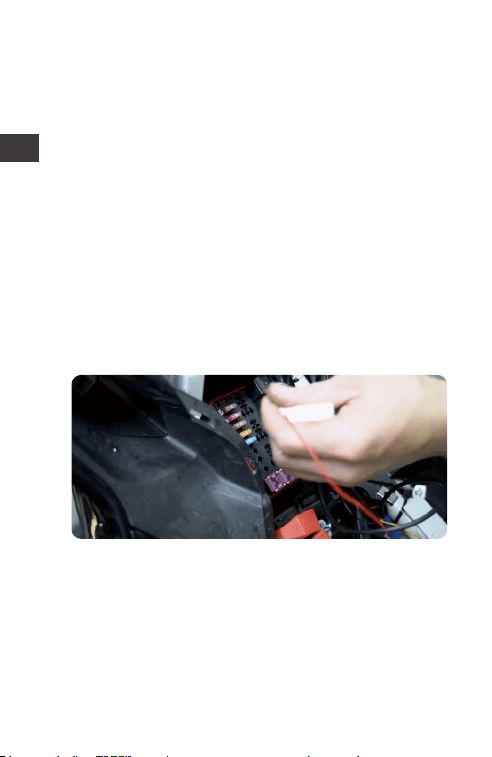
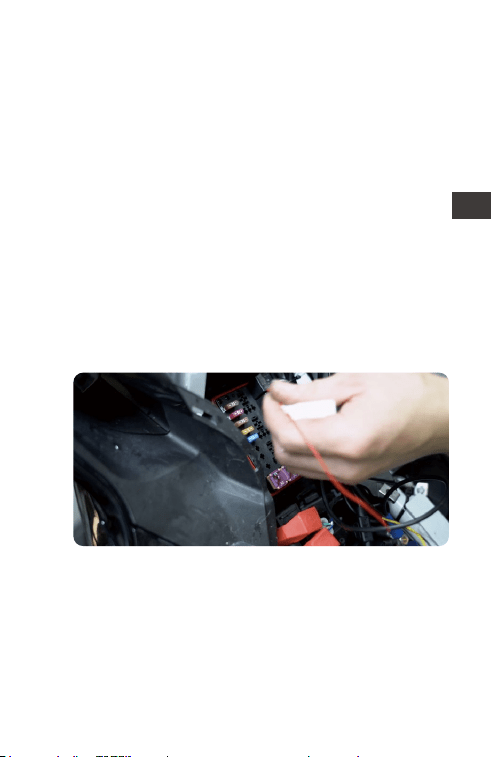
1.4 Installing the Power Cord
Connect the power cord to the fuse box as
follows.
Step 1: The red power cable is connected to the
positive terminal of the battery.
Step 2: The ACC signal wire (yellow wire) is
connected to the ACC power fuse of the battery.
Step 3: The black ground wire is connected to the
negative terminal of the battery or the override
position.
Step 4: Start the motorcycle power supply and
wait for the device to start.
Step 5: After confirming that the power supply is
properly installed, use the cable ties to organize
the storage lines and secure them to the
motorcycle.
Note:
<1>. Before installation and wiring, you need to turn
off the motorcycle and turn off the motorcycle
power to avoid short circuit during the operation.
<2>. For driving safety, please avoid leaving too
long power cables exposed. If necessary, please
use insulating tape to wrap and fix them.
Select the location
in the fuse box
where the fuse can
be accessed.
EN
- 5 -
EN
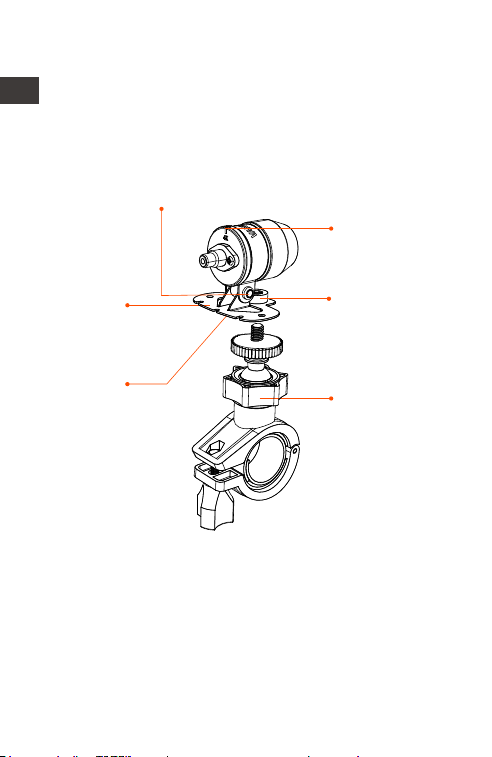
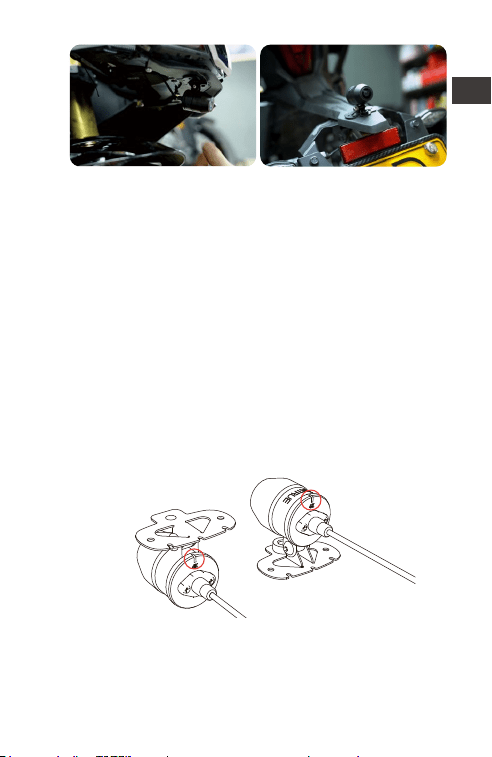
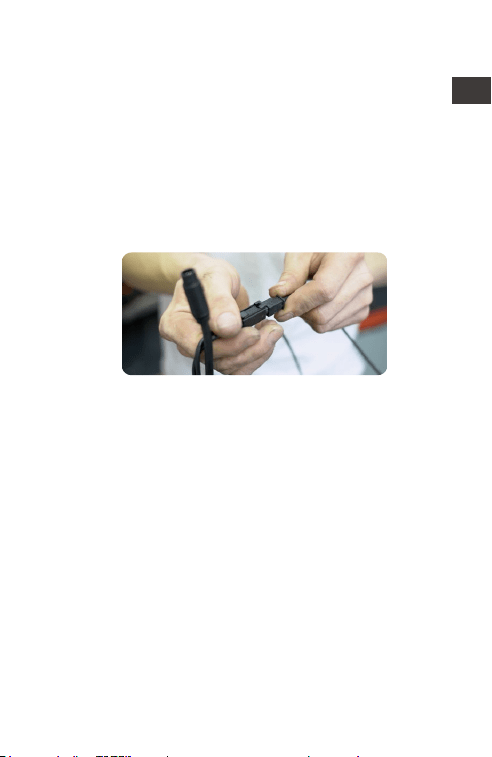
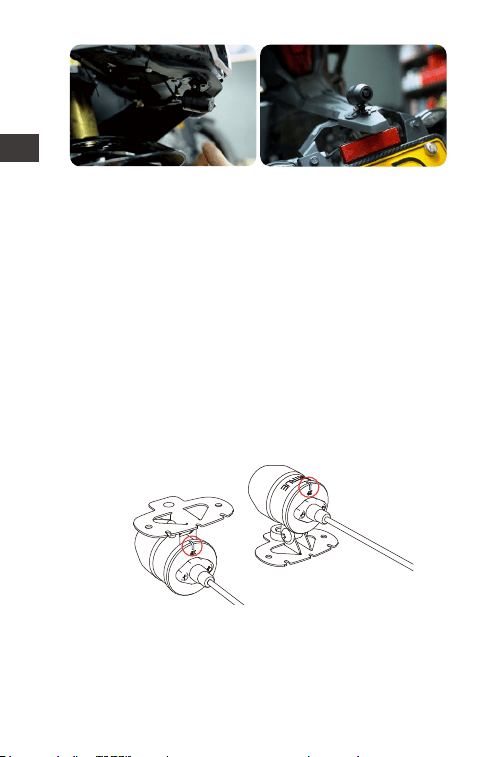
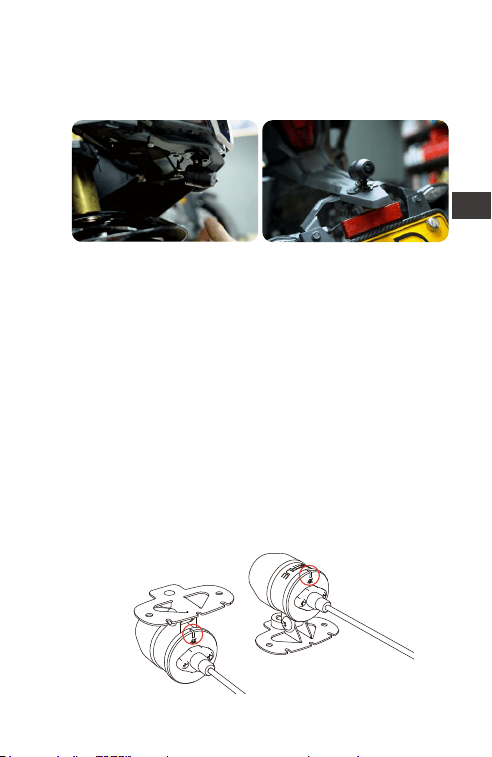
1.5 Installing the Front and Rear camera
The front and rear cameras can be loosened by
the hexagonal screw to adjust the camera
recording angle, as well as the recording direction.
Note:
<1>. If the front camera is mounted on the
handlebar position, you need to fix the front
camera to the multifunctional camera holder first,
and then fix the holder on the motorcycle
handlebar.
<2>. The front/rear cameras comes with 3M
adhesive, just stick it in the front/rear of the
motorcycle after choosing the right position.
EN
Camera
orientation
correction line
Camera
holder
3M adhesive
for camera
holder
Camera mount holder head cap screws: loosened,
you can adjust the camera angle up and down,
can be inverted, side-mounted rotation to adjust
the direction of the camera recording.
Multifunctional
camera holder:
fixing screw holes
Multifunctional
camera holder:
can be mounted
on motorcycle
handlebars and
other locations
- 6 -
(We recommend mounting the front and rear
cameras on the motorcycle body instead of the
handlebars to reduce camera shake and improve
the stability of the video)
<3>. The line of the camera is a high frequency
data line. Please do not bend the cable 180
degrees backwards, as it may cause damage to
the cable. We recommend using a circular way to
tie the wire fixed.
<4>. Due to different installation positions, the
front/rear camera may appear backwards, you
can adjust the camera according to the direction
of the camera correction line.
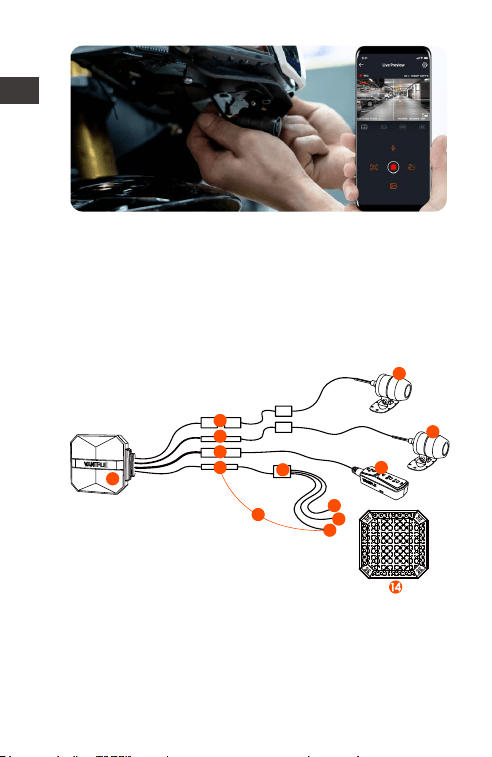
<5>. When adjusting the direction of the camera
recording, you can use the App real-time preview
function to accurately adjust to the appropriate
recording effect.
EN
Forward mounting
of the mount
Reverse mounting
of mount
Motorcycle head
mounting position
Motorcycle rear
mounting position
- 7 -
EN
After the camera is installed, you can enter the
VANTRUE App real-time preview to correct the
cameraorientation. After entering the live
preview, click on the word [ 田] calibration line at
the bottom left of the screen to confirm the
camera direction.
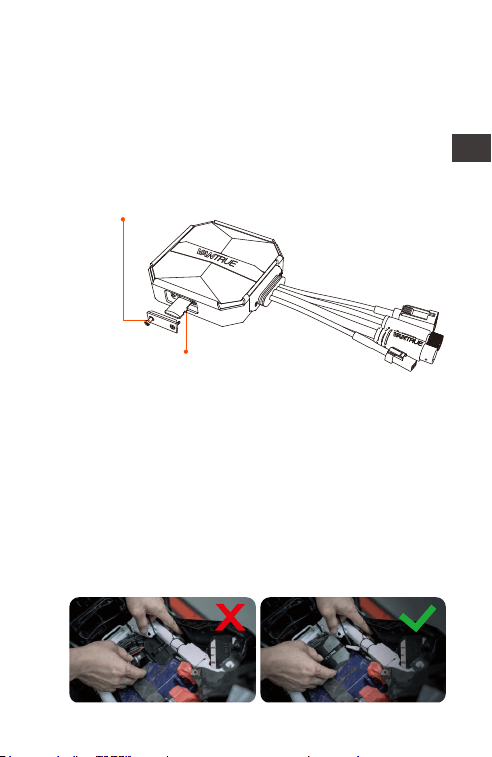
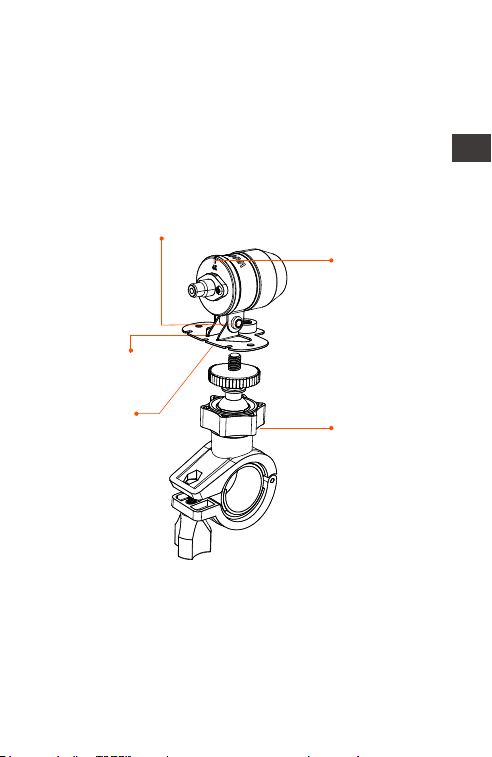
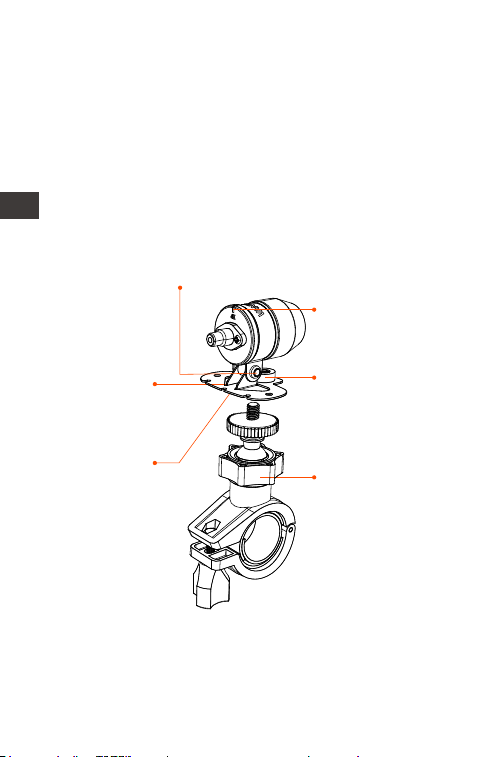
2. Structure Diagram
① F1 main camera
② 4K front camera
③ 1080P Rear Camera
④ Remote control
⑤ Power cord
⑥ Rear camera port
⑦ Front camera port
⑧ Connect the remote control
⑨ Connect the power cord
⑩ Fuse
1
4
7
6
8
10
11
12
13
9
5
2
3
- 8 -
EN
⑪ Red power cable (positive power supply)
⑫ ACC signal wire (yellow wire)
⑬ Black ground wire (power negative)
⑭ Protective housing
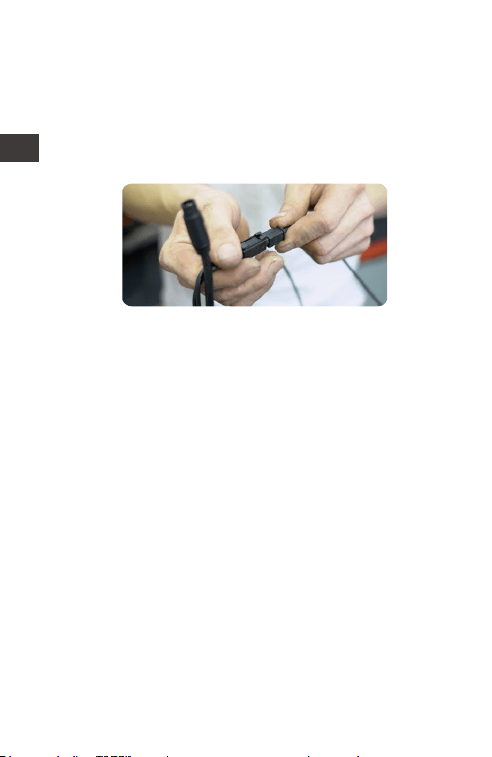
Note:
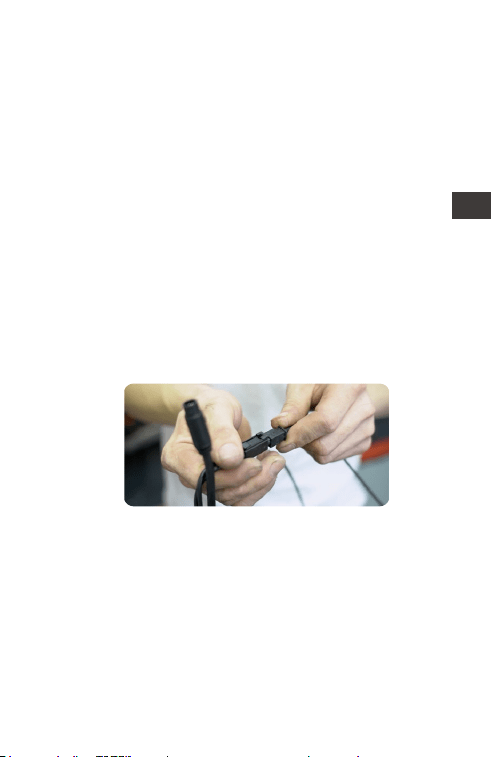
When connecting the front camera cable, until
you hear the "click" sound, indicating that the
cable buckle has been installed in place. You can
use a screwdriver to lift the end of the snap to
make the snap easier to snap into the slot.
Please avoid bending the F1 camera cable at a
sharp angle, as bending it at a sharp angle can
damage its shielding and cause improper signal
transmission or interference with other electronic
devices.
- 9 -
EN
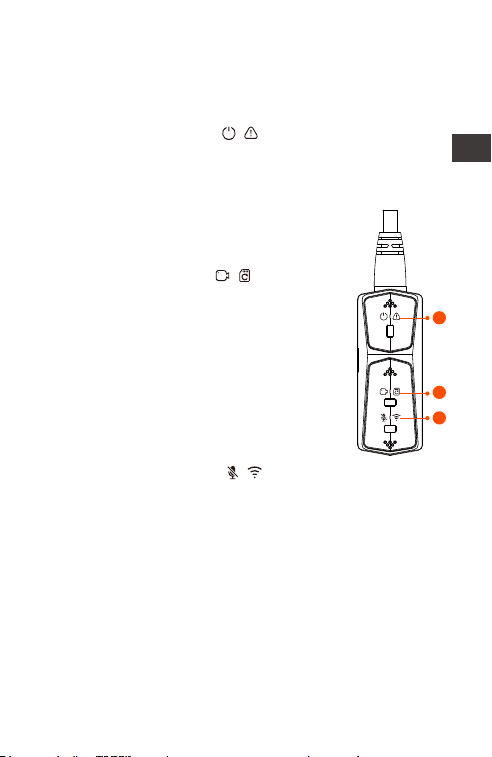
3. Basic operation (App operation/remote
control operation)
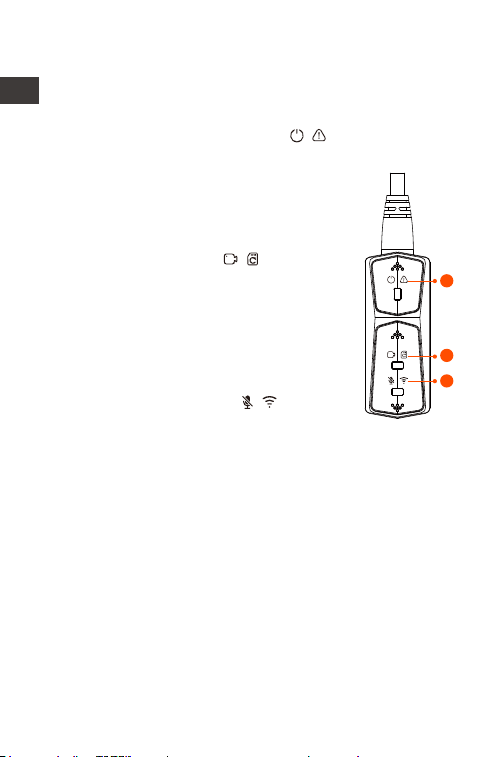
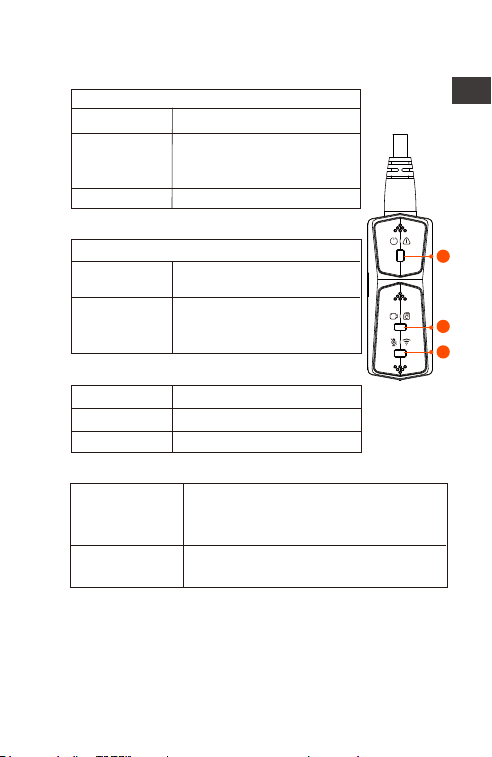
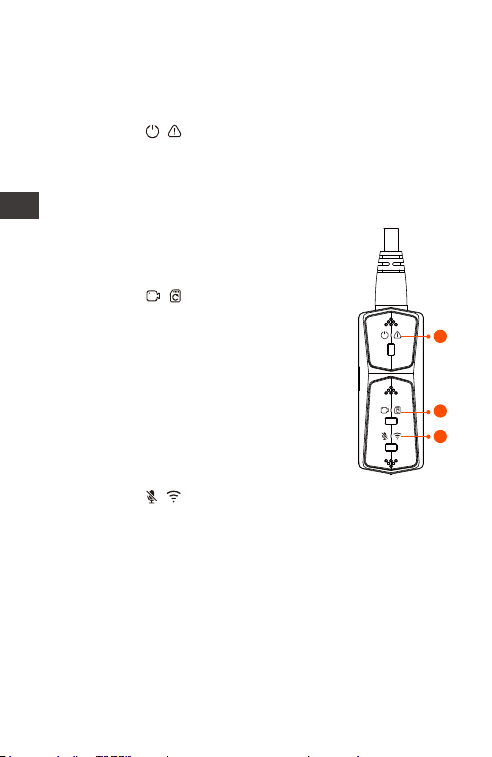
Remote control button function introduction
① Power/Emergency button
Long press function: Power off
Short press function: Power on; After
power on, short press to lock the file,
and short press again when locking
the file to capture the picture.
② Recording button
Long press function: After power on,
long press for 10 seconds to format SD
card.
Short press function: During recording,
short press to pause recording; during
standby, short press to start recording.
③ Microphone button
1
2
3
Long press function: After power on,
long press to turn on/off Wi-Fi.
Short press function: Short press to turn
on/off the microphone; short press 5
times or more continuously to restore
the default factory settings.
- 10 -
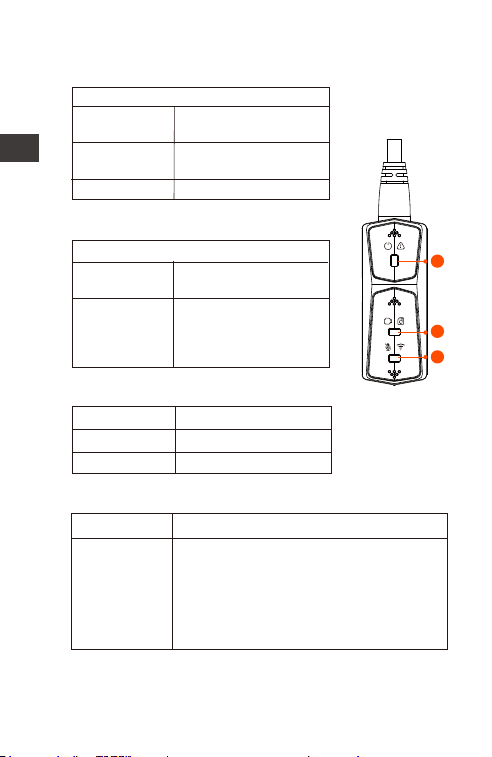
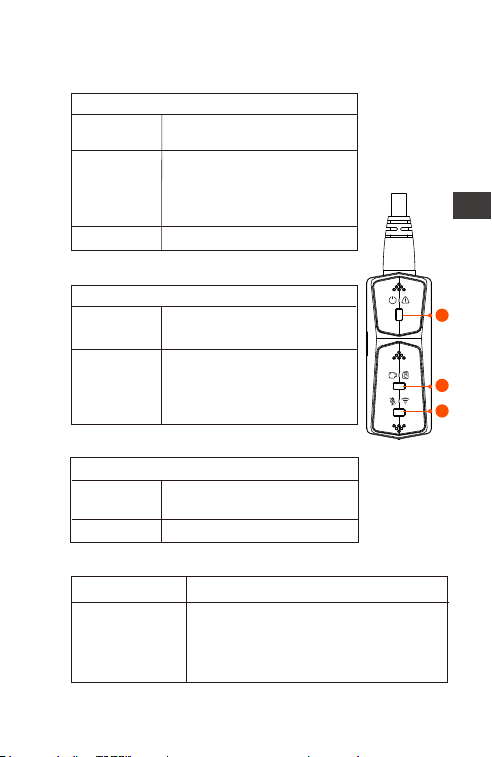
Collision
Detection
Red light + Green light + Blue light:
Off at the same time, in standby
EN
LED Indicator
Status
Normal power supply
Power off
Steady Light
Blinking Light
OFF
① Power Light(Red Light)
Fast flashing,
emergency
recording
Status
Standby; in emergency
recording.
Steady Light
Blinking Light
② Recording light(Green Light)
Fast flash: In formatting
the card.
Slow Flash: In Recording
Status
Audio On
Audio Off
Steady Light
Off
③ Microphone light(Blue Light)
Parking Mode
Type
Red light + Green light + Blue light:
Flashing at the same time, in the
recording
In parking mode, the indicator status is as follows.
1
2
3

- 11 -
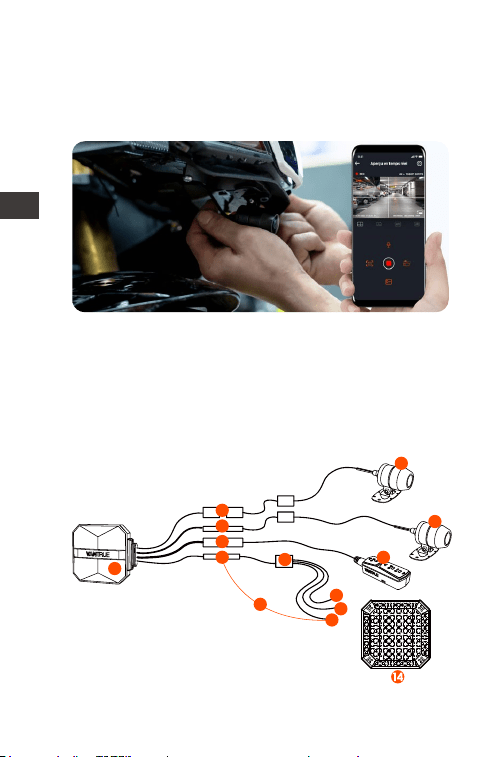
App Operation
App Download
Scan the QR code below to download the latest
App from Google Play and App Store. Or you can
search “Vantrue” on Google Play and App Store
to download it.
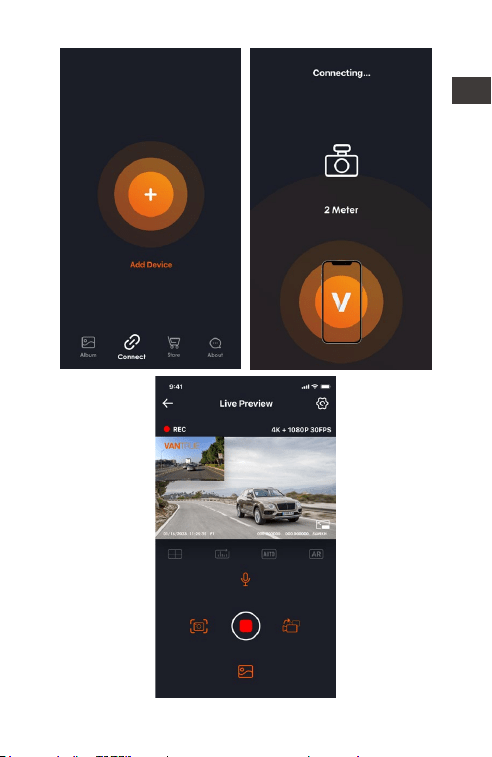
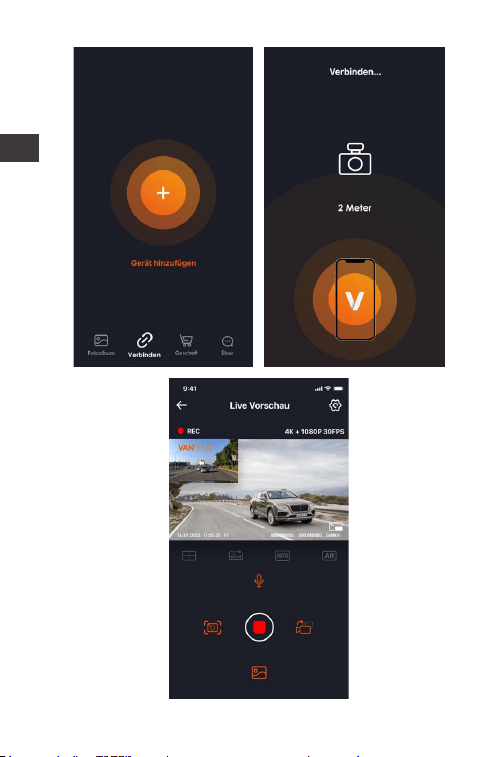
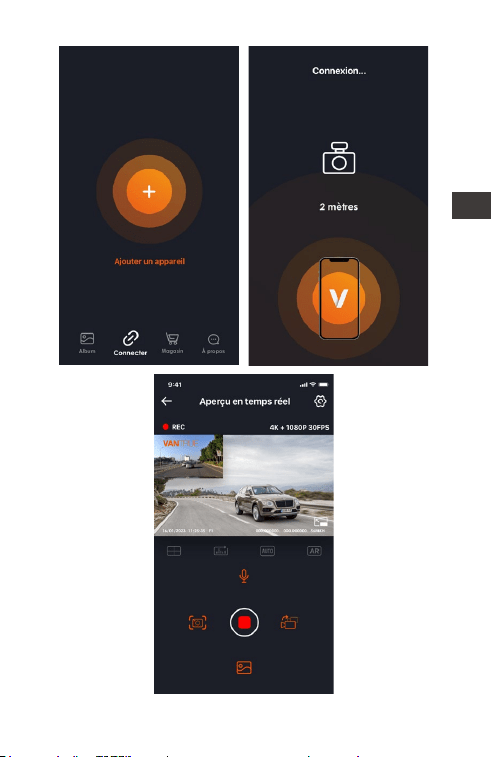
First time connection steps.
<1>. Power on the motorcycle dashcam, the F1
will open 5G Wi-Fi by default, and there will be
"Wi-Fi on" prompt after power on.
<2>. Open Vantrue App, click "+" to add the
device, the App will jump to the cell phone Wi-Fi
settings interface, please find the F1_VANTRUE_
XXXX name Wi-Fi in the Wi-Fi settings interface,
enter the default password 12345678, wait for the
Wi-Fi connection success, and then return to App.
EN
- 12 -
EN
- 13 -
Note:
<1>. For Wi-Fi connection operation, please refer to
Figure 1~3.
<2>. After the first successful connection, when you
turn on F1 again in the future, you can connect
automatically by clicking the App. If you turn off
the function that Wi-Fi starts when you turn on the
motorcycle dashcam, you need to manually turn
on Wi-Fi to connect. If you forget the password,
you can press the microphone button 5 times or
more to restore the factory settings and restore to
the initial password 12345678.
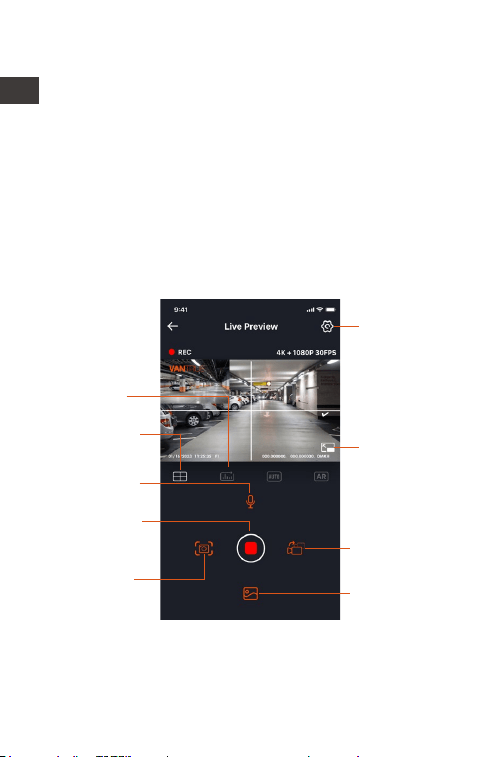
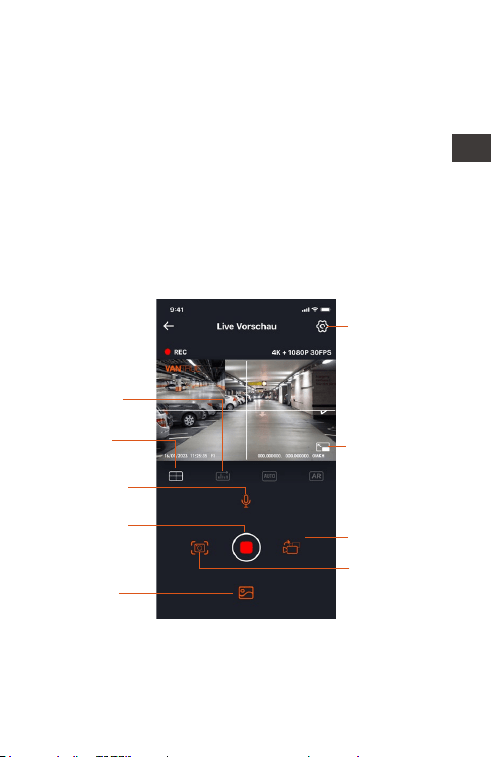
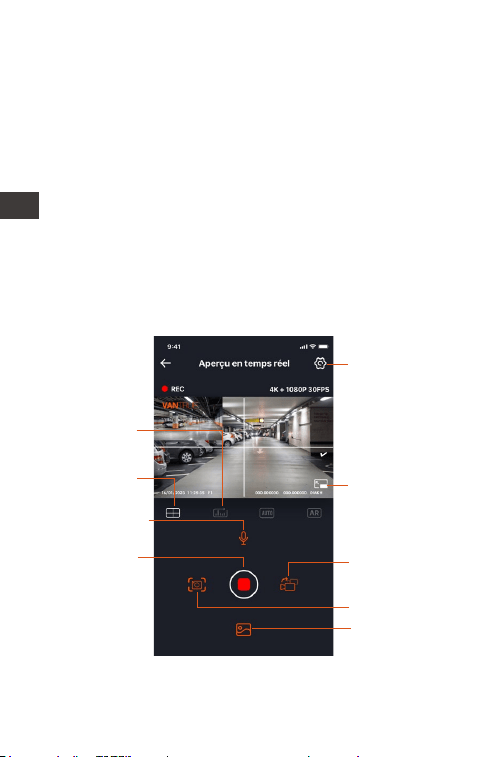
App Operation
Camera
Settings
Mileage
statistics
Camera
correction
auxiliary line
Microphone
ON/OFF
Stop
Recording
Icon
Playback files
Snapshot
Front and Rear
Display Switch
Full-screen
Icon
You can view live preview of driving screen,
change settings, play files, view video GPS track,
share files, view mileage statistics analysis and
other functions through the App.
EN

- 14 -
EN
Menu Options
Note:
<1>. The mileage statistics function is enabled by
default. For the GPS mileage information saved in
the memory card of the camera, you can view
the txt file in the GPS folder in the memory card
through the computer, or export pictures or PDF
files through the mileage statistics function in the
APP.
<2>. Camera calibration line is used to adjust the
camera recording direction. When installing the
front and rear camera of the car, you can use this
function.
App setting menu
Sync phone
time
Sync phone time is turned on by
default, you can sync phone time
to F1 dashcam.
Language English, French, Spanish, German,
Italian, Simplified Chinese, Russian,
Japanese, Korean can be set, and
the default language is English.
This function includes Wi-Fi auto-on,
Wi-Fi mode, Wi-Fi information.
Wi-Fi Auto-On: By default, Wi-Fi is
automatically turned on when the
dashcam is turned on. Wi-Fi needs
to be turned on manually only after
you turn it off.
Wi-Fi mode: The default is to turn on
5G WiFi, you can switch to 2.4G WiFi
Wi-Fi information: check Wi-Fi name,
Wi-Fi password and other informa-
tion.
Wi-Fi
There are two resolution modes to
choose from, front+back and front
resolution.
Resolution

- 15 -
EN
Front + Back: Default resolution is
2160P+1080P(HDR)30fps
Front : Default resolution is
3840*2160P 30FPS
Off by default. When turned on,
you can integrate the front and
rear camera recording video into
one segment.
Video 2-in-1
The default is 1 minute, other
options can be selected. When
the SD card file storage is full, it will
overwrite the loops automatically.
Loop
Recording
The default is+0.0, you can increase
the exposure value or reduce the
exposure value as needed
Exposure
WDR
Lock the sensitivity of the recording,
the default level is 3. You can
adjust the collision sensitivity level
for different directions of the car
front and back, left and right, up
and down respectively.
G-sensor
Indicator light is on by defaultIndicator
light
The default is on, the car behind
the display screen for the mirror
image, off the display screen for
the original image.
Rear camera
mirroring
Support license plate setting in
Chinese, English and Japanese
License plate
number
setting
Voice Prompt Default is on
Default is on
Default is to display date and time
tag, make and model tag, license
plate tag, speed tag, GPS location
tag
Tag Stamp

- 16 -
The default is off. When turned on,
it is collision detection mode. It
needs to be connected with ACC
function before it can be used.
Parking
Mode
Battery low voltage protection In
this interface, you can check the
current voltage of the motorcycle
battery, in addition, under this
function, you can set low voltage
protection
Battery low
voltage
protection
Default is off, you can choose 1FPS,
5FPS, 10FPS, 15FPS frame rate to
start time-lapse recording
Time-lapse
recording
The default is on. When turned on, it
takes effect when entering parking
mode
Low-light
Night Vision
in Parking
Mode
EN
Open by default, you can change
the speed unit and view the GPS
signal strength
GPS settings
Wi-Fi initial password is 12345678,
you can change it to other
password
Wi-Fi
connection
password
GPS auto time update is on by
default. After turning off, you can
manually change the time and
date
Date format default MM/DD/YY
Adjust the volume level of the
speaker at the remote control
Volume
Date/time
Format SD cardFormatting
Default is on. Users can generate
statistical reports in the APP. The
reports are saved in the APP in
image or PDF format for easy
viewing.
Mileage
Statistics
- 17 -
EN
Turn on all tones by default,
respectively, switch on/off sound,
key tone, lock tone, format
reminder tone, abnormal stop
recording reminder
Beep
Frequency 50Hz/60Hz
View all F1 certification information
Check F1 model, software version
information, official website
System
Information
Restore the default factory settings,
after restoring, Wi-Fi password will
also be restored to the initial
password
Default
Information
Certificated
Info
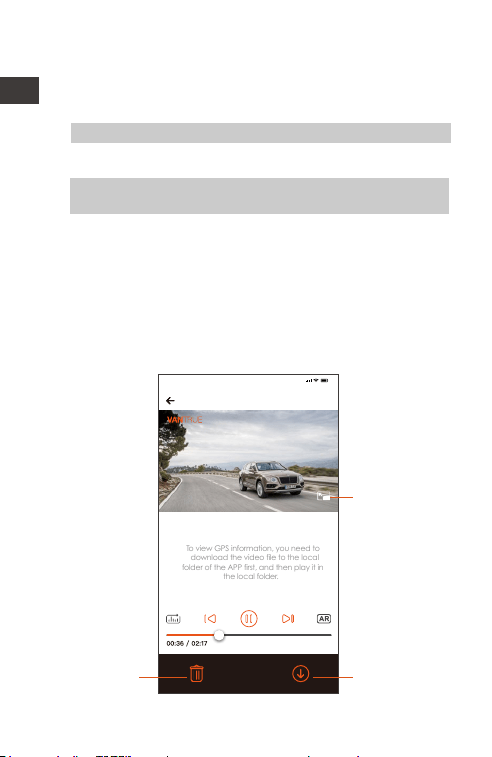
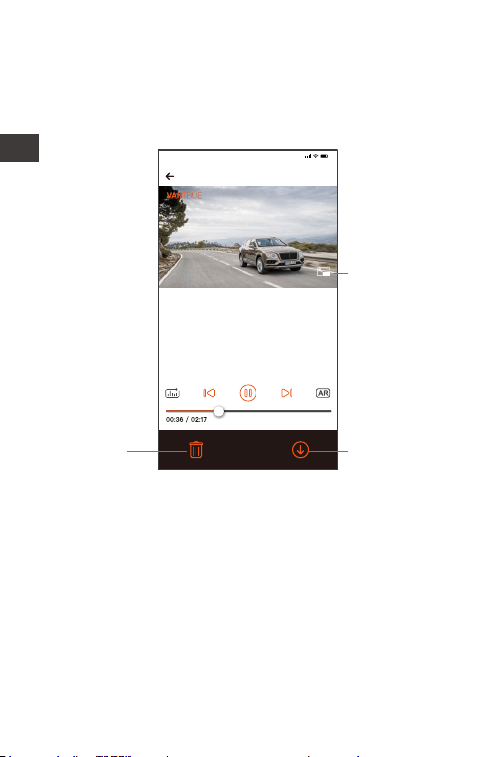
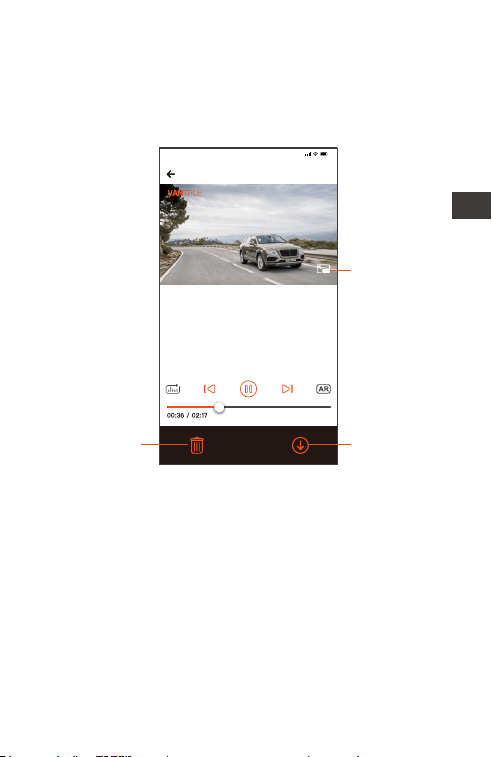
Playback, delete and download files in App
Enter the file browse in App, you can view the
daily recording files, play back, delete, download
to local save.
2023116_115036_0079_N_A.MP4
1/16/2023 11:5:35 F1 000.000000. 000.000000. 36MK/H
To view GPS information, you need to
download the video file to the local
folder of the APP first, and then play it in
the local folder.
Note:
9:41
Click on it to
play the file in
landscape.
Click to
download the
file
Click to
delete the
file
Note:
<1>. No data traffic consumption is generated for
playback and downloading files within the App.
<2>. You need to download the video to local to
view the GPS track information. After the video is
downloaded successfully. If the GPS track
information is not displayed, please disconnect the
Wi-Fi connection and refresh it to display the GPS
track information on the map.
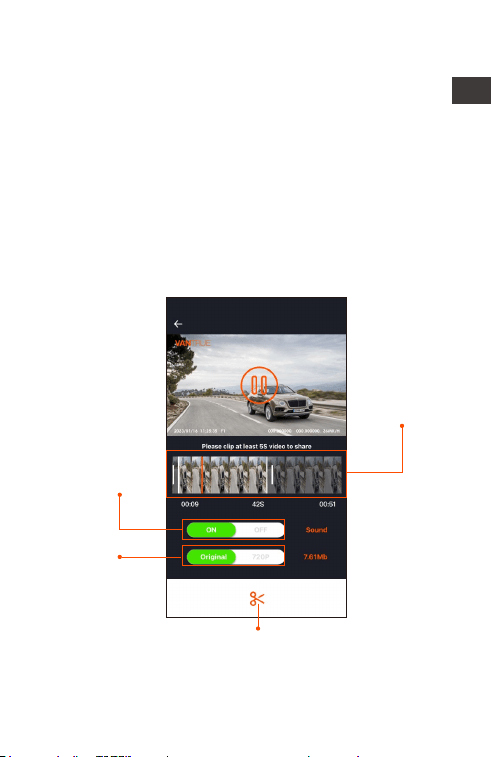
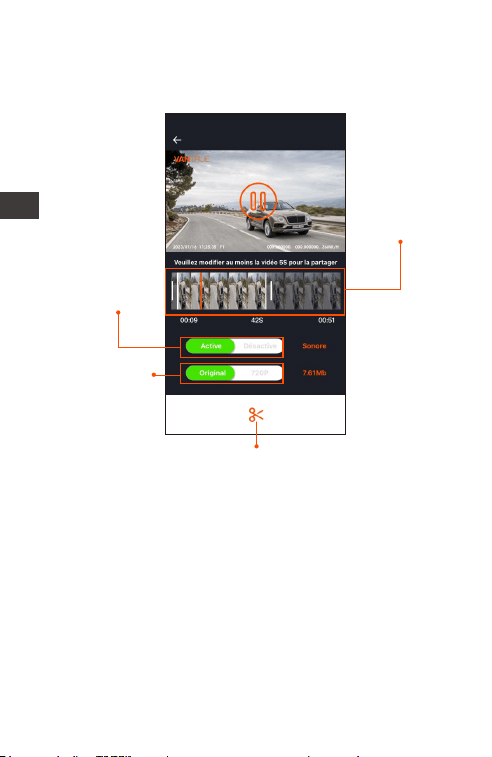
App share files
Already downloaded files can be shared to social
media by editing within the App.
Video sharing
length in the
range of 5-30s
Video sharing
can be done
with or without
sound
Shared video
file size
Confirm the video editing, after successful
editing, the shareable social media apps
will pop up automatically
- 18 -
EN
- 19 -
Note:
Data traffic is required for sharing, so you need to
disconnect the Wi-Fi connection with F1.
(Required for some Android users)
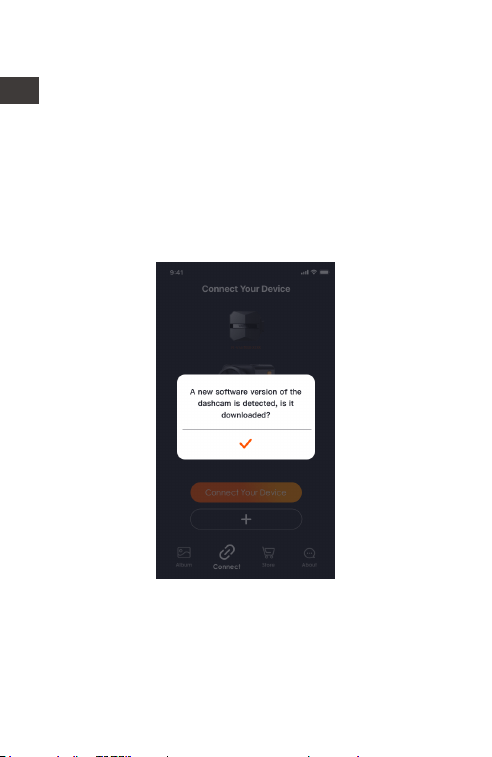
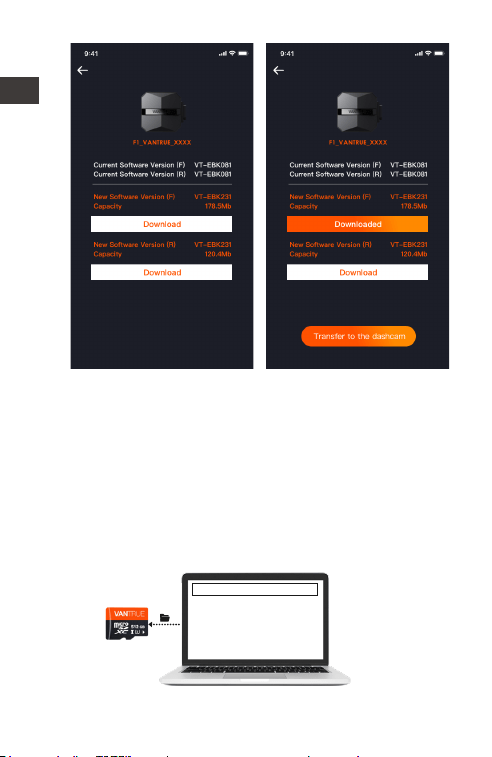
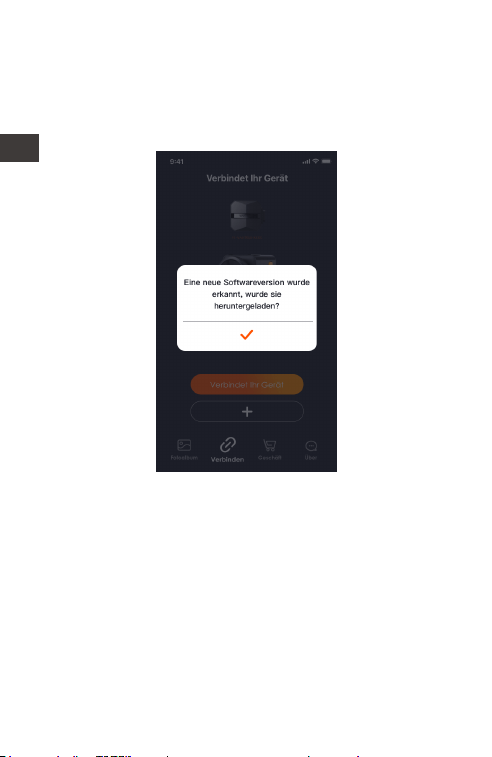
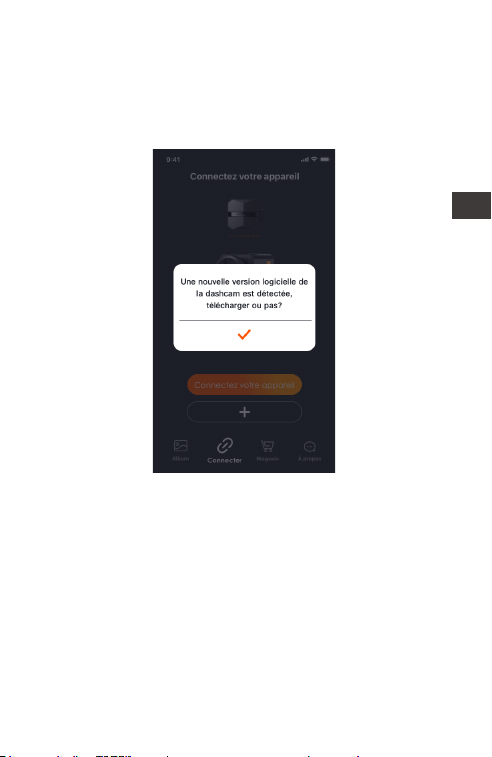
OTA Upgrade
F1 main camera upgrade supports OTA upgrade
in App. There are two types of OTA upgrade
pushes:
<1>. After opening the App, an upgrade prompt
will pop up.
EN
- 20 -
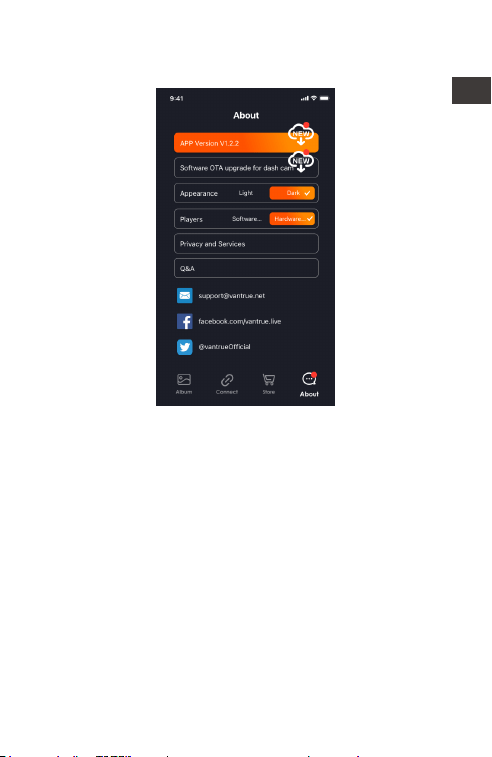
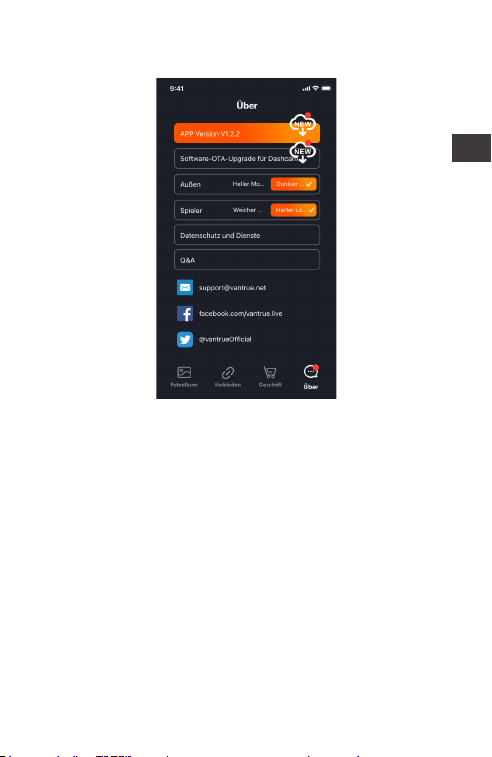
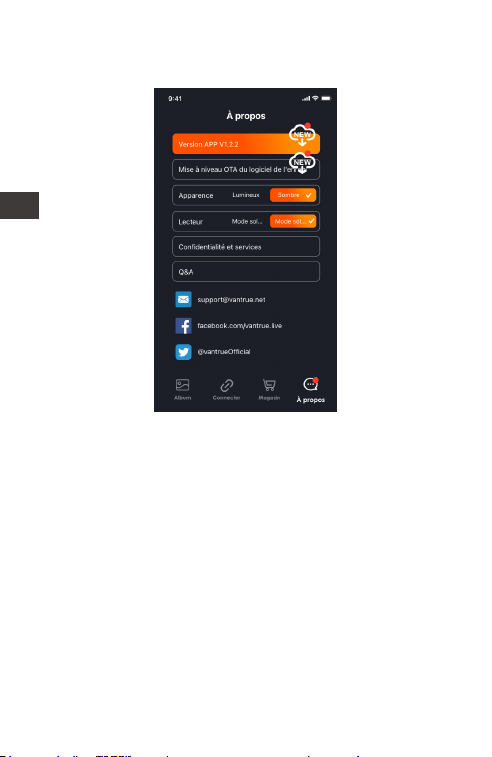
<2>. In the "About" screen, click OTA update to
check for updates.
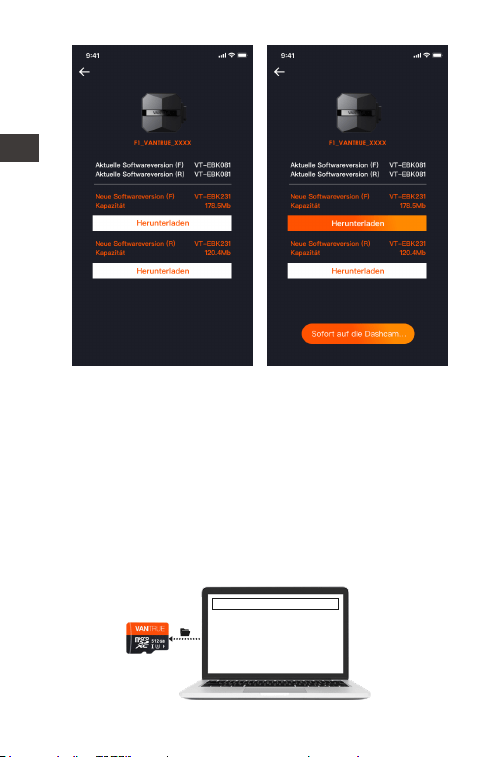
When the upgrade file is detected in the above 2
ways, click OK, it will enter the upgrade screen,
click "Download". Once the download is
complete, install the dashcam immediately.
EN
- 21 -
Note:
<1>. If the upgrade fails, please check whether the
Wi-Fi connection is normal. During the upgrade,
please do not disconnect the Wi-Fi, and make sure
the recorder host is powered on properly.
<2>. If the OTA upgrade has been failed, you can
use SD card upgrade, remove the SD card, copy
the upgrade software into the SD card, then insert
the SD card into the host computer, and then
power on the upgrade.
Upgraded Files
EN

- 22 -
4. Troubleshooting
Tip: The system supports a maximum of 512G SD
card storage, in order to ensure normal video, we
recommend the use of genuine storage cards. As
the recording system keeps reading and writing
data, you must use a high-speed card that
reaches the standard of Class10 and U3 or above.
Also, do not plug and unplug the SD card when
the system is on, so as not to cause damage to the
SD card.
<1>. The motorcycle does not turn on after starting:
Please check if the line connection is normal.
<2>. Press the power on button but the dashcam
can't power on: Please check whether the line
connection is normal.
<3>. The dashcam can not record/can not take
pictures/can not lock the video: Please check
whether to insert the SD card or need to format the
SD card; SD card format if the problem still exists,
please re-insert the SD card or replace the new
card to solve.
<4>. The front or rear camera screen is not
displayed: Please check whether the camera
cable is connected properly.
<5>. Video becomes blurred: Please check if there
is dust on the camera. If there is, please wipe the
camera.
<6>. No sound in the video: Please check if the
microphone is off.
<7>. Many videos are incorrectly locked during
normal driving: Please adjust the G-sensor
sensitivity. Default is 3. Please adjust to 1.
<8>. When a motorcycle collision occurs the video
file is not locked: Please check whether the
EN

- 23 -
EN
sensitivity adjustment of G-sensor is above 1st gear.
If the crash sensitivity is higher than 1 stop, please
further adjust the sensitivity level of the G-sensor
higher.
Please also note that if time lapse mode is turned
on, the video cannot be locked and only pictures
can be taken.
<9>. Wi-Fi does not connect properly.: Please
check whether Wi-Fi is turned on. When Wi-Fi is
turned on, the Wi-Fi of your phone will show the F1
Wi-Fi name F1_ VANTRUE_XXXX (initial password is
12345678).
<10>. If there is an abnormal phenomenon such as
a dead machine, please restart the power.
<11>. The App shows and recorded video appears
to have streaked EMI or purple EMI.
1) Please check the motorcycle spark plug type.
Please use R-rated resistive spark plugs.
2) Check the camera alignment and cable ties for
problems. When you run the wires, please run the
wires smoothly and do not fold them. Please don't
tie the wire too tightly or squeeze it too tightly with
the shell when you tie it.

- 24 -
5. Specifications
The specifications of this product may change
without prior notice due to product improvements.
Model F1
Chips Novatek high-performance
processor
Image
Sensor
Front Camera: Sony 8MP CMOS
Sensor
Rear Camera: Sony 2MP CMOS
Sensor
Aperture Front: F/1. 8 wide aperture
Rear: F/1. 8 wide aperture
G-sensor
Camera
Angle
Built-in Sensor
Front: 160°wide viewing angle;
Rear: 145° wide viewing angle
Languages Engish/Français/Español/Deutsch/
Italiano/简体中文/русский/ 日本語
/Polski
Video
Resolution
Front + Rear recording mode:
2160P+1080P(HDR) 30FPS;
1440P+1080P(HDR) 30FPS;
1080P+1080P(HDR) 30FPS;
720P+720P(HDR)30FPS;
2160P+1080P 30FPS;
1440P+1080P 30FPS;
1080P+1080P 30FPS
720P+720P 30FPS
Single front recording mode:
3840x2160P 30FPS
2560x1440P 30FPS
1920x1080P 30FPS
1280x720P 30FPS
EN
Video File
Format
MP4

- 25 -
Memory
Storage
External: 32GB-512GB Micro SD
Card, U3, Class 10(not included in
the package)
Picture Format JPEG
IP67
Built-in super capacitor
Waterproof
Power Source
12V, 2A
Support
Yes
-4°F to 140°F(-20°C to 60°C)
-13°F to 158°F(-25°C to 70°C)
Power Supply
Wi-Fi
GPS
Working
Temperature
Storage
Temperature
EN

- 26 -
6. Warranty & Support
Warranty
The VANTRUE
®
F1 Motorcycle Dash Cam comes
with a full 12 months warranty. If you register your
product on our official site (www.vantrue.net/
register), you can extend the warranty to 18
months.
Support new
If you have any questions regarding your product,
please do not hesitate to contact us at
[email protected], or drop us a message
through the live chat box at www.vantrue.net.
Queries are typically answered within 12-24hours.
Your opinion matters
VANTRUE
®
is firmly committed to always improving
our products, services, and user experience. If you
have any thoughts on how we can do even
better, we welcome your constructive feedback
and suggestions. Connect with us today at
EN

- 27 -
Lesen Sie die folgenden Anweisungen sorgfältig
durch.
Dieses Produkt ist eine Dashcam für Motorräder und
kann nur an einer 12-V-Batterie installiert werden.
Bitte schalten Sie das Motorrad vor der Installation
aus und schalten Sie es nach Abschluss der
Installation wieder ein.
Der WLAN-Name lautet F1_VANTRUE_XXXX und das
anfängliche WLAN-Passwort lautet 12345678.
Es ist strengstens verboten, eine Hochdruckwasserp-
istole zum Spülen der Maschine zu verwenden, um
zu verhindern, dass Wasser in den Maschinenkörper
eindringt.
Dieses Produkt unterstützt bis zu 512 GB SD-Kartens-
peicher. Um eine normale Videoaufnahme zu
gewährleisten, verwenden Sie bitte Hochgeschwin-
digkeitskarten der Klasse 10/U3 und höher
Die vordere und hintere Kamera von F1 sind
vollständig versiegelt und wasserdicht, aber es ist
dennoch notwendig, den Kontakt des Objektivs mit
Lösungsmitteln wie Entfettungsflecken, Alkohol und
Asphaltreiniger zu vermeiden, um die wasserdichte
Schicht nicht zu beschädigen.
Hinweis: Zur normalen Speicherung von Videodatei-
en formatieren Sie die SD-Karte bitte regelmäßig.
Freundliche Tipps:
1.
2.
3.
4.
5.
6.
7.
DE
- 28 -
1.1 Installation der SD-Karte
1. Installationsanleitung
Wenn Sie die SD-Karte zum ersten Mal einlegen,
halten Sie bitte die Video-Taste auf der
Fernbedienung 10 Sekunden lang gedrückt, um
die Karte zu formatieren.
Notiz:
Nachdem die Abdeckung des SD-Kartensteck-
platzes entfernt wurde, bewahren Sie die gesicher-
ten Schrauben auf, damit sie nicht verloren gehen.
Entfernen Sie die Verschlusskappe mit
einem Schraubendreher
Speicherkarte einlegen
1.2 Installieren Sie den Host
Bitte installieren Sie die Haupteinheit an einer
Stelle ohne Metallabschirmung, wie zum Beispiel
unter dem Sitz. Nachdem Sie die Position
bestätigt haben, reißen Sie den 3M-Kleber ab und
befestigen Sie ihn.
DE
- 29 -
Notiz:
<1>. Das WLAN-Signalübertragungsteil befindet
sich auf der Vorderseite der Haupteinheit. Bitte
legen Sie bei der Installation das Logo der
Haupteinheit nicht nach unten und installieren Sie
es nicht unter den Metallteilen des Motorrads.
<2>. Die F1-Haupteinheit muss mit 3M-Kleber
(Standardlieferung) befestigt werden. Bitte
befestigen Sie den 3M-Kleber in der Nut der
Schutzhülle der F1-Haupteinheit und kleben Sie ihn
dann auf das Motorrad.
<3>. Um die Wärmeableitungseffizienz der
F1-Haupteinheit zu verbessern, kann die
Schutzhülle entfernt und wieder installiert werden.
<4>. Bei der Installation auf einer gekrümmten
Oberfläche wird empfohlen, einen Kabelbinder
zur Befestigung hinzuzufügen.
WiFi-Startrichtung
DE
- 30 -
1.3 Installieren Sie die Fernbedienung
Die Fernbedienung kann je nach Nutzungs-
gewohnheiten an geeigneter Stelle angebracht
werden, z. B. am Lenker, am Kopf des Motorrads,
seitlich am Kraftstofftank usw.
Notiz:
<1>. Bei der Installation muss die Taste nach oben
zeigen, um den Empfang des GPS-Signals nicht zu
beeinträchtigen.
<2>. Verwenden Sie keinen 3M-Kleber, um die
Lautsprecheröffnung auf der Rückseite der
Fernbedienung abzudecken, um die Stabilität der
Fernbedienung zu erhöhen.
Lautsprecherloch
<3>. An der Seite befindet sich ein Schallloch für
das Mikrofon. Bitte platzieren Sie das Schallloch
nicht direkt davor, um starke Windgeräusche zu
vermeiden.
Am Lenker
des Motorrads
Auf der Vorderseite
des Motorrads
Kraftstofftankseite
DE
- 31 -
1.4 Schließen Sie das Netzkabel an
Schließen Sie das Netzkabel wie folgt an den
Sicherungskasten an:
Schritt 1: Verbinden Sie das rote Netzkabel mit
dem Pluspol der Batterie;
Schritt 2: Die ACC-Signalleitung (gelbe Leitung)
wird an die ACC-Stromsicherung der Batterie
angeschlossen;
Schritt 3: Schwarzes Massekabel und Minuspol der
Batterie;
Schritt 4: Schalten Sie das Motorrad ein und
warten Sie, bis das Gerät startet.
Schritt 5: Nachdem Sie sich vergewissert haben,
dass die Stromversorgung korrekt installiert ist,
verwenden Sie Kabelbinder, um die Aufbe-
wahrungsleitungen zu organisieren und am
Motorrad zu befestigen.
Notiz:
<1>. Vor der Installation und Verkabelung muss das
Motorrad ausgeschaltet und der Strom abges-
chaltet werden, um einen Kurzschluss während des
Betriebs zu vermeiden.
<2>. Vermeiden Sie es aus Sicherheitsgründen, zu
lange Netzkabel freizulegen, oder verwenden Sie
Isolierband, um sie zu umwickeln und zu befestigen.
Wählen Sie die
Position im
Sicherungsfeld aus,
um auf die Sicherung
zuzugreifen.
DE
- 32 -
1.5 Installieren Sie die vordere und hintere Linse des
Autos
Die vorderen und hinteren Linsen können durch
Lösen der Sechskantschrauben eingestellt werden,
um den Aufnahmewinkel und die Aufnahmerich-
tung einzustellen.
Kalibrierungslinie
für die
Linsenausrichtung
Objektivanschluss
Wenn die Schrauben im Bajonett gelöst sind,
können Sie den Objektivwinkel nach oben und
unten einstellen. Durch Spiegeln und seitliche
Drehung wird die Aufnahmerichtung angepasst.
Multifunktionell
Kamerahalter:
Kann am Lenker
und anderen
Positionen
installiert werden
Notiz:
<1>. Befestigen Sie beim Einbau der Frontlinse des
Autos zuerst die Frontlinse an der Halterung und
dann die Halterung am Lenker des Motorrads.
<2>. Die vorderen / hinteren Linsen sind mit
3M-Kleber ausgestattet, der nach Auswahl einer
geeigneten Position auf der Vorder- / Rückseite des
Motorrads aufgeklebt und fixiert werden kann.
3M Kleber
Schraubenlöcher
DE
- 33 -
(Es wird empfohlen, die vorderen und hinteren
Linsen des Autos an der Motorradkarosserie zu
installieren, was das Wackeln reduzieren und die
Stabilität verbessern kann.)
<3>. Der Anschluss des Objektivs ist ein Hochfre-
quenz -Datenkabel. Bitte biegen Sie das Kabel
nicht um 180 Grad, da dies zu Schäden am Kabel
führen kann. Es wird empfohlen, das Kabel
kreisförmig zu befestigen.
<4>. Aufgrund unterschiedlicher Einbaupositionen
kann die vordere / hintere Linse des Autos
umgekehrt sein und die Linie kann entsprechend
der Richtung der Linse korrigiert werden.
<5>. Wenn Sie die Richtung der Kameraaufnahme
anpassen, können Sie den entsprechenden
Aufnahmeeffekt über die Echtzeit-Vorschaufunktion
in der APP genau einstellen.
Normal
Umkehren
Einbauposition des
Motorrads vorne
Einbauposition des
Motorrads hinten
DE
- 34 -
2. Installationsdiagramm
① F1-Host
② 4K-Frontkamera
③ 1080P Rückkamera
④ Fernbedienung
⑤ Netzkabel
⑥ Anschluss für die Rückfahrkamera
⑦ Frontkameraanschluss
⑧ Schließen Sie die Fernbedienung an
⑨ Schließen Sie das Netzkabel an
⑩ Sicherung
⑪ Rotes Netzkabel (Pluspol der Stromversorgung)
⑫ ACC-Signalleitung (gelbe Leitung)
⑬ Schwarzes Erdungskabel (Minuspol der
Stromversorgung)
⑭ Schutzhülle
1
4
7
6
8
10
11
12
13
9
5
2
3
DE
Anmerkung:
Beim Anschließen des Frontkamerakabels ist ein
Klickton zu hören, das anzeigt, dass die
Kabelschnalle installiert wurde. Die Rückseite des
Druckknopfes kann mit einem Schraubendreher
angehoben werden, um das Einrasten des
Druckknopfes in den Schlitz zu erleichtern.
- 35 -
▲ F1-Kameralinie vermeidet scharfe Winkelbie-
gungen, da eine spitze Winkelbiegung die
Abschirmschicht beschädigt, eine abnormale
Signalübertragung verursacht oder andere
elektronische Geräte stört.
DE
① Power/SOS Taste
Lange Druckfunktion: Ausschalten
Kurzdruckfunktion: Einschalten; nach
dem Einschalten kurz drücken, um
die Datei zu sperren, erneut kurz
drücken, wenn die Datei gesperrt ist,
Sie können Schnappschuss.
②Aufnahme Taste
Lang drücken: Nach dem
Einschalten 10 Sekunden lang
gedrückt halten, um die SD-Karte zu
formatieren.
Kurz drücken: während der
Aufnahme kurz drücken, um die
Aufnahme anzuhalten; im Standby
kurz drücken, um die Aufnahme zu
starten;
③ Stummschalttaste
Lang drücken: Nach dem
Einschalten lange drücken, um
WLAN ein-/auszuschalten.
Kurz drücken: kurz drücken, um das
Mikrofon ein-/ auszuschalten; kurz 5
Mal oder öfter hintereinander
drücken, um die Werkseinstellungen
wiederherzustellen.
- 36 -
3. Betrieb (APP-Betrieb/Fernbedienungs-
betrieb)
Funktion der Fernbedienungstaste
1
2
3
DE
- 37 -
Anzeiger
LED-Status
Normale
Stromversorgung
Ausschalten
Dauerlicht
Blinken
Dunkel
① Power-Licht (rotes Licht)
Schnelles Blinken:
Notfallaufnahme
LED-Status
Standby;
Notfallaufnahme
Dauerlicht
Blinken
② Aufnahme-Licht (grünes Licht)
Schnelles Blinken:
formatieren…
Blinkt langsam:
aufnehmen…
LED-Status
Ton an
Ton aus
Dauerlicht
Dunkel
③ Stummlicht (blaues Licht)
Im Parkmodus sind die Kontrollleuchten wie folgt:
Parkmodus LED-Status
① Rotes Licht﹢② Grünes Licht﹢③
Blaues Licht gleichzeitiges Blinken:
aufnehmen…
① Rotes Licht﹢② Grünes Licht﹢③
Blaues Licht gleichzeitig aus:im
Standby
Kollisions-
erkennnung
DE
1
2
3

- 38 -
APP-Betrieb
APP-Download
Bitte laden Sie die Vantrue-APP vom Apple Store/
Google Play/der offiziellen Website von Vantrue
herunter oder scannen Sie zum Herunterladen
den QR-Code unten.
Schritte zur Wi-Fi-Verbindung
Erstmalige Verbindung:
<1>. Schalten Sie das Gerät ein, F1 öffnet
standardmäßig 5-GHz-WLAN.
<2>. Öffnen Sie die Vantrue APP, klicken Sie auf
„+“, um ein Gerät hinzuzufügen. Die APP springt
zur Oberfläche für die WLAN-Einstellungen des
Telefons, suchen Sie das WLAN mit dem Namen
F1_VANTRUE _XXXX und geben Sie das Standard-
passwort 12345678 ein.
DE
- 39 -
DE
- 40 -
Notiz:
<1>. WiFi-Verbindung kann sich auf Abbildung ①~
③ beziehen
<2>. Schalten Sie nach der ersten erfolgreichen
Verbindung F1 ein und klicken Sie auf die APP, um
automatisch eine Verbindung herzustellen. Wenn
die Wi-Fi-Startfunktion deaktiviert ist, müssen Sie
das Wi-Fi manuell einschalten, um eine Verbind-
ung herzustellen. Wenn Sie das Passwort vergessen
haben, können Sie die Stummschalttaste 5 Mal
oder öfter drücken, um die Werkseinstellungen
APP-Betrieb
Einstellung
Kilometer
-statistik
Linsen
-korrekturlinie
Mikrofon
-schalter
Aufnahme
starten/
pausierenss
Wiedergabe
-datei
Schnappschuss
Bildschirm
wechseln
Vollbild
-einstellungen
Nachdem Sie die APP aufgerufen haben, können
Sie den Fahrbildschirm in Echtzeit in der Vorschau
anzeigen, Einstellungen ändern, Dateien wiederge-
ben, Video-GPS-Tracks anzeigen, Dateien teilen
DE

- 41 -
DE
Notiz:
<1>. Die Funktion der Kilometerstatistik ist standard-
mäßig eingeschaltet, und die GPS-Kilometerinfor-
mationen werden auf der Speicherkarte gespe-
ichert. Der Kunde kann das txt-Dokument im
GPS-Ordner auf der SD-Karte anzeigen oder das
Bild oder PDF-Datei in der Kilometerstatistikfunktion
in der APP exportieren.
<2>. Die Linsenkorrekturlinie wird verwendet, um
die Richtung der Linsenaufnahme anzupas-
sen.Diese Funktion kann beim Einbau der vorderen
und hinteren Linsen des Autos verwendet werden.
Menü-Optionen
APP-Einstellungsmenü
Telefonzeit
synchronisieren
Standardmäßig an; synchronisie-
ren die Telefonzeit mit dem F1.
Sprache
Englisch, Deutsch,Französisch,
Spanisch, Italienisch, Chinesisch,
Russisch, Japanisch, Koreanisch
können eingestellt werden, und
die Standardsprache ist Englisch.
Wi-Fi Auto-An; WiFi-Modus;Wi-Fi
Informationen.
Wi-Fi Auto-An: standardmäßig
aktiviert, nach dem Schließen
manuell eingeschaltet;
Wi-Fi Modus: 5GWiFi ist standard-
mäßig aktiviert und Sie können zu
2,4 GWiFi wechseln
Wi-Fi Informationen: Wi-Fi Name,
Wi-Fi Passwort und andere
Informationen anzeigen.
Wi-Fi
sowie Kilometerstatistiken und -analysen über die
APP durchführen.

- 42 -
Die Auflösung hat zwei Modi zur
Auswahl, vorne + hinten und
vorne.
Standardauflösung vorne+hinten
2160P+1080P(HDR) 30FPS
Standardauflösung vorne ist
3840x2160P 30FPS
Standardmäßig aus; wenn
aktiviert, können die Videos der
Vorder-und Rückkamera in
einem Video integriert werden.
Auflösung
Standardmäßig aktiviertSprachansagen
Belichtungs
-ausgleich
Der Standardwert ist 1 Minute,
andere Einstellungen können
ausgewählt werden. Wenn der
Dateispeicher der SD-Karte voll
ist, wird der Zyklus automatisch
überschrieben.
Dauer
-aufnahme
Die Standardstufe ist 3, Sie
können die Kollisionsempfind-
lichkeitsstufe jeweils nach vorne,
hinten, links und rechts sowie
nach oben und unten anpassen
Kontrollleuchte
Videos 2 in 1
Es ist standardmäßig aktiviert
und der Bildschirm hinter dem
Auto ist ein Spiegelbild. Nach
dem Schließen ist der Anzeige-
bildschirm das Originalbild.
Rückspiegel
Der Standardwert ist +0,0, Sie
können den Belichtungswert
nach Bedarf erhöhen oder
verringern
Standardmäßig aktiviert
WDR Standardmäßig aktiviert
Nummernschild
-einstellung
Unterstützt chinesische, englische
und japanische Nummernschil-
deinstellungen
Kollisions-emp-
findlichkeit
DE

- 43 -
Standardmäßig werden Datums-
und Zeitangaben, Marken- und
Modellbezeichnungen,
Nummernschildbezeichnungen,
Fahrzeuggeschwindigkeitsbeze-
ichnungen und GPS-Standortbe-
zeichnungen angezeigt
Etikettenstempel
Es ist standardmäßig ausges-
chaltet. Nach dem Einschalten
ist es der Kollisionserkennungs-
modus. Es muss mit der
ACC-Funktion verbunden
werden, bevor es verwendet
werden kann.
Standardmäßig aktiviert. Wird
wirksam, wenn F1 in den
Parkmodus wechselt
Park
-überwachung
Sie können die aktuelle
Spannung der Motorradbatterie
überprüfen und den Unterspan-
nungsschutz einstellen.
Batterie
-unterspannungs
-schutz
Standardmäßig aktiviert, können
Benutzer statistische Berichte in
der APP generieren, und der
Bericht wird in der APP als Bilder
oder PDFs gespeichert.
Kilometerstatistik
Sternenlicht
-nachtsicht
Die Standardeinstellung ist aus,
Sie können 1 FPS, 5 FPS, 10 FPS,
15 FPS Bildnummer wählen, um
die Zeitraffer-Videoaufnahme zu
starten
Zeitraffer
Kilometerstatistik: Standard-
mäßig aktiviert, können Benutzer
statistische Berichte in der APP
generieren, und der Bericht wird
in der APP als Bilder oder PDFs
gespeichert.
GPS
DE

- 44 -
Die automatische GPS-Aktualis-
ierungszeit ist standardmäßig
aktiviert; nachdem sie
deaktiviert wurde, können
Uhrzeit und Datum manuell
geändert werden
Das Standarddatumsformat ist
YY/MM/DD
Datum/Zeit
Standardmäßig sind alle
Eingabeaufforderungen aktiviert;
dies sind: Ton beim Ein-und
Ausschalten, Ton bei Tastendruck,
Aufforderung zum Sperren,
Aufforderung zum Formatieren,
Aufforderung zum anormalen
Beenden der Aufnahme
Prompter Ton
Stellen Sie die Lautstärke des
Lautsprechers auf der Fernbedi-
enung ein
Lautstärke
Stellen Sie die Werkseinstellungen
wieder her, nach der Wiederher-
stellung wird auch das WLAN-
Passwort auf das ursprüngliche
Passwort zurückgesetzt
Standard
-einstellung
Zeigen Sie das F1-Modell,
Informationen zur Softwarever-
sion und die URL der offiziellen
Website an
Systemnachricht
Das anfängliche WLAN-Passwort
lautet 12345678, das geändert
werden kann
WLAN
-Verbindungs
-kennwort
Formatieren
SD-Karte formatieren
Alle F1-Zertifizierungsinforma-
tionen anzeigen
Zertifiziert
Lichtquellen
-frequenz
50Hz/60Hz
DE
2023116_115036_0079_N_A.MP4
16/1/2023 11:5:35 E1 000.000000. 000.000000. 36MK/H
Hinweis:
9:41
Um GPS-Informationen anzuzeigen,
müssen Sie zuerst die Videodatei in
den lokalen Ordner der APP
herunterladen und dann im lokalen
Ordner abspielen.
- 45 -
APP-Wiedergabe, Löschen, Dateidownload
Geben Sie die Dateisuche in der APP ein, Sie
können die täglichen Videodateien anzeigen,
wiedergeben, löschen, herunterladen und lokal
speichern.
Horizontaler
Bildschirm
Dateien
Herunterladen
Dateien
löschen
Notiz:
<1>. Das Abspielen und Herunterladen von
Dateien in der APP verbraucht keinen
Datenverkehr.
<2>. Das Video muss lokal heruntergeladen
werden, bevor die GPS-Track-Informationen
angezeigt werden. Wenn die GPS-Track-Informa-
tionen nach erfolgreichem Download nicht
angezeigt werden, trennen Sie bitte das WLAN
und aktualisieren Sie erneut.
DE

- 46 -
Teilen
Die heruntergeladenen Dateien können durch
Clipping in der APP in sozialen Medien geteilt
Die Video
Teilen Zeit liegt
innerhalb von
5-30 Sekunden
Teilen Videos
mit oder ohne
Ton
Einstellungen
für die Größe
der
Videodatei
Notiz:
Das Teilen verbraucht Datenverkehr, daher müssen
Sie die WLAN-Verbindung mit F1 trennen.
(erforderlich für einige Android-Benutzer)
Videoclips
DE DE
- 47 -
OTA-Upgrade
F1 führt OTA-Upgrades in der APP durch. Es gibt
zwei Typen von OTA-Upgrade-Pushs:
① Nach dem Öffnen der APP erscheint eine
Aufforderung zur Aktualisierung.
DE
- 48 -
② Klicken Sie in der „Info“-Oberfläche auf OTA-
Upgrade.
Wenn die obige Methode die Upgrade-Datei
erkennt, klicken Sie auf OK, um die Upgrade-Ober-
fläche aufzurufen, klicken Sie auf „Herunterladen“.
Nachdem der Download abgeschlossen ist,
installieren Sie ihn für die Dashcam.
DE
Notiz:
① Wenn das Upgrade fehlschlägt, überprüfen Sie
bitte, ob die WLAN-Verbindung normal ist, und
trennen Sie während des Upgrades bitte nicht das
WLAN und stellen Sie sicher, dass die Dashcam an
die Stromversorgung angeschlossen ist.
② Wenn das OTA-Upgrade fehlschlägt, können Sie
die SD-Karte zum Upgrade verwenden, die SD-
Karte entfernen, die Upgrade-Software auf die
SD-Karte kopieren, die SD-Karte wieder einlegen
und dann einschalten und das Upgrade starten.
- 49 -
DE
Datei-Upgrade

- 50 -
4. Allgemeine Fehlerbehebung
Tipps: Es unterstützt bis zu 512 G SD-Kartenspeicher.
Um eine normale Videoaufnahme zu gewährleis-
ten, wird empfohlen, eine echte Speicherkarte zu
verwenden, die eine Hochgeschwindigkeitskarte
der Klasse 10 und U3 oder höher sein muss.
Stecken Sie sie nicht ein oder entfernen Sie sie
nicht SD-Karte, wenn das System eingeschaltet ist,
um Schäden zu vermeiden.
① Das F1 schaltet sich nach dem Starten des
Motorrads nicht ein: Bitte überprüfen Sie die
Leitungsverbindung.
② Drücken Sie den Netzschalter, kann aber nicht
starten: Bitte überprüfen Sie die Leitungsverbind-
ung.
③ Kann nach dem Booten nicht aufzeichnen /
Bilder aufnehmen / Video kann nicht gesperrt
werden, überprüfen Sie bitte, ob die SD-Karte
eingelegt ist oder die SD-Karte formatiert werden
muss; wenn das Problem nach dem Formatieren
der SD-Karte weiterhin besteht, setzen Sie die
SD-Karte bitte erneut ein oder ersetzen Sie sie
durch eine neue SD-Karte.
④ Es gibt kein Bild von der Front- oder
Rückkamera: Bitte überprüfen Sie das Kameraka-
bel.
⑤ Das Video wird unscharf, bitte wischen Sie die
Linse ab.
⑥ Es gibt keinen Ton in der Aufnahme, bitte
überprüfen Sie, ob das Mikrofon ausgeschaltet ist.
⑦ Zu viele Videos sind gesperrt, bitte senken Sie
die Kollisionsempfindlichkeit.
⑧ Die Datei wird nicht gesperrt, wenn sie von
einer Kollision getroffen wird, bitte erhöhen Sie die
DE

- 51 -
Kollisionsempfindlichkeit. Hinweis: Wenn die
Zeitrafferaufnahme aktiviert ist, kann keine
gesperrte Aufnahme durchgeführt werden,
sondern nur ein Schnappschuss.
⑨ Die WLAN-Verbindung ist nicht normal. Bitte
überprüfen Sie, ob das WLAN eingeschaltet ist.
Nach dem Einschalten des WLANs zeigt das WLAN
des Telefons den WLAN-Namen des F1 F1_
VANTRUE_XXXX an (Anfangspasswort ist 12345678).
⑩ festgefahren, bitte starten Sie die Stromver-
sorgung neu.
⑪ Das vom Host angezeigte und aufgezeichnete
Video zeigt elektromagnetische Interferenzen mit
Streifen oder elektromagnetische Interferenzen mit
violetten Streifen:
1) Bitte überprüfen Sie das Motorrad-Zündkerzen-
modell, verwenden Sie bitte eine
Widerstands-Zündkerze der R-Klasse.
2) Überprüfen Sie, ob es ein Problem mit dem
Kabelbinder der Kamera gibt. Beim Verlegen des
Kabels führen Sie es bitte glatt, falten Sie es nicht
und behalten Sie einen gewissen Spielraum. Wenn
Sie das Kabel binden, binden Sie es bitte nicht zu
fest oder quetschen Sie es nicht fest mit der
Autoschale.
DE

- 52 -
DEDE
5. Parameter
Modell F1
Chip
-Prozessor
Novatek
Hochleistungsprozessor
Bildsensor Front: Sony 8-Millionen-Pixel-
Prozessor
Rück: Sony 2-Millionen-Pixel-
Prozessor
Blende Frontkamera F1.8
RückkameraF1.8
G-sensor
Weitwinkel
Eingebauter dreiachsiger
Sensor
Frontkamera 160°
Rückkamera 145°
Sprache Englisch, Französisch, Spanisch,
Deutsch, Italienisch, verein-
fachtes Chinesisch, Russisch,
Japanisch, Koreanisch
Auflösung
Front+Rück:
2160P+1080P(HDR) 30FPS
1440P+1080P(HDR) 30FPS
1080P+1080P(HDR) 30FPS
720P+720P(HDR) 30FPS
2160P+1080P 30FPS
1440P+1080P 30FPS
1080P+1080P 30FPS
720P+720P 30FPS
Front:
3840x2160P 30FPS
2560x1440P 30FPS
1920x1080P 30FPS
1280x720P 30FPS
Videoformat MP4
Bildformat JPEG

- 53 -
Speicher
-methode
IP67
Superkondensator
wasserdicht
Akku-Typ
12V, 2A
-20℃ ~60℃
-25℃ ~70℃
Versorgungsstrom
EingebautGPS
Eingebaut WiFi
Betriebs
-temperatur
Lagertemperatur
Micro-SD-Karte (unterstützt 32
GB-512 GB, Speicherkarte mit
U3- oder höherer Karten-
geschwindigkeit)
6. Kundendienst
Die Garantiezeit der Marke VANTRUE beträgt 12
Monate. Wenn Sie Fragen zum Produkt haben,
können Sie sich an die Kundendienstmitarbeiter
Ihres Einkaufskanals wenden oder eine E-Mail an
unsere offizielle E-Mail-Adresse support@vantrue.
net senden. Wir werden engagierte Mitarbeiter
haben, die innerhalb von 12-24 Stunden auf
Fragen antworten.
Die Marke VANTRUE
®
hat sich unermüdlich der
kontinuierlichen Verbesserung von Produkten,
Dienstleistungen und Benutzererfahrung verschrie-
ben. Wenn Sie Ideen haben, wie wir es besser
machen können, können Sie gerne wertvolle
Kommentare und Vorschläge an unsere offizielle
E-Mail-Adresse support@vantrue. net hinterlassen.
Vielen Dank, dass Sie sich für VANTRUE
®
entschie-
den haben!
DE

- 54 -
Lisez attentivement les instructions suivantes.
Ce produit est un enregistreur spécial pour motos,
qui ne peut être installé que sur des batteries 12V.
Veuillez éteindre la moto avant l'installation et
rallumer une fois l'installation terminée.
Le nom WiFi est F1_VANTRUE_XXXX et le mot de
passe WiFi initial est 12345678.
Il est strictement interdit d'utiliser un pistolet à eau
haute pression pour rincer la machine afin d'éviter
que l'eau ne pénètre dans le corps de la machine.
Ce produit prend en charge jusqu'à 512 Go de
stockage sur carte SD. Afin d'assurer un enregis-
trement vidéo normal, veuillez utiliser des cartes
haute vitesse standard de classe 10/U3 et
supérieures.
Les caméras avant et arrière de F1 sont entière-
ment scellées et étanches, mais il est toujours
nécessaire d'éviter tout contact de l'objectif avec
des solvants tels que des taches de dégraissage,
de l'alcool et un agent de nettoyage d'asphalte,
afin de ne pas endommager la couche
imperméable.
Remarque : Pour un stockage normal des fichiers
vidéo, veuillez formater régulièrement la carte SD.
Conseils aimables:
1.
2.
3.
4.
5.
6.
7.
FR
- 55 -
1.1 Installation de la carte SD
1. Installation
Après avoir inséré la carte SD pour la première fois,
veuillez appuyer sur le bouton vidéo de la
télécommande et le maintenir enfoncé pendant
10 secondes pour commencer à formater la carte.
Avis:
Une fois le cache du logement de carte SD retiré,
rangez les vis verrouillées afin de ne pas les perdre.
Utilisez un tournevis pour retirer le
couvercle d'étanchéité de la
fente pour carte
Insérer la carte mémoire
1.2 Installation de l'hôte
Veuillez installer l'unité principale dans un endroit
sans blindage métallique, comme sous le siège.
Après avoir confirmé la position, retirez l'adhésif 3M
et fixez-le.
FR
- 56 -
Remarquer:
1) La partie de transmission du signal WiFi se
trouve à l'avant de l'hôte, veuillez ne pas installer
l'hôte avec le logo vers le bas, ou l'installer sous les
parties métalliques de la moto.
2) L'unité principale F1 doit être fixée avec de la
colle 3M (livraison standard).Veuillez fixer l'adhésif
3M dans la rainure de la coque de protection de
l'unité principale F1, puis collez-le sur la moto.
3) Afin d'améliorer l'efficacité de dissipation
thermique de l'unité principale F1, le boîtier de
protection peut être retiré et réinstallé.
4) Lors de l'installation sur une surface incurvée, il
est recommandé d'ajouter un serre-câble pour la
fixation.
Direction de transmission
du signal wifi
FR
- 57 -
1.3 Installer la télécommande
La télécommande peut être installée dans un
endroit approprié selon les habitudes d'utilisation,
comme sur le guidon, la partie avant de la
voiture, le côté du réservoir de carburant, etc.
Remarquer:
1) Lors de l'installation, le bouton doit être orienté
vers le haut pour éviter d'affecter la réception du
signal GPS.
2) N'utilisez pas d'adhésif 3M pour couvrir le trou du
haut-parleur à l'arrière de la télécommande.
Trou de haut-parleur
3) Il y a un trou sonore pour microphone sur le côté,
veuillez ne pas placer le trou sonore directement
devant pour éviter les bruits de vent graves.
Guidon de moto Tête de moto Côté réservoir de
carburant
FR
- 58 -
1.4 Installer le câble d'alimentation
Connectez le cordon d'alimentation à la boîte à
fusibles comme suit:
Étape 1 : Connectez le cordon d'alimentation
rouge au pôle positif de la batterie ;
Étape 2: la ligne de signal ACC (ligne jaune) est
connectée au fusible d'alimentation ACC de la
batterie;
Étape 3 : connectez le fil de terre noir au pôle
négatif de la batterie ou à la position de mise à la
terre;
Étape 4 : Allumez la moto et attendez que
l'appareil démarre ;
Étape 5 : Après avoir vérifié que l'alimentation
électrique est correctement installée, utilisez des
câbles de serrage pour organiser les lignes de
stockage et fixez-les sur la moto.
Remarquer:
▲ Avant l'installation et le câblage, il est nécessaire
d'éteindre la moto et de couper l'alimentation de
la moto pour éviter tout court-circuit pendant le
fonctionnement.
▲ Pour la sécurité de conduite, veuillez éviter
d'exposer le cordon d'alimentation trop long, si
Sélectionnez un
emplacement
dans la boîte à
fusibles pour
accéder au fusible
FR
- 59 -
nécessaire, veuillez l'envelopper avec du ruban
isolant et le fixer.
1.5 Installez les lentilles avant et arrière
Les objectifs avant et arrière peuvent être ajustés
en desserrant les vis hexagonales intérieures pour
régler l'angle d'enregistrement et la direction
d'enregistrement de l'objectif.
Ligne de correction
d'orientation de
l'objectif
Porte-lentille
colle 3M
Après avoir desserré la vis hexagonale intérieure du
support d'objectif, l'angle de l'objectif peut être ajusté
de haut en bas, inversé, monté sur le côté et tourné
pour ajuster la direction d'enregistrement de l'objectif
Trous de vis de
fixation du support
d'objectif
multifonctions
Le porte-lentille
multifonctionnel
peut être installé
sur le guidon, etc
Remarquer:
① Lorsque la lentille avant est installée sur le
guidon, il est nécessaire de fixer d'abord la lentille
avant au support de lentille multifonction, puis de
fixer le support au guidon de la moto.
Porte-lentille
FR
- 60 -
② Les lentilles avant/arrière sont toutes équipées
d'adhésif 3M, qui peut être collé et fixé après avoir
sélectionné une position appropriée à l'avant/ar-
rière de la moto.
(Il est recommandé d'installer les objectifs avant et
arrière sur la carrosserie de la voiture, ce qui peut
réduire le tremblement de l'objectif et améliorer la
stabilité de la vidéo)
③ Le câble de l'objectif est un câble de données
haute fréquence. Veuillez ne pas plier le câble à
180 degrés, ce qui pourrait endommager le câble.
Il est recommandé d'utiliser une méthode
circulaire pour attacher le câble.
④ En raison des différentes positions d'installation,
la lentille avant/arrière de la voiture peut être
inversée et la lentille peut être ajustée en fonction
de la ligne de correction de direction de la lentille.
Position d'installation avant Position d'installation arrière
Lentille installée
dans le sens positif
Lentille installée
dans le sens opposé
FR
- 61 -
⑤ Lors du réglage de la direction de l'enregis-
trement de la caméra, vous pouvez régler avec
précision l'effet d'enregistrement approprié grâce
à la fonction de prévisualisation en temps réel sur
l'APP.
Une fois l'objectif installé, vous pouvez accéder à
l'application VANTRUE CAM pour un aperçu en
temps réel, puis cliquer sur la ligne d'étalonnage
[田] en bas à gauche de l'écran pour confirmer la
direction de l'objectif.
2. Schéma de combinaison d'installation
① Hôte F1
② Caméra avant 4K
③ Caméra arrière 1080P
④ Télécommande
⑤ Cordon d'alimentation
1
4
7
6
8
10
11
12
13
9
5
2
3
FR
- 62 -
⑥ Connectez la lentille arrière
⑦ Connectez la lentille avant
⑧ Connectez la télécommande
⑨ Connectez le cordon d'alimentation
⑩ Fusible
⑪ Cordon d'alimentation rouge (pôle positif de
l'alimentation)
⑫ Ligne de signal ACC (ligne jaune)
⑬ Fil de terre noir (pôle négatif de l'alimentation)
⑭ Coque de protection
Remarquer:
▲ Lors de la connexion du câble de la caméra
avant, vous devez entendre un "clic", indiquant
que la boucle du câble a été installée en place.
Vous pouvez utiliser un tournevis pour soulever la
queue de la boucle afin de faciliter l'enclenche-
ment de la boucle dans la fente.
▲ Le câble de l'objectif doit éviter de se plier à
angle vif, sinon il endommagera la couche de
protection, provoquera une transmission
anormale du signal ou interférera avec d'autres
équipements électroniques.
FR
- 63 -
FR
3. Opération (Application/ Télécommande)
① Bouton
Appui long: éteindre
Appui court: mise sous tension; après la
mise sous tension, appuyez brièvement
pour verrouiller le fichier, appuyez à
nouveau brièvement lors du verrouillage
du fichier, vous pouvez capturer des
images.
② Bouton
Appui long : Après la mise sous
tension, appuyez et maintenez
enfoncé pendant 10 secondes pour
formater la carte SD.
Appui court: pendant l'enregis-
trement, appuyez brièvement pour
mettre l'enregistrement en pause;
en mode veille, appuyez brièvement
pour démarrer l'enregistrement;
Introduction à la fonction du bouton de la
télécommande
③ Bouton
Appui long : Après la mise sous tension, appuyez
longuement pour activer/désactiver le WiFi.
Appui court: appuyez brièvement pour allumer/
éteindre le microphone; appuyez brièvement 5
fois de suite ou plus pour restaurer les paramètres
d'usine par défaut.
1
2
3
- 64 -
Voyant Lumineux
État
Alimentation normale
Éteindre
Toujours
allumé
Clignotant
Éteint
① Voyant d'alimentation(Rouge)
Clignote rapidement,
indiquant que la vidéo
est en cours d'enregis-
trement urgent
État
Toujours
allumé
Clignotant
② Voyant d'enregistrée(Vert)
Clignotement rapide:
formatage
Clignotant lentement:
enregistrement
Veille, en enregistrement
d'urgence
État
Audio activé
Audio désactivé
③ Voyant du micro(Bleu)
Toujours
allumé
Éteint
Mode Parking État
En mode stationnement
3 lumières clignotantes en même
temps: enregistrement
3 lumières éteintes en même
temps: en veille
Détection de
collision
FR
1
2
3

- 65 -
Application
Téléchargement de l'application
Veuillez télécharger l'application Vantrue sur
Apple Store/Google Play/site officiel de Vantrue,
ou scannez le code QR ci-dessous pour le
télécharger.
Étapes de connexion Wi-Fi
Première connexion:
① Allumez l'alimentation et allumez le F1 pour
activer le WiFi 5G par défaut, et il y aura une
invite disant "WiFi activé" après l'allumage.
② Ouvrez l'application Vantrue, cliquez sur "+"
pour ajouter un appareil. L'APP passera à
l'interface de réglage WiFi du téléphone portable,
veuillez trouver le WiFi nommé F1_VANTRUE_XXXX,
entrez le mot de passe par défaut 12345678,
attendez que la connexion WiFi réussisse, puis
revenez à l'APP.
FR
- 66 -
FR
- 67 -
Remarquer:
▲ L'opération de connexion WiFi peut se référer à
la figure ①~③
▲ Après la première connexion réussie, activez F1
et cliquez sur l'APP pour vous connecter
automatiquement.
▲ Si la fonction de mise sous tension Wi-Fi est
désactivée, vous devez allumer manuellement le
Wi-Fi pour vous connecter.
▲ Si vous oubliez le mot de passe, vous pouvez
appuyer 5 fois ou plus sur le bouton de sourdine
pour restaurer les paramètres d'usine et restaurer
le mot de passe initial sur 12345678.
Fonctionnement de l'application
Réglage
Statistiques
kilométriques
Ligne de
correction
de l'objectif
Microphone
Album
Commutateur
de vitre avant
et arrière
Bouton plein
écran
Après avoir accédé à l'APP, vous pouvez prévisual
iser l'écran de conduite en temps réel, modifier les
Instantané
Bouton
démarrer/
interrompre
l'enregis-
trement
FR

- 68 -
paramètres, lire des fichiers, afficher des pistes GPS
vidéo, partager des fichiers, ainsi que des
statistiques et des analyses de kilométrage via
l'APP.
Remarquer:
1) Les statistiques de kilométrage sont activées par
défaut, les informations GPS sont enregistrées sur la
carte mémoire, vous pouvez afficher les fichiers txt
sur la carte SD ou exporter des images ou des
fichiers PDF dans l'APP.
2) La ligne de correction de l'objectif est utilisée
pour régler la direction de l'enregistrement de
l'objectif.Cette fonction peut être utilisée lors de
l'installation des objectifs avant et arrière de la
voiture.
Menu
Synchroniser
l'heure du
téléphone
Il est activé par défaut et l'heure
du téléphone portable peut être
synchronisée avec l'enregistreur F1.
Langue Anglais, français, espagnol,
allemand, italien, chinois simplifié,
russe, japonais, coréen
Arrêt automatique du Wi-Fi: Activé
toujours par défaut, vous devez
l'ouvrir manuellement après l'avoir
fermé
Mode Wi-Fi: le Wi-Fi 5G est activé
par défaut et peut être commuté
sur le Wi-Fi 2,4G
Informations Wi-Fi: Afficher le nom
du Wi-Fi, le mot de passe
Wi-Fi
Résolution par défaut avant +
arrière : 2160P+1080P(HDR) 30FPS
Résolution par défaut devant la
voiture : 3840x2160P 30FPS
Résolution
FR

- 69 -
Il est désactivé par défaut et lorsqu'il
est activé, les vidéos des caméras
avant et arrière peuvent être
intégrées dans une seule vidéo.
Vidéo 2 en 1
Par défaut est 1 minute. Lorsque le
fichier de la carte SD est plein, il
écrasera automatiquement le
cycle.
Plus le niveau est élevé, plus la
collision est faible déclenchera
également l'enregistrement. Il peut
être ajusté dans différentes
directions, avant et arrière, gauche
et droite, et haut et bas.
Sensibilité
aux collisions
Par défaut +0.0, peut être modifié
selon les besoins
Correction
d'exposition
Invites
vocales
Activé par défaut
Enregis-
trement en
boucle
La valeur par défaut est
désactivée, vous pouvez choisir
1FPS, 5FPS, 10FPS, 15FPS
Vidéo
accélérée
Activé par défautVoyant
lumineux
Activé par défaut, l'écran
d'affichage derrière la voiture est
une image miroir
Activé par défautWDR
Mise en miroir
de l'écran de
la caméra
arrière
Prise en charge des paramètres de
plaque d'immatriculation chinois,
anglais et japonais
Plaque
d'immatricu-
lation
Par défaut, la date et l'heure, le
modèle de marque, la plaque
d'immatriculation, la vitesse du
véhicule et la position GPS sont
affichés
Timbre
d'étiquette
FR

- 70 -
Activé par défaut, lorsqu'il est
activé, prend effet lors de l'entrée
en mode parking
Vision
nocturne en
basse lumière
Il est désactivé par défaut. Une fois
allumé, c'est le mode de détection
de collision. Il doit être connecté à
la fonction ACC avant de pouvoir
être utilisé.
Surveillance
du parking
Activé par défaut,vous pouvez
changer l'unité de vitesse, vérifier
la force du signal GPS
GPS
Activé par défaut, vous pouvez
générer des rapports statistiques
dans l'APP et les enregistrer au
format image ou PDF pour les
afficher dans l'APP.
Dans cette interface, vous pouvez
afficher la tension actuelle de la
batterie de la moto et régler la
protection basse tension.
Protection
batterie
basse tension
Activé par défaut, vous pouvez
générer des rapports statistiques
dans l'APP et les enregistrer au
format image ou PDF pour les
afficher dans l'APP.
Statistiques
de
kilométrage
Réglez le volume du haut-parleur
sur la télécommande
Volume
Formater la carte SDFormater
Toutes les invites sont activées par
défaut: son de mise sous/hors
Son d'invite
Le mot de passe initial du Wi-Fi est
12345678, qui peut être remplacé
par d'autres mots de passe
Mot de passe
Wi-Fi
L'heure de mise à jour du freinage
GPS est activée par défaut, une
fois éteinte, vous pouvez modifier
manuellement l'heure et la date
Date/heure
Statistiques
de
kilométrage
FR

- 71 -
Afficher le modèle, les informations
sur la version du logiciel, l'URL du
site Web officiel
Informations
système
Voir toutes les informations sur la
certification F1
Informations
de certifica-
tion
Restaurer les paramètres d'usine
par défaut, y compris le mot de
passe WiFi
Paramètres
par défaut
50Hz/60HzFréquence
tension, son d'appui sur les
touches, son d'invite de verrouil-
lage, son d'invite de formatage,
rappel d'arrêt anormal de
l'enregistrement
FR
- 72 -
Lecture APP, supprimer, télécharger des fichiers
Entrez dans la navigation des fichiers dans l'APP,
vous pouvez afficher les fichiers vidéo quotidiens,
les lire, les supprimer, les télécharger et les
enregistrer localement.
2023116_115036_0079_N_A.MP4
16/1/2023 11:5:35 E1 000.000000. 000.000000. 36MK/H
Remarque :
9:41
pour afficher les informations GPS,
vous devez d'abord télécharger le
fichier vidéo dans le dossier local de
l'APP, puis le lire dans le dossier local.
Lire le fichier
horizontalement
Télécharger
un fichier
Supprimer
les fichiers
Remarquer:
▲ La lecture et le téléchargement de fichiers dans
l'APP ne généreront pas de trafic de données.
▲ La vidéo doit être téléchargée localement pour
afficher les informations de suivi GPS. Une fois le
téléchargement réussi, si les informations de suivi
GPS ne s'affichent pas, veuillez déconnecter la
connexion Wi-Fi. Après l'actualisation, les informa-
tions de suivi GPS peuvent être affichées sur la
carte.
FR
- 73 -
Partager des fichiers
Les fichiers téléchargés peuvent être partagés sur
les réseaux sociaux grâce à l'écrêtage dans l'APP.
Durée de
partage
vidéo: 5 à 30
secondes
Sélectionnez
l'audio
Sélectionnez
la taille du
fichier vidéo
Bouton de confirmation
du clip
Remarquer:
▲ Le partage nécessite un trafic de données, vous
devez donc déconnecter la connexion WiFi avec
F1. (requis pour certains utilisateurs d'Android)
FR
FR
Mise à niveau OTA
La mise à niveau de l'ordinateur central F1 prend
en charge la mise à niveau OTA dans l'APP.
① Après avoir ouvert l'APP, une invite de mise à
niveau apparaîtra.
FR
- 74 -
- 75 -
FR
② Dans l'interface "À propos", cliquez sur Mise à
niveau OTA pour vérifier les mises à jour.
Lorsque la méthode ci-dessus détecte le fichier
de mise à niveau, cliquez sur OK pour accéder à
l'interface de mise à niveau, cliquez sur
"Télécharger". Une fois le téléchargement terminé,
installez-le immédiatement pour la dashcam.
- 76 -
FR
Remarquer:
①Si la mise à niveau échoue, veuillez vérifier si la
connexion WiFi est normale, et pendant la mise à
niveau, veuillez ne pas déconnecter le WiFi et
assurez-vous que l'hôte de l'enregistreur est allumé
normalement.
②Si la mise à niveau OTA échoue tout le temps,
vous pouvez utiliser la carte SD pour la mise à
niveau, retirer la carte SD, copier le logiciel de mise
à niveau sur la carte SD, réinsérer la carte SD, puis
allumer et démarrer la mise à niveau.
Mettre à niveau le fichier

- 77 -
FR
4. Dépannage courant
Conseils : ce système prend en charge le
stockage sur carte SD jusqu'à 512 Go. Afin
d'assurer un enregistrement vidéo normal, il est
recommandé d'utiliser une carte mémoire
authentique. Étant donné que le système
d'enregistrement lit et écrit constamment des
données, une carte haute vitesse qui répond aux
normes. de classe 10 et au-dessus de U3 doit être
utilisé. En même temps, n'insérez pas ou ne retirez
pas la carte SD lorsque le système est allumé, afin
de ne pas causer de dommages.
① Après le démarrage de la moto, la caméra ne
s'allume pas:
veuillez vérifier si la connexion de la ligne est
normale.
② Appuyez sur le bouton d'alimentation mais ne
pouvez pas démarrer:
veuillez vérifier si la connexion de la ligne est
normale.
③ Impossible d'enregistrer une vidéo/ prendre des
photos/ verrouiller une vidéo après le démarrage:
Veuillez vérifier si la carte SD est insérée ou si la
carte SD doit être formatée; si le problème
persiste après le formatage de la carte SD, veuillez
réinsérer la carte SD ou la remplacer par une
nouvelle pour le résoudre.
④ Aucune caméra avant ou arrière n'affiche:
Veuillez vérifier si le câble de la caméra est
correctement connecté.
⑤ La vidéo devient floue:
veuillez vérifier s'il y a de la poussière sur l'objectif,
veuillez essuyer l'objectif.
⑥ Il n'y a pas de son dans la vidéo:

- 78 -
FR
Veuillez vérifier que le microphone est éteint.
⑦ De nombreuses vidéos sont verrouillées pendant
la conduite normale:
Veuillez ajuster la sensibilité du capteur de gravité,
la valeur par défaut est de 3 niveaux, veuillez
ajuster à 1 niveau.
⑧ Le fichier de l'enregistreur n'est pas verrouillé
lorsque la moto tombe en panne:
Veuillez vérifier si le réglage de la sensibilité aux
collisions est supérieur au niveau 1. Si c'est le cas,
veuillez augmenter le niveau de sensibilité aux
collisions. De plus, veuillez noter que lorsque
l'enregistrement accéléré est activé, l'enregis-
trement verrouillé ne peut pas être effectué, seuls
des instantanés peuvent être pris.
⑨ La connexion WIFI n'est pas normale:
Veuillez vérifier si le Wi-Fi est activé. Après avoir
activé le Wi-Fi, le WLAN du téléphone affichera le
nom Wi-Fi du F1 F1_VANTRUE_XXXX (le mot de
passe initial est 12345678).
⑩ Un phénomène anormal tel qu'un crash se
produit:
Veuillez redémarrer l'alimentation.
⑪ Il y aura des interférences électromagnétiques
à bande ou des interférences électromagnétiques
à bande violette dans la vidéo affichée et
enregistrée par l'hôte:
1) Veuillez vérifier le modèle de bougie d'allumage
de la moto, veuillez utiliser une bougie d'allumage
à résistance de grade R.
2) Vérifiez s'il y a un problème avec le serre-câble
de la caméra. Lors de l'acheminement du câble,
veuillez le faire passer en douceur, ne le pliez pas
et gardez une certaine marge. Lorsque vous
attachez le câble, veuillez ne pas l'attacher trop

- 79 -
FR
serré ou le presser trop étroitement avec la coque
de la voiture.
5. Paramètres du produit
Modèle F1
Processeur
de puce
Processeur haute performance
Novatek
Capteur
d'image
Lentille frontale : Processeur Sony
8 millions de pixels
Lentille arrière : Processeur Sony 2
millions de pixels
Ouverture Lentille frontale F1.8
Lentille arrière F1.8
G-sensor
Angle
Capteur à trois axes intégré
Caméra Frontale 160°
Lentille Arrière 145°
Langue Anglais, français, espagnol,
allemand, italien, chinois simplifié,
russe, japonais, coréen
Résolution Caméra avant et arrière :
2160P+1080P(HDR) 30FPS
1440P+1080P(HDR) 30FPS
1080P+1080P(HDR) 30FPS
720P+720P(HDR) 30FPS
2160P+1080P 30FPS
1440P+1080P 30FPS
1080P+1080P 30FPS
720P+720P 30FPS
Caméra avant :
3840x2160P 30FPS
2560x1440P 30FPS
1920x1080P 30FPS
1280x720P 30FPS
Format vidéo MP4

- 80 -
Méthode de
stockage
Format image JPEG
IP67
Super condensateur
Niveau
étanche
Batterie
12V 2A
-20℃ ~ 60℃
Courant
d'alimentation
Température
de travail
-25℃ ~ 75℃
Température
de stockage
Carte Micro SD (prise en charge
de 32 Go à 512 Go, carte
mémoire U3 ou supérieure)
6. Service après-vente
La période de service de garantie de la marque
VANTRUE est de 12 mois.Si vous avez des questions
sur le produit, vous pouvez contacter le service
clientèle de votre canal d'achat ou envoyer un
e-mail à notre e-mail officiel [email protected].
Nous aurons un personnel dédié pour répondre
aux questions dans les 12 à 24 heures.
La marque VANTRUE
®
s'est engagée sans relâche
à améliorer continuellement les produits, à
améliorer les services et l'expérience utilisateur. Si
vous avez des idées sur la façon dont nous
pouvons faire mieux, vous êtes invités à laisser de
précieux commentaires et suggestions sur notre
e-mail officiel [email protected].
Merci d'avoir choisi VANTRUE
®
PL

- 81 -
PL
Przeczytaj uważnie niniejszą instrukcję obsługi
przed rozpoczęciem korzystania z kamery.
Ten produkt jest rejestratorem przeznaczonym dla
motocykli i jest ograniczony do podłączenia do
akumulatora 12 V.
Proszę wyłączyć zasilanie motocykla przed
instalacją i włączyć zasilanie po zakończeniu
instalacji.
Nazwa Wi-Fi to F1_VANTRUE_XXXX, a początkowe
hasło Wi-Fi to 12345678.
Surowo zabrania się używania pistoletu na wodę
pod wysokim ciśnieniem do płukania urządzenia,
aby uniknąć przedostania się wody do środka.
Ten produkt obsługuje karty SD o pojemności do
512 GB. Aby zapewnić normalne nagrywanie
wideo, użyj szybkich kart klasy 10/U3 lub wyższej.
Przedni i tylny obiektyw F1 są w pełni uszczelnione i
wodoodporne, ale nadal należy unikać używania
rozpuszczalników, takich jak tłuszcz, alkohol i
środek do czyszczenia smoły, w celu uniknięcia
uszkodzenia warstwy wodoodpornej.
Uwaga: Aby normalnie przechowywać pliki wideo,
należy regularnie formatować kartę SD.
Wskazówki:
1.
2.
3.
4.
5.
6.
7.
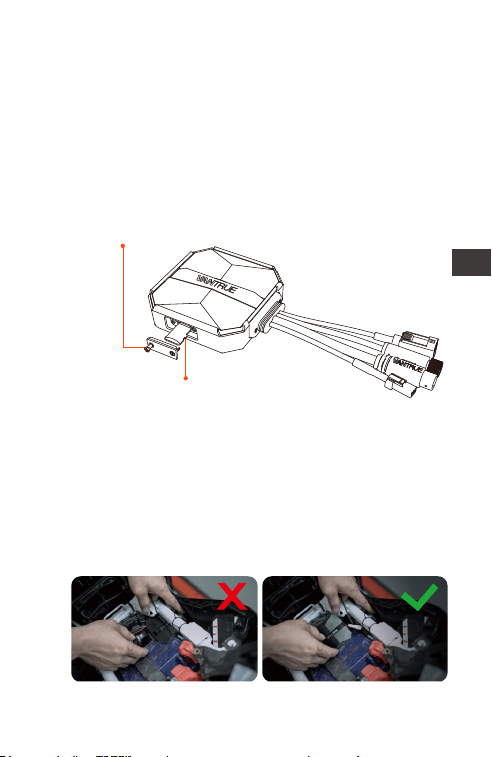
- 82 -
1.1 Wkładanie karty pamięci (zalecane: szybka karta
microSD Vantrue U3).
1. Instrukcja instalacji
Po włożeniu karty SD po raz pierwszy, naciśnij i
przytrzymaj przycisk nagrywania na pilocie przez
10 sekund, aby rozpocząć formatowanie karty.
Uwaga:
Po zdjęciu pokrywy gniazda karty SD wkręć śrubę,
aby jej nie zgubić.
Użyj pasującego śrubokręta,
aby zdjąć pokrywę
uszczelniającą gniazda
Włóż kartę pamięci
1.2 Instalowanie kamery głównej
Zainstaluj hosta w miejscu bez metalowej osłony,
na przykład pod siedzeniem, określ lokalizację i
oderwij folię z 3M, aby go przymocować.
PL
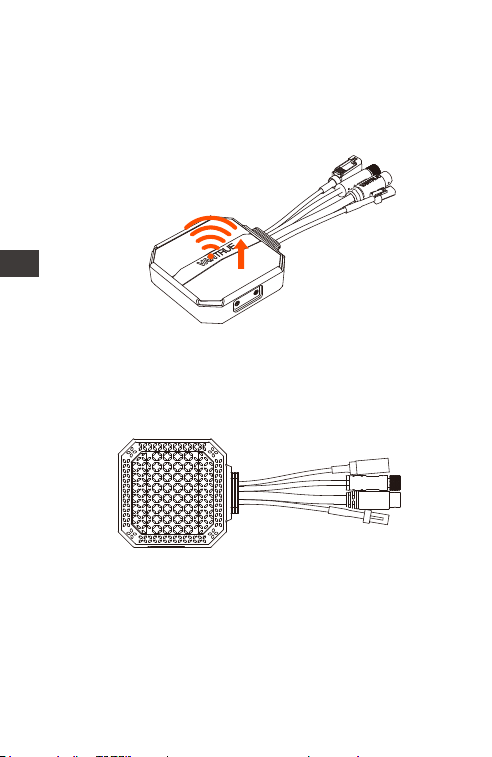
- 83 -
PL
Uwaga:
<1>. Część transmitująca sygnał Wi-Fi znajduje się
z przodu jednostki głównej. Nie instaluj go
ekranem do dołu podczas instalowania strony z
logo jednostki głównej lub pod metalowymi
częściami motocykla.
<2>. Rama główna F1 musi być przymocowana za
pomocą kleju 3M (dostarczanego w standardzie).
Proszę zamocować klej 3M we wnęce obudowy
ochronnej głównego korpusu F1, a następnie
wkleić go do motocykla.
<3>. Aby poprawić wydajność chłodzenia
komputera głównego F1, przed instalacją można
zdjąć obudowę ochronną.
<4>. W przypadku instalacji na zakrzywionej
powierzchni zalecamy użycie opasek kablowych
do mocowania.
Kierunek transmisji
sygnału Wi-Fi
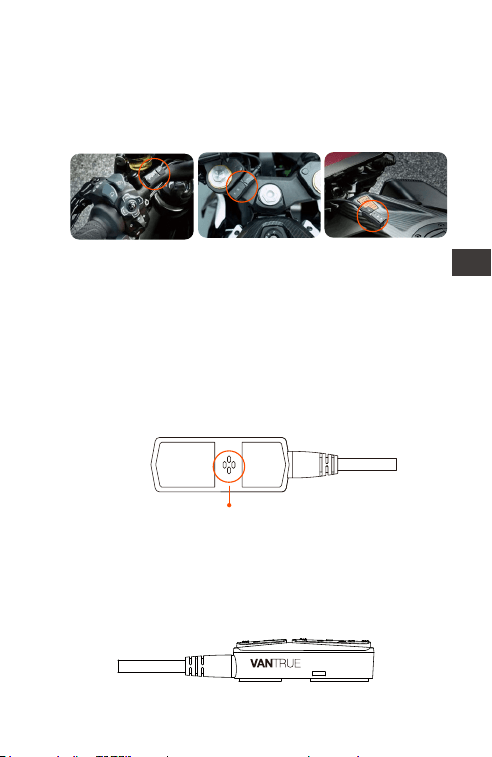
- 84 -
PL
1.3 Instalacja pilota
Możesz wybrać odpowiednią pozycję instalacji
zgodnie z własnymi przyzwyczajeniami użytkowa-
nia i zainstalować pilota na kierownicy, przedniej
części pojazdu, boku zbiornika paliwa itp.
Uwaga :
<1>. Podczas instalowania rejestratora motocyklo-
wego należy skierować stronę z przyciskiem do
góry, aby uniknąć wpływu na odbiór sygnału GPS.
<2>. Proszę nie używać kleju 3M do zakrywania
otworu głośnika z tyłu pilota, aby zwiększyć
stabilność pilota.
Otwór głośnika
Kierownice
motocyklowe
Pozycja przodu
motocykla
Strona zbiornika
paliwa
<3>. Bok to otwór odbiorczy mikrofonu, proszę nie
umieszczać otworu odbiorczego bezpośrednio z
przodu, aby uniknąć poważnego szumu wiatru.
PRZYPOMNIENIE:
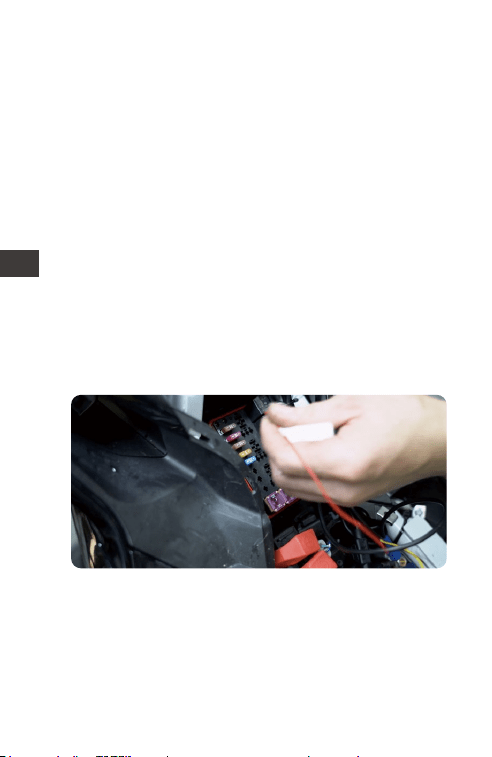
- 85 -
PL
1.4 Instalowanie przewodu zasilającego
Podłącz przewód zasilający do skrzynki bezpiec-
zników w następujący sposób.
Krok 1: czerwony kabel zasilający jest podłączony
do dodatniego bieguna akumulatora, stałe
zasilanie.
Krok 2: przewód sygnałowy ACC (żółty przewód)
jest podłączony do bezpiecznika zasilania ACC
akumulatora który ma napięcie po zapłonie.
Krok 3: Czarny przewód uziemiający jest
podłączony do ujemnego bieguna akumulatora
lub do ,,masy”.
Krok 4: uruchom zasilacz motocykla i poczekaj na
uruchomienie urządzenia.
Krok 5: Po potwierdzeniu, że zasilacz jest
prawidłowo zainstalowany, użyj opasek
kablowych, aby uporządkować linki do
przechowywania i przymocuj je do motocykla.
Uwaga:
<1>. Przed instalacją i okablowaniem należy
wyłączyć motocykl i wyłączyć zasilanie motocykla,
aby uniknąć zwarcia podczas pracy.
<2>. Ze względów bezpieczeństwa podczas jazdy
należy unikać pozostawiania odsłoniętych zbyt
Wybierz miejsce w
skrzynce
bezpieczników, w
którym można
uzyskać dostęp do
bezpiecznika.
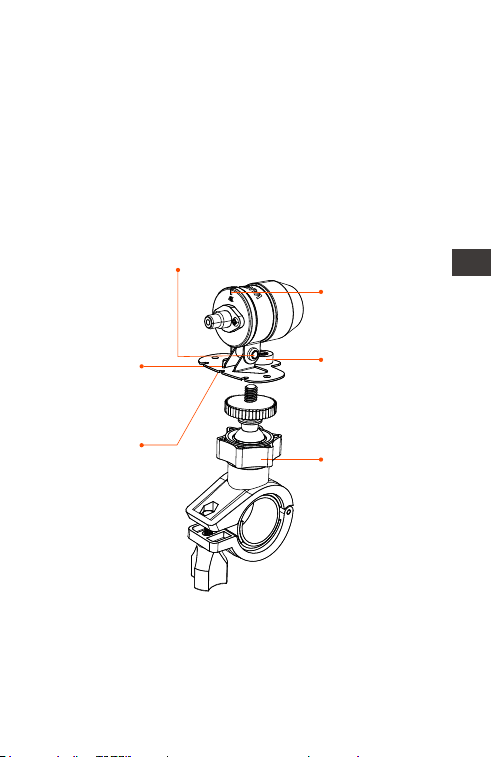
- 86 -
PL
długich kabli zasilających. W razie potrzeby użyj
taśmy izolacyjnej, aby je owinąć i zamocować.
1.5 Instalowanie przedniej i tylnej kamery
Przedni i tylny obiektyw można poluzować za
pomocą sześciokątnej śruby, aby dostosować kąt
nagrywania obiektywu, a także kierunek
nagrywania.
Linia korekcji
orientacji
obiektywu
Uchwyt na
kamerę
Klej 3M do
uchwytu
kamery
Śruby z końcówką walcową uchwytu kamery:
poluzowane, można regulować kąt kamery w górę
I w dół, można odwrócić, obracać z boku, aby
dostosować kierunek nagrywania kamery.
Wielofunkcyjny
uchwyt na
kamerę: otwory na
śruby mocujące
Wielofunkcyjny
uchwyt na kamerę:
może być
montowany na
kierownicy
motocykla i innych
miejscach
Uwaga:
<1>. Jeśli przednia kamera jest zamontowana na
kierownicy, należy najpierw przymocować
przednią kamerę do wielofunkcyjnego uchwytu
kamery, a następnie przymocować uchwyt do
kierownicy motocykla.
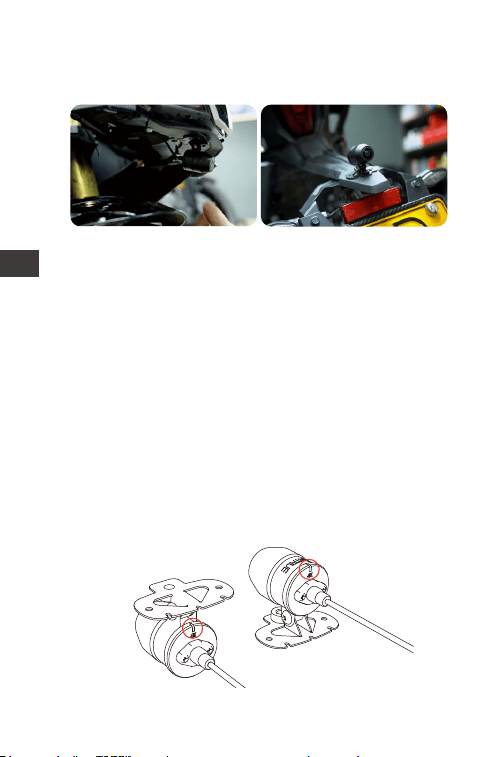
- 87 -
PL
<2>. Przednie/tylne kamery są dostarczane z
klejem 3M, wystarczy przykleić go z przodu/tyłu
motocykla po wybraniu odpowiedniej pozycji.
(Zalecamy zamontowanie przedniej i tylnej
kamery na karoserii motocykla zamiast na
kierownicy, aby zredukować drgania kamery i
poprawić stabilność wideo)
<3>. Linia kamery to linia danych o wysokiej
częstotliwości. Proszę nie zginać kabla o 180 stopni
do tyłu, ponieważ może to spowodować
uszkodzenie kabla. Zalecamy użycie okrągłego
sposobu wiązania drutu.
<4>. Ze względu na różne pozycje instalacji,
przednia/tylna soczewka może wyglądać na
odwróconą, można wyregulować soczewkę
zgodnie z kierunkiem linii korekcji soczewki.
Odwrotny montaż
mocowania
Mocowanie
mocowania do przodu
Pozycja montażu
głowicy motocykla
Tylna pozycja montażowa
motocykla
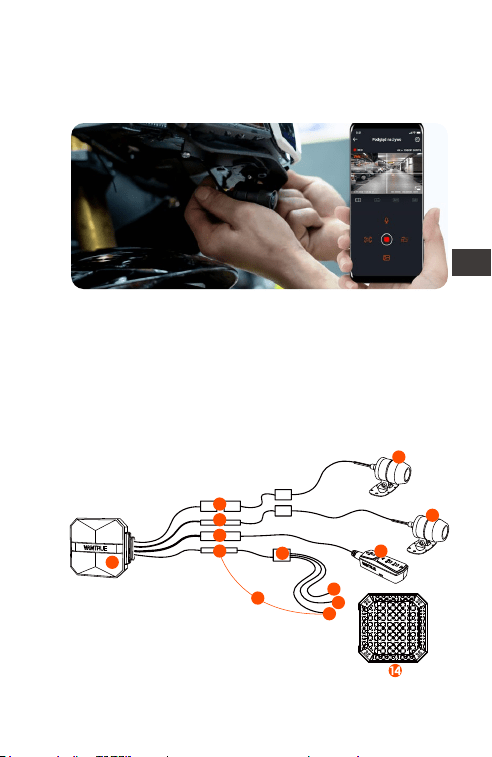
- 88 -
PL
<5>. Dostosowując kierunek nagrywania kamery,
możesz użyć funkcji podglądu aplikacji w czasie
rzeczywistym, aby dokładnie dostosować się do
odpowiedniego efektu nagrywania.
Po zainstalowaniu obiektywu możesz przejść do
podglądu w czasie rzeczywistym aplikacji
VANTRUE, aby poprawić orientację obiektywu.
Po przejściu do podglądu na żywo kliknij linię
kalibracji [] w lewym dolnym rogu ekranu, aby
potwierdzić kierunek obiektywu.
2. Schemat strukturalny
① Główny moduł F1
② Przednia kamera 4K
③ Tylna kamera 1080P
④ Pilot zdalnego sterowania
⑤ Przewód zasilający
1
4
7
6
8
10
11
12
13
9
5
2
3
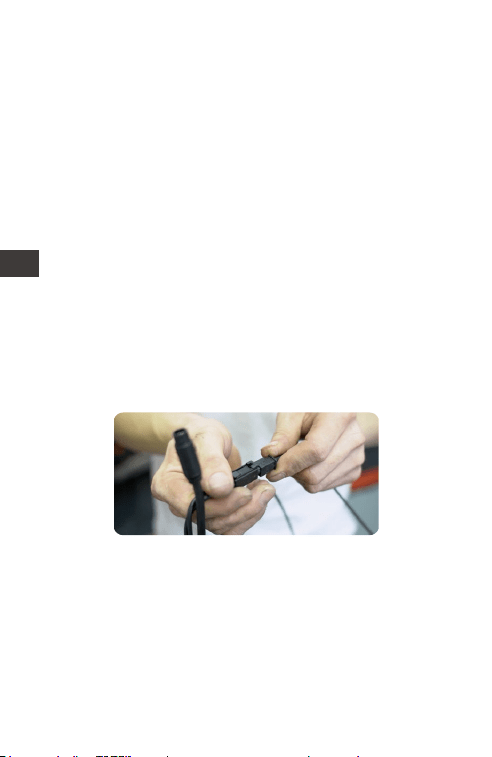
- 89 -
PL
Uwaga:
Podczas podłączania kabla przedniej kamery
usłyszysz dźwięk „kliknięcia”, wskazujący, że klamra
kabla została zainstalowana na swoim miejscu.
Możesz użyć śrubokręta, aby podnieść koniec
zatrzasku, aby ułatwić zatrzaskiwanie w gnieździe.
⑥ Port tylnej kamery
⑦ Port kamery przedniej
⑧ Podłączenie pilota
⑨ Podłączenie przewodu zasilającego
⑩ Bezpiecznik
⑪ Czerwony przewód zasilający (zasilanie
dodatnie, stałe)
⑫ Przewód sygnałowy ACC (żółty przewód,
zasilanie po zapłonie)
⑬ Czarny przewód uziemiający (zasilanie ujemne,
uziemienie)
⑭ Obudowa ochronna
Należy unikać zginania kabla kamery F1 pod
ostrym kątem, ponieważ zginanie go pod ostrym
kątem może uszkodzić jego ekranowanie i
spowodować niewłaściwą transmisję sygnału lub
zakłócenia innych urządzeń elektronicznych
urządzenia.
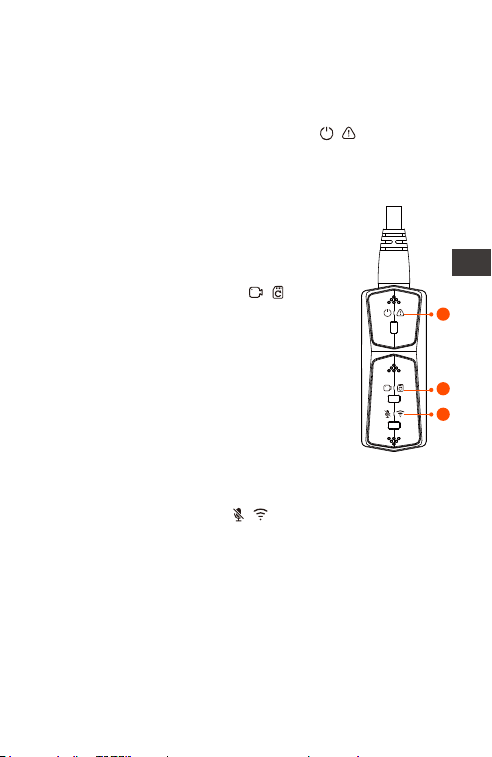
- 90 -
PL
③ Przycisk mikrofonu
Funkcja długiego naciśnięcia: po włączeniu
naciśnij długo, aby włączyć/wyłączyć Wi-Fi.
Funkcja krótkiego naciśnięcia: krótkie naciśnięcie
włącza/wyłącza mikrofon; krótkie naciśnięcie 5
razy lub więcej w sposób ciągły, aby przywrócić
domyślne ustawienia fabryczne.
① Przycisk zasilania/awaryjnego
Funkcja długiego naciśnięcia:
Wyłącz urządzenie
Funkcja krótkiego naciśnięcia:
włączanie; Po włączeniu naciśnij
krótko, aby zablokować plik i
ponownie naciśnij krótko, aby
zablokować plik, aby zrobić zdjęcie.
② Przycisk nagrywania
Funkcja długiego naciśnięcia: po
włączeniu naciśnij i przytrzymaj przez
10 sekund, aby sformatować kartę
SD.
Funkcja krótkiego naciśnięcia:
podczas nagrywania krótkie
naciśnięcie powoduje wstrzymanie
nagrywania; w trybie gotowości
naciśnij krótko, aby rozpocząć
nagrywanie.
3. Podstawowa obsługa (obsługa
aplikacji/obsługa pilota)
Wprowadzenie do funkcji przycisku pilota
1
2
3
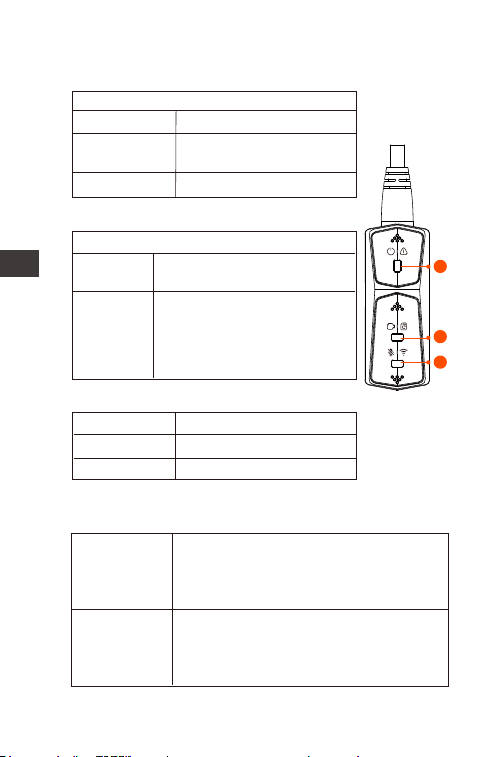
- 91 -
PL
Status diody LED
Status
Normalne zasilanie
Wyłączenie zasilania
Stałe światło
Migające
światło
WYŁ
① tło zasilania (czerwone światło)
Szybkie miganie,
nagrywanie awaryjne
Status
Czuwanie; w trybie
nagrywania awaryjnego.
Stałe
światło
Migające
światło
② Światło nagrywania (zielone światło)
Szybkie miganie:
podczas formatowania
karty.
Powolne miganie:
podczas nagrywania
Status
Audio wł
Audio wył
Stałe światło
Wył
③ Światło mikrofonu (niebieskie światło)
Tryb
parkingowy
Czerwone światło + zielone światło
+ niebieskie światło:
Miga w tym samym czasie, w
nagraniu
Detekcja
kolizji
Czerwone światło + zielone światło
+ niebieskie światło:
Wyłączone w tym samym czasie,
w trybie gotowości
W trybie parkowania stan wskaźnika jest
następujący.
1
2
3

- 92 -
PL
Działanie aplikacji
Pobieranie aplikacji
Zeskanuj poniższy kod QR, aby pobrać najnowszą
aplikację z Google Play i App Store. Lub możesz
wyszukać „Vantrue” w Google Play i App Store,
aby go pobrać.
Kroki pierwszego połączenia.
<1>. Włącz kamerę motocyklową, F1 domyślnie
otworzy Wi-Fi 5G, a po włączeniu pojawi się monit
„Wi-Fi włączony”.
<2>. Otwórz aplikację Vantrue, kliknij „+”, aby
dodać urządzenie, aplikacja przeskoczy do
interfejsu ustawień Wi-Fi telefonu komórkowego,
znajdź nazwę F1_VANTRUE_XXXX Wi-Fi w interfejsie
ustawień Wi-Fi, wprowadź domyślne hasło
12345678, czekaj dla powodzenia połączenia
Wi-Fi, a następnie wróć do aplikacji.
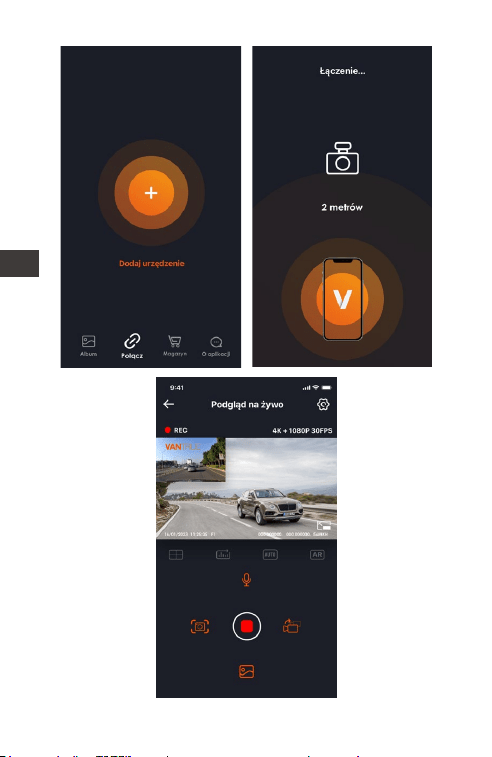
- 93 -
PLPL
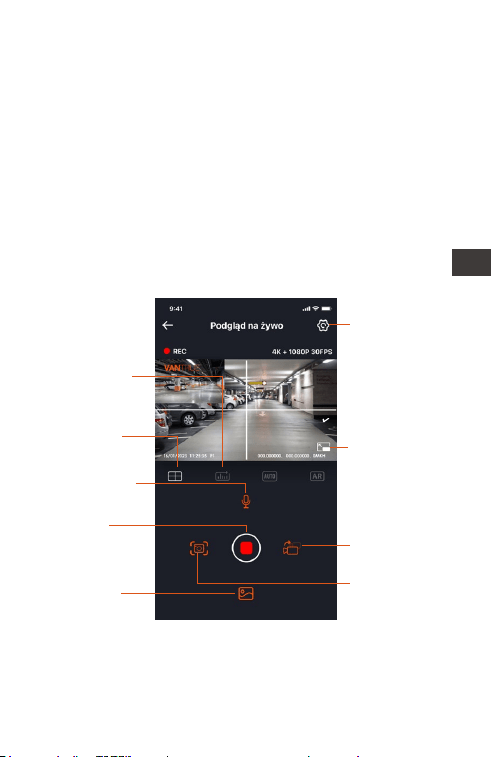
- 94 -
PL
Uwaga:
<1>. Aby uzyskać informacje na temat działania
połączenia Wi-Fi, patrz Rysunek 1~3.
<2>. Po pierwszym udanym połączeniu, kiedy
ponownie włączysz F1 w przyszłości, możesz
połączyć się automatycznie, klikając aplikację.
Jeśli wyłączysz funkcję uruchamianą przez Wi-Fi po
włączeniu kamery motocyklowej, musisz ręcznie
włączyć Wi-Fi, aby się połączyć. Jeśli zapomnisz
hasła, możesz nacisnąć przycisk mikrofonu 5 razy
lub więcej, aby przywrócić ustawienia fabryczne i
przywrócić początkowe hasło 12345678.
Aplikacja
Ustawienia
kamery
Statystyki
przebiegu
Linia
pomocnicza
korekcji
soczewki
WŁ./WYŁ.
mikrofonu
Ikona
zatrzymania
nagrywania
Zdjęcie
Album
Przełącznik
przedniego I
tylnego
obiektywu
Ikona pełnego
ekranu
Możesz przeglądać podgląd na żywo ekranu
jazdy, zmieniać ustawienia, odtwarzać pliki,
przeglądać ścieżkę GPS wideo, udostępniać pliki,

- 95 -
PL
przeglądać analizę statystyk przebiegu i inne
funkcje za pośrednictwem aplikacji.
Opcje menu
Uwaga:
<1>. Funkcja statystyki przebiegu jest domyślnie
włączona. Aby uzyskać informacje o przebiegu
GPS zapisane na karcie pamięci aparatu, możesz
wyświetlić plik txt w folderze GPS na karcie
pamięci za pośrednictwem komputera lub
wyeksportować zdjęcia lub pliki PDF za pomocą
funkcji statystyki przebiegu w aplikacji.
<2>. Linia kalibracji kamery służy do regulacji
kierunku nagrywania kamery. Podczas instalowan-
ia przedniej i tylnej soczewki kamery możesz użyć
tej funkcji.
Ustawienia aplikacji
Synchronizuj
czas z
telefonu
Synchronizacja czasu z telefonu jest
domyślnie włączona, możesz
zsynchronizować czas telefonu z F1.
Dostępne
języki
Można ustawić angielski, francuski,
hiszpański, niemiecki, włoski, chiński
uproszczony, rosyjski, japoński,
koreański, polski a domyślnym
językiem jest angielski.
Ta funkcja obejmuje automatyczne
włączanie Wi-Fi, tryb Wi-Fi,
informacje o Wi-Fi.
Automatyczne włączanie Wi-Fi:
Domyślnie Wi-Fi jest włączane
automatycznie po włączeniu
kamery samochodowej. Wi-Fi
należy włączyć ręcznie dopiero po
wyłączeniu.
Tryb Wi-Fi: Domyślnie jest włączone
Wi-Fi

- 96 -
PL
Domyślnie wyłączone. Po włącze-
niu można zintegrować przednią i
tylną kamerę nagrywającą wideo
w jeden segment.
Video 2-w-1
Domyślnie włączoneNagrywanie
dźwięku
Do wyboru są dwa tryby
rozdzielczości, rozdzielczość przód+
tył i rozdzielczość przód.
Domyślna rozdzielczość przód+tył
to 2160P+1080P(HDR) 30 kl./s
Przód pojazdu domyślnie ma
rozdzielczość 3840x2160P 30FPS
Rozdzielczość
Wartość domyślna to 1 minuta,
można wybrać inne opcje. Gdy
pamięć na karcie SD jest pełna,
pętle zostaną automatycznie
nadpisane.
Nagrywanie
w pętli
Czułość
Zablokuj czułość nagrywania,
domyślny poziom to 3, możesz
odpowiednio dostosować przód i
tył, lewo i prawo, w górę i w dół
różne kierunki poziomu czułości
kolizji.
G-sensor
Domyślnie jest włączony
Wskaźnik led
Domyślnie włączonyWDR
Wartość domyślna to +0,0, w razie
potrzeby można zwiększyć wartość
ekspozycji lub zmniejszyć wartość
ekspozycji
Ekspozycja
Wi-Fi 5G, możesz przełączyć się na
Wi-Fi 2,4G
Informacje Wi-Fi: sprawdź nazwę
Wi-Fi, hasło Wi-Fi i inne informacje.

- 97 -
PL
Domyślnie jest włączone, pojazd za
ekranem wyświetlacza dla odbicia
lustrzanego, poza ekranem
wyświetlacza dla oryginalnego
obrazu.
Odbicie
lustrzane
tylnej kamery
Ustawienia
tablic
pojazdu
Domyślnie wyświetlana jest data i
godzina, marka i model, tablica
rejestracyjna, prędkość, lokalizacja
GPS
Domyślnie jest wyłączone, możesz
wybrać szybkość klatek 1 FPS, 5 FPS,
10 FPS, 15 FPS, aby rozpocząć
nagrywanie poklatkowe
Obsługa ustawienia tablicy
rejestracyjnej w języku chińskim,
angielskim i japońskim
Dodaj do
nagrania
Ustawienie domyślne jest włączone.
Po włączeniu działa po wejściu w
tryb parkowania
Domyślnie jest wyłączony. Po
włączeniu jest to tryb wykrywania
kolizji. Musi być połączony z funkcją
ACC, zanim będzie można go użyć.
Tryb
parkingowy
W tym interfejsie można sprawdzić
aktualne napięcie akumulatora
motocykla, dodatkowo w ramach
tej funkcji można ustawić
zabezpieczenie przed zbyt niskim
napięciem
Nagrywanie
poklatkowe
Zabezpiecze-
nie przed
niskim
napięciem
akumulatora
Low-light
Night Vision
tryb
parkingowy
Użytkownicy mogą generować
raporty statystyczne w aplikacji.
Raporty są zapisywane w aplikacji
w formacie obrazu lub PDF w celu
łatwego przeglądania.
Domyślnie
jest
włączone

- 98 -
PL
Automatyczna aktualizacja czasu
GPS jest domyślnie włączona. Po
wyłączeniu można ręcznie zmienić
godzinę i datę
GPS
ustawienia
Formatowanie karty pamięciForma-
towanie
Domyślny format to rok/miesiąc/
dzień
Włącz domyślnie wszystkie dźwięki,
włącz/wyłącz dźwięk, dźwięk
klawiszy, dźwięk blokady, dźwięk
przypomnienia o formacie,
przypomnienie o nieprawidłowym
zatrzymaniu nagrywania
Dostosuj poziom głośności głośnika
za pomocą pilota
Głośność
50Hz/60Hz (Dla Polski 50Hz)
Zobacz certyfikację produktuCertyfikacja
Przywróć domyślne ustawienia
fabryczne, po przywróceniu hasło
Wi-Fi zostanie również przywrócone
do hasła początkowego
System info
Data/czas
Częstotliwość
Dźwięki
ostrzeżeń
Początkowe hasło Wi-Fi to
12345678, możesz je zmienić na
inne hasło
Wi-Fi hasło
Otwórz domyślnie, możesz zmienić
jednostkę prędkości i zobaczyć siłę
sygnału GPS
GPS
ustawienia
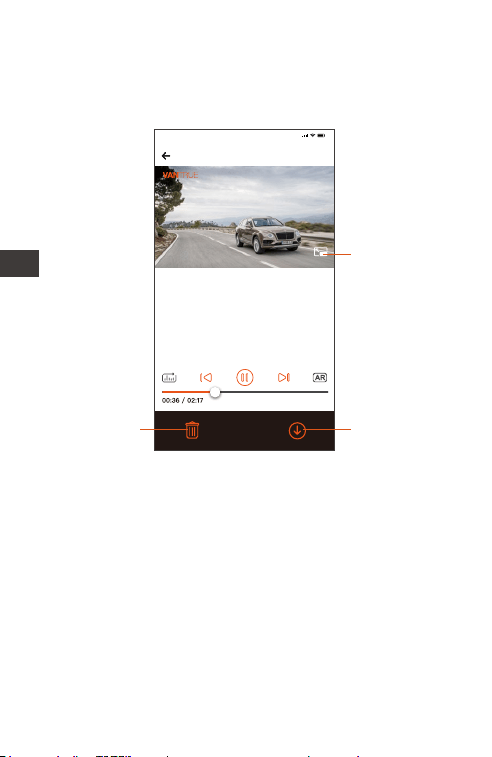
2023116_115036_0079_N_A.MP4
16/1/2023 11:5:35 E1 000.000000. 000.000000. 36MK/H
Uwaga:
9:41
Aby wyświetlić informacje GPS, musisz
najpierw pobrać plik wideo do
lokalnego folderu aplikacji, a
następnie odtworzyć go w folderze
lokalnym.
- 99 -
PL
Odtwarzaj, usuwaj i pobieraj pliki w aplikacji
Wejdź do przeglądania plików w aplikacji, możesz
przeglądać codzienne pliki nagrań, odtwarzać,
usuwać, pobierać do lokalnego folderu.
Kliknij go, aby
odtworzyć plik
w orientacji
poziomej.
Kliknij, aby
pobrać plik
Kliknij, aby
usunąć plik
Uwaga:
<1>. Podczas odtwarzania i pobierania plików w
aplikacji nie jest generowany ruch danych.
<2>. Aby wyświetlić informacje o ścieżce GPS,
musisz pobrać wideo na dysk lokalny. Jeśli po
pomyślnym pobraniu filmu informacje o trasie GPS
nie są wyświetlane, odłącz połączenie Wi-Fi i
odśwież je, aby wyświetlić informacje o trasie GPS
na mapie.
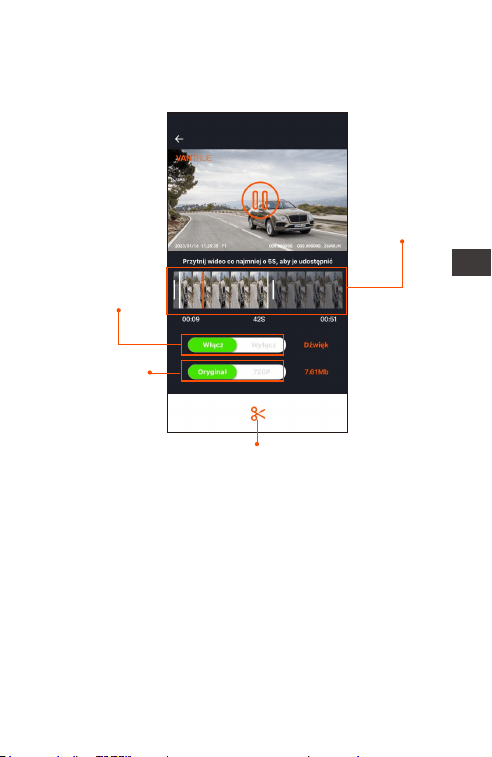
- 100 -
PL
Udostępnianie plików aplikacji
Już pobrane pliki można udostępniać w mediach
społecznościowych, edytując je w aplikacji.
Długość
udostępniania
wideo w
zakresie 5-30s
Udostępnianie
wideo może
odbywać się z
dźwiękiem lub
bez
Rozmiar
udostępnio-
nego pliku
wideo
Potwierdź edycję wideo, po udanej edycji
aplikacje mediów społecznościowych, które
można udostępniać, pojawią się automatycznie
Uwaga:
Przesyłanie danych jest wymagane do udostępni-
ania, więc musisz rozłączyć połączenie Wi-Fi za
pomocą F1. (Wymagane dla niektórych użytkown-
ików Androida)
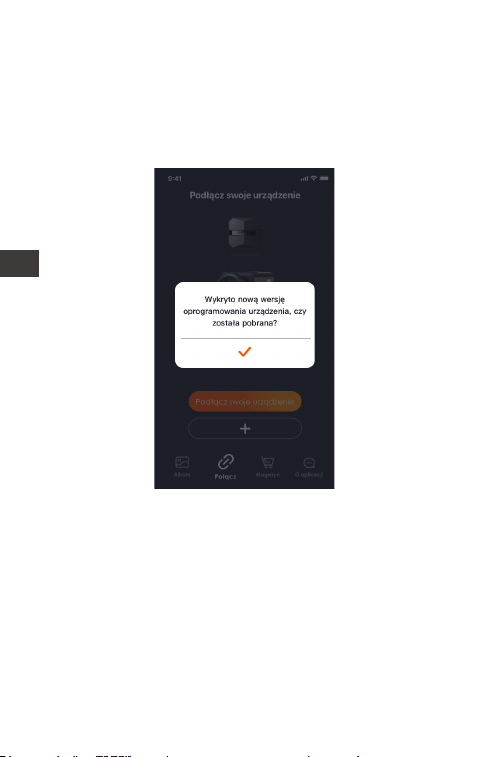
- 101 -
PL
Aktualizacja OTA
Aktualizacja głównego modułu F1 obsługuje
aktualizację OTA w aplikacji. Istnieją dwa rodzaje
aktualizacji OTA:
<1>. Po otwarciu aplikacji pojawi się monit o
aktualizację.
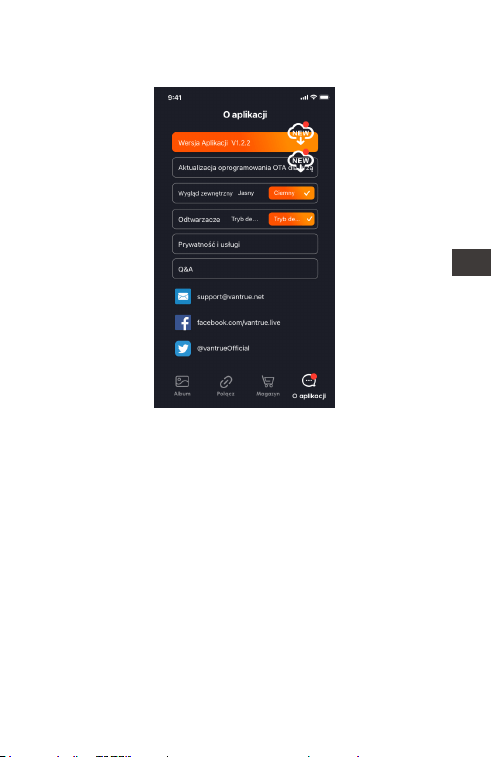
- 102 -
PL
<2>. Na ekranie „Informacje” kliknij opcję Aktual-
izacja OTA, aby sprawdzić dostępność aktualizacji.
Gdy plik aktualizacji zostanie wykryty na 2
powyższe sposoby, kliknij OK, przejdzie do ekranu
aktualizacji, kliknij „Pobierz”. Po zakończeniu
pobierania natychmiast zainstaluj kamerę.
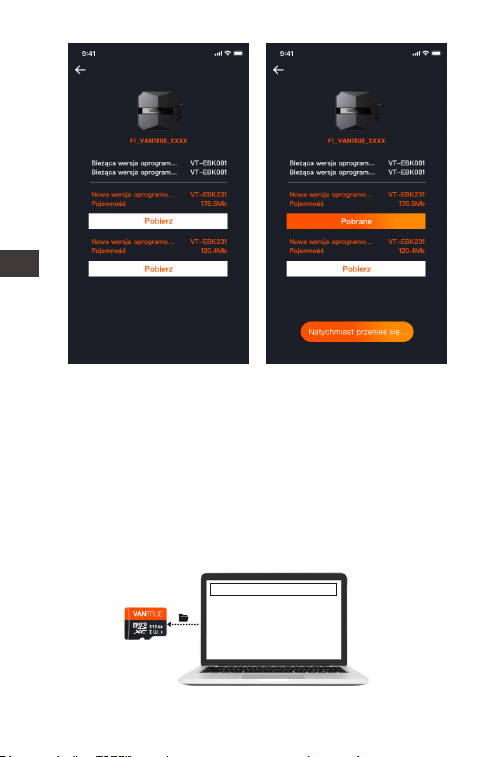
- 103 -
PL
Uwaga:
<1>. Jeśli aktualizacja się nie powiedzie, sprawdź,
czy połączenie Wi-Fi działa normalnie. Podczas
aktualizacji nie odłączaj Wi-Fi i upewnij się, że host
rejestratora jest prawidłowo włączony.
<2>. Jeśli aktualizacja OTA nie powiodła się,
możesz użyć aktualizacji karty SD, wyjąć kartę SD,
skopiować oprogramowanie do aktualizacji na
kartę SD, a następnie włożyć kartę SD do
komputera hosta, a następnie włączyć
aktualizację.
Uaktualnione pliki

- 104 -
PL
4. Rozwiązywanie problemów
Wskazówka: system obsługuje maksymalnie 512
GB pamięci na kartach SD, aby zapewnić
normalne wideo, zalecamy korzystanie z
oryginalnych kart pamięci. Ponieważ system
rejestrujący ciągle odczytuje i zapisuje dane,
należy użyć szybkiej karty, która spełnia standardy
klasy 10 i U3 lub wyższej. Nie należy również
podłączać i odłączać karty SD, gdy system jest
włączony, aby nie spowodować uszkodzenia
karty SD.
<1>. Motocykl nie włącza się po uruchomieniu:
Sprawdź, czy połączenie linii jest prawidłowe.
<2>. Naciśnij przycisk włączania gdy kamera nie
może się włączyć: Sprawdź, czy połączenie
liniowe jest normalne.
<3>. Kamera nie może nagrywać/nie może robić
zdjęć/nie może zablokować wideo: Sprawdź, czy
włożyłeś prawidłową kartę SD, czy też trzeba
sformatować kartę SD; Sformatuj kartę SD, jeśli
problem nadal występuje, włóż ponownie kartę
SD lub wymień nową kartę, aby rozwiązać
problem.
<4>. Ekran przedniej lub tylnej kamery nie jest
wyświetlany: Sprawdź, czy kabel kamery jest
prawidłowo podłączony.
<5>. Wideo jest rozmazane: Sprawdź, czy na
obiektywie nie ma kurzu. Jeśli tak, wytrzyj
obiektyw.
<6>. Brak dźwięku w filmie: Sprawdź, czy mikrofon
jest wyłączony.
<7>. Wiele filmów jest nieprawidłowo blokow-
anych podczas normalnej jazdy: Dostosuj czułość
czujnika G. Wartość domyślna to 3. Ustaw na 1.

- 105 -
PL
<8>. Kiedy dochodzi do kolizji motocykla, plik
wideo nie jest blokowany: Sprawdź, czy regulacja
czułości G-sensor jest powyżej 1. . Jeśli czułość
zderzeniowa jest wyższa niż 1 stopień, dostosuj
wyższy poziom czułości czujnika G.
Należy również pamiętać, że jeśli tryb poklatkowy
jest włączony, nie można zablokować filmu i
można robić tylko zdjęcia.
<9>. Wi-Fi nie łączy się prawidłowo.: Sprawdź, czy
Wi-Fi jest włączone. Gdy Wi-Fi jest włączone, Wi-Fi
telefonu pokaże nazwę F1 Wi-Fi F1_VANTRUE_XXXX
(początkowe hasło to 12345678).
<10>. Jeśli wystąpi nieprawidłowe zjawisko, takie
jak wył. urządzenie, uruchom ponownie zasilanie.
<11>. Aplikacja pokazuje, a nagrane wideo
wydaje się mieć smugi EMI lub fioletowe EMI.
1) Sprawdź typ świecy zapłonowej motocykla.
Należy używać rezystancyjnych świec
zapłonowych z oznaczeniem R.
2) Sprawdź wyrównanie kamery i opaski kablowe
pod kątem problemów. Podczas prowadzenia
przewodów należy je prowadzić płynnie i nie
zaginać. Proszę nie wiązać drutu zbyt mocno ani
nie ściskać go zbyt mocno spodczas wiązania.

- 106 -
PL
5. Dane techniczne
Specyfikacje tego produktu mogą ulec zmianie
bez wcześniejszego powiadomienia ze względu
na ulepszenia produktu.
Model F1
Procesor Novatek high-performance
procesor
Sensor
obrazu
Przednia kamera: Sony 8MP CMOS
Tylna kamera: Sony 2MP CMOS
Jasność
obiektywów
Przód: F/1. 8
Tył: F/1. 8
G-sensor
Kąt widzenia
obiektywów
Wbudowany
Przód: 160°
Tył: 145°
Dostępne
języki
Engish/Français/Español/Deutsch/
Italiano/简体中文/русский/ 日本語
/Polski
Dostępne
rozdzielczości
Przód + tył
2160P+1080P(HDR) 30FPS;
1440P+1080P(HDR) 30FPS;
1080P+1080P(HDR) 30FPS;
720P+720P(HDR)30FPS;
2160P+1080P 30FPS;
1440P+1080P 30FPS;
1080P+1080P 30FPS
720P+720P 30FPS
Tylko przód:
3840x2160P 30FPS
2560x1440P 30FPS
1920x1080P 30FPS
1280x720P 30FPS
Format video MP4
Format zdjęć JPEG

- 107 -
PL
IP67
Wbudowany kondensator
Wodoodporność
Zasilanie
12V, 2A
Obsługiwane
Tak
-4°F do 140°F(-20°C to 60°C)
-13°F do 158°F(-25°C to 70°C)
Napięcie
Wi-Fi
GPS
Temp. pracy
Temp.
pamięci
Zewnętrzna: 32GB-512GB Micro
SD Card, U3, Class 10(brak w
zestawie)
Memory
Storage
Obsługiwana
pamięć

- 108 -
PL
6. Gwarancja & wsparcie
Gwarancja
Kamera VANTRUE
®
F1 jest objęta pełną
12-miesięczną gwarancją. Zarejestruj swój produkt
na naszej oficjalnej stronie (www.vantrue.net/
register) aby być na bieżąco z aktualizacjami.
Wsparcie
Jeśli masz jakiekolwiek pytania dotyczące
produktu, nie wahaj się skontaktować z nami pod
adresem [email protected]
Zapytania są zazwyczaj udzielane w ciągu 12-24
godzin.
Twoja opinia ma znaczenie
Firma VANTRUE
®
jest mocno zaangażowana w
ciągłe ulepszanie naszych produktów, usług i
doświadczeń użytkowników. Jeśli masz jakieś
przemyślenia na temat tego, jak możemy zrobić
jeszcze lepiej, czekamy na Twoje konstruktywne
opinie i sugestie. Skontaktuj się z nami już dziś pod
adresem [email protected]
- 109 -
www.vantrue.pl
Skontaktuj się z nami:
facebook.com/vantruePolska
PL