
40V SV20 SERIES 40CM CORDLESS LAWN
MOWER BODY ONLY
MODEL NO: CP40VLM
Thank you for purchasing a Sealey product. Manufactured to a high standard, this product will, if used according to these instructions,
and properly maintained, give you years of trouble free performance.
IMPORTANT: PLEASE READ THESE INSTRUCTIONS CAREFULLY. NOTE THE SAFE OPERATIONAL REQUIREMENTS, WARNINGS & CAUTIONS. USE
THE PRODUCT CORRECTLY AND WITH CARE FOR THE PURPOSE FOR WHICH IT IS INTENDED. FAILURE TO DO SO MAY CAUSE DAMAGE AND/OR
PERSONAL INJURY AND WILL INVALIDATE THE WARRANTY. KEEP THESE INSTRUCTIONS SAFE FOR FUTURE USE.
1. SAFETY
1.1. SAFETY INSTRUCTIONS FOR LAWN MOWERS
1.2. TRAINING
9 Read the instructions carefully. Be familiar with the controls and the correct use of the machine.
8 Never allow children or people unfamiliar with these instructions to use the machine. Local regulations can restrict the age of the
operator. Retain this manual for future use.
8 Never operate the machine while people, especially children, or pets are nearby.
9 Keep in mind that the operator or user is responsible for accidents or hazards occurring to other people or their property.
1.3. PREPARATION
9 While operating the machine always wear substantial footwear and long trousers. DO NOT operate the machine when barefoot or
wearingopensandals.Avoidwearingclothingthatisloosettingorthathashangingcordsorties.
9 Thoroughly inspect the area where the machine is to be used and remove all objects which can be thrown by the machine.
9 Before using, always visually inspect to see that the blade bolt and the blade assembly are not worn or damaged. Replace worn
or damaged components in sets to preserve balance.
9 Replace damaged or unreadable labels.
1.4. OPERATION
9 Operatethemachineonlyindaylightoringoodarticiallight.Avoidoperatingthemachineinwetgrass.
9 Always be sure of your footing on slopes.
9 Walk, never run.
9 Mow across the face of slopes, never up and down.
9 Exercise extreme caution when changing direction on slopes.
8 DO NOT mow excessively steep slopes.
9 Use extreme caution when reversing or pulling the machine towards you. Stop the blade(s) if the machine has to be tilted for
transportation when crossing surfaces other than grass, and when transporting the machine to and from the area to be used.
8 Neveroperatethemachinewithdefectiveguardsorshields,orwithoutsafetydevices,forexampledeectorsand/orgrasscollector,in
place.
9 Switch on the motor carefully according to instructions and with feet well away from the blade(s).
8 DO NOT tilt the machine when switching on the motor, except if the machine has to be tilted for starting. In this case, do not tilt it more
than absolutely necessary and lift only the part, which is away from the operator.
8 DO NOT start the machine when standing in front of the discharge opening. Do not put hands or feet near or under rotating parts.
Keep clear of the discharge opening at all times.
8 DO NOT transport the machine while the power source is running.
9 Stop the machine and remove the disabling device. Make sure that all moving parts have come to a complete stop:
−Wheneveryouleavethemachine,
−Beforeclearingblockagesoruncloggingchute,
−Beforechecking,cleaning,orworkingonthemachine,
−Afterstrikingaforeignobject.Inspectthemachinefordamageandmakerepairsbeforerestartingandoperatingthemachine.
WARNING! If the machine starts to vibrate abnormally (check immediately)
−Inspectfordamage,
−Replaceorrepairanydamagedparts,
−Checkforandtightenanylooseparts.
1.5. MAINTENANCE AND STORAGE
9 Keep all nuts, bolts and screws tight to be sure the machine is in safe working condition.
9 Checkthegrasscollectorfrequentlyforwearordeterioration.
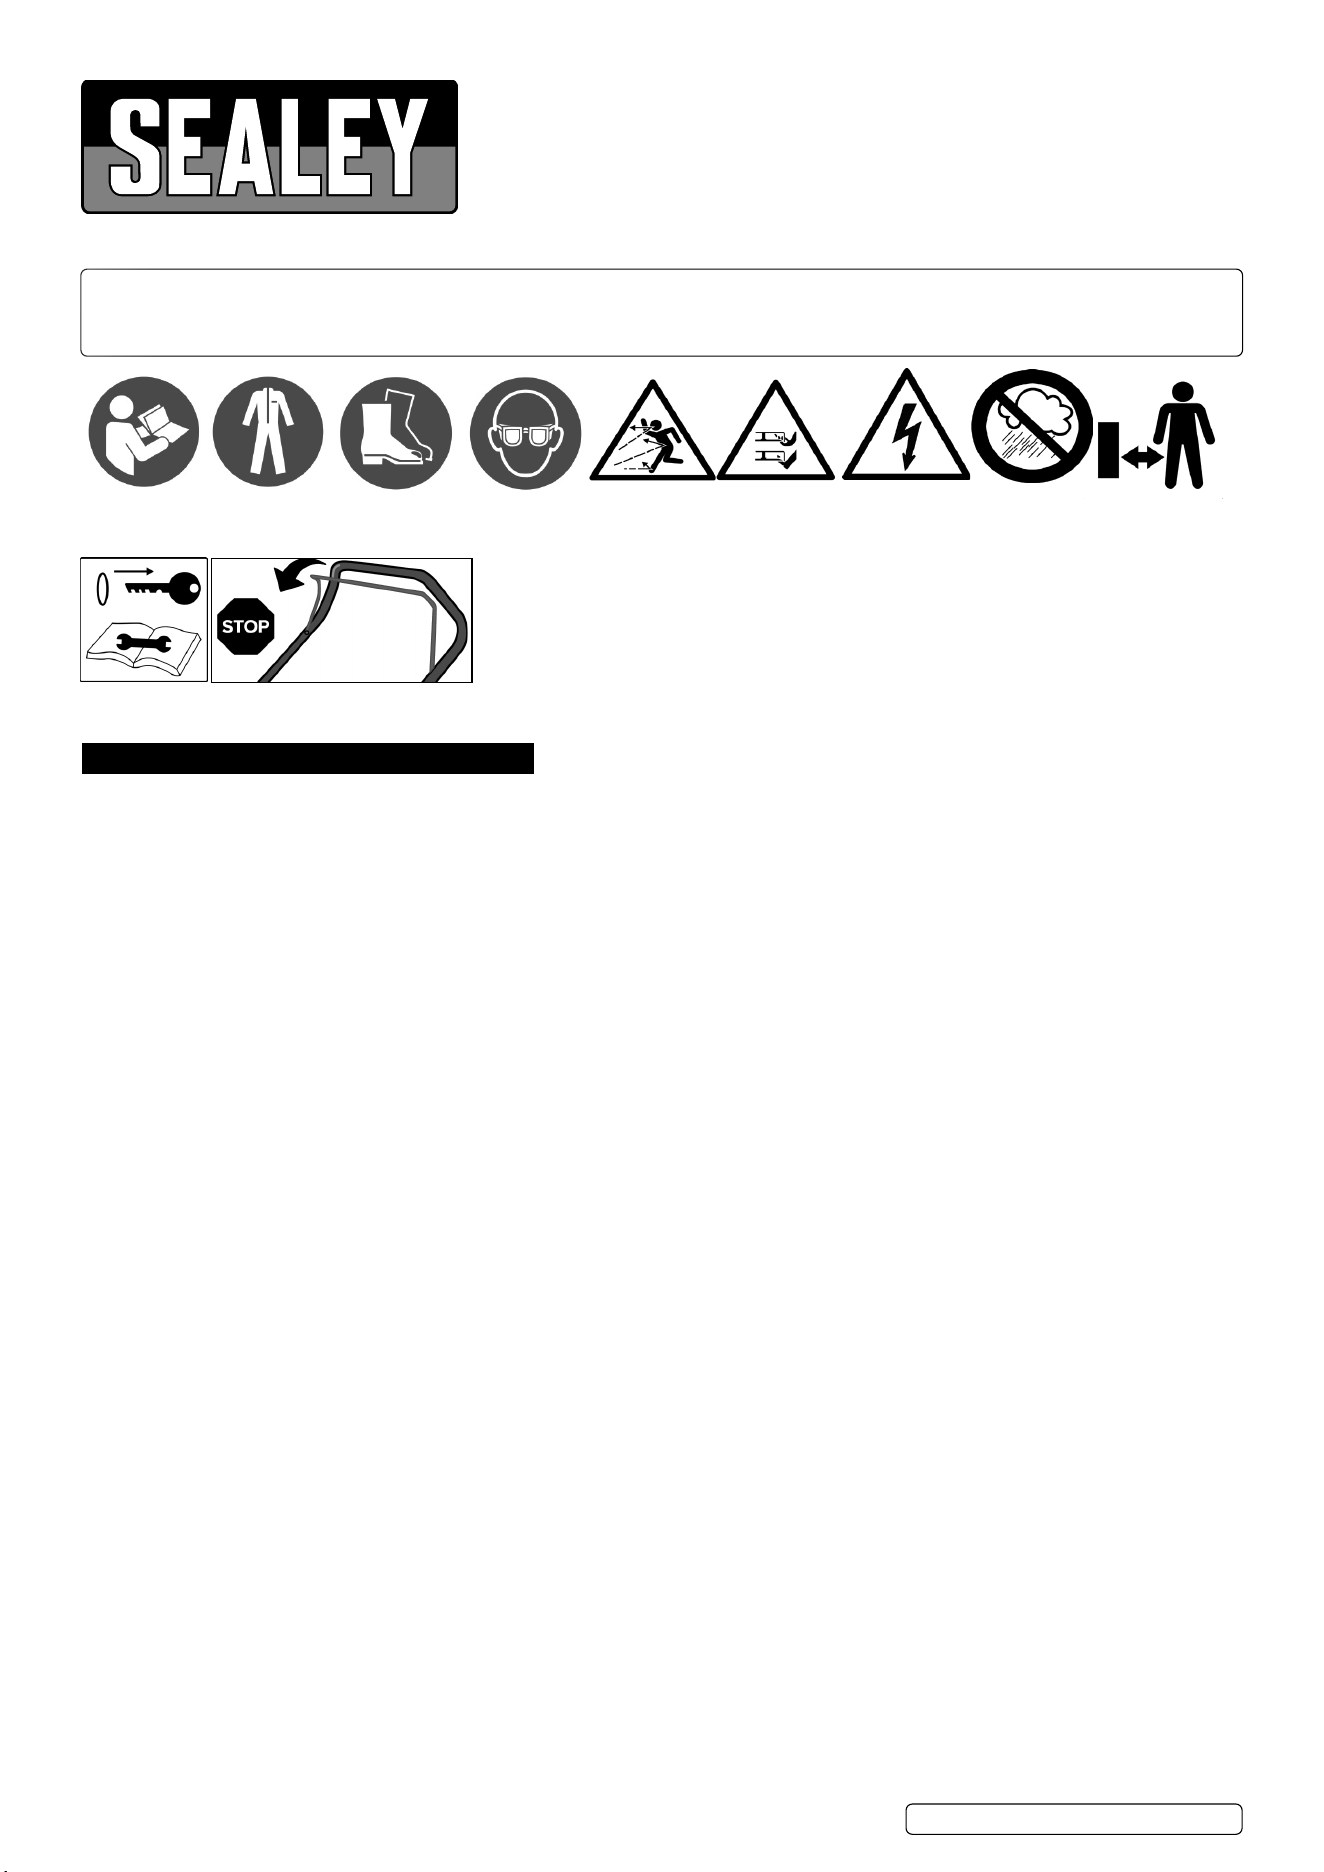
Refer to
instruction
manual
Wear protective
clothing
CP40VLMIssue:209/01/24
Original Language Version
© Jack Sealey Limited
Wear Safety
Footwear
Wear eye
protection
Cautionflying
objects
No reaching
under
Risk of electric
shock
Do not use in
rain
Keep
bystanders
away
Remove lock
key before
inspection
Stop release lever

9 Becarefulduringadjustmentofthemachinetoprevententrapmentofthengersbetweenmovingbladesandxedpartsofthe
machine.
9 Always allow the machine to cool down before storing.
9 Whenservicingthebladesbeawarethat,eventhoughthepowersourceisswitchedo,thebladescanstillbemoved.
9 Replace worn or damaged parts for safety. Use only genuine replacement parts and accessories.
1.6. ADDITIONAL SAFETY
8 DO NOT insert the lock key into mower until it is ready to be used.
9 Always wear protective goggles to protect your eyes from injury when using power tools.
9 Alwayskeeparmholdonthehandle.
8 DO NOT grasp the exposed cutting blades or cutting edges when picking up or holding the mower.
8 DO NOToperatemowerwhileundertheinuenceofdrugs,alcohol,oranymedication.
9 Keephandsandfeetawayfromrotatingblades.Caution-Bladescoastafterthemowerisswitchedo.
9 Releaseswitchleverandwaitforbladerotationtostopbeforecrossingdriveways,walks,roads,andanygravel-coveredareas.Also
remove the lock key if you leave the mower, reach to pick up or remove something out of your way, or for any other reason that may
distract you from what you are doing.
8 DO NOT start the mower when standing in front of the discharge opening.
9 Becarefulduringadjustmentofthemowertoprevententrapmentofthengersbetweenmovingbladesandxedpartsofthemower.
9 Checktheblademountingboltatfrequentintervalsforpropertightness.
9 Keepallnuts,bolts,andscrewstighttobesuretheequipmentisinsafeworkingcondition.
9 Whenservicingthebladesbeawarethat,eventhoughthepowersourceisswitchedo,thebladescanstillbemoved.
8 DO NOT use the machine when there is a risk of lightning.
8 DO NOT use the machine in bad weather where visibility is limited. Failure to do so may cause fall or incorrect operation due to low
visibility.
8 DO NOT replace the battery in the rain.
8 DO NOT submerge the machine into a puddle.
8 DO NOT leave the machine unattended outdoors in the rain.
8 DO NOT insert or remove the lock key in the rain.
9 When wet leaves or dirt adhere to the suction mouth (ventilation window) due to rain, remove them.
8 DO NOT wash the machine with high pressure water.
1.7. POWERED BY RECHARGEABLE BATTERIES
9 The battery must be removed from the appliance before it is scrapped.
9 The battery is to be disposed of safely.
9 Rechargeonlywiththechargerspeciedbythemanufacturer.Achargerthatissuitableforonetypeofbatterypackmaycreatearisk
ofrewhenusedwithanotherbatterypack.
9 Usepowertoolsonlywithspecicallydesignatedbatterypacks.Useofanyotherbatterypacksmaycreateariskofinjuryandre.
9 When battery pack is not in use, keep it away from other metal objects, like paper clips, coins, keys, nails, screws, or other small metal
objects,thatcanmakeaconnectionfromoneterminaltoanother.Shortingthebatteryterminalstogethermaycauseburnsorare.
WARNING! Underabusiveconditions,liquidmaybeejectedfromthebattery;avoidcontact.Ifcontactaccidentallyoccurs,ushwith
water.Ifliquidcontactseyes,additionallyseekmedicalhelp.
WARNING! Liquidejectedfromthebatterymaycauseirritationorburns.
2. INTRODUCTION
PartoftheSV20Seriesdesignedfortheprofessional,oeringheavy-duty,highperformance,durabletoolswithlightweightcomposite
designs for superior control and comfort. Operates using 2 x 20V batteries from the Sealey SV20 Series (batteries must be of the
sameAhrating).2-in-1Function40Lrearcollectionbagandmulchingattachment.Sixselectablecuttingheightsrangingfrom
25-75mm.Widecuttingwidthof40cmallowsforecientcuttingtimes.Foldinghandlesforeasystorage.Weighingonly16.5kgmakes
pushing this lawn mower around the garden easy.
3. SPECIFICATION
Model: ............................................................CP40VLM
Battery: ..........20V2Ah-6AhLithium-ion(notincluded)
CuttingWidth: ....................................................400mm
GrassCollectionVolume: .........................................40L
Height Adjustment: ................. 25,35,45,55,65,75mm
Noise Power: ............................................. 85 dB(A) LwA
Noise Pressure: ..........................................76dB(A)LPA
No-LoadSpeed: ............................................... 2800rpm
Propulsion Type: ....................................Hand Propelled
Uncertainty: ......................................................... 1.5m/s²
Vibration value:................................................1.213m/s²
CP40VLMIssue:209/01/24
Original Language Version
© Jack Sealey Limited
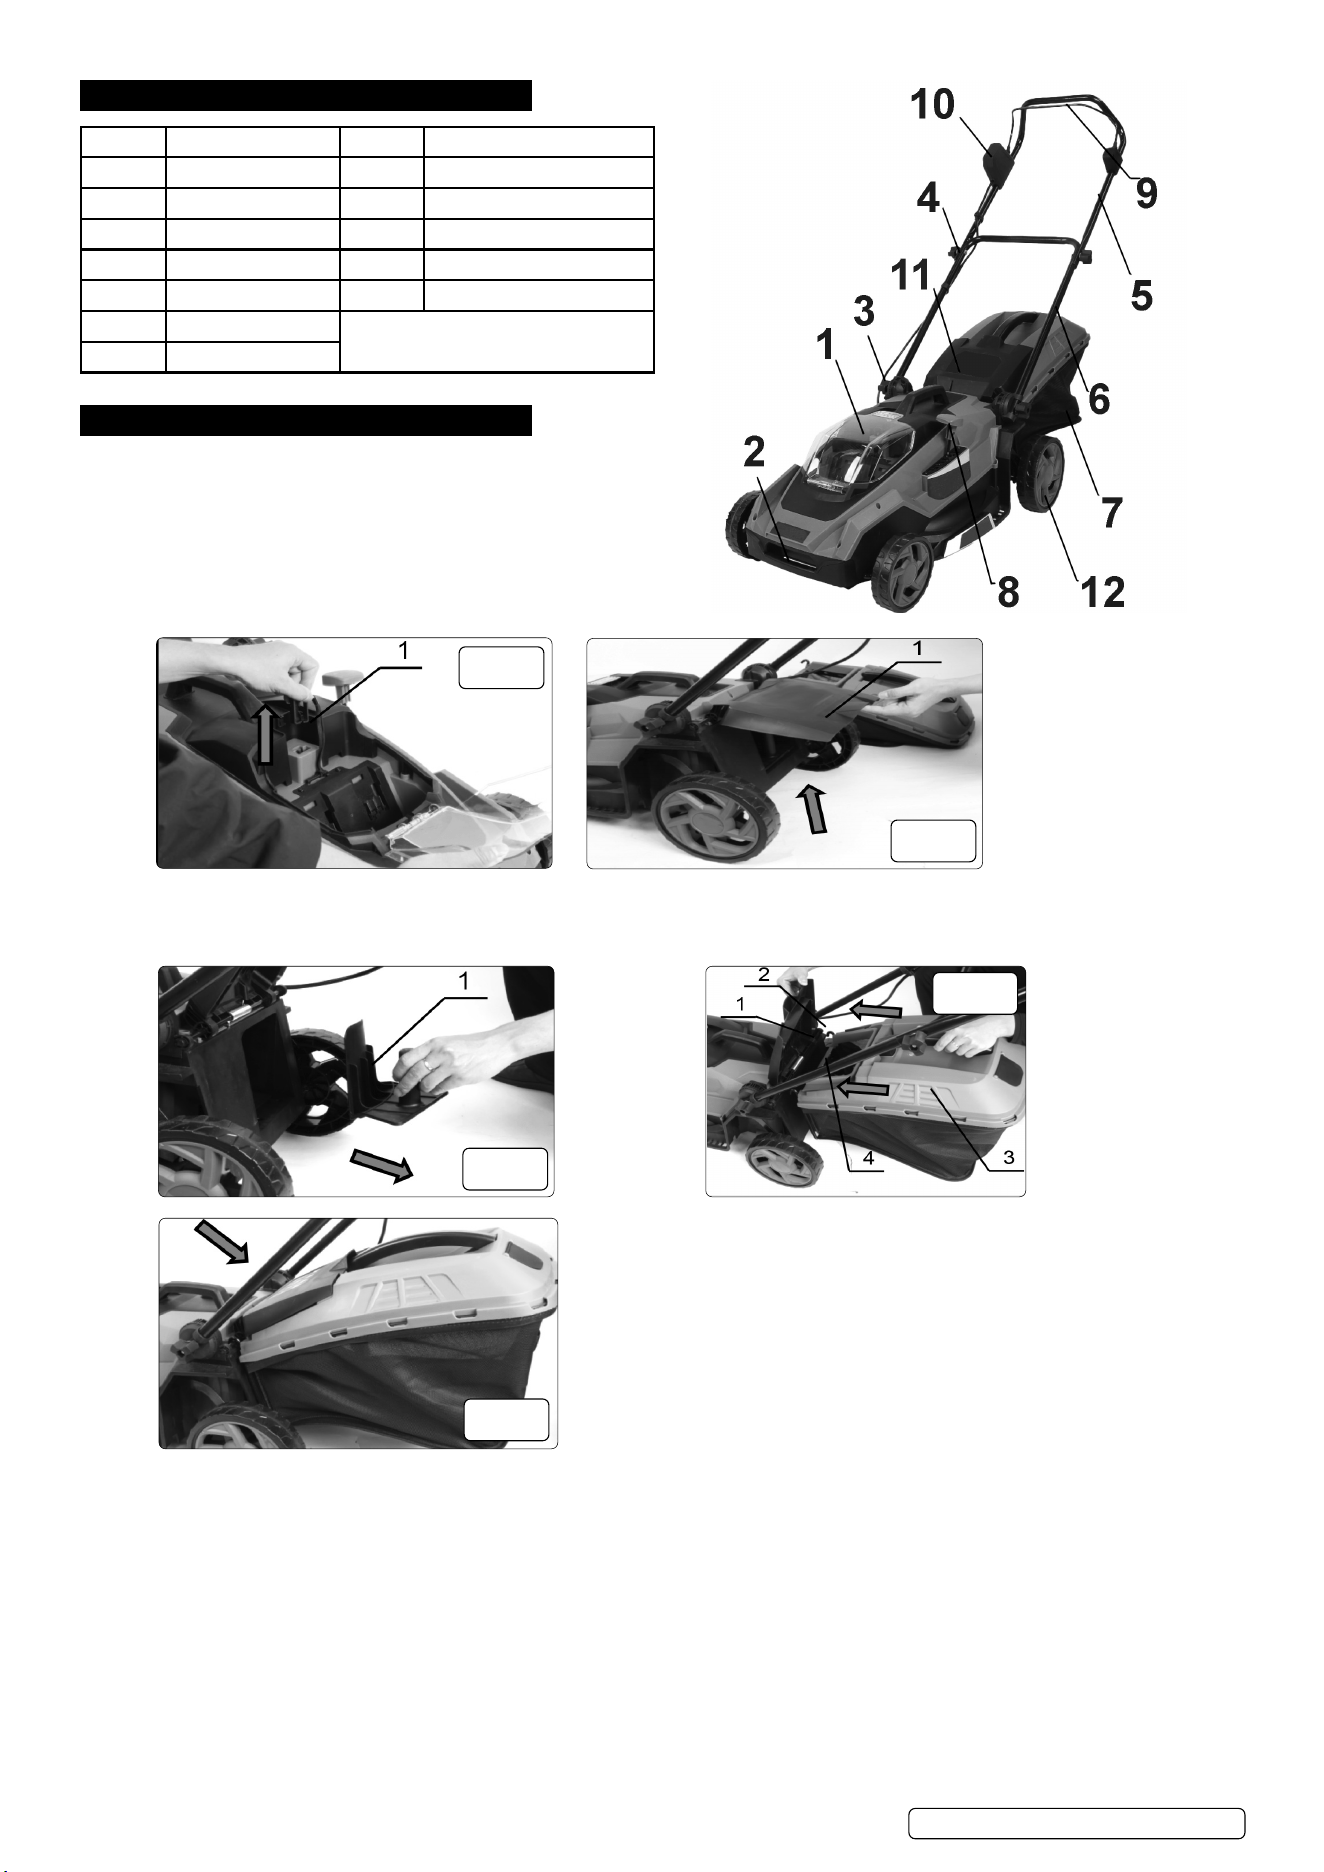
4. FEATURES
Number Description Number Description
1 Battery cover 8 Grass height adjustment
2 Front handle 9 Switch lever
3 Height adjustment 10 Switch button retainer
4 Handle adjustment 11 Rear cover
5 Upper handle 12 Wheel
6 Lower handle
7 Grass basket
5. ASSEMBLY
WARNING! Always be sure that the lock key and battery cartridge
are removed before carrying out any work on the mower. Failure to
remove the lock key and the battery cartridge may result in serious
personalinjuryfromaccidentalstart-up.(g.1)
WARNING! Never start the mower unless it is completely
assembled. Operation of the tools in a partially assembled state
mayresultinseriouspersonalinjuryfromaccidentalstart-up.
5.1. REMOVING MULCHING ATTACHMENT
Openrearcover(g.2)
5.1.1. Pullwithalittleforcetoremovethemulchingattachment(g.3).Hookthegrassbasketontherodofthemowerbodyasshowninthe
gure(g.4).
NOTE: Make sure that the guard on the grass basket is facing downward.Otherwise, the grass basket may not catch all of cut grass.
1.Rod2.Hook3.Grassbasket4.Guard
5.1.2. Loosen handle to release the rear cover.
5.2. REMOVING THE GRASS BASKET AND INSTALLING THE MULCHING ATTACHMENT
Toremovethegrassbasketandinstallthemulchingattachment,followtheInstall/removalprocedureinreverse.
5.3. INSTALLING OR REMOVING BATTERY CARTRIDGE
WARNING! Always switch off the tool before installing or removing of the battery cartridge.
WARNING! Make sure that you lock the battery cover before use. Otherwise, mud, dirt, or water may cause damage to the product or the
battery cartridge.
WARNING! DO NOT install the battery cartridge forcibly. If the cartridge does not slide in easily, it is not being inserted correctly.
▲ DANGER Hold the tool and the battery cartridge firmly when installing or removing battery cartridge. Failure to hold the tool and the
battery cartridge firmly may cause them to slip off your hands and result in damage to the tool and battery cartridge and a personal injury.
▲ DANGER Always install the battery cartridge fully. If not, it may accidentally fall out of the tool, causing injury to you or someone around
you.
NOTE: The tool does not work with only one battery cartridge (fig.6).
5.4. TO INSTALL THE BATTERY CARTRIDGES (fig.6).
fig.
1
fig.
2
fig.
3
fig.
5
fig.
4
© Jack Sealey Limited
Original Language Version
CP40VLMIssue:209/01/24
(Batteries NOT included).
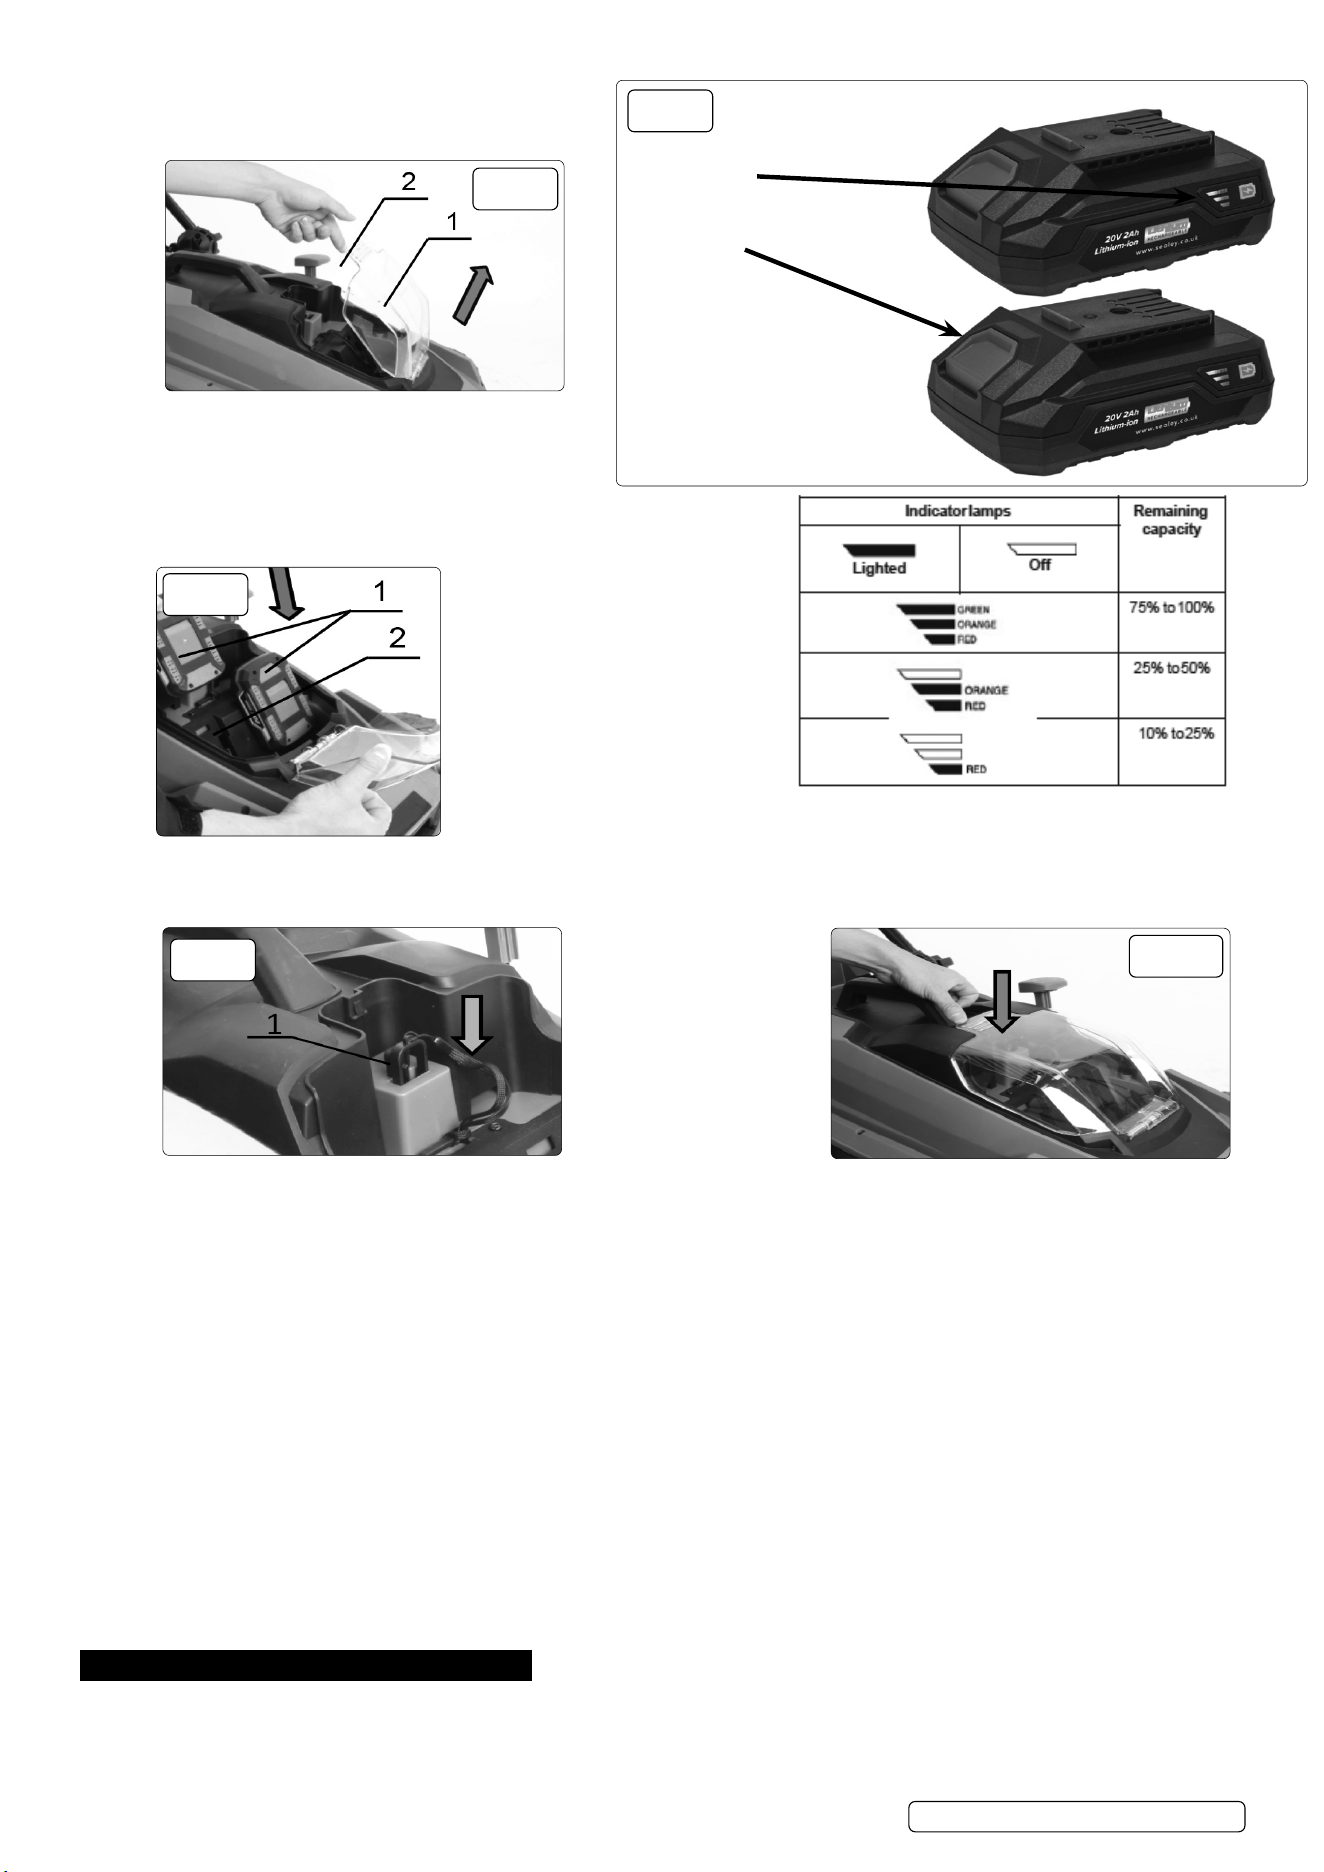
5.4.1. Pull up the locking buckle a little bit, and then open
the battery cover.
1.Batterycover2.Lockingbuckle
NOTE: Depending on the conditions of use and the
ambient temperature, the indication may differ slightly
from the actual capacity.
5.4.2. Seefig.7forchargeindications.
5.4.3. Align the tongue on the battery cartridge with the slot on the mower then
slide the cartridge until it locks in place with a little click (fig.8).
1.Batterycartridge2.Slot(fig.8).
5.4.4. Insert the lock key in the place shown in fig.9 as far as it will go.
5.4.5. Closethebatterycoverandpushituntilitislatchedwiththelockingbuckle.
Closethebatterycoverandpushituntilitislatchedwiththelockingbuckle(fig.9).
5.5. TO REMOVE THE BATTERY CARTRIDGE FROM THE LAWN MOWER
5.5.1. Pullupthebatterycoverlockingbuckleandopenthebatterycover(g.10).
5.5.2. . Pull out the battery cartridge from the mower while sliding the button on the front of the cartridge.
5.5.3. Pull out the lock key.
5.5.4. Closethebatterycover.
5.6. TOOL / BATTERY PROTECTION SYSTEM
5.6.1. Thetoolisequippedwithatool/batteryprotectionsystem.Thissystemautomaticallycutsopowertothemotortoextend
tool and battery life. The tool will automatically stop during operation if the tool or battery is placed under one of the
following conditions:
5.7. OVERLOAD PROTECTION
5.7.1. When the battery is operated in a manner that causes it to draw an abnormally high current, the tool automatically stops and
themainpowerlampblinksingreen.Inthissituation,turnthetooloandstoptheapplicationthatcausedthetooltobecome
overloaded. Then turn the tool on to restart.
5.8. OVERHEAT PROTECTION
5.8.1. When the tool or battery is overheated, the tool stops automatically. In this case, let the tool and battery cool before turning the tool
on again.
5.8.2. DISCHARGE PROTECTION
5.8.3. Whenthebatterycapacityisinsucient,thetoolstopsautomatically.Inthiscase,removethebatteryfromthetoolandchargethe
battery cartridges or change the battery cartridges to fully charged ones.
6. OPERATION
6.1. SWITCH OPERATION
6.1.1. Thismowerisequippedwiththeinterlockswitchandhandleswitch.Ifyounoticeanythingunusualwitheitheroftheseswitches,stop
operationimmediatelyandhavethemcheckedbyyournearestServiceCenter.
© Jack Sealey Limited
Original Language Version
CP40VLMIssue:209/01/24
fig.
9
fig.
10
fig.
6
fig.
7
Press the check button on the battery cartridge to
indicate the remaining battery capacity. The indicator
lampslightoimmediatelywhenreleasethecheck
button.
fig.
8
Battery level
indication lights
Lock and release
mechanism
WARNING! Before installing the battery cartridge, always check to see that the switch lever actuates properly and returns to the
original position when released. Operating a tool with a switch that does not actuate properly can lead to loss of control and serious
personal injury.
NOTE: The mower does not start without pressing the switch button even when the switch lever is pulled on.
NOTE: Mower may not start due to the overload when you try to mow long or dense grass. Increase the mowing height in this case.
6.1.2. Install the battery cartridges. Insert the lock key into the interlock switch and then close the battery cover.
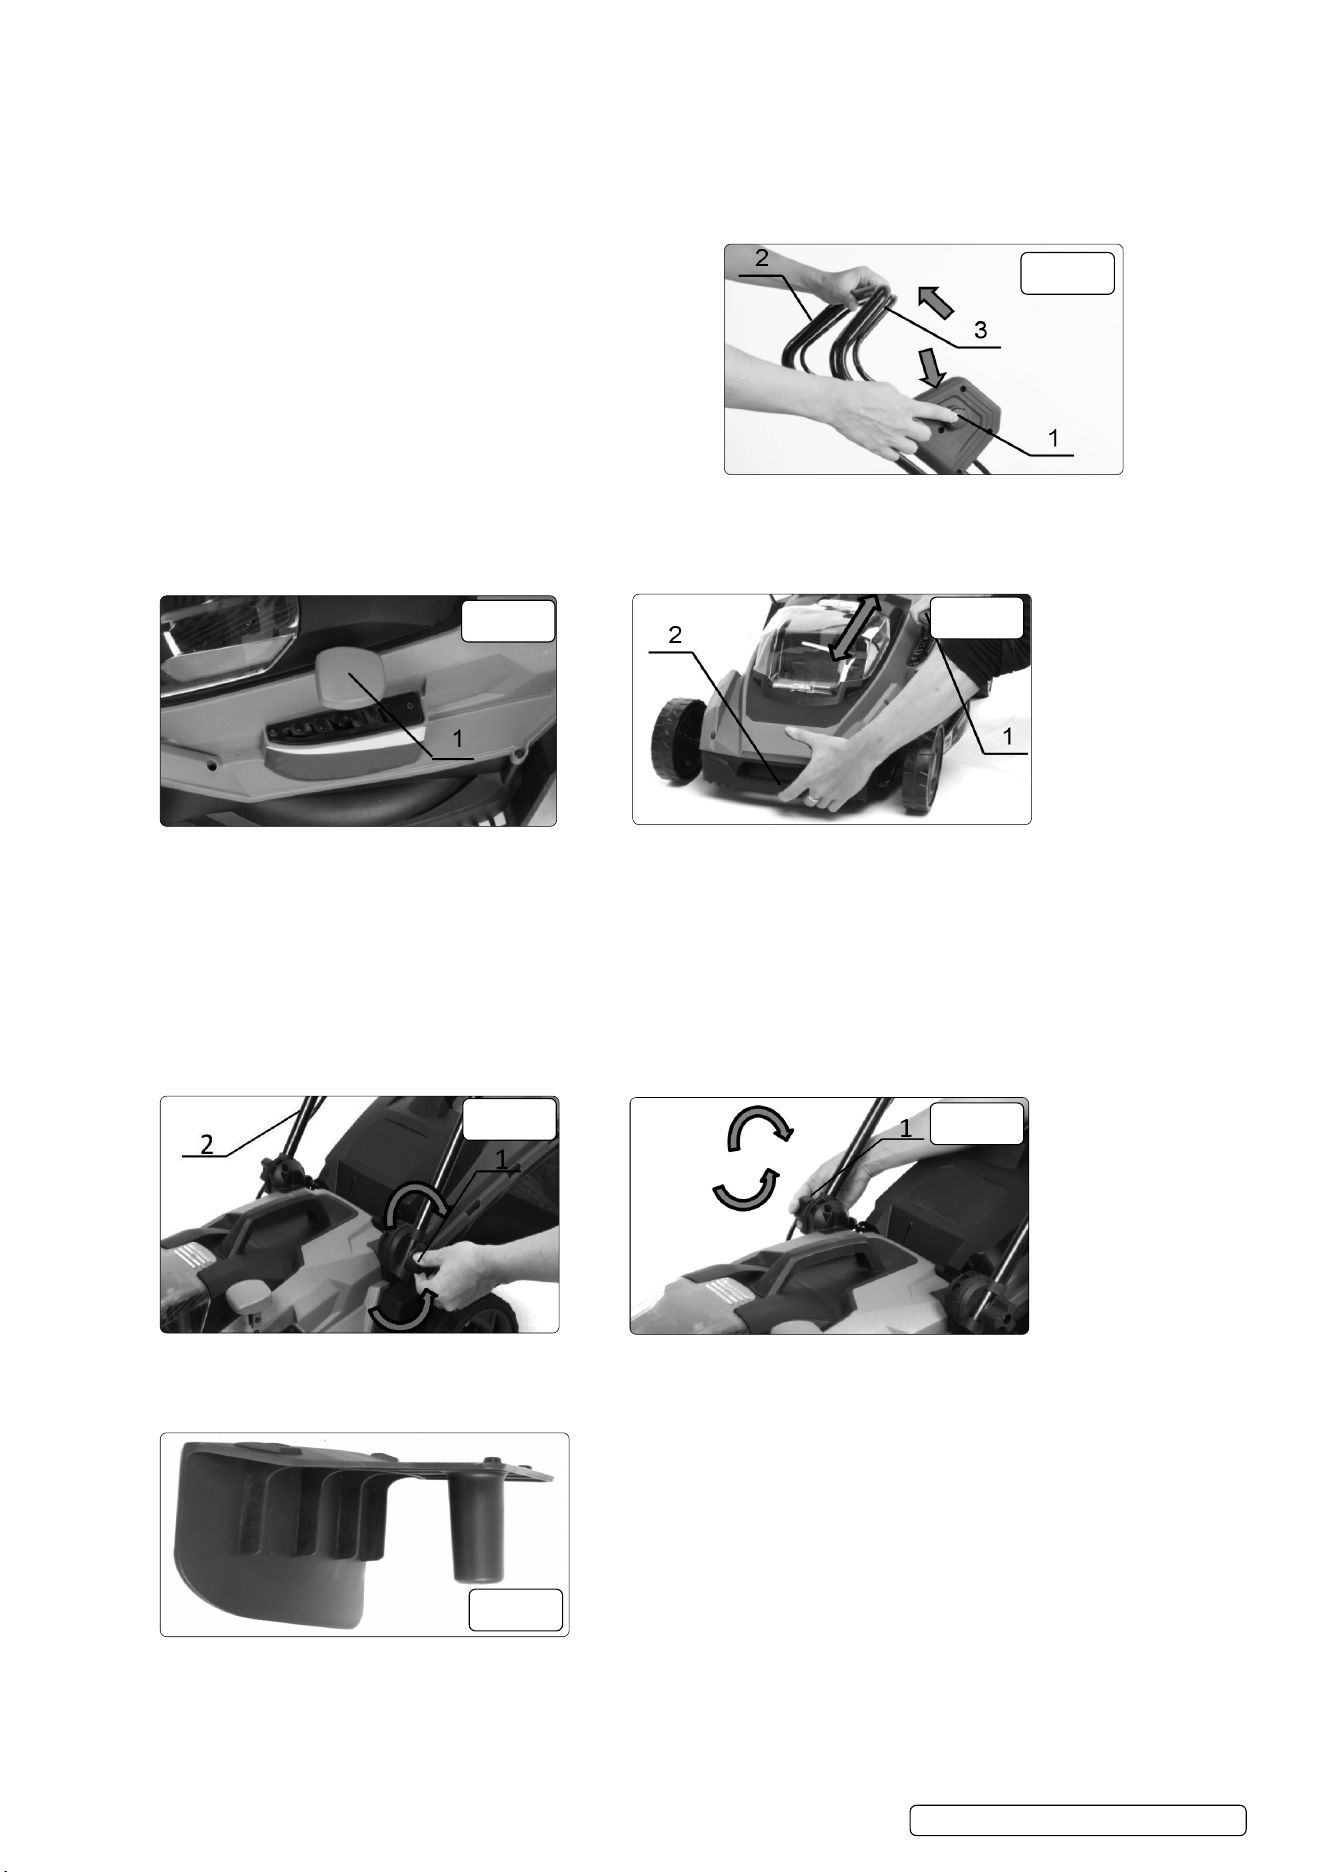
6.1.3. Pressdowntheswitchbuttonandholdit.Grabtheupperhandleandpulltheswitchleveron(refertog.11).
6.1.4. 1.Switchbutton
2. Upper handle
3. Switch lever
4. Release switch button
(which should be released as soon as the motor starts running.
The mower will continue to run until you release the switch lever).
5. Switch lever
(Releasetheswitchlevertostopthemotorg.11).
6.2. ADJUSTING THE MOWING HEIGHT
WARNING! Never put your hand or leg under the mower body when adjusting the mowing height.
WARNING!Alwaysmakesurethatthelevertsinthegrooveproperlybeforeoperation.
6.2.1. Themowingheightcanbeadjustedintherangeofbetween25mmand75mmintotal6position.Removethelockkey,andthenpull
themowingheightadjustingleveroutwardofthemowerbodyandmoveittoyourdesiredmowingheight(g.12).
6.3. MOWING HEIGHT ADJUSTING LEVER
6.3.1. Holdthefronthandlewithonehand,andthenmovethemowingheightadjustingleverwiththeotherhand(g13).
NOTE: Themowingheightguresshouldbeusedjustasaguideline.Dependingontheconditionsofthelawnortheground,the
actuallawnheightmaybecomeslightlydierentfromthesetheight.
NOTE: Try a test mowing of grass in a less conspicuous place to get your desired height.
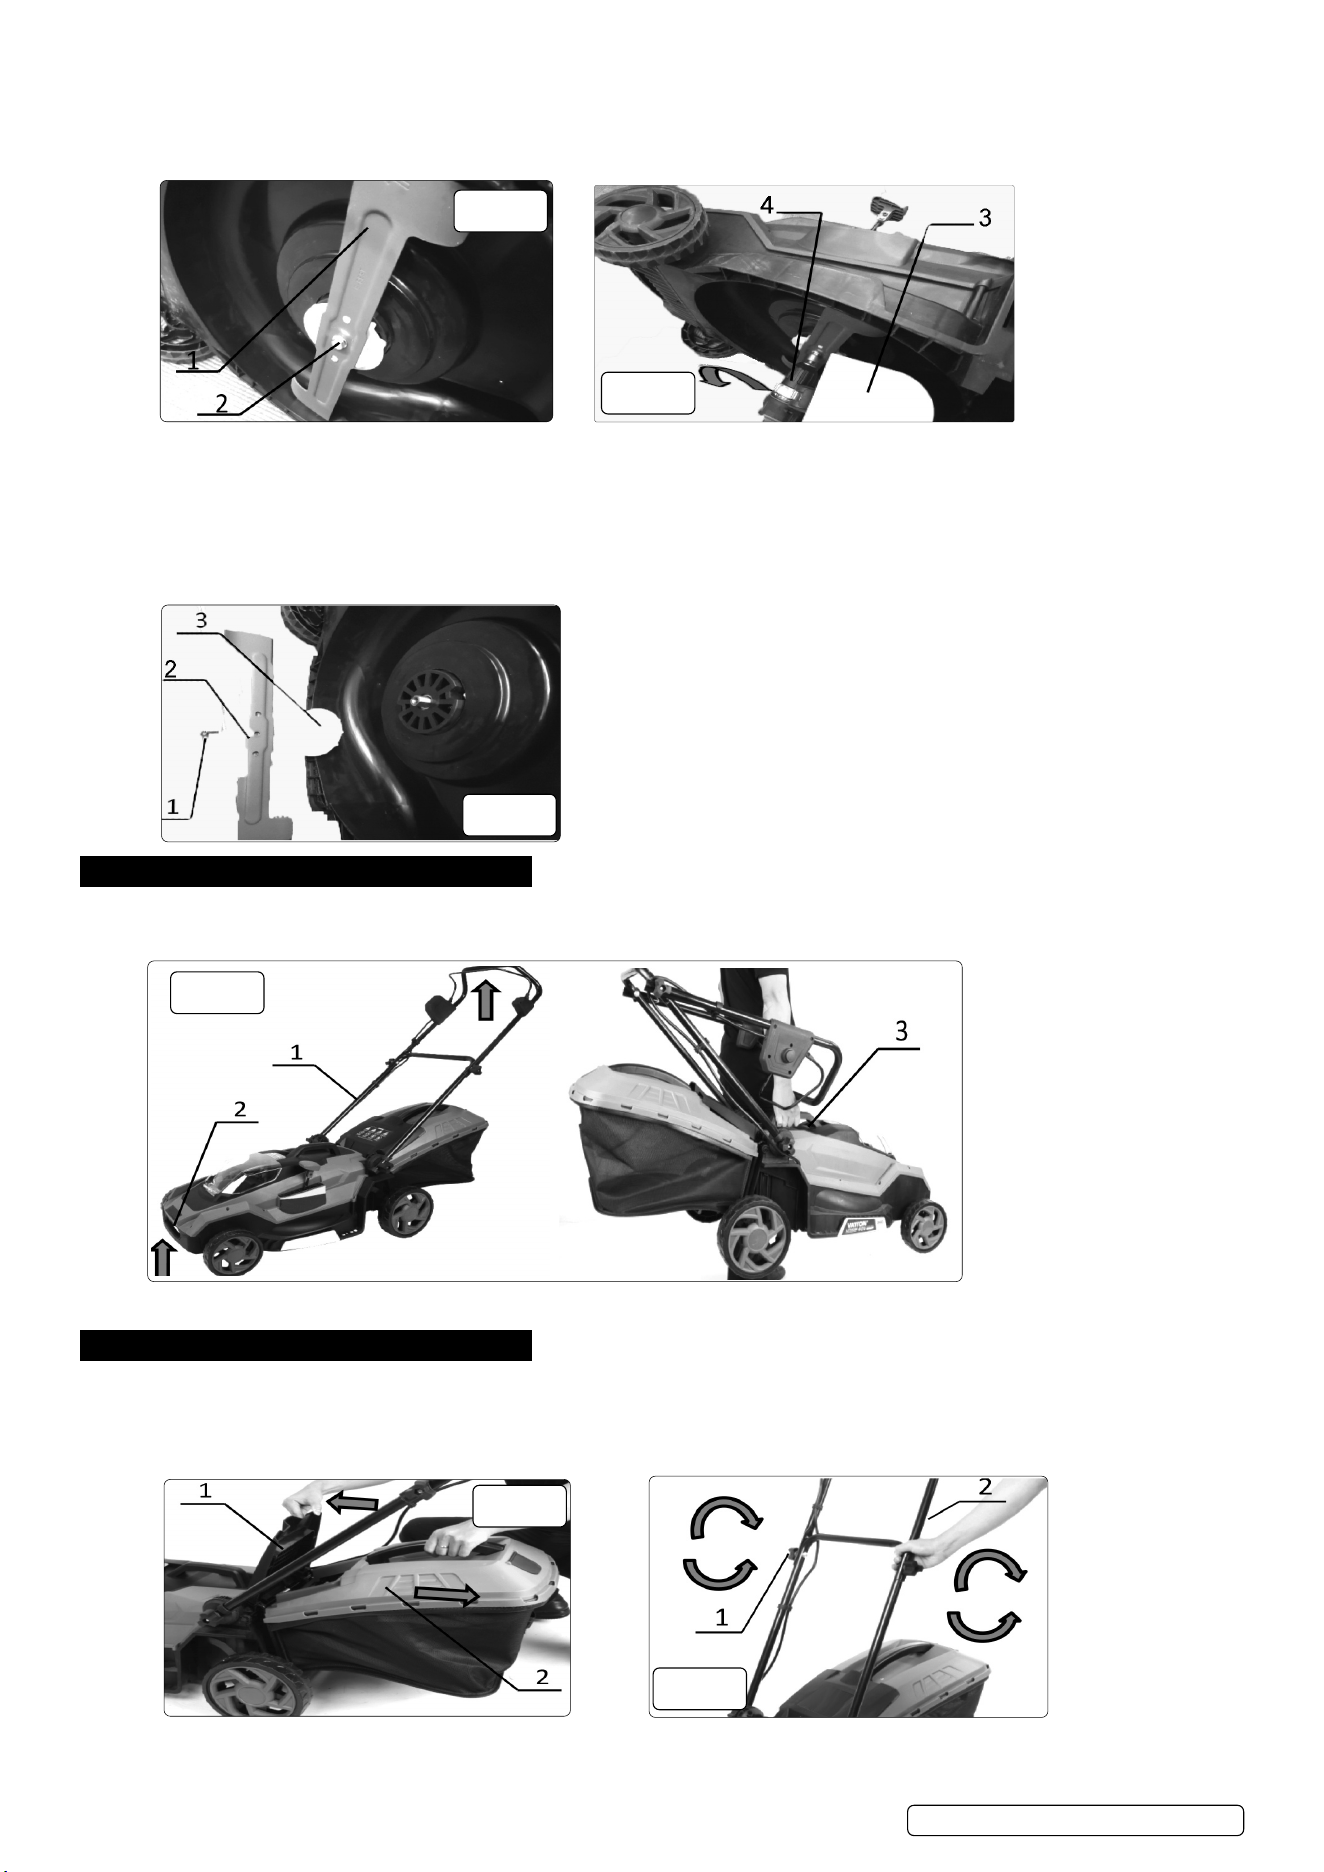
6.4. ADJUSTING THE HANDLE HEIGHT
WARNING!Beforeturningthebutton,holdthelowerhandlermly.Otherwise,thehandlemayfallandcauseaninjury.
6.4.1. 1.Holdthelowerhandlermlyandturnthehandleheightadjustbuttononbothsidesanticlockwisetoloosen.
6.4.2. 2. Rotate the lower handle up or down to your desire position, then turn the handle height adjust button on both sides clockwise to
tighten(g.14&g.15).
1.Handleheightadjustbutton2.Lowerhandle
6.5. USING MULCHING ATTACHMENT
The mulching attachment allows you to return the cut grass to the ground without gathering the cut grass in the grass basket. When
youoperatethemachinewiththemulchingattachment,besuretoremovethegrassbasket(g.16).
1.Mowingheight
adjusting lever 2. Front
handle
fig.
12
fig.
13
© Jack Sealey Limited
Original Language Version
CP40VLMIssue:209/01/24
fig.
14
fig.
15
fig.
16
fig.
11
7. MOWING
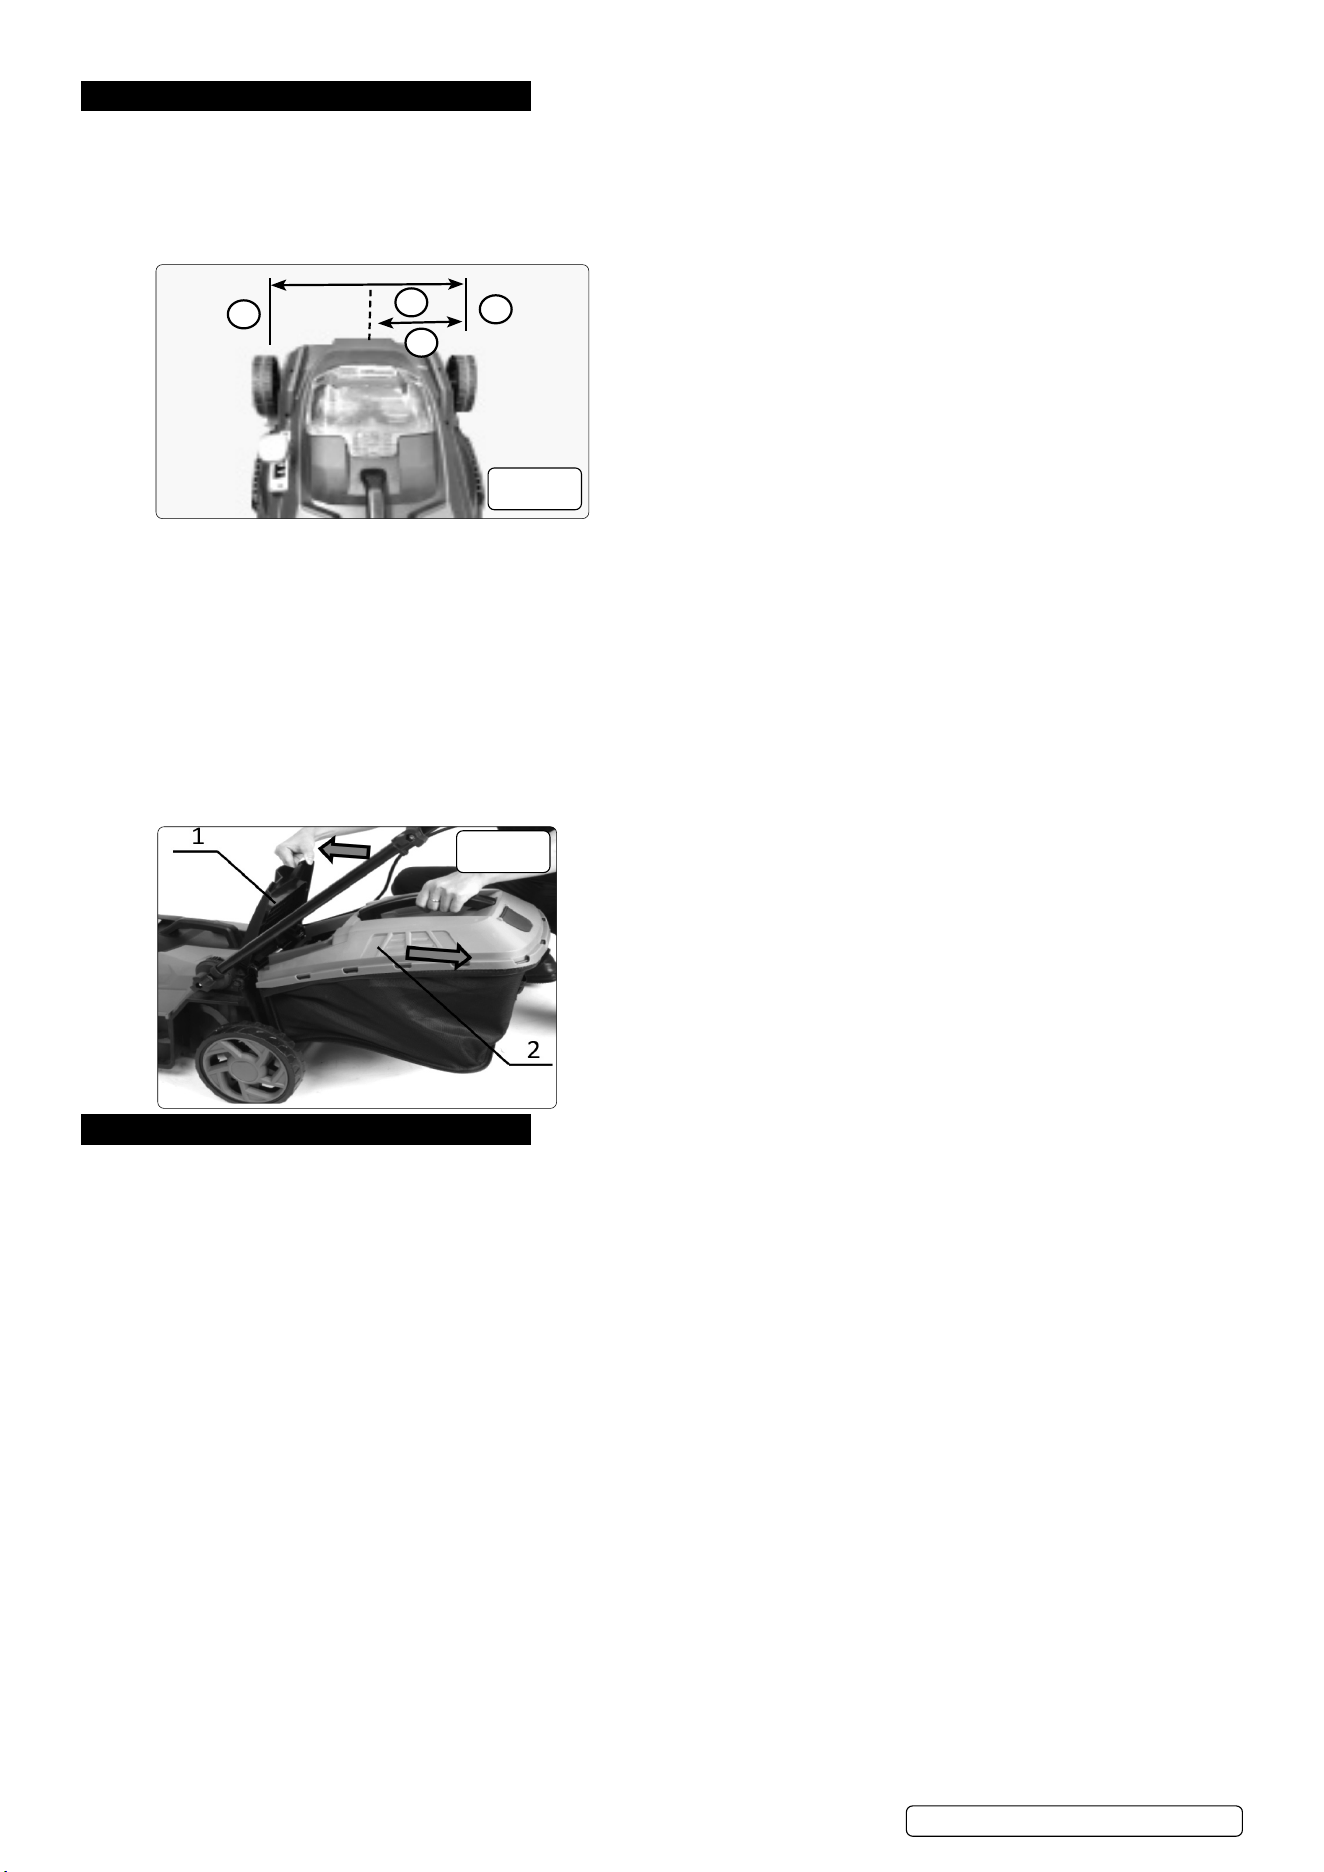
7.1. The centre lines of the front wheels are guidelines to mowing width. Using the centre lines as guidelines, mow in strips. Overlap by
onehalftoonethirdthepreviousstriptomowthelawnevenly(g.17).
7.2. Changethemowingdirectioneachtimetopreventthegrassgrainpatternfromforminginjustonedirection.
7.3. Periodically check the grass basket for mowed grass. Empty the grass before it becomes full. Before every periodical check, be sure
to stop the mower then remove the lock key and the battery cartridge.
NOTE: Use this machine for mowing the lawn only. DO NOT mow weeds with this machine.
1.Mowingwidth2.Overlappingarea3.Centreline.
WARNING! Using the mower with the grass basket full prevents smooth
blade rotation and places an extra load on the motor, which may cause
breakdown.
7.4. MOWING A LONG-GRASS LAWN
7.4.1. Do not try to cut long grass all at once. Instead, mow the lawn in steps. Leave a day or two between mowing until the lawn becomes
evenly short.
NOTE: Mowing long grass to a short length all at once may cause the grass to die. The cut grass may also block up inside of the
mower body.
7.5. EMPTYINGTHEGRASSBASKET(g.18)
WARNING! To reduce a risk of accident, regularly check the grass basket for any damage or weaknesses. Replace the grass
basket if necessary.
7.5.1. 1.Releasetheswitchlever.
7.5.2. 2.Remove the lock key.
7.5.3. 3.Open the rear cover and take out the grass basket by holding the handle.
7.5.4. 4.Empty the grass basket.
1.Rearcover2.Grassbasket
8. MAINTENANCE.
WARNING! Always be sure that the lock key and battery cartridge are removed from the mower before storing or carrying the mower
or attempting to perform inspection or maintenance.
WARNING! Always remove the lock key when the mower is not in use. Store the lock key in a safe place out of reach of children.
WARNING! Wear gloves when performing inspection or maintenance.
WARNING! Always wear the safety goggles or safety glasses with side shields when performing inspection or maintenance.
8.1. CLEANING
Keepallnuts,boltsandscrewstighttobesurethemachineisinsafeworkingconditionaftereveryuse.Checkthegrasscollector
frequentlyforwearordeterioration.Becarefulduringadjustmentofthemachinetoprevententrapmentofthengersbetweenmoving
bladesandxedpartsofthemachine.Alwaysallowthemachinetocooldownbeforestoring.Whenservicingthebladesbeaware
that,eventhoughthepowersourceisswitchedo,thebladescanstillbemoved.Replacewornordamagedpartsforsafety.Useonly
genuine replacement parts and accessories.
NOTE: Never use petrol, benzine, thinners, alcohol or similar. Discolouration, deformation or cracks may result.
To maintain this product SAFETY and RELIABILITY, repairs, any other maintenance or adjustment should be performed by a Sealey
authorisedServiceCenter,alwaysusingSealeyreplacementparts.
NOTE: Do not wash the machine with high pressure water.
1.Removethelockkeyandbatterycartridges,andthenclosethebatterycover.
2.Put the mower on its side and clean grass clippings accumulated on the underside of mower deck.
3.Pour water toward the bottom of the machine to which the blade is attached.
4.Checkallnuts,bolts,knobs,screws,fastenersetc.fortightness.
5.Inspect moving parts for damage, breakage, and wear. Damaged or missing parts should be repaired or replaced.
6.Storethemowerinasafeplaceoutofthereachofchildren.
8.2. REMOVE / INSTALL BLADE
WARNING! Always remove the lock key and battery cartridge when removing or installing the blade. Failure to remove the lock key
and battery cartridge may cause a serious injury.
WARNING! The blade coasts for a few seconds after releasing the switch. Do not start any operation until the blade comes to a
complete stop.
WARNING! Always wear gloves when handling the blade.
© Jack Sealey Limited
Original Language Version
CP40VLMIssue:209/01/24
1
2
3
3
fig.
17
fig.
18
8.3. REMOVING THE MOWER BLADE
8.3.1.1. Putthemoweronitssidesothatthemowingheightadjustinglevercomestotheupperside.(g.19)
8.3.2. 2. To lock the blade, insert a piece of timber or similar into the mower.
8.3.3. 3. Turntheboltcounteranticlockwisewiththewrench.(g.20)1.Mowerblade2.HexBolt3.Lumber4.Wrench.
8.4. INSTALLING THE MOWER BLADE
8.4.1. To install the mower blade, take the removal procedure in reverse.
WARNING! Installthebladecarefully.Ithasatop/bottomfacing.Placethebladesothattherotationaldirectionarrowfacesoutward.
WARNING! Tightentheboltclockwisermlytosecuretheblade.
WARNING!Makesurethatthebladeandallthexingpartsareinstalledcorrectlyandtightenedsecurely.
WARNING! When you replace the blade, always follow the instructions provided in this manual.
9. CARRYING THE MOWER
Method1:holdthefrontgrip(2)andlowerhandle(1)withtwopeopleasshowninthe(g.22).
Method2:Folduptheupperandlowerhandleandholdthehandleandliftupthemowerasshownintheg.22.
1.Lowerhandle2.Fronthandle3.Handle.
10. STORAGE
8 DO NOT store with batteries in place.
10.1. Store mower indoors in a cool, dry and locked place. Don’t store the mower and charger in locations where the temperature may
reachorexceed40°C(104°F).
10.2. 1.Opentherearcoverandtakeoutthegrassbasketbyholdingthehandle(g.23).
1.Rearcover2.Grassbasket. 1.Twistswitch2.Upperhandle
10.2.1. Loosenthetwistswitchonbothsidesandfoldtheupperhandle.(g.24)
fig.
19
fig.
20
fig.
21
fig.
23
fig.
24
© Jack Sealey Limited
Original Language Version
CP40VLMIssue:209/01/24
fig.
22
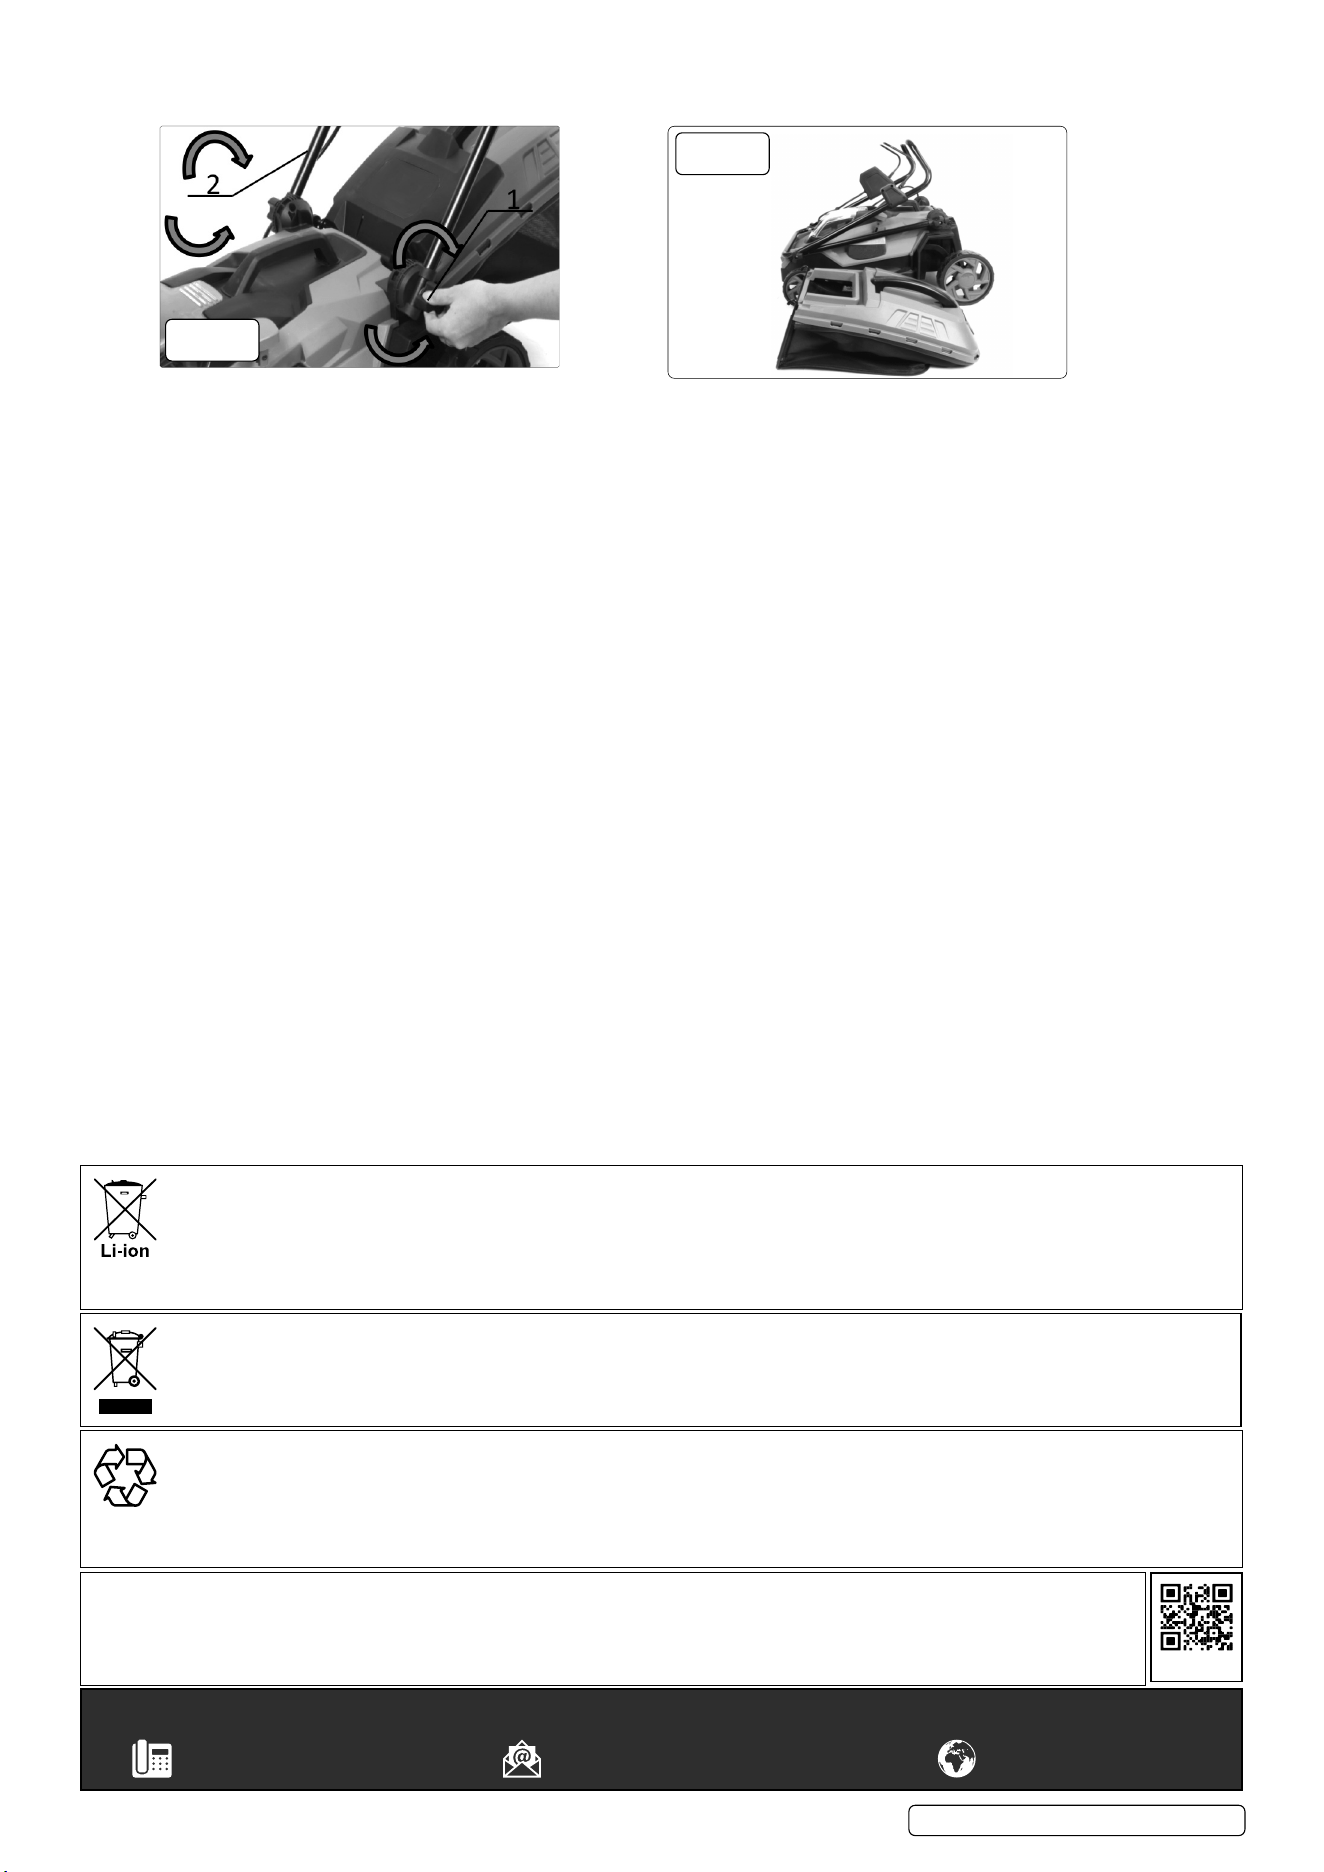
10.2.2. Loosenthehandleheightadjustbuttononbothsidesandfoldthelowerhandle(g.25).
10.2.3. Folded(g.26).
1.Handleheightadjustbutton2.Lowerhandle
10.3. To unfold the tool, follow the folding procedure in reverse.
WARNING! – Risk of Hand Arm Vibration Injury.
ThistoolmaycauseHandArmVibrationSyndromeifitsuseisnotmanagedadequately.
ThistoolissubjecttothevibrationtestingsectionoftheMachineryDirective2006/42/EC.
This tool is to be operated in accordance with these instructions.
Measured vibration emission value (a): 1.213m/s²
Uncertainty value (k): 1.5m/s²
Please note that the application of the tool to a sole specialist task may produce a different average vibration emission. We recommend
that a specific evaluation of the vibration emission is conducted prior to commencing with a specialist task.
A health and safety assessment by the user (or employer) will need to be carried out to determine the suitable duration of use for each
tool.
NB:StatedVibrationEmissionvaluesaretype-testvaluesandareintendedtobetypical.
Whilst in use, the actual value will vary considerably from and depend on many factors.
Suchfactorsinclude;theoperator,thetaskorconsumable.
The state of maintenance of the tool itself is also an important factor, a poorly maintained tool will also increase the risk of Hand Arm
Vibration Syndrome.
Health surveillance.
We recommend a programme of health surveillance to detect early symptoms of vibration injury so that management procedures can be
modified accordingly.
The declared vibration total value(s) and the declared noise emission value(s) have been measured in accordance with a standard test
method and may be used for comparing one tool with another.
The declared vibration total values and the declared noise emission values may also be used in a preliminary assessment of exposure.
The vibration and noise emissions during actual use of the power tool can differ from the declared values depending on the ways in which
the tool is used, especially what kind of workpiece is processed.
The need to identify safety measures to protect the operator that are based on an estimation of exposure in the actual condition of use.
Personal protective equipment.
Wearenotawareofanypersonalprotectiveequipment(PPE)thatprovidesprotectionagainstvibrationinjurythatmayresultfromthe
uncontrolled use of this tool. We recommend a sufficient supply of clothing (including gloves) to enable the operator to remain warm and
dry and maintain good blood circulation in fingers etc. Please note that the most effective protection is prevention, please refer to the
CorrectUseandMaintenancesectionintheseinstructions.Guidancerelatingtothemanagementofhandarmvibrationcanbefoundon
the HSE website
www.hse.gov.uk-Hand-ArmVibrationatWork.
© Jack Sealey Limited
Original Language Version
CP40VLMIssue:209/01/24
fig.
26
fig.
25
Sealey Group, Kempson Way, Suffolk Business Park, Bury St Edmunds, Suffolk. IP32 7AR
01284 757500 sales@sealey.co.uk www.sealey.co.uk
Note: It is our policy to continually improve products and as such we reserve the right to alter data, specifications and component parts
without prior notice.
Important: No Liability is accepted for incorrect use of this product.
Warranty:Guaranteeis12monthsfrompurchasedate,proofofwhichisrequiredforanyclaim.
REGISTER YOUR
PURCHASE HERE
ENVIRONMENT PROTECTION
Recycle unwanted materials instead of disposing of them as waste. All tools, accessories and packaging should be sorted, taken to
a recycling centre and disposed of in a manner which is compatible with the environment. When the product becomes completely
unserviceableandrequiresdisposal,drainanyfluids(ifapplicable)intoapprovedcontainersanddisposeoftheproductandfluids
according to local regulations.
WEEE REGULATIONS
DisposeofthisproductattheendofitsworkinglifeincompliancewiththeEUDirectiveonWasteElectricalandElectronicEquipment
(WEEE).Whentheproductisnolongerrequired,itmustbedisposedofinanenvironmentallyprotectiveway.Contactyourlocalsolid
waste authority for recycling information.
BATTERY REMOVAL
Remove the battery. Dispose of according to local government guidelines.
UndertheWasteBatteriesandAccumulatorsRegulations2009,JackSealeyLtdarerequiredtoinformpotentialpurchasersofproducts
containing batteries (as defined within these regulations), that they are registered with Valpak’s registered compliance scheme. Jack
SealeyLtd’sBatteriesProducerRegistrationNumber(BPRN)isBPRN00705.
