PB
1
USE AND CARE MANUAL
MANUAL DE USO Y CUIDADO
MCAFD800D
PARRILLA Y FREIDORA DE AIRE
PARA USO INTERIOR 7 EN 1
www.georgeforemancooking.com
TM
7-IN-1 INDOOR GRILL & AIR FRY
MCAFD800D_29235_ES_IB_B.indd 1MCAFD800D_29235_ES_IB_B.indd 1 4/28/22 11:42 AM4/28/22 11:42 AM

2
3
• Read all instructions.
• Do not touch hot surfaces. Use handles, knobs,
or gloves/mittens designed for hot surfaces.
• To protect against electrical shock do not
immerse cord, plugs or appliance in water or
other liquid.
• Close supervision is necessary when any
appliance is used by or near children.
• Unplug from outlet when not in use and before
cleaning. Allow to cool before putting on
or taking off parts, and before cleaning the
appliance.
• Do not clean with metal scouring pads. Pieces
can break off the pad and touch electrical parts,
creating a risk of electric shock.
• Do not operate any appliance with a damaged
cord or plug, or after the appliance malfunctions,
or has been dropped or damaged in any manner.
Contact the consumer service number listed in
this manual.
• The use of accessory attachments not
recommended by the appliance manufacturer
may cause injuries.
• Do not use outdoors.
• Do not let cord hang over edge of table or
counter, or touch hot surfaces.
• Do not place on or near a hot gas or electric
burner, or in a heated oven.
• Extreme caution must be used when moving an
appliance containing hot oil or other hot liquids.
• Use extreme caution when removing tray or
disposing of hot grease.
• To disconnect, remove plug from wall outlet.
• Risk of Electric Shock. Cook only in removable
container.
• CAUTION - Do not use for deep frying. This
appliance is not intended for deep frying food.
• Do not use this appliance for other than
intended use.
• The appliance is only to be operated in the
closed position.
• The appliance is intended for countertop use
only.
• This appliance is not intended for use by
persons (including children) with reduced
physical, sensory or mental capabilities, or
lack of experience and knowledge, unless they
have been given supervision or instruction
concerning use of the appliance by a person
responsible for their safety.
• Children should be supervised to ensure that
they do not play with the appliance.
• The appliance is not intended to be operated by
means of an external timer or separate remote-
control system.
• WARNING: Spilled food can cause serious
burns. Keep appliance and cord away from
children. Never drape cord over edge of
counter, never use outlet below counter, and
never use with an extension cord.
PLEASE READ AND SAVE THIS USE AND CARE BOOK.
IMPORTANT SAFEGUARDS.
When using electrical appliances, always follow basic safety precautions to
reduce the risk of fire, electric shock, and/or injury, including the following:
SAVE THESE INSTRUCTIONS.
This product is for household use only.
POLARIZED PLUG (USA/MEXICO)
This appliance has a polarized plug (one blade
is wider than the other). To reduce the risk of
electric shock, this plug is intended to fit into a
polarized outlet only one way. If the plug does
not fit fully into the outlet, reverse the plug. If it
still does not fit, contact a qualified electrician.
Do not attempt to modify the plug in any way.
TAMPER-RESISTANT SCREW
Warning: This appliance is equipped with a
tamper-resistant screw to prevent removal of
the outer cover. To reduce the risk of fire or
electric shock, do not attempt to remove the
outer cover. There are no user-serviceable
parts inside. Repair should be done only by
authorized service personnel.
ELECTRICAL CORD
A short power-supply cord is used to reduce the
risks resulting from becoming entangled in or
tripping over a longer cord, or being grabbed by
children.
Note: If the power cord is damaged, please
contact the warranty department listed in these
instructions.
MCAFD800D_29235_ES_IB_B.indd 2MCAFD800D_29235_ES_IB_B.indd 2 4/28/22 11:42 AM4/28/22 11:42 AM
2
3
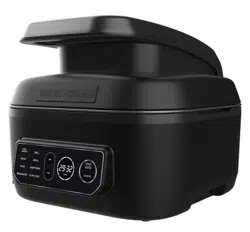
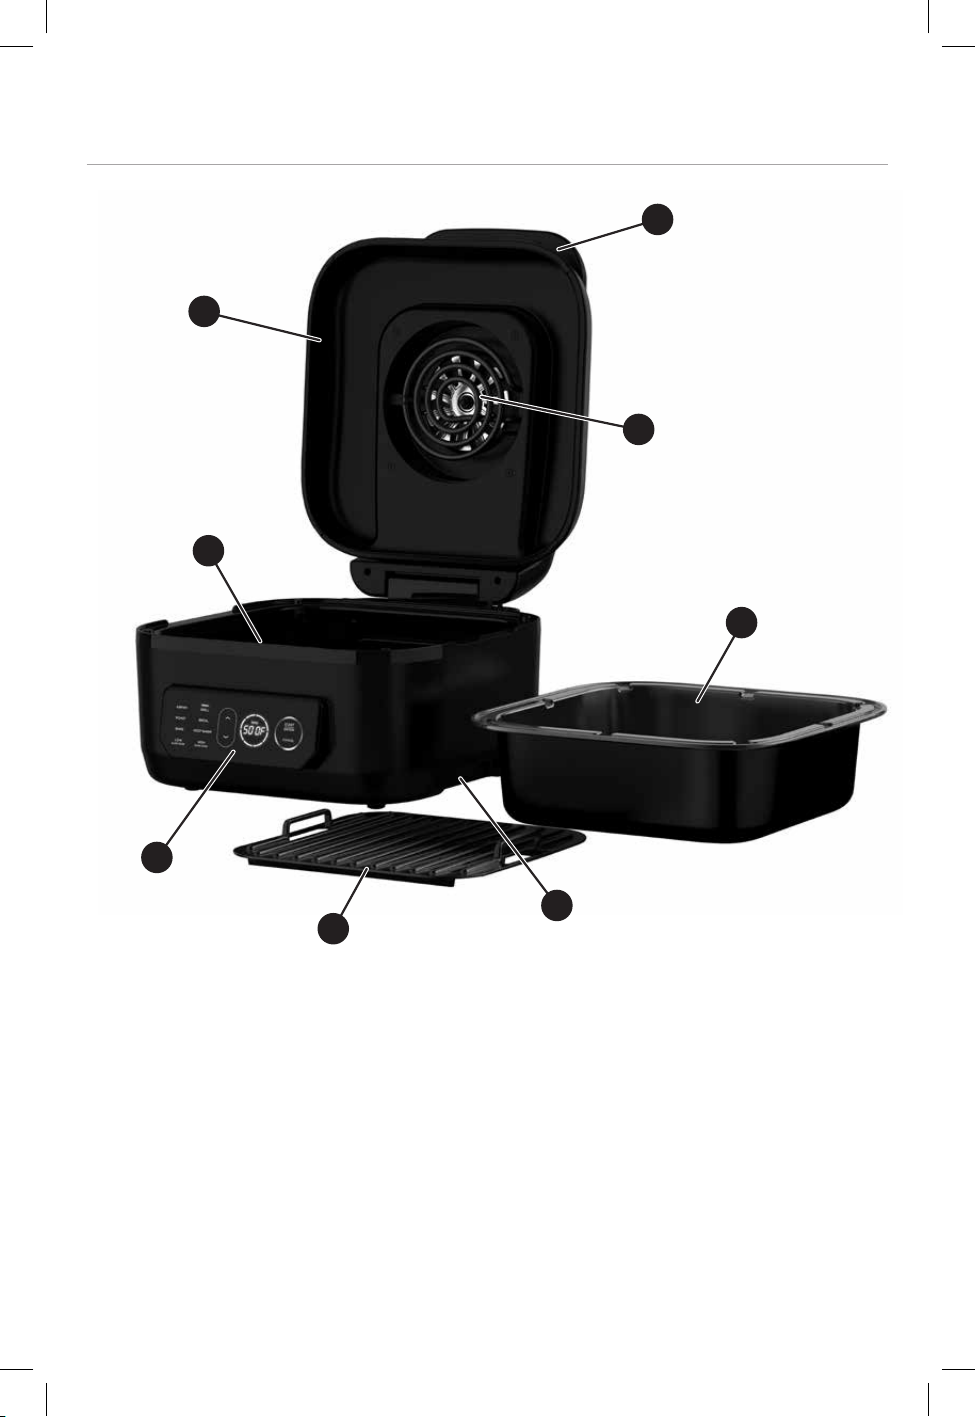
Product may vary slightly from what is illustrated.
1. Handle
2. Hood
3. Heating elements (bottom element located under cooking pot)
4. Removable Grill Plate *
5. Removable Cooking Pot *
6. Digital Control Panel
7. Integrated handles
* Indicates consumer replaceable/removable parts
GETTING TO KNOW YOUR GRILL
3
3
2
5
4
7
6
1
MCAFD800D_29235_ES_IB_B.indd 3MCAFD800D_29235_ES_IB_B.indd 3 4/28/22 11:42 AM4/28/22 11:42 AM
4
5
HOW TO USE
This product is for household use only.
GETTING STARTED
1. Remove all packaging material, promotional labels, any tape from the unit, and the
plastic band around the power plug.
2. Remove all accessories from the package and read this manual carefully. Please pay
particular attention to operational instructions, warnings, and important safeguards
to avoid any injury or property damage.
3. Wash the removable grill plate and cooking pot in warm, soapy water, then rinse
and dry thoroughly. The grill plate and cooking pot are also dishwasher safe. NEVER
clean the main unit in the dishwasher.
NOTE: The cooking pot must be in place in order for the unit to work. "ERR" will display
on control panel if pot is not inserted.
NOTE: The unit could create smoke during the cooking process. For less smoke, we
recommend using canola, coconut, avocado, grapeseed, or vegetable oil instead of olive
oil. The unit may also produce smoke when cooking meats on high temperature (500° F
/ 260° C). For more cooking recipes, visit www.georgeforemancooking.com.
D E
B
C
A
MCAFD800D_29235_ES_IB_B.indd 4MCAFD800D_29235_ES_IB_B.indd 4 4/28/22 11:42 AM4/28/22 11:42 AM

4
5
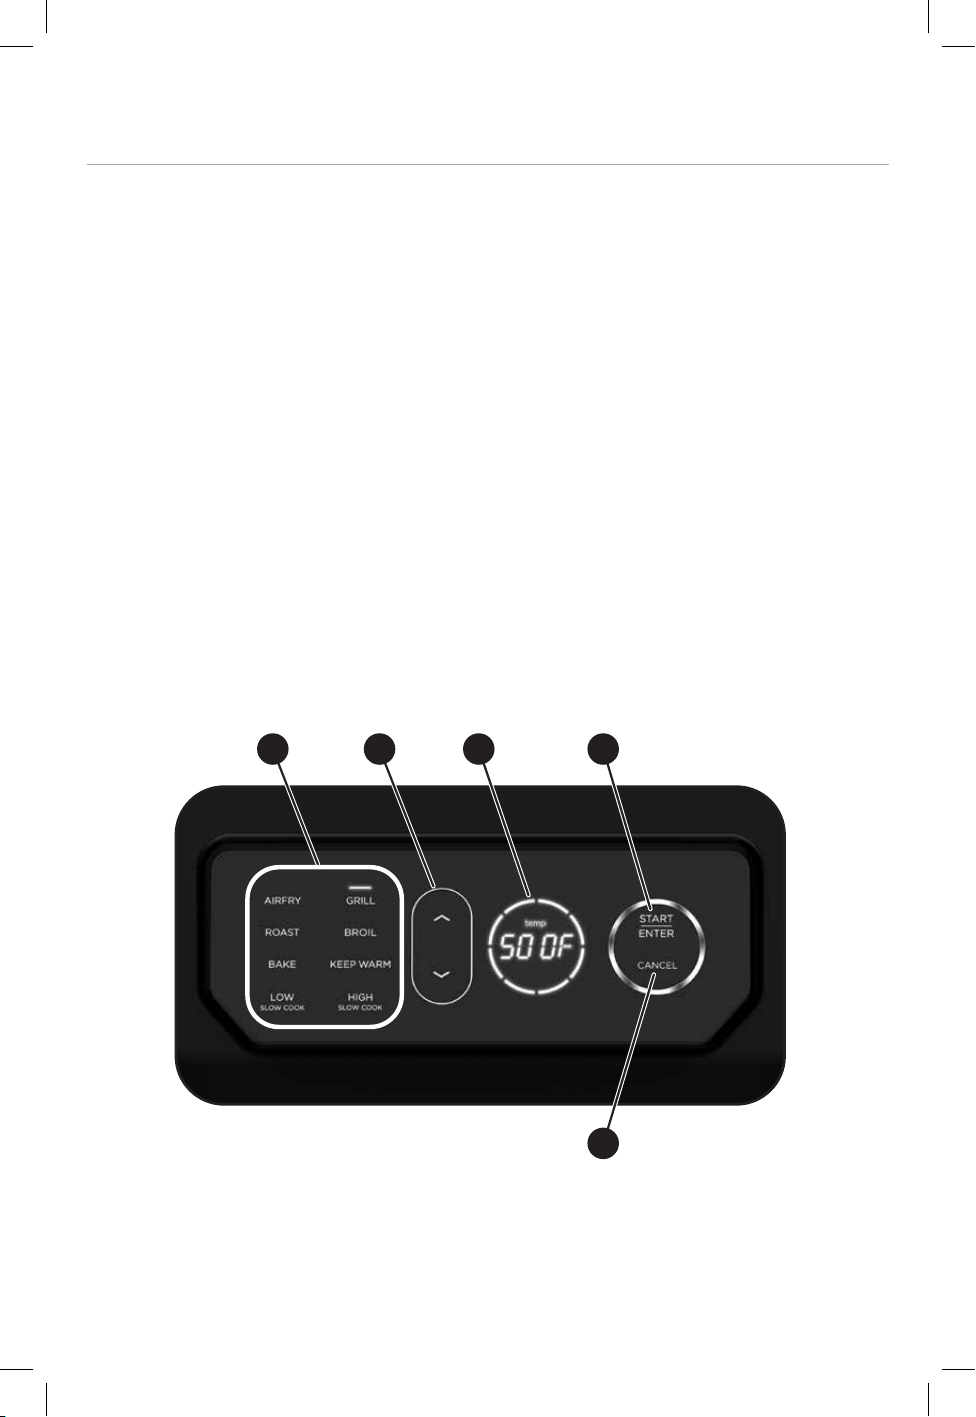
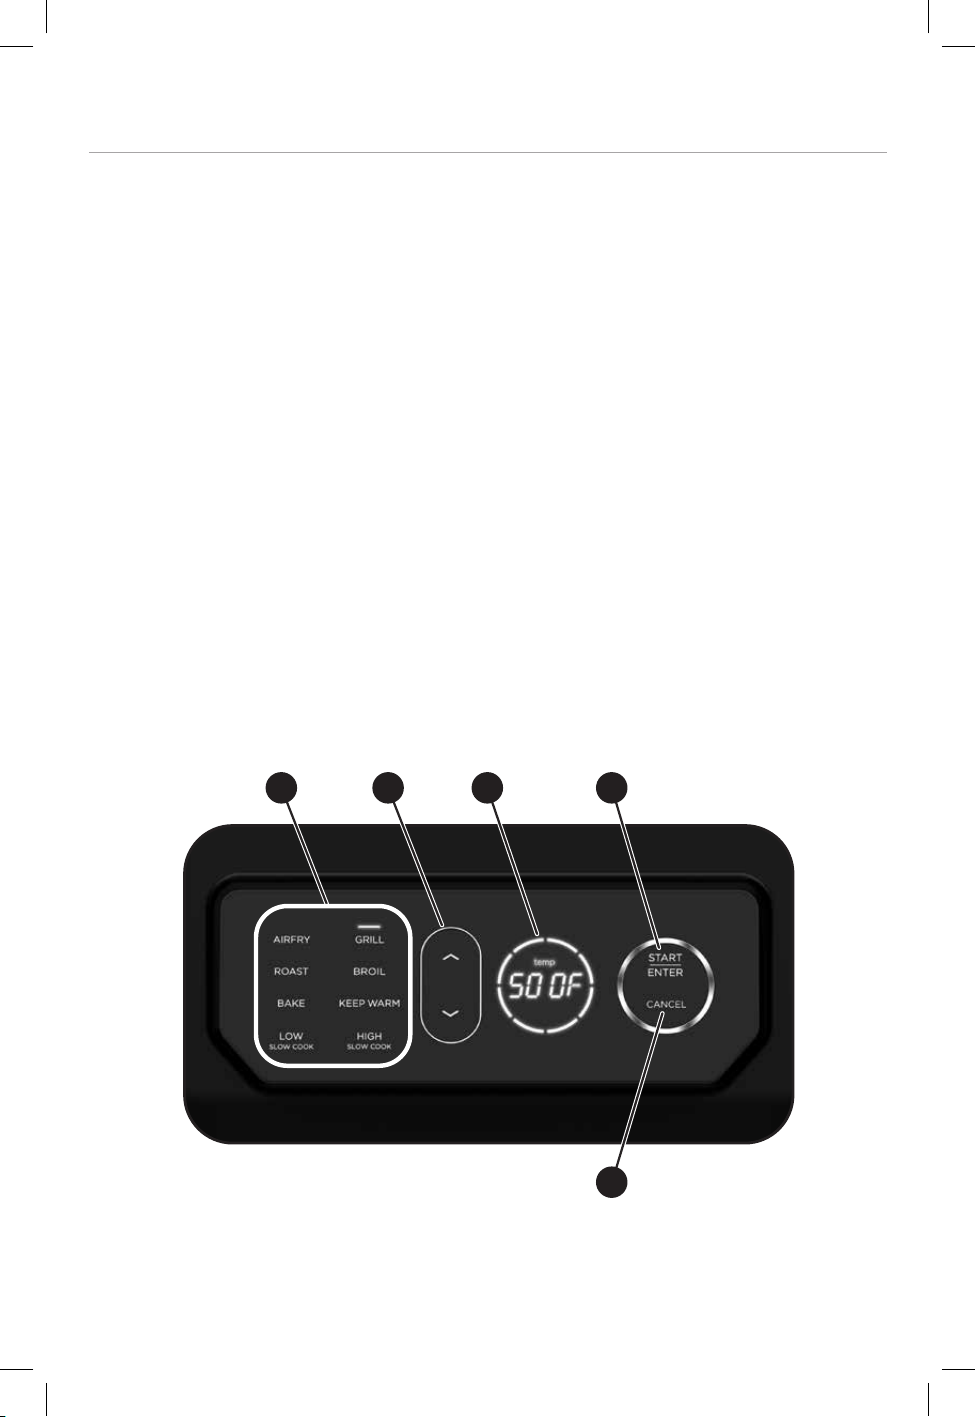
USING THE DIGITAL CONTROL PANEL
1. When the unit is not plugged in, the digital control panel display will be blank. To
start, plug the power cord into the wall outlet and the display will illuminate. If the
unit is not used for 5 minutes, the unit will go into sleep mode. Press any button to
start it back up.
2. COOKING FUNCTIONS (A): The unit has 7 preset cooking functions. Push the up
and down arrows to move through the different cooking functions. Once you get to
the function you desire, press START/ENTER.
3. START/ENTER button (B): Once START/ENTER is pushed on the mode you
selected, the display will flash the default temperature setting for that function. You
can adjust the temperature using the up and down arrows. Once the temperature is
at your desired setting, press START/ENTER.
The default time will display on the control panel. You can adjust the time by using
up and down arrows. Once the time is at your desired setting, press START/ENTER.
At this point the unit will start.
4. CANCEL button (C): The CANCEL button will help you start over in your selection
or stop the the cooking process. When choosing a preset cooking function, press
CANCEL once to move back and choose a different function. Press and hold
CANCEL for 3 seconds to return to the default display.
5. UP/DOWN arrows (D): Press the up/down arrows for selection of cooking presets,
changing temperature and changing time. If you press the up/down arrows, the
temperature will change by 5 degree increments and the time will change by 1
minute increments.
6. TIME/TEMPERATURE DISPLAY (E): During the cooking cycle, you can press
START/ENTER to toggle between displaying the time remaining and the set
temperature. When display is showing the time remaining, you can use the up/
down arrows to change the time remaining on the cooking function.
While adjusting the temperature during the cooking cycle, the display will flash.
After no changes have been made for 1 second, the display will flash 3 more times
and return to solid display of the set temperature. You can also press START/ENTER
to set the new temperature.
7. SWITCHING TEMPERATURE SCALES: When the unit is in default display, hold the
CANCEL button for 3 seconds to change the temperature unit from Fahrenheit to
Celsius or Celsius to Fahrenheit.
MCAFD800D_29235_ES_IB_B.indd 5MCAFD800D_29235_ES_IB_B.indd 5 4/28/22 11:42 AM4/28/22 11:42 AM

6
7
IMPORTANT INFORMATION
The pot gets hot. When in use, always use oven mitts or potholders when touching any
outer or inner surface of the appliance.
You can go through the selection process and setting up the unit while the lid is open,
but unit will not start the cooking process until lid is closed. Opening the lid in the middle
of the cycle will also pause the cooking.
Do not use metal utensils in the cooking pot or on the grill plate.
SWITCHING TO GRILL AFTER USING ANOTHER FUNCTION
If the unit is already warm from using a function other than GRILL and the grill plate is at
room temperature when you place it in the unit, we recommend allowing the grill plate
to heat up for at least 6 minutes before placing ingredients on it.
As the unit continues to run and the grill plate heats up, the digital temperature readout
will continue to blink until the unit reaches the desired temperature. When the unit
reaches the desired temperature, the readout will stop flashing.
BATCH GRILLING
When grilling more than two consecutive batches of food, if grease is building up above
the grill plate, you can empty the grease to do more batches. It is recommended that
you wait until the unit is cool before emptying the fat/oil from the removable cooking
pot. This will help prevent grease from burning and causing smoke. We also recommend
allowing the grill plate to heat back up for at least 3–5 minutes between batches to
ensure consistent grill marks and chart.
COOKING FUNCTION DESCRIPTION
GRILL - Use for grilling foods like burgers, steak, chicken, vegetables, and more.
AIR FRY - Use to fry your favorite foods with air instead of large amounts of oil. Works
well with frozen snacks, chicken, fries, vegetables and more.
SLOW COOK (Low or High) - Use to make your favorite soups, stews, and combinations
of meats and vegetables.
BAKE - Use for baking, including frozen foods/snacks, entrees, and even dessert.
ROAST - Use to cook whole pieces of meat, fish, or vegetables.
BROIL - Use to add finishing touches to your food that needs broiling per your recipes.
KEEP WARM - Use to keep food warm after slow cooking or other functions. This setting
will keep food warm at low temperature for up to 4 hours.
Refer to the cooking chart and recipe sections to find recommended cooking times and
temperatures for some common foods and ideas on how to utilize your new BEYONDGRILL
TM
MCAFD800D_29235_ES_IB_B.indd 6MCAFD800D_29235_ES_IB_B.indd 6 4/28/22 11:42 AM4/28/22 11:42 AM
6
7
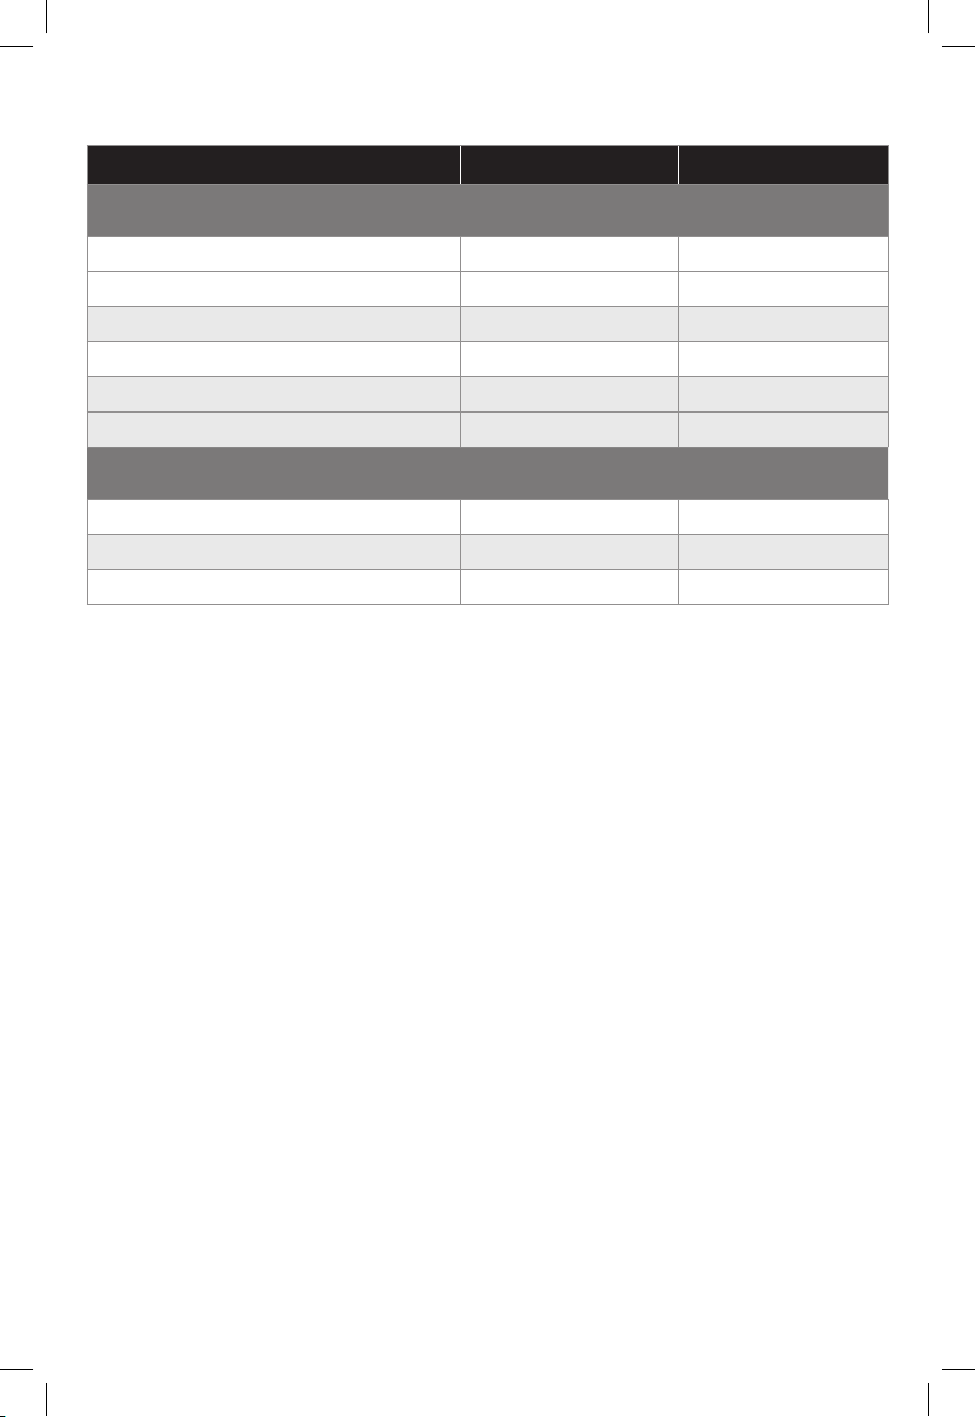
AIR FRYING GUIDE
*Note: For these and other foods, please review manufacturer suggested
cook times.
**Note: Do not air fry frozen raw meats (i.e. burgers, steaks).
FOOD TEMPERATURE COOK TIME
*
Frozen Food**
Chicken Nuggets (14)
400°F
8-12 minutes
Fish Sticks (1/4 - 1.1 lb)
425°F
8-12 minutes
Mozzarella Sticks (1 lb)
350°F
10-14 minutes
Thick Steak Fries (1 lb)
425°F
18-22 minutes
Thin Shoestring Fries (1 lb)
400°F
15-18 minutes
Broccoli 425-450°F
6-10 minutes
Fresh/Thawed Food
Homemade Fries (4 large potatoes)
400°F
18-22 minutes
Broccoli
425-450°F
6-10 minutes
Chicken Drumsticks (6)
325°F
24-28 minutes
MCAFD800D_29235_ES_IB_B.indd 7MCAFD800D_29235_ES_IB_B.indd 7 4/28/22 11:42 AM4/28/22 11:42 AM
8
9
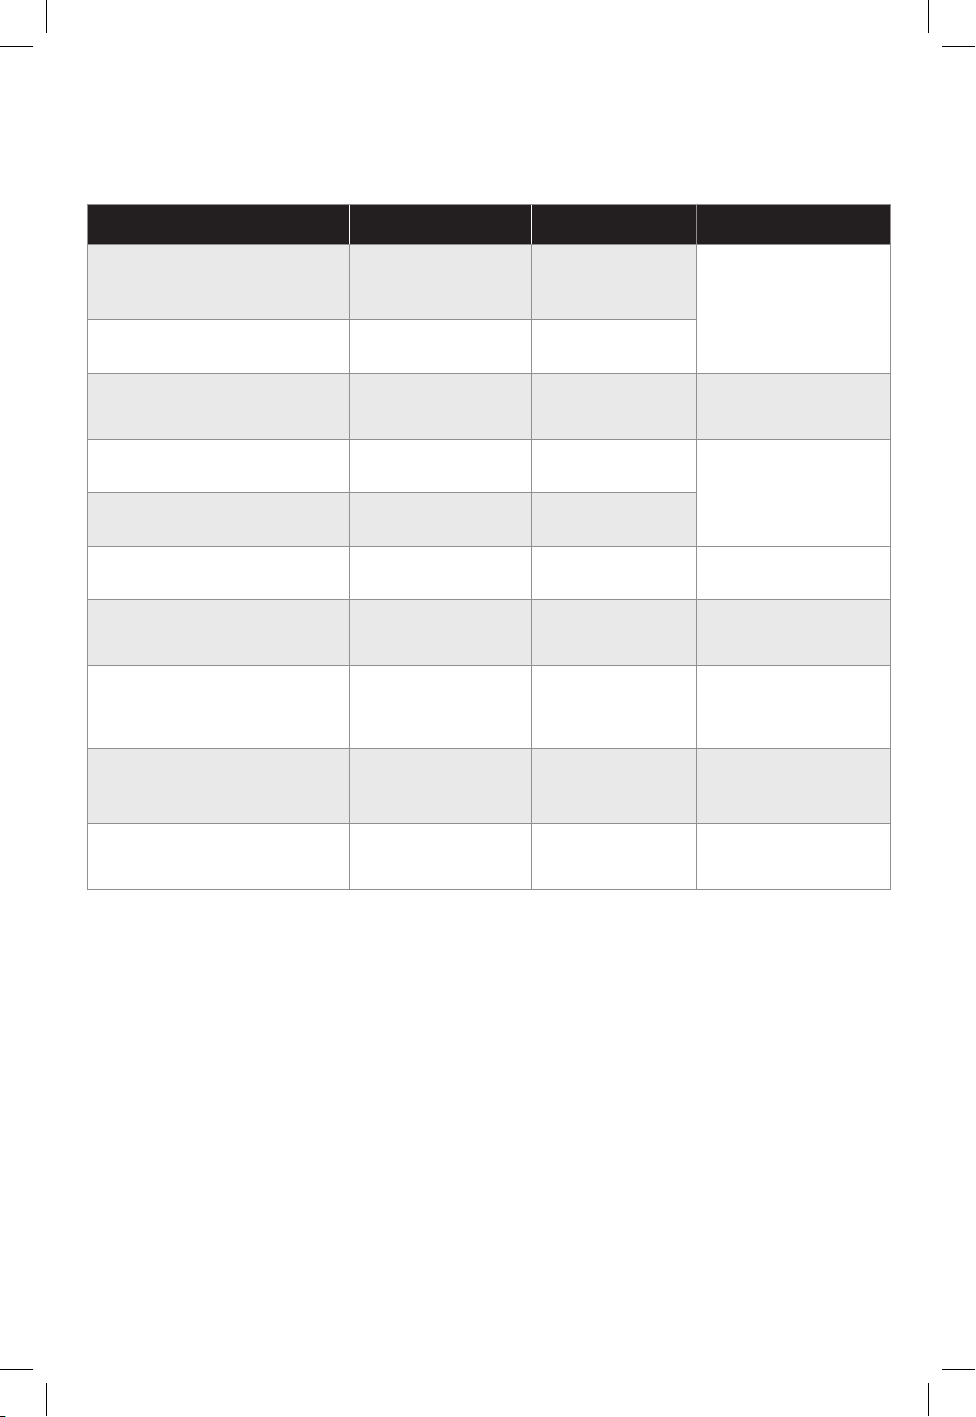
GRILLING GUIDE
(Times listed are after the unit is preheated)
FOOD TEMPERATURE COOK TIME
*
COMMENTS
Handmade/ Thawed
Hamburgers
4 patties (1/4 lb each)
500°F 14-18 minutes
Cooked to: 145°F
(ip halfway
through cooking)
Frozen Hamburgers
4 patties (1/4 lb each)
450°F 17-20 minutes
Bratwurst (uncooked)
4 bratwurst
400°F
8-12 minutes
Cooked to: 160°F
(ip halfway
through cooking)
Thawed Boneless Chicken
Breast (8oz)
500°F 18-23 minutes
Cooked to: 165°F
(ip halfway
through cooking)
Frozen Boneless Chicken
Breast (8oz)
450°F 22-26 minutes
Salmon
2 llets (8oz each)
450°F 12-16 minutes
Cooked to: 145°F
(do not ip)
Thawed New York Strip
2 steaks (12oz each)
500°F 12-16 minutes
Cooked to: 145°F
(ip halfway
through cooking)
Bacon (Thick cut)
4 slices (1.3oz each)
450°F 6-10 minutes
Cooked to desired
crispness
(ipping not
necessary)
Thawed Boneless Pork
Chops
4 chops (4oz each)
500°F 8-12 minutes
Cooked to: 145°F
(ip halfway
through cooking)
Fresh Vegetables
(peppers, onions)
500°F 12-18 minutes
Cooked to desired
doneness
(mix intermittently)
*Note: For these and other foods, please review manufacturer suggested
cook times.
MCAFD800D_29235_ES_IB_B.indd 8MCAFD800D_29235_ES_IB_B.indd 8 4/28/22 11:42 AM4/28/22 11:42 AM

8
9
HOW TO GRILL
1. Plug in the appliance.
2. Place the cooking pot in the unit and insert the grill plate.
3. To select the GRILL function, use the up and down arrows until GRILL is highlighted
and press START/ENTER. Setting will stop flashing and turn solid.
4. Once the function is selected, the temperature will flash (default temperature
is 450°F / 230°C) on the display. You can use the up/down arrows to change
temperature. Press START/ENTER.
5. Once the temperature is selected, time will flash (default time is 20 minutes). You
can push the up/down arrows to adjust the time. Press START/ENTER and the display
will stop flashing.
6. Once settings are chosen the unit will need to preheat. Unit will beep one time and
preheating will begin. While preheating, the circle around the time/temp display will
flash and the display will read “PrE” until the unit reaches the selected temperature
and then beep. Add food ingredients after the unit is preheated.
7. When the cooking cycle has been started, the 8 circular LED lights around the time/
temp display will start to illuminate. Each LED represents 1/8th of the time remaining
in the cycle. As each time segment is passed, the corresponding LED will stop
flashing. At the end of the cooking cycle, the circle will be completely illuminated.
8. After the cooking cycle is complete, the unit will beep. The current cooking function
will start flashing and the display will read “End” for 5 minutes. If the unit is not
touched, it will automatically go into sleep mode.
NOTE: Press START/ENTER to change time or temperature during the cooking cycle.
Display will flash for 1 second and then return to solid. During cooking, you can open the
hood to check on or flip your food. The timer will pause when the hood is opened and
then automatically resume after it is closed.
9. Once cycle is done you can remove the food and transfer to a serving plate. You can
also fully remove the pot with oven mitts.
10. Keep the hood open after removing your food so the unit will cool down more
quickly. If you need to cook your food longer, simply press the up arrow while time
remains on the cooking cycle, then press the START/ENTER button.
NOTE: If batch cooking, empty the oil from the removable cooking pot after every 2
batches. This will help prevent grease from burning and causing smoke.
FOOD TEMPERATURE COOK TIME
*
COMMENTS
Handmade/ Thawed
Hamburgers
4 patties (1/4 lb each)
500°F 14-18 minutes
Cooked to: 145°F
(ip halfway
through cooking)
Frozen Hamburgers
4 patties (1/4 lb each)
450°F 17-20 minutes
Bratwurst (uncooked)
4 bratwurst
400°F
8-12 minutes
Cooked to: 160°F
(ip halfway
through cooking)
Thawed Boneless Chicken
Breast (8oz)
500°F 18-23 minutes
Cooked to: 165°F
(ip halfway
through cooking)
Frozen Boneless Chicken
Breast (8oz)
450°F 22-26 minutes
Salmon
2 llets (8oz each)
450°F 12-16 minutes
Cooked to: 145°F
(do not ip)
Thawed New York Strip
2 steaks (12oz each)
500°F 12-16 minutes
Cooked to: 145°F
(ip halfway
through cooking)
Bacon (Thick cut)
4 slices (1.3oz each)
450°F 6-10 minutes
Cooked to desired
crispness
(ipping not
necessary)
Thawed Boneless Pork
Chops
4 chops (4oz each)
500°F 8-12 minutes
Cooked to: 145°F
(ip halfway
through cooking)
Fresh Vegetables
(peppers, onions)
500°F 12-18 minutes
Cooked to desired
doneness
(mix intermittently)
MCAFD800D_29235_ES_IB_B.indd 9MCAFD800D_29235_ES_IB_B.indd 9 4/28/22 11:42 AM4/28/22 11:42 AM

10
11
HOW TO AIR FRY
1. Plug in the appliance.
2. Add ingredients to the cooking pot. You do not need the grill plate for this setting.
NOTE: You do not need to agitate the food during cooking.
3. To select AIR FRY function use the up and down arrows to move to AIR FRY setting.
4. Press START/ENTER to select AIR FRY – setting will stop flashing and will turn solid.
5. Once setting is selected, temperature will flash (default temperature is 425°F/
218°C) on the display. You can use up/down arrows to change temp. Press START/
ENTER.
6. Once temperature is selected, time will flash (default time is 20 minutes). You can
push up/down arrows to adjust the time. Press START/ENTER. Display will no longer
flash.
7. Unit will beep one time.
8. When the cooking cycle has been started, the 8 circular LED lights around the
time/temp display will start to illuminate. Each LED represents 1/8th of the time
remaining in the cycle. As each time segment is passed, the corresponding LED
will stop flashing. At the end of the cooking cycle, the circle will be completely
illuminated.
9. End of cooking cycle: when time is up, unit will beep three times.
NOTE: Press START/ENTER to change time or temperature during the cooking cycle.
Display will flash for 1 second and then return to solid. During cooking, you can open the
hood to check on or flip your food. The timer will pause when the hood is opened and
then automatically resume after it is closed.
10. Once cycle is done you can remove the food and transfer to a serving plate. You can
also fully remove the pot with oven mitts.
11. Keep the hood open after removing your food so the unit will cool down more
quickly. If you need to cook your food longer, simply press the up arrow while time
remains on the cooking cycle, then press the START/ENTER button.
MCAFD800D_29235_ES_IB_B.indd 10MCAFD800D_29235_ES_IB_B.indd 10 4/28/22 11:42 AM4/28/22 11:42 AM

10
11
HOW TO BAKE
1. Plug in the appliance.
2. Place the cooking pot in the unit and add ingredients to the pot.
3. To select the BAKE function, use the up and down arrows until BAKE is highlighted
and press START/ENTER. Setting will stop flashing and turn solid.
4. Once the function is selected, the temperature will flash (default temperature
is 375°F / 190°C) on the display. You can use the up/down arrows to change
temperature. Press START/ENTER.
5. Once the temperature is selected, time will flash (default time is 30 minutes). You
can push the up/down arrows to adjust the time. Press START/ENTER and the
display will stop flashing.
6. Once settings are chosen the unit will need to preheat. Unit will beep one time and
preheating will begin. While preheating, the circle around the time/temp display will
flash and the display will read “PrE” until the unit reaches the selected temperature
and then beep.
7. When the cooking cycle has been started, the 8 circular LED lights around the
time/temp display will start to illuminate. Each LED represents 1/8th of the time
remaining in the cycle. As each time segment is passed, the corresponding LED
will stop flashing. At the end of the cooking cycle, the circle will be completely
illuminated.
8. After the cooking cycle is complete, the unit will beep. The current cooking function
will start flashing and the display will read “End” for 5 minutes. If the unit is not
touched, it will automatically go into sleep mode.
NOTE: Press START/ENTER to change time or temperature during the cooking cycle.
Display will flash for 1 second and then return to solid. During cooking, you can open the
hood to check on or flip your food. The timer will pause when the hood is opened and
then automatically resume after it is closed.
9. Once cycle is done you can remove the food and transfer to a serving plate. You can
also fully remove the pot with oven mitts.
10. Keep the hood open after removing your food so the unit will cool down more
quickly. If you need to cook your food longer, simply press the up arrow while time
remains on the cooking cycle, then press the START/ENTER button.
NOTE: If batch cooking, empty the oil from the removable cooking pot after every 2
batches. This will help prevent grease from burning and causing smoke.
MCAFD800D_29235_ES_IB_B.indd 11MCAFD800D_29235_ES_IB_B.indd 11 4/28/22 11:42 AM4/28/22 11:42 AM

12
13
HOW TO SLOW COOK
1. Plug in the appliance.
2. Place the cooking pot in the unit and add ingredients to the pot.
3. To select the SLOW COOK function, use the up and down arrows until SLOW COOK
HIGH or SLOW COOK LOW is highlighted and press START/ENTER. Setting will stop
flashing and turn solid.
4. Once the function is selected, the time interval will flash on the display (default
interval is 8 hours for SLOW, 4 hours for HIGH). You can use the up/down arrows to
change the time interval. Press START/ENTER and the display will stop flashing.
NOTE: The temperature cannot be set or adjusted in the SLOW COOK function.
5. When the cooking cycle has been started, the 8 circular LED lights around the
time/temp display will start to illuminate. Each LED represents 1/8th of the time
remaining in the cycle. As each time segment is passed, the corresponding LED
will stop flashing. At the end of the cooking cycle, the circle will be completely
illuminated.
6. After the cooking cycle is complete, the unit will beep and enter the KEEP WARM
function. The unit is programmed to stay in KEEP WARM function for 4 hours. Once
the KEEP WARM function has finished, the display will beep and read “End” for 5
minutes. If the unit is not touched, it will automatically go into sleep mode.
NOTE: Press START/ENTER to change time during the cooking cycle. Display will
flash for 1 second and then return to solid. During cooking, you can open the hood to
check on or flip your food. The timer will pause when the hood is opened and then
automatically resume after it is closed.
7. Once cycle is done you can remove the food and transfer to a serving plate. You can
also fully remove the pot with oven mitts.
8. Keep the hood open after removing your food so the unit will cool down more
quickly. If you need to cook your food longer, simply press the up arrow while time
remains on the cooking cycle, then press the START/ENTER button.
MCAFD800D_29235_ES_IB_B.indd 12MCAFD800D_29235_ES_IB_B.indd 12 4/28/22 11:42 AM4/28/22 11:42 AM

12
13
HOW TO ROAST
1. Plug in the appliance.
2. Place the cooking pot in the unit and add ingredients to the pot.
3. To select the ROAST function, use the up and down arrows until ROAST is
highlighted and press START/ENTER. Setting will stop flashing and turn solid.
4. Once the function is selected, the temperature will flash (default temperature
is 375°F / 190°C) on the display. You can use the up/down arrows to change
temperature. Press START/ENTER.
5. Once the temperature is selected, time will flash (default time is 20 minutes). You
can push the up/down arrows to adjust the time. Press START/ENTER and the
display will stop flashing.
6. When the cooking cycle has been started, the 8 circular LED lights around the
time/temp display will start to illuminate. Each LED represents 1/8th of the time
remaining in the cycle. As each time segment is passed, the corresponding LED
will stop flashing. At the end of the cooking cycle, the circle will be completely
illuminated.
7. After the cooking cycle is complete, the unit will beep. The current cooking function
will start flashing and the display will read “End” for 5 minutes. If the unit is not
touched, it will automatically go into sleep mode.
NOTE: Press START/ENTER to change time or temperature during the cooking cycle.
Display will flash for 1 second and then return to solid. During cooking, you can open the
hood to check on or flip your food. The timer will pause when the hood is opened and
then automatically resume after it is closed.
8. Once cycle is done you can remove the food and transfer to a serving plate. You can
also fully remove the pot with oven mitts.
9. Keep the hood open after removing your food so the unit will cool down more
quickly. If you need to cook your food longer, simply press the up arrow while time
remains on the cooking cycle, then press the START/ENTER button.
NOTE: If batch cooking, empty the oil from the removable cooking pot after every 2
batches. This will help prevent grease from burning and causing smoke.
MCAFD800D_29235_ES_IB_B.indd 13MCAFD800D_29235_ES_IB_B.indd 13 4/28/22 11:42 AM4/28/22 11:42 AM

14
15
HOW TO BROIL
1. Plug in the appliance.
2. Place the cooking pot in the unit and add ingredients to the pot.
3. To select the BROIL function, use the up and down arrows until BROIL is highlighted
and press START/ENTER. Setting will stop flashing and turn solid.
4. Once the function is selected, the time interval will flash (default interval is 10
minutes) on the display. You can use the up/down arrows to change the time
interval. START/ENTER and the display will stop flashing.
NOTE: The temperature cannot be set or adjusted in the BROIL function.
5. When the cooking cycle has been started, the 8 circular LED lights around the
time/temp display will start to illuminate. Each LED represents 1/8th of the time
remaining in the cycle. As each time segment is passed, the corresponding LED
will stop flashing. At the end of the cooking cycle, the circle will be completely
illuminated.
6. After the cooking cycle is complete, the unit will beep. The current cooking function
will start flashing and the display will read “End” for 5 minutes. If the unit is not
touched, it will automatically go into sleep mode.
NOTE: Press START/ENTER to change time during the cooking cycle. Display will
flash for 1 second and then return to solid. During cooking, you can open the hood to
check on or flip your food. The timer will pause when the hood is opened and then
automatically resume after it is closed.
7. Once cycle is done you can remove the food and transfer to a serving plate. You can
also fully remove the pot with oven mitts.
8. Keep the hood open after removing your food so the unit will cool down more
quickly. If you need to cook your food longer, simply press the up arrow while time
remains on the cooking cycle, then press the START/ENTER button.
NOTE: If batch cooking, empty the oil from the removable cooking pot after every 2
batches. This will help prevent grease from burning and causing smoke.
MCAFD800D_29235_ES_IB_B.indd 14MCAFD800D_29235_ES_IB_B.indd 14 4/28/22 11:42 AM4/28/22 11:42 AM

14
15
HOW TO KEEP WARM
1. Plug in the appliance.
2. Place the cooking pot in the unit and add ingredients to the pot.
3. To select the KEEP WARM function, use the up and down arrows until KEEP WARM
is highlighted and press START/ENTER. Setting will stop flashing and turn solid.
4. Once the function is selected, the time interval will flash (default interval is 15
minutes) on the display. You can use the up/down arrows to change the time
interval. The time can be set up to 4 hours. The display will count up from (0:00) to
(4:00). Press START/ENTER and the display will stop flashing.
NOTE: The temperature cannot be set or adjusted in the KEEP WARM function.
5. When the warming cycle has been started, the 8 circular LED lights around the
time/temp display will start to illuminate. Each LED represents 1/8th of the time
remaining in the cycle. As each time segment is passed, the corresponding LED
will stop flashing. At the end of the warming cycle, the circle will be completely
illuminated.
6. After the warming cycle is complete, the unit will beep. The current cooking function
will start flashing and the display will read “End” for 5 minutes. If the unit is not
touched, it will automatically go into sleep mode.
NOTE: Press START/ENTER to change time during the warming cycle. Display will
flash for 1 second and then return to solid. During warming, you can open the hood
to check on or flip your food. The timer will pause when the hood is opened and then
automatically resume after it is closed.
7. Once cycle is done you can remove the food and transfer to a serving plate. You can
also fully remove the pot with oven mitts.
8. Keep the hood open after removing your food so the unit will cool down more
quickly. If you need to cook your food longer, simply press the up arrow while time
remains on the cooking cycle, then press the START/ENTER button.
NOTE: If batch cooking, empty the oil from the removable cooking pot after every 2
batches. This will help prevent grease from burning and causing smoke.
MCAFD800D_29235_ES_IB_B.indd 15MCAFD800D_29235_ES_IB_B.indd 15 4/28/22 11:42 AM4/28/22 11:42 AM

16
17
CARE AND CLEANING
The unit should be cleaned thoroughly after every use. Always let the appliance cool
before cleaning.
1. Unplug the unit from the wall outlet before cleaning. Keep the hood open after
removing your food so the unit will cool down more quickly.
2. To clean the main unit, and control panel, wipe them with a damp cloth.
3. The cooking pot and removable grill plate are dishwasher safe.
4. If hand-washing, air-dry or towel-dry all parts after hand-washing.
5. If food residue or grease are stuck on the grill plate or any other removable part,
place them in a sink or stack them in the pot and fill with warm, soapy water and
allow to soak for a couple hours or overnight.
MCAFD800D_29235_ES_IB_B.indd 16MCAFD800D_29235_ES_IB_B.indd 16 4/28/22 11:42 AM4/28/22 11:42 AM

16
17
RECIPES
FALL-OFF-THE-BONE BBQ RIBS
Serving Size: 2
Ingredients
1 full rack baby back ribs, cut in half
2 tbsp blackening seasoning
1 12-oz can beer
1 cup barbeque sauce
¼ cup brown sugar
1 tbsp apple cider vinegar
Directions
1. Season the ribs with the blackening seasoning.
2. Place the ribs in the appliance and cover with the beer. Select the High Slow Cook
setting and cook for 2 hours.
3. Combine the barbeque sauce, brown sugar, and apple cider vinegar in a bowl and mix.
4. When the ribs are tender, remove them from the liquid.
5. Clean out the appliance. Place the Grill Plate in the appliance. Select the Grill setting
and let preheat.
6. When the appliance has preheated, brush both sides of the ribs with the barbeque
sauce and grill on both sides (about 4 minutes per side).
7. Serving suggestion: Serve with air-fried French fries.
MCAFD800D_29235_ES_IB_B.indd 17MCAFD800D_29235_ES_IB_B.indd 17 4/28/22 11:42 AM4/28/22 11:42 AM

18
19
PRIME RIB ROAST
Serving Size: 4
Ingredients
3 cloves garlic, minced
3 sprigs rosemary, chopped
3 sprigs thyme, stemmed & chopped
3 tsp salt, divided
1 ½ tsp ground black pepper, divided
4 tbsp olive oil, divided
1 3-lb prime rib roast
1 lb Brussels sprouts
1 lb baby potatoes
1 shallot, sliced
Directions
1. Combine the garlic, rosemary, thyme, 2 tsp salt, 1 tsp black pepper, and 2 tbsp olive
oil in a bowl and mix to make a paste. Rub the roast with the paste and let marinate
for about 30 minutes in the refrigerator before cooking.
2. Select the Roast setting. Set the cooking temperature to 375° F. Set the cooking time to
30 minutes. Add the roast and cook for 30 minutes.
3. Toss the Brussels sprouts, potatoes, 1 tsp salt, ½ tsp black pepper, 2 tbsp olive oil, and
the shallots in a bowl.
4. After 30 minutes, surround the roast with the Brussels sprouts and potatoes. Roast until an
instant-read thermometer inserted into the thickest part of the roast reads 110° F–115° F
(about 20 minutes). Add additional time if needed to reach the temperature.
5. Let the roast rest for 20 minutes. The internal temperature of the roast should have risen to
130° F.
6. Slice the roast thinly and serve with the Brussels sprouts and potatoes.
1. Toss the Brussels sprouts, potatoes, 1 tsp salt, ½ tsp black pepper, 2 tbsp olive oil, and
the shallots in a bowl.
2. Surround the roast with the Brussels sprouts and potatoes. Roast until an instant-read
thermometer inserted into the thickest part of the roast reads 110° F–115° F (about 20
minutes).
3. Let the roast rest for 20 minutes. The internal temperature of the roast should have risen to
130° F.
4. Slice the roast thinly and serve with the Brussels sprouts and potatoes.
MCAFD800D_29235_ES_IB_B.indd 18MCAFD800D_29235_ES_IB_B.indd 18 4/28/22 11:42 AM4/28/22 11:42 AM

18
19
Ingredients
Meatballs:
1 lb ground beef
¼ cup breadcrumbs
2 tbsp milk
½ tsp salt
½ tsp ground black pepper
½ small onion, chopped
1 clove garlic, minced
1 large egg
3 tbsp grated Parmesan cheese
2 tbsp chopped parsley
Tomato Sauce:
½ onion, chopped
3 cloves garlic, minced
2 tbsp olive oil
28 oz canned crushed tomatoes
1 cup water
½ tsp salt
½ tsp ground black pepper
½ tbsp sugar
2 tbsp chopped Italian parsley
10 basil leaves, chopped
Zoodles:
4 large zucchinis, spiralized or
store-bought spiralized zucchini
1 tsp salt
1 tbsp olive oil
ZOODLES WITH MEATBALLS
Serving Size: 4
Directions
Making the Meatballs and Tomato Sauce:
1. Combine the Meatballs ingredients in a bowl. Use your hands to form 1 ½-inch meatballs.
Place the meatballs in the appliance. Select the Airfry setting and cook for 10 minutes. When
the meatballs are done, remove and reserve them.
2. To make the sauce, add the onion, garlic, and 2 tbsp olive oil to the appliance. Select the
Airfry setting and cook for 3 minutes.
3. Add the crushed tomatoes to the appliance. Rinse out the tomato can with the water and add to
the appliance. Add the salt, black pepper, and sugar. Return the meatballs to the appliance. Set
the appliance to the High Slow Cook setting and cook until tender (about 2 hours).
4. When the meatballs are done cooking, add the parsley and basil to finish the sauce.
Making the Zoodles:
1. Place the zucchini in a colander and coat with ½ tsp salt. Let the zucchini rest for 10
minutes to remove any excess water.
2. Place the zoodles in a tea towel and squeeze out as much water as possible. This process
helps the zoodles be more tender and less soggy.
3. Place the zoodles in a large bowl and toss with 1 tbsp olive oil. Place in the appliance.
4. Select the Airfry setting. Set the cooking temperature to 425° F and cook until tender (about
15 minutes).
5. When the zoodles are done cooking, transfer to a platter and top with the meatballs and
sauce.
6. Serving suggestion: Sprinkle with cheese and fresh parsley or basil.
MCAFD800D_29235_ES_IB_B.indd 19MCAFD800D_29235_ES_IB_B.indd 19 4/28/22 11:42 AM4/28/22 11:42 AM

20
21
AIR-FRIED WHOLE CHICKEN
Serving Size: 4
Ingredients
1 tsp granulated garlic
1 tsp granulated onion
1 tsp paprika
2 tsp salt
1 tsp ground black pepper
1 tbsp dried rosemary
1 3 ½-lb chicken, cleaned & trimmed
1 lb baby potatoes
8 oz pearl onions
4 carrots, peeled & cut into 2-inch pieces
3 tbsp olive oil
Directions
1. Combine the garlic, onion, paprika, salt, black pepper, and rosemary in a small bowl
and mix. Rub the chicken the seasonings, reserving at most 1 tbsp to season the
vegetables.
2. Place the chicken in the appliance and surround it with the potatoes, onions, and carrots.
Season the vegetables with the reserved seasoning and drizzle with the olive oil.
3. Select the Airfry setting. Set the cooking temperature to 375° F and cook for 40 minutes.
4. After 40 minutes have passed, set the cooking temperature to 325° F. Continue to cook until
an instant-read thermometer inserted into the thickest part of the chicken reads 165° F
(about 15 minutes).
MCAFD800D_29235_ES_IB_B.indd 20MCAFD800D_29235_ES_IB_B.indd 20 4/28/22 11:42 AM4/28/22 11:42 AM

20
21
WARRANTY AND CUSTOMER
SERVICE INFORMATION
For support or any questions regarding your appliance, call the appropriate 800 number
listed within this section. Please DO NOT return the product to the place of purchase.
Also, please DO NOT mail product back to manufacturer, nor bring it to a service center.
You may also want to consult our Product Protection Center at www.prodprotect.com/
georgeforeman.
Three-Year Limited Warranty
(Applies only in the United States)
What does my warranty cover?
• Your warranty covers any defect in material or workmanship provided; however, the
liability of Spectrum Brands Inc. will not exceed the purchase price of product.
How long is the warranty period?
• Your warranty extends three years from the date of original purchase with proof of
purchase.
What support does my warranty provide?
• Your warranty provides you with a reasonably similar replacement product that is
either new or factory refurbished.
How do you get support?
• Save your receipt as proof of date of sale.
• Visit the online service website at www.prodprotect.com/georgeforeman, or call toll-
free 1-800-947-3745, for general warranty service.
• If you need parts or accessories, please call 1-800-738-0245.
How does state law aect my warranty?
• This warranty gives you specific legal rights. You may also have other rights that vary
from state to state or province to province.
What does my warranty not cover?
• Damage from commercial use
• Damage from misuse, abuse or neglect
• Products that have been modified in any way
• Products used or serviced outside the country of purchase
• Glass parts and other accessory items that are packed with the unit
• Shipping and handling costs associated with the replacement of the unit
• Consequential or incidental damages (Please note, however, that some states do
not allow the exclusion or limitation of consequential or incidental damages, so this
limitation may not apply to you.)
Are there additional warranty exclusions?
• This warranty shall not be valid where it is contrary to U.S. and other
applicable laws, or where the warranty would be prohibited under any
economic sanctions, export control laws, embargos, or other restrictive trade
measures enforced by the United States or other applicable jurisdictions. This
includes, without limitation, any warranty claims implicating parties from, or
otherwise located in, Cuba, Iran, North Korea, Syria and the disputed Crimea
region.
MCAFD800D_29235_ES_IB_B.indd 21MCAFD800D_29235_ES_IB_B.indd 21 4/28/22 11:42 AM4/28/22 11:42 AM

22
23
• Lea todas las instrucciones.
• No toque las superficies calientes. Use las asas o
las perillas.
• A fin de protegerse contra un choque eléctrico y
lesiones a las personas, no sumerja el cable,
los enchufes ni el aparato en agua ni en ningún
otro líquido.
• Todo aparato eléctrico usado en la presencia de los
niños o por ellos mismos requiere la supervisión de
un adulto.
• Desconecte el aparato del tomacorriente cuando
no esté en uso y antes de limpiarlo. Espere que el
aparato se enfríe antes de instalarle o retirarle piezas
y antes de limpiarlo.
• No limpie con estropajos de metal. Pedazitos de
metal pueden partirse y entrar en contacto con
piezas eléctricas, creando un riesgo de descarga
eléctrica.
• No opere ningún aparato que tenga el cable o
enchufe dañado o después de ocurrir una falla de
funcionamiento o si se ha dejado caer o dañado de
cualquier manera. Llame al número de servicio para
el consumidor que aparece en este manual.
• El uso de accesorios no recomendados por el
fabricante del aparato puede ocasionar incendio,
choque eléctrico o lesiones a las personas.
• No use este aparato a la intemperie.
• No permita que el cable cuelgue del borde de la
mesa o del mostrador ni que entre en contacto con
superficies calientes.
• No coloque el aparato sobre ni cerca de las hornillas
de gas o eléctricas ni adentro de un horno caliente.
• Tome mucha precaución al mover de un lugar a
otro un aparato que contenga aceite u otros líquidos
calientes.
• Utilice extrema precaución al retirar o desechar la
grasa caliente.
• Para desconectar, retire el enchufe del
tomacorriente.
• Riesgo de descarga eléctrica. Solamente cocine
en el recipiente extraíble.
• PRECAUCIÓN - No utilice para freír sumergido en
aceite. Este aparato no está diseñado para freír
los alimentos sumergidos en aceite.
• Este aparato se debe usar únicamente con
el fin previsto.
• El aparato debe ser operado solamente en la
posición cerrada.
• Este aparato está diseñado solamente para
usarse sobre el mostrador.
• Este aparato no está diseñado para ser usado por
personas (incluído niños) con capacidad limitada
física, mental o sensoriales disminuidas y falta de
experiencia o conocimiento que les impida utilizar
el aparato con toda seguridad sin supervisión o
instrucción.
• Se debe asegurar la supervisión de los niños para
evitar que usen el aparato como juguete.
• Este aparato no está diseñado para operar por
medio de un temporizador externo o control remoto.
• ADVERTENCIA: La comida derramada puede
ocasionar quemaduras serias. Mantenga el
aparato y el cable alejados de los niños. Nunca
deje que el cable cuelgue sobre el borde del
mostrador, nunca utilice el tomacorriente situado
por debajo del mostrador y nunca utilice con un
cable de extensión.
POR FAVOR LEA ESTE INSTRUCTIVO ANTES DE USAR EL PRODUCTO.
INSTRUCCIONES IMPORTANTES DE SEGURIDAD.
Al utilizar cualquier aparato eléctrico siempre deben tomarse precauciones básicas de seguridad,
incluyendo las siguientes:
CONSERVE ESTAS INSTRUCCIONES.
Este aparato eléctrico es para uso doméstico solamente.
ENCHUFE POLARIZADO (EE.UU/Mexico)
Este aparato cuenta con un enchufe polarizado (un contacto es
más ancho que el otro). A fin de reducir el riesgo de un choque
eléctrico, este enchufe encaja en un tomacorriente polarizada
en un solo sentido. Si el enchufe no entra en el tomacorriente,
inviértalo y si aun así no encaja, consulte con un electricista.
Por favor no trate de alterar esta medida de seguridad.
TORNILLO DE SEGURIDAD
Advertencia: Este aparato cuenta con un tornillo de
seguridad para evitar la remoción de la cubierta exterior
del mismo. A fin de reducir el riesgo de incendio o de
choque eléctrico, por favor no trate de remover la cubierta
exterior. Este producto no contiene piezas reparables
por el consumidor. Toda reparación se debe llevar a cabo
únicamente por personal de servicio autorizado.
CABLE ÉLECTRICO
Un cable de alimentación corto es provisto para reducir los
riesgos de enredarse o tropezar con un cable más largo, o
ser agarrada por niños.
Nota: Si el cable de alimentación está dañado, por favor
llame al número del departamento de garantía que aparece
en estar instrucciones.
MCAFD800D_29235_ES_IB_B.indd 22MCAFD800D_29235_ES_IB_B.indd 22 4/28/22 11:42 AM4/28/22 11:42 AM

22
23
El producto puede variar ligeramente del que aparece ilustrado aquí.
CONOZCA SU PARRILLA
1. Asa
2. Tapa
3. Elementos de calentamiento (elemento inferior, situado debajo de la olla
de cocción)
4. Placa de parrilla extraíble *
5. Olla de cocción extraíble *
6. Panel de control dígital
7. Asas integradas
* Indica piezas desmontables/reemplazables por el consumidor.
3
2
5
4
6
1
3
7
MCAFD800D_29235_ES_IB_B.indd 23MCAFD800D_29235_ES_IB_B.indd 23 4/28/22 11:42 AM4/28/22 11:42 AM
24
25
COMO USAR
Este producto es para uso doméstico solamente.
PRIMEROS PASOS
1. Retire todo material de empaque, las etiquetas promocionales, la cinta de la unidad,
y la tira plástica alrededor del enchufe.
2. Retire todos los accesorio del empaque y lea detenidamente este manual. Preste
particular atención a la instrucciones de uso, advertencias y medidas de seguridad
importantes a fin de evitar lesiones o daños a la propiedad.
3. Lave la placa de parrilla y la olla de cocción con agua caliente jabonosa, luego
enjuague y seque bien. La placa de parrilla y la olla de cocción también son
aptas para lavarse en la máquina lavaplatos. NUNCA ave la unidad principal en la
máquina lavaplatos.
NOTA: La olla de cocción debe estar colocada en su lugar para que funcione la unidad.
Si no se inserta la tapa, el panel de control mostrará “ERR”.
NOTA: La unidad puede generar humo durante el proceso de cocción. Para reducir la
cantidad de humo, recomendamos usar aceite de colza, coco, aguacate, grano de uva
o aceite vegetal en lugar de aceite de oliva. La unidad también puede producir humo
cuando se cocinan las carnes a temperatura alta (500° F / 260° C). Para más recetas de
cocina, visite www.georgeforemancooking.com.
D E
B
C
A
MCAFD800D_29235_ES_IB_B.indd 24MCAFD800D_29235_ES_IB_B.indd 24 4/28/22 11:42 AM4/28/22 11:42 AM

24
25
USO DEL PANEL DE CONTROL DIGITAL
1. Cuando la unidad no está enchufada, el panel de control dígital estará en blanco. Para
activar, enchufe el cable de alimentación al tomacorriente y la pantalla se iluminará.
Si la unidad no se utiliza por 5 minutos, ésta pasará al modo de espera. Presione
cualquier botón para activarla de nuevo.
2. FUNCIONES DE COCCIÓN (A): La unidad cuenta con 7 funciones de cocción
programadas. Presione los botones de flechas orientadas hacia arriba y hacia abajo
para moverse a través de la diferentes funciones de cocción. Una vez que llegue a la
función deseada, presione el botón START/ENTER (iniciar/introducir).
3. Botón START/ENTER (iniciar/introducir) (B): Cuando se presiona el botón START/
ENTER (iniciar/introducir) en el modo que seleccionó, la pantalla mostrará parpadendo
la temperatura programada para esa función. Puede ajustar la temperatura, utilizando
las flechas hacia arriba y hacia abajo. Cuando la temperatura llegue a su ajuste
deseado, presione el botón START/ENTER (iniciar/introducir).
El tiempo de cocción programado aparecerá en el panel de control. Puede ajustar
la temperatura, utilizando las flechas hacia arriba y hacia abajo. Cuando el tiempo
de cocción llegue a su ajuste deseado, presione el botón START/ENTER (iniciar/
introducir). En ese instante, la unidad se activará.
4. Botón CANCEL (cancelar) (C): El botón CANCEL (cancelar) le ayudará a comenzar
de nuevo su selección o detener el proceso de cocción. Cuando seleccione una
función de cocción programada, presione el botón CANCEL una vez para retroceder
y seleccionar una función diferente. Presione y sostenga el botón CANCEL durante 3
segundos para regresar a la pantalla programada.
5. Flechas UP/DOWN (hacia arriba/hacia abjo) (D): Presione las flechas hacia
arriba/hacia abajo para seleccionar las funciones de cocción programadas, cambiar
la temperatura y el tiempo de cocción. Si presiona las flechas arriba/abajo, la
temperatura cambiará en incrementos de 5 grados y el tiempo de cocción cambiará
en incrementos de 1 minuto.
6. PANTALLA DE TIME/TEMPERATURE (TIEMPO/TEMPERATURA DE COCCIÓN) (E):
Durante el ciclo de cocción, puede presionar el botón START/ENTER (iniciar/introducir)
para alternar entre el tiempo restante mostrado y la temperatura fijada. Cuando la
pantalla muestra el tiempo restante, puede utilizar las flechas hacia arriba/hacia
abajo para cambiar el tiempo restante en la función de cocción.
While adjusting the temperature during the cooking cycle, the display will flash. After
no changes have been made for 1 second, the display will flash 3 more times and
return to solid display of the set temperature. You can also press START/ENTER to set
the new temperature.
7. CAMBIO DE ESCALAS DE TEMPERATURA: Cuando la unidad se encuentra en la
pantalla programada, presione y sostenga el botón CANCEL (cancelar) durante 3
segundos para cambiar la temperatura de Fahrenheit a Celsius o Celsius a Fahrenheit.
MCAFD800D_29235_ES_IB_B.indd 25MCAFD800D_29235_ES_IB_B.indd 25 4/28/22 11:42 AM4/28/22 11:42 AM

26
27
DESCRIPCIÓN DE LA FUNCIÓN DE COCCIÓN
GRILL (asar a la parrilla) - Utilice para cocinar alimentos como hamburguesas, bistec,
pollo, vegetales y más.
AIR FRY (freír con aire) - Utilice para freír con aire sus alimentos favoritos en lugar de
grandes cantidades grandes de aceite. Funciona bien con bocadillos congelados, pollo,
papas fritas, vegetales y más.
SLOW COOK (cocción lenta) (Low or High) (temperatura alta o baja)- Utilice para
preparar sus sopas, estofados, y combinaciones de carnes y vegetales favoritos.
BAKE (hornear) - Utilice para hornear, incluso alimentos/bocadillos congelados, platos
principales y hasta postre.
ROAST (asado) - Utilice para cocinar piezas enteras de carne, pescado o vegetales.
BROIL (asar al horno) - Utilice para añadir toques finales a sus alimentos que requieren
asarse según sus recetas.
KEEP WARM (mantener caliente) - Utilice para mantener caliente los alimentos
después de cocinarlos a cocción lenta u otras funciones. Esta función mantendrá
caliente los alimentos a temperatura baja por hasta 4 horas.
Consulte la tabla de cocción y las recetas para encontrar los tiempos y las temperaturas
de cocción recomendados para algunos alimentos comunes e ideas de como utilizar su
nueva unidad BEYONDGRILL
TM
MCAFD800D_29235_ES_IB_B.indd 26MCAFD800D_29235_ES_IB_B.indd 26 4/28/22 11:42 AM4/28/22 11:42 AM

26
27
INFORMACIÓN IMPORTANTE
La olla de cocción se calienta. Cuando la utilice, siempre use guantes de horno o
agarraderas de olla si va a tocar cualquier superficie exterior o interios.
Puede navegar a través del proceso de selección y ajustar la unidad mientras que la
tapa esté abierta, pero la unidad no iniciará el proceso de cocción hasta que la tapa esté
cerrada. Abrir la tapa a mitad del ciclo, también pausará la cocción.
No utilice utensilios de metal en la olla de cocción o en la placa de parrilla.
CÓMO CAMBIAR A LA FUNCIÓN GRILL (ASAR A LA PARRILLA)
DESPUÉS DE UTILIZAR OTRA FUNCIÓN
Si la unidad ya está caliente por haber usado otra función y la placa de parrilla se
encuentra a temperatura ambiente cuando la coloca en la unidad, le recomendamos que
deje calentar la placa de parrilla durante 6 minutos, como mínimo, antes de colocarle los
ingredientes.
A medida que la unidad continua funcionando y la placa de parrilla se calienta, el
lector digital de temperatura continuará parpadeando hasta que la unidad alcance la
temperatura deseada. Cuando la unidad alcance la temperatura deseada, el lector digital
dejará de parpadear.
COCCIÓN A LA PARRILLA EN TANDAS
Cuando se cocina a la parrilla más de dos tandas consecutivas de alimentos, si se se
acumula la grasa encima de la placa de parrilla, puede vaciar la grasa para cocinar
otras tandas. Se recomienda que deje que la unidad se enfríe antes vaciar el aceite/
la grasa de la olla de cocción extraíble. Esto evitará que la grasa se queme y genere
humo. También recomendamos que deje que la placa de parrilla se caliente de nuevo
durante un mínimo de 3 a 5 minutos entre tandas, a fin de asegurar que se
vean marcas de cocción a la parrilla uniformes.
MCAFD800D_29235_ES_IB_B.indd 27MCAFD800D_29235_ES_IB_B.indd 27 4/28/22 11:42 AM4/28/22 11:42 AM
28
29
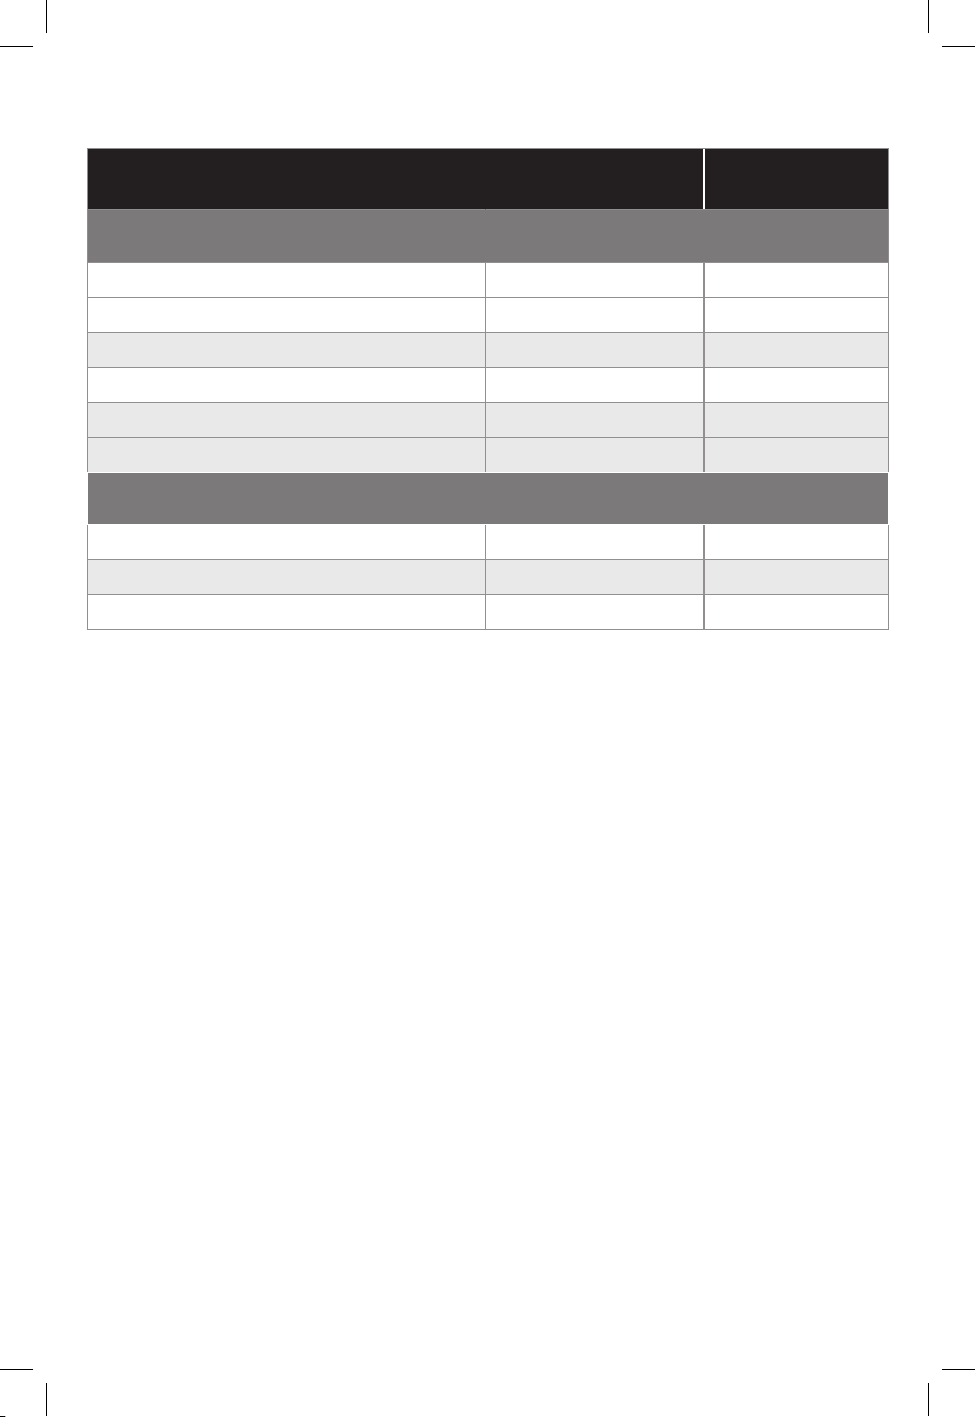
GUÍA PARA FREÍR CON AIRE
*Nota: Para estos y otros alimentos, consulte los tiempos de cocción
sugeridos por el fabricante.
**Nota: No fría con aire carnes crudas congeladas (por ejemplo,
hamburguesas, bistecs).
ALIMENTO TEMPERATURA
TIEMPO DE
COCCIÓN*
Alimento congelado**
Nuggets de pollo (14)
200°C
8-12 minutos
Palitos de pescado (1/4 - 1.1 lb)
215°C
8-12 minutos
Palitos de queso mozarella (1 lb)
175°C
10-14 minutos
Papas fritas grueso (1 lb)
215°C
18-22 minutos
Papas fritas nitas (1 lb)
200°C
15-18 minutos
Brócoli 215-230°C
6-10 minutos
Alimento fresco/descongelado
Papas fritas caseras (4 papas grandes)
200°C
18-22 minutos
Broccoli
215-230°C
6-10 minutos
Pechugas grandes de pollo (6)
160°C
24-28 minutos
MCAFD800D_29235_ES_IB_B.indd 28MCAFD800D_29235_ES_IB_B.indd 28 4/28/22 11:42 AM4/28/22 11:42 AM

28
29
GUÍA PARA ASAR A LA PARRILLA
(Los tiempos de cocción que aparecen incluyen el tiempo
de precalentamiento de la unidad)
ALIMENTO TEMPERATURA
TIEMPO DE
COCCIÓN* COMENTARIOS
Hamburguesas
descongeladas/
preparadas a mano
4 hamburguesas
(1/4 lb cada una)
260°C 14-18 minutos
Cocinados a: 65°C
(voltear a mitad
de la cocción)
Hamburguesas
congeladas
4 hamburguesas
(1/4 lb cada una)
230°C
17-20 minutos
Salchicha alemana
(sin cocinar)
4 salchichas alemanas
200°C
8-12 minutos
Cocinados a: 70°C
(voltear a mitad de
la cocción)
Pechuga de pollo sin
hueso, descongelada
(8 onzas)
260°C 18-23 minutos
Cocinados a: 75°C
(voltear a mitad de
la cocción)
Pechuga de pollo sin
hueso, congelada (8 onzas)
230°C
22-26 minutos
Salmón
2 letes (8 onzas cada una)
230°C
12-16 minutos
Cocinados a: 65°C
(no voltear a
mitad de la
cocción)
Lomillo estilo NY strip,
descongelado
2 bistecs
(12 onzas cada una)
260°C 12-16 minutos
Cocinados a: 65°C
(voltear a mitad
de la cocción)
Tocino (Corte Grueso)
4 tiras (1.3 onzas cada una)
230°C
6-10 minutos
Cocinados al
punto de coccion
deseado
(no es necesario
voltearlos)
Chuletas de cerdo sin
hueso, descongeladas
4 chuletas
(4 onzas cada una)
260°C 8-12 minutos
Cocinados a: 65°C
(voltear a mitad
de la cocción)
Vegetales gruesos
(pimientos, cebollas)
260°C 12-18 minutos
Cocinados al
punto de cocción
deseado
(mezcle de vez en
cuando)
*Nota: Para estos y otros alimentos, consulte los tiempos de cocción sugeridos
por el fabricante.
MCAFD800D_29235_ES_IB_B.indd 29MCAFD800D_29235_ES_IB_B.indd 29 4/28/22 11:42 AM4/28/22 11:42 AM

30
31
CÓMO COCINAR A LA PARRILLA
1. Enchufe el aparato.
2. Coloque la olla de cocción en la unidad e inserte la placa de parrilla.
3. Para seleccionar la función GRILL (asar a la parrilla), utilice las flechas hacia arriba y
hacia abajo hasta que aparezca la palabra GRILL y presione el botón START/ENTER
(iniciar/introducir). La función dejará de parpadear y se convertirá sólida.
4. Una vez seleccionada la función, la temperatura parpadeará en la pantalla (la
temperatura programada es 450°F / 230°C). Puede utilizar las flechas hacia arriba/
hacia abajo para cambiar la temperatura. Presione el botón START/ENTER (iniciar/
introducir).
5. Una vez seleccionada la temperatura, el tiempo de cocción parapadeará en la
pantalla (el tiempo programado es 20 minutos). Puede utilizar las flechas hacia
arriba/hacia abajo para ajustar el tiempo. Presione el botón START/ENTER (iniciar/
introducir) y la pantalla dejará de parpadear.
6. Después de seleccionar las funciones, será necesario precalentar la unidad.
La unidad emitirá un bip una vez y comenzará el ciclo de precalentamiento.
Mientras se precalienta, el círculo alrededor de la pantalla de tiempo/temperatura
parpadeará y la pantalla mostrará “PrE” hasta que la unidad alcance la temperatura
seleccionada y emita un bip. Una vez que la unidad esté precalentada, añada los
ingredientes.
7. Cuando haya comenzado el ciclo de cocción, las 8 luces led del círculo alrededor
de la pantalla de tiempo/temperatura comenzarán a iluminarse. Cada luz led
representa 1/8 del tiempo restante en el ciclo de cocción. Según va pasando cada
segmento de tiempo, la luz led correspondiente dejará de parpadear. Al final del
ciclo de cocción, el círculo estará iluminado completamente.
8. Cuando termine el ciclo de cocción, la unidad emitirá un bip. La función de cocción
actual comenzará a parpadear y la pantalla mostrará “End” (fin) durante 5 minutos.
Si no se toca la unidad, ésta pasará automáticamente al modo de suspensión.
NOTA: Presione el botón START/ENTER (iniciar/introducir) para cambiar el tiempo o la
temperatura durante el ciclo de cocción. La pantalla parpadeará por 1 segundo y luego
regresará a sólida. Durante la cocción, puede abrir la tapa para revisar o voltear sus
alimentos. El reloj automático pausará cuando la tapa esté abierta y luego resumirá la
cocción automáticamente después que esté cerrada.
9. Una vez que termine el ciclo de cocción, puede retirar los alimentos y transferirlos a
un plato de servir. También puede retirar la olla, utilizando guantes de horno.
10. Después de retirar los alimentos, mantenga la tapa abierta para que la unidad se
enfríe más rápido. Si necesita cocinar sus alimentos por más tiempo, simplemente
presione la flecha hacia arriba mientras queda tiempo en el ciclo de cocción, luego
presione el botón START/ENTER (iniciar/introducir).
NOTA: Para cocinar en tandas, vacíe el aceite/la grasa de la olla de cocción extraíble
cada 2 tandas. Esto ayudará a evitar que el aceite/la grasa se queme y genere humo.
MCAFD800D_29235_ES_IB_B.indd 30MCAFD800D_29235_ES_IB_B.indd 30 4/28/22 11:42 AM4/28/22 11:42 AM

30
31
CÓMO FREÍR CON AIRE
1. Enchufe el aparato.
2. Añada los ingredientes a la olla de cocción. No es necesario utilizar la placa de
parrilla para esta función.
NOTA: No es necesario agitar los alimentos durante la cocción.
3. Para seleccionar la función AIR FRY (freír con aire), utilice las flechas hacia arriba y
hacia abajo para mover la perilla hasta la función AIR FRY (freír con aire).
4. Presione START/ENTER (iniciar/introducir) para seleccionar AIR FRY (freír con aire),
– la función dejará de parpadear y se convertirá sólida.
5. Una vez seleccionada la función, la temperatura parpadeará en la pantalla (la
temperatura programada es 425°F / 215°C). Puede utilizar las flechas hacia arriba/
hacia abajo para cambiar la temperatura. Presione START/ENTER (iniciar/introducir).
6. Una vez seleccionada la temperatura, el tiempo de cocción parpadeará (el tiempo
programado es 20 minutos). Puede utilizar las flechas hacia arriba/hacia abajo para
ajustar el tiempo. Presione START/ENTER (iniciar/introducir) y la pantalla dejará de
parpadear.
7. La unidad emitirá un bip.
8. Cuando haya comenzado el ciclo de cocción, las 8 luces led del círculo alrededor
de la pantalla de tiempo/temperatura comenzarán a iluminarse. Cada luz led
representa 1/8 del tiempo restante en el ciclo de cocción. Según va pasando cada
segmento de tiempo, la luz led correspondiente dejará de parpadear. Al final del
ciclo de cocción, el círculo estará iluminado completamente.
9. Fin del ciclo de cocción: cuando termine, la unidad emitirá un bip por 3 veces.
NOTA: Presione el botón START/ENTER (iniciar/introducir) para cambiar el tiempo o la
temperatura durante el ciclo de cocción. La pantalla parpadeará por 1 segundo y luego
regresará a sólida. Durante la cocción, puede abrir la tapa para revisar o voltear sus
alimentos. El reloj automático pausará cuando la tapa esté abierta y luego resumirá la
cocción automáticamente después que esté cerrada.
10. Una vez que termine el ciclo de cocción, puede retirar los alimentos y transferirlos a
un plato de servir. También puede retirar la olla, utilizando guantes de horno.
11. Después de retirar los alimentos, mantenga la tapa abierta para que la unidad se
enfríe más rápido. Si necesita cocinar sus alimentos por más tiempo, simplemente
presione la flecha hacia arriba mientras queda tiempo en el ciclo de cocción, luego
presione el botón START/ENTER (iniciar/introducir).
MCAFD800D_29235_ES_IB_B.indd 31MCAFD800D_29235_ES_IB_B.indd 31 4/28/22 11:42 AM4/28/22 11:42 AM

32
33
CÓMO UTILIZAR LA FUNCIÓN BAKE (HORNEAR)
1. Enchufe el aparato.
2. Coloque la olla de cocción en la unidad y añada los ingredientes a la olla de cocción.
3. Para seleccionar la función BAKE (hornear), utilice las flechas hacia arriba y hacia
abajo hasta que la palabra BAKE resalte en la pantalla y presione el botón START/
ENTER (iniciar/introducir). La función dejará de parpadear y se convertirá sólida.
4. Una vez seleccionada la función, la temperatura parpadeará en la pantalla (la
temperatura programada es (375°F / 190°C). Puede utilizar las flechas hacia arriba/
hacia abajo para cambiar la temperatura. Presione el botón START/ENTER (iniciar/
introducir).
5. Una vez seleccionada la temperatura, el tiempo de cocción parapadeará en la
pantalla (el tiempo programado es 30 minutos). Puede utilizar las flechas hacia
arriba/hacia abajo para ajustar el tiempo. Presione el botón START/ENTER (iniciar/
introducir) y la pantalla dejará de parpadear.
6. Después de seleccionar las funciones, será necesario precalentar la unidad. La
unidad emitirá un bip una vez y comenzará el ciclo de precalentamiento. Mientras se
precalienta, el círculo alrededor de la pantalla de tiempo/temperatura parpadeará y
la pantalla mostrará “PrE” hasta que la unidad alcance la temperatura seleccionada
y emita un bip.
7. Cuando comience el ciclo de cocción, las 8 luces led del círculo alrededor de la
pantalla de tiempo/temperatura comenzarán a iluminarse. Cada luz led representa
1/8 del tiempo restante en el ciclo de cocción. Según va pasando cada segmento de
tiempo, la luz led correspondiente dejará de parpadear. Al final del ciclo de cocción,
el círculo estará iluminado completamente.
8. Cuando termine el ciclo de cocción, la unidad emitirá un bip. La función de cocción
actual comenzará a parpadear y la pantalla mostrará “End” (fin) durante 5 minutos.
Si no se ha tocado la unidad, ésta pasará automáticamente al modo de suspensión.
NOTA: Presione el botón START/ENTER (iniciar/introducir) para cambiar el tiempo o la
temperatura durante el ciclo de cocción. La pantalla parpadeará por 1 segundo y luego
regresará a sólida. Durante la cocción, puede abrir la tapa para revisar o voltear sus
alimentos. El reloj automático pausará cuando la tapa esté abierta y luego resumirá la
cocción automáticamente después que esté cerrada.
9. Una vez que termine el ciclo de cocción, puede retirar los alimentos y transferirlos a
un plato de servir. También puede retirar la olla, utilizando guantes de horno.
10. Después de retirar los alimentos, mantenga la tapa abierta para que la unidad se
enfríe más rápido. Si necesita cocinar sus alimentos por más tiempo, simplemente
presione la flecha hacia arriba mientras queda tiempo en el ciclo de cocción, luego
presione el botón START/ENTER (iniciar/introducir).
NOTA: Para cocinar en tandas, vacíe el aceite/la grasa de la olla de cocción extraíble
cada 2 tandas. Esto ayudará a evitar que el aceite/la grasa se queme y genere humo.
MCAFD800D_29235_ES_IB_B.indd 32MCAFD800D_29235_ES_IB_B.indd 32 4/28/22 11:42 AM4/28/22 11:42 AM

32
33
COMO UTILIZAR LA FUNCIÓN SLOW COOK (COCCIÓN LENTA)
1. Enchufe el aparato.
2. Coloque la olla de cocción en la unidad y añada los ingredientes a la olla de cocción.
3. Para seleccionar la función SLOW COOK (cocción lenta), utilice las flechas hacia
arriba y hacia abajo hasta que SLOW COOK LOW (cocción lenta baja) resalte en la
pantalla y presione el botón START/ENTER (iniciar/introducir). La función dejará de
parpadear y se convertirá sólida.
4. Una vez seleccionada la función, el intervalo de tiempo parpadeará en la pantalla (el
intervalo programado es 8 horas para SLOW (lento), 4 horas para HIGH (alto). Puede
utilizar las flechas hacia arriba/hacia abajo para cambiar la temperatura. Presione el
botón START/ENTER (iniciar/introducir) y la pantalla dejará de parpadear.
NOTA: La temperatura no puede fijarse o ajustarse en la función SLOW COOK (cocción
lenta).
5. Cuando comience el ciclo de cocción, las 8 luces led del círculo alrededor de la
pantalla de tiempo/temperatura comenzarán a iluminarse. Cada luz led representa
1/8 del tiempo restante en el ciclo de cocción. Según va pasando cada segmento de
tiempo, la luz led correspondiente dejará de parpadear. Al final del ciclo de cocción,
el círculo estará iluminado completamente.
6. Cuando termine el ciclo de cocción, la unidad emitirá un bip y cambiará a la función
KEEP WARM (mantener caliente). La unidad está programada para mantenerse en
la función KEEP WARM durante 4 horas. Cuando la función KEEP WARM termine, la
pantalla emitirá un bip y mostrará “End” (fin) durante 5 minutos. Si no se ha tocado
la unidad, ésta pasará automáticamente al modo de suspensión.
NOTA: Presione el botón START/ENTER (iniciar/introducir) para cambiar el tiempo
durante el ciclo de cocción. La pantalla parpadeará por 1 segundo y luego regresará
a sólida. Durante la cocción, puede abrir la tapa para revisar o voltear sus alimentos.
El reloj automático pausará cuando la tapa esté abierta y luego resumirá la cocción
automáticamente después que esté cerrada.
7. Una vez que termine el ciclo de cocción, puede retirar los alimentos y transferirlos a
un plato de servir. También puede retirar la olla, utilizando guantes de horno.
8. Después de retirar los alimentos, mantenga la tapa abierta para que la unidad se
enfríe más rápido. Si necesita cocinar sus alimentos por más tiempo, simplemente
presione la flecha hacia arriba mientras queda tiempo en el ciclo de cocción, luego
presione el botón START/ENTER (iniciar/introducir).
MCAFD800D_29235_ES_IB_B.indd 33MCAFD800D_29235_ES_IB_B.indd 33 4/28/22 11:42 AM4/28/22 11:42 AM

34
35
CÓMO UTILIZAR LA FUNCIÓN ROAST (ASADO)
1. Enchufe el aparato.
2. Coloque la olla de cocción en la unidad y añada los ingredientes a la olla de cocción.
3. Para seleccionar la función ROAST (asado), utilice las flechas hacia arriba y hacia
abajo hasta que resalte ROAST (asado) y presione el botón START/ENTER (iniciar/
introducir). La función dejará de parpadear y se convertirá sólida.
4. Una vez seleccionada la función, la temperatura parpadeará en la pantalla (la
temperatura programada en la pantalla es 375°F / 190°C). Puede utilizar las flechas
hacia arriba/hacia abajo para cambiar la temperatura. Presione el botón START/
ENTER (iniciar/introducir).
5. Una vez seleccionada la temperatura, el tiempo de cocción parpadeará en la
pantalla (el tiempo programado es 20 minutos). Puede utilizar las flechas hacia
arriba/hacia abajo para ajustar el tiempo. Presione el botón START/ENTER (iniciar/
introducir) y la pantalla dejará de parpadear.
6. Cuando comience el ciclo de cocción, las 8 luces led del círculo alrededor de la
pantalla de tiempo/temperatura comenzarán a iluminarse. Cada luz led representa
1/8 del tiempo restante en el ciclo de cocción. Según va pasando cada segmento de
tiempo, la luz led correspondiente dejará de parpadear. Al final del ciclo de cocción,
el círculo estará iluminado completamente.
7. Cuando termine el ciclo de cocción, la unidad emitirá un bip. La función de cocción
actual comenzará a parpadear y la pantalla mostrará “End” (fin) durante 5 minutos.
Si no se ha tocado la unidad, ésta pasará automáticamente al modo suspensión.
NOTA: Presione el botón START/ENTER (iniciar/introducir) para cambiar el tiempo o la
temperatura durante el ciclo de cocción. La pantalla parpadeará por 1 segundo y luego
regresará a sólida. Durante la cocción, puede abrir la tapa para revisar o voltear sus
alimentos. El reloj automático pausará cuando la tapa esté abierta y luego resumirá la
cocción automáticamente después que esté cerrada.
8. Una vez que termine el ciclo de cocción, puede retirar los alimentos y transferirlos a
un plato de servir. También puede retirar la olla, utilizando guantes de horno.
9. Después de retirar los alimentos, mantenga la tapa abierta para que la unidad se
enfríe más rápido. Si necesita cocinar sus alimentos por más tiempo, simplemente
presione la flecha hacia arriba mientras queda tiempo en el ciclo de cocción, luego
presione el botón START/ENTER (iniciar/introducir).
NOTA: Para cocinar en tandas, vacíe el aceite/la grasa de la olla de cocción extraíble
cada 2 tandas. Esto ayudará a evitar que el aceite/la grasa se queme y genere humo.
MCAFD800D_29235_ES_IB_B.indd 34MCAFD800D_29235_ES_IB_B.indd 34 4/28/22 11:42 AM4/28/22 11:42 AM

34
35
CÓMO UTILIZAR LA FUNCIÓN BROIL (ASAR AL HORNO)
1. Enchufe el aparato.
2. Coloque la olla de cocción en la unidad y añada los ingredientes a la olla de cocción.
3. Para seleccionar la función BROIL (asar al horno), utilice las flechas hacia arriba
y hacia abajo hasta que BROIL (asar al horno) resalte en la pantalla y presione
el botón START/ENTER (iniciar/introducir). La función dejará de parpadear y se
convertirá sólida.
4. Una vez seleccionada la función, el intervalo de tiempo (el intervalo programado es
de 10 minutos). Puede utilizar las flechas hacia arriba/hacia abajo para cambiar el
intervalo de tiempo. Presione el botón START/ENTER (iniciar/introducir) y la pantalla
dejará de parpadear.
NOTA: La temperatura no puede fijarse o ajustarse en la función BROIL (asar al horno).
5. Cuando comience el ciclo de cocción, las 8 luces led del círculo alrededor de la
pantalla de tiempo/temperatura comenzarán a iluminarse. Cada luz led representa
1/8 del tiempo restante en el ciclo de cocción. Según va pasando cada segmento de
tiempo, la luz led correspondiente dejará de parpadear. Al final del ciclo de cocción,
el círculo estará iluminado completamente.
6. Cuando termine el ciclo de cocción, la unidad emitirá un bip. La función de cocción
actual comenzará a parpadear y la pantalla mostrará “End” (fin) durante 5 minutos.
Si no se ha tocado la unidad, ésta pasará automáticamente al modo suspensión.
NOTA: Presione el botón START/ENTER (iniciar/introducir) para cambiar el tiempo
durante el ciclo de cocción. La pantalla parpadeará por 1 segundo y luego regresará
a sólida. Durante la cocción, puede abrir la tapa para revisar o voltear sus alimentos.
El reloj automático pausará cuando la tapa esté abierta y luego resumirá la cocción
automáticamente después que esté cerrada.
7. Una vez que termine el ciclo de cocción, puede retirar los alimentos y transferirlos a
un plato de servir. También puede retirar la olla, utilizando guantes de horno.
8. Después de retirar los alimentos, mantenga la tapa abierta para que la unidad se
enfríe más rápido. Si necesita cocinar sus alimentos por más tiempo, simplemente
presione la flecha hacia arriba mientras queda tiempo en el ciclo de cocción, luego
presione el botón START/ENTER (iniciar/introducir).
NOTA: Para cocinar en tandas, vacíe el aceite/la grasa de la olla de cocción extraíble
cada 2 tandas. Esto ayudará a evitar que el aceite/la grasa se queme y genere humo.
MCAFD800D_29235_ES_IB_B.indd 35MCAFD800D_29235_ES_IB_B.indd 35 4/28/22 11:42 AM4/28/22 11:42 AM

36
37
CÓMO UTILIZAR LA FUNCIÓN KEEP WARM
(MANTENER CALIENTE)
1. Enchufe el aparato.
2. Coloque la olla de cocción en la unidad y añada los ingredientes a la olla de cocción.
3. Para seleccionar la función KEEP WARM (mantener caliente), utilice las flechas hacia
arriba y hacia abajo hasta que KEEP WARM (mantener caliente) resalte en la pantalla
y presione el botón START/ENTER (iniciar/introducir). La función dejará de parpadear
y se convertirá sólida.
4. Una vez seleccionada la función, el intervalo de tiempo parpadeará (el intervalo
programado es de 15 minutos). Puede utilizar las flechas hacia arriba/hacia abajo
para cambiar el intervalo de tiempo. El tiempo puede fijarse hasta 4 horas. La
pantalla contará desde (0:00) hasta (4:00). Presione el botón START/ENTER (iniciar/
introducir) y la pantalla dejará de parpadear.
NOTA: La temperatura no puede fijarse o justarse en la función KEEP WARM (mantener
caliente).
5. Cuando comience el ciclo de calentamiento, las 8 luces led del círculo alrededor de
la pantalla de tiempo/temperatura comenzarán a iluminarse. Cada luz led representa
1/8 del tiempo restante en el ciclo de cocción. Según va pasando cada segmento de
tiempo, la luz led correspondiente dejará de parpadear. Al final del ciclo de cocción,
el círculo estará iluminado completamente.
6. Cuando termine el ciclo de calentamiento, la unidad emitirá un bip. La función de
cocción actual comenzará a parpadear y la pantalla mostrará “End” (fin) durante
5 minutos. Si no se ha tocado la unidad, ésta pasará automáticamente al modo
suspensión.
NOTA: Presione el botón START/ENTER (iniciar/introducir) para cambiar el tiempo
durante el ciclo de cocción. La pantalla parpadeará por 1 segundo y luego regresará
a sólida. Durante el ciclo de calentamiento, puede abrir la tapa para revisar o voltear
sus alimentos. El reloj automático pausará cuando se abre la tapa y luego resumirá la
cocción automáticamente después que se cierre.
7. Una vez que termine el ciclo de cocción, puede retirar los alimentos y transferirlos a
un plato de servir. También puede retirar la olla, utilizando guantes de horno.
8. Después de retirar los alimentos, mantenga la tapa abierta para que la unidad se
enfríe más rápido. Si necesita cocinar sus alimentos por más tiempo, simplemente
presione la flecha hacia arriba mientras queda tiempo en el ciclo de cocción, luego
presione el botón START/ENTER (iniciar/introducir).
NOTA: Para cocinar en tandas, vacíe el aceite/la grasa de la olla de cocción extraíble
cada 2 tandas. Esto ayudará a evitar que el aceite/la grasa se queme y genere humo.
MCAFD800D_29235_ES_IB_B.indd 36MCAFD800D_29235_ES_IB_B.indd 36 4/28/22 11:42 AM4/28/22 11:42 AM

36
37
CUIDADO Y LIMPIEZA
La unidad debe limpiarze bien después de cada uso. Siempre espere a que el aparato se
enfríe antes de limpiarlo.
1. Desenchufe la unidad del tomacorriente antes limpiarlo. Mantenga la tapa abierta
después de retirar los alimentos para que la unidad se enfríe más rápido.
2. Para limpiar la unidad principal y el panel de control, páseles un paño húmedo.
3. La olla de cocción y la placa de parrilla extraíbles son aptos para la máquina
lavaplatos.
4. Si lava a mano, seque todas las piezas con aire o una toalla.
5. Si residuos de alimentos o grasa están pegados en la placa de parrilla o cualquier
otra pieza extraíble, colóquelos en un fregadero o apilone en la olla y llene con agua
caliente jabonosa, remoje por un par de horas o durante toda la noche.
MCAFD800D_29235_ES_IB_B.indd 37MCAFD800D_29235_ES_IB_B.indd 37 4/28/22 11:42 AM4/28/22 11:42 AM

38
39
RECETAS
COSTILLAS CON SALSA BBQ TAN TIERNAS QUE LOS HUESOS
SALEN SOLOS
Tamaño de porción: 2
Ingredientes
1 costillar entero de costillitas de cerdo, cortado a la mitad
2 cucharadas de condimento ennegrecido
1 lata de cerveza de 12 onzas
1 taza de salsa de barbacoa
¼ taza de azúcar moreno
1 cucharada de vinagre de manzana
Preparación
1. Sazone las costillitas con el condimento ennegrecido.
2. Coloque las costillitas en el aparato y cúbralas con la cerveza. Seleccione la función High
Slow Cook (cocción lenta a temperatura alta) y cocine durante 2 horas.
3. Combine la salsa de barbacoa, azúcar moreno y el vinagre de manzana en un recipiente
y mézclelos.
4. Cuando las costillitas estén tiernas, retírelas del líquido.
5. Limpie el aparato. Coloque la placa de parrilla en el aparato. Seleccione la función
Grill (asar a la parrilla) y precaliente.
6. Cuando el aparato se haya precalentado, unte en cada lado de las costillitas la salsa
de barbacoa y cocine las costillas por ambos lados (unos 4 minutos por cada lado).
7. Sugerencia para servir: Sirva con papas fritas cocinadas con aire.
MCAFD800D_29235_ES_IB_B.indd 38MCAFD800D_29235_ES_IB_B.indd 38 4/28/22 11:42 AM4/28/22 11:42 AM

38
39
ASADO DE COSTILLAS
Tamaño de porción: 4
Ingredientes
3 dientes de ajo, picados finamente
3 ramitas de romero
2 ramitas de tomillo, sin tallo y picadas finamente
3 cucharaditas de sal, dividida
1 ½ cucharaditas de pimienta negra molida, dividida
4 cucharadas de aceite de oliva, dividido
1 asado de costillas de 3 libras
1 libra de coles de Bruselas
1 libra de papas pequeñas
1 chalote, rebanado
Preparación
1. Combine el ajo, romero, tomillo, 2 cucharaditas de sal, 1 cucharadita de primienta
negra y 2 cucharadas de aceite de oliva en un recipiente y mézclelos hasta crear
una pasta. Frote suavemente el asado con la pasta y deje adobar en el refrigerador
por unos 30 minutos antes de cocinar.
2. Seleccione la función Roast (asar al horno). Fije la temperatura de cocción a 190° C. Fije
la tiempo de cocción a 30 minutos. Añada el asado y cocine por 30 minutos.
3. Revuelva las coles de Bruselas, las papas, 1 cucharadita de sal, ½ cucharadita de
pimienta negra, 2 cucharadas de aceite de oliva y los chalotes en el recipiente.
4. Después de pasar 30 minutos, coloque las coles de Bruselas y las papas a todo alrededor del
asado. Cocine hasta que un termómetro de lectura instantánea, insertado dentro de la parte
más gruesa de la carne, indique 43-46° C (aproximadamente 20 minutos). Agregue tiempo
adicional si es necesario para alcanzar la temperatura.
5. Deje reposar el asado por 20 minutos. La temperatura interna del asado debe haber
incrementado a 55° C.
6. Corte el asado en tiras finas y sirva con las coles de Bruselas y las papas.
MCAFD800D_29235_ES_IB_B.indd 39MCAFD800D_29235_ES_IB_B.indd 39 4/28/22 11:42 AM4/28/22 11:42 AM

40
41
Ingredientes
Albóndigas:
1 libra de carne de res, molida
¼ de taza de migas de pan
2 cucharadas de leche
½ cucharadita de sal
½ cucharadita de pimienta negra,
molida
½ cebolla pequeña, picada
finamente
1 diente de ajo, picado finamente
1 huevo grande
3 cucharada de queso parmesano,
rallado
2 cucharadas de perejil, picado
finamente
Salsa de tomate:
½ cebolla, picada
3 dientes de ajo, picados finamente
2 cucharadas de aceite de oliva
1 lata de 28 onzas de tomates
triturados
1 taza de agua
½ cucharadita de sal
½ cucharadita de pimienta negra,
molida
½ cucharada de azúcar
2 cucharadas de perejil italiano,
picado finamente
10 hojas de albahaca, picadas
finamente
Espaguetis de calabacín verde:
4 calabacines verdes grandes,
cortados en espiral o comprados ya
cortados en espiral
1 cucharadita de sal
1 cucharada de aceite de oliva
ESPAGUETIS DE CALABACÍN VERDE CON ALBÓNDIGAS
Tamaño de porción: 4
Preparación
Preparación de las albóndigas y la salsa de tomate:
1. Combine los ingredientes de las albóndigas en un recipiente. Use sus manos para formar
albóndigas de 1 ½ pulgada. Coloque las albóndigas en la unidad. Seleccione la función
AirFry (freír con aire) y cocine por 10 minutos. Cuando las albóndigas estén cocinadas,
retíre, y consérvelas.
2. Para preparar la salsa de tomate, añada la cebolla, el ajo y 2 cucharadas de aceite de oliva.
Seleccione la función AirFry (freír con aire) y cocine por 3 minutos.
3. Añada los tomates triturados. Enjuague la lata de tomates con agua y añada el agua. Añada
la sal, la pimienta y el azúcar. Coloque las albóndigas de nuevo en la unidad. Ajuste la
función High Slow Cook (cocción lenta a temperatura alta) y cocine hasta que estén blandas
(aproximadamente 2 horas).
4. Cuando las albóndigas estén cocinadas, añada el perejil y la albahaca para terminar la salsa.
Preparación de los espaguetis de calabacín verde:
1. Coloque los espaguetis de calabacín verde en un colador y cubra con ½ cucharadita de sal.
Deje reposar los espaguetis de calabacín verde por 10 minutos para eliminar el exceso de
agua.
2. Coloque los espaguetis de calabacín verde en una bolsa de tela para té y exprima la más
cantidad posible de agua. Este proceso ayuda a que los espaguetis de calabacín verde
queden más blandos y menos pastosos.
3. Coloque los espaguetis en un recipiente grande y revuelva con 1 cucharada de aceite de
oliva. Colóquelos en la unidad.
MCAFD800D_29235_ES_IB_B.indd 40MCAFD800D_29235_ES_IB_B.indd 40 4/28/22 11:42 AM4/28/22 11:42 AM

40
41
POLLO ENTERO FRITO CON AIRE
Tamaño de porción: 4
Ingredientes
1 cucharadita de ajo granulado
1 cucharadita de cebolla granulada
1 cucharadita de pimentón
2 cucharaditas de sal
1 cucharadita de pimenta negra, molida
1 cucharada de romero seco
1 pollo de 3 ½ libras, limpiado y recortado
1 libra de papas pequeñas
8 onzas de cebollas perlas
4 zanahorias, peladas y cortadas en pedazos de 2 pulgadas
3 cucharadas de aceite de oliva
Preparación
1. Combine el ajo, la cebolla, el pimentón, la sal, pimienta negra y el romero en un
recipiente pequeño y mezcle. Frote suavemente los ingredientes sobre el pollo,
reservando como máximo 1 cucharada para sazonar los vegetales.
2. Coloque el pollo en la unidad con las papas, cebollas y zanahorias a todo su alrededor.
Sazone los vegetales con el condimento reservado y rocíe con el aceite de oliva.
3. Seleccione la función AirFry (freír con aire). Ajuste la temperatura de cocción a 190° C y
cocine por 40 minutos.
4. Después de pasar 40 minutos, ajuste la temperatura de cocción a 160° C. Continúe
cocinando hasta que un termómetro de lectura instantánea, insertado en la parte más gruesa
del pollo, muestre 75° C (about 15 minutes).
Espaguetis de calabacín verde:
4 calabacines verdes grandes,
cortados en espiral o comprados ya
cortados en espiral
1 cucharadita de sal
1 cucharada de aceite de oliva
4. Seleccione la función AirFry (freír con aire). Ajuste la temperatura de cocción a 215° C y
cocine hasta que estén blandos (aproximadamente 15 minutos).
5. Cuando los espaguetis de calabacín verde estén cocinados, transfiéralos a una bandeja y
colóqueles por encima las albóndigas y la salsa.
6. Sugerencia para servir: Rocíe con queso y perejil o albahaca fresca.
MCAFD800D_29235_ES_IB_B.indd 41MCAFD800D_29235_ES_IB_B.indd 41 4/28/22 11:42 AM4/28/22 11:42 AM

42
43
INFORMACIÓN DE GARANTÍA Y
SERVICIO AL CLIENTE
Garantía limitada de tres años
(Solamente aplica en los Estados Unidos y el Canadá).
Para servicio, reparaciones o cualquier pregunta sobre su electrodoméstico, por
favor llame a nuestra Línea de Servicio al Cliente al 1-800-947-3745. Por favor,
NO devuelva el producto al lugar donde lo compró. Además, por favor NO envie
el producto por correos al fabricante ni lo lleve a un centro de servicio. También
puede consultar el sitio web que aparece en la portada de este manual.
¿Qué cubre mi garantía?
• Su garantía cubre cualquier defecto de material o de mano de obra, siempre
y cuando la responsabilidad de Spectrum Brands, Inc. no exceda el precio de
compra del producto.
¿Por cuánto tiempo es valida la garantía?
• Su garantía se extiende por tres años a partir de la fecha original de compra
mientras que tenga una prueba de la compra.
¿Qué tipo de asistencia provee mi garantía?
• Su garantía le brinda un producto de reemplazo similar que sea nuevo o que
ha sido restaurado de fábrica.
¿Cómo se puede obtener asistencia?
• Conserve el recibo original de compra.
• Para servicio al cliente y para registrar su garantía, visite www.prodprotect.
com/georgeforeman, o llame al número
1-800-947-3745
, para servicio al
cliente
• Por favor llame al número del centro de servicio autorizado.
1-800-738-0245
.
¿Cómo afecta a mi garantía la ley estatal?
• Esta garantía le otorga derechos legales específicos y el consumidor podría
tener otros derechos que varían de una región a otra.
• Los productos que han sido utilizados en condiciones distintas a las
normales.
• Los daños ocasionados por el mal uso, el abuso o negligencia.
• Los productos que han sido alterados de alguna manera.
• Los daños ocasionados por el uso comercial del producto.
• Los productos utilizados o reparados fuera del país original de compra.
• Las piezas de vidrio y demás accesorios empacados con el aparato.
• Los gastos de tramitación y embarque asociados al reemplazo del producto.
• Los daños y perjuicios indirectos o incidentales.
¿Existen exclusiones de garantía adicionales?
Esta garantía no será válida donde exista oposición a EE.UU. y otras leyes
aplicables, o donde la garantía sería prohibida bajo cualquier sanción
económica, ley de control de exportación, embargo u otra medida comercial
impuesta por los Estados Unidos u otras jurisdicciones aplicables. Esto
incluye, sin limitación, cualquier reclamo de garantía que implique partes de,
u de otro modo localizadas en, Cuba, Irán, Corea del Norte, Siria y la región
disputada de Crimea.
MCAFD800D_29235_ES_IB_B.indd 42MCAFD800D_29235_ES_IB_B.indd 42 4/28/22 11:42 AM4/28/22 11:42 AM

42
43
INFORMACIÓN DE GARANTÍA Y
SERVICIO AL CLIENTE
Garantía limitada de tres años
(No aplica en Estados Unidos y Canadá)
Para servicio, reparaciones o preguntas relacionadas al producto, por favor
llame al número del centro de servicio que se indica para el país donde usted
compró su producto. NO devuélva el producto al fabricante. Llame o lleve el
producto a un centro de servicio autorizado. Usted también puede consultar
a nuestro Centro de Protección del Producto en www.prodprotect.com/
georgeforeman.
¿Qué cubre la garantía?
• La garantía cubre cualquier defecto de materiales o de mano de obra que no
haya sido generado por el uso incorrecto del producto.
¿Por cuánto tiempo es válida la garantía?
• Por tres años a partir de la fecha original de compra mientras que tenga una
prueba de la compra.
¿Cómo se obtiene el servicio necesario?
• Conserve el recibo original como comprobante de la fecha de compra,
comuníquese con el centro de servicio de su país y haga efectiva su garantía
si cumple lo indicado en el manual de instrucciones.
¿Cómo se puede obtener servicio?
• Conserve el recibo original de compra.
• Por favor llame al número del centro de servicio autorizado.
¿Qué relación tiene la ley estatal con esta garantía?
• Esta garantía le otorga derechos legales específicos y el consumidor podría
tener otros derechos que varían de una región a otra.
¿Qué aspectos no cubre esta garantía?
• Los productos que han sido utilizados en condiciones distintas a las
normales.
• Los daños ocasionados por el mal uso, el abuso o negligencia.
• Los productos que han sido alterados de alguna manera.
• Los daños ocasionados por el uso comercial del producto.
• Los productos utilizados o reparados fuera del país original de compra.
• Las piezas de vidrio y demás accesorios empacados con el aparato.
• Los gastos de tramitación y embarque asociados al reemplazo del producto.
• Los daños y perjuicios indirectos o incidentales.
¿Existen exclusiones de garantía adicionales?
Esta garantía no será válida donde exista oposición a EE.UU. y otras leyes
aplicables, o donde la garantía sería prohibida bajo cualquier sanción
económica, ley de control de exportación, embargo u otra medida comercial
impuesta por los Estados Unidos u otras jurisdicciones aplicables. Esto
incluye, sin limitación, cualquier reclamo de garantía que implique partes de,
u de otro modo localizadas en, Cuba, Irán, Corea del Norte, Siria y la región
disputada de Crimea.
MCAFD800D_29235_ES_IB_B.indd 43MCAFD800D_29235_ES_IB_B.indd 43 4/28/22 11:42 AM4/28/22 11:42 AM

44
45
Por favor llame al número correspondiente que aparece en la lista a continuación para
solicitar que se haga efectiva la garantía y donde Ud. puede solicitar servicio, reparaciones
o partes en el país donde el producto fué comprado.
Argentina
Atención al consumidor
0800 444 7296
Horario de atención:
Lunes a viernes de 9 a 13 hs
y de 14.30 a 17 hs.
Mail: postventa@spectrumbrands.com
Bolivia
Atención al consumidor
La Paz: c. Villalobos N°100 esq.
Busch. Miraflores. Tel. (02) 2224924
Santa Cruz: Av. Paraguá C.
Socoris N°2415 (03) 3602002
Cochabamba: c. Uruguay N°211 esq.
Nataniel Aguirre (04) 4501894
Chile
Atención al consumidor
Inversiones la Mundial Ltda.
Dirección: Libertad 790,
Santiago de Chile.
Teléfonos: +56 226820217 – 226810032
Colombia
Spectrum Brands Corp, S.A.S.
Transversal 23 #97-73
Oficinas 403-404-405, Bogotá, Colombia
Línea Servicio al Cliente: 018000510012
Tel. (506) 2233-1361
ryasasanjose1@gmail.com
Costa Rica
RYASA
San Jose centro -
El Parque La Merced: San José,
calle 10 avenidas 2 y 4
San José, Costa Rica
Tel. (506) 2257-5716
Ecuador
Servicio Master
Dirección: Capitán Rafael
Ramos OE 1-85 y Galo plaza lasso.
Tel (593) 2281-3882 / 2240-9870
El Salvador
Sedeblack
Calle San Antonio Abad,
Colonia Lisboa
No 2936
San Salvador,
Depto. de San Salvador
Tel. (503) 2284-8374
Guatemala
Kinal
17 avenida 26-75, zona 11
Centro comercial Novicentro,
Local 37 - Ciudad
Guatemala
Tel. (502)-2476-7367
Honduras
Serviteca
San Pedro Sula,
B Los Andes,
2 calle-entre 11-12 Avenida
Honduras
Tel. (504) 2550-1074
México
Articulo 123 # 95 Local 109 y 112
Col. Centro, Cuauhtemoc,
México, D.F.
Tel. 01 800 714 2503
Nicaragua
LRM ELECTRONICA
Managua - Sinsa Altamira 1.5
kilómetros al norte
Nicaragua
Tel. (505) 2270-2684
Panamá
Supermarcas
Centro comercial El dorado,
Plaza Dorado, Local 2.
Panama
Tel. (507) 392-6231
Perú
Servicio Central Fast Service
Av. Angamos Este 2431
San Borja, Lima Perú
Tel. (511) 2251 388
Puerto Rico
Buckeye Service
Jesús P. Piñero #1013
Puerto Nuevo, SJ PR 00920
Tel.: (787) 782-6175
Republica Dominicana
Prolongación Av. Rómulo
Betancourt
Zona Industrial de Herrera
Santo Domingo, República
Dominicana
Tel.: (809) 530-5409
Venezuela
Inversiones BDR CA
Av. Casanova C.C.
City Market Nivel Plaza
Local 153
Diagonal Hotel Melia,
Caracas.
Tel. (582) 324-0969
MCAFD800D_29235_ES_IB_B.indd 44MCAFD800D_29235_ES_IB_B.indd 44 4/28/22 11:42 AM4/28/22 11:42 AM

44
45
Sello del Distribuidor:
Fecha de compra:
IMPORTADO POR / IMPORTED BY:
Inversiones la Mundial Ltda.
Rut: 78.146.900-9
Libertad 790, Santiago – Chile
Fono: (562) 26810217 info@ilm.cl
IMPORTADO POR / IMPORTED BY:
Spectrum Brands de México, SA de C.V
Avenida 1° de Mayo No. 120
Piso 7, Oficina 702. Colonia San Andres Atoto,
C.P. 53500 Naucalpan de Juárez,
Estado de México, México
Para atención de garantía marque:
01 (800) 714 2503
IMPORTADO POR / IMPORTED BY:
Spectrum Brands Corp, S.A.S.
Transversal 23 #97-73
Oficinas 403-404-405, Bogotá, Colombia
Línea Servicio al Cliente: 018000510012
Tel. (506) 2233-1361
ryasasanjose1@gmail.com
Código de fecha / Date Code:
COMERCIALIZADO POR:
SPECTRUM BRANDS DE MEXICO, S.A. DE C.V.
Avenida 1° de Mayo No. 120 Piso 7, Oficina 702.
Colonia San Andres Atoto, C.P.53500 Naucalpan
de Juárez, Estado de México, México Tel. 01-800-
714-2503
SERVICIO Y REPARACIÓN
Art. 123 No. 95 Col. Centro, C.P. 06050 Deleg.
Cuauhtemoc SERVICIO AL CONSUMIDOR,
VENTA DE REFACCIONES Y ACCESORIOS
01 800 714 2503
At the end of this product’s life, you can mail it to Spectrum Brands at
507 Stokely Drive, Deforest, WI 53532 marked “Product Takeback: Please Recycle!"
Al final de la vida útil de este producto, puede enviarlo por correo a Spectrum Brands,
507 Stokely Drive, Deforest, WI 53532 marcado “Product Takeback: Please Recycle!"
1600 W 120 V ~ 60 HZ
USA 1-800-947-3745
Accessories/Parts 1-800-738-0245
Register your product at www.prodprotect.com/georgeforeman
EE.UU 1-800-947-3745
Accessorios/Partes 1-800-738-0245
Registre su producto a www.prodprotect.com/georgeforeman
IMPORTADO Y DISTRIBUIDO POR:
RAYOVAC ARGENTINA S.R.L.
Av. Del Libertador 6810,
piso 2 dpto. A
1429, CABA, Argentina
+ 54 11 5353-9500
CUIT: 30-70706168-1
Importador N° # 76983
IMPORTADO POR / IMPORTED BY:
AIDISA BOLIVIA S.A.
Av. Chacaltaya No. 2141- Zona
Achachicala La Paz, Bolivia.
Teléfono (591)2- 2305353
NIT 1020647023,
Resolución Ministerial 0661-12.
MCAFD800D_29235_ES_IB_B.indd 45MCAFD800D_29235_ES_IB_B.indd 45 4/28/22 11:42 AM4/28/22 11:42 AM

46
47
MCAFD800D_29235_ES_IB_B.indd 46MCAFD800D_29235_ES_IB_B.indd 46 4/28/22 11:42 AM4/28/22 11:42 AM

46
47
MCAFD800D_29235_ES_IB_B.indd 47MCAFD800D_29235_ES_IB_B.indd 47 4/28/22 11:42 AM4/28/22 11:42 AM
48
PB
29235 E/S
T22-9002760-B
®
Registered Trademark and
TM
Trademark of Spectrum Brands, Inc.
Los símbolos
®
y
TM
, respectivamente, indicant una marca registrada y una marca
comercial de Spectrum Brands, Inc.
Made in China.
Fabricado en China.
© 2022 Spectrum Brands Inc, All rights reserved/ Todos los derechos reservados
Spectrum Brands Inc., Middleton, WI 53562
MCAFD800D_29235_ES_IB_B.indd 48MCAFD800D_29235_ES_IB_B.indd 48 4/28/22 11:42 AM4/28/22 11:42 AM