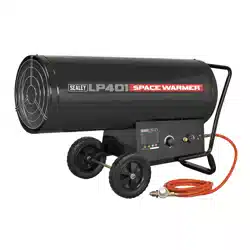
210,000-400,000BTU/HR Space Warmer®
Propane Heater
MODEL NO: LP401.V2
Thank you for purchasing a Sealey product. Manufactured to a high standard, this product will, if used according to these instructions,
and properly maintained, give you years of trouble free performance.
IMPORTANT: PLEASE READ THESE INSTRUCTIONS CAREFULLY. NOTE THE SAFE OPERATIONAL REQUIREMENTS, WARNINGS & CAUTIONS. USE
THE PRODUCT CORRECTLY AND WITH CARE FOR THE PURPOSE FOR WHICH IT IS INTENDED. FAILURE TO DO SO MAY CAUSE DAMAGE AND/OR
PERSONAL INJURY AND WILL INVALIDATE THE WARRANTY. KEEP THESE INSTRUCTIONS SAFE FOR FUTURE USE.
This product is not suitable for primary heating purposes.
1. SAFETY
1.1. ELECTRICAL SAFETY
WARNING! It is the responsibility of the owner and the operator to read, understand and comply with the following:
You must check all electrical products, before use, to ensure that they are safe. You must inspect power cables, plugs, sockets and
any other connectors for wear or damage. You must ensure that the risk of electric shock is minimised by the installation of
appropriate safety devices. A Residual Current Circuit Breaker (RCCB) should be incorporated in the main distribution board. We also
recommend that a Residual Current Device (RCD) is used. It is particularly important to use an RCD with portable products that are
pluggedintoasupplywhichisnotprotectedbyanRCCB.Ifinanydoubtconsultaqualiedelectrician.YoumayobtainaResidual
Current Device by contacting your Sealey stockist.
You must also read and understand the following instructions concerning electrical safety.
1.1.1. TheElectricityatWorkAct1989requiresallportableelectricalappliances,ifusedonbusinesspremises,tobetestedbyaqualied
electrician, using a Portable Appliance Tester (PAT), at least once a year.
1.1.2. The Health & Safety at Work Act 1974 makes owners of electrical appliances responsible for the safe condition of those appliances
andthesafetyoftheapplianceoperators.Ifinanydoubtaboutelectricalsafety,contactaqualiedelectrician.
1.1.3. Ensure that the insulation on all cables and on the appliance is safe before connecting it to the power supply. See 1.1.1 and 1.1.2 and
use a Portable Appliance Tester.
1.1.4. Ensure that cables are always protected against short circuit and overload.
1.1.5. Regularly inspect power supply cables and plugs for wear or damage and check all connections
to ensure that none are loose.
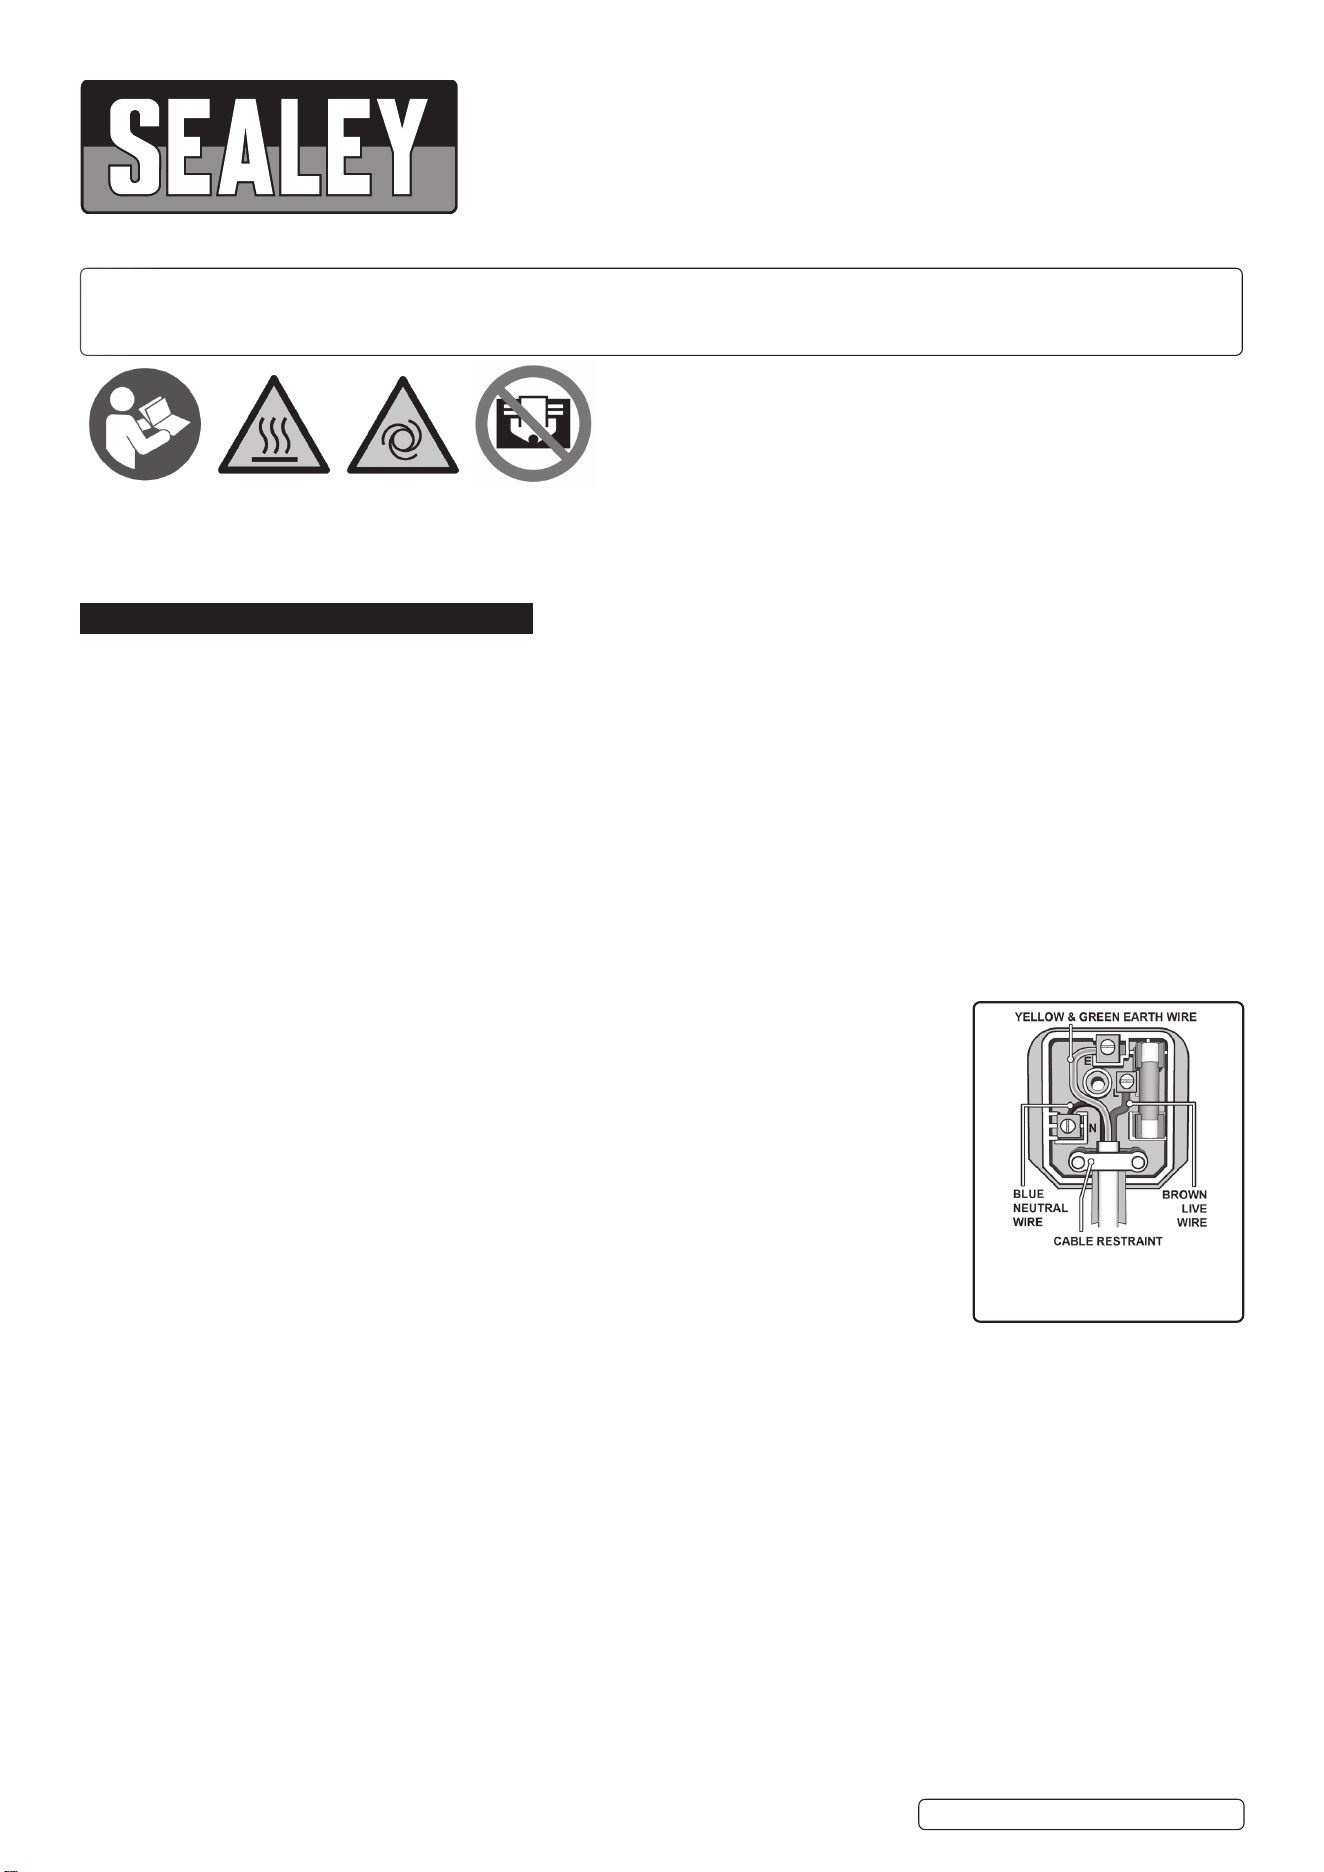
Important: Ensure that the voltage marked on the appliance matches the power supply to be
usedandthattheplugisttedwiththecorrectfuse-seefuseratingonright.
8 DO NOT pull or carry the appliance by the power cable.
8 DO NOT pull the plug from the socket by the cable.
8 DO NOT use worn or damaged cables, plugs or connectors. Have any faulty item repaired or
replacedimmediatelybyaqualiedelectrician.WhenanASTA/BSapprovedUK3pin
13ampplugisdamaged,cutthecablejustabovethepluganddisposeoftheplugsafely.
Fitanewplugaccordingtothefollowinginstructions(UKonly-seediagramsonright).
a) ConnecttheGREEN/YELLOWearthwiretotheearthterminal‘E’.
b) ConnecttheBROWNlivewiretotheliveterminal‘L’.
c) ConnecttheBLUEneutralwiretotheneutralterminal‘N’.
d) After wiring, check that there are no bare wires, that all wires have been connected correctly, that the cable outer insulation
extends beyond the cable restraint and that the restraint is tight.
1.1.6. Ifanextensionreelisuseditshouldbefullyunwoundbeforeconnection.AreelwithanRCDttedispreferredsinceanyappliance
plugged into it will be protected. The cable core section is important and should be at least 1.5mm², but to be absolutely sure that the
capacity of the reel is suitable for this product and for others which may be used in the other output sockets, we recommend the use of
2.5mm² section cable.
1.2. GENERAL SAFETY
WARNING! Disconnect heater from mains electrical supply and gas cylinder before servicing or performing maintenance. Replace or
repairdamagedparts.Usegenuinepartsonly.Unauthorisedpartsmaybedangerousandwillinvalidatethewarranty.
WARNING! NOT to be used for the heating of habitable areas of domestic premises.
9 Store gas cylinders in accordance with regulations applicable to such appliances.
9 Ensure that nothing stands or passes in front of the heater. Mandatory minimum distance from the heater is 2 metres at the front.
9 Only use the propane gas pressure regulator and hose assembly supplied with the heater, without alteration.
9 Useonlyoutdoorsorinwellventilatedsurroundingsawayfromcombustiblematerials.
9 Ensure continuous ventilation is provided to the heater operating area. A ventilation opening must run to the outside of the premises
where the heater is to be operated. The opening must be 100cm² for every kW and must also be set at an equal distance from the
upper and lower parts of the heater operating area.
WARNING! DO NOT use in basements or areas below ground level.
WARNING! If the heater is used for prolonged periods at maximum power, ice may form on the propane cylinder. This is due to
excessive evaporation. In such a case DO NOTusetheheatertode-icethecylinder.
LP401.V2Issue114/03/22
Original Language Version
© Jack Sealey Limited
Refer to
Instructions
Warning!
Hot
Surface
Warning!
Automatic
Start-up
Warning!
DO NOT cover
RECOMMENDED FUSE
RATING: 3AMP

WARNING!Ifthesmellofgasispresent,isolatethegascylinderimmediatelyandinvestigatethereasonbeforere-connectingit.Be
awarethatpropaneisheavierthanairandthatleakagewillaccumulateatoorlevel
8 DO NOTusetheheaterifdamaged.Takeimmediateactiontorepairorreplacedamagedparts.Useanauthorisedserviceagent
only.
8 DO NOT use the heater for residential use.
8 DO NOT allow untrained persons to ignite the heater.
8 DO NOT operate the heater without the cover.
8 DO NOTmodifytheheaterinanyway.Theheaterisnotdesignedtooperateinconjunctionwithanyformofducting.
8 DO NOTuseanakedametotryandignitetheheater.
8 DO NOTusetheheaternearammable,combustibleorexplosivematerials-liquids,solidsorgases.
8 DO NOT leave the heater unattended whilst in use.
8 DO NOTobstructtheairinletandoutletsectionsoftheheater.Keepimmediateareacleanandtidy.
8 DO NOT point the heater towards the gas cylinder.
9 Keepchildrenawayfromtheheater.
9 Keeptheheatercleanandingoodworkingorder.
9 Ensurethattheheateriscorrectlyturnedoandthegassourceisolatedwhennotinuse.
9 When not in use for any length of time, store heater in a safe, dry, childproof location.
▲ CARBON MONOXIDE (CO) RISKS
This heater will produce a very small amount of carbon monoxide as part of its normal operation. As carbon monoxide is a toxic gas,
particular care must be taken to provide adequate ventilation.
The result of inadequate ventilation could be fatal.
Early indications of the onset of carbon monoxide poisoning include:
●Headache
●Dizziness
●Burningeyesandnasalpassages
●Nausea
●Drymouthorsorethroat.
In the event of these symptoms being present, leave the area immediately and get fresh air.
Turnotheheaterandtakeoutofuseuntilserviced.
NOTE: This appliance is not intended for persons (including children) with reduced physical, sensory or mental capabilities, or lack of
experience and knowledge, unless they have been given supervision or instruction concerning use of the appliance by a
person responsible for their safety. Children should be supervised to ensure that they do not play with the appliance.
2. INTRODUCTION
Ideallargeheaterforheatingwell-ventilatedareasecientlyandquickly.Mountedonwheelswithintegralhandle,soeasilymovedtowhere
heatingisrequired.Featuresfullyautomaticelectronicignitionforeasytrouble-freestarting.Fullyadjustablethermostaticallycontrolledheat
output.Fuelsafetycut-outintheeventofoverheatorpowerfailure.Suppliedwithapprovedpropanegasregulatorandhose.
3. SPECIFICATION
Model No:..................................................LP401.V2
Airow: .....................................................1400cfm
Fuel Consumption: .........................................5.2-8.4kg/hr
Fuel: . . . . . . . . . . . . . . . . . . . . . . . . . . . . . . . . . . . . . . . . . . . . . . . . . . . . . . . Propane
Heated Area:.........................................72,000ft³(2,038m³)
Output: ...............................210,000-400,000Btu/hr(61.5-117kW)
Supply: . . . . . . . . . . . . . . . . . . . . . . . . . . . . . . . . . . . . . . . . . . . . . . . . . . . . . . . .230V
4. ASSEMBLY
4.1. Stand the heater carefully on end (air inlet upwards).
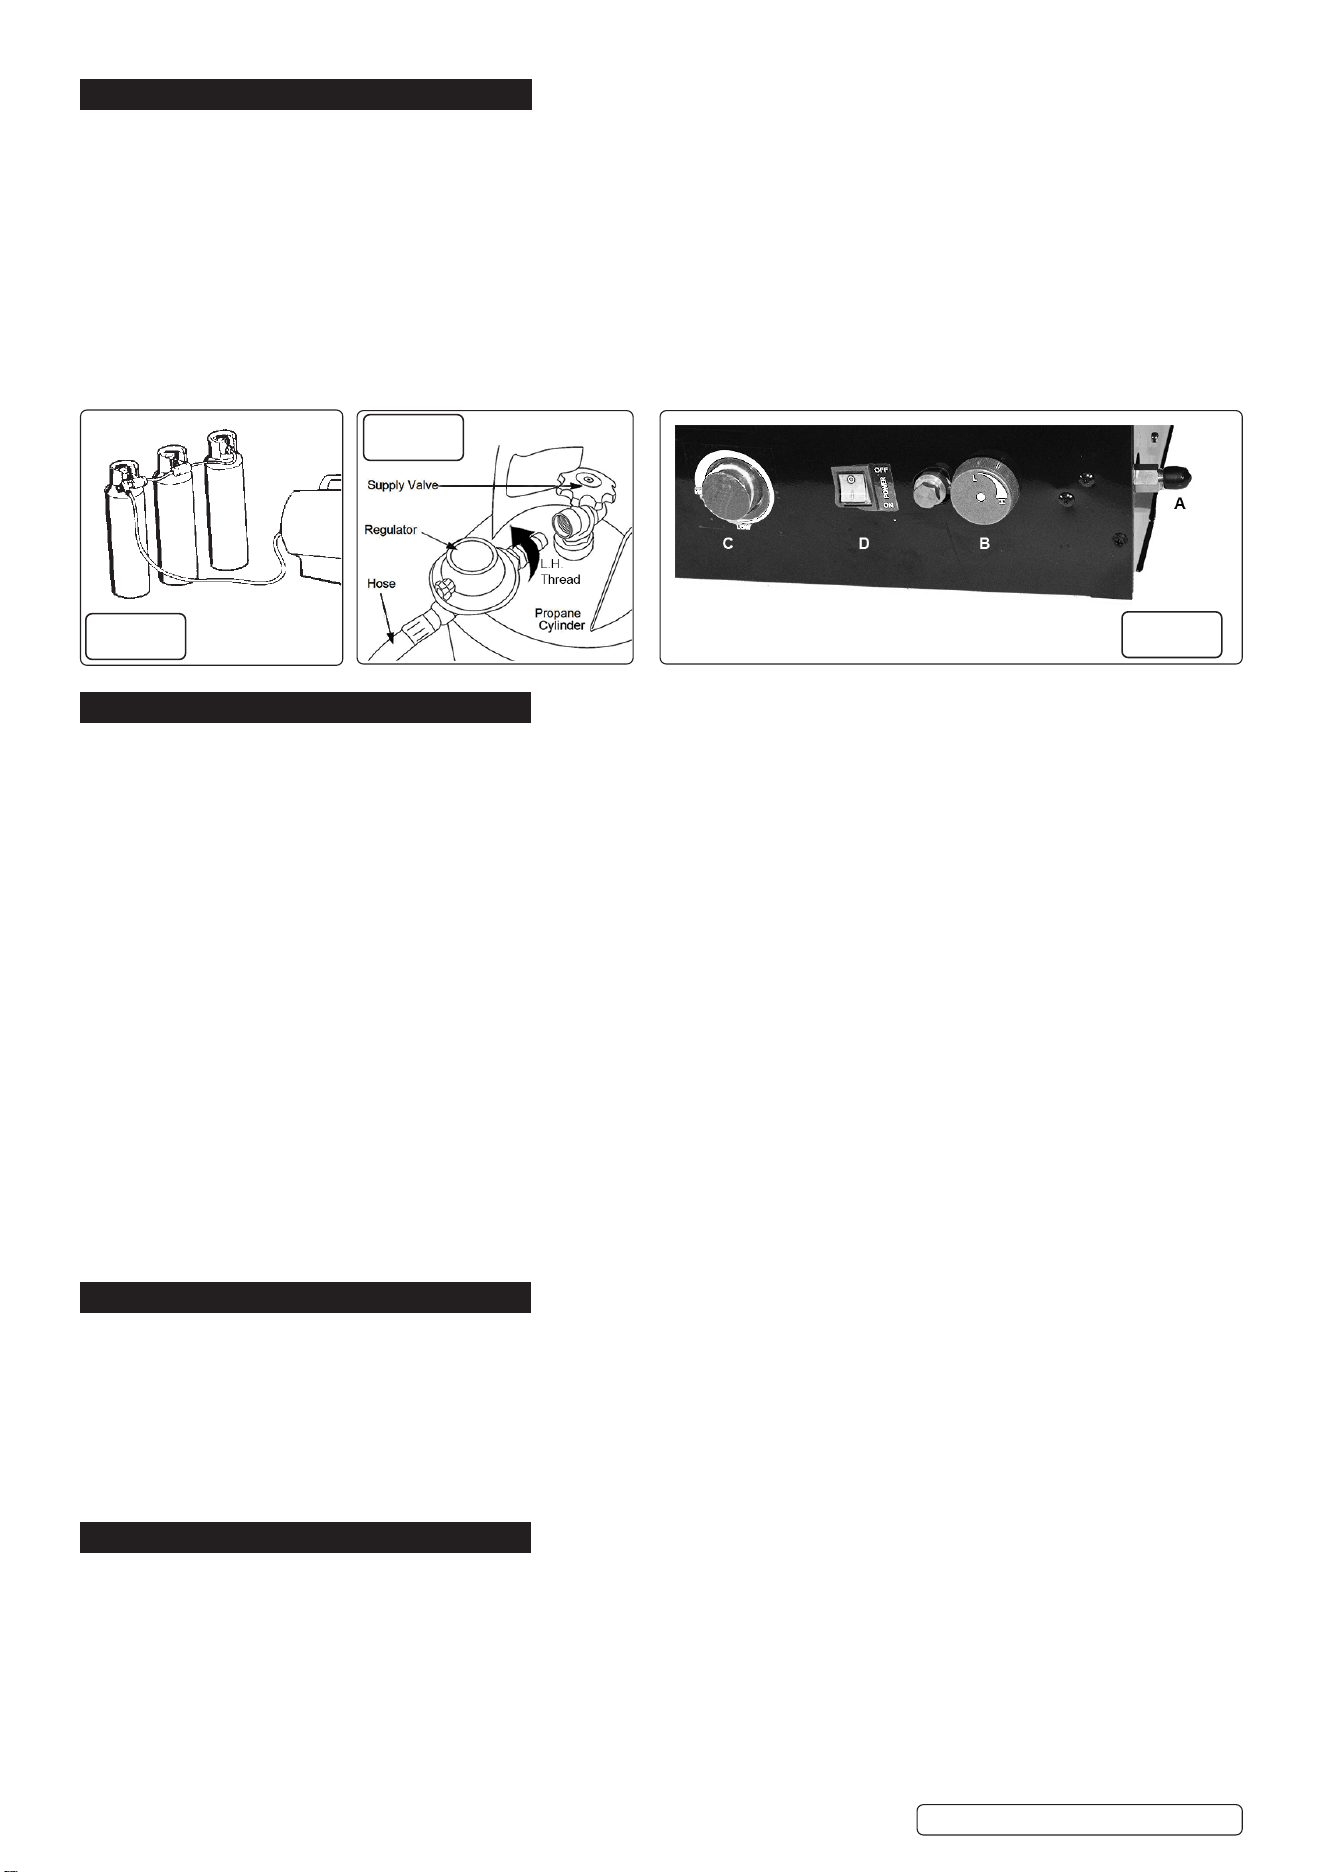
4.2. Attachthechassistotheheaterusingsixscrews(g.1.A).
4.3. Attachthehandletothechassisusingfourscrews(g.1.B).
4.4. Slidetheaxle(g.2.A)throughthechassislocations.
4.5. Slideaspacer(g.2.B)ontoeachendoftheaxle.
4.6. Slideawheelovereachendoftheaxle,followedbyawasher(g.2.C)
4.7. Securetheassemblybyinsertingacotterpin(g.2.D)ineachendoftheaxleandbendingthelegswithpliers.
Original Language Version
© Jack Sealey Limited
LP401.V2Issue114/03/22
Fig.1 Fig.2
5. INSTALLATION
Note: If a small gas cylinder is used, the heater may not operate at maximum efficiency. It is recommended to use two or more cylinders
linkedinparallel,toachievemaximumcontinuousefficiency(fig.3).Ifinanydoubt,consultthegassupplierforadvice.
5.1. CONNECTIONS
5.1.1. Check heater and gas cylinder(s) to ensure that they are in good condition. If not, stop and contact your supplier immediately.
5.1.2. Site the heater and gas cylinder in the location to be heated. Gas cylinders must only be used when standing vertically, with the outlet
upwards.
5.1.3. Connect the heater to an electrical supply outlet, ensuring that the machine is correctly earthed. See safety instructions.
5.1.4. Connect the gas supply hose to the pressure regulator, and connect the regulator to the gas cylinder (fig.4).
Note: The regulator connects to the cylinder with a left hand thread.
5.1.5. Connect the otherendofthegassupplyhosetotheheater’sgasinletconnector(fig.5.A).Ensureallconnectionsaretight.
5.1.6. Open the tap of the gas cylinder gradually, checking hose and all fittings for gas leaks. Close gas tap if a leak is suspected.
WARNING! DO NOT USE A NAKED FLAME! To check for leaks, we recommend the use of a foamy soap solution for leak tracing.
6. OPERATION
6.1. STARTING
6.1.1. Openthesupplyvalveonthecylinder(s)slowly.Openingtoorapidlymayshuttheexcessowvalveonthecylinder.Ifthisdoes
happen,closethesupplyvalveandre-openmoreslowly. Theexcessowvalveisasafetyfeaturetostoptheowofgasincaseofa
majorleakinthehose.
6.1.2. Setthethermostat(g.5.C)to‘High’.
6.1.3. TurnthepowerswitchON(g.5.D).
6.1.4. The heater will ignite automatically.
6.1.5. Theheatoutputcanberegulatedbyturningtheheatoutputvalve(g.5.B).
6.1.6. Settherequiredambienttemperaturebymeansofthethermostat.Whenthetargettemperatureisreached,theheaterwillswitcho
andwillre-ignitewhenthetemperaturedropsbelowthatset.
6.2. SHUTTING DOWN
6.2.1. Firstly, close the valve on the propane cylinder(s).
6.2.2. Ifnotalreadyrunning,startthemachineasin6.1.2.
6.2.3. Letthemachinerununtiltheameextinguishes,signifyingthegashasbledaway.
6.2.4.
TurnthepowerswitchOFF(g.5.D).
6.2.5. Turn the thermostat to
OFF
.
6.2.6. Disconnect the heater from the mains electric supply.
6.3. RESTART AFTER SAFETY SHUTDOWN
6.3.1. If the heater shuts down automatically owing to a safety issue:
Close the supply valve.
Disconnect from the mains.
Wait for a minimum of 5 minutes.
Restartasinsection6.1.
7. MAINTENANCE
7.1. Inspect the heater, its electrical and gas connections before each use.
If any component causes concern, replace before use.
7.2. Havetheheaterinspectedandservicedbyacompetentpersononaregularbasistoensuresafeandecientperformance.
WARNING Regarding Air Contaminants.
Air contaminants taken into the heater will damage the unit, cause health problems and safety issues.
Example: Body shop filler dust and overspray dust will clog the burner diffuser, contaminate the combustion chamber and damage the
internal parts of the heater. If contaminants are present the heater must be supplied with clean air.
Please note that any parts damaged by filler dust or overspray dust will not be covered by warranty. Additionally a cleaning
charge will be made for any heaters damaged by filler dust or overspray dust.
8. STORAGEt
8.1. When taking the heater out of use, disconnect from its cylinder(s) and remove them to secure outdoor storage in accordance with
local regulations.
8.2. Store the heater in a safe, dry, childproof location.
Original Language Version
© Jack Sealey Limited
Fig.3
Fig.4
LP401.V2Issue114/03/22
Fig.5
Original Language Version
© Jack Sealey Limited
Sealey Group, Kempson Way, Suffolk Business Park, Bury St Edmunds, Suffolk. IP32 7AR
01284 757500 01284 703534 sales@sealey.co.uk www.sealey.co.uk
ENVIRONMENT PROTECTION
Recycle unwanted materials instead of disposing of them as waste. All tools, accessories and packaging should be sorted, taken to
a recycling centre and disposed of in a manner which is compatible with the environment. When the product becomes completely
unserviceable and requires disposal, drain any fluids (if applicable) into approved containers and dispose of the product and fluids
according to local regulations.
WEEE REGULATIONS
DisposeofthisproductattheendofitsworkinglifeincompliancewiththeEUDirectiveonWasteElectricalandElectronicEquipment
(WEEE). When the product is no longer required, it must be disposed of in an environmentally protective way. Contact your local solid
waste authority for recycling information.
LP401.V2Issue114/03/22
Note: It is our policy to continually improve products and as such we reserve the right to alter data, specifications and component parts without prior
notice. Please note that other versions of this product are available. If you require documentation for alternative versions, please email or call
our technical team on technical@sealey.co.uk or 01284 757505.
Important: No Liability is accepted for incorrect use of this product.
Warranty: Guarantee is 24 months from purchase date, proof of which is required for any claim.