
www.kingsbottle.com (USA) |www.kingsbottle.com.au (Australia)
USER MANUAL
KBU50/100/170DX DUAL ZONE WINE REFRIGERATORS
COMPRESSOR WINE REFRIGERATORS
PLEASE NOTE: !
•
Every time the unit is powered ON, there will be a 6-minute delay for the compressor to start.
•
For optimal use of this product, the temperature of the LOWER cooling zone should be set to at least 5°F
(2°C) above the temperature of the UPPER cooling zone.
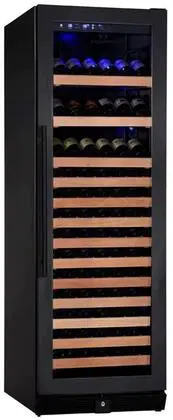
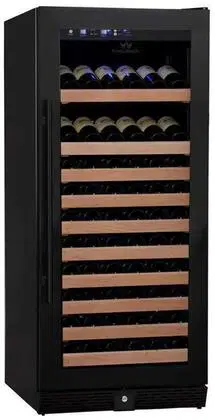
BORDERLESS BLACK GLASS DOOR SERIES
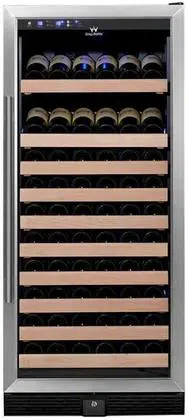
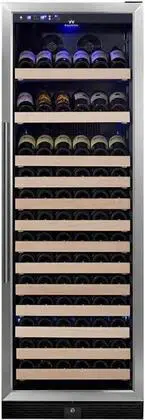
GLASS DOOR WITH STAINLESS TRIM SERIES
KBU50DX-FG
KBU100DX-FG
KBU170DX-FG
KBU170DX-SS
KBU100DX-SS
KBU50DX-SS
( Note: The model number in Australia is KB instead of KBU)
www.kingsbottle.com (USA) |www.kingsbottle.com.au (Australia) 2
Congratulations
Congratulations and thank you for
choosing our KingsBottle wine
coolers. We are sure you will find
your new appliance a pleasure to
use. Before installing and operating
the wine cooler, we recommend that
you read through this manual which
provides a description of your wine
cooler and its functions.!
To avoid the risks that are always
present when you use an electric
appliance, it is important that the
appliance is installed correctly and
that you read the safety instructions
carefully to avoid misuse and
hazards.!
We recommend that you keep this
instruction booklet for future
reference and pass it on to any
future owners.!
After unpacking the appliance,
please inspect it to verify it is not
damaged. If in doubt, do not use
the appliance but contact us or your
local customer care center.!
CONTENTS
TABLE OF CONTENTS
Chapter
Contents
Page
Part I
Important Safety & Pre-Use Instructions
3
Part II
Diagram & Description of Refrigerator
4
Part III
Installation Instructions!
5-7
Part IV
Layout & Storage
8-10
Part V
Temperature Setting and Operating the Refrigerator
11
PART VI
Troubleshooting Guide
12-14
Part VII
Maintenance Guide
15
Part VIII
Technical Data
16
Part IX
Warranty Information
16
COMPRESSOR WINE REFRIGERATORS
DISCLAIMER
The manufacturer accepts no liability for any spoilage to the
content of the refrigerator, not even when the device is within the
warranty period. Similarly, the manufacturer accepts no liability
for personal injury due to incorrectly stored goods, which are for
personal consumption or resale.
www.kingsbottle.com (USA) |www.kingsbottle.com.au (Australia) 3
PART I IMPORTANT SAFETY INSTRUCTIONS
Please read this user manual carefully and store in a handy
place for later reference. The symbols you will see in this
booklet have these meanings:!
This symbol indicates information concerning your personal safety
This symbol indicates information on how to avoid damaging the
appliance
This symbol indicates tips and information about the use of the
appliance
This symbol indicates tips and information about economical and
ecological use of the appliance
TO REDUCE THE RISK OF FIRE, ELECTRICAL SHOCK, OR
INJURY WHEN USING YOUR APPLIANCE, FOLLOW
THESE BASIC PRECAUTIONS:
1. Read all instructions before using the wine cooler.
2. DANGER or WARNING: Risk of child entrapment. Child
entrapment and suffocation pose a serious problem and
children should not be let near the appliance unsupervised.
Junked or abandoned appliances are still dangerous…
even if they will “just sit in the garage for a few days."
3. Before you throw away your old wine cooler:
•
Take off the door.
•
Dismantle the Shelves into pieces so that children may
not climb inside easily.
4. Never allow children to operate, play with, or crawl inside
the appliance.
1. The wine cooler must be plugged into its dedicated
110/115V, 60Hz AC electrical outlet.
( Note: 220/240V, 50 Hz in Australia)
2. The plug must be accessible when the cooler is in position.
3. It is essential that the power point is properly grounded.
Consult a qualified electrician if you are unsure.
4. Don’t use extension cords or adapter plugs with this cooler.
5. If the power cord is damaged, have it replaced by a
qualified service technician.
6. Unplug the cooler before cleaning it, or changing the light
bulb to avoid electric shock.
7. Never clean appliance parts with flammable fluids. The
fumes can create a fire hazard or explosion.
8. Never unplug the cooler by pulling the electrical cord as this
may damage it. Grip the plug firmly and pull straight out.
9. Choose a location for your cooler that isn’t too cold. The
ambient room temperature should be above 50° F.
10. Stand your cooler in a dry place – avoid areas of high
moisture or humidity.
11. Don’t put the cooler in frosty or unprotected areas like a
garage or on the verandah.
12. Keep the cooler out of direct sunlight.
13. Don’t locate the cooler near stoves, fires or heaters.
14. Do not store in the vicinity of any other appliance. Do not
store near gasoline or any other flammable vapors. The
fumes can create an explosion or lead to a fire hazard.
15. When installed correctly, your cooler should:
16. Have adequate space at the back and sides for air
circulation. (See Page 5)
17. Be aligned to the surrounding cupboards.
18. Have doors that will self-close from a partially open position
SAFETY
place for later reference.
The symbols you will see in this booklet have these meanings:
WARNING
CAUTION
TIPS & INFORMATION
ENVIRONMENTAL TIPS
Meanings of symbols used in this manual are shown below:
WARNING
‘flammable’ and/or a small flame symbol,
do not store them inside any refrigerator or
freezer. If you do so you may cause an explosion.
remove any doors. Children can suffocate if they get
trapped inside.
blowing gases. Avoid safety hazards by carefully
disposing of this appliance.
WARNING
The refrigerator must be plugged into its own
dedicated 220-240V, 50Hz AC electrical outlet.
The plug must be accessible when the refrigerator is
in position.
It is essential the power point is properly earthed to
ground. Consult a qualified electrician if you are unsure.
Don’t use extension cords or adapter plugs with this
refrigerator.
If the power cord is damaged, have it replaced by a
qualified service technician.
Unplug the refrigerator before cleaning it, or changing
the light bulb to avoid electric shock.
Never unplug the refrigerator by pulling the electrical
cord as this may damage it. Grip the plug firmly and
pull straight out.
Choose a location for your refrigerator that isn’t too cold.
The ambient room temperature should be above 10°C.
Stand your refrigerator in a dry place – avoid areas
of high moisture or humidity.
Don’t put the refrigerator in frosty or unprotected areas
like a garage or on the verandah.
Keep the refrigerator out of direct sunlight.
Don’t locate the refrigerator near stoves, fires or heaters.
When installed correctly, your refrigerator should:
– Have adequate space at the back and sides
for air circulation (refer to page 9).
– Be aligned to the surrounding cupboards.
– Have doors that will self-close from a partially
open position.
WARNING
This appliance may contain a small quantity of environmentally
friendly, but flammable, non-synthetic R600a refrigerant:
damaged during transportation and installation.
8g of refrigerant. The amount of refrigerant charged in the
appliance can be found on the rating plate on the appliance.
in the built-in structure, clear of obstruction.
accelerate the defrosting process, other than those
recommended by the manufacturer.
3
per 8g of refrigerant. The amount of refrigerant charged
in the appliance can be found on the rating plate on
the appliance.
BEFORE USING YOUR WINE COOLER
•
Remove the exterior and interior packing.
•
Before connecting the wine cooler to the power source, let it stand upright for approximately 24 hours. This will reduce the possibility of a
malfunction in the cooling system from handling during transportation.
•
Clean the interior surface with lukewarm water using a soft cloth.
www.kingsbottle.com (USA) |www.kingsbottle.com.au (Australia) 4
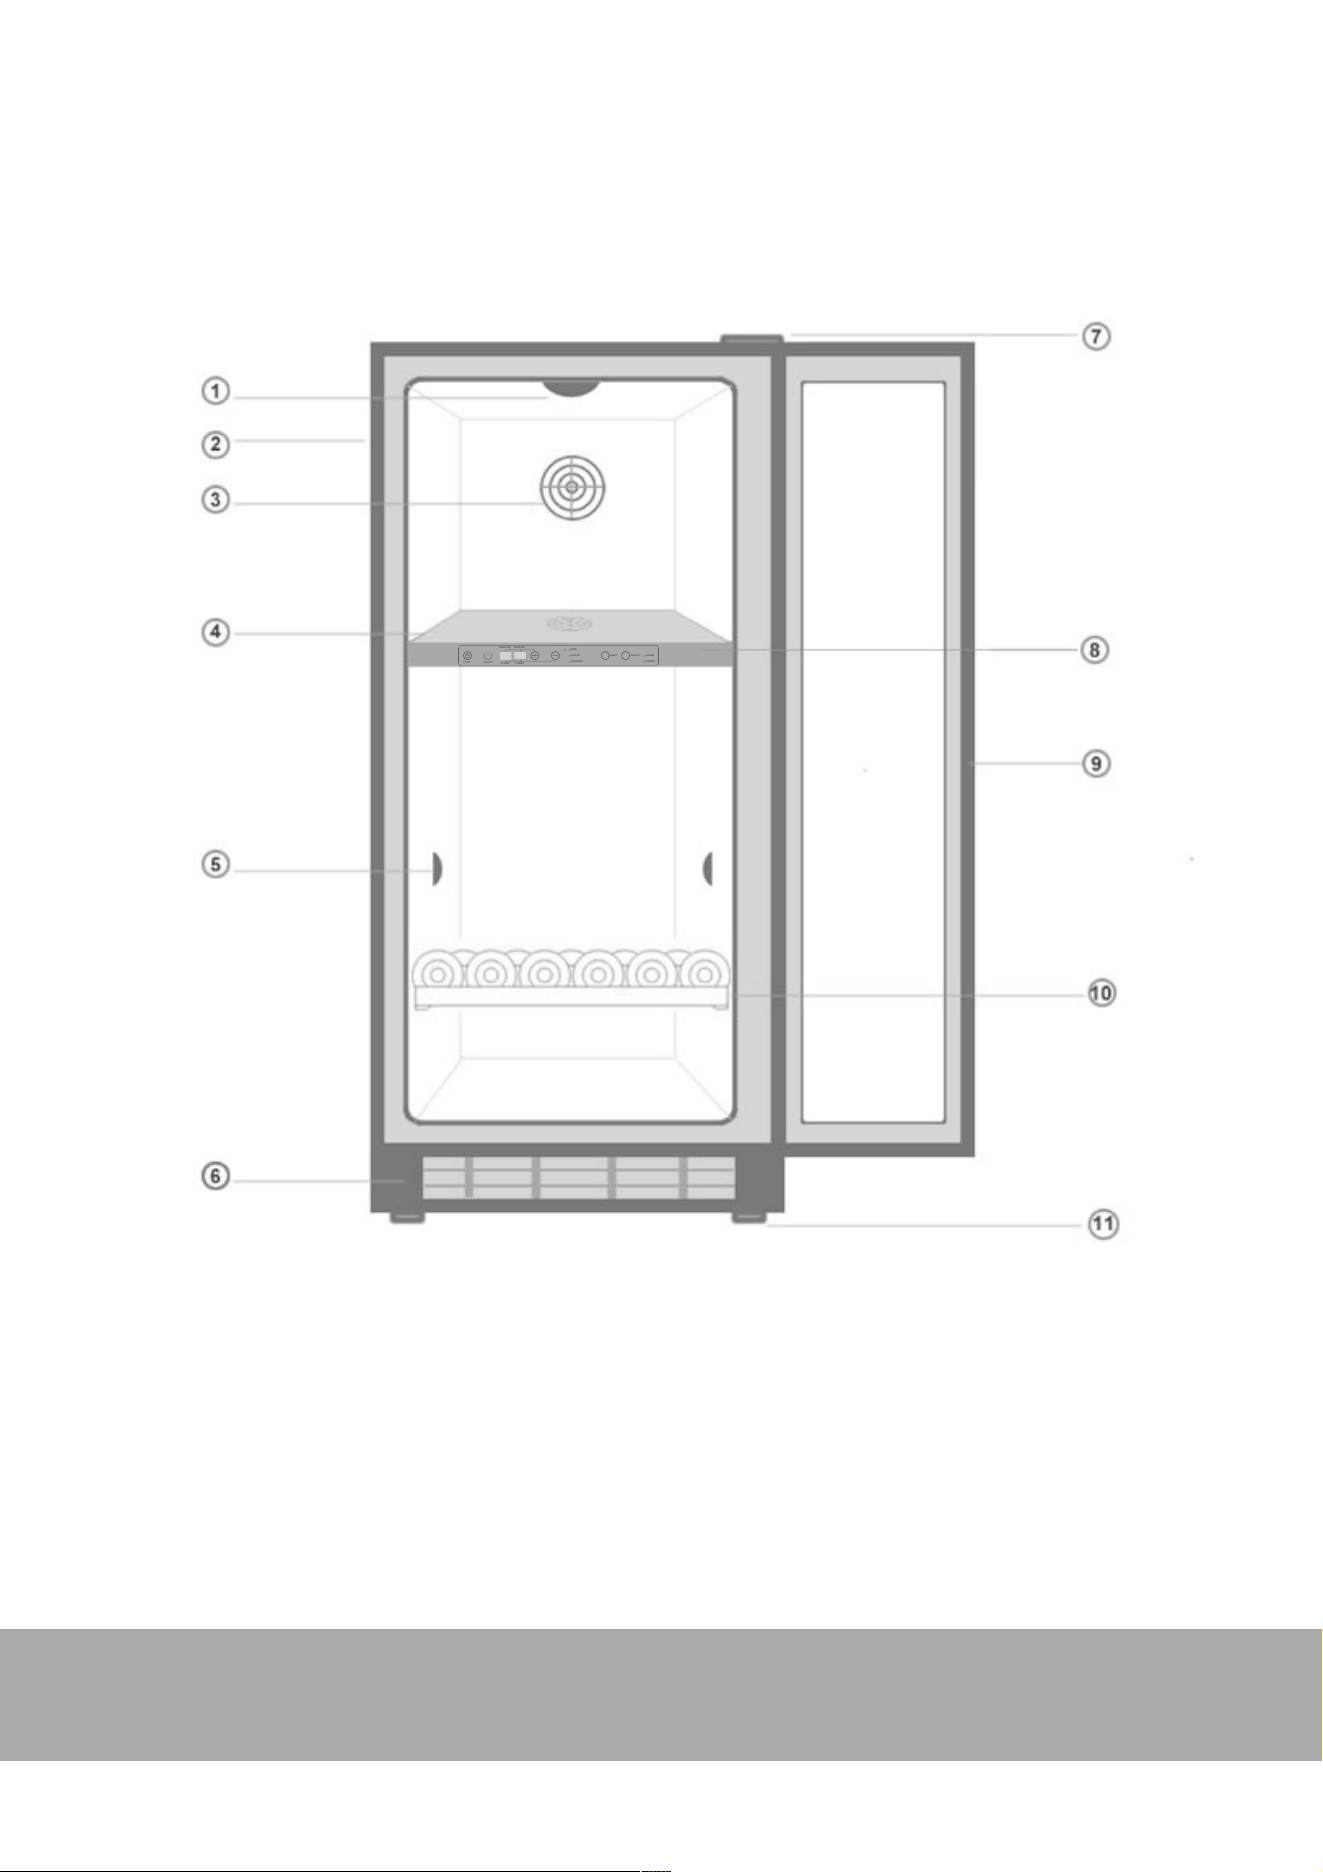
PART II"" DIAGRAM & DESCRIPTION OF REFRIGERATOR
FEATURES
COMPRESSOR WINE REFRIGERATORS
YOUR WINE COOLER ALSO INCLUDES THE FOLLOWING:
•
Instruction manual
•
Two keys
•
Top and bottom hinges , also screws for changing the door hinge
1 Interior Top LED Light!
2 Housing!
3 Ventilation DC Fan!
4 PCB Control Board!
5 Interior Side LED Light!
6 Front grill!
7 Door hinge!
8 Display and Control Panel!
9 Glass Door!
10 Sliding shelf!
11 Adjustable stand feet
TEMP.SET
TEMP.SET
UPPER LOWER
ON/OFF
LOCK
RED
WHITE
SPARKLE
LIGHT
SELECT
UPPER
LOWER
UPPER ZONE
LOWER ZONE
www.kingsbottle.com (USA) |www.kingsbottle.com.au (Australia) 5
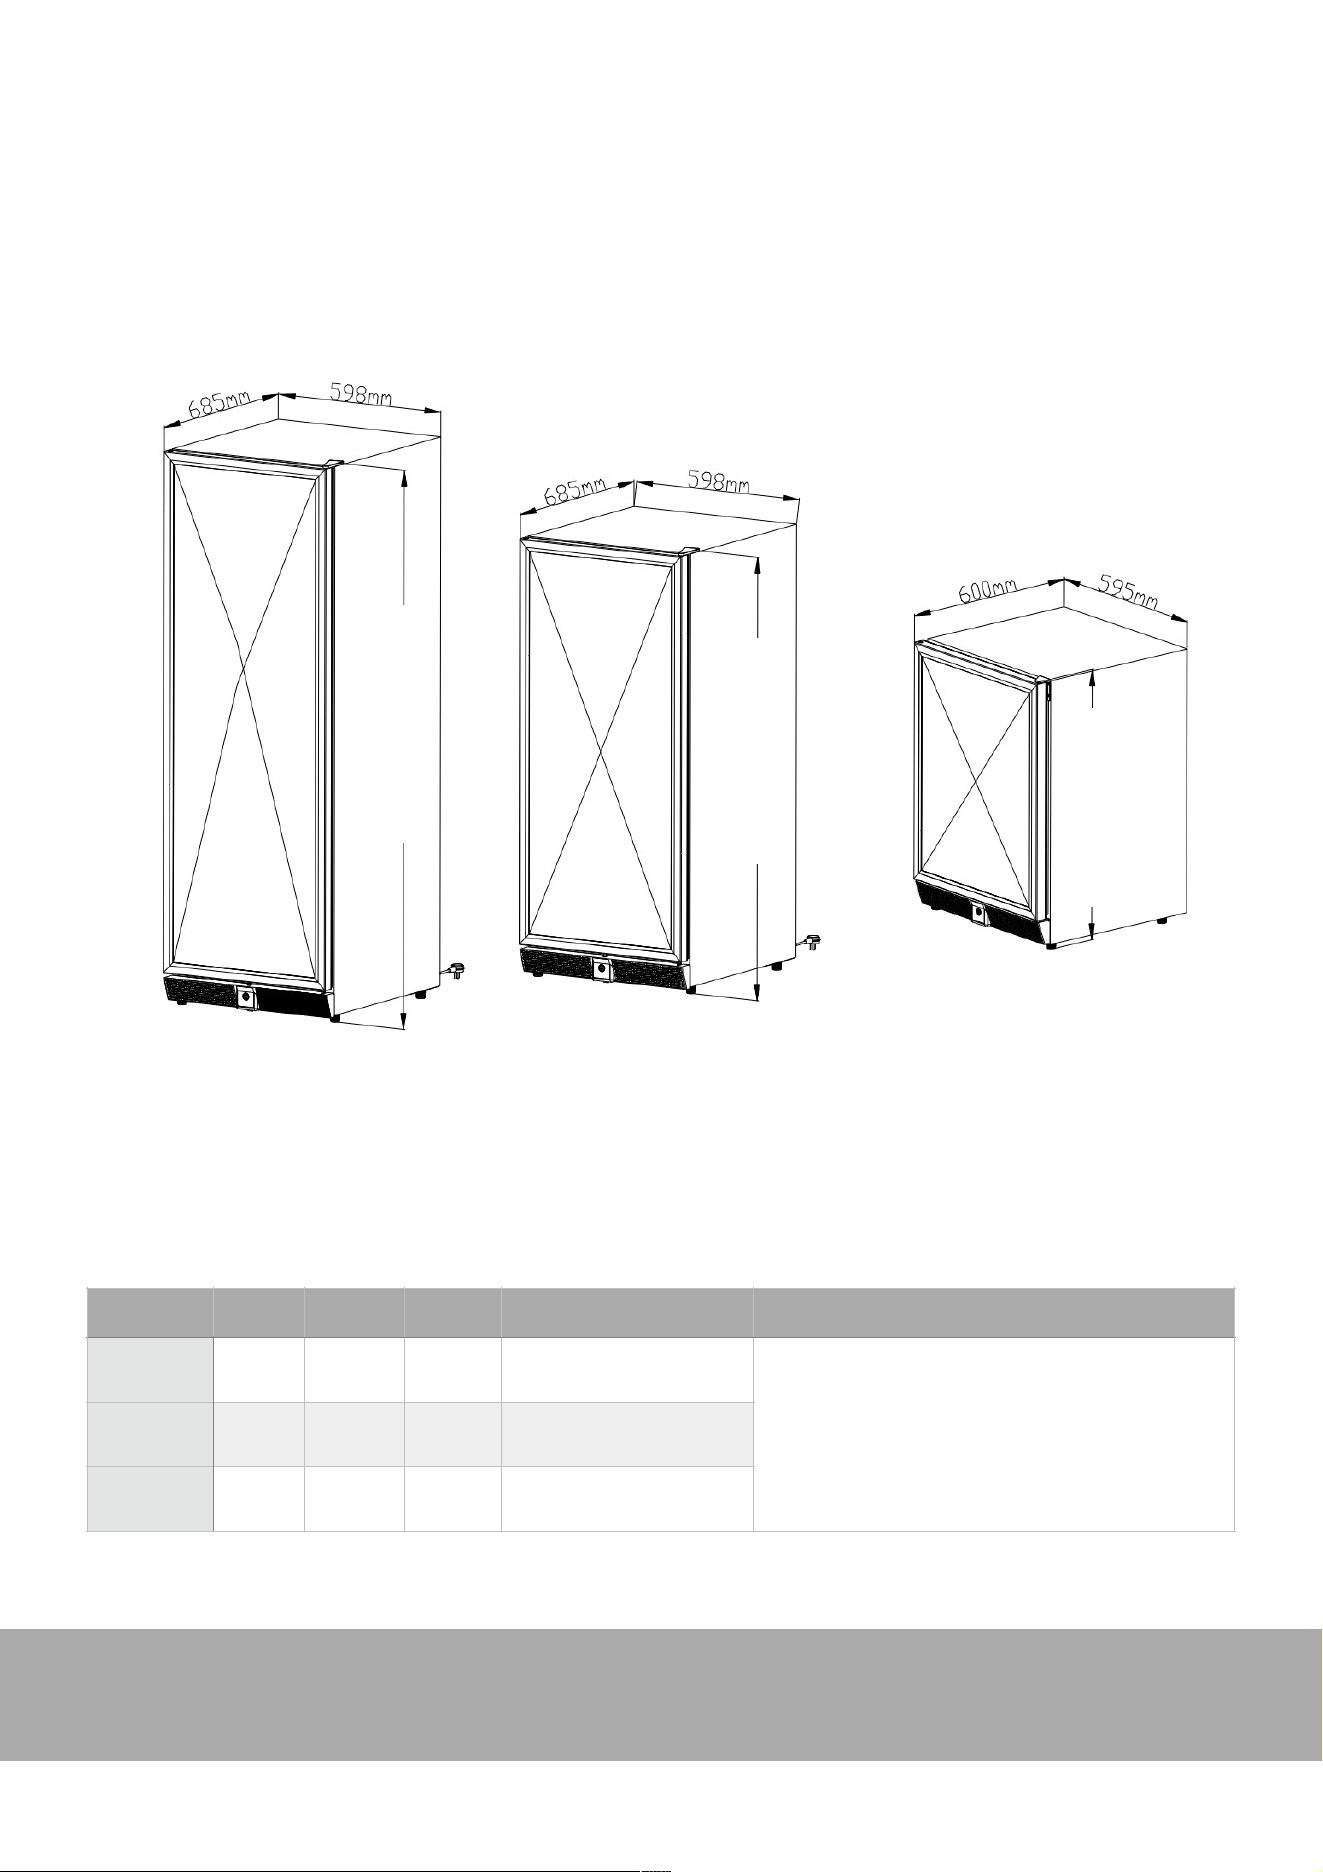
PART III" INSTALLATION INSTRUCTIONS
INSTALLATION
MODEL
WIDTH
DEPTH
HEIGHT
INCLUDED STAND HEIGHT
NOTE
KBU-50
23.42”
595mm
23.62”
600mm
33.86”
860mm
0.79”
20mm
These front-venting models can be built into cabinetry.
Should it be built into cabinetry, there should be an
additional 0.5” (20mm) on either side, behind and on top of
the unit. These extra spaces enable units to be placed in the
position efficiently, accommodate the door when opened,
and without the power cords being damaged.
KBU-100
23.54”
598mm
26.97”
685mm
55.43”
1408mm
0.98”
25mm
KBU-170
23.54”
598mm
26.97”
685mm
71.69”
1821mm
0.98”
25mm
KBU-170 SERIES
23.54”W x 26.97”D x 71.69”H
(598W x 685D x 1821H mm)
Included stand height 0.98”(25mm)
KBU-100 SERIES
23.54”W x 26.97”D x 55.43”H
(598W x 685D x 1408H mm)
Included stand height 0.98”(25mm)
KBU-50 SERIES
23.42”W x 23.62”D x 33.86”H !
( 595W x 600D x 860H mm )!
Included stand height 0.79” (20mm)
CUTOUT DIMENSION ILLUSTRATED
71.69” (1821 mm)
55.43” (1408 mm)
33.86” (860 mm)
26.97”
23.54”
23.54”
26.97”
23.62”
23.42”
www.kingsbottle.com (USA) |www.kingsbottle.com.au (Australia)" 6
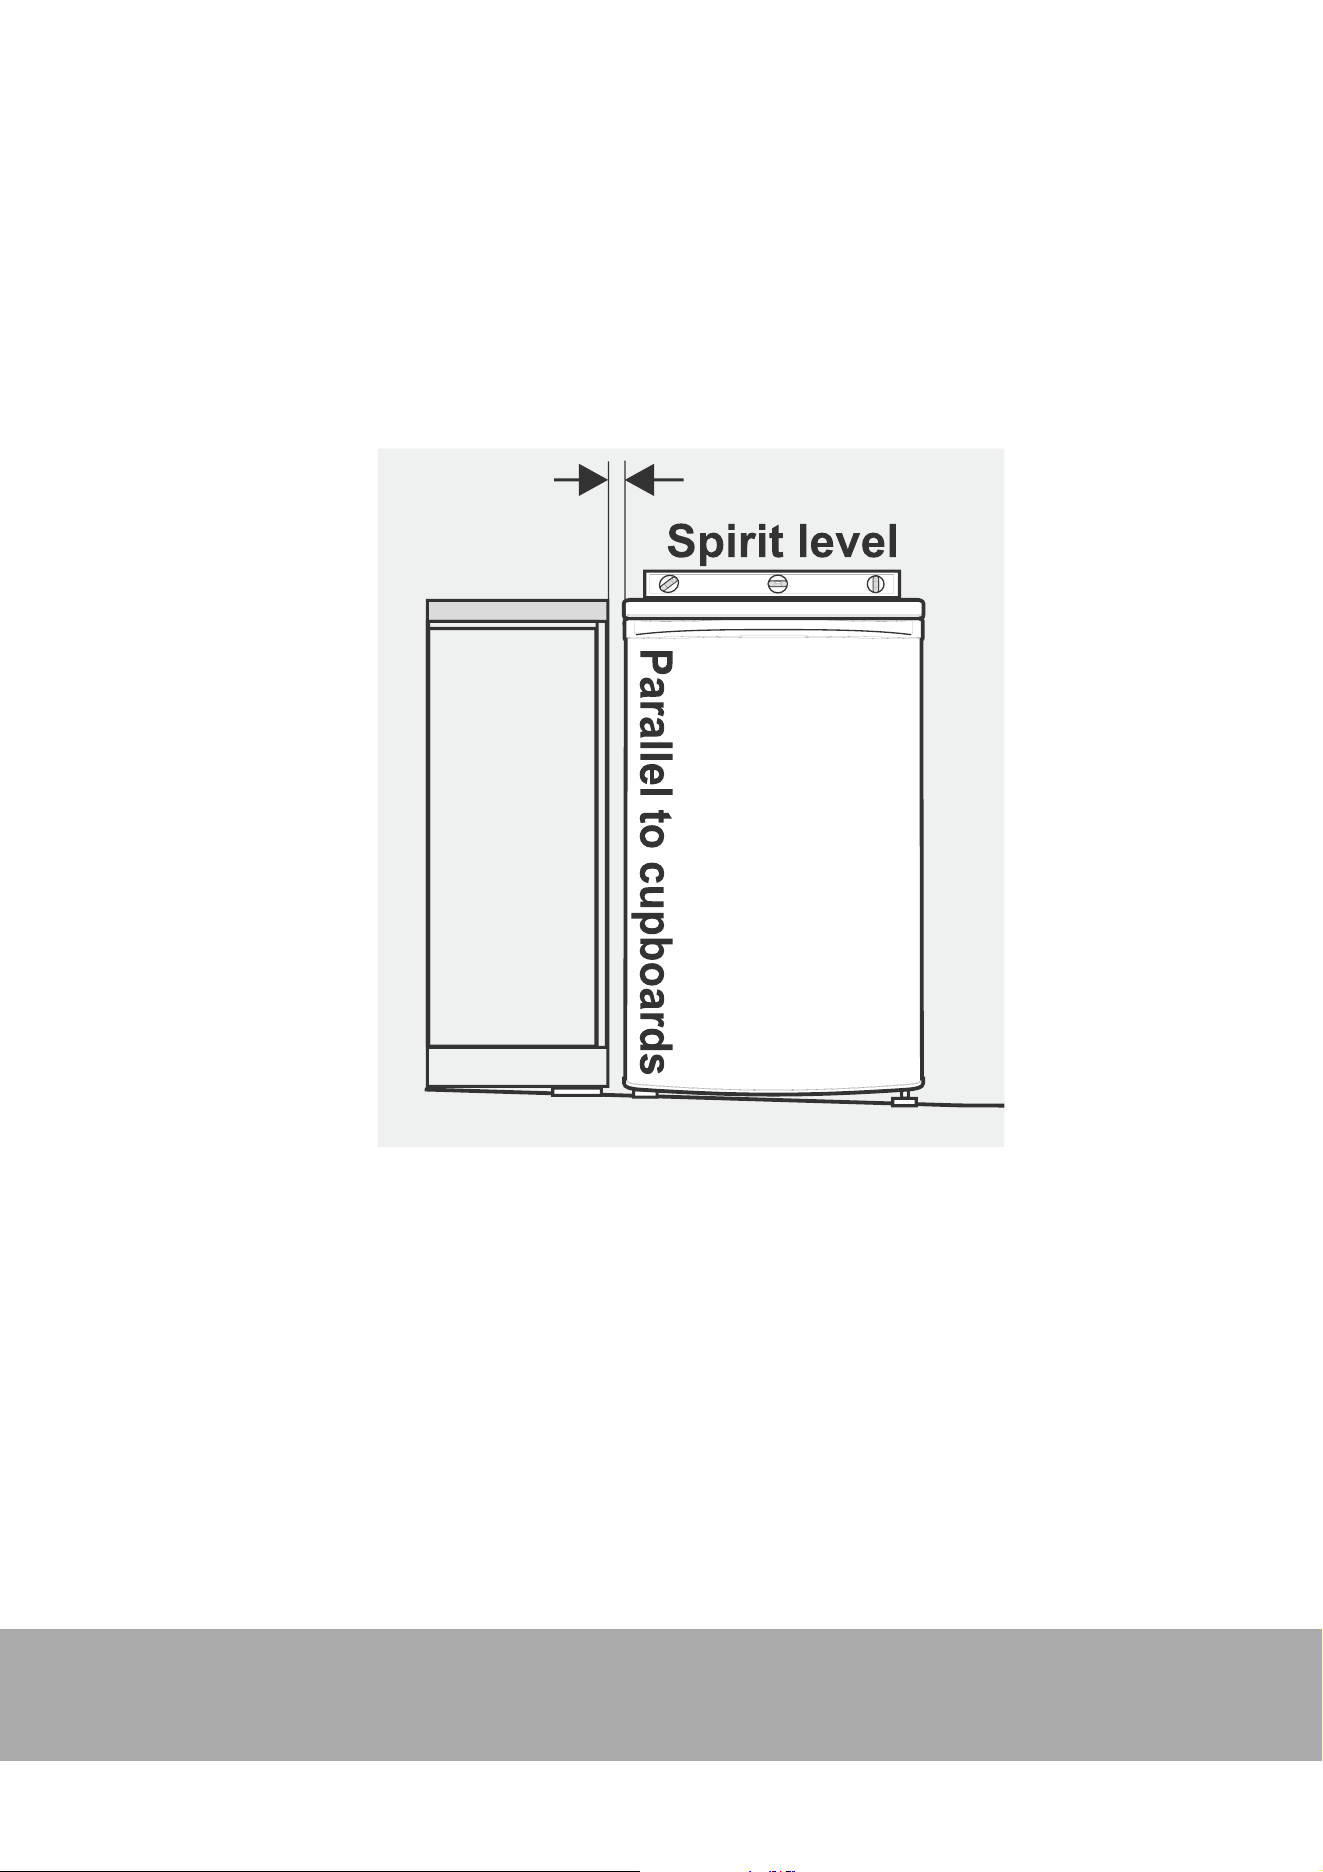
PART III" INSTALLATION INSTRUCTIONS
INSTALLATION
COMPRESSOR WINE REFRIGERATORS
INSTALLING YOUR WINE COOLER
1. Move the unit into its final position. (CAUTION: for safety purpose, for the KBU100 and KBU170 models, it is necessary to anchor
the appliances to the wall, please refer to the instruction on the next page.)
2. If the unit is not tilting back, minor adjustments can be made to the leveling legs.
3. Compare the alignment of the appliance to the surrounding cupboard. The top of the appliance should be level side to side (see
diagram below).
4. If the unit now rocks from one corner to the opposite rear corner, this means that the floor is uneven. You may need to put some
packing under the ridge to the rear of the appliance. You could use thin pieces of a solid material such as a thin board, vinyl floor tiles
or laminate.
5. You may now need to fine tune the installation by repeating steps 2, 3 and 4.
6. Wipe off any dust that has accumulated during shipping and clean following the directions in Part VI ( Care & Maintenance)
7. Plug the appliance into the power point. Don’t use a double adaptor or extension cord.
8. It is recommended that you allow the unit to rest an hour or two before you put any wine bottles in it. This will confirm that it is
operating correctly and make the conditions appropriate for wine storage.
Congratulations! You have successfully installed your wine cooler.
DOOR LOCK
This unit comes with an optional key lock. The keys are located inside the plastic bag that contains the user manual. To lock the door,
simply insert the key into the lock and turn clockwise making sure the metal pin is engaged completely. Then remove the key and place it
in a secure place for safekeeping. To unlock the door, insert the key into the lock and turn counterclockwise.
Before you move your appliance into the place where it
will operate, check that it will have adequate clearance.
Clearance is required for air circulation and too little
clearance may affect the performance of your appliance.
We recommend minimum clearances of:
NOTE:
Doors are designed to sit proud of cabinetry (not flush).
The clearances shown above are the recommended
minimum clearances. The clearance at the rear must not
exceed 75mm.
The appliance should arrive with the front levelling feet
wound up. The appliance may need to be tilted backward
at the top by about 10-15mm from vertical (see diagram
below). This will allow the door to gravitate to the closed
position. The complete closure of the door seal is reliant on
manually pushing the door closed to provide a consistent
door seal.
CAUTION
The rollers are designed for forward or backward movement
only. They are not castors. Moving the refrigerator sideways
may damage your floor and the rollers.
1. Move the appliance into its final position.
2. If the appliance is not tilting back as described earlier,
minor adjustments can be made to the two front
levelling legs by turning the feet in an anticlockwise
direction (below). This will increase the height of
the feet. If you have difficulty turning the foot, have
someone tilt the appliance back to gain better access.
If it is not tilted back enough and the levelling legs are
fully extended, additional packing might be required
(see note 4 for appropriate materials).
3. Compare the alignment of the appliance to the
surrounding cupboard. The top of the appliance should
be level from side to side (see diagram below). If
you need to adjust the level, use the levelling feet as
detailed in step 2.
4. If the appliance now rocks from one corner to the
opposite rear corner, this means that the floor is uneven.
You may need to put some packing under the ridge to
the rear of the appliance. You could use thin pieces of
solid material such as thin board, vinyl floor tiles
or laminate.
5. You may now need to fine tune the installation by
repeating steps 2, 3 and 4.
6. Wipe off any dust that has accumulated during shipping
and clean following the directions on page 17.
double adaptor or extension cord.
8. It is recommended that you let the appliance for an hour
or two (three hours for a freezer) before you put any
food in it. This will confirm that it is operating correctly
and make the conditions appropriate for food storage.
Congratulations! You have successfully installed your
refrigerator/freezer.
10 –15mm
Height adjustable
front rollers
50mm (75mm max)
30mm
30mm
Recommended
airspace
CABINET
DOOR
www.kingsbottle.com (USA) |www.kingsbottle.com.au (Australia)" 7
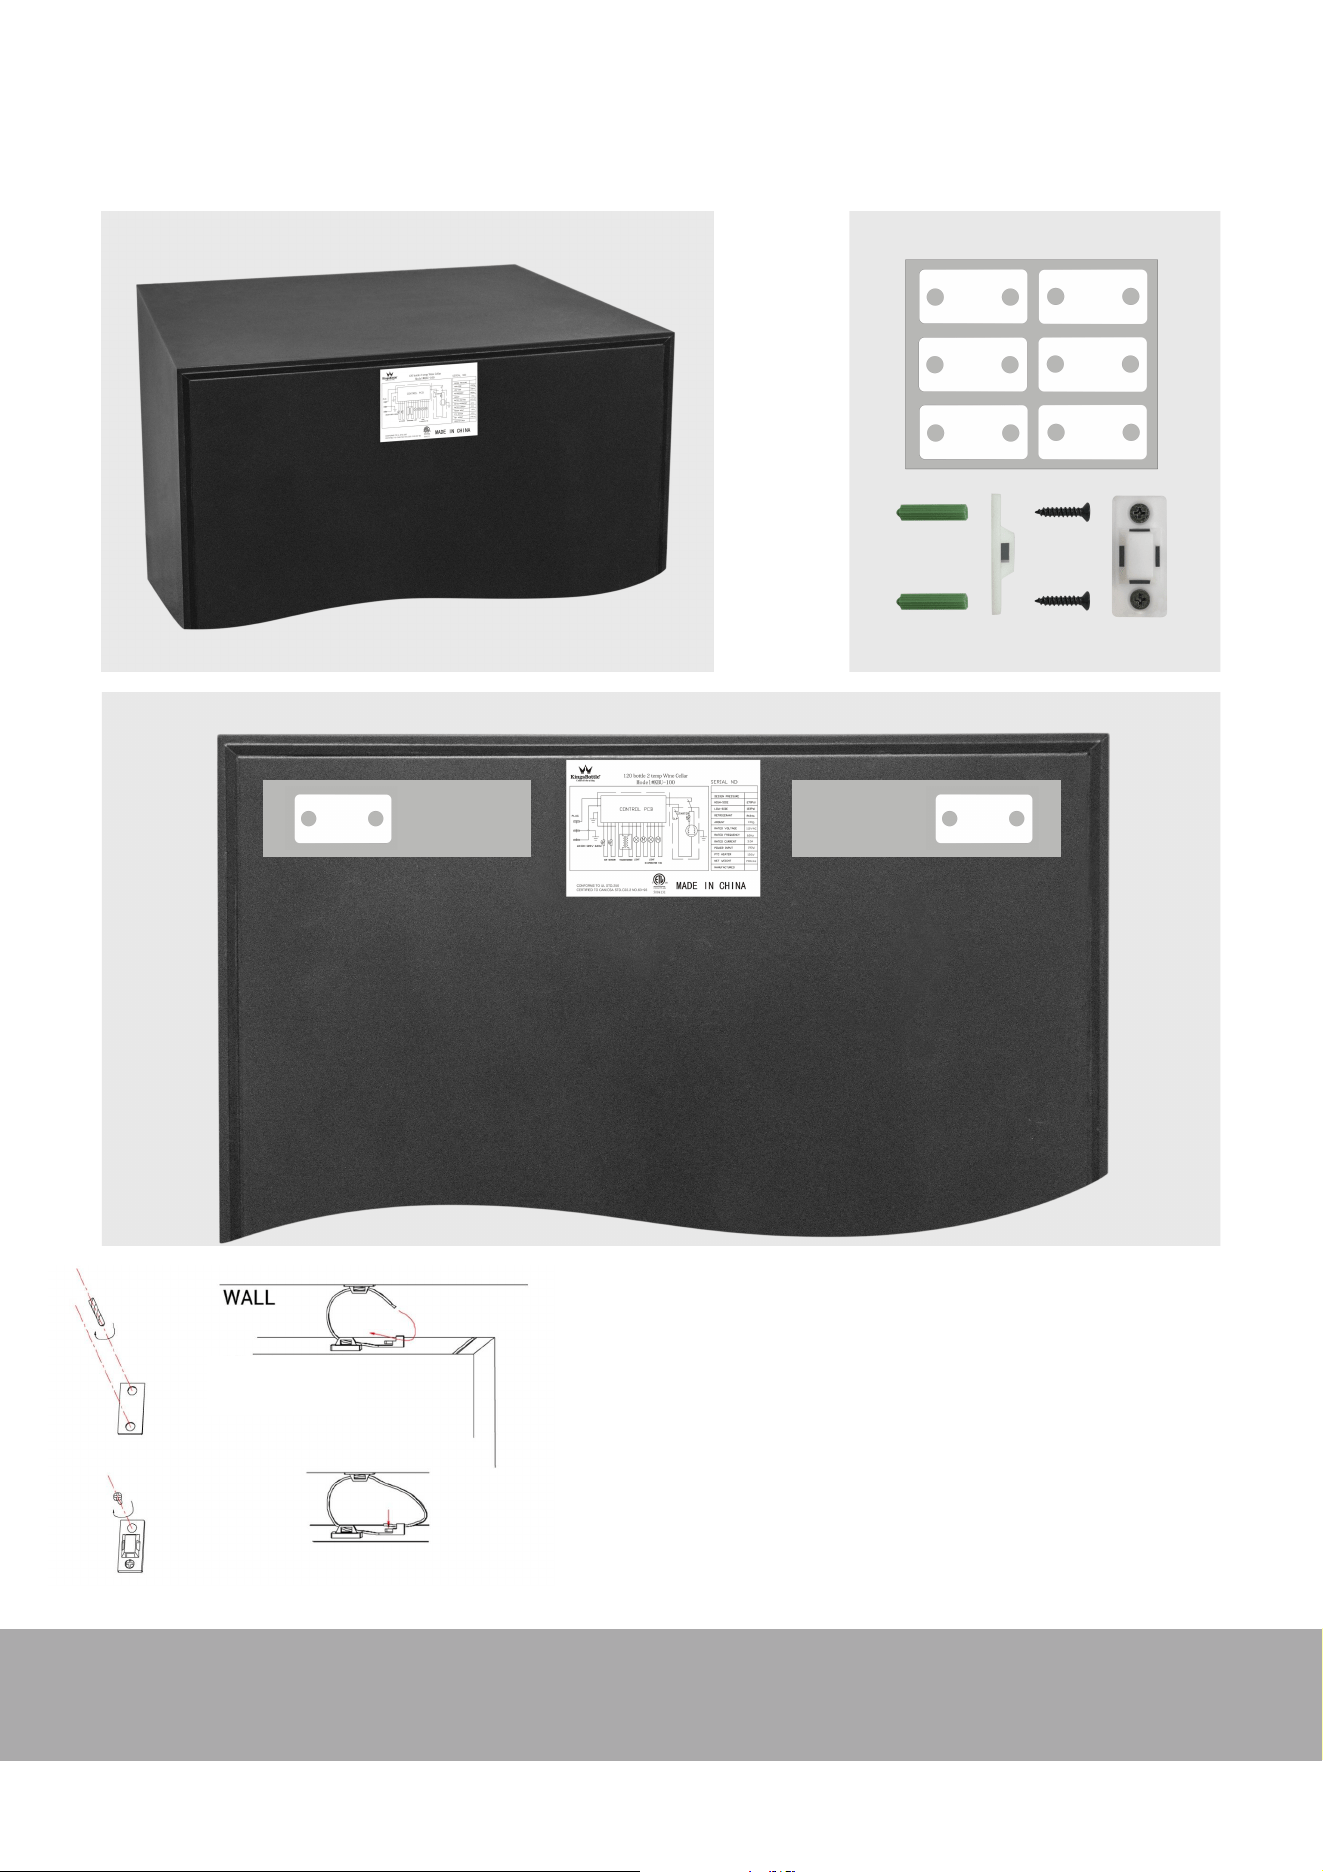
Rear of the refrigerator
parts included
B
B
A
1. Area “A” is around 7”W x 2”H ( 180Wx50H mm ). #
This area is located 1.2 inch (30mm) from the edge of the appliance on
top, left or right side (see above image).!
2. “B” refers to the position where the holes for brackets should be drilled.#
Note: “B” should always be inside the area “A”!
3. Position the brackets on the desired location, mark and drill pilot holes for
the screws about 0.32” (8mm) into the appliance. Then use a screwdriver
to tighten the screws all the way into the appliance
A
Position the appliance in the desired location. Locate wall studs behind the appliance and
mark the location where the bracket lines up with a stud on the back of the appliance. Move
the appliance away from the wall and position bracket on the mark. Mark and drill pilot holes
into the center of the stud with a 3/32” (2.5mm) drill bit. Attach a bracket to the stud with the
long screws provided.
Move the appliance into its final position, taking care to line up the wall bracket close enough
to the bracket on the back of the appliance to strap them together. Thread a strap through the
brackets as shown in the illustration. Tighten the straps until snug. Do not over tighten.
CAUTION: These instructions are not intended to be a substitute for proper supervision. The
manufacturer assumes no liability for improper installation or excessive loads placed on
screws, brackets, or straps.
Straps should be periodically adjusted, tested and replaced.
Instructions to Anchor The Appliance to The Wall
B
INSTALLATION
www.kingsbottle.com (USA) |www.kingsbottle.com.au (Australia)" 8
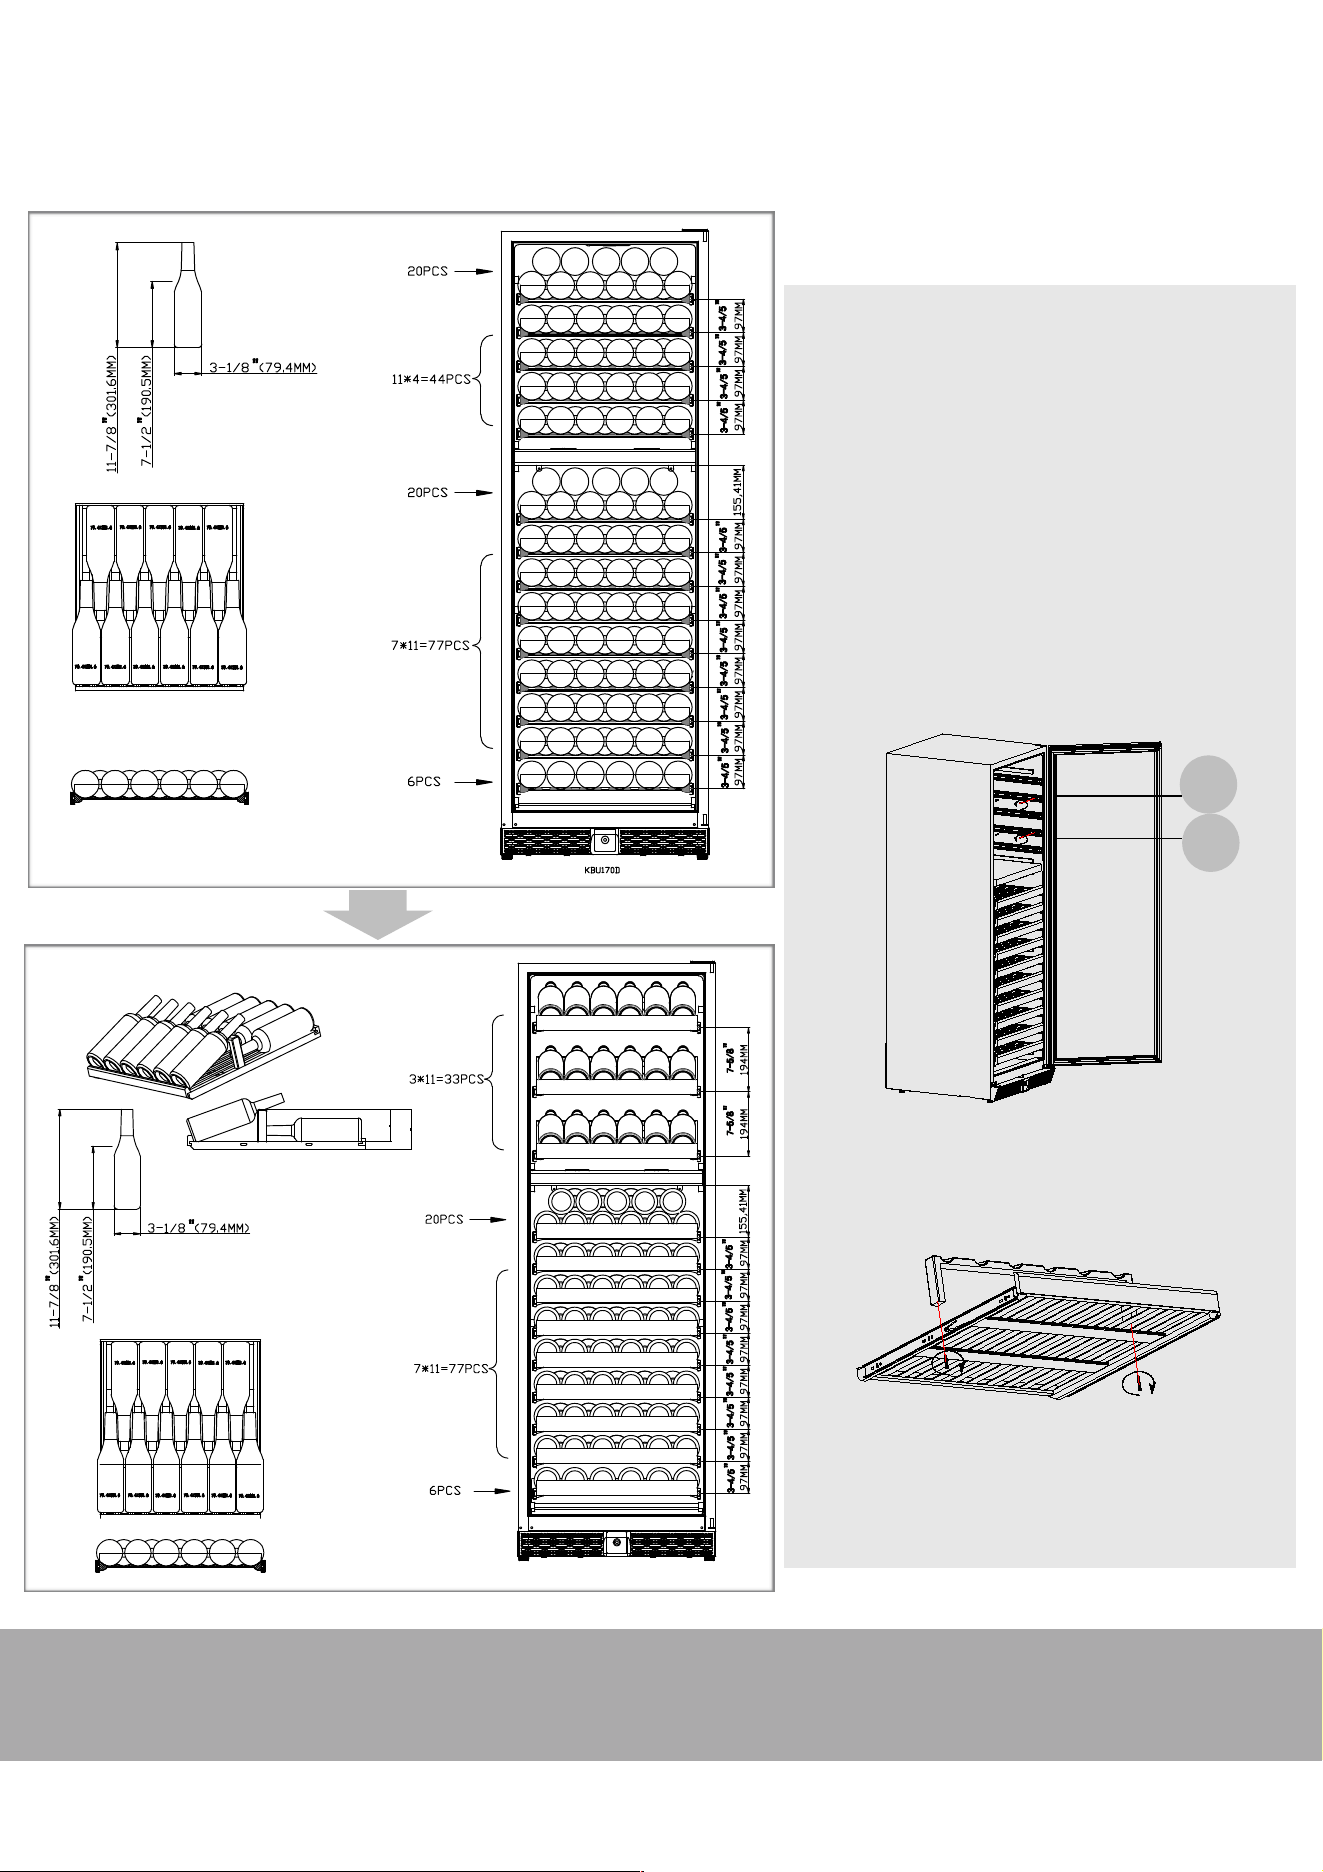
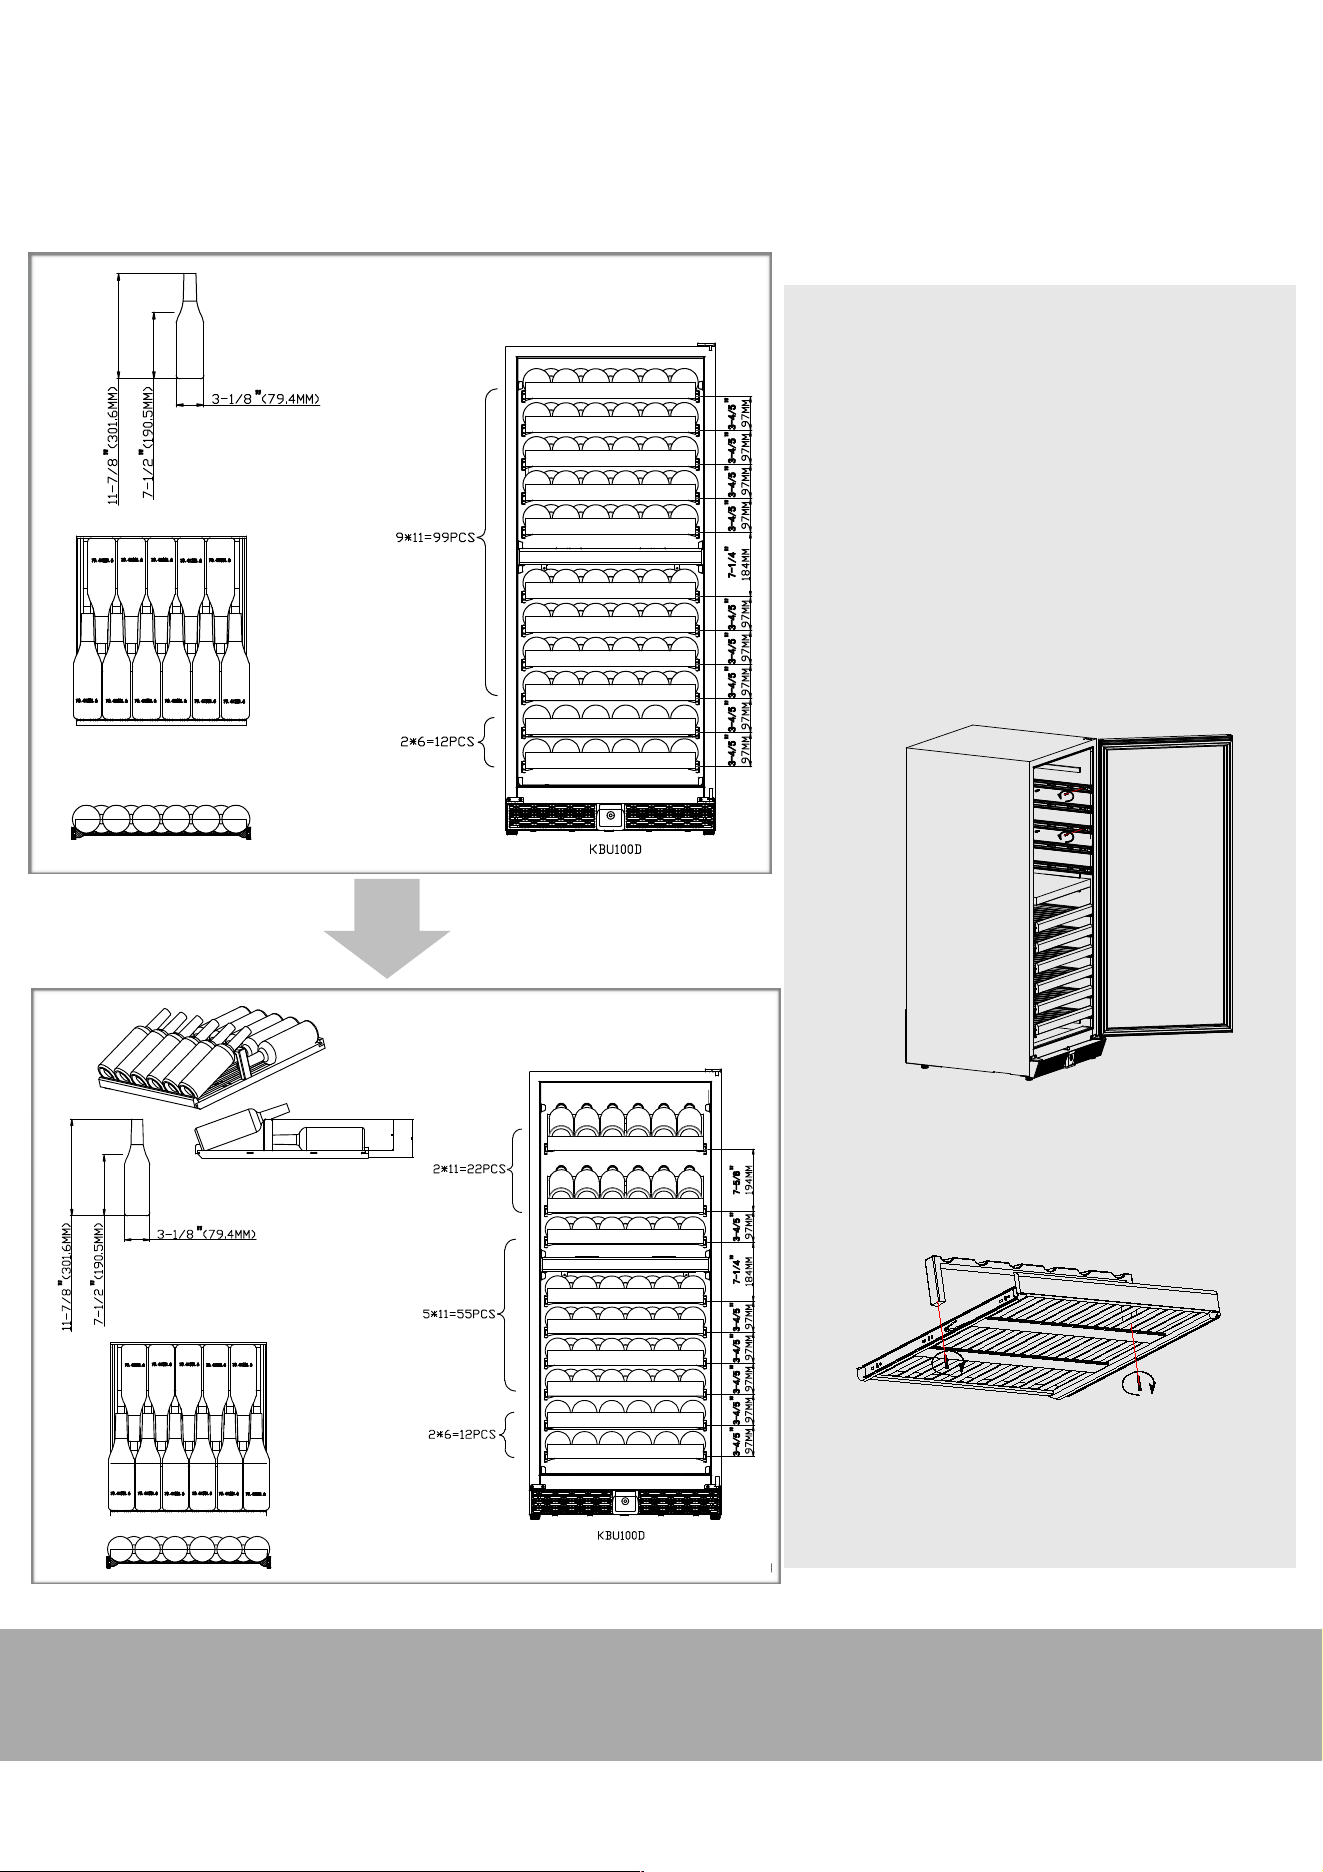
PART IV" " LAYOUT AND STORAGE
STORAGE
COMPRESSOR WINE REFRIGERATORS
As an additional option, you might like the idea of
having some display shelves to show your bottle
label. You could refer to the instruction on how to
remove the 2nd, 4th shelves in the upper zone (use
the screws to fill the holes on the wall after the
shelves are removed), and then change the 1st, 3rd,
5th shelves to display shelves.
Note:
This changes will reduce the total storage capacity.
2
4
remove the 2nd, 4th shelves
change the 1st, 3rd, 5th standard
shelves to display shelves
display shelves options
( for KBU170DX Models)
Total 167 Bottles
Total 136 Bottles
www.kingsbottle.com (USA) |www.kingsbottle.com.au (Australia)" 9
PART IV" " LAYOUT AND STORAGE
STORAGE
As an additional option, you might like the idea of having
some display shelves to show your bottle label. You could
refer to the instruction on how to remove the 1st, 3rd
shelves in the upper zone (use the screws to fill the holes
on the wall after the shelves are removed), and then
change the 2nd, 4th shelves to display shelves.
Note:
This changes will reduce the total storage capacity.
remove the 1st, 3rd shelves
change the 2nd, 4th standard
shelves to display shelves
display shelves options
( for KBU100DX Models)
Total 111 Bottles
Total 89 Bottles
www.kingsbottle.com (USA) |www.kingsbottle.com.au (Australia)" 10
PART IV" " LAYOUT AND STORAGE
STORAGE
YOUR CABINET WAS DESIGNED TO STORE A MAXIMUM NUMBER OF BOTTLES SECURELY. WE RECOMMEND THAT YOU
OBSERVE THE TIPS BELOW TO OPTIMIZE LOADING.
1. Disperse your bottles evenly so as not to concentrate the weight in any one area. Also, be careful that your bottles do not touch either
the back of the cabinet or the step at the bottom.
2. Also, make sure that bottles are not all grouped together either at the top or bottom of the cabinet.
3. A cooler that is full and has a nice allowance for air movement will work more efficiently.
4. Never try to adjust shelf with bottles still on it.
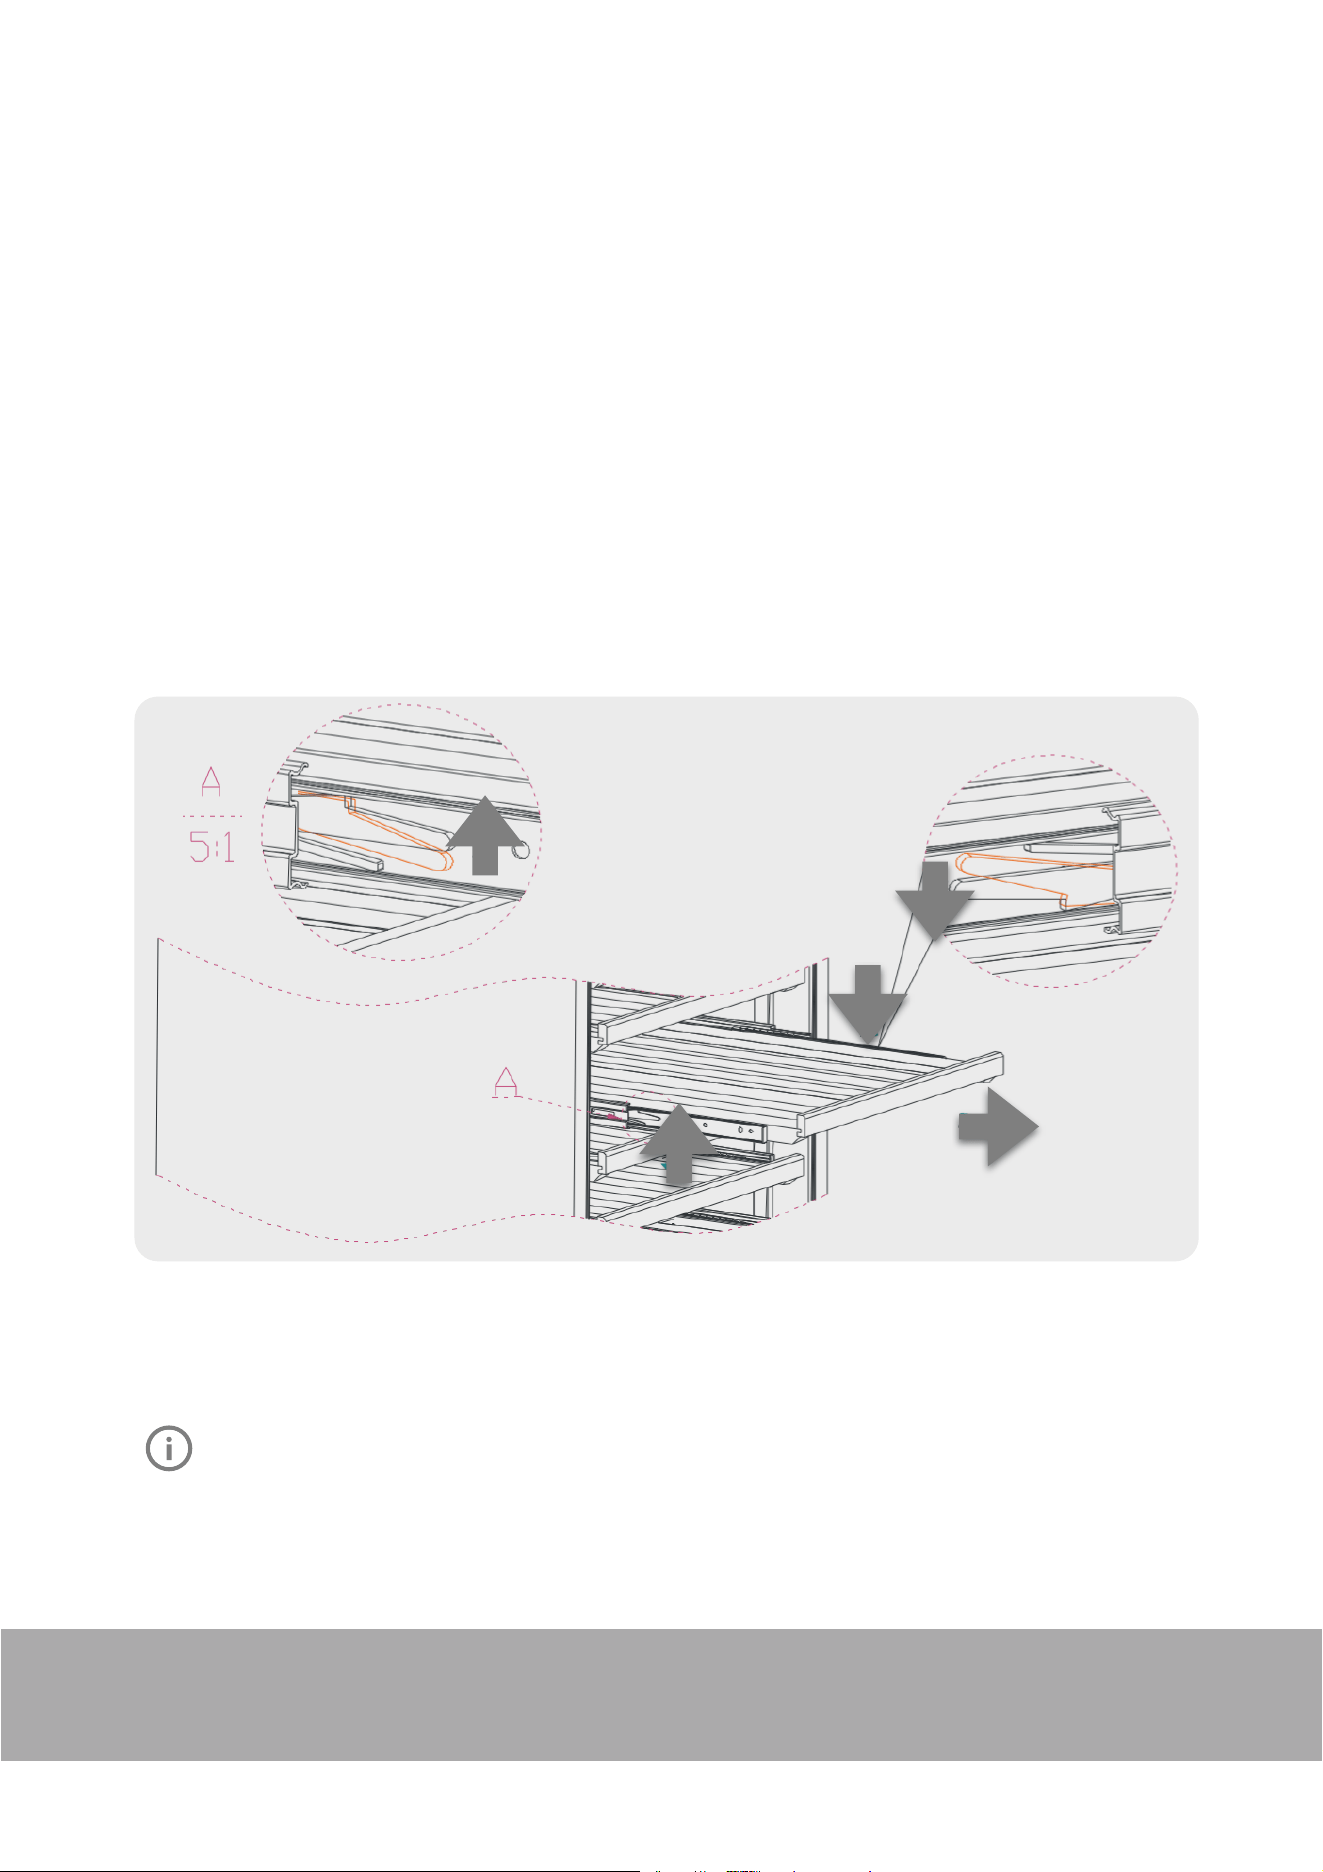
TO REMOVE A ROLLING SHELF:
1. Remove all bottles
2. Pull the shelf out as far as possible
3. Push the LEFT side lever downward but the RIGHT side lever upward (as illustrated below)
4. Remove the shelf
PLEASE NOTE
Before modifying your cabinet’s original configuration in any way, be sure to ask your dealer for advice.
Important safety instructions . . . . . . . . . . . . . 3
Bar refrigerator with ice box features . . . . . . . . . 4
Bar refrigerator without ice box features . . . . . . . 5
Single door all refrigerator features . . . . . . . . . 6
Bar freezer features . . . . . . . . . . . . . . . . 7
Single door all freezer features . . . . . . . . . . . 8
Installing your new appliance . . . . . . . . . . . . 9
Ventilation around your appliance. . . . . . . . . 9
Installing your refrigerator . . . . . . . . . . . 9-10
Initial start-up . . . . . . . . . . . . . . . . . . . 10
Manual controls . . . . . . . . . . . . . . . . . . 10
Controlling the temperature. . . . . . . . . . . . 10
Using your appliance – Ice box models . . . . . . . . 11
Making ice . . . . . . . . . . . . . . . . . . 11
De-icing the ice box . . . . . . . . . . . . . . . 11
Freezer operation . . . . . . . . . . . . . . . . . 12
Reversing the ice box door opening direction . . . . . 13
Reversing the door opening direction WIM1000 &
WFM0700 . . . . . . . . . . . . . . . . . . . . 14
Reversing the door opening direction WIM1200,
WRM1300, WRM2400, WFM0900 & WFM1800 .15
Care and maintenance . . . . . . . . . . . . . . . .
Changing the light bulb . . . . . . . . . . . . . 16
General information . . . . . . . . . . . . . . . . 17
Cleaning the appliance . . . . . . . . . . . . . 17
Safety . . . . . . . . . . . . . . . . . . . . . 17
Switching off your appliance . . . . . . . . . . . 17
Troubleshooting . . . . . . . . . . . . . . . . . . 18
Warranty . . . . . . . . . . . . . . . . . . . . . 19
Congratulations and thank you for choosing our
refrigerator/freezer. We are sure you will find your new
appliance a pleasure to use. Before you use the appliance,
we recommend that you read through the relevant sections
of this manual, which provides a description of your
appliance and its functions.
To avoid the risks that are always present when you use
an electric appliance, it is important that the appliance is
installed correctly and that you read the safety instructions
carefully to avoid misuse and hazards.
We recommend that you keep this instruction booklet
for future reference and pass it on to any future owners.
After unpacking the appliance, please check it is not
damaged. If in doubt, do not use the appliance but contact
your local customer care centre.
TIPS & INFORMATION
If you find
the refrigerator is damaged or marked, you must report it
within 7 days if you wish to claim for damage/marks
under the manufacturers warranty. This does not affect
your statutory rights.
ENVIRONMENTAL TIPS
dispose of those materials through your local recycling
depot or by placing them in appropriate collection
containers.
your local authorities and ask for the correct method
of disposal.
COMPRESSOR WINE REFRIGERATORS
www.kingsbottle.com (USA) |www.kingsbottle.com.au (Australia)" 11
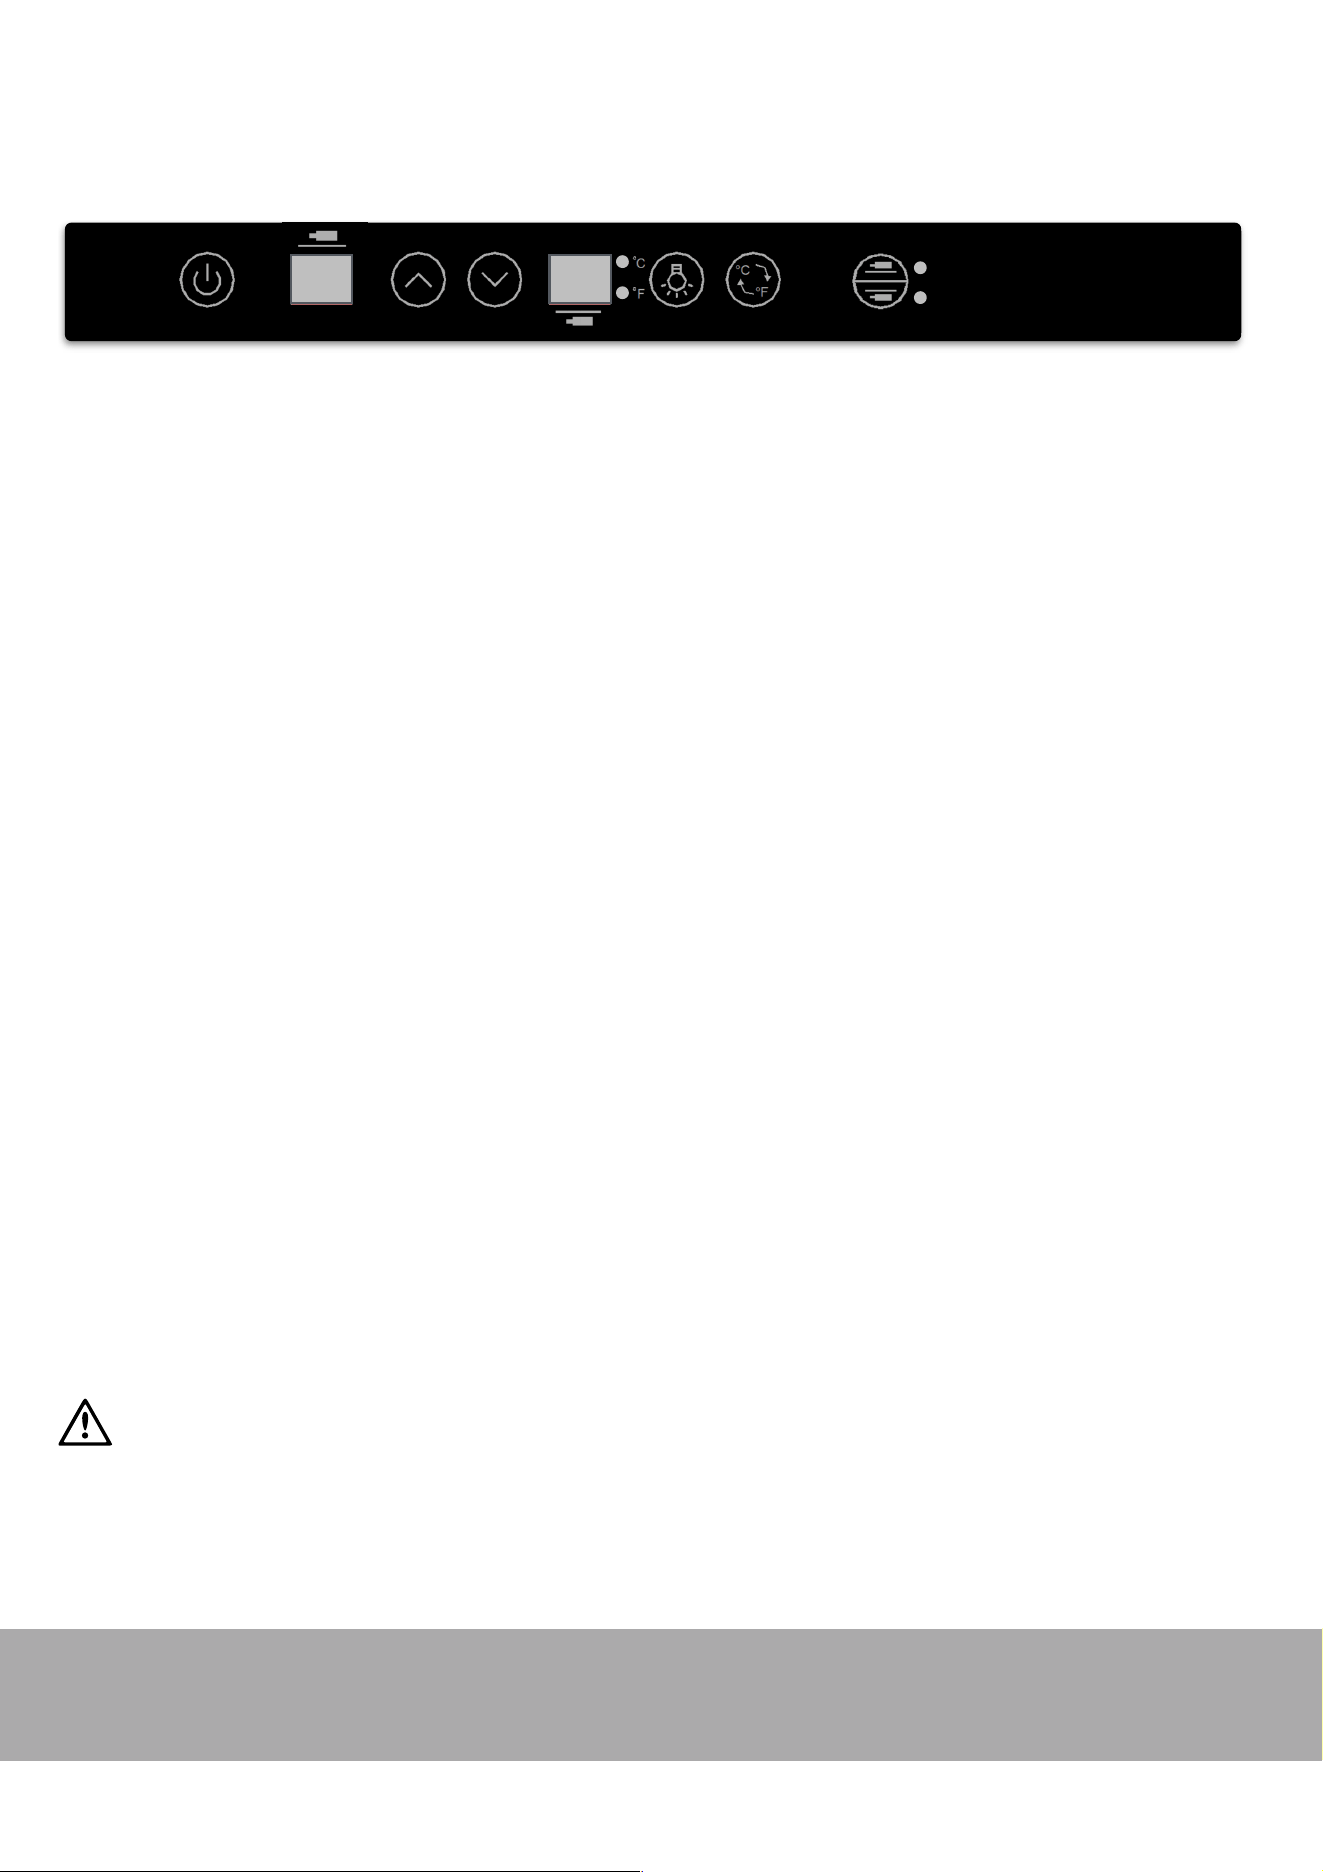
OPERATION
PART V"" OPERATING YOUR REFRIGERATOR
Each wine cooler includes an operating panel on the front of the unit. This operating panel includes several features to operate and control the temperature of
both the upper and lower zones of the wine cooler, light color and brightness.
ON/OFF: Turns the wine cooler power on or off.
SELECT: Allows the user to select to control the UPPER or LOWER zone temperature.
UPPER/LOWER ZONE: Displays, via LED, the desired temperature and the actual temperature of the UPPER/LOWER zone.
UP / DOWN: Adjust the temperature preset value.
LIGHT: Turns the interior light on/off, or change the light colors.
LIGHT+UP: Increase the light brightness; LIGHT+DOWN: Decrease the light brightness.
C/F SWITCH: Switch between °C and °F
LIGHT ON/OFF, COLOR & BRIGHTNESS CONTROL
1. Press the LIGHT button to turn the light on/off, or change the light color. The order of change is as follows: ON, red, orange, yellow, green, blue, purple,
white, color changing, OFF.
2. While holding down the LIGHT button, press the UP button to increase the brightness, or press the DOWN button to decrease the light brightness.
Brightness is divided into 5 levels: 20%, 40%, 60%, 80% and 100%.
SETTING THE TEMPERATURE CONTROL
IMPORTANT: IN ORDER FOR THIS UNIT TO FUNCTION AT OPTIMUM LEVEL, THE LOWER COMPARTMENT SHOULD BE SET AT LEAST 5°F (2°C)
HIGHER THAN THE UPPER COMPARTMENT.
1. Make sure the power cord is connected to a properly grounded outlet.
2. Press the ON/OFF button to turn the power ON.
3. Press the SELECT button to choose the UPPER ZONE or LOWER ZONE. Each zone is independently controlled.
•
Upper Zone: The temperature setting can be adjusted between 41°F to 60°F ( 5°C to 15°C)
•
Lower Zone: The temperature setting can be adjusted between 45°F to 64°F ( 7°C to 18°C )
4. Set the temperature of the Upper Zone or Lower Zone as you desire by pushing the UP or DOWN button. When you push the two buttons for the first
time, the LED readout will show the original temperature set at the previous time.
5. Once you have set the desired temperature, wait for 5 seconds. The temperature shown in both Upper and Lower zone display panels will automatically
switch to show the actual temperature inside the unit. The actual temperature will always be shown until the next time you press the UP or DOWN button
to change the temperature settings.
NOTE: The desired temperatures may fluctuate depending on whether the interior light is ON or OFF, the ambient temperature, the location of the unit and
the orientation of the bottles. The display is just a guide, be guided by how cold your drinks are at consumption. Remember units go into defrost mode, and
this will show a higher display, it’s only for short periods and doesn’t have time to affect drink temperature. In general, once the unit has settled, it will keep
products within 5°F (2°C) of the set temp easily in temperatures up to and beyond 100°F (38°C).
TEMPERATURE SETTINGS FOR WINE SERVICE
Different varietals of wine require different temperature settings. The recommended temperature ranges for long term preservation of various wines is
Red Wines: 52-64°F (11-18°C ); White Wines: 44-51°F (7-10°C); Sparkle Wines: 41-43°F (5-6°C).
1. In the event of a power interruption, all previous temperature settings will be automatically saved and each compartment will return to the previous
temperature setting.
2. If the unit is unplugged, loses power, or is turned off, there will be a 6 minute delay for the compressor to restart after the unit is powered ON.
3. When you use the wine cooler. for the first time or restart the wine cooler after having been shut off for a long time, there will be a few degrees variance
between the temperature you select and the one indicated on the LED readout for the first few hours of operation. After a few hours of operation, the
temperature will normalize to the displayed temperature.
place for later reference.
The symbols you will see in this booklet have these meanings:
WARNING
CAUTION
TIPS & INFORMATION
ENVIRONMENTAL TIPS
Meanings of symbols used in this manual are shown below:
WARNING
‘flammable’ and/or a small flame symbol,
do not store them inside any refrigerator or
freezer. If you do so you may cause an explosion.
remove any doors. Children can suffocate if they get
trapped inside.
blowing gases. Avoid safety hazards by carefully
disposing of this appliance.
WARNING
The refrigerator must be plugged into its own
dedicated 220-240V, 50Hz AC electrical outlet.
The plug must be accessible when the refrigerator is
in position.
It is essential the power point is properly earthed to
ground. Consult a qualified electrician if you are unsure.
Don’t use extension cords or adapter plugs with this
refrigerator.
If the power cord is damaged, have it replaced by a
qualified service technician.
Unplug the refrigerator before cleaning it, or changing
the light bulb to avoid electric shock.
Never unplug the refrigerator by pulling the electrical
cord as this may damage it. Grip the plug firmly and
pull straight out.
Choose a location for your refrigerator that isn’t too cold.
The ambient room temperature should be above 10°C.
Stand your refrigerator in a dry place – avoid areas
of high moisture or humidity.
Don’t put the refrigerator in frosty or unprotected areas
like a garage or on the verandah.
Keep the refrigerator out of direct sunlight.
Don’t locate the refrigerator near stoves, fires or heaters.
When installed correctly, your refrigerator should:
– Have adequate space at the back and sides
for air circulation (refer to page 9).
– Be aligned to the surrounding cupboards.
– Have doors that will self-close from a partially
open position.
WARNING
This appliance may contain a small quantity of environmentally
friendly, but flammable, non-synthetic R600a refrigerant:
damaged during transportation and installation.
8g of refrigerant. The amount of refrigerant charged in the
appliance can be found on the rating plate on the appliance.
in the built-in structure, clear of obstruction.
accelerate the defrosting process, other than those
recommended by the manufacturer.
3
per 8g of refrigerant. The amount of refrigerant charged
in the appliance can be found on the rating plate on
the appliance.
ON/OFF
UPPER ZONE
UP
DOWN
LOWER ZONE
LIGHT
C/F SWITCH
SELECT
www.kingsbottle.com (USA) |www.kingsbottle.com.au (Australia)" 12
TROUBLESHOOTING GUIDE
PROBLEM
POSSIBLE CAUSE
SOLUTION
1. Refrigerator
does not operate
1. Not plugged in
2. The appliance is turned OFF at the control panel
3. The power outlet is powered off or the output voltage is
too low
4. The circuit breaker has tripped, or a fuse has blown out
1. Press ON/OFF
2. Check and make sure the power plug is well connected
3. Ask a technician to check whether the power outlet has an accurate
voltage output
4. Ask an technician for help
2. Refrigerator is
not cold enough;
can not cool
down to the
preset temp.
The compressor does not start
ask a technician for help / check the connection of the compressor
The ambient temperature is too high (over 100°F | 38°C)
Move the refrigerator to a cool and ventilated place
Place too many bottles at once
Put in the bottles in batches. It is recommended not to exceed 1/3 of full load
at a time. After the temperature in the cabinet drops to the set temperature,
store the next batch.
The inlet and outlet of the front grille are blocked.
Remove objects that may block the air inlet and outlet
The door is not closed tightly, or the door gasket is not
properly sealed.
Please refer to the problem #6 “The door will not close properly” and its
solutions. Then unplug the power plug for 5 hours, wait for the ice on the
evaporator melt, restart the refrigerator.
The door opening time is too long or too frequent
Reduce the times/frequency of door openings.
There are other objects besides drink bottles in the
cabinet, which affects the air circulation.
This refrigerator is designed for wine storage, if there are other objects, please
remove it. The number of bottles placed on each layer cannot exceed the
standard configuration.
If the refrigerator is placed outdoors or in a place with a
lot of dust/oil stains, after a period of time, a large amount
of dust will accumulate on the condenser fins, which will
affect the cooling effect.
Move the refrigerator to a place with less dust, regularly check the dust
accumulation status, and clean it with a blower.
Fans (condenser fan or evaporator fan) stop working or
operate at low speed
Ask the technician to check whether there is a standard voltage on the fan
terminal when turning on the power. If the voltage is abnormal, please check
the switching power supply or the motherboard or circuit failure. If the voltage
is normal, the fan may be damaged, please replace with a new fan.
The compressor or its accessories are damaged
Turn off the power and ask the technician to diagnose.
3. Compressor
starts and stops
frequently
The door is not closed tightly.
Please refer to the problem #6 “The door will not close properly” and its
solutions. Then unplug the power plug for 5 hours, wait for the ice on the
evaporator melt, restart the refrigerator.
The door gasket is not properly sealed.
1. Use low heat on a hairdryer to make the door seal take shape.
2. Replace with a new door gasket.
The door is opened too often.
Reduce the times/frequency of door openings.
The ambient temperature is too high (over 100°F | 38°C)
Move the refrigerator to a cool and ventilated place
Improper setting of temperature and the temperature
variances
Properly increase the temperature and its variances
The temperature sensor is not connected correctly.
Read the wiring diagram to make the correct connection of the sensor.
The sensor is faulty.
Replace with a new sensor
4. The light does
not work.
Not plugged in, or the light button is "OFF." Not enough
brightness.
The light itself is faulty.
PCB circuit faulty.
1. Adjust the brightness of the lamp according to the operating instructions.
2. Replace with new bulb; the lamp has its polarity.
3. Find a technician to repair.
PART VI" TROUBLESHOOTING GUIDE
www.kingsbottle.com (USA) |www.kingsbottle.com.au (Australia)" 13
TROUBLESHOOTING GUIDE
PROBLEM
POSSIBLE CAUSE
SOLUTION
5. The
Refrigerator
seems to make
too much noise.
No standing hours before connecting the refrigerator to
the power source.
Turn off the power and let it stand for hours.
The stand feet is not leveling; vibrations lead to noise
Adjust the stand feet and ensure they are leveled.
The floor is not stable enough
Move to a solid and stable floor
Hot and cold contraction sounds of the inner tank and
other plastics
No action required. It will gradually disappear.
Copper pipe hits other objects and makes noise
Gently adjust the position of the pipe.
The vibration of internal moving parts caused by inertia
when the compressor is stopped or started
It’s normal, no action required.
A liquid plumbing noise may come from the flow of the
refrigerators gases
As each cycle ends, you may hear gurgling sounds. It’s normal, no action
required.
Vibration of cooling copper pipes or fans hit other objects
Open the back cover of the refrigerator, and properly adjust the copper pipes
and wires so that they will not hit or resonate with other objects.
Compressor or fan itself failure
Find a technician to repair.
6. The door will
not close
properly.
Door is blocked by the non-standard size bottles
Adjust the position of bottles, or the number of shelves appropriately
The hinges of the upper and lower doors are loose
Adjust and fix the door hinge
The door sealing rubber is deformed
1. Use low heat on a hairdryer to make the door seal take shape.
2. Replace with a new door gasket.
The door body is deformed
Replace with a new door
7. Evaporator ice
up
The door is not closed tightly, or the door gasket is not
properly sealed.
Please refer to the problem #6 “The door will not close properly” and its
solutions. Then unplug the power plug for 5 hours, wait for the ice on the
evaporator melt, restart the refrigerator.
Poor cooling performance. The fridge does not cool or
can not reach the preset temperature value.
Please refer to the problem #2 “Refrigerator is not cold enough; can not cool
down to the preset temp.” and the corresponding solutions. Then unplug the
power plug for 5 hours, wait for the ice on the evaporator melt, restart the
refrigerator.
The compressor never stops even if the refrigerator cools
and reaches the preset temperature value
The controller (PCB board) or temperature sensor is faulty, please ask a
technician to repair.
8. External
cabinet seems
too hot
The ambient temperature is too high (over 100°F | 38°C)
Move the refrigerator to a cool and ventilated place
The inlet and outlet of the front grille are blocked.
Remove objects that may block the air inlet and outlet
If the refrigerator is placed outdoors or in a place with a lot
of dust/oil stains, after a period of time, a large amount of
dust will accumulate on the condenser fins, which will
affect the cooling effect.
Move the refrigerator to a place with less dust, regularly check the dust
accumulation status, and clean it with a blower.
The condenser fan stops working or operates at low
speed
Ask the technician to check whether there is a standard voltage on the fan
terminal when turning on the power. If the voltage is abnormal, please check
the switching power supply or the motherboard or circuit failure. If the voltage
is normal, the fan may be damaged, please replace with a new fan.
9. Condensation
on the glass
door
Ambient humidity is high
Use a soft cloth to wipe dry the water
The door opening is too frequent
Reduce the frequency of door openings.
The door does not close properly.
Please refer to the problem #6 “The door will not close properly” and its
solutions. Then unplug the power plug for 5 hours, wait for the ice on the
evaporator melt, restart the refrigerator.
The heating glass is OFF (heating glass door is only
available for specific models)
Turn on the heating glass
The heating glass function fails (heating glass door is only
available for specific models)
Find a technician to repair, or replace with a new door.
PART VI" TROUBLESHOOTING GUIDE
www.kingsbottle.com (USA) |www.kingsbottle.com.au (Australia)" 14
TROUBLESHOOTING GUIDE
PROBLEM
POSSIBLE CAUSE
SOLUTION
10. Water
leakage (outside
of the cabinet)
Condensation dripping from the glass door to the floor
Please refer to the problem #9 “Condensation on the glass door” and its
solutions.
Water overflows in the water pan next to the compressor
Open the back cover of the compressor and make sure that the water pipe is
in the water receiving tray.
11. Water
leakage inside
the cabinet
The outlet of the water tray below the evaporator is
blocked
Remove the blockages
The water pipe connected to the water tray under the
evaporator falls off.
Re-connect the water pipe, glue it with glue and tighten it with cable ties
The water tray cannot catch all the water drops from the
evaporator
Reinstall the water tray.
12. High humidity
in the cabinet or
condensation on
the bottle
surface
Ambient humidity is high
Move the refrigerator to a cool and ventilated place
The door opening time is too long or too frequent
Reduce the times/frequency of door openings.
The door does not close properly.
Please refer to the problem #6 “The door will not close properly” and its
solutions.
13. The
temperature
difference
between the
bottles inside the
cabinet is large
There are other objects besides drink bottles in the
cabinet, which affects the air circulation.
This refrigerator is designed for wine storage, if there are other objects,
please remove it. The number of bottles placed on each layer cannot exceed
the standard configuration.
The running time is too short, and the system has not
reached a stable state.
No action required. After extending the cooling time, the temperature inside
the cabinet will be uniform.
The upper and lower temperatures are not preset
properly. (only applicable to dual-zone wine cabinets)
Adjust the temperature setting value; the best setting is that the preset value
in the LOWER zone is 9°F (5°C) higher than the UPPER zone.
14. The power
consumption is
different from the
value on the
label
Power consumption is related to many factors, such as
ambient temperature, ventilation conditions, the number
of bottles in the cabinet, preset temperature, and voltage
level. The actual situation may differ from the power
consumption indicated on the label. This is normal.
No action required.
15. Incomplete
display
characters
The number on the display is missing one or two strokes
The wiring of the display is poor connected. In most cases, it will not affect
the cooling function of the refrigerator.
The display is not displayed, but the keys have sound
Find a technician to repair.
16. Button failure
The door opening time is too long, resulting in too much
condensation on the glass panel
Avoid opening the door for a long time when the machine is turned on, it will
return to normal in ten minutes after the door is closed.
Signals such as cars, hair dryers, induction cookers, and
mobile phones accidentally interfere with the wine cabinet
Keep away from the signal source, turn off and unplug the power, then restart
the refrigerator.
Display or control board failure.
Find a technician to repair.
17. There is smell
inside the
cabinet
The new machine may leave a small amount of
environmental cleaner
No action required, it will disappear gradually.
The smell of wooden shelves
No action required, it will disappear gradually.
18. Error code
U1, C1, U2 or C2
Error code U1 or C1 means the sensor in the UPPER zone
is short-circuit or open-circuit.
The sensor in the UPPER zone is defective, or the socket/plug with UP mark
on PCB is poor connected. Please check the connection or replace the
sensor.
Error code U2 or C2 means the sensor in the LOWER zone
is short-circuit or open-circuit.
The sensor in the LOWER zone is defective, or the socket/plug with DOWN
mark on PCB is poor connected. Please check the connection or replace the
sensor.
19. Error code
HH
High-temperature alarm
Please refer to the problem #2 “Refrigerator is not cold enough; can not cool
down to the preset temp.” and its solutions. Then unplug the power plug for 5
hours, restart the refrigerator.
20. Error code LL
Low-temperature alarm
1. Unplug the power for 5 hours, restart the refrigerator and check again.
2. Check or replace the sensors and control board.
3. Check or replace the the electromagnetic valve (applicable to KBU28LR)
PART VI" TROUBLESHOOTING GUIDE

www.kingsbottle.com (USA) |www.kingsbottle.com.au (Australia)" 15
MAINTENANCE
CLEANING YOUR WINE COOLER
BEFORE CLEANING: Turn off the power, unplug the appliance, and remove all items including all the shelves.
•
Wash the inside surfaces with warm water and baking soda solution. The solution should be about 2 tablespoons of baking soda
with a quart of water.
•
Wash the shelves with a mild detergent solution.
•
Wring excess water out of the sponge or cloth when cleaning area of the controls, or any electrical parts.
•
Wash the outside cabinet with warm water and a mild liquid detergent. Rinse well and wipe dry with a clean, soft cloth.
•
After installation, we recommend that owners apply a thin layer of Olive Oil with a clean rag, to all exposed Stainless Steel areas.
This should then be polished in and buffed off with another clean rag to a non-oily finish. This process will aid protection against
dirt and other corrosive contaminants, by providing a temporary food-safe shield. The Olive Oil layer also makes later polishing
and removal of fingerprints easier. This process should be repeated frequently every 3-4 months. ALL stainless steel can rust; it is
a myth that stainless steel doesn’t rust.
POWER FAILURE
Most power failures are corrected within a few hours and should not affect the temperature of your appliance if you minimize the number of
times the door is opened. If the power is going to be off for a longer period of time, you need to take the proper steps to protect your
contents.
VACATION TIME
Short vacations: You may leave the wine cooler operating during vacations of less than three weeks.!
Long vacations: If the appliance will not be used for several months, remove all items and turn off the appliance. Clean and dry the
interior thoroughly. To prevent mold growth, leave the door open slightly, blocking it open if necessary.!
MOVING YOUR WINE COOLER
1. Remove all items.
2. Securely tape down all loose items (shelves) inside your appliance.
3. Turn the adjustable leg up to the base to avoid damage.
4. Tape the door shut.
5. Be sure the appliance stays secure in the upright position during transportation. Also, protect the outside of the appliance with a
blanket or similar item.
ENERGY SAVING TIPS
•
The wine cooler should be located in the coolest area of the room, away from heat-producing appliances, and away from direct
sunlight. Ventilation at the rear also helps a lot with energy usage, to create a positive air flow where possible, although with this
range they are designed to be fully built in.
•
When you are not using cooler during weekdays etc. it is recommended to set the temp at a higher level, so set at 64°F (18°C )
during periods of non-usage, this will not only mean less run time, it will also keep drinks at a temp that won’t get them spoiled. It
saves energy also which these days are a growing concern for most households.
•
Keep the cooler stocked; an empty cooler will run longer, believe it or not.
place for later reference.
The symbols you will see in this booklet have these meanings:
WARNING
CAUTION
TIPS & INFORMATION
ENVIRONMENTAL TIPS
Meanings of symbols used in this manual are shown below:
WARNING
‘flammable’ and/or a small flame symbol,
do not store them inside any refrigerator or
freezer. If you do so you may cause an explosion.
remove any doors. Children can suffocate if they get
trapped inside.
blowing gases. Avoid safety hazards by carefully
disposing of this appliance.
WARNING
The refrigerator must be plugged into its own
dedicated 220-240V, 50Hz AC electrical outlet.
The plug must be accessible when the refrigerator is
in position.
It is essential the power point is properly earthed to
ground. Consult a qualified electrician if you are unsure.
Don’t use extension cords or adapter plugs with this
refrigerator.
If the power cord is damaged, have it replaced by a
qualified service technician.
Unplug the refrigerator before cleaning it, or changing
the light bulb to avoid electric shock.
Never unplug the refrigerator by pulling the electrical
cord as this may damage it. Grip the plug firmly and
pull straight out.
Choose a location for your refrigerator that isn’t too cold.
The ambient room temperature should be above 10°C.
Stand your refrigerator in a dry place – avoid areas
of high moisture or humidity.
Don’t put the refrigerator in frosty or unprotected areas
like a garage or on the verandah.
Keep the refrigerator out of direct sunlight.
Don’t locate the refrigerator near stoves, fires or heaters.
When installed correctly, your refrigerator should:
– Have adequate space at the back and sides
for air circulation (refer to page 9).
– Be aligned to the surrounding cupboards.
– Have doors that will self-close from a partially
open position.
WARNING
This appliance may contain a small quantity of environmentally
friendly, but flammable, non-synthetic R600a refrigerant:
damaged during transportation and installation.
8g of refrigerant. The amount of refrigerant charged in the
appliance can be found on the rating plate on the appliance.
in the built-in structure, clear of obstruction.
accelerate the defrosting process, other than those
recommended by the manufacturer.
3
per 8g of refrigerant. The amount of refrigerant charged
in the appliance can be found on the rating plate on
the appliance.
PART VII" CARE AND MAINTENANCE
www.kingsbottle.com (USA) |www.kingsbottle.com.au (Australia)" 16
TECHNICAL DATA
PART VIII" " TECHNICAL DATA
MODEL NO.
KBU170DX
KBU100DX
KBU50DX
VOLUME
14.30 CF ( 405 Liter )
10.88 CF ( 308 Liter)
5.37 CF ( 152 Liter )
TYPE OF COOLING
compressor with air-circulated fan
cooling
compressor with air-circulated fan
cooling
compressor with air-circulated fan
cooling
CLIMATE TYPE
N
N
N
ELECTRICITY PROTECTION
GRADE
I
I
I
NOMINAL VOLTAGE/
FREQUENCY
110-115V/60HZ (USA)
220-240V/50HZ (AU)
110-115V/60HZ (USA)
220-240V/50HZ (AU)
110-115V/60HZ (USA)
220-240V/50HZ (AU)
RATED CURRENT
1.1 A
1.1 A
0.9 A
RATED POWER(W)
80W
80W
72W
REFRIGERANT
R600a
R600a
R600a
AMBIENT TEMPERATURE
32 - 100 °F ( 0 -38°C)
32 - 100 °F ( 0 -38°C)
32 - 100 °F ( 0 -38°C)
TEMPERATURE RANGE
Upper Zone: 39-60 °F ( 4 - 15°C);
Lower Zone: 45-64 °F ( 7 - 18°C)
Upper Zone: 39-60 °F ( 4 - 15°C);
Lower Zone: 45-64 °F ( 7 - 18°C)
Upper Zone: 39-60 °F ( 4 - 15°C);
Lower Zone: 45-64 °F ( 7 - 18°C)
NET WEIGHT
286.60 lbs (130 KGS)
198.41 lbs (90 KGS)
112.43 lbs (51 KGS)
GROSS WEIGHT
(INC. PALLET)
310 lbs (141 KGS)
239 lbs (108 KGS)
159 lbs (72 KGS)
DIMENSION
23.54”W x 26.97”D x 71.69”H
( 598W x 685D x 1821H mm )
Included stand height 0.98” (25mm)
23.54”W x 26.97”D x 55.43”H
( 598W x 685D x 1408H mm )
Included stand height 0.98” (25mm)
23.42”W x 23.62”D x 33.86”H;
( 595W x 600D x 860H mm )
Included stand height 0.79” (20mm)
PART IX" WARRANTY INFORMATION
Please speak to your retailer before calling us if you did not purchase your refrigerator directly from KingsBottle.
WHO IS COVERED: This warranty is extended only to the original end-user purchaser or the person receiving the product as a gift, and shall not be extended
to any other person or transferee.
LIMITED WARRANTY – If your refrigerator is not operating properly, KingsBottle reserves the right to repair or replace the refrigerator. KingsBottle may
request the consumer to contact a local refrigeration company to service the refrigerator. All cost for labor and materials is covered for 2-year from the date of
receipt. If KingsBottle deems the unit not repairable, KingsBottle will use the value of your original order toward a replacement (Any replacement unit will follow
the warranty terms of the initial purchase). For customer service, please e-mail us via [email protected].
THE LIMITED WARRANTY DOES NOT COVER: Damage due to such things as an accident, misuse, abuse, mishandling, neglect, unauthorized repair or
any other cause beyond the control of the seller whether similar or dissimilar to the foregoing. Purchaser understands and acknowledges that the goods sold
here are WINE & BEVERAGE COOLERS, which house beer and other wines. Purchaser assumes all the risk of using these units, including the risk of spoilage,
humidity variations, temperature variations, leaks, fires, water damage, mold, mildew, dryness and similar perils that may occur.
SPECIAL NOTE: Warranty is only honored for the unit which is used in the countries where the unit was initially purchased. And, if your product was
purchased at any 3rd party retailer and not directly from KingsBottle, we do not offer an extended warranty policy. You MUST contact the retailer of purchase
directly. In the event your retailer does not offer an extended warranty plan, we recommend you contact a third party warranty provider. However, regardless of
point of purchase, all KingsBottle coolers are backed by a TWO YEAR manufacturer's warranty from date of sale.
COMPRESSOR WINE REFRIGERATORS

COMPRESSOR WINE REFRIGERATORS

www.kingsbottle.com
MANUEL DE L’UTILISATEUR
KBU-50 / 100 / 170DX REFROIDISSEURS À VIN À DOUBLE ZONE
REFROIDISSEURS À VIN AVEC COMPRESSEUR
VEUILLEZ NOTER!
•
À chaque fois que l’unité est ALLUMÉE, il y aura un délai de 6 minutes avant que le compresseur démarre.
•
Pour une utilisation optimale du produit, la température de la zone de refroidissement INFÉRIEURE devrait
être d’au moins 4°F plus élevée que la zone de refroidissement SUPÉRIEURE.
MODÈLES À PORTE VITRÉE NOIR SANS BORDURE
MODÈLES À PORTE VITRÉE AVEC BORDURE EN ACIER INOXYDABLE
KBU50DX-FG
KBU100DX-FG
KBU170DX-FG
KBU170DX-SS
KBU100DX-SS
KBU50DX-SS

www.kingsbottle.com 2
Félicitations
Félicitations et merci d’avoir choisi
nos refroidisseurs à vin KingsBottle.
Nous sommes convaincus que vous
trouverez votre nouvel
électroménager agréable à utiliser.
Avant d’installer et d’utiliser votre
refroidisseur à vin, nous vous
recommandons de lire ce manuel
qui vous donne une description de
votre refroidisseur à vin ainsi que
ses fonctions.!
Afin d’éviter les risques qui sont
toujours présents lors d’utilisation
d’électroménagers, il est important
que l’appareil soit installé
correctement et que vous lisiez
attentivement les consignes de
sécurité afin d’éviter toute mauvaise
utilisation ou risque potentiel.!
Nous recommandons de conserver
ce manuel d’instruction en cas de
besoin ou à l’intention d’un futur
acheteur.!
Après avoir déballé votre
électroménager, veuillez l’inspecter
afin de vérifier qu’il n’est pas
endommagé. En cas de doute,
n’utilisez pas l’appareil, et
contactez-nous directement ou
communiquez avec votre centre de
service à la clientèle local.!
TABLE DES MATIÈRES
Chapitre
Contenu
Page
Partie I
Consignes importantes de sécurité avant
l’utlisation
3
Partie II
Diagramme et description du réfrigérateur
4
Partie III
Consignes d’installation
5-7
Partie IV
Configuration et stockage
8-10
Partie V
Utilisation du réfrigérateur et réglage de
température
11-12
PARTIE VI
Guide de dépannage
13
Partie VII
Entretien
14
Partie VIII
Données techniques
16
Partie IX
Information sur la garantie
16
CONTENU
REFROIDISSEURS À VIN AVEC COMPRESSEUR
www.kingsbottle.com"3
SÉCURITÉ
PARTIE I" CONSIGNES DE SÉCURITÉ " "
IMPORTANTES
Veuillez lire attentivement ce manuel d’instruction et le conserver
en cas de besoin. La signification des symboles que vous verrez
dans ce manuel est expliquée ci-dessous!
AVERTISSEMENT!
Ce symbole signifie des renseignements concernant votre sécurité.
ATTENTION
Ce symbole signifie des renseignements qui permettent d’éviter
d’endommager l’appareil.
CONSEILS ET INFORMATIONS
Ce symbole signifie des renseignements et des conseils sur l’utilisation de
l’appareil.
CONSEILS ENVIRONNEMENTAUX
Ce symbole signifie des renseignements et des conseils sur une utilisation
économique et écologique de l’appareil.
AVERTISSEMENT
VEUILLEZ SUIVRE LES MESURES DE PRÉCAUTIONS CI-
DESSOUS AFIN DE RÉDUIRE LE RISQUE D’INCENDIE, DE
CHOC ÉLECTRIQUE OU DE BLESSURES LORS DE
L’UTILISATION DE VOTRE APPAREIL.
1. Lisez toutes les consignes avant d’utiliser le refroidisseur à vin.
2. DANGER ou AVERTISSEMENT": Risque de prise au piège. Un
enfant pris au piège ou qui suffoque n’est pas seulement un
problème du passé. Les appareils abandonnés sont toujours
dangereux…même s’ils ne vont «"qu’être dans le garage
quelque jours seulement"».
3. Avant de vous débarrasser de votre ancien refroidisseur à vin":
a. Enlevez la porte.
b. Laissez les tablettes à l’intérieur pour que les enfants ne
puissent pas facilement grimper à l’intérieur.
4. Ne laissez jamais des enfants utiliser, grimper à l’intérieur ou
jouer avec l’appareil.
AVERTISSEMENT
1.Le refroidisseur à vin doit être connecté sur une prise
électrique de 110-115V, 50/60Hz CA réservée uniquement
pour l’appareil.
2. La prise doit être accessible lorsque le refroidisseur est en place.
3. Il est essentiel que la prise électrique soit bien mise à terre.
4. N’utilisez pas de rallonges électriques et d’adaptateurs avec ce
refroidisseur.
5. Si le cordon d’alimentation est endommagé, faites-le remplacer
par un technicien qualifié.
6. Débranchez le refroidisseur avant de le nettoyer ou lors du
changement d’ampoule afin d’éviter un choc électrique.
7. Ne nettoyez jamais l’appareil à l’aide de liquide inflammable. Les
vapeurs peuvent entrainer un risque d’incendie ou d’explosion.
8. Ne débranchez jamais le refroidisseur en tirant sur le cordon
d’alimentation car ceci peut l’endommager. Empoignez la prise
et tirez fermement.
9. Choisissez un endroit pas trop froid pour votre refroidisseur, la
température ambiante de la pièce devrait être de plus de 50°F.
10.Placez votre refroidisseur dans un endroit sec – évitez les
endroits humides.
11.Ne placez pas votre refroidisseur dans un endroit froid ou non-
protégé, tels qu’un garage ou une véranda.
12.Gardez le refroidisseur à l’abri de la lumière directe du soleil.
13.Ne placez-pas votre refroidisseur à proximité de cuisinières, feux
ou chaufferettes.
14.N’entreposez-pas le refroidisseur à proximité d’aucun autre
électroménager. N’entreposez-pas l’appareil à proximité
d’essence ou tout autre produit inflammable. Les vapeurs
peuvent entrainer un risque d’incendie ou d’explosion.
15.Lorsqu’installé correctement, le refroidisseur devrait":
•
Disposer d’espace adéquat en avant et sur les côtés afin
d’assurer une circulation d’air.
•
Être aligné avec les armoires voisines.
•
Avoir des portes qui se ferment automatiquement
lorsqu’elles sont dans une position semi-ouverte.
16.Veuillez vérifier et nettoyer le filtre de la grille d’aération avant une
fois par mois. Omettre ce nettoyage annule la garantie et
augmente les coûts de fonctionnement.
AVANT D’UTILISER VOTRE REFROIDISSEUR À VIN
•
Retirez l’emballage extérieur et intérieur.
•
Avant de brancher le refroidisseur à vin à la prise électrique,
laissez-le debout pour une durée d’environ 24 heures. Ceci
réduira la possibilité d’une défaillance du système de
refroidissement causée par le transport.
•
Nettoyez la surface intérieure avec un chiffon doux imbibé d’eau
tiède.
DISCLAIMER
Le fabricant décline toute responsabilité en cas d'altération du
contenu du réfrigérateur, même lorsque l'appareil est dans la
période de garantie. De même, le fabricant décline toute
responsabilité pour les dommages corporels dus à un stockage
incorrect des produits, qu'ils soient destinés à la consommation
personnelle ou à la revente.
place for later reference.
The symbols you will see in this booklet have these meanings:
WARNING
CAUTION
TIPS & INFORMATION
ENVIRONMENTAL TIPS
Meanings of symbols used in this manual are shown below:
WARNING
‘flammable’ and/or a small flame symbol,
do not store them inside any refrigerator or
freezer. If you do so you may cause an explosion.
remove any doors. Children can suffocate if they get
trapped inside.
blowing gases. Avoid safety hazards by carefully
disposing of this appliance.
WARNING
The refrigerator must be plugged into its own
dedicated 220-240V, 50Hz AC electrical outlet.
The plug must be accessible when the refrigerator is
in position.
It is essential the power point is properly earthed to
ground. Consult a qualified electrician if you are unsure.
Don’t use extension cords or adapter plugs with this
refrigerator.
If the power cord is damaged, have it replaced by a
qualified service technician.
Unplug the refrigerator before cleaning it, or changing
the light bulb to avoid electric shock.
Never unplug the refrigerator by pulling the electrical
cord as this may damage it. Grip the plug firmly and
pull straight out.
Choose a location for your refrigerator that isn’t too cold.
The ambient room temperature should be above 10°C.
Stand your refrigerator in a dry place – avoid areas
of high moisture or humidity.
Don’t put the refrigerator in frosty or unprotected areas
like a garage or on the verandah.
Keep the refrigerator out of direct sunlight.
Don’t locate the refrigerator near stoves, fires or heaters.
When installed correctly, your refrigerator should:
– Have adequate space at the back and sides
for air circulation (refer to page 9).
– Be aligned to the surrounding cupboards.
– Have doors that will self-close from a partially
open position.
WARNING
This appliance may contain a small quantity of environmentally
friendly, but flammable, non-synthetic R600a refrigerant:
damaged during transportation and installation.
8g of refrigerant. The amount of refrigerant charged in the
appliance can be found on the rating plate on the appliance.
in the built-in structure, clear of obstruction.
accelerate the defrosting process, other than those
recommended by the manufacturer.
3
per 8g of refrigerant. The amount of refrigerant charged
in the appliance can be found on the rating plate on
the appliance.

www.kingsbottle.com 4
PARTIE II" " DIAGRAMME ET DESCRIPTION DU RÉFRIGÉRATEUR
CARACTÉRISTIQUES
REFROIDISSEURS À VIN AVEC COMPRESSEUR
AUSSI INCLUS DANS VOTRE REFROIDISSEUR À VIN":
•
Manuel d’instruction
•
Deux clefs
•
Charnières d’en haut et d’en bas, ainsi que les vis pour le changement de charnières
1. Lumière LED supérieure intérieure!
2. Boîtier!
3. Ventilateur CC!
4. Tableau de contrôle PCB!
5. Lumière LED latérale intérieure!
6. Grille avant!
7. Charnière de la porte!
8. Panneau d’affichage et de contrôle!
9. Porte en verre!
10. Tablette coulissante!
11. Pieds ajustables!
TEMP.SET
TEMP.SET
UPPER LOWER
ON/OFF
LOCK
RED
WHITE
SPARKLE
LIGHT
SELECT
UPPER
LOWER
ZONE
SUPÉRIEURE
ZONE
INFÉRIEURE
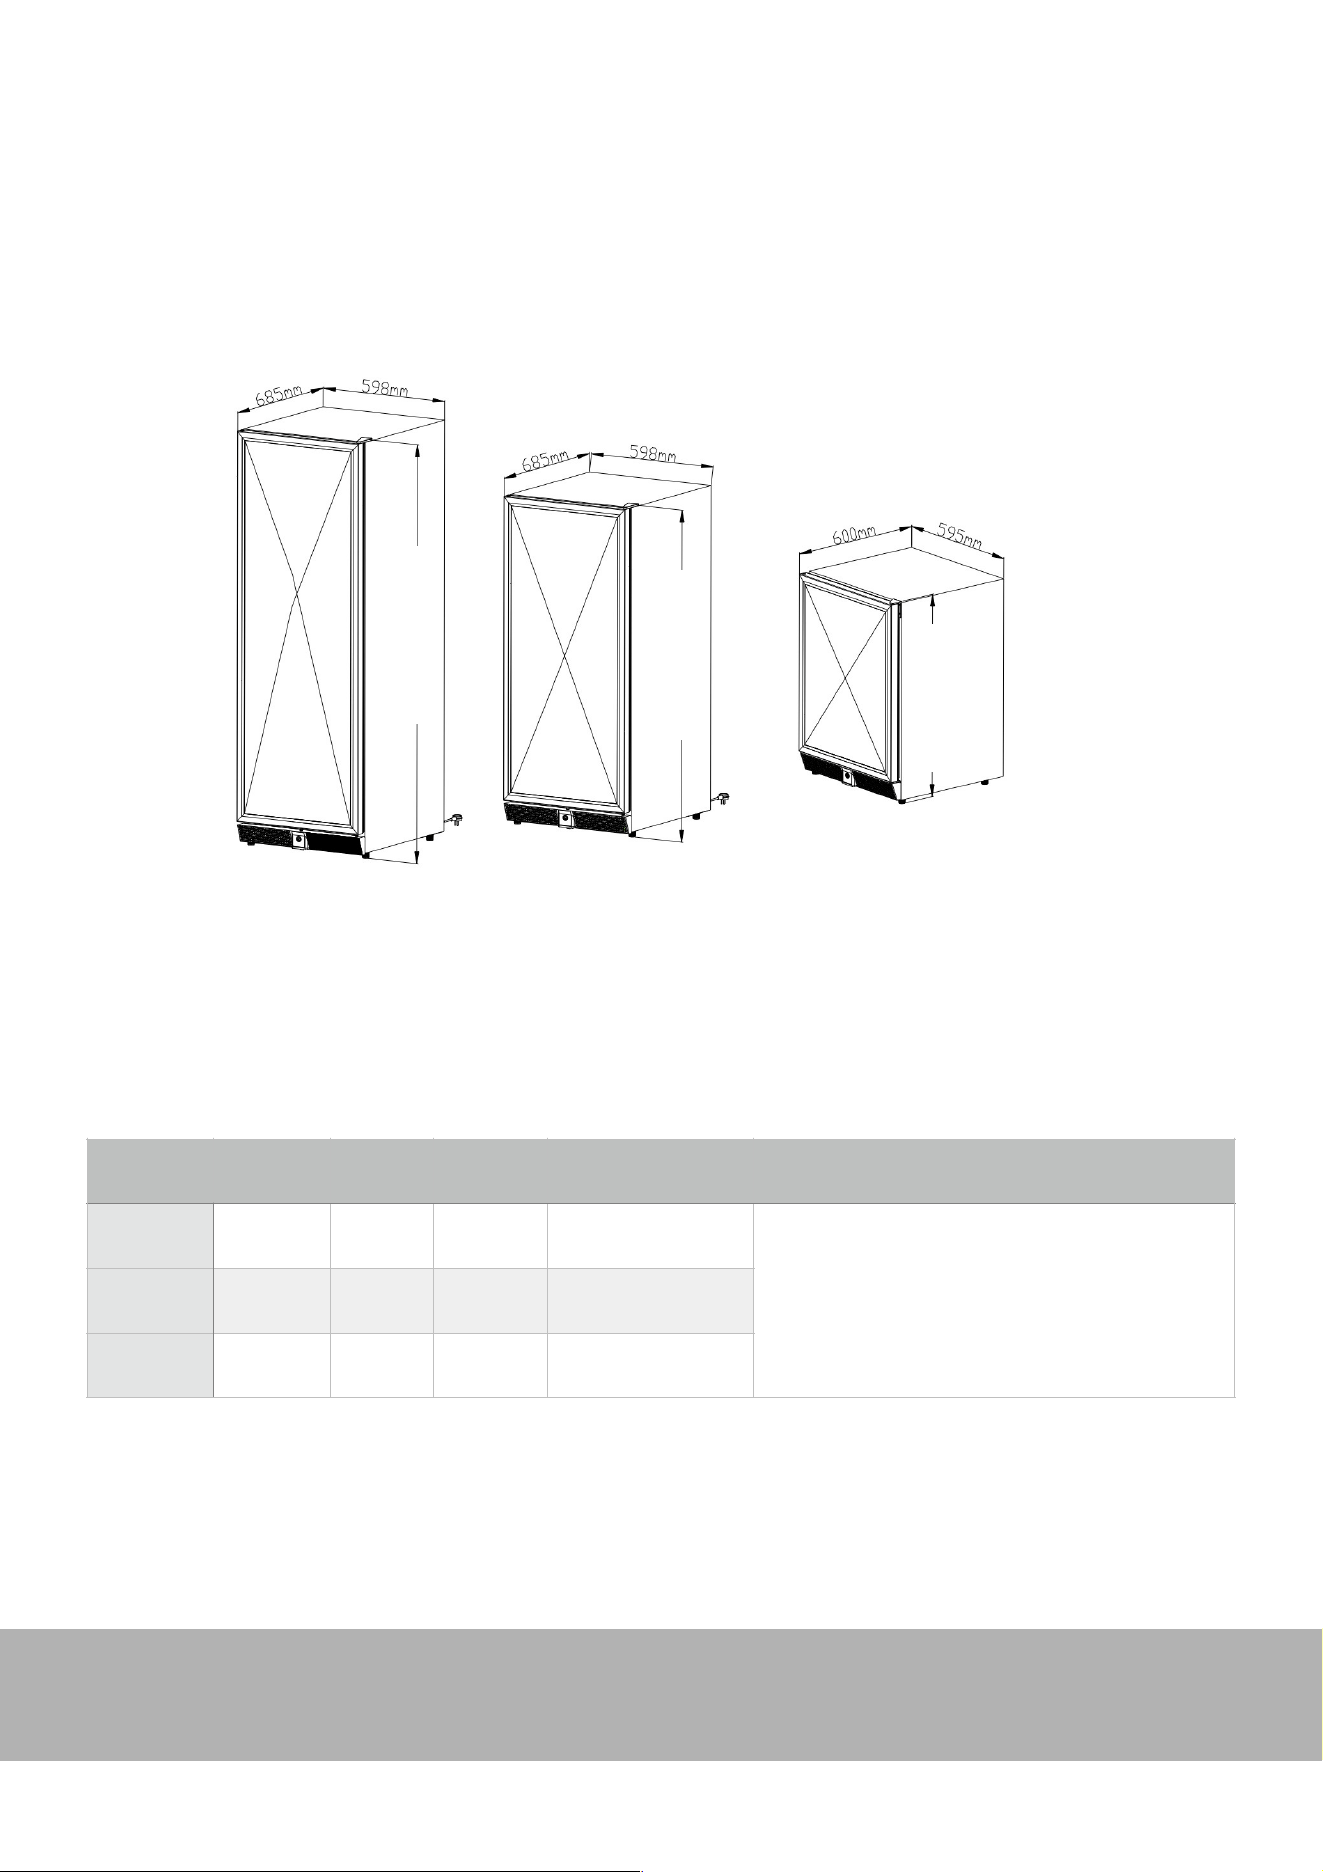
www.kingsbottle.com"5
PARTIE III " CONSIGNES D’INSTALLATION
INSTALLATION
MODEL
LARGEUR
LONGEU
R
HAUTEUR
HAUTEUR DU PIED
INCLUSE
NOTE
KBU-50
23.42”
595mm
23.62”
600mm
33.86”
860mm
0.79”
20mm
Ces modèles à ventilation frontale peuvent être encastrés
dans les armoires. L’entrepreneur devrait allouer 0.5 ”
additionnel de chaque côté, en arrière et par-dessus l’unité.
Ces espaces supplémentaires permettent de bien placer les
unités, d’ouvrir la porte sans problème et d’empêcher
l’usure des cordons d’alimentation.
KBU-100
23.54”
598mm
26.97”
685mm
55.43”
1408mm
0.98”
25mm
KBU-170
23.54”
598mm
26.97”
685mm
71.69”
1821mm
0.98”
25mm
KBU-170
23.54”W x 26.97”D x 71.69”H !
(598W x 685D x 1821H mm) !
Hauteur du pied de 0.98” (25 mm) incluse!
KBU-100
23.54”W x 26.97”D x 55.43”H !
(598W x 685D x 1408H mm) !
Hauteur du pied de 0.98” (25 mm) incluse
KBU-50
23.42”W x 23.62”D x 33.86”H !
( 595W x 600D x 860H mm )!
Hauteur du pied de 0.79” (20 mm) incluse!
CUTOUT DIMENSION ILLUSTRATED
71.69” (1821 mm)
55.43” (1408 mm)
33.86” (860 mm)
26.97”
23.54”
23.54”
26.97”
23.62”
23.42”
DIMENSIONS DÉCOUPÉE ILLUSTRÉE
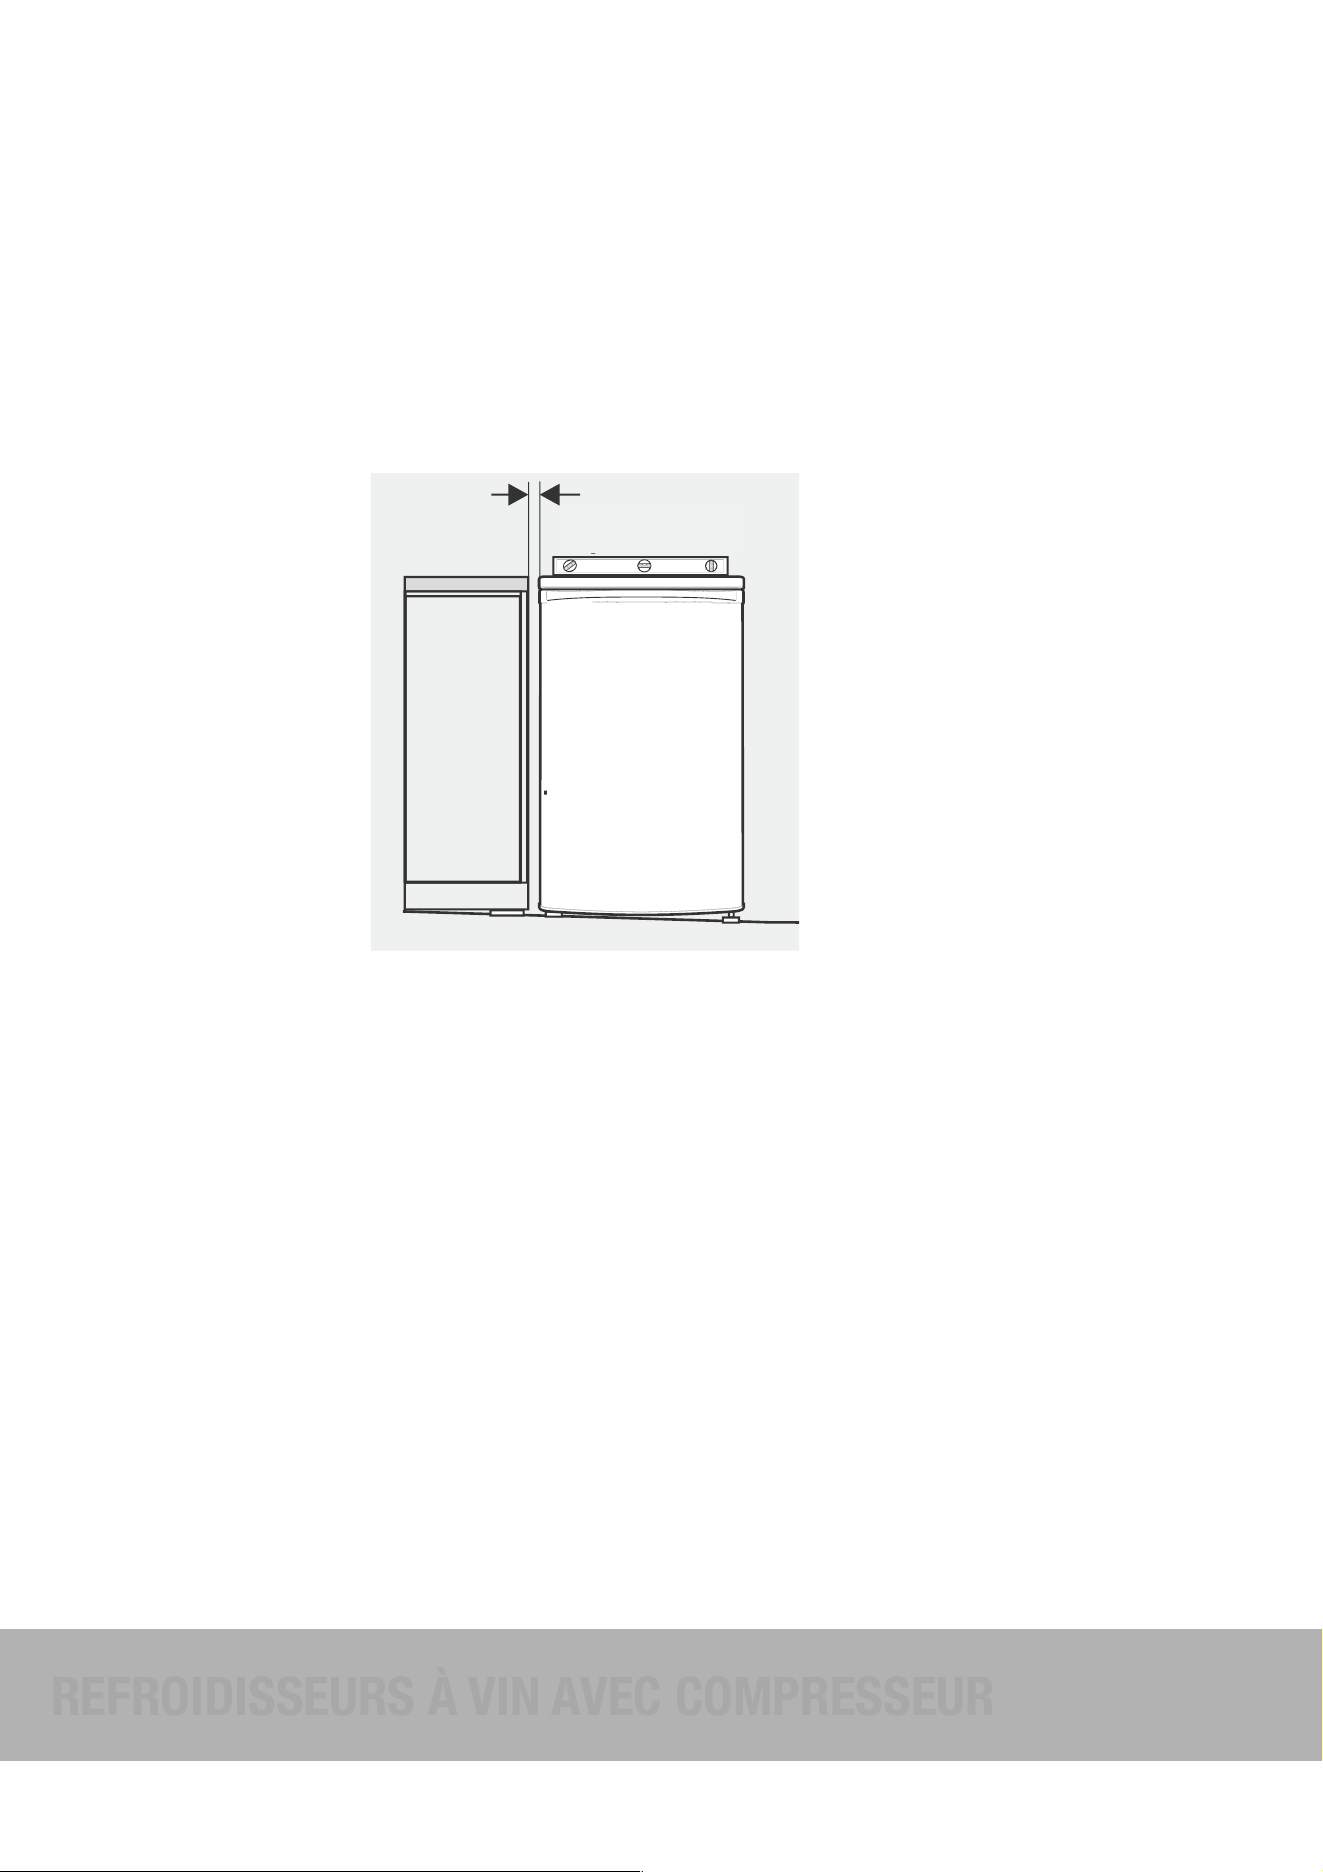
www.kingsbottle.com"6
PARTIE III " CONSIGNES D’INSTALLATION
INSTALLATION
REFROIDISSEURS À VIN AVEC COMPRESSEUR
INSTALLER VOTRE REFROIDISSEUR À VIN
1. Placez l’unité dans sa position finale. (ATTENTION": pour votre sécurité, il est nécessaire que les modèles KBU100 et KBU170 soient
ancrés dans le mur, veuillez-vous fier aux instructions à la page suivante.
2. Si l’unité n’a pas d’inclinaison arrière, des ajustements mineurs peuvent être fait à l’aide des pieds ajustables.
3. Comparez l’alignement de l’appareil aux armoires adjacentes. Le dessus de l’appareil devrait être au niveau d’un côté à l’autre (voir
le diagramme ci-dessous)
4. Si l’unité tangue d’un coin au coin arrière transversal, cela signifie que le plancher est inégal. Il est possible que vous devriez mettre
du remplissage en dessous du côté arrière de l’appareil. Vous pouvez utiliser des pièces minces de matériaux solides tels que des
planches minces, des carreaux en vinyle ou laminés.
5. Il est possible que vous deviez ajuster l’installation en répétant les étapes 2, 3 et 4.
6. Nettoyez toute saleté qui s’est accumulée lors de la livraison et nettoyez en suivant les consignes dans la Partie VI (Manutention).
7. Branchez l’appareil dans la prise électrique. N’utilisez pas un adaptateur double ou une rallonge électrique.
8. Il est recommandé que vous laissiez l’appareil se reposer une heure ou deux avant de mettre des bouteilles de vin à l’intérieur. Cela
confirmera que l’appareil fonctionne correctement et que les conditions sont appropriées pour l’entreposage de vin
Félicitations! Vous avez installé votre refroidisseur à vin avec succès.
VERROU
Cette unité vient avec une serrure à clé optionnelle. Les clés se trouvent dans le sac en plastique qui contient le manuel de l’utilisateur.
Pour verrouiller la porte, inversez simplement l’opération en vous assurant que la goupille en métal est complètement engagée. Après,
retirez la clé et placez la dans un endroit sécuritaire. Pour déverrouiller la porte, insérez la clé dans la serrure et tournez dans la direction
antihoraire.
Before you move your appliance into the place where it
will operate, check that it will have adequate clearance.
Clearance is required for air circulation and too little
clearance may affect the performance of your appliance.
We recommend minimum clearances of:
NOTE:
Doors are designed to sit proud of cabinetry (not flush).
The clearances shown above are the recommended
minimum clearances. The clearance at the rear must not
exceed 75mm.
The appliance should arrive with the front levelling feet
wound up. The appliance may need to be tilted backward
at the top by about 10-15mm from vertical (see diagram
below). This will allow the door to gravitate to the closed
position. The complete closure of the door seal is reliant on
manually pushing the door closed to provide a consistent
door seal.
CAUTION
The rollers are designed for forward or backward movement
only. They are not castors. Moving the refrigerator sideways
may damage your floor and the rollers.
1. Move the appliance into its final position.
2. If the appliance is not tilting back as described earlier,
minor adjustments can be made to the two front
levelling legs by turning the feet in an anticlockwise
direction (below). This will increase the height of
the feet. If you have difficulty turning the foot, have
someone tilt the appliance back to gain better access.
If it is not tilted back enough and the levelling legs are
fully extended, additional packing might be required
(see note 4 for appropriate materials).
3. Compare the alignment of the appliance to the
surrounding cupboard. The top of the appliance should
be level from side to side (see diagram below). If
you need to adjust the level, use the levelling feet as
detailed in step 2.
4. If the appliance now rocks from one corner to the
opposite rear corner, this means that the floor is uneven.
You may need to put some packing under the ridge to
the rear of the appliance. You could use thin pieces of
solid material such as thin board, vinyl floor tiles
or laminate.
5. You may now need to fine tune the installation by
repeating steps 2, 3 and 4.
6. Wipe off any dust that has accumulated during shipping
and clean following the directions on page 17.
double adaptor or extension cord.
8. It is recommended that you let the appliance for an hour
or two (three hours for a freezer) before you put any
food in it. This will confirm that it is operating correctly
and make the conditions appropriate for food storage.
Congratulations! You have successfully installed your
refrigerator/freezer.
10 –15mm
Height adjustable
front rollers
50mm (75mm max)
30mm
30mm
Recommended
airspace
CABINET
DOOR
Niveau à bulle
Parallèle aux armoires
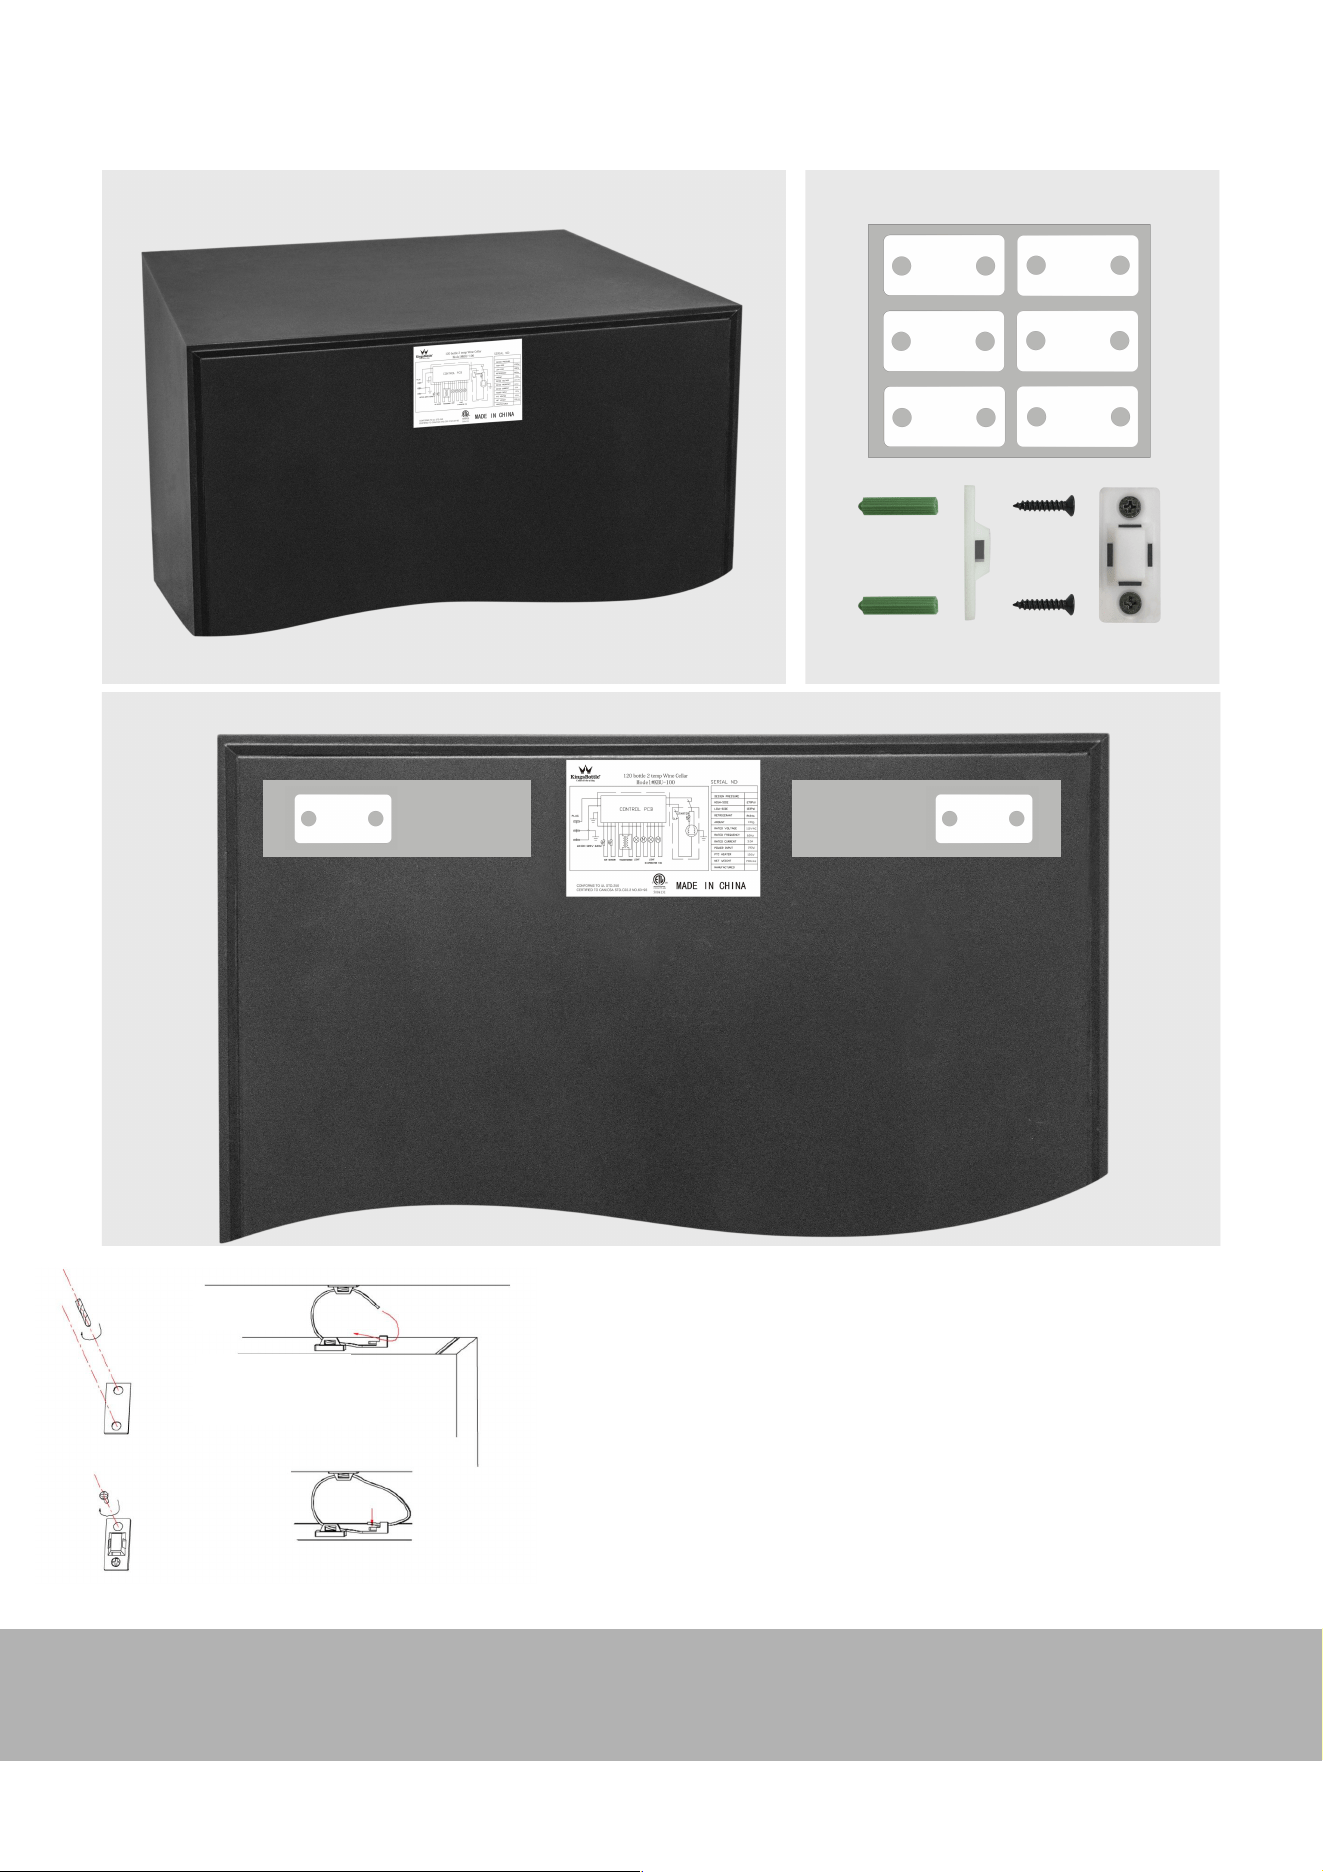
www.kingsbottle.com"7
Arrière du réfrigérateur
Pièces incluses
B
B
A
1. L’aire «&A&» est d’environ 7” l x 2” h (180 l x 50 h mm). Cette surface est
située à 1.2” (30 mm) du bord de l’appareil des côtés supérieurs droit et
gauche.!
2. «&B&» réfère à l’endroit où les trous pour les supports devraient être percés.
Note&: «&B"» devrait toujours être situé à l’intérieur de l’aire «&A&».!
3. Positionnez les supports à l’endroit désiré, faites une marque et percez un
trou pilote pour les vis d’environ 0.32” (8 mm) dans l’appareil. Ensuite,
utilisez un tournevis pour serrer les vis jusqu’au bout dans l’appareil.
A
APPLIANCE
Positionnez l’appareil à l’endroit voulu. Localisez les montants derrière l’appareil et marquez
l’endroit où le support derrière l’appareil est aligné avec un montant. Éloignez l’appareil du
mur et lignez le support sur la marque. Marquez et percez un trou pilote dans le milieu du
montant avec une mèche de 3/32”. Attachez un support au montant avec une vis longue
incluse dans les pièces.
Positionnez l’appareil dans sa position finale, en prenant soin d’aligner le support mural assez
proche du support à l’arrière de l’appareil pour les attacher ensemble. Enfilez une sangle entre
les supports comme illustré. Serrez les sangles jusqu’à qu’elles soient bien ajustées. Ne pas
trop serrer.
ATTENTION": Ce produit n’est pas conçu pour remplacer une supervision adéquate. Le
fabricant n’assume aucune responsabilité dans le cas d’une installation fautive ou un poids
excessif exercé sur les vis, les supports ou les sangles.
Les sangles devraient être ajustées, testées et remplacées périodiquement.
Instructions pour ancrer l’unité dans le mur
B
INSTALLATION
MUR
APPAREIL
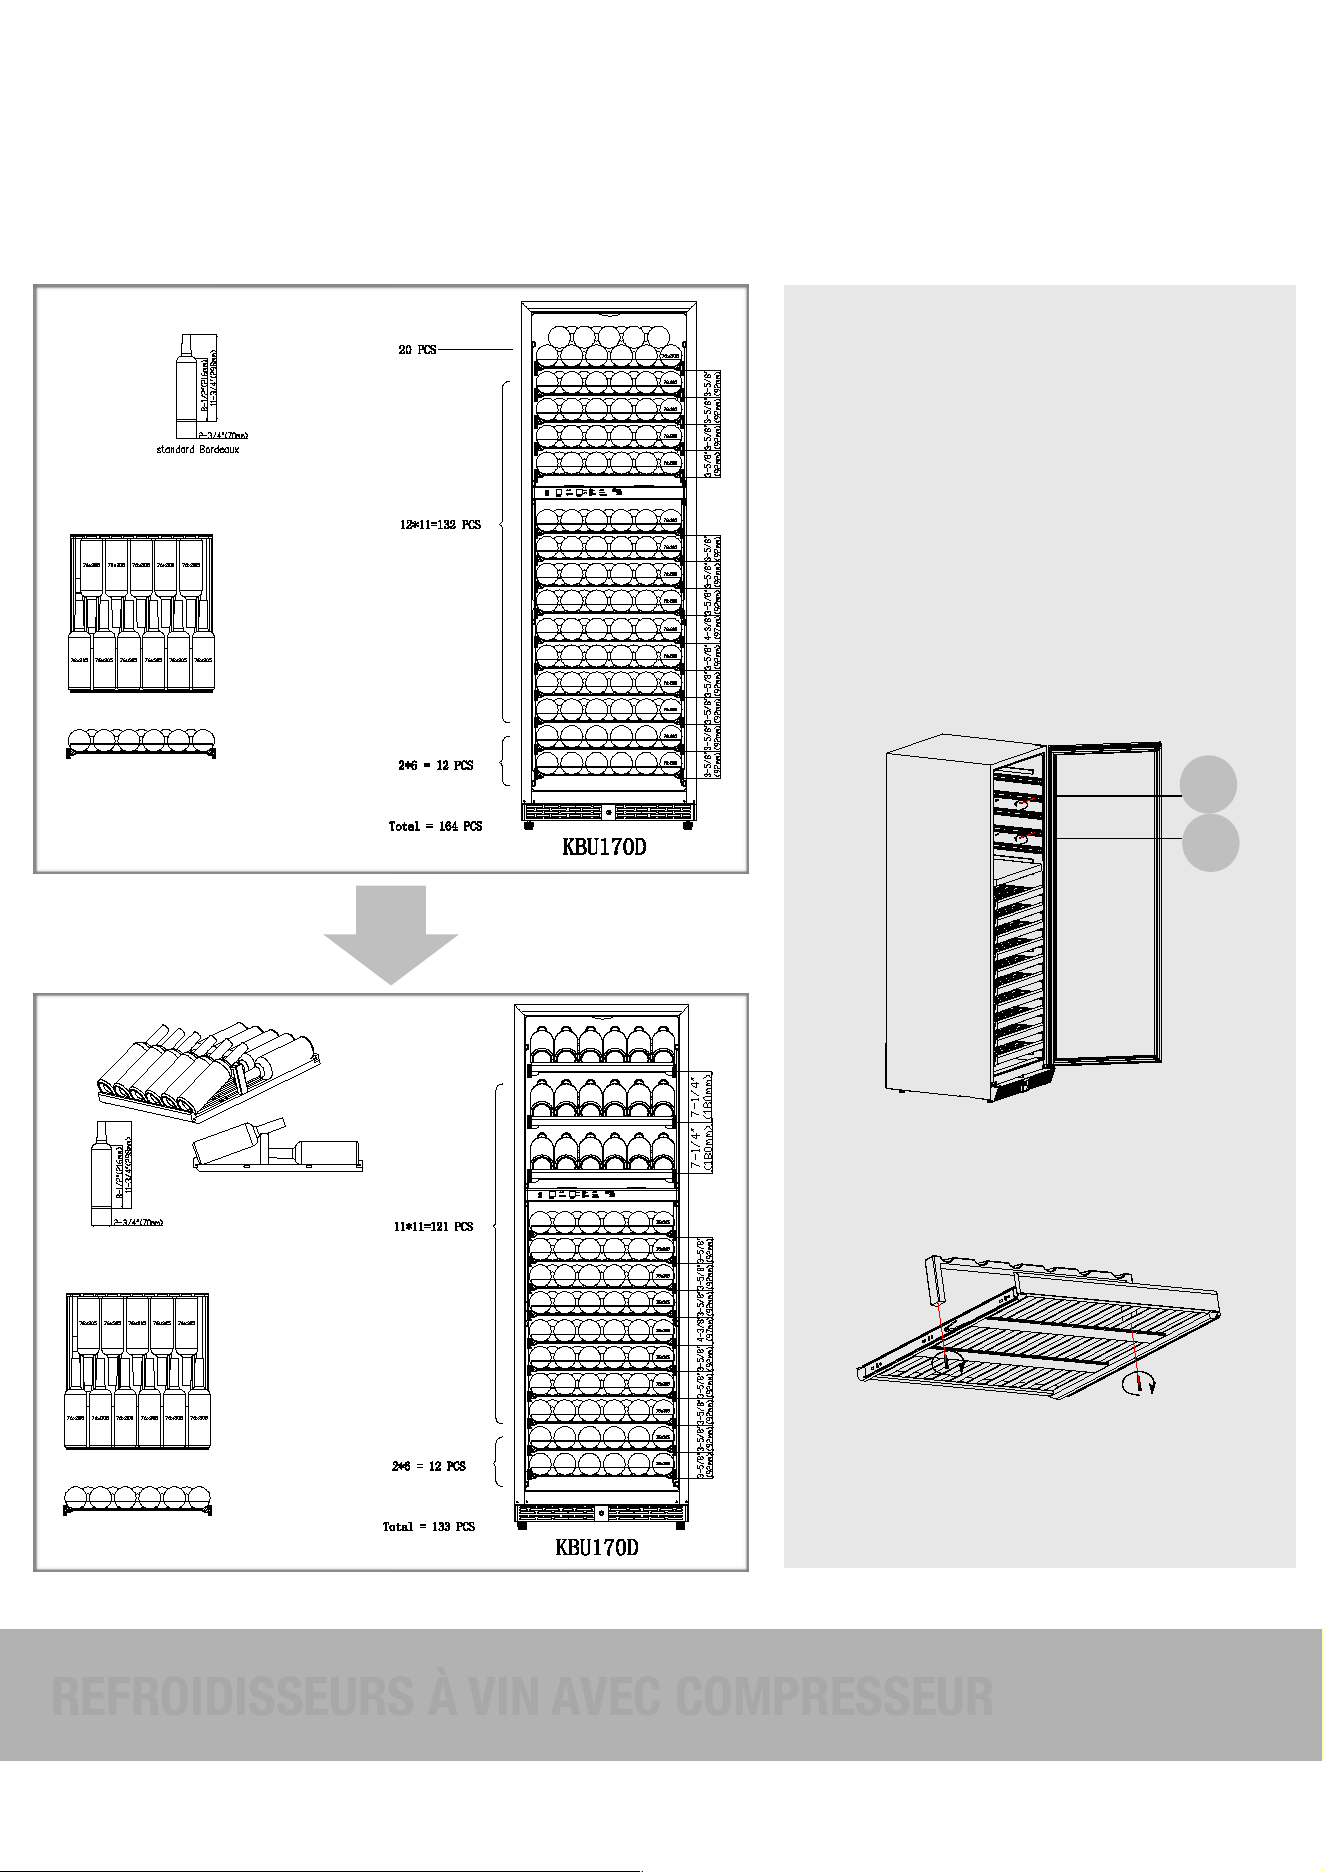
www.kingsbottle.com"8
PARTIE IV " CONFIGURATION ET STOCKAGE
STOCKAGE
REFROIDISSEURS À VIN AVEC COMPRESSEUR
En option, vous aimerez peut-être l’idée d’avoir
quelques tablettes en présentoir pour exposer les
étiquettes de vos bouteilles. Veuillez vous référer
aux instructions pour retirer les 2e et 4e tablettes
dans la zone supérieure (utilisez les vis pour
combler les trous dans les murs après le retrait
des tablettes), et ensuite changez les 1re, 3e et 5e
tablettes en présentoir.
Note": Ces changements réduisent la capacité de
stockage totale.
2
4
Retirez les 2e et 4e tablettes
ez les 1re, 3e et 5e tablettes en
présentoir
Option de présentoir
(Pour les modèles KBU170D)
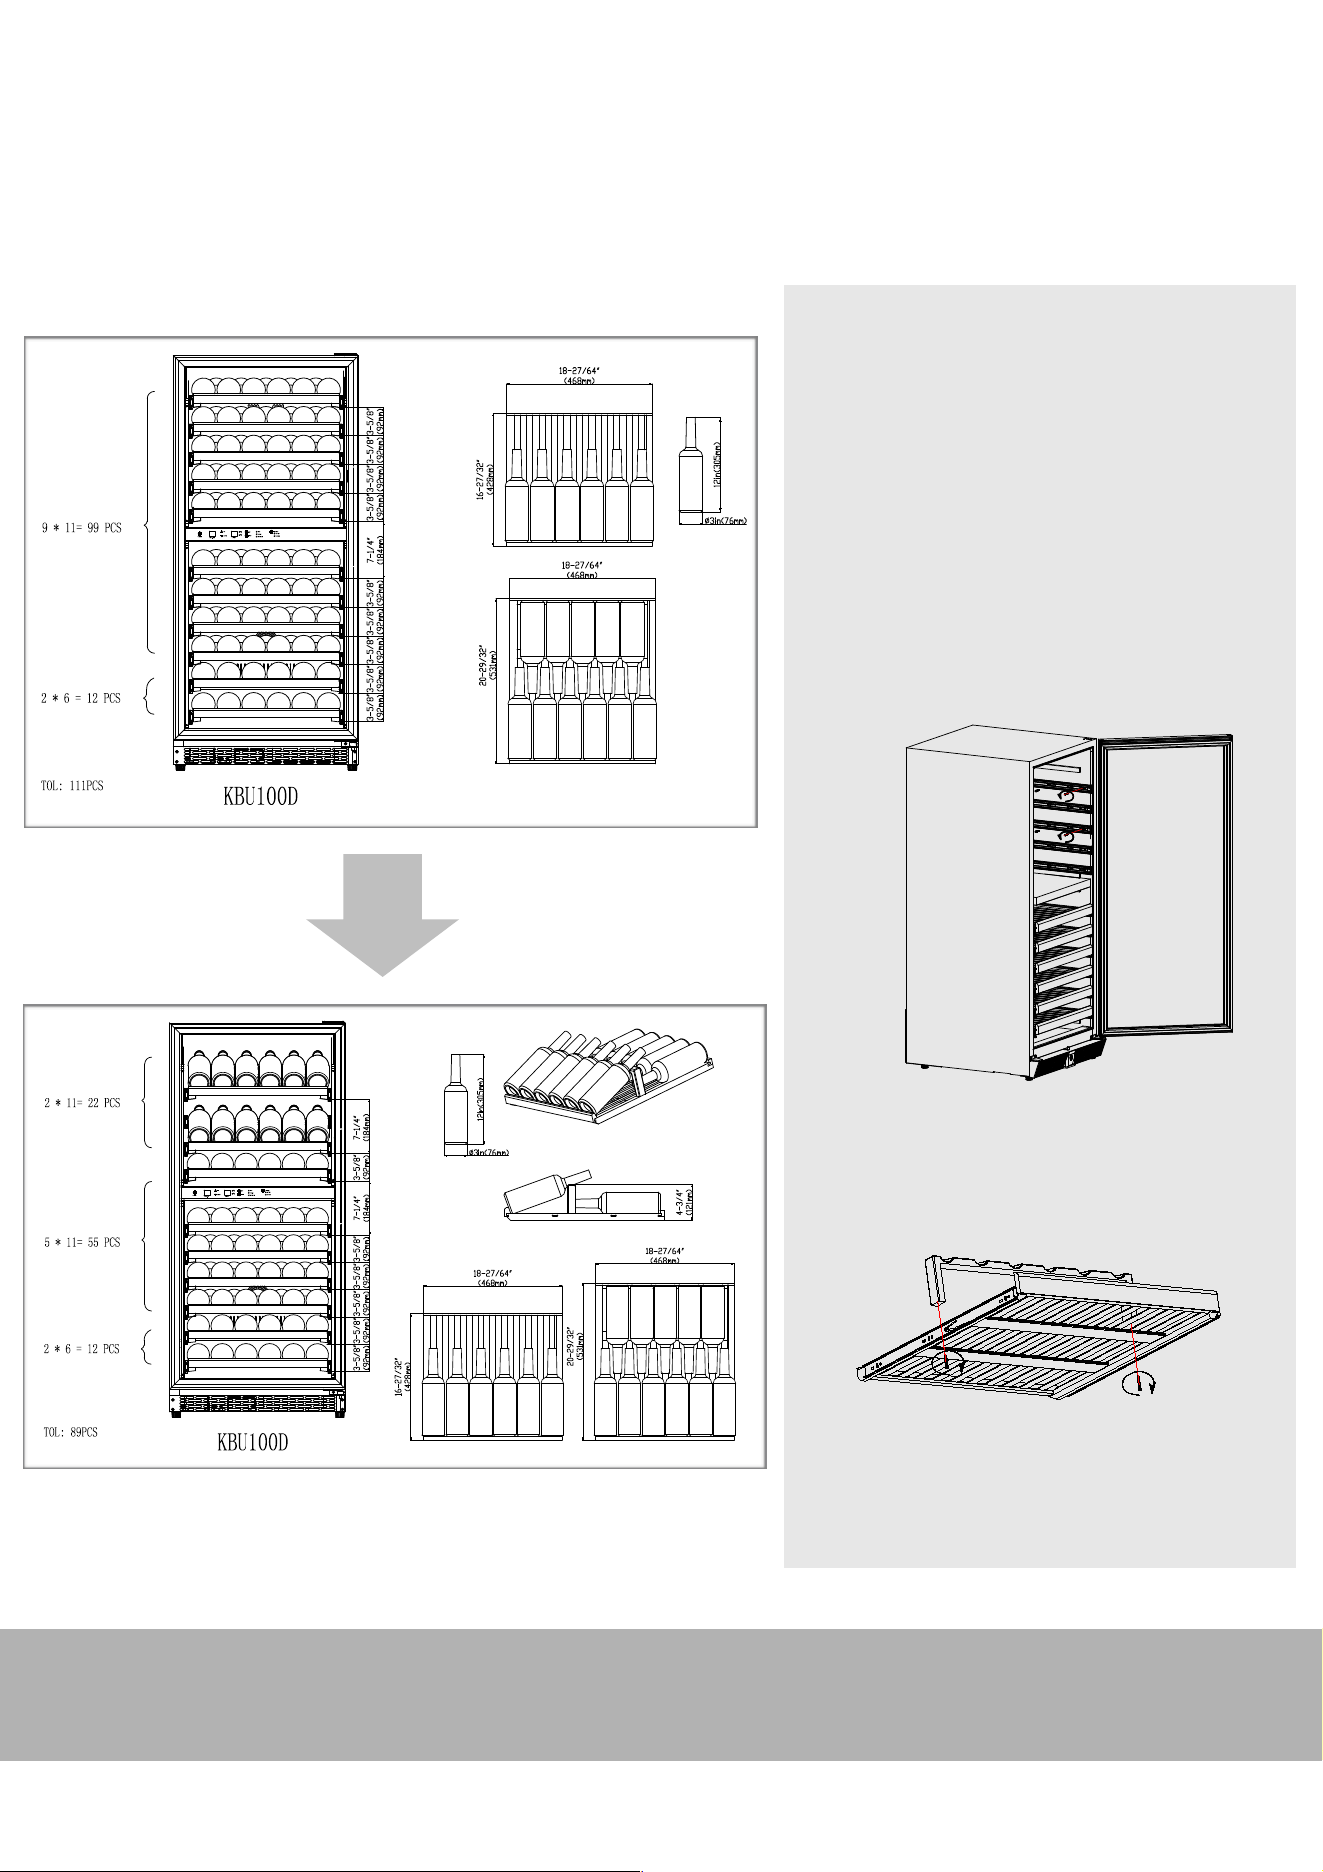
www.kingsbottle.com"9
STOCKAGE
En option, vous aimerez peut-être l’idée d’avoir quelques
tablettes en présentoir pour exposer les étiquettes de vos
bouteilles. Veuillez vous référer aux instructions pour retirer les
1re et 3e tablettes dans la zone supérieure (utilisez les vis pour
combler les trous dans les murs après le retrait des tablettes), et
ensuite changez les 2e et 4e tablettes en présentoir.
Note":
Ces changements réduisent la capacité de stockage totale.
Retirez les 1re et 3e tablettes
Changez les 2e et 4e tablettes en
présentoir
Option de présentoir
(Pour les modèles KBU100)
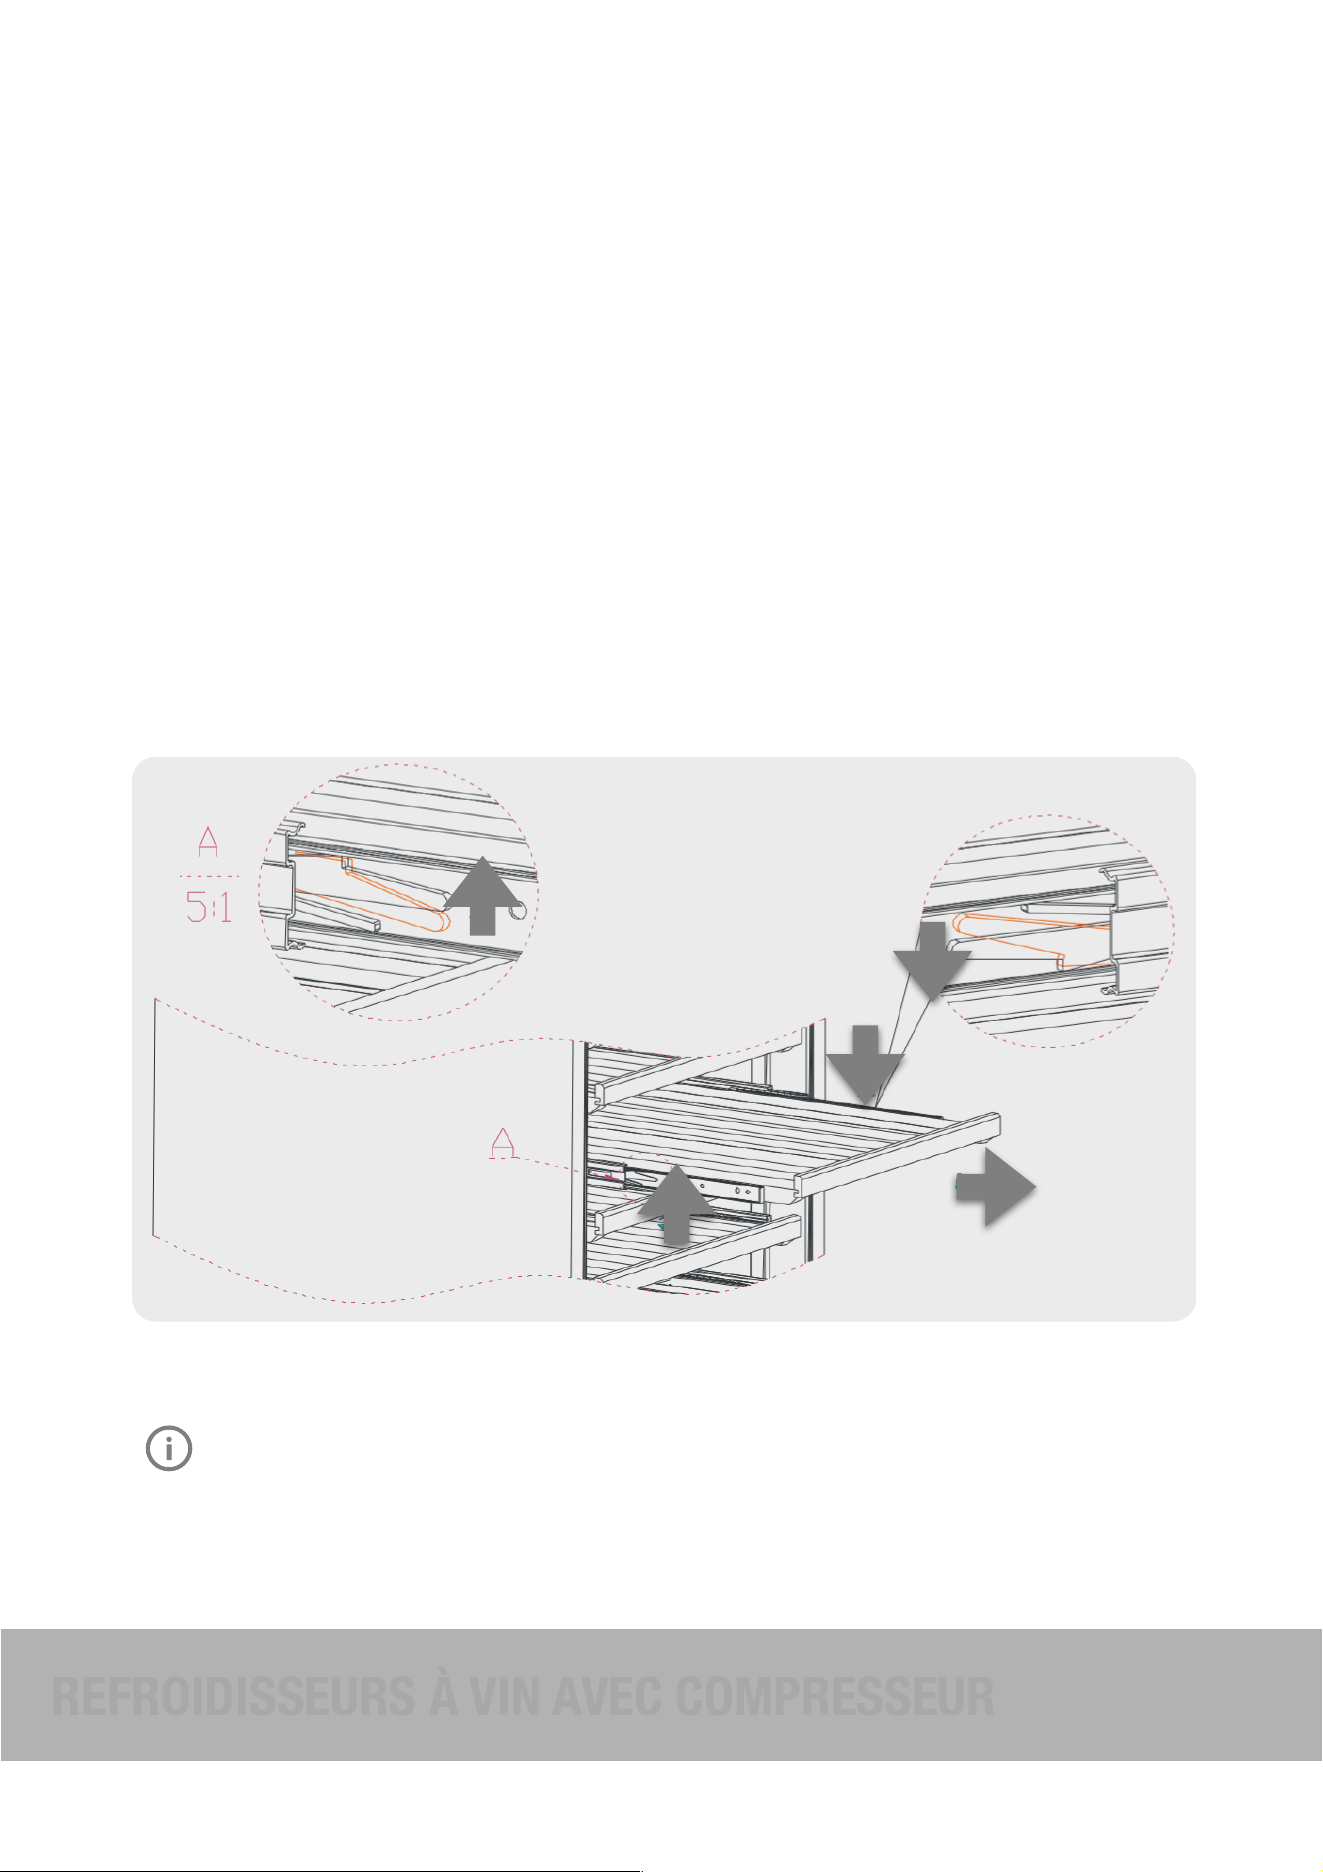
www.kingsbottle.com" 10
Partie IV" Configuration et stockage
VOTRE CELLIER A ÉTÉ CONCU POUR STOCKER UN NOMBRE MAXIMAL DE BOUTEILLES DE FAÇON SÉCURITAIRE. NOUS
VOUS RECOMMANDONS DE PORTER ATTENTION AUX CONSEILS CI-DESSOUS POUR OPTIMISER LA CAPACITÉ DE
STOCKAGE.
1. Répartissez vos bouteilles de façon égale afin de ne pas concentrer le poids dans une seule zone. Aussi, assurez-vous que vos
bouteilles ne touchent ni l’arrière de l’armoire ni le seuil du bas.
2. Faites-attention à ce que vos bouteilles ne soient pas toutes en haut ou en bas de l’armoire.
3. Un refroidisseur qui est plein et qui a un espace suffisant permettant une bonne circulation d’air fonctionnera plus efficacement.
4. N’essayez jamais d’ajuster les tablettes s’il reste des bouteilles dessus.
POUR RETIRER UNE TABLETTE COULISSANTE
1. Enlevez toutes les bouteilles.
2. Tirez la tablette le plus loin possible.
3. Poussez le levier GAUCHE vers le bas et le levier DROIT vers le haut (comme illustré ci-dessous).
4. Retirez la tablette
VEUILLEZ NOTER
Veuillez demander des conseils à votre vendeur avant de modifier la configuration initiale du cellier de quelconque façon.
Important safety instructions . . . . . . . . . . . . . 3
Bar refrigerator with ice box features . . . . . . . . . 4
Bar refrigerator without ice box features . . . . . . . 5
Single door all refrigerator features . . . . . . . . . 6
Bar freezer features . . . . . . . . . . . . . . . . 7
Single door all freezer features . . . . . . . . . . . 8
Installing your new appliance . . . . . . . . . . . . 9
Ventilation around your appliance. . . . . . . . . 9
Installing your refrigerator . . . . . . . . . . . 9-10
Initial start-up . . . . . . . . . . . . . . . . . . . 10
Manual controls . . . . . . . . . . . . . . . . . . 10
Controlling the temperature. . . . . . . . . . . . 10
Using your appliance – Ice box models . . . . . . . . 11
Making ice . . . . . . . . . . . . . . . . . . 11
De-icing the ice box . . . . . . . . . . . . . . . 11
Freezer operation . . . . . . . . . . . . . . . . . 12
Reversing the ice box door opening direction . . . . . 13
Reversing the door opening direction WIM1000 &
WFM0700 . . . . . . . . . . . . . . . . . . . . 14
Reversing the door opening direction WIM1200,
WRM1300, WRM2400, WFM0900 & WFM1800 .15
Care and maintenance . . . . . . . . . . . . . . . .
Changing the light bulb . . . . . . . . . . . . . 16
General information . . . . . . . . . . . . . . . . 17
Cleaning the appliance . . . . . . . . . . . . . 17
Safety . . . . . . . . . . . . . . . . . . . . . 17
Switching off your appliance . . . . . . . . . . . 17
Troubleshooting . . . . . . . . . . . . . . . . . . 18
Warranty . . . . . . . . . . . . . . . . . . . . . 19
Congratulations and thank you for choosing our
refrigerator/freezer. We are sure you will find your new
appliance a pleasure to use. Before you use the appliance,
we recommend that you read through the relevant sections
of this manual, which provides a description of your
appliance and its functions.
To avoid the risks that are always present when you use
an electric appliance, it is important that the appliance is
installed correctly and that you read the safety instructions
carefully to avoid misuse and hazards.
We recommend that you keep this instruction booklet
for future reference and pass it on to any future owners.
After unpacking the appliance, please check it is not
damaged. If in doubt, do not use the appliance but contact
your local customer care centre.
TIPS & INFORMATION
If you find
the refrigerator is damaged or marked, you must report it
within 7 days if you wish to claim for damage/marks
under the manufacturers warranty. This does not affect
your statutory rights.
ENVIRONMENTAL TIPS
dispose of those materials through your local recycling
depot or by placing them in appropriate collection
containers.
your local authorities and ask for the correct method
of disposal.
REFROIDISSEURS À VIN AVEC COMPRESSEUR
STOCKAGE
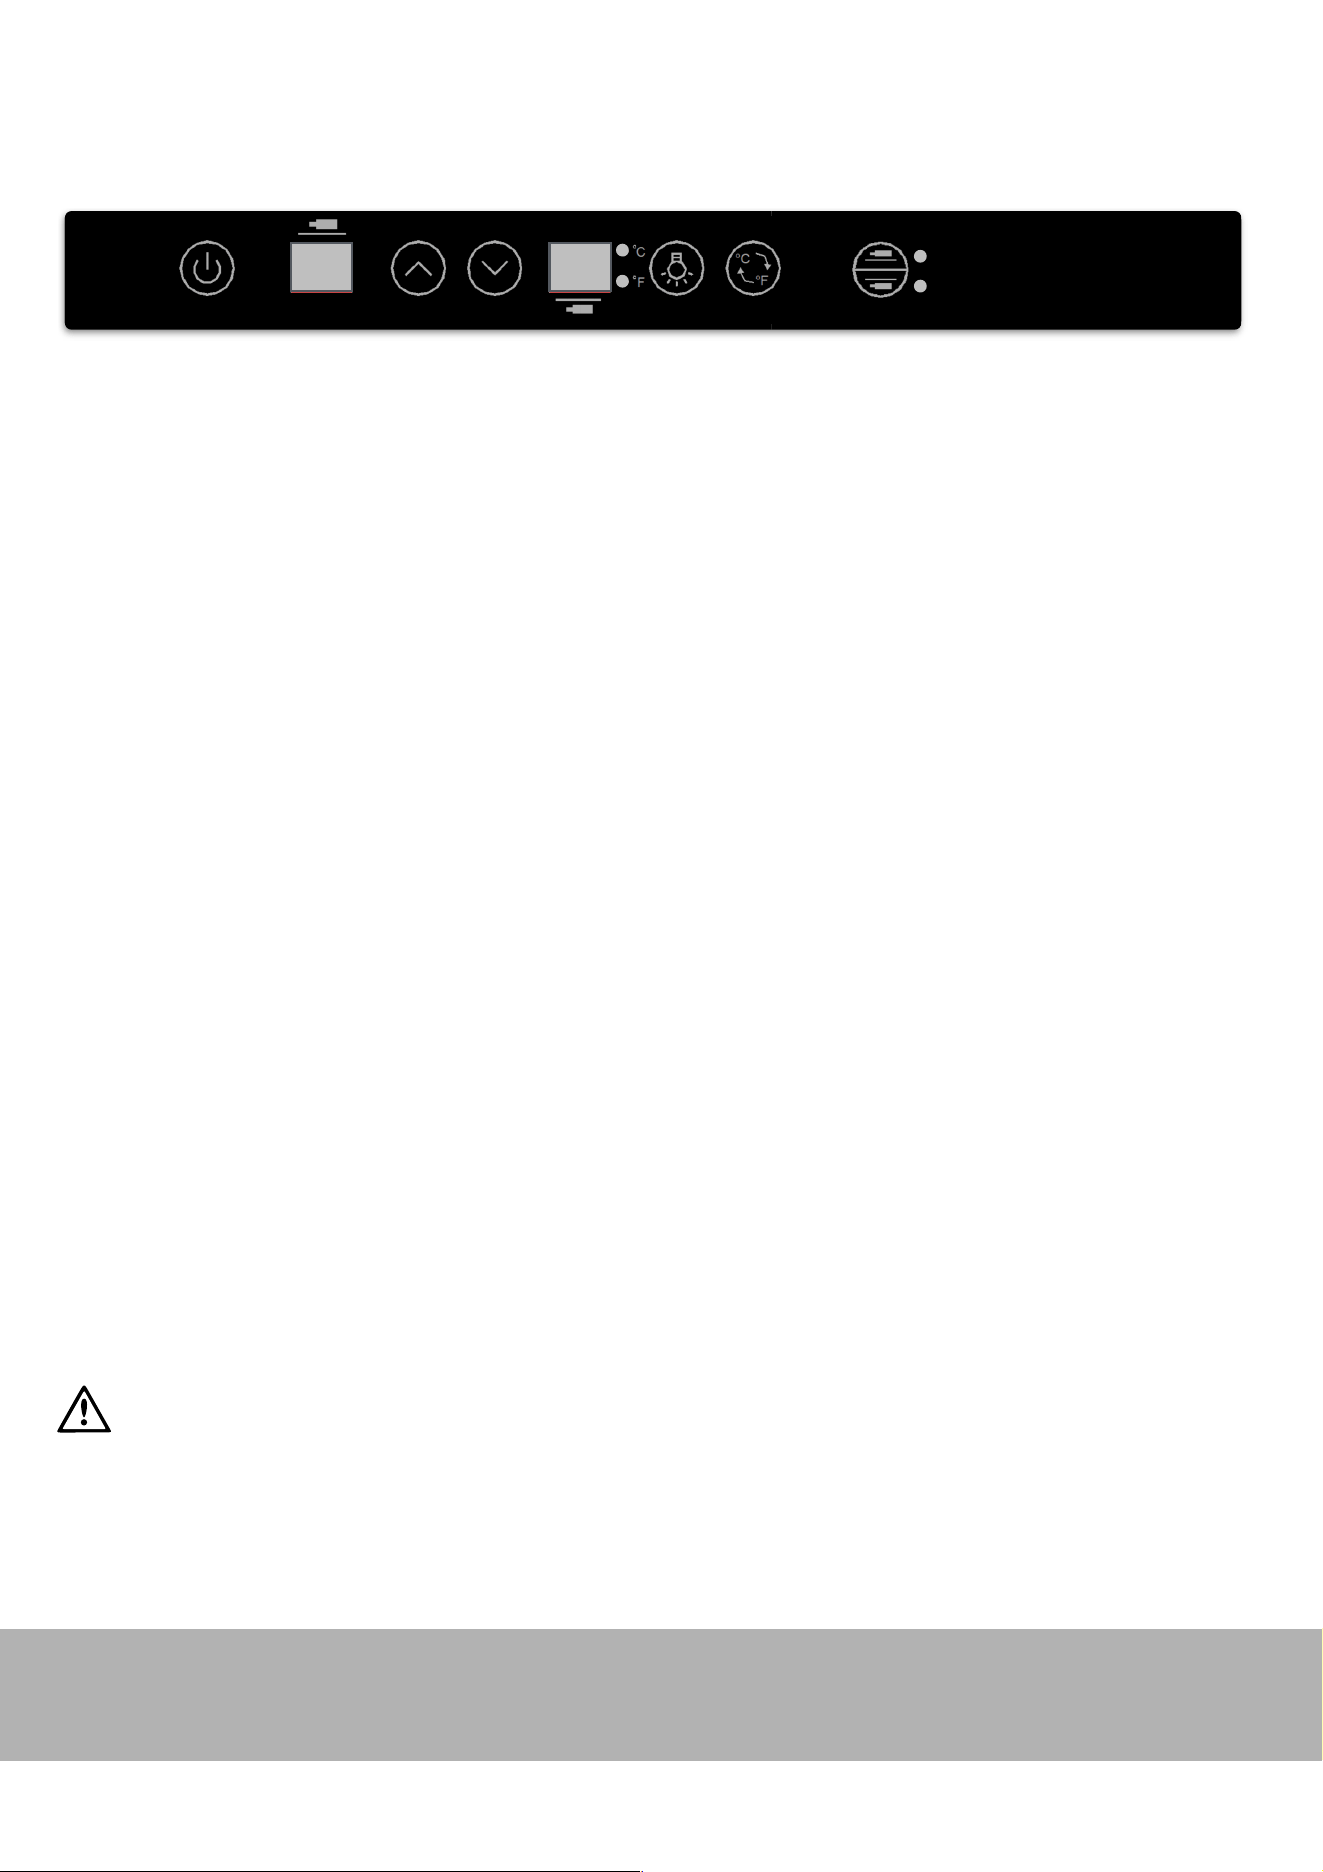
www.kingsbottle.com" 11
UTILISATION
PARTIE V " UTILISER VOTRE RÉFRIGÉRATEUR
Chaque refroidisseur à vin comprend un panneau de contrôle frontal. Ce panneau de contrôle comprend plusieurs fonctionnalités afin de faire fonctionner et de
contrôler la température des zones inférieure et supérieure de votre refroidisseur à vin.
Le panneau de contrôle inclus les fonctionnalités suivantes":
ON/OFF: Allume et éteint le refroidisseur.
TEMP. SET UPPER ZONE: Ajuste et indique, à l’aide de LED, la température désirée et la température actuelle de la partie supérieure.
TEMP. SET LOWER ZONE: Ajuste et indique, à l’aide de LED, la température désirée et la température actuelle de la partie inférieure.
LIGHT: Allume et éteint la lumière interne du refroidisseur.
SELECT": Permet à l’utilisateur de sélectionner la zone SUPÉRIEURE ou INFÉRIEURE.
C/F: Basculer entre ° C et ° F
RÉGLER LA TEMPÉRATUR
IMPORTANT": POUR ASSURER UN FONCTIONNEMENT OPTIMAL, LA TEMPÉRATURE DE LA ZONE DE REFROIDISSEMENT INFÉRIEURE DEVRAIT ÊTRE D’AU
MOINS 4°F PLUS ÉLEVÉE QUE LA ZONE DE REFROIDISSEMENT SUPÉRIEURE.
1. Assurez-vous que le cordon d’alimentation est bien connecté à une prise électrique mise à terre.
2. Allumer l’appareil en pressant sur «"ON"».
3. Appuyez sur le bouton «"SELECT"» pour choisir la zone supérieure «"UPPER"» ou inférieure «"LOWER"». Chaque zone est indépendamment contrôlée.
3.1. Zone supérieure": La température peut être ajustée entre 41°F et 60°F.
3.2. Zone inférieure": La température peut être ajustée entre 45°F et 64°F.
4. Réglez la zone inférieure ou supérieure à la température désirée en appuyant sur les boutons PLUS (+) ou MOINS (-). Quand vous appuyez sur les deux
boutons en même temps une première fois, le panneau LED indiquera la température réglée antérieure.
5. Après avoir réglé la température désirée, attendez 5 secondes. La température indiquée sur les panneaux d’affichage des zones supérieure et inférieure
changera automatiquement et indiquera la température ambiante dans l’unité. La température ambiante sera toujours indiquée jusqu’à la prochaine fois où vous
appuierez sur PLUS (+) ou MOINS (-) afin de changer le réglage de température.
NOTE: Il est possible que la température désirée fluctue, dépendamment de si les lumières intérieures sont ALLUMÉES ou ÉTEINTES, de la température ambiante,
de l’emplacement de l’unité et de l’orientation des bouteilles. L’affichage est seulement une référence, fiez-vous à la température de vos boissons lorsque vous les
consommez. Rappelez-vous, l’unité entre en mode dégivrage et cette opération indique une température plus élevée, mais ce n’est qu’un pour un bref moment et
l’opération ne dure pas assez longtemps pour affecter la température des bouteilles. En général, une fois l’unité installée, celle-ci gardera facilement les produits à
une température de plus ou moins 5°F (2°C) de la température réglée, même lors d’une température ambiante de plus de 100°F (38°C).
RÉGLAGE DE TEMPÉRATURE POUR LE SERVICE DU VIN
Chaque variété de vin a besoin de différents réglages de température. Ci-dessous vous trouverez l’écart de température recommandé pour l’entreposage à long
terme de chaque variété de vin. Lorsque vous réglerez les zones supérieure/inférieur aux températures ci-dessous, votre refroidisseur à vin vous l’indiquera.
•
Vins rouges": 52-64°F
•
Vins blancs": 44-51°F
•
Vins mousseux": 41-43°F
1. Dans l’éventualité d’une coupure de courant, tous les réglages de température seront automatiquement sauvegardés et chaque compartiment retournera à la
température réglée antérieurement.
2. Si l’unité est débranchée, perd le courant ou est éteinte, il y aura un délai de 6 minutes avant que le compresseur redémarre quand l’unité sera allumée de
nouveau.
3. Quand vous utilisez le refroidisseur à vin pour une première fois ou que vous redémarrez le refroidisseur à vin après l’avoir éteint pour une longue période de
temps, il y aura une différence de quelques degrés entre la température que vous sélectionnerez et la température indiquée sur le panneau LED durant les
premières heures d’opération. Après quelques heures d’opération, la température sera la même qu’indiquée.
place for later reference.
The symbols you will see in this booklet have these meanings:
WARNING
CAUTION
TIPS & INFORMATION
ENVIRONMENTAL TIPS
Meanings of symbols used in this manual are shown below:
WARNING
‘flammable’ and/or a small flame symbol,
do not store them inside any refrigerator or
freezer. If you do so you may cause an explosion.
remove any doors. Children can suffocate if they get
trapped inside.
blowing gases. Avoid safety hazards by carefully
disposing of this appliance.
WARNING
The refrigerator must be plugged into its own
dedicated 220-240V, 50Hz AC electrical outlet.
The plug must be accessible when the refrigerator is
in position.
It is essential the power point is properly earthed to
ground. Consult a qualified electrician if you are unsure.
Don’t use extension cords or adapter plugs with this
refrigerator.
If the power cord is damaged, have it replaced by a
qualified service technician.
Unplug the refrigerator before cleaning it, or changing
the light bulb to avoid electric shock.
Never unplug the refrigerator by pulling the electrical
cord as this may damage it. Grip the plug firmly and
pull straight out.
Choose a location for your refrigerator that isn’t too cold.
The ambient room temperature should be above 10°C.
Stand your refrigerator in a dry place – avoid areas
of high moisture or humidity.
Don’t put the refrigerator in frosty or unprotected areas
like a garage or on the verandah.
Keep the refrigerator out of direct sunlight.
Don’t locate the refrigerator near stoves, fires or heaters.
When installed correctly, your refrigerator should:
– Have adequate space at the back and sides
for air circulation (refer to page 9).
– Be aligned to the surrounding cupboards.
– Have doors that will self-close from a partially
open position.
WARNING
This appliance may contain a small quantity of environmentally
friendly, but flammable, non-synthetic R600a refrigerant:
damaged during transportation and installation.
8g of refrigerant. The amount of refrigerant charged in the
appliance can be found on the rating plate on the appliance.
in the built-in structure, clear of obstruction.
accelerate the defrosting process, other than those
recommended by the manufacturer.
3
per 8g of refrigerant. The amount of refrigerant charged
in the appliance can be found on the rating plate on
the appliance.
ON/OFF
UPPER ZONE
UP
DOWN
LOWER ZONE
LIGHT
C/F SWITCH
SELECT
www.kingsbottle.com 12
OPERATION
Code
Description
Solution
E1
Quand la temp. de la zone SUPÉRIEURE est de 4oF (2oC) de plus que la zone
INFÉRIEURE, le code E1 s’affiche sur le panneau.
Quand la temp. change et que la temp. de la zone
SUPÉRIEURE est plus basse que la zone INFÉRIEURE, E1
disparaitra automatiquement. Alors, attendez environ une
heure et regardez de nouveau.
F1
Quand la temp. de l’évaporateur est plus basse que 0oF (-18oC), F1 s’affiche sur le
panneau.
F1 signifie que le refroidisseur est en mode dégivrage.
Pendant la période de DÉGIVRAGE, le ventilateur de l’évaporateur fonctionne, mais
le compresseur s’arrête.
Quand la temp. de l’évaporateur est plus haute que 39oF (4oC), F1 disparait.
C’est normal, aucune intervention nécessaire. Attendez 3
heures et vérifiez de nouveau, ou ÉTEIGNEz l’appareil,
ouvrez la porte et attendez 3 heures, puis vérifiez de
nouveau.
F2
Si le compresseur fonctionne pendant plus de 8 heures, le refroidisseur entre en
mode DÉGIVRAGE et F2 apparait sur le panneau.
F2 signifie que le refroidisseur est en mode dégivrage.
Pendant la période de DÉGIVRAGE, le ventilateur de l’évaporateur fonctionne, mais
le compresseur s’arrête.
F2 disparaitra après 20 minutes.
C’est normal, aucune intervention nécessaire. Attendez 30
minutes et vérifiez de nouveau.
C1
C1 qui apparait sur le panneau signifie que le senseur de la zone SUPÉRIEURE est
en circuit ouvert. Le compresseur cesse et aucun refroidissement ne s’opère.
Besoin d’un ingénieur pour vérification
Une prise avec la marque UP du PCB est mal connectée.
Le senseur est endommagé, besoin de remplacer.
Réparer ou remplacer le PCB.
C2
C2 qui apparait sur le panneau signifie que le senseur de la zone INFÉRIEURE est
en circuit ouvert. Le compresseur cesse et aucun refroidissement ne s’opère.
* Ceci ne s’applique pas aux modèles à une seule zone.
Besoin d’un ingénieur pour vérification
Une prise avec la marque DOWN du PCB est mal
connectée.
Le senseur est endommagé, besoin de remplacer.
Réparer ou remplacer le PCB.
C3
C3 qui apparait signifie que le senseur de l’évaporateur est en circuit ouvert. Le
compresseur cesse et aucun refroidissement ne s’opère.
Besoin d’un ingénieur pour vérification
Une prise avec la marque PTC du PCB est mal connectée.
Le senseur est endommagé, besoin de remplacer.
Réparer ou remplacer le PCB.
U1
U1 qui apparait sur le panneau signifie qu’un senseur dans la zone SUPÉRIEURE a
court-circuité. Le compresseur cesse et aucun refroidissement ne s’opère.
Besoin d’un ingénieur pour vérification
Le senseur est endommagé, besoin de remplacer le
senseur qui est connecté à la prise UP du PCB.
Réparer ou remplacer le PCB.
U2
U2 qui apparait sur le panneau signifie qu’un senseur dans la zone INFÉRIEURE a
court-circuité. Le compresseur cesse et aucun refroidissement ne s’opère.
* Ceci ne s’applique pas aux modèles à une seule zone.
Besoin d’un ingénieur pour vérification
Le senseur est endommagé, besoin de remplacer le
senseur qui est connecté à la prise DOWN du PCB.
Réparer ou remplacer le PCB.
U3
U3 qui apparait signifie que le senseur de l’évaporateur a court-circuité. Le
compresseur cesse et aucun refroidissement ne s’opère.
Besoin d’un ingénieur pour vérification
Le senseur est endommagé, besoin de remplacer le
senseur qui est connecté à la prise PTC du PCB.
Réparer ou remplacer le PCB.
Aucun
Code
Quand la temp. est plus basse que 32°F (0oC) ou plus haute que 69°F (20oC), un
signal sonore se fera entendre et l’utilisateur devra y porter attention.
C’est normal, aucune intervention nécessaire.
REFROIDISSEURS À VIN AVEC COMPRESSEUR
CODE D’ERREUR ET ALARME

www.kingsbottle.com" 14
DÉPANNAGE
PROBLÈME
CAUSE PROBABLE
Solution
Le réfrigérateur ne
fonctionne pas
Non connecté
L’appareil est éteint «!OFF!» sur le panneau de contrôle
Le disjoncteur s’est déclenché ou un fusible a sauté
Appuyez sur ON/OFF
Vérifiez et assurez-vous que le cordon d’alimentation est bien branché
Demandez de l’aide à un ingénieur
Le réfrigérateur
n’est pas assez
froid, ne peut
refroidir à la temp.
désirée
Le compresseur ne démarre pas
Demandez de l’aide à un ingénieur / vérifiez la connexion du compresseur
Le compresseur s’auto-protège et a cessé de fonctionner
La température ambiante est trop élevée (au-dessus de 100°F)
Le flux d’air n’est pas constant, vérifiez si le conduit d’air n’est pas bloqué
Le ventilateur fonctionne lentement ou a cessé de fonctionner
La porte est restée ouverte trop longtemps ou est mal fermée
Le compresseur ou ces composantes sont défectueux
Le ventilateur fonctionne lentement ou a cessé de
fonctionner
Demandez de l’aide à un ingénieur. Éteignez et allumez le réfrigérateur.
Vérifiez le ventilateur et le voltage. Si le voltage est normal, alors le
ventilateur pourrait être endommagé
L’évaporateur se givre
ÉTEIGNEZ le réfrigérateur et laissez la porte ouverte pendant une heure.
La glace sur l’évaporateur fondra. Vérifiez le joint de porte pour
l’étanchéité
La porte ne se ferme pas correctement
Vérifiez la serrure, les tablettes, et tout autre objet; assurez-vous que la
porte est bien fermée
Vérifiez le joint de porte pour l’étanchéité
Vérifiez les charnières; assurez-vous qu’elles soient bien serrées
Le condensateur est poussiéreux
Lavez et nettoyez le condensateur
Le système de refroidissement est défectueux (fuite de gaz
ou blocage)
Demandez de l’aide à un ingénieur
Le compresseur
démarre et arrête
fréquemment
Le joint de porte n’est pas étanche
Utilisez un sèche-cheveux à basse temp. pour sceller correctement le
joint
La connexion du senseur est défectueuse
Lisez le schéma de câblage pour effectuer le raccordement correct du
capteur
Le senseur est défectueux
Remplacez le senseur
La porte est ouverte trop souvent
Réduisez la fréquence et la durée de temps où la porte est ouverte
La lumière ne
fonctionne pas
Non connectée, ou le bouton de la lumière est à «"OFF"»
La lumière elle-même est défectueuse
Assurez-vous que le bouton de la lumière soit à «"ON"», ou demandez de
l’aide à un ingénieur
Le réfrigérateur
semble faire trop de
bruit
Les pieds ajustables ne sont pas au niveau, les vibrations
causent du bruit
Ajustez les pieds et assurez-vous qu’ils sont au niveau
Le tuyau en cuivre frappe d’autres objets et fait du bruit
Ajustez doucement la position du tuyau
Quand le compresseur s’éteint ou démarre, les vibrations
crées par les pièces mobiles internes font du bruit à cause de
l’inertie
Ne rien faire
Un bruit de tuyauterie liquide peut provenir du débit des gaz
des réfrigérateurs, ce qui est normal. À la fin de chaque
cycle, vous pouvez entendre des gargouillis
Ne rien faire
La porte ne se
ferme pas
correctement
La porte est bloquée par la serrure, des tablettes ou autres
objets
Enlevez le blocage
Le joint en caoutchouc est déformé
Réparez ou remplacez le joint en caoutchouc
Les charnières de la porte ne sont pas assez serrées
Ajustez et serrez les charnières
Givre
Obstruction de la prise / aspiration
Enlevez le blocage
Le ventilateur fonctionne lentement ou a cessé de
fonctionner
Demandez de l’aide à un ingénieur. Éteignez et allumez le réfrigérateur.
Vérifiez le ventilateur et le voltage. Si le voltage est normal, alors le
ventilateur pourrait être endommagé
Le joint de la porte ne se ferme pas correctement ou la porte
est ouverte trop souvent
Utilisez un sèche-cheveux à basse temp. pour sceller correctement le
joint
Fuite de gaz ou blocage du système de refroidissement
Demandez de l’aide à un ingénieur
Le boitier extérieur
semble trop chaud
La température ambiante est trop élevée ou lumière du soleil
directe
Les conditions de fonctionnement doivent être améliorées
Obstruction de la prise / aspiration de la grille avant
Enlevez le blocage
Le ventilateur fonctionne lentement ou a cessé de
fonctionner
Demandez de l’aide à un ingénieur. Éteignez et allumez le réfrigérateur.
Vérifiez le ventilateur et le voltage. Si le voltage est normal, alors le
ventilateur pourrait être endommagé
Gouttes d’eau sur
la porte en verre
L’humidité ambiante est trop élevée
Utilisez un chiffon doux pour essuyer l’eau
La porte est ouverte trop souvent
Réduisez la fréquence et la durée de temps où la porte est ouverte
Le joint de la porte ne se ferme pas correctement
Utilisez un sèche-cheveux à basse temp. pour sceller correctement le
joint
PARTIE VI " GUIDE DE DÉPANNAGE

www.kingsbottle.com" 13
ENTRETIEN
NETTOYER VOTRE REFROIDISSEUR À VIN
AVERTISSEMENT
AVANT LE NETOYAGE": Éteignez et déconnectez l’appareil et retirez tous les objets, incluant les tablettes.
•
Nettoyez les surfaces internes avec un mélange d’eau tiède et de bicarbonate de soude. Ce mélange devrait être composé de 2
cuillerées à soupe de bicarbonate de soude et environ 1L d’eau.
•
Nettoyez les tablettes avec un détergent doux.
•
Essorez les éponges ou les chiffons lors du nettoyage des commandes ou des composantes électriques.
•
Nettoyez le boitier extérieur avec de l’eau tiède et un détergent doux. Bien rincer et essuyez avec un chiffon doux propre.
•
Après l’installation, nous recommandons aux propriétaires d’appliquer une mince couche d’huile d’olive à l’aide d’un
chiffon propre sur toutes les surfaces d’acier inoxydable visibles. Celle-ci devrait être astiquée et polie jusqu’à un fini non-
huileux avec un autre chiffon. Ce processus protège contre les saletés et autres contaminants, en étant une protection anti-
nourriture. La couche d’huile d’olive facilitera le polissage et le nettoyage des empreintes de doigts. Ce processus devrait être répété
à chaque 3-4 mois. TOUT acier inoxydable peut rouiller, c’est un mythe que l’acier inoxydable ne rouille pas.
PANNE DE COURANT
La plupart des pannes de courant ne durent que quelques heures et ne devraient pas affecter la température de votre appareil si vous
minimisez le nombre de fois que vous ouvrez la porte. Si la panne de courant dure pendant une plus longue période, vous devez réaliser les
étapes appropriées pour protégez le contenu.
VACANCES
Courtes vacances: Vous pouvez laisser votre refroidisseur fonctionner pendant des vacances de moins de 3 semaines.
Longues vacances: Si l’appareil n’est pas utilisé pendant plusieurs mois, retirez tout le contenu et éteignez l’appareil. Nettoyez et essuyez
minutieusement l’intérieur. Pour prévenir l’apparition de moisissure, laissez la porte entrecouverte, bloquez-la dans une position ouverte si
nécessaire.
DÉPLACER VOTRE REFROIDISSEUR À VIN
1. Retirez tout le contenu.
2. Fixez tous les objets mobiles (tablettes) à l’intérieur de l’appareil.
3. Tournez les pieds ajustables vers le haut jusqu’à la base pour éviter des dommages.
4. Attachez la porte avec du ruban adhésif.
5. Assurez-vous que l’appareil reste en position verticale lors du transport. Protégez l’extérieur de l’appareil avec une couverture ou
un objet similaire.
CONSEILS D’ÉCONOMIE D’ÉNERGIE
•
Le refroidisseur à vin devrait être placé dans la partie la plus froide de la pièce, loin des appareils produisant de la chaleur et loin de la
lumière directe du soleil. La ventilation à l’arrière aide aussi beaucoup à l’économie d’énergie en produisant un courant d’air, même si
cette gamme de produit est conçue pour être encastrée.
•
Quand vous n’utilisez pas l’appareil en jours de semaine, etc., il est recommandé d’augmenter la température à 64°F (18°C) lors des
périodes de non-utilisation. Cela signifie qu’il fonctionne moins longtemps, mais qu’il garde aussi vos bouteilles à une température
qui les empêchera de se gâter. Cela économise donc de l’énergie, un souci de plus en plus présent pour la plupart des propriétaires.
•
Gardez le refroidisseur plein, un refroidisseur vide refroidira plus lentement, croyez-le ou non.
place for later reference.
The symbols you will see in this booklet have these meanings:
WARNING
CAUTION
TIPS & INFORMATION
ENVIRONMENTAL TIPS
Meanings of symbols used in this manual are shown below:
WARNING
‘flammable’ and/or a small flame symbol,
do not store them inside any refrigerator or
freezer. If you do so you may cause an explosion.
remove any doors. Children can suffocate if they get
trapped inside.
blowing gases. Avoid safety hazards by carefully
disposing of this appliance.
WARNING
The refrigerator must be plugged into its own
dedicated 220-240V, 50Hz AC electrical outlet.
The plug must be accessible when the refrigerator is
in position.
It is essential the power point is properly earthed to
ground. Consult a qualified electrician if you are unsure.
Don’t use extension cords or adapter plugs with this
refrigerator.
If the power cord is damaged, have it replaced by a
qualified service technician.
Unplug the refrigerator before cleaning it, or changing
the light bulb to avoid electric shock.
Never unplug the refrigerator by pulling the electrical
cord as this may damage it. Grip the plug firmly and
pull straight out.
Choose a location for your refrigerator that isn’t too cold.
The ambient room temperature should be above 10°C.
Stand your refrigerator in a dry place – avoid areas
of high moisture or humidity.
Don’t put the refrigerator in frosty or unprotected areas
like a garage or on the verandah.
Keep the refrigerator out of direct sunlight.
Don’t locate the refrigerator near stoves, fires or heaters.
When installed correctly, your refrigerator should:
– Have adequate space at the back and sides
for air circulation (refer to page 9).
– Be aligned to the surrounding cupboards.
– Have doors that will self-close from a partially
open position.
WARNING
This appliance may contain a small quantity of environmentally
friendly, but flammable, non-synthetic R600a refrigerant:
damaged during transportation and installation.
8g of refrigerant. The amount of refrigerant charged in the
appliance can be found on the rating plate on the appliance.
in the built-in structure, clear of obstruction.
accelerate the defrosting process, other than those
recommended by the manufacturer.
3
per 8g of refrigerant. The amount of refrigerant charged
in the appliance can be found on the rating plate on
the appliance.
PARTIE VII " ENTRETIEN
www.kingsbottle.com" 15
DONNÉES TECHNIQUES
PARTIE X " DONNÉES TECHNIQUES
NO. DE MODÈLE
KBU170D
KBU100D
KBU50D
VOLUME
14.30 CF ( 405 litre )
10.88 CF ( 308 litre)
5.37 CF ( 152 litre )
TYPE DE
REFROIDISSEMENT
Compresseur avec refroidissement par
ventilateur à circulation d’air
Compresseur avec refroidissement par
ventilateur à circulation d’air
Compresseur avec refroidissement par
ventilateur à circulation d’air
TYPE DE CLIMAT
N
N
N
INDICE DE PROTECTION
I
I
I
TENSION NOMINALE/
FRÉQUENCE
110-115V/50-60HZ
110-115V/50-60HZ
110-115V/50-60HZ
COURANT NOMINAL
1.64 A
1.64 A
1.45 A
PUISSANCE NOMINALE(W)
160W
160W
112W
TEMPÉRATURE AMBIANTE
32 - 100 °F ( 0 -38°C)
32 - 100 °F ( 0 -38°C)
32 - 100 °F ( 0 -38°C)
ÉCART DE TEMPÉRATURE
Zone Supérieure: 39-60 °F ( 4 - 15°C);
Zone Inférieure: 45-64 °F ( 7-18°C)
Zone Supérieure: 39-60 °F ( 4 - 15°C);
Zone Inférieure: 45-64 °F ( 7-18°C)
Zone Supérieure: 39-60 °F ( 4 - 15°C);
Zone Inférieure: 45-64 °F ( 7-18°C)
POIDS NET
286.60 lbs. (130 KGS)
198.41 lbs. (90 KGS)
112.43 lbs. (51 KGS)
POIDS BRUT (INC.
PALLETTE)
310 lbs. (141 KGS)
239 lbs. (108 KGS)
159 lbs. (72 KGS)
DIMENSION
23.54”l x 26.97” L x 71.69” h
( 598 l x 685 L x 1821 h mm )
Hauteur du pied de 0.98”(25 mm)
incluse
23.54” l x 26.97” L x 55.43” h
( 598 l x 685 L x 1408 h mm )
Hauteur du pied de 0.98”(25 mm)
incluse
23.42” l x 23.62” L x 33.86” h
( 595 l x 600 L x 860 h mm )
Hauteur du pied de 0.79” (20mm)
incluse
PARTIE IX INFORMATION SUR LA GARANTIE
REFROIDISSEURS À VIN AVEC COMPRESSEUR
L’enregistrement en ligne est simple et rapide!
https://kingsbottle.com/apps/product-registration
Si vous n’avez pas acheté directement votre réfrigérateur chez KINGSBOTTLE, veuillez communiquer avec votre revendeur avant de nous contacter.
QUI EST COUVERT: Cette garantie est offerte seulement à l’acheteur original ou la personne ayant reçu le produit en cadeau, et ne sera pas offerte à toute
autre personne ou cessionnaire.
GARANTIE LIMITÉE: Si votre réfrigérateur ne fonctionne pas correctement, KingsBottle se réserve le droit de réparer ou remplacer le réfrigérateur.
KingsBottle peut demander au consommateur de contacter une entreprise de réfrigération locale pour l’entretien du réfrigérateur. Tous les frais de main
d’œuvre et de matériaux sont couverts pour 2 ans à partir de la preuve d’achat. Si KingsBottle juge que l’unité est irréparable, KingsBottle considèrera la
valeur originale de votre commande en vue d’un remplacement (Toute unité de remplacement suivra les conditions de garantie de l'achat initial). Pour le
service à la clientèle, veuillez nous transmettre un courriel via [email protected].
LA GARANTIE LIMITÉE NE COUVRE PAS: Les dommages causés à la suite d’un accident, d’une mauvaise utilisation, d’abus, d’une mauvaise
manipulation, de négligence, de réparations non-autorisée ou tout autre cause nommées, semblables ou différentes hors-contrôle du vendeur. L’acheteur
comprend et accepte que les biens vendus sont des REFROIDISSEURS À VIN ET BREUVAGES, qui peuvent loger de la bière et autres vins. L’acheteur
assume tous les risques d’utilisation liées à ces appareils, incluant le risque de détérioration, de changement d’humidité et de température, fuites, incendies,
dégâts d’eau, moisissure, rouille, sécheresse et tous autres sinistres pouvant survenir.
NOTE SPÉCIALE: La garantie est honorée seulement pour l’unité utilisée dans les pays où elle a été achetée à l’origine. Et, si votre produit fut acheté chez
un revendeur tiers et non pas directement de KingsBottle, nous n’offrons pas de politique de garantie prolongée. Vous DEVEZ contacter le revendeur
directement. Dans le cas ou votre revendeur n’offre pas de garantie prolongée, nous vous recommandons de contacter un fournisseur de garantie tiers.
Cependant, peu importe l’endroit de l’achat, tous les refroidisseurs KINGSBOTTLE sont couverts par une garantie du fabricant de DEUX ANS à compter de
la date de vente.