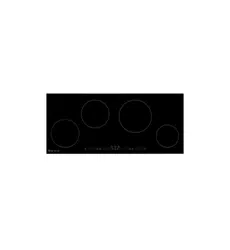
Operating instructions
CookTop V4000 I604 | I804
Induction hob

Thank you for choosing to buy one of our products. Your appliance is made to high
standards and is easy to use. Nevertheless, please take the time to read these operating
instructions in order to familiarize yourself with the appliance and get the best use out of
it.
Please follow the safety precautions.
Modifications
Text, diagrams and data correspond to the technical standard of the appliance at the
time these operating instructions went to press. The right to make technical modifications
for the purpose of the further development of the appliances is reserved.
Validity
These operating instructions apply to:
Model designation Type
CookTop V4000 I604 CTI4T-31157
CookTop V4000 I804 CTI4T-31158
Variations depending on the model are noted in the text.
© V-ZUG Ltd, CH-6302 Zug, 2024
2

3
Contents
2
1 Safety precautions 4
1.1 Symbols used .........................................................4
1.2 General safety precautions ..................................4
1.3 Appliance-specific safety precautions................4
1.4 Instructions for use ................................................5
2 Using for the first time 8
3 Appliance description 8
3.1 Appliance overview................................................8
3.2 Hob ...........................................................................8
3.3 Operating and display elements .........................9
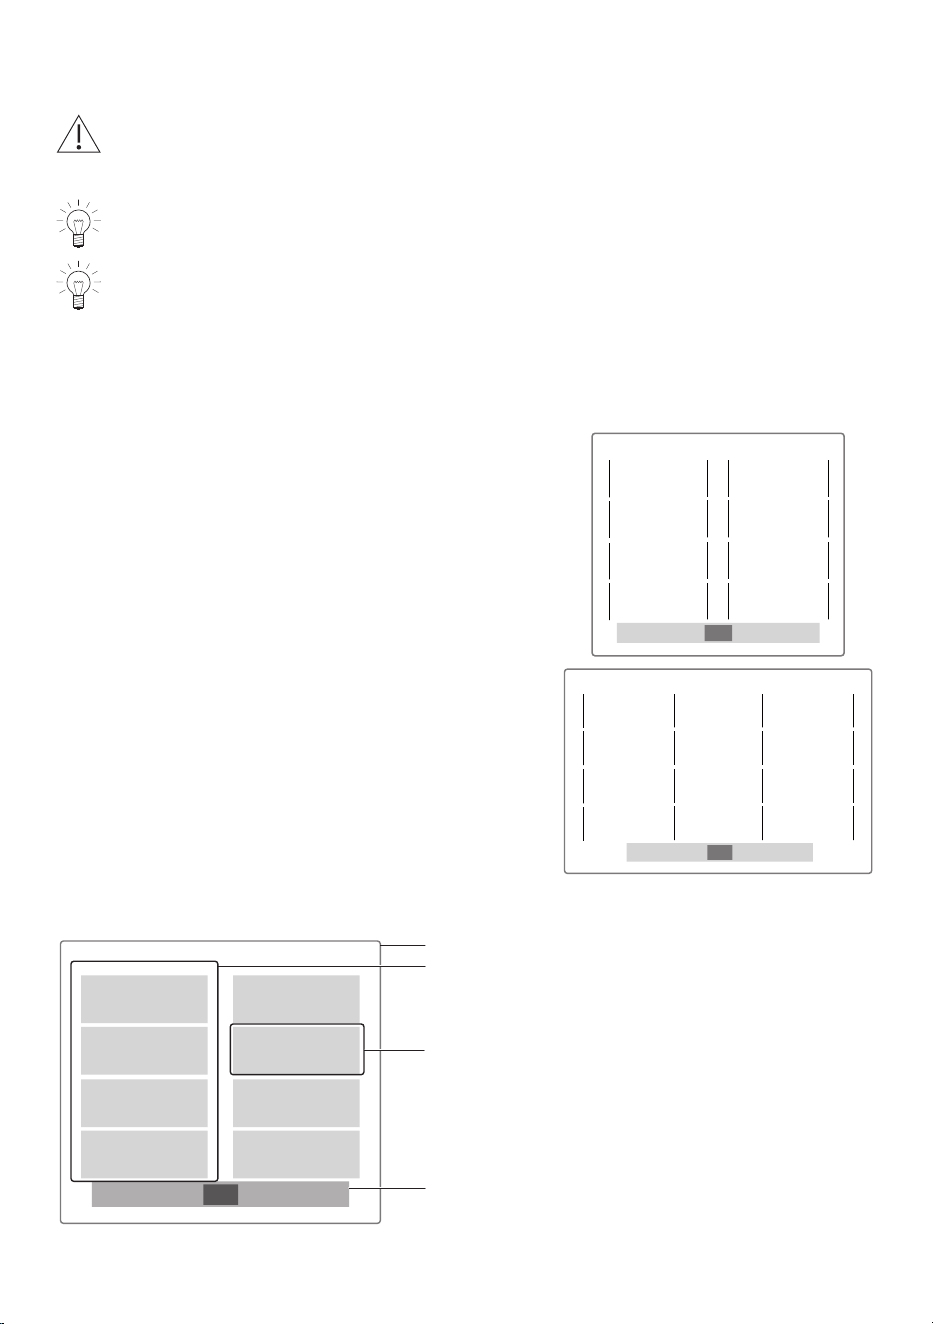
3.4 How induction hobs function ...............................9
3.5 ZoneFlex cooking ............................................... 10
3.6 Pan detection....................................................... 10
3.7 MemoryFunction.................................................. 10
3.8 Cookware ............................................................. 11
4 Operating the appliance 12
4.1 Switching the appliance on............................... 12
4.2 Setting the power level....................................... 12
4.3 Overview of power levels................................... 13
4.4 Bridging function ................................................. 13
4.5 Residual heat indicator ...................................... 14
4.6 PowerPlus............................................................. 14
4.7 Operating time..................................................... 15
4.8 Melting function ................................................... 16
4.9 Keep warm function............................................ 16
4.10 Simmer function .................................................. 16
4.11 Timer...................................................................... 17
4.12 Childproof lock .................................................... 18
4.13 Pause cooking..................................................... 18
4.14 Wipe protection ................................................... 19
4.15 Restore function .................................................. 19
4.16 Demo mode ......................................................... 19
4.17 Switching the cooking zone area off............... 19
4.18 Switching the appliance off............................... 20
5 OptiLink 20
5.1 Connecting the hob to the range hood .......... 20
5.2 Deactivating OptiLink ......................................... 20
6 User settings 20
6.1 Changing user settings...................................... 21
6.2 Restoring the factory settings........................... 22
7 Care and maintenance 22
7.1 Cleaning agent .................................................... 23
8 Trouble-shooting 23
8.1 Error messages................................................... 23
8.2 Other possible problems................................... 26
9 Technical data 27
10 Disposal 27
11 Index 29
12 Service & Support 31
4
1 Safety precautions
1.1 Symbols used
Denotes important safety precau-
tions.
Failure to observe said precautions
can result in injury or in damage to
the appliance or fittings!
Information and precautions that
should be observed.
Information on disposal
Information about the Operating In-
structions
▸ Indicates step-by-step instructions.
– Describes how the appliance reacts
to the steps taken.
▪ Indicates a list.
1.2 General safety precautions
▪ Read the operating instruc-
tions before using the appli-
ance for the first time.
▪ This appliance can be used
by children aged 8 and above
and by persons with reduced
physical, sensory or mental
capabilities, or lack of experi-
ence and/or knowledge,
provided they are supervised
or have been instructed on
the safe use of the appliance
and have understood the haz-
ards involved. Children shall
not play with the appliance.
Cleaning and user mainten-
ance shall not be undertaken
by children without supervi-
sion.
▪ If an appliance is not
equipped with a mains cable
and a plug or other means for
disconnecting from the mains
with a contact opening on
each pole complying with the
conditions of overvoltage cat-
egory III for full isolation, an
isolating device must be in-
corporated into the perman-
ently installed electrical install-
ation in accordance with the
installation regulations.
▪ If the mains cable of this ap-
pliance is damaged, it must
be replaced by the manufac-
turer or its Customer Services
or a similarly qualified person
in order to avoid hazard.
1.3 Appliance-specific safety
precautions
▪ WARNING: If the surface has
a crack running through the
thickness of the material,
switch the appliance off and
disconnect it from the mains
to avoid possible electric
shock.

1 Safety precautions
5
▪ WARNING: The appliance
and its accessible parts get
hot during use. Be careful not
to touch the heating ele-
ments.
▪ Under no circumstances use
a steam cleaner to clean the
appliance.
▪ Do not place metal objects
such as knives, forks,
spoons, lids or aluminium foil
on the hob as they can get
hot.
▪ After use, switch the hob off
using the controls and do not
rely on the pan detector.
▪ WARNING: It can be danger-
ous to leave the hob unatten-
ded when cooking with fat or
oil, as this can lead to fires.
NEVER attempt to extinguish
a fire with water. Instead,
switch the appliance off and
then carefully smother the
flames with, for example, a lid
or a fire blanket.
▪ WARNING: Never store ob-
jects on the hob due to the
risk of fire.
▪ WARNING: The cooking pro-
cess should always be super-
vised. Shorter cooking pro-
cesses, in particular, must be
supervised the entire time.
▪ Do not operate the appliance
using an external time switch
or a separate remote control
system.
1.4 Instructions for use
Before using for the first time
▪ The appliance must be installed and
connected to the electricity supply in
accordance with the separate installa-
tion instructions. Have a qualified fitter/
electrician carry out the necessary
work.
▪ Dispose of the packaging material in
accordance with local regulations.
Correct use
▪ The appliance is designed for use in
the home for preparing food. No liability
is assumed for any damage caused by
improper use or incorrect handling.
▪ Any repairs, modifications or manipula-
tions to the appliance, especially any
electrically live parts, may only be car-
ried out by the manufacturer, its Cus-
tomer Services or a similarly qualified
person. Repairs if carried out incorrectly
may cause serious injury, damage to
the appliance and fittings, as well as af-
fect the functioning of the appliance. If
the appliance is not working properly or
in case a repair is needed, follow the in-
structions given in the «Service & Sup-
port» section. If required, please contact
our Customer Services.
▪ Use original spare parts only.
▪ Retain these operating instructions for
future reference. If you sell the appli-
ance or pass it on to a third party,
please ensure these operating instruc-
tions accompany the appliance, to-
gether with the installation instructions.
In this way, the new owners can inform
themselves about how to use the appli-
ance correctly and read the pertinent
safety precautions.

1 Safety precautions
6
▪ The appliance corresponds to recog-
nized technology standards and the rel-
evant safety regulations. Proper use of
the appliance is essential to avoid dam-
age and accidents. Please therefore fol-
low the precautions given in these oper-
ating instructions.
▪ The heated surface will remain hot for
some time after it is switched off and
will cool down only slowly to room tem-
perature. Please allow sufficient time for
the appliance to cool down before, for
instance, cleaning it.
Note on use
▪ Tests have shown that under normal cir-
cumstances there is no risk to cardiac
pacemaker users. If, as the user of a
cardiac pacemaker (or a hearing aid or
another type of implant), you would like
to be reassured that using the appli-
ance does not pose a risk, you are ad-
vised to consult a competent medical
authority.
▪ If the appliance is visibly damaged, do
not use it. Contact our Customer Ser-
vices.
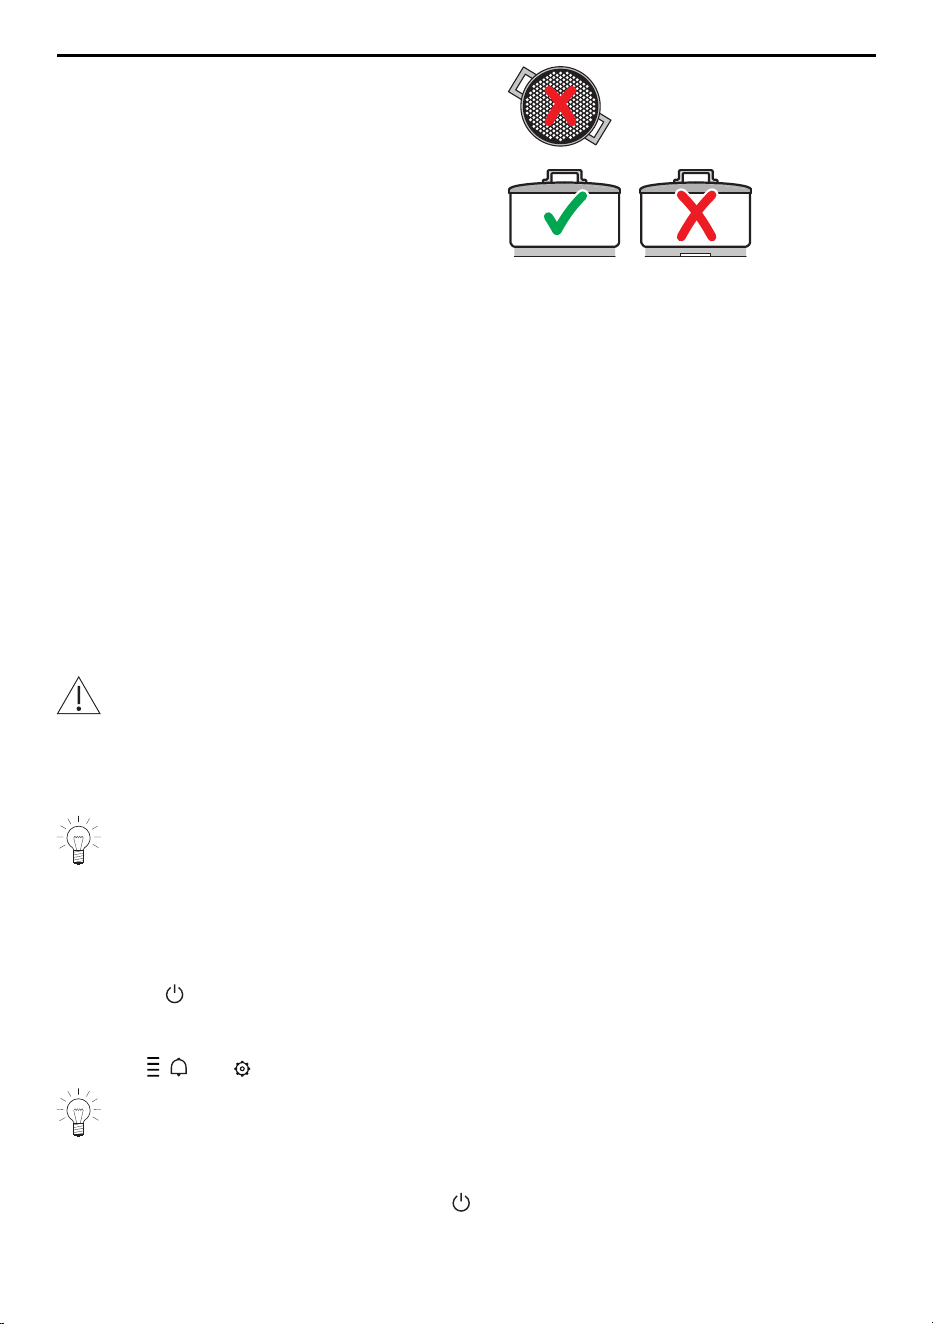
Caution: Burns hazard
▪ Overheated fat and oil can easily catch
fire. NEVER attempt to extinguish burn-
ing oil or fat with water. Danger of ex-
plosion! Smother the flames with a fire
blanket. Keep doors and windows
closed.
▪ The accessible surfaces of the hob can
get very hot when operated with pans in
place.
Caution: Risk of injury
▪ Keep pets away from the appliance.
▪ The appliance is designed for use by
adults who are familiar with the content
of these operating instructions. Children
may not always be aware of the danger
involved in using electrical appliances.
Ensure proper supervision and do not
allow children to play with the appliance
– there is a danger that children could
hurt themselves.
Caution: Risk to life
▪ Packaging material, e.g. plastic film and
polystyrene, can be dangerous for chil-
dren and animals. Danger of suffoca-
tion! Keep packaging material away
from children and animals.
How to avoid damaging the appliance
▪ In case of overheating, switch the hot-
plate off and allow it to cool down com-
pletely. Do not put any dishes on it. Un-
der no circumstances use cold water to
cool it down quickly.
▪ Do not climb on to the appliance.
▪ Do not put hot cookware on the hob
frame in order not to damage the silic-
one joints.
▪ Do not cut or prepare food on the sur-
face and avoid impact with hard ob-
jects. Do not drag cookware across the
surface.
▪ Take particular care that sugary foods
or juices do not get onto the hot cook-
ing zones as this can damage the sur-
face. If sugary foods or juices do get on
to the hot cooking zones clean away
immediately (while still hot) with a
scraper.
▪ Pots with pure copper or aluminium
bases should not be used for cooking
as they can leave behind traces that
can be difficult to clean. If the traces
are not removed immediately after
cooking with a suitable cleaning agent,
they can be permanently burned on and
therefore permanently ruin the visual
appearance of the appliance.
▪ Sliding pans and cookware across the
glass ceramic causes scratches. This
can be largely prevented by lifting pans
and cookware up and then placing
them down in position.

1 Safety precautions
7
▪ The hob is designed to be used – signs
of use, such as scratches or the wear
and tear from pans and cookware, are
normal. The more intensively it is used,
the greater the signs of use; however,
the appliance remains in perfect work-
ing order and therefore does not give a
right of complaint. Safety is guaranteed
at all times.
▪ There is no such thing as completely
scratch-proof glass; scratches can even
develop on sapphire glass, which is
used in watches. The glass ceramic
used is of the best quality available on
the market.
2 Using for the first time
The appliance must be installed and connected to the electricity supply in accord-
ance with the separate installation instructions. Have a qualified fitter/electrician
carry out the necessary work.
All traces of adhesive must be removed before the appliance is used for the first
time.
During the first few hours of use, a cooking zone can give off an unpleasant smell.
This is normal for brand new appliances. Ensure that the room is well ventilated.
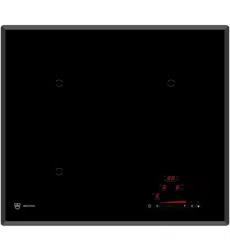
3 Appliance description
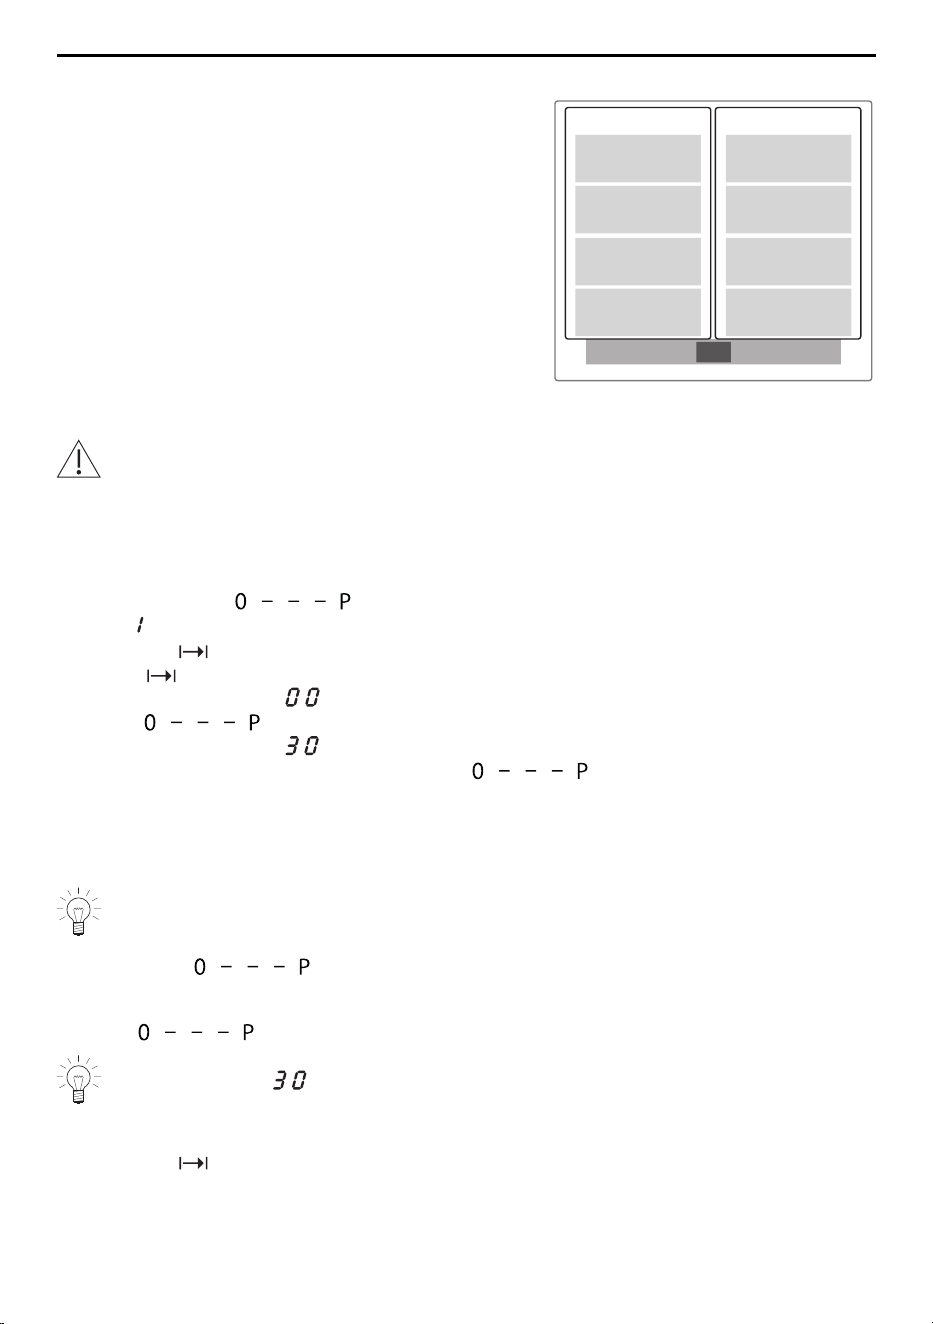
3.1 Appliance overview
▪ 2 ZoneFlex cooking zones 220×370mm,
with 4cooking zone areas each
▪ 2 ZoneFlex cooking zones 220×370mm,
with 4cooking zone areas each
3.2 Hob
1
2
4
3
1
Hob
2
ZoneFlex cooking zone for
max. 2 items of cookware
3
Cooking zone area
4
Operating and display elements
8
3 Appliance description
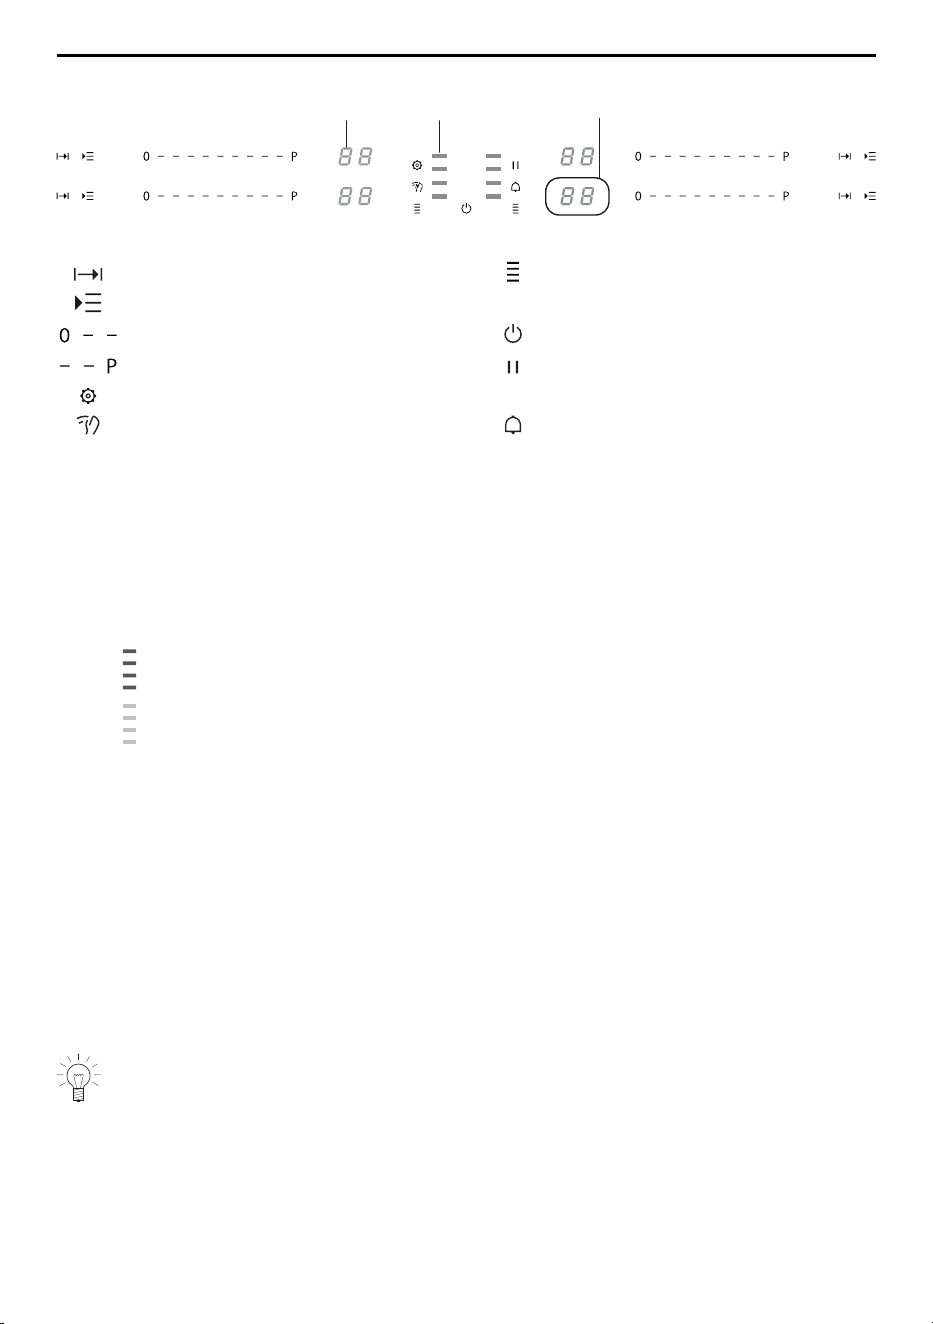
3.3 Operating and display elements
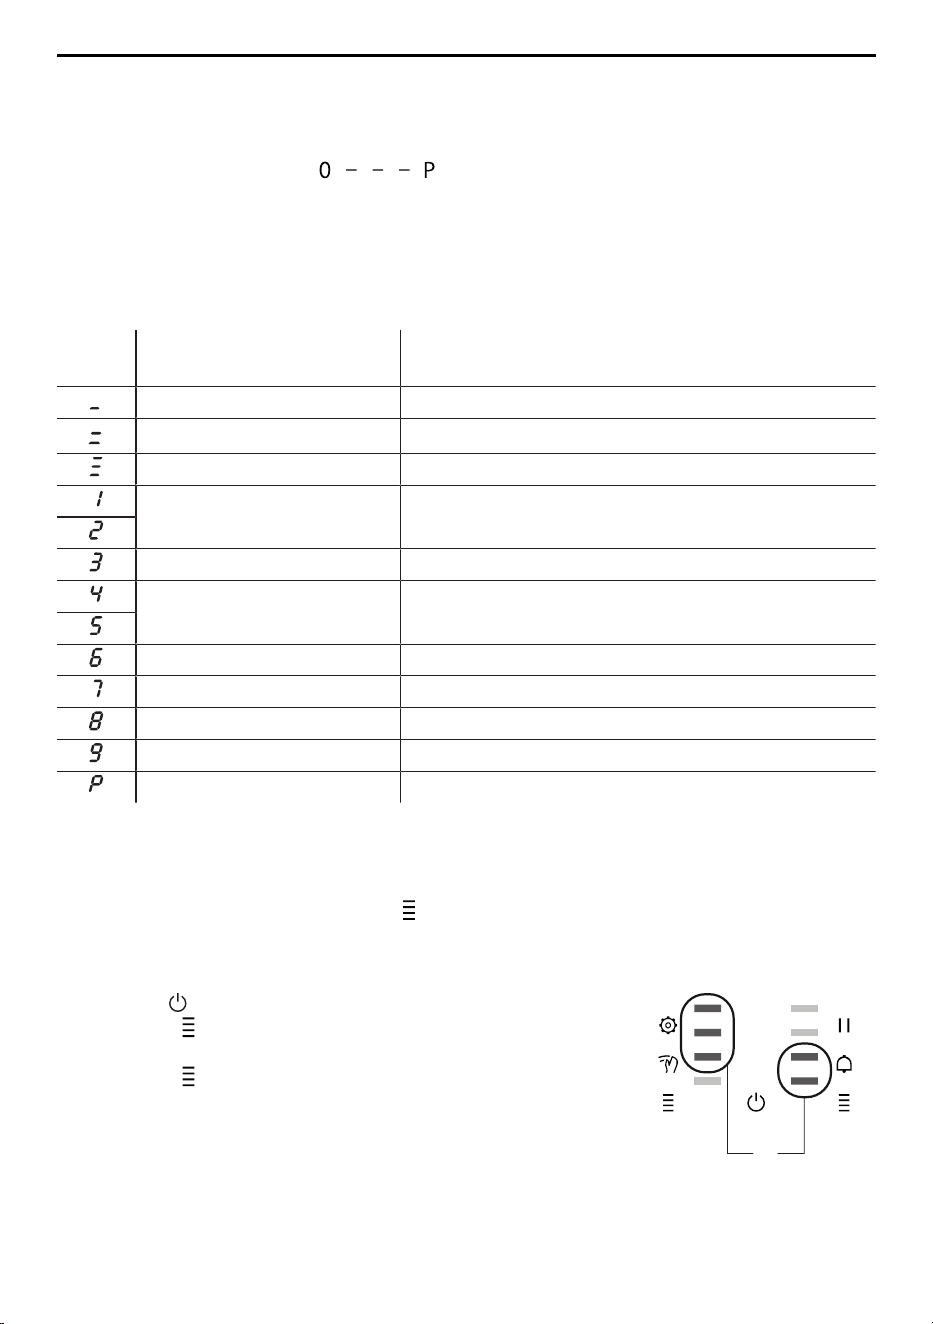
1 2
3
Buttons
Operating time Bridging function per ZoneFlex
cooking zone
Multi-function button
Slider Appliance ON/OFF
PowerPlus Pause cooking ON/OFF and
restore function
User settings
Wipe protection ON/OFF Timer
Displays
1
Digital display
3
Timer
The digital displays show the
power level, user settings and op-
erating time for each active cook-
ing zone area.
The timer is displayed in the digital
display at the bottom right and can
be used independently of the
ZoneFlex cooking zones.
2
Pan detection
Dark red: cooking zone areas
are being used
Dimmed red: cooking zone
areas can be used
3.4 How induction hobs function
Induction hobs work very differently from conventional hobs or hot plates. The induction
coils under the glass ceramic plate produce a rapidly changing magnetic field which dir-
ectly heats up the magnetic base of the cookware.
The glass ceramic plate is only warmed by the hot cookware. Removing the cookware
from the cooking zone immediately interrupts the supply of energy.
Induction hobs are:
▪ quick reacting ▪ energy-efficient
▪ finely adjustable ▪ safe
▪ powerful
Cookware with a full-surface or full magnetic base is required for cooking with an
induction hob.
9
3 Appliance description
3.5 ZoneFlex cooking
A maximum of two items of cookware can be operated on any one ZoneFlex cooking
zone. The hob detects cookware with a diameter of ø11cm or larger, shows its position
in the pan detection display and activates the corresponding slider. Pans with different
diameters can be placed freely on the ZoneFlex cooking zones one behind the other. For
pan detection, cookware must be positioned centrally on the cooking zone areas.
For even frying, cookware must be positioned centrally on the cooking zone areas.
The diameter of the base of the cookware should not be larger than the cooking
zone areas.
3.6 Pan detection
Each cooking zone area is equipped with pan detection. This detects suitable induction-
compatible cookware with a magnetic base. Adjacent to the digital display, pan detection
appears in dark red (1b, 2b, 3b). It indicates which cooking zone areas (1a, 2a, 3a) are
activated.
▪ If the cookware is removed during operation or
if unsuitable cookware is used,
– the power level selected flashes alternately
with in the digital display.
▪ If no suitable cookware is placed on the cook-
ing zone areas while pan detection is running
(20seconds),
– the cooking zone areas switch off.
– the digital display changes from to «0».
– the appliance switches off after 30seconds
if no other cooking zone areas are in use.
2a
3a
1a
1b
2b
3b
If cookware that is too small (≤ ø11cm) is placed on a cooking zone area, it will
not be detected and therefore cannot be heated. The slider remains switched off.
3.7 MemoryFunction
If the cookware is moved or lifted inside the ZoneFlex cooking zone, the settings are
saved and automatically applied to the new position. The new position is indicated in the
pan detection display, and the relevant settings in the digital display.
10
3 Appliance description
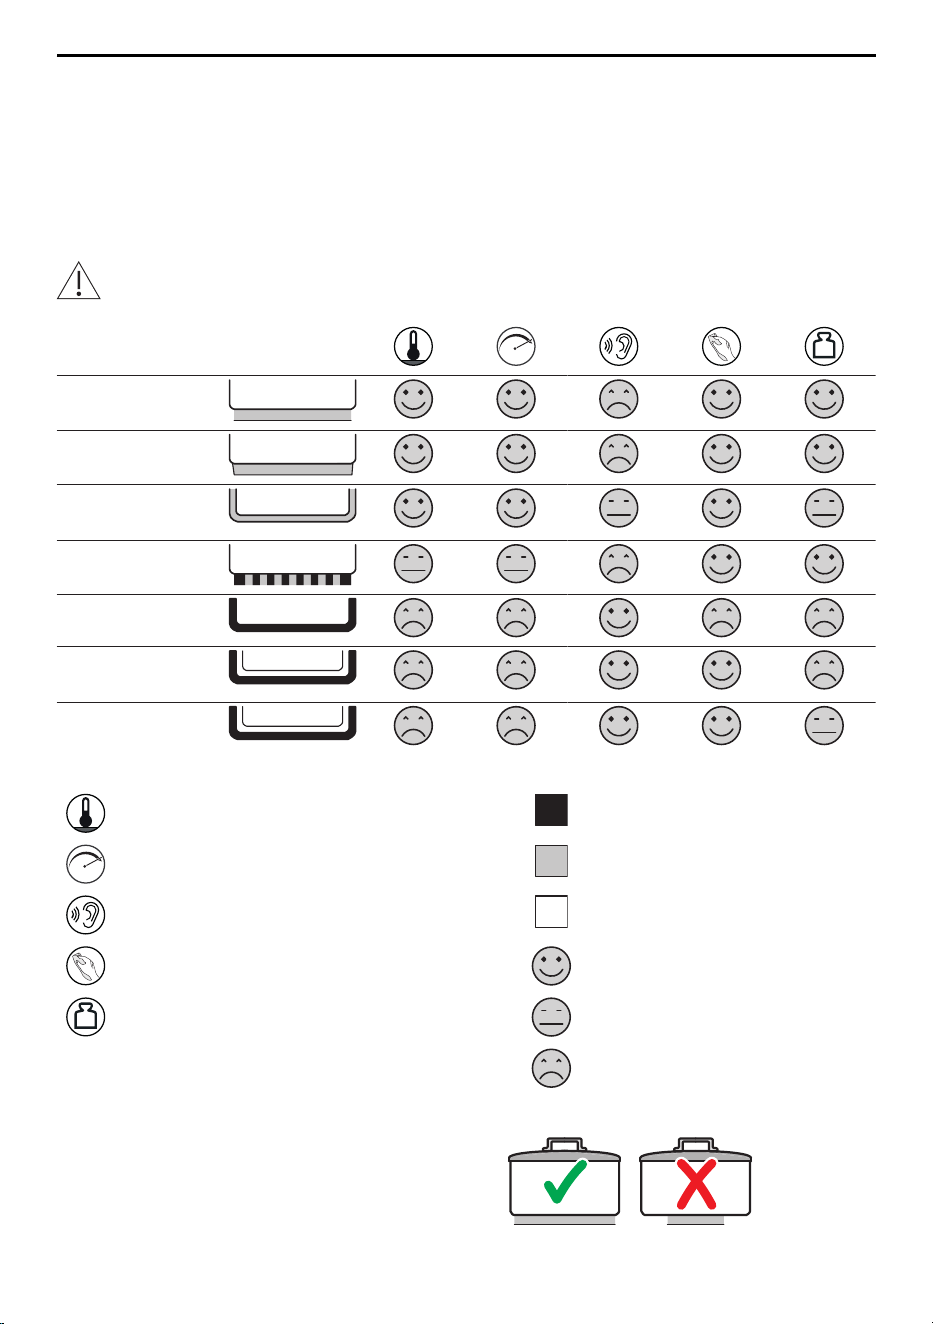
3.8 Cookware
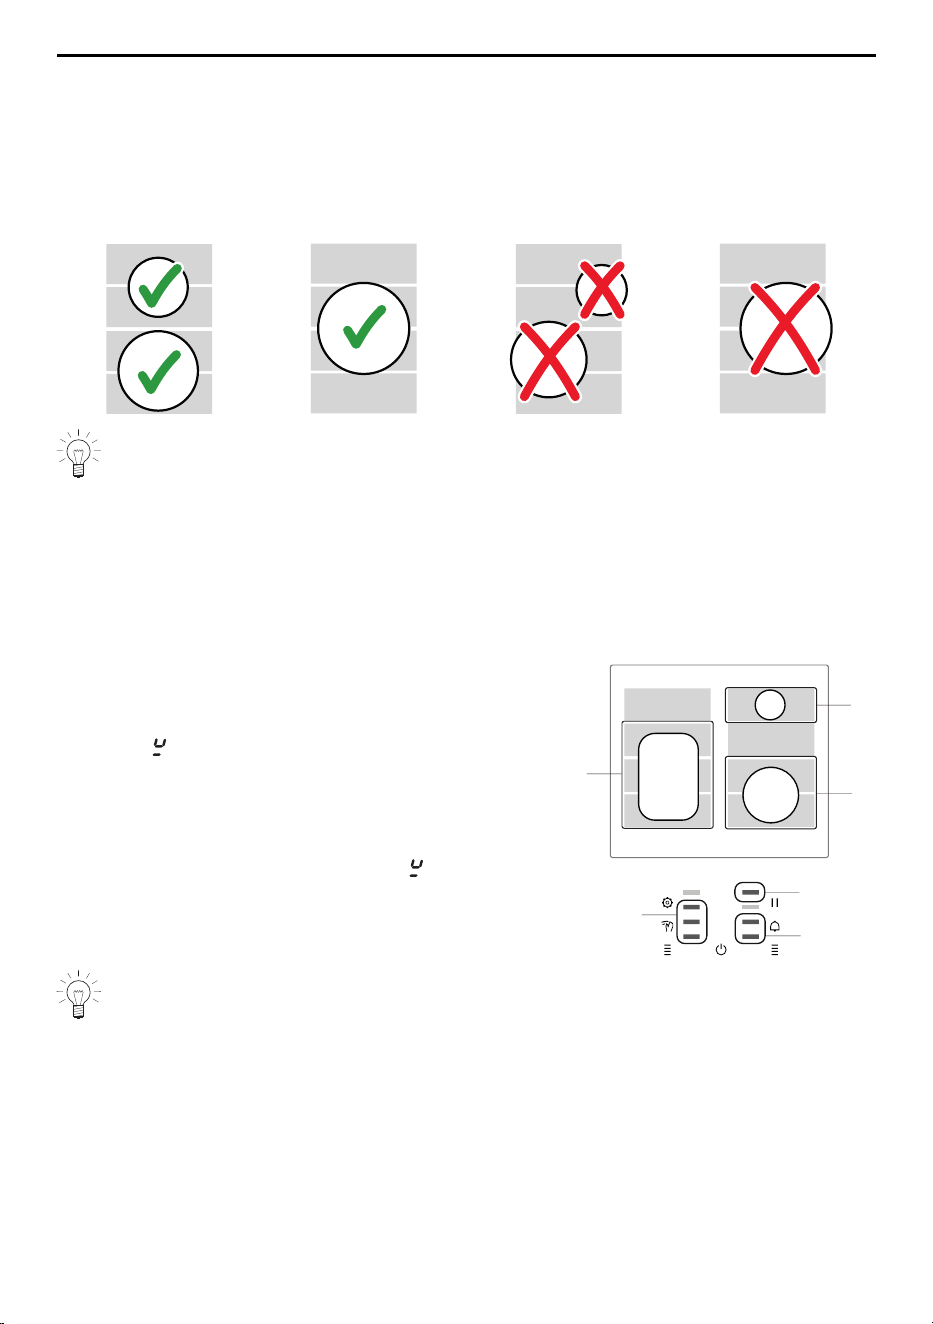
Suitable cookware
Only cookware with a magnetic base (minimum ø11cm) is suitable for use with the in-
duction hob.
This can be checked in the following ways:
▪ A magnet sticks anywhere on the base of the cookware.
▪ Only the power level set illuminates on the hob.
Do not heat any unsuitable cookware using aids such as metal rings and the like.
This can damage the hob.
Sandwich base
Capsule base
Multi-layer
material
Pressed base
Cast iron
Enamelled cast
iron
Enamelled steel
Key:
Heat distribution Steel
Reaction speed Aluminium
Noise level Enamel
Care Good
Weight Satisfactory
Unfavourable
General notes on cookware
▸ As far as possible ensure that the dia-
meter of the base of the cookware is
the same size as the upper diameter
of the cookware.
11
4 Operating the appliance
▸ We advise against the use of cook-
ware with a pressed base as this type
of cookware does not work with all in-
duction hobs.
▸ Some induction hobs have the melt,
keep warm and simmer functions. We
recommend using cookware without a
concave base for these functions.
▸ Handles that are loose or hollow can produce a loud whistling noise.
▸ The adherence of the cookware to the hob surface is reduced during operation, and
the cookware can therefore be moved more easily.
▸ Thick pan walls absorb the vibrations and reduce the noise level.
Energy-efficient cooking
For maximum energy efficiency and even heat distribution note the following:
▪ The base of the cookware must be clean, dry and smooth.
▪ Centre the cookware in the middle of the cooking zone.
▪ Use a well-fitting lid.
▪ Match the diameter of the cookware to the quantity of food to be cooked.
Coated cookware
▪ For frying, do not use a higher power level than «7».
▪ Coated cookware may be operated above level «7» provided that the bottom of the
pan is completely covered with liquid.
– The coating may otherwise become overheated and damaged.
Never use coated frying pans with automatic boost or PowerPlus.
Noise during cooking
Cookware can make noise during cooking. This does not indicate any malfunction, nor
does it affect the functioning of the appliance in any way.
Noise depends on the cookware used. If the noise causes considerable disturb-
ance, it can help to change the cookware.
4 Operating the appliance
4.1 Switching the appliance on
▸ Hold the button depressed for 1second.
– An acoustic signal is emitted and the slider animation runs for a maximum 2
seconds.
– The , and buttons illuminate for 30 seconds.
The displays disappear after 30 seconds.
4.2 Setting the power level
▸ If the appliance is switched off, hold the button depressed for 1second.
▸ Place the cookware on a ZoneFlex cooking zone.
12
4 Operating the appliance
– The assigned cooking zone areas appear dark red in the pan detection display.
– The assigned slider is activated.
– If there is already cookware standing on the hob, it will be detected and the as-
signed slider activated.
▸ Touch or swipe the slider to set the power level.
– The power level can be set as long as the cooking zone areas are displayed in the
pan detection and the slider.
– The power level selected is accepted when the slider is released.
– Shortly after the last entry is made, the slider disappears.
4.3 Overview of power levels
Power
level
Cooking method Use
Melting Butter, chocolate, gelatine, sauces, approx. 40°C
Keep warm Keeps food warm, approx. 65°C
Simmering Water temperature stays below boiling point
Melting, gentle warming Butter, chocolate, gelatine, sauces
Swelling Rice
Resume cooking, reducing,
stewing, steaming
Vegetables, potatoes, sauces, fruit, fish
Resume cooking, braising Pasta, soup, braised meat
Gentle frying Rösti, omelettes, breaded fried foods, sausages
Frying, deep frying Meat, chips
Flash frying Steak
Fast heating Boiling water
4.4 Bridging function
As soon as cookware is detected on the ZoneFlex cooking zone, the assigned cooking
zone areas are automatically activated. Cooking zone areas can be assigned manually to
cookware using the bridging function if no power is being delivered to the ZoneFlex
cooking zone.
Switching the bridging function on
▸ Hold the button depressed for 1second.
▸ Touch the button for the required ZoneFlex
cooking zone.
▸ Touch the button repeatedly until the required
assignment of cooking zone areas appears
dark red in pan detection 1.
– The selected cooking zone areas are activ-
ated.
▸ Place cookware on the ZoneFlex cooking zone.
▸ Set the power level (see page 12).
1
13
4 Operating the appliance
Once the cooking zone areas are assigned manually, the cooking zone area of
each additional item of cookware must also be assigned manually.
Switching the bridging function off
In order for the cooking zone areas to be assigned automatically again, the appliance
must be switched off.
Either:
▸ Hold the button depressed for 1second.
– All cooking zone areas are switched off.
– If the cooking zone areas are still hot, Illuminates in the digital display as long as
there is a risk of burns.
Or:
▸ Remove the cookware.
▸ Touch the button repeatedly until all the assigned cooking zone areas appear
dimmed red in pan detection 1.
4.5 Residual heat indicator
remains illuminated in the relevant digital display as long as there is a risk of burns.
4.6 PowerPlus
All the cooking zone areas are equipped with the PowerPlus booster.
When PowerPlus is switched on, the cooking zone areas selected work at extra high
power for 10minutes. PowerPlus can be used, for instance, to heat a large quantity of
water quickly.
For PowerPlus to work at full power, cookware must have a diameter of at least 21
cm.
Switching PowerPlus on
▸ Touch « » on the slider for the required cooking zone area.
– illuminates in the digital display.
– After 10minutes it automatically switches back to power level .
Removing the cookware interrupts PowerPlus. PowerPlus is resumed as soon as
the cookware is placed back on the cooking zone areas.
If PowerPlus is not possible, flashes for 3 seconds and PowerPlus is switched
off.
Ending PowerPlus before time
▸ Touch the desired power level on the slider for the required cooking
zone area.
– PowerPlus ends.
14
4 Operating the appliance
Power management
High power levels cannot be set with both cook-
ware items of a ZoneFlex cooking zone (AorB)
at the same time. If an attempt is made to oper-
ate two items of cookware at high power levels
within a ZoneFlex cooking zone, then the power
is reduced for the cookware that was first selec-
ted. Reducing the power protects the appliance
connection from overheating.
A
B
4.7 Operating time
Do not leave the hob unattended during use. Risk of food boiling over, burning on
and igniting!
With the operating time function, the cooking zone areas switch off automatically after a
set time (1 – 99 mins.).
Setting the operating time
▸ Touch the slider for the required cooking zone area and set to power
level or higher.
▸ Touch the button for the required cooking zone area.
– The button flashes.
– The operating time flashes in the digital display of the slider.
▸ Touch on the slider.
– The operating time appears in the digital display of the slider.
▸ To set the operating time, swipe the slider left or right.
– The new operating time is shown in the digital display.
– If no further changes are made within 5seconds, the new operating time is accep-
ted.
– The operating time is counted down in the digital display.
The operating time can also be increased or reduced quickly:
▸ To increase the operating time quickly, press and hold the right half of the
slider .
▸ To reduce the operating time quickly, press and hold the left half of the slider
.
The default value can be adjusted in the user settings (see page 21).
Changing the operating time
▸ Touch the button for the required cooking zone area.
– The operating time selected appears in the digital display.
15
4 Operating the appliance
▸ To change the operating time, swipe the slider left or right.
– The new operating time is shown in the digital display.
– If no further changes are made within 5seconds, the new operating time is accep-
ted.
– The operating time is counted down in the digital display.
Switching the operating time off before time
▸ Touch the button for the required cooking zone area.
– The operating time selected appears in the digital display.
▸ Touch « » on the slider for the required cooking zone area.
– The operating time switches off after 5 seconds.
End of the operating time
When the operating time is up
– the relevant cooking zone area switches off.
– an acoustic signal is emitted.
– flashes in the digital display.
▸ Touch any button to switch off the acoustic signal and digital display.
4.8 Melting function
With the melting function , butter, chocolate or honey, for instance, can be gently
melted at approx. 40°C.
Switching the melting function on
▸ Touch the button 1×.
– illuminates in the digital display.
Switching the melting function off
▸ Touch « » on the slider for the required cooking zone area or touch the
button.
– If no other entry is made and the other cooking zone areas are switched off, the ap-
pliance switches off after 10seconds.
4.9 Keep warm function
The keep warm function keeps cooked food warm at approx. 65°C.
Switching the keep warm function on
▸ Touch the button 2×.
– illuminates in the digital display.
Switching the keep warm function off
▸ Touch « » on the slider for the required cooking zone area or touch the
button.
– If no other entry is made and the other cooking zone areas are switched off, the ap-
pliance switches off after 10seconds.
4.10 Simmer function
With the simmer function , sausages, dumplings and stuffed pasta, for instance, can be
cooked in hot water, just below boiling point.
16

4 Operating the appliance
The precision of the simmer function depends on the cookware used. Water can
start to boil. If this is the case, we recommend the pan lid be left off when using
the simmer function.
For locations over 1,500 meters above sea level, it is generally recommended the
pan lid be left off when using the simmer function.
Switching the simmer function on
▸ Touch the button 3×.
– illuminates in the digital display.
Switching the simmer function off
▸ Touch « » on the slider for the required cooking zone area or touch the
button.
– If no other entry is made and the other cooking zone areas are switched off, the ap-
pliance switches off after 10seconds.
4.11 Timer
The timer functions like an egg timer (1 – 99 mins.).
It can be used at any time and independently of all other functions.
Setting the timer
▸ Touch the button.
– The button flashes.
– The duration of the timer flashes in the digital display for the timer.
▸ Touch on the slider.
– The duration of the timer appears in the digital display for the timer.
▸ To set the duration of the timer, swipe the slider for the timer left or right.
– The new timer duration is shown in the digital display.
– If no further changes are made within 5seconds, the new time duration is accep-
ted.
– The duration of the timer is counted down in the digital display.
The duration of the timer can also be increased or reduced quickly:
▸ To increase the duration of the timer quickly, press and hold the right half of the
slider .
▸ To reduce the duration of the timer quickly, press and hold the left half of the
slider .
The default value can be adjusted in the user settings (see page 21).
Changing the timer
▸ Touch the button.
– The timer duration selected appears in the digital display for the timer.
▸ To change the duration of the timer, swipe the slider for the timer left or
right.
– The new timer duration is shown in the digital display.
– If no further changes are made within 5seconds, the new time duration is accep-
ted.
– The duration of the timer is counted down in the digital display.
17
4 Operating the appliance
Switching the timer off before time
▸ Touch the button.
– The timer duration selected appears in the digital display for the timer.
▸ Touch « » on the slider for the timer.
– The timer switches off after 5 seconds.
Timer finished
When the timer duration is finished
– an acoustic signal is emitted.
– flashes in the digital display for the timer.
▸ Touch any button to switch off the acoustic signal and digital display.
4.12 Childproof lock
The childproof lock makes it difficult for children to switch the appliance on.
Switching the childproof lock on
▸ If the appliance is switched off, hold the button depressed for 1second.
▸ Touch and hold down the and buttons at the same time.
– An acoustic signal is emitted.
▸ Touch the button within the next 3 seconds.
– An acoustic signal is emitted.
– The and buttons flash.
– « » appears in all the digital displays.
Operating the appliance with the childproof lock activated
▸ If the appliance is switched off, hold the button depressed for 1second.
– The and buttons flash.
– « » appears in all the digital displays.
▸ Touch and hold down the and buttons at the same time.
– An acoustic signal is emitted.
– The childproof lock is unlocked. The appliance can now be used as normal.
Switching the childproof lock off
▸ If the appliance is switched off, hold the button depressed for 1second.
– The and buttons flash.
– « » appears in all the digital displays.
▸ Touch and hold down the and buttons at the same time.
– An acoustic signal is emitted.
▸ Touch the button within the next 3 seconds.
– A double acoustic signal is emitted.
– The childproof lock is switched off.
4.13 Pause cooking
With this function, the power level of all the cooking zone areas that are switched on can
be switched to for up to 10minutes. After pause cooking, operation can be resumed
using the previous settings.
18
4 Operating the appliance
Switching pause cooking on
▸ Hold the button depressed for 1second.
– All cooking zone areas that are switched on switch to power level .
– Operating times are paused.
– The timer continues to run.
– Wipe protection is deactivated.
The maximum pause time is 10minutes. By which time, if it has not already
ended, the appliance switches off.
Switching pause cooking off
▸ Hold the button depressed for 1second.
– All cooking zone areas switch back to the previous setting.
– The operating times continue to run again.
4.14 Wipe protection
Switching wipe protection on
▸ Touch the button.
– Wipe protection remains activated until cancelled.
Switching wipe protection off
▸ Touch the button.
– Wipe protection has been cancelled and the appliance may be operated again.
Touch the button to switch the appliance off at any time.
4.15 Restore function
If the hob is inadvertently switched off, the recall function can restore the previous set-
tings within 6seconds.
▸ Hold the button depressed for 1second.
– The button flashes for 6seconds.
▸ Touch the button within these next 6 seconds.
– The most recent settings are restored.
4.16 Demo mode
This setting enables specialist retailers to put the appliance into the demonstration mode
in order to show the functions without the appliance turning on. This setting is not recom-
mended for private use.
The demo mode can only be terminated by a service technician.
4.17 Switching the cooking zone area off
▸ Touch « » on the slider for the required cooking zone area.
– The cooking zone area is switched off.
– If the cooking zone area is still hot, Illuminates in the digital display as long as
there is a risk of burns.
– If no other entry is made and the other cooking zone areas are also switched off,
the appliance switches off after 30seconds.
19
5 OptiLink
4.18 Switching the appliance off
▸ Hold the button depressed for 1second.
– All cooking zone areas are switched off.
– If cooking zone areas are still hot, Illuminates in the digital display as long as
there is a risk of burns.
5 OptiLink
5.1 Connecting the hob to the range hood
The hob can only be connected to a range hood with the OptiLink function.
Activating the connecting mode on the hob
▸ Switch the hob off (see page 20).
▸ Access the user setting (see page 21).
▸ Select the user setting .
▸ Select the setting by touching or swiping slider ; no further actions are
needed.
– and the setting illuminate in the digital displays.
Activating the connecting mode on the range hood
▸ Make the settings as described in the operating instructions for the range hood.
If a connection between the hob and the range hood has been successfully established,
this is indicated on the range hood. See the operating instructions for the range hood.
5.2 Deactivating OptiLink
To terminate the connection between the range hood and the hob:
▸ Access the user setting (see page 21).
▸ Select the user setting .
▸ Select the setting by touching or swiping slider .
▸ To save the change, hold the button depressed for 2 seconds.
– The setting is saved and user settings are closed.
– The connection to the range hood is deleted.
– OptiLink is deactivated.
See the operating instructions for the range hood for terminating OptiLink.
6 User settings
The following user settings can be set and saved individually:
User setting Setting value Factory
setting
Button tone loudness Off
Low
Medium
High
20
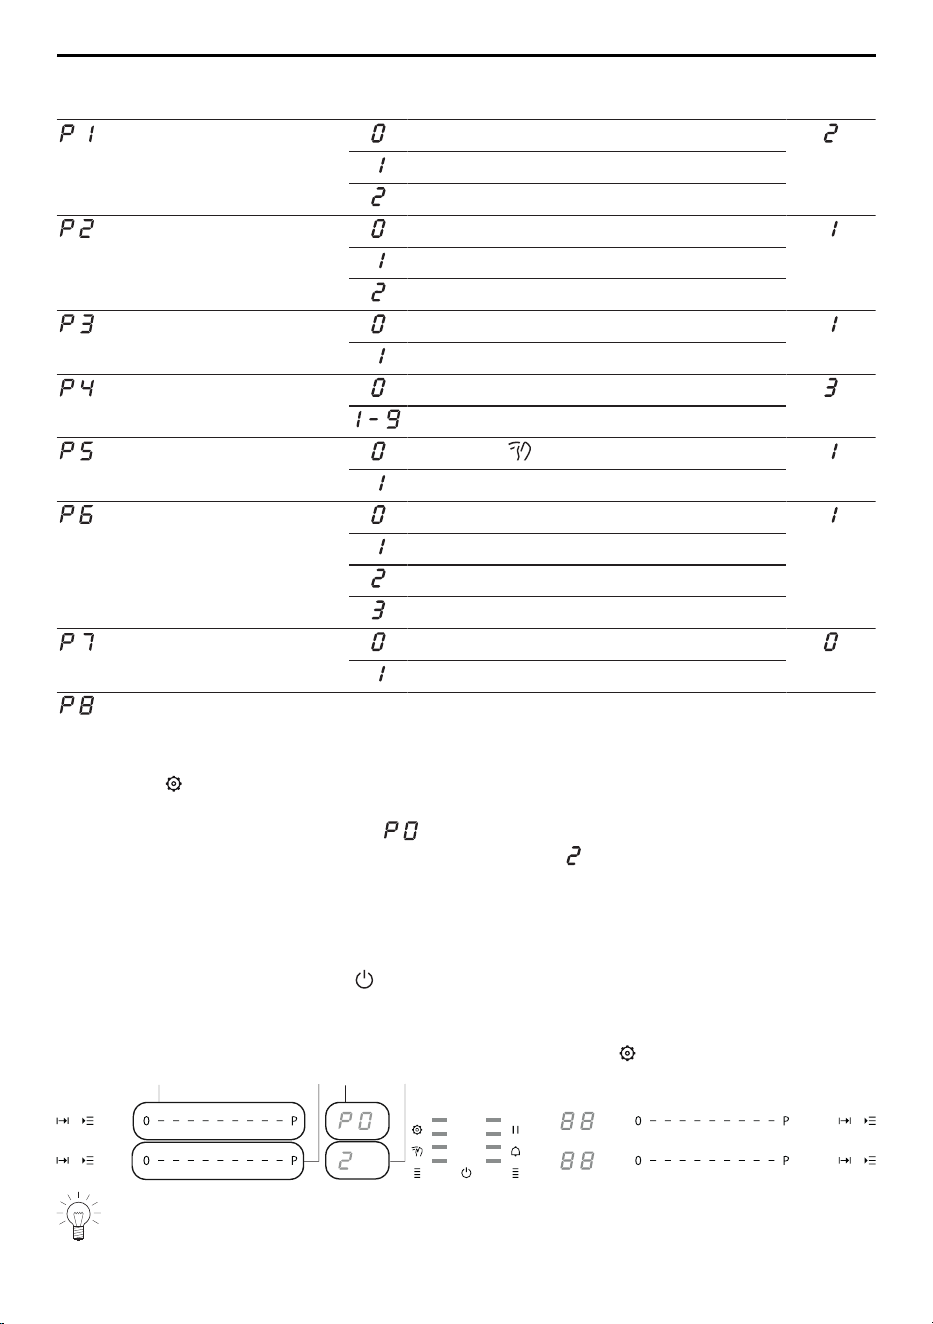
6 User settings
User setting Setting value Factory
setting
Acoustic signal
loudness
Low
Medium
High
Acoustic signal when
the timer is up
No acoustic signal
Ends after 10seconds
Ends after 1minute
PowerPlus time Ends after 5minutes
Ends after 10minutes
Default timer duration 0minutes
Adjustable in steps from 10–90minutes
Cancel wipe protection
Touch the button
Automatic after 30seconds
Brightness Minimum
Low
Medium
Maximum
OptiLink Off
On
Restore factory settings - Restoration of factory settings -
6.1 Changing user settings
▸ Hold the button depressed for 6seconds.
– An acoustic signal is emitted.
– The indexed user setting, e.g. , appears in the upper digital display 3.
– The current setting value for this user setting, e.g. , appears in the lower digital
display 4.
▸ To go to another user setting, swipe the upper slider 1 left or right.
▸ To change the current setting value for a user setting, swipe the lower slider 2 left or
right.
▸ To save the change, hold the button depressed for 2 seconds.
– An acoustic signal is emitted.
– The appliance is switched off.
▸ To exit user settings without saving any change, touch the button.
1
2
3
4
If no entry is made, the user settings are exited automatically after 1minute.
21
7 Care and maintenance
6.2 Restoring the factory settings
User settings that have been changed can be restored to the factory setting.
▸ Select the user setting.
▸ Hold the button depressed for 2seconds.
– All user settings have been reset to factory settings.
7 Care and maintenance
Ideally, clean the appliance when it has completely cooled down.
Burns hazard!
Always clean the hob after use. This prevents food residue from burning on. Dried-on or
burned-on food residue is harder to clean off.
Use of improper cleaning techniques can result in damage to the markings or surface.
Avoid cleaning the surface of the glass ceramic hob with abrasive cleaning agents,
scouring pads, wire wool, etc. as they can damage the surface.
▸ Use only a soft cloth or sponge with water and standard washing-up liquid for clean-
ing everyday soiling.
▸ Remove stubborn soiling, e.g. boiled-over milk, while still warm using a glass ceramic
hob scraper. Always follow the scraper manufacturer's instructions for use.
▸ Foods with a high sugar content, e.g. marmalade, that boil over should be removed
while still hot using a glass ceramic hob scraper. The surface of the glass ceramic
hob could otherwise become damaged.
▸ Remove melted plastic while still warm using a glass ceramic hob scraper. The sur-
face of the glass ceramic hob could otherwise become damaged.
▸ Remove limescale stains when cool with a small amount of mild vinegar cleaner or
lemon juice. Then wipe clean with a damp cloth.
▸ Use a suitable Cleaning agent (see page 23) to remove stubborn soiling.
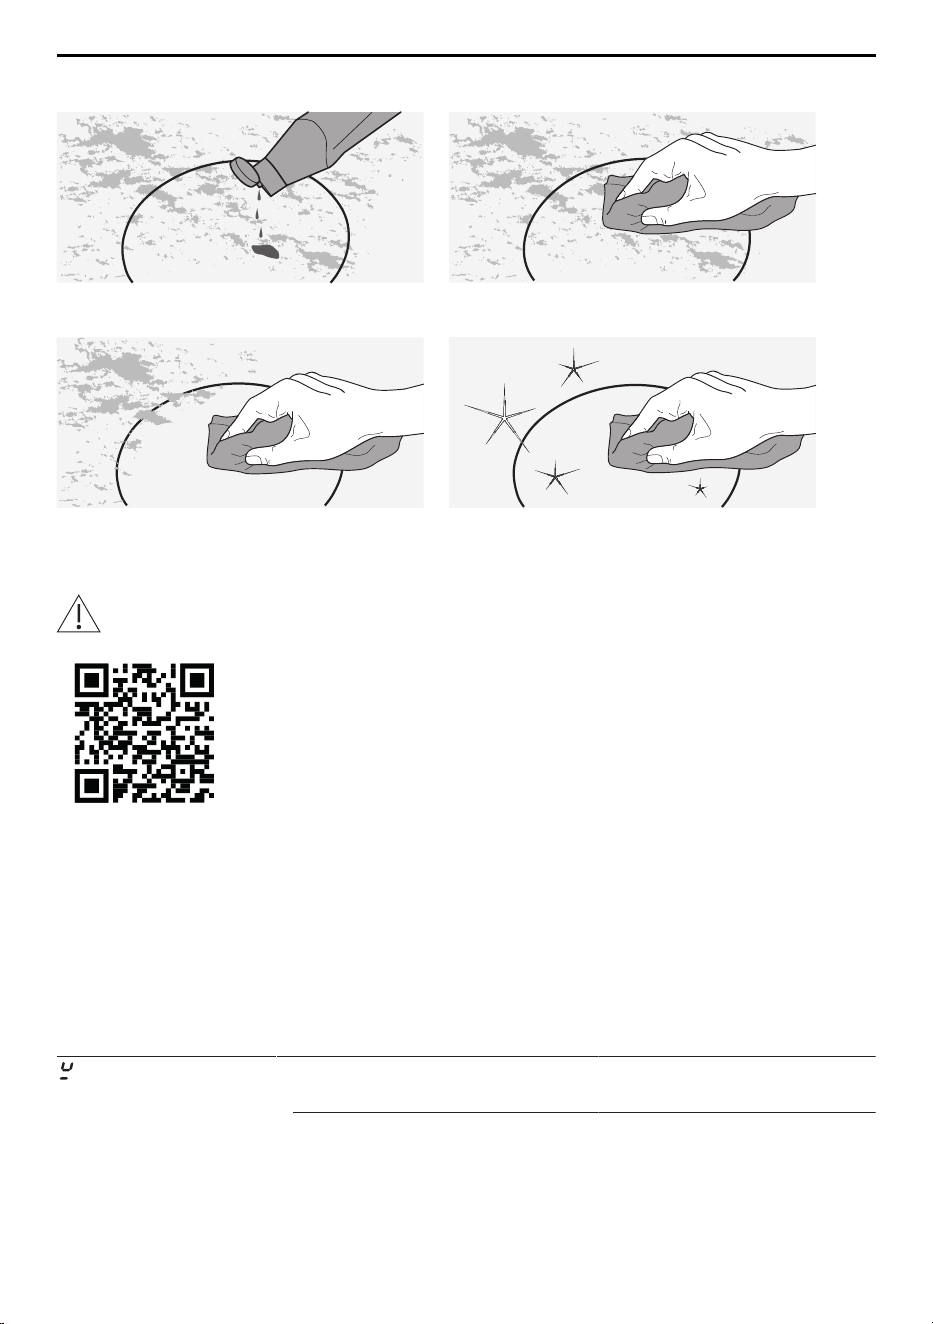
Cleaning
For good results, follow these cleaning instructions.
▸ To clean thoroughly, remove most of the soiling using a hob scraper or a special
cleaning sponge for glass ceramic hobs.
22
8 Trouble-shooting
▸ Add a few drops of a suitable Cleaning agent (see page 23) to the cold hob surface
and rub over the surface using kitchen towel or a clean cloth.
▸ Wipe off with a wet cloth and then polish with a dry cloth or the soft side of a suitable
cleaning sponge.
7.1 Cleaning agent
Glass ceramic with OptiGlass
Unsuitable cleaning agents may attack and damage the coating.
▸ Only use the cleaning agents and methods for glass ceramic
with OptiGlass that we recommend.
8 Trouble-shooting
You may be able to trouble-shoot the following errors yourself. If not, note down the error
message in full (message and E numbers) and then call Customer Services or report it
to us online.
8.1 Error messages
Display Possible cause Solution
flashes alternately
with the power level
▪ Cookware is not suitable for
use with induction hobs.
▸ Use suitable magnetic
cookware (see page 11).
▪ Cookware is not standing on
the cooking zone area.
▪ Cookware is too small for the
cooking zone area selected.
▸ Ensure cookware corres-
ponds to the size of the
cooking zone area.
23
8 Trouble-shooting
Display Possible cause Solution
illuminates
▪ The childproof lock is activ-
ated.
▸ See how to operate appli-
ance with childproof lock
activated (see page 18).
▸ Switch the childproof lock
off (see page 18).
A continuous acoustic
signal is emitted and
flashes
▪ A button or a slider was
touched for longer than
10seconds.
▪ There is an object or boiled-
over food on the control
panel.
▸ Remove object or food
that has boiled over.
▸ Touch .
– goes out and the
continuous acoustic
signal is silenced.
▸ The appliance can be
used again as normal.
flashes
▪ The excess temperature pro-
tection of a cooking zone
area was triggered.
▸ Allow the cooking zone
area to cool down.
▸ Continue cooking on a dif-
ferent cooking zone area.
▸ Check cookware.
▪ An object (e.g. paper) under-
neath the hob is obstructing
the air intake.
▸ Remove any objects in the
drawer underneath the
hob.
▸ Touch any button to ac-
knowledge the error.
▸ After 10minutes the appli-
ance can be used again
as normal.
▪ Ventilation is defective. ▸ Note down the error mes-
sage in full and the serial
number (SN) of the appli-
ance.
▸ Contact Customer Ser-
vices.
flashes
▪ An interruption in the power
supply.
▸ Touch any button to ac-
knowledge the display.
▸ The appliance can be
used again as normal.
and illuminate
▪ Object (e.g. pan, dish) on the
control panel.
▪ There is boiled-over food on
the control panel.
▸ Remove object or food
that has boiled over.
▸ The appliance can be
used again as normal.
24
8 Trouble-shooting
Display Possible cause Solution
and illuminate
▪ Control unit has overheated
due to, for instance, hot
cookware or food being on
the control panel.
▸ Immediately remove the
hot cookware or food that
has boiled over from the
control panel.
▸ Touch the button to ac-
knowledge the error.
▪ An object (e.g. paper) under-
neath the hob is obstructing
the air intake.
▸ Remove any objects in the
drawer underneath the
hob.
▸ Touch any button to ac-
knowledge the error.
▸ After 10minutes the appli-
ance can be used again
as normal.
▪ Ventilation is defective. ▸ Note down the error mes-
sage in full and the serial
number (SN) of the appli-
ance.
▸ Contact Customer Ser-
vices.
or and a num-
ber illuminate in the
display
▪ Internal error occurred. ▸ Note down the error mes-
sage in full and the serial
number (SN) of the appli-
ance.
▸ Contact Customer Ser-
vices.
and illuminate and
the cooking zone area
switches off
▪ Cookware is not suitable for
use with induction hobs.
▸ Use suitable magnetic
cookware (see page 11).
▪ Cookware is too small for the
cooking zone area selected.
▸ The diameter of the base
of the cookware must be
at least 10 cm.
and illuminate
▪ The automatic safety shut-off
was triggered.
▸ Switch the hob back on
again if required (see
page 12).
If a cooking zone area has been running for longer without any settings being
changed, the appliance switches the cooking zone area off automatically, after
how much time depends on the power level set.
Power level / Function
Safety shut-off after hrs.:mins.
2:00 10:00 5:00 5:00 4:00
3:00 2:00 2:00 2:00 1:00
25

8 Trouble-shooting
8.2 Other possible problems
Problem Possible cause Solution
The cookware is not
being heated and no
power is being de-
livered to the cooking
zone area.
▪ The demo mode is switched
on.
The demo mode must be ter-
minated by the service tech-
nician.
▸ Contact Customer Ser-
vices.
The appliance is not
working and all the dis-
plays remain dark.
▪ The fuse or circuit breaker for
electrical installations in the
home is defective.
▸ Change the fuse.
▸ Reset the circuit breaker.
▪ An interruption in the power
supply.
▸ Check the power supply.
▪ The fuse or circuit breaker
keeps blowing.
▸ Note down the serial num-
ber (SN) of the appliance.
▸ Contact Customer Ser-
vices.
No cookware detected. ▪ Cookware is too small. ▸ Move cookware into the
centre of the cooking zone
area.
▪ The cookware is not induc-
tion-compatible or is dam-
aged.
▸ Use undamaged, induc-
tion-compatible cookware
(see page 11).
Cooking zone areas
are not assigned cor-
rectly to the cookware.
▪ Cookware is not positioned
centrally on the cooking zone
area.
▸ Position the cookware
centrally on the cooking
zone area.
▪ The cookware was placed on
the cooking zone area before
the hob was switched on.
▸ Switch the hob on before
placing the cookware on
the cooking zone area.
▸ Assign cooking zone
areas manually (see page
13).
OptiLink is not working ▪ The connection was not suc-
cessful.
▸ Deactivate OptiLink on the
hob.
▸ Re-establish the connec-
tion.
▪ If the problem could not be
resolved:
▸ Note down the serial num-
ber (SN) of the appliance.
▸ Contact Customer Ser-
vices.
26

9 Technical data
9 Technical data
In accordance with EU Regulation No. 66/2014
Description Unit Value
Model number GK 31157, 31158
Type designation GK CTI4T-31157, CTI4T-31158
Number of cooking zones/areas 2
Heating technology induction
Dimension of cooking zone/area cm 22 × 37 22 × 37
Energy consumption per cooking zone/area Wh/kg 191.3 191.7
Energy consumption of the entire hob EC Wh/kg 191.5
10 Disposal
10.1 Packaging
Never allow children to play with packaging material due to the danger of injury or
suffocation. Store the packaging material in a safe location or dispose of it in an
environmentally-friendly way.
10.2 Safety
Render the appliance unusable to prevent accidents caused by improper use (e.g.
through children playing):
▸ Disconnect the appliance from the mains. With a fixed appliance, this is to be carried
out by a qualified electrician. Then cut the mains cable off flush with the appliance.
10.3 Disposal
▪ The «crossed‐out wheeled bin» symbol requires the separate collection of waste
electrical and electronic equipment (WEEE). Such equipment can contain hazardous,
environmentally harmful materials.
▪ These appliances are to be handed over to a designated collection point for the recyc-
ling of electrical and electronic equipment and must not be disposed of with unsorted
household waste. And in this way, you will be helping to protect resources and the en-
vironment.
▪ For more information, please contact the local authorities.
27

Addresses of the importers
Addresses of the importers
AU/NZ
V-ZUG Australia Pty. Ltd.
2/796 High Street
Kew East, Victoria 3102,
AUSTRALIA
LB
Kitchen Avenue SAL
Mirna El Chalouhi Highway
Wakim Bldg, Jdeiheh
Beirut
LEBANON
CN
V-ZUG (Shanghai)
Domestic Appliance Co. Ltd.
Raffles City Changning Office
Tower 3
No. 1139 Changning Road
200051 Shanghai
CHINA
RU
OOO Hometek
Dubininskaya Street 57 building 1
113054 Moscow
RUSSIA
AT/BE/
DK/DE/
ES/FR/
NO/NL/
LU/SE
V-ZUG Europe BV
Evolis 102
8530 Harelbeke
BELGIUM
SG
V-ZUG Singapore Pte. Ltd.
6 Scotts Road
Scotts Square #03-11/12/13
228209 Singapore
SINGAPORE
GB/IE
V-ZUG UK Ltd.
27 Wigmore Street
London W1U 1PN
GREAT BRITAIN
TH
V-ZUG (Thailand) Ltd.
140/36, 17th Floor ITF Tower,
Silom Road
Suriyawong Sub-district
Bangrak District
Bangkok 10500
THAILAND
HK/MO
V-ZUG Hong Kong Co. Ltd.
12/F, 8 Russell Street
Causeway Bay
HONG KONG
TR
GÜRELLER
Anchor Sit.3A/1-2 Çayyolu
06690 ÇANKAYA/ANKARA
TURKEY
IT
Frigo 2000 S.p.A
Viale Fulvio Testi 125
20092 Cinisello Balsamo (Mil-
ano)
ITALY
UA
Private enterprise “Stirion” (MIRS
corp.)
Osipova Street 37
65012 Odessa
UKRAINE
IL
Digital Kitchen
Hataarucha 3
6350903 Tel Aviv
ISRAEL
VN
V-ZUG VIETNAM COMPANY LTD.
21st Floor, Saigon Centre, 67 Le
Loi
Ben Nghe Ward, District 1
Ho Chi Minh City, 700000
VIETNAM
28

11 Index
A
Acoustic signal ................................................. 21
Addresses of the importers ........................... 28
Appliance
Disposal......................................................... 27
Switching off .............................................9, 20
Switching on .............................................9, 12
Appliance overview ............................................ 8
Appliance-specific safety precautions
........................................................................ 4
B
Braising.............................................................. 13
Bridging function.......................................... 9, 13
Brightness ......................................................... 21
Button tone........................................................ 20
C
Care and maintenance ................................... 22
Childproof lock ................................................. 18
Switching off ................................................. 18
Switching on ................................................. 18
Unlocking ...................................................... 18
Cleaning agent
OptiGlass....................................................... 23
Coated cookware............................................. 12
Connection plate.............................................. 31
Cooking zone area ........................................ 8, 9
Automatically assigning.............................. 14
Manually assigning...................................... 13
Pausing.......................................................... 19
Switching off ................................................. 19
Switching on ................................................. 12
Cookware .......................................................... 11
D
Deep frying........................................................ 13
Demo mode ...................................................... 19
Disposal............................................................. 27
E
Energy-efficient cooking ................................. 12
F
Factory setting.................................................. 22
Frying ................................................................. 13
H
Heating............................................................... 13
Heating up......................................................... 13
Hob........................................................................ 8
Connecting to range hood......................... 20
Terminating connection to range hood
........................................................................ 20
How induction hobs function............................ 9
K
Keep warm function ............................. 9, 13, 16
Switching off ................................................. 16
Switching on ................................................. 16
M
Malfunctions...................................................... 23
Melting function..................................... 9, 13, 16
Switching off ................................................. 16
Switching on ................................................. 16
MemoryFunction .............................................. 10
Model designation .............................................. 2
Multi-function button ........................................... 9
Keep warm.................................................... 16
Melting ........................................................... 16
Simmering..................................................... 16
N
Noise during cooking...................................... 12
O
Operating and display elements................. 8, 9
Buttons..............................................................9
Display ..............................................................9
Operating time.............................................. 9, 15
Changing....................................................... 15
Finished ......................................................... 16
Setting............................................................ 15
Switching off before time ........................... 16
OptiLink
Activating....................................................... 20
Deactivating .................................................. 20
User setting................................................... 21
Overview of power levels ............................... 13
P
Pan detection................................................ 9, 10
Pause cooking.............................................. 9, 18
Switching off ................................................. 19
Switching on ................................................. 19
Power levels
Overview........................................................ 13
Setting............................................................ 12
Power management ........................................ 15
PowerPlus............................................................. 9
Ending before time...................................... 14
Switching on ................................................. 14
User setting................................................... 21
Problems ........................................................... 23
29

Product fiche..................................................... 27
Q
Quick instructions ............................................ 32
R
Range hood
Connecting to hob....................................... 20
Terminating connection to hob ................. 20
Reducing ........................................................... 13
Residual heat indicator................................... 14
Restore function........................................... 9, 19
Resume cooking.............................................. 13
S
Safety precautions
General .............................................................4
Safety shut-off ................................................... 25
Serial number (SN).......................................... 31
Service & Support............................................ 31
Signals and tones
Acoustic signal............................................. 21
Button tone ................................................... 20
Simmer function .................................... 9, 13, 16
Switching off ................................................. 17
Switching on ................................................. 17
Slider ..................................................................... 9
Steaming............................................................ 13
Swelling.............................................................. 13
Symbols ................................................................ 4
T
Technical questions......................................... 31
Timer .............................................................. 9, 17
Changing....................................................... 17
Finished ......................................................... 18
Setting............................................................ 17
Switching off before time ........................... 18
User setting................................................... 21
Type....................................................................... 2
U
User settings................................................. 9, 20
Changing....................................................... 21
Factory setting.............................................. 22
Using for the first time........................................ 8
V
Validity................................................................... 2
W
Warranty extensions ........................................ 31
Wipe protection ................................................... 9
Switching off ................................................. 19
Switching on ................................................. 19
User setting................................................... 21
Z
ZoneFlex cooking zone .............................. 8, 10
30
12 Service & Support
12 Service & Support
The «Trouble-shooting» section gives you valuable tips on how to deal with minor
malfunctions yourself, saving you the time and trouble of calling out a service tech-
nician and any cost that goes along with it.
Information on the V-ZUG warranty can be found at www.vzug.com →Service
→Warranty information. Please read this information carefully.
Please register your appliance straightaway online at www.vzug.com →Service
→Warranty registration. This will allow you to take advantage of the best possible support
in the event of a fault in the appliance during the guarantee period. You will require the
serial number (SN) and appliance designation to register your appliance. You will find
them on the identification plate of your appliance.
My appliance information:
SN: __________________________ Appliance: ________________________________
Please have this appliance information to hand when contacting V-ZUG. Thank you.
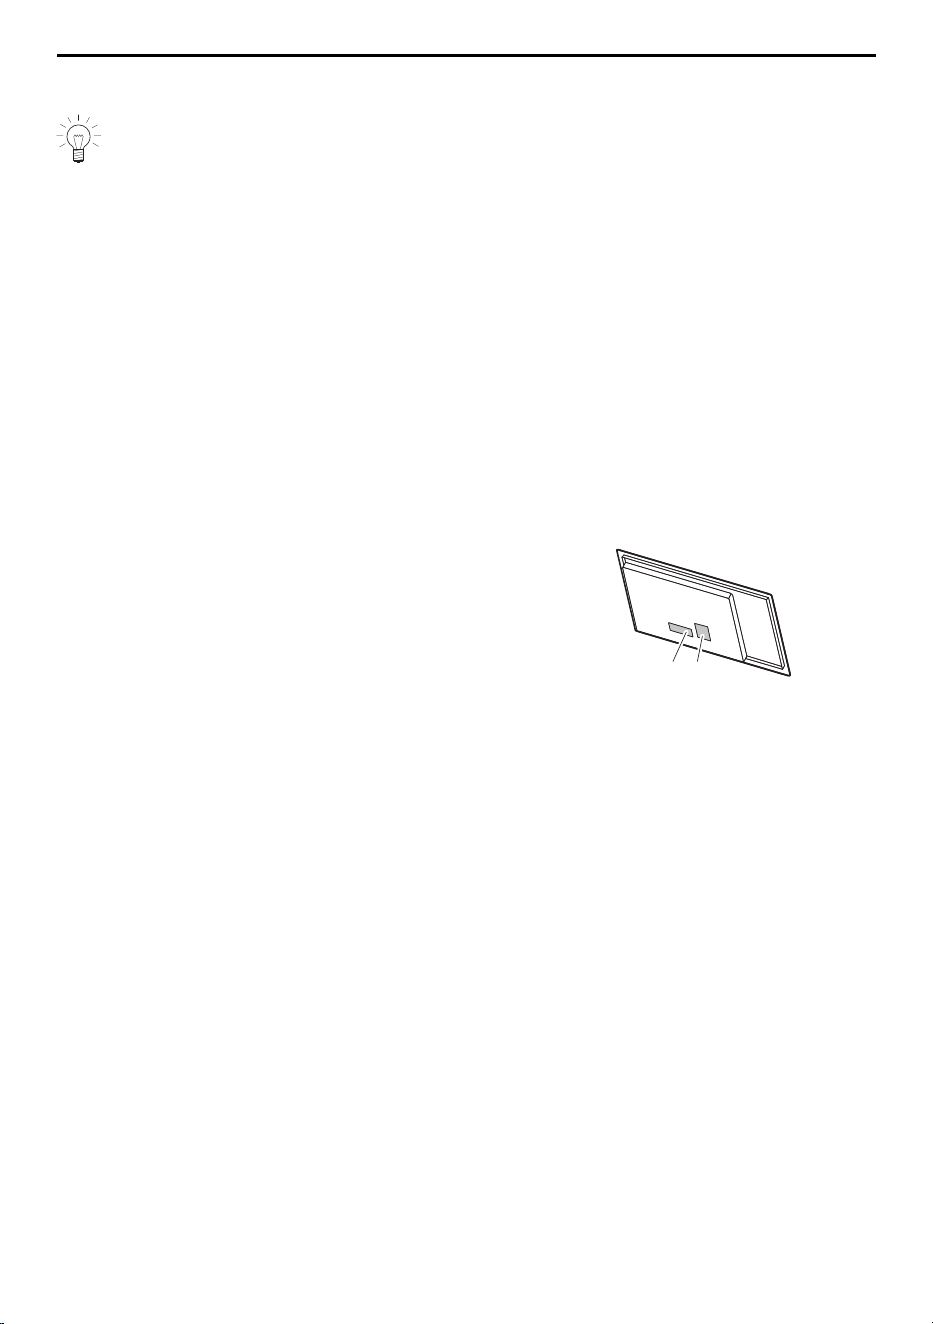
The identification plate and the connection plate are located on the underside of the hob.
1
Identification plate with serial number (SN)
21
2
Connection plate
A second identification plate is supplied and should
be affixed in the fitted unit underneath the hob.
Your repair order
At www.vzug.com →Service→Service number you will find the telephone number of your
nearest V‑ZUG service centre.
Technical questions, accessories, warranty extensions
V-ZUG is happy to help you with any general administrative or technical queries, to take
your orders for accessories and spare parts and to inform you about our progressive
service agreements.
31
Quick instructions
Please first read the safety precautions in the operating instructions!
To switch appliance on
▸ Hold the button depressed for 1second.
To set cooking zone area
▸ Place the cookware on the hob.
▸ Touch or swipe the slider for the required cooking zone area to set the
power level.
To switch cooking zone area off
▸ Touch « » on the slider for the required cooking zone area.
To switch appliance off
▸ Hold the button depressed for 1second.
V-ZUG Ltd, Industriestrasse 66, CH-6302 Zug
[email protected], www.vzug.com
1146981-07