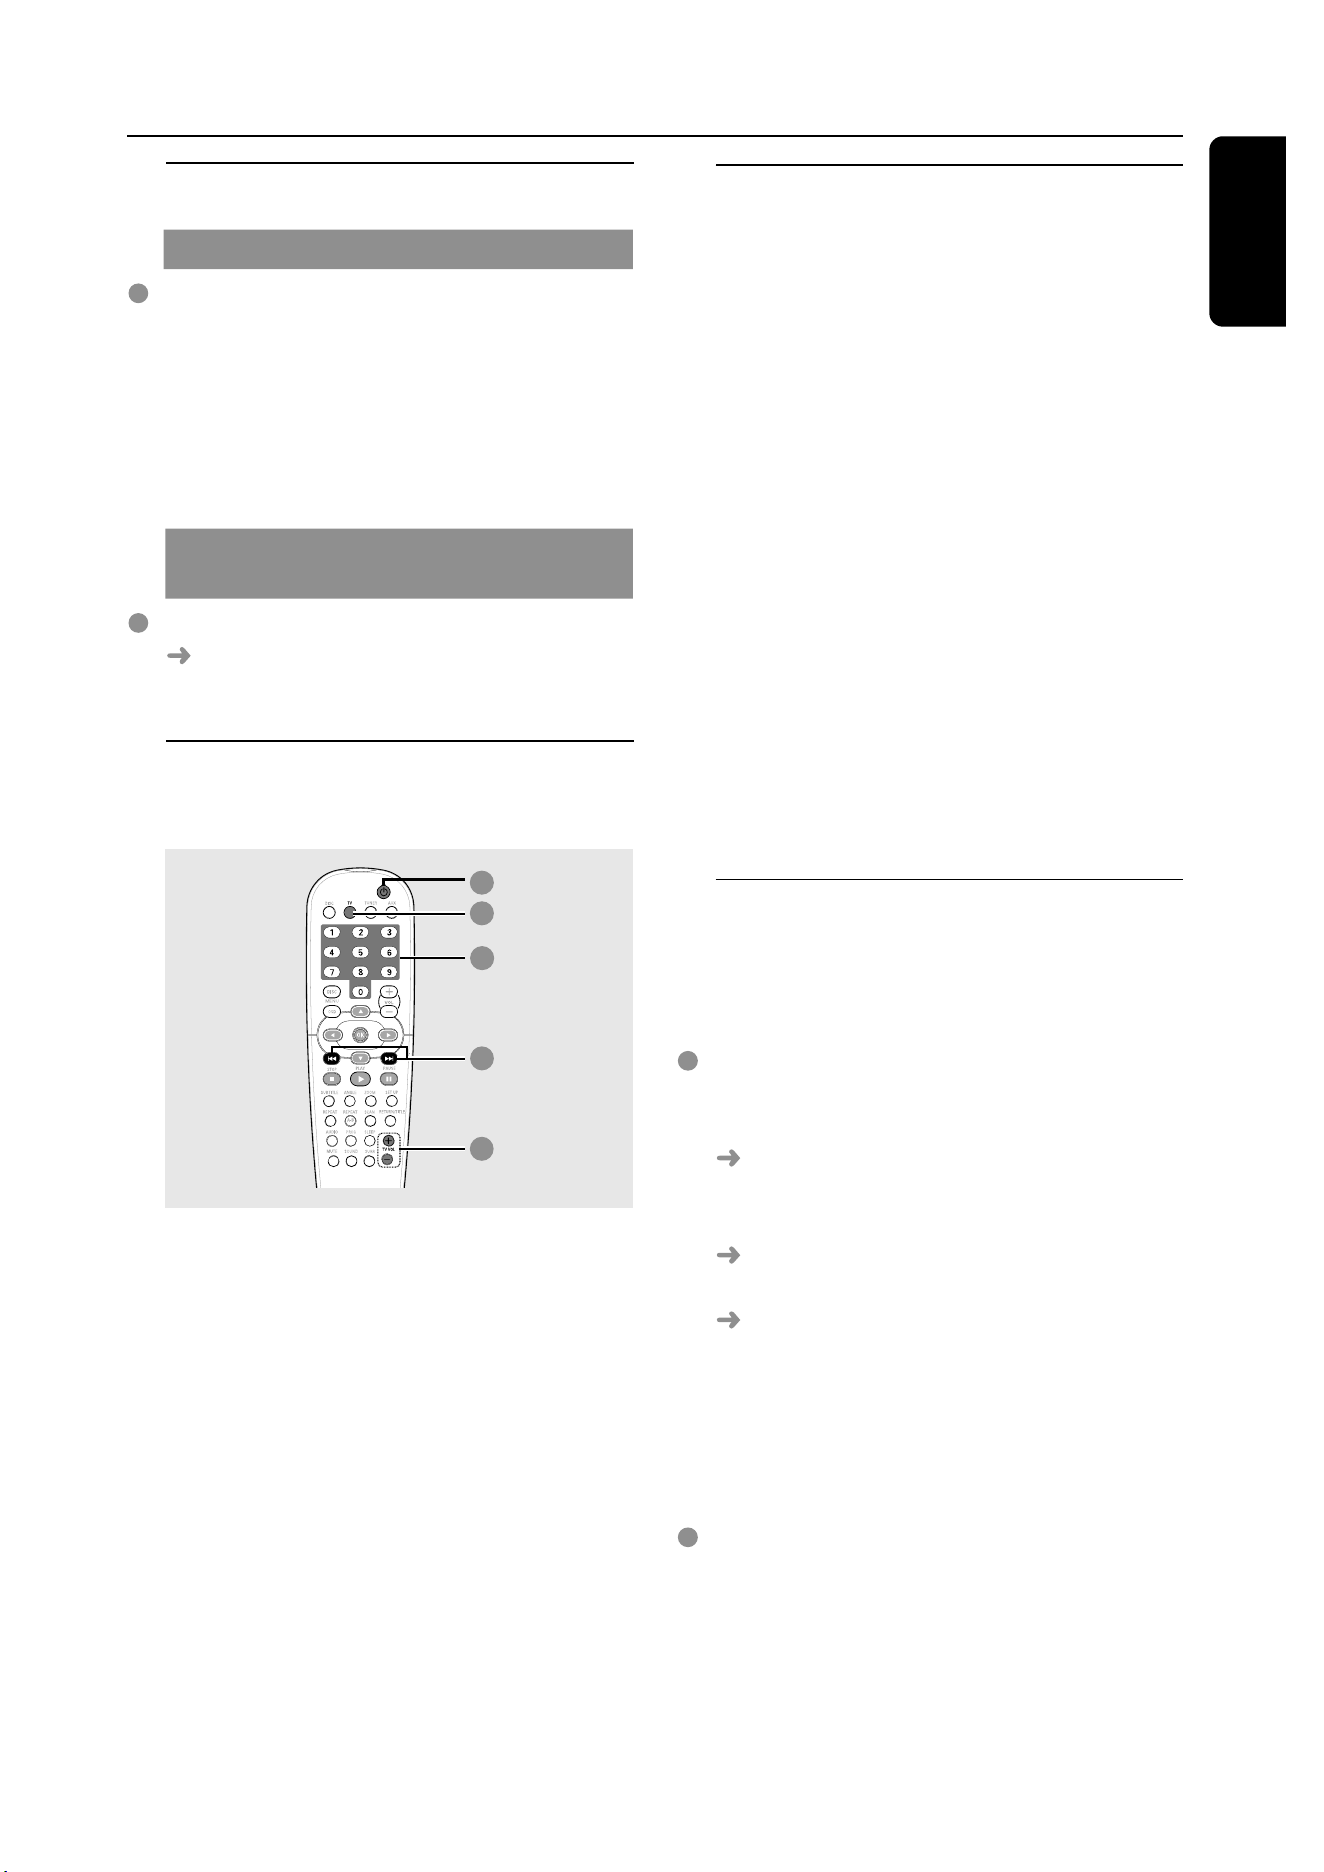
1
DVD VIDEO DIGITAL SURROUND SYSTEM
LX3900SA • LX3950W
DVD HOME
CINEMA
SYSTEM
DVD HOME
CINEMA
SYSTEM
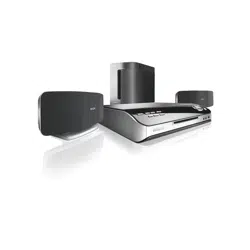
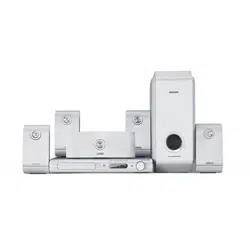
LX3900SA
LX3950W

2
3139 115 22872
Important notes for users in the
U.K.
Mains plug
This apparatus is fitted with an approved 13
Amp plug. To change a fuse in this type of plug
proceed as follows:
1
Remove fuse cover and fuse.
2
Fix new fuse which should be a BS1362 5 Amp,
A.S.T.A. or BSI approved type.
3
Refit the fuse cover.
If the fitted plug is not suitable for your socket
outlets, it should be cut off and an appropriate
plug fitted in its place.
If the mains plug contains a fuse, this should
have a value of 5 Amp. If a plug without a fuse
is used, the fuse at the distribution board
should not be greater than 5 Amp.
Note: The severed plug must be disposed of to
avoid a possible shock hazard should it be
inserted into a 13 Amp socket elsewhere.
How to connect a plug
The wires in the mains lead are coloured with
the following code: blue = neutral (N),
brown = live (L).
¶ As these colours may not correspond with the
colour markings identifying the terminals in
your plug, proceed as follows:
– Connect the blue wire to the terminal
marked N or coloured black.
– Connect the brown wire to the terminal
marked L or coloured red.
– Do not connect either wire to the earth
terminal in the plug, marked E (or e) or
coloured green (or green and yellow).
Before replacing the plug cover, make certain
that the cord grip is clamped over the sheath
of the lead - not simply over the two wires.
Copyright in the U.K.
Recording and playback of material may
require consent. See Copyright Act 1956 and
The Performer’s Protection Acts 1958 to 1972.
Norge
Typeskilt finnes på apparatens underside.
Observer: Nettbryteren er sekundert
innkoplet. Den innebygde netdelen er
derfor ikke frakoplet nettet så lenge
apparatet er tilsluttet nettkontakten.
For å redusere faren for brann eller elektrisk
støt, skal apparatet ikke utsettes for regn eller
fuktighet.
Italia
DICHIARAZIONE DI CONFORMITA’
Si dichiara che l’apparecchio LX3900SA/
LX3950W, Magnavox risponde alle prescrizioni
dell’art. 2 comma 1 del D.M. 28 Agosto 1995 n.
548.
Fatto a Eindhoven
Philips Consumer Electronics
Philips, Glaslaan 2
5616 JB Eindhoven, The Netherlands
CAUTION
Use of controls or adjustments or
performance of procedures other than
herein may result in hazardous
radiation exposure or other unsafe
operation.
VAROITUS
Muiden kuin tä ssä esitettyjen
toimintojen sä ä dö n tai asetusten
muutto saattaa altistaa vaaralliselle
sä teilylle tai muille vaarallisille
toiminnoille.
3
3139 115 22872
CAUTION
VISIBLE AND INVISIBLE LASER
RADIATION WHEN OPEN AVOID
EXPOSURE TO BEAM
ADVARSEL
SYNLIG OG USYNLIG
LASERSTRÅ LING VED Å BNING
UNDGÅ UDSÆTTELSE FOR STRÅ LING
VARNING
SYNLIG OCH OSYNLIG
LASERSTRÅ LNING NÄ R DENNA DEL
Ä R Ö PPNAD BETRAKTA EJ STRÅ LEN
VARO!
AVATTAESSA OLET ALTTIINA
NÄ KYVÄ LLE JA NÄ KYMÄ TTÖ MÄ LLE
LASER SÄ TEILYLLE. Ä LÄ KATSO
SÄ TEESEEN
VORSICHT
SICHTBARE UND UNSICHTBARE
LASERSTRAHLUNG WENN
ABDECKUNG GEÖ FFNET NICHT DEM
STRAHL AUSSETSEN
ATTENTION
RAYONNEMENT LASER VISIBLE ET
INVISIBLE EN CAS D’OUVERTURE
EXPOSITION DANGEREUSE AU
FAISCEAU
LASER
Type Semiconductor laser
GaAlAs
Wave length 650 nm (DVD)
780 nm (VCD/CD)
Output Power 7 mW (DVD)
10 mW (VCD/CD)
Beam divergence 60 degree
Manufactured under license from Dolby
Laboratories. “Dolby”, “Pro Logic” and
the double-D symbol are trademarks of
Dolby Laboratories.
Manufactured under license from Digital
Theater Systems, Inc. US Pat. No.
5,451,942, 5,956,674, 5,974,380, 5,978,762
and other world-wide patents issued and
pending. “DTS” and “DTS Digital
Surround” are registered trademarks of
Digital Theater Systems, Inc. Copyright
1996, 2000 Digital Theater Systems, Inc.
All Rights Reversed.
This product complies with the radio
interference requirements of the
European Community.
This DVD player is in
conformity with the EMC
directive and low-voltage
directive.
For Customer Use:
Read carefully the information located at
the bottom of your DVD VIDEO player
and enter below the Serial No. Retain this
information for future reference.
Model No. DVD VIDEO LX3900SA/
LX3950W
Serial No. _______________
‘CONSUMERS SHOULD NOTE THAT NOT ALL HIGH
DEFINITION TELEVISION SETS ARE FULLY
COMPATIBLE WITH THIS PRODUCT AND MAY CAUSE
ARTIFACTS TO BE DISPLAYED IN THE PICTURE. IN
CASE OF 525 OR 625 PROGRESSIVE SCAN PICTURE
PROBLEMS, IT IS RECOMMENDED THAT THE USER
SWITCH THE CONNECTION TO THE ‘STANDARD
DEFINITION’ OUTPUT. IF THERE ARE QUESTIONS
REGARDING OUR TV SET COMPATIBILITY WITH THIS
MODEL 525p AND 625p DVD PLAYER, PLEASE
CONTACT OUR CUSTOMER SERVICE CENTRE’.
DivX
®
, DivX Certified,
and associated logos
are trademarks of
DivXNetworks, Inc and
are used under license.
4
En gli sh
3139 115 22872
DK
Advarsel: Usynlig laserstrå ling ved å bning
nå r sikkerhedsafbrydere er ude af funktion.
Undgå utsættelse for strå ling.
Bemærk: Netafbryderen er sekundært
indkoblet og ofbryder ikke strømmen fra
nettet. Den indbyggede netdel er derfor
tilsluttet til lysnettet så længe netstikket
sidder i stikkontakten.
S
Klass 1 laseraparat
Varning! Om apparaten anvä nds på annat
sä tt ä n i denna bruksanvisning specificerats,
kan anvä ndaren utsä ttas fö r osynlig
laserstrå lning, som ö verskrider grä nsen fö r
laserklass 1.
Observera! Stö mbrytaren ä r sekundä rt
kopplad och bryter inte strö mmen frå n
nä tet. Den inbyggda nä tdelen ä r dä rfö r
ansluten till elnä tet så lä nge stickproppen
sitter i vä gguttaget.
SF
Luokan 1 laserlaite
Varoitus! Laitteen kä yttä minen muulla kuin
tä ssä kä yttö ohjeessa mainitulla tavalla
saattaa altistaa kä yttä jä n
turvallisuusluokan 1 ylittä vä lle
nä kymä ttö mä lle lasersä teilylle.
Oikeus muutoksiin varataan. Laite ei saa
olla alttiina tippu-ja roiskevedelle.
Huom. Toiminnanvalitsin on kytketty
toisiopuolelle, eikä se kytke laitetta irti
sä hkö verkosta. Sisä ä nrakennettu verkko-
osa on kytkettynä sä hkö verkkoon aina
silloin, kun pistoke on pistorasiassa.
English
Hereby, Philips Consumer Electronics, B. U. Peripherals &
Accessories, declares that this product is in compliance
with the essential requirements and other relevant
provisions of Directive 1999/5/EC.
Français
Par la pré sente, Philips Consumer Electronics, B. U.
Peripherals & Accessories, déclare que l’appareil est
conforme aux exigences essentielles et aux autres
dispositions pertinentes de la directive 1999/5/CE.
Españ ol
Por medio de la presente, Philips Consumer Electronics,
B. U. Peripherals & Accessories, declara que el cumple
con los requisitos esenciales y cualesquiera otras
disposiciones aplicables o exigibles de la Directiva
1999/5/CE.
Deutsch
Hiermit erklärt Philips Consumer Electronics, B. U.
Peripherals & Accessories die Ü bereinstimmung des
Gerätes mit den grundlegenden Anforderungen und den
anderen relevanten Festlegungen der Richtlinie 1999/5/EG.
Nederlands
Hierbij verklaart, Philips Consumer Electronics, B. U.
Peripherals & Accessories dat het toestel in overeenstem-
ming is met de essentië le eisen en de andere relevante
bepalingen van richtlijn 1999/5/EG.
Italiano
Con la presente Philips Consumer Electronics, B. U.
Peripherals & Accessories dichiara che questo è
conforme ai requisiti essenziali ed alle altre disposizioni
pertinenti stabitilite dalla direttiva 1999/5/CE.
Svenska
Härmed intygar, Philips Consumer Electronics, B. U.
Peripherals & Accessories, att denna står l
ö verensstämmelse med de väsentliga egenskapskrav och
ö vriga relevanta bestämmelser som framgår av direktiv
1999/5/EG.
Dansk
Undertegnede Philips Consumer Electronics, B. U.
Peripherals & Accessories erklærer herved, at følgende
udstyr overholder de væsentlige krav og øvrige
relevante krav i direktiv 1999/5/EF.
Finnish
Philips Consumer Electronics, B. U. Peripherals &
Accessories vakuuttaa täten että tyyppinen laite on
direktiivin 1999/5/EY oleellisten vaatimusten ja sitä
koskevien direktiivin muiden ehtojen mukainen.
Portuguese
Philips Consumer Electronics, B. U. Peripherals &
Accessories declara que este está conforme com os
requisitos essenciais e outras disposiçõ es da Directiva
1999/5/CE.
Ekkgmij
LE PAQOTRA Philips Consumer Electronics, B. U.
Peripherals & Accessories DGXMEI OSI
RTLLOQuXMESAI QOR SIR OTRIXDEIR
AAISGREIR JAI SIR OIER RVESIJER IASAEIR
SGR ODGCIAR 1999/5/EJ
.

5
D
e
En gli shFrançai s
Españ olNederla ndsItal ian o Deutsch
3139 115 22872
Index
English ----------------------------------------- 6
Français -------------------------------------- 42
Españ ol -------------------------------------- 78
Deutsch ------------------------------------- 114
Nederlands -------------------------------- 150
Italiano -------------------------------------- 186
Due to the inconsistency of disc formats provided
by various disc manufacturers, your DVD system
may require a playability enhancement or upgrade.
As DVD technology advances, these enhancement
will become common and will be easy to complete.
Go to www. p4c.philips.com for software upgarde.
En raison de la diversité des formats utilisés par les
fabricants, votre système DVD peut né cessiter
l'ajout de pé riphé riques ou une mise à niveau
logicielle. Au fur et à mesure des progrè s de la
technologie DVD, ces pé riphé riques se font de plus
en plus courants et aisé s à inté grer. Pour
té lé charger la mise à niveau logicielle, visitez le site
www.p4c.philips.com.
Debido a los diferentes formatos de discos
disponibles en el mercado, es posible que deba
realizar mejoras o actualizaciones en el sistema de
DVD relativas a las funciones de reproducció n.
Conforme la tecnología DVD avanza, estas mejoras
estarán al alcance de todo tipo de usuarios y se
podrán llevar a cabo fácilmente. Visite la página
“www.p4c. philips.com” para buscar informació n
sobre actualizaciones de software.
Da das Disk-Format je nach Hersteller verschieden
ist, ist fü r Ihr DVD-System mö glicherweise die
Erweiterung der Spielbarkeit oder eine
Aktualisierung erforderlich. Da die
DVD-Technologie sich ständig weiterentwickelt,
werden sich diese Erweiterungen durchsetzen und
einfach auszufü hren sein. Gehen Sie zu fü r Ihre
Software-Aktualisierung zu „www.p4c. philips.com“.
Doordat fabrikanten verschillende schijfindelingen
aanbieden, moet uw dvd-systeem mogelijk worden
geü pgradet of uitgebreid. Naarmate de
dvd-technologie zich verder ontwikkelt, zullen
deze uitbreidingen normaal worden en zult u ze
gemakkelijk kunnen uitvoeren. Ga naar
"www.p4c. philips.com" om uw software te
upgraden.
A causa della differenza di formato tra i dischi
forniti dai vari produttori, il sistema DVD potrebbe
richiedere un potenziamento o aggiornamento
della riproducibilità. Col progredire della tecnologia
DVD, questi potenziamenti diverranno comuni e
facili da implementare. Visitare
“www.p4c. philips.com” per scaricare gli
aggiornamenti del software.

6
En gli sh
3139 115 22872
General Information
Supplied accessories ................................... 8
Care and safety information ..................... 8
Connections
Step 1: Placing the speakers and
subwoofer ..................................................... 9
Step 2: Connecting speakers and
subwoofer ..................................................... 9
Step 3: Connecting TV .............................. 10
Using Scart jacks .................................. 10
Using S-Video jack ............................... 10
Using Composite Video jack (CVBS) 10
Step 4: Connecting FM/MW antennas . 11
Step 5: Connecting the power cord ..... 11
Connections (optional)
Connecting a VCR or Cable/
Satellite Box ............................................... 12
Viewing and listening to the
playback .................................................. 12
Using the VCR for recording
DVD playback ....................................... 12
Connecting digital audio equipment ..... 13
Listening to the playback .................... 13
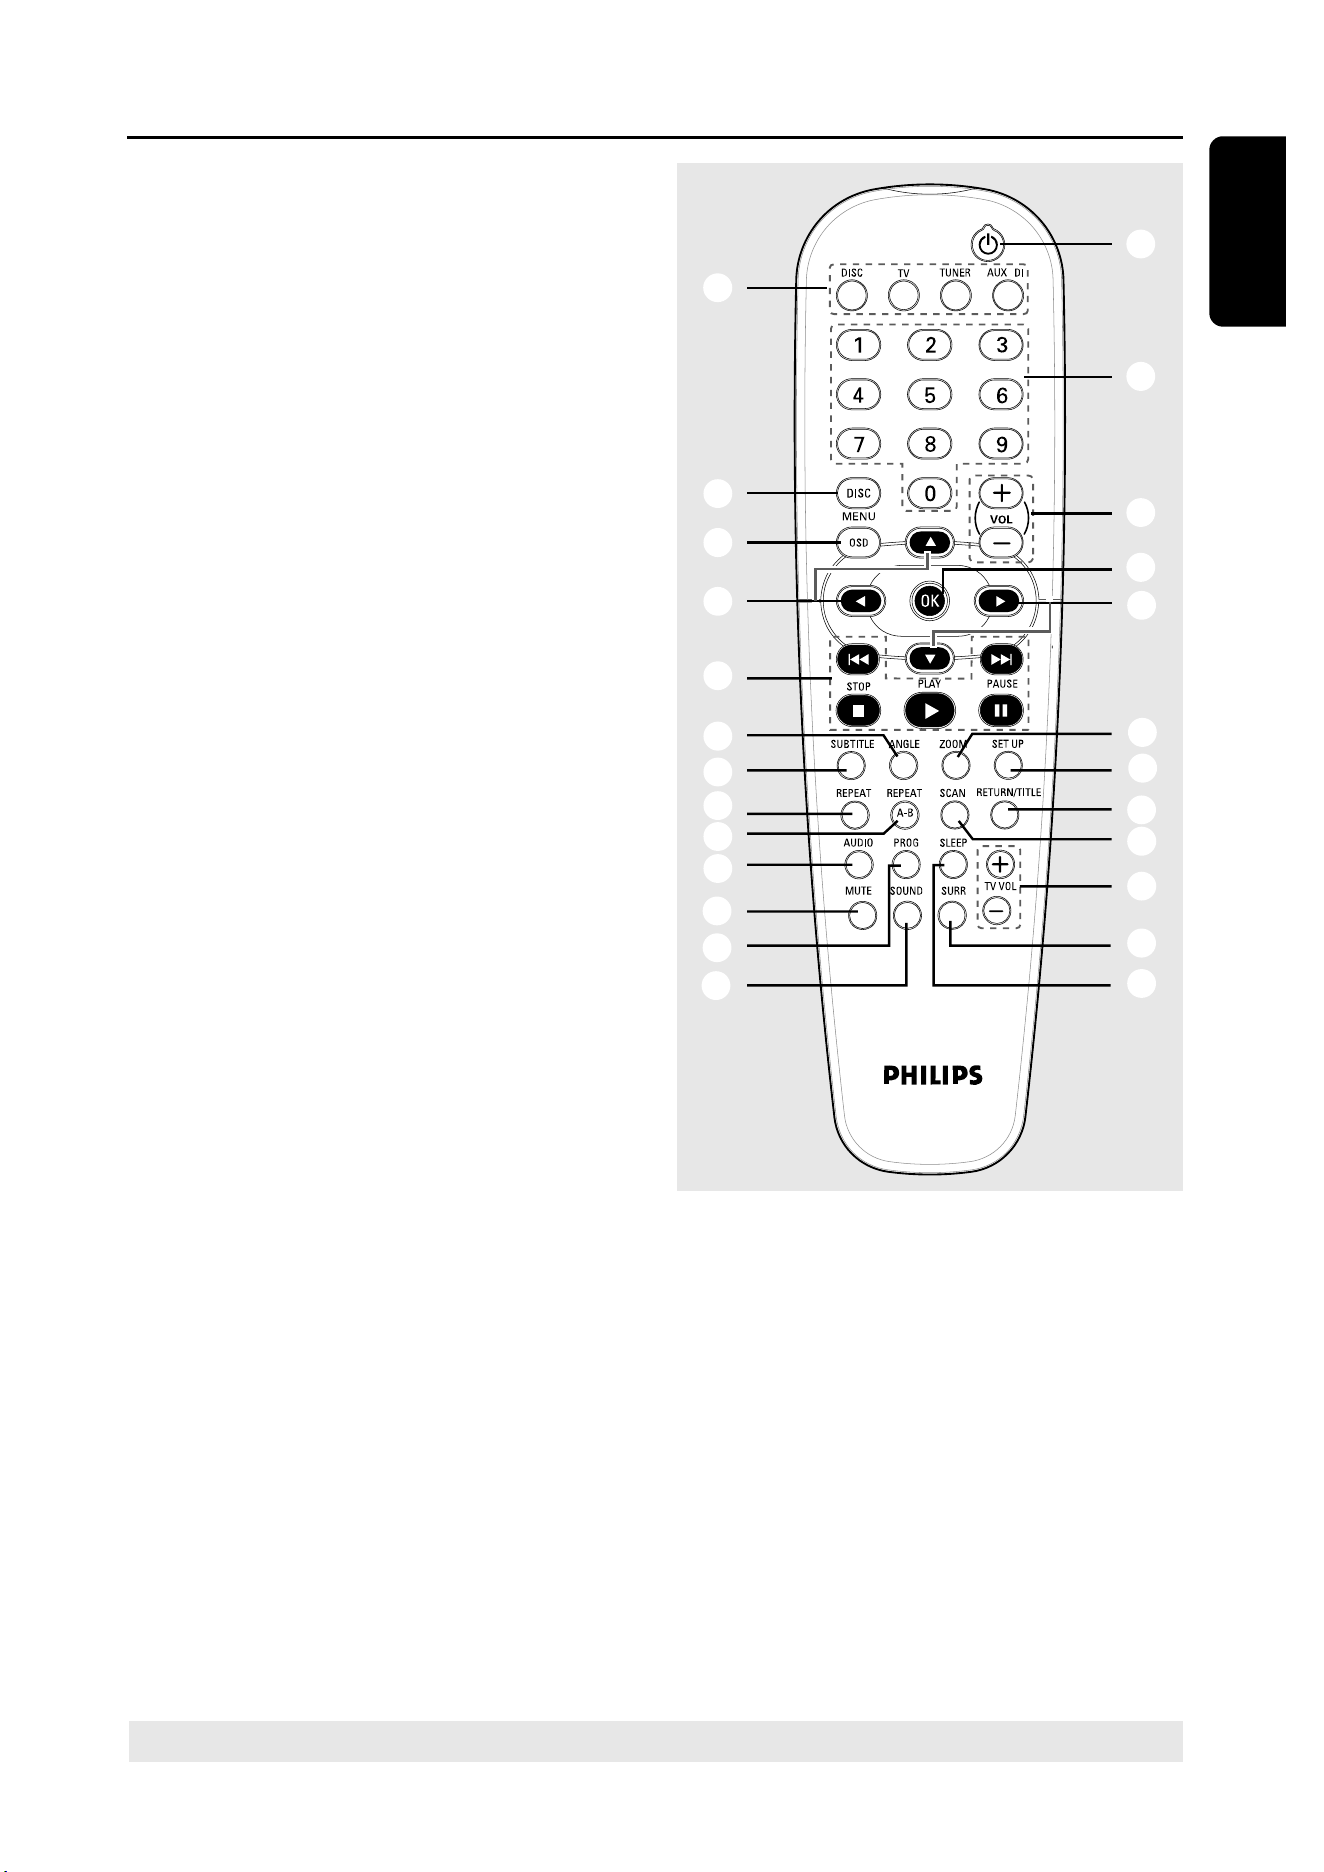
Functional Overview
Main unit and remote control ................ 14
Control buttons available on
the remote only ............................. 14–15
Getting Started
Step 1: Inserting batteries into the
remote control .......................................... 16
Using the remote control to
operate the system .............................. 16
Step 2: Setting the TV ............................... 16
Selecting the colour system that
corresponds to your TV ..................... 17
Setting the TV Display ......................... 17
Step 3: Setting language preferences ..... 18
On-Screen Display (OSD) language . 18
Audio, Subtitle and Disc menu
languages ................................................ 18
Step 4: Setting the speakers’ channels .. 19
Disc Operations
Playable discs .............................................. 20
Playing discs ................................................ 20
Auto Eco Power standby mode ........ 21
Basic playback controls ............................ 21
Selecting various repeat/ shuffle
functions ...................................................... 21
Repeat play mode ................................ 21
Repeating a section within a
chapter/track ........................................ 21
Other operations for video playback
(DVD/VCD/SVCD) ................................. 22
Using the Disc Menu ........................... 22
Zooming in ............................................ 22
Using the OSD Menu .......................... 22
Resuming playback from the last
stopped point ........................................ 23
Advancing by frame ............................. 23
Changing sound track language ......... 23
Changing subtitle language
(DVD only) ............................................ 23
Viewing from another angle
(DVD only) ............................................ 23
Selecting a title (DVD only) ............... 23
Playback Control (PBC) (VCD only) 24
Preview Function (VCD only) ........... 24
Playing MP3/ JPEG/DivX/MPEG-4 disc 25
Playing MP3 music and JPEG
picture simultaneously ........................ 25
Playing Super Audio CD (SACD) ........... 26
Special features for picture
disc playback ............................................... 26
Preview Function .................................. 26
Zoom picture ........................................ 26
Playback with multi-angles ................. 26
Scan Effect .............................................. 26
Contents

7
3139 115 22872
En gli sh
Contents
DVD Setup Menu Options
General Setup Menu ................................. 27
Locking/Unlocking the disc
for viewing ............................................. 27
Dimming system’s display screen ...... 27
Programming disc tracks (not
for Picture CD/MP3/SACD) ...... 27–28
OSD language ....................................... 28
Screen Saver – turning on/off ........... 28
DivX(R) VOD registration code ....... 28
Audio Setup Menu .................................... 29
Setting the analogue output............... 29
Speaker Setup ....................................... 29
Night mode – turning on/off ............ 29
Video Setup Menu..................................... 30
TV Type ................................................... 30
TV Display ............................................. 30
Picture Setting ................................ 30–31
Preference Setup Menu ........................... 31
Audio, Subtitle, Disc Menu ................. 31
Restricting playback by Parental
Control ............................................ 31–32
PBC ......................................................... 32
MP3/JPEG Navigator – turning
on/off ...................................................... 32
Changing the Password ....................... 33
Restoring to original settings ............ 33
Tuner Operations
Tuning to radio stations ........................... 34
Presetting radio stations .......................... 34
Using the Plug and Play ....................... 34
Automatic presetting .......................... 35
Manual presetting ................................. 35
Selecting a preset radio station ............. 35
Deleting a preset radio station ......... 35
Sound and Volume Controls
Sound Control ........................................... 36
Selecting surround sound ................... 36
Selecting digital sound effects ............ 36
Volume Control ......................................... 36
Other Functions
Switching on/off ........................................ 37
Switching to an active mode .............. 37
Switching to Eco Power standby
mode ....................................................... 37
Using the remote to operate your
‘Philips’ television ...................................... 37
Recording to an external device ............ 37
Setting the Sleep timer ............................ 37
Troubleshooting ............................. 38–39
Specifications ......................................... 40
Glossary
.......................................................
41
Language Code
.....................................
223

8
En gli sh
3139 115 22872
Supplied accessories
Scart cable (black)
FM wire antenna
MW loop antenna
Remote control
and two batteries
(12nc: 3139 258 70031)
Speaker brackets
and screws
Additional accessories (only for
LX3950W)
Wireless
transmitter
Wireless receiver
Table stand for
wireless receiver
General Information
(5x)
Care and safety information
Avoid high temperatures, moisture,
water and dust
– Do not expose the system, batteries
or discs to humidity, rain, sand or
excessive heat (caused by heating
equipment or direct sunlight). Always
keep the disc tray closed to avoid getting
dust on the lens.
Avoid condensation problem
– The lens may cloud over when the
player is suddenly moved from cold to
warm surroundings, making it impossible
to play a disc. Leave the player in the
warm environment until the moisture
evaporates.
Do not block the vents
– Do not operate the DVD system in an
enclosed cabinet and allow about 10 cm
(4 inches) of free space all around the
player for adequate ventilation.
10 cm
(4 inches)
10 cm
(4 inches)
10 cm
(4 inches)
DVD Home Cinema System
PHILIPS
Care of disc
– To clean a CD, wipe it in a
straight line from the centre
toward the edge using a soft,
lint-free cloth. Do not use
cleaning agent, as they may
damage the disc.
– Write only on the printed side of a
CD-R/CD-RW and only with a soft felt-
tipped pen.
– Handle the disc by its edge, do not
touch the surface.
Care of the cabinet
– Use a soft cloth slightly moistened
with a mild detergent solution. Do not
use a solution containing alcohol, spirits,
ammonia or abrasives.
Finding a suitable location
– Place the player on a flat, hard, stable
surface.
9
3139 115 22872
En gli sh
Connections
1 1
3
3
2
4
2
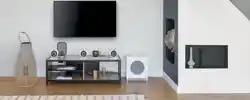
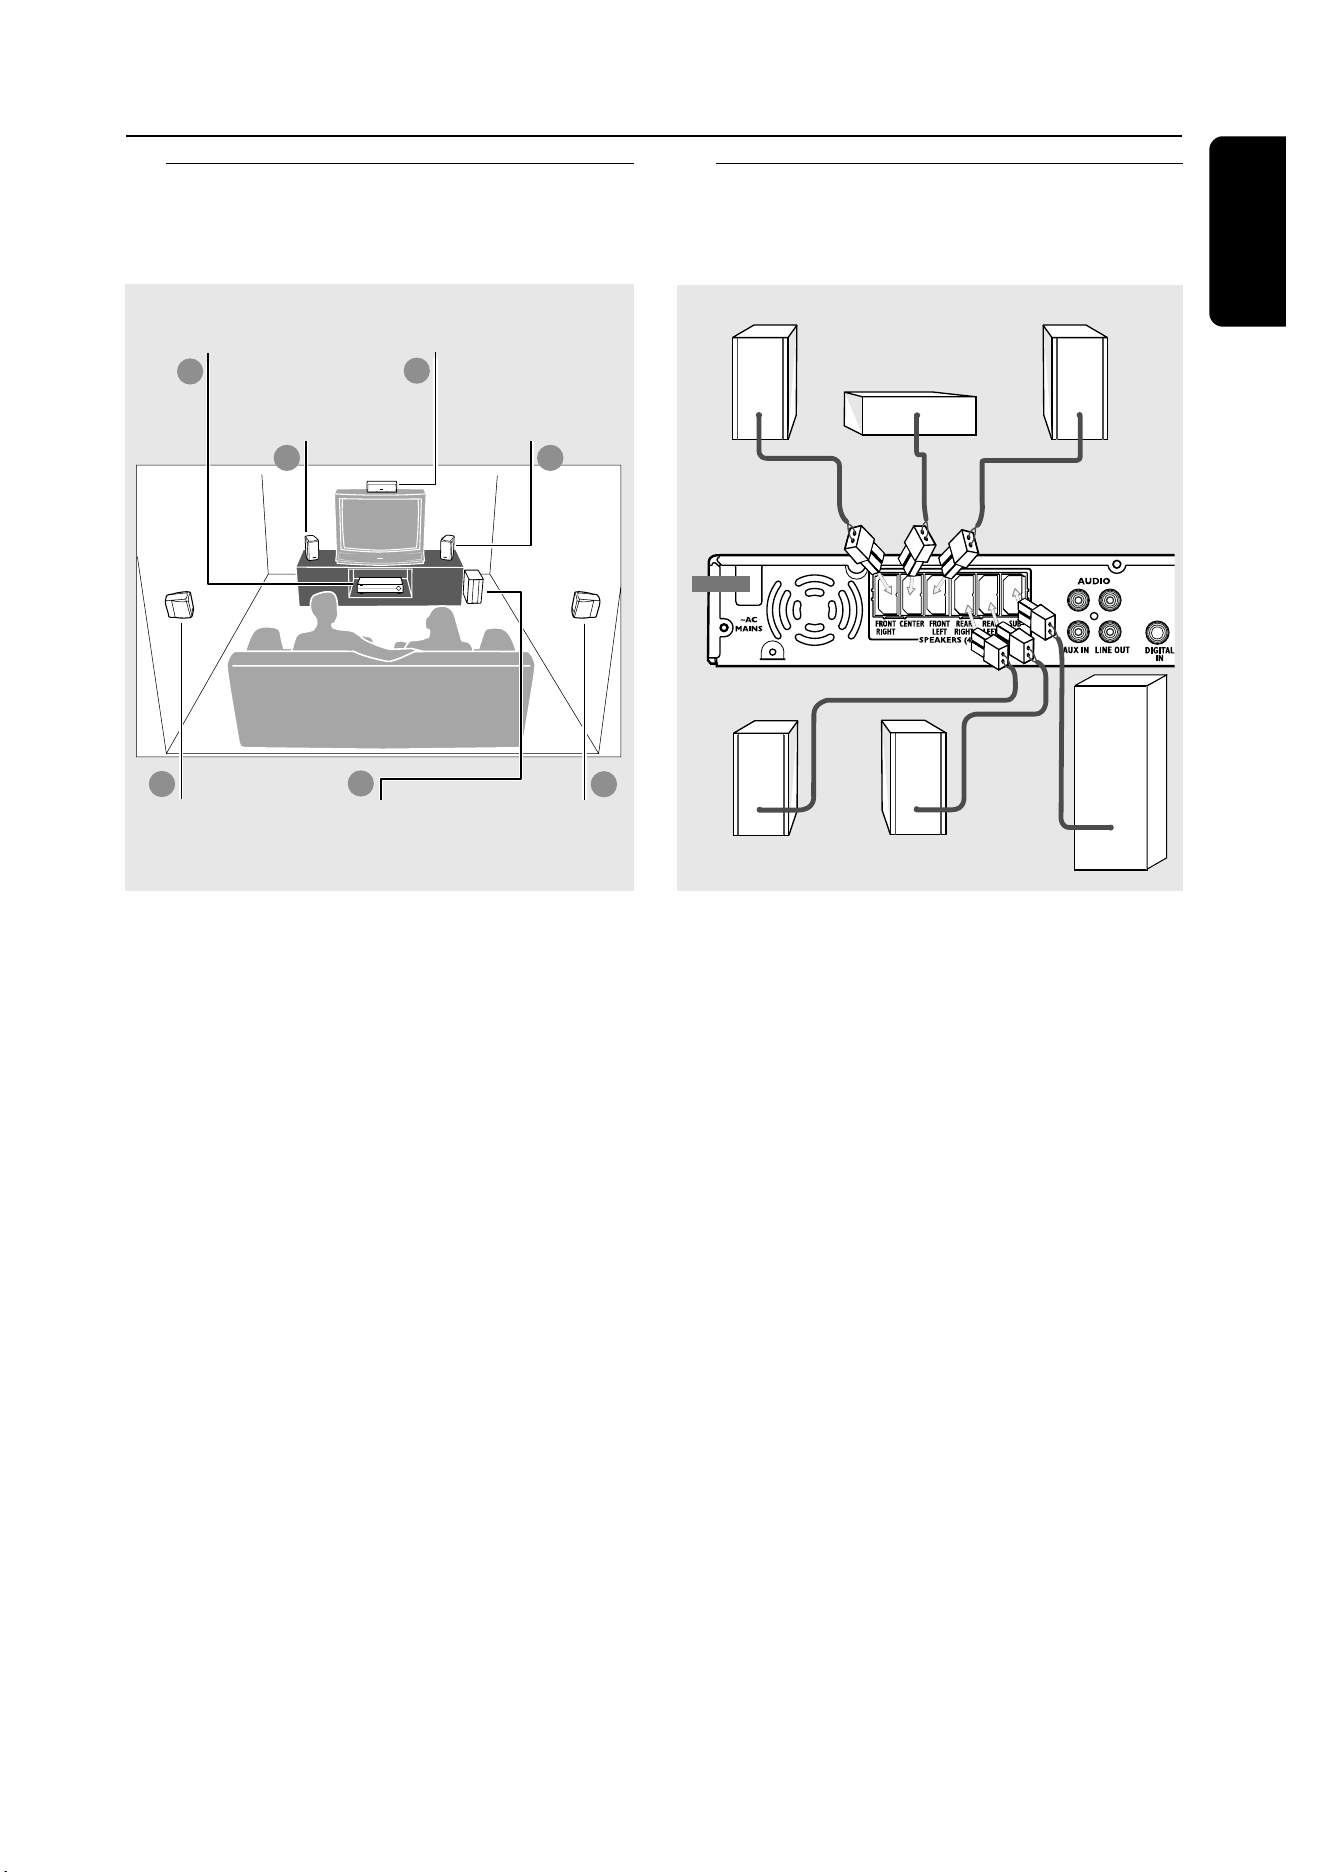
Step 1: Placing the speakers
and subwoofer
For best possible surround sound, all the
speakers (except subwoofer) should be
placed at the same distance from the
listening position.
1
Place the front left and right speakers at
equal distances from the TV and at an
angle of approximately 45 degrees from
the listening position.
2
Place the centre speaker above the TV or
the DVD system so that the centre
channel’s sound is localised.
3
Place the surround speakers at normal
listening ear level facing each other or
hang on the wall.
4
Place the subwoofer on the floor near
the TV.
Helpful Hints:
– To avoid magnetic interference, do not
position the front speakers too close to your
TV.
– Allow adequate ventilation around the
DVD system.
Front Speaker
(Left)
Front Speaker
(Right)
Subwoofer
Rear speaker
(Right)
Rear speaker
(Left)
Step 2: Connecting speakers
and subwoofer
L
R
L
R
Front Right
Rear Right
Rear Left
Centre
Subwoofer
Front Left
DVD System Centre speaker
Connect the supplied speaker systems
using the fixed speaker cables by
matching the colours of the jacks and
speaker cables.
For LX3950W wireless system
connection, please refer to the
separate ‘Quick Use Guide’.
The wireless transmitter and receiver
give you the option for wireless speaker
connection.
Helpful Hints:
– Ensure that the speaker cables are
correctly connected. Improper connections
may damage the system due to short-circuit.
– To prevent unwanted noise, do not place
the wireless transmitter and receiver too
close to the DVD system, AC power adaptor,
TV or other radiation sources.
10
En gli sh
3139 115 22872
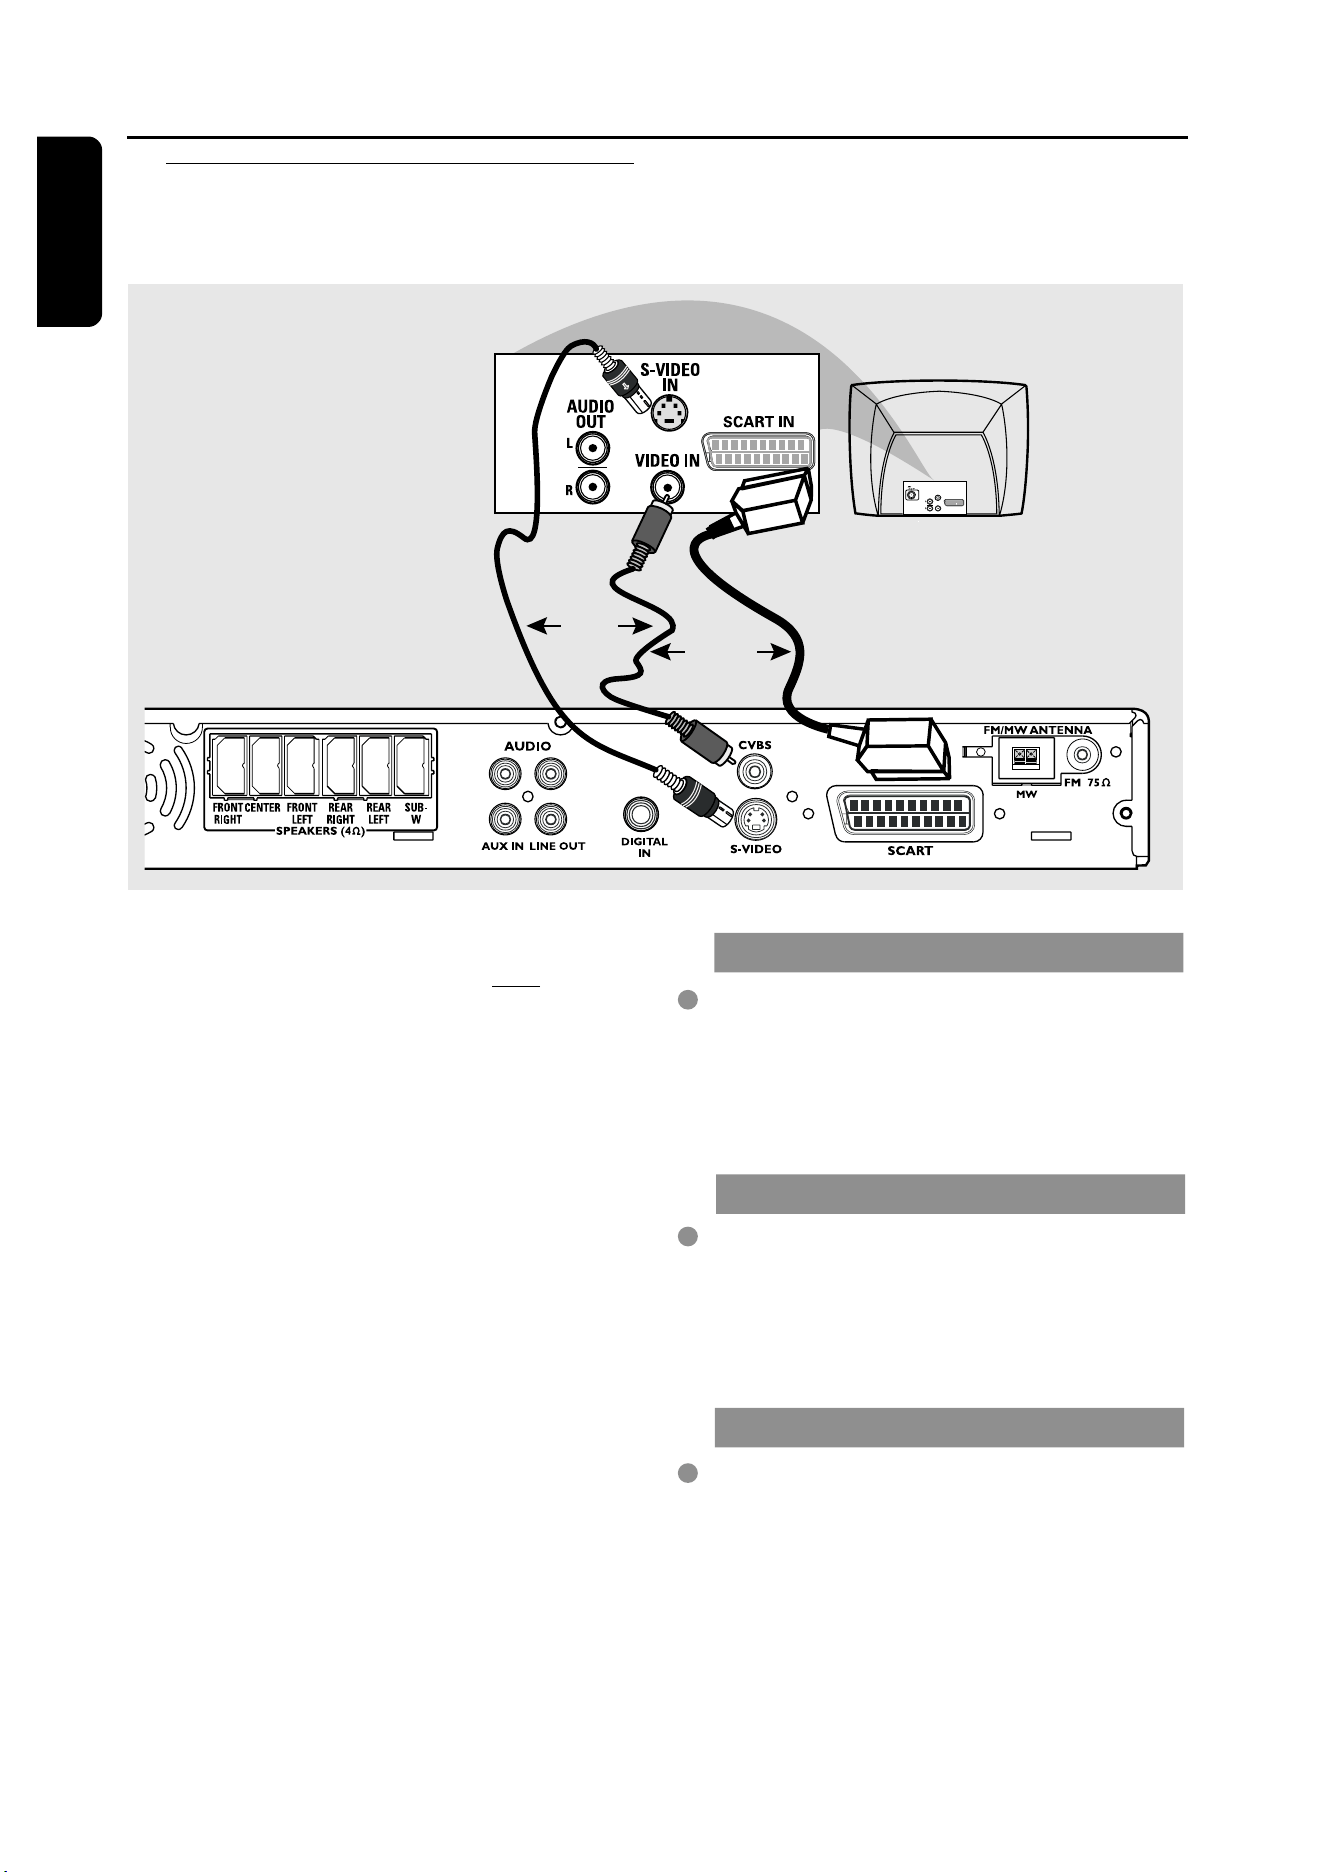
Step 3: Connecting TV
L
R
L
R
AUDIO
OUT
S-VIDEO
IN
VIDEO IN
SCART IN
Connections
OR
OR
IMPORTANT!
– You only need to make one video
connection from the following
options, depending on the
capabilities of your TV.
– Connect the DVD system directly
to the TV.
– Scart (RGB) Video provides better
picture quality than S-Video. These
options must be available on your
TV.
– If both S-Video and Scart video
are used to connect to your TV, the
TV signal will detect automatically
to SCART when you power up the
DVD system.
Using Scart jack
Use the supplied scart video cable (black)
to connect the DVD system’s SCART
jack to the corresponding Scart input
jacks on the TV.
OR
Using S-Video jack
Use an S-video cable (not supplied) to
connect the DVD system’s S-VIDEO
OUT jack to the S-Video input jack (or
labelled as Y/C or S-VHS) on the TV.
OR
Using Composite Video jack (CVBS)
Use a composite video cable (yellow -
not supplied) to connect the DVD
system’s CVBS jack to the video input
jack (or labelled as A/V In, Video In,
Composite or Baseband) on the TV.
11
3139 115 22872
En gli sh
S-VIDEO
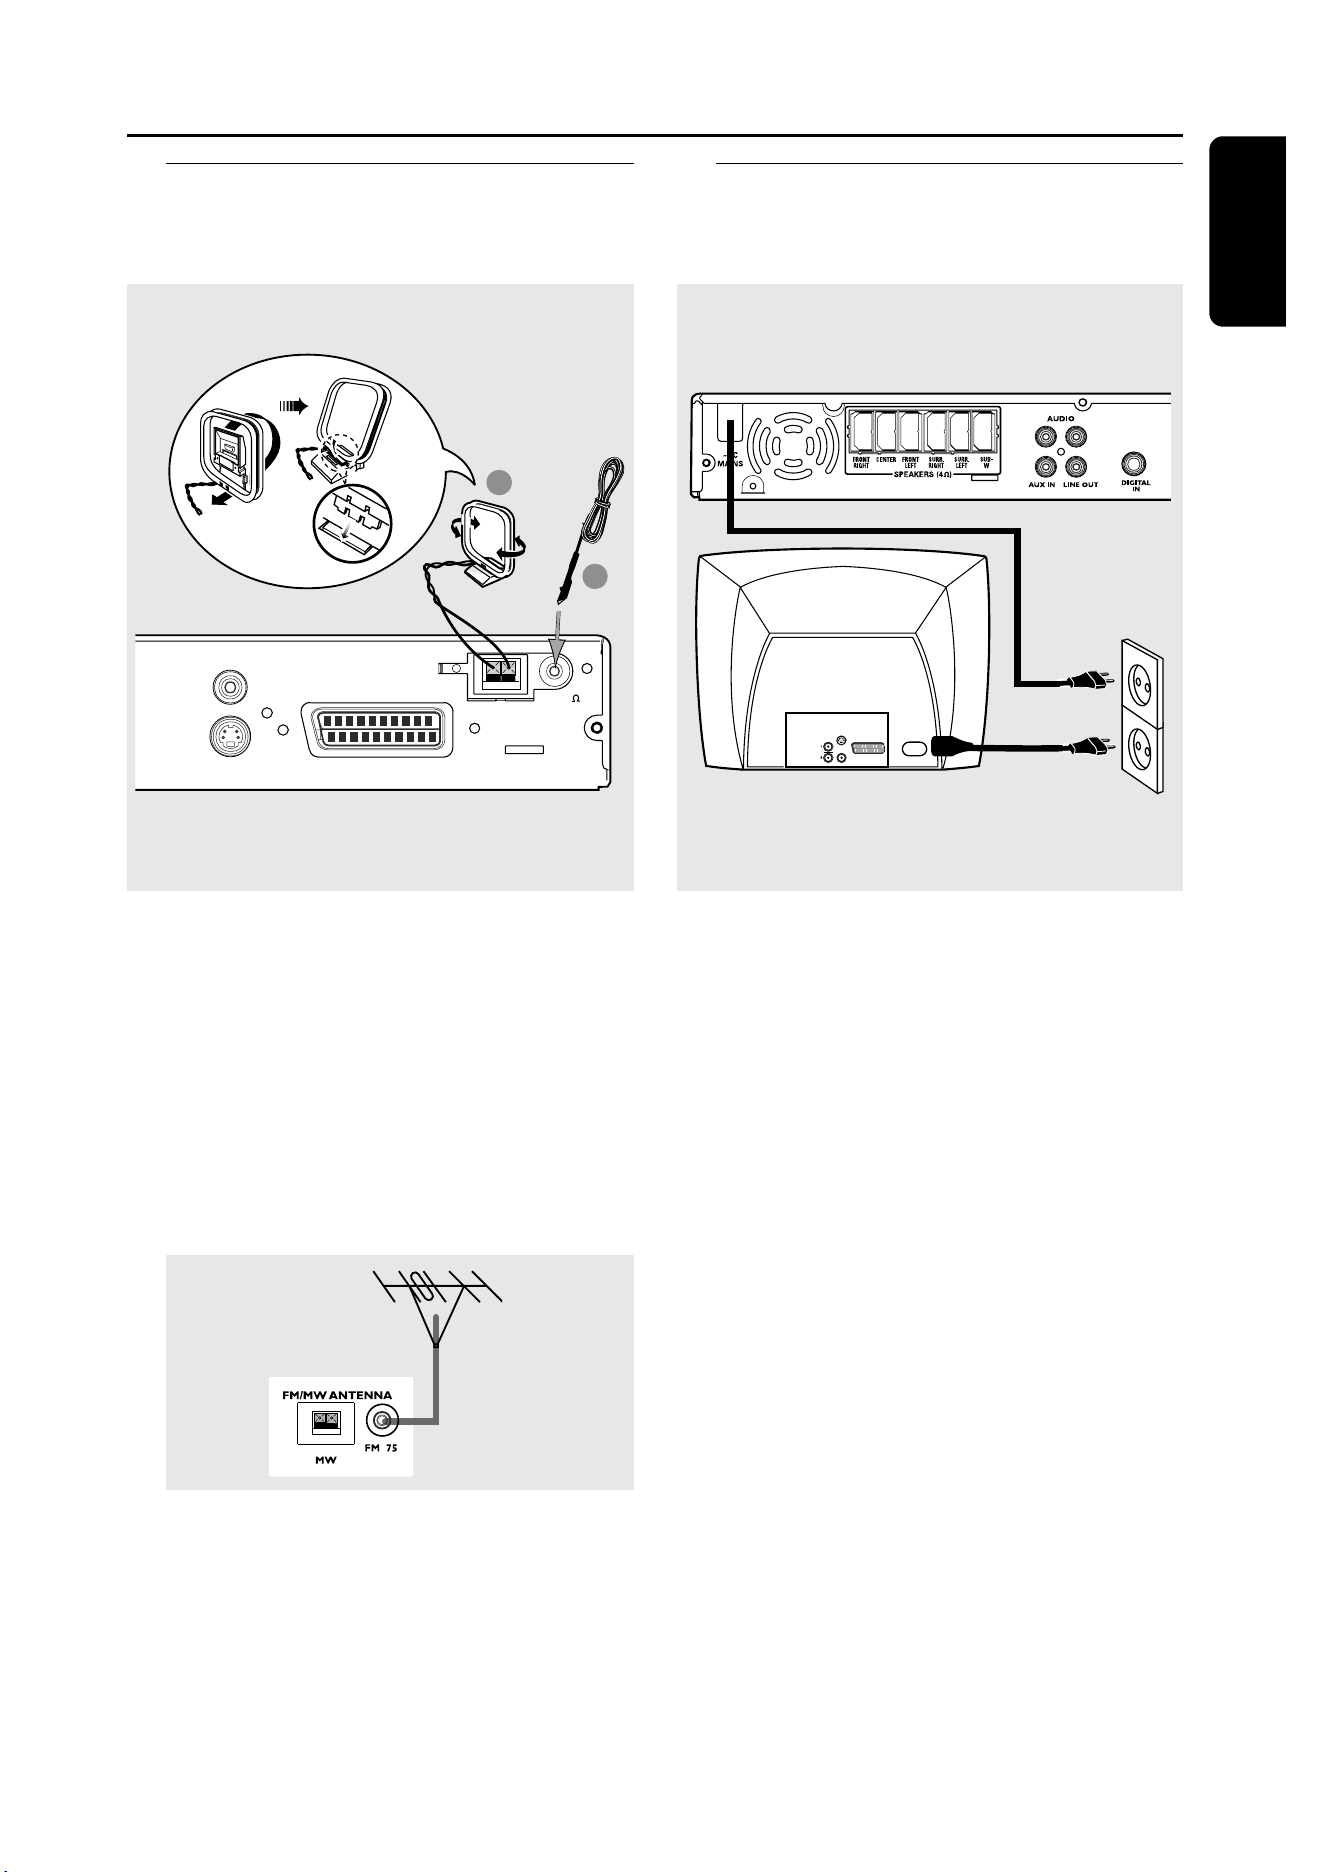
MW
FM/MW ANTENNA
FM 75
SCART
CVBS
1
2
L
MW
antenna
fix the claw
into the
slot
Connections
Step 5: Connecting the
power cord
L
R
L
R
AUDIO
OUT
S-VIDEO
IN
VIDEO IN
SCART IN
~ AC MAINS
Step 4: Connecting FM/MW
antennas
1
Connect the supplied MW loop antenna
to the MW jack. Place the MW loop
antenna on a shelf or attach it to a stand
or wall.
2
Connect the supplied FM antenna to the
FM jack. Extend the FM antenna and fix
its ends to the wall.
For better FM stereo reception, connect
an external FM antenna (not supplied).
Helpful Hints:
– Adjust the position of the antennas for
optimal reception.
– Position the antennas as far as possible
from your TV, VCR or other radiation source
to prevent unwanted interference.
After everything is connected
properly, plug the AC power cord
into the power outlet.
Never make or change any connections
with the power switched on.
Helpful Hint:
– Refer to the type plate on the rear or
bottom of the system for identification and
supply ratings.
FM
antenna
12
En gli sh
3139 115 22872
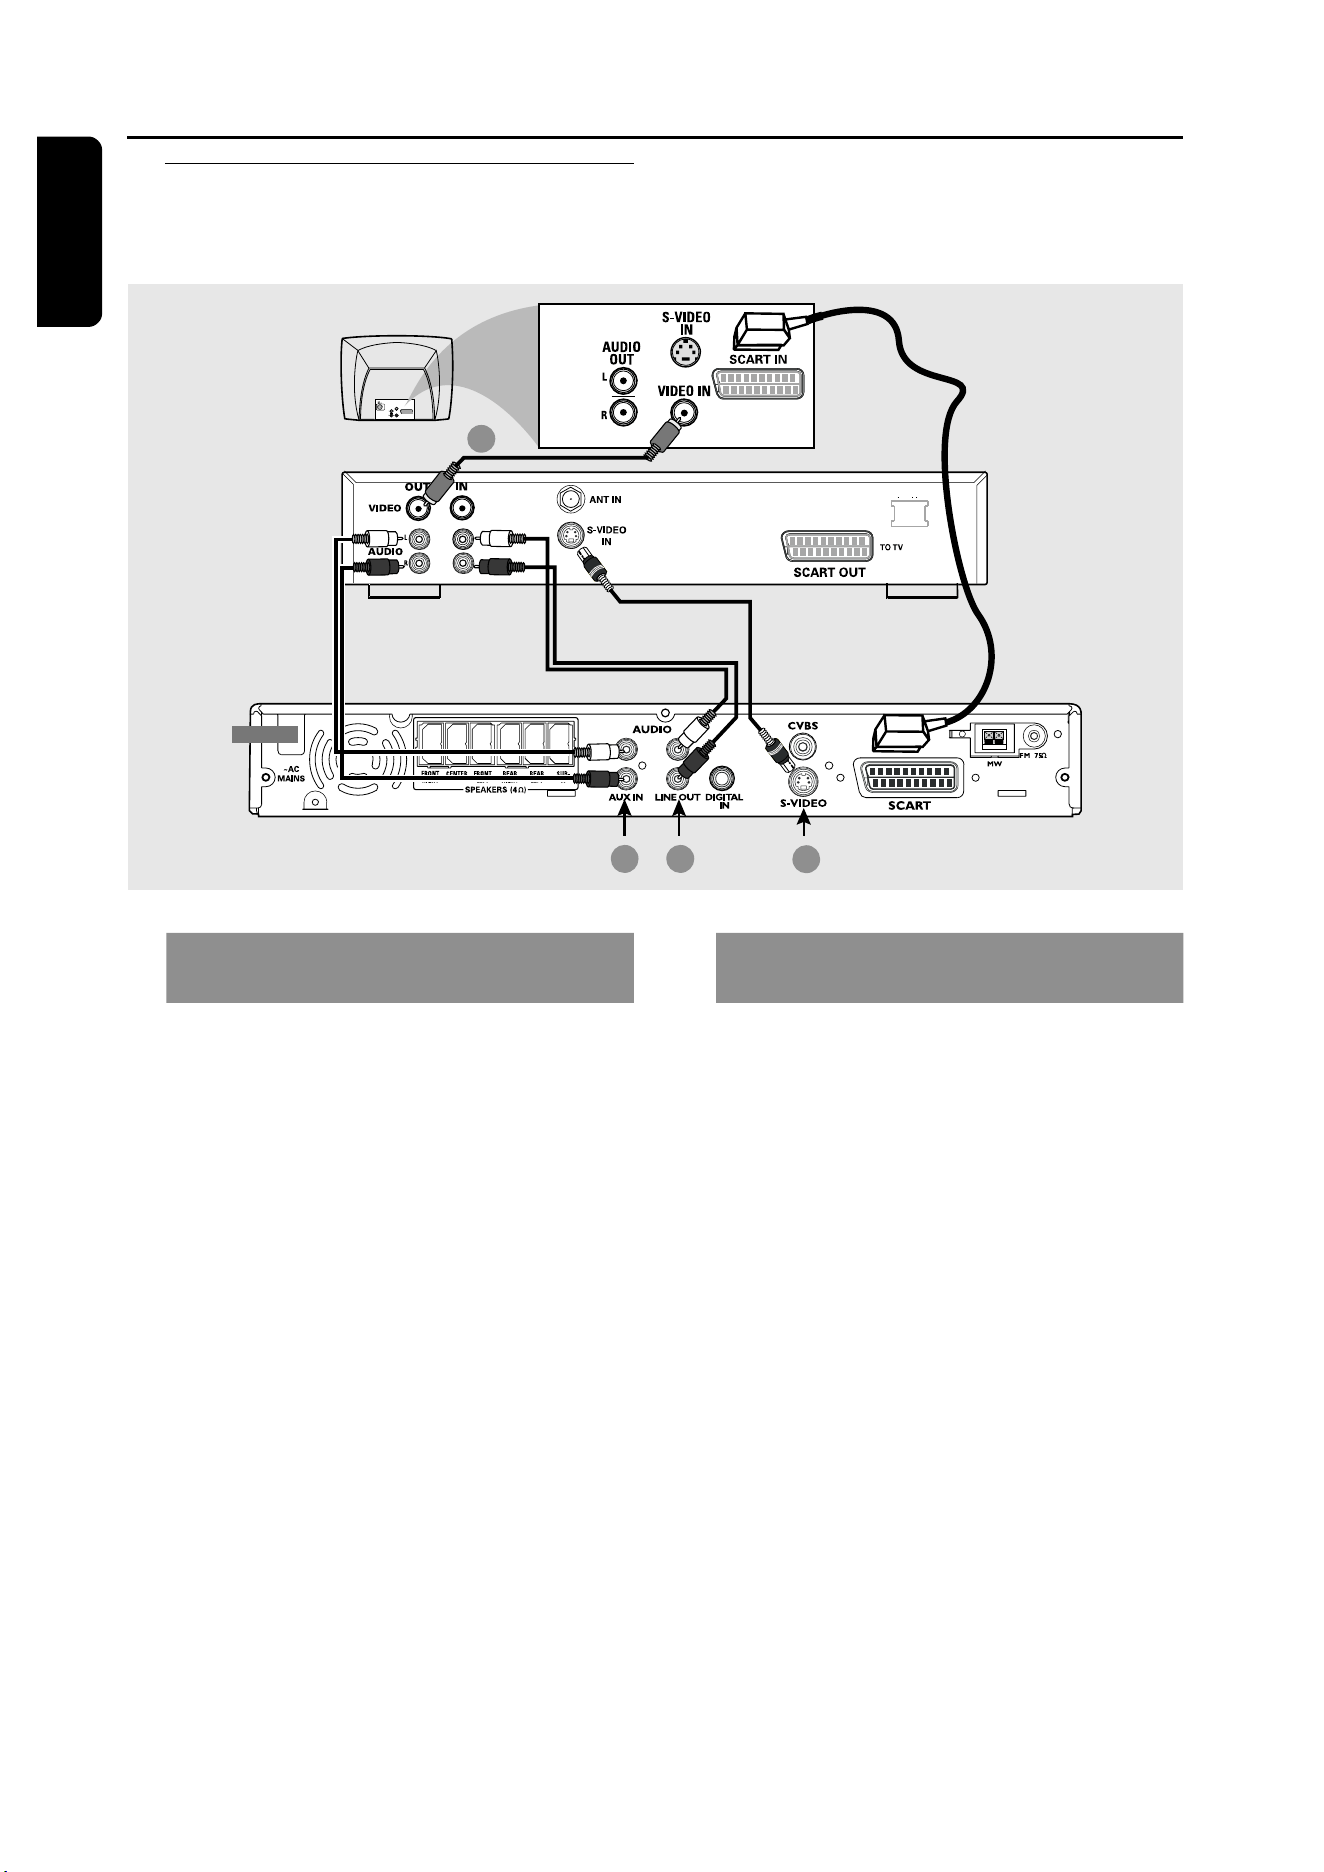
Connections (Optional)
Connecting a VCR or
Cable/Satellite Box
L
R
L
R
FM/MW ANTENNA
AUDIO
OUT
S-VIDEO
IN
VIDEO IN
SCART IN
2 4
1
~ AC MAINS
3
VCR or Cable/
Satellite Box
Viewing and listening to the
playback
1
Connect the VCR or Cable/Satellite Box
to the TV as shown.
2
Connect the DVD system’s AUX IN
(R/L) jacks to the AUDIO OUT jacks on
the VCR or cable/satellite box.
Before starting operation, press AUX/DI
on the remote to select “AUX” in order
to activate the input source.
Using the VCR for recording DVD
playback
Some DVDs are copy-protected. You
cannot record or dub protected discs
using a VCR.
3
Connect the DVD system’s S-VIDEO
jack to the S-VIDEO IN jack on the VCR.
4
Connect the DVD system’s LINE OUT
(R/L) jacks to the AUDIO IN jacks on
the VCR.
This will allow you to make analogue
stereo (two channel, right and left)
recordings.
To view DVD playback while
recording,
you must connect the DVD system to
your TV using SCART (as shown above)
connection.
13
3139 115 22872
En gli sh
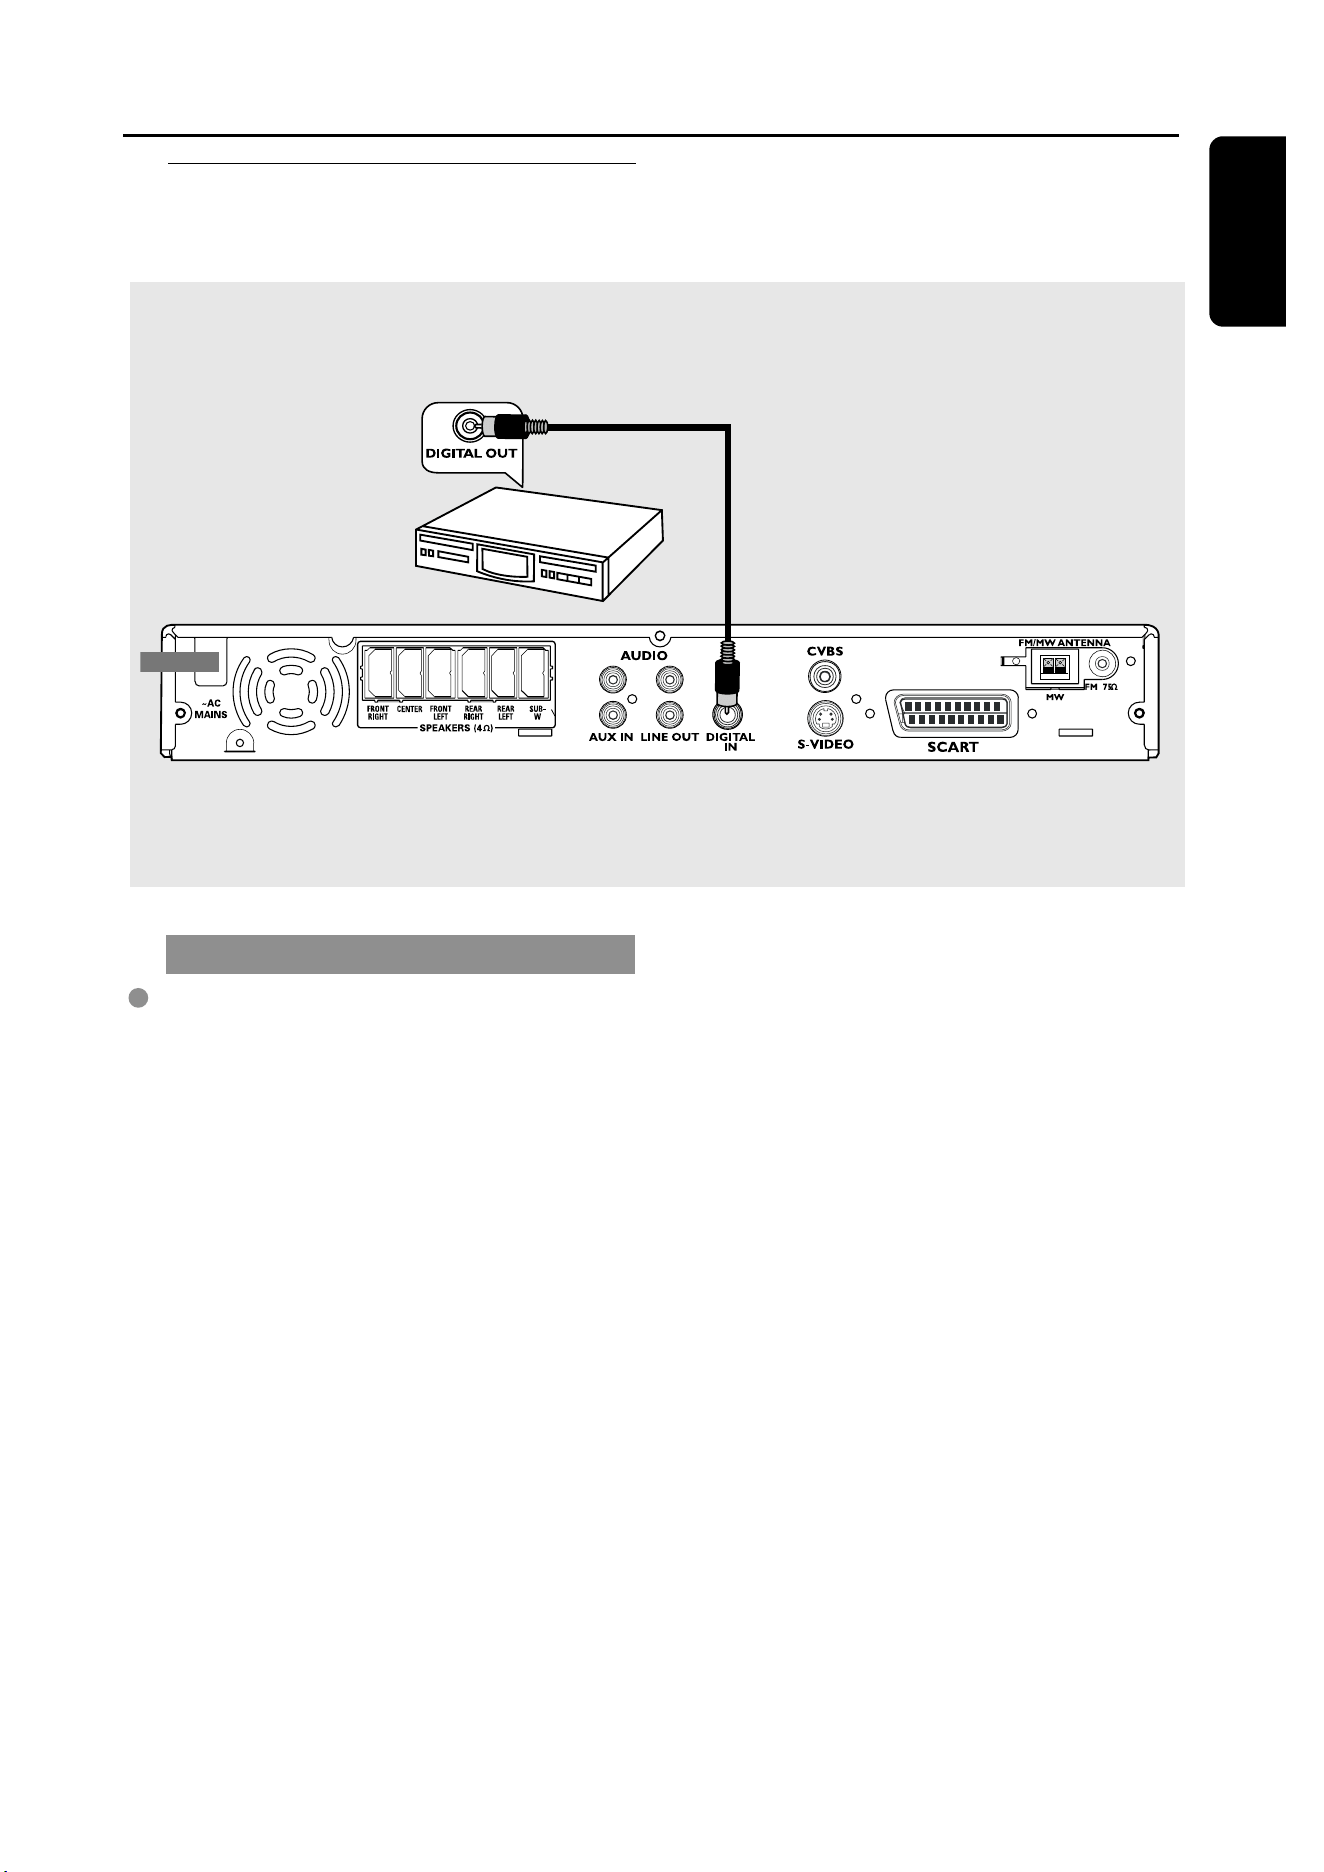
Connecting digital audio
equipment
(for example)
CD Recorder
L
R
L
R
Listening to the playback
Connect the DVD system’s DIGITAL
IN jack to the DIGITAL OUT jack on a
digital audio device.
Before starting operation, press AUX/DI
on the remote to select “DI” in order to
activate the input source.
Helpful Hints:
– Some DVDs are copy-protected. You
cannot record the disc through a VCR or
digital recording device.
– You cannot hear or record the SACD or
MP3-CD playback if you use the digital
connection.
– For your playback through DIGITAL IN
connection, set the digital output of that
player to PCM format.
– Always refer to the owner’s manual of the
other equipment for complete connection
and use details.
Connections (Optional)

14
En gli sh
3139 115 22872
Functional Overview
* = Press and hold the button for more than two seconds.
1
STANDBY ON (B)
– Switches to Eco Power standby mode or
turns on the system.
– Led ON in Eco Power standby mode.
2
Disc tray
3
OPEN•CLOSE 0
– Opens/Closes the disc tray.
4
System display panel
5
SOURCE
– Selects the relevant active source mode:
DISC, TV, TUNER or AUX/DI.
– DISC: switches to DISC source mode.
– TV: switches to TV source mode and/or
*to turn on the Philips TV (only on the
remote control).
– TUNER: toggles between FM and MW
band.
– AUX/DI: toggles between AUX and
DIGITAL IN source mode.
6
ÉÅ PLAY•PAUSE
– DISC: starts/pauses playback.
– TUNER: starts preset radio station
installation in Plug & Play mode (only on
the main unit).
S PREV / NEXT T
– DISC: *searches backward/forward or
selects a track.
– TV: selects previous/next channel (Philips
TV only).
– TUNER: tunes the radio frequency up/
down.
1
2 3 54 6
8
7
Ç STOP
– Exits an operation.
– DISC: stops playback.
– TUNER: *erases a preset radio station.
7
iR
– Point the remote control towards this
sensor.
8
VOLUME (VOL +-)
– Adjusts the volume level.
Control buttons available on the
remote only
9
DISC MENU (DISC source mode only)
– Enters or exits disc contents menu.
– For VCD version 2.0 only;
In stop mode, turns on/off playback
control (PBC) mode.
During playback, returns to main menu.
0
OSD MENU (DISC source mode only)
– Enters or exits on-screen display.
!
1 2 3 4
– Selects movement direction in the
menu.
– Use 1 2 to select a preset radio
station.
– Use 3 4 to select auto tuning in Tuner
source mode.
Main unit and remote control
15
3139 115 22872
En gli sh
Functional Overview
* = Press and hold the button for more than two seconds.
/
5
ª
9
0
!
6
@
#
$
%
^
&
*
(
•
8
≥
!
§
∞
≤
¡
)
™
£
@
ANGLE
– Select a DVD disc camera angle (if
available).
#
SUBTITLE
– Selects a subtitle language.
$
REPEAT
– Selects various repeat modes.
%
REPEAT A-B
– Repeats a specific section on a disc.
^
AUDIO
– Selects an audio language (DVD) or an
audio channel (CD).
&
MUTE
– Mutes or restores the volume.
*
PROG
– DISC: starts programming.
– TUNER: starts *automatic/ manual preset
programming.
(
SOUND
– Selects a sound effect.
)
SLEEP
– Sets the sleep timer function.
¡
SURR
– Selects multichannel surround or stereo
mode.
™
TV VOL +-
– Adjusts TV volume (Philips TV only).
£
SCAN
– Plays the first few seconds of each track/
chapter within a disc.
≤
RETURN/TITLE
– To go back to previous menu.
– Displays the disc’s Title menu (if available).
∞
SETUP
– Enters or exits system setup menu.
§
ZOOM
– Enlarges a picture on the TV screen.
≥
OK
– Confirms a selection.
•
Numeric Keypad (0-9)
– Enters a track/title number of the disc.
– Enters a number of a preset radio station.
ª
B
– Switches to Eco Power standby mode.
– In TV mode, *switches Philips TV on/off.
16
En gli sh
3139 115 22872
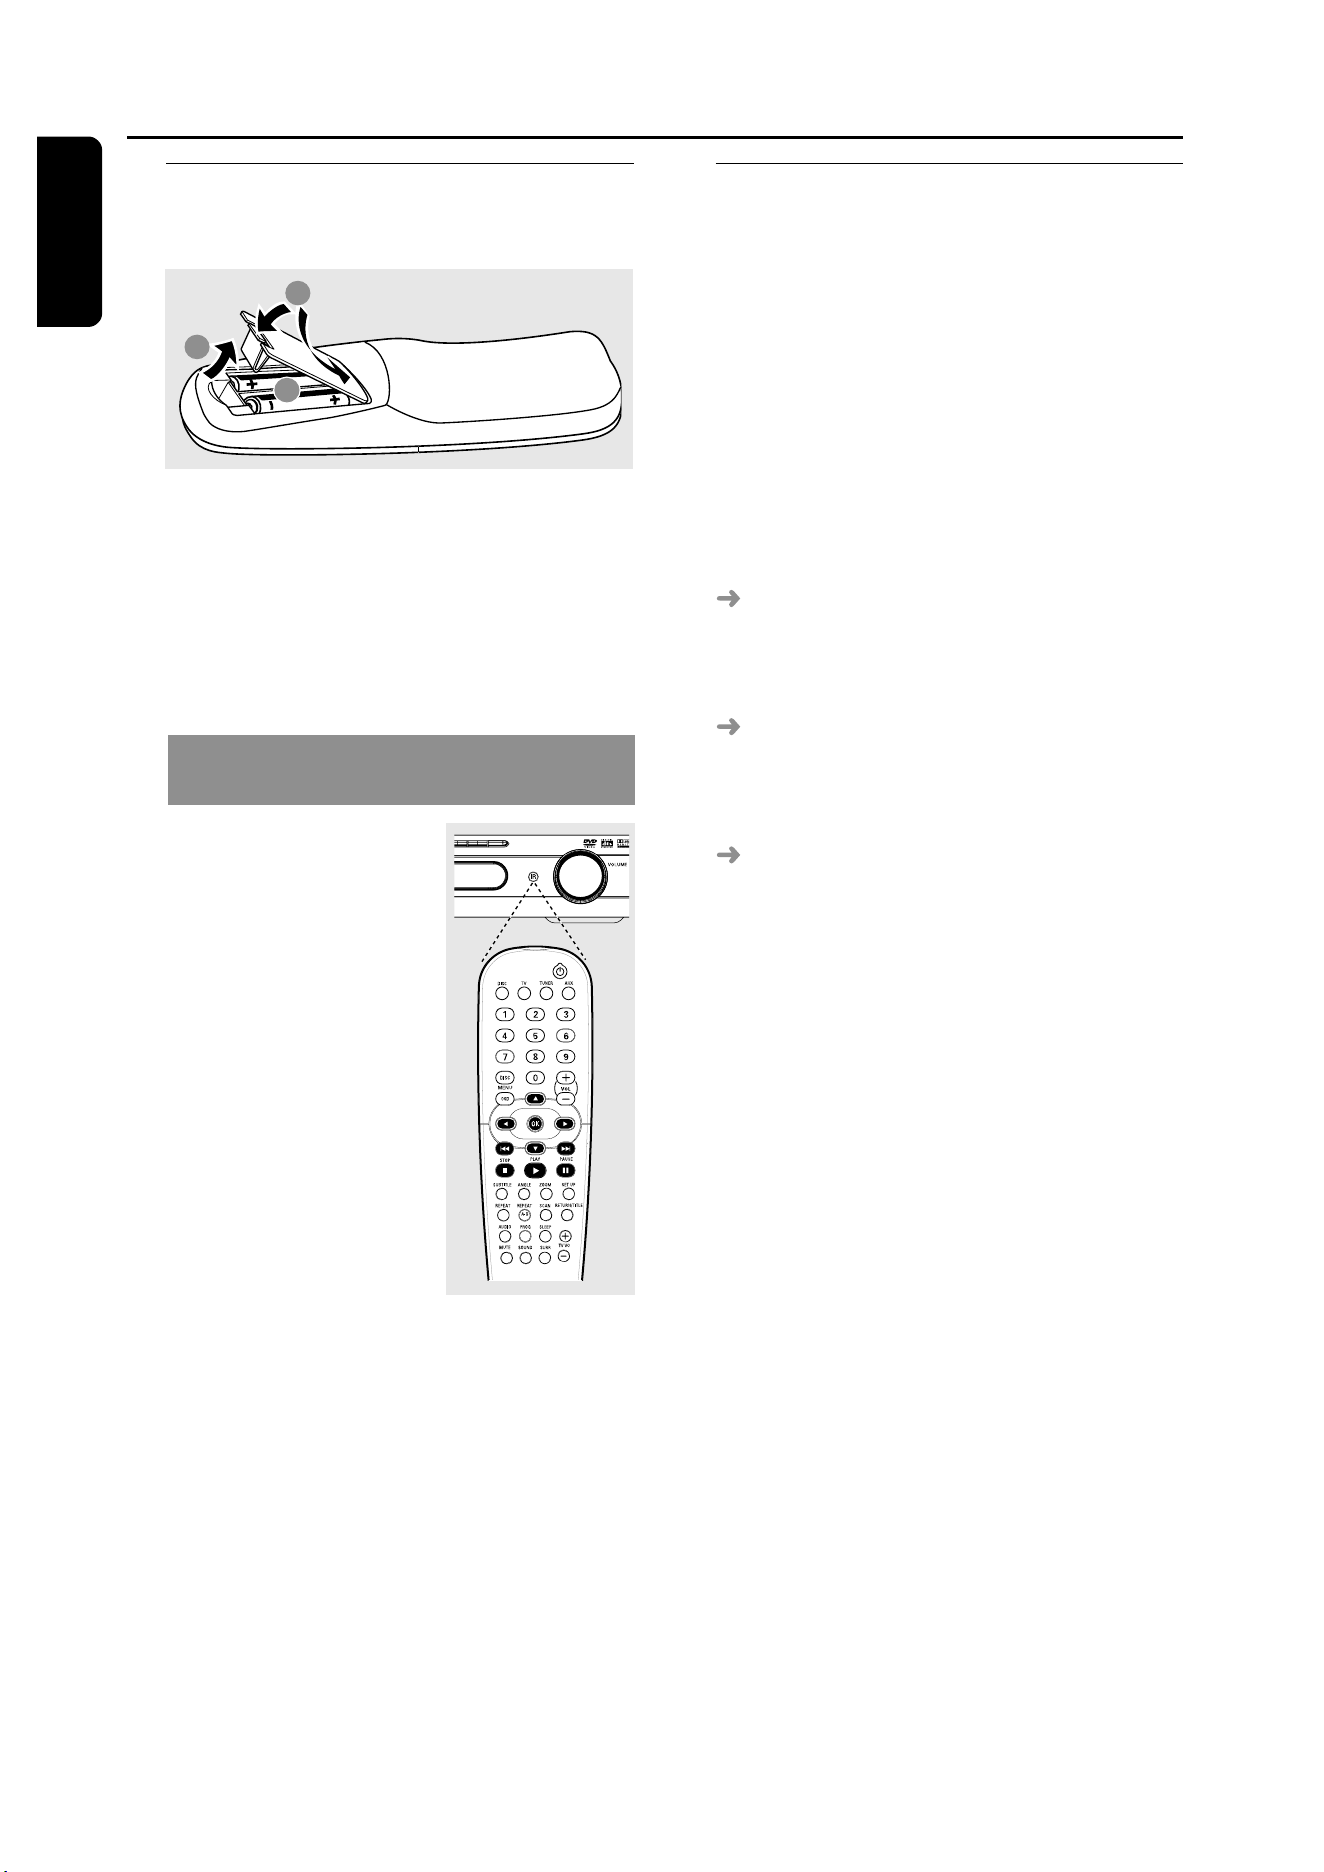
Step 1: Inserting batteries into
the remote control
1
3
2
1
Open the battery compartment.
2
Insert two batteries type R06 or AA,
following the indications (+-) inside
the compartment.
3
Close the cover.
Using the remote control to operate
the system
1
Aim the remote control
directly at the remote
sensor (iR) on the front
panel.
2
Select the source you
wish to control by
pressing one of the
source select buttons
on the remote control
(for example TV,
TUNER).
3
Then select the desired
function (for example
ÉÅ,
S,
T).
CAUTION!
– Remove batteries if they are
exhausted or if the remote is not to
be used for a long time.
– Do not use old and new or
different types of batteries in
combination.
– Batteries contain chemical
substances, so they should be
disposed of properly.
Getting Started
Step 2: Setting the TV
IMPORTANT!
Make sure you have completed all
the necessary connections. (See
page 10 “Connecting TV”).
1
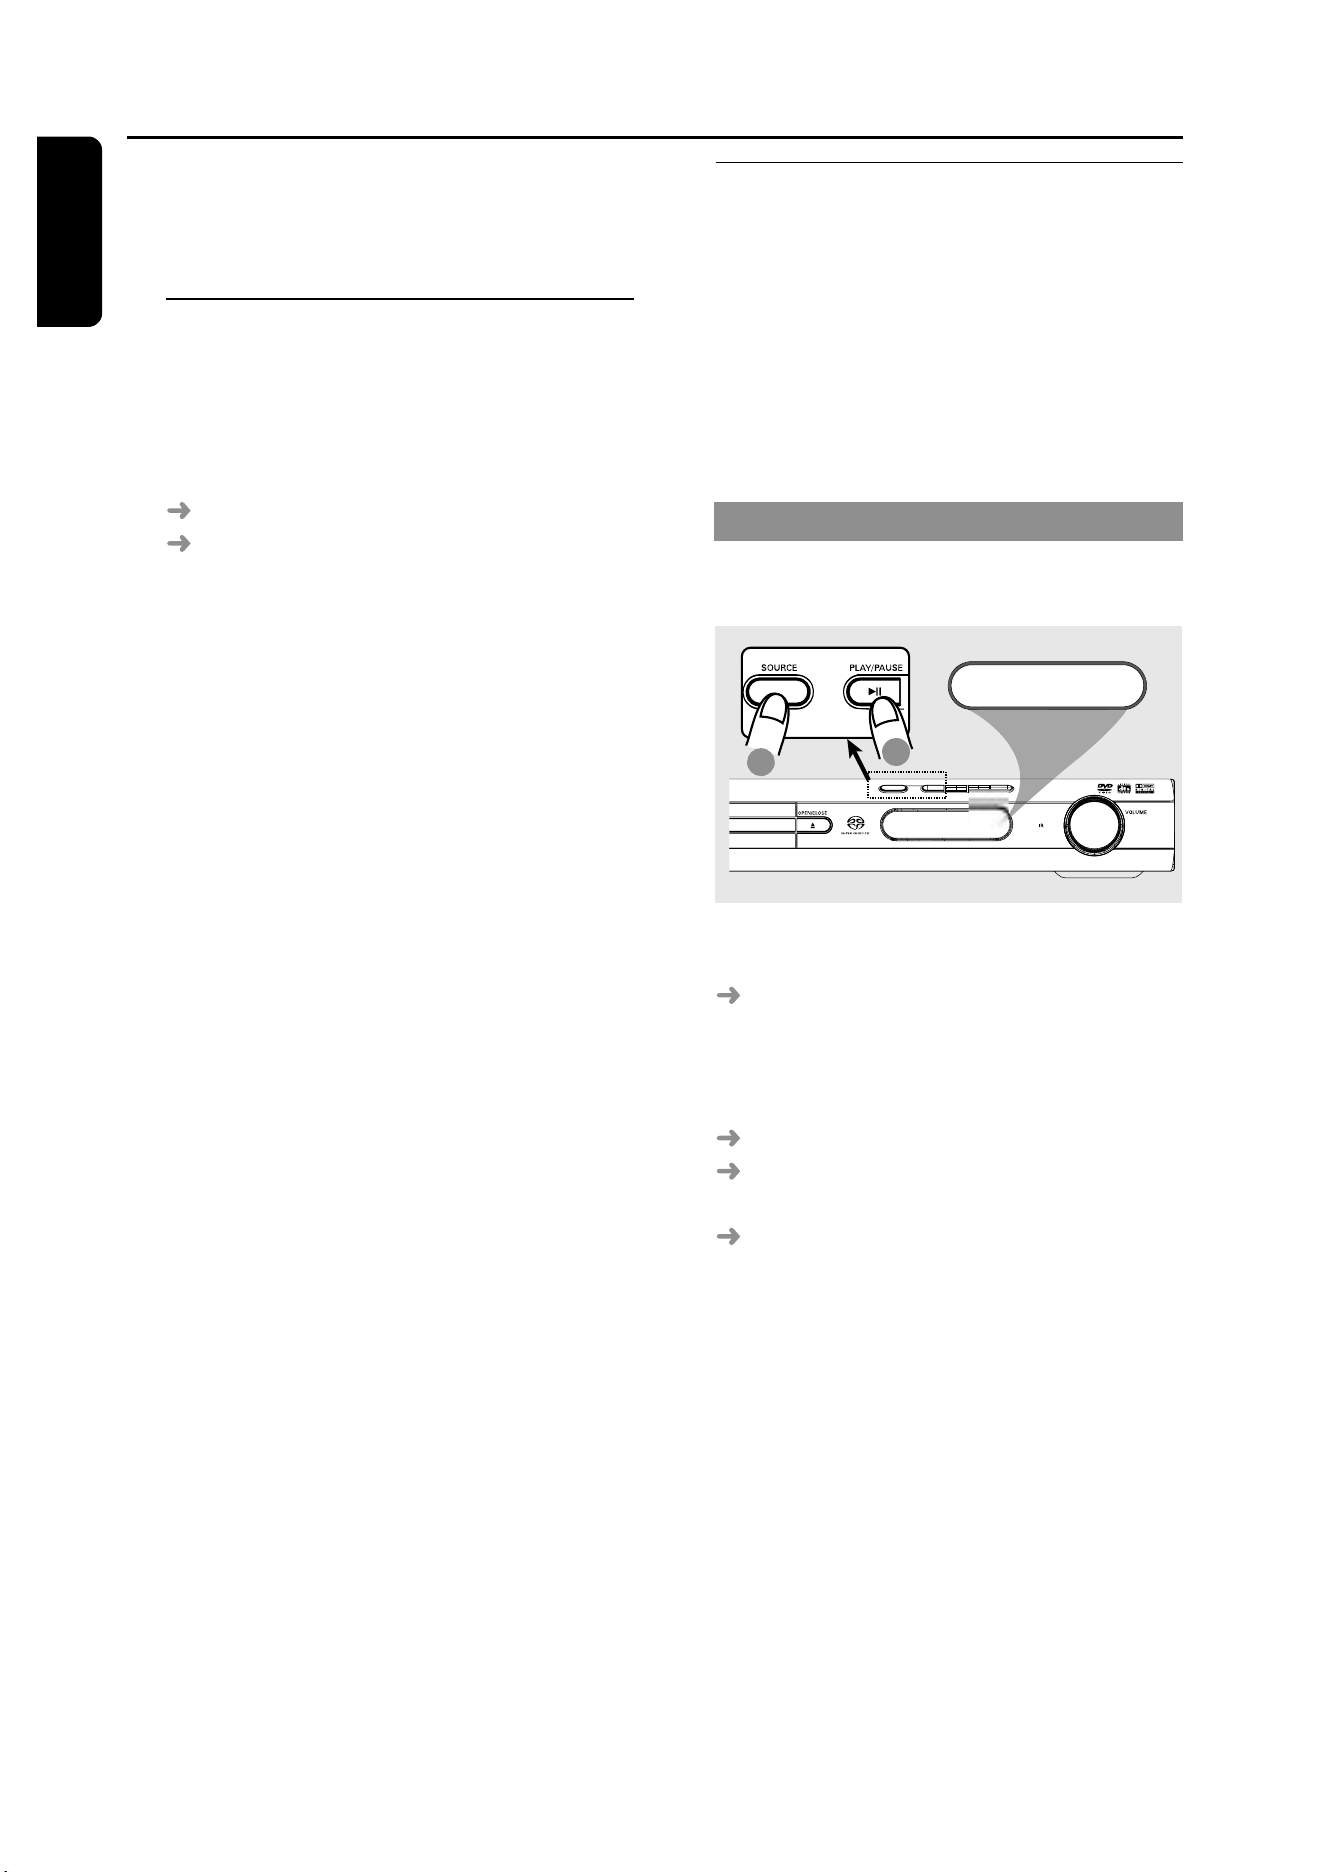
Press SOURCE control until “
DISC
”
appears on the display panel (or press
DISC on the remote).
2
Turn on the TV and set to the correct
video-in channel. You should see the blue
DVD background screen on the TV.
Usually this channel is between the
lowest and highest channels and may be
called FRONT, A/V IN, VIDEO. See your
TV manual for more details.
Or, you may go to channel 1 on your
TV, then press the Channel down button
repeatedly until you see the Video In
channel.
Or, the TV remote control may have a
button or switch that chooses different
video modes.
17
3139 115 22872
En gli sh
Getting Started
TIPS:
To return to the previous menu, press 1.
To remove the menu, press SETUP.
Selecting the colour system that
corresponds to your TV
In order for a DVD to play on this DVD
system, the colour system of the DVD,
the TV and the DVD player should match.
Before changing the TV system, determine
the colour system of your TV.
1
In disc mode, press SETUP.
2
Press 2 repeatedly to select {VIDEO
SETUP PAGE}.
3
Press 34 to highlight {TV TYPE}, then
press 2.
4
Press 34 to highlight one of the options
below:
PAL – Select this if the connected TV has
the PAL colour system. It will change the
video signal of an NTSC disc and output it
to PAL format.
NTSC – Select this if the connected TV
has the NTSC colour system. It will
change the video signal of a PAL disc and
output it to NTSC format.
MULTI – Select this if the connected TV
is compatible with both NTSC and PAL
(multi-system). The output format will be
in accordance with the video signal of the
disc.
5
Select a setting and press OK.
Follow the instructions show on the
TV to confirm the selection (if any).
If a blank/distorted TV screen appears,
wait for 15 seconds for auto recovery.
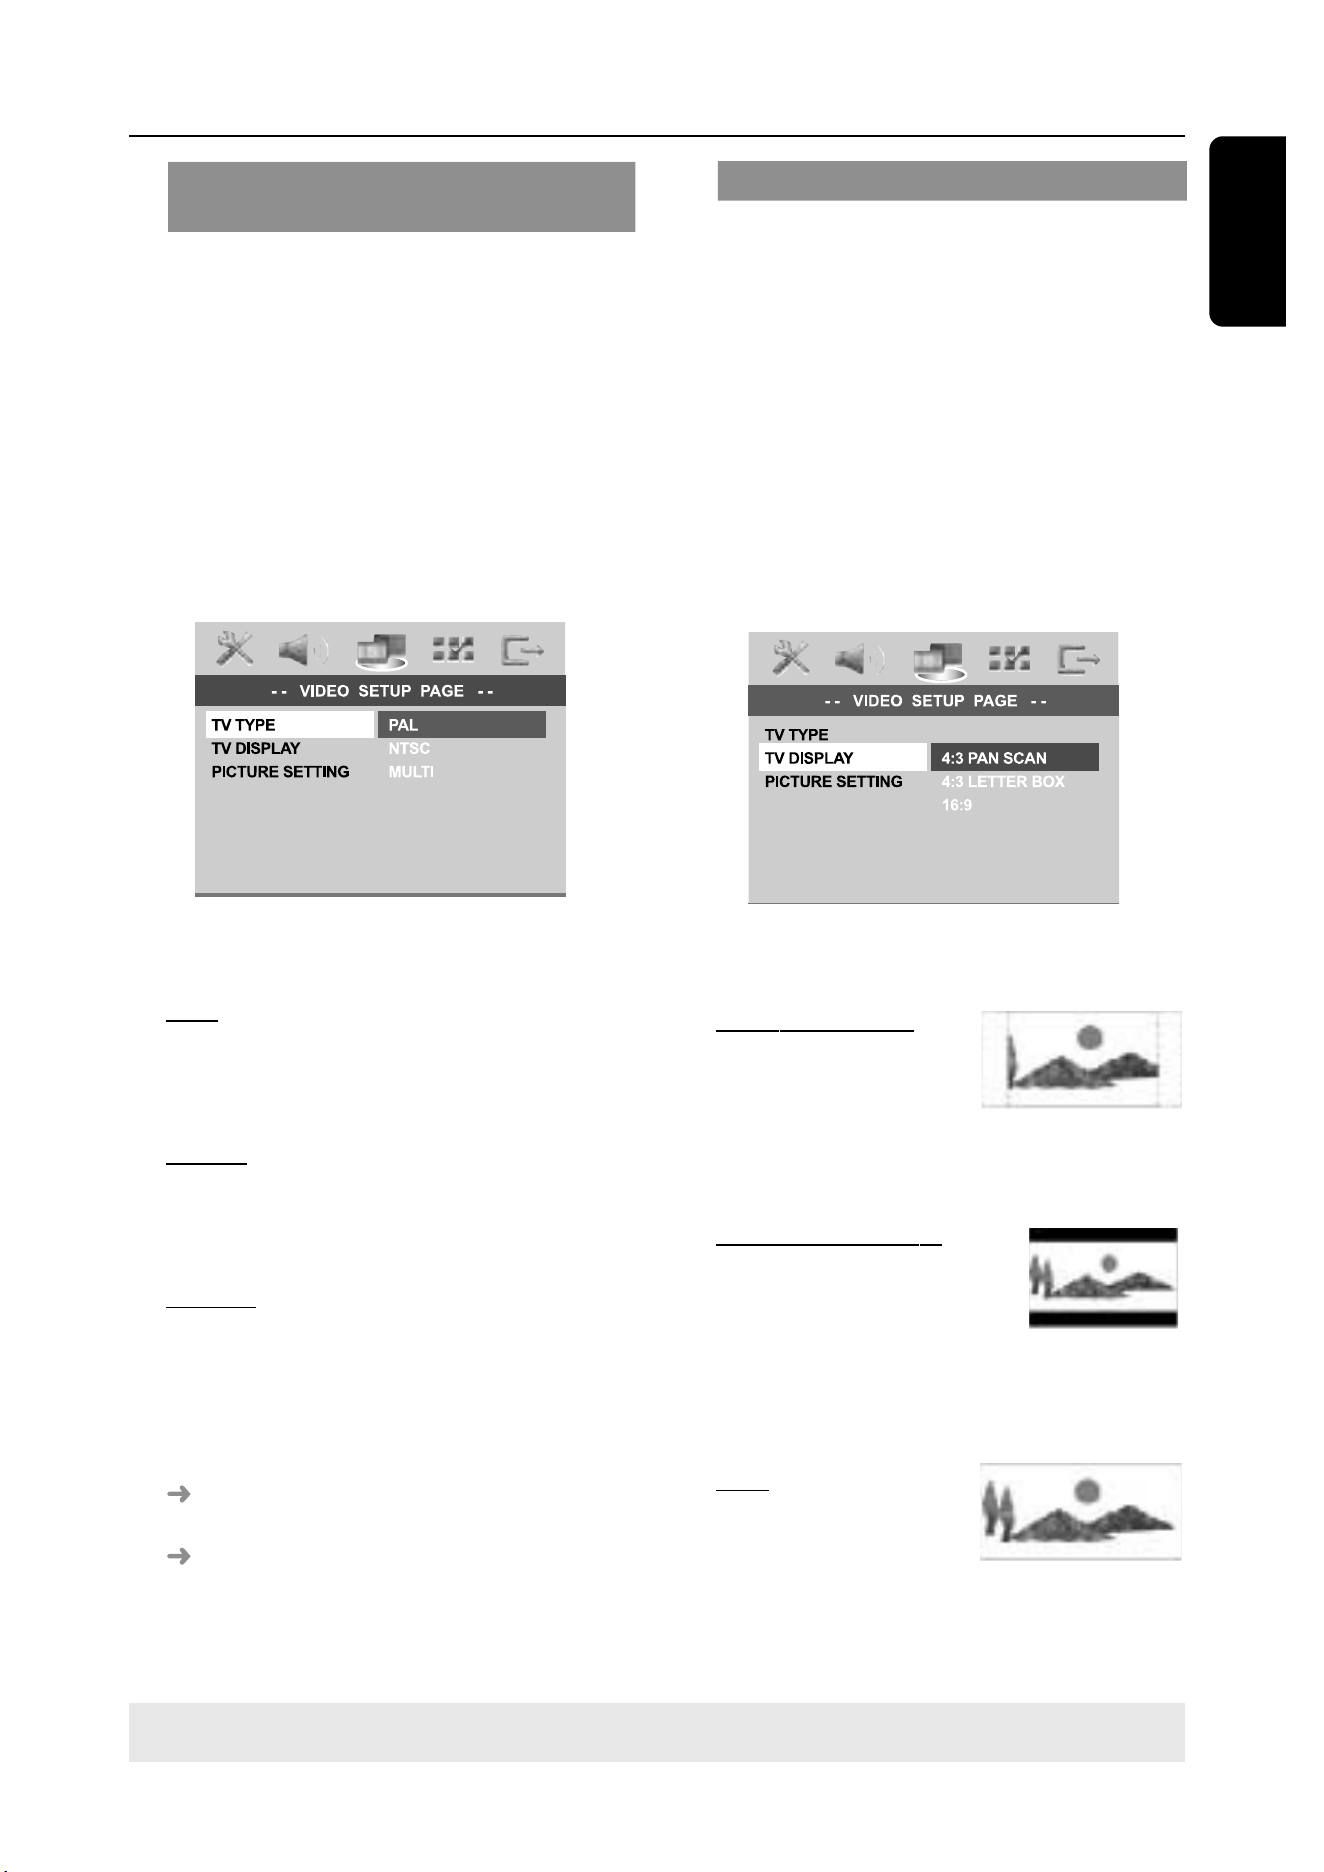
Setting the TV Display
Set the aspect ratio of the DVD Player
according to the TV you have connected.
The format you select must be available
on the disc. If it is not, the setting for TV
display will not affect the picture during
playback.
1
In disc mode, press SETUP.
2
Press 2 repeatedly to select {VIDEO
SETUP PAGE}.
3
Press 34 to highlight {TV DISPLAY}, then
press 2.
4
Press 34 to highlight one of the options
below:
4:3 PAN SCAN –
Select this if you have
a conventional TV and
want both sides of the
picture to be trimmed or formatted to fit
your TV screen.
4:3 LETTER BOX –
Select this if you have a
conventional TV. In this
case, a wide picture with
black bands on the upper and lower
portions of the TV screen will be
displayed.
16:9 – Select this if
you have a wide-
screen TV.
5
Select a setting and press OK.
18
En gli sh
3139 115 22872
Getting Started
TIPS:
To return to the previous menu, press 1.
To remove the menu, press SETUP.
Step 3: Setting language
preferences
You can select your preferred language
settings so that this DVD system will
automatically switch to the language for
you whenever you load a disc. If the
language selected is not available on the
disc, the disc’s default setting language will
be used instead. The OSD (on-screen
display) language for the system menu will
remain as you set it, regardless of various
disc languages.
On-screen display (OSD) language
1
In disc mode, press SETUP.
2
Press 2 to select {GENERAL SETUP
PAGE}.
3
Press 34 to highlight {OSD
LANGUAGE}, then press 2.
4
Press 34 to select a language and press
OK to confirm.
Audio, Subtitle and Disc menu
languages
1
Press Ç twice to stop playback (if any),
then press SETUP.
2
Press 2 repeatedly to select
{PREFERENCE PAGE}.
3
Press 34 to highlight one of the options
below at a time, then press 2.
– {AUDIO} (disc’s soundtrack)
– {SUBTITLE} (disc’s subtitles)
– {DISC MENU} (disc’s menu)
4
Press 34 to select a language and press
OK to confirm.
If the language you want is not in
the list, then select {OTHERS}.
Use the numeric keypad (0-9) on the
remote to enter the 4-digit language code
‘XXXX’ (see page 223 “Language Code”)
and press OK to confirm.
5
Repeat steps
3
~
4
for other settings.
19
3139 115 22872
En gli sh
Getting Started
TIPS:
To return to the previous menu, press 1.
To remove the menu, press SETUP.
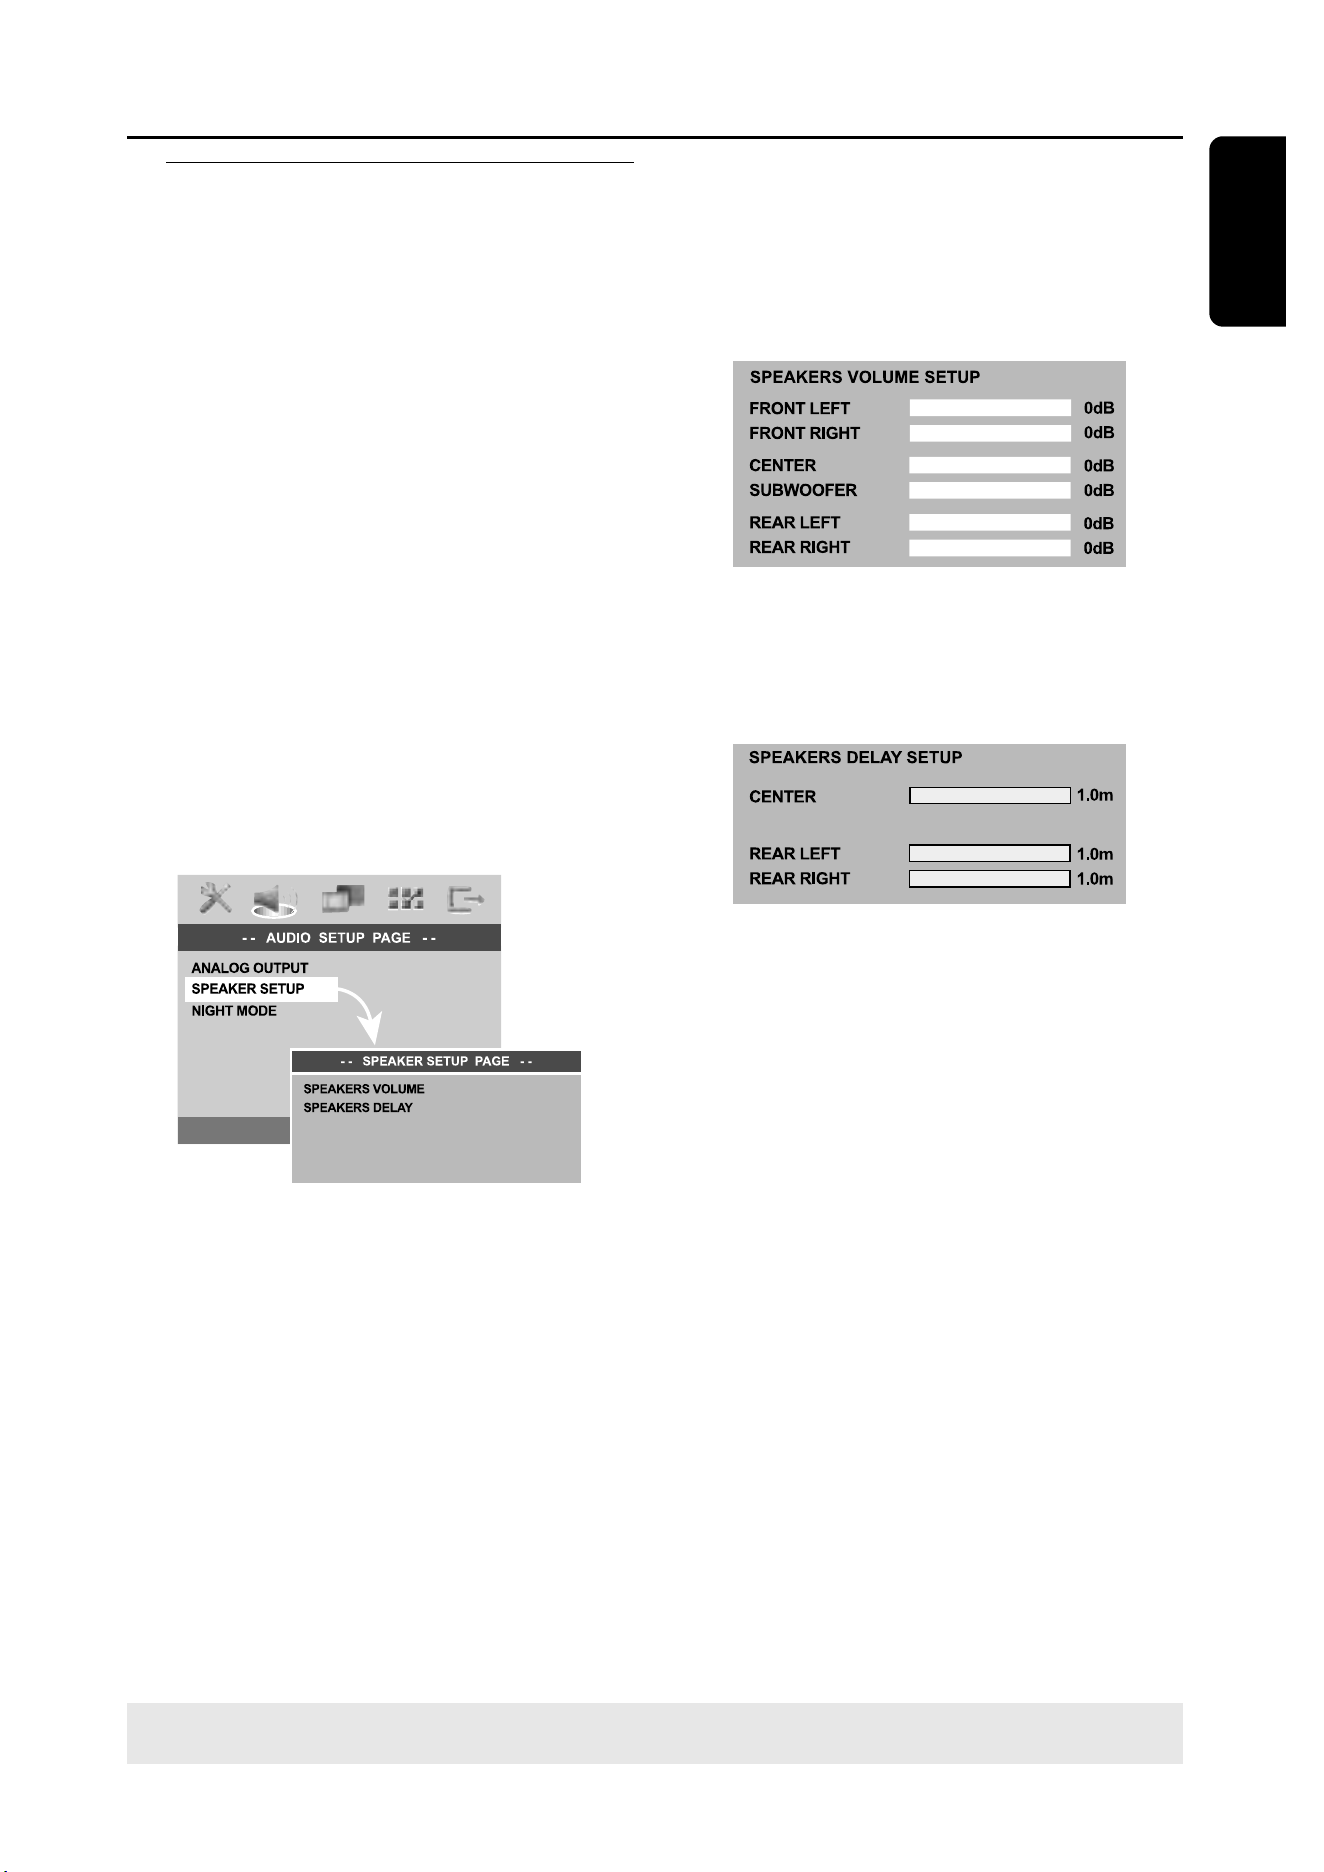
Step 4: Setting the speakers’
channels
You can adjust the delay times (centre
and surround only) and volume level for
individual speakers. These adjustments let
you optimise the sound according to your
surroundings and setup.
IMPORTANT!
Press SURR button on the remote
to select Multi-channel surround
mode before adjusting the speaker
settings.
1
Press Ç to stop playback, then press
SETUP.
2
Press 2 repeatedly to select {AUDIO
SETUP PAGE}.
3
Press 34 to highlight {SPEAKER SETUP},
then press 2.
4
Enter its submenu by pressing 2.
5
Press 34 to highlight one of the options
below at a time, then press 2.
{SPEAKERS VOLUME} – Volume level
setting for individual speakers (-6dB ~
+6dB).
{SPEAKERS DELAY} – Delay times setting
in relation to the listening position/
distance for center and surround
speakers (1m ~ 10m).
6
Press 1 2 to adjust the setting that best
suit your surround sound needs.
7
Press OK to confirm.
Helpful Hints:
– Use the longer delay time settings when
the surround speakers are closer to the
listener than the front speakers.
– The test tone will be automatically
generated to help you judge the sound level
of each speaker.
20
En gli sh
3139 115 22872
IMPORTANT!
– If the inhibit icon (ø or X) appears
on the TV screen when a button is
pressed, it means the function is not
available on the current disc or at
the current time.
– DVD discs and players are
designed with regional restrictions.
Before playing a disc, make sure the
disc is for the same zone as your
player.
– Do not push on the disc tray or
put any objects other than discs on
the disc tray. Doing so may cause
the disc player to malfunction.
Playable discs
Your DVD home cinema system will
play:
– Digital Versatile Discs (DVDs)
– Video CDs (VCDs)
– Super Video CDs (SVCDs)
– Super Audio CDs (SACDs)
– Finalised Digital Video Discs +
Recordable[Rewritable] (DVD+R[W])
– Audio Compact Discs (CDs)
– MP3 discs, picture (Kodak, JPEG) files
on CD-R(W).
– JPEG/ISO 9660 format
– Maximum 30 characters display
– Supported sampling frequencies :
32 kHz, 44.1 kHz, 48 kHz
– Supported Bit-rates : 32~256 (kbps),
variable bit rates
– MPEG-4 files on CD-R[W]:
– Simple profile
– Advanced simple profile (640-480)
– DivX disc on CD-R[W]/DVD+R[W]:
– DivX 3.11, 4.x and 5.x
– GMC (Global Motion Compensation)
and QP (Quarter Pixel) not supported.
SUPER VIDEO
Disc Operations
Region Codes
DVDs must be labelled for ALL
regions or Region 2 in order to
play on this DVD system. You
cannot play discs that are labelled
for other regions.
Helpful Hints:
– It may not be possible to play CD-R/RW or
DVD-R/RW in all cases due to the type of
disc or condition of the recording.
– If you are having trouble playing a certain
disc, remove the disc and try a different one.
Improperly formatted discs will not play on
this DVD system.
Playing discs
1
Press SOURCE control until “DISC”
appears on the display panel (or press
DISC on the remote).
2
Turn on the TV power and set to the
correct Video In channel. (See page 16
“Setting the TV”).
You should see the blue DVD
background screen on the TV.
3
Press OPEN•CLOSE
0
once to open
the disc tray and load a disc, then press
the same button again to close the disc
tray.
Make sure the disc label is facing up.
For double-sided discs, load the side you
want to play face up.
4
Playback will start automatically.
If a disc menu shows on the TV, see
page 22 “Using the Disc Menu”.
If the disc is locked by parental control,
you must enter your six-digit password.
(See page 31-32).
TIPS:
The operating features described here might not be possible for certain discs. Always refer
to the instructions supplied with the discs.

21
3139 115 22872
En gli sh
Disc Operations
TIPS:
The operating features described here might not be possible for certain discs. Always refer
to the instructions supplied with the discs.
Auto Eco Power standby mode
This is a power-saving feature, the system
will automatically switch to Eco Power
standby mode if you do not press any
buttons within 30 minutes after a disc has
stopped playing.
Basic playback controls
Pausing playback
During playback, press Å (2;).
To resume normal playback,
press PLAY B (2;).
Selecting another track/chapter
Press S / T or use the numeric
keypad (0-9) to key in a track/chapter
number.
If repeat mode is active, pressing S
/ T will replay the same track/chapter.
Searching backward/forward
Press and hold S / T. To resume
normal playback, press PLAY B (2;).
While searching, pressing S / T
again will decrease/increase the search
speed.
Stopping playback
Press Ç.
Selecting various repeat/
shuffle functions
Repeat play mode
While playing a disc, press REPEAT
continuously to choose a ‘Play Mode’.
DVD
™ RPT ONE (repeat chapter)
™ RPT TT (repeat title)
™ SHUFFLE (random play)
™ RPT SHF (repeat shuffling)
™ RPT OFF (repeat off)
VCD/SVCD/CD
™ RPT ONE (repeat track)
™ RPT ALL (repeat disc)
™ SHUFFLE (random play)
™ RPT SHF (repeat shuffling)
™ RPT OFF (repeat off)
MP3/SACD/DivX
™ RPT FLD (repeat folder)
™ RPT ONE (repeat track)
™ SHUFFLE (random play)
™ RPT OFF (repeat off)
Helpful Hint:
– For VCD, repeat playback is not possible if
the PBC mode is switched on.
Repeating a section within a
chapter/track
1
While playing a disc, press REPEAT A-B
at your chosen starting point.
2
Press REPEAT A-B again at your chosen
end point.
The section A and B can be set only
within the same chapter/track.
The section will now repeat
continuously.
3
To exit the sequence, press REPEAT
A-B.
22
En gli sh
3139 115 22872
Other operations for video
playback (DVD/VCD/SVCD)
Using the Disc Menu
Depending on the disc, a menu may
appear on the TV screen once you load in
the disc.
To select a playback feature or item
Use 1 2 3 4 keys or numeric keypad
(0-9) on the remote, then press OK to
start playback.
To access or remove the menu
Press DISC MENU on the remote.
Zooming in
This function allows you to enlarge the
picture on the TV screen and to pan
through the enlarged picture.
1
During playback, press ZOOM
repeatedly to select different zoom
factor.
Use 1 2 3 4 keys to move through
the zoomed image.
Playback will continue.
2
Press ZOOM repeatedly to return to
the original size.
Disc Operations
TIPS: The operating features described here might not be possible for certain discs. Always refer
to the instructions supplied with the discs.
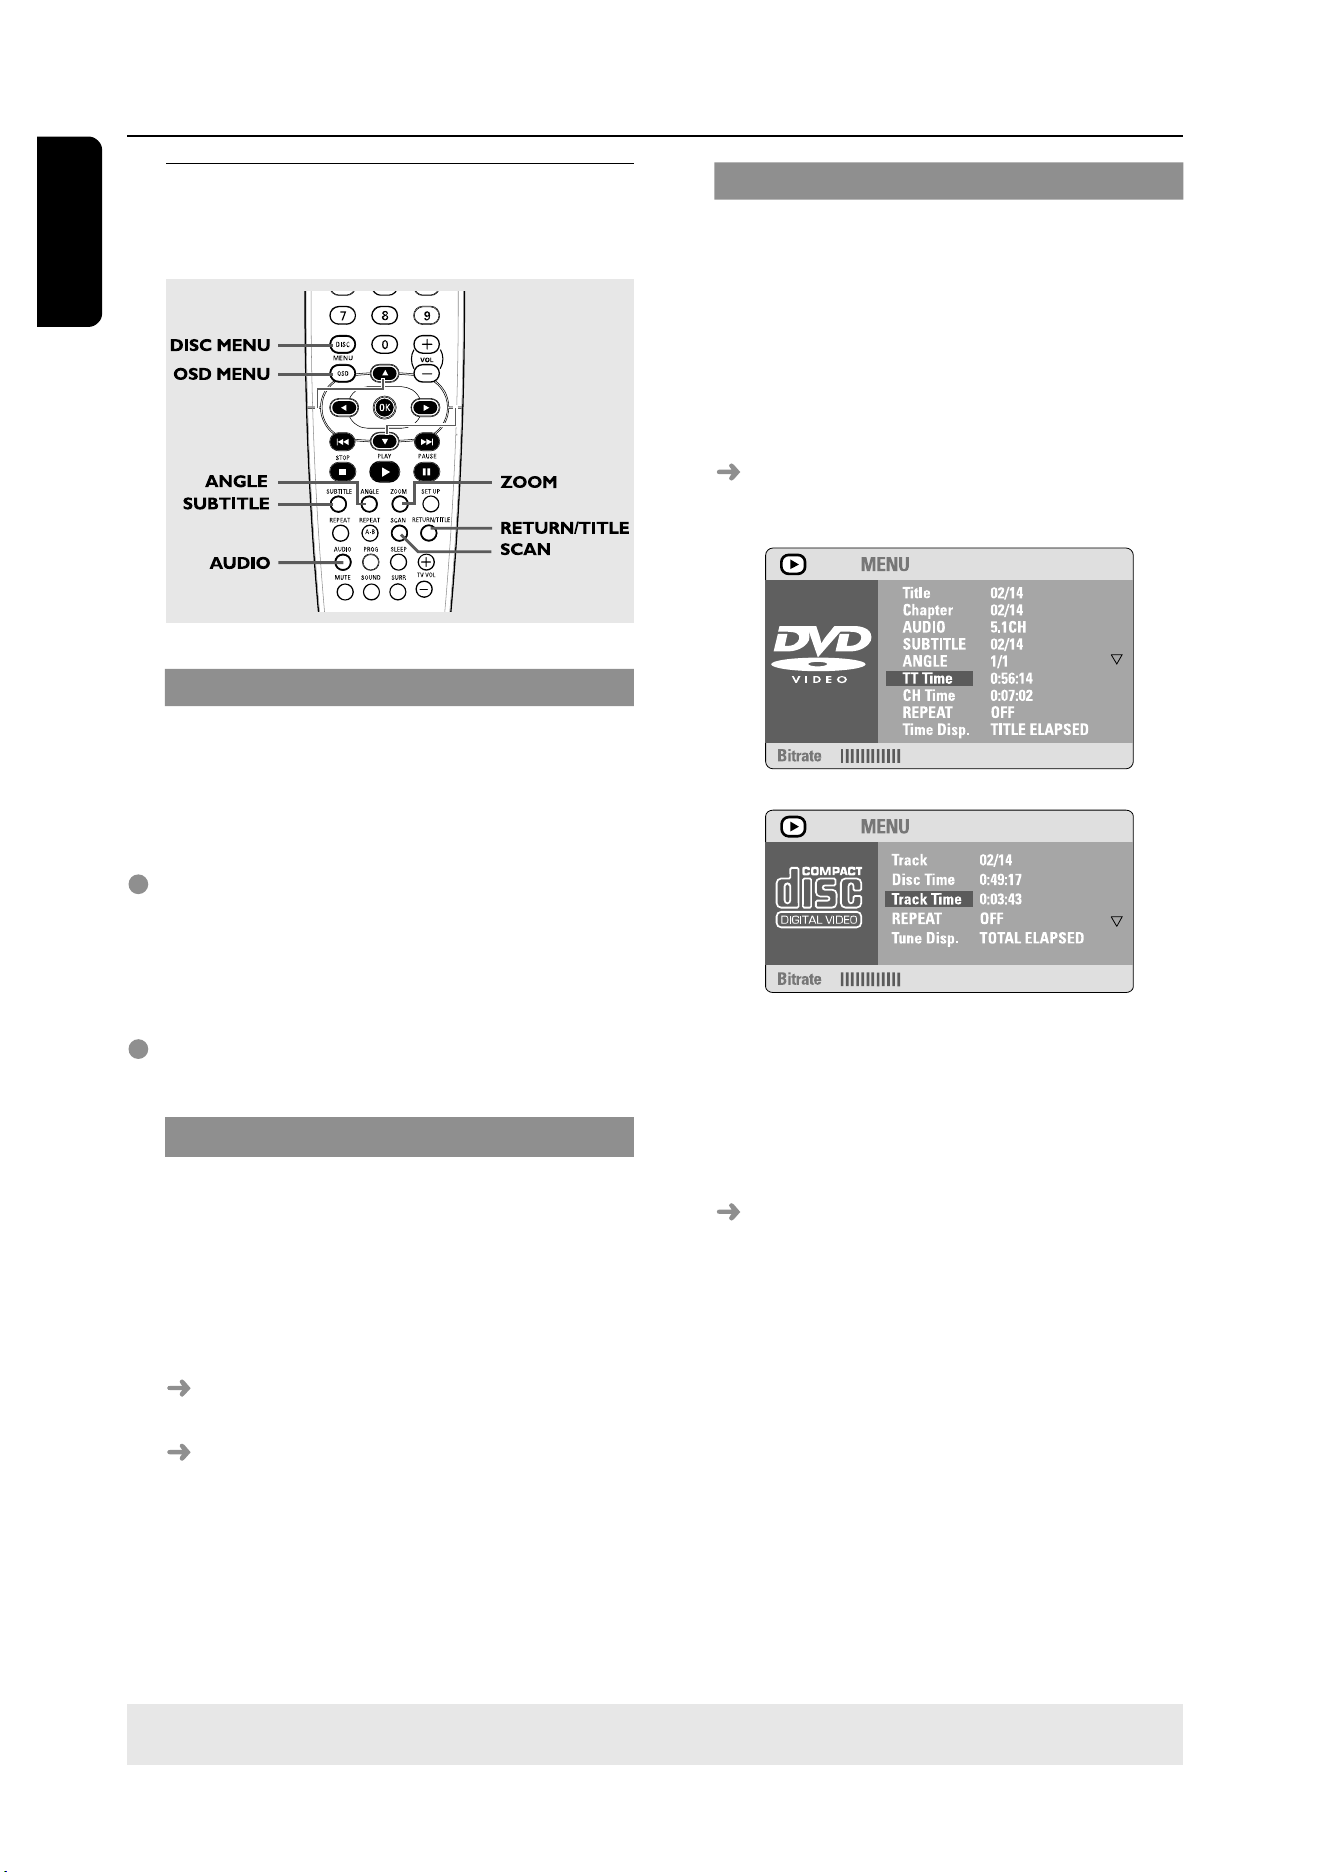
Using the OSD menu
OSD menu shows the disc playback
information (for example, title or chapter
number, elapsed playing time, audio/
subtitle language), a number of operations
can be done without interrupting disc
playback.
1
During playback, press OSD MENU.
A list of available disc information
appears on the TV screen.
2
Press 34 to view the information and
press OK to access.
3
Use the numeric keypad (0-9) to input
the number/time or press 34 to make
the selection, then press OK to confirm.
Playback will change to the chosen
time or to the selected title/chapter/
track.

23
3139 115 22872
En gli sh
Disc Operations
TIPS:
The operating features described here might not be possible for certain discs. Always refer
to the instructions supplied with the discs.
Resuming playback from the last
stopped point
Resume playback of the last 10 discs is
possible, even if the disc was ejected or
the power switched off.
1
Load one of the last played 10 disc.
“LOADING” appears.
2
Press PLAY B (2;) and the disc will be
played back from the last stop point.
To cancel the resume mode
In stop mode, press Ç again.
Advancing by frame
1
During playback, press Å on the remote.
Play will pause and sound will be mute.
2
Press Å again to select the next picture
frame.
3
To resume normal playback, press
PLAY B.
Changing sound track language
This operation works only on DVDs with
multiple soundtrack language, you can
change the language you want while
playing DVD.
Press AUDIO repeatedly to select the
available audio languages.
For VCD - changing the audio
channel
Press AUDIO repeatedly to select the
available audio channels provided by the
disc (STEREO, LEFT MONO, RIGHT
MONO or MIX MONO).
Changing subtitle language (DVD
only)
This operation works only on DVDs with
multiple subtitle languages, you can
change the language you want while
playing DVD.
Press SUBTITLE repeatedly to select
different subtitle languages.
Viewing from another angle (DVD
only)
If the disc contains sequences recorded
from different camera angles, this allows
you to view the picture from different
angles. The selections of angle are
depending on the disc format.
Press ANGLE repeatedly to select a
desired angle.
Playback changes to the selected angle.
Selecting a title (DVD only)
Some DVDs may contain several titles. If
the disc has a title menu recorded on it,
you can start playback from the selected
movie title.
1
Press RETURN/TITLE.
The disc title menu appears on the TV
screen.
2
Use 1 2 3 4 keys or numeric keypad
(0-9) to select a play option.
3
Press OK to confirm.
24
En gli sh
3139 115 22872
Disc Operations
TIPS:
The operating features described here might not be possible for certain discs. Always refer
to the instructions supplied with the discs.
Playback Control (PBC) (VCD only)
PBC playback allows you to play Video
CDs interactively, following the menu on
the display. This function can also be
accessed via the ‘PREFERENCE PAGE’
menu (see page 32).
For VCDs with Playback Control
(PBC) feature (version 2.0 only)
When play is stopped, press DISC
MENU to toggle between ‘PBC ON’ and
‘PBC OFF’.
If you select ‘PBC ON’, the disc menu
(if available) will appear on the TV. Use
S / T or numeric keypad (0-9) to
select a play option and press OK to
confirm.
If you select ‘PBC OFF’, the VCD will
skip the index menu and playback directly
from the beginning.
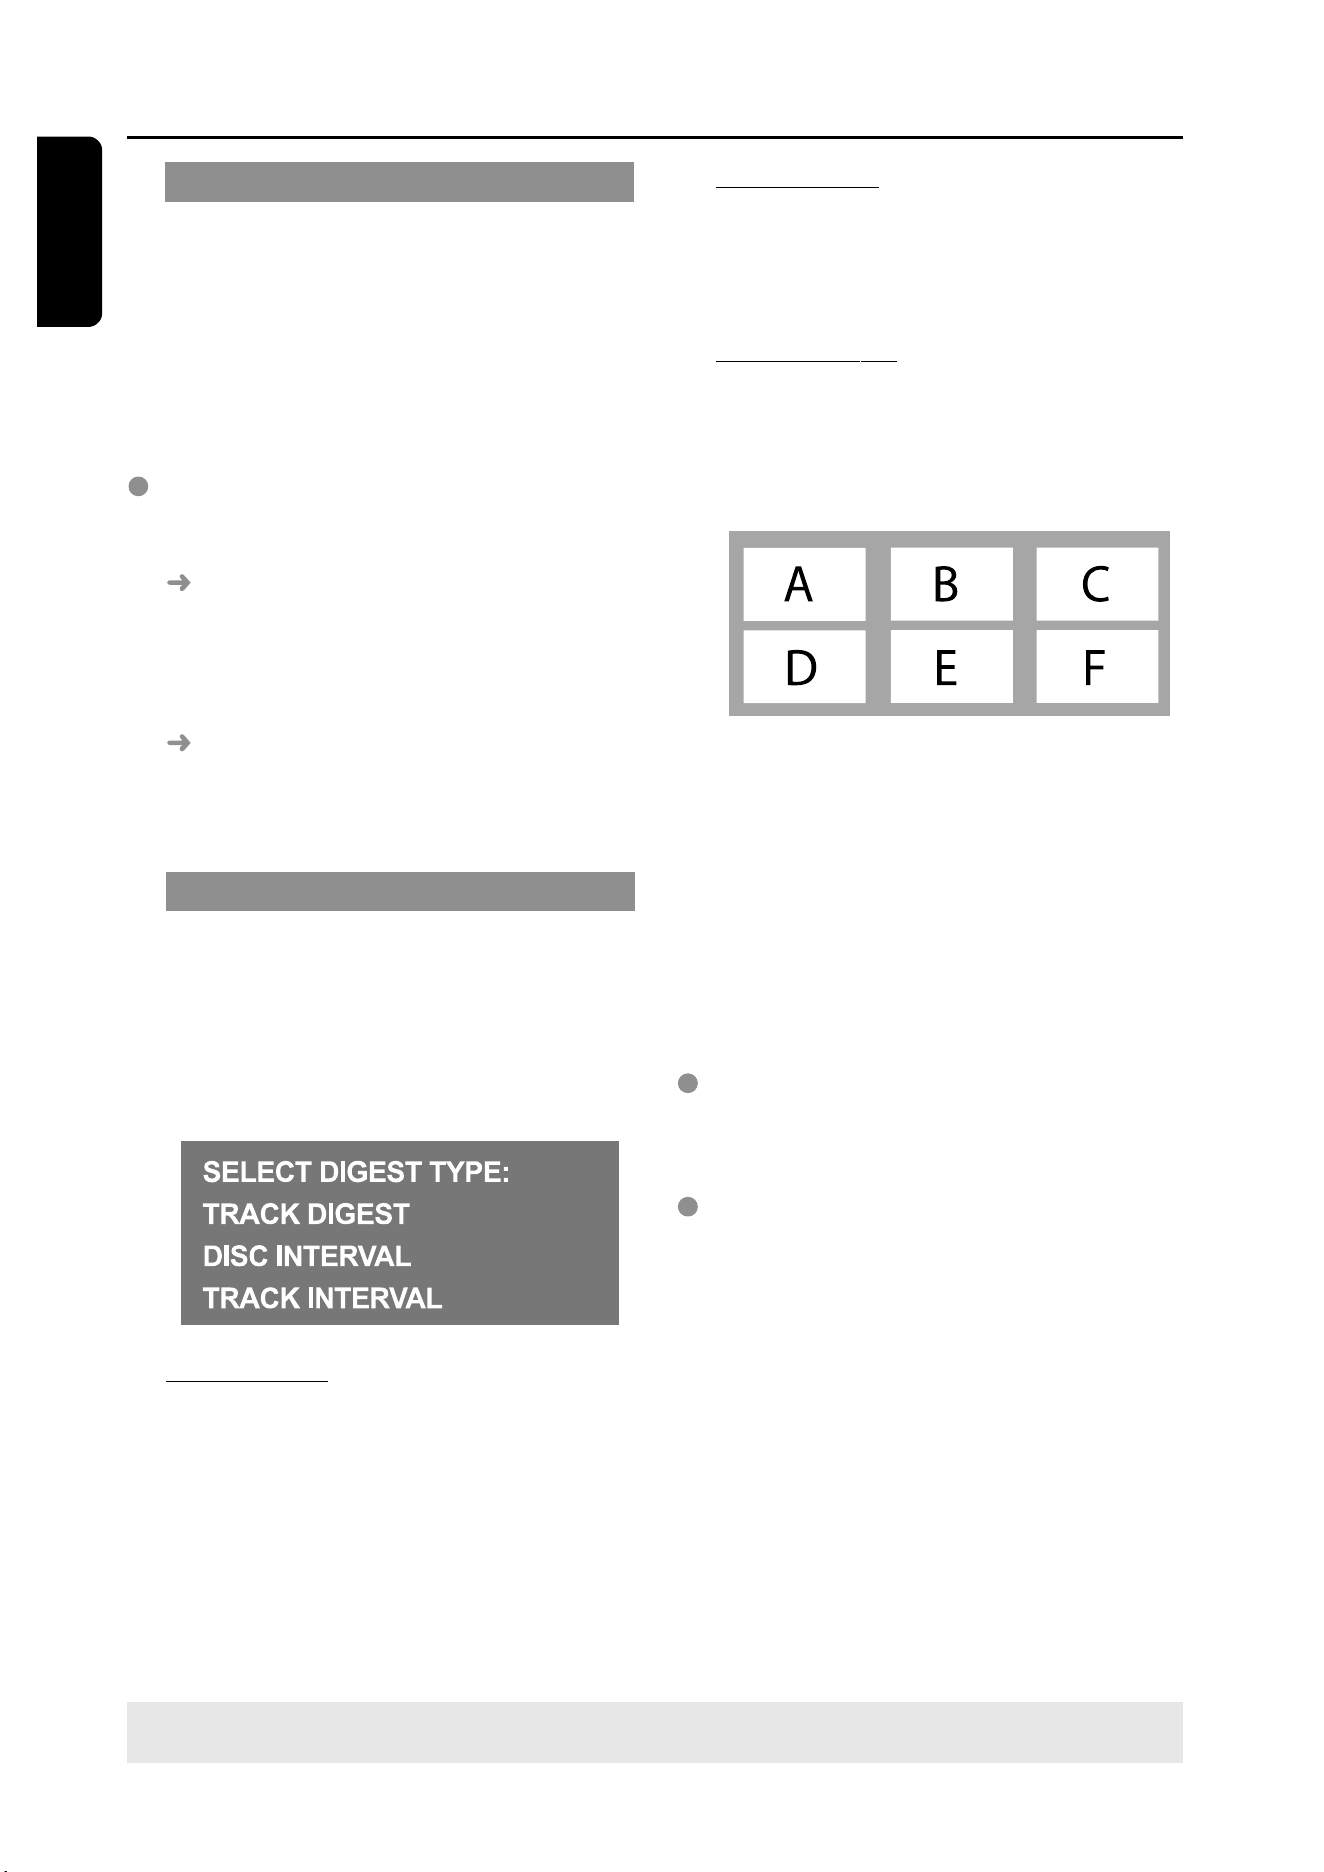
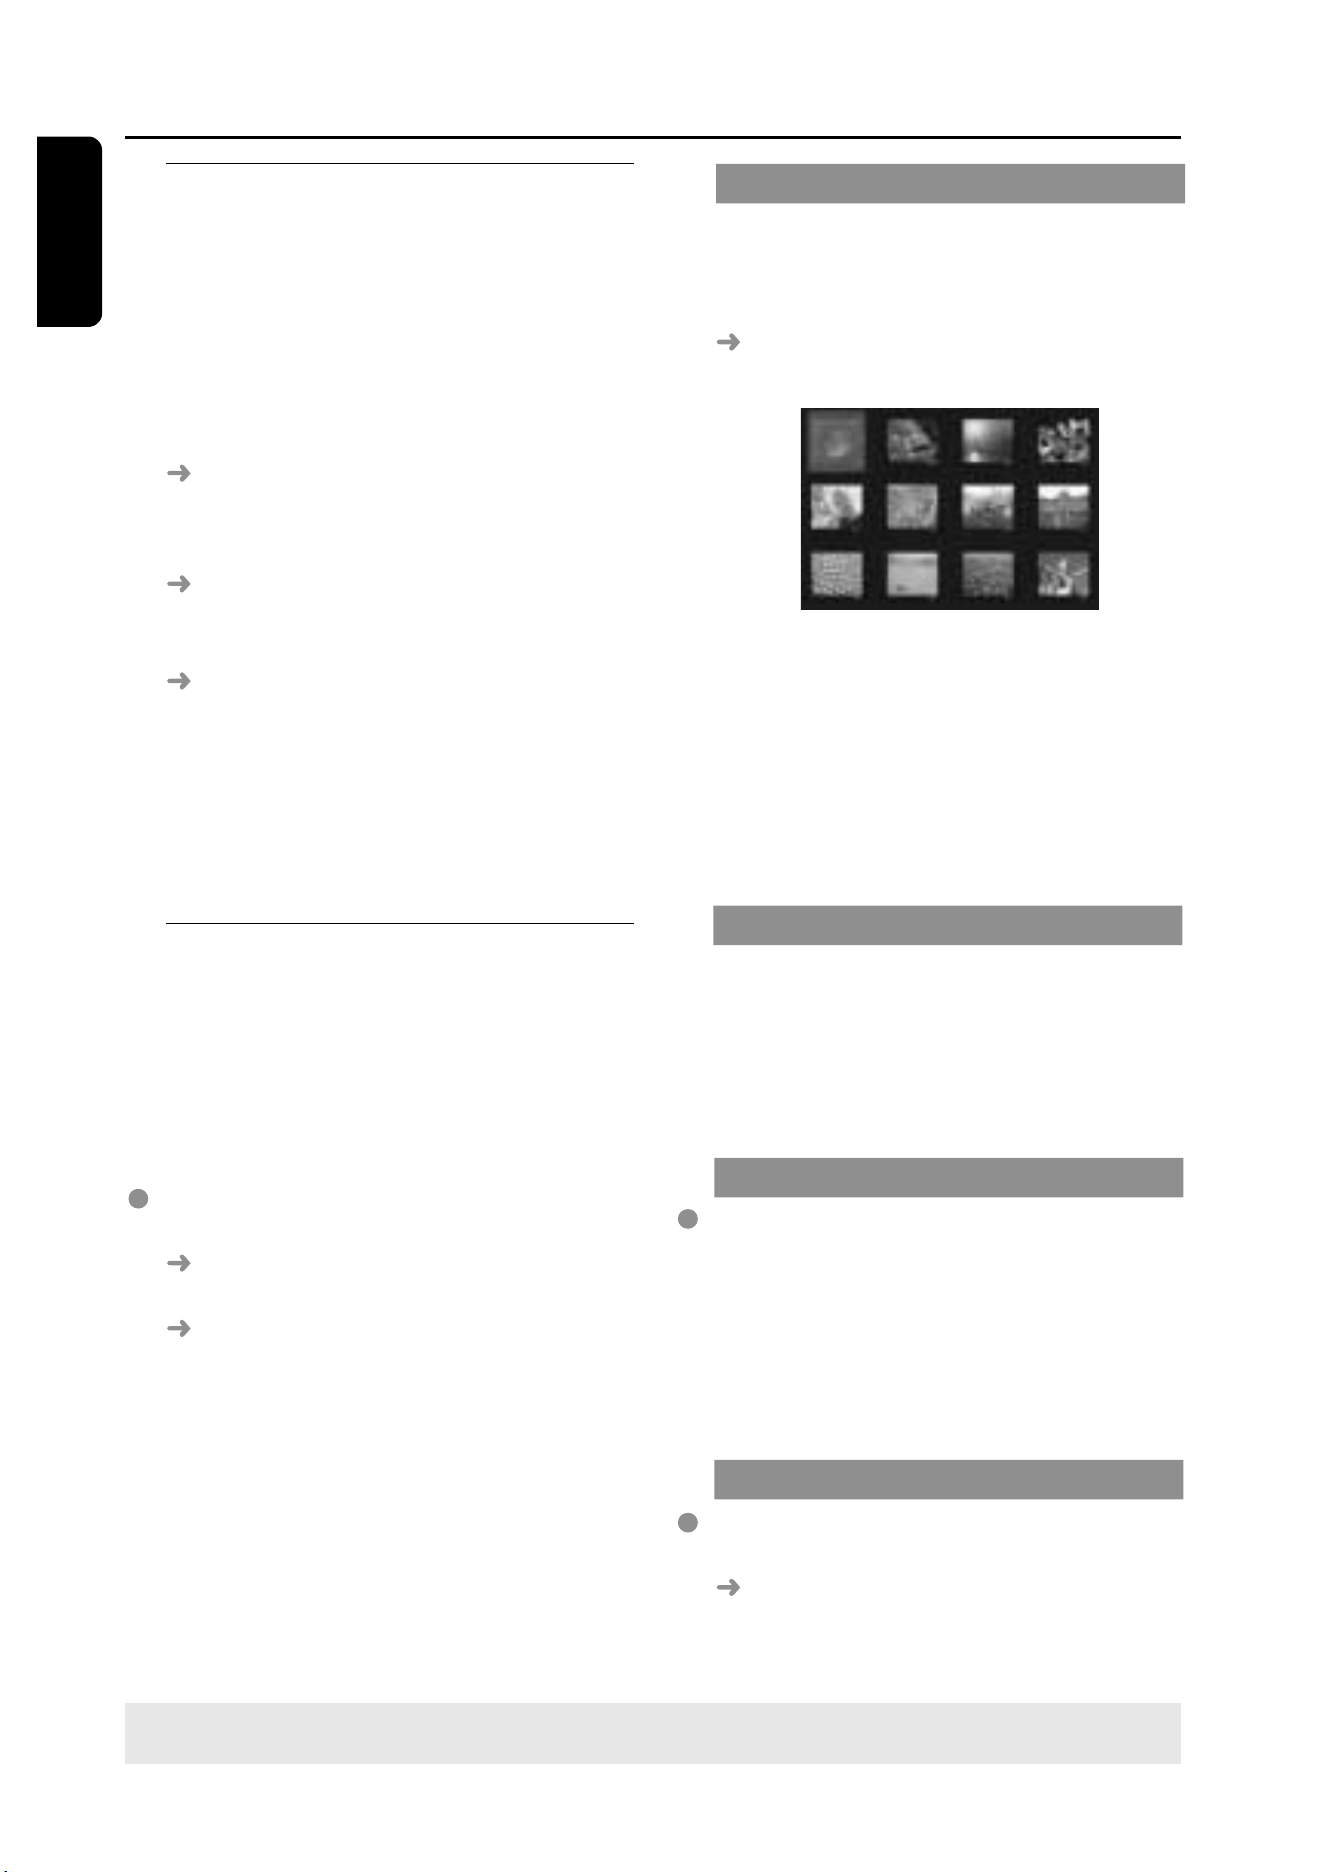
Preview Function (VCD only)
1
Press SCAN.
2
Press 34 to highlight {TRACK DIGEST},
{DISC INTERVAL} or {TRACK
INTERVAL}.
3
Press OK to open one option.
Track Digest
This function will minimise the picture of
every track in order to display every six
of these tracks on the screen to help you
know the content of every track on the
disc.
Disc Interval
This function is used to divide a disc into
six parts by regular intervals and display
them on one page to preview the whole
disc.
Track Interval
This function is used to divide a single
track into six parts by regular intervals
and display them on one page to help you
preview the selected track.
(example for 6 thumbnail pictures display)
4
Use 1 2 3 4 keys to select a track or
use numeric keypad (0-9) to input the
selected track number next to {SELECT}.
5
Press S / T to open the previous
or next page.
6
Press OK to confirm.
To quit preview function
Use 1 2 3 4 keys to highlight {EXIT}
and press OK to confirm.
To return to preview menu
Use 1 2 3 4 keys to highlight {MENU}
and press OK to confirm.

25
3139 115 22872
En gli sh
Playing MP3/JPEG/DivX/
MPEG-4 disc
This player can playback DivX, MPEG-4,
MP3, JPEG, VCD & SVCD files on a
personally recorded CD-R/RW disc or
commercial CD.
IMPORTANT!
You have to turn on your TV and set to
the correct Video In channel. (See page
16 “Setting the TV”).
1
Load a disc.
The disc reading time may exceed 30
seconds due to the complexity of the
directory/file configuration.
The disc menu appears on the TV
screen.
MP3
MP3
MP3
MP3
2
Press 34 to select a desired folder and
press OK to open the folder.
3
Press 34 to select a track/file.
4
Press OK to confirm.
Playback will start from the selected
file to the end of the folder.
During playback, you can;
Press S / T to select another
track/file in the current folder.
To select another folder from the current
disc, press 1 to return to the root menu,
then press 34 to make your selection
and press OK to confirm.
Disc Operations
Press REPEAT continuously to access
different ‘Play Mode’.
REPEAT FOLDER: all files in one folder
being played repeatedly.
REPEAT ONE: one file being played
repeatedly.
SHUFFLE: all files in the current folder
being played at random order.
Press Å to pause or PLAY B to
resume playback.
Playing MP3 music and JPEG
picture simultaneously
1
Load a MP3 disc that contains music and
picture.
The disc menu appears on the TV
screen.
2
Select a MP3 track and press PLAY B
(2;) to start playback.
3
During MP3 music playback, select a
picture folder from the TV screen and
press PLAY B (2;).
The picture files will be played back
until end of the folder.
4
To quit simultaneous playback, press
DISC MENU followed by Ç.
Helpful Hints:
– It may not be possible to play certain
MP3/JPEG/DixV/MPEG-4 disc due to the
configuration and characteristics of the disc
or condition of the recording.
– It is normal to experience an occasional
“skip” while listening to your MP3 disc.
– It is normal to experience an occasional
pixelation during MPEG-4/DivX playback
due to poor clarity of digital contents during
internet downloading.
– For multi-session discs with different
formats, only the first session will be available.
TIPS:
The operating features described here might not be possible for certain discs. Always refer
to the instructions supplied with the discs.
26
En gli sh
3139 115 22872
Disc Operations
TIPS:
The operating features described here might not be possible for certain discs. Always refer
to the instructions supplied with the discs.
Playing Super Audio CD (SACD)
There are three types of SACD discs :
single layer, double layer or hybrid disc.
The hybrid disc contains both Super
Audio CD and standard audio CD layers,
only the SACD layer is possible to
playback on this DVD player.
1
Load a SACD.
The disc menu appears on the TV
screen.
2
Playback will start automatically.
If the SACD consists of multi-channel
and stereo tracks, multi-channel tracks
will have the priority for playback.
To playback stereo tracks, use 3 4
keys to make your selection from the disc
menu, then press PLAY B (or 2;).
Helpful Hint
– Programme SACD tracks is not possible.
Special features for picture
disc playback
IMPORTANT!
You have to turn on your TV and set to
the correct Video In channel. (See page
16 “Setting the TV”).
Load a Picture disc (Kodak Picture CD,
JPEG).
For Kodak disc, the slide show will
begin.
For JPEG disc, the picture menu
appears on the TV screen. Press
PLAY B (2;) to start the slide-show
playback.
Preview Function
This function shows the content of the
current folder or the whole disc.
1
During playback, press Ç.
12 thumbnail pictures will appear on
the TV screen.
2
Press S / T to display the other
pictures on the previous/next page.
3
Use 1 2 3 4 keys to highlight one of the
picture and press OK to start playback.
4
Press DISC MENU to return to Picture
CD menu.
Zoom picture
1
During playback, press ZOOM repeatedly
to select different zoom factor.
2
Use 1 2 3 4 keys to move through the
zoomed image.
Playback with multi-angles
During playback, use 1 2 3 4 keys to
rotate/flip the picture on the TV screen.
3
: flip the picture vertically
4
: flip the picture horizontally
1
: rotate the picture anti-clockwise
2
: rotate the picture clockwise
Scan Effect
Press ANGLE repeatedly to choose a
different scan effect.
Various scan effects appear in the top
left corner of the TV screen.
27
3139 115 22872
En gli sh
DVD Setup Menu Options
This DVD system setup is carried out via
the TV, enabling you to customise the
DVD system to suit your particular
requirements.
General Setup menu
1
In disc mode, press SETUP.
2
Press 1 2 to select ‘General Setup’ icon.
3
Press OK to confirm.
Locking/Unlocking the disc for
viewing
Not all discs are rated or coded by the
disc maker. You can prevent a specific
disc from playing by locking the disc. Up
to 40 discs can be locked.
1
In ‘GENERAL SETUP PAGE’, press 34 to
highlight {DISC LOCK}, then press 2.
LOCK
Select this to block the playback of the
current disc. Subsequent access to a
locked disc requires six-digit password.
The default password is ‘136900’ (see
page 33 “Changing the password”).
UNLOCK
Select this to unlock the disc and allow
future playback.
2
Press 34 to select a setting and press
OK to confirm.
TIPS:
To return to the previous menu, press 1.
To remove the menu, press SETUP.
Dimming system’s display panel
You can select different levels of
brightness for the display screen.
1
In ‘GENERAL SETUP PAGE’, press 34 to
highlight {DISPLAY DIM}, then press 2.
100% –
Select this for full brightness.
70% – Select this for medium brightness.
40% – Select this for dimming the display.
2
Press 34 to select a setting and press
OK to confirm.
Programming disc tracks (not for
Picture CD/MP3/SACD)
You can play the contents of the disc in
the order you want by programming the
tracks to be played. Up to 20 tracks can
be stored.
1
Press PROG on the remote.
OR
In ‘GENERAL SETUP PAGE’, press 34 to
highlight {PROGRAM}, then press 2 to
select {INPUT MENU}.
2
Press OK to confirm.
2
06
07
00
09
10
To programme your favourite tracks/
chapter
3
Use the numeric keypad (0-9) to enter
a valid track/chapter number.
4
Use 1 2 3 4 keys to move the cursor to
the next position.
If the number of tracks is more than
ten, press T to open the next page
and proceed with programming or,
Use 1 2 3 4 keys to highlight {NEXT}
on the programme menu, then press OK.

28
En gli sh
3139 115 22872
TIPS:
To return to the previous menu, press 1.
To remove the menu, press SETUP.
DVD Setup Menu Options
5
Repeat steps
3
~
4
to input another
track/chapter number.
If you want to remove a track
6
Use 1 2 3 4 keys to move the cursor to
the track you want to remove.
7
Press OK to remove this track from the
programme menu.
To start programme playback
8
Use 1 2 3 4 keys to highlight {START}
on the programme menu, then press OK.
Playback will start with the selected
tracks under the programmed sequence.
To exit programme playback
9
Use 1 2 3 4 keys to highlight {EXIT} on
the programme menu, then press OK.
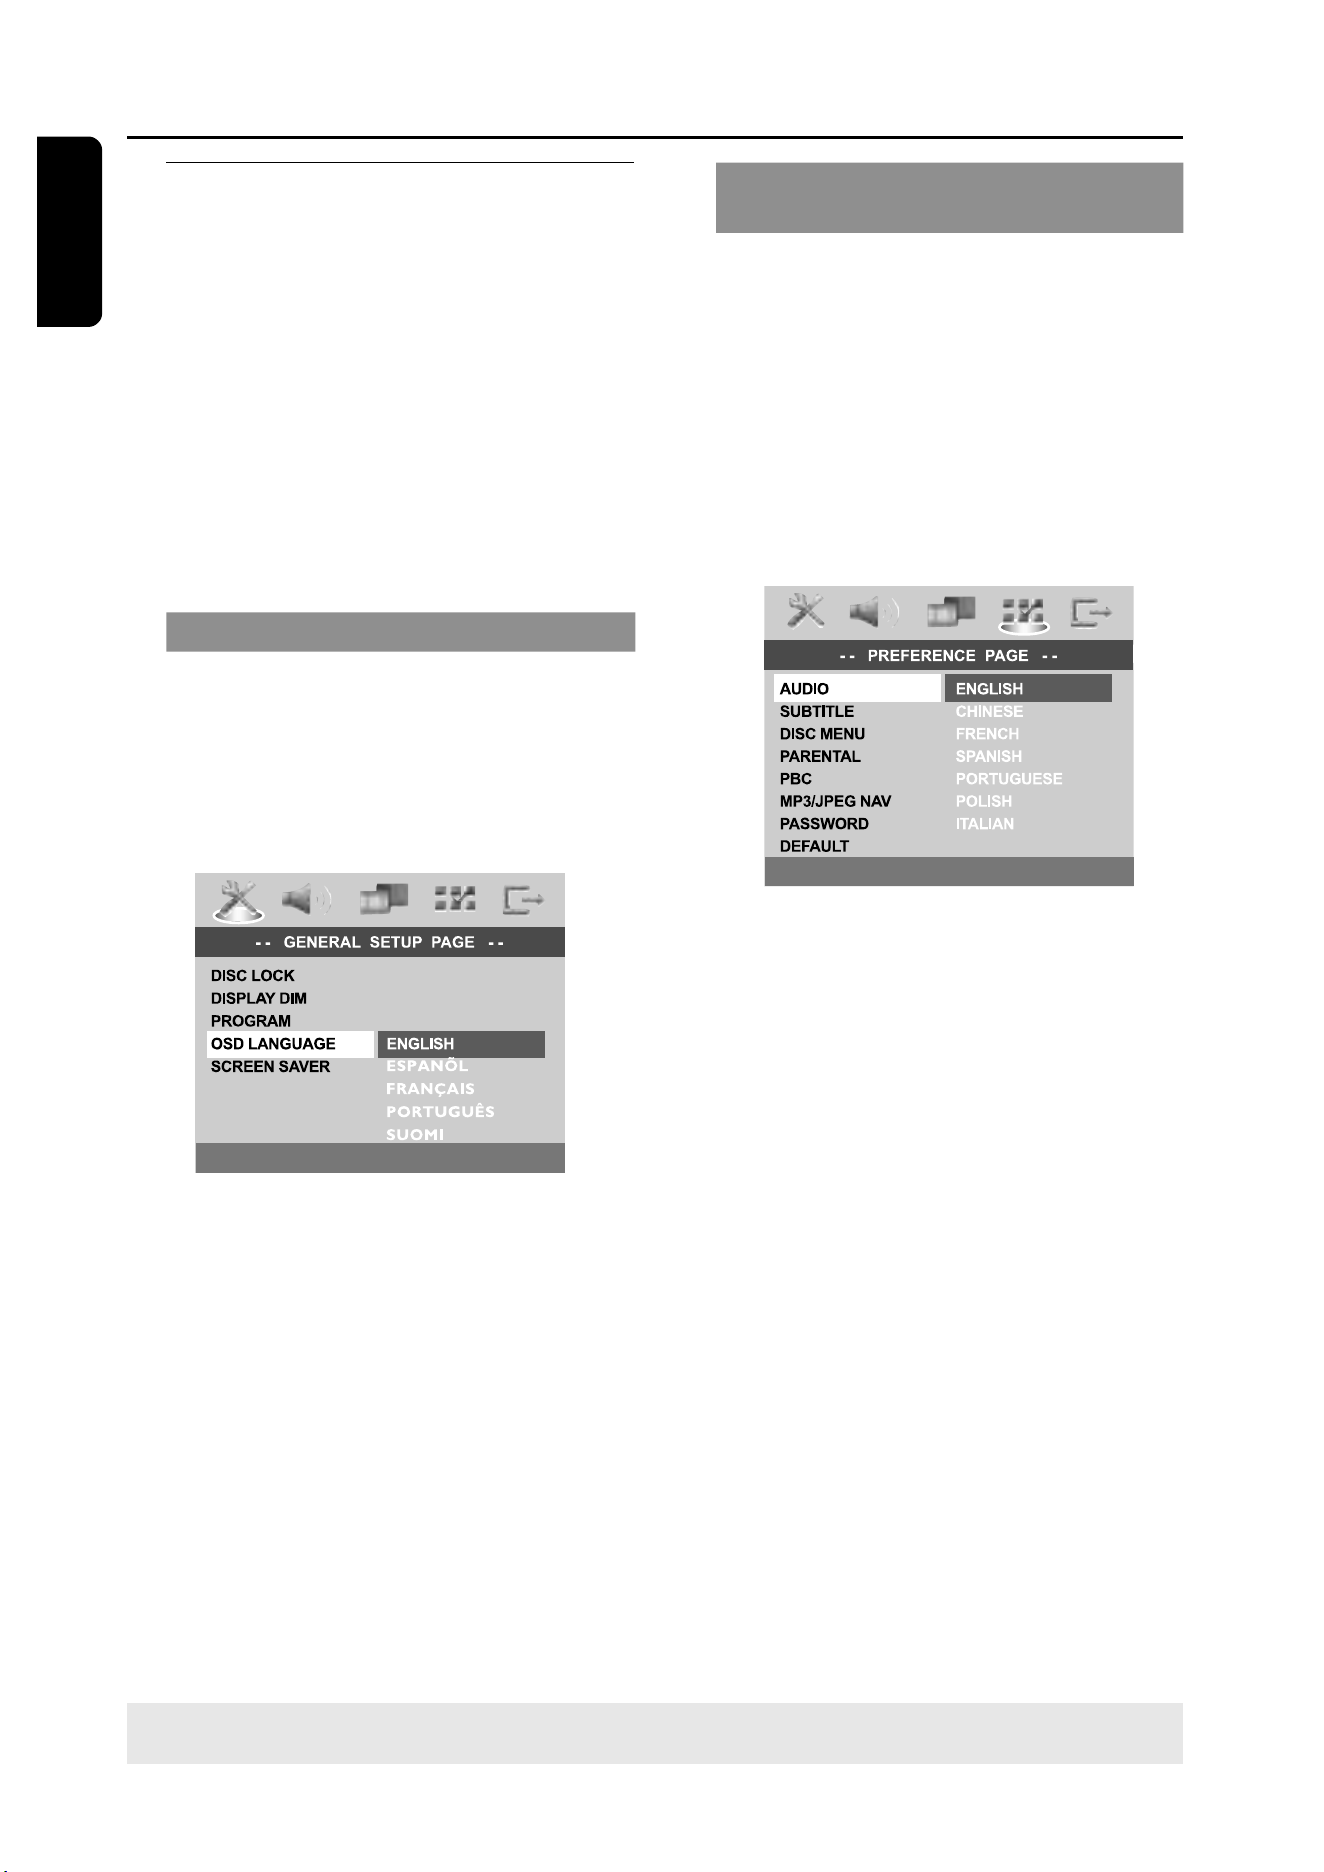
OSD Language
This menu contains various language
options for display language on the
screen. For details, see page 18.
Screen Saver - turning on/off
The screen saver will help to prevent
your TV display device from becoming
damaged.
1
In ‘GENERAL SETUP PAGE’, press 34 to
highlight {SCREEN SAVER}, then press 2.
ON
Select this if you wish to turn off the TV
screen when play is stopped or paused
for more than 15 minutes.
OFF
Select this to disable the screen saver
function.
2
Press 34 to select a setting and press
OK to confirm.
DivX
®
VOD registration code
Philips provide you the DivX
®
VOD
(Video On Demand) registration code
that allows you to rent and purchase
videos using the DivX
®
VOD service.
For more information, visit us at
www.divx.com/vod.
1
In ‘GENERAL SETUP PAGE’, press 34 to
highlight {DIVX(R) VOD CODE}, then
press 2.
The registration code will appear.
2
Press OK to exit.
3
Use the registration code to purchase or
rent the videos from DivX
®
VOD service
at www.divx.com/vod. Follow the
instructions and download the video onto
a CD-R/RW for playback on this DVD
system.
Helpful Hints:
– All the downloaded videos from DivX
®
VOD can only be played back on this DVD
system.
– Time search feature is not available during
DivX
®
movie playback.
29
3139 115 22872
En gli sh
DVD Setup Menu Options
TIPS: To return to the previous menu, press 1.
To remove the menu, press SETUP.
Audio Setup Menu
1
In disc mode, press SETUP.
2
Press 1 2 to select ‘Audio Setup’ icon.
3
Press OK to confirm.
Setting the analogue output
Set Analogue Output to match your DVD
home cinema system’s playback capability.
This function can also be accessed via the
SURR. button on the remote.
1
In ‘AUDIO SETUP PAGE’, press 34 to
highlight {ANALOG OUTPUT}, then
press 2.
STEREO
Select this to change channel output to
stereo which delivers sound from only
the two front speakers and subwoofer.
MULTI-CHANNEL
Select this to enable Multi-channel
output.
2
Press 34 to select a setting and press
OK to confirm.
Speaker Setup
This menu contains setup options for
your audio output which makes the
speaker setup system reproduce high
quality surround sound. For details, see
page 19.
Night Mode - turning on/off
When night mode is activated, the high
volume outputs are softened and low
volume outputs are brought upward to
an audible level. It is useful for watching
your favourite action movie without
disturbing others at night.
1
In ‘AUDIO SETUP PAGE’, press 34 to
highlight {NIGHT MODE}, then press 2.
ON
Select this to level out the volume. This
feature is only available for movies with
Dolby Digital mode.
OFF
Select this when you want to enjoy the
surround sound with its full dynamic range.
2
Press 34 to select a setting and press
OK to confirm.
30
En gli sh
3139 115 22872
DVD Setup Menu Options
TIPS:
To return to the previous menu, press 1.
To remove the menu, press SETUP.
Video Setup Menu
1
In disc mode, press SETUP.
2
Press 1 2 to select ‘Video Setup’ icon.
3
Press OK to confirm.
TV Type
This menu contains the options for
selecting the colour system that matches
the connected TV. For details, see page
17.
TV Display
This menu contains the options for
setting the aspect ratio of the DVD
system according to the connected TV.
For details, see page 17.
Picture Setting
This DVD system provides three
predefined sets of picture colour settings
and one personal setting which you can
define yourself.
1
In ‘VIDEO SETUP PAGE’, press 34 to
highlight {PICTURE SETTING}, then press
2.
STANDARD
Select this for standard picture setting.
BRIGHT
Select this will make the TV picture
brighter.
SOFT
Select this will make the TV picture
softer.
PERSONAL
Select this to personalise your picture
colour by adjusting the brightness,
contrast, tint and colour (saturation).
2
Press 34 to select a setting and press
OK to confirm.
3
If you select {PERSONAL}, then proceed
to steps
4
~
7
.
The ‘PERSONAL PICTURE SETUP’
menu appears.
4
Press 34 to highlight one of the
following options.
BRIGHTNESS
Increase the value will brighten the
picture or vice versa. Choose zero (0) for
average setting.

31
3139 115 22872
En gli sh
DVD Setup Menu Options
TIPS: To return to the previous menu, press 1.
To remove the menu, press SETUP.
CONTRAST
Increase the value will sharpen the
picture or vice versa. Choose zero (0) to
balance the contrast.
TINT
Increase the value will darken the picture
or vice versa. Choose zero (0) for
average setting.
COLOUR
Increase the value will enhance the
colour in your picture or vice versa.
Choose zero (0) to balance the colour.
5
Press 1 2 to adjust the setting that best
suit your personal preference.
6
Repeat steps
4
~
5
for adjusting other
colour features.
7
Press OK to confirm.
Preference Setup Menu
1
Press Ç twice to stop playback (if any),
then press SETUP.
2
Press 1 2 to select the ‘Preference Setup’
icon.
3
Press OK to confirm.
Audio, Subtitle, Disc Menu
These menus contain various language
options for audio, subtitle and disc menu
which may be recorded on the DVD. For
details, see page 18.
Restricting playback by Parental
Control
Some DVDs may have a parental level
assigned to the complete disc or to
certain scenes on the disc. This feature
lets you set a playback limitation level.
The rating levels are from 1 to 8 and are
country dependent. You can prohibit the
playing of certain discs that are not
suitable for your children, or have certain
discs played with alternative scenes.
32
En gli sh
3139 115 22872
DVD Setup Menu Options
TIPS: To return to the previous menu, press 1.
To remove the menu, press SETUP.
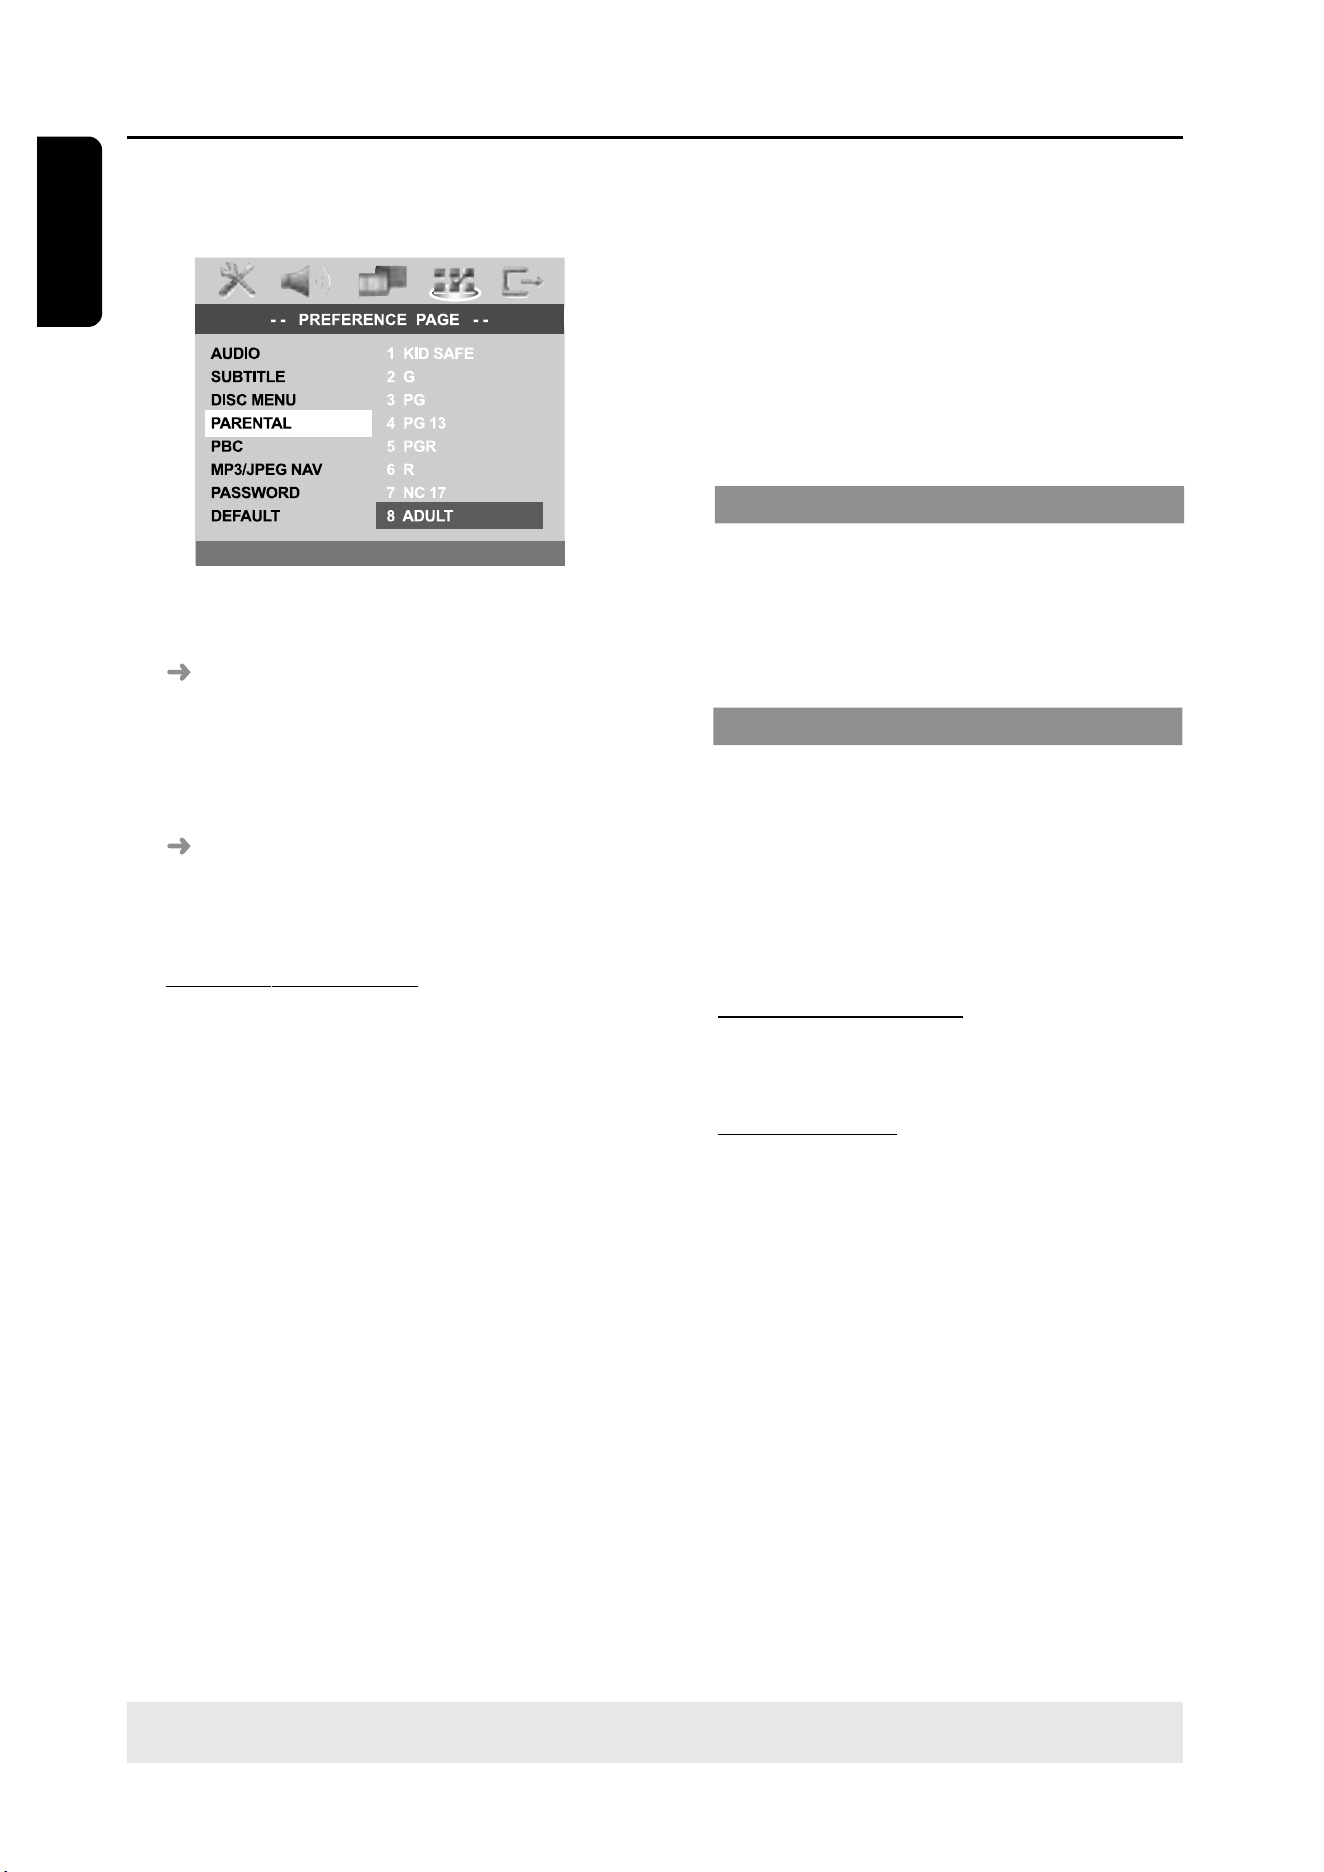
1
In ‘PREFERENCE PAGE’, press 34 to
highlight {PARENTAL}, then press 2.
2
Press 34 to highlight a rating level for
the disc inserted and press OK.
To disable Parental controls and allow
all discs to play, select {1 KID SAFE}.
3
Use the numeric keypad (0-9) to enter
the six-digit password (see page 33
“Changing the password”).
DVDs that are rated above the level
you selected will not play unless you
enter your six-digit password.
Rating explanations
1KID SAFE – 2 G
– General Audience; recommended as
acceptable for viewers of all ages.
3 PG
– Parental Guidance suggested.
4 PG13
– Material is unsuitable for children under age
13.
5 PGR – 6 R
– Parental Guidance - Restricted;
recommended that parents restrict children
under 17 from viewing or allow to view only
when supervised by a parent or adult guardian.
7 NC-17
– No children under age 17; not recommended
viewing for children under age 17.
8 ADULT
– Mature material; should be viewed only by
adults due to graphic sexual material, violence
or language.
Helpful Hints:
– VCD, SVCD, CD have no level indication, so
parental control has no effect on these type
of discs. This also applies to most illegal
DVDs.
– Some DVDs are not encoded with a rating
though the movie rating may be printed on
the Disc cover. The rating level feature does
not prohibit play of such Discs.
PBC
You can set the PBC to ON or OFF. This
feature is available only on Video CD 2.0
with playback control (PBC) feature. For
details, see page 24.
MP3/JPEG Menu - turning on/off
MP3/JPEG Navigator can be set only if the
disc is recorded with menu. It allows you
to select different display menus for easy
navigation.
1
In ‘PREFERENCE PAGE’, press 34 to
highlight {MP3/JPEG NAV}, then press 2.
WITHOUT MENU
Select this to display all the files
contained in the MP3/Picture CD.
WITH MENU
Select this to display only the folder menu
of the MP3/Picture CD.
2
Press 34 to select a setting and press
OK to confirm.
33
3139 115 22872
En gli sh
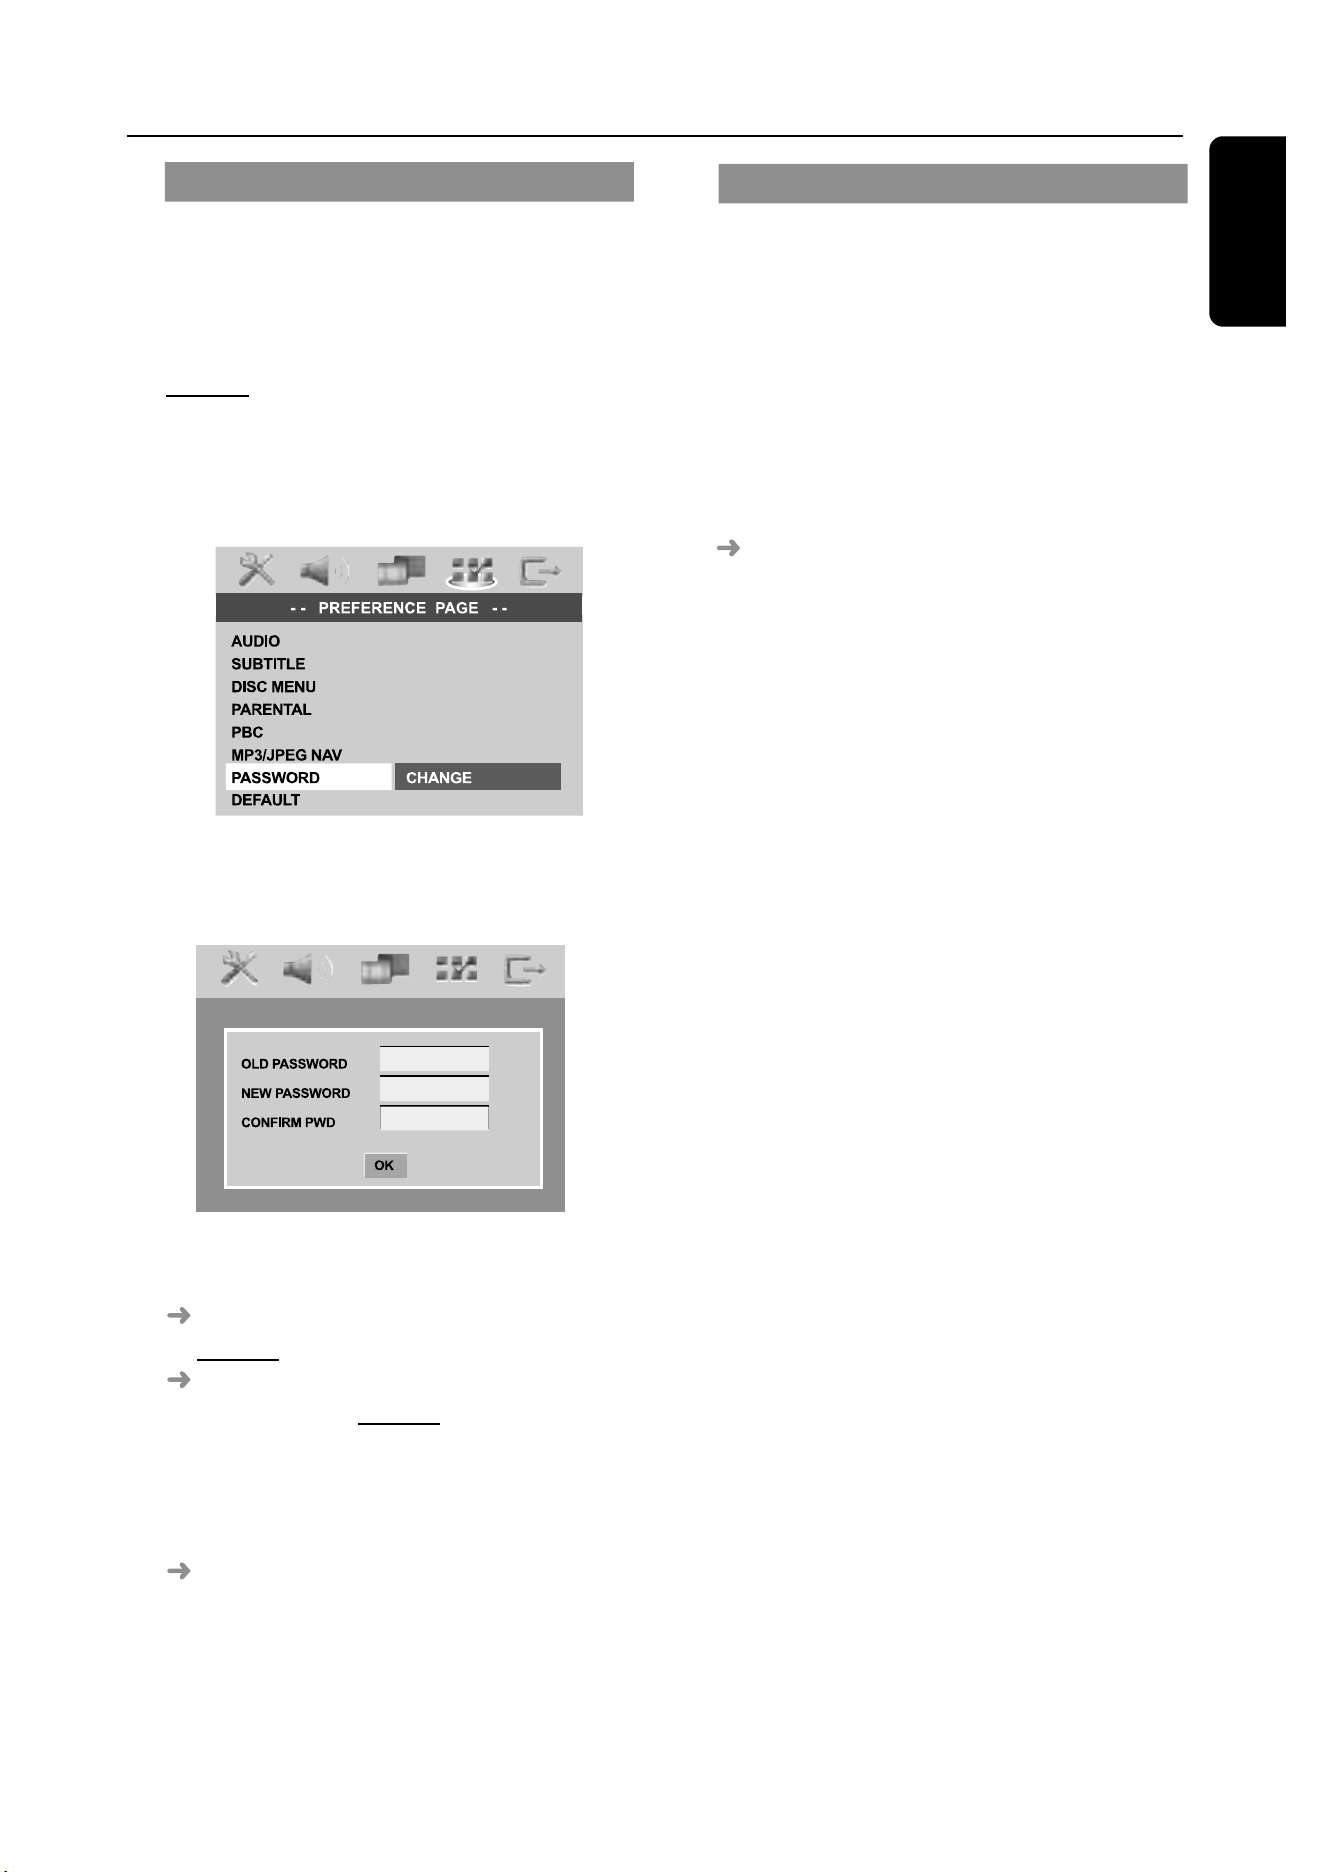
Changing the Password
The same password is used for both
Parental Control and Disc Lock. Enter
your six-digit password to play a
prohibited disc or if prompted for a
password. The default password is
136900.
1
In ‘PREFERENCE PAGE’, press 34 to
highlight {PASSWORD}, then press 2 to
select {CHANGE}.
2
Press OK to enter the ‘Password Change
Page’.
3
Use the numeric keypad (0-9) to enter
your old six-digit password.
When doing this for the first time, key
in ‘136900’.
If you forget your old six-digit
password, key in ‘136900’.
4
Enter the new six-digit password.
5
Enter the new six-digit password a
second time to confirm.
The new six-digit password will now
take effect.
6
Press OK to confirm.
DVD Setup Menu Options
Restoring to original settings
Setting the DEFAULT function will reset
all options and your personal settings to
the factory defaults, except your
password for Parental Control and Disc
Lock.
1
In ‘PREFERENCE PAGE’, press 34 to
highlight {DEFAULT}, then press 2 to
select {RESET}.
2
Press OK to confirm.
All settings will now reset to factory
defaults.
34
En gli sh
3139 115 22872
IMPORTANT!
Make sure the FM and MW
antennas are connected.
Tuning to radio stations
1
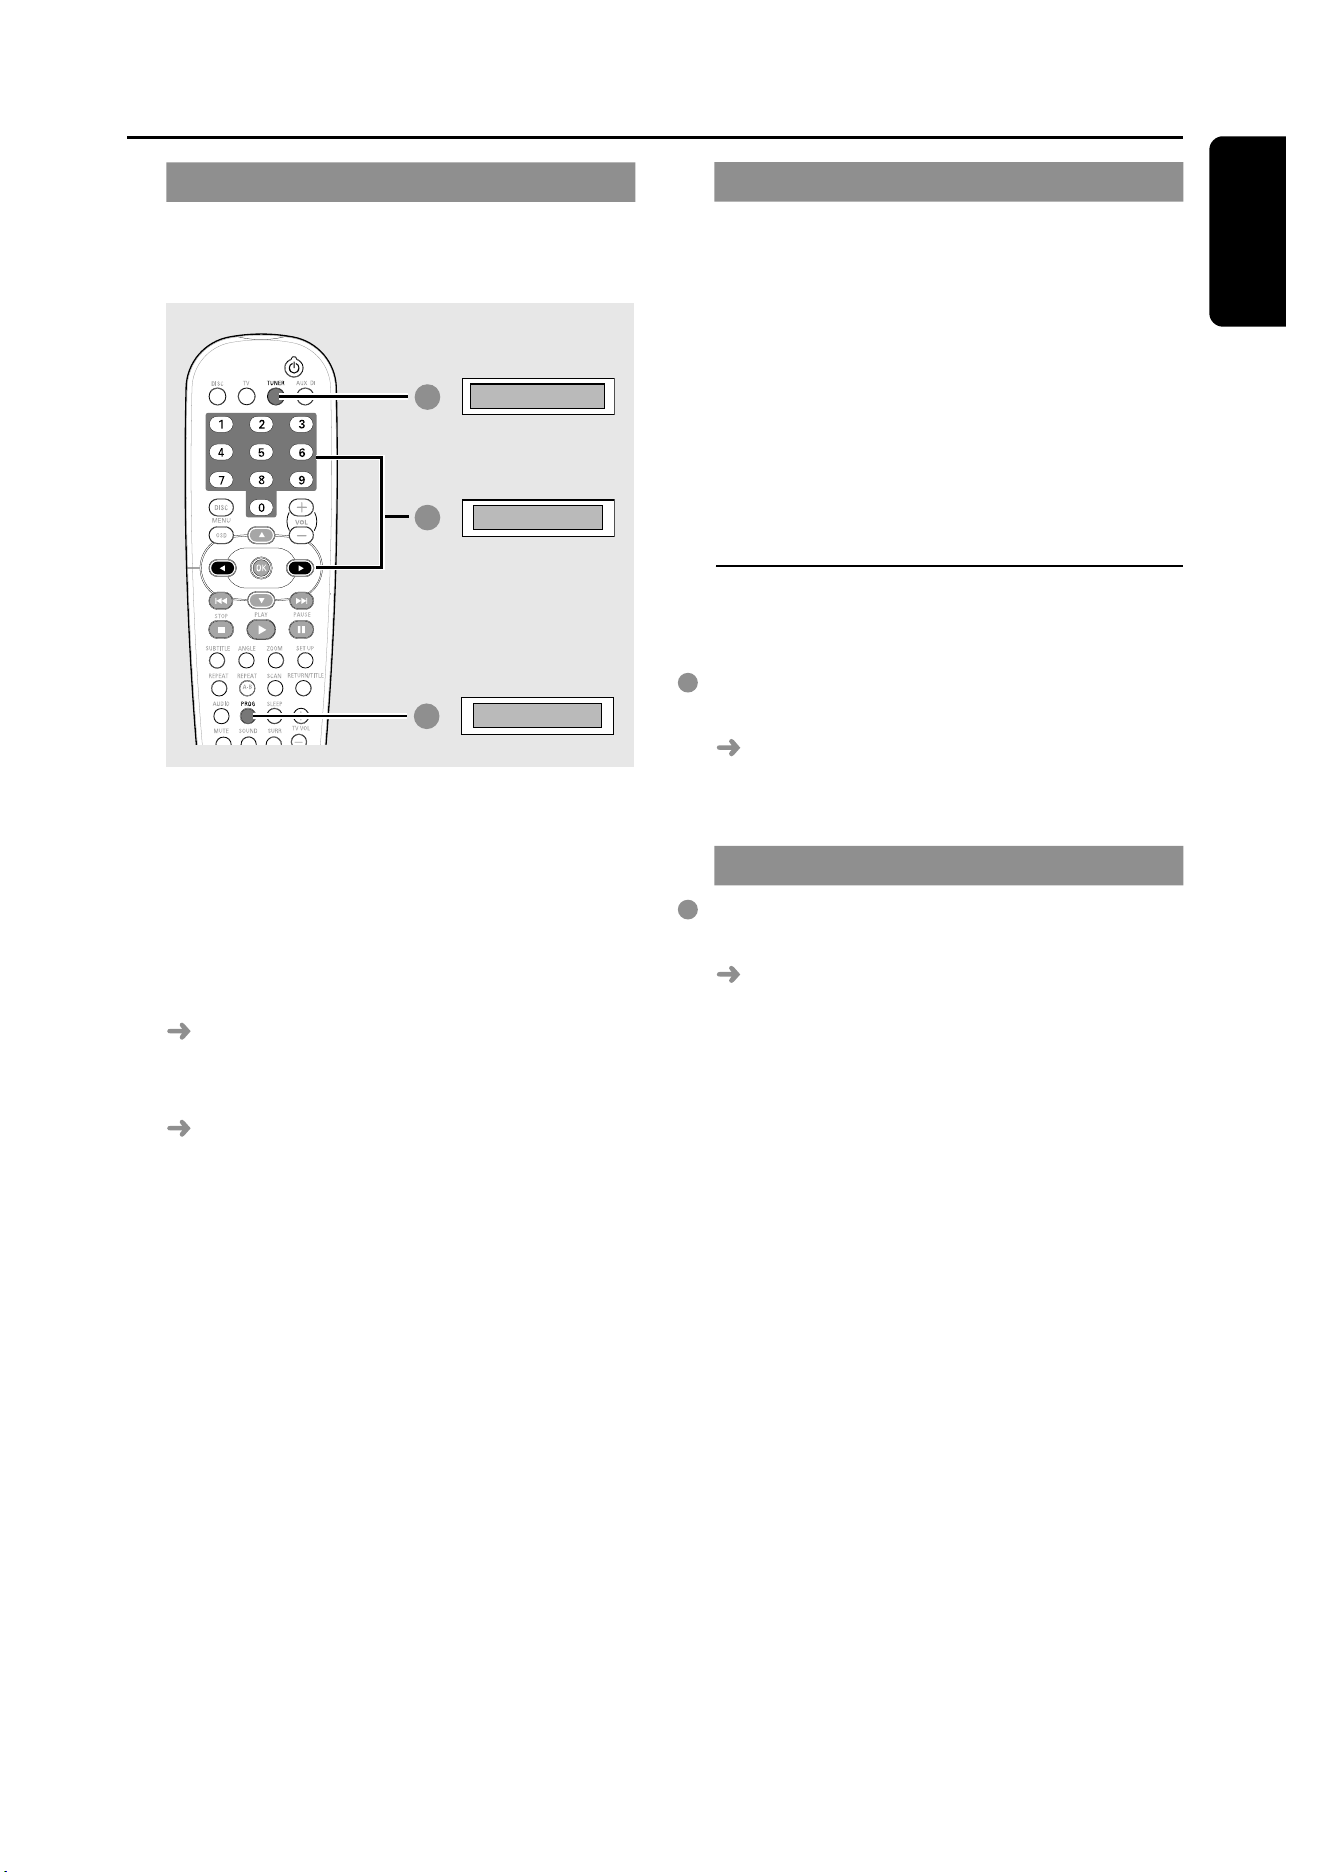
Press TUNER on the remote (or press
SOURCE control on front panel) to
select “FM” or “MW”.
2
Press 34 briefly on the remote.
"SEARCH" appears.
The next radio station will tune
automatically.
3
To tune a weak station, press S / T
briefly and repeatedly until an optimal
reception is found.
Helpful Hint:
– If the FM radio station is transmitting RDS
(Radio Data System) data, the RDS name
will be displayed and stored.
Tuner Operations
Presetting radio stations
You can store up to 20 FM and 10 MW
preset radio stations in the memory.
Helpful Hints:
– The system will exit presetting mode if no
button is pressed within 20 seconds.
– If no valid frequency is detected during
Plug and Play," CHECK ANTENNA" appears.
Using the Plug and Play
Plug and Play allows you to store all
available radio stations automatically.
AUTO INSTALL PRESS PLAY
1
2
1
For first time setup, press SOURCE
on front panel to select TUNER mode.
"AUTO INSTALL PRESS PLAY"
appears.
2
Press 2; on the front panel to start
installation.
"INSTALL TUNER" appears.
Once completed, the last tuned radio
station will play.
FM followed by MW bands will be
stored.
35
3139 115 22872
En gli sh
Tuner Operations
DVD system’s
display panel
Automatic presetting
You can start the automatic presetting
from a selected preset number.
1
3
02
FM
AUTO
2
/
1
Press TUNER on the remote to select
“FM” or “MW”.
2
Press 1 2 or use the numeric keypad
(0-9) to select a preset number to begin.
3
Press and hold PROG until "AUTO"
appears.
If a radio station is stored in one of the
earlier presets, the same radio station will
not store under another preset number.
If no preset number is selected,
automatic preset will begin from preset
(1) and all your former presets will be
overridden.
Manual presetting
You can choose to store only your
favourite radio stations.
1
Tune to your desired radio station (see
“Tuning to radio stations”).
2
Press PROG.
3
Press 1 2 to select a preset number.
4
Press PROG again to store.
Selecting a preset radio
station
Press 1 2 or use the numeric keypad
(0-9) to select a preset number.
The waveband, preset number follow
by radio frequency will appear.
Deleting a preset radio station
Press and hold 9 until “MWXX DELETED”
or “FMXX DELETED” appears.
The current preset radio station will
be deleted.

36
En gli sh
3139 115 22872
Sound Control
IMPORTANT!
For proper surround sound, make
sure the speakers and subwoofer are
connected (see page 9).
Selecting surround sound
Press SURR to select :
MULTI-channel or STEREO.
The availability of the various surround
sound modes depends on the number of
speakers used and the sound available on
the disc.
The centre and surround speakers
operate only in Multi-channel surround
mode.
The available output modes for Multi-
channel include: Dolby Digital, DTS
(Digital Theatre Systems) Surround and
Dolby Pro Logic II.
Stereo broadcasts or recordings will
produce some surround channel effects
when played in a surround mode.
However, mono (single channel sound)
sources will not produce any sound from
the surround speakers.
Helpful Hints:
– SURR button is not functional for SACD
playback. You have to access to the disc
menu in order to select between multi-
channel and stereo tracks, see page 26.
– You are not able to select the surround
sound mode if the system setup menu is
turned on.
Sound and Volume Controls
Selecting digital sound effects
Select a preset digital sound effects that
matches your disc’s content or that
optimises the sound of the musical style
you are playing.
Press SOUND on the remote.
When playing movie discs or in TV mode,
you can select :
CONCERT, DRAMA, ACTION or SCI-FI.
When playing music discs or while in
TUNER or AUX/DI mode, you can select :
ROCK, DIGITAL, CLASSIC or JAZZ.
Helpful Hint:
– For flat sound output, select CONCERT or
CLASSIC.
Volume control
Adjust VOLUME control (or press
VOL +/- on the remote) to increase
or decrease the volume level.
"VOL MIN" is the minimum volume
level and “VOL MAX” is the maximum
volume level.
To turn off the volume temporarily
Press MUTE on the remote.
Playback will continue without sound
and "MUTE" appears.
To restore the volume, press MUTE
again or increase the volume level.
37
3139 115 22872
En gli sh
Other Functions
Switching on/off
Switching to active mode
Press the SOURCE control to select :
DISC ™ FM ™ MW™ TV ™ AUX ™
DI ™ DISC ....
OR
Press DISC, TV, TUNER or AUX/DI on
the remote.
Switching to Eco Power standby
mode
Press STANDBY ON (B).
The display screen will go blank.
Using the remote to operate
your ‘Philips’ television
1
3
2
2
4
1
Press and hold TV to turn on your TV.
2
Press ¡1 / 2™ or use the numeric
keypad (0-9) to select the TV’s channel.
3
Press TV VOL +/- to adjust the TV’s
volume level.
4
Press and hold B to turn off your TV.
Helpful Hint:
– When listening to TV or AUX/DI
programmes, press the respective TV or
AUX/DI button on the remote in order for
the sound to be heard.
Recording to an external
device
1
Connect the external recording device to
LINE OUT (R/L) (see page 12
“Connections-optional“).
2
Select the source to record from your
DVD system (DISC, TUNER, TV or
AUX/DI) and start playback (if
necessary).
3
For ultimate recording, press SOUND
to select ‘CLASSIC’ or ‘CONCERT’ and
press SURR to select ‘STEREO’.
4
Start recording on the external recording
device.
Helpful Hint:
– Refer to the owner’s manual of the
connected equipment for details.
Setting the Sleep timer
The sleep timer enables the system to
switch to Eco Power standby mode
automatically at a preset time.
Press SLEEP on the remote repeatedly
until it reaches the desired preset turn-off
time.
The selections are as follows (time in
minutes):
15 ™ 30 ™ 45 ™ 60 ™ OFF ™ 15…
SLEEP
will show on the display panel,
except if "OFF" is selected.
Before the system switches to Eco
Power standby mode, a countdown of 10
seconds is displayed.
"SLEEP10" ™ "SLEEP 9".... ™
"SLEEP1" ™ "SLEEP"
To cancel the sleep timer
Press SLEEP repeatedly until "OFF"
appears or press the STANDBY ON
(B) button.

38
En gli sh
3139 115 22872
WARNING
Under no circumstances should you try to repair the system yourself, as this will
invalidate the warranty. Do not open the system as there is a risk of electric shock.
If a fault occurs, first check the points listed below before taking the system for repair. If
you are unable to remedy a problem by following these hints, consult your dealer or
Philips for help.
No power.
No picture.
Completely distorted picture or black/
white picture.
The aspect ratio of the screen cannot be
changed even though you have set the
TV display.
No sound or distorted sound.
The DVD player does not start playback.
– Check if the AC power cord is properly
connected.
– Press the STANDBY ON on the front of the
DVD system to turn on the power.
– Refer to your TV’s manual for correct Video In
channel selection. Change the TV channel until
you see the DVD screen.
– Press DISC on the remote.
– If this happens when you changing the setting
of the ‘TV TYPE’, wait for 15 seconds for auto
recovery.
– Check the video connection.
– Sometimes a small amount of picture
distortion may appear. This is not a
malfunction.
– Clean the disc.
– The aspect ratio is fixed on the DVD disc.
– Depending on the TV, it may not be possible to
change the aspect ratio.
– Adjust the volume.
– Check the speaker connections and settings.
– Press the correct source button on the
remote (TV or AUX/DI, for example) to
choose the equipment that you want to hear
through the DVD system.
– Insert a readable disc with the playback side
facing down. The DVD+R/CD-R must be
finalised.
– Check the disc type, colour system (PAL or
NTSC) and region code.
– Check for any scratches or smudges on the disc.
– Press SETUP to turn off the setup menu screen.
– You may need to enter the password in order
to change the parental control rating level or
to unlock the disc for playback.
– Moisture has condensed inside the system.
Remove the disc and leave the system turned
on for about an hour.
Problem
Solution
Troubleshooting
Visit us at www.p4c.philips.com for service support

39
3139 115 22872
En gli sh
Cannot activate some features such as
Angles, Subtitles, or multi-language
Audio.
No able to select some Items in the
setup/system menu.
There is no sound from the centre and
surround speakers.
Radio reception is poor.
The remote control does not function
properly.
Low hum or buzz sound.
Unable to play DivX movies.
The DVD system does not work.
– The features may not be available on the DVD.
– Changing the language for the sound or
subtitle is prohibited on the DVD.
– Press STOP button twice before selecting the
setup/system menu.
– Depending on the disc availability, some menu
items cannot be selected.
– Make sure the centre and surround speakers
are connected correctly.
– Press SURR button to select a correct
surround sound setting.
– Make sure the source you are playing is
recorded or broadcast in surround sound
(DTS, Dolby Digital, etc.).
– The wireless transmitter and receiver must
using the same transmission frequency.
– If the signal is too weak, adjust the antenna or
connect an external antenna for better
reception.
– Increase the distance between the system and
your TV or VCR.
– Tune in to the correct frequency.
– Place the antenna farther away from any
equipment that may be causing the noise.
– Select the source (DISC or TUNER, for
example) before pressing the function button
(ÉÅ, S ,
T).
– Reduce the distance between the remote
control and the system.
– Replace the batteries with new ones.
– Point the remote control directly toward the
IR sensor.
– Check that the batteries are loaded correctly.
– Place the DVD system as far away as possible
from electrical devices that may be causing
interference.
– Check that the DivX file is encoded in ‘Home
Theatre’ mode with DivX 5.x encoder.
– Disconnect the power cord from the power
outlet for a few minutes. Reconnect the power
cord and try to operate again as usual.
Problem
Solution
Troubleshooting
Visit us at www.p4c.philips.com for service support

40
En gli sh
3139 115 22872
AMPLIFIER SECTION
Output power
- Front 50 W RMS / channel
- Rear 50 W RMS / channel
- Centre 50 W RMS
- Subwoofer 75 W RMS
Frequency Response 20 Hz – 20 kHz / –3 dB
Signal-to-Noise Ratio > 65 dB (CCIR)
Input Sensitivity
- AUX In 900 mV
- DIGITAL In 450 mV
TUNER SECTION
Tuning Range FM 87.5 – 108 MHz (50 kHz)
MW 531 – 1602 kHz (9 kHz)
26 dB Quieting Sensitivity FM 20 dB
MW 4 V/m
Image Rejection Radio FM 25 dB
MW 28 dB
IF Rejection Ratio FM 60 dB
MW 24 dB
Signal-to-Noise Ratio FM 60 dB
MW 40 dB
AM Suppression Ratio FM 30 dB
Harmonic Distortion FM Mono 3%
FM Stereo 3%
MW 5%
Frequency Response FM 180 Hz – 10 kHz / ±6 dB
Stereo Separation FM 26 dB (1 kHz)
Stereo Threshold FM 23.5 dB
DISC SECTION
Laser Type Semiconductor
Disc Diametre 12cm / 8cm
Video Decoding MPEG-1 / MPEG-2 / MPEG-4
/ DivX 3.11, 4.x & 5.x
Video DAC 12 Bits
Signal System PAL / NTSC
Video Format 4:3 / 16:9
Video S/N 56 dB (minimum)
Composite Video Output 1.0 Vp-p, 75
S-Video Output Y - 1.0 Vp-p, 75
C - 0.286 Vp-p, 75
Audio DAC 24 Bits / 96 kHz
Frequency Response 4 Hz – 20 kHz (44.1 kHz)
4 Hz – 22 kHz (48 kHz)
4 Hz – 44 kHz (96 kHz)
PCM IEC 60958
Dolby Digital IEC 60958, IEC 61937
DTS IEC 60958, IEC 61937
SACD D/A converter DSD
SACD cut-off frequency 30 kHz
Specifications
MAIN UNIT
Power Supply Rating 220 – 240 V; 50 Hz
Power Consumption 80 W
Dimensions (w x h x d) 360 mm x 55 mm x 325 mm
Weight 3 kg
FRONT SPEAKERS
System 2-way, closed box system
Impedance 4
Speaker drivers 18mm cone dome tweeter,
Frequency response 120 Hz – 20 kHz
Dimensions (w x h x d) 92 mm x 170 mm x 64 mm
Weight
0.73 kg/each
REAR SPEAKERS
System 2-way, closed box system
Impedance (LX3900SA) 4
Impedance (LX3950W) 8
Speaker drivers 18mm cone dome tweeter,
Frequency response 120 Hz – 20 kHz
Dimensions (w x h x d) 92 mm x 170 mm x 64 mm
Weight 0.73 kg/each
CENTRE SPEAKER
System 3-way, closed box system
Impedance 4
Speaker drivers 18mm cone dome tweeter,
Frequency response 120 Hz – 20 kHz
Dimensions (w x h x d) 245 mm x 92 mm x 68 mm
Weight 1.3 kg
PASSIVE SUBWOOFER
System Bass Reflex System
Impedance 4
Speaker driver 6 1/2” woofer
Frequency response 20 Hz – 120 Hz
Dimensions (w x h x d) 154 mm x 361 mm x 350 mm
Weight 4.2 kg
WIRELESS SYSTEM (ONLY FOR LX3950W)
Power supply 220 – 240V; 50Hz/60Hz
Transmission frequency 863.3 MHz – 864.5 MHz
Transmission channel 4
Dimension (w x h x d)
-Transmitter 131 mm x 34 mm x 130 mm
- Receiver 207 mm x 55 mm x 186 mm
Weight 1.12kg
Specifications subject to change without prior
notice

41
3139 115 22872
En gli sh
Analogue: Sound that has not been turned into
numbers. Analogue sound varies, while digital
sound has specific numerical values. These jacks
send audio through two channels, the left and
right.
Aspect ratio: The ratio of vertical and horizontal
sizes of a displayed image. The horizontal vs.
vertical ratio of conventional TVs. is 4:3, and that of
wide-screens is 16:9.
AUDIO OUT Jacks: Red and white jacks on the
back of the DVD System that send audio to
another system (TV, Stereo, etc.).
Bit Rate: The amount of data used to hold a
given length of music; measured in kilobits per
second, or kbps. Or, the speed at which you
record. Generally, the higher the bit rate, or the
higher the recording speed, the better the sound
quality. However, higher bit rates use more space
on a Disc.
Chapter: Sections of a picture or a music piece
on a DVD that are smaller than titles. A title is
composed of several chapters. Each chapter is
assigned a chapter number enabling you to locate
the chapter you want.
Disc menu: A screen display prepared for
allowing selection of images, sounds, subtitles,
multi-angles, etc recorded on a DVD.
DivX 3.11/4.x/5.x: The DivX code is a patent-
pending, MPEG-4 based video compression
technology, developed by DivXNetworks, Inc., that
can shrink digital video to sizes small enough to be
transported over the internet, while maintaining
high visual quality.
Dolby Digital: A surround sound system
developed by Dolby Laboratories containing up to
six channels of digital audio (front left and right,
surround left and right, centre and subwoofer).
Dolby Pro Logic II: It creates five full-bandwidth
output channels from two-channel sources.
Decode only systems that derive 5.1 channels
instead of the conventional 4 channels of Dolby
Pro Logic surround sound.
DTS: Digital Theatre Systems. This is a surround
sound system, but it is different from Dolby Digital.
The formats were developed by different
companies.
JPEG: A very common digital still picture format. A
still-picture data compression system proposed by
the Joint Photographic Expert Group, which
features small decrease in image quality in spite of
its high compression ratio.
MP3: A file format with a sound data compression
system. “MP3” is the abbreviation of Motion
Picture Experts Group 1 (or MPEG-1) Audio Layer
3. By using the MP3 format. One CD-R or CD-RW
can contain about 10 times more data then a
regular CD.
Multichannel: DVDs are formatted to have each
sound track constitute one sound field.
Multichannel refers to a structure of sound tracks
having three or more channels.
Parental control: Limits Disc play according to
the age of the users or the limitation level in each
country. The limitation varies from disc to disc;
when it is activated, playback will be prohibited if
the software’s level is higher than the user-set
level.
Playback control (PBC): Refers to the signal
recorded on video CDs or SVCDs for controlling
playback. By using menu screens recorded on a
Video CD or SVCD that supports PBC, you can
enjoy interactive playback and searching.
Plug and Play: First time power up to the Tuner
mode, the system will prompt the user to proceed
with the automatic installation of radio stations by
simply pressing the PLAY button on the main unit.
Region code: A system allowing discs to be
played only in the region designated. This unit will
only play discs that have compatible region codes.
You can find the region code of your unit by
looking on the product label. Some discs are
compatible with more than one region (or ALL
regions).
S-Video: Produces a clear picture by sending
separate signals for the luminance and the colour.
You can use S-Video only if your TV has an S-Video
In jack.
Super Audio CD (SACD): This audio format is
based upon the current CD standards but includes
a greater amount of information that provides
higher quality sound. There are three types of
discs: single layer, double layer and hybrid discs.
The hybrid disc contains both standard audio CD
and Super Audio CD information.
Surround: A system for creating realistic three-
dimensional sound fields full of realism by
arranging multiple speakers around the listener.
Title: The longest section of a movie or music
feature on DVD. Each title is assigned a title
number, enabling you to locate the title you want.
VIDEO OUT jack: Yellow jack on the back of
the DVD system that sends the DVD picture video
to a TV.
Glossary
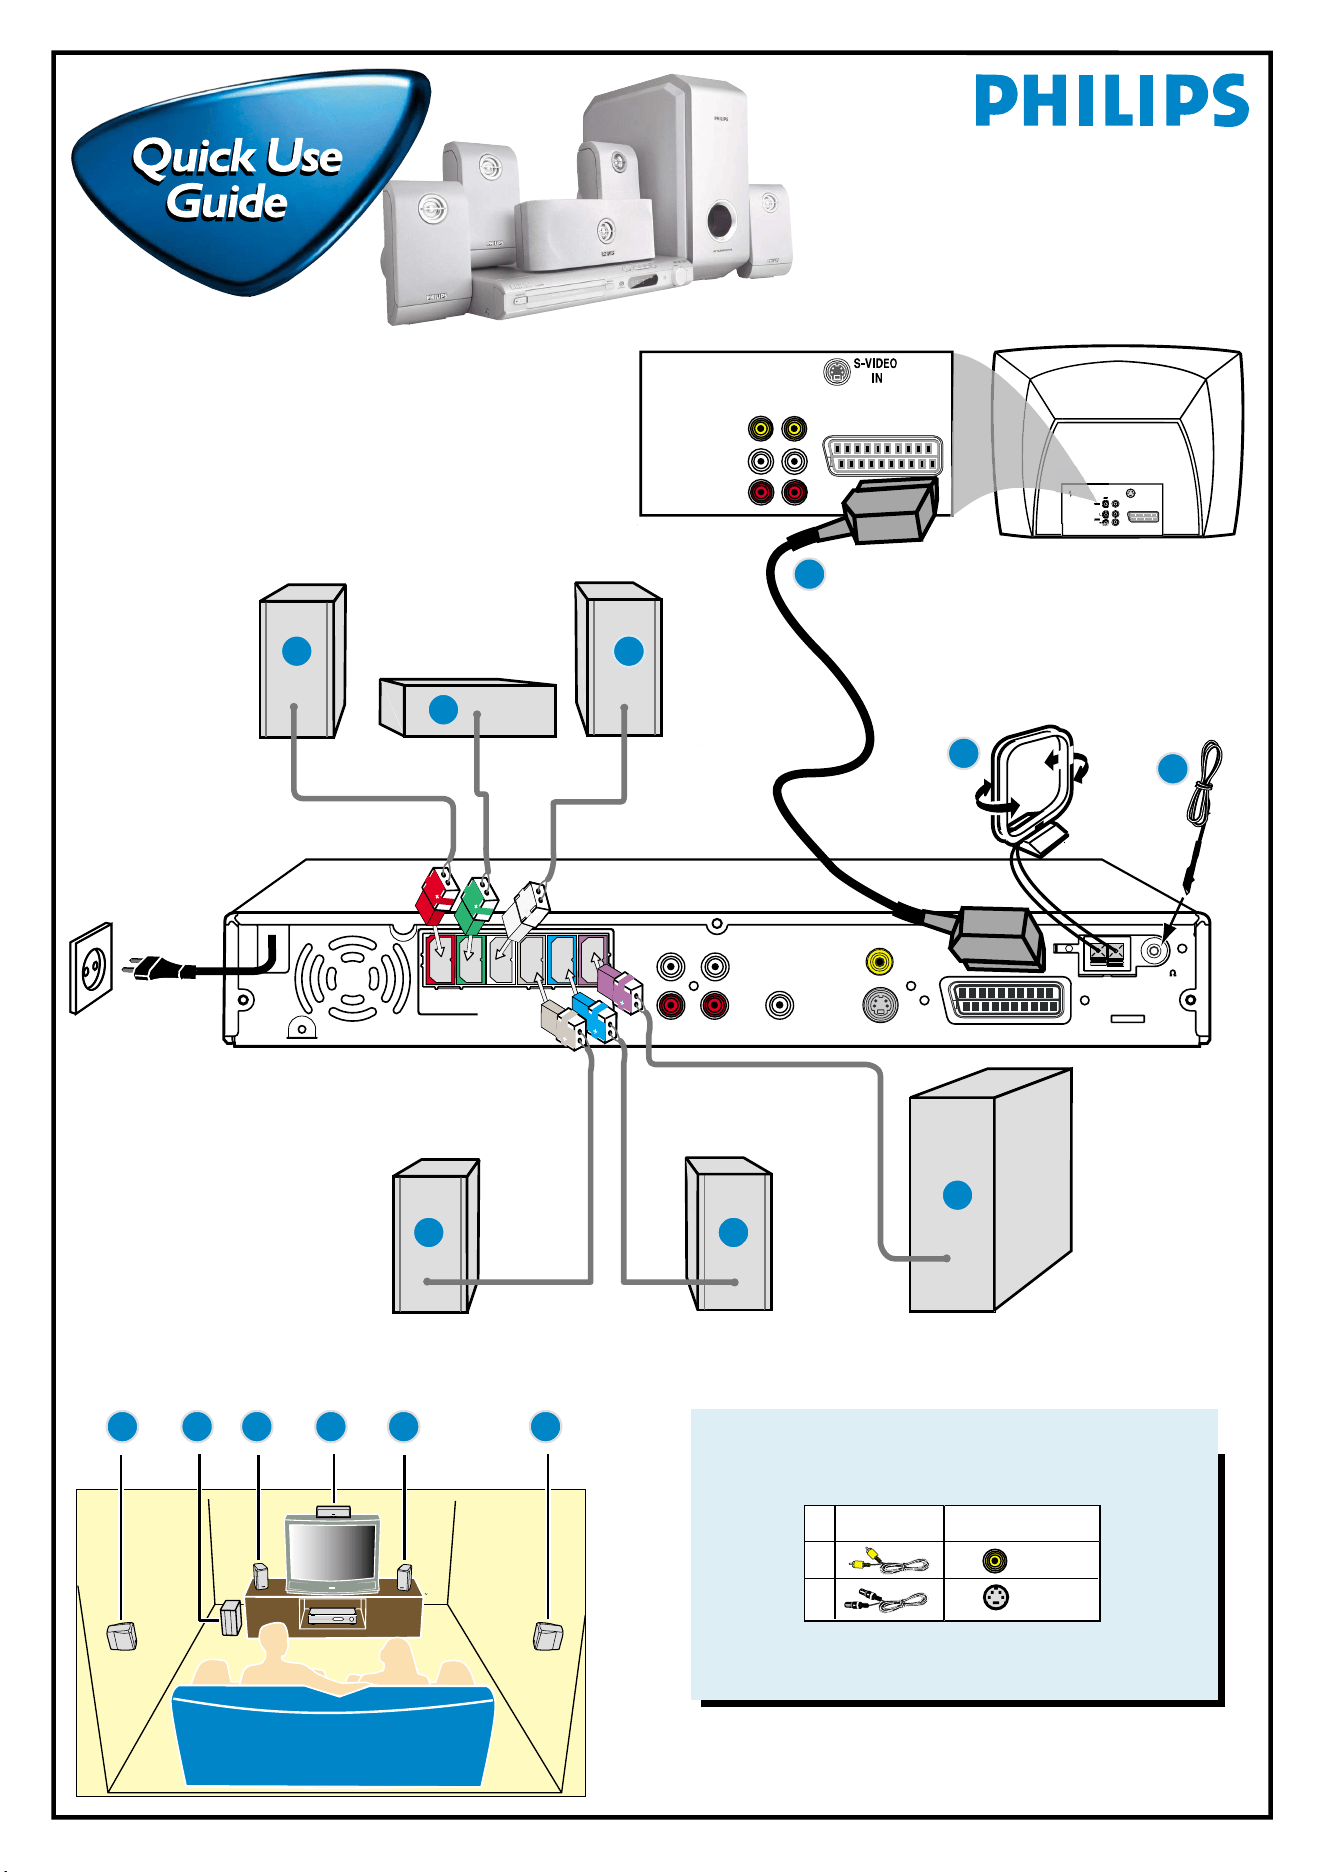
~AC
MAINS
FRONT
RIGHT
CENTER FRONT
LEFT
REAR
RIGHT
REAR
LEFT
SUB-
W
SPEAKERS (4 )
AUX IN LINE OUT
AUDIO
L
R
L
R
S-VIDEO
MW
FM/MW ANTENNA
FM 75
SCART
Rear of TV
(example only)
VIDEO
AUDIO
OUT IN
S-VIDEO
IN
SCART IN
SCART IN
I
N
DIGITAL
IN
CVBS
LX3900SA
First connect ...
... then play
(see next page)
Helpful Hints
You only need to make one video connection to your TV in
order to view the DVD playback.
If your TV has
this video input jack(s)
1
2
Use this
video cable(s)
S-VIDEO
IN
VIDEO
IN
If your TV is not equipped with a SCART connector, connect
your TV through the corresponding video connection 1 or 2
(cables not supplied).
Front Speaker
(left)
Rear Speaker
(right)
Rear Speaker
(left)
Centre Speaker
MW loop antenna
FM antenna
Scart cable
12nc: 3139 115 22861
Front Speaker
(right)
Subwoofer
C BGH A
B
C
J
H
J
D
A
E
F
G
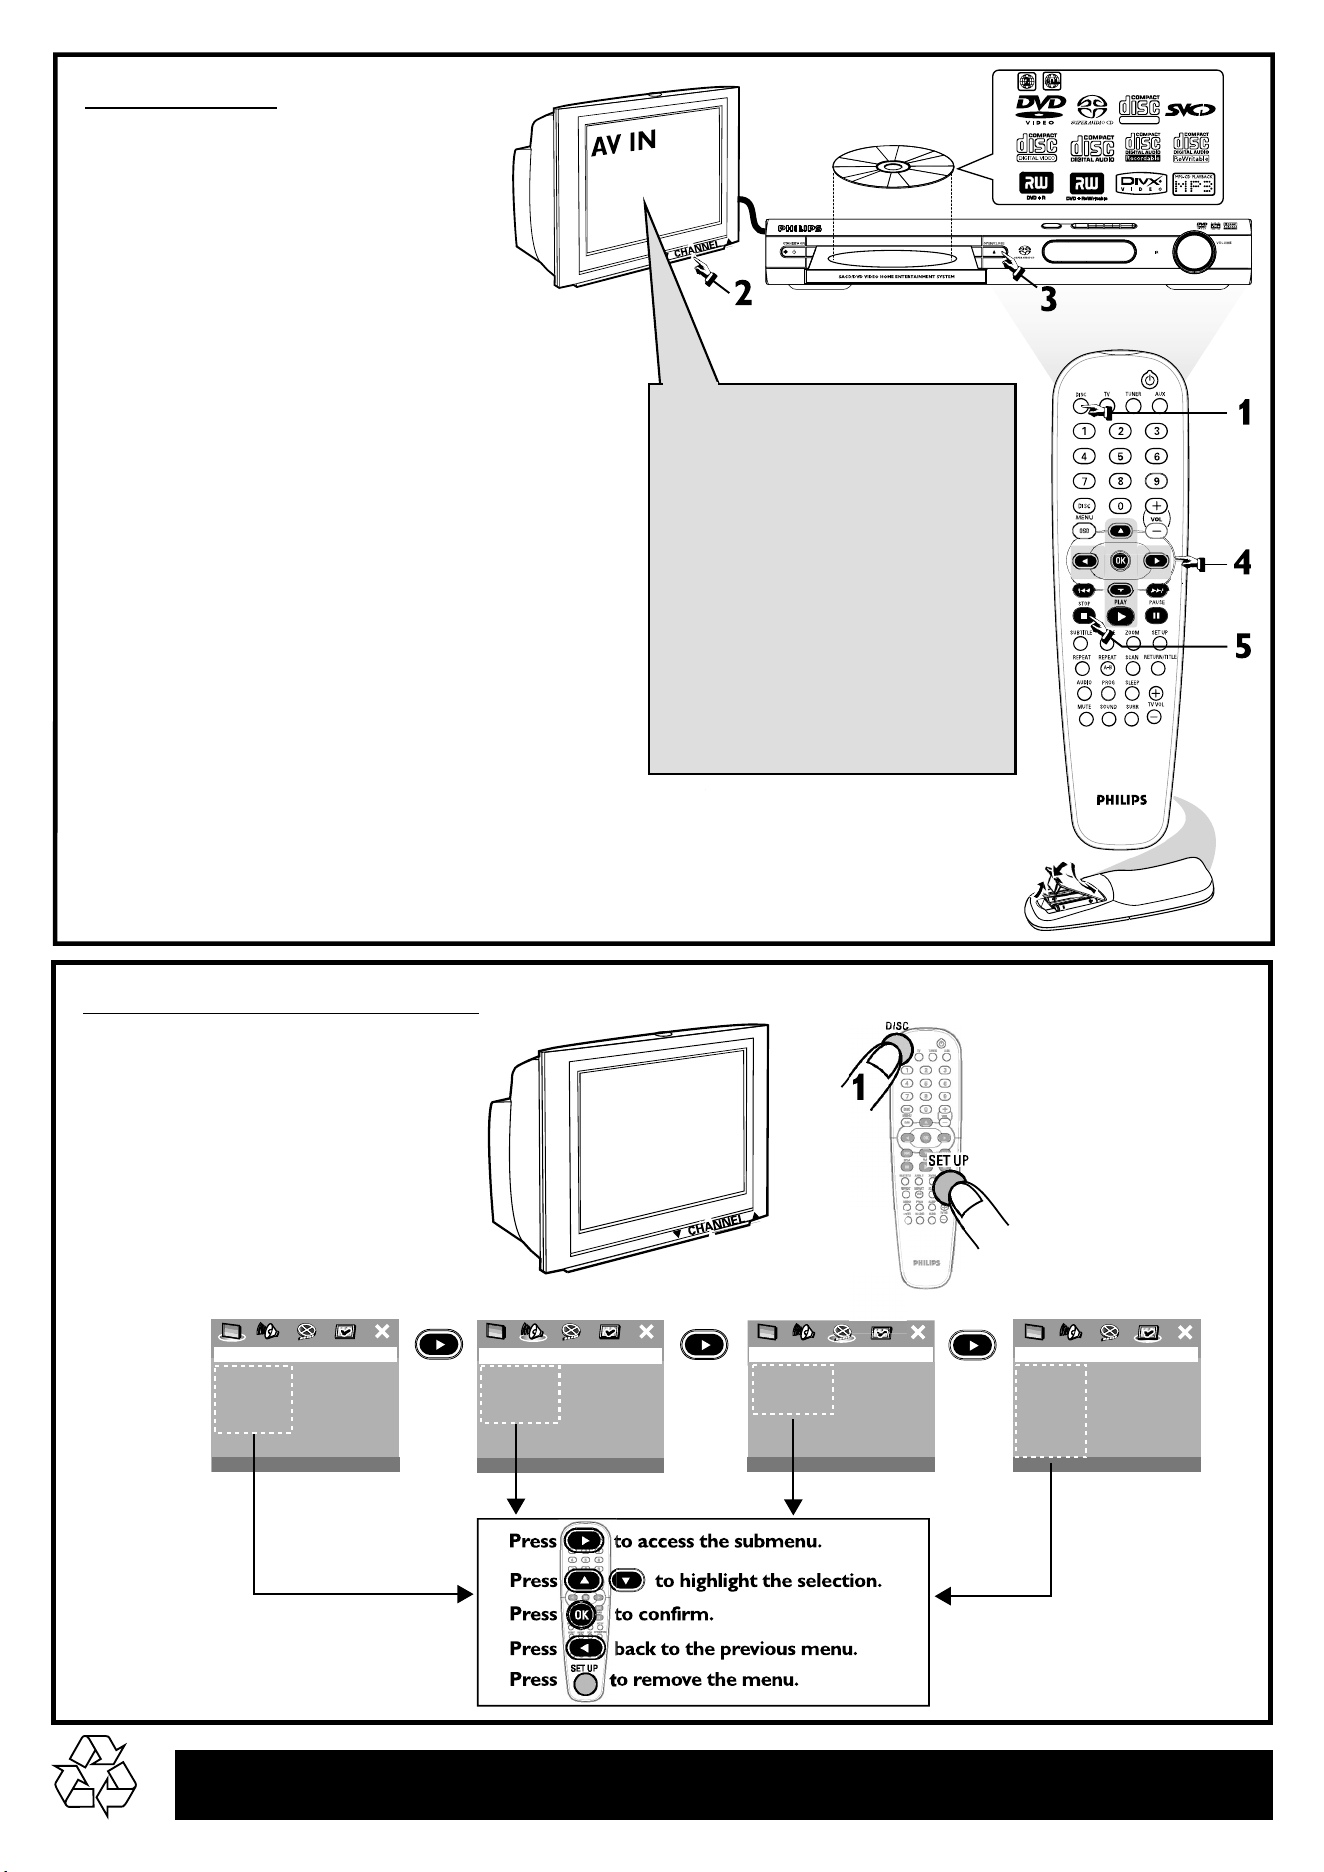
ALL
SUPER VIDEO
Detailed playback features and additional functions are described in the
accompanying owner’s manual.
Playing a disc
1
Press DISC on the remote control.
You can also press the SOURCE button on the front
panel until “DISC” appears on the display panel.
2
Turn on the TV and select the correct Video
In mode.
You should see the blue DVD background screen on the
TV (if no disc in the DVD system).
3
Press OPEN/CLOSE 0 on the front of the
DVD system and load a disc, then press
OPEN•CLOSE 0 again to close the disc
tray.
Make sure the disc label is facing up. For double-sided
discs, load the side you want to play face up.
4
Playback will start automatically.
If a disc menu appears, use 3 4 1 2 buttons on the
remote to make the necessary selection, then press OK
to confirm. Or, use the numeric keypad on the remote to
select features. Follow the instructions given in the disc
menu.
5
To stop playback, press STOPÇ.
Make sure your DVD system and
TV are connected and turned on!
Check the AV (Audio/Video) mode
on your TV.
* Usually this channel is between the lowest
and highest channels and may be called
FRONT, A/V IN, or VIDEO.
* Or, you may go to channel 1 on your TV,
then press the Channel down button
repeatedly until you see the Video In
channel.
* Or, your TV remote control may have a
button or switch that chooses different
video modes.
* See your TV manual for more details.
No picture?
TV TYPE
TV DISPLAY
PICTURE SETTING
DISC LOCK
DISPLAY DIM
PROGRAM
OSD LANGUAGE
SCREEN SAVER
ANALOG OUTPUT
SPEAKER SETUP
CD UPSAMPLING
NIGHT MODE
AUDIO
SUBTITLE
DISC MENU
PARENTAL
PBC
MP3/JPEG NAV
PASSWORD
DEFAULT
- - VIDEO SETUP PAGE - -
- - PREFERENCE PAGE - -
- - GENERAL SETUP PAGE - -
- - AUDIO SETUP PAGE - -
2
Using the DVD setup menu
Guide de dé marrage rapide
Commencez par connecter ...
A Enceinte avant (droite)
B Enceinte centrale
C Enceinte avant (gauche)
D Câble SCART (Pé ritel)
E Antenne-cadre AM
F Antenne filaire FM
G Caisson de basses
H Enceinte arrière (surround gauche)
J Enceinte arrière (surround droite)
Conseils utiles
Il vous suffit de faire une seule connexion vidéo entre votre
té léviseur et le lecteur de DVD pour voir le DVD.
Si votre té lé viseur n’est pas é quipé d’un connecteur
SCART (PÉ RITEL), connectez votre té lé viseur par la connexion
vidéo correspondante 1 ou 2 (câbles non fournis).
... puis démarrez la lecture
Vé rifiez que votre systè me DVD et votre té lé viseur
sont connecté s et sous tension!
Lire un disque
1
Appuyez sur la touche DISC de la té lé commande.
Vous pouvez aussi faire appuyez sur SOURCE de la façade jusqu’à ce que
“DISC” apparaisse à l’é cran.
2
Allumez le té lé viseur et sé lectionnez le mode d’entré e
vidé o adé quat.
Vous devriez voir l’é cran bleu d’arriè re-plan DVD sur le té lé viseur (si aucun
disque ne se trouve dans le lecteur).
3
Appuyez sur OPEN/CLOSE 0 à l’avant du lecteur de
DVD et insé rez un disque, puis appuyez à nouveau sur
OPEN/CLOSE 0 pour fermer le tiroir de disque.
Veillez à ce que le cô té é tiquette soit sur le dessus. Pour les CD double-face,
chargez la face que vous voulez lire vers le haut.
4
La lecture commencera automatiquement.
Si un menu de disque apparaît, utilisez les boutons 3 4 1 2 de la
té lé commande pour faire la sé lection né cessaire, puis appuyez sur OK pour
confirmer. Ou utilisez le clavier numé rique de la té lé commande pour
sélectionner les fonctions. Suivez les instructions donné es dans le menu de disque.
5
Pour arrê ter la lecture, appuyez sur STOP Ç.
Pas les images !!
Vé rifiez le mode AV (audiovisuel) sur votre té lé viseur.
* Gé né ralement, ces canaux se trouvent entre les canaux les plus hauts
et les plus bas et s’appellent FRONT, A/V IN ou VIDEO.
* Vous pouvez aussi sé lectionner le canal 1 de votre té lé viseur et
appuyer à plusieurs reprises sur le bouton de chaîne suivante, jusqu’à
ce que le canal d’entré e vidé o apparaisse.
* D’autre part, la té lé commande du té lé viseur peut avoir un bouton ou
un commutateur permettant de choisir diffé rents modes vidé o.
* Pour en savoir plus, reportez-vous au mode d’emploi du té lé viseur.
Utilisation du menu configuration du lecteur de DVD
Appuyez sur pour accé der au sous-menu.
Appuyez sur pour mettre en surbrillance la sé lection.
Appuyez sur pour confirmer.
Appuyez sur pour retourner au menu pré cé dent.
Appuyez sur pour quitter le menu.
Guía de utilizació n rá pida
En primer lugar conecte ...
A Altavoz delantero (derecha)
B Altavoz central
C Altavoz delantero (izquierdo)
D Cable Scart
E Antena de cuadro MW
F Antena de alambre FM
G Subwoofer
H Altavoz trasero (surround izquierdo)
J Altavoz trasero (surround derecho)
Consejos ú tiles
Solamente necesita realizar una conexió n de vídeo a su televisor
para ver la reproducció n de DVD.
Si su televisor no está equipado con un conector SCART,
conecte su televisor a través de la conexió n de vídeo
correspondiente 1 ó 2 (cables no suministrados).
... y después reproduzca
¡Asegú rese de que su sistema de DVD y su televisor
esté n conectados y encendidos!
Reproducció n de un disco
1
Pulse DISC en el control remoto.
Tambié n puede pulse SOURCE en el panel delantero hasta que en el panel
de visualizació n aparezca “DISC”.
2
Encienda el televisor y seleccione el modo de entrada de
video correcto.
Debería ver la pantalla de fondo azul de DVD (si no hay disco en el sistema DVD).
3
Pulse OPEN/CLOSE 0 en la parte delantera del sistema
DVD y coloque un disco, y vuelva pulsar el botó n
OPEN/CLOSE 0 correspondiente para cerrar la bandeja
de discos.
Asegú rese de que la etiqueta del disco esté cara arriba. En el caso de discos de
dos caras, coloque el disco con la cara que quiere reproducir hacia arriba.
4
La reproducció n se inicia automá ticamente.
Si aparece un menú de disco, utilice los botones 3 4 1 2 del control
remoto para realizar la selecció n necesaria y despué s pulse OK para
confirmarla. O utilice el teclado numé rico del control remoto para
seleccionar funciones. Siga las instrucciones dadas en el menú del disco.
5
Para detener la reproducció n, pulse STOP Ç.
¿No imagen!!
Compruebe el modo (AV/Audio/Video) en su televisor.
* Normalmente, estos canales se encuentran entre los canales más altos y
má s bajos y pueden llamarse FRONT, A/V IN o VIDEO.
* O, puede ir al canal 1 de su televisor y pulsar el botó n de reducció n de
nú mero de canal hasta que vea el canal de entrada de vídeo.
* O, el control remoto de su televisor puede tener un botó n o interruptor
que seleccione diferentes modos de video.
* Para más detalles, consulte el manual de su televisor.
Utilizació n del menú de configuració n de DVD
Pulse para acceder al submenú .
Pulse para resaltar la selecció n.
Pulse para confirmarla.
Pulse para volver al menú anterior.
Pulse para retirar el menú .
Les programmes de lecture dé taillé s et les fonctions
supplé mentaires sont dé crits dans le manuel d’utilisation fourni.
En el manual del propietario adjunto se describen funciones
de reproducció n detalladas y funciones adicionales.
Kurzanleitung
Erst anschließen ...
A Lautsprecher vorne (rechts)
B Center-Lautsprecher
C Lautsprecher vorne (links)
D Scart-Kabel
E MW-Antenne
F FM-Antenne
G Subwoofer
H Surround-Lautsprecher (links)
J Surround-Lautsprecher (rechts)
Hilfreiche Tipps:
Sie mü ssen nur einen Video-Anschluss an Ihr Fernsehgerät
vornehmen, um sich die DVD-Wiedergabe anschauen zu kö nnen.
Wenn Ihr Fernsehgerä t nicht einem SCART-Verbinder
ausgerü stet ist, schließen Sie Ihr Fernsehgerät durch den
entsprechenden Videoanschluss 1 oder 2 an (Kabel nicht
mitgeliefert).
... dann abspielen
Vergewissern Sie sich, dass Ihr DVD-System und
Fernsehgerä t angeschlossen und eingeschaltet sind!
Abspielen einer Disk
1
Drü cken Sie DISC auf der Fernbedienung.
Oder, drü cken Sie SOURCE auf dem vorderen Bedienfeld justieren, bis
„DISC“ im Anzeigefeld erscheint.
2
Schalten Sie das Fernsehgerä t ein und stellen Sie den
richtigen Videoeingangskanal ein.
Sie sollten den blauen DVD-Hintergrundbildschirm auf dem Fernsehgerät
sehen (wenn keine Disk im DVD-System befindlich ist).
3
Drü cken Sie die Taste OPEN/CLOSE 0 einmal, um die
Disk-Lade zu ö ffnen und eine Disk einzulegen.
Anschließend drü cken Sie dieselbe Taste erneut, um die
Disk-Lade zu schließen.
Achten Sie darauf, dass die Disk-Beschriftung nach oben zeigt. Bei doppelseitigen
Disks legen Sie die Seite, die Sie abspielen wollen, nach oben zeigend ein.
4
Die Wiedergabe beginnt automatisch.
Wenn ein CD-Menü erscheint, benutzen Sie 3 4 1 2, um die notwendige
Auswahl zu treffen, dann drü cken Sie OK. Oder benutzen Sie die
nummerische Tastatur auf der Fernbedienung zur Wahl von Funktionen.
Folgen Sie den Anweisungen im CD-Menü .
5
Zum Anhalten der Wiedergabe drü cken Sie STOP Ç.
Aber kein Bild!!
Ü berprü fen Sie den AV- (Audio/ Video) Modus an Ihrem Fernsehgerät.
* In der Regel befindet sich dieser Kanal zwischen den niedrigsten und
hö chsten Kanälen und kann als FRONT, A/V IN oder VIDEO bezeichnet sein.
* Oder Sie kö nnen zu Kanal 1 auf Ihrem Fernsehgerät gehen; anschließend
drü cken Sie die Kanal-nach-unten-Taste wiederholt, bis Sie den
Videoeingangskanal sehen.
* Oder: die Fernsehgerät-Fernbedienung kö nnte eine Taste oder einen
Schalter haben, womit verschiedene Videomodi gewählt werden.
* Nähere Angaben sind Ihrem Fernsehgerät-Handbuch zu entnehmen.
Benutzung des DVD Setup-Menü s
Drü cken Sie um auf das Untermenü zuzugreifen.
Drü cken Sie um die Auswahl hervorzuheben.
Drü cken Sie zur Bestätigung.
Drü cken Sie zur Rü ckkehr zum vorigen Menü .
Drü cken Sie zum Entfernen des Menü s.
Verkorte handleiding
Eerst aansluiten ...
A Voorluidspreker (rechts)
B Middenluidspreker
C Voorluidspreker (links)
D Scart-kabel
E MW-antenne
F FM-antenne
G Subwoofer
H Surround-luidspreker (links)
J Surround-luidspreker (rechts)
Handige tips:
U hoeft slechts éé n videoaansluiting te maken op uw tv om het
afspelen van de dvd’s te kunnen zien.
Als uw tv geen SCART-aansluiting heeft, sluit uw tv dan aan
via de overeenkomstige videoaansluiting 1 of 2 (kabels niet
bijgeleverd).
... dan afspelen
Controleer of uw dvd-systeem en uw tv aangesloten
en ingeschakeld zijn!
Afspelen van een disk
1
Druk op DISC op de afstandsbediening.
U kunt druk op SOURCE op de voorkant draaien tot in het display “DISC”
verschijnt.
2
Zet de tv aan en kies het juiste video-ingangskanaal.
U moet nu het blauwe dvd-achtergrondscherm zien op uw tv (als er geen
disk in het dvd-systeem zit).
3
Druk eenmaal op de toets OPEN/CLOSE 0 om de
disklade te openen, plaats er een disk in en druk
vervolgens opnieuw op dezelfde toets om de disklade te
sluiten.
Let erop dat de disk met het etiket naar boven geplaatst is. Bij tweezijdige
disks, plaatst u de disk met de zijde die u wilt afspelen naar boven.
4
Het afspelen gaat automatisch van start.
Als er een diskmenu verschijnt, gebruik dan 3 4 1 2 om de gewenste keuze
te maken en druk vervolgens op OK. Of gebruik de cijfertoetsen op de
afstandsbediening om een functie te kiezen. Volg de aanwijzingen die in het
diskmenu gegeven worden.
5
Om het afspelen te beë indigen, drukt u op STOP Ç.
Geen beeld!!
Controleer het AV (audio/video)-kanaal op uw tv.
* Dit kanaal bevindt zich normaal gezien tussen het laagste en het hoogste
kanaal en kan de naam FRONT, A/V IN of VIDEO hebben.
* U kunt ook naar kanaal 1 op uw tv gaan en vervolgens herhaaldelijk op
de toets Volgend kanaal drukken tot u het video-ingangskanaal ziet.
* Het kan ook zijn dat de afstandsbediening van de tv een toets of
schakelaar heeft waarmee u de verschillende videokanalen kunt kiezen.
* Zie de gebruiksaanwijzing van uw tv voor meer details.
Gebruik van het dvd-instellingenmenu
Druk op om het submenu te openen.
Druk op om uw keuze te laten oplichten.
Druk op om te bevestigen.
Druk op om terug te keren naar het vorige menu.
Druk op om het menu af te sluiten.
Detaillierte Wiedergabe-Funktionen und zusätzliche Funktionen
sind im begleitenden Benutzerhandbuch erläutert.
Meer afspeelfuncties en overige functies staan beschreven in
de bijbehorende gebruiksaanwijzing.

Guida d’uso rapido
Prima collegare ...
A Altoparlante anteriore (destro)
B Altoparlante centrale
C Altoparlante anteriore (sinistro)
D Cavo Scart
E Antenna MW
F Antenna FM
G Subwoofer
H Altoparlante surround (sinistro)
J Altoparlante surround (destro)
Suggerimenti di aiuto:
Basta effettuare un collegamento video alla TV per poter
visualizzare la riproduzione del DVD.
Se la TV non è munita di un connettore SCART, collegarla
tramite il corrispondente collegamento video 1 o 2 (cavo non
fornito).
... quindi riprodurre
Assicurarsi che il sistema DVD e la TV siano collegati
ed accesi!
Come riprodurre un disco
1
Premere il tasto DISC sul telecomando.
Oppure, premere il pulsante SOURCE sul pannello anteriore fino a quando
“DISC” appare sul pannello del display.
2
Accendere la TV ed impostare il corretto canale video.
Si deve visualizzare lo schermo blu di sfondo del DVD sulla TV (se nessun
disco è presente nel sistema DVD).
3
Premere una volta il pulsante OPEN/CLOSE 0 per
aprire la piastra del disco e caricarvi un disco, quindi
premere lo stesso pulsante un’altra volta per chiudere la
piastra del disco.
Assicurarsi che l’etichetta del disco sia rivolta verso l’alto. Per dischi a doppio
lato, caricare il disco col lato che si vuole riprodurre rivolto in alto.
4
La riproduzione inizierà automaticamente.
Se appare un menu del disco, usare 3 4 1 2 per effettuare la dovuta
selezionare, quindi premere OK. Oppure, usare la tastierina numerica sul
telecomando per selezionare le funzioni. Seguire le istruzioni che appaiono
sul menu del disco.
5
Per arrestare la riproduzione, premere STOP Ç.
Assenza di immagine!!
Controllare il modo AV (audio/ video) della TV.
* Normalmente questo canale si trova tra il canale più alto e quello più
basso e potrebbe essere denominato FRONT, A/V IN o VIDEO.
* Oppure, si potrebbe andare al canale 1 della TV, quindi premere
ripetutamente il pulsante giù del canale fino a quando si vede il canale
d’ingresso video.
* Oppure, il telecomando della TV potrebbe avere un pulsante o un
interruttore che seleziona diverse modalità video.
* Per ulteriori dettagli consultare il manuale della TV.
Utilizzazione del menu setup
Premere per accedere al submenu.
Premere per evidenziare la selezione.
Premere per confermare.
Premere per ritornare al menu precedente.
Premere per eliminare il menu.
Snabbguide
Anslut först.....
A Fronthö gtalare (hö ger)
B Centerhö gtalare
C Fronthö gtalare (vänster)
D SCART-kabel
E MV-antenn
F FM-antenn
G Subwoofer
H Surroundhö gtalare (vänster)
J Surroundhö gtalare (hö ger)
Nyttiga tips:
Du behö ver bara gö ra en enda videoanslutning till din TV fö r att
titta på DVD-skivor.
Om TV:n saknar SCART-kontakt, anslut då TV:n via
motsvarande videokontakt 1 eller 2 (kablar medfö ljer inte).
... Spela sedan
Guide Kontrollera att DVD-systemet och TV:n ä r
anslutna och på slagna!
Spela en skiva
1
Tryck DISC på fjä rrkontrollen.
Eller, tryck SOURCE på spelarens framsida tills ”DISC” visas på
teckenfö nstret.
2
Sä tt på TV:n och stä ll in den på korrekt videoingå ngskanal.
Du bö r se den blå Philips DVD-bakgrundsbilden på TV:n (om det inte sitter
någon skiva i DVD-spelaren).
3
Tryck på knappen OPEN/CLOSE 0 en gå ng fö r att ö ppna
skivfacket och sä tt i en skiva. Tryck sedan på samma
knapp igen fö r att stä nga facket.
Se till att etikettsidan är vänd uppåt. Fö r dubbelsidiga skivor, ska du vända den
sida du vill spela uppåt.
4
Spelningen kommer att startas automatiskt.
Om en skivmeny visas, gö r då nö dvä ndigt val med hjä lp av 3 4 1 2, och
tryck sedan på OK. Eller, använd siffertangenterna på fjärrkontrollen till att
välja funktioner. Fö lj anvisningarna som ges på skivmenyn.
5
Fö r att stoppa spelningen, tryck på STOP Ç.
Ingen bild !!
Kontrollera AV-lä get (Audio/Video) på din TV.
* Vanligtvis ligger denna kanal mellan de lägsta och de hö gsta kanalerna och
kan heta FRONT, A/V IN eller VIDEO.
* Eller gå till kanal 1 på din TV och tryck sedan på knappen fö r att gå till
lägre kanal upprepade gånger tills du får fram videoingå ngskanalen.
* Eller så har TV-apparatens fjärrkontroll en knapp eller omkopplare fö r att
välja mellan olika videolägen.
* Se bruksanvisningen fö r din TV fö r närmare information.
Anvä nda DVD-instä llningsmenyn
Trycka på så att undermenyn visas.
Trycka på så att valet markeras.
Trycka på så att valet bekräftas.
Trycka på så att återgå till fö regående meny genom.
Trycka på så att stä ng menyn genom.
Le funzioni di riproduzione dettagliate ed altre funzioni sono
descritte nell’accluso manuale dell’utente.
Fö r detaljer om avspelnings- och andra funktioner, se den
medfö ljande bruksanvisningen.
Hurtigbrugsguide
Tilslut først….
A Fronthøjttaler (højre)
B Midterhøjttaler
C Fronthøjttaler (venstre)
D Scart-kabel
E MW-antenne
F FM-antenne
G Subwoofer
H Surround-højttaler (venstre)
J Surround-højttaler (højre)
Nyttige tips:
For at se DVD-afspilning er det kun nødvendigt at foretage é n
videotilslutning til TV’et.
Hvis dit tv ikke er udstyret med en SCART-
stikforbindelse, tilsluttes tv’et via den tilsvarende
videotilslutning 1 eller 2 (kabler medfølger ikke).
... og spil derefter
Sørg for at DVD-anlægget og TV’et er forbundet, og
at der er tændt for apparaterne!
Afspilning af discs
1
Tryk på DISC på fjernbetjeningen.
Eller, tryk på SOURCE knappen på frontpanelet indtil displaypanelet viser
”DISC”.
2
Tænd for TV’et og stil det ind på den rigtige videokanal.
Den blå DVD-baggrund skal ses på TV-skærmen (uden ilagt disc i DVD-
systemet).
3
Tryk é n gang på OPEN/CLOSE 0 knappen for at lukke
disc-skuffen op og ilægge en disc. Tryk igen på samme
knap for at lukke disc-skuffen i.
Sørg for at dics’ens trykte side vender opad. Hvis det er en dobbeltsidet disc,
skal den side, der skal afspilles, vende opad.
4
Afspilningen starter automatisk.
Hvis der ses en disc-menu på skærmen, foretages det nødvendige valg ved at
trykke på 3 4 1 2 tasterne. Tryk derefter på OK. Eller brug ciffertasterne
på fjernbetjeningen til at vælge det ønskede. Følg de instruktioner der ses i
disc-menuen.
5
Afspilningen stoppes ved at trykke på STOP Ç.
Ingen billede!!
Kontrollé r AV (Audio/Video) indstillingen i TV’et.
*Denne kanal ligger normalt mellem den laveste og den højeste kanal og
kaldes for FRONT, A/V IN, eller VIDEO.
*Eller: Vælg kanal 1 på TV’et og tryk derefter gentagne gange på ”kanal
ned” knappen indtil videokanalen ses.
*Eller: Fjernbetjeningen har en tast eller en omskifterknap, som vælger
mellem forskellige videostillinger.
*Angående flere detaljer se i TV’ets brugervejledning.
Brug af menuen til DVD-opsætning
Tryk på for at åbne undermenuen.
Tryk på for at fremhæve valget.
Tryk på for at bekræfte.
Tryk på for at vende tilbage til foregående menu.
Tryk på for at fjerne menuen.
Pikakä yttö ohje
Yhdistä ensin ...
A Etukaiutin (oikea)
B Keski-kaiutin
C Etukaiutin (vasen)
D Scart-johto
E KA-antenni
F ULA-antenni
G Subwoofer
H Surround-kaiutin (vasen)
J Surround-kaiutin (oikea)
Hyö dyllisiä vinkkejä :
Sinun tarvitsee tehdä vain yksi kytkentä televisioon voidaksesi
katsoa DVD-levyjä.
Jos televisiossa ei ole SCART-liitä ntä ä , yhdistä televisio
vastaavan videoliitäntään 1 tai 2 (johtoja ei ole mukana).
... toista sitten
Varmista, että DVD-jä rjestelmä ja tv on yhdistetty ja
virta on kytketty!
Levyn toisto
1
Paina kauko-ohjaimesta painiketta DISC.
Tai, paina painiketta SOURCE, kunnes näyttö paneeliin ilmestyy “DISC”.
2
Kytke televisio toimintaan ja valitse oikea videokanava.
Televisiosta tulisi näkyä sininen DVD -taustakuva (jos levyä ei ole sisällä).
3
Avaa levykelkka painamalla kerran painiketta
OPEN/CLOSE 0 ja syö tä levy, sulje sitten levykelkka
painamalla samaa painiketta uudelleen.
Aseta levy etiketti ylö späin. Aseta kaksipuolisista levyistä ylö späin se puoli,
jonka haluat toistaa.
4
Toisto alkaa automaattisesti.
Jos näytetään levyvalikko, valitse painikkeilla 3 4 1 2 ja paina sitten
painiketta OK. Tai valitse käyttämällä kauko-ohjaimen numeropainikkeita.
Noudata levyvalikossa annettuja ohjeita.
5
Pysä ytä toisto painikkeella STOP Ç.
Ei kuvaa !!
Tarkista television AV-toiminto (Audio/Video).
*Yleensä tämä kanava on alimman ja ylimmän kanavan vä lillä ja sen nimenä
voi olla FRONT, A/V IN tai VIDEO.
*Tai, voit valita televisiosta kanavan 1; paina sen jälkeen kanavan
pienentävää painiketta toistuvasti, kunnes videokanava näkyy.
*Tai, television kauko-ohjaimessa voi olla painike, jolla valitaan eri
videotoiminnot.
*Katso tarkemmat ohjeet television käyttö ohjeesta.
DVD-asetusvalikon kä yttä minen
Siirry alivalikkoon painamalla -painiketta.
Korosta valinta painamalla -painiketta.
Vahvista valita painamalla -painiketta.
Voit palata edelliseen valikkoon painamalla -painiketta .
Voit poistaa valikon näytö stä painamalla -painiketta.
Detaljerede afspilningsfinesser og yderligere funktioner er
beskrevet i den medfølgende brugsanvisning.
Toisto-ominaisuudet ja muut toiminnot on selostettu
tarkemmin mukana tulevassa kä yttö ohjeessa.
Guia de Utilizaçã o Ré pida
Primeiro Ligue...
A Altifalante frontal (direito)
B Altifalante central
C Altifalante frontal (esquerdo)
D Cabo Scart
E Antena MW
F Antena FM
G Subwoofer
H Altifalante surround (esquerdo)
J Altifalante surround (direito)
Sugestõ es Ú teis:
Só é necessário proceder a uma ligação vídeo ao televisor para
visualizar a leitura de DVDs.
Se o televisor nã o estiver equipado com um conector
SCART, ligue o televisor atravé s da ligação de vídeo
correspondente 1 ou 2 (cabos não fornecidos).
... depois Leia
Certifique-se de que o sistema de DVDs e o televisor
estã o ligados!
Ler um disco
1
Prima DISC no telecomando.
Ou, prima SOURCE no painel frontal até “DISC” aparecer no visor.
2
Ligue o televisor e defina o canal de vídeo correcto.
Deverá visualizar o ecrã de fundo azul DVD no televisor (se não estiver
nenhum DVD no sistema).
3
Prima uma vez o botã o OPEN/CLOSE 0 para abrir o
tabuleiro e coloque um disco e, depois, prima novamente
o mesmo botã o para fechar o tabuleiro.
Certifique-se de que a etiqueta do disco está virada para cima. Para os
discos de duas faces, coloque a face que pretende ler virada para cima.
4
A leitura inicia-se automaticamente.
Se aparecer um menu de disco, utilize 3 4 1 2 para proceder à selecção
pretendida e, depois, prima OK. Ou utilize o teclado numérico do controlo
remoto para seleccionar funcionalidades. Siga as instruçõ es fornecidas no
menu do disco.
5
Para interromper a leitura, prima STOP Ç.
Sem imagem !!
Verifique o modo AV (á udio/vídeo) no televisor.
* Normalmente, este canal está entre os canais inferiores e superiores e
pode ser designado de FRONT, A/V IN ou VIDEO.
* Ou pode ir para o canal 1 do televisor e, depois, premir repetidamente
o botão de canal até visualizar o canal Video In.
* Alternativamente, o telecomando do televisor pode ter um botão ou
interruptor que escolhe modos de vídeo diferentes.
* Consulte o manual do televisor para mais informaçõ es.
Utilizar o menu de configuraçã o do DVD
Prima para aceder ao submenu.
Prima para realçar a selecção.
Prima para confirmar.
Prima para regressar ao menu anterior.
Prima para remover o menu.
…
A ()
B
C ()
D Scart
E MW
F FM
G
H ()
J ()
:
DVD, x
.
SCART,
1 2 ( ).
...
DVD
!
1
DISC .
, SOURCE ,
“DISC ” ( ).
2
.
DVD
( DVD).
3
OPEN/CLOSE 0
, ,
.
. ,
.
4
.
, 3 4 1 2
, , OK. ,
.
.
5
, STOP Ç.
!!
AV (/)
.
*
FRONT, A/V IN VIDEO.
* , 1 ,
,
, .
* ,
.
* ,
.
DVD
.
.
.
.
.
As características de leitura detalhadas e funçõ es adicionais
sã o descritas no manual do utilizador fornecido.
.

Skeócona instrukcja obsługi
Najpierw podłącz ...
A Przedni głośnik (prawy)
B Głośnik środkowy
C Przedni głośnik (lewy)
D Przewód Scart
E Antena MW
F Antena FM
G Subwoofer
H Głośnik satelitarny (lewy)
J Głośnik satelitarny (prawy)
Wskazó wki:
Do odtwarzania płyt DVD potrzebne jest tylko jedno połączenie
wideo z odbiornikiem TV.
Jeśli odbiornik TV nie jest wyposażony w złącze SCART,
należy go podłączyć za pośrednictwem odpowiedniego gniazda
wideo 1 lub 2 (kable nie należą do wyposażenia).
... potem odtwarzaj
Zestaw DVD i odbiornik TV muszą być połączone i
włączone!
Odtwarzanie płyty
1
Naciśnij przycisk DISC na pilocie zdalnego sterowania.
Naciśnij przycisk SOURCE aż na wyświetlaczu pojawi się wskazanie “DISC"
(Płyta).
2
Włącz odbiornik TV i ustaw prawidłowy kanał Video In.
Na ekranie odbiornika TV powinien wyświetlić się niebieski ekran
odtwarzacza DVD (jeżeli w odtwarzaczu nie ma płyt).
3
Naciśnij jeden raz przycisk OPEN/CLOSE 0 w celu
otwarcia szuflady odtwarzacza, włóż płytę, a następnie
ponownie naciśnij ten przycisk w celu zamknięcia szuflady.
Należy sprawdzić, czy płyta została ułożona nadrukiem do góry. W przypadku
płyt dwustronnych, strona, która ma być odtwarzana powinna być zwrócona
do góry.
4
Odtwarzanie rozpocznie się automatycznie.
Jeśli wyświetlone zostanie menu płyty, dokonaj odpowiedniego wyboru za
pomocą przycisków 3 4 1 2 i naciśnij OK. Wybór funkcji umożliwiają
również przyciski numeryczne na pilocie. Postępuj zgodnie z instrukcjami w
menu płyty.
5
Aby zatrzymać odtwarzanie, naciśnij przycisk STOP Ç.
Brak obrazu!!
Sprawdź tryb AV (audio/wideo) odbiornika TV.
* Zazwyczaj kanał ten znajduje się pomiędzy najniższym i najwyższym
kanałem i może być oznaczony jako FRONT, A/V IN lub VIDEO.
* Można również przejść do kanału 1 odbiornika TV, a następnie naciskać
przycisk zmiany kanałów w dół do momentu znalezienia kanału wideo.
* Także pilot zdalnego sterowania odbiornika TV może być wyposażony w
przycisk lub przełącznik pozwalający na wybór różnych trybów wideo.
* Więcej informacji znajduje się w instrukcji obsługi odbiornika TV.
Korzystanie z menu ustawień DVD
Naciśnij aby przejść do podmenu.
Naciśnij aby wybrać pozycję.
Naciśnij aby potwierdzić.
Naciśnij aby powró ciç do poprzedniego menu.
Naciśnij aby usunàç menu.
Zaawansowane funkcje odtwarzania oraz funkcje dodatkowe
opisano w dołączonej do zestawu instrukcji obsługi.
Краткое руководство
Сначала подключите ...
A Передняя колонка (Правая)
B Центральная колонка
C Передняя колонка (Левая)
D Кабель Scart
E Рамочная антенна MW
F Проводная антенна FM
G Низкочастотная колонка
H Колонка объемного звучания (Левая)
J Колонка объемного звучания (Правая)
Полезные советы
Для воспроизведения дисков DVD необходимо выполнить
только одно видеосоединение с телевизором.
Если у тлвизора нт разъма SCART, подсодинит тлвизор
чрз соотвтствующ видо содинни 1 или 2 (кабли н
прилагаются).
...затем воспроизводите
Убедитесь, что микросистема DVD и телевизор
соединены и включены!
Воспроизведение диска
1
На пульте ДУ нажмите кнопку DISC.
Также можно нажимать кнопку SOURCE на передней панели до
появления на экране дисплея надписи "DISC".
2
Включите телевизор и выберите соответствующий
режим видеовхода.
На телевизоре должен появиться фоновый экран (если в системе
DVD нет диска).
3
На передней панели системы DVD нажмите
OPEN/CLOSE 0 и загрузите диск, затем снова нажмите
соответствующую кнопку OPEN/CLOSE 0, чтобы
закрыть лоток для диска.
Убедитесь, что диск вставлен этикеткой вверх. Диски, записанные с
обеих сторон, вставляйте вверх стороной, которая будет проигрываться.
4
Воспроизведение начнется автоматически.
Если появилось меню диска, при помощи кнопок 3 4 1 2 сделайте
нужный выбор, для подтверждения нажмите OK. Можно также
использовать цифровую клавиатуру на пульте ДУ. Следуйте
инструкциям, приведенным в меню диска.
5
Для остановки воспроизведения нажмите STOP Ç.
Нет изображения !!
Проверьте, находится ли телевизор в режиме AV (Аудио/
Видео).
* Обычно этот канал находится между самым нижним и самым
высоким каналами и обычно называется FRONT, A/V IN, или VIDEO.
* Можно также перейти к каналу 1 телевизора и нажимать кнопку
канала вниз до тех пор, пока вы не появится канал видеовхода.
* На пульте ДУ может находиться специальная кнопка или
переключатель для выбора различных видеорежимов.
* Подробности смотрите в руководстве своего телевизора.
Использование меню настройки DVD
Нажмите для входа в подменю.
Нажмите , чтобы выбрать выбранный пункт.
Нажмите для подтверждения выбора.
Нажмите , чтобы вернуться к предыдущему меню.
Нажмите , чтобы убрать меню.
Детальное описание функций воспроизведения и описание дополнительных
функций содержится в прилагаемом руководстве пользователя.