Manual de Instrucciones
LICUADORA CLASICA
LEA TODAS LAS INSTRUCCIONES ANTES DE USAR ESTE APARATO
MODELS /
MODELOS
BLSTBKP-BR0-000
BLSTBKP-WR0-000
BLSTBKP-B5K-000
BLSTBKP-W8K-000
Instruction Manual
CLASSIC BLENDER
READ ALL INSTRUCTIONS BEFORE USING THIS APPLIANCE
BLSTBKP-xxx_23ESM1.indd 1BLSTBKP-xxx_23ESM1.indd 1 2023/4/17 11:052023/4/17 11:05

English-1 English-2
IMPORTANT SAFEGUARDS
When using electrical appliances, basic safety precautions should always be followed to
reduce the risk of fire, electric shock, and/or injury to persons including the following:
1. Read all instructions before using this product.
2. To protect against electric shock, do not place or immerse cord, plugs, or
appliance in water or other liquid.
3. This appliance is not intended for use by children or by persons with reduced
physical, sensory, or mental capabilities, or lack of experience and knowledge.
Close supervision is necessary when any appliance is used near children.
Children should be supervised to ensure that they do not play with the appliance.
Keep the appliance and its cord out of reach of children.
4. Never leave appliance unattended when in use.
5. Unplug from outlet when not in use, before putting on or taking off parts and
before cleaning. Allow to cool before putting on or taking off parts, and before
cleaning. To disconnect, turn any control to OFF, then unplug power cord from
outlet. To unplug, grasp the plug and pull from the outlet. Never pull from the
power cord.
6. Avoid contacting moving parts.
7. Do not operate any appliance with a damaged cord or plug or after the appliance
malfunctions, or has been damaged in any manner. Do not attempt to replace or
splice a damaged cord. Return appliance to the manufacturer (see warranty) for
examination, repair or adjustment.
8. For appliances with markings on plug blade: This appliance has important
markings on the plug blade. The attachment plug or entire cordset (if plug is
molded onto cord) is not suitable for replacement. If damaged, the appliance
shall be replaced.
9. The use of attachments, including canning jars, not recommended or sold by the
manufacturer may cause fire, electric shock or injury.
10. Do not use outdoors or for commercial purposes.
11. Do not let cord hang over edge of table or counter, or touch hot surfaces,
including the stove.
12. Keep hands and utensils out of container while blending to reduce the risk of
severe injury to persons or damage to the blender. A scraper may be used but
must be used only when the blender is not running.
13. Blades are sharp. Handle carefully, especially when removing the blades from
the container, emptying the container and during cleaning.
14. To reduce the risk of injury, never place cutter-assembly blades on base without
jar properly attached.
15. Always hold container while operating the appliance. If the container should turn
when the motor is turned ON, switch appliance OFF immediately and tighten the
container in the threaded bottom.
16. Always operate blender with cover in place. Always wait until all moving parts
have stopped before removing any lid or cover.
17. When blending hot liquids, remove center piece of two-piece cover (if a two-piece
cover is provided). Beware of steam. Do not blend boiling liquids.
18. Do not use appliance for other than intended use. Misuse can cause injuries.
Always use appliance on a dry, stable, level surface. Never fill beyond the MAX
fill line.
For containers with no lids or vents (when inserted in the blender), such as
personal Blend and Go containers:
19. Do not blend carbonated, hot or boiling liquids and ingredients, as this may
create pressure buildup. Only blend non-carbonated liquids and ingredients that
are at room temperature or cooler. If the container is warm to the touch, allow to
cool before opening.
20. Do not use the blender for longer than 1 minute at a time to avoid heat and
pressure buildup. Allow to cool for 1 minute between cycles.
For appliances with food processor or food chopper attachments:
21. Keep hands and utensils away from moving blades or discs while processing or
chopping food to reduce the risk of severe injury to persons or damage to the
food processor or chopper. A scraper may be used but must be used only when
the food processor or chopper is not running.
22. To reduce the risk of injury, never place cutting blade or discs on base without
first putting container properly in place.
23. Be certain cover is securely locked in place before operating appliance.
24. For food processors: Never feed food by hand. Always use food pusher.
25. Do not attempt to defeat the cover interlock mechanism.
SAVE THESE INSTRUCTIONS
HOUSEHOLD USE ONLY
SPECIAL INSTRUCTIONS FOR POWER CORD
1. A short power-supply cord is provided to reduce risk resulting from a person or pet
becoming entangled in or tripping over a longer cord.
2. An extension cord may be purchased and used if care is exercised in its use.
3. If an extension cord is used, electrical rating of cord must be at least equal or
greater than electrical rating of appliance. Extension cord should be arranged
so that it will not drape over countertop or tabletop where it can be pulled on by
children or tripped over unintentionally.
North American models with polarized plugs:
POLARIZED PLUG
This appliance has a polarized plug, (one blade is wider than the
other). As a safety feature to reduce the risk of electrical shock,
this plug is intended to fit in a polarized outlet only one way. If the
plug does not fit fully in the outlet, reverse the plug. If it still does
not fit, contact a qualified electrician. Do not attempt to defeat
this safety feature or modify the plug in any way. If the plug fits loosely into the AC
outlet or if the AC outlet feels warm do not use that outlet.
BLSTBKP-xxx_23ESM1.indd 1-2BLSTBKP-xxx_23ESM1.indd 1-2 2023/4/17 11:052023/4/17 11:05
English-3 English-4
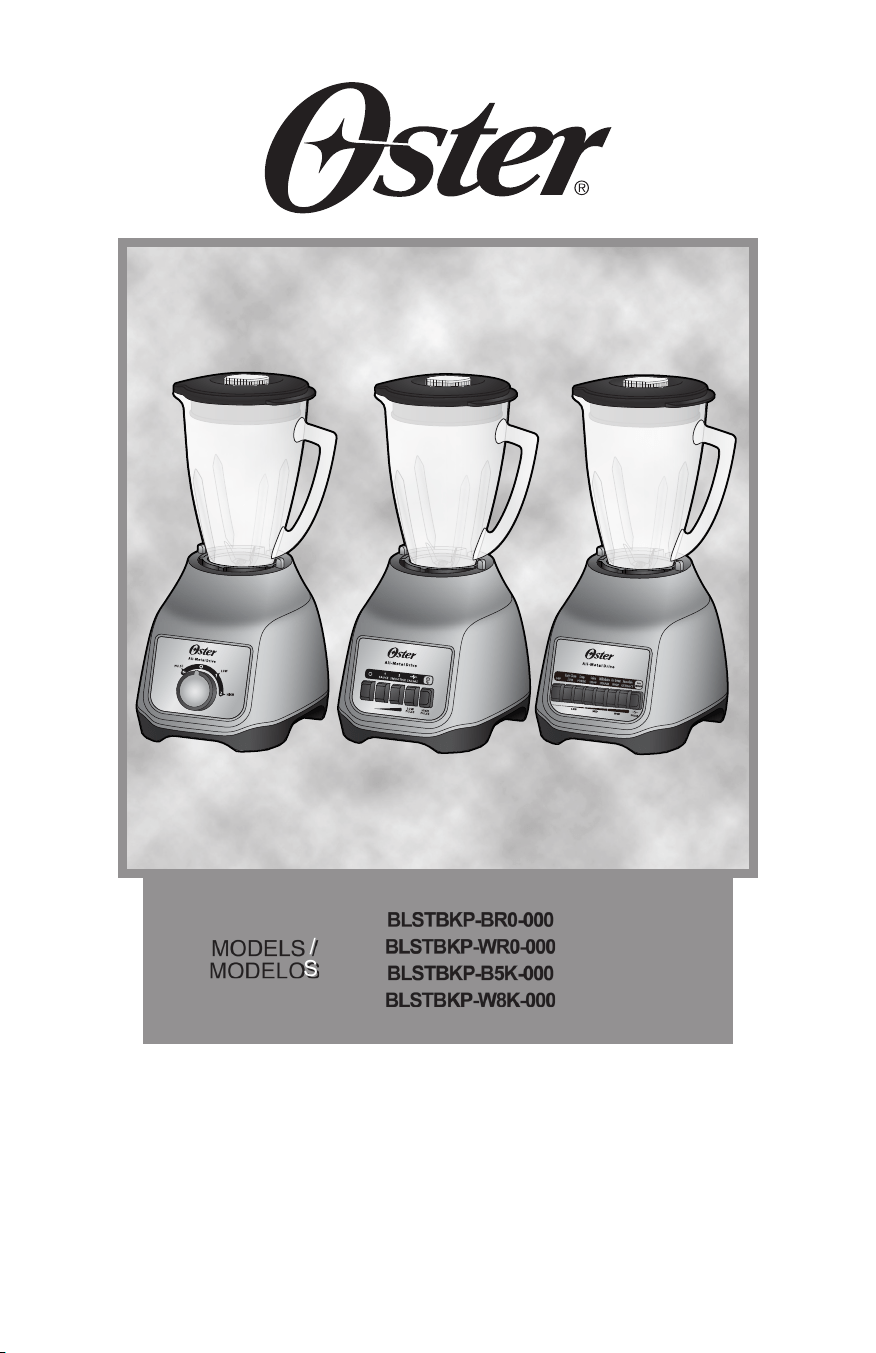
1. Filler cap
2. Spill-proof lid
3. Jar – Your Oster
®
blender includes
one of the following:
• BPA free plastic jar with 6-cup
capacity
4. Leak-proof sealing ring
5. Ice-crushing blade pulverizes ice for
smooth frozen drinks
6. Threaded bottom cap
7. Powerful motor with exclusive All-
Metal Drive
®
system for increased
durability
8. Control Panel – Your Oster
®
blender
includes one of the following:
• Rotary dial control panel
(3 speeds with pulse)
• 5 push button control panel
(4 speeds with 2 pulse speeds)
• 8 push button control panel
(7 speeds with pulse)
9. On/Off Button
10. Pulse Button
APPLIANCE DESCRIPTION ASSEMBLING YOUR BLENDER
1. Turn your jar upside down so smaller opening is facing up.
2. Place sealing ring over small jar opening.
3. Turn blade assembly upside down and place it over small jar opening.
4. Tighten jar’s threaded bottom cap.
ADJUSTING THE JAR
a. To adjust jar positioning, carefully place assembled jar into motor base, with
handle and jar stopper in front of right break.
b. Using jar handle, turn jar to the left as much as possible. This will ensure bottom
of jar is properly adjusted.
c. To operate blender, place assembled jar into motor base with jar stopper against
flat side of motor base break. If jar stopper is not against flat side of the right
break, lift jar and replace stopper against flat side of the left break. Put jar firmly in
place and operate blender.
d. To remove jar, lift it straight up. (If jar cannot be removed easily, gently twist it from
side to side and lift it up; do not turn.) If bottom of jar cannot be released by hand,
place assembled jar into motor base, with jar handle in front of the left side break.
Using handle, turn jar to the right until bottom of jar is released. Do not attempt to
place or remove jar from motor base while motor is running.
ALWAYS HOLD JAR WITH ONE HAND WHILE POWERING ON YOUR
BLENDER!
1
2
4
3
7
6
5
8
9
10
10 9
1
2
4
3
7
6
5
8
9
10
BLSTBKP-xxx_23ESM1.indd 3-4BLSTBKP-xxx_23ESM1.indd 3-4 2023/4/17 11:052023/4/17 11:05
English-5 English-6
HOW DOES YOUR OSTER® BLENDER
WORK
Your OSTER
®
blender is a multiple-speed electrical appliance that operates at a wide range of
speeds—from lowest to highest. This speed range makes food preparation quick and easy.
In addition, your OSTER
®
blender has two different operation modes:
1. CONTINOUS to blend, mix, and finely chop.
2. BLEND CONTROL CYCLE, used to grind chopped food, such as chopped vegetables,
nuts or cheese. There are different ways to operate the BLEND CONTROL CYCLE, but
they are all related to activating blender motor at intervals, alternating between on and off.
During “on” position of cycle, food is ground and moved away from blades. During “off”
position of cycle, food is replaced over blades to smooth out processing.
NOTE: One cycle includes operating blender for about 2 seconds and then allowing blades to
come to a complete stop.
SPEED SELECTION
PULSE FUNCTION ( )
1. Press and hold PULSE ( ) button for desired length of time.
2. Release PULSE button and allow blades to stop. Repeat cycle as needed.
NOTE: One cycle includes operating blender for about 2 seconds and then allowing
blades to come to a complete stop.
ICE-CRUSHING FUNCTION ( )
1. Press and hold ice-crushing function ( ) for desired length of time.
2. Release button and allow blades to stop.
Repeat cycle as needed.
NOTE: One cycle includes operating blender for about 2 seconds and then allowing blades to
come to a complete stop.
SPEED CHART
In the chart below, you will find a typical application, which will serve as a guide to use your blender.
(Follow chart matching model/number of speeds of your blender.)
FOR MODELS WITH PUSH BUTTON CONTROL PANEL:
BLENDING TIPS
1. Always place liquids in jar first, unless recipe indicates otherwise.
2. To crush ice: Crush 6 ice cubes or about 2 cups of ice at a time.
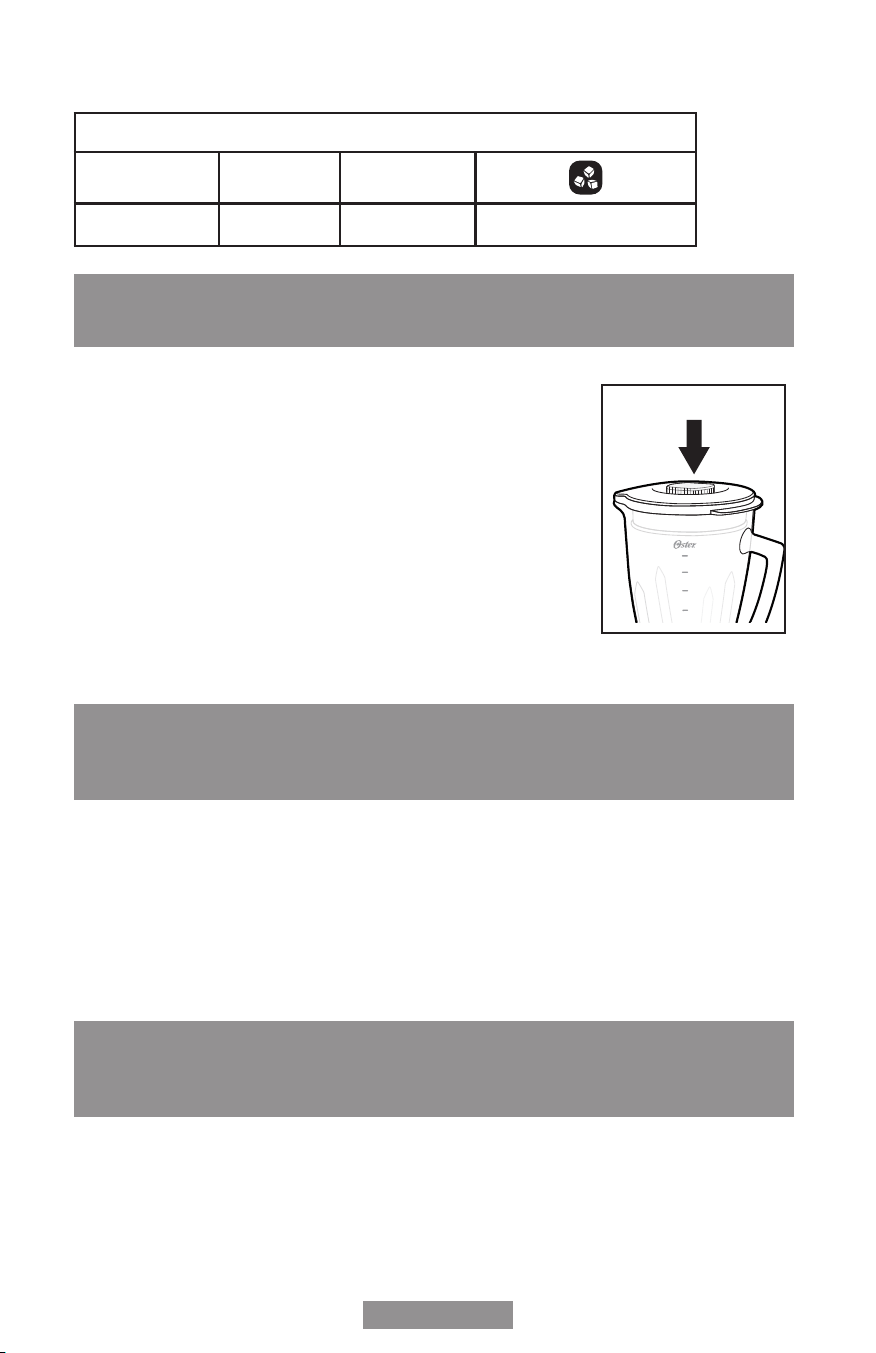
3. Do not remove lid while appliance is running. Remove filler cap
to add smaller ingredients.
4. Cut all firm fruits and vegetables, cooked meats, fish and
seafood into pieces of no more than 1/2 in. to 1 in. Cut all types
of cheeses into pieces of no more than 1/2 in.
5. This blender does not puree, does not whisk egg whites or egg
substitutes for spreads, does not knead dough, and does not cut
raw meats.
Be careful when pouring hot liquids into food processor or blender, as hot liquids may pop out
of appliance due to a sudden burst of steam.
CARE AND MAINTENANCE
PLEASE NOTE: UNPLUG MOTOR BASE BEFORE CLEANING. NEVER IMMERSE
BLENDER IN WATER OR ANY OTHER LIQUID. Wash blender’s outside surface with
a damp, soft sponge using mild soap. All parts, except motor base, may be washed
in dishwasher. Pull apart sealing ring and threaded bottom cap to clean. Hold sealing
ring with both hands and pull down over threaded bottom cap using both your thumbs.
Sealing ring and threaded bottom cap may be washed in dishwasher top rack ONLY.
You may also wash all parts with warm soapy water.
STORING YOUR APPLIANCE
After cleaning, reassemble jar with blade, sealing ring and threaded bottom cap.
Store blender leaving a gap between lid and jar to prevent container odors.
FOR MODELS WITH ROTARY DIAL CONTROL PANEL:
4 SPEEDS WITH HIGH AND LOW PULSE
SPEED
1 2
FUNCTION
SAUCE SMOOTHIE SALSAS / LOW PULSE
ICE-CRUSHING / HIGH PULSE
3 SPEEDS WITH PULSE
SPEED
1 2
FUNCTION
SAUCE SMOOTHIE
ICE-CRUSHING/PULSE
7 SPEEDS WITH PULSE
SPEED
1 2 3 4 5 6
FUNCTION
EASY
CLEAN
SOUP SALSA MILKSHAKE
FROZEN
DRINK
SMOOTHIE
ICE-CRUSHING
BLSTBKP-xxx_23ESM1.indd 6BLSTBKP-xxx_23ESM1.indd 6 2023/4/17 11:052023/4/17 11:05

Español-1
English-7
3 Year Limited Warranty
Sunbeam Products, Inc. (collectively “Sunbeam”) warrants that for a period of 3 years from
the date of purchase, this product will be free from defects in material and workmanship.
Sunbeam, at its option, will repair or replace this product or any component of the product
found to be defective during the warranty period. Replacement will be made with a new or
remanufactured product or component. If the product is no longer available, replacement
may be made with a similar product of equal or greater value. This is your exclusive
warranty. Do NOT attempt to repair or adjust any electrical or mechanical functions on this
product. Doing so will void this warranty.
This warranty is valid for the original retail purchaser from the date of initial retail purchase
and is not transferable. Keep the original sales receipt. Proof of purchase is required to
obtain warranty performance. Sunbeam dealers, service centers, or retail stores selling
Sunbeam products do not have the right to alter, modify or any way change the terms and
conditions of this warranty.
This warranty does not cover normal wear of parts or damage resulting from any of the
following: negligent use or misuse of the product, use on improper voltage or current, use
contrary to the operating instructions, disassembly, repair or alteration by anyone other
than Sunbeam or an authorized Sunbeam service center. Further, the warranty does not
cover: Acts of God, such as fire, flood, hurricanes and tornadoes.
What are the limits on Sunbeam’s Liability?
Sunbeam shall not be liable for any incidental or consequential damages caused by the
breach of any express, implied or statutory warranty or condition.
Except to the extent prohibited by applicable law, any implied warranty or condition of
merchantability or fitness for a particular purpose is limited in duration to the duration of the
above warranty.
Sunbeam disclaims all other warranties, conditions or representations, express, implied,
statutory or otherwise.
Sunbeam shall not be liable for any damages of any kind resulting from the purchase, use
or misuse of, or inability to use the product including incidental, special, consequential or
similar damages or loss of profits, or for any breach of contract, fundamental or otherwise,
or for any claim brought against purchaser by any other party.
Some provinces, states or jurisdictions do not allow the exclusion or limitation of incidental
or consequential damages or limitations on how long an implied warranty lasts, so the
above limitations or exclusion may not apply to you.
This warranty gives you specific legal rights, and you may also have other rights that vary
from province to province, state to state or jurisdiction to jurisdiction.
How To Obtain Warranty Service
In the U.S.A.
If you have any question regarding this warranty or would like to obtain warranty service,
please call 1 800-334-0759 and a convenient service center address will be provided to
you.
In the U.S.A., this warranty is offered by Sunbeam Products, Inc. located in 6655
Peachtree Dunwoody Rd. Atlanta, GA 30328. If you have any other problem or claim in
connection with this product, please write our Consumer Service Department.
PLEASE DO NOT RETURN THIS PRODUCT TO ANY OF THESE ADDRESSES OR TO
THE PLACE OF PURCHASE.
LIMITED WARRANTY
PRECAUCIONES IMPORTANTES
A fin de reducir el riesgo de accidentes (tales como incendio, descarga eléctrica y/o lesión
personal), cuando se utilizan aparatos eléctricos, siempre se deben seguir precauciones
básicas de seguridad, incluyendo las siguientes recomendaciones:
LEA TODAS LAS INSTRUCCIONES ANTES DE UTILIZAR ESTE PRODUCTO.
1. A fin de protegerse contra una descarga eléctrica, no coloque ni sumerja el cable,
los enchufes o el aparato en agua ni en ningún otro líquido.
2. Este aparato no está destinado para ser usado por personas (incluyendo niños)
cuyas capacidades físicas, sensoriales o mentales estén disminuidas, o carezcan de
experiencia y conocimiento, a menos que una persona responsable por su seguridad
les haya supervisado o instruido en el uso de este electrodoméstico. Los niños deberán
estar bajo supervisión para cerciorarse de que NO jueguen con el artefacto eléctrico.
3. Nunca deje el aparato desatendido cuando esté en uso.
4. Desenchufe el aparato del tomacorriente cuando no esté en uso, antes de
instalarle o retirarle piezas y antes de limpiarlo. Permita que se enfríe antes de
instalarle o retirarle piezas y antes de limpiarlo. Para desconectar, seleccione la
posición de apagado, luego desenchufe el cable del tomacorriente. No tire del
cable para desconectar el aparato.
5. En los modelos diseñados con el modo de espera, una luz parpadeante indica que
el aparato está listo para utilizar. Evite el contacto con la cuchilla o piezas móviles.
6. No opere ningún electrodoméstico que tenga el cable o enchufe dañado, si no
funciona correctamente, se ha dejado caer o está dañado de cualquier otra forma.
Lleve el artefacto al Centro de Servicio Autorizado de Electrodomésticos Oster
®
más cercano para su revisión, reparación o ajuste eléctrico o mecánico.
7. Para aparatos con marcas en el contacto del enchufe: Este aparato tiene marcas
importantes en el contacto del enchufe. Ni el enchufe del accesorio ni el cable (si el
enchufe está moldeado en el cable) debe ser reemplazado. Si alguno de los dos se
daña, se debe reemplazar el aparato.
8. El uso de accesorios, incluyendo frascos para conservas, no recomendados
ni vendidos por el fabricante del producto podría ocasionar incendio, descarga
eléctrica o lesión personal.
9. No utilice al aire libre ni para fines comerciales.
10. No permita que el cable cuelgue del borde de la mesa o del mostrador ni que entre
en contacto con superficies calientes, inclusive la estufa.
11. Mantenga las manos y los utensilios fuera del vaso mientras licua para reducir el riesgo
de lesiones severas personales o causar daño a la licuadora. Una espátula puede ser
utilizada, pero solo debe ser utilizada cuando el aparato no esté funcionando.
12. ADVERTENCIA: La cuchilla es filosa. Manipúlela con cuidado, especialmente al
retirar la cuchilla del vaso, vaciar el vaso y durante la limpieza.
13. A fin de reducir el riesgo de una lesión personal, nunca coloque el montaje de
cuchillas en la base sin el vaso instalado correctamente.
14. El vaso debe estar en posición correcta antes de utilizar el aparato.
15. Siempre opere la licuadora con la tapa en su lugar. Siempre espere hasta que
todas las piezas móviles se hayan detenido antes de retirar la tapa.
16. Cuando licúe líquidos calientes, retire la copa de alimentación. Tenga cuidado con
el vapor.
17. No utilice el aparato para otro fin que no sea para el que ha sido diseñado. El uso
incorrecto puede ocasionar lesiones. Siempre utilice el aparato sobre una superficie
BLSTBKP-xxx_23ESM1.indd 7-1BLSTBKP-xxx_23ESM1.indd 7-1 2023/4/17 11:052023/4/17 11:05

Español-2 Español-3
seca, estable y nivelada. Nunca llene el vaso por encima de la línea MAX.
18. Si su licuadora está equipada con un enchufe de conexión a tierra, solo conéctela a
tomacorrientes diseñados adecuadamente para conexión a tierra.
Para modelos con los mini vasos o los vasos portátiles Blend-N-Go:
19. Asegúrese que el vaso esté bien colocado en la base antes de utilizarlo.
20. No mezcle ingredientes y líquidos con gas, calientes ni hirviendo, ya que esto
puede crear acumulación de presión. Solo licue líquidos sin gas e ingredientes a
temperatura ambiente o más fríos. Si el vaso se siente caliente al tocarlo, deje que
se enfríe antes de abrirlo.
21. No utilice la licuadora por más de 1 minuto a la vez para evitar la acumulación de
calor y presión. Permita que se enfríe por 1 minuto entre cada ciclo.
Para modelos con los accesorios procesador de alimentos o picadora de
alimentos:
22. Mantenga las manos y los utensilios alejados de cuchillas o discos móviles
mientras procesa o pica los alimentos, a fin de reducir el riesgo de lesiones severas
personales u ocasionar daño al procesador de alimentos o picadora de alimentos.
Una espátula puede ser utilizada para raspar los alimentos, pero solo cuando el
procesador de alimentos o picadora de alimentos no esté funcionando.
23. A fin de reducir el riesgo de una lesión, nunca coloque la cuchilla de corte o los
discos en la base sin antes colocar correctamente el recipiente en su lugar.
24. Verifique que la tapa esté cerrada firmemente en su lugar antes de operar el aparato.
25. Para procesadores de alimentos: Nunca empuje los alimentos con la mano. Siempre
utilice el empujador de alimentos.
26. No intente ignorar el mecanismo de entrecierre de la tapa.
CONSERVE ESTAS INSTRUCCIONES
PARA USO DOMÉSTICO SOLAMENTE
INSTRUCCIONES ESPECIALES PARA EL CABLE
1. Se proporciona un cable de alimentación corto para disminuir el peligro de que una
persona o una mascota se enrede o tropiece con un cable largo.
2. Se puede comprar y utilizar una extensión si se emplean las debidas precauciones.
3. Si se usa una extensión, la potencia nominal indicada en la misma debe ser igual o
mayor a la de la unidad. El cable alargado resultante debe colocarse de manera que
no cuelgue del mostrador o de la mesa, donde los niños podrían halarla o podría
ocasionar tropiezos accidentales.
MODELOS NORTEAMERICANOS CON ENCHUFES POLARIZADOS:
ENCHUFE POLARIZADO
Este electrodoméstico tiene un enchufe polarizado (un contacto
es más ancho que el otro). Para reducir el riesgo de descargas
eléctricas, como una función de seguridad, este enchufe está
diseñado para encajar en un tomacorriente polarizado solo de
una forma. Si el enchufe no se inserta completamente en el tomacorriente, invierta
el enchufe. Si aún no encaja, consulte a un electricista calificado. No intente ignorar
esta medida de seguridad ni modificar el enchufe en forma alguna. Si el enchufe se
inserta holgadamente en el tomacorriente de corriente alterna o si el tomacorriente
de corriente alterna se siente caliente, no use ese tomacorriente.
1. Tapita
2. Tapa Sellada
3. El Vaso – La Licuadora Oster
®
incluye
uno de los siguientes elementos:
• Vaso plástico de 1,5L libre de BPA
4. Anillo Sellador
5. La Cuchilla para picar hielo pulveriza
el hielo para las bebidas congeladas
6. Parte Inferior Enroscable
7. Potente motor con sistema exclusivo
All-Metal Drive
®
(acople metálico)
para mayor durabilidad
8. Panel de Controles - La licuadora
Oster
®
incluye uno de los siguientes
paneles:
• Control con perilla rotatoria
(3 velocidades con pulso)
• Control con 5 botones
(4 velocidades con 2 velocidades
de pulso)
• Control con 8 botones
(7 velocidades con pulso)
9. Botón de Encendido/Apagado
10. Función de Pulso
DESCRIPCIÓN DEL ARTEFACTO
1
2
4
3
7
6
5
8
9
10
10 9
1
2
4
3
7
6
5
8
9
10
BLSTBKP-xxx_23ESM1.indd 2-3BLSTBKP-xxx_23ESM1.indd 2-3 2023/4/17 11:052023/4/17 11:05
Español-4 Español-5
ENSAMBLANDO SU LICUADORA
1. Invierta el vaso para que la abertura pequeña quede hacia arriba.
2. Coloque el anillo sellador sobre la abertura del vaso.
3. Invierta la cuchilla del agitador y coloque en la boca del vaso.
4. Apriete la parte inferior enroscable al vaso.
AJUSTANDO EL VASO
a. Para ajustar la parte inferior enroscable del vaso, coloque el vaso ensamblando
con cuidado en el anillo de la base del motor con el asa y el tope del vaso
enfrente del freno derecho.
b. Usando el asa del vaso, gire hacia la izquierda hasta donde sea posible. Esto
asegurará que el fondo del vaso esté correctamente ajustado.
c. Para operar la licuadora, coloque el vaso ensamblado en el anillo de la base del
motor con el tope del vaso contra el lado plano del freno de la base del motor.
Si el tope del vaso no queda colocado contra el lado plano del freno derecho,
remuévalo y colóquelo contra el lado plano del freno izquierdo. Asiente el vaso
firmemente y opere.
d. Para remover el vaso, levántelo en forma vertical. (Si no es fácilmente removido,
mueva delicadamente de lado a lado y levante, no lo gire). Si el fondo del vaso
no puede ser liberado con la mano, coloque el vaso ensamblado en el anillo
de la base del motor con el asa enfrente del freno de lado izquierdo. Usando el
asa, gire el vaso a la derecha hasta que la parte inferior del vaso se libere. No
intente colocar el vaso o removerlo de la base del motor mientras el motor está
funcionando.
¡SIEMPRE SOSTENGA EL VASO CON UNA MANO MIENTRAS PONE LA
LICUADORA EN FUNCIONAMIENTO!
CÓMO FUNCIONA SU LICUADORA
OSTER®
Su Licuadora OSTER
®
es un aparato electrodoméstico de múltiples velocidades, que opera
en un amplio rango de velocidades de la más lenta hasta la más rápida. Selección de
velocidades para obtener mejor resultados en menos tiempo.
Además, su Licuadora OSTER
®
tiene dos distintos métodos de operación:
1. CONTINUO para licuar, mezclar y picar finamente.
2. CICLO DE CONTROL DEL LICUADO, usado para moler piezas picadas de alimentos,
tales como vegetales picados, nueces o quesos. Hay varias maneras diferentes de
operar el dispositivo de CICLO DE CONTROL DEL LICUADO, pero todas se relacionan
con accionar intermitentemente el motor de encendido a apagado. Durante la posición
de encendido del ciclo, los alimentos son molidos y removidos fuera del camino de las
cuchillas. Durante la posición de apagado del ciclo, los alimentos regresan sobre las
cuchillas para hacer el procesamiento más uniforme.
NOTA: Un ciclo consiste en operar la licuadora por aproximadamente 2 segundos y después
permitir un alto total de la cuchilla.
SELECCIONANDO LA VELOCIDAD
FUNCIÓN DE PULSO ( )
1. Presione el botón de PULSO ( ) y mantenga en esa posición durante el tiempo deseado.
2. Libere PULSO y espere a que la cuchilla se detenga. Repita el ciclo según lo deseado.
NOTA: un ciclo consiste en hacer funcionar la cuchilla durante aproximadamente dos
segundos y dejar que se detenga por completo.
FUNCIÓN PARA TRITURAR HIELO ( )
1. Oprima el botón de la función para triturar hielo ( ) y manténgalo apretado por el
tiempo deseado.
2. Suelte el botón y espere a que las cuchillas se detengan.
Repita el ciclo según lo desee.
NOTA: Un ciclo consiste en operar la licuadora por aproximadamente 2 segundos y después
permitir un alto total de la cuchilla.
TABLA DE VELOCIDADES
En la tabla de abajo usted encontrará una aplicación típica por velocidad que lo guiará en el uso de su
licuadora. (Siga la tabla que corresponda con el modelo/ número de velocidades de su licuadora).
PARA LOS MODELOS CON PANEL DE CONTROL CON BOTONES:
4 VELOCIDADES CON PULSO ALTO Y BAJO
VELOCIDAD
1 2
FUNCIÓN
SALSA LICUADOS
SALSAS / PULSO BAJO
TRITUAR HIELO / PULSO ALTO
7 VELOCIDADES CON PULSO
VELOCIDAD
1 2 3 4 5 6
FUNCIÓN
LIMPIAR SOPA SALSA BATIDOS BEBIDAS
CONGELADAS
LICUADOS
TRITURAR
HIELO
BLSTBKP-xxx_23ESM1.indd 4-5BLSTBKP-xxx_23ESM1.indd 4-5 2023/4/17 11:052023/4/17 11:05
Español-6 Español-7
PARA LOS MODELOS CON PANEL DE CONTROL CON PERILLA:
3 VELOCIDADES CON PULSO
VELOCIDAD
1 2
FUNCIÓN
SALSA LICUADOS
PULSO/TRITURAR HIELO
RECOMENDACIONES PARA EL LICUADO
1. Coloque primero los líquidos en el vaso, a menos que la receta indique lo contrario.
2. Para picar hielo: Pique 6 cubos de hielo o aproximadamente 2
tazas de hielo a la vez.
3. No retire la tapa con el artefacto en funcionamiento. Retire la
tapita para agregar ingredientes más pequeños.
4. Corte todas las frutas y vegetales firmes, carnes cocidas,
pescado y mariscos en trozos de no más de 1/2 pulg. (1,8 cm) a
1 pulg. (2,5 cm). Corte todo tipo de quesos en trozos de no más
de 1/2 pulg. (1,8 cm).
5. Esta licuadora no hace puré de papas, no bate claras de huevo
ni sustituye lácteos para untar, no mezcla masas duras ni pica
carne cruda.
Tenga cuidado si líquido caliente se vierte dentro del procesador de alimentos o
licuadora, ya que este puede expulsarse fuera del aparato debido a un vapor repentino.
CUIDADO Y LIMPIEZA
IMPORTANTE: DESENCHUFE ANTES DE LIMPIAR LA BASE Y NO SUMERJA LA
LICUADORA EN AGUA NI EN NINGÚN OTRO LÍQUIDO. Use una esponja suave y
húmeda con detergente suave para limpiar el exterior de la base de la licuadora. Todas
las partes, con excepción de la base de la licuadora, pueden lavarse en lavaplatos. El
anillo sellador y la parte inferior enroscable pueden ser separados para su limpieza.
Sostenga el anillo sellador con ambas manos y presione hacia abajo sobre la parte
inferior enroscable con ambos pulgares. El anillo sellador y la parte inferior enroscable
SÓLO pueden lavarse en el estante superior del lavaplatos. También puede lavar las
partes en agua jabonosa tibia.
GUARDANDO SU ARTEFACTO
Después de la limpieza, vuelva a ensamblar el vaso con la cuchilla, el anillo sellador, y la
parte inferior enroscable.
Guarde la licuadora con la tapa entreabierta para evitar malos olores en el recipiente.
GARANTÍA LIMITADA DE 3 AÑO
Sunbeam Products, Inc. (“Sunbeam”) garantiza que por un período de 3 año a partir de
la fecha de compra, este producto estará libre de defectos de materiales y mano de obra.
Sunbeam, a su elección, reparará o reemplazará este producto o cualquier componente
del mismo que presente defectos durante el período de garantía. El reemplazo se
realizará por un producto o componente nuevo o reparado. Si el producto ya no estuviera
disponible, se lo reemplazará por un producto similar de valor igual o superior. Ésta es
su garantía exclusiva. NO trate de reparar o ajustar ninguna de funciones mecánicas o
eléctricas de este producto. El hacerlo anulará esta garantía.
La garantía es válida para el comprador minorista original a partir de la fecha de compra
inicial y la misma no es transferible. Conserve el recibo de compra original. Para solicitar
servicio en garantía se requiere presentar un recibo de compra. Los agentes y centros de
servicio de Sunbeam o las tiendas minoristas que venden productos Sunbeam no tienen
derecho a alterar, modificar ni cambiar de ningún otro modo los términos y las condiciones
de esta garantía.
Esta garantía no cubre el desgaste normal de las piezas ni los daños que se produzcan
como resultado de uso negligente o mal uso del producto, uso de voltaje incorrecto o
corriente inapropiada, uso contrario a las instrucciones operativas, y desarme, reparación
o alteración por parte de un tercero ajeno a Sunbeam o a un Centro de Servicio
Sunbeam autorizado. Asimismo, la garantía no cubre actos fortuitos tales como incendios,
inundaciones, huracanes y tornados.
¿Cuál es el límite de responsabilidad de Sunbeam?
Sunbeam no será responsable de daños incidentales o emergentes causados por el
incumplimiento de alguna garantía o condición expresa, implícita o legal.
Excepto en la medida en que lo prohíba la ley aplicable, cualquier garantía o condición
implícita de comerciabilidad o aptitud para un fin determinado se limita, en cuanto a su
duración, al plazo de la garantía antes mencionada. Sunbeam queda exenta de toda
otra garantía, condición o manifestación, expresa, implícita, legal o de cualquier otra
naturaleza.
Sunbeam no será responsable de ningún tipo de daño emergente de la compra, uso o
mal uso del producto, ad de usar el producto, incluidos los daños incidentales, especiales,
emergentes o similares, o la pérdida de ganancias, ni de ningún incumplimiento
contractual, sea de una obligación esencial o de otra naturaleza, ni de ningún reclamo
iniciado contra el comprador por un tercero. Algunas provincias, estados o jurisdicciones
no permiten la exclusión o limitación de los daños incidentales o emergentes ni las
limitaciones a la duración de las garantías implícitas, de modo que es posible que la
exclusión o las limitaciones antes mencionadas no se apliquen en su caso. Esta garantía
le otorga derechos legales específicos y es posible que usted tenga otros derechos que
varían de un estado, provincia o jurisdicción a otro.
Cómo solicitar el servicio en garantíah
En los Estados Unidos
Si tiene alguna pregunta sobre esta garantía o desea obtener el servicio de garantía, llame
al 1 800-334-0759 y podrá obtener la dirección del centro de servicio que le resulte más
conveniente.
En los Estados Unidos, esta garantía es ofrecida por Sunbeam Products, Inc.
6655 Peachtree Dunwoody Rd. Atlanta, GA 30328.
POR FAVOR NO DEVUELVA ESTE PRODUCTO A LA DIRECCIÓN ARRIBA O AL LUGAR
DE COMPRA.
GARANTÍA LIMITADA
BLSTBKP-xxx_23ESM1.indd 6-7BLSTBKP-xxx_23ESM1.indd 6-7 2023/4/17 11:052023/4/17 11:05

For product questions contact:
Sunbeam Consumer Service
1.800.334.0759
www.oster.com
© 2023 Sunbeam Products, Inc. Product Of: Sunbeam Products, Inc.
6655 Peachtree Dunwoody Rd. Atlanta, GA 30328.
Para preguntas sobre los productos llame:
Sunbeam Consumer Service
1.800.334.0759
www.oster.com
© 2023 Sunbeam Products, Inc. Producto de: Sunbeam Products, Inc.
6655 Peachtree Dunwoody Rd. Atlanta, GA 30328.
Printed in Mexico Impreso en Mexico
BLSTBKP-XXX_23ESM1_GCDS-LD P.N. NWL0001517516
BLSTBKP-xxx_23ESM1.indd 8BLSTBKP-xxx_23ESM1.indd 8 2023/4/17 11:052023/4/17 11:05