
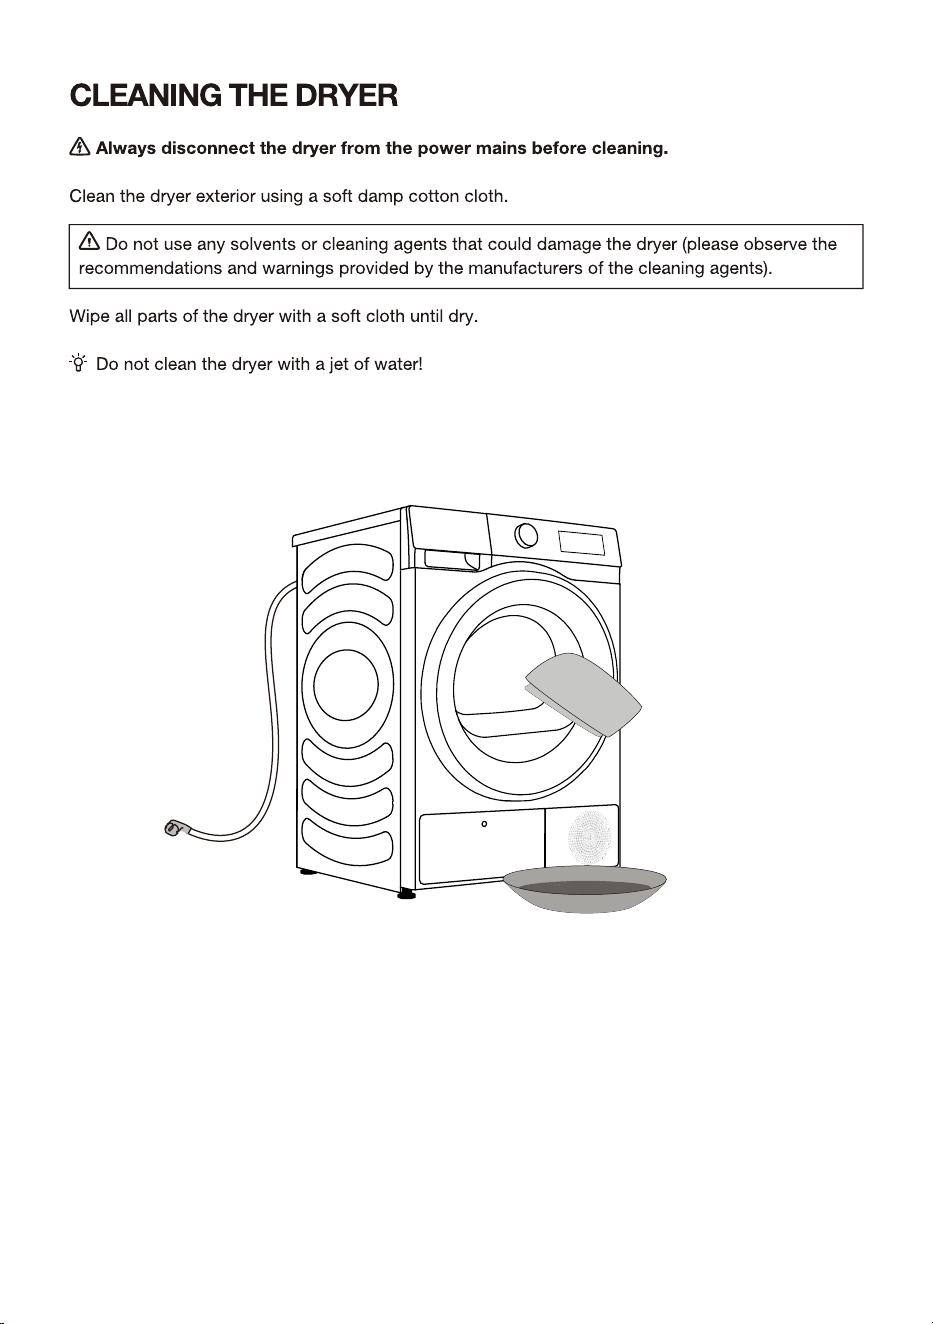
USER’S OPERATION MANUAL
Before operating this unit, please read this manual
thoroughly, and retain for future reference.
English
EN
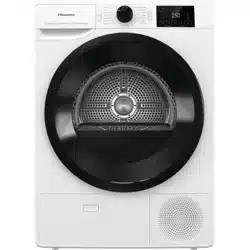
DH3S802BW3
DH3S802BW3*
DH3S802BB3
DH3S802BB3*
DH3S802BT3
DH3S802BT3*
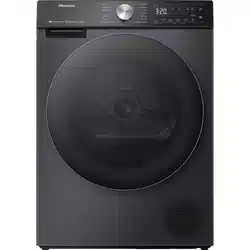
DH3G802BT3*
DH3G802BW3
DH3G802BW3*
DH3G802BB3
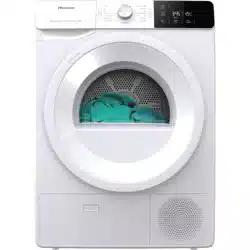
DH3S802U
DH3S802
DH3G802
DH3G802BB3*
DH3G802BT3
DH3G802U
The following symbols used in the manual have the following meanings:
Information, advice, tip, or recommendation
Warning - general danger
Warning - danger of electric shock
Warning - danger of hot surface
Warning - danger of fire
It is important to read the instructions carefully.
40
39
41
43
44
45
45
49
51
52
55
38
16
16
19
20
22
23
24
25
26
26
27
53
31
34
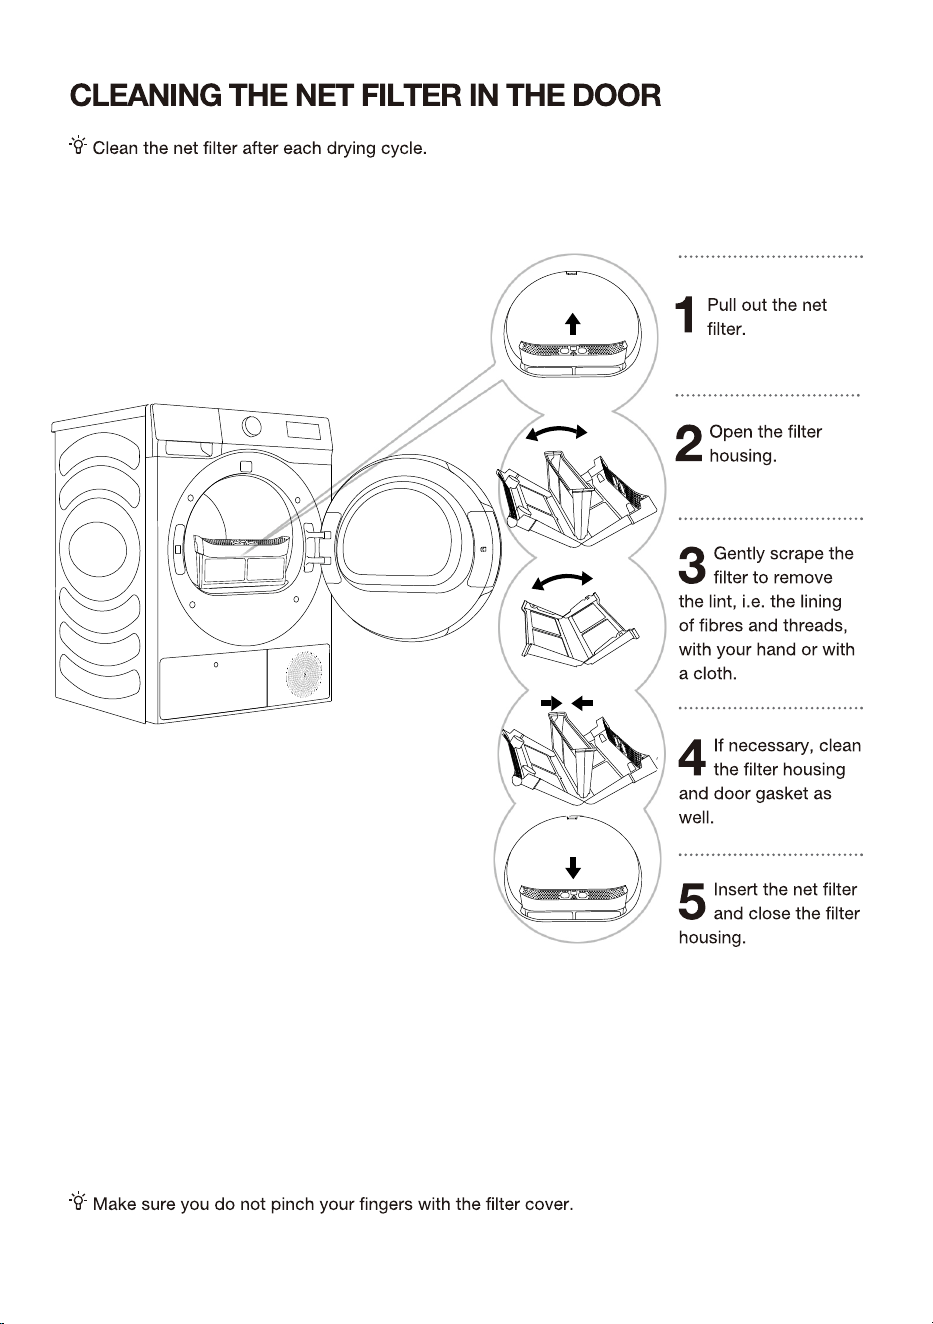
Changing the door opening direction
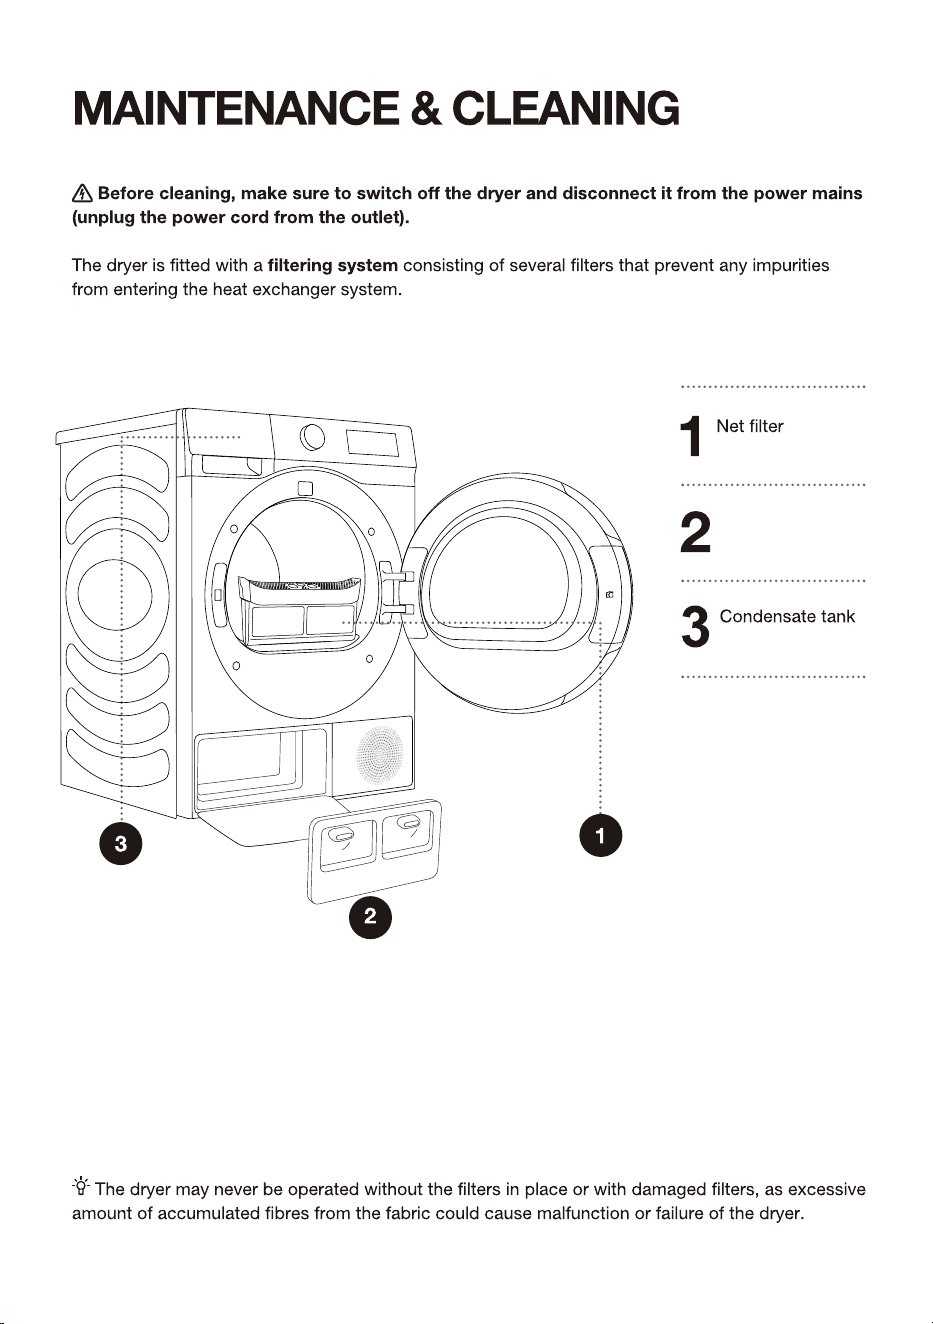
Heat exchanger door cover
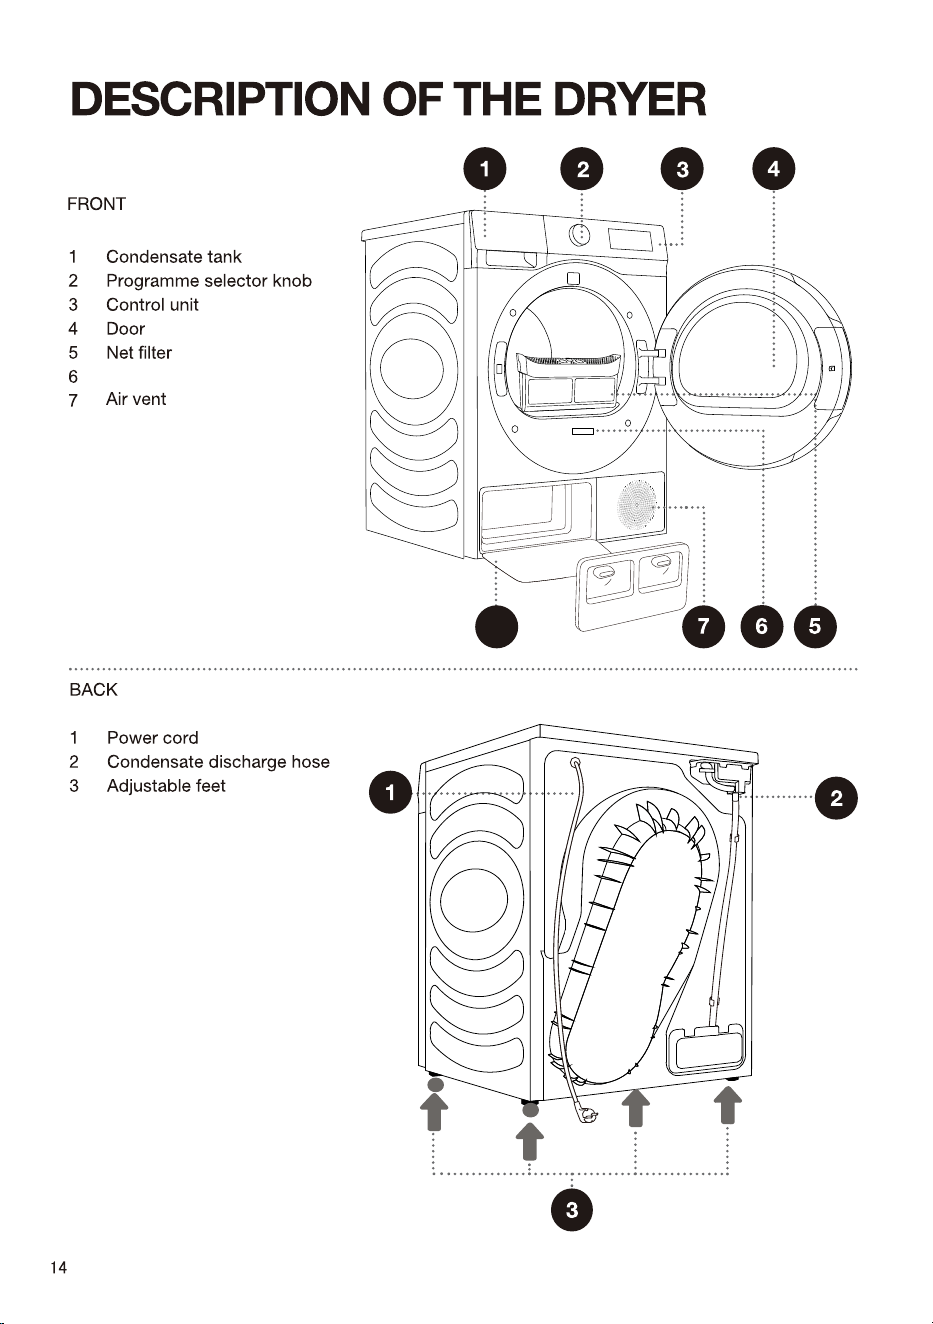
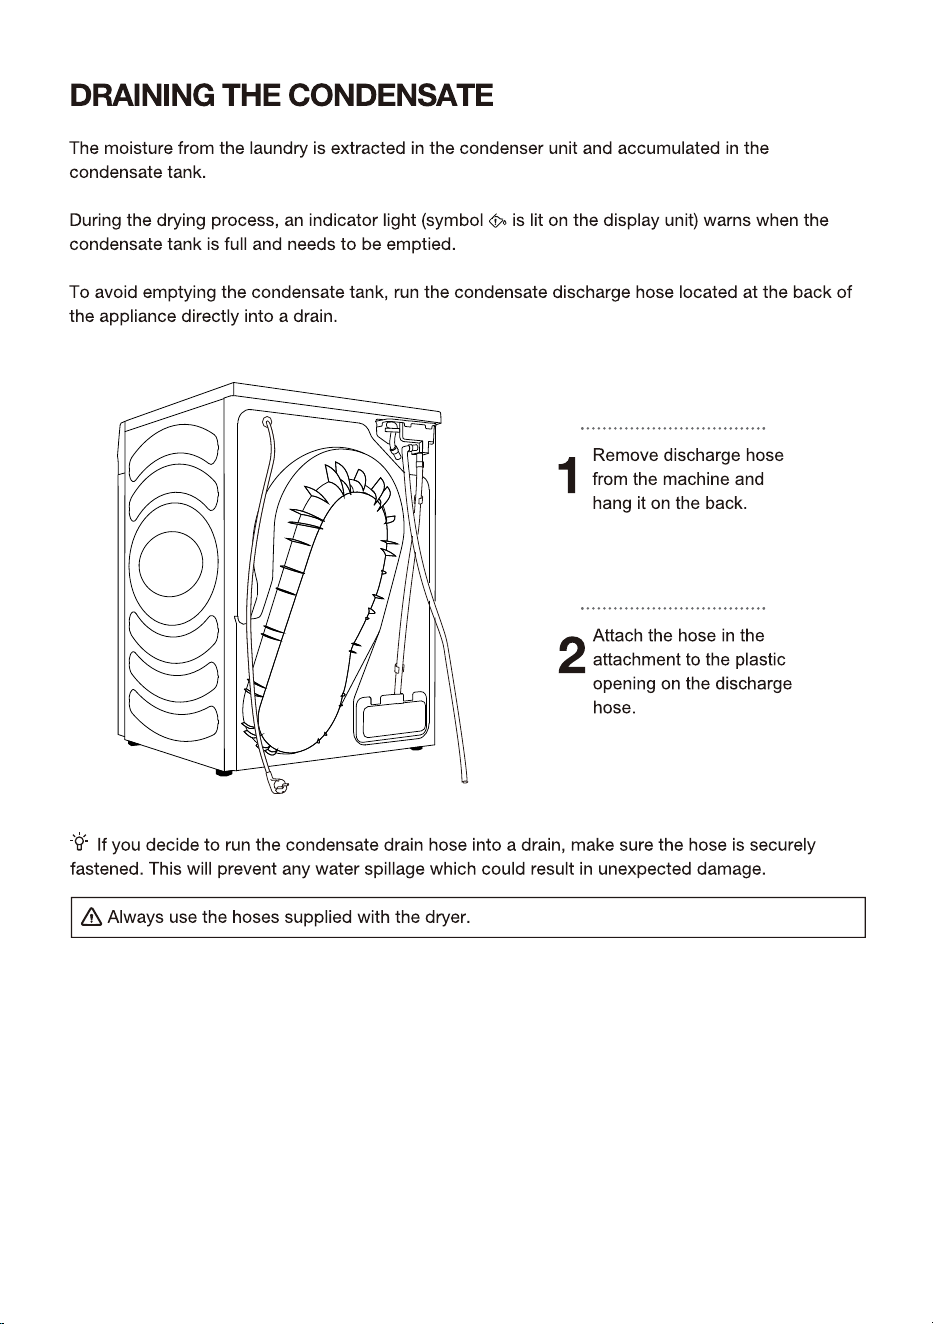
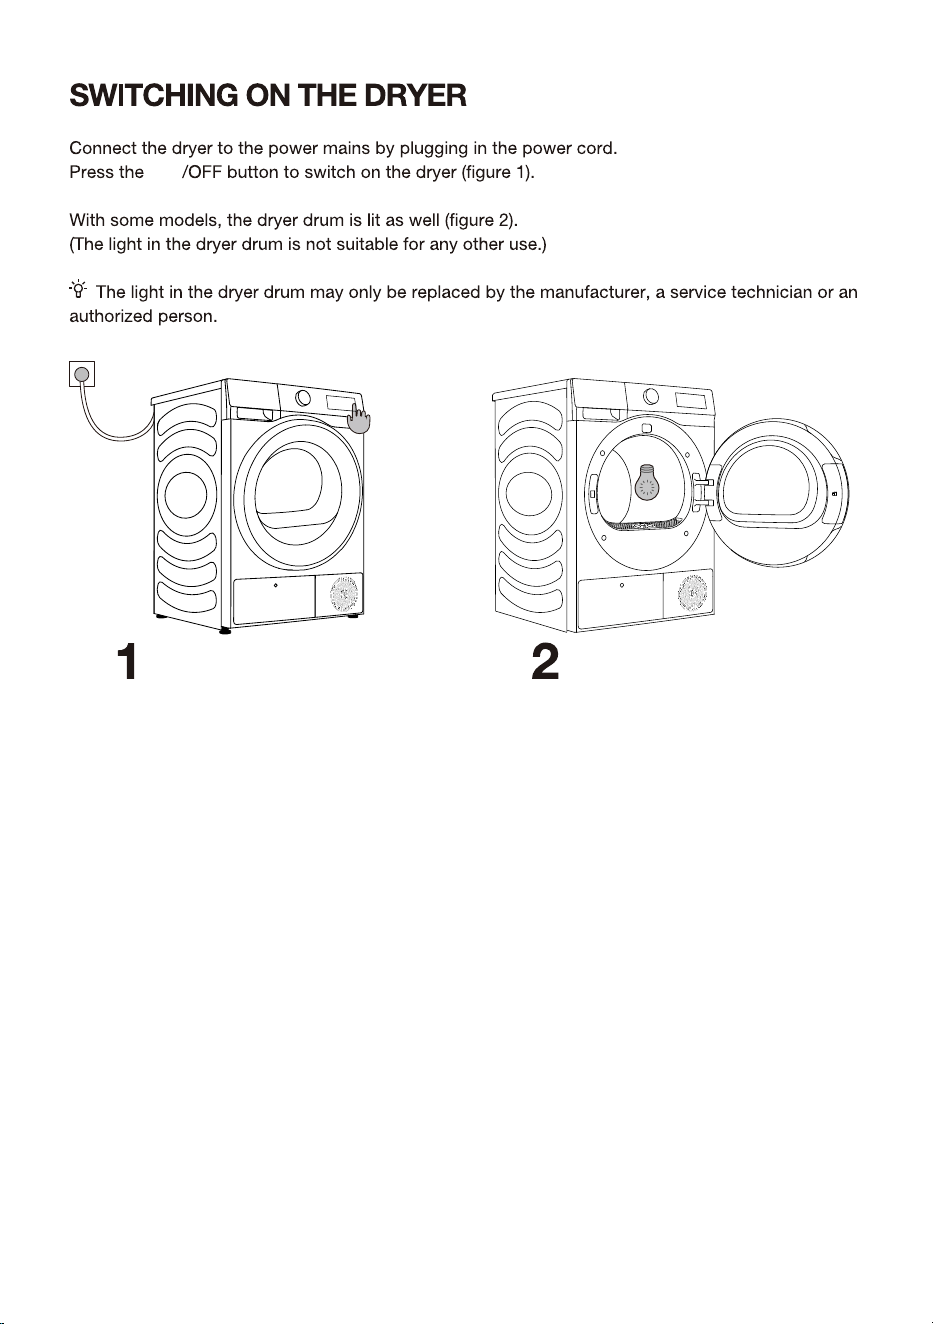
8
8
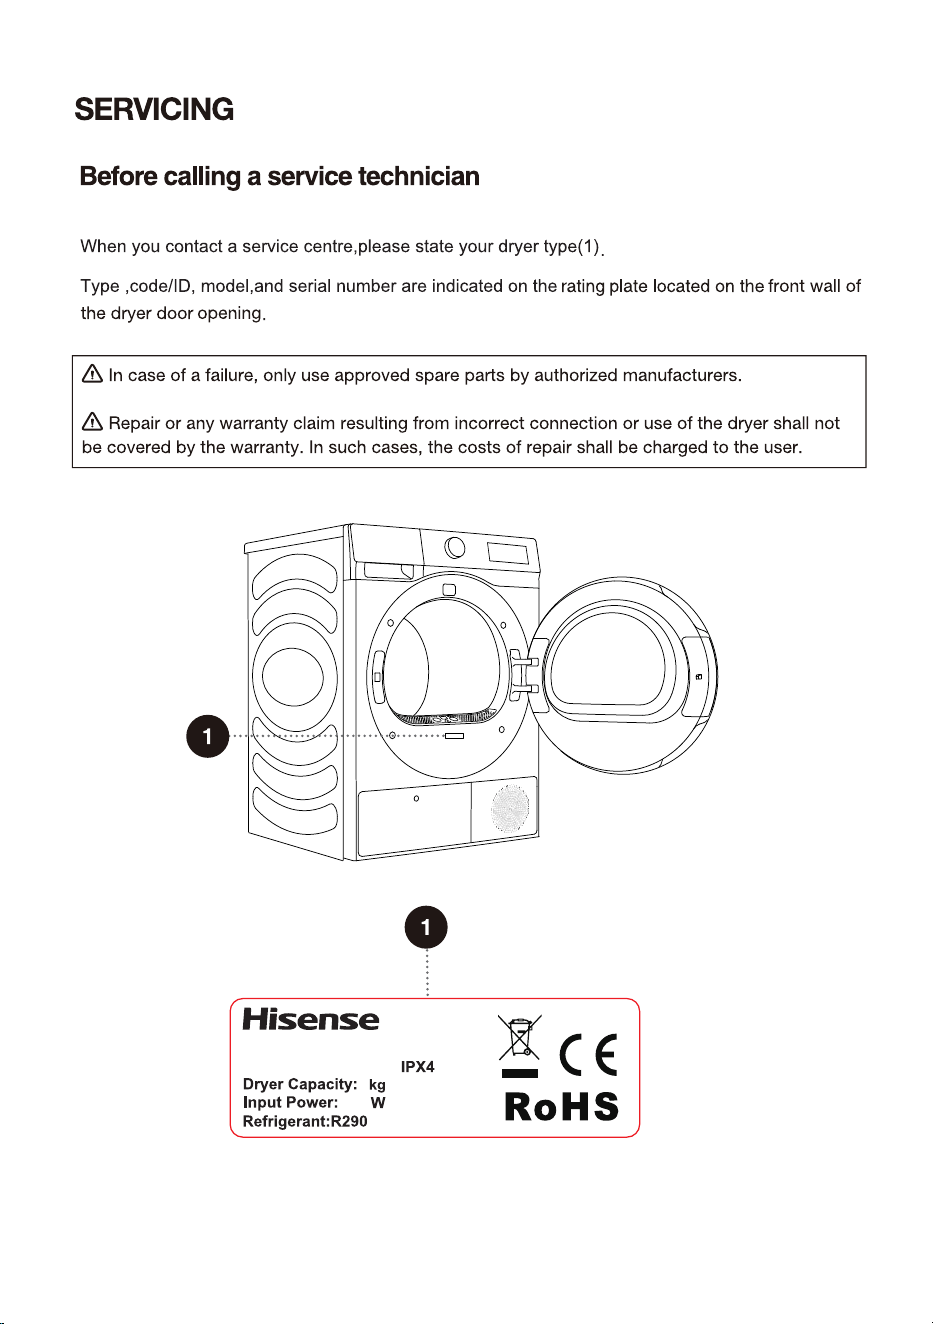
Rating plate
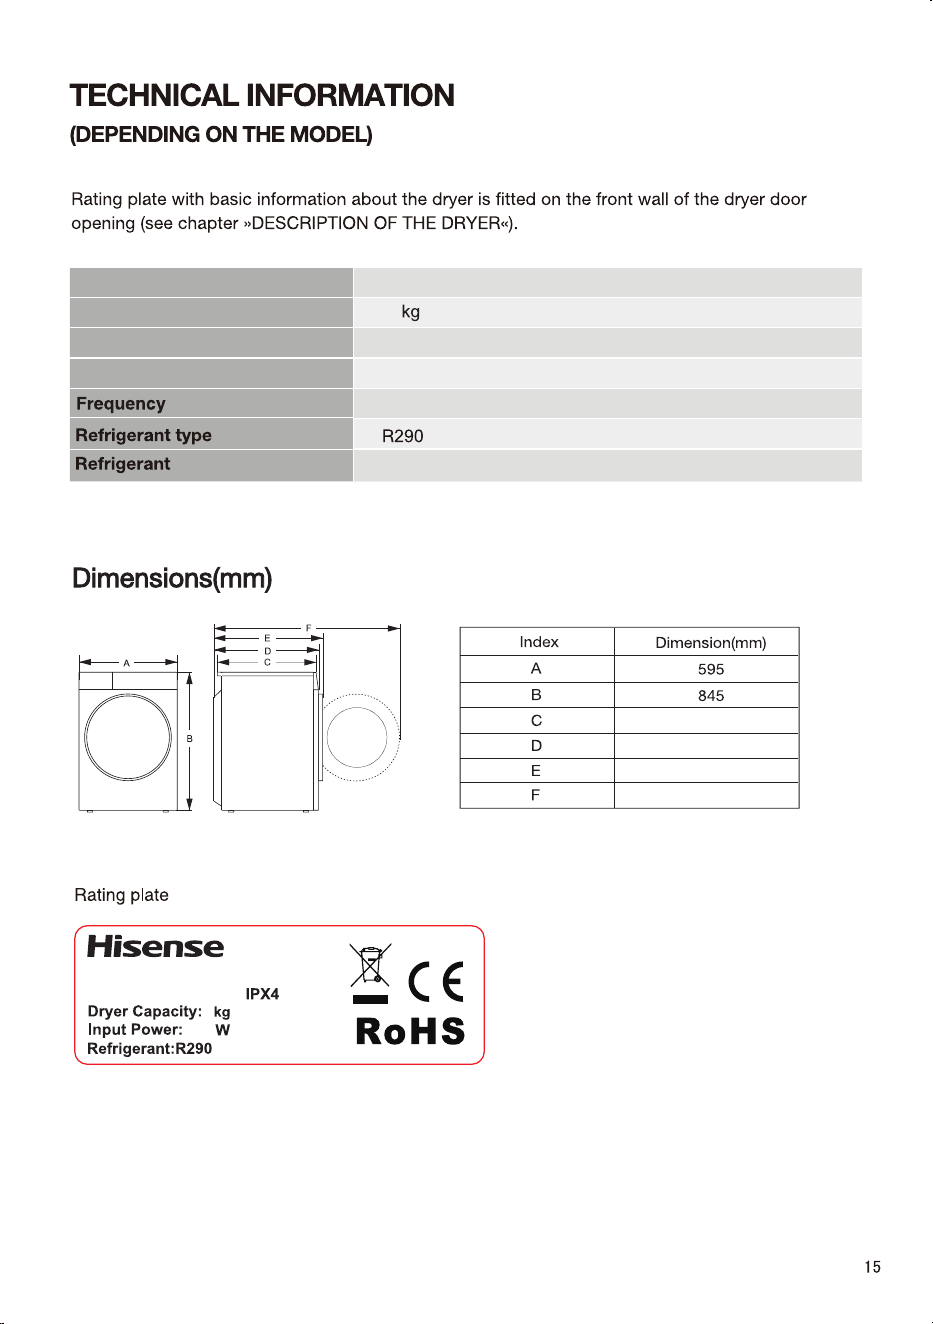
Dryer
xxxxxxxxxx
XXX-XXXV~XXHz
XXX
X
(XXXg)
Rated capacity
Rated Power
Net weight
Charge
8kg
550W
50Hz
140g
Rated Voltage
220-240V~
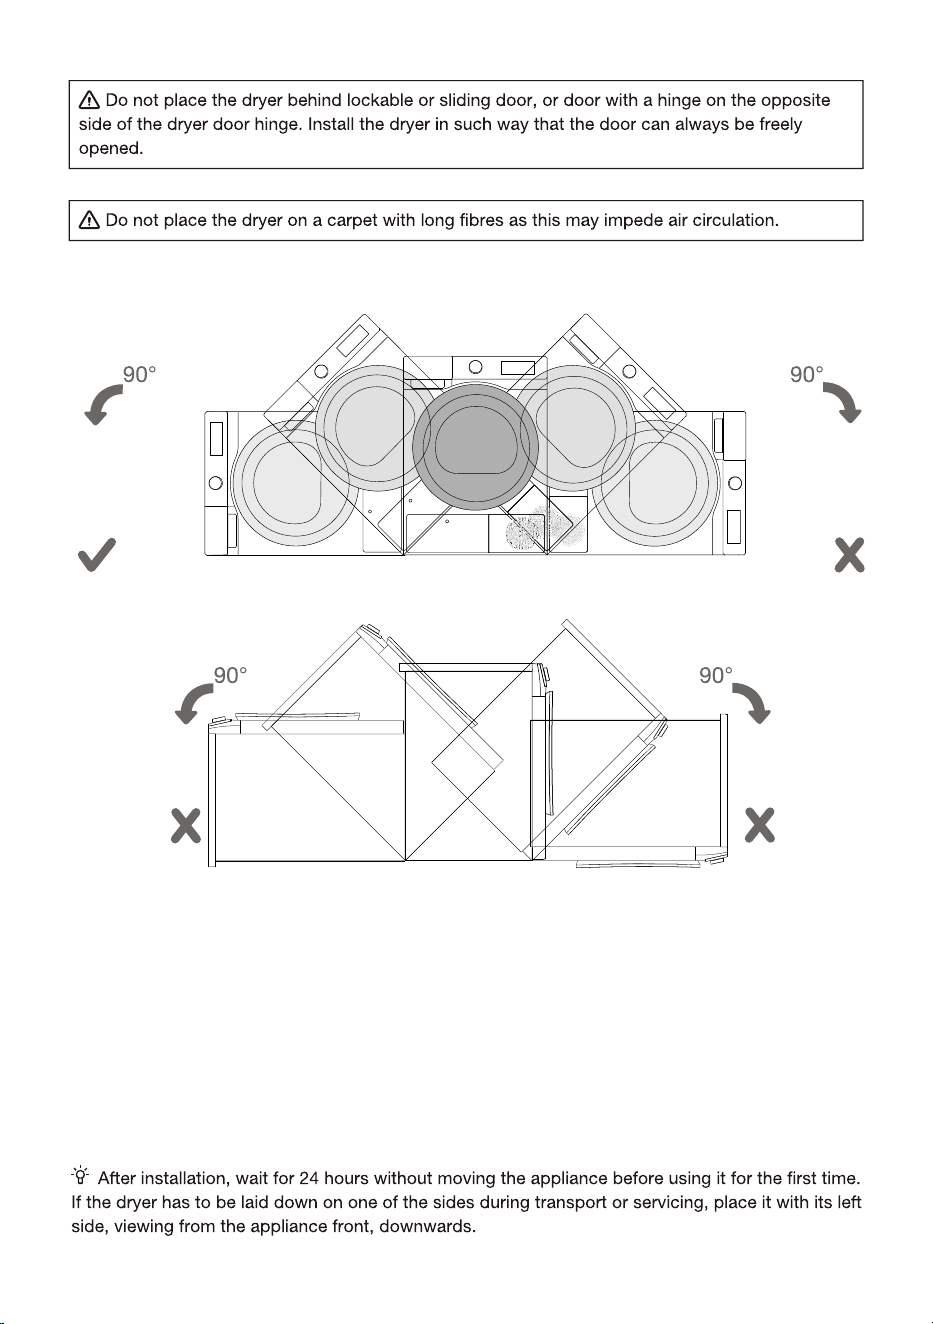
46
520
550
580
1060
16
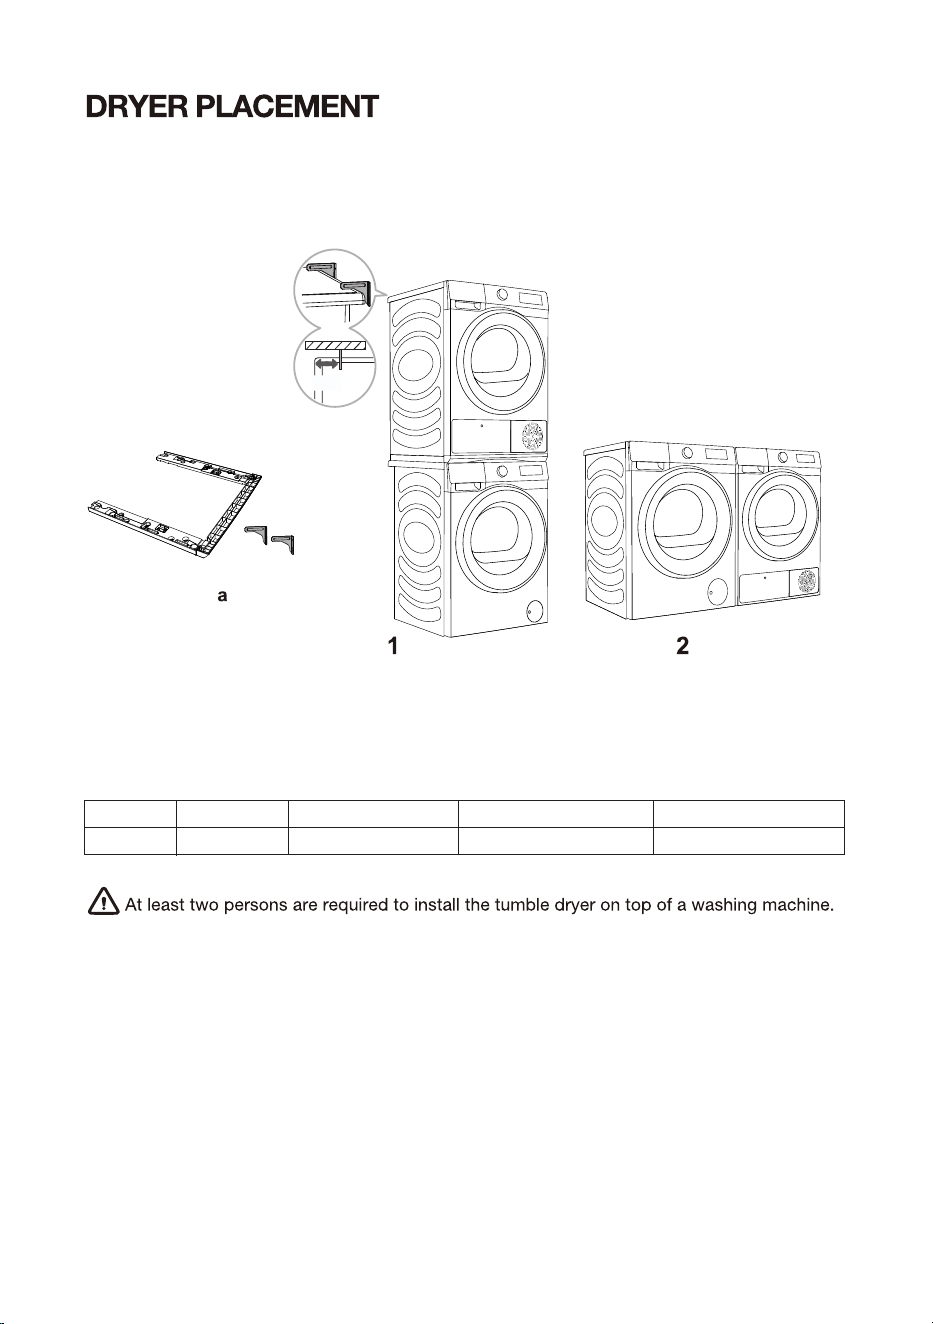
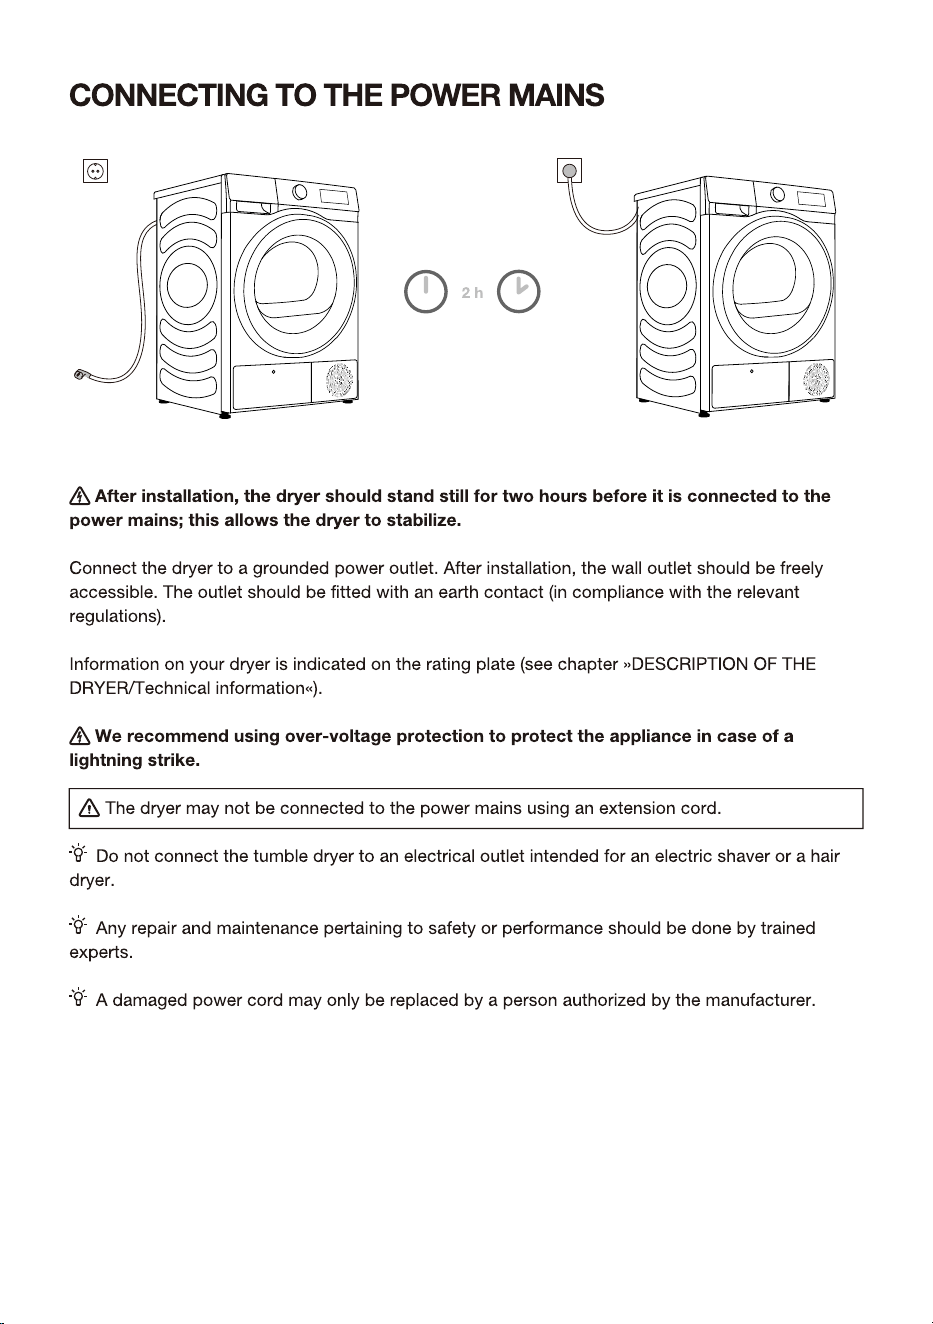
If you own a Hisense dryer, it should only be placed atop the Hisense washing machine using
a Hisense stacking bracket (see Figure 1) .
Alternatively, the dryer can be placed next to the washing machine (figure 2). You can contact
aftersales for purchase figure a, and install it according to user manual.
17
STACKING BRACKET (ACCESSORIES)
Please use original accessories. You can refer to the following recommendations for
purchasing stacking brackets.
Dryer series
3S
Washing machine series
3S
Washing machine depth (D)
510/550
Matching Stacking Brackets
SKHDSN*
Dryer depth (D)
550mm
5 cm
Stacking Brackets
Wall fixed support
18

19
20
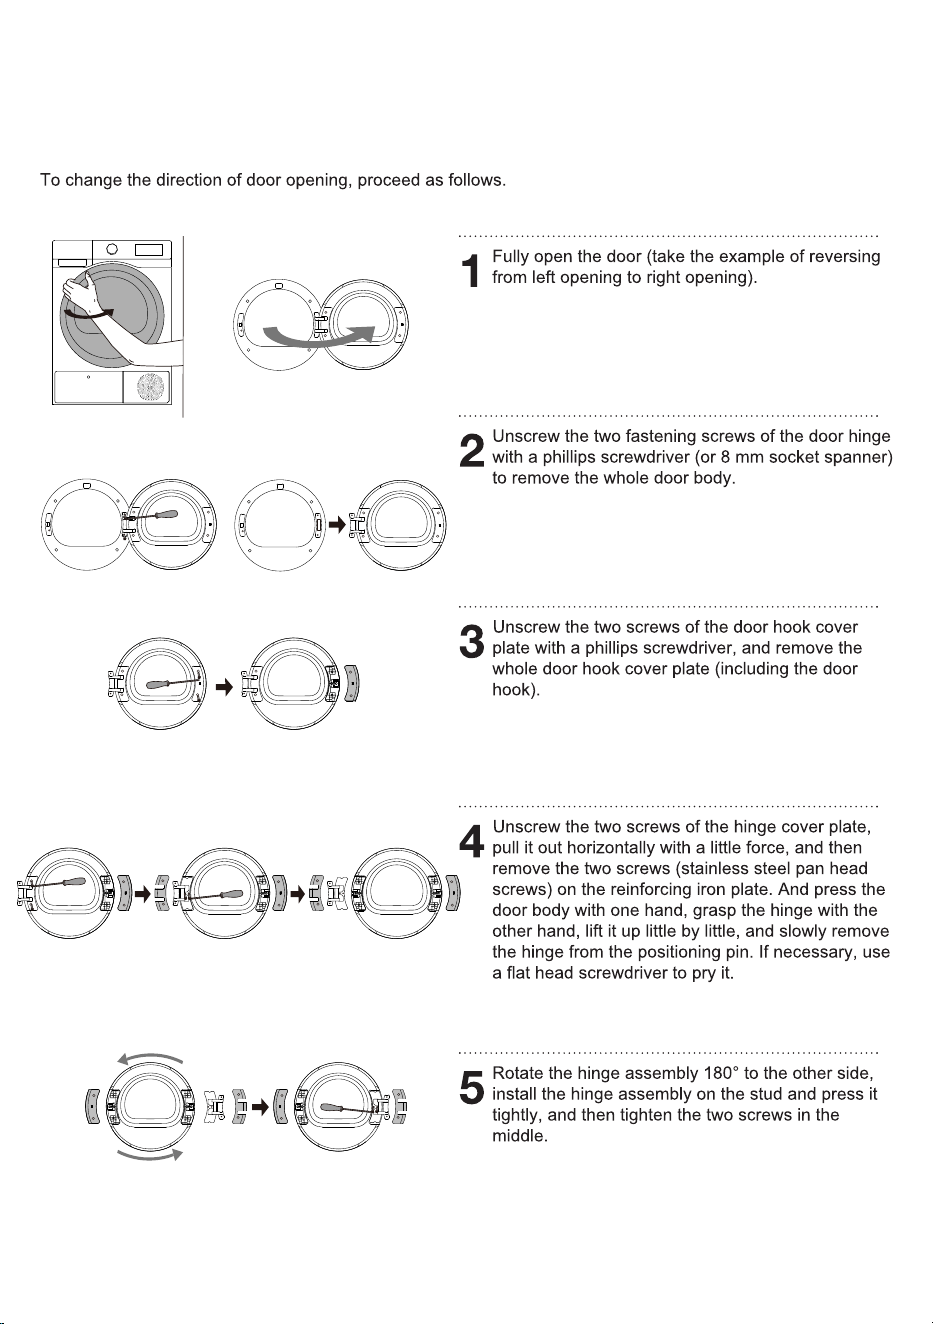
CHANGING THE DOOR OPENING DIRECTION
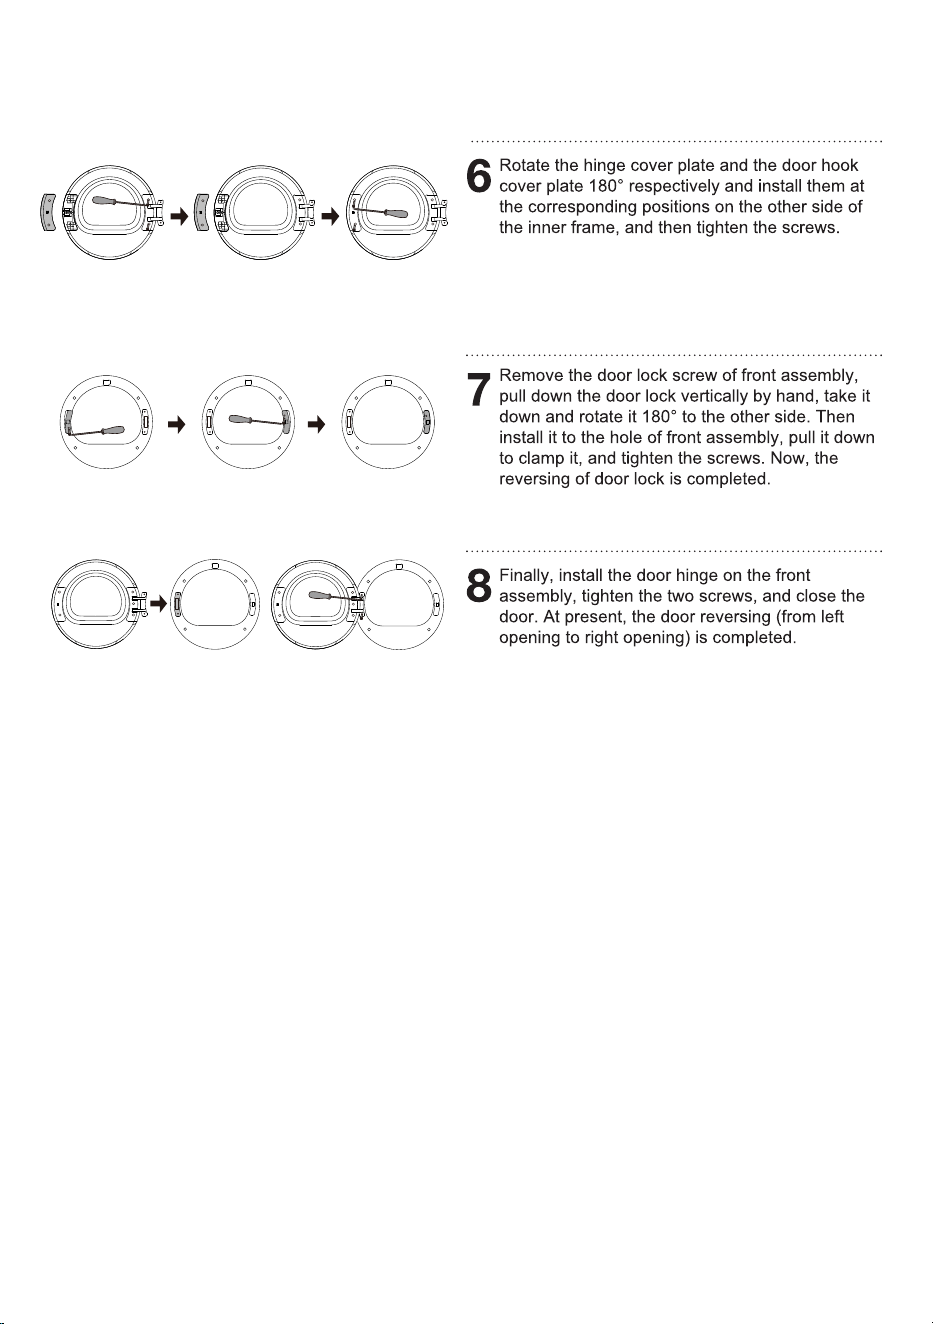
21
22
23
24
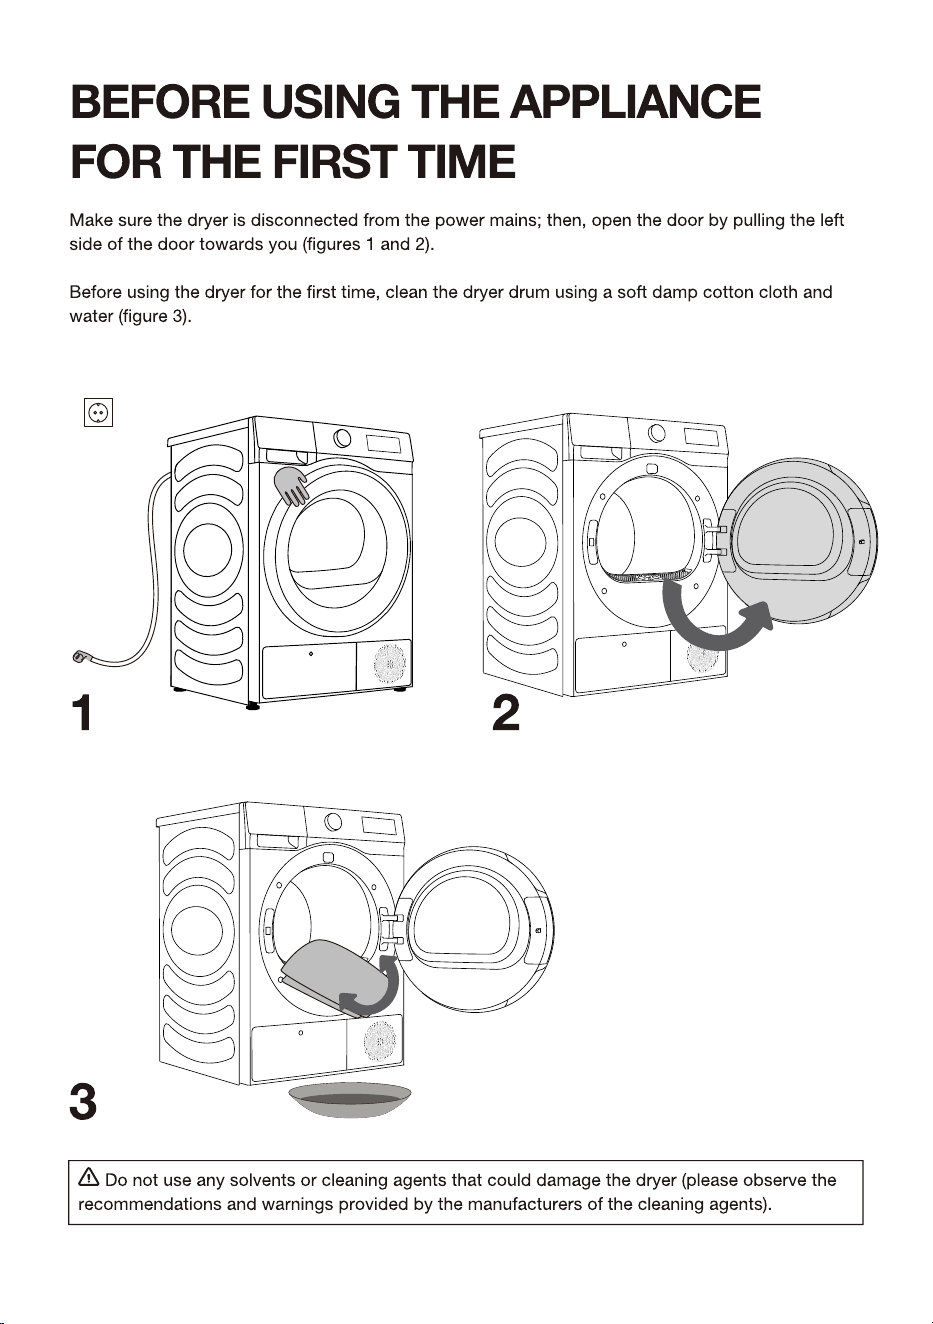
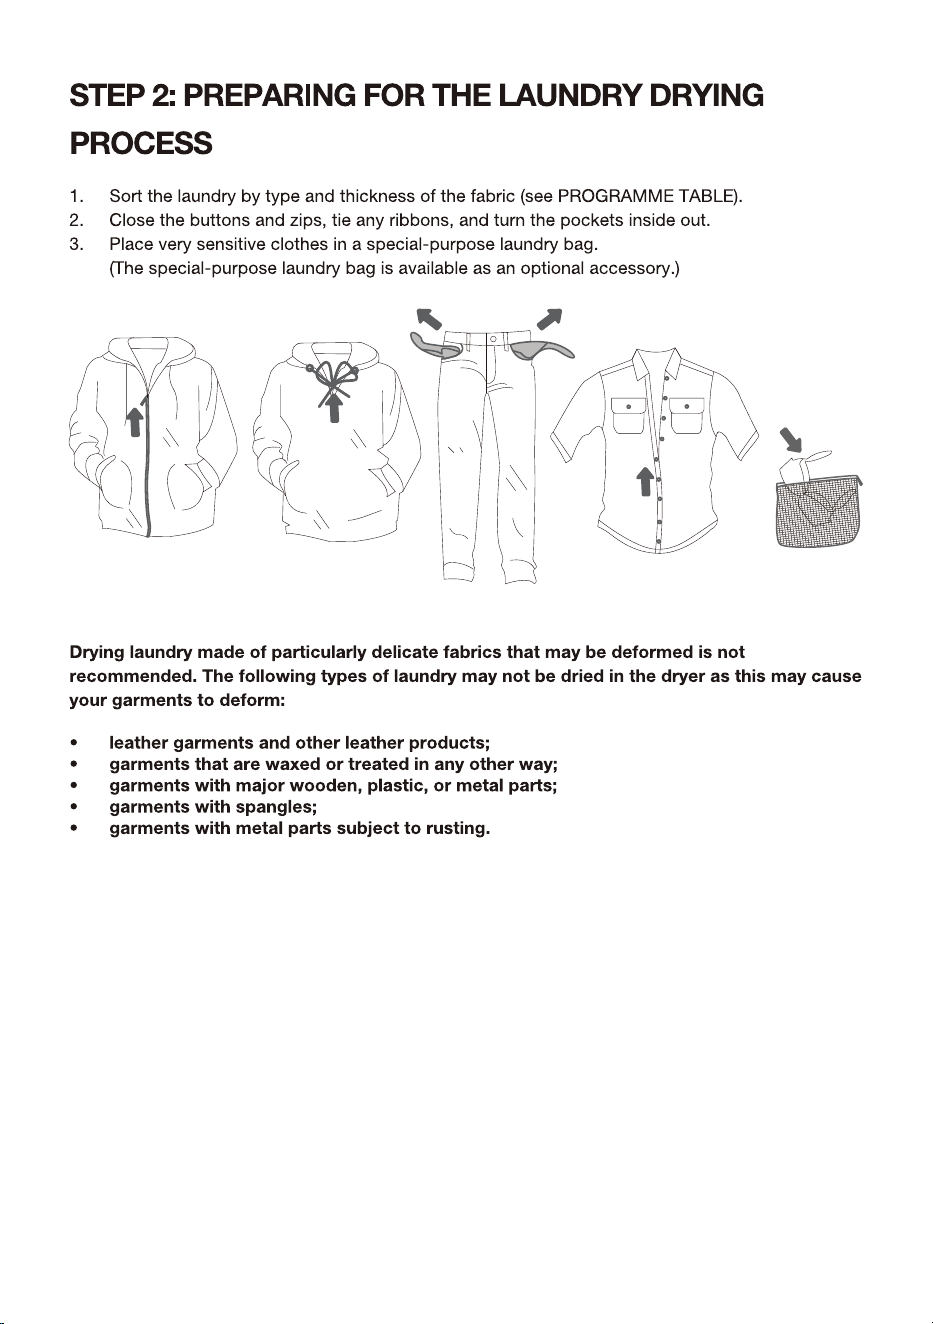
Pack all the packaging material (plastic bags, other plastic parts etc.).
25
26
27
ON
28

29
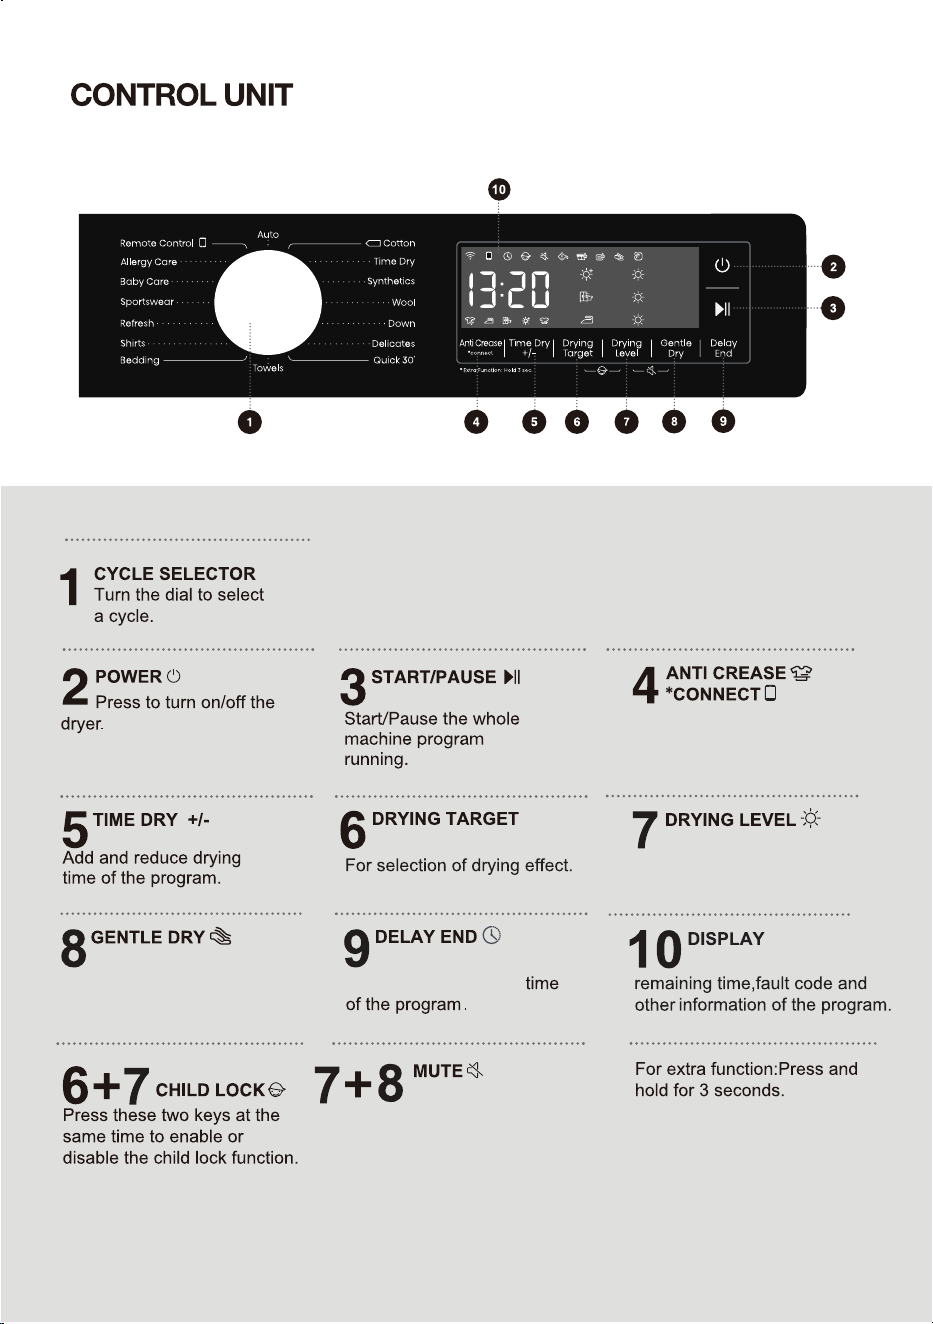
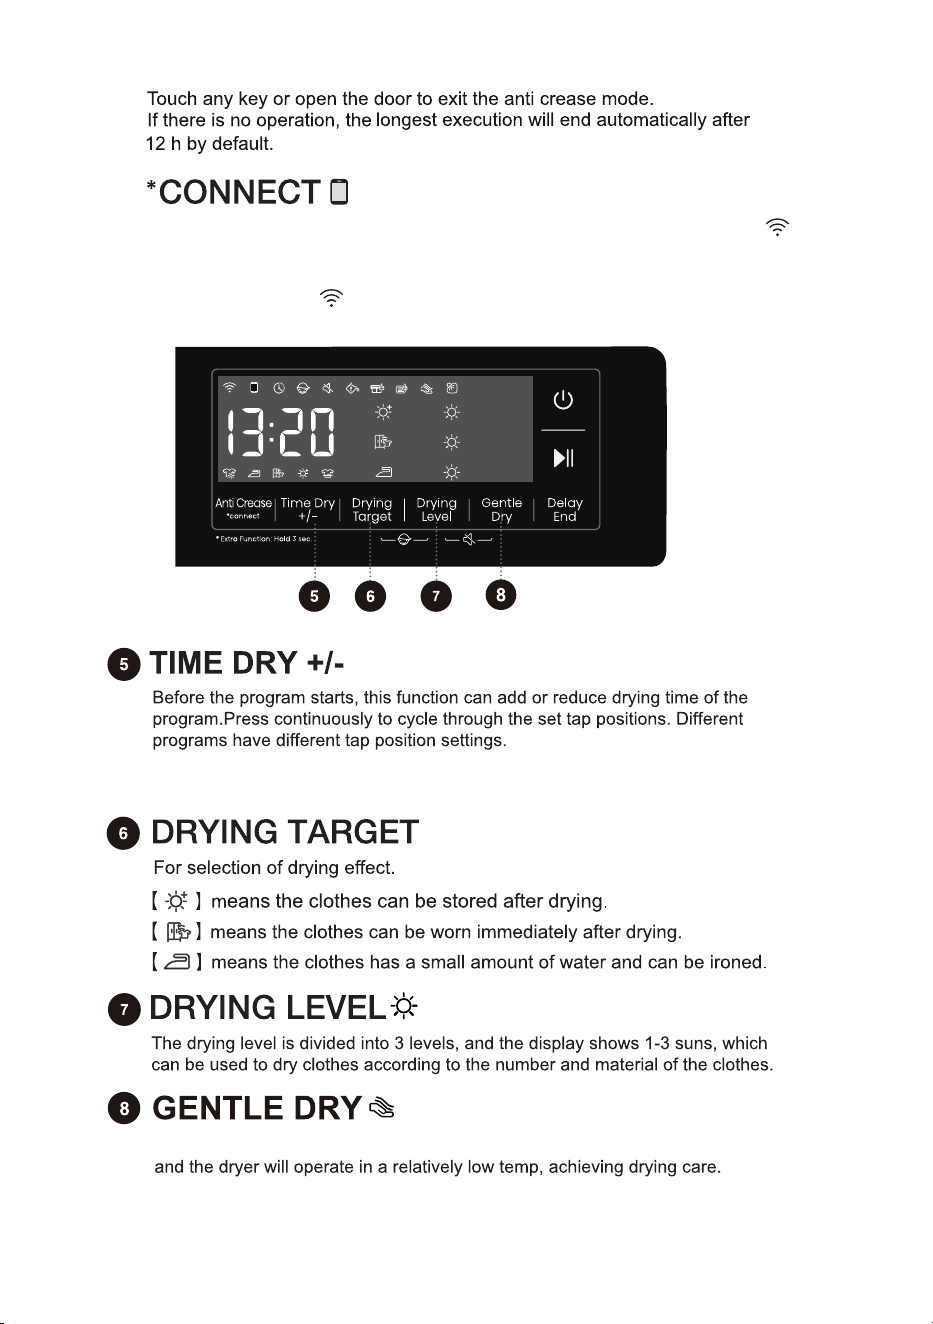
Short press to add or subtract
Anti Crease function.
Long press to control dryer
network.
Press to delay the end
Press these two keys at the
same time to switch or
restore the acoustic signals.
30
It is used to display the
Press to select the gentle
dry function.
Press to select the degree of
dryness.
31
or right
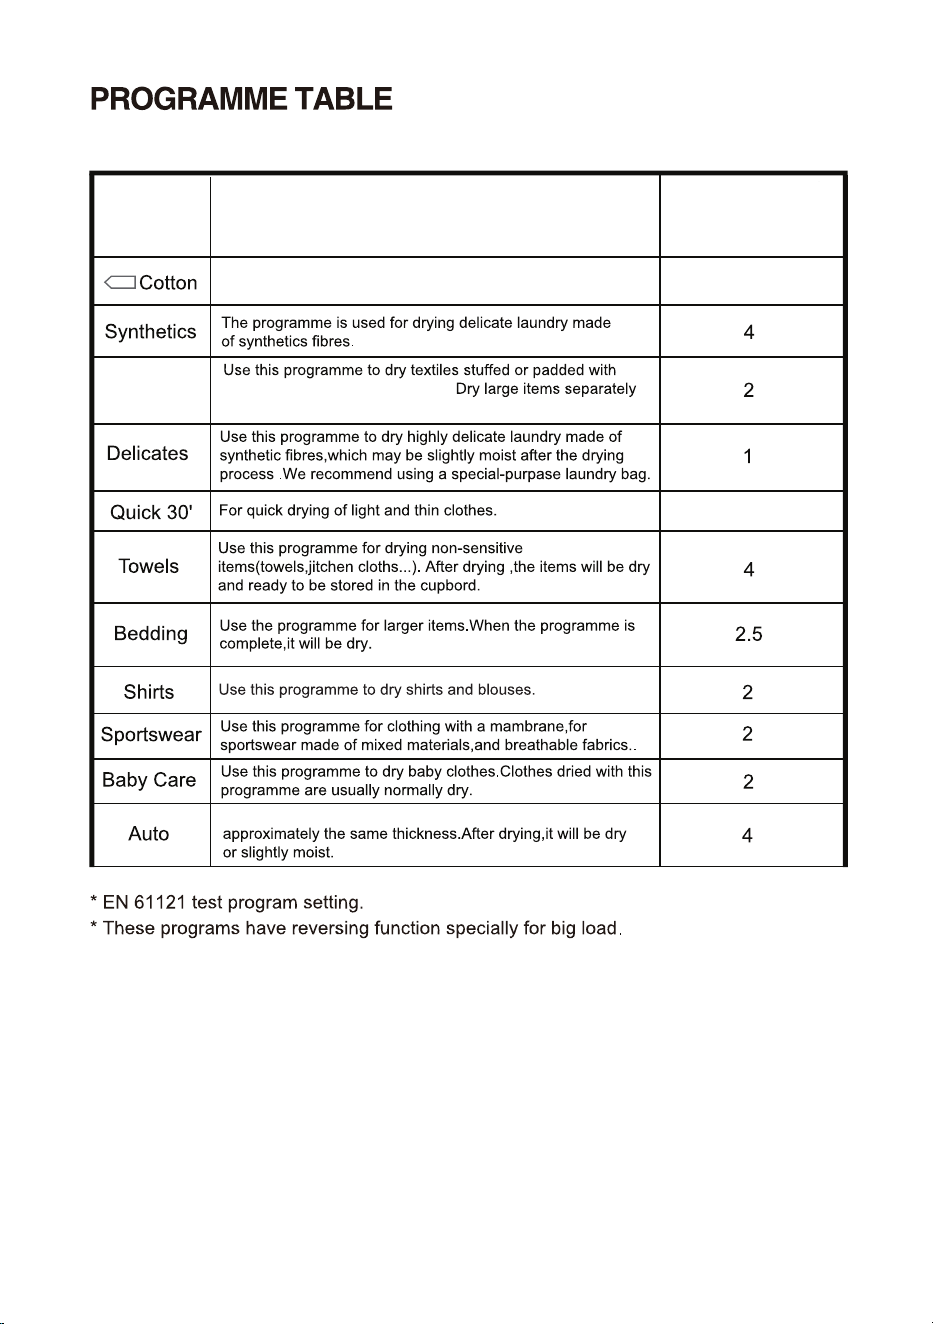
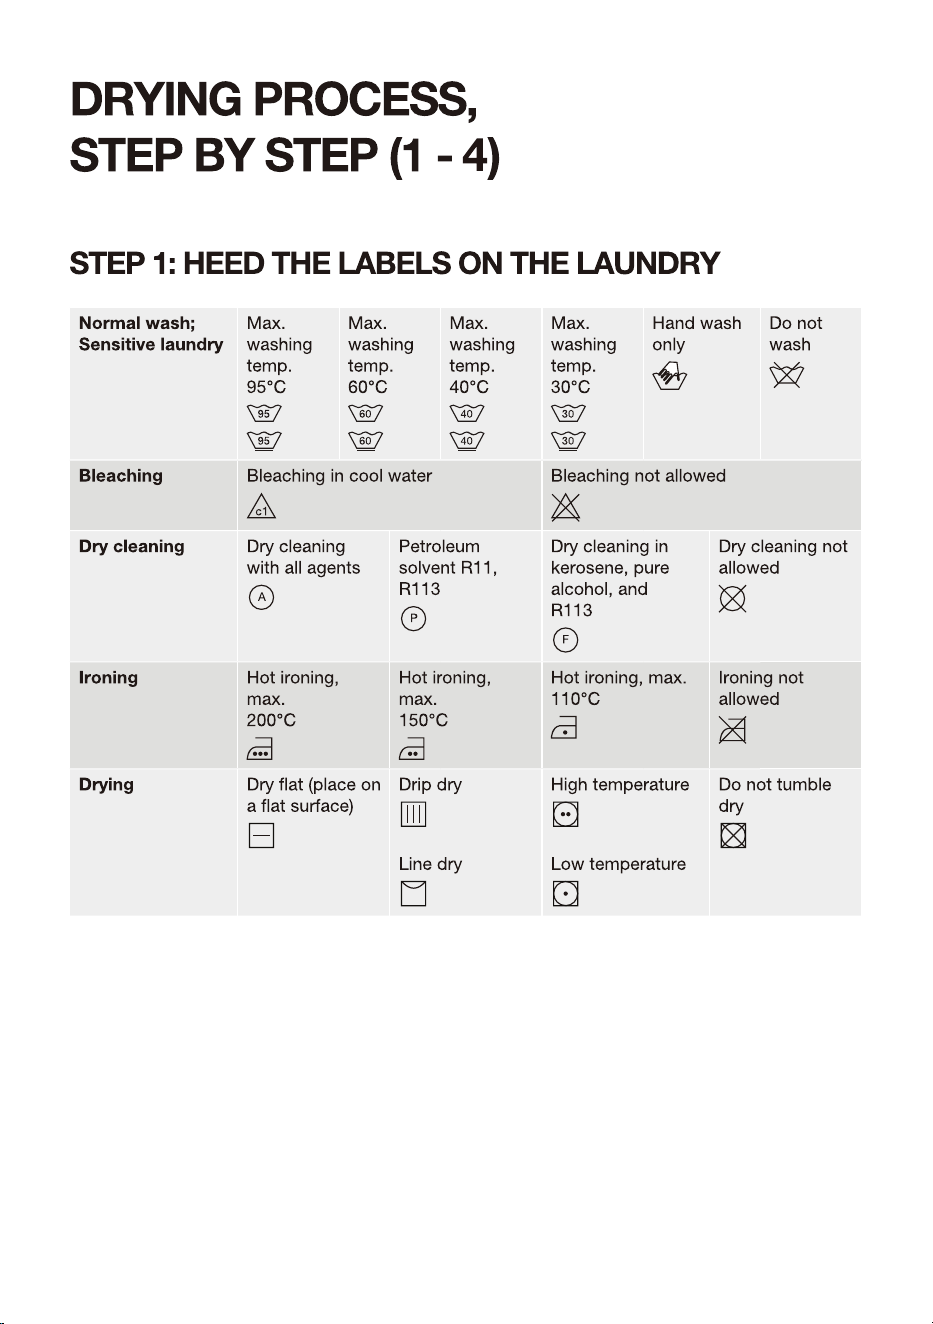
Use this programme for thicker non-sensitive cotton
laundry of approximately the same thickness.
Use this program for thicker non-sensitive cotton laundry of
Down
32
down(pillows, down, jackets etc.).
and use
8
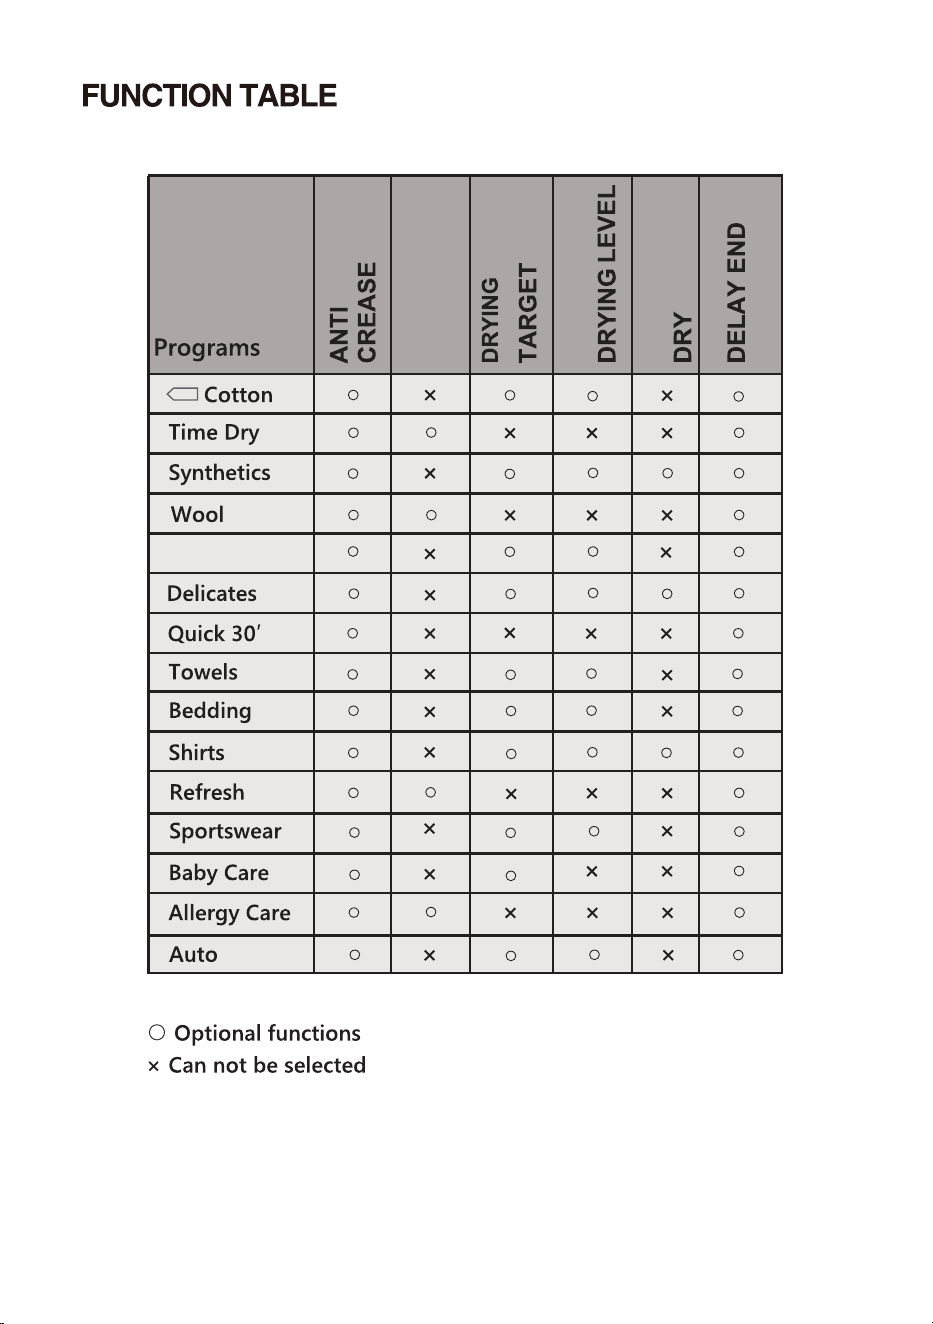
Programme
Sensor dry programmes
Type of clothes
Maximum capacity
(kg)
the Time Dry programme if necessary.
0.5
33
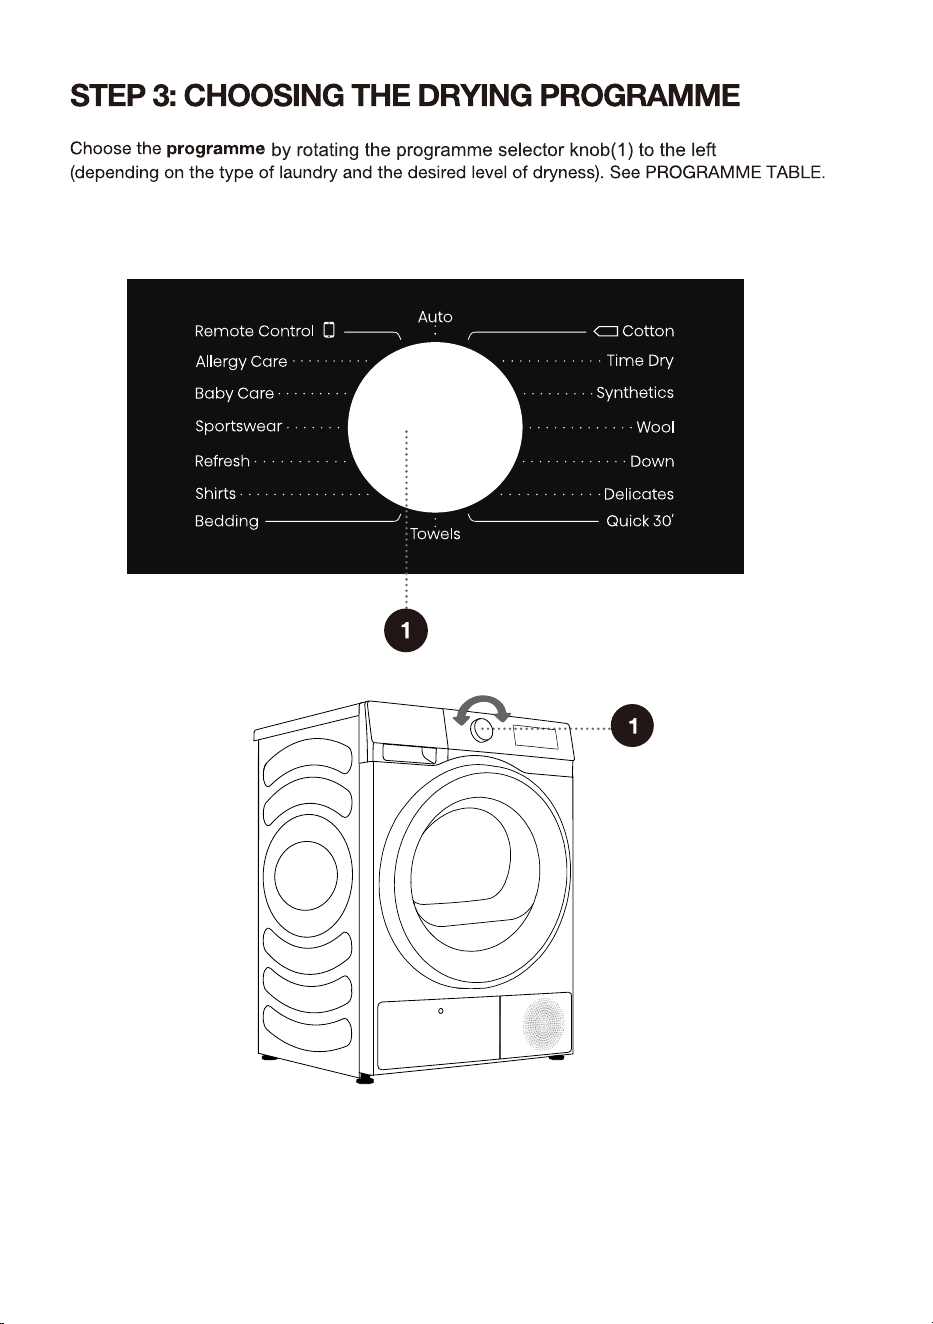
Rotate the knob to Remote Control so that user can select programs via the APP.
Programme
Type of clothes
Maximum capacity
(kg)
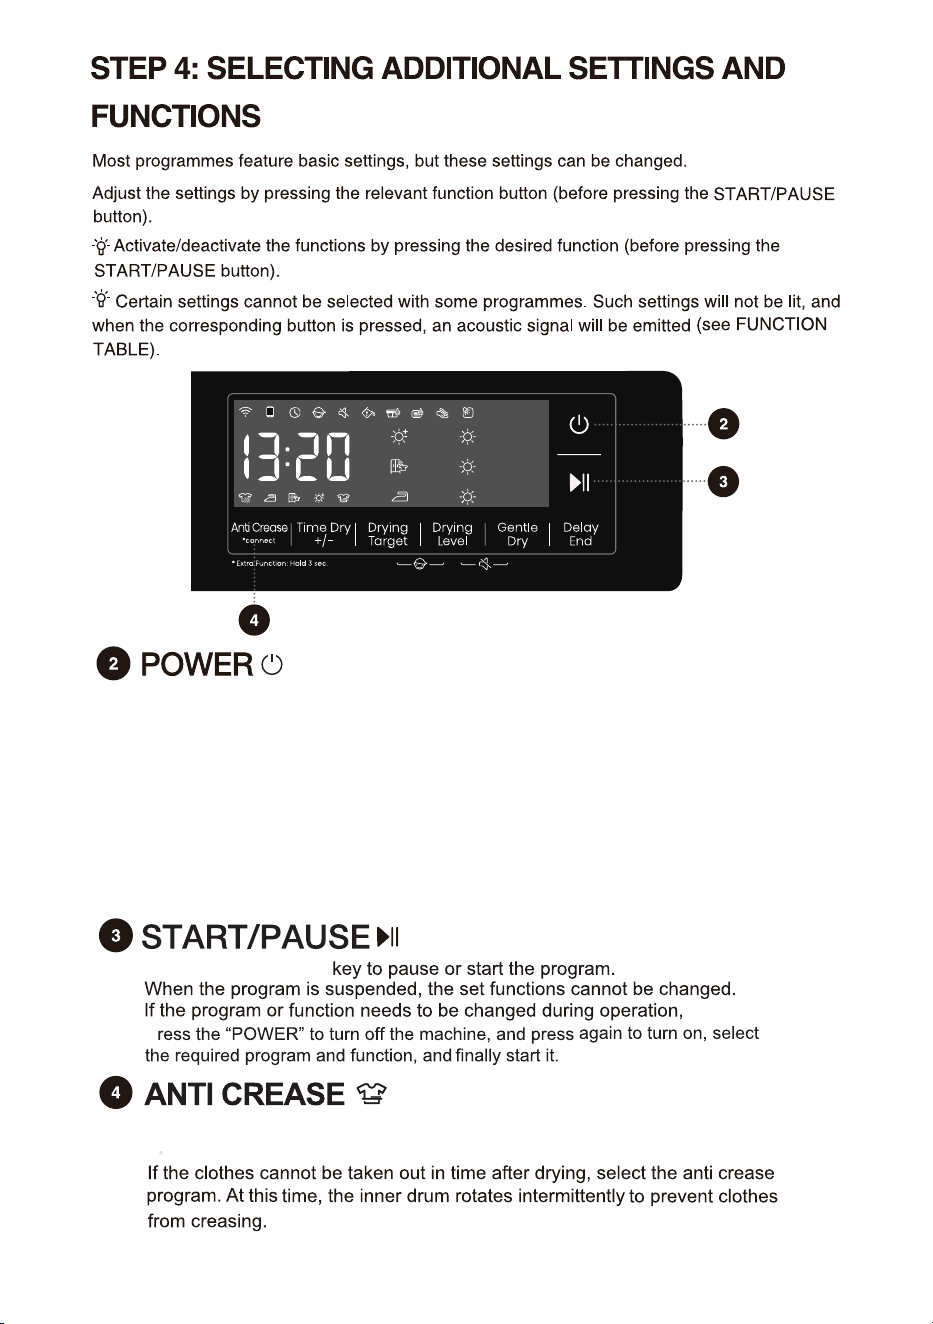
Press briefly: Add "Anti Crease" function, press twice to cancel the function, and
cycle in sequence.
34
Press the “Start/Pause”
p
Pressthe"POWER"buttontopoweron/offtheappliance.
Whentheapplianceispoweredon,itentersstandbymodewiththedisplaylit
up.Inthestandbymodeorafteraprogramhasended,pressandholdthe
"POWER"buttontopoweroffthe appliance.
Ifnooperationisperformedwithin10minuteswhileinstandbymode,ontheEnd
screen,oronthewash-dryretrypromptscreen,theappliancewillautomatically
poweroff.Inthepower-offstate, all displays and outputs are disabled.
Whentheremotecontrolmodeisenabled,theapplianceentersenergy-saving
mode10minutesafterbeingpoweredoffandwillautomaticallyshutoffifthereis
nooperationfor7days.
Shirts, Synthetics and Delicates these three programs can choose this function before start,
35
Press and hold: Connect the Wi-Fi of the appliance, the control panel symbol " "
flashes, and then conduct the networking operation. See the networking description
for the specific networking method.
The network symbol " " stays on once connected successfully.
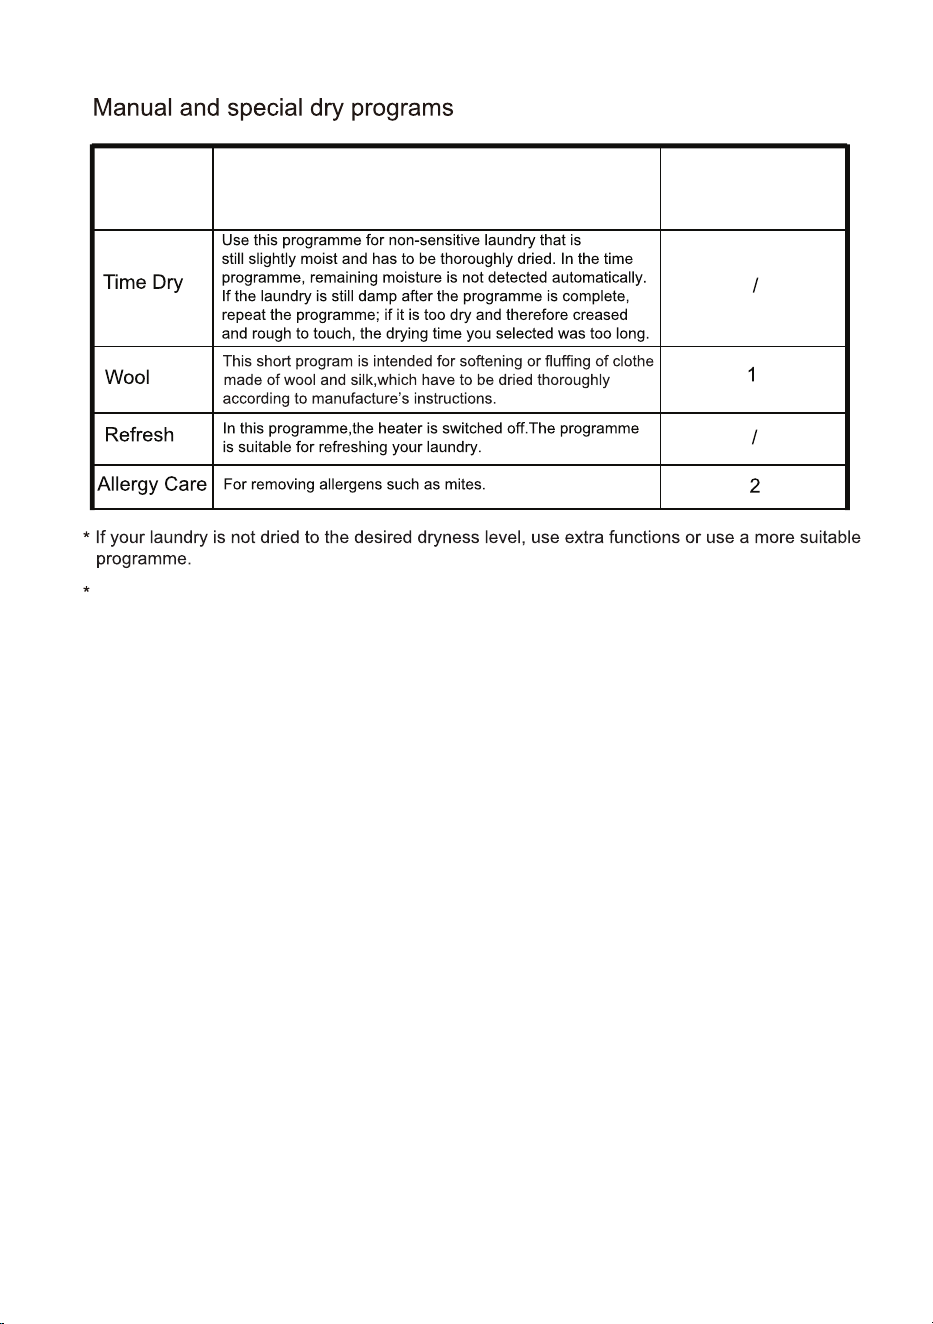
This function is only applicable to the manual and special dry programs.
Sensor dry programs cannot be started.
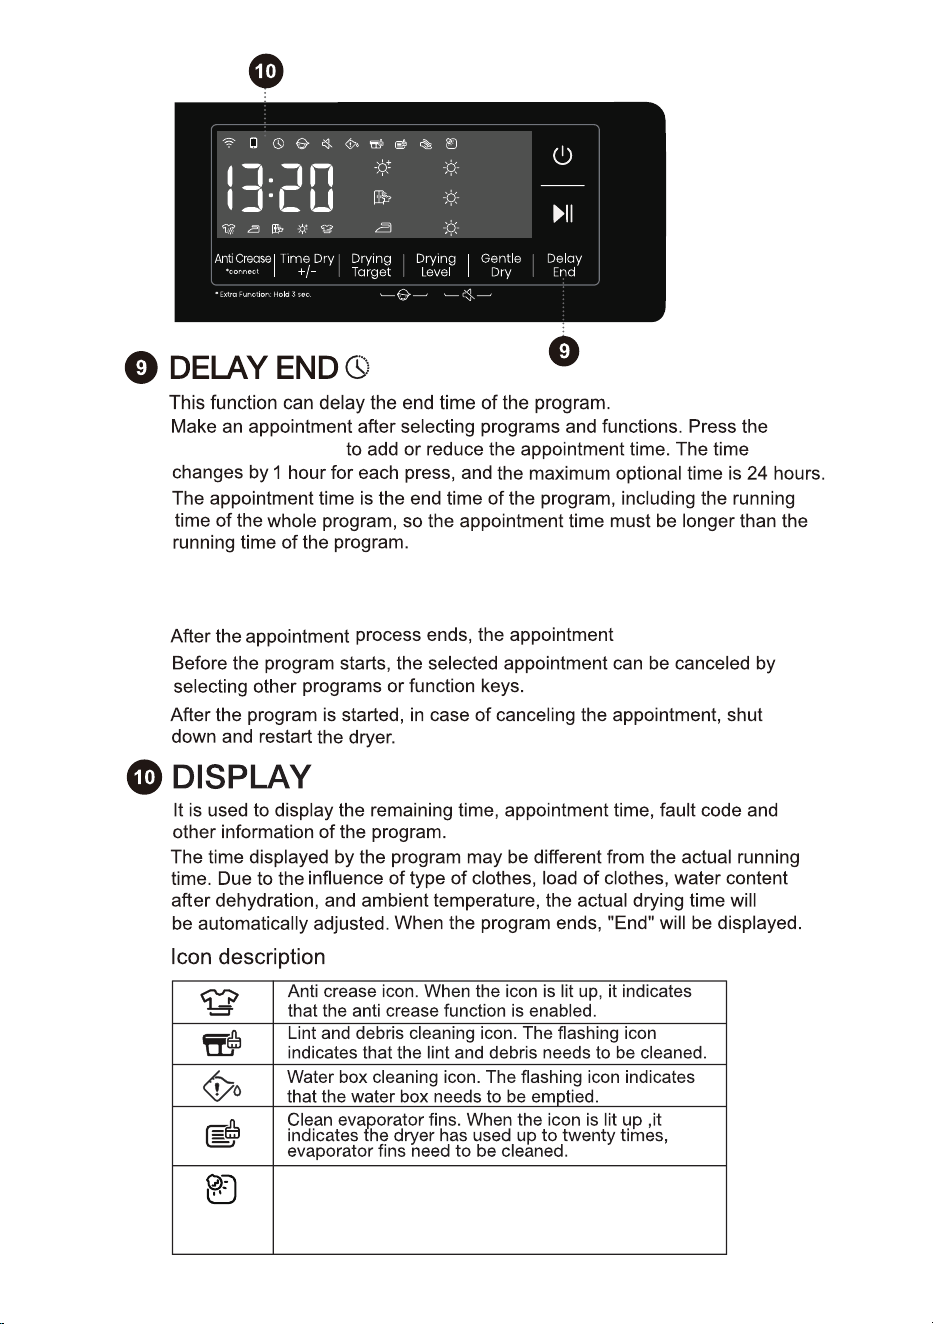
Drum light icon. When the dryer is in running (If the
knob is turned or any key is pressed), pause, program
end or just turned on, drum light will illuminate for 1
minute.
appointment button
36
icon goes out.
When the Delay End function is being selected (set), the Clock icon is lit up;
When the Delay End programme is running, the Clock icon always on or flashes
(depends on the model).
37
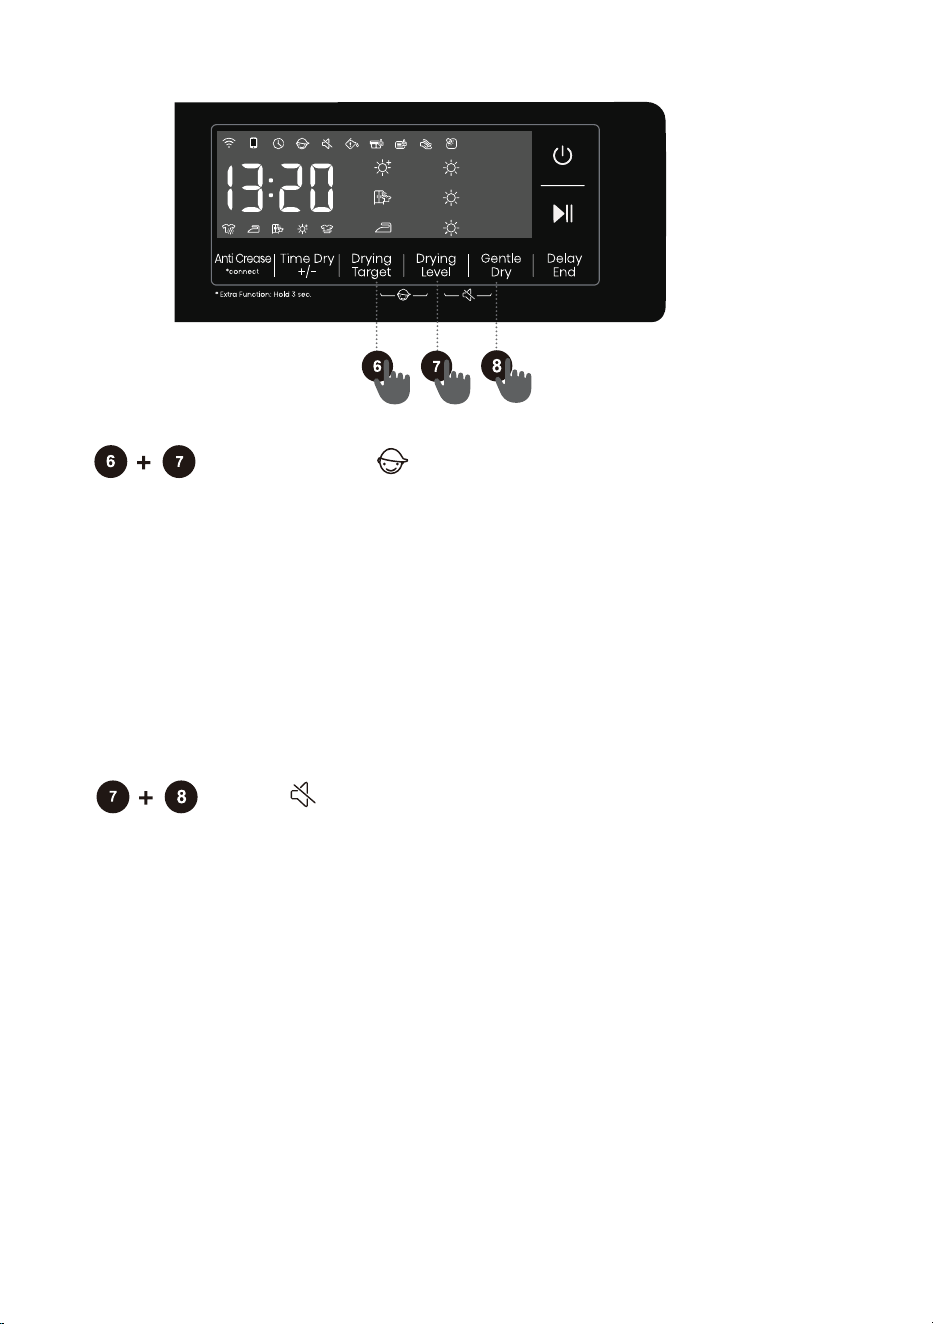
Child Lock
This is a safety feature. To activate it, simultaneously press the positions
"Drying Target + Drying Level" until the Child Lock icon light up, and then
Child Lock is set up. Repeat the same operation, the Child Lock will be
released.
When the Child Lock is set, all function buttons will be shielded except the
power button.
After completing program, child lock will automatically unlock.
The Child Lock feature includes a memory function, and the setting will
remain effective unless it is manually activated or deactivated.
Mute
Use this to switch off or restore the acoustic signals.
When the appliance is in the state of holding, pause or operation, press
"Drying Level + Gentle Dry" buttons until the display show mute
function icon. All the buzzing will be turned off except the alarms.
When the appliance is in the mute state, repeat the same operation
until mute function icon light off. All the buzzing will be activated.
The Mute feature also includes a memory function and the setting will
remain effective unless it is manually turned on or off.
After the child lock function is enabled: During running in anti crease
mode, the child lock needs to be released manually, and the anti crease
function ends automatically.
38
Down
GENTLE
TIME DRY
+/-
SETTING
39
Heat exchanger
door cover
40

41
cover to unlock position.
Install the inner door cover
to the origin positions,lock
the knob and close the heat
exchanger door cover.
After using for a period of
time, if there is dust on the
heat exchanger, please
remove the dust with tools. Do
not touch the heat exchanger
directly with your hands to
avoid in jury.
42
43
44
45
46
The dryer display
shows running time
different from actual
program duration.
For programs that stop automatically when clothes are
dry, the drying duration displayed is calculated according
to standard environment, initial laundry moisture, load
mass and type. The drying time is automatically adjusted
for any change in conditions. The difference between the
actual time and the display time is normal, which ensures
the best drying effect.
47
48
49
Dryer
xxxxxxxxxx
XXX-XXXV~XXHz
X
XXX
(XXXg)

Baby Care
Delicates
7[OIQȟ
SportYwear
Auto
Bedding
Cotton
Synthetics
Towels
The table indicates the power consumption and time values for drying of a test batch of laundry
with various loads and after spinning at various rates.
The following requirements apply to the consumption values speciŲed below.
Inlet air temperature room temperature
Inlet air humidity 50–60%
Drying temperature Normal
Full load
Partial load
Small load
Due to deviations in terms of type and amount of laundry, spinning, power supply oscillation, and
environment temperature and humidity, the values measured at the user may diŰer from the one stated
in the table.
50
9hirtY
Program
Amount
Spinning澳
澻瀅瀃瀀澼
Program
consumption,
approximately
(kWh)*
Program澳
duration,appr激澳
oximately
(h:min)*
PROGRAM TABLE
1200
1.40
3:10
1400
0.80 2:10
1400
0.54
1:25
1000
0.57
1:26
1000 0.36 1:
0
0
1000
0.42
1:10
1400 0.18
0:
41
1000 0.75 2:05
1400 0.53
1:19
1400 0.38 1:05
1400 1.06 2:45
1400 0.58 1:35
1000 0.24 0:55
1000 0.44 1:15
1000 0.62
1:38
1000
0.78
2:10
1400
0.56
1:30
1400
0.41
1:10
51
52
53
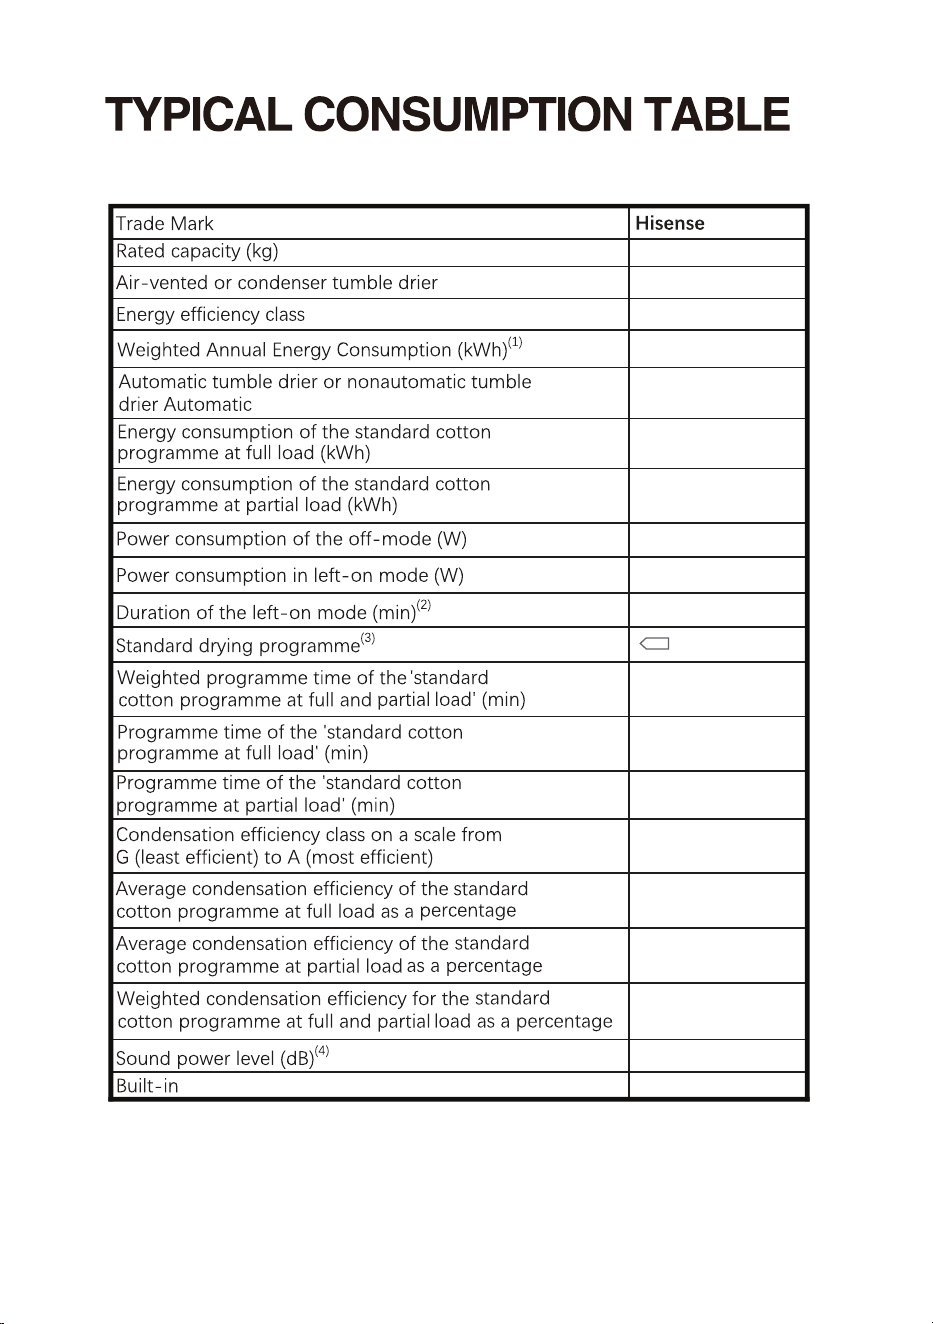
172.0
8
1.41
0.78
0.59
145
188
112
85
85
85
Cotton
condenser
A+++
Automatic
tumble dryer
0.49
5
B
64
NO
54
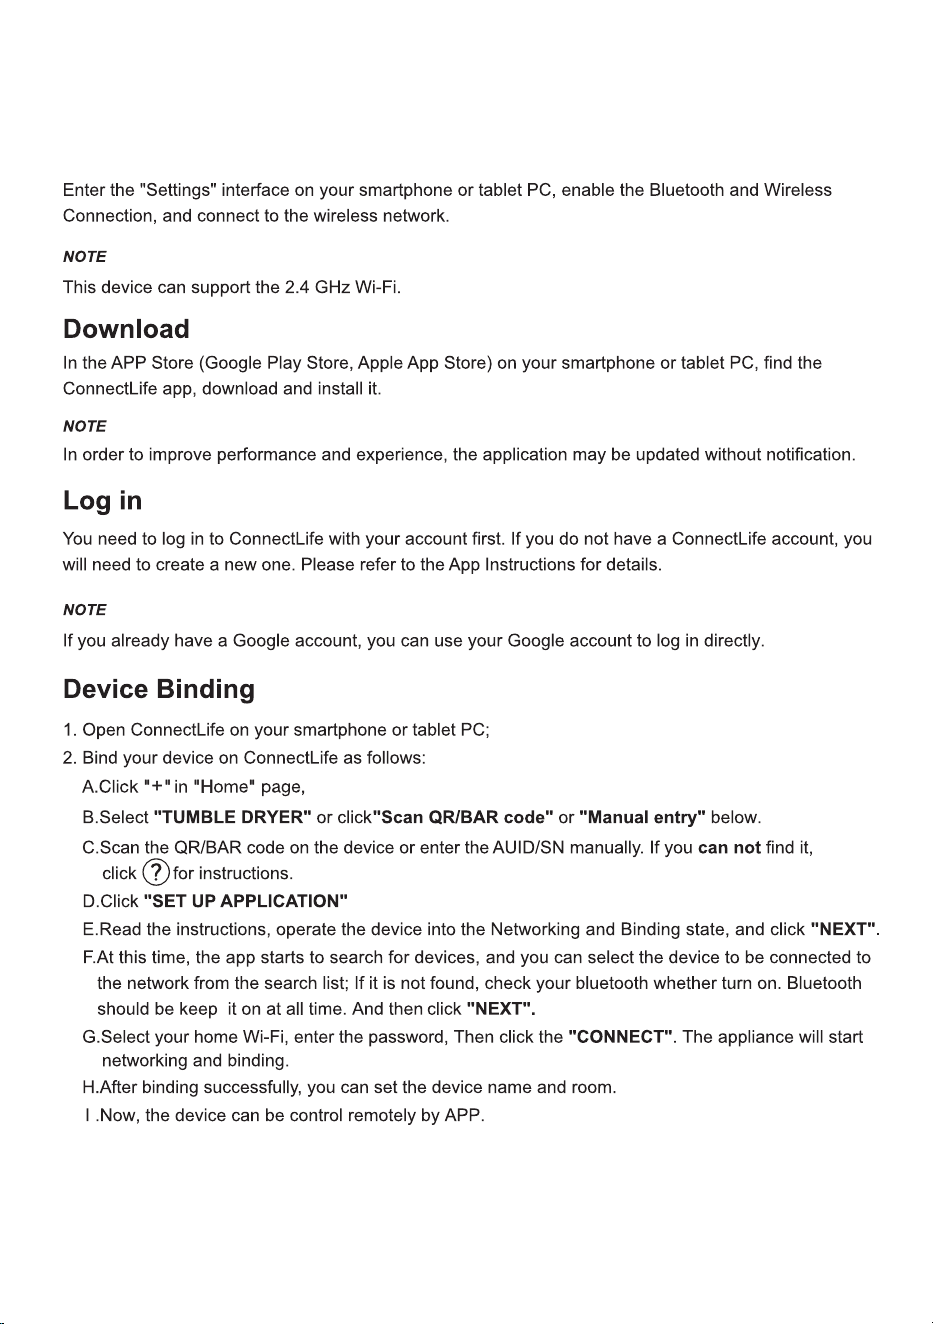
55
choose "Add device" or "Scan".
Wi-Fi CONNECTION
When the "
" display light on the display window is not on, you cannot remotely control
the machine through the mobile phone. To enable this function, rotate the knob to Remote
Control until the " " display light on the display again.
.
How to active the Wi-Fi function?
1. Long press the " " button to connect the Wi-Fi of the appliance until the control panel symbol
" " flashes.
2. Long press " ", and you can see "Bon" on the display.
3. After the above steps, your appliance is ready to connect to the Internet, and then you can follow the
guide on your APP .
4. Otherwise, you can turn off the appliance and start from the first step.
How to active the Remote Control?
2.
Turn the programme selector konb to "Remote Control" to power on the Remote Control module.
Remote Control icon " " is on, the remote control is set successfully and the door is locked; Remote
Control icon is off, the remote control is closed.
1. " to turn on the Wi-Fi Verify that the Wi-Fi switch is on. If the Wi-Fi switch is not on, long press "
network.
56
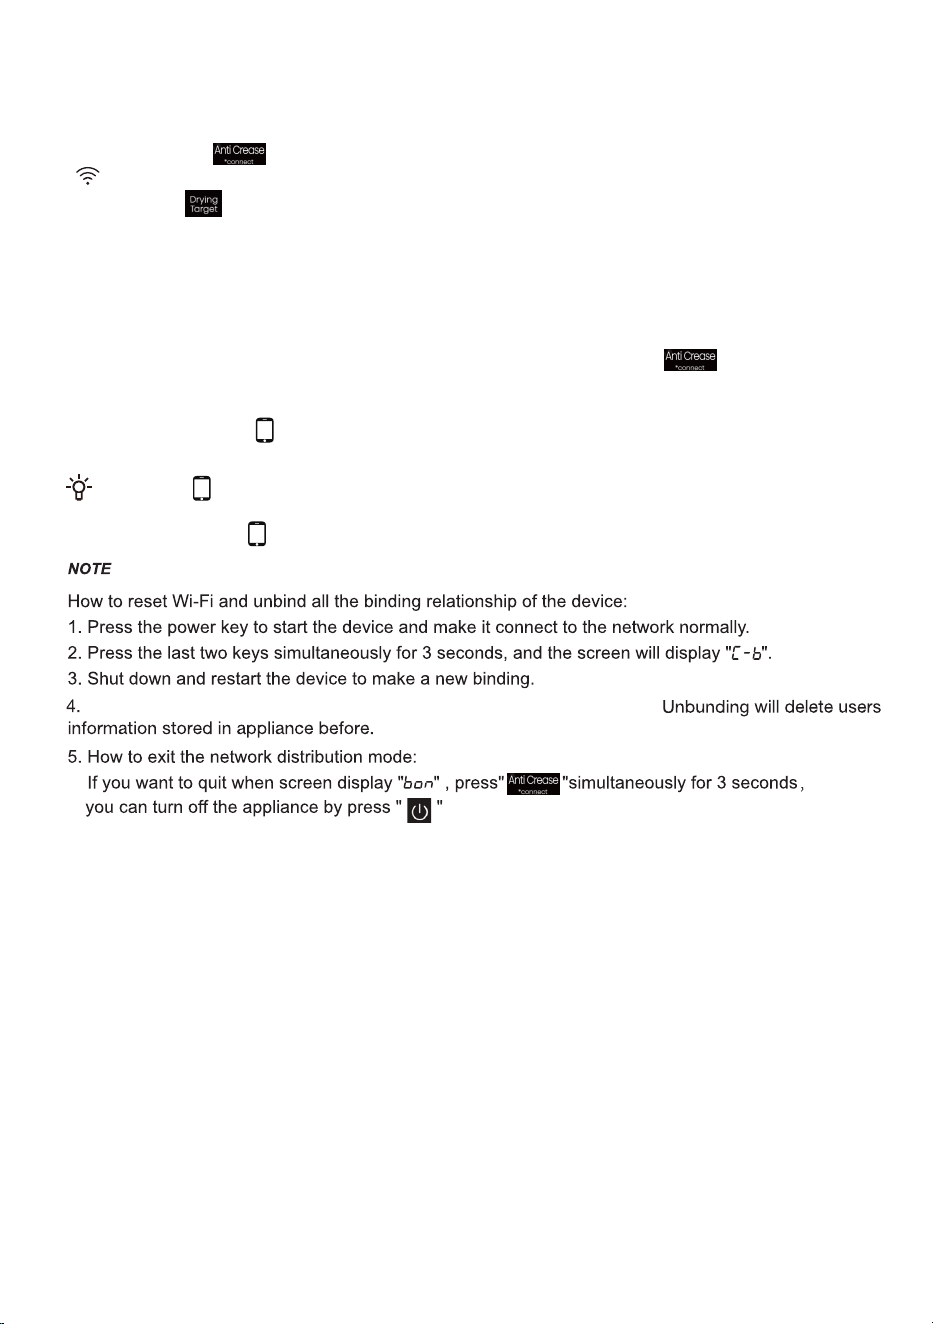
After unbinding, the device must be restarted, or the next binding will fail.
2413026-X08063144A