
English
USER’S OPERATION MANUAL
Before operating this unit, please read this manual
thoroughly, and retain for future reference
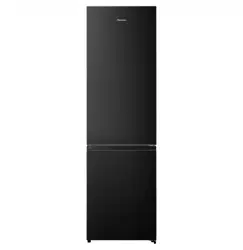
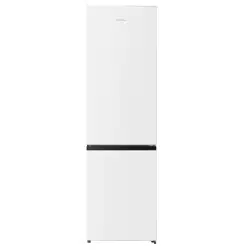
RB440N4WWF
RB440N4WCF
RB440N4WFF
RB435N4WCE
RB435N4BCE
RB435N4BWE
RB435N4BFE
RB435N4WWE
RB435N4WFE

2
Contents
Safety and warning information...........2
Installing your new appliance...............9
Reversing the door..........................10
Description of the appliance...............14
Display controls................................17
Using your appliance.........................21
Helpful hints and tips.........................24
Cleaning and care..............................25
Troubleshooting...............................26
Disposal of the appliance...................28
Safety and warning information
For your safety and correct usage, before installing and
first using the appliance,read this user manual carefully,
including its hints and warnings.To avoid unnecessary
mistakes and accidents,it is important to make sure that all
people using the appliance are thoroughly familiar with its
operation and safety features. Save these instructions and
be sure that they remain with the appliance if it is moved or
sold,so that anyone using it throughout its life,will be
properly informed on its usage and safety notices.
For the safety of life and property,keep the precautions of
these user's instructions as the manufacturer is not
responsible for damages caused by omission.
According to EN standard
This appliance can be used by children aged from 8 years
and above and persons with reduced physical, sensory or
mental capabilities or lack of experience and knowledge if
they have been given supervision or instruction concerning
use of the appliance in a safe way and understand the
hazards involved.Children shall not play with the
appliance.Cleaning and user maintenance shall not be
made by children without supervision.
Children aged from 3 to 8 years are allowed to load and
unload refrigerating appliances.
According to IEC standard
This appliance is not intended for use by persons
Safety for children and others who are vulnerable people
●
●

3
(including children) with reduced physical,sensory or
mental capabilities,or lack of experience and knowledge,
unless they have been given supervision or instruction
concerning use of the appliance by a person being
responsible for their safety.
Children should be supervised to ensure that they do not
play with the appliance.
Keep all packaging away from children as there is a risk
of suffocation.
If you are discarding the appliance,pull the plug out of the
socket,cut the connection cable (as close to the appliance
as you can) and remove the door to prevent children
playing from suffering an electric shock or from closing
themselves inside it.
If this appliance, featuring a magnetic door seals,is to
replace an older appliance having a spring lock (latch) on
the door or lid,be sure to make the spring lock unusable
before you discard the old appliance.This will prevent it
from becoming a death trap for a child.
WARNING —This appliance is intended to be used
in household and similar applications such as
-staff kitchen areas in shops,offices and other working
environments;
-farm houses and hotels, motels and other residential type
environments;
-bed and breakfast type environments;
-catering and similar non-retail applications.
WARNING — Do not store explosive substances such as
aerosol cans with a flammable propellant in this appliance.
WARNING — If the supply cord is damaged,it must be
replaced by the manufacturer,its service agent or similarly
●
●
●
●
●
●
●
General safety

4
qualified persons in order to avoid a hazard.
WARNING — Keep ventilation openings,in the appliance
enclosure or in the built-in structure,clear of obstruction.
WARNING — Do not use mechanical devices or other
means to accelerate the defrosting process,other than
those recommended by the manufacturer.
WARNING — Do not damage the refrigerant circuit.
WARNING — Do not use electrical appliances inside the
food storage compartments of the appliance,unless they
are of the type recommended by the manufacturer.
WARNING — The refrigerant and insulation blowing gas
are flammable. When disposing of the appliance,do so only
at an authorized waste disposal centre.Do not expose to
flame.
WARNING —When positioning the appliance,ensure the
supply cord is not trapped or damaged.
WARNING —Do not locate multiple portable socket-
outlets or portable power supplies at the rear of the
appliance.
WARNING—The illuminating lamps must not be replaced
by the user! If the illuminating lamps is damaged,contact
the customer helpline for assistance.
This warning is only for refrigerators that contain
illuminating lamps.
The refrigerant isobutene (R600a) is contained within the
refrigerant circuit of the appliance,a natural gas with a high
level of environmental compatibility,which is nevertheless
flammable.During transportation and installation of the
appliance,ensure that none of the components of the
refrigerant circuit becomes damaged.
●
●
●
●
●
●
●
●
Replacing the illuminating lamps
Refrigerant
The refrigerant (R600a) is flammable.
WARNING — Refrigerators contain refrigerant and gases
in the insulation.Refrigerant and gases must be disposed
of professionally as they may cause eye injuries or ignition.
Ensure that tubing of the refrigerant circuit is not damage
prior to proper disposal.
The symbol is a warning and indicates the
refrigerant and insulation blowing gas are flammable.
If the refrigerant circuit should be damaged:
-Avoid opening flames and sources of ignition.
-Thoroughly ventilate the room in which the appliance is
situated.
It is dangerous to alter the specifications or modify this
product in any way.
Any damage to the cord may cause a short circuit,fire,
and/or electric shock.
1.The power cord must not be lengthened.
2. Make sure that the power plug is not crushed or
damaged.
A crushed or damaged power plug may overheat and
cause a fire.
3.Make sure that you can access the main plug of the
appliance.
4. Do not pull the main cable.
5. If the power plug socket is loose, do not insert the power
plug. There is a risk of electric shock or fire.
6.You must not operate the appliance without the interior
lighting lamp cover.
7.The fridge is only applied with power supply of single
●
WARNING : Risk of fire / flammable materials
Electrical safety
5
6
phase alternating current of 220~240V/50Hz. If fluctuation
of voltage in the district of user is so large that the voltage
exceeds the above scope,for safety sake, be sure to apply
A.C. Automatic voltage regulator of more than 350W to the
fridge.The fridge must employ a special power socket
instead of common one with other electric appliances. Its
plug must match the socket with ground wire.
Do not store flammable gas or liquids in the appliance,
there is a risk of an explosion.
Do not operate any electrical appliances in the appliance
(e.g. electric ice cream makers,mixers etc.).
When unplugging always pull the plug from the mains
socket,do not pull on the cable.
Do not place hot items near the plastic components of
this appliance.
Do not place food products directly against the air outlet
on the rear wall.
Store pre-packed frozen food in accordance with the
frozen food manufacture’s instructions.
The appliances manufactures storage recommendations
should be strictly adhered to.Refer to relevant instructions
for storage.
Do not place carbonated or fizzy drinks in the freezer
compartment as it creates pressure on the container,which
may cause it to explode,resulting in damage to the
appliance.
Frozen food can cause frost burns if consumed straight
from the freezer compartment.
Do not place the appliance in direct sunlight.
Keep burning candles,lamps and other items with naked
flames away from the appliance so that do not set the
appliance on fire.
Daily use
●
●
●
●
●
●
●
●
●
●
●
7
●
●
●
●
●
●
●
●
●
●
●
The appliance is intended for keeping food stuff and/or
beverages in normal household as explained in this
instruction booklet.You should take care when move it as
the appliance is heavy.
Do not remove or touch items from the freezer
compartment if your hands are damp/wet, as this could
cause skin abrasions or frost/freezer burns.
Never use the base,drawers,doors etc. to stand on or as
supports.
Frozen food must not be refrozen once it has been
thawed out.
Do not consume ice popsicles or ice cubes straight from
the freezer as this can cause freezer burn to the mouth and
lips.
To avoid items falling and causing injury or damage to the
appliance,do not overload the door racks or put too much
food in the crisper drawers.
●
This refrigerating appliance is not intended to be used
as a a built-in appliance.
Before maintenance,switch off the appliance and
disconnect the mains plug from the mains socket.
Do not clean the appliance with metal objects,steam
cleaner,ethereal oils,organic solvents or abrasive
cleansers.
Do not use a sharp objects instead of a plastic scraper
to remove frost from the appliance.
For electrical connection carefully, follow the instructions
given in this manual.Unpack the appliance and check if
there are damages on it.
Do not connect the appliance if it is damaged. Report
possible damages immediately to the place you bought
caution!
Care and cleaning
Installation Important!

8
it.In this case retain packing.
It is advisable to wait at least four hours before
connecting the appliance to allow the oil to flow back in the
compressor.
Adequate air circulation should be around the appliance,
lacking this leads to overheating. To achieve sufficient
ventilation, follow the instructions relevant to installation.
Wherever possible the back of the product should not be
too close to a wall to avoid touching or catching warm parts
(compressor, ) to prevent the risk of a fire, follow
the instructions relevant to installation.
The appliance must not be locate close to radiators or
cookers.
Make sure that the mains plug is accessible after the
installation of the appliance.
Any electrical work required to do the servicing of the
appliance should be carried out by qualified electrician or
competent person.
This product must be serviced by an authorized Service
Center, and only genuine spare parts must be used.
1)If the appliance is Frost Free.
2)If the appliance contains freezer compartment.
●
●
●
●
●
●
●
Service
condenser
Note:
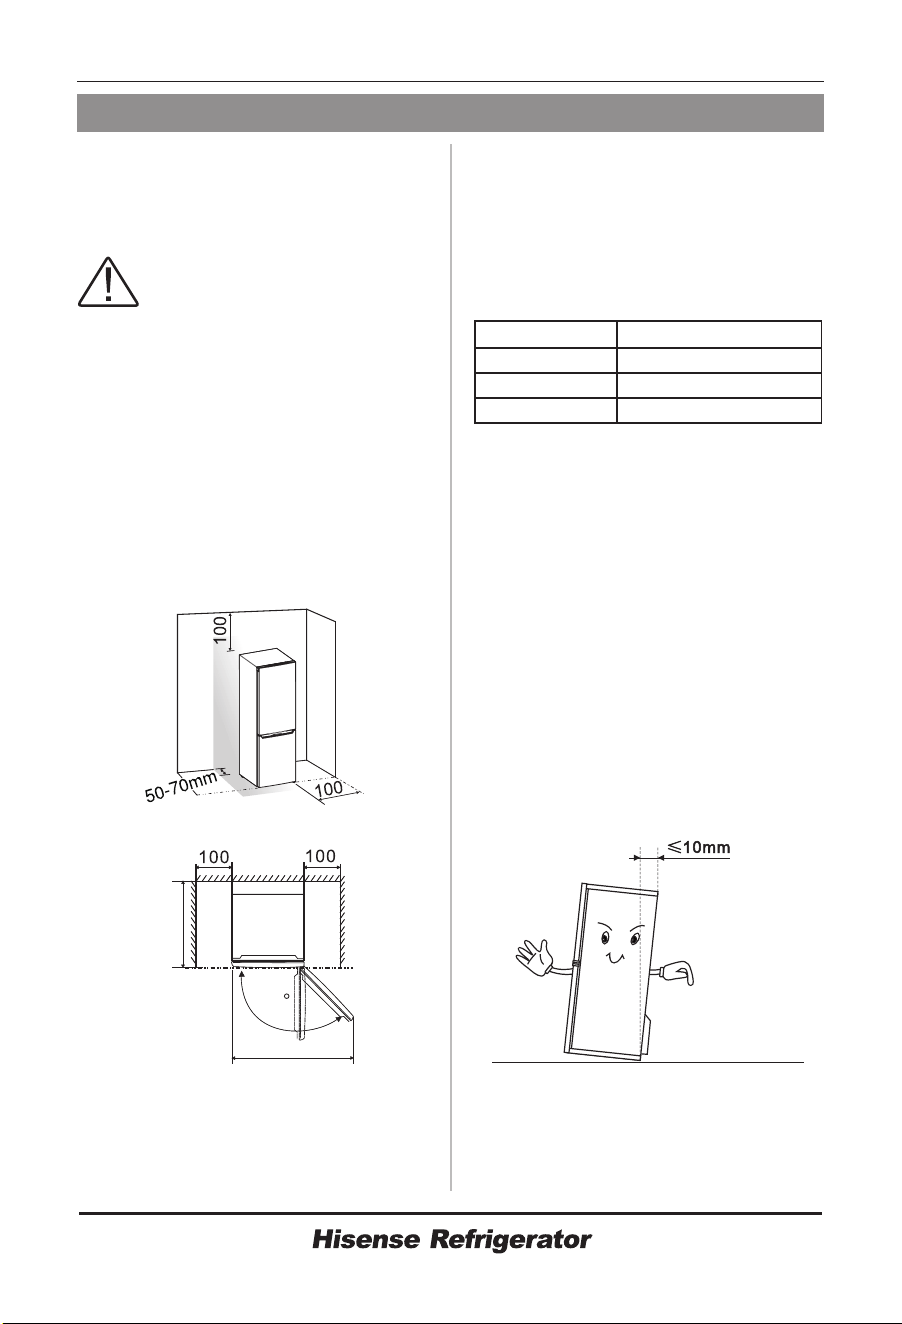
Leveling of appliance
●
●
●
●
●
This appliance performs well within
the climate class from SN to ST
showed in the table below.It may not
work properly if being left at a
temperature above or below the
indicated range for a long period.
Stand your appliance in a dry place to
avoid high moisture.
Keep the appliance out of direct
sunlight, rain or frost. Stand the
appliance away from heat sources such
as stoves,fires or heaters.
For sufficient leveling and air
circulating in the lower rear section of
the appliance, the bottom feet may
need to be adjusted.You can adjust
them manually by hand or by using a
suitable spanner.
To allow the doors to self-close, tilt the
top backwards by about 10mm .
9
Installing your new appliance
Before using the appliance for the first
time, you should be informed of the
following tips.
Ventilation of appliance
In orderto improve efficiency of
the cooling system and save
energy, it isnecessary to
maintain good ventilation around the
appliance for the dissipation of heat.For
this reason,sufficient clear space should
be available around the refrigerator.
It is advisable for there to be
50-70mm of space from the back to the
wall,at least 100mm from its top,at least
100mm from its side to the wall and a
clear space upfront to allow the doors to
open 115°.As shown in follow
diagrams.
Suggest:
Climate class
SN
N
ST
Ambient temperature
+10°C to +32°C
+16°C to +32°C
+16°C to +38°C
831
717
115
10
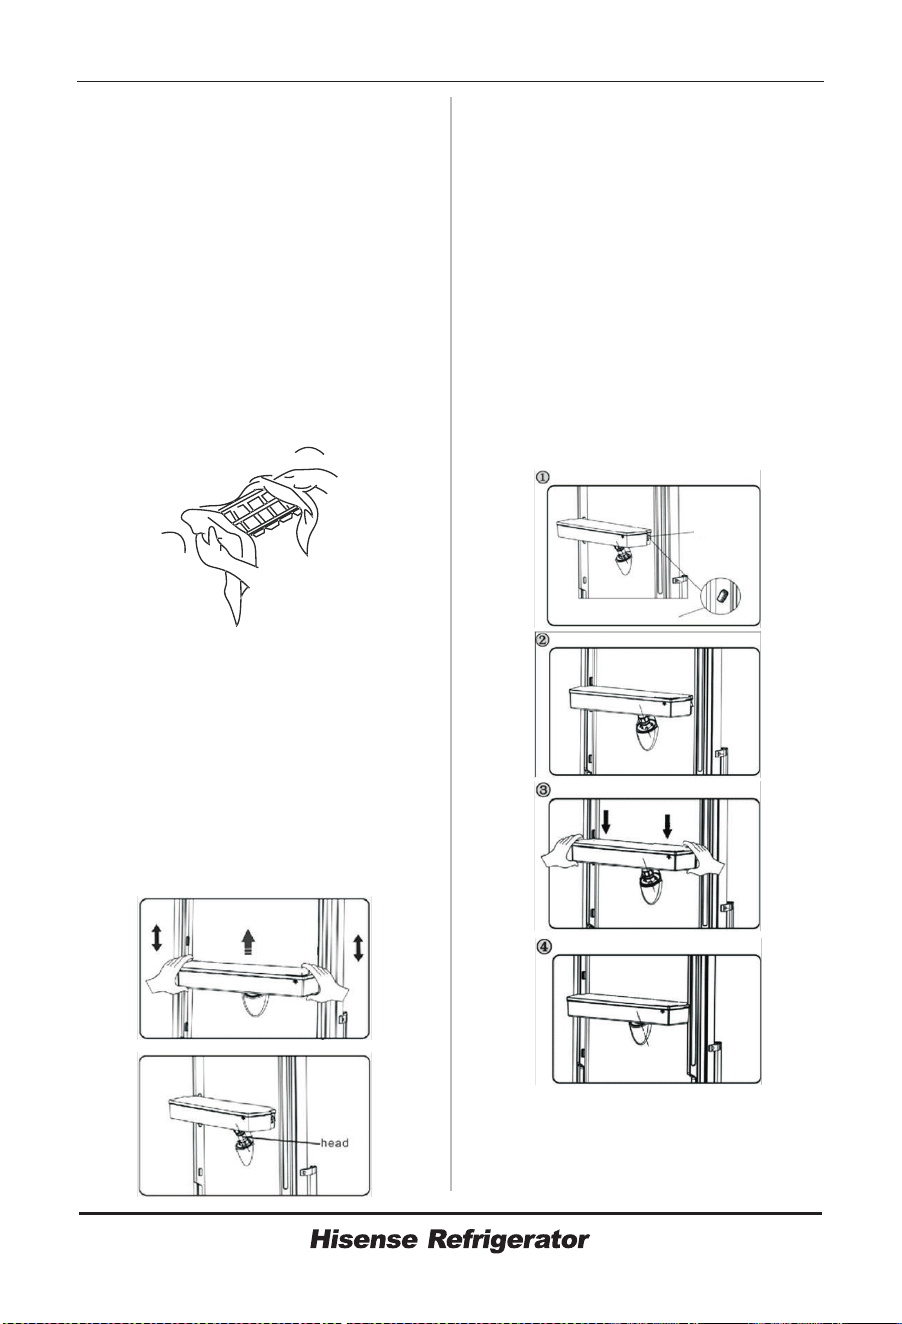
Reversingthedoor
Thesideatwhichthedooropens
canbechanged,fromtherightside
(assupplied)totheleftside,ifthe
installationsiterequires.
Whenreversing thedoor,
theappliancemustnotbeconnected
tothemains.Ensurethattheplugis
removedfromthemainssocket.
Whenrequired,tilttherefrigerator
backinordertogainaccesstothe
base,youshouldresttheappliance
onsoftfoampackagingorsimilar
materialtoavoiddamagingthe
backboardoftherefrigerator. To
reversethedoor,thefollowingsteps
aregenerallyrecommended.
Differentmodelsmaycorrespondto
different pictures.Modelswillbe
writteninthepicture.Ifsomeparts
arenotshowninthepicture,please
ignoretherelevantdescription.
1. Standtherefrigeratorupright.
Opentheupperdoortotakeoutall
doorracks(toavoidracksdamaged)
andthenclosethedoor.
Warning!
Toolsyouwillneed
●
2.Removepart loosepart from
thetoprightsideofrefrigerator.
3.Removescrews andhinge
.Whentherefrigeratorwith
displayondoor,youneedtopass
connector throughtheholeof
hinge (Pleaseholdupperdoorby
handwheninstalling).
①, ②
③
①
②
②.
Not provided
8mm socket wrench
Thin-blade screwdriver
8mm wrench
Cross-shaped screwdriver
Doorracks
MODEL WITHOUT DISPLAY
① screwsSpecialflange
Upperhinge②
MODEL WITH DISPLAY
① screwsSpecialflange
Upperhinge
Electricalconnector
②
③
① screwsSelf-tapping
Upperhingecover②
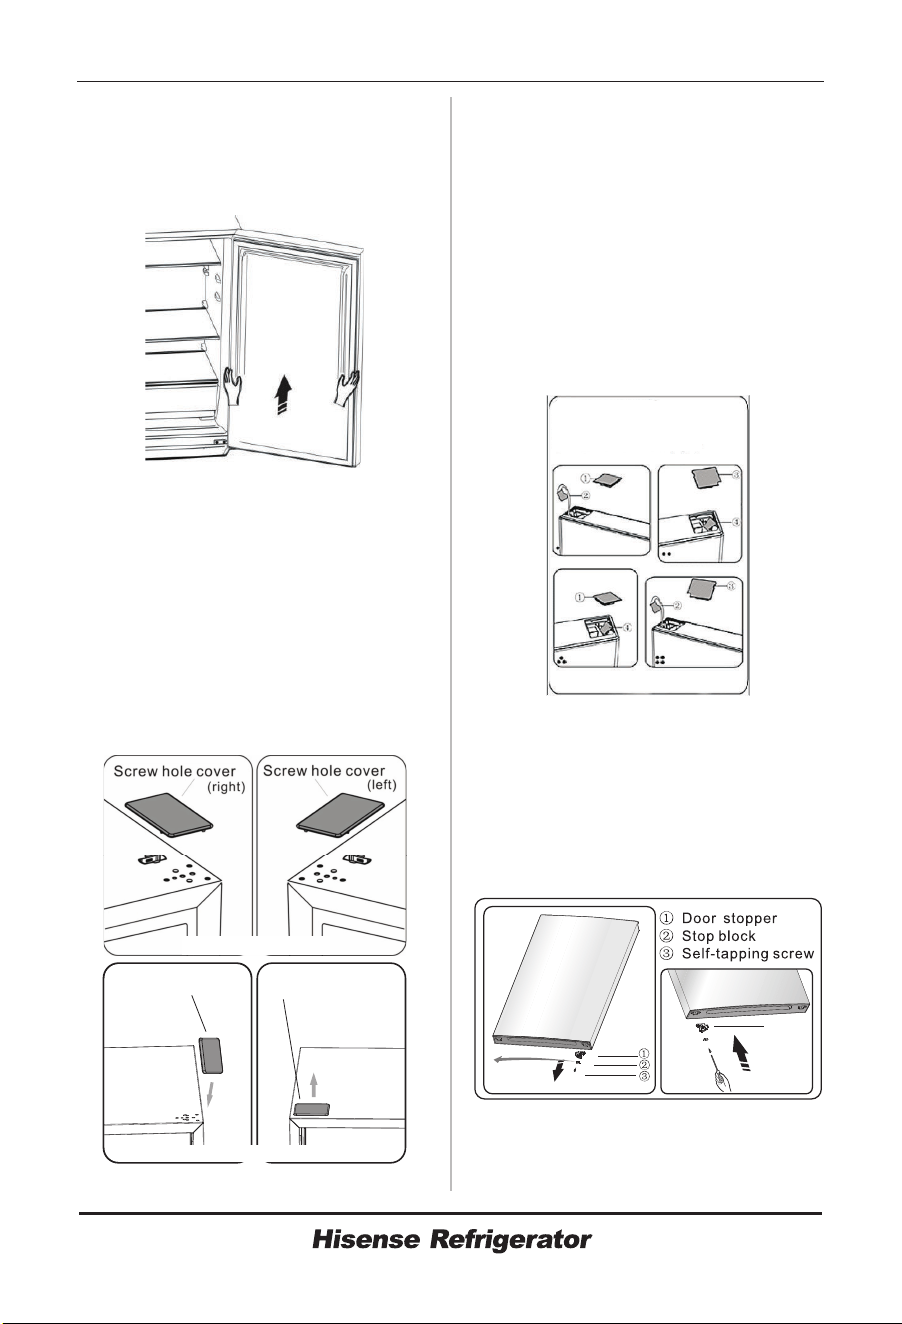
11
4. Removetheupperdoorfromthe
middlehingebycarefullyliftingthe
doorstraightup. Thenplacethe
upperdooronasmoothsurfacewith
itsuppercoverupwards.
Whentherefrigeratorwitha
displayondoor,takescrewhole
cover(right)fromplasticbagand
installitontothetoprightsideof
refrigeratorbody.Thenremove
screwholecover(left)fromthetop
leftsideofapplianceandputitinto
plasticbag.
Whentherefrigeratorwithouta
displayondoor,pulloutscrewhole
coverfromtheleftsideuprightly,
andfixitontherightside.
5.
7. Loosescrew andtakedown
part andpart ,Install
replacementdoorstopper-left
provided(intheplasticbag)andpart
(stopblock)totheleftsidewith
screw .Keeppart withthe
applianceforfuturereference.
8. Loosescrewsusedtofixthe
middlehingeandremovemiddle
hinge. Thenremovethelowerdoor.
③
②
②
③
①
①
④
① ornercover left
Electricalconnector left
Cornercover right
Electricalconnector right
( )
② ( )
③ ( )
④ ( )
C
MODEL WITH DISPLAY
MODEL WITH DISPLAY
Screwholecover Screwholecover
MODEL WITHOUT DISPLAY
④
6.Whentherefrigeratorwitha
displayondoor,removepart from
thetopleftsideofuppercoverand
takeoutpart . Thenremovepart
andputpart into thetopright
sideofuppercover.Refertoabove
operatio n,install part
ontothetopleftsideofupper
cover.Installpart o fthetopright
sideofuppercover.Whenthe
refrigeratorwithoutadisplayon
door,skipthisstep.
①
②
③
④
③
①
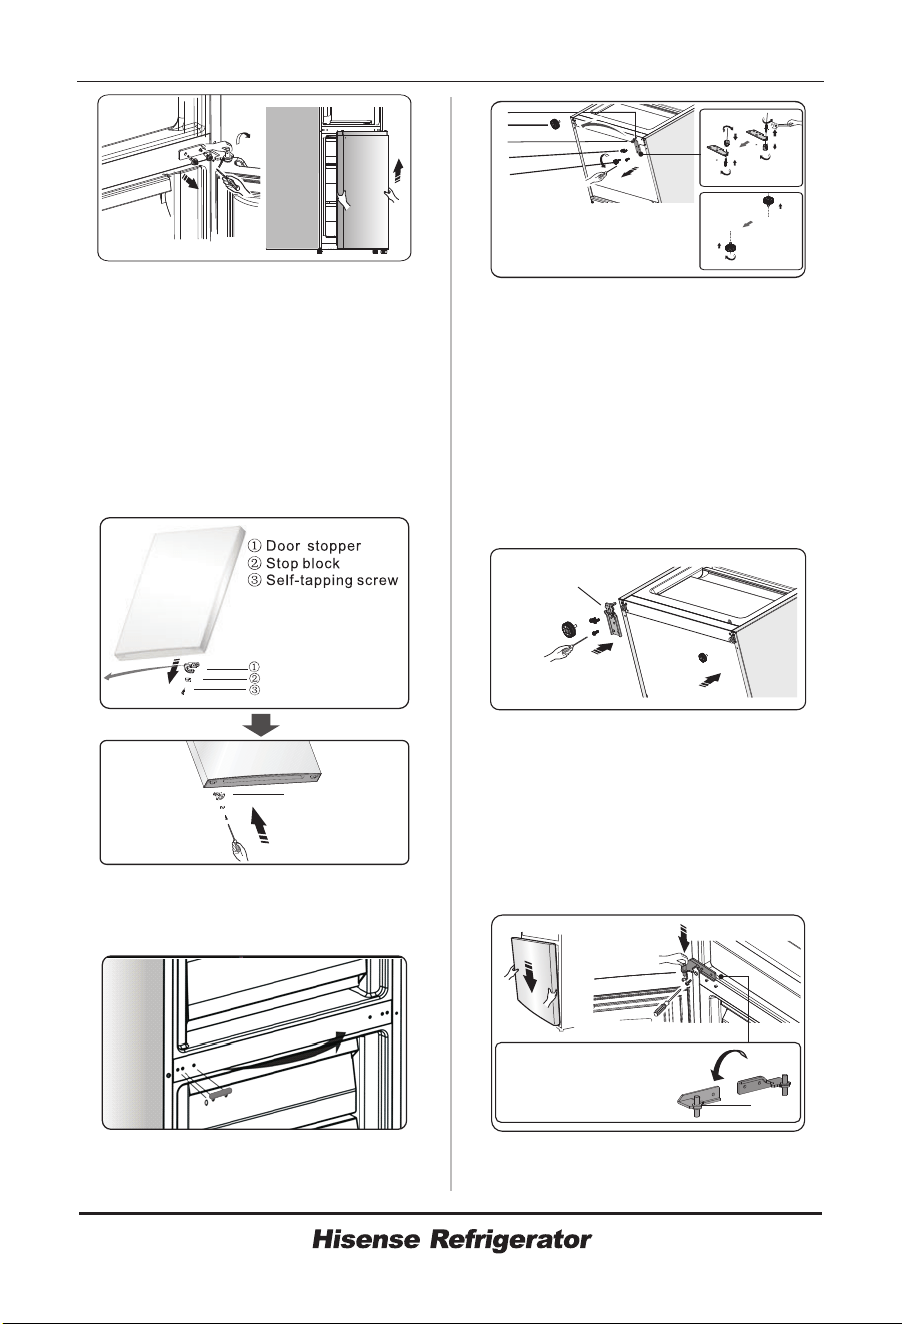
12
9. Placethelowerdooronasmooth
surfacewithitspanelupwards.
Loosescrew andtakedownpart
andpart ,Installreplacement
doorstopper-left provided(inthe
plasticbag)andpart (stopblock)
totheleftsidewithscrew .Keep
part withtheapplianceforfuture
reference.
10. Change screwholecoverson
middlecoverplatefromlefttoright
(asshowninfigurebelow).
③
②
②
③
11. Tiptherefrigeratorbackwards,
removepart
①
①
②.
④
12.
13.
14.
15.
Removepart fromthelower
hingepin,looseoutthelowerhinge
pin,changeittothereversehole
site,andthentightenintoposition,
theninstall part onthelower
hingepin.
Slotthelowerdoorontothe
bottomhingepinandholdin
position. Turnthemiddlehingeby
180°,changethewasherontheaxis
tothelowerside,adjustthemiddle
hingetotheappropriatepositionand
theninstallitensuringthelower
doorinsecuredplace.
Movetheupperdoortoan
appropriateposition,andthenfix
③
①
④.
②
③
Replacetheitemsremountin
step11,changepart toleft and
thenfixthemwithscrews Install
part atlast.
,
Lower hinge part(left)
① Lowerhingepart(right)
Adjustablebottomfeetpart
Adjustablebottomfeetpart
Self-tappingscrews
Adjustablebottomfeetpart
②
③
④
⑤
①
②
③
④
⑤
Note:washermay
sticktolowerdoor.
Washer
④
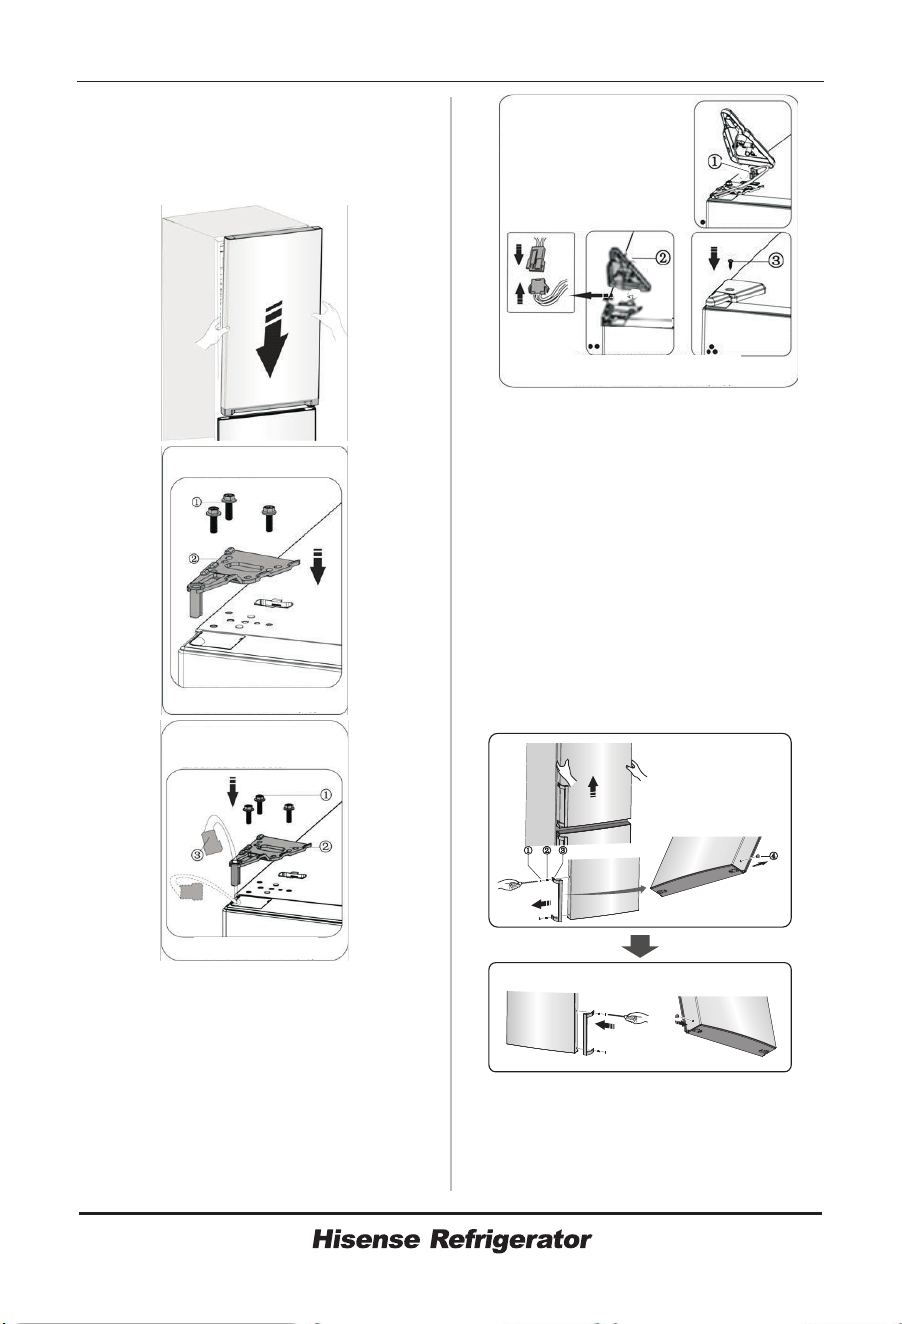
13
part byscrews .Beforefixpart ,
passconnector throughhinge
refertostep3.(Pleaseholdupper
doorbyhandwheninstalling)
Connectelectricalconnector
asshowninthepicture,thenfixpart
byscrew refertostep2.
②
①
① ②
③ ②
16.
② ③
17. Opentheupperdoor,mountdoor
racksandthencloseit.
Ifyourappliancehashandle,you
havetoreversehandlebyfollow
instructionsbelow.
Removetheupperdoorandplaceit
onasmoothsurfacewithitspanel
upwards.Leverpart andpart ,
thenloosescrews ,asshownin
thepicture.Changehandle tothe
rightside,theninstallscrews ,
part andpart inturn.
Note:
① ④
②
③
②
① ④
② Special screws
③ Handle
① Handle covers
④ Screw hole cover
① Specialflangescrews
② Upperhinge
MODEL WITHOUT DISPLAY
① Specialflangescrews
Upperhinge
Electricalconnector
②
③
MODEL WITH DISPLAY
①
②
③ -
electricalconnector
upperhingecover
self tappingscrew
MODEL WITH DISPLAY
14
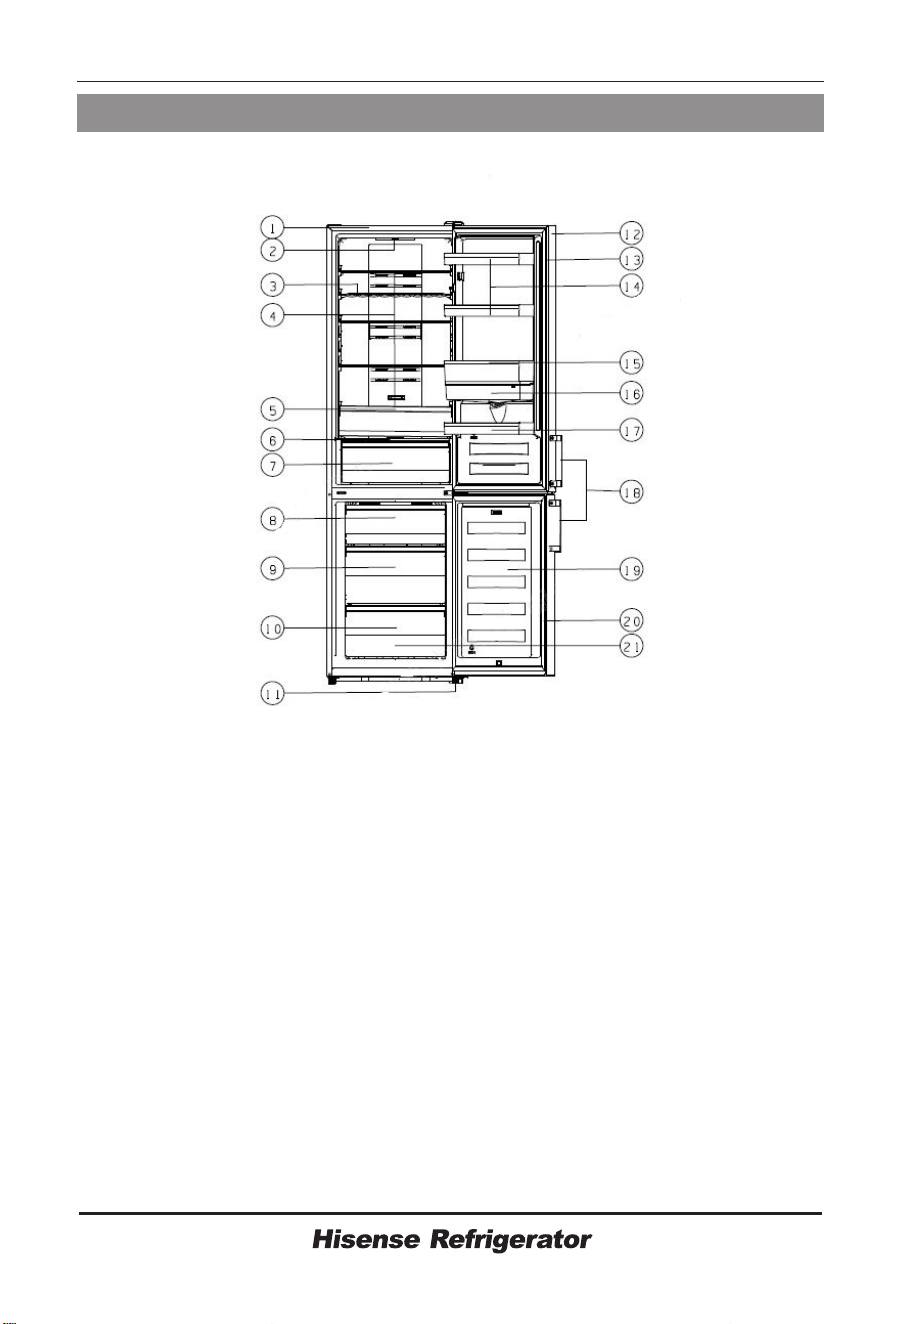
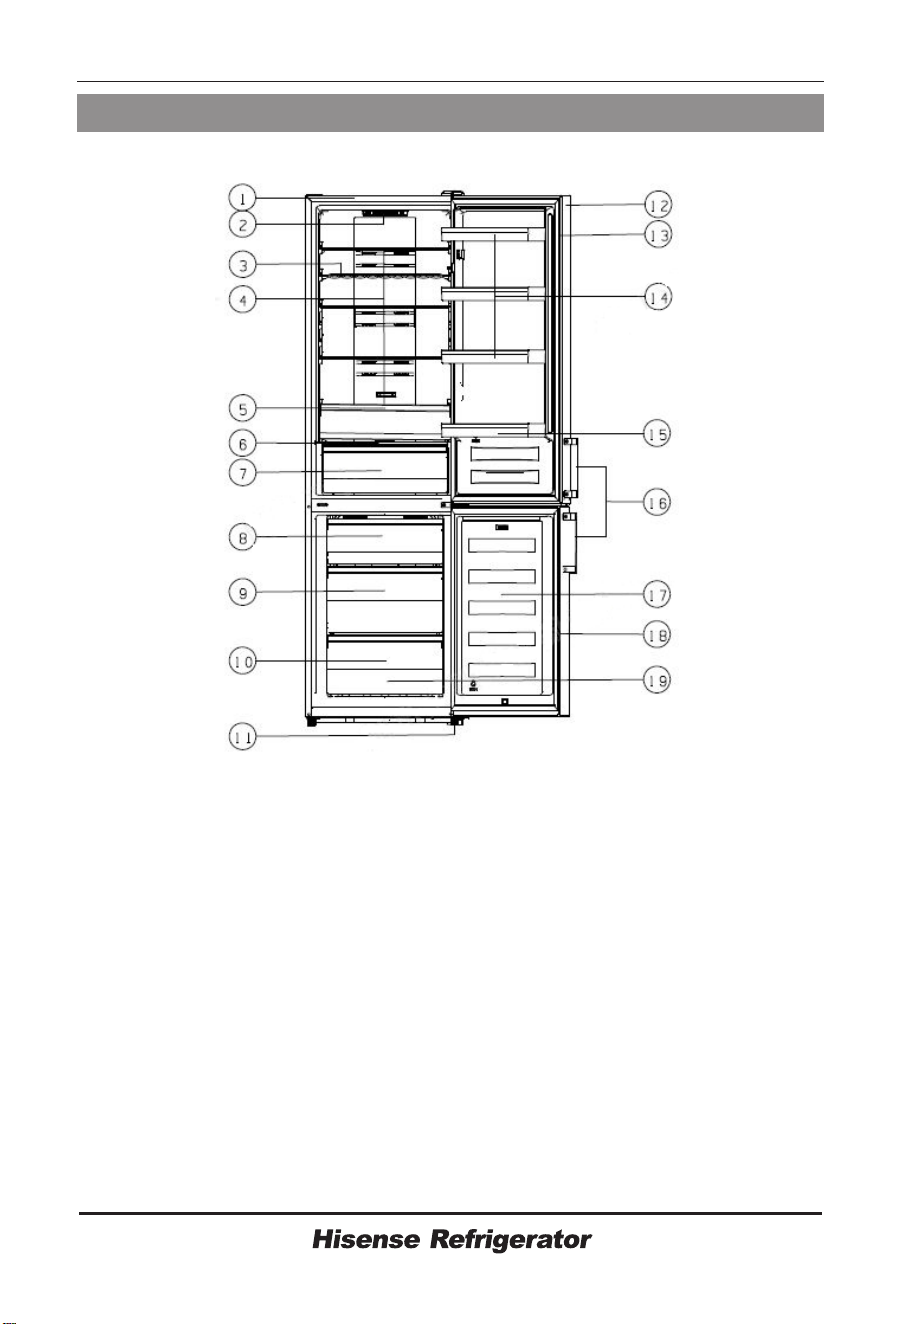
Description of the appliance
Theviewofanappliancewithdispenser
Note:
Duetounceasingmodificationofourproducts,somepartsofyour
refrigeratormaybeslightlydifferentfromthisinstructionmanual,
To get more space in the freezer, you can remove drawers(except the bottom
drawer in freezer! ) .To get the best energy of this product, please place all
shelves drawers on their original position as the illustration above.
butits
functionsandusingmethodsremainthesame.
●
●
1.Cabinet
2.LEDlight
3.Wineshelf(alternative)
4.Glassshelves
5.Uppercrisper
6.Crispercover
7.LowerCrisper
8.Upperdrawer
9.Middledrawer
10.Lowerdrawer
11.Adjustablefeet
12.Refrigerator door
13.Refrigerator door gasket
14.Upper rack(X2)
15.Middle rack
16.Water rack
17.Lower rack
18.Handle (optional)
19.Freezer door
20.Frezzer door gasket
21.Accessories
15
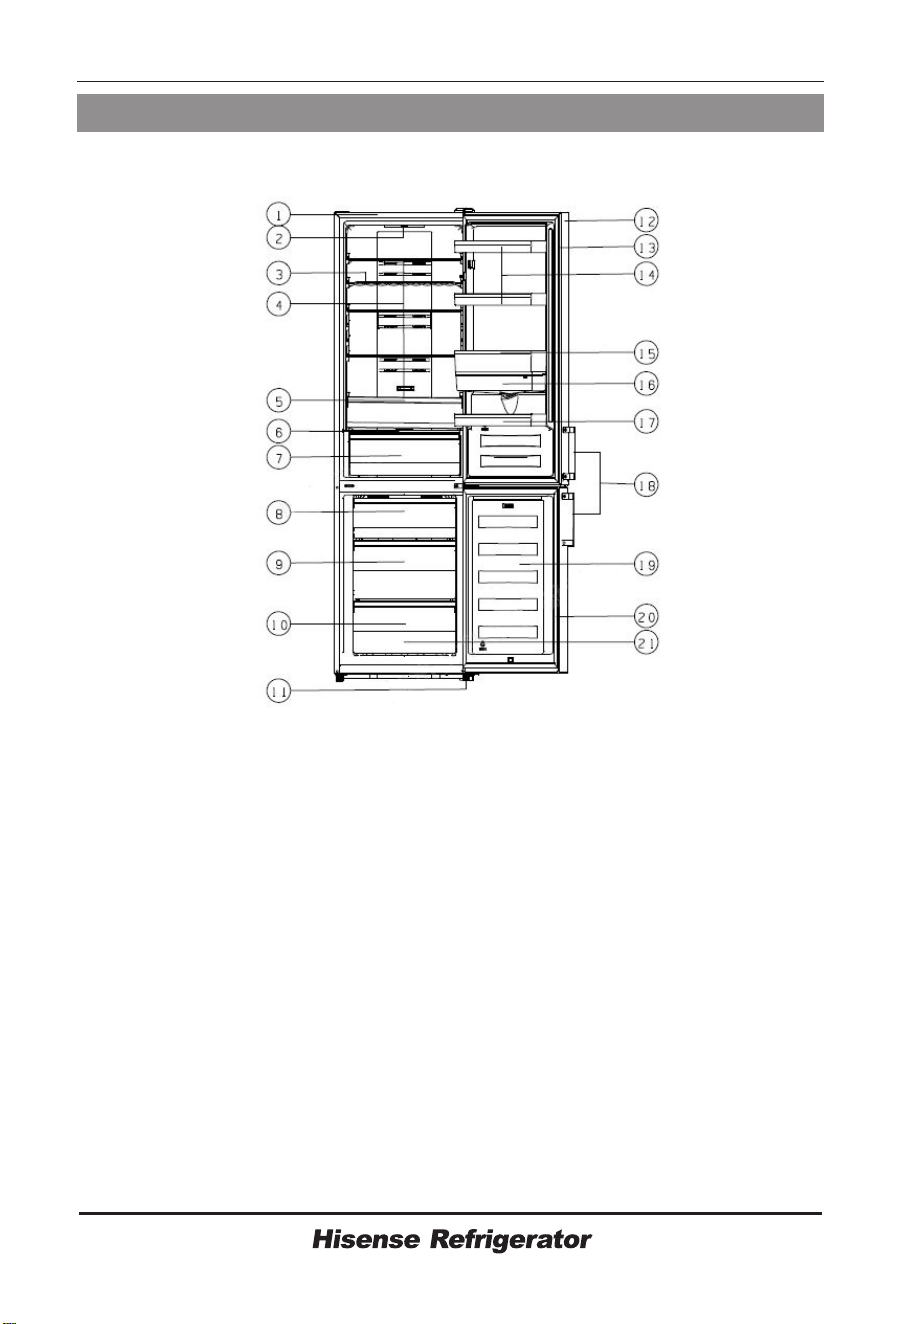
Note:
Duetounceasingmodificationofourproducts,somepartsofyour
refrigeratormaybeslightlydifferentfromthisinstructionmanual,
To get more space in the freezer, you can remove drawers(except the bottom
drawer in freezer! ) .To get the best energy of this product, please place all
shelves drawers on their original position as the illustration above.
butits
functionsandusingmethodsremainthesame.
●
●
Theviewofanappliancewithoutdispenser
Description of the appliance
1.Cabinet
2.LEDlight
3.Wineshelf(alternative)
4.Glassshelves
5.Uppercrisper
6.Crispercover
7.LowerCrisper
8.Upperdrawer
9.Middledrawer
10.Lowerdrawer
11.Adjustablefeet
12.Refrigerator door
13.
Refrigerator door gasket
14.Upper rack(X3)
15.Middle rack
16.Handle (optional)
17.Freezer door
18.Freeze door gasket
19.Accessories
16
Note:
Duetounceasingmodificationofourproducts,somepartsofyour
refrigeratormaybeslightlydifferentfromthisinstructionmanual,
To get more space in the freezer, you can remove drawers(except the bottom
drawer in freezer! ) .To get the best energy of this product, please place all
shelves drawers on their original position as the illustration above.
butits
functionsandusingmethodsremainthesame.
●
●
Theviewofanappliancewithdisplayondoor
Description of the appliance
1.Cabinet
2.LEDlight
3.Wineshelf(alternative)
4.Glassshelves
5.Uppercrisper
6.Crispercover
7.LowerCrisper
8.Upperdrawer
9.Middledrawer
10.Lowerdrawer
11.Adjustablefeet
12.Refrigerator door
13.Refrigerator door gasket
14.Upper rack(X2)
15.Middle rack
16.Water rack
17.Lower rack
18.Handle (optional)
19.Freezer door
20.Frezzer door gasket
21.Accessories
17
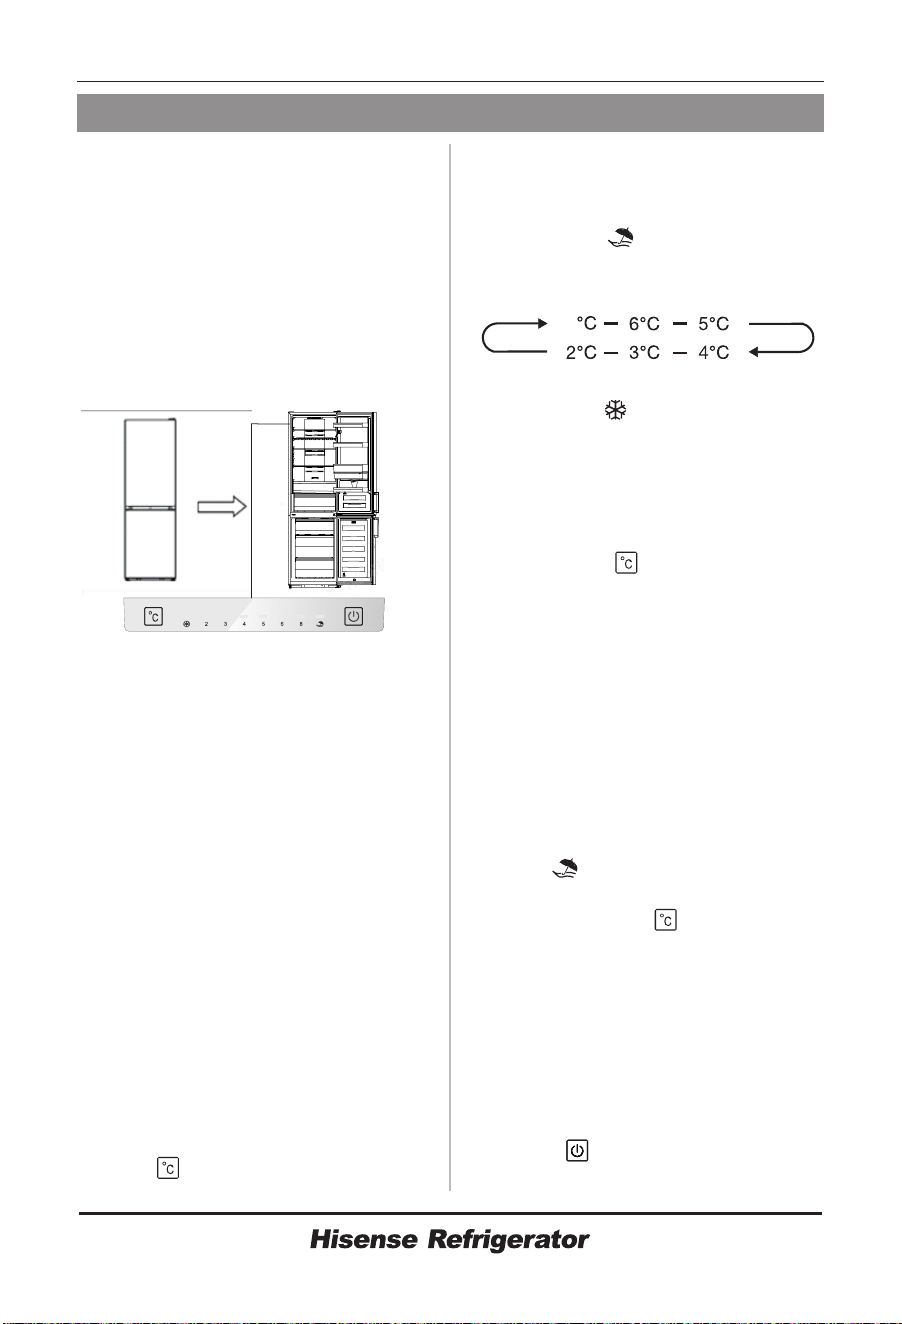
Display controls
Displaypanelinsidedoor
Useryourapplianceaccordingtothe
followingcontrolregulations,your
appliancehasthecorresponding
functionsandmodesasthedisplay
panelsshowedinthepicturesbelow.
When the appliance is powered on for the
first time, the backlighting of the icons on
display panel starts working. If no buttons
have been pressed and the doors are
closed, the backlighting will turn off.
Displaypanelinsidedoor
Controlling the temperature
Caution!
For optimum food preservation,
Werecommendthatwhenyoustartyour
refrigeratorforthefirsttime,the
temperaturefortherefrigeratorissetto 4°
C.Ifyouwanttochangethe
temperature,followtheinstructionsbelow
.NOTE:High temperature setting will
accelerate food waste.
Whenyousetatemperature,youset
anaveragetemperaturefor the
wholerefrigeratorcabinet.
Temperaturesinsideeach
compartmentmayvaryfromthe
temperaturevaluesdisplayedonthe
panel,dependingonhowmuchfood
youstoreandwhereyouplacethem.
Ambienttemperaturemayalso
affecttheactualtemperatureinside
theappliance.
Fridge
●Press
“ ” to set fridge temperature
between 2°C and 8°C as needed, and
display panel will display corresponding
values according to the following
sequence.
Note: When the“ ” is lighted, the holiday
mode is activated. Check the Holiday
mode instruction.
Super Freeze will quickly lower the
temperature within the freezer so food will
freeze faster. This can lock in the vitamins
and nutrients of fresh food and keep food
fresh longer.
You can press “ ”for 3 sec to get into
super freeze mode.
When Super freeze Mode is selected,
the light will be illuminated and the freezer
temperature will be set at -24°C.
In case of the maximum amount of food
to be frozen, please wait about 24 h.
Super freeze automatically switches off
after 52 hours and then the freezer
temperature setting will revert back to the
previous setting.
If you are going to be away for a long
period of time, press “ ”,you can
activate this function.
When Holiday Mode is activated, the
light will be illuminated. The freezer
temperature will be set at -18°C and the
fridge temperature will be set at 15°C.
Do not store any food in the
fridge during this time.
You can switch on or switch off your
Super Freeze( )
Holiday ( )
Important!
3.Switch( )(displaypanel inside
door)
●
●
●
●
●
8
for1seconds, after a
18
appliance by press this button.
Press “ ” for 3 seconds, after a
buzzer sound, the appliance will be
turned off.
●
Press “ ”
buzzer sound, the appliance will be
turned on.
●
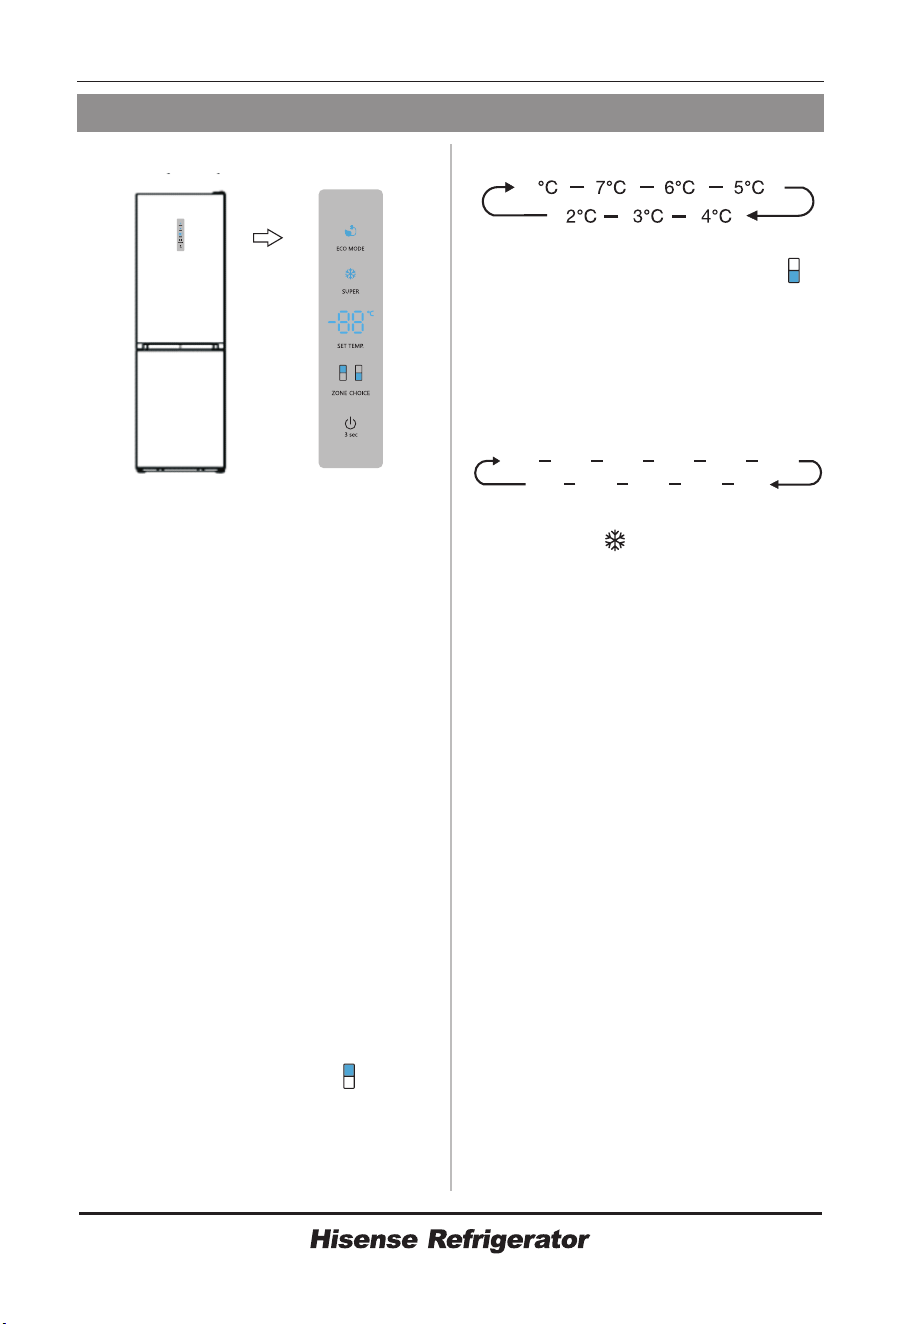
-20°C
-21°C
-22°C -23°C
-24°C-14°C
-19°C
-17°C
-16°C
-15°C
-18°C
19
Display controls
Displaypanelondoor
Displaypanelondoor
Controlling the temperature
For optimum food preservation,
We recommend
thatwhen you startyour
refrigerator forthe firsttime,the
temperature forthe refrigerator is set to
4°C.Ifyou want tochange the
temperature, follow the instructions
below.
NOTE:High temperature setting will
accelerate food waste.
Caution!
When you seta temperature, you setan
average temperature forthe whole
refrigerator cabinet.Temperatures inside
each compartment may vary fromthe
temperature values displayed on the
panel, depending on how much food you
store and where you place them.Ambient
temperature may also affectthe actual
temperature inside the appliance.
Press “ZONE CHOICE”, the “ ”light
will turn on. Then press “SETTEMP.”, you
can set fridge temperature between 2°C
and 8°C as needed, and display panel will
display corresponding values according
Fridge
●
to the following sequence.
Press “ZONE CHOICE”, when the “ ”
light turns on. Then press “SETTEMP ”,
you can set freezer temperature between
-14°C and -24°C as needed, and the
display panel will display corresponding
value according to the following
sequence.
Super Freeze will quickly lower the
temperature within the freezer so food will
freeze faster. This can lock in the vitamins
and nutrients of fresh food and keep food
fresh longer.
You can press “SUPER” to get into
super freezer mode.
Whensuper freeze Mode is selected,
the light will be illuminated and the freezer
temperature will be set at -24°C.
In case of the maximum amount of food
to be frozen, please wait about 24 h.
Super freeze automatically switches off
after 52 hours and then the freezer
temperature setting will revert back to the
previous setting.
This function makes the freezer work in a
power saving mode which is useful for
reducing energy consumption when you
are away.
You can press “ECO MODE” to get into
economic energy mode.
When economic energy Mode is
Freezer
Super Freeze( )
Eco energy
.
●
●
●
●
●
●
8

20
activated, the light will be illuminated. The
freezer temperature will be set at -17°C
and the fridge temperature will be set at
6°C.
You can switch on or switch off your
appliance by press this button.
Press “ ”for 3 seconds, after a buzzer
sound, meanwhile the digital light will
show “OF”, the appliance will be turned
off.
Press “ ” for 3 seconds, after a
buzzer sound,the appliance will be
turned on.
Switch
●
●
Alarm
When the door of fridge has been
opened for over 2 minutes, the door alarm
will sound. In case of door alarm, buzzer
will sound 3 times every 1 minute and will
stop alarming automatically after 8
minutes.
To save energy, please avoid keeping
the door open for a long time when using
the appliance. The door alarm can also be
cleared by closing the door.
●
●
21
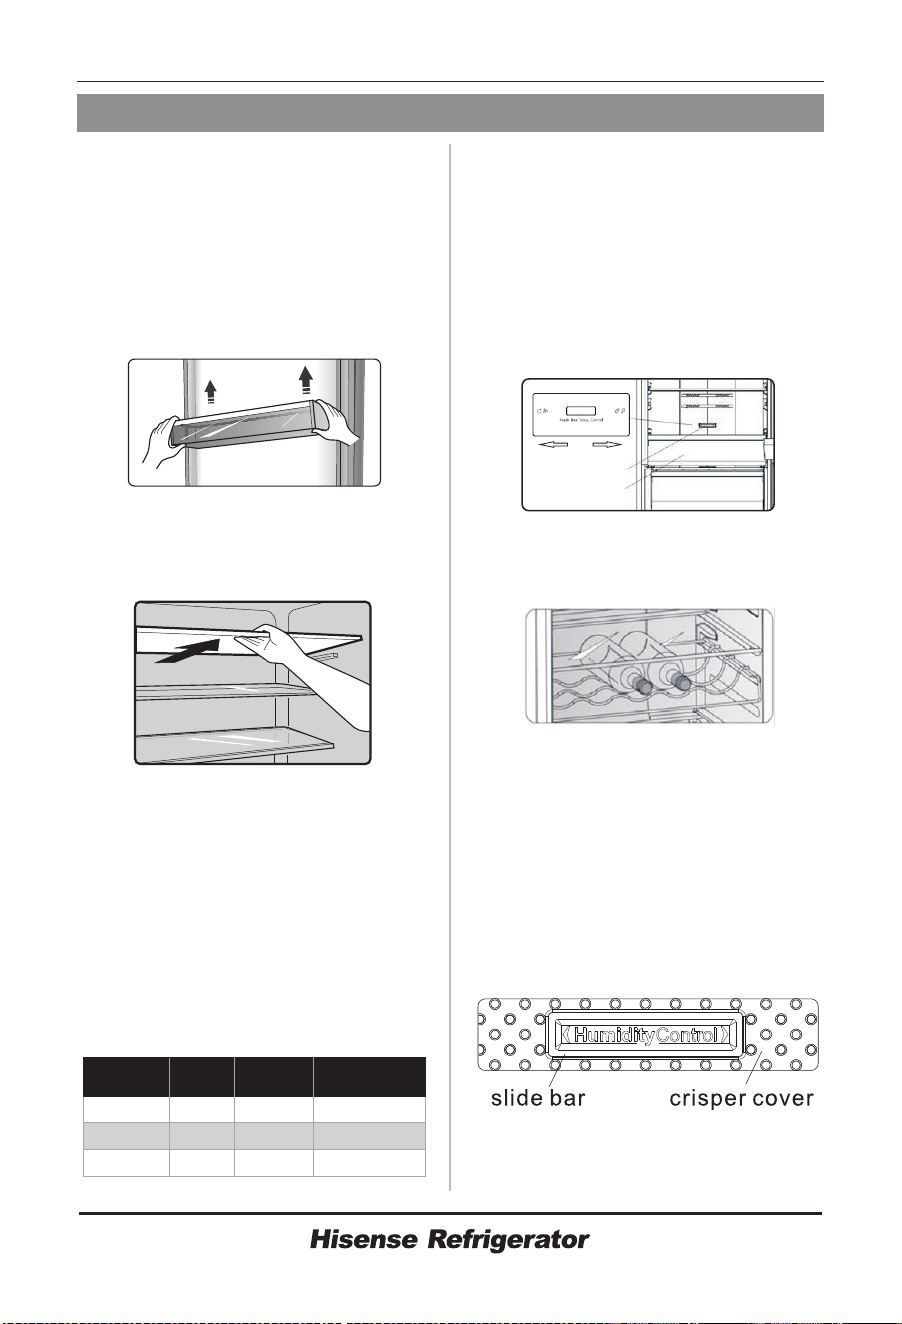
Using your appliance
Yourapplianceissuppliedwitha
numberofaccessoriesandthis
sectiondescribeshowbesttouse
them.
It is suitable for the storage of eggs,
canned liquid, bottled drinks and packed
food, etc. Do not place too many heavy
things in the racks.
There are three shelves in refrigerator
chamber, and they can be taken out to be
cleaned.
Doorrack
ShelfinRefrigeratorchamber
Extra fresh box(optional)
In certain model, there will be an extra
fresh box(drawer). In this drawer you can
get a lower temperature to store fish,
meat and other erodible food .
Normally it will be about 2°C lower than
the other part of the fresh compartment.
You can move the slide bar to set the
temperature. There are some
recommendations in the below table
which you can consult.
●
●
●
temporarily
Due to the environment
temperature and setting
temperature both influence the
temperature of extra fresh
box(drawer), the actual temperature
may change in a certain range.
The temperature of this drawer may
lower than zero, so it is normal that
liquid in this drawer was frozen.
You can adjust the slide bar on the
crisper cover to keep differenthumidity in
the crisper.Push the slide bar to the left,
you will keep a higher humidity which can
storage vegetable and fruit long and
fresh,to the right will be lower humidity.
Note:
Flexible wine rack
Crispercover
Fruitandvegetablecrisper
It is for storing bottled wine or drinks,
and it can be taken out to clean.
It is for controlling the temperature of the
crisper and avoiding the vegetable losing
moisture.
It is suitable for the storage of fruits and
vegetable.
●
●
●
●
slidebar
Extrafreshbox
left right
fridgetemp.
set
slidebar
2°C
5°C
8°C
rightmost
rightmost
rightmost
food
fish&meat
fruit
vegetables
storageperiod
<3days
<2weeks
<5days
22
FreezerDrawer
Icecubetray
WaterDispenser
Before Using
It is used to store food which needs to be
frozen, including meat, fish, ice cream,
etc.
It is used to make ice cubes. To make ice
cubes, please fill water into the ice cube
trays and the water level shall not exceed
the top line(ideally eighty percent of the
ice tray volume). Place the tray into the
freezer drawer and wait at least two hours
for the ice cubes to be formed.After the
cubes are formed, gently twist the tray to
separate the cubes and trays.
Thewaterdispenser,locatedinthe
fridgedoor,isforstoringdrinking
water.Withthisapplianceyoucan
obtainchilledwatereasilywithout
openingtherefrigerator. Youshould
beinformedoffollowingtips.
Beforeusingthisapplianceforthe
firsttime,youshoulduseitas
follows.
●
●
●
1. Takeoutthemiddlerack.
2. Holdthetwosidesofthewater
tanktightly,thenpullupthewater
tankbyshakingupanddown.
3. Unscrewthehead,thenclean it
andtheinsideofwatertank.
Beforeassembling,pleasedrainthe
waterinsidethetank,andcheck
whetherthewasherreversedornot.
1.Insert theheadintothehole.
2.Fitthetankalongtheguideson
thedoor.
3.Pressdowntwosideofthetank.
4.Whenyouhearaclicksound,that
meanstheinstallationiscompleted.
1.Be careful not to press on the head;
2.Whenfittingthewatertank,
ensuretheheadinsertedintothe
Assembling
Warning!
●
Slot
Guide
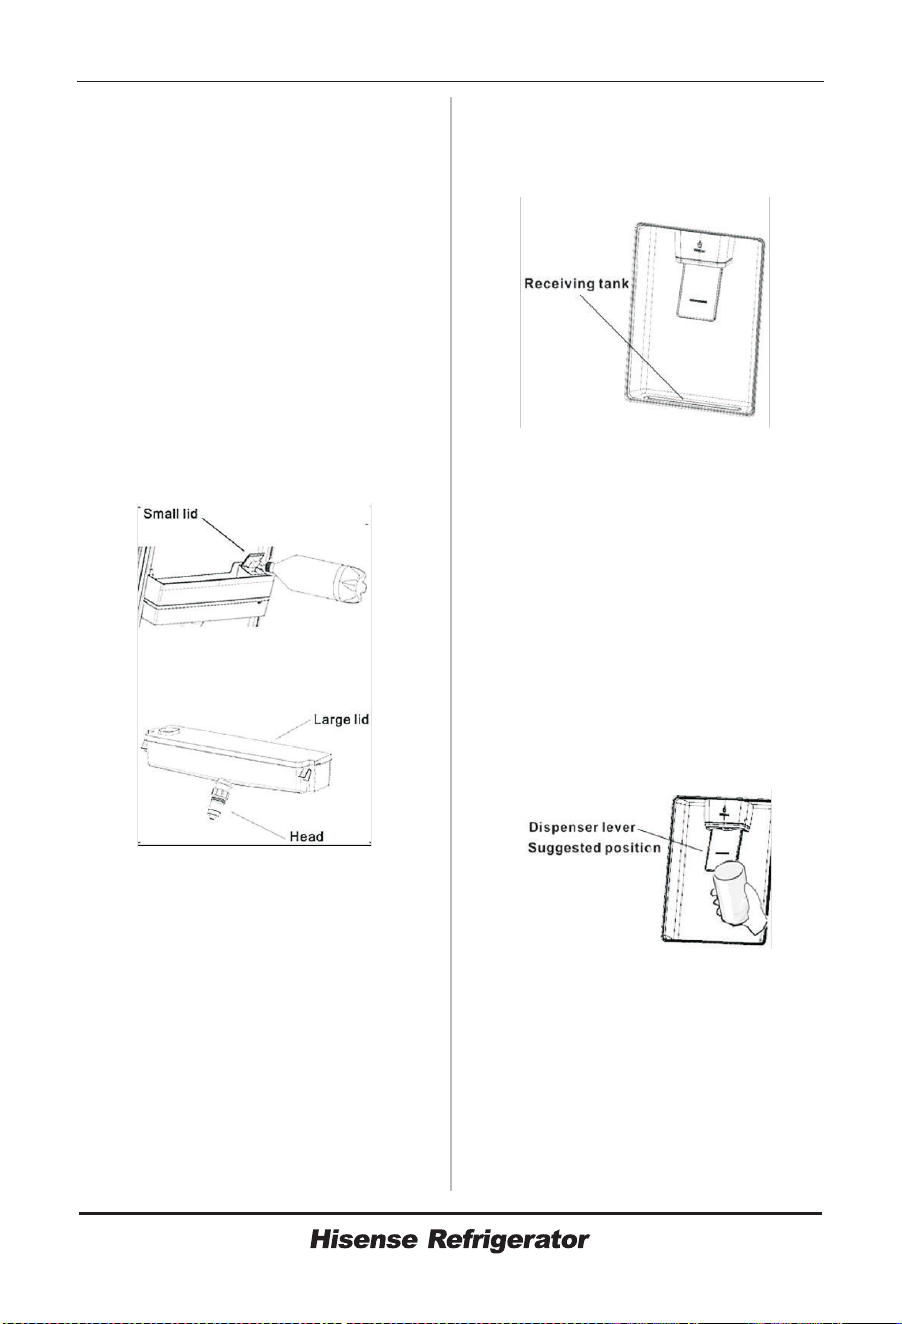
23
holefirst.
Before you fill the drinking water into
the water tank, ensure that the water
tank is steady and in a correct position.
Fillwithwaterupto3L(whichis
suggested),andnotabovethelevel.
Otherwise,itmayoverflowwhenthe
lidisclose.
1.Werecommendthatyoufillthe
waterbythefollowingway.
2.Openthesmalllidbyrotatingit,
andfillwaterfromtheinletofthe
largelid.Pleaserememberrotate
thesmalllidbacktoit’soriginal
positionwhenfinishfillingwater.
Don'ttouchotherpartsofthe
appliancewhenfillingwater,itmay
causethewaterleakage.
1.Makesurethecoverofthewater
tankisfittedon.
2.Closethefridgedoorandcheck
thedispenser.
Youshouldusethecorrectcupto
receivewaterunderneaththewater
dispenser.
Filling water
Caution!
Warning!
Dispensingwater
ReceivingWater
●
Warning!
Cleaning
Don'tpushthedispenserlever
forwardwithoutcup,itmaycause
thewaterleakfromthedispenser.
1.Putthewatertankoutofthedoor
carefully,andthenwashthetank,lid
andheadlightlyinwater.
Afteryouhavesuccessfully
cleanedtheappliance,youshould
dryitbynaturaldryingorusingthe
dryer.
3.Ifyouhaveusedthewater
dispenserformanytimes,thewater
inthereceivingtankmaydroponthe
floor,whichmaymakeyourfloor
wet,andyou shouldcleanthetank
withdrytowelregularlybefore
overflow.
2.
●

24
Helpful hints and tips
Energy saving tips
We recommend that you follow the tips
below to save energy.
Try to avoid keeping the door open for
long periods in order to conserve energy.
Ensure the appliance is away from any
sources of heat (Direct sunlight, electric
oven or cooker etc)
Don't set the temperature colder than
necessary.
Don't store warm food or evaporating
liquid in the appliance.
Place the appliance in a well ventilated,
humidity free, room. Please refer to
Installing your new appliance
●
●
●
●
●
●
●
●
●
●
●
●
●
chapter.
If the diagram shows the correct
combination for the drawers, crisper and
shelves, do not adjust the combination as
this is designed to be the most energy
efficient configuration.
Do not place hot food directly into the
refrigerator or freezer the internal
temperature will increase resulting in the
compressor having to work harder and
will consume more energy.
Do cover or wrap the food particularly if
it has a strong flavor.
Place food properly so that air can
circulate freely around it.
Meat (All Types) Wrap in polythene
food: wrap and place on the glass shelf
above the vegetable drawer. Always
follow food storage times and use by
dates suggested by manufacturers.
Cooked food, cold dishes, etc.:
They should be covered and may be
placed on any shelf.
Fruit and vegetables:
They should be stored in the special
drawer provided.
Butter and cheese:
Should be wrapped in airtight foil or
plastic film wrap.
Hints for fresh food refrigeration
Hints for refrigeration
,
,
●
●
●
●
●
●
●
●
●
Milk bottles:
Should have a lid and be stored in the
door racks.
When first starting-up or after a period
out of use, let the appliance run at least 2
hours on the higher settings before
putting food in the compartment.
Prepare food in small portions to enable
it to be rapidly and completely frozen and
to make it possible to subsequently thaw
only the quantity required.
Wrap up the food in aluminum foil or
polyethylene food wraps which are
airtight.
Do not allow fresh unfrozen food to
touch the food which is already frozen to
avoid temperature rise of the latter.
Iced products if consumed immediately
after removal from the freezer
compartment will probably cause frost
burns to the skin.
It is recommended to label and date
each frozen package in order to keep
track of the storage time.
Ensure that frozen food has been
stored correctly by the food retailer.
Once defrosted food will deteriorate
rapidly and should not be re-frozen. Do
not exceed the storage period indicated
by the food manufacturer.
If the appliance needs to be switched off
for an extended period the following
steps should be taken prevent mould on
the appliance.
1.Remove all food.
2.Remove the power plug from the mains
socket.
3.Clean and dry the interior thoroughly.
4.Ensure that all the doors are wedged
open slightly to allow air to circulate.
Hints for freezing
Hints for the storage of frozen food
Switching off your appliance
,
,
,
,
,
25
Cleaning and care
For hygienic reasons the appliance
(including exterior and interior
accessories) should be cleaned regularly
(at least every two months).
The appliance must not be connected to
the mains during cleaning as there is a
danger of electrical shock! Before
cleaning switch the appliance off and
remove the plug from the mains socket.
To maintain good appearance of your
appliance, you should clean it regularly.
Wipe the control panel with a clean, soft
cloth.
Spraywateronto thecleaningcloth
insteadofspraying directlyonthesurface
ofthe appliance.Thishelpsensurean even
distribution ofmoistureto thesurface.
Clean the doors, handles and cabinet
surfaces with a mild detergent and then
wiped dry with a soft cloth.
Don't use sharp objects as they are
likely to scratch the surface.
Don't use Thinner, Car detergent,
Clorox, ethereal oil,abrasive cleansers or
organic solvent such as Benzene for
cleaning. They may damage the surface
of the appliance and may cause fire.
You should clean the appliance interior
regularly.It will be easier to clean when
food stocks are low. Wipe the inside of the
fridge freezer with a weak solution of
bicarbonate of soda,and then rinse with
warm water using a wrung-out sponge or
cloth.Wipe completely dry before
replacing the shelves and baskets.
Thoroughly dry all surfaces and
removable parts before putting them
back into place.
Although this appliance automatically
Warning!
Exterior cleaning
Caution!
Interior cleaning
●
●
●
●
●
defrosts, a layer of frost may occur on the
freezer compartment’s interior walls if the
freezer door is opened frequently or kept
open too long.If the frost is too thick,
choose a time when the freezer is nearly
empty and proceed as follow:
1.Remove existing food and accessories
baskets,unplug the appliance from the
mains power and leave the doors open.
Ventilate the room thoroughly to
accelerate the process.
2. When defrosting is completed,clean
your freezer as described above.
Do not use sharp objects to remove frost
from the freezer compartment. Only after
the interior is completely dry should the
appliance be switched back on and
plugged back into the mains socket.
Take care to keep door seals clean.
Sticky food and drinks can cause seals to
stick to the cabinet and tear when you
open the door.Wash seal with a mild
detergent and warm water. Rinse and dry
it thoroughly after cleaning.
Only after the door seals are
completely dry should the appliance be
powered on .
Warning: The LED light must not be
replaced by the user! If the LED light is
damaged, contact the customer helpline
for assistance.
Caution!
Door seals cleaning
Caution!
Replacing the LED light:
26
Troubleshooting
It is normal to frequently hear the sound of the motor, it will
need to run more when in following circumstances:
Temperature setting is set colder than necessary
Large quantity of warm food has recently been stored
within the appliance.
The temperature outside the appliance is too high.
Doors are kept open too long or too often.
After your installing the appliance or it has been switched
off for a long time.
●
●
●
●
●
Problem
Possible cause & Solution
Appliance is not
working correctly
Check whether the power cord is plugged into the power
outlet properly.
Check the fuse or circuit of your power supply,replace
if necessary.
It is normal that the freezer is not operating during the
defrost cycle, or for a short time after the appliance is
switched on to protect the compressor.
Odours from the
compartments
The interior may need to be cleaned
Some food, containers or wrapping cause odours.
Noise fromthe appliance
The sounds below are quite normal:
Compressor running noises.
Air movement noise from the small fan motor in the
freezer compartment or other compartments.
Gurgling sound similar to water boiling.
Popping noise during automatic defrosting.
Clicking noise before the compressor starts.
●
●
●
●
●
Other unusual noises are due to the reasons below and
may need you to check and take action:
The cabinet is not level.
The back of appliance touches the wall.
Bottles or containers fallen or rolling.
●
●
●
The motor runs
continuously
Ifyouexperienceaproblemwithyourapplianceorareconcernedthatthe
applianceisnotfunctioningcorrectly,youcancarryoutsomeeasychecks
beforecallingforservice,pleaseseebelow.
Don’ttrytorepairtheapplianceyourself.Iftheproblempersists
afteryouhavemadethechecksmentionedbelow,contactaqualified
electrician,authorizedserviceengineerortheshopwhereyoupurchasedthe
product.
Warning!

27
Temperature inside is
too warm
You may have left the doors open too long or too
frequently; or the doors are kept open by some obstacle;
or the appliance is located with insufficient clearance at
the sides, back and top .
Temperature inside
is too cold
Doors can’t be
closed easily
Increase the temperature by following the“Display controls”
chapter.
Check whether the top of the refrigerator is tilted back by
10-15mm to allow the doors to self close, or if something
inside is preventing the doors from closing.
Water drips
on the floor
●
●
The LED light may be damaged Refer to replace LED
lights in cleaning and care chapter.
The controI system has disabled the lights due to the
door being kept open too long,close and reopens the door
to reactivate the Iights.
.
The light is not working
Alayer of frost occurs
in the compartment
Check that the air outlets are not blocked by food and
ensure food is placed within the appliance to allow
sufficient ventilation.Ensure that door is fully closed.To
remove the frost, please refer to the“Cleaning and care”
chapter.
The water pan (located at the rear bottom of the cabinet)
may not be properly leveled, or the draining spout under
neath the top of the compressor depot may not be properly
positioned to direct water into this pan, or the water spout is
blocked. You may need to pull the refrigerator away from the
wall to check the pan and spout.
Check if the refrigerator is power-off for a long time, this may
cause the ice in the bucket to melt into water,and flow to the
floor .
28
Disposal of the appliance
It is prohibited to dispose of this appliance as household waste.
Packaging materials with the recycle symbol are recyclable. Dispose of the
packaging into a suitable waste collection container to recycle it.
1. Pull out the mains plug from the mains socket.
2. Cut off the power cord and discard with the mains plug.
Refrigerators contain refrigerant and gases in the insulation. Refrigerant
and gases must be disposed of professionally as they may cause eye injuries or
ignition. Ensure that tubing of the refrigerant circuit is not damage prior to proper
disposal.
Packaging materials
Before disposal of the appliance
Warning!
To avoid contamination of food, please respect the following instructions:
- Opening the door for long periods can cause a significant increase of the
temperature in the compartments of the appliance.
- Clean regularly surfaces that can come in contact with food and accessible drainage
systems.
- Store raw meat and fish in suitable containers in the refrigerator, so that it is not in
contact with or drip onto other food.
- Two-star frozen-food compartments are suitable for storing pre-frozen food, storing
or making icecream and making ice cubes.
- One-, two- and three-star compartments are not suitable for the freezing of fresh
food.
CorrectDisposalofthisproduct
This symbol on the product or in its packing indicates that this product
may not be treated as household waste. Instead, it should be taken to
the appropriate waste collection point for the recycling of electrical and
electronic equipment. By ensuring this product is disposed of correctly,
you will help prevent potential negative consequences for the
environment and human health, which could otherwise be caused by
the inappropriate waste handling of this product. For more detailed
information about the recycling of this product, please contact your
local council your household waste disposal service, or the shop where
you purchased the product.
29
5
6
7
8
9
*-Freezer
0-star
Chill
FreshFood
Wine
≤ 6-
-6~0
-2~ 3+
0~ 4+
+ +5~ 20
Seafood (fish, shrimp, shellfish), freshwater
aquatic products and meat products
(recommended for 1 month,the longer the storage
time,the worse the taste and nutrition),
are not suitable for frozen fresh food.
Fresh pork, beef, fish, chicken, some packaged
processed foods, etc. (Recommended to eat within
the same day, preferably no later than3 days) .
Partially encapsulated processed foods (non-
freezable foods)
Fresh/frozen pork, beef, chicken, freshwater aquatic
products, etc.(7 days below 0 and above 0
isrecommended for consumption within that day,
preferably no more than 2 days).
Seafood (less than 0 for 15 days, it is not
recommended to store above 0 )
℃ ℃
℃
Fresh pork,beef,fish,chicken,cooked food,etc.
(Recommended to eat within the same
day,preferably no more than 3 days)
red wine,white wine,sparkling wine etc.
Target storage
temp.[ ]
℃
Order
Compartments
TYPE
Appropriate food
1
2
3
4
Fridge
(***)*-Freezer
***-Freezer
**-Freezer
+2~+8
≤ 18-
≤ 18-
≤ 12-
Eggs, cooked food, packaged food, fruits and
vegetables, dairy products, cakes, drinks and
other foods which are not suitable for freezing.
Seafood (fish,shrimp,shellfish),freshwater
aquatic products and meat products
(recommended for 3 months , he longer the
storage time,the worse the taste and
nutrition),suitable for frozen fresh food.
t
Seafood (fish, shrimp, shellfish),freshwater aquatic
products and meat products (recommended for 3
months,
are not suitable for
.
the longer the storage time,the worse the
taste and nutrition), frozen fresh
food
Seafood (fish, shrimp, shellfish), freshwater
aquatic products and meat products
(recommended for 2 months,the longer the storage
time,the worse the taste and nutrition),
are not suitable for frozen fresh food.
Note: please store different foods according to the compartments or target storage
temperature of your purchased products.
- If the refrigerating appliance is left empty for long periods,switch off,defrost,
clean,dry, and leave the door open to prevent mould developing within the appliance.
Hisense Service Help Line:0191 387 0804