
www.tunturi.com Cable Cross Stand Alone Unit Owner’s Man-
Owner’s Manual
Revision 0
Record Serial Number Here
Platinum by Tunturi
www.tunturi.com
Date of Purchase
September 2010
Cable Cross Stand Alone Unit

Platinum by Tunturi 2 Cable Cross Stand Alone Unit Owner's
__________ Page
Instructions 2
Parts Listing 3
Hardware Comparison 4-7
Pre-Assembly Instructions 8
Congratulations on the purchase of your new Cable Cross Stand Alone Unit. This gym will provide you with a lifetime of en-
joyment to meet your strength training needs. Platinum by Tunturi strives to build the best quality multi-station gyms and to package
these gyms in such a way to avoid any damage during shipping.
In order to get started with your assembly you should first familiarize yourself with this manual. It is recommended that you
read through each step thoroughly before you begin. Begin by opening your boxes and separating all of your parts. Verify that all
parts are accounted for and have no damage. When all parts are accounted for, you may begin your assembly. Some items may
have been pre-assembled for your convenience. Please note that hardware quantities shown reflect total quantities for your gym and
may not reflect actual quantities in each bag. Assemble your gym on a solid level surface. This will ensure the best possible perform-
ance, function, and safety for the gym and your workout.
Assemble your gym according to the step by step instructions found in this manual. Failure to do so will void your warranty
and may result in personal injury. After assembly, you should check each station to ensure correct operation. If a problem arises,
recheck your assembly with these instructions to verify correct assembly. If you are unable to correct a problem or have questions
with your assembly please contact your authorized Tunturi dealer.
Platinum by Tunturi has built this gym to give you a safe, effective and enjoyable workout. However, there
is a risk assumed by individuals who use this type of equipment. It is very important that all warnings and
instructions are read and followed before beginning any exercise program.
It is also very important to read and follow the preventative maintenance schedule described in this
manual. If any of the warning labels or stickers are worn, faded, torn, scratched or missing they should be replaced
immediately.
WARNING
: There is a risk assumed by individuals who use this type of equipment. To minimize risk
always follow these rules.
1) It is essential that you consult with your physician before beginning any exercise program.
2) Inspect equipment before each use for loose, worn, or frayed parts (including cables, nuts and bolts). Replace
parts at first signs of wear (use only genuine Tunturi replacement parts). Use of equipment that is damaged,
worn, frayed or not completely assembled on a solid, level surface may result in injury.
3) Make sure all adjustment pins are fully engaged before using equipment.
4) Keep all parts of the body and clothing outside the path of any moving parts of the gym. Be alert to the
possibility of injury. Do not be careless.
5) Minors and children should not be allowed to play on or around this gym.
6) If you have any questions on proper use or maintenance of this gym, do not hesitate to call your local
PLATINUM BY TUNTURI distributor or TUNTURI www.tunturi.com
__________ Page
Main Assembly 9-13
Maintenance 14
Floor plan Layout 15
Contact 16
Table of Contents
Instructions
Warning
www.tunturi.com 3 Cable Cross Stand Alone Unit Owner’s
Frame Components
ITEM NO. DESCRIPTION QTY
1 Side Frame 2
2 Short Base Frame 1
3 Upright Support Frame 2
4 Wall Mount Tube 2
5 Selector Tube 2
6 Right Side Height Adjustment 1
7 Left Side Height Adjustment 1
8 Swivel Pulley Holder 2
9 Upper Support Brace 1
10 Pulley Holder/ Support Plate 4
11 Extended Upper Support Brace 1
12 Front Angle Bracket 1
13 Rear Angle Bracket 1
Tools Required
Hardware
ITEM NO. DESCRIPTION QTY
14 HCS 3/8”-16 x 5 1/4” 8
15 HCS 3/8”-16 x 2 3/4” 4
16 HCS 3/8”-16 x 2 1/2” 10
17 3 1/2” Pulley 4
18 Threaded Collar 2
19 HCS 3/8”-16 x 1 1/4 4
20 FHSCS 3/8”-16 x 3” 2
21 FHSCS 3/8”-16 x 5 1/4” 2
22 3/8” Flat Washer 64
23 3/8” Nylock 34
24 HCS 3/8”-16 x 2 1/4” 4
25 Plate 2
• 9/16” Wrench
• 9/16” Ratchet
• 3/4” Wrench
• Allen Wrench Set
• Tape Measure
Platinum by Tunturi 2 Cable Cross Stand Alone Unit Owner's
__________ Page
Instructions 2
Parts Listing 3
Hardware Comparison 4-7
Pre-Assembly Instructions 8
Congratulations on the purchase of your new Cable Cross Stand Alone Unit. This gym will provide you with a lifetime of en-
joyment to meet your strength training needs. Platinum by Tunturi strives to build the best quality multi-station gyms and to package
these gyms in such a way to avoid any damage during shipping.
In order to get started with your assembly you should first familiarize yourself with this manual. It is recommended that you
read through each step thoroughly before you begin. Begin by opening your boxes and separating all of your parts. Verify that all
parts are accounted for and have no damage. When all parts are accounted for, you may begin your assembly. Some items may
have been pre-assembled for your convenience. Please note that hardware quantities shown reflect total quantities for your gym and
may not reflect actual quantities in each bag. Assemble your gym on a solid level surface. This will ensure the best possible perform-
ance, function, and safety for the gym and your workout.
Assemble your gym according to the step by step instructions found in this manual. Failure to do so will void your warranty
and may result in personal injury. After assembly, you should check each station to ensure correct operation. If a problem arises,
recheck your assembly with these instructions to verify correct assembly. If you are unable to correct a problem or have questions
with your assembly please contact your authorized Tunturi dealer.
Platinum by Tunturi has built this gym to give you a safe, effective and enjoyable workout. However, there
is a risk assumed by individuals who use this type of equipment. It is very important that all warnings and
instructions are read and followed before beginning any exercise program.
It is also very important to read and follow the preventative maintenance schedule described in this
manual. If any of the warning labels or stickers are worn, faded, torn, scratched or missing they should be replaced
immediately.
WARNING: There is a risk assumed by individuals who use this type of equipment. To minimize risk
always follow these rules.
1) It is essential that you consult with your physician before beginning any exercise program.
2) Inspect equipment before each use for loose, worn, or frayed parts (including cables, nuts and bolts). Replace
parts at first signs of wear (use only genuine Tunturi replacement parts). Use of equipment that is damaged,
worn, frayed or not completely assembled on a solid, level surface may result in injury.
3) Make sure all adjustment pins are fully engaged before using equipment.
4) Keep all parts of the body and clothing outside the path of any moving parts of the gym. Be alert to the
possibility of injury. Do not be careless.
5) Minors and children should not be allowed to play on or around this gym.
6) If you have any questions on proper use or maintenance of this gym, do not hesitate to call your local
PLATINUM BY TUNTURI distributor or TUNTURI www.tunturi.com
__________ Page
Main Assembly 9-13
Maintenance 14
Floor plan Layout 15
Contact 16
Table of Contents
Instructions
Warning
www.tunturi.com 3 Cable Cross Stand Alone Unit Owner’s
Frame Components
ITEM NO. DESCRIPTION QTY
1 Side Frame 2
2 Short Base Frame 1
3 Upright Support Frame 2
4 Wall Mount Tube 2
5 Selector Tube 2
6 Right Side Height Adjustment 1
7 Left Side Height Adjustment 1
8 Swivel Pulley Holder 2
9 Upper Support Brace 1
10 Pulley Holder/ Support Plate 4
11 Extended Upper Support Brace 1
12 Front Angle Bracket 1
13 Rear Angle Bracket 1
Tools Required
Hardware
ITEM NO. DESCRIPTION QTY
14 HCS 3/8”-16 x 5 1/4” 8
15 HCS 3/8”-16 x 2 3/4” 4
16 HCS 3/8”-16 x 2 1/2” 10
17 3 1/2” Pulley 4
18 Threaded Collar 2
19 HCS 3/8”-16 x 1 1/4 4
20 FHSCS 3/8”-16 x 3” 2
21 FHSCS 3/8”-16 x 5 1/4” 2
22 3/8” Flat Washer 64
23 3/8” Nylock 34
24 HCS 3/8”-16 x 2 1/4” 4
25 Plate 2
• 9/16” Wrench
• 9/16” Ratchet
• 3/4” Wrench
• Allen Wrench Set
• Tape Measure
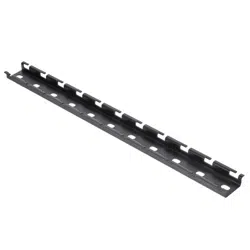
Platinum by Tunturi 4 Cable Cross Stand Alone Unit Owner's
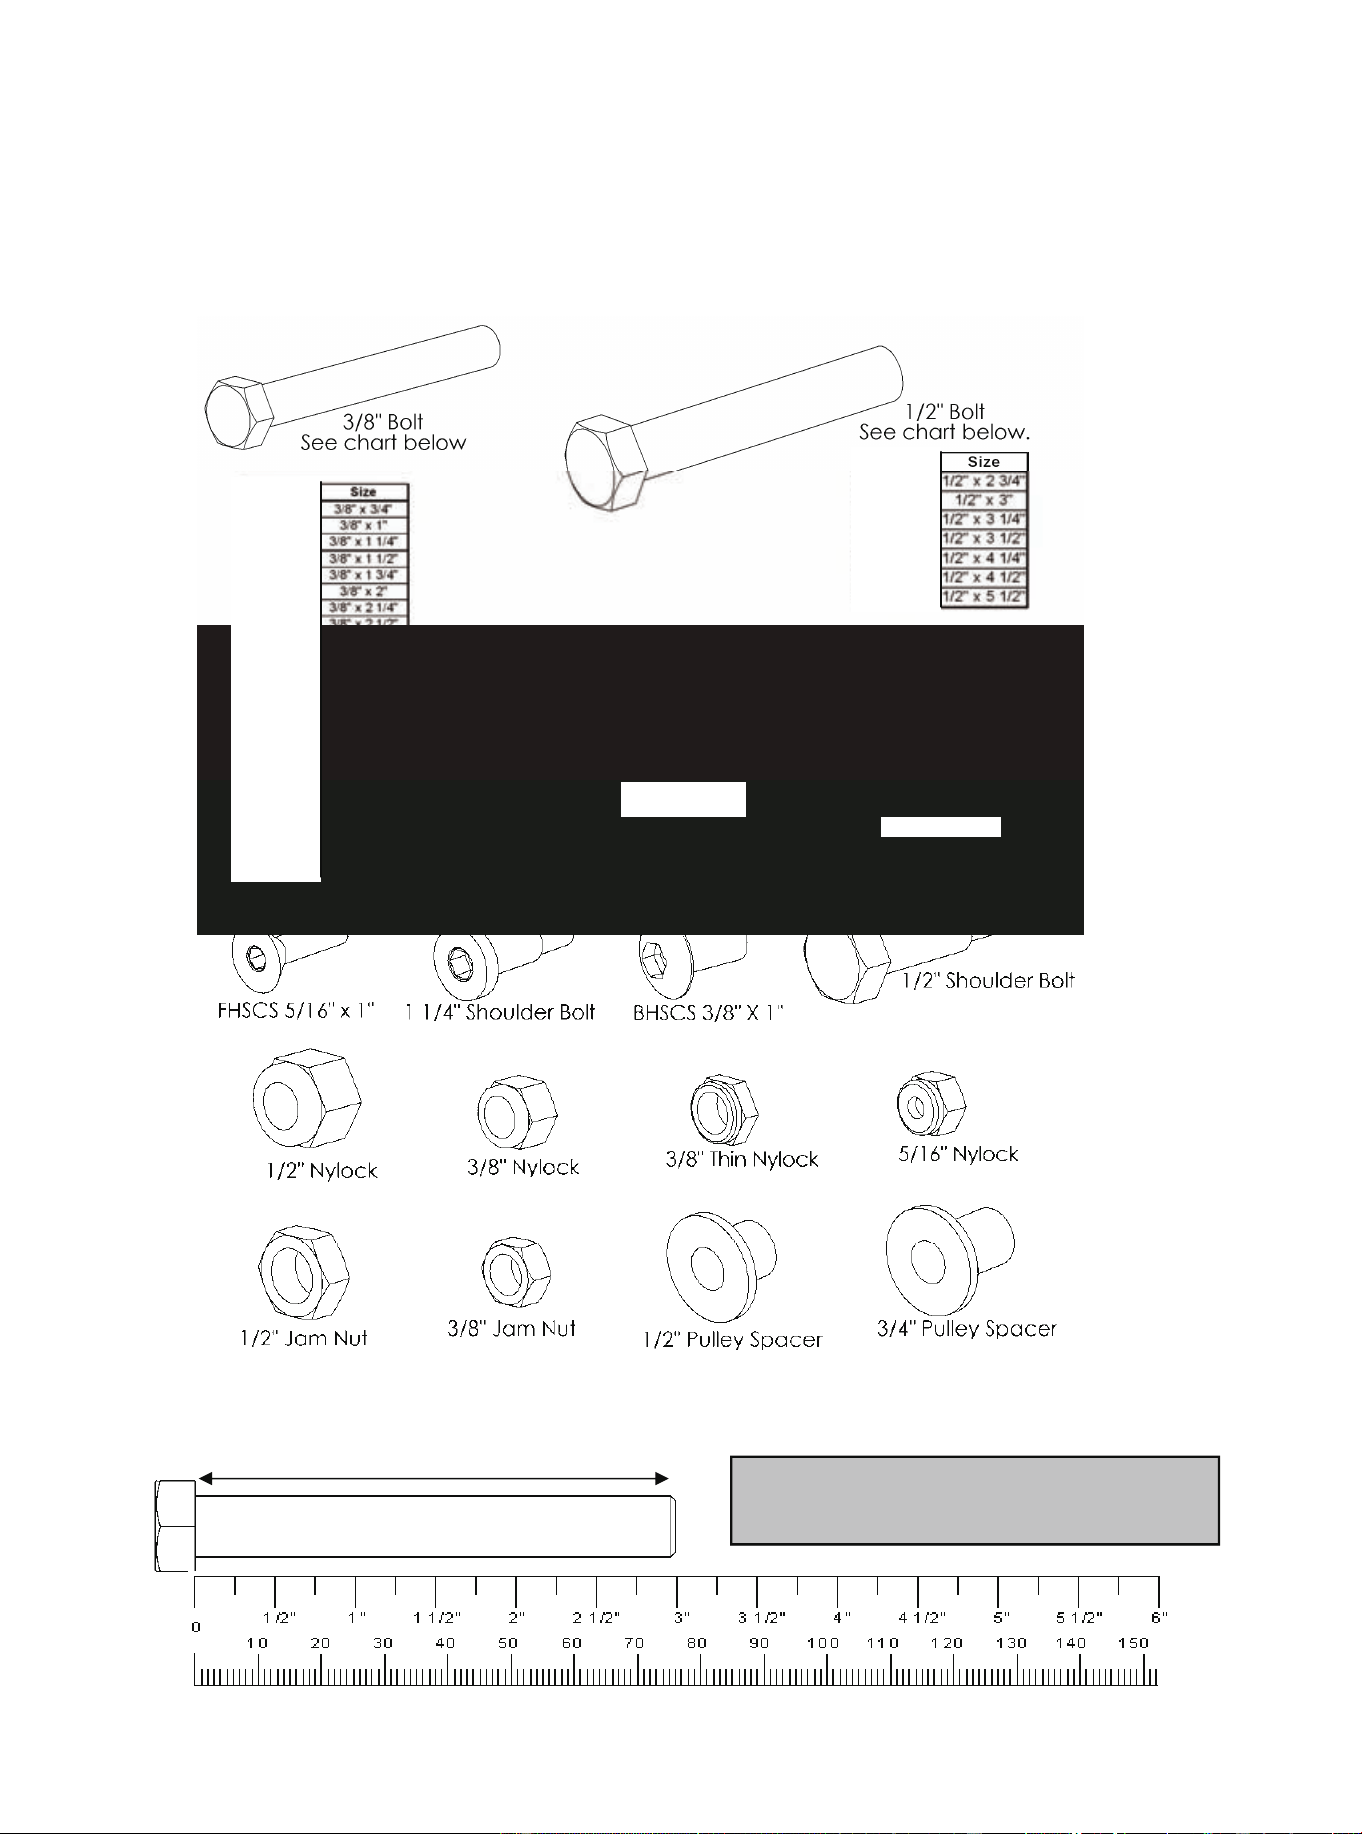
Bolt Length
Note: Bolt length is measured from
the underside of the head of the bolt.
www.tunturi.com 5 Cable Cross Stand Alone Unit Owner’s
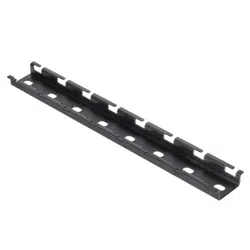
Platinum by Tunturi 4 Cable Cross Stand Alone Unit Owner's
Bolt Length
Note: Bolt length is measured from
the underside of the head of the bolt.
www.tunturi.com 5 Cable Cross Stand Alone Unit Owner’s
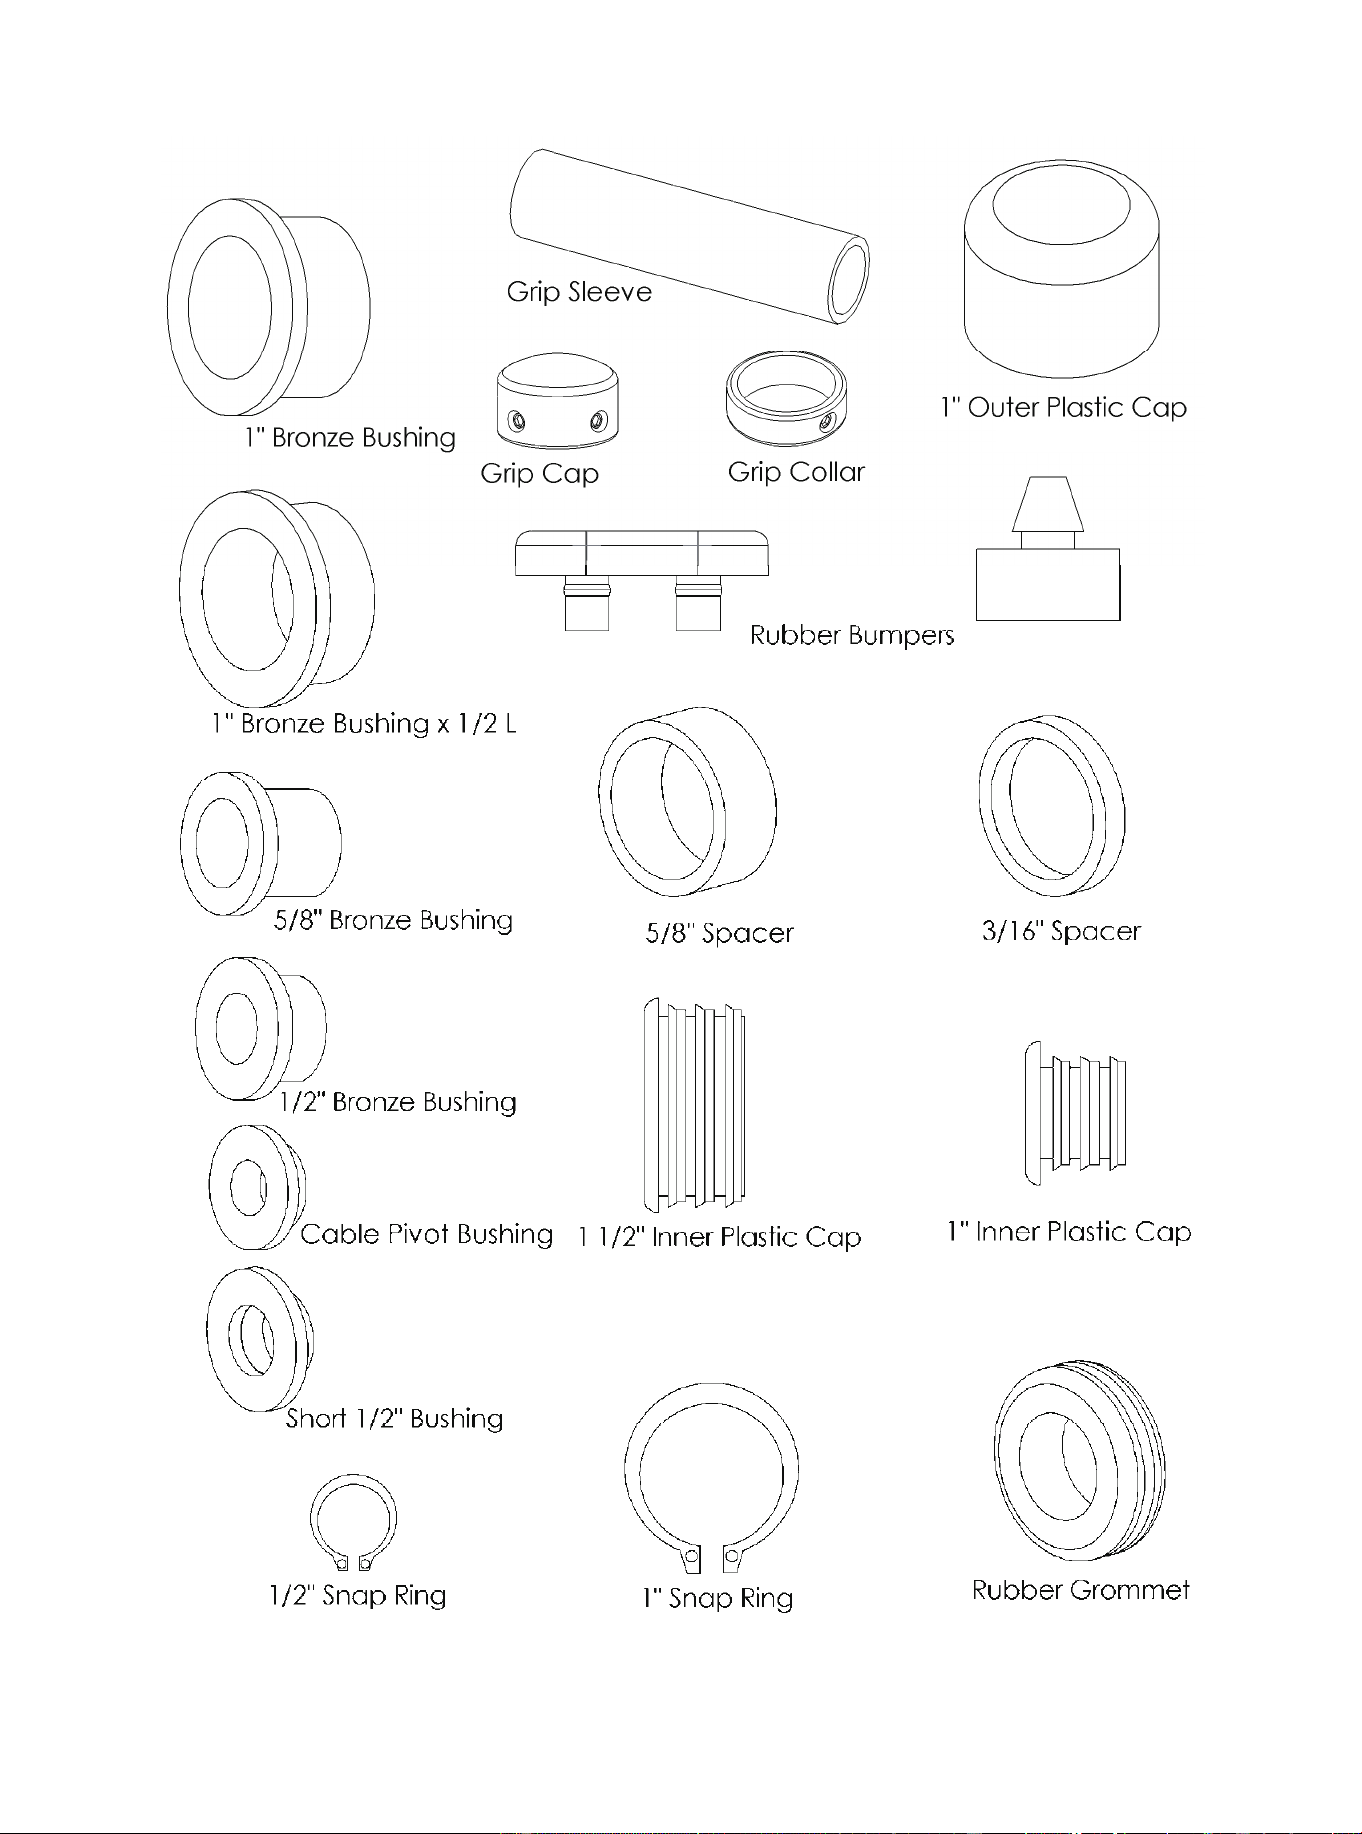
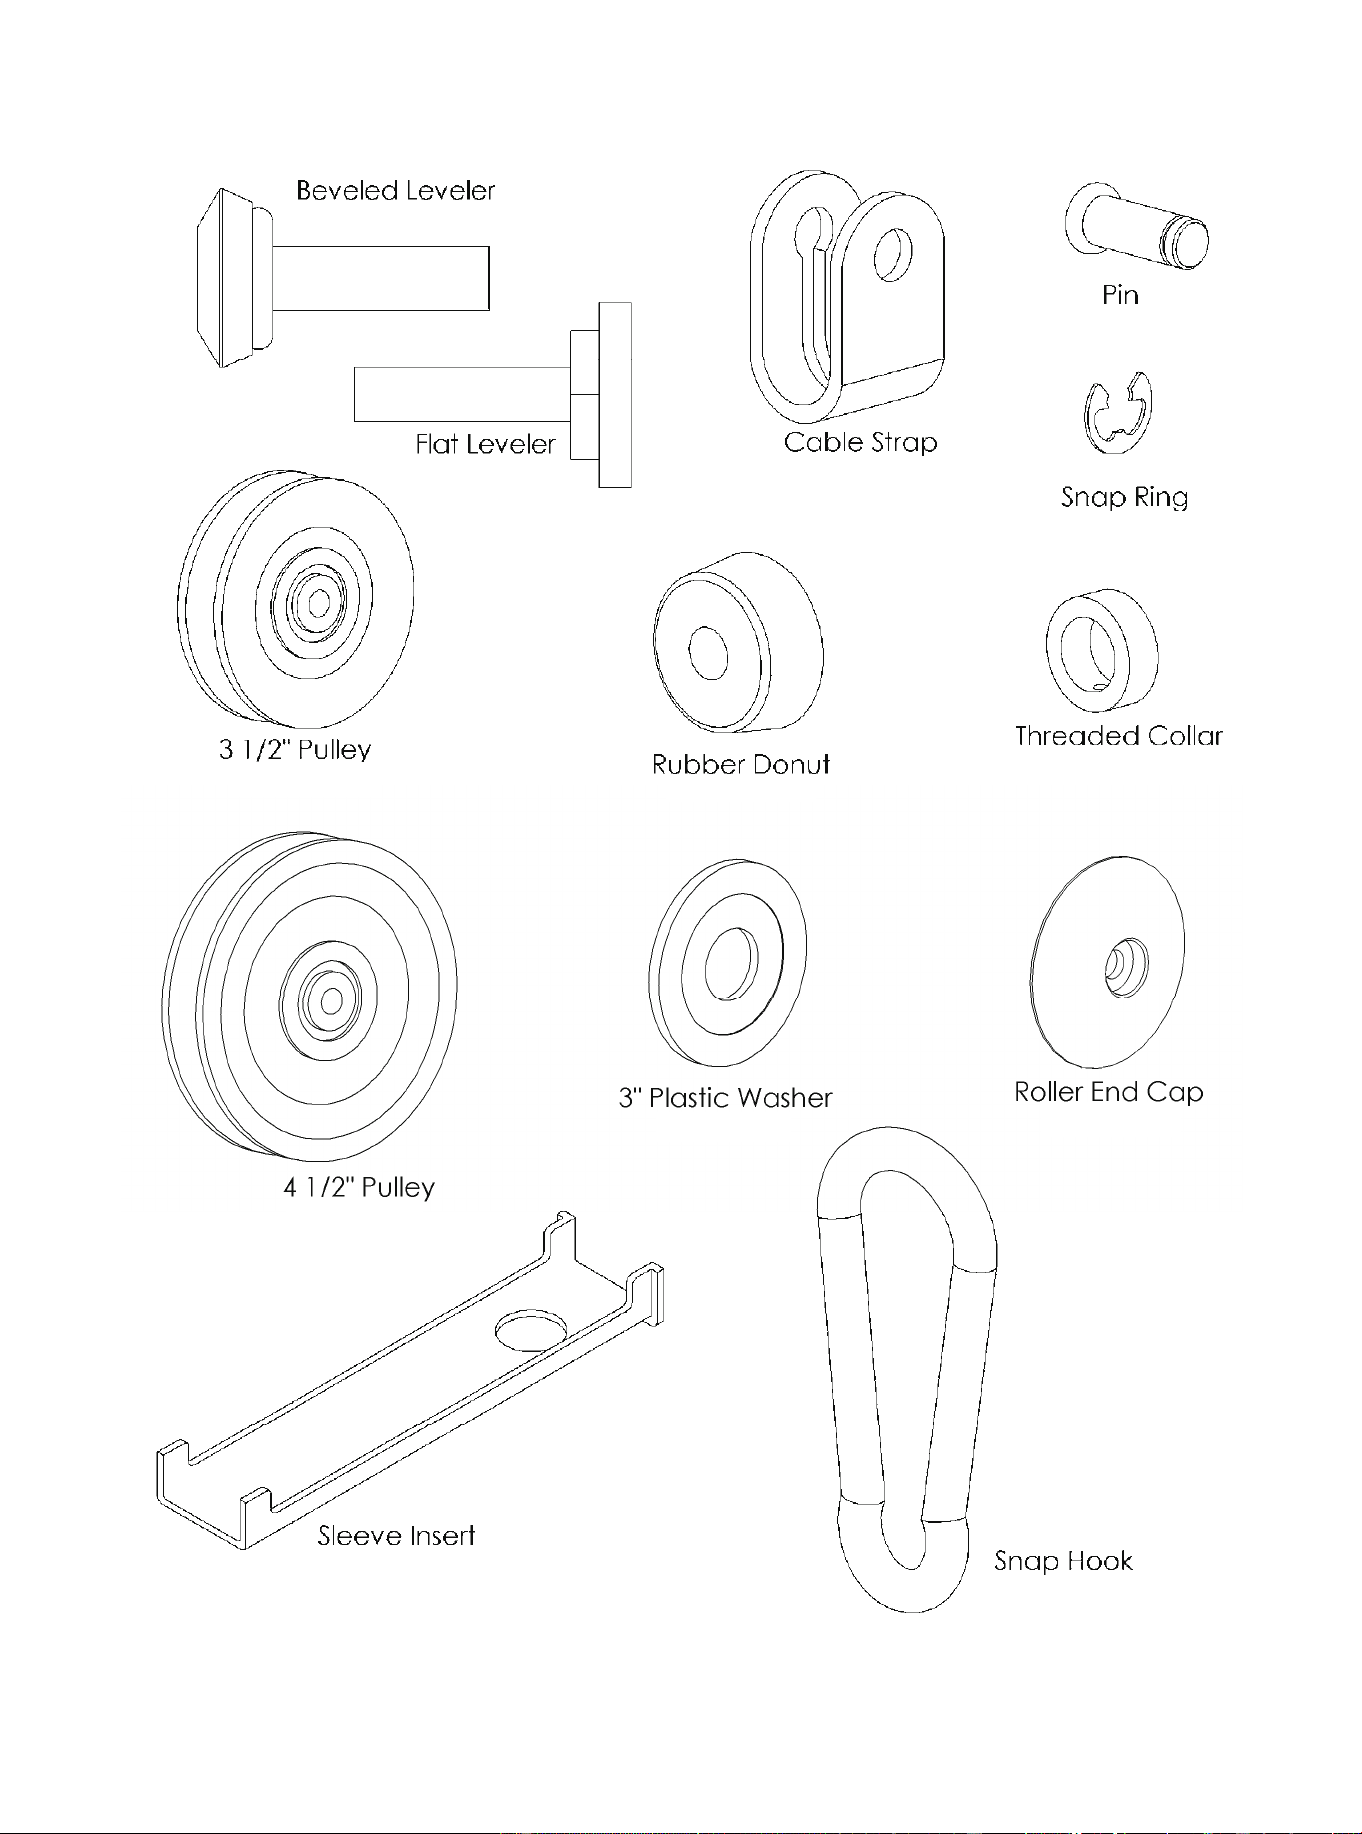
Platinum by Tunturi 6 Cable Cross Stand Alone Unit Owner's
www.tunturi.com 7 Cable Cross Stand Alone Unit Owner’s

Platinum by Tunturi 6 Cable Cross Stand Alone Unit Owner's
www.tunturi.com 7 Cable Cross Stand Alone Unit Owner’s
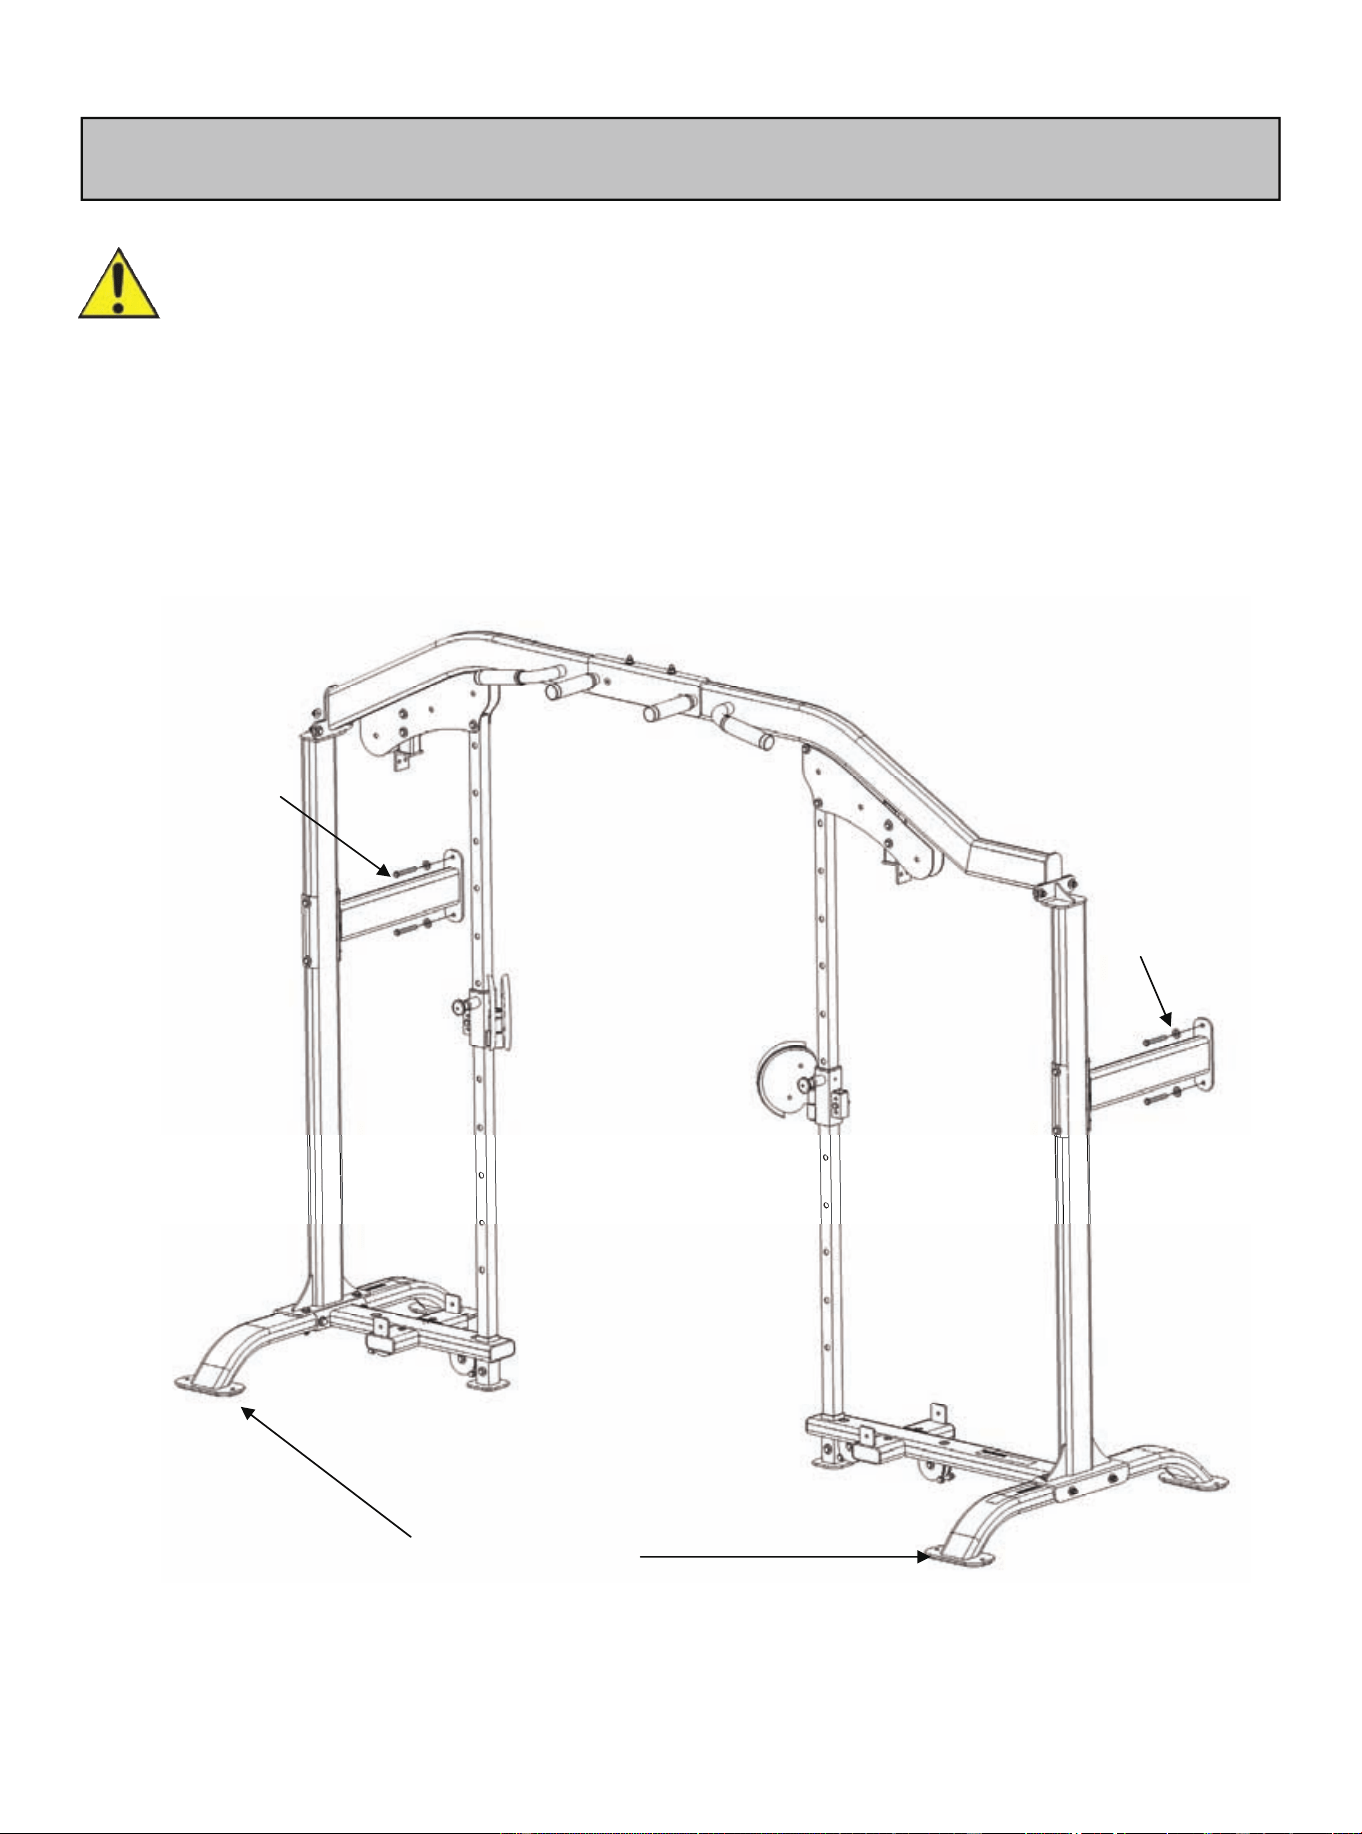
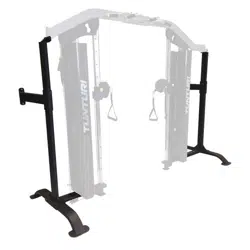
Platinum by Tunturi 8 Cable Cross Stand Alone Unit Owner's
Pre-Assembling Instructions
IMPORTANT: It is important to fix the Cable Cross Stand Alone Unit,
either to the wall or to the floor. This security is needed in order to prevent
the Unit from moving/falling over when weights are being pulled. Units
which are not secured tightly to the wall or floor are not covered by the
Warranty.
Also make sure the wall or floor is able to withstand enough force to sup-
port the Cable Cross Unit. Weak walls/floors or any damage done to the
walls/floors by use of the Cable cross unit is not covered in the Warranty.
See Step 4 for mounting the product.
Mount to the wall
Mount to the wall
Mount to the floor
www.tunturi.com 9 Cable Cross Stand Alone Unit Owner’s
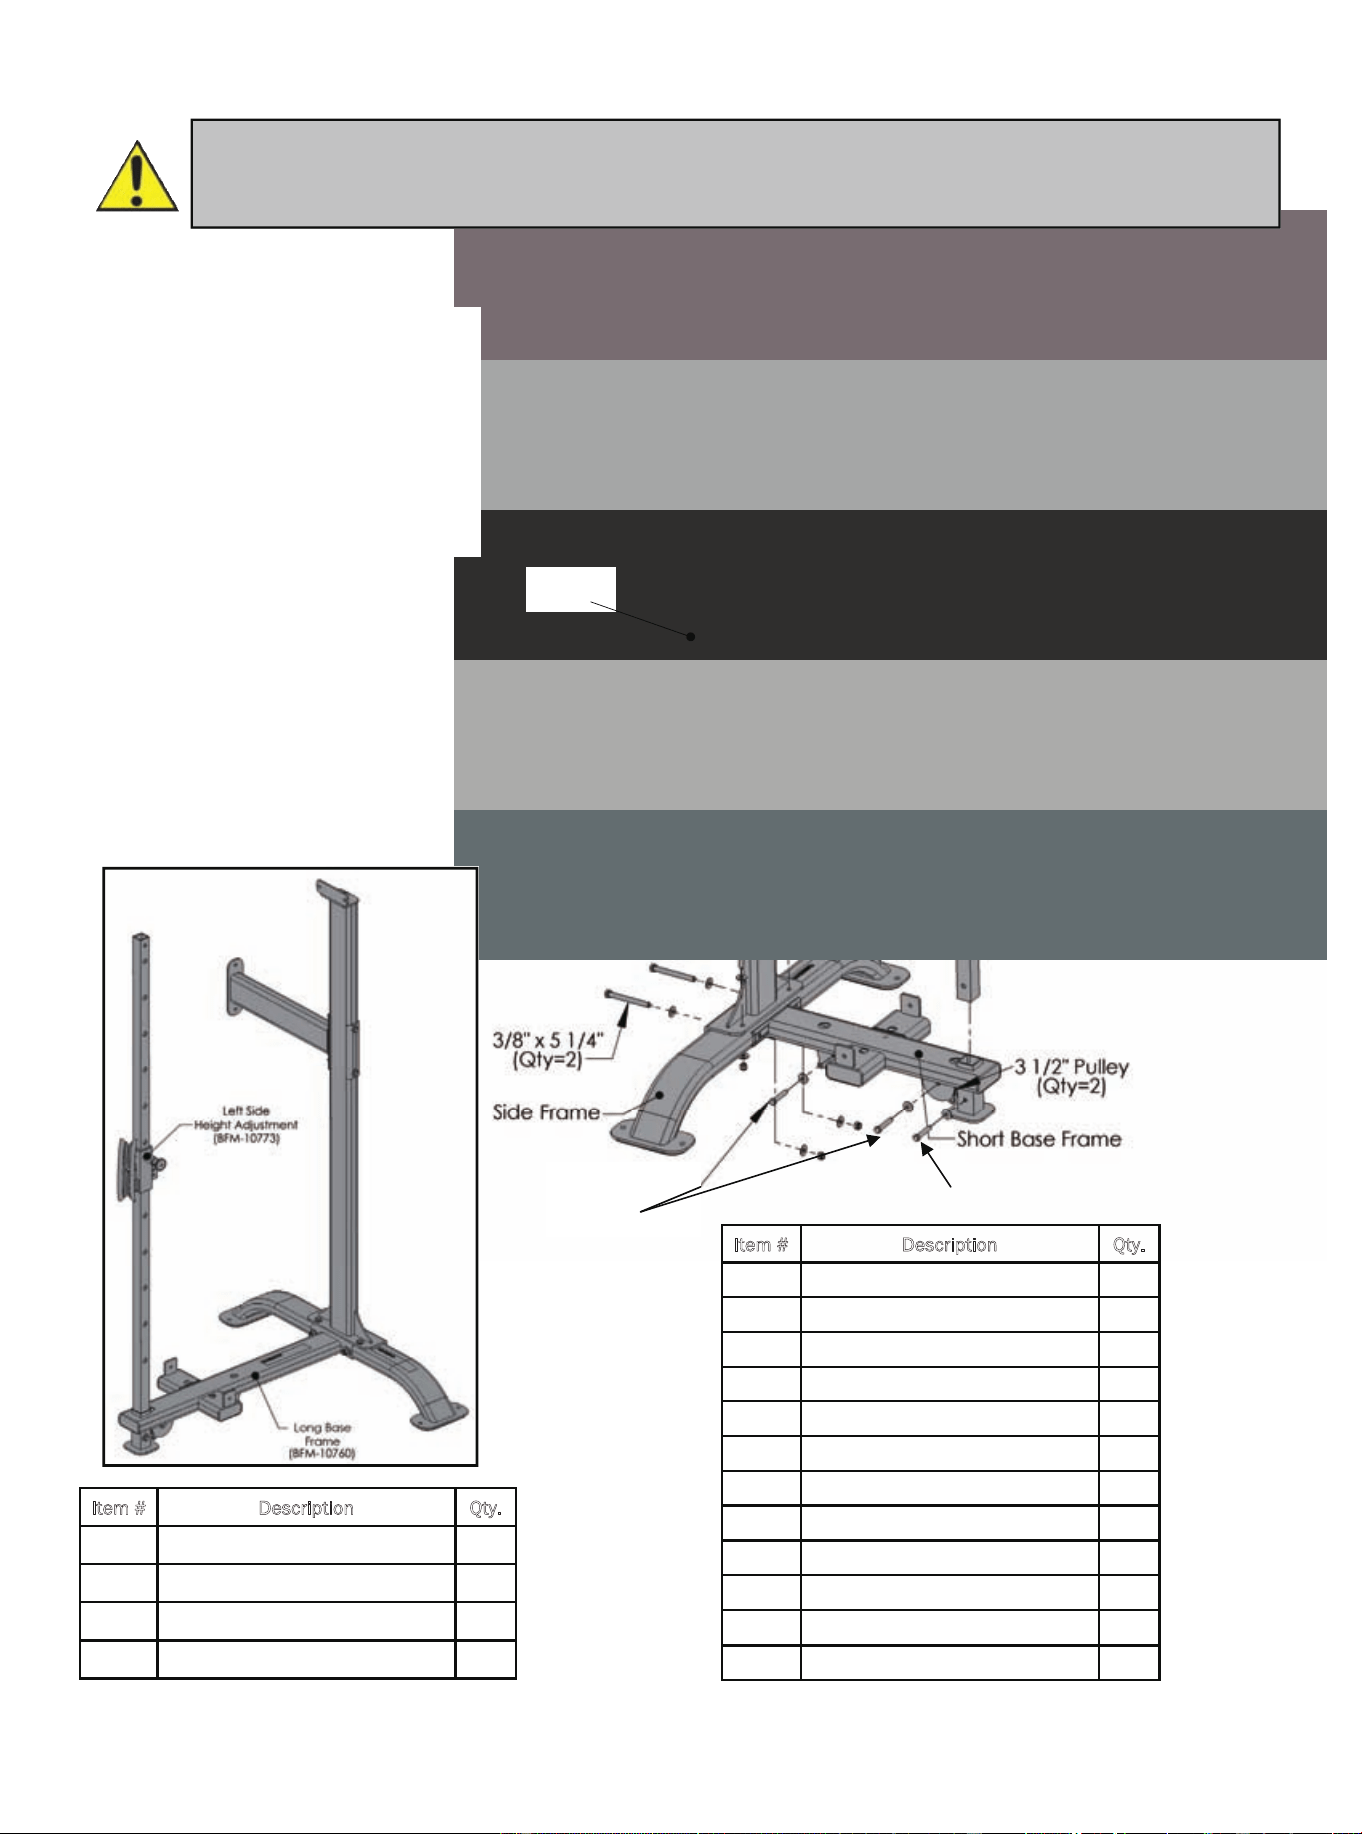
Step 1:
Item # Description Qty.
1 Side Frame 1
2 Short Base Frame 1
3 Upright Support Frame 1
4 Wall Mount Tube 1
It
em # Description Qty.
5 Selector Tube 1
6 Right Side Height Adjustment 1
8 Swivel Pulley Holder 1
14 HCS 3/8”-16 x 5 1/4” 4
15 HCS 3/8”-16 x 2 3/4” 2
16 HCS 3/8”-16 x 2 1/2” 1
17 3 1/2” Pulley 2
18 Threaded Collar 1
22 3/8” Flat Washer 18
23 3/8” Nylock 9
24 HCS 3/8”-16 x 2 1/4” 2
25 Plate 1
PLEASE FOLLOW ALL DIRECTIONS VERY CAREFULLY FOR PROPER
INSTALLATION.
Step 1a: Repeat Step
1
Note: For a more consistent
appearance, position all
bolts in the direction shown
in each figure.
• All Flat Washers and Nylocks
are 3/8” unless noted otherwise.
3/8”x2 1/4”
(Qty=2)
3/8”x2 1/2” (Qty=1)
Plate
Platinum by Tunturi 8 Cable Cross Stand Alone Unit Owner's
Pre-Assembling Instructions
IMPORTANT: It is important to fix the Cable Cross Stand Alone Unit,
either to the wall or to the floor. This security is needed in order to prevent
the Unit from moving/falling over when weights are being pulled. Units
which are not secured tightly to the wall or floor are not covered by the
Warranty.
Also make sure the wall or floor is able to withstand enough force to sup-
port the Cable Cross Unit. Weak walls/floors or any damage done to the
walls/floors by use of the Cable cross unit is not covered in the Warranty.
See Step 4 for mounting the product.
Mount to the wall
Mount to the wall
Mount to the floor
www.tunturi.com 9 Cable Cross Stand Alone Unit Owner’s
Step 1:
Item # Description Qty.
1 Side Frame 1
2 Short Base Frame 1
3 Upright Support Frame 1
4 Wall Mount Tube 1
Item # Description Qty.
5 Selector Tube 1
6 Right Side Height Adjustment 1
8 Swivel Pulley Holder 1
14 HCS 3/8”-16 x 5 1/4” 4
15 HCS 3/8”-16 x 2 3/4” 2
16 HCS 3/8”-16 x 2 1/2” 1
17 3 1/2” Pulley 2
18 Threaded Collar 1
22 3/8” Flat Washer 18
23 3/8” Nylock 9
24 HCS 3/8”-16 x 2 1/4” 2
25 Plate 1
PLEASE FOLLOW ALL DIRECTIONS VERY CAREFULLY FOR PROPER
INSTALLATION.
Step 1a: Repeat Step
1
Note: For a more consistent
appearance, position all
bolts in the direction shown
in each figure.
• All Flat Washers and Nylocks
are 3/8” unless noted otherwise.
3/8”x2 1/4”
(Qty=2)
3/8”x2 1/2” (Qty=1)
Plate
Platinum by Tunturi 10 Cable Cross Stand Alone Unit Owner's
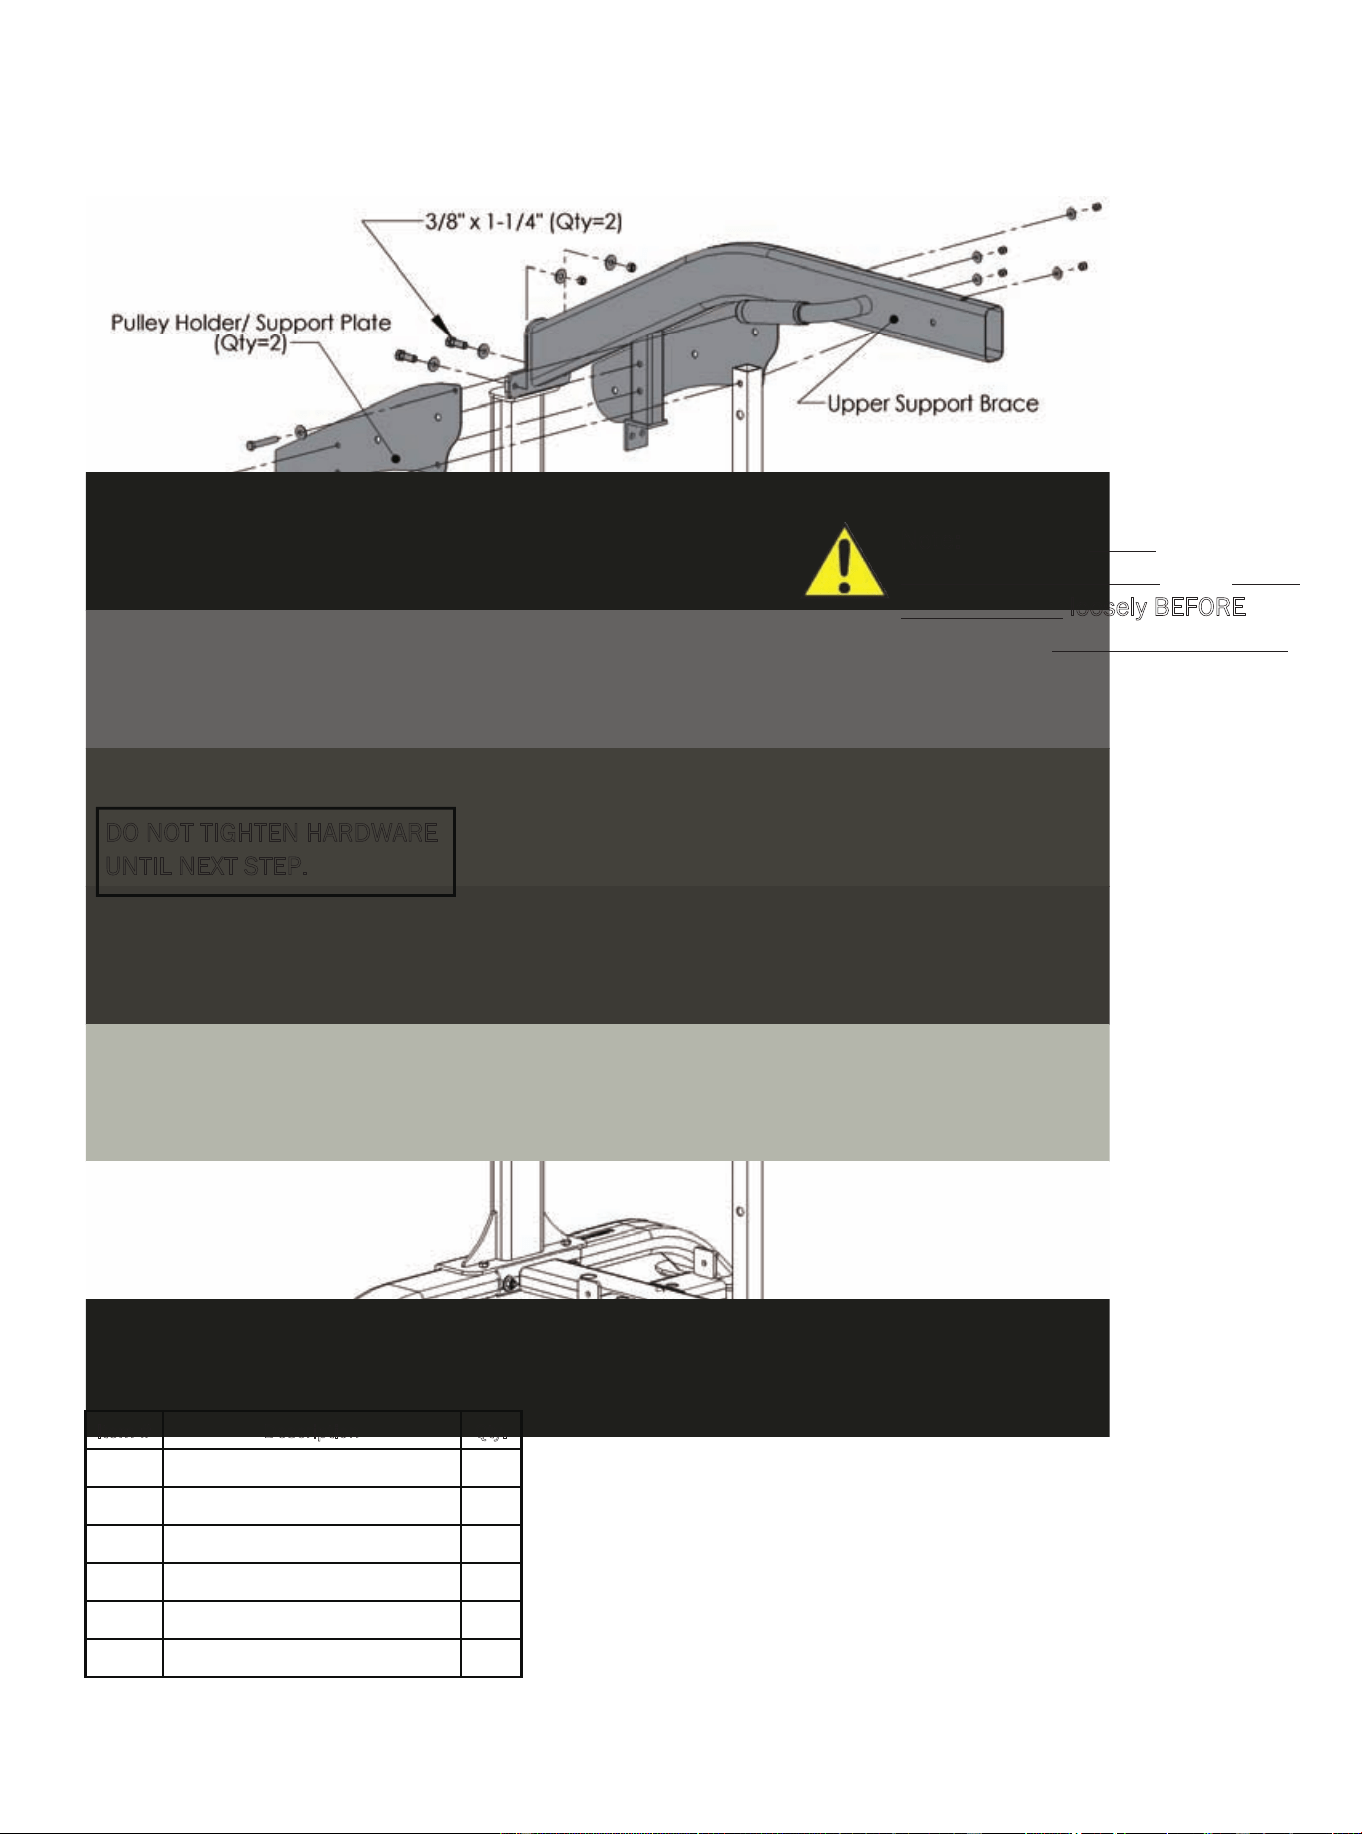
Step 2:
Item # Description Qty.
9 Upper Support Brace 1
10 Pulley Holder/ Support Plate 2
16 HCS 3/8”-16 x 2 1/2 4
19 HCS 3/8”-16 x 1 1/4 2
22 3/8” Flat Washer 12
23 3/8” Nylock 6
Note: Attach the Pulley
Holder/Support Plates to the Upper
Support Brace loosely BEFORE
installing the Upper Support Brace.
This will help continue to make the
installation process effortless.
DO NOT TIGHTEN HARDWARE
UNTIL NEXT STEP.
www.tunturi.com 11 Cable Cross Stand Alone Unit Owner’s
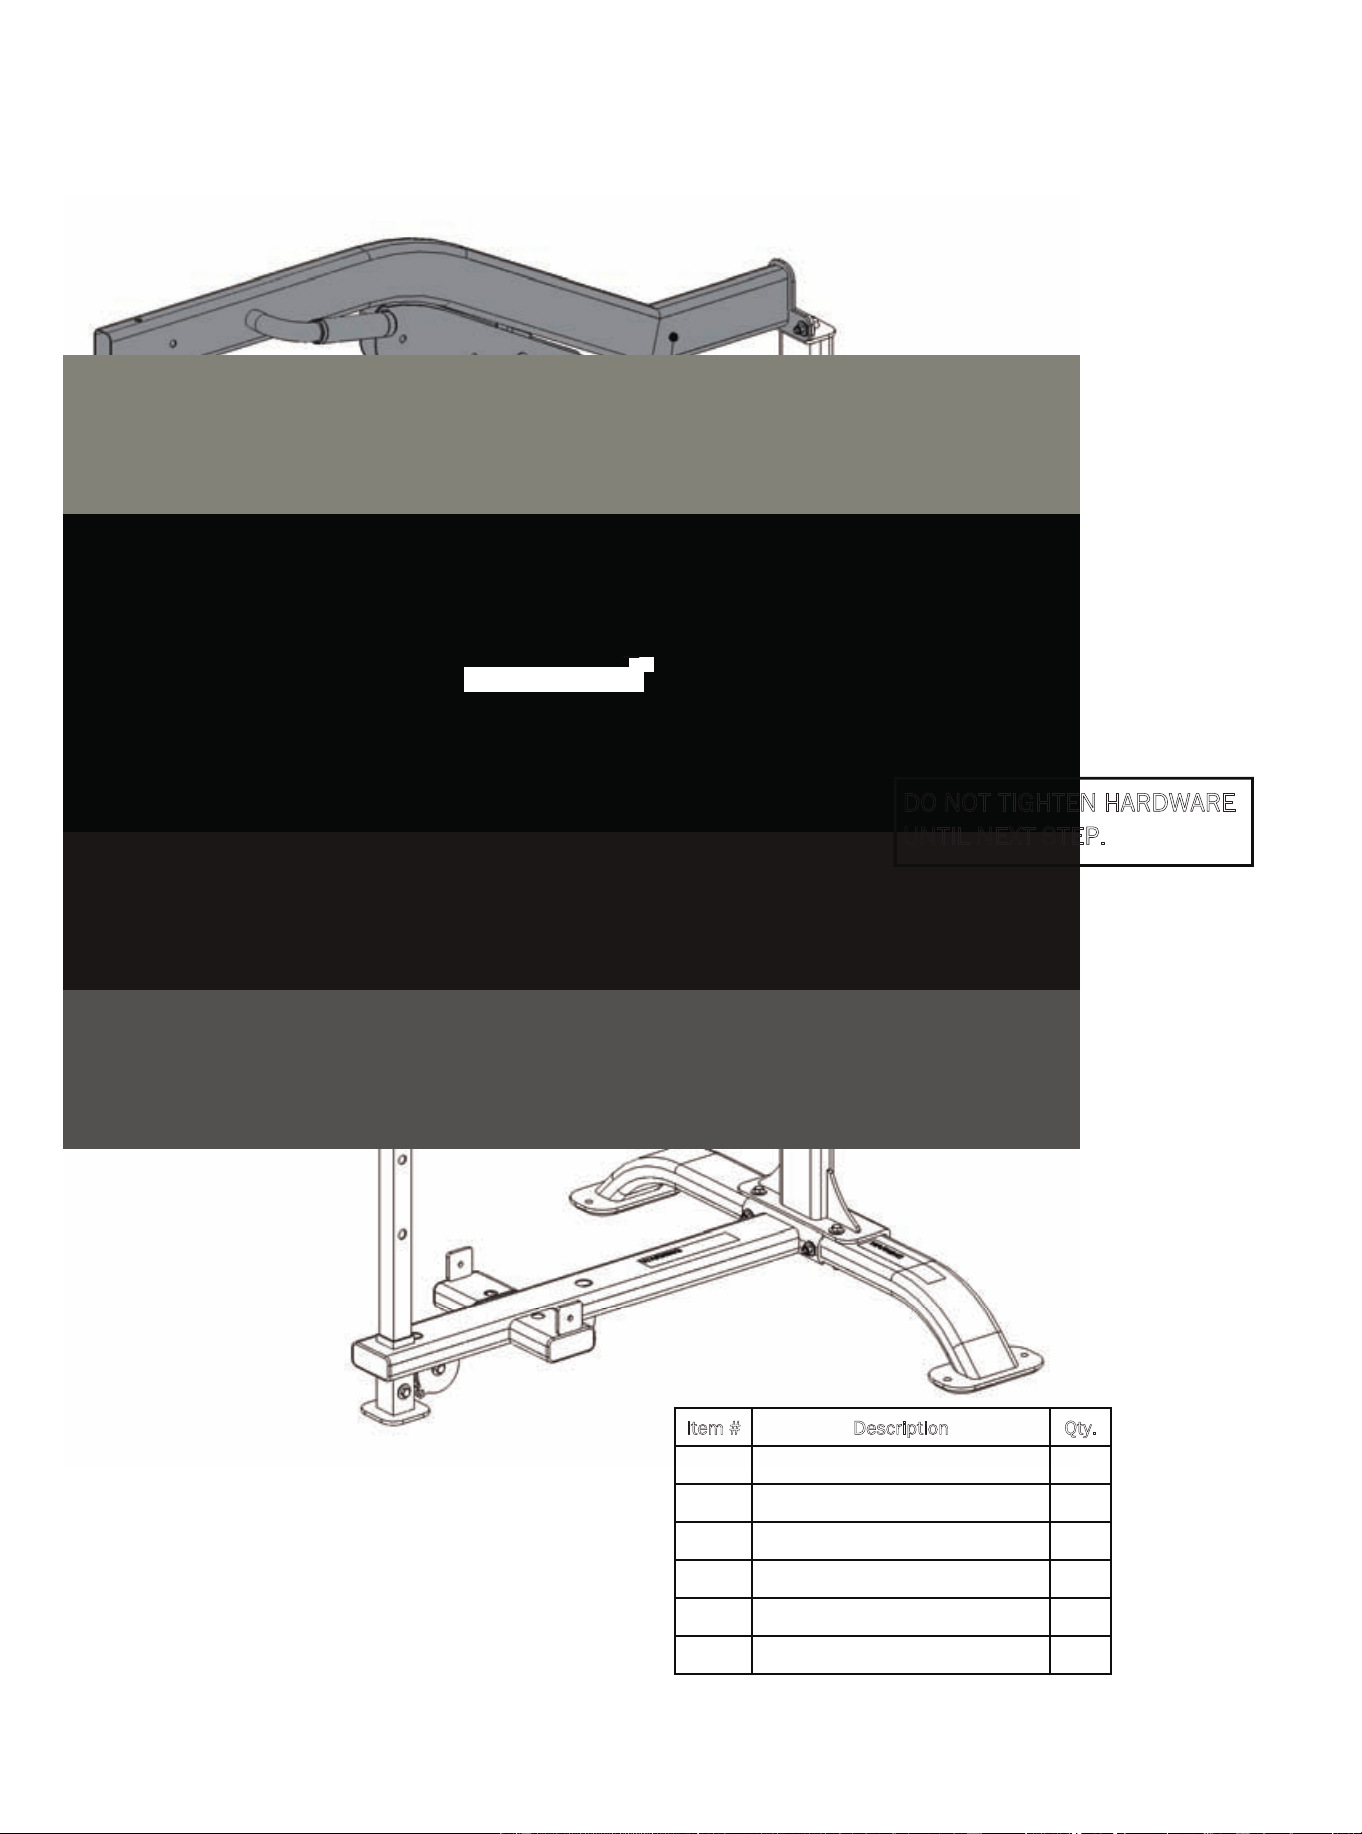
Step 2a:
Repeat step 2 for
Item # Description Qty.
11 Extended Upper Support Brace 1
10 Pulley Holder/ Support Plate 2
16 HCS 3/8”-16 x 2 1/2 4
19 HCS 3/8”-16 x 1 1/4 2
22 3/8” Flat Washer 12
23 3/8” Nylock 6
DO NOT TIGHTEN HARDWARE
UNTIL NEXT STEP.
Platinum by Tunturi 10 Cable Cross Stand Alone Unit Owner's
Step 2:
Item # Description Qty.
9 Upper Support Brace 1
10 Pulley Holder/ Support Plate 2
16 HCS 3/8”-16 x 2 1/2 4
19 HCS 3/8”-16 x 1 1/4 2
22 3/8” Flat Washer 12
23 3/8” Nylock 6
Note: Attach the Pulley
Holder/Support Plates to the Upper
Support Brace loosely BEFORE
installing the Upper Support Brace.
This will help continue to make the
installation process effortless.
DO NOT TIGHTEN HARDWARE
UNTIL NEXT STEP.
www.tunturi.com 11 Cable Cross Stand Alone Unit Owner’s
Step 2a:
Repeat step 2 for
Item # Description Qty.
11 Extended Upper Support Brace 1
10 Pulley Holder/ Support Plate 2
16 HCS 3/8”-16 x 2 1/2 4
19 HCS 3/8”-16 x 1 1/4 2
22 3/8” Flat Washer 12
23 3/8” Nylock 6
DO NOT TIGHTEN HARDWARE
UNTIL NEXT STEP.
Platinum by Tunturi 12 Cable Cross Stand Alone Unit Owner's
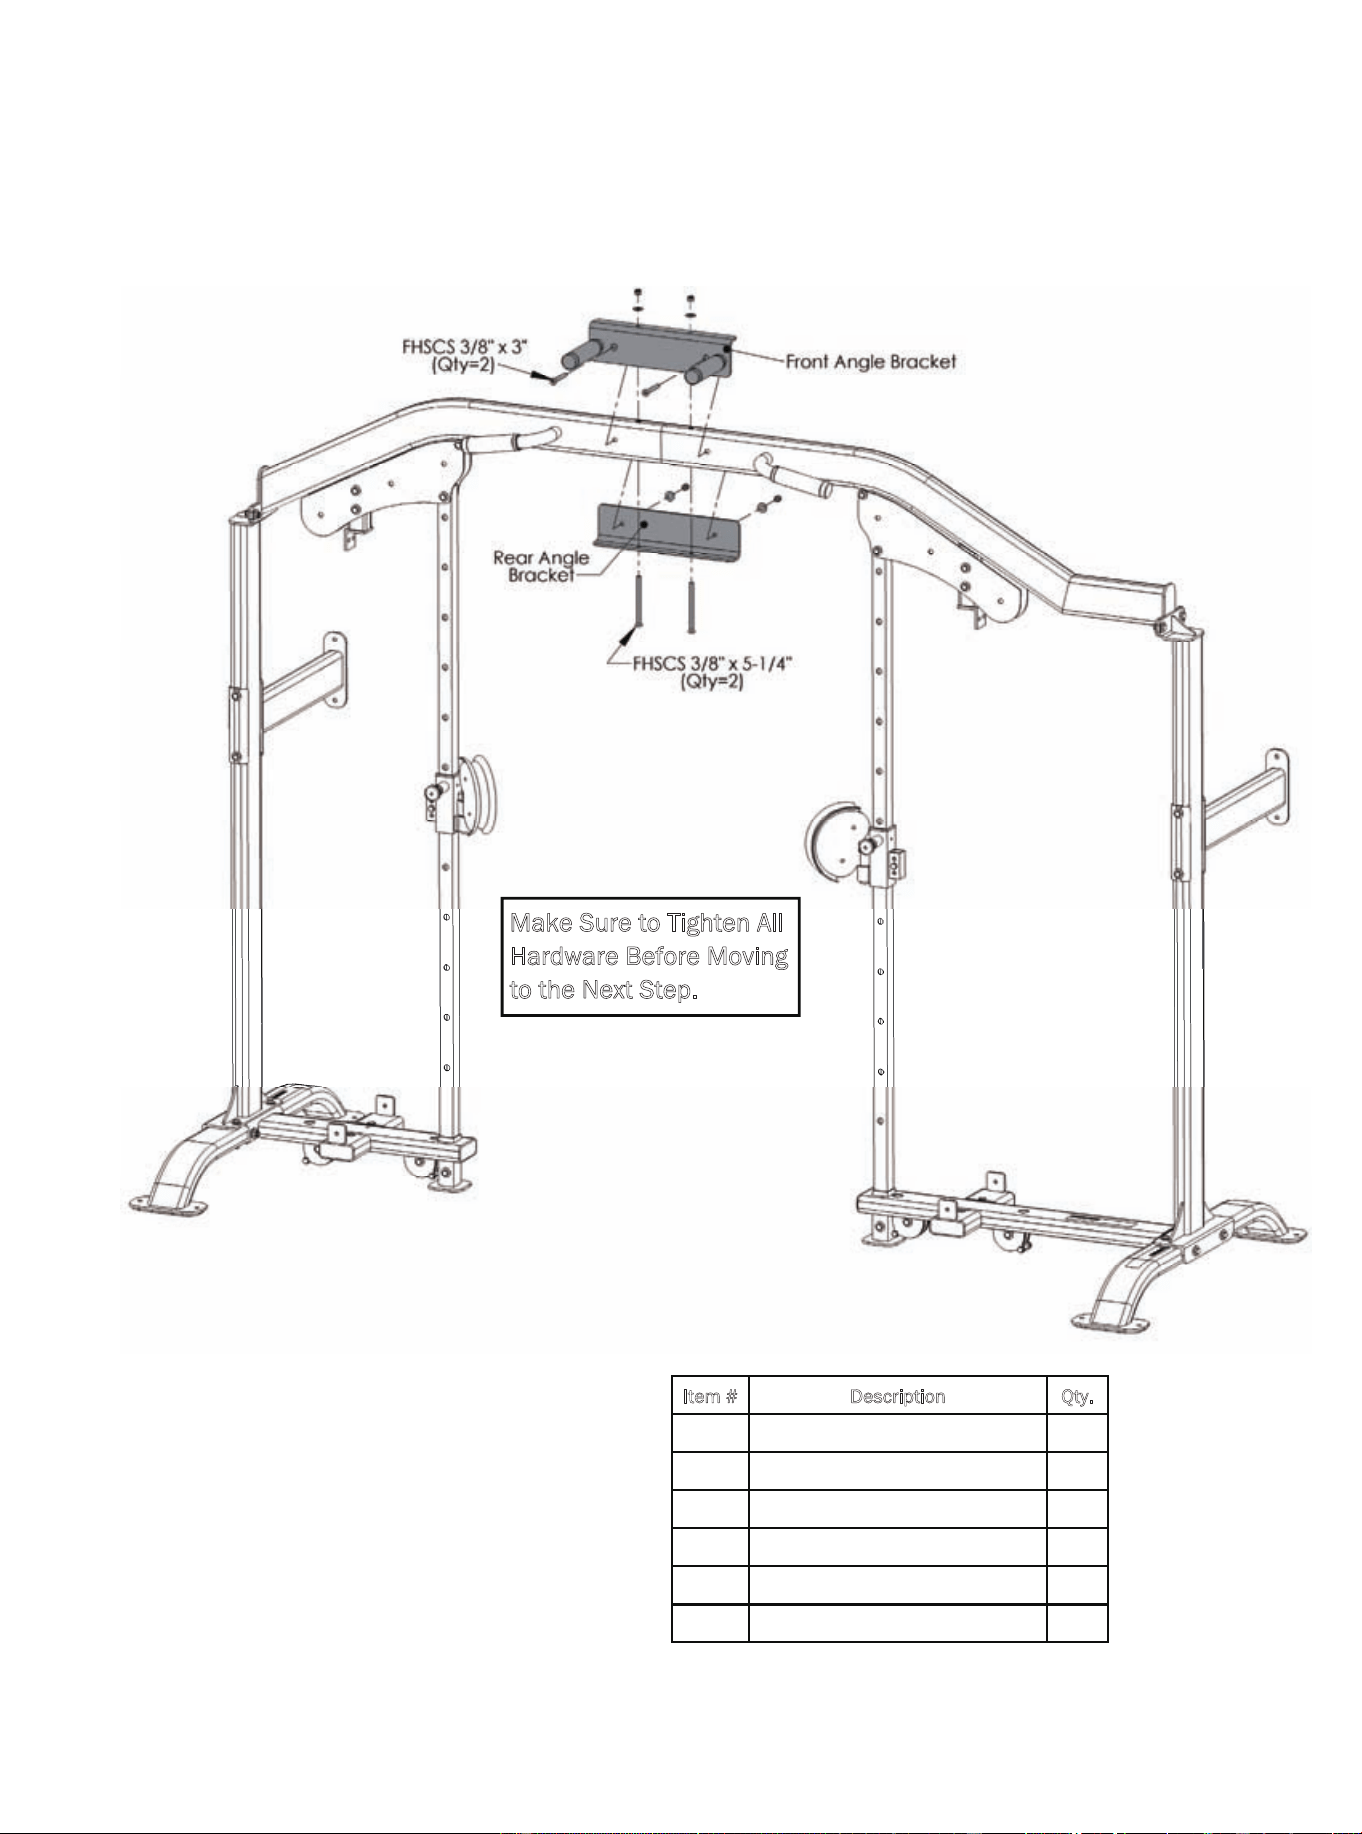
Step 3:
Item # Description Qty.
12 Front Angle Bracket 1
13 Rear Angle Bracket 1
20 FHSCS 3/8”-16 x 3” 2
21 FHSCS 3/8”-16 x 5 1/4” 2
22 3/8” Flat Washer 4
23 3/8” Nylock 4
Make Sure to Tighten All
Hardware Before Moving
to the Next Step.
www.tunturi.com 13 Cable Cross Stand Alone Unit Owner’s
Step 4:
Mount to the wall
Mount to the wall
Mount to the floor

Platinum by Tunturi 12 Cable Cross Stand Alone Unit Owner's
Step 3:
Item # Description Qty.
12 Front Angle Bracket 1
13 Rear Angle Bracket 1
20 FHSCS 3/8”-16 x 3” 2
21 FHSCS 3/8”-16 x 5 1/4” 2
22 3/8” Flat Washer 4
23 3/8” Nylock 4
Make Sure to Tighten All
Hardware Before Moving
to the Next Step.
www.tunturi.com 13 Cable Cross Stand Alone Unit Owner’s
Step 4:
Mount to the wall
Mount to the wall
Mount to the floor
Platinum by Tunturi 14 Cable Cross Stand Alone Unit Owner's
Platinum by Tunturi strives to give you the very best in quality, performance and safety through carefully engineered designs and
excellent workmanship. In order to maintain this high level of quality the preventative maintenance schedule below should be
followed.
Clean upholstery, grips, and roller pads with mild soap and water generally after every use. The guide rods, chrome slides and frame
should be cleaned with a cotton cloth. Upon cleaning the guide rods, a thin layer of Silicone or Teflon gel should be applied to each
rod to ensure a glass smooth performance.
An overall inspection should be done before each workout. If the warning and safety decals are worn or have been removed they
should be replaced immediately. The cables and cable systems should be inspected for signs of wear and proper tension. In order to
check cables properly you should carefully run the cable through your fingertips, checking for signs of wear, cracks, burs and thinning
spots. Replace any part at first signs of wear. Cables should be adjusted for proper tension. See assembly instructions for this
detail. All hardware, stops, and adjustments should be checked and tightened as required.
The guide rods on your machine should be cleaned and lubricated regularly. This will ensure a glass smooth performance from your
weight stack. A thin layer of either Silicone or Teflon gel should applied to each rod. Each pillow block bearing and flange bearing
has a grease fittings that must be lubricated regularly. Use general purpose bearing grease and follow the schedule below.
Although cables should be inspected daily, it is important that ALL cables be replaced as directed in the schedule below. Please note
that at any first sign of wear the cable should be replaced immediately.
If there are any questions concerning maintenance, please contact your local Tunturi dealer or contact Platinum by Tunturi directly at:
www.tunturi.com
Daily Weekly Monthly Quarterly Years
Clean
Upholstery X
Hand Grips X
Roller Pads X
Guide Rods X
Chrome Slides X
Frame X
Inspect
Overall X
Safety Decals X
Cables X
Cable Tension X
Pulleys X
Hardware X
Stops X
Upholstery X
Hand Grips X
Frame X
Bushings X
Bearings X
Lubricate
Guide Rods X
Bearings 1
Replace
Cables 3
Preventive Maintenance
www.tunturi.com 15 Cable Cross Stand Alone Unit Owner’s
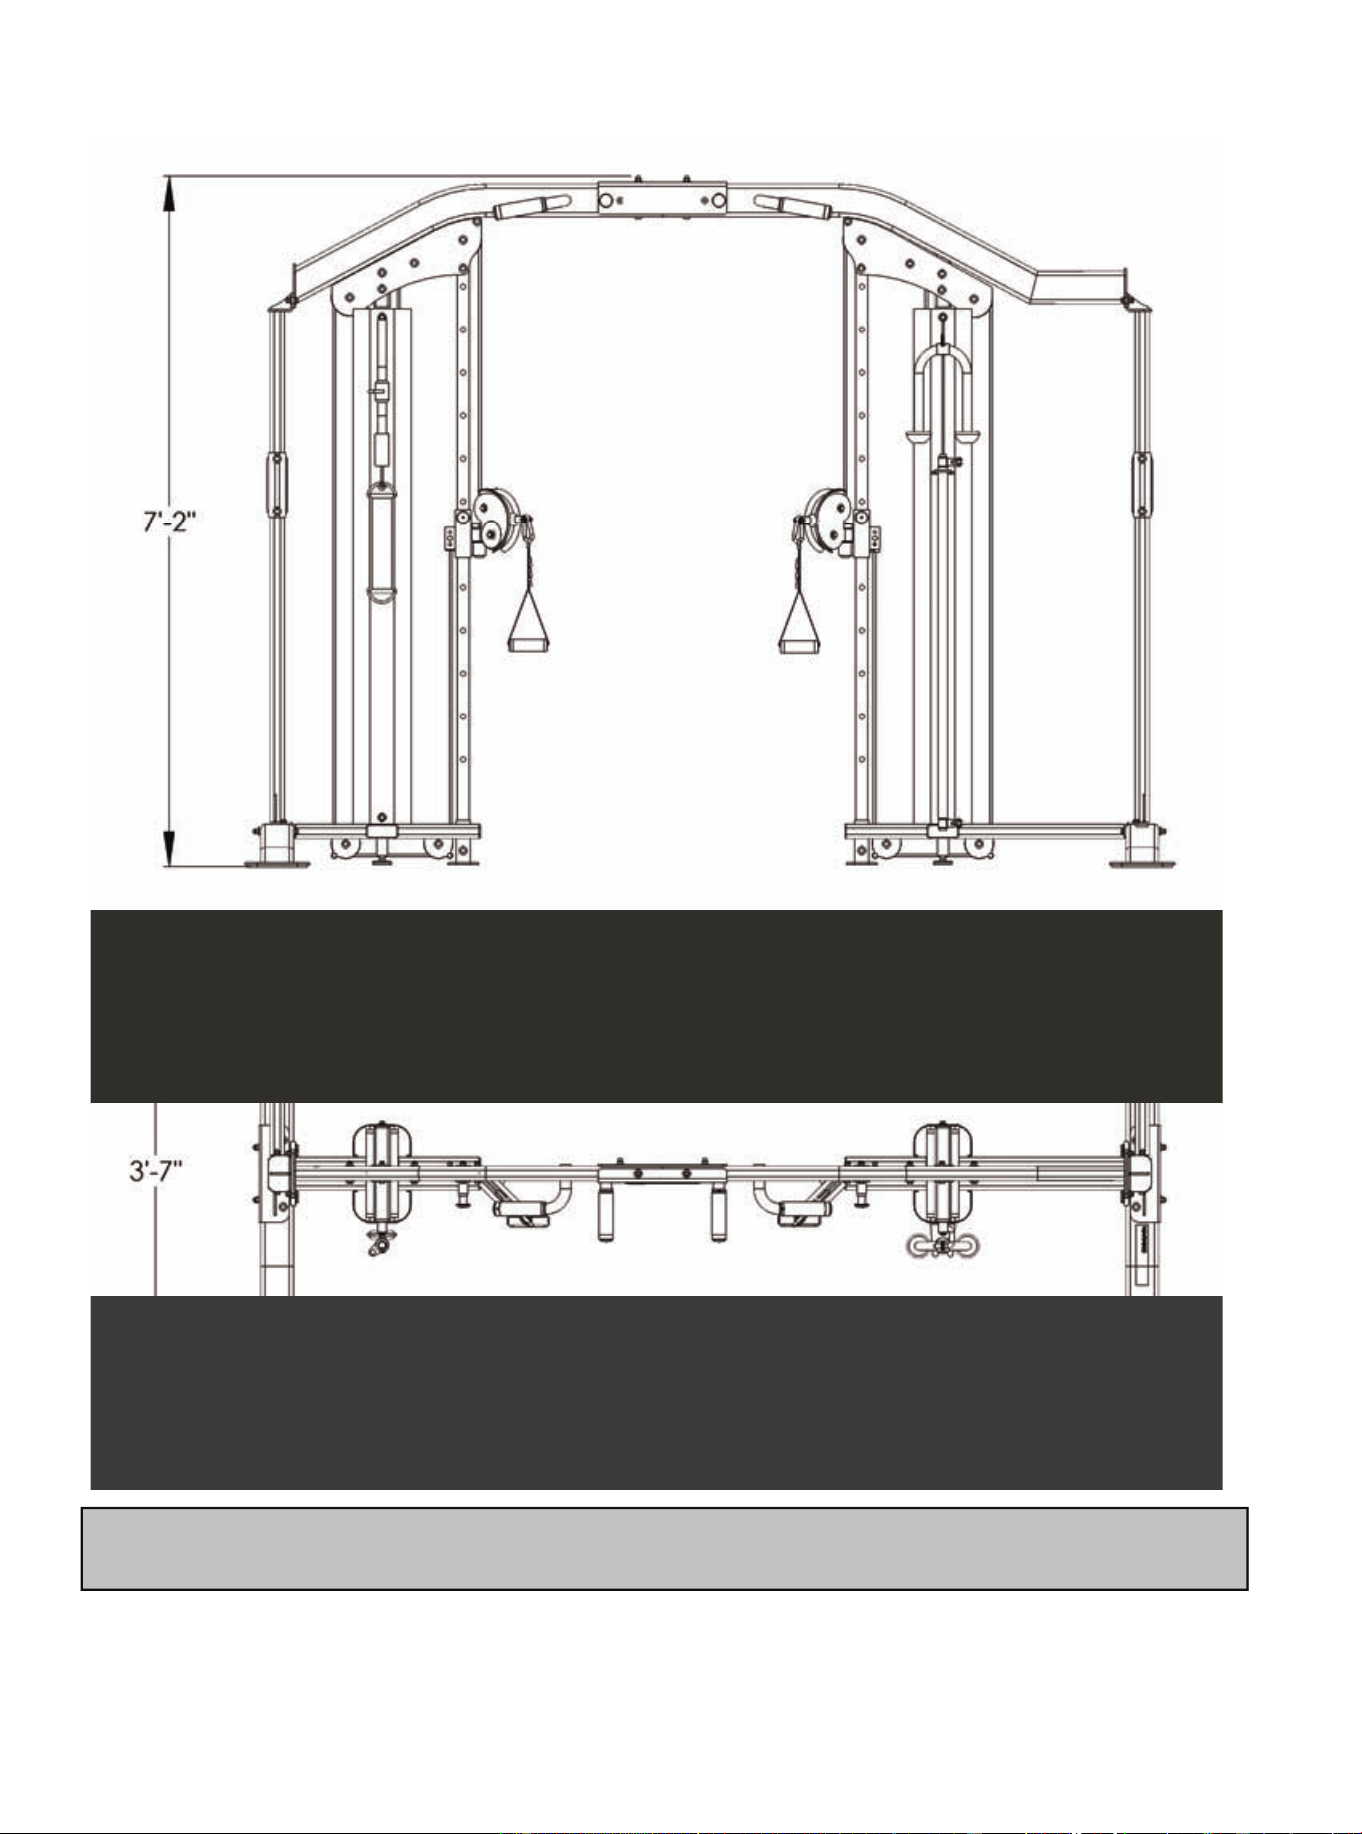
The Platinum Cable Crossover has a layout dimension of 3’-7” (width) x 9’-7” (length) x 7’-2” (height).
There should be a minimum of 18”, preferably 24”, of working space around the entire unit.
Layout Diagram Cable Crossover
Platinum by Tunturi 14 Cable Cross Stand Alone Unit Owner's
Platinum by Tunturi strives to give you the very best in quality, performance and safety through carefully engineered designs and
excellent workmanship. In order to maintain this high level of quality the preventative maintenance schedule below should be
followed.
Clean upholstery, grips, and roller pads with mild soap and water generally after every use. The guide rods, chrome slides and frame
should be cleaned with a cotton cloth. Upon cleaning the guide rods, a thin layer of Silicone or Teflon gel should be applied to each
rod to ensure a glass smooth performance.
An overall inspection should be done before each workout. If the warning and safety decals are worn or have been removed they
should be replaced immediately. The cables and cable systems should be inspected for signs of wear and proper tension. In order to
check cables properly you should carefully run the cable through your fingertips, checking for signs of wear, cracks, burs and thinning
spots. Replace any part at first signs of wear. Cables should be adjusted for proper tension. See assembly instructions for this
detail. All hardware, stops, and adjustments should be checked and tightened as required.
The guide rods on your machine should be cleaned and lubricated regularly. This will ensure a glass smooth performance from your
weight stack. A thin layer of either Silicone or Teflon gel should applied to each rod. Each pillow block bearing and flange bearing
has a grease fittings that must be lubricated regularly. Use general purpose bearing grease and follow the schedule below.
Although cables should be inspected daily, it is important that ALL cables be replaced as directed in the schedule below. Please note
that at any first sign of wear the cable should be replaced immediately.
If there are any questions concerning maintenance, please contact your local Tunturi dealer or contact Platinum by Tunturi directly at:
www.tunturi.com
Daily Weekly Monthly Quarterly Years
Clean
Upholstery X
Hand Grips X
Roller Pads X
Guide Rods X
Chrome Slides X
Frame X
Inspect
Overall X
Safety Decals X
Cables X
Cable Tension X
Pulleys X
Hardware X
Stops X
Upholstery X
Hand Grips X
Frame X
Bushings X
Bearings X
Lubricate
Guide Rods X
Bearings 1
Replace
Cables 3
Preventive Maintenance
www.tunturi.com 15 Cable Cross Stand Alone Unit Owner’s
The Platinum Cable Crossover has a layout dimension of 3’-7” (width) x 9’-7” (length) x 7’-2” (height).
There should be a minimum of 18”, preferably 24”, of working space around the entire unit.
Layout Diagram Cable Crossover

Platinum by Tunturi 16 Cable Cross Stand Alone Unit Owner's
Benelux
Accell Fitness Benelux
Koningsbeltweg 51
1329 AE ALMERE
The Netherlands
Tel: +31 36 5460050
Fax: + 31 36 5460055
Scandinavia
Accell Fitness Scandinavia
Varusmestarintie 26
20361 TURKU
Finland
Tel: +358 10 2733 200
Fax: +358 2513 313
Germany
Accell Fitness Deutschland
P/a Koningsbeltweg 51
1329 AE ALMERE
The Netherlands
Tel: +31 36 5460050
Fax: + 31 36 5460055
North America
Accell Fitness North America Inc.
130 Hayward Ave, Suite 2
N2C 2E4
Kitchener, ON Canada
Tel. 1-888-388-6887
Fax: 1-519-576-2521
www.accellfi tness.com
www.tunturi.com
Contact