
Portable Air Conditioner
Please read the manual carefully
before using the unit
KY-10K/04A
USER MANUAL

Thank you for purchasing our dehumidifier.
Waykar wishes that our products and services can bring convenience to your
work and life.We highly recommend that you keep the manual for reference if
you encounter unexpected events using the unit.
Please read the manual carefully to ensure proper use of the dehumidifier.
Our dehumidifiers are widely used in family bedrooms, bathrooms,
basements, offices and storage rooms, etc.
The dehumidifiers from provide quick and efficient operation to Waykar
reduce room's humidity and bring you a healthy and comfortable life.
If there is any problem of the product, please contact Waykar Customer
Service at with your Purchase Order ID to help you support@waykar.com
address the problem more effectively.
FOR CUSTOMERS
TO ACCESS CUSTOMER SUPPORT FASTER
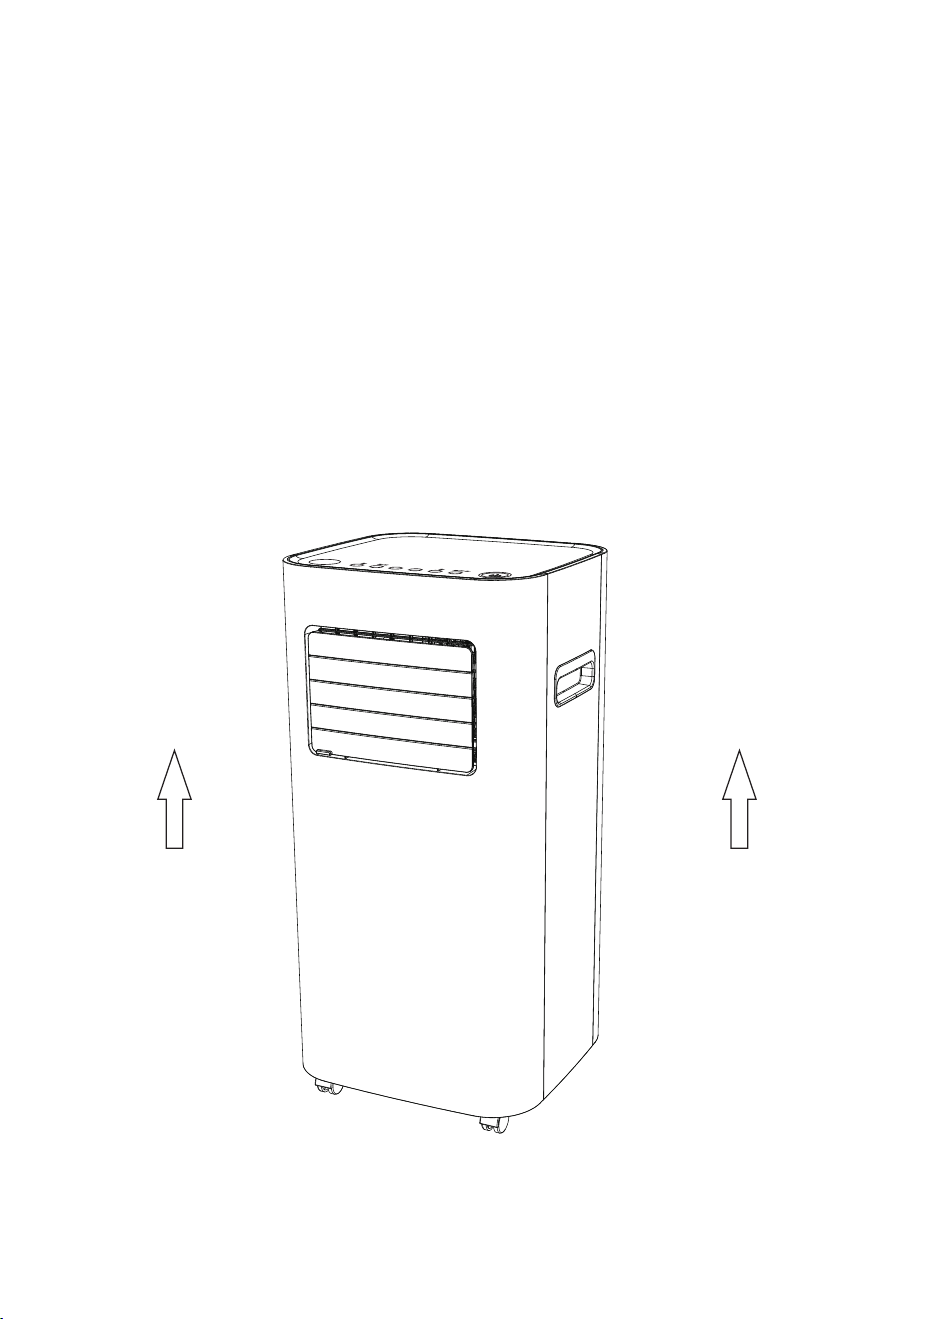
To prevent any internal damage, it is very important to
keep refrigeration units (like this one) upright throughout
their journey.
Please leave it standing upright and outside the box for
24 HOURS before plugging it in.
BEFORE FIRST USE:
TABLE OF CONTENTS
Safety Instructions................................................................
Parts Description ..................................................................
Control Interface...................................................................
Operation Instructions...........................................................
Cleaning and Maintenance.....................................................
Common Faults and Solutions................................................
Special Notes.......................................................................
Technical Parametes................................................................
Warranty and Contact Us...........................................................
01
02
03
04
12
13
16
17
18
Before cleaning or storing the air conditioner, turn off the power and unplug it from
the power outlet.
Please do not place the machine near heat or flammable dangerous goods.
Do not insert your fingers or sticks into the air inlet or outlet.
In order to prevent water leakage, always keep the machine on even surfaces,
avoid uneven or sloping ground.
Do not spray water, insecticides or flammable liquids on the unit.
When moving this machine, make sure to turn off the power and move slowly.
When the power cord is damaged, it must be replaced by the qualified technician
approved by our company.
The machine power wiring must be in accordance with national wiring rules, and
power line should be connected to the reliable external Earth Line.
Model specification of safety tube:2A.
This appliance can not be used by children aged under 8 years old and persons
with reduced physical, sensory or mental capabilities or lack of experience and
knowledge unless they have been given supervision or instructions concerning use
of the appliance in a safe way and understand the hazards involved. Children shall
not play with the appliance. Cleaning and user
maintenance shall not be made by children
without supervision.
This air conditioner is designed to operate in a
working environment between 41°F (5°C) and
95°F (35°C).
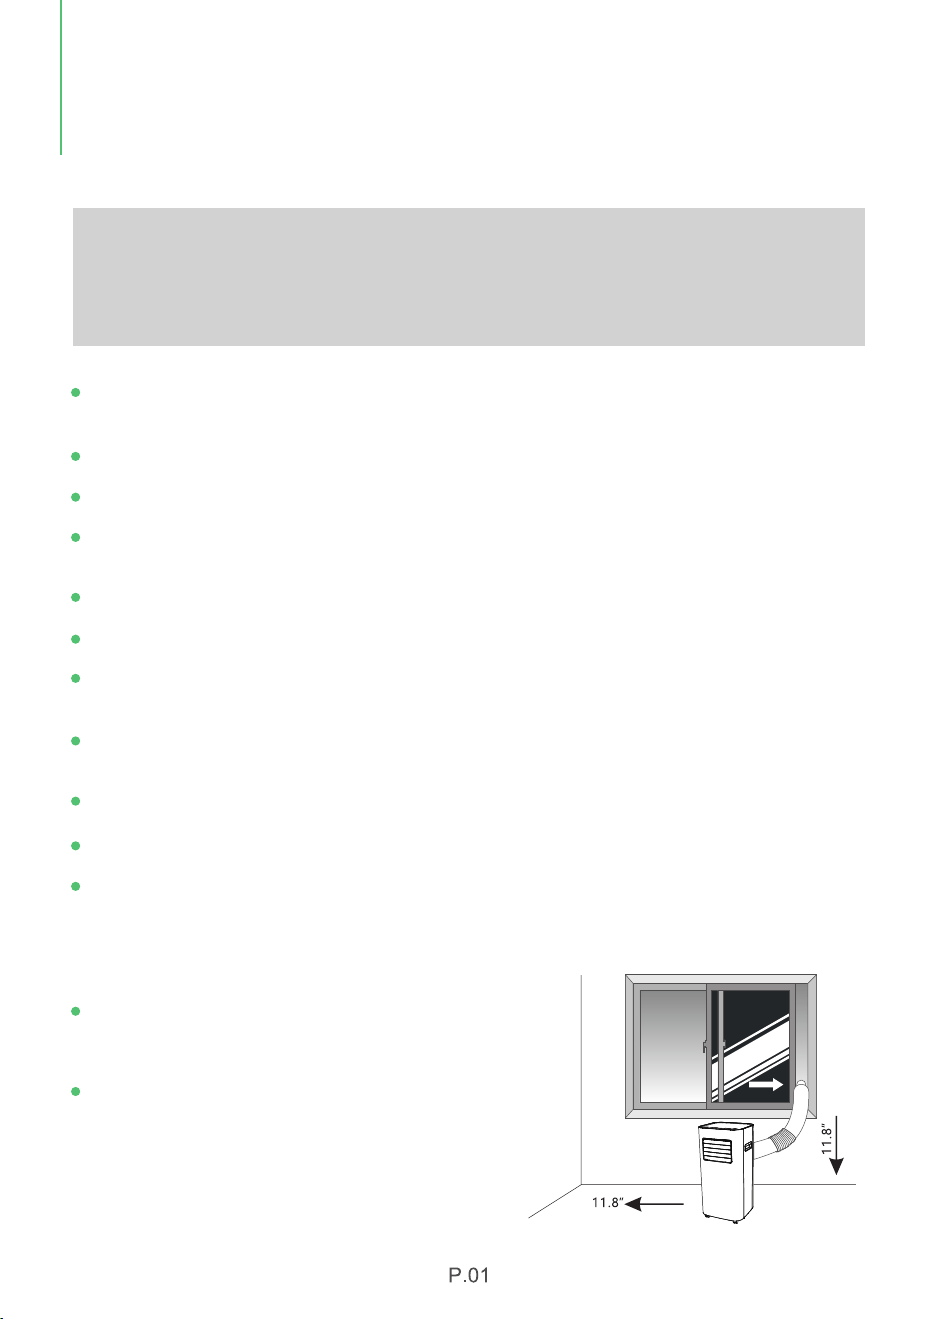
When using air conditoner, other objects
surrounding the machine need to be kept at
least a distance of 11.8 inches (30cm) as
shown in the picture on the right:
Safety Notes:
For your safety, please read the manual carefully and keep the manual for future
reference. Please use this product according to the instructions of installation and
operation of this manual.
SAFETY
INSTRUCTIONS
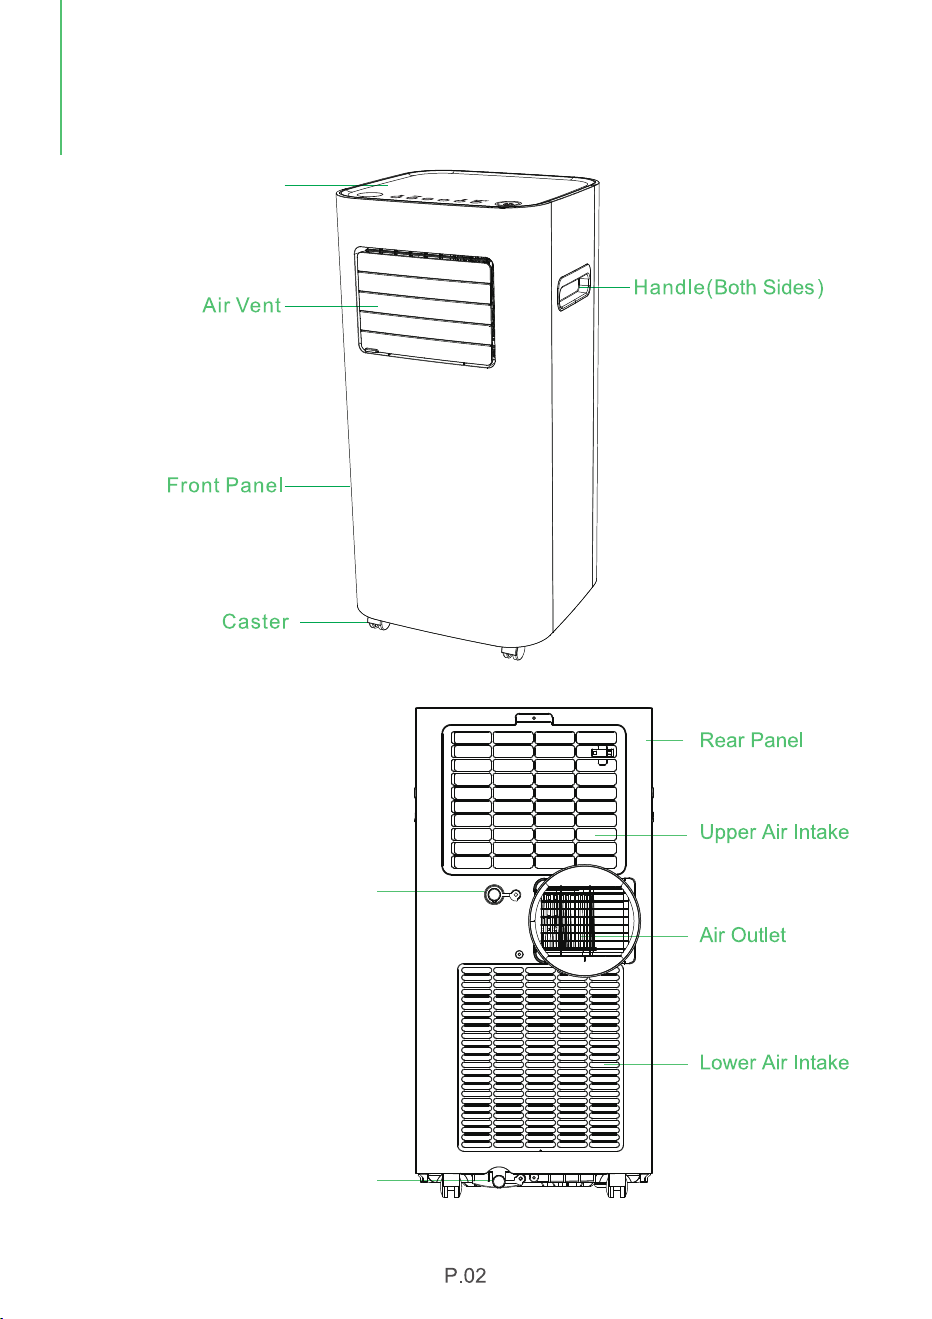
Top Cover
Continuous Drainage Outlet
(Dehumidification)
Bottom Tray Drainage Outlet
PARTS
DESCRIPTION
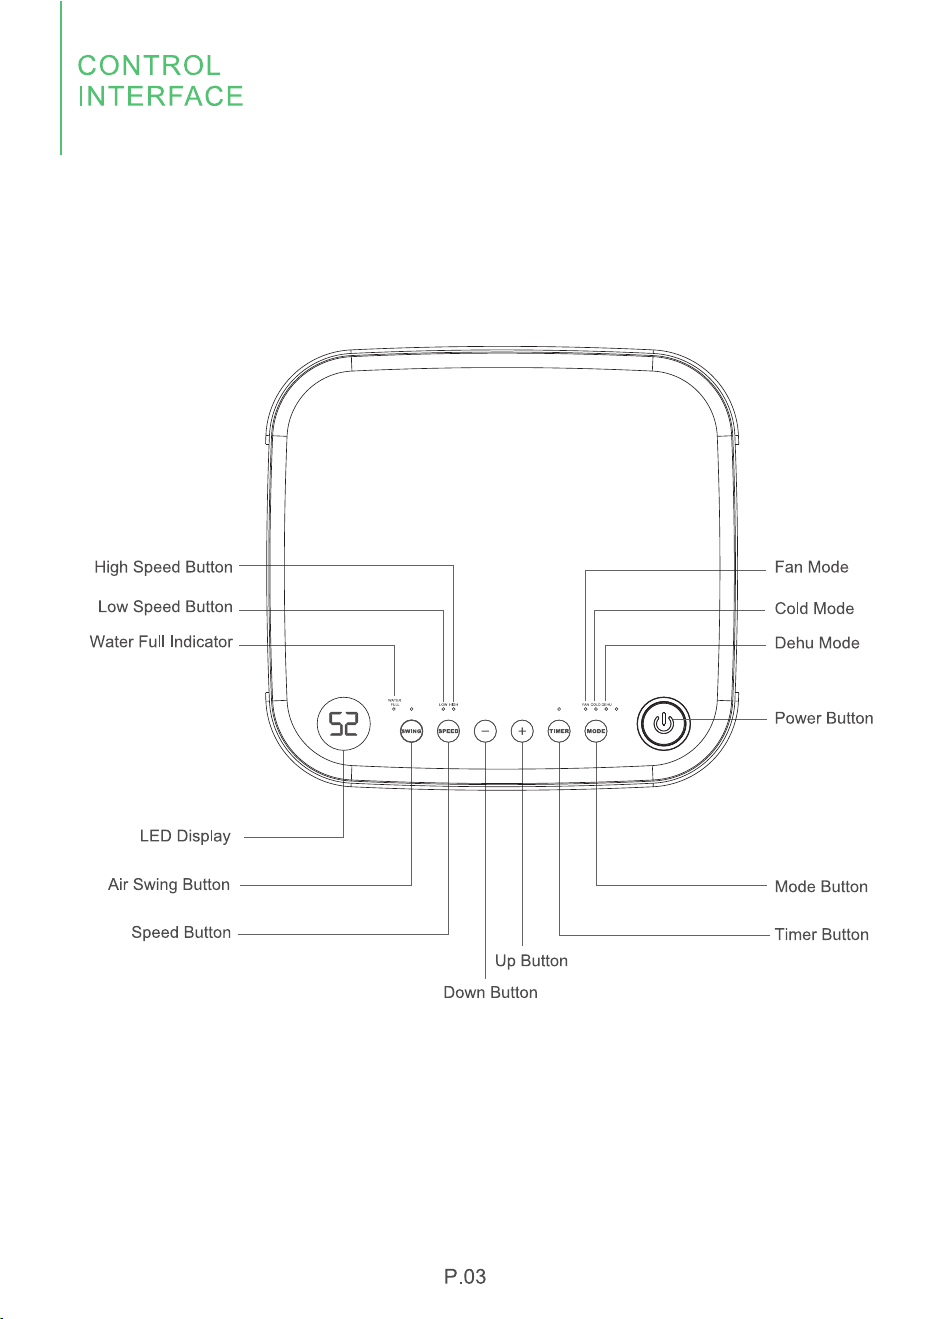
1. Control Panel

2.1 Power Button
Press to turn on or turn off the machine.
2.Display Status Description
2.2 Mode Indicator
Press to select the desired operating mode. Each time you press this button, you will
select the working modes from "FAN", "COOL" to "DEHU" in order. The mode light will
indicate you which function has been chosen.
2.3 Wind Speed Indicator
The "SPEED" button is for you to switch to high or low wind speed, the "HIGH" or "LOW"
light indicator will be on when you select either of them at "FAN" or "COOL" mode.
2.4 Swing Mode Indicator
Press the "SWING" button to enable or disable the swing mode, when you choose the
swing mode, the fan will swing from left to right when blowing the wind.
2.5 Screen Display
The screen will show the cooling temperature when you choose the FAN or COOL
mode, and display the " " character when you choose DEHU mode.
Up (+) and Down (-) Buttons:
The temperature can be adjusted when you choose the COOL mode, you can press
the (+) or (-) button to adjust the room cooling temperature.
When you choose the FAN mode, the temperature can not be adjusted.
When you choose DEHU mode, the machine will automatically work to dehumidify,
according to the environment condition.
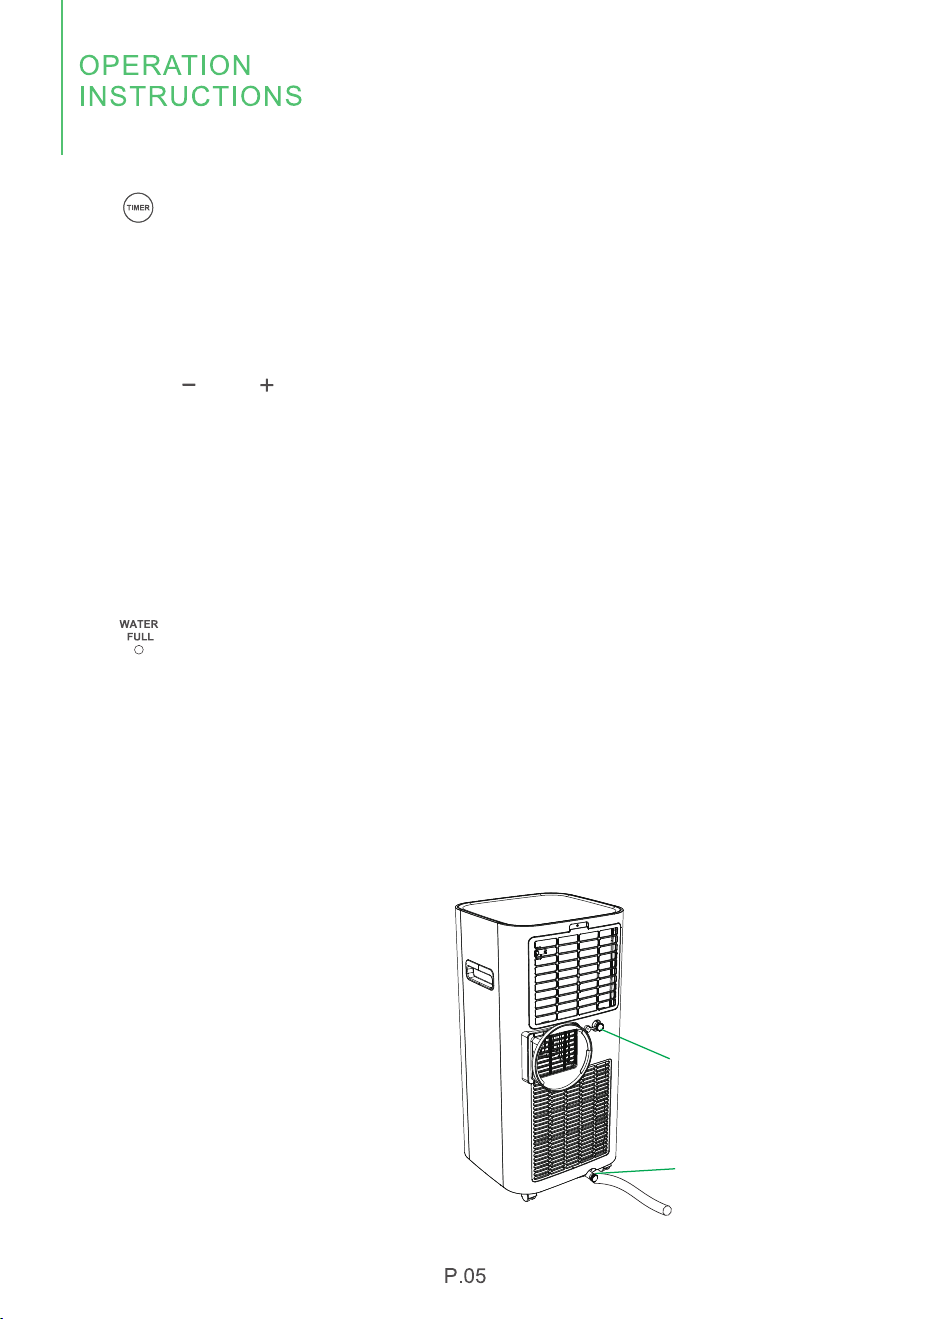
2.6 Timer Indicator
This TIMER setting function is designed for you to set a time to turn off (when the
machine is on) or turn on (when the machine is off) the machine, automatically by
the timer.
Press the "TIMING" button, you can set the timer within the range of 1-24 hours.
Press the " " or " " button, you can set the timer in 1 hour increment or
decrement. Long press either of these two buttons can make continuous time
setting.
If you set the timer successfully, the "TIMING" indicator light will be on, the screen
will display the current humidity after seconds, but when you press the "TIMER"
again, you can see the remaining setting time.
If the time is set to 00, this is called the invalid time.
2.7 Water Tray Full Alarm Indicator
Water needs to be drained out when you choose the duhumidification mode. Please
connect the drainage hose to "Continuous Drainage Outlet" for continuous
drainage.
If the continuous drainage is not being used at "DEHU" mode, the water will be
collected by the water tray at the bottom, when the water tray is full, the machine will
automatically stop working and the "FULL" indicator will flash and the screen will
display "E7" code to remind you that the water tray needs to be emptied.
At this time, you can connect the
drainage hose to the bottom tray
drainage outlet to drain out the water.
The bottom tray drainage outlet can
also be used when draining remaining
sewage as well.
Reinstall the rubber plug after
draining and restart the machine, the
"E7" symbol will disappear.
If the error repeats, call for service.
Bottom Drainage Outlet
Continuous Drainage Outlet
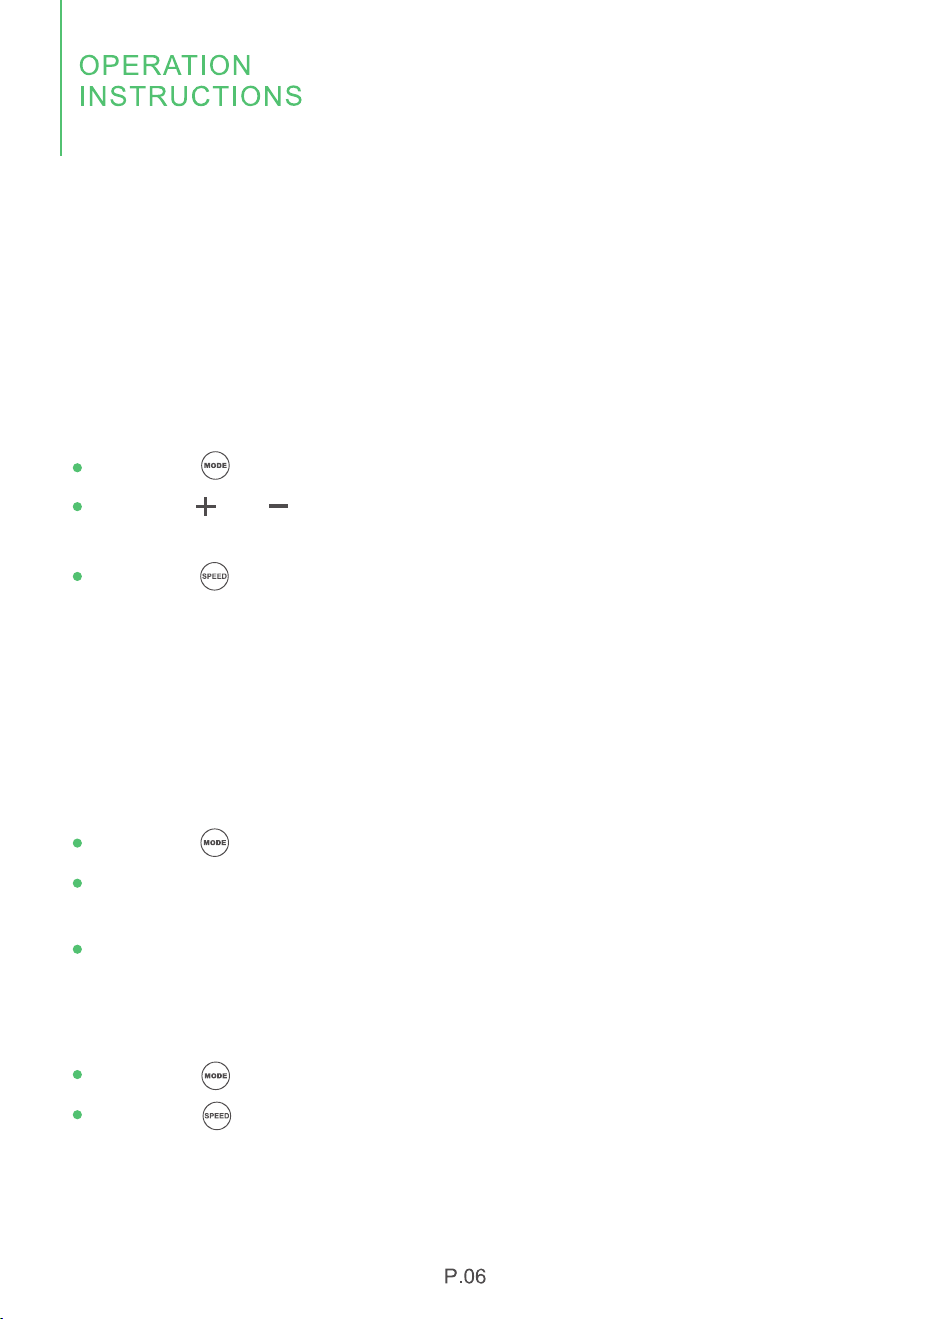
3. Mode Description
3.1 Cool Mode
Ideal for hot muggy weather when you need to cool and dehumidify the room.
To set operation of the appliance correctly, press adjust buttons until the desired
temperature is displayed.
Operation:
Press the " " until the "COOL" indicator light comes on.
Press the " " or " " to select your desired temperature.
The temperature can be set within a range of 62℉ to 86℉.
Press the " " button to choose the fan speed (HIGH/LOW).
3.2 DEHU Mode
ldeal for reducing humidity in spring and autumn, during rainy days or in damp
rooms, etc.
In dehumidifying mode, the appliance must allow the air exhaust to discharge air
externally.
Operation:
Press the " " until the "DEHU" indicator light comes on.
While in this mode, you cannot select a wind speed or adjust the temperature, the
fan will work at low speed mode when dehumification.
Keep windows and doors closed for the best dehumidifying effect. Do not connect
the hose to a window.
3.3 Fan Mode
Press the " " until the "FAN" indicator light comes on.
Press the " " to choose the fan work at low or high speed, temperature cannot
be adjusted at this mode. Do not connect the hose to a window.
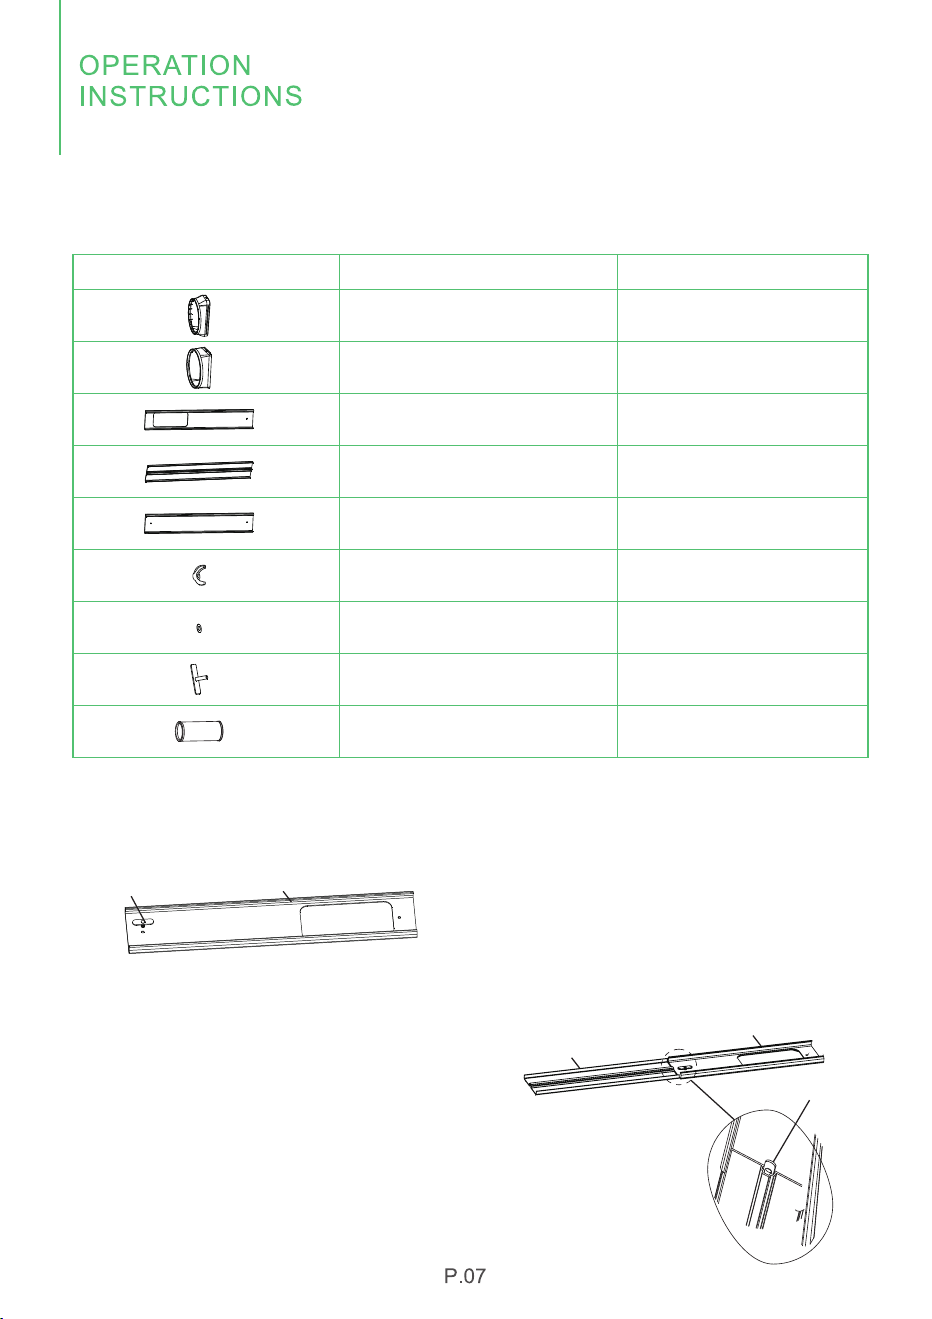
Window Slider, Exhaust Hose and Adaptor Assembly Instructions:
Installation Accessories List
Window Slider Adaptor
Unit Adaptor
Window Slider A
Window Slider B
Window Slider C
Wing Nut
Gasket
Wing Screw
Exhaust Hose
Item Name Quantity
1PCS
1PCS
1PCS
1PCS
1PCS
2PCS
2PCS
2PCS
1PCS
Assembly of Window Slider & Exhaust Hose
1. Insert the wing screw into the
window slider A as the figure 1 shows.
Figure 1
Figure 2
2. Insert window slider B from the
side into window slider A (the head of
wing screw needs to be inserted into
the slot of window slider B), and
adjust the assembly length according
to requirements.
Wing Screw
Window Slider A
Window Slider B
Wing Screw
Window Slider A
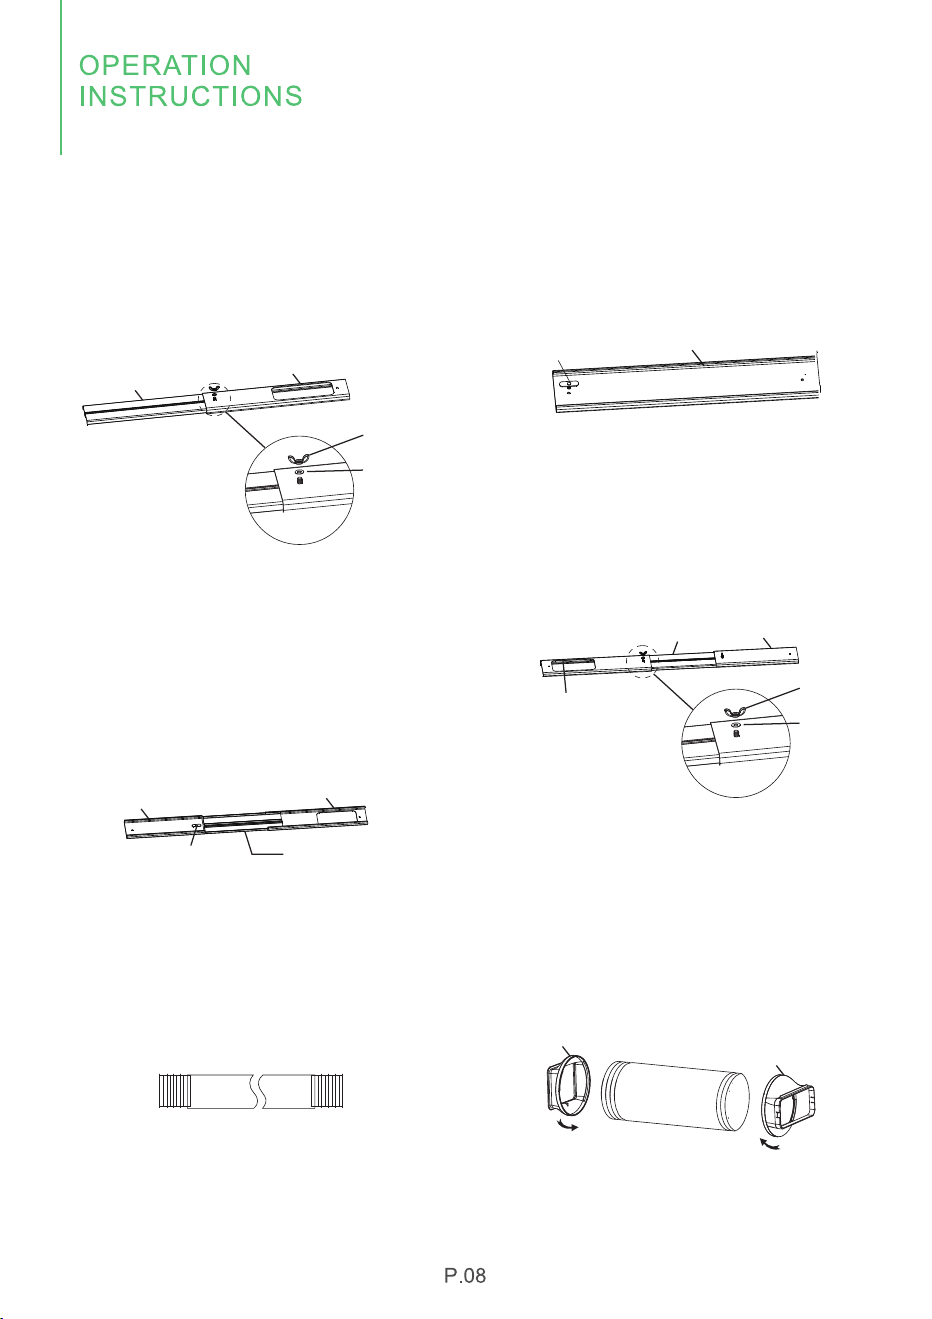
Assembly of Window Slider & Exhaust Hose
3. Turn over the window slider, put
in gasket and wing nut in turn and
tighten them.
Figure 3
Window Slider A
Window Slider B
Wing Nut
Gasket
4. Insert the wing screw into the
window slider C.
Figure 4
Window Slider C
Wing Screw
5. Insert window slider C from the
side into window slider B (the head of
wing screw needs to be inserted into
the slot of window slider B), and
adjust the assembly length according
to requirements.
6. Turn over the window slider, put
in a gasket and wing nut in turn and
tighten them.
Window Slider A
Wing Screw
Window Slider B
Window Slider C
Figure 5
Window Slider A
Window Slider B
Window Slider C
Wing Nut
Gasket
Figure 6
7. Stretch both ends and unfold the
exhaust hose.
Figure 7
8. Rotate the unit adaptor to the left
to screw one end of the exhaust
hose, and then rotate the window
slider adaptor to the right to screw
the other end of the exhaust hose.
Unit Adaptor
Window Slider Adaptor
Rotate Left
Rotate Right
Figure 8
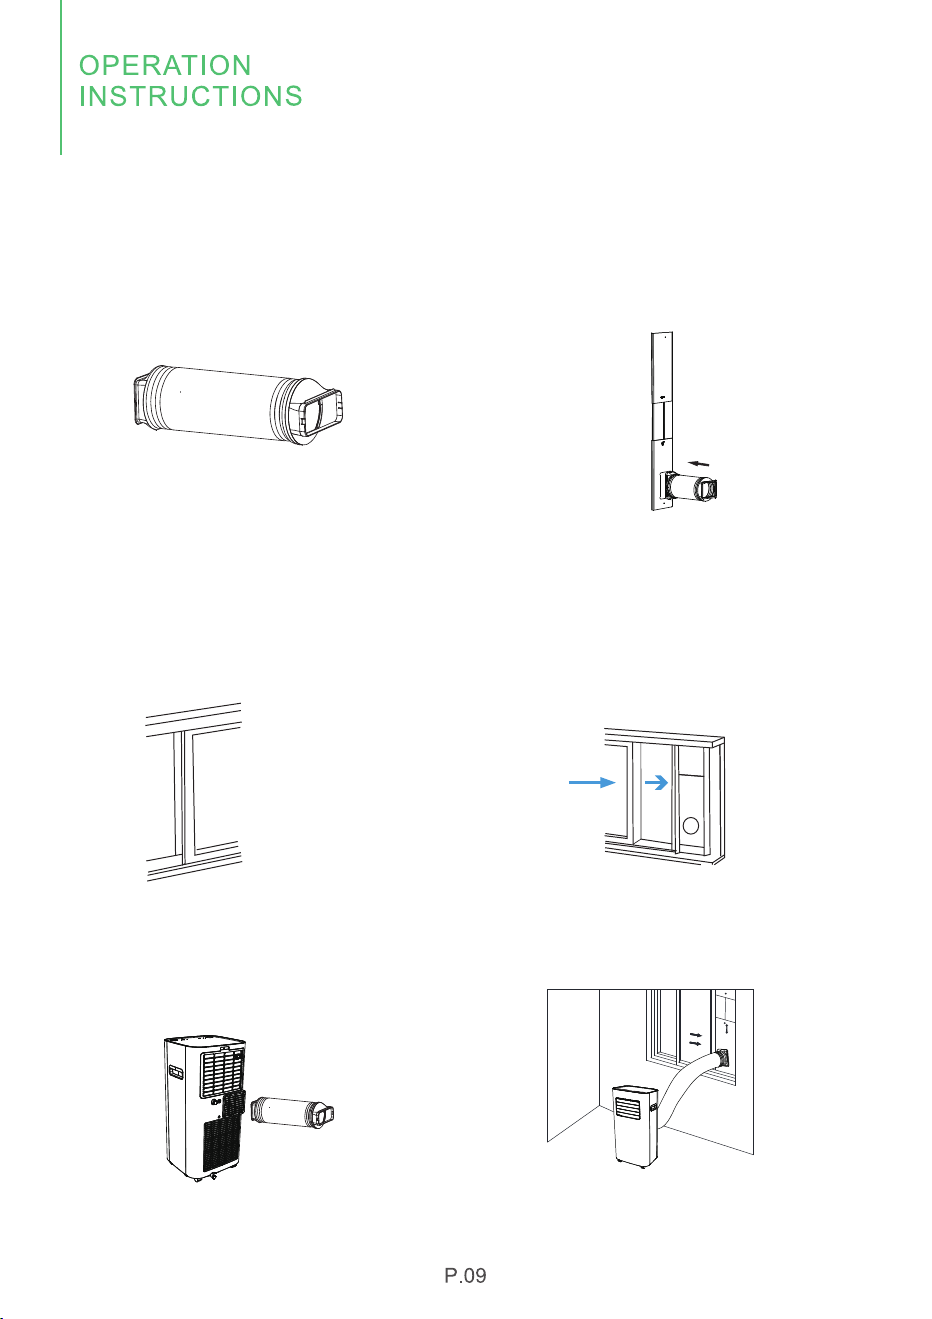
Assembly of Window Slider & Exhaust Hose
9. Finish the assembly of unit adaptor
and window slider adaptor to both
ends of the exhaust hose as shown in
Figure 9.
Figure 9
10. Align the window slider adaptor of
exhaust hose with the window slider
and clamp it tightly.
Figure 10
The overall installation of the appliance
(left and right sliding window)
11. Open the window where components
such as exhaust hose and window sliders
need to be installed.
12. Install the exhaust hose and
window sliders on the window and
close the window in the arrow direction
to locate the window sliders tightly.
Figure 11
Figure 12
13. Install the unit adaptor of the
exhaust hose on the exhaust outlet
on the back of the air conditioner
and fasten it.
Figure 13
14. The appliance assembly is
completed as shown in Figure 14.
Figure 14
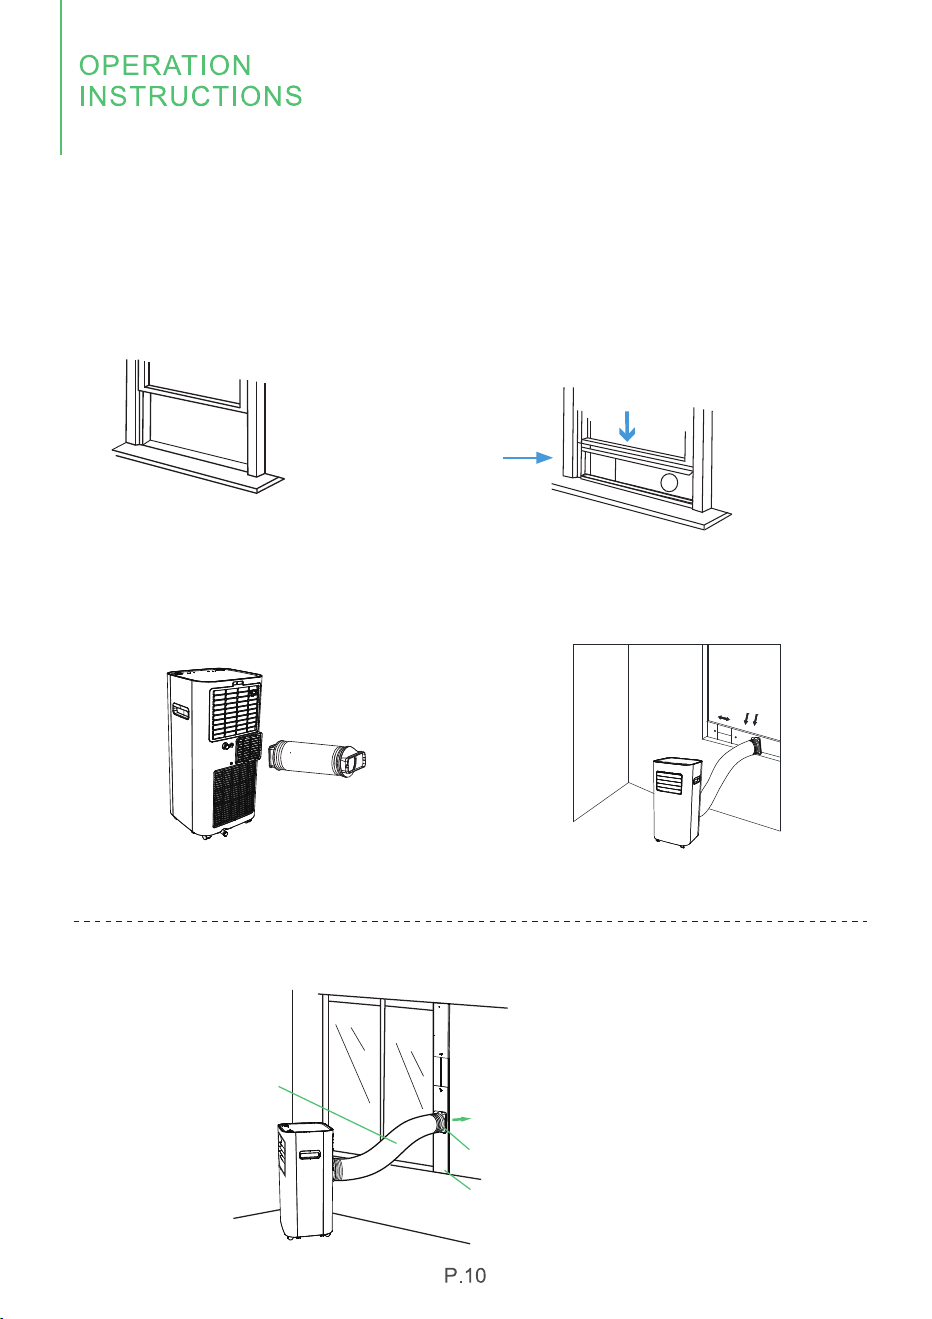
The Overall Installation of the Appliance
(Up and down sliding window)
15. Open the window where
components such as exhaust hose and
window sliders need to be installed.
16. Install the exhaust hose and window
sliders on the window and close the
window in the arrow direction to locate
the window sliders tightly.
Figure 16
Figure 15
17. Install the unit adaptor of the
exhaust hose on the exhaust outlet on
the back of the air conditioner and
fasten it.
Figure 17
Figure 18
18. The appliance assembly is completed
as shown in Figure 18.
Working Schematic Diagram of the Appliance
Exhaust Hose
Indoor
Outdoor
Exhaust Heat Air
Window Slider Adaptor
Window Slider
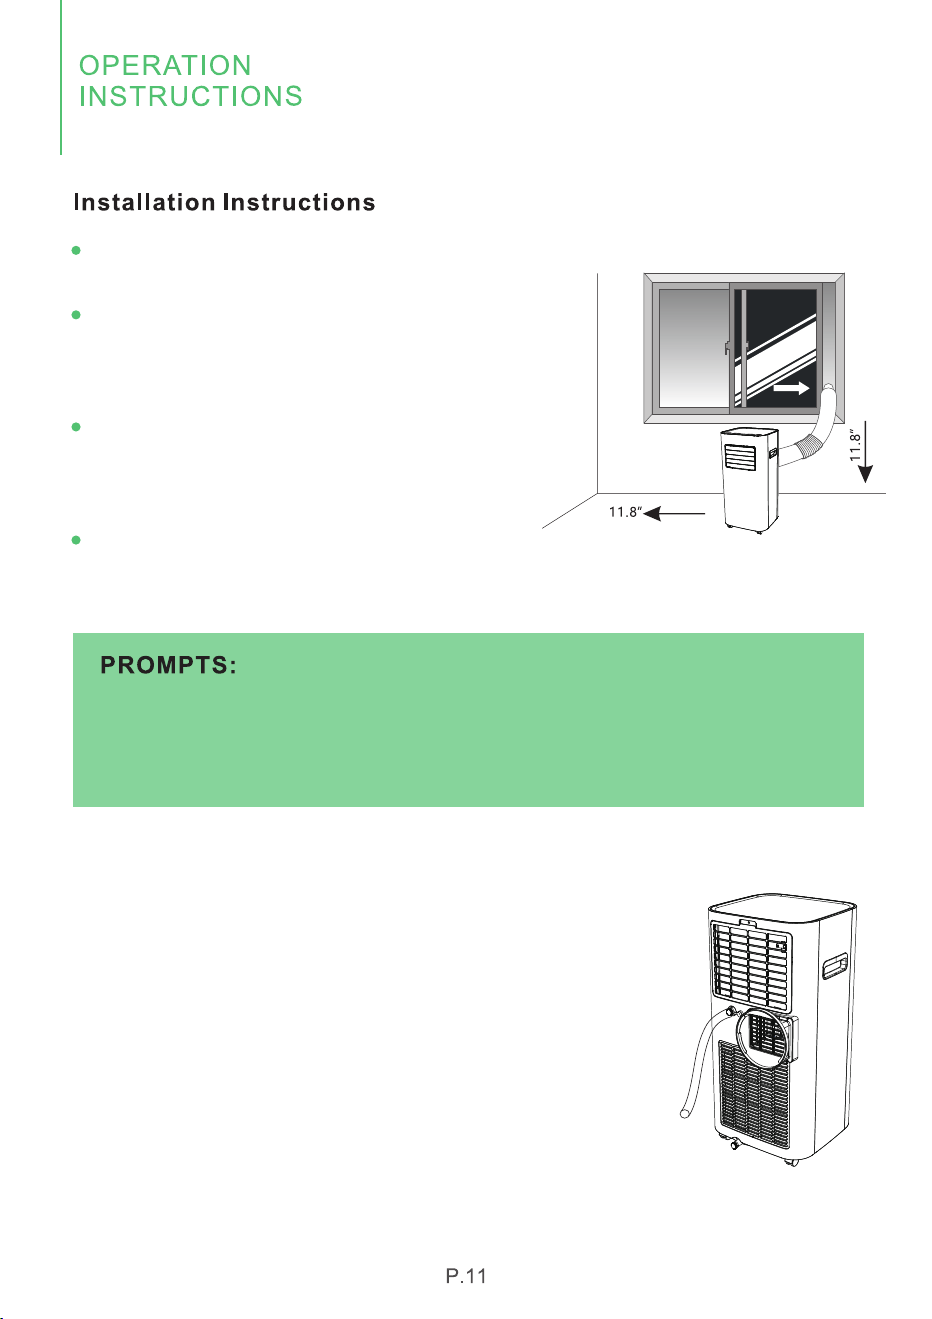
Make sure that you install your unit on an even
surface to minimize noise and vibration.
The unit must be installed near a grounded
plug, and the Bottom Drainage Outlet of
Collection Tray (found on the back of the unit)
must be accessible.
The unit should be located at least 12 inches
(30 cm) from the nearest wall to ensure proper
air conditioning. The air vent blade should be at
least 19.7 inches (50 cm) away from obstacles.
Do NOT cover the Intakes or Outlets of the unit,
as this could cause damage to the unit.
The installation of the exhaust hose depends on the operating mode of the air
conditioner. When the air conditioner is in COOL mode, the exhaust hose is
required; when the it is in FAN or DEHU mode, it is not necessary to install the
exhaust hose.
Install Water Drainage Hose
During dehumidification mode, the upper drainage outlet on
the back of the unit must be connected to the drainage hose.
1. Unplug the rubber plug of the continuous drainage outlet
on the upper side.
2. Insert one end of the drainage hose into the continuous
drainage outlet.
3. Link the other end of the drainage hose to the sewer or
other container (basin or bucket).
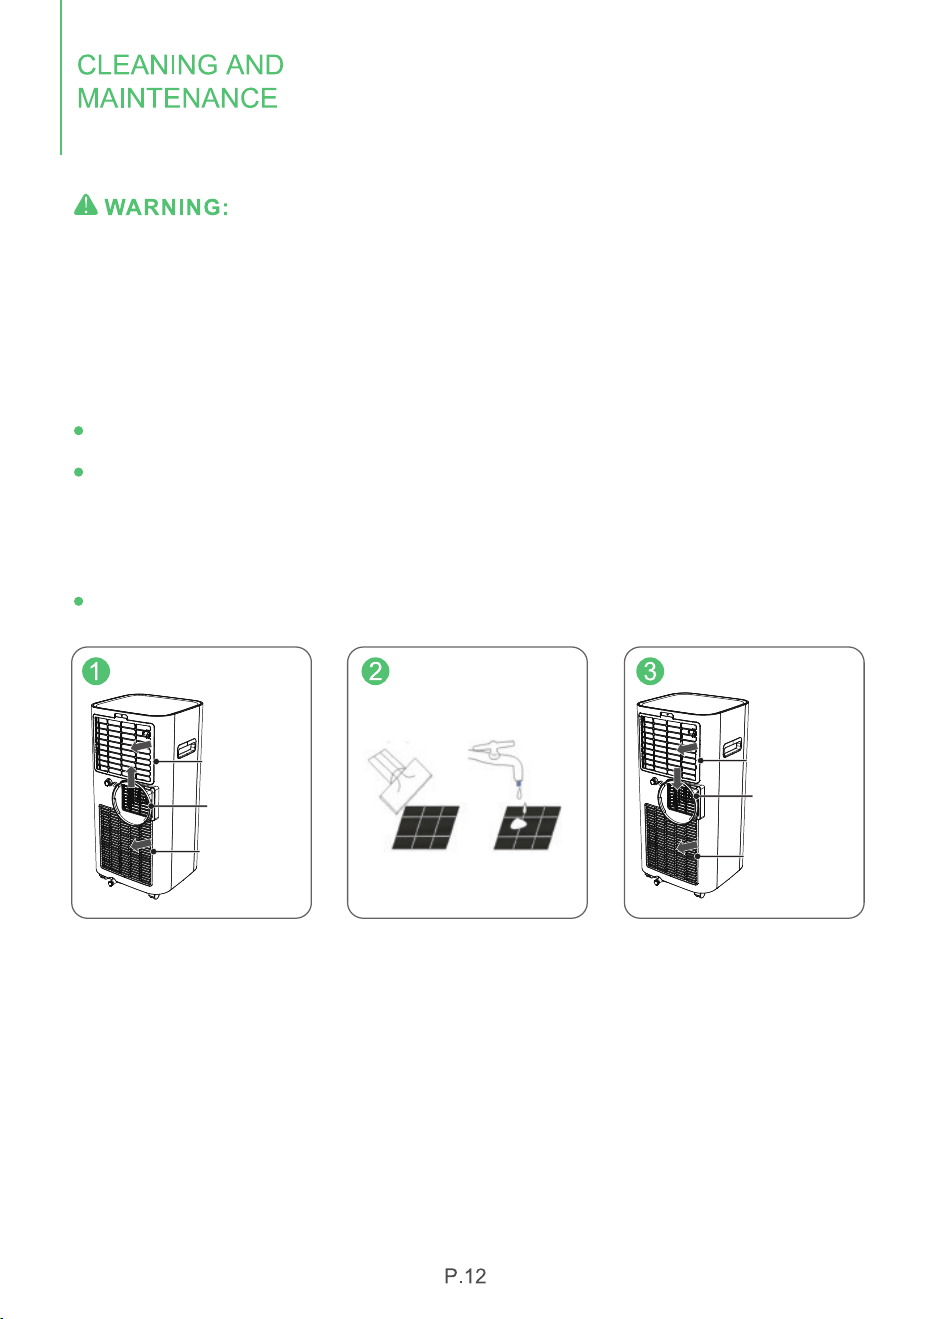
Turn the air conditioner off and remove the plug from the wall outlet before cleaning.
A- Cleaning the unit
Please use a soft and slightly wet textile or cloth to clean it.
B- Cleaning filter
Take out the unit adaptor and air filter 1 (remove the screw above first) in turn.
Clean the filter: Use a vacuum cleaner to gently remove the dust from the surface
of the filter1 and filter 2.
If very dirty, you can wipe filter 1 with warm water and a mild detergent and dry it
completely.
Slowly insert the filter back into the unit, and install the unit adaptor.
C-air conditioner storage
When you want to store the appliance, you don't use it for a long time. Please pay
attention to the following steps:
1. Empty the water in the water tray.
2. Roll up the power cord and tie it up.
3. Clean the filter.
4. Place the machine in a cool and dry environment.
Air Filter 1
Air Filter 2
Unit Adaptor
Air Filter 1
Air Filter 2
Unit Adaptor
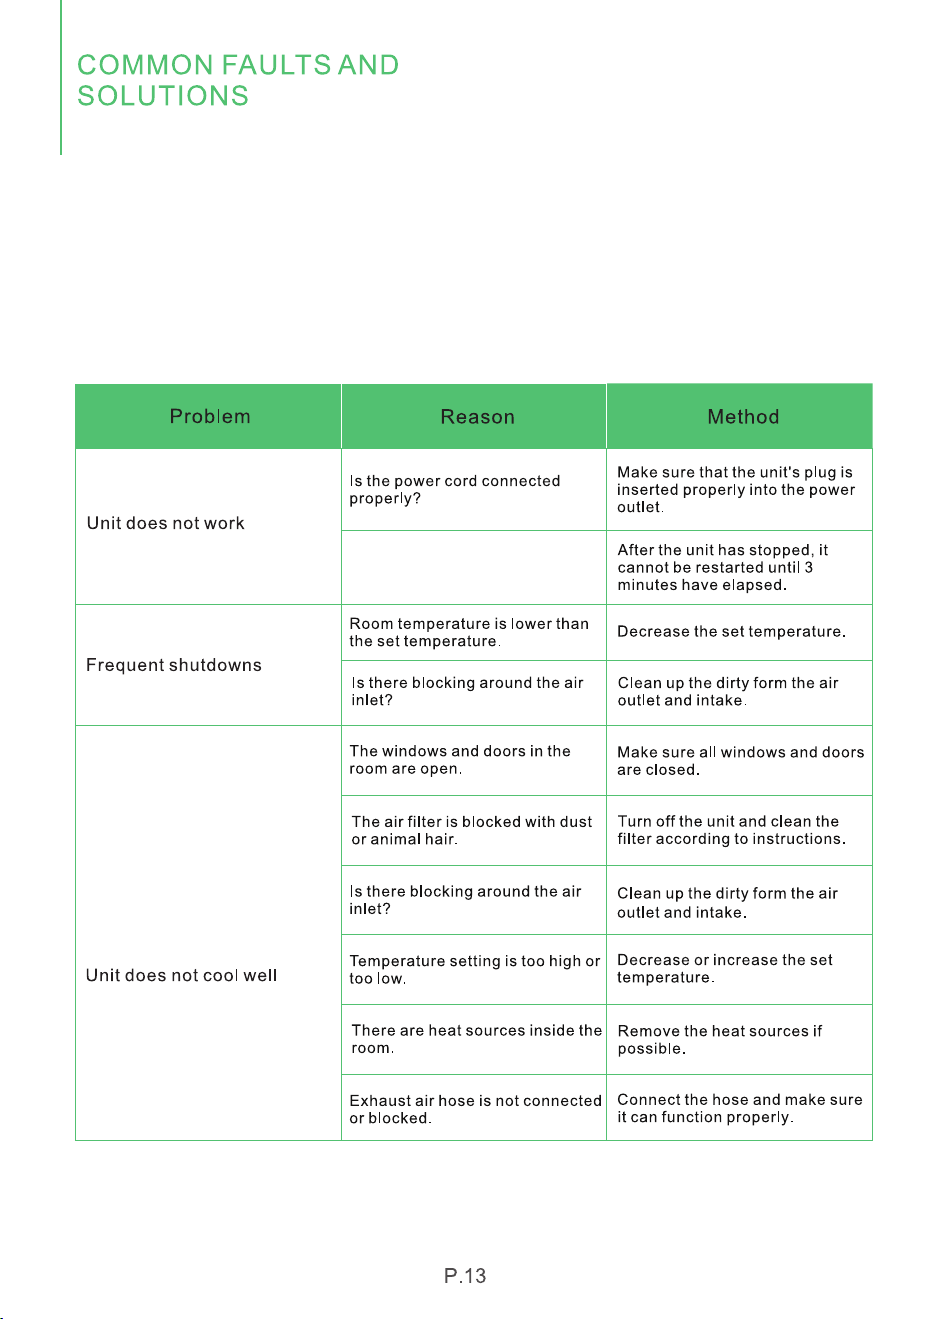
Check the information below for troubleshooting steps. It will save you time to
resolve issues that may happen with the unit.
The list includes moist of the common cases, but not the results of defective units.
crafts or materials in the unit.
If all troubleshooting steps have been exhausted and the issue is still occurring,
please feel free to reach out to Waykar Customer Service to get further
assistance.
The unit will take approximately
3 minutes of operation before
cooling occurs.

The sound comes from the
flowing of the refrigerant inside
the airconditioner.
If the appliance is still not working properly as expected and the troubleshooting
steps or solutions above may not resolve the issue. Please unplug the power and
shut down the unit then contact Wavkar customer service . support@waykar.com
Please check whether the filter
packing bag removed and the
filter installed correctly.
Check whether the rubber
drainage plug on the continuous
drainage port on the top of the
unit is broken?
Replace with a new rubber
drainage plug.
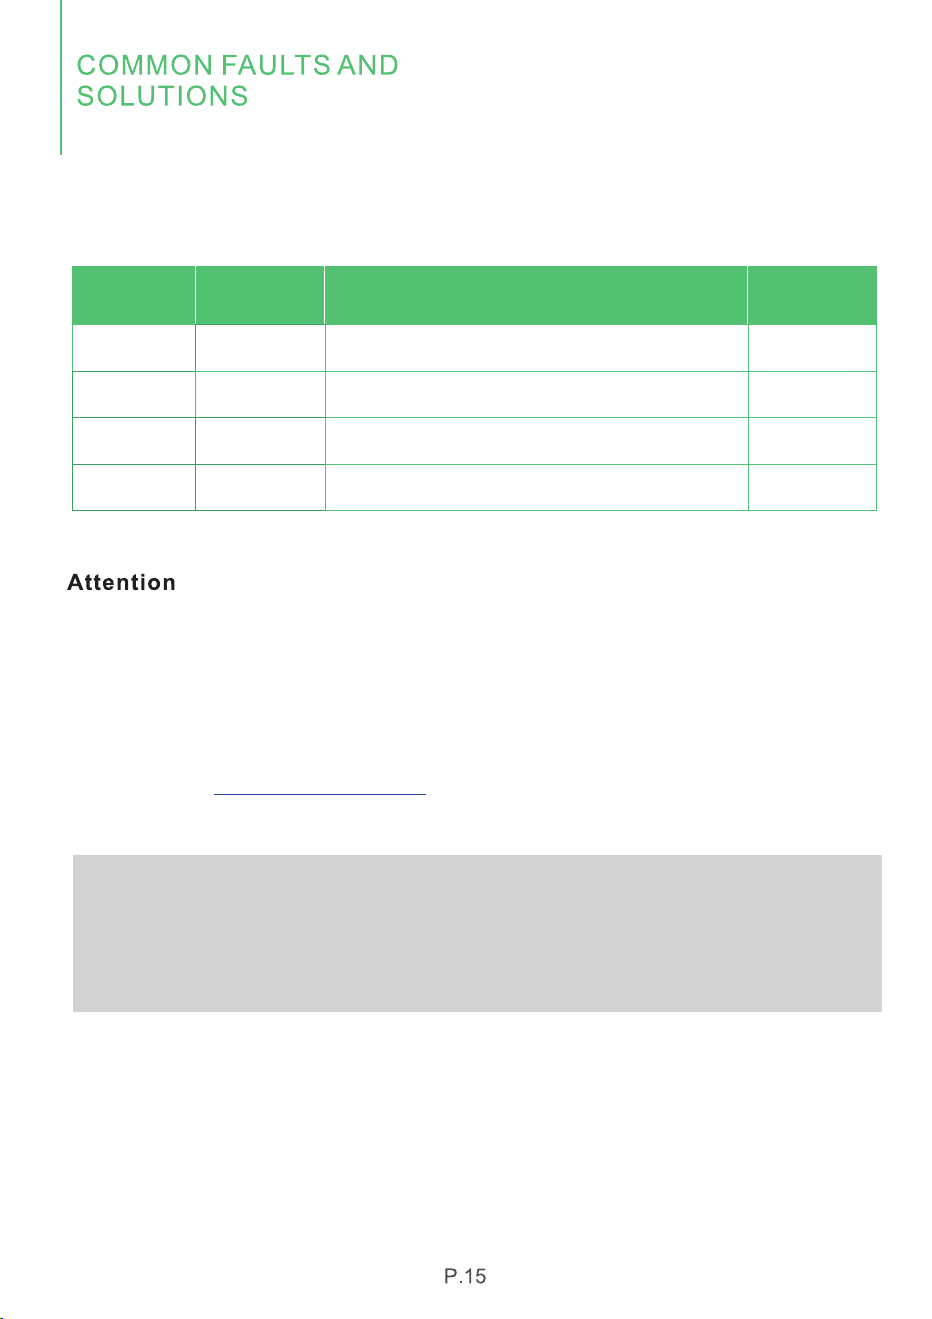
4. Error&Protection Code
Name of the fault
Humidity sensor error
Defrost temperature sensor error
Temperature sensor error
Water tray is full, empty the tray
Error Code
E1
E2
E4
E7
Number
1
2
3
4
Note
When the machine signals the alarm, it will flash or display the alarm, in case there
are multiple errors on the unit, it will display the error in turn.
When one of the above malfunctions occurs, the buzzer will alarm for a few seconds.
Press any key during the alarm to release the alarm sound.
If the malfunction is still present,please don't hesitate to contact Waykar Customer
Service email: for help.support@waykar.com
Note:
Before starting the machine, please ensure that the air outlet has been opened,
otherwise the machine will overheat. Do not pull out the power cord directly to
stop the machine.

Before moving and carrying
the machine, please first pour
out the water in the water tray.
SPECIAL NOTES
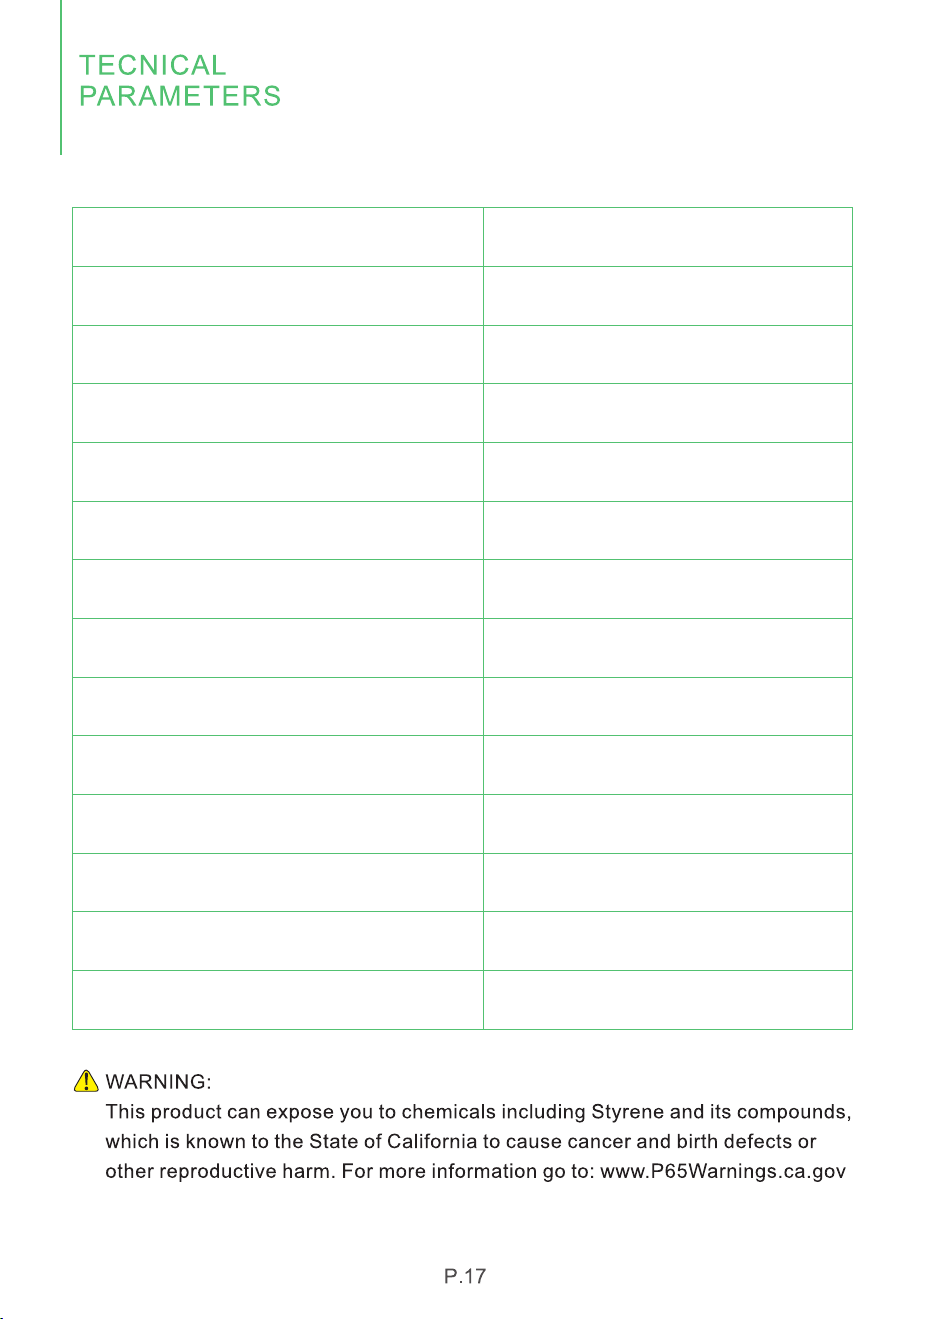
Model
Power Source
Cooling Rated Current (104℉/80°F)
Cooling Current (95℉/83℉)
Cooling Capacity (95℉/83℉)
Motor FLA
Motor Compressor
Refrigerant
Max Allowable Pressure
High Pressure
Low Pressure
Noise
Dimensions
Weight
KY-10K/04A
110-120V-60Hz
12A
10.0A
10000Btu/h
1.1A
RLA:7.65A LRA:35A
R410A/9.17ozs (260g)
800PSIG (5.5MPa)
580PSIG (4.0MPa)
247PSIG (1.7MPa)
52dB (A)
12.9*12*26.6 inches
44LB
Waykar offers a 12-month warranty to all of our products together with the original
proof of purchase when a defect occured, including those newly purchased and
unused, from Waykar or through an authorized reseller, wholly or substantially, or
as a result of faulty manufacturing parts, or workmanship during the Warranty
Period. The warranty does not apply if damage is caused by other factors, including
but without limitation of:
*Please fill out all required fields and inlcude your Order ID, Date of Purchased if
applicable.
Order Number ready
Warranty
Extend Your Warranty by 1 Year
Customer Support
There are our general terms for the warranty service, but we always encourage
our customers to contact us if any issues, regardless of warranty terms. If you
are experiencing an issue with Waykar product, you can reach out to us at
support@waykar.com, we will dedicate our efforts to resolve it for you.


We are expecting to see our products fulfill your life and hear your voice.
Your satisfaction means a lot to us.
Please tag us if you share a snap on your social media.