
11
IMPORTANT! Fill Out And Keep For Your Records.
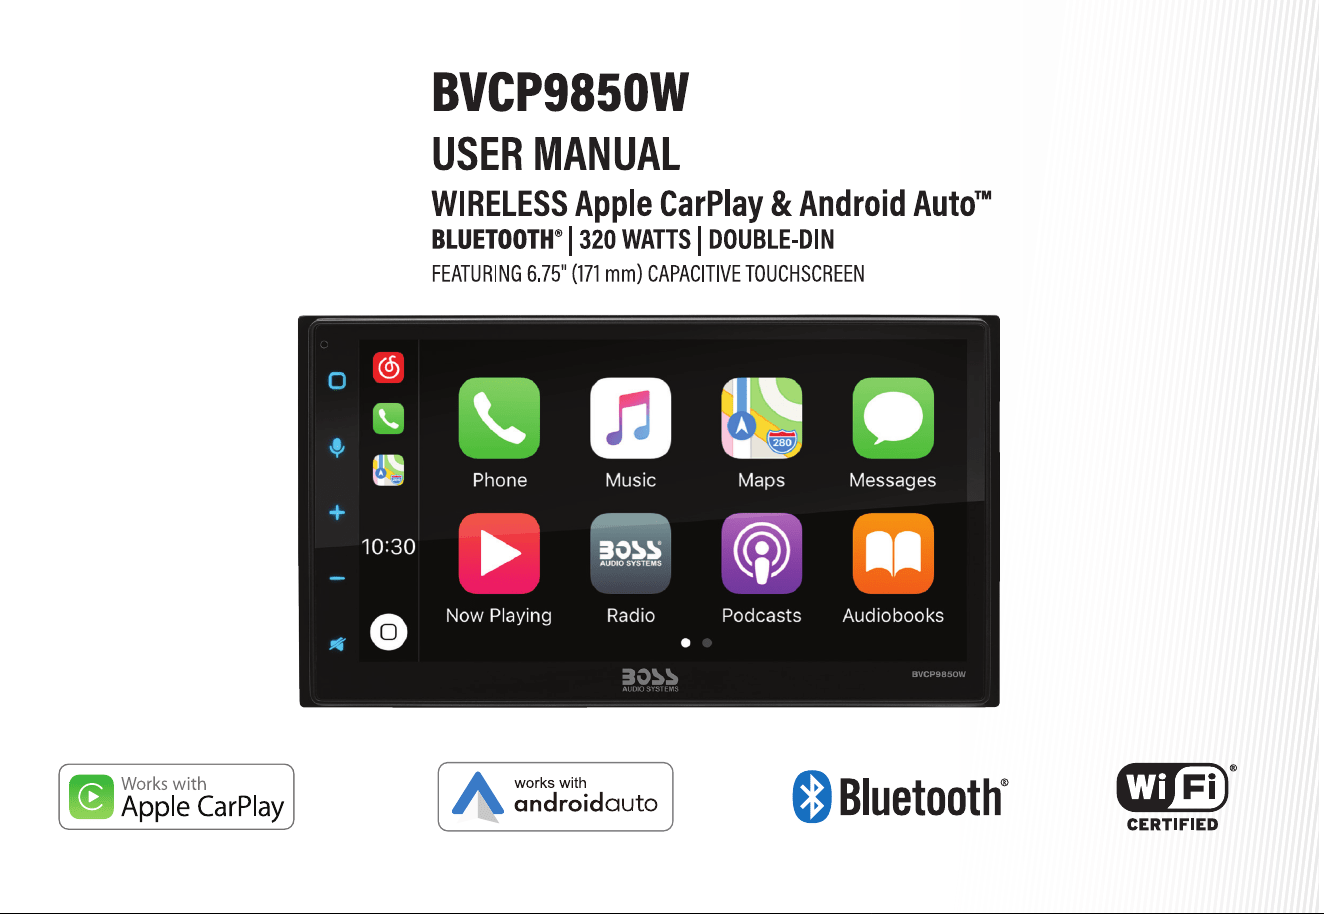
Thank you for Choosing BOSS Audio Systems!

22
Android Auto
.................................................
17
Warnings
........................................................
17
Using Android Auto
..................................
17-18
Bluetooth®
.....................................................
19
Setup & Connections
.....................................
Phone book
....................................................
Device Status
............................................... .
.
19
19
19
Calling
............................................................
20
History
............................................................
20
Private Mode
.................................................
20
Call Waiting
....................................................
20
Audio
..............................................................
21
Track Control
.............................................. .
...
21
Media
............................................................
22
Warnings
........................................................
22
USB Playback
..................................................
22
Navigating Menu
............................................
22
Photos
............................................................
22
Radio
..............................................................
23
Tuning
..........
.
.................................................
23
Bands
.............................................................
23
RDS/RBDS
.......................................................
23
Aux-In
.............................................................
24
Playback
.........................................................
24
Camera
...........................................................
24
Warnings
.......................
.
................................
24
Reverse View
..................................................
24
Audio Se�ngs
................................................
25
System Tone
...................................................
25
Loudness
........................................................
25
Subwoofer
......................................................
25
Contents
.......................................................
2-3
Notes
................................................................
4
FCC Statement
................................................
. 5
Cau�ons
........................................................
6-8
About This Manual
..........................................
8
California Prop. 65
.......................................
.... 8
Basic Product Opera�on
............................
9 -14
Product Basics
...........................................
10-15
Using/Caring for the Touchscreen
............
..... 12
Product Setup
...........................................
..... 13
Naviga�ng the Menus
..............................
......14
Apple CarPlay
.................................................
15
Warnings
.................................................
.......15
Using CarPlay
..........................................
....... 15
Gestures & Control
.................................
....... 15
Apple CarPlay Display
.............................
........16
Disable Apps
...........................................
........16
Volume
...........................................................
25
Source Level
...................................................
25
Audio Effect
........................
...........................
25
Balance Fader
................................................
25
Contents
General Se�ngs
Advance Se�ngs
Display Se�ngs
Radio Se�ngs
About Se�ngs
Connec�ons..................................................
Hands-free Mic Installa�on.............................34
SWC Introduc�on
SWC Installa�on/Programming
SWC Compa�bility
Troubleshoo�ng
Specifica�ons
Bluetooth® Se�ngs

33
Audio Se�ngs
ts
�
s �
�
General Se�ngs
............................................
26
Date & Time
...................................................
26
Android Auto
..................................................
26
Camera Settings
.............................................
26
ACC OFF
.........................................................
26
System Language
...........................................
26
Power Off Delay
...............................
..............
26
Advance Se�ngs
...........................................
26
Display Se�ngs
.............................................
27
Day Brightness
...............................................
27
Night Brightness
.............................................
27
Gamma
..........................................................
27
LED Animation
...............................................
27
LED Color
.................................
.......................
27
Illumination Default
.......................................
27
Bluetooth Setting
...........................................
27
Bluetooth Power
............................................
27
Auto Connect
.................................................
27
Auto Answer
..................................................
27
Auto Download Phone Book
..........................
28
Radio Se�ngs
....................
............................
28
Seek Quality
...................................................
28
Region
............................................................
28
Power and SWC Wiring
..................................
30
RDS/RBDS............
...........................................
28
Speaker Wiring..............
.................................
31
Parking Brake and Remote Wiring
.................
32
Alternative Frequency (AF)
............................
28
Traffic Announcement (TA)
.......................
.....
28
About Se�ngs
...............................................
29
Connec�ons.................................................. 30
Camera/USB/Audio/Radio/Mic.......................33
Hands-free Mic Installa�on.............................34
SWC Introduc�on
...........................................
35
Programmable Controls
.................................
35
SWC Installa�on/Programming
......................
35
SWC Compa�bility
.........................................
35
Troubleshoo�ng
.......................................
36-37
Specifica�ons
.................................................
38
Bluetooth® Se�ngs
.......................................
27
Bluetooth Device
...........................................
27
Apple CarPlay Device
..
...................................
27
Contents
44
4
This symbol with “WARNING” is intended to alert
the user to the presence of critical
instructions/procedures. Failure to observe the
instructions/procedures can result in
injury, death, damage to the product and or
property.
WARNING
This symbol with “CAUTION” is intended to alert
the user to the presence of important
instructions/procedures. Failure to observe the
instructions/procedures can result in
injury or damage to the product and or property.
CAUTION
The Bluetooth® word mark and logos are
registered trademarks owned by Bluetooth
SIG, Inc. and any use of such marks by
Other trademarks and trade names are those
Apple CarPlay is a trademark of Apple Inc.
Use of the Apple CarPlay logo means that
this user interface meets Apple
performance standards.
Android Auto is a trademark of Google LLC.
.
BOSS Audio Systems is under license.
Important
Apple is not responsible for the opera�on of
this device or its compliance with safety and
regulatory standards. Please note that the use
of this product with iPhone, iPod or iPad may aect
wireless performance.
iPod® and iPhone® is a trademark of Apple Inc.,registered
in the U.S. and other countries.
□ □ □
□
Cau�on
55
5
Caution
Adjustments or alterations of this device may result in hazardous radiation exposure.
This device complies with part 15 of the FCC Rules. Operation is subject to the following two conditions: (1) this device may not cause interference, and (2) this
device must accept any interference, including interference that may cause undesired operation of this device. This transmitter must not be co-located or
operated in conjunction with any other antenna or transmitte
r. The Bluetooth antenna cannot be removed (or replaced) by user. This equipment complies with
FCC/ IC radiation exposure limits set forth for an uncontrolled environment and meets the FCC radio frequency (RF) Exposure Guidelines and RSS-102 of the IC
radio frequency (RF) Exposure rules. This equipment has very low levels of RF energy that it deemed to comply without maximum permissive exposure
evaluation (MPE). But it is desirable that it should be installed and operate
d keeping the radiator at least 20 cm or more away from person’s body
(excluding extremities: hands, wrists, feet and ankles). Alteration or modifications carried out without appropriate authorization may invalidate the user’s right
to operate the equipment.
NOTE: This equipment has been tested and found to comply with the limits for a Class B digital device, pursuant to Part 15 of the F CC Rules. These limits are
designed to provide reasonable protection against harmful
interference in a residential installation. This equipment generates, uses and can radiate radio
frequency energy and, if not installed and used in accordance with the instructions, may cause harmful interference to radio communications. However, there
is no guarantee that interference will not occur in a particular installation. If this equipment does cause harmful interference to radio or television reception,
which can be determined by turning the equipment of
f and on, the user is encouraged to try to correct the interference by one or more of the following
measures: □ Relocate or reorient the receiving antenna. □ Increase the separation between the equipment and receiver. □ Connect the equipment into an
outlet on a circuit different from that to which the receiver is connected. □ Consult the dealer or an experienced radio/TV technician for help.
FCC Compliance Statement
Cau�on

66
BE SURE TO OBSERVE THE FOLLOWING GUIDELINES: Do not turn up the volume so high that you can’t hear what’s around you.
Use caution or temporarily discontinue use in potentially hazardous situations.
Do not operate mobile video equipment while driving a motorized vehicle – safe driving and safety consideration of others should always be your highest
priority.
Set your volume control at a low setting, then slowly increase the sound until you can hear it comfortably without di
stortion, or ear discomfort.
In the event you should notice smoke, strange noises or odor from this product, or any other abnormal signs, immediately turn off the power and consult your
dealer or the nearest authorized BOSS AUDIO SYSTEMS Service Center.
Using this product in this condition may result in permanent damage to the system.
InstallationPrecautions
BOSS AUDIO SYSTEMS does not recommend to install the product yourself.
We recommend to have it professionally installed by a certified professional.
Always consult with a professional installer .
Do not attempt to install or service this product by yourself. Installation or servicing of this product by persons without professional training and
experience in electronic equipment and motorized vehicle accessories may be dangerous and could expose you to the risk of electric shock, injury or other
hazards
Refer
any repairs to a qualified BOSS AUDIO SYSTEMS Service Center.
Precau�ons
Cau�on
Cau�on
77
7
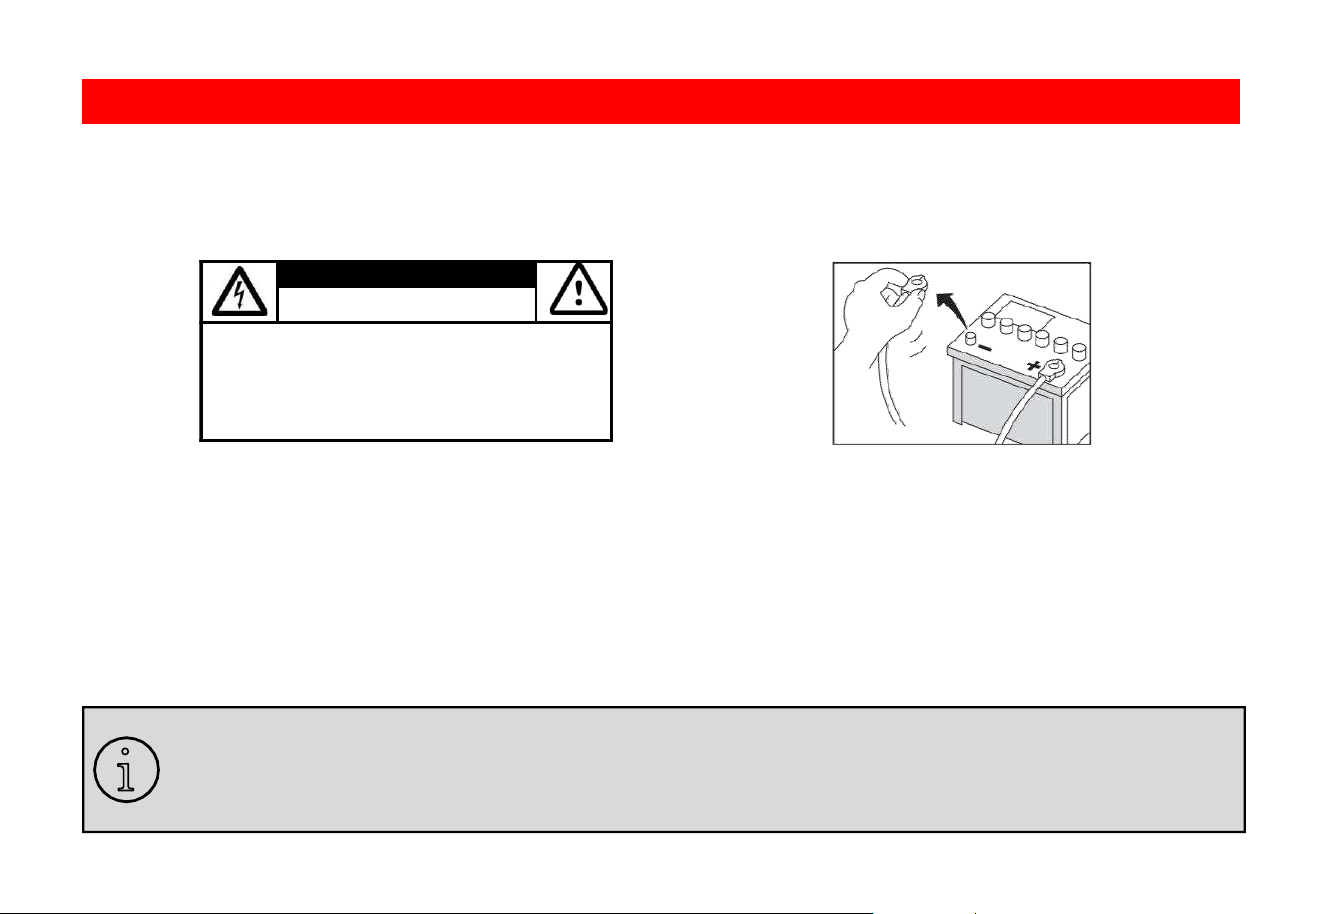
CAUTION
RISK OF ELECTRIC SHOCK
DO NOT OPEN
CAUTION: TO REDUCE THE RISK OF ELECTRICL SHOCK,
DO NOT REMOVE COVERS.
NO USER SERVICABLE PARTS INSIDE. REFER SERVICING
TO A QUALIFIED SERVICE PROFESIONAL
Before Installing
To avoid potential shorts in the electrical system, be sure to disconnect the (–) battery cable before installation.
Use this unit with a 12-volt battery and negative grounding only. Failure to do so may result in a fire or malfunction.
Product Safety
It is against Federal and Local laws for video to be viewed by the driver while the vehicle is in motion. This video product was intended to be used with the
parking brake safety feature. Video cannot be seen with
out the proper parking brake powered connection. Tampering or disabling this feature will void any
and all warranty. Please check with a professional installer to have your product installed properly.
Due to ongoing enhancements, example images on screens may slightly differ from actual product.
Important Note
i
Cau�on

88
Images and Video
Watching video while driving is against Federal, State, and Local laws.
Drive safely, know and obey traffic rules. Watching this screen and making selections while driving can lead to a serious accident.
Check surroundings for safety while camera images are displayed.
Do not use features of this product while driving if it cannot be operated safely and legally in your location. Before operation of smartphone Apps accessible
from this device, read safety
instructions in your Owner’s Manual. When using navigation Apps stay alert to observe real world conditions.
About this manual
To entirely understand how to properly use your new BOSS product, it is recommended to read this en�re user manual, and keep it in a safe place for future
reference.
-Read the entire manual
-Keep the manual
-Follow all instructions
-Clean with a dry cloth only
-Do not use or operate near water
-Do not defeat any safetyfeatures
California Residents (Proposition 65)
This product may contain chemicals known to the State of California to cause cancer, birth defects or other reproductive harm.
Cau�on
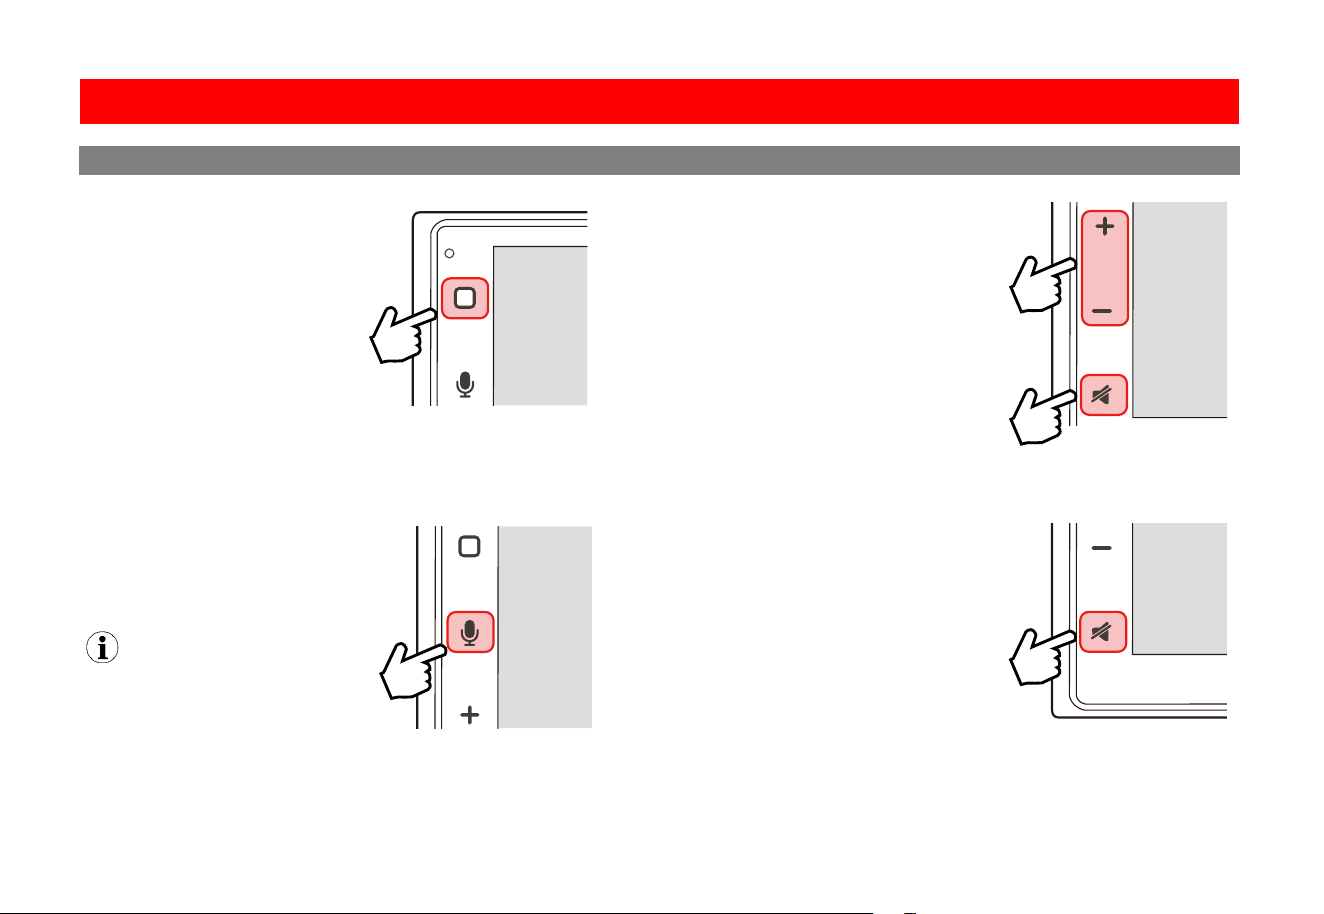
Mute/Screen O
Basic Product Opera�on
99
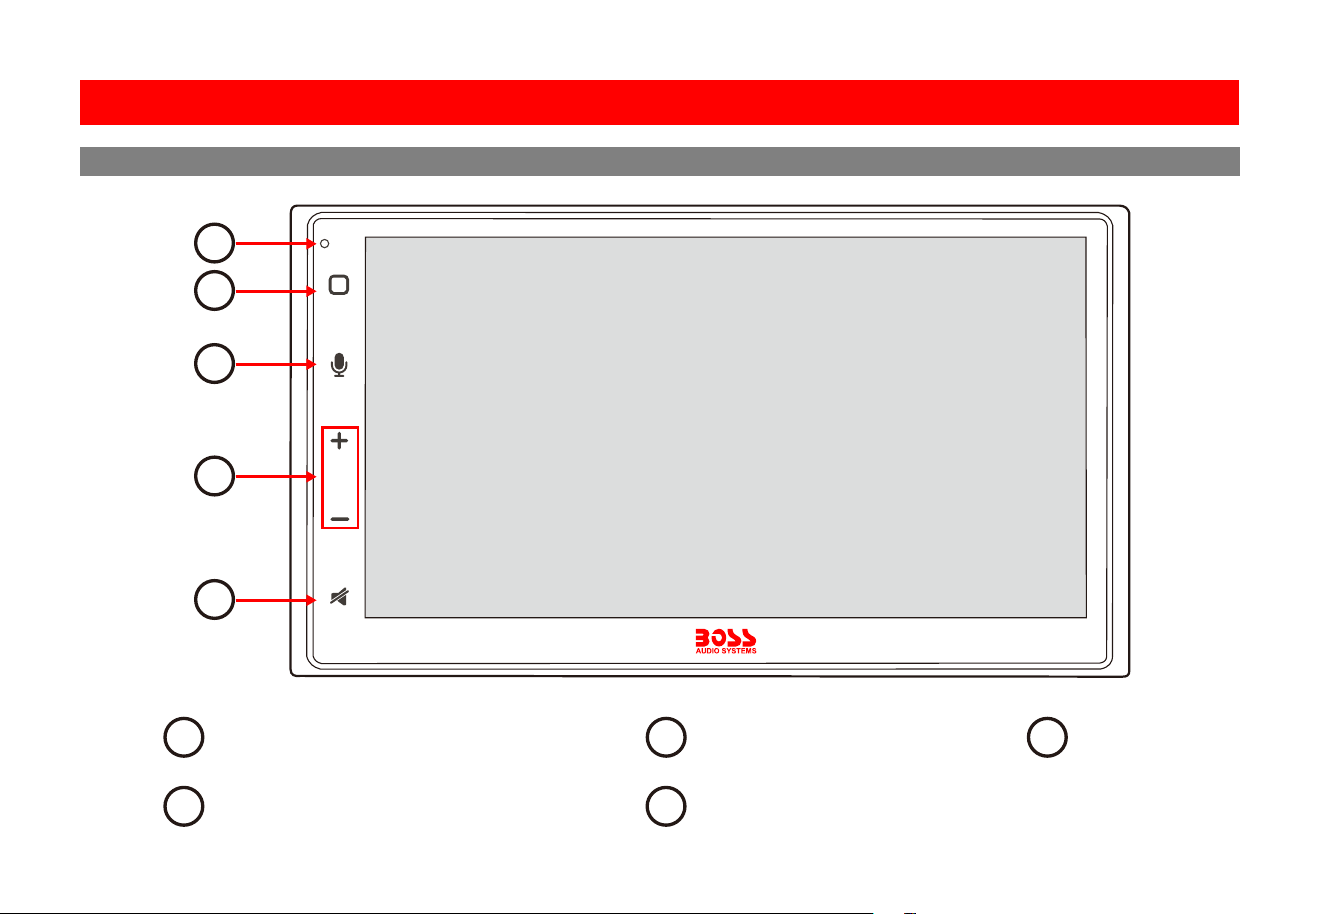
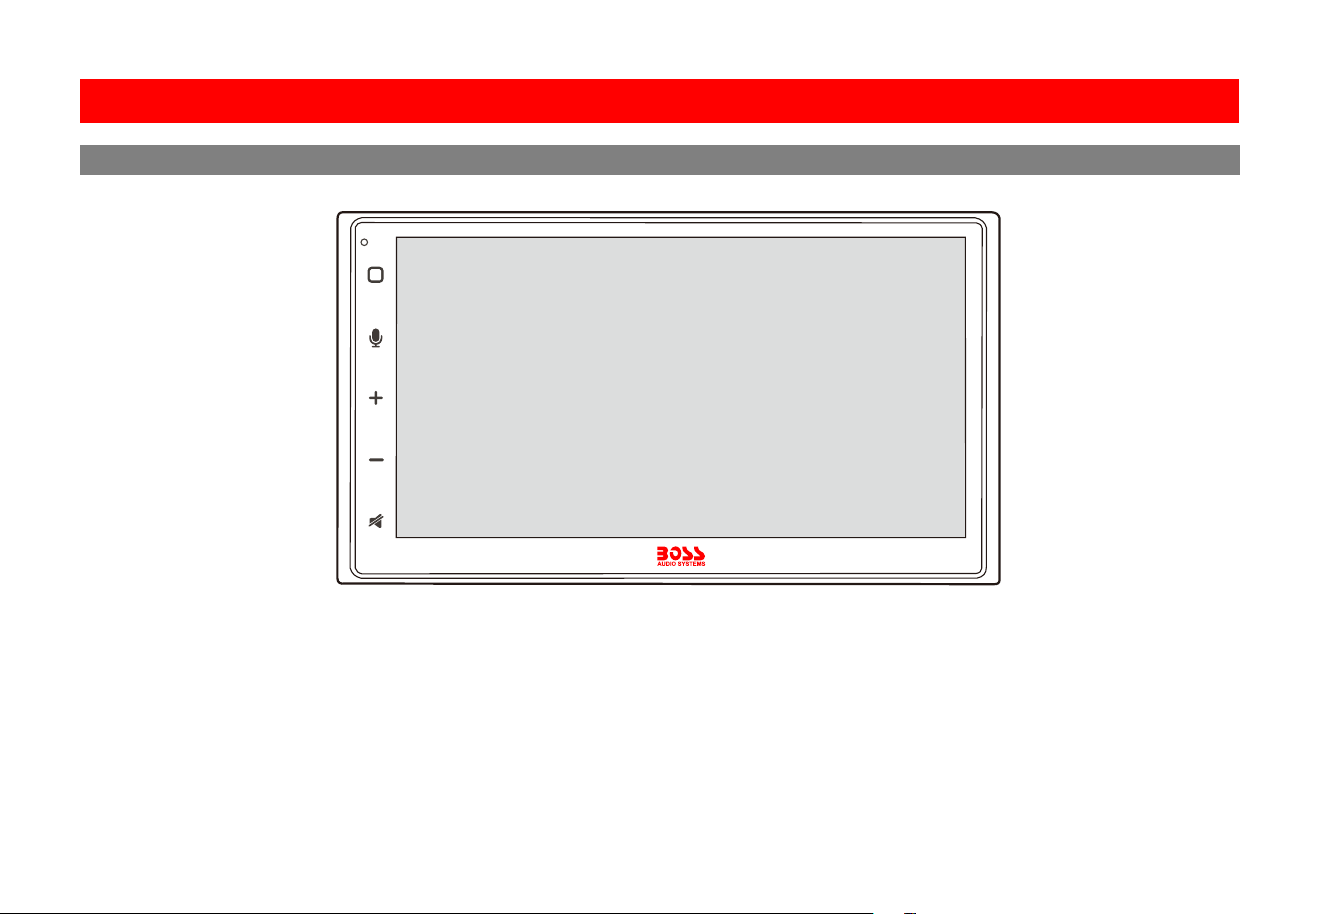
Front Detail
Microphone
MIC
1
2
3
4
5
Volume Control Mute/Screen O
Power/Home Voice Control
Basic Product Opera�on
1
4 5
2 3

1010
Pre-Amp Audio Outputs
(FL/FR/RL/RR/SUB)
Rear Camera Signal Input (RC)
Parking Brake Input
Amp Remote Output
FM/AM Antenna Input
Wire Harness
(Power/Speaker/SWC Input/
Reverse Input/Illumina�on Input
Antenna Output)
15A Mini ATM Fuse
Hands-free
Microphone Input
Apple CarPlay / Android Auto
USB Play / Charging (2A)
* Lightning Cable Not Included
GPS Antenna Input
(Connects the supplied GPS antenna for auxiliary
Android Auto/CarPlay naviga�on)
RCA Audio Input
Front Camera Signal Input
Front/Rear Camera Power Output
Rear Detail
Basic Product Opera�on
be ac�ve to enable voice control.
Display Off
1. Touch briey to switch the unit on. 1. Touch briey “+” or “-”.
1. Touch the Mute buon.
1. Touch to ac�vate and then say your
command.
1. Touch and hold the Mute buon.
1. Touch the display to reac�vate.
2. Touch and hold to switch the unit to
standby.
In standby, the display is o.
2. Touch and hold for quick volume
adjustment.
Basic Product Opera�on
1111
11
Adjust Volume
Voice Control
NOTE
Apple CarPlay or Android Auto must
be ac�ve to enable voice control.
Display Off
Display On
MIC
Power On / Standby
1. Touch briey to switch the unit on. 1. Touch briey “+” or “-”.
Mute
1. Touch the Mute buon.
1. Touch to ac�vate and then say your
command.
1. Touch and hold the Mute buon.
1. Touch the display to reac�vate.
2. Touch and hold to switch the unit to
standby.
In standby, the display is o.
2. Touch and hold for quick volume
adjustment.
Product Basics
Basic Product Opera�on
1212
12
Use:
This head unit utilizes a Capacitive Touchscreen, the same type that is used on high-end mobile devices. It should be used for and cared for like that type of
device. As with all capacitive type technology, if your fingers are wet or sweaty, it will not function properly.
Do not allow any sharp objects to come in contact with the screen glass.
Care and Cleaning:
To clean the screen, use a dry microfiber type cloth to clean. Do not use ammonia, window cleaner, or any other type of household chemicals to clean the
screen. Abrasives should not be used at all.
MIC
Using and Caring for the Touch Screen
Basic Product Opera�on
Aer CarPlay connec�on, date and �me
will automa�cally set.
m m m
m
,
m , ,
Basic Product Opera�on
1313
13
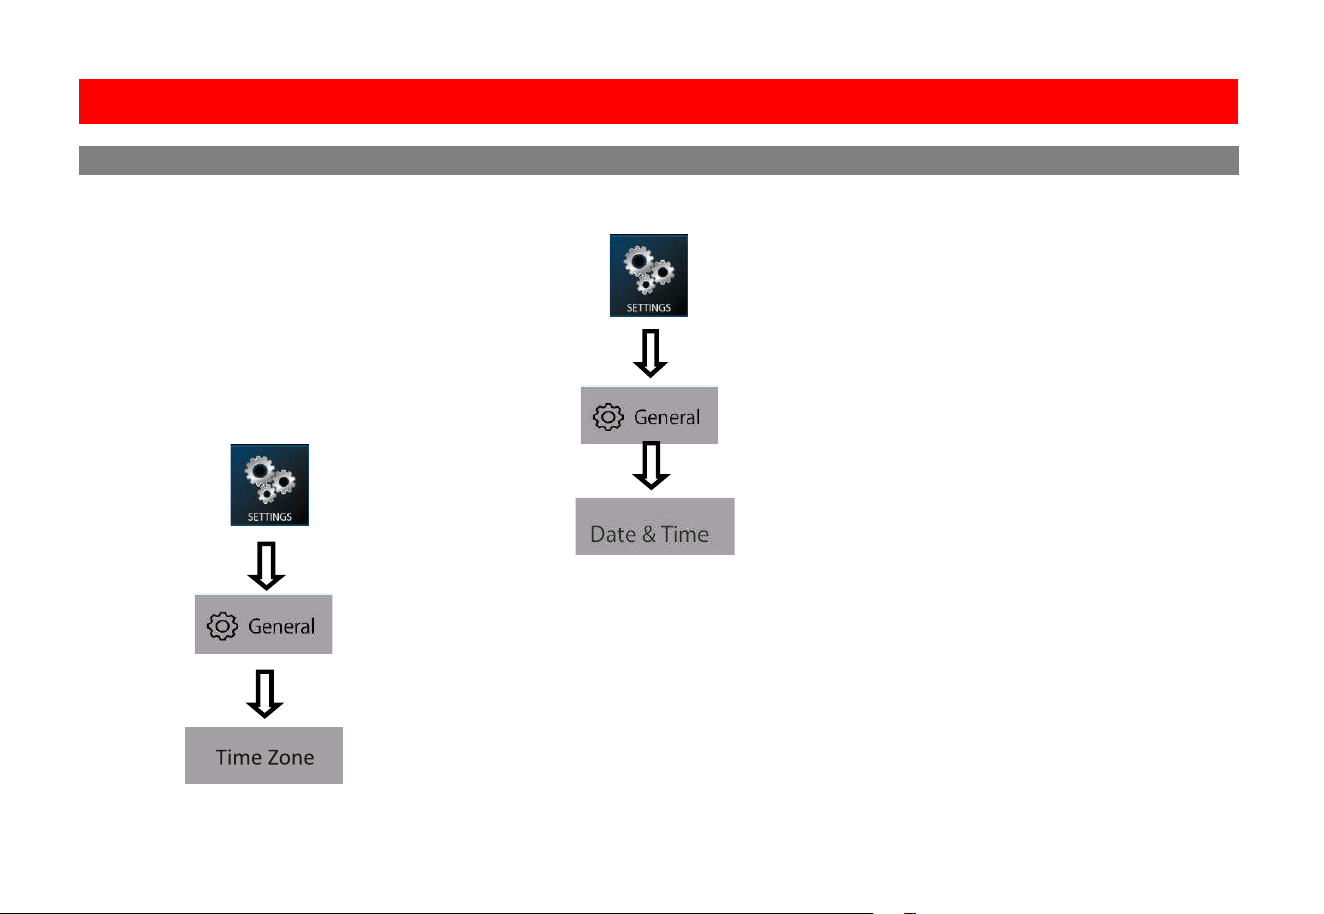
Setup Option A: Apple CarPlay Method
Connect your iPhone to this unit through
CarPlay in a wired or wireless way. See
pg.15.
Aer CarPlay connec�on, date and �me
will automa�cally set.
User must set Time Zone manually.
Default is Pacific Time Zone
Setup Option B: Date and Time Additional Setup see pg. 27.
General > Language
Audio > EQ, Other Audio Settings
Display > Illumination, Brightness, LED
Product Setup (Date and Time)
Basic Product Opera�on
1414
14
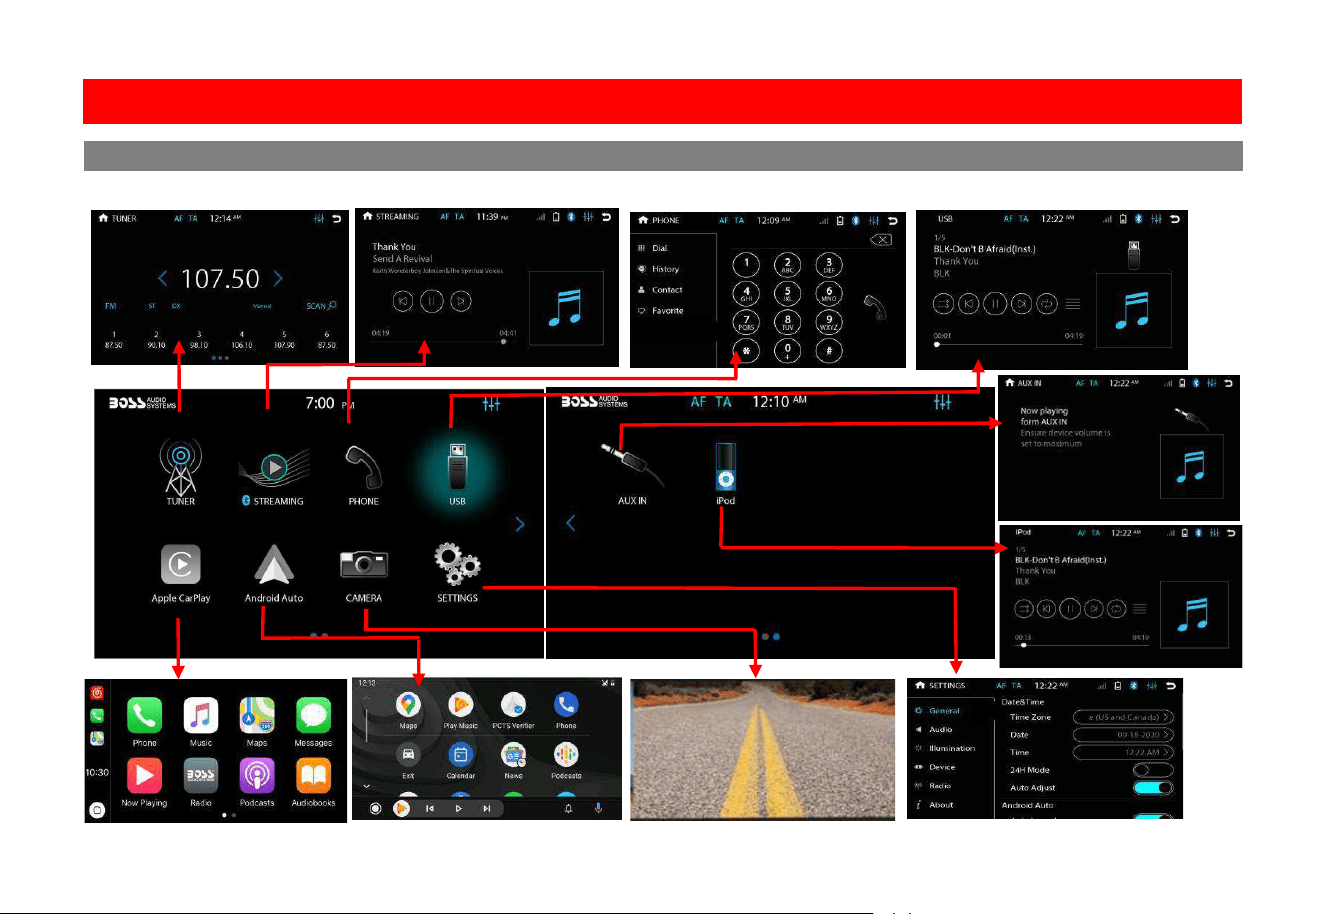
Naviga�ng the Menus
Basic Product Opera�on
Radio
Streaming
Phone
Media
Apple CarPlay
Android Auto
Front and Rear camera
Settings
first-�me CarPlay connec�on, wireless CarPlay will
Se�ngs > General > CarPlay
When connec�ng to CarPlay, Bluetooth streaming/
phone on this unit will be automa�cally disabled.
In this case, you can make hands-free calls and
C n
B
gg ng
Connect your iPhone to the USB port (labeled
Apple CarPlay
included) to enable CarPlay connec�on.
For the ini�al USB connec�on, you will be
Wired Connec�on via USB Port
Wireless Connec�on
Enable Wi-Fi and Bluetooth on your iPhone.
For first-�me use of wireless CarPlay between
● Bluetooth pairing
Se�ngs Bluetooth
Boss Audio BVCP9850W .
● Initial USB port connection for CarPlay.
To enable CarPlay connec�on
Bluetooth streaming/phone will disable
wireless CarPlay connec�on.
Device
> Bluetooth Device
name to enable wireless CarPlay connec�on.
To enter CarPlay menu
Using CarPlay
Wired and Wireless Apple CarPlay
1515
14
Naviga�ng the Menus
Basic Product Opera�on
NOTE
Apple CarPlay usage is limited while driving.
Functions, content, and usability is
determined by the App provider(s).
Controls will vary with each App thatis
available for CarPlay.
For more detailsvisit:
http://www.apple.com/ios/carplay
WARNING
Familiarize yourself with your Local and State
laws regarding mobile devices.
Certain functions of an iPhone might be
prohibited and or illegal while driving in your
location.
When in doubt, park the vehicle and engage
the parking brake first before performing the
function(s).
For other cautions and warnings see pg. 6
If you do not allow wireless CarPlay use during
first-�me CarPlay connec�on, wireless CarPlay will
be disabled on your iPhone. To use wireless CarPlay
later, you need to enable CarPlay on your iPhone
(go to Se�ngs > General > CarPlay > paired device
then enable its CarPlay).
When connec�ng to CarPlay, Bluetooth streaming/
phone on this unit will be automa�cally disabled.
In this case, you can make hands-free calls and
stream music through CarPlay.
Note
Note
Gestures & Control
Basic controls, but not limited to:
Touch
Swipe
Dragging
Other gestures and controls might di
er from apps.
Volume control is handled exclusively by this
unit.
Connect your iPhone to the USB port (labeled
“Apple CarPlay”) with a lightning cable (not
included) to enable CarPlay connec�on.
For the ini�al USB connec�on, you will be
prompted to enable wireless CarPlay on your
iPhone.
Wired Connec�on via USB Port
Wireless Connec�on
Enable Wi-Fi and Bluetooth on your iPhone.
For first-�me use of wireless CarPlay between
your iPhone and this unit, you need to allow
wireless CarPlay use via either of the pairing:
● Bluetooth pairing. On your iPhone, go to
Se�ngs > Bluetooth then select
“Boss Audio BVCP9850W" for pairing.
Enable wireless CarPlay when prompted
on your iPhone.
● Initial USB port connection for CarPlay.
To enable CarPlay connec�on
Bluetooth streaming/phone will disable
wireless CarPlay connec�on.
On the home screen, go to SETTINGS > Device
> Bluetooth Device then touch the iPhone
name to enable wireless CarPlay connec�on.
To enter CarPlay menu
Touch the “Apple CarPlay” icon on the home
screen.
Using CarPlay
Wired and Wireless Apple CarPlay
1616
Using CarPlay
Wired and Wireless Apple CarPlay
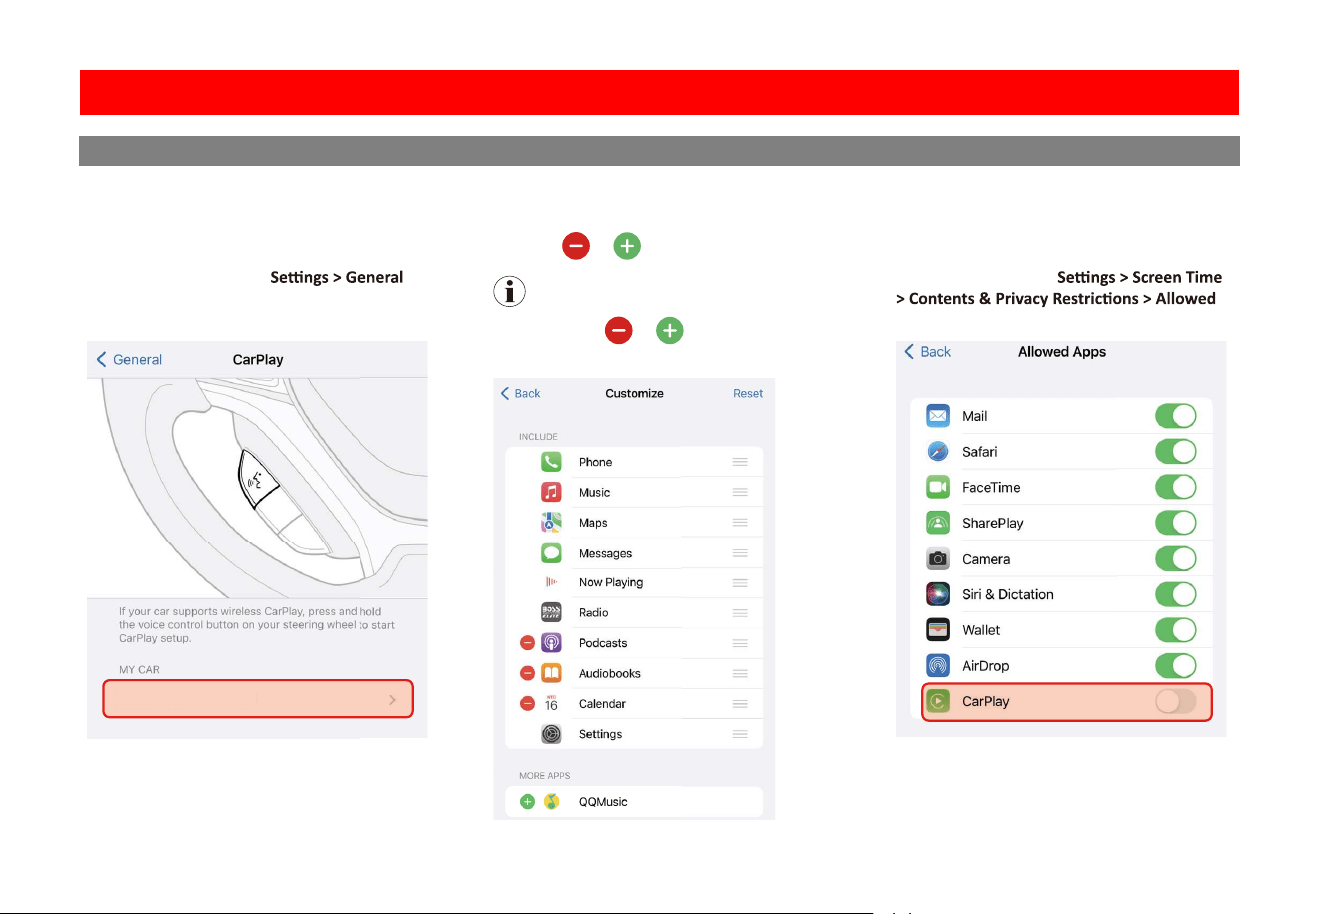
CarPlay Display Setup
You can add, remove, or arrange the order of
the apps on the CarPlay screen of the unit.
1. On your iPhone, go to
> CarPlay, select this head unit then select
Customize.
Boss Audio BVCP9850W
2. Touch and drag an app to change the order
the apps appear on the CarPlay screen.
Touch
or to remove and add apps.
Note
Only apps with
or can be removed
from CarPlay or added in CarPlay.
Disable Apps
You can disable all CarPlay apps to restrict
CarPlay use on this unit.
On your iPhone, go to
Apps > CarPlay.
● Wired connection: Android 6.0
● Wireless connection: Android 11.0
For Android 9.0 or earlier, download and
Play. For smartphone with Android 10.0 or
Wired Connec�on via USB Port
to enable Android Auto connec�on.
For the ini�al USB connec�on, you will be
Wireless Connec�on
For first-�me use of wireless Android Auto
● Bluetooth pairing
Se�ngs > Bluetooth
Boss Audio BVCP9850W
● Initial USB port connection for Android Auto.
To enable Android Auto connec�on
Android Auto connec�on.
> Device
> Bluetooth Device
to enable wireless Android Auto connec�on.
When connec�ng to Android Auto, Bluetooth
automa�cally disabled.
Using Android Auto
1717
NOTE
Android Auto usage is limited while driving.
Functions, content, and usability is
determined by the App provider(s).
Controls will vary with each App that is
available for Android Auto.
For more details visit:
https://www.android.com/auto/
WARNING
Familiarize yourself with your Local and State
laws regarding mobile devices.
Certain functions of the mobile device might
be prohibited and or illegal while driving in
your location.
When in doubt, park the vehicle and engage
the parking brake first before performing the
function(s).
For other cautions and warnings see pg. 6
NOTE
WARNING
For your safety, the setup process must be
accomplished while the vehicle is parked and
parking brake engaged.
To complete the setup properly, the
Parking Brake status wire must be connected.
See pg.32
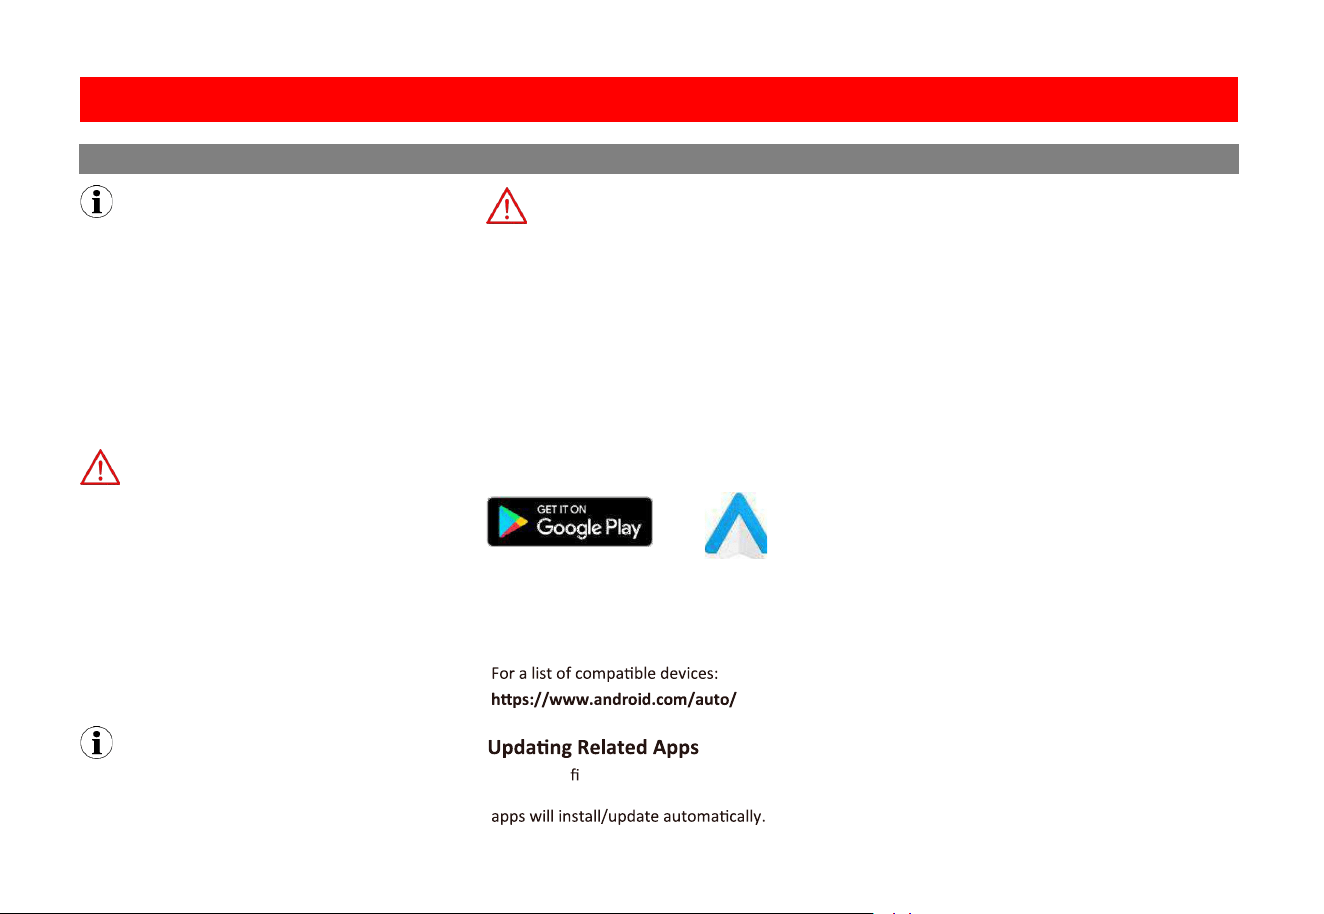
Android Auto App
Minimum System Requirements
● Wired connection: Android 6.0
● Wireless connection: Android 11.0
During the rst start up and setup of the
Android Auto app, the Maps, Music, Google
For Android 9.0 or earlier, download and
install the Android Auto app from Google
Play. For smartphone with Android 10.0 or
later, plug in your phone and follow the
prompts on your phone to accept the
permissions that Android Auto requires.
Wired Connec�on via USB Port
Connect your phone to the USB port (labeled
“Android Auto”) with a USB cable (not included)
to enable Android Auto connec�on.
For the ini�al USB connec�on, you will be
prompted to connect wireless Android Auto on
this unit.
Wireless Connec�on
Enable Wi-Fi and Bluetooth on your Phone.
For first-�me use of wireless Android Auto
between your phone and this unit, you need to
allow Android Auto use via either of the pairing:
● Bluetooth pairing. On your phone, go to
Se�ngs > Bluetooth then select
"Boss Audio BVCP9850W" for pairing.
● Initial USB port connection for Android Auto.
To enable Android Auto connec�on
Bluetooth streaming/phone will disable wireless
Android Auto connec�on.
On the home screen, go to SETTINGS > Device
> Bluetooth Device then touch the phone name
to enable wireless Android Auto connec�on.
To enter Android Auto menu
Touch the “Android Auto” icon on the home screen.
When connec�ng to Android Auto, Bluetooth
streaming/phone on this unit will be
automa�cally disabled.
Using Android Auto
Wired and Wireless Android Auto
1818
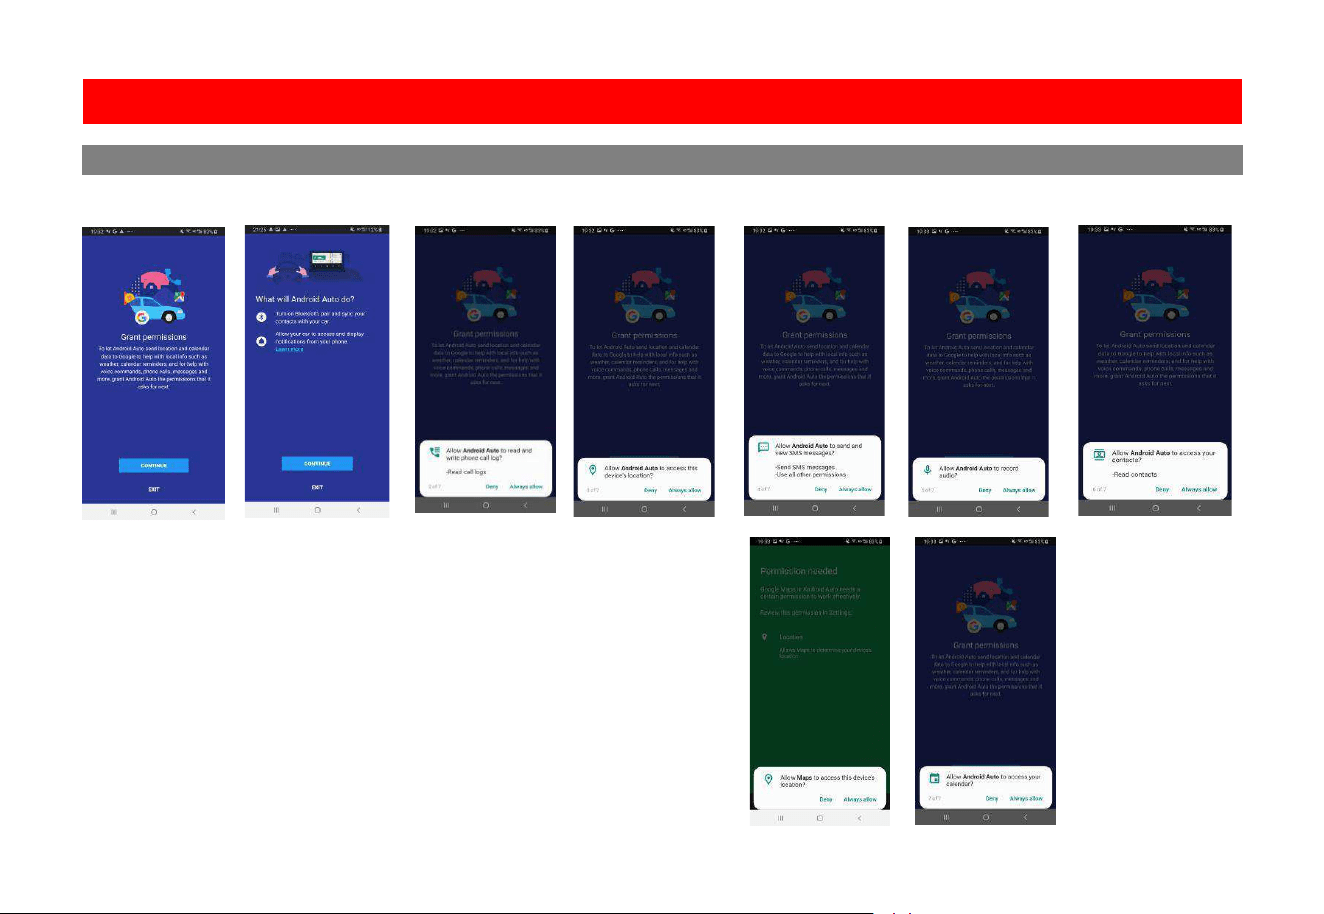
Android Auto Permissions
Permissions
Several features can be allowed or denied access to customize your usability of the
product.
The access can always be modified in Settings on the Android device.
Using Android Auto
Wired and Wireless Android Auto
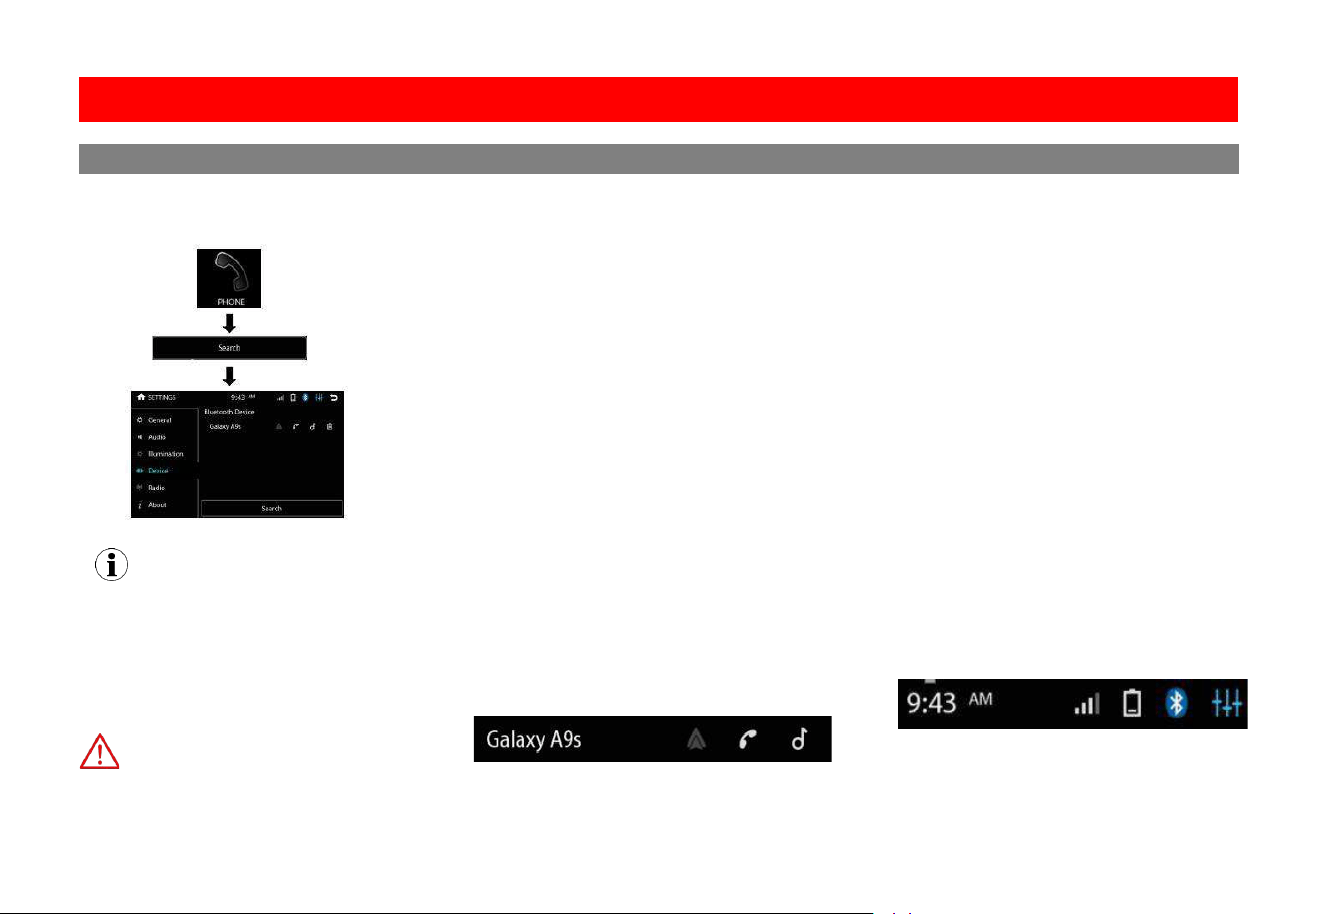
st �me Pairing
Bluetooth pairing can be made through ini�al
connec�on to CarPlay or Android Auto. Or
follow the instruc�ons below to complete it.
On your mobile device, go to Se�ngs >
Enable Bluetooth Streaming/Phone
On the home screen, go to
>
> Bluetooth Device
For wired CarPlay or Android Auto connec�on,
unplug the connec�on cable for use of Bluetooth
Setup and Connec�on
1919
Phone Menu
NOTE
Compatibility with all mobile devices is not
guaranteed. Please read through the user
guide of the mobile device.
CAUTION
For your safety, the setup process should be
accomplished while the vehicle is parked and
parking brake engaged.
Contacts and History
T
To Download History
o Download Contacts:
1.
1. Touch History to access download.
Touch Contact to access download.
Device Status
Battery strength and signal strength
is displayed on the top right of the home
menu.
First �me Pairing
Enabling CarPlay or Android Auto will disable
Bluetooth streaming/phone.
Pair this product with your Bluetooth device
before you can make hands-free calls or stream
music through Bluetooth.
Bluetooth pairing can be made through ini�al
connec�on to CarPlay or Android Auto. Or
follow the instruc�ons below to complete it.
On your mobile device, go to Se�ngs >
Bluetooth then select “Boss Audio B
VCP9850W
for pairing.
Follow the prompts on your mobile device and
this product to complete Bluetooth pairing.
Enable Bluetooth Streaming/Phone
When CarPlay or Android Auto is connected to
this product, Bluetooth streaming/phone will
be disabled. In this case, you need to enable
Bluetooth Bluetooth streaming/phone.
On the home screen, go to
SETTINGS > Device
> Bluetooth Device then touch the music or
phone icon to enable Bluetooth streaming or
phone.
For wired CarPlay or Android Auto connec�on,
unplug the connec�on cable for use of Bluetooth
streaming/phone.
When Bluetooth streaming/phone is enabled,
CarPlay or Android Auto will be disabled. You
can now make hands-free calls or stream music
through Bluetooth (on the home screen, touch
the “STREAMING” or “PHONE” icon to access
Bluetooth streaming or phone).
Setup and Connec�on
Bluetooth®
Touch
2020
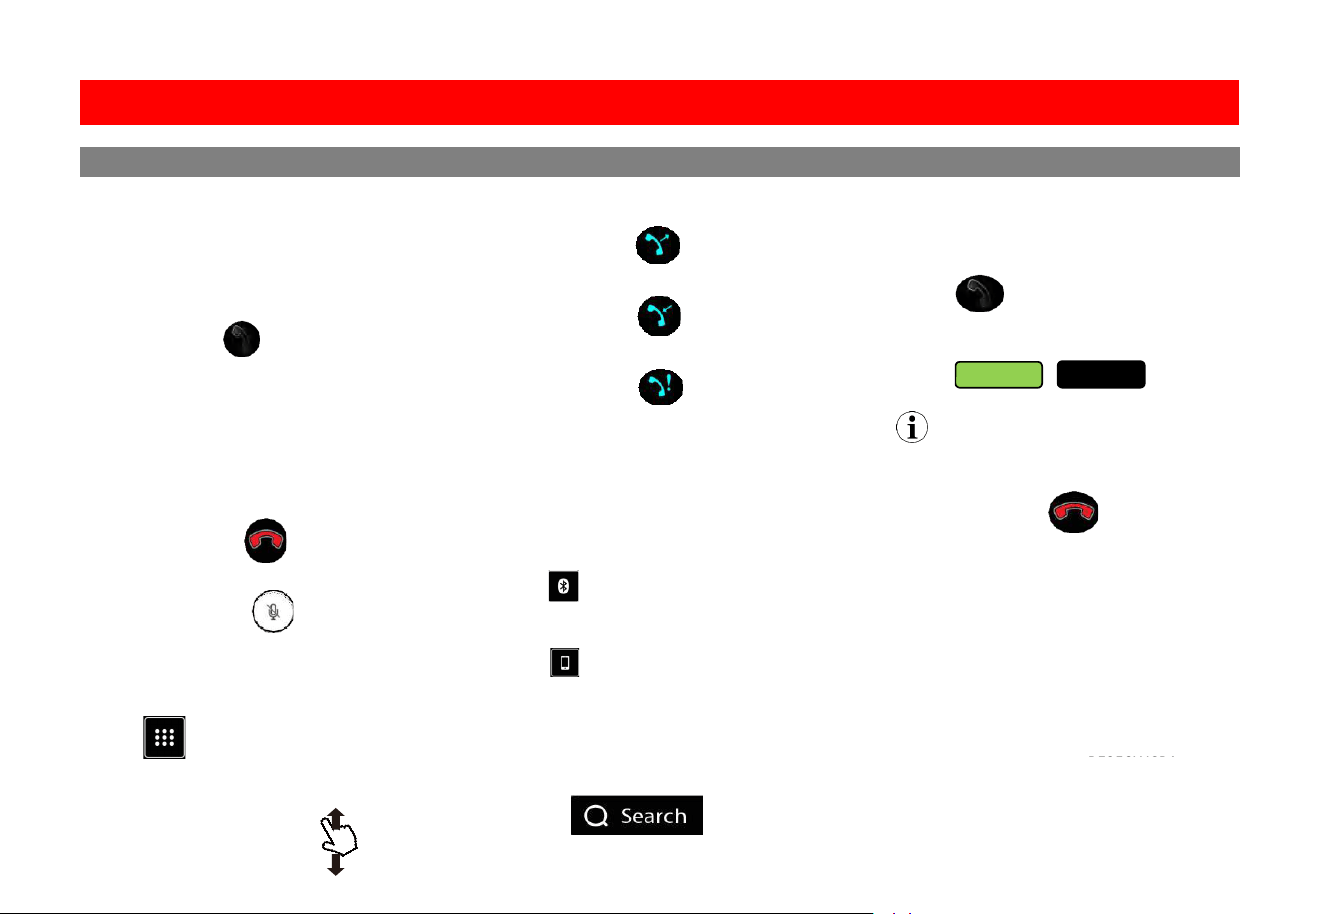
Calling
M
Dial Pad
aking & Receiving Calls
1. Dialing from the dial pad
Touch to makecall
2. Contacts
Touch the contact name
3. History
Choose the name
To end a call Touch
To mute a call Touch
To use the dial pad while on a call
Touch
Searching History
To search, swipe Up or Down
History
1. Outgoing
Call
2. Incoming
Call
3. Missed Call
Private Mode
When a call needs to be transferred to the
mobile device:
Touch to switch the mobile device
Touch
to return to hands-free mode
Searching Contacts
Contacts must be downloaded to search.
1. Touch
Call Waiting
To accept another call:
Touch
To toggle between calls:
Touch
Default Settings
Bluetooth Power :ON
Auto Connect: ON
Auto Answer: OFF
Auto Download Phone book: OFF
Device Name: Boss Audio BE950WCPA
Call 1
Call 2
NOTE
Ac�ve calls will be illuminated green
To End a call, Touch
Phone
Bluetooth®
For wired CarPlay or Android Auto connec�on,
unplug the connec�on cable for use of
Bluetooth connec�on.
BVCP9850W
2121
�
Bluetooth®
Audio
Audio Streaming
To play media through Bluetooth, the mobile
device must be Paired and Connected to the
BVCP9850W. See pg. 19.
Touch
The music will play automatically.
Track Control
1. Play/Pause
2. Track Fwd / Rev
NOTE
For best performance, your mobile device
volume setting should be set to maximum.
All volume adjustments for the system should
be controlled from the product.
The unit will recall the last volume setting on
your mobile device every time is connects.
Formats
Playback is supported from the mobile device
with any format it can play.
Audio will only be played by the product.
Video cannot be viewed on the unit.
Display
Track info will be displayed when available.
Track, Album
and Artist.
Album art supported via Bluetooth
playback.
If CarPlay or Android Auto is connected, you
need to enable Bluetooth streaming on this
product (on the home screen, go to SETTINGS
> Device > Bluetooth Device then touch the
music icon).
For wired CarPlay or Android Auto connec�on,
unplug the connec�on cable for use of
Bluetooth connec�on.
2222
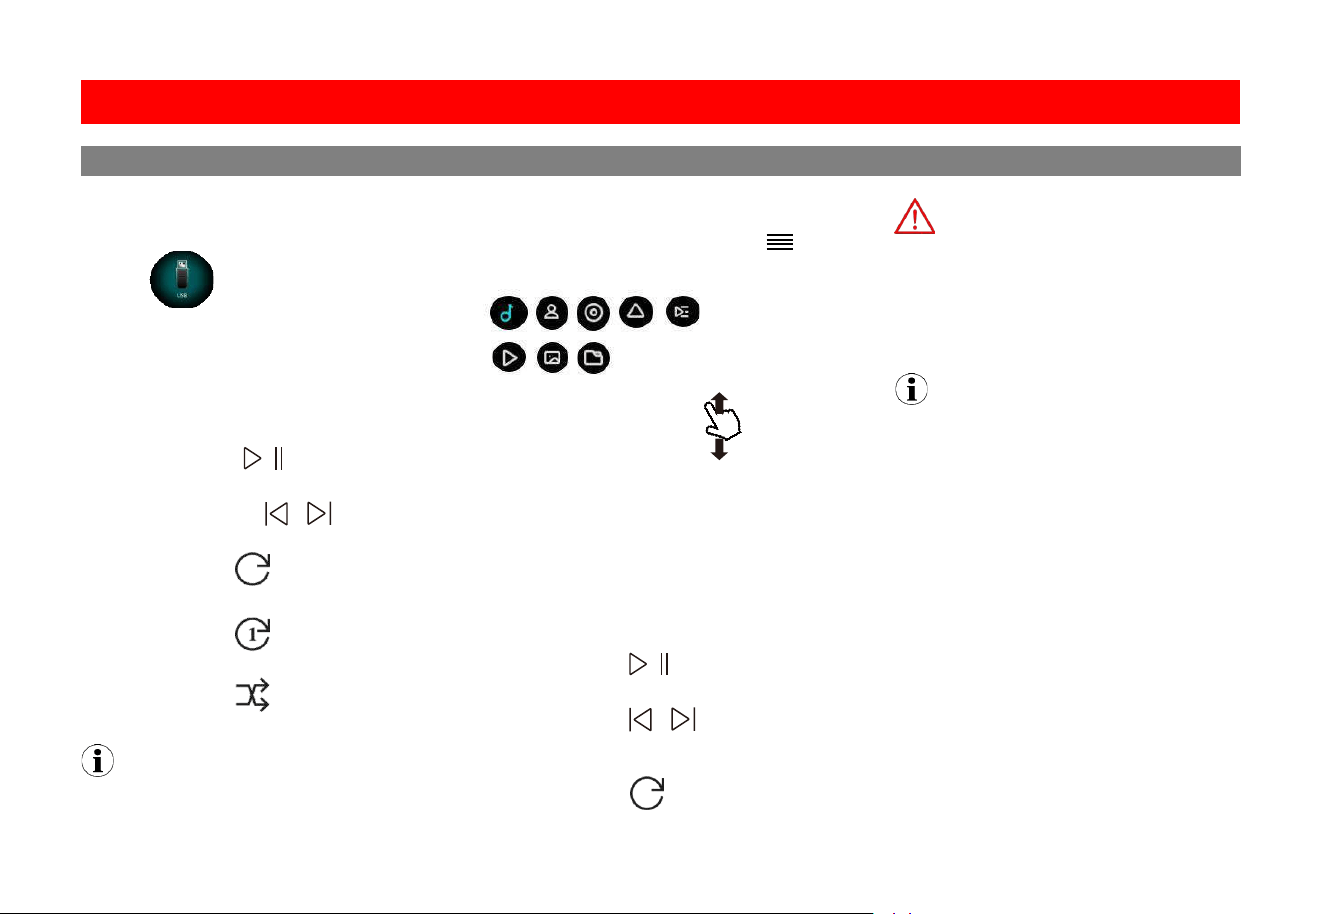
USB Playback
Touch
The music will play automatically.
Audio & Video Control
1. Play/Pause
2. Track Fwd / Rev
3. Repeat List
4. Repeat File
5. Random
NOTE
If there are other files in the USB, music files
will play first.
Navigating Menu
T
In the music playback interface, touch
to access the following menu op�ons.
o
browse contents Swipe
To return to the current file playing,
Touch
Photos
1. Play/Pause
2. Fwd/Rev
3. Rotate
WARNING
Watching videos or photos while driving is
against Federal, State, and Local laws.
Do not use features of this product if it cannot
be operated safely and legally in your location.
NOTE
Review the connections of this product, to
properly integrate the parking brake wire
to the vehicle.
Video and or photos cannot be viewed while
driving. The vehicle must be stationary and
the parking brake applied to enable viewing.
USB
Media
stored sta�ons
n
Tune to a sta�on
Fine tune a sta�on
1. Press and hold un�l “Manual”
2. Press briey to adjust radio
frequency step by step.
RDS/RBDS info (if available) and currently
tuned sta�on will display on the radio icon
in the home screen.
t t t ns will have or display RDS/RBDS
orma�on.
Bands
and store
Select a band
Touch “FM” or “AM” to switch a radio band.
Access EQ se�ngs
To access preset sound modes or customize
frequency se�ngs, touch .
Touch “DX” or “Local” to switch between
local and distant broadcas�ng sta�ons.
“Local” to receive strong FM signals only.
“DX” to receive both weak and strong FM
signals.
When an FM sta�on with stereo is received,
“ST” is displayed.
Tuner
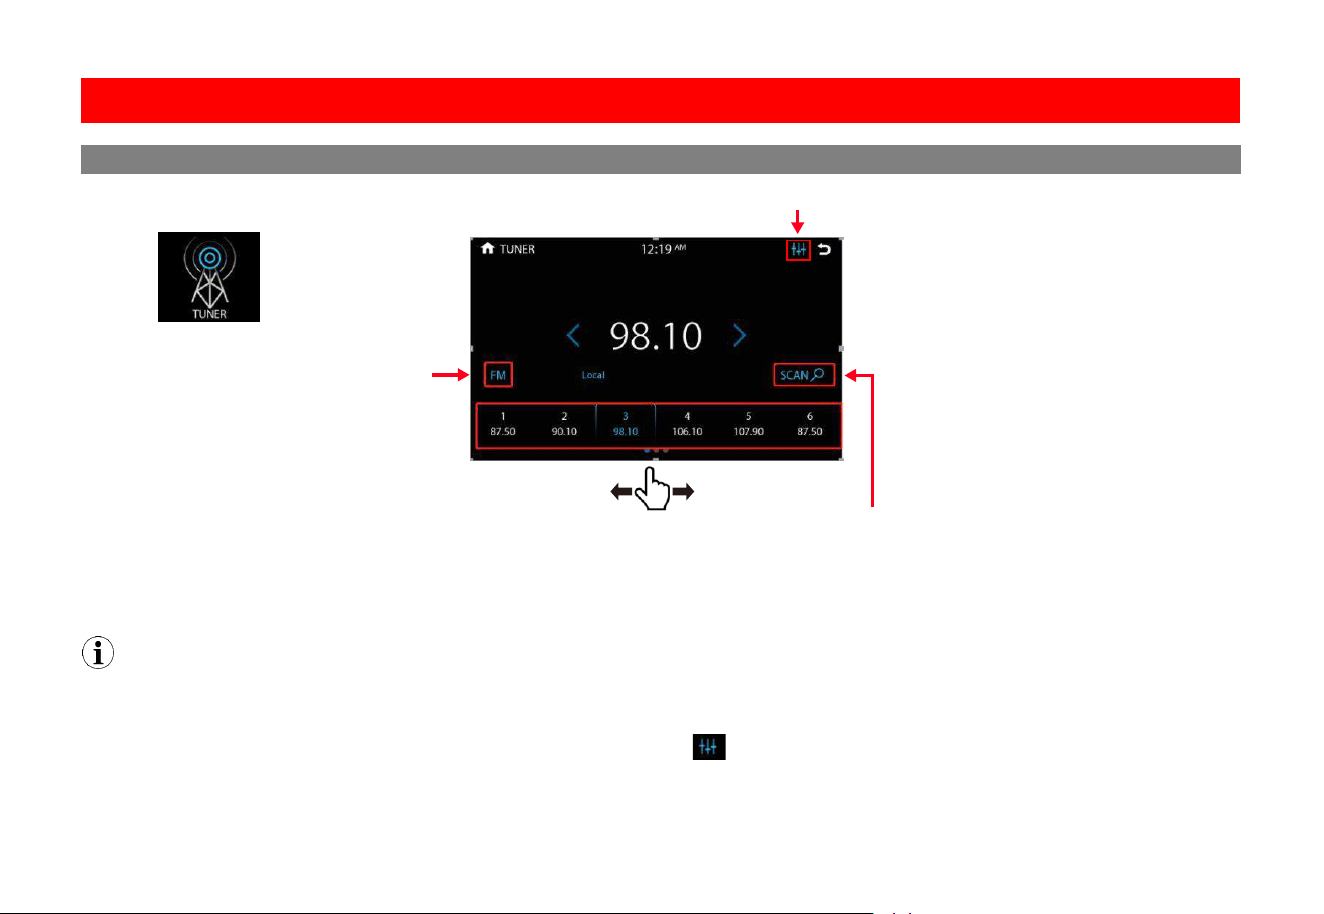
2323
to access the following menu op�ons.
EQ
Swipe to access more
stored sta�ons
Controls
Touch
Search
Tune to a sta�on
Press .
Fine tune a sta�on
1. Press and hold un�l “Manual”
is displayed.
2. Press briey to adjust radio
frequency step by step.
EQ
NOTE
RDS/RBDS info (if available) and currently
tuned sta�on will display on the radio icon
in the home screen.
Not all stations will have or display RDS/RBDS
informa�on.
Bands
Auto search
and store
< >
< >
< >
Select a band
Touch “FM” or “AM” to switch a radio band.
Access EQ se�ngs
To access preset sound modes or customize
frequency se�ngs, touch .
Local/DX
Touch “DX” or “Local” to switch between
local and distant broadcas�ng sta�ons.
“Local” to receive strong FM signals only.
“DX” to receive both weak and strong FM
signals.
When an FM sta�on with stereo is received,
“ST” is displayed.
FM/ AM
Tuner
2424
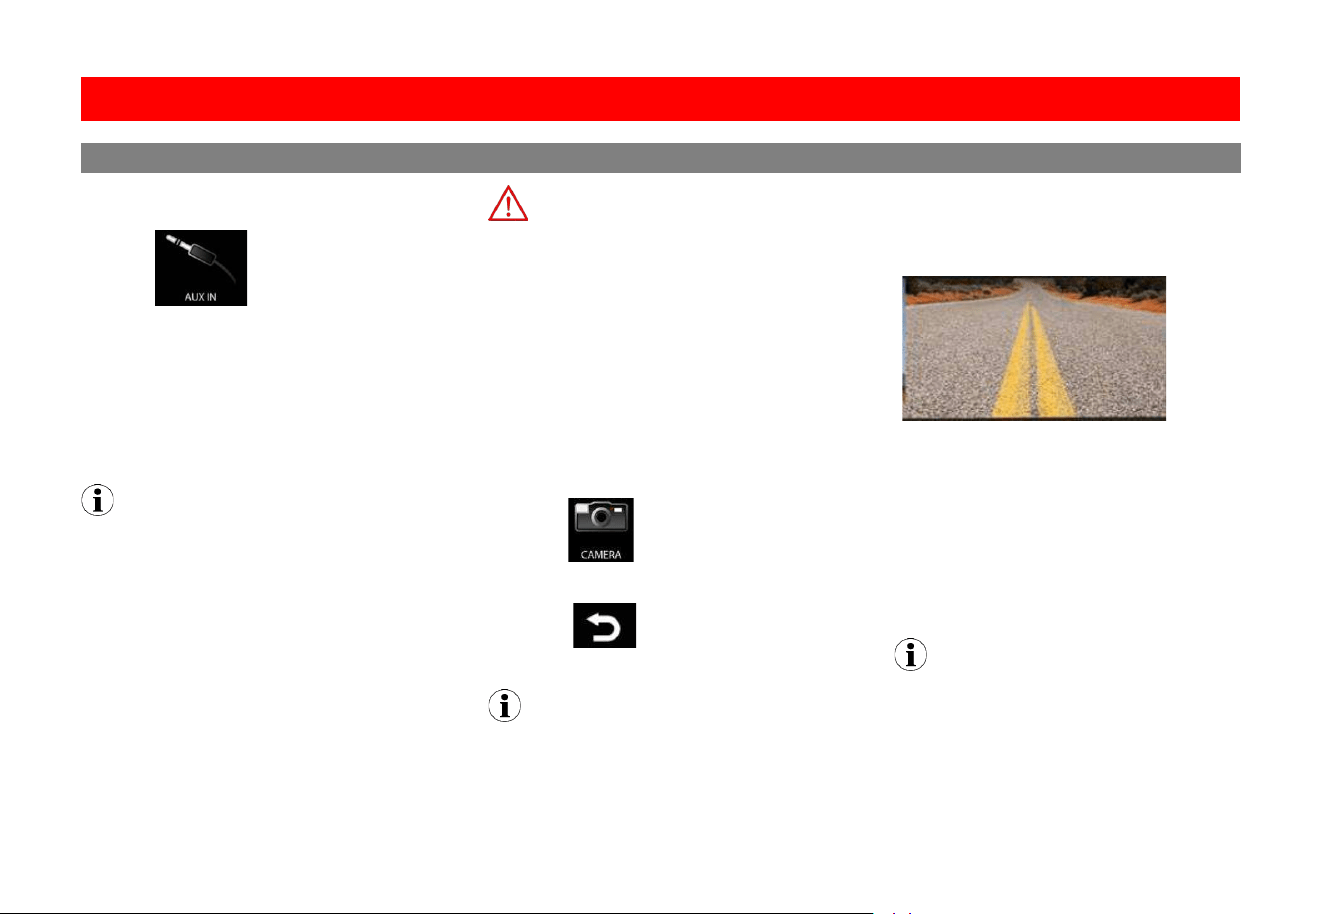
Playback (Audio Only)
Touch
Media must be controlled from the external
device.
Track functions are not controlled from the
product.
NOTE
To adjust the volume level properly, the
carry-in device volume should be set between
50 % - 75%. The volume level should remainat
that level for the remainder of the time it is
connected to the product.
WARNING
Never rely solely on the rear view camera;
always check your surroundings before
proceeding.
Images may appear reversed
Do not use features of this product if it cannot
be operated safely and legally in your location.
Front + Rear View
Rear and Front view camera can by
displayed on demand.
Touch
To return to the Home screen
Touch
NOTE
The Camera Trigger Output wire must be
connected for Camera source to function.
Reverse View
When the vehicle is put into reverse gear, the
camera will display the image on the screen.
Rear View Delay
Due to varying vehicle configurations, the rear
view trigger or front view trigger can be delayed
to best suit the vehicle.
See Settings pg. 26
Default setting: 0 Sec Delay
NOTE
The rear or front view camera will still
function normally, if the product is in
standby mode
External Source
AUX In/Camera
Se�ngs
2525
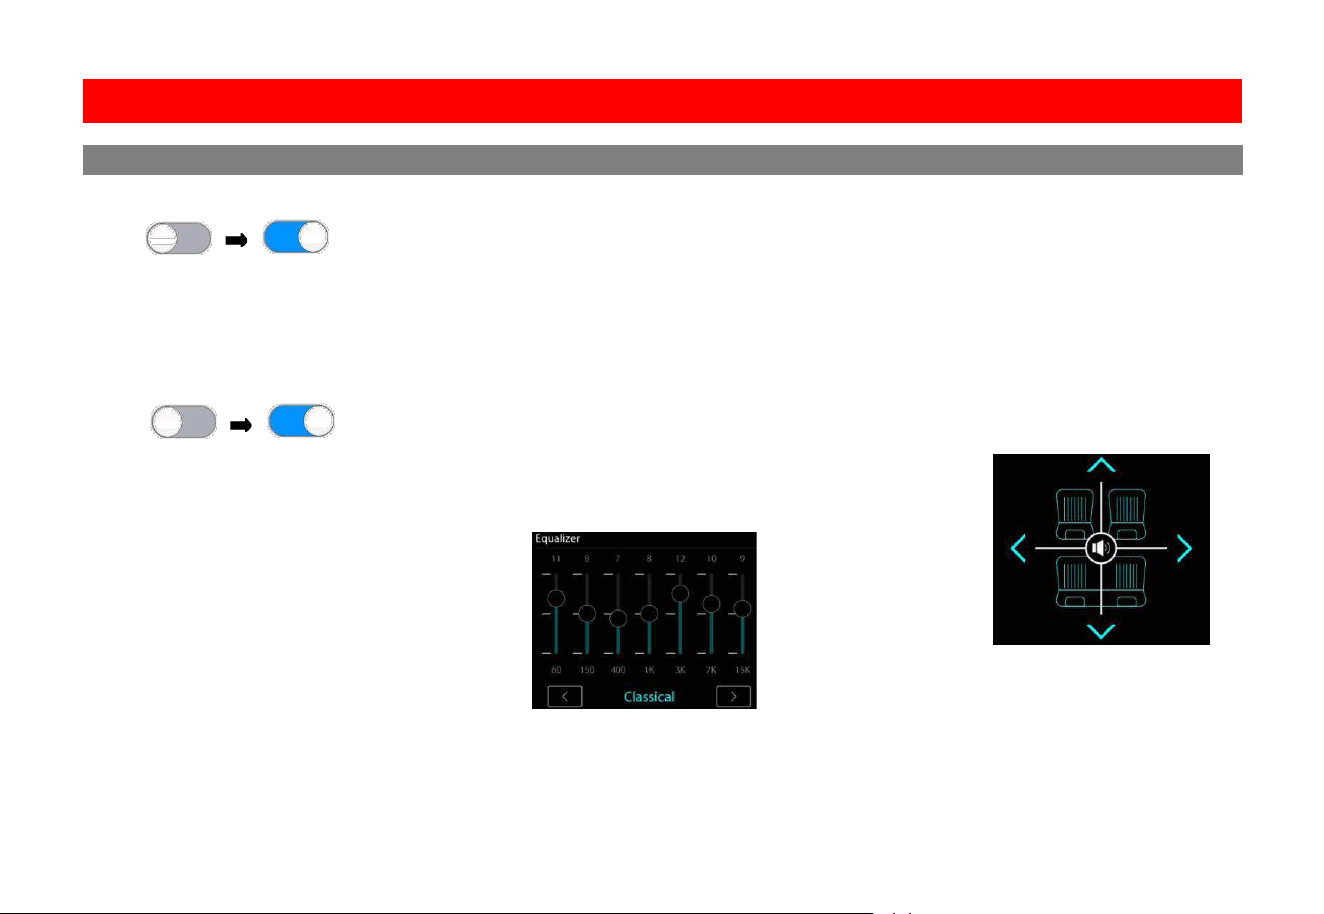
System Tone
Touch
Default Setting: OFF
Loud
Enhances and gently boosts low and high freq.
Touch
Default Setting: OFF
Subwoofer
The level and filter can be adjusted
for the Sub pre-amp output.
Level, -8 - +8 dB
Default Setting: 0dB
Filter: 80 Hz, 120 Hz, 160 Hz @ 12dB/Oct
To select a preset sound mode
Touch
< >
Volume
Settings are for default volumes for Hands- free.
Media Player is a global setting for media.
Source Level
The level can be adjusted for the different
source output.
Audio Effect
Preset EQ , User, Pop, Blues, classical, Jazz,
Electronic, Rock, Country
Balance/Fader
Left/Right Balance,
Swipe
for quick adjustment
Swipe for quick adjustment
Front/Rear Fader,
Touch
Touch
< >
Touch
< >
Touch
< >
Touch
< >
< >
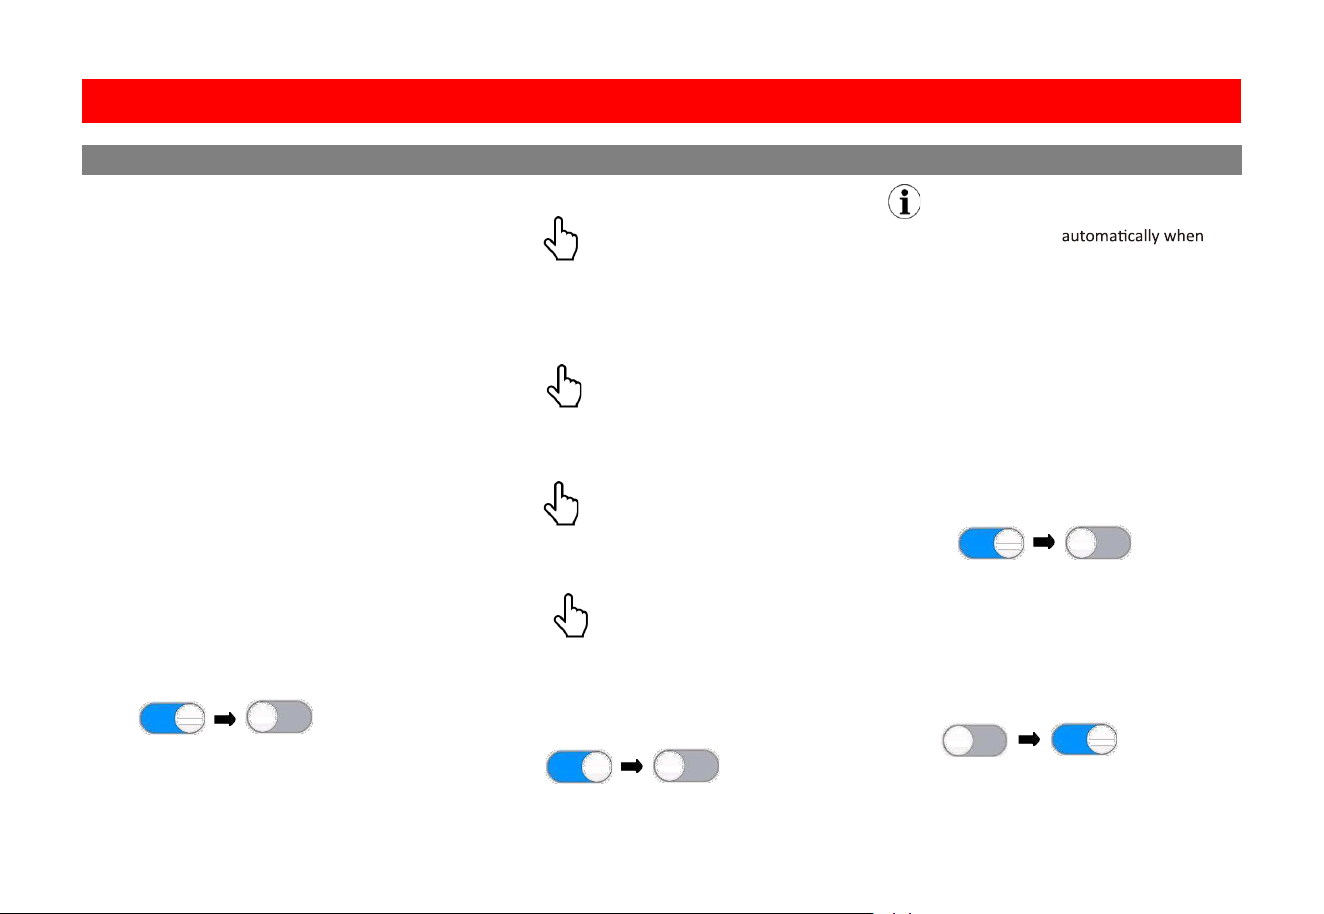
OFF ON
OFF ON
Audio
Se�ngs
2626
.
night use automa�cally.
Default Se�ng:
be disconnected for CarPlay/Android connec�on.
To enable Bluetooth connec�on, on the home
For wired CarPlay or Android Auto connec�on,
unplug the connec�on cable for use of
Bluetooth connec�on.
Illumina�on
Se�ngs
D
Android Auto
ate & Time
Time Zone
Set your �me zone to display correct �me.
The default: (GMT-05:00) Eastern Time (US)
Set manually year/month/day.
Date
Set manually hours and minutes.
Time
Enable or disable automa�c Android Auto
ac�va�on when Android Auto is connected.
Auto Launch
Set 24-hour or 12-hour display.
24H Mode
Enable or disable automa�c �me accuracy
correc�on when Apple CarPlay is connected.
Auto Adjust
Camera Se�ngs
Enable or disable trigger of rear/front camera
view when your vehicle is in reverse gear.
Camera Trigger
ACC OFF
Language
Enable or disable trigger of the unit o one
minute later when your vehicle is turned o.
Radio off aer 1 minute
Delay trigger of the unit o by a set �me
(1/2/3 seconds, or o) when your vehicle is
turned o.
Retain ACC Power
Enable or disable rear camera signal input.
Rear Camera
Enable or disable front camera signal input.
Front Camera
Enable or disable power connec�on to camera.
Select a display language for menu.
Wallpaper
Select a background picture for home screen.
Restore Factory Se�ngs
Restore the unit to the factory se�ngs.
Camera Power
Delay trigger of camera view o by a set �me
(1/2/3 seconds, or o) upon disengagement of
the reverse gear.
Rear/Front Camera Delay
Advance Se�ngs
Input "0000" to access the advance se�ngs.
If your camera does not have parking guide,
enable the func�on to display parking guide.
Otherwise, disable the func�on.
Enable Trajectory
Enable to display the safety warning message
each �me the head unit starts up.
Disclaimer
Select "Right" or "Le" to posi�on the CarPlay
menu bar on the right or le side of the screen.
To ac�vate the change, you need to unplug the
iPhone from the head unit and re-plug it.
Driving Seat
If you enable parking guide (Enable Trajectory),
you can adjust on-screen parking guidelines.
Touch and drag a circle icon on the screen to
reposi�on the related guideline. To fine tune
posi�oning of the guideline, repeatedly touch
an on-screen arrow icon. To reset the guidelines,
press the reset icon on the screen.
Sta�c Trajectory Adjust
Enable screenshot taking func�on.
Press briey the power buon on the front
panel, then the screenshot is taken and saved
in the connected USB device.
Screenshot Control
CAUTION
All se�ngs and presets will be cleared aer
restoring to the factory se�ngs.
General
Se�ngs
2727
Day Brightness
Adjust day mode brightness value.
Night Brightness
Adjust night mode Brightness.
When the vehicle lights are on, the
products illumination will be changed to
night use automa�cally.
Screen and LED brightness settings for this
Gamma
LED Animation
Touch
Will cycle through all colors on LED
Default Setting: ON
LED Color
Touch
Adjust button lights in different colors.
Illumination Default
To restore Illumination settings to default.
Touch
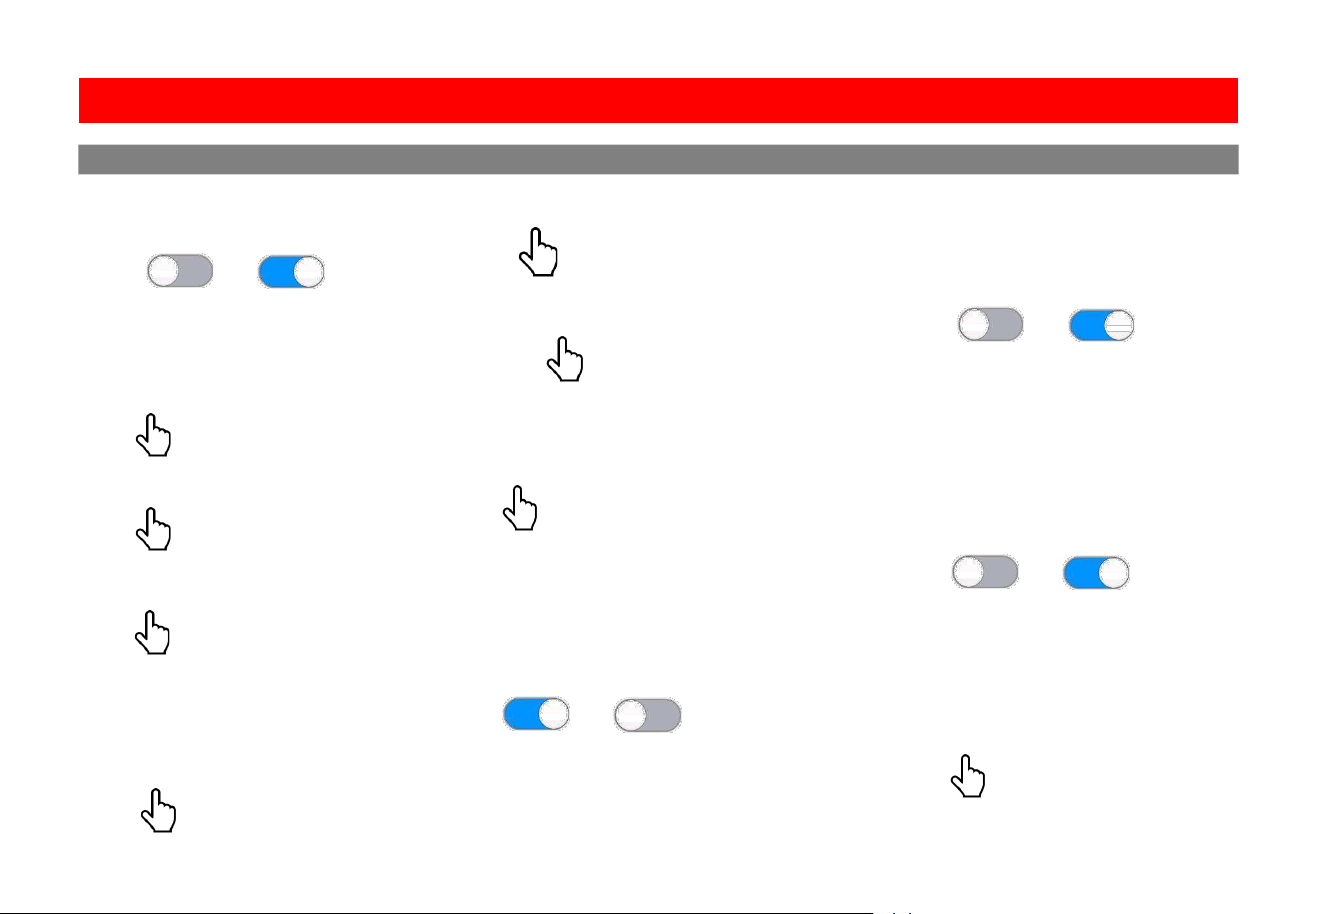
Bluetooth Setting
Bluetooth Power
Touch
Default Setting: ON
Auto Connect
Touch
Gamma can be adjusted for both day
and night settings.
Will restore all display settings.
Bluetooth Device
Touch
Bluetooth device search.
Auto connect to the device when the product
is powered ON
Default Setting: ON
Auto Answer
Touch
Apple CarPlay Device
Touch
Wireless Apple CarPlay device search.
Auto answer when there is an incoming call.
Default Se�ng: OFF
NOTE
Touch
< >
Touch
< >
Touch
< >
Bluetooth will turn OFF
CarPlay or Android Auto is connected. If other
devices are connected via Bluetooth, they will
be disconnected for CarPlay/Android connec�on.
To enable Bluetooth connec�on, on the home
screen, go to
SETTINGS > Device > Bluetooth
Device then touch the music or phone icon to
enable Bluetooth streaming or phone.
For wired CarPlay or Android Auto connec�on,
unplug the connec�on cable for use of
Bluetooth connec�on.
ON OFF
ON OFF
ON OFF
OFF ON
Illumina�on Device
Se�ngs
2828
Auto Download
Phone Book
Touch
Seek Quality FM/AM
Touch
RDS/RBDS
Not all sta�ons will broadcast informa�on to
dispaly.
Automatically download phone book.
Default Setting: OFF
Manual Download Phone Book
Manual Delete Phone Book
Touch
Touch
Device Name
Touch
Default name:
Boss Audio BVCP9850W
Adjust the sensitivity of both AM/FM bands.
Reset Touch
Will reset the seek sensitivity to back to default.
Region
Touch
Default Setting: America 2
US Tuner Spacing: FM (200 KHz), AM (10 KHz)
European Spacing: FM (50 KHz), AM (9 KHz)
RDS/RBDS, Radio Broadcast Data System
Touch
AF (Alternative Frequency)
Touch
When On, the tuner will automatically locate
the same tuning program on other stations
and select the strongest signal of those being
broadcast.
Default Setting: OFF
TA (Traffic Announcement)
Touch
The radio will automatically tune in to traffic
information broadcasts while receiving FM
broadcasts playing media.
Default Setting: OFF
ON OFF
Reset WIFI Password
Default Setting: ON
Auto Preset
Touch
Touch
Allows data from the radio station to be displayed
on the produc
t.
Automatically search and preset stations.
OFF ON
OFF ON
OFF ON
Device Radio
Se�ngs
Se�ngs
2929
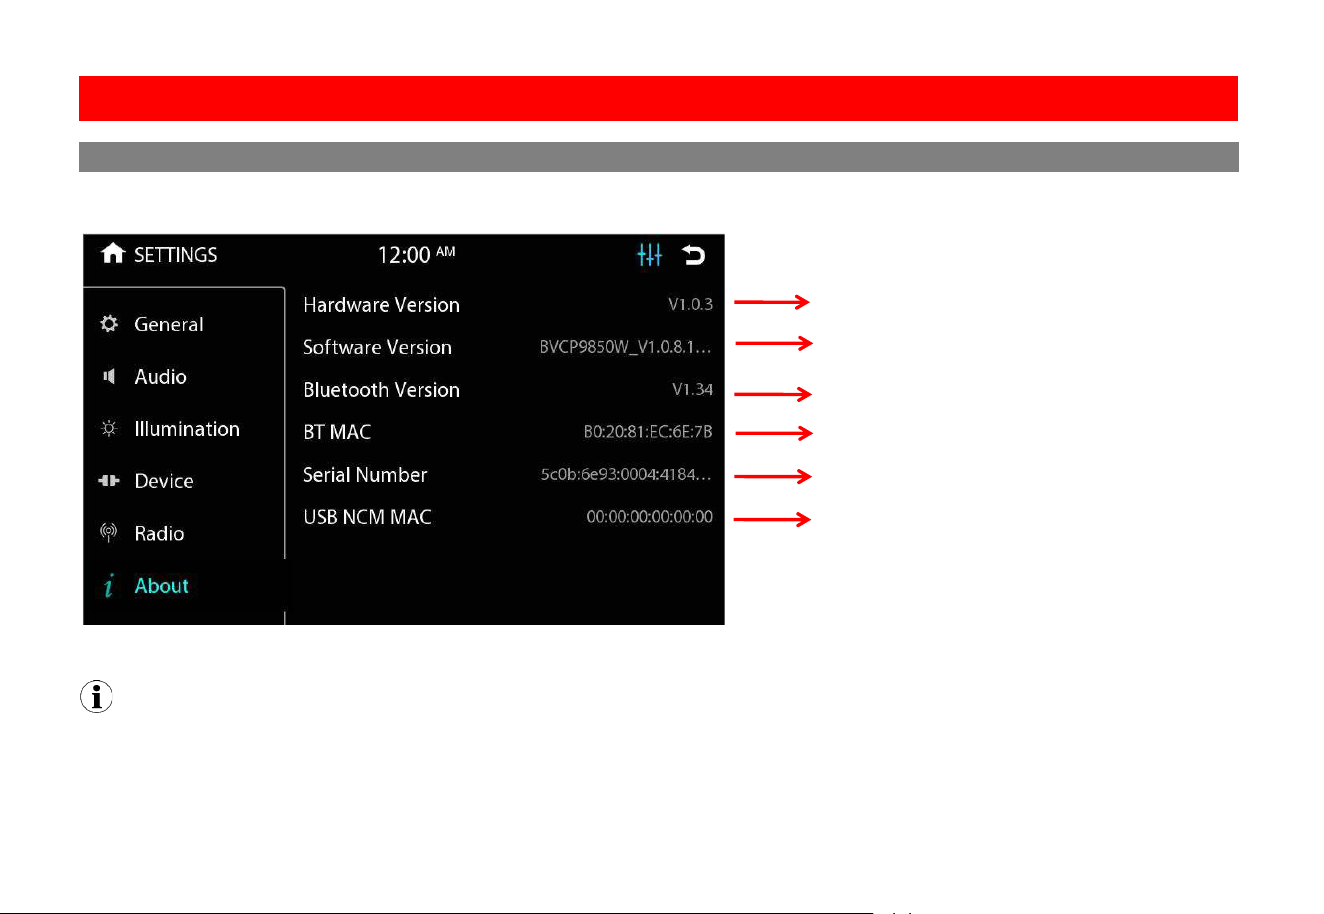
Displays the system information:
Hardware Version
NOTE
Software version information depends on the software used for production.
Bluetooth Version
BT MAC
Serial Number
USB NCM MAC
Software Version
About
Se�ngs
3030
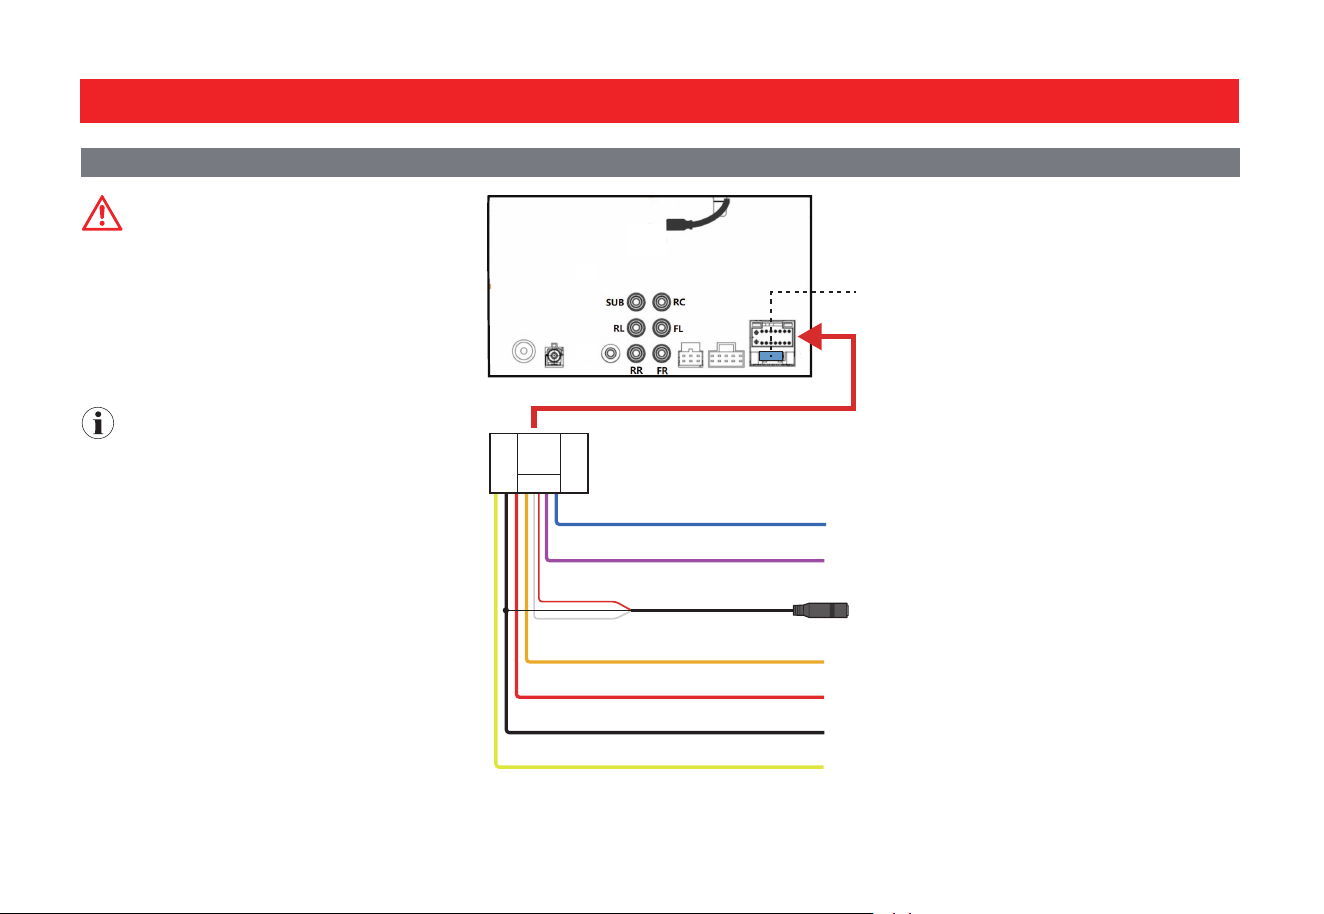
Connec�ons
Power and Steering Wheel Control (SWC) Wiring
CAUTION
Always replace the faulty fuse with the same
type and ra�ng (15A).
Constant/Accessory power input is rated at 12V.
Antenna output is rated at 500mA max. It is
recommended to use a relay if addi�onal power
is required.
NOTE
Unused input/output wires need to be insulated
with tape, heat shrink, or crimp connectors.
Never use wire nuts.
Illumina�on input wire (orange) must be
connected to the parking light for screen
dimming adjustment at night.
Reverse Input wire (Purple/white) must be
connected to the reverse light wire for the
backup camera trigger when the gear is
switched to reverse.
A separate interface might be needed for your
vehicle applica�on. It is recommended that you
consult with a professional installer.
15A Mini ATM Fuse
(Pre-installed)
Antenna Output (Blue)
Reverse Input (Purple/white)
SWC Input (Black)
Illumina�on Input (Orange)
Accessory (Red)
Ground (Black)
Constant (Yellow)
To a car antenna (not included)
To reverse light for backup camera trigger
To a steering wheel control adapter (not included)
To vehicle’s parking light
To igni�on key switch (+12V)
To vehicle’s metal frame/car chassis
To posi�ve car baery terminal (+12V)
Red
White
3131
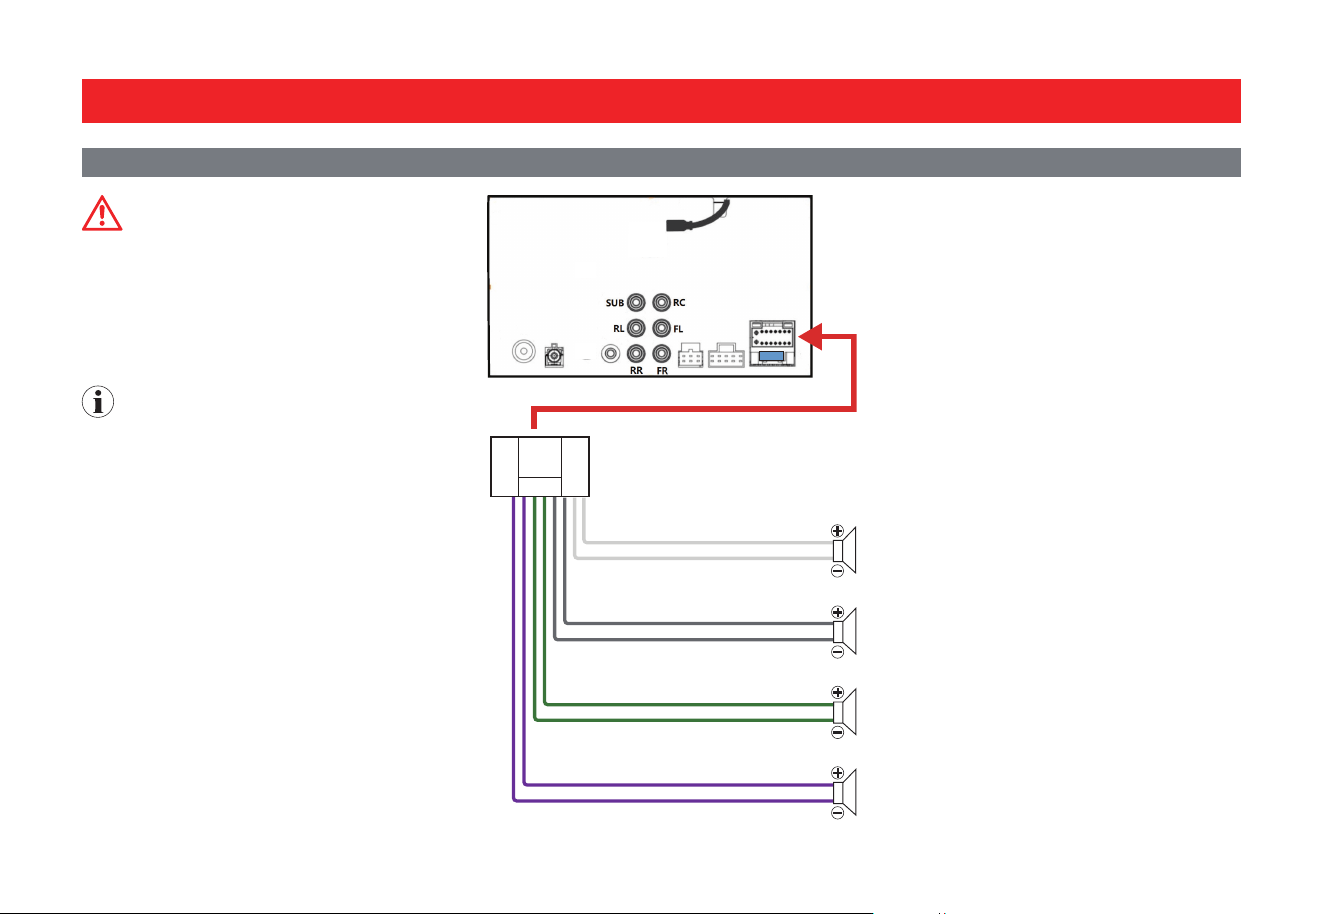
Connec�ons
Speaker Wiring
CAUTION
Do not chassis ground any speaker wire leads.
Only use 4-8 Ω speakers.
DO NOT use 1-3 Ω speakers.
Do not bridge any of the channels. They are
only to be wired in stereo mode.
NOTE
Unused speaker wires need to be insulated with
tape, heat shrink, or crimp connectors to avoid
damage to the unit. Never use wire nuts.
Double check speaker polarity when making
connec�ons.
RADIO
SUB2SUB1
FL
RL RR
R-IN
V-IN
FR L-IN
15
To front le speaker
To front right speaker
To rear le speaker
To rear le speaker
Front Le (White)
Front Le (White/Black)
Front Right (Gray)
Front Right (Gray/Black)
Rear Le (Green)
Rear Le (Green/Black)
Rear Right (Purple)
Rear Right (Purple/Black)
3232
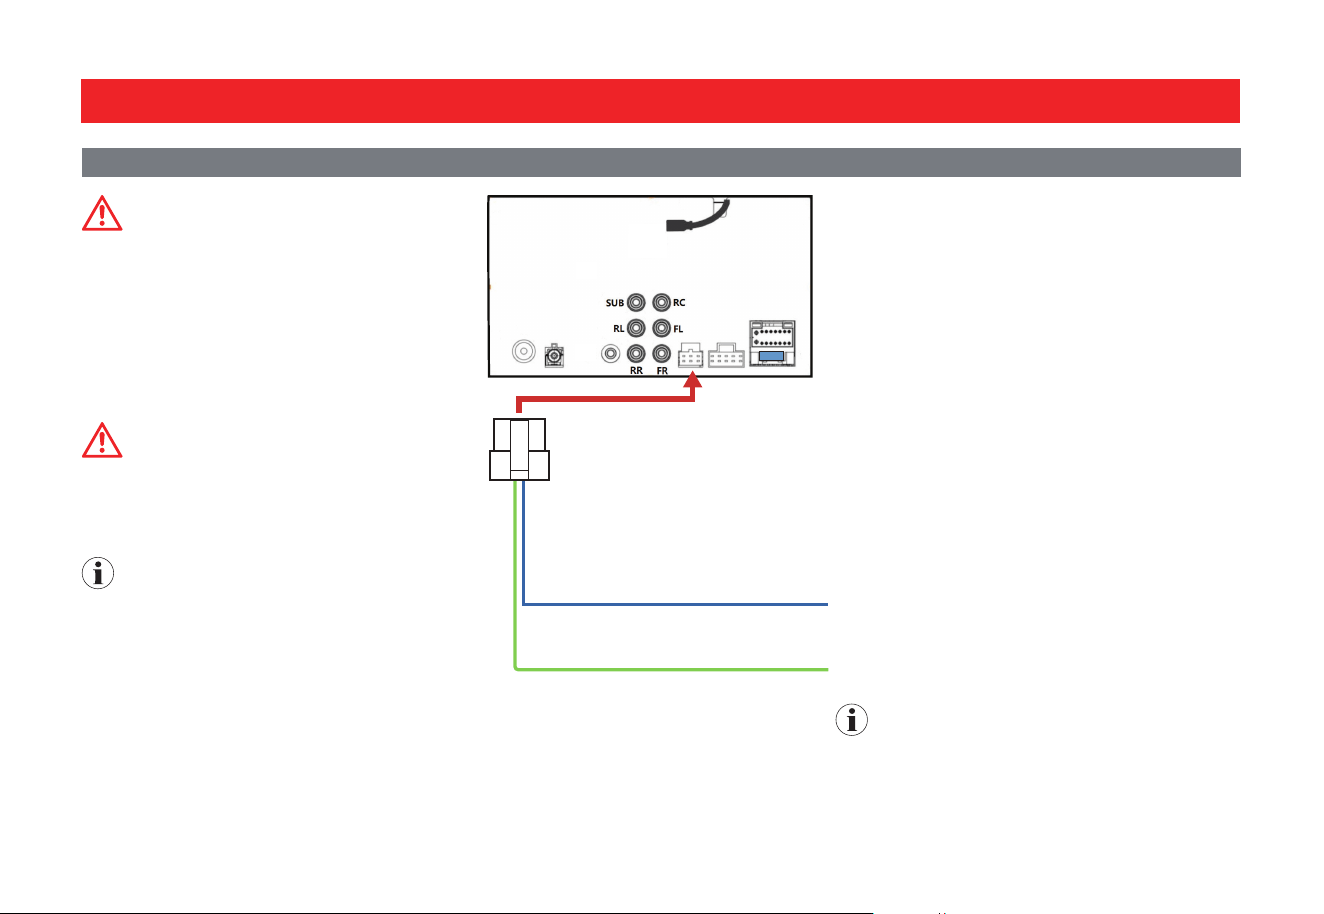
Connec�ons
Parking Brake and Amplifier Remote Output Wiring
WARNING
Improper connec�on or use of the parking
brake status wire (e.g. defea�ng the safety
feature) violates Federal, State, and Local laws.
This may lead to injury, property damage, and/
or death.
Watching videos or photos while driving is
against Federal, State, and Local laws.
CAUTION
Remote output is rated at 500mA max. It is
recommended to use a relay if addi�onal power
is required.
NOTE
For Android Auto setup, the parking brake
status wire MUST be connected.
Review the connec�on of this product to
properly integrate the parking brake wire to the
vehicle.
Video and photo cannot be viewed while
driving. The vehicle must be sta�onary and the
parking brake applied to enable viewing.
To power terminal on an amplifier (not included)
AMP Remote Output (Blue/white)
Parking Brake Input (Light green)
To vehicle’s parking brake switch
NOTE
Parking brake wire loca�on varies from vehicles.
Consult a cer�fied professional installer
3333
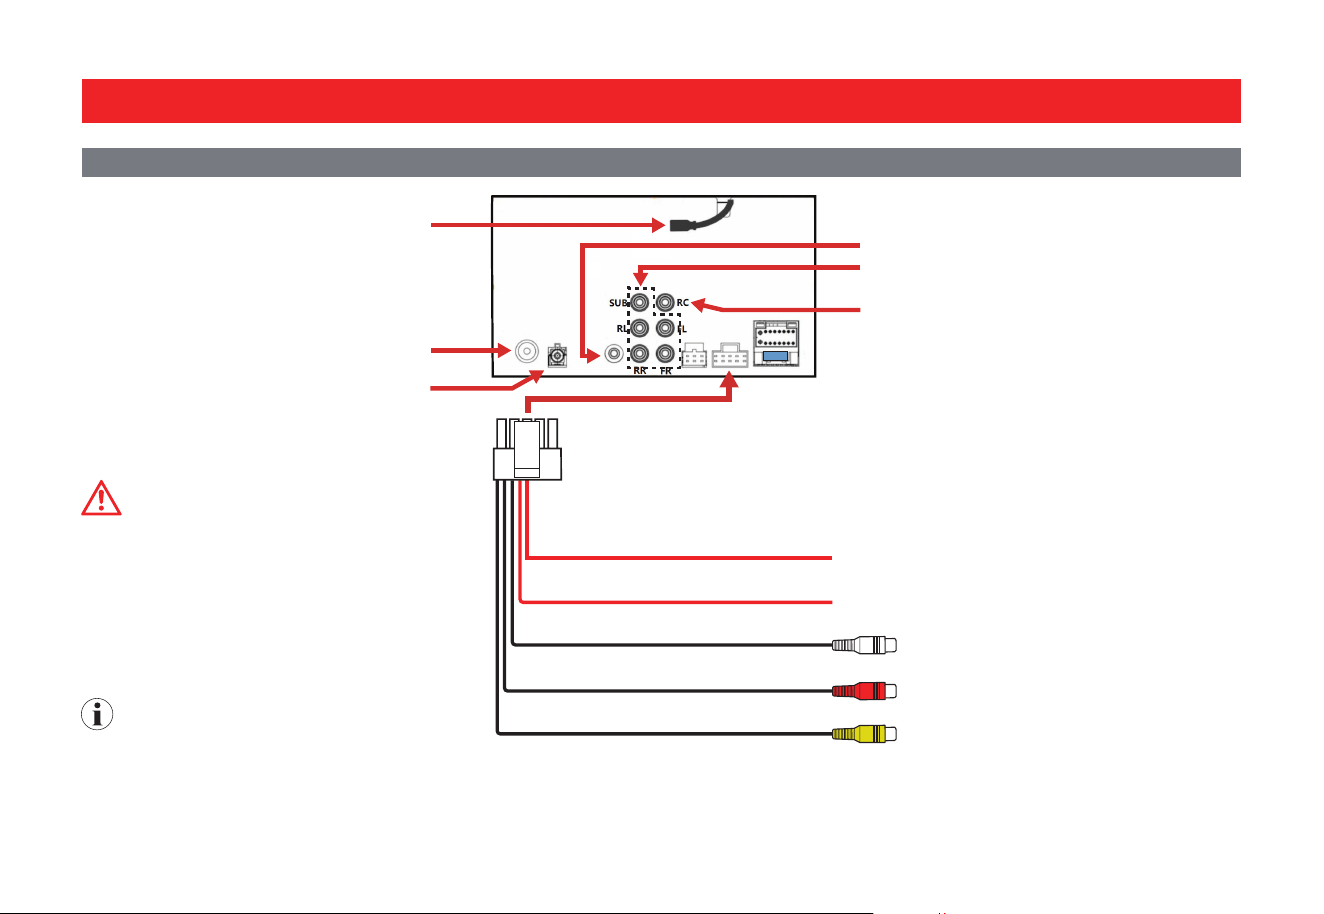
Connec�ons
Camera/USB/Audio/Radio/Mic
Front Cam Power Output (Red/Purple)
Rear Cam Power Output (Red/White)
Le AUX Input
Right AUX Input
Front Camera Input
To a front camera (not supplied) for power output
To a rear camera (not supplied) for power output
To RCA audio outputs on an audio playback
device (e.g. a CD or external media receiver)
*
To a front camera for video signal input
WARNING
Never rely solely on the backup camera. Always
check your surroundings before backing up.
Images may appear reversed if your camera is
not properly installed or set up.
Do not use features of this unit if it cannot be
operated safely and legally in your loca�on.
NOTE
Subwoofer pre-amp output is a non-fading
mono output.
Always run signal wires away from power cables
to reduce the possibility of noise.
• Using a lightning cable or USB cable,
connect your iPhone or Android device to
enable use of CarPlay or Android Auto.
• Connect to a USB ash drive for media play.
• Connect and charge your mobile phone.
Connect the supplied GPS antenna for auxiliary
Android Auto/CarPlay naviga�on.
Connect a FM/AM radio antenna (not included).
Connect the supplied hands-free microphone.
Connect an amplifier (not included) for pre-
amp audio output.
Connect a rear camera for video signal input
*
Or using a RCA to 3.5mm/USB-C/lightning adapter (not
included), connect the AUX input to the audio output on
your mobile phone.
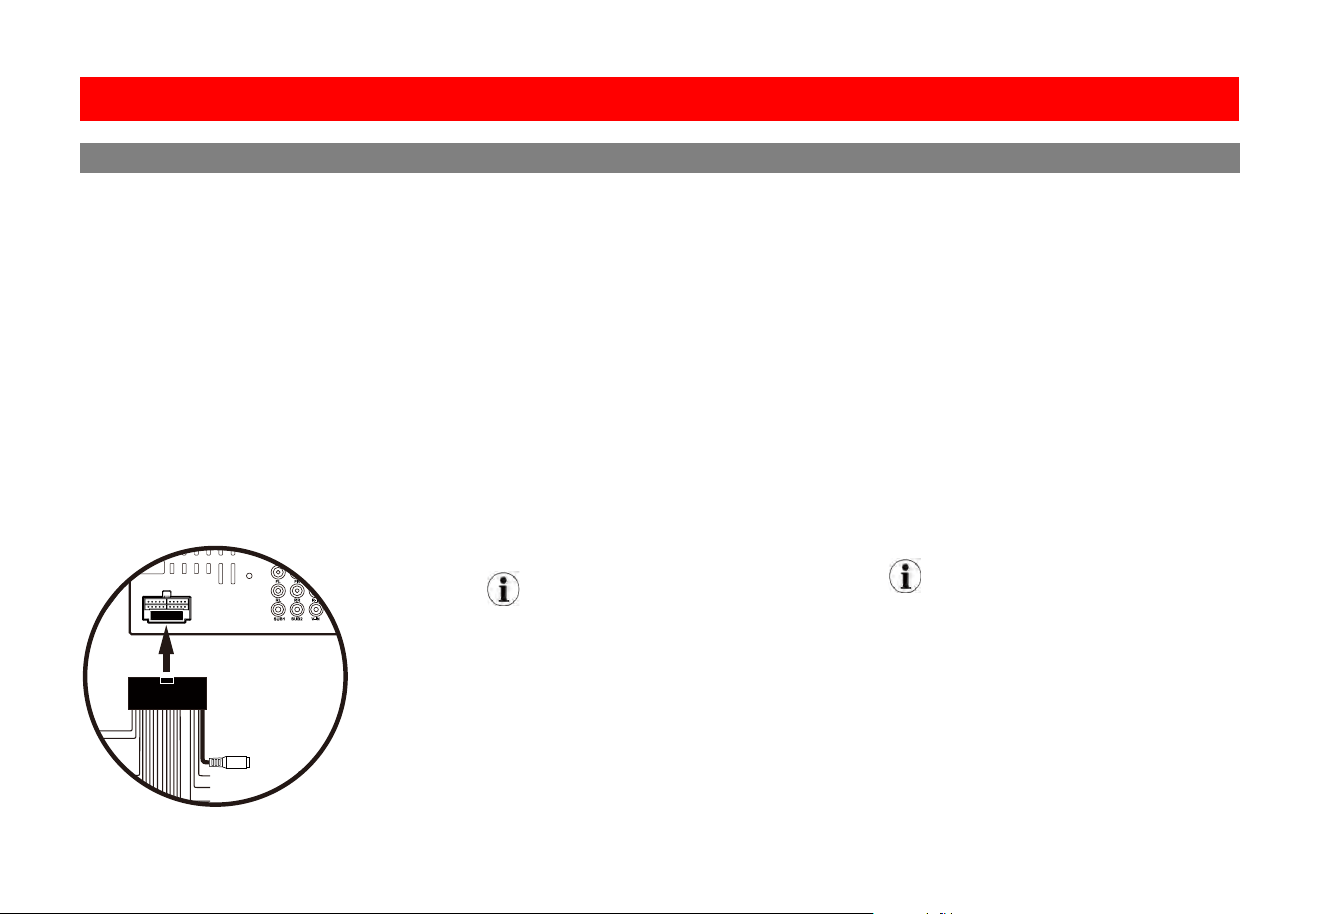
3434
Steering Wheel Control (SWC) func�on allows
you to operate this unit via an external device
(steering wheel control).
A third-party adapter must be used in order
for this unit to be compa�ble with your OEM
steering wheel controls. We recommend PAC
SWC series.
This unit has a built-in 3.5mm SWC interface
at is m a�bl w ma ar 3rd part
SWC control modules, such as PAC, METRA,
and others.
3.5mm SWC input (black socket) is located on
the supplied wire harness which is connected
to the rear of the unit.
Wire Harness
Illustra�on for reference only
The following radio / audio func�on controls
are available to be programmed.
Mute
Home
Seek + / Next Track
Seek - / Previous Track
Volume +
Volume -
Band
Phone Menu
Bluetooth Talk
Bluetooth End Call
Voice Assistant / PTT
SWC Installa�on / ProgrammingProgrammable ControlsSWC Introduc�on
ote
Not all OEM steering wheel func�ons may be
supported.
Specifica�ons are subject to change without
no�ce.
ote
For SWC programming technical assistance, call
the number in your SWC instruc�on manual.
Contact your local installa�on expert for the
correct SWC adapter for your specific vehicle.
1. For most SWC adapters, select program
using "Pioneer/Sony/Other" mapping order
as described in “Programmable Control”.
2. When programming, if a func�on is not
supported (or not desired), then the func�on
MUST be skipped as per the SWC module
instruc�ons.
3. The SWC func�on MUST be programmed in
the correct order as per the func�on mapping
order instruc�ons.
Front Detail
Basic Product Opera�on
Using SWC
Steering Wheel Control Compa�bility
Connec�ons
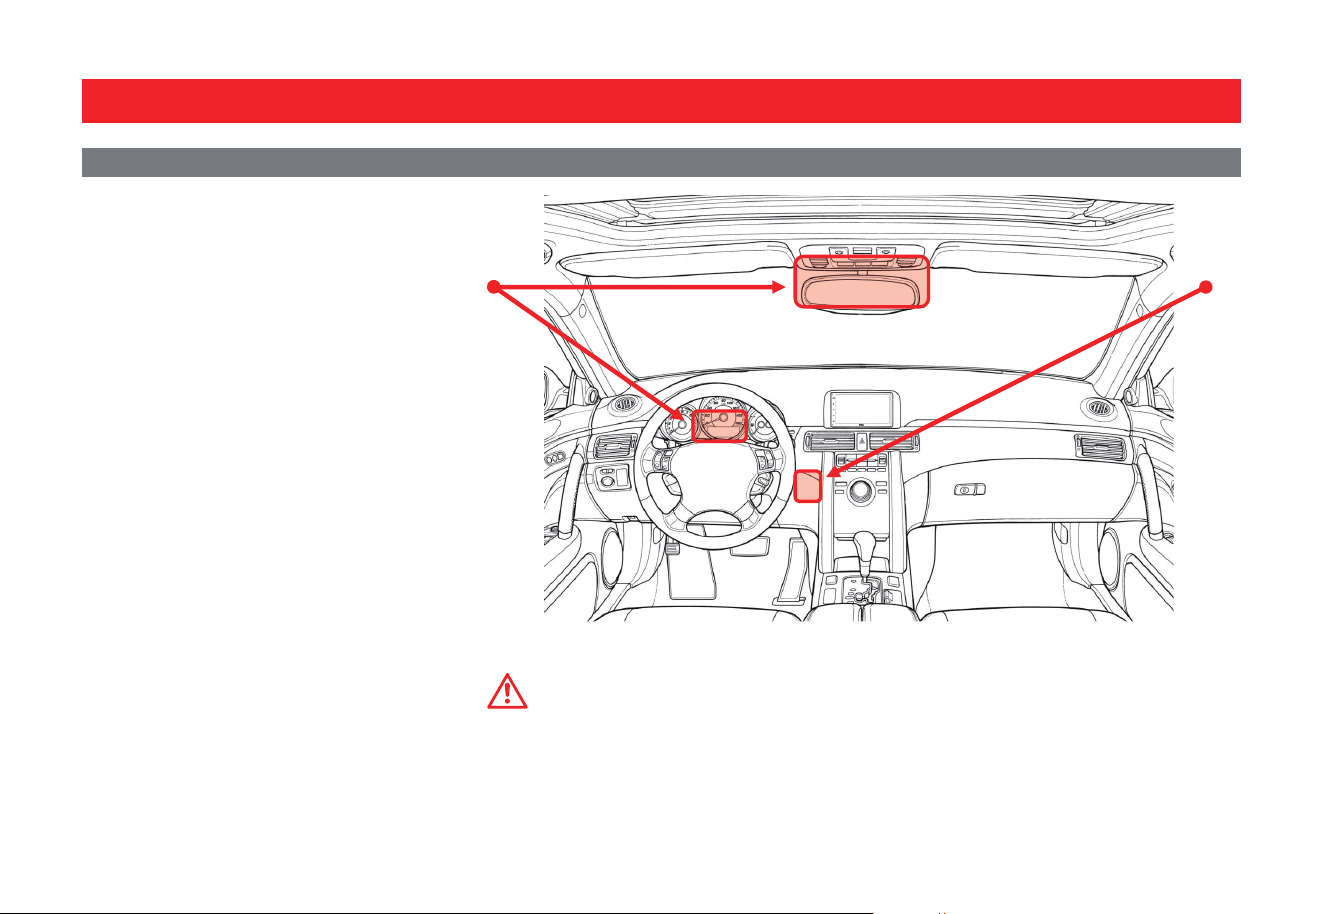
Hands-free Mic Installa�on
Placement
The unit comes with a hands-free microphone.
The loca�on of the microphone can vary
from dierent vehicles due to layout, interior
materials, etc.
The
Red shaded areas are the recommended
loca�ons for best microphone performance.
Items to look for before placement:
1. Do not place in front of air vents.
2. If the vehicle has tweeters placed on sail
panel, do NOT locate the microphone on
steering column area.
3. The front of the microphone must not be
blocked.
4. Microphone should be firmly aached to
moun�ng loca�on.
5. Do not cover the grille openings surrounding
the microphone.
6. To avoid excessive wind noise, do not place
near the sunroof opening.
WARNING
Run the microphone wire where it will NOT impede
with the opera�on of any safety items (e.g. airbags,
knee airbags, etc.)
3535
Steering Wheel Control (SWC) func�on allows
you to operate this unit via an external device
(steering wheel control).
A third-party adapter must be used in order
for this unit to be compa�ble with your OEM
steering wheel controls. We recommend PAC
SWC series.
This unit has a built-in 3.5mm SWC interface
that is compa�ble with many popular 3rd party
SWC control modules, such as PAC, METRA,
and others.
POWER
3.5mm SWC input (black socket) is located on
the supplied wire harness which is connected
to the rear of the unit.
Wire Harness
SWC Input
Illustra�on for reference only
The following radio / audio func�on controls
are available to be programmed.
Source
Mute
Home
Seek + / Next Track
Seek - / Previous Track
Volume +
Volume -
Band
Phone Menu
Bluetooth Talk
Bluetooth End Call
Voice Assistant / PTT
SWC Installa�on / ProgrammingProgrammable ControlsSWC Introduc�on
Note
Not all OEM steering wheel func�ons may be
supported.
Specifica�ons are subject to change without
no�ce.
Note
For SWC programming technical assistance, call
the number in your SWC instruc�on manual.
Contact your local installa�on expert for the
correct SWC adapter for your specific vehicle.
1. For most SWC adapters, select program
using "Pioneer/Sony/Other" mapping order
as described in “Programmable Control”.
2. When programming, if a func�on is not
supported (or not desired), then the func�on
MUST be skipped as per the SWC module
instruc�ons.
3. The SWC func�on MUST be programmed in
the correct order as per the func�on mapping
order instruc�ons.
Front Detail
Basic Product Opera�on
Using SWC
Steering Wheel Control Compa�bility

3636
Issues
No Sound
Media Not Supported
Bad Radio Reception
Cause
Product is muted
External amplifiers
Audio source
Media on USB flash drive
Radio area
Antenna
Solution
Touch the volume.
Check the external amplifiers are on.
Change the audio source
Change the media format on the USB device.
Change the USB device.
Go to Settings > Radio > Sensitivity
Adjust AM/FM Sensitivity
Change the station
Turn OFF AF and TA
Turn OFF RDS/RBDS
A
Connect an antenna to the unit.
ntenna output wire is not connected.
Apple CarPlay/
Bad lightning/USB cable
Wi-Fi or Bluetooth disabled
Wireless CarPlay/Android Auto
connec�on disabled
Replace the cable for wired connec�on.
Enable Wi-Fi and Bluetooth on your phone.
Allow wireless CarPlay/Android Auto use when
prompted during first �me connec�on/pairing.
For CarPlay use, make sure CarPlay is enabled
on your iPhone (Se�ngs > General > CarPlay >
Paired device > Open CarPlay).
Enable CarPlay/Android Auto connec�on (on
the home screen, go to SETTINGS > Device >
Bluetooth Device then tap the phone name.
Android Auto unable to start
Bluetooth streaming/phone call not possible Bluetooth connec�on disabled
Make sure your mobile device is within range.
Enable Bluetooth on your mobile device.
Troubleshoo�ng
Bluetooth connec�on disabled
Enable Bluetooth connec�on (on the home screen,
For wired CarPlay/Android Auto connec�on,
unplug the connec�on cable.
Troubleshoo�ng
3737
.
connec�on disabled
e for wired connec�on.
prompted during first �me connec�on/pairing.
Se�ngs General CarPlay
Enable CarPlay/Android Auto connec�on (on
SETTINGS Device >
Bluetooth Device
Bluetooth connec�on disabled
Troubleshoo�ng
Issues
Hands-free call quality
Cause
Mobile device
Microphone
Solution
Check cellular strength on mobile device.
End call and redial number.
Microphone placement needs to be relocated.
Microphone needs to be firmly attached to
location it’s mounted on.
Check to see if microphone is properly
plugged in.
If you have questions about this product:
Customer Service
805-751-4853
M-F 8:30a-5:00p (PST)
Tech Support:www.bossaudio.com/support/technical-support
© 2023 BOSS Audio Systems
BVCP9850W
Bluetooth streaming/phone call not possible Bluetooth connec�on disabled
Enable Bluetooth connec�on (on the home screen,
go to SETTINGS > Device > Bluetooth Device then
tap the music or phone icon to enable Bluetooth
streaming or phone).
For wired CarPlay/Android Auto connec�on,
unplug the connec�on cable.
Troubleshoo�ng

3838
General
Power Input
............................
10.8 V—16 V DC
Nominal
...........................
14.4 V DC
Current Consumption
......................
10 A (Max)
Fuse Type
.................................
15 A, Mini-ATM
Dimensions (H x W x D)
................
4” x 7” x 6.5”
Unit Weight
............................................
3.1 lbs.
Operational Temperature
................
-4—158�F
Display
Screen Size
..........................................
......
6.75”
Aspect Ratio
...............................................16:9
Resolution
.........................................
480 x 800
Screen Type
....................
TFT-LED ActiveMatrix
Audio
Max Power
..........................................
80 W x 4
Acceptable Speaker Load
......................
….4-8 Ω
Preset EQ
.........................................................
8
EQ Boost/Cut
...........................................
± 7 dB
Audio
Sub LPF
......
80 Hz, 120 Hz, 160 Hz @12dB/Oct
Sub Level..............................................-8 - +8dB
Radio Tuner
Freq. Range
................
87.5 MHz-108 MHz (FM)
Freq. Range
.................
522 kHz-1710 kHz (AM)
USA 1 Range (FM)...................100 kHz Spacing
USA 2 Range (FM)................... 200 kHz Spacing
Europe Range (FM)
...................
50 kHzSpacing
RDS/RBDS
...............................................
AF, TA
S/N Ratio (FM)
..........
60 dB (Analog Broadcast)
Sensitivity
..................
...............................10 dB
S/N Ratio (AM)
..........
45 dB (Analog Broadcast)
Sensitivity
.................................................30 dB
Apple CarPlay
iPhone Support
...................
iPhone 5 or Newer
iOS
..........................................
iOS 7.1 or Newer
USB
USB Spec
..........................
USB 2.0 (High-Speed)
USB Current Output
............................
2A (Max)
File System
...............................................
FAT32
Audio Playback
....................
Video Playbac
k..............AVI, MKV, MOV, WMV
Picture Playback........................ JPG, PNG, BMP
Flash Drive Support
.........................
up to 128GB
* Not all listed compressed files guaranteed to
play due to different creation methods or file
contents.
Bluetooth®
Version
............................................
v3.0+E.D.R.
Audio Code
...............................................
S.B.C.
Profiles…………………………………………………………..
A2DP v1.2, AVRCP v1.4, GATT v1.0, HFP v1.5,
PBAP v1.0
Output P
ower
........................................
Class 2
U
Specificaons are subject to change without noce.
p to 33 ft (10m), Free-range
0323
Pre-amp Output
............................................4.1
Front
........................
2V, Full-Range
Rear
..........................
2V, Full-Range
Sub (Mono)
.........................
2V, LPF
Android Auto
Wired...…........................Android 6.0 or Newer
Wireless...…..................Android 11.0 or Newer
MP3, WMA, WAV,
Wi-Fi
Frequency Band.......................................5 GHz
(Only used in wireless connec�on for CarPlay
and Android Auto)
FLAC (24 bit/192 kHz)
Specifica�ons
0323