P. O. Box 1386, 97 KENT AVENUE, KITCHENER, ON N2G 4J1
Printed In USA
OperatOr’s Manual
Safe Operation Practices • Set-Up • Operation • Maintenance • Service • Troubleshooting • Warranty
WARNING
READ AND FOLLOW ALL SAFETY RULES AND INSTRUCTIONS IN THIS MANUAL
BEFORE ATTEMPTING TO OPERATE THIS MACHINE.
FAILURE TO COMPLY WITH THESE INSTRUCTIONS MAY RESULT IN PERSONAL INJURY.
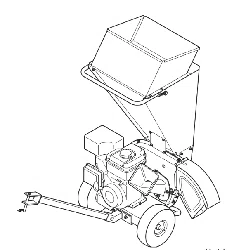
Chipper Shredder — Model Series 410 & 420
Model Series 410 Shown
769-09856
5. 2.14

Thank you for purchasing your new equipment. It was carefully
engineered to provide excellent performance when properly
operated and maintained.
Please read this entire manual prior to operating the equipment.
It instructs you how to safely and easily set up, operate and
maintain your machine. Please be sure that you, and any other
persons who will operate the machine, carefully follow the
recommended safety practices at all times. Failure to do so could
result in personal injury or property damage.
All information in this manual is relative to the most recent
product information available at the time of printing. Review
this manual frequently to familiarize yourself with the machine,
its features and operation. Please be aware that this Operator’s
Manual may cover a range of product specifications for
various models. Characteristics and features discussed and/or
illustrated in this manual may not be applicable to all models.
The manufacturer reserves the right to change product
specifications, designs and equipment without notice and
without incurring obligation.
If applicable, the power testing information used to establish
the power rating of the engine equipped on this machine can be
found at www.opei.org or the engine manufacturer’s web site.
If you have any problems or questions concerning the machine,
phone a authorized service dealer or contact us directly.
Customer Support telephone numbers, website address and
mailing address can be found on this page. We want to ensure
your complete satisfaction at all times.
Throughout this manual, all references to right and left side of the
machine are observed from the operating position
The engine manufacturer is responsible for all engine-related
issues with regards to performance, power-rating, specifications,
warranty and service. Please refer to the engine manufacturer’s
Owner’s/Operator’s Manual, packed separately with your
machine, for more information.
Thank You
Record Product Information
Before setting up and operating your new equipment, please
locate the model plate on the equipment and record the
information in the provided area to the right. You can locate the
model plate by standing at the operator’s position and looking
down at the frame below the engine. This information will be
necessary, should you seek technical support via our web site,
Customer Support Department, or with a local authorized service
dealer.
Model NuMber
Serial NuMber
Customer Support
Please do
NOT
return the unit to the retailer from which it was purchased, without first contacting Customer Support.
If you have difficulty assembling this product or have any questions regarding the controls, operation, or maintenance of
this machine, you can seek help from the experts. Choose from the options below:
◊ Visit our web at www.troybilt.ca
◊ Locate your nearest dealer from Customer Support: 1-800-668-1238
◊ Contact P.O. Box 1386 • 97 Kent Avenue • Kitchener, Ontario, Canada • N2G 4J1
To The Owner
1
2
Safe Operation Practices ........................................ 3
Assembly & Set-Up .................................................. 7
Controls & Features ................................................. 9
Operation ................................................................10
Maintenance & Adjustment .................................12
Service .....................................................................14
Troubleshooting .....................................................16
Replacement Parts .................................................18
Warranty ................................................................ 22
Table of Contents

Important Safe Operation Practices
2
3
Training
1. Read, understand, and follow all instructions on the
machine and in the manual(s) before attempting to
assemble and operate. Keep this manual in a safe place for
future and regular reference and for ordering replacement
parts.
2. Be familiar with all controls and their proper operation.
Know how to stop the machine and disengage them
quickly.
3. Never allow children under 16 years of age to operate this
machine. Children 16 and over should read and understand
the instructions and safe operation practices in this manual
and on the machine and be trained and supervised by an
adult.
4. Never allow adults to operate this machine without proper
instruction.
5. Keep bystanders, pets, and children at least 75 feet from
the machine while it is in operation. Stop machine if
anyone enters the area.
6. Never run an engine indoors or in a poorly ventilated area.
Engine exhaust contains carbon monoxide, an odorless
and deadly gas.
7. Do not put hands and feet near rotating parts or in the
feeding chambers and discharge opening. Contact with
the rotating impeller can amputate fingers, hands, and
feet.
8. Never attempt to unclog either the feed intake or discharge
opening, remove or empty bag, or inspect and repair the
machine while the engine is running. Shut the engine off
and wait until all moving parts have come to a complete
stop. Disconnect the spark plug wire and ground it against
the engine.
Preparation
1. Thoroughly inspect the area where the equipment is to
be used. Remove all rocks, bottles, cans, or other foreign
objects which could be picked up or thrown and cause
personal injury or damage to the machine.
2. Always wear safety glasses or safety goggles during
operation and while performing an adjustment or repair,
to protect your eyes. Thrown objects which ricochet can
cause serious injury to the eyes.
3. Wear sturdy, rough-soled work shoes and close-fitting
slacks and shirts. Loose fitting clothes or jewelry can be
caught in movable parts. Never operate this machine
in bare feet or sandals. Wear leather work gloves when
feeding material in the chipper chute.
4. Before starting, check all bolts and screws for proper
tightness to be sure the machine is in safe working
condition. Also, visually inspect machine for any damage at
frequent intervals.
5. Maintain or replace safety and instructions labels, as
necessary.
WARNING: This symbol points out important safety instructions which, if not followed,
could endanger the personal safety and/or property of yourself and others. Read and follow
all instructions in this manual before attempting to operate this machine. Failure to comply
with these instructions may result in personal injury.
When you see this symbol. HEED ITS WARNING!
DANGER: This machine was built to be operated according to the safe operation practices in
this manual. As with any type of power equipment, carelessness or error on the part of the
operator can result in serious injury. This machine is capable of amputating fingers, hands,
toes and feet and throwing debris. Failure to observe the following safety instructions could
result in serious injury or death.
CALIFORNIA PROPOSITION 65
WARNING: Engine Exhaust, some of its constituents, and certain vehicle components
contain or emit chemicals known to State of California to cause cancer and birth defects
or other reproductive harm.

4 Section 2 — important Safe operation practiceS
Safe Handling of Gasoline:
To avoid personal injury or property damage use extreme care
in handling gasoline. Gasoline is extremely flammable and the
vapors are explosive. Serious personal injury can occur when
gasoline is spilled on yourself or your clothes which can ignite.
Wash your skin and change clothes immediately.
a. Use only an approved gasoline container.
b. Never fill containers inside a vehicle or on a truck
or trailer bed with a plastic liner. Always place
containers on the ground away from your vehicle
before filling.
c. When practical, remove gas-powered equipment
from the truck or trailer and refuel it on the ground.
If this is not possible, then refuel such equipment on
a trailer with a portable container, rather than from a
gasoline dispenser nozzle.
d. Keep the nozzle in contact with the rim of the fuel
tank or container opening at all times until fueling is
complete. Do not use a nozzle lock-open device.
e. Extinguish all cigarettes, cigars, pipes and other
sources of ignition.
f. Never fuel machine indoors.
g. Never remove gas cap or add fuel while the engine
is hot or running. Allow engine to cool at least two
minutes before refueling.
h. Never over fill fuel tank. Fill tank to no more than ½
inch below bottom of filler neck to allow space for
fuel expansion.
i. Replace gasoline cap and tighten securely.
j. If gasoline is spilled, wipe it off the engine and
equipment. Move unit to another area. Wait 5
minutes before starting the engine.
k. To reduce fire hazards, keep machine free of grass,
leaves, or other debris build-up. Clean up oil or fuel
spillage and remove any fuel soaked debris.
l. Never store the machine or fuel container inside
where there is an open flame, spark or pilot light
as on a water heater, space heater, furnace, clothes
dryer or other gas appliances.
Operation
1. Do not put hands and feet near rotating parts or in the
feeding chambers and discharge opening. Contact with
the rotating impeller can amputate fingers, hands, and
feet.
2. Before starting the machine, make sure the chipper chute,
feed intake, and cutting chamber are empty and free of all
debris.
3. Thoroughly inspect all material to be shredded and
remove any metal, rocks, bottles, cans, or other foreign
objects which could cause personal injury or damage to
the machine.
4. If it becomes necessary to push material through the
shredder hopper, use a small diameter stick. Do not use
your hands or feet.
5. If the impeller strikes a foreign object or if your machine
should start making an unusual noise or vibration,
immediately shut the engine off. Allow the impeller to
come to a complete stop. Disconnect the spark plug wire,
ground it against the engine and perform the following
steps:
a. Inspect for damage.
b. Repair or replace any damaged parts.
c. Check for any loose parts and tighten to assure
continued safe operation.
6. Do not allow an accumulation of processed material to
build up in the discharge area. This can prevent proper
discharge and result in kickback of material through the
feed opening.
7. Do not attempt to shred or chip material larger than
specified on the machine or in this manual. Personal injury
or machine damage could result.
8. Never attempt to unclog either the feed intake or
discharge opening while the engine is running. Shut
the engine off, wait until all moving parts have stopped,
disconnect the spark plug wire and ground it against the
engine before clearing debris.
9. Never operate without the shredder hopper, chipper chute,
or chute deflector properly attached to the machine.
Never empty or change discharge bag while the engine is
running.
10. Keep all guards, deflectors and safety devices in place and
operating properly.
11. Keep your face and body back and to the side of the
chipper chute while feeding material into the machine to
avoid accidental kickback injuries.
12. Never operate this machine without good visibility or light.
13. Do not operate this machine on a paved, gravel or non-
level surface.
14. Do not operate this machine while under the influence of
alcohol or drugs.
15. Muffler and engine become hot and can cause a burn. Do
not touch.
16. Never pick up or carry machine while the engine is running.
17. If situations occur which are not covered in this manual,
use care and good judgement. Contact Customer Support
for assistance and the name of the nearest service dealer.
Maintenance & Storage
1. Never tamper with safety devices. Check their proper
operation regularly.
2. Check bolts and screws for proper tightness at frequent
intervals to keep the machine in safe working condition.
Also, visually inspect machine for any damage and repair, if
needed.

5Section 2 — important Safe operation practiceS
3. Before cleaning, repairing, or inspecting, stop the engine
and make certain the impeller and all moving parts have
stopped. Disconnect the spark plug wire and ground it
against the engine to prevent unintended starting.
4. Do not change the engine governor settings or overspeed
the engine. The governor controls the maximum safe
operating speed of the engine.
5. Maintain or replace safety and instruction labels, as
necessary.
6. Follow this manual for safe loading, unloading,
transporting, and storage of this machine.
7. Never store the machine or fuel container inside where
there is an open flame, spark or pilot light such as a water
heater, furnace, clothes dryer, etc.
8. Allow machine to cool at least 5 minutes before storing.
9. Always refer to the operator’s manual for proper
instructions on off-season storage.
10. If the fuel tank has to be drained, do this outdoors.
11. Observe proper disposal laws and regulations for gas, oil,
etc. to protect the environment.
12. According to the Consumer Products Safety Commission
(CPSC) and the U.S. Environmental Protection Agency (EPA),
this product has an Average Useful Life of seven (7) years,
or 60 hours of operation. At the end of the Average Useful
Life have the machine inspected annually by an authorized
service dealer to ensure that all mechanical and safety
systems are working properly and not worn excessively.
Failure to do so can result in accidents, injuries or death.
Do not modify engine
To avoid serious injury or death, do not modify engine in any
way. Tampering with the governor setting can lead to a runaway
engine and cause it to operate at unsafe speeds. Never tamper
with factory setting of engine governor.
Notice Regarding Emissions
Engines which are certified to comply with California and federal
EPA emission regulations for SORE (Small Off Road Equipment)
are certified to operate on regular unleaded gasoline, and
may include the following emission control systems: Engine
Modification (EM), Oxidizing Catalyst (OC), Secondary Air
Injection (SAI) and Three Way Catalyst (TWC) if so equipped.
Spark Arrestor
WARNING: This machine is equipped with an
internal combustion engine and should not be used
on or near any unimproved forest-covered, brush
covered or grass-covered land unless the engine’s
exhaust system is equipped with a spark arrester
meeting applicable local or state laws (if any).
If a spark arrester is used, it should be maintained in effective
working order by the operator.
A spark arrester for the muffler is available through your nearest
engine authorized service dealer.

6 Section 2 — important Safe operation practiceS
Safety Symbols
This page depicts and describes safety symbols that may appear on this product. Read, understand, and follow all instructions on the
machine before attempting to assemble and operate.
Symbol Description
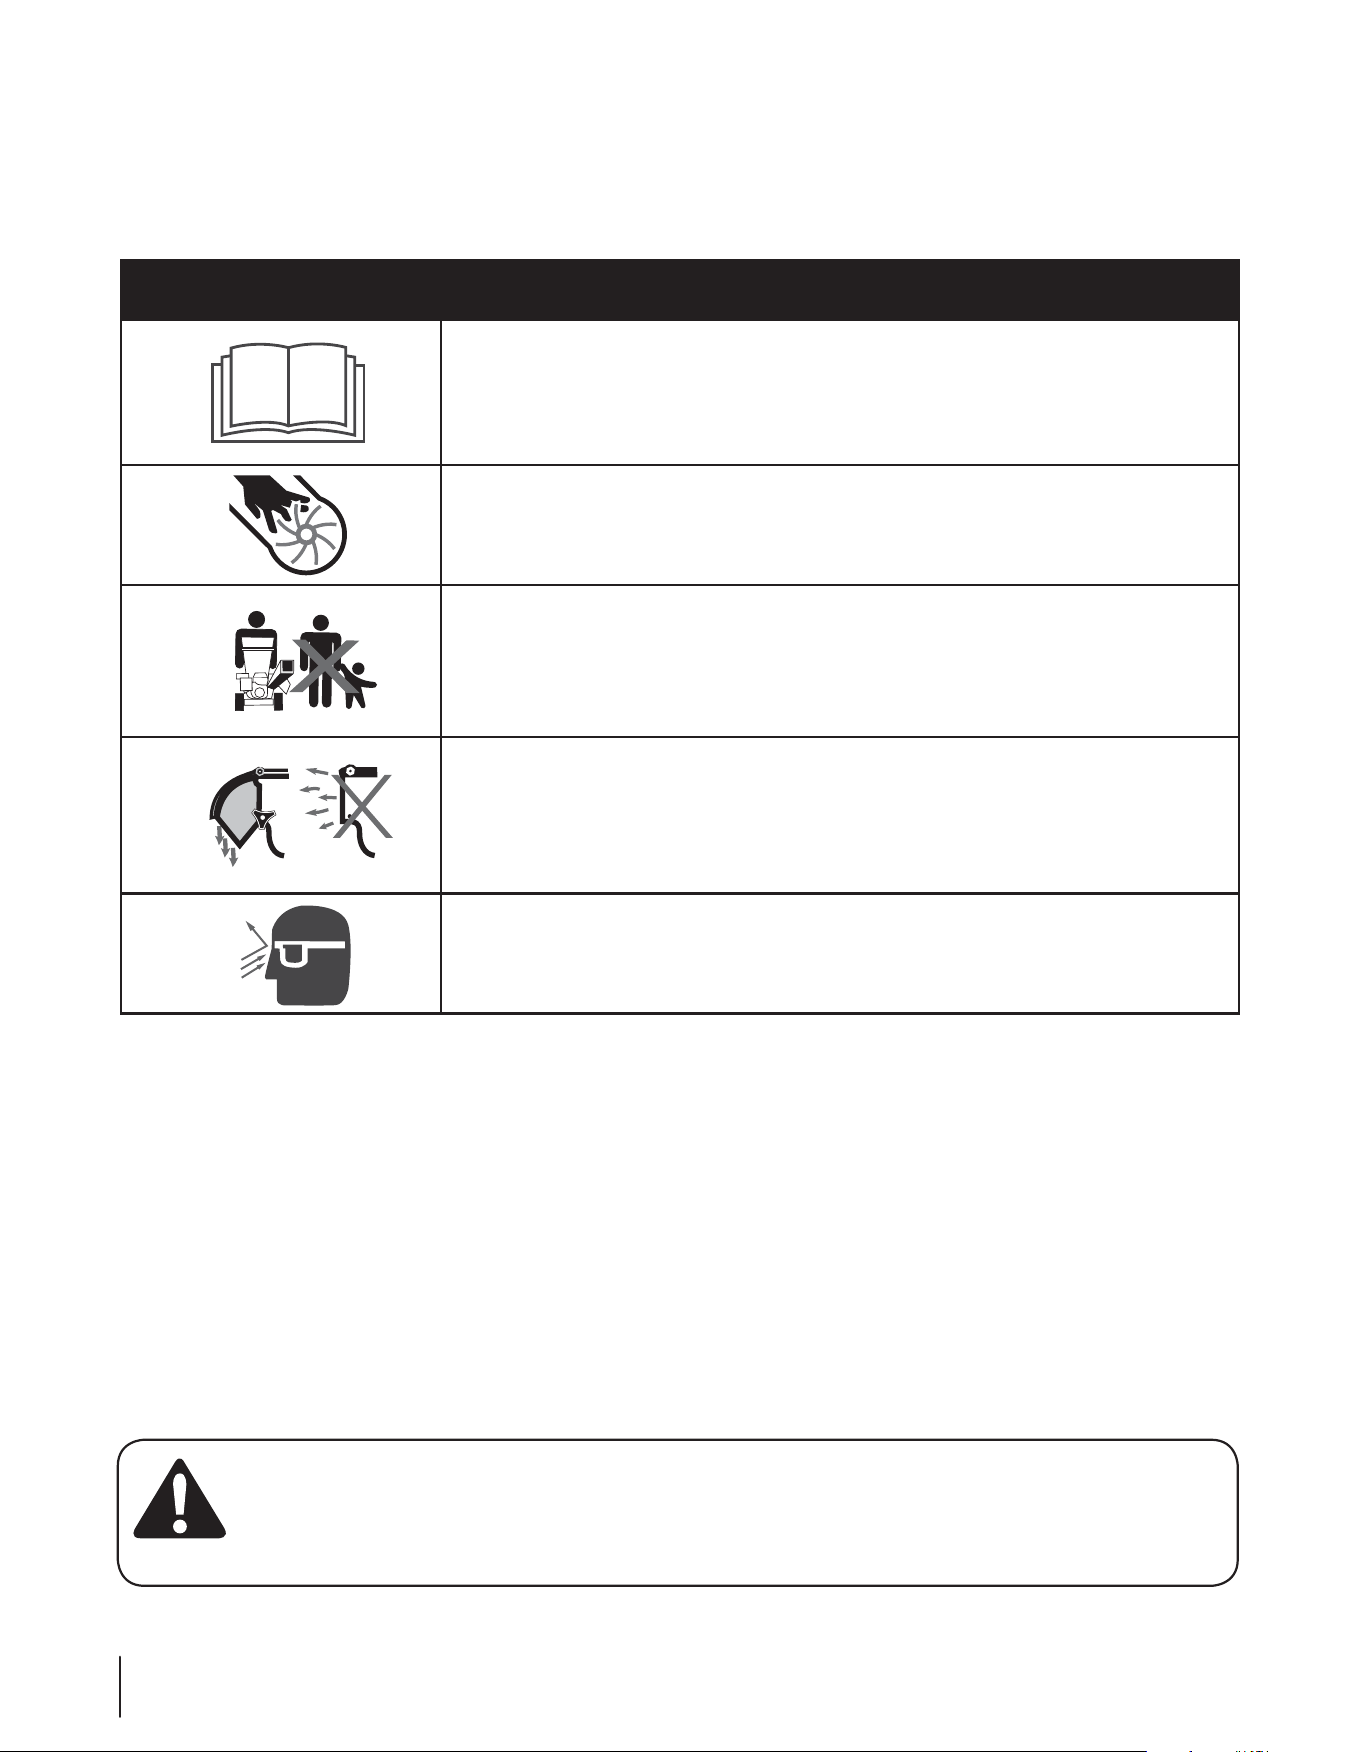
READ THE OPERATOR’S MANUAL(S)
Read, understand, and follow all instructions in the manual(s) before attempting to
assemble and operate
WARNING— ROTATING BLADES
Keep hands out of inlet and discharge openings while machine is running. There are rotating
blades inside
BYSTANDERS
Keep bystanders, pets, and children at least 75 feet from the machine while it is in operation.
Stop machine if anyone enters the area.
WARNING— THROWN DEBRIS
Never operate without the chute deflector properly attached to the machine.
EYE PROTECTION
Always wear safety glasses or safety goggles when operating this machine.
WARNING: Your Responsibility—Restrict the use of this power machine to persons who read, understand and
follow the warnings and instructions in this manual and on the machine.
SAVE THESE INSTRUCTIONS!
Assembly & Set-Up
3
7
Contents of Carton
• One Chipper Shredder • One Operator’s Manual • One Engine Operator’s Manual
• One Tow Bar • One Bag • One Safety Glasses
• One Bottle of Oil
Assembly
NOTE: This unit is shipped without gasoline or oil in the engine.
Fill up gasoline and oil as instructed in the accompanying engine
manual BEFORE operating your chipper shredder.
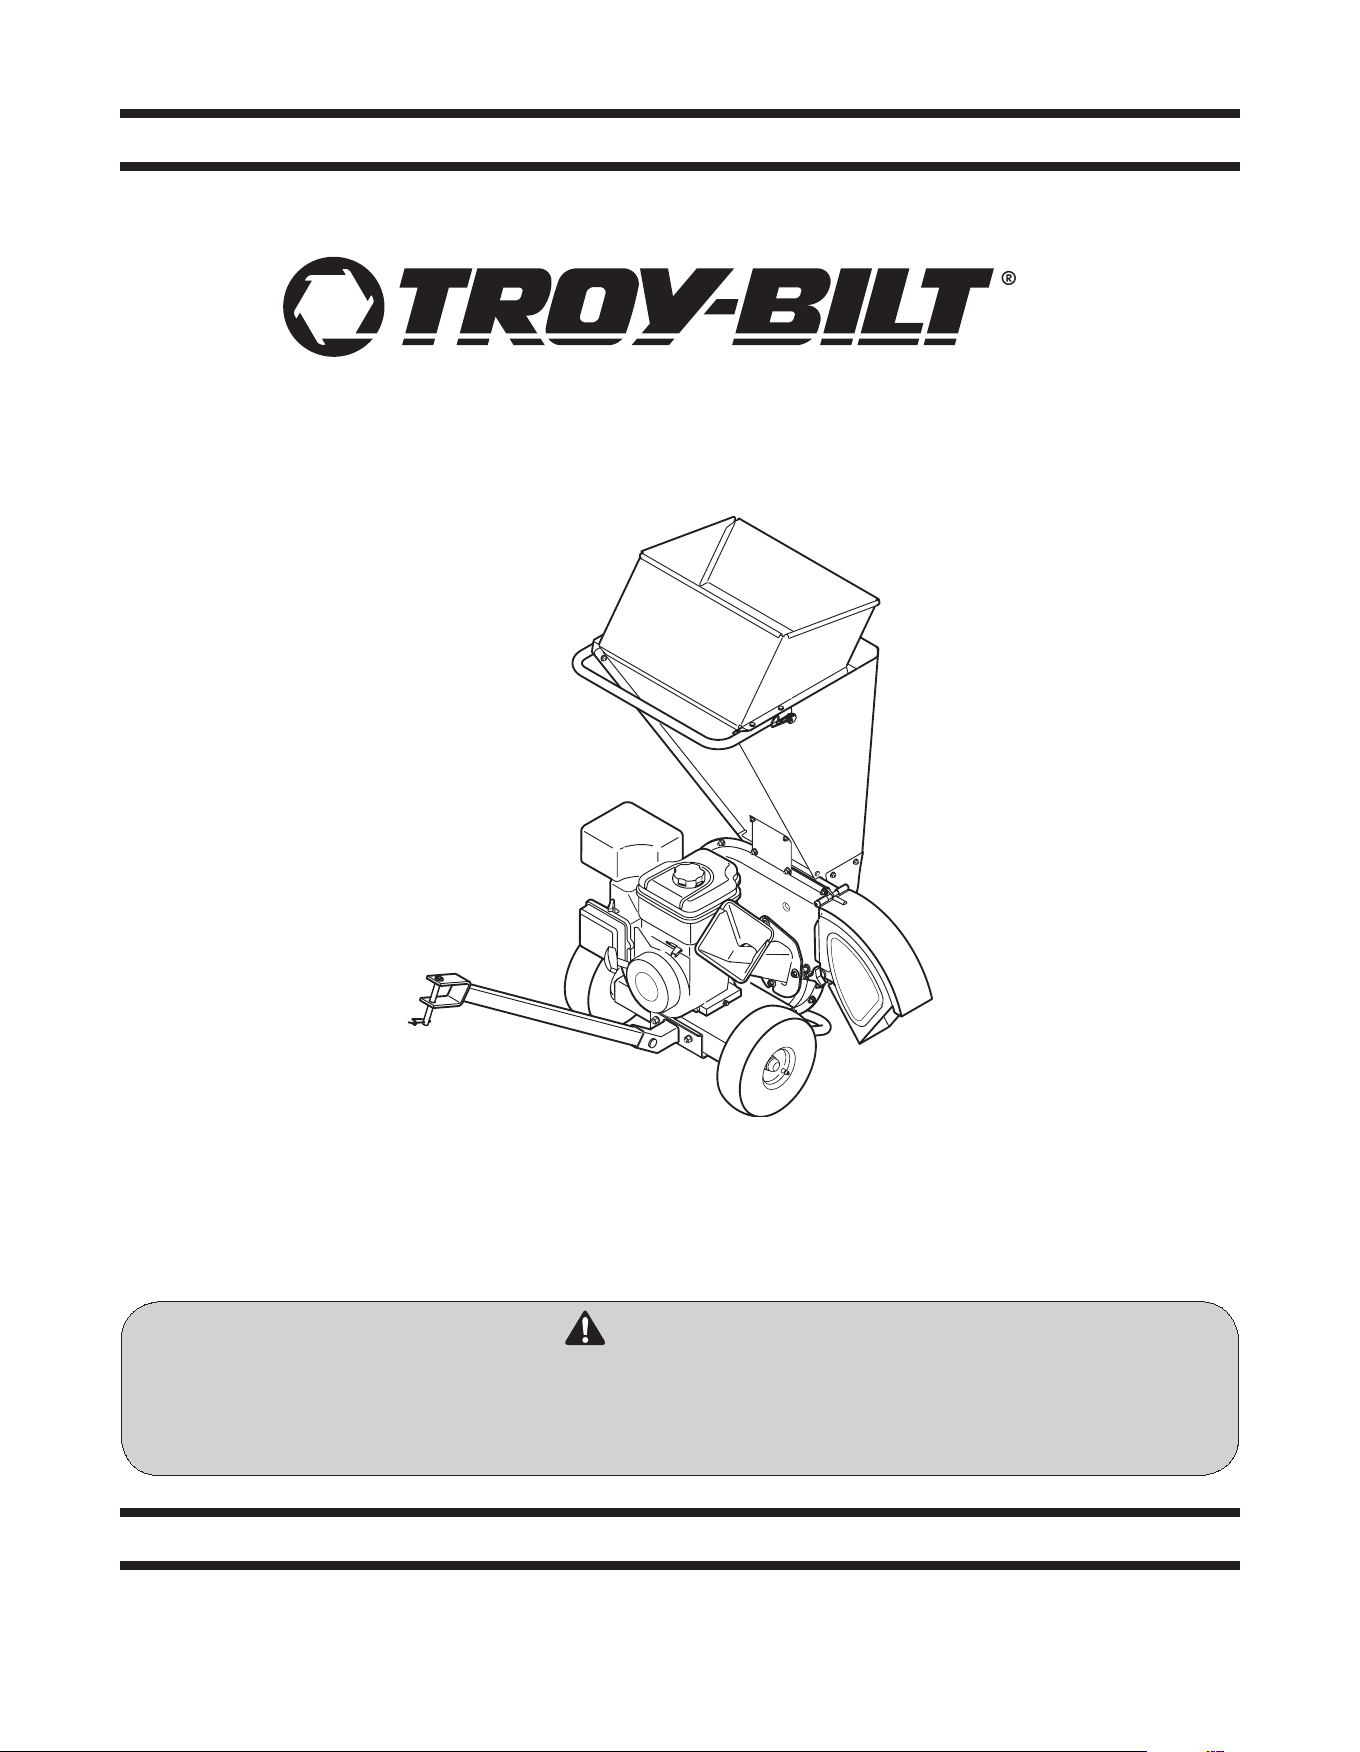
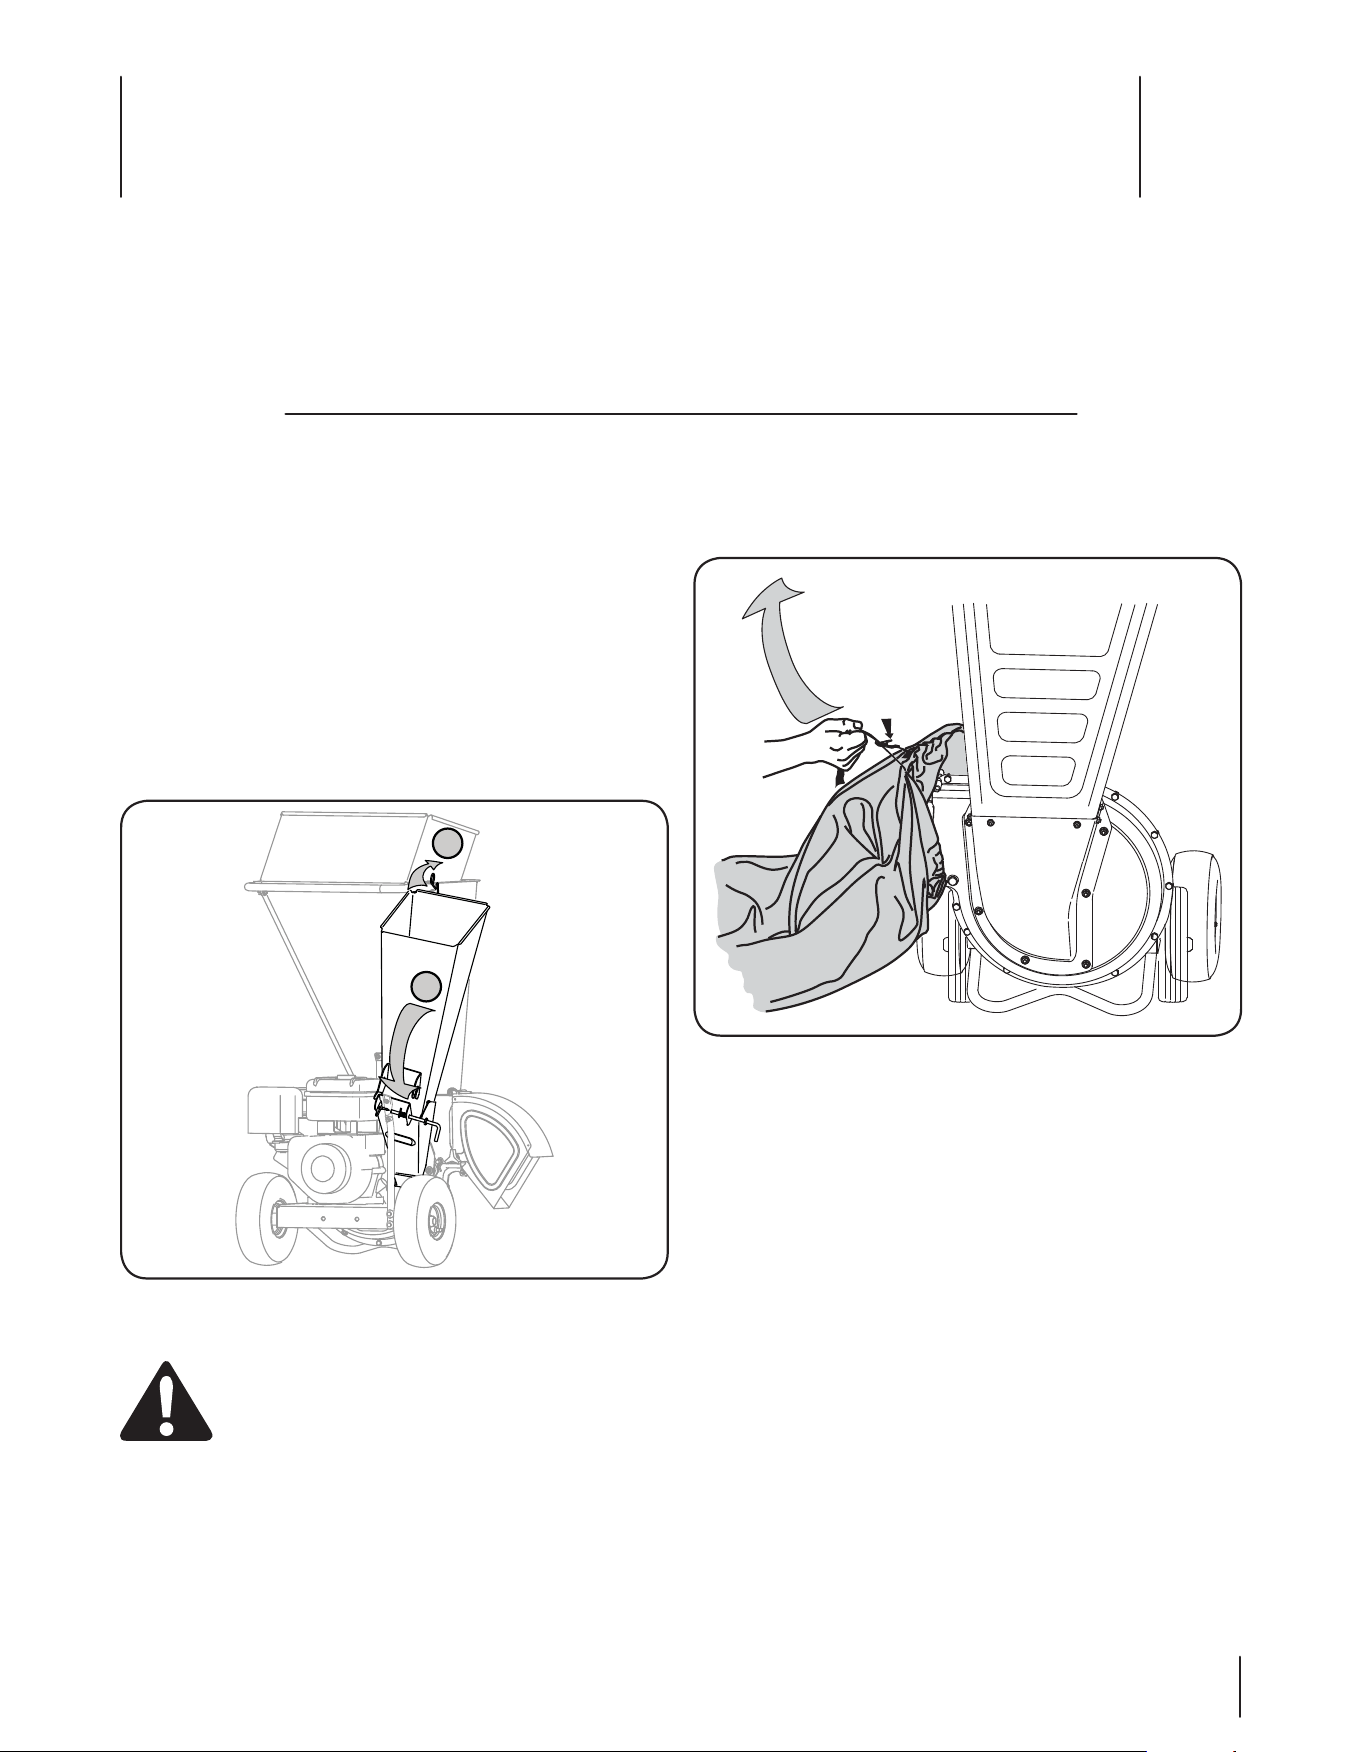
Chipper Chute (Model Series 420 Only)
For shipping reasons, the unit is crated with its chipper chute in a
raised position. To pivot it downward, proceed as follows:
1. Pull the spring latch upward.
2. Gently pivot the chipper chute down until it clicks into the
lock rod. See Fig. 3-1.
WARNING: Never operate the chipper shredder
with the chipper chute in the raised position. Doing
so may result in property damage or serious injury
to the operator or bystanders.
B
A
Figure 3-1
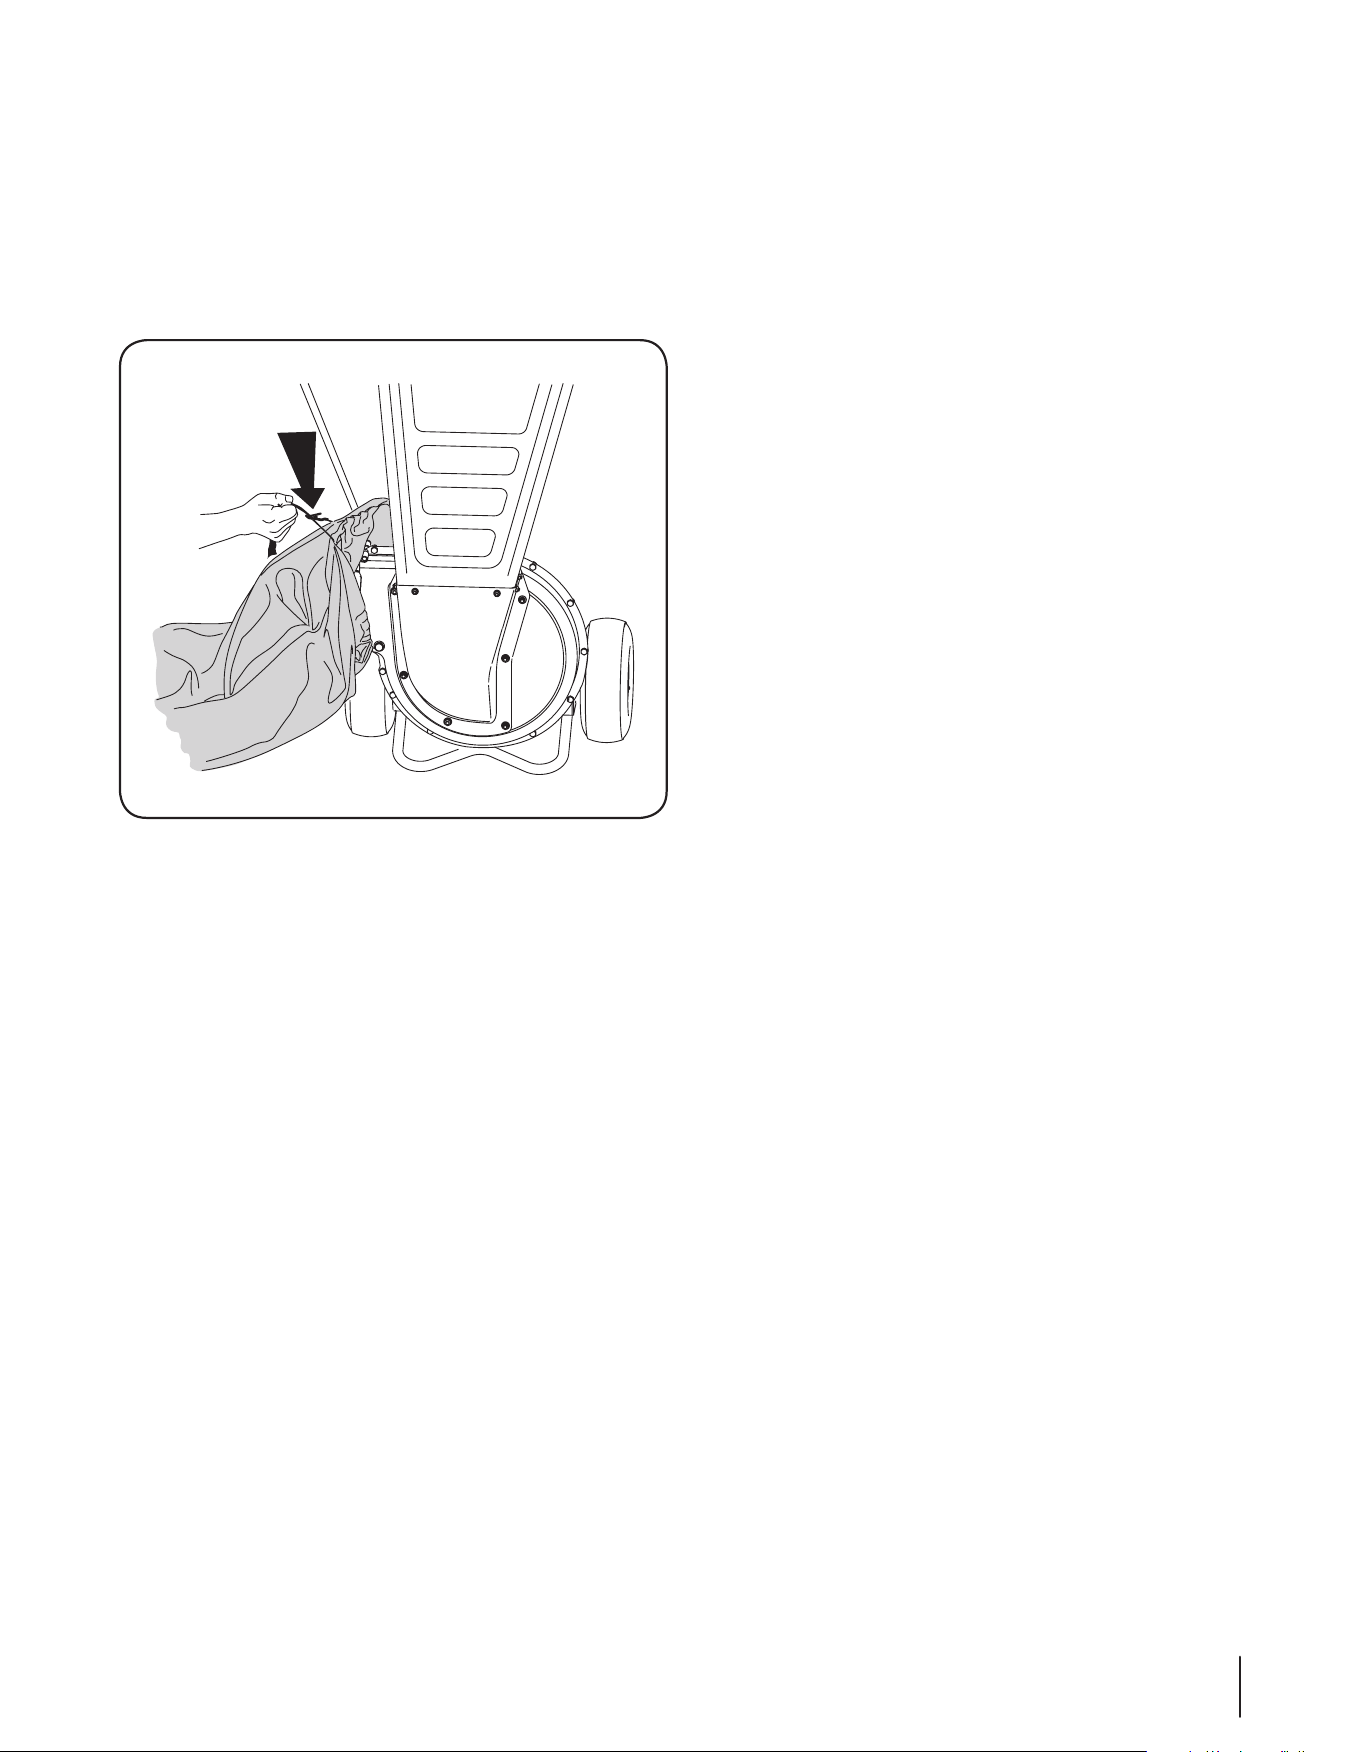
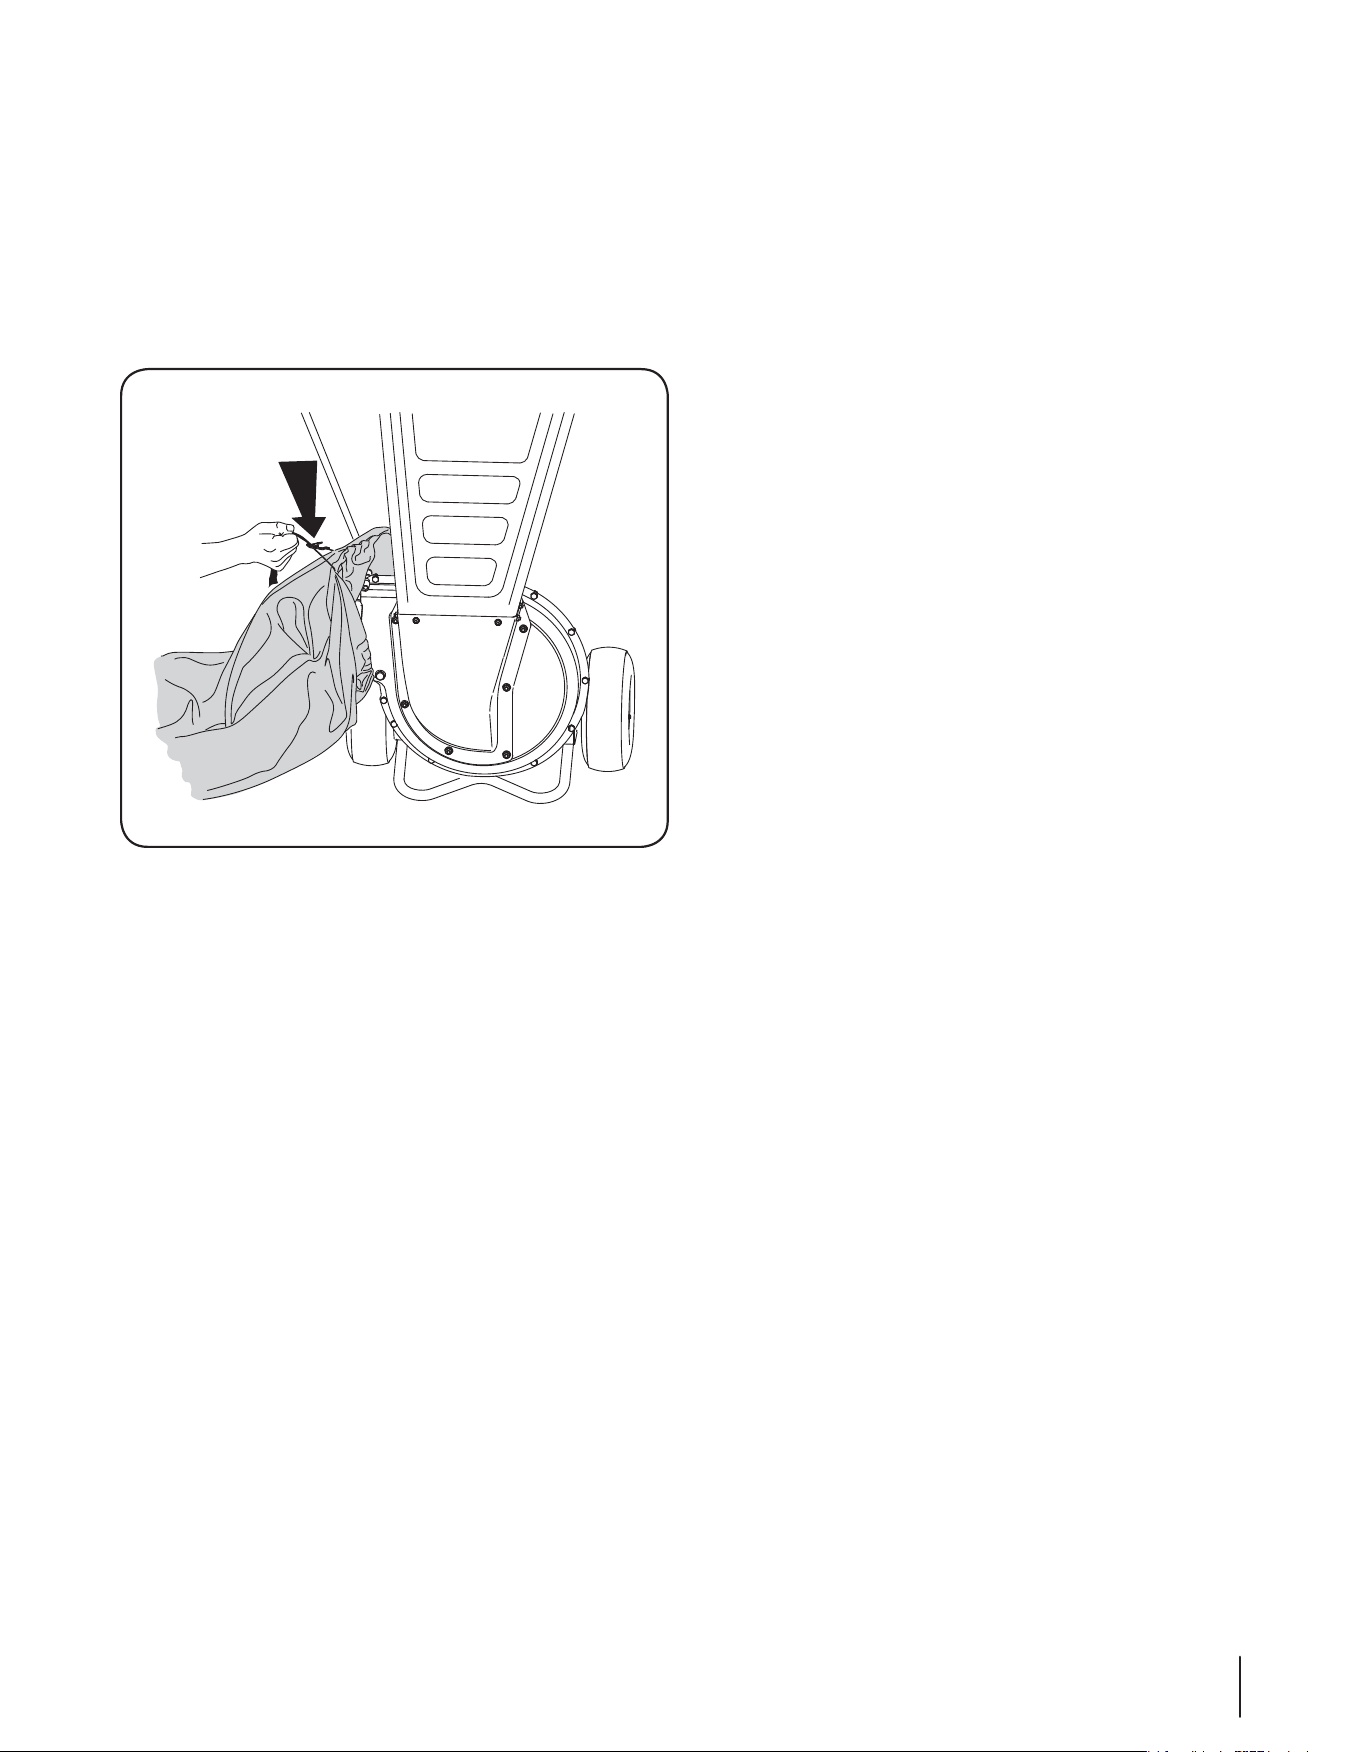
Bag
To attach the bag:
1. Place the opening of the bag completely over the chute
deflector. See Fig. 3-2.
2. Position the bag so that the wing knobs which secure the
chute deflector to the impeller housing are completely
covered.
3. Pull on the draw-strap until the bag is tight around chute
deflector opening.
Figure 3-2
8 Section 3 — ASSembly & Set-Up
Set-Up
Gas and Oil Fill-Up
Refer to the separate engine owner’s manual for additional
engine information.
1. Add oil provided before starting unit for the first time out
of the box.
2. Service the engine with gasoline as instructed in the
separate engine owner’s manual.
WARNING: Use extreme care when handling
gasoline. Gasoline is extremely flammable and the
vapors are explosive. Never fuel the machine
indoors or while the engine is hot or running.
Extinguish cigarettes, cigars, pipes and other
sources of ignition.
WARNING: Never fill fuel tank indoors with engine
running or until the engine has been allowed to cool
for at least two minutes after running.
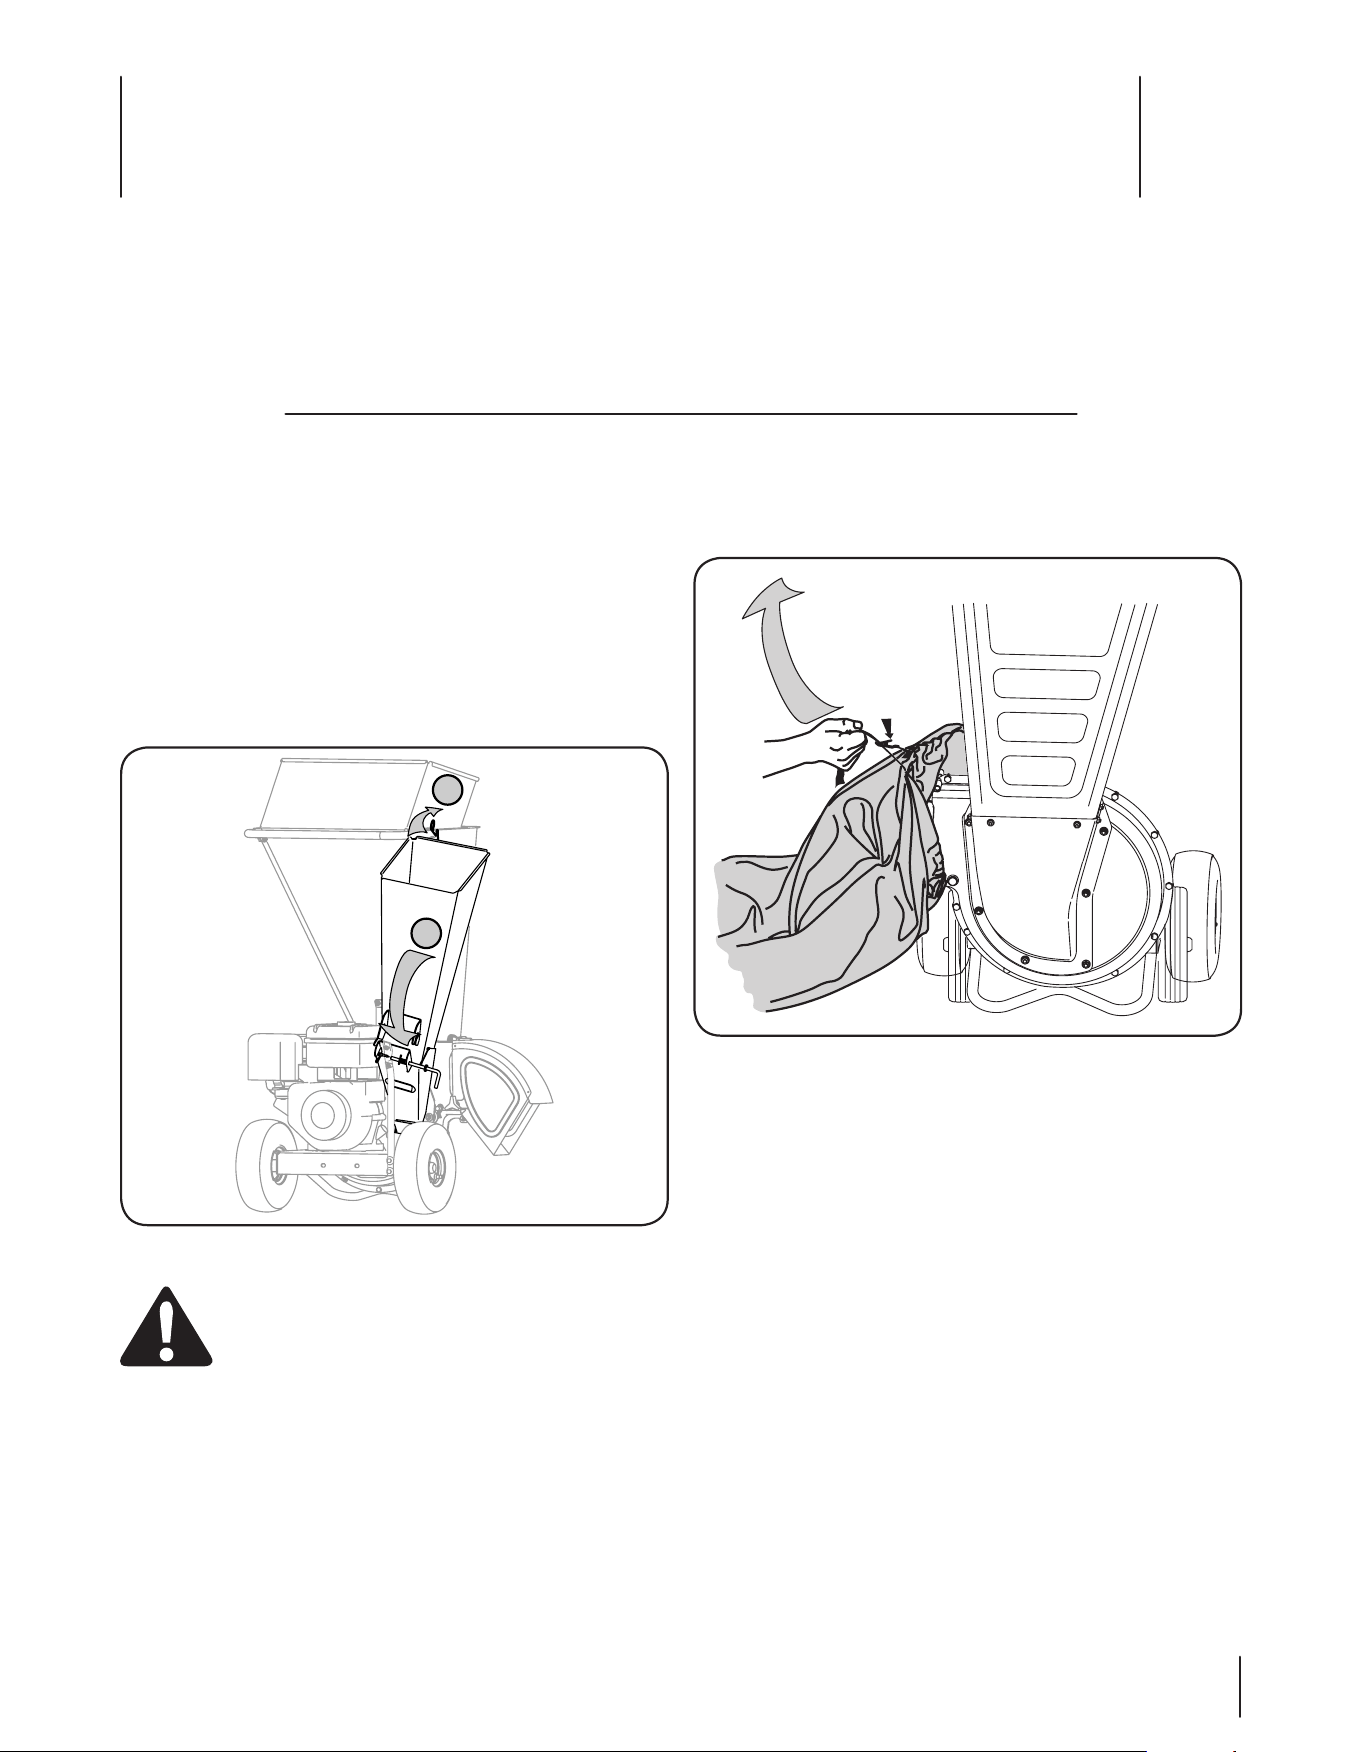
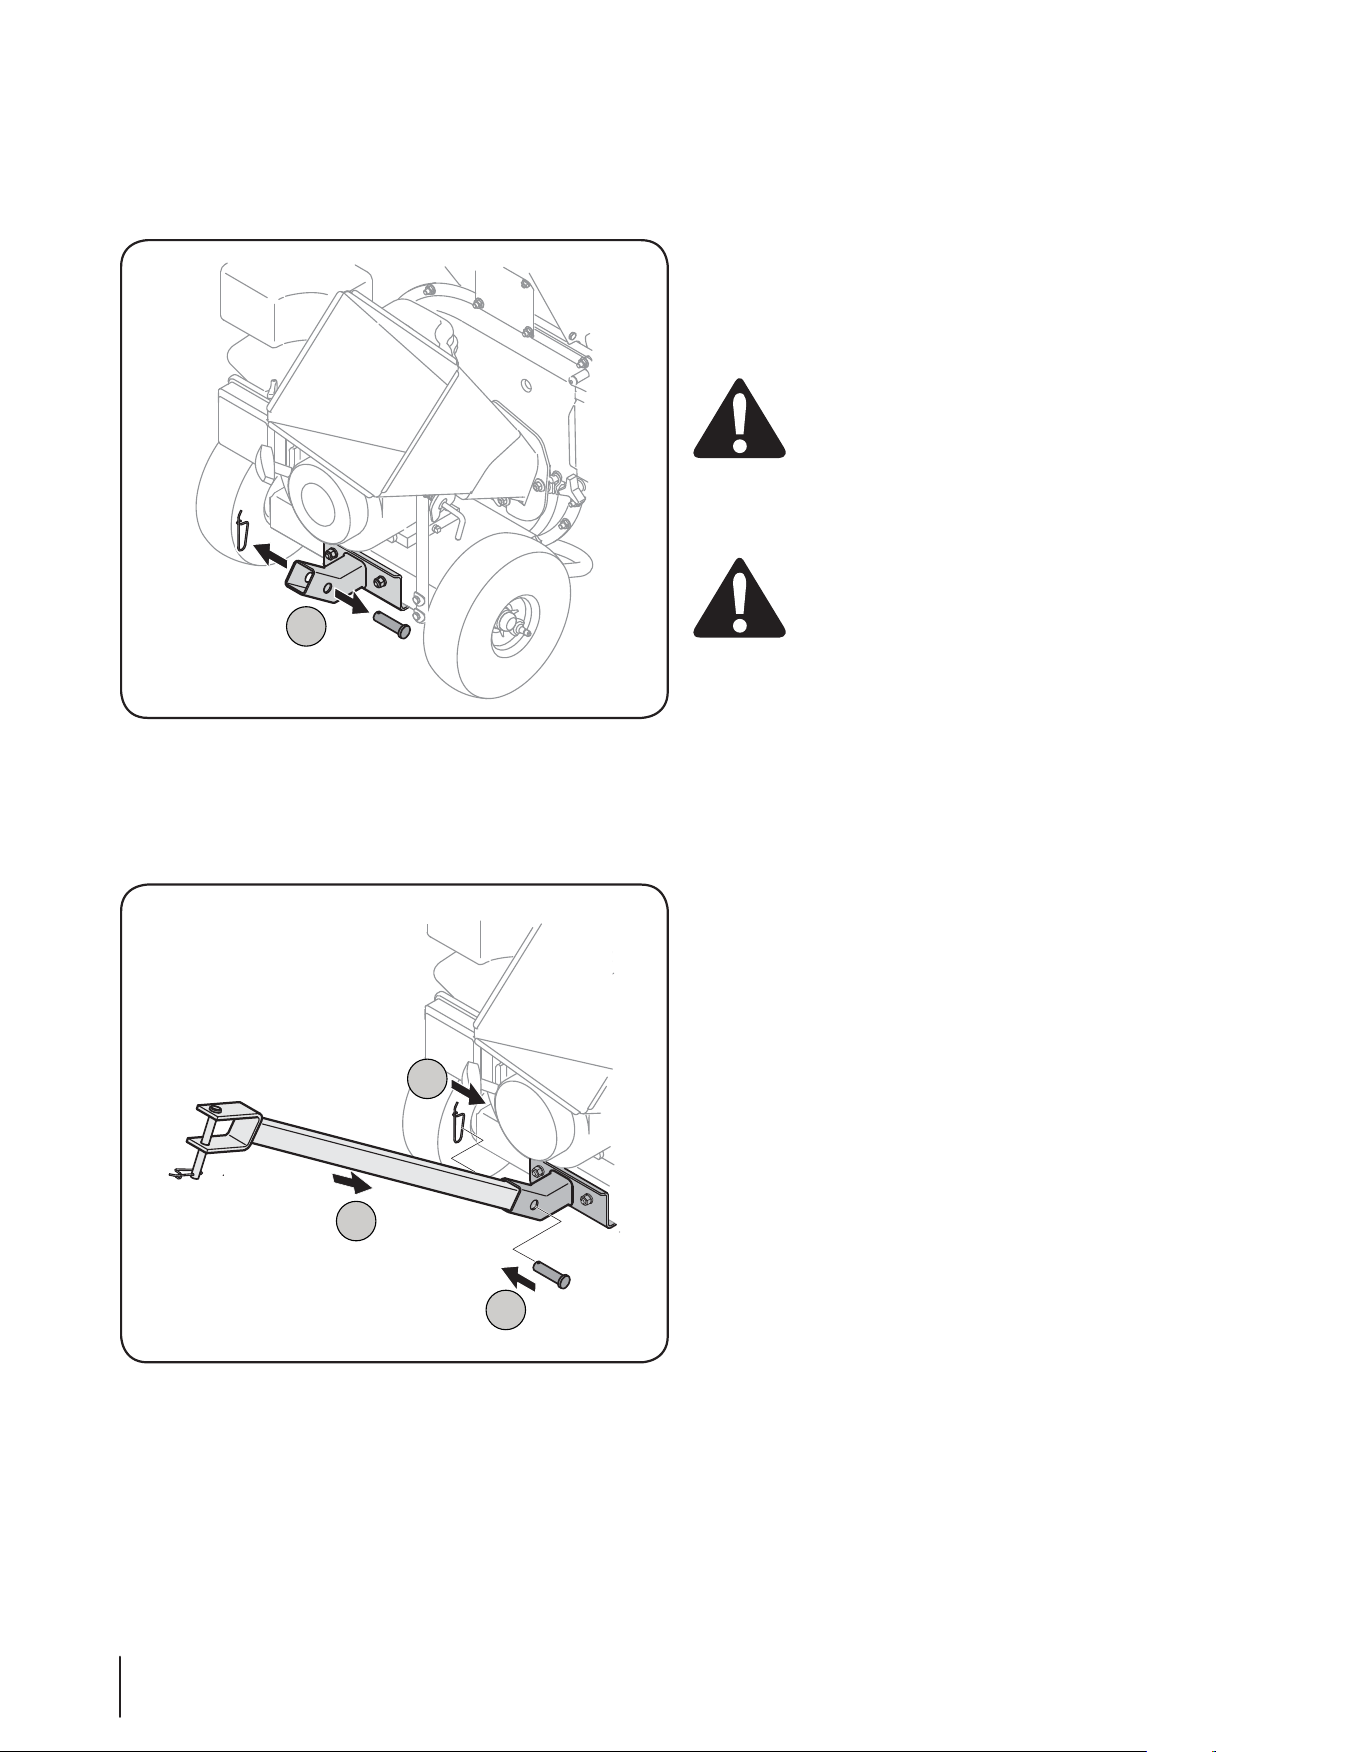
Tow Bar
To attach the tow bar:
1. Remove the spring pin and clevis pin from the end of the
tongue. See Fig. 3-3.
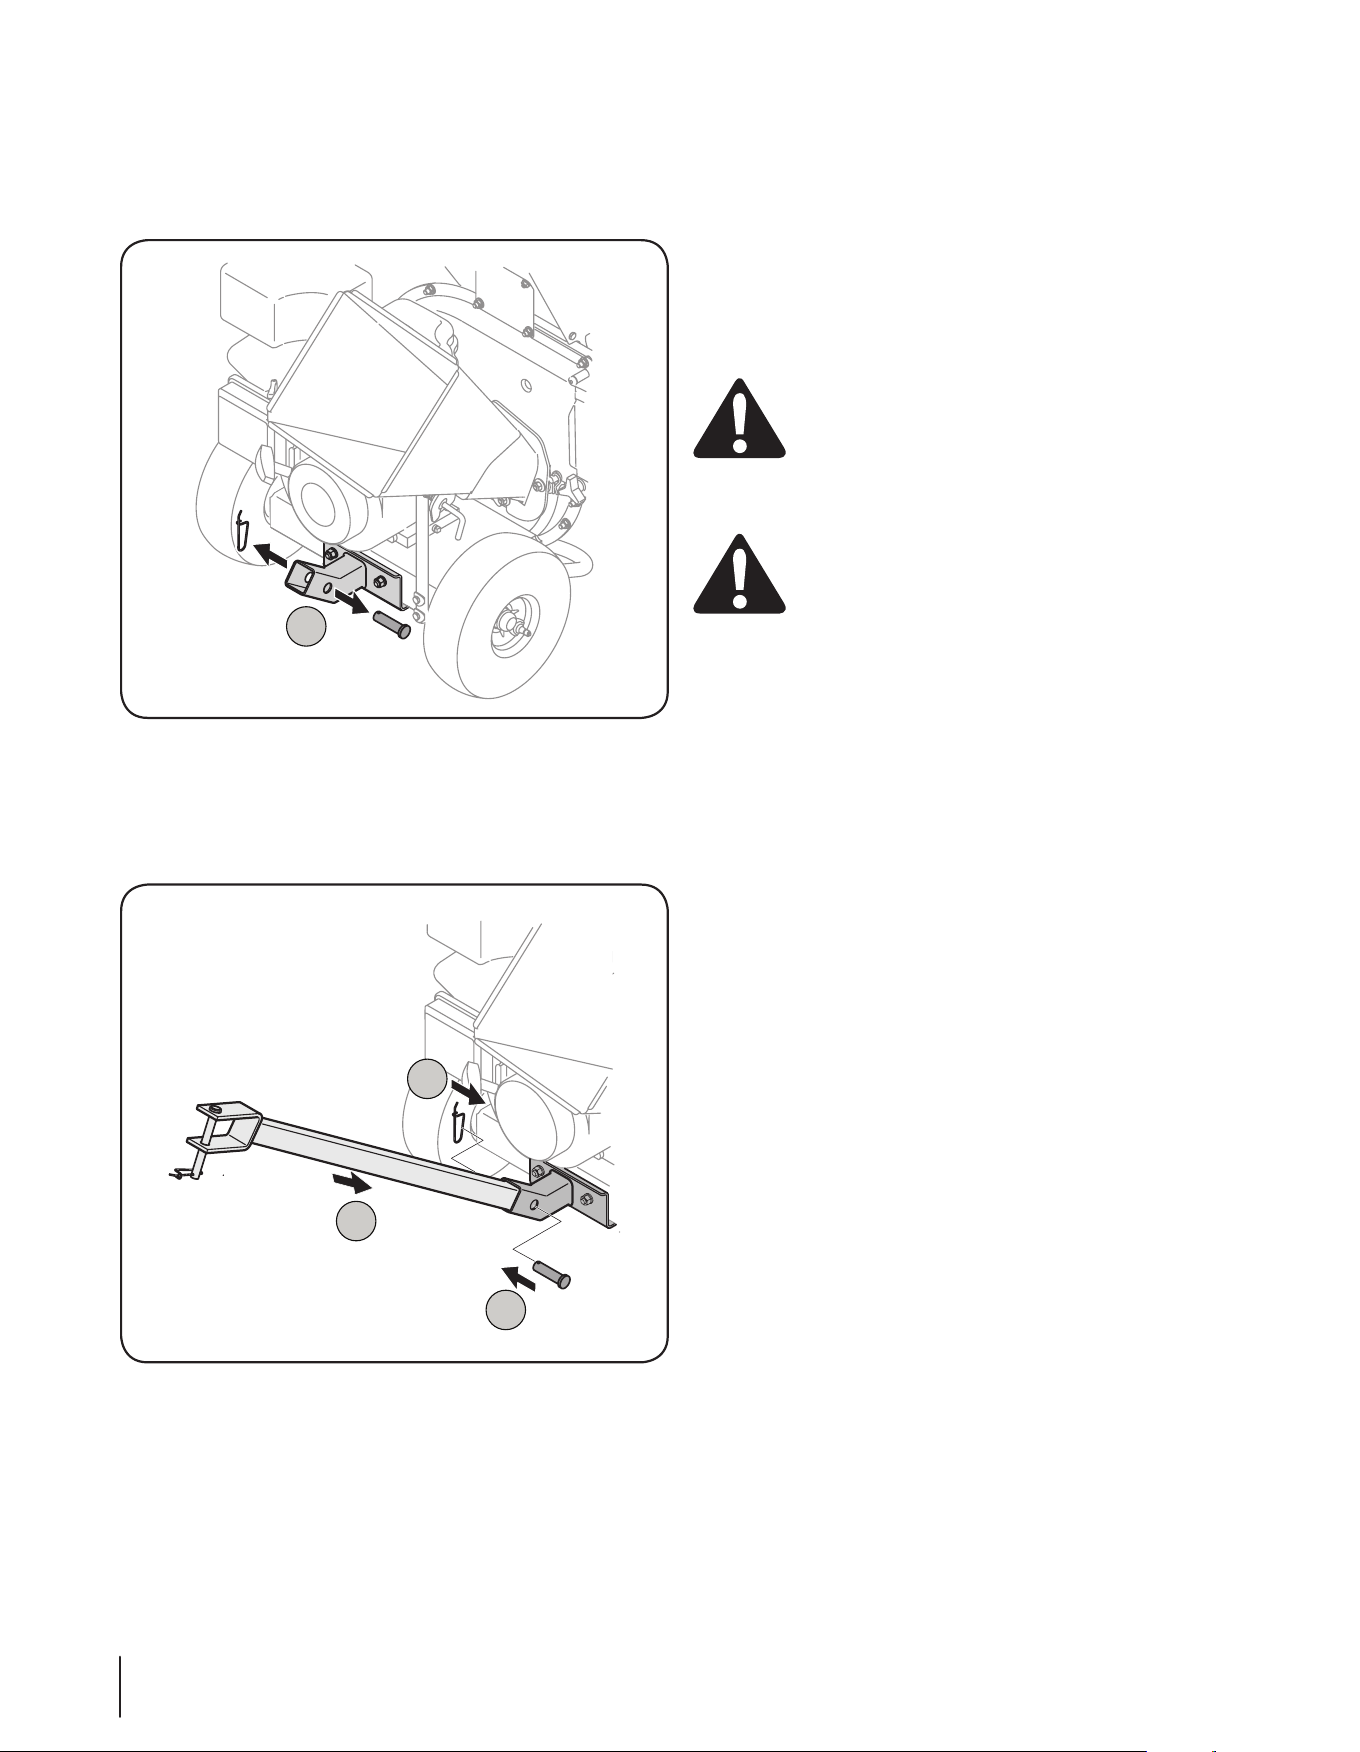
2. Insert the tongue into the base.
3. Reinsert the clevis pin through aligning holes in both the
tongue and the base. Fasten with the spring pin to secure.
See Fig. 3-4.
1
Figure 3-3
Figure 3-4
2
3
3
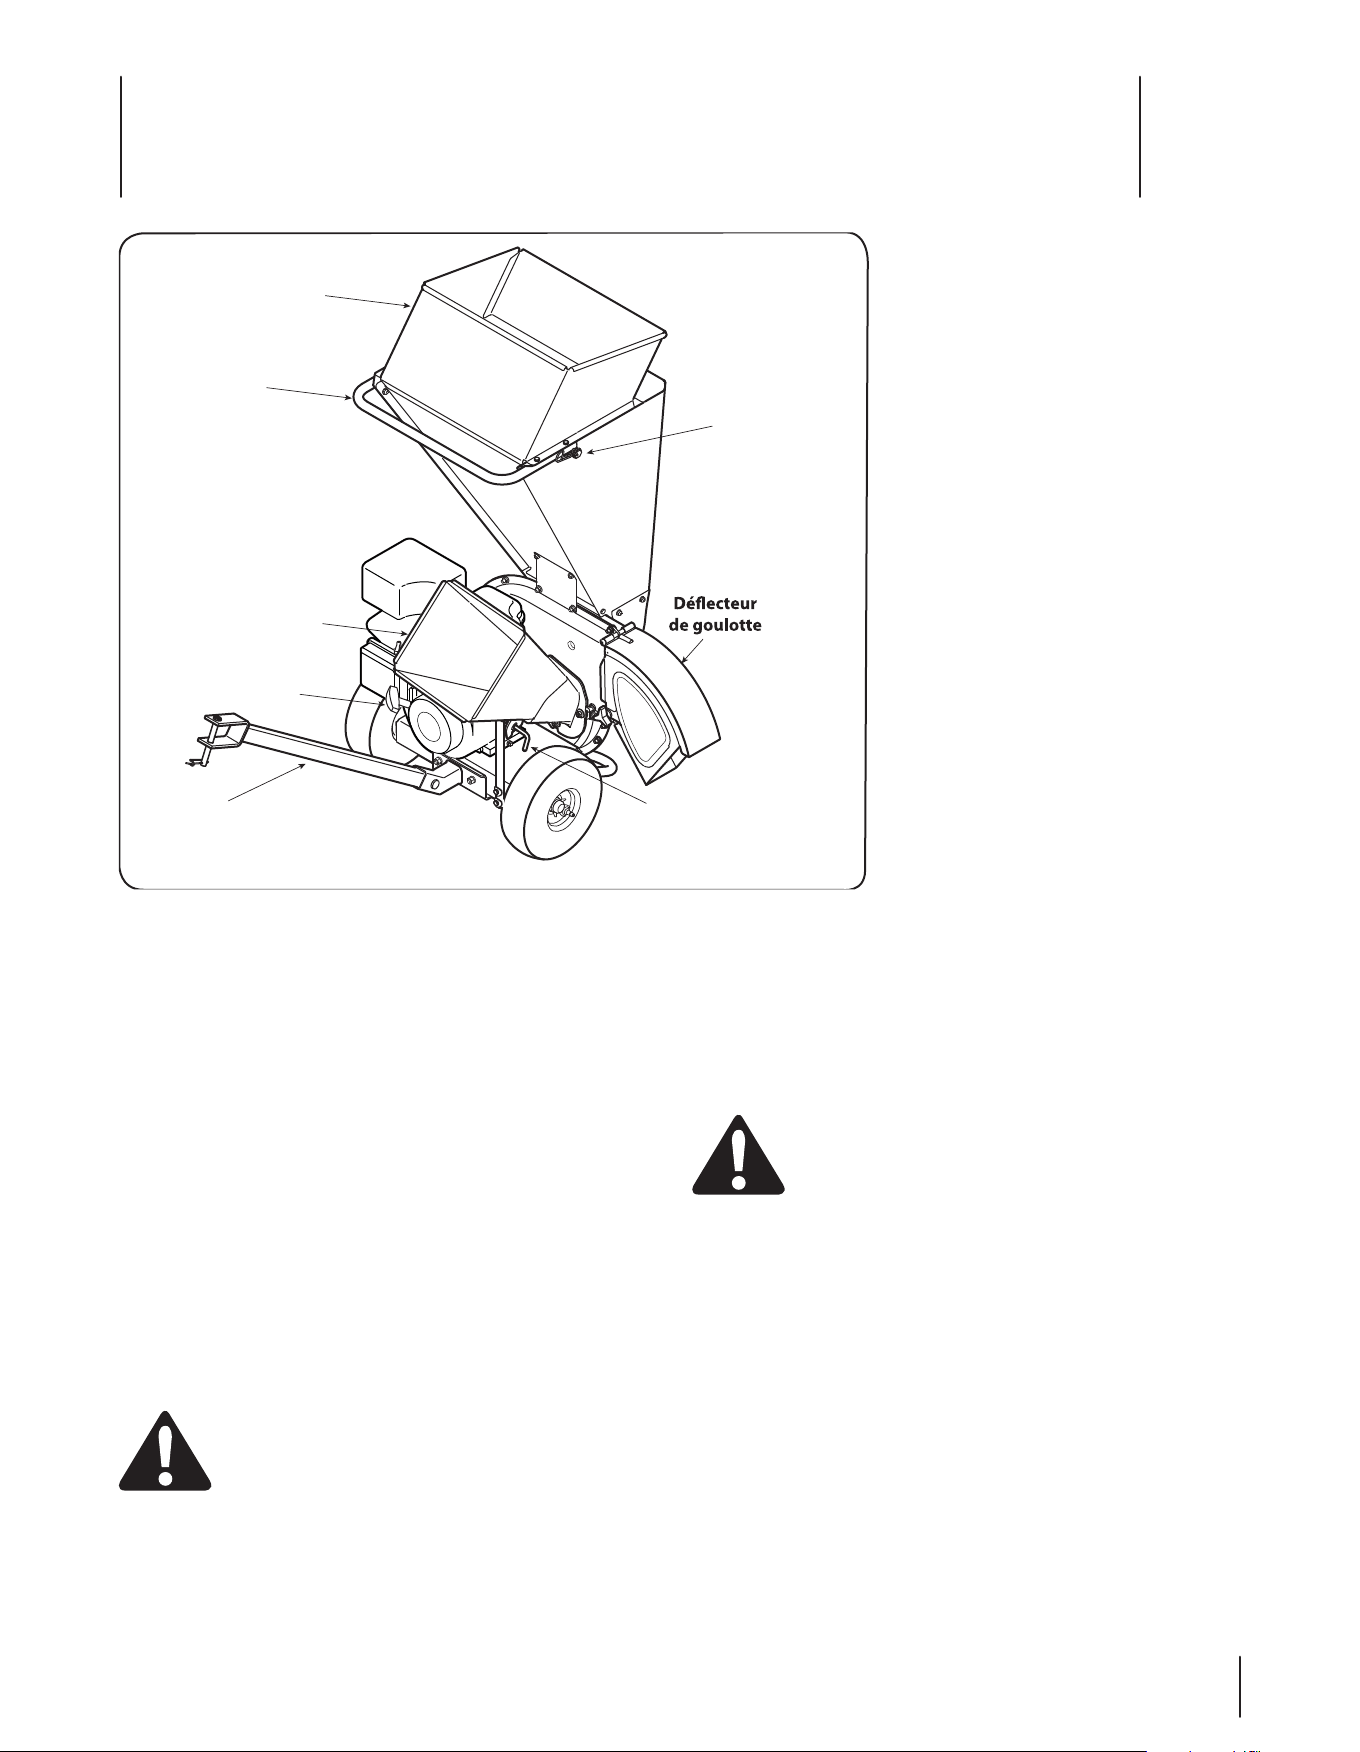
Controls and Features
4
9
Figure 4-1
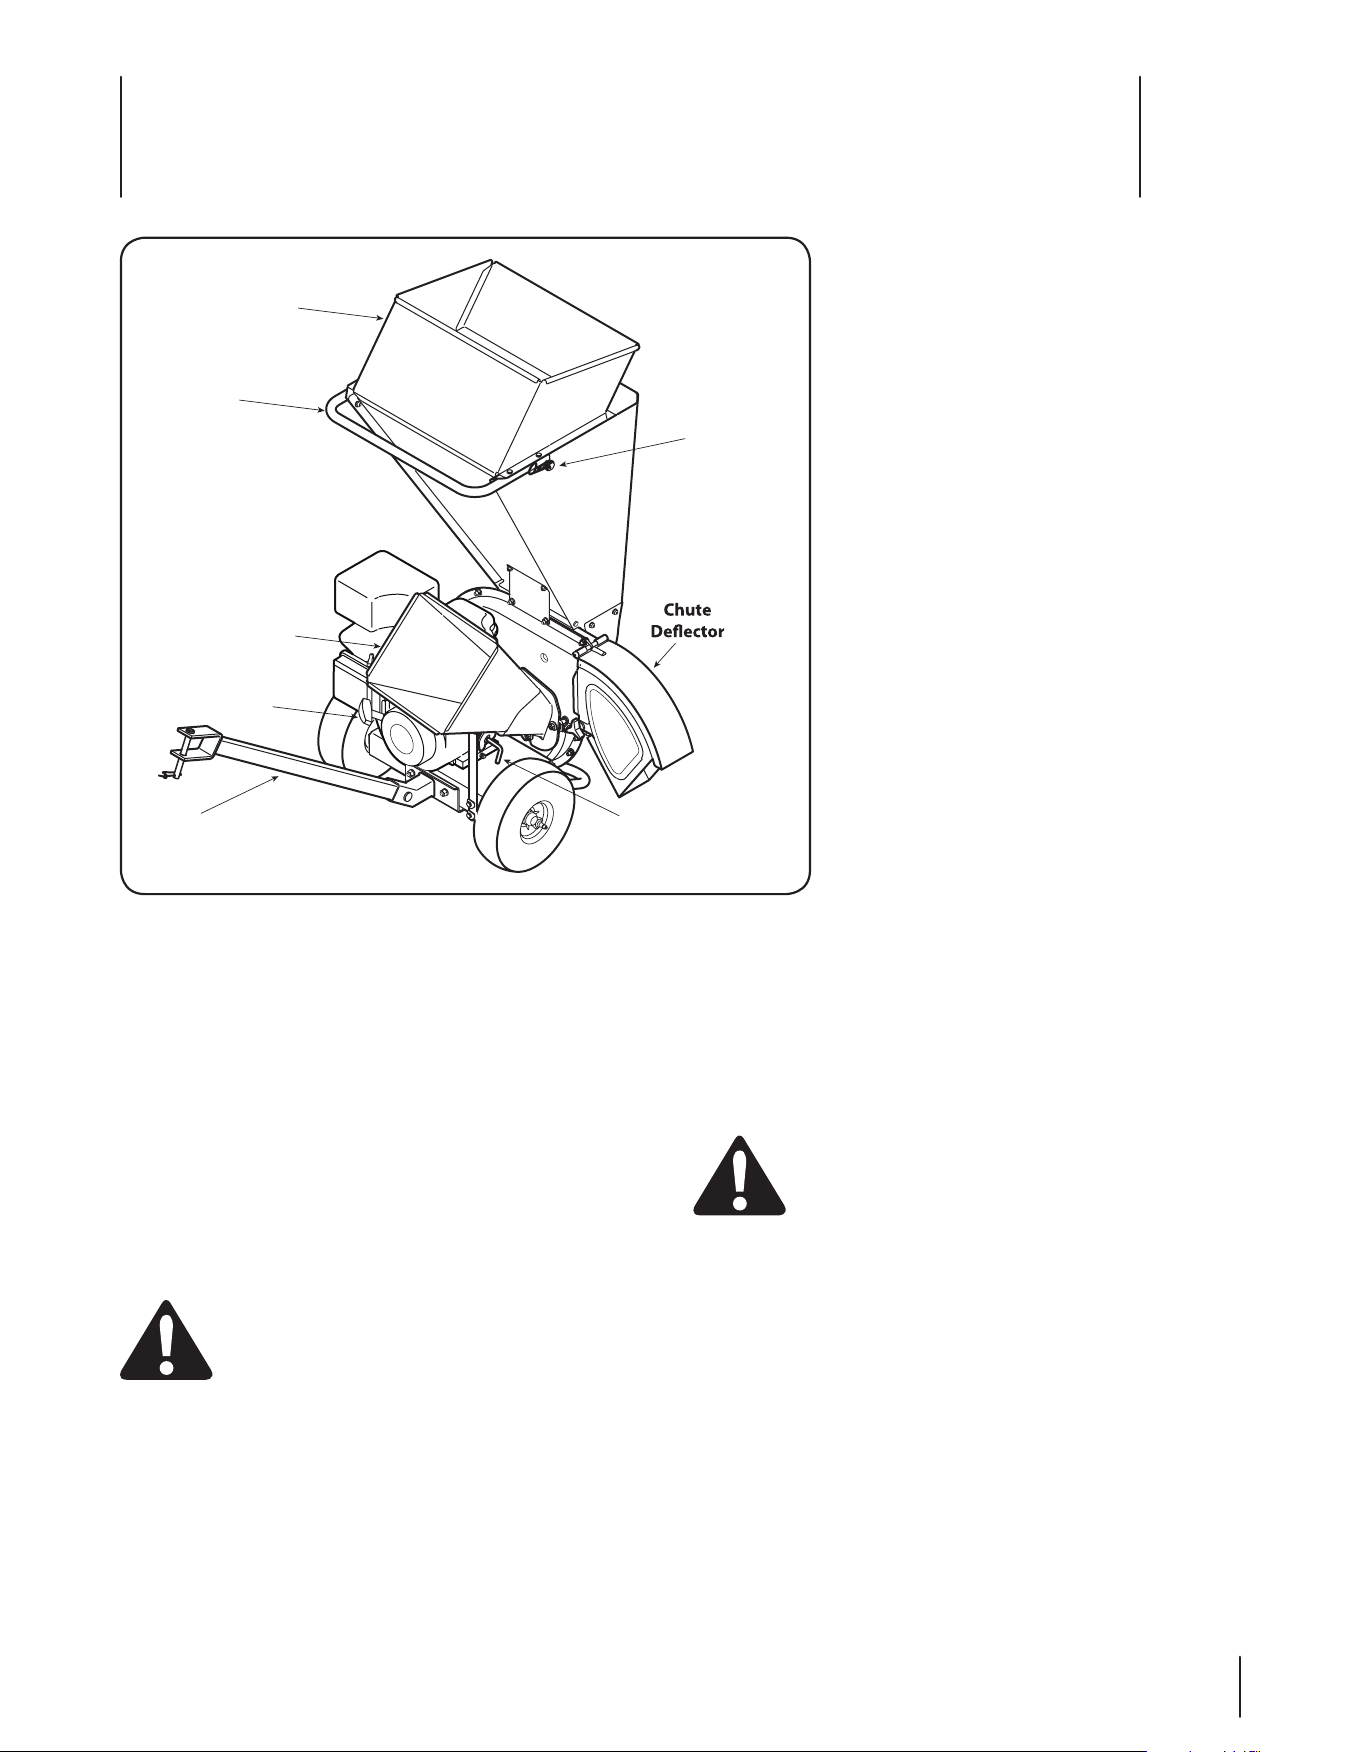
Hopper
Leaves, twigs, and branches up to 1/2-inch in diameter may be
placed into the hopper for shredding. See Fig. 4-1.
IMPORTANT: Never place branches with a diameter greater than
1/2-inch in the hopper. Doing so can result in serious damage to
your unit’s shredder blade, flails or impeller.
Tow Bar
Use the tow bar to tow the chipper shredder behind a tractor to
a job site.
WARNING : This machine should not be towed on
any street, highway, or public road behind a vehicle.
It should be transported only by hand or by tractor.
Spring Latch (Model Series 420 Only)
The spring latch is located on the top of the hopper. It is used to
release or lock the chipper chute in a raised position for storage
or for transporting. See Fig. 4-1.
WARNING: Never operate the chipper shredder
with the chipper chute in the raised position. Use
the spring latch to lower the chipper chute into the
operating position before starting the engine.
Lock Rod (Model Series 420 Only)
The lock rod is located on the chipper chute support. It is used
to release or lock the chipper chute in a lowered position for
operation.
Recoil Starter
The recoil starter is located on the engine.
Pull the recoil starter to start engine.
Engine Controls
See the engine Owner/Operator manual
packed with your unit for the location and
function of the controls on the engine.
Chipper Chute
Branches up to two inches (model series
410) or three inches (model series 420) in
diameter may be fed into the chipper chute
for chipping.
Chute Deflector
Debris is discharged from the machine’s
reduction chamber through the chute
deflector.
Handle
Use the handle when manually transporting
the chipper shredder.
Chipper Chute
Handle
Hopper
Recoil Starter
Tow Bar
Model Series 420 Shown
Lock Rod
Spring Latch

Operation
5
10
WARNING: The operation of any chipper shredder
can result in foreign objects being thrown into the
eyes, which can damage your eyes severely. Always
wear the safety glasses provided with this unit or
eye shields before chipping or shredding and while
performing any adjustments or repairs.
Starting Engine
Refer to the engine operator’s manual for the starting
instructions.
Shredding
WARNING: Never operate the chipper shredder
without chipper chute lowered into the operating
position.
Yard waste such as leaves and pine needles can be placed in
the hopper for shredding. After material has been processed by
the shredder blade and flails, it will be forced out of the chute
deflector, and, if attached, into a debris collection bag.
Observe the following guidelines when shredding yard debris:
• Never attempt to shred material other than normal yard
debris (leaves, twigs, pine cones, etc.).
• Avoid shredding fibrous plants such as tomato vines until
they are thoroughly dried out. Fresh vines do not shred
well and tend to wrap themselves around the impeller and
flails.
• Place reasonable amounts of debris into the hopper at a
time. Do not overload the hopper.
• Allow the material in the hopper to be drawn into the
blades and shredded before adding additional debris
to the hopper. Failure to due so may result in a clogged
hopper, clogged chute deflector or a stalled engine.
• Avoid placing twigs longer than 24 inches into the hopper.
Twigs longer than 24 inches may result in a clogged
hopper.
IMPORTANT: Never place branches with a diameter greater
than 1/2-inch in the hopper. Doing so can result in serious
damage to the unit’s shredder blade, flails or impeller.
Clearing the Hopper
Should the hopper become clogged with debris during
operation, proceed as follows:
1. Grasp the handle with both hands and gently agitate the
chipper shredder to help loosen debris, drawing it into the
impeller.
If the clog does not clear, proceed as follows:
1. Stop engine.
2. Use your hands to remove any debris found near the top of
the hopper.
3. Use a branch (or other available device, i.e. broomstick) to
dislodge debris located toward the base of the hopper.
4. Restart engine.
NOTE: If you’re unable to pull the starter rope as a result of
accumulated debris near the impeller, follow instructions
under the heading Cleaning the Reduction Chamber in the
“Maintainenance & Adjustments” section of this manual.
Chipping
WARNING: Never operate the chipper shredder
without chipper chute lowered into the operating
position.
Branches up to two inches (model series 410) or three inches
(model series 420) in diameter can be fed into the chipper chute.
Observe the following guidelines when chipping branches:
• Keep both hands firmly on the branch as you feed it into
the chipper chute.
• Never feed more than one branch into the chipper chute at
a time.
• Never feed anything other than branches (or wood) into
the chipper chute.
• Apply intermittent pressure (force, in short pulses) while
feeding larger branches into the chipper chute, to avoid
bogging or stalling the engine.
IMPORTANT: Never feed branches with a diameter greater
than two (2) inches (Model Series 410) or three (3) inches
(model series 420) into the chipper chute. Doing so can
result in serious damage to your unit’s chipper blades, flails
or impeller.
NOTE: For best performance, always operate the unit with
sharp chipper blades. If a noticeable loss in performance is
encountered while chipping branches, the chipper blades
should be replaced.
11Section 5 — operation
Emptying the Bag
1. Stop engine.
2. Squeeze the locking buckle to release the bag’s drawstrap
before loosening it from the chute deflector. See Fig. 5-1.
3. Empty the bag and reattach to the chute deflector
opening. Refer to the “Set-Up & Adjustments” section of
this manual.
Figure 5-1

Maintenance & Adjustments
6
12
Equipment Care
• Clean the chipper shredder thoroughly after each use.
• Wash bag periodically with water. Allow to dry thoroughly
in shade.
• If the reduction chamber becomes clogged, remove and
clean as instructed below.
NOTE: Cleaning with a forceful spray of water is not
recommended as it could contaminate the fuel system.
Engine Care
Refer to the Maintenance section of the Engine Owner/ Operator
manual packed with your unit. Read and follow instructions
carefully.
• Check engine oil level before each use as instructed in the
separate engine manual.
• Clean or replace air cleaner every 25 hours under normal
conditions. Clean every few hours under extremely dusty
conditions. To service the air cleaner, refer to the engine
manual.
• The spark plug should be cleaned and the gap reset once
a season. Check engine manual for correct plug type and
gap specifications.
• Clean engine regularly with a cloth or brush. Keep the
top of the engine clean to permit proper air circulation.
Remove all grass, dirt, and combustible debris from muffler
area.
Maintenance
General Recommendations
• Always observe safety rules when performing any
maintenance.
• The warranty on this chipper shredder does not cover
items that have been subjected to operator abuse or
negligence. To receive full value from warranty, operator
must maintain the equipment as instructed here.
• Changing of engine-governed speed will void engine
warranty.
• All adjustments should be checked at least once each
season.
• Periodically check all fasteners and make sure these are
tight.
WARNING: Always stop engine, disconnect spark
plug, and ground against engine before, cleaning,
lubricating, or performing any type of maintenance
on your machine.
Lubrication
1. Lubricate the chipper chute hinge a with light oil once a
season.
2. Lubricate the pivot points on the chute deflector with light
oil once a season.
3. Follow the separate engine manual packed with your unit
for engine lubrication instructions.

13Section 6 — Maintenance & adjuStMentS
3. Remove the hairpin clip from the clevis pin which extends
through the housing and shredder screen. See Fig. 6-1B.
Remove clevis pin.
4. Pivot the shredder screen upward. See Fig. 6-1C. Clean the
surrounding area by scraping away debris.
5. Confirm that the spark plug wire is disconnected and away
from spark plug. Pull on the starter rope two-to-three
times to purge any remaining debris from the reduction
chamber.
6. When the area is cleaned, pivot the shredder screen
downward and re-secure with the clevis pin and hairpin
clip removed earlier.
7. Reattach the debris collection bag to the chute deflector, if
desired.
Cleaning The Reduction Chamber
WARNING: The impeller’s shredder blade and
chipper blades are sharp. Wear leather work gloves
to protect your hands when cleaning out the
reduction chamber.
If the reduction chamber becomes clogged with debris, the
shredder screen can be pivoted upward so that you can clean the
surrounding area. To do so, proceed as follows:
1. Stop engine, disconnect spark plug, and make certain the
chipper shredder has come to a complete stop.
WARNING: The muffler and surrounding area will
be hot if the engine has been running. Use caution
and protect your hands if working near the muffler.
2. If attached, remove debris bag. Remove the two wing
knobs on either side of the chute deflector and pivot the
chute deflector upward. See Fig. 6-1A.
A
C
B
Figure 6-1

Se rvice
7
14
7. Install a replacement blade (Part No. 742-0544) with the
hardware removed earlier or sharpen.
IMPORTANT: When sharpening the blade, protect hands by
using gloves. Follow the original angle of grind and make
sure to remove an equal amount from each blade.
8. To replace the other blade, rotate the impeller to expose
the second blade and repeat the steps above.
NOTE: Make certain blades are reassembled with the sharp
edge outward (toward the chipper chute). Torque hardware
to between 20 ft.-lbs and 25 ft.-lbs.
Shredder Blade
WARNING: The shredder blade is sharp. Wear
leather work gloves to protect your hands.
1. Stop engine, disconnect spark plug, and make certain that
all moving parts have come to a complete stop.
2. Remove the two flange nuts (and hex bolts) which secure
the hopper support bracket to the impeller housing. Retain
the hardware. See Fig. 7-2.
3. Pivot the shredder screen upward as instructed under the
heading Cleaning the Reduction Chamber.
Blade Care
Chipper Blades
WARNING: The impeller’s chipper blades are
sharp. Wear leather work gloves to protect your
hands.
1. Stop engine, disconnect spark plug, and make certain the
chipper shredder has come to a complete stop.
2. Pivot the shredder screen upward as instructed under the
heading Cleaning the Reduction Chamber.
3. Remove the chipper chute support brace from the frame
by removing the two hex bolts and saddle washers which
secure it. See Fig. 7-1A.
4. Remove the chipper chute by removing three hex nuts and
washers which secure it to the impeller housing. See Fig.
7-1B.
5. Rotate the impeller by hand until one of the two chipper
blades is visible through the impeller housing opening.
6. Remove the blade by removing the internal hex screws,
lock washers and hex nuts which secure it to the impeller.
See Fig. 7-1C. Retain the hardware.
NOTE: Use a 3/16” hex key (Allen) wrench on the outside of
the blade and a 1/2” box (or socket) wrench on the inside of
the impeller. Hold the Allen wrench stationary and rotate
the box (or socket) wrench to loosen the nut.
Figure 7-1
Figure 7-2
A
C
B
Model Series CS 3210 Shown

15Section 7 — Service
4. Remove six flange nuts which secure hopper inlet guide to
impeller housing. See Fig. 7-3A.
5. Carefully separate the hopper assembly from the impeller
housing and set it aside.
6. Insert a piece of wood into the chute deflector opening to
stabilize the impeller and prevent it from rotating when
removing the shredder blade.
7. Remove the two internal hex screws, hex lock nuts, and
lock washers which secure the shredder blade to the
impeller. See Fig. 7-3B.
NOTE: Use a 3/16” hex key (Allen) wrench on the outside
of the shredder blade and a 1/2” box (or socket) wrench
on the inside of the shredder blade. Hold the Allen wrench
stationary and rotate the box (or socket) wrench to loosen
the nut.
8. Remove the hex bolt, lock washer, and flat washer to
completely free shredder blade. See Fig. 7-3C.
IMPORTANT: If sharpening the blade for reuse, follow
the original angle of grind as a guide. Make certain each
cutting edge receives an equal amount of grinding to
prevent an unbalanced blade. Remove metal from the
heavy side until it is balanced evenly.
IMPORTANT: When reassembling the blade, tighten center
bolt to between 45 ft.-lbs and 58 ft.-lbs and the two out
bolts to between 20 ft.-lbs and 25 ft.-lbs.
Off-Season Storage
• Allow the unit to run and clear out all debris for a short
time before shutting the unit down before storage.
• When storing the chipper shredder in an unventilated or
metal storage shed, care should be taken to rustproof the
non-painted surfaces. Using a light oil or silicone, coat the
equipment, especially any springs, bearings, and cables.
• Remove all dirt from exterior of engine and equipment.
• Follow lubrication recommendations.
• Refer to engine manual for correct engine storage
instructions.
• Store equipment in a clean, dry area. Do not store in an
area where equipment is present that may use a pilot light
or has a component that can create a spark.
Figure 7-3
A
C
B

Troubleshooting
8
16
Problem Cause Remedy
Excessive Vibration 1. Loose parts or damaged impeller. 2. See authorized service dealer.
Unit does not discharge 1. Discharge area clogged.
2. Foreign object lodged in impeller.
3. Low engine RPM.
1. Stop engine immediately and disconnect
spark plug wire. Clean flail screen and inside
of discharge opening.
2. Stop engine and disconnect spark plug wire.
Remove lodged object.
3. Always run engine at full throttle.
Rate of discharge slows
considerably or composition
of discharged material
changes
1. Low engine RPM.
2. Chipper blade dull.
1. Always run engine at full throttle.
2. Replace chipper blade or see your authorized
service dealer.

No tes
17
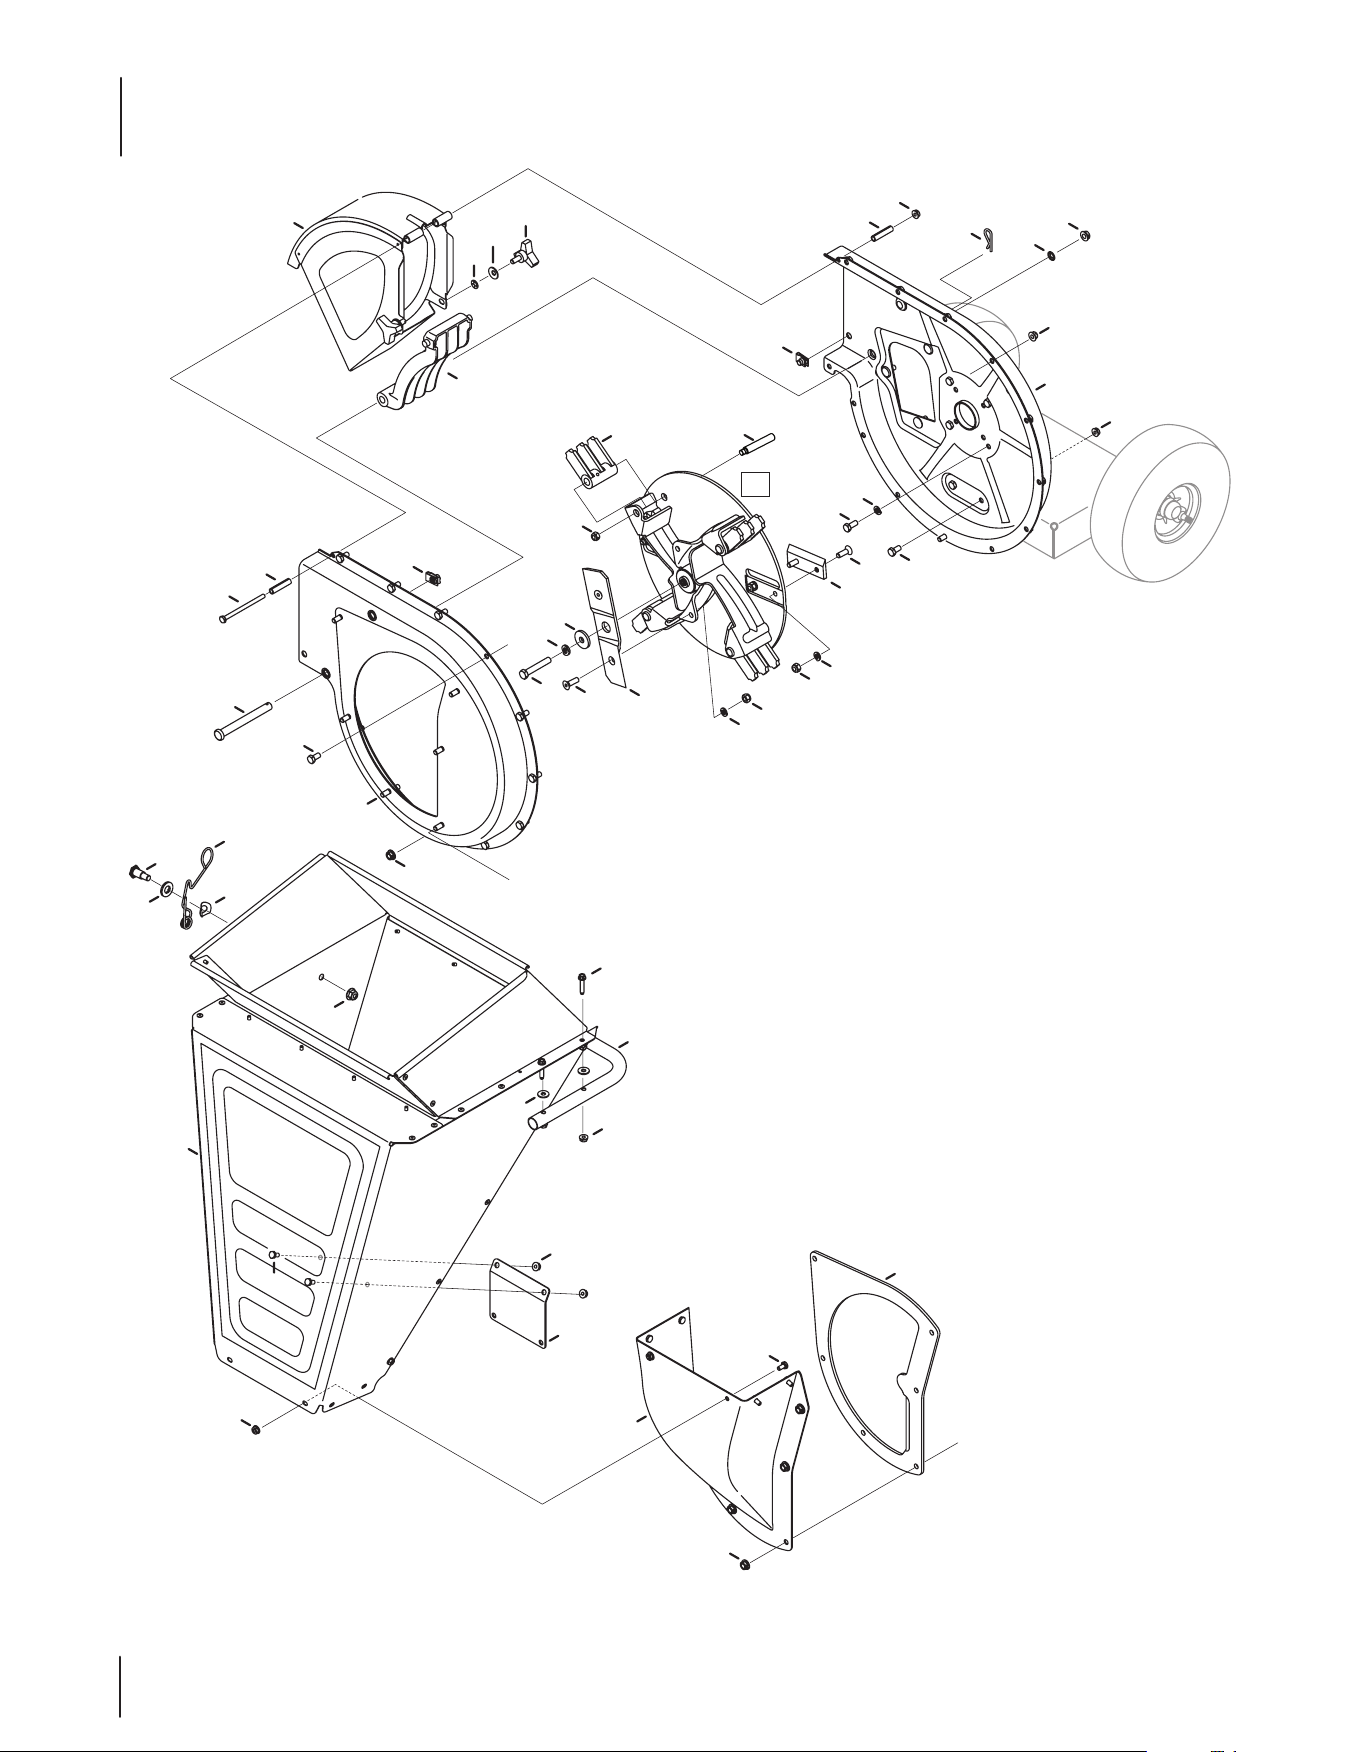
18
Model Series/Séries de modèles 410 & 420
B
A
A
B
6
16
22
19
20
17
42
23
41
39
41
24
25
34
11
12
34
32
32
3
5
41
37
40
18
33
29
36
30
10
31
15
41
18
42
31
2
9
7
4
4
7
8
2
13
18
38
40
35
14
18
18
27
28
21
26
1

19
Model Series/ Séries de modèles 410 & 420
REF PART
NO. NO.
N° DE N° DE
RÉF PIÈCE DESCRIPTION DESCRIPTION
1 981-04094 Impeller Assembly Complete Ensemble de turbine
2 710-1054 Machine Screw 5/16-24 x 1.0 Vis usinee a tete bombee de 5/16-18 x 0,75
3 738-04286 Shoulder Pin .5 x 2.625 Goupille de épaulée 0,5 x 2,625
4 912-0411 Hex Lock Nut 5/16-24 Contre-écrou à six pans 5/16-24
5 712-0266A Hex Cent. L-Nut 3/8-16 Contre-écrou de blocage 3/8-16
6 719-04308 Flail Blade Lame de éau
7 936-0119 Lockwasher 5/16 Rondelle frein 5/16
8 942-04050 Shredder Blade Lame déchiqueteuse
9 942-0544B Chipper Blade Lame de broyeuse
10 911-0835 Clevis Pin .50 x 4.62 Axe de chape 0,5 x 4,62
11 936-0217 Lockwasher 3/8 Rondelle frein 3/8
12 736-0247 Flat Washer .406 x 1.25 Rondelle plate 0,406 x 1,25
13 710-1254 Hex Cap Screw 3/8-24 x 2.2 Vis à chapeau à six pans de 3/8-24 x 2,2
14 736-0242 Cupped Washer .340 ID x .872 OD Rondelle creuse 0,340 DI x 0,872 DE
15 681-04011-0638 Shredder Hopper Assembly Ensemble de la déchiqueteuse/trémie
16 710-0809 Hex Cap Screw 1/4-20 x 1.250 Vis à chapeau à six pans de 1/4-20 x 1,250
17 712-04065† Flange Lock Nut 3/8-16 Contre-écrou à embase 3/8-16
18 712-04063 Flange Lock Nut 5/16-18 Contre-écrou à embase 5/16-18
19 932-04167† Torsion Spring Ressort de tortion
20 736-0182† Spring Washer .50 x 1.0 x .022 Rondelle à ressort 0,50 x 1,0 x 0,022
21 936-0326† Flat Washer .50 x 1.0 x .0125 Rondelle plate 0,50 x 1,0 x 0,0125
22 738-0430† Shoulder Screw 3/8-16 Vis à épaulée 3/8-16
23 749-04103-0637 Hopper Handle Poignée de la trémie
24 781-04007-0638 Shredder Plate Plaque de déchiquetage
25 781-04027-0638 Hopper Support Bracket Support de la trémie
26 781-04033-0638 Inlet Guide Guide de l’entrée
27 681-0117-0638 Inner Flail Housing Assembly Ensemble de la boitier interieur du eau
28 681-04002-0638 Outer Flail Housing Assembly Ensemble de la boitier extérieur du eau
29 710-0157 Hex Cap Screw 5/16-24 x .75 Vis à chapeau à six pans de 5/16-24 x 0,75
30 710-0825 Hex Cap Screw 1/4-20 x 3.75 Vis à chapeau à six pans de 1/4-20 x 3,75
31 710-3025 Hex Cap Screw 5/16-18 x .625 Vis à chapeau à six pans de 5/16-18 x 6,25
32 926-0211 U-Nut 5/16-18 Écrou en «U» 5/16-18
33 936-0119 Lockwasher 5/16 Rondelle frein 5/16
34 950-0793 Hinge Spacer .265 x .380 x 1.66 Entretoise articulée 0,265 x 0,380 x 1,66
35 720-0170 Knob 5/16-18 Bouton 5/16-18
36 681-0094-0637 Chute Deector Assembly Déecteur de la goulotte
37 914-0149B Internal Cotter Pin Goupille fendue
38 719-04070 Shredder Screen Écran déchiqueteuse
39 736-0173 Flat Washer .28 x .74 x .063 Rondelle plate 0,28 x 0,74 x 0,063
40 726-0201 Speed Nut .3125 ID Écrou rapide 0,3125 DI
41 712-3027 Flange Lock Nut 1/4-20 Contre-écrou à embase 1/4-20
42 710-0599 TT Screw 1/4-20 x .5 Vis 1/4-20 x 0,5
† Model Series/Séries de modèles 420
†† Model Series/Séries de modèles 410
20
35
31
33
34
32
20
13
37
14
38
20
39
13
2
27
7
1
6
8
3
20
21
14
23
4
26
28
24
15
22
25
18
17
19
A
A
5
7
38
21
29
30
10
11
12
14
36
9
16
26
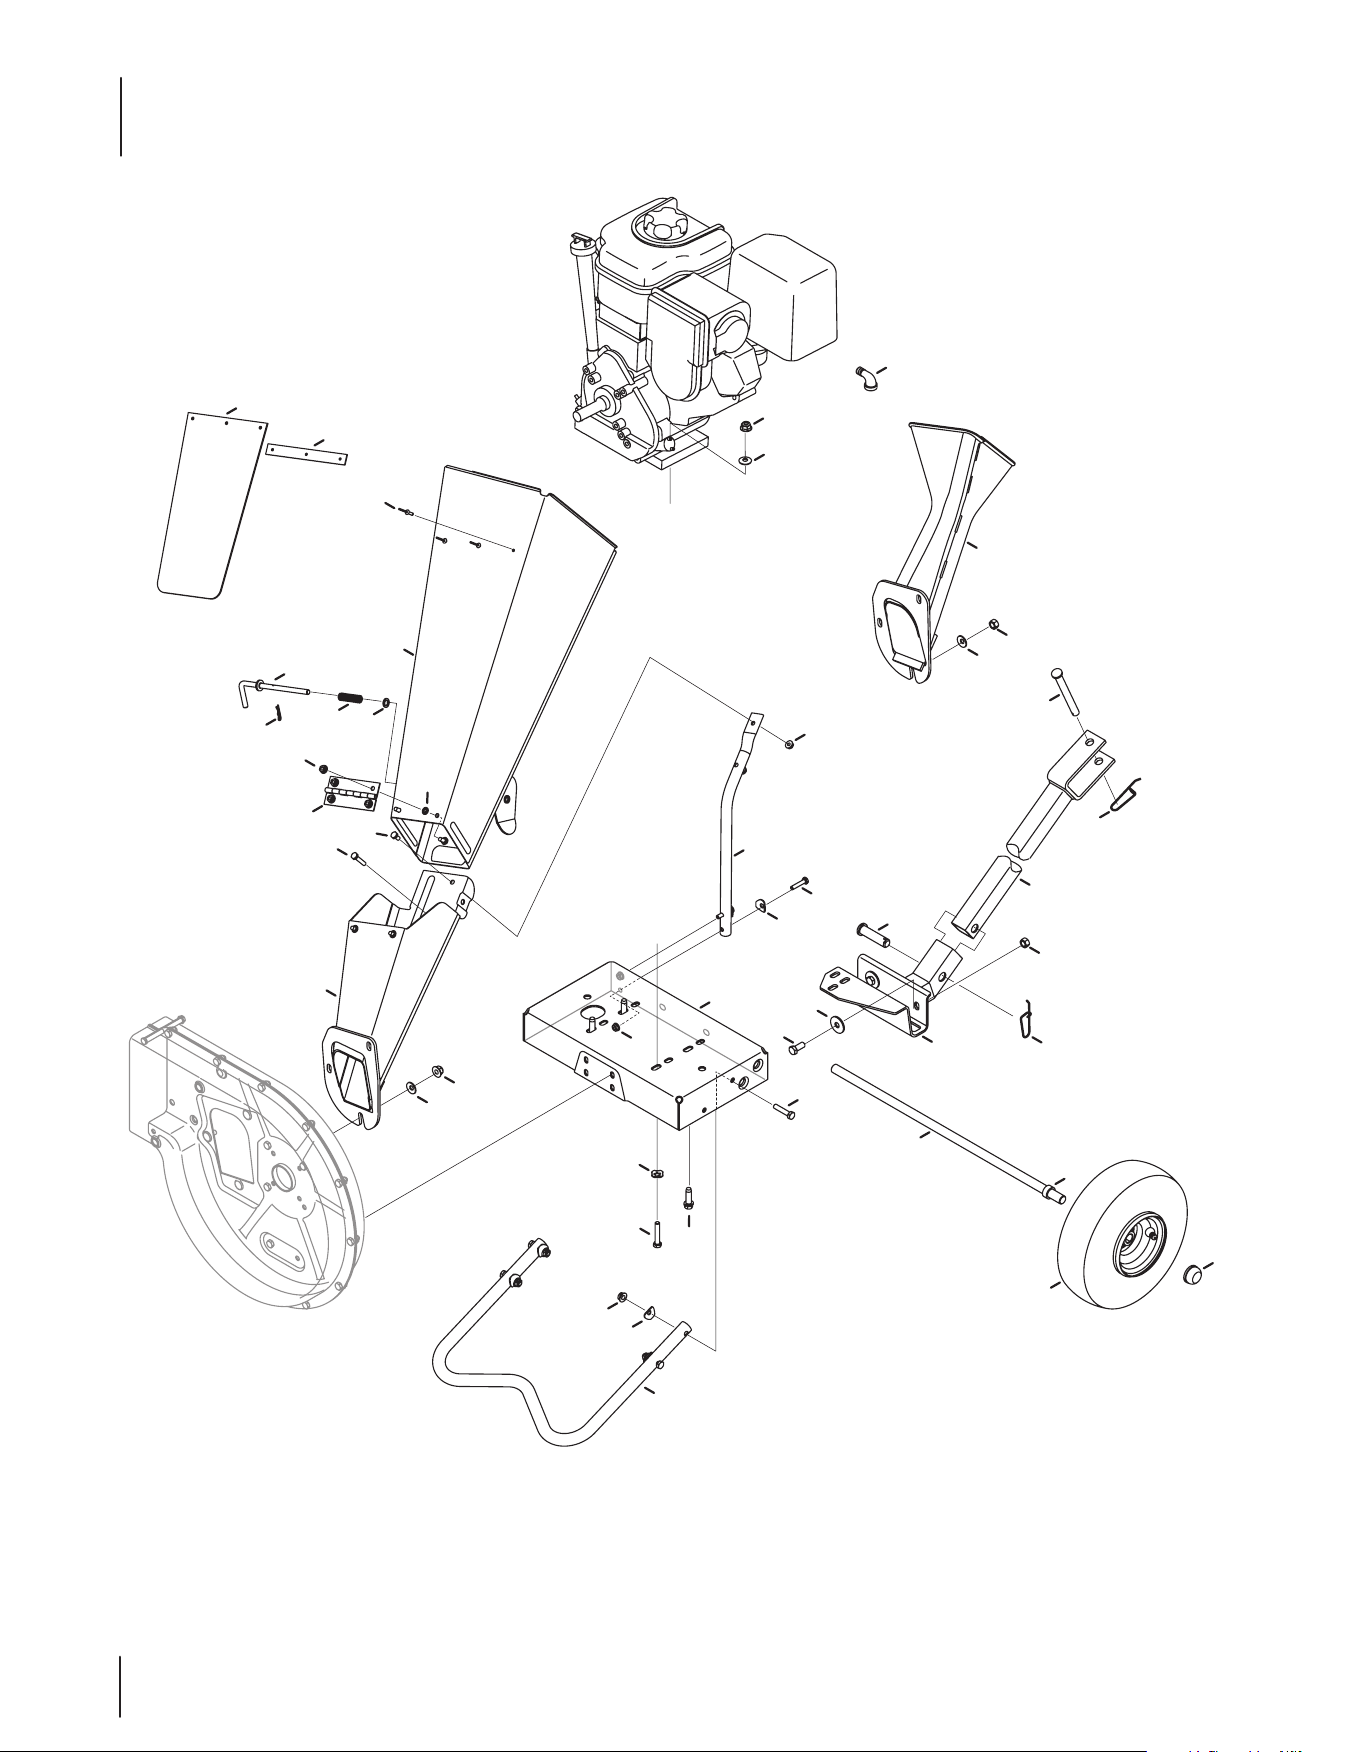
Model Series/Séries de modèles 410 & 420

21
† Model Series/Séries de modèles 420
†† Model Series/Séries de modèles 410
* Not Shown/Non illustrée
REF PART
NO. NO.
N° DE N° DE
RÉF PIÈCE DESCRIPTION DESCRIPTION
1 981-0133-0637 Tongue Hitch Mount Timon d’attelage
2 681-0134A-0637 Base Hitch Mount Base d’attelage
3 710-3001 Hex Cap Screw 3/8-16 x .88 Vis à chapeau à six pans de 3/8-16 x 0,88
4 711-0299 Clevis Pin .625 x 2.4 Axe de chape 0,625 x 2,4
5 911-0835 Clevis Pin .50 x 4.62 Axe de chape 0,5 x 2,4
6 712-04065 Flange Lock Nut 3/8-16 Contre-écrou à embase 3/8-16
7 732-0194 Spring Pin Goupille ressort
8 936-0133 Flat Washer .411 x 1.25 x 1.0 Rondelle plate 0,411 x 1,25 x 1,0
9 681-04006-0638† Upper Chipper Chute Assembly Goulotte de déchiquetage supérieur
10 681-04007-0638† Lower Chipper Chute Assembly Goulotte de déchiquetage inférieur
11 710-0106† Hex Cap Screw 1/4-20 x 1.25 Vis à chapeau à six pans de 1/4-20 x 1,25
12 710-3013† Screw 1/4-20 x .50 Vis 1/4-20 x 0,50
13 912-3010 Hex Nut 5/16-18 Écrou à six pans 5/16-18
14 712-04064† Flange Lock Nut 1/4-20 Contre-écrou à embase 1/4-20
15 914-0104† Cotter Pin Goupille fendue
16 728-0175† Pop Rivet Rivet
17 932-0306A† Compression Spring .531 x 1.75 Ressort de compression 0,531 x 1,75
18 735-0249A† Chute Flap Abattant goulotte
19 936-0140† Flat Washer Rondelle plate
20 736-0242 Cupped Washer .340 ID x .872 OD Rondelle creuse 0,340 DI x 0,872 DE
21 936-0451 Washer .320 ID x .93 OD Rondelle 0,320 DI x 0,93 DE
22 947-04163† Lock Rod Verrouillage tige
23 749-1004-0638† Chipper Chute Support Support de goulotte de déchiquetage
24 981-04032† Chipper Chute Hinge Charnière de goulotte de déchiquetage
25 781-0633† Chute Flap Strip Bande de rabat goulotte
26 710-0805 Hex Cap Screw 5/16-18 x 1.50 Vis à chapeau à six pans de 5/16-18 x 1,50
27 749-04104-0637 Tube Support Support de tube
28 681-0184-0638B†† Frame Assembly Bâti
681-0183A-0638† Frame Assembly Bâti
29 710-0502A Hex Sems Screw 3/8-16 x 1.25 Vis Sems à tête hex. 3/8-16 x 1,25
30 936-0170 Special Lock Washer 5/16 Rondelle frein 5/16, spéciale
31 726-0214 Push Cap 5/8 Pousser le capuchon
32 634-04009 Wheel 10 x 4 x 4 Roue 10 x 4 x 4
33 950-0786 Spacer .64 x .88 x .38 Entretoise 0,64 x 0,88 x 0,38
34 738-0813 Axle 22.47” Essieu 22,47 po de lg.
35 937-0195 Elbow Fitting Raccord coudé
36 726-0233† Push Nut .25 ID x .50 OD Écrou poussée 0,25 DE x 0,50 DE
37 681-0095-0638†† Chipper Chute Goulotte de déchiquetage
38 712-3004A Flange Lock Nut 5/16-18 Contre-écrou à embase 5/16-18
39 710-0809 Hex Cap Screw 1/4-20 x 1.250 Vis à chapeau à six pans de 1/4-20 x 1,250
— 964-04023* Debris Collection Bag Sac récupérateur
— 723-0400* Safety Glasses Lunettes de sécurité
Model Series/ Séries de modèles 410 & 420

MANUFACTURER’S LIMITED WARRANTY FOR
GDOC-100023 REV. C
The limited warranty set forth below is given by Troy-Bilt LLC with
respect to new merchandise purchased and used in the United States
and/or its territories and possessions, and by MTD Products Limited
with respect to new merchandise purchased and used in Canada and/
or its territories and possessions (either entity respectively, “Troy-
Bilt”).
“Troy-Bilt” warrants this product (excluding its Belts, Transmission
and Attachments as described below) against defects in material and
workmanship for a period of two (2) years commencing on the date
of original purchase and will, at its option, repair or replace, free of
charge, any part found to be defective in materials or workmanship.
This limited warranty shall only apply if this product has been
operated and maintained in accordance with the Operator’s Manual
furnished with the product, and has not been subject to misuse,
abuse, commercial use, neglect, accident, improper maintenance,
alteration, vandalism, theft, fire, water, or damage because of other
peril or natural disaster. Damage resulting from the installation or use
of any part, accessory or attachment not approved by Troy-Bilt for use
with the product(s) covered by this manual will void your warranty as
to any resulting damage.
Belts are warranted to be free from defects in material and
workmanship for a period of thirty (30) days from the date of
purchase.
Transmission — Troy-Bilt warrants the transmission (including
all gears, shafts and housings) against defects in material and
workmanship for the life of the tiller, to the original purchaser only,
commencing on the date of original purchase or lease.
Attachments — Troy-Bilt warrants attachments for this product
against defects in material and workmanship for a period of one (1)
year, commencing on the date of the attachment’s original purchase
or lease. Attachments include, but are not limited to items such as:
grass collectors and mulch kits.
HOW TO OBTAIN SERVICE: Warranty service is available, WITH
PROOF OF PURCHASE, through your local authorized service dealer.
To locate the dealer in your area:
In the U.S.A.
Check your Yellow Pages, or contact Troy-Bilt LLC at P.O. Box 361131,
Cleveland, Ohio 44136-0019, or call 1-866-840-6483,
1-330-558-7220 or log on to our Web site at www.troybilt.com.
In Canada
Contact MTD Products Limited, Kitchener, ON N2G 4J1, or call
1-800-668-1238 or log on to our Web site at www.mtdcanada.com.
This limited warranty does not provide coverage in the following
cases:
a. The engine or component parts thereof. These items may carry a
separate manufacturer’s warranty. Refer to applicable manufac-
turer’s warranty for terms and conditions.
b. Log splitter pumps, valves, and cylinders have a separate one-
year warranty.
c. Routine maintenance items such as lubricants, filters, blade
sharpening, tune-ups, brake adjustments, clutch adjustments,
deck adjustments, and normal deterioration of the exterior finish
due to use or exposure.
d. Service completed by someone other than an authorized service
dealer.
e. Troy-Bilt does not extend any warranty for products sold or
exported outside of the United States and/or Canada, and their
respective possessions and territories, except those sold through
Troy-Bilt’s authorized channels of export distribution.
f. Replacement parts that are not genuine Troy-Bilt parts.
g. Transportation charges and service calls.
h. Troy-Bilt does not warrant this product for commercial use.
No implied warranty, including any implied warranty of
merchantability of fitness for a particular purpose, applies after
the applicable period of express written warranty above as to the
parts as identified. No other express warranty, whether written or
oral, except as mentioned above, given by any person or entity,
including a dealer or retailer, with respect to any product, shall
bind Troy-Bilt. During the period of the warranty, the exclusive
remedy is repair or replacement of the product as set forth above.
The provisions as set forth in this warranty provide the sole and
exclusive remedy arising from the sale. Troy-Bilt shall not be liable
for incidental or consequential loss or damage including, without
limitation, expenses incurred for substitute or replacement lawn
care services or for rental expenses to temporarily replace a
warranted product.
Some states do not allow the exclusion or limitation of incidental
or consequential damages, or limitations on how long an implied
warranty lasts, so the above exclusions or limitations may not apply
to you.
In no event shall recovery of any kind be greater than the amount of
the purchase price of the product sold. Alteration of safety features of
the product shall void this warranty. You assume the risk and liability
for loss, damage, or injury to you and your property and/or to others
and their property arising out of the misuse or inability to use the
product.
This limited warranty shall not extend to anyone other than the
original purchaser or to the person for whom it was purchased as a
gift.
HOW STATE LAW RELATES TO THIS WARRANTY: This limited
warranty gives you specific legal rights, and you may also have other
rights which vary from state to state.
IMPORTANT: Owner must present Original Proof of Purchase to
obtain warranty coverage.
Troy-Bilt LLC, P.O. BOX 361131 CLEVELAND, OHIO 44136-0019; Phone: 1-866-840-6483, 1-330-558-7220
MTD Canada Limited - KITCHENER, ON N2G 4J1; Phone 1-800-668-1238
NOTICE D’UTILISATION
$POTJHOFTEFTÏDVSJUÏt.POUBHFt'PODUJPOOFNFOUt&OUSFUJFOt4FSWJDFt%ÏQBOOBHFt(BSBOUJF
IMPRIMÉ AUX ÉTATS-UNIS
AVERTISSEMENT
PRIÈRE DE LIRE TOUTES LES INSTRUCTIONS FIGURANT DANS CETTE NOTICE D’UTILISATION
AVANT D’ESSAYER DE VOUS SERVIR DE CETTE MACHINE. LE NONRESPECT DE CES
INSTRUCTIONS PEUT ENTRAÎNER DES BLESSURES CORPORELLES.
P. O. Box 1386, 97 Kent Avenue, KITCHENER, ONTARIO, CANADA N2G 4J1
Déchiqueteuse-broyeuse — Séries 410 et 420
Série 410 modèle illustré
769-09856
5.2.14

Service après-vente
Veuillez NE PAS retourner la machine au détaillant qui vous l’à vendue, sans vous adresser d’abord au service après vente.
Nos techniciens peuvent vous aider si vous avez des difficultés en assemblant cette machine ou si vous avez des questions concernant
ses commandes, son fonctionnement ou son entretien. Choisissez parmi les options ci-dessous :
◊ Visitez notre site web à www.troybilt.ca
◊ Rendez visite au concessionnaire le plus proche de chez vous en appelant le service après-vente au 1-800-668-1238.
◊ ²DSJWF[OPVTË10#PYt,FOU"WFOVFt,JUDIFOFS0OUBSJP$BOBEBt/(+
À l’intention du propriétaire
1
2
Consignes de sécurité ............................................. 3
Assemblage de montage ........................................ 7
Commandes et caractéristiques ........................... 9
Fonctionnement .....................................................10
Entretien et réglages ..............................................12
Service technique ...................................................14
Dépannage .............................................................16
Pièces de rechange (voir les page 18-21 de la
version anglaise de cette notice d’utilisation).
Garantie ..................................................................18
Enregistrez les renseignements concernant la
machine.
"WBOUEFQSÏQBSFSFUEVUJMJTFSWPUSFOPVWFMMFNBDIJOFWFVJMMF[
localiser la plaque signalétique et reporter les renseignements
fournis sur la droite. Pour localiser la plaque signalétique, placez-
vous derrière la machine à la poste de conduite et regardez à
MBSSJÒSFEFMBNBDIJOF$FTSFOTFJHOFNFOUTTFSPOUOÏDFTTBJSFTTJ
WPVTBWF[CFTPJOEVOFBJEFUFDIOJRVFTPJUQBSMJOUFSNÏEJBJSFEF
notre site internet, soit auprès du concessionnaire votre localité.
NUMÉRO DE MODÈLE
NUMÉRO DE SÉRIE
.FSDJEBWPJSBDIFUÏWPUSFOPVWFMÏRVJQFNFOU$FWÏIJDVMFB
été soigneusement conçu pour vous offrir des performances
SFNBSRVBCMFTTJMFTUDPSSFDUFNFOUVUJMJTÏFUFOUSFUFOV
7FVJMMF[MJSFDFUUFOPUJDFEVUJMJTBUJPOBVDPNQMFUBWBOUEVUJMJTFS
MÏRVJQFNFOU&MMFWPVTFYQMJRVFDPNNFOUQSÏQBSFSMBNBDIJOF
FUDPNNFOUMVUJMJTFSFUMFOUSFUFOJSGBDJMFNFOUFUFOUPVUF
sécurité. Veuillez vous assurer que toute personne qui utilisera
la machine suivra soigneusement les consignes de sécurité
énoncées. Le non respect de ces consignes peut causer des
blessures corporelles ou des dégâts matériels.
Tous les renseignements fournis ici sont les plus récents
qui sont disponibles à propos de ce produit au moment de
MJNQSFTTJPOEFDFUUFOPUJDFEVUJMJTBUJPO$POTVMUF[TPVWFOUDFUUF
OPUJDFEVUJMJTBUJPOQPVSWPVTGBNJMJBSJTFSBWFDMBNBDIJOFTFT
caractéristiques et son fonctionnement. Sachez que cette notice
peut mentionner une vaste gamme de spécifications techniques
concernant différents modèles. Les caractéristiques et les
avantages mentionnés et/ou illustrés dans cette notice peuvent
OFQBTTBQQMJRVFSËUPVTMFTNPEÒMFT-FGBCSJDBOUTFSÏTFSWFMF
droit de modifier les caractéristiques techniques du produit, les
NPEÒMFTFUMÏRVJQFNFOUTBOTQSÏBWJTFUTBOTPCMJHBUJPO
&ODBTEFQSPCMÒNFPVEFRVFTUJPODPODFSOBOUDFUUFNBDIJOF
adressez-vous au concessionnaire de service de votre localité ou
appelez-nous directement. Les numéros de téléphone du service
BQSÒTWFOUFMBESFTTFJOUFSOFUFUMBESFTTFQPTUBMFTFUSPVWFOU
sur cette page. Nous voulons nous assurer que nos clients seront
toujours satisfaits.
Les mentions de droite et de gauche dans cette notice
EVUJMJTBUJPOTFOUFOEFOUËQBSUJSEVQPTUFEFDPOEVJUF
Le fabricant du moteur est responsable pour tous les
problèmes concernant la performance, la puissance, les
caractéristiques techniques, la garantie et l’entretien du
moteur. Veuillez consulter la notice d’utilisation du moteur,
fournie séparément avec la machine, pour obtenir de plus
amples renseignements.
Merci !

Consignes de sécurité
2
3
Fonctionnement
1. "TTVSF[WPVTEFMJSFFUEFCJFODPNQSFOESFUPVUFTMFT
instructions qui figurent sur la machine et dans la notice
EVUJMJTBUJPOBWBOUEFMBTTFNCMFSFUEFMBNFUUSFFONBSDIF
$POTFSWF[DFUUFOPUJDFEVUJMJTBUJPOËVOFOESPJUTßSQPVS
toute consultation ultérieure et pour commander des
pièces de rechange.
2. Familiarisez-vous avec les commandes et leur
fonctionnement avant de vous en servir. Sachez comment
arrêter la machine et débrayer les commandes rapidement.
3. /FQFSNFUUF[KBNBJTËEFTFOGBOUTEFNPJOTEFBOT
de se servir de la machine. Des enfants plus âgés doivent
MJSFFUDPNQSFOESFMFNPEFEFNQMPJEFMBNBDIJOFFUMFT
consignes de sécurité. Un adulte doit leur apprendre à se
servir de cette machine et les surveiller.
Seuls des adultes responsables connaissant bien le
GPODUJPOOFNFOUEFMBNBDIJOFEPJWFOUÐUSFBVUPSJTÏTËTFOTFSWJS
5. Éloignez tout le monde, en particulier les jeunes enfants et
MFTBOJNBVYEFDPNQBHOJFEFMB[POFEFUSBWBJM"SSÐUF[MB
NBDIJOFTJRVFMRVVOTBQQSPDIF
6. Ne faites jamais fonctionner la machine dans un local
DMPTPVNBMBÏSÏDBSMFTHB[EÏDIBQQFNFOUEVNPUFVS
contiennent du monoxyde de carbone, un gaz inodore très
dangereux.
/BQQSPDIF[KBNBJTWPTQJFETPVNBJOTEFTQJÒDFTFO
NPVWFNFOUEVDPNQBSUJNFOUEBMJNFOUBUJPOPVEFMB
HPVMPUUFEÏKFDUJPO-BUVSCJOFSPUBUJWFQFVUBNQVUFS
doigts, mains et pieds.
8. /FTTBZF[KBNBJTEFEÏCPVDIFSMFDPNQBSUJNFOU
EBMJNFOUBUJPOMBHPVMPUUFEÏKFDUJPOEFSFUJSFSPVEF
WJEFSMFTBDEFMBTQJSBUFVSEFYBNJOFSPVEFSÏQBSFSMB
NBDIJOFQFOEBOURVFMFNPUFVSUPVSOF"SSÐUF[MFNPUFVS
et attendez que toutes les pièces en mouvement se soient
complètement immobilisées. Débranchez le fil de la bougie
et mettez-le à la masse contre le moteur.
Préparation
1. &YBNJOF[TPJHOFVTFNFOUMB[POFEFUSBWBJM3BNBTTF[UPVT
les cailloux, bouteilles, boîtes métalliques et autres objets
RVJSJTRVFOUEÐUSFQSPKFUÏTQBSMBNBDIJOFEFCMFTTFS
RVFMRVVOPVEFOEPNNBHFSMBNBDIJOF
2. Portez toujours des lunettes de sécurité en utilisant la
machine ou en effectuant un réglage ou une réparation.
Un objet peut en effet être projeté, ricocher et vous blesser
aux yeux.
3. Portez des chaussures robustes à semelle épaisse et des
vêtements bien ajustés. Nous recommandons le port
EVOFDIFNJTFËNBODIFTMPOHVFTFUEVOQBOUBMPOBJOTJ
que de chaussures à bout en acier. Ne portez jamais des
vêtements lâches ni des bijoux et attachez les cheveux
longs au-dessus des épaules. Ils risquent de se prendre
EBOTMFTQJÒDFTNPCJMFT/VUJMJTF[KBNBJTMBNBDIJOFQJFET
nus, avec des sandales ou chaussures de tennis. Portez
des gants pour charger les matériaux dans la goulotte de
déchiquetage.
"WBOUEFNFUUSFMBNBDIJOFFONBSDIFWÏSJGJF[RVFUPVT
les boulons et vis sont bien serrés et maintenez la machine
FOCPOÏUBUEFNBSDIF&YBNJOF[SÏHVMJÒSFNFOUMB
NBDIJOFQPVSWPVTBTTVSFSRVFMMFOFTUQBTFOEPNNBHÏF
5. 1SFOF[TPJOEFTÏUJRVFUUFTEFTÏDVSJUÏFUEJOTUSVDUJPOTFU
remplacez-les au besoin.
Manipulation de l’essence:
Pour éviter toute blessure ou dégât matériel, faites très attention
FONBOJQVMBOUEFMFTTFODF*MTBHJUEVOQSPEVJUFYUSÐNFNFOU
JOGMBNNBCMFFUMFTWBQFVSTSJTRVFOUEFYQMPTFS7PVTQPVWF[
être grièvement blessé si des éclaboussures sur votre peau ou
TVSWPTWÐUFNFOUTTFOGMBNNBJFOU3JODF[WPUSFQFBVFUDIBOHF[
immédiatement de vêtements.
a. Remissez le carburant dans des bidons homologués
seulement.
b. /FGBJUFTKBNBJTMFQMFJOEBOTVOWÏIJDVMFOJËMBSSJÒSF
EVOFDBNJPOFUUFEPOUMFQMBODIFSFTUSFDPVWFSUEVO
revêtement en plastique. Placez toujours les bidons par
terre et loin de votre véhicule avant de les remplir.
AVERTISSEMENT: Ce symbole attire votre attention sur des consignes de sécurité importantes qui, si elles
ne sont pas respectées, peuvent mettre en danger non seulement votre personne et vos biens, mais aussi
DFVYEBVUSVJ1SJÒSFEFMJSFUPVUFTMFTJOTUSVDUJPOTGJHVSBOUEBOTDFUUFOPUJDFEVUJMJTBUJPOBWBOUEFTTBZFSEF
vous servir de cette machine. Le non-respect de ces instructions peut entraîner des blessures corporelles.
RESPECTEZ L’AVERTISSEMENT QUI ACCOMPAGNE CE SYMBOLE!
DANGER: Cette machine doit être utilisé conformément aux consignes de sécurité qui figurent dans ce
NBOVFM$PNNFBWFDUPVUBQQBSFJMNPUPSJTÏVOFOÏHMJHFODFPVVOFFSSFVSEFMBQBSUEFMPQÏSBUFVSQFVU
entraîner de graves blessures. Par conséquent, le non-respect de ces consignes peut causer des blessures
corporelles graves et même mortelles.

4 SECTION 2 — CONSIGNES DE SÉCURITÉ
c. 7ÏSJGJF[TJMZBEFTQJÒDFTEFTTFSSÏFTFUSFTTFSSF[MFTQPVS
CÏOÏGJDJFSEVOGPODUJPOOFNFOUTBOTEBOHFS
/FMBJTTF[QBTMFTNBUÏSJBVYEÏDIJRVFUÏTTBDDVNVMFSË
proximité de la goulotte car ils empêcheront une éjection
satisfaisante et risquent de provoquer des rejets par la
goulotte de déchiquetage.
/FTTBZF[KBNBJTEFCSPZFSPVEFEÏDIJRVFUFSEFT
NBUÏSJBVYEVOEJBNÒUSFQMVTJNQPSUBOURVFMFEJBNÒUSF
QSÏDJTÏTVSMBNBDIJOFPVEBOTMBOPUJDFEVUJMJTBUJPO7PVT
SJTRVF[EFWPVTCMFTTFSPVEFOEPNNBHFSMBNBDIJOF
/FTTBZF[KBNBJTEFEÏCPVDIFSMFDPNQBSUJNFOU
EBMJNFOUBUJPOPVMPVWFSUVSFEÏKFDUJPOQFOEBOURVFMF
NPUFVSUPVSOF"SSÐUF[MFNPUFVSFUBUUFOEF[RVFUPVUFTMFT
pièces en mouvement se soient immobilisées. Débranchez le
fil de la bougie et mettez-le à la terre contre le moteur avant
de retirer les débris.
/VUJMJTF[KBNBJTMBNBDIJOFTJMFMBUSÏNJFMBHPVMPUUFEF
EÏDIJRVFUBHFFUMBHPVMPUUFEÏKFDUJPOOFTPOUQBTJOTUBMMÏT
/FTTBZF[KBNBJTEFSFUJSFSFUEFWJEFSMFTBDEFMBTQJSBUFVS
pendant que le moteur tourne.
10. Laissez tous les dispositifs de protection, les déflecteurs et
autres dispositifs de sécurité en place et en bon état.
11. Ne vous approchez jamais de l
a goulotte de déchiquetage
pour éviter tout rejet accidentel des matériaux.
/VUJMJTF[QBTMBNBDIJOFTJMBWJTJCJMJUÏFTUNBVWBJTFPVTJMB
lumière est insuffis
ante.
/VUJMJTF[QBTDFUUFNBDIJOFTVSVOFTVSGBDFHPVESPOOÏF
recouverte de gravier ou accidentée.
/FWPVTTFSWF[QBTEFMBNBDIJOFBQSÒTBWPJSCVEFTCPJTTPOT
alcoolisées ou après avoir pris des médicaments.
15. Le silencieux et le moteur deviennent très chauds et peuvent
DBVTFSEFTCSßMVSFT/FMFTUPVDIF[QBT
16.
Ne soulevez jamais la machine et ne la portez pas quand le
moteur tourne.
'BJUFTUPVKPVSTQSFVWFEFCPOTFOTEBOTEFTTJUVBUJPOT
RVJOPOUQBTÏUÏBCPSEÏFTQBSDFUUFOPUJDFEVUJMJTBUJPO
"ESFTTF[WPVTBVTFSWJDFBQSÒTWFOUFQPVSPCUFOJSMFOPNEV
concess
ionnaire le plus proche de chez vous.
Entretien et Remisage
1. Ne modifiez jamais les dispositifs de sécurité. Vérifiez
TPVWFOURVJMTGPODUJPOOFOUDPSSFDUFNFOU
2. Vérifiez régulièrement que les boulons et vis sont bien
serrés et maintenez la machine en bon état de marche.
&YBNJOF[TPJHOFVTFNFOUMBNBDIJOFQPVSWPVTBTTVSFS
RVFMMFOFTUQBTFOEPNNBHÏFFUOBQBTCFTPJOEÐUSF
réparée.
3. "WBOUEFOFUUPZFSEFSÏQBSFSPVEFYBNJOFSMBNBDIJOF
assurez-vous que la turbine et autres pièces en mouvement
se sont immobilisées. Débranchez le fil de la bougie et
éloignez-le de celle-ci pour empêcher tout démarrage
accidentel.
Ne modifiez pas le réglage du régulateur qui assure
un régime optimum sans présenter de danger. Il est
EBOHFSFVYEFMBJTTFSMFNPUFVSTFNCBMMFSDFRVJSJTRVF
EFMFOEPNNBHFSBJOTJRVFEBVUSFTQJÒDFTNPCJMFTEFMB
machine.
c. %BOTMFNFTVSFEVQPTTJCMFEÏDIBSHF[MÏRVJQFNFOU
motorisé de la remorque et faites le plein par terre. Si
DFMBOFTUQBTQPTTJCMFGBJUFTMFQMFJOBWFDVOCJEPO
plutôt que directement de la pompe à essence.
d. Maintenez le gicleur en contact avec le bord du réservoir
EFTTFODFPVBWFDMPVWFSUVSFEVCJEPOKVTRVËDFRVFMF
QMFJOTPJUUFSNJOÏ/VUJMJTF[QBTVOHJDMFVSÏRVJQÏEVO
dispositif de blocage en position ouverte.
e. Éteignez toute cigarette ou pipe, tout cigare ou toute
autre chaleur incandescente.
f. /FGBJUFTKBNBJTMFQMFJOËMJOUÏSJFVSDBSEFTWBQFVST
JOGMBNNBCMFTSJTRVFOUEFTBDDVNVMFS
g. /FOMFWF[KBNBJTMFDBQVDIPOEFTTFODFFUOBKPVUF[
QBTEFTTFODFQFOEBOURVFMFNPUFVSUPVSOFPVTJMFTU
chaud. Laissez le moteur refroidir pendant au moins
deux minutes avant de faire le plein.
h. Ne faites jamais déborder le réservoir. Laissez un espace
EVOEFNJQPVDFFOWJSPOQPVSQFSNFUUSFMFYQFOTJPOEV
carburant.
i. 3FTTFSSF[CJFOMFDBQVDIPOEFTTFODF
j. &ODBTEFEÏCPSEFNFOUFTTVZF[UPVUFÏDMBCPVTTVSFT
sur le moteur et la machine. Déplacez la machine à une
BVUSFFOESPJU"UUFOEF[DJORNJOVUFTBWBOUEFNFUUSF
en marche le moteur.
k. -JNJUF[MFTSJTRVFTEJODFOEJFFOEÏCBSSBTTBOUMFNPUFVS
EFTCSJOTEIFSCFGFVJMMFTFUBVUSFTTBMFUÏT&TTVZF[MFT
ÏDMBCPVTTVSFTEFDBSCVSBOUPVEIVJMFFUFOMFWF[UPVTMFT
EÏCSJTJNCJCÏTEFTTFODF
l. /FSFNJTF[KBNBJTMBNBDIJOFPVMFTCJEPOTEFTTFODFË
MJOUÏSJFVSTJMZBVOFGMBNNFVOFÏUJODFMMFDIBVGGFFBV
ËHB[SBEJBUFVSTÒDIFMJOHFFUD
Fonctionnement
1. Ne plBDF[KBNBJTWPTNBJOTPVWPTQJFETQSÒTEVOFQJÒDF
FONPVWFNFOUEBOTMIBCJUBDMFEFMBUBSJÒSFPVEFMB
UVSCJOFPVEBOTMBHPVMPUUFEÏKFDUJPO-FTQJÒDFTFO
mouvement peuvent amputer doigts, mains et pieds.
2. "WBOUEFNFUUSFMBNBDIJOFFONBSDIFBTTVSF[WPVTRVFMB
HPVMPUUFEFEÏDIJRVFUBHFMFDPNQBSUJNFOUEBMJNFOUBUJPO
et le compartiment de déchiquetage ne sont pas
encombrés de débris.
3. &YBNJOF[UPVTMFTEÏCSJTËEÏDIJRVFUFSFUSFUJSF[UPVU
morceau de métal, caillou, bouteille, boîte métallique ou
autre objet qui risque de causer des blessures graves ou
EFOEPNNBHFSMBNBDIJOF
4JMEFWJFOUOÏDFTTBJSFEFQPVTTFSMFNBUÏSJFMÉUSBWFSTMB
USÏNJFVUJMJTF[VOCÉUPOEFQFUJUEJBNÒUSF/VUJMJTF[KBNBJT
vos mains ou pieds.
5. Si la turbine frappe un objet dur ou si la machine produit
des bruits inhabituels ou vibre anormalement, arrêtez
JNNÏEJBUFNFOUMFNPUFVS"UUFOEF[RVFMBUVSCJOF
TJNNPCJMJTFDPNQMÒUFNFOUDébranchez le fil de la bougie
et mettez-le à la terre contre le moteur. Procédez comme
suit :
a. Recherchez les dégâts éventuels;
b. Réparez ou remplacez les pièces endommagées.

5SECTION 2 —CONSIGNES DE SÉCURITÉ
5. 1SFOF[TPJOEFTÏUJRVFUUFTEFTÏDVSJUÏFUEJOTUSVDUJPOTFU
remplacez-les au besoin.
6. 4VJWF[MFTDPOTFJMTGPVSOJTEBOTDFUUFOPUJDFEVUJMJTBUJPO
pour ce qui concerne le chargement, le déchargement, le
transport et le remisage sans danger de cette machine.
/FSFNJTF[KBNBJTMBNBDIJOFPVMFTCJEPOTEFTTFODFË
MJOUÏSJFVSTJMZBVOFGMBNNFVOFÏUJODFMMFDIBVGGFFBVË
HB[SBEJBUFVSTÒDIFMJOHFFUD
8. Laissez la machine refroidir pendant au moins 5 minutes
avant de la remiser.
$POTVMUF[UPVKPVSTMBOPUJDFEVUJMJTBUJPORVBOUBVY
instructions de remisage hors-saison.
10. -FDBTÏDIÏBOUWJEF[MFSÏTFSWPJSEFTTFODFËMFYUÏSJFVS
11. 3FTQFDUF[MFTSÒHMFNFOUTDPODFSOBOUMÏMJNJOBUJPOEFT
déchets et liquides qui risquent de nuire à la nature et à
MFOWJSPOOFNFOU
12. %BQSÒTMB$POTVNFS1SPEVDUT4BGFUZ$PNNJTTJPO$14$
$PNNJTTJPOTVSMBTÏDVSJUÏEFTQSPEVJUTEFDPOTPNNBUJPO
FUMBi64&OWJSPONFOUBM1SPUFDUJPO"HFODZw&1""HFODF
BNÏSJDBJOFEFQSPUFDUJPOEFMFOWJSPOOFNFOUDFQSPEVJU
BVOFEVSÏFEFWJFVUJMFNPZFOOFEFTFQUBOTPV
IFVSFTEFGPODUJPOOFNFOU"VUFSNFEFDFUUFEVSÏF
de vie utile moyenne, achetez une machine neuve ou
faites inspecter la machine chaque année par une station
technique agréée pour vous assurer que tous les dispositifs
mécaniques et de sécurité sont en bon état de marche et
ne sont pas usés de façon excessive. Le non-respect de
ces recommandations peut causer des accidents et des
blessures graves ou mortelles.
Ne modifiez pas le moteur.
Pour éviter toute blessure grave ou fatale, ne modifiez pas du
tout le moteur. Toute modification du réglage du régulateur
QFVUQSPWPRVFSMFNCBMMFNFOUEVNPUFVSFUFOUSBÔOFSTPO
fonctionnement à des vitesses dangereuses. Ne modifiez jamais
MFSÏHMBHFEFMVTJOFEVSÏHVMBUFVS
Avis concernant les émissions de gaz
Les moteurs certifiés conformes aux normes régulatrices de
MB$BMJGPSOJFFUEFMBHFODF&1"GÏEÏSBMFTQPVS403&QFUJU
ÏRVJQFNFOUIPSTSPVUFTPOUDFSUJGJÏTQPVSGPODUJPOOFSBWFD
EFMFTTFODFTBOTQMPNCPSEJOBJSFFUQFVWFOUÐUSFEPUÏTEFT
TZTUÒNFTEFDPOUSÙMFEFTÏNJTTJPOTEFHB[TVJWBOUT&OHJOF
.PEJGJDBUJPO&.FU5ISFF8BZ$BUBMZTU58$MFDBTÏDIÏBOU
Pare-étincelles
AVERTISSEMENT : Cette machine est équipée
EVONPUFVSËDPNCVTUJPOJOUFSOFFUFMMFOFEPJU
pas être utilisée sur un terrain non entretenu,
SFDPVWFSUEFCSPVTTBJMMFTPVEIFSCFTJMFTZTUÒNF
EÏDIBQQFNFOUEVNPUFVSOFTUQBTNVOJEVOQBSF
étincelles, conformément aux lois et règlements
QSPWJODJBVYPVMPDBVYMFDBTÏDIÏBOU
Si un pare-étincelles est utilisé, il doit être maintenu en bon état
EFNBSDIFQBSMVUJMJTBUFVSEFMBNBDIJOF
La station technique agréée la plus proche peut vous fournir un
QBSFÏUJODFMMFTQPVSMFQPUEÏDIBQQFNFOUEFDFUUFNBDIJOF
6 SECTION 2 — CONSIGNES DE SÉCURITÉ
Symboles de sécurité
Cette page illustre et explique les symboles de sécurité qui peuvent se trouver sur cette machine. Veuillez lire et suivre
UPVUFTMFTJOTUSVDUJPOTTVSMBNBDIJOFFUWPVTBTTVSFSEFCJFOMFTDPNQSFOESFBWBOUEFTTBZFSEBTTFNCMFSFUEVUJMJTFSMB
machine.
Symbole Description
7&6*--&;-*3&-"06-&4/05*$&4%65*-*4"5*0/
Veuillez lire et suivre toutes les instructions sur la machine et vous assurer de bien les
DPNQSFOESFBWBOUEFTTBZFSEBTTFNCMFSFUEVUJMJTFSMBNBDIJOF
"7&35*44&.&/5o-".&4&/.067&.&/5
/BQQSPDIF[QBTMFTNBJOTEFMPVWFSUVSFEÏKFDUJPOQFOEBOURVFMBNBDIJOF
GPODUJPOOF%FTMBNFTFONPVWFNFOUTPOUËMJOUÏSJFVS
41&$5"5&634
(BSEF[MFTTQFDUBUFVSTMFTBOJNBVYEFDPNQBHOJFFUMFTFOGBOUTËVOFEJTUBODF
EBVNPJOTQJFETEFMBNBDIJOFRVBOEFMMFFTUFONBSDIF"SSÐUF[MBNBDIJOFTJ
RVFMRVVOTBQQSPDIF
"7&35*44&.&/5o0#+&54130+&5²4
/VUJMJTF[KBNBJTMBNBDIJOFTJMBHPVMPUUFEÏKFDUJPOOFTUQBTJOTUBMMÏ
sur la machine.
1305&$5*0/%&4:&69
Portez toujours des lunettes de sécurité ou des lunettes étanches en utilisant cette
machine.
AVERTISSEMENT: Votre responsabilité. Cette machine ne doit être utilisée que par des personnes qui peuvent
lire, comprendre et respecter les avertissements et instructions qui figurent dans cette notice et sur la machine
CONSERVEZ CES INSTRUCTIONS!
Assemblage et Installation
3
7
Pièces détachées dans le carton
t Déchiqueteuse-broyeuse t 6OFOPUJDFEVUJMJTBUJPO t 6OFOPUJDFEVUJMJTBUJPOEFNPUFVS
t Barre de remorquage t Sac t Lunettes de sécurité
t 6OCJEPOEIVJMF
Assemblage
IMPORTANT: $FUUFNBDIJOFFTUFYQÏEJÏF4"/4&44&/$&OJ
)6*-&-PSTRVFMBTTFNCMBHFFTUUFSNJOÏWFVJMMF[MJSFMBOPUJDF
EVUJMJTBUJPOEVNPUFVSRVBOUBVDBSCVSBOUFUËMIVJMFËNPUFVS
recommandés.
Goulotte de déchiquetage (Séries 420 seulement)
Pour faciliter la livraison, le conduit de broyage a été placé en
QPTJUJPOÏMFWÏF"CBJTTF[MFEFMBGBÎPOTVJWBOUF
1. Tirez le loquet à ressort vers le haut.
2. 'BJUFTQJWPUFSMFDPOEVJUEFCSPZBHFEPVDFNFOUKVTRVË
DFRVJMTFMPHFEBOTMBUJHFEFWFSSPVJMMBHF7PJSJMMVTUSBUJPO
3-1.
AVERTISSEMENT /VUJMJTF[KBNBJTMBCSPZFVTF
déchiqueteuse lorsque le conduit de déchiquetage
est en position élevée, car cela pourrait entraîner de
graves blessures et des dommages matériels.
B
A
Figure 3-1
Installer le sac récupérateur
Pour installer le sac :
1. 3FDPVWSF[DPNQMÒUFNFOUMFDPOEVJUEÏKFDUJPOBWFD
MPVWFSUVSFEVTBD
2. Placez le sac de façon à ce que les boutons papillon,
RVJSFUJFOOFOUMFDPOEVJUEÏKFDUJPOBVCPÔUJFSTPJFOU
entièrement couverts.
3. 5JSF[TVSMBTBOHMFEFDPOUPVSKVTRVËDFRVFMFTBDTPJU
TFSSÏBVUPVSEFMPVWFSUVSFEVDPOEVJUEÏKFDUJPO7PJS
illustration 3-2.
Figure 3-2
8 SECTION 3 — ASSEMBLAGE & INSTALLATION
Montage
Pleins d’essence et d’huile
$POTVMUF[MBOPUJDFEVUJMJTBUJPOEVNPUFVSQPVSUPVU
renseignement supplémentaire concernant le moteur.
1. 'BJUFTMFQMFJOBWFDMIVJMFGPVSOJFMBQSFNJÒSFGPJTRVFWPVT
utilisez la machine après son assemblage.
2. 'BJUFTMFQMFJOEFTTFODFDPOGPSNÏNFOUBVYJOTUSVDUJPOT
GPVSOJFTEBOTMBOPUJDFEVUJMJTBUJPOEVNPUFVS
AVERTISSEMENT: Faites très attention en
NBOJQVMBOUEFMFTTFODF-FTTFODFFTUFYUSÐNFNFOU
inflammable et les vapeurs sont explosives. Ne faites
KBNBJTMFQMFJOEFTTFODFËMJOUÏSJFVSQFOEBOURVFMF
moteur tourne ou quand le moteur est chaud.
Éteignez toute cigarette ou pipe, tout cigare ou
toute autre source incandescente.
AVERTISSEMENT : Ne faites jamais le plein
EFTTFODFEBOTVOFOESPJUDMPTQFOEBOURVFMF
moteur tourne ou sans avoir laissé le moteur
refroidir au moins deux minutes.
Installer la barre de remorquage
Pour installer la barre de remorquage :
1. 3FUJSF[MBHPVQJMMFEFSFTTPSUFUMBYFEFDIBQFEVCPVUEV
UJNPOEBUUFMBHF7PJSJMMVTUSBUJPO
2. *OTÏSF[MFUJNPOEBUUFMBHFEBOTMBCBTF
3. 3ÏJOTÏSF[MBYFEFDIBQFEBOTMFTUSPVTBMJHOÏTEVUJNPO
et de la base. Fixez le tout avec la goupille de ressort. Voir
JMMVTUSBUJPO
1
Figure 3-3
Figure 3-4
2
3
3
Commandes et caractéristiques
4
9
Figure 4-1
Déflecteur de goulotte
Les débris sont déchiquetés dans la chambre de broyage, puis
éjectés par le déflecteur de la goulotte.
Trémie
&MMFQFSNFUMFDIBSHFNFOUEFGFVJMMFTFUEFQFUJUFTCSBODIFTEVO
demi-pouce de diamètre maximum dans le trémis où elles seront
EÏDIJRVFUÏFTFUCSPZÏFT7PJSMB'JHVSF
IMPORTANT /FQMBDF[KBNBJTEFTCSBODIFTEVOEJBNÒUSFTVQÏSJFVS
à demi-pouce dans la goulotte de déchiquetage. Vous risqueriez
EFOEPNNBHFSTÏSJFVTFNFOUMFTMBNFTMFTGMÏBVYPVMBUVSCJOF
Barre de remorquage
Utilisez cette barre pour remorquer votre broyeuse-
EÏDIJRVFUFVTFEFSSJÒSFVOUSBDUFVSBGJOEFMFNNFOFSTVSMFMJFV
EFUSBWBJMEÏTJSÏ7PJSMB'JHVSF
AVERTISSEMENT $FUUFNBDIJOFOBQBTÏUÏ
DPOÎVFQPVSÐUSFSFNPSRVÏF&MMFOFEPJUÐUSF
déplacée que par un tracteur ou manuellement.
Loquet à ressort (Modèles séries 420 seulement)
Le loquet à ressort est situé au haut de la trémie. Il est utilisé pour
verrouiller le conduit de broyage en position élevée pour faciliter
le remisage et le transport, et pour le déverrouiller. Voir la Figure
AVERTISSEMENT /VUJMJTF[KBNBJTMBCSPZFVTF
déchiqueteuse lorsque le goulotte de déchiquetage
est en position élevée, car cela pourrait entraîner de
graves blessures et des dommages matériels.
Tige de verrouillage (Modèles séries 420 seulement)
La tige de verrouillage est située sur le support du conduit de
CSPZBHF&MMFTFSUËWFSSPVJMMFMFDPOEVJUEFCSPZBHFËMBQPTJUJPO
CBTTFQPVSMVUJMJTBUJPO7PJSMB'JHVSF
Poignée de démarrage
La poignée de démarrage est située
sur le moteur. Tirez-la pour démarrer le
NPUFVS7PJSMB'JHVSF
Commandes du moteur
Consultez le manuel du propriétaire
EVNPUFVSGPVSOJBWFDMBQQBSFJMQPVS
DPOOBÔUSFMFNQMBDFNFOUFUMFTGPODUJPOT
des commandes du moteur.
Goulotte de déchiquetage:
&MMFQFSNFUMFDIBSHFNFOUEFWÏHÏUBUJPO
QMVTHSPTTJÒSFUJHFTPVCSBODIFTQMVT
ÏQBJTTFTEBOTMBUVSCJOFPáFMMFTFSB
déchiquetée et broyée. Diamètre
NBYJNBMQPTVSMFNPEÒMFFUQP
TVSMFNPEÒMF7PJSMB'JHVSF
Poignée
Utilisez la poignée lorsque vous
transportez manuellement la broyeuse-
EÏDIJRVFUFVTF7PJSMB'JHVSF
Goulotte de
déchiquetage
Guidon
Trémie
Barre de
remorquage
Tige de verrouillage
Loquet à ressort
Modèle séries 420 illustrée
Poignée
de démarrage

Fonctionnement
5
10
AVERTISSEMENT -VUJMJTBUJPOEVOF
déchiqueteuse/broyeuse peut provoquer la
QSPKFDUJPOEPCKFUTEJWFSTRVJQFVWFOUDBVTFSEFT
CMFTTVSFTHSBWFTTJMTBUUFJHOFOUMFTZFVY1PSUF[
toujours les lunettes de sécurité fournies avec la
machine ou un masque en travaillant ou en
effectuant toute réparation ou tout ajustement à la
machine.
Démarrer le moteur
Reportez au manuel du moteur pour connaître les bonnes
instructions de démarrage.
Broyage
-FTEÏCSJTWÏHÏUBVYGFVJMMFTFUBJHVJMMFTEFQJOQBSFYFNQMF
peuvent être placés dans la trémie où ils seront broyés. Quand les
débris auront été broyés par la lame et les fléaux de broyage, ils
seront éjectés par le déflecteur de la goulotte, et le cas échéant,
ils seront projetés dans un sac.
Respectez les consignes suivantes pour broyer des débris
végétaux.
t /FTTBZF[QBTEFEÏDIJRVFUFSPVEFCSPZFSEFTEÏCSJT
BVUSFTRVFMBWÏHÏUBUJPOPSEJOBJSFEVOKBSEJOCSBODIFT
GFVJMMFTCSJOEJMMFTQPNNFTEFQJOFUD
t Évitez de broyer des plantes fibreuses comme les plants de
UPNBUFTUBOURVJMTOFTPOUQBTDPNQMÒUFNFOUEFTTÏDIÏT
Les lianes encore vertes sont difficiles à broyer car elles ont
UFOEBODFËTFOSPVMFSBVUPVSEFMBUVSCJOFFUEFTGMÏBVY
t Placez une quantité raisonnable de débris végétaux dans la
trémie mais ne la surchargez pas.
t "UUFOEF[RVFMFTEÏCSJTQMBDÏTEBOTMBUSÏNJFTPJFOUBUUJSÏT
QBSMFTMBNFTFUCSPZÏTBWBOUEFOBKPVUFSEBWBOUBHF
Dans le cas contraire, vous risquez de boucher la trémie, le
déflecteur ou de faire caler le moteur.
t ²WJUF[EFNFUUSFEFTCSJOEJMMFTEFQMVTEFQPDN
dans la trémie pour ne pas la bloquer.
IMPORTANT : Ne mettez jamais de branches dont le
EJBNÒUSFFYDÒEFQPDNEBOTMBUSÏNJFDBSMB
lame déchiqueteuse, le fléau ou la turbine pourraient être
sérieusement endommagés.
Nettoyer la trémie
4JMBUSÏNJFEFWJFOUCMPRVÏFQFOEBOUMVUJMJTBUJPOTVJWF[MFT
étapes ci-dessous :
1. Prenez la poignée avec les deux mains et agitez doucement
la déchiqueteuse pour aider les débris à se déprendre et à
passer dans la turbine.
Si la trémie est toujours bloquée :
1. "SSÐUF[MFNPUFVS
2. &OMFWF[NBOVFMMFNFOUUPVTMFTEÏCSJTRVJTPOUTVSMFEFTTVT
de la trémie.
3. 6UJMJTF[VOFCSBODIFPVUPVUBVUSFBDDFTTPJSFEVHFOSF
QBSFYFNQMFVONBODIFËCBMBJTQPVSEÏMPHFSMFTEÏCSJT
qui sont au fond de la trémie.
Redémarrez le moteur.
NOTE : Si vous êtes incapable de tirer la corde de
EÏNBSSBHFËDBVTFEVOFBDDVNVMBUJPOEFEÏCSJTQSÒTEFMB
turbine, consultez les instructions de la section « Nettoyer
MBDIBNCSFEFCSPZBHFxEVDIBQJUSFj&OUSFUJFOEFMB
broyeuse-déchiqueteuse » de ce manuel.
Déchiquetage
AVERTISSEMENT /VUJMJTF[KBNBJTMBCSPZFVTF
EÏDIJRVFUFVTFTJMFHPVMPUUFEFEÏDIJRVFUBHFOFTU
QBTBCBJTTÏËMBQPTJUJPOEVUJMJTBUJPO
7PVTQPVWF[QMBDFSEFTCSBODIFTEVOEJBNÒUSFNBYJNBMEF
QPNPEÒMFTÏSJFTPVQPNPEÒMFQPEBOTMBHPVMPUUF
de déchiquetage. Respectez les consignes suivantes lors du
déchiquetage de branches :
t Tenez bien la branche avec les deux mains en la plaçant
dans la goulotte de déchiquetage.
t /FQMBDF[KBNBJTQMVTEVOFCSBODIFËMBGPJTEBOTMB
goulotte de déchiquetage.
t /FQMBDF[KBNBJTRVFEFTCSBODIFTCPJTEBOTMBHPVMPUUF
de déchiquetage.
t "QQMJRVF[VOFQSFTTJPOJOUFSNJUUFOUFFOBQQVZBOUQBS
QFUJUFTJNQVMTJPOTFOQMBÎBOUEFTCSBODIFTQMVTHSPTTFT
QPEFEJBNÒUSFEBOTMBHPVMPUUFQPVSÏWJUFSEFCPVDIFSMB
goulotte ou de faire caler le moteur.
IMPORTANT /FQMBDF[KBNBJTEFTCSBODIFTEVOEJBNÒUSF
TVQÏSJFVSËUSPJTQPVDFTEBOTMBHPVMPUUFEFEÏDIJRVFUBHF
7PVTSJTRVFSJF[EFOEPNNBHFSTÏSJFVTFNFOUMFTMBNFTMFTGMÏBVY
ou la turbine.
REMARQUE : Vous obtiendrez de meilleurs résultats si les lames
sont bien aiguisées. Remplacez les lames si vous constatez une
diminution des performances de déchiquetage.
11SECTION 5 — FONCTIONNEMENT
Vider le sac récupérateur
1. "SSÐUF[MFNPUFVS
2. Serrez la boucle de verrouillage et relâchez la sangle de
DPOUPVSEVTBDBWBOUEFOMFWFSMFTBDEVDPOEVJUEÏKFDUJPO
Voir la Figure 5-1.
3. 7JEF[MFTBDFUSFQMBDF[MFTVSMPVWFSUVSFEFMBHPVMPUUF
$POTVMUF[MFDIBQJUSFj"TTFNCMBHFFU*OTUBMMBUJPOxEBOT
DFUUFOPUJDFEVUJMJTBUJPO
Figure 5-1

Entretien et réglages
6
12
Entretien de la machine
t Nettoyez la déchiqueteuse-broyeuse après chaque
utilisation.
t -BWF[QÏSJPEJRVFNFOUMFTBDËMFBVFUMBJTTF[MFTÏDIFSË
MPNCSF
t 4JMB[POFEÏKFDUJPOTFCPVDIFEÏNPOUF[FUOFUUPZF[MFFO
suivant les instructions ci-dessous.
REMARQUE *MOFTUQBTDPOTFJMMÏEVUJMJTFSVOKFUËGPSUFQSFTTJPO
pour nettoyer le tamis car cela pourrait contaminer le système de
carburant.
Moteur
$POTVMUF[MBOPUJDFEVUJMJTBUJPOEVNPUFVSQPVSDFRVJFTUEF
MFOUSFUJFOEVNPUFVS
t .BJOUFOF[MFOJWFBVEIVJMFËNPUFVSBVOJWFBV
SFDPNNBOEÏEBOTMBOPUJDFEVUJMJTBUJPOEVNPUFVS
Veuillez lire attentivement et bien suivre ces instructions.
t /FUUPZF[MFGJMUSFËBJSUPVUFTMFTIFVSFTEVUJMJTBUJPO
dans des conditions normales. Nettoyez-le plus souvent
dans des conditions très poussiéreuses. Consultez la notice
EVUJMJTBUJPOEVNPUFVSGPVSOJFTÏQBSÏNFOUQPVSMFOUSFUJFO
du filtre à air.
t /FUUPZF[MBCPVHJFFUSÏHMF[MÏDBSUFNFOUVOFGPJTQBS
TBJTPO$POTVMUF[MBOPUJDFEVUJMJTBUJPOEVNPUFVSQPVS
EÏUFSNJOFSMFUZQFEFCPVHJFSFRVJTFUMÏDBSUFNFOU
conseillé.
t Nettoyez régulièrement le moteur avec un linge ou
VOFCSPTTF(BSEF[MFTZTUÒNFEFSFGSPJEJTTFNFOU
DPNQBSUJNFOUEVWFOUJMBUFVSQSPQSFQPVSBTTVSFSMB
CPOOFDJSDVMBUJPOEBJSFTTFOUJFMMFBVYQFSGPSNBODFTFUËMB
durabilité du moteur. Vérifiez que tous les débris et saleté
sont éliminés de la proximité du silencieux.
Entretien
Recommandations d’ordre général
t Suivez toujours les consignes de sécurité lors de tout
entretien.
t -BHBSBOUJFEFDFUUFEÏDIJRVFUFVTFCSPZFVTFOFTBQQMJRVF
QBTËUPVUFQJÒDFRVJBGBJUMPCKFUEVOFNQMPJBCVTJG
PVEVOFOÏHMJHFODF1PVSCÏOÏGJDJFSBVNBYJNVN
EFMBHBSBOUJFMVUJMJTBUFVSEPJUFOUSFUFOJSMBUPOEFVTF
conformément aux instructions de cette notice.
t La garantie sera nulle et non avenue si une modification est
apportée au régulateur du moteur.
t Vérifiez tous les réglages au moins une fois par saison.
t Vérifez régulièrement que toute la boulonnerie est bien
serrée.
AVERTISSEMENT "SSÐUF[UPVKPVSTMFNPUFVS
débranchez le fil de la bougie et mettez-le à la terre
contre le moteur avant tout nettoyage, toute
MVCSJGJDBUJPOPVBWBOUEFGGFDUVFSUPVUFPQÏSBUJPO
EFOUSFUJFOEFMBNBDIJOF
Lubrication
1. -VCSJGJF[MBSUJDVMBUJPOEVHPVMPUUFEFEÏDIJRVFUBHFBWFD
une huile légère une fois par saison.
2. Lubrifiez les points de pivotement du déflecteur de la
goulotte avec une huile légère une fois par saison.
3. 4VJWF[MFTJOTUSVDUJPOTEFMBOPUJDFEVUJMJTBUJPOEVNPUFVS
fournie séparément pour les instructions de lubrification.
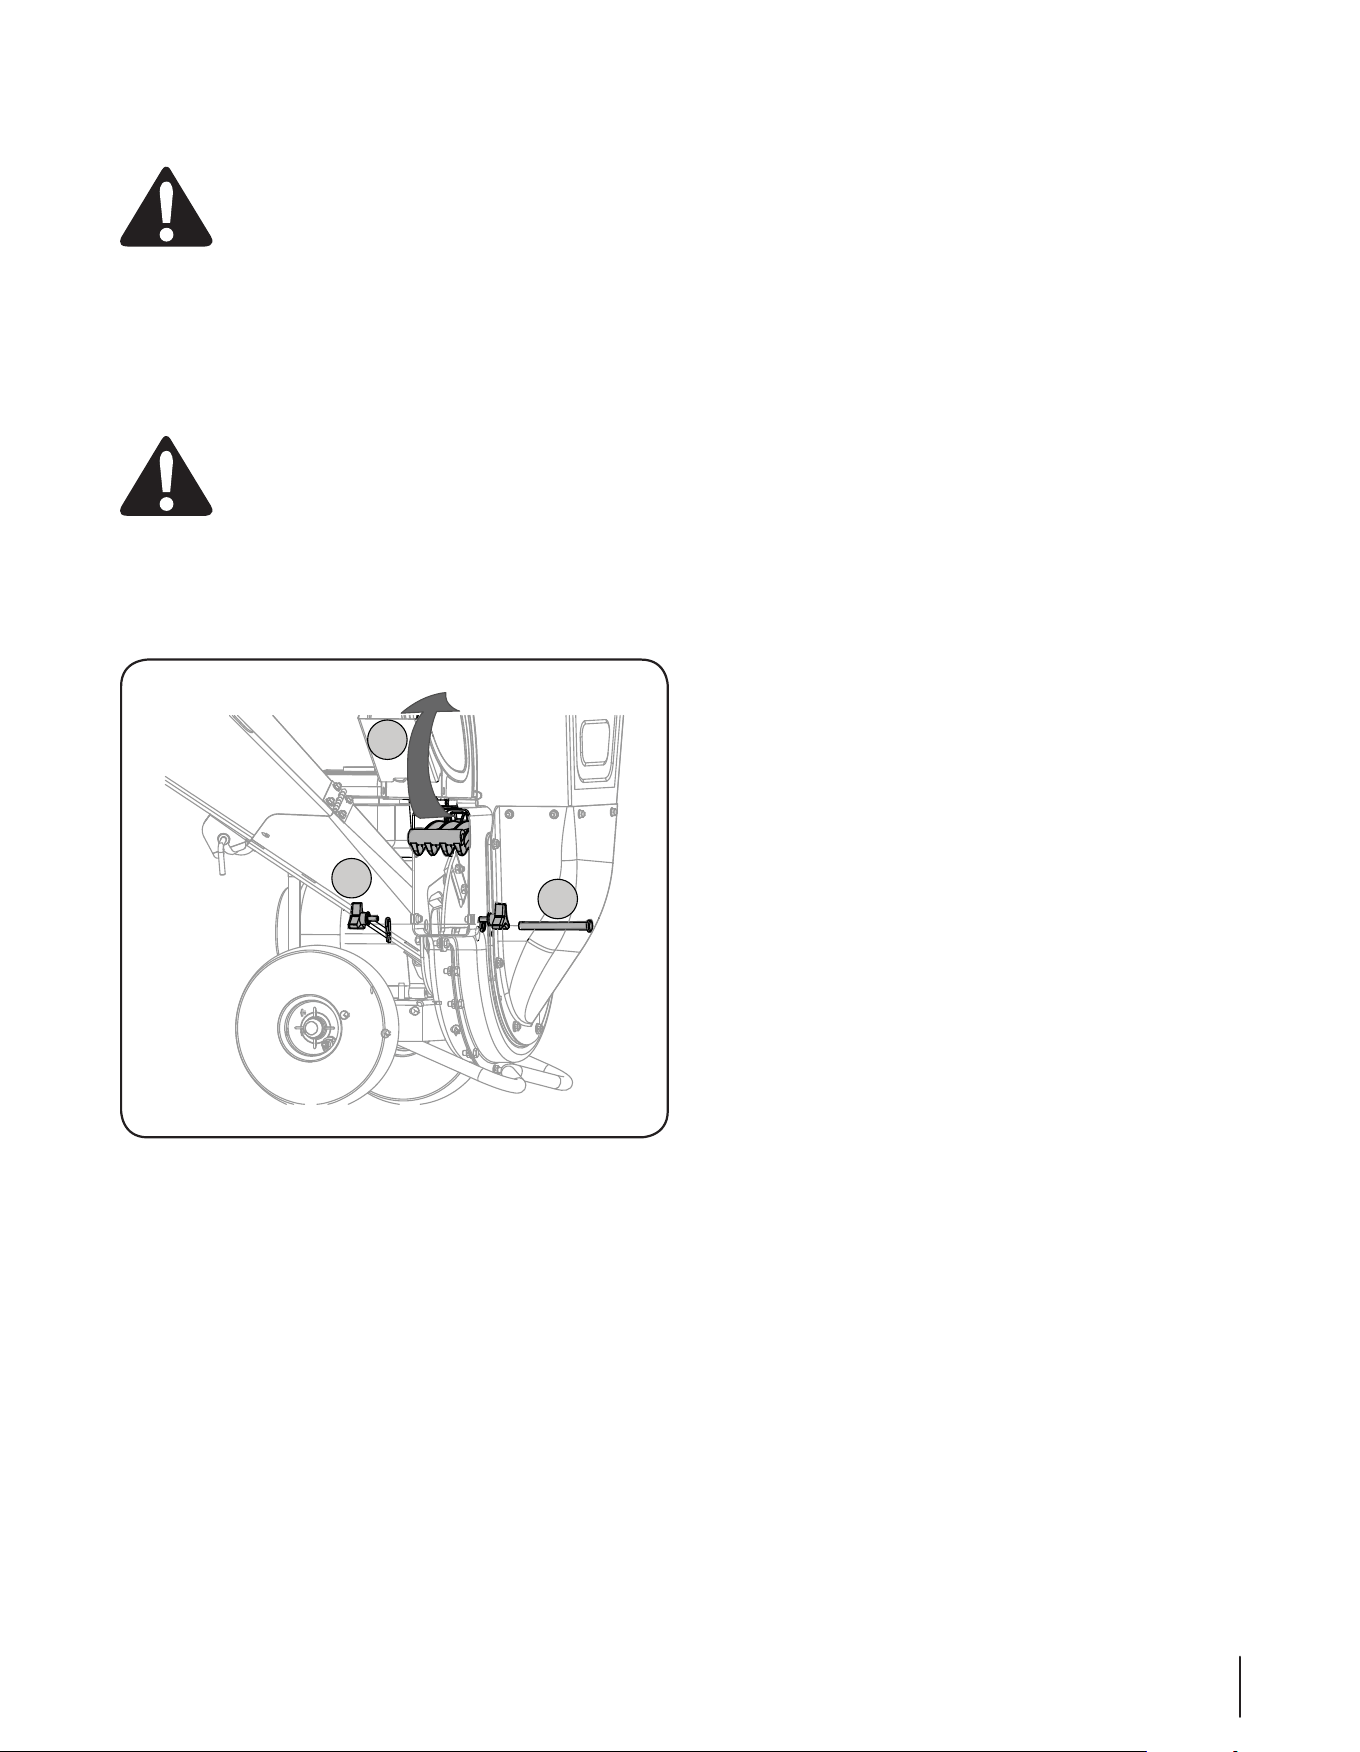
13SECTION 6 — ENTRETIEN ET RÉGLAGES
3. &OMFWF[MBHPVQJMMFÏQJOHMFEFMBYFEFDIBQFRVJQBTTFË
travers le boîtier et la grille de déchiquetage. Voir la Fig.
"3FUJSF[MBYFEFDIBQF
Tournez la grille de déchiquetage vers le haut et nettoyez
cette zone en grattant les débris.
5. "TTVSF[WPVTRVFMFGJMEFMBCPVHJFFTUEÏCSBODIÏFUMPJO
de la bougie. Tirez sur la corde de démarrage deux à trois
GPJTBGJOEÏMJNJOFSMFTEÏCSJTSFTUBOUEBOTMBDIBNCSFEF
broyage.
6. Lorsque le nettoyage de cette zone est terminé, abaissez la
HSJMMFEFEÏDIJRVFUBHFFUGJYF[MBBWFDMBYFEFDIBQFFUMB
goupille-épingle enlevés plus tôt.
3ÏJOTUBMMF[MFTBDSÏDVQÏSBUFVSTVSMFDPOEVJUEÏKFDUJPOTJ
vous le désirez.
Nettoyer la chambre de broyage
AVERTISSEMENT : Les lames broyeuses de la
turbine sont très coupantes. Portez toujours des
gants de travail en cuir pour protéger vos mains
lorsque vous nettoyez la chambre de broyage.
Si la chambre de broyage est bloquée, vous pouvez faire pivoter
la grille de déchiquetage vers le haut afin de nettoyer toute la
zone. Pour ce faire, suivez la procédure ci-dessous :
1. "SSÐUF[MFNPUFVSEÏCSBODIF[MFGJMEFMBCPVHJF
EBMMVNBHFFUBTTVSF[WPVTRVFMBCSPZFVTFEÏDIJRVFUFVTF
est bien arrêtée.
AVERTISSEMENT : Le silencieux et la zone qui
MFOUPVSFTFSPOUDIBVETTJMFNPUFVSWJFOUEÐUSF
éteint. Faites attention et portez des gants si vous
travaillez près du silencieux.
2. &OMFWF[MFTBDSÏDVQÏSBUFVSTJJOTUBMMÏ3FUJSF[MFTEFVY
boutons papillon situés de chaque côté du déflecteur de la
goulotte et faites pivoter ce dernier vers le bas. Voir la Fig.
"
A
C
B
Figure 6-1
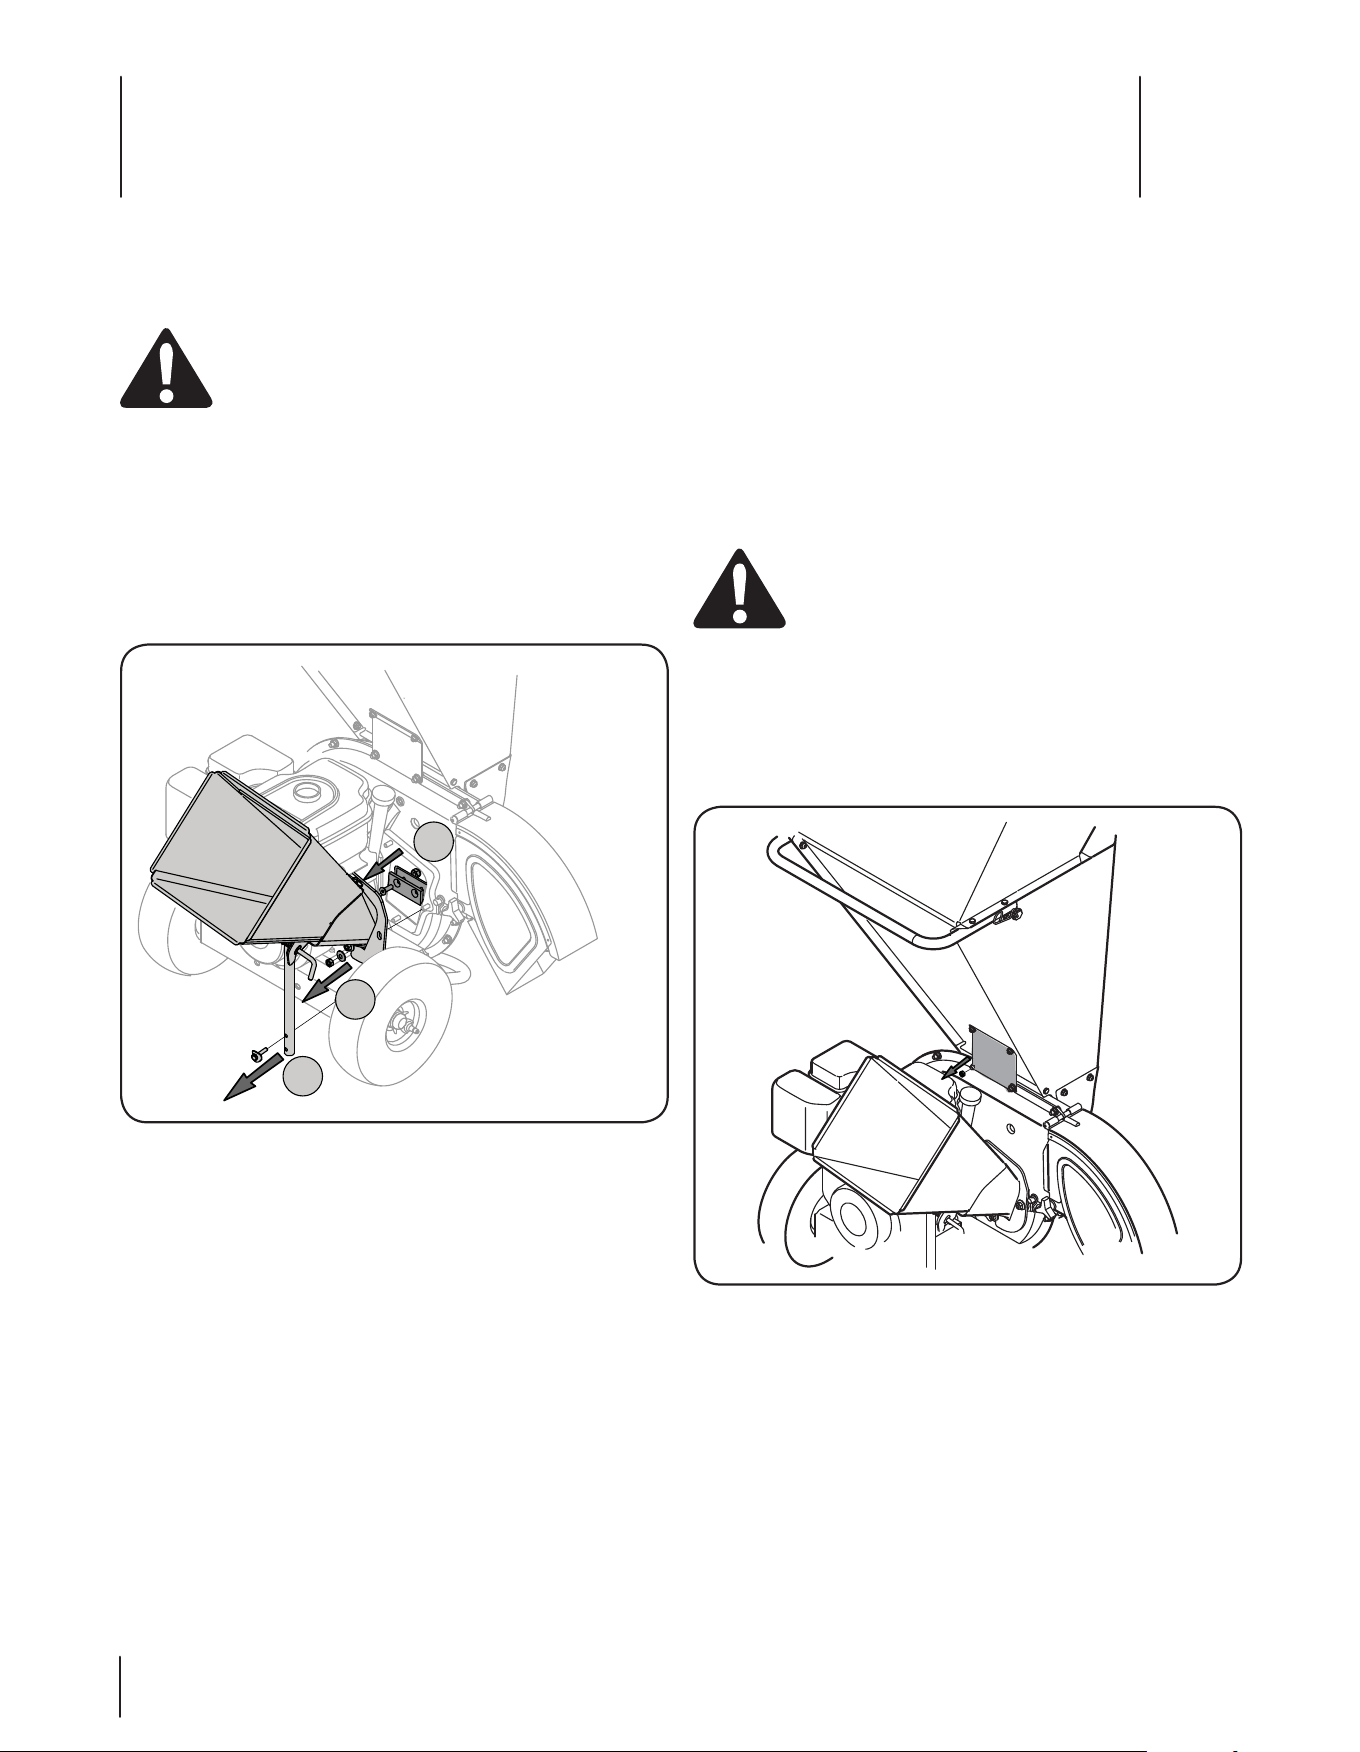
Service
7
14
IMPORTANT: Portez des gants pour vous protéger lors de
MBJHVJTBHF4VJWF[MBOHMFEPSJHJOFFUGBJUFTBUUFOUJPOEFSFUJSFS
une quantité égale de métal de chaque lame.
8. 1PVSSFNQMBDFSMBVUSFMBNFUPVSOF[MBUVSCJOFËMBNBJO
pour exposer la deuxième lame et répéter les étapes ci-
dessus.
NOTE : Lorsque vous réassemblez les lames, assurez-vous
RVFMFDÙUÏUSBODIBOUTPJUWFSTMFYUÏSJFVSGBDFBVDPOEVJU
EFCSPZBHF4FSSF[MBRVJODBJMMFSJFËVODPVQMFFOUSFFU
25 lb-pi.
Lames de broyage
AVERTISSEMENT: Les lames de broyage de la
turbine sont très coupantes. Portez des gants de
travail en cuir en guise de protection.
1. "SSÐUF[MFNPUFVSFUBUUFOEF[RVFMBEÏDIJRVFUFVTF
broyeuse soit tout à fait immobile.
2. 3FUJSF[MFTEFVYÏDSPVTËFNCBTFFUMFTEFVYCPVMPOT
IFYBHPOBVYRVJSFUJFOOFOUMFTVQQPSUEFMBUSÏNJFBV
CPÔUJFSFUDPOTFSWF[MFT7PJSMB'JH
3. Tournez la tamis de déchiquetage vers le haut tel que
SFDPNNBOEÏTPVTMFOUÐUFj/FUUPZFSMBDIBNCSFEF
déchiquetage ».
Entretien de la lame
Lames de déchiquetage
AVERTISSEMENT: Les lames de déchiquetage et
de fléau de la turbine sont très coupantes. Portez
des gants de travail en cuir pour protéger vos mains
en nettoyant la chambre de broyage.
1. "SSÐUF[MFNPUFVSFUBUUFOEF[RVFMBEÏDIJRVFUFVTF
broyeuse soit tout à fait immobile.
2. 5PVSOF[MFUBNJTWFSTMFIBVUUFMRVJOEJRVÏTPVTMFOUÐUFj
Nettoyer la chambre de broyage ».
3. Démonter le support qui retient la goulotte de
déchiquetage sur le châssis en enlevant les boulons hex. et
SPOEFMMFTEFTFMMFRVJMZSBUUBDIFOU7PJSMB'JH
&OMFWF[MBHPVMPUUFEFEÏDIJRVFUBHFEVCPÔUJFSEFMB
turbine en retirant les trois écrous à six pans et les trois
SPOEFMMFTRVJMZSFUJFOOFOU7PJSMB'JH#
5. 5PVSOF[NBOVFMMFNFOUMBUVSCJOFKVTRVËDFRVVOFEFT
MBNFTCSPZFVTFTTPJUWJTJCMFQBSMPVWFSUVSFEVCPÔUJFSEFMB
turbine.
6. Démontez la lame en enlevant les vis hex. internes, les
rondelles-frein et les écrous à six pans qui la maintiennent sur
la turbine. Voir la Fig. 7-1C. Garder la boulonnerie.
REMARQUE: 1MBDF[VOFDMÏIFY"MMFOEFQP
TVSMFYUÏSJFVSEFMBMBNFEFEÏDIJRVFUBHFFUVOFDMÏ
QPMZHPOBMFEFQPTVSMJOUÏSJFVS(BSEF[MBDMÏ"MMFOGJYF
FUGBJUFTUPVSOFSMBDMÏQPMZHPOBMFQPVSEFTTFSSFSMÏDSPV
*OTUBMMF[MBMBNFEFSFDIBOHFOBWFDMB
boulonnerie retirée plus tôt ou aiguissez la lame.
Figure 7-1
Figure 7-2
A
C
B
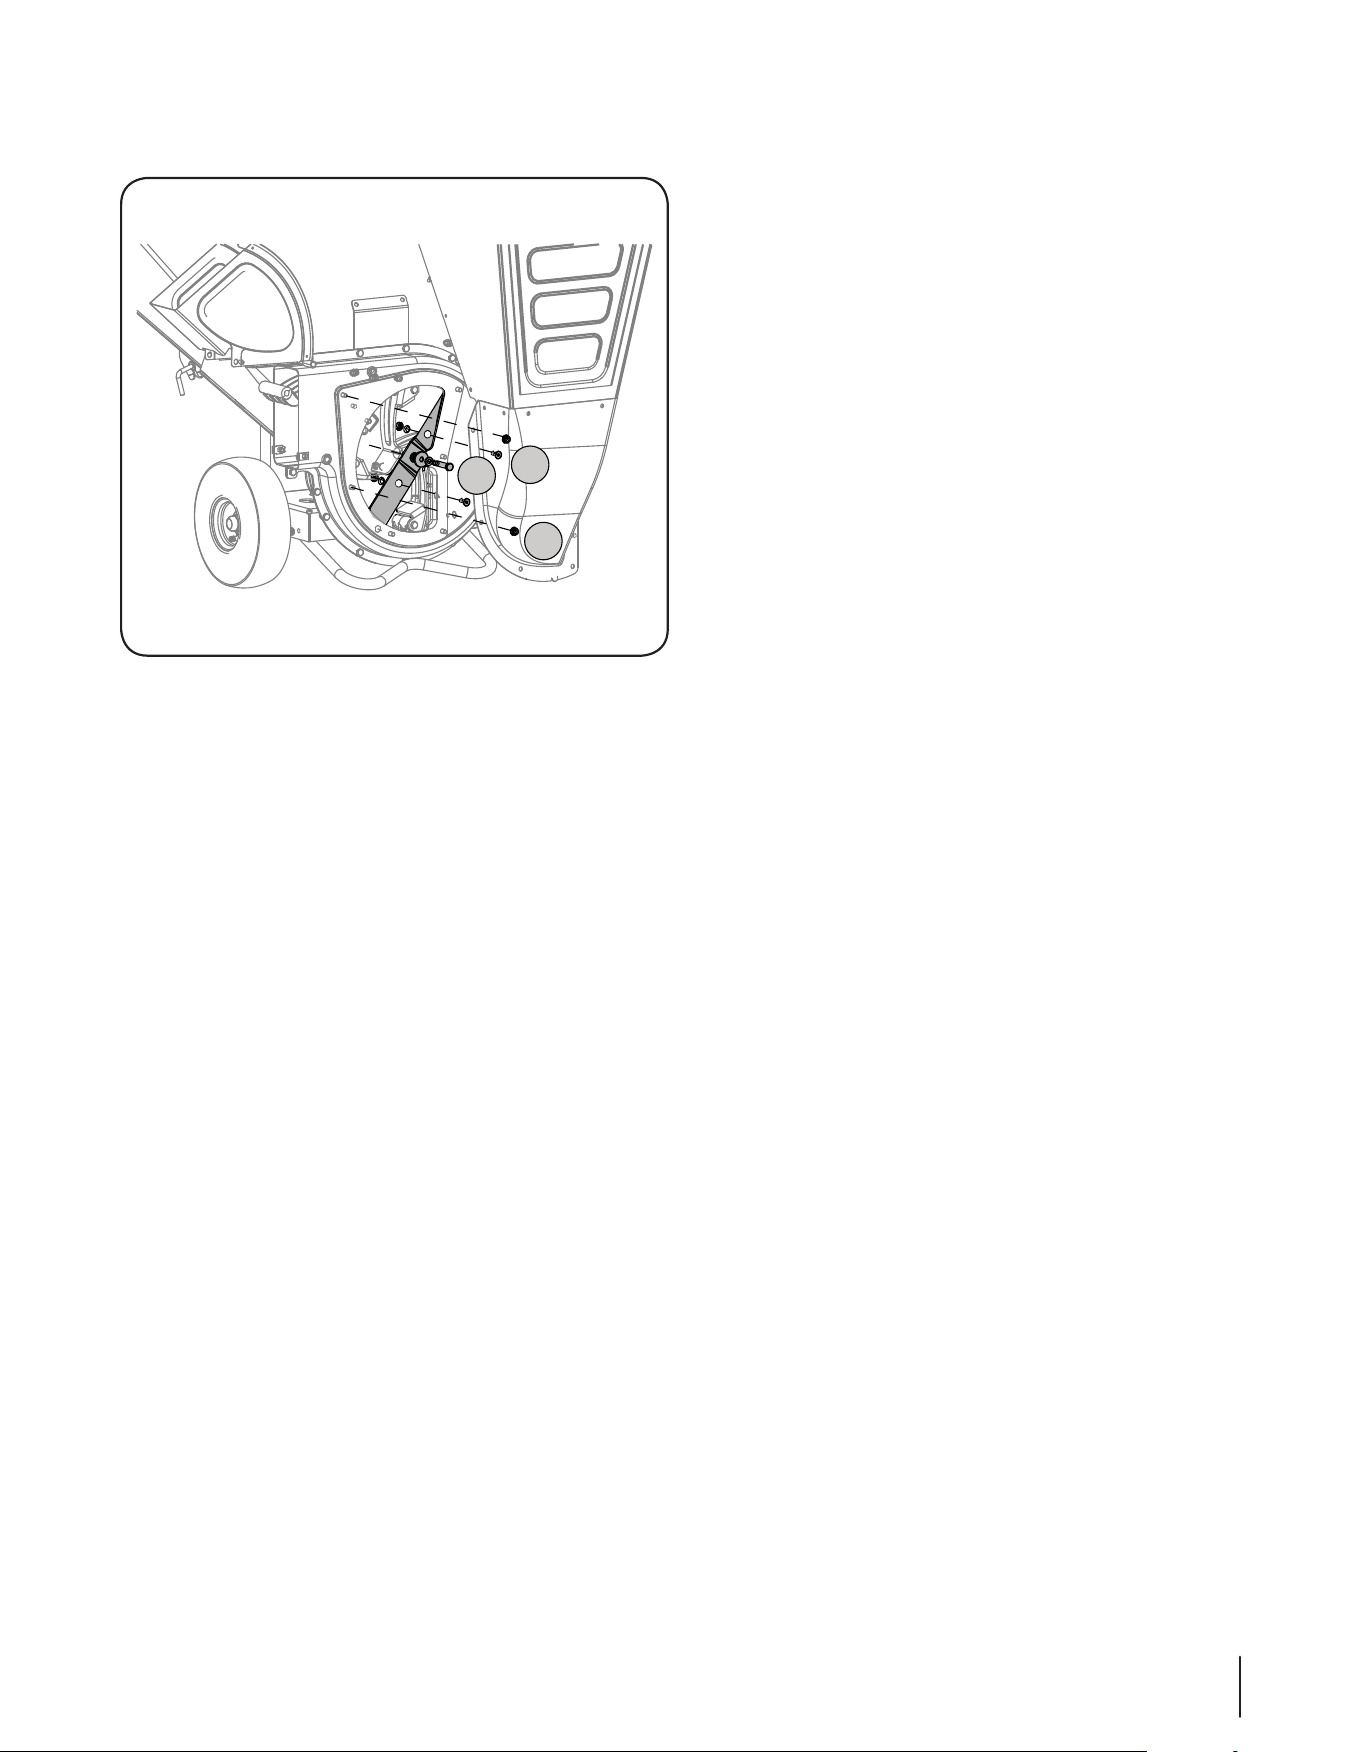
15SECTION 7 — SERVICE
&OMFWF[MFTTJYÏDSPVTËFNCBTFRVJSFUJFOOFOUMBVCF
EFOUSÏFEFMBUSÏNJFBVCPÔUJFS7PJSMB'JH"
5. Séparez doucement la trémie assemblée du boîtier de la
turbine et mettez-la de côté.
6. *OTÏSF[VONPSDFBVEFCPJTEBOTMPVWFSUVSFEVDPOEVJU
EÏKFDUJPOBGJOEJNNPCJMJTFSMBUVSCJOFFUEFMFNQÐDIFSEF
tourner lorsque vous enlèverez les lames déchiqueteuses.
&OMFWF[MFTEFVYWJTIFYJOUFSOFTRVJNBJOUJFOOFOUMBMBNF
EFCSPZBHFTVSMBUVSCJOF7PJSMB'JH#
REMARQUE: 1MBDF[VOFDMÏIFY"MMFOEFQP
TVSMFYUÏSJFVSEFMBMBNFEFEÏDIJRVFUBHFFUVOFDMÏ
QPMZHPOBMFEFQPTVSMJOUÏSJFVS(BSEF[MBDMÏ"MMFOGJYF
FUGBJUFTUPVSOFSMBDMÏQPMZHPOBMFQPVSEFTTFSSFSMÏDSPV
8. Dégagez la lame de broyage après avoir retiré le boulon
IFYMBSPOEFMMFGSFJOFUMBSPOEFMMFQMBUF7PJSMB'JH
IMPORTANT: 4VJWF[MBOHMFEBJHVJTBHFEPSJHJOFQPVS
BGGßUFSMBMBNF*MFTUUSÒTJNQPSUBOUEBJHVJTFSDIBRVF
USBODIBOUEFGBÎPOÏHBMFQPVSÏWJUFSEPCUFOJSVOFMBNF
non équilibrée. Éliminez davantage de métal du côté plus
MPVSEKVTRVËDFRVFMBMBNFTPJUCJFOÏRVJMJCSÏe.
IMPORTANT 4FSSF[MFCPVMPODFOUSBMFOUSFFUMCQJ
et les deux boulons extérieurs entre 20 et 25 lb-pi.
Remisage hors saison
t -BJTTF[MBQQBSFJMGPODUJPOOFSFUEFGGBDFSUPVTMFTEÏCSJT
QFOEBOUVOFDPVSUFQÏSJPEFBWBOUEBSSÐUFSMBQQBSFJMBWBOU
EFMFSBOHFS&TTVZF[MBNBDIJOFBWFDVODIJGGPOJNCJCÏ
EIVJMFQPVSFNQÐDIFSMBSPVJMMF
t Il est très important de bien protéger le matériel contre la
rouille si la déchiqueteuse-broyeuse doit être entreposé
EBOTVOBCSJNÏUBMMJRVFOPOWFOUJMÏ&OEVJTF[UPVUFMB
machine, en particulier , les ressorts, les roulements et les
câbles avec une huile légère ou de la silicone.
t 3FUJSF[UPVUFTMFTTBMFUÏTEFMFYUÏSJFVSEVNPUFVSFUEF
MÏRVJQFNFOU
t Lubrifiez le machine selon les instructions.
t $POTVMUF[MBOPUJDFEVUJMJTBUJPOEVNPUFVSRVBOUBV
remisage hors saison.
t &OUSFQPTF[MBQQBSFJMEBOTVOFOESPJUQSPQSFFUTFD/F
MFOUSFQPTF[QBTEBOTVOFOESPJUPáVOBQQBSFJMFTUQSÏTFOU
qui peut employer une lampe témoin ou a un composant
qui peut créer une étincelle.
Figure 7-3
A
C
B

Problème Cause(s) Possible(s) Solution
Vibrations excessives.. 1. Pièces desserrées ou turbine endommagée. 2. "ESFTTF[WPVTËVOFTUBUJPOUFDIOJRVFBHSÏÏF
-BNBDIJOFOÏKFDUF
rien
1. (PVMPUUFEÏKFDUJPOCPVDIÏF
2. Objet dans la turbine.
3. Régime du moteur trop bas.
Sac filtrant est plein.
1. "SSÐUF[JNNÏEJBUFNFOUMFNPUFVSFUEÏCSBODIF[MFGJM
EFMBCPVHJF/FUUPZF[MFUBNJTËGMÏBVYFUMJOUÏSJFVS
EFMPVWFSUVSFEVCPÔUJFSEFMBUVSCJOF
2. "SSÐUF[JNNÏEJBUFNFOUMFNPUFVSFUEÏCSBODIF[MFGJM
EFMBCPVHJF%ÏHBHF[MPCKFU
3. Le moteur doit toujours tourner à plain régime.
Videz le sac.
Le débit
EÏWBDVBUJPOSBMFOUJU
considérablement
ou la consistance
du matériau broyé
change
1. Régime du moteur trop bas.
2. La lame de la déchiqueteuse ou de la broyeuse est
émoussée.
1. Le moteur doit toujours tourner à plain régime.
2. Remplacez la lame de la déchiqueteuse ou de la
broyeuse ou adressez-vous à la station technique.
Dépannage
8
16

Notes
17

GARANTIE LIMITÉE DU FABRICANT DES
GDOC-100023 REV. C
La garantie limitée qui est énoncée ci-dessous est offerte par Troy-Bilt
LLC pour toutes les marchandises neuves achetées et utilisées aux
États-Unis, dans ses possessions et territoires, et par MTD Products
Limited, pour toutes les marchandises achetées et utilisées au
Canada et/ou ses possessions et territoires (l’une ou l’autre entité
respectivement appelée « Troy Bilt »).
Troy-Bilt garantit que ce produit (à l’exception de les courroies, la
transmission et les accessoiries comme décrits ce-dessous) est
exempt de tout vice de matière et de fabrication pour une durée
de deux (2) ans à compter de la date de l’achat initial et s’engage à
réparer ou à remplacer, gratuitement et à son choix, toute pièce qui
s’avère défectueuse en raison d’un vice de matière ou de fabrication.
Cette garantie limitée n’est applicable que si ce produit a été utilisé
et entretenu conformément aux instructions de la notice d’utilisation
qui l’accompagne. De plus, le produit ne doit pas avoir fait l’objet d’un
emploi incorrect ou abusif, d’une utilisation à des fins commerciales,
d’une négligence, d’un accident, d’un entretien incorrect, d’une
modification, d’un acte de vandalisme, d’un vol, d’un incendie, d’une
inondation ou de tout autre dégât causé par tout incident ou désastre
naturel. Les dégâts causés par l’installation ou l’utilisation d’une pièce,
d’un accessoire ou d’un équipement annexe, dont l’emploi avec le
produit faisant l’objet de la notice d’utilisation n’est pas homologué par
Troy-Bilt, rendront la garantie nulle et non avenue.
Les courroies sont garantis exemptes de tout vice de matière et de
fabrication, pour une période de trente (30) jours à partir de la date
d’achat au détail.
Transmission – Troy-Bilt garantit la transmission (incluant tous les
engrenages, les arbres d’entraînement et les boîtiers) exempte de
tout vice de matière et de fabrication, durant toute la durée de vie du
motoculteur, pour l’acheteur initial seulement, à compter de la date
d’achat ou du bail initial.
Accessoires – Troy-Bilt garantit que les accessoires pour ce produit
sont exempts de tout vice de matière et de main d’œuvre pendant une
période de une (1) ans, à compter de la date de l’achat ou du bail initial.
Les accessoires comprennent, sans s’y limiter, les collecteurs d’herbe
et les ensembles de déchiquetage.
POUR FAIRE HONORER LA GARANTIE : Présentez UNE PREUVE
D’ACHAT, à la station technique agréée de votre localité. Pour localiser une
station technique agréée ou un concessionnaire dans votre région :
Aux États-Unis : Consultez les Pages Jaunes ou adressez-vous à Troy-Bilt
LLC, P.O. Box 361131, Cleveland, Ohio 44136-0019 ou appelez le 1-866-840-
6483, 1-330-558-7220. Vous pouvez aussi visiter notre site web au www.
toybilt.com
Au Canada : Adressez-vous à MTD Products Limited, Kitchener, Ontario,
N2G 4J1 ou appelez le 1-800-668-1238 ou visitez notre site web au www.
mtdcanada.com
Sans se limiter à ce qui précède, cette garantie ne couvre pas :
a. Le moteur et les pièces du moteur. Ces pièces sont garanties
séparément par la garantie du fabricant. Consultez les termes et
conditions de cette garantie.
b.
Les pompes, soupapes et pistons des fendeuses à bois sont
couverts par une garantie séparée d’un an.
c. Les articles d’entretien courant tels que les lubrifiants, filtres, ai-
guisages de lame et révisions, les réglages de frein, de l’embrayage
ou du plateau de coupe et la détérioration normale de la finition du
fait de l’utilisation de la machine ou de son exposition aux intem-
péries.
d. L’entretien ou les réparations effectués par quiconque autre qu’une
station technique agréée.
e. Troy-Bilt ne garantit pas les produits vendus ou exportés hors des
États-Unis et/ou du Canada, de leurs possessions et territoires
respectifs, sauf si ces produits ont été vendus par l’intermédiaire
des services d’exportation de Troy-Bilt.
f. Les pièces de rechange si elles ne sont pas des pièces Troy-Bilt
authentiques.
g. Les frais de transport des machines et de déplacement des
techniciens.
h. Troy-Bilt ne garantit pas ce produit pour un utilisation commercial.
Aucune garantie tacite ne s’applique, y compris sans s’y limiter, toute
garantie tacite de qualité marchande ou d’adaptabilité dans un but
particulier. Aucune garantie ne s’applique après la période de vigueur
applicable de la garantie écrite expresse ci-dessus. Aucune autre
garantie expresse, à l’exception des stipulations ci-dessus, n’engage
Troy-Bilt même si elle est offerte par toute personne ou entité, y
compris un concessionnaire/revendeur, pour n’importe quel produit. La
réparation ou le remplacement du produit dans les conditions ci-dessus
constitue le recours unique et exclusif à la disposition du client. Les
stipulations énoncées dans cette garantie offrent le seul recours à la
suite de la vente ou de la location-bail des produits couverts par cette
garantie. Troy-Bilt ne peut être tenue responsable pour toute perte ou
tout dommage accessoire ou immatériel comprenant, sans s’y limiter,
les frais de remplacement ou de substitution des services d’entretien
des pelouse ou les frais de location pour remplacer temporairement un
produit sous garantie.
Certaines juridictions ne permettent pas l’inclusion ou la restriction
des dommages accessoires ou immatériels ou une limite à la durée de
la garantie tacite. Par conséquent, les exclusions ci-dessus peuvent ne
pas s’appliquer dans votre situation.
Le remboursement ou remplacement quel qu’il soit ne sera en aucun
cas supérieur au montant du prix d’achat du produit vendu. Toute
modification des caractéristiques de sécurité rendra la garantie nulle
et non avenue. L’utilisateur assume tout risque et toute responsabilité
en cas de perte, de dommage matériel ou de blessure résultant de
l’utilisation incorrecte du produit ou de l’incapacité de l’employer.
Cette garantie limitée n’est offerte qu’à l’acheteur initial ou à la
personne à laquelle le produit a été offert en cadeau.
LES LOIS LOCALES ET CETTE GARANTIE : Cette garantie limitée vous
accorde des droits juridiques spécifiques et vous pouvez bénéficier
d’autres droits qui varient selon les juridictions.
IMPORTANT : Le propriétaire doit présenter le reçu original pour faire
honorer la garantie.
Troy-Bilt LLC, P.O. BOX 361131 CLEVELAND, OHIO 44136-0019; Phone: 1-866-840-6483, 1-330-558-7220
MTD Canada Limited - KITCHENER, ON N2G 4J1; Phone 1-800-668-1238
