
Owner’s Manual
Technics Audio Connect application
Model No.

Welcome!
Welcome! ....................................................4
Quick start guide
Quick start ..................................................5
Let’s Get Started
Part names and functions .......................13
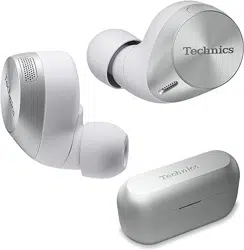
EAH-AZ80 ..................................................13
EAH-AZ60M2 .............................................15
Status Indicator LEDs ................................17
Charge .......................................................17
Charging .....................................................17
Charge the earphones and charging cradle at
the same time .............................................18
Charge only the charging cradle ................19
Charge only the earphones ........................19
Charge wirelessly .......................................20
Turn the earphones on/off .......................21
Wear the earphones .................................21
EAH-AZ80 ..................................................21
EAH-AZ60M2 .............................................22
For better sound (Change earpieces) ....22
Pair for the first time ................................23
Use the app to pair with a Bluetooth
®
device .........................................................23
Pair with a Bluetooth
®
device without the
app .............................................................24
Pair a subsequent device ........................24
Use the app to pair the earphones with a
subsequent Bluetooth
®
device ...................24
Pair the earphones with a subsequent
Bluetooth
®
device without the app .............25
Convenient Function
Listen to music .........................................27
Talk ............................................................27
Use only one earphone ............................28
Use external sound control .....................28
Activate voice assistant features ...........28
Establish multi-point connections .........29
Use the touch sensors .............................29
Use the app ...............................................32
Launch the app ..........................................32
Home screen ..............................................33
Set external sound control .........................34
Set sound enhancement ............................35
Play a sound to find the headphones .........36
Use location services to find the
headphones ...............................................37
Check JustMyVoice ....................................37
Set the language, messages, and
screen ........................................................37
Add/change/find headphones ....................38
Set auto power off ......................................38
Set the headphone fitting sensor ...............38
Use LDAC ..................................................38
Select a connection mode ..........................39
Use multi-point ...........................................39
Suppress sound interruptions and
delays .........................................................39
Disable the touch sensors ..........................39
Customize the touch sensors .....................39
Customize external sound control
switching ....................................................41
Select an ambient mode ............................42
Optimize noise cancelling ..........................42
Select a level of background noise
reduction ....................................................42
Select a voice assistant ..............................43
Set maintenance notifications ....................43
Reset the app .............................................43
Reset the headphones to factory
settings .......................................................43
Firmware updates ......................................43
Help ............................................................44
FAQ
Troubleshooting .......................................45
FAQ for the smartphone app (Technics
Audio Connect) ........................................48
Reset to factory settings .........................55
Maintenance .............................................55
Maintenance ...............................................55
Clean the earpieces ...................................56
Clean the charging terminals of the
earphones ..................................................59
Clean the charging cradle terminal
section ........................................................59
Specifications ...........................................60
EAH-AZ80/EAH-AZ60M2 ...........................60
Other Information
About Bluetooth
®
.....................................63
2
Table of Contents

Welcome!
Thank you for purchasing this product.
Delivering the Ultimate Emotive Musical
Experience to All
At Technics we understand that the listening experience is not
purely about technology but the magical and emotional relationship
between people and music.
We want people to experience music as it was originally intended
and enable them to feel the emotional impact that enthuses and
delights them.
Through delivering this experience we want to support the
development and enjoyment of the world
’
s many musical cultures.
This is our philosophy.
With a combination of our love of music and the vast high-
end audio experience of the Technics team, we stand committed
to building a brand that provides the ultimate emotive musical
experience by music lovers, for music lovers.
Director
Michiko Ogawa
4
Welcome!
Quick start
{{"Google Play"|tolink("https://play.google.com/store/apps/details?
id=com.panasonic.technicsaudioconnect")}}
5
Quick start guide
{{"Apple Store"|tolink("https://itunes.apple.com/app/id1498029651")}}
EAH-AZ80
EAH-AZ60M2
6
Quick start guide
7
Quick start guide
EAH-AZ80
Technics EAH-AZ80
Bluetooth
Bluetooth
ON
8
Quick start guide
ON
Bluetooth
Technics EAH-AZ80
ON
Bluetooth
Technics EAH-AZ80
Press
for 5~8s
9
Quick start guide
EAH-AZ60M2
10
Quick start guide
Press
for 5~8s
11
Quick start guide
12
Quick start guide
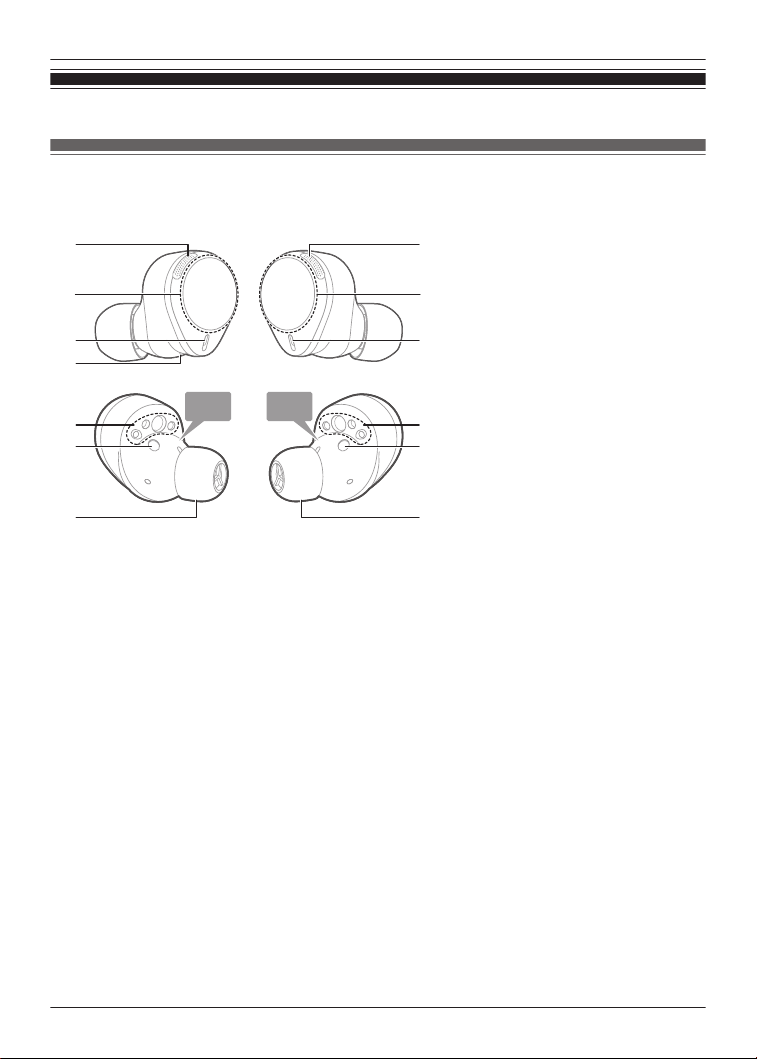
Part names and functions
EAH-AZ80
Earphones
1
5
7
2
4
1
7
3
4
L
R
8
6
8
6
1. Microphones for noise cancelling
2. Touch sensor (L) (left)
R Operate the earphone by touching.
3. Touch sensor (R) (right)
R Operate the earphone by touching.
4. Microphones for calls
5. Raised dot indicating the L side
R Indicates the left earphone.
6. Charging terminals
7. Earpieces
R Select the size with the best audio quality and comfort.
8. Wear sensors
R Detects whether earphones are worn and pauses/resumes music accordingly.
13
Let’s Get Started
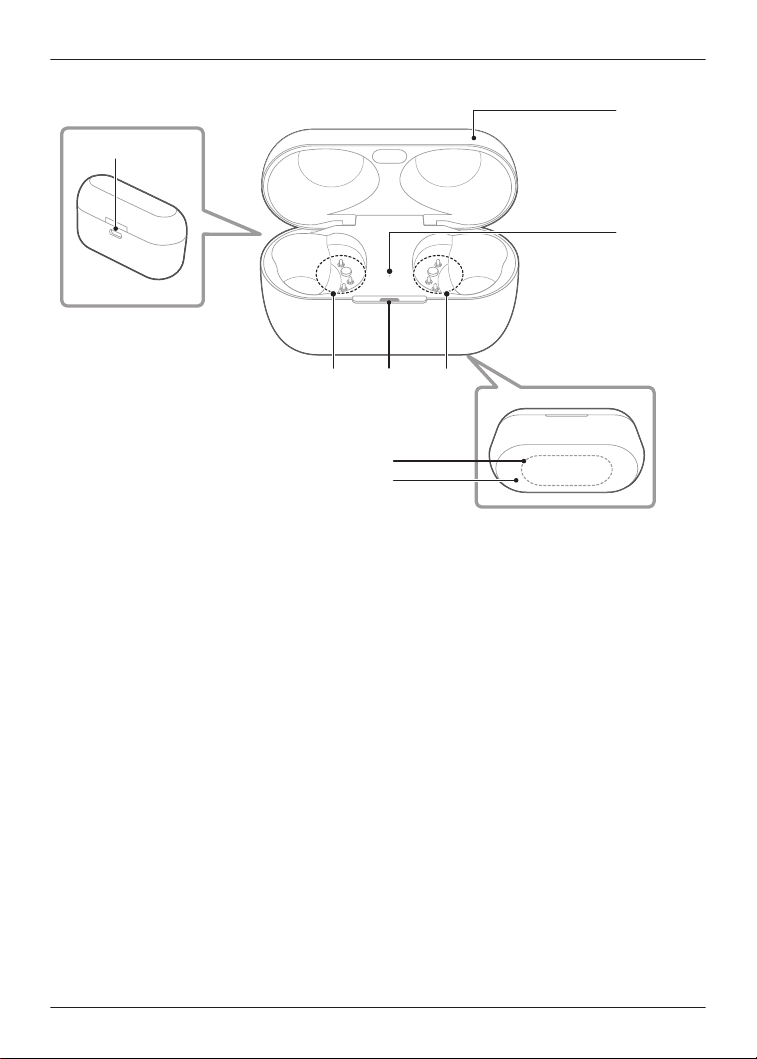
Charging cradle
6
43
1
3
5
7
2
1. Charging cradle lid
2. Rating
R Displays the model number.
3. Terminal section
4. Charging cradle status indicator LED
R Indicates the status of the charging cradle.
“Status Indicator LEDs”, Page 17
5. Earphone status indicator LED
R Indicates the status of the earphones when they are in the charging cradle.
(No LEDs on the earphones)
“Status Indicator LEDs”, Page 17
6. Charging terminal
R Use when charging with the USB charging cord.
7. Qi charging contact
R Use when charging with a separately sold Qi standard certified wireless charger.
14
Let’s Get Started
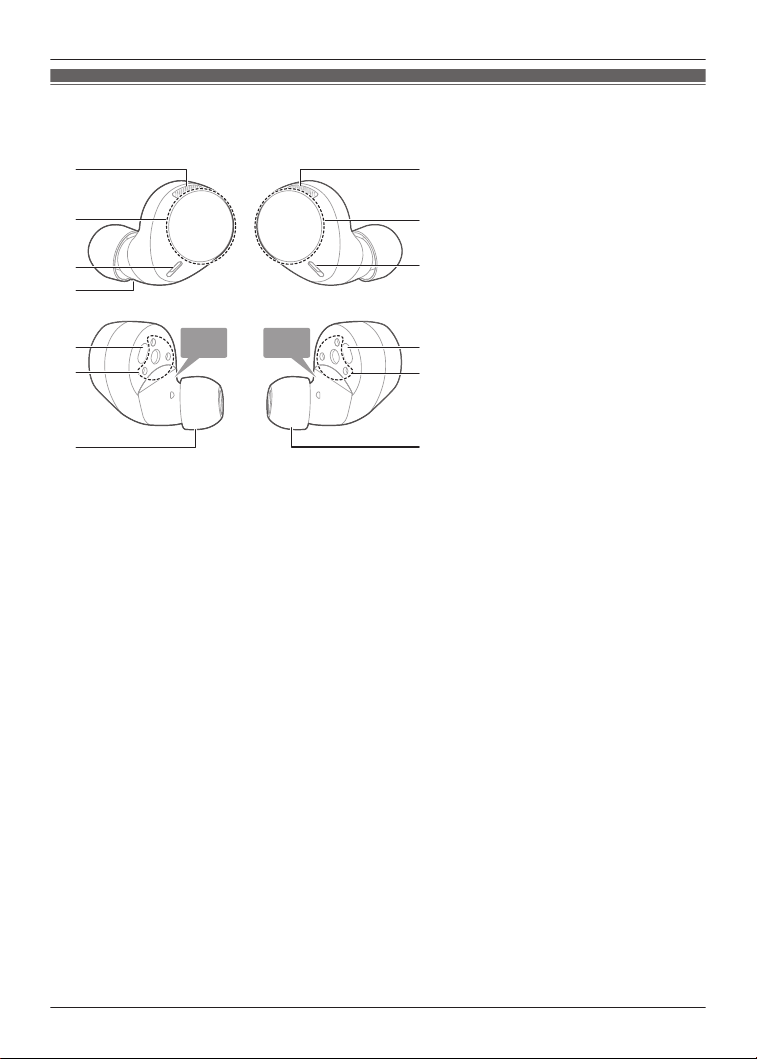
EAH-AZ60M2
Earphones
L
R
1 1
5
7
2
4
7
3
4
8
6
8
6
1. Microphones for noise cancelling
2. Touch sensor (L) (left)
R Operate the earphone by touching.
3. Touch sensor (R) (right)
R Operate the earphone by touching.
4. Microphones for calls
5. Raised dot indicating the L side
R Indicates the left earphone.
6. Charging terminals
7. Earpieces
R Select the size with the best audio quality and comfort.
8. Wear sensors
R Detects whether earphones are worn and pauses/resumes music accordingly.
15
Let’s Get Started

Charging cradle
6
43
1
7
2
3
5
1. Charging cradle lid
2. Rating
R Displays the model number.
3. Terminal section
4. Charging cradle status indicator LED
R Indicates the status of the charging cradle.
“Status Indicator LEDs”, Page 17
5. Earphone status indicator LED
R Indicates the status of the earphones when they are in the charging cradle.
(No LEDs on the earphones)
“Status Indicator LEDs”, Page 17
6. Charging terminal
R Use when charging with the USB charging cord.
7. Qi charging contact
R Use when charging with a separately sold Qi standard certified wireless charger.
16
Let’s Get Started
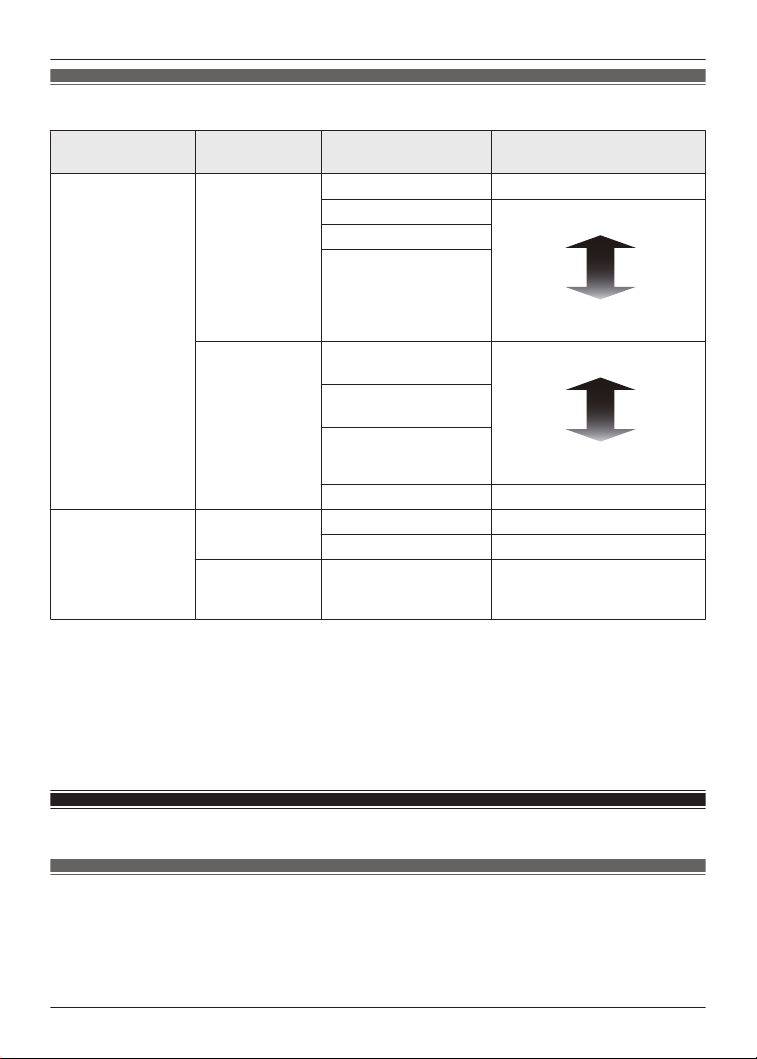
Status Indicator LEDs
LED type
Charging
cradle status
LED color/pattern Status description
Charging cradle
status indicator
LED
Charging Off
Fully charged
*1
Flashing green Sufficient charge
Low charge
Flashing yellow
Flashing red
When the lid of
the charging
cradle is opened
Green (about 3
seconds)
Sufficient charge
Low charge
Yellow (about 3
seconds)
Red (about 3 seconds)
Does not light up No charge
Earphone status
indicator LED
Charging
earphones
Off Fully charged
Red Earphones charging
When the
earphones are
inserted
Quickly flashing red
(twice)
The earphones are properly
inserted into the charging
cradle
*1 Charging is complete when the lid of the charging cradle is opened and the LED lights up
green.
Note:
R You can check the remaining charge of the earphones and charging cradle on the home
screen of the [Technics Audio Connect] app.
“Home screen”, Page 33
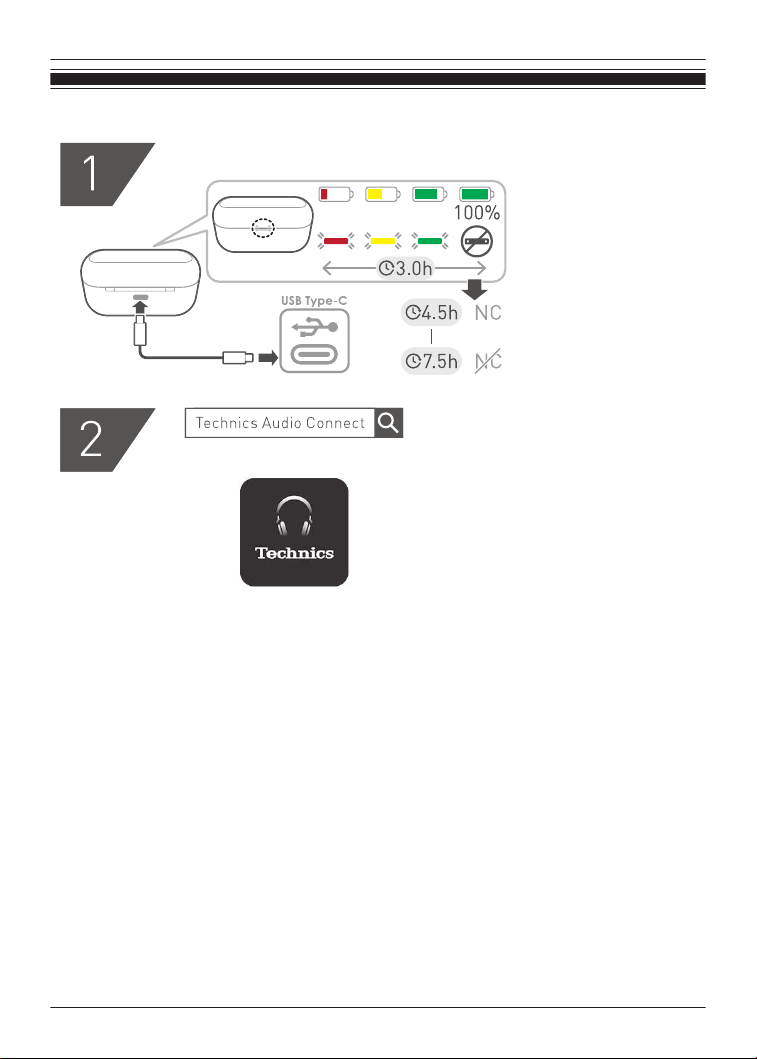
Charge
Charging
Upon purchase, charge first before use.
Important:
R Do not touch the terminal section with your bare hands.
17
Let’s Get Started
R The device cannot charge properly if there is dust or water droplets on the charging terminal,
earphones, or charging cradle terminal section. Remove dust and water droplets before
charging.
“Clean the charging terminals of the earphones”, Page 59
“Clean the charging cradle terminal section”, Page 59
R Hold the plug of the USB charging cord straight when plugging in or out.
(Plugging the USB charging cord at an angle to the charging terminal will deform the plug and
cause a malfunction.)
R Confirm (L) and (R) on the earphones, and align the terminal section of the charging cradle
with the charging terminals of the earphones. (Earphones will not charge if their charging
contact positions are incorrect.)
R We recommend charging at a room temperature between 10°C to 35°C.
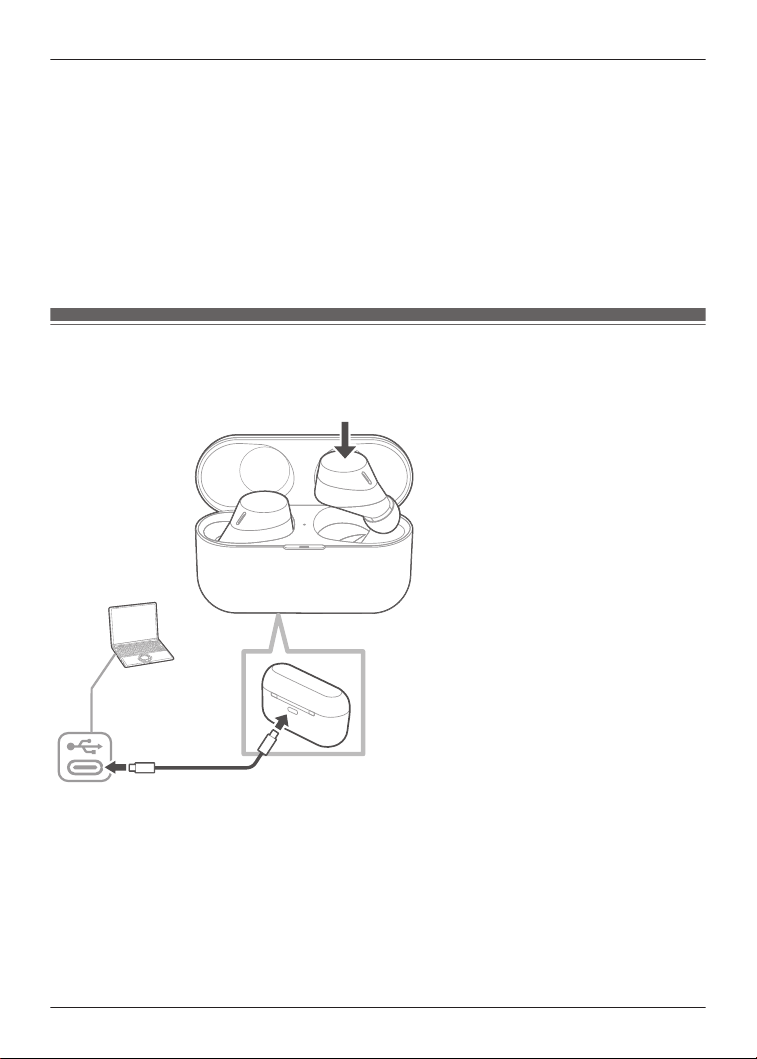
Charge the earphones and charging cradle at the same
time
The illustrations use EAH-AZ60M2 as an example.
USB Type-C
1 Use the included USB charging cord to connect the charging cradle to a separately sold
USB PD supported AC adapter (USB Type-C).
R You can also charge from a USB Type-C port on a computer. Turn on your computer. It
may not charge if the computer is in standby or sleep mode.
R The charging cradle status indicator LED flashes (red, yellow, or green), and charging
starts.
2 Put the earphones into the charging cradle.
R The earphone status indicator LED quickly flashes red (twice). (Put the earphones into
the charging cradle again if the LED does not flash.)
R The earphone status indicator LED lights up (red), and charging starts.
18
Let’s Get Started

R Charging for the earphones is complete when the earphone status indicator LED turns off.
R Charging for the charging cradle is complete when the charging cradle status indicator
LED turns off.
R Charging time (the time from empty to full charge)
Charging the earphones and
charging cradle at the same time
About 3.0 hours
Note:
R You cannot turn on the earphones or connect them to a Bluetooth
®
device when they are
charging in the charging cradle.
R You can charge using a separately sold AC adapter.
Recommended AC adapter specifications
Supports PD (Power Delivery)
DC 5 V (500 mA or higher)
USB Type-C port
We do not guarantee that all AC adapters can be used for charging.
Charge only the charging cradle
To charge only the charging cradle, charge without putting in the earphones.
1 Use the included USB charging cord to connect the charging cradle to a separately sold
USB PD supported AC adapter (USB Type-C).
R The charging cradle status indicator LED flashes (red, yellow, or green), and charging
starts.
R Charging is complete when the charging cradle status indicator LED turns off.
R Charging time (the time from empty to full charge)
Charging only the charging cradle About 2.5 hours
Charge only the earphones
You can charge the earphones with the charging cradle if it is sufficiently charged, even when
there is no power supply nearby.
1 Put the earphones into the charging cradle.
R The earphone status indicator LED quickly flashes red (twice). (Put the earphones into
the charging cradle again if the LED does not flash.)
R The earphone status indicator LED lights up (red), and charging starts.
R Charging is complete when the earphone status indicator LED turns off.
R Charging time (the time from empty to full charge)
Charging only the earphones About 2.0 hours
19
Let’s Get Started

Note:
R If the charging cradle is fully charged, you can charge earphones with no charge about two
times.
Charge wirelessly
You can charge this unit with a separately sold Qi standard wireless charger. For information
about your wireless charger, please refer to its manual.
1 Close the charging cradle lid.
2 Place the charging cradle on the wireless charger with the Technics logo facing up.
R Qi charging contact position
EAH-AZ80: Qi charging contact Page 14
EAH-AZ60M2: Qi charging contact Page 16
Important:
R The unit is not guaranteed to charge with all commercially available Qi standard wireless
chargers.
R This unit does not support wireless chargers that are not Qi standard certified or have
magnetic attachments. Do not use these chargers to charge the charging cradle. (It may
cause the charging cradle to malfunction.)
R Do not charge wirelessly in the following places.
In humid, dusty, or shaky areas, or near telephones, TVs, radios, or devices with built-in
magnets
R Before charging wirelessly:
– Remove any covers attached to the charging cradle.
(The material and thickness of covers, or foreign matter such as dust caught between the
charging cradle and covers, may prevent the battery from charging properly and result in
fire, burns, or injury.)
– If there are other devices that support wireless charging nearby, keep them at least 30 cm
away.
(The wireless charger may not detect the charging cradle correctly and charging may fail.)
R While charging wirelessly:
– Do not place metal objects (such as coins, or straps and clips that contain metal) on the
wireless charger. (It may result in fire, burns, or injury.)
– If you hear noise from a TV or radio, charge in a place farther away from the TV or radio.
– Do not use a wireless charger while it is covered with something such as a blanket.
R If you have an electronic medical device such as an implanted cardiac pacemaker or
defibrillator, consult your physician before using a wireless charger. (It may result in radio
waves that adversely affect the operation of electronic medical devices.)
R Do not attach metal objects (such as stickers with materials that contain metal) to the wireless
charger or charging cradle. (It may result in fire, burns, or injury.)
R Keep IC cards, magnetic cards, and magnetic objects away from the wireless charger.
– IC cards may malfunction. Magnetic data on cash cards, credit cards, telephone cards, and
floppy disks may be erased. Placing the charger close to a strong magnetic field may also
result in malfunction.
Note:
R If the charging cradle is not placed properly during wireless charging, charging may be slower,
charging may stop, or the wireless charger, earphones, and charging cradle may get hot.
20
Let’s Get Started
R Depending on your wireless charger, charging may be slower or may stop at high or low
temperatures. Also, although the earphones and charging cradle may get warm while and
after charging, it is not a malfunction.
Turn the earphones on/off
Turn on
1 Take out the earphones from the charging cradle.
R A startup sound will play.
Turn off
1 Put the earphones into the charging cradle.
R When you put them in, the earphone status indicator LED quickly flashes red (twice).
(Put the earphones into the charging cradle again and charge the charging cradle if the
LED does not flash.)
Important:
R Bringing a magnetic object close to the earphones during use may turn off the earphones. Do
not bring magnetic objects close to the earphones during use.
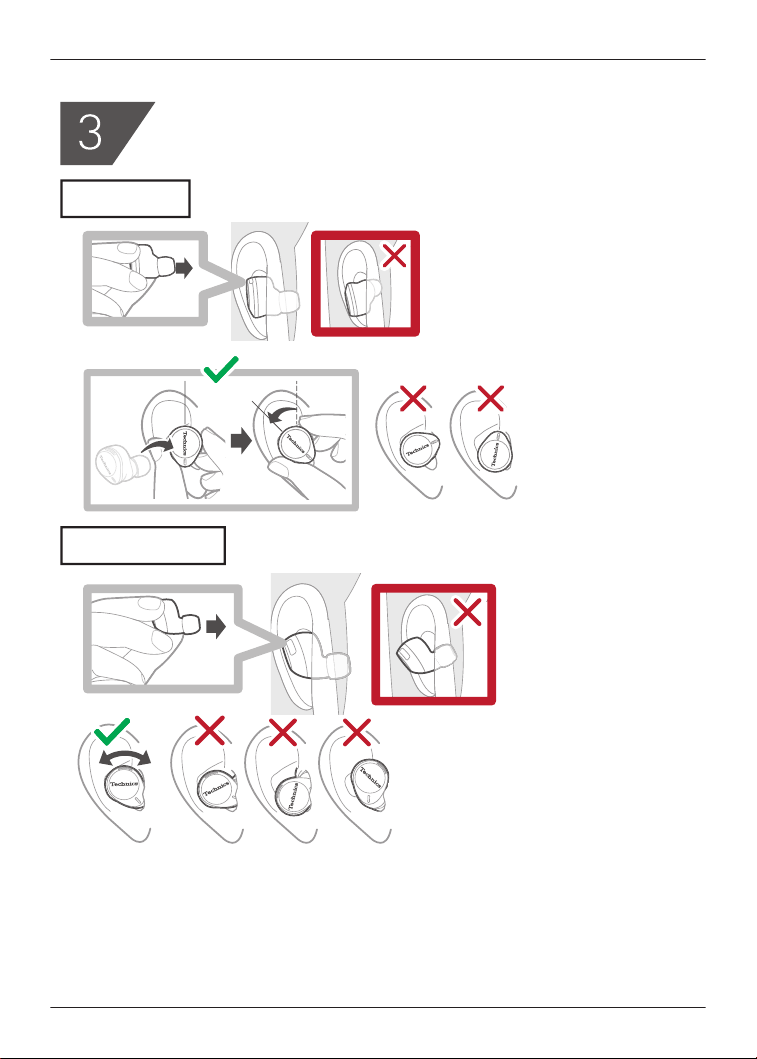
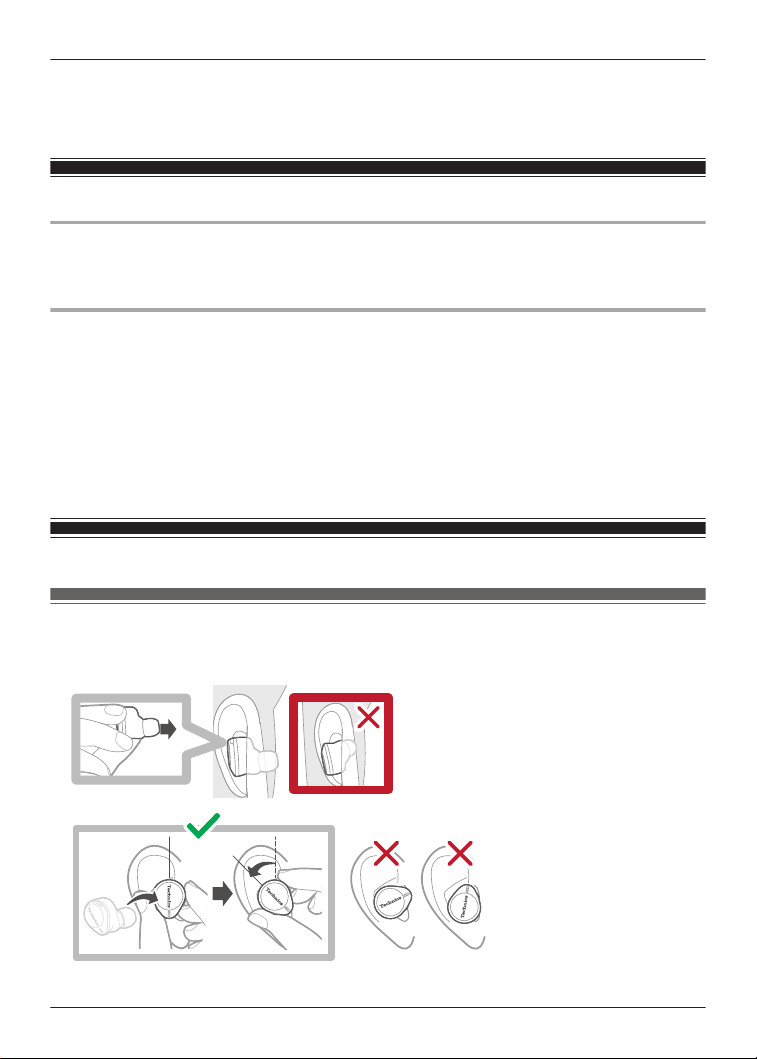
Wear the earphones
EAH-AZ80
Wear the earphones correctly to achieve good noise cancelling and acoustics.
21
Let’s Get Started
1 Check the top and bottom orientation of the earphones and the L (left) and R (right) positions.
2 Wear them securely.
R With the Technics logo oriented vertically, insert into your ears while twisting slightly
backwards, and adjust so that the earpieces fit well into your ear canals.
R Earphone (L) has a raised dot indicating the L side.
R After wearing them, check that they do not fall off from your ears.
R If the earphones fall off easily, replace them with earpieces of a different size (included).
“For better sound (Change earpieces)”, Page 22
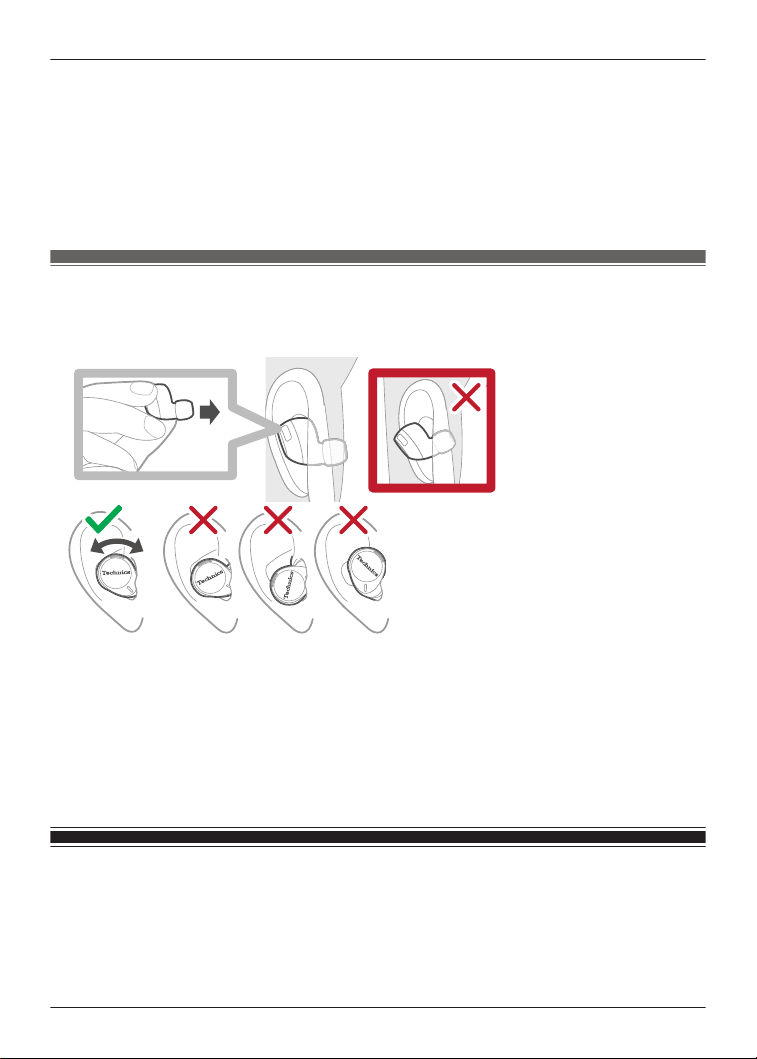
EAH-AZ60M2
Wear the earphones correctly to achieve good noise cancelling and acoustics.
1 Check the top and bottom orientation of the earphones and the L (left) and R (right) positions.
2 Wear them securely.
R Earphone (L) has a raised dot indicating the L side.
R After wearing them, check that they do not fall off from your ears.
R If the earphones fall off easily, replace them with earpieces of a different size (included).
“For better sound (Change earpieces)”, Page 22
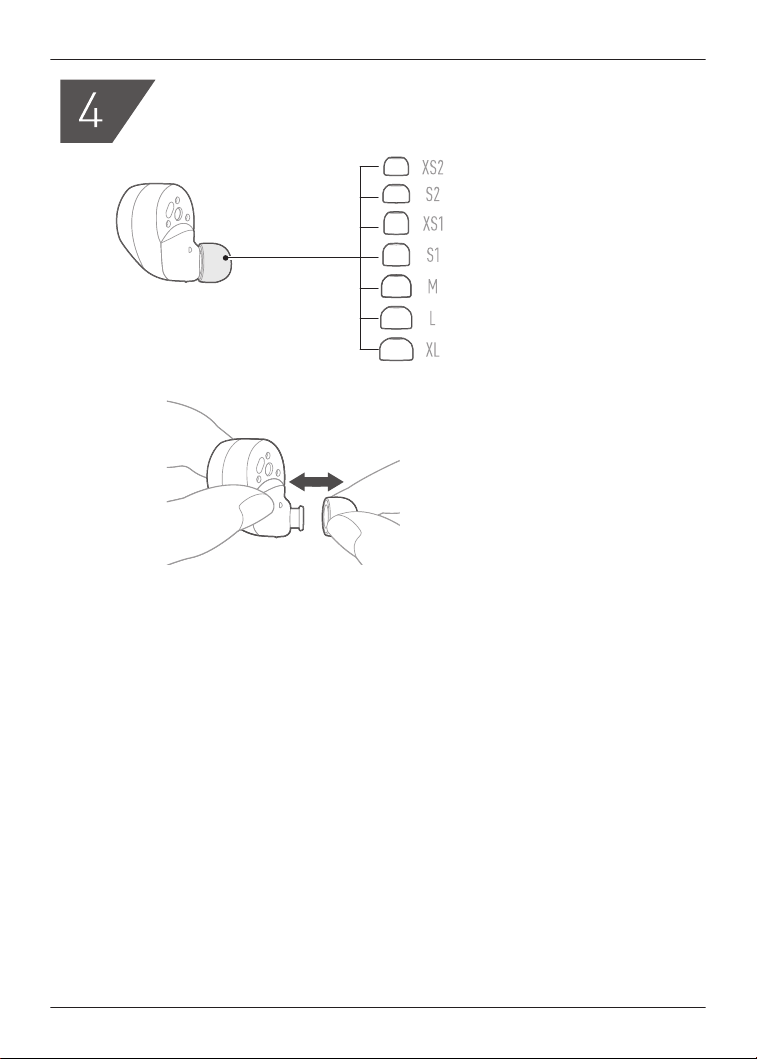
For better sound (Change earpieces)
The size of the earpieces affects the audio quality (music playback, calls) and comfort. Select a
size that is comfortable and fits well in both ears.
The illustrations use EAH-AZ60M2 as an example.
22
Let’s Get Started
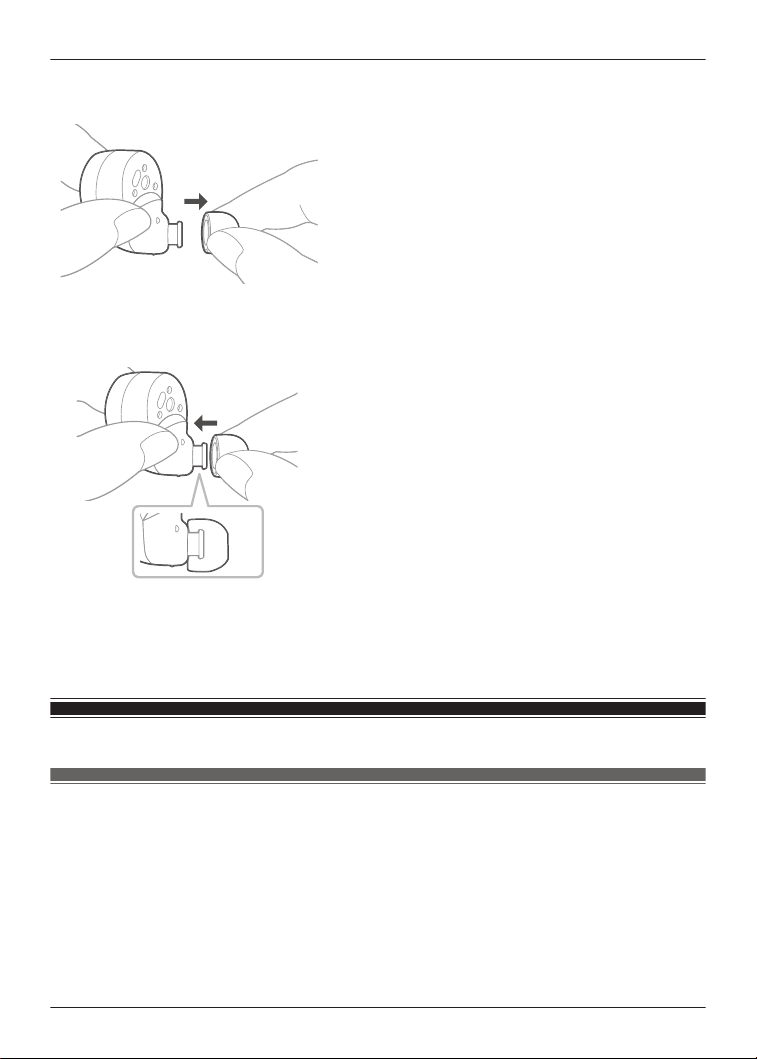
1 Remove the earpiece.
R Hold the earpiece and pull out while twisting slightly.
2 Attach the earpiece.
R Make sure that the earpiece is firmly attached and not slanted.
Note:
R The size of the earpieces that fit your ears may differ between the left and right.
R Select the earpieces that provide the best noise cancelling.
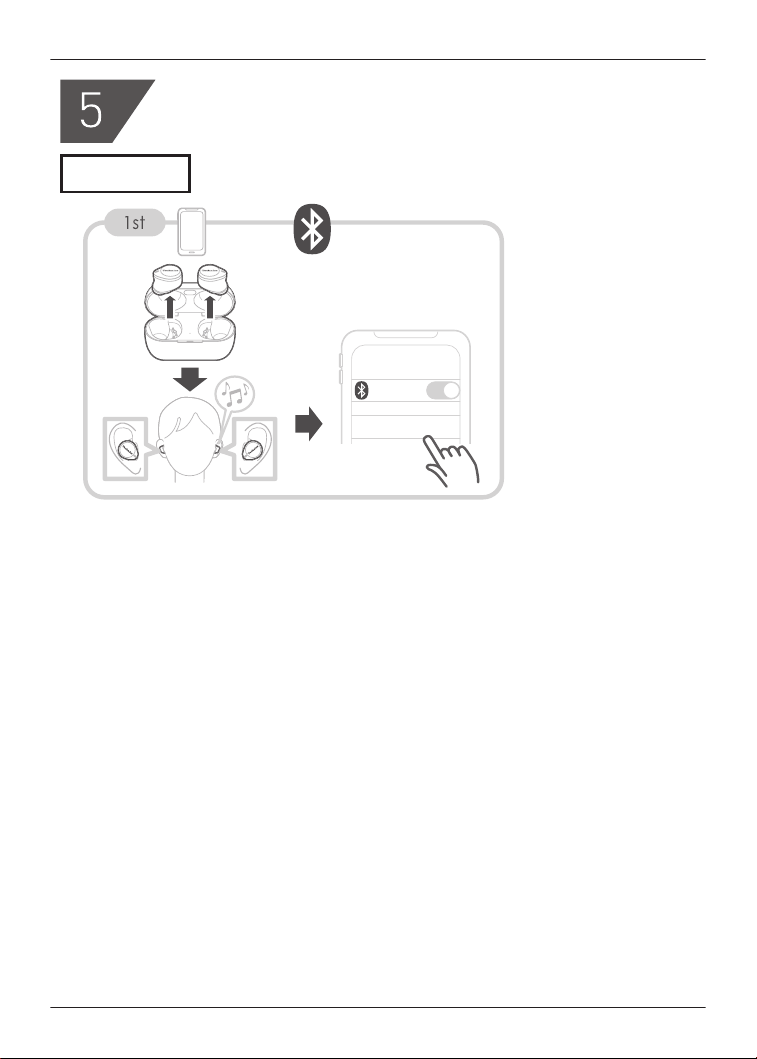
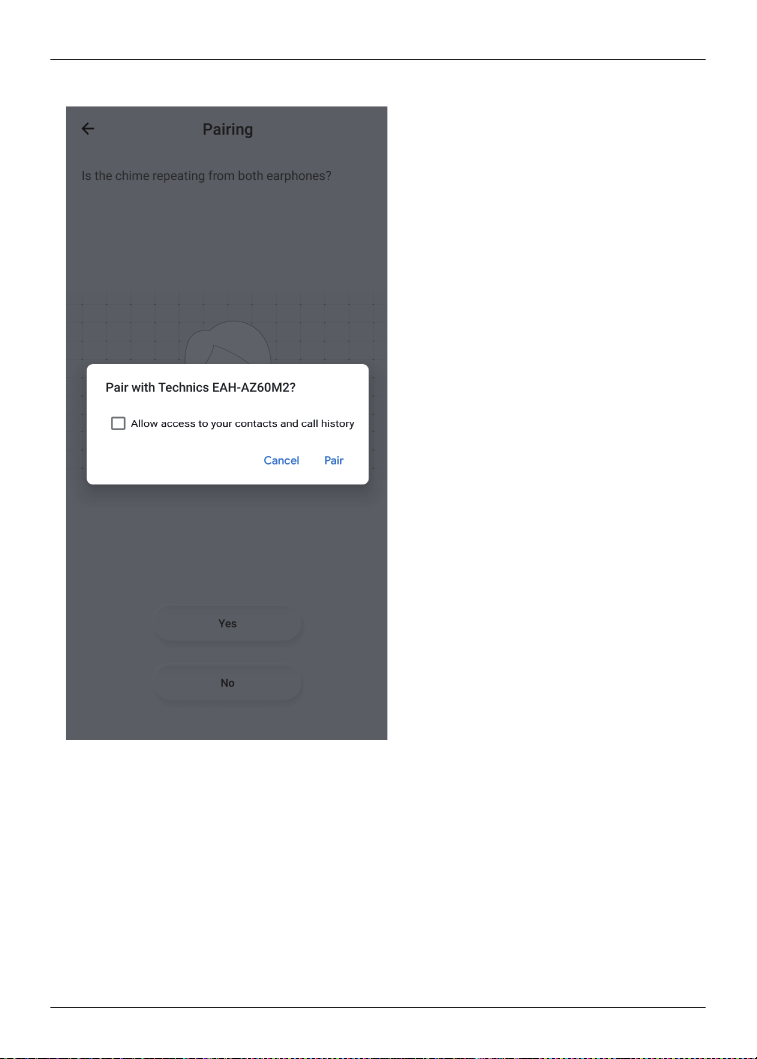
Pair for the first time
Use the app to pair with a Bluetooth
®
device
Important:
R Depending on the connected Bluetooth
®
device, a loud sound may be output during playback.
Check the volume setting of the Bluetooth
®
device before starting playback.
1 Download the [Technics Audio Connect] app.
{{"Google Play"|tolink("https://play.google.com/store/apps/details?
id=com.panasonic.technicsaudioconnect")}}
{{"Apple Store"|tolink("https://itunes.apple.com/app/id1498029651")}}
2 Launch the [Technics Audio Connect] app.
23
Let’s Get Started

3 Tap the product you want to pair.
4 Follow the on-screen instructions.
Pair with a Bluetooth
®
device without the app
You can pair without using the [Technics Audio Connect] app.
(Example)
R Using the earphones with a Bluetooth
®
device not supported by the [Technics Audio Connect]
app
Important:
R When pairing, keep the Bluetooth
®
device and earphones close together. (Within about 1 m)
R Depending on the connected Bluetooth
®
device, a loud sound may be output during playback.
Check the volume setting of the Bluetooth
®
device before starting playback.
1 Put both earphones (L and R) into the charging cradle and charge.
2 Take out both earphones (L and R) from the charging cradle and wear them.
R After the startup sound plays, a melody repeats. To listen to the melody, click {{"Here"|
tolink("https://eww.pavc.panasonic.co.jp/avcacc/technics/sound-data/Pair_const.wav")}}.
3 Turn on Bluetooth
®
in the Bluetooth
®
device.
4 From the Bluetooth
®
menu in the Bluetooth
®
device, select the earphones.
R If you are asked to input a passkey, input the earphone passkey “0000” (four zeros).
R For details about setting up Bluetooth
®
, please refer to the manual of the Bluetooth
®
device.
Pair a subsequent device
Use the app to pair the earphones with a subsequent
Bluetooth
®
device
You can pair up to 10 Bluetooth
®
devices with the earphones.
(Example)
R Using the earphones with a work phone as the first device and a private phone as the second
device
Important:
R Depending on the connected Bluetooth
®
device, a loud sound may be output during playback.
Check the volume setting of the Bluetooth
®
device before starting playback.
1 Install and launch the [Technics Audio Connect] app on the subsequent Bluetooth
®
device.
2 Follow the on-screen instructions.
24
Let’s Get Started

Note:
R If you pair a device when the maximum number of paired Bluetooth
®
devices is exceeded,
previously paired devices will be overwritten. To use overwritten devices again, pair them
again.
R Pairing a subsequent device is easier if you turn off Bluetooth
®
in the first device.
R When pairing a subsequent device, the earphones will cancel pairing mode and go into
connection standby mode if the device is not connected within 5 minutes. Pair again.
R The unit remembers the last connected device. The unit may connect automatically after it is
turned on.
R The unit can connect to up to 3 Bluetooth
®
devices at the same time.
“Establish multi-point connections”, Page 29
Pair the earphones with a subsequent Bluetooth
®
device
without the app
You can pair up to 10 Bluetooth
®
devices with the earphones.
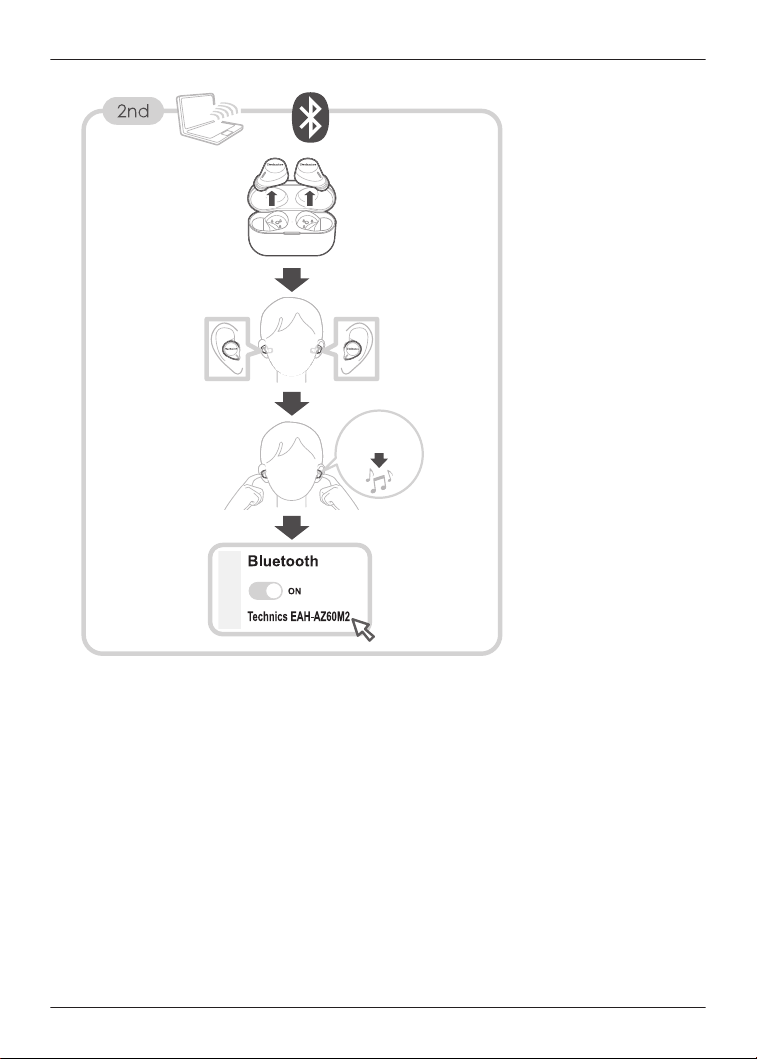
You can pair by using the touch sensors on the earphones.
(Example)
R Using the earphones with a smartphone as the first device and a computer as the second
device
Important:
R When pairing, keep the Bluetooth
®
device and earphones close together. (Within about 1 m)
R Depending on the connected Bluetooth
®
device, a loud sound may be output during playback.
Check the volume setting of the Bluetooth
®
device before starting playback.
1 Put both earphones (L and R) into the charging cradle and charge.
2 Take out both earphones (L and R) from the charging cradle and wear them.
3 Touch and hold both touch sensors (L and R) at the same time until you hear the pairing
sound.
R A message about starting to pair plays, and a melody repeats.
To listen to the melody, click {{"Here"|tolink("https://eww.pavc.panasonic.co.jp/avcacc/
technics/sound-data/Pair_const.wav")}}.
4 Turn on Bluetooth
®
in the subsequent Bluetooth
®
device.
5 From the Bluetooth
®
menu in the subsequent Bluetooth
®
device, select the earphones.
R If you are asked to input a passkey, input the earphone passkey “0000” (four zeros).
R For details about setting up Bluetooth
®
, please refer to the manual of the Bluetooth
®
device.
Note:
R If you pair a device when the maximum number of paired Bluetooth
®
devices is exceeded,
previously paired devices will be overwritten. To use overwritten devices again, pair them
again.
R Pairing a subsequent device is easier if you turn off Bluetooth
®
in the first device.
R The earphones will cancel pairing mode and go into connection standby mode if the device is
not connected within 5 minutes. Pair again.
R The unit remembers the last connected device. The unit may connect automatically after it is
turned on.
25
Let’s Get Started


Listen to music
If a Bluetooth
®
device supports the “A2DP” and “AVRCP” Bluetooth
®
profiles, you can use the
earphones to play music and video.
1 Connect the Bluetooth
®
device and earphones.
2 On the Bluetooth
®
device, select and play the music or video.
R The earphones will play the audio of the music or video.
R You can adjust the volume by using the touch sensor (L) on the earphones.
“Use the touch sensors”, Page 29
“Operating time (Earphones)”, Page 61
Note:
R A2DP (Advanced Audio Distribution Profile): Transmits audio to the earphones.
R AVRCP (Audio/Video Remote Control Profile): Allows remote control with the earphones.
R Be aware that sound may leak from the earphones depending on the volume.
R Music may sound distorted if you increase the volume to near maximum. Decrease the
volume.
R At default settings, the music pauses when you take off the earphones during playback, and
resumes when you wear them again within about 1 minute. You can change the settings.
“Set the headphone fitting sensor”, Page 38
Talk
If a Bluetooth
®
phone (mobile phone or smartphone) supports the “HSP” or “HFP” Bluetooth
®
profile, you can use the earphones to talk.
1 Connect the Bluetooth
®
phone and earphones.
2 When receiving a call, touch an earphone touch sensor (L or R) once to answer.
R When receiving a call, the ringtone plays from the earphones.
R (HFP only) To reject a call, touch and hold a touch sensor (L or R) for about 2 seconds.
3 Talk.
R You can adjust the volume or mute the call by using the touch sensors on the earphones.
“Use the touch sensors”, Page 29
R “Call time (Earphones)”, Page 61
4 Touch and hold an earphone touch sensor (L or R) for about 2 seconds to end the call.
Note:
R HSP (Headset Profile): Allows the earphones to receive monaural audio and the microphone
to transmit audio.
R HFP (Hands-Free Profile): Provides incoming and outgoing communication in addition to the
HSP functions. (The earphones cannot make calls.)
R You may have to configure hands-free settings on the Bluetooth
®
phone.
R Depending on the Bluetooth
®
phone, you may hear incoming and outgoing ringtones from the
earphones.
R You can use the microphone on the earphones and the app on a Bluetooth
®
device to have
the Bluetooth
®
device make a call.
“Activate voice assistant features”, Page 28
27
Convenient Function

Use only one earphone
You can use just one earphone after completing initial settings and after connecting to a
Bluetooth
®
device. For example, if you take out only earphone (R) and leave earphone (L) in the
charging cradle, earphone (R) will connect to the smartphone. You can listen to music or make
calls with one earphone while charging the other.
Note:
R The audio will be monaural.
R If you take out the other earphone from the charging cradle when using only one earphone,
the earphones will automatically connect wirelessly and switch to using both. The audio will be
stereo.
Use external sound control
External sound control switches between noise cancelling and ambient sound.
1 While wearing the earphones, touch and hold touch sensor (R) for about 2 seconds.
R The mode switches between noise cancelling and ambient sound every time you touch
and hold.
(A voice prompt will notify you of the mode you switched to.)
R The default setting is “Noise cancelling”.
Note:
R The [Technics Audio Connect] app allows you to turn off external sound control.
“Set external sound control”, Page 34
R Noise Cancelling: Reduces sound (noise) from the surroundings. While using noise cancelling,
you may hear a slight noise from the noise reduction circuit, but this is not a malfunction. (You
may hear this slight noise in quiet places or during the silence between songs.)
R Ambient Sound: The microphones capture sound from the surroundings and play it on the
earphones. You can hear sounds from your surroundings such as train announcements while
wearing the earphones.
Activate voice assistant features
You can activate voice assistant features (such as Amazon Alexa or Siri) with a touch sensor on
the earphone.
1 Connect the Bluetooth
®
device and earphones.
“When using Amazon Alexa as a voice assistant”, Page 29
2 Touch and hold touch sensor (L) for about 2 seconds.
R The voice assistant feature in the Bluetooth
®
device is activated.
Note:
R Voice assistant features may not activate depending on the smartphone specifications and the
app version.
28
Convenient Function

R For details about voice commands for the voice assistant feature, please refer to the manual
of the Bluetooth
®
device that uses the voice assistant feature.
When using Amazon Alexa as a voice assistant
Use the [Technics Audio Connect] app to complete setup.
Important:
R Install the latest version of the Amazon Alexa app.
1 Connect the Bluetooth
®
device and earphones.
2 In the home screen of the [Technics Audio Connect] app, tap [SETTINGS].
3 Tap [Select voice assistant] and select Amazon Alexa.
4 Follow the on-screen instructions.
R After signing into Amazon, you will need to add the headphones in the Amazon device
setup.
Note:
R Amazon Alexa is not available in all languages and countries. Amazon Alexa features may
also vary by location. For details, please refer to the manuals of the apps.
Establish multi-point connections
Multi-point allows the earphones to connect up to 3 Bluetooth
®
devices at the same time.
Note:
R Multi-point connections are established only with the last device connected via Bluetooth
®
(up
to 3).
R When connecting 3 devices with multi-point, set the number of multi-point devices to 3.
“Use multi-point”, Page 39
R For information about using the Bluetooth
®
devices, please refer to the manuals of the
Bluetooth
®
devices.
R This feature may not work with some apps or software.
1 Confirm that the earphones are paired with the Bluetooth
®
devices.
2 Connect the first Bluetooth
®
device and earphones.
R From the Bluetooth
®
menu in the Bluetooth
®
device, select your headphones.
3 Connect the subsequent Bluetooth
®
device and earphones.
R From the Bluetooth
®
menu in the Bluetooth
®
device, select your headphones.
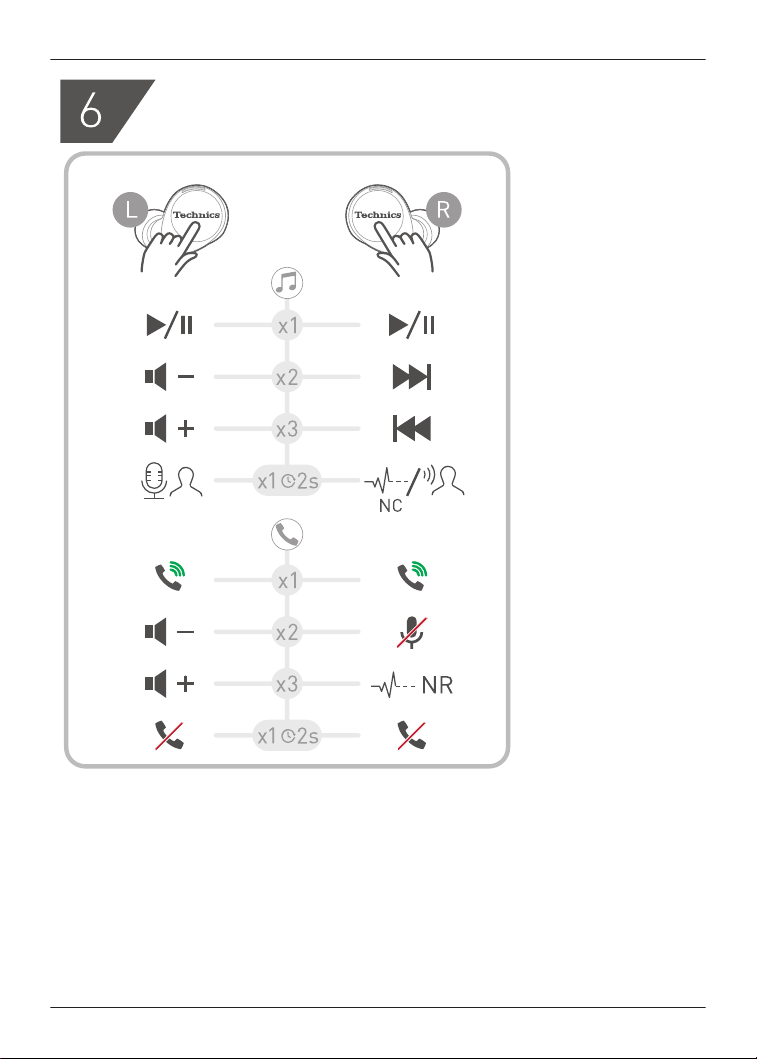
Use the touch sensors
You can use the touch sensors on the earphones to operate the earphones, or remote control
Bluetooth
®
devices connected to the earphones.
29
Convenient Function
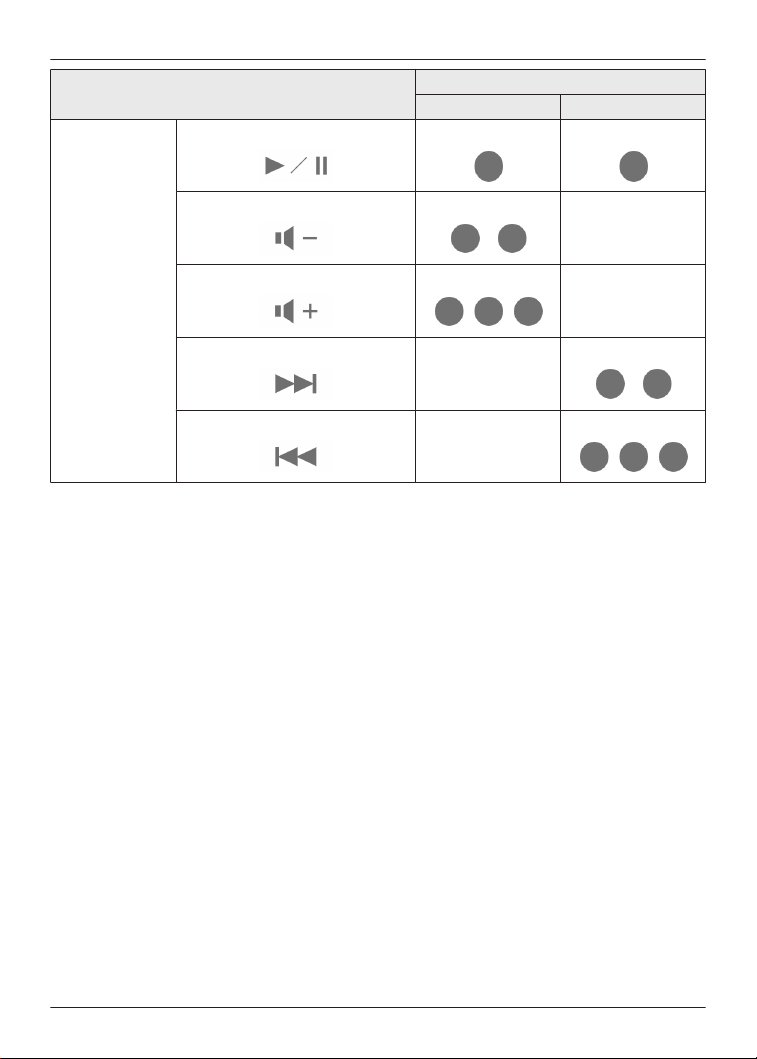
Function
Touch sensor gesture
L R
Music
Playback/Pause
Single tap Single tap
Decrease volume
Double tap
-
Increase volume
Triple tap
-
Next track
-
Double tap
Previous track
-
Triple tap
30
Convenient Function
Function
Touch sensor gesture
L R
Calls
Answer call
Single tap during
incoming call
Single tap during
incoming call
Decrease volume
Double tap
-
Increase volume
Triple tap
-
Mute your voice
-
Double tap during
a call
Unmute -
Double tap during
mute
Switch the noise level from the
other party
-
Triple tap during a
call
Reject call
Tap and hold for
about 2 seconds
during incoming
call
Tap and hold for
about 2 seconds
during incoming
call
End call
Tap and hold for
about 2 seconds
during a call
Tap and hold for
about 2 seconds
during a call
Switch external sound control
-
Tap and hold for
about 2 seconds
31
Convenient Function
Function
Touch sensor gesture
L R
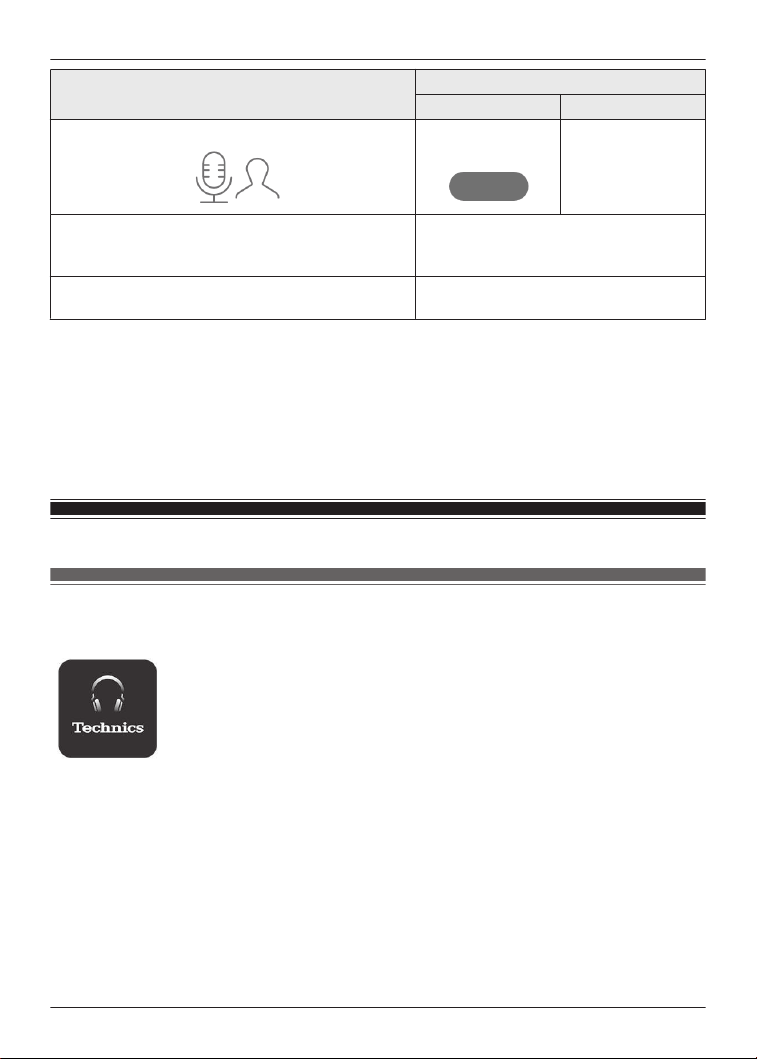
Activate voice assistant
Tap and hold for
about 2 seconds
-
Set to Bluetooth
®
pairing mode
“Pair the earphones with a subsequent
Bluetooth
®
device without the app”,
Page 25
Reset to factory settings
“Reset to factory settings”, Page 55
Note:
R You can change the touch sensor control buttons on the [Technics Audio Connect] app.
“Customize the touch sensors”, Page 39
R Depending on the Bluetooth
®
device or the app, some features may not work or may operate
differently even if you use the touch sensors.
R If you use only one earphone, you can only perform operations that are available on that side.
R A beep will play to indicate that you have reached the maximum or minimum volume level.
Use the app
Launch the app
1 Tap the [Technics Audio Connect] icon on the smartphone.
2 Take out the earphones from the charging cradle.
R The earphones turn on and the home screen is displayed.
32
Convenient Function
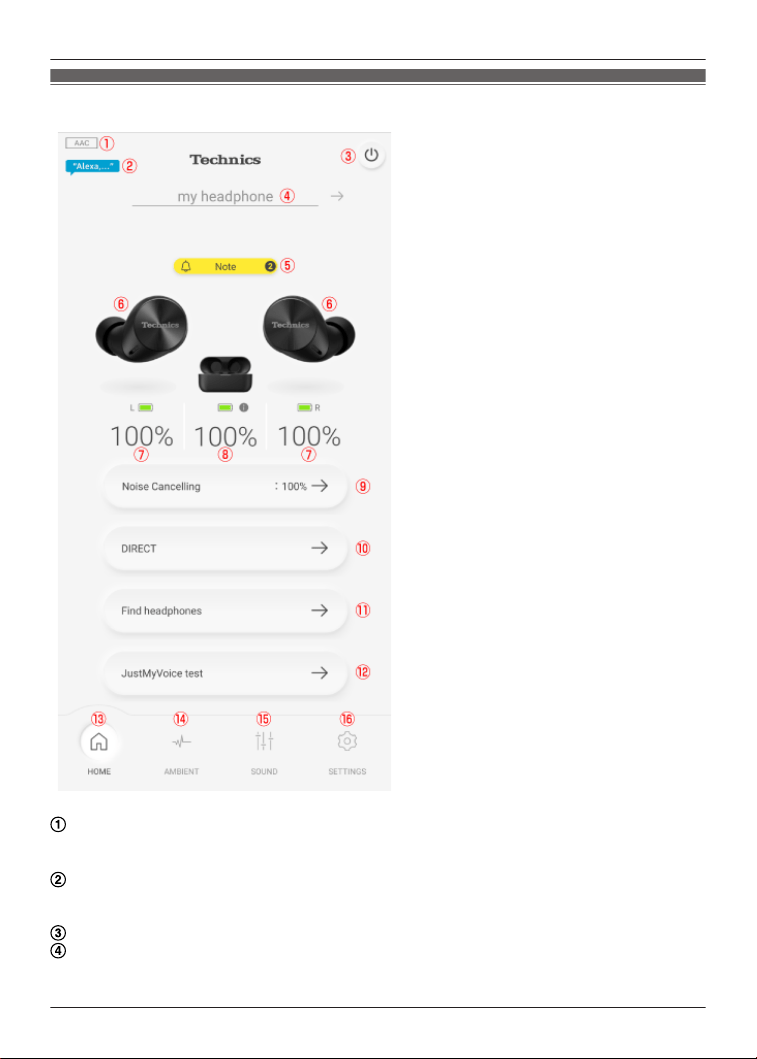
Home screen
Connected codec
R Displays the codec of the Bluetooth
®
device connected to the headphones. It may not be
displayed depending on the Bluetooth
®
device.
Amazon Alexa
R Displayed when [Use voice commands to start Alexa] for Amazon Alexa is on.
“When using Amazon Alexa as a voice assistant”, Page 29
Turns off the headphones.
Headphone name
33
Convenient Function

Note
R Displayed when there is a notification (such as an update). You can tap it to view the
notifications.
Connected headphones
Remaining earphone charge
Remaining charging cradle charge
External sound control setting
R You can tap it to set external sound control.
“Set external sound control”, Page 34
Sound enhancement setting
R You can tap it to set the sound enhancement.
“Set sound enhancement”, Page 35
Use to find your lost headphones.
R You must set in advance.
“Play a sound to find the headphones”, Page 36
“Use location services to find the headphones”, Page 37
You can check the voice transmitted to the other party.
“Check JustMyVoice”, Page 37
Displays the home screen.
Displays the setting screen for external sound control.
“Set external sound control”, Page 34
Displays the setting screen for sound enhancement.
“Set sound enhancement”, Page 35
Displays the setting screen.
Set external sound control
1 In the home screen of the [Technics Audio Connect] app, tap [AMBIENT].
R When setting external sound control for the first time, tap [Adjust] and pre-adjust noise
cancelling.
“Optimize noise cancelling”, Page 42
2 Select and tap an external sound control mode.
R [Ambient Sound] has Transparent and Attention modes.
34
Convenient Function
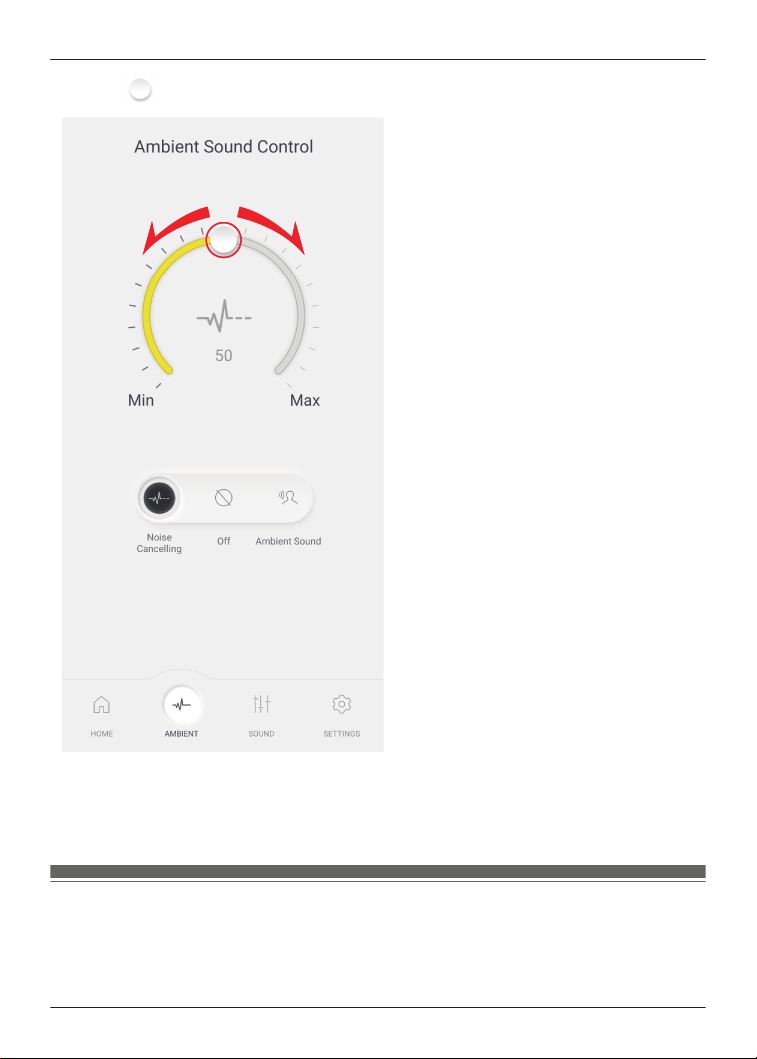
3 Move to adjust the level.
R Noise Cancelling: The closer to Max (100), the more noise is removed.
R Ambient Sound (Transparent): The closer to Max (100), the more external sound is
transmitted.
R If you select “Off” or “Ambient Sound” (Attention), you cannot adjust the level.
Set sound enhancement
1 In the home screen of the [Technics Audio Connect] app, tap [SOUND].
2 Select and tap a sound enhancement.
R You can select an option such as Bass Enhancer or Clear Voice.
35
Convenient Function
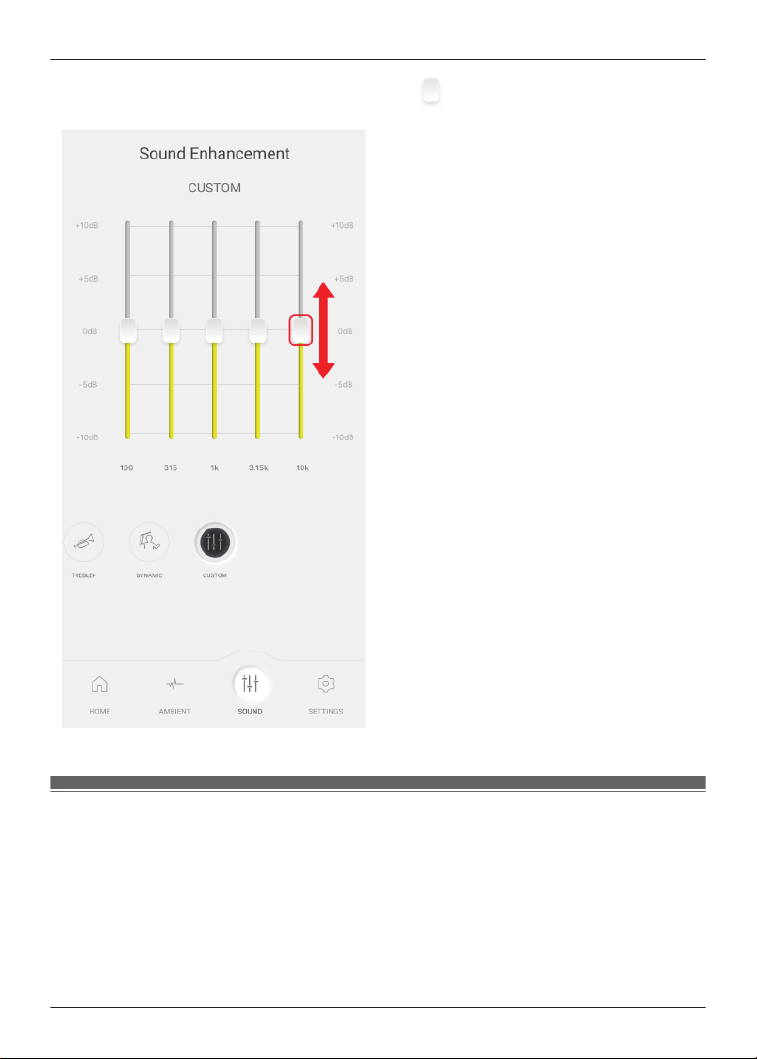
R In Custom, you can set 5 sound ranges. Move up or down to adjust the level.
Play a sound to find the headphones
You can find your lost headphones.
Important:
R When playing a sound to find your earphones, the sound will not play if the headphones are
off. Set the auto power off setting to [Always on] in advance.
“Set auto power off”, Page 38
1 In the home screen of the [Technics Audio Connect] app, tap [Find headphones].
Or tap [SETTINGS]®[Find headphones].
36
Convenient Function

2 Tap [Emit sound].
3 Follow the on-screen instructions.
Use location services to find the headphones
You can find your lost headphones.
Important:
R When searching with location services, turn on location services in the smartphone in advance
and allow the app to access the location information of the smartphone.
1 In the home screen of the [Technics Audio Connect] app, tap [Find headphones].
Or tap [SETTINGS]®[Find headphones].
2 Tap [Switch on].
R If [Switch on] is not displayed, go to step 4.
3 Follow the on-screen instructions.
4 Tap [Check position].
R The location information when the headphones and smartphone were last connected is
displayed.
Check JustMyVoice
You can check the voice transmitted to the other party when you use the earphones to talk.
1 In the home screen of the [Technics Audio Connect] app, tap [JustMyVoice test].
2 Tap [Next].
3 Confirm that JustMyVoice is [ON].
4 Tap [START] and talk.
R Your will hear the voice (your voice) transmitted to the other party with a delay of about 2
seconds.
5 When you are finished checking, tap [STOP].
Set the language, messages, and screen
1 In the home screen of the [Technics Audio Connect] app, tap [SETTINGS].
2 Tap [Voice prompt language], [Customize voice prompt], [Headphone name] or [Body
color].
R Voice prompt language: Select the language of the headphone voice prompt.
R Customize voice prompt: Select the voice prompt and notification volume, and external
sound control and device connection messages.
R Headphone name: Edit the name displayed on the home screen.
R Body color: Select the color of the earphones displayed on the home screen.
3 Follow the on-screen instructions.
37
Convenient Function

Add/change/find headphones
1 In the home screen of the [Technics Audio Connect] app, tap [SETTINGS].
2 Tap [Add headphones], [Use other headphones], or [Find headphones].
R Add headphones: Select a model to pair in the app and start pairing.
R Use other headphones: Select from other paired headphones.
R Find headphones: “Play a sound to find the headphones”, Page 36
3 Follow the on-screen instructions.
Set auto power off
1 In the home screen of the [Technics Audio Connect] app, tap [SETTINGS].
2 Tap [Auto power off].
3 Select the time it takes for the headphones to turn off after a period of silence.
Set the headphone fitting sensor
You can set how the earphones work when you wear or take off the earphones.
1 In the home screen of the [Technics Audio Connect] app, tap [SETTINGS].
2 Tap [Headphone fitting sensor].
3 Set based on your preferences.
Use LDAC
Important:
R To play music on a device that cannot install the [Technics Audio Connect] app, install the app
on another Bluetooth
®
device and turn on [LDAC for headphones].
R You may need to set the audio codec of the playback device. For details, please refer to the
manual of the playback device.
1 In the home screen of the [Technics Audio Connect] app, tap [SETTINGS].
2 Tap [Connection mode].
3 Select [Prioritize sound quality], and turn on [LDAC for headphones].
4 Follow the on-screen instructions.
Note:
R This unit complies with the “High Resolution Audio” standard of the Japan Audio Association.
R To enjoy wireless high-resolution quality (sound quality certified by the high-resolution wireless
logo), use a playback device with the high-resolution wireless logo and set the Bluetooth
®
sound quality setting to sound quality priority mode / LDAC 990 kbps.
38
Convenient Function

R In modes other than the above (connection priority mode, etc.), playback may not be possible
with high resolution quality.
Select a connection mode
1 In the home screen of the [Technics Audio Connect] app, tap [SETTINGS].
2 Tap [Connection mode].
3 Select a mode.
4 Follow the on-screen instructions.
Use multi-point
1 In the home screen of the [Technics Audio Connect] app, tap [SETTINGS].
2 Tap [Multi-point].
3 Select the number of devices.
4 Follow the on-screen instructions.
Suppress sound interruptions and delays
1 In the home screen of the [Technics Audio Connect] app, tap [SETTINGS].
2 Tap [Suppression of sound interruptions and delays].
3 Select a mode.
4 Follow the on-screen instructions.
Disable the touch sensors
You can disable the touch sensors on the earphones during music playback and calls.
1 In the home screen of the [Technics Audio Connect] app, tap [SETTINGS].
2 Tap [Customizing the touch sensor].
3 Turn off [Touch sensor operations].
4 Tap [OK].
Customize the touch sensors
You can change the functions assigned to the left and right touch sensors.
1 In the home screen of the [Technics Audio Connect] app, tap [SETTINGS].
39
Convenient Function
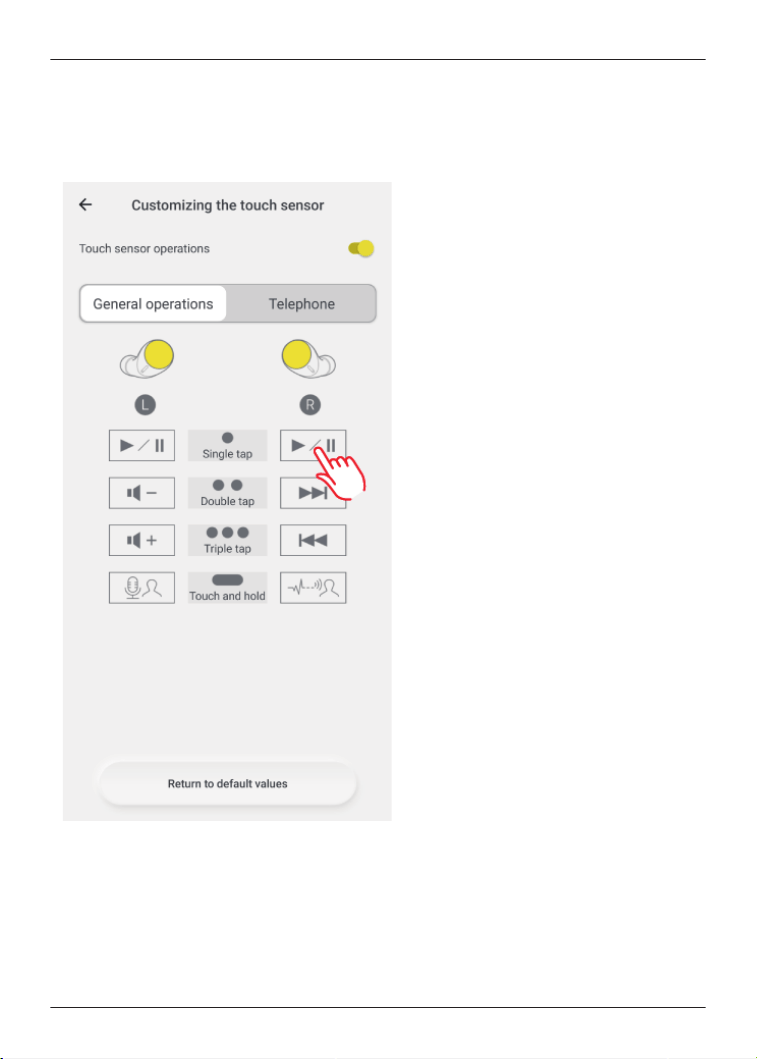
2 Tap [Customizing the touch sensor].
3 Tap [General operations] or [Telephone].
4 Tap the icon of the function you want to change.
Example) Changing the single tap function of the right earphone in [General operations]
40
Convenient Function
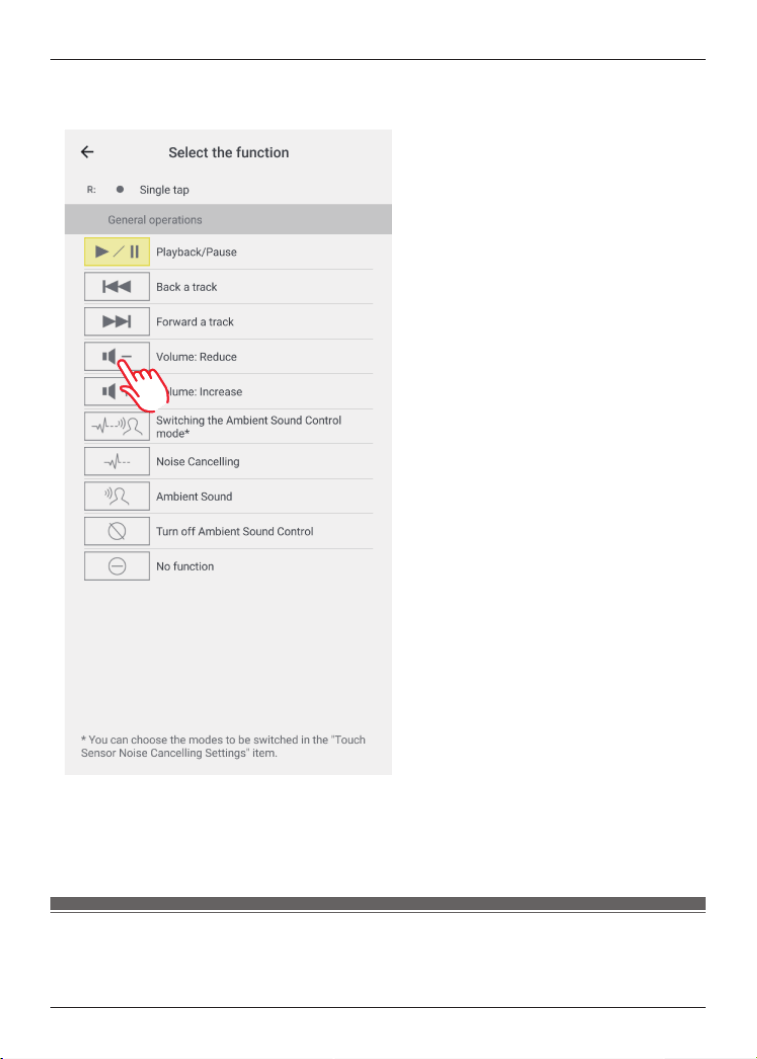
5 Select and tap a function.
Example) Changing to [Volume: Reduce]
6 Tap [Confirm].
Note:
R To reset to default settings, tap [Return to default values], and then tap [OK].
Customize external sound control switching
The mode switches every time you touch and hold the touch sensor (R) on the earphones. You
can select what modes to switch between.
41
Convenient Function

1 In the home screen of the [Technics Audio Connect] app, tap [SETTINGS].
2 Tap [Touch Sensor Noise Cancelling Settings].
3 Select 2 or more modes.
4 Tap [Set].
5 Tap [OK].
Select an ambient mode
Ambient sound allows you to select the mode when listening to sounds from your surroundings
without removing the earphones.
1 In the home screen of the [Technics Audio Connect] app, tap [SETTINGS].
2 Tap [Ambient mode settings].
3 Select a mode.
R Transparent: Transmits external sounds as-is. (Music does not pause.)
R Attention: Pauses music and emphasizes voices such as conversations and
announcements.
Optimize noise cancelling
1 In the home screen of the [Technics Audio Connect] app, tap [SETTINGS].
2 Tap [Optimizing noise cancellation (pre-adjustment)].
3 Move up or down to adjust the level.
R Adjust to a level that minimizes noise in noisy areas.
4 Tap [Confirm].
5 Tap [OK].
Select a level of background noise reduction
Set a level that reduces background noise from the other party during a call.
1 In the home screen of the [Technics Audio Connect] app, tap [SETTINGS].
2 Tap [Level of background noise reduction].
3 Select a level.
R Select “Normal” if the other party’s environment is relatively quiet, or “Strong” if the other
party’s environment is noisy (constant noise such as a ventilation fan).
42
Convenient Function

Select a voice assistant
1 In the home screen of the [Technics Audio Connect] app, tap [SETTINGS].
2 Tap [Select voice assistant].
3 Select a voice assistant.
4 Follow the on-screen instructions.
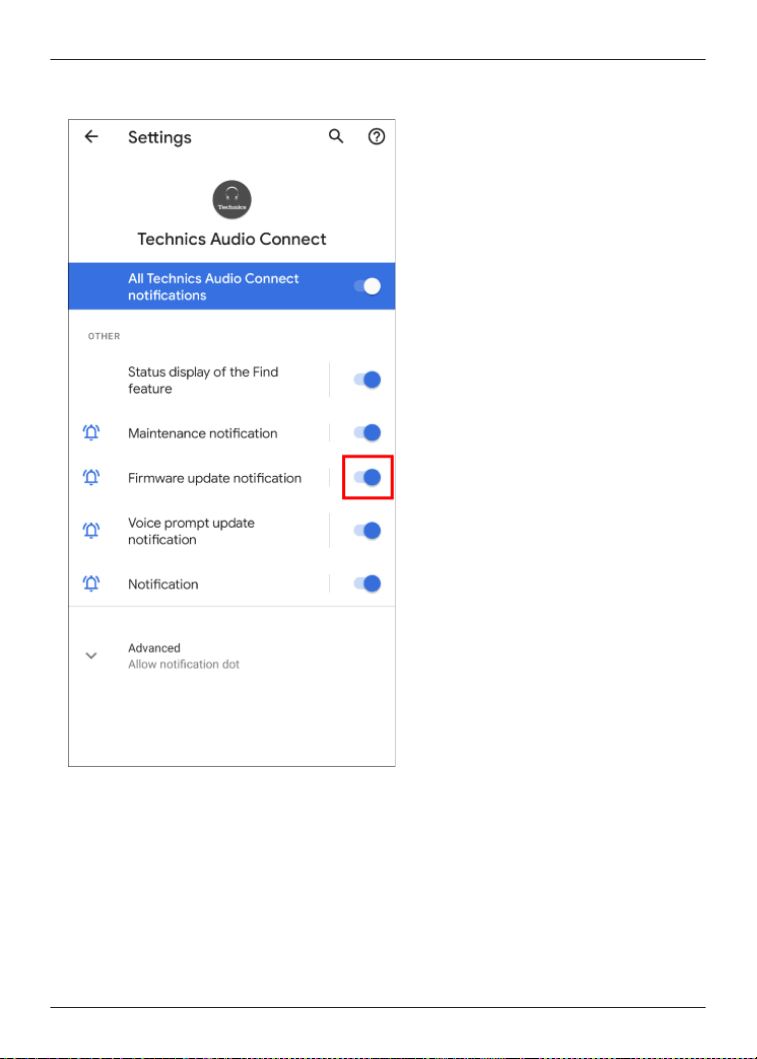
Set maintenance notifications
Regular maintenance is required to use this unit comfortably.
You will be informed about maintaining the earphones and earpieces regularly.
1 In the home screen of the [Technics Audio Connect] app, tap [SETTINGS].
2 Turn on [Maintenance notification].
R You can tap [Website with maintenance tips] to check the maintenance procedure.
Reset the app
1 In the home screen of the [Technics Audio Connect] app, tap [SETTINGS].
2 Tap [About the application].
3 Tap [Reset app].
4 Tap [Reset].
5 Follow the on-screen instructions.
Reset the headphones to factory settings
1 In the home screen of the [Technics Audio Connect] app, tap [SETTINGS].
2 Tap [Headphone information].
3 Tap [Restore headphones to the factory settings].
4 Tap [Reset].
5 Follow the on-screen instructions.
Firmware updates
If an update notification is displayed on your smartphone, follow the on-screen instructions to
update to the latest version.
43
Convenient Function

Important:
R While the firmware is updating, place the headphones and your smartphone close together
and wait without using them. The update may be interrupted or delayed if there is music
playing or a call during the update.
1 In the home screen of the [Technics Audio Connect] app, tap [SETTINGS].
2 Tap [Update headphones].
3 Follow the on-screen instructions.
R Wait until the update is complete and do not operate the headphones or the app.
4 In the home screen, tap [SETTINGS].
5 Tap [Headphone information] and confirm that “Firmware is up to date.” is displayed.
Help
You can check user guides and headphone information.
1 In the home screen of the [Technics Audio Connect] app, tap [SETTINGS].
2 Select and check an item in Help.
44
Convenient Function

Troubleshooting
Before requesting repair:
R Update the firmware.
R Resetting to factory settings may resolve the problem.
R Refer to “FAQ”.
{{"https://av.jpn.support.panasonic.com/support/technics/product-faq/AZ3/index.html"|
tolink("https://av.jpn.support.panasonic.com/support/technics/product-faq/AZ3/index.html")}}
If the FAQ or the following measures do not resolve the problem, or if the problem is not
described below, please contact your dealer.
Cannot connect to a Bluetooth
®
device.
R Up to 10 Bluetooth
®
devices can be paired with the earphones. If you pair a device when the
maximum number of paired Bluetooth
®
devices is exceeded, previously paired devices will be
overwritten. To use overwritten devices again, pair them again.
R Unpair this unit from the Bluetooth
®
menu in the Bluetooth
®
device, and pair again.
“Use the app to pair with a Bluetooth
®
device”, Page 23
“Pair with a Bluetooth
®
device without the app”, Page 24
There is no sound.
R Check if the earphones and the Bluetooth
®
device are connected.
R Check if music is playing on the Bluetooth
®
device.
R Check if the earphones are on and if the volume is not too low.
“The volume is low./The other party’s voice is low.”, Page 46
R Pair/connect the earphones and the Bluetooth
®
device again.
“Use the app to pair with a Bluetooth
®
device”, Page 23
“Pair with a Bluetooth
®
device without the app”, Page 24
R Check if the Bluetooth
®
device supports the “A2DP” profile. For details, please refer to the
manual of the Bluetooth
®
device.
“Listen to music”, Page 27
The sound cuts out./Lots of noise./Poor audio quality.
R
Are you covering the earphones or Bluetooth
®
device with your palm? The signals and audio
may be interrupted.
R Are you out of the Bluetooth
®
communication range (about 10 m)? Bring the earphones and
the Bluetooth
®
device closer together.
R Are there any obstacles between the earphones and the Bluetooth
®
device? Avoid obstacles.
R Turn off wireless LAN devices that you are not using.
R Using devices that interfere with radio waves, such as microwaves, may affect communication.
R Depending on the signal conditions, radio waves in the same 2.4 GHz band as Bluetooth
®
may interfere and cause sound skipping.
R When using LDAC and multi-point together, change the “LDAC playback sound quality setting”
and “connection setting” of the playback device from “prioritize sound quality” to “best effort” or
“prioritize connectivity” to lower the bit rate. You may not be able to change the settings on
some playback devices. For details, please refer to the manual of the playback device.
R Setting [Suppression of sound interruptions and delays] to [Suppress the interruption of
the sound] in the [Technics Audio Connect] app may resolve the problem.
My voice doesn’t go through during a call.
R Check if the Bluetooth
®
device supports the “HSP” or “HFP” profile. For details, please refer to
the manual of the Bluetooth
®
phone.
“Talk”, Page 27
45
FAQ

R Check that the audio settings of the Bluetooth
®
phone are set to communicate with this unit.
It’s difficult for the other party to hear my voice during a call.
R If JustMyVoice is on, the earphones detect your voice with a speech detection microphone so
that the other party can hear you. Your voice cannot be detected if the earpieces are not in
close contact with your ears. Replace with earpieces that fit well in your ears.
“For better sound (Change earpieces)”, Page 22
R At default settings, JustMyVoice is on. When talking in a quiet environment, turning off
JustMyVoice may resolve the problem. You can turn it off even if [We recommend enabling
the setting.] is displayed in the setting screen.
“Check JustMyVoice”, Page 37
R To make calls using an app on a computer connected through Wi-Fi
®
, we recommend setting
the Wi-Fi router to the 5 GHz band, which does not interfere with Bluetooth
®
radio waves.
The volume is low./The other party’s voice is low.
R Wear the earphones correctly.
“EAH-AZ80”, Page 21
“EAH-AZ60M2”, Page 22
R The volume of Bluetooth
®
devices such as smartphones and the volume of the earphones
may be controlled separately. Increase the volume of both the earphones and the Bluetooth
®
device.
“Use the touch sensors”, Page 29
R Is there earwax or dust in the earpieces? Foreign matter such as earwax or dust may clog the
protective mesh of the earphones and decrease the volume or change the acoustic
characteristics, resulting in malfunction. If the sponge inside the earpieces get dirty, remove
the earpieces from the earphones and clean them.
“Clean the earpieces”, Page 56
The left and right batteries deplete at different rates.
R The left and right may vary depending on signal and operating conditions.
R Using the microphone of an earphone for calls will quickly deplete the battery of that earphone.
R The remaining earphone charge values may differ between the left and right on the [Technics
Audio Connect] app.
Amazon Alexa doesn’t respond.
R Confirm that the voice assistant is set to Amazon Alexa.
R Confirm that your mobile device can transmit data.
R Confirm that the device is registered in the Amazon Alexa app.
Cannot charge.
R If the charging cradle status indicator LED turns off immediately when you try to charge, the
charging cradle is fully charged. If the earphone status indicator LED turns off when you put
the earphones in the charging cradle and open the lid, the earphones are fully charged.
R If the charging and operating time have gotten shorter, the internal batteries of the earphones
and charging cradle may be exhausted. (Each internal battery can be recharged about 500
times.)
R Immediately after purchase or when this has not been used for a while, the charging cradle
status indicator LED may not turn on for a few minutes after starting to charge, but will if you
continue charging. If it does not turn on even after a while, please request your dealer for
repair.
The charging cradle does not charge with the USB charging cord.
R Is there any foreign matter or dirt on either ends of the USB charging cord and on the contacts
of the connected devices?
→ Wipe off dirt because it may cause overheating or malfunction.
“Clean the charging cradle terminal section”, Page 59
46
FAQ

R Firmly connect one end of the USB charging cord to a computer or separately sold USB PD
supported AC adapter (USB Type-C connector), and the other end to the charging terminal of
the charging cradle.
R If you are using a computer USB port, confirm that the computer supplying power is on. It will
not charge if the computer is in standby or sleep mode. (If it still does not charge, try another
USB port on your computer.)
R If this unit does not charge even after trying the measures above, remove the USB charging
cord and insert it again.
The charging cradle does not charge wirelessly.
R Is the charging cradle placed properly on the wireless charger?
→ If it is not placed properly, charging may be slower or may stop. For information about the
charging position, please refer to the manual of the wireless charger.
R Charge at a room temperature between 10 °C to 35 °C. Higher room temperatures may result
in longer charging times. Depending on your wireless charger, charging may be slower or may
stop.
The earphones do not charge.
R Are the charging terminals of the earphones dirty?
→ Wipe off the dirt.
“Clean the charging terminals of the earphones”, Page 59
R Are the earphones properly inserted into the charging cradle?
“Charge the earphones and charging cradle at the same time”, Page 18
R If you are using third-party earpieces, you may not be able to charge them with the included
charging cradle. Use the included earpieces.
The earphones or charging cradle is warm while charging.
R Although the earphones or charging cradle may get warm while charging, it is not a
malfunction.
R If the charging cradle is not placed properly during wireless charging, the wireless charger,
earphones, and charging cradle may get hot. For correct placement, please refer to the
manual of the wireless charger.
The earphones don’t turn on. The earphones don’t work.
R Turn them off and then on again. (Put them in the charging cradle, wait about 15 seconds, and
then take them out.)
“Turn the earphones on/off”, Page 21
R Are the touch sensors disabled?
“Disable the touch sensors”, Page 39
“Customize the touch sensors”, Page 39
Music doesn’t pause and the touch sensors aren’t disabled even after I take off the
earphones.
R At default settings, the music pauses and the touch sensors are disabled when you take off
the earphones.
→ Check the headphone fitting sensor settings.
“Set the headphone fitting sensor”, Page 38
→ If the wear sensors are dirty, music may not pause or the touch sensors may respond to
unintended operation. Wipe off any dirt on the wear sensors with a dry, soft cloth.
R When putting the earphones down on a desk, etc., the earphones may be detected as being
worn or music may be played if the wear sensors are close to the desk. To prevent erroneous
operation, take care to keep the wear sensors away from the desk, etc. when putting the
earphones down.
The wear sensors don’t work.
R The wear sensors may not work if they are dirty or moist. Wipe off any dirt and moisture with a
dry, soft cloth.
47
FAQ

The charging cradle status indicator LED does not turn on (about 3 seconds) even after
the lid is opened.
R The battery has no charge. Charge with the included USB charging cord.
“Charge the earphones and charging cradle at the same time”, Page 18
The charging cradle status indicator LED is quickly flashing red.
R It could not charge properly. Remove the USB charging cord and insert it again. If the problem
persists, clean the charging terminals of the earphones and the charging cradle terminal
section.
“Clean the charging terminals of the earphones”, Page 59
“Clean the charging cradle terminal section”, Page 59
R If the charging terminals of the charging cradle become abnormally hot, immediately unplug
the USB charging cord and contact your dealer.
R The temperature of the charging cradle internal battery is abnormal. Stop charging and wait for
a while. We recommend charging at an ambient temperature between 10 °C to 35 °C.
The charging cradle status indicator LED and the earphone status indicator LED are
flashing red at the same time.
R The earphones are not properly inserted into the charging cradle. Put in the earphones again
properly.
R Is there dust, water droplets, or dirt on the terminals of the earphones or charging cradle?
Remove dust, water, and dirt.
“Clean the charging terminals of the earphones”, Page 59
“Clean the charging cradle terminal section”, Page 59
The pattern of the charging cradle status indicator LED changed while charging.
R The pattern differs depending on whether the charging cradle lid is open or closed. (This is not
a malfunction.)
FAQ for the smartphone app (Technics Audio
Connect)
Q01. What products can I use with Technics Audio Connect?
R EAH-AZ70W, EAH-AZ60, EAH-AZ40, EAH-A800, EAH-AZ80, EAH-AZ60M2 (as of February
2023)
R This manual describes instructions for EAH-AZ80 and EAH-AZ60M2.
Q02. What devices can run Technics Audio Connect?
Android™ devices
R Operating system Android 6.0 or later. However, operation of the app on all Android™ devices
running these operating systems is not guaranteed.
iPhone/iPad/iPod touch
R Operating system iOS 12 or later. However, the app may not operate correctly depending on
the OS version.
Q03. What languages are supported?
R The app supports the display of Japanese, English, French, German, Spanish, Canadian
French, Italian, Polish, Russian, Ukrainian, Simplified Chinese, and Traditional Chinese. The
language switches automatically to match the language of the smartphone. The display is set
to English if the language is not Japanese, English, French, German, Spanish, Canadian
French, Italian, Polish, Russian, Ukrainian, Simplified Chinese, or Traditional Chinese.
48
FAQ

Q04. How do I unpair the headphones?
R You cannot unpair from this app.
To unpair, remove the headphones from the Bluetooth
®
settings on the device.
Q05. Cannot connect to the headphones.
R When pairing new headphones or when the headphones are not paired, on the home screen
of the [Technics Audio Connect] app, tap [SETTINGS]®[Add headphones] and follow the
on-screen instructions. When the headphones are not connected, tap [Add headphones] in
the headphone list and follow the on-screen instructions.
R If you cannot connect to paired headphones, turn on the headphones and connect from the
Bluetooth
®
settings of your device.
R If your device is in airplane mode, turn off the mode.
R If the device’s Bluetooth
®
is off, turn it on.
R You may be able to connect by bringing the device and headphones closer together or by
turning off other Bluetooth
®
devices.
R If you cannot connect even after doing the above, follow the steps below to pair the
headphones and device again.
Android™ devices
1 Close all apps running in the background.
2 Delete the headphone registration information from the device’s Bluetooth
®
settings.
3 Turn off the device’s Bluetooth
®
, and then on again.
4 Reset the headphones to factory settings.
“Reset to factory settings”, Page 55
5 Launch the Technics Audio Connect app and follow the on-screen instructions to pair the
headphones again.
R Depending on your device, you may not be able to connect on the Technics Audio
Connect app. In that case, try pairing from the connection notification displayed at the
top of the device screen or from the device’s Bluetooth
®
settings. After pairing, press
the home key and tap the Technics Audio Connect app.
R Depending on the device, the following pairing setting screen may be displayed. Follow
the pairing setting screen to pair.
49
FAQ
Display example)
iPhone/iPad/iPod touch
1 Close all apps running in the background.
2 In the device’s Bluetooth
®
settings, delete “(model number)” and “LE-(model number)”
registered in “MY DEVICE” (tap the “i” icon and then tap “Forget This Device”).
3 Turn off the device’s Bluetooth
®
, and then on again.
4 Reset the headphones to factory settings.
“Reset to factory settings”, Page 55
5 Put both earphones (L and R) into the charging cradle and charge.
6 Take out both earphones (L and R) from the charging cradle and wear them.
R After the startup sound plays, a melody repeats.
50
FAQ

7 Tap “(model number)” detected in the device’s Bluetooth
®
settings.
8 When “(model number)” is connected, launch the Technics Audio Connect app and
operate the headphones and device while following the on-screen instructions.
R In iOS 13 or later, a Bluetooth
®
confirmation screen is displayed when you launch the
app for the first time. If you selected [Don’t Allow], follow the steps below to turn on
Bluetooth
®
.
1 On the device, go to Settings>Privacy & Security (or Privacy)>Bluetooth>turn on
[Audio Connect].
2 Launch the app.
Q06. Cannot update the firmware.
R Connect the device to the Internet.
R Check if the firmware version is the latest from [SETTINGS] on the home screen of the
[Technics Audio Connect] app®[Headphone information].
R If the transfer of the firmware to the headphones does not start, or if the number stops and
does not progress during transfer, try the following methods.
[Method 1]
1 Confirm that the remaining charge for both earphones (L and R) is at least 70%.
2 Keep the headphones out of the charging cradle from the start to the end of the transfer/
update.
R After starting the transfer/update, do not make calls or play music until the end of the
update.
[Method 2] *If Method 1 does not resolve the problem
1 Force close the app.
2 Launch the app again.
R If the firmware update notification is not displayed, allow notifications.
Android™ devices
51
FAQ
R On the device, go to “Settings”>“Apps & notifications”>“App info”>[Technics Audio
Connect]>“Notifications”>turn on “Firmware update notification”.
iPhone/iPad/iPod touch
52
FAQ
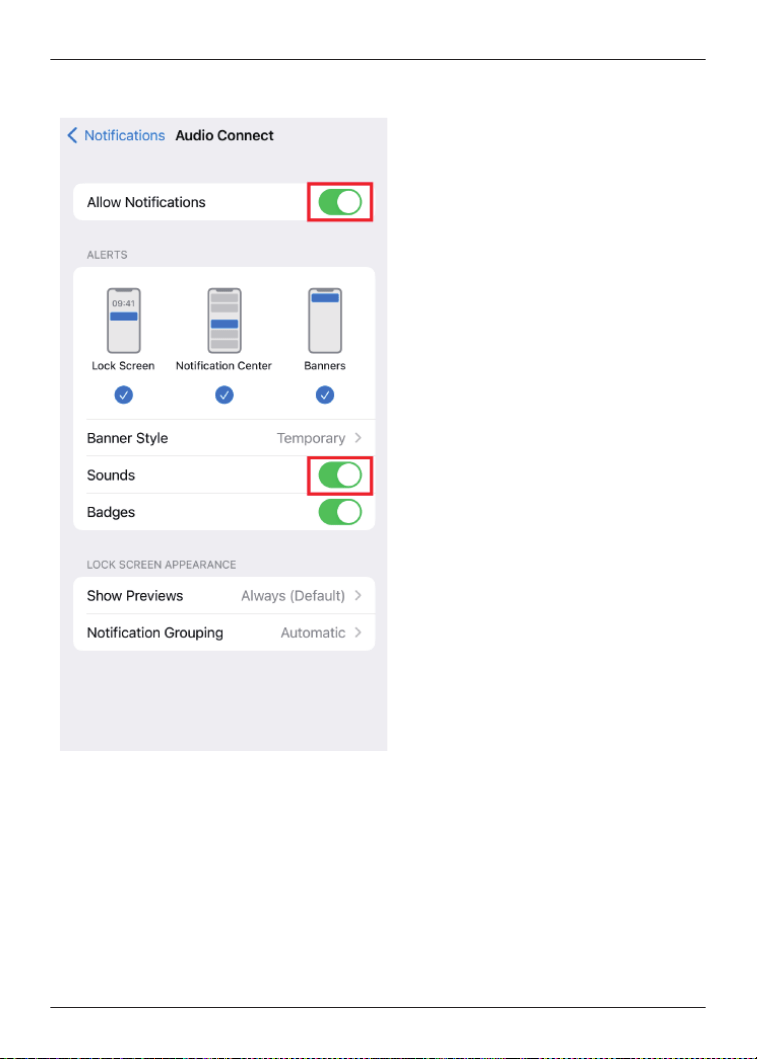
R On the device, go to “Settings”>“Notifications”>[Audio Connect]>turn on “Allow
Notifications”. To disable update notification sounds, turn off “Sounds”.
R If the firmware update fails, the transfer may start when the firmware is detected again.
R After restarting your device and launching the app, the app will check for the latest
firmware. If a later firmware is detected, it will be prepared in the background. When it is
ready, you will be notified by an update notification. (iOS only)
Q07. A specific codec is not displayed in the connected codec display.
R Some codecs may not be displayed because the codec used is selected from those supported
by your device.
For information about codecs supported by your device, please confirm with the device
manufacturer or carrier.
53
FAQ

Q08. I cannot change the settings on the app when multiple headphones are connected.
R If multiple headphones are connected to the device, you cannot change the settings for
headphones other than those recognized by this app. Use after confirming that only one pair
of headphones is connected on the device’s Bluetooth
®
settings.
Q09. Cannot turn on location services (Android™ devices only)
R Location services may not turn on if battery saving mode is on in the Android location settings.
Set Android’s location settings to a mode other than battery saving.
(The specifications of the location service mode depend on the Android™ device. Please refer
to the manual of your device.)
Q10. I want to delete the headphones connected to the app from the list.
Android™ devices
R Delete the headphone pairing information from the device’s Bluetooth
®
settings.
iPhone/iPad/iPod touch
R Tap [Delete headphones from the list] in the headphone list on the [Technics Audio
Connect] app and follow the on-screen instructions.
Q11. Can I operate messaging apps that use the Internet?
R You can answer incoming calls, but you cannot operate messaging apps that use the Internet.
(Some smartphones do not support functions for answering incoming calls.)
Q12. Can I turn on the headphones without the charging cradle?
R To turn on the headphones, wear both earphones (L and R) on each ear, and touch and hold
the touch sensor for at least 2 seconds until you hear the startup sound.
Q13. I reset the headphones to factory settings, but “Headphone name” displayed in the
app and the language settings for voice prompt and Amazon Alexa have not changed.
R Those are not reset even if you reset the headphones to factory settings because the app
manages “Headphone name”. Language settings for voice prompt and Amazon Alexa are
saved as downloaded data in the earphones. Downloaded data is not reset even if the
headphones are reset to factory settings.
Q14. When can I adjust the headphone volume?
R You can adjust the volume during music playback and calls. You may not be able to adjust the
volume depending on the Bluetooth
®
device. Be aware that if you touch and adjust the volume
during a call, the microphone on the headphones may pick up the sound of your touch and
transmit it as noise to the other party.
Q15. The [Turn Bluetooth on] button doesn’t disappear. (iOS only)
R Turn on the “Bluetooth” setting in the smartphone’s “Settings” screen.
Apart from the setting above, you may be able to temporarily turn Bluetooth on and off in the
Control Center.
Confirm that the “Bluetooth” setting in the “Settings” screen and “Bluetooth” in the Control
Center are on.
In iOS 13 or later, also turn on “Settings”>[Audio Connect]>“Bluetooth” on the device.
Q16. The settings change sometimes.
R When putting the earphones down on a desk, etc., the touch sensors may register a touch
depending on the desk material. To prevent erroneous operation, take care to keep the touch
sensors away from the desk, etc. when putting the earphones down.
Q17. Can I use only one side (L or R)?
R If pairing with the smartphone is complete, you can use just the side (L or R) that you take out
of the charging cradle.
54
FAQ

Reset to factory settings
You can reset to the factory settings (default settings upon purchase) when you want to delete all
pairing information in the earphones.
1 Put both earphones (L and R) into the charging cradle and charge for about 15 minutes.
2 Take out earphone (R) from the charging cradle and wear it.
3 When you hear the startup sound of earphone (R), touch and hold touch sensor (R). (Do not
release your finger even when you hear the message.)
4 When you hear the pairing sound (melody) from earphone (R), release your finger from
touch sensor (R).
R To listen to the pairing sound, click {{"Here"|tolink("https://eww.pavc.panasonic.co.jp/
avcacc/technics/sound-data/Pair_const.wav")}}.
R If you do not hear the pairing sound even after touching for about 10 seconds, start over
from step 1.
5 Touch and hold touch sensor (R) again until you hear the completion message.
R Resetting earphone (R) is complete when you hear the completion message.
6 Put earphone (R) back into the charging cradle.
7 Repeat steps 2 to 6 above for earphone (L).
Note:
R To pair a Bluetooth
®
device with the earphones again, delete the pairing information (device
name) on the Bluetooth
®
device that was paired with the earphones, and then pair the
earphones with the Bluetooth
®
device again.
“Use the app to pair with a Bluetooth
®
device”, Page 23
“Pair with a Bluetooth
®
device without the app”, Page 24
R Some settings such as the language settings for voice prompt and Amazon Alexa are not
reset.
R You can use the [Technics Audio Connect] app to reset to the factory settings (default settings
upon purchase).
“Reset the headphones to factory settings”, Page 43
Maintenance
Maintenance
R Wipe with a soft, dry cloth.
R Remove the earpieces from the earphones and remove any earwax or dust. (Do not touch the
protective mesh because it affects the audio characteristics.)
55
FAQ

The illustrations use EAH-AZ60M2 as an example.
2
1
1. Earpiece
2. Protective mesh
R If it is very dirty, firmly wring a cloth soaked in water, wipe off the dirt, and then wipe with a dry
cloth.
R Do not use solvents such as benzine, thinner, alcohol, kitchen detergent, or chemical wipes
because they may alter or damage the exterior.
R Use a dry cotton swab with a pointed tip (such as for make-up) to wipe off dust on the
charging terminals of the earphones. Do not use sharp, hard objects.
“Clean the charging terminals of the earphones”, Page 59
R Clean the contact pins of the charging cradle with a cotton swab or soft dry cloth.
“Clean the charging cradle terminal section”, Page 59
R Maintaining battery performance
If you will not use the unit for long periods, fully charge it once every 6 months to maintain the
performance of the internal battery.
R The earpieces will wear out after long-term use. To replace the earpieces, please contact your
dealer or repair service.
Keep the earphones clean.
R After use, confirm that there is no earwax or dust on the earpieces. If there is, remove the
earpieces from the earphones and clean them.
“Clean the earpieces”, Page 56
R Store the earphones in the charging cradle to protect them from dust.
R If hair styling products or cosmetics get on the earphones, quickly wipe them off with a soft,
dry cloth. (Do not touch the protective mesh because it affects the audio characteristics.)
Keep the holes clean.
R Foreign matter such as earwax or dust in the holes of the earpieces may decrease the volume
or change the acoustic characteristics, and result in malfunction.
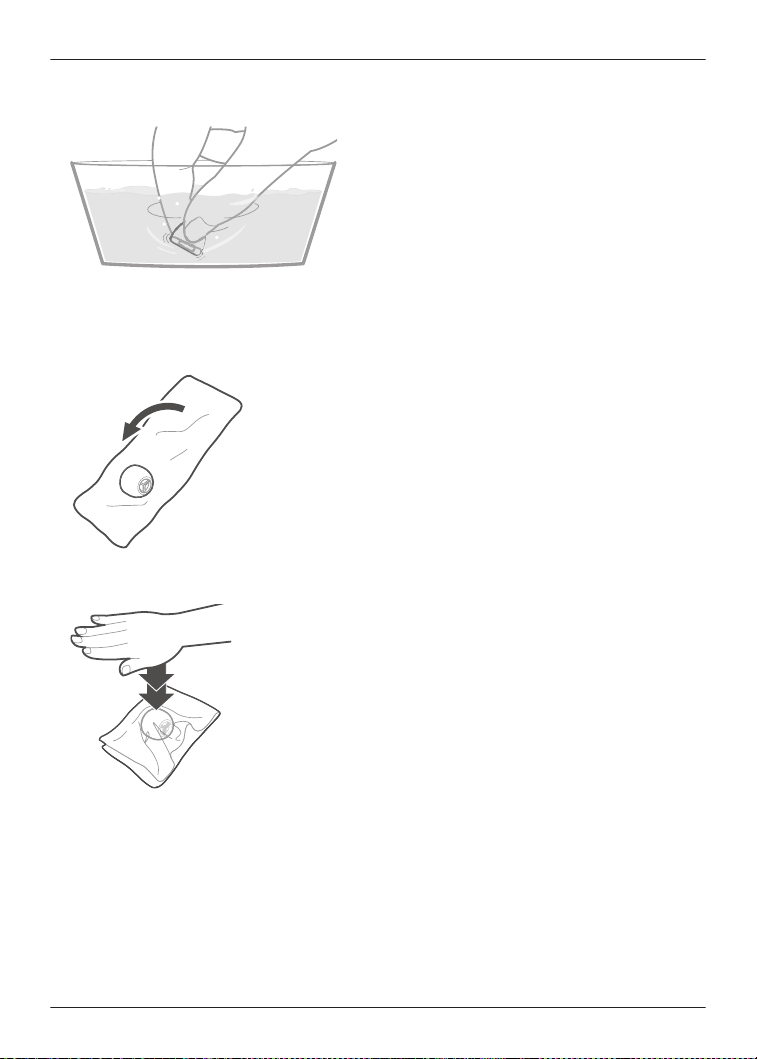
Clean the earpieces
Regular maintenance is required for comfortable use.
Foreign matter such as earwax or dust in the holes of the earpieces may decrease the volume or
change the acoustic characteristics, and result in malfunction.
The illustrations use EAH-AZ60M2 as an example.
56
FAQ
1 Remove the earpiece.
R Hold the earpiece and pull out while twisting slightly.
R If you clean the earphones with the earpieces attached, you may damage the protective
mesh on the earphones.
2 Wash the earpieces with your fingertips.
(Using a diluted neutral detergent or warm water is effective.)
・・・
B A
A B
・・・
R Do not remove the sponge from the earpieces.
57
FAQ
3 Rinse thoroughly with clean water after washing.
4 Wrap the earpieces with a soft, dry cloth and press firmly about 3 to 5 times to remove the
moisture.
R After washing the earpieces, remove the moisture and dry them thoroughly.
58
FAQ
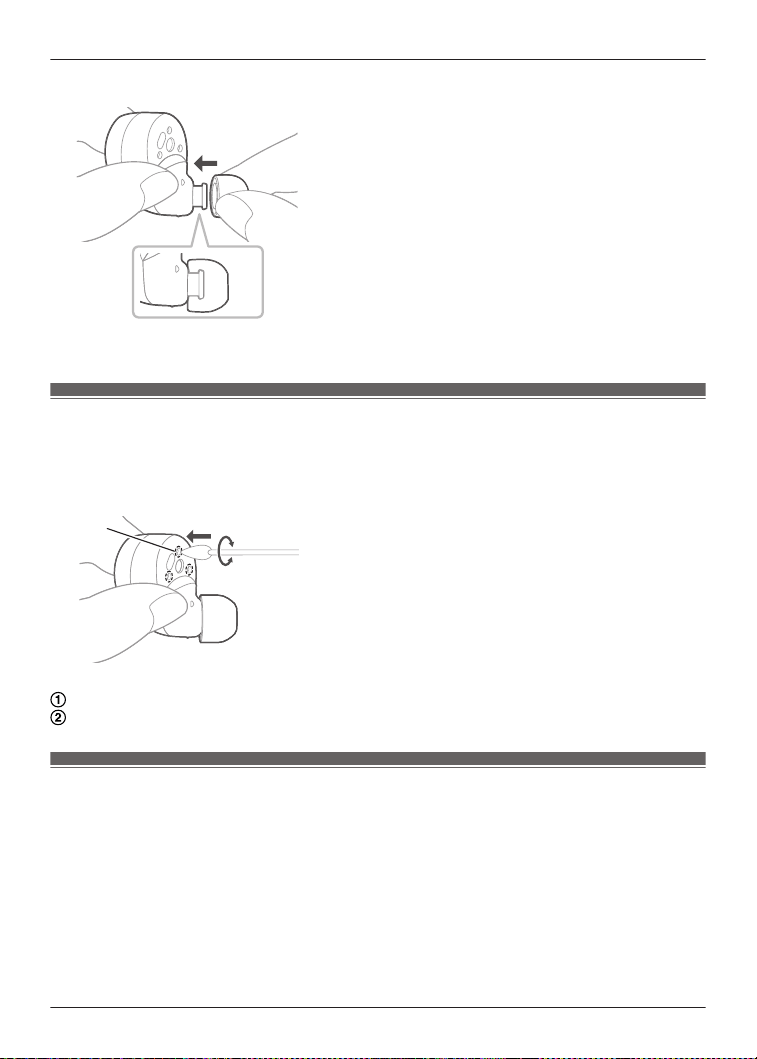
5 Attach the earpiece.
R Make sure that the earpiece is firmly attached and not slanted.
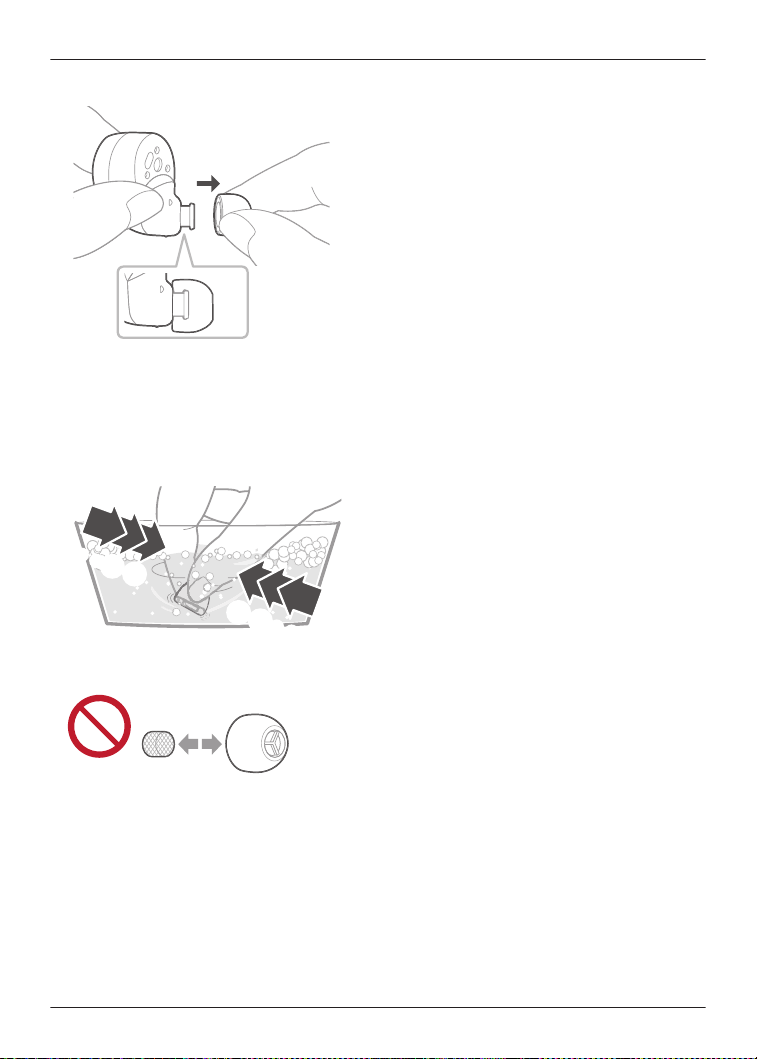
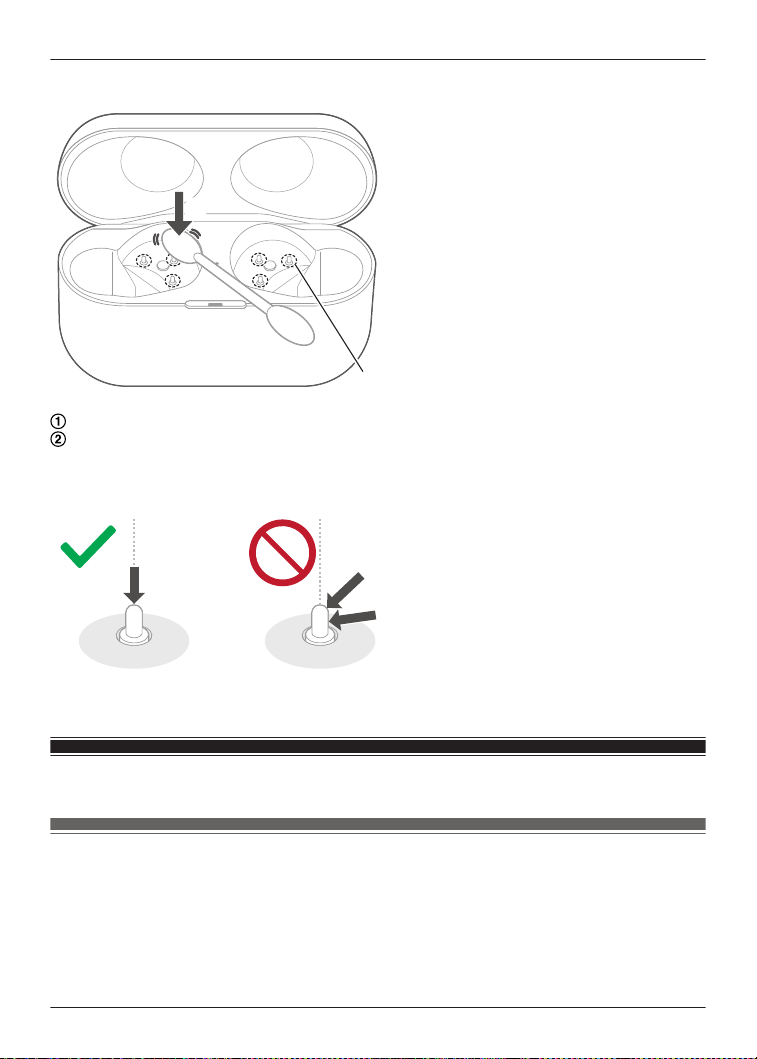
Clean the charging terminals of the earphones
Use a cotton swab with a pointed tip (such as for make-up) to wipe off dirt from the charging
terminals of the earphones.
The illustrations use EAH-AZ60M2 as an example.
A
A
B
Put the tip of the cotton swab on the charging terminal (A).
Rotate the cotton swab to wipe off dirt.
Clean the charging cradle terminal section
Clean the contact pins of the charging cradle with a cotton swab or soft dry cloth.
59
FAQ
The illustrations use EAH-AZ60M2 as an example.
AA
BB
B
Put the cotton swab on the tip of the contact pin (B) from above.
Stroke the tip of the contact pin with a cotton swab to wipe off dirt.
Note:
R Do not apply force to the contact pin from the side or at an angle. (It may result in malfunction.)
Specifications
EAH-AZ80/EAH-AZ60M2
n General
Power supply (Charging cradle)
DC 5 V, 500 mA (USB charge)
Built-in Battery
Earphones: 3.7 V, Lithium polymer
Charging cradle: 3.7 V, Lithium polymer
60
FAQ

Built-in Battery Capacity
EAH-AZ80:
Earphones: 85 mAh
Charging cradle: 700 mAh
EAH-AZ60M2:
Earphones: 85 mAh
Charging cradle: 650 mAh
Operating time (Earphones)
*1
Approx. 7.0 hours (Noise cancelling: ON, AAC)
Approx. 7.5 hours (Noise cancelling: OFF, AAC)
Approx. 6.5 hours (Noise cancelling: ON, SBC)
Approx. 7.0 hours (Noise cancelling: OFF, SBC)
Approx. 4.5 hours (Noise cancelling: ON, LDAC)
Approx. 5.0 hours (Noise cancelling: OFF, LDAC)
Operating time (Earphones + Charging cradle)
*1
Approx. 24 hours (Noise cancelling: ON, AAC)
Approx. 25 hours (Noise cancelling: OFF, AAC)
Approx. 23 hours (Noise cancelling: ON, SBC)
Approx. 24 hours (Noise cancelling: OFF, SBC)
Approx. 16 hours (Noise cancelling: ON, LDAC)
Approx. 17 hours (Noise cancelling: OFF, LDAC)
Call time (Earphones)
*1
Approx. 4.5 hours (JMV
*2
: ON)
Approx. 5.5 hours (JMV
*2
: OFF)
Waiting time (Earphones)
*1
Approx. 9 hours (Noise cancelling: ON)
Approx. 15 hours (Noise cancelling: OFF, Auto power off does not work)
Quick charge Operating time (Earphones)
*1
15 min. charge, Approx. 70 min. (Noise cancelling: ON, AAC)
Charging time
*3
(25 °C (77 °F))
Earphones: Approx. 2.0 hours
Charging cradle: Approx. 2.5 hours
*4
Earphones with Charging cradle: Approx. 3.0 hours
*4
Charging temperature range
10 °C to 35 °C (50 °F to 95 °F)
Operating temperature range
0 °C to 40 °C (32 °F to 104 °F)
Operating humidity range
35 %RH to 80 %RH (no condensation)
Mass (Weight)
EAH-AZ80:
Earphone: Approx. 7 g (0.25 oz) (one side only: L and R are the same)
Charging cradle: Approx. 50 g (1.8 oz)
EAH-AZ60M2:
Earphone: Approx. 7 g (0.25 oz) (one side only: L and R are the same)
Charging cradle: Approx. 45 g (1.6 oz)
n Bluetooth
®
section
Bluetooth
®
system specification
Ver. 5.3
61
FAQ

Wireless equipment classification
Class 1
Max RF Power
9 dBm
Max RF Power (e.i.r.p)
6 dBm
Frequency band
2402 MHz to 2480 MHz
Supported profiles
A2DP, AVRCP, HSP, HFP
Supported codec
SBC, AAC, LDAC
n Earphones section
Driver units
EAH-AZ80: 10 mm (3/8 in)
EAH-AZ60M2: 8 mm (5/16 in)
Microphone
Monaural, MEMS Mic
n Charging cradle section
Charging terminal
USB Type-C Shape
n Accessory section
USB Charging Cord
(Input Plug: USB Type-C Shape, Output Plug: USB Type-C Shape)
Approx. 0.2 m (0.66 ft)
Earpieces set
XS1, XS2, S1, S2, M, L, XL each 2 pcs.,
(Size M attached)
R Only for U.S.A.: To order accessories, refer to “Limited Warranty”.
n Water resistant
Water resistant
IPX4 equivalent (earphones only)
*1 It may be shorter depending on the operating conditions.
*2 JustMyVoice™
*3 The time required to charge the batteries from empty to full.
*4 When charging via USB
R Specifications are subject to change without notice.
62
FAQ

About Bluetooth
®
Panasonic bears no responsibility for data and/or information that is compromised during
a wireless transmission.
Frequency band used
This unit uses the 2.4 GHz frequency band.
Certification of this unit
R This unit conforms to frequency restrictions and has received certification based on frequency
laws. Thus, a wireless permit is not necessary.
R The actions below are punishable by law in some countries:
– Taking apart/modifying this unit.
– Removing specification indications.
Restrictions of use
R Wireless transmission and/or usage with all Bluetooth
®
equipped devices is not guaranteed.
R All devices must conform to standards set by Bluetooth SIG, Inc.
R Depending on the specifications and settings of a device, it can fail to connect or some
operations can be different.
R This unit supports Bluetooth
®
security features. But depending on the operating environment
and/or settings, this security may not be sufficient. Transmit data wirelessly to this unit with
caution.
R This unit cannot transmit data to a Bluetooth
®
device.
Range of use
Use this unit at a maximum range of 10 m (33 ft).
The range can decrease depending on the environment, obstacles or interference.
Interference from other devices
R This unit may not function properly and troubles such as noise and sound jumps may arise
due to radio wave interference if this unit is located too close to other Bluetooth
®
devices or
the devices that use the 2.4 GHz band.
R This unit may not function properly if radio waves from a nearby broadcasting station, etc. is
too strong.
Intended usage
R This unit is for normal, general use only.
R Do not use this system near an equipment or in an environment that is sensitive to radio
frequency interference (example: airports, hospitals, laboratories, etc).
About water resistance
Specifications for this unit are equivalent of IPX4 of IEC 60529, the protection level of electronic
device enclosures that protects from splashes, and is not designed to be totally waterproof.
About IPX4 (liquid ingress protection level against splashing water)
This unit is compatible to operate after splashing from nozzles approximately 0.84 L/min (0.2 gal/
min) of room temperature tap water from every direction approximately 20 cm (8 in) from this unit
for 10 minutes.
The charging cradle and the USB charging cord (supplied) are not water resistant.
Water resistance is not guaranteed under all conditions.
63
Other Information

Cautions for use in places where the unit may get wet (from spray, rain, etc.)
Observe the following precautions. Incorrect operation cause malfunction.
R Do not charge the charging cradle or the earphones while your hands are wet or while there
are still water droplets on this unit (earphones or charging cradle).
R Do not use the USB charging cord.
R Do not apply soapy water or detergent or immerse in water.
R If water drops get onto the unit in cold climates, wipe off with a soft, dry cloth.
R If water gets onto the earphones or microphone, wipe off with a soft, dry cloth.
– Sound may get smaller or get distorted.
– If there are water drops left in the earpieces, you may hear the sound at reduced volume or
you may not be able to hear anything at all. If this is the case, remove the earpieces and
get rid of the water drops.
If water does get into the earphones or the charging cradle, cease use and consult your
dealer.
Malfunction due to improper handling by you will not be covered by the warranty.
Disposal of Old Equipment and Batteries
(Only for European Union and countries with
recycling systems)
These symbols on the products, packaging, and/or accompanying documents mean that used
electrical and electronic products and batteries must not be mixed with general household waste.
For proper treatment, recovery and recycling of old products and used batteries, please take
them to applicable collection points in accordance with your national legislation.
By disposing of them correctly, you will help to save valuable resources and prevent any potential
negative effects on human health and the environment.
For more information about collection and recycling, please contact your local authority.
Penalties may be applicable for incorrect disposal of this waste, in accordance with national
legislation.
Note for the battery symbol (bottom symbol):
This symbol might be used in combination with a chemical symbol. In this case it complies with
the requirement set by the Directive for the chemical involved.
64
Other Information

Recommended operating environment
The following is the recommended operating environment to correctly display this document. (As
of February 2023)
When displaying on a computer
– Latest stable build of various modern browsers
When displaying on a smartphone
– iOS 12.0 or later
– Android 6.0 or later
Terms used in this document
R In this document, smartphones and tablets are collectively referred to as “smartphones”.
Trademarks
R iPad, iPhone, iPod touch and Siri are trademarks of Apple Inc. registered in the U.S. and other
countries.
App Store is a service mark of Apple Inc.
R Google, Android, Google Play and the Google Play logo are trademarks of Google LLC.
R The Bluetooth
®
word mark and logos are registered trademarks owned by Bluetooth SIG, Inc.
Any use of these marks and logos by Panasonic Entertainment & Communication Co., Ltd. is
under license. Other trademarks and registered trademarks are those of their respective
owners.
R Amazon, Alexa and all related logos are trademarks of Amazon.com, Inc. or its affiliates.
R LDAC and LDAC logo are trademarks of Sony Corporation.
R Wi-Fi is a registered trademark or trademark of the Wi-Fi Alliance.
R Company names, logos, product names, and software names appearing in this document are
trademarks or registered trademarks of their respective companies.
Other
R Screenshots and icons in this document are for reference only. The actual display may differ
depending on the model and OS you are using. It also depends on the devices connected to
the system and the current state of the system.
R The illustrations in this document are for visual reference. They may differ from actual
situations.
R The illustrations of the earphones and charging cradle in this document are those of
EAH-AZ60M2.
R Design and specifications are subject to change without notice.
65
About this document

66
Notes

67
Notes

PNQP1774ZA C0223KM0