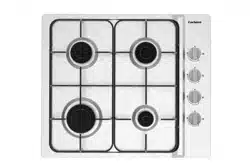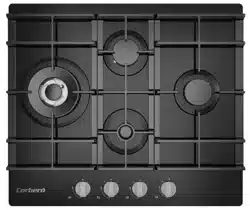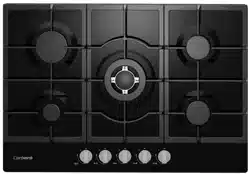

GAS HOB 5 BURNERS BLACK GLASS
CPCGM5F5021N
USER MANUAL
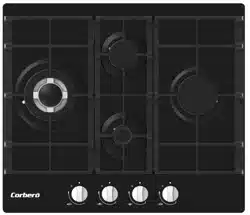
GAS HOB 3 BURNERS BLACK GLASS
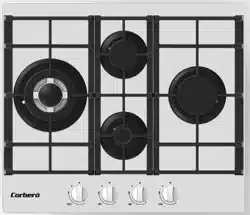
GAS HOB 3 BURNERS WHITE GLASS
CPCGM3F3 21N
CPCGM3F3122W
GAS HOB 4 BURNERS BLACK GLASS
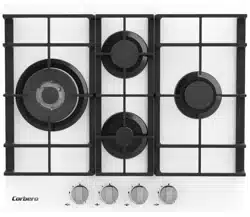
GAS HOB 4 BURNERS WHITE GLASS
CPCGM4F4121N
CPCGM4F4122W
1

Preface
Thank you for choosing our gas cooktop.
To use this appliance correctly and prevent any potential risk, read these instructions
before using the appliance.
Keep these instructions in a place where you can find them easily.
If you are unsure of any of the information contained in these instructions, please contact
our customer care centre.
The manufacturer shall not be responsible for any damages to persons or property caused
by incorrect installation or use of the appliance.
The appliance has been certified for use in countries other than those marked on the
appliance.
The manufacturer also reserves the right to make any modifications to the products as may
be considered necessary or useful, also in the interests of the user, without jeopardising
the main functional and safety features of the products themselves.
The appliance is designed for a domestic environment and not a commercial one.
1

contents
Preface
Instructions for use and maintenance
Safety Warning
Safety Instructions
Installation
Child and People Safety
During Use
Cleaning and Service
8
Environmental Information
Description of the appliance
How to Use the appliance
Safety and Energy saving advice
Cleaning and Maintenance
Technical instructions
6
16
17
18
19
15
13
12
21
2
5
4
3
8
9
10
20
22
Using instructions
Positioning
Installing the appliance
Gas Connection
Gas Specifition
Electrical Connection
Gas adjustment
Trouble shooting
Safety Instructions
Danger/Warning
Caution
Neglect of this mark may result in minor personal injury
or property damage.
Caution No Access
No Fire Tool
Must Do
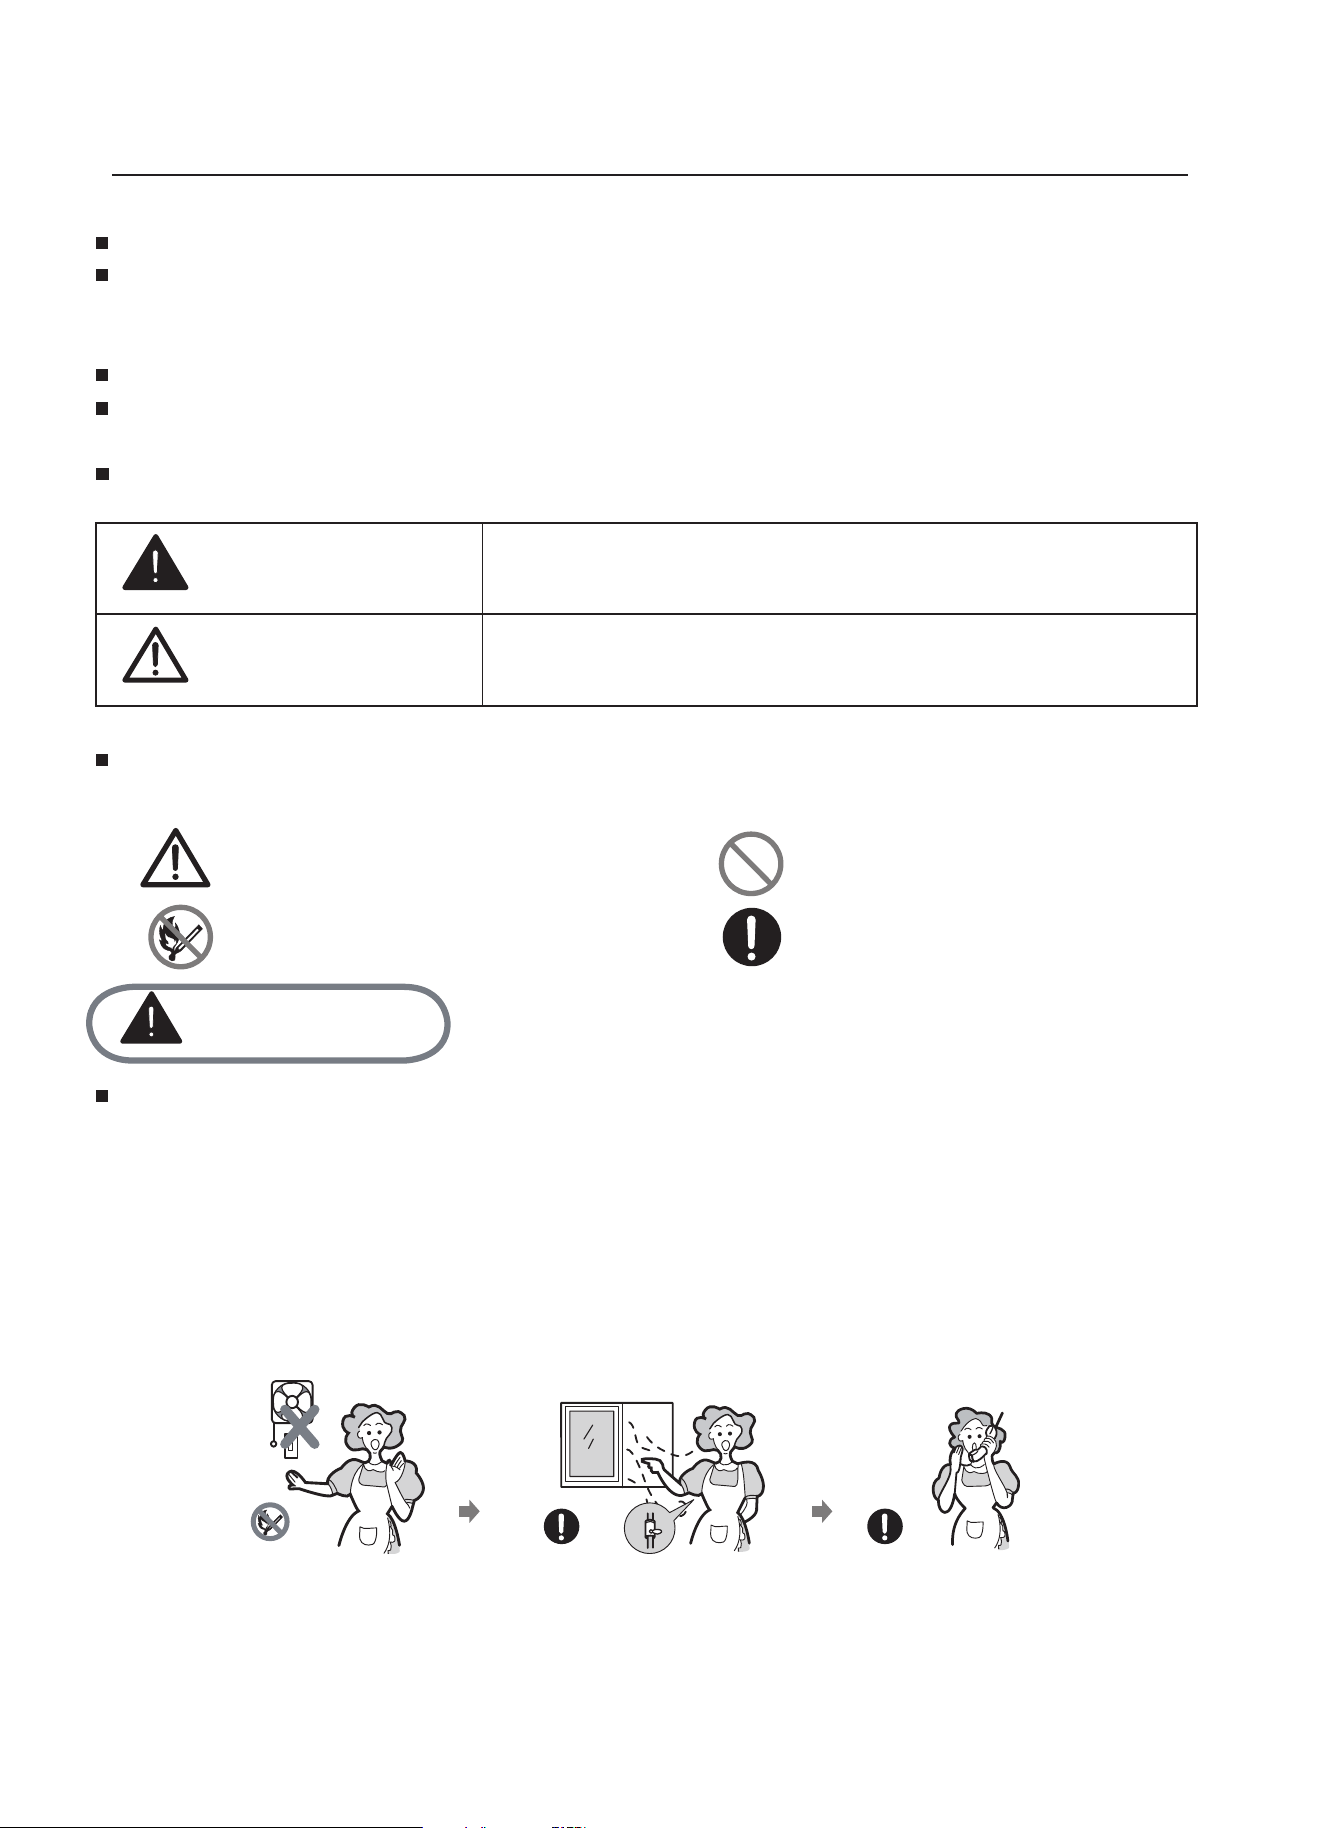
Dange r
- Do not turn on the light.
- Do not switch on/off any electrical appliance and do not touch any electric plug.
- Do not use a telephone.
1 Stop using the product and close the middle valve.
2 Open the window to ventilate.
3 Contact our service centre by using a phone outside.
cilrag nettor fo llems( kael sag eht llems nac uoy taht os ,natpacrem sniatnoc sag leuf ehT *
or egg) even where only 1/1000 of the gas is in the air.
The following marks are used
in the Instruction Manual
as follows:
3
If gas seems to leak,take the actions as follow:
Neglect of this mark may result in severe personal injury
or death.
Please take the time to read this Instruction Manual before installing or
using the
appliance.
7KLVLQVWUXFWLRQERRNOHWPXVWEHNHSWZLWKWKHDSSOLDQFHIRUDQ\IXWXUHUHIHUHQFH.
If the appliance is sold or transferred to another person,ensure the booklet is passed on to
the new user.
7KHPDQXIDFWXUHUGHFOLQHVDQ\OLDELOLW\VKRXOGWKHVHVDIHW\PHDVXUHVQRWEHREVHUYHG
TKHIROORZLQJPDUNVDUHPDGHWREHHDVLO\XQGHUVWRRGVRWKDW\RXFDQSUHYHQWDQ\
accident caused by misuse in advance, and use the appliance more conveniently.
RHDGWKHIROORZLQJFRQWHQWVWKRURXJKO\DQGHQVXUH\RXXQGHUVWDQGWKHP
.

Installation
Warning
This appliance shall be installed in
accordance with regulations in force
and only used in a well ventilated
space.
Prior to installation,ensure that the
gas and electrical supply complies
with the type stated on the rating
plate.
Where this appliance is installed in
marine craft or in caravans, it should
not be used as a space heater.
The gas pipe and electrical cable
must be installed in such a way that
they do not touch any parts or the
appliance.
Caution
4
220V-240V
Ŷ7KLVDSSOLDQFHVKRXOGEHLQVWDOOHGE\DTXDOL¿HGWHFKQLFLDQRULQVWDOOHU
Ŷ7KHDGMXVWPHQWFRQGLWLRQVIRUWKLVDSSOLDQFHDUHVWDWHGRQWKHODEHORUGDWDSODWH
Ŷ5HPRYHDOOSDFNDJLQJEHIRUHXVLQJWKHDSSOLDQFH
Ŷ$IWHUXQSDFNLQJWKHDSSOLDQFHPDNHVXUHWKHSURGXFWLVQRWGDPDJHGDQGWKDWWKH
connection cord is in perfect condition. Otherwise, contact the dealer before
installing the appliance.
Ŷ7KHDGMDFHQWIXUQLWXUHDQGDOOPDWHULDOVXVHGLQWKHLQVWDOODWLRQPXVWEHDEOHWR
ZLWKVWDQGDPLQLPXPWHPSHUDWXUHRIÛ&DERYHWKHDPELHQWWHPSHUDWXUHRIWKH
room it is located in, whilst in use.
Ŷ,QWKHHYHQWRIEXUQHUÀDPHVEHLQJDFFLGHQWDOO\H[WLQJXLVKHGWXUQRIIWKHEXUQHU
control and do not attempt to re-ignite the burner for at least one minute.
Ŷ
The use of a gas cooking appliance results in the production of heat and moisture in the
room in which it is installed. Ensure that the kitchen is well ventilated: keep natural
YHQWLODWLRQKROHVRSHQRULQVWDOODPHFKDQLFDOYHQWLODWLRQGHYLFHPHFKDQLFDOH[WUDFWRUKRRG
Ŷ3URORQJHGLQWHQVLYHXVHRIWKHDSSOLDQFHPD\FDOOIRUDGGLWLRQDOYHQWLODWLRQIRU
H[DPSOHRSHQLQJRIDZLQGRZRUPRUHHIIHFWLYHYHQWLODWLRQIRUH[DPSOHLQFUHDVLQJ
the level of mechanical ventilation where present.
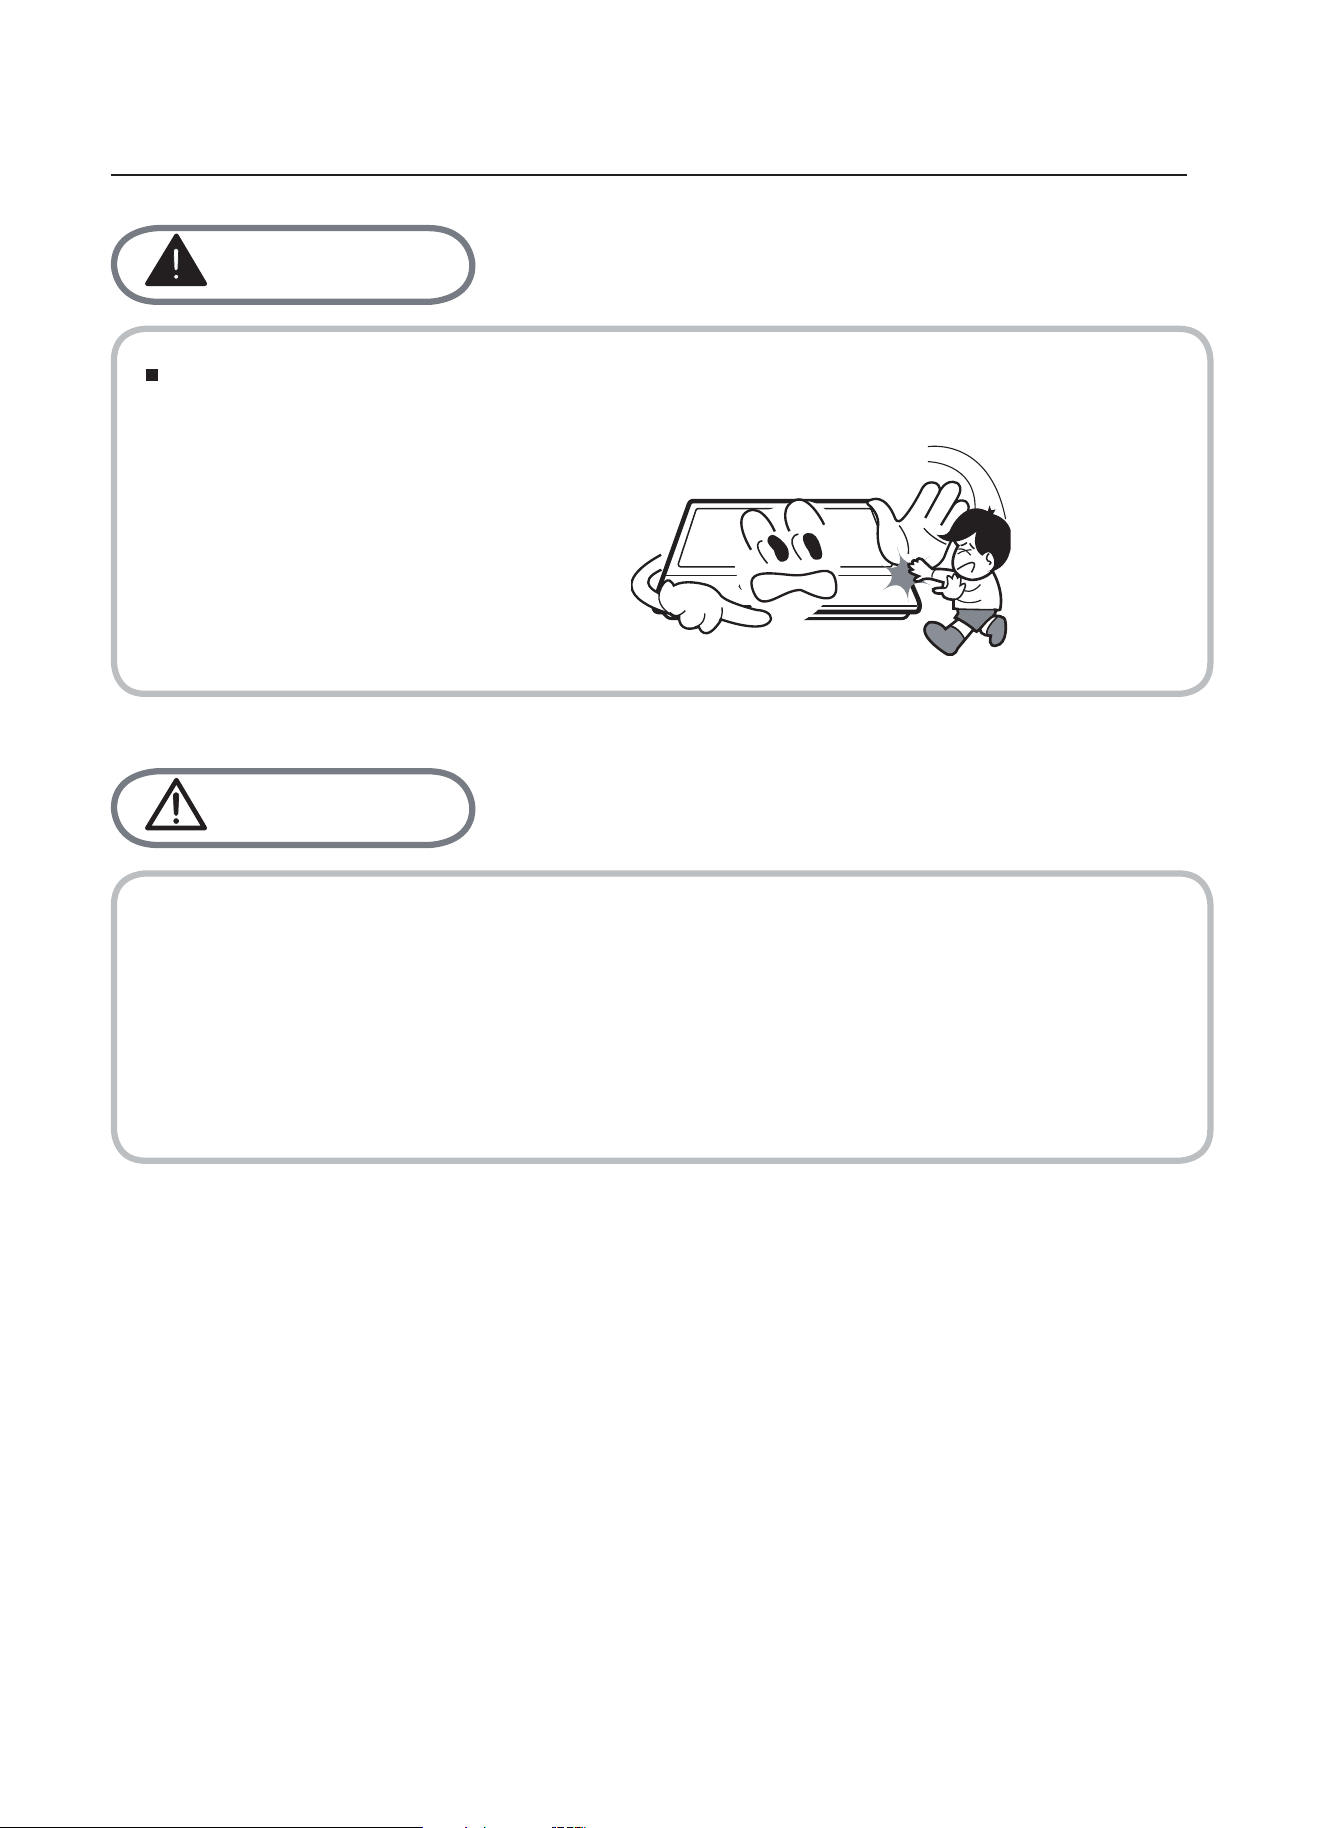
Child and People Safety
Do not allow children to play near or with the appliance.
The appliance gets hot when it is in use.
Children should be kept away until it has cooled.
Warning
Caution
5
Ŷ7KLVDSSOLDQFHLVGHVLJQHGWREHRSHUDWHGE\DGXOWV
Ŷ&KLOGUHQFDQDOVRLQMXUHWKHPVHOYHVE\SXOOLQJSDQVRUSRWVRIIWKHDSSOLDQFH
Ŷ7KLVDSSOLDQFHLVQRWLQWHQGHGIRUXVHE\FKLOGUHQRURWKHUSHUVRQVZKRVHSK\VLFDO
VHQVRU\RUPHQWDOFDSDELOLWLHVRUODFNRIH[SHULHQFHDQGNQRZOHGJHSUHYHQWVWKHP
from using the appliance safety without supervision or instruction by a responsible
person to ensure that they can use the appliance safety.
During Use
Warning
The use of a gas cooking appliance
results in the production of heat and
moisture in the room in which it is
installed. Ensure that the kitchen is
well ventilated : keep natural
ventilation holes open or install a
mechanical ventilation device
(mechanical
extractor hood).
Never leave the appliance unattended
when cooking.
Burner
panel is not designed to operate from
an external timer or separate remote
control system.
6
Ŷ2QO\XVHWKHDSSOLDQFHIRUSUHSDULQJ
food.
LQ
contact with water. Do not operate
this appliance with wet hands.
Ŷ'RQRWXVHWKLVDSSOLDQFHLILW
comes
Ŷ7KHKHDWLQJDQGFRRNLQJVXUIDFHVRI
the appliance become hot when they
are in use, take all due precautions.
Ŷ'RQRWXVHODUJHFORWKVWHDWRZHOVRU
similar as the ends could touch the
ÀDPHVDQGFDWFK¿UH
Ŷ8QVWDEOHRUPLVVKDSHQSDQVVKRXOG
not be used on the appliance as they
can cause an accident by tipping or
spillage.
During Use
Ŷ'RQRWVSUD\DHURVROVLQWKHYLFLQLW\RI
this appliance while it is in operaiton.
‘ ’ position when not in use.
Caution
7
Ŷ 'RQRWXVHRUVWRUHÀDPPDEOH materials
in the storage drawer near this
appliance.
Ŷ3HULVKDEOHIRRGSODVWLFLWHPVDQG
aerosols may be affected by heat and
should not stored above or below the
appliance.
Ŷ(QVXUHWKHFRQWURONQREVDUHLQWKH
This appliance is intended for domestic cooking only.It is not designed for commercial
or industrial purposes.
Prolonged intensive use of the appliance may call for additional ventilation,for example
opening of a window, or increasing the level of mechanical ventilation where present.
Ŷ8VHKHDWUHVLVWDQWSRWKROGHUVRUJORYHVZKHQKDQGOLQJKRWSRWVDQGSDQV
Ŷ'RQRWOHWSRWKROGHUVFRPHQHDURSHQÀDPHVZKHQOLIWLQJFRRNZDUH
Ŷ7DNHFDUHQRWWROHWSRWKROGHUVRUJORYHVJHWGDPSRUZHW DVWKLVFDXVHVKHDWWRWUDQVIHU
WKURXJKWKHPDWHULDOTXLFNHUZLWKWKHULVNRIEXUQLQJ\RXUVHOI
ŶOQO\HYHUXVHWKHEXUQHUVDIWHUSODFLQJSRWVDQGSDQVRQWKHP'RQRWKHDWXSDQ\HPSW\
is made of glass-cracked, switch off the appliance to avoid defeat electrocution.
Ŷ 7RPLQLPLVHWKHSRVVLELOLW\RIEXUQVLJQLWLRQRIÀDPPDEOHPDWHULDOVDQGVSLOODJHWXUQ
FRRNZDUHKDQGOHVWRZDUGWKHVLGHRUFHQWHURIWKHWRSSODWHZLWKRXWH[WHQGLQJRYHU
adjacent burners.
Ŷ$OZD\VWXUQEXUQHUFRQWUROVRIIEHIRUHUHPRYLQJFRRNZDUH
Ŷ&DUHIXOO\ZDWFKIRRGVEHLQJIULHGDWDKLJKÀDPHVHWWLQJ
Ŷ$OZD\VKHDWIDWVORZO\DQGZDWFKDVLWKHDWV
Ŷ)RRGVIRUIU\LQJVKRXOGEHDVGU\DVSRVVLEOH)URVWRQIUR]HQIRRGVRUPRLVWXUHRQIUHVK
Ŷ:KHQXVLQJJODVVFRRNZDUH PDNHVXUHLWLVGHVLJQHGIRUWRSSODWHFRRNLQJ
If the surface
using the appliance.
'RQRWXVHDWHDWRZHORUVL PL ODUPDWHUL DOVL QSODFHRIDSRWK ROGHU6XFK FORWK VFDQ
FDWFK IL UHRQDK RWEXUQHU
foods can cause hot fat to bubble up and over the sides of the pan.
Never try to move a pan of hot fat,especially a deep fat fryer.Wait until the fat is
completely cool.
pots or pans.
Ŷ1HYHUXVHSODVWLFRUDOXPLQLXPIRLOGLVKHVRQWKHDSSOLDQFH
Ŷ:KHQXVLQJ RWKHUHOHFWULFDODSSOLDQFHV HQVXUHWKHFDEOHGRHVQRWFRPHLQWRFRQWDFWZLWK
the appliance surfaces of the cooking appliance.
Ŷ,I\RXKDYHDQ\PHFKDQLFDOSDUWVHJDQDUWL¿FDOKHDUWLQ\RXUERG\FRQVXOWDGRFWRUEHIRUH
Cleaning and Service
Environmental Information
unusable, by cutting off the cable.
disposed with other household wastes at the end of its working life. To prevent
possible harm to the environment or human health from uncontrolled waste disposal,
please separate this from other types of wastes and recycle it responsibly to promote
the sustainable reuse of material resources.
agents.
Warning
and cooled.
clean the appliance.
or serviced by an authorised Service
Engineer and only genuine approved
spare parts should be used.
Caution
8
Ŷ1HYHUXVHDEUDVLYHRUFDXVWLFcleaning
Ŷ 7KLVDSSOLDQFHVKRXOGRQO\EHrepaired
Ŷ%HIRUHDWWHPSWLQJWRFOHDQWKHDSSOLDQFHLWVKRXOGEHGLVFRQQHFWHGIURPWKHPDLQV
Ŷ<RXVKRXOGQRWXVHDVWHDPMHWRUDQ\RWKHUKLJKSUHVVXUHFOHDQLQJHTXLSPHQWWR
Ŷ$IWHULQVWDOODWLRQSOHDVHGLVSRVHRIWKHSDFNDJLQJ
with due regard to safety and the environment.
Ŷ:KHQGLVSRVLQJRIDQROGDSSOLDQFHPDNHLW
Ŷ7KLVPDUNLQJVKRZQRQWKHSURGXFWRULWVOLWHUDWXUHLQGLFDWHVWKDWLWVKRXOGQRWEH
Ŷ+RXVHKROGXVHUVVKRXOGFRQWDFWHLWKHUWKHUHWDLOHUZKHUHWKH\SXUFKDVHGWKLVSURGXFW
RUWKHLUORFDOJRYHUQPHQWRI¿FHIRUGHWDLOVRIZKHUHDQGKRZWKH\FDQWDNHWKLVLWHP
for environmentally safe recycling.
Ŷ%XVLQHVVXVHUVVKRXOGFRQWDFWWKHLUVXSSOLHUDQGFKHFNWKHWHUPVDQGFRQGLWLRQVRI
WKHSXUFKDVHFRQWUDFW7KLVSURGXFWVKRXOGQRWEHPL[HGZLWKRWKHUFRPPHUFLDO
wastes for disposal.
Correct Disposal of This Product
(Waste Electrical & Electronic Equipment)
9
Description of the appliance
ΣQn
Dimension
(W*D*H)mm
Ignition
device
Gas
Connection
Electric
supply
Burner
Feature
Model Top Plate
10.8kW
8.5kW
6. 5kW
Continuous
Ignition
Type
G1/2 thread
Triple-Crown(1),
Semi-rapid(2),
Auxiliary (1)
Triple-Crown(1)
Semi-rapid(1),
Auxiliary (1)
Triple-Crown(1)
Rapid(1)
Semi-rapid(2),
Auxiliary (1)
CPCGM5F5021N
Glass
750*510*90
600*520*97
600*510*90
CPCGM4F4121N
CPCGM4F4122W
CPCGM3F3121N
CPCGM3F3122W
220-240Vac,
50Hz-60Hz,
2W
0

A
How to Use the appliance
ccessories
Description of the appliance
Black circle: gas off
Large flame: maximum setting
Small flame: minimum setting
Automatic ignition with flame failure safety device
10
Bracket
(4)
Sponge
(4)
Screw
(4)
Instruction
Manual (1)
The appliance is fitted with a flame failure safety device on each burner, which
is designed to stop the flow of gas to the burner head in the event of the flame
going out.
The minimum setting is at the end of the anti-clockwise rotation of the control handle.
All operation positions must be selected between the maximum and minimum position.
The symbol on the control panel,next to the control handle will indicate which burner it
operates.
7KHIROORZLQJV\PEROVZLOODSSHDURQWKHFRQWUROSDQHOQH[WWRHDFKFRQWUROKDQGOH
Gas-pipe bend (1)
I n ctor (5)
I
n ctor (4)
I n ctor (3)
(5 burner)
(4 burner)
(3 burner)
je
je
je

How to Use the appliance
Automatic ignition with flame failure safety device
The appliance is fitted with a flame failure safety device on each burner, which
is designed to stop the flow of gas to the burner head in the event of the flame
going out.
To ignite a burner:
o Press in the control knob of the burner that you wish to light and turn it
anti-clockwise to the maximum position.
o If you keep the control knob depressed, the automatic ignition for the
burner will operate.
o
o After this 15-second interval, to regulate the flame you should continue
turning the control knob anti-clockwise until the flame is at a suitable level.
The operating position MUST be at a position between the maximum and
minimum position.
o
To switch the burner off, turn the control knob fully clockwise to the gas
off position.
o In case of power failure, the burners can be lit by carefully using a match.
11
You should hold down the control knob for 15 seconds after the flame on
the burner has lit. If after 15s the burner has not lit, stop operating the
device and open the compartment door and/or wait at least 1 min before
attempting a further ignition of the burner.
Safety and Energy saving advice
- The diameter of the bottom of the pan should correspond to that of the burner.
BURNERS
200mm
240mm
200mm 240mm
160mm
NO YES
120mm
160mm
180mm
12
Triple-Crown
Rapid
Semi-Rapid
Auxiliary
PANS
min.
max.
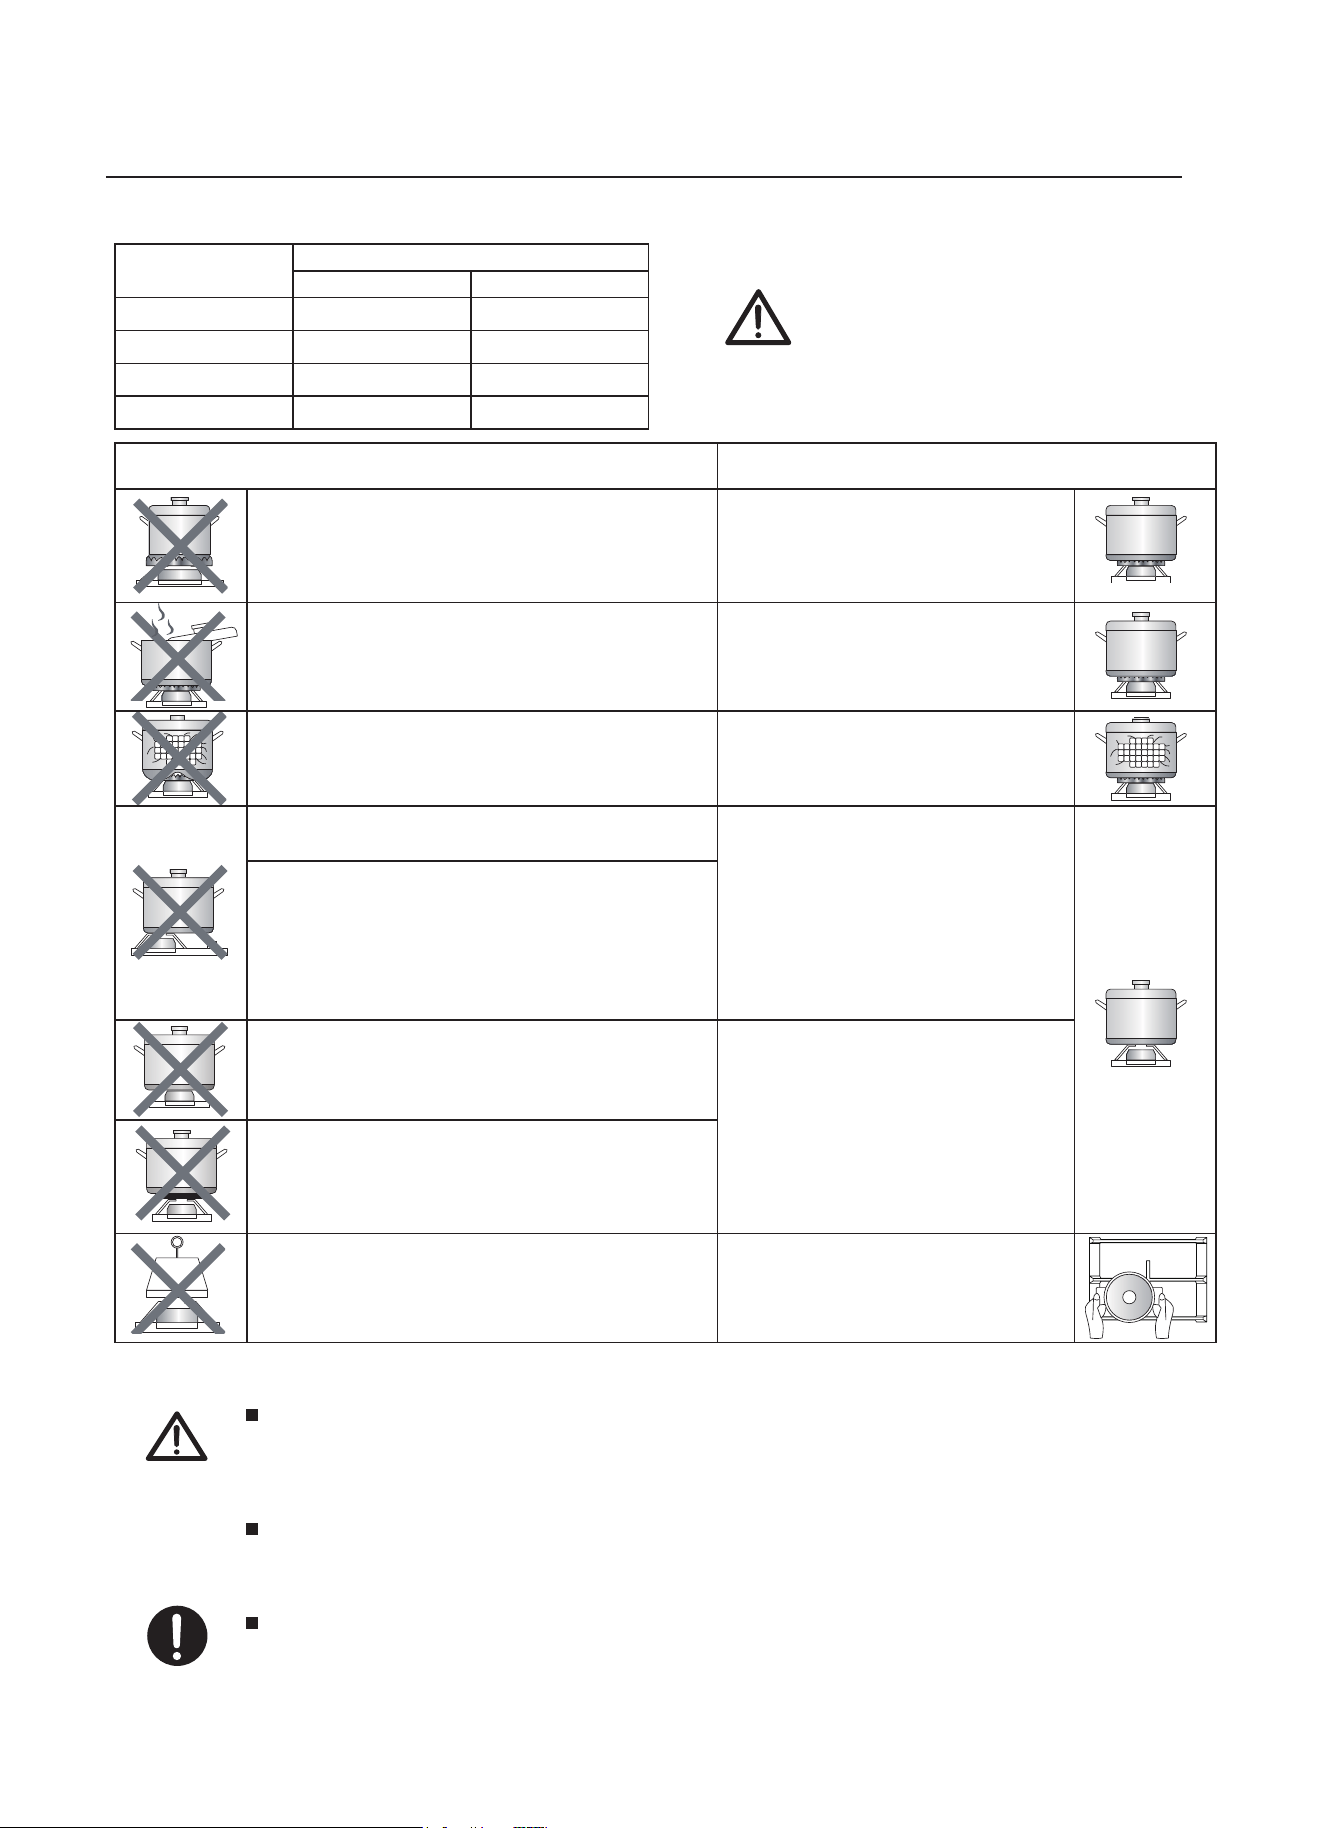
Do not use small diameter cookware on large
burners.
The flame should never come up the sides of
the cookware.
Avoid cooking without a lid or with the
lid half off
-as this wastes energy
Do not use a pan with a convex or
concave bottom.
Do not place cookware on one side of a
burner,as it could tip over.
Do not use cookware with a large diameter
on the burners near the controls,which when
placed on the middle of the burner may
touch the controls or be so close to them
that they increase the temperature in this
area and may cause damage.
Never place cookware directly on top of the
burner.
Do not place anything,eg.flame
tamer,asbestos mat,between pan and pan
support as serious damage to the appliance
may result.
Do not use excessive weight and do not
hit the cooktop with heavy objects.
Always use cookware that is
suitable for each burner, to avoid
wasting gas and discolouring the
cookware.
Place a lid on the cookware.
Only use pots,saucepans and
frying pans with a thick,flat
bottom.
Always place the cookware right
over the burners,not to one
side.
Place the cookware on top of
the trivet.
Handle cookware carefully when
they are on the burner.
Ŷ'RQRWXVHFRRNZDUH
WKDW
RYHUODSVWKH
HGJH
of the
burner.
It is not recommended to use roasting pans,frying pans or grill stones
heated simultaneously on several burners because the resulting heat
build-up may damage the appliance.
Do not touch the top plate and trivet whilst in use for a certain period
after use.
As soon as a liquid starts boiling,turn down the flame so that it will
barely keep the liquid simmering.

Cleaning and Maintenance
Soft cloth
Neutral Detergent
Nylon Brush
13
Edible Oil
Abrasive
Detergent
Thinner/Benzene
Metal Brush
Acidic/Alkali
Ŷ7DNHRIIWKH3DQVXSSRUW
Ŷ&OHDQWKHVHDQGWKHFRQWUROKDQGOHVZLWKDGDPSFORWKZDVKLQJXSOLTXLGDQGZDUP
water. For stubbon soiling, soak beforehand.
Ŷ'U\HYHU\WKLQJZLWKDFOHDQVRIWFORWK
3DQVXSSRUW&RQWUROKDQGOHV
Ŷ5HJXODUO\ZLSHRYHUWKHWRSSODWHXVLQJDVRIWFORWKZHOO rung-out
LQZDUPZDWHUWR
ZKLFKDOLWWOHZDVKLQJXSOLTXLGKDVEHHQDGGHG
Ŷ'U\WKHWRSSODWHWKRURXJKO\DIWHUFOHDQLQJ
Ŷ7KRURXJKO\UHPRYHVDOW\IRRGVRUOLTXLGVIURPWKHKREDVVRRQDVSRVVLEOHWRDYRLG
the risk of corrosion.
Ŷ6WDLQOHVVVWHHOSDUWVRIWKHDSSOLDQFHPD\EHFRPHGLVFRORXUHGRYHUWLPH7KLVLV
normal because of the high temperatures. Each time the appliance is used these
parts should be cleaned with a product that is suitable for stainless steel.
7RSSODWH
Ŷ &OHDQLQJRSHUDWLRQVPXVWRQO\EHFDUULHGRXWZKHQWKHDSSOLDQFH is
completely cool.
Ŷ7KHDSSOLDQFHVKRXOGEHGLVFRQQHFWHGIURP\RXUPDLQVVXSSO\EHIRUH
FRPPHQFLQJDQ\FOHDQLQJSURFHVV
Ŷ&OHDQWKHDSSOLDQFHUHJXODUO\SUHIHUDEO\DIWHUHDFKXVH
Ŷ$EUDVLYHFOHDQHUVRUVKDUSREMHFWVZLOOGDPDJHWKHDSSOLDQFHVXUIDFH
\RXVKRXOGFOHDQLWXVLQJZDWHUDQGDOLWWOHZDVKLQJXSOLTXLG
Cleaning and Maintenance
14
2
1
2
3
3
4
4
5
7
6
6
7
5
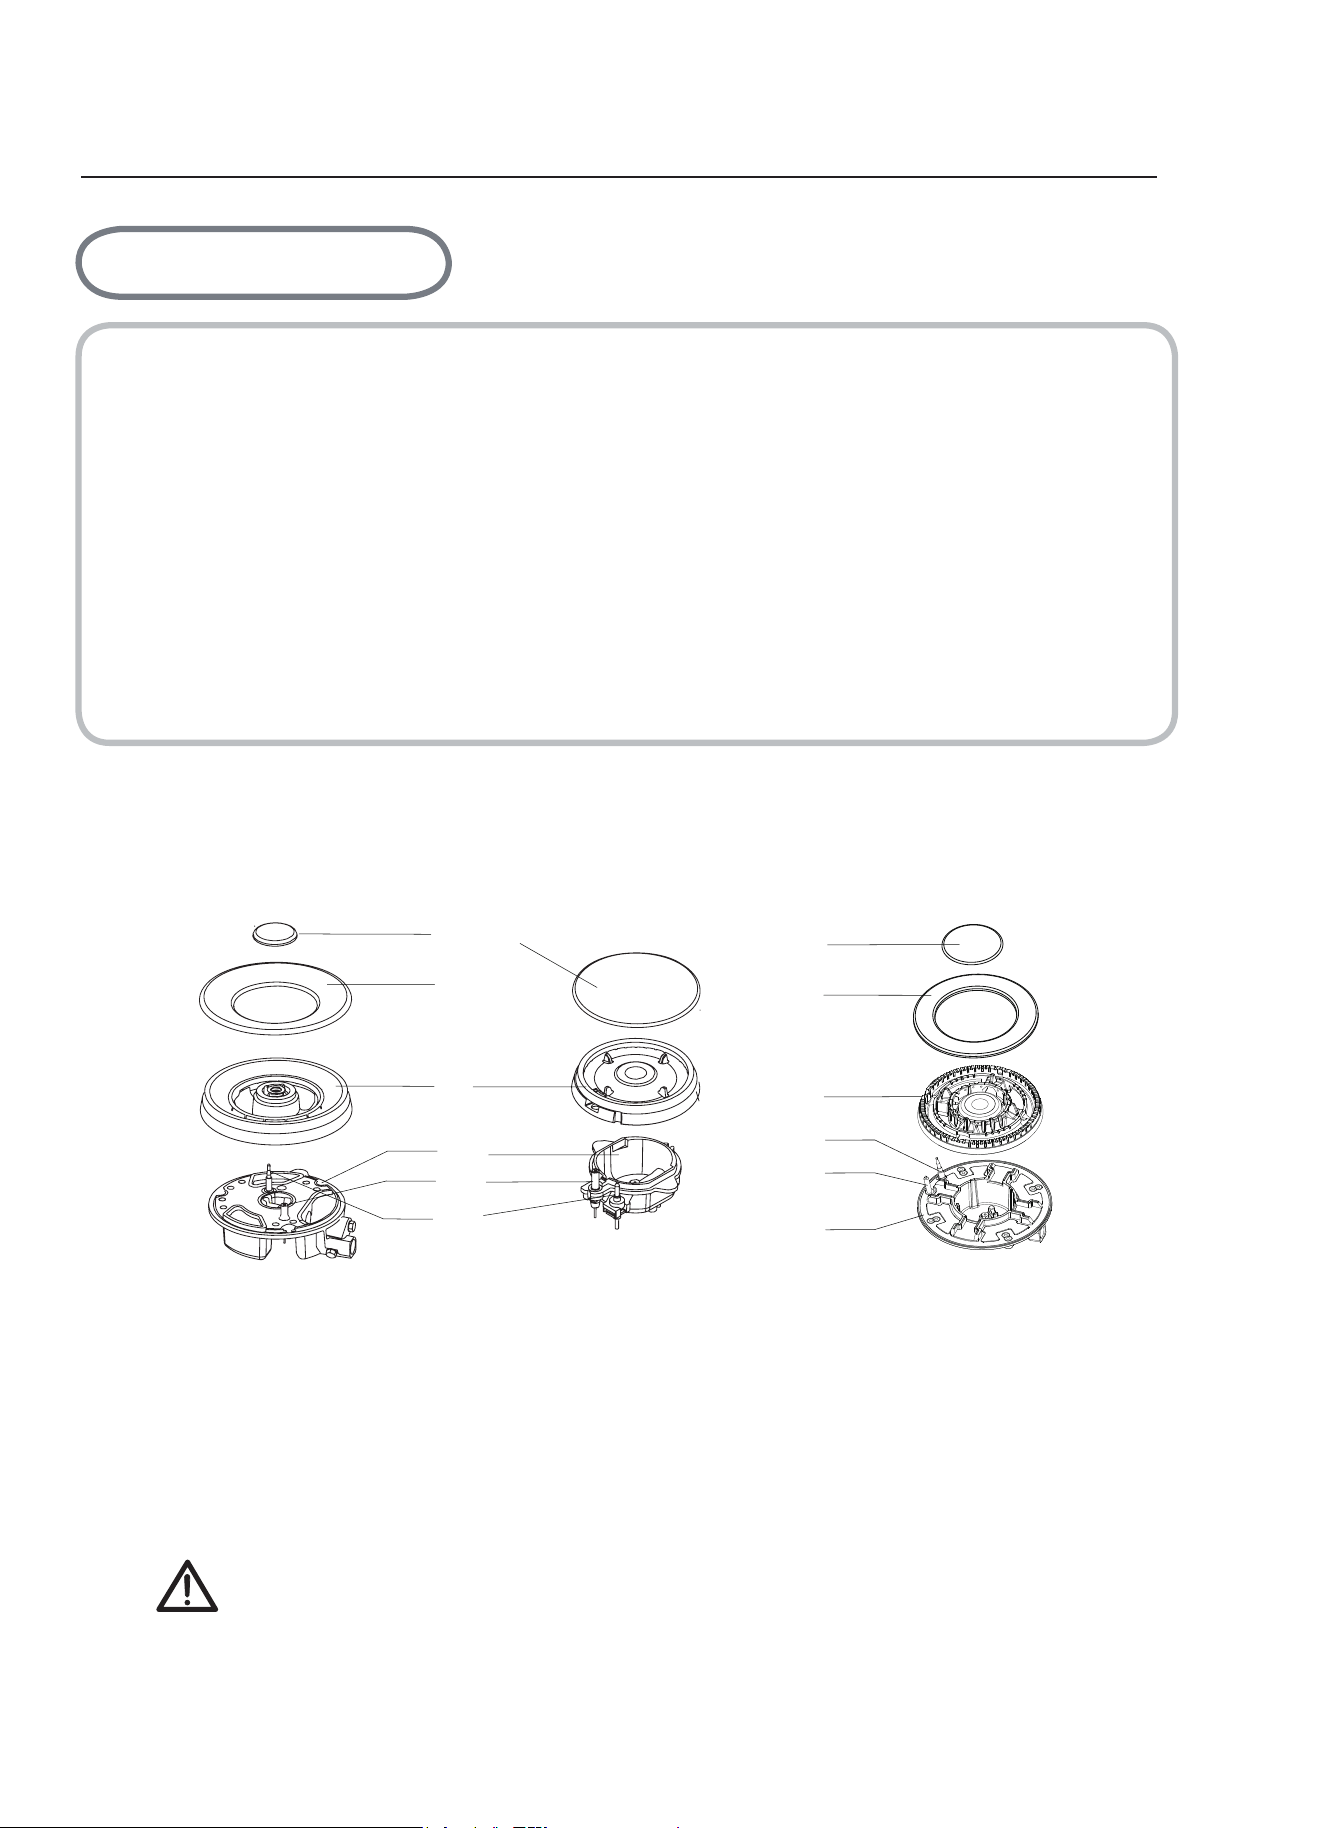
1.
Place the flame spreader ( 4 ) on to the burner cup ( 5 ) so that the ignition device
and the flame supervision device extend through their respective holes in the flame
spreader.The flame spreader must click into place correctly.
2.Position the burner lid ( 1,2,3 ) onto the flame speader ( 4 ) so that the retaining pins
fit into their respective recesses.
Ŷ5HPRYHWKHEXUQHUOLGVDQG)ODPH6SUHDGHUVE\SXOOLQJWKHPXSZDUGVDQGDZD\
from the top plate.
Ŷ6RDNWKHPLQKRWZDWHUDQGDOLWWOH detergent or washing up liqui.
Ŷ$IWHUFOHDQLQJDQGZDVKLQJWKHPZLSHDQGGU\WKHPFDUHIXOO\0DNHVXUHWKDWWKH
ÀDPHKROHVDUHFOHDQDQGFRPSOHWHO\GU\
Ŷ:LSHWKH¿[HGSDUWVRIWKHEXUQHUFXSZLWKDGDPSFORWKDQGGU\DIWHUZDUGV
Ŷ*HQWO\ZLSHWKH
L
JQLWLRQGHYLFHDQGÀDPHVXSHUYLVLRQGHYLFHZLWKDZHOOZUXQJRXW
cloth and wipe dry with a clean cloth.
Ŷ%HIRUHSODFLQJWKHEXUQHUVEDFNRQWKHWRSSODWHPDNHVXUHWKDWWKHLQMHFWRULVQRW
blocked.
%851(56
ʄ5HDVVHPEOHWKH$X[LOLDU\6HPL5DSLG5DSLGDQG
7ULSOH&URZQEXUQHUVDVIROORZV
5HSODFHSDUWVLQWKHFRUUHFWRUGHUDIWHUFOHDQLQJ
'RQRWPL[XSWKHWRSDQGERWWRP
7KHORFDWLQJSLQVPXVW¿WH[DFWO\LQWRWKHQRWFKHV

Warnings
Using instructions
15
Ŷ'RQRWPRGLI\WKLVDSSOLDQFH
Ŷ7KLVDSSOLDQFHPXVWEHLQVWDOOHGE\DQDXWKRULVHGWHFKQLFLDQRU
LQVWDOOHU
Ŷ3ULRUWRLQVWDOODWLRQHQVXUHWKDWWKHORFDOGLVWULEXWLRQFRQGLWLRQV
QDWXUHRIWKHJDVDQGJDVSUHVVXUHDQGWKHDGMXVWPHQWRIWKH
DSSOLDQFHDUHFRPSDWLEOH
Ŷ7KHDGMXVWPHQWFRQGLWLRQVIRUWKLVDSSOLDQFHDUHVWDWHGRQWKHODEHO
RUGDWDSODWH
Ŷ7KLVDSSOLDQFHLVQRWFRQQHFWHGWRDFRPEXVWLRQSURGXFWVHYDFXDWLRQ
LQVWDOODWLRQUHJXODWLRQV3DUWLFXODUDWWHQWLRQ
VKRXOG
EHJLYHQWRWKH
UHOHYDQWUHTXLUHPHQWVUHJDUGLQJYHQWLODWRQ
Ŷ%HIRUHLQVWDOOLQJWXUQRIIWKHJDVDQGHOHFWULFLW\VXSSO\WRWKH
DSSOLDQFH
Ŷ$OODSSOLDQFHVFRQWDLQLQJDQ\HOHFWULFDOFRPSRQHQWVPXVWEHHDUWKHG
Ŷ(QVXUHWKDWWKHJDVSLSHDQGHOHFWULFDOFDEOHDUHLQVWDOOHGLQVXFKD
ZD\WKDWWKH\GRQRWWRXFKDQ\SDUWVRIWKHapplianceZKLFK
may
EHFRPH
KRW
Ŷ*DVSLSHRUFRQQHFWRUVKRXOGQ¶WEHEHQWRUEORFNHGE\DQ\RWKHU
DSSOLDQFHV
Ŷ&KHFNWKHGLPHQVLRQVRIWKHDSSOLDQFHDVZHOODVWKHGLPHQVLRQVRI
WKHJDSWREHFXWLQWKHNLWFKHQXQLW
Ŷ7KHSDQHOVORFDWHGDERYHWKHZRUNVXUIDFHGLUHFWO\QH[WWRWKH
DSSOLDQFHPXVWEHPDGHRIQRQÀDPPDEOHPDWHULDO%RWKWKHVWUDWL
¿HGVXUIDFLQJDQGWKHJOXHXVHGWRVHFXUHLWVKRXOGEHKHDWUHVLVWDQW
WRSUHYHQWGHWHULRUDWLRQ
Ŷ7XUQRQDSSOLDQFHWDSDQGOLJKWHDFKEXUQHUV
&KHFNIRUDFOHDUEOXHÀDPHZLWKRXW\HOORZWLSSLQJ
,IEXUQHUVVKRZVDQ\DEQRUPDO
L
WLHVFKHFNWKHIROORZLQJ
%XUQHUOLGRQFRUUHFWO\
)ODPHVSUHDGHUSRVLWLRQHGFRUUHFWO\
%XUQHUYHUWLFDOO\DOLJQHGZLWKLQMHFWRUQLSSOH
Ŷ$IXOORSHUDWLRQDOWHVWDQGDWHVWIRUSRVVLEOHOHDNDJHVPXVWEHFDUULHG
RXWE\WKH¿WWHUDIWHUinstallation
Ŷ7KHÀH[LEOHKRVHVKDOOEH¿WWHGLQVXFKDZD\WKDWLWFDQQRWFRPHLQWR
FRQWDFWZLWKDPRYHDEOHSDUWRIWKHKRXVLQJXQLWDQGGRHVQRWSDVV
WKURXJKDQ\VSDFHVXVFHSWLEOHRIEHFRPLQJFRQJHVWHG
GHYLFH,WVKRXOG be installed and connected in accordance with current
Grease cranes produced at the factory to meet the requirement of all
life hob.
Ŷ
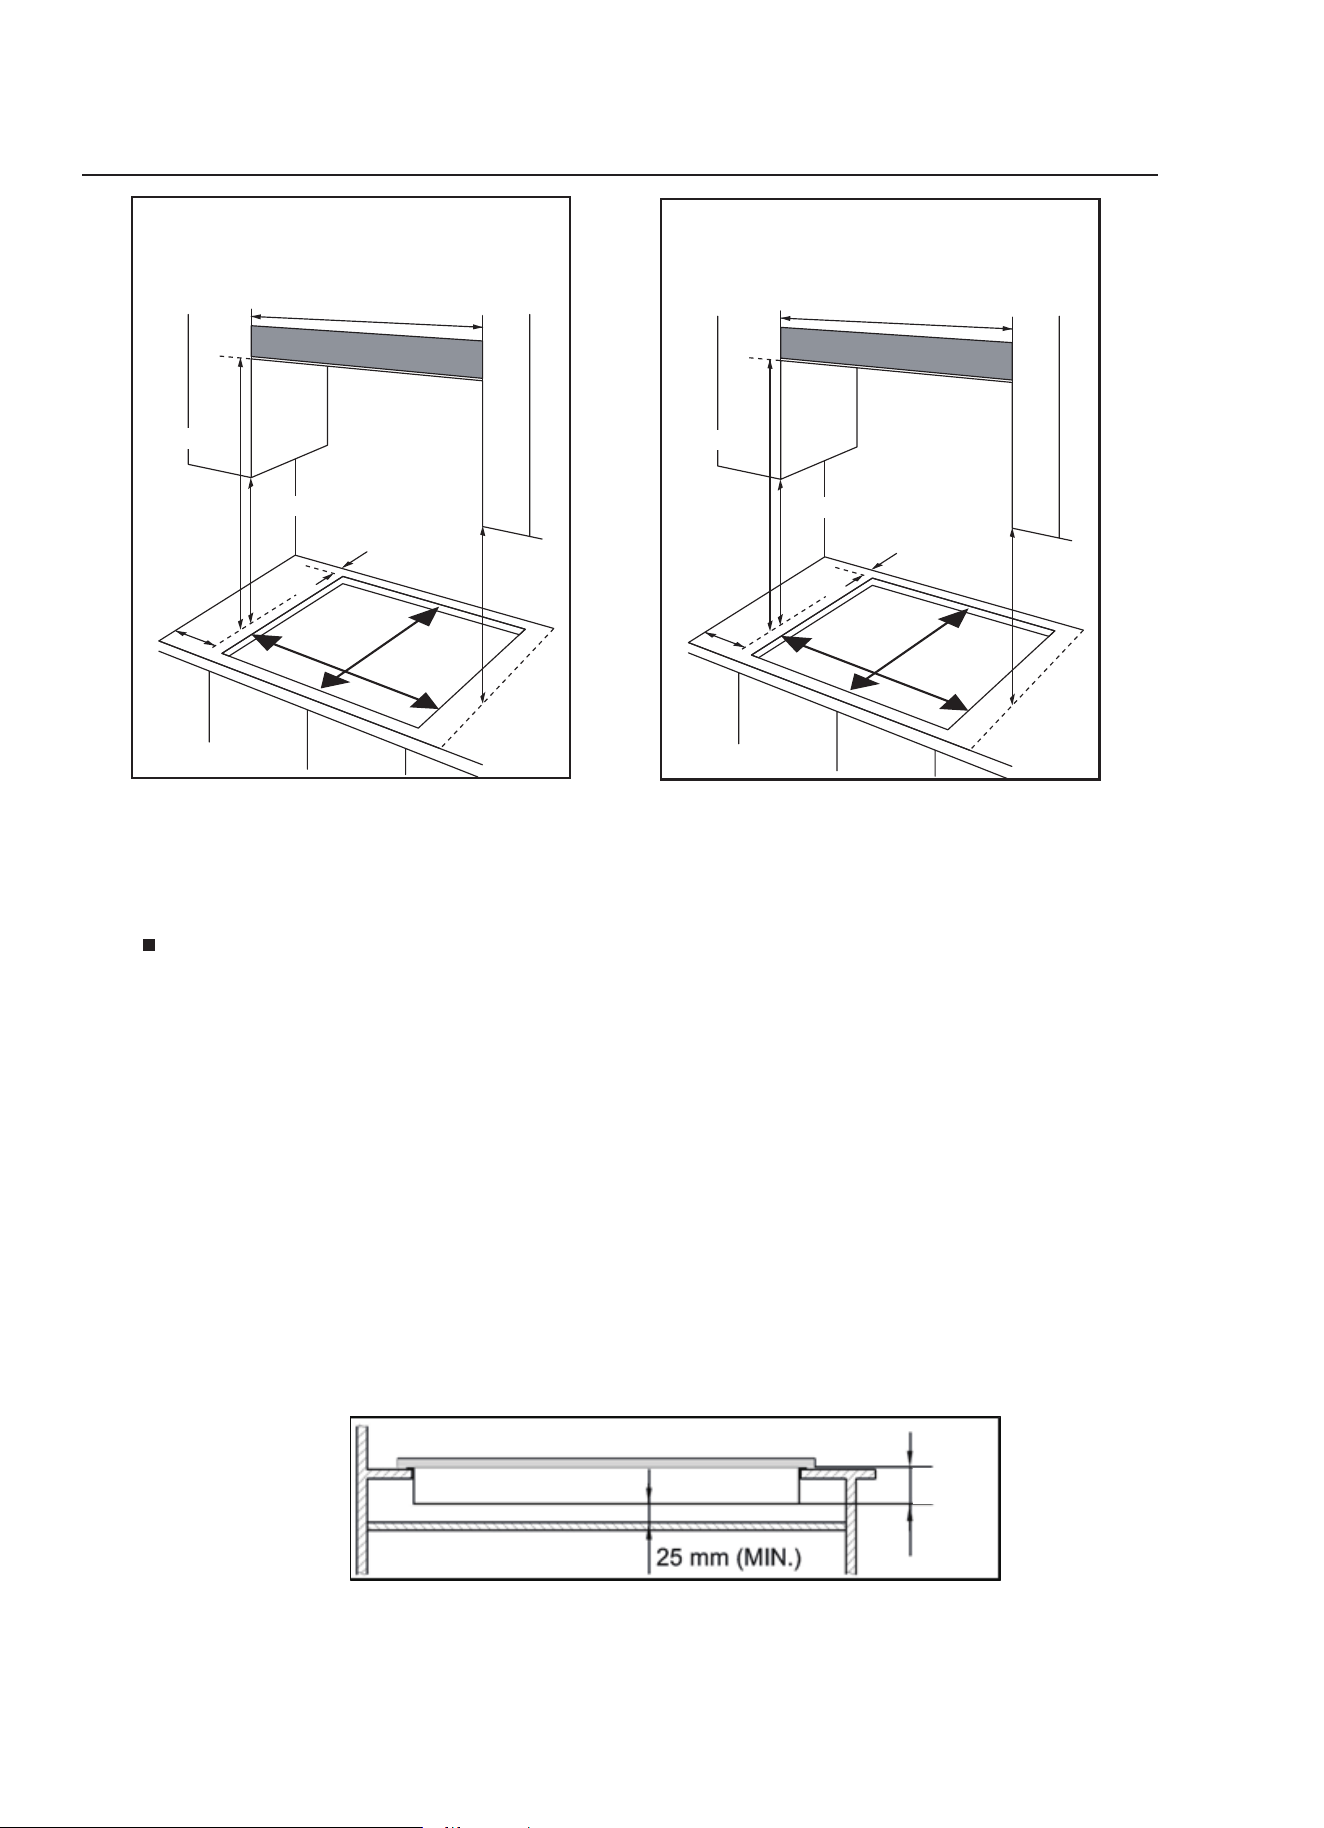
Positioning
The edges of the hob must be a minimum distance of mm from a side or
rear wall.
700 mm between the highest point of the hob surface (including the burners)
and the underside of any horizontal surface directly above it.
400 mm between the hob surfaces, providing that the underside of the
horizontal surface is in line with the outer edge of the hob. If the underside of
the horizontal surface is lower than 400 mm, then it must be at least 50 mm
away from the outer edges of the hob.
50 mm clearance around the appliance and between the hob surface and any
combustible materials.
45 mm
60
You must have a gap of at least 25 mm and at most 74 mm between
the underneath of the appliance and any surface that is below it.
16
o
o
o
o
o
CLEARANCES REQUIRED
WHEN FITTING THE HOB
WITH A COOKER HOOD ABOVE
750mm
700mm
400mm
400mm
60mm
in
0
.
0mm
M
2
This appliance is to be built into a kitchen unit or 600mm worktop,providing
the following minium distances are allowed;
- An oven must have forced ventilation to install a hob above it.
- Check the dimensions of the oven in the installation manual.
- The cut out size must obey the indication.
FO 0813
560mm
480mm
CLEARANCES REQUIRED WHEN
FITTING THE HOB WITH A COOKER
HOOD ABOVE
600mm
700mm
400mm
400mm
60mm
in
0
.
0mm
M
2
560mm
CPCGM4F4122W:560*490mm
CPCGM4F4121N:560*490mm
CPCGM3F3122W:560*480mm
CPCGM3F3121N:560*480mm
CPCGM5F5021N:560*480mm
490/480mm
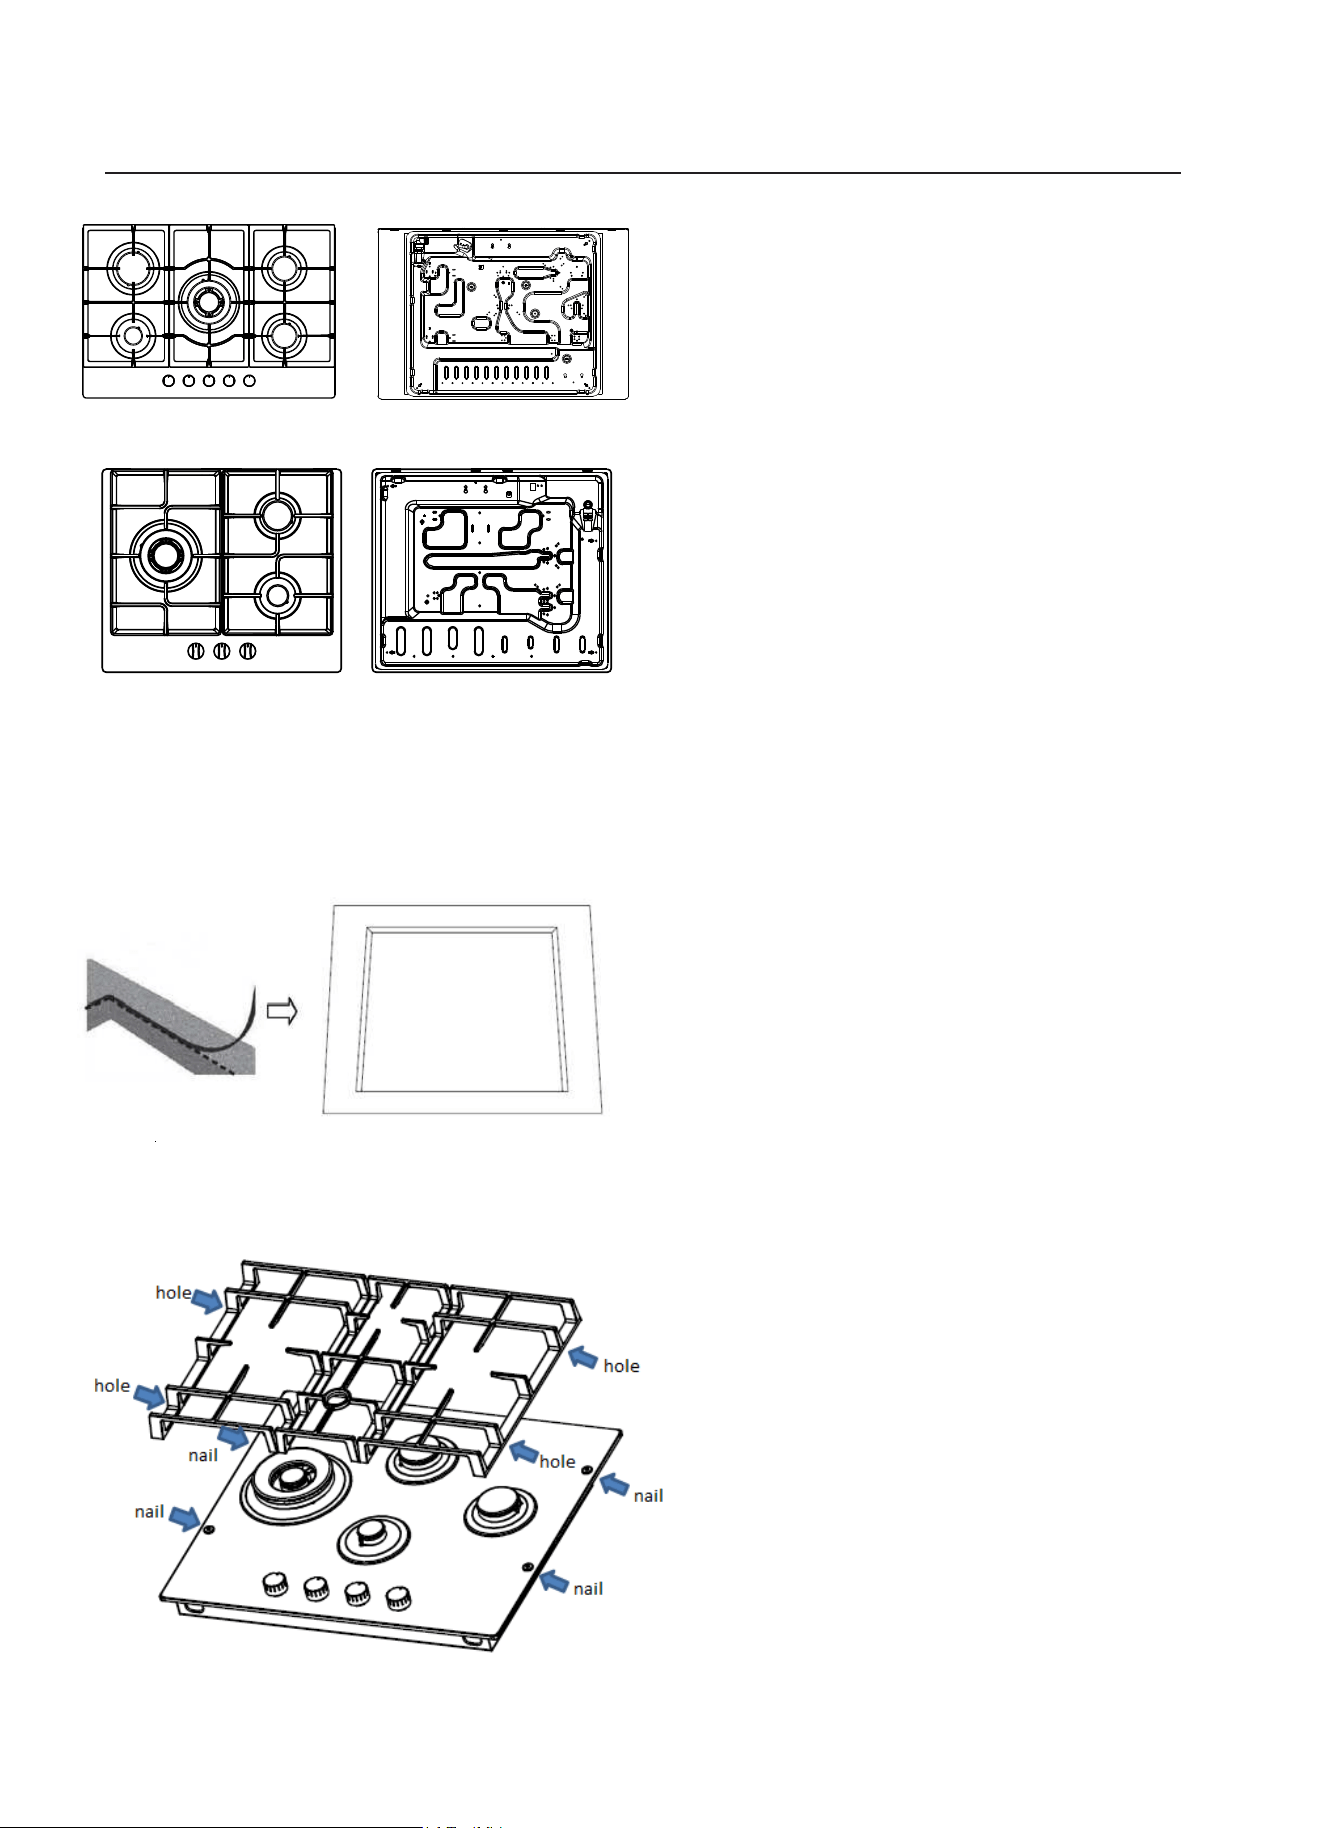
Installing the appliance
Bottom view
17
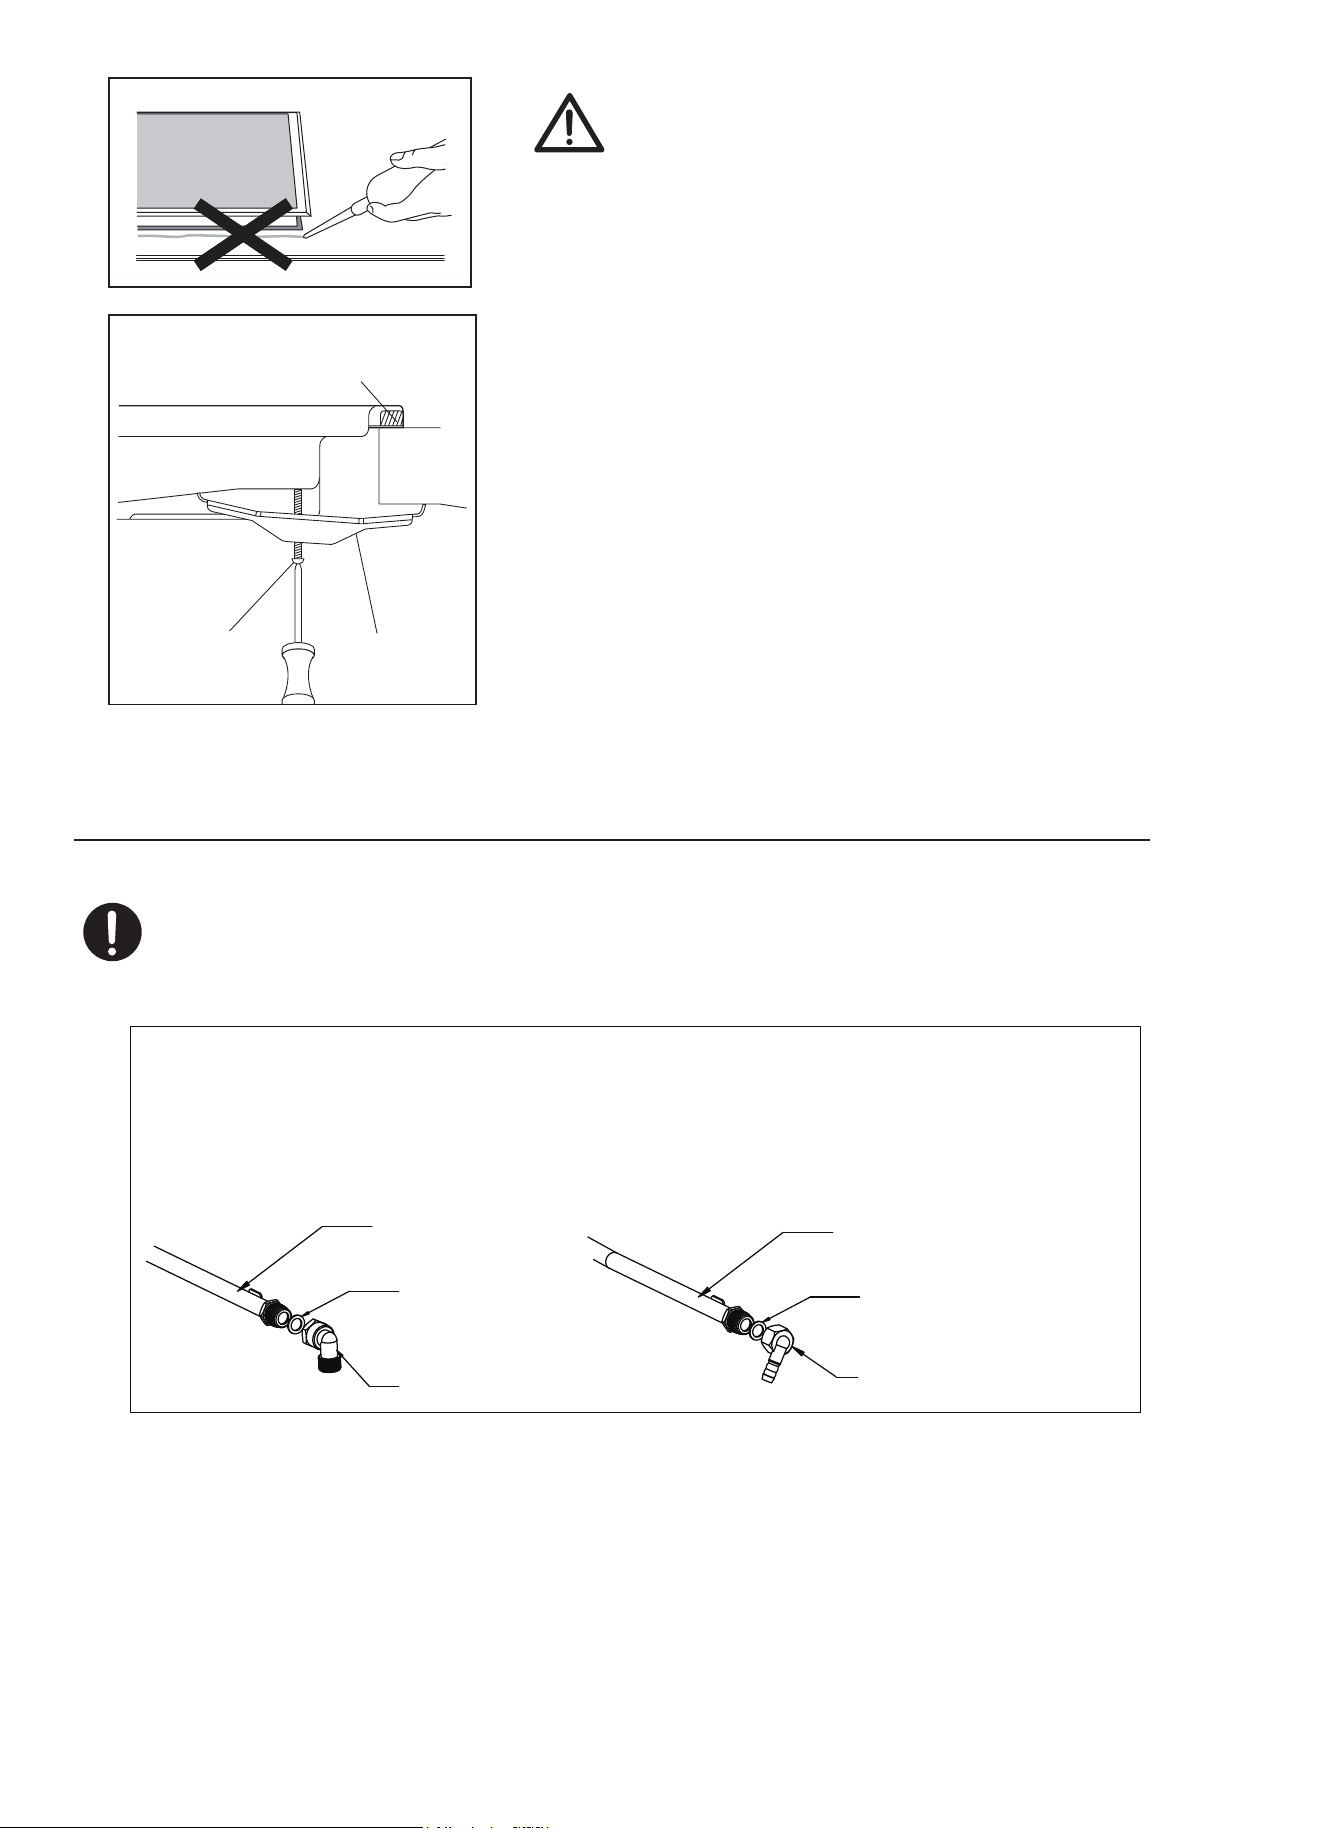
Remove the pan supports, the burner lid
and flame spreader and carefully turn the
appliance upside down and place it on a
cushioned mat.
Take care that the Ignition devices and
flame supervision devices are not damaged
in this operation.
2.
Apply the sponge provided around the
edge of the appliance.
3.
1.
Do not leave a gap in the sealing agent or
overlap the thickness.
2. Tear off the paper.
3. Stick the sponge round the edge of the
cut-out hole.
eput the left/right pan support
on the glass follow the naile
put the left/right pan support
on the glass follow the nail
2put the middle pan support between
them.
please follow the sequence to put
on pan support
(CPCGM5F5021N / CPCGM3F3122W CPCGM3F3121N)
(CPCGM4F4122W/CPCGM4F4121N)
/
Gas Connection
18
Ŷ7KLVDSSOLDQFHPXVWEHLQVWDOOHGDQGFRQQHFWHGLQDFFRUGDQFHZLWKLQVWDOOD
WLRQUHJXODWLRQVLQIRUFHLQWKHFRXQWU\LQZKLFKWKHDSSOLDQFHLVWREHXVHG
Ŷ7KLVDSSOLDQFHLVVXSSOLHGWRUXQRQLPG and natural gas. Conversion for
XVHRQ/3*DQGnaturalJDVHVPXVWRQO\EHXQGHUWDNHQE\DTXDOL¿HGSHUVRQ
o It is the law that all gas appliances are installed by competent persons in
accordance with the current edition of the Gas Safety Installation and
Use Regulations .
o It is in your interest and that of safety to ensure compliance with the law.
o In the UK, GASSAFE registered installers work to safe standards of
practice. The hob must also be installed in accordance with the current
edition of BS 6172. Failure to install the cooker correctly could invalidate
the warranty, liability claims and lead to prosecution.
seal
G1/2"Female coupler
The gas rail
seal
The gas rail
Ø11.5 Female coupler
LPG > NG NG > LPG
Gas supply replacement and installation guidelines:
Gas category, gas type and destination country (for all models)
of the screws.There are one set of screw holes in each
corner of the hob (H) .
Slightly tighten a screw (C) through the bracket (B) so
that the bracket is attached to the hob, but so that you
can still adjust the position
.
.2
Carefully turn the hob back over and then gently lower
it into the aperture hole that you have cut out.
.3 On the underneath of the hob, adjust the brackets into
a position that is suitable for your worktop.
Then fully tighten the screws (C) to secure the hob into
position.
(A) SEALING STRIP
(C) SCREW (B) BRACKET
3ODFHWKHEUDFNHW %RYHUWKHKROHVWKDWPDWFKWKHVL]H
7KLVZLOOPDNHLWGLI¿FXOWWRUHPRYHWKH
DSSOLDQFHIURPWKHDSHUWXUHLQIXWXUH
SDUWLFXODUO\LILWQHHGVWREHVHUYLFHG
Do not use a silicon sealant to seal the
appliance against the aperture.
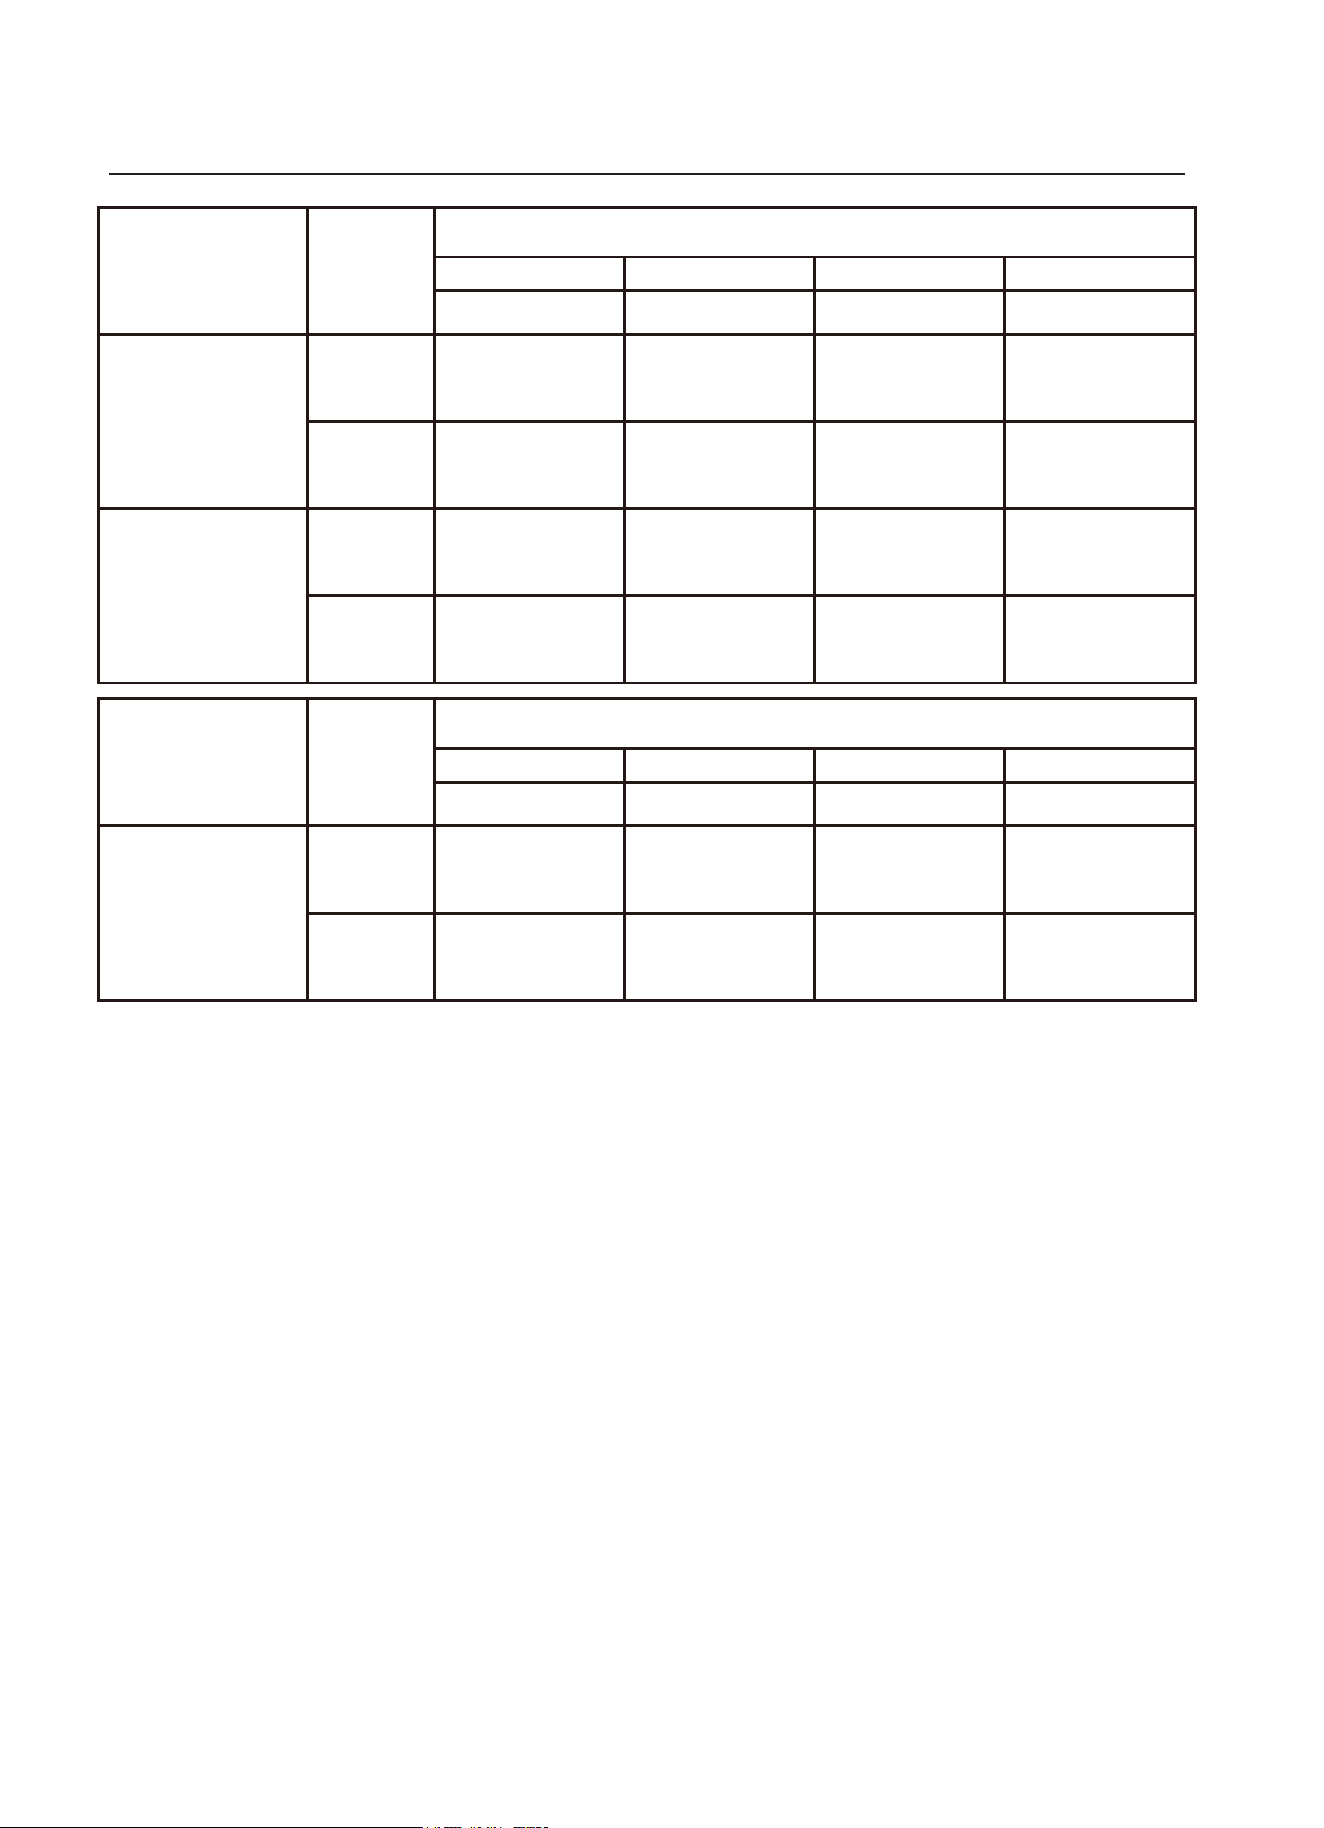
Gas Specification
19
Wok burner Semi-rapid Auxiliary-rapidRapid burner
Model
CPCGM5F5021N
CPCGM3F3121N
CPCGM3F3122W
G30 29
mbar
G20 20
mbar
G30 29
mbar
G20 20
mbar
0.870.93 0.66 0.50
1.301.28 1.00 0.78
/1.28 1.00 0.78
/0.93 0.66 0.50
Heat input and orifice size marked(mm)
Gas type
&
pressure
3.3kW (240g/h) 3.0kW (219g/h) 1.75kW (127g/h) 1.0kW (73g/h)
Wok burner Semi-rapid Auxiliary-rapidRapid burner
Model
G30 29
mbar
G20 20
mbar
0.871.00 0.66 0.50
1.301.50 1.00 0.78
Heat input and orifice size marked(mm)
Gas type
&
pressure
4.0kW (291g/h) 3.0kW (219g/h) 1.75kW (127g/h) 1.0kW (73g/h)
CPCGM4F4121N
CPCGM4F4122W

Electrical Connection
- Green/yellow = Earth
- Blue = Neutral
- Brown = Live
20
■ This appliance is designed to be connected to a 220-240V, 50Hz-60Hz AC electricity supply.
Ŷ7KHZLUHZKLFKLVFRORXUHGJUHHQDQG\HOORZPXVWEHFRQQHFWHG
WRWKHWHUPLQDOZKLFKLVPDUNHGZLWKWKHOHWWHU(RUE\WKHHDUWK
V\PERO
Ŷ7KLVDSSOLDQFHPXVWEHHDUWKHG
Ŷ7KHZLUHVLQWKHPDLQVOHDGDUHFRORXUHGLQDFFRUGDQFHZLWKWKHIROORZLQJFRGH
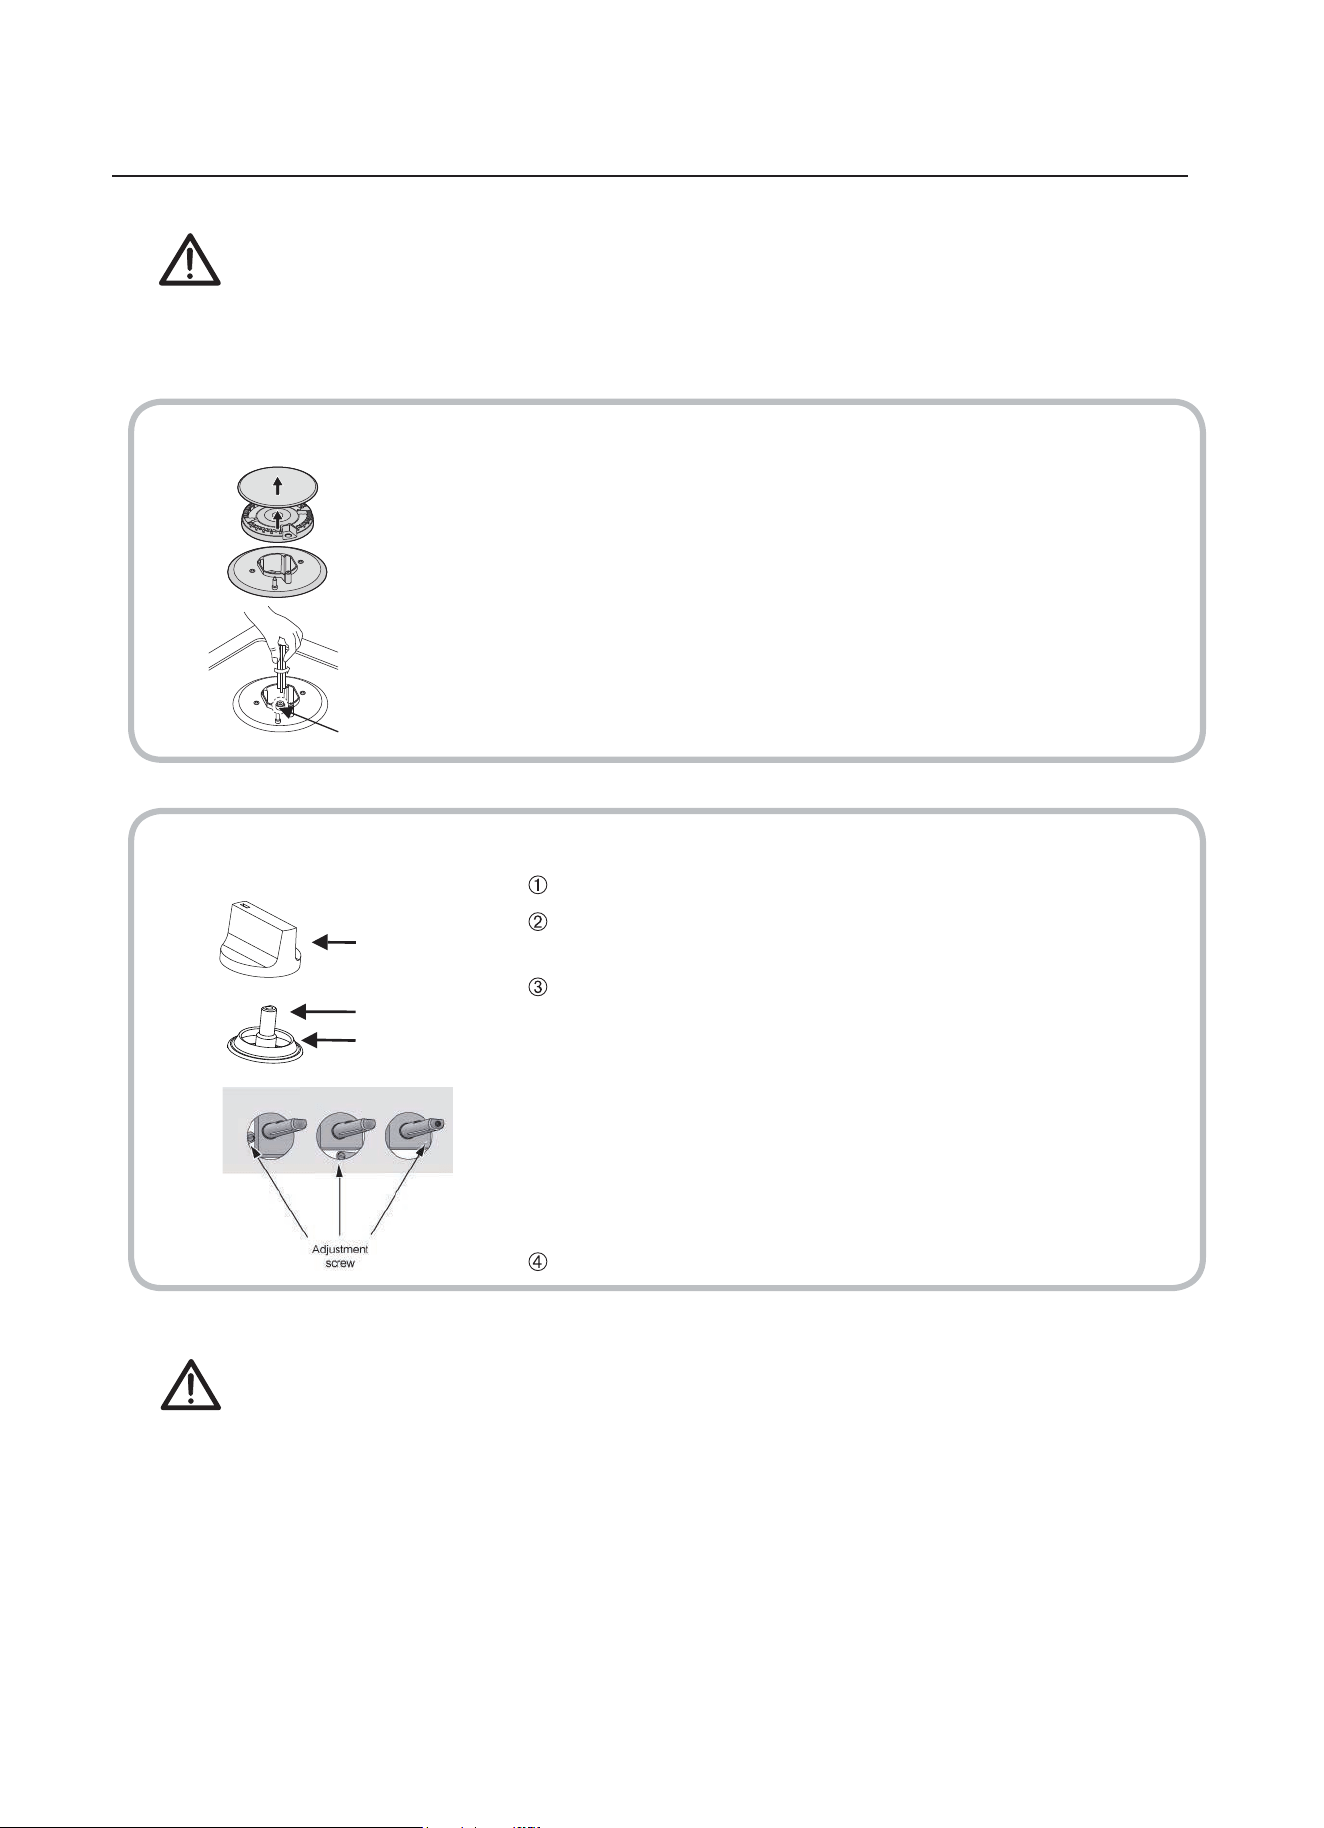
Gas adjustment
1
2
Injector
Control handle
Tap
Sealing ring
21
Remove the pan support, Burner lid and Flame spreader.
Unscrew the injector using a 7mm box spanner and
replace it with the stipulated injector for new gas
supply. Carefully reassemble the all components.
After injectors are replaced, it is advisable to strongly
tighten the injector in place.
Adjustment of minimum level of the flame.
Turn the taps down to minimum.
-
Remove the knob from the tap and place a small
bladed screwdriver in the centre of the tap shaft.
The correct adjustment is obtained when the flame
has a length of about 3 - 4 mm.
-
For butane
/
propane gas, the adjusting screw must
M
ake sure that the flame does not go out by
quickly turning from maximum flow to minimum
flow. If it does then remove the control knob and
make further adjustments to the gas flow, testing it
again once the adjustment has been made.
Repeat this process for each one of the gas taps.
be tightly screwed in.
Refit the control knob.
Ŷ7DNHSUHFDXWLRQVRQWKHRSHUDWLRQVDQGDGMXVWPHQWVWREHFDUULHGRXWZKHQ
FRQYHUWLQJIURPRQHJDVWRDQRWKHU
Ŷ$OOZRUNPXVWEHFDUULHGRXWE\DTXDOL¿HGWHFKQLFLDQ
Ŷ%HIRUH\RXEHJLQWXUQRIIWKHJDVDQGHOHFWULFLW\VXSSO\WRWKHDSSOLDQFH
-
Ŷ
%HIRUHSODFLQJWKHEXUQHUV
EDFNRQWKHWRSSODFHPDNHVXUH
WKDWWKHLQMHFWRULV
QRWEORFNHG
FDUULHGRXWDIWHU
JDVFRQYHUVLRQ
VXFKDVVRDSZDWHURUJDV
DTXDOL¿HGWHFKQLFLDQRULQVWDOOHU
KDVWRPDUN³9´
RQWKHULJKWJDV
FDWHJRU\
WRPDWFKZLWKWKH
VHWWLQJ
LQUDWLQJSODWH
5HPRYHWKHSUHYLRXV
VHWWLQJ³9´PDUN
LQWKHHYHQWRIDPDOIXQFWLRQ
FKDQJHWKHZKROHWDS
Ŷ
$IXOORSHUDWLRQDOWHVWDQGDWHVW
IRUSRVVLEOHOHDNDJHVPXVWEH
Ŷ
$IWHUFRPSOHWLQJFRQYHUVLRQ
GHWHFWRU
Change the injector of the burners.
Ŷ
Do not dismantle the tap shafe:
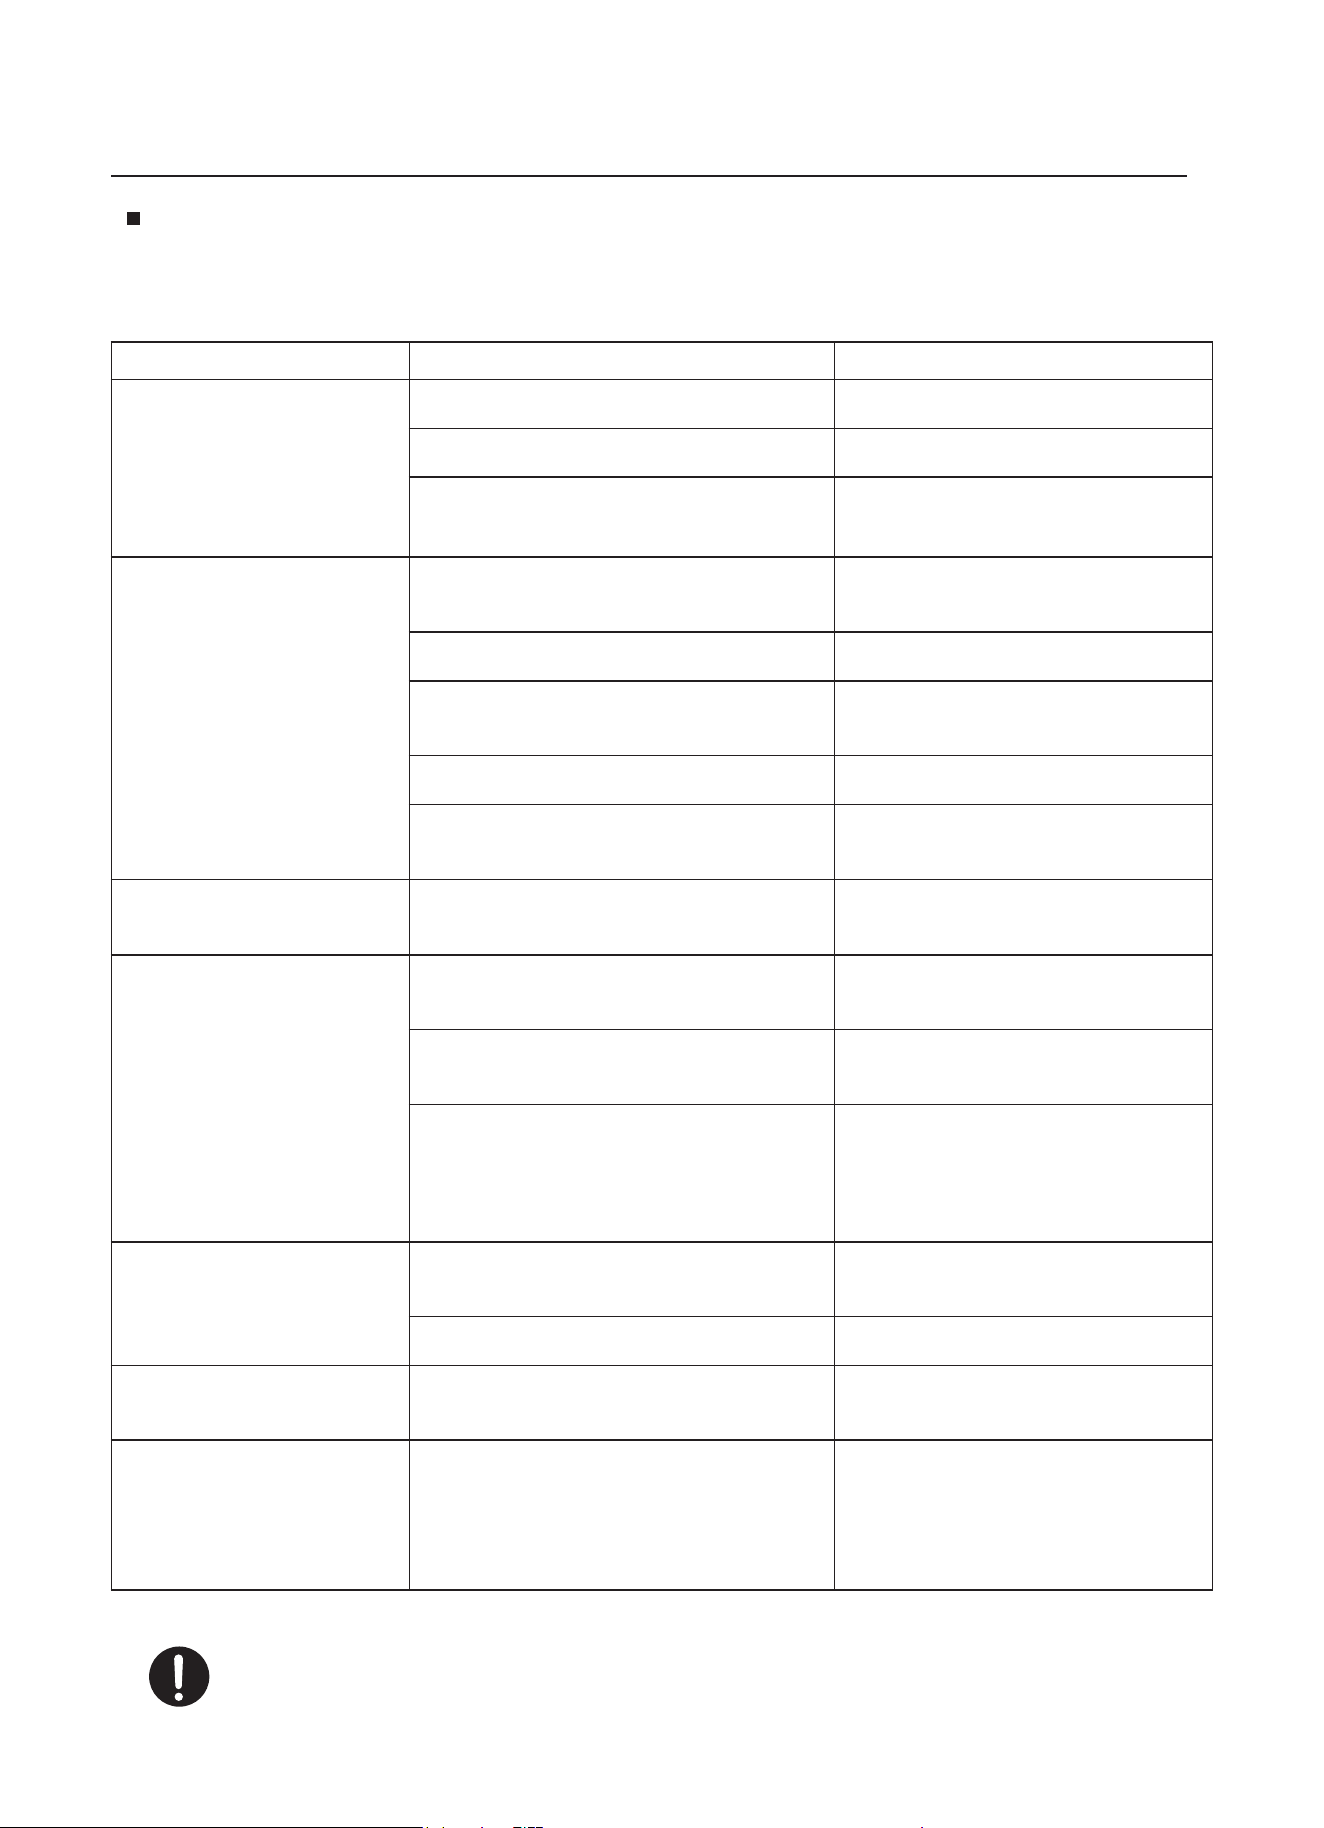
Trouble shooting
Not ignited
No Spark.
Check the electricity supply.
Badly ignited
The gas supply is closed.
The ignition plug is contaminated
with alien substance.
Noise made when
combusted and ignited
Flame goes out
when in use.
Yellow Flame
Different gas is used.
Check the gas used.
Unstable Flame
Gas Smell
Wipe alien substance with a
dry cloth.
Gas leakage
Stop using the product and
close the
middle valve.
Open
the window to ventilate.
Contact our service centre
by
using a phone outside.
22
Repairs should be performed by a licensed technician only.Improper repair may result in
considerable danger to you and others.
The burner lid is badly assembled. Assemble the lid correctly.
The gas supply is not completely
open.
Open the gas supply
completely.
The burners are wet.
Dry the burners lids carefully.
The holes in the flame spreader
are clogged.
Clean the flame spreader.
The burner lid is badly assembled.
Assemble the burner lid
correctly.
The flame supervision device is
contaminated with alien substance.
Open the gas supply
completely.
The burner lid is badly assembled.
Assemble the lid correctly.
Clean the flame supervision
device.
Product being cooked has boiled
over and extinguished the flame.
Turn off burner knob.Wait one
minute and reignite zone.
A strong draught may have blown
the flame out.
Please turn off zone and check
cooking area for draught such
as open windows.Wait one
minute and reignite zone
The holes in the flame spreader
are clogged.
Clean the flame spreader.
The burner lid is badly assembled.
Assemble the burner lid
correctly.
Ŷ+RZHYHUVRPHPLQRUSUREOHPVFDQEHUHVROYHGDVIROORZV
Problem
Probable cause
Solution
Ŷ,ISUREOHPLVQRWVROYHGSOHDVHFRQWDFWFXVWRPHUFDUH centre.

CERTIFICADO DE GARANTÍA
Imprescindible la presentación de la factura de compra acompañada del presente certificado de garantía.
Riesgos cubiertos.
Este aparato está garantizado contra cualquier defecto de funcionamiento, siempre que se destine a uso doméstico,
procediéndose a su reparación dentro del plazo de garantía y sólo por la red de SAT autorizados.
Nuestros electrodomésticos Corberó cuentan con la garantía legal del fabricante que cubre cualquier avería o defecto durante36
meses, desde su fecha factura de 1 de enero del 2022. En caso de que fuera necesario, nosotros nos ocupamos de cualquier posible
incidencia siempre que se deba a un componente defectuoso o fallo de fabricación.
Excepciones de garantía.
• Que la fecha del certificado no coincida con la fecha de venta de la factura original.
• Averías producidas por golpe, por caída o cualquier otra causa de fuerza mayor.
• Si el apa
rato ha sido manipulado por personal no autorizado.
• Las averías producidas o derivadas como consecuencia de un uso inadecuado, por defectos de instalación,
por introducir modificaciones en el aparato que alteren su funcionamiento.
• Puestas en marcha, mantenimiento, limpiezas, componentes sujetos a desgaste, lámparas, piezas estéticas,
oxidaciones, plásticos, gomas, carcasas y cristales.
“ESTAS EXCEPCIONES ANULAN LA GARANTÍA, SIENDO LA REPARACIÓN CON CARGO AL CLIENTE”
Periodo amparado en aparatos según ley de garantias en la venta de bienes de consumo Ley vigente es “RD 7/2021”
Horario de atención Lunes a Viernes de 9h00 a 19h00. Teléfono de contacto_ 911 08 08 08 Mail de contacto_ [email protected] web_ www.corbero.es
Dirección de Servicio técnico oficial_Vidal i Ribes 8-10 08950 Esplugues de Llobregat Barcelona
Sevicio Técnico Oficial: 911 08 08 08
Los hornos microondas (a excepción de los integrables) y los hornos sobremesa en el caso de cualquier incidencia de
funcionamiento, deben de llevarse al servicio técnico más próximo por parte del cliente. No se recojen ni reparan en el
domicilio.
•
Garantía termos eléctricos. Garantía de 3 años incluyendo los costes de desplazamiento y mano de obra que
correspondan de la reparación del producto, teniendo que tener un mantenimiento una vez cada 12 meses.
Especialmente si Ud. ha instalado un aparato a gas, tenga presente como titular de la instalación, la obligatoriedad de
realizar una revisión completa de los equipos, (según Real Decreto 238 / 2013, del 5 Abril. RITE. IT3, M. Lo termos
eléctricos y calderas que incluyen depósitos acumuladores de agua caliente, para que se aplique la prestación de la
Garantía, es obligatorio que el ánodo de magnesio esté operativo y que realice la función de protección
adecuadamente. Para ello es recomendable que el ánodo se revise bianualmente por el Servicio Oficial y sea renovado
cuando fuera necesario. Periodicidad que deberá ser anual en aquellas zonas con aguas críticas (contenido de CaCO3
superiores a 200mg/L, es decir a partir de 20ºfH de dureza). Depósitos sin el correcto estado del ánodo de protección, no
tienen la cobertura de la garantía. Independientemente del tipo de depósito o producto, todas las válvulas de
sobrepresión de calefacción o a.c.s., deberán ser canalizadas para evitar daños en Ia vivienda por descargas de agua. La
garantía del producto no asume los daños causados por Ia no canalización del agua derramada por esta válvula.
•
CERTIFICATE OF GUARANTEE
The presentation of the purchase invoice accompanied by this guarantee certificate is essential.
Covered Risks.
This appliance is guaranteed against any malfunction, provided that it is intended for domestic use, proceeding to its repair within
the warranty period and only by the authorized SAT network.
Our Corberó appliances have the manufacturer's legal warranty that covers any breakdown or defect for 36 months, from the
invoice date of January 1, 2022. If necessary, we take care of any possible incident whenever it is due to a defective component or
manufacturing fault. Warranty Exceptions
Warranty Exceptions
•
That the date of the certificate does not coincide with the date of sale of the original invoice.
•
Faults produced by blow, by fall or any other cause of force majeure.
•
If the device has been manipulated by unauthorized personnel.
•
Faults produced or derived as a consequence of improper use, installation defects, or modifications to the device that
alter its operation.
•
Start-up, maintenance, cleaning, components subject to wear, lamps, aesthetic parts,
oxidation, plastics, rubbers, housings and crystals.
“THESE EXCEPTIONS VOID THE WARRANTY, THE REPAIR BEING CHARGED TO THE CUSTOMER”
Period covered in devices according to the law of guarantees in the sale of consumer goods Current law is “RD 7/2021”
Hours of operation Monday to Friday from9h00 a 19h00. Telephone contact_ 911 08 08 08 Contact email_ [email protected] web_ www.corbero.es
Official Technical Service Address_Vidal i Ribes 8-10 08950 Esplugues de Llobregat Barcelona
Official Technical Service: 911 08 08 08
Microwave ovens (with the exception of built-in ones) and tabletop ovens in the event of any incident of
operation, they must be taken to the nearest technical service by the customer. They are not collected or repaired at
home.
•
Electric thermos guarantee. 3-year warranty including travel and labor costs that correspond to the repair of the
product, having to have maintenance once every 12 months. Especially if you have installed a gas appliance, keep in
mind as the owner of the installation, the obligation to carry out a complete review of the equipment, (according to
Royal Decree 238 / 2013, of April 5. RITE. IT3, M. Lo thermos electrical and boilers that include hot water storage tanks,
for the benefit of the Guarantee to apply, it is mandatory that the magnesium anode is operational and that it performs
the protection function adequately.For this, it is recommended that the anode be checked biannually by the Official
Service and is renewed when necessary Periodicity that must be annual in those areas with critical waters (CaCO3
content greater than 200mg/L, that is, from 20ºfH of hardness) Deposits without the correct state of the protection
anode are not covered by the warranty Regardless of the type of tank or product, all heating or DHW overpressure
valves must be channeled to avoid damage and n the house due to water discharges. The product warranty does not
cover damages caused by not channeling the water spilled by this valve.
•