©COPYRIGHT AVPRO GLOBAL HOLDINGS 2023 - 22410 70TH AVENUE WEST, MOUNTLAKE TERRACE, WA 98043
1
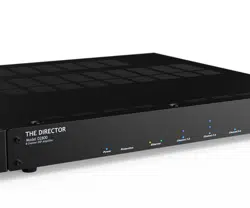
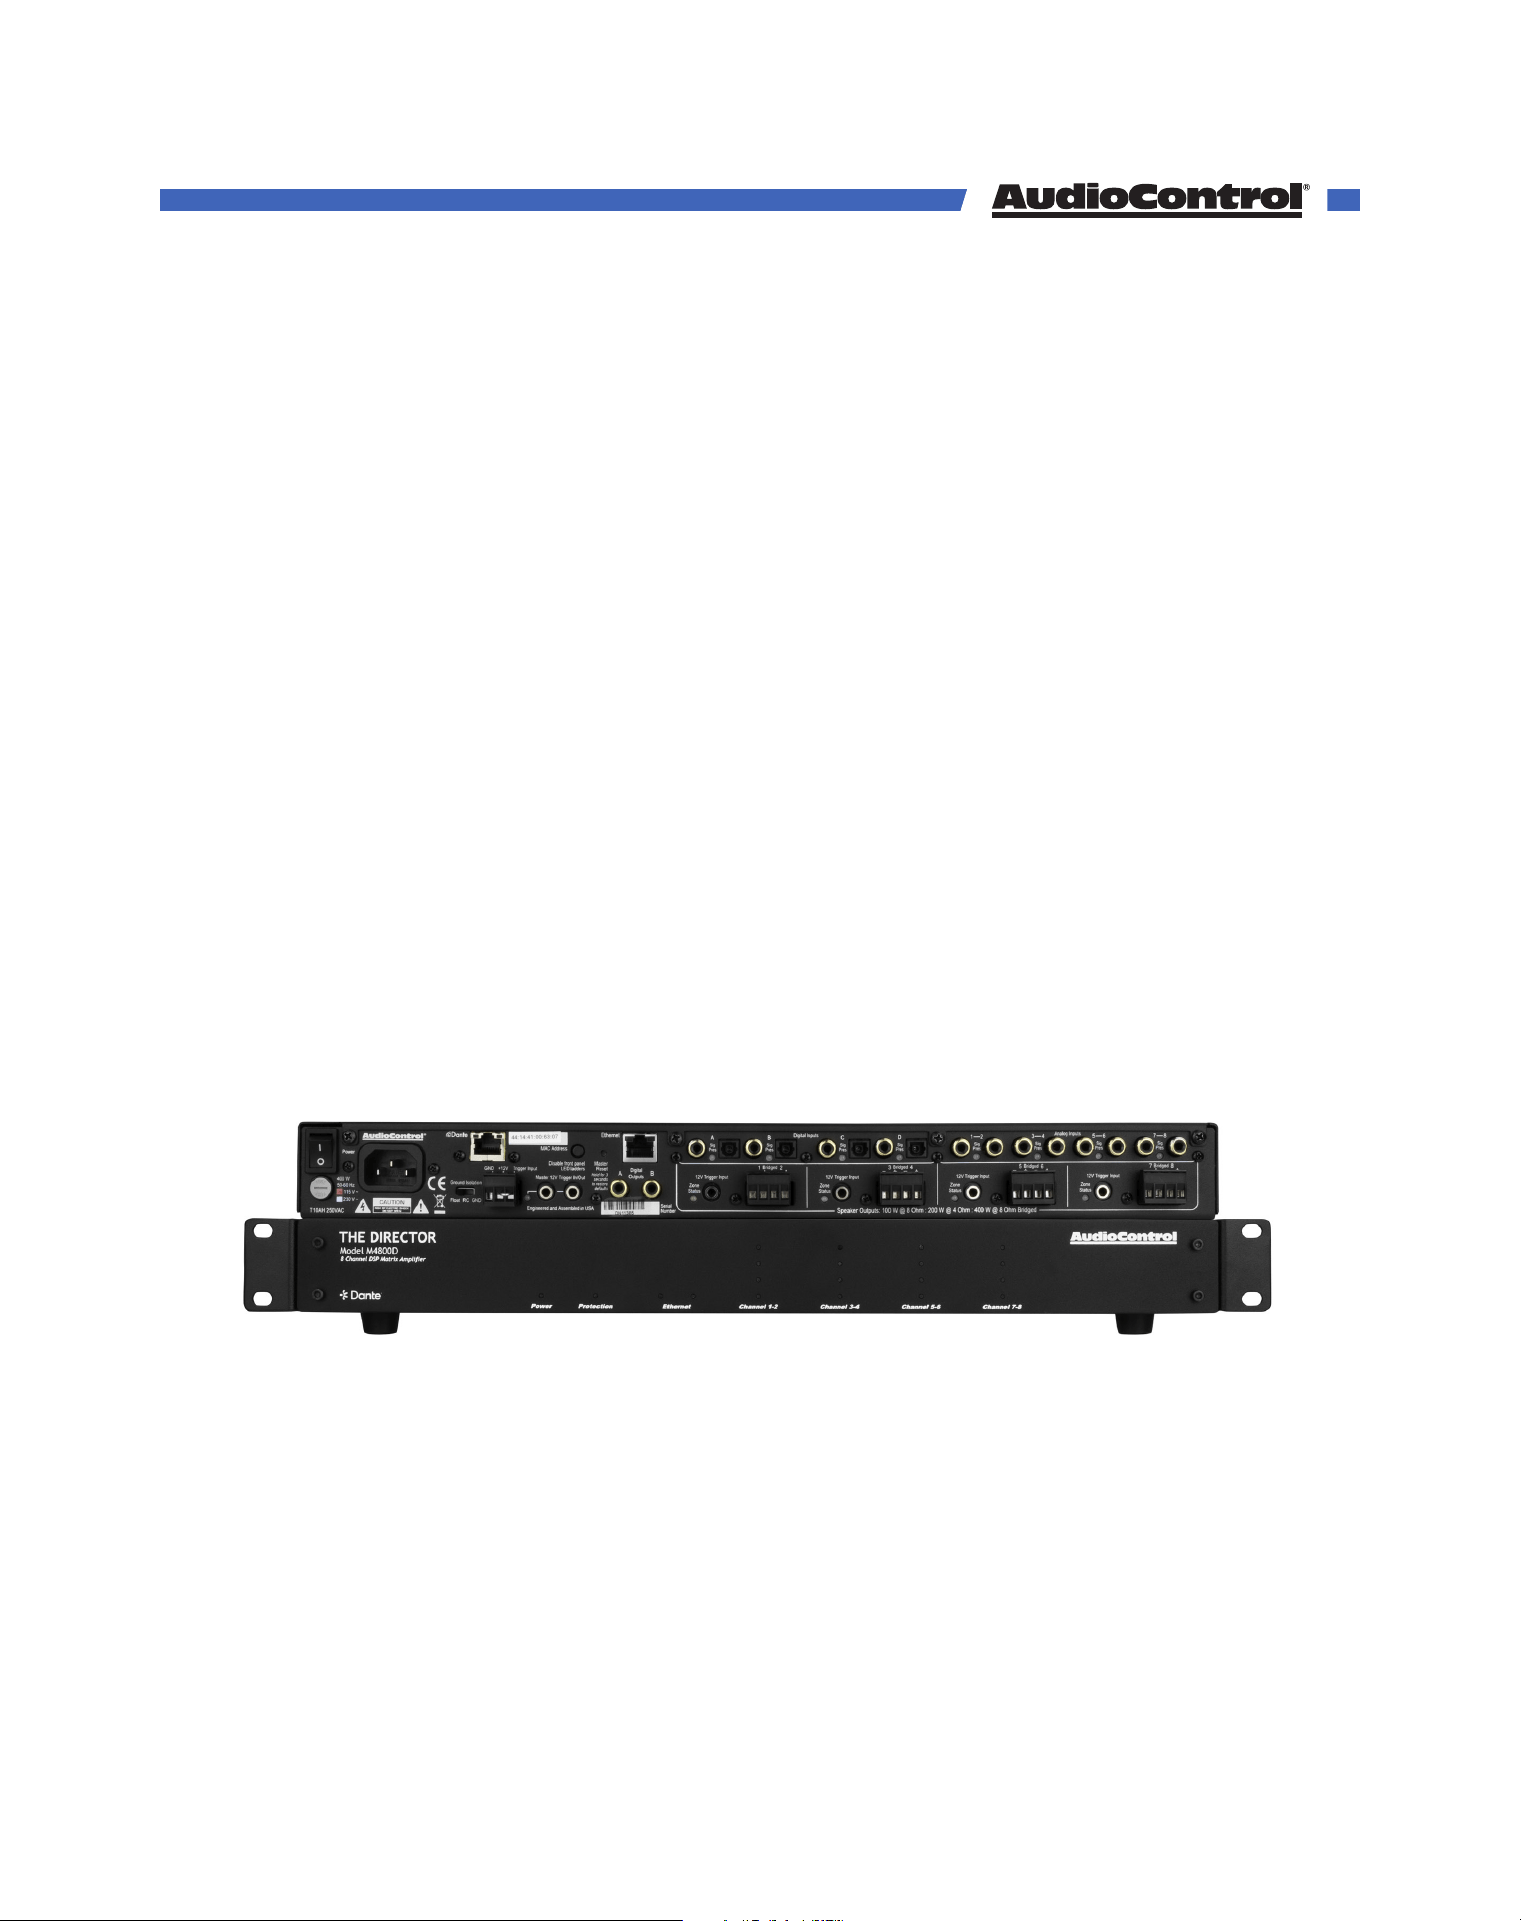
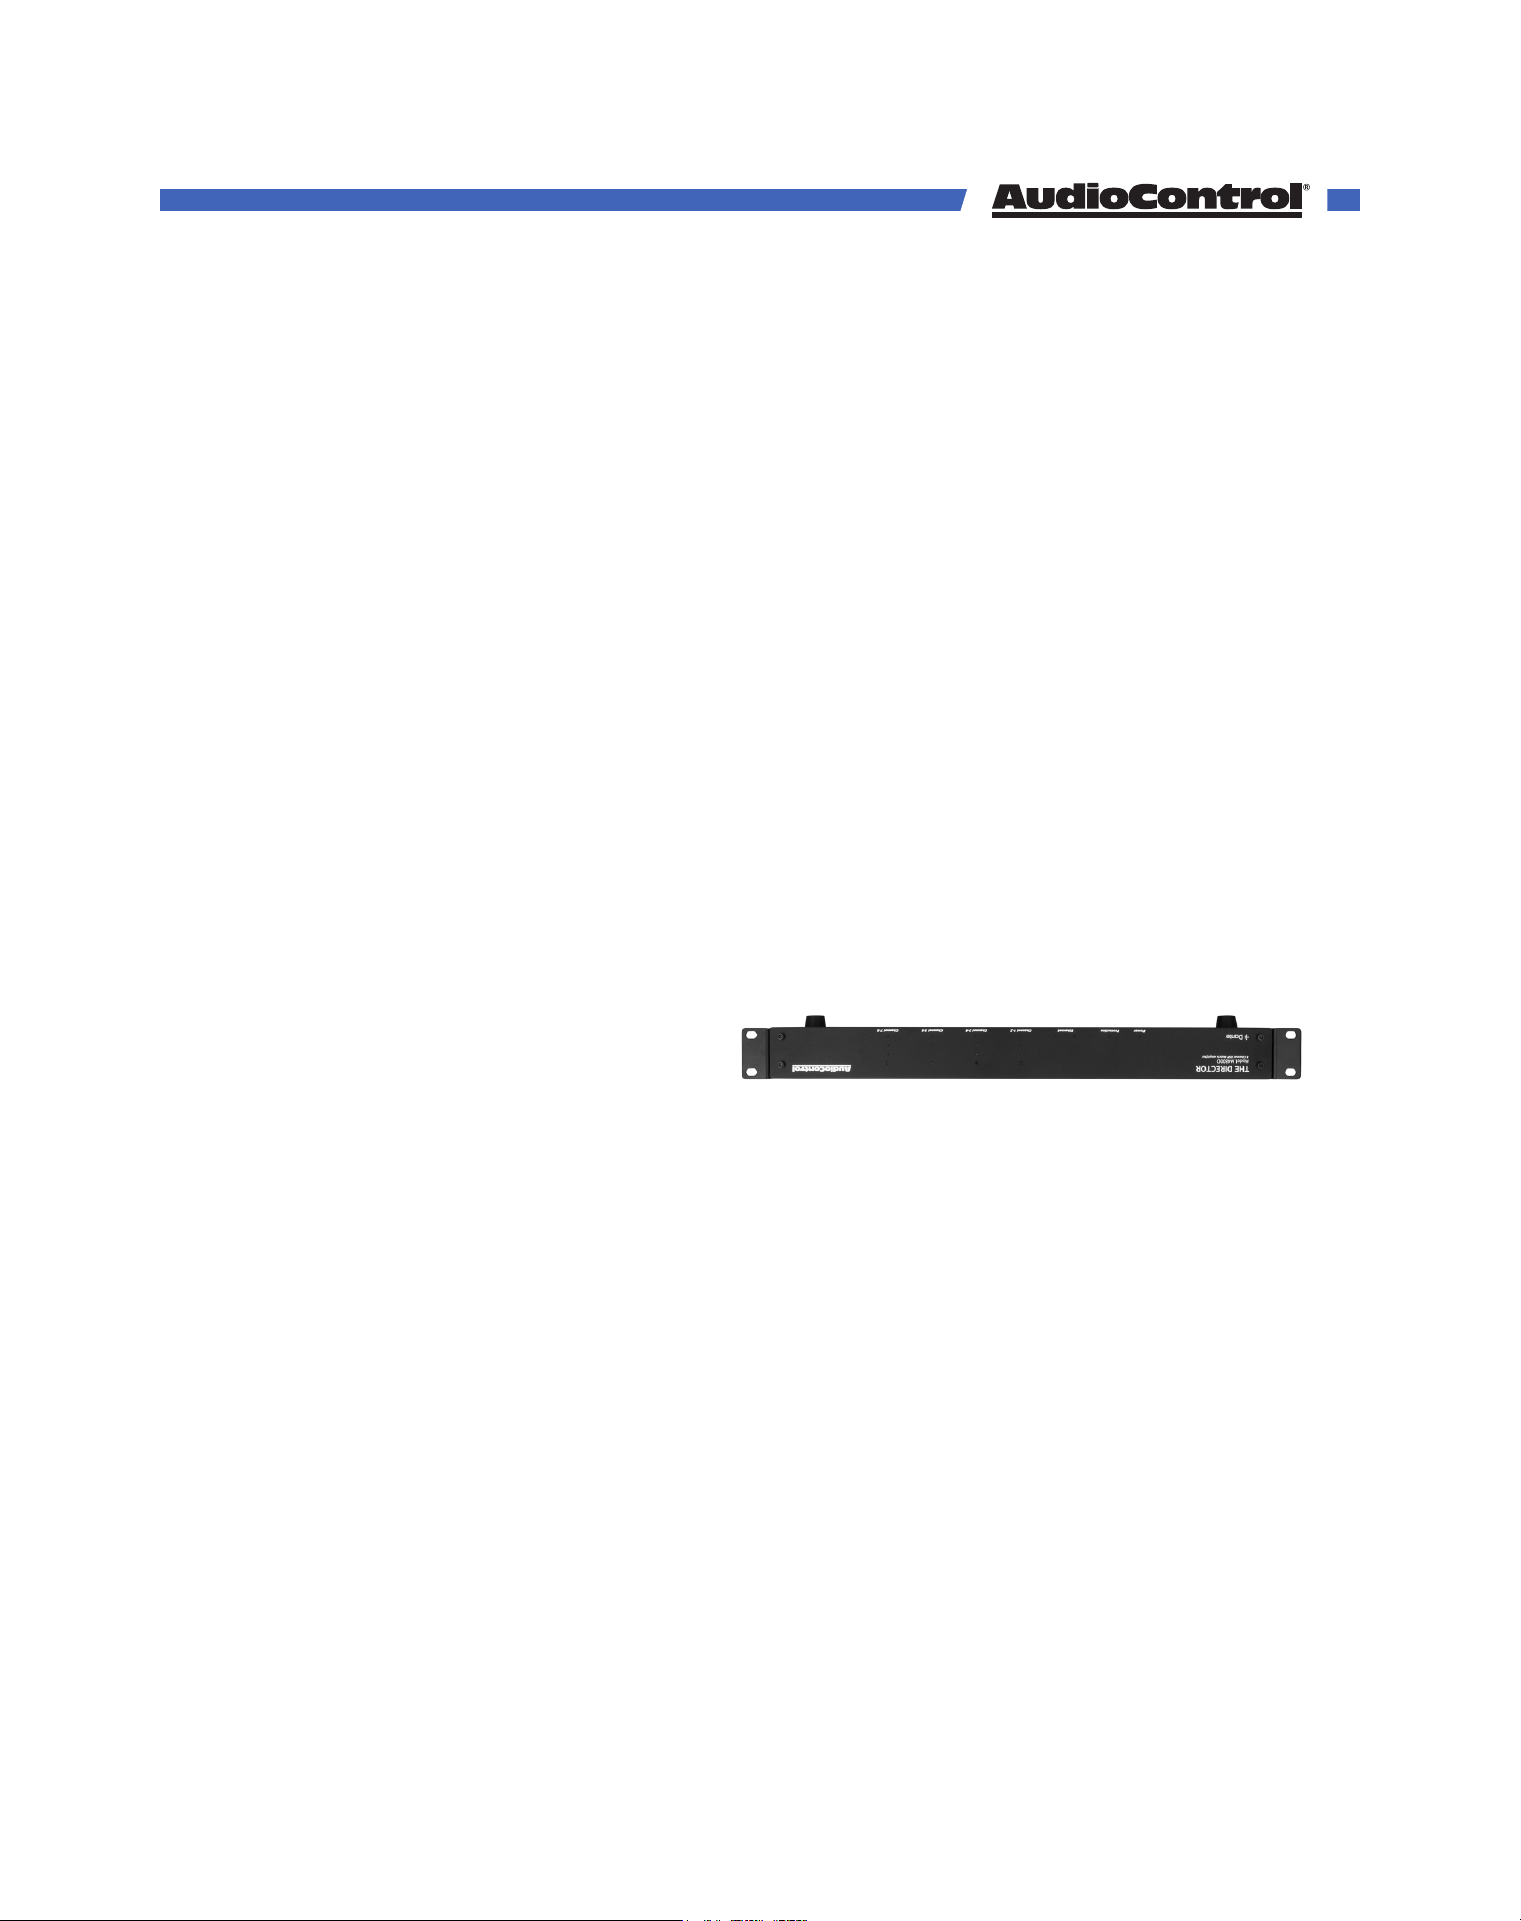
Front
8 Channel Multi-Zone Network Amplifier with Dante
The Director
Model M4800D
User Manual

Table of Contents
Introduction ........................................................................................................................................3
Features ........................................................................................................................................3
Whats in the box ..........................................................................................................................3
Specifications .....................................................................................................................................4
Compatible products .......................................................................................................................5
Front Panel Overview .......................................................................................................................6
LED Function Panel ...........................................................................................................................7
Rear Panel Overview ........................................................................................................................8
Speaker Connections .......................................................................................................................11
12 Volt Triggers ...................................................................................................................................12
Ventilation ...........................................................................................................................................14
Connecting to the Web GUI ............................................................................................................15
Quick Start Guide .............................................................................................................................. 16
Tour of the Web GUI .........................................................................................................................19
Advanced Setup: ...............................................................................................................................30
Dante Configuration ..................................................................................................................30
EQ ...................................................................................................................................................34
Firmware Update ..............................................................................................................................37
Troubleshooting ................................................................................................................................. 38
FAQ ....................................................................................................................................................... 40
Service .................................................................................................................................................41
Warranty .............................................................................................................................................42
Installation Notes ...............................................................................................................................44
Dante Boogie .....................................................................................................................................46
Thank you ...........................................................................................................................................46
©COPYRIGHT AVPRO GLOBAL HOLDINGS 2023 - 22410 70TH AVENUE WEST, MOUNTLAKE TERRACE, WA 98043
2

Photo of what is in the box
• The Director Model M4800D
• Speaker connectors
• Trigger connector with jumper
• Power cord
• Rack-mounts
• A hint of oregano
Whats in the box
• Digital and analog input matrix
• High-resolution digital inputs, 32-96 kHz, 16/24-bit digital signals
• 100 watts per channel at 8 ohms, or 200 watts at 4 ohms, all channels actively driven
• Bridged for mono operation for 400 watts per bridged zone at 8 ohms.
• Discrete amp modules designed for long-term operation and optimal audio
performance.
• Superior sound quality
• Energy ecient Class D amplifier technology
• LightDrive Anti-clipping
• Control system integration
• Digital Signal Processing
• Graphic and Parametric equalization settings
• Customizable high-pass and low-pass crossover filters
• Speaker profiles designed by popular speaker manufacturers
• Dante spoken here
• Self resetting protection features.
• Backed by a conditional five-year warranty.
Features
When a whole-house audio system demands high levels of audio performance, but the
physical installation space is limited, the AudioControl Director M4800 is an ideal solutions.
Requiring only one rack space, the M4800D produces at least 100 watts per channel into
8 ohms, and 200 watts per channel into 4 ohms. With the addition of the Dante audio
network, the M4800D can seamlessly communicate with other AudioControl Dante
amplifiers, and share sources with other devices using the Dante Controller.
Introduction
©COPYRIGHT AVPRO GLOBAL HOLDINGS 2023 - 22410 70TH AVENUE WEST, MOUNTLAKE TERRACE, WA 98043
3
Inputs
Digital Inputs 4 Stereo Analog Local Inputs
Analog Inputs 4 Coaxial/TOSLINK S/PDIF Inputs
Dante Inputs 16 channels (Broadway chipset)
Input Sensitivity 1 Vrms for full output, level at maximum
Output
Amplifier Channels 8
Power Output 8Ω 100 W per channel
Power Output 4Ω 200 W per channel
Power Output (8 Ω Bridged Mono) 400 W
Minimum Speaker Load 4 Ω
Preamp Outputs 2 Coaxial Digital S/PDIF BUS Outputs
Dante Outputs 16 channels (Broadway chipset)
Performance
Signal to Noise Ratio >95 dB, A-wtd, ref full output
DAC Specifications 32 to 96 kHz sample rate, 16-/24-bit depth
Control
12 Volt Trigger Inputs +12 VDC or Dry Contact Closure
IP Control 10Base-T Ethernet TCP/IP
Communication Protocol HTTP or Telnet
AC Power Requirements
Standby <1.9 Watts
Idle (main power on, all channels o) 41 watts
All channels 1/8th rated power 186 watts
Full power (20 A residential service limited) 1800 watts
BTU/HR Output
Standby 6.5 BTU/hr
Idle (main power on, all channels o) 140 BTU/hr
All channels 1/8th rated power 270 BTU/hr
Full power (20 A residential service limited) 1560 BTU/hr
Weight and Dimensions
Dimensions 17” W x 15.5” D x 1.75” H (1 RU)
Weight 16.5 lbs. (9.5 kg)
Specifications
©COPYRIGHT AVPRO GLOBAL HOLDINGS 2023 - 22410 70TH AVENUE WEST, MOUNTLAKE TERRACE, WA 98043
4
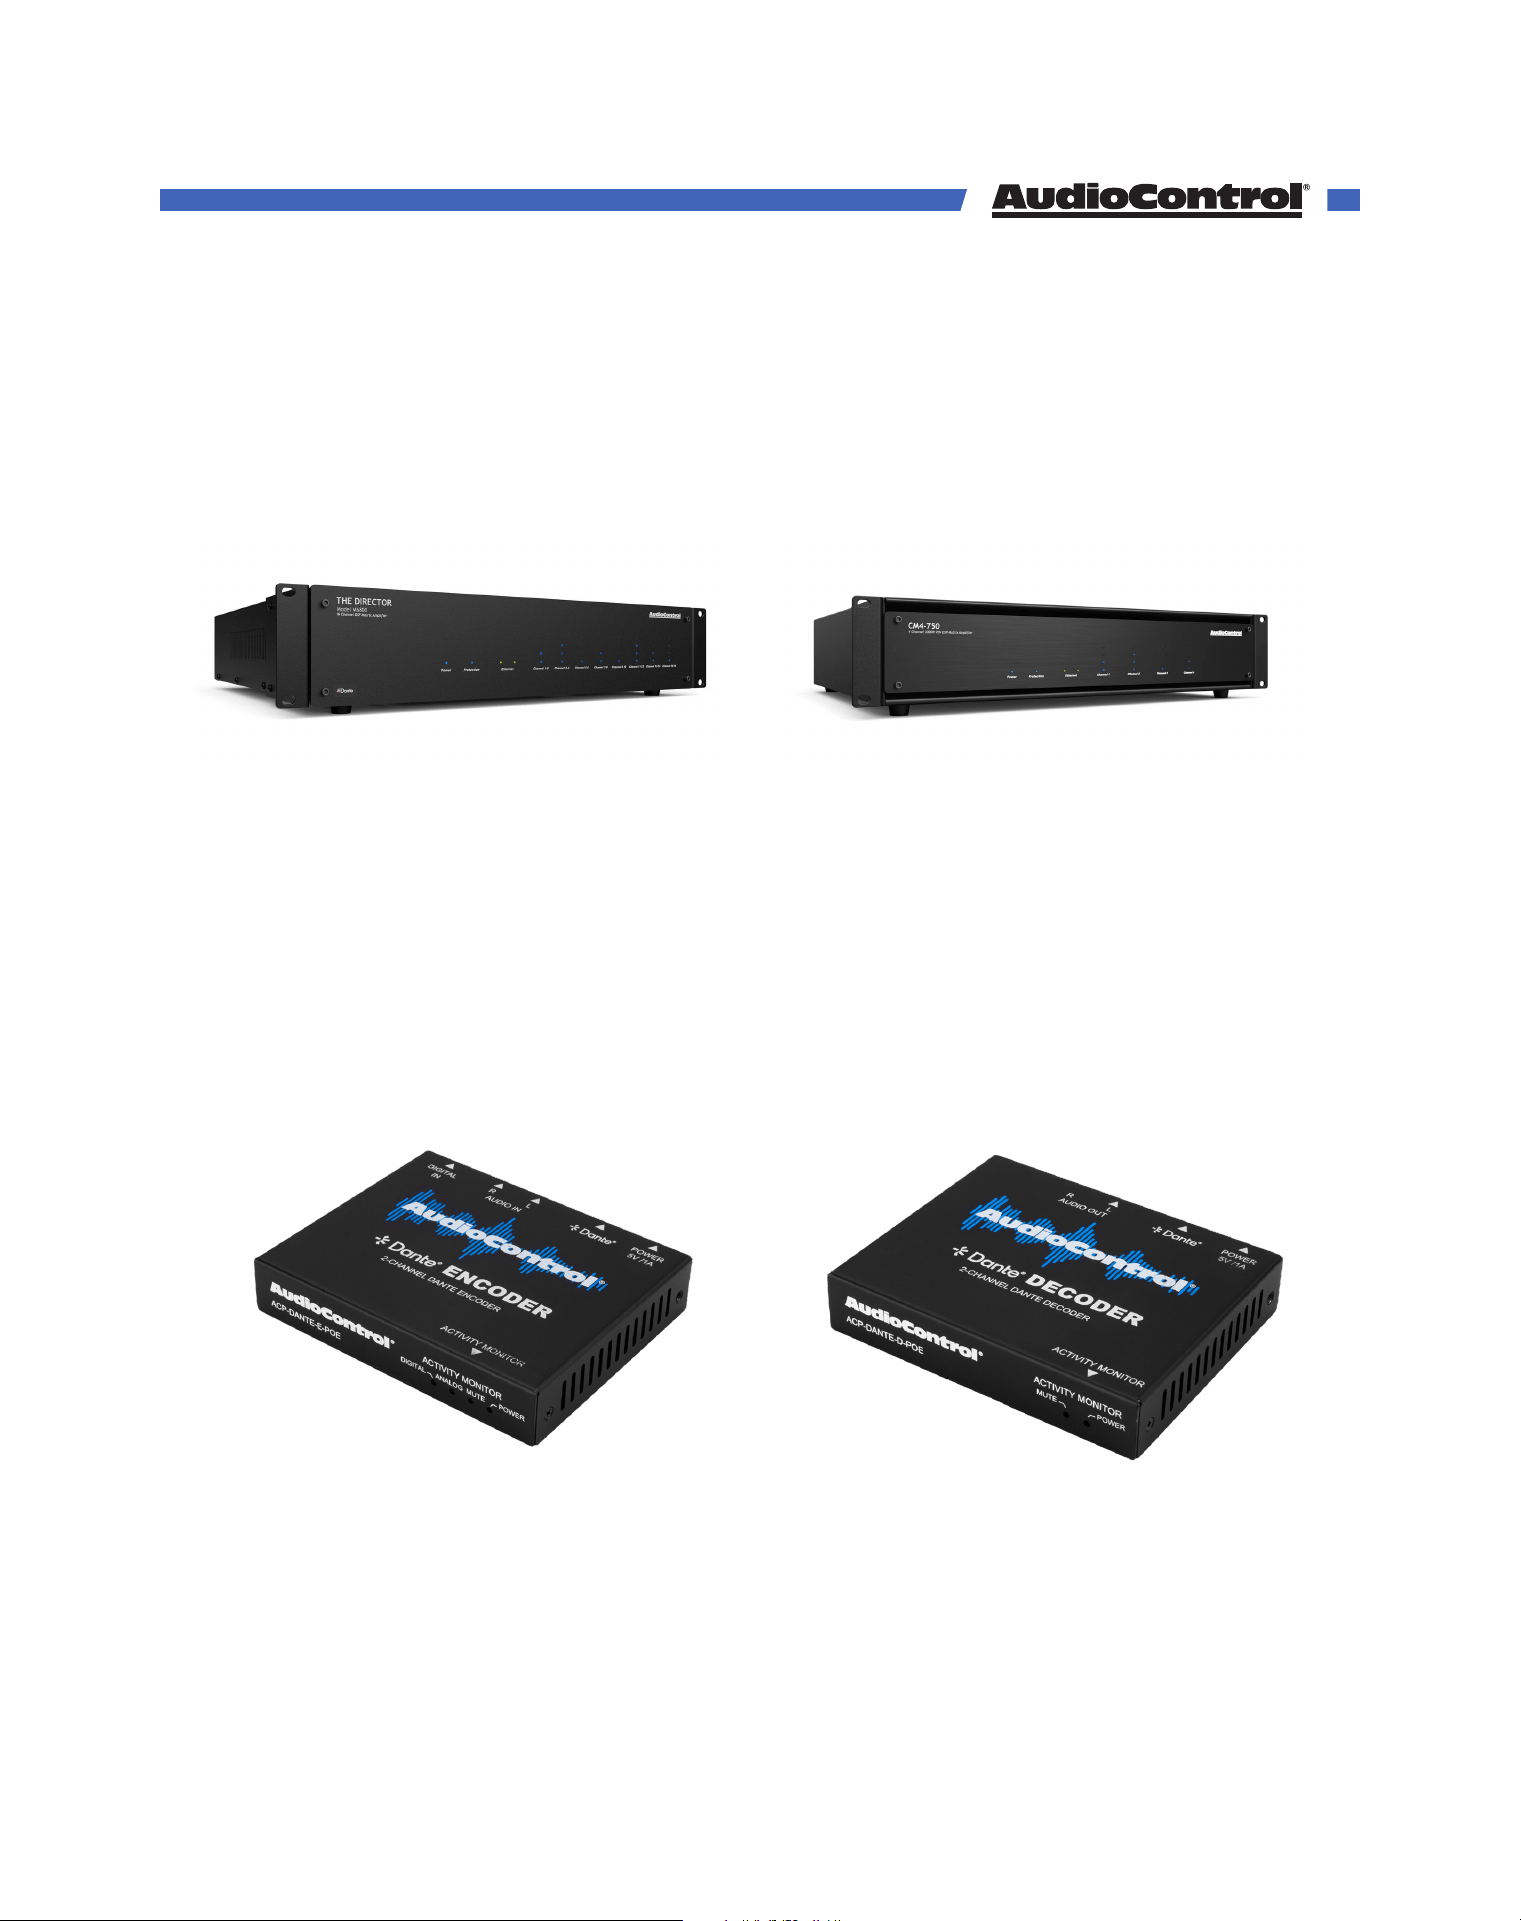
Dante Decoder
ACP-DANTE-D-POE
• Send Dante audio signal to non-Dante
amplifiers
Dante Encoder
ACP-DANTE-E-POE
• Add audio signals from anywhere in the
system onto the Dante network.
CM4-750 Dante
SKU Number
• 4 Channel 70V Matrix amplifier
• Easily share Dante sources with M4800D
M6800D
ACP-M6800D
• 16 Channel Matrix amplifier
• Easily share Dante sources with M4800D
Compatible Products
©COPYRIGHT AVPRO GLOBAL HOLDINGS 2023 - 22410 70TH AVENUE WEST, MOUNTLAKE TERRACE, WA 98043
5
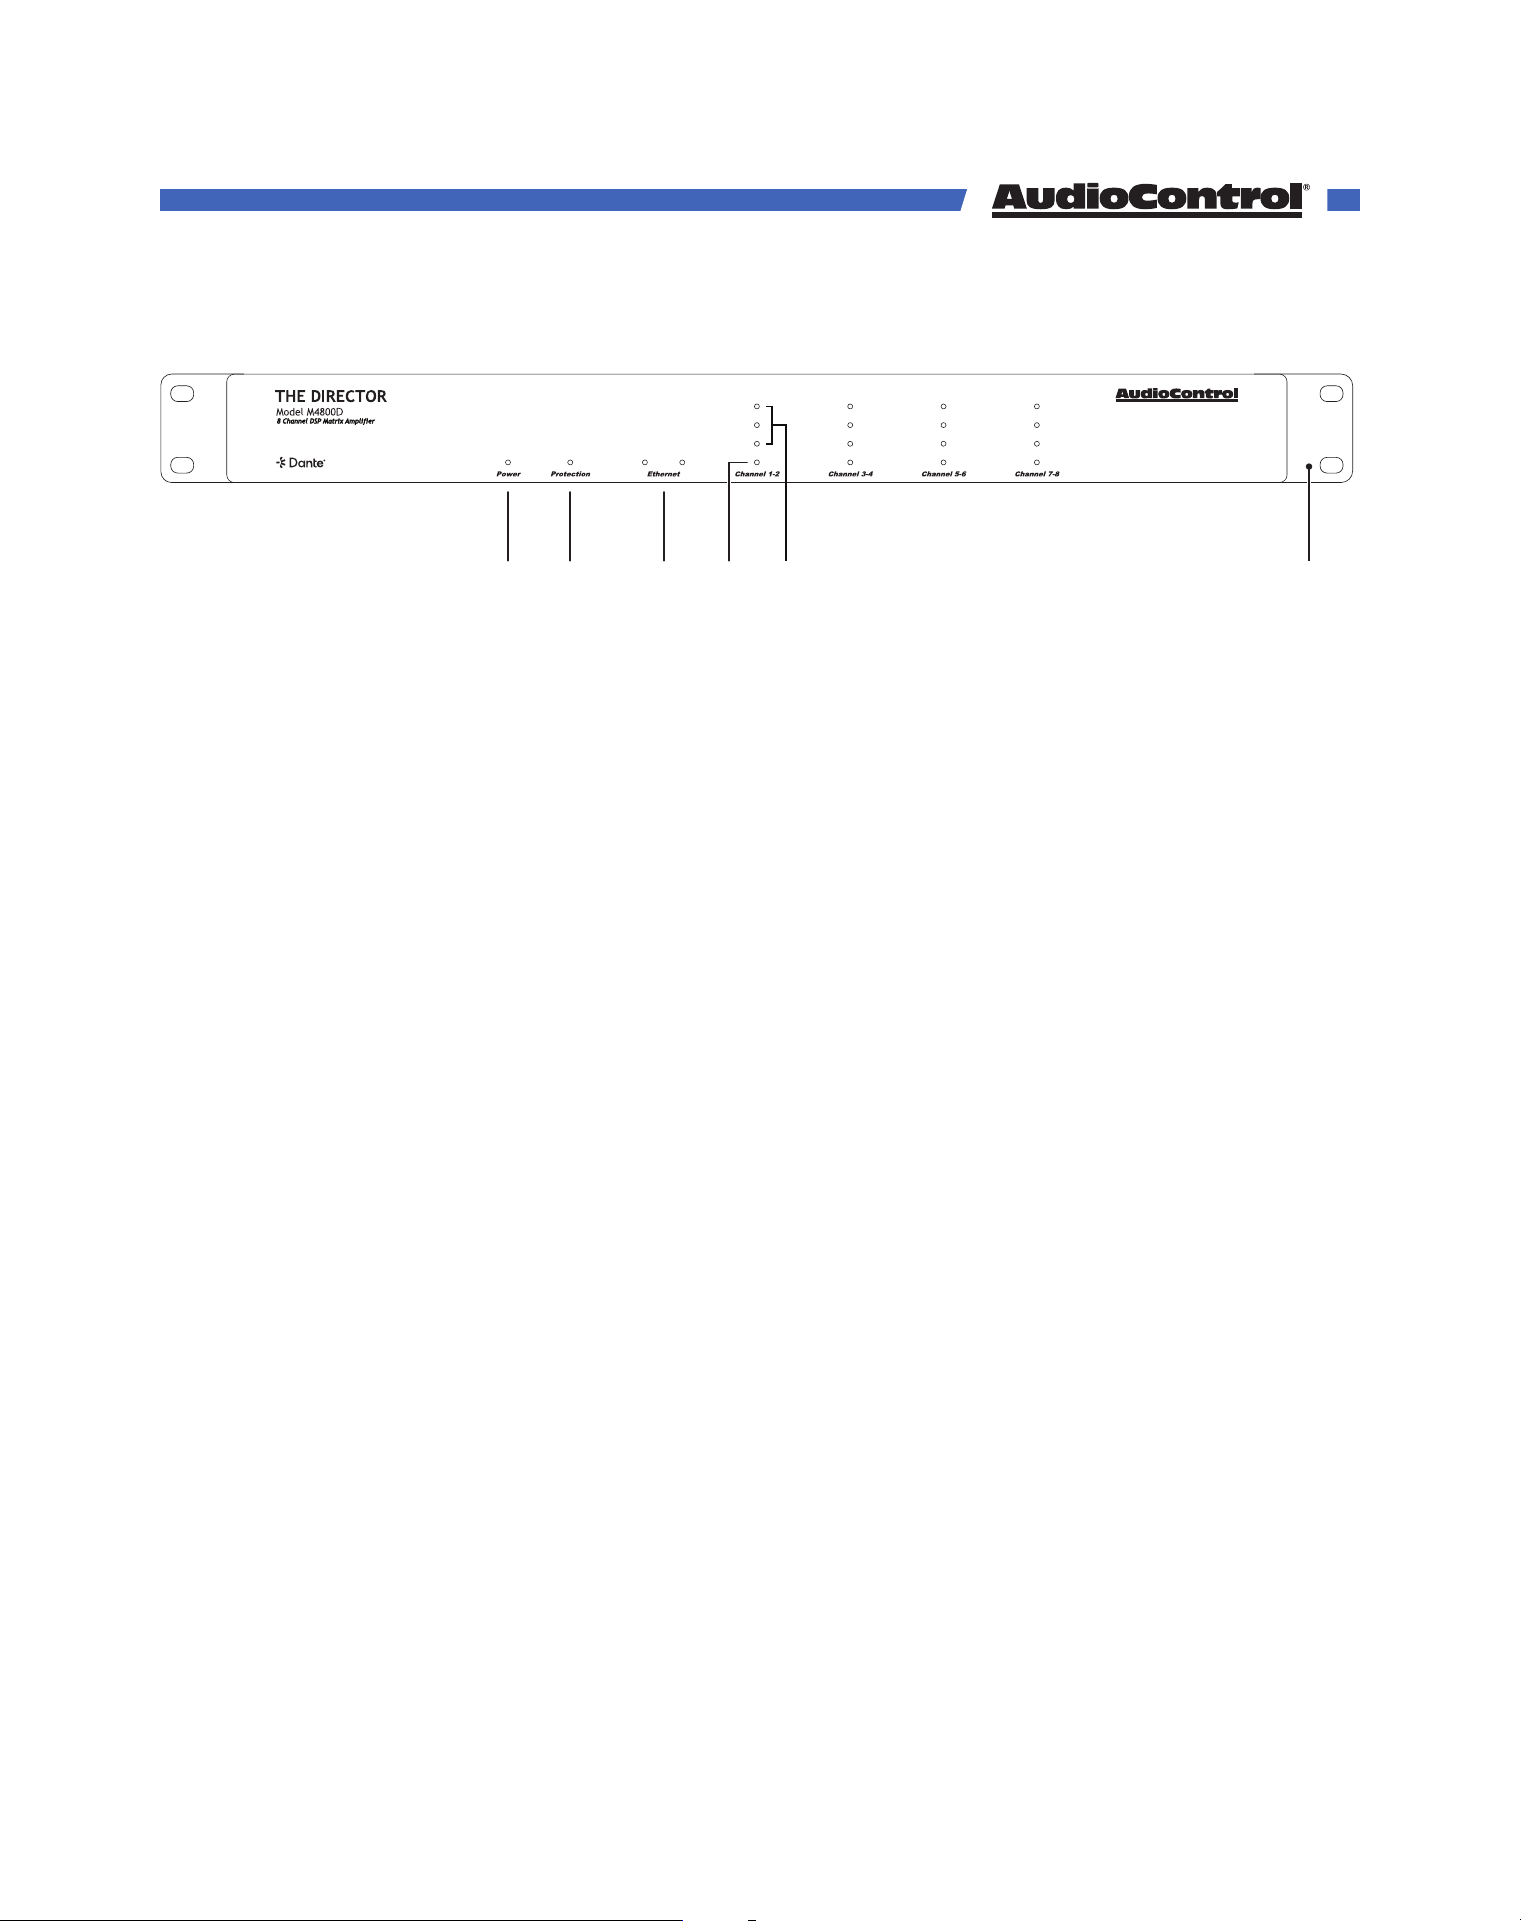
1 2 3 4 5 6
1. Power LED - This dual color LED indicates when the unit is in standby, on, or o.
Red: The unit is in standby and is ready to be turned on via Ethernet or 12v Trigger.
Blue: The unit is on.
O: The unit is o.
2. Protection LED - This red LED will illuminate briefly during turn on/o phases, and if a
fault is detected in any amp channel or the power supply. If a fault is detected, the unit
will go into its protection mode to prevent any damage to loudspeakers and to allow
cooling.
3. Ethernet LEDs - These indicate the status, readiness, and willingness of The Director’s
Ethernet communications protocol. The green LED glows when Ethernet is connected
and operational, the yellow LED blinks during data activity.
4. Zone Status LED - This dual color LED indicates when the zone is active, in standby, or
in fault mode.
Red: The zone has detected a fault, such as DC oset or a short circuit.
Blue: The zone is active.
O: The zone is in standby.
5. Zone Level LEDs - These three LEDs light from the bottom to the top depending on the
zone’s output level (-33, -20, -10 dBFS). These LEDs can be turned o using the rear
panel switch.
6. Rack-Mount Ears - The unit comes supplied with removable rack-mount ears. These
allow the unit to be rack mounted in a standard 19” wide rack, with a 1U height. Use
standard rack-mount screws and washers to secure the unit in a rack. The unit does not
have to be supported at the rear if the rack is located in a fixed location.
To remove the rack ears (making the unit 17” wide), first unplug the power cord, undo
the four screws securing each ear to the side of the chassis, and remove the ears.
Replace the screws securely back into the chassis. Do not remove any of the other
screws from the chassis or top cover. Keep the rack ears in a safe place.
Front Panel Overview
©COPYRIGHT AVPRO GLOBAL HOLDINGS 2023 - 22410 70TH AVENUE WEST, MOUNTLAKE TERRACE, WA 98043
6
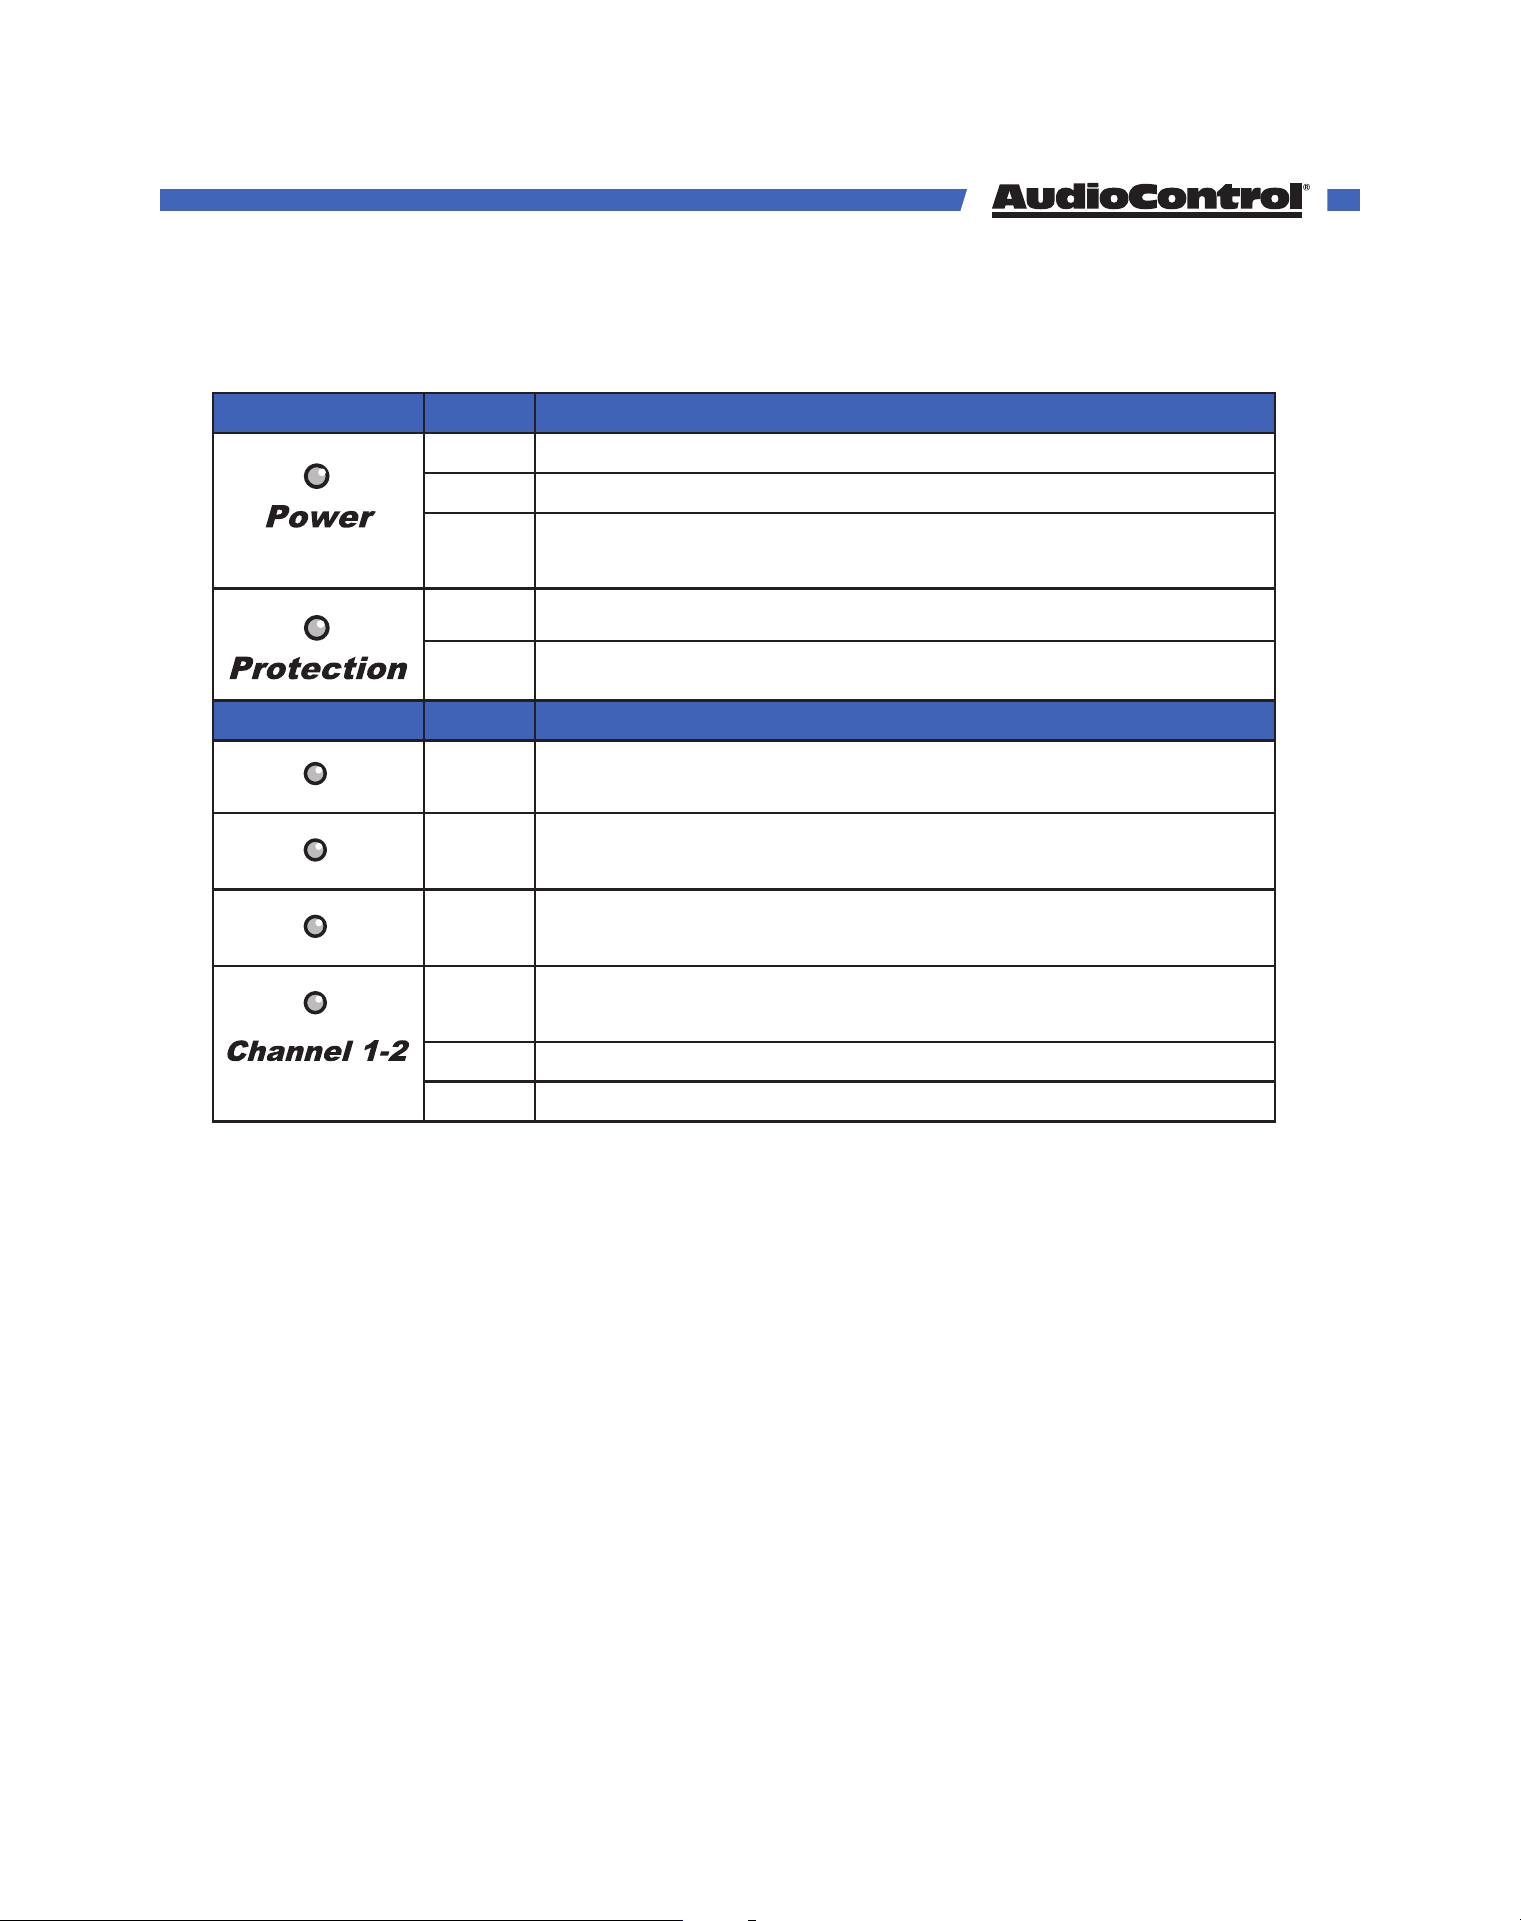
LED
Color Description
Red The unit is in standby mode
Blue The unit is on
O
The unit is powered o, or all the lights are o in your
town
Red The unit has detected a fault and is in protect mode*
O The unit is operating normally, or it is powered o
ZONE LEDs
Color Description
Blue -10 dBFS zone output level
Blue -20 dBFS zone output level
Blue -33 dBFS zone output level
Red
The zone has detected a fault, or a smooth-jazz
saxophone solo, and is in protect mode
Blue The zone is active
O The zone is in standby
LED Function Panel
©COPYRIGHT AVPRO GLOBAL HOLDINGS 2023 - 22410 70TH AVENUE WEST, MOUNTLAKE TERRACE, WA 98043
7
Zone
Status
Zone
Status
Zone
Status
Zone
Status
50-60 Hz
400 W
115 V ~
230 V ~
Speaker Outputs: 100 W @ 8 Ohm : 200 W @ 4 Ohm : 400 W @ 8 Ohm Bridged
Serial
Number
Power
T10AH 250VAC
B
Digital Inputs Analog Inputs
CDAB
1
2
4 13 16149
6
5 10 12 1711 157
8
3
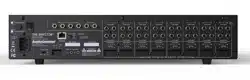
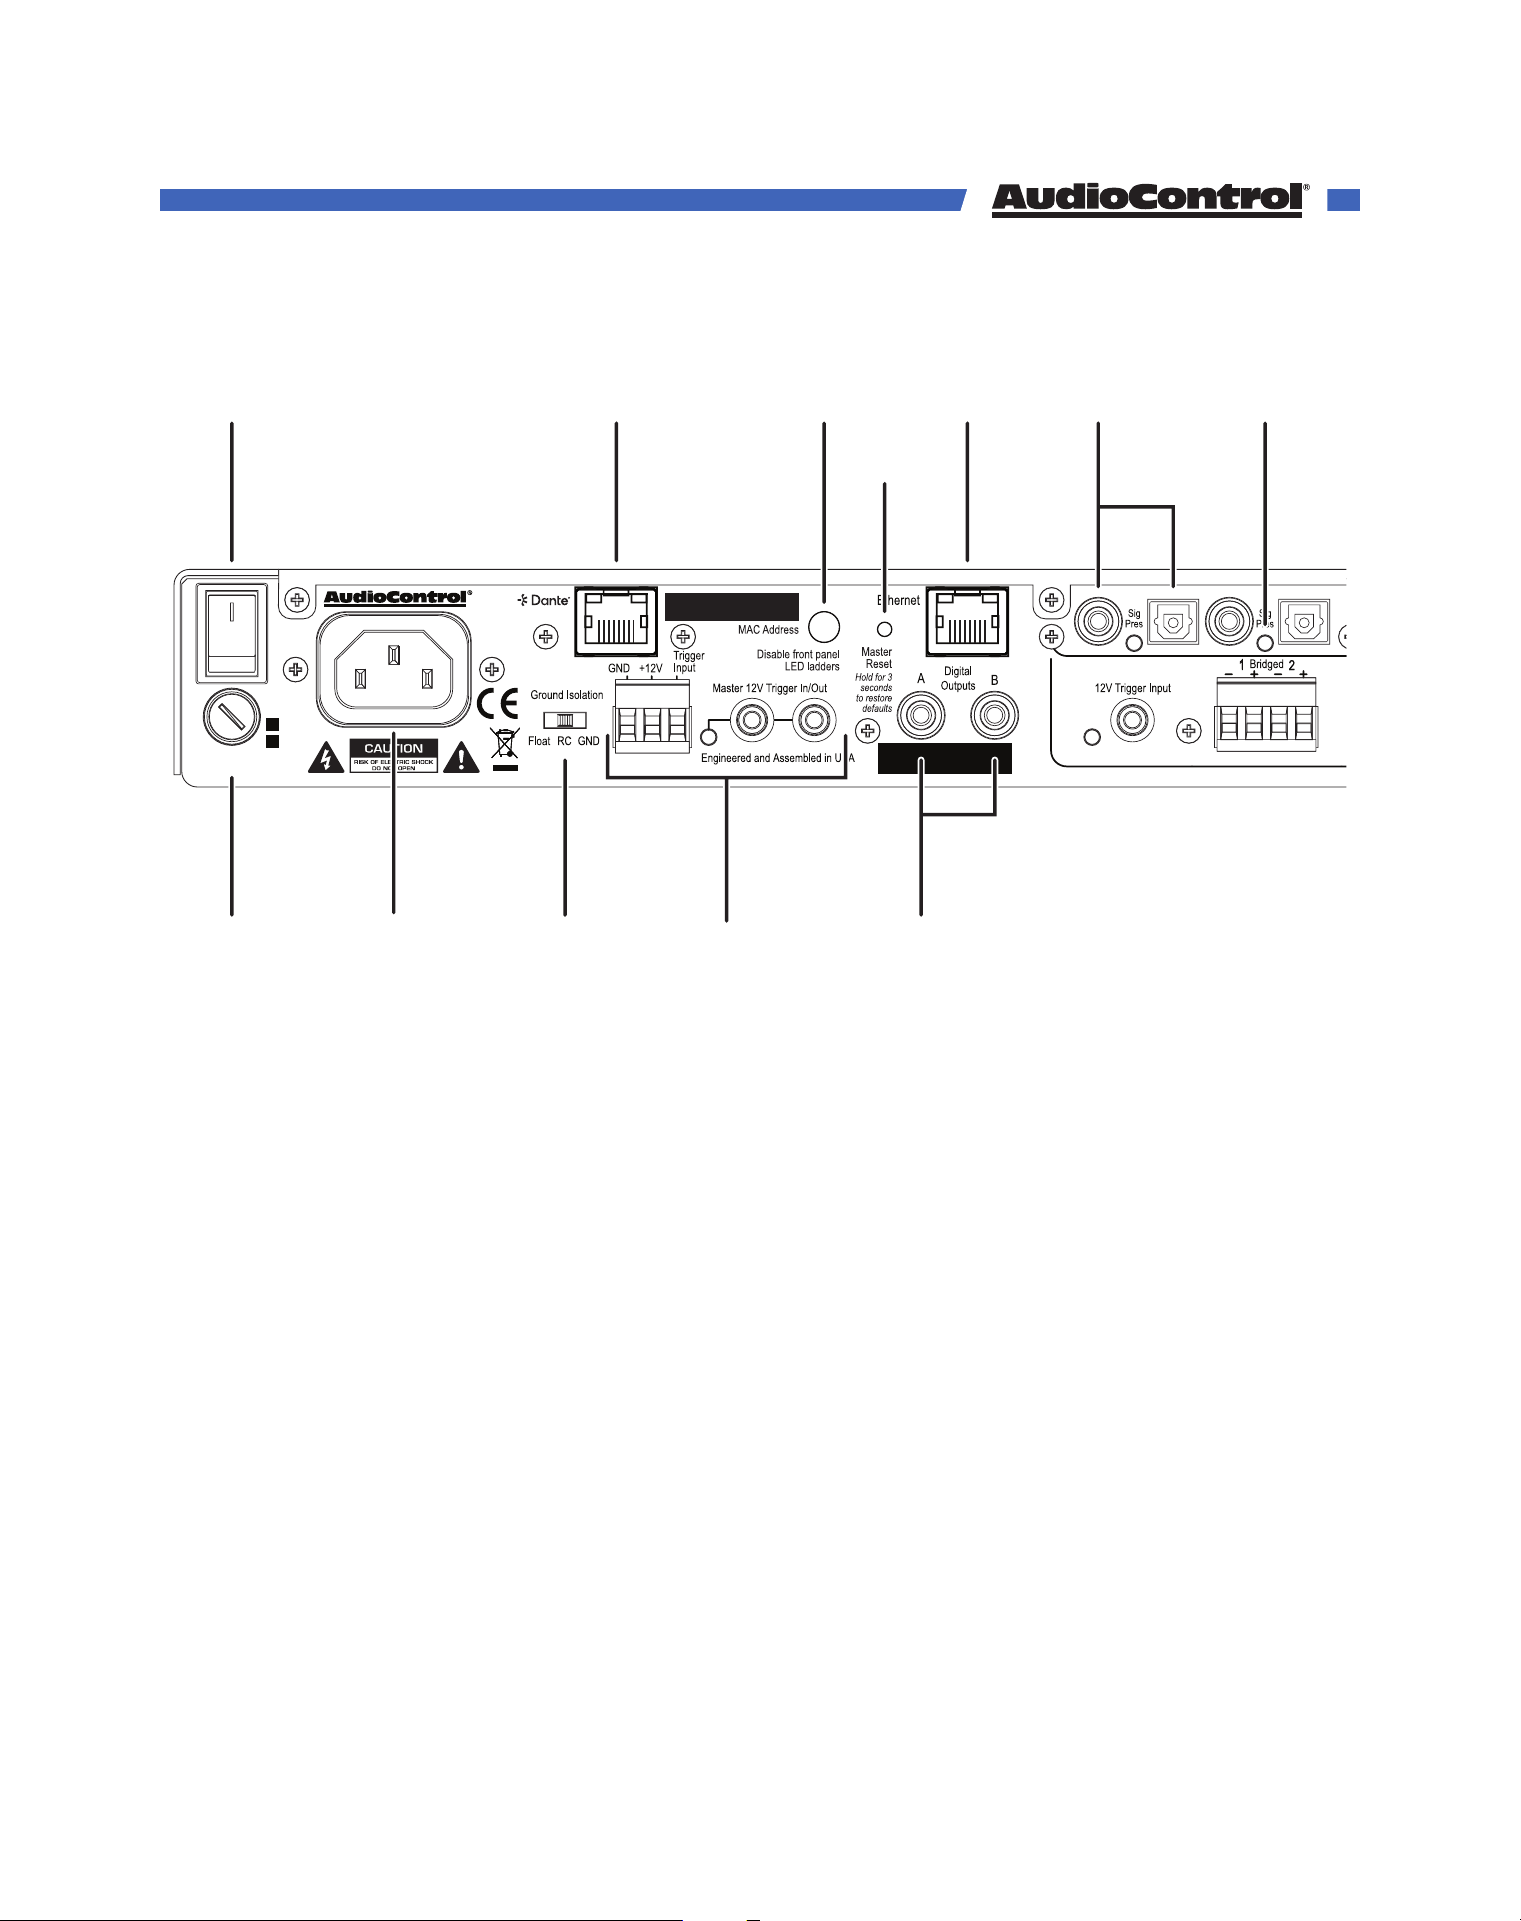
1. AC Power Switch - This switch shuts o the main AC power. Leave this switch on, and use
IP Commands or 12v triggers to turn the amp on and put it into standby.
Also turn the power switch o during lightning storms, wind storms with frequent power
outages, or when a giant asteroid is heading toward the power station (again).
2. AC Fuse - The main power supply fuse may be checked or replaced. Make sure that the
power cord is unplugged, a use a flat-headed screwdriver to undo the fuse carrier from
the fuse holder. If necessary, replace with the exact same type indicated on the unit. If the
fuse blows again, immediately unplug the power cord and contact our fine folks in tech
support.
3. AC Input - Connect the supplied AC power cord securely to this input. Plug the other end
into an AC mains outlet of the correct voltage rating for your unit. They are either 100 -120
VAC (50 – 60 Hz) or 220 – 240 VAC (50 – 60 Hz), indicated by the marking by the AC Fuse.
The voltage setting is not user-settable. This unit is a class 1 device, do not defeat the
safety ground connection or use a power cord that does not have the safety ground pin.
Rear Panel Overview
©COPYRIGHT AVPRO GLOBAL HOLDINGS 2023 - 22410 70TH AVENUE WEST, MOUNTLAKE TERRACE, WA 98043
8

4. Ground Isolation Switch - This switch selects the level of isolation between the audio
signal ground and the AC earth ground. In normal operation this switch should be in
the GND Ground position. If there is trouble with an AC ground hum, try the other two
settings for the best operation. For safety, the chassis is always connected to the earth
ground regardless of the switch setting.
5. Dante Port - Connecting this RJ-45 port to a network switch supporting Dante audio
streams allows the Director to decode network information into uncompressed audio
signals via Cat5 (or better) cabling.
6. Master Trigger - There are three methods to turn on the unit or to place it into standby
mode: via Ethernet, the TS 1/8” mono 12V trigger jacks, and the 3-pin block connector.
If ethernet is not used to power on the Director, and no trigger voltage is present at any
trigger input, the unit will remain in standby and all zones will be muted.
7. Disable front panel LEDs - The front panel LED ladders show the output levels of each
zone. If this is distracting, or your pets or children keep getting hypnotized, press this
switch in to turn o the LED ladders. This switch does not aect the Power, Protection, or
Zone Status LEDs.
8. Master Reset - If things are not going well, for example you are unable to communicate
with The Director, press and hold down this button for more than 3 seconds. This will reset
the M4800D to its default settings, and hopefully lead you along the pathway to Ethernet
communications once again.
WARNING: Do not do this while turning on the power switch. All flash memory will be
erased, and the milk in your fridge will go bad. You will have to go to the store and get
more milk, and inquire from our fine folks in technical support about the latest firmware
file.
9. Digital Outputs - These S/PDIF digital outputs use standard RCA coaxial connectors.
All digital and analog inputs can be routed to the digital outputs, and fully controlled like
any other audio zone.
10. Ethernet LAN Port - This port allows The Director to be connected to a 10BaseT network
via CAT5 cabling. The unit can then be controlled using its internal web server, accessible
through standard and popular (and some unpopular) web browsers. See the section on
Internet Connectivity and Control for detailed information.
11. Digital Inputs - 4 sets of Optical and Coax ports are available as inputs A, B, C, and D.
The digital signals are transferred directly to the Director’s DSP, and are then available to
any zone or all zones at the same time. The digital inputs are selected for any or all zones
using The Director’s web page interface.
12. Digital Signal Present LEDs - These LEDs illuminate whenever a digital input signal is
present at a digital input.
Rear Panel Overview
©COPYRIGHT AVPRO GLOBAL HOLDINGS 2023 - 22410 70TH AVENUE WEST, MOUNTLAKE TERRACE, WA 98043
9
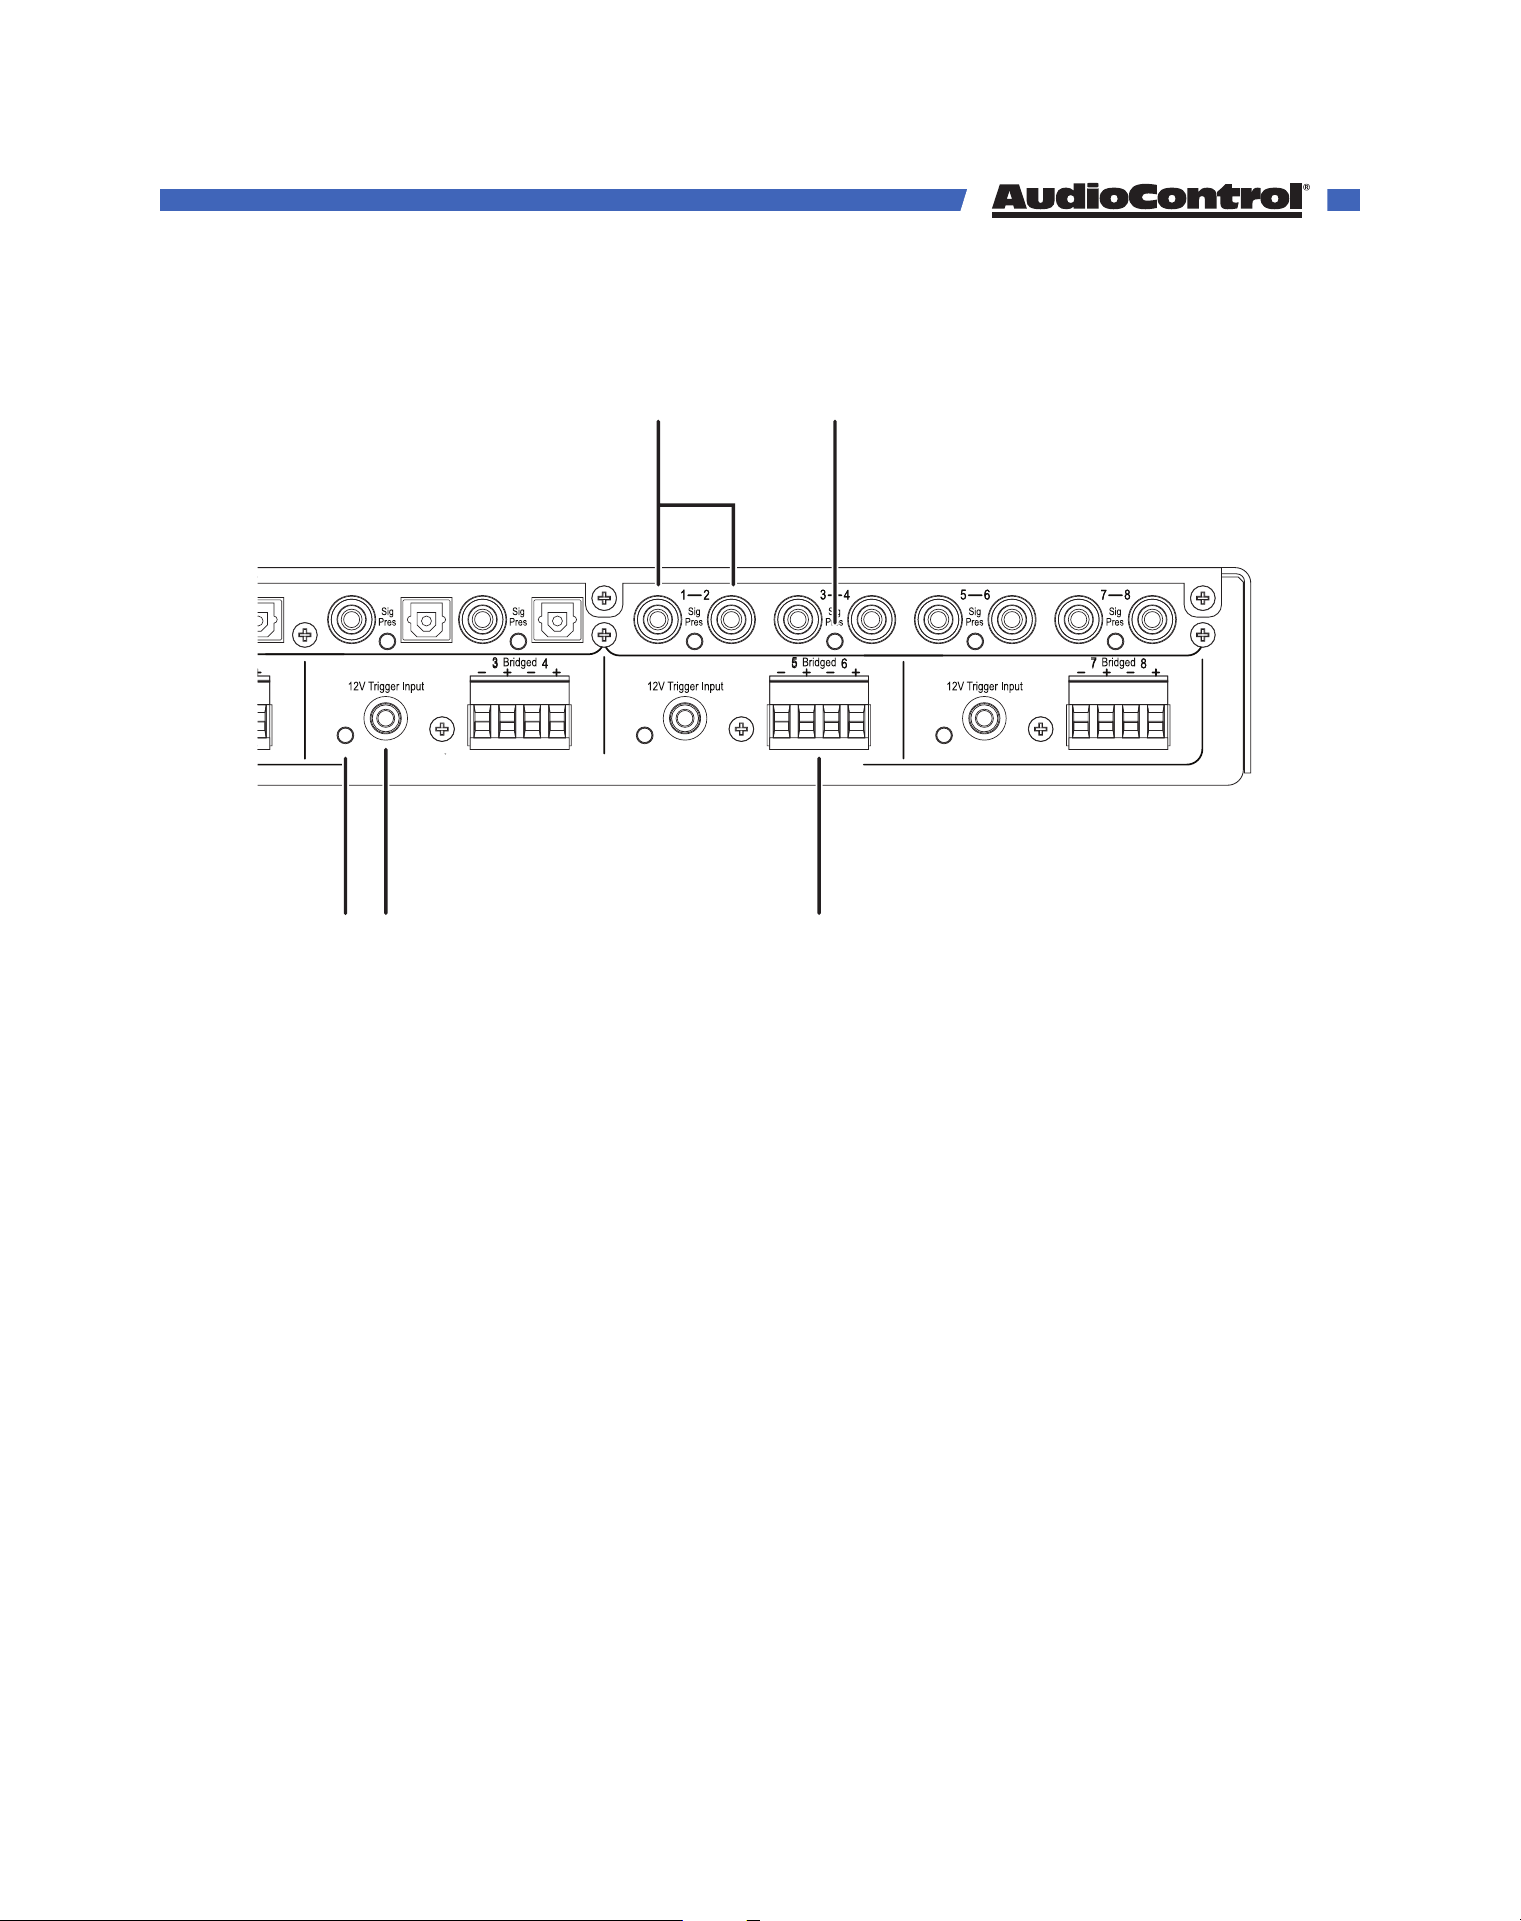
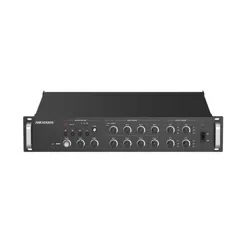
13. Zone Status LED - These will illuminate whenever a zone is active.
14. Local Trigger Input - Individual zones can be turned on using a +12VDC trigger.
15. Analog Inputs - These are line-level analog RCA inputs. Analog signals entering maybe
selected to play in its matching zone, or any combination of zones and digital outputs.
16. Speaker Outputs - This 4-pin connector allows easy connection for two stereo speakers,
or one speaker in bridged mono operation.
Zone
Status
Zone
Status
Zone
Status
Zone
Status
50-60 Hz
400 W
115 V ~
230 V ~
Speaker Outputs: 100 W @ 8 Ohm : 200 W @ 4 Ohm : 400 W @ 8 Ohm Bridged
Serial
Number
Power
T10AH 250VAC
B
Digital Inputs Analog Inputs
CD
AB
1
2
4 13 16149
6
5 10 12 1711 157
8
3
Rear Panel Overview
©COPYRIGHT AVPRO GLOBAL HOLDINGS 2023 - 22410 70TH AVENUE WEST, MOUNTLAKE TERRACE, WA 98043
10
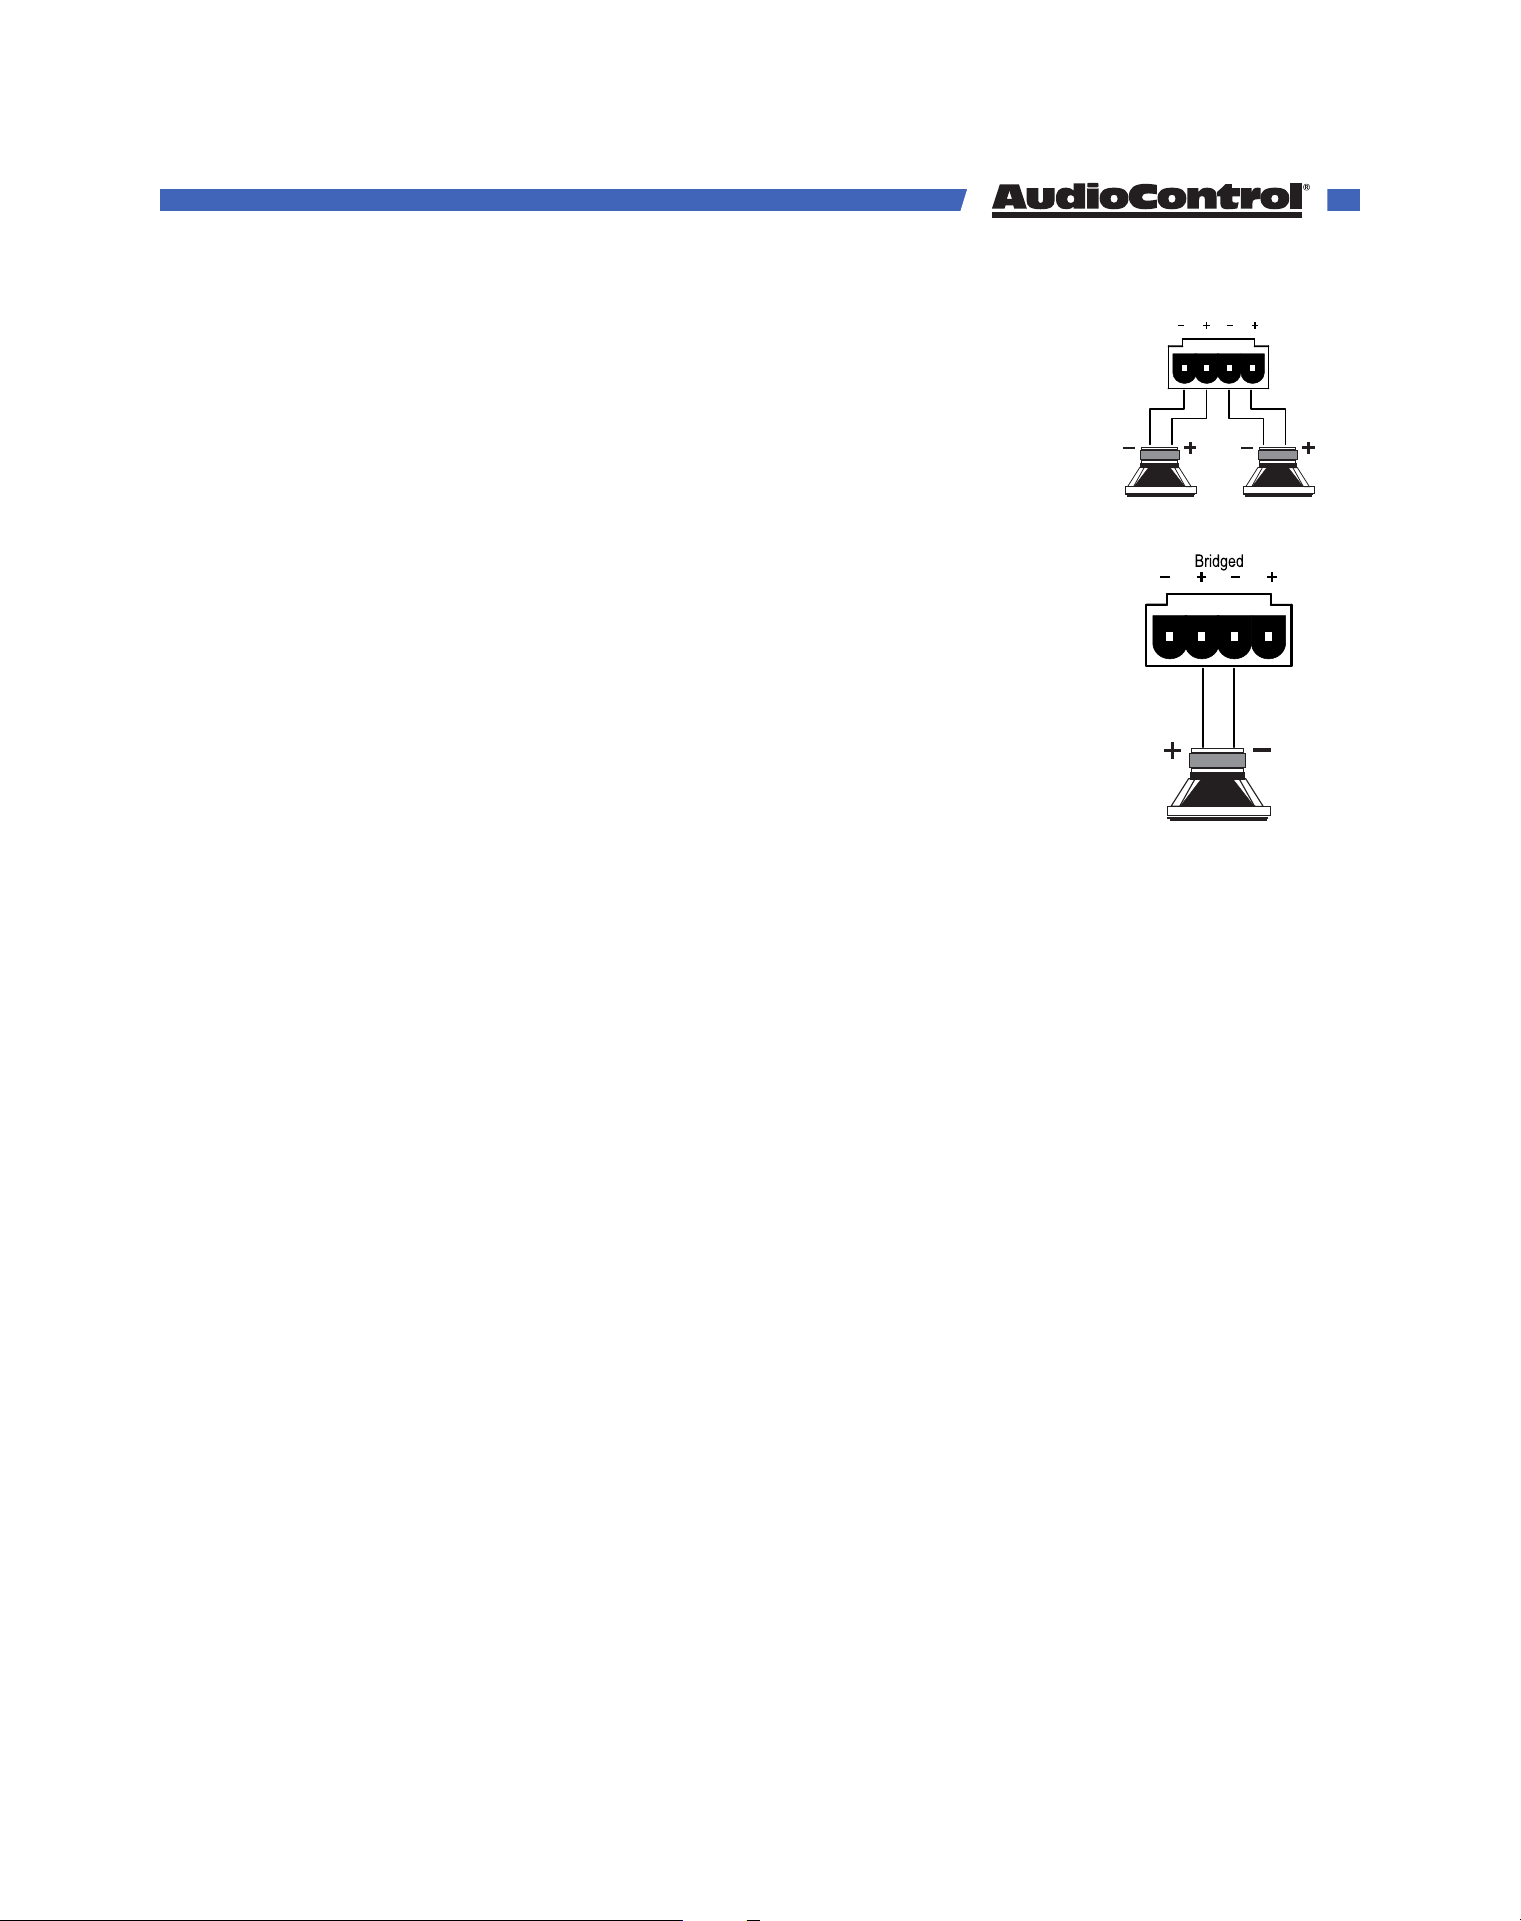
Stereo Speaker Connection:
Note the polarity markings for each pair of outputs.
The speaker impedance should be 4 ohms minimum in stereo operation.
Bridged Mono Speaker Connection:
Note the polarity markings of the inner pair of connections. In this mode, the
input signals are combined in mono, and the power from both channels is
combined to drive a single, more powerful, speaker.
The speaker impedance should be 8 ohms minimum in bridged mono
operation.
To set the output to mono, use The Director’s web interface and click the
Stereo/Mono button for this zone.
Speaker Wiring
Establish a standard connection color code and stick with it. One conductor of the speaker
wire is normally marked by a dierent color (silver versus copper) or there is a ribbing on
one side. Typically this marked conductor is used for the positive (+) speaker leads. Some
wires have positive and negative printed right onto the wire jacket.
Match the polarity markings on the unit with the polarity markings on your speakers. If the
wiring is incorrect then the speakers will be out-of-phase, with a noticeable decrease in the
bass response and less than goodly-sounding awesomeness.
Speaker Impedance
We’ve said it before, and we’ll say it again: Minimum impedance for stereo operation is 4
ohms, and the minimum for Bridged operation is 8 ohms. If lower impedances are connected
to the speaker channel, the amp will go into protect.
If you plan to run two speakers in parallel on one channel, be aware of how that aects the
total impedance. When connected parallel to each other, two 8 ohm speakers will have their
total impedance halved, and present a 4 ohm load to the amplifier.
Speaker Connections
©COPYRIGHT AVPRO GLOBAL HOLDINGS 2023 - 22410 70TH AVENUE WEST, MOUNTLAKE TERRACE, WA 98043
11
The Director M4800D can woken from standby to turn on in five dierent ways. Additionally,
you can use the triggers from the Director to turn on other components in your system. Here’s
the break down to (hopefully) clear up any confusion:
Trigger Method LED Indicators
Ethernet / IP commands Ethernet Triggered
12 Volt mini plug input 12V Trigger Activated
Jumped Phoenix
connector
12V Trigger Activated
Contact Closure on
Phoenix connector
12V Trigger Activated
12 Volt input on Phoenix
connector
12V Trigger Activated
When using a Dante Enabled matrixing amplifier, IP commands from the Director’s web GUI
or a control system will be the most common way to power zones on and o. The following
details apply if you do not want to use IP commands.
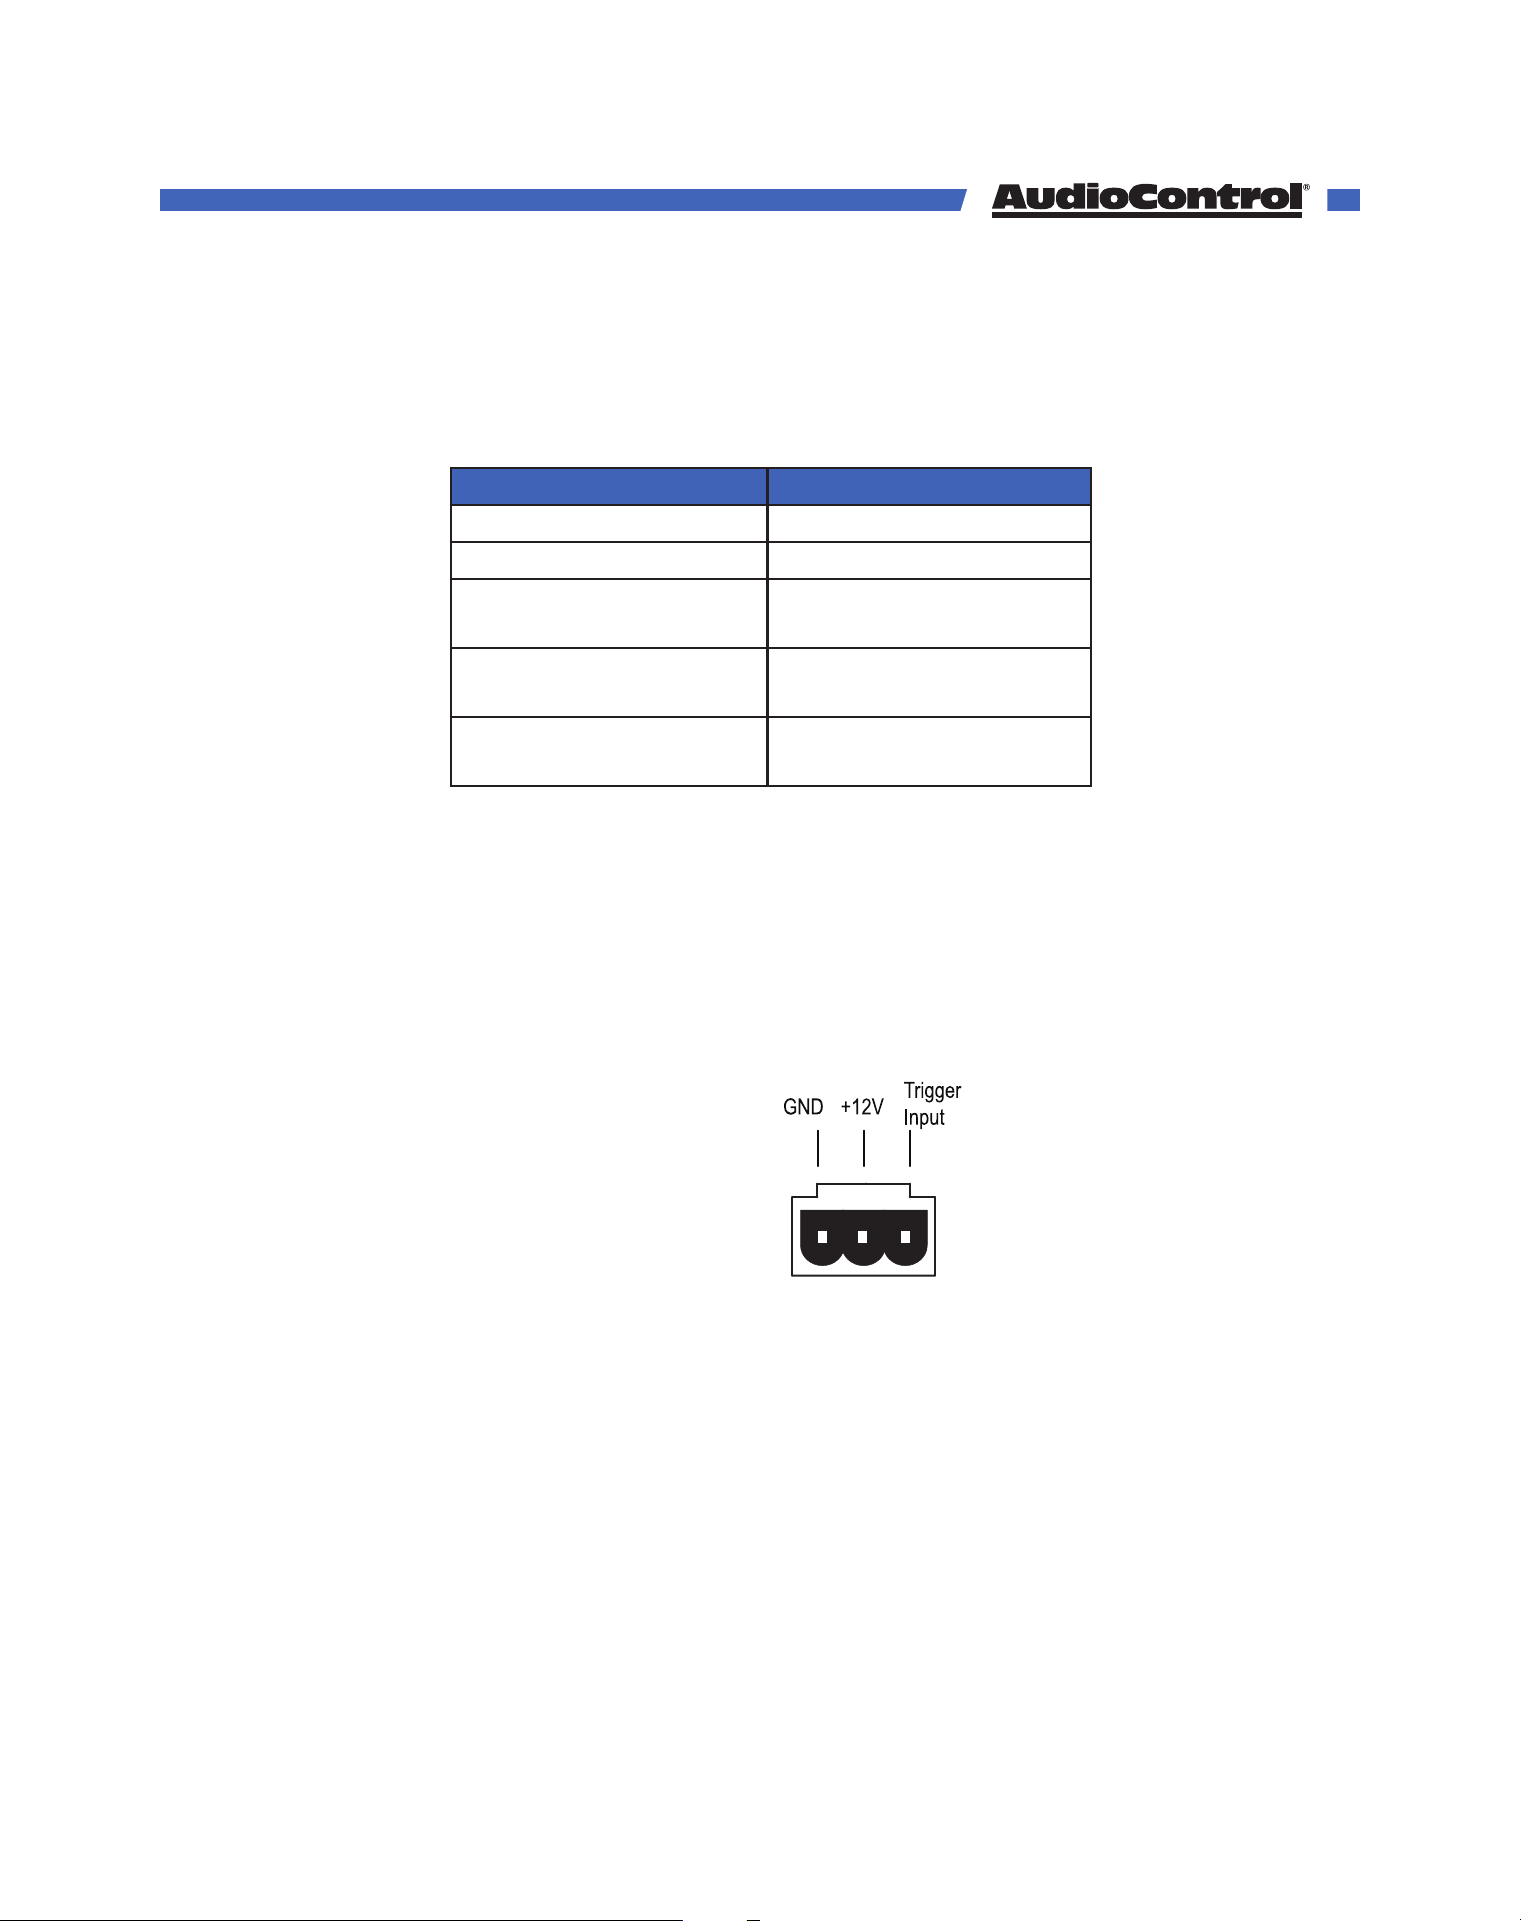
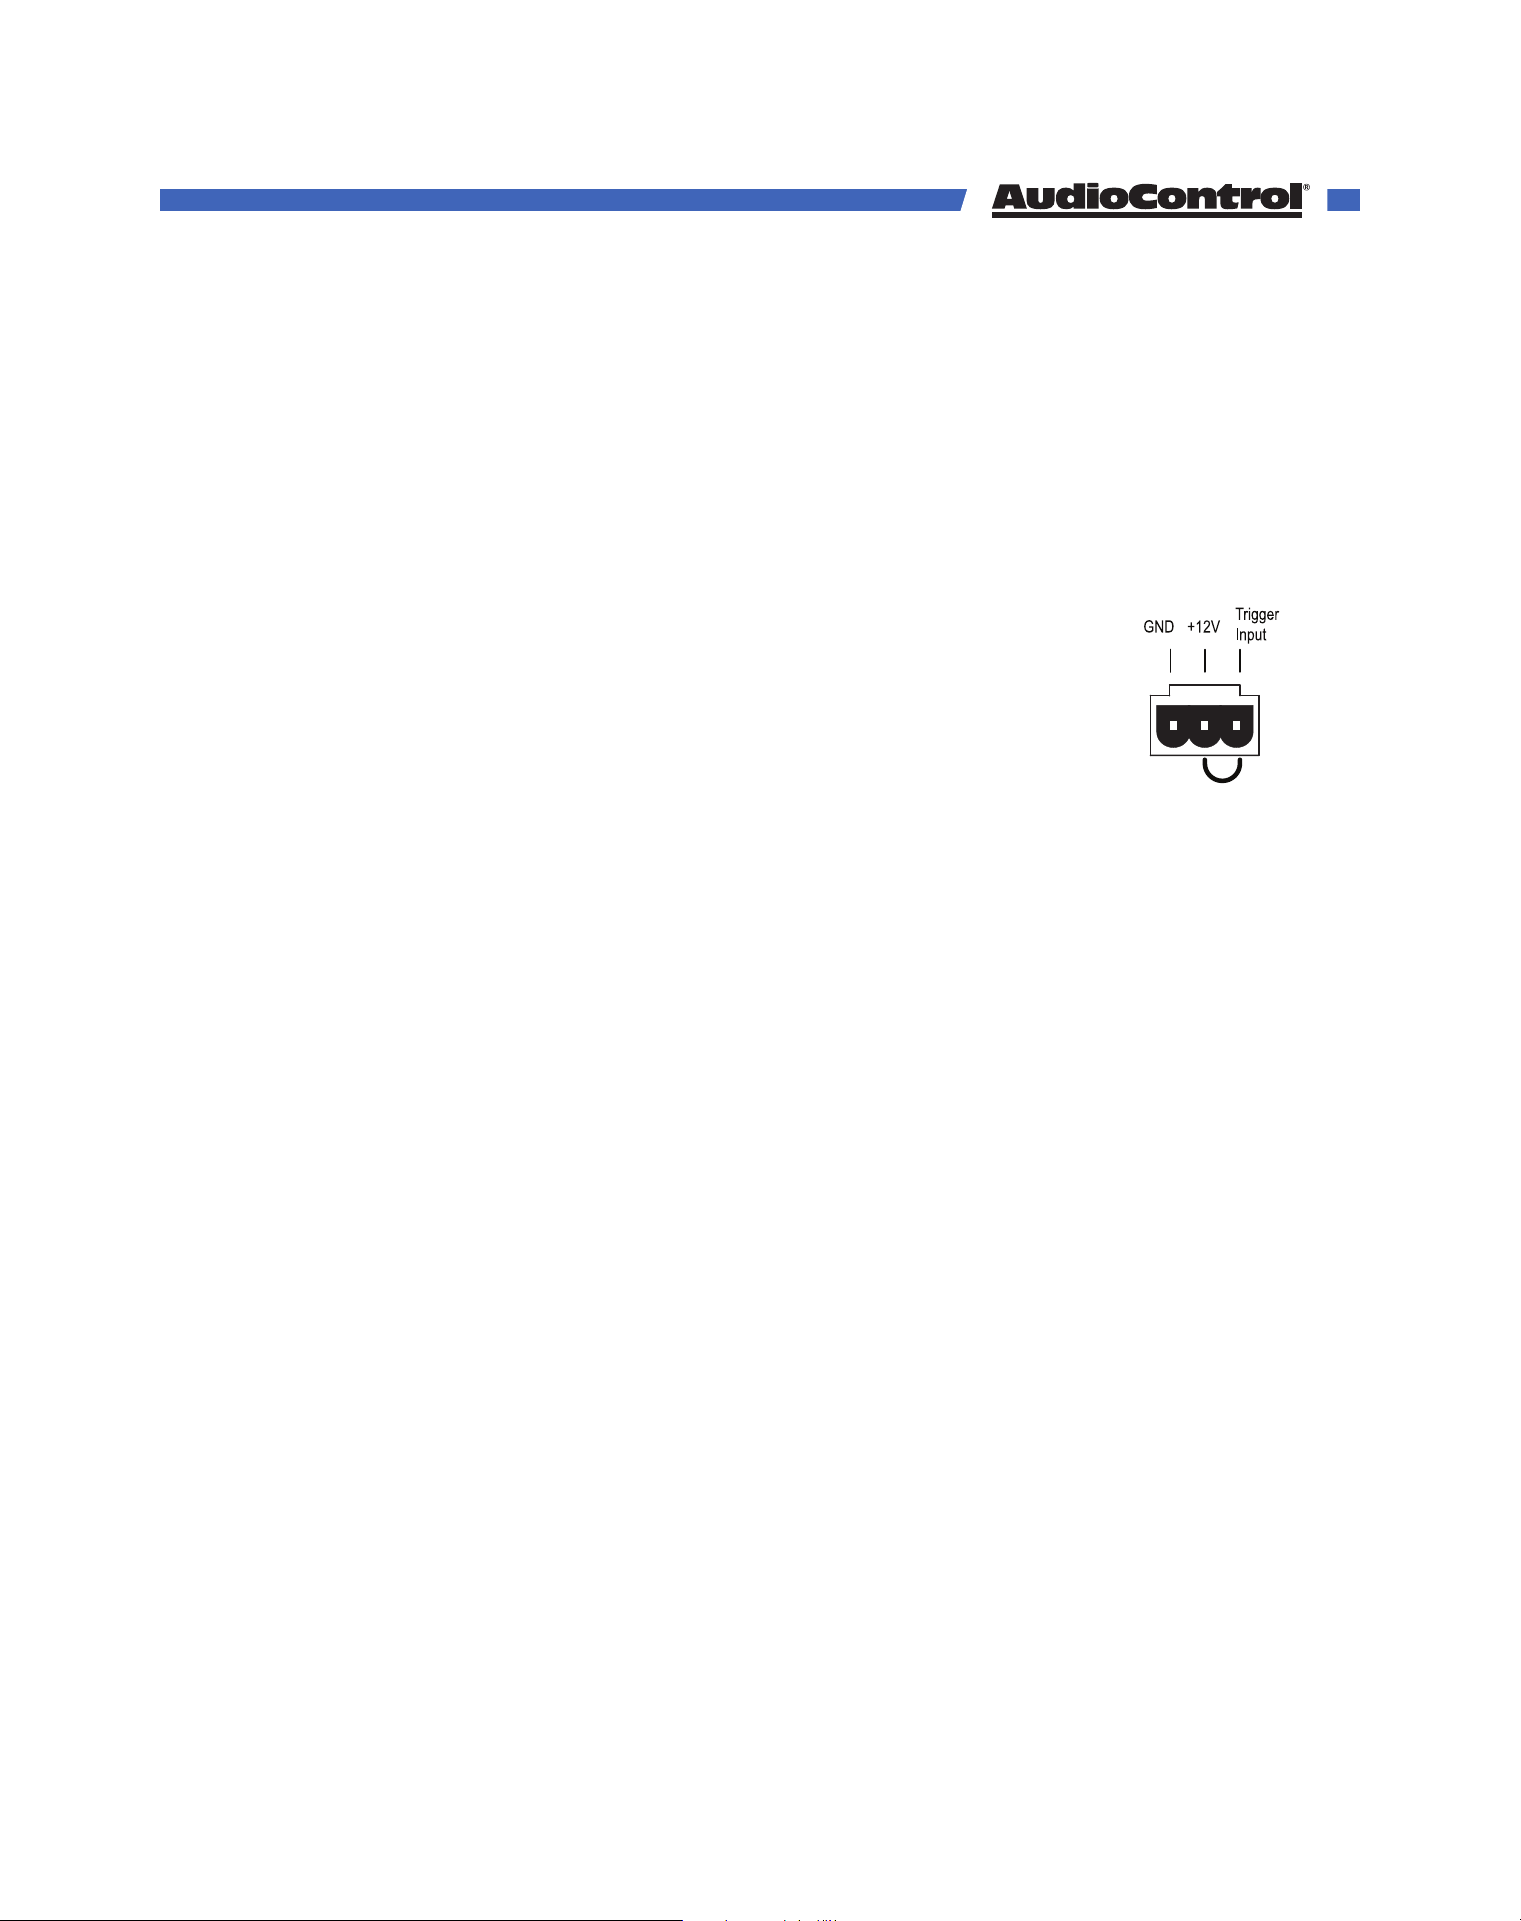
3-pin Phoenix Connector - To remotely turn on the Director, use either a contact closure
between the Trigger Input and +12V output, or an external +12V trigger between the
Trigger Input and GND Terminals. The +12V output is not designed to power other pieces of
equipment or jump start your car. To trigger other units using the Director, use the Master
Trigger mono jacks.
Pinout
1. GND - Ground
2. +12V - Constant +12V output
3. Trigger Input - +12V Input
Master 1/8” TS Mono Jacks - These are wired in parallel to each other and work in
conjunction with the 3-pin connector. Either input can receive a +12V input to turn the
Director on, and the unused jack can output +12V to turn on a second unit. If the 3-pin
connector is used to turn the Director on, both jacks can be used to output +12V to other units.
Pinout
Tip = +12V Input
Sleeve = Ground
12 Volt Triggers
©COPYRIGHT AVPRO GLOBAL HOLDINGS 2023 - 22410 70TH AVENUE WEST, MOUNTLAKE TERRACE, WA 98043
12
Power up & Power down
After any master trigger input receives a +3 to +12V signal, the master trigger LED will
illuminate blue. All zones will be held in standby for about 2 seconds while the power supplies
charge up and perform their self-tests. During this time the Power and Protect LEDs will be
red. Once this is complete, the Power LED will turn blue and the Protect LED will turn o.
As soon as voltage is removed from the trigger inputs, all zones will be muted and placed
in standby, and the master trigger LED will turn o. After about 2 seconds, the front panel
power LED will turn red, and the protect light may flash red during the power down process.
Signal Sense and Local Triggers
If you plan to turn on zones using signal sense or local triggers, the Director’s
master trigger must be active. If you are you not using a separate master
trigger, you must use the 3-pin connector with a short wire between the +12V
output to the trigger input.
Using External Triggers on the 3-pin Connector
1. Trigger ON with a contact closure:
Connect the contact closure between the +12V Trigger input.
2. Trigger OFF with a contact closure:
Connect a 1 kΩ resistor between +12V and Trigger Input.
Connect the contact closure between Trigger Input and GND.
3. Use an external +12V Trigger:
Connect the ground wire to GND.
Connect the external +12V to Trigger Input.
Wire Link
12 Volt Triggers
©COPYRIGHT AVPRO GLOBAL HOLDINGS 2023 - 22410 70TH AVENUE WEST, MOUNTLAKE TERRACE, WA 98043
13
An amplifier is much like a person, in the way that it requires a proper flow of air to continue
working properly. The Director M4800D features cool-running ecient switch mode power
supplies and Class D amplifiers, and they are equipped with thermally controlled fans.
Despite its impressive build quality, it is still an 8-channel amplifier, and therefore requires
plenty of good ventilation to properly cool.
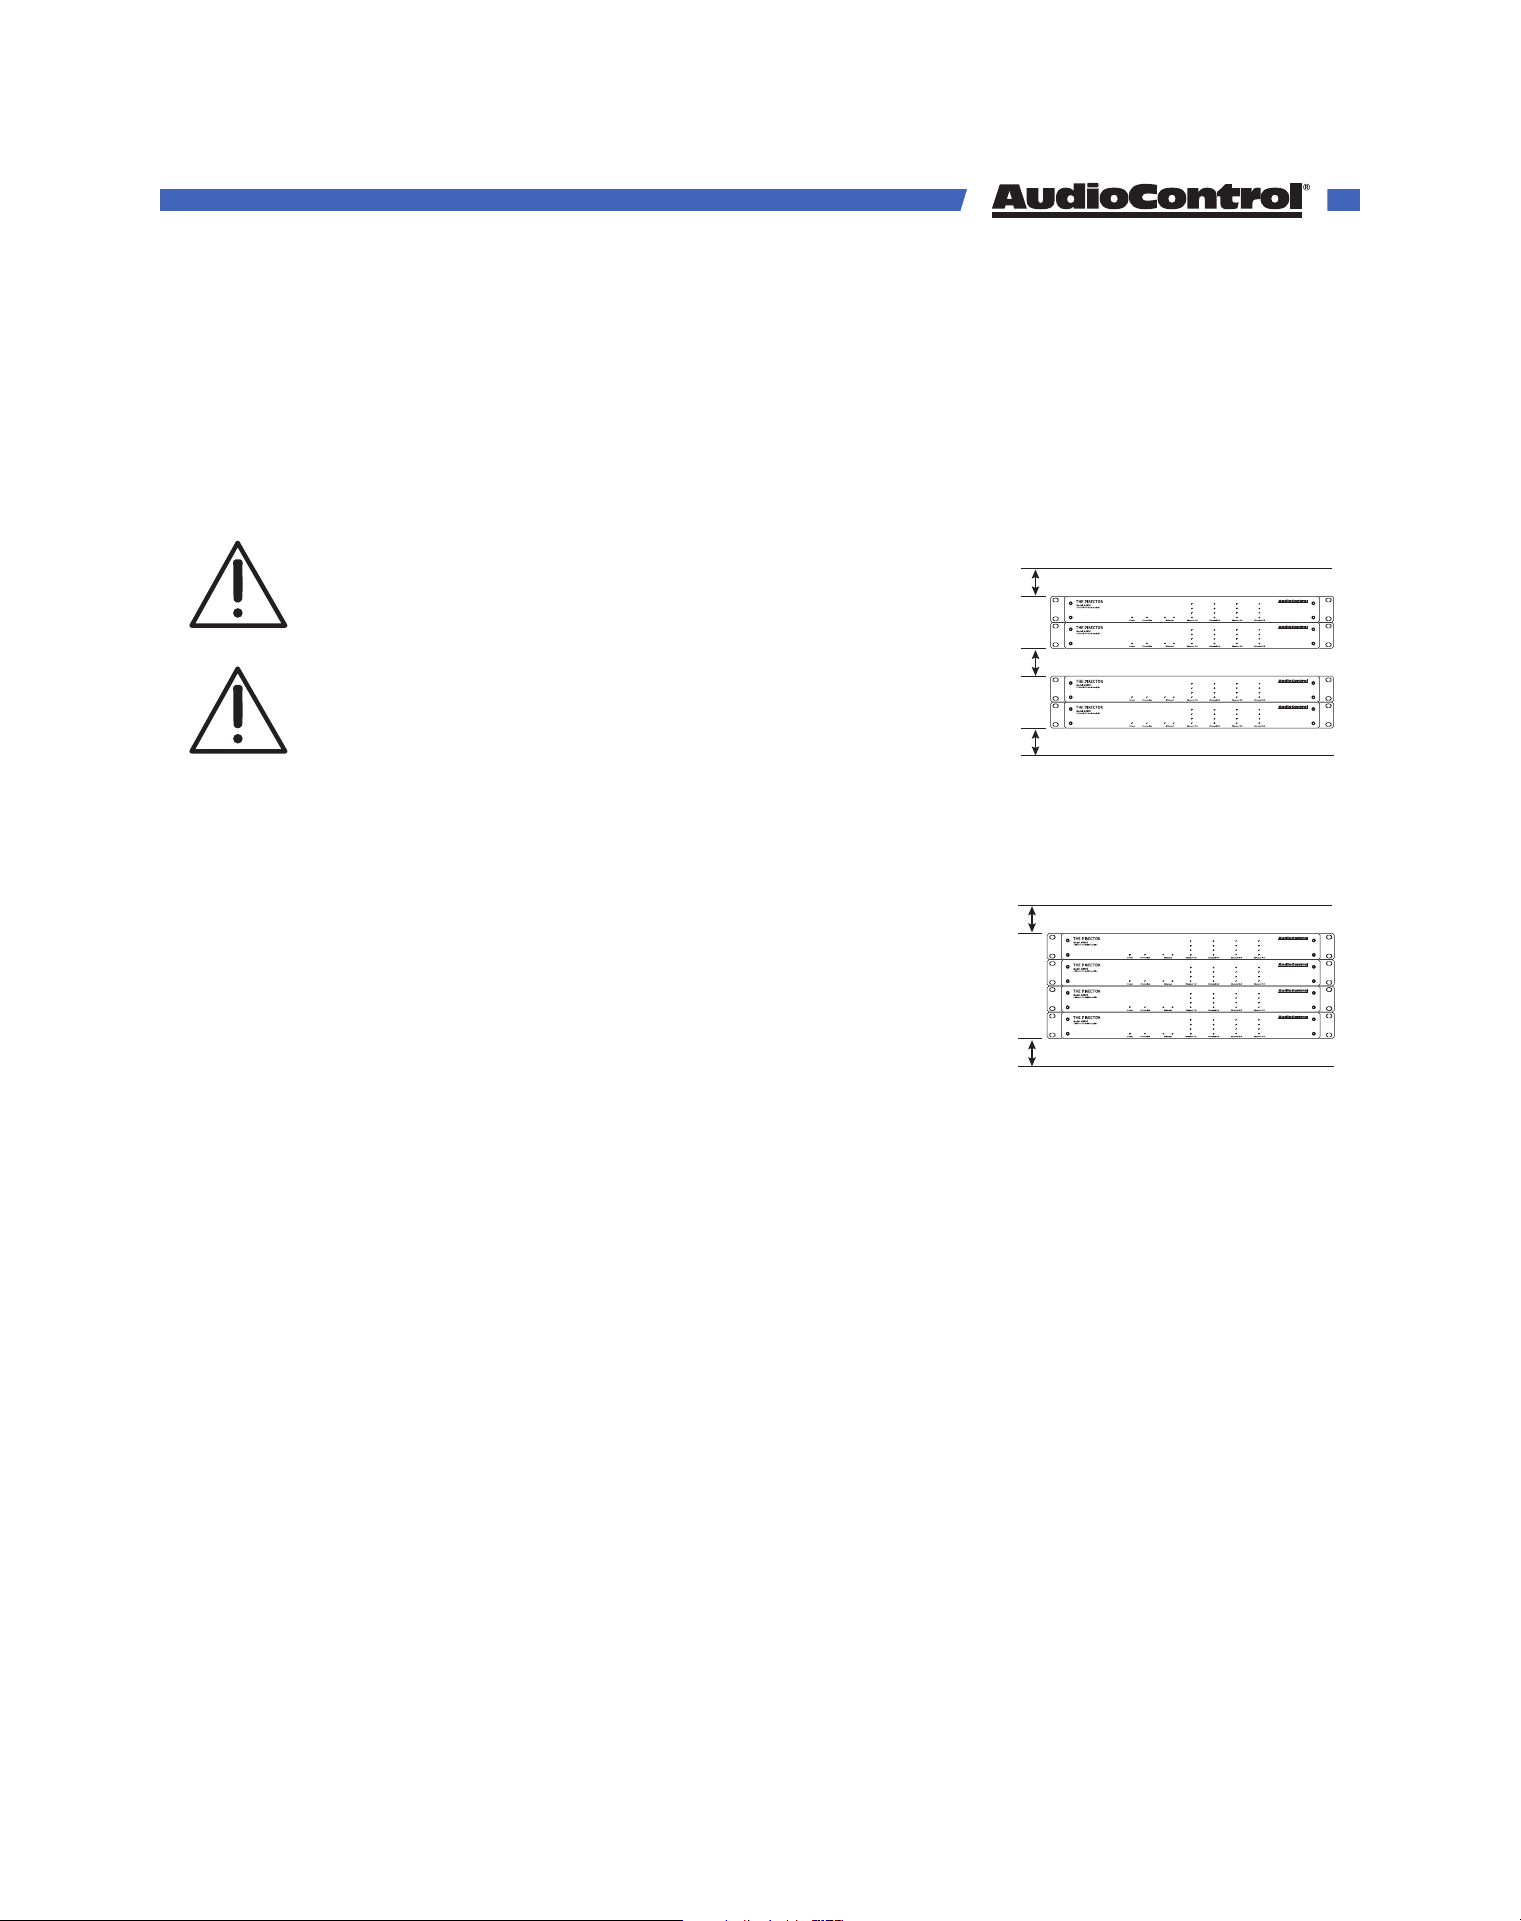
Ideal spacing is at least 1U of rack space above and below
every two amplifiers, and no more than four units can be
stacked without a rack space between them.
If the amplifier should overheat, a thermal sensor will trigger
the amp into standby mode, allowing it to cool down. Once
the amplifier has cooled to a safe operating temperature, the
amplifier will reactivate. If this occurs often, identify the cause
of the problem and take corrective action. For example:
• Provide additional ventilation.
• Do not installed in a sealed location with limited or no airflow.
• Install a fan in the rack.
• Make sure that the amplifiers re not overloaded with speaker impedances below the
minimum recommendation.
• Check that there are no short circuits in speaker cables or speakers. Each zone will
shout o independently when a short circuit is detected.
Please be advised that no more than 4 Director
amplifiers may be stacked together. Any more than
that, then a rack space above and below is required for
adequate ventilation.
Review the heat load specifications and ensure that
your rack room meets these requirements.
1U
1U
Ideal Spacing 1U rack space or more
above and below each pair
1U
1U
1U
No more than four units can be stacked
without a rack space between them.
Allow 1U rack space or more above and
below each stack of four.
Ventilation
©COPYRIGHT AVPRO GLOBAL HOLDINGS 2023 - 22410 70TH AVENUE WEST, MOUNTLAKE TERRACE, WA 98043
14

When the M4800D is first connected to an existing network, the DHCP server will assign an
IP address to the Director. Take note of the units MAC address on the back, it can help you
find the amp’s IP address on a network scan. Once you find the unit’s IP address, type it
into your browser of choice and the Director’s web GUI will open.
On the web GUI, the amp can be configured and EQ’d to your hearts content. With the Di-
rector on the network, you will also be able to control the amplifier via Telnet. The M4800D
uses telnet port 23.
Connecting without a DHCP server
If no DHCP server has been enabled on your network, or you want to connect directly to
the Director, use an ethernet cable to connect the amplifier to your computer. The default
IP address of the Director is 192.168.0.249 when a DHCP is unavailable. In order to connect
to this IP address, you will need to give your computer a matching static IP address.
Change your computer’s IP address to a static address of 192.168.0.x — where x is a value
between 1 through 254, but not using 249.
On a Windows computer, you can change your IP address in the Control Panel.
On an Apple computer, the IP address can be changed in System Preferences.
If you don’t know how to give your computer a static IP address, please consult your local
search engine.
Be sure to use a static IP address for your computer that is NOT in use by another device —
an IP address should be unique across the local network — if it’s not, you’re going to have a
bad time.
Connecting to the Web GUI
©COPYRIGHT AVPRO GLOBAL HOLDINGS 2023 - 22410 70TH AVENUE WEST, MOUNTLAKE TERRACE, WA 98043
15
Upon opening the Director M4800D’s web GUI for the first time, you will be greeted with
the page seen here:
The web page is responsive, meaning it will auto size to your screen. If you have a small
phone, the layout adjusts to that size, and is touch sensitive. On a computer, the web page
is sized according to your browser.
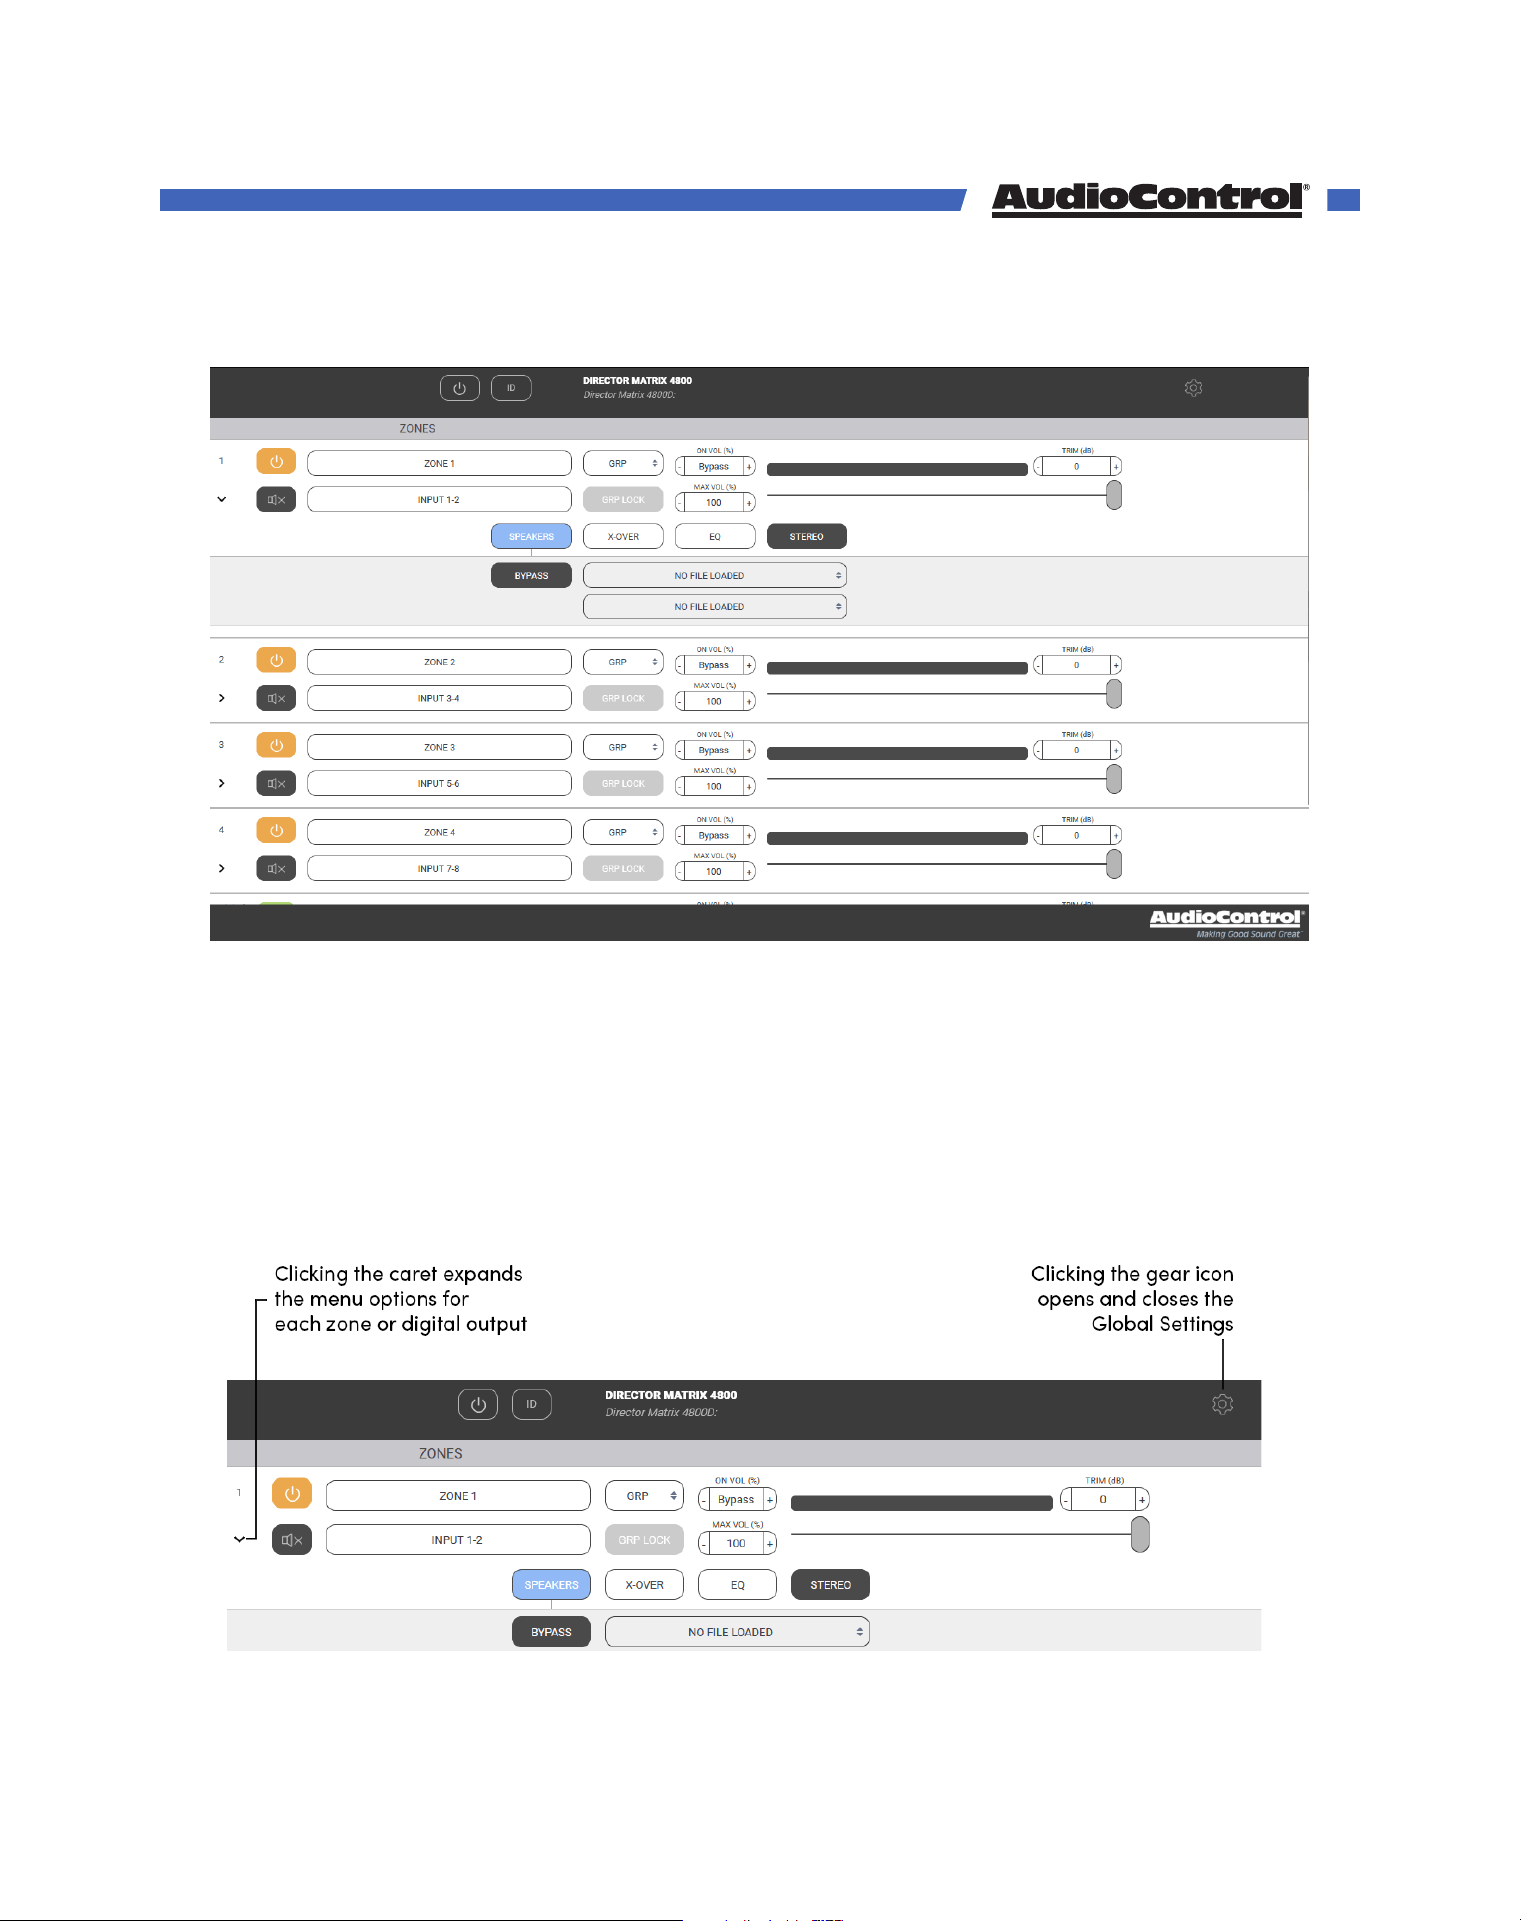
Through this interface, you will configure all the parameters of The Director. The initial view
of the web page shown below illustrates the current state of the unit. To change global
settings, click on the “gear” icon in the top right of the page. To change zone settings,
click on the caret (the “>” icon) to expand the selections. Simply clicking on an option will
expand the adjustable parameters.
Quick Start Guide
©COPYRIGHT AVPRO GLOBAL HOLDINGS 2023 - 22410 70TH AVENUE WEST, MOUNTLAKE TERRACE, WA 98043
16
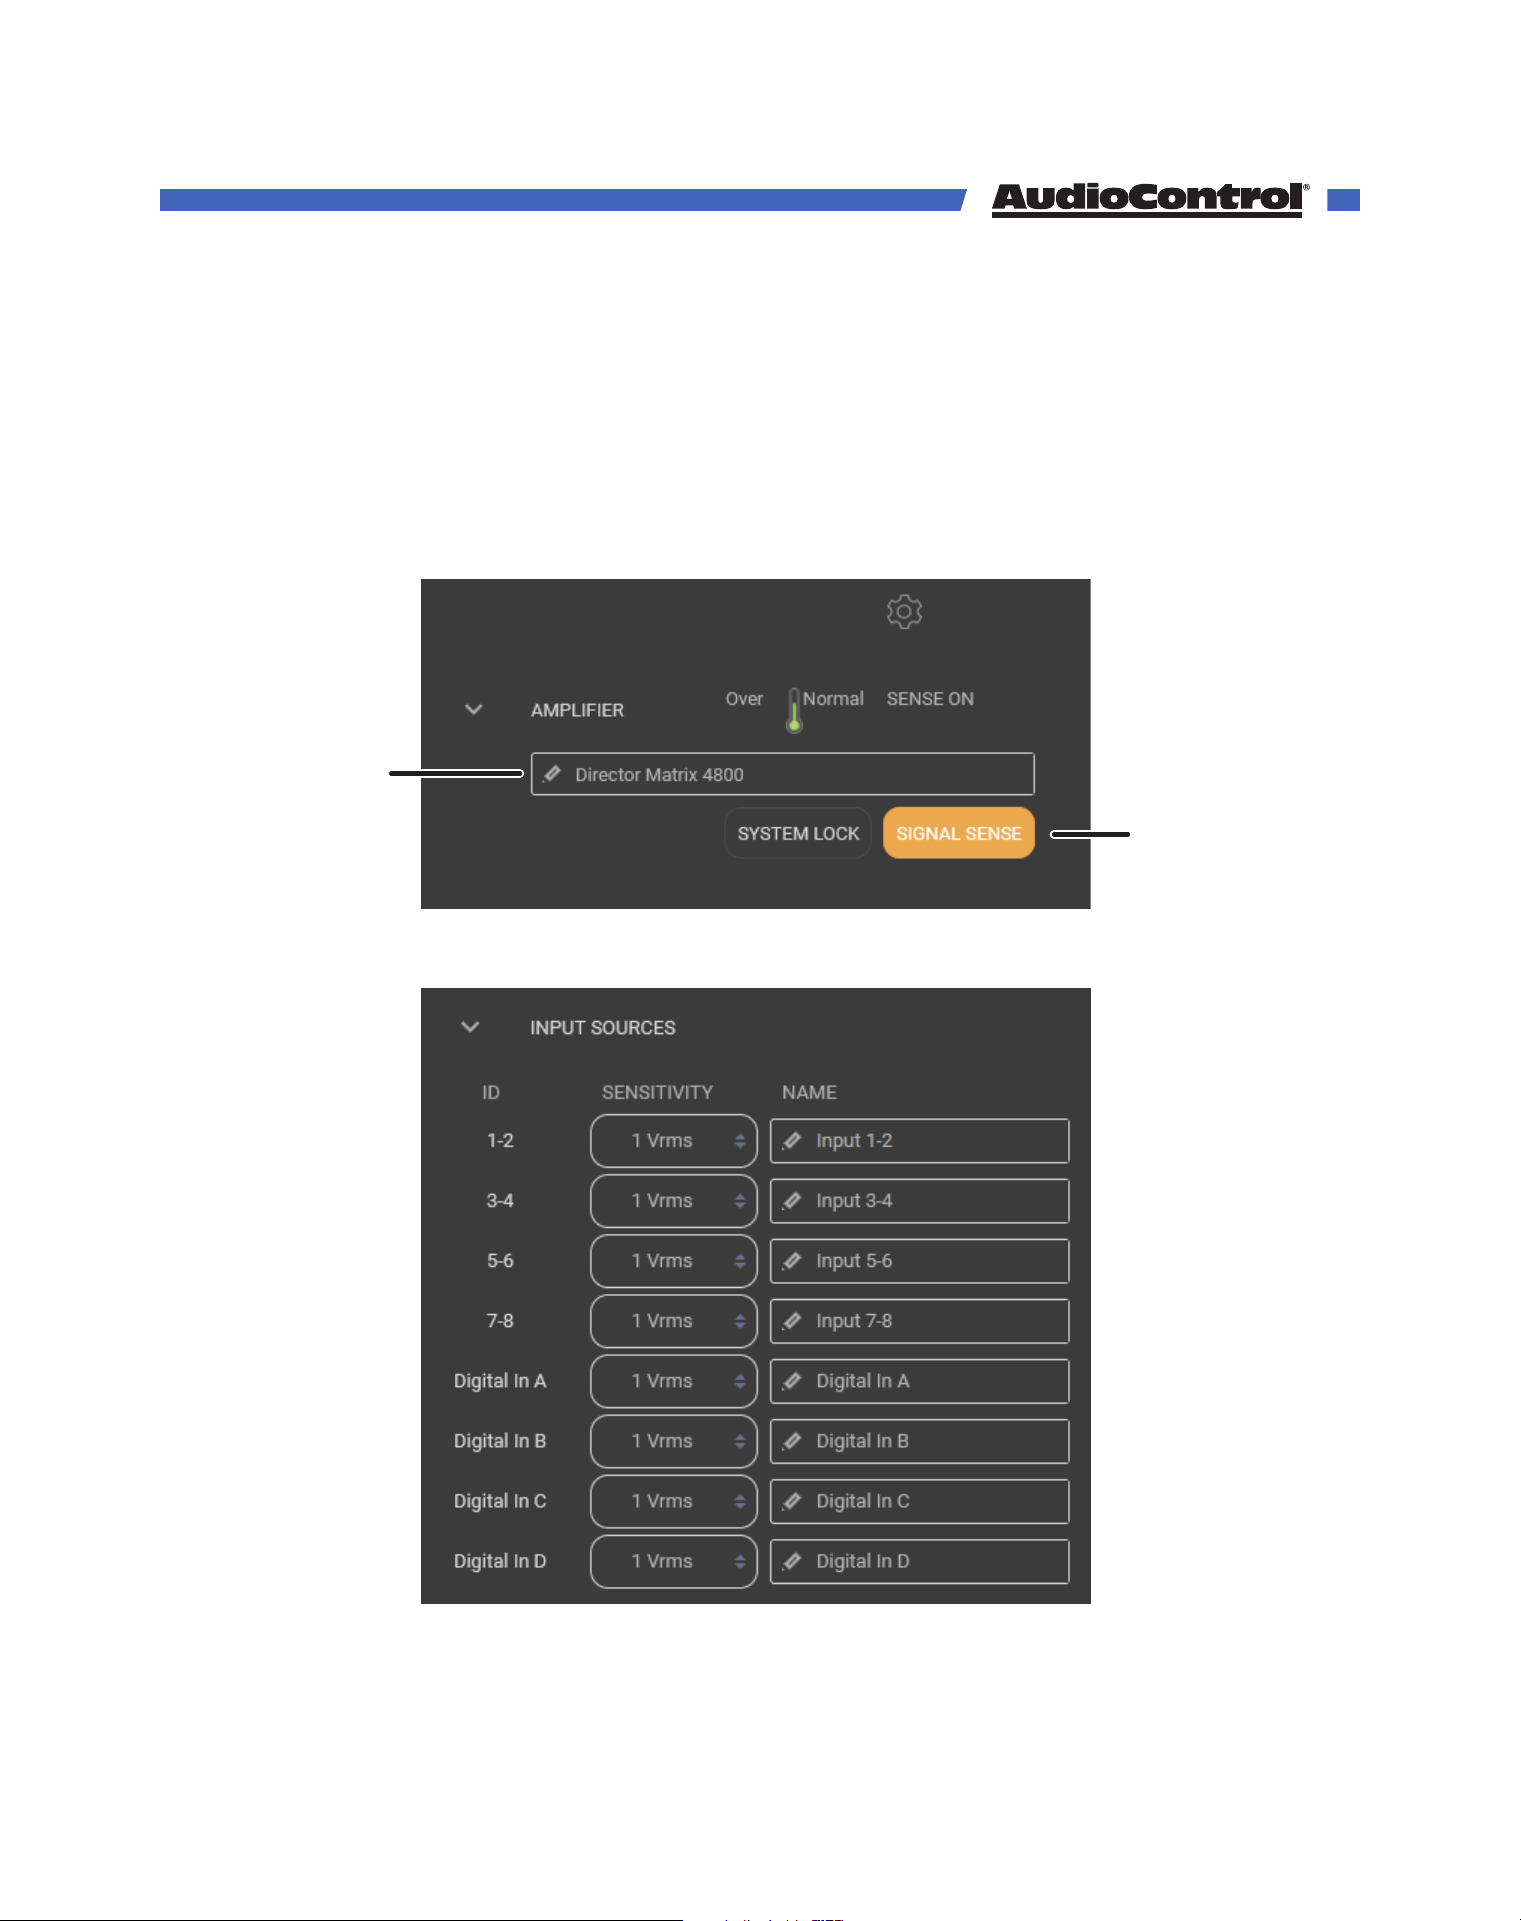
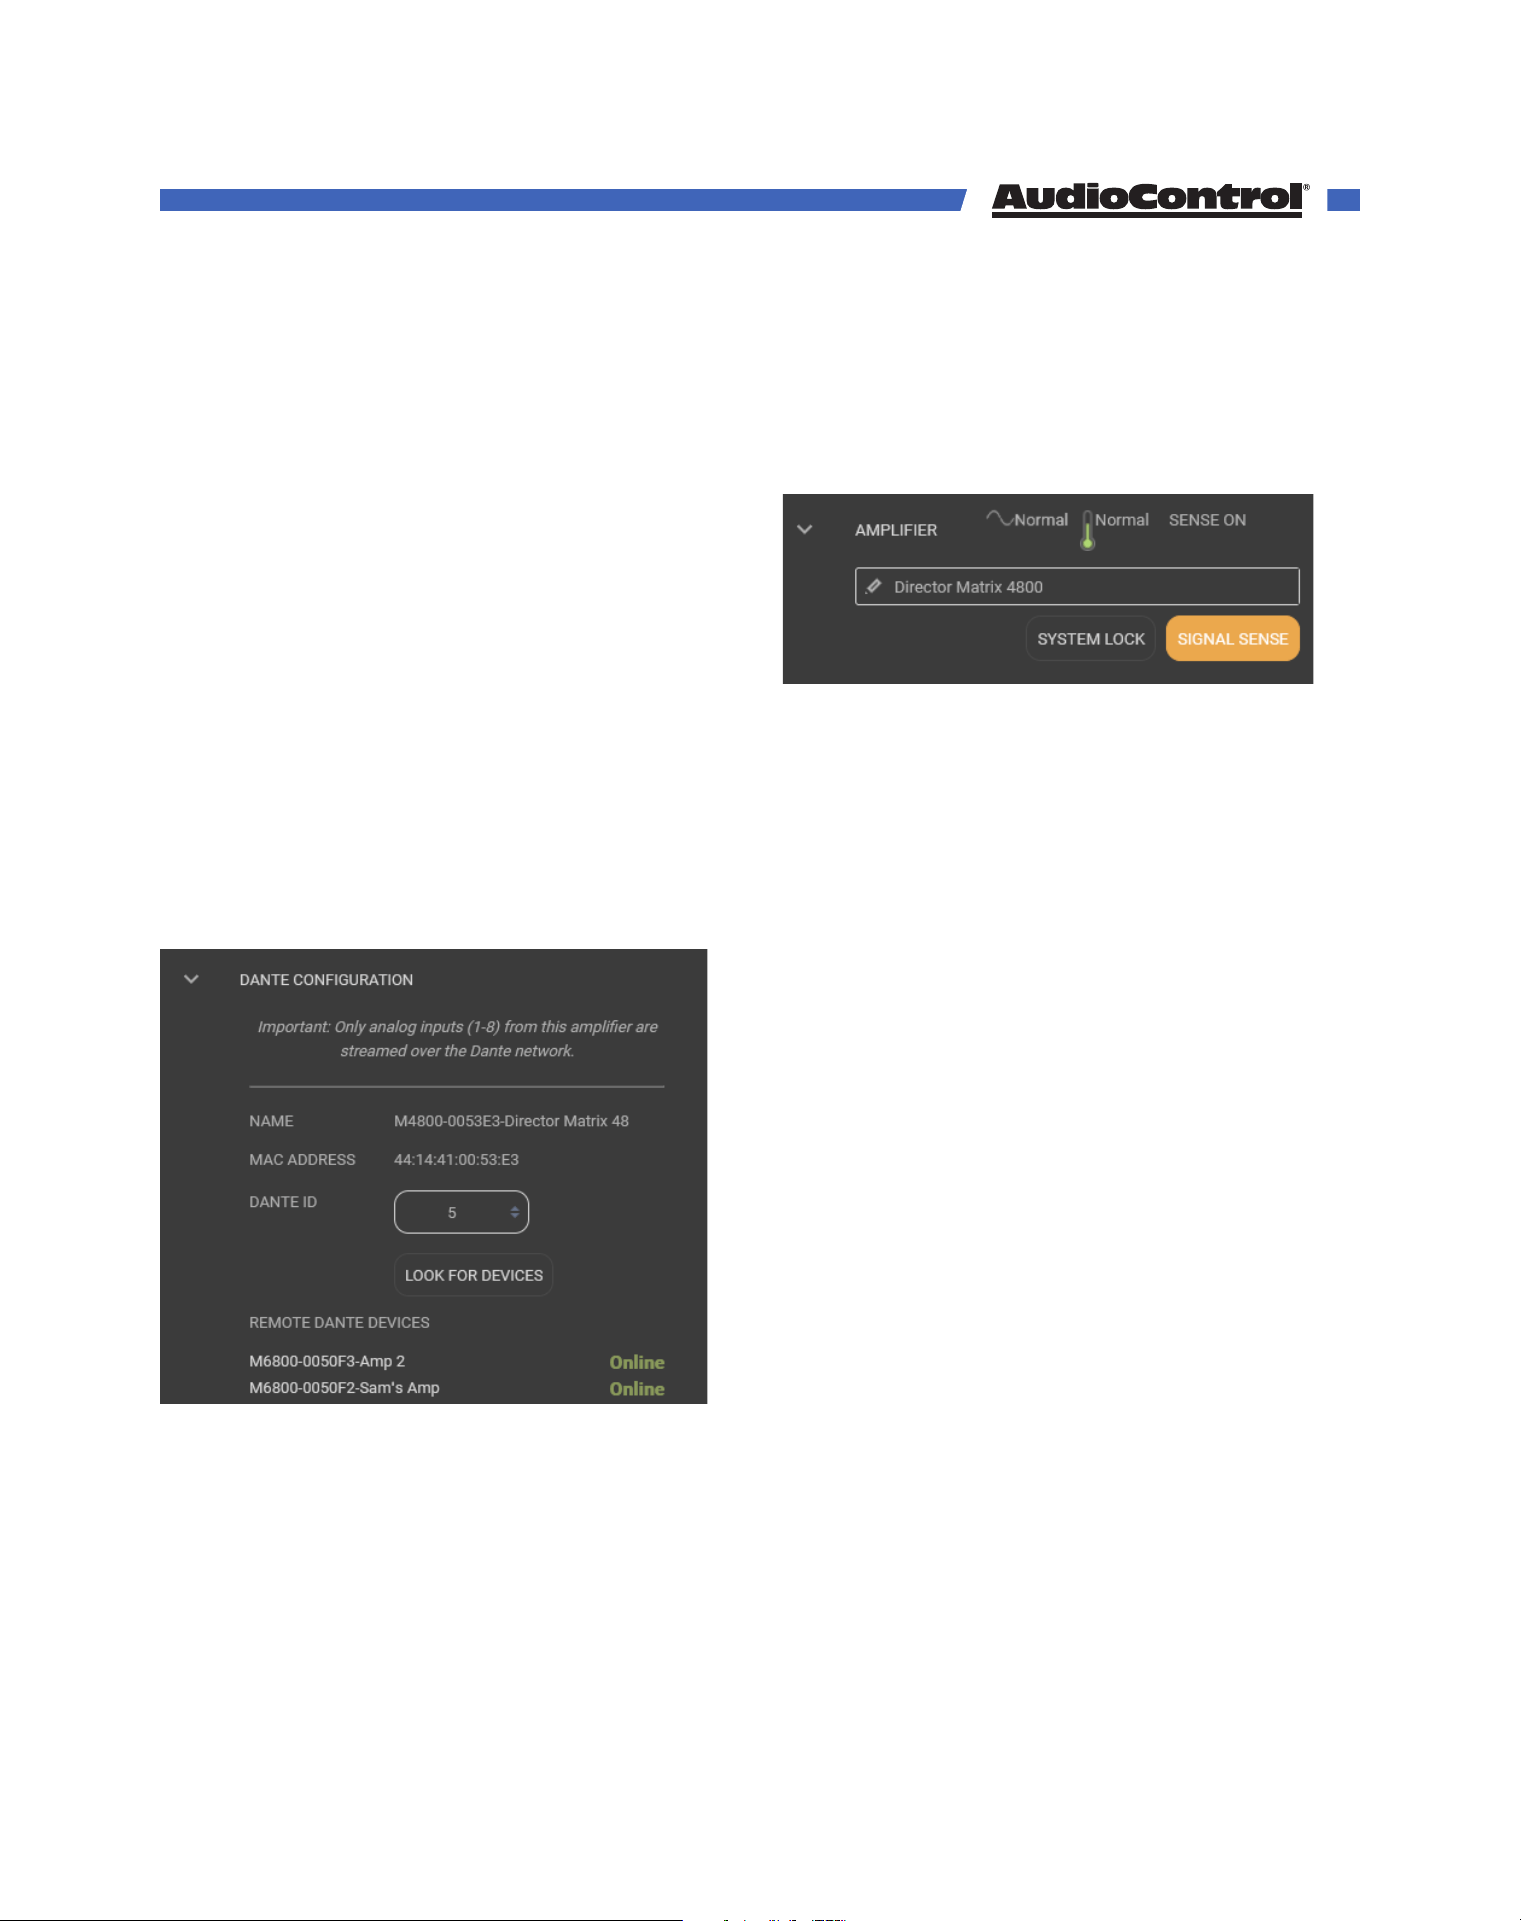
By default, signal sense is on, and the amp zones will not turn on until signal is present on
their assigned inputs. If you are going to use a control system or 12V triggers to control the
zones, go to the Global Settings, and turn signal sense O in the Amplifier panel.
If there are multiple amps in the system, now is a good time to rename the amp in the
same panel. We recommend calling it something that helps you keep track of which amp
you’re working on. For example, common names include “Amp 1,” “First Floor Amplifier,”
and “Marvin.”
Next, rename all inputs and set the input sensitivity in the Input Sources panel.
Rename amplifier
Toggle Signal Sense
(orange = ON)
Quick Start Guide
©COPYRIGHT AVPRO GLOBAL HOLDINGS 2023 - 22410 70TH AVENUE WEST, MOUNTLAKE TERRACE, WA 98043
17
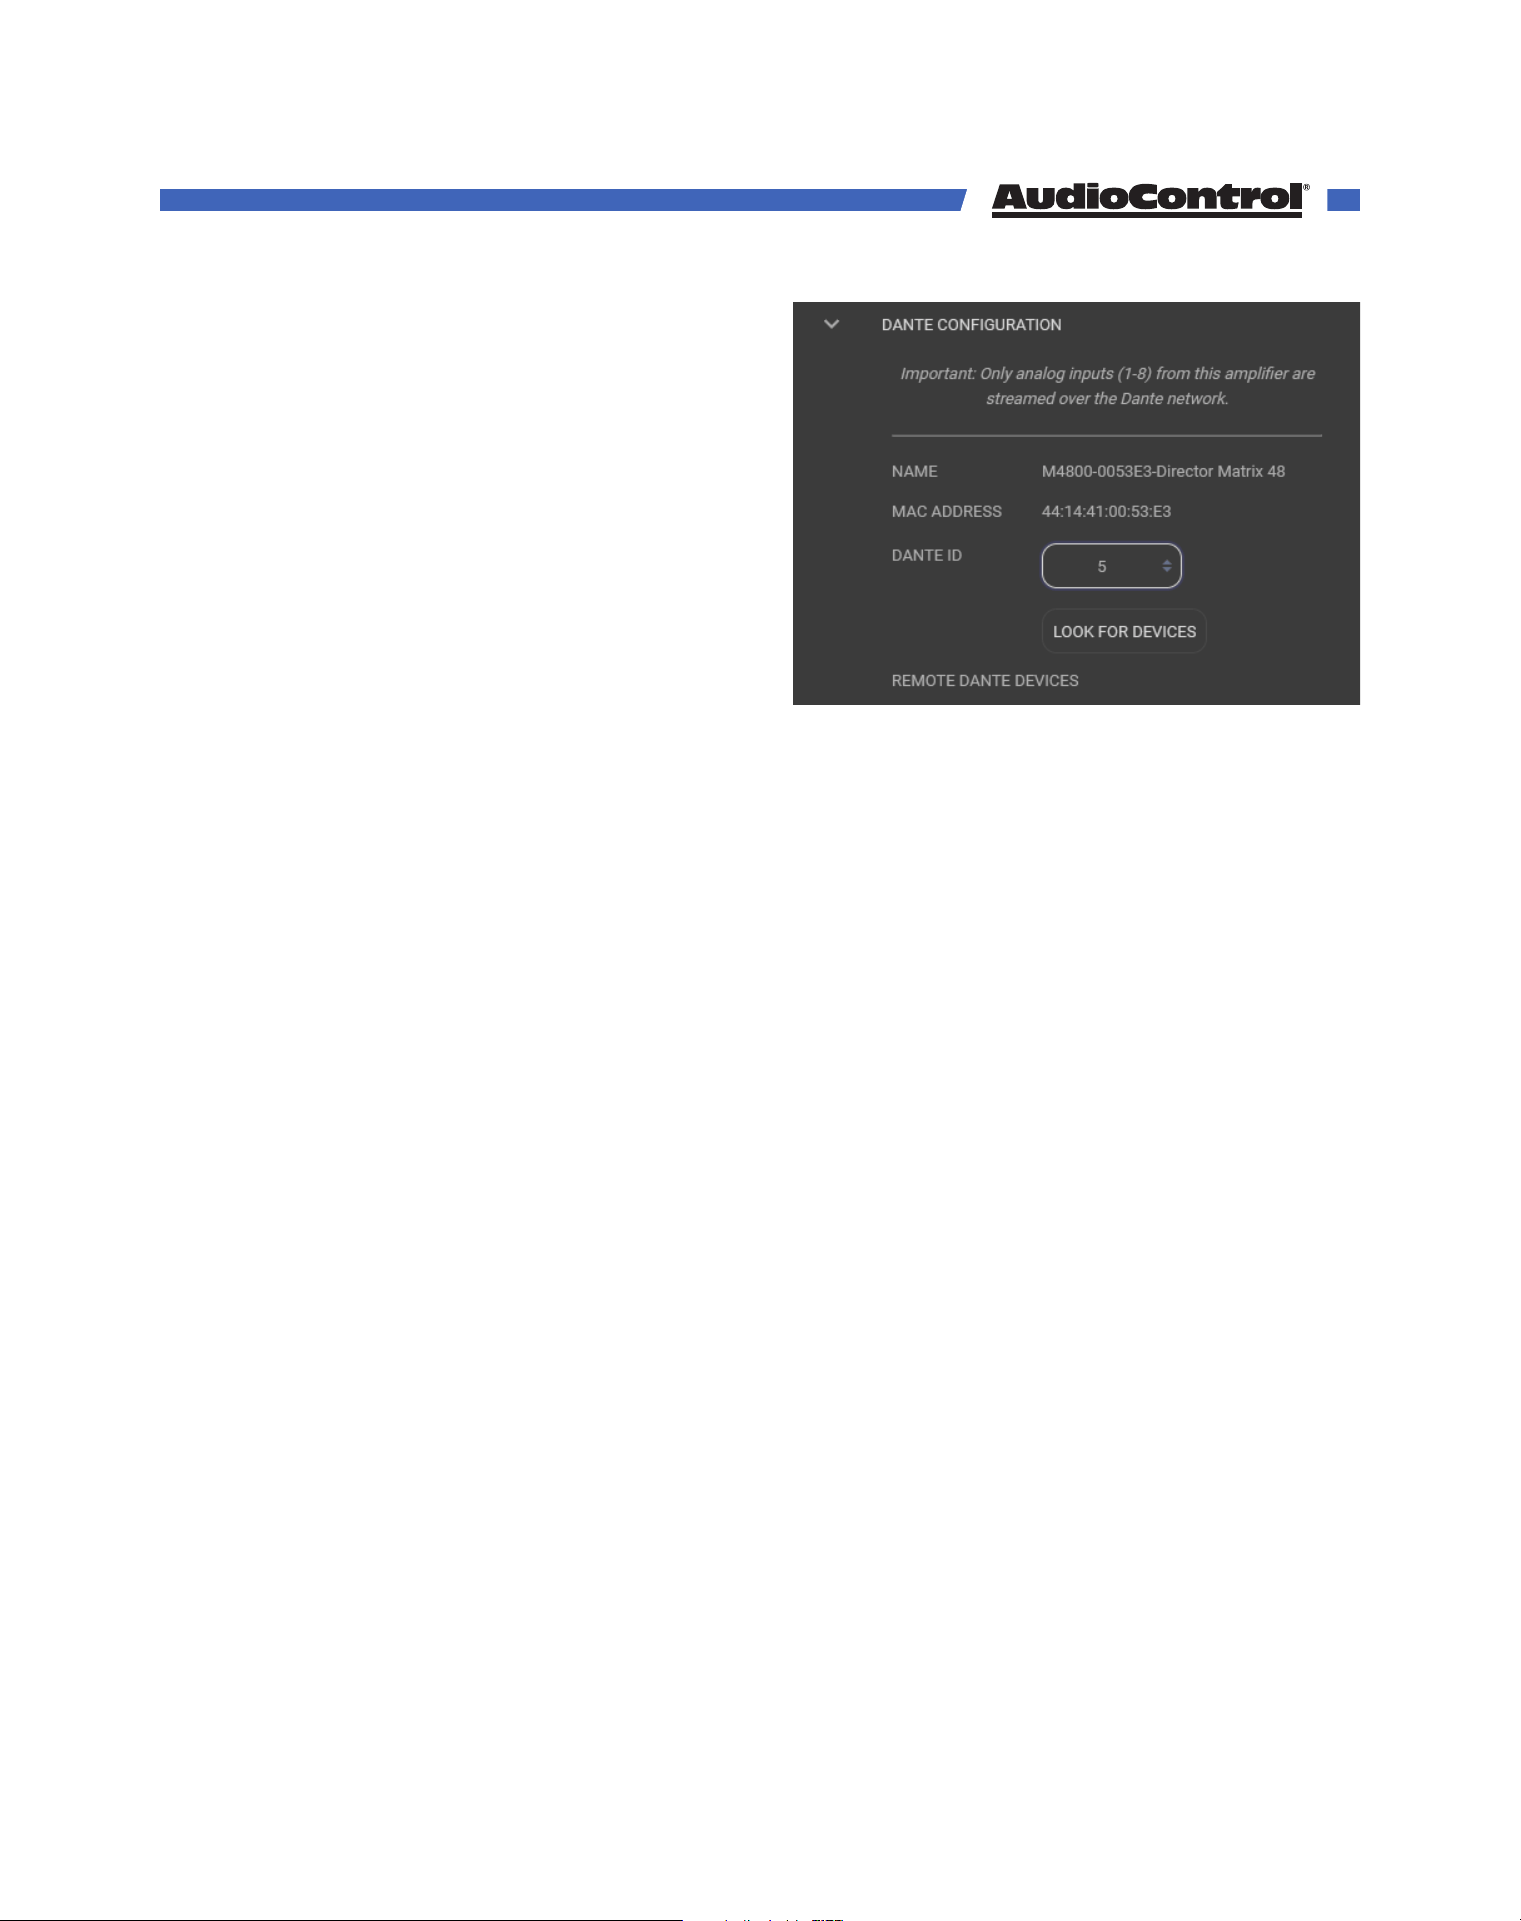
Go to the Dante Configuration panel, set
an ID for the M4800D, and click Look for
Devices. The page will reload and all inputs
from other AudioControl Dante Amplifiers
on the network will be available to use on
this amplifier, and all inputs on this amp will
be shared with the others.
Connect sources and speakers to the inputs
and outputs of your AudioControl Dante
amplifiers, and any other audio gear you
have in the system.
The Director M4800D is now ready to play audio from local sources connected directly into
it, and from Dante sources streamed over the network.
We’ll dig deeper into the specific details of all the Web GUI’s settings in the next section.
Speaking of...
Quick Start Guide
©COPYRIGHT AVPRO GLOBAL HOLDINGS 2023 - 22410 70TH AVENUE WEST, MOUNTLAKE TERRACE, WA 98043
18
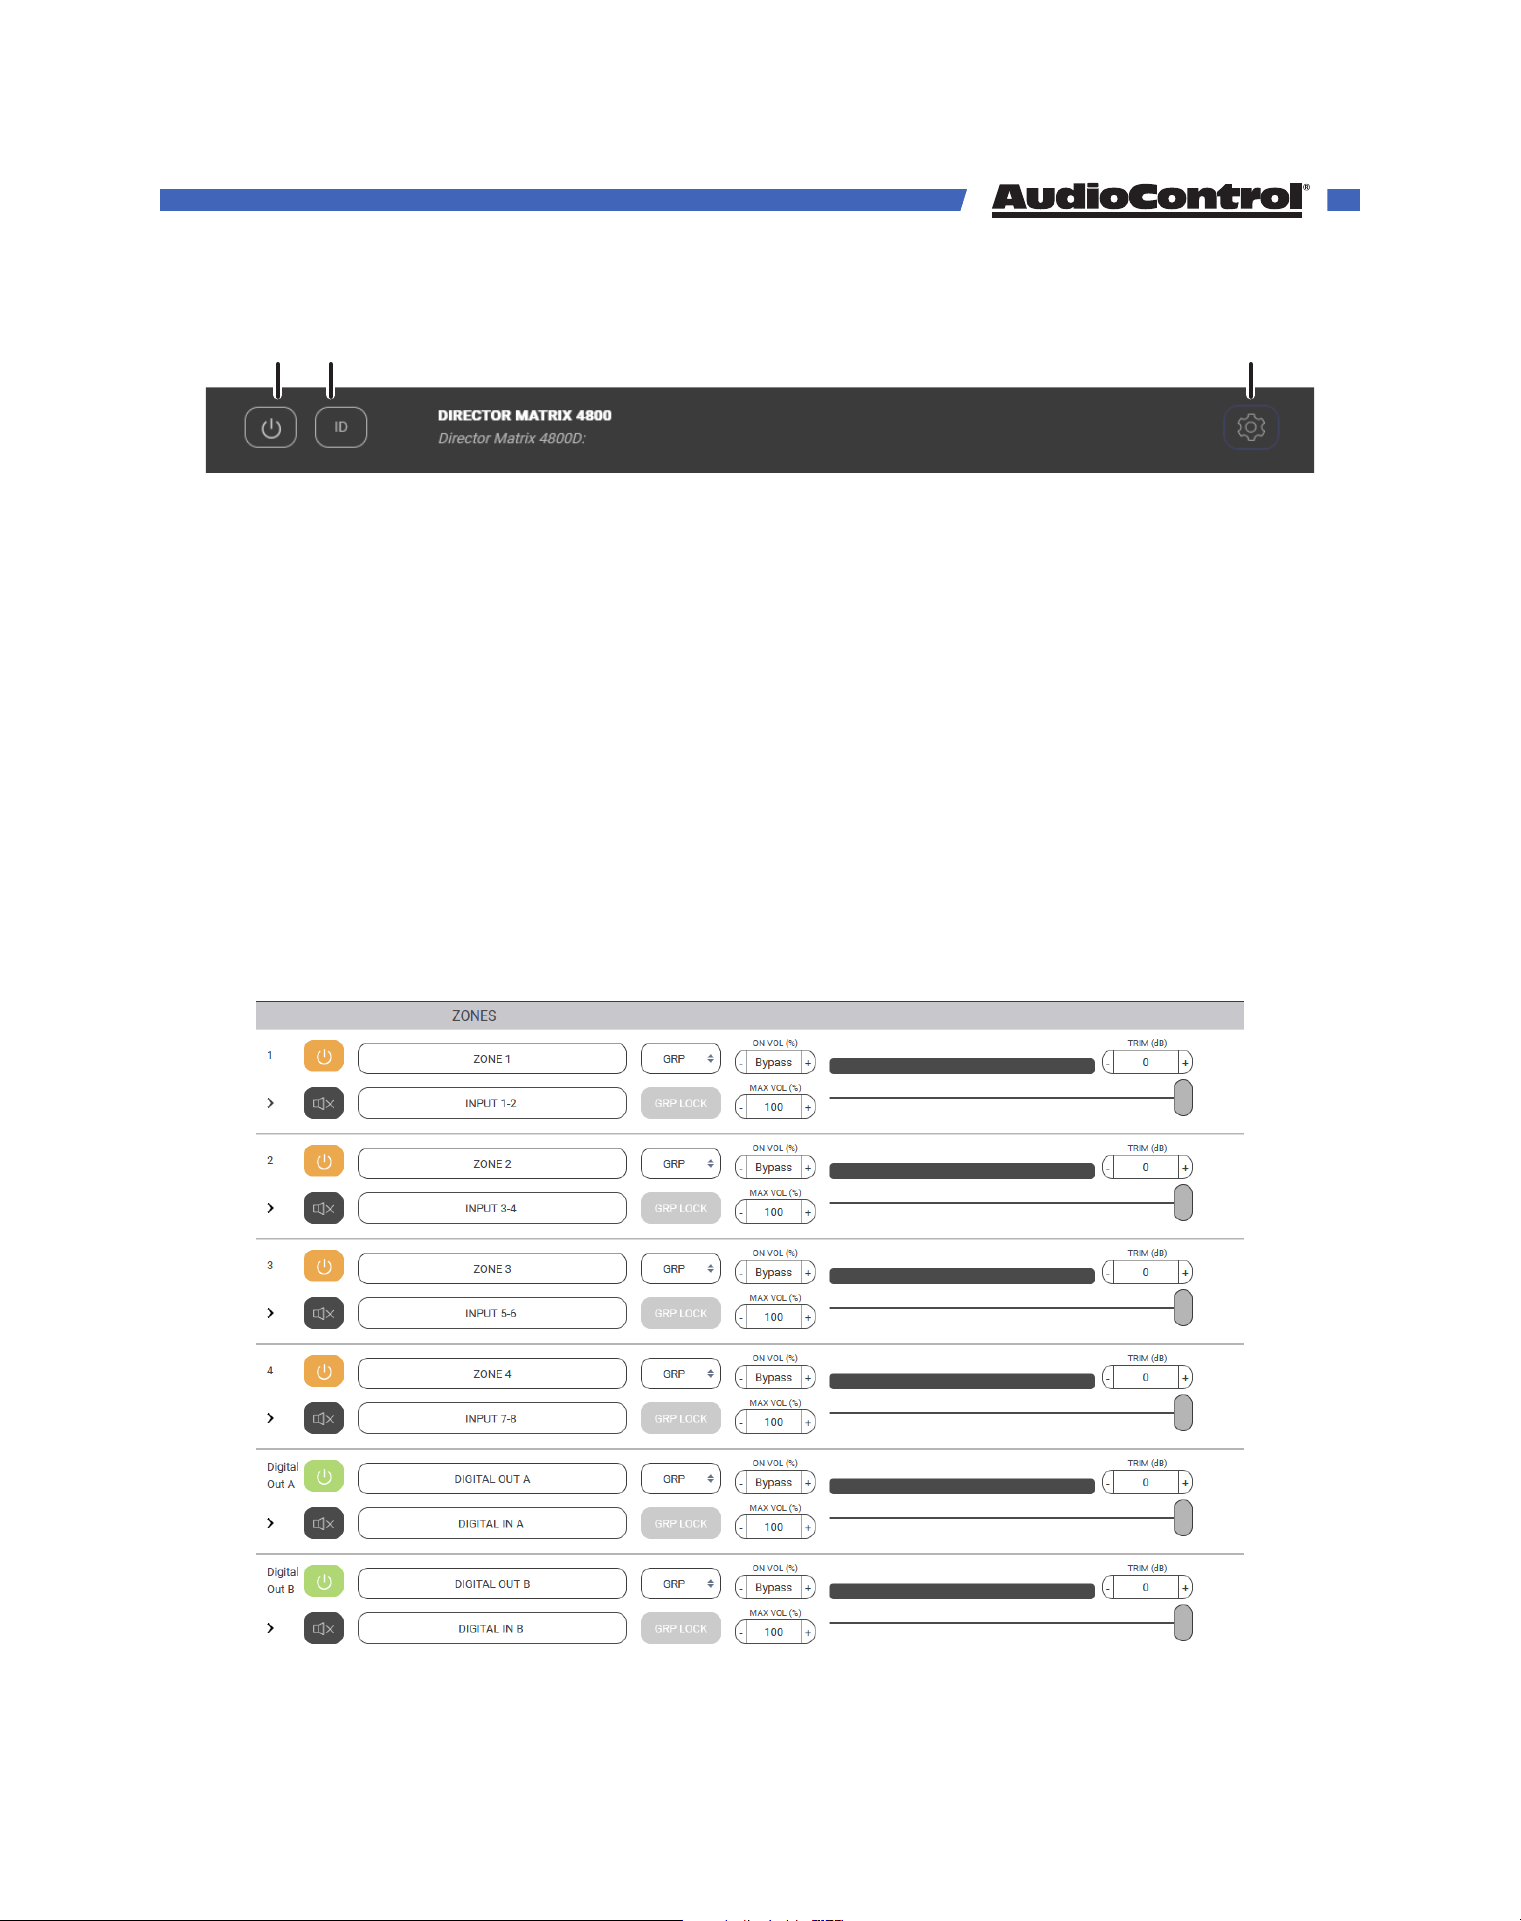
Global Standby - This is basically a main power-o where the amp, power supply and
DSP are shut down. Power up from this state is about 10 seconds. If you plan on leaving
the 3-pin connector with the jumper in place, or using an external 12V trigger, the amp will
remain on even when this button is o.
On = Green
O = Grey
ID - Pressing this button will cause the two ethernet lights to flash in tandem on the front of
the unit to help you identify the amp you are working on.
Global Settings - Expand this panel for additional controls.
Zones 1-4 - The settings in each section defines the rear panel speaker-level output to
each of these 4 zones.
Digital Outs A & B - The settings in these sections are identical to those in the zone outputs,
and control the 2 Digital Coax outputs on the rear of the amplifier.
Global
Standby
Global
Settings
ID
Tour of the Web GUI
©COPYRIGHT AVPRO GLOBAL HOLDINGS 2023 - 22410 70TH AVENUE WEST, MOUNTLAKE TERRACE, WA 98043
19
Web Gui
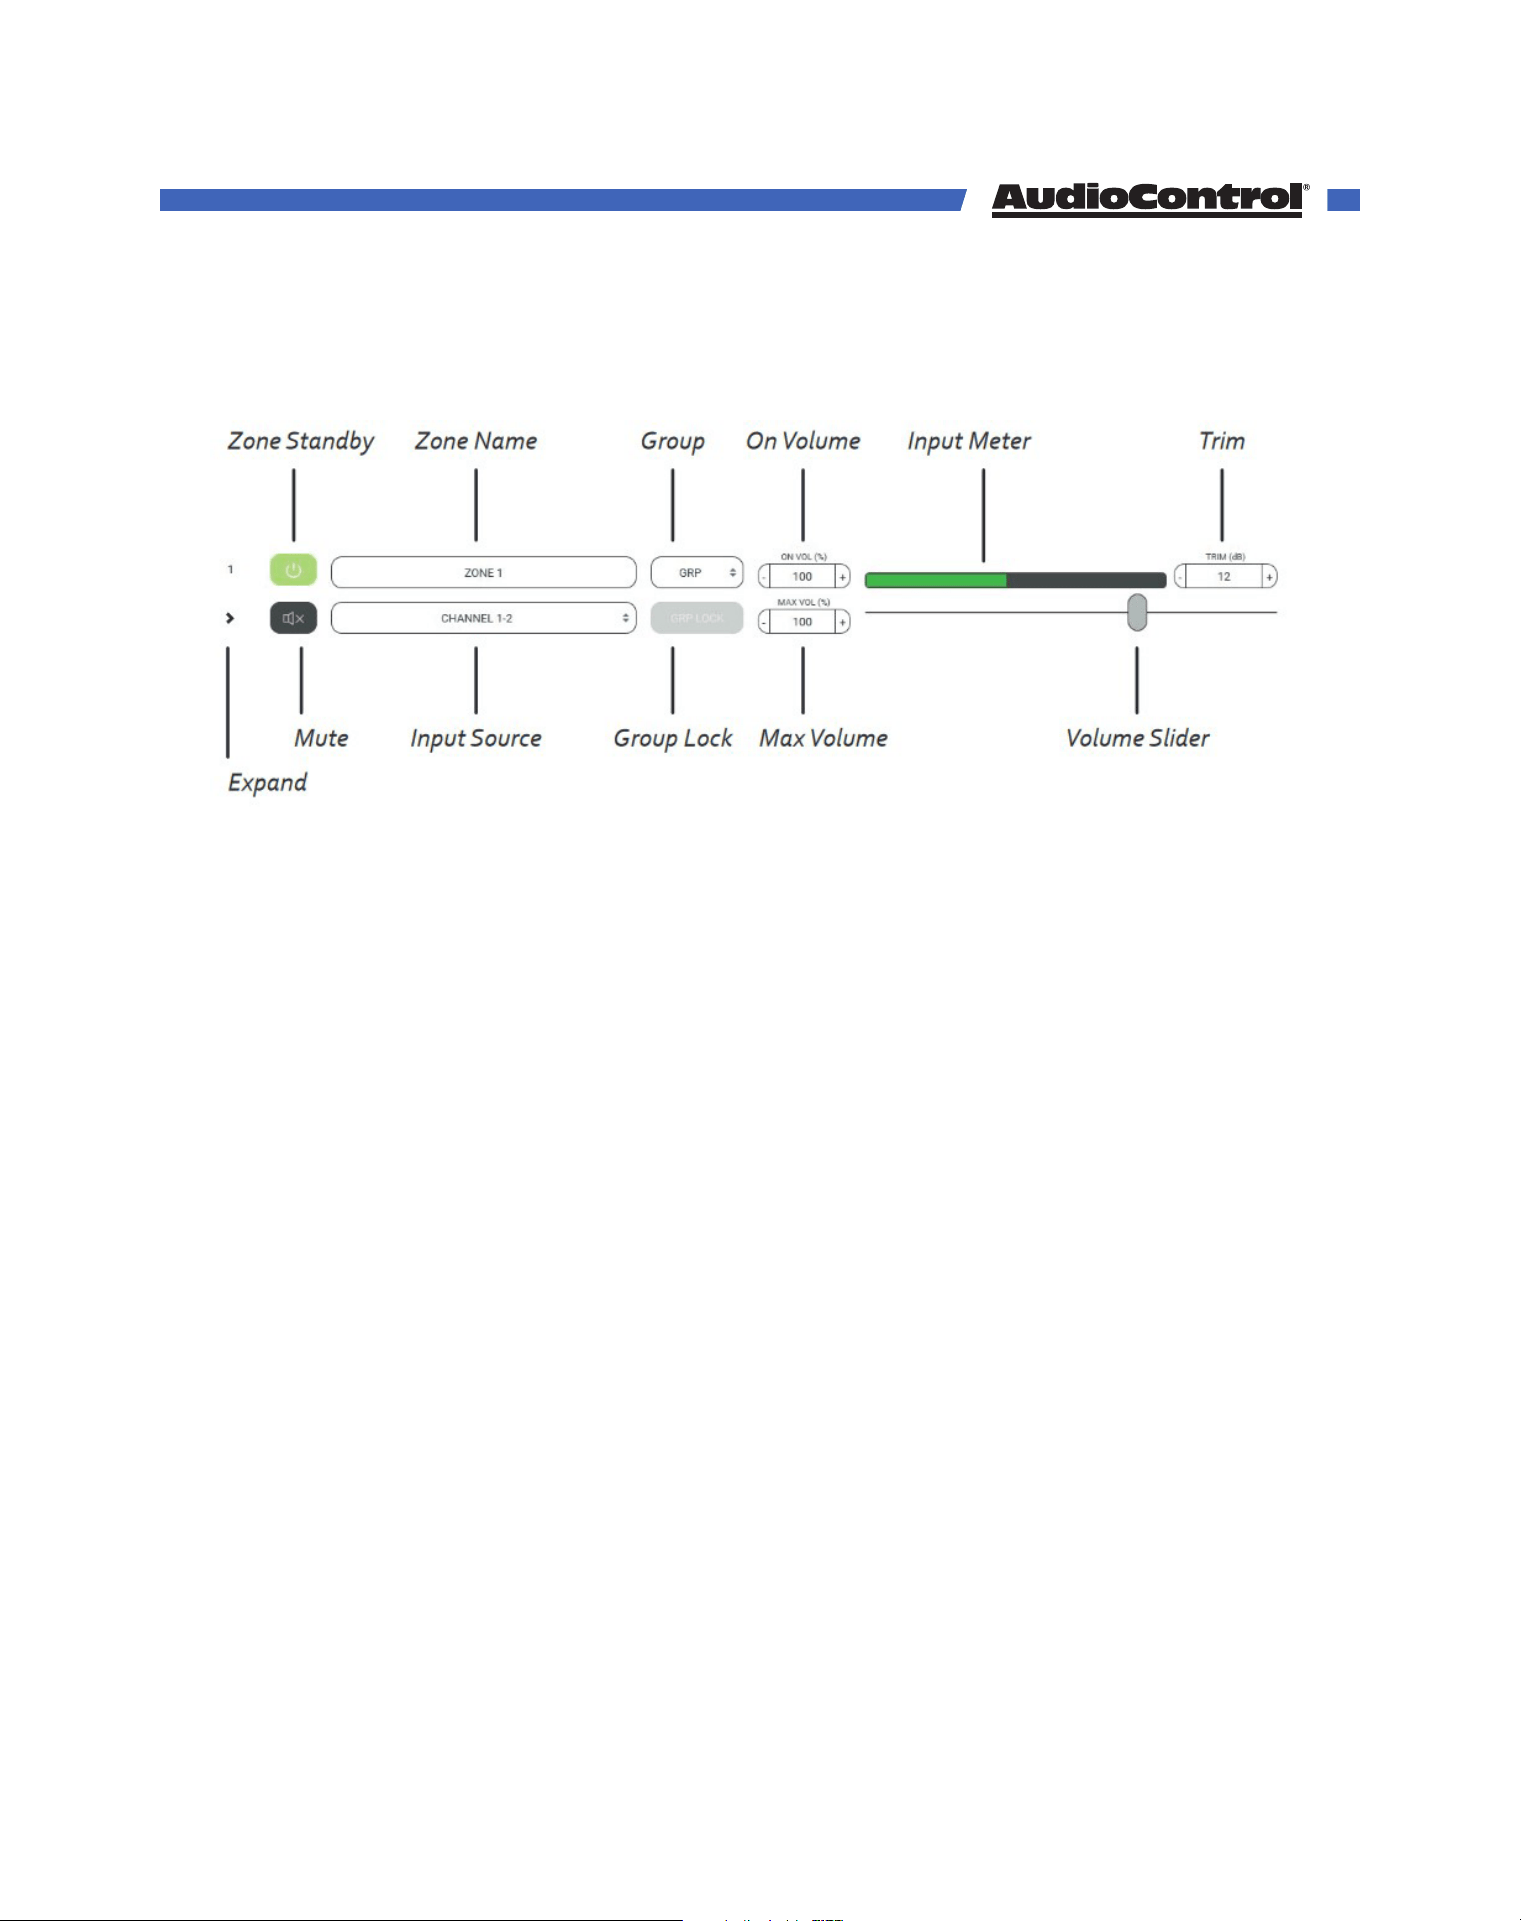
Zone Standby - This turns its respective zone on and o, allowing for a quick time to power
output. Turn this on and in less than 500ms you’ll have sound. No boot-up time to worry
about. It’s important to note, if you are using signal sense, the local zone will need to be
on, and either an external trigger will need to be in place or the global standby button will
need to be on.
On = Green
Awaiting signal sense = Orange
Standby = Grey
Zone Name - The zone name can be changed by typing in this box. As you do this, a small
tick mark box appears at the right. Remember to click on it to save your changes, or they
will be lost. Up to 30 characters and spaces are available to express yourself.
Expand - Click here to expand and collapse the zone settings.
Mute - Click here to quickly mute or unmute the output from this zone during accordion/
harmonica/yodeling/smooth jazz solos.
Muted = Red
Unmuted = Grey
Zone Controls
©COPYRIGHT AVPRO GLOBAL HOLDINGS 2023 - 22410 70TH AVENUE WEST, MOUNTLAKE TERRACE, WA 98043
20

Input Source - This drop down menu allows you to
select the input source to play in this zone. We have
thoughtfully included Pink Noise to assist when setting
volumes and calibrations of each zone.
If your amplifier is on a Dante network, the menu will
show you Local inputs, inputs from other AudioControl
Dante amplifiers, and any other Dante sources you
may have.
Group - Each zone can be assigned to a group using
this drop down. Each zone in a group should share the
same group number. Leave this on GRP if you are not
using grouping for the zone.
Group Lock - If the zone is assigned to a group, click
here ensure the zones work together.
A warning message will appear:
“Proceeding will set the volume of all the zones in the
group (that also have group lock engaged) to the
minimum of them.” You are then given the opportunity
to continue, or go home and rethink your life.
As an example, if Zones 1, 2, and 3 are assigned to group 1, select Group Lock for each of
these three zones. Each group lock button will turn orange when engaged. The volume will
change to the current lowest volume.
If you raise the volume of Zone 1, the volume of Zones 2 and 3 will raise to match it.
Any changes to zone power, volume, input, Bass, and Treble will aect every zone in a
group. All other settings (EQ, Crossover, Trim, etc) will remain independent to each zone.
On Volume - Sets the zone volume to a specific value at when powered on, if the volume
was at a higher level than what is defined here. If lower, then the lower value is used at
startup.
Max Volume - Sets the maximum volume level of the zone.
Input Meter - This was designed to hypnotize little kittens and the eect is quite adorable
as the music goes up and down.
Web GUI
©COPYRIGHT AVPRO GLOBAL HOLDINGS 2023 - 22410 70TH AVENUE WEST, MOUNTLAKE TERRACE, WA 98043
21

Volume - The volume slider is used to set the volume in the zone.
Trim - This trims the level of the zone output. The range of adjustment is suitable for
balancing SPL in grouped zones, for example, 3 sets of speakers grouped for a living room.
It will also serve as a way to limit volume in a particular zone if, for some reason, you don’t
want to use the maximum volume setting.
Zone Options
Speakers - Here you can set your speaker profile. The speaker profile is an optimized
settings file that the speaker manufacturer has designed to maximize the speakers
performance with the Director.
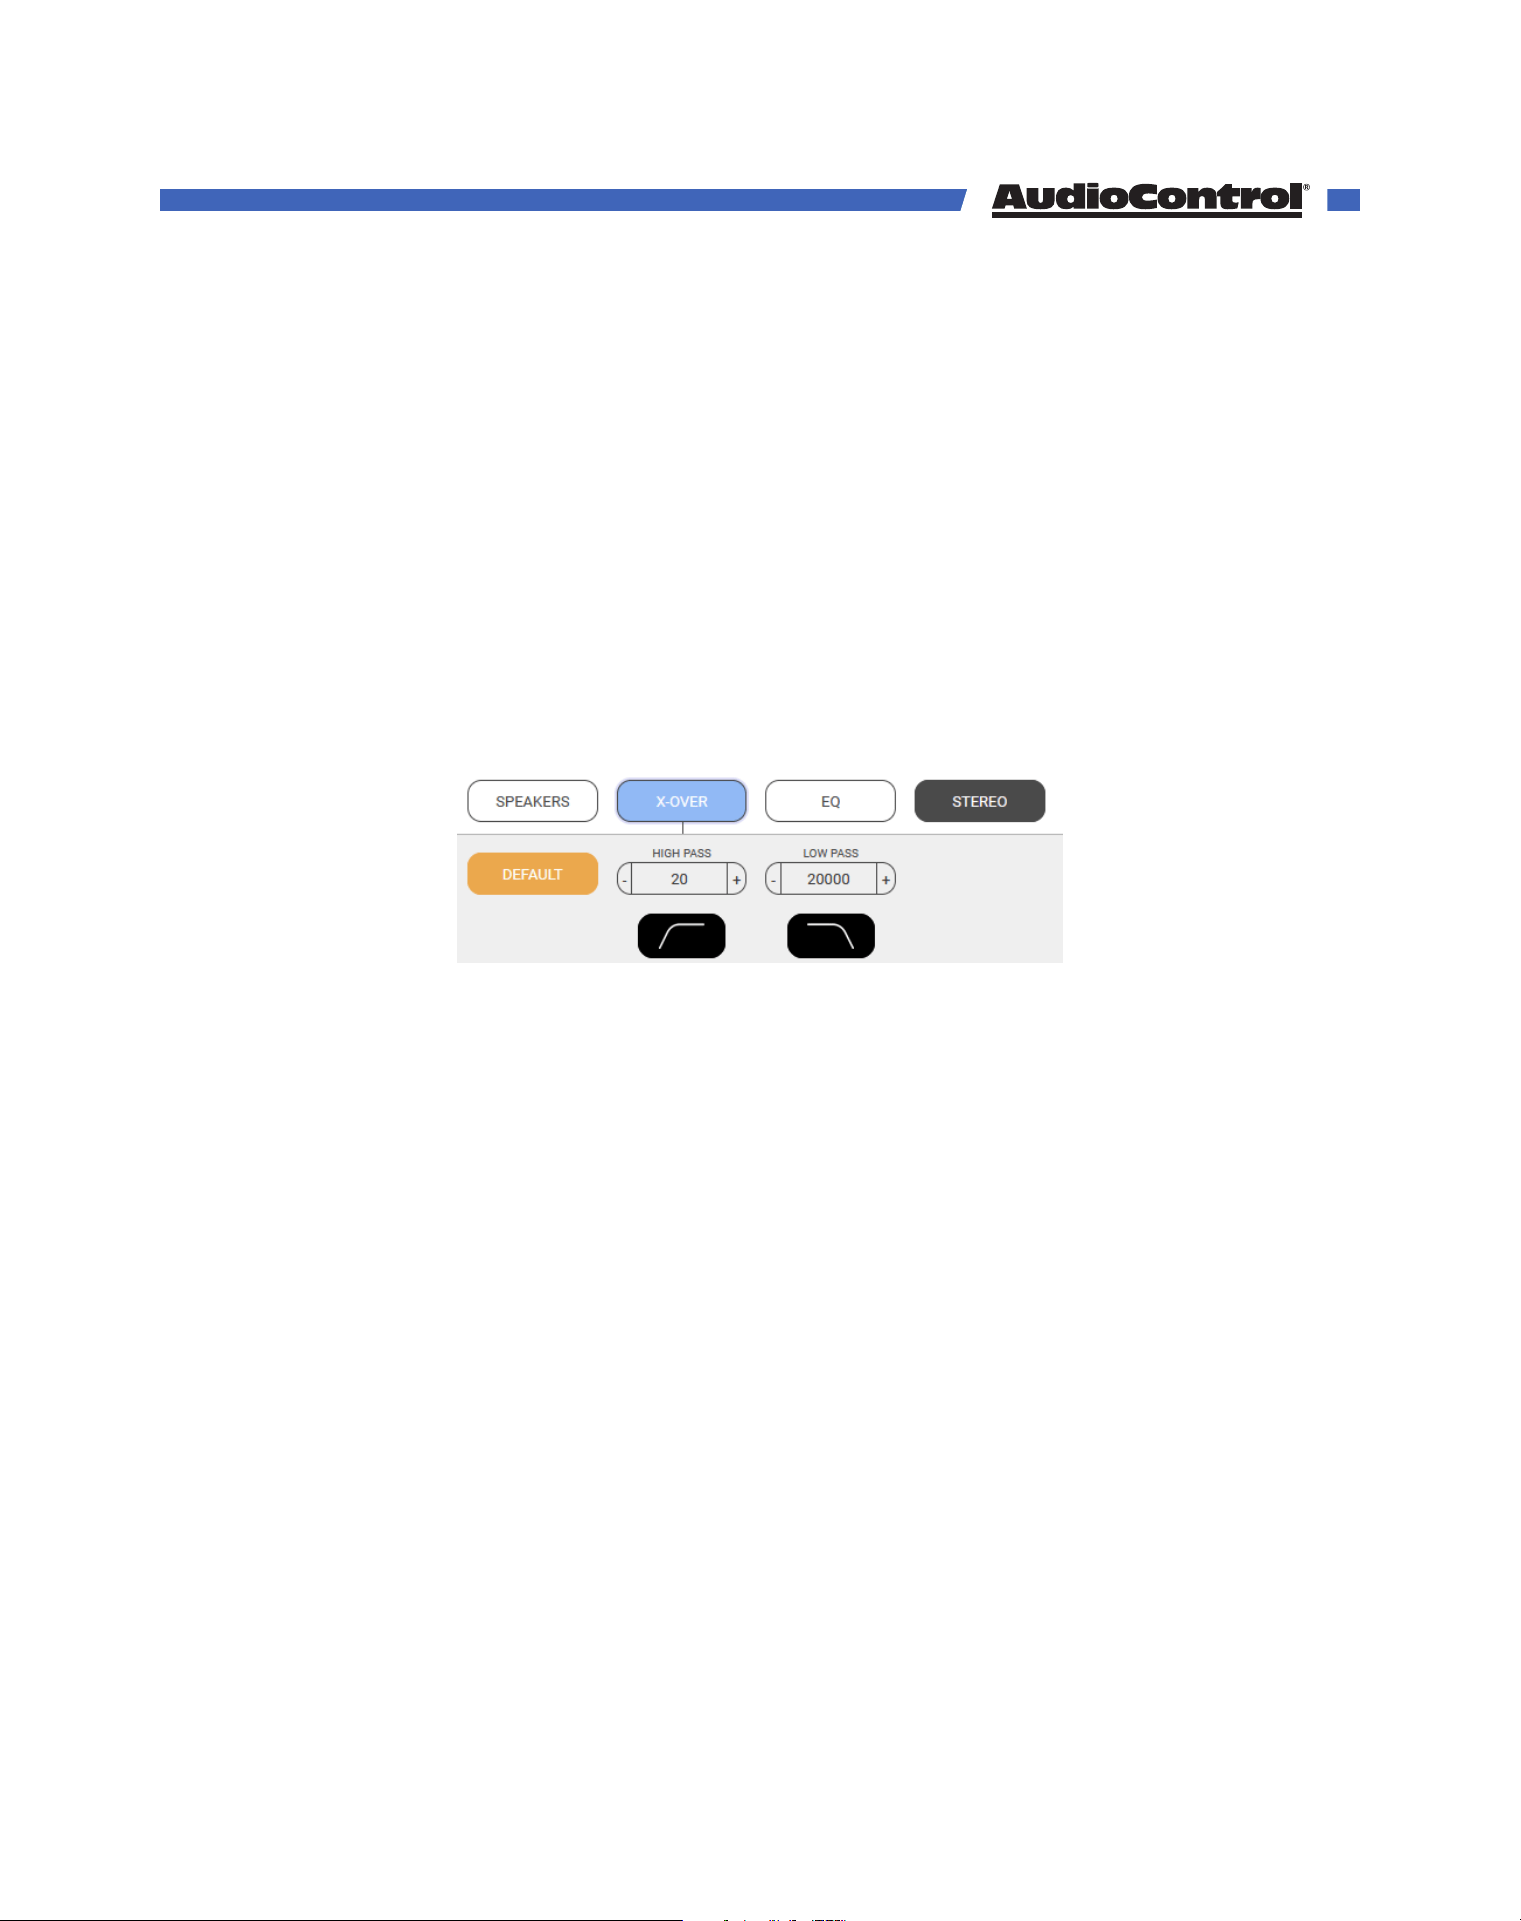
X-Over - Here you can set the low-pass, band-pass, and High-pass crossover filters to
control the frequencies being sent to your speakers.
EQ - In this section, you can control both the graphic and parametric EQ filters to dial in
your speakers’ performance.
Stereo/Mono - With this button, you can set the output to mono or stereo. When mono
mode is engaged, the button will change to say “Mono.”
Speakers
Speaker Calibration Profiles - Each Speaker
Profile contains equalization and crossovers
that have been carefully crafted by the speaker
manufacturers as the best curve for that
particular speaker model.
The profile is applied in the background, and you will not see the EQ sliders move. With
the speaker profile applied, you can still adjust the graphic EQ to fine tune the response
to the room, and/or client preferences, but crossover and parametric EQ will be locked.
Web GUI
©COPYRIGHT AVPRO GLOBAL HOLDINGS 2023 - 22410 70TH AVENUE WEST, MOUNTLAKE TERRACE, WA 98043
22
Each output zone can be assigned to a dierent speaker profile to accommodate dierent
models.
Speaker profiles do not come pre-loaded on the Director, but are downloadable from our
website. The speaker profiles we have available grow regularly, so keep an eye on our
website for the latest information.
Crossover
The crossover allows you to create dierent filters for each zone. By default, the crossover
is set wide open, with virtually no limit to frequency response at 20Hz to 20,000Hz.
The high-pass filter determines the lowest frequency that will pass through the zone. The
low-pass filter determines the highest frequency that will pass through the zone.
These two filters work together to create a specified frequency range between the High
and low-pass.
A crossover can protect speakers from playing frequencies too low or too high for their
design. The filters should be chosen slowly, with considerable forethought and care,
possibly while mulling things over in your favorite comfy chair.
Each speaker has its own frequency range that should be listed by the manufacturer. Take
that into consideration when setting a crossover for your speaker.
To prevent over-stress of speakers by sending frequencies lower than they are physically
able to handle, use the subsonic filter. For most in-wall speakers, we recommend setting
the high-pass filter to 40 Hz or higher.
A common use of this feature is to set up a 2-way crossover, with a pair of stereo speakers
playing the mids and highs, and a subwoofer for the lows.
Web GUI
©COPYRIGHT AVPRO GLOBAL HOLDINGS 2023 - 22410 70TH AVENUE WEST, MOUNTLAKE TERRACE, WA 98043
23
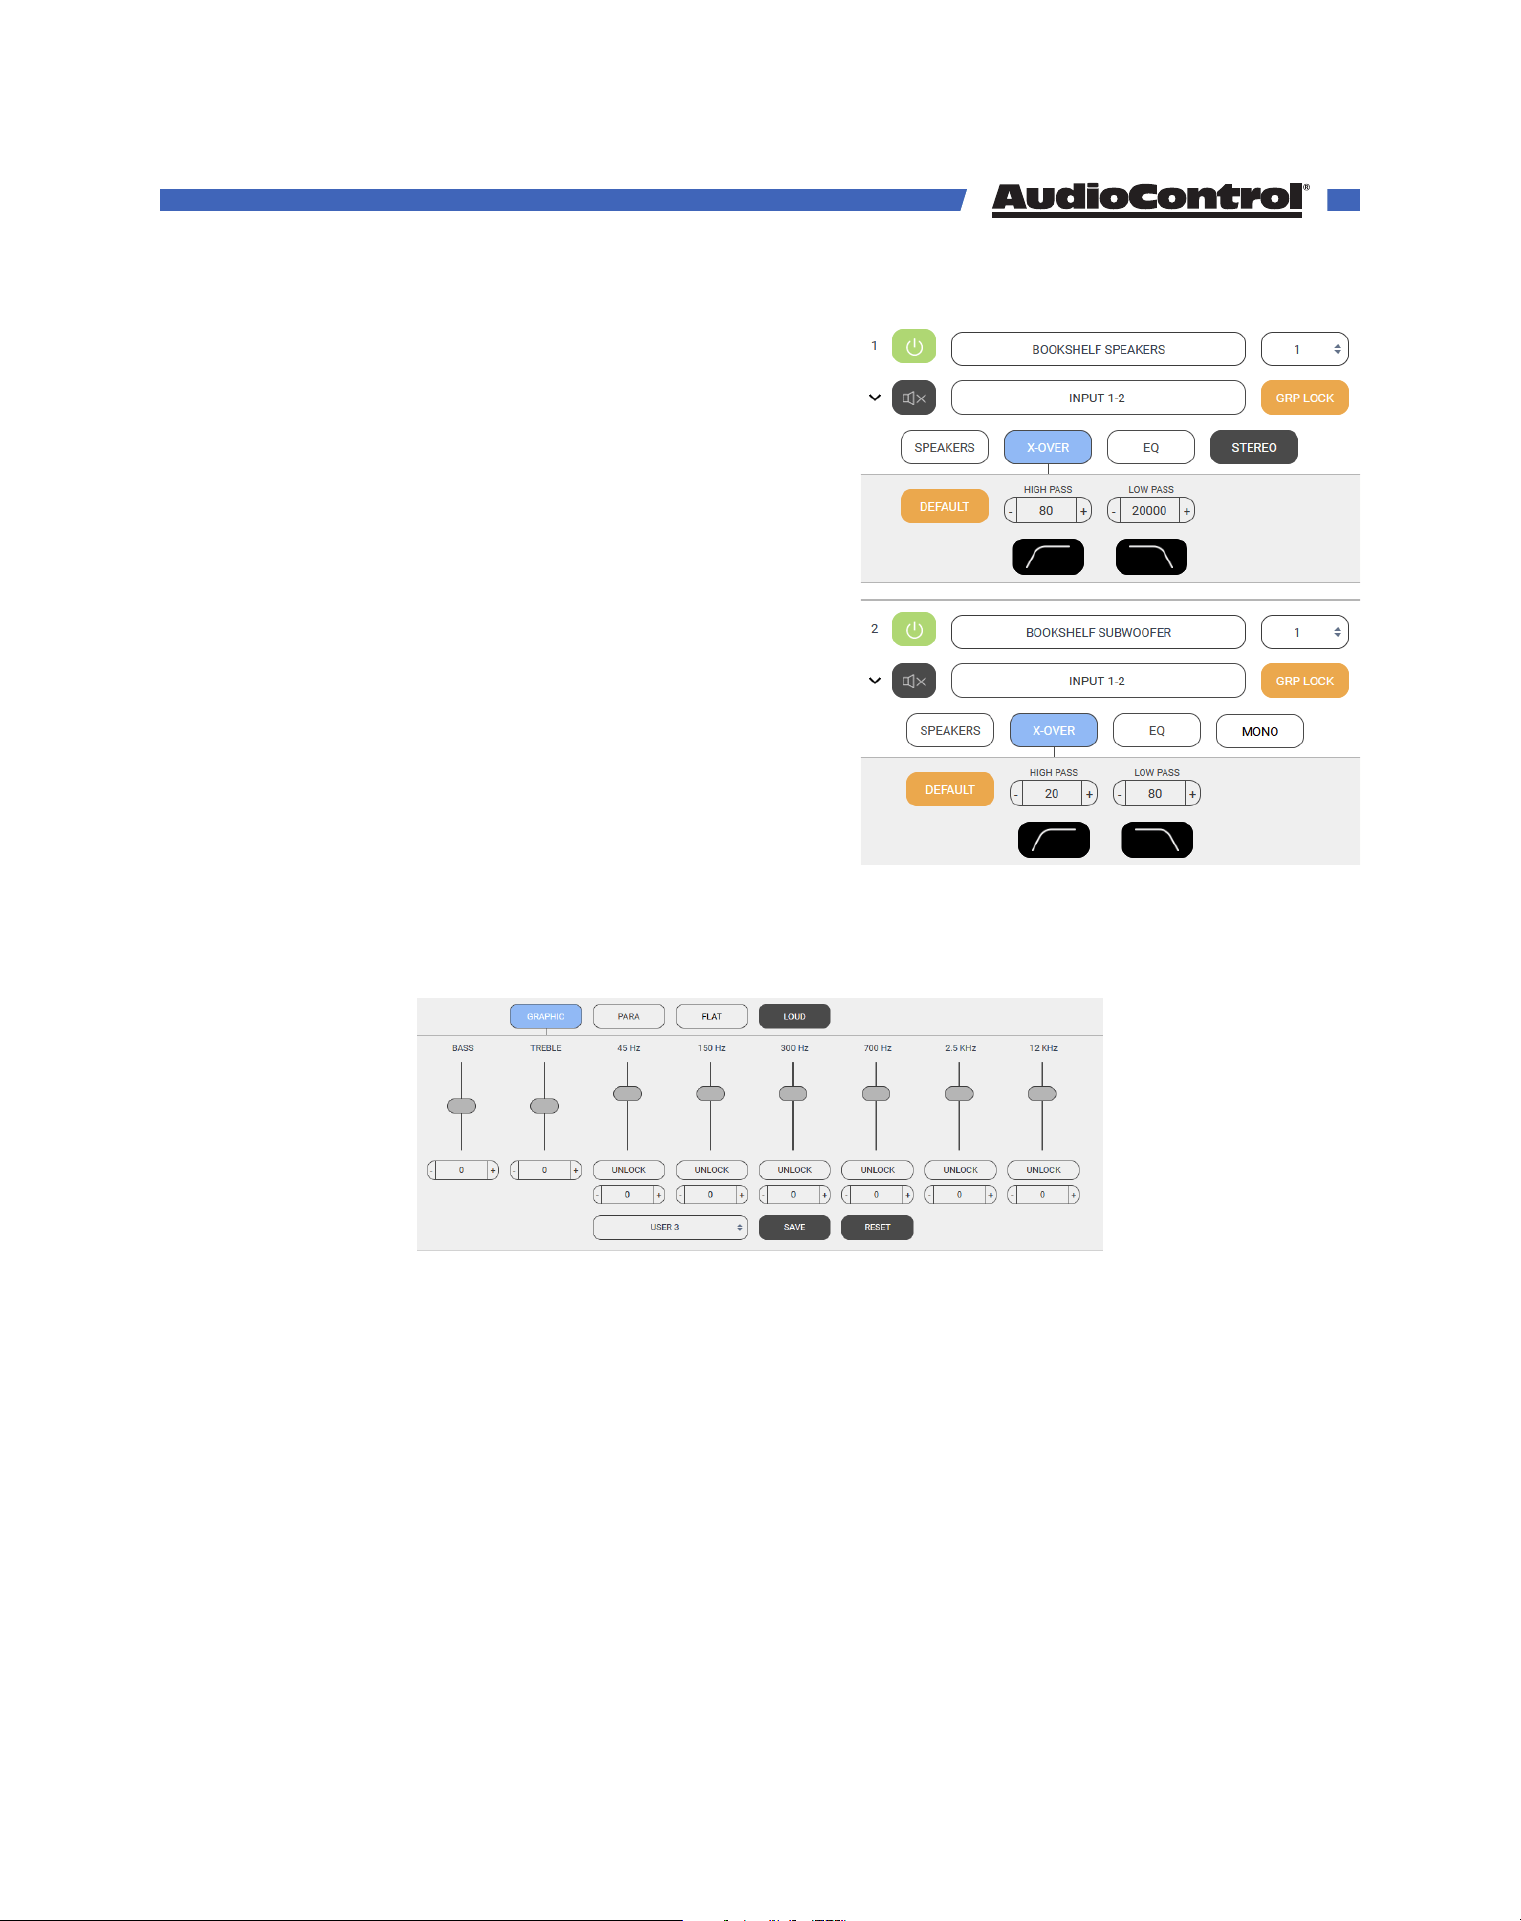
In a stereo zone, set the high-pass to around
80Hz (or to your preference) and the low-pass up
to 20,000Hz allowing it to play the mid-to-high
frequencies, while the sub handles the lows.
In a bridged mono zone for the subwoofer, set
the low-pass crossover to match the high-pass of
the stereo zone. Set this zone’s high-pass filter to
around 20Hz, or whatever is recommended by the
manufacturer. The sub will only receive the low
frequencies and receive the combined power from
both channels.
Group the two zones together, and they will act in
perfect auditory harmony.
The crossover cannot be adjusted if a speaker
profile is active.
Graphic EQ
The Director M4800D comes with 2 types of EQ, a 6-band Graphic EQ with Bass and
Treble adjustment, and an 8-band Parametric EQ.
Adjustment of the Graphic EQ of the selected zone is done by dragging the EQ sliders to
the desired position, by clicking the +/- buttons under the slider, or by typing the desired
value between +6 to -6 into the number field.
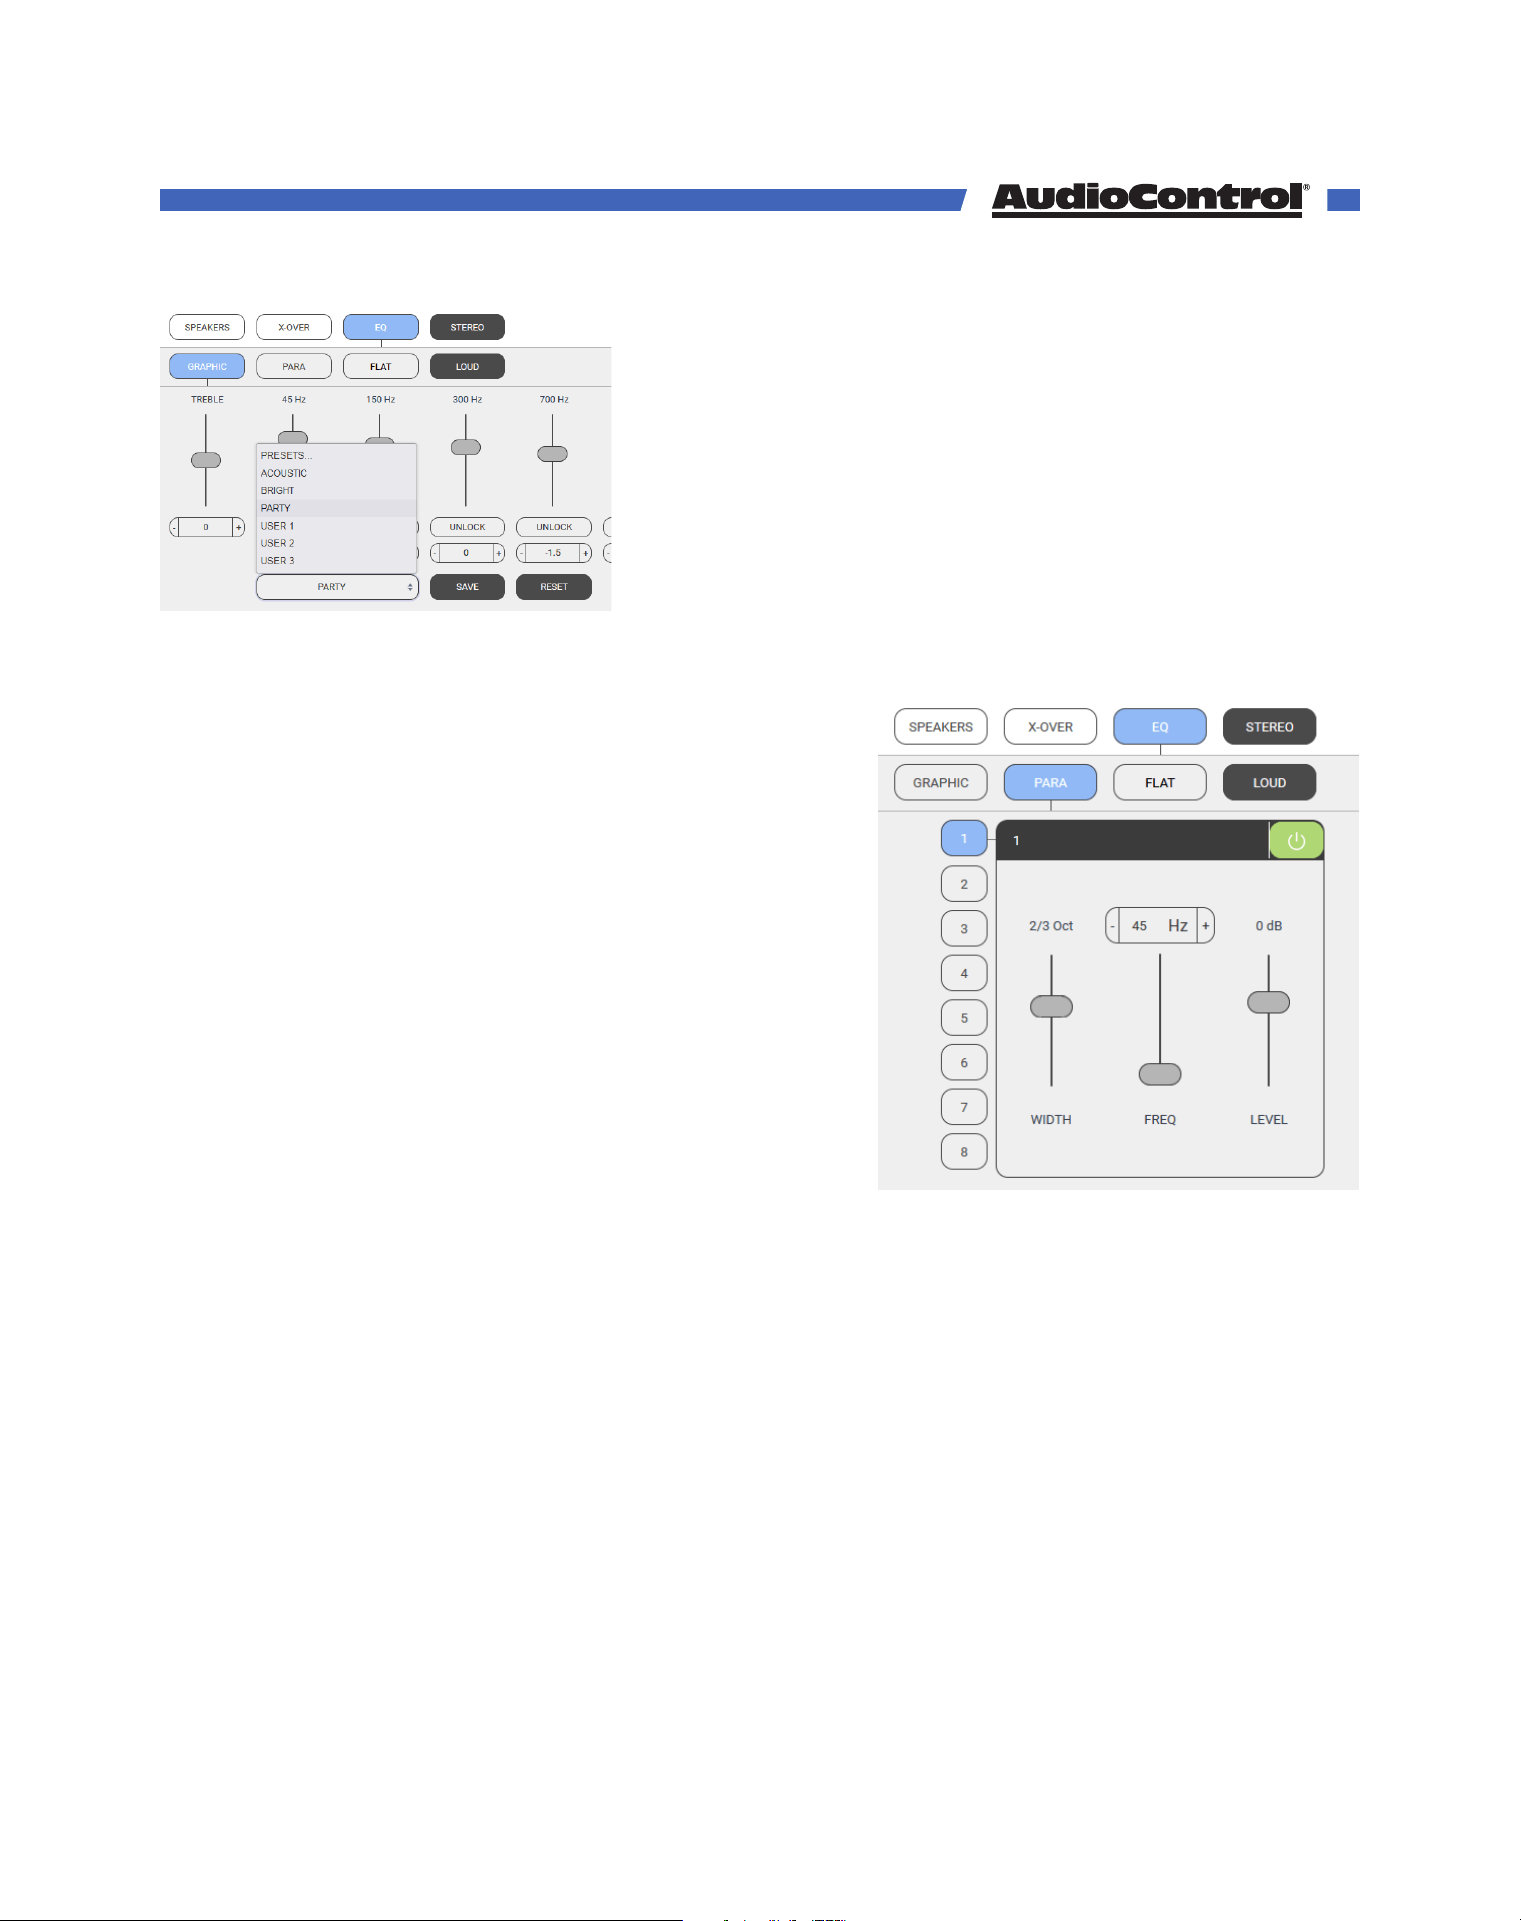
By default, the EQ bands control both the outputs of a zone as one. Click “Unlock” to adjust
the left and right channels separately.
There are some presets available using the large button at the bottom of this menu. Once
you have the EQ settings just the way you like them, you must save the settings as user
presets. Select User 1, User 2, or User 3 from the drop down menu, set your EQ and press
SAVE to copy your EQ to the user preset. RESET returns the user preset to a flat EQ.
Web GUI
©COPYRIGHT AVPRO GLOBAL HOLDINGS 2023 - 22410 70TH AVENUE WEST, MOUNTLAKE TERRACE, WA 98043
24
You can save dierent settings to dierent user presets
and see which one the clients like. Their taste may be
dierent than yours.
Bass and Treble - At no extra charge, two of the sliders
oer bass and treble EQ adjustment of the shelving
kind. Shelving EQ, used in combination with the
graphic EQ and parametric EQ, gives you a high level
of adjustment in any system Start with the graphic EQ
flat, apply a bit of shelving bass or treble EQ, and see
how that sounds. Maybe that will do.
Parametric EQ
In addition (or subtraction) to the graphic EQ sliders,
there are 8 separate parametric equalizers per
zone, for the ultimate in room-acoustics problem
solving.
Each parametric EQ has adjustments for the
frequency, octave width, and the level boost or cut.
For an example of their use, if a certain frequency
sets all the kitchen teacups rattling, a narrow width
filter can be tried at the teacup-rattling-onset-
frequency, with a cut in the level.
Once you have the EQ settings just the way you like
them, you must save the settings, or you will lose
them. Go back to the Graphic EQ area and use the
SAVE button.
Flat & Loud Buttons
The Flat button will set the current graphic and parametric EQ settings to zero, flattening
out the EQ curve. A warning will pop up asking if you want to continue before resetting the
EQ, just in case a keyboard-crossing-cat clicked Flat by accident.
When active, the Loud button will turn orange. It will also set both the treble and bass EQ
sliders to +5dB for a pleasing low frequency boost at lower listening levels. Deactivating
Loud mode will revert the treble and bass sliders to their original positions.
Web GUI
©COPYRIGHT AVPRO GLOBAL HOLDINGS 2023 - 22410 70TH AVENUE WEST, MOUNTLAKE TERRACE, WA 98043
25
Global Settings
Clicking the Gear Icon in the top right corner of the Web GUI will bring up the global
settings options. If your screen is large enough, the global settings will already be open.
Amplifier
When collapsed, the Amplifier settings panel
will give you a quick glimpse of the amp’s
status. It will report if voltage is normal, high,
or low; if temperature is normal or too hot;
and whether signal sense is on or o.
The expanded menu will let you change the
name of the amplifier, make sure to click the
check mark that appears when you edit the
name to save your settings.
You can also turn signal sense on or o with the toggle button here, and use the system
lock feature to keep out users who think they know what they’re doing.
System Lock requires you to enter in a system password. Once system is locked, control
over parameters can only be done with the password you entered here, so make sure to
write it down, or you will have to perform a
master reset.
Dante Configuration
This setting panel allows your AudioControl
Dante amplifier to easily share and matrix
sources from any other AudioControl Dante
amp on the network.
Pretty simple to get started: open the Dante
Configuration, set the IDs for each amp, then
click “Look for other devices.” The page will
refresh, and the inputs from all available
devices will populate the input selection menus.
This means that inputs on those other devices
are available to your local amp. Pretty great!
Set the first Dante-enabled unit that you log into as #1. The unit will scan for other Dante
devices and make sure that the sought-after position of #1 isn’t taken. If the all clear has
been obtained, henceforth, this device will now be known as #1 (along with the MAC
address).
Web GUI
©COPYRIGHT AVPRO GLOBAL HOLDINGS 2023 - 22410 70TH AVENUE WEST, MOUNTLAKE TERRACE, WA 98043
26
Set your other Dante AudioControl amps with ID 2, ID 3, etc. This designation will enable
remote control over Dante routing through these amps via 3rd party automation systems
like Crestron/Control 4, Elan and others! Very cool!
Dante sources that are not connected to a Dante-enabled AudioControl CM or Director
amplifier can be routed to these amplifiers using Dante Controller, we’ll talk about that
more in the next section.
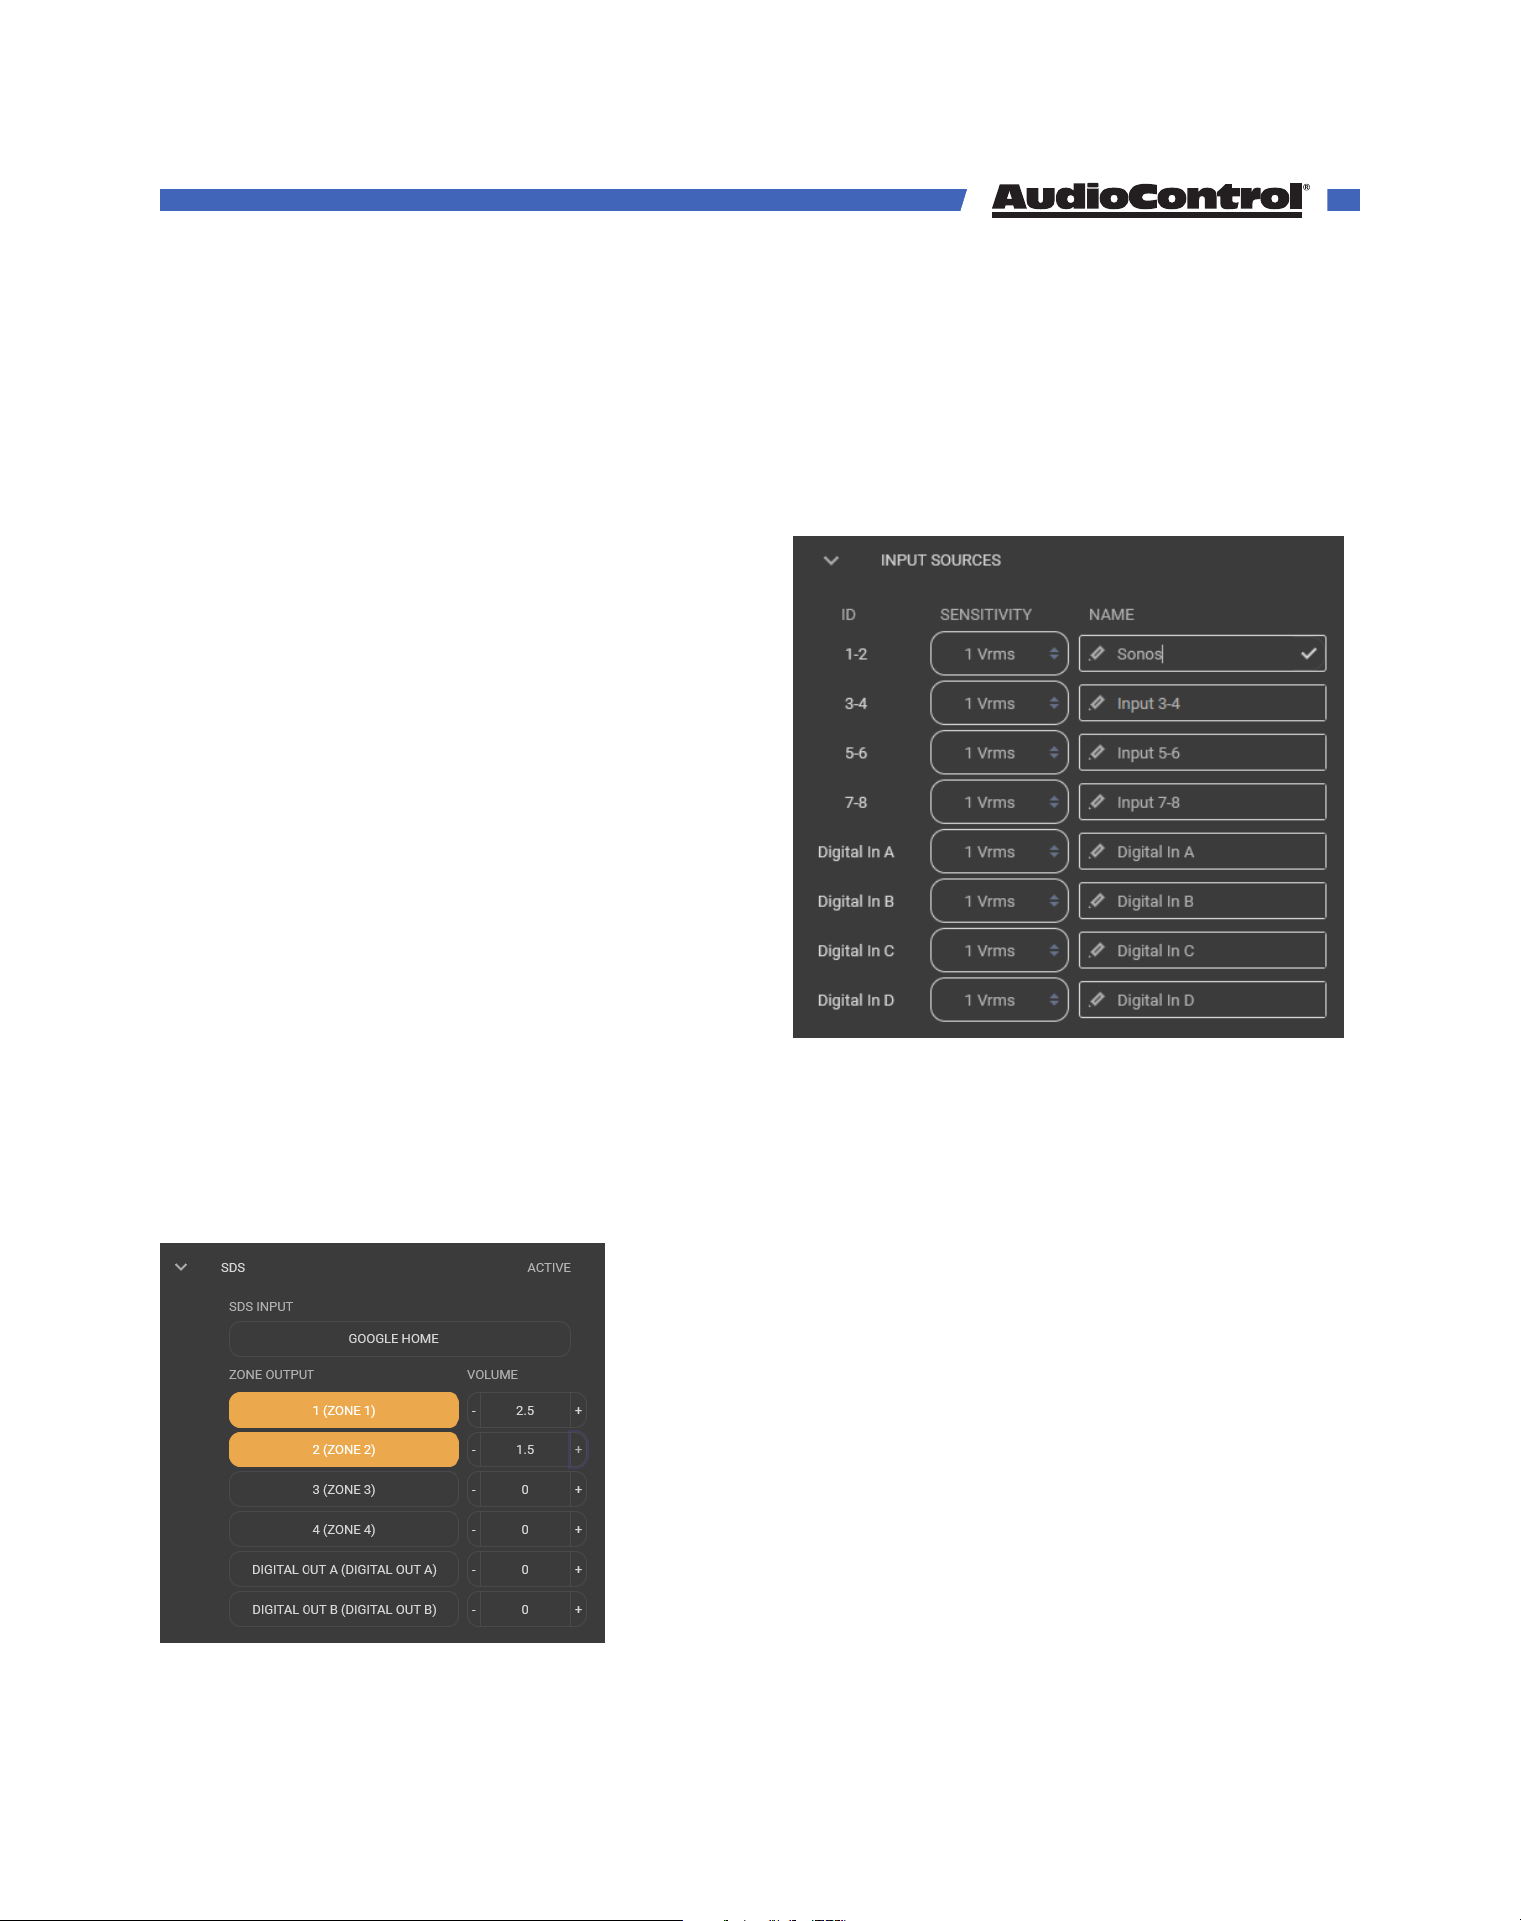
Input Sources
This settings panel allows you to rename
the input sources to something witty and
charming. Click on the small check mark that
appears at the right in each box, to save your
changes. (Do this before renaming the next
input, or your changes will not be saved.) The
new names will then appear in each Zone’s
list of inputs.
You can also change the input voltage
sensitivity from 0.5Vrms to 4Vrms - the lower
the number the more sensitive the input
becomes. This setting can boost the output
of a low-powered source, or prevent clipping
from a high-powered source.
Most home audio products output around 1-2Vrms.
SDS - Signal Detecting Switching
SDS enables third party automation systems to route doorbell audio, or any voice activated
device into the M4800D for distribution through residential or commercial audio systems.
Any input may be configured as the designated SDS
input, while any or all outputs may be selected as
announcement or paging zones. When an incoming
audio signal is detected at the SDS input, audio
present in assigned SDS output zones is muted until
the announcement has been completed, at which time
previous signals will resume playing.
In the SDS input drop down list, select the input that will
be assigned as the SDS input.
Select the zone outputs that will output SDS audio when
Web GUI
©COPYRIGHT AVPRO GLOBAL HOLDINGS 2023 - 22410 70TH AVENUE WEST, MOUNTLAKE TERRACE, WA 98043
27
it is detected. The zone buttons while highlight orange when they are selected.
Volume levels for the announcements are adjustable in each output zone using the + and -
buttons next to the selected zones.
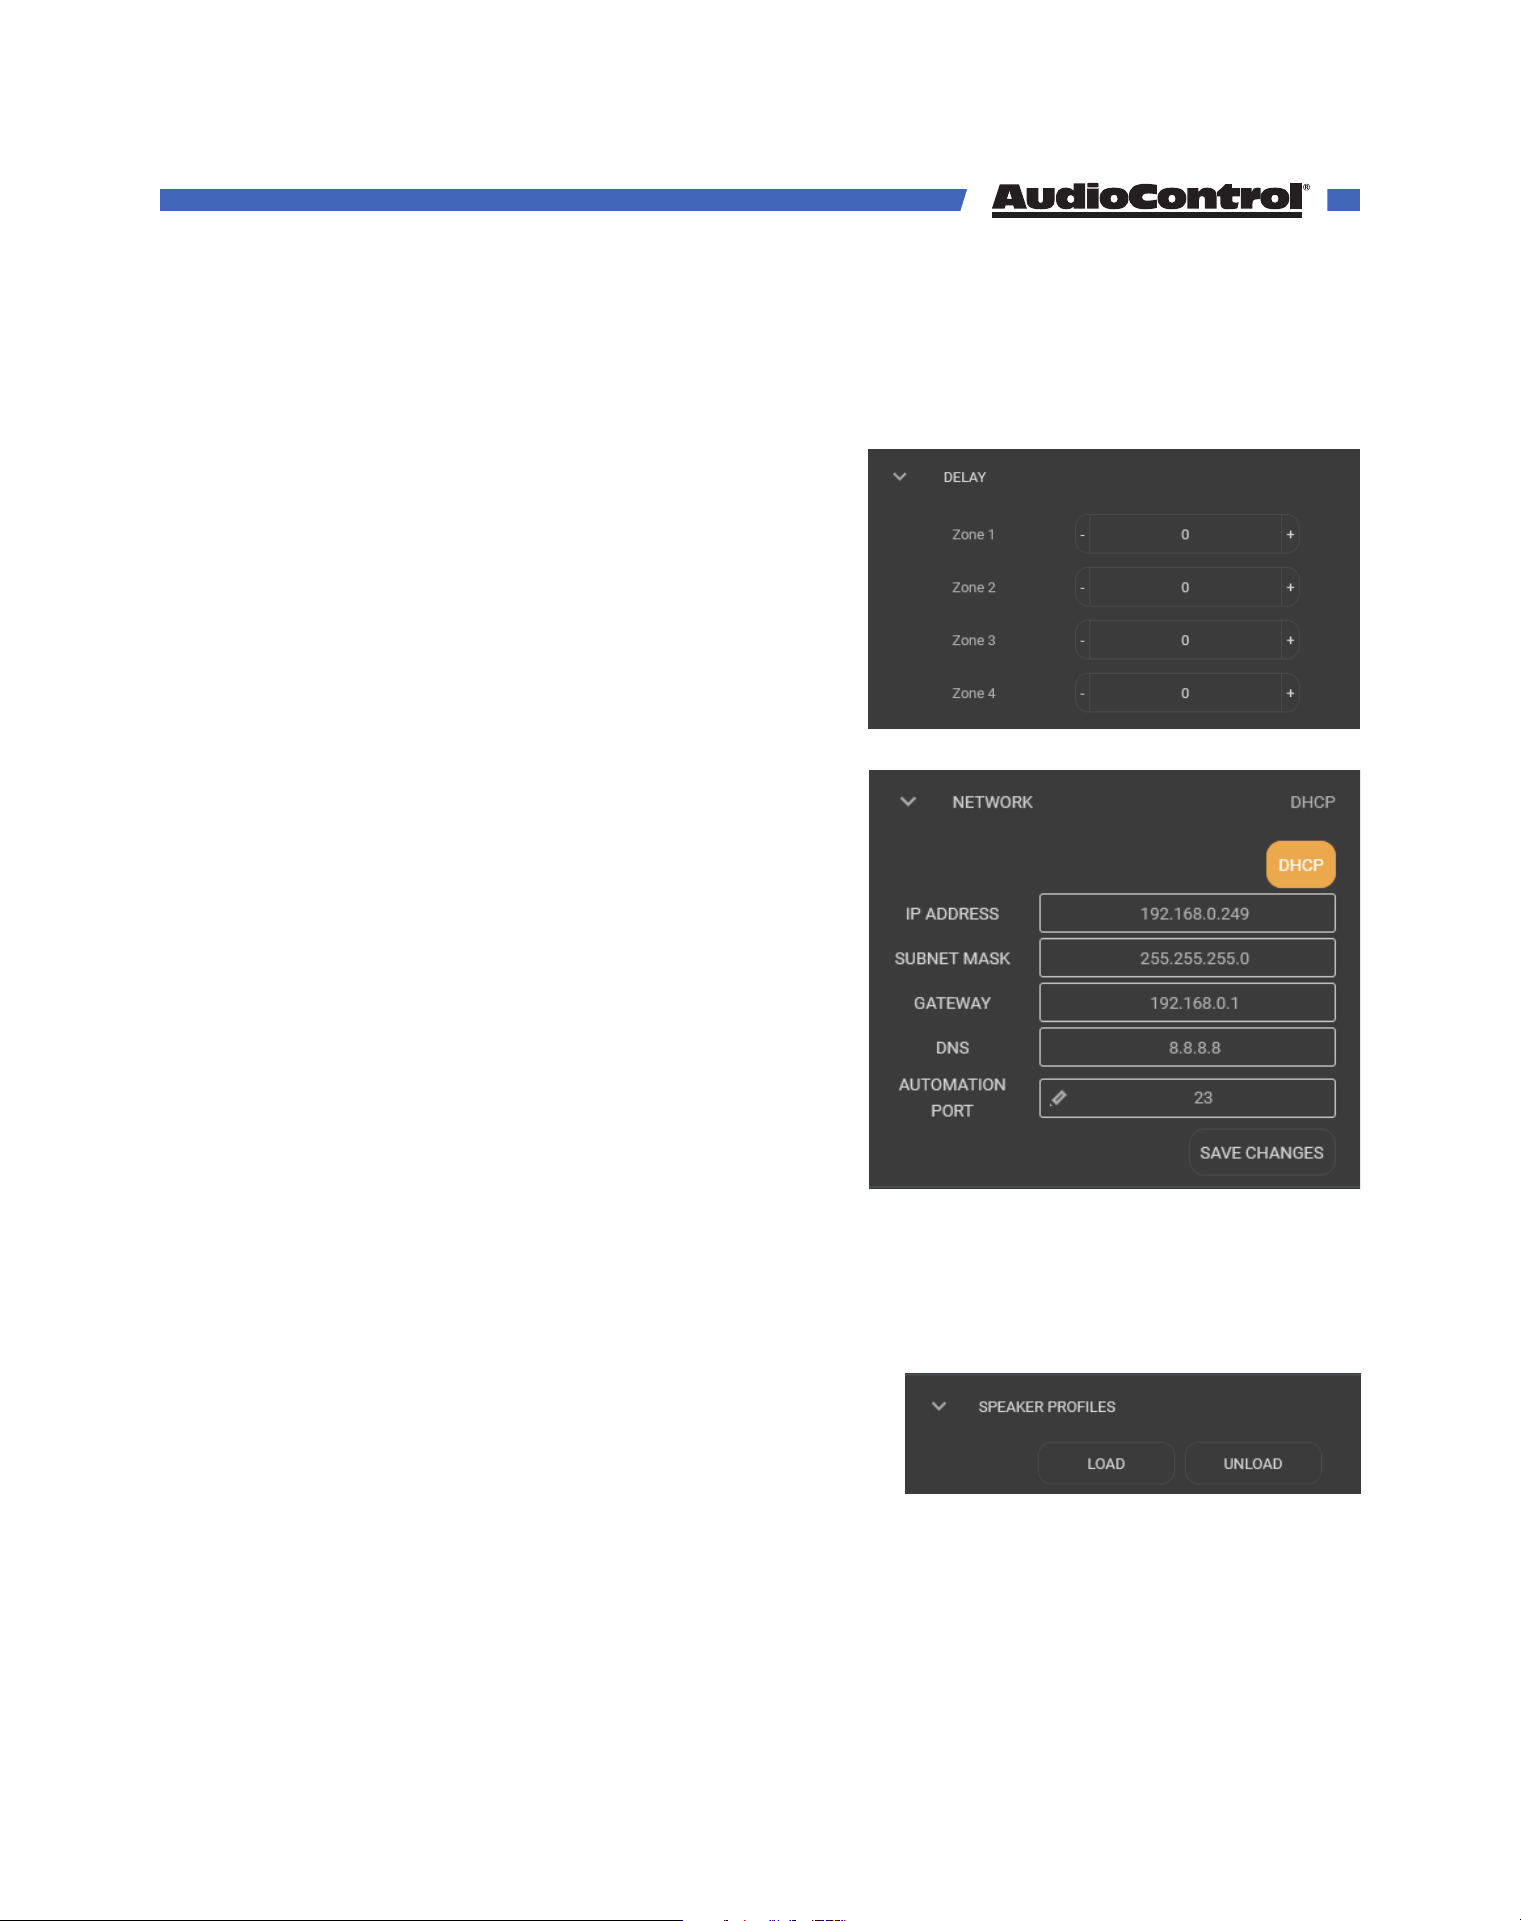
Delay
This is where you can adjust the time delay for all
speaker zones in 5 millisecond increments, up to
85 milliseconds. AudioControl engineers are hard
at work to make audio travel back in time.
Network
Here you can set your static IP, or leave thing. If
you don’t need to set a static IP there’s not much
to do here other than ensure the DHCP button is
selected.
De-select the DHCP button, edit all the IP address
settings appropriately for your network, and click
Save Changes to set your static IP.
Double check that the IP address you’ve chosen
for a static IP is not being used by another device
on the network! If you gave the amplifier another
unit’s IP address, you’ll need to take a trip to the
amp’s Master Rest button.
If you are having trouble connecting, the default IP
address of the unit 192.168.0.249. You can connect manually peer to peer to troubleshoot.
Speaker Profiles
Here you can load in the latest and greatest profiles from our speaker partners. All
available speaker profiles* come loaded in a single .csv
file, can be downloaded from www.audiocontrolpro.
com, and uploaded to the Director using the LOAD
option.
*Attempting to read Speaker Profiles without loading them into The Director may cause headaches. Code carefully!
Web GUI
©COPYRIGHT AVPRO GLOBAL HOLDINGS 2023 - 22410 70TH AVENUE WEST, MOUNTLAKE TERRACE, WA 98043
28
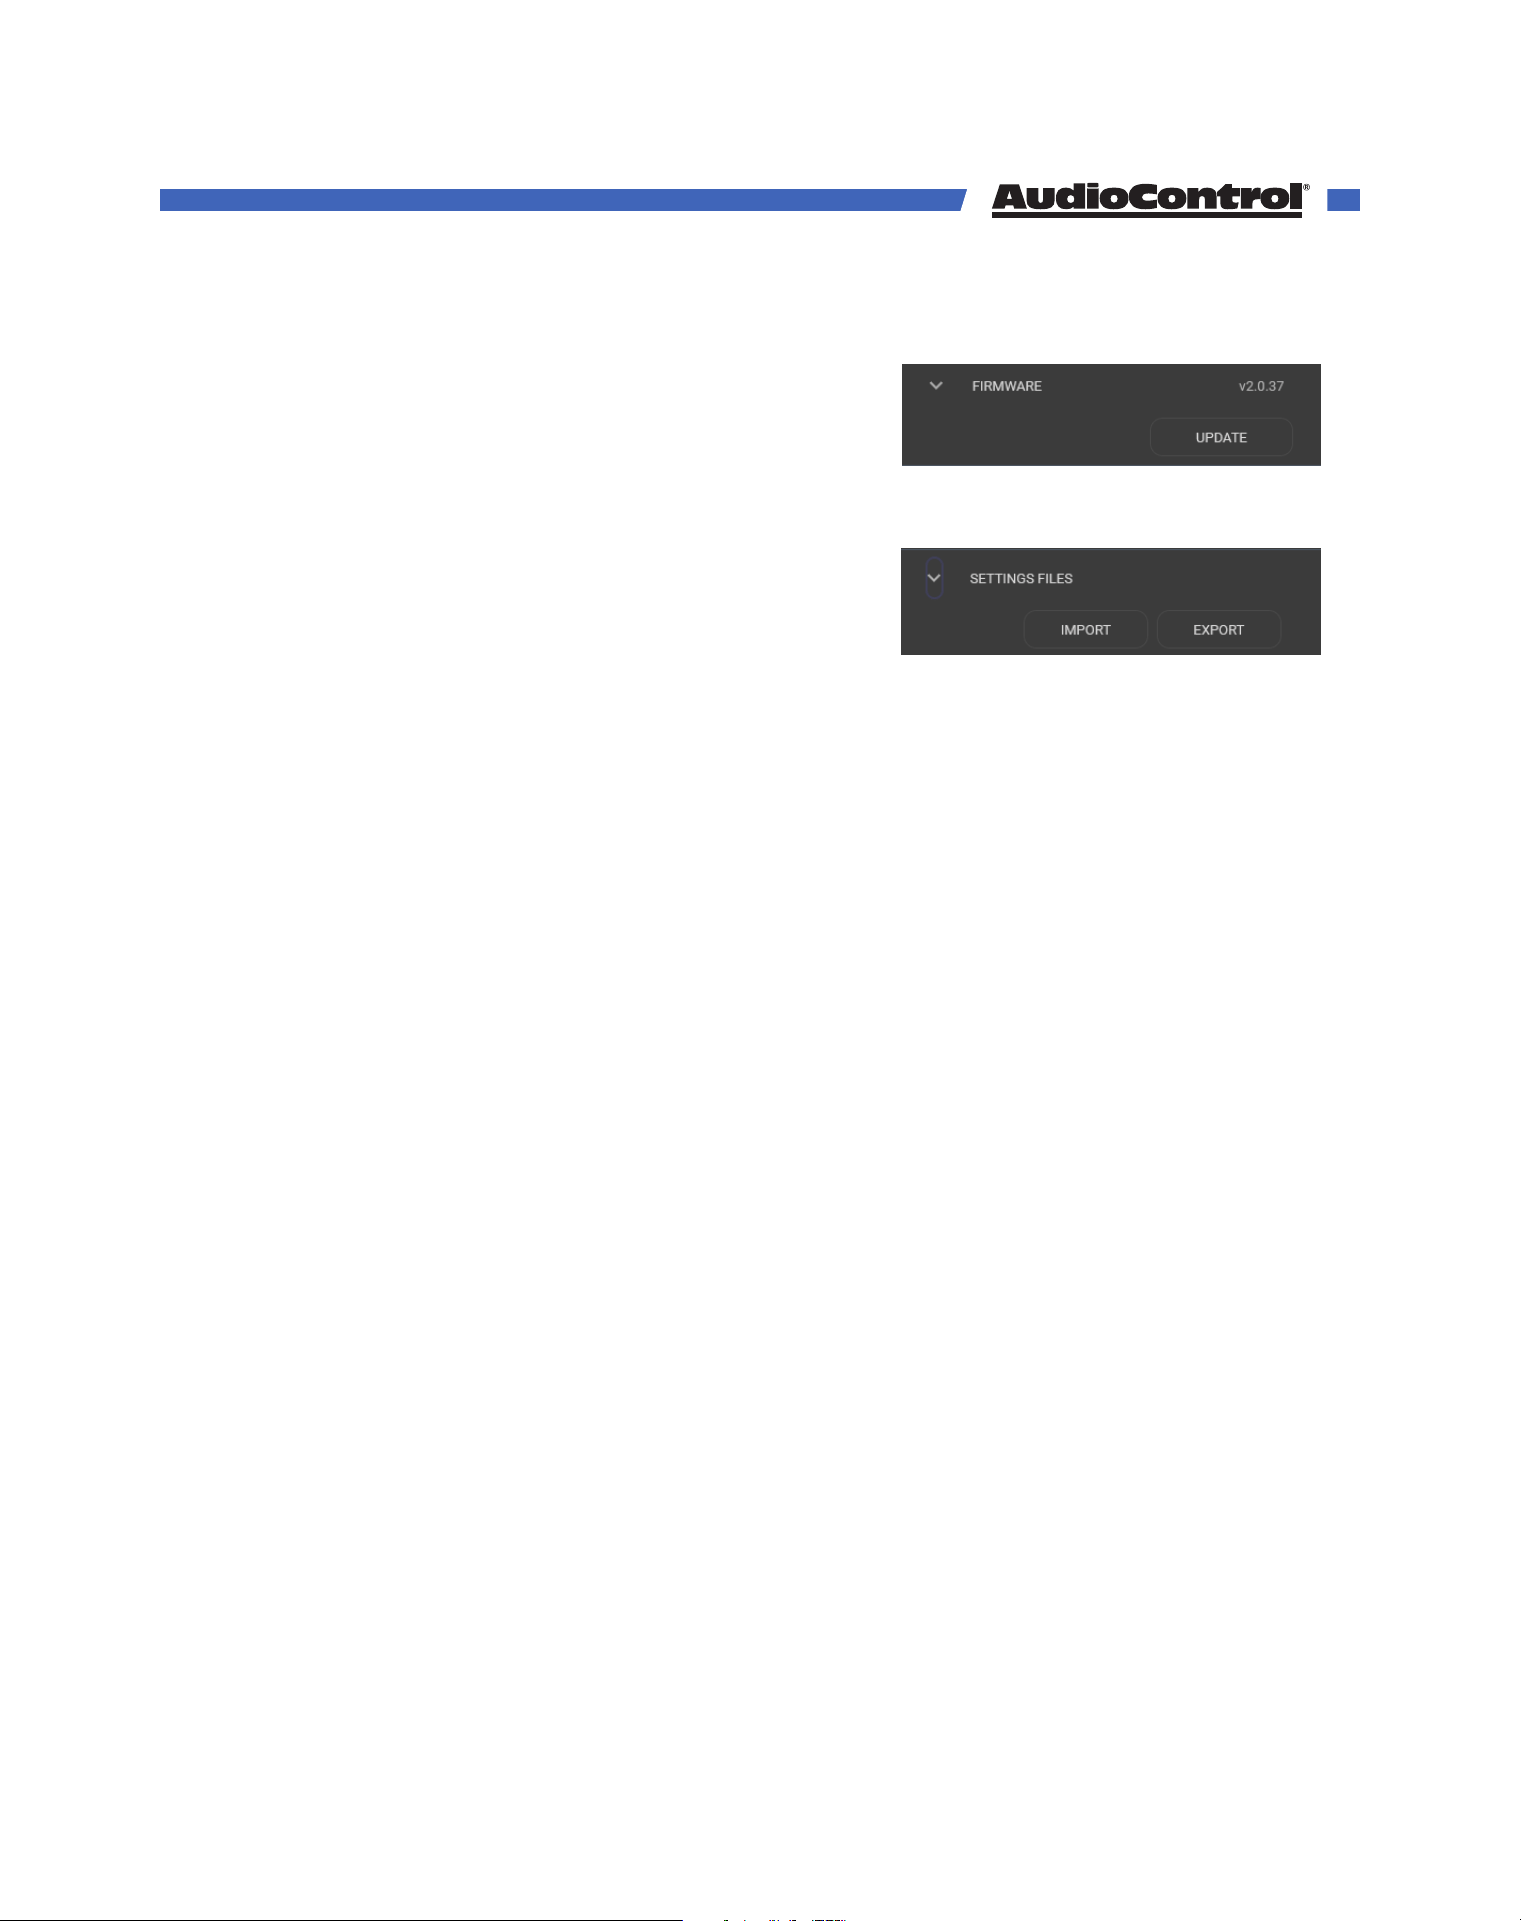
Firmware
Check your device’s firmware here, and run an update
if one is available at www.audiocontrolpro.com.
A step by step guide to updating firmware can be
found in a later section.
Settings Files
Here you can back up the settings of The Director. All
parameters are stored into a single external file.
It is important to save each zone configuration settings to a user memory. If you do
not need to have multiple EQ memories for recall, it is still necessary for the zone
configurations to be saved should the power go out. The Save function in the graphic EQ
section of each zone saves the EQ for that zone as user presets.
The Export button allows you to save the settings for all zones onto your computer. All the
graphic and parametric EQ settings, crossover setting, input and zone names, and more
will be retained in the exported file.
If you need to restore settings to the amplifier, or you save the perfect template you
want to load into multiple Directors, use the Import button to load a previously exported
settings file. Be patient, it can take about 2 minutes for the Director to load a settings file,
depending on the amount of adjusting it needs to make.
Web GUI
©COPYRIGHT AVPRO GLOBAL HOLDINGS 2023 - 22410 70TH AVENUE WEST, MOUNTLAKE TERRACE, WA 98043
29

Using Dante with AudioControl Amplifiers
All Dante-enabled AudioControl Amplifiers are able to easily find and share sources
with each other over the Dante network. To achieve this, the amp requires 2 ethernet
connections: one to allow access to the web GUI and IP controls, and another to send and
receive Dante audio signals.
When all of the amps are connected to the network, we recommend taking the following
steps:
1. Setup the amplifiers
Begin by setting up this amplifier as you would with any other non-Dante amp.
Connect inputs and speakers, make sure audio passes through, and adjust input
sensitivity as needed.
Set a static IP address if you plan to use one, upload speaker profiles, and make sure
that the firmware is up to date.
2. Rename the amplifier, inputs and zones
Since you’re likely going to have multiple AudioControl Dante amps on the network, we
recommend naming them before connecting the devices together. Otherwise, you’ll be
looking at a list of seemingly identical amps with no way to distinguish between them,
and even more unnamed inputs.
Rename the amplifier in the Amplifier panel, and rename the inputs in the Input
Sources panel. You can name them however you like, but best practice is to name them
by the signal they are receiving.
Renaming the zones will help you keep track of where the selected audio is outputting
to, so update the zone names now unless you regularly refer to your kitchen as “Zone 2”.
3. Route audio in Dante Controller
If you have sources that need to be routed via the Dante Controller (from sources other
than AudioControl Dante Amplifiers), create those connections in the Dante Controller
App now. There are a limited number of Dante Inputs on each amp, so make sure not
to fill every slot if you’re using a mix of AudioControl Dante amps and other Dante
products. We go into this more in a later section.
4. Set IDs
You can have up to 8 Dante-enabled AudioControl amplifiers connected together, and
each of them need to have their own ID number.
In the Global Settings on the amp’s web interface, open the Dante Configuration tab,
and select an ID between 1 and 8.
Dante Configuration
Advanced Setup
©COPYRIGHT AVPRO GLOBAL HOLDINGS 2023 - 22410 70TH AVENUE WEST, MOUNTLAKE TERRACE, WA 98043
30
Go through each amp in your system and give them
their own ID. If you named your amps Amp 1, Amp 2,
Amp 3, etc, we recommend setting them with ID 1, ID
2, and ID 3 respectively.
4. Look for Devices
Once all of the IDs are set, go through and click Look
for Devices on each amplifier. The amps’ web pages
will refresh, the available Dante amps in the system
will all appear under Remote Dante Devices, and all
of their inputs will be selectable in the input selection
drop down menus.
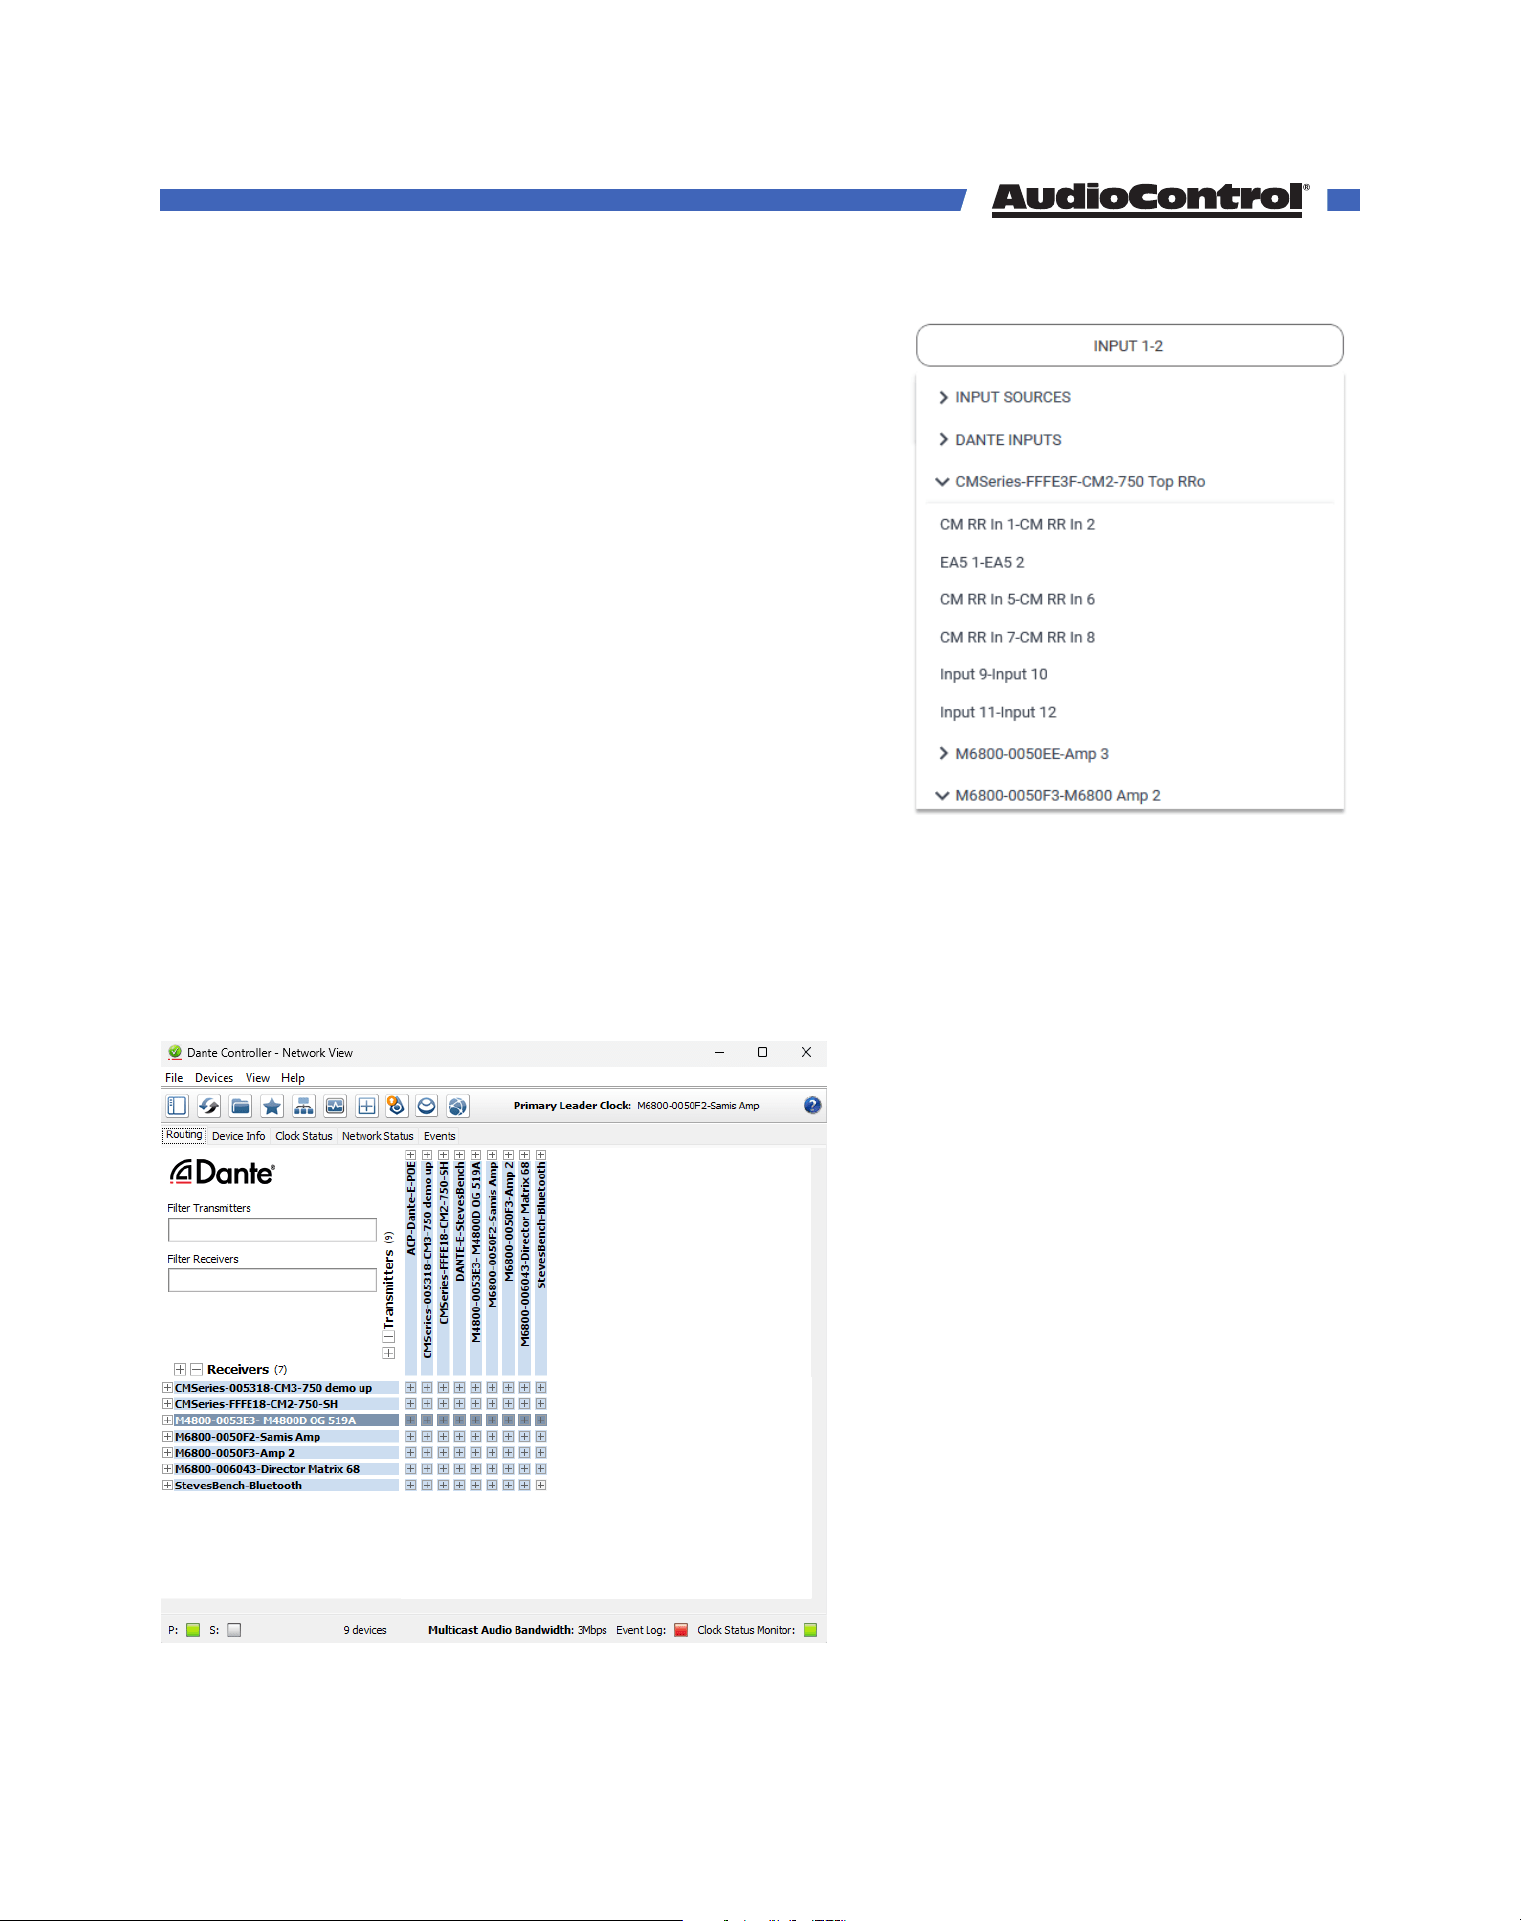
Using Dante Controller
In order to use Dante to its fullest, you will need to
download the Dante Controller software from Audinate’s website: https://my.audinate.
com/support/downloads/dante-controller
If you are only using AudioControl’s Dante enabled Director and CM amplifiers, there’s no
need to use Dante Controller. However, if you’re using any other Dante products like our
Dante Encoder, any non-AudioControl Dante product, or even AES67 Audio-over-Ethernet
products, you will need to use Dante Controller.
Your computer will need to have an
ethernet connection to the same
network as all the Dante devices.
When Dante Controller opens, it will
show you all available Dante devices.
Since our amplifiers can input and
output audio over Dante, they will
show up in both the Receivers and
Transmitters sections. Some products,
like the Dante Encoder and Decoder,
will only show up as either a Receiver
or a Transmitter.
Clicking any of the “+” buttons will
expand the selected products,
showing you a matrix grid of all
available inputs and outputs.
Dante Configuration
©COPYRIGHT AVPRO GLOBAL HOLDINGS 2023 - 22410 70TH AVENUE WEST, MOUNTLAKE TERRACE, WA 98043
31
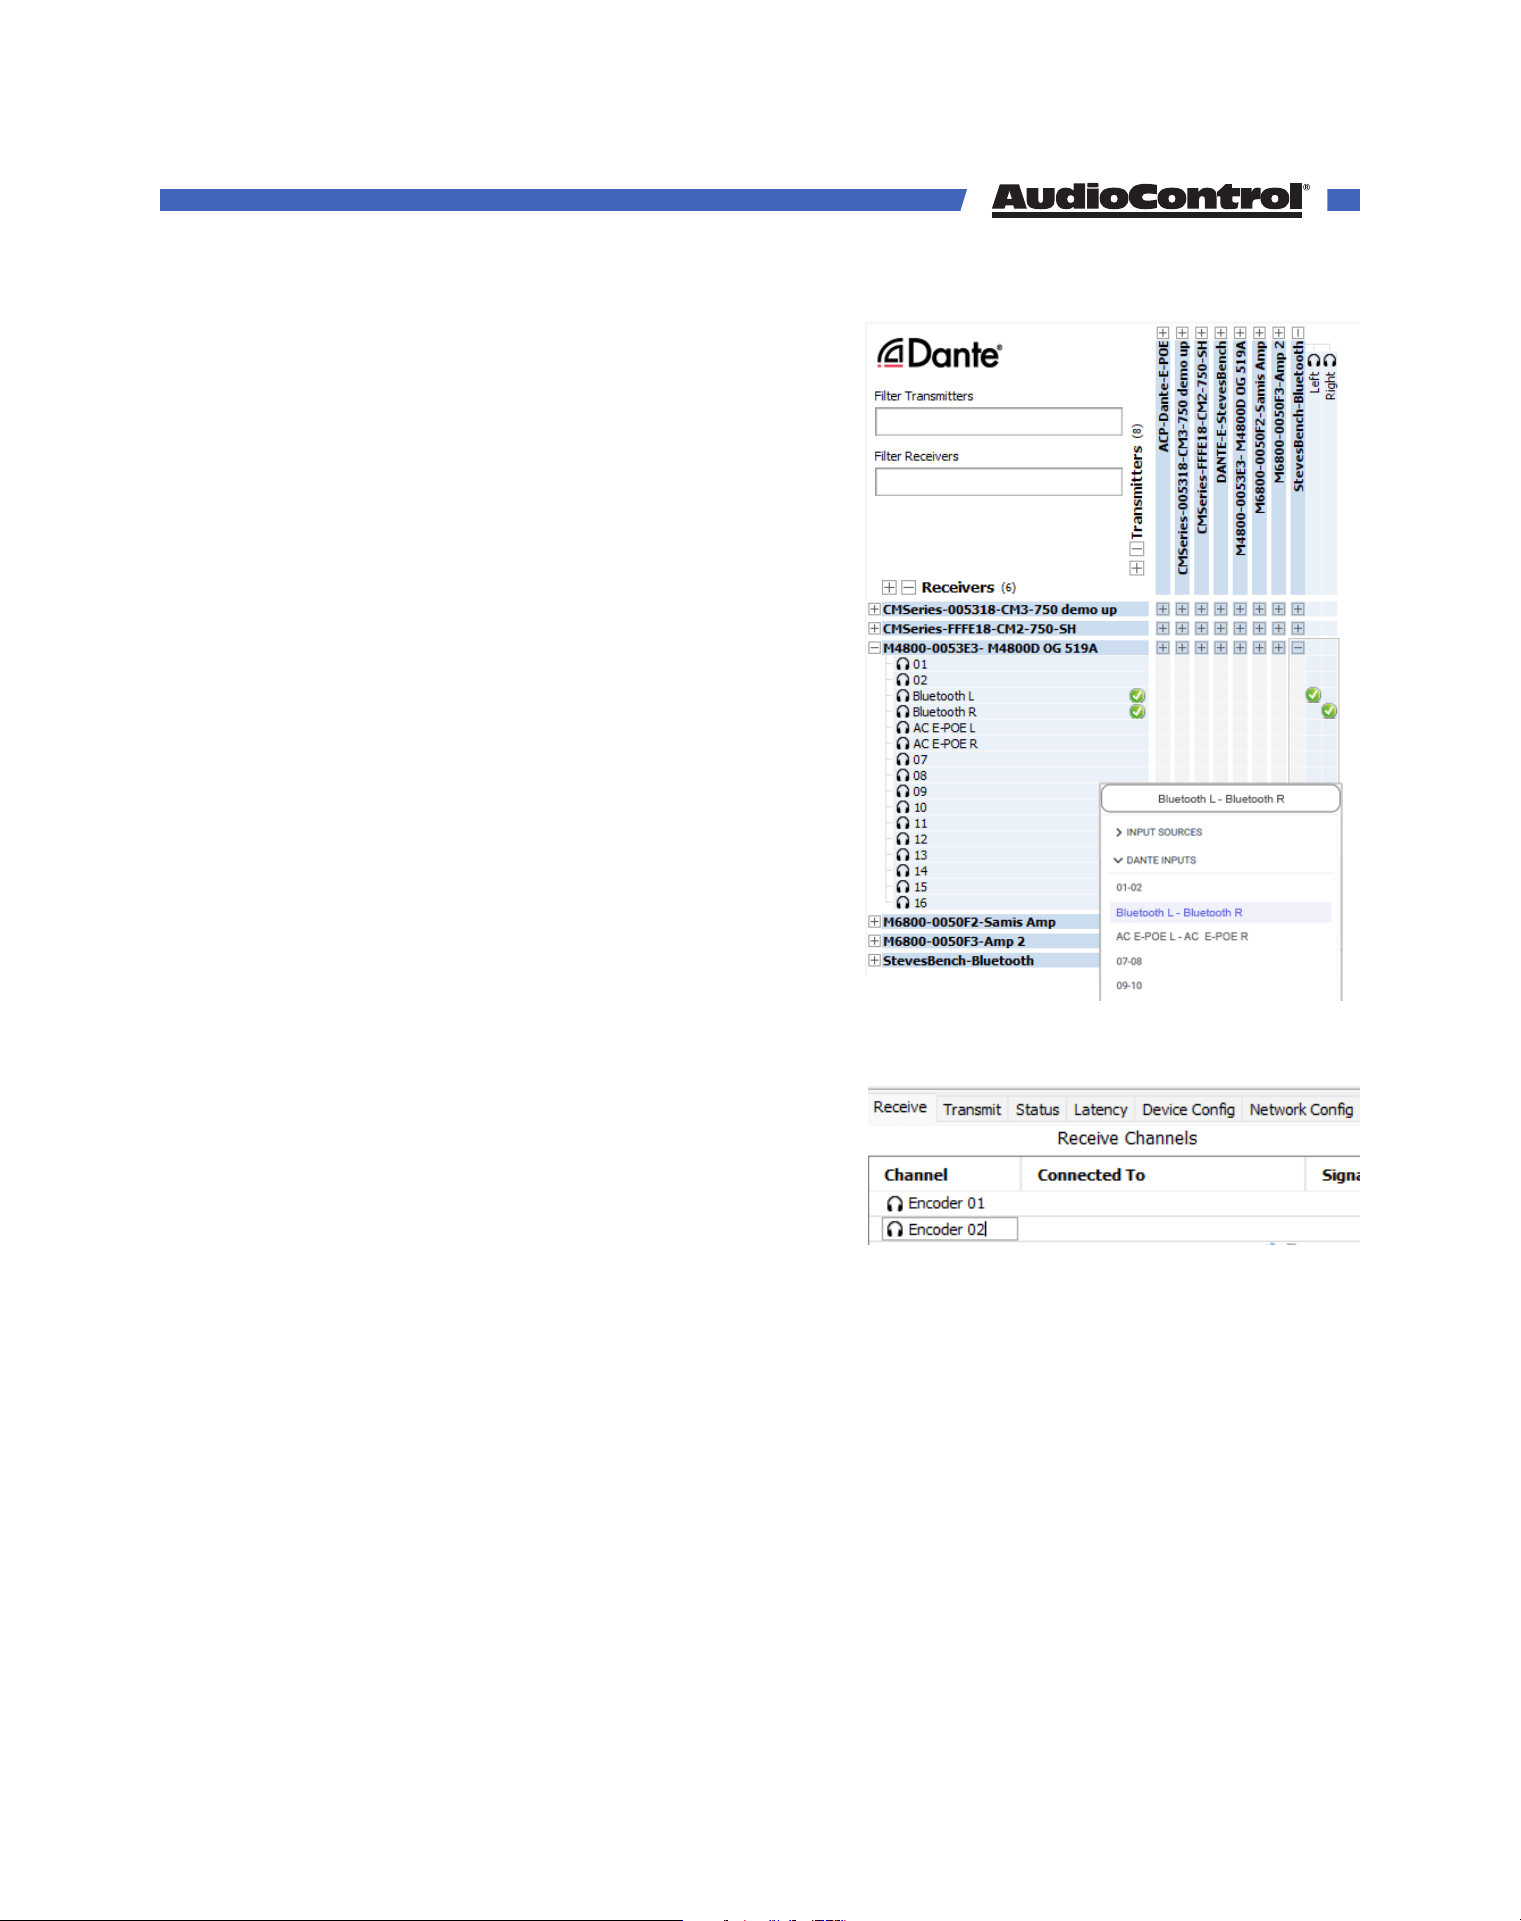
With the matrix open, you can send the signal from
any transmitter to any receiver by simply clicking
on where the Transmitter and Receiver meet on the
grid. Successful connections will display a green
check mark, are immediately available on M4800D
as a Dante Input.
Audio signals from one transmitter can be routed
to multiple receivers, as long as the transmitter can
Multicast audio streams.
You can also transmit audio from an AudioControl
amplifier to dierent Dante devices in the same
way.
Note: Though it is hard to do, there is a possibility
that a connection made in Dante Controller could
be disconnected, and will need to be manually
reconnected. There are only 16 Dante inputs
available at any given time. If all 16 of those inputs
are taken by AudioControl Dante sources, any
other Dante Connection will be disconnected. The
AudioControl amplifiers will try their best not to let
this happen.
Renaming inputs from Dante Controller
The Director amplifier’s web GUI allows you to edit
the names of all its inputs, except for the Dante
inputs. To rename the Dante inputs, open Dante
Controller and double click the amp whose input
you wish to name and a Device View window will
open.
In this window’s “Receive” tab, click on the input channel and you can type in a new name
for it. Do this for every input you’d like to rename, then power cycle the Director. When the
Director is back on, all the Dante inputs will have their chosen names.
Device View
In addition being able to rename inputs on your amp with the Device View window, there
are many other useful tools you can use here as well.
The Transmit tab allows you to see the active audio channels, and where they are
streaming their signal to.
The Status tab displays all current information about the Dante card.
Dante Configuration
©COPYRIGHT AVPRO GLOBAL HOLDINGS 2023 - 22410 70TH AVENUE WEST, MOUNTLAKE TERRACE, WA 98043
32
The Latency tab allows Dante to show o how cool it is, by showing how low the latency is
between connected Dante streams
Device Config lets you change the type of digital audio encoding that Dante is using, set a
desired maximum latency, and to rename the device in Dante Controller. Note, this will not
change the Director’s name on the web interface, but it may make it easier to find in Dante
Controller.
The AES67 Config tab lets you configure AES67. What does that mean? Well...
AES67
AES67 is an Audio-over-Ethernet protocol similar to Dante, and is used by manufacturers
like Crestron to send and receive audio signals across a local area network.
If you have AES67-capable devices in your system you can enable AES67 communication in
the AES67 Config tab. Otherwise, leave this disabled.
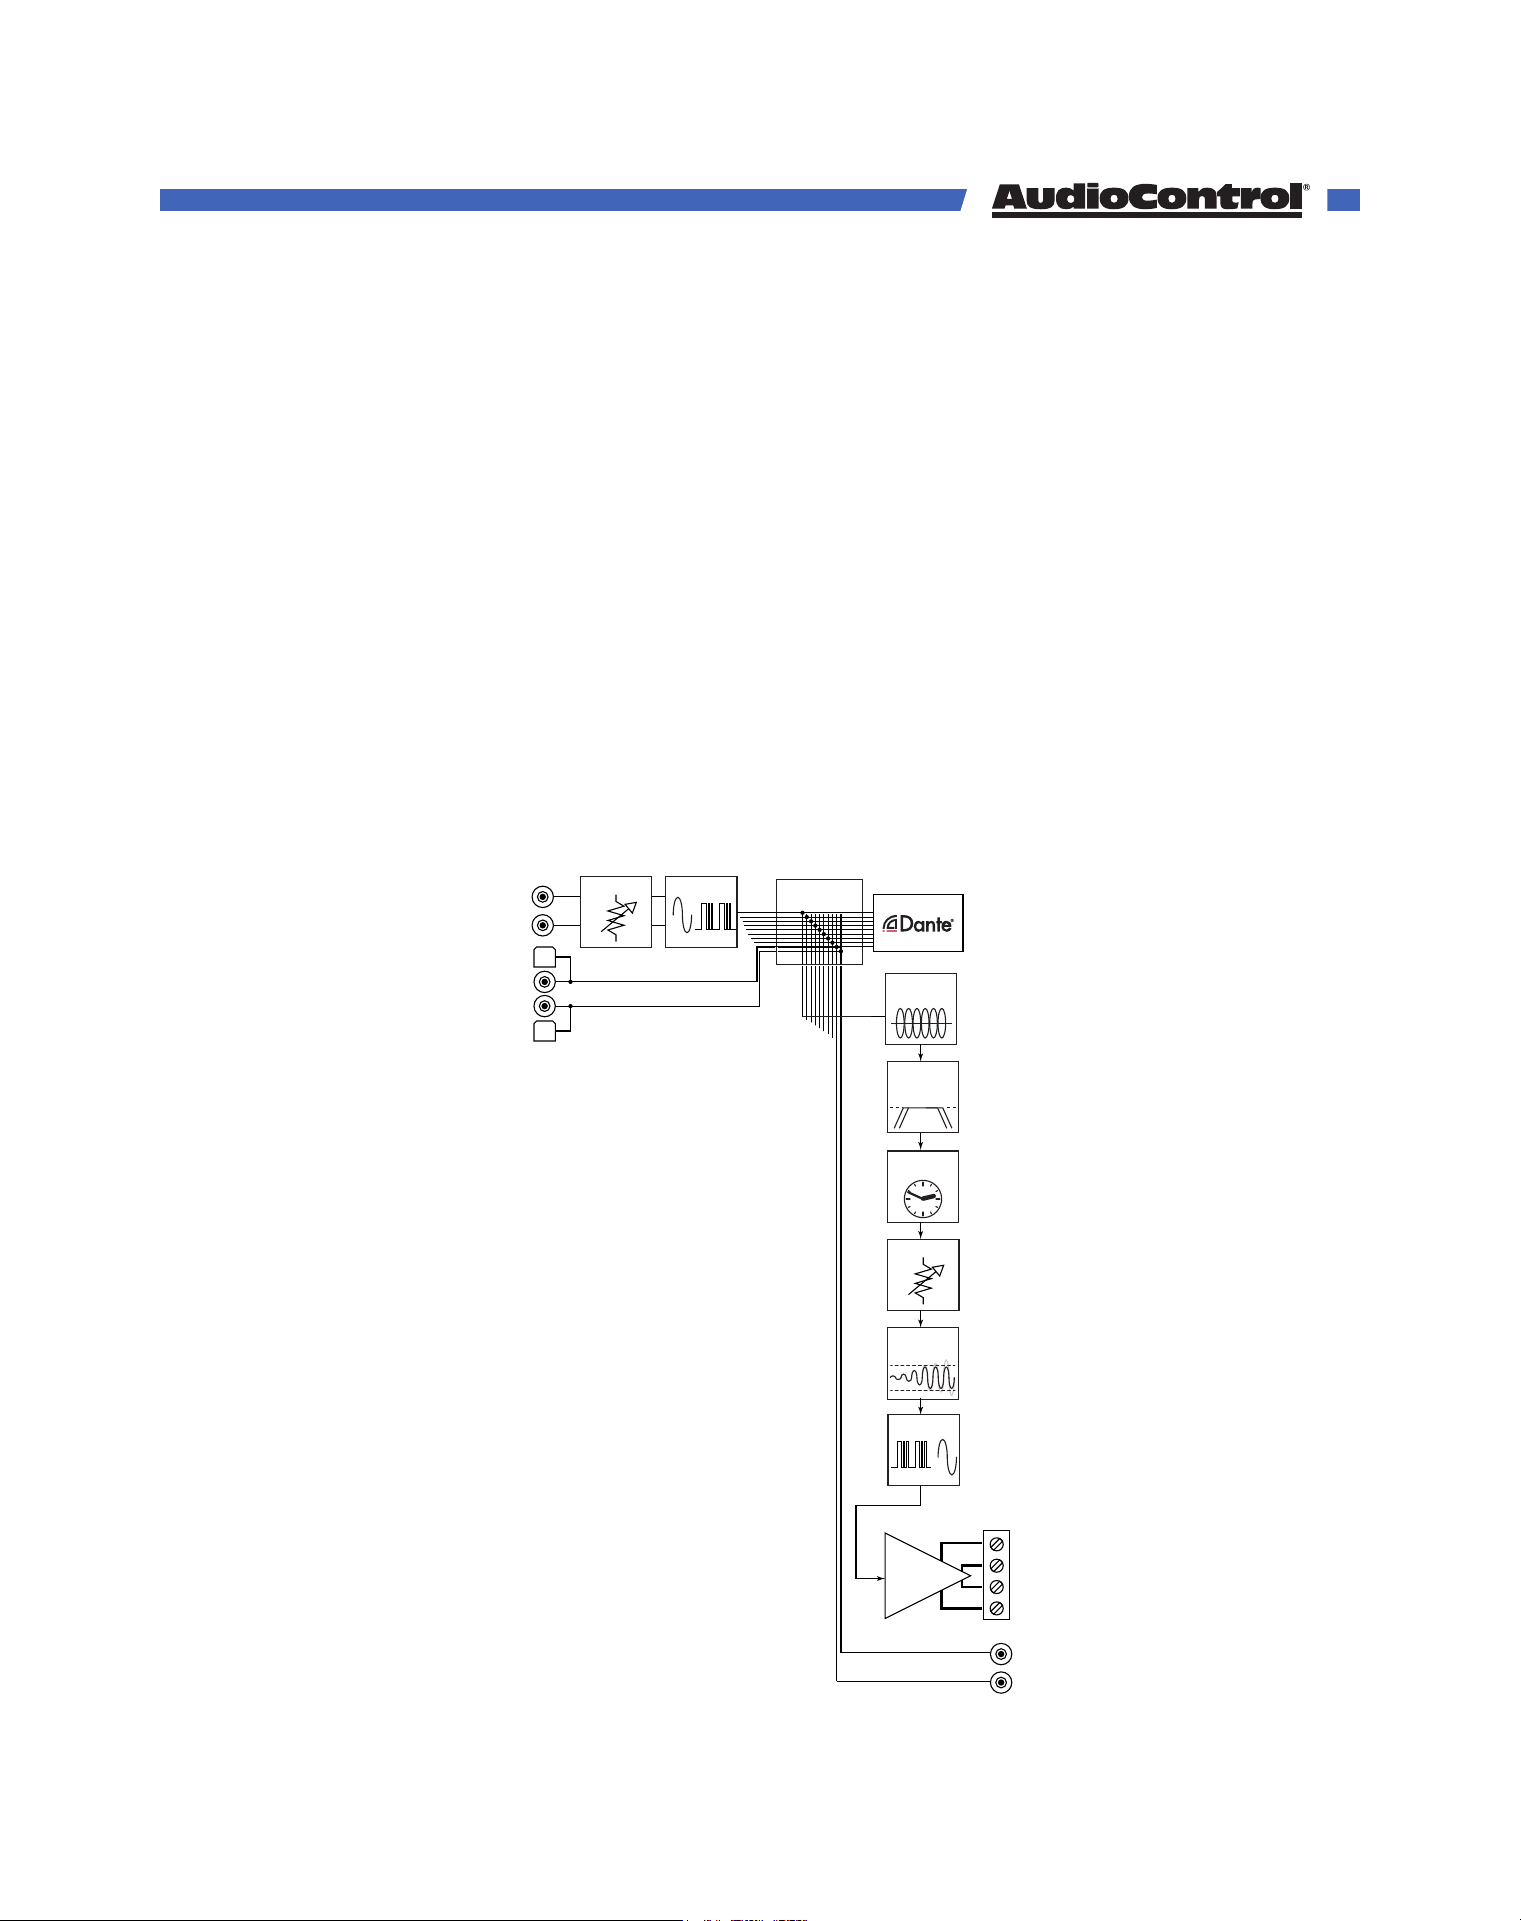
Here’s a block diagram:
Time Align
Delay
Analog
Inputs
1 - 8
DAC
ADC
Parametric
Graphic EQ
High Pass /
Low Pass
Filters
Volume
Gain
Digital
Inputs
A - D
Limiter
Amplifiers
Speaker
Outputs
1 - 8
S/PDIF
Outputs
A - B
Stereo Matrix
10 X 10
Dante Outputs 1-16
Dante Configuration
©COPYRIGHT AVPRO GLOBAL HOLDINGS 2023 - 22410 70TH AVENUE WEST, MOUNTLAKE TERRACE, WA 98043
33

Once your head has stopped racing from the possibilities opened by Dante, it’s time we
talk about Equalization - the easiest way to improve (or ruin) the audio quality in a zone.
Acoustics
Room acoustics is a complicated subject about which hefty textbooks have been written,
and entire galaxies have gone to war over. We simply want you to be aware of a few
basics that have a direct eect on real time audio analysis.
The sound waves that emanate from your speakers may
be perfect and pristine, but rooms are rarely designed with
acoustics in mind. Just as waves in a pond reach the bank
and reflect back, sound waves bounce o walls, ceilings,
and floors, reflecting, reinforcing and canceling each other.
Unless your living room is a perfect enclosed ellipse, and
your speakers and listening position are situated at the foci,
sound waves will reflect from all around and create a less-
than-ideal listening situation.
Room acoustics is an important but complicated subject. To learn more, we recommend
AudioControl’s Technical Paper 107, “Small Room Acoustics De-Mythologized”. You can
download this paper from support.audiocontrolpro.com (search “De-mythologized”).
The overall point is that the rooms in a home function as gigantic, clunky EQs, boosting or
cutting frequencies depending on how the room is built, and the position of the speakers.
Benefits of Equalization
The laws of physics are hard to violate, sound waves will reflect and diminish in even the
best circumstances. Equalization is here to level the playing field, improving the user’s
listening experience in even the most sound wave-reflective room in their home.
How to EQ
To begin, make sure the Director whose rooms you wish to equalize is powered on and
connected to the network.
The process can be done by ear, but you won’t get the most accurate results. An RTA (Real
Time Analyzer) and a measurement microphone are the best tools to even out the peaks
and valleys caused by the room.
1. Set the measurement microphone in the middle of the listening area, at the height of
the typical listener’s head.
2. Access the Director’s web GUI, and navigate to the zone you want to adjust. Expand the
zone settings to access the EQ sliders, and change the zone’s input to the built-in Pink
Noise channel.
3. Pink Noise plays all frequencies at the same level, and the RTA will show you which
frequencies are being cut and which are being boosted from the room acoustics.
EQ
Advanced Setup
©COPYRIGHT AVPRO GLOBAL HOLDINGS 2023 - 22410 70TH AVENUE WEST, MOUNTLAKE TERRACE, WA 98043
34

4. In general, the goal is to flatten the audio so the RTA displays all frequencies equally.
Use the graphic and parametric EQ controls to lower peaks in the frequency response,
first. Peaks obscure the surrounding sounds and lowering the peaks will unleash
overshadowed sounds.
5. Save dierent settings to dierent memories and see which one the clients like. Their
taste may be dierent than yours.
Graphic equalization controls in The Director M4800D are selected to correspond with the
characteristics of wall and ceiling speakers, and as such are very eective. This provides a
“graphic” representation of what the adjustments are.
Parametric equalization requires selecting the frequency, the bandwidth of the control,
as well as the level of adjustment, not an easy task to get correct. In general, parametric
equalization is valuable for very large areas of change, or very narrow areas.
It is best used for taming very narrow peaks. Do not use for very narrow dips as these dips
are likely caused by cancellations and will not respond to equalization boost.
Graphic EQ Frequency Controls
45 Hz — Low bass. This is about the lowest frequency in-wall, extension and small
bookshelf speakers can achieve. Boosting it too far might cause problems, but if your
speakers can take it, a mild boost will enhance bass instruments such as Fender bass, kick
drum, floor toms, timpani and double bass viols.
150 Hz — High bass. There’s a lot of bass information at this frequency. In fact, most
modern music is mixed to enhance this area of the frequency spectrum. 150Hz also
determines the depth of male vocals and contains reverberant information which
contributes to the spaciousness of sound. Boosting 150Hz can add “POW!” and impact to
bass or it can make the sound “bonky” and “boomy”. This is a critical adjustment with small
or in-wall speakers. Experiment with it.
300 Hz and 700 Hz — High and low midrange. These controls directly aect the sound of
instruments and vocals. These bands also determine the speaker’s presence (whether the
music sounds far away or close in). Small speakers often produce too much midrange, so
these controls can be turned down slightly during your initial experimentation. Consider
reducing 700Hz if you are only using extension speakers for background music.
2500 Hz — Treble. Female vocals and the “edge” of instruments such as guitars, snare
drums, saxes, violins, etc. are found in this range. If accentuated too much (by boosting
this control) sounds in the 2500Hz range can seem harsh and fatiguing to the ear due to
excessive output by the speaker or because of live, reflective room acoustics.
12 kHz — High treble. The fine detail, texture and sheen of music is found here. The
breathiness of vocals, the “sheen” of cymbals, the high overtones of piano and strings.
Actually, there’s audible music information up to 20,000Hz on some CDs and most adult’s
hearing is still pretty good at 15,000Hz. We’ve chosen 12,000Hz because it provides more
useful control to compensate for room acoustics and common small-speaker deficiencies.
EQ
©COPYRIGHT AVPRO GLOBAL HOLDINGS 2023 - 22410 70TH AVENUE WEST, MOUNTLAKE TERRACE, WA 98043
35

Remember, if you are using your speaker model’s Speaker Profile, the parametric EQ will
already be tuned and locked to the manufacturer’s specification.
Subsonic and Tweeter Protection Filters
The Subsonic (high-pass) filter and Tweeter Protection (low-pass) filter are adjusted on the
along with EQ. Their function is simply to make the speakers sound better, play louder, and
last longer.
All speakers have frequency response limitations. For the best performance, operate
speakers in their linear zone, the frequencies where their sound reproduction is not
compromised by mechanical limitations.
If you operate speakers at their mechanical limits, sound is compromised, parts of the
speakers are stressed and can heat up, shortening their life. In other words, both the
tweeter protection and subsonic filter are very important tools.
Experiment with higher subsonic filters and lower tweeter protection settings than you
might think from the speaker’s published specifications. You may find the system actually
sounds much better than pushing the frequency limits. For sure, the speaker will be less
stressed and last longer.
EQ
©COPYRIGHT AVPRO GLOBAL HOLDINGS 2023 - 22410 70TH AVENUE WEST, MOUNTLAKE TERRACE, WA 98043
36
Before starting a firmware update, we recommend saving a backup of your settings by
going to the M4800D’s web GUI, opening the Global Settings, expanding the Settings Files
panel, and clicking EXPORT.
Your settings should stay the same after the update, but in our modern world it’s always
better to practice safe updating.
1. Go to www.audiocontrolpro.com and navigate to the Director M4800D’s product page.
Locate and download the firmware .zip file from the Resources section.
2. In your computer’s download folder, extract the files from the .zip folder.
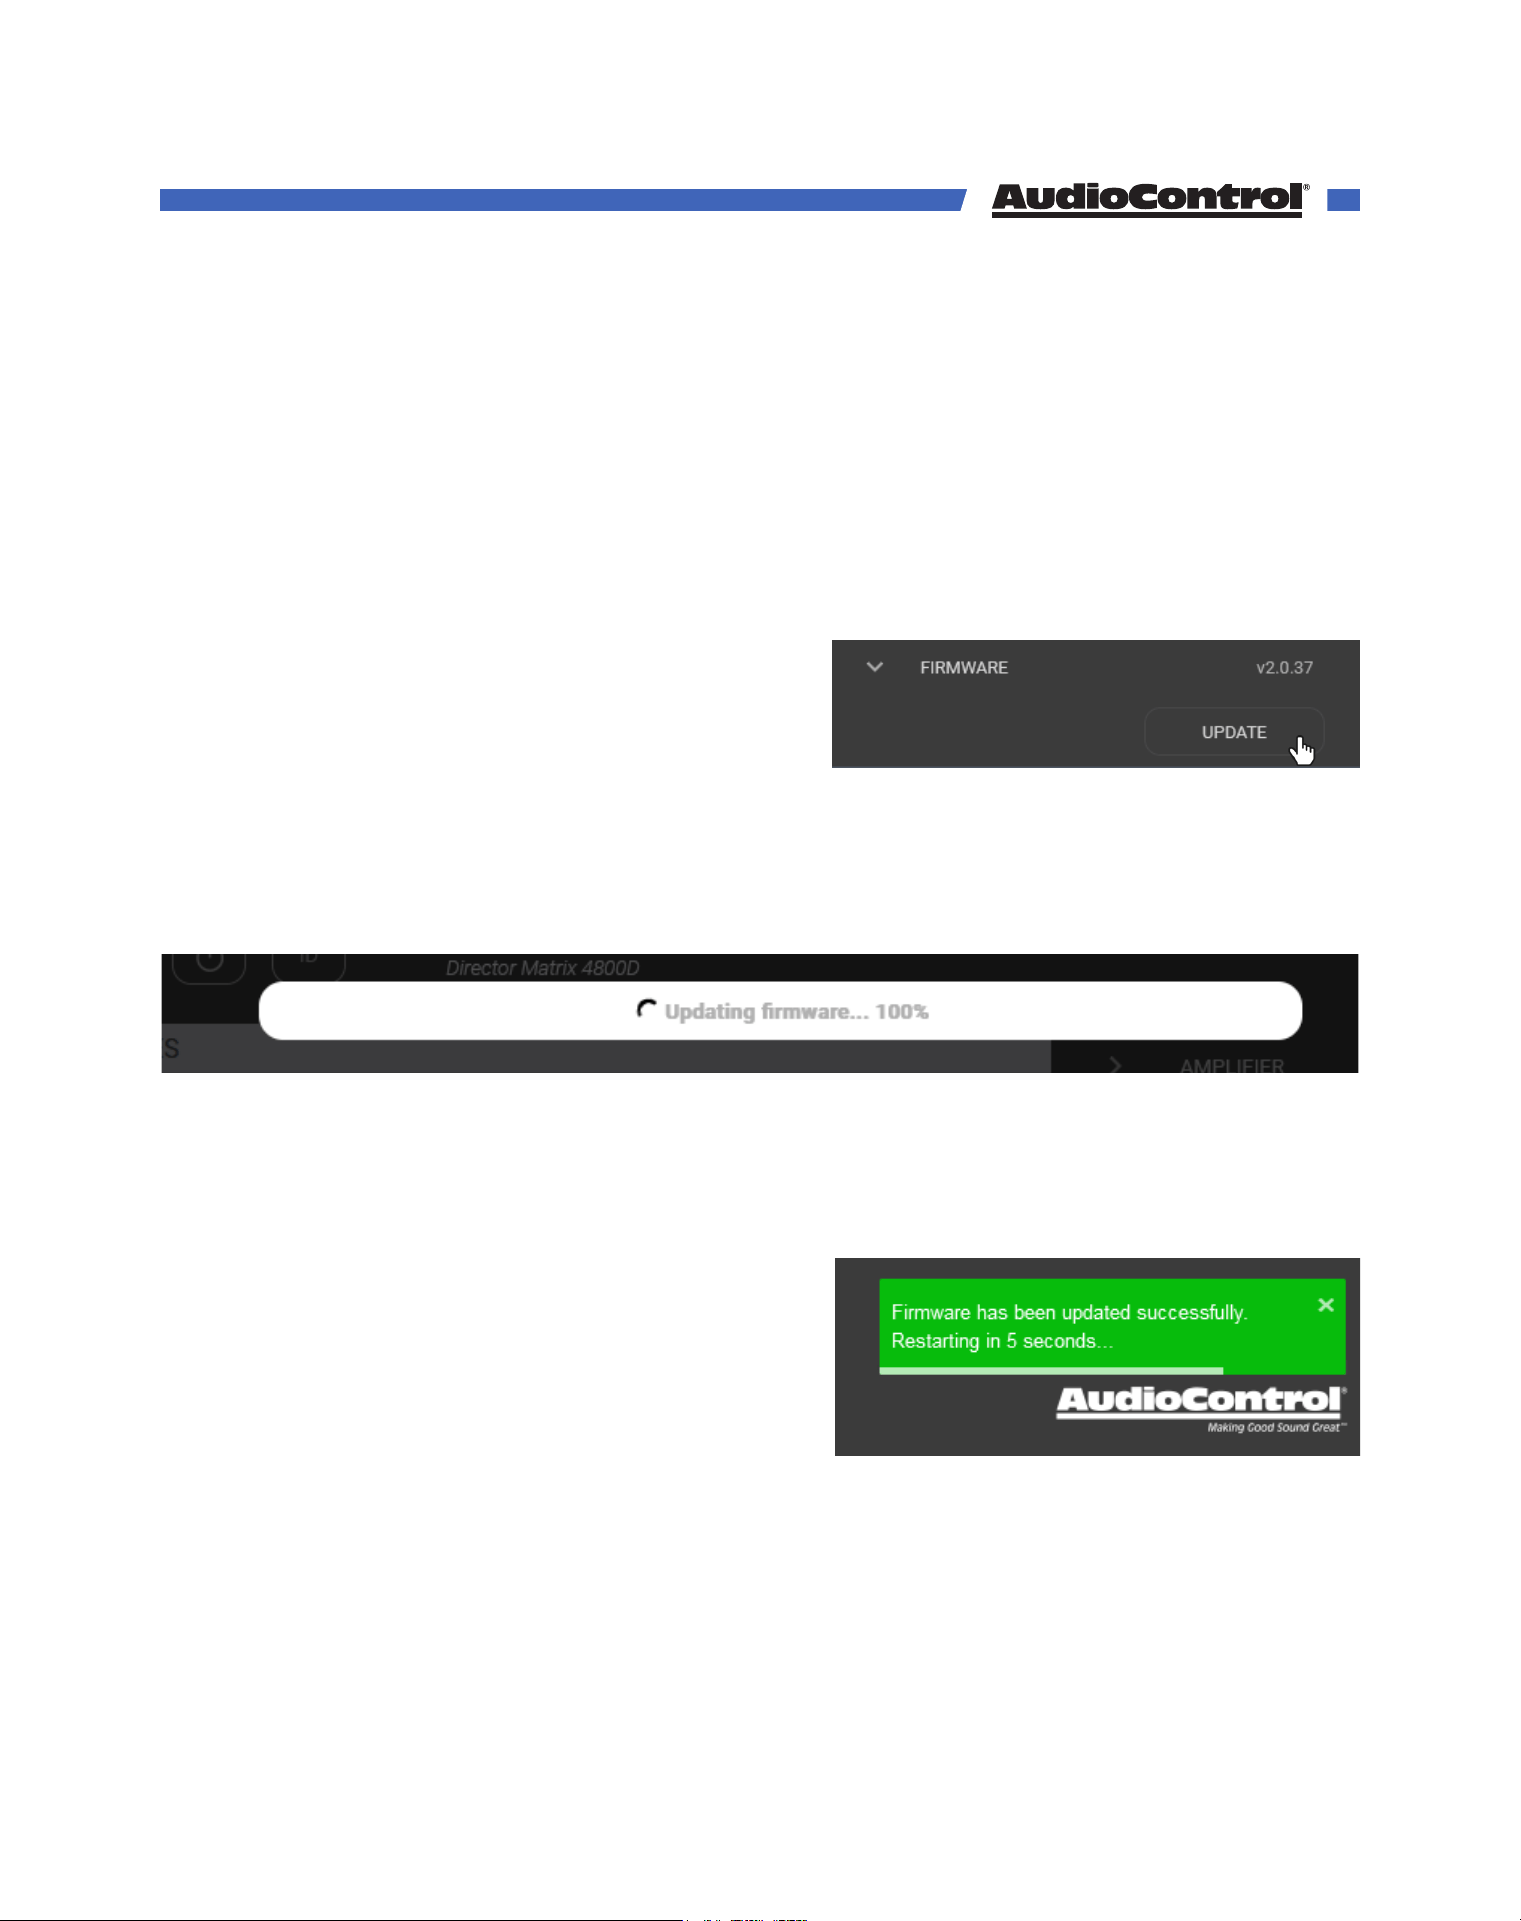
3. Navigate to the M4800D’s web GUI by
typing its IP address into your browser.
4. Go to the amp’s Global Settings, open the
Firmware panel, and select Update.
5. In the navigator window that opens, locate the downloaded and extracted .bnc
firmware file, select it, and open it.
6. The processor will begin to update, progress will be indicated by a bar at the top of the
page, and a notification will pop up in the bottom right corner of the screen when the
update is complete, and the amp will restart.
7. After the amp restarts, it will reload it’s save settings and apply the update. The process
takes about a minute to complete.
8. When the Director’s web GUI is refreshed, the amplifier will be on the latest firmware.
Firmware Update
©COPYRIGHT AVPRO GLOBAL HOLDINGS 2023 - 22410 70TH AVENUE WEST, MOUNTLAKE TERRACE, WA 98043
37

Many problems can be eliminated by re-checking the wiring and settings of the unit. If a
problem cannot be solved using the guide below, please call the AudioControl team for
further assistance, or e-mail us at techsupport@audiocontrolpro.com.
No Sound
1. Verify the Power LED is Blue.
2. Verify Protection LED is O.
3. Verify Zone Status LED is Blue.
4. Verify that the correct input has been selected in the web server menus
5. Verify the source unit is operating.
6. Check the speaker connector plugs on the rear panel are secure.
7. Unplug the power cord and check the AC Power Fuse on the rear panel.
Protection LED is o, but none of the Zone Status LEDs are on
1. Turn Signal Sense o in the web GUI. All of the zone status LEDs should turn on. If they
do not, call AudioControl tech support.
2. Verify the audio source unit is operating.
3. Increase the preamp volume if signal sense is engaged, or just going steady.
Channel Status LED is Red
1. Check speaker leads for a short. Swap speaker connectors on rear to see if the problem
moves with the wires.
2. If the unit is excessively hot, turn down the volume and allow it to cool o. The
protection LED should turn o after a short while. Verify that any ventilation holes have
not become blocked.
3. The speaker impedance may be too low. Use an ohmmeter to measure the impedance
on the speaker wires.
Speaker channels are cutting in and out
1. If using external volume controls, check that they can handle the power output.
2. Make sure the speaker impedance is not less than 4 ohms, or 8 ohms when used in
bridged mono.
3. There may be a short in the wires. Suspect a short if the problem happens only at the
highest volumes.
Protection LED is Red
1. Disconnect power from the unit for 3 to 4 minutes and reconnect to power.
2. Disconnect all speaker wires. If it still turns red, and the unit has cooled, something
rather serious has happened inside the unit. Call AudioControl’s lonely Support team.
Troubleshooting
©COPYRIGHT AVPRO GLOBAL HOLDINGS 2023 - 22410 70TH AVENUE WEST, MOUNTLAKE TERRACE, WA 98043
38
Speaker Buzzing or Crackling at high volume
1. Reduce any preamplifier/equalizer low-frequency boost.
2. Turn o your “Sounds of the Pacific Northwest” chainsaw and bacon-frying CD.
There is no audio input signal, but the Zone Status LEDs are still blue
1. Check the signal sense status in the web GUI. If signal sense is o, the zone status LEDs
will stay on as long as the master trigger is enabled.
2. When signal sense is on, the zone status LEDs stays on for 2 minutes after the audio
signal has stopped. This delay prevents premature muting during quiet passages or
song changes.
The unit is on but you cannot trigger it o
1. The unit will stay on if either the 12v master trigger is on, or jumpered on.
Is an in-wall volume control rated at 80 watts (continuous) adequate?
1. No, is the simple answer. The Director’s built-in volume controls and a third-party IP
control system will always work best to control the audio volume.
2. If the customer still wants in-wall volume control, go for one with a higher rating than
the output of the M4800D with a fixed 8 ohm impedance if you want reliable, long-
lasting system.
The Director M4800D looks like this:
1. It has been installed upside down.
2. You are trying a new Yoga position
Troubleshooting
©COPYRIGHT AVPRO GLOBAL HOLDINGS 2023 - 22410 70TH AVENUE WEST, MOUNTLAKE TERRACE, WA 98043
39

How many M4800Ds can be stacked top of each other without an air space in between?
You can stack a maximum of 4 units on top of one another, and allow a free rack space
above and below.
Ideally, 2 units can be stacked with a free space above and below, as this will improve
the ventilation to the units.
May you daisy chain or y-cord audio and power trigger connections?
Sharing audio is made easy with the M4800D’s Dante capability, removing the need to
split audio signal between amps
To share audio with non-Dante amplifiers, use the amplifier’s digital outputs, or an
analog Dante Decoder.
For power control, it’s easiest to send IP commands to each amp. The 12 volt mini jacks
can loop to multiple triggers, but if you need more than 15mA of current on the 12 volt
output, use a relay.
What are the power requirements and BTU outputs of The Director?
Check the specifications section for detailed information. In general, 1/8th power is
typical loud use of the amplifier. This will be a quite loud listening level for most rooms
and assumes all zones driven at the same time.
How many units may I put on one 15 amp breaker?
Since you are limited to 1500 watts per device by most codes, there should be a
separate 15 amp circuit for each unit, however, the circumstances where The Director
M4800D draws maximum power are very rare outside of an engineering lab.
If the only use is background music, then the 1/8th power in the specifications is a
reasonable power draw. Of course, you will want to include a margin of safety for
unusual circumstances. And at the end of the day, defer to what the electrical inspector
tells you.
What should I use the “Trim” controls for?
The Trim controls are an easy-to-access level setting control which you can use while
in the zone. If the user thinks a zone should be louder or queiter at 60% volume, trim is
there to help. These controls allow minor, not major, adjustments.
What about large rooms as well as rooms where the listener is far from the speakers?
Larger rooms will require larger speakers, and there are in-wall speakers designed for
these longer “throw” distances. In general, larger rooms with more height require more
speakers and speakers with tighter “directivity” to get party-level SPL.
Do you bite your thumb at us Sir?
I do bite my thumb sir.
FAQ
©COPYRIGHT AVPRO GLOBAL HOLDINGS 2023 - 22410 70TH AVENUE WEST, MOUNTLAKE TERRACE, WA 98043
40

What to do if you need service
If the unit needs service, then please contact AudioControl, either by e-mail or phone. We will verify
if there is anything wrong in the system that you can correct yourself, or if it needs to be sent back
to our factory.
Please include the following items when returning the unit:
1. A copy of your proof of purchase. No originals please. We cannot guarantee returning them
to you.
2. A brief explanation of the trouble you are having with the unit. (You’d be surprised how
many people forget this.) If you can supply a really detailed description of the problem, this
would be so much better, and our service technicians may add you to their Christmas Card
list. Please include any notes about the system and other components you are using. Is it an
intermittent problem that only occurs on the first full moon of Spring?
3. A return street address. (No PO Boxes, please).
4. A daytime phone number in case our technicians have a question about the problem you are
having, or if they are just feeling lonely.
5. Package the unit in the original packaging if you still have it. Use great care and plenty of
good packing materials to protect the unit and prevent it from moving about inside the box.
Do not use loose materials like packing peanuts or real peanuts.
You are responsible for the freight charges to us, but we’ll pay the return freight back as long as
the unit is under warranty. We match whatever shipping method you use to send it to us, so if you
return the unit overnight freight, we send it back overnight. We recommend United Parcel Service
(UPS) for most shipments.
Please do not return the unit to AudioControl if you have not received an RMA number from our
masterful customer support team.
Phone 425-775-8461
techsupport@audiocontrolpro.com
support.audiocontrolpro.com
www.audiocontrolpro.com/contact-us
Service
©COPYRIGHT AVPRO GLOBAL HOLDINGS 2023 - 22410 70TH AVENUE WEST, MOUNTLAKE TERRACE, WA 98043
41

Warranty
In just the same way as being covered in honey and thrown into a dark pit full of hungry
woodchucks, people are scared of warranties. Lots of fine print. Months of waiting around. Well,
fear no more. This warranty is designed to make you rave about AudioControl. It’s a warranty that
looks out for you and your client, plus helps you resist the temptation to have your friend Sparky,
who’s “good with electronics,” try to repair your AudioControl product. So go ahead, grab a cup of
tea, and carefully read through this warranty.
Our warranty has conditional conditions! “Conditional” doesn’t mean anything ominous. The
Federal Trade Commission tells all manufacturers to use the term to indicate that certain conditions
have to be met before they’ll honor the warranty. If you meet all of these conditions, AudioControl
will, at its discretion, perform warranty service on any AudioControl products that exhibit defects in
materials and/or workmanship during the warranty on your product for five (5) years from the date
you bought it, and we will fix or replace it, at our option, during that time.
Here are the conditional conditions:
1. You need to hold on to your sales receipt! All warranty service requires original sales receipt
documentation. The warranty only applies to the original purchaser from an authorized
AudioControl dealer. Note: Products purchased from unauthorized dealers are not covered
under warranty.
2. If an authorized AudioControl dealer installs your AudioControl product, the warranty is five
years, otherwise the warranty is limited to one year.
3. Our warranty covers AudioControl products that have been installed according to the
instructions in the installation manual.
4. You cannot let anybody who isn’t: (A) the AudioControl factory; or (B) somebody authorized
in writing by AudioControl service your AudioControl product. If anyone other than (A), or (B)
messes with your AudioControl product, the warranty is void.
5. The warranty is void if the serial number is altered, defaced or removed, or if your product
has been used improperly. Now that may sound like a big loophole, but here is what we
mean by this: Unwarranted abuse is: (A) physical damage (don’t use your product to level
your dining room table); (B) improper connections (120 volts into the RCA jacks can fry
the poor thing); (C) sadistic things! This is the best product we know how to build, but for
example if you mount it to the front bumper of your car, drop it over the Niagara Falls or use
it for Clay Pigeon shooting practice, something will go wrong.
Assuming you conform to 1 through 5, and it really isn’t all that hard to do, we will have you send
your product to us for warranty service.
©COPYRIGHT AVPRO GLOBAL HOLDINGS 2023 - 22410 70TH AVENUE WEST, MOUNTLAKE TERRACE, WA 98043
42

Warranty
Legalese Section
This is the only warranty issued by AudioControl. This warranty gives you specific legal rights, and
you may also have rights that vary from state to state. Promises of how well your AudioControl
product will work are not implied by this warranty. Other than what we’ve said we’ll do in this
warranty, we have no obligation, express or implied. We make no warranty of merchantability or
fitness for any particular purpose. Also neither we nor anyone else who has been involved in the
development or manufacture of the unit will have any liability of any incidental, consequential,
special or punitive damages, including but not limited to any lost profits or damage to other
parts of your system by hooking up to the unit (whether the claim is one for breach of warranty,
negligence of other tort, or any other kind of claim). Some states do not allow limitations of
consequential damages.
©COPYRIGHT AVPRO GLOBAL HOLDINGS 2023 - 22410 70TH AVENUE WEST, MOUNTLAKE TERRACE, WA 98043
43

Installation Notes
©COPYRIGHT AVPRO GLOBAL HOLDINGS 2023 - 22410 70TH AVENUE WEST, MOUNTLAKE TERRACE, WA 98043
44
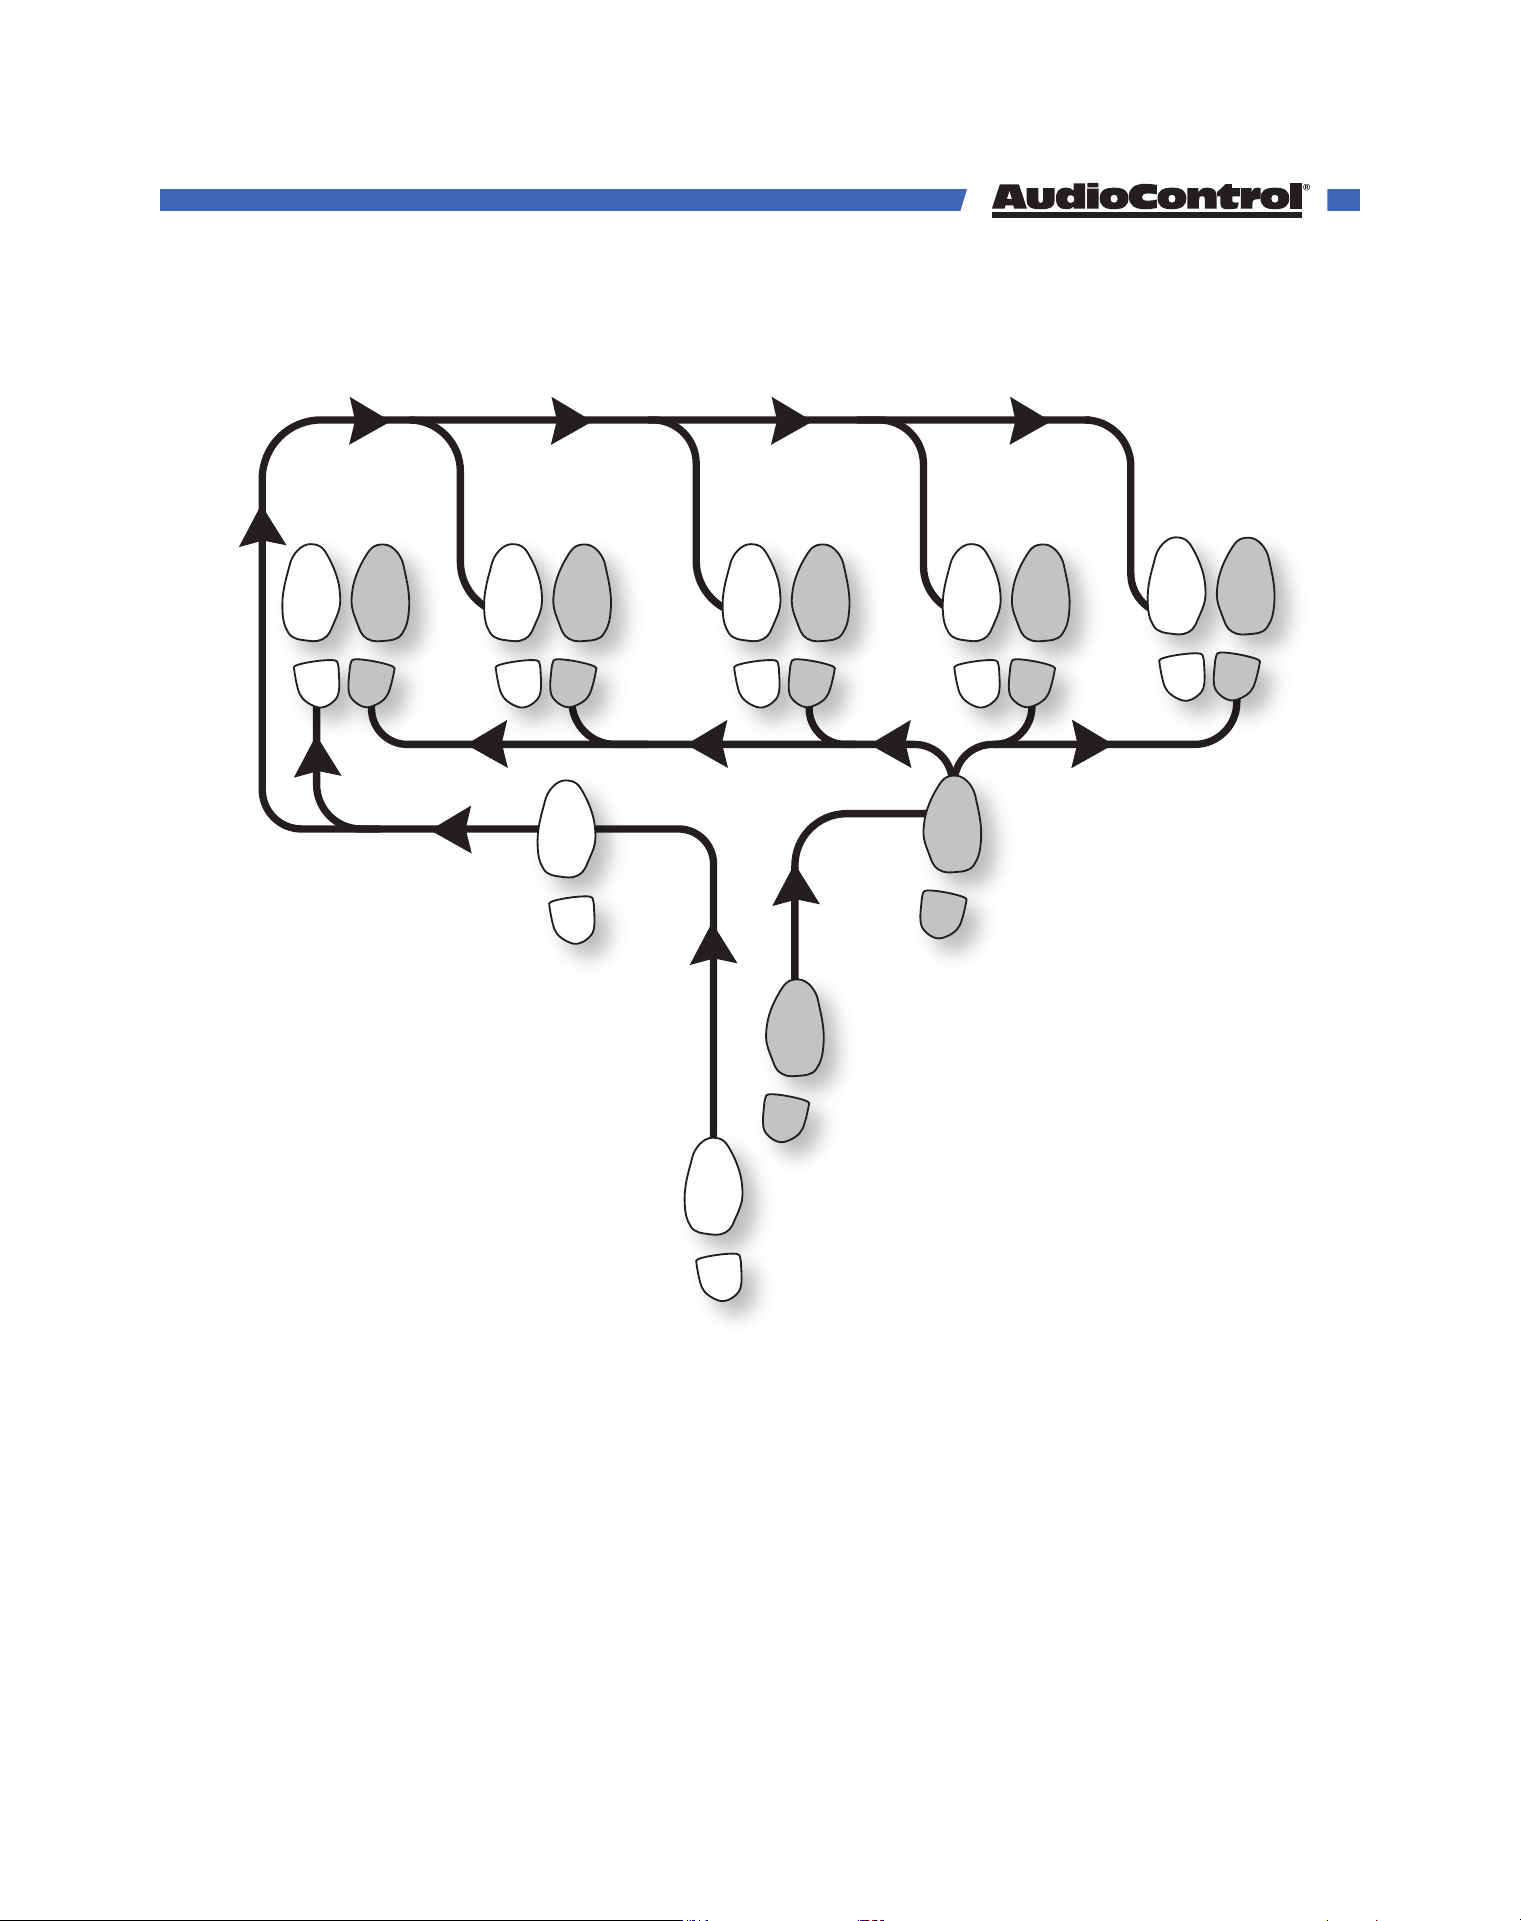
Hurrah, You are done!
The Dante Boogie
2
1
5 6
3
START
FINISH
4
5 65 6
5 6
5 6
FINISHFINISHFINISHFINISH
Other common names for this dance:
• Dante Boogie Nights
• Dante 2 Electric Boogaloo
• Dante Inferno
©COPYRIGHT AVPRO GLOBAL HOLDINGS 2023 - 22410 70TH AVENUE WEST, MOUNTLAKE TERRACE, WA 98043
45
Thank you for choosing AudioControl!
Please contact us with any questions, we are
happily at your service!
22410 70th Avenue West ~ Mountlake Terrace, WA 98043
support: 425-775-8461
techsupport@audiocontrolpro.com
Thank you
©COPYRIGHT AVPRO GLOBAL HOLDINGS 2023 - 22410 70TH AVENUE WEST, MOUNTLAKE TERRACE, WA 98043
46