Operating and Maintenance Manual
COLOP e-mark go

CONTENT
INTRODUCTION 2
1 LEGAL DETAILS 2
1.1 Liability 3
1.2 Intended use 3
1.3 Principle 4
2 SAFETY 5
2.1 Signal words used in safety notices 5
2.2 Symbols used in safety notices 5
2.3 Residual hazards 6
2.4 Safety notices on the product 9
3 DESCRIPTION 11
3.1 Scope of supply 11
3.2 Layout 12
3.3 Technical specifications and dimensions 13
3.4 Battery 14
3.5 Operating systems 14
4 OPERATION AND FUNCTIONALITY 15
4.1 Transport 15
4.2 Unpacking 15
4.3 Assembly and switching on 15
4.4 Software Setup 17
4.5 WIFI connection 17
4.6 Image transfer 18
4.7 Online mode 18
4.8 Offline mode 18
4.9 Printing 18
4.10 Sleep mode 19
4.11 Warning mode 19
4.12 Light indicators and symbols 20
5 SOFTWARE 22
5.1 Overview of the app 22
5.2 Printing at a glance 25
5.3 Sharing imprints 26
5.4 Continual Printing 26
6 MAINTENANCE 27
6.1 Print head cleaning 27
6.2 Charging the battery 28
6.3 Changing the ink cartridge 29
6.4 Reset 30
6.5 Storage 31
6.6 Troubleshooting 32
6.7 Repairs & Return 34
6.8 Spare and wear parts 35
7 SHUTDOWN AND DISPOSAL 36
8 APPENDIX 39

LIST OF FIGURES
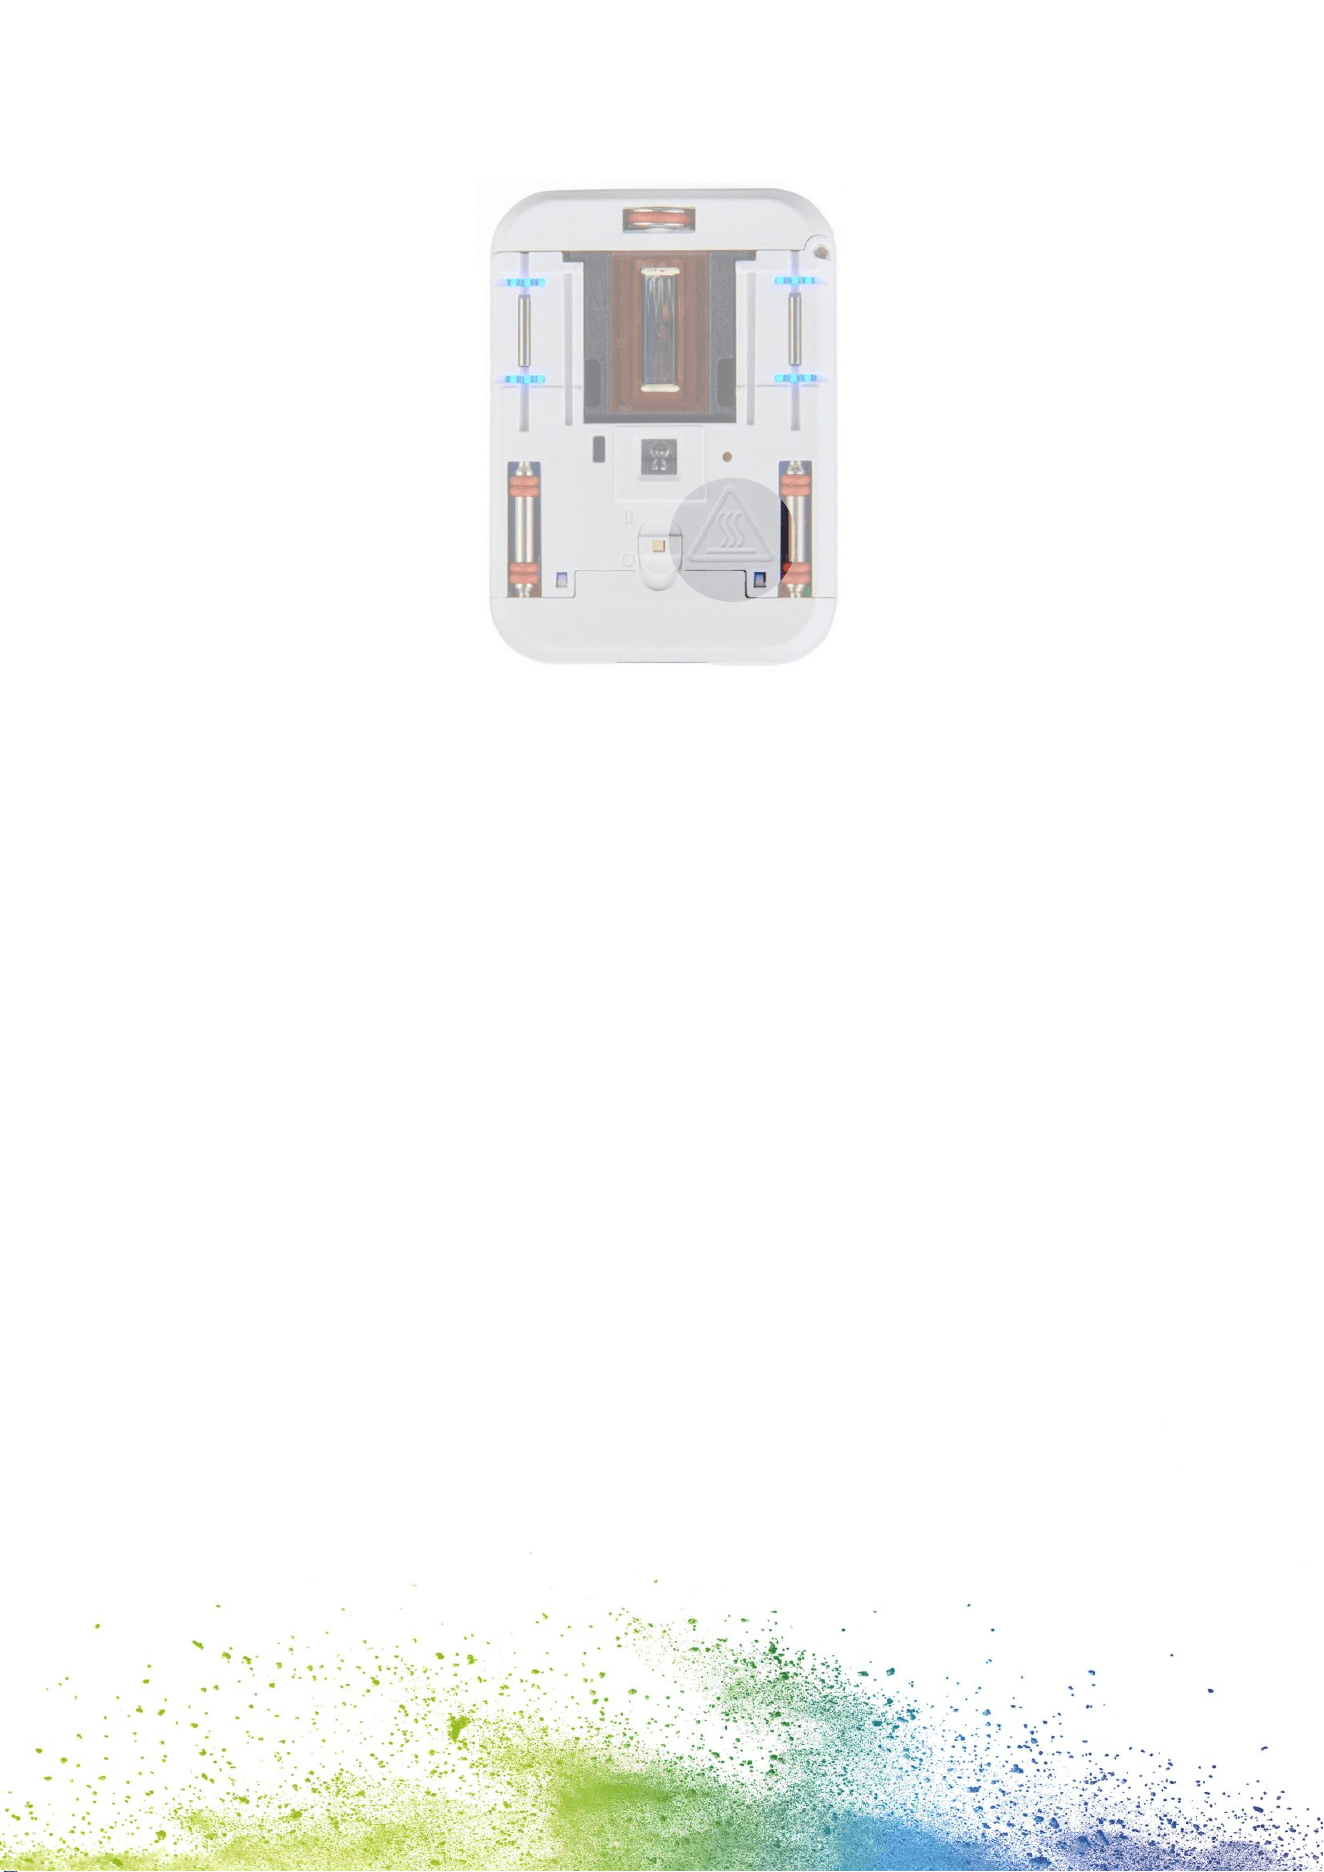
Fig. 1: Safety instructions on the underside of the e-mark go ........................................................................................... 10
Fig. 2: Content ...................................................................................................................................................................................................... 11
Fig. 3: Flex PCB .................................................................................................................................................................................................... 11
Fig. 4: COLOP e-mark go 1 .......................................................................................................................................................................... 12
Fig. 5: COLOP e-mark go 2 ......................................................................................................................................................................... 12
Fig. 6: Docking station................................................................................................................................................................................... 13
Fig. 7: Insert Cartridge ................................................................................................................................................................................... 16
Fig. 8: App logo .................................................................................................................................................................................................. 17
Fig. 9: Example test imprint with SSID and password ............................................................................................................ 17
Fig. 10: On/off switch....................................................................................................................................................................................... 18
Fig. 11: Ready to print light .......................................................................................................................................................................... 19
Fig. 12: Printing from left to right ........................................................................................................................................................... 19
Fig. 13: Light indicators ................................................................................................................................................................................. 20
Fig. 14: Start page ............................................................................................................................................................................................ 22
Fig. 15: Settings page ..................................................................................................................................................................................... 23
Fig. 16: Editor ....................................................................................................................................................................................................... 24
Fig. 17: Editor bottom sheet ...................................................................................................................................................................... 25
Fig. 18: How to clean the print head ................................................................................................................................................... 27
Fig. 19: USB-C cable ........................................................................................................................................................................................ 28
Fig. 20: Change ink cartridge .................................................................................................................................................................. 30
Fig. 21: Reset hole .............................................................................................................................................................................................. 31
Fig. 22: Removing the battery from the e-mark go ................................................................................................................. 37

1
VERSIONS
Version
Date
Description
0.1
13.05.2022
Draft version e-mark go
1.0
05.09.2022
Version delivered to docusolutions
1.1
28.09.2022
Updated information
2.0
05.12.2022
Print head cleaning updated
2.1
23.12.2022
Images updated
2.2
31.01.2023
Final version (with declaration of conformity)
Copyright ©
This original documentation has copyright protection. All rights, in particular the right to
reproduction and dissemination as well as translation are reserved. No part of these
instructions may be reproduced or utilized in any form by any means, electronic or
mechanical (including photocopying, microfilm, or any other process) or be saved,
processed, duplicated or distributed using any electronic system, without written permission
from COLOP Digital GmbH. Contraventions can entail prosecution under criminal law.
© 2023 COLOP Digital GmbH

2
INTRODUCTION
With the COLOP e-mark go you have a product that is exemplary in terms of safety for users
and leading edge in terms of technology. In spite of this, the e-mark go may be hazardous if
used incorrectly or not as intended. We refer to potential hazards in Section 2 ‘Safety’ and
with safety notices throughout the entire documentation.
Preface
This original documentation is intended to assure safety-aware work on and with the
product. It contains safety notices that must be followed! Everybody who works with the
e-mark go must have access to this documentation and must observe the relevant
specifications and instructions. The documentation must always be complete and easily
legible.
COLOP Digital GmbH is not liable for technical or printing-related defects in this
documentation, nor will it accept any liability for damage caused directly or indirectly by the
delivery, performance or usage of this documentation.
Identification
The COLOP e-mark go is clearly identified on both the product and the packaging.
1 LEGAL DETAILS
COLOP Digital GmbH
Dr.-Arming-Straße 5
A-4600 Wels
Austria
Phone: +43 (0) 7242 661 04
Fax: +43 (0) 7242 466 64
E-Mail: [email protected]
Website: https://emarkgo.colop.com/

3
1.1 Liability
The details in this documentation describe the properties of the product without assuring
those properties.
No liability is accepted for damages that arise from:
Unintended use of the product.
Failure to follow the documentation.
Improper work on and with the product.
Operating the product while in a defective condition.
Defective monitoring of parts of the product that are subject to wear.
Improperly conducted repair work.
Unauthorized modification of the product.
Natural disasters, the action of foreign bodies and force majeure.
1.2 Intended use
The COLOP e-mark go, hereafter referred to as e-mark go, is a mobile handheld printer. The
device can be operated by smartphone or tablet. It can make imprints directly on a variety of
absorbent surfaces including paper or cardboard. The e-mark go is suitable for making
individual imprints and for occasional multiple use.
The multicolor ink cartridge (CMY) uses inkjet technology. Surface navigation and/or speed
control is managed by an optical sensor. The printing content is sent to the device directly
from an application (app). Transfer is via a WIFI connection from a smartphone or tablet.
Printing begins automatically if the e-mark go is in print mode and the device is moved over
the printing surface by hand. If rotation or height of the device above the surface exceeds a
maximum range, printing is interrupted. When returned to the normal range, printing
restarts.
The e-mark go must be returned to the docking station after each use. The last saved imprint
can also be saved on the device so that it can be used without the app (offline mode). The
rechargeable battery (supplied) is recharged using the USB-C cable (supplied). Only use
original replacement ink cartridges.
After extended periods between uses, the ink cartridge must undergo a cleaning cycle. The
e-mark go should be used at least once a month.

4
Target groups and previous knowledge
Users are able to recharge the e-mark go with the USB-C cable (supplied) and replace ink
cartridges. Users are not authorized to carry out repairs on the product.
Inspection and maintenance and/or repairs must only be carried out by qualified
electricians.
The content and purpose of this documentation
Users can download this original Operating and Maintenance Manual at
emarkgo.colop.com/usermanual for information.
This documentation contains the relevant information for e-mark go assembly,
commissioning, operation, maintenance and disposal. This documentation is intended to
ensure hazard-free work with the e-mark go.
Compliance with the instructions contained within this document enables hazard-free
working and avoids damaging the e-mark go.
Limits of use
The limits of use for the e-mark go are defined as follows:
The device is intended for use in enclosed, clean and dry areas (offices, warehouses,
private residences)
Horizontal place of use on level, firm ground
Ambient temperature: +59 °F to 95 °F / 15 °C to 35 °C
Humidity range 5 % to 100 % (storage 5 % to 80 %)
The e-mark go is a marking device to print imprints sent via a software application
It can print directly onto a variety of absorbent surfaces including standard paper,
cardboard, fabric, wood, cork, dry wall, high-gloss paper, photo paper and other
surfaces with special coatings.
The e-mark go is fitted with a LED positioning indicator to visualize the printing area.
The rechargeable battery of the e-mark go is recharged using the USB-C cable.
1.3 Principle
This product incorporates state-of-the-art technology and complies with applicable health
and safety regulations. Nonetheless, the following hazards can arise as a result of incorrect
transport, improper use, or failure to observe the safety instructions contained in this
Operating and Maintenance Manual or in the event of misuse:
fatal or serious injury to users or third parties
damage to the product and other items of capital equipment
impairment to the efficient operation of the product
5
2 SAFETY
The user of the e-mark go is responsible for complying with safety-related information in this
documentation.
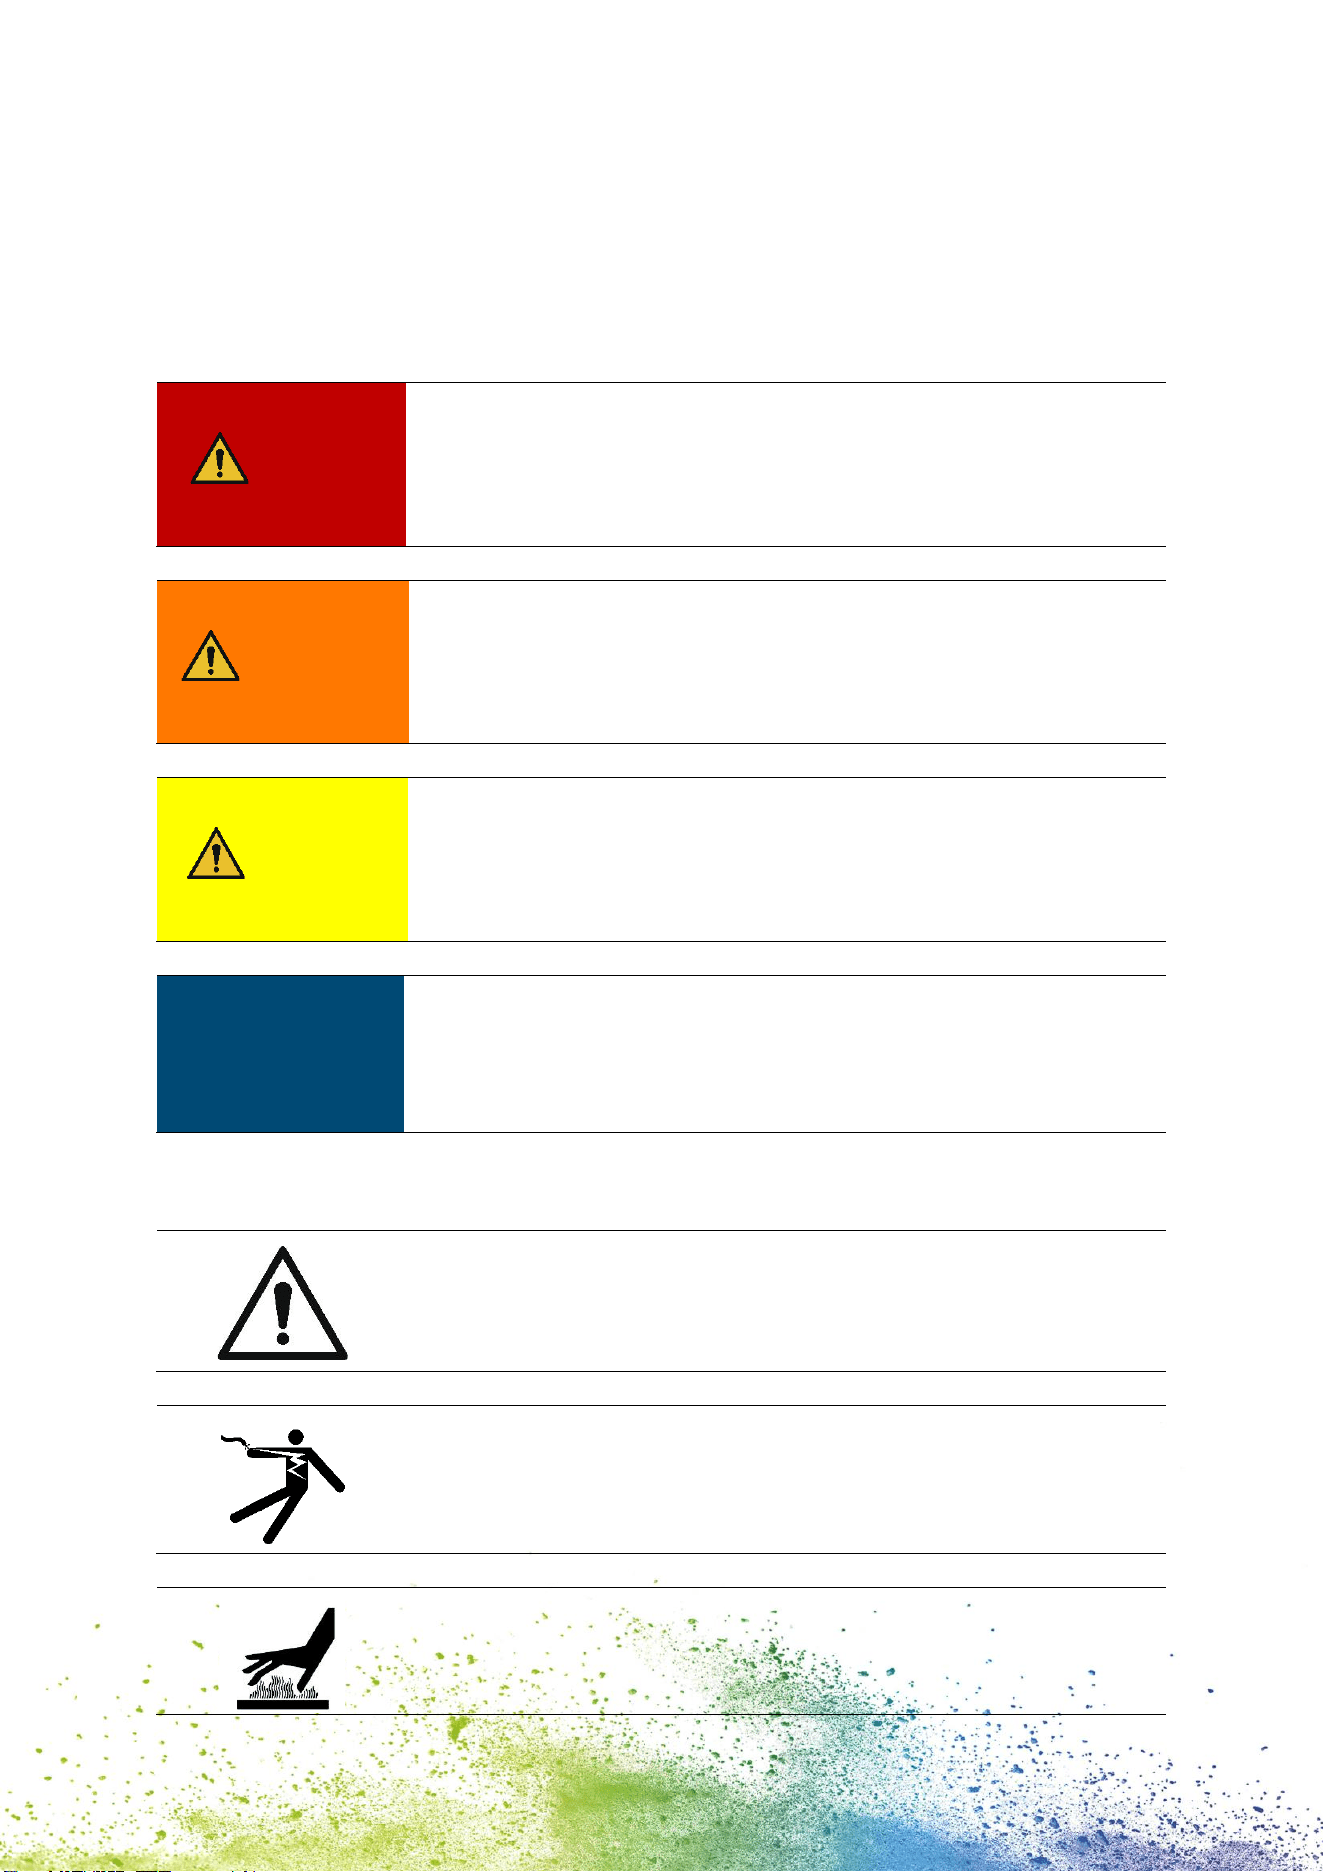
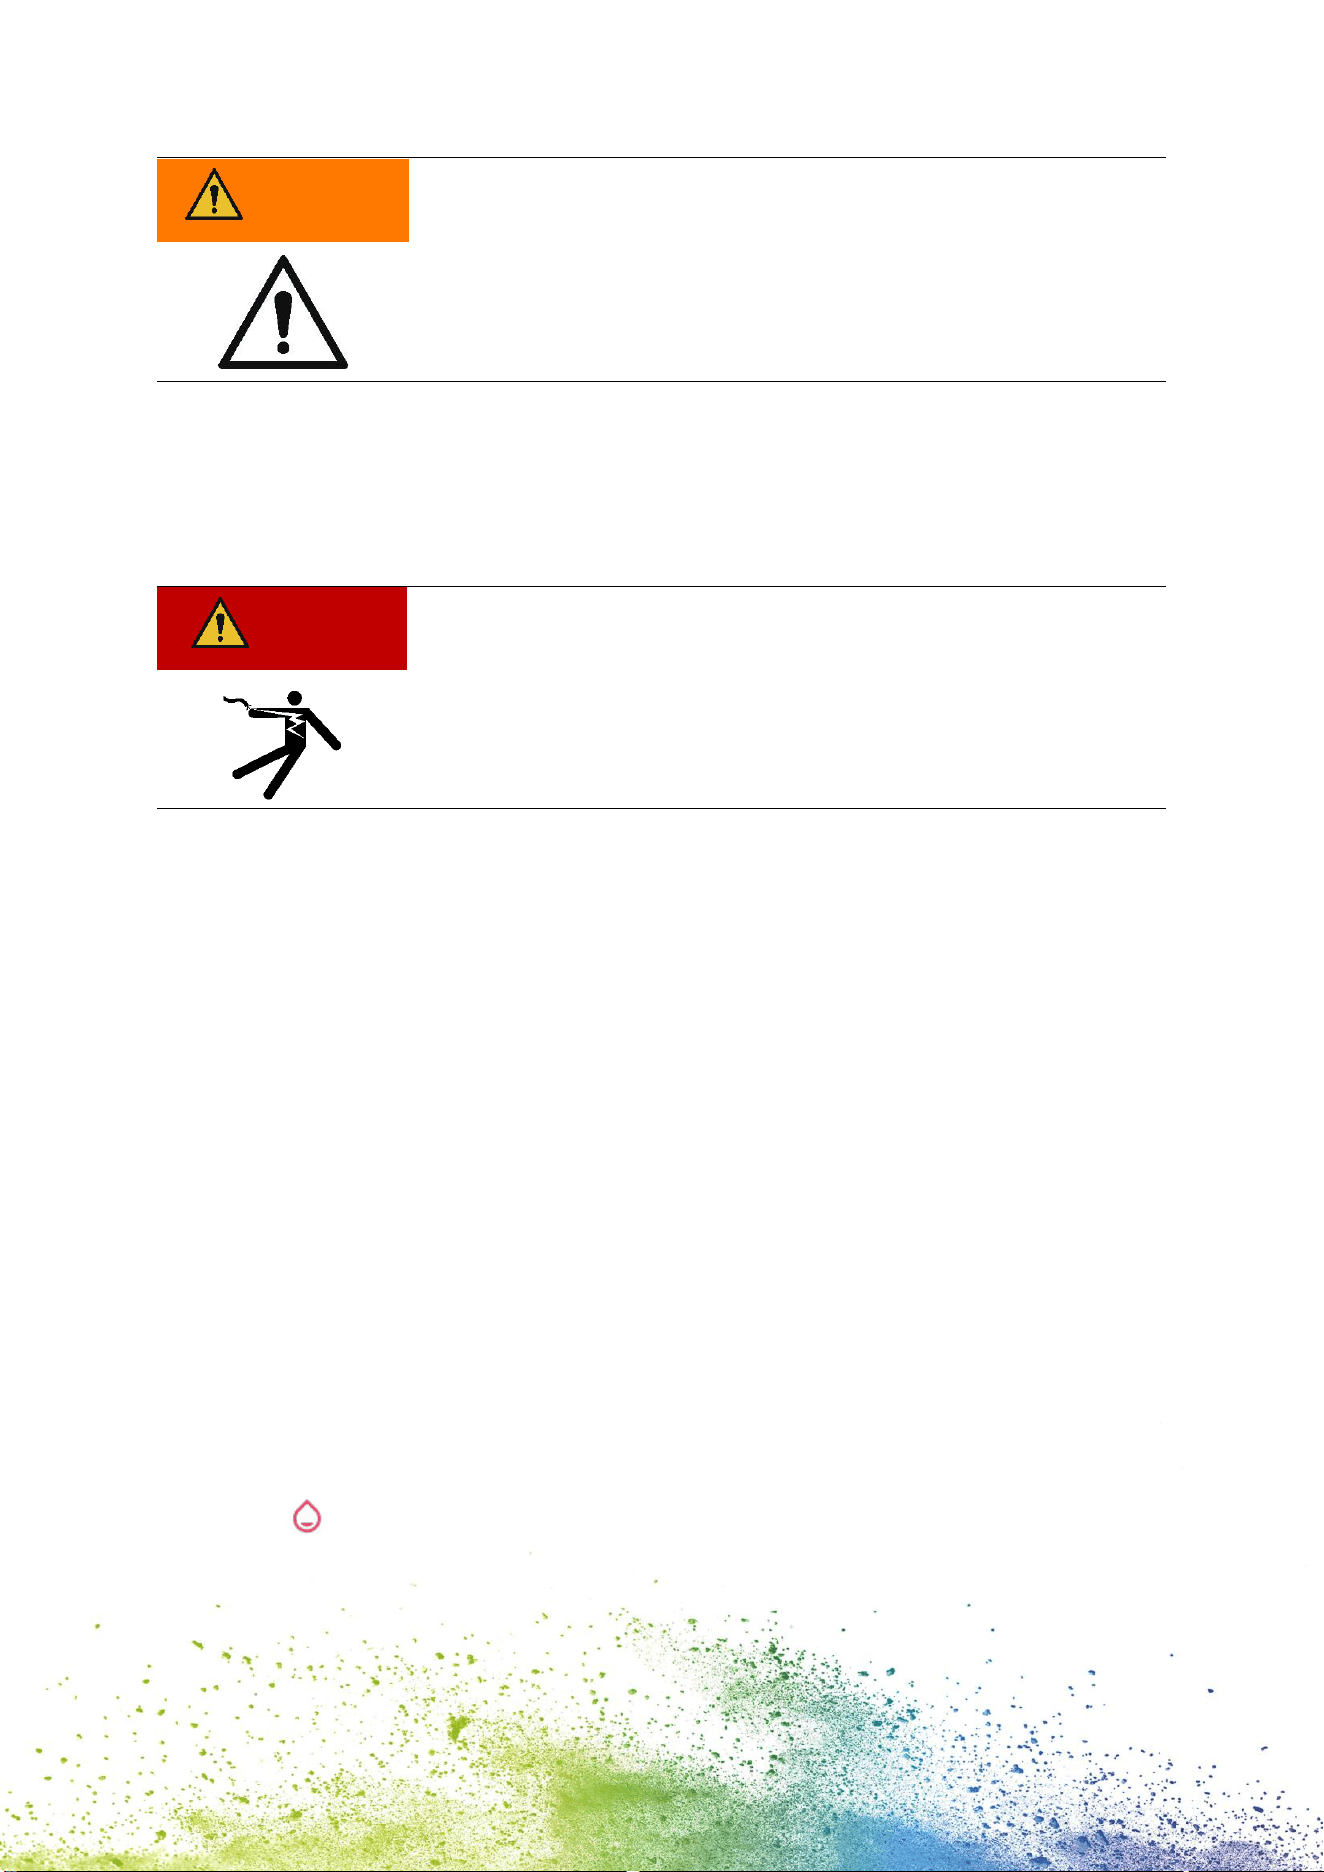
2.1 Signal words used in safety notices
DANGER!
A safety notice with the signal word DANGER points to an
immediately threatening hazard to the life and limb of people!
This signal word denotes a hazard with a high level of risk, which, if
not avoided, can result in death or serious injury.
WARNING!
A safety notice with the signal word WARNING denotes a
dangerous situation that could cause personal injury (of a serious
nature) and may cause damage to items of capital equipment!
This signal word denotes a hazard with a moderate level of risk,
which, if not avoided, can result in death or serious injury.
CAUTION!
A safety notice with the signal word CAUTION denotes a
potentially hazardous situation that can result in slight injuries or
damage to items of capital equipment!
This signal word denotes a hazard with a low level of risk, which, if
not avoided, can result in minor or moderate injury.
NOTICE
A safety notice with the signal word NOTICE denotes a situation
that could result in damage to items of capital equipment!
This signal word denotes a hazard, which, if not avoided, can result
in damage to items of capital equipment or damage to the device.
2.2 Symbols used in safety notices
General warning symbol, this symbol warns of risks of injury.
Follow all measures designated with this warning symbol to
prevent serious or fatal injuries!
This safety notice draws attention to the possible hazards of
electrical voltage.
This safety notice draws attention to possible hazards of hot
surfaces!
6
Reference to the obligation to read the Operating Manual!
Danger symbol for environmentally hazardous substances
Notice relating to additional information and/or to cross
references!
2.3 Residual hazards
Even when the greatest care and attention is paid to the design and build of the product,
and when full account is taken of safety-related factual content, residual hazards can still
exist, which were evaluated in a risk assessment.
DANGER!
Hazard from electric shock. There is a risk of a fatal electric shock
in wet conditions.
Never handle the charger mains plug with wet hands. Never use
the device in humid areas. Never expose the battery and charger,
including USB port, to water and/or rain.
WARNING!
Danger of suffocation from plastic film.
The packaging is not a toy. Dispose of packaging materials
immediately and in an environmentally appropriate manner.
WARNING!
Risk of asphyxiation from small parts for children below the age
of three.
The device is not a toy. Do not leave children alone with the device
unsupervised.
7
WARNING!
Hazard from cleaning.
NEVER use inflammable substances near the e-mark go. This may
cause a fire or an electric shock.
Cleaning the outside of the e-mark go:
- Ensure that the mains cable of the e-mark go charger has been
removed from the socket and the device is switched off.
- Use neutral cleaning agent. Using liquids such as thinners or
petrol damages the outer surface of the e-mark go.
- Do NOT use cleaning agents containing ammonia.
WARNING!
Hazard from damaged electrical components or damaged
insulation.
In the event the device, housing or insulation is damaged, stop
using the device and have it tested and repaired by an electrician
or the manufacturer's customer service.
WARNING!
Hazard from rechargeable batteries (short-circuit, overheating,
fire).
- Do not expose lithium batteries to heat, cold or water (do not
leave in direct sunlight or charge or store outdoors).
- Do not (forcibly) open or expose to large impacts or shocks.
- Only use charging systems as recommended by the manufacturer.
- The manufacturer's safety instructions must be complied with
throughout the entire disposal process.
- Battery contacts (outside the device) must not come into contact
with metallic objects such as coins or keys to prevent a short
circuit.
- The marking device and/or rechargeable battery must never get
wet.
- Burning batteries can cause blow-outs, causing a battery to be
blown away. Battery fires give off extremely thick, particularly toxic
smoke.
- Following extended periods in storage or before taking to a
collection point, the poles on lithium rechargeable batteries should
be covered with adhesive tape to prevent short circuits. Maximum
protected storage, e. g. in the original packaging and quick deposit
in a collection point are recommended.
- Visually damaged, overheated or blown out batteries must not be
reused and must not be stored in the house, flat or garage.
8
WARNING!
Hazard posed by improper use.
Read the Operating Manual before switching on the device. Pay
attention to all safety notices. The Operating Manual must be kept!
CAUTION!
Hazard from hot surfaces.
Immediately after using the e-mark go, certain parts can be hot. Do
not touch the print head on the underside of the marking device.
Leave to cool before replacing.
CAUTION!
Hazard from hot surfaces.
Pay attention when cleaning the print head. Never touch the print
head directly.
CAUTION!
Possible hazard from substances, slight eye and skin irritation
from ink.
Do not direct the print head towards the eyes, face or skin. Do not
open the ink cartridges. Do not swallow! Keep ink cartridge out of
the reach of children.
CAUTION!
Risk of explosion if battery is replaced by an incorrect type.
Dispose of used batteries according to the instructions.
NOTICE
Only insert the cartridge when the e-mark go is switched off and
avoid any contact with the contacts on the flex PCB!
9
NOTICE
Always return the e-mark go to the docking station to prevent the
print head from drying out and damaging the e-mark go.
NOTICE
Packaging materials (paper, plastic) must be disposed of separately.
Dispose of components of the device in accordance with legislative
stipulations. Dispose of materials separately and recycle as much as
possible.
Consumable materials like ink cartridges must be disposed of in
accordance with the respective regulations.
Electrical components of the product must be sent for recycling as
waste of electrical or electronic equipment. Dispose of batteries at
collection points in accordance with legislation.
NOTICE
The electrical components of the product must be sent for recycling
as waste of electrical or electronic equipment.
2.4 Safety notices on the product
Safety notice panels are fitted to the product to draw attention to potential hazards. Always
pay attention to and comply with the safety designation instructions on the product. During
the service life of the product, if the safety designation label fades or gets damaged, you
must shut down the product.
The pictograms for warnings, prohibitions and stipulations on the product, together with
their meaning:
Pictograms
Location
Designation
Description
Underside
Printer
Warning: hot
surface.
The print head surface may become hot.
Do not touch the print head!
Battery,
cartridge,
e-mark go
Indications on
disposing of
electronic waste
Dispose of the appliance in accordance
with legislation and recycle wherever
possible.
10
Fig. 1: Safety instructions on the underside of the e-mark go
11
3 DESCRIPTION
3.1 Scope of supply
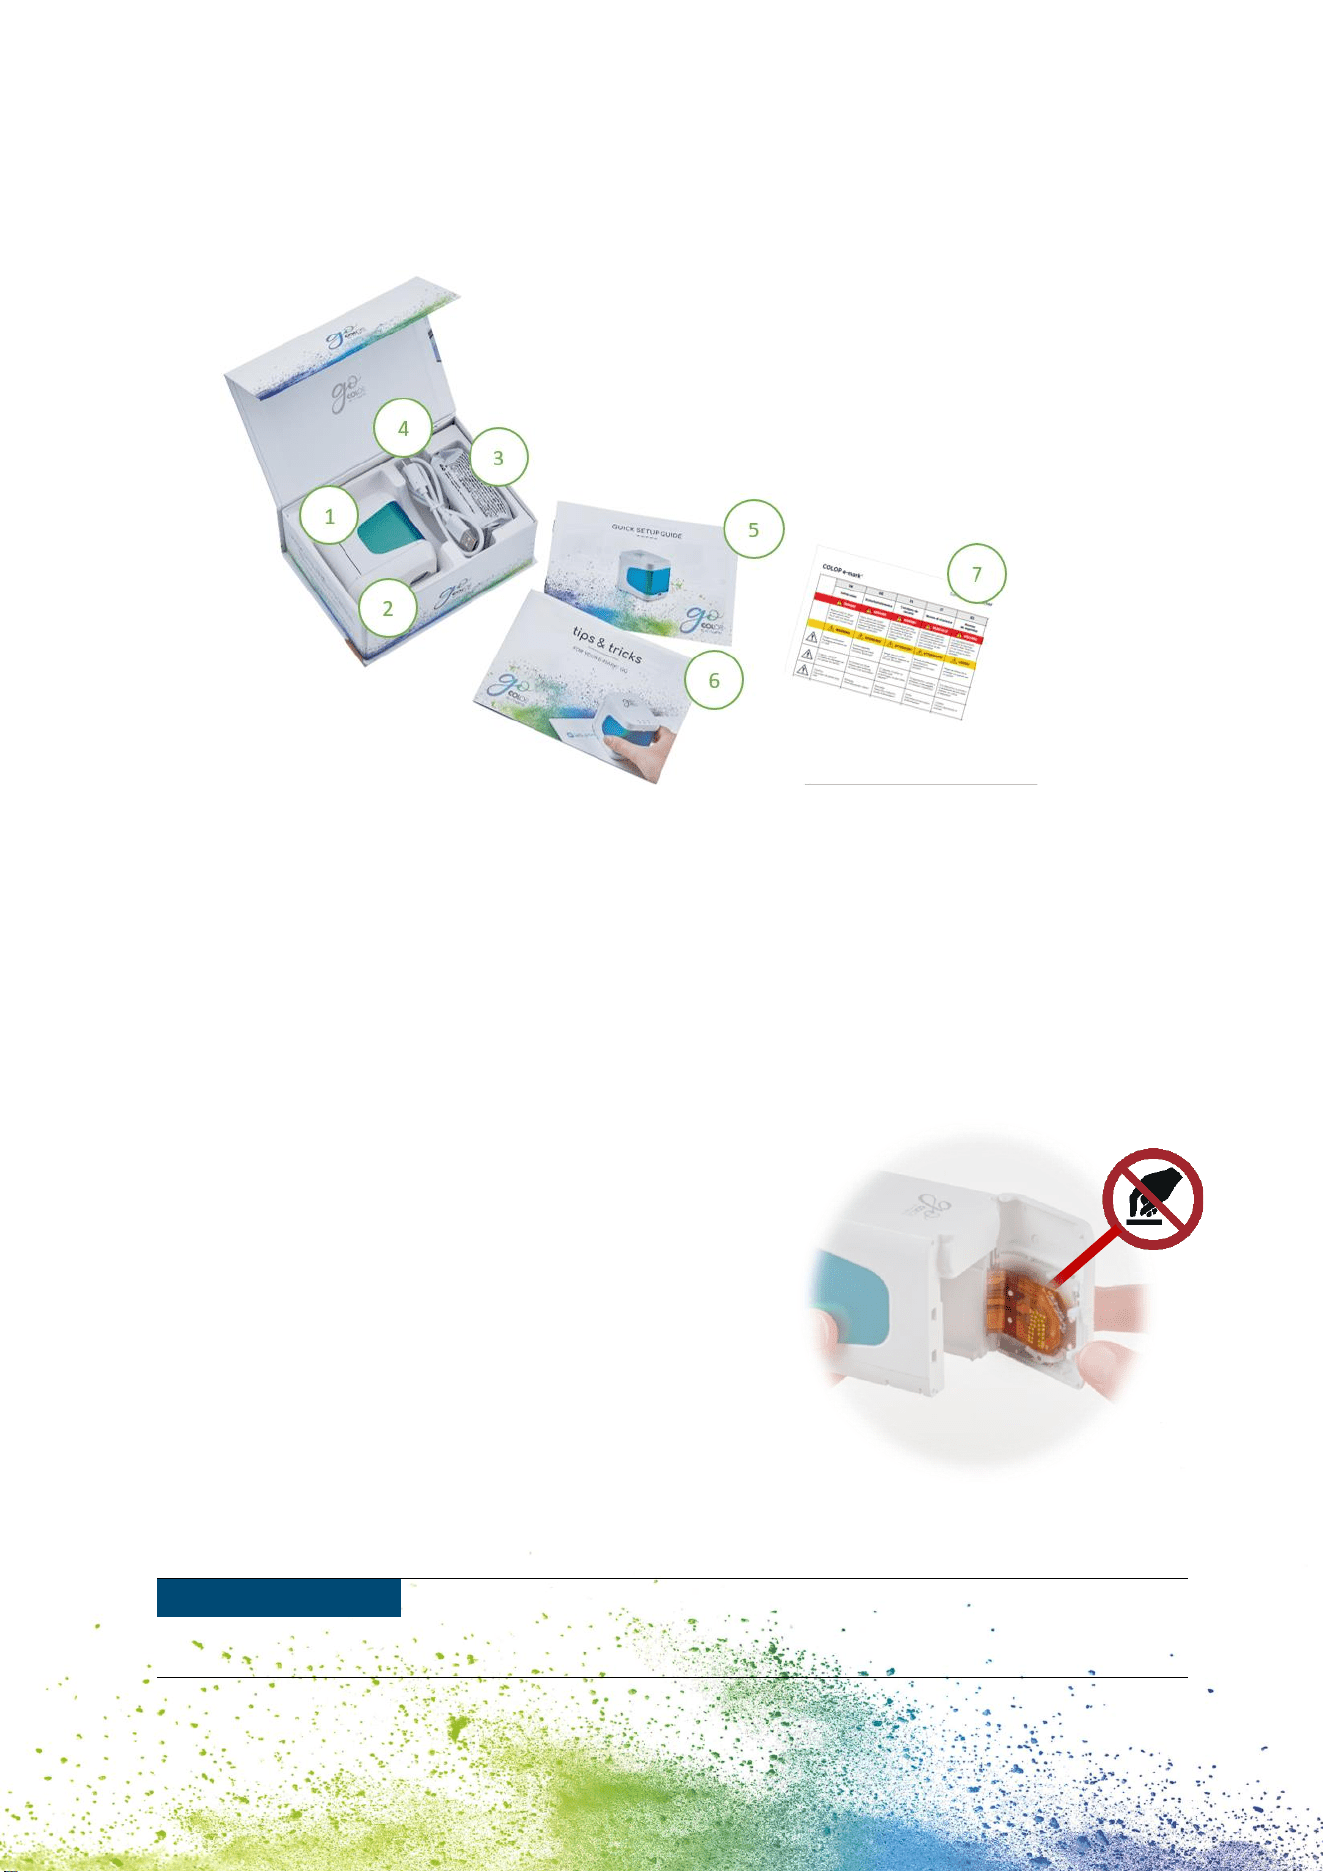
Fig. 2: Content
The packaging of the e-mark go contains the handheld printer with a build-in rechargeable
battery (1), docking station (2), ink cartridge (3), USB-C cable for charging (4), the Quick
Setup Guide (5), the Tips and Tricks brochure (6) and the Safety Notes (7).
The mobile handheld printer comprises the housing with a door on the front that can be
opened (access to compartment for ink cartridge), an on/off switch on the underside, a USB-
C port, LED indicator lights on the top and on the left as well as on the right side, sliding
wheels on the underside for stable movement, magnets
for secure docking, a light sensor for position guiding and
a WIFI module.
The docking station comprises rubber lips and flap to
prevent the ink cartridge from drying out.
The ink cartridge is packaged separately and must be
inserted before use.
Fig. 3: Flex PCB
NOTICE
Only insert the cartridge when the e-mark go is switched off and avoid
any contact with the contacts on the flex PCB!
12
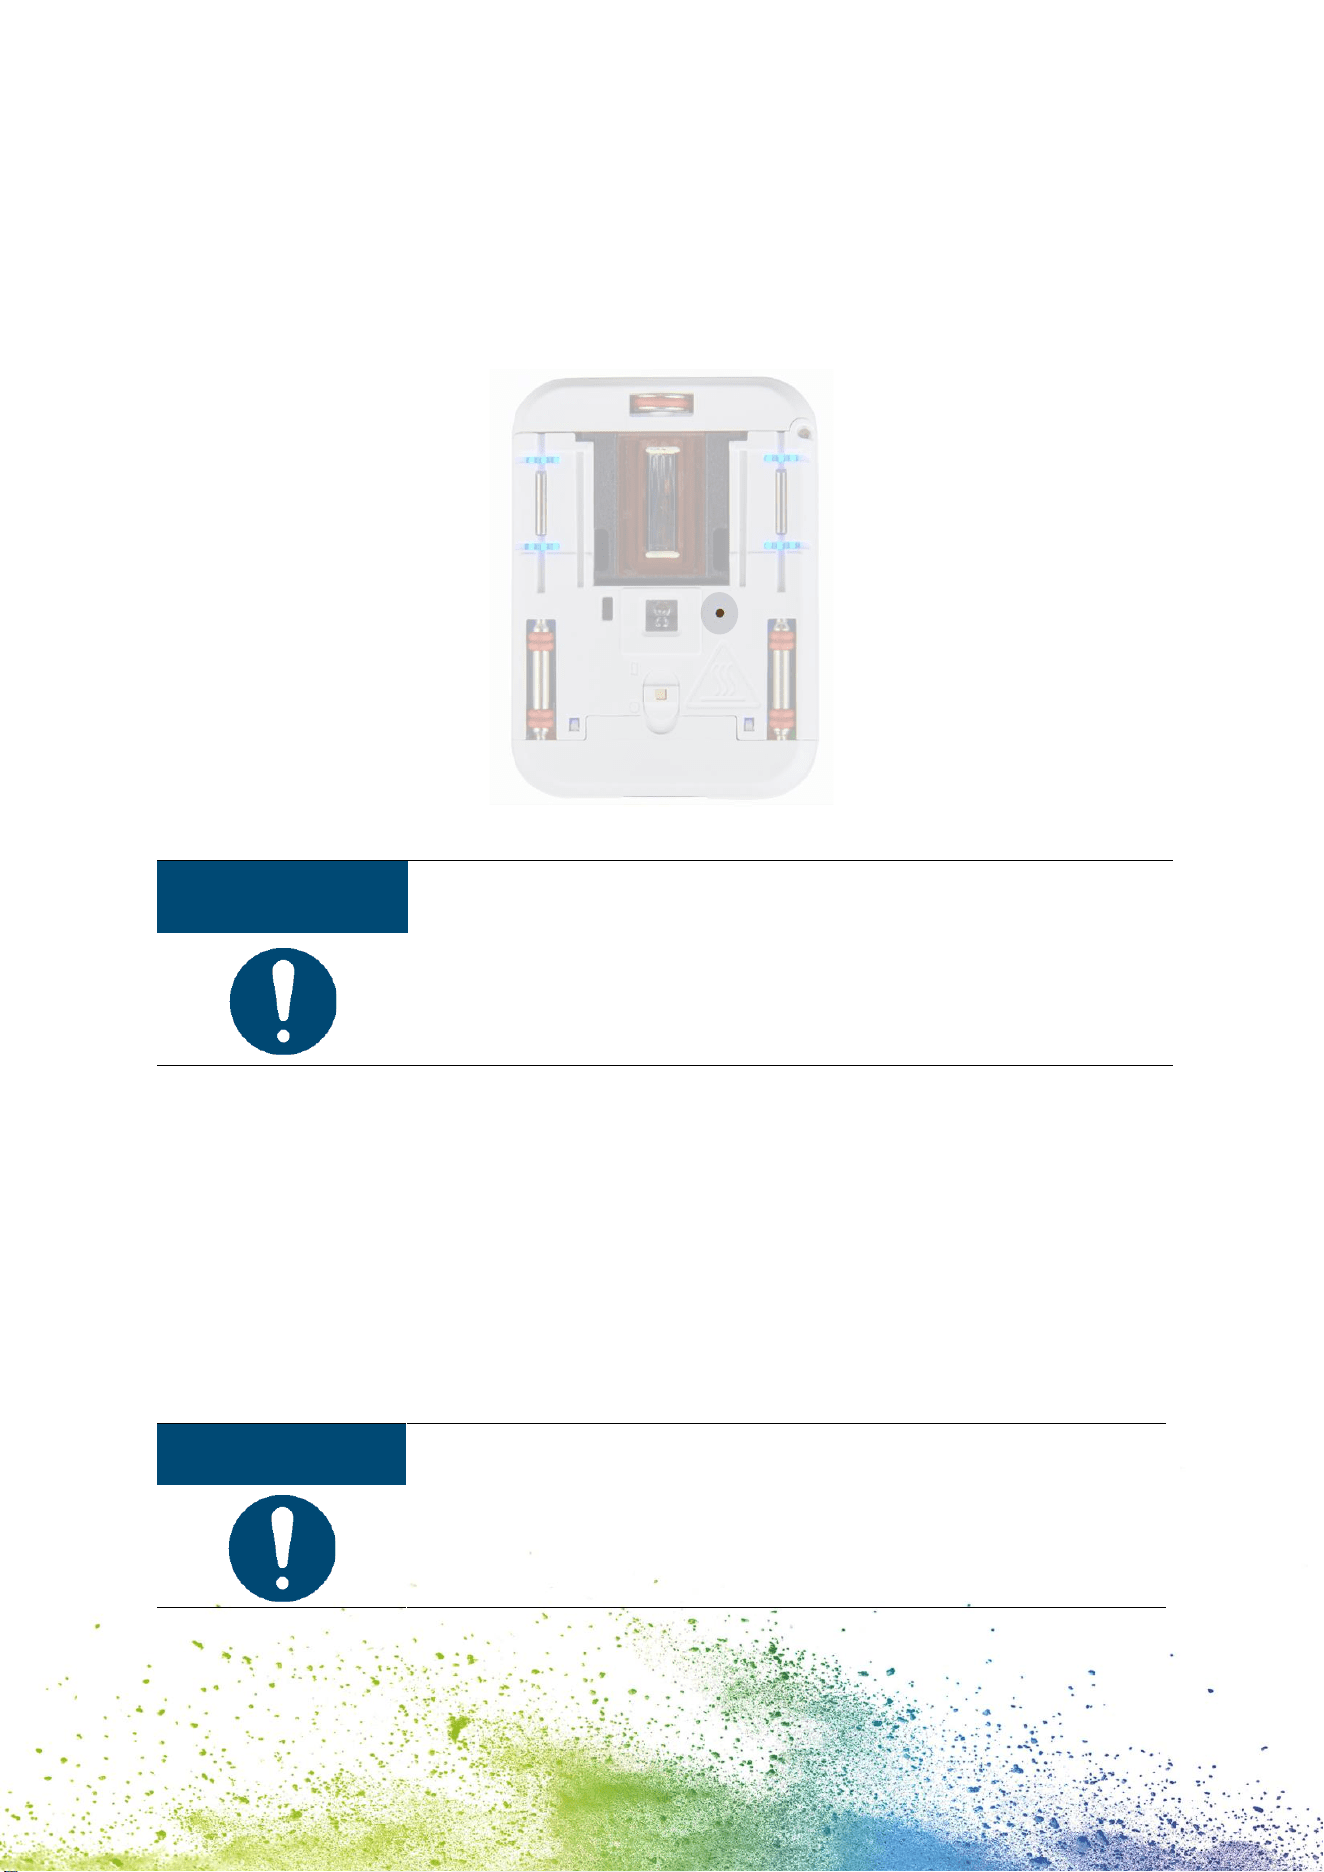
3.2 Layout
Fig. 4: COLOP e-mark go 1
Fig. 5: COLOP e-mark go 2
Printing area visualised
by two LEDs for easier
orientation
USB-C port for
charging
Indicator lights –
battery, printing, WIFI
status
Sliding wheels for a
smooth movement
Print head of the
cartridge
Optical sensor –
is detecting the
movement
On/off switch
13
Fig. 6: Docking station
3.3 Technical specifications and dimensions
Technical specifications of the e-mark go
Weight
178 g (approx. 408 g incl. packaging)
Dimensions L x W x H
2.89” x 2.15” x 2.74” /
73.5 x 54.5 x 69.7 mm
Rechargeable battery
7.4 V Li-Ion with 800 mAh
Energy content of battery:
5.92 Wh
Power consumption from USB while
charging:
438 mA
WIFI interface
WIFI IEEE 802.11b, IEEE 802.11g, IEEE 802.11n
USB interface
USB-C
Optimum print speed
4 in/s
0.1 m/s
Maximum print speed
11 ¾ in/s
0.3 m/s
Print quality
600 dpi
Print head 3-colour (cyan, magenta,
yellow)
COLOP 3-color Ink Cartridge C2 (3UB55A)
Storage temperature range
41 °F to 122 °F /
5 °C to 50 °C
Operating temperature range
59 °F to 95 °F /
15 °C to 35 °C
Non-operating humidity range
20 to 80 %
Print on absorbent surfaces such as
Plain paper, cardboard, fabric, wood, cork, dry
wall, high-gloss paper, photo paper
Magnets for
the perfect fit
Cap to prevent your
cartridge from drying out

14
3.4 Battery
The lithium ion rechargeable battery lasts for up to 3.6 hours of continuous printing and can
be recharged approximately 1,000 times. Battery charging takes up to around 3.25 hours
from 0 % to 100 %.
3.5 Operating systems
The COLOP e-mark go app is available for mobile devices using Android and iOS. Please
check the following site for the compatible versions:
emarkgo.colop.com/osversion
Please always make sure to use the latest software version. There may be issues with
previous versions and certain functions may be limited.
15
4 OPERATION AND FUNCTIONALITY
4.1 Transport
When transporting the product, please use the original packaging.
4.2 Unpacking
Carefully remove the e-mark go from the packaging. Keep the original packaging for storing
or transporting the e-mark go. Dispose of other packaging materials appropriately. Never let
children play with the packaging or with parts of it, since there is a risk of asphyxiation from
small parts or plastic film.
WARNING!
Danger of suffocation from plastic film. Risk of suffocation from
small parts for children below the age of three.
The packaging is not a toy. Dispose of packaging materials
immediately and in an environmentally appropriate manner.
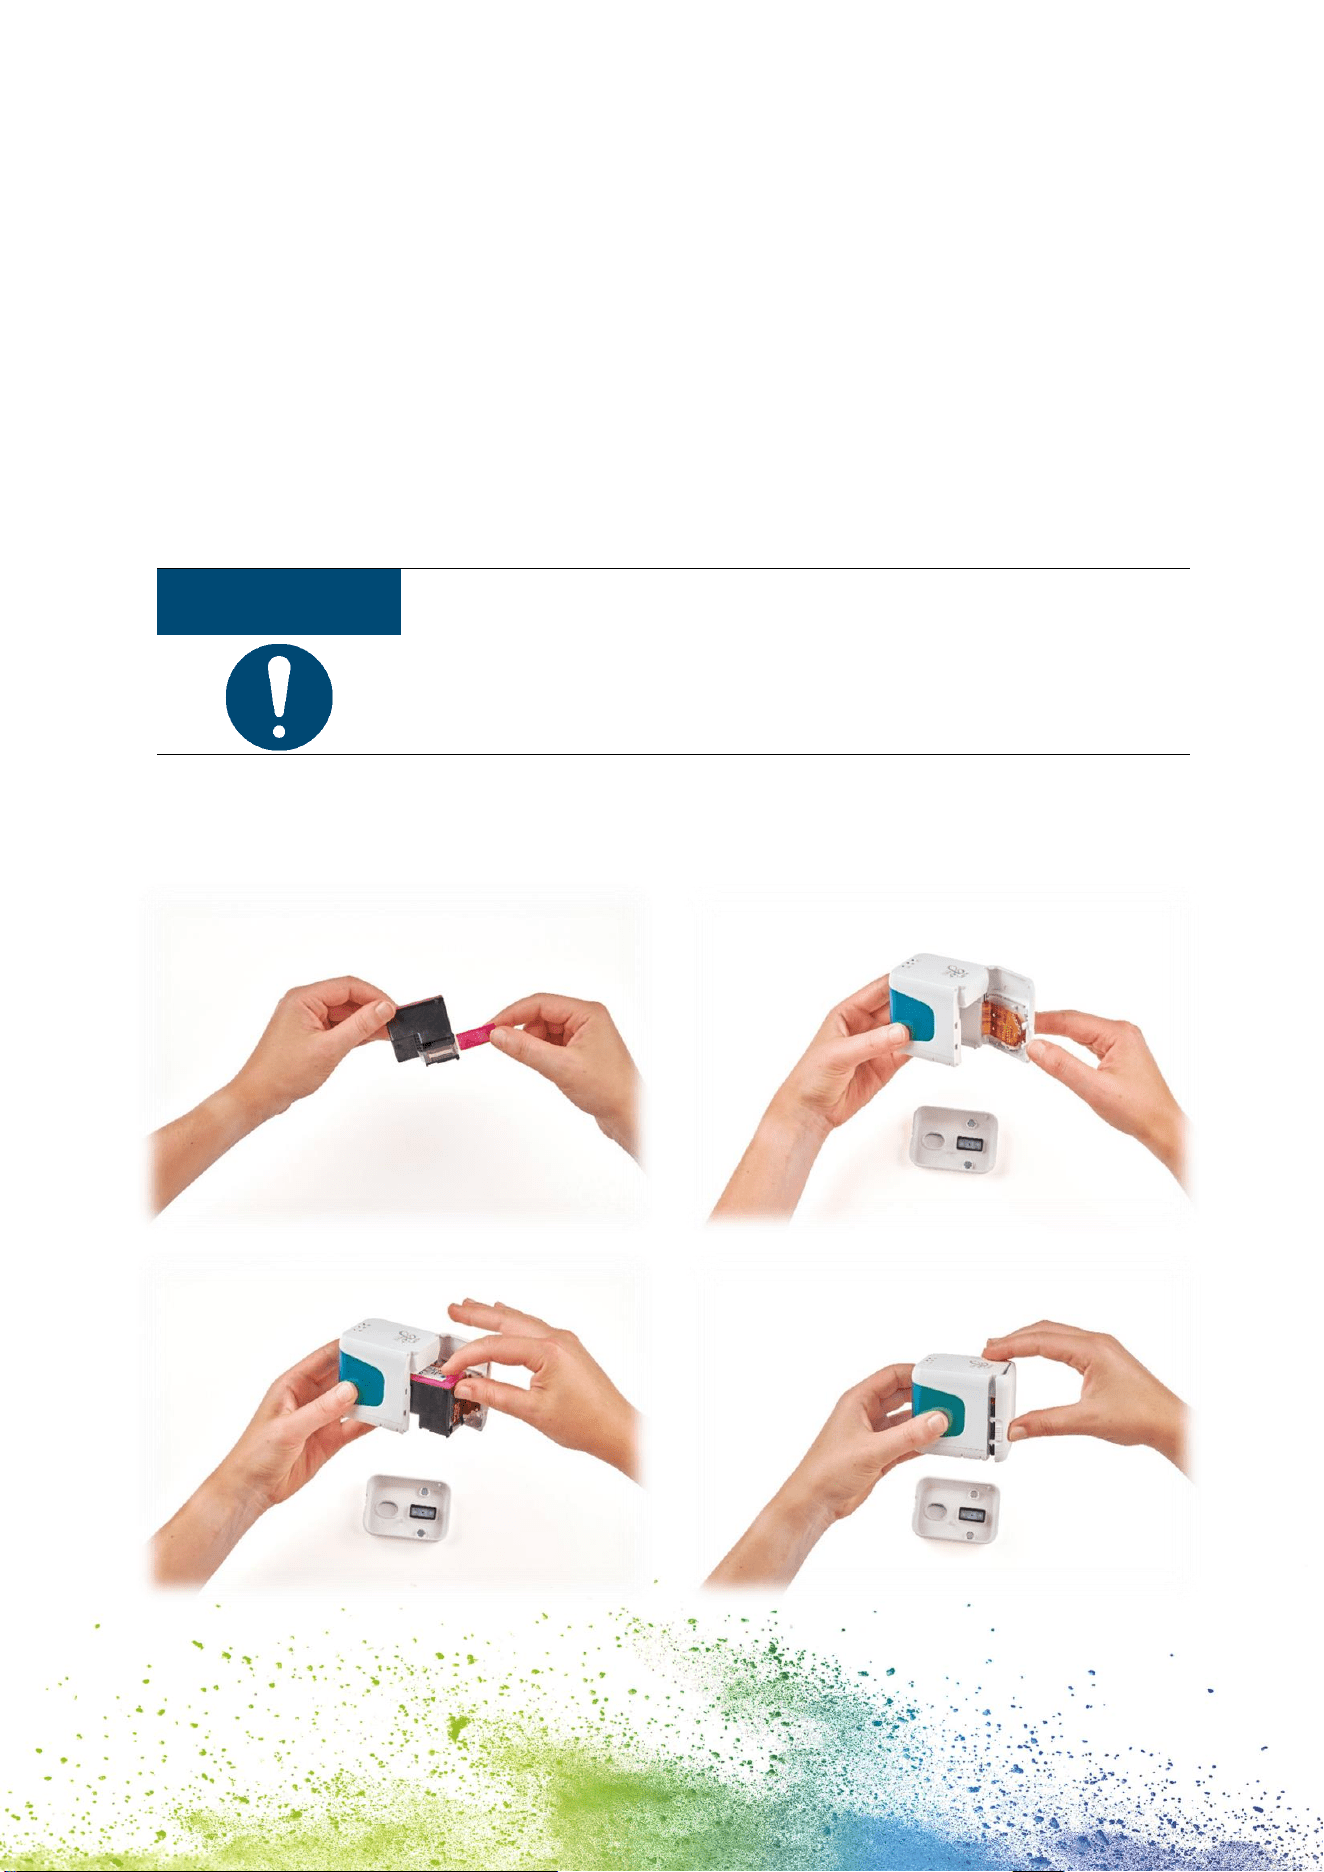
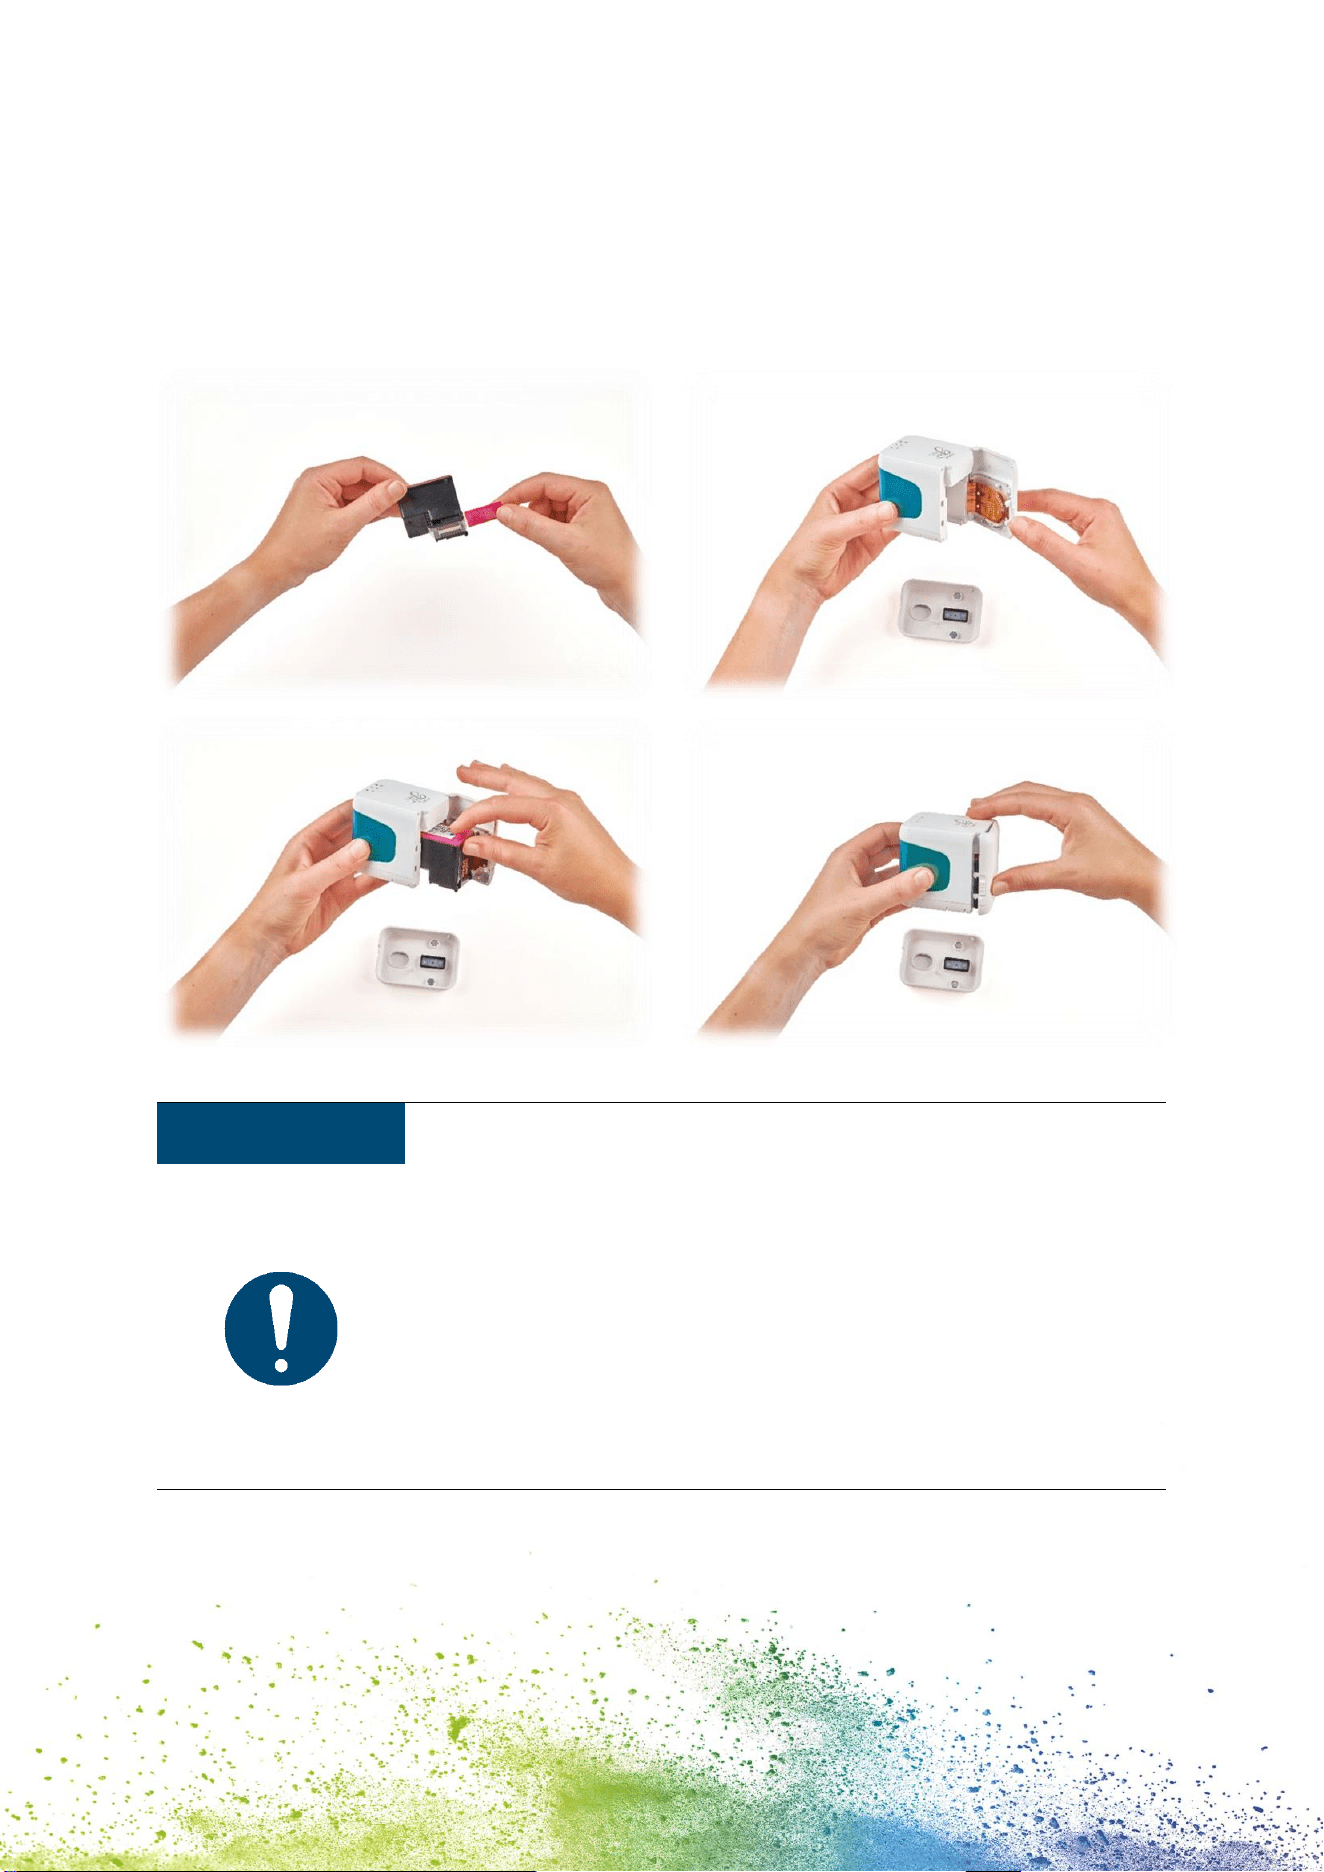
The ink cartridge is packaged separately. It must be inserted before using for the first time.
NOTICE
Only insert the cartridge when the e-mark go is switched off and
avoid any contact with the contacts on the flex PCB!
4.3 Assembly and switching on
Check the following points before commissioning:
Visual inspection
Ensure that the Quick Setup Guide is legible and is available in full.
Are all product parts present? - docking station, e-mark go body, ink cartridge, USB
cable, the Quick Setup Guide, Tips and Tricks and Safety Notes
Is the product damage-free? Look for any deformations and cracks on the housing, cable
damage, in particular.
The product must not go into operation if it has any visible defects or signs of damage.
16
Commissioning
1. Remove the e-mark go from the packaging.
2. Remove the ink cartridge from the packaging and dispose of the packaging
responsibly.
3. Pull off the strip from the print head and dispose of responsibly.
4. Insert ink cartridge
- Lift the e-mark go out of the docking station.
- Open the front door of the e-mark go.
- Insert the cartridge.
NOTICE
Only insert the cartridge when the e-mark go is switched off and avoid
any contact with the contacts on the flex PCB!
5. Close the front door
6. ALWAYS place the e-mark go in the docking station.
Fig. 7: Insert Cartridge

17
NOTICE
ALWAYS place the e-mark go in the docking station after use.
Otherwise, the print head dries out, affecting print quality.
If the e-mark go is not placed in the docking station immediately:
- switched on: a warning signal sounds (return to docking
station!)
- switched off: NO warning signal sounds
4.4 Software Setup
1. Download the e-mark go app and install it on the mobile device.
emarkgo.colop.com/appdownload
Fig. 8: App logo
2. Create an account/login or continue without login
3. Type in the login code you received via e-mail
4. Accept the Privacy Policy and the Terms and Conditions and click on “Confirm code”
5. The start screen will open
4.5 WIFI connection
Setting up the connection between your device and the app starts with entering SSID and
password.
1. Pay attention that the WIFI on your smartphone or tablet is switched on
2. Open the e-mark go app
3. Click on “Setup e-mark go” on the start screen
4. Read the information carefully and click on “Connect”
5. Click on “Scan QR code”, scan the QR code and click on “Connect” or manually enter
the SSID and password that came with your e-mark go (to be found on the label, the
presaved imprint or the imprint after a reset (Fig. 9)
6. On iOS devices you will be asked to join the WIFI connection the e-mark go generates
- click “Join”
Fig. 9: Example test imprint with SSID and password
emarkgo123456
12345678
18
If you are having trouble in setting up a connection, refer to the troubleshooting chapter
(see chapter 6.6), visit our homepage and have a look in the help center or contact our
Customer Helpline.
emarkgo.colop.com/helpcenter
emarkgo.colop.com/support
4.6 Image transfer
The e-mark go takes time to save the newly transferred image to the internal flash memory.
Do not switch off the e-mark go before you hear the beep confirming the saving process has
been successful, otherwise saving is interrupted.
Refer to the software description in chapter 5 for details.
4.7 Online mode
In online mode (active connection to the app) the e-mark go is able to receive and print an
imprint as soon as the user has created and sent it.
4.8 Offline mode
In offline mode (without connection to the app) the e-mark go is ready to print the last sent
imprint at any time.
4.9 Printing
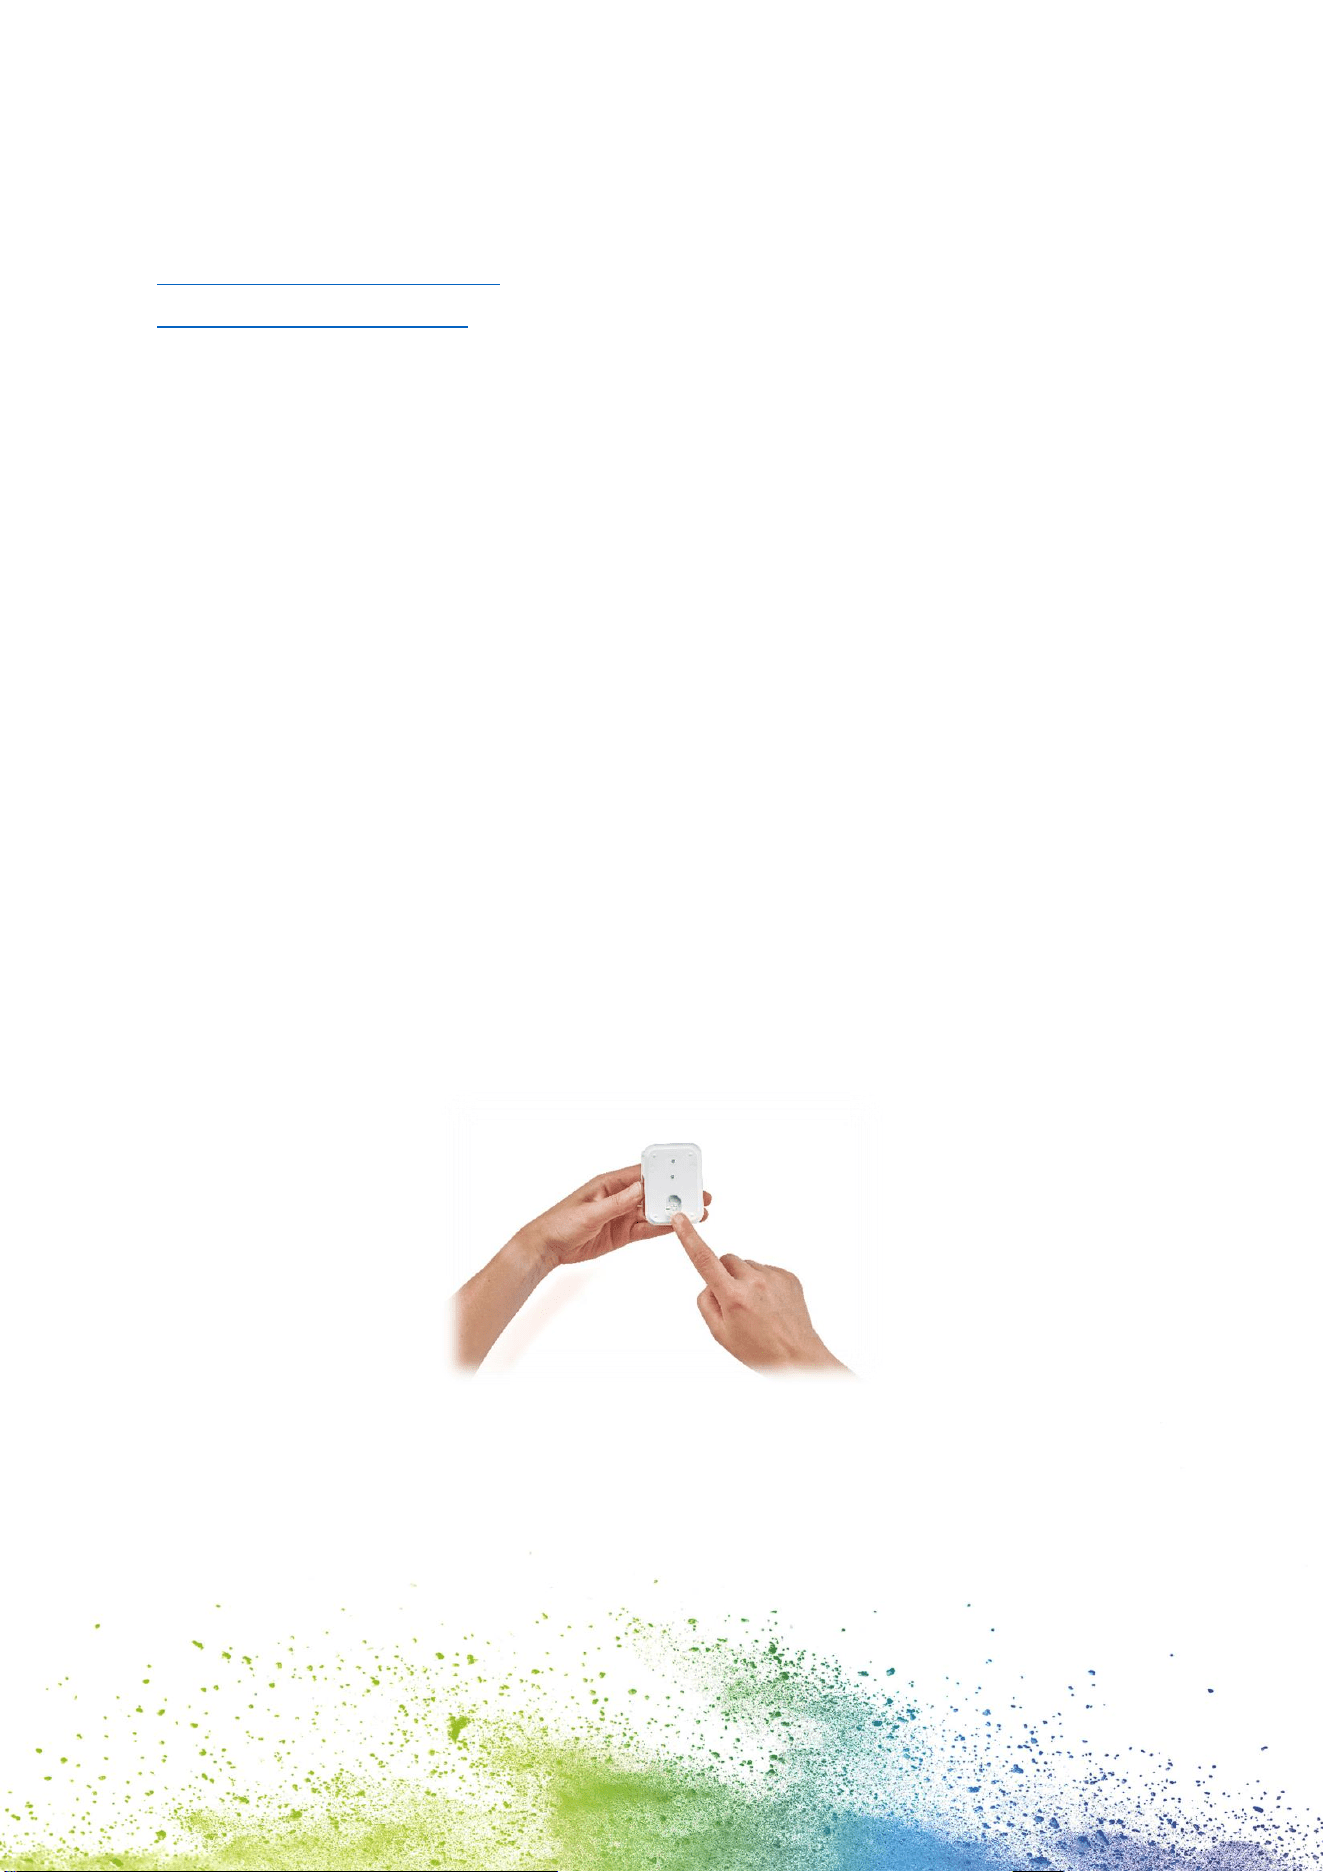
1. Switch on the e-mark go by sliding the switch from the 0 to the I position (Fig. 10). Wait
until the ink indicator light indicates that printing can begin (Fig. 11)
Fig. 10: On/off switch
2. An automatic self-cleaning process starts when removed from the docking station.
3. Position the e-mark go on the selected printing surface. The blue light stripes indicate
the upper and under limit of the printing area to both, the left and the right side, as
printing can be done either to the left or to the right.
19
Fig. 11: Ready to print light
4. Move the e-mark go slowly and in a straight line from left to right or from right to left
over the surface (Fig. 12).
Fig. 12: Printing from left to right
5. The e-mark go automatically detects the direction of movement (the blue light stripes
on the opposite side of the printing direction will fade away) and starts printing. A
signal sounds when printing is complete (end position is reached).
6. Return the e-mark go to the docking station immediately after printing.
4.10 Sleep mode
If the e-mark go is switched on and is not used for 3 minutes, the device goes into sleep
mode. The e-mark go is not going into sleep mode as long as it is connected to the app.
4.11 Warning mode
If the e-mark go is not in the docking station and is not used for more than one minute, a
warning signal sounds to prevent the print head from drying out. Please return the device to
the docking station immediately.
20
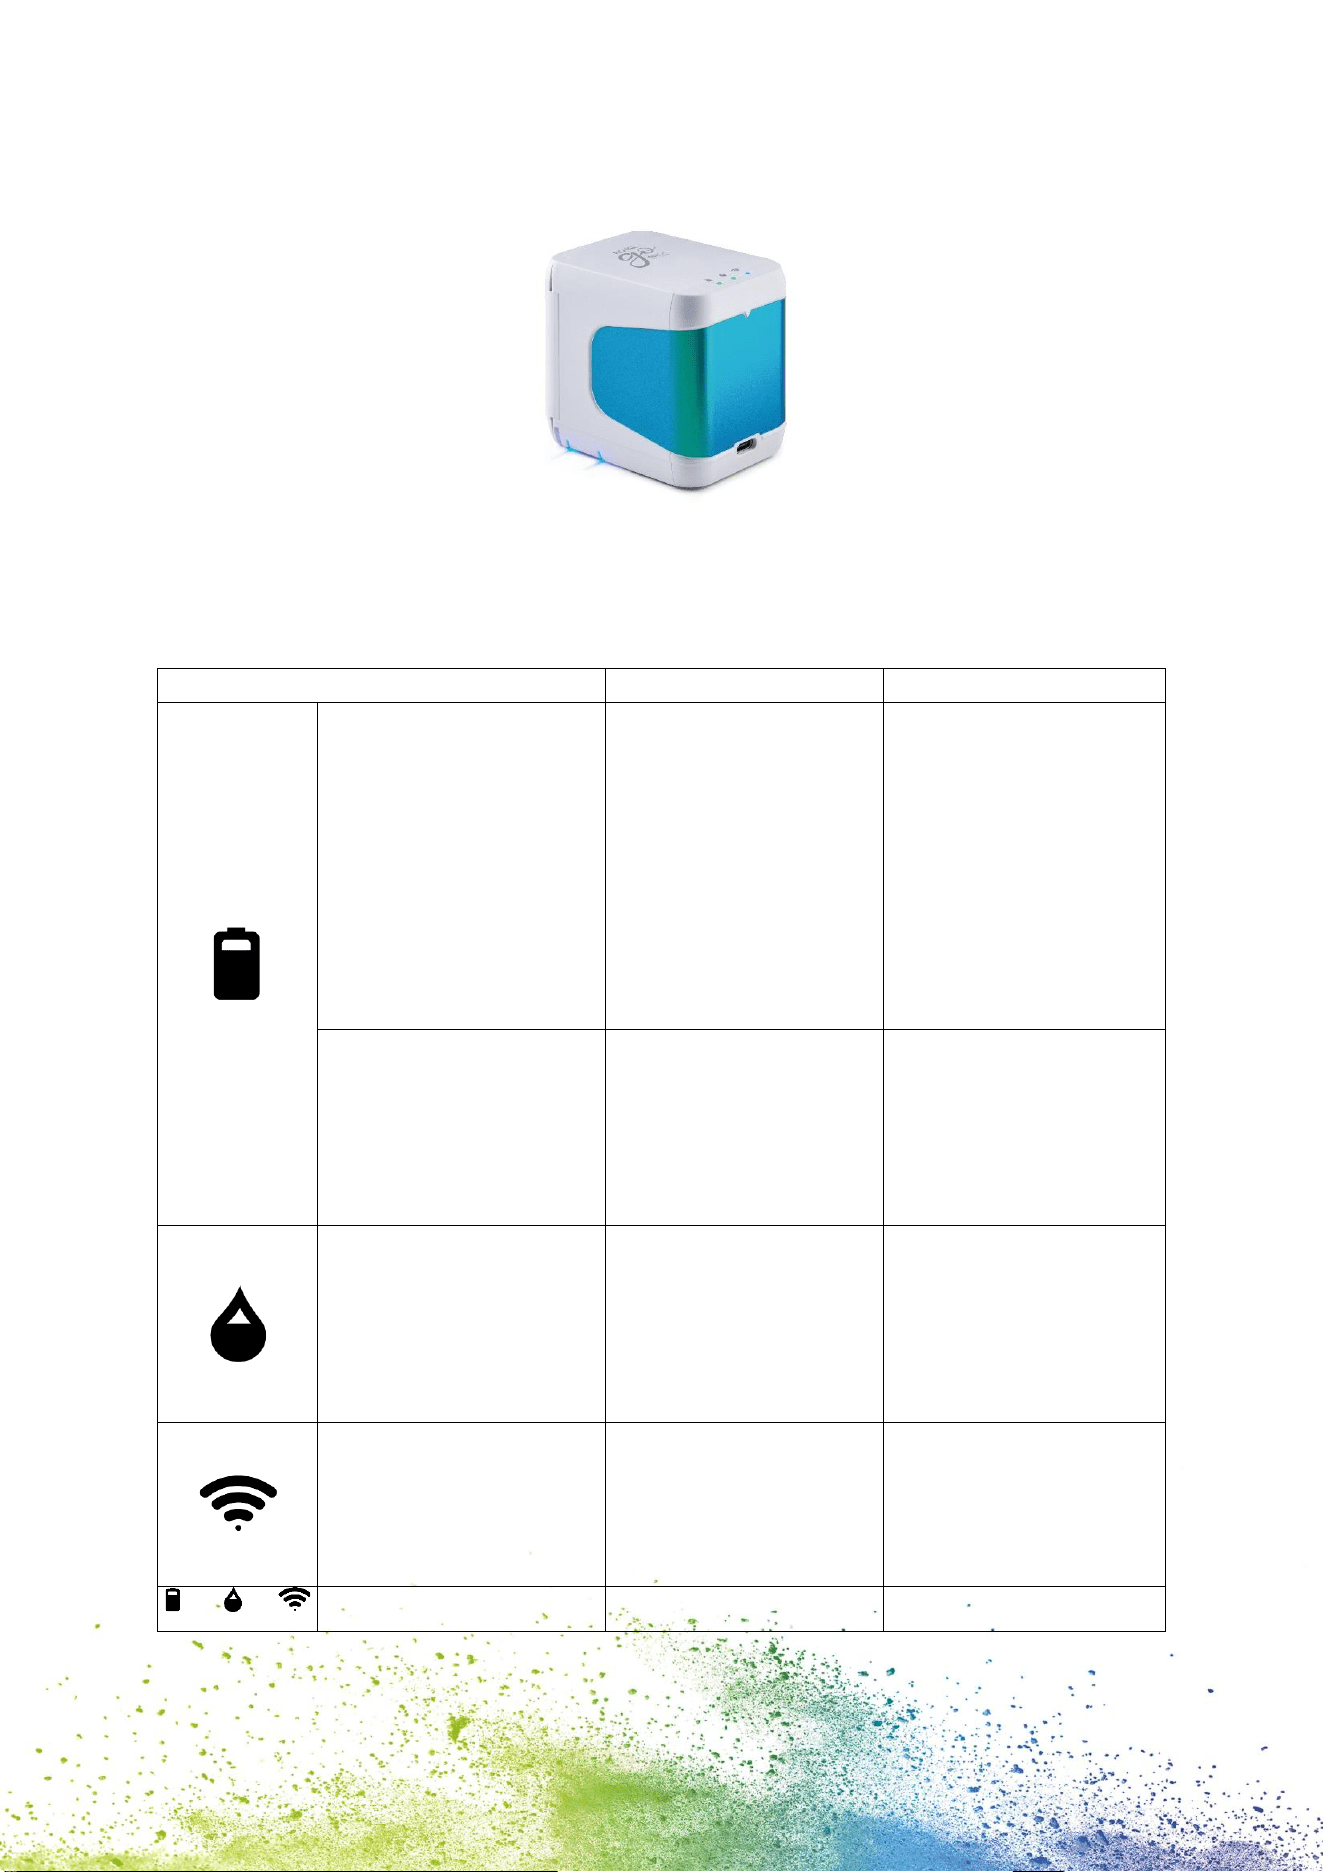
4.12 Light indicators and symbols
Fig. 13: Light indicators
Light Guide and signal tone table:
Color code, flashing code, direction code and signal tones
Light indicator
Designation
Description
Green light
Yellow light
Red light
Battery level indicator
Battery level is
between 41 and 100 %
Battery level is
between 11 and 40 %
Battery level is lower
than 10 %
During charging
Green light
Green flashing light
Charge indicator light
The battery is fully
charged (100 %)
Battery is charging
Green light
Green flashing light
Flashing Red light
Ready to print
Transmitting print job
No ink cartridge
inserted
The ink cartridge must
be inserted (correctly)
Blue light
Blue flashing light
WIFI connection
e-mark go has an active
WIFI connection
Establishing WIFI
connection
White flashing light
Firmware update
Firmware is updating
21
Light indicator
Designation
Description
Single beep
Continuous beep
Print job is transmitted
Print job is completed
Cleaning cycle is finished
Please return the e-mark go into the docking
station
Device error: switch e-mark go off and on
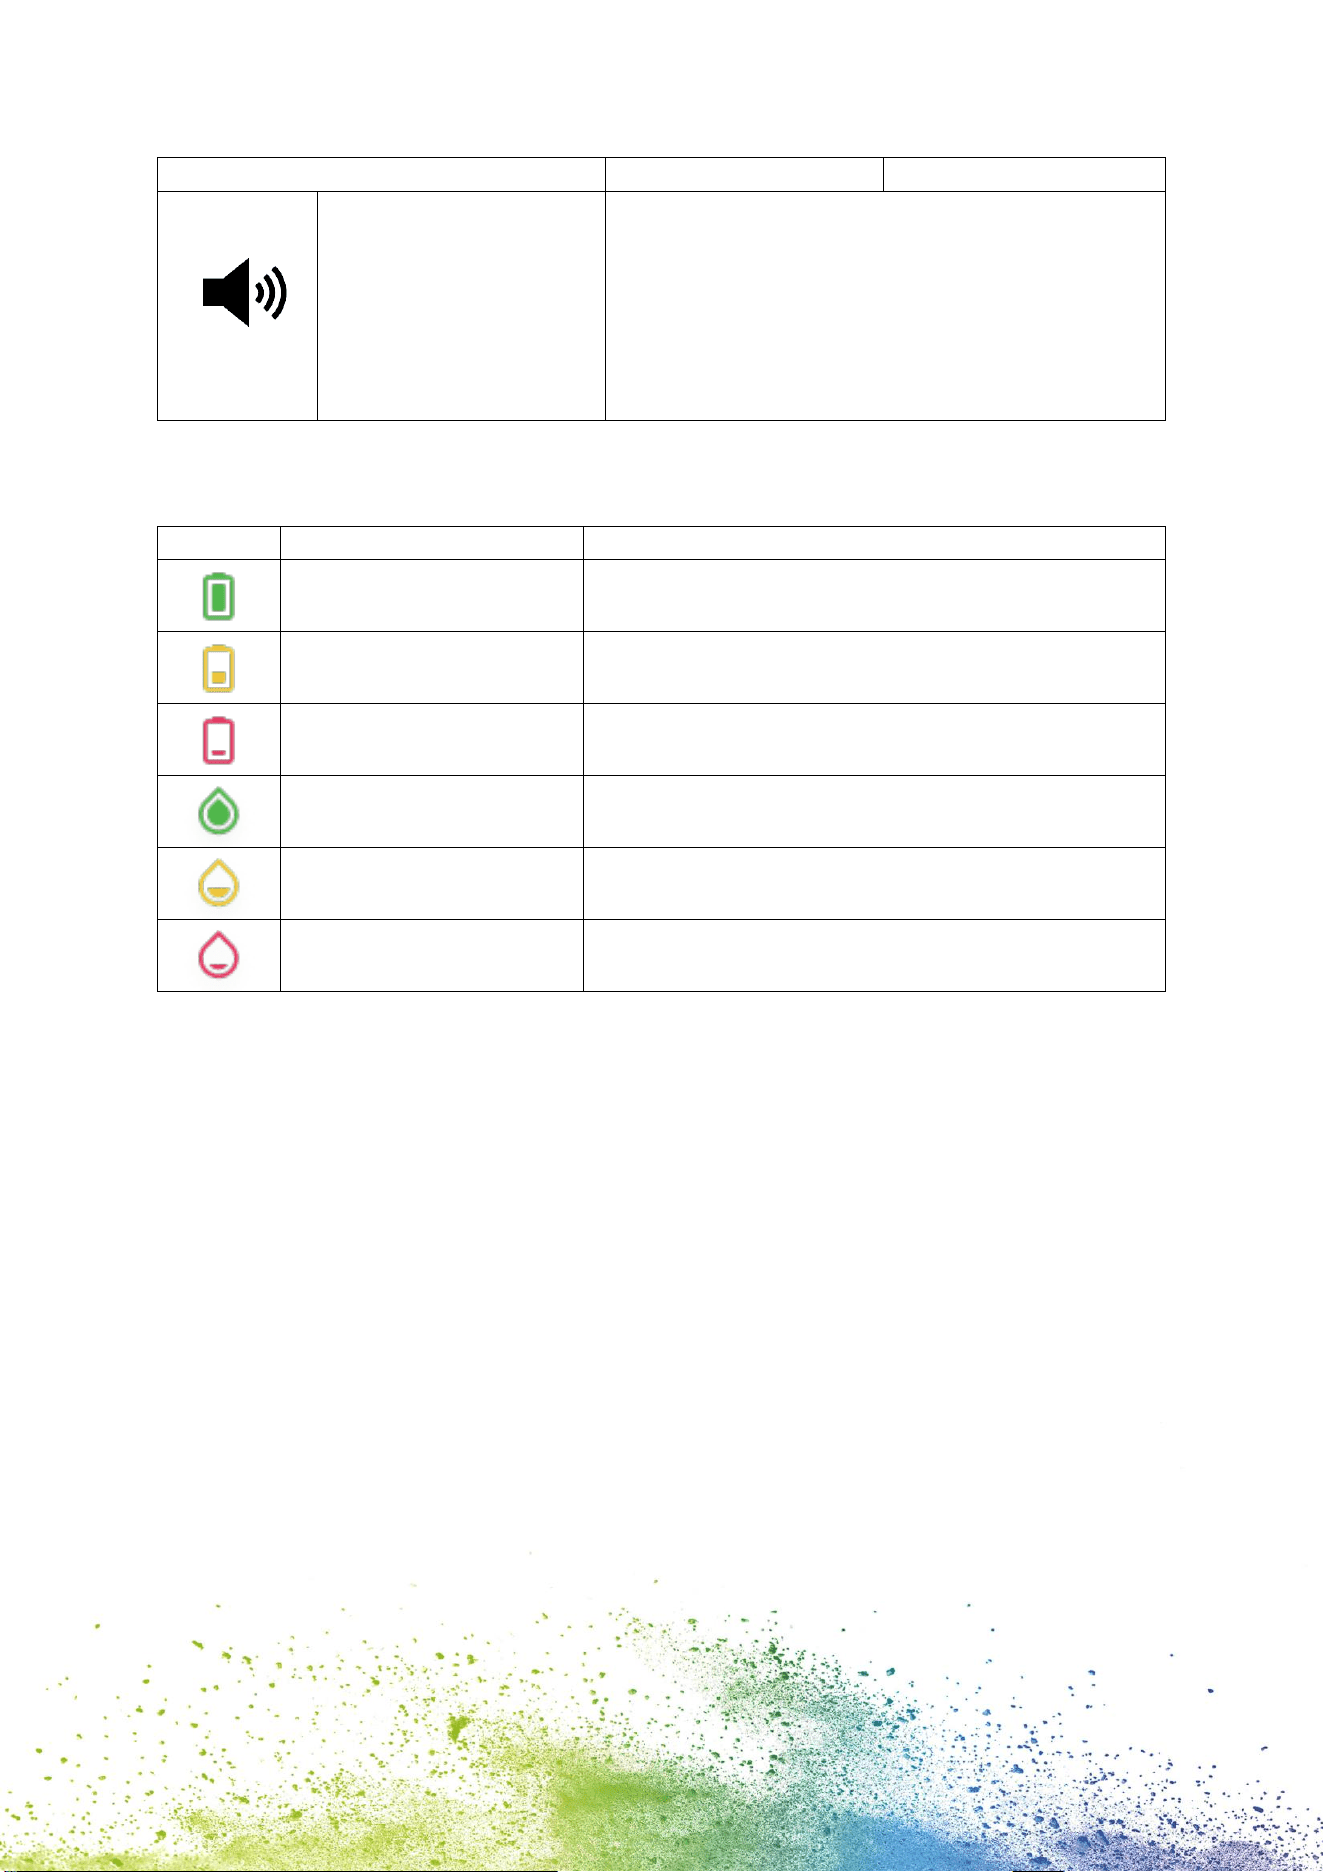
Symbols in the app:
Symbol
Designation
Description
Battery level display
green
Battery level between 41 and 100 %
Battery level display
yellow
Battery level between 11 and 40 %
Battery level display red
Critical battery level, below 10 %
Ink level display green
Ink level between 21 and 100 %
Ink level display yellow
Ink level between 11 and 20 %
Ink level display red
Critical ink level (below 10 %)
22
5 SOFTWARE
After downloading the application (app) from the App Store (Google Play Store or AppStore)
(emarkgo.colop.com/appdownload) and installing it on their mobile device the users can
start using the e-mark go. Due to continuous improvement on the app, the display on the
users’ devices may differ from the one illustrated below.
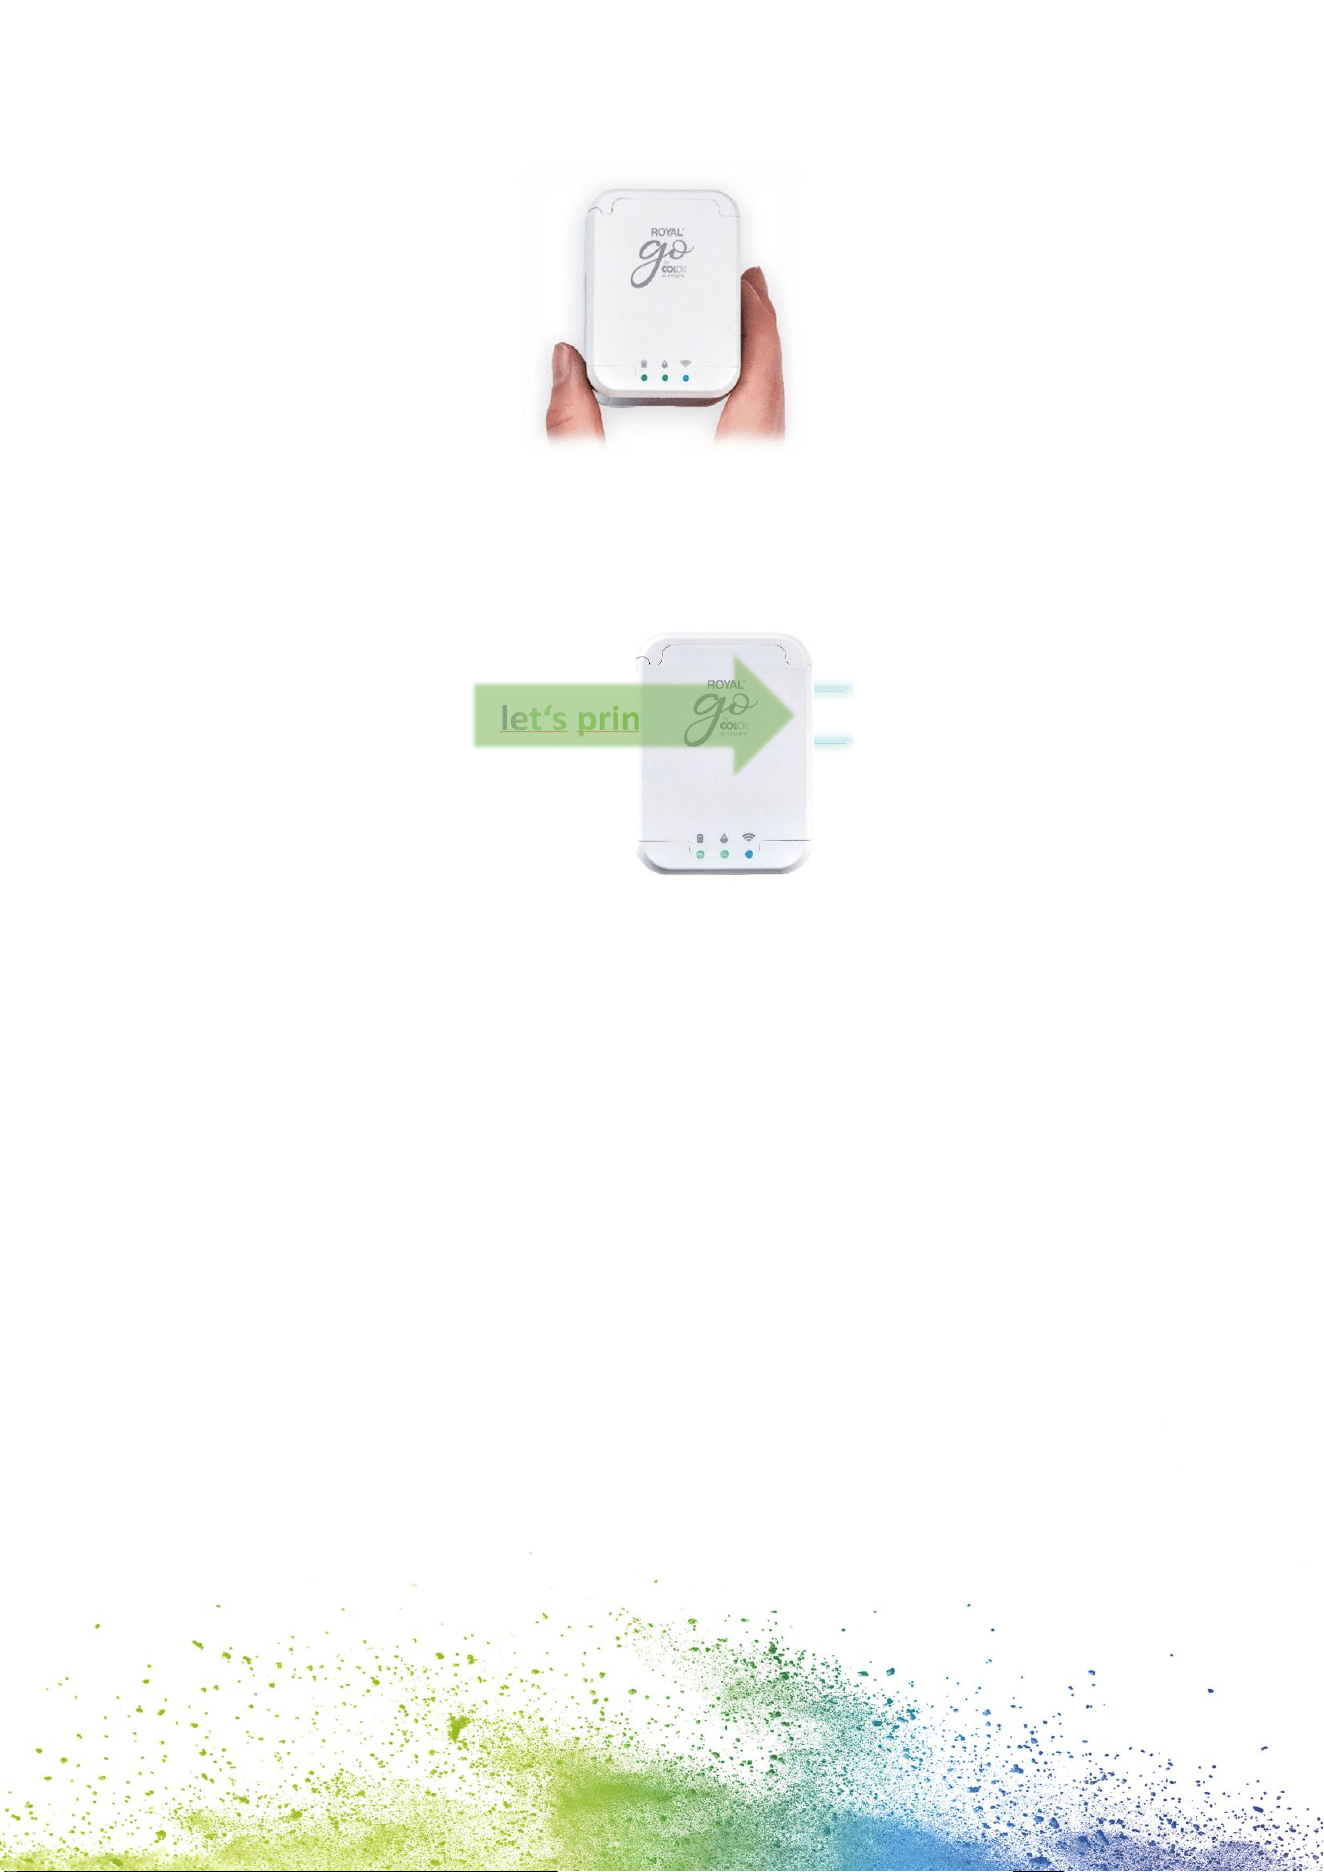
5.1 Overview of the app
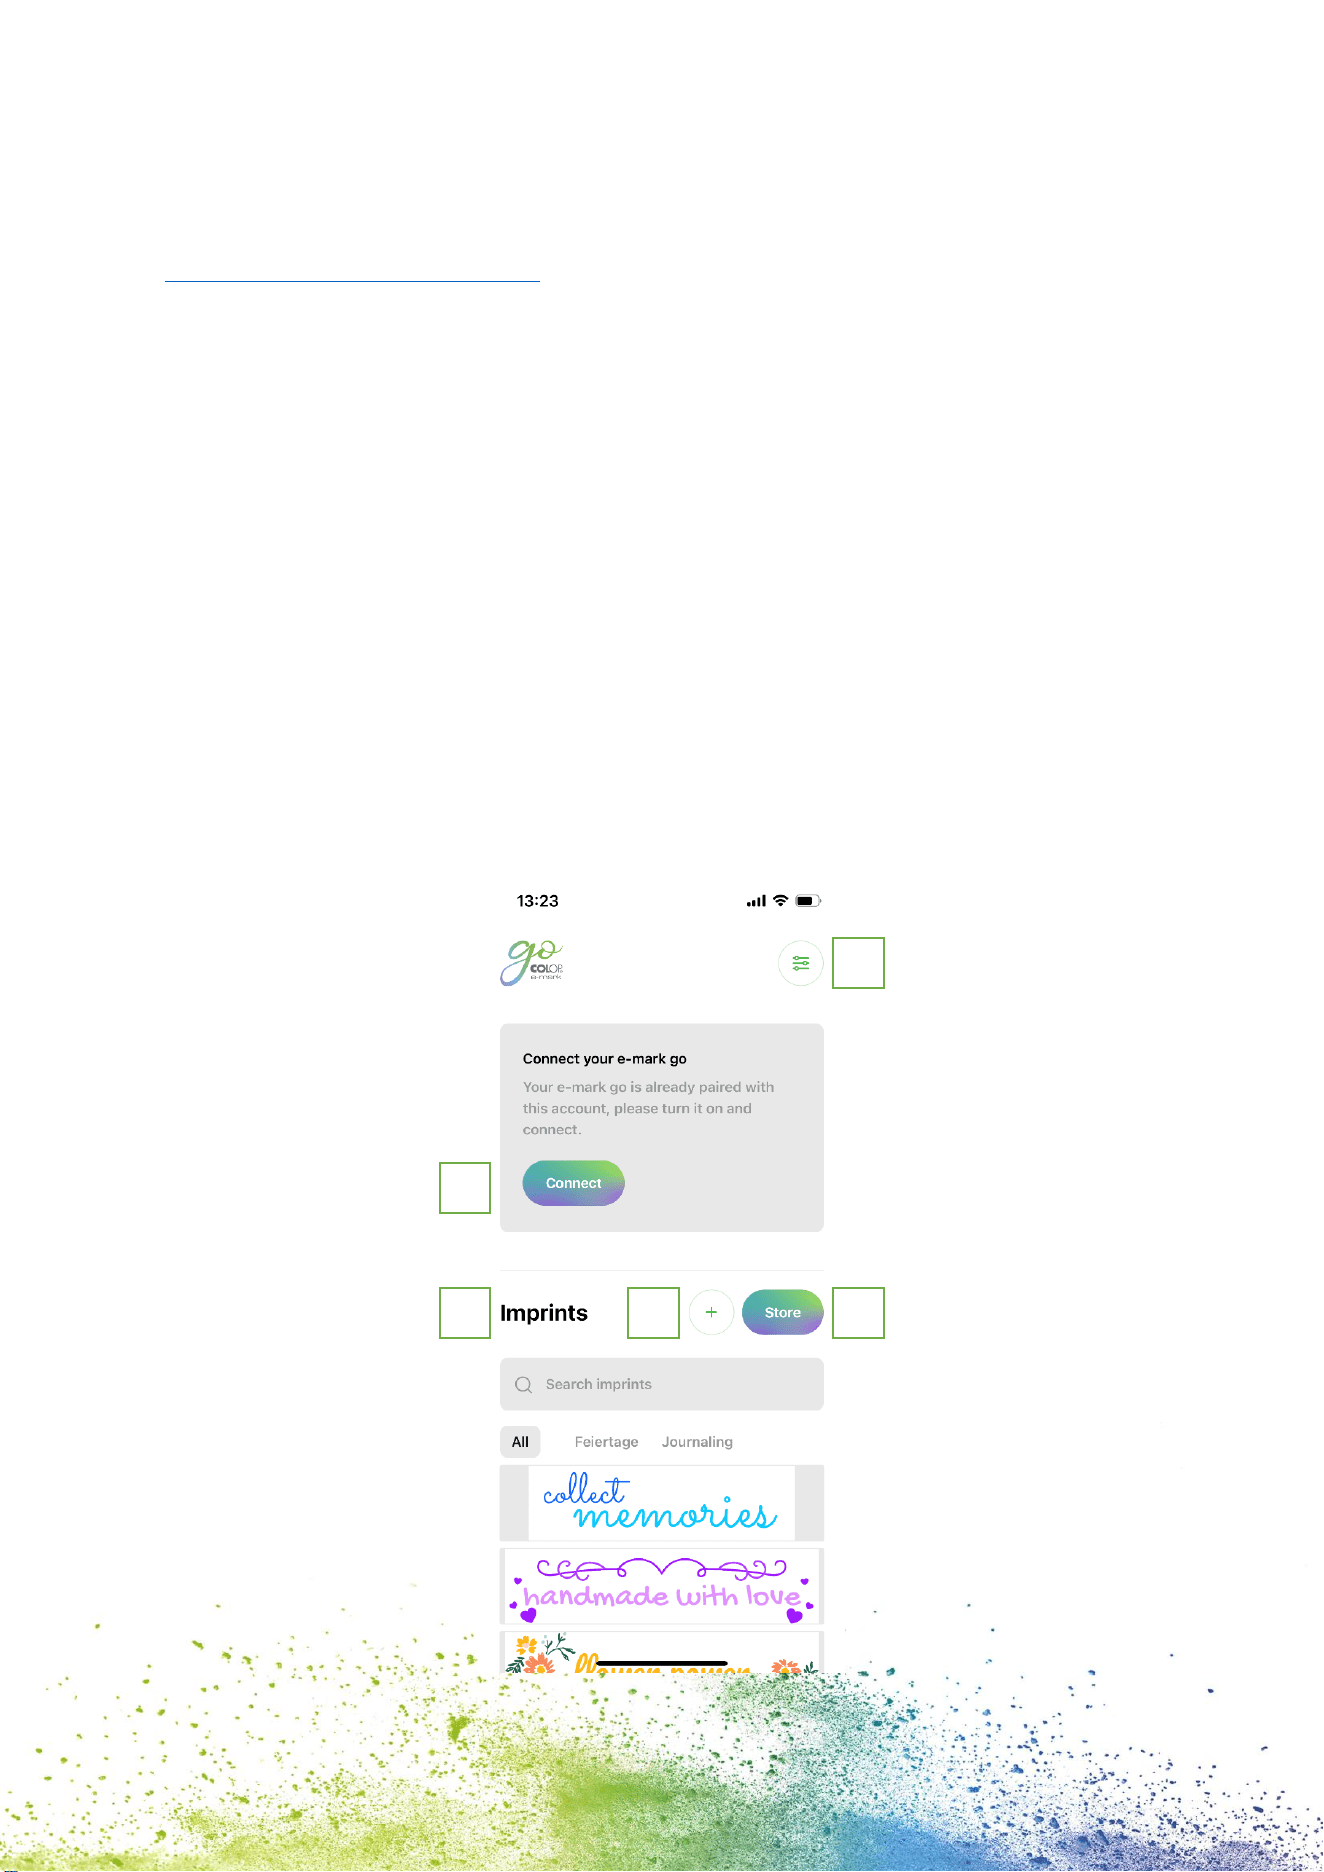
Start page
On the top right of the start page the users can open the settings page (1).
On the top section the users see a “Set up e-mark go” or a “Connect” button (2) if an e-mark
go has already been set up.
By clicking on “Store” (3) the template and clipart store for the e-mark go app opens. The
users only have access to the store when they have already created an account in the app.
The store will offer a range of free sets consisting of imprints and clipart as well as sets
available for purchase.
The “+” button (4) takes the users immediately to the editor where they can create their
own imprint from scratch.
In the imprint list (5) all imprints including the users’ downloaded/purchased imprints are
sorted after last edited. In this list, the users can add tags to the imprint, print it directly,
open it in the editor for further editing or delete it.
Fig. 14: Start page
1
2
3
4
5
23
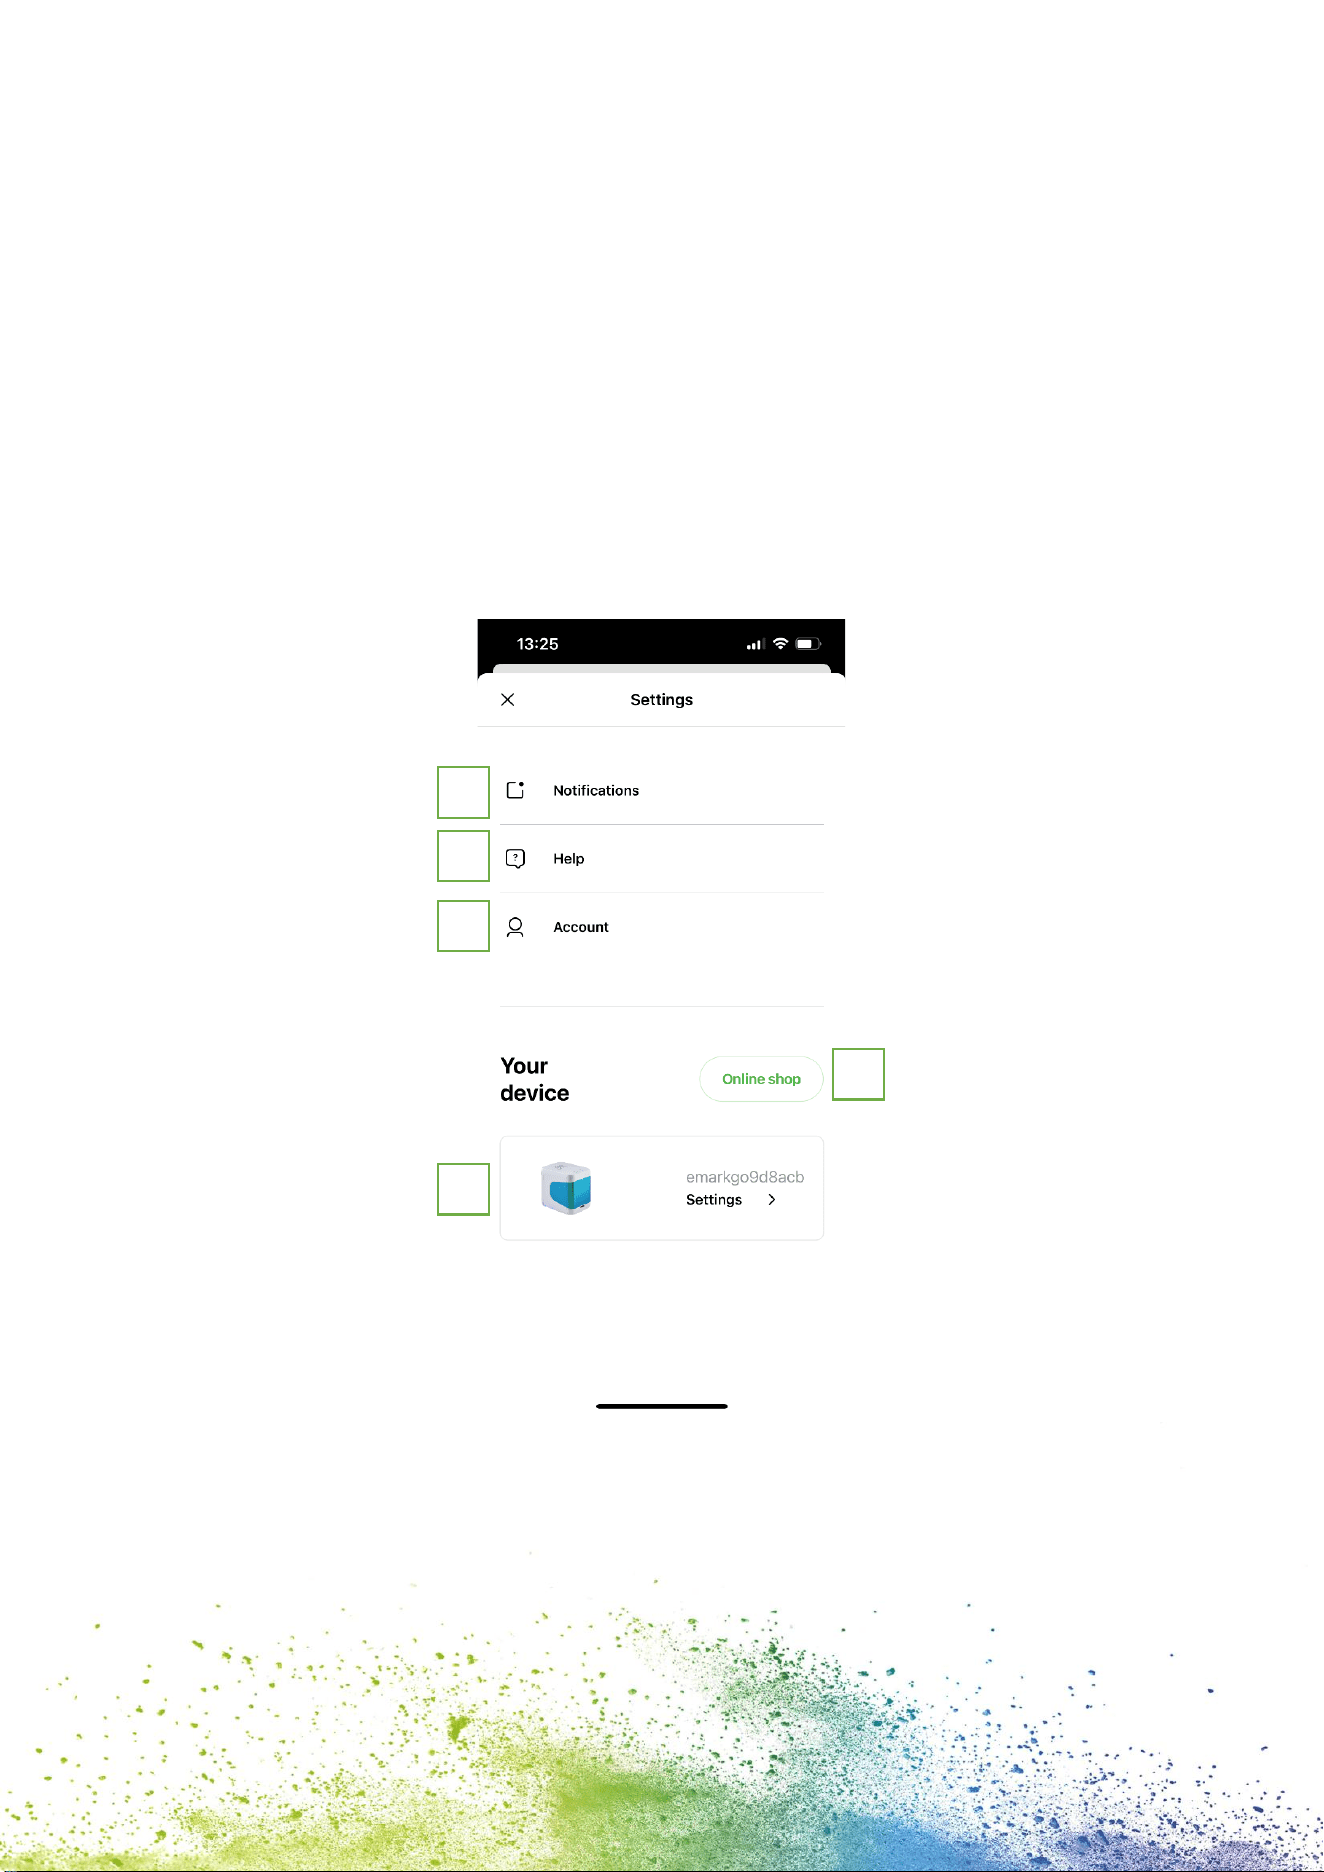
Settings page
In the settings, the users can turn on and off notifications (1).
When opening the help register (2) the users can directly open our FAQs with further help
and explanations about the e-mark go and the app. The users can directly open the COLOP
website or contact the customer service.
In the account register (3), the users can either login or logout, delete their account and
restore their purchases in case the account was accidentally deleted. When deleting an
account, all created imprints with this account are permanently deleted.
By clicking the “Online shop” button (4) the COLOP online shop will open where the users
can buy all accessories and consumables for the e-mark go.
In the “Your device” section (5) the users get information about their e-mark go, such as
firmware number and serial number. Furthermore, the print head cleaning can be started. In
this section the users can actively disconnect their e-mark go or delete its connection to the
account.
Fig. 15: Settings page
Editor
When the users open the editor to start creating from scratch, an empty canvas opens.
Underneath the canvas, a ruler shows the length in either inch or cm, the unit can be defined
by the users. The users can insert clipart, text elements, images from their phone or shapes
(triangle, circle, square, and polygon) by clicking on the respective element.
1
2
3
4
5
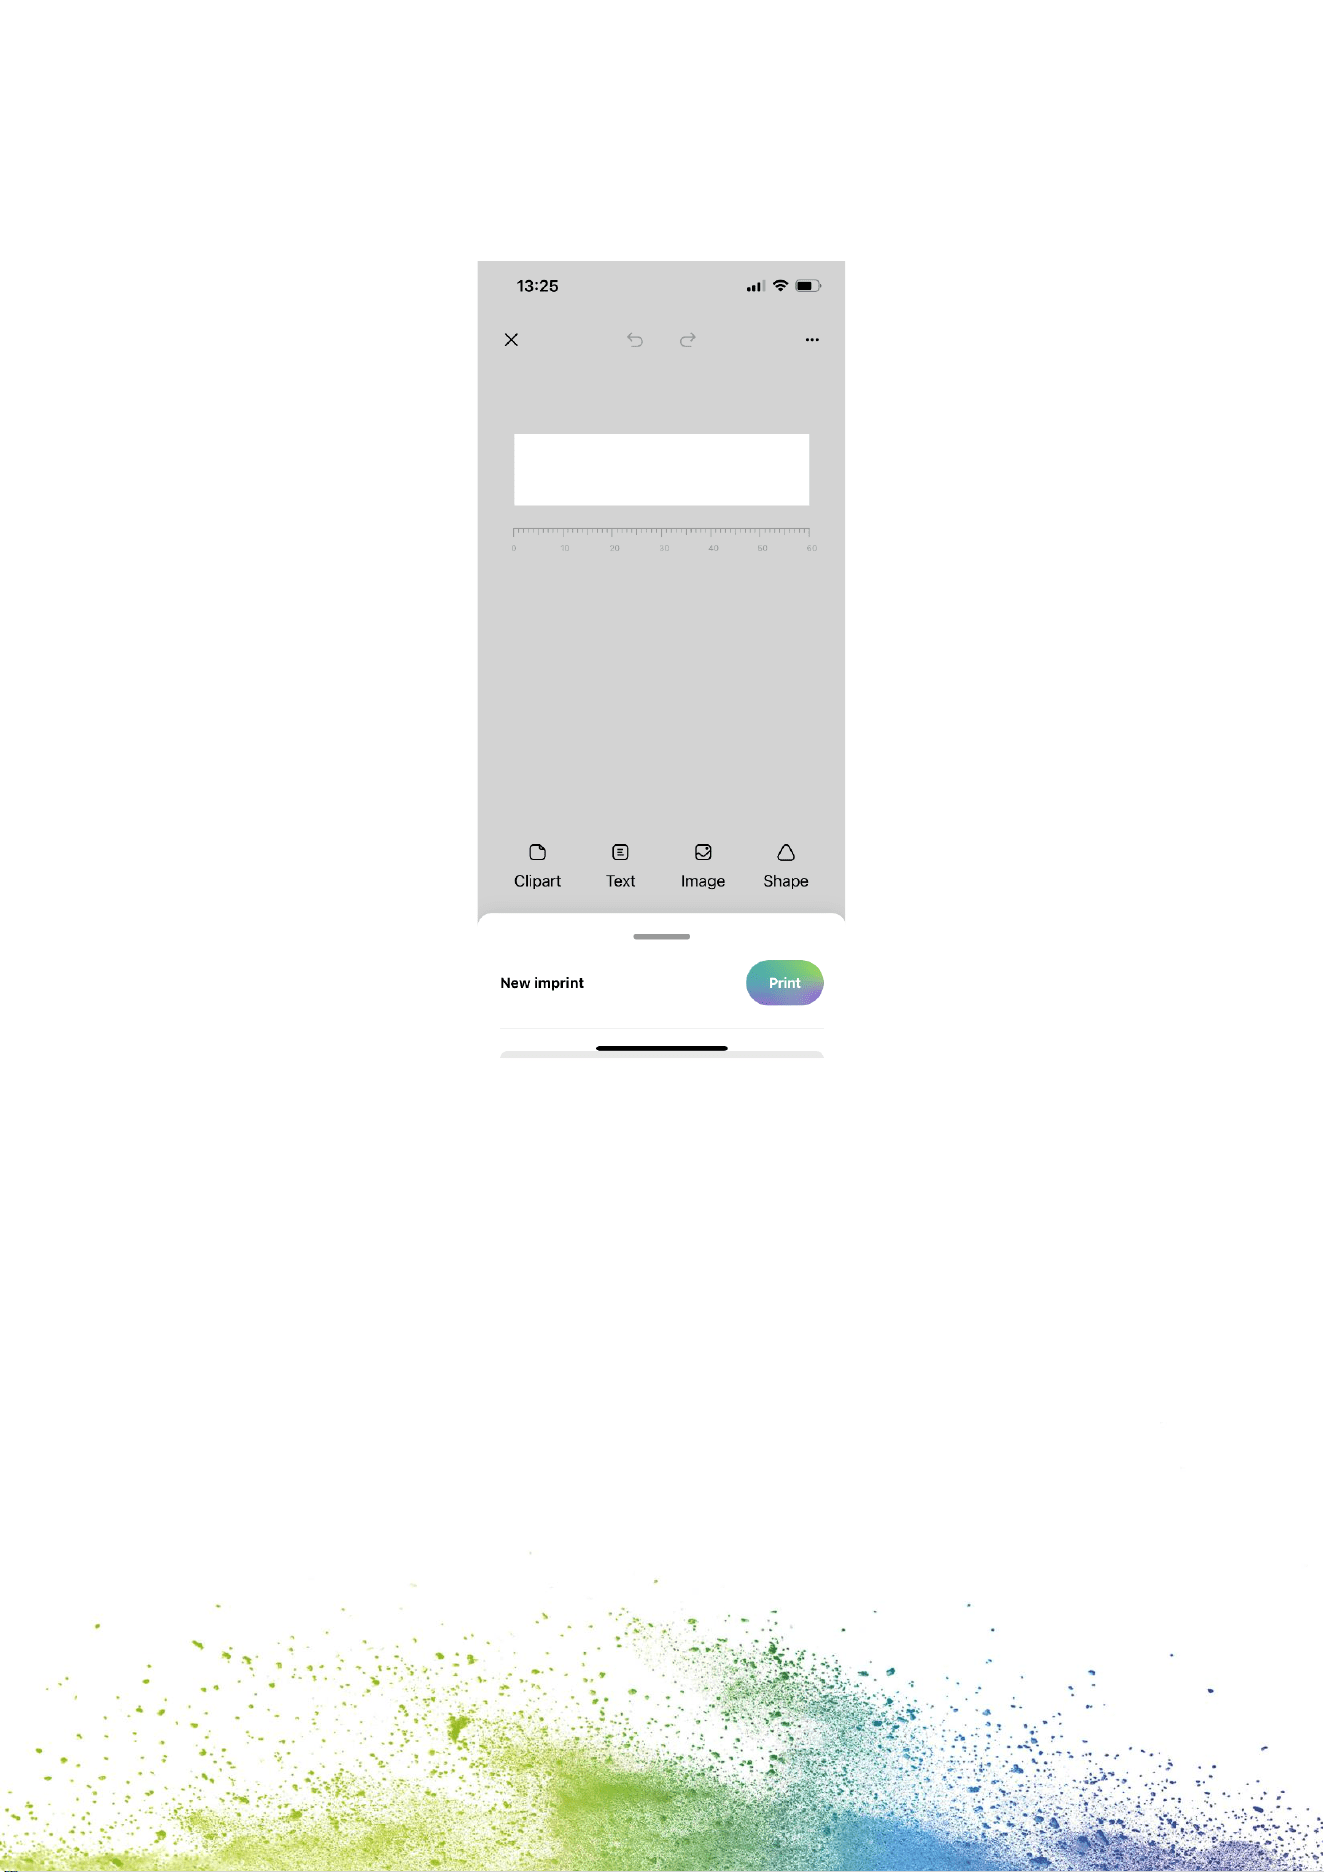
24
After the users inserted an element the size, color, rotation, roundness, stroke width and
color can be varied as preferred. For text elements, the users can additionally change the
font to a font provided in the app or one uploaded by themselves.
Fig. 16: Editor
When the users did not select an element and open the editor bottom menu (Fig. 17), they
can change general settings of the imprint, as well as see the name of the imprint and
directly send it to the e-mark go by clicking “Print”. Furthermore, the background color and
canvas width can be changed as preferred. The users can change the measurement unit,
choose the start position of the imprint, activate auto snapping of elements, activate
continual marking and remove the whitespace left and right of the canvas.
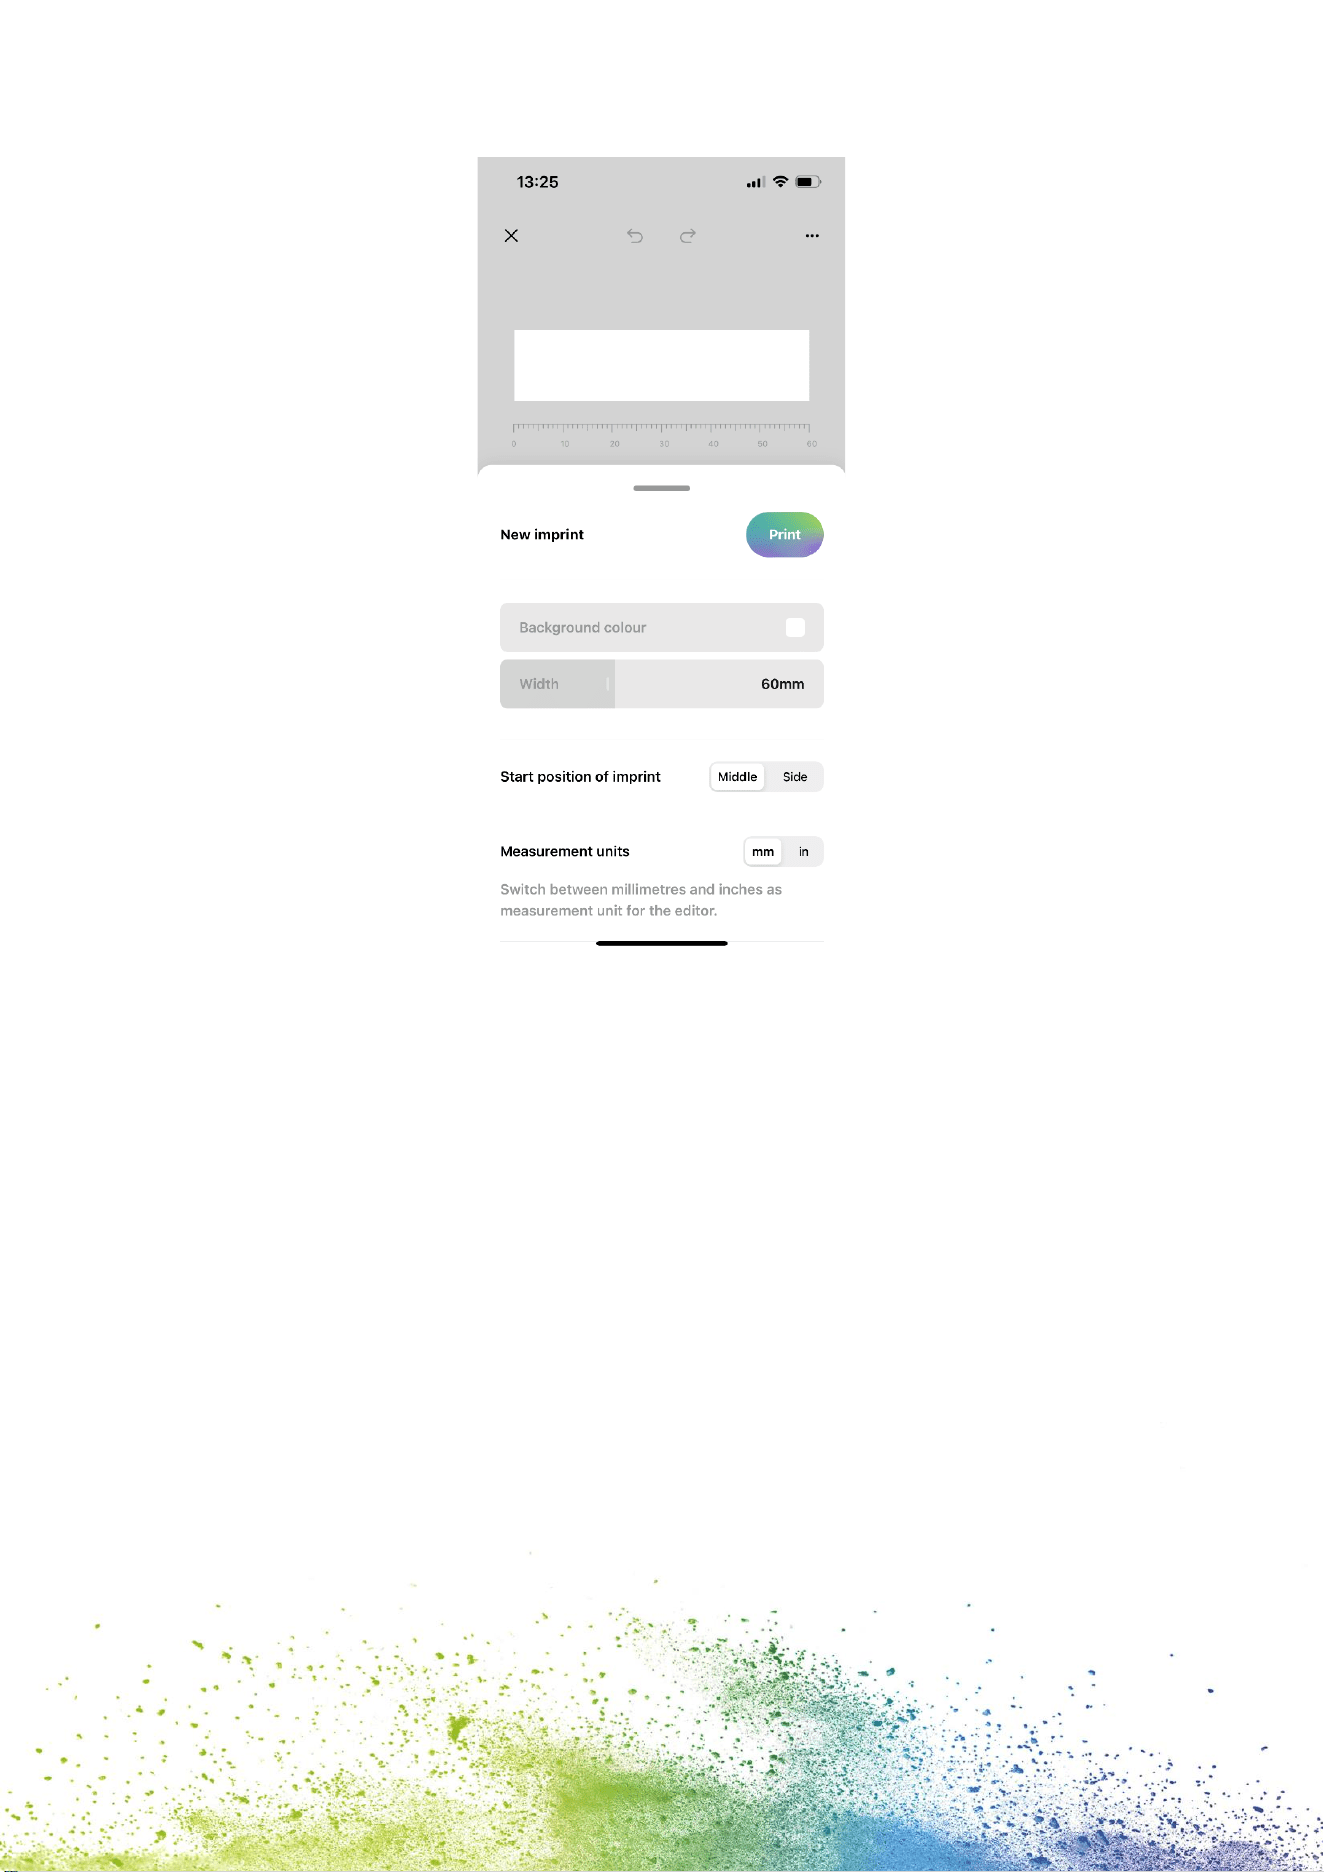
25
Fig. 17: Editor bottom sheet
5.2 Printing at a glance
1. Click on the “+” button on the start screen to create an imprint from scratch
2. Arrange or change your artwork in the editor
3. Once your design is ready to go, click on “Print” in the bottom menu
4. The e-mark go will beep and the app will indicate when your print has been received
5. Put the device on a plain surface and simply swipe it either to the left or right to print
your design
6. On both sides of the printer blue LED lights indicate the position of the imprint
7. A short beep signals that the imprint is finished

26
5.3 Sharing imprints
1. Click on one of your saved imprints on the start screen of the e-mark go app and then
on the menu button.
2. Click on “Share”. Now you can send an image of your imprint via e-mail or WhatsApp,
ideal to exchange your beautiful artworks with other e-mark go users.
5.4 Continual Printing
Continual Printing is a special printing mode where your imprint is printed endlessly, ideal
for printing on ribbons, endless labels, wrapping paper and more.
1. Activate “Continual printing” in the bottom menu
2. Once your design is ready to go, click on “print“ in the bottom menu
3. The e-mark go will beep and the app signals when your print has been received
4. Swipe the e-mark go to print your design. The device will continue to print as long as
it is in motion
27
6 MAINTENANCE
The following sections describe the tasks required for maintenance purposes.
6.1 Print head cleaning
If the imprint quality deteriorates (e. g. smears, colors not clear, imprint becomes reddish) or
the e-mark go is not used for a longer time, print head cleaning is necessary. In the case of
irregular use, it is recommended to clean the print head at least once a week.
CAUTION!
Possible hazard from substances, slight eye and skin irritation
from ink.
Do not direct the print head towards the eyes, face or skin. Do not
open the ink cartridge. Do not swallow! Keep ink cartridge out of
the reach of children.
Start print head cleaning manually in the app
1. Go to settings
2. Click on the e-mark go settings
3. Select “start cleaning”
4. Follow the instructions in the app
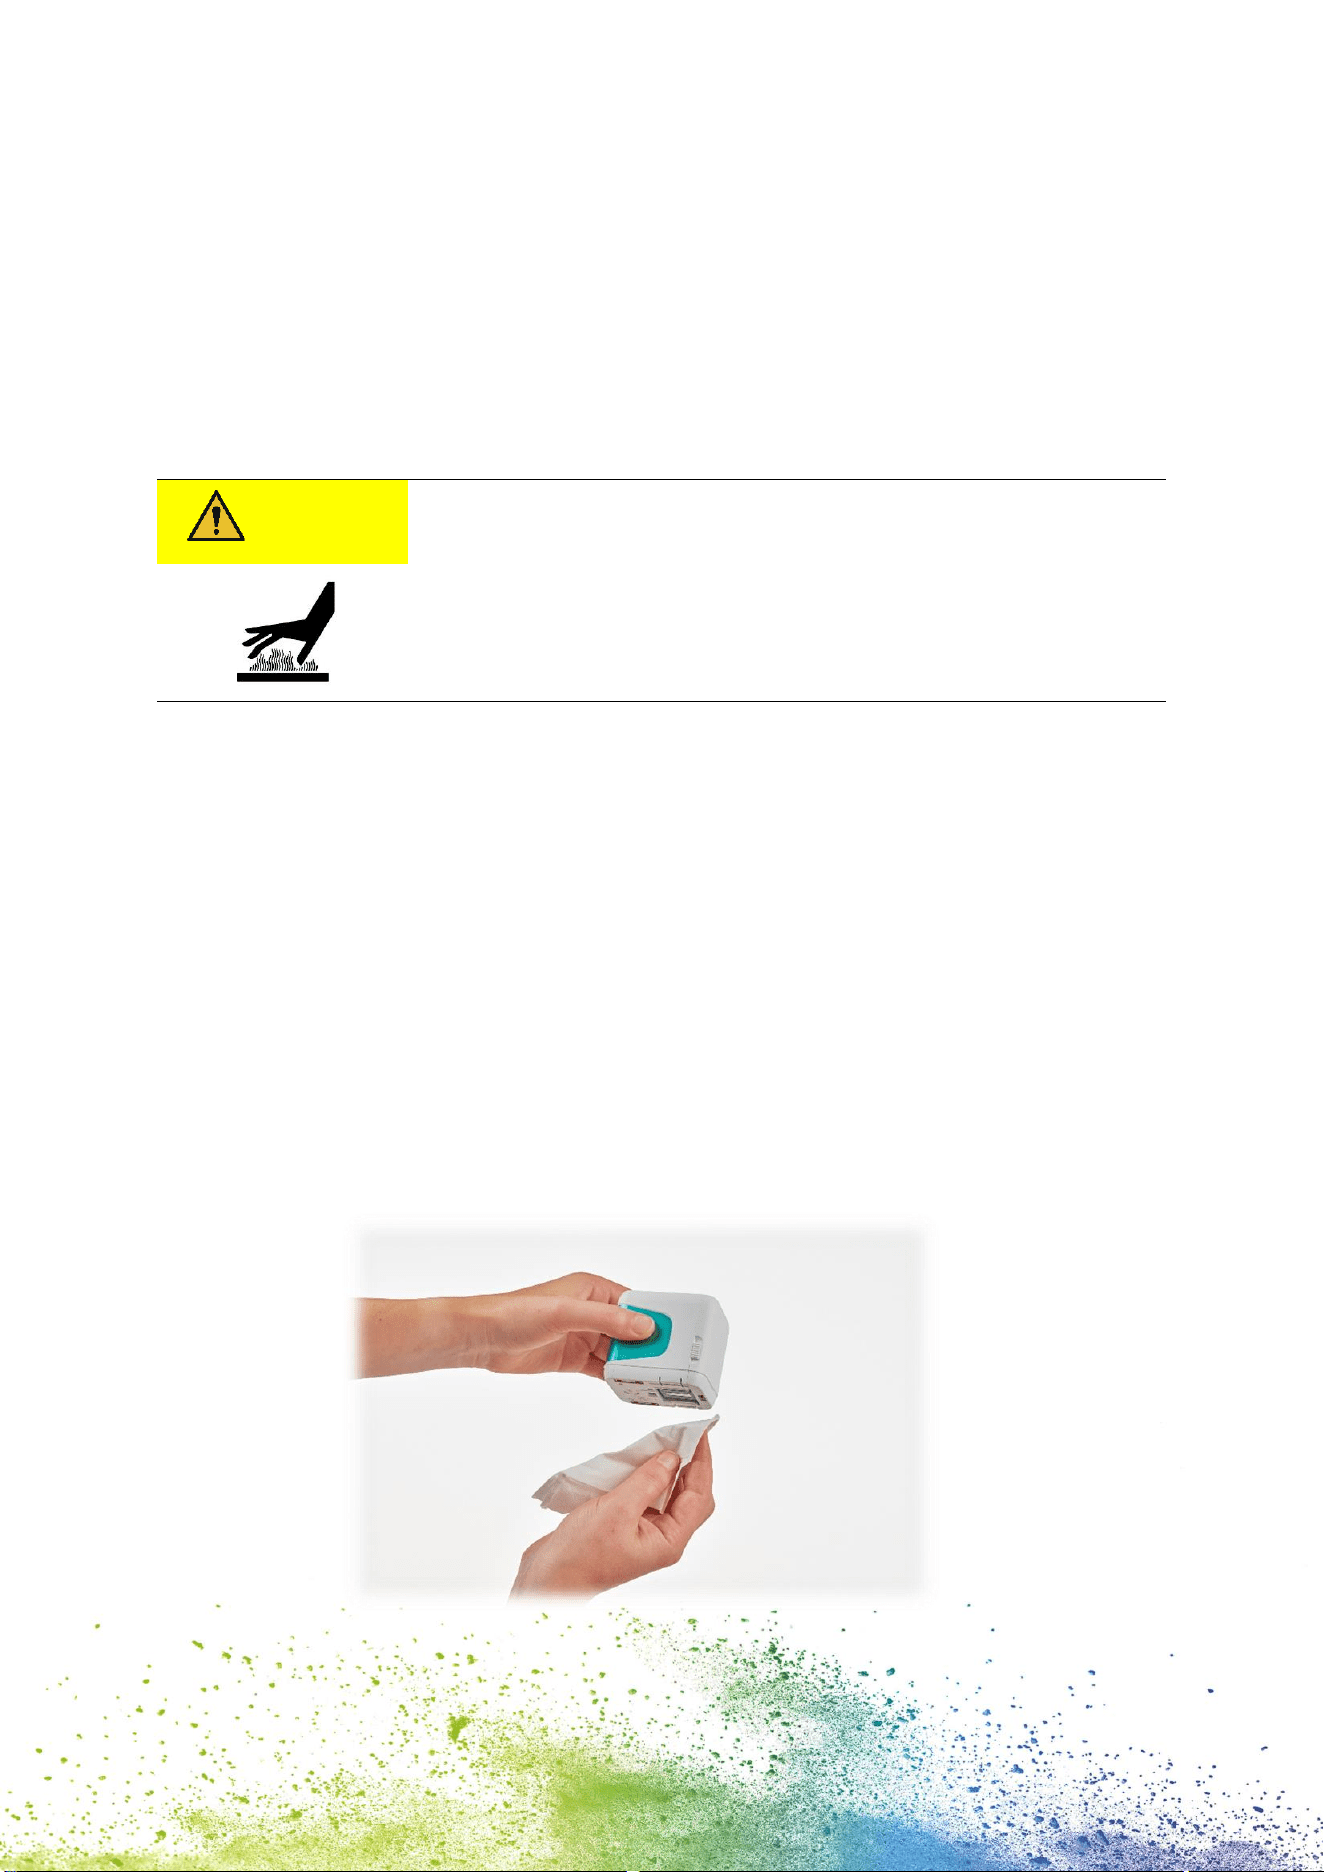
Clean the print head and the docking station
To clean the print head and docking station manually, use a damp lint free piece of cloth. It is
important that the cloth is only moved from the top of the print head to the bottom to avoid
color smears (Fig. 18).
All plastic parts of the e-mark go can be easily cleaned with a moistened cloth.
Fig. 18: How to clean the print head
28
NOTICE
Only use pure water without cleaning agent to clean your e-mark
go and the print head.
General cleaning
WARNING!
Cleaning could make electrical components damp, causing injury
to people through electric shock.
During cleaning work, avoid any ingress of water, steam or cleaning
agent in the electrical components of the product.
Wipe down the product with a damp cloth.
All cleaning work on the product must be carried out by people who have read this
Operating and Maintenance Manual and who are informed of the hazards that can result
from this product.
For cleaning purposes, the product can be vacuumed, brushed or wiped with a damp cloth
that does not contain an aggressive cleaning agent.
6.2 Charging the battery
Check the charge indicator light on the LED Light Guide (see chapter 4.12):
- The battery LED shines red when battery charge is lower than 10 %.
NOTICE
The battery must not be deep discharged. This may cause damage.
Fully charge the battery before an extended downtime period.
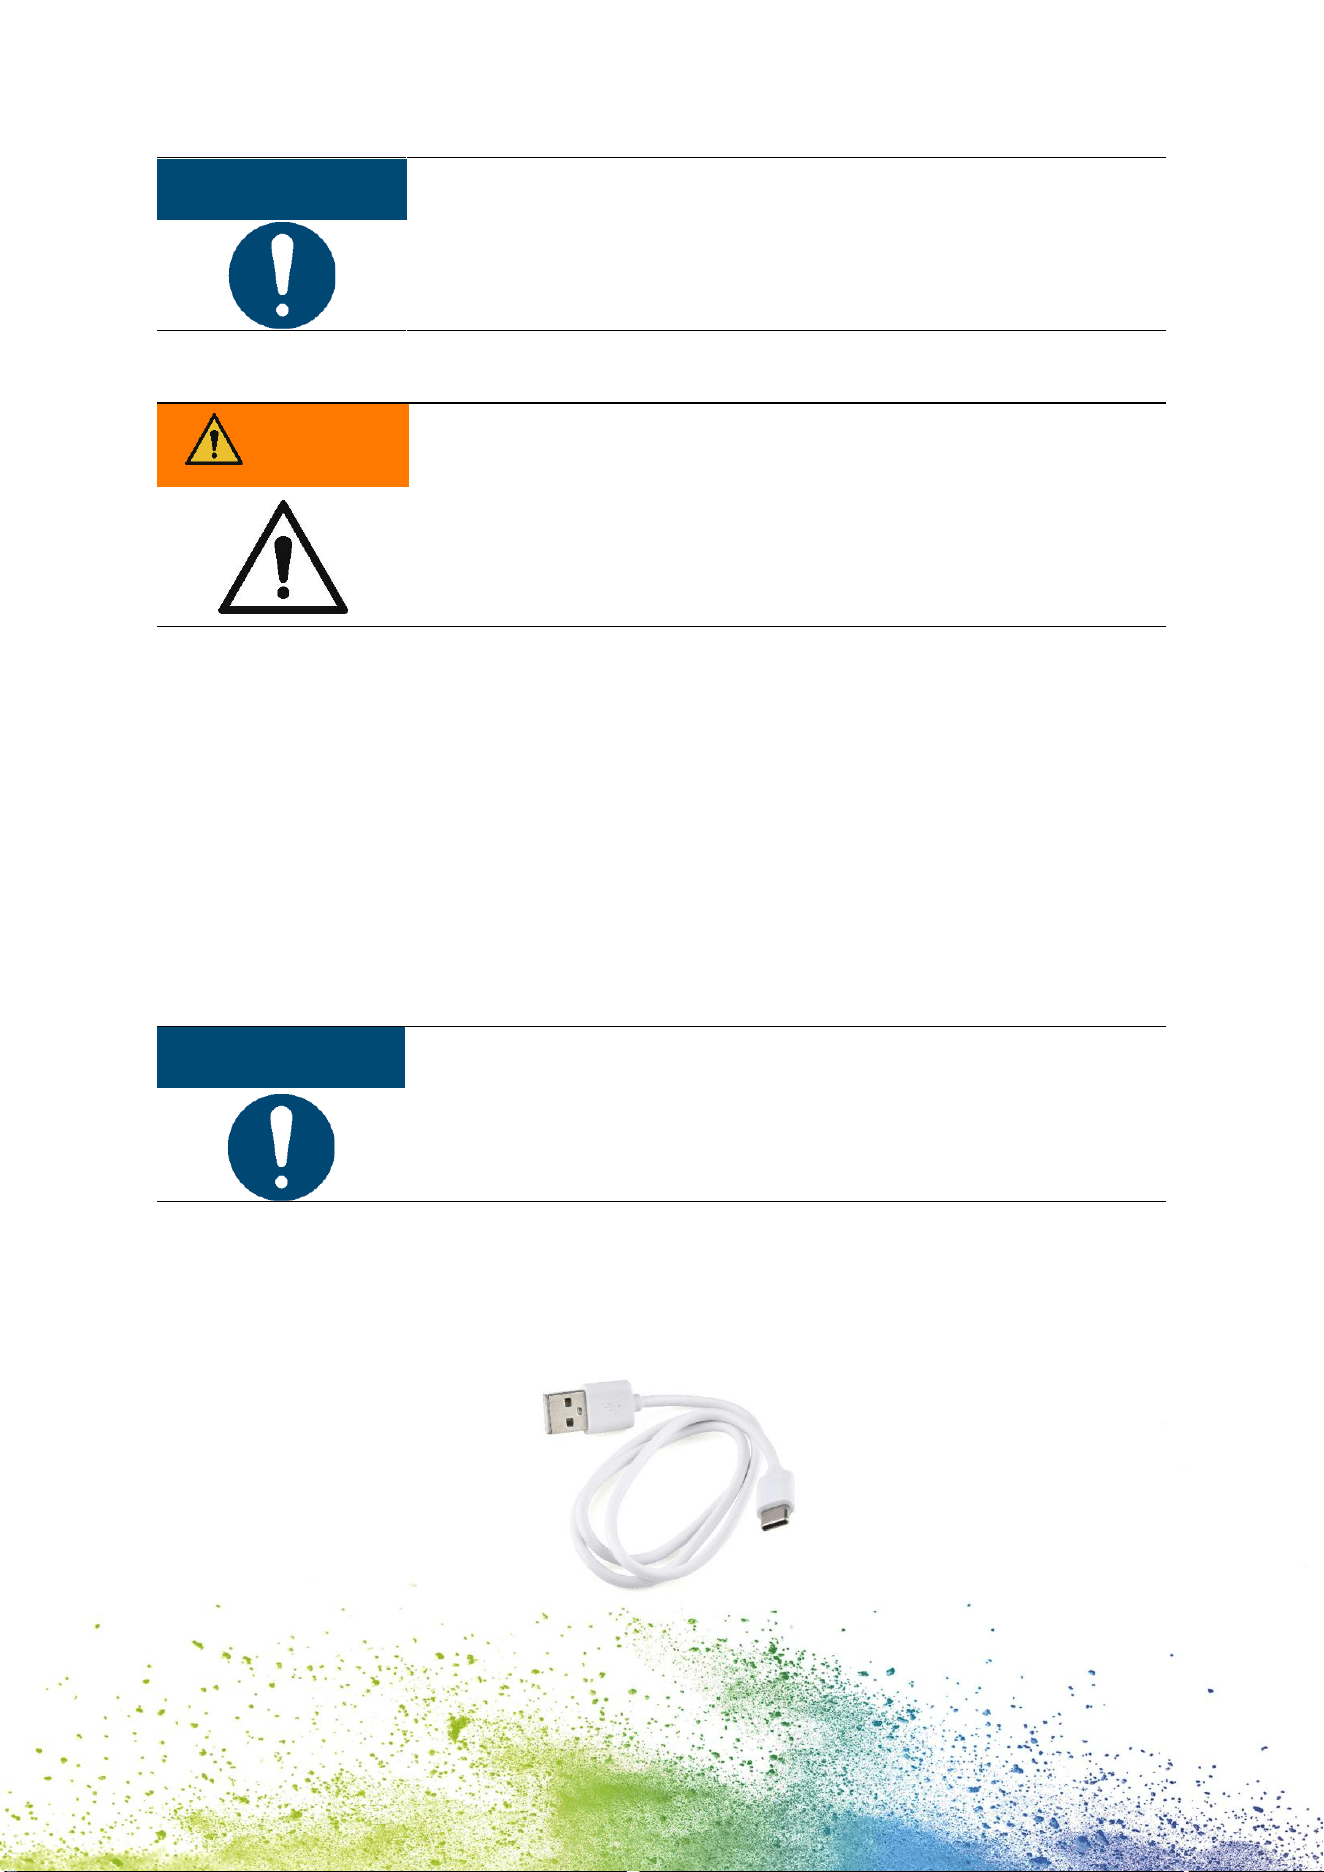
Proceed as follows to charge the device battery:
1. Remove the USB-C cable from the packaging and unwind.
Fig. 19: USB-C cable
29
WARNING!
Hazard from rechargeable batteries (short-circuit, overheating,
fire).
Only use charging systems as recommended by the manufacturer.
The battery must not be deep discharged!
The battery must not be short-circuited. Fire risk!
2. Connect the USB-C cable to a charger.
3. Connect the charger to the mains power supply.
4. Connect the USB-C cable to the e-mark go.
5. Place the e-mark go in the docking station.
DANGER!
Risk of a fatal electric shock in wet conditions.
Never handle the charger mains plug with wet hands. Never use
the device in humid areas. Never expose the battery and charger,
including USB port, to water and/or rain.
The e-mark go can be charged when switched on or off.
1. Observe charging indicator light
- green flashing indicator light means that the battery is charging
- continuous green indicator light means that the battery is fully charged
The indicator light also shows the battery level when not charging
- Red light indicates very low battery level (below 10 %)
- Yellow light indicates low battery level (between 10 and 39 %)
- Green light indicates sufficient/high battery level (between 40 and 100 %)
If the app is on and there is a WIFI connection with the device, the charging process is
also displayed in the app.
2. Disconnect the charger when fully charged.
6.3 Changing the ink cartridge
An empty ink cartridge is indicated with a red flashing indicator light and in online mode with
the symbol in the app. Change the ink cartridge as follows:
1. Lift the e-mark go out of the docking station.
2. Open the front door of the e-mark go.
3. Remove the old ink cartridge and dispose of responsibly.
30
4. Remove the new ink cartridge from the packaging and dispose of the packaging
responsibly.
5. Pull out the strip from the print head and dispose of responsibly.
6. Insert new ink cartridge.
7. Close the front door.
Fig. 20: Change ink cartridge
NOTICE
ALWAYS place the e-mark go in the docking station after use.
Otherwise, the ink cartridge head dries out, affecting print quality.
If the e-mark go is not placed in the docking station immediately:
- switched on: a warning signal sounds (return to docking
station!)
- switched off: NO warning signal sounds
Tip: Always place the e-mark go in the docking station first and then
switch it off.
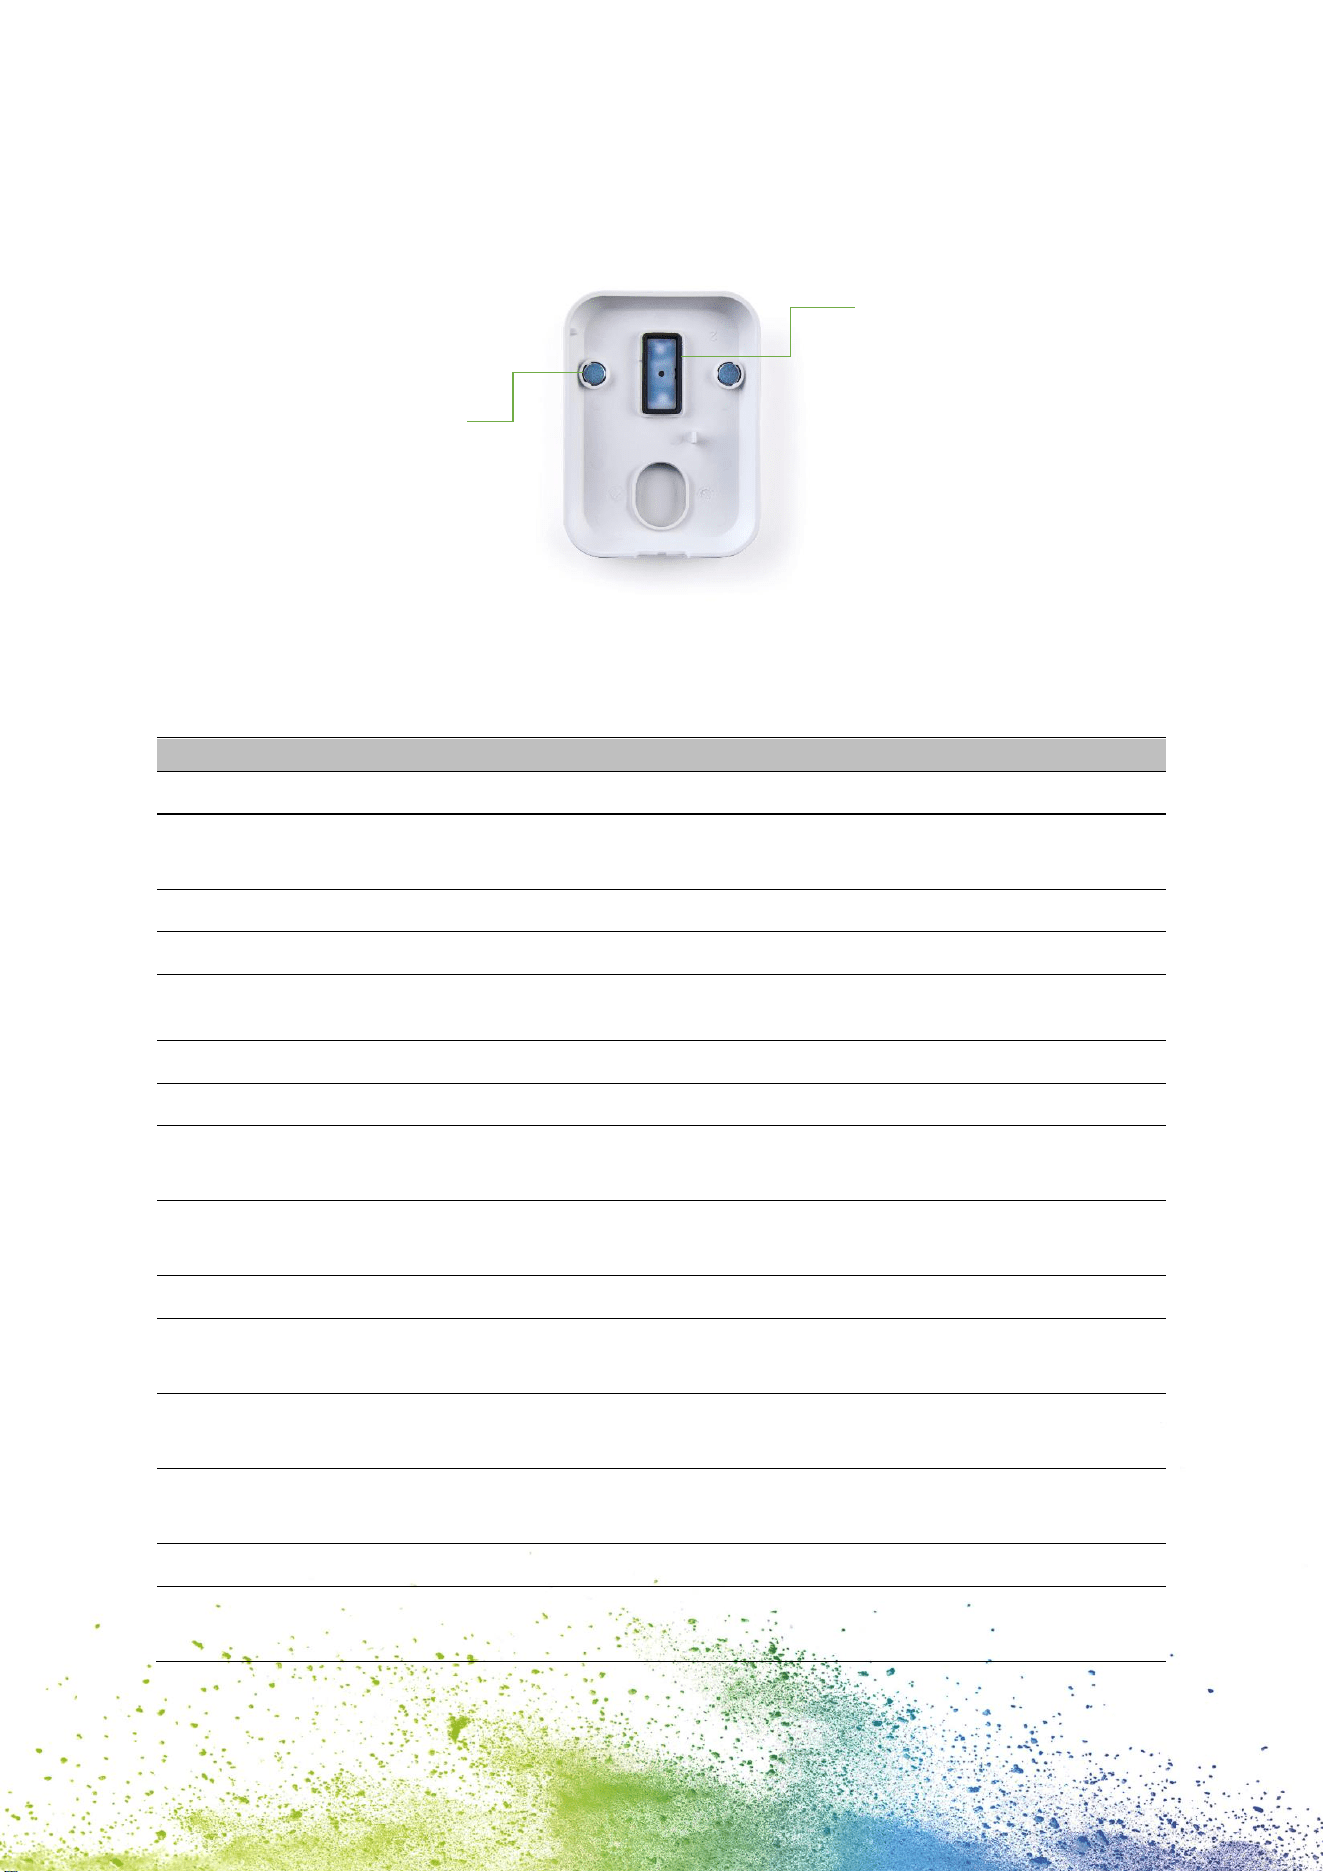
6.4 Reset
1. Take the e-mark go out of the docking station and turn it upside down, switch it on.
2. You will find a small hole. Use a paper clip or similar thin item to press inside this hole
for several seconds. (Fig. 21)
31
3. The e-mark go will be restarted and brought to its initial state. Do not switch it off until
it has restarted.
4. Then print on a blank piece of paper.
5. On the imprint you will find the initial SSID and password of your e-mark go as well as
a QR code containing the same information.
Fig. 21: Reset hole
NOTICE
If you reset your e-mark go, the stored imprint (last sent) is deleted.
6.5 Storage
Store the product in a dry place. When storing the e-mark go, always place in the docking
station to prevent drying out the print head.
When stored for extended periods, keep it in the original packaging or in the additionally
available transport case to protect it. It is recommended to activate the e-mark go at least
once a week to prevent the print head from completely drying out. Batteries should be
charged, if required. Complete the self-cleaning process and make a test imprint. If the test
imprint quality is poor, complete a manual cleaning cycle.
NOTICE
Always place the e-mark go in the docking station during storage. It
is recommended to activate the e-mark go at least once a week and
to complete the automatic cleaning process (or manual cleaning
process, if required).
32
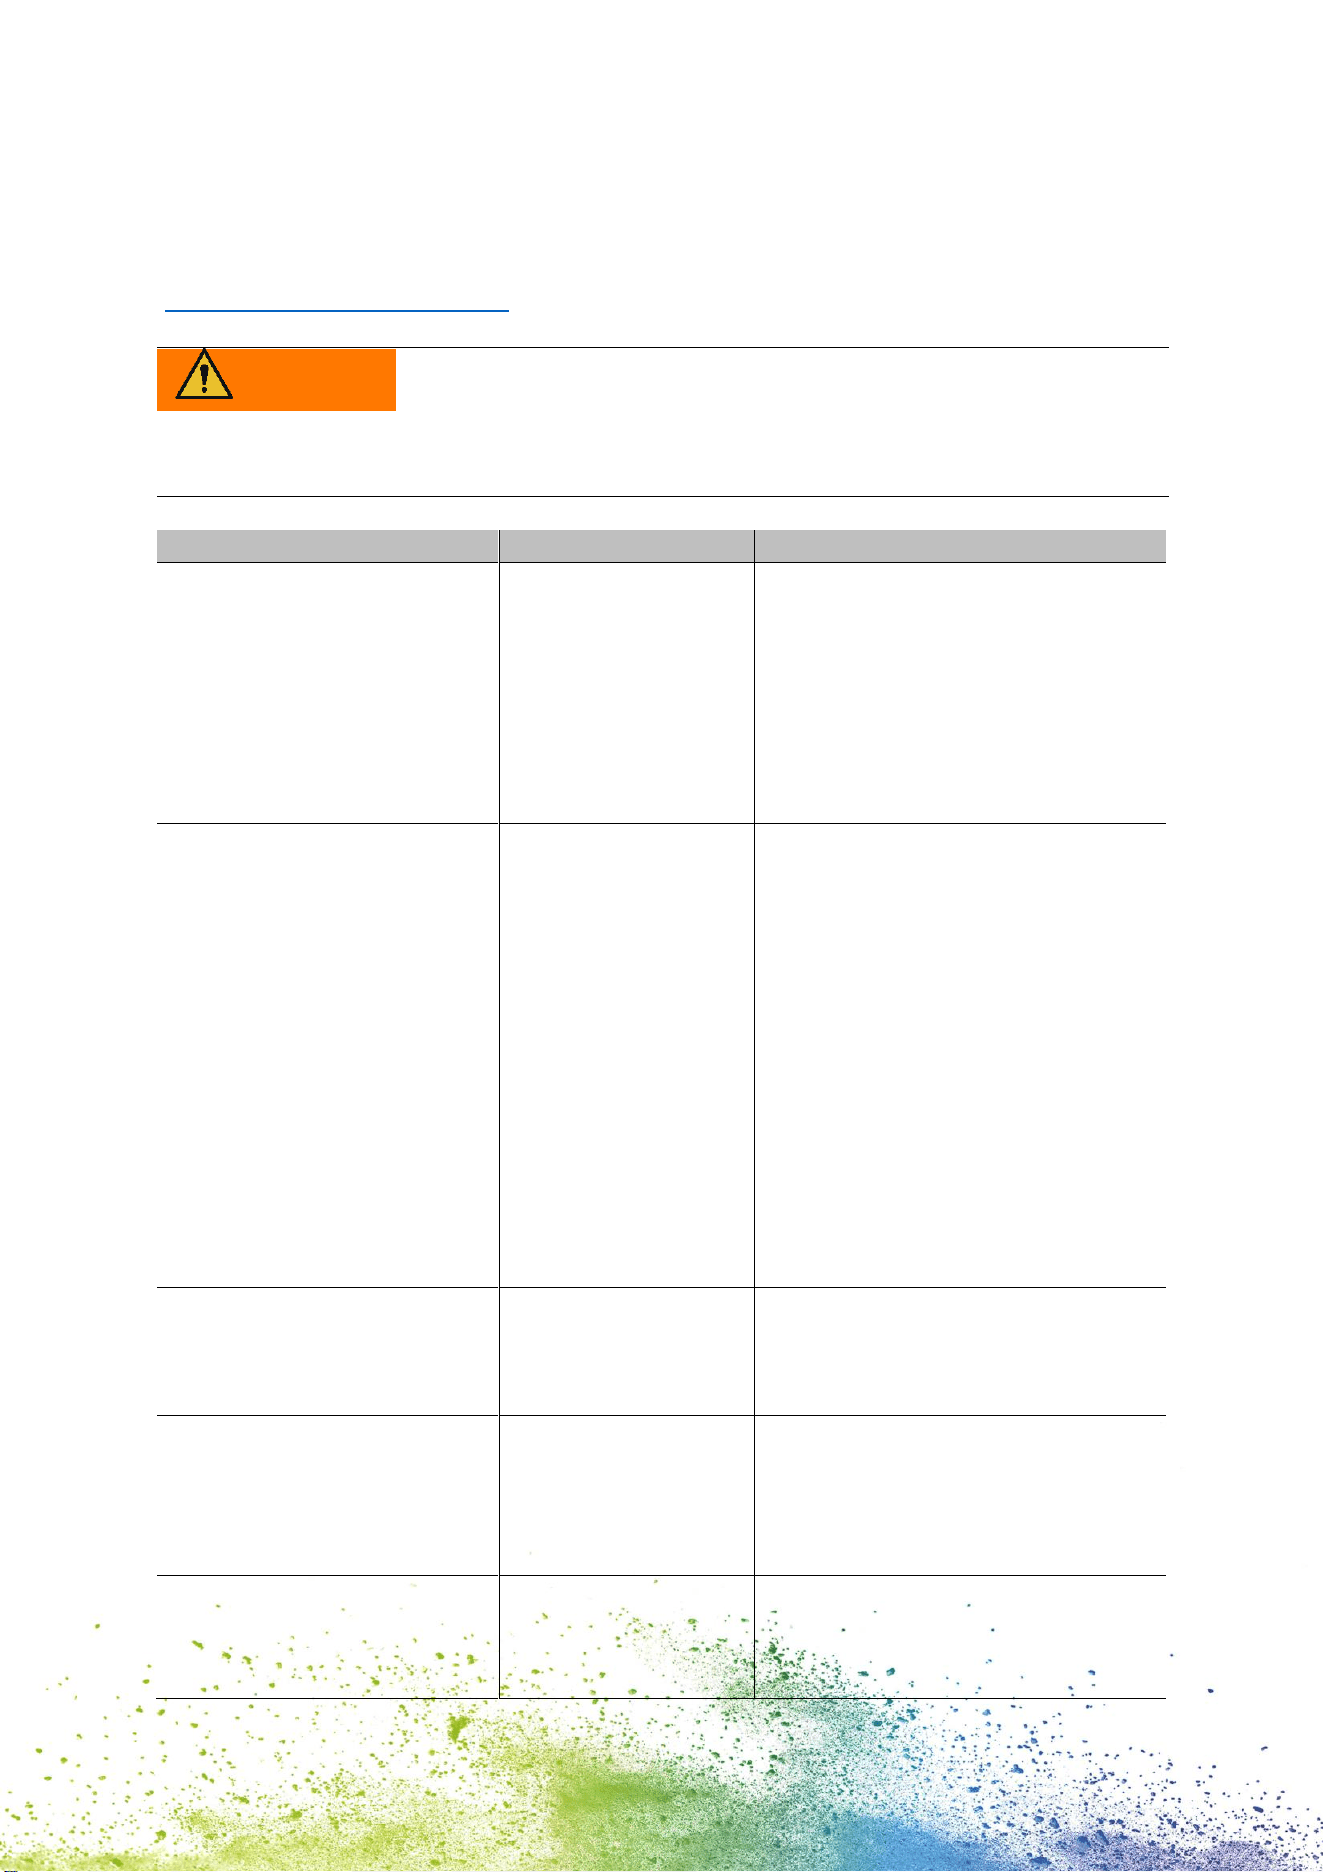
6.6 Troubleshooting
Problems may occur with the product as listed in the table below, which includes their
causes and actions to be taken. More troubleshooting tips can be found on our homepage
(emarkgo.colop.com/helpcenter). These are continuously expanded and updated.
WARNING!
Maintenance activities can be hazardous.
Problems and unexpected changes to the product must be resolved
immediately. Refer to the instructions in this documentation.
Problem
Cause
Action
Print quality deteriorates or
individual colors are pale or
no longer printed
Red flashing indicator light
Empty ink drop symbol
display in the app
Ink cartridge empty
Change ink cartridge see chapter
6.3
Unsatisfactory imprint color
gradient/quality
Parts of imprint missing
and/or imprint not straight
Imprint too pale
Individual thin lines are
missing in the imprint
Print head is
(slightly) dried out
Uneven surface
Ink cartridge contact
problem
Ink cartridge empty
Excessive printing
speed
Manual cleaning cycle see chapter
6.1
Use flat surface for printing
Remove ink cartridge and insert
correctly see chapter 6.3
Change ink cartridge see chapter
6.3
Adjust printing speed: Move the
e-mark go by hand from right to
left or from left to right 4 in/s, max.
11 ¾ in/s (0.1 m/s, max. 0.3 m/s)
Imprint blurred
Unsuitable base,
e. g. smooth plastic
surface, glass etc.
Use absorbent surfaces as a base
only
see chapter 3.3
e-mark go leaves spots
Automatic print head
cleaning
Place e-mark go in the docking
station. After raising for the self-
cleaning cycle, hold in the air and
then return to the printing surface
Imprint is not printed even
though it was sent and e-
mark go is ready
Print head has dried
out because e-mark
go was not placed in
Clean print head with damp cloth
or wiper, see chapter 6.1
33
Problem
Cause
Action
the docking station
for too long
Always place the e-mark go in the
docking station
Battery light lights up red
Empty battery symbol
display in the app
Battery almost
empty
Charge battery
See chapter 6.2
All lights flash red
Empty ink level display in the
app
No ink cartridge
inserted or not
inserted properly
Insert ink cartridge or check
position
See chapter 6.3
Ink indicator light flashes red
Empty ink level display in the
app
Wrong ink cartridge
inserted
Insert an original COLOP ink
cartridge
No data transfer possible
No WIFI connection
possible
Check settings in the app or WIFI
settings on the mobile device
See chapter 4.5
No WIFI connection possible
Other e-mark go
already connected
with the mobile
device
e-mark go is
connected with
other device via WIFI
Wrong password
Disconnect the other device and
connect with e-mark go
Enter right password
e-mark go password entry
not possible
Wrong password or
password forgotten
Reset e-mark go to factory settings
see chapter 6.4
Data transfer takes too long
Poor WIFI
connection between
e-mark go and
mobile device
Use the mobile device alongside
the e-mark go
e-mark go signal sounds
continuously
Not placed in the
docking station; e-
mark go signal
sounds after one
minute
Always place the e-mark go in the
docking station
e-mark go does not switch
on
Battery is completely
discharged
Charge device
See chapter 6.2
34
Problem
Cause
Action
The print head also needs cleaning,
depending on printing quality
See chapter 6.1
e-mark go does not charge
Battery is completely
discharged or
defective
Charger or USB-C
cable is defective
Contact dealer if battery is
defective
Change defective charger or USB-C
cable
No data transfer, even
though e-mark go switched
on
Positioning indicators do not
light up
e-mark go has gone
into sleep mode
Remove e-mark go from the
docking station, it switches on
again automatically
Housing damaged
e-mark go has been
dropped
Send device away for repair
See chapter 6.7
6.7 Repairs & Return
Repairs may only be carried out by a licensed electrician. Contact the dealer you purchased
the e-mark go from for information on spare parts and procedures.
In case of returning the e-mark go, put it back in its original packaging or in similar quality
packaging. Ensure that the e-mark go is firmly secured and protected against impacts and
other damage.
WARNING!
Repair activities can be hazardous.
Repairs should only be carried out by an electrician. The e-mark go
must not be dismantled.
35
6.8 Spare and wear parts
The cartridge available as spare part for the e-mark go, which can be ordered from the
manufacturer and other retailers. More information are available here: emarkgo.colop.com
WARNING!
Unauthorized repairs on the product may be dangerous.
Repairs should only be carried out on the product by an electrician.
Only original spare parts should be used. All modifications to the
product are prohibited.
Spare parts
Ink cartridge
36
7 SHUTDOWN AND DISPOSAL
This chapter contains information about discontinuing use and disposal of the product at the
end of its service life.
Principle:
Before disposing of product parts, check to see whether they can be recycled. Send away as
much as possible for recycling. Negligent or improper disposal can result in unforeseeable
consequences. Dispose of product materials and components in a manner that is verifiably
compatible for mankind, the natural world and the environment. Comply with details
provided by the manufacturer and with corresponding legislation and regulations.
NOTICE
Packaging materials (paper, plastic) must be disposed of separately.
Dispose of components of the device in accordance with legislative
stipulations. Dispose of materials separately and send as much as
possible away for recycling.
Consumable materials such as ink cartridges must be disposed of in
accordance with the respective regulations.
Electrical components of the product must be sent for recycling as
waste of electrical or electronic equipment. Dispose of batteries in
accordance with legislative stipulations.
NOTICE
The electrical components of the product must be sent for recycling as
waste of electrical or electronic equipment.
Steps when shutting down:
The product has to be dismantled into individual parts as far as possible. These have to be
disposed of separately.
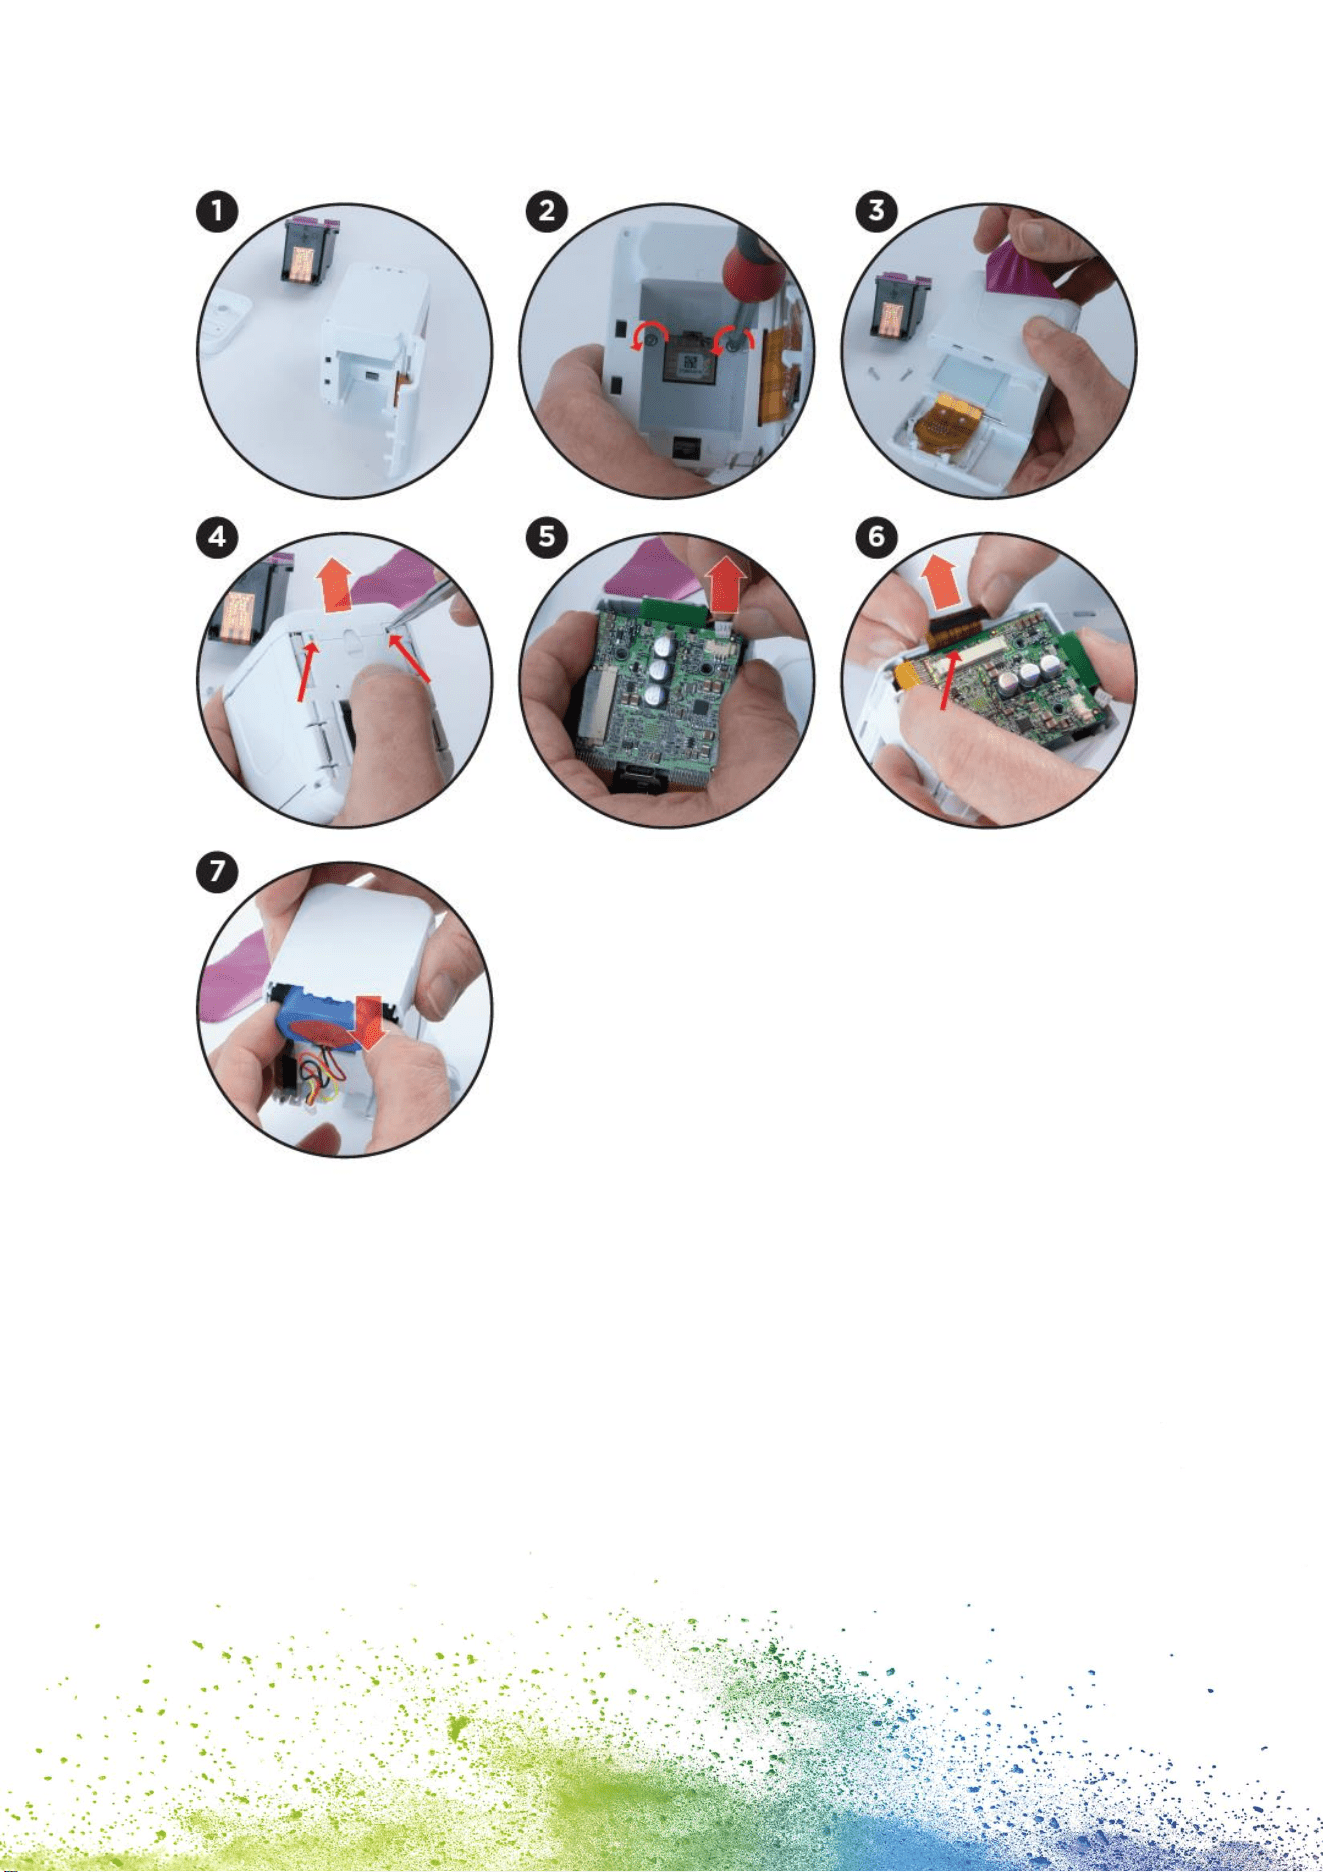
The battery has to be removed without destroying it:
1. Open the front door of the e-mark go and remove the cartridge
2. Remove the two screws inside the e-mark go
3. Remove the handle label
4. Remove the other front door by using tweezers or a pin on the underside of the e-mark
go
5. Unplug the white plug
6. Unplug the black plug
7. Remove the battery
37
Fig. 22: Removing the battery from the e-mark go
Product materials and parts:
Dispose of the segregated materials and components of the product separately:
1. Plastics
2. Return battery to collection point with taped contacts
3. Send electrical and electronic components away for recycling as electrical scrap, in
accordance with the Waste Electrical & Electronic Equipment Directive (WEEE)
38
WARNING!
Hazard from rechargeable batteries (short-circuit, overheating, fire).
The poles on lithium rechargeable batteries should be covered with
adhesive tape to prevent short circuits before taking to a collection
point. Maximum possible storage, e. g. in the original packaging and
quick deposit in a collection point are recommended.
CAUTION!
Risk of explosion if battery is replaced by an incorrect type.
Dispose of used batteries according to the instructions.
39
8 APPENDIX
EU – Declaration of Conformity
We
Manufacturer:
COLOP Digital GmbH
Dr.-Arming-Straße 5
A-4600 Wels
declare under our sole responsibility that the product(s)
Product Name:
Electronic Marking Device
Model:
COLOP e-mark go
Electrical Rating:
7.4 V, 800 mAh
is (are) in conformity with the essential requirements of EU Directive(s) and Regulation(s)
2014/53/EU & 2011/65/EU; 2015/863/EU
by applying the following standards
EU Directive(s)
Reference of standard(s) and amendment(s)
2014/53/EU
Article 3.2 (Radio)
ETSI EN 300 328 V2.2.2:2019
Article 3.1 (Safety, EMC)
ETSI EN 301 489-1 V2.2.3:2019
EN 55032:2015
ETSI EN 301 489-17 V3.2.4:2020
EN 55035:2017
EN 62311:2008
EN 62368-1:2018
2011/65/EU ; 2015/863/EU
EN63000:2018
Person responsible for
documentation:
Distributor:
COLOP Digital GmbH
Dr.-Arming-Straße 5
A-4600 Wels
Wels, 18 January 2023
(Place, date)
(CEO, Christoph Skopek)
(CSO, Franz Ratzenberger