OPERATING INSTRUCTIONS
Commercial Dishwasher
PFD104SCVi
To prevent accidents and machine damage,
read these instructions before installation or
use.
en-US, CA
M.-Nr. 11 673 630

2

Contents
3
Notes about these instructions........................................................................ 6
Operating steps ................................................................................................... 6
IMPORTANT SAFETY INSTRUCTIONS ............................................................ 7
APPROPRIATE USE ............................................................................................ 7
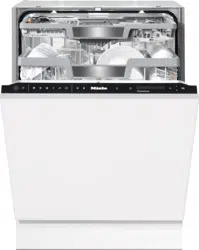
Machine description.......................................................................................... 18
Machine overview................................................................................................ 18
Control field......................................................................................................... 19
Display functions................................................................................................. 20
Caring for the environment .............................................................................. 21
Initial commissioning ........................................................................................ 22
Basic settings...................................................................................................... 22
Setting the language ...................................................................................... 22
Setting up Miele@home ................................................................................. 22
Setting the time .............................................................................................. 23
Setting water hardness................................................................................... 23
Miele@home ........................................................................................................ 24
Opening the door ................................................................................................ 26
Door-opening aid ................................................................................................ 27
Closing the door.................................................................................................. 27
Reactivation salt.................................................................................................. 28
Filling the salt reservoir................................................................................... 29
Refilling the salt .............................................................................................. 29
Rinse aid.............................................................................................................. 30
Adding rinse aid ............................................................................................. 31
Filling the rinse-aid reservoir .......................................................................... 31
Caring for the environment .............................................................................. 32
Energy-saving dishwashing................................................................................. 32
EcoFeedback consumption display .................................................................... 33
Loading the dishwasher.................................................................................... 34
General information............................................................................................. 34
Upper basket....................................................................................................... 36
Adjusting the upper basket ................................................................................. 39
Lower basket....................................................................................................... 40
Cutlery tray .......................................................................................................... 43
Loading the 3D MultiFlex Tray ........................................................................ 43
Loading examples ............................................................................................... 44
Dishwashers with cutlery tray......................................................................... 44

Contents
4
Detergents ......................................................................................................... 48
Dispensing detergent .......................................................................................... 49
Adding detergent................................................................................................. 50
Operation............................................................................................................ 51
Turning on the dishwasher .................................................................................. 51
Selecting a program ............................................................................................ 51
Display of program cycle time............................................................................. 52
Starting a program .............................................................................................. 52
Program end........................................................................................................ 53
Energy management ........................................................................................... 53
Turning off the dishwasher .................................................................................. 54
Unloading the dishwasher................................................................................... 54
Interrupting a program......................................................................................... 55
Canceling or changing a program ....................................................................... 55
Options ............................................................................................................... 56
Options................................................................................................................ 56
Timer .............................................................................................................. 57
Activating Remote start.................................................................................. 61
Program chart.................................................................................................... 62
Cleaning and care ............................................................................................. 65
USER MAINTENANCE INSTRUCTIONS ............................................................. 65
Cleaning the wash cabinet .................................................................................. 65
Cleaning the door and the door seal................................................................... 66
Cleaning the control panel .................................................................................. 66
Cleaning the reflector panel ................................................................................ 66
Cleaning the front of the machine ....................................................................... 66
Cleaning the spray arms...................................................................................... 68
Checking the filters in the wash cabinet ............................................................. 70
Cleaning the filters............................................................................................... 70
Cleaning the water-inlet filter............................................................................... 72
Cleaning the drain pump..................................................................................... 73
Frequently asked questions ............................................................................. 75
Technical faults.................................................................................................... 75
Fault messages ................................................................................................... 76
Door release ........................................................................................................ 77
Water intake fault................................................................................................. 78
Water drainage fault ............................................................................................ 79
General dishwasher problems............................................................................. 80
Noises.................................................................................................................. 82

Contents
5
Poor cleaning results........................................................................................... 83
Miele Service ..................................................................................................... 86
Contact in the event of a fault ............................................................................. 86
EPREL database ................................................................................................. 86
Warranty .............................................................................................................. 86
INSTALLATION INSTRUCTIONS ....................................................................... 87
Electrical connection ........................................................................................ 88
Plumbing ............................................................................................................ 89
The Miele Waterproof system.............................................................................. 89
Water inlet ........................................................................................................... 89
Connecting the water drainage system............................................................... 91
Technical details................................................................................................ 92
Settings ........................................................................................................... 93
Opening the Settings menu................................................................................. 93
Changing settings ............................................................................................... 93
Language ......................................................................................................... 94
Time of day.......................................................................................................... 94
Water hardness ................................................................................................... 95
Rinse Aid ............................................................................................................. 96
Temperature unit.................................................................................................. 96
High-temperature final rinse................................................................................ 96
Miele@home ........................................................................................................ 97
Remote control.................................................................................................... 100
RemoteUpdate .................................................................................................... 100
SmartStart ........................................................................................................... 101
EcoStart............................................................................................................... 102
Consumption (EcoFeedback) .............................................................................. 104
Display brightness............................................................................................... 104
Volume................................................................................................................. 105
Refill reminders.................................................................................................... 105
AutoOpen ............................................................................................................ 106
Knock2open ........................................................................................................ 106
BrilliantLight (depending on model)..................................................................... 106
Software version.................................................................................................. 106
Showroom program............................................................................................. 106
Factory default..................................................................................................... 107
Sound emission tests........................................................................................ 108

Notes about these instructions
6
Warnings
Warnings important for safety are highlighted like this. This alerts you to the
potential danger of injury to people or damage to property.
Read the warnings carefully and follow the instructions and directions.
Notes
Notes contain information that is particularly important to follow.
They are highlighted in a thick framed box.
Additional information and comments
Additional information and comments are contained in a narrow frame.
Operating steps
Instructions on how to operate the commercial dishwasher are identified by
marked operating steps. They explain the procedure step by step.
Operating steps are identified by a black square bullet point.
Example:
Select the setting you want and press OK to confirm.
Display
Information that is shown in the commercial dishwasher display appears in a spe-
cial font similar to the display text.
Example:
When the messageEnd or Auto Open Dryingappears in the display...
IMPORTANT SAFETY INSTRUCTIONS
7
APPROPRIATE USE
This Commercial Dishwasher complies with all current local and
national safety requirements. Inappropriate use can, however, lead
to personal injury and material damage.
WARNING:
When using your dishwasher, follow basic precautions, including
the following:
Read the operating instructions carefully before using the Com-
mercial Dishwasher for the first time. They contain important infor-
mation on the safety, use, and maintenance of the machine. Keep
these operating instructions in a safe place and pass them on to
any future user.
This dishwasher with its short program cycle times and powerful
cleaning performance is intended for commercial use in offices,
lunch rooms, clubhouses, workshops, large kitchens, and similar
professional environments.
It is also suitable for use in domestic households and in similar resi-
dential environments; for example, by customers in hotels, motels,
bed and breakfasts, and other related establishments.
The commercial dishwasher is subsequently referred to as a dish-
washer in these operating instructions.
Glasses, cutlery and dishes are referred to generally as cookware
when not more specifically defined.
This dishwasher is not intended for continuous use.
This dishwasher is not intended to be used to clean medical de-
vices or products.
This machine is designed exclusively for use as a “dishwasher” for
cleaning wash items as described in these instructions. Conversions,
modifications, and any other use are not permitted.
This dishwasher is intended for stationary, indoor use only.

IMPORTANT SAFETY INSTRUCTIONS
8
This dishwasher is intended for use at altitudes of up to 13,000ft
(4,000m) above sea level.
The special inserts in the baskets should only be used for their
specific application.
This dishwasher can only be used by people with reduced physi-
cal, sensory or mental capabilities, or lack of experience or knowl-
edge, if they are supervised while using it or have been shown how
to use it in a safe way and understand and recognize the conse-
quences of incorrect operation.
The dishwasher is equipped with interior lighting. It is not suitable
for room lighting. Replacement lamps may only be installed by a
Miele-authorized specialist or by Miele Service.
IMPORTANT SAFETY INSTRUCTIONS
9
Proper installation
Do not install the machine in an area where a danger of explosion
or of freezing temperatures may be present.
Be careful when installing the dishwasher. Wear protective
gloves to avoid injury on any sharp metal components.
To ensure the stability of undercounter dishwashers, these units
may only be installed beneath a continuous countertop that is bolted
to adjacent cabinetry.
In order to reduce the risk of damage from condensation, the cab-
inetry in the area around the dishwasher should be designed for
commercial use.
Delicate cabinetry can be protected using the damp protection set,
which is available as an optional accessory.
The vapor barrier film needs to be adhered to the underside of the
countertop where the dishwasher door is opened.
The door springs must be evenly adjusted on both sides. They are
correctly adjusted when the door remains stationary when left half
open (approx. 45° opening angle). It is also important that the door
cannot fall open.
The machine must only be operated with properly adjusted door
springs.
If the door cannot be adjusted properly, contact the Miele Customer
Service.
The maximum weight of the front panel that can be aligned with the
factory-installed door springs is 22-26.5 lb (10–12kg) (depending on
model).
Technical safety
This dishwasher should be installed, commissioned, repaired, and
maintained by Miele Service, a dealer, or a suitably qualified special-
ist. Unauthorized installation, maintenance, and repairs can cause
considerable danger for the user.

IMPORTANT SAFETY INSTRUCTIONS
10
This dishwasher should only be operated by appropriately trained
personnel. They should be instructed and trained regularly.
Do not operate your dishwasher unless all enclosure panels are
properly in place. Before using the dishwasher, check it for any ex-
ternally visible damage. Do not use a damaged dishwasher. This
could be dangerous.
In the event of a damaged or leaking dishwasher, switch off at the
power supply immediately and call Miele Technical Service, a Miele
dealer, or a suitably qualified service technician.
Faulty components should only be replaced by genuine Miele
original parts. Only when these parts are fitted can Miele guarantee
the safety standards of the appliance.
WARNING – Improper connection of the equipment-grounding
conductor can result in a risk of electric shock. Check with a quali-
fied electrician or service representative if you are in doubt whether
the appliance is properly grounded. Do not modify the plug provided
with the appliance, if it will not fit the outlet, have a proper outlet in-
stalled by a qualified electrician.
Be sure to follow the installation instructions in this manual and in
the installation diagram.
Ensure that the connection data on the data plate (voltage, fre-
quency, and fuse rating) match those of your electrical supply.
The dishwasher may only be operated if the door-opening mecha-
nism is working correctly. Otherwise there could be a risk of danger
while the automatic door-opening mechanism (depending on the
model) is active.
The maximum weight of the front panel that can be aligned with the
factory-installed door springs is 22-26.5 lb (10–12 kg) (depending on
model).
To check that the door-opening mechanism is working correctly:

IMPORTANT SAFETY INSTRUCTIONS
11
- The door springs must be evenly adjusted on both sides. They are
correctly adjusted when the door remains stationary when left half
open (approx. 45° opening angle). It is also important that the
door cannot fall open.
- The door locking pins automatically retract when the door opens
at the end of the drying phase.
The control elements of the dishwasher must not be tampered
with.
WARNING - Fire hazard! Do not cover or crush the plug of the ap-
pliance. Ensure that the cabinet opening for the dishwasher provides
ample space for the plug and cord. Installing the dishwasher in a
tight space may crimp the power cord or put pressure on it. See
“Electrical connection”.
Do not use an extension cord to connect this machine to electric-
ity. Extension cords do not guarantee the required safety of the ma-
chine (e.g., danger of overheating).
Do not open the casing of the dishwasher. Any contact with live
connections or tampering with the electrical or mechanical compo-
nents of the dishwasher will endanger your safety and may lead to
machine malfunctions.
The dishwasher must not be used if the wire is damaged. A dam-
aged wire may only be replaced by a suitable wire of the same type.
For safety reasons, such replacement may only be carried out by
Miele Technical Service or a qualified service technician.
Before servicing the appliance, disconnect it from the power sup-
ply.
The plastic housing of the water connection contains electrical
components. It must not be dipped in water.
There are live wires in the water intake hose. Do not shorten the
water intake hose, even if it is too long.

IMPORTANT SAFETY INSTRUCTIONS
12
The built-in Waterproof system offers reliable protection against
water damage if the following conditions are met:
- Installation has been carried out correctly.
- The dishwasher is properly maintained and parts are replaced in
case of noticeable damage.
- The shut-off valves have been turned off during longer absences
(for example, vacation).
The Waterproof system will work even when the dishwasher is
switched off. However, the dishwasher must remain connected to
the electricity supply.
The manufacturer’s warranty will be invalidated if the machine is
not repaired by a Miele-authorized service technician.

IMPORTANT SAFETY INSTRUCTIONS
13
Correct use
This dishwasher is designed for operation with water and cleaning
agents suitable for use in dishwashers only. Organic solvents and
flammable liquid agents must not be used.
This could cause an explosion, damage rubber or plastic compo-
nents in the dishwasher, and cause liquids to leak out of it.
You could injure yourself on the open dishwasher door or trip over
it. Avoid leaving the door open unnecessarily.
Do not sit, stand, or lean on the opened door or dish rack. This
could tip or damage the dishwasher.
After any plumbing work, the water pipework to the dishwasher
will need to be vented. If this is not done, components can be dam-
aged.
Please be aware that the dishwasher may be operating at high
temperatures. When the door is opened there is a risk of burning or
scalding. Wash items, baskets, and inserts must be allowed to cool
down before they are unloaded. Any water remaining in containers
could still be very hot. Empty them into the wash cabinet before tak-
ing them out.
The water in the wash cabinet is NOT safe to drink!
The pretreatment of items (for example with dishwashing liquid
and other detergents), but also some types of soiling and some de-
tergents, can cause a build-up of foam in the wash cabinet. Foam
can have an adverse effect on the cleaning result.
Foam escaping from the wash chamber can cause damage to the
dishwasher. If foam escapes, the program must be canceled imme-
diately and the dishwasher must be disconnected from the mains
electrical supply.

IMPORTANT SAFETY INSTRUCTIONS
14
Depending on the properties of the flooring and footwear worn on
it, liquids can cause a slipping hazard. Keep the floor dry where pos-
sible and take care to clean up any liquid spills straight away. Take
the necessary precautions when cleaning up hazardous substances
and hot liquids.
When using detergents and specialized products, it is essential
that the manufacturer's instructions are followed. Detergents must
only be used for the purpose they are designed for by the manufac-
turer to avoid any material damage or the occurrence of strong
chemical reactions (e.g., oxyhydrogen explosion).
Under certain conditions, hydrogen gas might be produced in a
hot-water system that has not been used for two weeks or more.
HYDROGEN GAS IS EXPLOSIVE. If the hot-water system has not
been used for such a period, before using the dishwasher turn on all
hot-water faucets and let the water flow from each for several min-
utes. This will release any accumulated hydrogen gas. As the gas is
flammable, do not smoke or use an open flame during this time.
Miele cannot be held liable for any effect chemical detergents may
have on the material of the items being cleaned. Observe the deter-
gent manufacturer's instructions with regard to storage conditions,
use, and dosage.
Do not inhale or ingest powder detergent. Dishwasher detergents
contain irritant or corrosive ingredients which can cause burning in
the nose, mouth and throat if swallowed, or inhibit breathing. Seek
medical attention immediately if detergent has been swallowed or in-
haled.
People aged 16 and above may refill the dishwasher detergent or
change the media canister provided that they know exactly what
they are doing.
Powder and liquid detergents containing active chlorine must not
be used. You may damage plastic parts and the seals of the dish-
washer.

IMPORTANT SAFETY INSTRUCTIONS
15
To avoid material damage and corrosion, do not allow any acids
or solutions containing chloride to get into the wash cabinet or onto
the casing. Similarly avoid any ferrous materials with a corrosive ef-
fect.
Do not wash items soiled with ash, sand, wax, lubricating grease,
or paint in the dishwasher. These materials will cause damage to the
dishwasher.
Do not clean the dishwasher or its near vicinity with a hose or a
pressure washer.
Be careful when sorting items with sharp pointed ends and posi-
tioning them in the dishwasher so that you do not hurt yourself or
create a danger for others. Cutlery should be placed in baskets in
such a way that no injuries can occur.
Arrange sharp and pointy utensils so that they cannot damage the
door seal.
Remove any coarse food deposits from the items being cleaned
before loading them in the dishwasher.
Children in the vicinity
Children should be supervised in the vicinity of the dishwasher.
Never allow children to play with the dishwasher. There is a danger
that children might shut themselves in the dishwasher.
Children must be kept away from the dishwasher unless they are
constantly supervised.
Children aged eight and older may only use the dishwasher with-
out supervision if they have been shown how to use it in a safe man-
ner. Children must be able to recognize and understand the potential
risks of improper use.

IMPORTANT SAFETY INSTRUCTIONS
16
If the automatic door opening mechanism is active, keep young
children away from the area in which the door opens. There is a dan-
ger of injury in the unlikely event of a fault with the opening mecha-
nism.
Keep children away from process chemicals. These contain ingre-
dients which can cause burning in the mouth or throat, or inhibit
breathing. Keep children away from the dishwasher when the door is
open. There could still be residual process chemicals in the dish-
washer. Seek medical advice immediately if a child has swallowed or
inhaled any process chemicals.
IMPORTANT SAFETY INSTRUCTIONS
17
Accessories
Only use original Miele accessories. Using parts or accessories
from other manufacturers will invalidate the warranty, and Miele can-
not accept liability.
Miele will guarantee to supply functional spare parts for a mini-
mum of 10years and up to 15years following the discontinuation of
your dishwasher.
Transport
Only transport the dishwasher in an upright position so that no
water flows into the electrical controls, as this would cause faults.
If you wish to transport the dishwasher, empty it and securely fas-
ten all loose parts such as baskets, hoses, and cords.
After use
Remove the door to the washing compartment when removing an
old dishwasher from service or discarding it.
Miele cannot be held liable for damage caused by failure to com-
ply with these IMPORTANT SAFETY INSTRUCTIONS.
STORING THE INSTRUCTIONS
Machine description
18
Machine overview
a
Upper spray arm
b
3DMultiFlex Tray
c
Upper basket
d
Middle spray arm
e
Ventilation
f
Bottom spray arm
g
Filter combination
h
Salt reservoir
i
Data plate
j
Rinse aid reservoir
k
Detergent compartment
Machine description
19
Control field
a
On/Offsensor button
For turning the dishwasher on and
off.
b
In-operation indicator light
For indicating an ongoing wash pro-
gram when the door is closed.
c
Remote start sensor button
For activating/deactivating the Re-
mote start option.
d
Program selection
= Short
= Universal
= Intensive
= Glasses
= Economy
= Additional programs
e
Settings sensor button
Open the Settings menu.
f
Temperature sensor button
For displaying the current tempera-
ture.
g
Extra dry sensor button
For activating drying.
h
Timer sensor button
For selecting a later program start.
i
Display
For further information, see “Display
functions” under “Machine descrip-
tion”.
j
Backsensor button
For navigating back to the previous
menu or deleting previously set val-
ues.
k
sensor buttons
For program selection.
For changing the values displayed.
For scrolling to other menu pages.
l
OK sensor button
To select menu options and values
displayed.
To confirm messages.

Machine description
20
Display functions
The display is used to select or set the
following:
- the program
- the timer
- the Settings
The display can show the following:
- the program stage
- the estimated time left for the pro-
gram to run
- the water consumption (EcoFeed-
back)
- any relevant fault messages and in-
formation
To save energy, the dishwasher turns
off after a few minutes if you do not
press any sensor buttons during this
time.
Touch the sensor button to turn the
dishwasher back on.
The OKsensor button is used to con-
firm a message or setting and also to
move to the next menu or another level.
Under Further programs/settings, a
scroll bar will appear in the right of the
display. This offers additional options.
These options can be shown using the
sensor buttons.
You can alter the dishwasher’s controls
to suit changing requirements in the
Settings menu (see “Settings”).
The option which is selected will have a
check next to it.
To exit a submenu again, use the
Backsensor button.
If you do not press any sensor buttons
for several seconds, the display will re-
vert to the previous menu. You will then
have to enter your settings again.
Caring for the environment
21
Disposal of the packing mate-
rial
The cardboard box and packing materi-
als protect the appliance during ship-
ping. They have been designed to be
biodegradable and recyclable.
Ensure that any plastic wrappings,
bags, etc. are disposed of safely and
kept out of the reach of children. Dan-
ger of suffocation!
Disposal of your old appliance
Electrical and electronic appliances
contain valuable materials. They also
contain certain substances, compounds
and components which were essential
for the proper functioning and safe use
of the equipment. Handling these mate-
rials improperly by disposing of them in
your household waste can be harmful to
your health and the environment. There-
fore, please do not dispose of your old
appliance with regular household waste
and follow local regulations on proper
disposal.
Consult with local authorities, dealers or
Miele in order to dispose of and recycle
electrical and electronic appliances.
Miele assumes no responsibility for
deleting any personal data left on the
appliance being disposed. Please en-
sure that your old appliance is kept
away from children until removal. Ob-
serve safety requirements for appli-
ances that may tip over or pose an en-
trapment hazard.
Initial commissioning
22
Basic settings
Turning on the dishwasher
Open the door.
Turn the dishwasher on using the
sensor button.
The welcome screen will appear when
the dishwasher is turned on and the
welcome melody will sound.
For further information about the dis-
play functionality, see “Display func-
tions” under “Guide to the appliance”.
Setting the language
The display will change automatically to
the screen for setting the language.
Select the language you want as well
as the country, if appropriate, using
the sensor button and confirm
with OK.
For further information on setting the
language, see “Language” under “Set-
tings”.
A check will appear next to the lan-
guage that has been set.
Setting up Miele@home
The message Miele@home will appear
on the display.
To set up Miele@home now, confirm
by touching OK.
Tip: To postpone setup until later, select
the Skipoption and confirm with OK.
There are 2ways of connecting your
dishwasher to your WiFi network:
Select the connection method you
want and confirm your choice with
OK.
1. Connect using App
2. Connect using WPS
(WPS = WiFi Protected Setup)
You will then be guided by the display
and the Miele network solution.
For further information on
Miele@home, see “Miele@home” un-
der “Settings”.
Initial commissioning
23
Setting the time
The time is updated automatically if a
connection is established with the
WiFi network.
The display will then change to the
screen for setting the time.
The current time of day must be set be-
fore you can use the timer option.
Use the sensor buttons to enter
the hour and confirm your entry with
OK.
Then set the minutes and confirm
with OK.
Keeping the relevant or sensor
button pressed will increase or de-
crease the time automatically.
Setting water hardness
The display changes to the screen for
setting the water hardness.
- The dishwasher must be pro-
grammed to the correct water hard-
ness for your area.
- Your local water authority will be able
to advise you of the water hardness
level in your area.
- Where the water hardness fluctuates,
e.g., between 10 and 16gr/gal (10–
15°dH – German scale), always pro-
gram the dishwasher to the higher
value (16gr/gal or 15°dH in this ex-
ample).
It is useful to know your water hardness
so that you can provide the service
technician with this information in the
event of any service calls.
Enter the water hardness below:
____________ gpg (°dH)
The dishwasher is programmed at the
factory for a water hardness level of 15
gpg (14°dH).
Set the water hardness level in your
area and confirm with OK.
See “Water hardness” under “Set-
tings” for more information.

Initial commissioning
24
Prompts will then appear in the display.
After confirming these prompts with
OK, the messages Refill salt and
Add rinse aid may appear.
Add salt and rinse aid if necessary
(see “Reactivation salt” and “Rinse
aid” under “Before using for the first
time”).
Select OK to confirm the messages.
The program selected will appear briefly
in the display and the appropriate sen-
sor button will be illuminated.
Next, the estimated energy and water
consumption may be shown for the se-
lected program for several seconds.
The display will then show the esti-
mated program duration for the pro-
gram selected.
Miele@home
Your dishwasher is equipped with an
integrated Wi-Fi module.
To use this feature, you will need:
- a Wi-Fi network
- a network solution from Miele, e.g.,
Miele@mobile app
- a Miele user account
You can create a user account using
the network solutions from Miele,
e.g., via the Miele@mobile app.
The relevant network solution will guide
you as you connect your dishwasher to
your home Wi-Fi network.
Once your dishwasher is connected to
your WiFi network, you can use the net-
work solution to carry out the following
tasks:
- Call up information on the operating
status of your dishwasher
- Call up information on the program
sequence of your dishwasher
Connecting your dishwasher to your
Wi-Fi network will increase energy con-
sumption, even when the dishwasher is
turned off.
Make sure that your Wi-Fi network
signal strength is strong enough at
the installation site of your dish-
washer.

Initial commissioning
25
Availability of the WiFi connection
The Wi-Fi connection shares a fre-
quency range with other appliances (in-
cluding microwave ovens and remote
control toys). This can cause sporadic
or even complete connection failures.
Therefore, the availability of featured
functions cannot be guaranteed.
Miele@home availability
The ability to use the Miele@mobile
app, or other network solutions, de-
pends on the availability of the
Miele@home service in your country.
The Miele@home service is not avail-
able in every country.
For information about availability,
please visit www.miele.com.
Miele app
You can connect the dishwasher to the
Miele@mobile app.
The app is available to download free of
charge from the Apple App Store
®
or
from the Google Play Store™.
Miele@mobile app
Initial commissioning
26
Every dishwasher is tested at the fac-
tory. There will be residual water in the
machine from this test. It is not an in-
dication that the dishwasher has been
used previously.
Opening the door
In some programs, the door automati-
cally opens slightly to assist the drying
process.
This function can be deactivated, if pre-
ferred (see “AutoOpen” under “Set-
tings”).
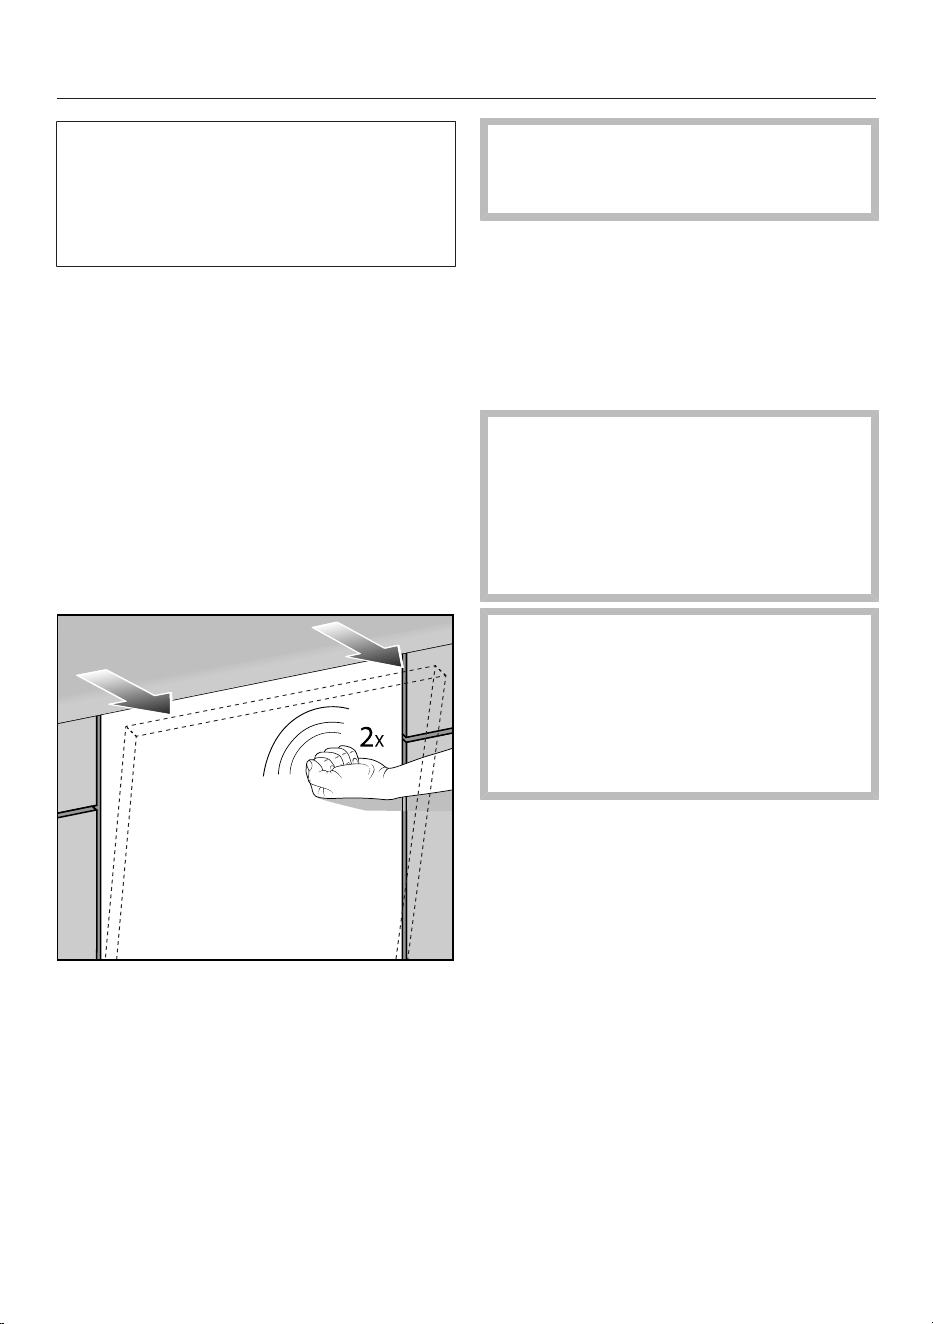
This dishwasher has a motorized door
opener which is activated by knocking
on the door front (Knock2open func-
tion).
Knock twice in quick succession on
the top third of the door front.
The door will open a little.
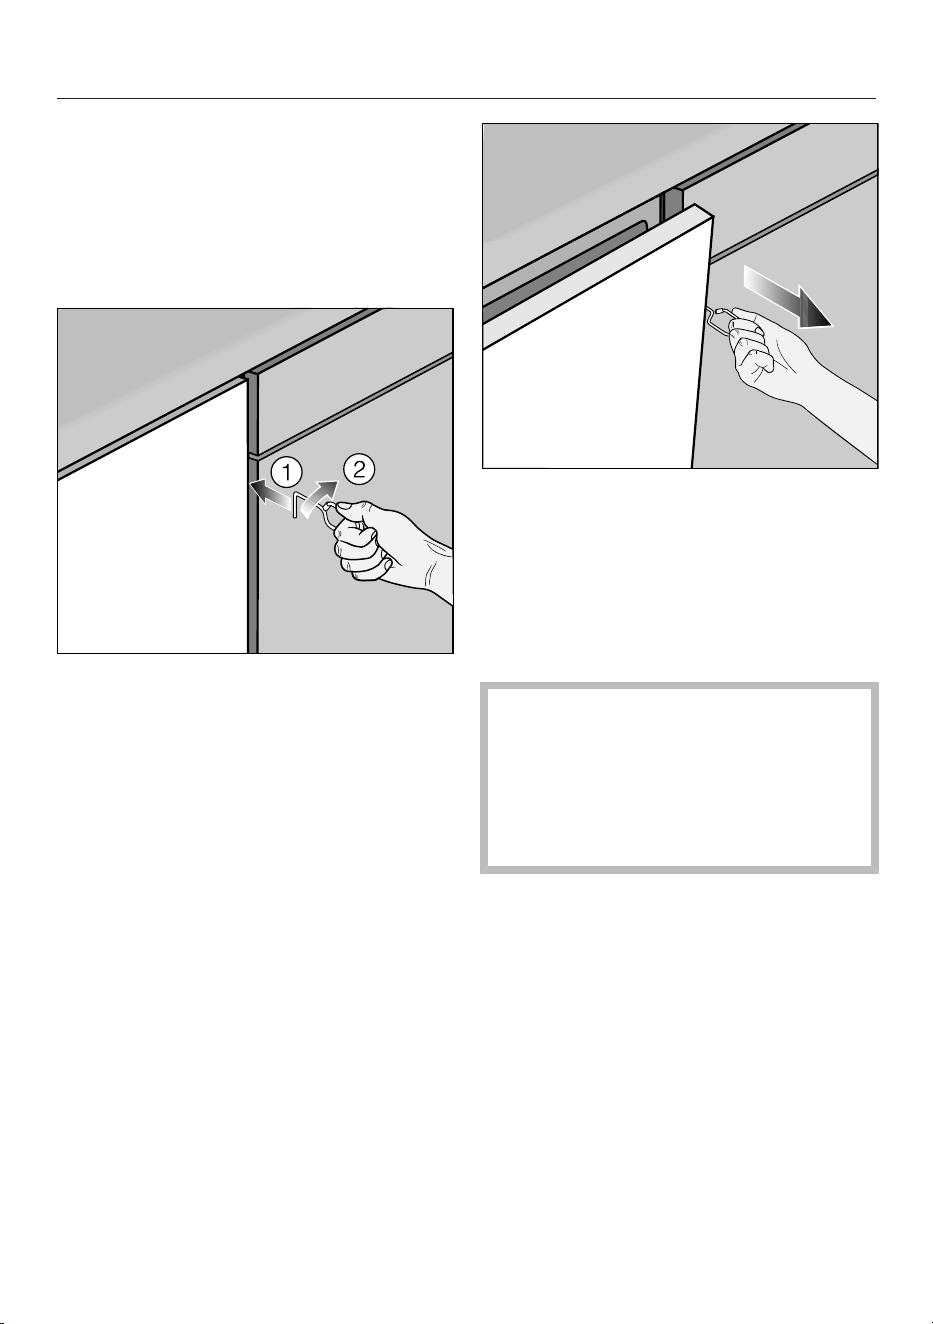
Hold the door at the top edge and
pull the door out of the lock.
The door locking pins will retract.
To prevent a technical fault, do not
hold the door locking pins firmly
when they are retracting.
If the door is opened during operation,
all functions are automatically inter-
rupted.
You can change the number of knocks
required or deactivate the function (see
“Knock2open” under “Settings”).
Risk of scalding due to hot wa-
ter.
During operation, water in the dish-
washer may be very hot.
During operation, only open the door
with extreme caution.
Risk of injury due to door open-
ing automatically.
The door may open automatically at
the end of a program.
Keep the area around the door free
of obstructions.
Initial commissioning
27
Door-opening aid
If the door will not open when knocked
or if there is a power failure, the door
can be opened manually with the door-
opening aid supplied with the dish-
washer.
Push the door-opening aid into the
gap between the dishwasher front
and the neighboring unit door
about 57/8” (15cm) below the coun-
tertop.
Turn the door-opening aid clockwise
until it engages behind the dish-
washer front.
Then use it to pull the door open.
Closing the door
Push the baskets in.
Push the door until it clicks shut.
The door will then close automatically.
Risk of crushing due to the door
closing.
When closing the door, you are at
risk of shutting your fingers in it.
Do not put your hand inside the door
as it is closing.

Initial commissioning
28
Reactivation salt
In order to achieve good cleaning re-
sults, the dishwasher needs to operate
with soft water. Hard water results in
the build-up of calcium deposits on
dishes and on the inner surfaces of the
machine.
Tap water with a water hardness level
higher than 5.2gr/gal (5°dH – German
scale) must be softened. This occurs
automatically in the integrated water
softener. The water softener is suitable
for a water hardness level of up to 38°F
(36°dH).
In order to maintain the functions of the
water softener, it must be reactivated
regularly. Reactivation occurs automati-
cally every ninth program sequence. At
the start of the next program, an addi-
tional 4.4l of water is required for this
process. Energy consumption increases
by 0.015kWh and the program is ex-
tended by 3minutes.
The above only applies to the Economy
program at a water hardness of 14°dH.
For other programs and water hardness
levels, the frequency of reactivation will
differ.
In order to be reactivated, the water
softener requires reactivation salt.
Depending on the water hardness level
(<22gr/gal, or <21°dH – German
scale), reactivation salt is not required if
combination detergents are being used
(see “Active ingredients” under “Deter-
gents”).
Damage caused by using unsuit-
able salts.
Some types of salt may contain in-
soluble components which can
cause the water softener to malfunc-
tion.
Use only special, coarse-grained re-
activation salt.
Damage to the water softener
from detergent.
Dishwasher detergent will damage
the water softener.
Do not fill the salt reservoir with pow-
der or liquid detergent.
If the water in your area is very soft
and constantly lower than 5gr/gal
(5°dH – German scale), you do not
need to add reactivation salt. The salt
refill indicator will automatically turn
off after the water hardness has been
set accordingly (see “Water hardness”
under “Settings”).
If you only ever use combination de-
tergent products in your dishwasher,
you can turn off both refill reminders if
you wish (see “Refill reminders” under
“Settings”).
Please make sure that if you stop us-
ing combination detergents, you refill
the reactivation salt and rinse aid. Turn
the refill reminders back on if required.
Initial commissioning
29
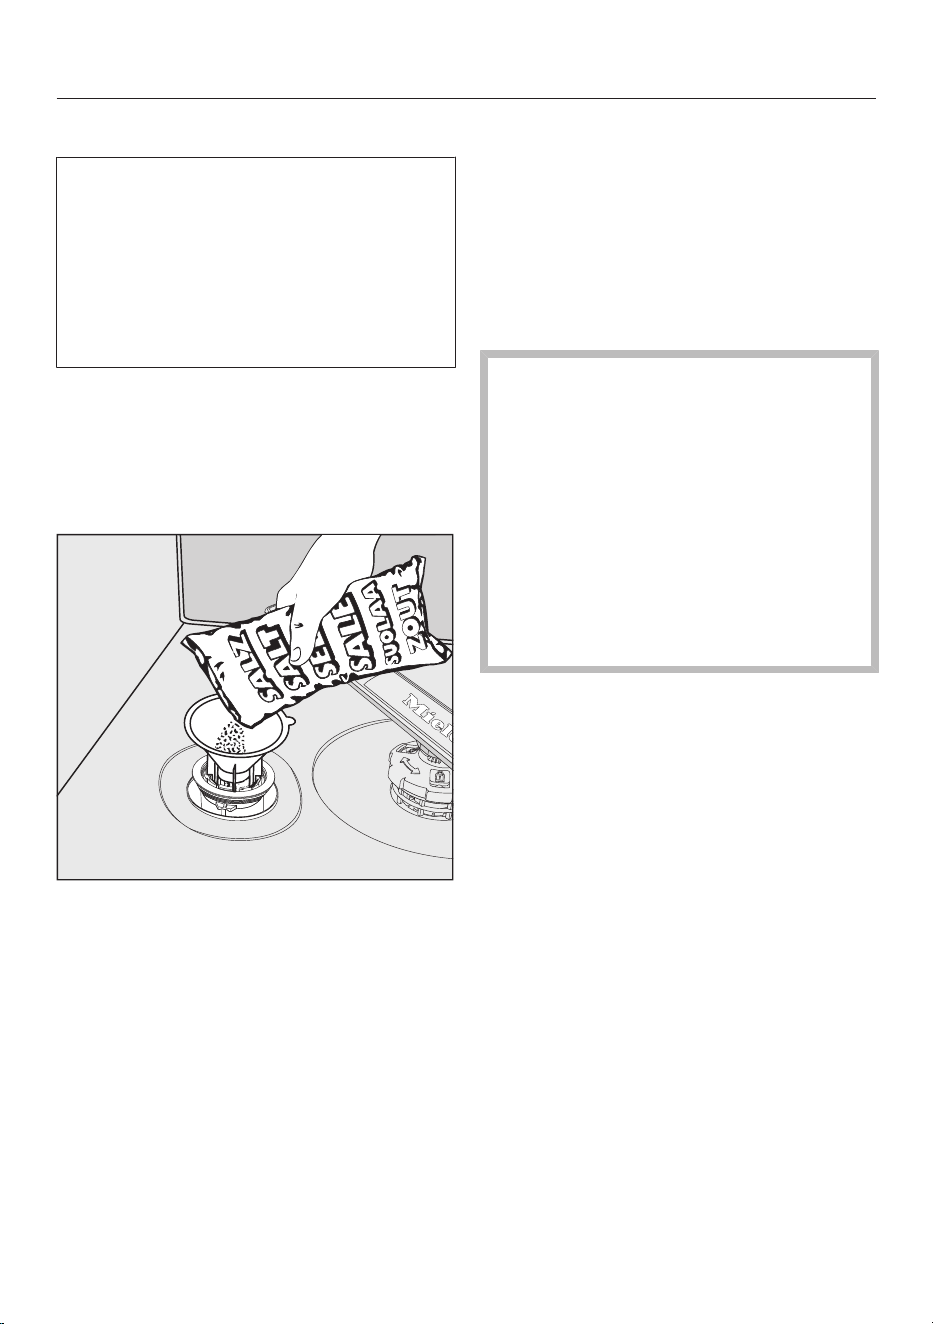
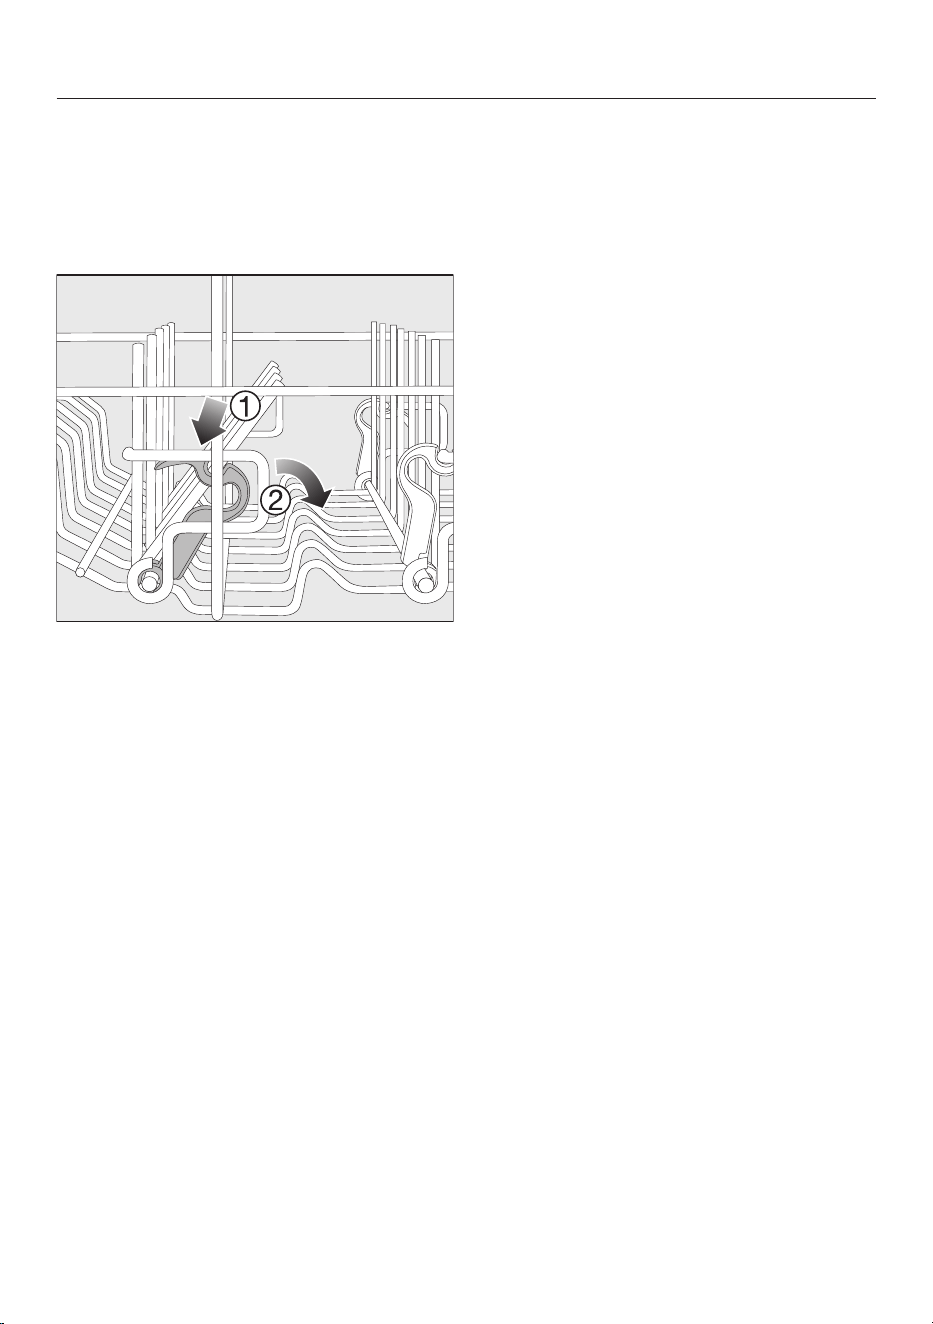
Filling the salt reservoir
Before filling the salt reservoir for the
first time, you must fill it with approx.
2l of water to enable the salt to dis-
solve.
Once the dishwasher has been used
once, there is always sufficient water
in the salt reservoir.
Remove the lower basket from the
wash cabinet and unscrew the salt
reservoir cap.
Fill the salt reservoir with approx. 2l
of water (first use only).
Place the funnel provided over the
salt reservoir and carefully fill with re-
activation salt until the reservoir is
full. The salt reservoir holds up to
2kg of salt, depending on the type of
salt used.
Clean off salt residues from around
the salt reservoir opening. Next,
screw the salt reservoir cap on again
firmly.
Refilling the salt
When the refill reminder Refill salt
appears in the display, wait until the
end of the program and then refill the
salt reservoir.
Confirm with OK.
The salt refill indicator will go out.
Risk of corrosion due to saline
solution.
Saline solution that runs out can
cause corrosion in the wash cabinet
and to the wash items.
Each time you remove the salt reser-
voir cap, you must run the Cold
pre-rinse program without any wash
items in the dishwasher. This will dis-
solve and remove any traces of salt
from the wash cabinet.
After the salt reservoir has been filled,
the refill indicator may still appear in the
display if the salt concentration has not
yet reached the correct level. In this
case, still confirm the message with OK.

Initial commissioning
30
Rinse aid
Rinse aid is necessary to ensure that
water does not cling and leave marks
on dishes during the drying phase, and
helps dishware dry faster after it has
been washed.
Rinse aid is poured into the container
and the amount set is dispensed auto-
matically.
Liquid dish soap or detergent
can cause damage.
Liquid dish soap and detergent can
damage the rinse-aid reservoir.
Commercial rinse aids are recom-
mended.
Alternatively, you could use liquid citric
acid at a concentration of up to 10%.
The resulting rinsing and drying quality
will not, however, be as good as when
rinse aid is used.
Risk of acid damage.
The dishwasher can be damaged by
high concentrations of acid.
Under no circumstances should you
use citric acid with a higher acid
content.
If you only ever wish to use combina-
tion detergent products in your dish-
washer, you do not need to add rinse
aid.
However, for optimum rinsing and
drying results, use dishwasher deter-
gent and add reactivation salt and
rinse aid separately.
If you only ever use combination de-
tergent products containing salt and
rinse aid in your dishwasher, you can
turn off both refill reminders if you
wish (see “Refill reminders” under
“Settings”).
Please make sure that if you stop us-
ing combination detergents, you refill
the reactivation salt and rinse aid. Turn
the refill reminders back on if required.
Initial commissioning
31
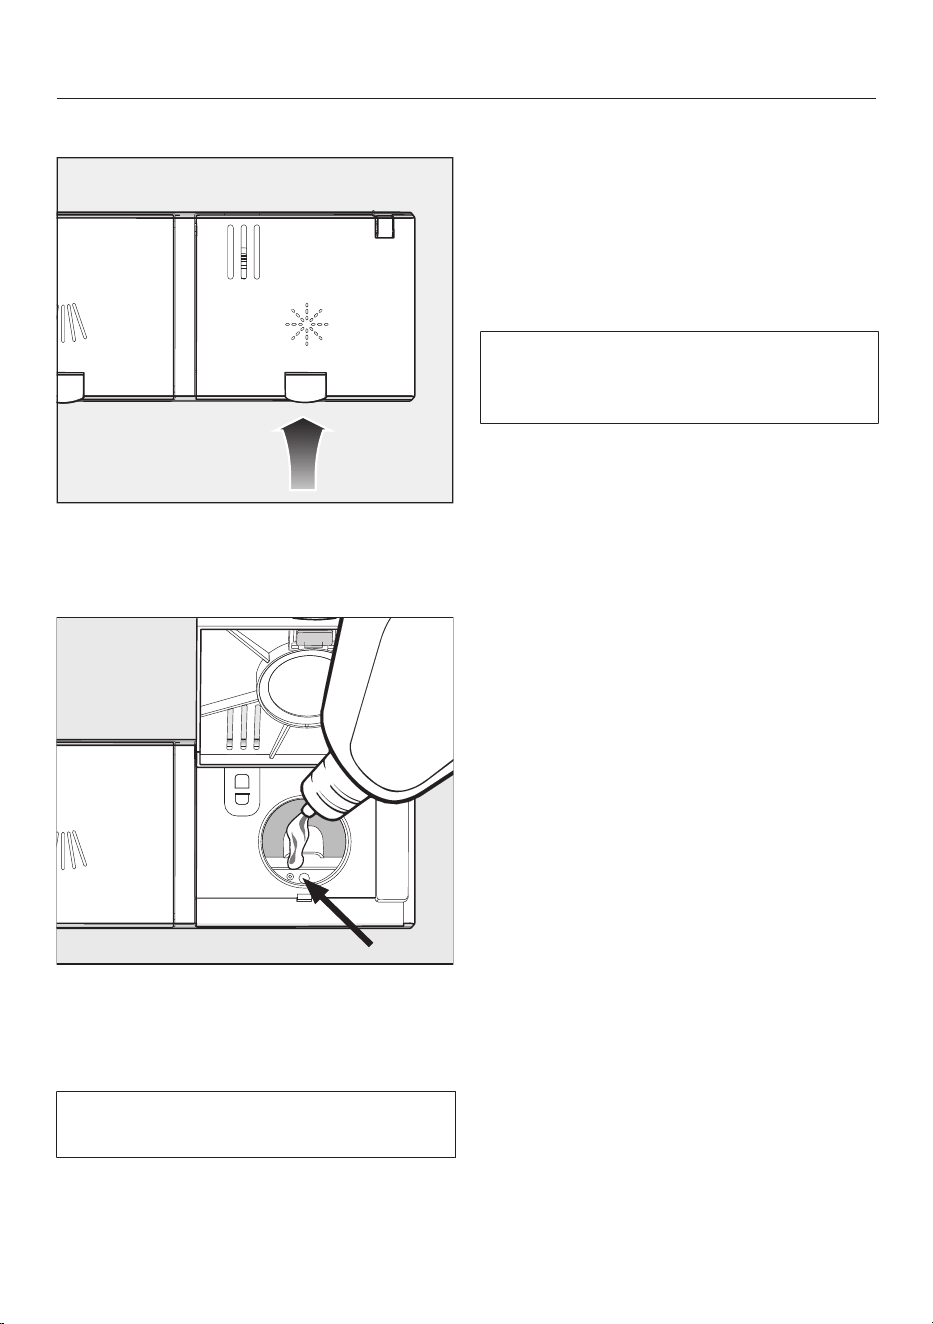
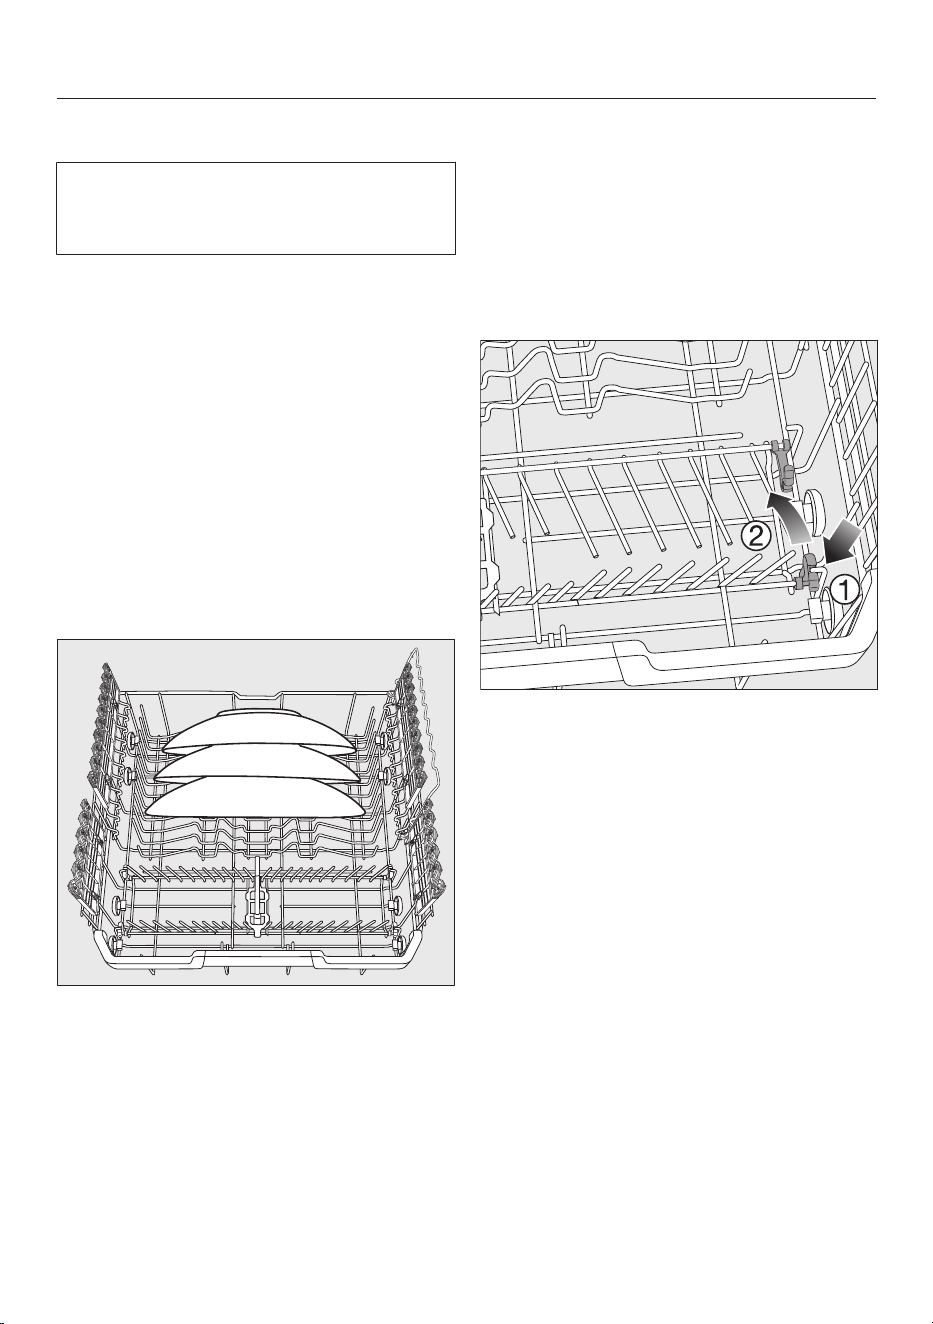
Adding rinse aid
Press the yellow button on the lid
of the rinse aid reservoir.
The lid will spring open.
Fill with rinse aid until the filling level
indicator (arrow) changes to a dark
color while the door is horizontally
open.
The rinse aid reservoir holds approxi-
mately 110ml.
Close the lid firmly until you hear it
click into place. Otherwise, water can
enter the rinse aid reservoir during a
program.
Wipe up any spilled rinse aid. This
prevents excess foam developing
during the next program.
You can adjust the rinse aid dosage
for best wash results (see “Rinse aid”
under “Settings”).
Filling the rinse-aid reservoir
When Add rinse aid appears in the
display, the reservoir contains sufficient
rinse aid for 2–3 programs only.
Add rinse aid in plenty of time.
Confirm with OK.
The rinse-aid refill reminder will go out.

Caring for the environment
32
Energy-saving dishwashing
This dishwasher is exceptionally eco-
nomical in its use of water and electric-
ity.
You can make the most of your ma-
chine by following these tips:
- Washing in a dishwasher generally
uses less water and energy than
washing by hand.
- There is no need to pre-rinse items
under running water, and this unnec-
essarily increases water and energy
consumption.
- Make full use of the basket capacity
without overloading the dishwasher.
This results in the most economical
dishwashing in terms of energy and
water consumption.
- Choose a program that best suits the
degree of soiling and the type of
dishes being washed (see “Program
overview”).
- Select the Economy program for
energy-saving dishwashing. This pro-
gram is the most efficient in terms of
its combined energy and water con-
sumption for cleaning dishware with a
normal level of soiling.
- Follow the detergent manufacturer’s
recommendations on detergent
dosage.
- If you are manually dosing the deter-
gent, reduce the amount by
1
/
3
when
using powder detergent if the baskets
are only half full.

Caring for the environment
33
EcoFeedback consumption
display
The “Consumption” function is used for
calling up information about the water
consumption of your dishwasher (see
“Consumption” under “Settings”).
The following information can be shown
on the display:
- an estimate of the consumption be-
fore the program sequence
- the actual consumption at the end of
the program
- the total consumption of the dish-
washer
1. Estimated consumption
After a program has been selected, first
the name of the program and then the
estimated water consumption will ap-
pear in the display for a few seconds.
The estimated consumption will be
shown as a bar chart. The more bars
that are visible (), the higher the wa-
ter consumption.
The values are influenced by the pro-
gram, any program options selected,
the ambient conditions, and the size of
the load.
The display will change automatically
from showing the estimated consump-
tion to showing the time remaining.
The estimated consumption function is
activated as standard. This function can
be deactivated, however, if preferred
(see “Consumption” under “Settings”).
2. Displaying consumption
At the end of the program, you can call
up the actual water consumption for the
program that has just been run.
Confirm the message Consumption
(OK) with OK.
Turning the dishwasher off at the end
of the program will delete the actual
consumption values for the program
that has just been run.
3. Total consumption
You can view the total consumption of
water for all previously used programs
of your dishwasher (see “Consumption”
under “Settings”).

Loading the dishwasher
34
General information
Remove coarse food residues from
dishes.
There is no need to pre-rinse items un-
der running water.
Damage can be caused by ash,
sand, wax, lubricating grease, or
paint.
These substances will contaminate
the dishwasher and can then no
longer be removed.
Do not wash items soiled with these
substances in the dishwasher.
Dishes can be loaded anywhere in the
baskets, but the following notes should
be observed:
- Do not place dishes and utensils in-
side other items where they will cover
one another.
- Load the dishes so that water can
access all surfaces. This ensures that
they get properly cleaned.
- Make sure that all items are securely
positioned.
- Hollow items such as cups, glasses,
pans, etc., must be inverted in the
baskets.
- Tall, narrow, hollow items such as
champagne glasses should be
placed in the center of the basket
rather than in the corners. This en-
sures the hollow items are more eas-
ily accessed by the water jets.
- Concave items such as mugs or
bowls should be placed at an angle
so that the water can run off.
- The spray arms must not be blocked
by items which are too tall or hang
through the baskets. Test for free
movement by manually rotating the
spray arms.
- Make sure that small items cannot
fall through the holders in the bas-
kets.
Small items such as lids should
therefore be placed in the 3D Multi
Flex Tray.
Some foods such as carrots, toma-
toes, or ketchup may contain natural
dyes. These dyes can discolor plastic
items in the dishwasher if large quanti-
ties of these foods are in contact with
the dishes inside the machine. The
stability of plastic items is not affected
by this discoloration.
Washing silverware can also cause
plastic items to discolor.

Loading the dishwasher
35
Wash items not suitable for dish-
washers:
- Wooden cutlery and dishes or items
with wooden parts. These may dis-
color and fade. The glue used in
these items is not dishwasher-safe
and wooden handles may come
loose after being washed in a dish-
washer.
- Craft items, antiques, valuable vases,
and decorative glassware. Such
items are not dishwasher-safe.
- Plastic items that are not heat resis-
tant. The high temperatures in the
dishwasher may cause them to melt
or lose shape. Use only dishwasher-
safe plastic containers.
- Copper, brass, tin, and aluminum
items. These may discolor or become
dull.
- Colors painted over a glaze. These
may fade after a number of washes.
- Delicate glassware and glassware
containing lead crystal. Clouding may
occur over time.
Silver
Silverware that has been in contact with
foods containing sulfur can discolor.
These include egg yolk, onions, mayon-
naise, mustard, pulses, fish, fish brine,
and marinades.
Silverware previously cleaned with a
silver polish may still be damp or spot-
ted at the end of a program, where wa-
ter has not run off smoothly.
Tip: Rub the silver dry with a cloth.
Damage due to caustic alkaline
detergents.
Aluminum parts (e.g., the grease fil-
ters of ventilation hoods) can be
damaged by caustic alkaline deter-
gents. In extreme cases, there is a
risk of an explosive chemical reac-
tion (such as an explosive oxyhydro-
gen gas reaction).
Aluminum components must not be
cleaned in the dishwasher with caus-
tic alkaline commercial or industrial
detergents.
Tip: When purchasing new dishware
and cutlery, make sure they are dish-
washer-safe if you want to wash them
in the dishwasher.
Glass care
- Clouding may occur on glasses after
frequent washing in the dishwasher.
When washing delicate glassware in
the dishwasher, ensure that only a
special glass-care program with very
low temperatures is selected (see
“Program overview”). This will reduce
the risk of clouding.
- Purchase glassware that is dish-
washer-safe (e.g., Riedel glassware).
- Use detergents with glass protective
additives.
Loading the dishwasher
36
Upper basket
See “Loading examples” under “Load-
ing the dishwasher” for examples of
how to load dishware and utensils.
Loading the upper basket
Risk of damage due to water
leakage.
If you run the dishwasher without the
upper basket, water can leak out of
the dishwasher.
Only run the dishwasher with the up-
per basket in place.
Use the upper basket for small, light-
weight, and delicate items such as
cups, saucers, glasses, dessert
bowls, etc.
Shallow pans or casserole dishes can
also be placed in the upper basket.
Long items such as soup ladles and
mixing spoons should be placed lying
down across the front of the upper
basket.
Loading the FlexCare cup rack
You can put cups, small bowls, and flat
dishes on the FlexCare cup rack.
Glasses can be arranged along the cup
rack so they sit securely during the pro-
gram.
Lower the cup rack to do so.
Raise the cup rack upwards to make
room for tall items.
Loading the dishwasher
37
Adjusting the FlexCare cup rack
You can set the height and depth of the
cup rack at 2 different levels so that it
can accommodate larger cups and so
that taller items can be placed under-
neath it.
Pull the cup rack upwards and click it
into the desired position (see arrow).
Loading the silicone elements of the
FlexCare cup rack
The silicone elements in the cup rack
are specially designed to hold tall
glasses with long stems securely.
Lower the cup rack and lean the
glasses against the openings.
If you wish you can adjust the left in-
sert of the 3D MultiFlex Tray to make
space for taller glasses (see “3D Mul-
tiFlex Tray” under “Cutlery”).
Loading the dishwasher
38
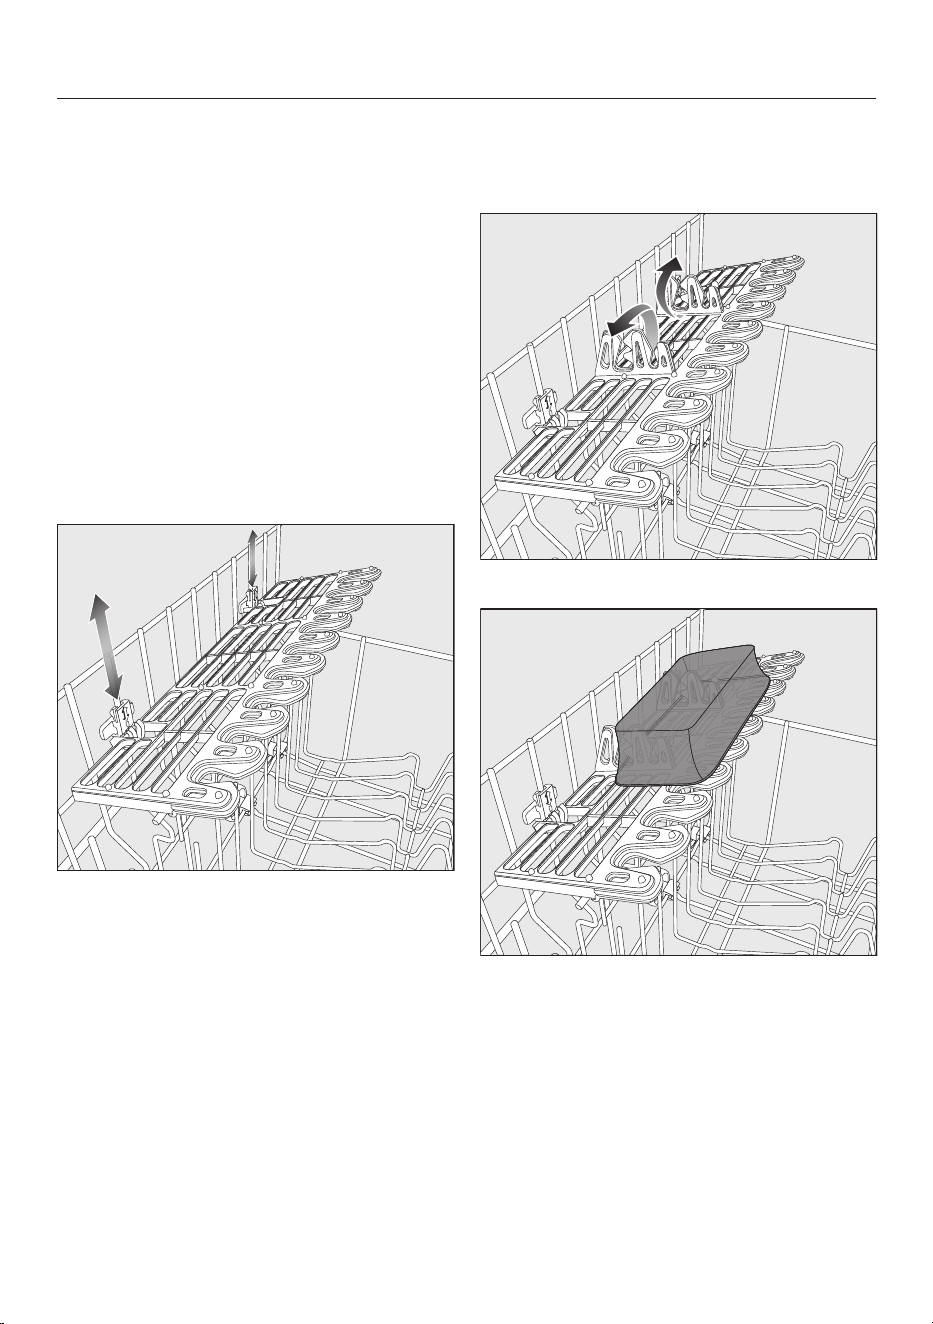
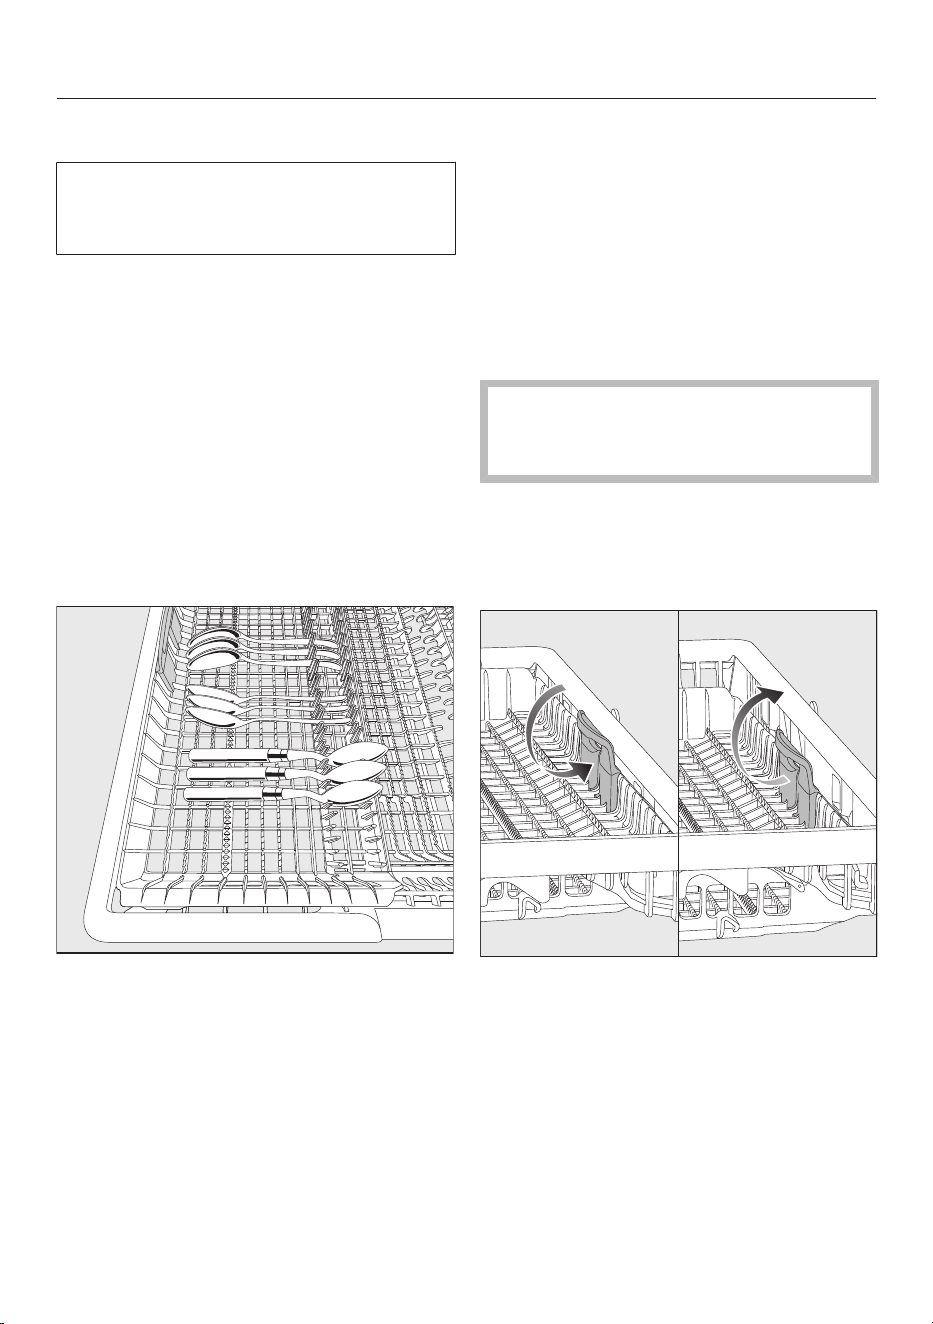
Lowering the spikes
On both right-hand rows of spikes, you
can lower every other spike to make it
easier to arrange larger dishes, like ce-
real bowls.
Press the yellow lever downwards,
and then lower the dark gray
spikes.
Place the bowls vertically in the row
of spikes.

Loading the dishwasher
39
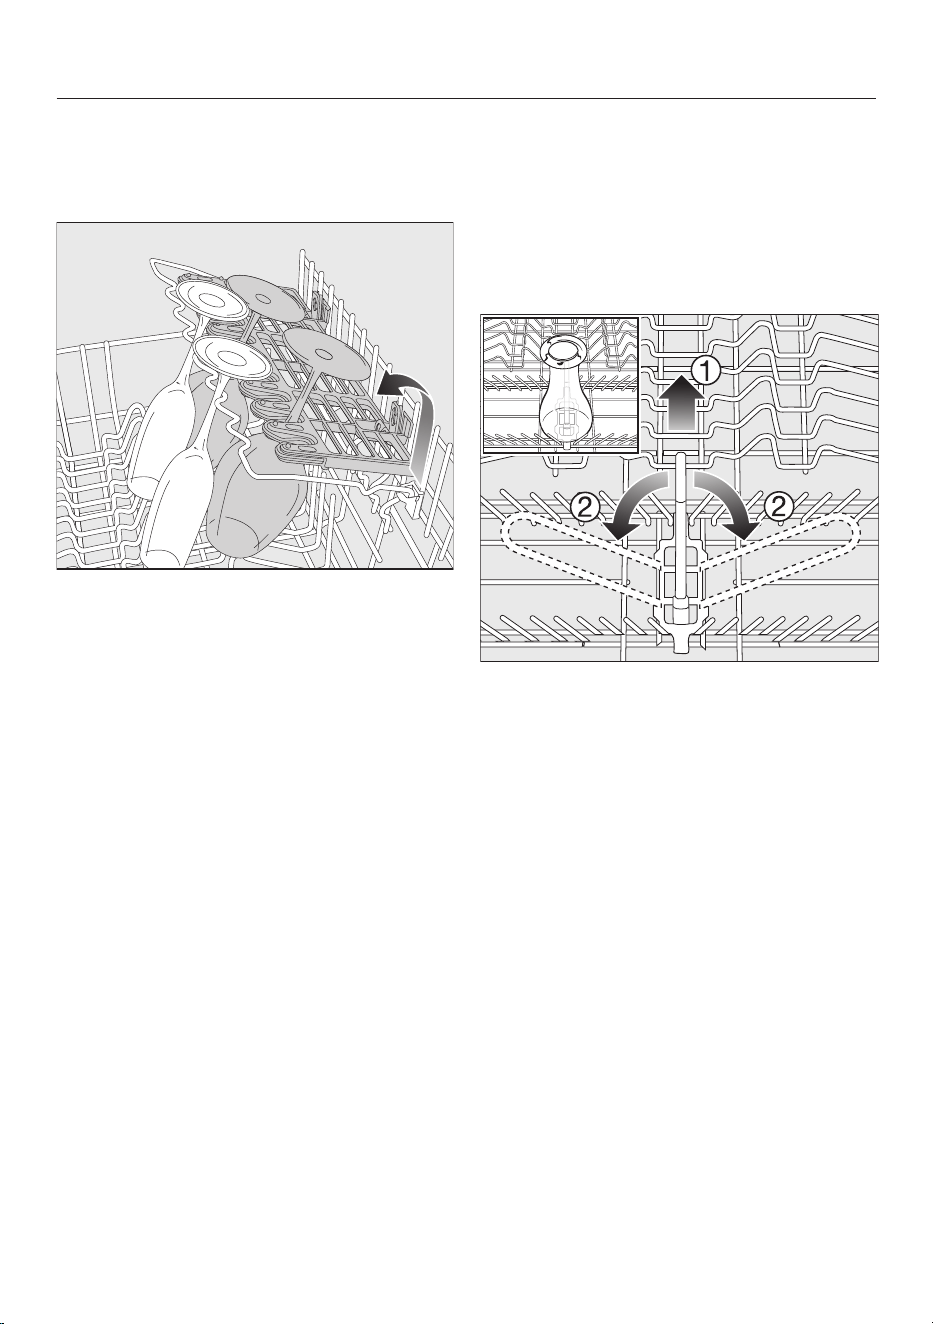
Adjusting the upper basket
In order to gain more space for taller
items, the upper basket can be ad-
justed on 3 levels with 3/4inches (2cm)
between each level.
The upper basket can also be set at an
angle so that water can run off freely
from recesses. Make sure, however,
that the basket can slide smoothly in
and out of the wash cabinet.
Pull out the upper basket.
To raise the upper basket:
Lift the basket until it clicks into
place.
To lower the upper basket:
Pull upwards on the levers at either
side of the upper basket.
Adjust the basket to the desired
height and then push the levers se-
curely back down into position.
When adjusting the upper basket,
make sure it does not block the mid-
dle spray arm.
Loading the dishwasher
40
Lower basket
See “Loading examples” under “Load-
ing the dishwasher” for examples of
how to load dishware and utensils.
Loading the lower basket
Place larger and heavier items such
as plates, serving platters,
saucepans, bowls, etc., in the lower
basket.
Glasses, cups, and small plates and
saucers can also be placed in the
lower basket.
Loading the MultiComfort area
The rear section of the lower basket is
used for washing cups, glasses, plates,
and pots.
Place very large plates in the center
of the lower basket.
Tip: When tilted, plates up to
13 3/4" (35cm) in diameter can be ac-
commodated.
Lowering the spikes
The spikes at the front are used for
washing plates, soup bowls, platters,
dessert bowls, and saucers.
The spikes can be lowered to make
more room for large items, e.g., pots,
pans, and dishes.
Press the yellow lever downwards,
and then lower the spikes.
Loading the dishwasher
41
Loading the FlexCare glass holder
with MultiClips
The silicone elements in the glass
holder provide a stable and secure hold
for delicate stemware.
Stemware such as wine glasses,
champagne flutes, and beer glasses
can be leaned against the glass
holder or suspended from it.
The glass holder can be raised to
make more room for tall items.
You can set the glass holder at 2 differ-
ent heights.
Slide the glass holder to the desired
height until the catches click into
place at the top or the bottom.
The MultiClips enable you to fasten
wash light items such as those made
from plastic onto the glass holder.
Fold up the MultiClips.
Secure light items to the MultiClips.
Loading the dishwasher
42
Loading the glassware rail
This rail is designed to hold tall glasses
and glasses with stems securely.
Lower the rail and lean tall glasses
against it.
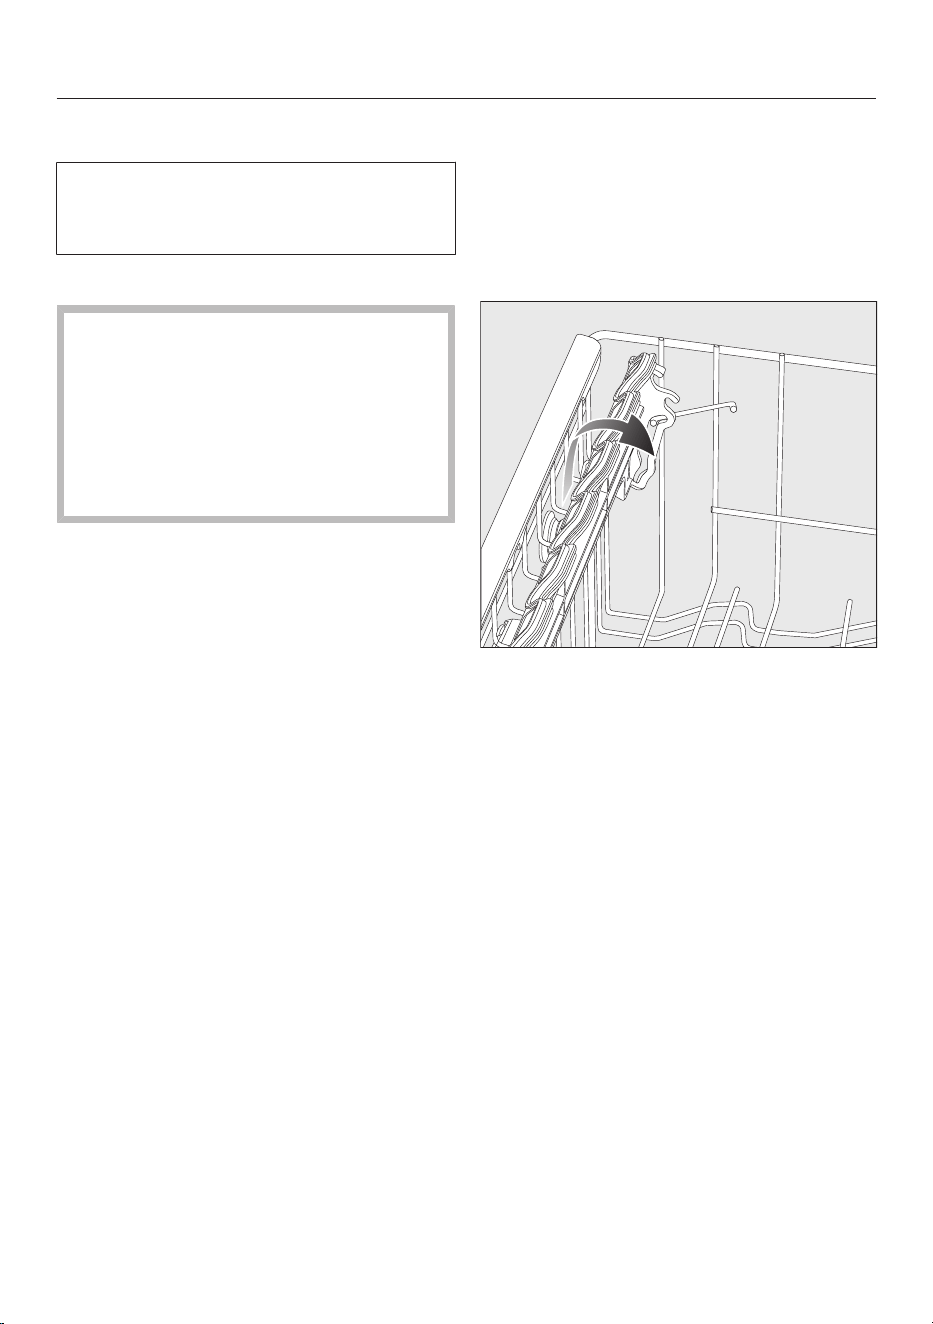
Lowering the bottle holder
The bottle holder can be used to keep
narrow items such as milk and baby
bottles secure during a program.
Raise the bottle holder upwards and
push it down until it clicks into place.
If the bottle holder is not needed, lift
it up using the yellow lever and
fold it to the side.
Loading the dishwasher
43
Cutlery tray
See “Loading examples” under “Load-
ing the dishwasher” for examples of
how to load dishware and utensils.
Load the utensils into the 3D Multi-
Flex Tray.
Loading the 3D MultiFlex Tray
To make unloading easier, cutlery
should be grouped in zones, one for
knives, one for forks, one for spoons,
etc.
Spoon heads should be placed in con-
tact with at least one of the serrated re-
tainers on the base of the cutlery tray to
ensure that water runs off them freely.
If spoon handles do not fit between
the holders, then lay them the other
way round.
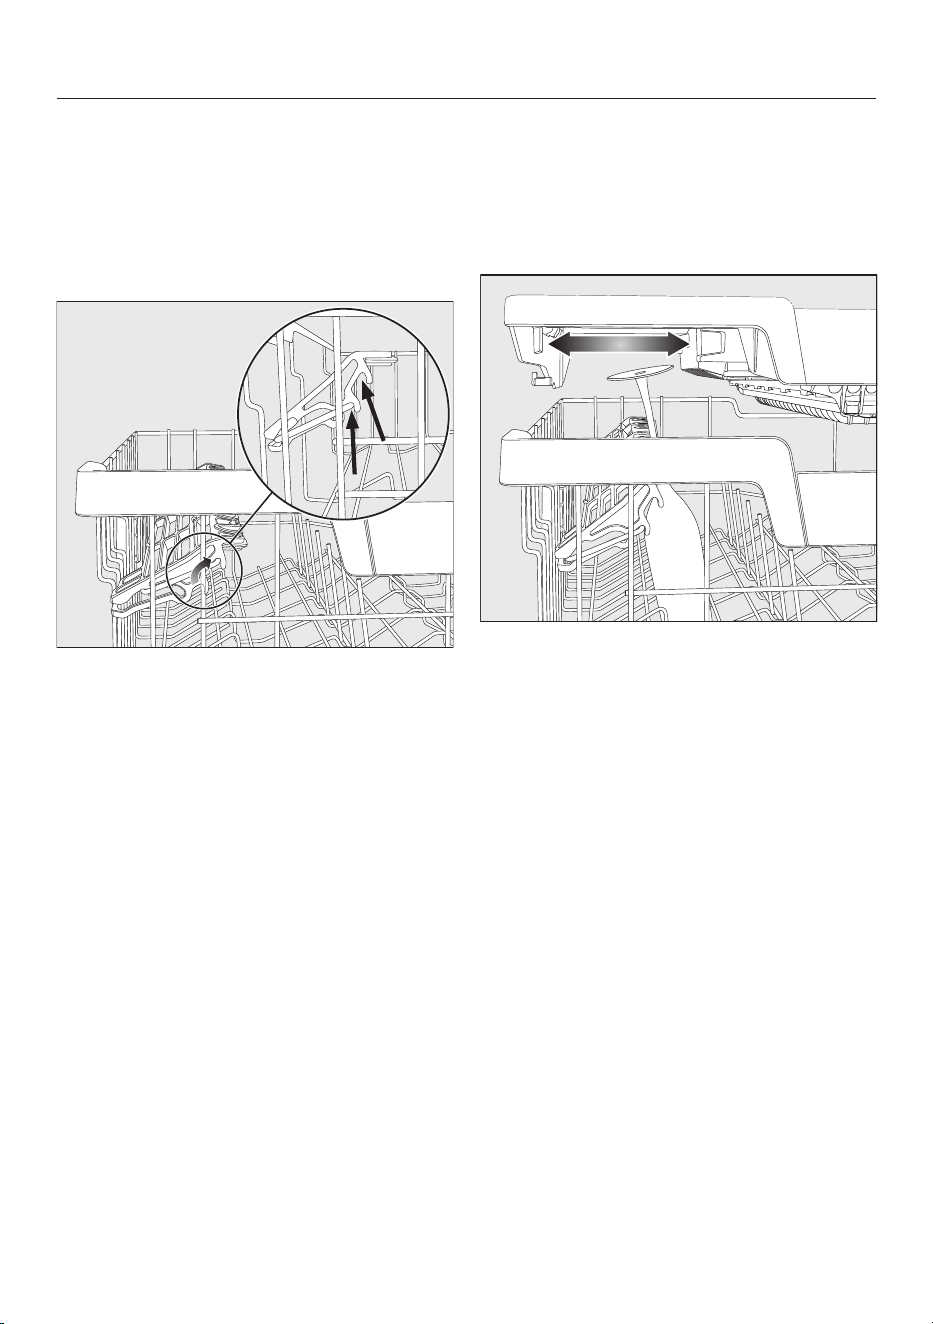
You can push the left insert to the mid-
dle in order to accommodate tall items
and long stemmed glasses in the upper
basket (see “Loading the silicone ele-
ments of the FlexCare cup rack” under
“Upper basket”).
You can put large and long cutlery (such
as salad servers and chef’s knives) in
the recessed center part of the tray.
Arrange tall items (such as cake
server) so that they do not block the
upper spray arm.
You can adjust the height of the right-
hand insert to create more space in the
right-hand part of the tray for larger cut-
lery items or smaller dishes.
Pull the insert inwards by the yellow
handle and click it into place in one of
the two positions.
Loading the dishwasher
44
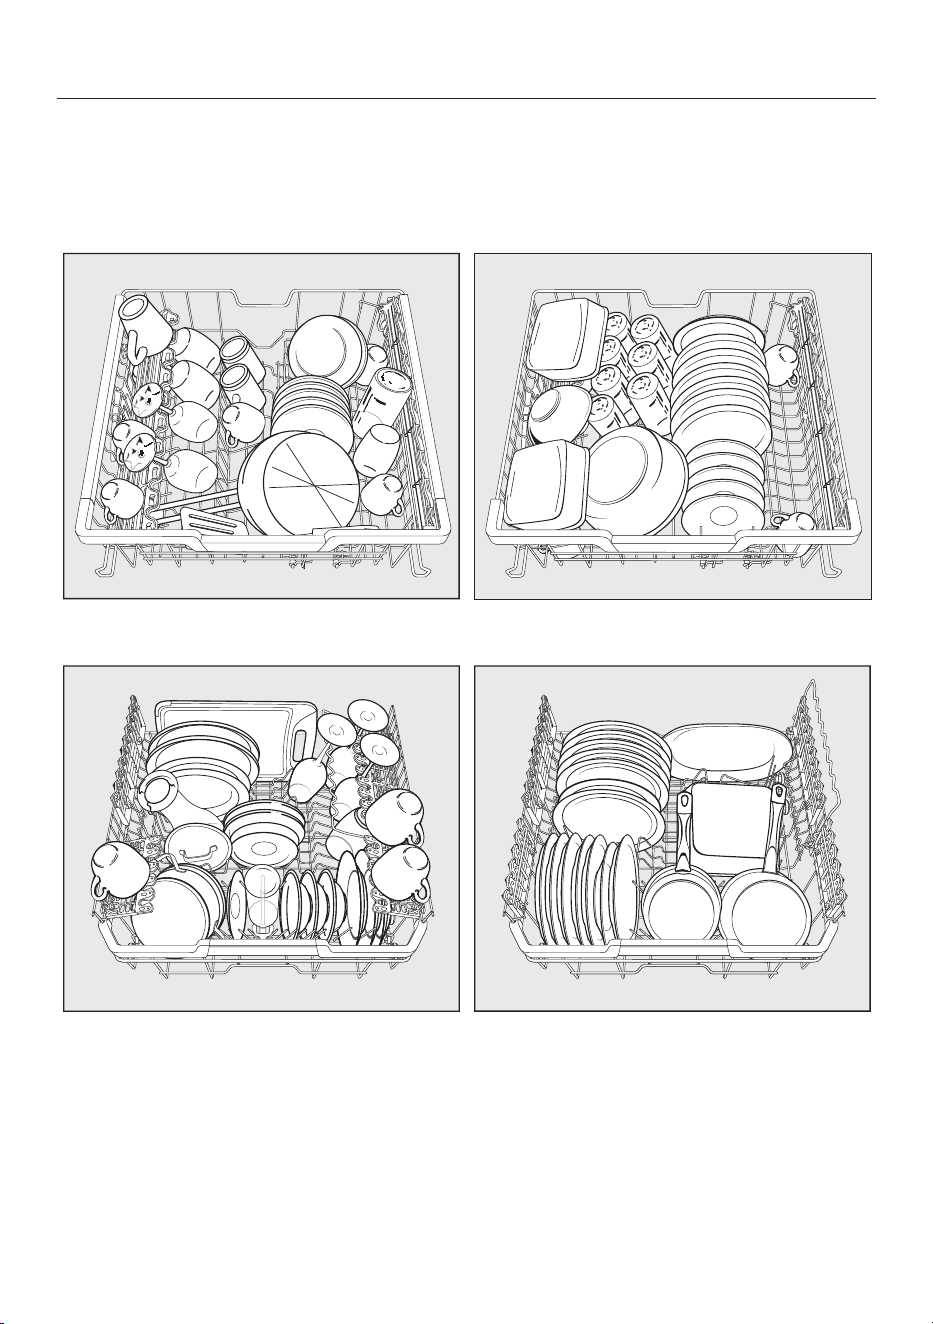
Loading examples
Dishwashers with cutlery tray
Upper basket
Lower basket
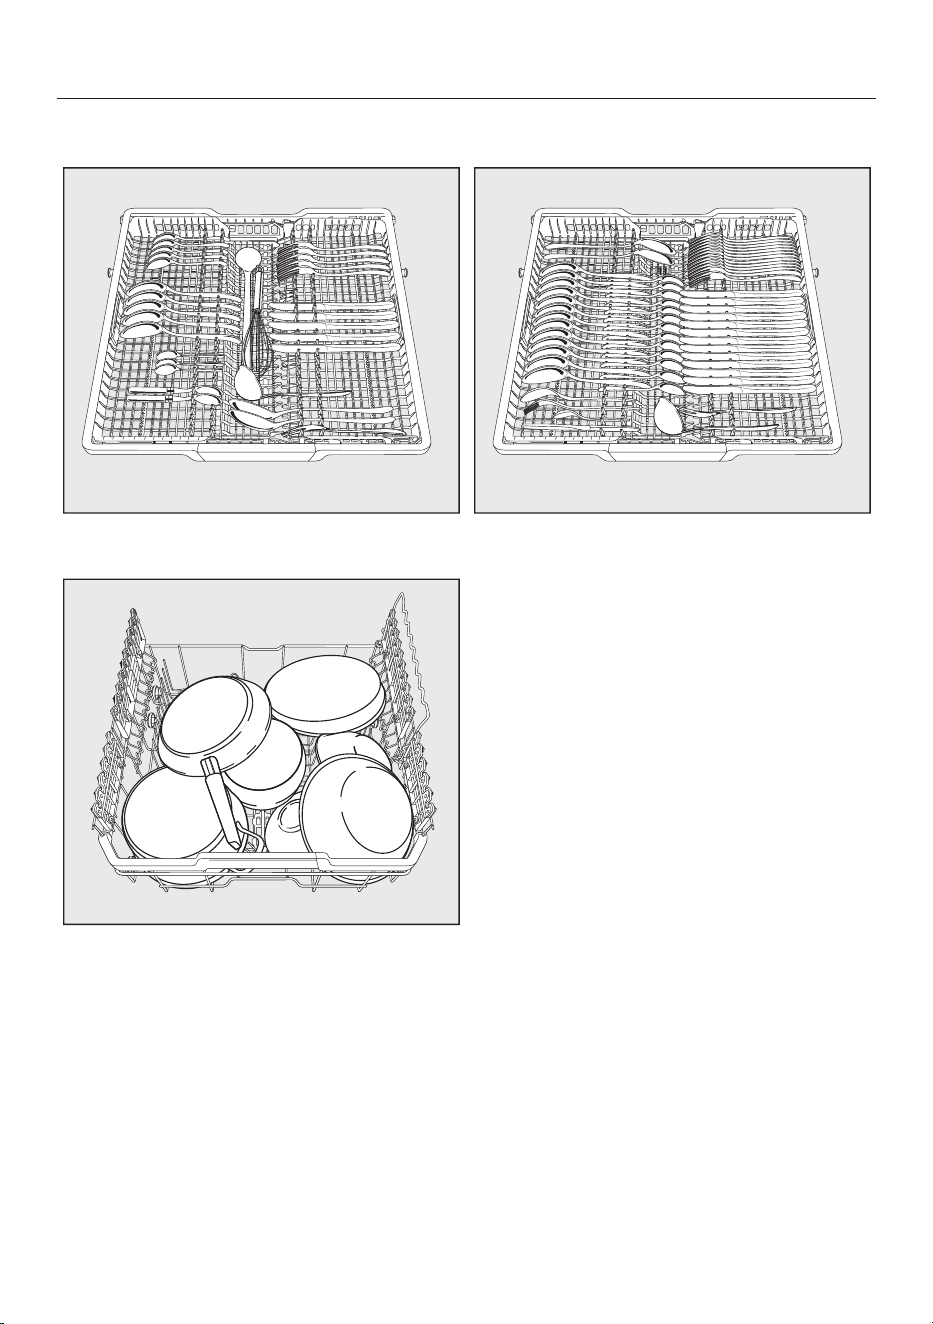
Loading the dishwasher
45
Cutlery tray
Heavily soiled dishware
Loading the dishwasher
46
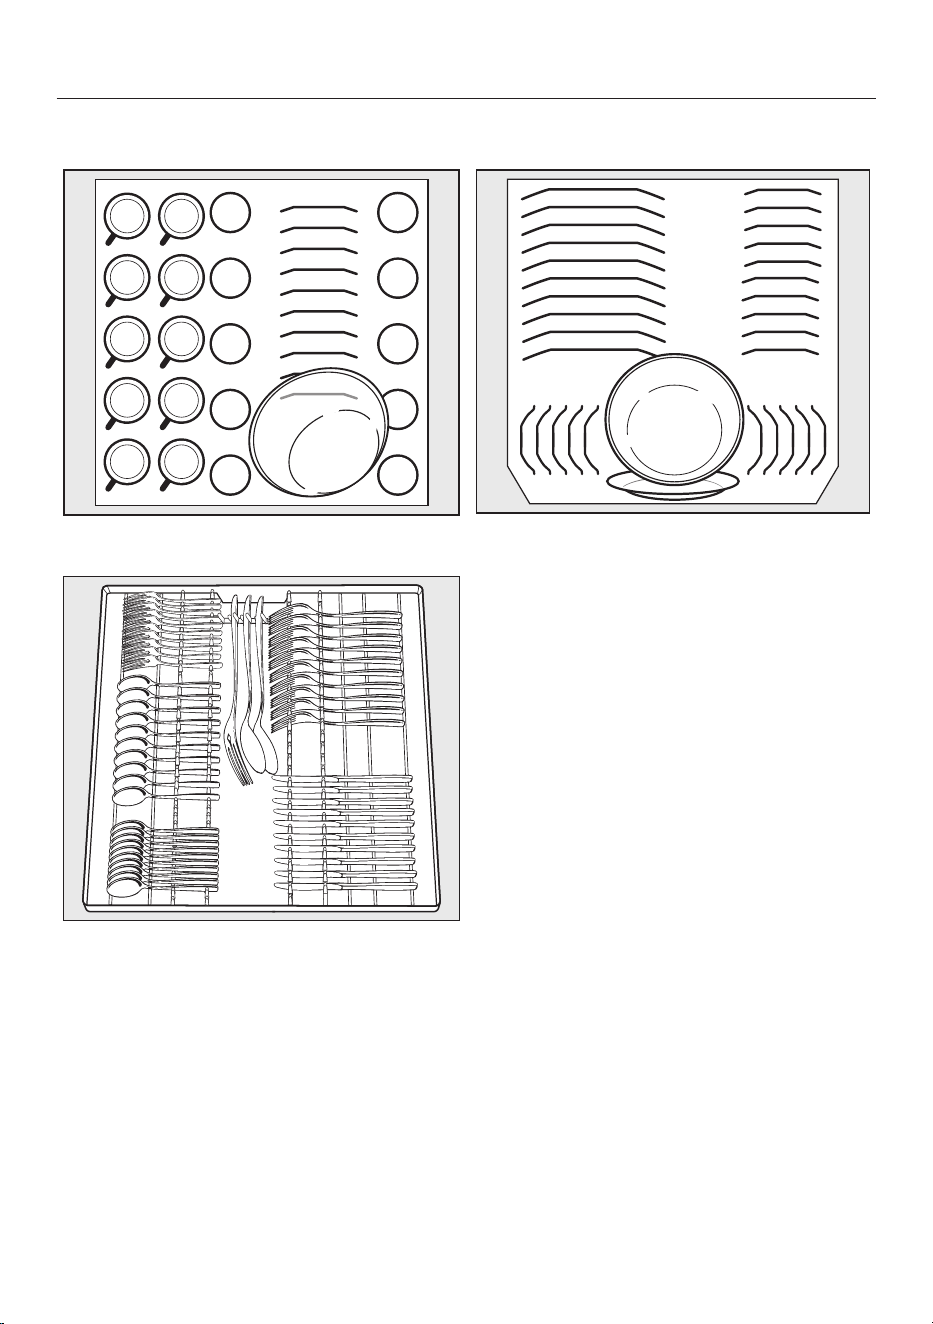
Loading for 10 standard place settings with cutlery tray
Upper basket
Lower basket
Cutlery tray (depending on model)

Loading the dishwasher
47
Loading for 16 standard place settings with cutlery tray
Upper basket Lower basket
Cutlery tray (depending on model)
Detergents
48
Risk of chemical burns from de-
tergent.
Dishwasher detergents can cause
burning on the skin and in the eyes,
nose, mouth, and throat.
Avoid contact with detergents.
Do not inhale or ingest powder de-
tergents. Do not swallow dishwasher
detergents. Seek medical attention
immediately if detergent has been
swallowed or inhaled.
Keep children away from detergents.
Detergent residues could still be
present in the machine. Keep chil-
dren away from the dishwasher when
the door is open. Do not fill the de-
tergent dispenser until just before
starting the program and activate the
door safety lock (depending on
model).
Risk of damage due to deter-
gents containing active chlorine.
Detergents containing active chlorine
must not be used. You may damage
plastic parts and the seals of the
dishwasher.
Do not use detergents containing ac-
tive chlorine.
You can easily order powder detergents
and other consumables for your dish-
washer for domestic use via the
Miele@mobile app or the Miele website:
https://www.mieleusa.com/.

Detergents
49
Powder detergents and deter-
gent tabs
Use powder detergent or detergent
tabs only in the door dispenser com-
partment.
Only use detergent tabs that are
quick-dissolving.
Suitable detergent tabs are available
from the Miele range. When using
combination detergents (tabs that of-
fer rinse aid and water softening ef-
fects as well as cleaning), it is rec-
ommended that you also add rinse
aid and reactivation salt (at a lower
concentration) owing to the short
program cycle times and potentially
the water quality.
Add powder detergent or detergent
tabs to the detergent compartment.
Dispensing detergent
The detergent compartment holds a
maximum of 50ml.
There are marks in the detergent com-
partment to aid with dispensing: 20, 30,
max. When the door is opened to a hor-
izontal position, they show the approxi-
mate fill level in ml and the maximum fill
height.
They also indicate the approximate fill
level in grams for powder detergents,
depending on the manufacturer and the
coarseness.
Follow the detergent dosage recom-
mended by the manufacturer on the
packaging.
Unless directed otherwise, use one
detergent tab or add 20 to 30ml of
detergent to the detergent compart-
ment, depending on the level of soil-
ing of the dishware.
If you use less than the recommended
amount of detergent, the dishware may
not get properly clean.

Detergents
50
Adding detergent
Press the yellow button on the lid
of the detergent compartment.
The lid will spring open.
The lid will also open at the end of a
program.
Add the detergent to the detergent
compartment.
Push the lid shut until you hear it click
into place.
The detergent must not cause the
detergent-compartment lid to get
stuck. This can prevent the lid from
opening during the program.
Do not overfill the detergent com-
partment.
Ensure that the detergent packaging
is properly closed after use. This pre-
vents the detergent from getting
damp and clumping together.
You can also apply a small amount of
detergent to the inner panel of the
door in programs that have a pre-
rinse stage (see “Program overview”).

Operation
51
Turning on the dishwasher
Turn on the water supply if it is turned
off.
Open the door.
Make sure the spray arms can rotate
freely.
Touch the sensor button.
If the dishwasher has been turned off
for longer than 1minute, you will
need to hold the sensor button for
a bit longer (wipe protection).
The program selected will appear briefly
in the display and the appropriate sen-
sor button will be illuminated.
Next, the estimated water consumption
may be shown for the chosen program
for several seconds.
Then the display will show the esti-
mated duration for the selected pro-
gram.
Selecting a program
Choose your program according to the
type of load and the degree of soiling.
The different programs and their uses
are described in the Program overview
later on in this booklet.
Touch the sensor button for the re-
quired program.
The sensor button for the selected pro-
gram will light up.
Additional programs can be selected via
the option.
To do so, touch the sensor button.
The first of the additional programs will
appear in the display.
Use the sensor buttons in the
display to select the program you
want.
You can now select program options
(see “Program options”).
If any program options are selected, the
appropriate sensor buttons will also
light up.

Operation
52
Display of program cycle time
The estimated duration of the selected
program appears on the display before
the program begins. If the door is
opened during the program, the time
left until the end of the program is dis-
played.
Each program phase is indicated by a
symbol:
Pre-rinse/Soak
Main wash
Interim rinse
Final rinse
Drying
Finish
The displayed duration may vary for the
same program. It is influenced by, for
example, the temperature of the incom-
ing water, the reactivation cycle of the
water softener, and the amount of dish-
ware and how soiled it is.
When a program is selected for the first
time, the display will show the average
cycle time for a hot water connection.
The program durations shown under
“Program overview” refer to standard
test loads and temperatures.
Each time a program is run, the control
module calculates the program duration
required depending on the temperature
of the water taken into the dishwasher
and the amount of dishware.
Starting a program
Start the program by closing the
door.
Confirm the previously displayed
messages with OK.
The in-operation indicator light comes
on to show that a program has been
started.
During a program sequence, you can
use OK to display the name of the
program that is currently running while
the door is open.
Risk of scalding due to hot wa-
ter.
During operation, water in the dish-
washer may be very hot.
During operation, only open the door
with extreme caution.
Operation
53
Program end
At the end of a program, the in-opera-
tion indicator light will be flashing slowly
with the door shut. The audible signal
may also be sounding.
The in-operation indicator light will go
out 10minutes after the end of the pro-
gram if the door is closed.
The program has ended when the dis-
play shows the message Ready.
In some programs, if the AutoOpen
function is activated, the door will auto-
matically open slightly (see “AutoOpen”
under “Settings”). This improves the
drying process.
If the Consumptionprogrammable func-
tion is turned on, you can now call up
the actual water consumption of the
program that has just finished (see
“EcoFeedback consumption display”
under “Caring for the environment”).
The drying fan may continue to run for
a few minutes at the end of the pro-
gram.
Risk of damage due to steam.
Steam from the dishwasher could
damage the edges of delicate coun-
tertops when you open the door at
the end of the program if the fan is
no longer running.
If you have deactivated the auto-
matic door-opening function (see
“AutoOpen” under “Settings”), but
would still like to open the door at
the end of the program, then make
sure that you open the door fully.
Energy management
To save energy, the dishwasher will turn
off automatically 10minutes after the
last time a sensor button is pressed or
after the end of a program.
You can turn the dishwasher back on
again with the sensor button.
If the dishwasher has been turned off
for longer than 1minute, you will need
to hold the sensor button for a bit
longer (wipe protection).
The dishwasher will not turn itself off
while a program is running or if there is
a fault.

Operation
54
Turning off the dishwasher
Open the door.
The dishwasher can be turned off at
any time using the sensor button.
Confirm the query Turn appliance off
with OK.
Turning the dishwasher off during a pro-
gram stops the program.
You can also do this to stop an ongoing
timer.
If you have pressed the sensor
button, but in fact do not wish to can-
cel the program, use the button to
select the Do not turn off option on the
display and confirm with OK.
Risk of damage from leaking wa-
ter.
Leaking water can cause damage.
If the dishwasher is not going to be
used for a longer period of time, e.g.,
during vacations, the water supply
valve should be turned off.
Unloading the dishwasher
Dishes tend to break and chip more
easily when they are hot. Allow the
dishes to cool until they are comfortable
enough to handle before unloading
them.
The dishes will cool much faster if you
open the door when the program has
ended.
First unload the lower basket, then
the upper basket, and finally the 3D
MultiFlex Tray.
This will prevent water drops from the
upper basket and 3D MultiFlex Tray
from falling onto the dishes in the
lower basket.

Operation
55
Interrupting a program
A program will be interrupted as soon
as the door is opened.
If the door is closed again within 4sec-
onds, the program will continue from
the point it was at before the door was
opened after a few seconds.
4seconds after the door was opened,
the following will appear in the display:
Continue with OK.
Press the OK button and close the door.
The program will continue from the
point at which it was interrupted.
Risk of scalding due to hot wa-
ter.
During operation, water in the dish-
washer may be very hot.
During operation, only open the door
with extreme caution.
Canceling or changing a pro-
gram
If a program is canceled, important
program stages may be missed.
A program should only be canceled
in the first few minutes.
If a program has already started and
you wish to cancel it, proceed as fol-
lows:
Open the door.
Turn the dishwasher off using the
sensor button.
Confirm the query Turn appliance off
with OK.
If you would like to select another pro-
gram:
If you have dispensed detergent
manually, check whether the deter-
gent compartment is still closed.
If the lid is already open, fill it with de-
tergent again and close the lid.
Turn the dishwasher back on using
the sensor button.
Select the program you want within
4seconds and then start it by shut-
ting the door.
After 4seconds, the following will ap-
pear in the display: Continue with OK.
Press the OK button and close the
door.
The in-operation indicator light comes
on to show that a program has been
started.

Options
56
Options
Options can be selected and dese-
lected using the appropriate buttons
and the display before starting the pro-
gram.
Open the door.
Turn the dishwasher on by touching
the sensor button.
The Startsensor button flashes.
Select a program.
Press the button for the option you
want.
The indicator light for the relevant but-
ton will come on if the option is avail-
able for the program selected.
If the option is not compatible with the
program selected, a message to this ef-
fect will appear in the display.
In this instance, confirm the message
with OK.
Start the program by closing the
door.
The option selected will remain active
for that particular program until the set-
ting is changed.
Time left
The Time leftoption is selected as
standard and displays the time remain-
ing until the end of the program.
Temperature
The Temperatureoption shows the
current temperature of the wash block.
Extra dry
The Extra dryoption improves the
drying performance in programs in
which this option is available.
Energy consumption is increased due
to an extended fan running time.
If the AutoOpen function has been acti-
vated, the door will automatically open
at the end of the program.
Settings
The Settings option opens the menu
to enable settings to be selected on the
machine and changes to be made to
program parameters.
See the “Settings” chapter for more in-
formation.

Options
57
Timer
The timer gives you several options
for starting a program at a later time.
The start or finish time of a program can
be delayed. You can also use the
EcoStart or SmartStart functions to bene-
fit from lower electricity rates at night.
During manual detergent dispensing,
the detergent will clump together if
the detergent compartment is not
dry, and this may mean it is not fully
rinsed out.
When using the timer function, make
sure that the detergent compartment
is dry before adding detergent. Wipe
dry with a cloth first, if necessary.
Do not use any liquid detergents.
These can leak out.
Danger to health due to deter-
gent.
To prevent children coming into con-
tact with dishwasher detergent:
Do not fill the detergent dispenser
until just before starting the pro-
gram, i.e., before you activate the
timer.
Activating the timer
Open the door.
Turn the dishwasher on using the
sensor button.
Select the program you want to use.
Touch the sensor button.
The sensor button lights up.
You can use the sensor buttons to
choose between the Start at, Finish at, or
EcoStart functions, or SmartStart if appli-
cable.
Confirm selection of the function you
want with OK.
The last time set for the timer will be
displayed and the hour number block
will be highlighted.
Enter the time you want for the timer
using the sensor buttons and
confirm with OK.
If, while you are setting the time, you do
not apply any settings for several sec-
onds, the display will revert to the previ-
ous menu. You will then have to enter
your settings again.
After you have activated the timer, all
the displays will turn off after a few
minutes to save energy.
You can also activate a timer via the
Miele@mobile app.

Options
58
Setting “Start at”
With the Start at function, you set the
exact time at which you want the pro-
gram to start.
Use the sensor buttons to enter
the hour and confirm your entry with
OK.
The hour will be saved and the minute
number block will be highlighted.
Use the sensor buttons to enter
the minutes and confirm your entry
with OK.
The saved start time for the selected
program will appear in the display for
several minutes.
Close the door.
When the set time is reached, the pro-
gram selected will begin automatically.
Setting “Finish at”
Use the Finish at function to set the lat-
est time by which the program selected
has to be finished.
Use the sensor buttons to enter
the hour and confirm your entry with
OK.
The hour will be saved and the minute
number block will be highlighted.
Use the sensor buttons to enter
the minutes and confirm your entry
with OK.
The estimated start time for the se-
lected program will appear in the dis-
play for several minutes.
A message will appear in the display if
the program cannot be completed by
the set finish time because the cycle
time is too long.
If it appears, confirm the message
with OK.
Close the door.
The program will start automatically
when the estimated start time is
reached.

Options
59
Setting EcoStart
The EcoStart function enables you to
benefit from cheaper electricity rates at
night. Before you can use this option,
you need to set up to 3electricity-rate
time zones (see “EcoStart” under “Set-
tings”).
Then set the time by which the selected
program has to be finished.
The dishwasher will then start automati-
cally in the most economical rate zone
within the time set.
Use the sensor buttons to enter
the hour and confirm your entry with
OK.
The hour will be saved and the minute
number block will be highlighted.
Use the sensor buttons to enter
the minutes and confirm your entry
with OK.
The estimated start time for the se-
lected program will appear in the dis-
play for several minutes.
Close the door.
The program will start automatically
when the estimated start time is
reached.
Setting SmartStart
The SmartStart function is used for start-
ing your dishwasher automatically at a
time when your energy costs are most
economical.
To use this function you may need fur-
ther technical accessories.
If you have activated the SmartStart
function in the Settings menu, the
Timer menu will no longer show the
EcoStart function but will instead show
SmartStart (see “Miele@home” under
“Settings”).
If your energy provider offers this ser-
vice, they will send a signal to your
dishwasher when energy costs are at
their most economical.
This signal will start the dishwasher.
You can set the time by which the pro-
gram selected has to be finished. The
dishwasher will then calculate the latest
possible start time for the program se-
lected and will wait until this start time
for the signal from the energy provider.

Options
60
Set the time by which the selected pro-
gram has to be finished.
Use the sensor buttons to enter
the hour and confirm your entry with
OK.
The hour will be saved and the minute
number block will be highlighted.
Use the sensor buttons to enter
the minutes and confirm your entry
with OK.
Waiting for SmartStart will appear in the
display.
Close the door.
The selected program will start auto-
matically as soon as the energy
provider has sent the signal or the latest
possible calculated start time has been
reached.
Changing or deleting set times
You can change the time set for the
timer or delete it.
Open the door.
Touch the sensor button.
Use the sensor buttons in the
display to select the previously acti-
vated timer function and confirm your
entry with OK.
Use the sensor buttons to select
the Change or Delete function and
confirm with OK.
After confirming the Change function
with OK, you can change the time set
for the timer.
After confirming the Delete function with
OK, the cycle time of the selected pro-
gram will appear in the display.
The sensor button goes out and the
sensor button for the selected program
will light up.
You can now start a program or turn the
dishwasher off.
Turning the dishwasher off while a timer
is running stops the timer.
You can also change the time set for
the timer or delete it using the
Miele@mobile app.

Options
61
Activating Remote start
You can start your dishwasher remotely
using the Miele@mobile app. To do this,
you first need to install the app on your
mobile device, connect the dishwasher
to your WiFi network (see
“Miele@home” under “Settings”), and, if
applicable, activate the Remote control
option (see “Remote control” under
“Settings”).
Open the door.
Turn the dishwasher on using the
sensor button.
Touch the sensor button.
The sensor button lights up.
Turn the dishwasher off using the
sensor button.
Close the door.
The dishwasher can now be operated
remotely using the Miele@mobile app.
The Remote start option will remain ac-
tivated until you deactivate it again us-
ing the sensor button. The option
will also remain active if you turn the
dishwasher off and back on again in the
meantime.
Even if the Remote start option is not
active, you can check the status of your
dishwasher and apply settings using
the Miele@mobile app.
If you start a program by closing the
dishwasher door, the Remote start op-
tion will automatically be activated for
the duration of the program.
Program chart
62
Program Application Detergents
The following dosages are
based on Miele detergents.
Please follow manufacturer’s
instructions.
Detergent compartment
1)
QuickIntense-
Wash
For fresh, non-sticky food residues. 20–25g
or 1 detergent tab
Universal
For normal, slightly dried food residues.
The normal cycle for regular use to completely
wash a full load of normally soiled dishes.
20–25g
or 1 detergent tab
Pots & Pans
For burnt-on, stubborn, dried-on food deposits
containing starch or protein
1)
.
20–25g
or 1 detergent tab
China & Crys-
tal
Special glassware program. 20–25g
or 1 detergent tab
ECO *)
Energy-saving program with a long cycle time for
normal, slightly dried food residues.
20–25g
or 1 detergent tab
Plastics
Special plastics program. 20–25g
or 1 detergent tab
SaniWash
Special SaniWash program for items that need
to be hygienically clean.
20–25g
or 1 detergent tab
Rinse & Hold
To rinse heavily soiled items, e.g., for initial re-
moval of dirt or to prevent residues drying on to
dishes when a complete program does not yet
need to be run.
*) Program for regular use to completely wash a full load of normally soiled dishes with the ability to
adjust energy and water consumption based on the soil load of the dishes.
(Fixed program sequence which cannot be altered)
1)
See “Detergents”
Program chart
63
Program cycle
Pre-rinse Main wash Interim rinse Final rinse Drying AutoOpen
X
140-150°F (60–
65°C)
2)
1min
X
40s
X
150°F (65°C)
3)
30s
(X)
20min
4)
(X)
X
150°F (65°C)
6min
X
3min
X
150°F (65°C)
3)
2min
(X)
30min
(X)
X
6min
X
167°F (75°C)
6min
X
3min
X
150°F (65°C)
3)
2min
(X)
30min
(X)
X
122°F (50°C)
1min
X
3min
X
122°F (50°C)
2min
(X)
20min
(X)
X
125°F (51.5°C)
44min
X
4min
X
118°F (48°C)
10min
X
127min
(X)
X
6min
X
122°F (50°C)
1min
X
5min
X
140°F (60°C)
1min
X
30min
(X)
X
8min
X
151°F (66°C)
10min
X
3min
X
180°F (82°C)
2min
X
30min
(X)
X
Cold
10min
X = Program stages
(X) = Optional extra program stages (See “Program options, Options”)
2)
The temperature reached depends on the type and amount of wash items as well as the water inlet
temperature.
3)
Optional temperature increase to 180°F (82°C).
4)
If the temperature is increased to 180°F (82°C), the drying time will be extended to 30minutes.
Program chart
64
Program
Consumption
6)
Duration
6)
Electrical energy Water
Cold water
60°F (15°C)
Hot water
130°F (55°C)
Cold water
60°F (15°C)
Hot water
130°F (55°C)
1.4kW 4.0kW 1.4kW 4.0kW 1.4kW 4.0kW 1.4kW 4.0kW 1.4kW 4.0kW
QuickIn-
tenseWash
1.5kW
h
1.4kW
h
0.9kWh 3.9 gal (14.7l) 80min
7)
33min
7)
52min
7)
24min
7)
Universal
1.6kW
h
1.5kW
h
1.0kWh 3.9 gal (14.8l) 95min
7)
43min
7)
63min
7)
35min
7)
Pots &
Pans
1.8kW
h
1.7kW
h
1.1kW
h
1.0kW
h
5 gal (19.2l) 111mi
n
7)
60min
7)
76min
7)
48min
7)
Plastics
1.3kWh 0.6kW
h
0.5kW
h
5.15 gal (19.5l) 115mi
n
75min 77min 63min
China &
Crystal
1.0kWh 0.5kW
h
0.4kW
h
4 gal (15.3l) 60min
7)
30min
7)
35min
7)
22min
7)
SaniWash
2.2kW
h
2.0kW
h
1.5kW
h
1.3kW
h
5 gal (19.2l) 121mi
n
7)
66min
7)
85min
7)
54min
7)
Rinse &
Hold
0.02kWh 0.02kWh 1.19 gal (4.5l) 13min 13min
ECO
14 place set-
tings
0.950kWh 0.6kWh 3.2 gal (12l) 255min 245min
6)
The quoted values are calculated in accordance with EN50242 for a connected load of 1.4 and
4.0kW. In practice, considerable variations may be noted due to differing conditions.
The duration displayed is adjusted to the on-site conditions.
7)
The value is based on the wash time without drying.

Cleaning and care
65
USER MAINTENANCE IN-
STRUCTIONS
To prolong the service life of the dish-
washer, maintenance should be carried
out at least once a year by Miele Cus-
tomer Service.
Maintenance covers the following:
- Electrical safety according to national
regulations
- Door mechanism and door seal
- Any screw connections and connec-
tors in the wash cabinet
- Water inlet and drainage
- Internal and external dispensing sys-
tems
- Spray arms
- Filter combination
- Sump including drain pump and non-
return valve
- All baskets and inserts
The following operational tests will be
carried out as part of the maintenance:
- A program will be run as a test run
- Seals will be tested for water tight-
ness
- All relevant measuring systems will
be safety tested, including fault dis-
plays
- Safety features
Check the condition of your dish-
washer regularly (approx. every 4–6
months). This way, faults and prob-
lems can be avoided.
Damage due to unsuitable clean-
ing agents.
All surfaces are susceptible to
scratching. Contact with unsuitable
cleaning agents can alter or discolor
the external surfaces.
Only use cleaning agents formulated
for use on the relevant surfaces.
Cleaning the wash cabinet
The wash cabinet is largely self-clean-
ing, provided that the correct amount of
detergent is always used.
If, despite this, limescale or grease de-
posits build up in the chamber, these
can be removed with a proprietary dish-
washer cleaner (available from Miele).
Follow the dosage recommended by
the manufacturer on the packaging.
Clean the filters in the wash cabinet
regularly.

Cleaning and care
66
Cleaning the door and the door
seal
The door seal and the sides of the dish-
washer door are not accessed and
cleaned by the spray arm jets.
Wipe off any food or drink residues
which may have dripped onto the
sides and seals of the dishwasher
door with a damp cloth on a regular
basis to prevent the build-up of mold.
Cleaning the control panel
The control panel should only be
wiped with a damp cloth.
Cleaning the reflector panel
The reflector panel for the in-operation
indicator light is situated on the cover
sheeting underneath the countertop.
The reflector panel should only be
cleaned with a damp cloth if neces-
sary.
Cleaning the front of the ma-
chine
Damage due to soiling.
Soiling that is left too long might be-
come impossible to remove and
could cause the external surfaces to
alter or discolor.
It is therefore best to remove any
soiling immediately.
Clean the appliance front with a clean
soft sponge and a solution of warm
water and washing-up liquid. After
cleaning, wipe the surfaces dry using
a soft cloth.
A clean, damp microfiber cloth with-
out detergent can also be used.

Cleaning and care
67
To avoid damaging the external sur-
faces, do not use the following:
- cleaning agents containing soda, am-
monia, acids, or chloride
- cleaning agents containing lime scale
remover
- abrasive cleaning agents, such as
scouring powder, scouring liquid, or
pumice stones
- cleaning agents containing solvents
- stainless-steel cleaning agents
- dishwasher cleaner
- oven cleaner
- glass cleaner
- hard, abrasive brushes or sponges,
e.g., pot scourers, brushes, or
sponges which have been previously
used with abrasive cleaning agents
- eraser sponges
- sharp metal scrapers
- steel wool
- steam cleaners
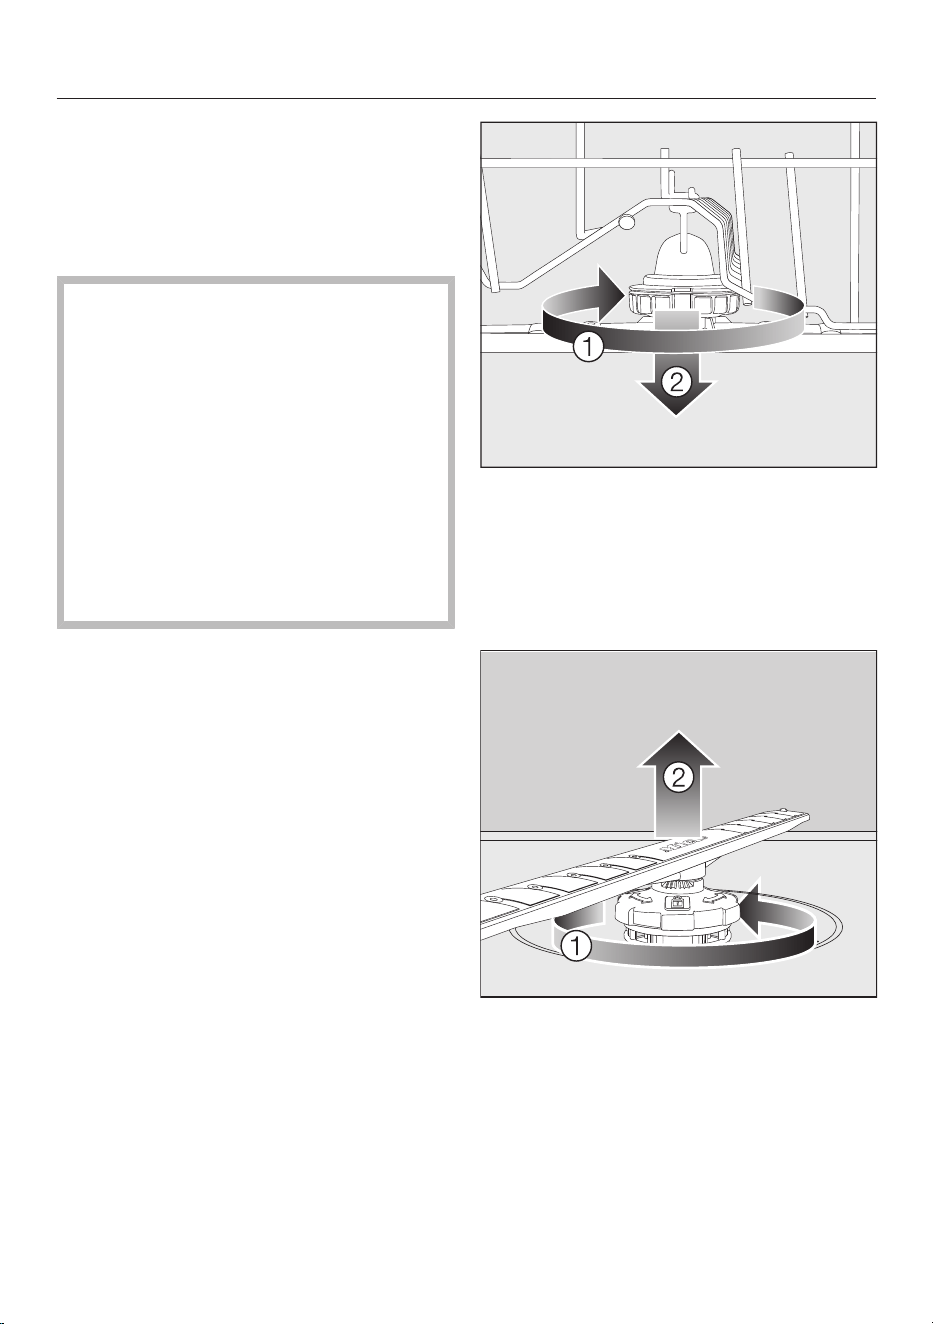
Cleaning and care
68
Cleaning the spray arms
Particles of food can get stuck in the
spray arm jets and bearings. The spray
arms should therefore be inspected reg-
ularly (approx. every 2–4months).
Damage due to soiling entering
the circulation system.
Without filters, soiling can enter the
circulation system and cause a
blockage.
Do not run a wash program without
the lower spray arm or without the fil-
ters.
When cleaning the filters and spray
arms, make sure that coarse soiling
cannot get into the circulation sys-
tem.
Turn off the dishwasher.
Removing the upper and middle
spray arms
Take out the 3D MultiFlex Tray (if your
dishwasher is fitted with one).
Push the upper spray arm upwards to
engage the inner ratchet. Then un-
screw the spray arm by rotating the
screw thread counterclockwise.
Rotate the screw thread of the middle
spray arm clockwise (see diagram)
and remove the spray arm.
Removing the lower spray arm
Remove the lower basket.
Rotate the screw thread of the lower
spray arm counterclockwise and
pull the spray arm upwards to re-
move.
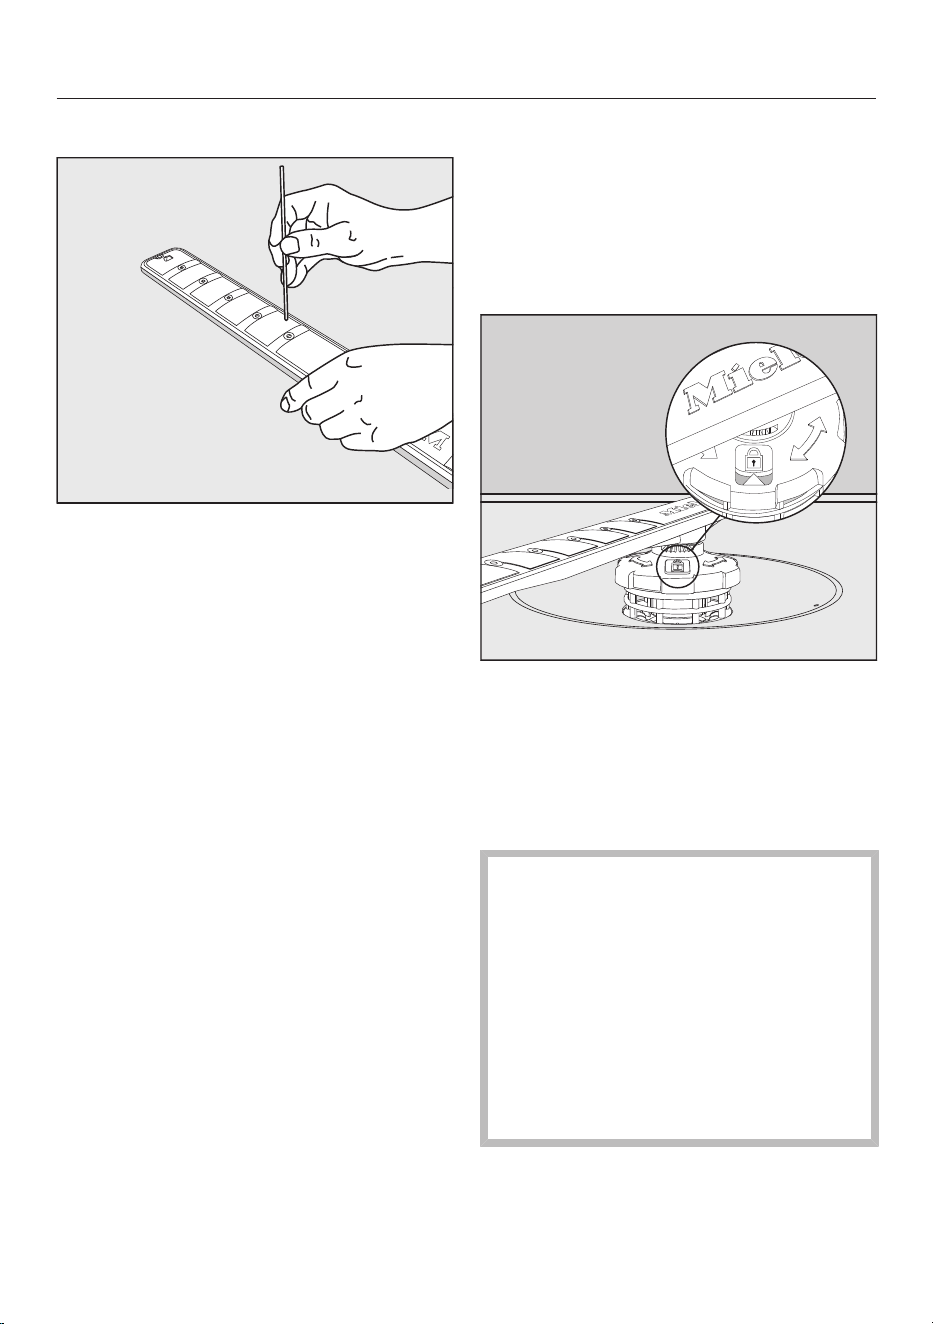
Cleaning and care
69
Cleaning the spray arms
Use a pointed object to push food
particles that are stuck in the spray
arm jets into the spray arm.
Rinse the spray arm thoroughly under
running water.
Refitting the spray arms
Refit the upper and middle spray
arms.
Refit the lower spray arm and ensure
that the filter combination lies flat in
the base of the wash cabinet.
Rotate the screw thread of the lower
spray arm clockwise until the arrow in
the viewing window points to the lock
symbol.
Make sure the spray arms can rotate
freely.
Damage due to soiling entering
the circulation system.
The lower spray arm is used to se-
cure the filter combination. Without
filters, coarse soiling can enter the
circulation system and cause a
blockage.
Do not run a wash program without
the lower spray arm or without the fil-
ters.

Cleaning and care
70
Checking the filters in the
wash cabinet
The filter combination in the base of the
wash cabinet retains coarse soil from
the suds solution. This prevents soiling
getting into the circulation system and
re-entering the wash cabinet through
the spray arms.
Damage due to soiling entering
the circulation system.
Without filters, soiling can enter the
circulation system and cause a
blockage.
Do not run a wash program without
the lower spray arm or without the fil-
ters.
When cleaning the filters and spray
arms, make sure that coarse soiling
cannot get into the circulation sys-
tem.
The filters can become blocked by soil-
ing that collects over time. The level of
soiling and time it takes before the fil-
ters need cleaning will vary depending
on use.
The message Check filters will appear in
the display after every 50program se-
quences.
Check the filter combination.
Clean, if necessary.
Then confirm the message with OK.
Cleaning the filters
Turn off the dishwasher.
Remove the lower spray arm (see
“Cleaning the spray arms” under
“Cleaning and care”).
Before removing the filter combina-
tion, remove any coarse soiling to
prevent it from entering the circulation
system.
Remove the filter combination.
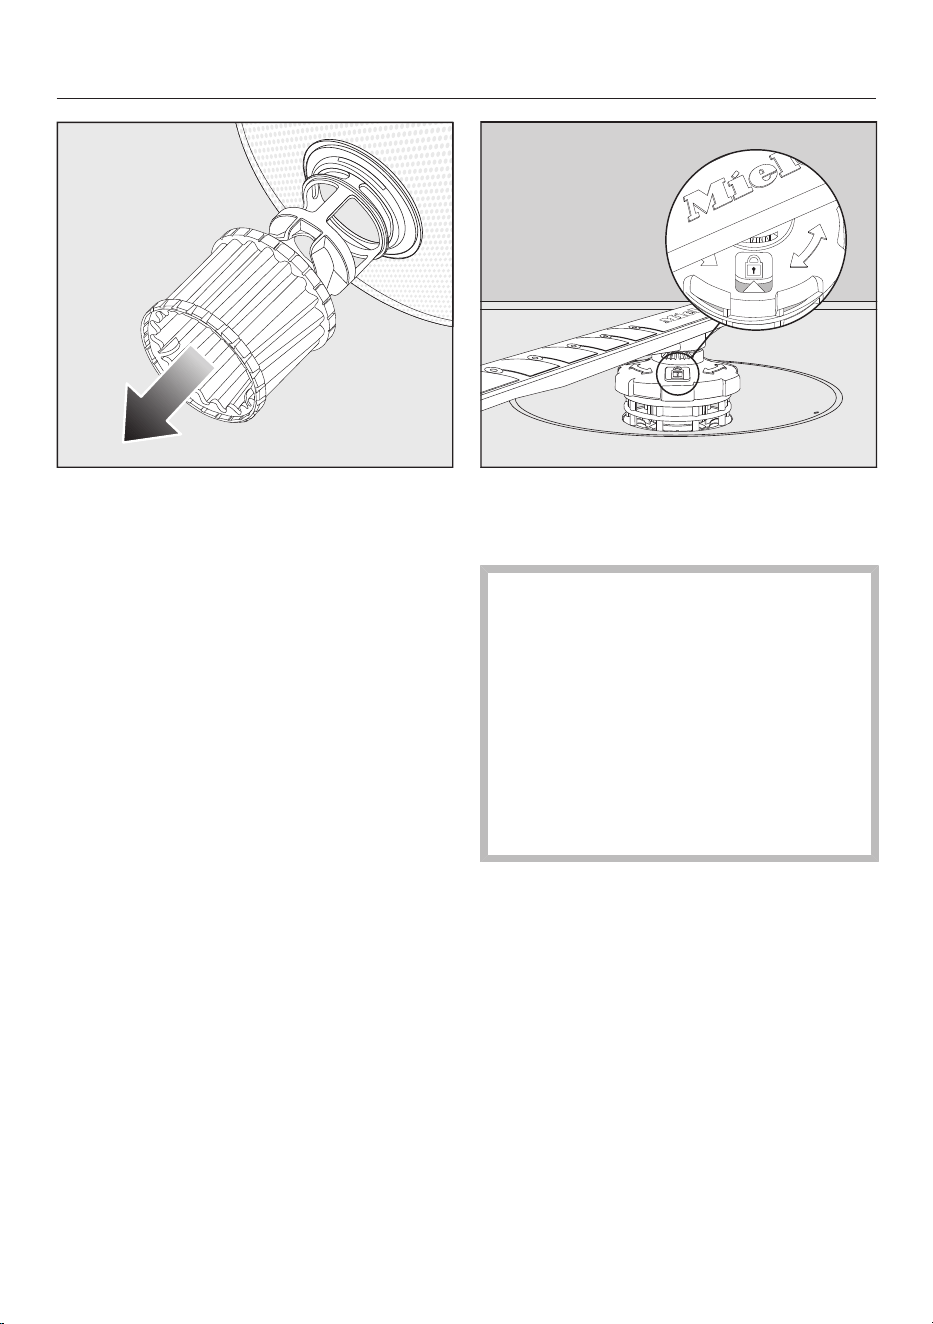
Cleaning and care
71
In order to clean the inside of the fil-
ter, pull the microfilter on the plastic
ring downwards and away from the
filter combination.
Rinse all of the filters under running
water.
If necessary, use a soft cleaning
brush to remove soiling.
Insert the microfilter back into the fil-
ter combination.
Reinstall the filter combination so that
it lies flat in the base of the wash cab-
inet.
Refit the lower spray arm to the filter
combination using the screw thread.
Rotate the screw thread clockwise
until the arrow in the viewing window
points to the lock symbol.
Damage due to soiling entering
the circulation system.
The lower spray arm is used to se-
cure the filter combination. Without
filters, coarse soiling can enter the
circulation system and cause a
blockage.
Do not run a wash program without
the lower spray arm or without the fil-
ters.
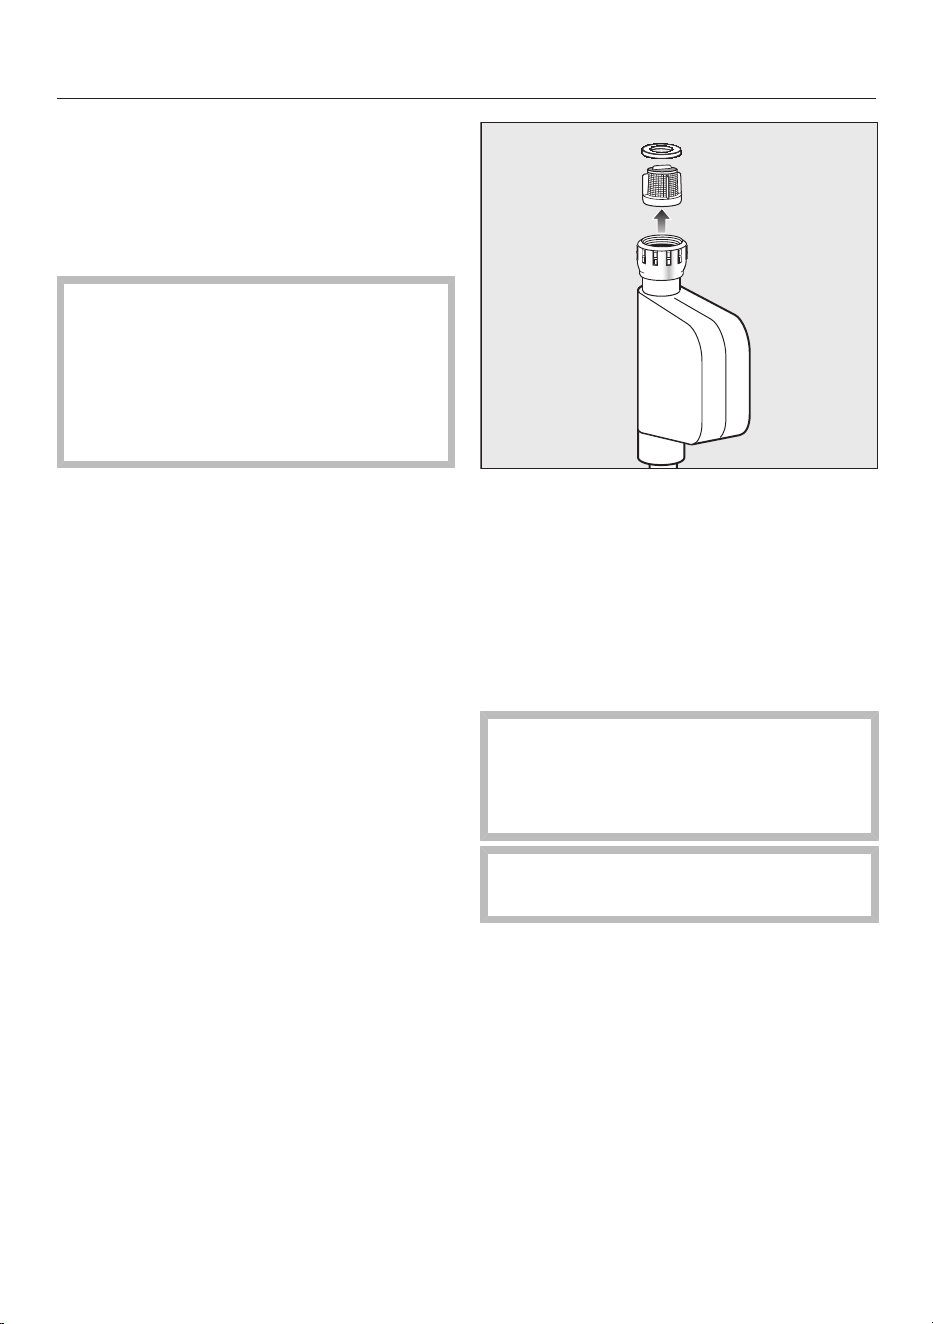
Cleaning and care
72
Cleaning the water-inlet filter
A filter is incorporated in the screw con-
nection to protect the water-intake
valve. If the filter is soiled, insufficient
water flows into the wash cabinet.
Risk of electric shock from volt-
age.
The plastic housing of the water con-
nection contains an electrical valve.
The housing must not be dipped in
water.
Disconnect the dishwasher from the
power supply.
To do this, turn off at the socket and
unplug the machine.
Close the faucet.
Unscrew the water-intake valve.
Take the seal ring out of the screw
connection.
Using pointed pliers, take hold of the
plastic filter bar and pull it through the
filter.
Rinse the filter under running water.
Reassemble in reverse order.
Screw the screw connection securely
back onto the faucet. Slowly open
the faucet. If water drips out, tighten
the connection.
Never forget to put the filter back in
place after cleaning.
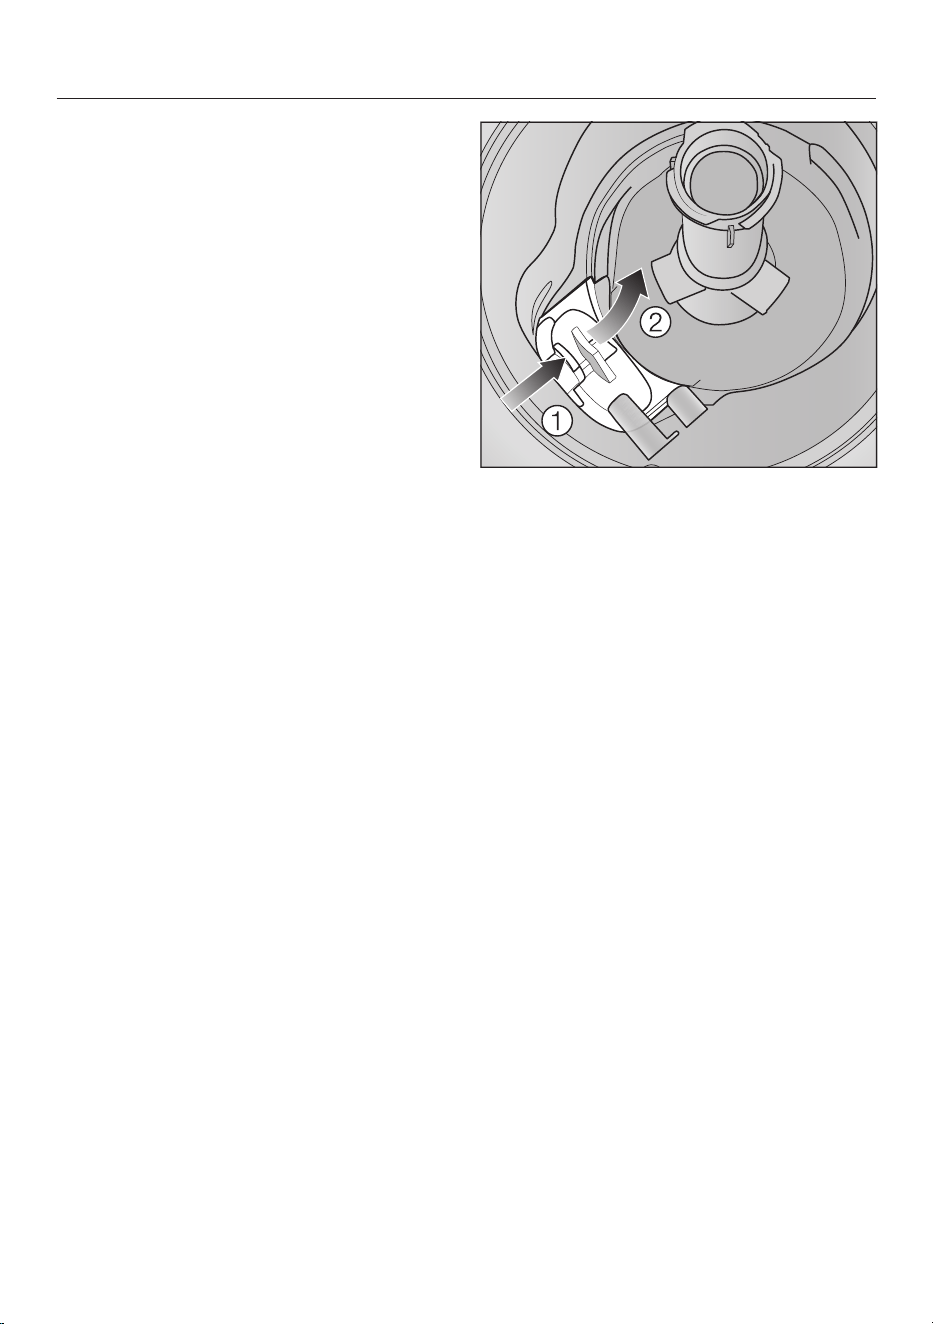
Cleaning and care
73
Cleaning the drain pump
If water remains in the wash cabinet af-
ter the end of a program, the water has
not been pumped away. The drain
pump may be blocked by foreign ob-
jects. These foreign objects are easy to
remove.
Disconnect the dishwasher from the
power supply.
To do this, turn off and unplug the
dishwasher.
Take the filter combination out of the
wash cabinet (see “Cleaning the fil-
ters” under “Cleaning and care”).
Scoop the water out of the wash cab-
inet using a suitable small container
or utensil.
Press the catch of the drain pump
cover inwards.
Tip the cover inwards until it is re-
leased.
Rinse the cover thoroughly under run-
ning water and remove all foreign ob-
jects.

Cleaning and care
74
The drain pump (see arrow) is under-
neath the cover.
Risk of injury from glass splin-
ters.
It is especially difficult to see glass
splinters in the drain pump.
Take care when cleaning the drain
pump.
Carefully remove all foreign objects
from the drain pump. Check the drain
pump impeller by manually turning it.
You will feel a little resistance when
you turn the impeller.
Refit the cover by placing it down
vertically from above.
Ensure that the catch engages cor-
rectly.
Damage due to incorrect clean-
ing.
The components are delicate and
can be damaged during cleaning.
Take care when cleaning the drain
pump.
Frequently asked questions
75
With the aid of the following guide, most minor problems can be corrected without
contacting Miele. You can save time and money in many cases, as you do not
need to contact Miele Customer Service.
The following guide should help you to find the reason for a malfunction or fault,
and to correct it. However, please note:
Danger due to incorrect repairs.
Repairs by unqualified persons can cause considerable danger to users.
Repairs must only be carried out by Miele Customer Service, an authorized
Miele dealer, or a suitably qualified specialist in accordance with local and na-
tional safety regulations.
Technical faults
Problem Possible cause and solution
The dishwasher will not
start.
The door is not properly closed.
Raise the door upward until the catch engages.
The dishwasher is not plugged in.
Insert the plug.
The circuit breaker has tripped.
Reset the breaker (see data plate for the correct
fuse rating).
If the breaker trips again, contact Miele Customer
Service.
The dishwasher is not turned on.
Turn the dishwasher on using the sensor button.
The dishwasher stops
during a program.
The circuit breaker has tripped.
Reset the circuit breaker (see data plate for the
correct fuse rating).
If the circuit breaker trips again, contact Miele
Technical Service.
After the program has
started, the in-operation
indicator light is not vis-
ible.
The reflector panel was not correctly fitted.
Re-fit the reflector panel correctly (see installation
sheet).

Frequently asked questions
76
Fault messages
Problem Possible cause and solution
The in-operation indica-
tor light is flashing
quickly.
The alarm tone is
sounding.
One of the following
faults appears in the
display:
Before remedying the fault:
Turn off the dishwasher.
Fault FXX
There may be a technical fault.
Turn the dishwasher back on after a few seconds.
Restart the desired program.
If the fault message appears again, there is a techni-
cal fault.
Turn off the dishwasher.
Close the faucet.
Contact Miele Customer Service.
Waterproof
The Waterproof system has reacted.
Turn off the dishwasher.
Close the faucet.
Contact Miele Customer Service.
Fault F78
Circulation-pump fault.
Turn off the dishwasher.
Turn the dishwasher back on.
Restart the desired program.
If the fault message appears again, there is a techni-
cal fault.
Turn off the dishwasher.
Close the faucet.
Contact Miele Customer Service.

Frequently asked questions
77
Door release
Problem Possible cause and solution
The in-operation indica-
tor light is flashing
quickly.
The alarm tone is
sounding.
The following fault is in-
dicated via the display:
Before remedying the fault:
Turn off the dishwasher.
F33
The door does not open automatically.
There may be a technical fault.
Open the door manually (see “Opening the door”
under “Before using for the first time”) and turn the
dishwasher back on again.
If the same fault message appears again, contact
Miele Customer Service.
The door does not close automatically.
The door might be obstructed by an item inside the
machine.
If this is the case, remove the item causing an ob-
struction and turn the dishwasher on again.
If the same fault message appears again, contact
Miele Customer Service.
Frequently asked questions
78
Water intake fault
Problem Possible cause and solution
The in-operation indica-
tor light is flashing
quickly.
The alarm tone is
sounding.
One of the following
messages appears in
the display:
Open water supply
The water supply faucet is turned off.
Open the water-supply faucet all the way.
Intake
Before remedying the fault:
Turn off the dishwasher.
Water-inlet fault.
Open the water-supply faucet all the way and start
the program again.
Clean the water-inlet filter (see “Cleaning the wa-
ter-inlet filter” under “Cleaning and care”).
The water-connection pressure is lower than
7.25psi (50kPa).
Consult a plumber.
The on-site connection for the water drain may be
too low and you will need to raise the water drain
(see “Hose installation” under “Installation”).
Fault F18
A technical fault has occurred.
Turn off the dishwasher.
Close the faucet.
Contact Miele Customer Service.

Frequently asked questions
79
Water drainage fault
Problem Possible cause and solution
The in-operation indica-
tor light is flashing
quickly.
The alarm tone is
sounding.
The following message
appears in the display:
Drain
Before remedying the fault:
Turn off the dishwasher.
Water-drainage fault.
There might be water in the wash cabinet.
Clean the filter combination (see “Cleaning the fil-
ters” under “Cleaning and care”).
Clean the drain pump (see “Cleaning the drain
pump” under “Cleaning and care”).
Remove any kinks or loops in the drain hose.
Frequently asked questions
80
General dishwasher problems
Problem Possible cause and solution
The door will not open
when knocked.
The Knock2open function has been permanently dis-
abled.
Turn the door-opening function on again (see
”Knock2open” under “Settings”).
If the door still will not open or if there is a power fail-
ure, the door can still be opened manually using the
the door-opening aid supplied (see ”Door-opening
aid” under ”Before using for the first time”).
The indicator lights and
the display are dark.
The dishwasher has turned off automatically to save
energy.
Turn the dishwasher back on using the sensor
button.
The wash cabinet light-
ing does not come on
when the door is
opened.
The wash cabinet lighting has been turned off per-
manently.
Turn the lighting back on again (see “BrilliantLight”
under “Settings”).
Faulty wash cabinet lighting.
Contact Miele Technical Service.
Detergent residue is left
in the detergent com-
partment at the end of a
program.
The detergent compartment was still damp when de-
tergent was added.
Only add the detergent when the detergent com-
partment is dry.
The detergent compart-
ment lid cannot be
closed.
Residual detergent is blocking the catch.
Remove the residual detergent.
At the end of a program
there is a film of mois-
ture on the inside of the
door and possibly on
the interior cabinet
walls.
This is part of the normal function of the drying sys-
tem. The moisture will dissipate after a short time.
Frequently asked questions
81
Problem Possible cause and solution
Water remains in the
wash cabinet at the end
of a program.
Before remedying the fault:
Turn off the dishwasher.
The filter combination in the wash cabinet is clogged.
Clean the filter combination (see “Cleaning the fil-
ters” under “Cleaning and care”).
The drain pump is blocked.
Clean the drain pump (see “Cleaning the drain
pump” under “Cleaning and care”).
The drain hose is kinked.
Remove any kinks from the drain hose.

Frequently asked questions
82
Noises
Problem Possible cause and solution
There is a knocking
noise in the wash cabi-
net.
A spray arm is knocking against a wash item.
Carefully open the door and rearrange the wash
items that are obstructing the spray arm.
There is a rattling noise
in the wash cabinet.
Wash items are not secure in the wash cabinet.
Carefully open the door and rearrange the wash
items so that they sit securely.
There is a foreign object (e.g., glass shard) in the
drain pump.
Remove the foreign object from the drain pump
(see “Cleaning the drain pump” under “Cleaning
and care”).
Knocking noise in the
water pipes
This may be caused by the on-site installation or the
cross-section of the piping.
However, this will not affect the functioning of the
dishwasher in any way. If in doubt, contact a suit-
ably qualified plumber.
Frequently asked questions
83
Poor cleaning results
Problem Possible cause and solution
The dishes are not
clean.
The dishes were not loaded correctly.
See notes under “Loading the dishwasher”.
The program was not powerful enough.
Select a more powerful program (see “Program
overview”).
Not enough detergent was dispensed during manual
detergent dispensing.
Use more detergent, or change the brand you are
using.
Items are blocking the path of the spray arms.
Carry out a rotation check and if needed rearrange
the items so that the spray arms can rotate freely.
The filter combination in the wash cabinet is not
clean or was incorrectly fitted.
This may have caused the spray arm jets to become
blocked.
Clean and/or fit the filter combination correctly.
Clean the spray arm jets if necessary (see “Clean-
ing the spray arms” under “Cleaning and care”).
There are smears on
glassware and cutlery.
There is a bluish sheen
on the surface of glass-
ware. The film can be
wiped off.
The rinse aid dosage is set too high.
Reduce the dosage (see “Rinse aid” under “Set-
tings”).
Frequently asked questions
84
Problem Possible cause and solution
The dishware is not dry
or utensils and glasses
are flecked.
The rinse-aid dosage is set too low or the rinse-aid
reservoir is empty.
Replenish the reservoir, increase the dosage, or
change the brand of rinse aid (see “Rinse aid” un-
der “Before using for the first time”).
The dishware was taken out of the wash cabinet too
soon.
Leave the dishware in longer (see “Unloading the
dishwasher” under “Operation”).
You have used combination products that have insuf-
ficient drying performance.
Switch to another detergent or replenish the rinse
aid (see “Rinse aid” under “Before using for the
first time”).
Glassware has a brown
or blue tinge. The film
cannot be wiped off.
Ingredients from the detergent have formed a de-
posit.
Switch to another detergent straight away.
Glassware is dull and
discolored. The film
cannot be wiped off.
The glassware is not dishwasher-safe. The surface
has altered.
No remedy.
Purchase glassware which is dishwasher-safe.
Tea or lipstick stains
have not been com-
pletely removed.
The wash temperature of the selected program was
too low.
Select a program with a higher wash temperature.
The bleaching effect of the detergent is too low.
Switch to another detergent.
Plastic parts are discol-
ored.
Natural dyes, e.g., from carrots, tomatoes, or
ketchup may be the cause. The amount of detergent
used or its bleaching effect was not sufficient to deal
with natural dyes.
Use more detergent (see “Detergent”).
Parts that are already discolored will not revert to
their original color.
Frequently asked questions
85
Problem Possible cause and solution
White residue is visible
on the dishes. Clouding
has occurred on glass-
ware and cutlery. The
film can be wiped off.
The rinse aid dosage is set too low.
Increase the dosage (see “Rinse aid” under “Set-
tings”).
The salt reservoir is empty.
Fill the salt reservoir (see “Reactivation salt” under
“Before using for the first time”).
The salt reservoir cap has not been screwed on cor-
rectly.
Replace it, making sure that it screws back on cor-
rectly.
Unsuitable combination detergents were used.
Switch to another detergent. If using tabs or pow-
der detergent, do not choose combination prod-
ucts and ensure you refill the reactivation salt and
rinse aid.
The water softener is programmed to too low a water
hardness level.
Program the water softener to a higher water hard-
ness level (see “Water hardness” under “Set-
tings”).
There are rust stains on
the utensils.
The affected items are not corrosion resistant.
No remedy.
Purchase utensils which are dishwasher-safe.
A program was not run after reactivation salt was
added. Traces of salt have got into the normal wash
cycle.
Always run the Rinse & Hold program without
any wash items in the dishwasher immediately af-
ter refilling salt.
The salt-reservoir cap has not been screwed on cor-
rectly.
Replace it, making sure that it screws back on cor-
rectly.
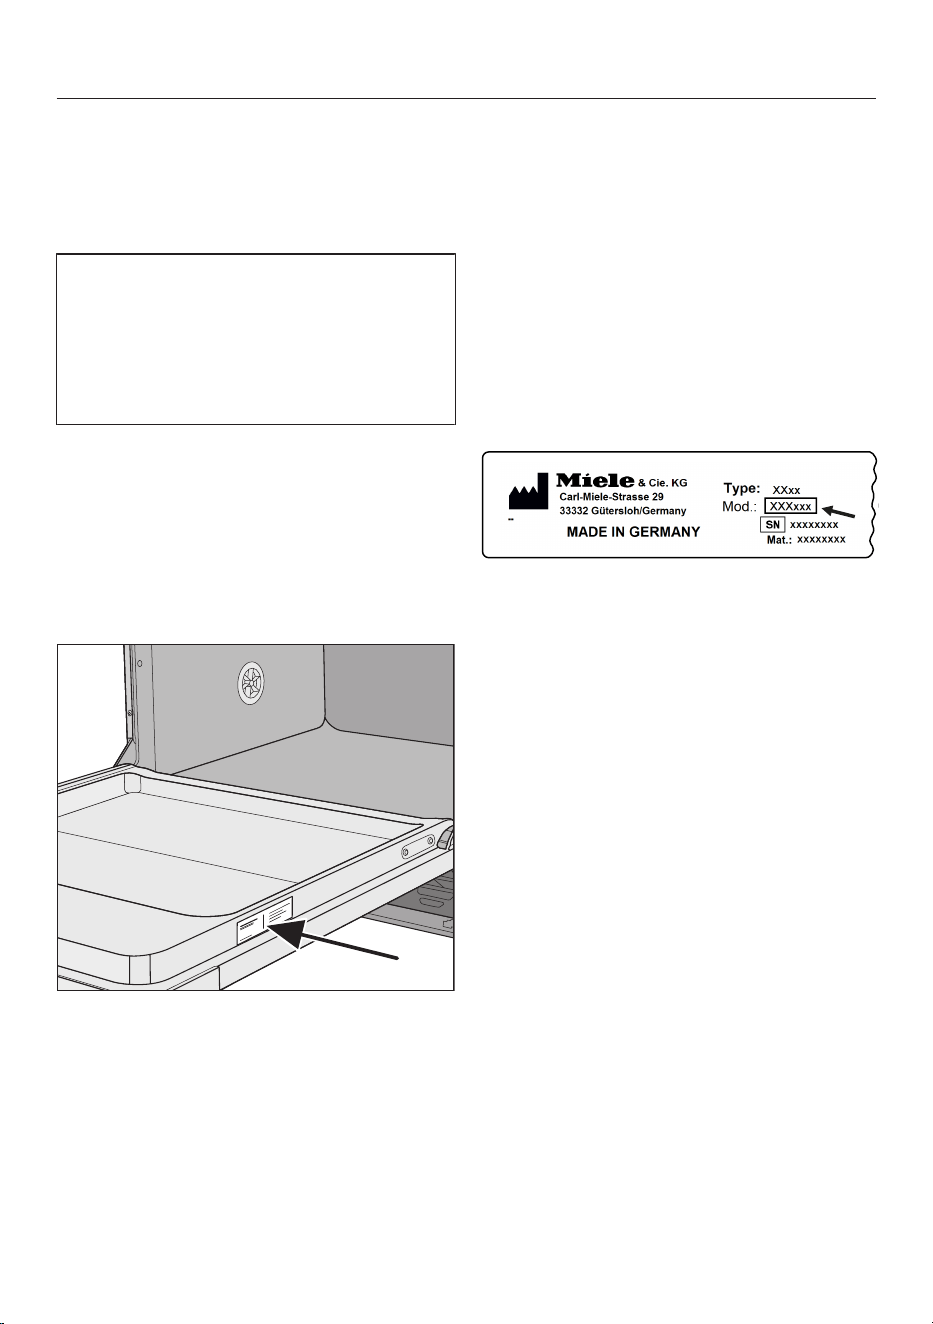
Miele Service
86
Contact in the event of a fault
In the event of a fault which you cannot
remedy yourself, please contact your
Miele dealer or Miele Customer Service.
You can book a Miele Customer Ser-
vice call-out online at www.miele.com/
service or www.miele.ca/service.
Contact information for Miele Cus-
tomer Service can be found at the end
of this document.
Please quote the model and serial num-
ber of your dishwasher when contacting
Miele. These can be found on the data
plate along the right edge of the open
door.
The data plate is located on the right
side of the door.
EPREL database
From March 1, 2021, information on en-
ergy labeling and ecodesign require-
ments will be available in the European
Product Database (EPREL). You can
find the product database at the follow-
ing link https://eprel.ec.europa.eu/. You
will be asked to enter the model identi-
fier.
The model identifier can be found on
the data plate.
Warranty
The warranty period for this machine is
1 year from date of purchase.
For further information, please refer to
the warranty conditions in the booklet
provided.
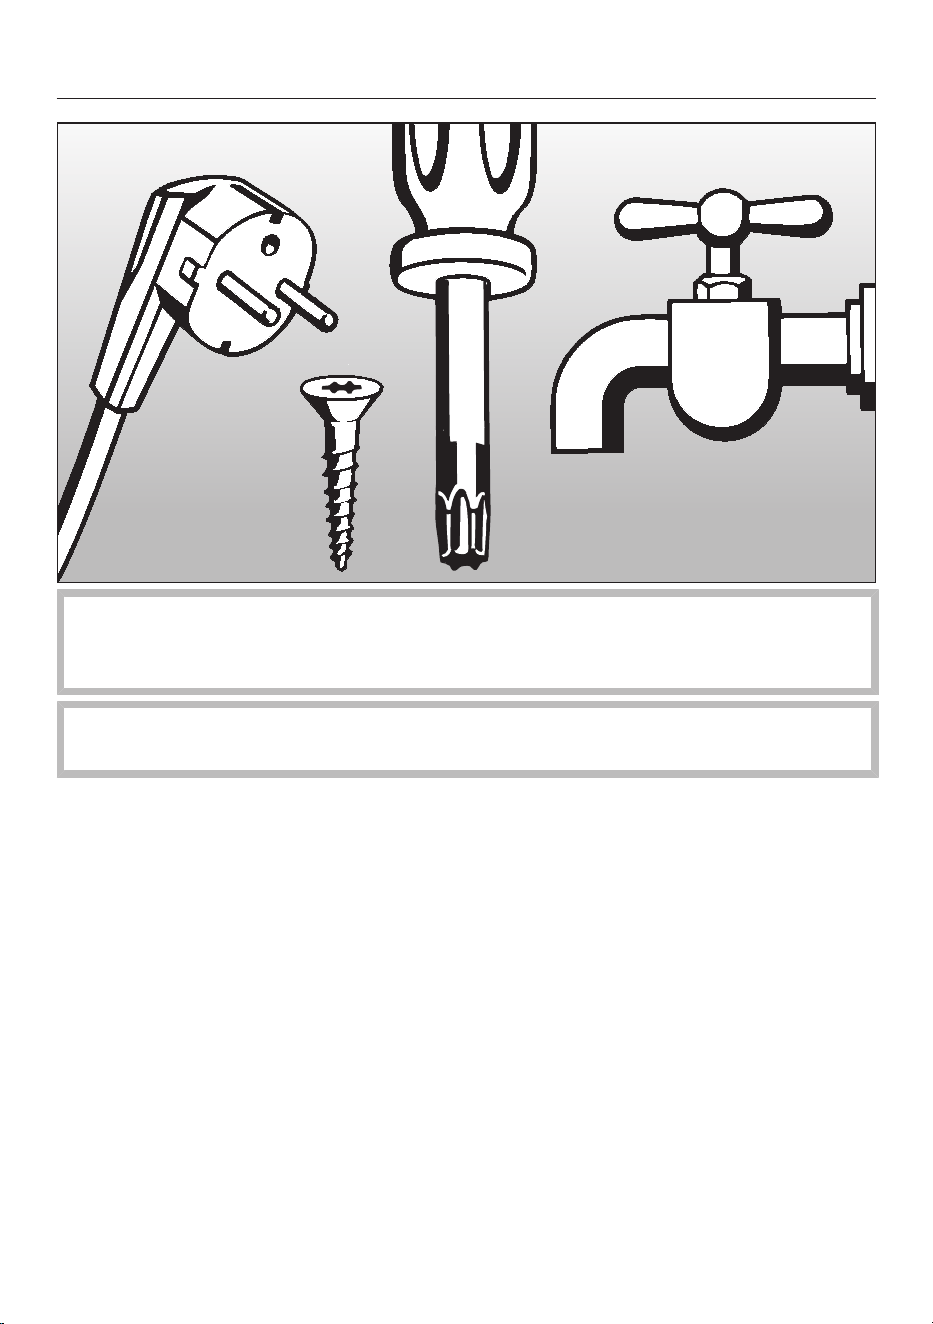
INSTALLATION INSTRUCTIONS
87
Please refer to the Installation Diagram supplied with these instructions.
To comply with IEC sound testing protocols, please contact Miele for additional
instructions.
Information is subject to change. Please refer to our website to obtain the most
current product specification, technical & warranty information.

Electrical connection
*INSTALLATION*
88
Electrical connection
All work on the electrical con-
nection must be carried out by Miele
Customer Service, an authorized
Miele dealer, or a qualified electri-
cian.
- The electrical installation must be in
compliance with current local and na-
tional safety regulations!
- The connection to the power supply
must comply with national regula-
tions (plug and outlet must be acces-
sible after the machine has been in-
stalled). This therefore facilitates an
electrical safety test performed dur-
ing maintenance or service work, for
example.
- If the dishwasher is hard-wired to the
power supply, a circuit breaker capa-
ble of disconnecting the dishwasher
at all poles must be installed. This
power switch must have a contact
gap of at least 1/8" (3mm) and also
be lockable in the off-position.
- If necessary, equipotential bonding
must be carried out.
- If replacing the power cord, use only
original Miele replacement parts.
- For technical data, see the data plate
or the attached wiring diagram.
The dishwasher must only be operated
with the voltage, frequency, and fuse
rating shown on the data plate.
The data plates (with test certificate,
etc.) are located at the back of the dish-
washer and along the right edge of the
open door.
The wiring diagram is supplied with
the machine.
The conversion diagram is attached to
the electrical connection toe-kick panel.
Grounding connection
The ground lead must be connected to
the screw connection point (marked
with the ground symbol ) at the back
of the machine.
In the event of a malfunction or break-
down, grounding will reduce the risk of
electric shock by providing a path of
least resistance for electric current. This
appliance is equipped with a cord hav-
ing an equipment-grounding conductor
and a grounding plug. The plug must be
plugged into an appropriate outlet that
is installed and grounded in accordance
with all local codes and ordinances.
WARNING
THIS APPLIANCE MUST BE
GROUNDED

Plumbing
*INSTALLATION*
89
The Miele Waterproof system
Provided your dishwasher has been in-
stalled correctly, the Miele Waterproof
system will provide extensive protection
against water damage throughout its
lifetime.
Water inlet
Water in the dishwasher must
not be used as drinking water.
- The dishwasher must be connected
to the water supply in strict accor-
dance with current local and national
water authority regulations.
- The water used must at least comply
with national regulations for drinking
water quality.
If the water supply has a high iron
content, there is a danger of corro-
sion occurring on wash items in the
dishwasher, as well as the machine
itself.
If the chloride content of the water
exceeds 100mg/l, the risk of corro-
sion to items being cleaned in the
dishwasher will be further increased.
- In certain regions (e.g., mountainous
regions), the water composition may
cause precipitates to form, requiring
the use of softened water for the
dishwasher.
- The water pressure (flow pressure at
the connection point) must be be-
tween 7.3 and 145psi (50 and
1000kPa).
If the water pressure is lower than
this, the fault message Intake will ap-
pear in the display (see “Frequently
asked questions”).
If the water pressure is too high, a
pressure-reducing valve must be fit-
ted.
- The dishwasher is supplied as stan-
dard for connection to cold water and
hot water up to max. 140°F (60°C).
Connect the inlet hoses to the
faucets for cold and hot water.
- A faucet with a 3/4" male thread
must be provided on site. This should
be easily accessible, since the water
supply should be shut off whenever
the machine is not in use.
- The DN10 inlet hose is approx. 4'
11" (1.5m) long terminating in a 3/4"
female thread. A 1.5m long flexible
metal extension hose tested to
2,030psi (14,000kPa) is available as
an optional accessory if required. Do
not remove the dirt filter and the flow
regulator in the screw connection.
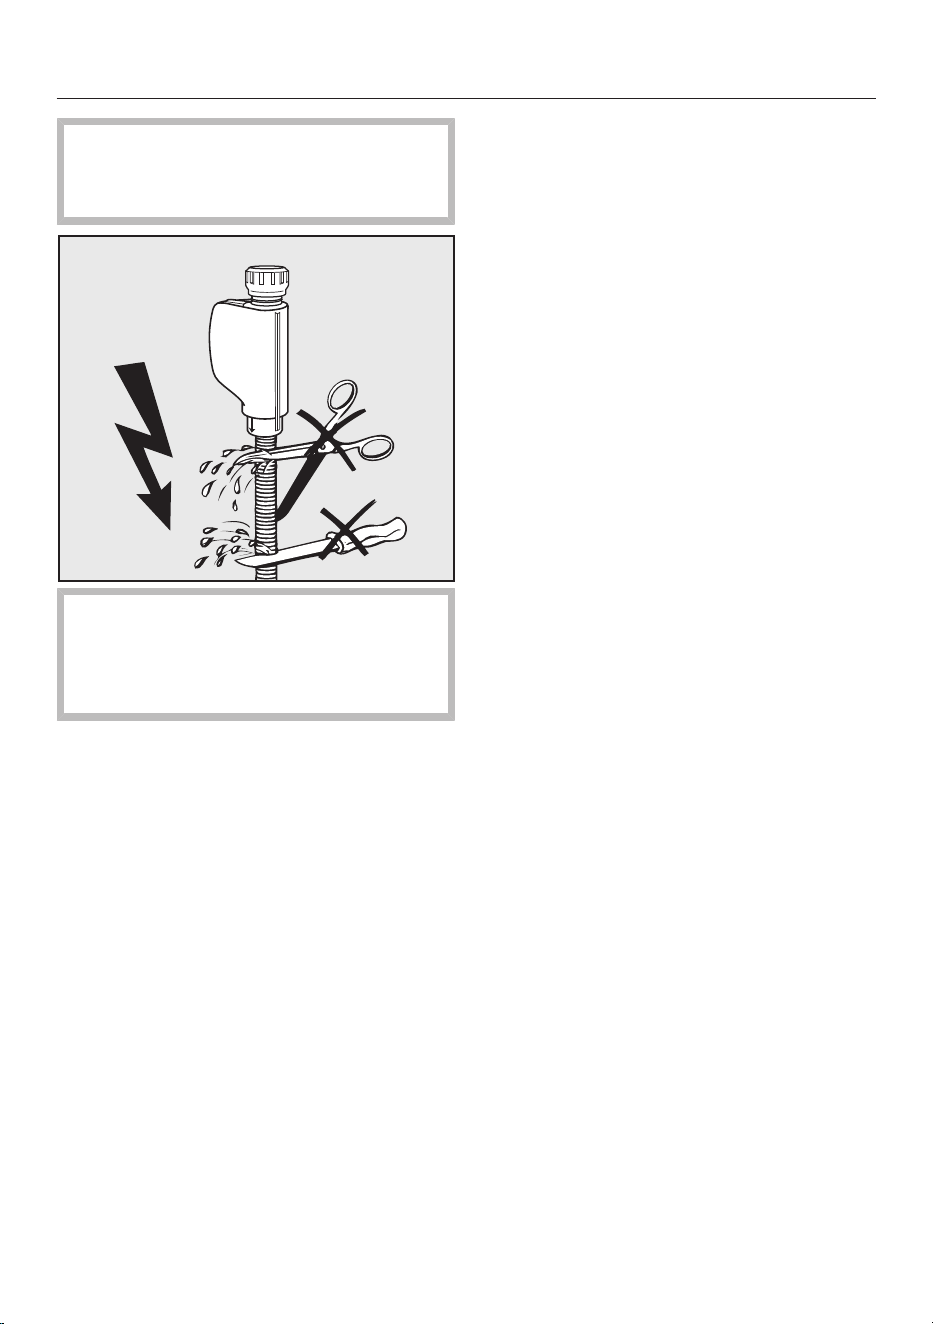
Plumbing
*INSTALLATION*
90
To avoid any damage to the ma-
chine, the dishwasher must only be
connected to fully vented pipework.
The intake hose must not be
shortened or damaged in any way as
it contains electrical components
(see illustration).

Plumbing
*INSTALLATION*
91
Connecting the water drainage
system
- The machine drainage system has a
non-return valve, which prevents dirty
water from flowing back into the
dishwasher via the drain hose.
- The dishwasher drainage hose
should be connected to a separate
on-site drain for the dishwasher only.
If no separate drain is available, we
recommend connecting it to a dual-
chamber siphon.
- The dishwasher is supplied with an
approx. 4' 11" (1.5m) flexible drain
hose with an internal diameter of
7/8" (22mm).
Hose clips are supplied with the dish-
washer.
- A method of avoiding using a counter
mounted airgap is to advise the fol-
lowing: A "high loop" can be used to
provide a drainage air gap by routing
a drain line above a sink's flood level.
- The drain hose must not be short-
ened. The hose can be extended us-
ing a connection piece to attach a
further length of hose. The drainage
length must not be longer than 13'
1" (4m) and the delivery head no
higher than 3' 3" (1m).
- The drainage system must be able to
handle a discharge rate of at least
16l/min.
Make sure that there are no kinks
in the hose, and that it is not crushed
or stretched.
Hose installation when water
drainage is low
If the on-site water drainage connection
is situated lower than the guide path for
the lower basket rollers in the door, the
water drain hose must be installed at
that level with a bend in it. Otherwise,
water may flow out of the wash cabinet
during a program.
Tall-unit installation
APFD101 and APFD102 are available
as optional accessories for use when
installing the dishwasher in a tall unit.

Technical details
92
Imperial Metric
Height of freestanding model -
Height of built-in model 33 1/4"
(adjustable + 2 9/16")
845mm
(adjustable + 65mm))
Installation height From 33 1/4"
(adjustable +2 9/16")
From 845mm
(adjustable + 65mm)
Width 23 9/16" 598mm
Installation width 23 5/8" 600mm
Depth of freestanding model - -
Depth of built-in model 22 7/16" 570mm
Weight Max. 112 lb Max. 51kg
Voltage
Connected load
Fuse rating
See data plate See data plate
Power consumption when turned off 0.4W 0.4W
Power consumption when not turned
off
5.0W 5.0W
Network Standby 0.9W 0.9W
Frequency range 2.4000–2.4835GHz 2.4000–2.4835GHz
Maximum transmission power < 100mW < 100mW
Water connection pressure 7.25 psi 50–1.000kPa
Cold or hot water connection Up to max. 140°F Up to max. 60°C
Domestic water hardness Max. 38 gpg Max. 36°dH
Delivery head Max. 3' 3 3/8" Max. 1.0m
Drainage length Max. 13' 1 1/2" Max. 4.0m
Ambient temperature 41°F to 104°F 5°C to 40°C
Relative humidity
Maximum
Linear decreasing to
80% for temperatures up to
88°F
50% for temperatures up to
104°F
80% for temperatures up to
31°C
50% for temperatures up to
40°C
Power cord Approx. 5' 6 15/16" Approx. 1.7m
Capacity 16 place settings
Noise emission values
Sound power in LwA
Sound pressure in LpA
45dB (A)
32.5dB (A)
Test certificates awarded CSA, UL 921, UL 749, Energy Star
Manufacturer’s address Miele & Cie. KG, Carl-Miele-Straße 29,
33332 Gütersloh, Germany

Settings
93
You can alter the dishwasher’s con-
trols to suit changing requirements by
adjusting the settings.
The settings can be altered at any
time.
Opening the Settings menu
Turn the dishwasher on with the
sensor button if it is turned off.
Touch the Settings sensor button.
The first option in the Settings menu will
appear in the display.
For more information about the display
functionality, see “Display functions”
under “Machine description”.
Changing settings
Use the sensor buttons to select
the menu option you want to change
and confirm your selection with OK.
Submenu options that have already
been selected will have a check be-
side them.
Select the setting you want using the
sensor buttons and confirm with
OK.
To exit a submenu again, use the
Backsensor button.
The display will revert to the menu
above.

Settings
94
Language
The display can be set to appear in one
of several different languages.
You can change the language used in
the display and also the country via the
Language submenu.
The flag after the word Language
serves as a guide if a language that
you do not understand has been set.
In this case, keep selecting the menu
option that has a flag after it until you
reach the Language submenu.
Time of day
The current time of day must be set be-
fore you can use the timer option.
Setting the clock format
You can select either a 24-hour or 12-
hour clock.
Select the Clock format menu option.
Select the setting you want and con-
firm with OK.
Setting the time
You can set the time of day.
Select the Set menu option.
Use the sensor buttons to enter
the hour and confirm your entry by
touching OK.
Then set the minutes and confirm
with OK.
The time of day has now been saved.
Settings
95
Water hardness
Your dishwasher is fitted with a water
softener.
- The dishwasher must be pro-
grammed to the correct water hard-
ness for your area.
- Your local water authority will be able
to advise you of the water hardness
level in your area.
- Where the water hardness fluctuates,
e.g., between 10 and 16gr/gal (10–
15°dH – German scale), always pro-
gram the dishwasher to the higher
value (16gr/gal or 15°dH in this ex-
ample).
If the water hardness in your area is
available in a unit other than °dH, you
can convert the values as follows:
1°dH = 0.18mmol/l = 1.04 gpg
°d mmol/l gpg Display
1 0.2 1 1
2 0.4 2 2
3 0.5 3 3
4 0.7 4 4
5 0.9 5 5
6 1.1 6 6
7 1.3 7 7
8 1.4 8 8
9 1.6 9 9
10 1.8 10 10
11 2.0 11 11
12 2.2 13 12
13 2.3 14 13
14 2.5 15 14
15 2.7 16 15
16 2.9 17 16
17 3.1 18 17
18 3.2 19 18
19 3.4 20 19
20 3.6 21 20
21 3.8 22 21
22 4.0 23 22
23 4.1 24 23
24 4.3 25 24
25 4.5 26 25
26 4.7 27 26
27 4.9 28 27
28 5.0 29 28
29 5.2 30 29
30 5.4 32 30
31 5.6 33 31
32 5.8 34 32
33 5.9 35 33
34 6.1 36 34
35 6.3 38 35
36 6.5 36

Settings
96
Rinse Aid
You can adjust the rinse-aid dosage for
best results.
The rinse-aid dosage can be set from 0
to 6ml.
3ml is the factory default setting.
The rinse-aid dosage can turn out to be
higher than the set value due to the au-
tomatic adjustment of the program.
If stains appear on dishware and glass-
ware:
- Increase the rinse-aid dosage.
If clouding or smearing appears on
dishware and glassware:
- Decrease the rinse-aid dosage.
Temperature unit
The temperature can be displayed in
degrees Celsius or degrees Fahrenheit.
Select the setting you want and con-
firm with OK.
High-temperature final rinse
For better drying, the final rinse temper-
ature can be increased for individual
programs. This function is not available
for all programs (see “Program guide”).
Select the setting you want and con-
firm with OK.
Settings
97
Miele@home
Your dishwasher is equipped with an in-
tegrated WiFi module.
You can connect your dishwasher to
your WiFi network.
This will increase the energy consump-
tion, even when the dishwasher is
turned off.
The Settings and Miele@home settings
menus will be added as additional
menu options.
Make sure that your WiFi network
signal strength is strong enough at
the installation site of your dish-
washer.
There are a number of ways of connect-
ing your dishwasher to your WiFi net-
work:
Setting up Miele@home
You can connect your dishwasher to
your network using WPS or via the app.
Connect using WPS
You can connect your dishwasher to
your WiFi network using WPS (WiFi Pro-
tected Setup).
Your WiFi router must support WPS.
Confirm the message Press WPS but-
ton with OK.
Activate the WPS function on your
router within 2minutes.
Once the connection has been estab-
lished, confirm the message with OK.
If the connection fails, you have proba-
bly not activated WPS on your router
quickly enough. Repeat the steps
above.

Settings
98
Connect using App
You can connect the dishwasher to the
Miele@mobile app.
The apps are available to download free
of charge from the Apple App Store
®
or
from the Google Play Store™.
Miele@mobile app
Select the Connect using App menu
option and confirm with OK.
Follow the instructions in the app.
Once your dishwasher is connected to
your WiFi network, you can use the app
to carry out the following tasks:
- Call up information on the operating
status of your dishwasher
- Call up information on the program
sequence of your dishwasher
- Set up a Miele@home network with
other WiFi-enabled Miele appliances

Settings
99
Deactivate
If you do not wish to use the WiFi mod-
ule of your dishwasher, you can turn it
off.
Select the Deactivate menu option
and confirm with OK.
In the Miele@home menu, the Activate
menu option will now be displayed in-
stead of Deactivate.
Activate
If you wish to connect your dishwasher
to your WiFi network, you can turn on
the WiFi module.
Select the Activate menu option and
confirm with OK.
In the Miele@home menu, the Deactivate
menu option will now be displayed in-
stead of Activate.
Displaying Connection status
You can call up the current connection
status of your dishwasher.
Select the Connection status menu op-
tion and confirm with OK.
Use the sensor buttons to con-
secutively call up the WiFi signal
strength, the name of your router, and
the associated IP address.
Select OK to confirm the messages.
Set up again
This menu option only appears if you
have already connected your dish-
washer to your WiFi network.
Connect using App
Select the Connect using App menu
option and confirm with OK.
Follow the instructions in the app.
Connect using WPS
Select the Connect using WPS menu
option and confirm with OK.
Follow the instructions in the display.

Settings
100
Network configuration
You can use this menu option to reset
all WiFi module settings (if available) to
the factory default settings.
The network configuration should be re-
set whenever a dishwasher is being dis-
posed of or sold, or if a used dish-
washer is being put into operation. This
is the only way to ensure that all per-
sonal data has been removed and the
previous owner will no longer be able to
access the dishwasher.
Remote control
This menu option will only be dis-
played if you have connected your
dishwasher to your WiFi network (see
“Miele@home” under “Settings”).
If you wish to permanently turn off the
Remote control option, you can do this
under this menu option. The sensor
button will then no longer be available
to select until you change this setting
again.
Even if the Remote control option is
turned off, you can use Miele@mobile to
call up information about your machine.
However, you cannot start any pro-
grams or change any settings from it.
RemoteUpdate
The RemoteUpdate menu option is
only displayed and can only be se-
lected if the requirements for using
Miele@home have been met (see
“Miele@home” under “Before using for
the first time”).
The RemoteUpdate function is used for
updating the software in your dish-
washer. If an update is available for
your dishwasher, it will automatically
download it. Updates will not be in-
stalled automatically. They must be initi-
ated manually.
If you do not install an update, you can
continue to use your dishwasher as
usual. However, Miele recommends in-
stalling updates.
Activating/deactivating
The RemoteUpdate function is acti-
vated as standard. Available updates
will be downloaded automatically but
will only be installed if you initiate instal-
lation manually.
Deactivate RemoteUpdate if you do not
want any updates to be downloaded
automatically.

Settings
101
Running a RemoteUpdate
Information about the content and
scope of a RemoteUpdate will be pro-
vided in the Miele@mobile app.
A message will appear in your dish-
washer display if a software update is
available.
You can install the update immediately
or postpone this until later. When the
machine is turned on again, you will be
reminded about the update.
Deactivate RemoteUpdate if you do not
want to install the update.
The update may take several minutes.
Please note the following information
about the RemoteUpdate function:
- You will only receive a message when
an update is available.
- Once an update has been installed, it
cannot be undone.
- Do not turn the dishwasher off during
the update. Otherwise, the update
will be aborted and will not be in-
stalled.
- Some software updates can only be
carried out by Miele Customer Ser-
vice.
SmartStart
This menu option will only be dis-
played if you have connected your
dishwasher to your WiFi network (see
“Miele@home” under “Settings”).
The SmartStart function is used for start-
ing your dishwasher automatically at a
time when your energy costs are most
economical.
To use this function you may need fur-
ther technical accessories.
If you have activated SmartStart Permit-
ted, the Timer menu of the selected
program will no longer show EcoStart
but will instead show SmartStart. The
dishwasher will then start within the
timeframe specified when it receives a
signal from the energy provider.
If it has not received a signal from the
energy provider by the latest possible
start time, the dishwasher will start au-
tomatically.

Settings
102
EcoStart
In order to run your dishwasher in the
most economical way, you can use the
EcoStart option to take advantage of
your electricity supplier’s cheaper en-
ergy tariffs (see “Timer” under “Op-
tions”).
With this option selected, your dish-
washer will start automatically at your
electricity supplier’s cheapest rate
times.
To use this option, you must first set up
to 3 electricity-rate time zones in which
the dishwasher can start. You can allo-
cate different priorities to these time
zones. The time with the cheapest elec-
tricity rate will be given Priority 1.
Contact your energy provider to find out
the times of the cheapest electricity
rates.
Once the electricity-rate times have
been set, you can use the EcoStart op-
tion to set the latest finish time required
for each program.
The dishwasher will then start automati-
cally during the cheapest electricity-rate
time period. The program will end at the
set finish time at the latest.
Setting the electricity-rate times
Before you can use the EcoStart option,
you must set at least one electricity-rate
time.
Use the sensor buttons to select
an electricity-rate time T1–T3 and
confirm with OK.
The start of the electricity-rate time se-
lected will appear in the display and the
hour number block will be highlighted.
Use the sensor buttons to set
the hours and minutes for the start
time and confirm both with OK.
The end of the electricity-rate time se-
lected will appear in the display and the
hour number block will be highlighted.
Use the sensor buttons to set
the hours and minutes for the end
time and confirm both with OK.
The electricity-rate time will be saved
and its priority will appear in the display.
Use the sensor buttons to set
the priority you want and confirm with
OK.
Confirm the message with OK.
The electricity-rate time will be acti-
vated.

Settings
103
Changing the electricity rate times
You can change the start, finish, or pri-
ority of an electricity rate time.
Use the sensor buttons to select
an electricity tariff time T1–T3 that
you wish to change and confirm with
OK.
Select the setting you want to change
and confirm with OK.
Use the sensor buttons to
change the setting and confirm with
OK.
Confirm the message with OK.
The change will be saved.
Deleting the electricity-rate times
You can delete the settings for an elec-
tricity-rate time and in doing so deacti-
vate the EcoStart option for this time
zone.
Use the sensor buttons to select
an electricity-rate time T1–T3 that you
wish to delete and confirm with OK.
For example, select Delete R1 and
confirm with OK.
For example, select Delete R1? and
confirm with OK.
The settings for the electricity-rate time
selected will be reset.
Confirm the message with OK.
The electricity-rate time will be deleted.

Settings
104
Consumption (EcoFeedback)
You can set whether the water con-
sumption is displayed for the selected
program. This function shows the esti-
mated consumption before a program
sequence and the actual consumption
after the end of the program.
In this menu you can also call up the to-
tal consumption of water for all the
wash programs you have previously run
on your dishwasher (see “EcoFeedback
consumption display” under “Caring for
the environment”).
Displaying Consumption
Select the Display menu option and
confirm with OK.
Select the setting you want and con-
firm with OK.
Displaying Total consumption
Select the Total consumption menu op-
tion and confirm with OK.
You can display the total consump-
tion via the Water menu option.
You can reset the value for the total
consumption to 0.
Select the Reset menu option and
confirm with OK.
Select the Yes menu option and con-
firm with OK.
Confirm the message with OK.
The values are now reset to 0.
Display brightness
You can set the display brightness to
one of 7 different levels.
Settings
105
Volume
A sequence of audible signals will
sound at the end of the program or if
there is a fault, provided that the audi-
ble signals have been activated.
Audible signals in the event of a fault
In the event of a fault, the alarm tone
will sound 4times at intervals with a
short pause between each set of tones.
The alarm tone that sounds when
there is a fault cannot be deacti-
vated.
Audible signals
The audible signals at the end of a pro-
gram will sound 4times at intervals with
a short pause between each signal.
The volume of the audible signals at the
end of the program can be set to one of
7different settings. If no volume is se-
lected, the audible signals are turned
off.
Keypad tone
An audible tone sounds each time a
sensor button is pressed.
The volume for the keypad tone can be
set to one of 7different settings. If no
volume is selected, the keypad tone is
turned off (except the On/Offsensor
button).
Welcome melody
If you turn the dishwasher on or off, a
brief melody will sound.
You can turn the melody off.
Refill reminders
If you only ever use combination deter-
gent products or AutoDos using Miele
PowerDisks (if available), you can turn
off the refill reminders for reactivation
salt and rinse aid if you wish.
Please make sure that if you stop us-
ing combination detergents, you refill
the reactivation salt and rinse aid.
Turn the refill reminders back on.
Settings
106
AutoOpen
In some programs, the door automati-
cally opens slightly to assist the drying
process.
This function can be deactivated if you
wish.
Risk of damage due to steam.
Steam from the dishwasher could
damage the edges of delicate coun-
tertops when you open the door at
the end of the program if the fan is
no longer running.
If you have deactivated the auto-
matic door-opening function but
would like to open the door as soon
as the program has finished, make
sure that you open the door fully.
Knock2open
You can choose whether the door
should open after 1 or 2 knocks.
The function can be deactivated, in
which case the door has to be
equipped with a handle to open it.
BrilliantLight (depending on
model)
This dishwasher is equipped with wash
cabinet interior lighting.
When the door is open, the lighting
turns off automatically after 15minutes.
You can also turn off the wash cabinet
interior lighting permanently.
Software version
You can display the electronic software
version of your dishwasher electronic
for technical support purposes.
Showroom program
For demonstration purposes only.
The dishwasher is equipped with a
demo mode for showroom use.

Settings
107
Factory default
You can reset all the machine settings
to the factory default settings.
WiFi module settings (where applicable)
have to be reset separately (see
“Miele@home” under “Settings”).
Machine settings
You can use this menu option to reset
all dishwasher settings, except WiFi
module settings, to the factory default
settings.
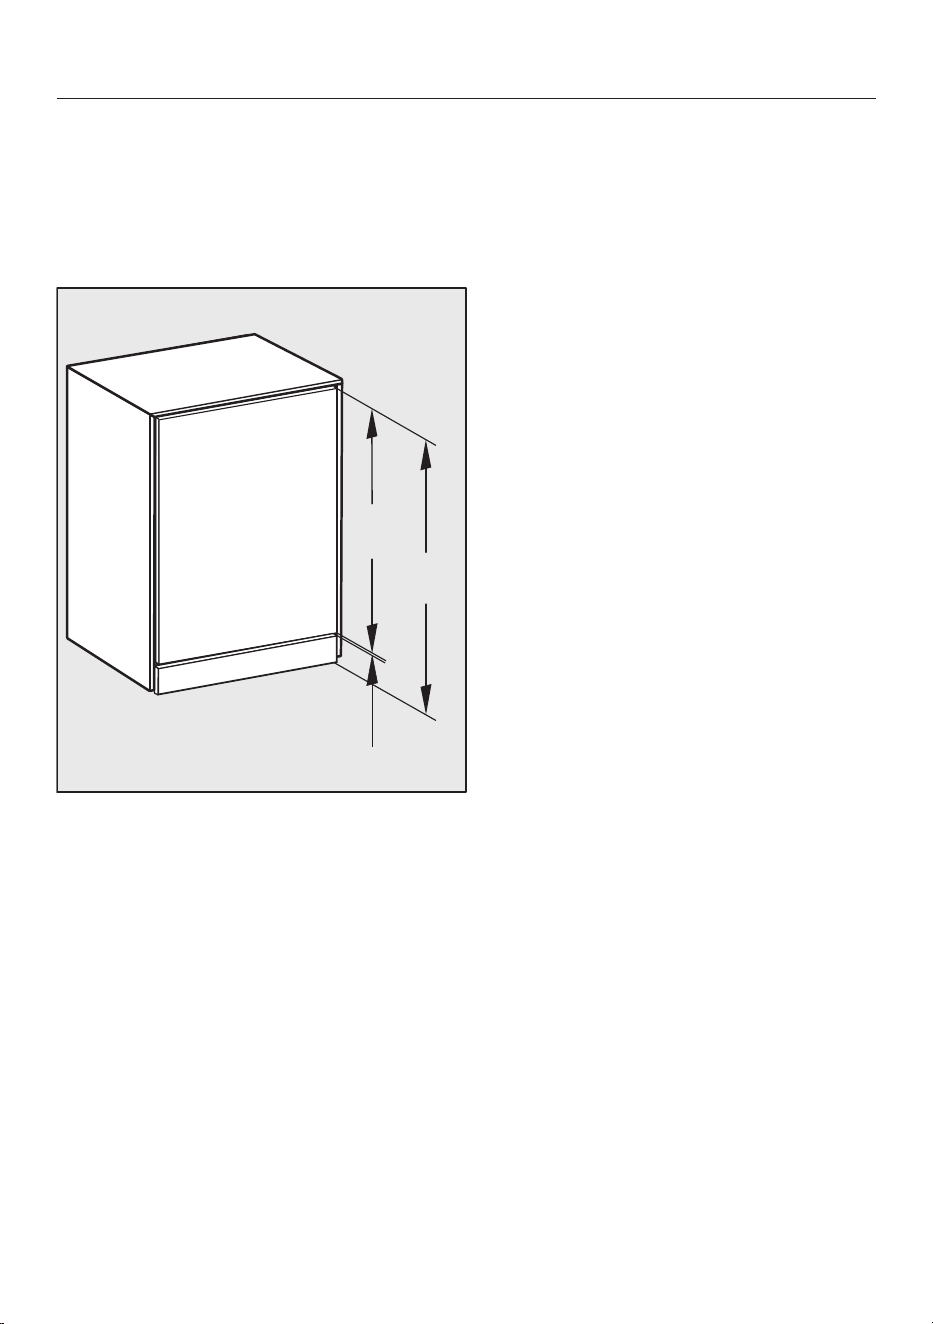
Sound emission tests
108
Prerequisites for sound emission tests
Load the dishwasher with 16 standard place settings and use the ECO program.
Setup for sound emission tests
The dishwasher must be set up according to the following specifications.
810 mm
860 mm
5/16”
31 7/8”
33 7/8”
8 mm
XXL
Install the dishwasher into an analyzing unit.
Secure the front panel.
Sound emission tests
109
Push the provided fleece strips (depending on model) under the toe-kick until it
is flush with the appliance feet .
Push the toe-kick into place in such a way that it is flush with the door front .
Sound emission tests
110
Remove the protective film from the provided insulating strip (depending on
model) .
Push the insulating strip into the front top edge of the toe-kick .


Please have the model and serial number
of your machine available when
contacting Technical Service.
U.S.A.
Miele, Inc.
National Headquarters
Importer
Miele Limited
Professional Division
Miele Professional
Technical Service
Phone: 1-888-325-3957
Canada
161 Four Valley Drive
Vaughan, ON L4K 4V8
Phone: 1-888-325-3957
www.mieleprofessional.ca
Manufacturer: Miele & Cie. KG
Carl-Miele-Straße 29, 33332 Gütersloh, Germany
9 Independence Way
Princeton, NJ 08540
Phone: 800-991-9380
www.mieleusa.com/professional
Technical Service & Support
Phone: 800-991-9380
2021-10-07 M.-Nr. 11 673 630 / 00GG11