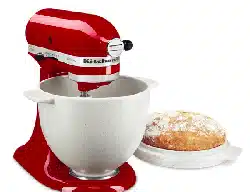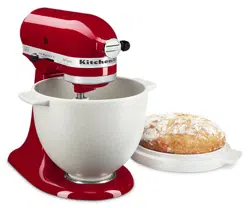
Bread Bowl with Baking Lid
KSM2CB5B*
*Stand Mixer sold seperately.
*Batteur sur socle vendu séparément.
*La batidora con base se vende por separado.

2
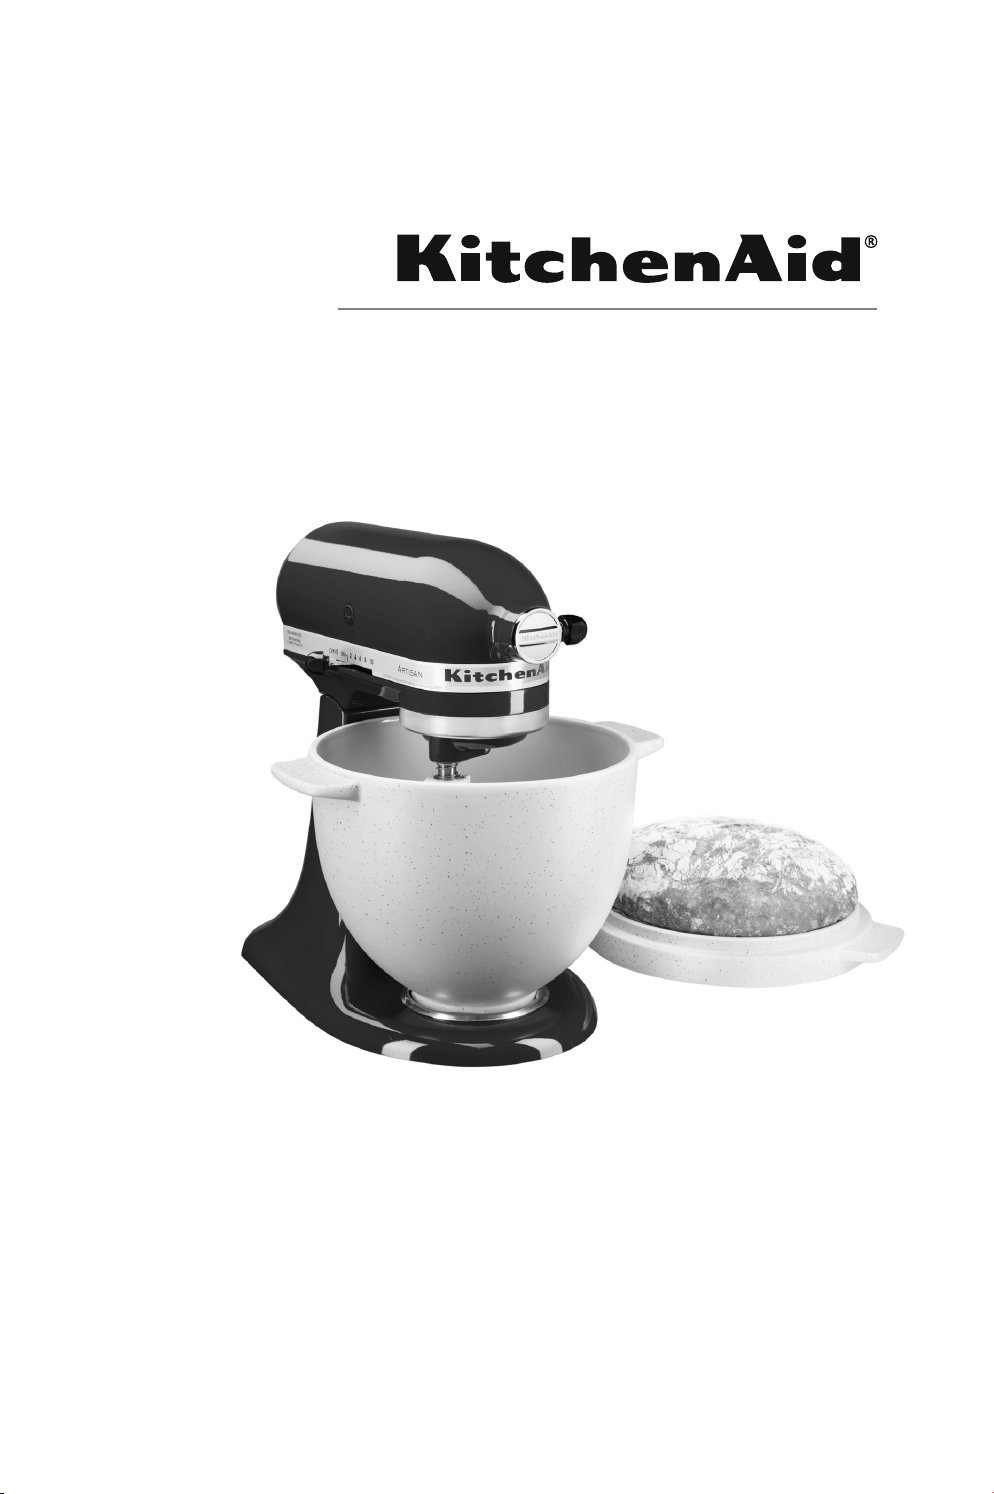
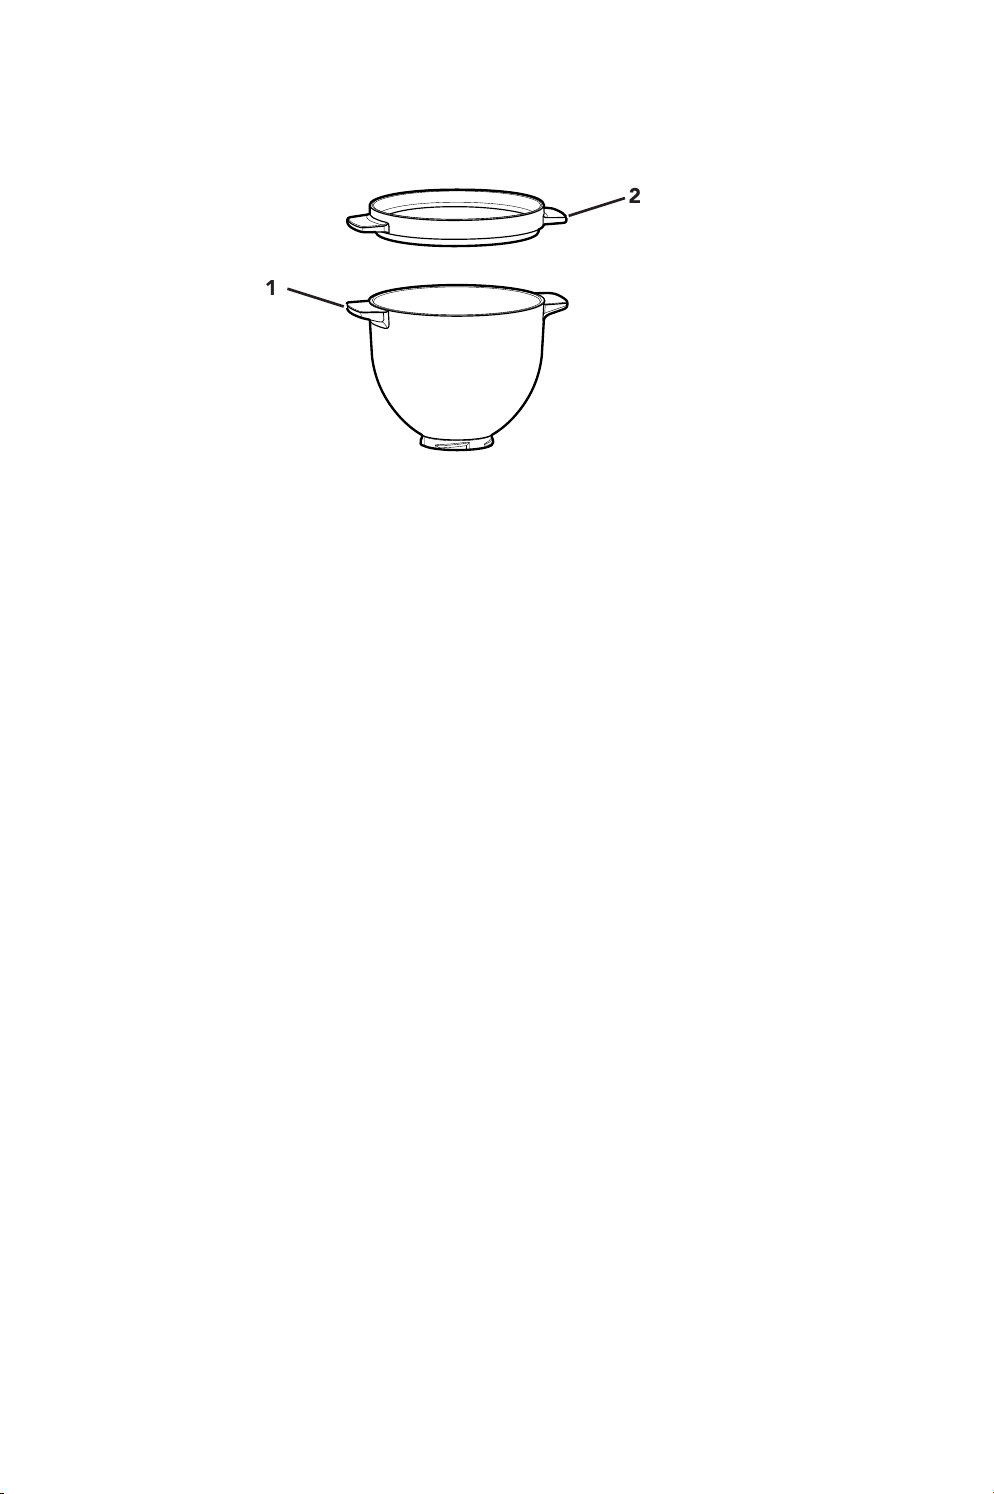
PARTS AND FEATURES
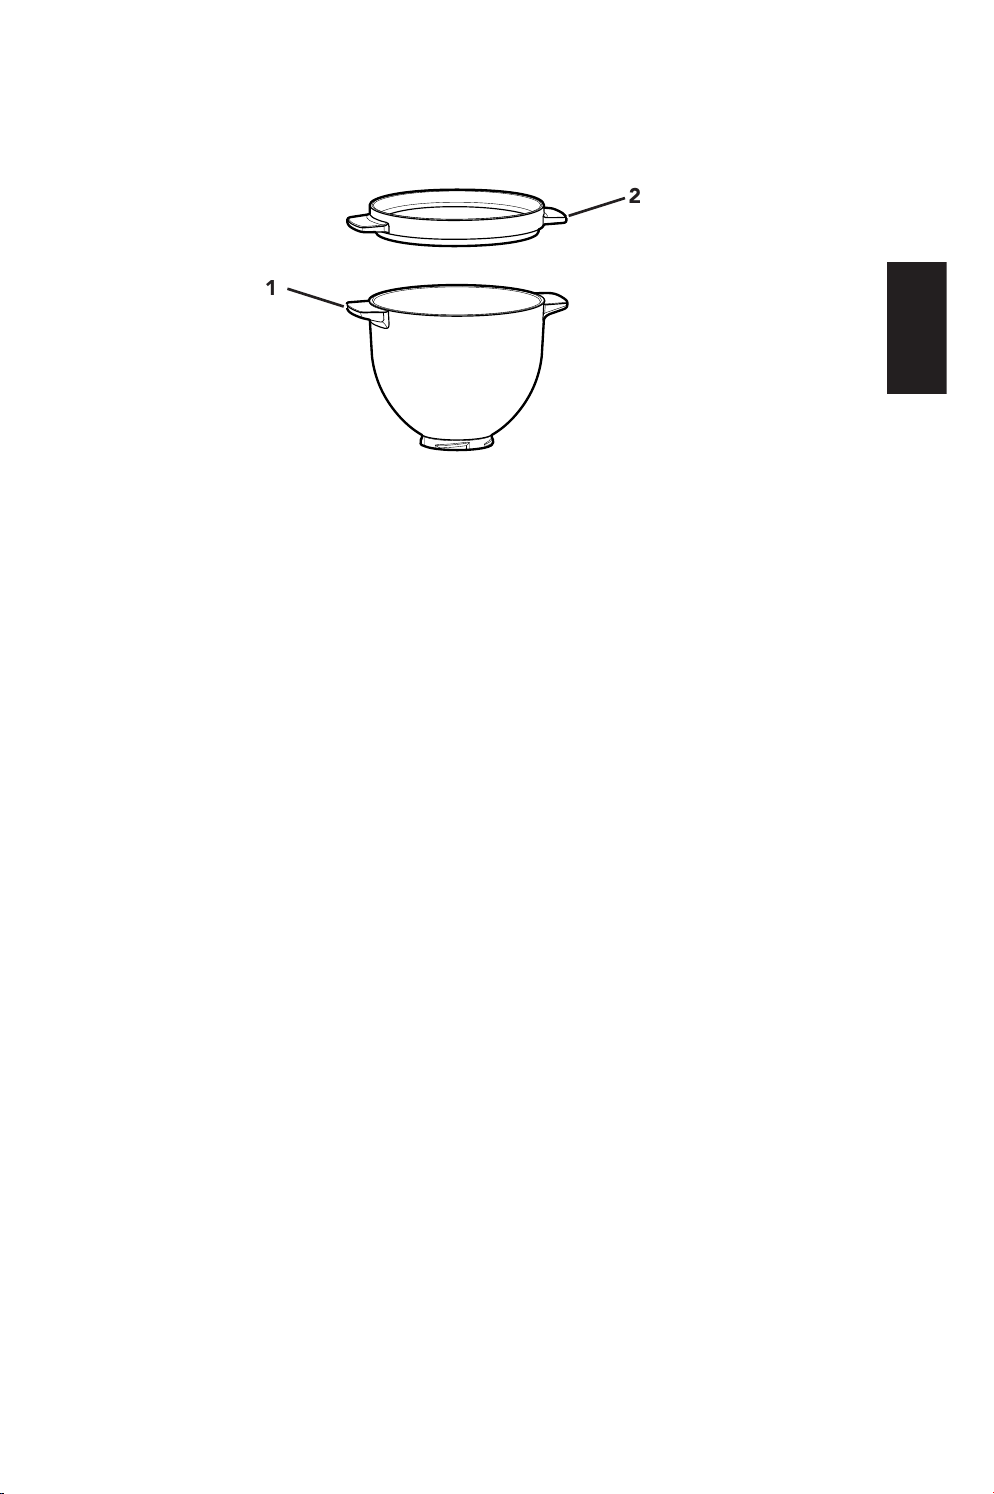
1 Bread Bowl* 2 Baking Lid
PRODUCT SAFETY
IMPORTANT SAFEGUARDS
When using electrical appliances, basic safety precautions should always be
followed. Please refer to the basic Important Safeguards as outlined in the
Instructions manual included with your Stand Mixer.
SAVE THESE INSTRUCTIONS
This product is designed for household use only.
1
2
*Bread Bowl is compatible to fit all 4.5 and 5 quart Tilt Head Stand Mixers.
ENGLISH
3
PRODUCT ASSEMBLY
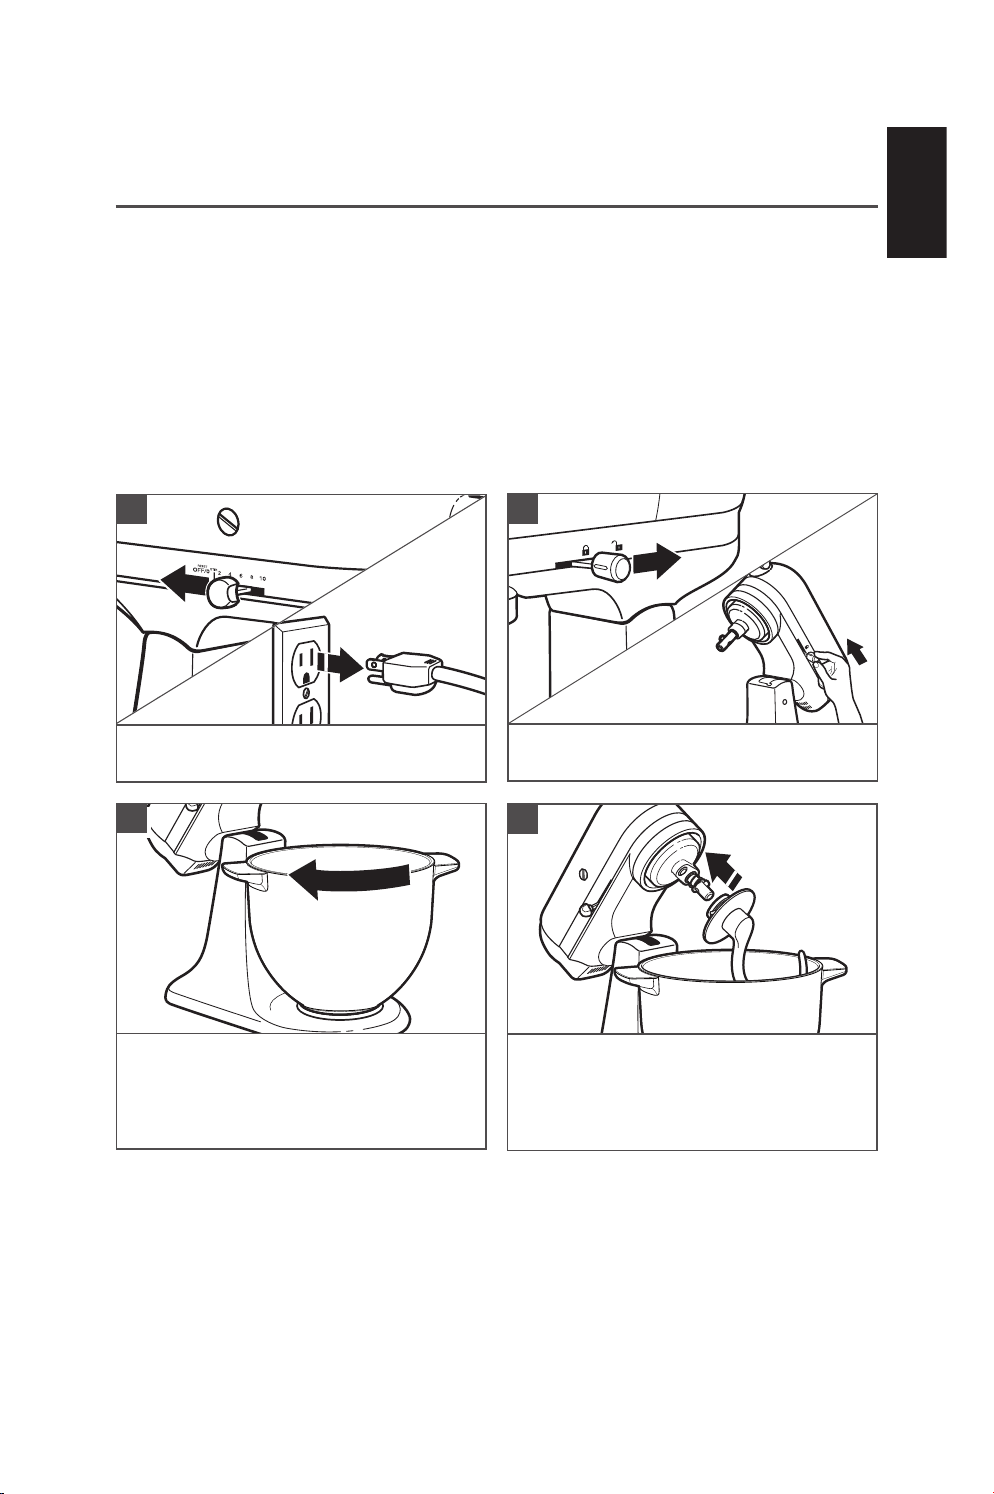
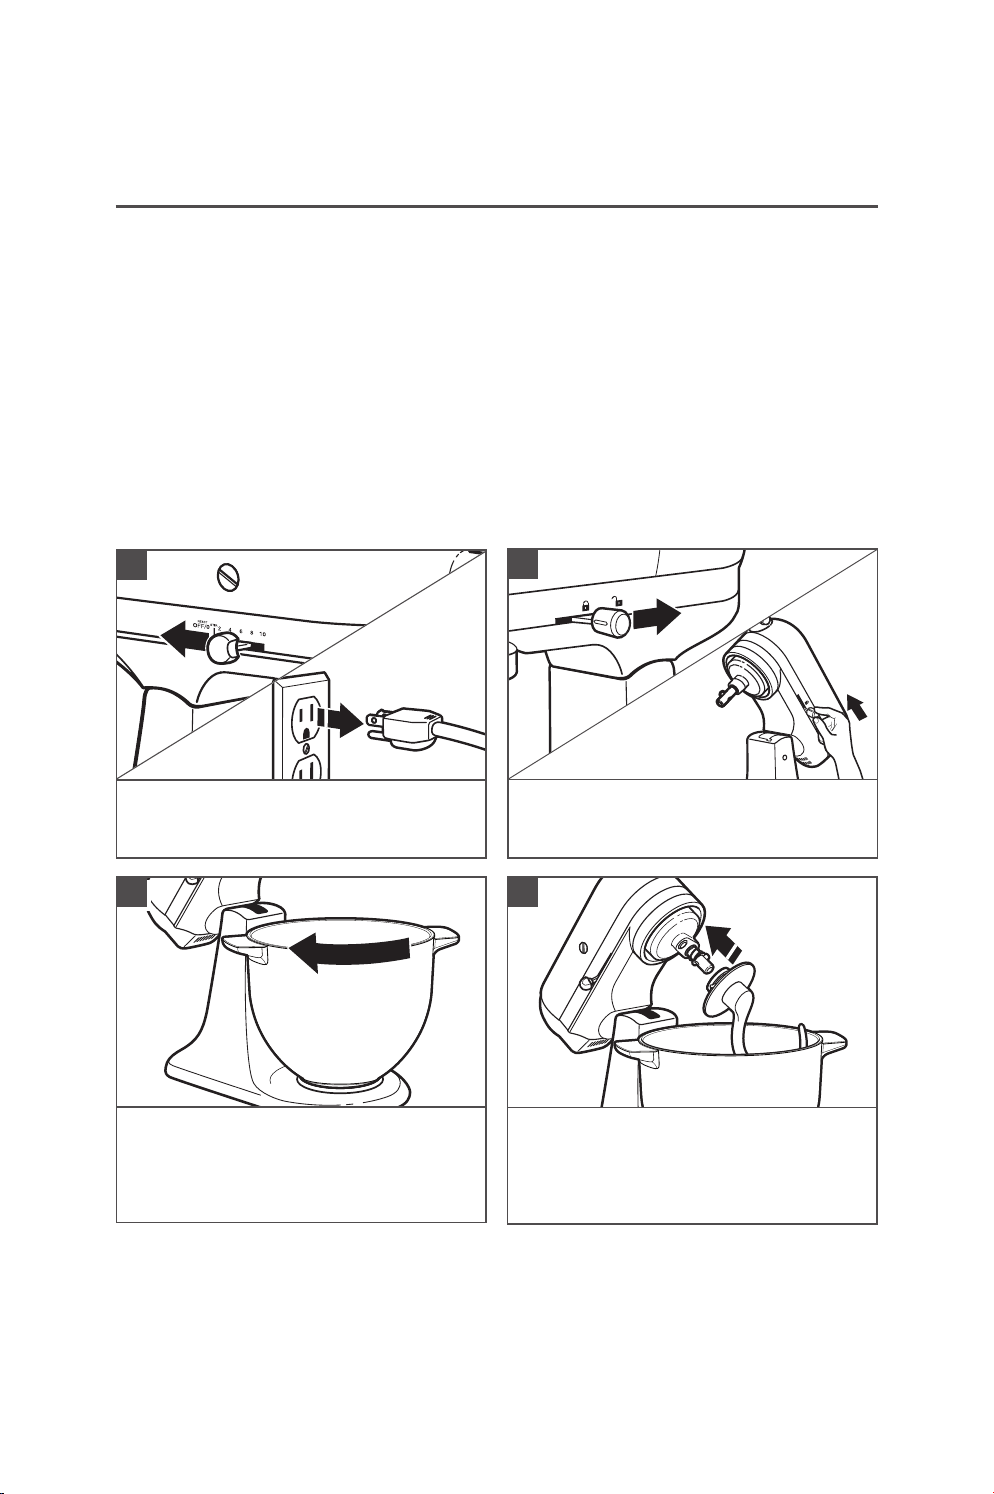
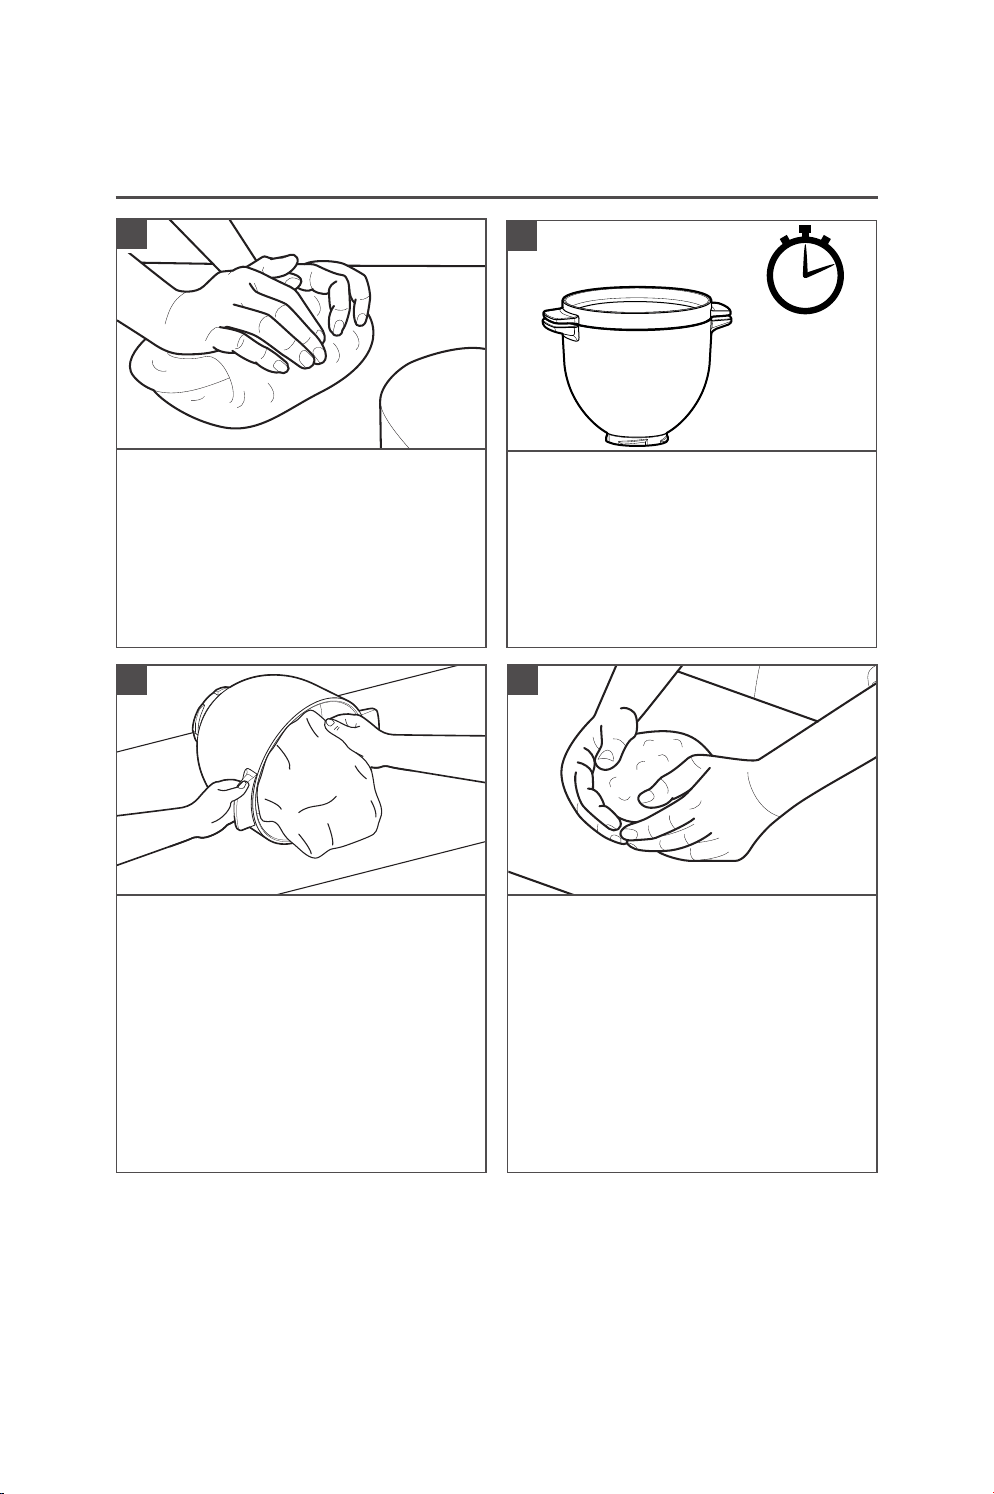
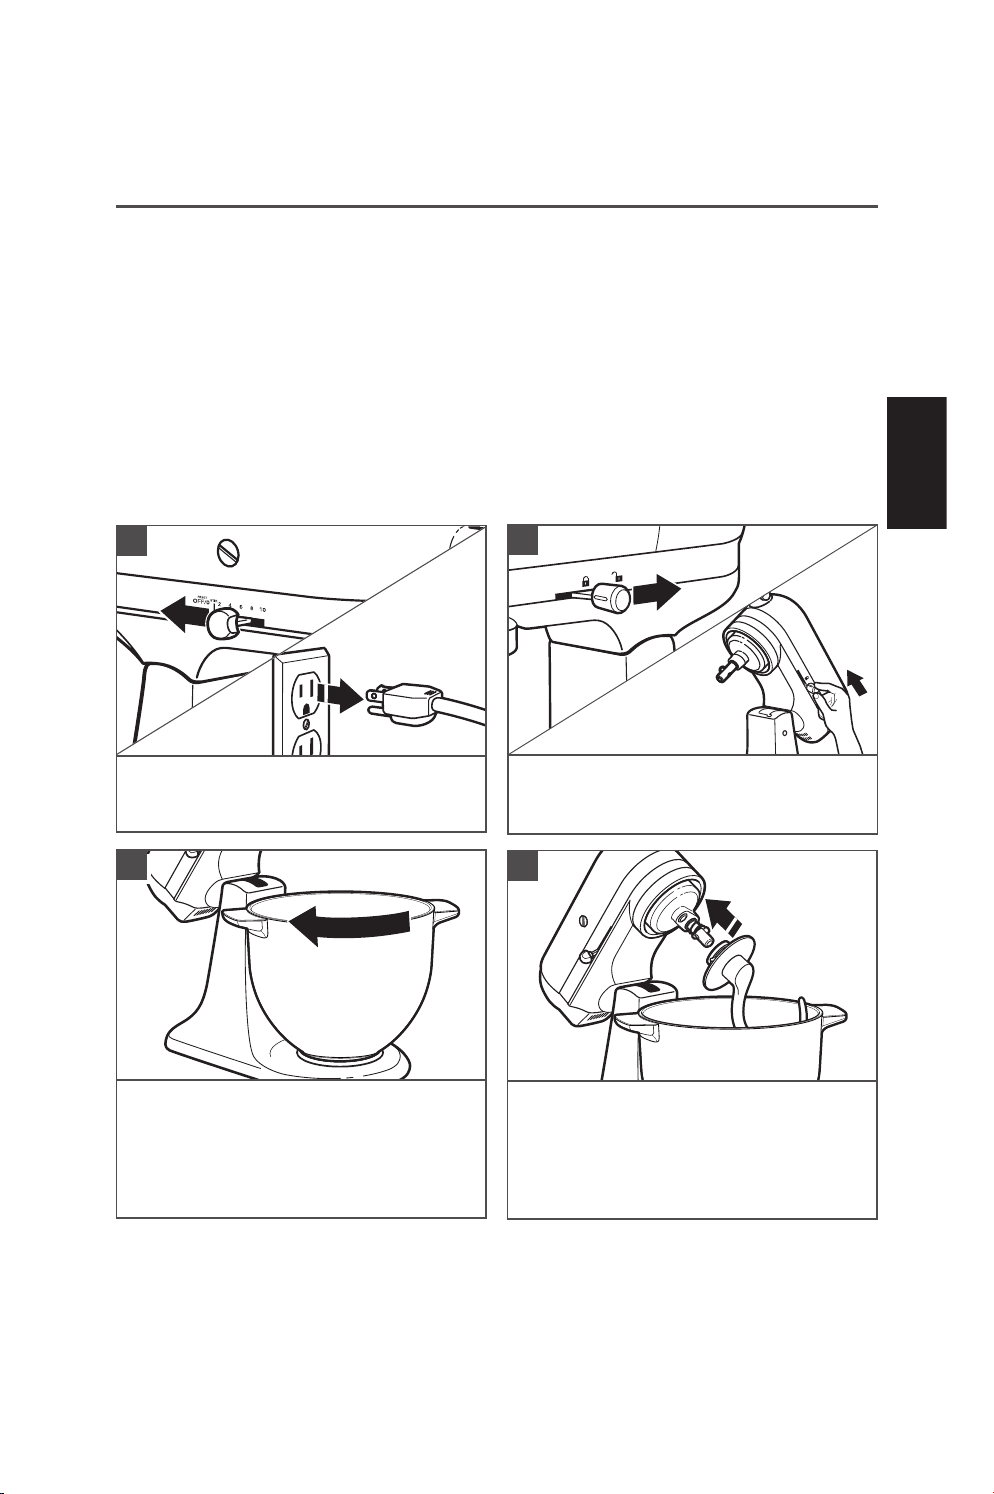
ATTACHING THE BREAD BOWL
Before First Use
Your Stand Mixer is individually adjusted at the factory for optimal performance. When using the
Bread Bowl with Baking Lid, it may be necessary to readjust the beater-to-bowl clearance. Please
refer to the Stand Mixer Instructions manual for complete information on adjusting the
beater-to-bowl clearance, or call 1-800-541-6390 Monday through Friday 8-8 EST and we would
be happy to assist you in making this adjustment.
IMPORTANT: Before use, wash with hot, soapy water; rinse and dry thoroughly. It is not
necessary to season the Bread Bowl with Baking Lid before use.
NOTE: This Bread Bowl is designed to fit all 4.5 and 5 quart Tilt Head Stand Mixer models
except model KN15E1X. The Bread Bowl with Baking Lid is oven safe (up to 500°F/260°C).
Follow these instructions to attach the Bread Bowl to your Stand Mixer.
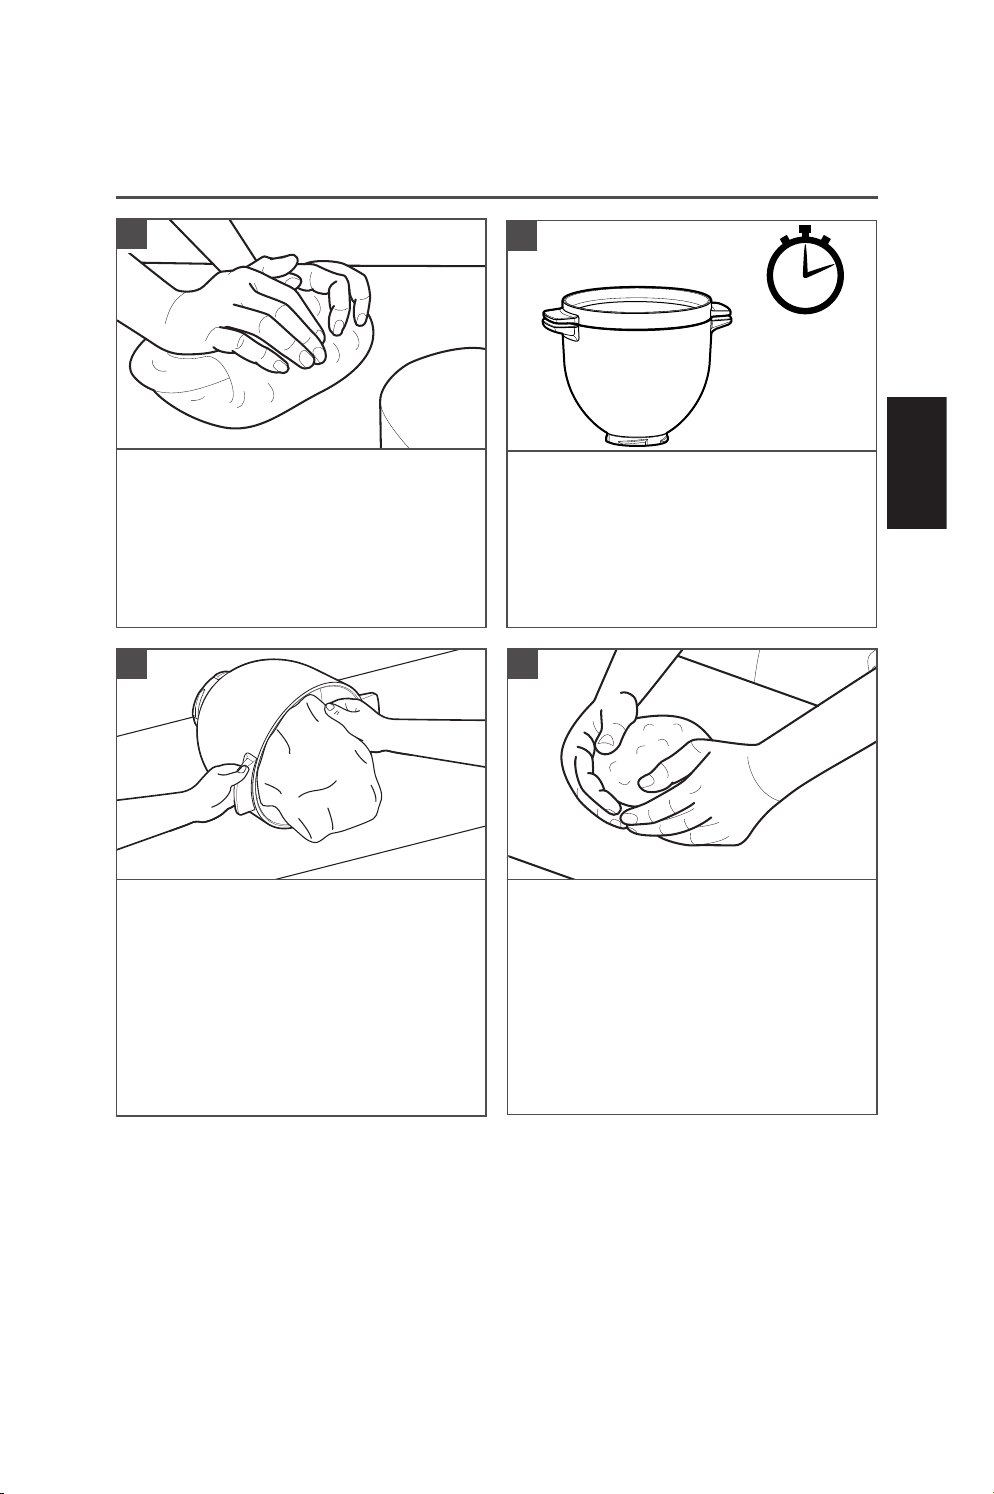
Place the Bread Bowl on the clamping
plate to secure in place.
3
Attach the Dough Hook for your recipe,
using the directions in the Stand Mixer
Instructions manual. Then place the Motor
Head back in the down position and lock
*
into place.
4
Turn the Stand Mixer OFF (0) and unplug.
1
Unlock and lift the Motor Head. Then,
lock* the head to keep it lifted.
2
*Locking option is available on select models.
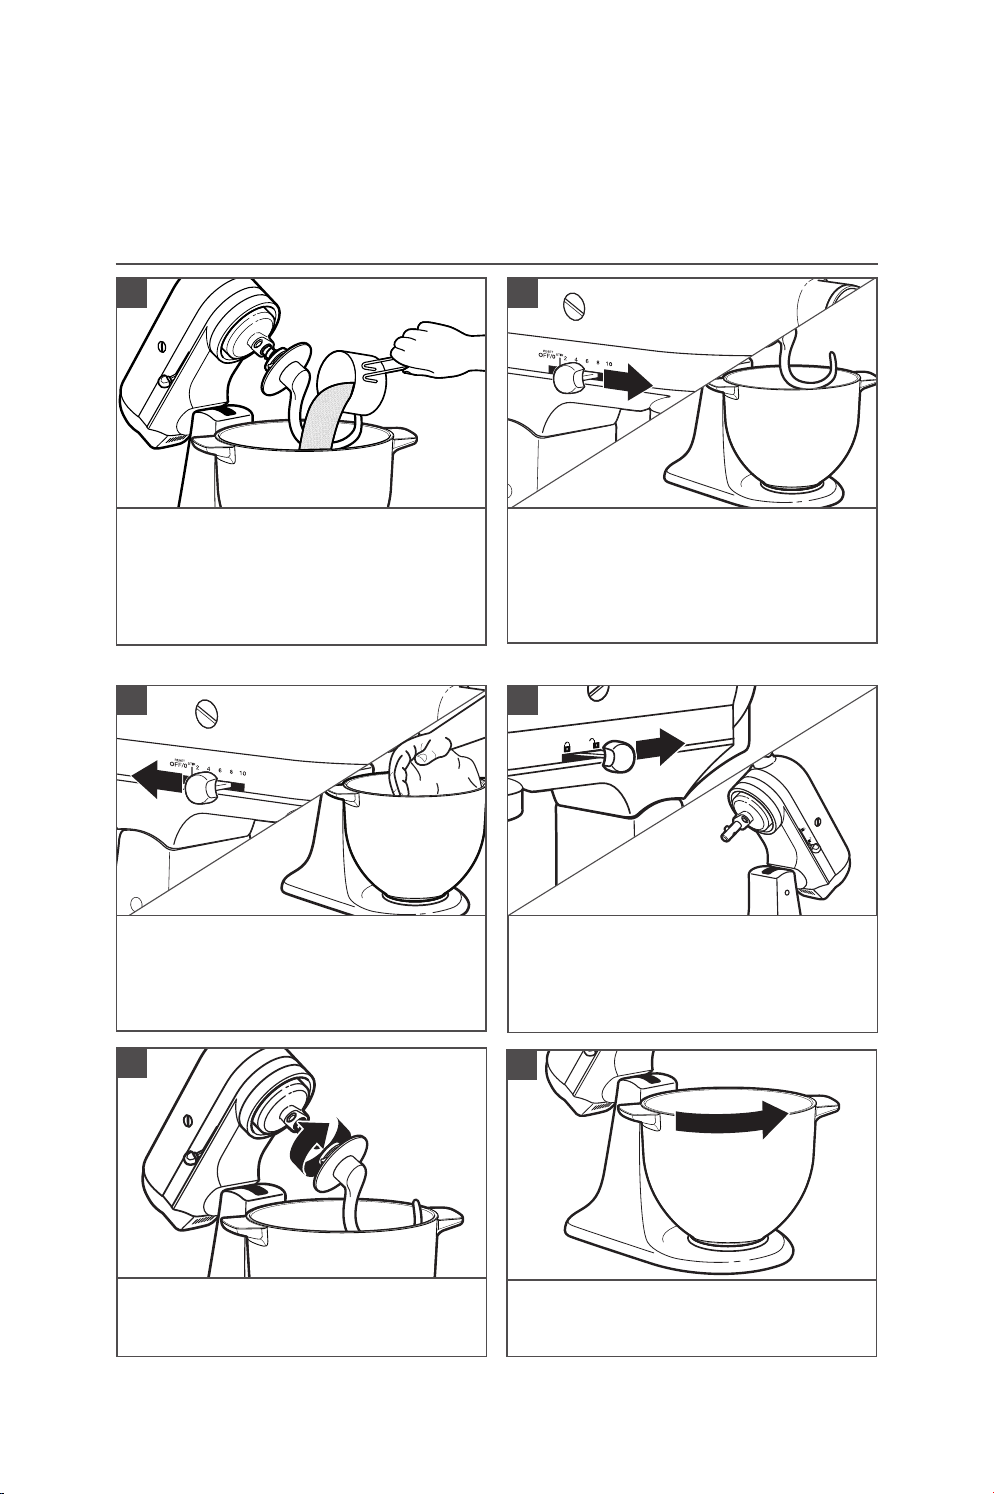
4
*Locking option is available on select models.
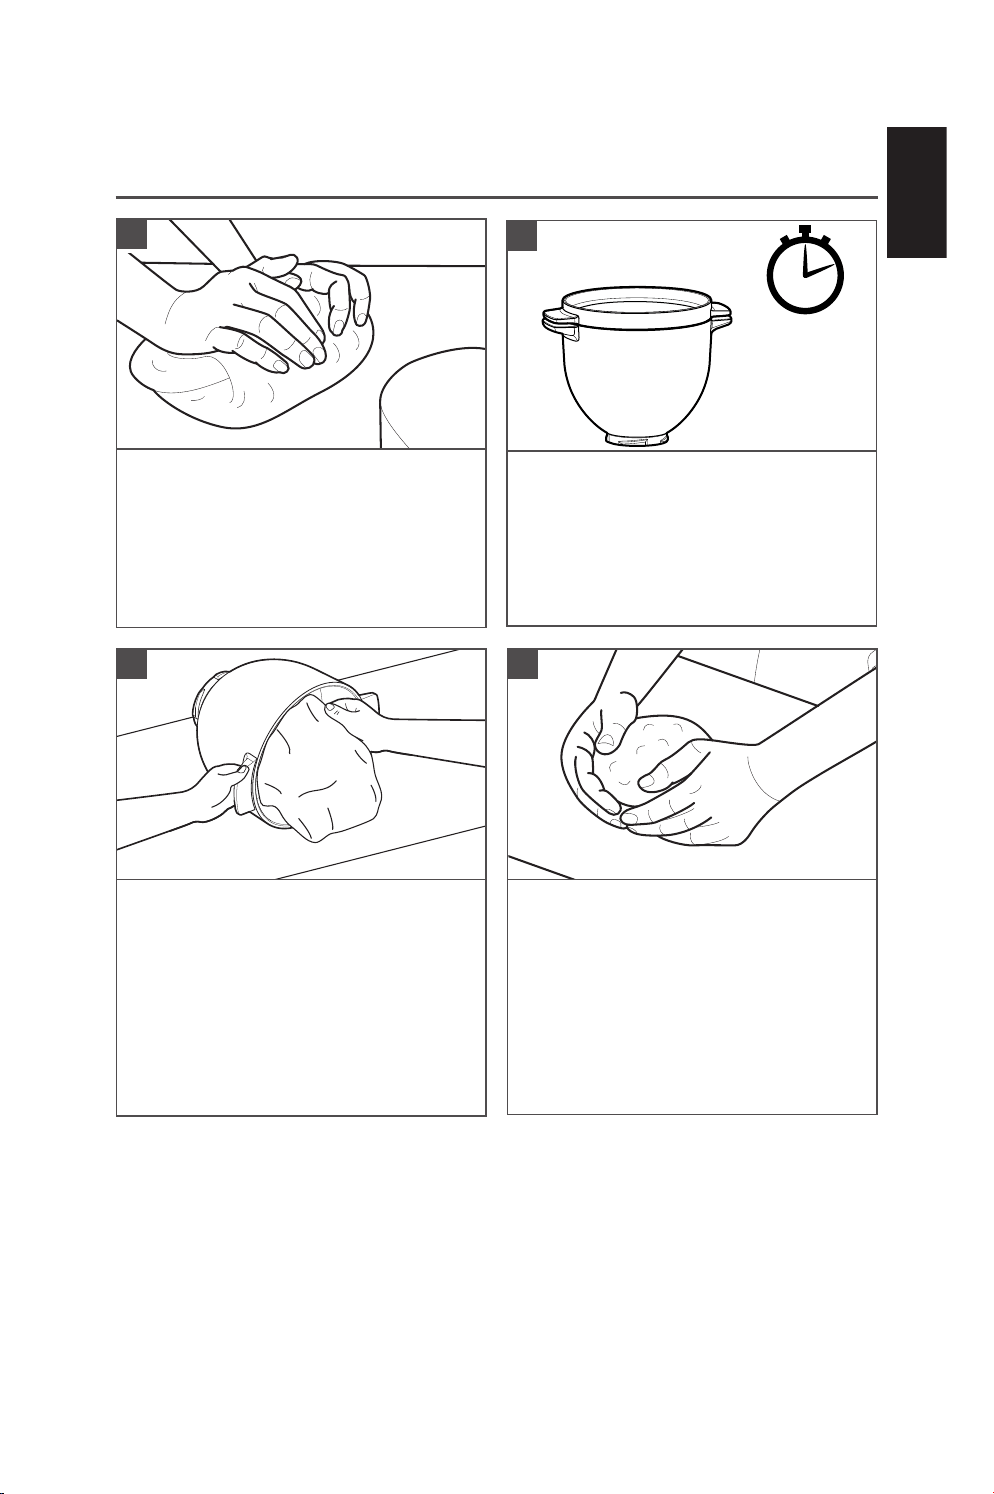
PRODUCT USAGE
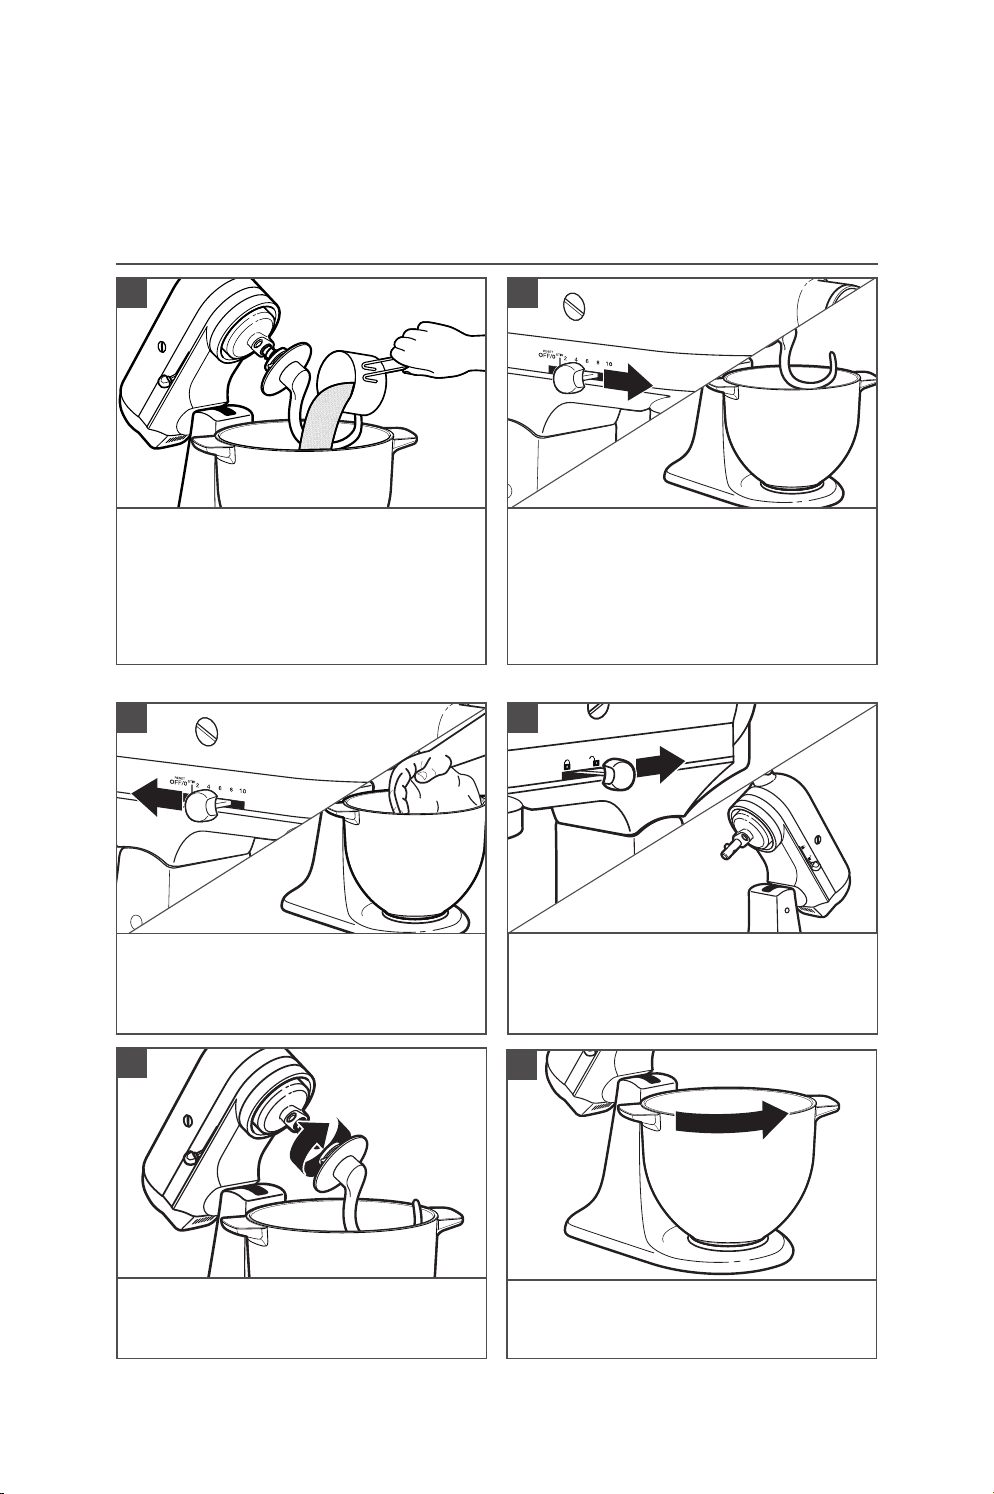
Once bowl and dough hook attachment
are secured on Stand Mixer, you will add in
ingredients into the Bread Bowl.
NOTE: See ingredient list on recipe insert.
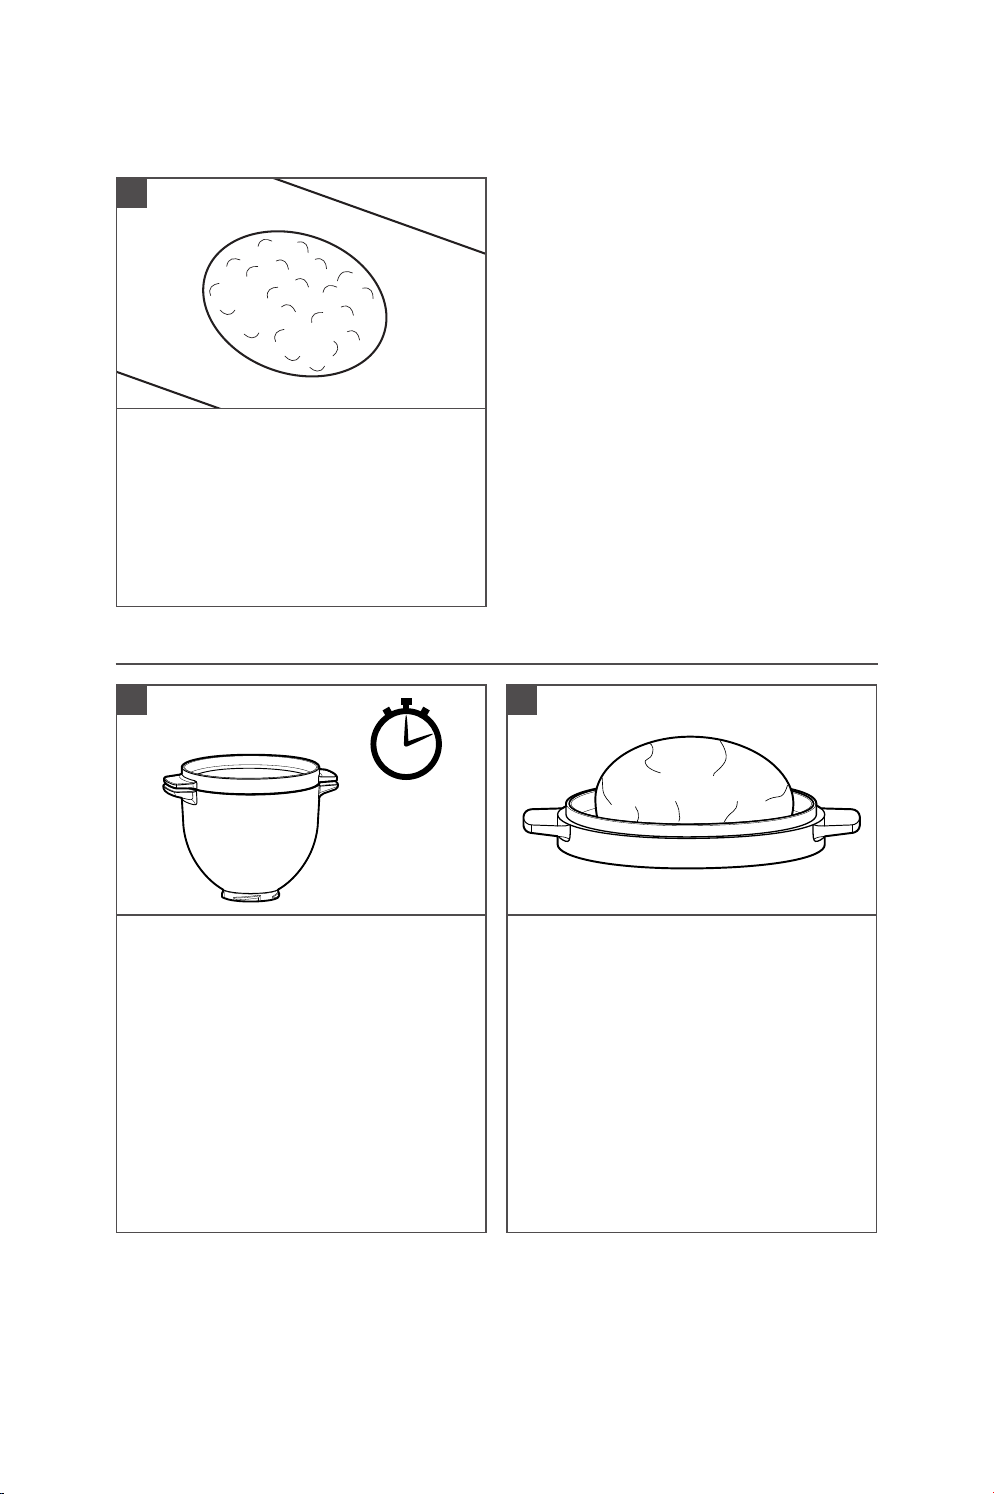
1
Turn the Stand Mixer to speed 2 to
combine dry ingredients. After about 30
seconds, slowly stream in warm water.
Allow the mixer to knead the ingredients
for 1½ - 2½ minutes - or, until the dough
pulls away from the bowl and forms a ball.
2
NOTE: The Bread Bowl is used for yeasted receipes only.
Turn the Stand Mixer OFF (0) and unplug.
Remove dough from the Bread Bowl.
3
Raise the Motor Head: Unlock and lift
the Motor Head. Then, lock* the head
to keep it lifted.
4
Remove the accessory: Press the
accessory upward, turn it and pull it
away from the beater shaft.
5
Remove the Bread Bowl: Twist to unlock
the
Bread Bowl from the clamping plate.
6
MIX AND KNEAD
NOTE: Product usage steps based on insert recipe card. Recipe steps may vary based on
different recipes in other recipe books. The Bread Bowl with Baking Lid is oven safe
(up to 500°F/260°C).
ENGLISH
5
PRODUCT USAGE
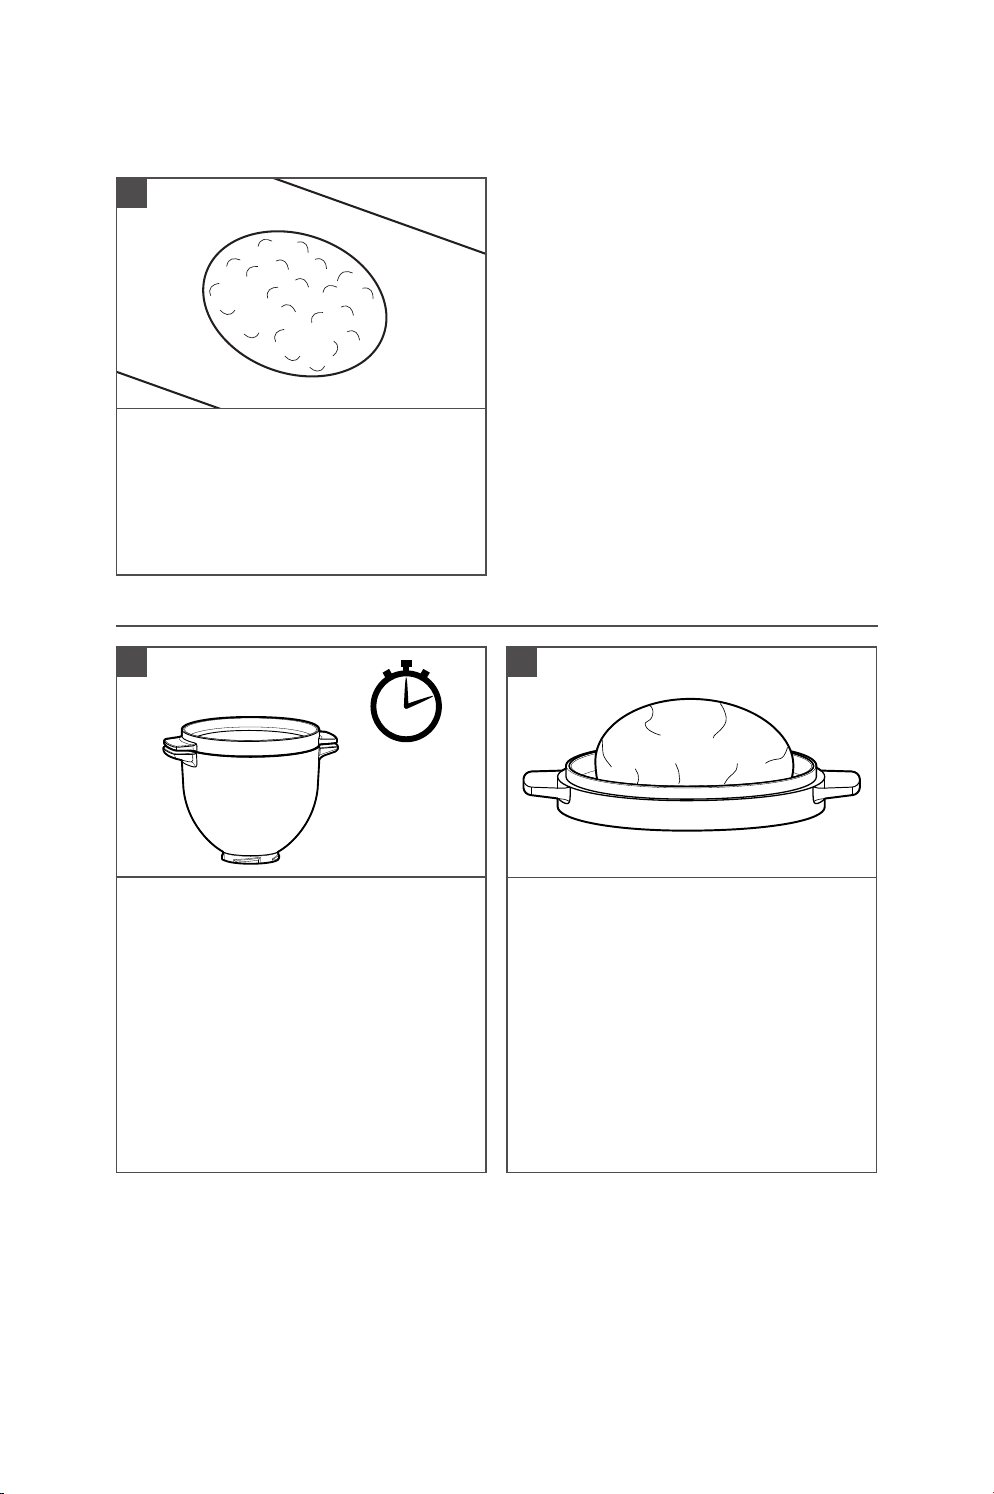
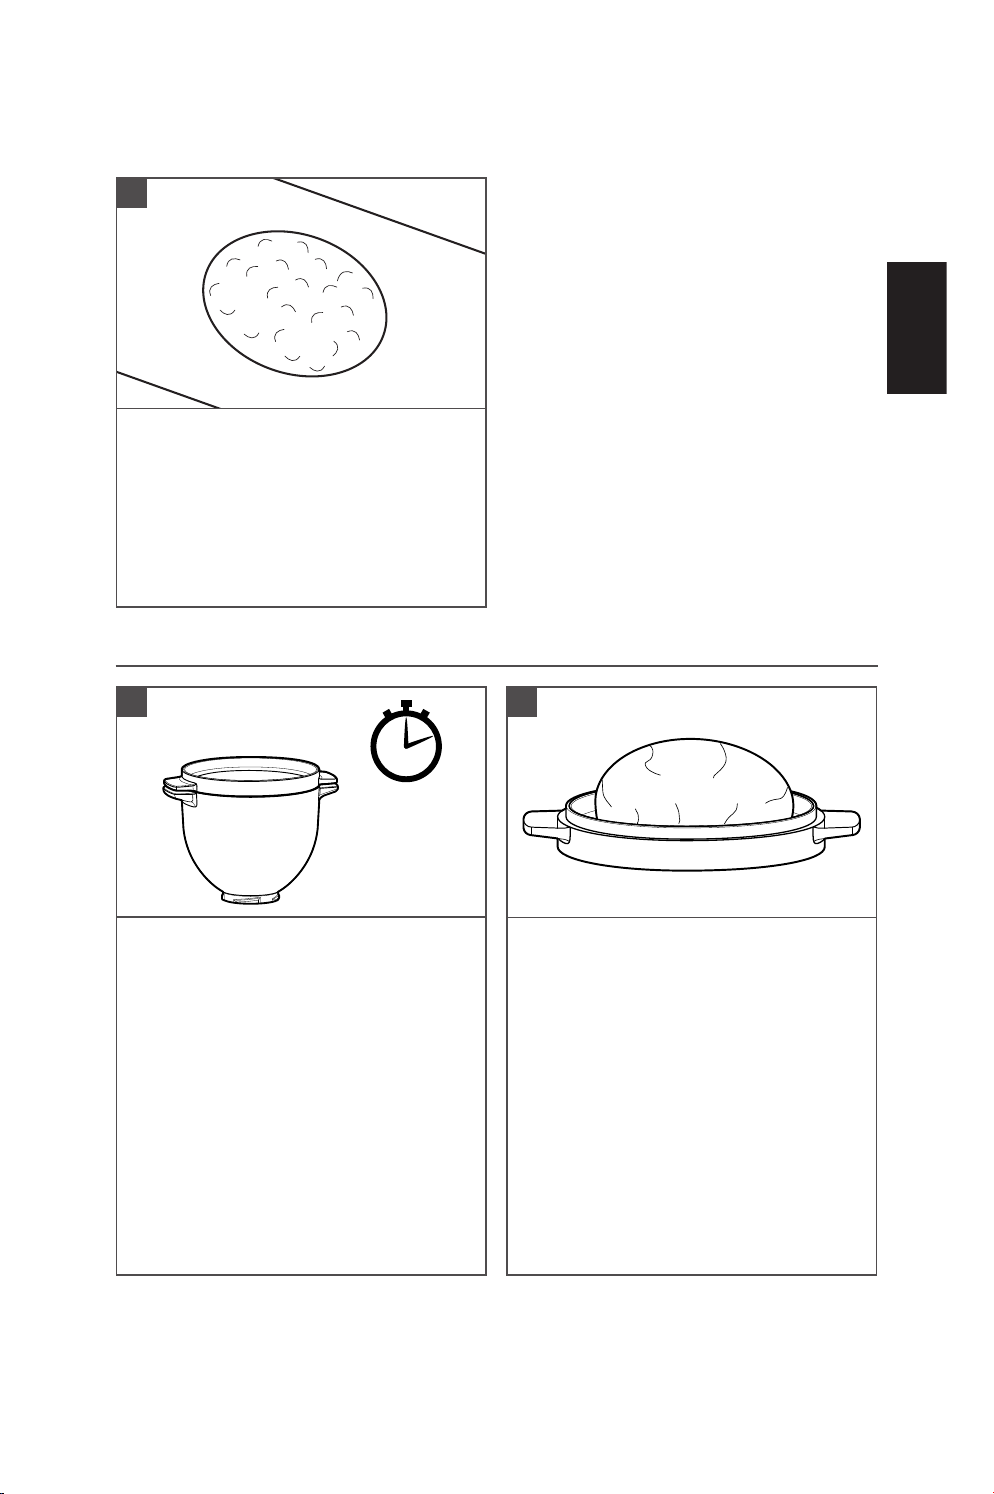
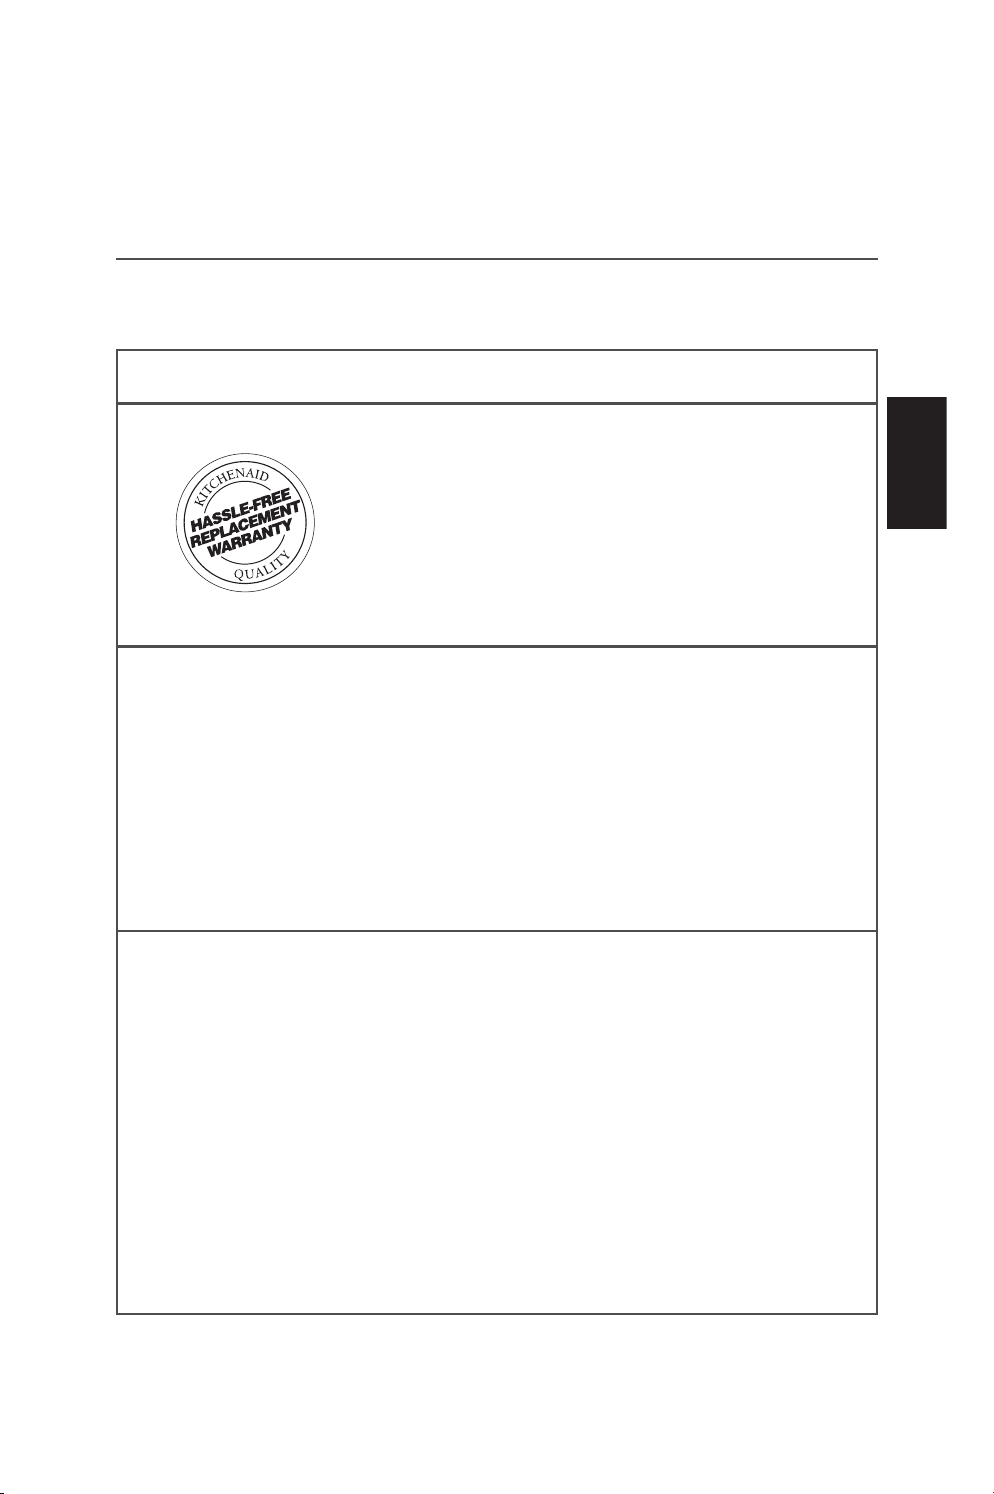
PROOF
Place the dough in the Bread Bowl and
dust the top of the dough with a bit of
flour. Use a hand to turn and coat the
dough in flour, then cover the bowl with
the Baking Lid. Let the dough rise for 60
minutes.
Use measurements marks* on side of
Bread Bowl for visual rising level.
2
If necessary, hand knead the dough on the
counter so it forms a smooth round ball.
Return to Bread Bowl.
1
Uncover the bowl and gently pull the
dough from the bowl onto a generously
floured surface.
3
With dough in a rough round in front of
you, pinch the top of the dough, stretch
it away from you, then fold it into the
center of the dough like you are folding
an envelope. Give the dough a slight twist
and do the same thing to the portion now
at the top. Continue turning, stretching
and folding the dough into the center for
three to four full circles. (You will notice it
gets harder to stretch the dough as you
work.)
4
*Marks are for visual reference only and will depend on recipe size used.
6
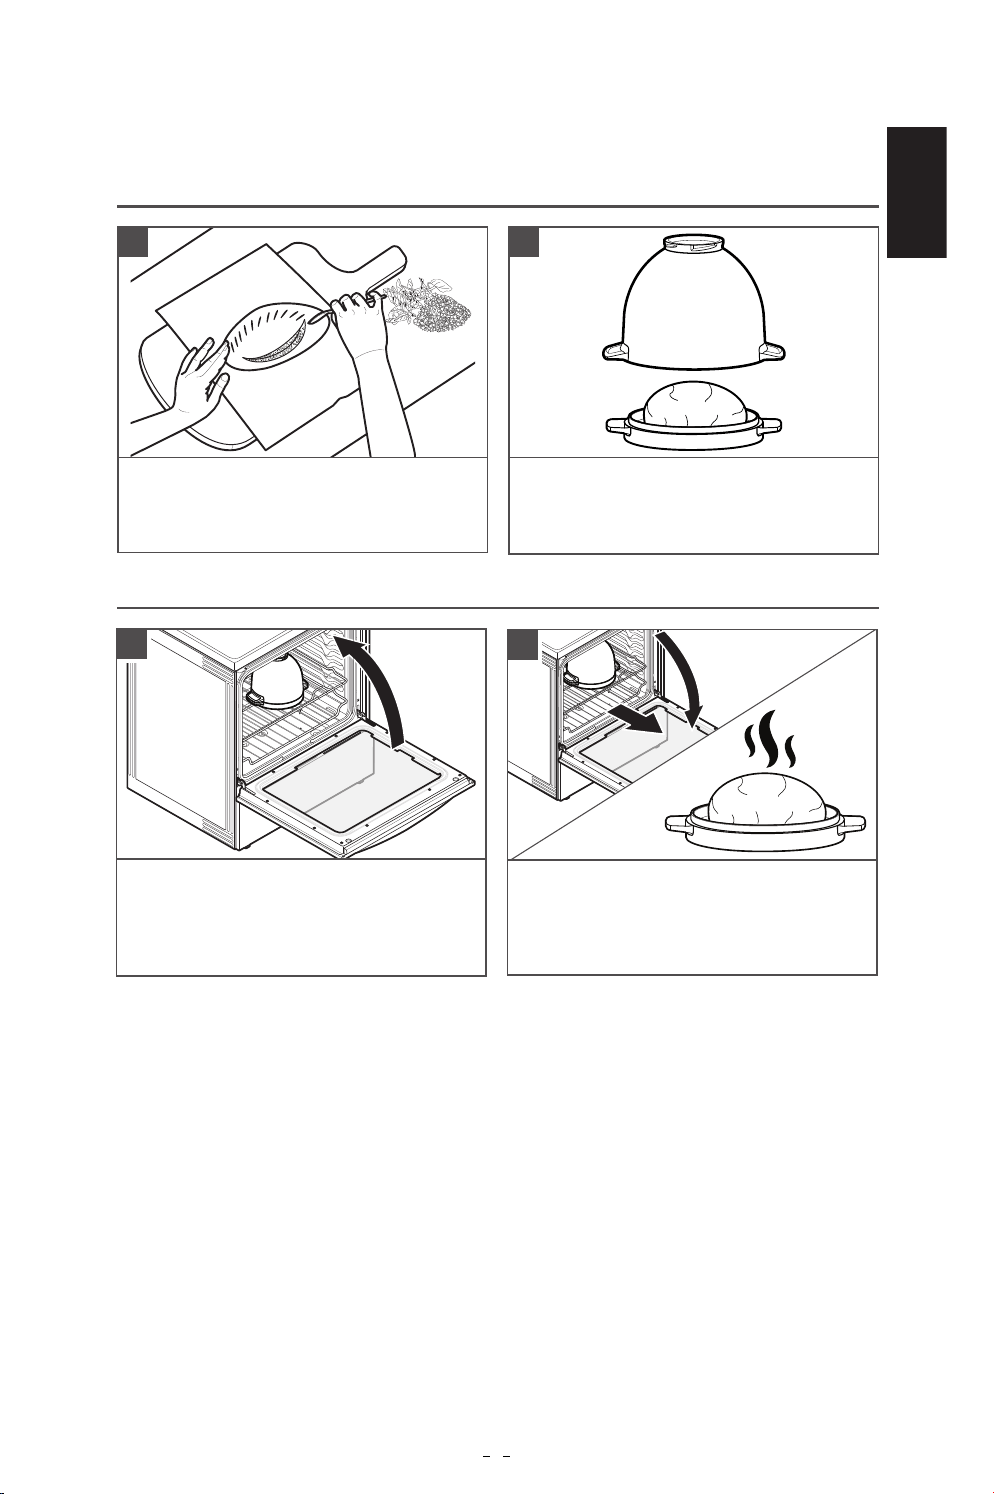
PRODUCT USAGE
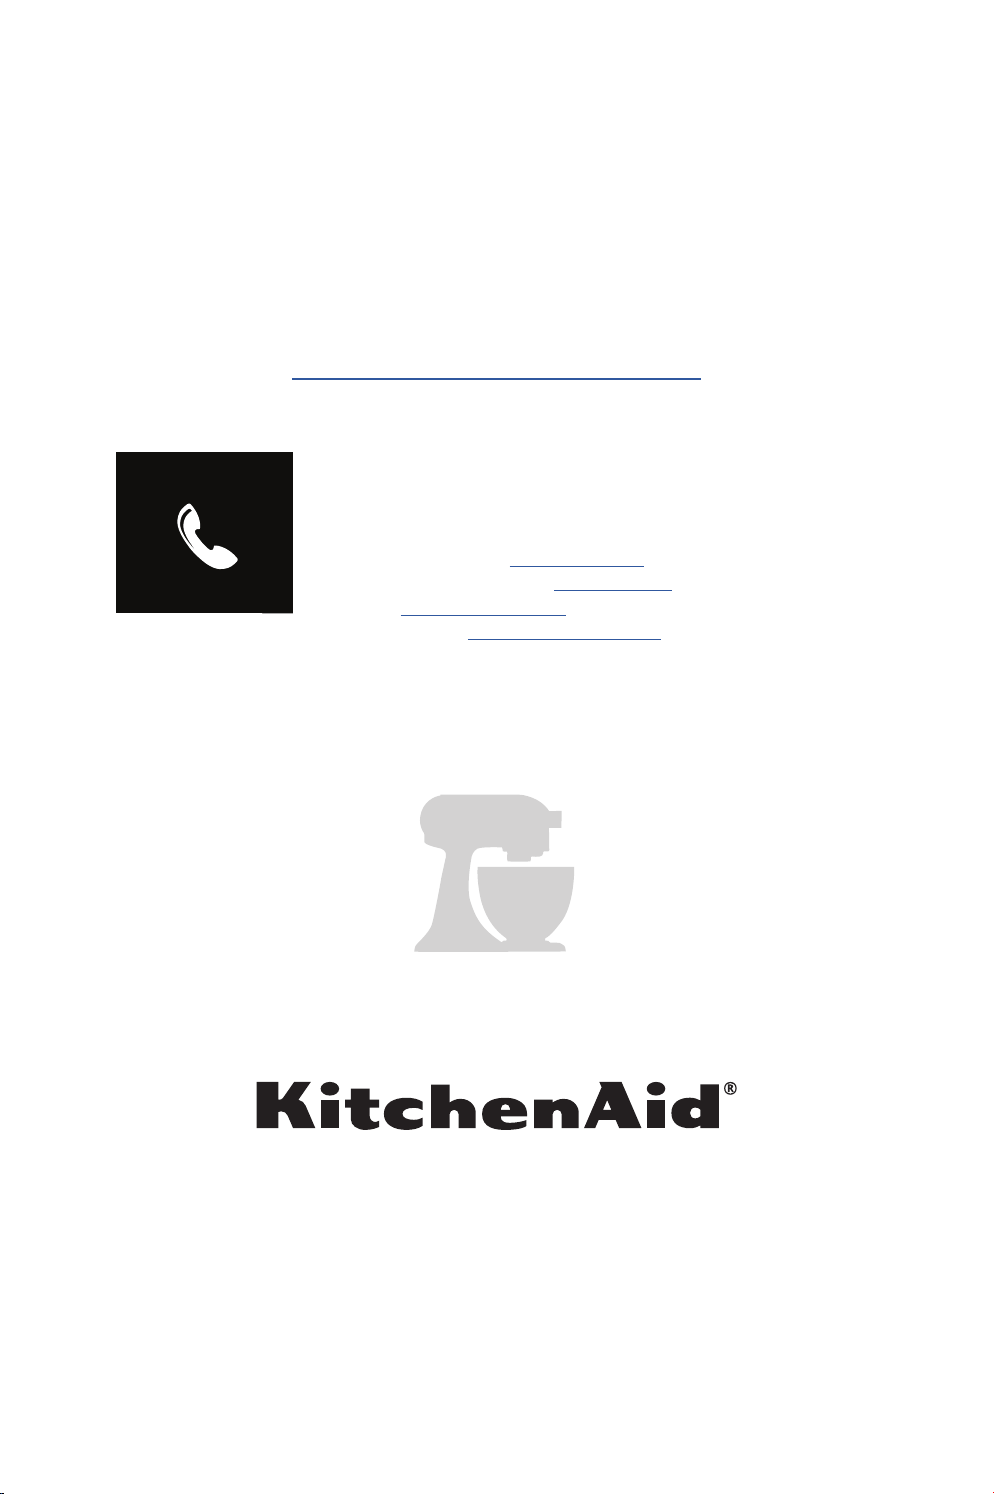
RISE
Generously flour the inside of the Bread
Bowl and the top of the dough. Return
the dough, seam side down, to the Bread
Bowl. Cover the bowl with the Baking Lid
and allow it to rise for 30 more minutes.
1
Once dough has risen, remove the lid from
the Bread Bowl and line the inside of the
lid with a round of parchment paper, or
coat with grease and flour. Remove dough
from the Bread Bowl and carefully invert
the round from the Bread Bowl onto the
Baking Lid (so the fold side is now facing
up) being careful not to deflate it or
disturb the shape.
TIP: To avoid bread sticking to lid, use
parchment paper or coat the lid with
grease and flour prior to baking. For larger
loaves also consider coating the sides of
the bowl with oil and flour prior to baking.
2
After the final stretch and fold, flip the
dough over, fold side down. Gently place
both hands on each side of the round and
gently curl your right palm around the right
edge while using your left hand to rotate
the round on the surface. This action will
smooth the dough into a round mound.
5
ENGLISH
7
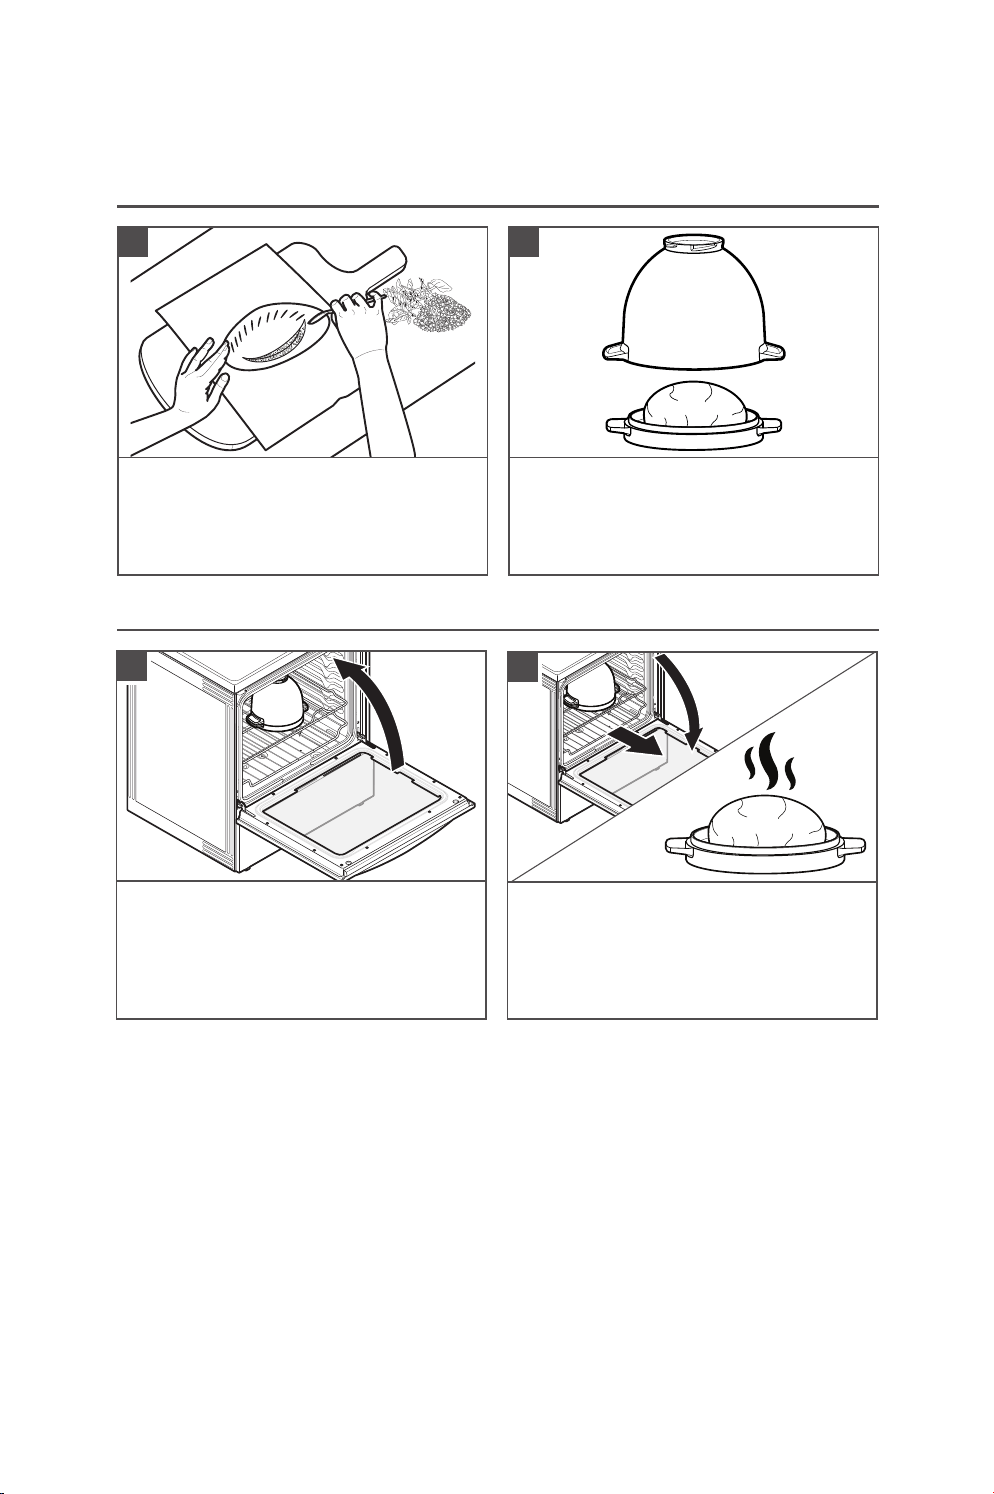
SHAPE AND SCORE ON LID
Shape and score the dough, using sharp
knife or scoring tool.
Optional: Sprinkle flour on top of dough,
egg wash, or herbs for customization.
1
Gently place the Bread Bowl upside down
on top of the dough and Baking Lid to
secure in place.
2
PRODUCT USAGE
BAKE
Preheat oven to 450°F/232°C.
Place the Bread Bowl with Baking Lid side
down on middle oven rack and bake it for
30 minutes.
1
TIP: Remove the Bread Bowl and bake for the
last 8-10 minutes to get crispy brown crust.
Remove the Bowl covering to expose
the bread and finish baking for 10 more
minutes, this will help brown the crust.
Remove to a cooling rack and let cool
completely before slicing.
2
IMPORTANT: Always use oven mitts when
removing Bread Bowl or racks.
TIP: When inserting into oven, place lid side
down on to rack.
NOTE: Set your rack as close to the center of
the oven as possible while still leaving enough
height for the Bread Bowl with Baking Lid to
fit.
8
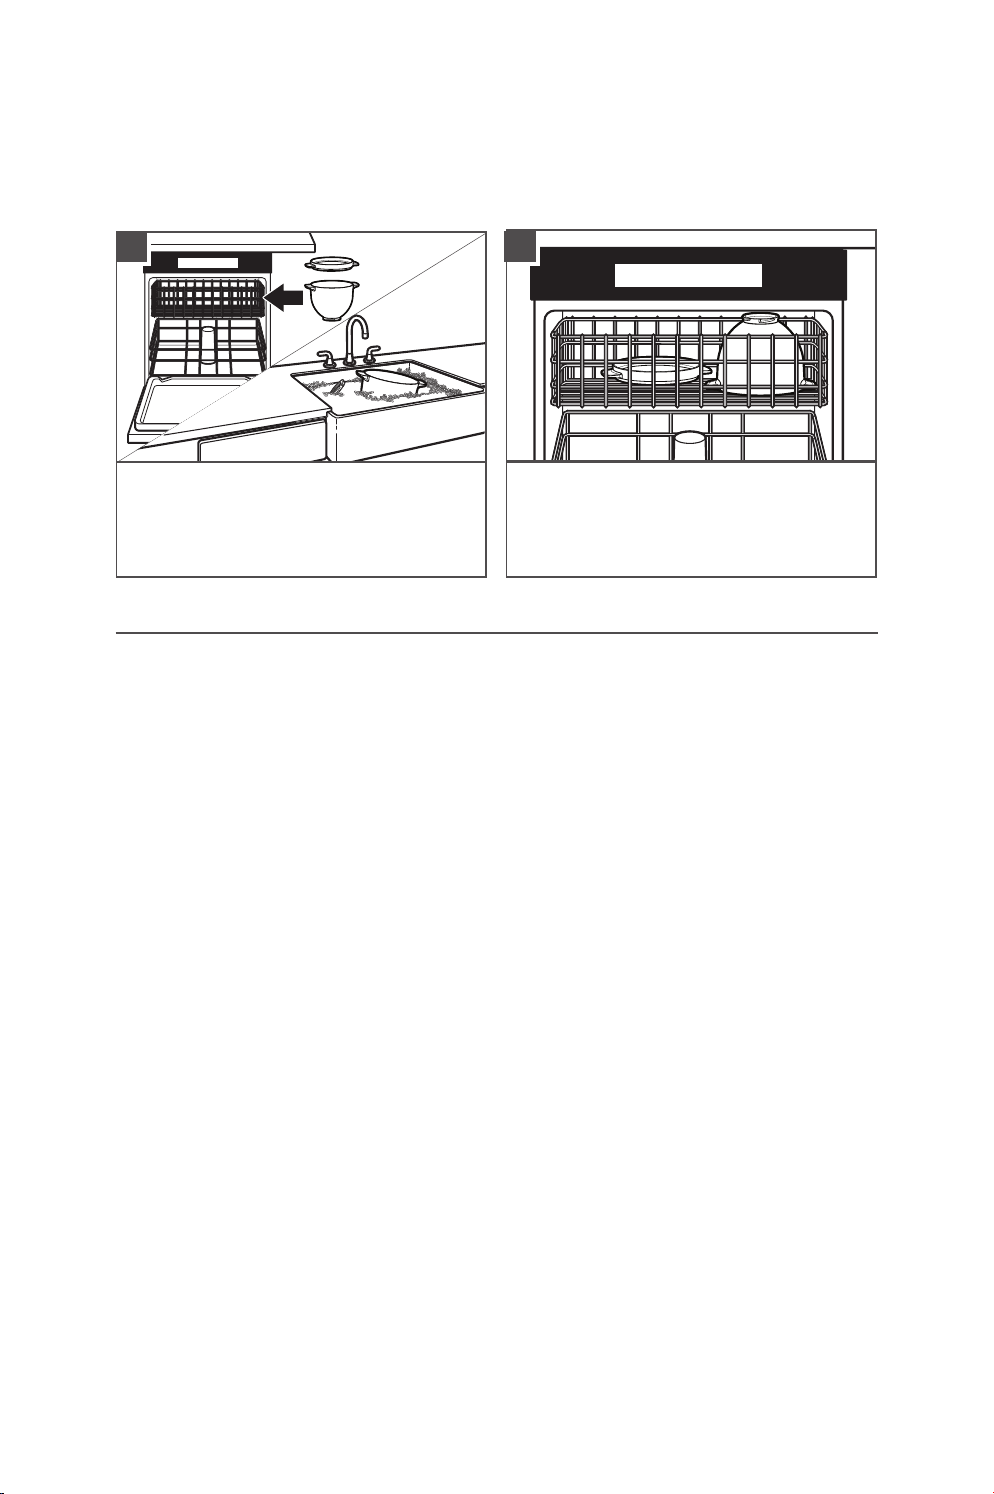
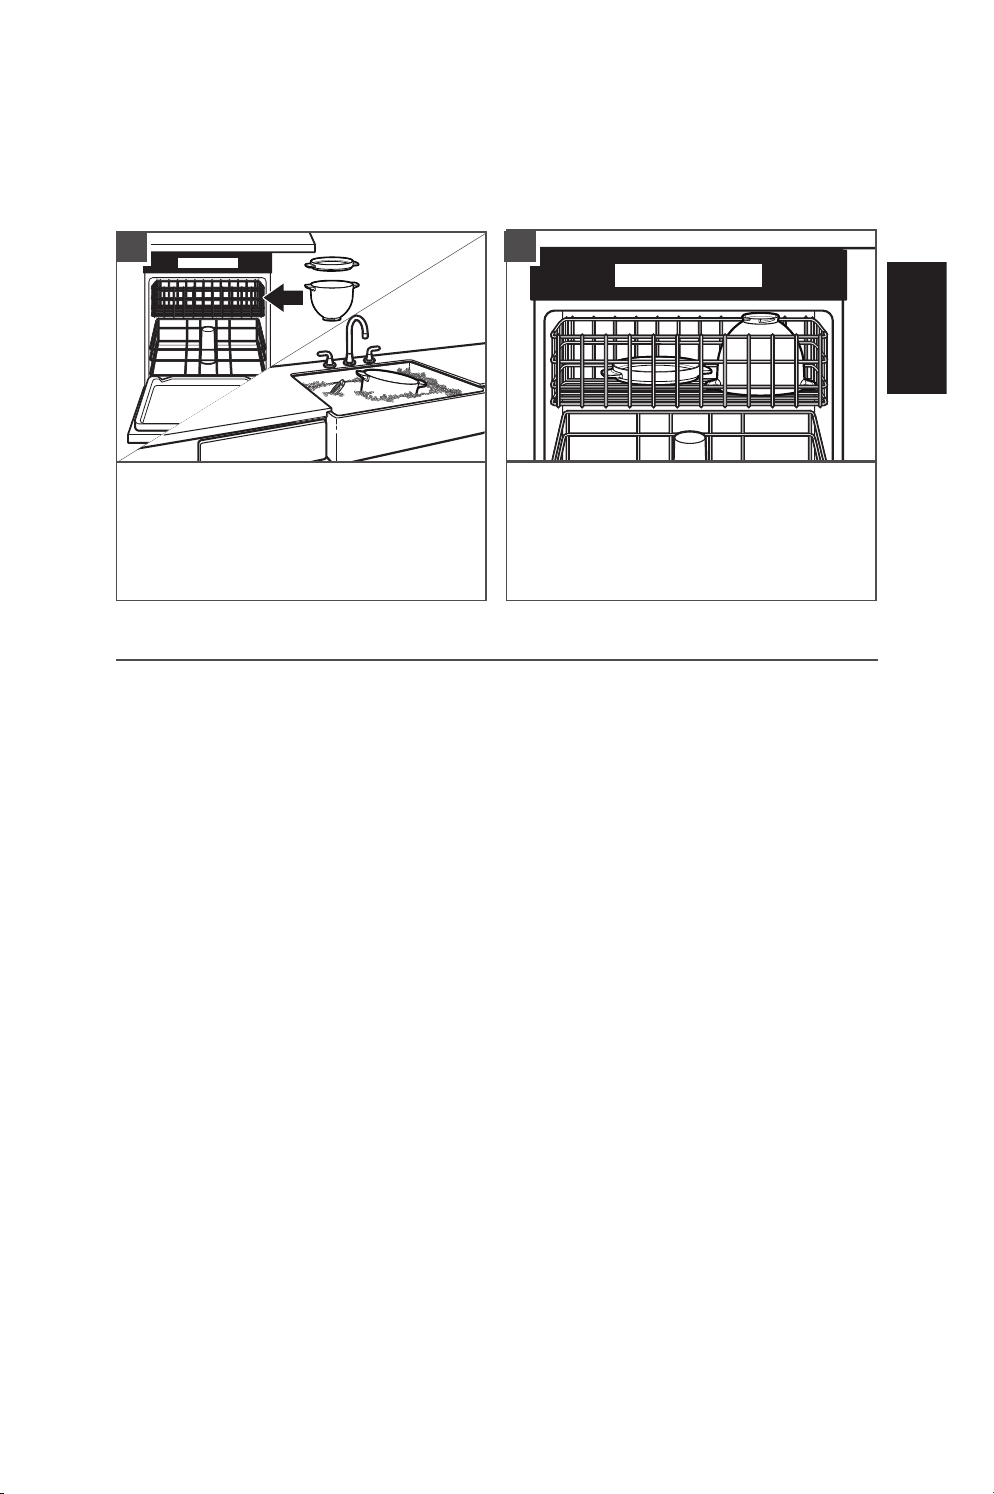
CARE AND CLEANING
• To remove baked-on food, soak the
Bread Bowl in hot, soapy water for
15-20 minutes or as needed before
placing it in the dishwasher.
• Always dry the Bread Bowl thoroughly
before storing.
• After using the Bread Bowl with the
Stand Mixer, some marks may appear
where the Bread Bowl locks in to the
base of the Stand Mixer. The marks are
normal and can be removed by cleaning
with an abrasive cleaner and sponge.
• You may also clean using an abrasive
sponge and a baking soda and warm
water mixture, vigorously scrub stains to
reduce staining appearance.
• It is recommended to minimize
sudden changes in the temperature of
your ceramic. Ceramic must be heated
or cooled gradually to avoid thermal
shock and possible damage.
• When the Bread Bowl with Baking Lid
is hot, do not place it in contact with
anything cold, such as cold water or a
cold surface. When you take it out of
the oven, place it on a neutral surface
and let fully cool.
BREAD BOWL WITH BAKING LID CARE
The Bread Bowl and Lid may be washed
in an automatic dishwasher on the top or
bottom rack; or, clean thoroughly in hot
sudsy water and rinse completely before
drying.
1
The Bread Bowl should be placed upside
down if washing in an automatic dishwasher.
2
IMPORTANT: Allow the appliance to cool completely before putting on or taking off parts, and
before cleaning the appliance.
ENGLISH
9
LIMITED WARRANTY AND SERVICE
KITCHENAID BREAD BOWL WITH BAKING LID LIMITED WARRANTY
FOR THE 50 UNITED STATES, THE DISTRICT OF COLUMBIA,
PUERTO RICO, AND CANADA
This warranty extends to the purchaser and any succeeding owner for the Bread Bowl with
Baking Lid operated in the 50 United States, the District of Columbia, Puerto Rico,and Canada.
Length of Warranty: Five Years Limited Warranty from date of purchase.
KitchenAid Will Pay
for Your Choice of:
Hassle-Free Replacement of your Bread Bowl with Baking
Lid. See the next page for details on how to arrange for
service, or call the Customer eXperience Center toll-free
at
1-800-541-6390.
OR
The replacement parts and repair labor costs to correct
defects in materials and workmanship.
Service must be provided by an Authorized
KitchenAid Service Center.
KitchenAid Will
Not Pay for:
A. Repairs when your Bread Bowl with Baking Lid is used
in other than normal single family home use.
B. Damage resulting from accident, alteration,
misuse or abuse.
C. Any shipping or handling costs to deliver your Bread
Bowl with Baking Lid to an Authorized Service Center.
D. Replacement parts or repair labor costs for Bread
Bowl with Baking Lid operated outside the 50 United
States, District of Columbia, Puerto Rico, and Canada.
DISCLAIMER OF IMPLIED WARRANTIES; LIMITATION OF REMEDIES
IMPLIED WARRANTIES, INCLUDING TO THE EXTENT APPLICABLE WARRANTIES
OF MERCHANTABILITY OR FITNESS FOR A PARTICULAR PURPOSE, ARE EXCLUDED
TO THE EXTENT LEGALLY PERMISSIBLE. ANY IMPLIED WARRANTIES THAT MAY
BE IMPOSED BY LAW ARE LIMITED TO FIVE YEARS, OR THE SHORTEST PERIOD
ALLOWED BY LAW. SOME STATES AND PROVINCES DO NOT ALLOW LIMITATIONS
OR EXCLUSIONS ON HOW LONG AN IMPLIED WARRANTY OF MERCHANTABILITY
OR FITNESS LASTS, SO THE ABOVE LIMITATIONS OR EXCLUSIONS MAY NOT APPLY
TO YOU.
IF THIS PRODUCT FAILS TO WORK AS WARRANTED, CUSTOMER’S SOLE AND
EXCLUSIVE REMEDY SHALL BE REPAIR OR REPLACEMENT ACCORDING TO THE
TERMS OF THIS LIMITED WARRANTY. KITCHENAID AND KITCHENAID CANADA
DO NOT ASSUME ANY RESPONSIBILITY FOR INCIDENTAL OR CONSEQUENTIAL
DAMAGES. This warranty gives you specific legal rights and you may also have other
rights which vary from state to state or province to province.

10
In the United States and Puerto Rico:
For service information, or to order
accessories or replacement parts, call
toll-free at 1-800-541-6390 or write to:
Customer eXperience Center,
KitchenAid Small Appliances,
P.O. Box 218, St. Joseph, MI 49085-0218
Outside the United States and Puerto
Rico:
Consult your local KitchenAid dealer or the
store where you purchased the Bread Bowl
with Baking Lid for information on how to
obtain service.
For service information in Canada:
Call toll-free 1-800-807-6777.
For service information in Mexico:
Call toll-free 01-800-0022-767.
We’re so confident the quality of our
products meets the exacting standards
of KitchenAid that, if your Bread Bowl with
Baking Lid should fail within the first five
years of ownership, KitchenAid will arrange
to deliver an identical or comparable
replacement to your door free of charge
and arrange to have your original Bread
Bowl with Baking Lid returned to us. Your
replacement unit will also be covered by
our five-year limited warranty.
If your Bread Bowl with Baking Lid should
fail within the first five years of ownership,
simply call our toll-free Customer
eXperience Center at 1-800-541-6390
Monday through Friday. Please have your
original sales receipt available when you
call. Proof of purchase will be required to
initiate the claim. Give the consultant your
complete shipping address (no P.O. Box
numbers, please).
When you receive your replacement Bread
Bowl with Baking Lid, use the carton,
packing materials, and prepaid shipping
label to pack up your original Bread
Bowl with Baking Lid and send it back to
KitchenAid.
We’re so confident the quality of our
products meets the exacting standards of
the KitchenAid brand that, if your Bread
Bowl with Baking Lid should fail within the
first five years of ownership, we will replace
your Bread Bowl with Baking Lid with an
identical or comparable replacement. Your
replacement unit will also be covered by
our five-year limited warranty.
If your Bread Bowl with Baking Lid should
fail within the first five years of ownership,
simply call our toll-free Customer
eXperience Center at 1-800-807-6777
Monday through Friday. Please have your
original sales receipt available when you
call. Proof of purchase will be required to
initiate the claim. Give the consultant your
complete shipping address.
When you receive your replacement Bread
Bowl with Baking Lid, use the carton,
packing materials, and prepaid shipping
label to pack up your original Bread
Bowl with Baking Lid and send it back to
KitchenAid.
LIMITED WARRANTY AND SERVICE
HASSLE-FREE REPLACEMENT WARRANTY – 50 UNITED STATES,
DISTRICT OF COLUMBIA, AND PUERTO RICO
HASSLE-FREE REPLACEMENT WARRANTY – CANADA
ARRANGING FOR SERVICE AFTER THE WARRANTY EXPIRES,
OR ORDERING ACCESSORIES AND REPLACEMENT PARTS
®/™ ©2021 KitchenAid. All rights reserved. The design of the stand mixer is a trademark in the U.S.
and elsewhere. Used under license in Canada.
11
FRANÇAIS
PIÈCES ET CARACTÉRISTIQUES
1 Bol à pain* 2 Couvercle de cuisson
SÉCURITÉ DU PRODUIT
CONSIGNES DE SÉCURITÉ
IMPORTANTES
Lors de l’utilisation d’appareils électriques, il faut toujours observer certaines
précautions élémentaires. Consulter les consignes de sécurité importantes du
guide d’instructions fourni avec le batteur sur socle.
CONSERVER CES INSTRUCTIONS
Ce produit est conçu uniquement pour un usage domestique.
1
2
*Le bol à pain est compatible avec tous les batteurs sur socle à tête inclinable de 4,5 et 5 pintes.
12
ASSEMBLAGE DU PRODUIT
FIXER LE BOL À PAIN
Avant la première utilisation
Ce batteur sur socle a été réglé individuellement à l’usine pour assurer une performance
optimale. Lors de l’utilisation du bol à pain avec couvercle de cuisson, il peut être nécessaire
de réajuster l’espacement bol-batteur. Consulter le manuel d’instruction du batteur sur socle
pour obtenir des informations complètes sur la façon d’ajuster l’espacement bol-batteur ou
composer le 1800541-6390 du lundi au vendredi de 8h à 20h HNE, nous nous ferons un
plaisir de vous aider à effectuer cet ajustement.
IMPORTANT: Avant utilisation, laver avec de l’eau chaude et savonneuse; rincer et sécher
complètement. Il n’est pas nécessaire d’apprêter le bol à pain avec couvercle de cuisson
avant son utilisation.
REMARQUE: Ce bol à pain est conçu pour s’adapter à tous les batteurs sur socle à tête
inclinable de 4,5 et 5 pintes, à l’exception du modèleKN15E1X. Le bol à pain avec couvercle
de cuisson peut aller au four (jusqu’à 500°F/260°C). Suivre ces instructions pour fixer le bol
à pain au batteur sur socle.
Placer le bol à pain sur la plaque de
serrage pour le verrouiller en place.
3
Fixer le crochet pétrisseur adapté à votre
recette en suivant les instructions figurant
dans le guide d’instructions du batteur sur
socle. Rabattre ensuite la tête du moteur
et verrouiller
* en place.
4
Déplacer le bouton d’alimentation sur
OFF (arrêt) (0), puis débrancher le batteur
sursocle.
1
Déverrouiller et lever la tête du moteur.
Verrouiller* ensuite la tête pour la
garder levée.
2
*L’option de verrouillage est offerte sur les modèles sélectionnés.

13
FRANÇAIS
*L’option de verrouillage est offerte sur les modèles sélectionnés.
UTILISATION DU PRODUIT
Une fois que le bol et le crochet pétrisseur
sont fixés sur le batteur sur socle, ajouter
des ingrédients dans le bol à pain.
REMARQUE: Voir la liste des ingrédients
de la recette insérée.
1
Placer le batteur sur socle à la vitesse2 pour
mélanger les ingrédients secs. Après environ
30 secondes, ajouter lentement l’eau chaude.
Laisser le batteur pétrir les ingrédients
pendant 1 ½ à 2 ½ minutes ou jusqu’à ce que
la pâte se détache du bol et forme une boule.
2
REMARQUE: Le bol à pain est utilisé uniquement pour les recettes à la levure.
Déplacer le bouton d’alimentation sur OFF
(arrêt) (0), puis débrancher le batteur sur
socle. Retirer la pâte du bol à pain.
3
Soulever la tête du moteur:
Déverrouiller et lever la tête du moteur.
Verrouiller* ensuite la tête pour la
garder levée.
4
Retrait des accessoires: Pousser
l’accessoire vers le haut, le faire tourner,
puis le retirer de l’arbre du batteur.
5
Retrait du bol à pain: Faire tourner le
bol à
pain afin de le déverrouiller de la
plaque de serrage.
6
MÉLANGER ET PÉTRIR
REMARQUE: Les étapes d’utilisation du produit sont basées sur la carte de recette insérée.
Les étapes des recettes peuvent varier en fonction des différentes recettes d’autres livres de
recettes. Le bol à pain avec couvercle de cuisson peut aller au four (jusqu’à 500°F/260°C).
14
UTILISATION DU PRODUIT
FAIRE LEVER
Placer la pâte dans le bol à pain et
saupoudrez le dessus de la pâte d’un peu
de farine. Utiliser une main pour retourner
la pâte et la recouvrir de farine, puis
couvrir le bol avec le couvercle de cuisson.
Laisser la pâte lever pendant 60 minutes.
Se référer aux marques de mesure* sur
le côté du bol à pain pour le niveau de
levage visuel de la pâte.
2
Si nécessaire, pétrir à la main la pâte sur
le comptoir pour qu’elle forme une boule
ronde et lisse. Retourner la pâte dans le
bol à pain.
1
Découvrir le bol et retirer doucement
la pâte du bol pour la déposer sur une
surface recouverte d’une généreuse
couche de farine.
3
Placer la pâte moulée en forme de boule
grossière devant vous, puis pincer le haut
de la pâte et l’étirer dans la direction
opposée à soi, puis la replier vers le centre
de la pâte, comme plier une enveloppe.
Faire pivoter légèrement la pâte et
effectuer la même procédure avec la
partie qui se trouve maintenant en haut.
Continuer à tourner, à étirer et à plier la
pâte vers le centre pour trois ou quatre
tours complets. (Remarquer qu’il devient
de plus en plus difficile d’étirer la pâte au
fur et à mesure de la travailler.)
4
*Les marques sont à titre indicatif uniquement et dépendent de la taille de la recette utilisée.
15
FRANÇAIS
UTILISATION DU PRODUIT
LEVÉE
Ajouter une généreuse quantité de farine
dans le bol à pain et sur le dessus de la
pâte. Placer la pâte, joints en dessous,
dans le bol à pain. Couvrir le bol avec
le couvercle de cuisson et laisser lever
pendant 30 autres minutes.
1
Lorsque la pâte a levé, retirer le couvercle
du bol à pain et doubler l’intérieur du
couvercle d’une feuille de papier parchemin
ou le recouvrir d’une couche de graisse et
de farine. Retirer la pâte du bol à pain et
retourner délicatement la partie ronde du
bol à pain sur le couvercle à cuisson (de sorte
que le côté du pli soit maintenant tourné
vers le haut) en faisant attention de ne pas
ledégonfler ou de déranger la forme.
ASTUCE: Pour éviter que le pain colle
au couvercle, utiliser du papier parchemin
ou recouvrir le couvercle de graisse et de
farine avant la cuisson. Pour les grosses
miches, il pourrait aussi être nécessaire
d’enduire l’intérieur du bol d’huile et de
farine avant la cuisson.
2
Après avoir étiré et plié la pâte pour la
dernière fois, retourner la pâte pour placer
le côté plié vers le bas. Placer délicatement
les mains de chaque côté du rond et
entourer doucement la paume de la main
droite sur le contour droit tout en utilisant
la main gauche pour faire tourner le rond
sur la surface. Cette action permet de
façonner la pâte en une boule ronde.
5
16
FAÇONNER ET MARQUER SUR LE COUVERCLE
Façonner et marquer la pâte à l’aide
d’uncouteau tranchant ou d’un outil.
Facultatif: Saupoudrer de la farine sur
la pâte, appliquer de la dorure d’œuf ou
ajouter des herbes, selon les besoins.
1
Placer délicatement le bol à pain à l’envers
sur la pâte et le couvercle à cuisson pour le
fixer en place.
2
UTILISATION DU PRODUIT
CUISSON AU FOUR
Préchauffer le four à 450°F/232°C
Placer le bol à pain avec le couvercle à
cuisson vers le bas sur la grille centrale du
four et faire cuire pendant 30 minutes.
1
ASTUCE: Retirer le bol et continuer à cuire
le pain au four pendant les 8 à 10 dernières
minutes pour obtenir une croûte brune
croustillante.
Retirer le couvercle du bol pour exposer
le pain et terminer la cuisson pendant
10minutes de plus, cela aidera à dorer
la croûte. Déposer le pain sur une grille
et le laisser refroidir complètement avant
deletrancher.
2
IMPORTANT: Toujours utiliser des gants
isolants lors du retrait du bol à pain ou des
grilles.
ASTUCE: Lors de l’insertion dans le four,
placer le couvercle vers le bas sur la grille.
REMARQUE: Placer la grille aussi près du
centre du four que possible tout en laissant
suffisamment d’espace pour que le bol à
pain avec couvercle de cuisson puisse y
êtredéposé.
17
FRANÇAIS
ENTRETIEN ET NETTOYAGE
• Pour éliminer les résidus alimentaires
ayant adhéré pendant la cuisson, laisser
tremper le bol à pain dans de l’eau
chaude et savonneuse pendant 15 à
20 minutes, ou au besoin, avant de
lemettre au lave-vaisselle.
• Toujours sécher complètement le bol
àpain avant de le ranger.
• Suite à l’utilisation du bol à pain avec le
batteur sur socle, des marques peuvent
apparaître à l’endroit où le bol à pain
se verrouille sur le socle du batteur.
Les marques sont normales, mais il est
possible de les effacer à l’aide d’un
nettoyant abrasif et d’une éponge.
• L’on peut également nettoyer le bol
avec une éponge abrasive et un mélange
d’eau chaude et de bicarbonate de
sodium. Frotter vigoureusement les
taches pour réduire l’apparence tachée.
• Il est recommandé de minimiser
les changements brusques de
température de la céramique.
Lacéramique doit être chauffée
ourefroidie progressivement pour
éviter les chocs thermiques et les
dommages éventuels.
• Lorsque le bol à pain avec couvercle
de cuisson est chaud, ne le placez pas
en contact avec quelque chose de
froid comme de l’eau froide ou une
surface froide. Lorsque vous le sortez
du four, placez-le sur une surface
neutre et laissez-le complètement
refroidir.
ENTRETIEN DU BOL À PAIN AVEC COUVERCLE DE CUISSON
Le bol à pain et le couvercle sont lavables
au lave-vaisselle dans le panier supérieur
ou inférieur. Il est également possible
de les nettoyer avec soin à l’eau chaude
savonneuse et de les rincer complètement
avant de les sécher.
1
Le bol à pain doit être placé à l’envers
dans le cas d’un lavage au lave-vaisselle.
2
IMPORTANT: Attendre que l’appareil ait refroidi complètement avant d’installer ou de retirer
des pièces, et avant de nettoyer l’appareil.
18
GARANTIE LIMITÉE ET SERVICE
GARANTIE DU BOL À BAIN AVEC COUVERCLE DE CUISSON KITCHENAID
POUR LES 50 ÉTATS DES ÉTATS-UNIS, LE DISTRICT FÉDÉRAL DE
COLUMBIA, PORTO RICO ET LE CANADA
La présente garantie couvre l’acheteur et les propriétaires suivants du bol à pain avec couvercle
de cuisson lorsqu’il est utilisé dans les 50 États des États-Unis, le district fédéral de Columbia,
àPorto Rico et au Canada.
Durée de la garantie: Garantie limitée de cinq ans à partir de la date d’achat.
KitchenAid prendra en
charge les éléments
suivants à votre choix:
Remplacement sans tracas du bol à pain avec couvercle
de cuisson. Voir la page suivante pour plus de détails
concernant la procédure à suivre pour un dépannage,
ouappeler le numéro sans frais 1800541-6390 du
Centre eXpérience à la clientèle.
OU
Le coût des pièces de rechange et de la main-d’œuvre
pour corriger les vices de matériaux et de fabrication.
L’intervention de dépannage doit être effectuée par un
centre de dépannage KitchenAid agréé.
KitchenAid ne paiera
paspour:
A. Les réparations lorsque le bol à pain avec couvercle
de cuisson est utilisé hors du cadre d’un usage
unifamilial normal.
B. Les dommages causés par: accident, altération,
mauvaise utilisation ou abus.
C. Tous frais d’expédition ou de manutention pour livrer
le bol à pain avec couvercle de cuisson à un centre de
dépannage agréé.
D. Les frais des pièces de rechange ou de main-d’œuvre
pour le bol à pain avec couvercle de cuisson lorsqu’il
est utilisé à l’extérieur des 50 États des États-Unis,
du district fédéral de Columbia, de Porto Rico et
duCanada.
CLAUSE D’EXONÉRATION DE RESPONSABILITÉ AU TITRE DES GARANTIES
IMPLICITES; LIMITATION DES RECOURS
LES GARANTIES IMPLICITES, Y COMPRIS DANS LA MESURE APPLICABLE LES
GARANTIES DE QUALITÉ MARCHANDE OU D’APTITUDE À UN USAGE PARTICULIER,
SONT EXCLUES DANS LA MESURE AUTORISÉE PAR LA LOI. TOUTE GARANTIE
IMPLICITE POUVANT ÊTRE IMPOSÉE PAR LA LOI EST LIMITÉE À CINQ ANS OU À
LA PLUS COURTE PÉRIODE AUTORISÉE PAR LA LOI. CERTAINES JURIDICTIONS
NE PERMETTENT PAS LA LIMITATION DE LA DURÉE DE VALIDITÉ DES GARANTIES
IMPLICITES DE QUALITÉ MARCHANDE OU D’APTITUDE À UN USAGE PARTICULIER;
PAR CONSÉQUENT, LES LIMITATIONS OU EXCLUSIONS STIPULÉES DANS LES
PRÉSENTES PEUVENT NE PAS ÊTRE APPLICABLES.
SI CE PRODUIT NE FONCTIONNE PAS TEL QUE GARANTI, LE SEUL ET
UNIQUE RECOURS DU CLIENT CONSISTE À EN OBTENIR LA RÉPARATION
OU LE REMPLACEMENT CONFORMÉMENT AUX TERMES DE LA PRÉSENTE
GARANTIE LIMITÉE. KITCHENAID ET KITCHENAID CANADA DÉCLINENT
TOUTE RESPONSABILITÉ AU TITRE DES DOMMAGES FORTUITS OU INDIRECTS.
Cettegarantie vous confère des droits juridiques spécifiques et vous pouvez également
jouir d’autres droits qui peuvent varier d’un État à l’autre ou d’une province à l’autre.

19
FRANÇAIS
Aux États-Unis et à Porto Rico:
Pour des informations sur le service
de dépannage ou pour commander
des accessoires ou des pièces de
rechange, composer le numéro sans
frais
1800541-6390 ou écrire à:
Customer eXperience Center,
KitchenAid Small Appliances,
P.O. Box218, St. Joseph, MI 49085-0218
En dehors des États-Unis et de Porto Rico:
Consulter le revendeur KitchenAid ou le
détaillant auprès duquel le bol à pain avec
couvercle de cuisson a été acheté pour obtenir
des informations sur le service dedépannage.
Pour des informations concernant toute
intervention de dépannage au Canada:
Composer sans frais le 1800807-6777.
Pour des informations concernant toute
intervention de dépannage au Mexique:
Composer sans frais le 01-800-0022-767.
Nous sommes tellement certains que la
qualité de nos produits satisfait aux normes
rigoureuses de KitchenAid que si le bol
à pain avec couvercle de cuisson ne peut
plus être utilisé au cours de la première
année suivant son acquisition, KitchenAid
prendra les mesures nécessaires pour faire
livrer gratuitement à votre porte un bol de
remplacement identique ou comparable et
prendra les dispositions nécessaires pour
que le bol à pain avec couvercle de cuisson
d’origine nous soit retourné. Votre accessoire
de remplacement sera également couvert
par notre garantie limitée de cinq ans.
Si votre bol à pain avec couvercle de cuisson
n’est plus en état d’être utilisé durant les cinq
premières années suivant son acquisition,
ilvous suffit d’appeler notre Centre
eXpérience clientèle au 1800541-6390,
du lundi au vendredi. Veuillez avoir l’original
de votre reçu de vente à portée de main au
moment de votre appel. Une preuve d’achat
est indispensable pour que votre réclamation
puisse être traitée. Fournissez votre adresse
de livraison complète au représentant
(aucune boîte postale).
Après avoir reçu le bol à pain avec couvercle
de cuisson de rechange, utiliser le carton,
les matériaux d’emballage et l’étiquette
d’expédition prépayée pour emballer le bol
à pain avec couvercle de cuisson d’origine
et le renvoyer à KitchenAid.
Nous sommes tellement certains que la
qualité de nos produits satisfait aux normes
exigeantes de la marque KitchenAid
que si le bol à pain avec couvercle de
cuisson n’est plus en état d’être utilisé au
cours des cinq premières années suivant
son acquisition, KitchenAid Canada
le remplacera par un bol à pain avec
couvercle de cuisson de remplacement
identique ou comparable. Votre accessoire
de remplacement sera également couvert
par notre garantie limitée de cinq ans.
Si votre bol à pain avec couvercle de
cuisson n’est plus en état d’être utilisé
durant les cinq premières années suivant
son acquisition, ilvous suffit d’appeler
notre Centre eXpérience clientèle au
1800807-6777, du lundi au vendredi.
Veuillez avoir l’original de votre reçu de
vente à portée de main au moment de votre
appel. Une preuve d’achat est indispensable
pour que votre réclamation puisse être
traitée. Il vous faudra fournir votre adresse
de livraison complète au représentant.
Après avoir reçu le bol à pain avec couvercle
de cuisson de rechange, utiliser le carton,
les matériaux d’emballage et l’étiquette
d’expédition prépayée pour emballer le bol
à pain avec couvercle de cuisson d’origine
et le renvoyer à KitchenAid.
GARANTIE LIMITÉE ET SERVICE
GARANTIE DE REMPLACEMENT SANS DIFFICULTÉ POUR LES 50 ÉTATS
DES ÉTATS-UNIS, LE DISTRICT FÉDÉRAL DE COLUMBIA ET PORTO RICO
GARANTIE DE REMPLACEMENT SANS DIFFICULTÉ POUR LE CANADA
OBTENIR UN DÉPANNAGE UNE FOIS LA GARANTIE EXPIRÉE OU
COMMANDER DES ACCESSOIRES ET DES PIÈCES DE RECHANGE
®/™ ©2021 KitchenAid. Tous droits réservés. La forme du batteur sur socle est une marque
decommerce aux É.-U. et dans d’autres pays. Utilisé sous licence au Canada.
20
PIEZAS Y CARACTERÍSTICAS
1 Tazón para pan* 2 Tapa para hornear
SEGURIDAD DEL PRODUCTO
MEDIDAS DE PRECAUCIÓN
IMPORTANTES
Al utilizar electrodomésticos, siempre se deben seguir las precauciones básicas
de seguridad. Consulte las Medidas de precaución importantes y básicas
indicadas en el Manual de instrucciones incluido con su batidora con base.
GUARDE ESTAS INSTRUCCIONES
Este producto está diseñado únicamente para uso doméstico.
1
2
*El tazón para pan es compatible para adaptarse a los modelos de la batidora con base de
cabeza inclinable de 4,5 y 5 cuartos de galón.
21
ESPAÑOL
MONTAJE DEL PRODUCTO
COLOCACIÓN DEL TAZÓN PARA PAN
Antes del primer uso
Su batidora con base ha sido ajustada individualmente en la fábrica para lograr un
funcionamiento óptimo. Al usar el tazón para pan con la tapa para hornear, tal vez sea
necesario ajustar el espacio entre el batidor y el tazón. Consulte el Manual de instrucciones
de la batidora con base para obtener información completa acerca de cómo ajustar el espacio
entre el batidor y el tazón, o llame al 1-800-541-6390 de lunes a viernes de 8:00 a.m. a 8:00
p.m., hora del Este, y estaremos encantados de asistirlo para hacer ese ajuste.
IMPORTANTE: Antes de su uso, lave con agua caliente y jabonosa, enjuague y seque bien.
No es necesario curar el tazón para pan con tapa para hornear antes de usarlo.
NOTA: Este tazón para pan diseñado para adaptarse a los modelos de la batidora con base
de cabeza inclinable de 4,5 y 5 cuartos de galón, excepto el modelo KN15E1X. El tazón
para pan con tapa para hornear puede usarse en el horno (hasta 500 °F/260 °C). Siga las
instrucciones a continuación para colocar el tazón para pan en la batidora con base.
Coloque el tazón para pan en la placa de
fijación para asegurarlo en su lugar.
3
Coloque el gancho para masa para su
receta, siguiendo las indicaciones del
Manual de instrucciones de la batidora
conbase. Luego vuelva a colocar la cabeza
del motor en la posición inferior y trábela
*
ensu lugar.
4
Coloque la batidora con base en la posición
OFF (0) (Apagado) y desenchúfela.
1
Desbloquee y levante la cabeza del
motor. Luego, bloquee* la cabeza del
motor para mantenerla levantada.
2
*La opción de bloqueo está disponible en modelos seleccionados.
22
*La opción de bloqueo está disponible en modelos seleccionados.
USO DEL PRODUCTO
Una vez que el tazón y el gancho para masa
están sujetos en la batidora de pie, agregará
los ingredientes en el tazón para pan.
NOTA: Vea la lista de ingredientes en
elinserto de la receta.
1
Ponga la batidora de base a velocidad
2 para combinar los ingredientes secos.
Después de unos 30 segundos, vierta
lentamente el agua caliente. Deje que la
batidora amase los ingredientes durante
1½ - 2½ minutos, o hasta que la masa se
separe del tazón y forme una bola.
2
NOTA: El tazón para pan se usa únicamente para recetas con levadura.
Coloque la batidora con base en
la posición OFF (0) (Apagado) y
desenchúfela. Retire la masa del tazón
parapan.
3
Levante la cabeza del motor:
Desbloquee y levante la cabeza del
motor. Luego, bloquee* la cabeza del
motor para mantenerla levantada.
4
Retire el accesorio: Presione el accesorio
hacia arriba, gírelo y sáquelo del eje del
batidor.
5
Quite el tazón para pan: Gire para
desbloquear el tazón para
pan de la
placa de fijación.
6
MEZCLAR Y AMASAR
NOTA: Pasos de uso del producto según la tarjeta de receta insertada. Los pasos de la receta
pueden variar con base en diferentes recetas que se encuentren en otros recetarios. El tazón
para pan con tapa para hornear puede usarse en el horno (hasta 500 °F/260 °C).
23
ESPAÑOL
USO DEL PRODUCTO
LEUDE
Coloque la masa en el tazón para pan y
espolvoree un poco de harina por encima
de ella. Use una mano para voltear y cubrir
la masa en harina, luego cubra el tazón
con la tapa. Déjela que suba durante
60minutos. Use marcas de medidas* en
el costado del tazón para pan para ver
elnivel de elevación.
2
De ser necesario, amase a mano sobre
la encimera para que forme una bola
redonda y suave. Regrese al tazón
parapan.
1
Destape el recipiente y saque suavemente
la masa del recipiente y colóquela sobre
una superficie enharinada generosamente.
3
Con la masa en forma de bola rugosa
frente a usted, pellizque la parte superior
de la masa, estírela hacia afuera y luego
dóblela en el centro de la masa como
si estuviera doblando un sobre. Dé un
ligero giro a la masa y haga lo mismo
con la porción ahora en la parte superior.
Continúe girando, estirando y doblando
la masa hacia el centro de tres a cuatro
vueltas completas. (Notará que se vuelve
más difícil estirar la masa mientras trabaja).
4
*Las marcas son únicamente para usar como referencia y dependerán de la receta que se use.
24
USO DEL PRODUCTO
ELEVE
Enharine generosamente dentro del tazón
para pan y la parte superior de la masa.
Regrese la masa con la juntura hacia abajo
en el tazón para pan. Cubra el tazón con
la tapa para hornear y permita que se suba
por 30 minutos más.
1
Una vez que se eleve la masa, retire la tapa
del tazón para pan y forre el interior de la
tapa con una ronda de papel pergamino o
recubra con grasa y harina. Retire la masa
del bol para pan e invierta con cuidado
la bola del tazón para pan sobre la tapa
para hornear (de modo que el lado del
pliegue quede ahora hacia arriba) teniendo
cuidado de no desinflar ni alterar la forma.
CONSEJO: Para evitar que el pan se
pegue a la tapa,use papel pergamino o
recubra la tapa con grasa y harina antes de
hornear. Para panes más grandes, también
considere cubrir los lados del tazón con
aceite y harina antes de hornear.
2
Después de estirar y doblar por última
vez, voltee la masa con los pliegues hacia
abajo. Coloque suavemente ambas manos
a cada lado de la bola y rice suavemente
su palma derecha alrededor del borde
derecho mientras usa su mano izquierda
para girar la bola en la superficie. Esta
acción suavizará la masa y quedará
comoun montículo redondo.
5

25
ESPAÑOL
FORMA Y MARCADO EN LA TAPA
Dé forma y marque la masa con un cuchillo
afilado o una herramienta de incisión.
Opcional: Espolvoree harina sobre la masa,
huevo batido o hierbas para personalizar.
1
Coloque suavemente el tazón para pan
boca abajo sobre la masa y la tapa para
hornear para asegurarlo en su lugar.
2
USO DEL PRODUCTO
HORNEE
Precaliente el horno a 450 °F/232 °C.
Coloque el tazón para pan con la tapa para
hornear hacia abajo en la rejilla del horno
central y hornee por 30 minutos.
1
CONSEJO: Retire el tazón para pan y hornee
por lo menos entre 8 y 10 minutos para
obtener una corteza café y crujiente.
Retire la tapa del tazón para exponer el
pan y termine de hornear por 10 minutos
más, esto ayudará a dorar la corteza. Retire
a una rejilla de enfriamiento y deje enfriar
completamente antes de rebanar.
2
IMPORTANTE: Use siempre guantes de
cocina al extraer el tazón para pan o parrillas.
CONSEJO: Cuando lo inserte en el horno,
coloque la tapa hacia abajo sobre la rejilla.
NOTA: Ponga su rejilla lo más cerca posible
del centro del horno mientras deja suficiente
altura para que quepa el tazón para pan con
la tapa para hornear.

26
CUIDADO Y LIMPIEZA
• Para quitar alimentos endurecidos a
causa del horneado, ponga en remojo
el tazón para pan en agua caliente con
jabón durante 15 a 20 minutos o según
sea necesario, antes de colocarlo en la
lavavajillas.
• Siempre seque completamente el
tazónpara pan antes de guardarlo.
• Luego de usar el tazón para pan en
la batidora con base, es posible que
aparezcan algunas marcas donde el
tazón se traba a la base. Las marcas son
normales y se pueden quitar con un
limpiador y una esponja abrasivos.
• También puede limpiar con una esponja
abrasiva y una mezcla de bicarbonato de
sodio y agua tibia, frote vigorosamente
las manchas para reducir la apariencia
delas manchas.
• Se recomienda minimizar los cambios
bruscos de temperatura de su
cerámica. La cerámica debe calentarse
o enfriarse gradualmente para evitar
un choque térmico y posibles daños.
• Cuando el tazón para pan con la
tapa para hornear estén calientes,
no los ponga en contacto con nada
frío, como agua o una superficie fría.
Cuando lo saque del horno, póngalo
en una superficie neutral y deje que se
enfríe completamente.
CUIDADO DEL TAZÓN PARA PAN CON TAPA PARA HORNEAR
El tazón para pan y la tapa pueden lavarse
en la canasta superior o inferior de una
lavavajillas automática; o bien, limpiarse
completamente en agua caliente con jabón
y enjuagarse totalmente antes de secarlo.
1
El tazón para pan debe colocarse boca
abajo si se lava en una lavavajillas
automática.
2
IMPORTANTE: Deje que el aparato se enfríe completamente antes de colocar o quitar piezas
y antes de limpiar el aparato.
W11490701C.indb 26
27
ESPAÑOL
GARANTÍA LIMITADA Y SERVICIO
GARANTÍA DE KITCHENAID PARA EL TAZÓN PARA PAN CON TAPA PARA
HORNEAR EN LOS 50 ESTADOS DE ESTADOS UNIDOS, EL DISTRITO DE
COLUMBIA, PUERTO RICO Y CANADÁ
Esta garantía se extiende al comprador y a cualquier propietario posterior del tazón para
pan con tapa para hornear que se utilice en los 50 estados de Estados Unidos, el Distrito de
Columbia y Canadá.
Duración de la garantía: Cinco años de garantía limitada desde la fecha de
compra.
KitchenAid pagará por lo
siguiente, a su elección:
Reemplazo sin complicaciones de su tazón para pan
con tapa para hornear. Consulte la página siguiente
para obtener detalles acerca de cómo obtener servicio
técnico o llame sin cargo al Centro para la experiencia
del cliente al 1-800-541-6390.
O BIEN
El costo de las piezas de repuesto y de la mano de
obra de reparación para corregir los defectos de
losmateriales y de la mano de obra.
El servicio debe ser proporcionado por un centro de
servicio autorizado por KitchenAid.
KitchenAid no pagará por:
A. Reparaciones cuando su tazón para pan con tapa para
hornear se hayan utilizado para fines ajenos al uso
doméstico normal de una sola familia.
B. Daños causados por accidente, alteración, uso
indebido o abuso.
C. Cualquier gasto de envío o manipulación para llevar
eltazón para pan con tapa para hornear a un centro
de servicio técnico autorizado.
D. Piezas de repuesto o costos de mano de obra para
tazón para pan con tapa para hornear operado fuera
de los 50 estados de Estados Unidos, el Distrito de
Columbia, Puerto Rico y Canadá.
EXCLUSIÓN DE GARANTÍAS IMPLÍCITAS; LIMITACIÓN DE RECURSOS
LAS GARANTÍAS IMPLÍCITAS, INCLUIDAS EN LA MEDIDA QUE CORRESPONDA
LAS GARANTÍAS DE COMERCIABILIDAD O DE IDONEIDAD PARA UN PROPÓSITO
PARTICULAR, QUEDAN EXCLUIDAS EN LA MEDIDA EN QUE ESTÉ PERMITIDO
POR LEY. TODA GARANTÍA IMPLÍCITA QUE SEA IMPUESTA POR LEY SERÁ
LIMITADA A CINCO AÑOS O AL PERÍODO MÁS CORTO PERMITIDO POR LEY.
ALGUNOS ESTADOS Y PROVINCIAS NO PERMITEN LAS LIMITACIONES O
EXCLUSIONES ACERCA DE CUÁNTO DEBE DURAR UNA GARANTÍA IMPLÍCITA
DE COMERCIABILIDAD O DE IDONEIDAD, DE MODO QUE LAS LIMITACIONES O
EXCLUSIONES ARRIBA MENCIONADAS PUEDEN NO APLICARSE EN SU CASO.
SI ESTE PRODUCTO NO FUNCIONA COMO SE HA GARANTIZADO, EL ÚNICO Y
EXCLUSIVO RECURSO DEL CLIENTE SERÁ EL DE REPARARLO O REEMPLAZARLO
SEGÚN LOS TÉRMINOS DE ESTA GARANTÍA LIMITADA. KITCHENAID Y KITCHENAID
CANADÁ NO ASUMEN NINGUNA RESPONSABILIDAD POR DAÑOS INCIDENTALES
O CONSECUENTES. Esta garantía le otorga derechos legales específicos y puede
quetambién tenga otros derechos que varíen de un estado a otro o de una provincia
aotra.

28
En los Estados Unidos y Puerto Rico:
Para obtener información acerca del
servicio técnico o para pedir accesorios
o piezas de repuesto, llame sin costo al
1-800-541-6390 o escriba a:
Customer eXperience Center,
KitchenAid Small Appliances,
P.O. Box 218, St. Joseph, MI 49085-0218
Fuera de Estados Unidos y Puerto Rico:
Consulte a su distribuidor local de
KitchenAid o a la tienda donde compró
el tazón para pan con tapa para hornear
para obtener información sobre el servicio
técnico.
Para obtener información acerca del
servicio en Canadá:
Llame sin costo al 1-800-807-6777.
Para obtener información acerca del
servicio en México:
Llame sin costo al 01-800-0022-767.
Confiamos tanto en que la calidad de
nuestros productos cumple con las
exigentes normas de KitchenAid que, si
el tazón para pan con tapa para hornear
presentara alguna falla durante el primer
año de compra, KitchenAid hará arreglos
para entregar un reemplazo idéntico o
comparable a su domicilio sin cargo y
gestionará la devolución del tazón de
cerámica original a nosotros. La unidad
de reemplazo estará también cubierta por
nuestra garantía limitada de cinco años.
Si su tazón para pan con tapa para hornear
presentara alguna falla durante el primer
año de compra, simplemente llame sin
cargo a nuestro Centro para la eXperiencia
del cliente al 1-800-541-6390 de lunes a
viernes. Tenga a mano el recibo de compra
original cuando llame. Se requerirá el
comprobante de compra para iniciar una
reclamación. Proporcione al consultor su
dirección de envío completa (no números
de apartado postal).
Cuando reciba el tazón para pan con tapa
para hornear de reemplazo, use la caja, el
material de embalaje y la etiqueta de envío
prepago para embalar el tazón para pan
con tapa para hornear original y devolverlo
a KitchenAid.
Confiamos tanto en que la calidad de
nuestros productos cumple con las
exigentes normas de KitchenAid que,
si el tazón para pan con tapa para
hornear presentara alguna falla durante
los primeros cinco años de la compra,
reemplazaremos el tazón de cerámica por
uno idéntico o comparable. La unidad de
reemplazo estará también cubierta por
nuestra garantía limitada de cinco años.
Si su tazón para pan con tapa para hornear
presentara alguna falla durante el primer
año de compra, simplemente llame sin
cargo a nuestro Centro para la eXperiencia
del cliente al 1-800-807-6777 de lunes a
viernes. Tenga a mano el recibo de compra
original cuando llame. Se requerirá el
comprobante de compra para iniciar una
reclamación. Proporcione al asesor su
dirección de envío completa.
Cuando reciba el tazón para pan con
tapa para hornear de reemplazo, use la
caja, elmaterial de embalaje y la etiqueta
de envío prepago para embalar el tazón
para pan con tapa para hornear original
ydevolverlo a KitchenAid.
GARANTÍA LIMITADA Y SERVICIO
GARANTÍA DE REEMPLAZO SIN DIFICULTADES: EN LOS 50 ESTADOS DE
ESTADOS UNIDOS, EL DISTRITO DE COLUMBIA Y PUERTO RICO
GARANTÍA DE REEMPLAZO SIN DIFICULTADES: CANADÁ
CÓMO OBTENER SERVICIO TÉCNICO DESPUÉS DE QUE EXPIRE LA
GARANTÍA O CÓMO PEDIR ACCESORIOS Y PIEZAS DE REPUESTO
®/™ ©2021 KitchenAid. Todos los derechos reservados. El diseño de la batidora es una
marcacomercial en EE.UU. y en otros países. Usado bajo licencia en Canadá.
W11490701C 10/21
DISCOVER MORE. DÉCOUVREZ PLUS. DESCUBRA MÁS.
KITCHENAID.COM/QUICKSTART
PRODUCT QUESTIONS OR RETURNS
QUESTIONS SUR LE PRODUIT OU LES RETOURS
PREGUNTAS SOBRE EL PRODUCTO O DEVOLUCIÓNES
USA: 1.800.541.6390 | KitchenAid.com
CANADA: 1.800.807.6777 | KitchenAid.ca
MEXICO: KitchenAid.com.mx
LATIN AMERICA: KitchenAid-Latam.com
Todos los derechos reservados. KITCHENAID y el diseño de la batidora con base son marcas
registradas en EE.UU. y en otros países. Usado bajo licencia en Canadá.
Tous droits réservés. KITCHENAID et la forme de l’écran verseur sont desmarques
de commerce aux É.-U. et ailleurs. Utilisé sous licence au Canada.
®/™ ©2021 KitchenAid. All rights reserved. KITCHENAID and the design of the
stand mixer are trademarks in the U.S. and elsewhere. Used under license in Canada.