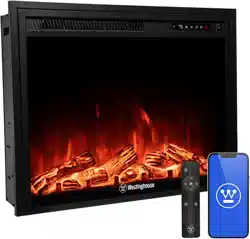
Model No.:
ELECTRIC FIREPLACE
WTH-28EF09A2
CONSUMER SAFETY INFORMATION
Read this manual before installing and operating this appliance.
Failure to follow these instructions may result in electric shock, fire, or personal injury
Do not store or use gasoline or other flammable liquids in the vicinity of this appliance.

and WESTINGHOUSE are trademarks of Westinghouse Electric
Corporation. Used under license by Westinghouse Fireplace
(Ningbo) Co., Ltd. All Rights Reserved
CONTACT US :[email protected]

CONTENTS
1. NOTICE TO USERS ------------------------------------------------
2. PARTS AND HARDWARE ---------------------------------------
3. PRODUCT DIMENSIONS ----------------------------------------
4. INSTALLATION AND ASSEMBLY -------------------------------
5. CONTROL DESCRIPTION ----------------------------------------
6. REMOTE CONTROL DESCRIPTION ----------------------------
7. WI-FI LINK CONTROL ---------------------------------------------
8. CARE AND MAINTENANCE --------------------------------------
9. ELECTRICAL SCHEMATICS -------------------------------------
10. CUSTOMER SUPPORT -------------------------------------------
01
03
03
04
06
09
13
16
18
19
IMPORTANT SAFETY INFORMATION!
WARNING
WARNING
1
● Read all instructions before using this heater!
● This heater is hot when in use. To avoid burns, DO NOT let bare skin touch hot surfaces. If provided, use
handles when moving this heater. Keep combustible materials, such as furniture, pillows, bedding,
papers, clothes, and curtains at least 3 feet (0.9 m) from the front of the heater, and keep them away from
the sides and rear.
● Extreme caution is necessary when any heater is used by or near children or vulnerable individuals and
whenever the heater is left operating and unattended.
● DO NOT operate any heater with a damaged cord or plug, or after the heater malfunctions or has been
dropped or damaged in any manner. Discard heater, or return to authorized service facility for examination
and/or repair.
● DO NOT run power cord under carpeting. DO NOT cover power cord with throw rugs, runners, or similar
coverings. DO NOT route power cord under furniture or appliances. Arrange power cord away from
high-traffic areas, where it will not be tripped over.
● Connect to properly grounded outlets ONLY.
● DO NOT insert or allow foreign objects to enter any ventilation or exhaust openings, as this may cause
electric shock or fire, or damage the heater.
● To prevent a possible fire, DO NOT block air intakes or exhaust in any manner. Doing so could cause a fire.
DO NOT use on soft surfaces, like a bed, where openings may become blocked.
● A heater has hot and arcing or sparking parts inside. DO NOT use it in areas where gasoline, paint, or
flammable liquids are used or stored.
● Use this heater only as described in this manual. Any other use not recommended by the manufacturer
may cause fire, electric shock, or injury to persons.
● ALWAYS plug heaters directly into a wall outlet/receptacle. Never use with an extension cord or
relocatable power tap (outlet/power strip).
● DO NOT place the heater near a bed because objects such as pillows or blankets can fall off the bed and
be ignited by the heater.
● NEVER use this heater in bathrooms, laundry rooms, or in any other location where the heater could fall
into a bathtub or pool, become damp, or come into contact with water.
● TO AVOID FIRE, regularly inspect all air vents to make sure they are free from dust, lint, or other
blockages. Unplug the unit and clean with a vacuum ONLY. DO NOT rinse or get wet.
● ALWAYS mount to wall bracket before use. DO NOT set on the floor, or other surface, to use.

PREPARATION
22
● NEVER use a wall mount bracket from another manufacturer.
● This product is not intended to be a primary heat source. It is for supplemental heat only.
● INDOOR use only! NEVER use this heater outdoors! Doing so may result in electric shock!
● Risk of electric shock! DO NOT OPEN! No user-serviceable parts inside!
● ALWAYS turn this heater off before unplugging it from the outlet.
● ALWAYS disconnect this unit from the power supply before performing any assembly or cleaning, or
before relocating the electric fireplace.
● NEVER leave this heater unattended. ALWAYS unplug this heater when not in use.
● ALWAYS store this heater in a dry location. NEVER use the fireplace if it has become wet.
● NEVER plug this heater into an outlet that is old, cracked, or has any loose wires or connections.
Plugging this heater into a faulty outlet could result in electric arcing within the outlet that could cause
the outlet to overheat or catch fire.
● ALWAYS check your heater cord and plug connections with each use!
i) MAKE SURE the plug fits tightly into the outlet! Faulty wall outlet connections or loose plugs can
cause the outlet to overheat.
ii) Heaters draw more current than small appliances. Overheating may occur even if it has not
occurred with the use of other appliances.
iii) During use, check frequently to see if the plug outlet or face plate is HOT!
iv) If the outlet or face plate is HOT, discontinue use immediately and have a qualified electrician inspect
and/or replace the faulty outlets.
● The power cord supplied with the heater has a
plug with two flat blades (live and neutral) and
one round pin (ground). If a
3-slot receptacle is not available, an adapter
MUST be used. The adapter MUST be properly
grounded to the outlet box (see figure to the
right). (Note: Adapter NOT INCLUDED.)
● SAVE THESE INSTRUCTIONS!
This product includes a GLASS panel! Always use extreme caution when handling glass. Failure to do
so could result in personal injury or property damage.
Remove all parts and hardware from the box and place them on a clean, soft, dry surface. Parts and assembly
steps are grounded for wall-hanging or recessing use. Check the parts list to make sure nothing is missing.
Dispose of packaging materials properly. Please recycle whenever possible. You will need the following tools
(not included): Phillips screwdriver; stud finder; level; tape measure; electric drill; battery; 1/4 wood drill bit,
hammer.
PARTS & HARDWARE
A. Fireplace
B. 4x12mm Screws
(4pcs)
C.Remote Control
D. Instructions
Your appliance is a wall-mounted, recessed and /or mantel installed appliance. Select a suitable location
that is not susceptible to moisture and is aw
ay from drapes, furniture and high traffic areas. NOTE: Follow all
national and local electrical codes.
MINIMUM CLEARANCE TO COMBUSTIBLES
Measurements are taken from the glass front.
Bottom 0" Top
Sides 0" Top
11.8" (300mm) to mantel
11.8" (300mm) to ceiling
Back 0"
WARNING
SPECIFICATION S AND DIMENSIONS
3
WHEN USING PAINT OR LACQUER TO FINISH THE MANTEL, THE
PAINT OR LACQUER MUST BE HEAT-RESISTANT TO PREVENT
DISCOLORATION.
Framing Hole Size
Model Number W H D
WTH-28EF09A2
27 3/8"
695mm
22 7/16"
570mm
7 1/2"
190.5mm
Figure (A) Hole Cut Size
Figure (B)
INSTALLATION AND ASSEMBLY
4
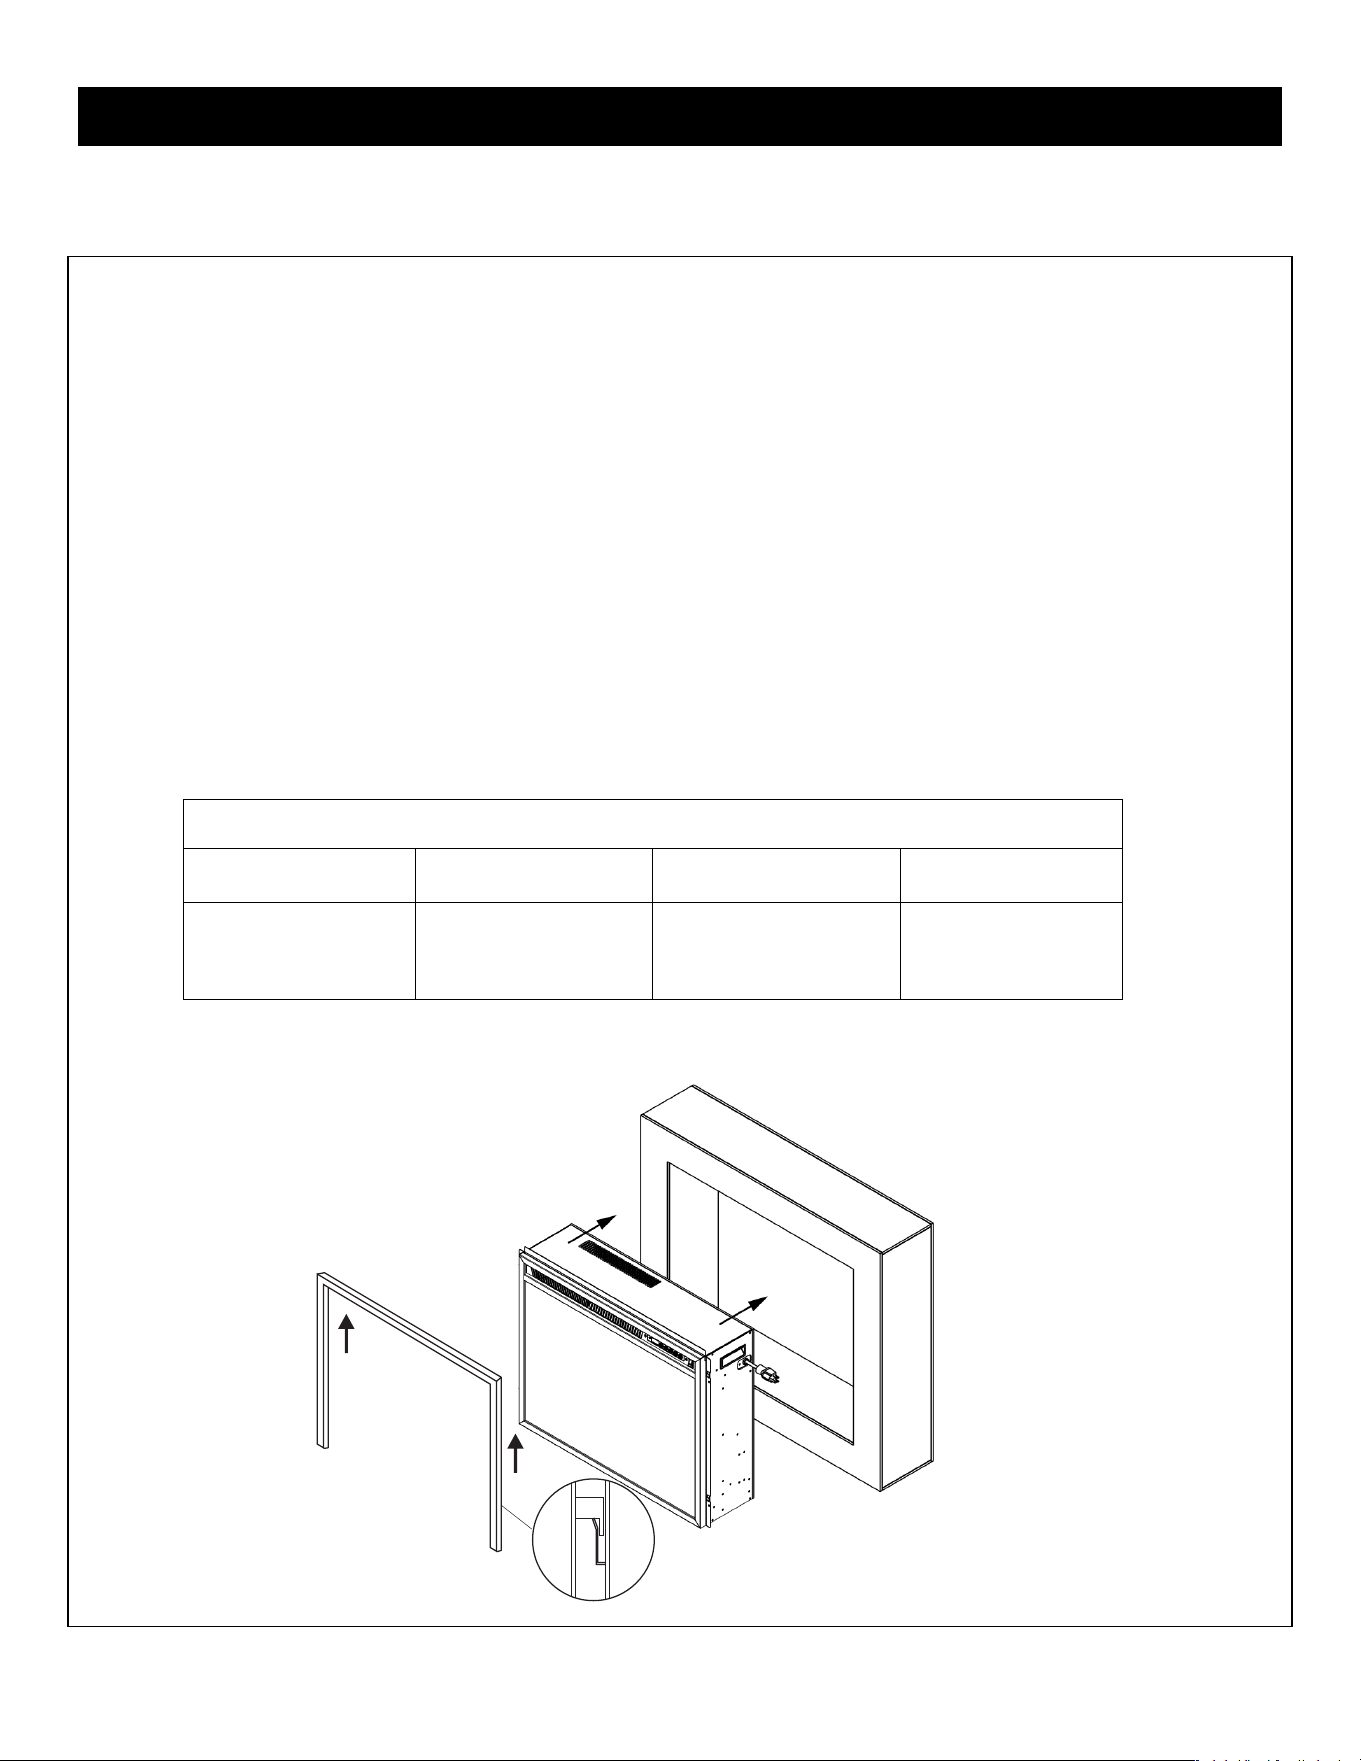
RECESSED TO WALL INSTALLATION (Tips: Wall bracket removal is NOT required. )
STEP 1 Select a dry wall to open a hole for fireplace box. Figure (A)
STEP 2 Lift the decorative kit out upwards, move the fireplace box into the wall hole or fireplace mantel.
Figure (B)
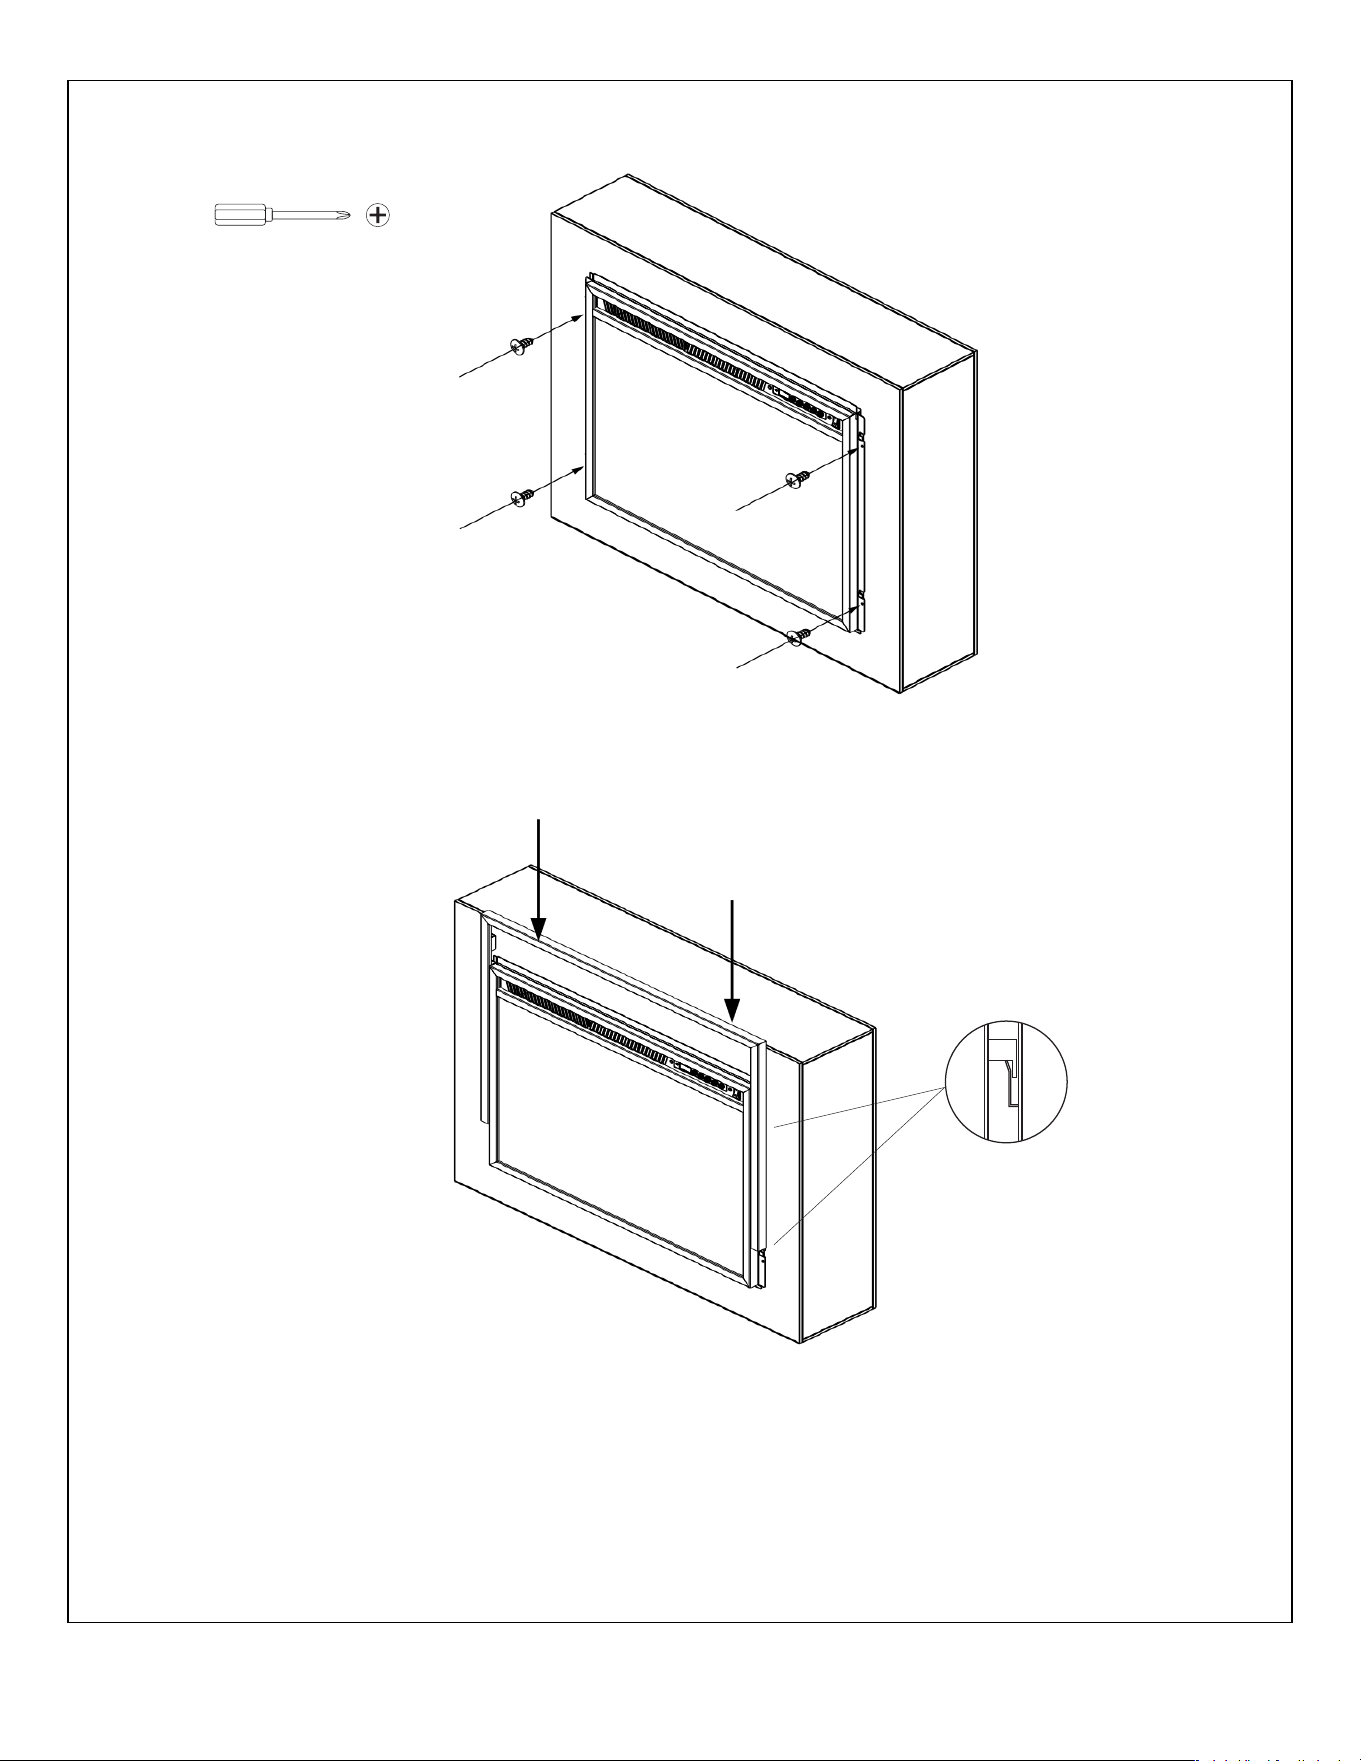
STEP 3 Use the 4 screws(provided) to lock the appliance into wall or
fireplace mantel .Figure(C)
Figure(C)
STEP 4 Fix the trim kit .Figure(D)
Figure(D)
5
WARNING
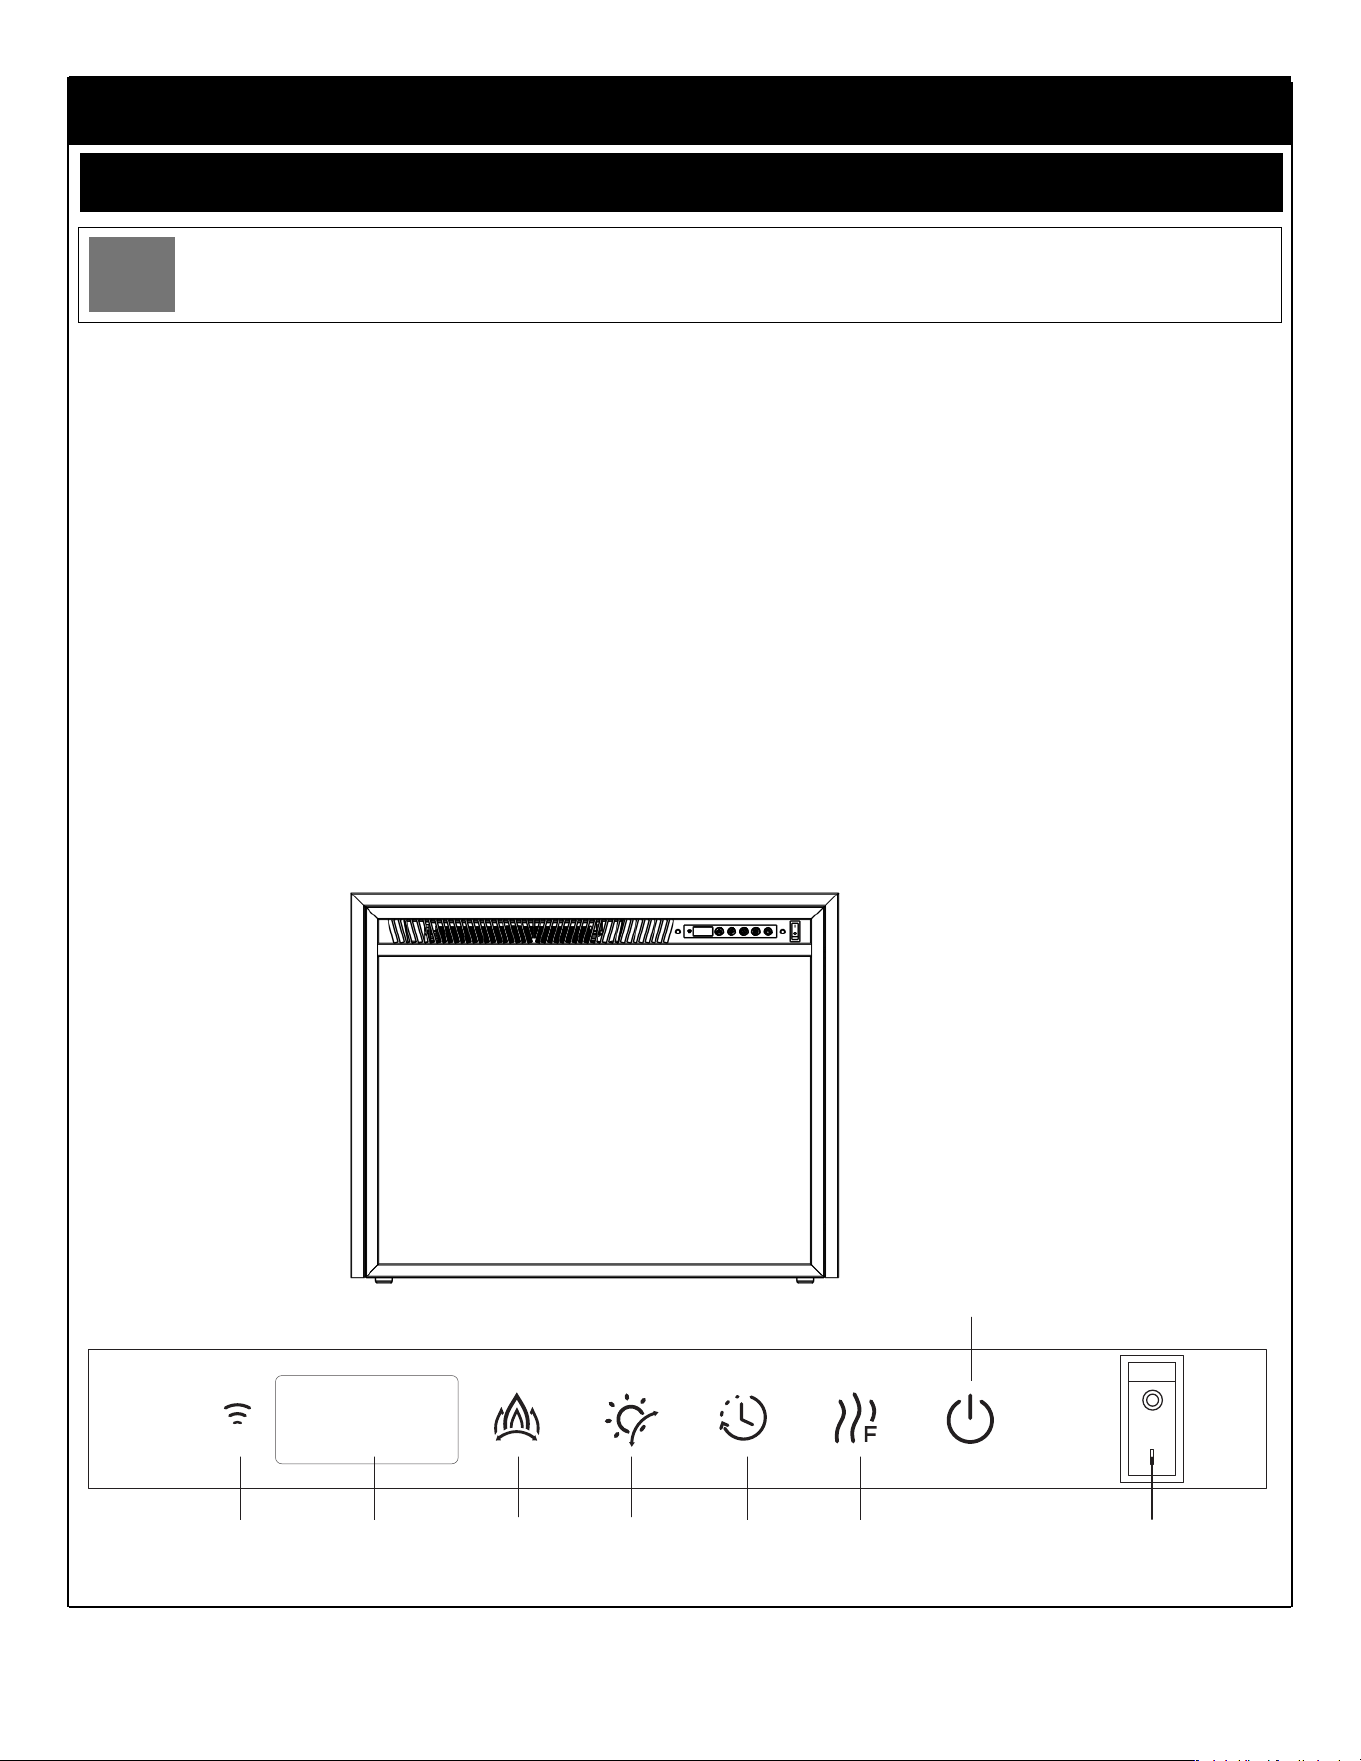
WIFI
TIMER
HEATER
Power standby switch
FLAME
EMBER
color / brightness
CONTROL DESCRIPTION
DISPLAY AREA
6
Read and make sure you understand this entire owner’s manual, including all safety information, before plugging
in or using this product.
Failure to do so could result in electric shock, fire, serious injury, or death.
POWER
Make sure the ON/OFF switch, located on the control panel, is in the OFF position. Plug the power cord into a
120V 15A grounded outlet (see IMPORTANT SAFETY INFORMATION on pages 2 and 3). Make sure the outlet is
in good condition and that the plug is not loose. NEVER exceed the maximum amperage for the circuit. DO
NOT plug other appliances into the same circuit.
METHODS OF OPERATION
This electric fireplace can be operated by the button located on the glass panel at the top right-hand side of
the fireplace, or by the battery-powered REMOTE CONTROL.
The operation and functions of the two methods are the same.
Before operating, please review the IMPORTANT SAFETY INFORMATION on pages 2 and 3, and heed all
warnings.
MAIN POWER SWITCH
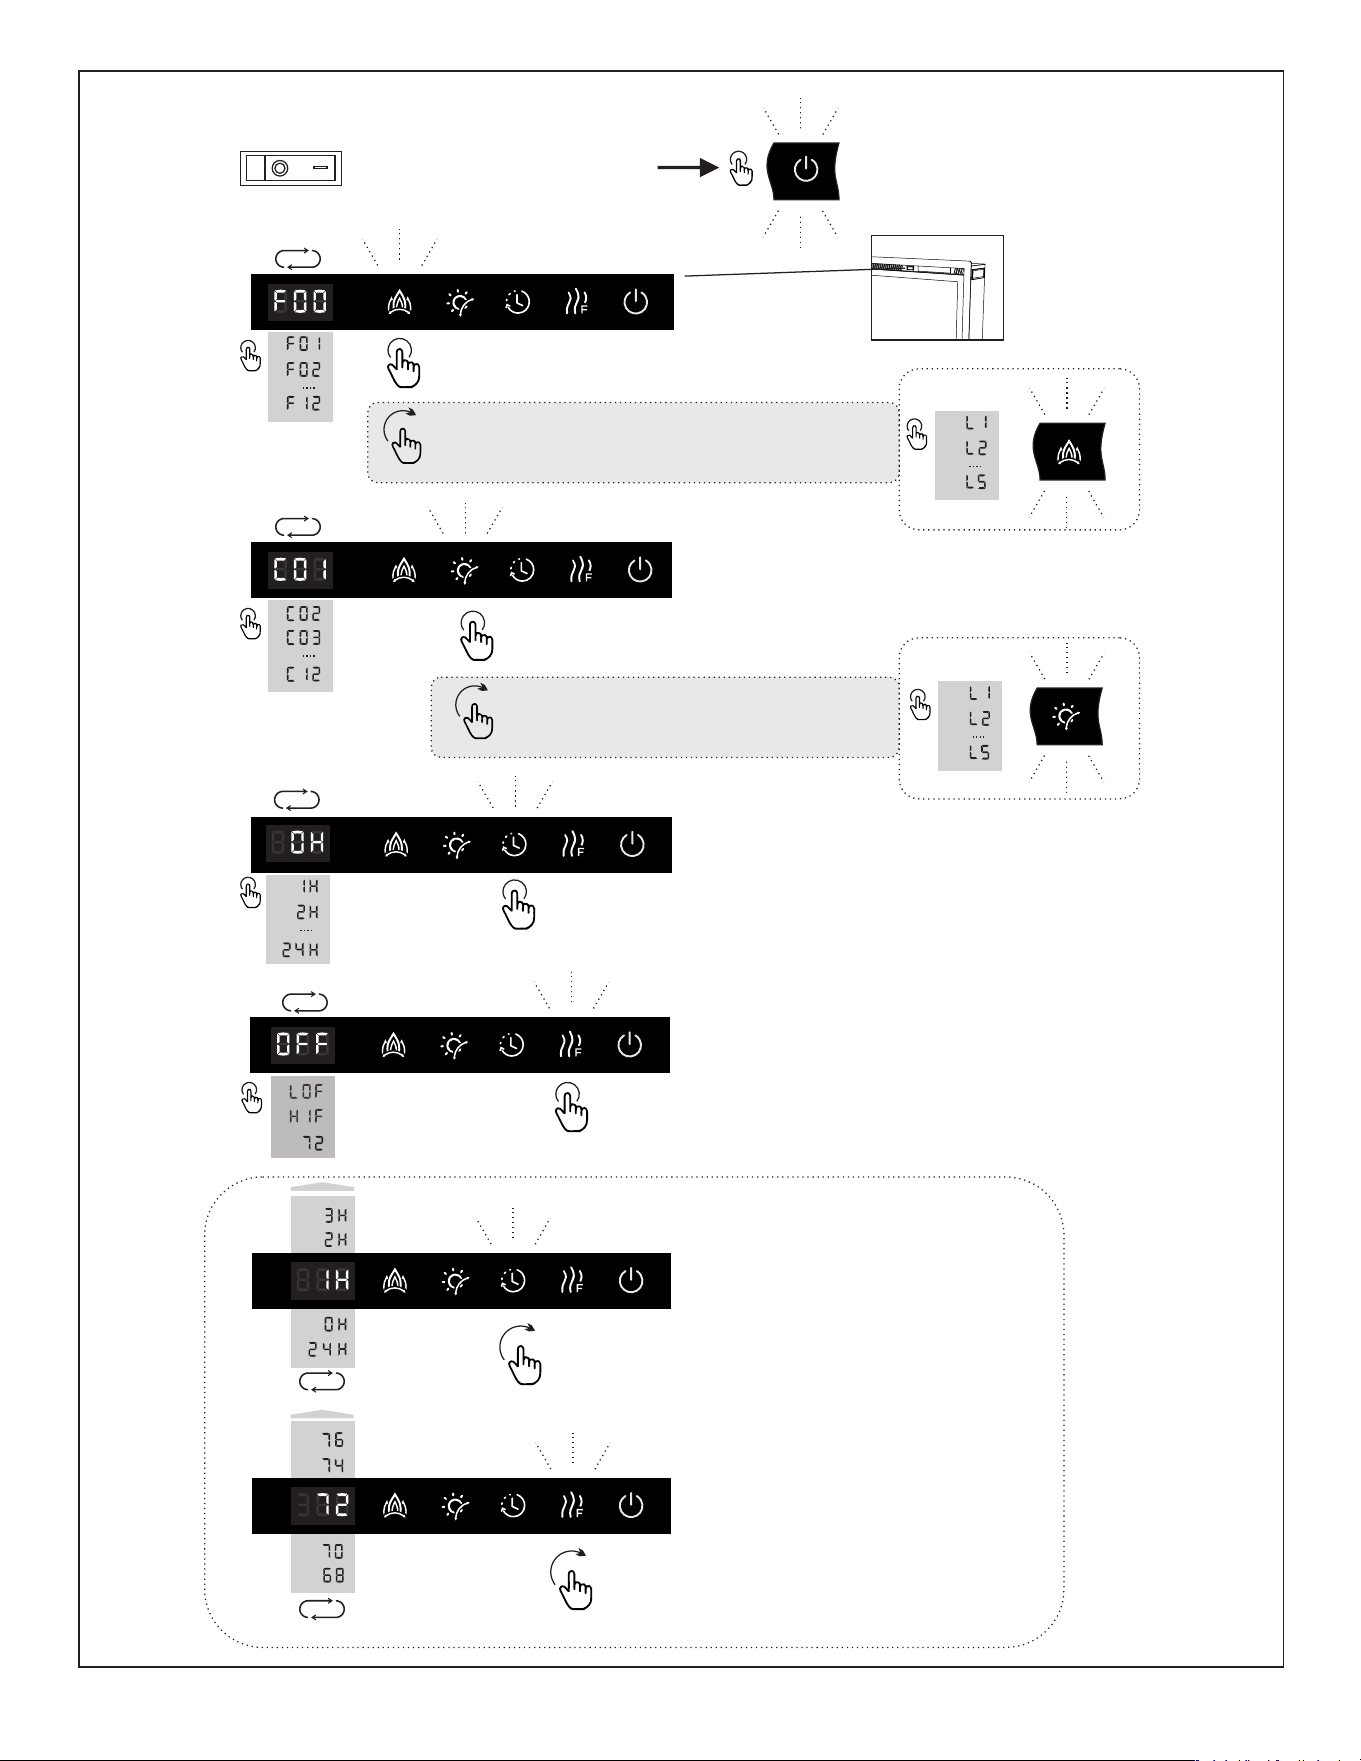
7
Turn on main power switch first.
BUTTON FUNCTION ACTIONS INDICATION
POWER
ON: Enables control panel functions and remote
control. Turns on flame effect.
OFF: Disables control panel functions and remote
control. Turns off flame effect.
1. Press once. Indicator light turns on. Power turns
on. All functions enabled.
2. Press again. Indicator light turns off. Power turns
off. All functions turn off.
HEATER
HEATER button: Turns heater on and off.
NOTE: To prevent overheating, the heater fan will
blow out cool air for 30 seconds after the heater
turns off. TEMPERATURE button: Controls
temperature settings to choose desired
temperature.
Settings range from 62°F to 82°F.
1. Press once. Indicator lights up (LOF). 750W heater
turns on and blows out warm air.
2. Press again. Indicator lights up (HIF). 1500W
heater turns on and blows hot air.
3. Press again. Smart 72°F.
4. Press again. Heaters turn off. The display shows
“OFF”.
5. Hold button for 3 seconds to start temperature
control mode. The temperature can be set to
between 62°F and 82°F.
TIMER
TIMER button: Controls timer settings to turn off
fireplace at selected time.
Settings range from 0 hours to 24 hours.
1. Press once. Indicator light turns on.
2. Press again until desired setting is reached
(0–8 h). LED display shows setting.
3. Hold button for 3 seconds to set between 0 and
24 hours.
EMBER
EMBER button:
Makes the ember bed color effect change. Makes
the ember bed effect dimmer and brighter.
1. Press once. Ember bed color effect changes (12
colors).
2. Press again until desired setting is reached. When
color is set to C0, the ember bed color will automatic
change.
3. Hold button for 3 seconds to make the ember bed
effect dimmer and brighter (L5–L1).
FLAME
FLAME button:
Makes the flame color effect change. Makes the
flame effect dimmer and brighter.
1. Press once. Flame color effect changes (12 colors).
2. Press again until desired setting is reached. When
color is set to F0, the flame color will automatically
change.
3. Hold button for 3 seconds to make the flame
effect dimmer and brighter (L5–L1).
UP
UP button: Flame & ember bed color/Dimmer and
brighter/Timer/Flame speed/Temperature
Flame & ember bed color/Dimmer and
brighter/Timer/Flame speed/Temperature.
DOWN
DOWN button: Flame & ember bed color/Dimmer
and brighter/Timer/Flame speed/Temperature
Flame & ember bed color/Dimmer and
brighter/Timer/Flame speed/Temperature.
SPEED
FLAME SPEED button: Sets the flame speed (S5–S1). Sets the flame speed (S5–S1).
3S
3S
Timer to turn o the fireplace
Heater 750W /1500W/ 72F/OFF
3S
8
Press for 3s to enter automatic
forward time mode. Then press to
stop scrolling. Setting complete.
Press for 3s to enter automatic
forward temperature mode. Then
press to stop scrolling. Setting
complete.
Turn on main power switch
Power standby switch
Flame color effect
Press for 3s. Then press the flame brightness
effect button.
Ember bed color effect
Press for 3s. Then press the ember bed
brightness effect button.
FLAME
TIMER
HEATER
EMBER
DOWN
SPEED
UP
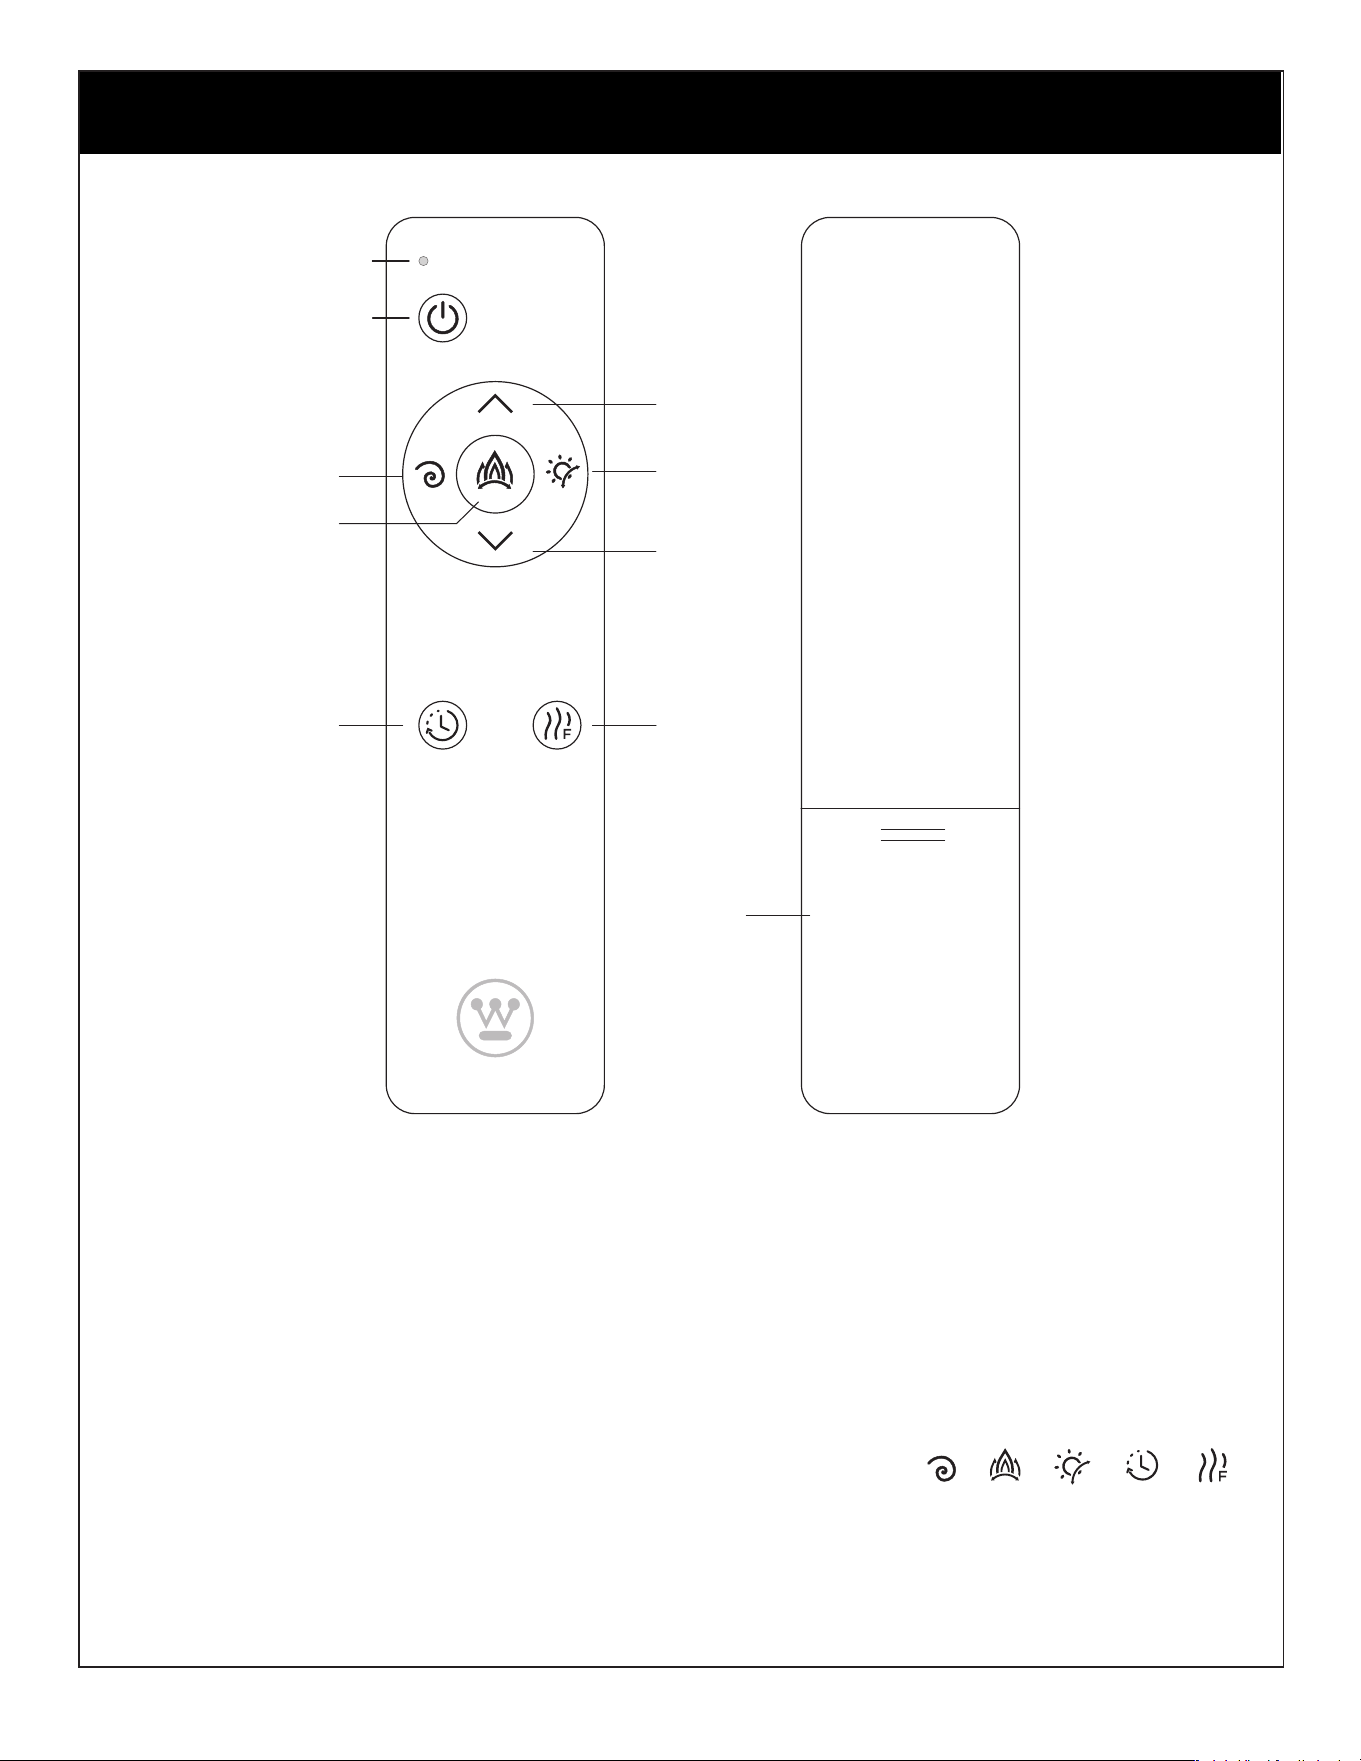
MODE 1
Remote control
1. Illustration of button mode.
Remote Control Description
REMOTE
INDICATOR LIGHT
POWER STANDBY SWITCH
BATTERY
9
1. Open the battery
compartment cover
and install 2 x AAA
batteries.
2. Test whether the
battery is installed
properly by pressing
any key to observe
whether the indicator
light is on.
MODE 2
Remote control
2. Remote control function
selection mode – up and
down selection.
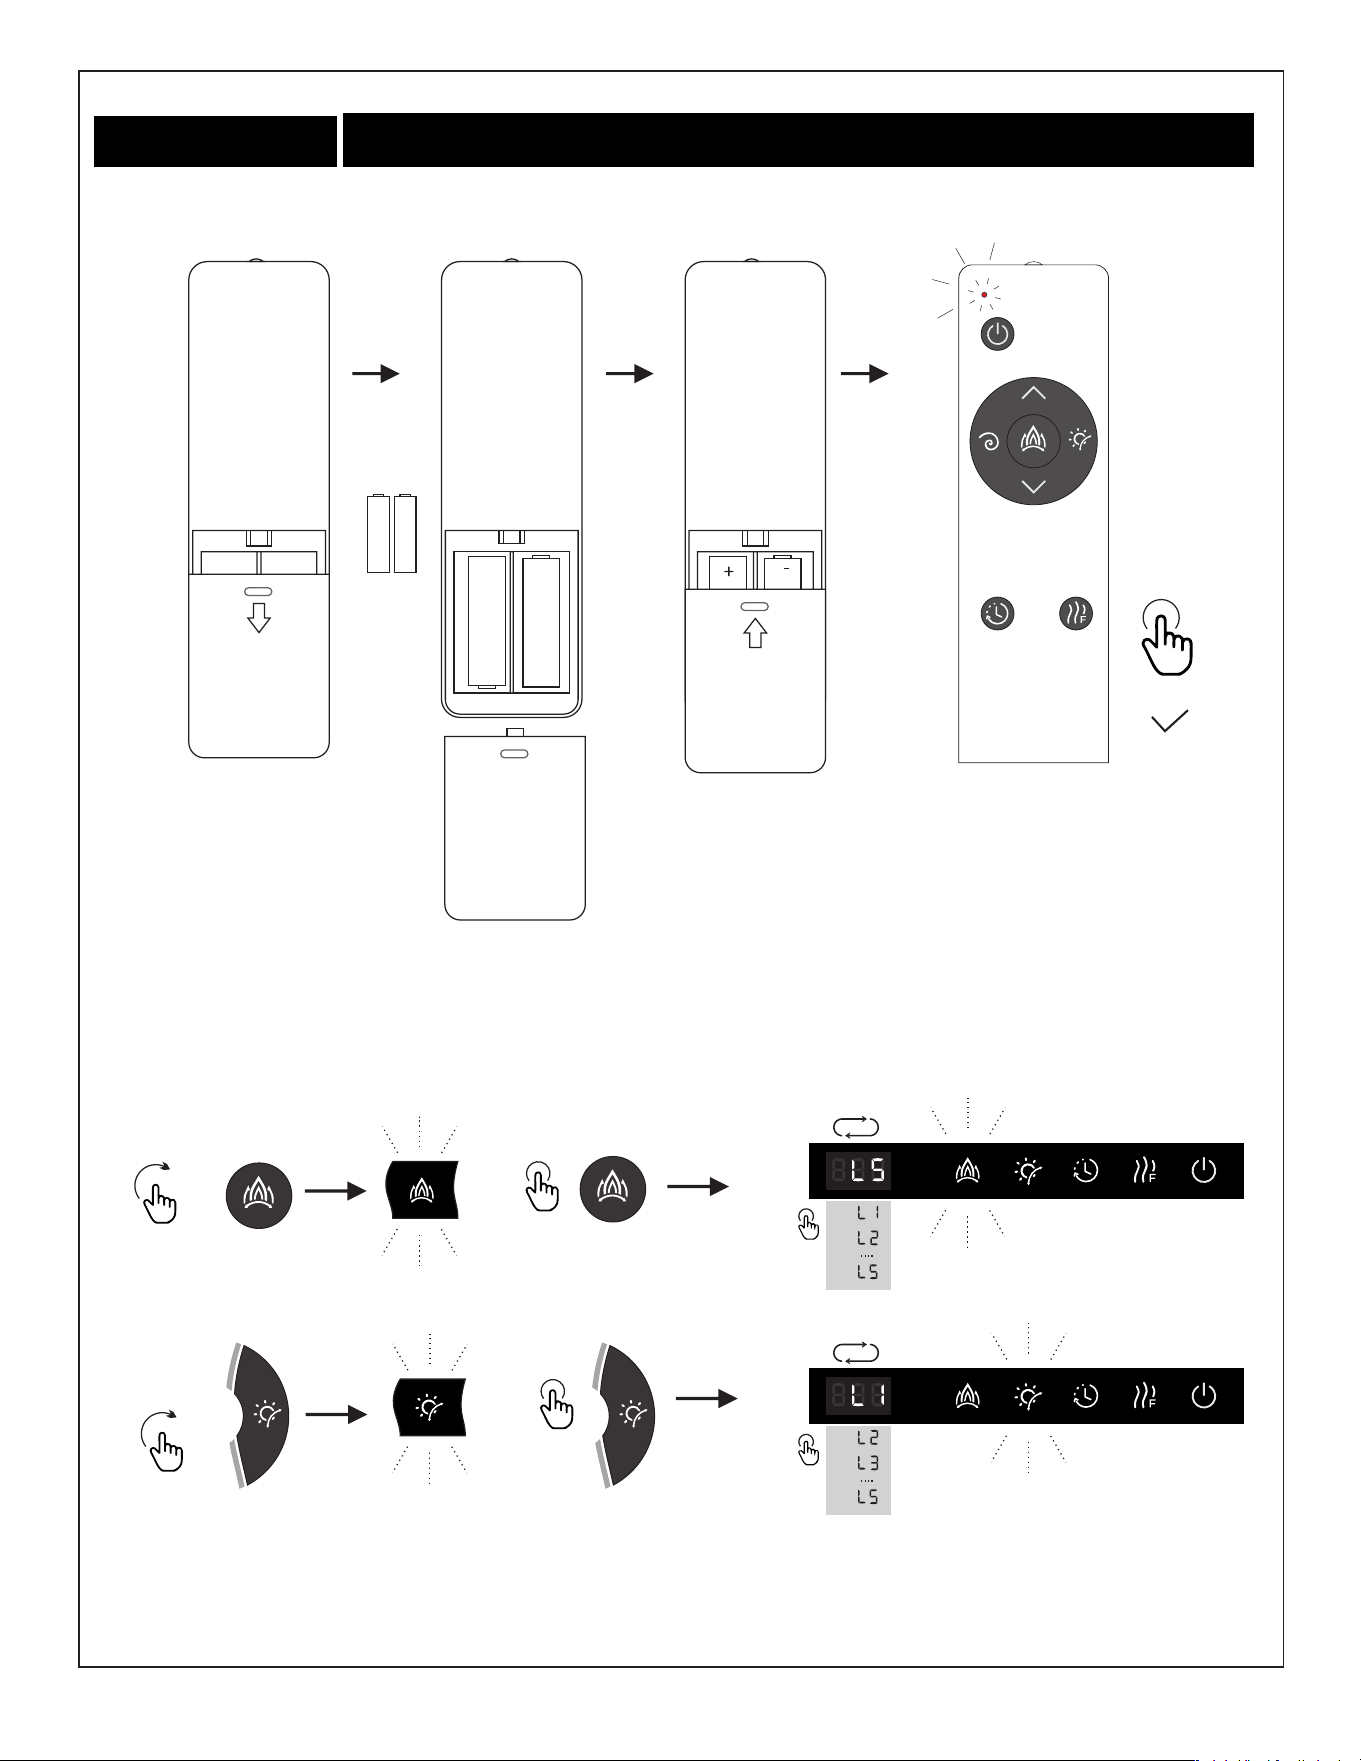
AAA
AAA AAA
+
-
+
-
2xAAA
AAA
3S
3S
• Remote control to adjust brightness.
NOTICE
To improve operation, aim the remote control at the front of the fireplace. DO NOT press
the buttons too quickly.Give the unit time to respond to each command.
10
● Excludes batteries. Prepare 2 x AAA batteries.
2. Test whether the
battery is installed
properly by pressing
any key to observe
whether the indicator
light is on.
1. Open the battery
compartment cover and
install 2 x AAA batteries.
Press for 3s. Then press the flame brightness effect button..
Press for 3s. Then press the ember bed brightness effect button..
Press any key to remotely
activate the control board.
Once the control board lights
up, control operations can be
carried out.
Flame color e. ect
Ember bed color e. ect
Setting the flame speed
Timer to turn o the fireplace
Remote control 1. Illustration of button mode
11
UP/DOWN to select a temperature
Heater 750W/1500W/72F/OFF

Flame color e. ect
Timer to turn o the fireplace
Ember bed color e. ect
Setting the flame speed
Adjust the temperature
UP
DOWN
select
12
Remote control 2. Remote control function selection mode – up and down selection
Select the
function mode
and the function
light flashes.
Select the
required
parameters by
pressing UP and
DOWN for the
current function.
Wait for the
controller to turn
off the light, and
exit the current
selection mode.
Alternatively,
press other
function keys to
access other
functions.
The default mode up and down keys can directly adjust the temperature.
13
Turn on main power switch first
10S
10S
WIFI
WIFI 2.4G
WIFI
***
***
The WIFI indicator light in distribution mode flashes, displaying "P-0" Add WIFI
network and mobile app for network distribution.Turn on Bluetooth and WIFI
APP
Scan
WIFI
or
Registration process
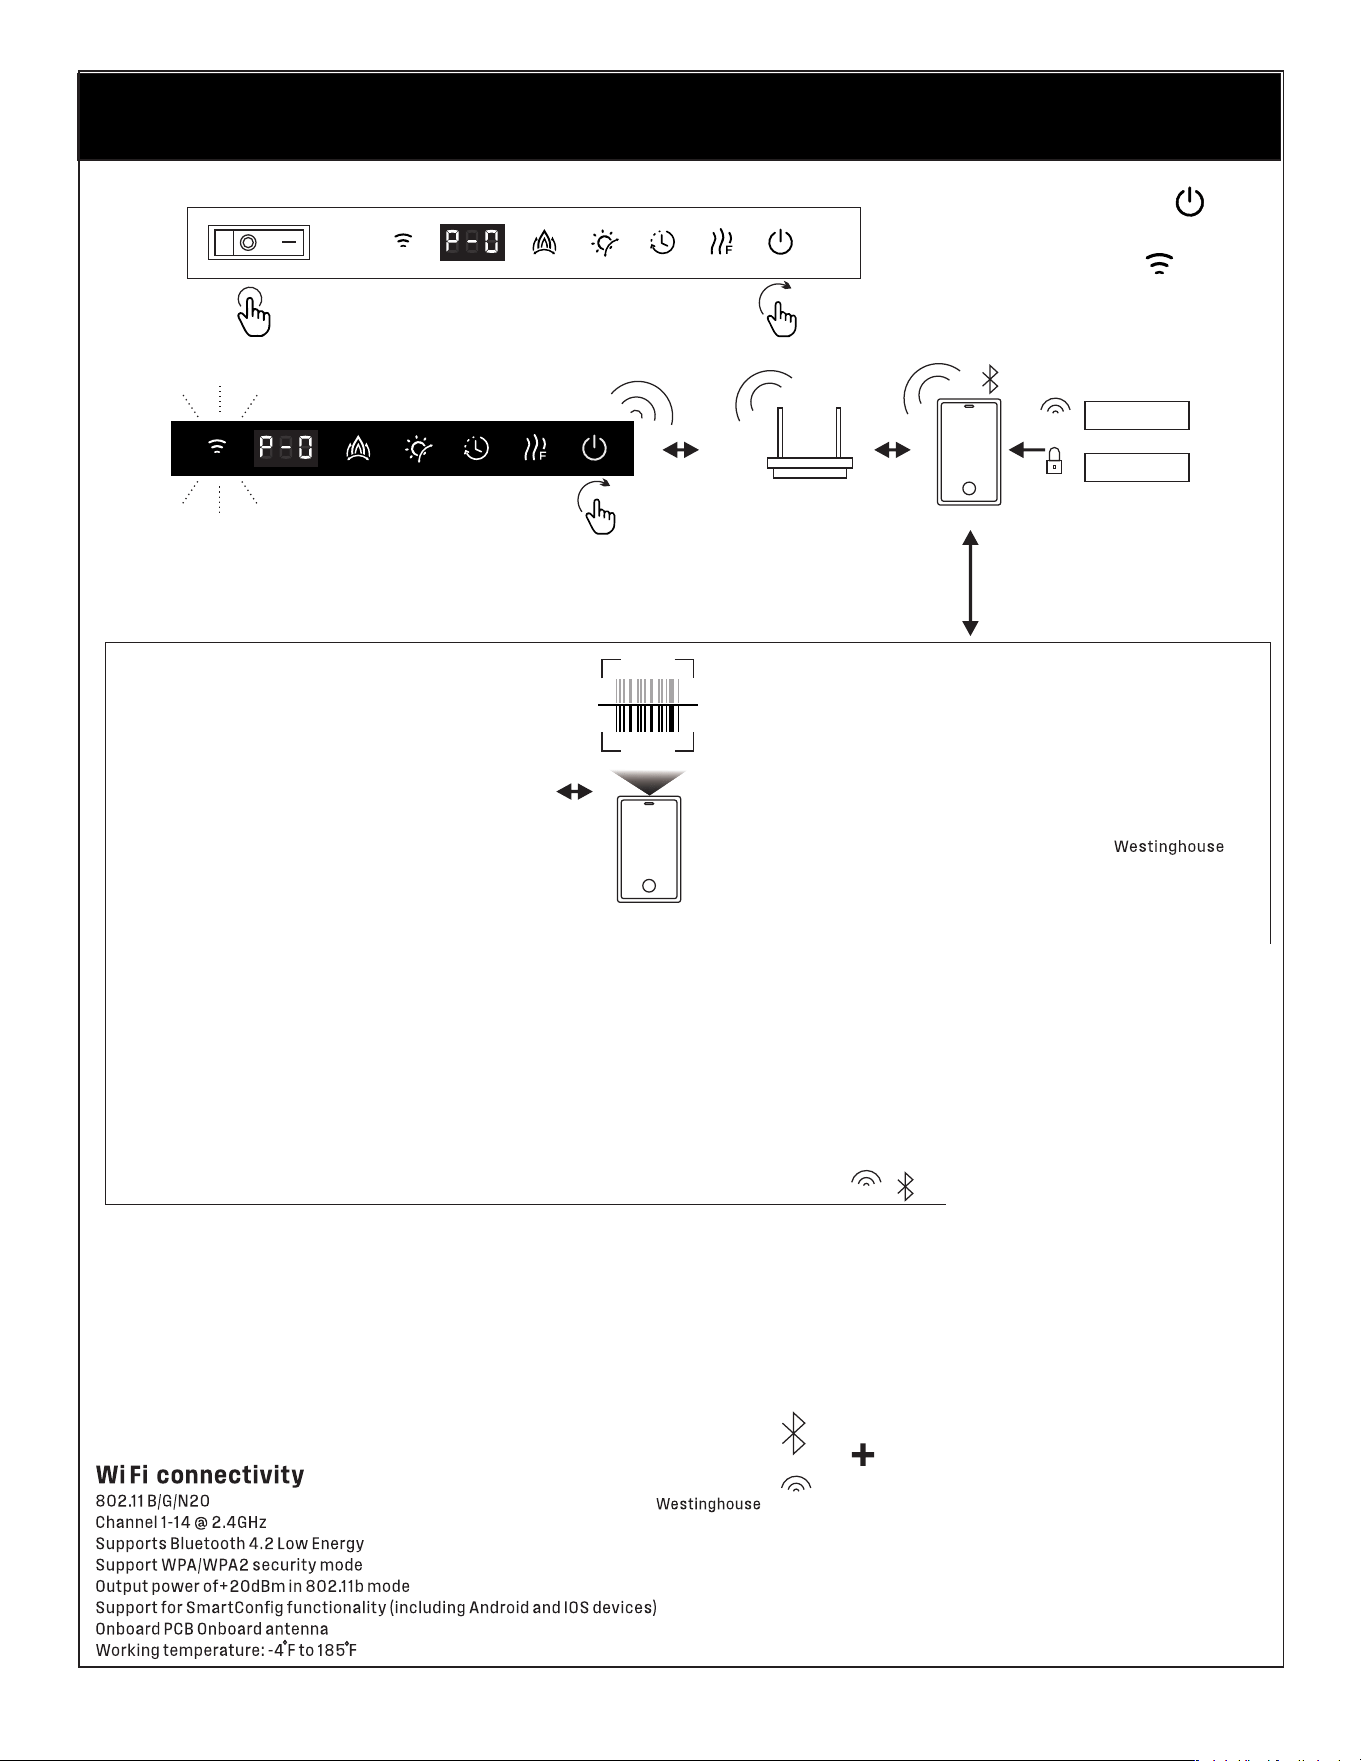
1. Open the "Westinghouse " app, click register, and start registration
2. Enter your email address and fill in the verification code
3. Set your login password
4. Enter the app to open the settings page, then allow nearby devices and location
NOTE: You should allow the app access "Location" and "Nearby devices"on your cell phone
before networking.
Note: Please make sure that the wireless network and the Bluetooth function of the
cell phone are turned on before networking.
Open the app to go to the home page, click add device and the app will
automatically search for the fireplace. Press add fireplace (or scan app code).
WI-FI LINK CONTROL
Fireplace networking process
WIFI
Press the power standby button
for 10s to enter the network
distribution mode. The WI-FI
indicator flashes, showing “P-0”.
Google Play and App Store
for Android and IOS Search
"Westinghouse " and install
the app
Install the"Westinghouse" app
Scan code with cell phone to install
"Westinghouse" app
14
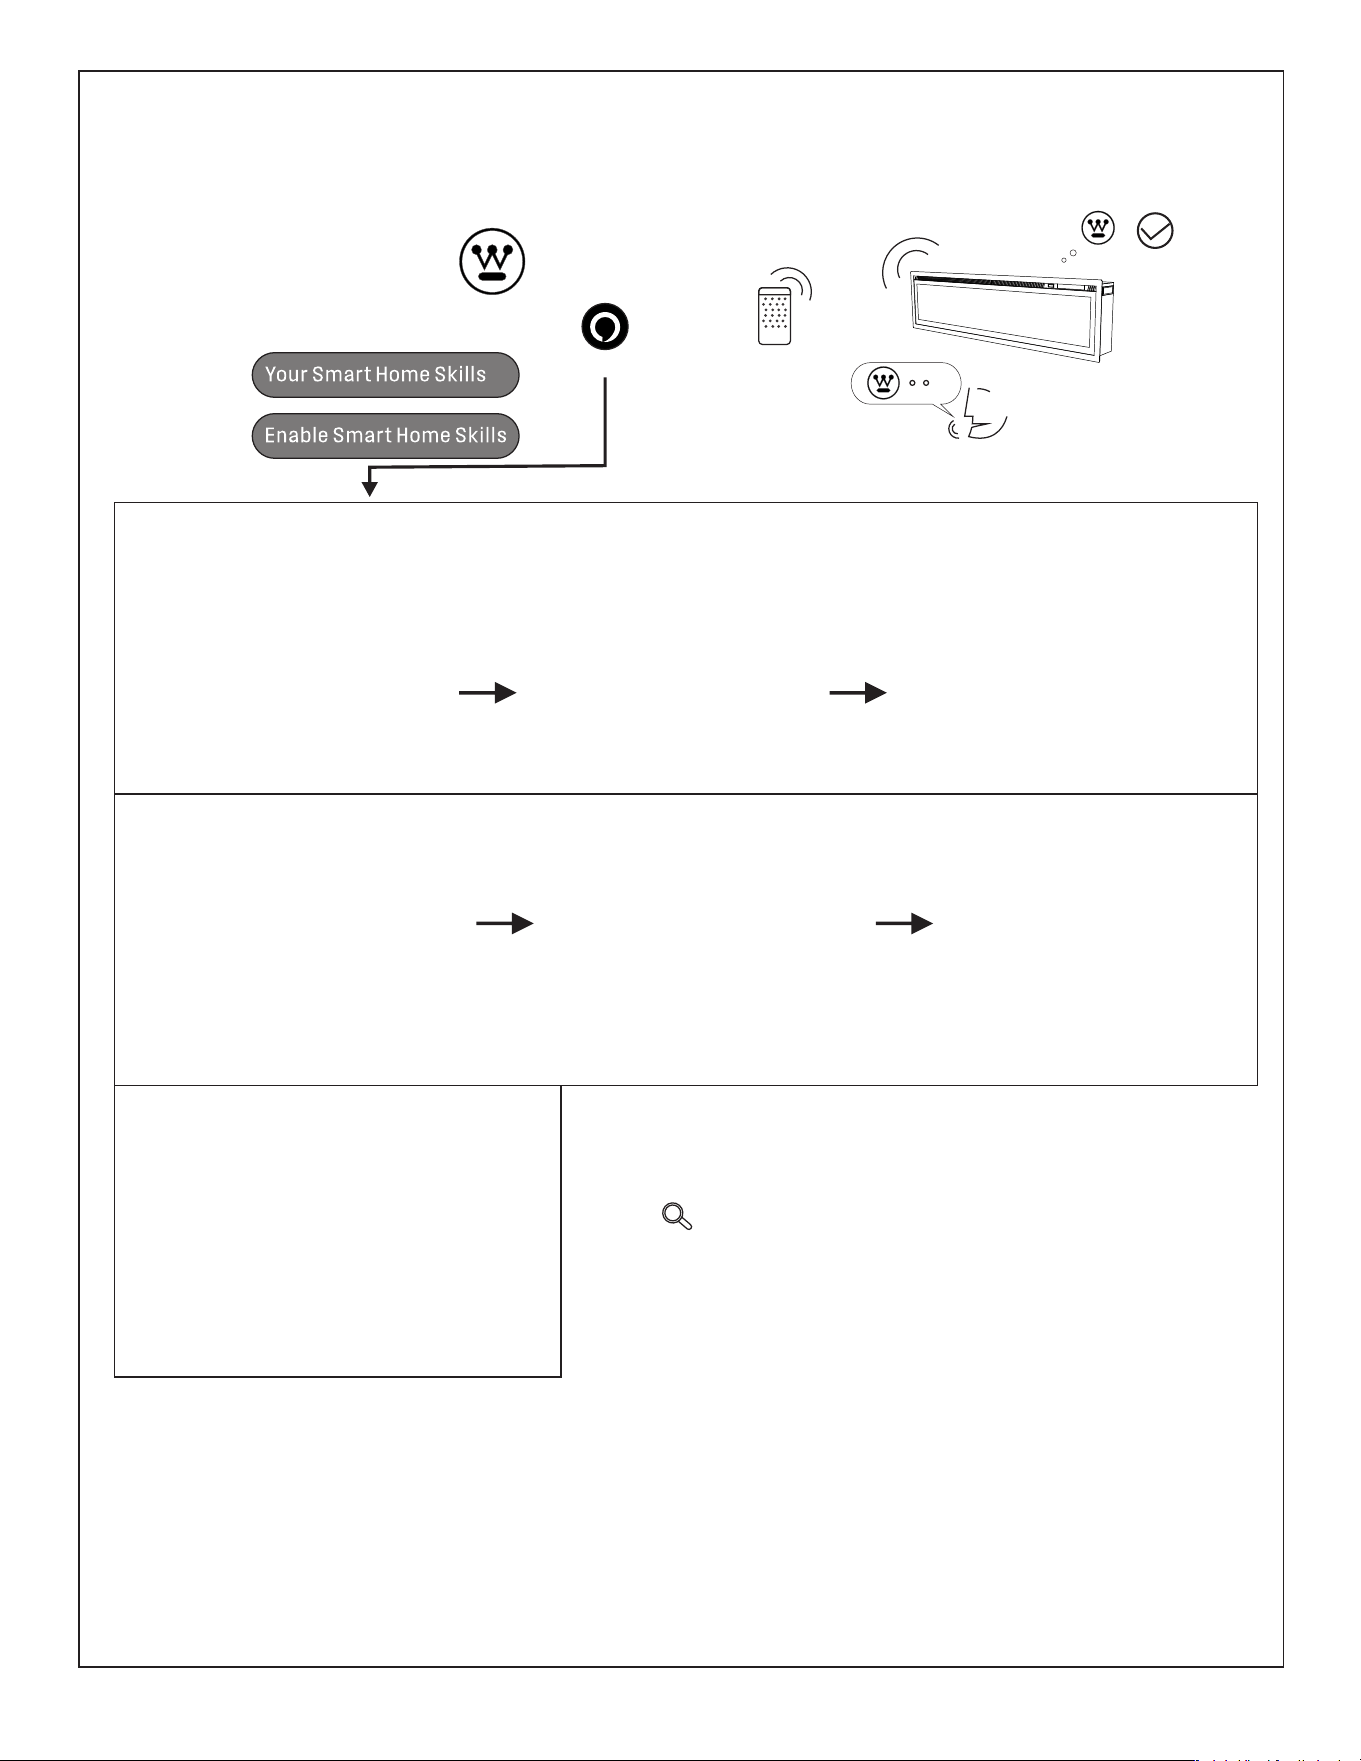
Alexa Link and Voice Control
Alexa Link and Voice Control
Alexa +
***
1. Your Smart Home Skills
2. Enable Smart Home Skills to discover devices and
scenes that Alexa can control.
3. Search for"Smart Life".
4. ENABLE "Smart Life" TO USE.
5. Associated "Westinghouse " account.
6. Alexa is looking for devices to connect to.
7. Device found and connected.
8. Heater is set up and ready to use.
Special statement: The content of this material has been carefully checked. If there are typographical errors and omissions in the content of
this manual, in case of misunderstanding, the company reserves the right of final interpretation.
* If the product is technically improved without notice, or the appearance and color of the product are changed, the actual product shall
prevail.

For Both FCC & IC application:
This device complies with Part 15 of the FCC Rules / Industry Canada licence-exempt
RSS standard(s). Operation is subject to the following two conditions: (1) this device may not cause harmful
interference, and (2) this device must accept any interference received, including interference that may
cause undesired operation.
Le présent appareil est conforme aux CNR d'Industrie Canada applicables aux appareils radio exempts de
licence. L'exploitation est autorisée aux deux conditions suivantes : (1) l'appareil ne doit pas produire de
brouillage, et (2) l'utilisateur de l'appareil doit accepter tout brouillage radioélectrique subi, même si le
brouillage est
susceptible d'en compromettre le fonctionnement.
Changes or modifications not expressly approved by the party responsible for compliance could void the
user's authority to operate the equipment.
This equipment has been tested and found to comply with the limits for a Class B digital device, pursuant to
part 15 of the FCC Rules. These limits are designed to provide reasonable protection against harmful
interference in a residential installation. This equipment generates uses and can radiate radio frequency
energy and, if not installed and used in accordance with the instructions, may cause harmful interference
to radio communications. However, there is no guarantee that interference will not occur in a particular
installation. If this equipment does cause harmful interference to radio or television reception, which can be
determined by turning the equipment off and on, the user is encouraged to try to correct the interference by
one or more of the following measures:
— Reorient or relocate the receiving antenna.
— Increase the separation between the equipment and receiver.
— Connect the equipment into an outlet on a circuit different from that to which the receiver is connected.
—Consult the dealer or an experienced radio/TV technician for help.
MPE Requirements
To satisfy FCC / IC RF exposure requirements, a separation distance of 20 cm or more should be maintained
between the antenna of this device and persons during device operation.
To ensure compliance, operations at closer than this distance is not recommended.
Les antennes installées doivent être situées de facon à ce que la population ne puisse y être exposée à une
distance de moin de 20 cm. Installer les antennes de facon à ce que le personnel ne puisse approcher à 20
cm ou moins de la position centrale de l’ antenne.
La FCC des éltats-unis stipule que cet appareil doit être en tout temps éloigné d’au moins 20 cm des
personnes pendant son functionnement.
WARNING
This product can expose you to chemicals including[name of one or more chemicals known to cause
cancer, name of one or more chemicals known to cause reproductive toxicity, or name of one or more
chemicals known to cause both cancer and birth defects or other reproductive harm], which is [are] known
to the State of California to cause cancer or birth defects or other reproductive harm. For more information
go to www.P65Warnings.ca.gov/furniture.
15
Temperature Limiting Control
This heater is equipped with a Temperature Limiting Control. Should the heater reach an unsafe
temperature, the heater will automatically turn OFF. To reset:
1. Unplug the power cord from the outlet.
2. Turn the ON/OFF switch on the CONTROL PANEL to OFF. Wait for 5- minutes.
3. Inspect the fireplace to make sure no vents are blocked, or clogged with dust or lint. If there
are, use a vacuum to clean the vent areas.
4. With the POWER switch in the OFF position, plug the power cord back into the outlet.
5. If the problem continues, have your outlet and wiring inspected by a professional.
Remote Control Battery Information
Excludes batteries. Prepare 2 x AAA batteries.
NEVER dispose of batteries in a fire. Failure to observe this precaution may result in
an explosion.
Dispose of batteries at your local hazardous material processing center.
CARE AND MAINTENANCE
Cleaning
NEVER immerse in water or spray with water. Doing so could result in electric shock, fire,
or personal injury.
Metal:
Buff using a soft cloth, slightly dampened with a citrus oil-based product.
DO NOT use brass polish or household cleaners as these products will damage the metal trim.
Glass:
• Use a good quality glass cleaner and dry thoroughly with a paper towel or lint-free cloth.
• NEVER use abrasive cleansers, liquid sprays, or any cleaner that could scratch the surface.
NOTICE
1
NOTICE 2
To improve operation, aim the remote control at the front of the fireplace. DO NOT press
the buttons too quickly.Give the unit time to respond to each command.
ALWAYS turn the heater OFF and unplug the power cord from the outlet before cleaning,
performing maintenance, or moving this fireplace. Failure to do so could result in electric shock,
fire, or personal injury.
16
When the heater is first turned on, a slight odor may be present. This is normal
and should not occur again unless the heater is not used for a long period of time.
Vents:
• Use a vacuum or duster to remove dust and dirt from the heater and vent areas.
• Clean the exterior of the fireplace with a slightly damp cloth or duster.
Maintenance
Risk of electric shock! DO NOT OPEN! No user-serviceable parts inside!
ALWAYS turn the heater OFF and unplug the power cord from the outlet before cleaning,
performing maintenance, or moving this fireplace. Failure to do so could result in electric shock,
fire, or personal injury.
Electrical and Moving Parts:
• The fan motors are lubricated at the factory and will not require lubrication.
• Electrical components are integrated in the fireplace and are not serviceable by the consumer.
Storage:
• Store heater in a clean dry place when not in use.
WARNING! No other servicing should be performed by the consumer. Do not attempt to service
the unit yourself.
Troubleshooting
WARNING
DISCONNECTED THE APPLIANCE COMPLETELY AND LET COOL PRIOR TO ANY SERVICE.
ONLY PROFESSIONAL TECHNICIANS CAN REPAIR THIS APPLIANCE .
PROBLEM POSSIBLE CAUSE SOLUTION
Fireplace turns off and
will not turn on.
Flame is not moving.
17
1. Fireplace has overheated and safety
device has caused thermal switch to
disconnect or home circuit breaker
has opened.
1. Reset switch by turning the main power
switch off and waiting to turn it back on.
1. Loose wiring.
2. Flame motor defective.
3. Flame rod out of place.
1. Inspect wiring for loose connections.
2. Call a qualified service technician
to replace flame motor.
3. “Flame Rod” out of place due to
rough transit/handing of the product.
This issue can be corrected by simply
removing the glass, flipping the
fireplace upside down, removing the set
of screws that are holding the bottom
frame plate, and placing the flame rod
back into place.

120VAC 60Hz 1500W
ELECTRICAL SCHEMATIC
18
Flame is not visible.
1. Wiring is loose.
1. Disconnect from power source and
inspect wiring for loose connections and
repair or replace if necessary.
2. Push the flame button to high.
Log set is not glowing.
1. Disconnect from power source and
inspect wiring for loose connections and
repair or replace if necessary.
Remote control does not
work.
1. Low batteries.
2. Not aiming remote control
correctly.
3. Defective remote control and/or
sensor.
1. Replace batteries in remote control.
2. Aim remote control at sensor located
directly behind glass screen in center of
unit just above logs.
3. Replace remote control and/or sensor.
1. Wiring is loose.
2. Ember mode is off.

CONTACT US : [email protected]
Warranty
• 2-year warranty (2-year full replacement) .
• Replacement of any non-functioning electronic parts.
CUSTOMER SUPPORT
19
Returns
The returns policy refers to products purchased directly from Westinghouse Fireplace. Reseller sales are
subject to the respective policies of the seller.
Electric Fireplace Returns Policies
• If an order arrives damaged, defective, or incomplete, please contact.
• If a product is discovered to be damaged or defective after fourteen (14) days of delivery,
the product will be processed under its warranty.
• Westinghouse Fireplace does not accept returns for refunds due to customer change of mind
more than thirty (30) days after delivery.
• Fireplaces may be returned due to customer change of mind in the original packaging and
in saleable condition within thirty (30) days from the date of delivery.
• Product return warranty coverage does not include man-made damage to the product.
• Return shipping costs are the responsibility of the consumer.
