Read All Instructions Carefully.
Save These Instructions.
JC-128UEL
Antarctic Star
User Manual
BEVERAGE AND WINE CENTER

Table of Contents
Product Introduction ............................................................. 2
Installation .......................................................................... 3-9
Defrosting ............................................................................ 10
Cleaning and Maintenance ................................................. 10
LED Light Replacement ...................................................... 11
Troubleshooting ................................................................... 12
Safety Warnings .................................................................. 14
Customer Service ................................................................ 14
Product Warranty ................................................................. 15
- 1 -
- 2 -
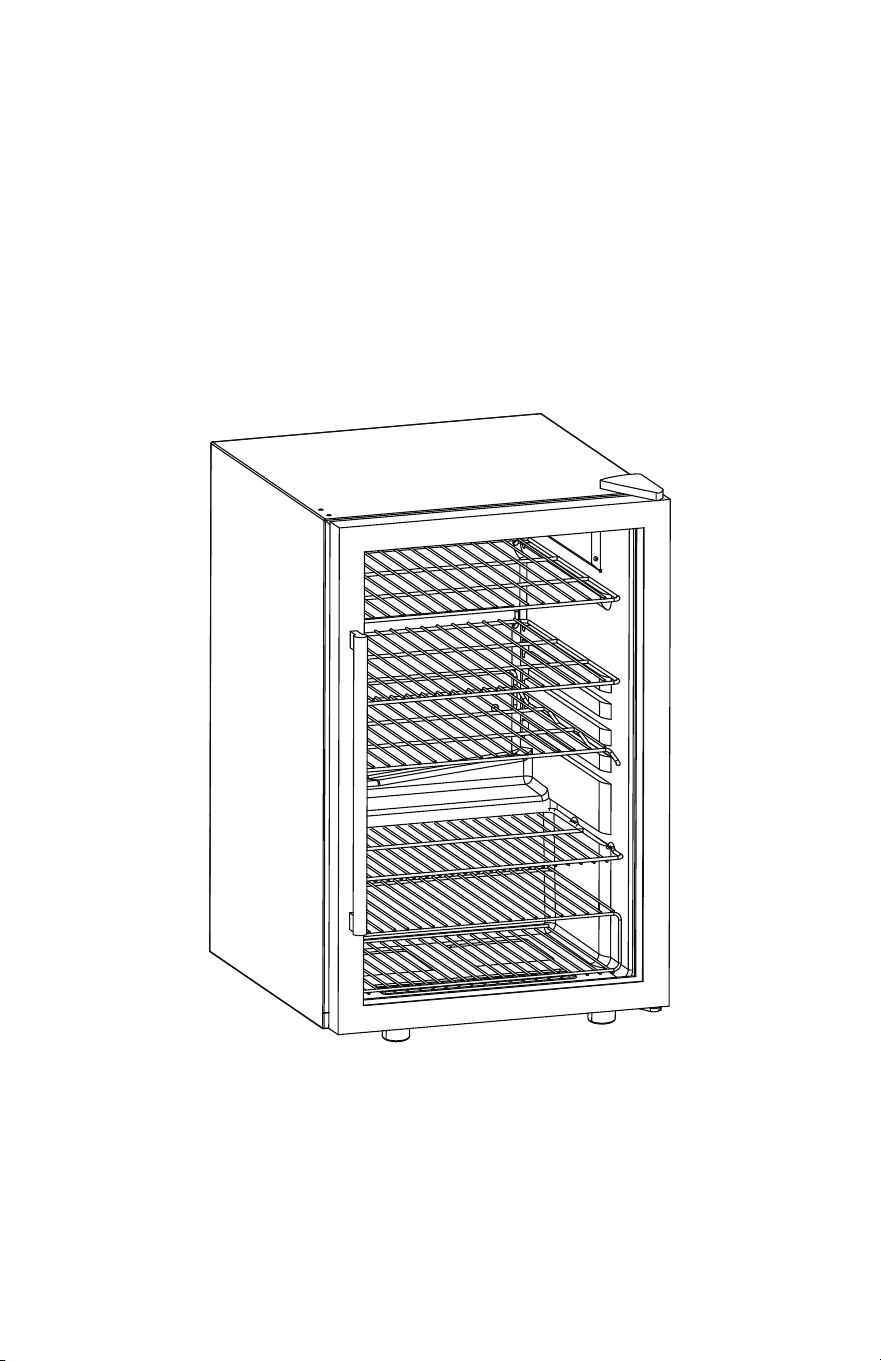
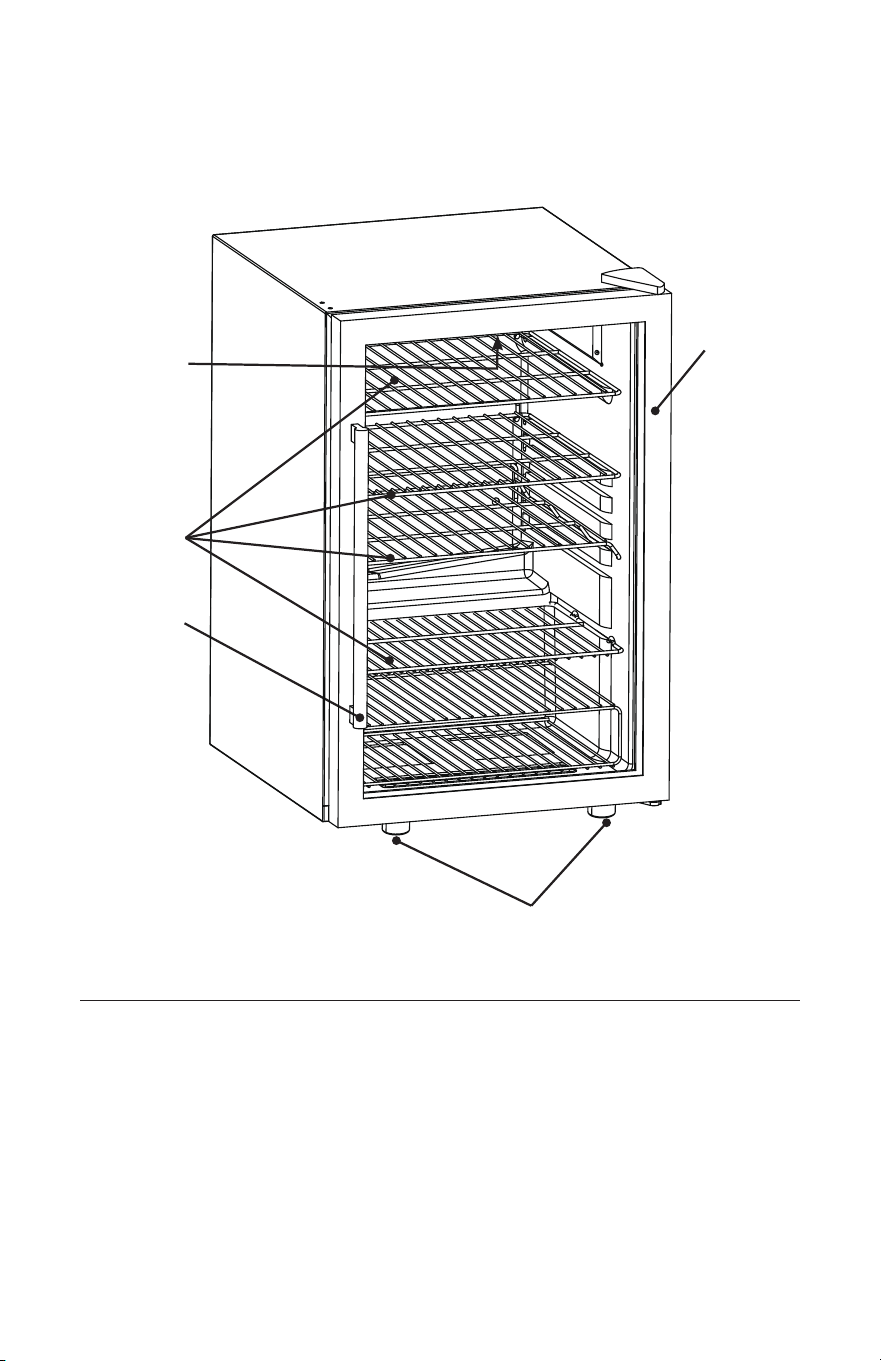
PRODUCT INTRODUCTION
1 LED Interior Light
2 Adjustable Wire Shelves
3 Adjustable Front Leveling Legs
4 Reversible Double Pane Glass Door with Stainless Steel Frame
5 Stainless Steel Handle
3
4
5
2
1

- 3 -
STOP!
BEFORE YOU DO ANYTHING!
Do not plug the wine and beverage center into
a power outlet until it has been resting in its
upright position for at least six (6) hours.
If the wine and beverage center has been laid on its side, placed
upside down or tilted more than 45° during moving or transport,
it is extremely important to allow the refrigerant and compressor
oil to separate and settle so the compressor operates properly.
Failure to do so will cause severe mechanical problems with the
unit’s motor/compressor, and will void the warranty.
INSTALLATION
TRANSPORT
Use two or more people to move the wine and beverage center.
Do NOT use stainless steel handle to move or lift the unit.
VENTILATION SPACE
In order for the wine and beverage center to function efficiently, it MUST be placed in an adequately
ventilated space to allow for heat dissipation. It is important to allow at least 2 inches (50 mm) of
space on each side and above the unit, and 4 inches (100 mm) of space behind the unit.
The door requires approximately 22 inches (558 mm) of space in front of the wine and beverage
center to open. To fully utilize the unit, space should be allowed for the door to open fully to 160º.
STABLE SURFACE
The wine and beverage center must be placed on a flat, stable surface. Adjust the unit’s front
leveling legs to assure quiet operation and prevent rattling when the compressor activates.
IMPORTANT:
-
Never place the unit on soft materials such as foam, plastic or thick textured carpeting.
-
Make sure the unit and door are aligned. Use the adjustable legs (front only) to align the unit and/or
the screws under the triangular bracket cover to align the door. See page 6 for more detailed
instructions on accessing the metal bracket.

- 4 -
INSTALLATION
POWER SUPPLY
This wine and beverage center is equipped with a 115V/60Hz single phase motor.
Do not use a ground-fault circuit interrupter (GFCI) outlet to connect the unit. (Fig. A.)
The power plug is a standard grounded three-prong non-polarized flush mount,
which allows for easier connection to power outlets.
Power plug must be connected to the outlet directly, and never to an extension cord.
POWER CORD
Never shorten or lengthen the power cord. Do not fold or coil the power cord.
IMPORTANT - Never place the excess length of power cord into the compressor enclosure in the
back of the wine and beverage center. This action creates a dangerous heat build-up which can
melt the cord, cause an electrical hazard and may potentially cause a fire.
Touching the power cord to the compressor at the back of the unit during operation can create an
electrical hazard and damage the compressor.
If the power cord is damaged, it must immediately be replaced by a trained service provider, as
special tools are required.
CLEAN BEFORE USE
To remove any manufacturing dust and residual odors, wipe the wine and beverage center inside and
out with a damp cloth and a solution of baking soda and warm water (2 tbsp. baking soda to 1 qt.
water). Wipe away any residual baking soda with a clean moist cloth. Allow to dry before operating.
Periodically clean the wine and beverage center with a sponge or cloth moistened with mild soapy
water, or baking soda and water.
PROTECT FROM MOISTURE
Heavy moisture in the environment can cause degradation to the insulation, as well as rust to the
cabinet, compressor and/or power supply.
Do not spray the wine and beverage center with water.
PROTECT FROM HEAT
Place the wine and beverage center away from heat source or direct sun.
Do not operate your wine and beverage center outdoors or in an environment with high
temperatures and/or high humidity, such as garages, attics or outdoor patios. The temperature
variances will create condensation on the glass door.
Do not cover the wine and beverage center with tarps or other items while operating, as this may
cause overheating.
IMPORTANT: Do not cut or remove the third ground prong from the power cord.
IMPORTANT: Never use with an extension cord. Power cord length is 5 feet long (1524 mm).
TEST
RESET
Fig. A

INSTALLATION
- 5 -
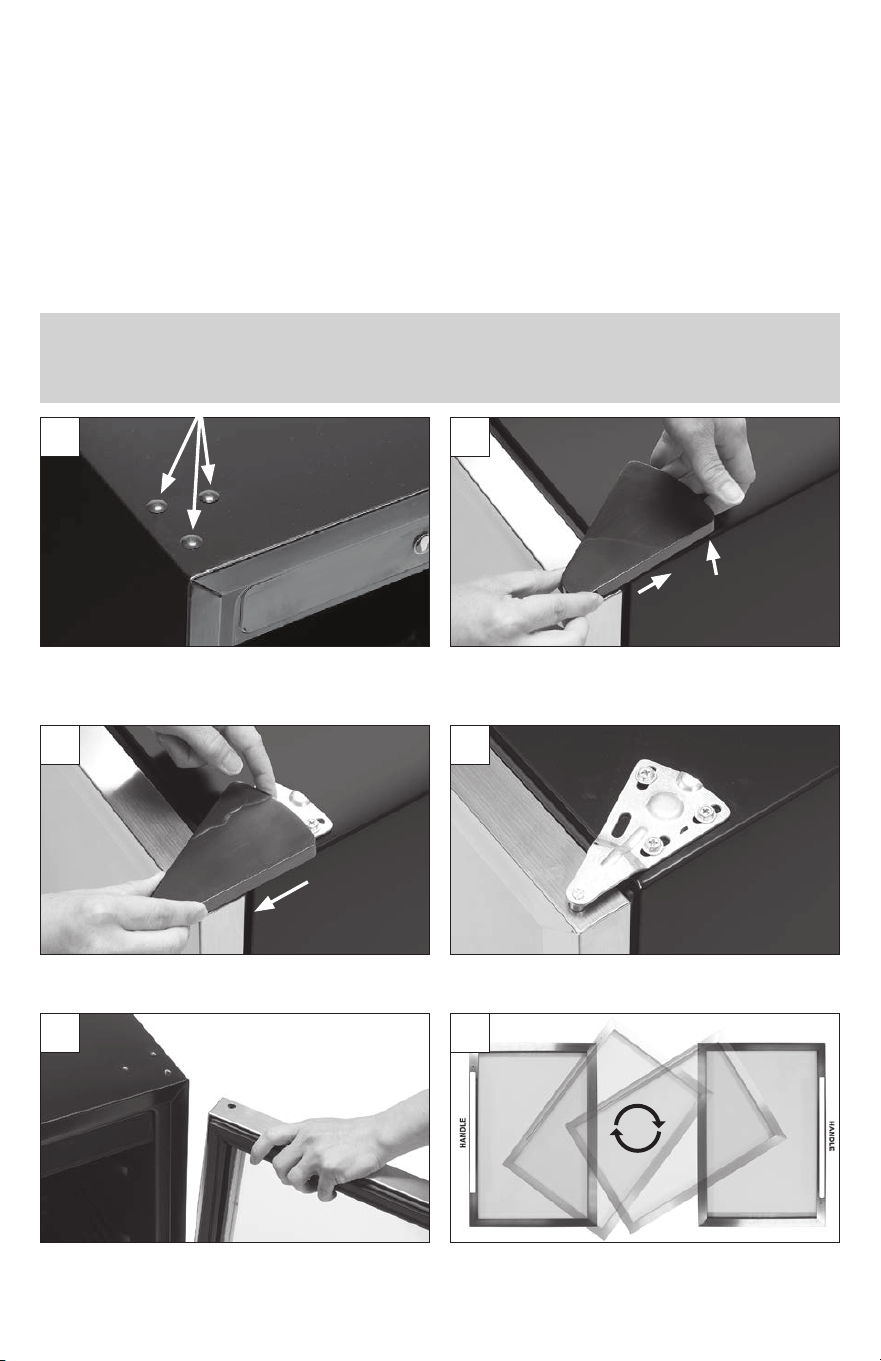
Carefully pull back the gasket from the interior door
frame as indicated. Insert screws into holes on
back side of door under the door gasket. Position
the handle on the outside of the glass door.
Gently press and thread the gasket back into
the slot on the door frame. Ensure the gasket is
properly seated prior to using the unit.
The stainless steel handle is easily attached
to the left side of the glass door with two
enclosed screws.
Tighten both screws until the door handle is flush
with the stainless steel frame. Take care not to
over tighten the screws, as this may damage the
handle or frame.
IMPORTANT: NEVER LAY THE WINE AND BEVERAGE CENTER ON ITS BACK.
The compressor and motor components are installed at the back of the unit and may easily be
damaged if the wine and beverage center is placed on its back.
IMPORTANT: DO NOT USE STAINLESS STEEL HANDLE TO MOVE OR LIFT THE UNIT.
HANDLE INSTALLATION
TOOLS NEEDED: Phillips screwdriver #2.
1
2
3
4
INSTALLATION
- 6 -
DOOR REVERSAL INSTRUCTIONS
Loosen the triangular bracket cover by pushing the
bracket cover towards the back of the wine and
beverage center and simultaneously pulling up.
Remove the metal bracket by unscrewing the three
screws.
Rotate door 180° so that the handle is on the
opposite side.
Gently remove the plastic hole insert plugs from
the left side of the wine and beverage center with a
thin athead screwdriver. Save the plugs for Step 11.
Slide the cover towards the front of the wine and
beverage center and lift off.
Lift and remove the door.
IMPORTANT: NEVER LAY THE WINE AND BEVERAGE CENTER ON ITS BACK.
The compressor and motor components are installed at the back of the wine and beverage
center and may easily be damaged if the unit is placed on its back.
TOOLS NEEDED: Phillips screwdriver #2 or 5/16" (8 mm) socket tool and thin athead screwdriver.
The wine and beverage center is shipped with the door hinge brackets attached on the right side.
The door may be reversed to allow opening from the left side.
If you plan on reversing the door hinges, DO NOT plug the wine and beverage center into the
power outlet.
REMOVE GLASS SHELVES BEFORE REVERSING THE DOOR.
2
4
6
1
3
5
INSTALLATION
DOOR REVERSAL INSTRUCTIONS
Gently place the wine and beverage center on
opposite side to complete the door reversal. Remove
screw and re-insert into the opposite side. Re-attach
the metal base bracket with nylon washer on the
new hinge side. Lift the unit to an upright position.
With the unit on its side, remove the bottom metal
base bracket with nylon washer. Unscrew the axle
insert with a flathead screwdriver. Screw into the
opposite hole of the metal base bracket.
The rubber gasket should be compressed on all
sides of the door. If the gasket is more compressed
on one side, the metal bracket position should be
adjusted. Make sure the door is level. Once the door
position is finalized, securely tighten the screws.
Reinstall the triangular bracket cover by carefully
threading the bracket cover onto the metal bracket
and pressing down.
To reattach the door, place the door onto the bottom
axle insert. Place the top bracket into the door and
align the metal bracket holes over the holes in the
top of the unit cabinet. Tighten the three screws to
hold in place.
Reinstall all plastic hole insert plugs. The re-installation
of the plastic hole insert plugs is important to
maintain the seal and integrity of the insulation. Extra
inserts are included in case the plugs are damaged
during removal.
IMPORTANT: It is extremely important to wait at least six hours before plugging the wine
and beverage center into a power outlet. During the door reversal process, the refrigerant and
compressor oil fluids mixed. It is important to allow the refrigerant and compressor oil to separate
and settle so the compressor operates properly. Failure to do so will cause severe mechanical
problems, perhaps even the destruction of the unit’s motor/compressor, and will void the warranty.
7a7
98
10 11
- 7 -
Switch Axel
Insert Position
Remove Metal
Base Bracket
Remove
screw and
re-insert
into the
opposite
side
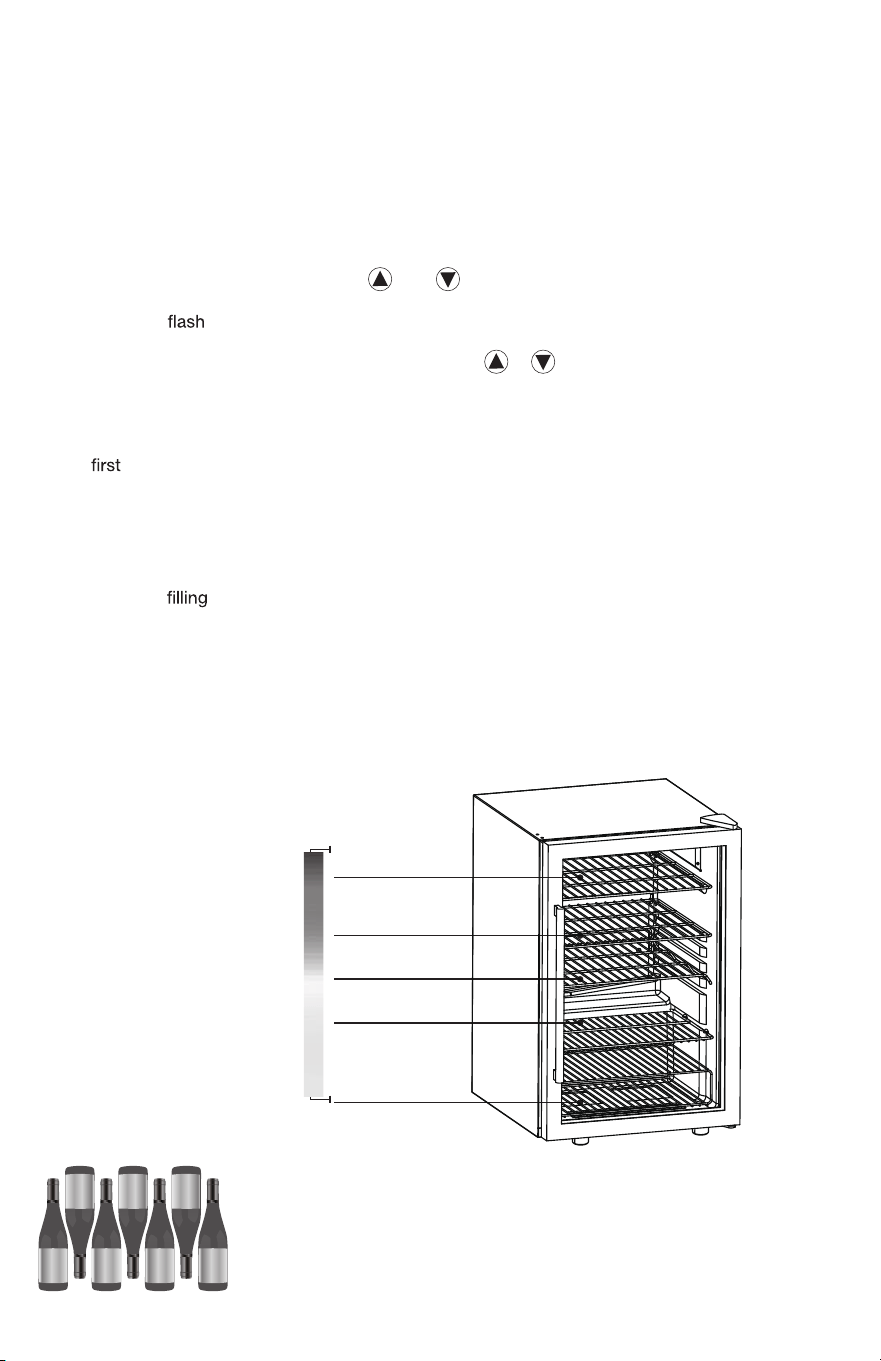
ROW 1
30 cans (Upright)
ROW 2
30 cans (Upright)
ROW 3
18 cans (Laying Down)
ROW 4
24 cans (Upright)
ROW 5
24 cans (Upright)
- 8 -
USING YOUR WINE AND BEVERAGE CENTER
Startup
Connect the power cord to a standard wall outlet. Do not use a GFCI outlet to connect the unit
(see page 4). After connection, you will immediately hear a short beep.
Temperature - Adjustable Thermostat Control
The default temperature is 43ºF. Use the and buttons to set the desired temperature
between the range of 39ºF - 56ºF.
The display will
while the temperature is being set. After a few seconds, it will revert to its
current internal temperature reading The digital display reading will adjust as the unit cools.
While the unit is adjusting to the new setting, press the or buttons to view the selected
temperature setting.
If there is a power outage, the unit will revert to the last temperature setting once power is restored.
Loading Beverages
When loading the wine and beverage center to full capacity, we recommend the following steps
to effectively cool a large number of beverages.
1. Use the Adjustable Thermostat Control to set the temperature to 43ºF (also the default
temperature).
2. Allow the wine and beverage center to cool for a minimum of two hours.
3. Load the beverages. To achieve maximum capacity, refer to the loading diagrams.
4. After initially
with beverages, the internal temperature will rise as indicated on the display.
5. Once the wine and beverage center has cooled the beverages to 43ºF, use the Adjustable
Thermostat Control to select a desired cooler internal temperature (lowest temperature setting is 32ºF).
6. Allow several hours for the wine and beverage center to cool to the desired lower temperature.
Note: It is normal for temperature variances to occur inside the unit, and areas near the door will
have slightly warmer temperatures.
INSTALLATION
Standard 12 Ounce Cans
The wine and beverage center
accommodates 126 beverages
(standard 12 ounce cans).
To accommodate all 126
beverages, position the glass
shelves and load the
beverages as shown:
Wine Bottles
The wine and beverage center
accommodates a range of wine
bottles, and the capacity varies
depending on the position of
the shelves and width of the
wine bottles.
Nest the wine bottles to gain
greater capacity:
LOADING DIAGRAM
Other Beverages
The glass shelves can be adjusted to accommodate varying sizes
of beverage cans and bottles depending upon storage needs.

INSTALLATION
- 9 -
Press the button to turn the LED light on and off.
To enhance the lifespan of the LED light and conserve energy, it is recommended to predominantly
utilize the light for loading and selecting beverages.
LED LIGHT
SHUTDOWN
If the wine and beverage center will not be in use for a long period of time, disconnect it from the
power outlet, clean inside thoroughly and leave the door open to prevent mildew.
SAFETY WARNING
The appliance is not intended for use by young children or infirm persons without supervision.
Young children should be supervised to ensure that they do not play with the appliance.
This wine and beverage center should not be positioned within a recessed or enclosed cabinet. It is
designed for freestanding installation only. This unit is not designed to be installed in a RV, garage
or any outside installation.
The surface of the compressor may become hot during normal operation. Do not touch as this may
cause injury.
OTHER DANGERS
Keep the wine and beverage center away from any combustible or volatile liquids or gases,
including gasoline, oil, alcohol, paint, paint thinners and solvents. Such chemicals should never be
stored in the unit.

CLEANING AND MAINTENANCE
- 10 -
It is important to periodically clean and maintain the wine and beverage center. When performing
maintenance, make certain the unit is unplugged from the power outlet.
Wipe the inner and outer surfaces of the wine and beverage center clean with a damp cloth. If
needed, use a gentle detergent or a solution of baking soda and water. Remove any residue with
clean water and a soft cloth, then dry with another cloth.
Once clean, you may use a common kitchen appliance wax on outer surfaces.
Inspect, clean and maintain the rubber gasket around the door. A small amount of petroleum jelly
applied to the bracket side of gaskets will keep the gasket pliable and ensure a good seal.
IMPORTANT:
- Do NOT use hot water, harsh detergents, gasoline, kerosene, solvents, acids or anything
flammable to clean the wine and beverage center. These can damage the paint and degrade
the plastic components.
- Do NOT spray the wine and beverage center with water as this may cause rust and degrade
the insulation.
- Do NOT clean glass shelves with hot water when they are cold. Shelves may break if
exposed to sudden temperature changes or impact. For your protection, tempered glass is
designed to shatter into many small pebble-size pieces.
- If any replacement components are required, they must be obtained from Tramontina’s
Customer Service Department. This ensures the correct replacement components are
provided, and minimizes risk of possible ignition due to incorrect parts or improper service.
DEFROSTING
Frost may develop on the interior back panel of the unit when the temperature setting is very low
and the unit is not fully stocked with beverages. The presence of frost may force the unit to run
continuously and thus increase internal temperature.
To defrost the wine and beverage center:
1. Use the and buttons to increase the temperature until the compressor turns off.
2. Allow the internal ice/frost buildup to melt. Ensure the internal drain (located at the middle back
of the lower shelf) is not clogged.
3. During this time, the melted frost flows through an internal drain into a holding pan on top of the
compressor. The heat of the compressor evaporates the liquid.
4. Reset the temperature to 43ºF and allow to cool for at least one hour.
5. Adjust to the desired temperature setting

- 11 -
LED LIGHT REPLACEMENT
TOOLS NEEDED: Phillips screwdriver and flashlight to
illuminate the work area.
If the LED light is not illuminating, the light most likely
needs to be replaced.
Replacement LED lights may be purchased from
Tramontina by calling Tramontina’s Customer Service
Department (800-221-7809).
NOTE: The replacement light is NOT available from home
improvement, hardware or discount stores.
LED Light
LED Light Diagram
Clear Plastic
Cover
Removing the Existing LED Light
Unplug the wine and beverage
center.
1) Using a Phillips screwdriver,
remove the two screws from the
clear plastic cover.
2) Tilt the panel towards the front
of the wine and beverage center
and unscrew the LED board
from the black plastic spacer.
3) Gently unclip the power cable
from the red socket insert on
the LED board.
Installing the Replacement
LED Light
• Insert the power cable into
the red socket insert on the
replacement LED board.
• Position within the black plastic
spacer.
• Reassemble the LED board,
spacer and cover together using
the two screws.
• Tuck the cable into the wire slot.
• Reposition the panel and
carefully enclose the cord within
the LED housing.
• Reattach the clear plastic panel
using two screws.
Power Cable
LED Board
Black Plastic
Spacer
Wire Slot
2
3
1
TROUBLESHOOTING
Problem Recommended Adjustment
Wine and beverage center doesn’t work. • Check for power failure.
• Verify unit is plugged into a standard power outlet and not a
GFCI outlet (see page 4).
• Check if control panel is on.
Wine and beverage center is too cold. • Adjust thermostat to higher number.
Wine and beverage center is not cooling
sufficiently.
• Adjust thermostat to lower number.
• Ensure door is closed properly.
• Ensure the door gasket provides a proper seal. If you can slide
a piece of paper between the gasket and unit body, the gasket
is not sealing properly.
• Unit may not have enough ventilation space around it.
• Check if the sides of the unit are warm. If not, please contact
Tramontina’s Customer Service Department.
• Do not put hot beverages in the wine and beverage center.
Wine and beverage center compressor runs
for long periods.
• Hot weather and/or frequent door opening will force the unit to
work harder to keep cool.
• Do not overload the wine and beverage center.
• Do not put hot beverages in the wine and beverage center.
Wine and beverage center door does not
close properly.
• Unit may be tilted – adjust front legs to level unit.
• Align the door using a 5/16” (8 mm) socket, adjusting the
screws under the triangular bracket cover. For assistance,
please contact Tramontina’s Customer Service Department.
Side panel of wine and beverage center
is hot.
• The unit exchange heats through the side walls, therefore does
not indicate malfunction.
• Usually happens when door is opened and closed frequently,
or when operated in high temperature weather. Results from
dissipation of heat from within the unit. Do not touch the panel.
Does not indicate a malfunction.
Condensation forms on the glass door • Condensation forms under conditions of high humidity; does
not indicate a failure. Wipe condensation with dry towel.
• Relocate unit to a cooler area or adjust thermostat to a higher
setting to balance out the exterior and interior temperatures.
Condensation will dissipate as time goes on.
Sound of trickling water. • This is the refrigerant flowing. Does not indicate a malfunction.
Buzzing sound. • A buzzing noise is typically generated by the compressor when
starting up or shutting down.
Odor. • Unit may require cleaning.
- 12 -

- 13 -
SAFETY WARNINGS
Before you use your wine and beverage center, please read this owner’s manual carefully. Use this
appliance only for its intended purpose as described in this owner’s manual.
DANGER - Risk of child entrapment. Before you throw away your old refrigerator or freezer:
• Take off the doors.
• Leave the shelves in place so that children may not easily climb inside.
• The appliance must be correctly installed and connected to the power supply in accordance with
the installation instructions before it is used.. (See: “HOW TO INSTALL”).
• The main power supply must be properly grounded.
• This wine and beverage center must be positioned so that the plug is accessible. Never unplug the
unit by pulling on the power cord. Always grasp the plug firmly and pull straight out from the outlet.
• Do not use an extension cord as this can negatively affect the performance of the unit.
• When transporting the wine and beverage center, keep the unit in the upright position. Do not tilt
the appliance beyond 45° or place the unit in upside down position. Do not tip over.
• Do not touch the cooled surfaces while the appliance operates, especially not with wet hands,
because the skin may stick to the cold surfaces.
• It is recommended that the wine and beverage center is positioned away from any combustible
sources, such as gas, petrol, alcohol, lacquer and banana oil, etc. The aforementioned objects
should not be stored in the wine and beverage center under any circumstances.
• If the unit fails to cool properly, dispose of spoiled food as needed.
• Unplug your unit before cleaning or making any repairs. NOTE: If for any reason this product
requires service, we strongly recommend that a certified technician perform the service. Repairs
made by non-qualified personnel will void the warranty.
• Do not defrost the appliance with other electrical devices (hair dryer, etc.), and never scrape the
ice or frost layer with sharp tools. Warning: Do not damage the refrigerant circuit.
• The rating plate is inside the appliance or outside on the rear or side wall.
• This appliance is not intended for use by persons (including children) with reduced physical,
sensory or mental capabilities, or lack of experience and knowledge, unless they have been
given supervision or instruction concerning use of the appliance by a person responsible for their
safety. Children should be supervised to ensure that they do not play with the appliance.
• Do not run cord over carpeting or other heat insulators. Do not cover the cord. Keep cord away
from traffic areas, and do not submerge in water. If the supply cord is damaged, it must be
replaced by the manufacturer or its service agent or a similarly qualified person in order to avoid
a hazard. Repair or replace immediately all electric cords that have become frayed or otherwise
damaged. Do not use a cord that shows cracks or abrasion along its length, the plug or the
connector end.
• Do not operate your wine and beverage center in the presence of explosive fumes.
• WARNING – Do not use flammable materials on or near the unit. This can result in fire and cause
irreparable harm or damage to the unit.
• DANGER – Risk of Fire or Explosion. Flammable Refrigerant Used. To Be Repaired Only By
Trained Service Personnel. Do Not Puncture Refrigerant Tubing.
• CAUTION – Risk of Fire or Explosion. Dispose of Property In Accordance With Federal or Local
Regulations. Flammable Refrigerant Used.
• CAUTION – Risk of Fire or Explosion. Flammable Refrigerant Used. Consult Repair Manual/
Owner’s Guide Before Attempting to Service this Product. All Safety Precautions Must be
Followed.
• CAUTION – Risk of Fire or Explosion Due to Puncture of Refrigerant Tubing; Follow Handling
Instructions Carefully. Flammable Refrigerant Used.

- 14 -
SAFETY WARNINGS
REMOVE WINE & BEVERAGE CENTER DOOR BEFORE DISPOSING OF UNIT.
SUFFOCATION HAZARD:
The shelves should remain in the wine and beverage center for disposal. This deters children
from climbing into the unit, becoming trapped and potentially suffocating.
All safety precautions must be followed.
IMPORTANT
Do not return this product to the store.
Simply call our customer service department for any questions or concerns:
213-4467172
(8:30am - 5:30pm P.S.T.)
(8:30am - 5:30pm P.S.T.)
(8:30am - 5:30pm P.S.T.)
DATED PROOF OF PURCHASE REQUIRED FOR WARRANTY SERVICE.
AVIS
Ne pas retourner ce produit au magasin.
Veuillez appeler le service à la clientèle pour toutes questions au:
213-4467172
PREUVE D’ACHAT ORIGINALE REQUISE POUR SERVICE DE GARANTIE.
IMPORTANTE
No devuelva este producto a la tienda.
Sólo hay que llamar nuestro departamento de servicio
al cliente en caso de tener preguntas o inquietudes:
213-4467172
SE REQUIERE PRUEBA DE COMPRA CON FECHA PARA SERVICIO BAJO GARANTÍA.
Add:9733 Topanga Canyon Blvd. APT310, Chatsworth, CA 91311
Phone: 213-4467172
Thank you for purchasing this product! If you have questions about assembly or operation of this
product, are missing parts, or if the product is damaged, please contact us via
Amazon Message or call
customer serve Phone:
213-4467172.