
User manual
SCF883, SCF885

Table of contents
Important ��������������������������������������������������������������������������������������������������������������������������� 3
Safety systems ����������������������������������������������������������������������������������������������������������������������� 8
Electromagnetic elds (EMF) �������������������������������������������������������������������������������������������� 8
Introduction ����������������������������������������������������������������������������������������������������������������������� 8
General description ���������������������������������������������������������������������������������������������������������� 9
Before rst use ����������������������������������������������������������������������������������������������������������������10
Using the appliance ������������������������������������������������������������������������������������������������������� 11
Filling the water tank ��������������������������������������������������������������������������������������������������������12
Steaming ������������������������������������������������������������������������������������������������������������������������������13
Blending after steaming ���������������������������������������������������������������������������������������������������16
Blending without steaming���������������������������������������������������������������������������������������������18
Reheating ����������������������������������������������������������������������������������������������������������������������������� 21
Defrosting ����������������������������������������������������������������������������������������������������������������������������24
Ingredients and steaming time ����������������������������������������������������������������������������������� 26
Cleaning and descaling ������������������������������������������������������������������������������������������������� 27
Cleaning ��������������������������������������������������������������������������������������������������������������������������������27
Descaling the water tank �������������������������������������������������������������������������������������������������29
Storage ������������������������������������������������������������������������������������������������������������������������������ 30
Recycling ��������������������������������������������������������������������������������������������������������������������������� 30
Support ����������������������������������������������������������������������������������������������������������������������������� 30
Troubleshooting ������������������������������������������������������������������������������������������������������������� 31
Technical specications ������������������������������������������������������������������������������������������������� 35

- 3 -
Important
Read this user manual carefully before you use the appliance and save it for future
reference�
Danger
- Never immerse the main unit in water or any other liquid. Do
not rinse it under the tap.
Warning
- Check that the voltage indicated on the appliance corresponds
to the local mains voltage before you connect the appliance.
- Do not use the appliance if the plug, the power cord or the
appliance itself is damaged. If the power cord is damaged, you
must have it replaced by Philips; a service center authorised by
Philips or similarly qualied persons in order to avoid a hazard.
- This appliance can be used by persons with reduced physical,
sensory or mental capabilities or lack of experience and
knowledge if they have been given supervision or instruction
concerning use of the appliance in a safe way and if they
understand the hazards involved.
- Children shall not play with the appliance (including the
accessories).
- This appliance shall not be used by children. Keep the
appliance and its cord out of reach of children (including the
accessories).
- Cleaning and user maintenance shall not be made by children.
- Do not touch the blades, especially when the appliance is
plugged in. The blades are very sharp.
- Take care in handling the sharp blades when emptying the jar
and during cleaning.
- If the blades become stuck, unplug the appliance before you
remove the ingredients blocking the blades.

- 4 -
- The appliance gets hot during or shortly after steaming
(especially surfaces with this symbol “ ”) and may cause burns
when touched. Only lift the jar by its handle.
- Hot steam comes out of the jar during steaming and when its
lid is removed.
- Beware of hot steam that comes out of the water tank when
you open its lid.
- When the steaming cycle is nished, hot steam will continue
to come out of the steam outlet on the water tank lid and the
steam hole in the jar for some time. Be careful when you lift
the jar o the main unit.
- If the appliance is used improperly, hot steam could
escape from the edge of the water tank lid. Refer to the
“Troubleshooting” chapter for preventing or resolving this.
- Take extra caution when pouring hot liquid into the jar as the
liquid may splash.
- Always put previously blended food in the storage pot if you
want to reheat or defrost food with this appliance.
- Do not use this appliance to chop hard and sticky ingredients.
- Never use bleach or chemical sterilizing solutions/tablets in
the appliance.
- Never use scouring pads, abrasive cleaners or aggressive liquids
such as gasoline, acetone or alcohol to clean the appliance.
- Always let the appliance cool down for 10minutes after one
steaming cycle before you start steaming again.
- Do not let the appliance blend for more than 30 seconds at
a time. If you have not nished blending after 30 seconds,
release the button to stop blending and wait a few seconds
before you continue. If the main unit becomes hot, let it cool
down for a few minutes before you continue.
- Never put water or any other liquid in the jar for steaming to
avoid damaging the appliance.
- Always remove the storage pot lid before using the pot to
heat up food in a microwave.

- 5 -
Caution
- Never use any accessories or parts from other manufacturers
or that Philips does not specically recommend. If you use
such accessories or parts, your guarantee becomes invalid.
- Do not place the appliance on or near an operating or still hot
stove or cooker.
- Always switch o the appliance and disconnect from
supply when it is left unattended and before assembling,
disassembling, changing accessories, cleaning or approaching
parts that move in use.
- Always unplug the appliance and let it cool down before you
clean it�
- Always turn the control knob to the o position (OFF) every
time after steaming, reheating, or defrosting.
- Never use the jar or any other part of the appliance (except
the storage pots) in a microwave, as the metal parts of the jar
handle and blade unit are not suitable for this use.
- Never sterilize the jar or any other part of the appliance
(except the storage pots) in a sterilizer or in a microwave,
as the metal parts of the jar handle and blade unit are not
suitable for this use.
- This appliance is intended for household use only. If the
appliance is used improperly or for professional or semi-
professional purposes or if it is not used according to the
instructions in the user manual, the guarantee becomes
invalid and Philips refuses any liability for damage caused.
- Place the appliance on a stable, horizontal, and level surface.
The appliance emits hot steam during use. Make sure there is
enough free space around it to prevent damage to cabinets or
other objects.
- Do not use the appliance if it has fallen or is damaged in any
way. Take it to an authorized Philips service center for repair.
- Never use the steam function without water in the water tank.

- 6 -
- Always disconnect the device from supply if it’s left
unattended.
- Make sure that the water in the tank does not exceed the
MAX water level marking on the side of the water tank
(250ml) or the MAX water level indication in the water tank.
- Make sure the water tank lid is correctly locked before putting
the jar on the main unit.
- When you steam ingredients, make sure that you
do not ll the jar beyond the top of the plastic
part of blade unit.
- When you blend liquids, do not exceed the MAX
ll level indicated on the jar (720 ml).
- Do not lift and move the appliance while it is in
operation.
- Do not insert any object into the steam outlet on the water
tank lid or the steam inlet on the jar lid.
- Never rell the water tank during steaming, as hot water and
steam may come out of the appliance.
- Always make sure that the jar lid has cooled down after
steaming before you open it to add more ingredients for
blending.
- Never run this appliance’s power supply through an external
switching device, such as a timer, or connect it to a circuit that
is regularly switched on and o.
- Always check the temperature of the cooked food on the back
of your hand to make sure it is safe for your baby.
- Always check the consistency of the food for your baby. For
guidance on what food consistencies are appropriate for
dierent ages, refer to the professional weaning advice that
comes with this appliance, or seek advice from a doctor or
consultant.
- Only use the provided spatula for taking food out of the jar.
- Regular descaling prevents damage to the appliance.
MAX.
MAX.

- 7 -
- The storage pot provided with this appliance is not a children
feeding utensil. Do not feed children directly from the storage
pot.
- Before using the storage pot, clean it thoroughly, and then
sterilize it with a Philips Avent sterilizer or place the storage
pot in boiling water for 5 minutes. This is to ensure hygiene.
Make sure that there is enough water in the container when
using boiling water to sterilize the storage pot, and that the
pot does not contact the container for too long, to avoid heat
deformation.
- Make sure that the amount of food in the storage pot does
not exceed the maximum scale marked on the side of the pot,
otherwise the pot may leak.
- When reheating or defrosting food, make sure that the storage
pot lid is closed tightly before putting the storage pot in the jar,
otherwise the pot may leak when you take it out of the jar.
- Heating food with the provided storage pot in a microwave
may produce localized high temperatures in the food and may
aect its nutritional value. Always stir heated food to ensure
even heat distribution and test the temperature before serving.
- Do not select the grill function if you use a combination
microwave (with grill function) to reheat or defrost food with
the storage pots. If you have just nished a grilling process,
wait until the microwave has cooled down before putting the
storage pots in it, as the residual heat can cause damage to
the storage pots.

- 8 -
Safety systems
For your safety during use, this appliance is equipped with a built-in safety lock. This
appliance will only function if all parts have been assembled correctly. Assembling all parts
correctly will disarm the built-in safety lock.
This appliance is also equipped with an overheat safety stop function. Overheating can
occur if the time between two steaming cycles is too short. If the appliance’s overheat
safety stop activates during a steaming cycle, turn the control knob back to the o position
(OFF) and let the appliance cool down for a few minutes. After this, you can use the
appliance again.
Electromagnetic elds (EMF)
This Philips appliance complies with all applicable standards and regulations regarding
exposure to electromagnetic elds.
Introduction
Congratulations on your purchase and welcome to Philips Avent! To fully benet from the
support that Philips Avent oers, register your product at www.philips.com/welcome�
This 4-in-1 healthy baby food maker helps all parents in preparing nutritious meals for their
babies with steaming and blending functions combined in one appliance. You can also use
the baby food maker to defrost and warm up baby food.
- 9 -
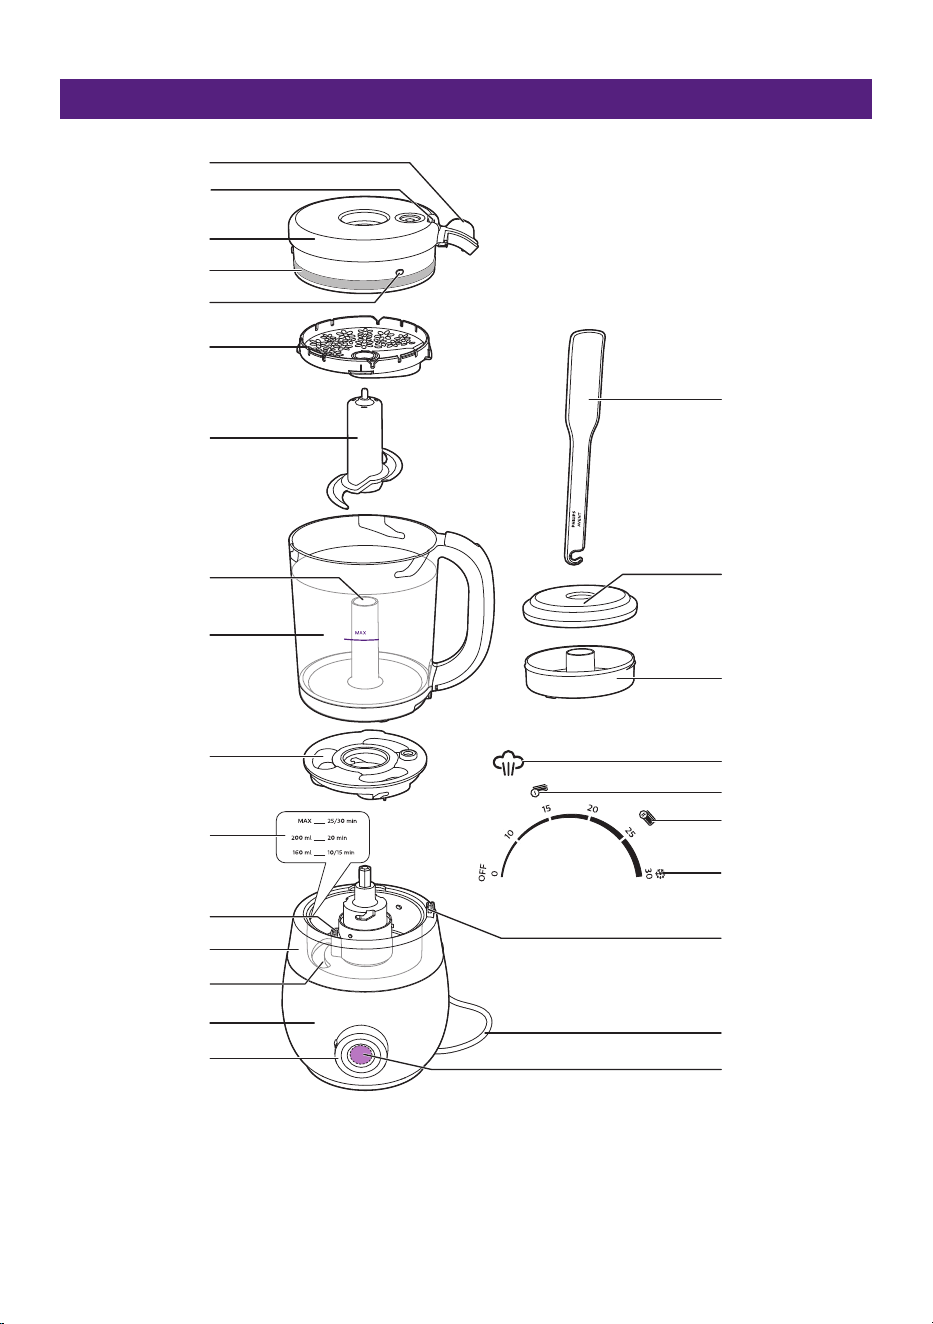
General description
C
B
A
E
D
F
G
H
I
J
M
N
O
P
Q
R
S
X
Y
Z
T
V
W
U
K
L
- 10 -
Product overview
A Lid tab K Water level markings
B Connector on the jar lid L MAX water level indication
C Jar lid M Water tank (not detachable)
D Sealing ring N Boiler
E Locking pin O Main unit
F Sieve P Control knob
G Blade unit Q Blending button
H Blade unit holder R Power cord
I Jar S Locking area on the water tank
J Water tank lid
Controls overview
T Defrost setting V
Reheat setting for the 120 ml storage
pot
U
Reheat setting for the 240 ml
storage pot
W Steaming light
Accessories
X Storage pot Z Spatula
Y Storage pot lid
Before rst use
1 Remove all packaging material from the appliance�
2 Clean all parts thoroughly before rst use. Refer to the chapter “Cleaning and
descaling”�
3 We recommend running one steaming cycle with an empty jar before using
the appliance for the rst time. Refer to chapters “Filling the water tank” and
“Steaming”.

- 11 -
Using the appliance
Caution
• Always check the temperature of the cooked food on the back of your hand to make
sure it is safe for your baby.
This appliance is intended for steaming fresh, solid ingredients and blending them to the
consistency of your choice. Please refer to the enclosed recipe booklet for some tasty and
nutritious recipe ideas. The appliance can also be used for just steaming or blending only.
For blending only, refer to the chapter “Blending without steaming”.
This appliance can also be used to defrost or reheat cooked food that has been stored in
the specially designed storage pots. Always use these storage pots to defrost or reheat
blended foods. Defrosting or reheating without the storage pots will cause the food to
drop through the sieve into the jar lid.
Never put the jar with blended food inside in the steaming position on the main unit.
Never steam the same batch of raw ingredients for longer than 30 minutes or more than
once�
This appliance is NOT intended for the following purposes�
- Steaming frozen raw ingredients
- Steaming previously blended food without the storage pot
- Steaming the same ingredients for more than 30 minutes
- Cooking rice and pasta
- Blending rst, then steaming
- Heating or reheating liquids such as soup, sauces or water
- Keeping food warm for several hours
- Cutting hard ingredients such as ice cubes and sugar cubes, or sticky ingredients like
cheese
- 12 -
Filling the water tank
Note
• Make sure that the water in the tank does not exceed the MAX water level marking
on the side of the water tank (250 ml) or the MAX water level indication in the water
tank.
• We recommend using soft or puried water, as the minerals in mineral or tap water
cause limescale buildup to occur more quickly inside the water tank.
• Except for materials needed for descaling, never put any liquids other than water in
the water tank.
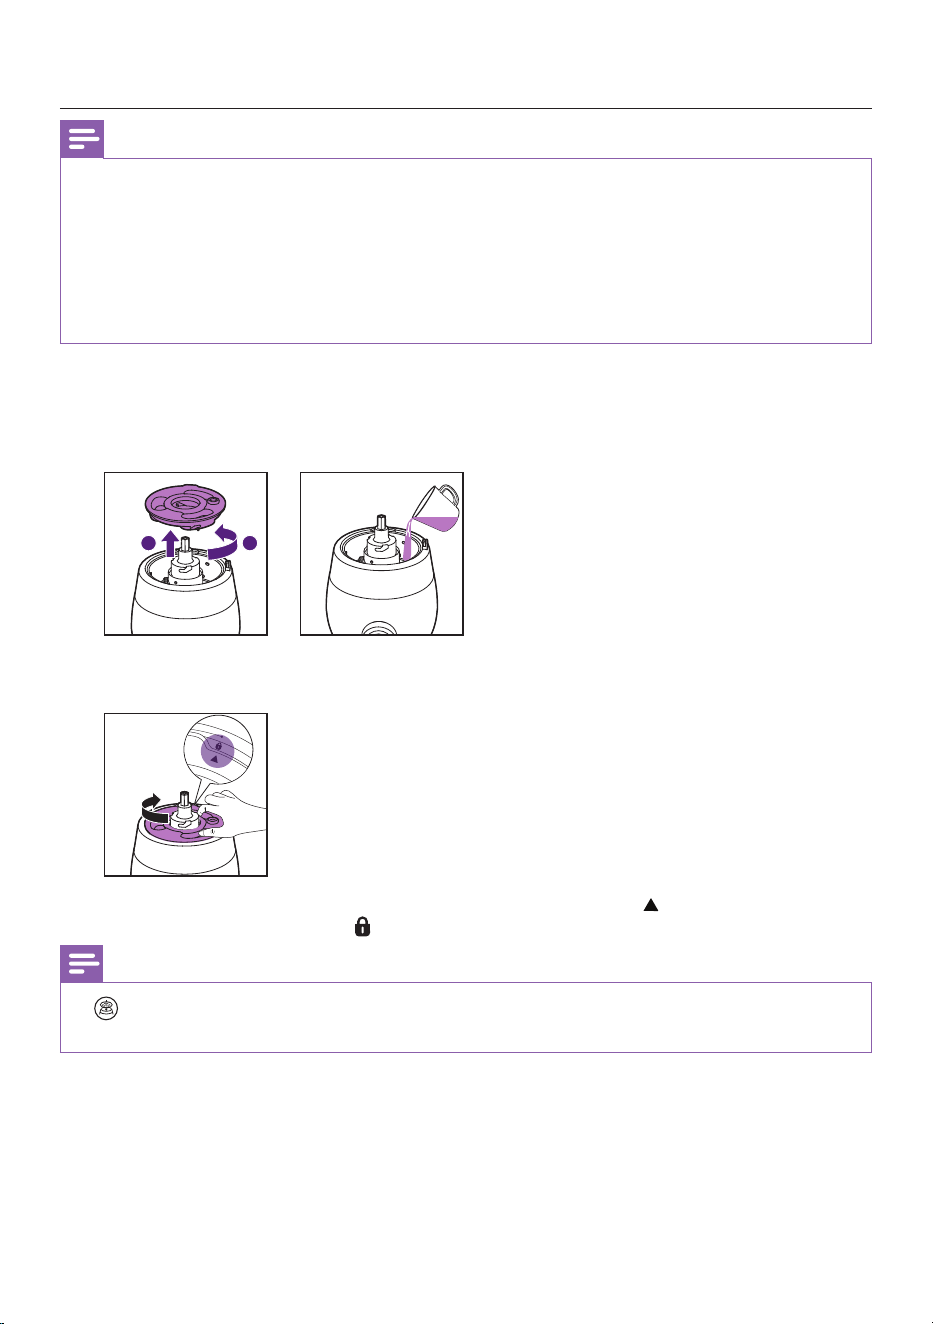
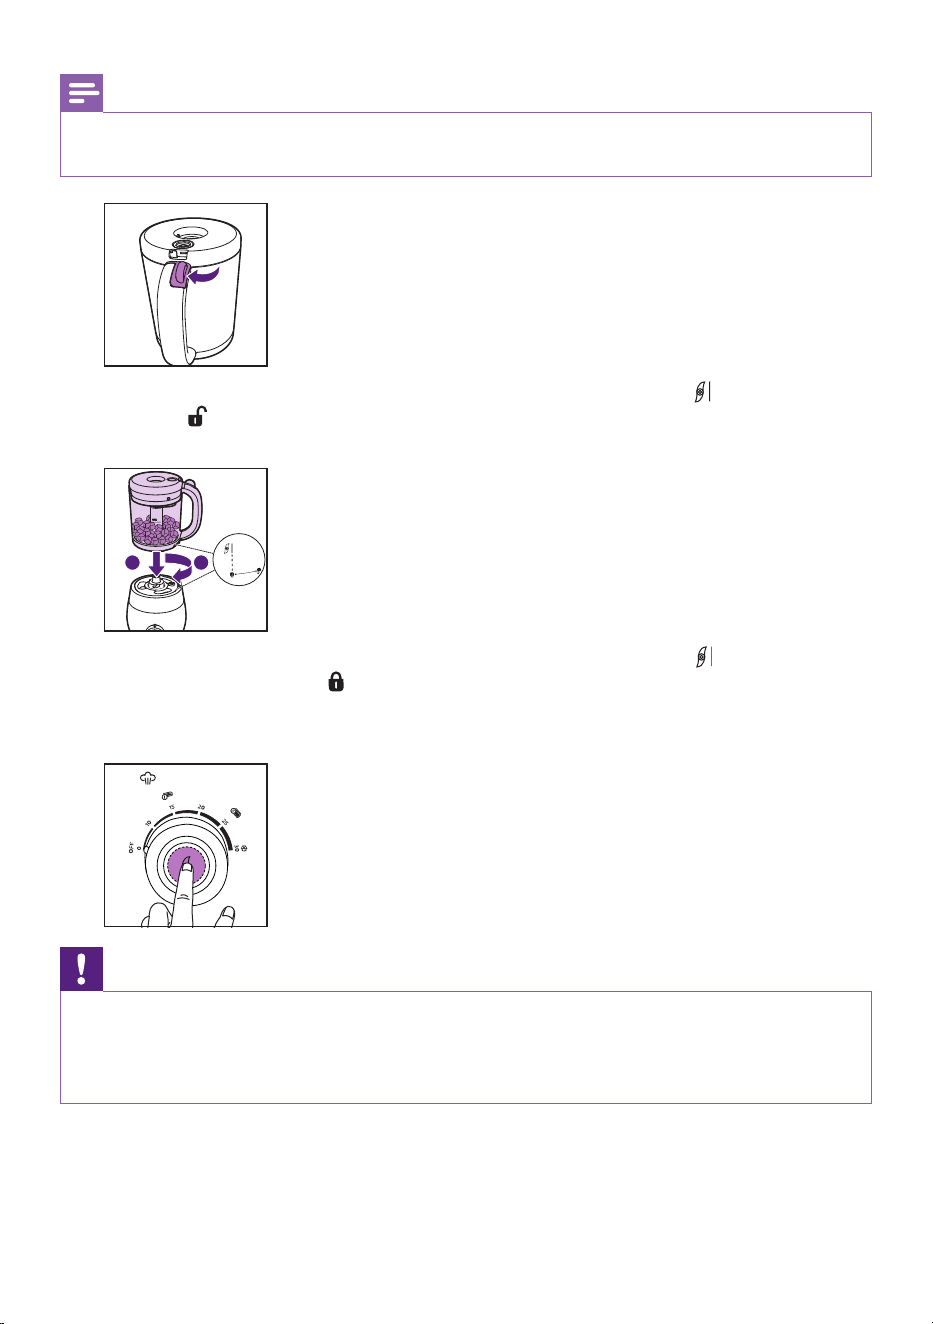
1 Turn the water tank lid counterclockwise to open the water tank, then follow the
water level markings on the water tank and ll with water to the required level
according to the chapter “Ingredients and steaming time” in the user manual or
the enclosed recipe booklet�
1
2
2 Put the water tank lid on the water tank and turn the lid clockwise to lock it
securely in place�
» When the water tank lid is correctly locked in place, the icon on the water tank
lid will line up with the icon on the water tank.
Note
•
Always make sure that you have locked the water tank lid before the appliance
starts operating.
- 13 -
Steaming
Caution
• Hot steam or hot water can burn your ngers. Do not touch, and never let children
touch any hot parts of the appliance or the steam coming from the top of the
appliance, as this may cause scalding.
Note
• Always defrost frozen raw ingredients before placing them in the jar for steaming.
Shake o any excess water from the defrosted ingredients before placing them in the
jar.
• Do not ll past the top edge of the plastic part of blade unit when adding ingredients.
• Never put water or any other liquid in the jar for steaming to avoid damaging the
appliance.
• The appliance will not start steaming if the jar is not correctly locked in place.
• Make sure that the sealing ring is assembled around the jar lid before steaming, and
that the at side of the sealing ring is facing out.
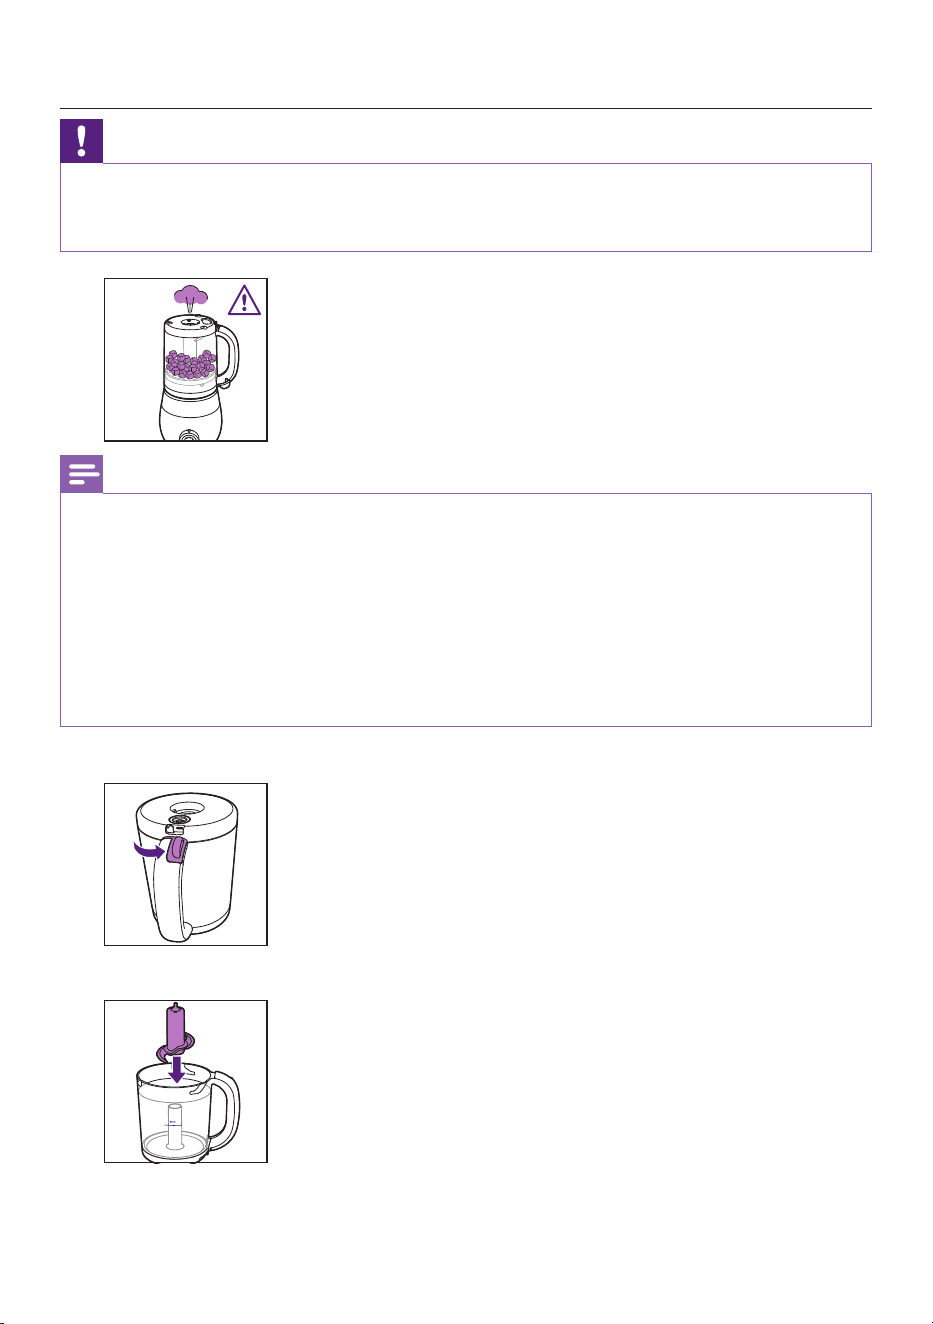
1 Push the lid tab counterclockwise to release the lid from the jar�
2 If the blade unit is not in the jar, put it on the blade unit holder in the jar�
- 14 -
3 We recommend cutting solid ingredients into small pieces (cubes not bigger than
1 cm)�
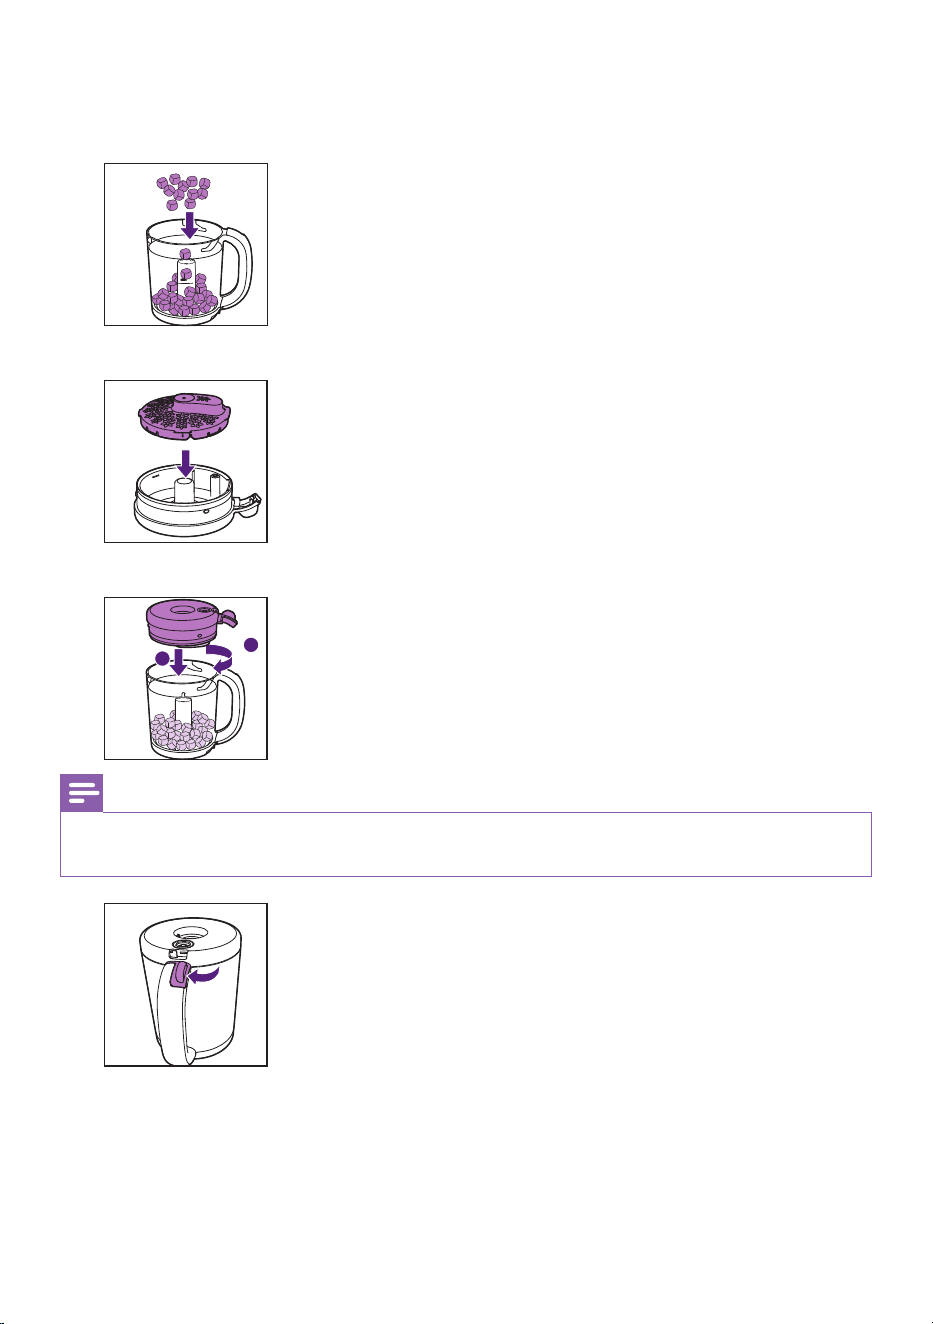
4 Put the ingredients in the jar�
5 Press the sieve into the jar lid�
6 Place the jar lid on the jar and turn it clockwise to close it securely�
1
2
Note
• The jar has grooves that help smoothly guide the locking pins and lock the lid in place.
Make sure that the lid tab slides into the handle of the jar.
- 15 -
7 If you have not yet lled the water tank with water for steaming, refer to the
chapter “Filling the water tank” and add water to the water tank before putting
the jar on the main unit�
Note
• Make sure the water tank lid is correctly locked in place before placing the jar on the
main unit.
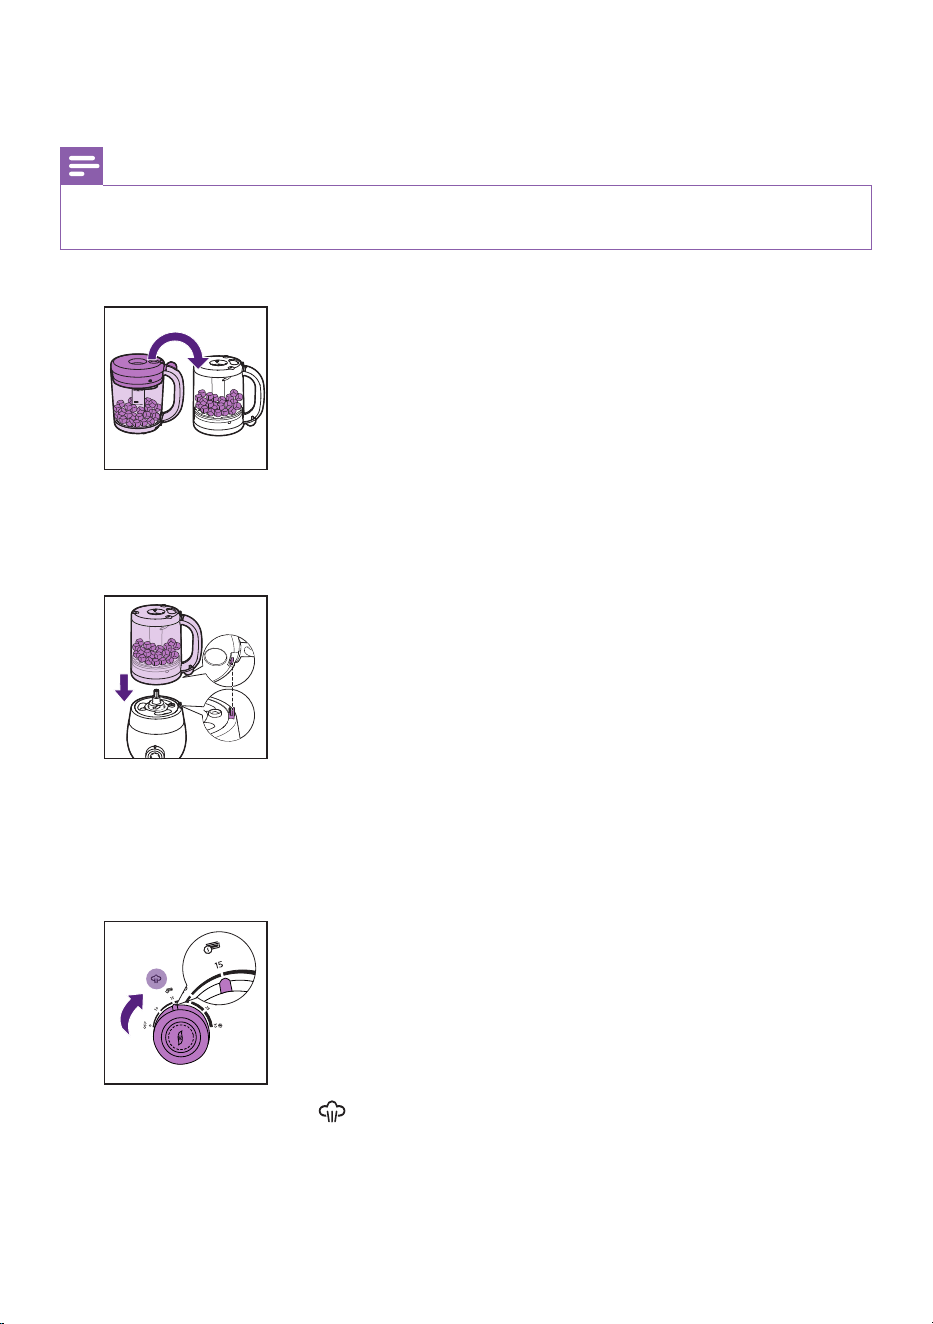
8 Flip the jar over with the jar lid on the bottom�
9 Align the connector on the jar lid to the locking area on the water tank, and
then place the jar on the main unit with the jar lid on the bottom� Press the jar
downwards to lock it rmly on the main unit, and make sure the handle is on the
right-hand side�
10 If the control knob is not in the o position (OFF), turn it to the o position rst.
11 Plug in the appliance�
12 Turn the control knob to select the steaming time you need� Refer to the table
in the chapter “Ingredients and steaming time” and the recipe booklet for the
recommended steaming time�
» The steaming light will turn white to indicate that the appliance is steaming.
» When the steaming cycle is nished, the appliance will beep and the steaming
light will go out.
- 16 -
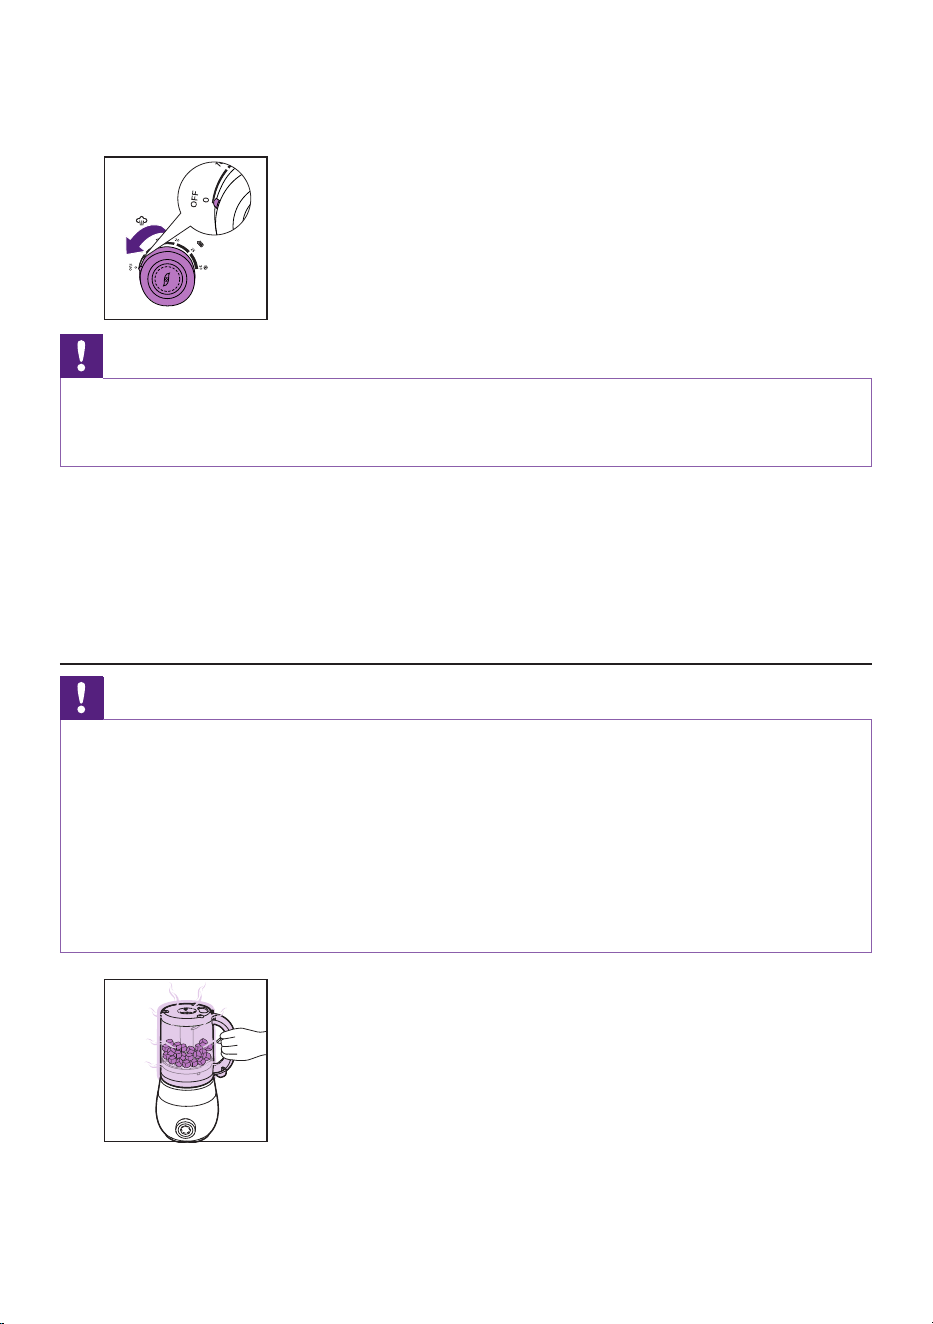
13 Turn the control knob back to the o position (OFF)� Wait 2 minutes, or until
there is no more steam coming from the top of the appliance before removing
the jar�
Caution
• If you intend to start another steaming cycle, let the appliance cool down for
10minutes, and empty any remaining water out of the water tank before you rell
and start a new steaming cycle.
14 To blend the steamed ingredients, refer to chapter “Blending after steaming”.
15 There may still be some water remaining in the water tank after a steaming cycle�
This is normal� Wait until the appliance cools down to room temperature, then
empty the water tank of all residual water� To empty or clean the water tank,
refer to the chapter “Cleaning and descaling”.
Blending after steaming
Caution
• The jar and the lid will become hot after the steaming cycle. Only hold the jar by the
specially designed heat-resistant handle.
• Always make sure that the lid of the jar is correctly closed and locked in place while the
appliance is in use.
• Always make sure that the jar lid has cooled down after steaming before you open
it to add more ingredients (do not ll the jar past the top edge of the plastic part of
blade unit), or to remove the remaining water from the jar.
• If you have added additional liquids, never put the jar in the steam position, as the
liquid will go through the sieve.
- 17 -
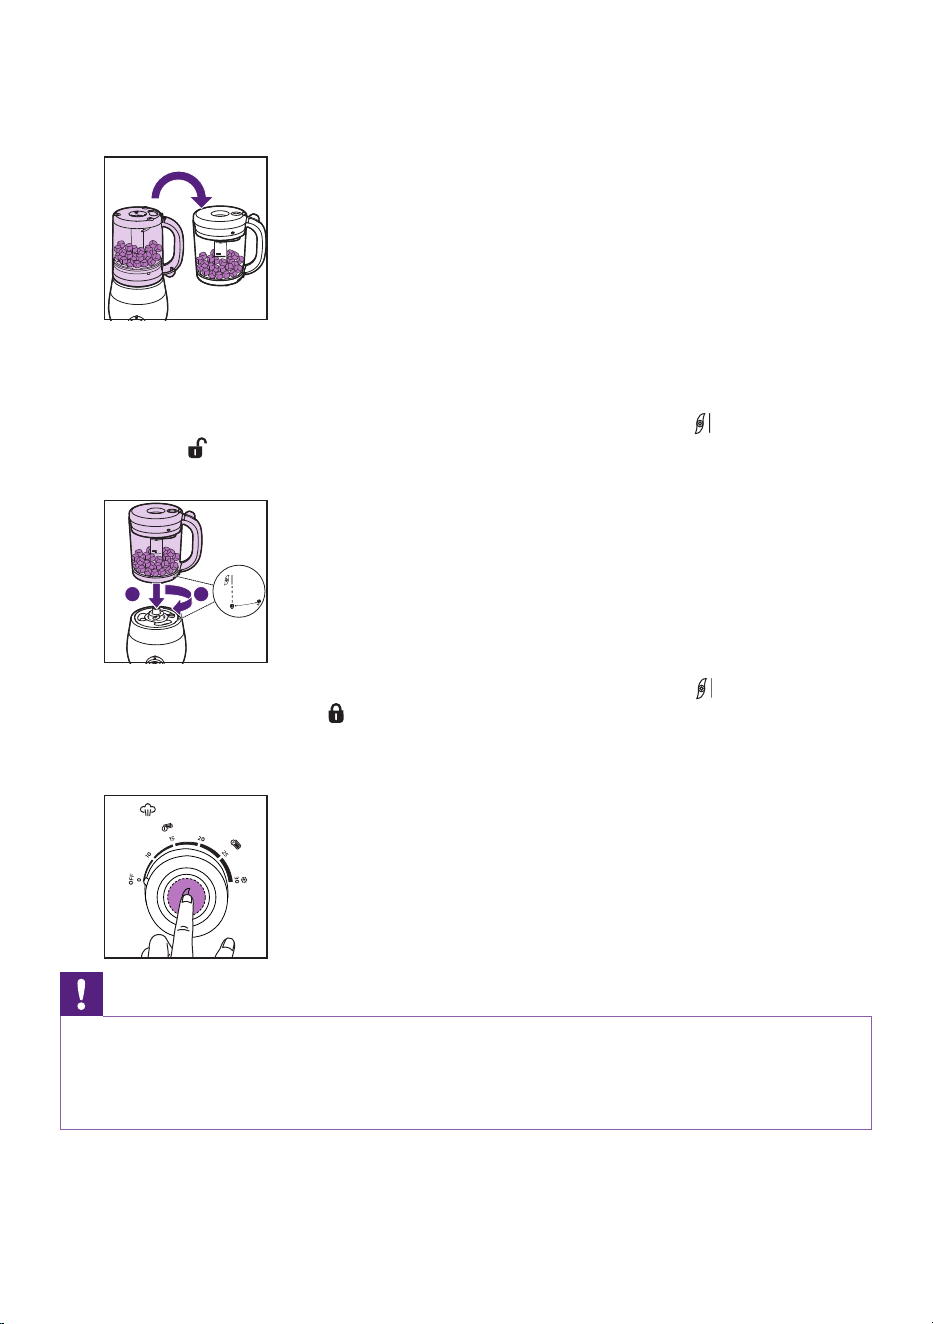
1 From the steaming position, lift the jar by the handle and turn it upside down�
Shake the jar to allow the steamed ingredients to move to the bottom of the jar
where the blending blades are�
2 If needed, remove the jar lid and add additional ingredients for blending
(e.g.water for purees or additional cooked ingredients like rice or pasta). Place
the jar lid back on the jar before you start blending�
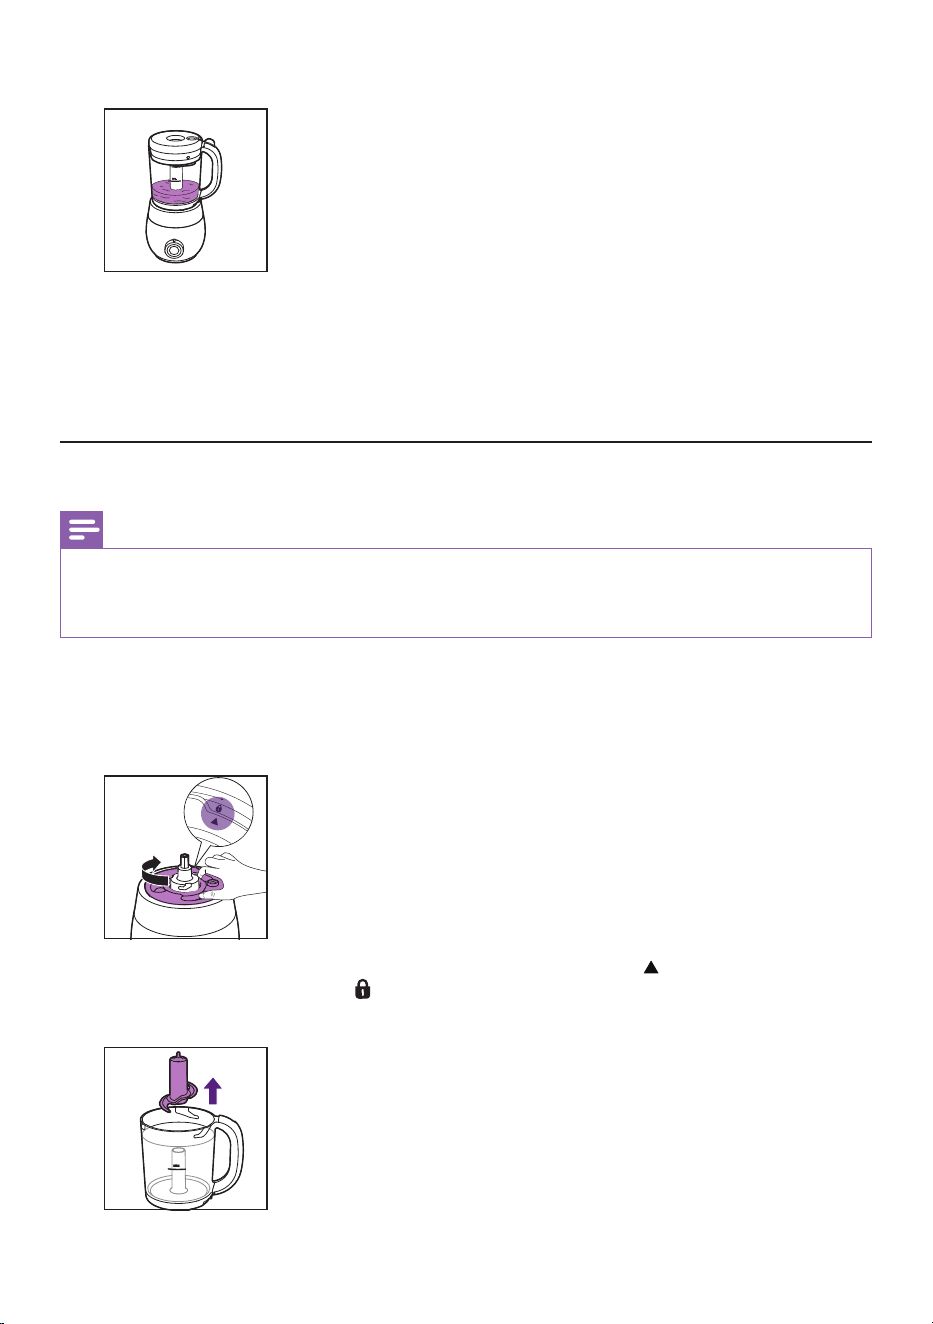
3 Place the jar on the main unit with the lid on the top, align the icon on the jar
with the icon on the main unit, and turn the jar clockwise to securely lock it in
place on the main unit� Make sure the handle is on the right-hand side�
2
1
» When the jar is correctly locked in place on the main unit, the icon on the jar
will line up with the icon on the main unit.
4 Push and hold the blending button to start blending until the ingredients are
blended to the consistency of your choice�
Caution
• Do not let the appliance blend for more than 30 seconds at a time. If you have not nished
blending after 30 seconds, release the button to stop blending and wait a few seconds
before you continue. If the main unit becomes hot, let it cool down for a few minutes
before you continue.
- 18 -
5 When you have nished blending, release the blending button.
6 Unplug the appliance�
7 Remove the blade unit� Be careful when you remove the blade unit as it might be
hot� Remove the blended food from the jar� If necessary, use the spatula included
with this appliance�
Blending without steaming
This appliance is intended for the following purposes�
- Pureeing steamed and cooked ingredients
- Blending uids and fruits
Caution
• The appliance is not intended for cutting hard ingredients such as ice cubes and sugar
cubes or sticky ingredients like cheese.
• If you have added liquids to the jar, never put the jar in the steam position, as the
liquid will go through the sieve.
Note
• When blending ingredients with uids, make sure you do not ll the jar past the MAX
ll level indicated on the jar.
• Do not ll past the top edge of the plastic part of blade unit when adding ingredients.
• Never put the jar with blended food inside in the steaming position on the main unit.
• If the ingredients stick to the wall of the jar, or if the blended ingredients are still too
solid, release the blending button, remove the jar from the main unit, and loosen the
ingredients with the spatula or add some liquid (e.g. drinking water) until the blended
food has the right consistency for your baby’s age. When adding liquid in the jar, do not
ll the jar past the MAX ll level indicated on the jar.
• Make sure that the blended baby food has the right consistency before you serve it.
For guidance on what food consistencies are appropriate for dierent ages, refer to
the professional weaning advice that comes with this appliance, or seek advice from a
doctor or consultant.
• Do not process large quantities of solid ingredients at the same time. Process these
ingredients in a series of small batches to get a ner texture.
- 19 -
1 Put the blade unit on the blade unit holder in the jar�
2 Cut solid ingredients into small pieces (cubes not bigger than 1 cm) before you
put them in the jar�
3 Put the ingredients in the jar�
4 Press the sieve into the jar lid�
5 Place the lid on the jar and turn it clockwise to close it securely�
1
2
- 20 -
Note
• The jar has grooves that help smoothly guide the locking pins and lock the lid in place.
Make sure that the lid tab slides into the handle of the jar.
6 Place the jar on the main unit with the lid on the top, align the icon on the jar
with the icon on the main unit, and turn the jar clockwise to securely lock it in
place on the main unit� Make sure the handle is on the right-hand side�
2
1
» When the jar is correctly locked in place on the main unit, the icon on the jar
will line up with the
icon on the main unit.
7 Push and hold the blending button to start blending until the food is properly
blended�
Caution
• Do not let the appliance blend for more than 30 seconds at a time. If you have not
nished blending after 30 seconds, release the button to stop blending and wait a
few seconds before you continue. If the main unit becomes hot, let it cool down for a
few minutes before you continue.
- 21 -
8 When you have nished blending, release the blending button.
9 Unplug the appliance�
10 Remove the blade unit� Be careful when you remove the blade unit as it might be
hot� Remove the blended food from the jar� If necessary, use the spatula included
with this appliance�
Reheating
A 120 ml storage pot is included with the appliance. Use the storage pot to reheat the baby
food you have made with the appliance.
Note
• Always put previously blended food in the storage pot to reheat.
• Make sure that the sealing ring is assembled around the jar lid before reheating, and
that the at side of the sealing ring is facing out.
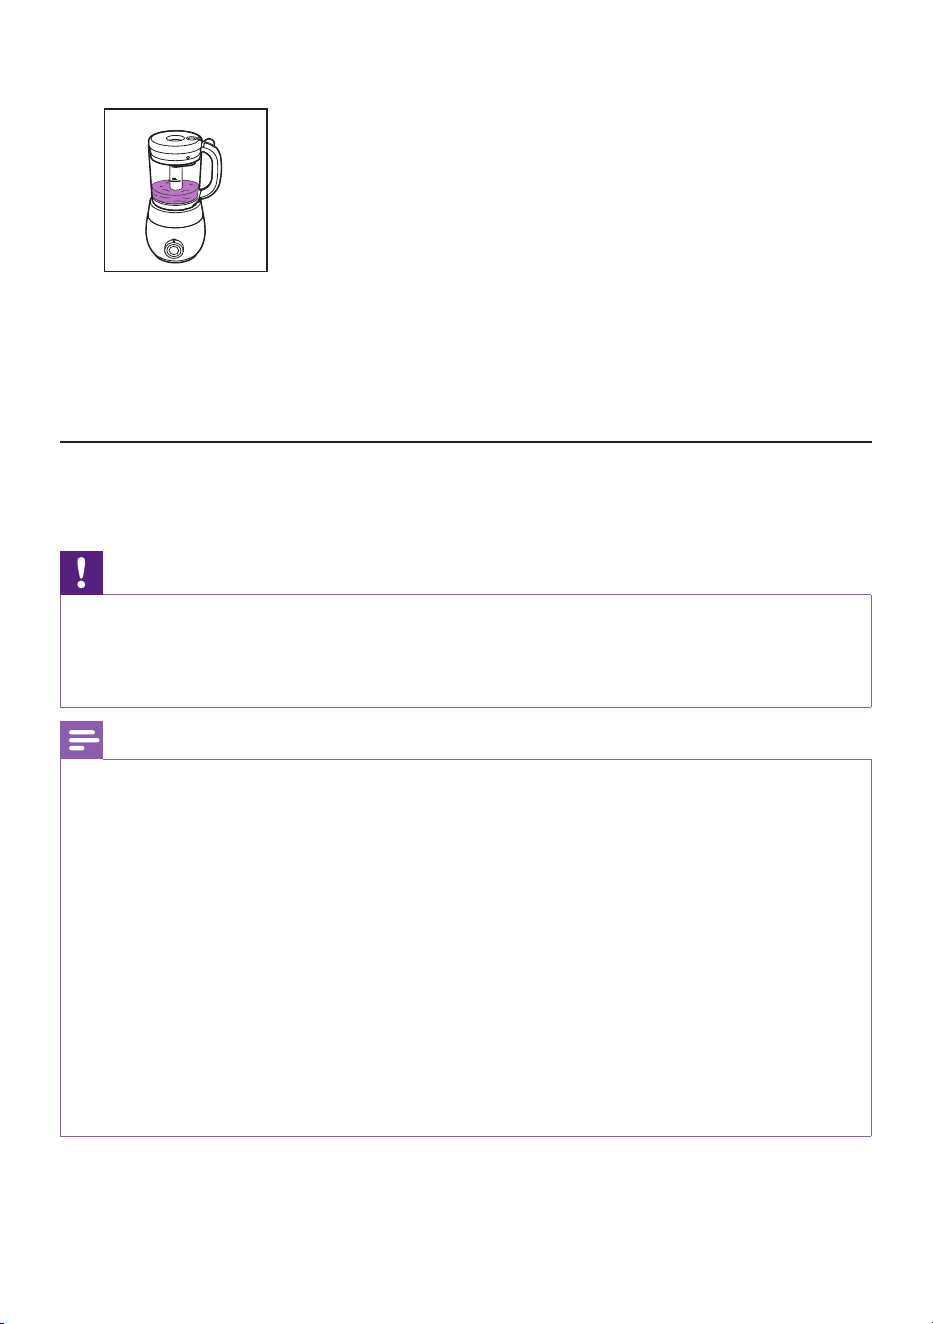
1 Pour 160 ml of water into the water tank (i�e� to the water level marking for
10/15 min�)�
2 Put the water tank lid on the water tank and turn the lid clockwise to lock it
securely in place�
» When the water tank lid is locked correctly in place, the icon on the water tank
lid will line up with the
icon on the water tank.
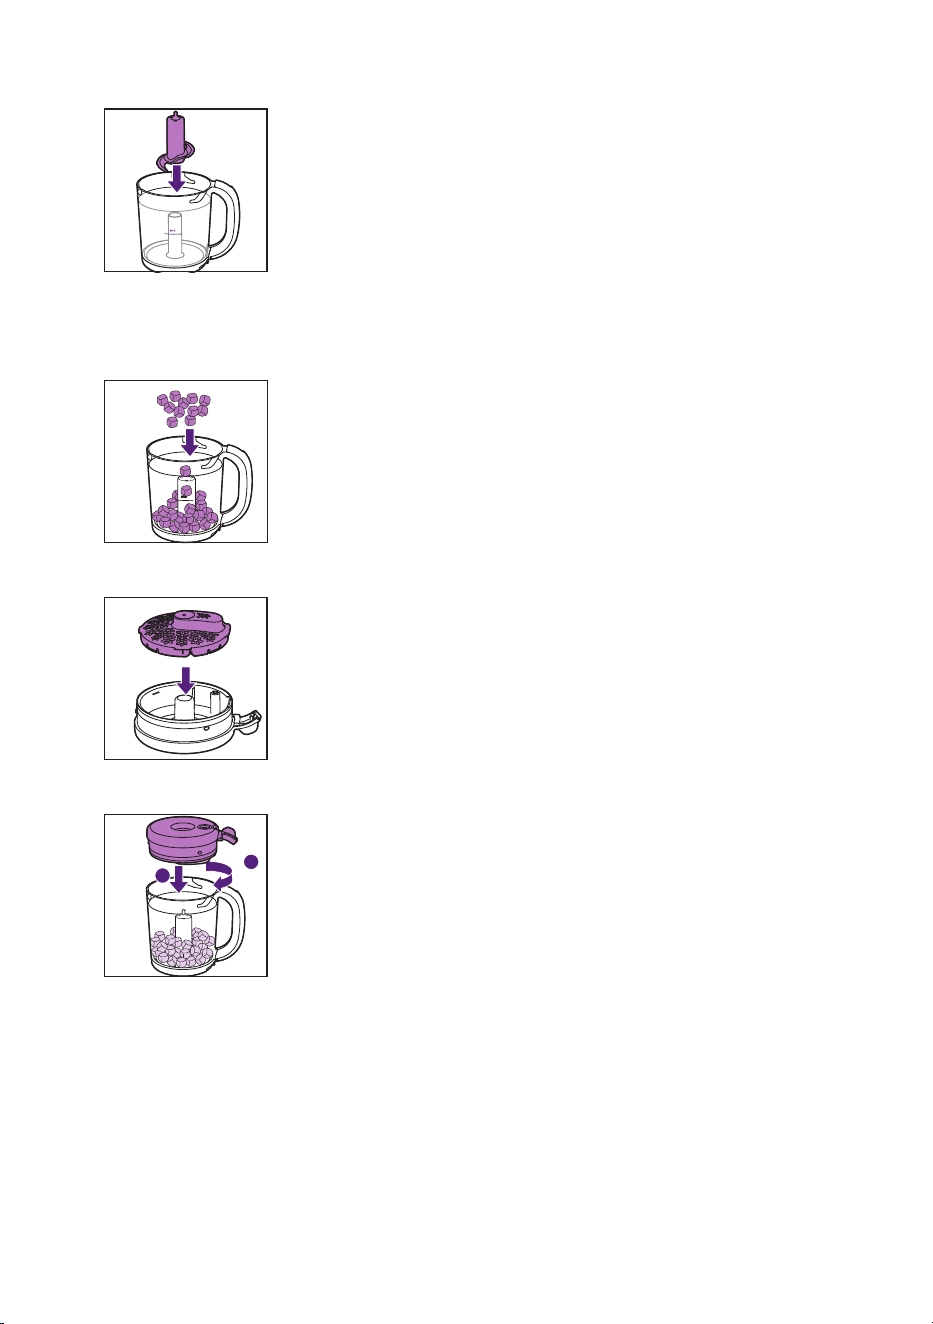
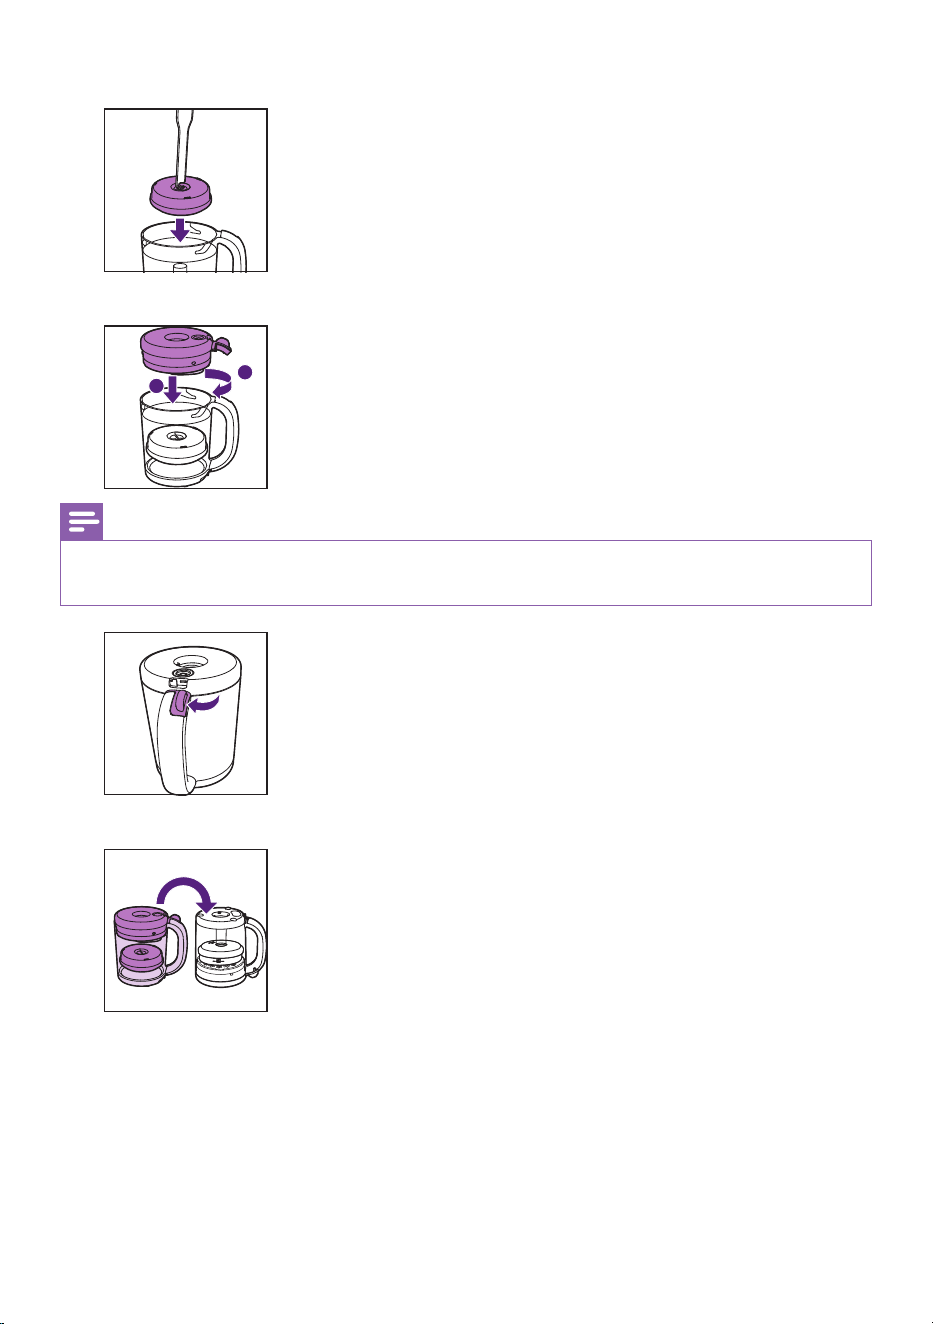
3 Take the blade unit out of the jar�
- 22 -
4 Flip the storage pot over and place it onto the blade unit holder in the jar�
5 Place the jar lid on the jar and turn it clockwise to close it securely�
1
2
Note
• The jar has grooves that help smoothly guide the locking pins and lock the lid in place.
Make sure that the lid tab slides into the handle of the jar.
6 Flip the jar over with the jar lid on the bottom�
- 23 -
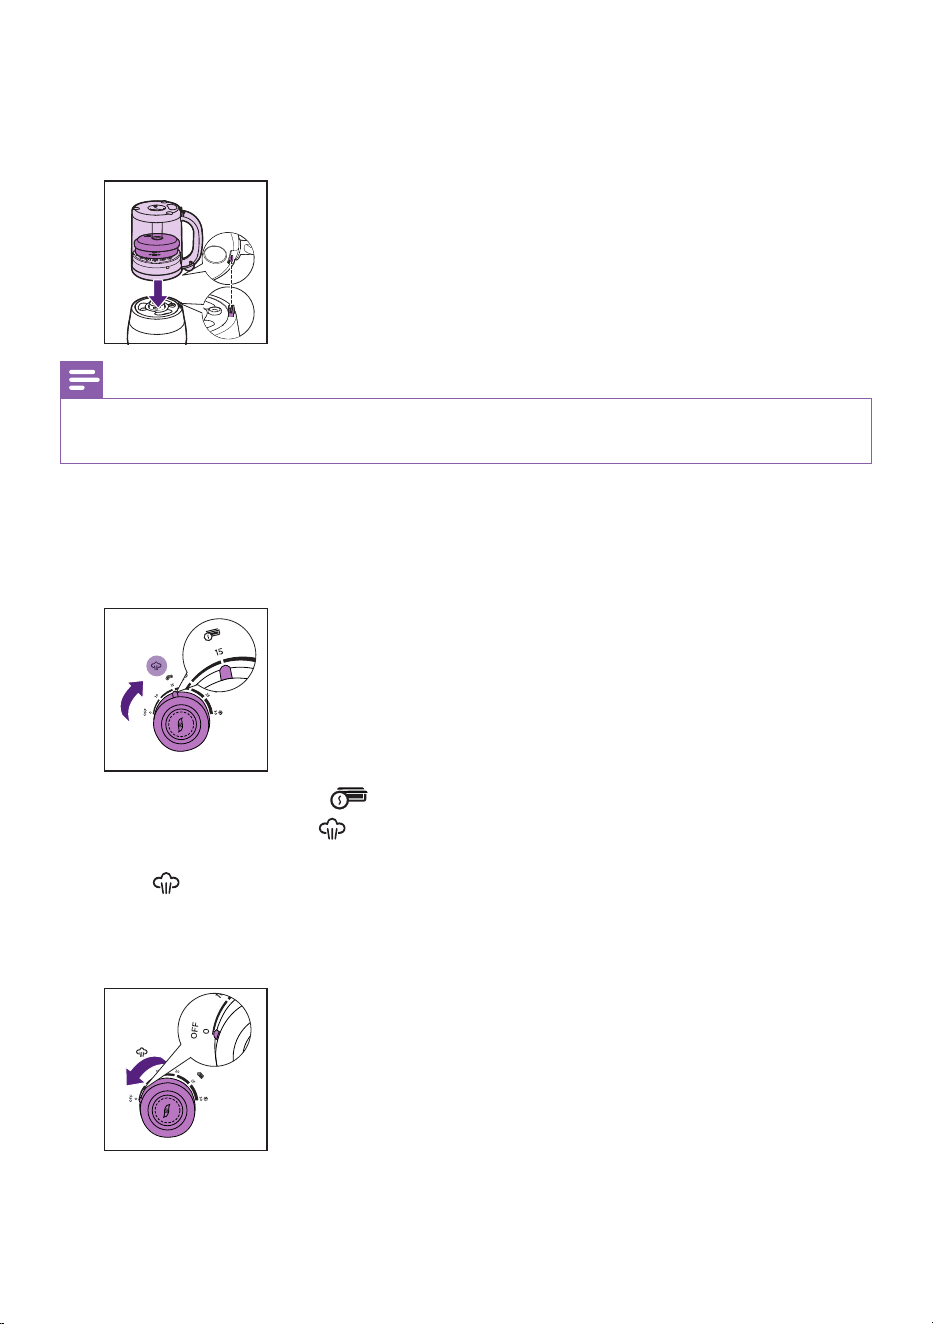
7 Align the connector on the jar lid to the locking area on the water tank, and
then place the jar on the main unit with the jar lid on the bottom� Press the jar
downwards to lock it rmly on the main unit, and make sure the handle is on the
right-hand side�
Note
• Make sure the water tank lid is correctly locked in place before placing the jar on the
main unit.
8 If the control knob is not in the o position (OFF), turn it to the o position rst.
9 Plug in the appliance�
10 Turn the control knob to select the reheat time that matches with the storage pot
placed in the jar�
» Choose 15minutes ( ).
» The steaming light
will turn white to indicate that the appliance is reheating.
11 When the reheating cycle is nished, the appliance will beep and the steaming
light will turn o.
12 Turn the control knob back to the o position (OFF)� Wait 2 minutes, or until
there is no more steam coming from the top of the appliance before removing
the jar�
- 24 -
13 Open the jar lid, and use the hook on the spatula to take the storage pot out �
14 There may still be some water remaining in the water tank after a reheating cycle�
This is normal� Wait until the appliance cools down to room temperature, then
empty the water tank of all residual water� To empty or clean the water tank,
refer to the chapter “Cleaning and descaling”.
Defrosting
If you have used the special storage pots to freeze blended food, you can use the
appliance to gently defrost the frozen food.
Note
• Always put previously blended food in the storage pot to defrost.
• Make sure that the sealing ring is assembled around the jar lid before defrosting, and
that the at side of the sealing ring is facing out.
1 Fill the water tank with water up to the MAX water level marking indicated on
the side of the water tank or the MAX water level indication in the water tank�
2 Follow steps 2 to 8 in the chapter “Reheating”.
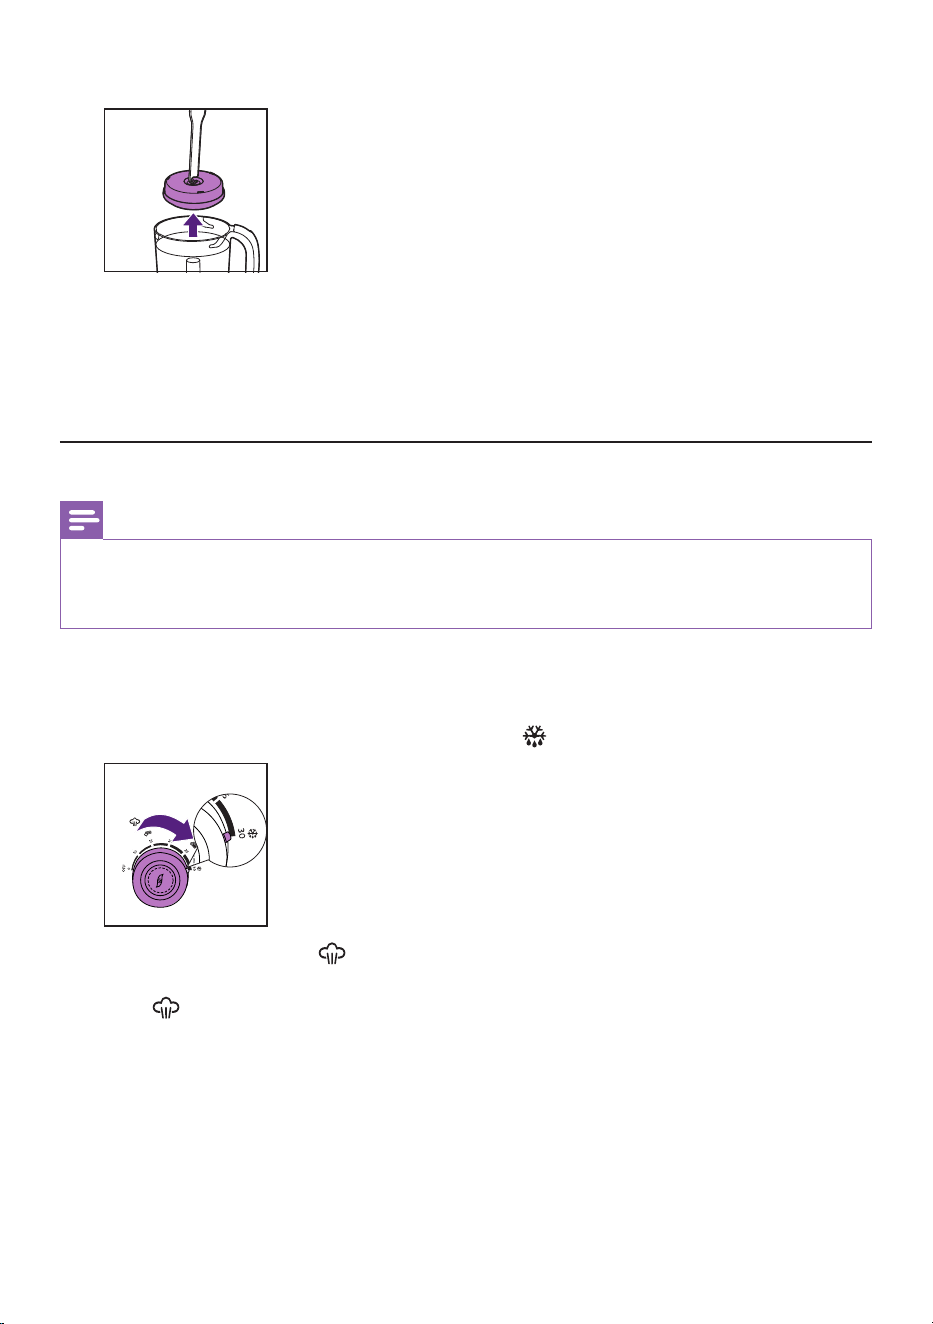
3 Turn the control knob and select 30 minutes �
» The steaming light will turn white to indicate that the appliance is defrosting.
4 When the defrosting cycle is nished, the appliance will beep and the steaming
light will turn o.
- 25 -
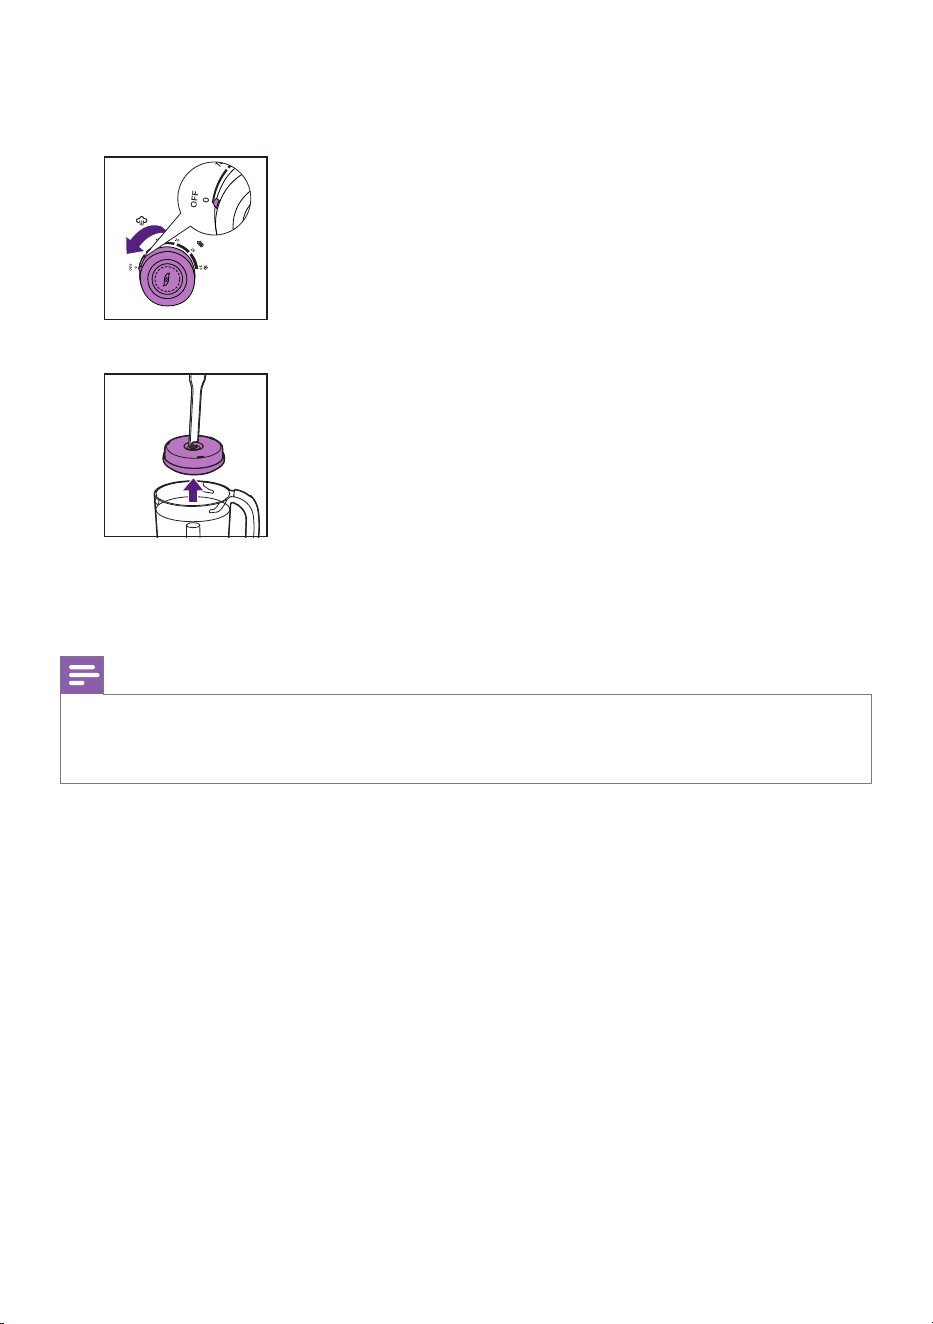
5 Turn the control knob back to the o position (OFF)� Wait 2 minutes, or until
there is no more steam coming from the top of the appliance before removing
the jar�
6 Open the lid and use the hook on the spatula to take the storage pot out�
7 There may still be some water remaining in the water tank after a defrosting
cycle� This is normal� Wait until the appliance cools down to room temperature,
then empty the water tank of all residual water� To empty or clean the water
tank, refer to chapter “Cleaning and descaling”.
Note
• Only defrost the same batch of food once.
• After defrosting, we recommend running another reheating cycle to thoroughly heat
up the food.

- 26 -
Ingredients and steaming time
Type of food Ingredient
Approximate
steaming time (min.)*
Water level in the
water tank (ml)
Fruit Apple 15 160
Orange/mandarin 15 160
Peach 10 160
Pear 15 160
Pineapple 20 200
Plum 10 160
Strawberry 15 160
Vegetables Asparagus 15 160
Broccoli 15 160
Carrot 20 200
Cauliower 15 160
Celery 15 160
Eggplant 15 160
Fennel 15 160
French beans 20 200
Leek 15 160
Onion 15 160
Peas 15 160
Bell pepper 15 160
Potato 20 200
Pumpkin 15 160
Spinach 15 160
Swede 15 160
Sweet corn 15 160
Sweet potato 15 160
Tomato 15 160
Turnip 15 160
Zucchini 15 160
Meat Chicken, beef, lamb,
pork etc.
20 200
Fish Salmon, whiting, sole,
cod, trout etc.
15 160
* Steam times may vary. The approximate timings are based on all ingredients being cut
into small cubes, no larger than 1 cm, and a total weight of 250 g.
- 27 -
Cleaning and descaling
Cleaning
Caution
• Clean the appliance after every use.
• Never immerse the main unit in water. Never rinse the main unit under the tap.
• Never use bleach or chemical sterilizing solutions/tablets in the appliance.
• Never use scouring pads, abrasive cleaners or aggressive liquids such as gasoline,
acetone or alcohol to clean the appliance.
Note
• All parts, except the main unit, can also be cleaned in the dishwasher.
• Always assemble the sealing ring around the jar lid after you have removed it for
cleaning, and make sure the at side of the sealing ring is facing out.
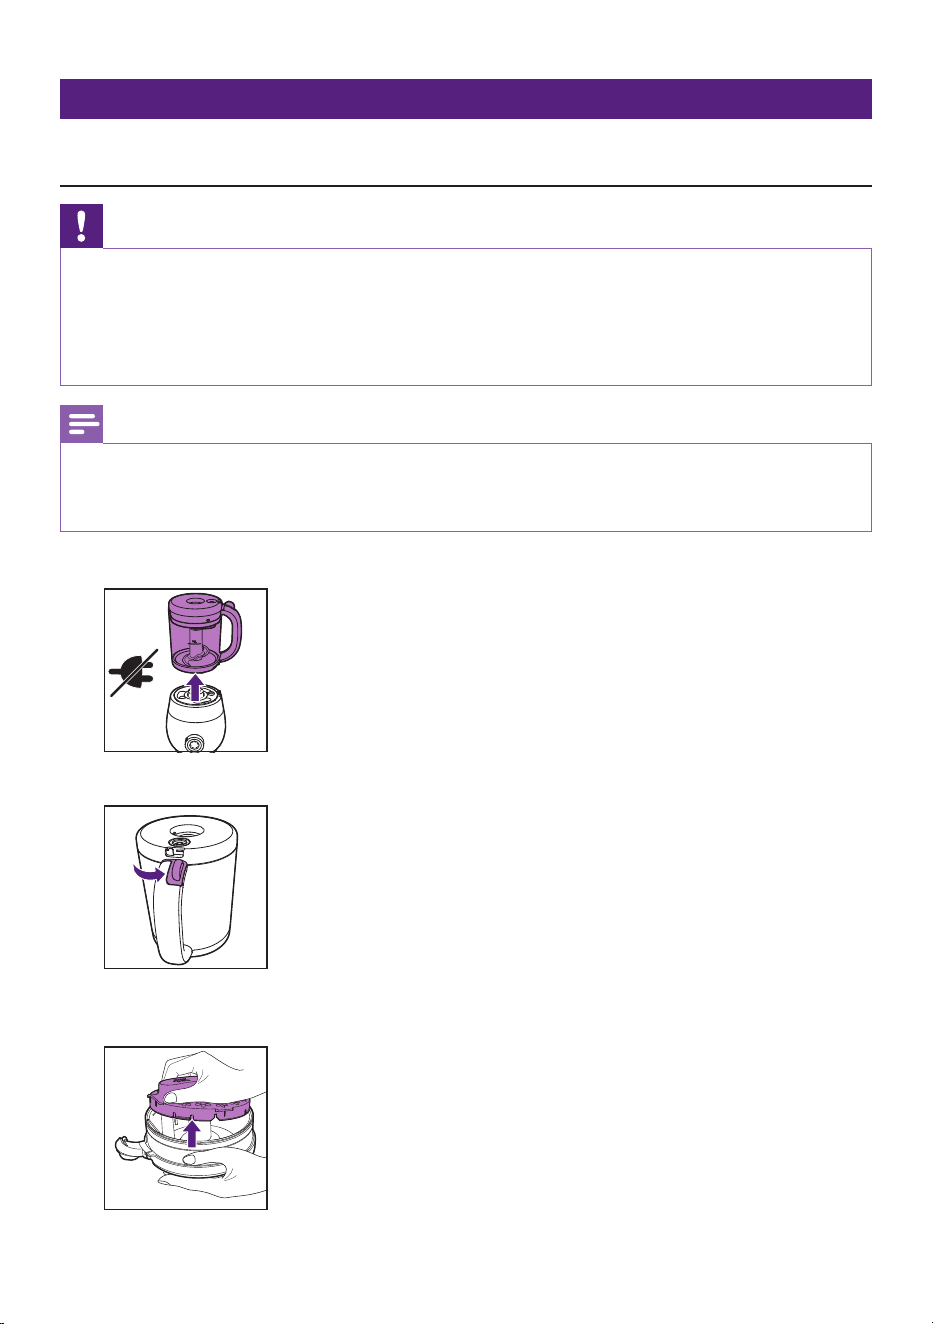
1 Unplug the appliance and remove the jar from the main unit�
2 Push the lid tab counterclockwise to release the jar lid from the jar�
3 Grab the protrusion on the sieve and pull one side of the sieve out rst, and then
release the sieve from the jar lid�
- 28 -
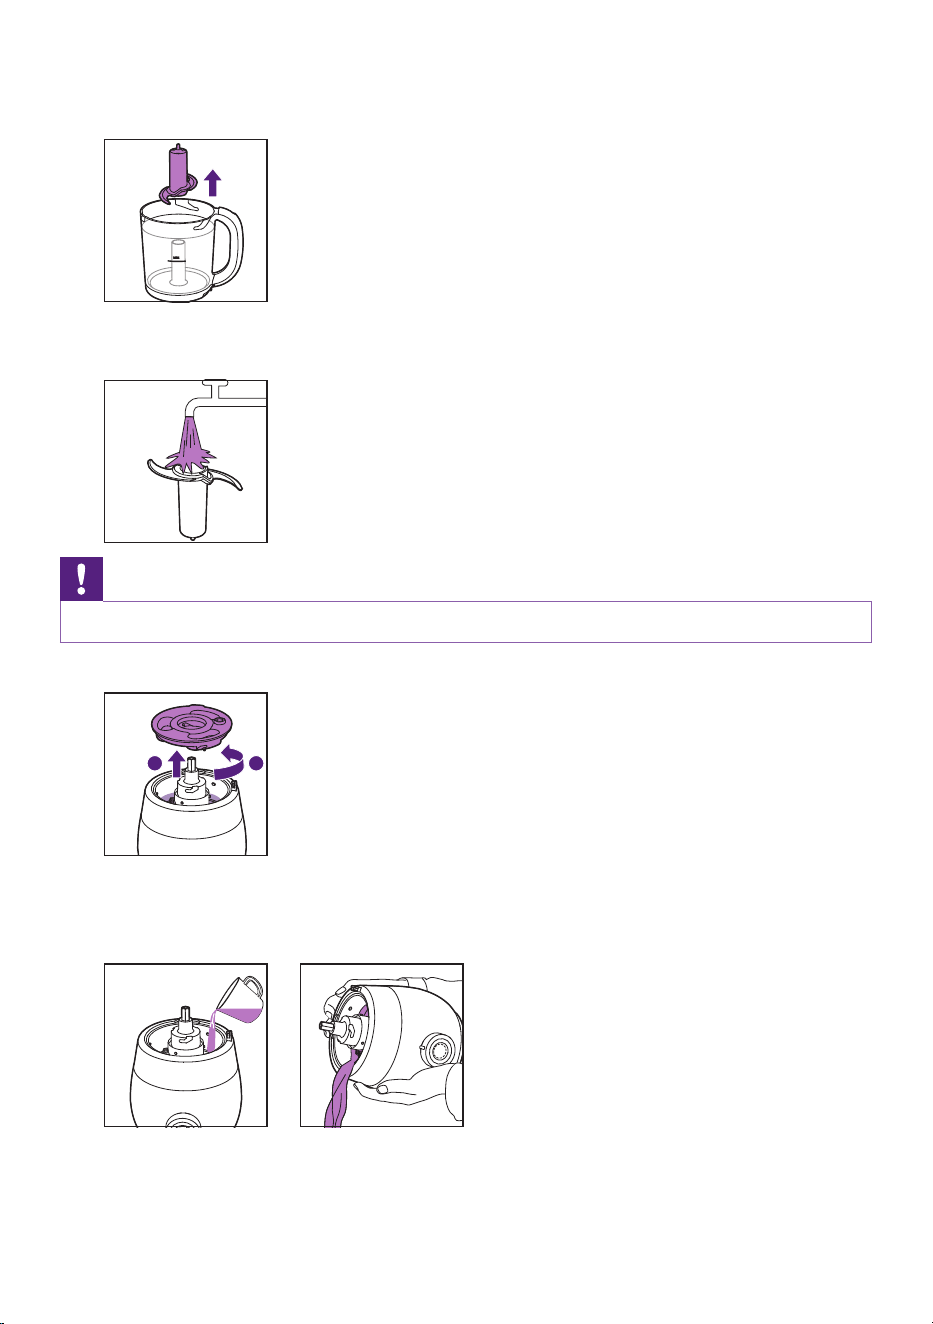
4 Dissemble the sealing ring from the jar lid for cleaning when necessary�
5 Remove the blade unit�
6 Thoroughly clean the blade unit under the tap immediately after use� Make sure
you also rinse the inside of the blade unit tube�
Caution
• Handle the blade unit very carefully. The cutting edges are very sharp.
7 Turn the water tank lid counterclockwise and remove it from the water tank�
1
2
8 Wash the water tank lid under the tap�
9 Pour out any excess water in the tank� If necessary, pour fresh water into the
water tank and ush it out. Repeat as necessary until the water tank is clean.
10 Clean all other parts that come into contact with food in hot water with
detergent immediately after use�
11 Dry the main unit and all parts after washing�

- 29 -
Descaling the water tank
For optimum performance, we recommend descaling the appliance every 4 weeks. To
reduce the build up of limescale, we recommend using soft or puried water for steaming,
reheating or defrosting.
To descale the appliance, follow the descaling instructions below.
1 Make sure the appliance is switched o.
2 Mix 80 ml of white vinegar (6 % acetic acid) with 80 ml of water, or you can use
citric acid with warm water to descale the water tank�
3 Add the solution to the boiler in the water tank�
4 Put the water tank lid on the water tank and turn the lid clockwise to lock it
securely in place�
5 Wait for 6 hours/overnight or until all limescale has dissolved�
6 Pour the used solution out of the water tank�
7 If the limescale buildup has not completely dissolved, repeat the descaling cycle
from step 1 to 6 in this chapter�
8 Pour some fresh water into the water tank and ush it out. Repeat as necessary
until the water tank is clean�
9 Rinse the water tank lid thoroughly under the tap�
10 Fill the water tank with 200 ml of water and let the appliance complete a
20-minute steaming cycle with the empty jar before you use the appliance with
food again�
- 30 -
Storage
1 Empty the water tank before you store the appliance�
2 Make sure all parts are clean and dry before you store the appliance (refer to the
chapter “Cleaning and descaling”).
3 Store the appliance with the blade unit in the jar to prevent damage�
4 Always make sure that the lids for both the water tank and the jar are correctly
locked in place for storage�
Recycling
This symbol means that electrical products shall not be disposed of with normal
household waste.
Follow your country’s rules for the separate collection of electrical products.
Support
For all product support such as frequently asked questions, please visit
www.philips.com/support�

- 31 -
Troubleshooting
This chapter summarizes the most common problems you could encounter with the
appliance. If you are unable to solve the problem with the information below, contact the
Consumer Care Center in your country.
Problem Possible cause Solution
The appliance
does not work.
This appliance is
equipped with a safety
lock. This appliance will
not work if the parts are
not assembled correctly
onto the main unit.
Assemble all parts correctly. Before
steaming, the jar should be placed on the
main unit vertically with the jar lid on the
bottom; before blending, put the jar on
the main unit with the lid on the top, and
lock the jar by turning it clockwise.
The steaming light
does not turn
on�
The appliance is not
connected to the power
supply.
Put the plug in the outlet.
The jar is not placed on
the main unit correctly.
Place the jar on the main unit correctly
with the jar lid on the bottom.
You have started a
second steaming cycle
immediately after
the previous one has
nished.
Switch o the appliance and allow it to
cool down for 10 minutes before you start
a second steaming cycle.
The control knob has not
been turned to the o
position (OFF) after the
previous steaming cycle
was nished.
Turn the control knob to the o position
(OFF) rst, and then turn it again to
choose the operating time.
The water tank
gives o an
unpleasant smell
during the rst
few times of use.
You have not pre-
washed the water tank
before use.
Refer to the chapter “Cleaning and
descaling” to clean the water tank, and
then nish a steaming cycle with an
empty jar.
The appliance
does not generate
steam�
You have not put water
in the water tank.
Switch o and unplug the appliance, and
then add water to the water tank.
There is too much
limescale buildup in the
water tank.
Descale the water tank. Refer to the
section “Descaling” in the chapter
“Cleaning and descaling”.

- 32 -
Problem Possible cause Solution
Steam is leaking
from the water
tank.
The water tank lid is not
closed correctly.
Close the water tank lid correctly. Make
sure the
icon on the water tank lid is
lined up with the icon on the water
tank.
The jar is not assembled
correctly on the main
unit.
Place the jar correctly on the main unit.
The steam outlet on the
water tank lid is blocked
by contamination or
limescale buildup.
Clean the steam outlet on the water tank
lid.
The steam inlet on the
jar lid is blocked by
contamination�
Clean the steam inlet on the jar lid.
The ingredients
are not completely
heated through.
The pieces in the jar are
too big.
Cut the food into smaller pieces (cubes no
bigger than 1cm).
There is too much food
in the jar.
Decrease the amount of food in the jar.
There is too much or too
little water in the water
tank.
Add the correct amount of water
according to the steaming time. Check
the recipe booklet and/or the table in
the chapter “Ingredients and steaming
time” to make sure that you add the
correct amount of water according to the
steaming time for the ingredients you
want to steam or the recipe you want to
prepare.
The steaming time is too
short.
Select a longer steaming time (30minutes
tops).
The jar is not placed on
the main unit correctly.
Place the jar on the main unit correctly
with the jar lid on the bottom.
There is too much
limescale buildup in the
water tank.
Descale the water tank. Refer to the
section “Descaling” in the chapter
“Cleaning and descaling”.
The jar lid leaks. There is too much food
in the jar.
Switch o the appliance and process a
smaller quantity.
The jar lid is not locked
onto the jar correctly.
Place the jar lid on the jar and turn it
clockwise to close it securely.

- 33 -
Problem Possible cause Solution
The sealing ring
around the jar lid is not
assembled correctly or is
not assembled.
Make sure the sealing ring is correctly
assembled around the jar lid with the at
side facing out.
The blending
function does not
work.
There is too much food
in the jar.
Switch o the appliance and process a
smaller quantity. Raw food put in the jar
should not exceed top of the blade unit.
The jar is not placed on
the main unit correctly.
Place the jar on the main unit with the
lid on the top, align the
icon on the jar
with the icon on the main unit, and
turn the jar clockwise to securely lock it in
place on the main unit.
The jar lid is not locked
onto the jar correctly.
Place the jar lid on the jar and turn it
clockwise to close it securely.
You are using the
appliance to blend sticky
food such as cheese.
Check the recipe booklet and use
appropriate ingredients to blend.
You have been using
the blending function
continuously for more
than 30 seconds.
Stop blending and let the appliance cool
down for a few seconds and then start
blending again.
The appliance
makes a lot of
noise, produces an
unpleasant smell,
is hot to touch,
emits smoke, etc.
There is too much food
in the jar.
Switch o the appliance and process a
smaller quantity.
You have been using the
blending function for too
long�
Do not let the appliance blend
continuously for more than 30seconds at
a time�
The appliance
produces a lot
of noise and
vibration during
blending.
The sieve is not attached
to the jar lid.
Make sure that the sieve is attached to the
jar lid.
Temperature of
the defrosted food
is still low.
There is too much food
in the storage pot.
Make sure that the amount of food in
the storage pot does not exceed the
maximum scale marked on the side of the
pot.

- 34 -
Problem Possible cause Solution
Food in the storage pot is
too viscous.
Let the appliance cool down for
10minutes and defrost again.
The storage pot
leaks during
reheating/
defrosting.
The storage pot lid is not
closed correctly.
Before putting the storage pot in the jar
to reheat/defrost, make sure that the lid is
closed correctly.
Water in the
water tank has
an unusual color
when you pour it
out of the water
tank or when
it enters the jar
during steaming,
or the water in the
water tank has an
unpleasant smell.
Food particles have
entered the water tank
during use.
Clean the water tank according to the
instructions in the chapter “Cleaning
and descaling”. Use the appliance strictly
according to the instructions. Make sure
you do not overll the water tank with
water (max. 250ml) and that you do not
overll the jar with food (do not ll the
jar past the top edge of the plastic part
of blade unit). Do not steam the same
ingredients for more than 30minutes or
add liquid to the jar to steam. After you
have put liquids in the jar, never put the
jar in the steaming position with the jar lid
on the bottom.
There are white
spots on the water
tank, water tank
lid, jar, jar lid and
sieve.
There is limescale
buildup on these parts.
This is normal. Remove the limescale
periodically. Clean the water tank lid,
jar, jar lid and sieve with a moist cloth.
Descale the water tank. Refer to the
section “Descaling” in the chapter
“Cleaning and descaling”.
The surfaces that
come into contact
with food are
discolored.
Food colorings may
discolor the parts that
come into contact with
food.
This is normal. All parts are still safe to use
and will do no harm to the cooked food.
The appliance
sounds 5 times
and the steaming
light ashes during
steaming, reheating
or defrosting.
The jar is out of position
or removed from
the main unit during
processing.
Turn the control knob to the o position
(OFF), check the water amount in the
water tank, place the jar on the main unit
correctly, and reselect the processing time
to start again�
Water in the water tank
is not enough for the
selected processing time.
Turn the control knob to the o position
(OFF), and add enough water for the
selected processing time.
There is too much
limescale buildup in the
water tank.
Descale the water tank. Refer to the
section “Descaling” in the chapter
“Cleaning and descaling”.

- 35 -
Problem Possible cause Solution
There are food
residues in the
inner layer at the
bottom of the jar.
Small food residue
particles get into the
inner layer at the
bottom of the jar during
cleaning�
Remove the jar from the main unit. Remove
the jar lid and blade unit from the jar.
Flip the jar, align the small hole on the
bottom to a tap and ush water into the
small hole. Use warm water to achieve a
better cleaning result.
Hold the jar handle and shake the jar for
about 15 seconds to mix the water with
the accumulated residues.
Pour out the water from the small hole.
Repeat above steps for several times until
the residues are cleaned.
Technical specications
- Voltage/wattage: See type plate on the bottom of the appliance
- Maximum water capacity of the water tank: 250 ml
- Maximum capacity of the jar: 1050 ml
- Operating temperature: 10 °C to 40 °C
- Protection: Temperature-controlled heating system

© 2023 Koninklijke Philips N�V�
All rights reserved�
15/05/2023