Para asegurar un uso correcto de este aparato y para su seguridad, por favor,
lea este manual completamente antes de empezar a utilizar el dispositivo.
Frigorífico Combi Dos Puertas
con Tecnología NO FROST
Congelador - Frigorífico
Manual de Instrucciones
CCH18521EWD
CCH18521EXD

v
v
!
v""
#$!
v
#
%&!
v'$!
!
*OGPSNBDJOEFTFHVSJEBE
,
$!,
#
#&
!-+#
##+
&
!
,
#
!
4FHVSJEBEEFOJ¯PTZQFSTPOBTWVMOFSBCMFT
1
v(%#
)%#*
#
&!
v(&
%#
)*
+#
$!%#
!
4FHVSJEBEHFOFSBM
£$'9(57(1&,$'
!
£$'9(57(1&,$.%
#!
£$'9(57(1&,$.!
*OGPSNBDJOEFTFHVSJEBE
£$'9(57(1&,$.&
)*
#&
!
£$'9(57(1&,$.#
#
!
£$'9(57(1&,$7+
#&!
£$'9(57(1&,$.#+
%%
*'
:*(!
2
v N !
v )/0122*%
#
!
v 3
+#
!
04!
0#
v
!5#
&!
v %
&
0%
$6
0
6
06
07!
`"%7&35&/$*"5#&
)!*
!
*OGPSNBDJOEFTFHVSJEBE
3

`"%7&35&/$*"
8%9
#!
8%9
&
*'
!
7+#$&
!
;
!
7+#
!
.!
(%$
!&!
.%!
!(!
.#
+$#
#
<!
!
*OGPSNBDJOEFTFHVSJEBE
Uso diario
v
.%!
v.#
!
v
#!
:*(!
4

v7
!
v
&
!5!
v.#
#
##
!
:*
v#
!
:*
:*(!
=*(!
,
v7
!
v#
$
!
v#
>6$
?!
v-
#
!
v
)*
0
!
*OGPSNBDJOEFTFHVSJEBE
5
*OTUBMBDJO
,&
%
!
v3&!
.%!/
! $!
Cuidado y Limpieza
v7
!
v.$%!
v.$
!;%
*'
v$
!(
@!(@%#
%!
2'
:*(!
=*(
!
v)
% *
!
v($
#$
#$
!
*OGPSNBDJOEFTFHVSJEBE
v
#
!
6

v3
#
!,
!
v(#
)
*#!
v
!
v7+#
&
!
Servicio
v5#$&##
&
!
v5(
!
"IPSSPEFFOFSH¥B
v.6
v.#$##
6
v7+##
)*6
*OGPSNBDJOEFTFHVSJEBE
v()*)*6
v.)*)*6
v.6
v.#6
v7$
#
!
7

Proteccion Ambiental
#
!
$!
A
!
!
!
7#
%
#
$
!,
%$
#$
&#
!
#
#
&!
$#
&!
*OGPSNBDJOEFTFHVSJEBE
'$
!3
$
!
!
8
:! 3!
=! 5!
`"%7&35&/$*"3
similar
###
)
*! Dicho símbolo será de color
amarillo u orange.
s símbolo de advertencia de riesgo de incendio!
B
!
&$
!
*OGPSNBDJOEFTFHVSJEBE
9
Tapa de gaveta
Pies de nivelación
10
Fresh box
11

screw
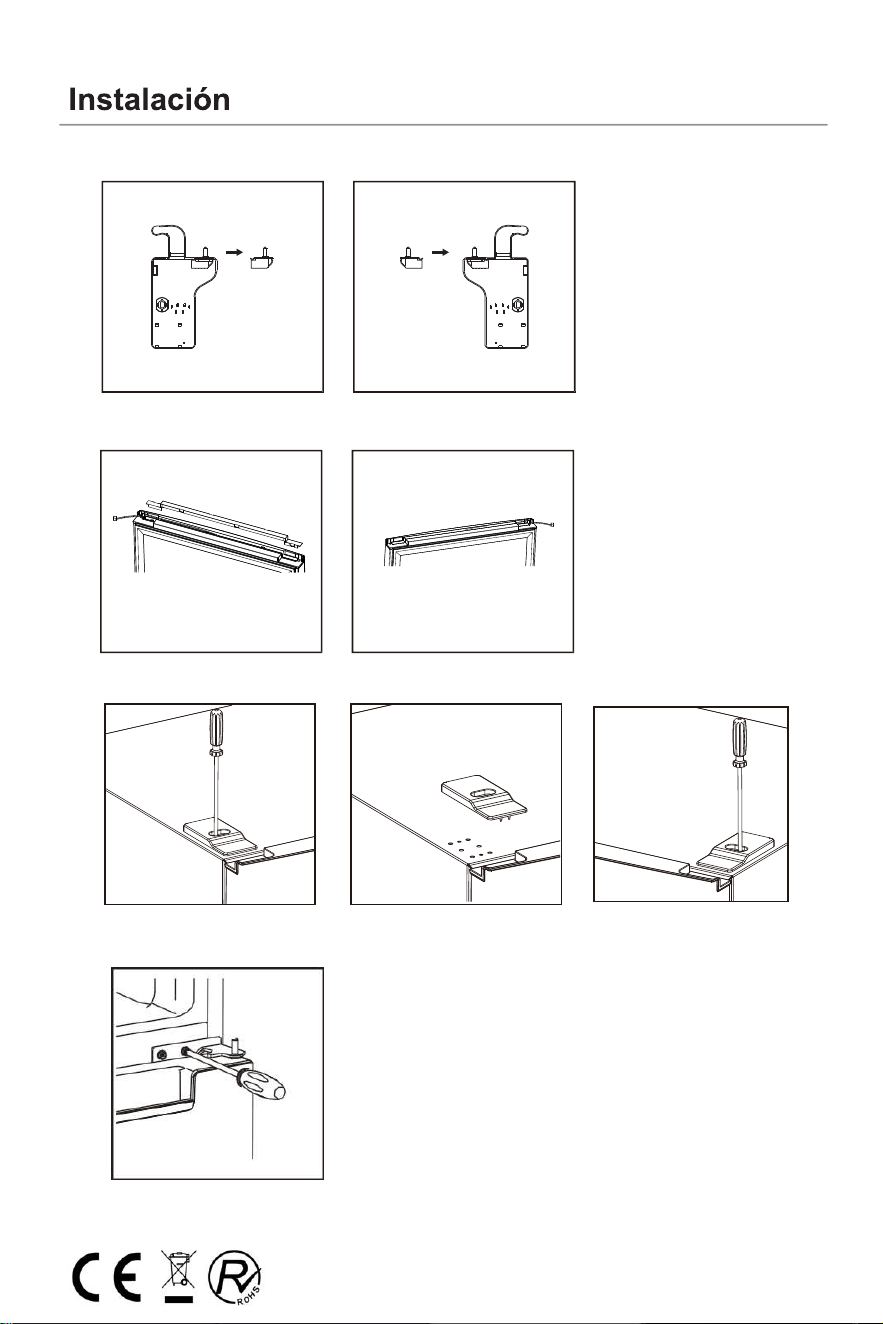
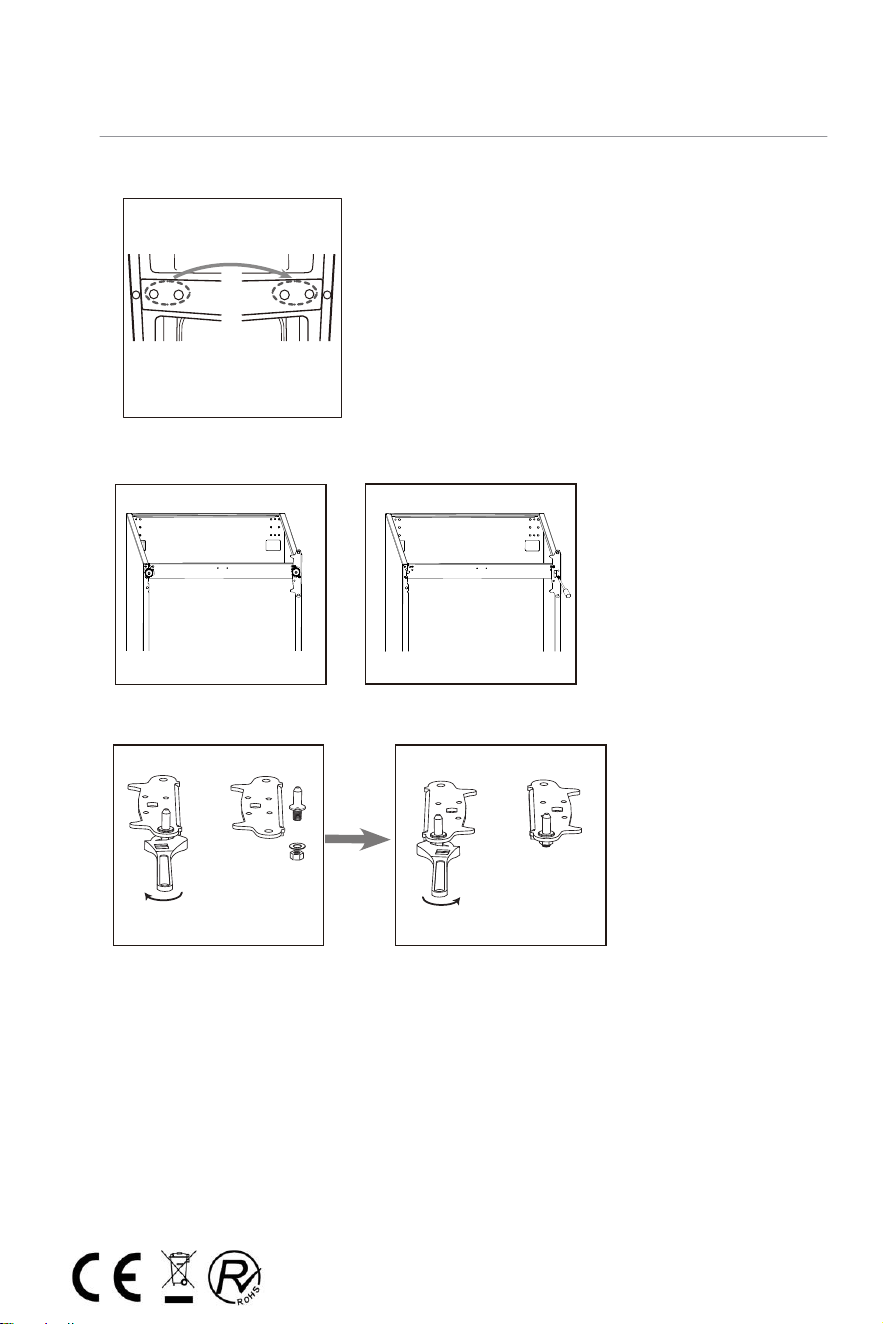
Reversibilidad de la puerta
Antes de invertir la puerta, prepárese debajo de las herramientas y el material: destornillador recto, destornillador cruzado,
llave inglesa y los componentes incluidos en la bolsa de plástico:
Cubierta de la bisagra de
la puerta izquierda x 1
Aydante superior de cierre izquierdo x 1Aydante superior de cierre derecho x 1
1. Desatornille la cubierta de la bisagra superior y desconecte los conectores del interruptor de la puerta y el
arnés.
2.
Desatornille la bisagra superior
3. Retire el pasador con un destornillador y tire del soporte de la bisagra. Luego vuelva a colocar el pasador en el
soporte de la bisagra
VOscrew
screw
12
4. Mueva el interruptor de la puerta de la tapa de la bisagra derecha a la tapa de la bisagra izquierda en la bolsa
de acceso.
5.
Separe la cubierta en la parte superior de la puerta superior y mueva el arnés de lado derecho a lado
izquierdo, luego vuelva a colocar la cubierta.
6.
Mueva la cubierta superior izquierda al lado derecho
7.
Quite la puerta superior, saque el tornillo de la bisagra central con un destornillador cruzado, luego
retire la puerta inferior.
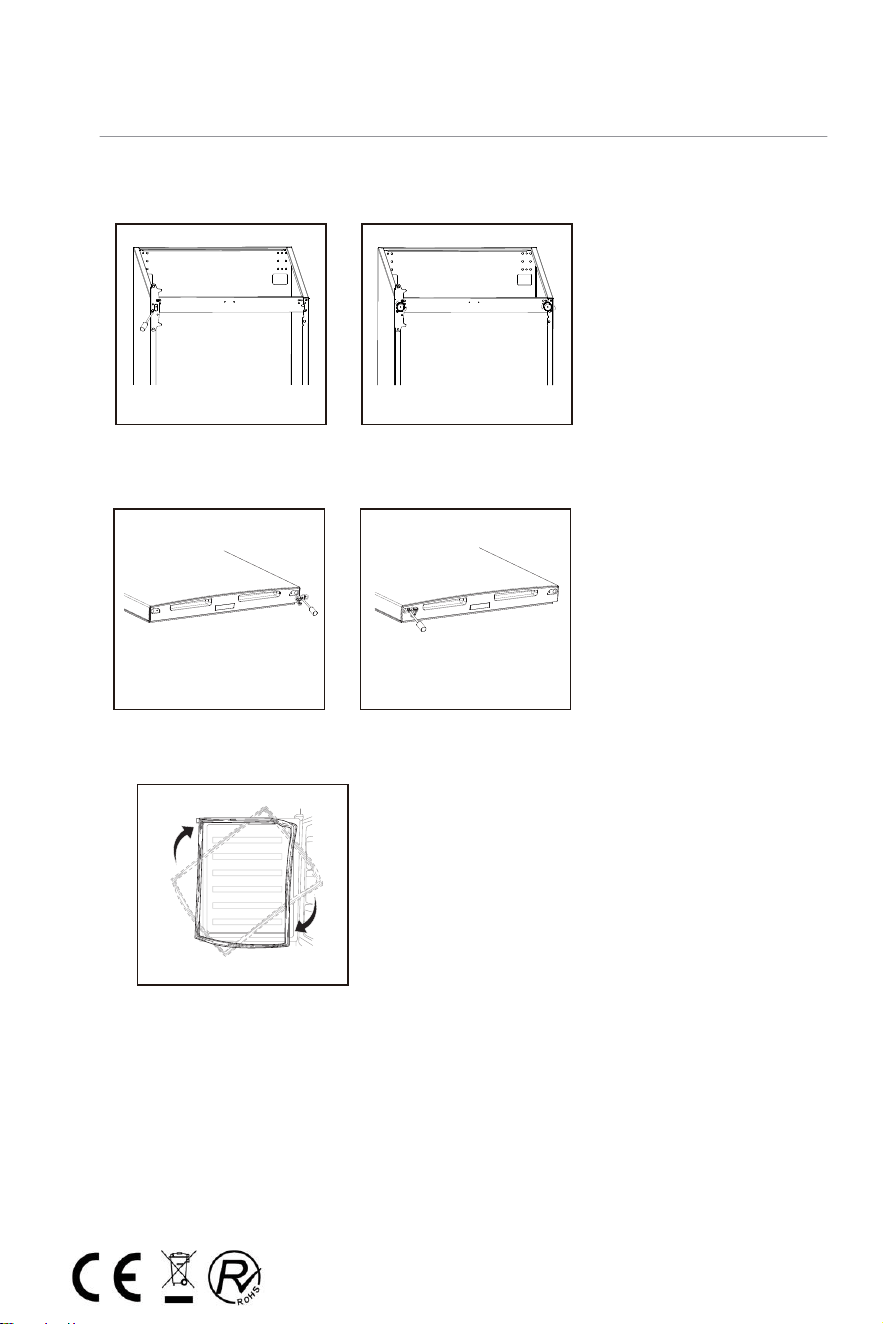
13

8. Mueva las cubiertas del orificio de la bisagra del lado izquierdo al lado derecho.
9. Desatornille la bisagra inferior. Luego retire los pies ajustables de ambos lados.
10. Desatornille y retire el pasador de la bisagra inferior, gire el soporte y sustitúyalo.
unscrew
screw
14

11. Vuelva a colocar el soporte que encaja en el pasador de la bisagra inferior. Reemplace ambos pies ajustables.
12. Retire los cierres de ayuda de la parte inferior de las puertas superior e inferior, luego saque los nuevos cierres
de ayuda de la bolsa de accesorios e instálelos en el lado izquierdo.
13. Retire las juntas de la puerta del refrigerador y del congelador y luego fíjelas después de girar.
15
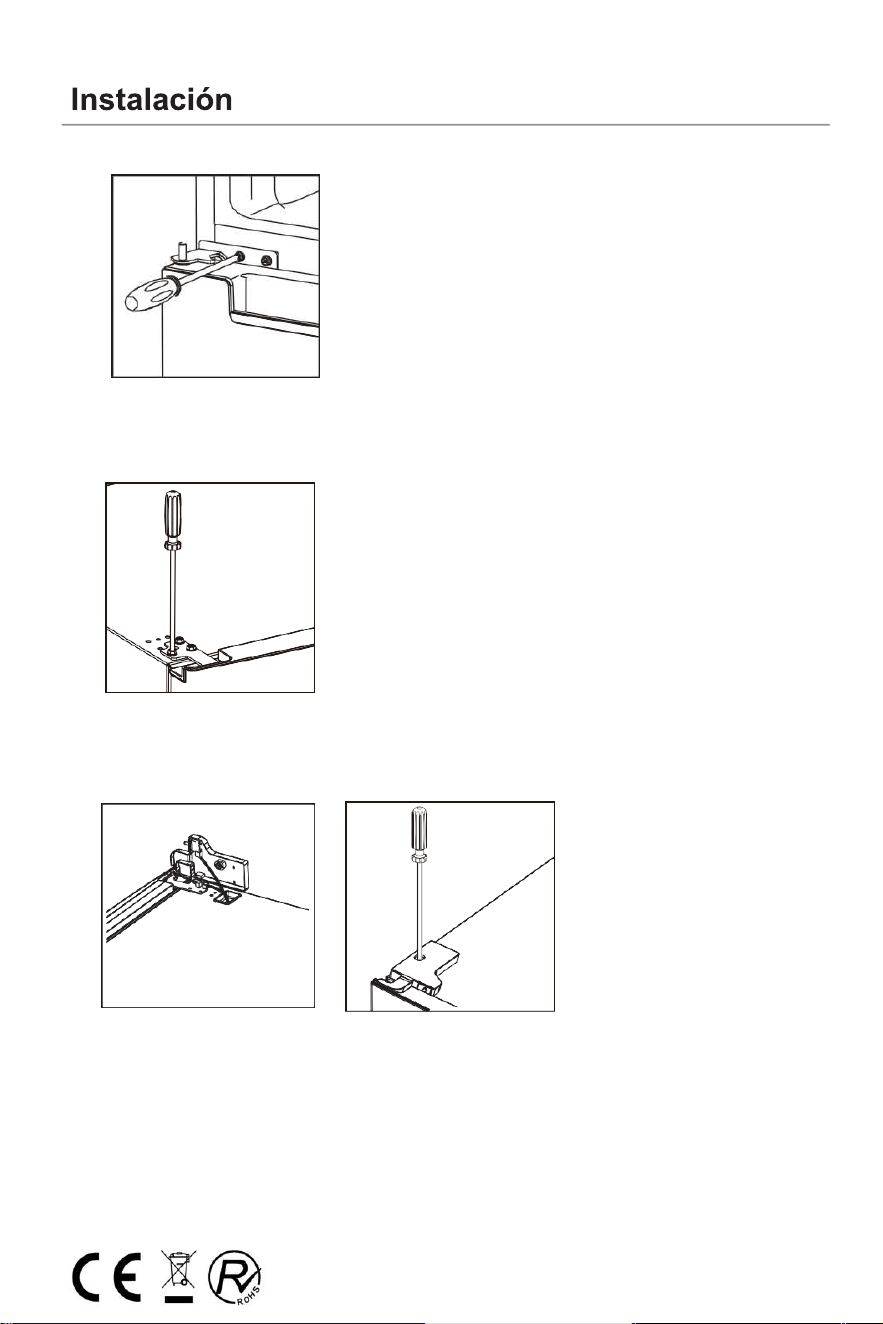
14. Instale la puerta inferior, ajuste y fije la bisagra central en el gabinete.
15. Reemplace la puerta superior, asegúrese de que la puerta esté alineada con el gabinete
para asegurarse de que la junta de la puerta selle el gabinete firmemente. Luego, conecte
la puerta con el gabinete mediante una bisagra superior firmemente fijada.
16. Conecte los arneses de la puerta y el gabinete. Luego vuelva a colocar la cubierta de la
bisagra superior. Antes de atornillar la tapa, conectar los terminales del interruptor de la
puerta.
16
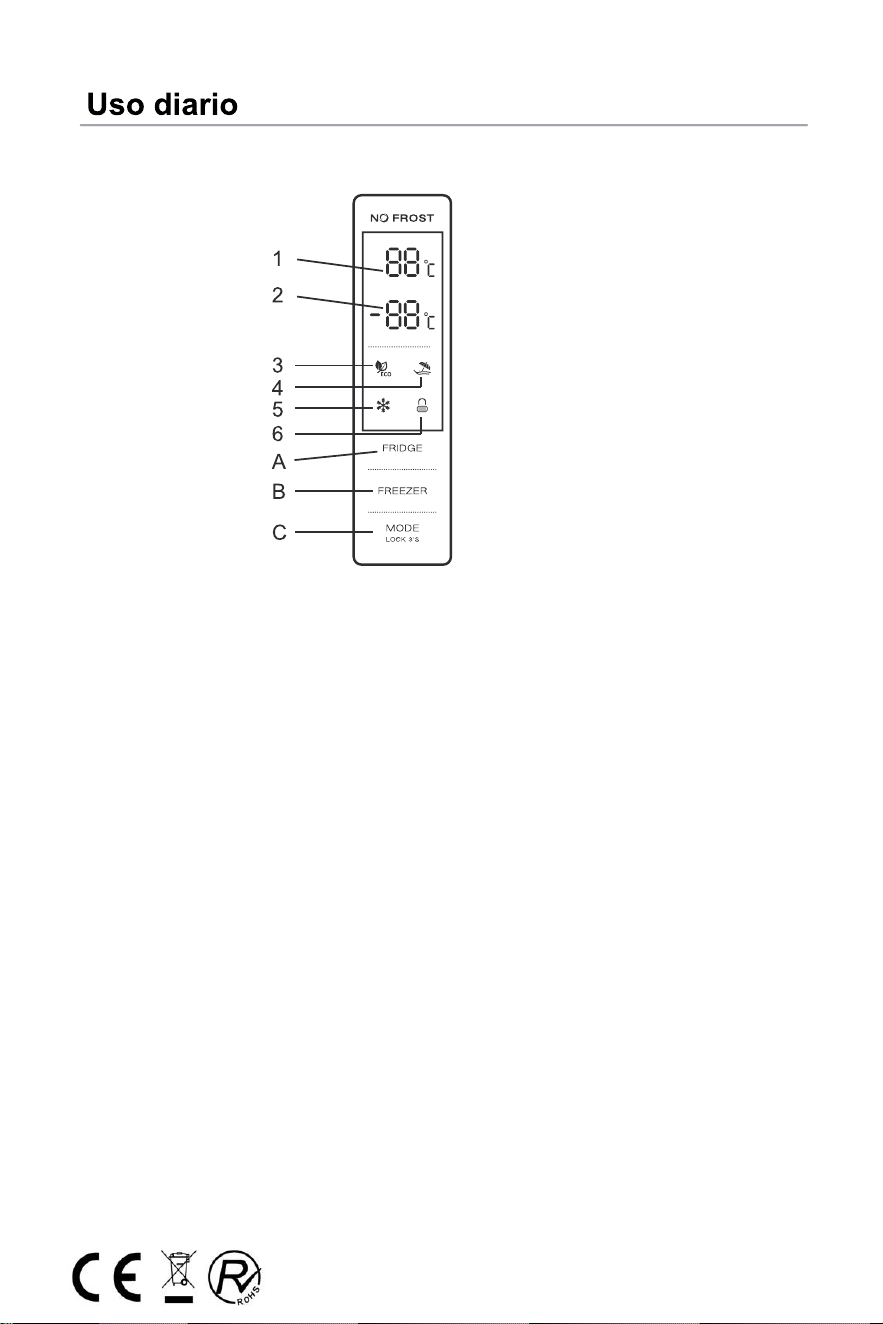
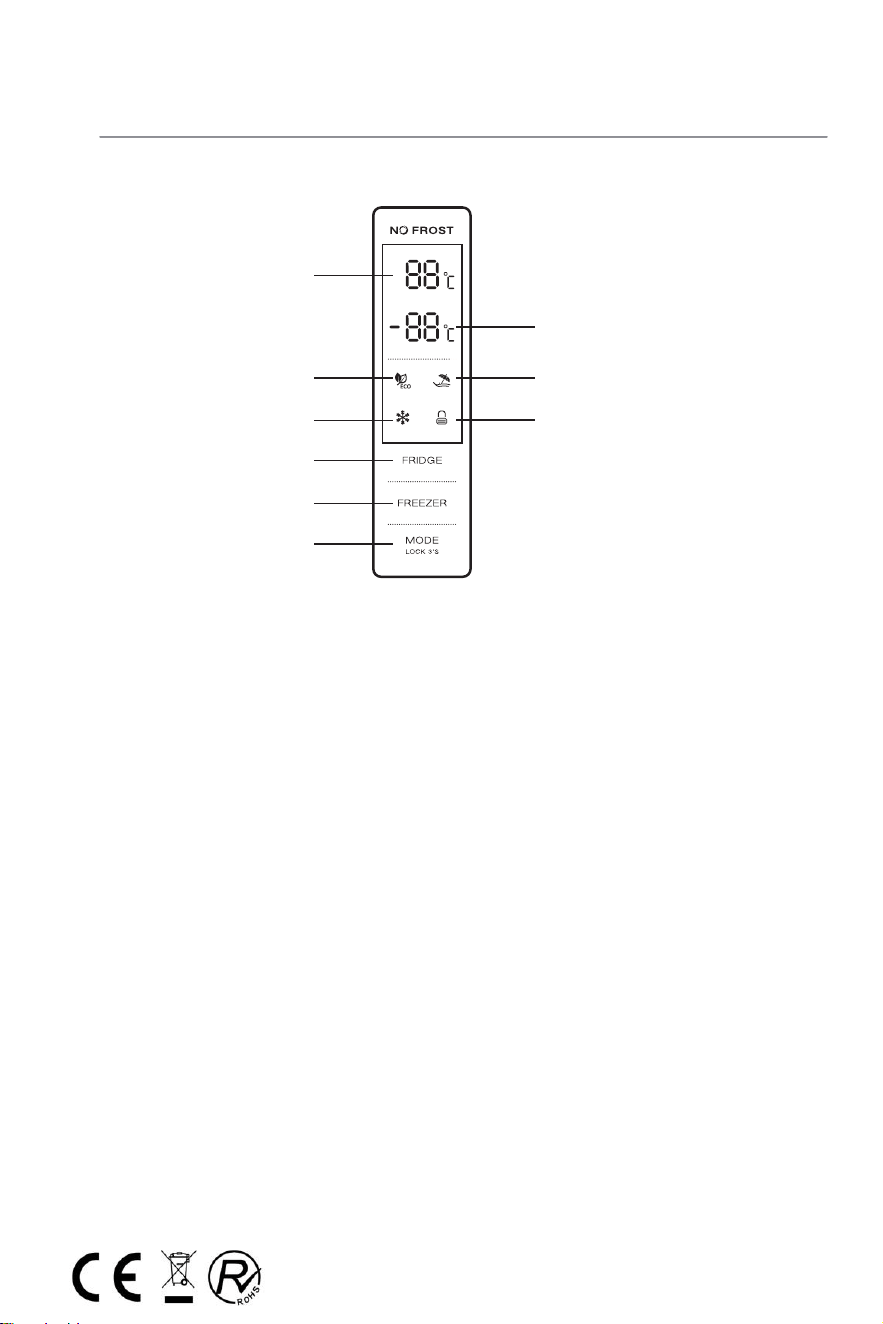
Panel de control
1.1 FUNCIÓN DE BOTONES
A. Control de temperatura del frigorífico
B. Control de temperatura del congelador
C. Modo / Bloqueo / Desbloqueo
1.2 DISPLAY LED
1. Temperatura del frigorífico
2. Temperatura del congelador
3. Modo ECO
4. Modo Vacaciones
5. Modo Super
6. Bloqueo / Desbloqueo
2.0 CONDICIONES DE FUNCIONAMIENTO
A. El panel de control ilumina al 100% durante 3 segundos, que funciona
exactamente en cada modo (modo y temperatura) antes de apagarlo. El
sistema estará bloqueado 25 segundos después de la última operación.
Desbloqueo, la luz del panel estará apagado durante 30 segundos después de
la última operación.
B. Los dos presentan temperatura del frigorífico y congelador en la
pantalla.
2.1 PANTALLA
2.1.1. El panel ilumina durante 2 minutos una vez que la puerta del
frigorífico o congelador esté abierta (suena una vez que se abre la puerta)
17

2.1.2 El panel se ilumina apretando cualquier botón mientras que
debería estar 2 minutos apagado después de la última operación.
2.1.3 Pantalla durante operación normal
Pantalla de temperatura del frigorífico: indica la temperatura del
ajuste actual.
Pantalla de temperatura del congelador: indica la temperatura del
ajuste actual.
3.0 ILUSTRACIÓN DE LOS BOTONES
3.1 Control de temperatura del frigorífico
a. Control de temperatura del frigorífico:
Este botón funciona tanto en Modo Definido como en Modo Super.
Después de introducir el control de temperatura del frigorífico, este
ilumina. Presionando el botón consecutivamente, la temperatura
debería cambiar en círculos de 2ºC,3ºC,4ºC,5ºC,6ºC,7ºC,8ºC, OFF,
después de 5 segundos de flash demuestra que la temperatura está
seleccionada.
b. Apagar el compartimento del frigorífico:
Presionando la temperatura del compartimento del frigorífico, escoja
''OFF'', 5 segundos de flash significa que se ha seleccionado, de este
modo el frigorífico debería de dejar de funcionar.
3.2. Control de temperatura del congelador
Control de temperatura del congelador: Este botón funciona tanto en
Modo Definido como en Modo Vacaciones. Después de introducir el
control de temperatura del congelador, este ilumina. Presionando el
botón consecutivamente, la temperatura debería cambiar en círculos
de -16ºC a 22ºC, después de 5 segundos de flash significa que la
selección de temperatura está ajustada.
3.3 Modo / Bloqueo / Desbloqueo
a. Presionando el botón consecutivamente, el modo seleccionado del
frigorífico cambiará en círculo a modo ECO-Vacaciones, Modo Super,
Modo Definido. 5 segundos de flash indica la temperatura está
seleccionada.
b. Mantener presionado para introducir / Salir de modo de bloqueo
- Desbloqueo: Presione por 3 segundos en modo de bloqueo, todos los
botones deberían desbloquear después de sonar un beep.
- Bloqueo: Presione por 3 segundos en modo desbloqueo, todos los
botones deberían bloquear después de sonar un beep.
3.4 Botón de presión
Sonará un beep cada vez que se aprete un botón.
Todos los botones serán validos en modo desbloqueo.
3.5 Función Bloqueo
En 25 segundos, la pantalla se bloqueará.
18

4.0 Modo ECO
Presione el modo de escoger modo ECO, el icono ECO iluminará
después de 5 segundos de flash. Las temperaturas predeterminadas en
modo ECO son las siguientes: 5º en frigorífico y -18º en congelador.
Salir de Modo Eco
Presione el mismo botón de nuevo para salir del modo ECO durante 5
segundos, así desactivará el modo Eco.
4.1 Modo Vacaciones
Presione el modo para escoger modo Vacaciones, el icono iluminará
después de 5 segundos de flash, así activando el modo Vacaciones.
Las temperaturas predeterminadas del modo Vacaciones en frigorífico
es de 17º, botón de frigorífico en vano, el icono de vacaciones hará
flash tres veces para avisar.
Salir de modo vacaciones: presione el modo durante 5 segundos para
desactivar el modo Vacaciones.
4.2 Modo Super Freezing
Escoja el modo, el icono iluminará después de 5 segundos de flash,
activando el modo de congelación.
Las temperaturas no son ajustables del congelador, el botón freezer en
vano, el icono hará flash tres veces para avisar.
Para salir del modo congelación: hay dos condiciones.
- Se desactiva manualmente el modo de congelación.
- Se desactiva si está en modo congelación por más de 50 horas.
19

20
21
Instalación
Consejos para la refrigeración.
Consejos útiles:
verduras.
ales herméticos o envueltos en papel de aluminio o bolsas
de polietileno para excluir la mayor cantidad de aire posible.
Bottle Botella de leche: deben tener una tapa y deben almacenarse en los balcones de la puerta.
y el ajo, si no están empacados, no deben guardarse en la nevera.
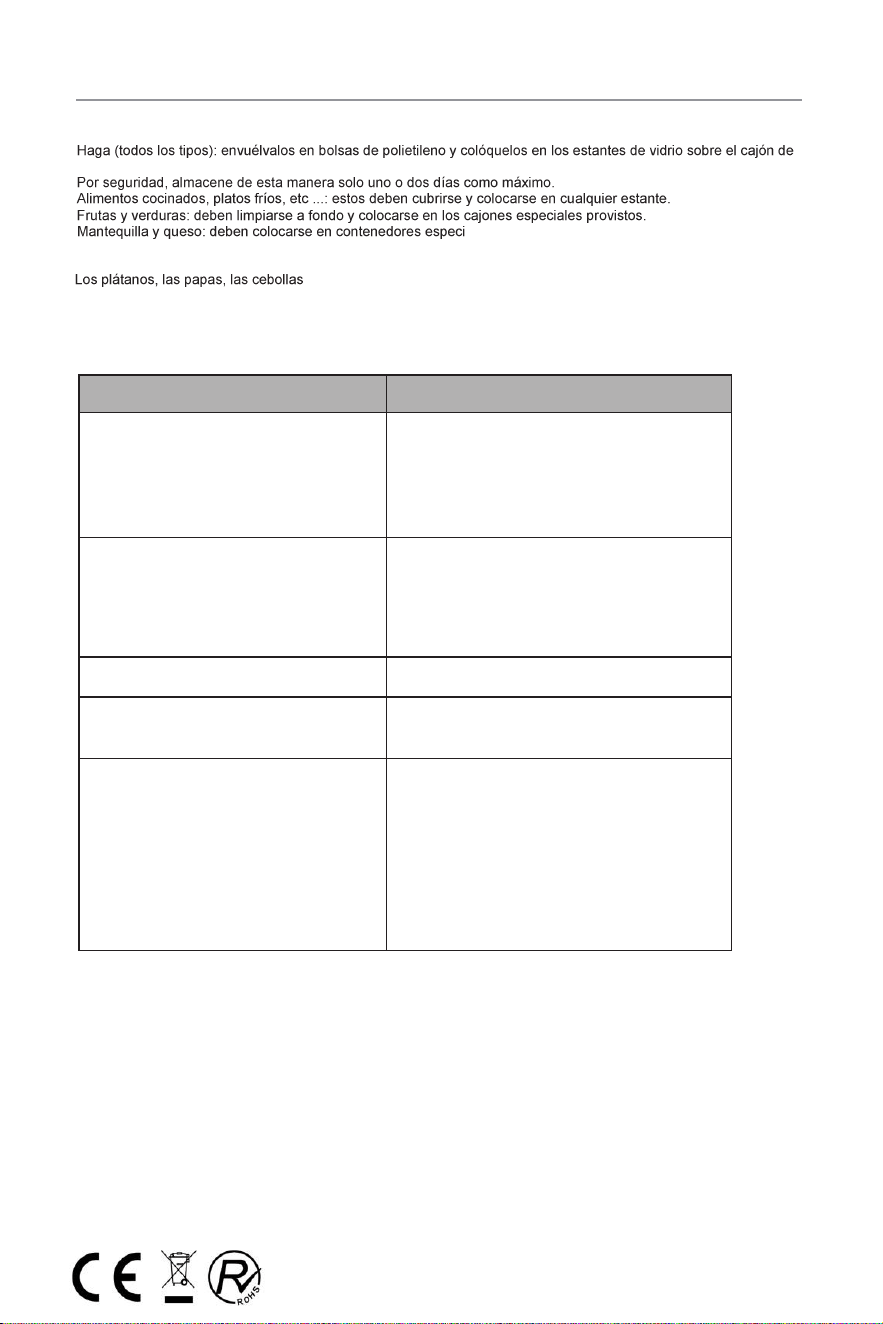
Coloque distintos alimentos en distintos compartimentos
correspondientes de acuerdo con la siguiente tabla
22
&
&RPSDUWLPHQWRV7LSRGHFRPLGD
%DOFRQHVGHOFRPSDUWLPLHQWRGHO
frigoríILFR
$OLPHQWRVFRQFRQVHUYDQWHVQDWXUDOHVFRPR
PHUPHODGDVMXJRV
EHELGDVFRQGLPHQWRV
1RDOPDFHQDUDOLPHQWRVSHUHFHGHURV
&DMµQSDUDYHUGXUDVFDMµQSDUD
HQVDODGDV
6HGHEHQFRORFDUIUXWDVKLHUEDV\YHUGXUDV
SRUVHSDUDGRHQHOFDMµQGHYHUGXUDV
1RDOPDFHQDUSO£WDQRVFHEROODVSDWDWDVR
DMRV
(VWDQWHGHQHYHUDPHGLR3URGXFWRVO£FWHRVKXHYRV
(VWDQWHGHOUHIULJHUDGRUVXSHULRU
$OLPHQWRVTXHQRQHFHVLWHQFRFFLµQFRPR
DOLPHQWRVOLVWRVSDUDFRPHU
&DMµQVHVWDQWHGHOFRQJHODGRU
$OLPHQWRVSDUDDOPDFHQDPLHQWRDODUJR
SOD]R
&DMµQLQIHULRUHVWDQWHSDUDFDUQHFUXGD
DYHVSHVFDGR
&DMµQHVWDQWHLQWHUPHGLRSDUDYHUGXUDV
FRQJHODGDVSDWDWDVIULWDV
&DMµQHVWDQWHVXSHULRUSDUDKHODGRVIUXWD
FRQJHODGDSURGXFWRVKRUQHDGRVFRQJHODGRV
Instalación
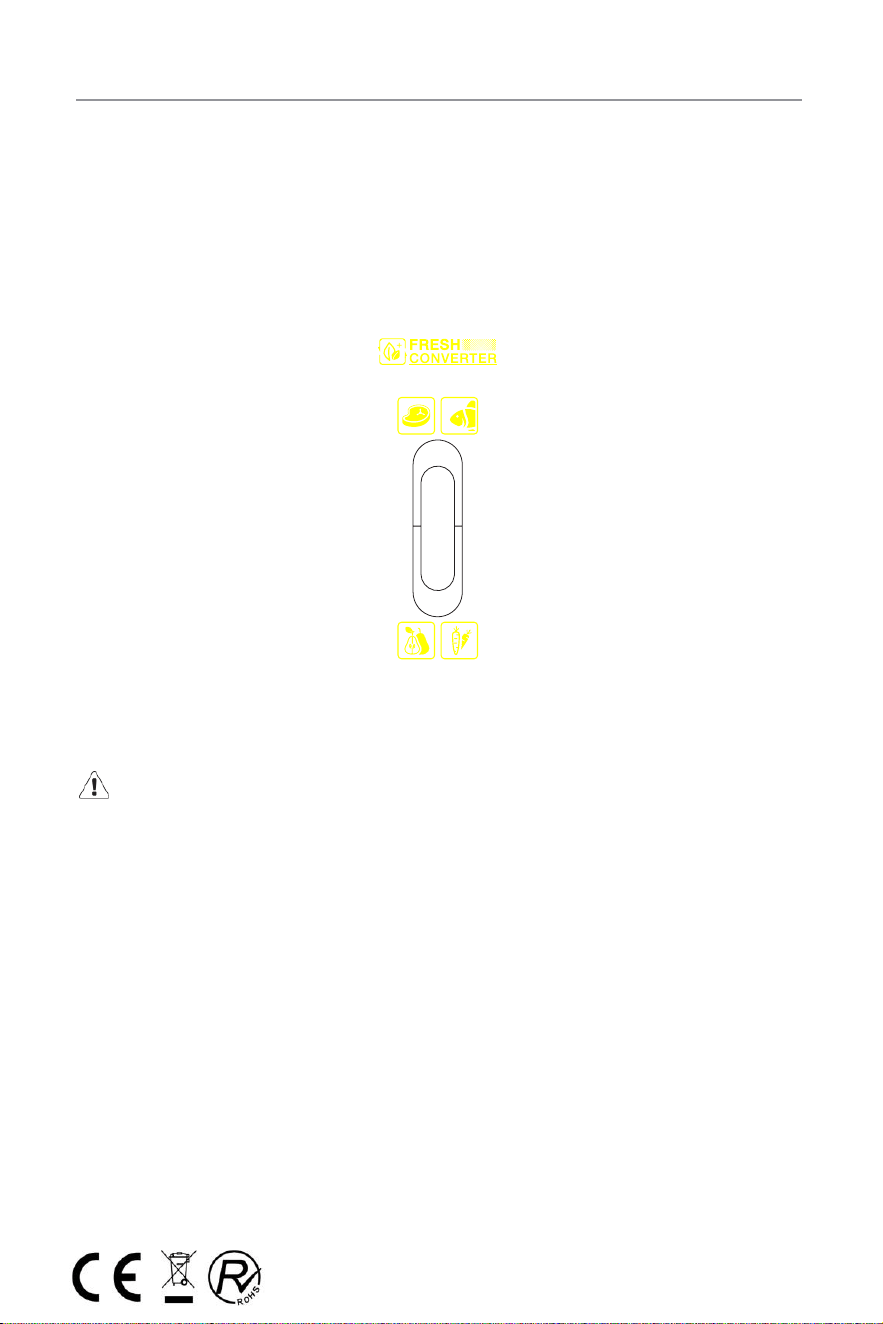
Control de temperatura del congelador
La temperatura del fresco se puede ajustar según el tipo de alimento de almacenamiento.
Presione la perilla hacia arriba desde la parte inferior, la temperatura en la zona fresca se reducirá
gradualmente.
Cuando el botón se coloca en la posición “CRISPER”, la zona fresca puede funcionar como zona más fresco y mantener la
temperatura y humedad adecuadas para frutas y verduras.
Cuando el botón se coloca en la posición " FRESH ", es adecuado para el almacenamiento a corto plazo
de pescado u otros alimentos frescos. La comida se mantendrá fresca pero no congelada, lo que la
convierte en la mejor opción para almacenar alimentos frescos.
Consejos: Cuando elija la función " FRESH ", se recomienda ajustar la temperatura del refrigerador por
debajo de 4 ° C. y conserva el plazo de entrega no más de 3 días, con el fin de mantener la mejor frescura.
Limpieza
Por razones de higiene, el interior del aparato, incluidos los accesorios interiores, debe limpiarse con regularidad.
Precaución!
Es posible que el aparato no esté conectado a la red eléctrica durante la limpieza. ¡Peligro de
descarga eléctrica! Antes de limpiar, apague el aparato y retire el enchufe de la red eléctrica, o apague o
apague el interruptor o fusible. Nunca limpie el aparato con un limpiador a vapor. ¡La humedad podría
acumularse en los componentes eléctricos, peligro de descarga eléctrica! Los vapores calientes pueden
provocar daños en las piezas de plástico. El aparato debe estar seco antes de volver a ponerlo en servicio.
Importante!
Los aceites etéreos y los disolventes orgánicos pueden atacar las piezas de plástico, por ej. El
jugo de limón o la forma de jugo de cáscara de naranja, ácido butírico, limpiador que contiene ácido acético.
No permita que dichas sustancias entren en contacto con las piezas del aparato.
No utilice limpiadores abrasivos.
Retire los alimentos del congelador. Guárdalos en un lugar fresco, bien cubierto.
Apague el aparato y retire el enchufe de la red eléctrica, o apague o apague el interruptor del fusible.
Limpie el aparato y los accesorios interiores con un paño y agua tibia. Después de limpiar, limpie con agua
fresca y frote en seco.
Después de que todo esté seco, vuelva a poner el aparato en servicio.
23
24

Anexo al manual de instrucciones
Esta lista proporciona todos los requisitos de Eco-design (según el
Reglamento (UE) 2019/2019 sobre Eco-design y el Reglamento (UE)
2019/2016 sobre etiquetado energético, si dichos requisitos son
aplicables a su producto.
Este frigorífico no ha sido diseñado para ser integrado en un mueble,
a no ser que se indique lo contrario en el manual de instrucciones.
Los cajones, cestas y estantes deben mantenerse en la posición
actual a no ser que se indique otra cosa en este documento.
Las puertas y tapas del frigorífico deberán retirarse antes de
desecharlo, para evitar que niños o animales puedan quedar
atrapados en su interior.
Ajustes recomendados:
Frigorífico: +4 ºC
Congelador: -18 ºC
CONGELACIÓN RÁPIDA
Se recomienda usar esta función cuando se coloque una gran
cantidad de alimentos para congelar en el congelador. 24 horas antes
de congelar alimentos frescos, pulse el botón "Fast Freeze" para
activar la función de congelación rápida. Cuando se active esta
función, se encenderá el indicador "Fast Freeze". Cuando hayan
transcurrido las 24 horas, coloque los alimentos a congelar en el
congelador. Esta función se desactiva automáticamente al cabo de 72
horas; también se puede desactivar manualmente pulsando el botón
"Fast Freeze".
25

ENFRIAMIENTO RÁPIDO
Con la función de enfriamiento rápido es posible aumentar la
capacidad de refrigeración del frigorífico. Se recomienda usar esta
función cuando se coloque una gran cantidad de alimentos en el
frigorífico. Para activar la función de enfriamiento rápido, pulse el
botón "Fast Cool". Cuando se active esta función, se encenderá el
indicador "Fast Cool". Esta función se desactiva automáticamente al
cabo de 6 horas; también se puede desactivar manualmente
pulsando el botón "Fast Cool".
Cómo almacenar los alimentos:
Para evitar el desperdicio de alimentos, consulte la configuración y los
tiempos de almacenamiento recomendados:
Frigorífico: Los diferentes alimentos, especialmente frutas y verduras,
tienen diferentes temperaturas de almacenamiento. El tiempo de
almacenamiento es de entre 1 y 3 días (con el ajuste de temperatura
"medio").
Congelador: 1 semana (ajuste de temperatura: Min) 1 mes (ajuste de
temperatura: Max)
Para optimizar la velocidad de congelación y obtener más espacio de
almacenamiento, el congelador se puede utilizar sin los cajones que
incorpora.
La cantidad de alimentos frescos que se pueden congelar en un
período de tiempo específico se indica en la placa de características
técnicas. Los límites de carga están determinados por las cestas, los
cajones, los estantes, etc. Asegúrese de que estos componentes
26
puedan cerrarse fácilmente después de introducir los alimentos.
Para evitar el desperdicio de alimentos, consulte la configuración y los
tiempos de almacenamiento recomendados en el manual del usuario.
La información sobre el modelo se puede obtener escaneando el
código QR impreso en la etiqueta energética.
Dicha etiqueta también incluye el identificador del modelo, que se
puede utilizar para consultar el portal de registro en:
https://eprel.ec.europa.eu
Este producto contiene una fuente de luz de clase de eficiencia
energética G (si está incluida).
27

Proceso correcto de desecho de este producto
28
Marca Corbero
Modelo
,ϭϴϱϮϭt / ,ϭϴϱϮϭy
Clase de energía
Certificación CE
Consumo anual de energía
Ϯϰ9kWh / año
Volumen útil refrigerador 219L
Volumen útil congelador 104L
Número de estrellas 4
Sistema de descongelación No-Frost
Potencia de descongelación 160W
Autonimía de mantenimiento 630min
Capacidad de congelación 6.4kg/24h
Clase climática
SN,N,ST
Nivel de ruido
ϰϬdB
Dimensiones
ϲϬϬdžϲϲϱdžϭϴϰϬmm
Tensión 220-240V
Corriente
ϬϵA
To ensure proper use of this appliance and your safety, please read
the instruction manual completely before operating this appliance.
Refrigerator Combi Two Doors with
Technology NO FROST
Freezer - Refrigerator
User Manual
CCH18521EWD
CCH18521EXD

!
"
#$
#
#
%
1

&'
%
(
)
or
other
process,
)
&
'
)
&'
)
*)
*'
2

)!
&+(,--'
)
(
(
.
/
(
0
(
0
(0
((
5
)
(
3
. &
'
qualified
3 4
3
*'
4
6
7 1
.
1
7
)
8
#
) "
/
/"
. !
)
)
*'
4

("
"
*'
.
recommendations
should be
+
) ""
"
!
*'
*'
*'"
2'(
9
#contact
systems.
#
: 0
;
( "( &
'
(" (
*'
" ("
5

= and
)>
)> the
<
*'
+! for
2'
*'"
2'(
9(((& they
' suitable
"
door
the
<
)
+
6
.1
5
& ('
7
.
1 of
qualified
"
# must
)
0
) air
0
7
&'0
7
"
?
.
!
as
taken
&'0
)&'10
)&'0
) !
0
1
=
1
8
)
6
)
*)
2#
During using, service and
disposal the appliance, please pay attention to
symbol similar as left side, which is located on
rear of appliance (rear panel or compressor) and
with yellow or orange color.
It’s risk of fire warning symbol. There are
flammable materials in refrigerant pipes and
compressor.
Please be far away fire source during using,
service and
disposal.
9
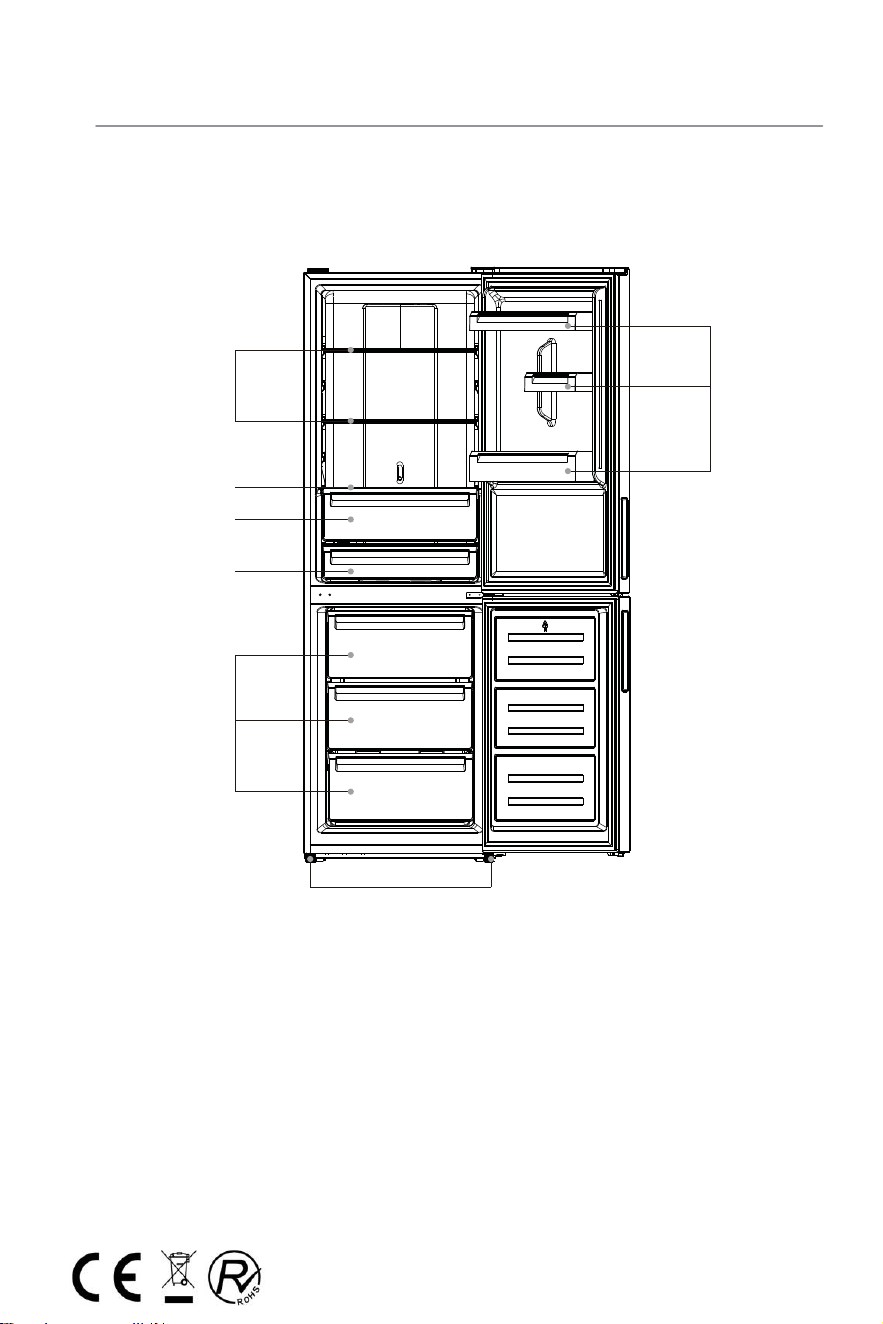
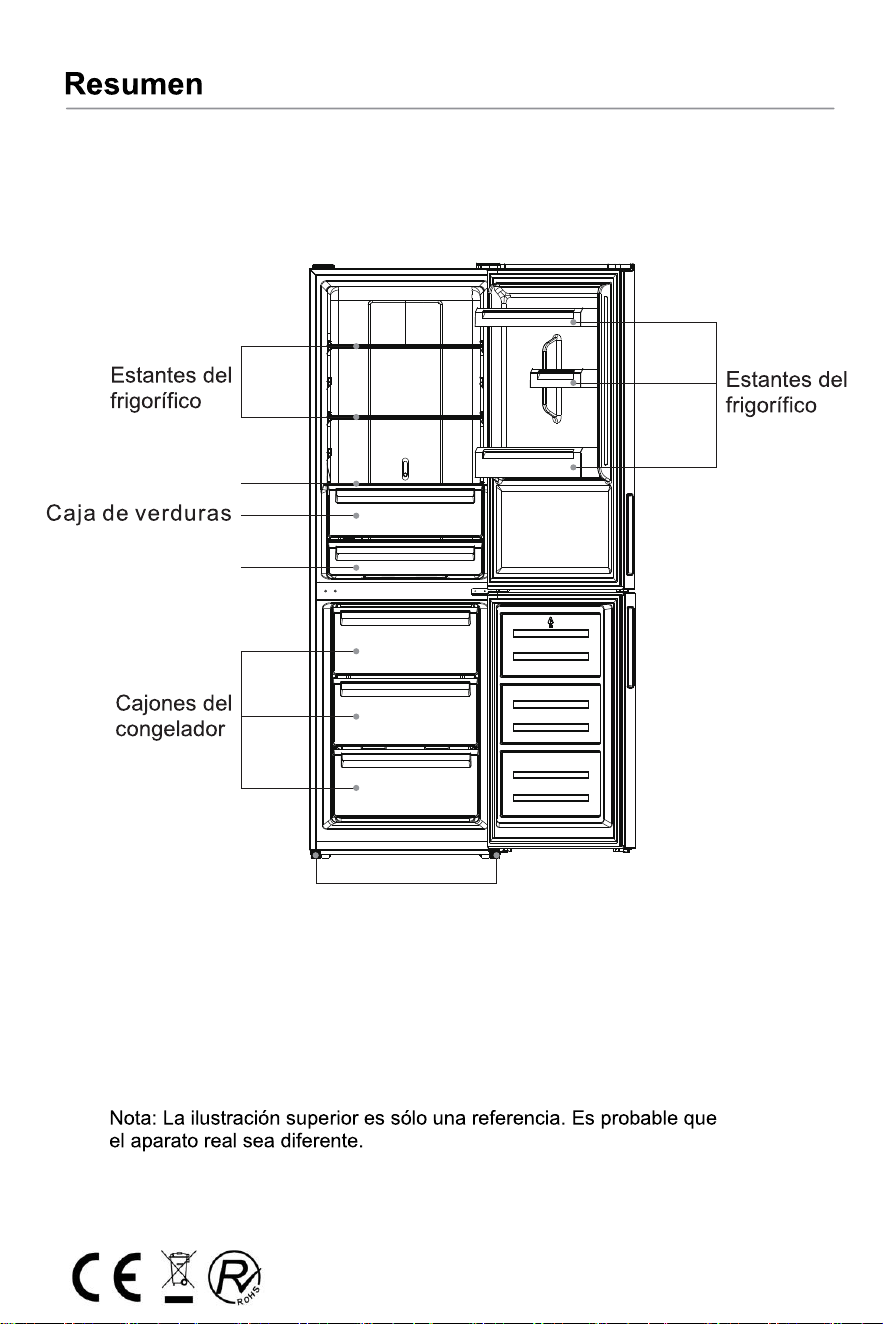
2YHUYLHZ
Note: Above picture is for reference only. Real appliance probably is different.
FridgeShelves
Fridge
Balconies
Crisper
Crisper Cover
Freezer Drawers
Leveling Feet
10
Fresh box

,QVWDOODWLRQ
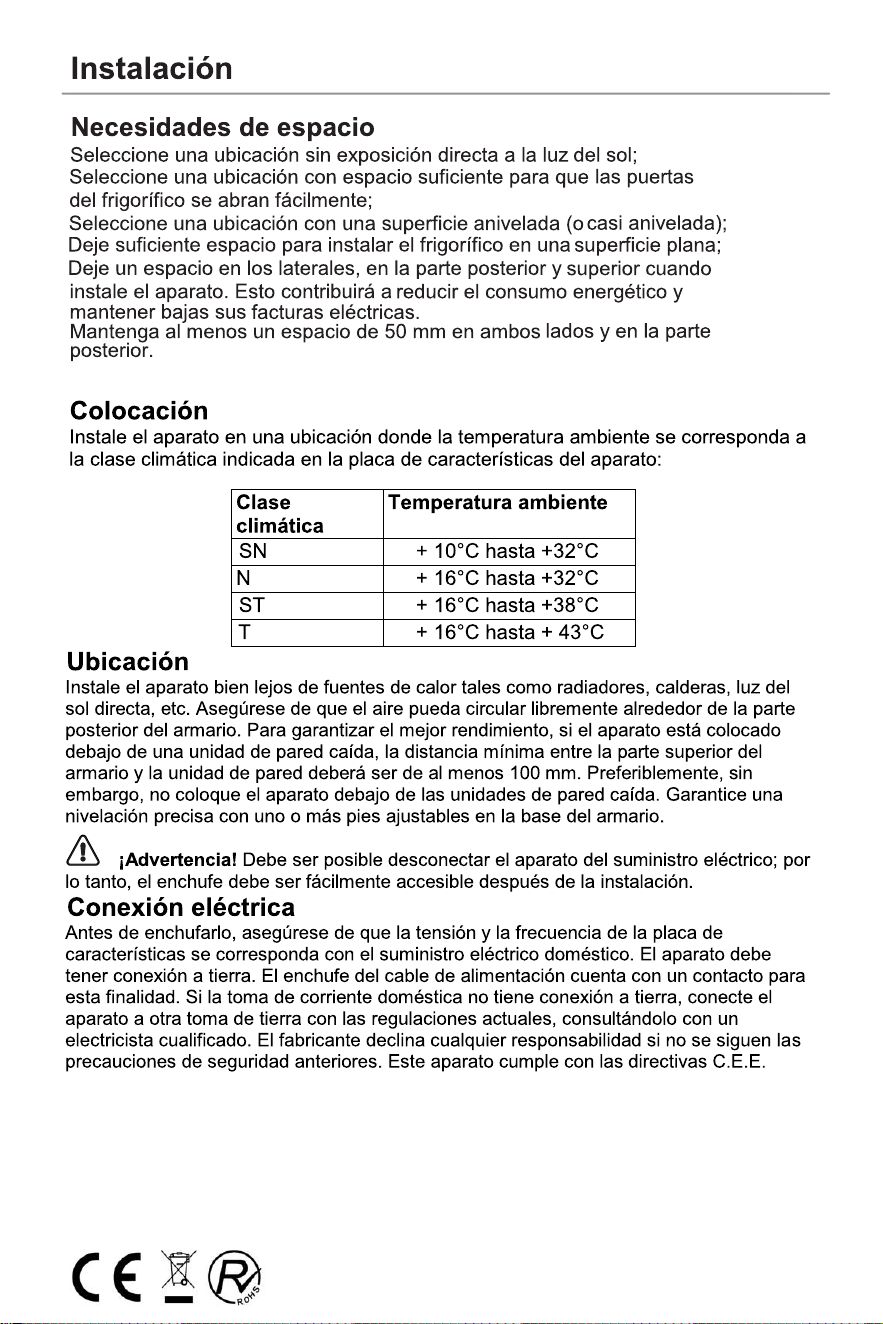
SpaceRequirement
y Select a location without direct exposure to sunlight;
y Select a location with enough space for the refrigerator doors to open
easily;
y Select a location with level (or nearly level) flooring;
y Allow sufficient space to install the refrigerator on a flat surface;
y Allow clearance to the right, left, back and top when installing. This
will help reduce power consumption and keep your energy bills lower.
y Keep at lest 50mm gap at two sides and back.
Positioning
Install this appliance at a location where the ambient temperature corresponds to the climate class
indicated on the rating plate of the appliance:
Climate class
Ambient temperature
SN
N
ST
T
+10 C to +32
oo
C
+16 C to +32
oo
C
+16 C to +38
oo
C
+16 C to +43
oo
C
Location
The appliance should be installed well away from sources of heat such as radiators, boilers, direct sunlight
etc. Ensure that air can circulate freely around the back of the cabinet. To ensure best performance, if the
appliance is positioned below an overhanging wall unit, the minimum distance between the top of the cabi-
net and the wall unit must be at least 100 mm. Ideally, however, the appliance should not be positioned
below overhanging wall units. Accurate leveling is ensured by one or more adjustable feet at the base of
the cabinet.
Warning! It must be possible to disconnect the appliance from the mains power supply; the plug must
therefore be easily accessible after installation.
Electrical connection
Before plugging in, ensure that the voltage and frequency shown on the rating plate correspond to your
domestic power supply. The appliance must be earthed. The power supply cable plug is provided with a
contact for this purpose. If the domestic power supply socket is not earthed, connect the appliance to a
separate earth in compliance with current regulations, consulting a qualified electrician.
The manufacturer declines all responsibility if the above safety precautions are not observed.
This appliance complies with the E.E.C. Directives.
11

,QVWDOODWLRQ
-$D&*.
Door Reversibility
'&)!8!%!,&)%!8
%!8!),!!)&
Left Aid-Closer on Upper Door x 1 Left Aid-Closer on Lower Door x 1
nscrew top hinge cover and disconnect connectors of door switch and harness.
2.Unscrew top hinge
3.Remove the pin with a screwdriver and filp the hinge bracket. Then refit the pin to hinge bracket
VOscrew
screw
12
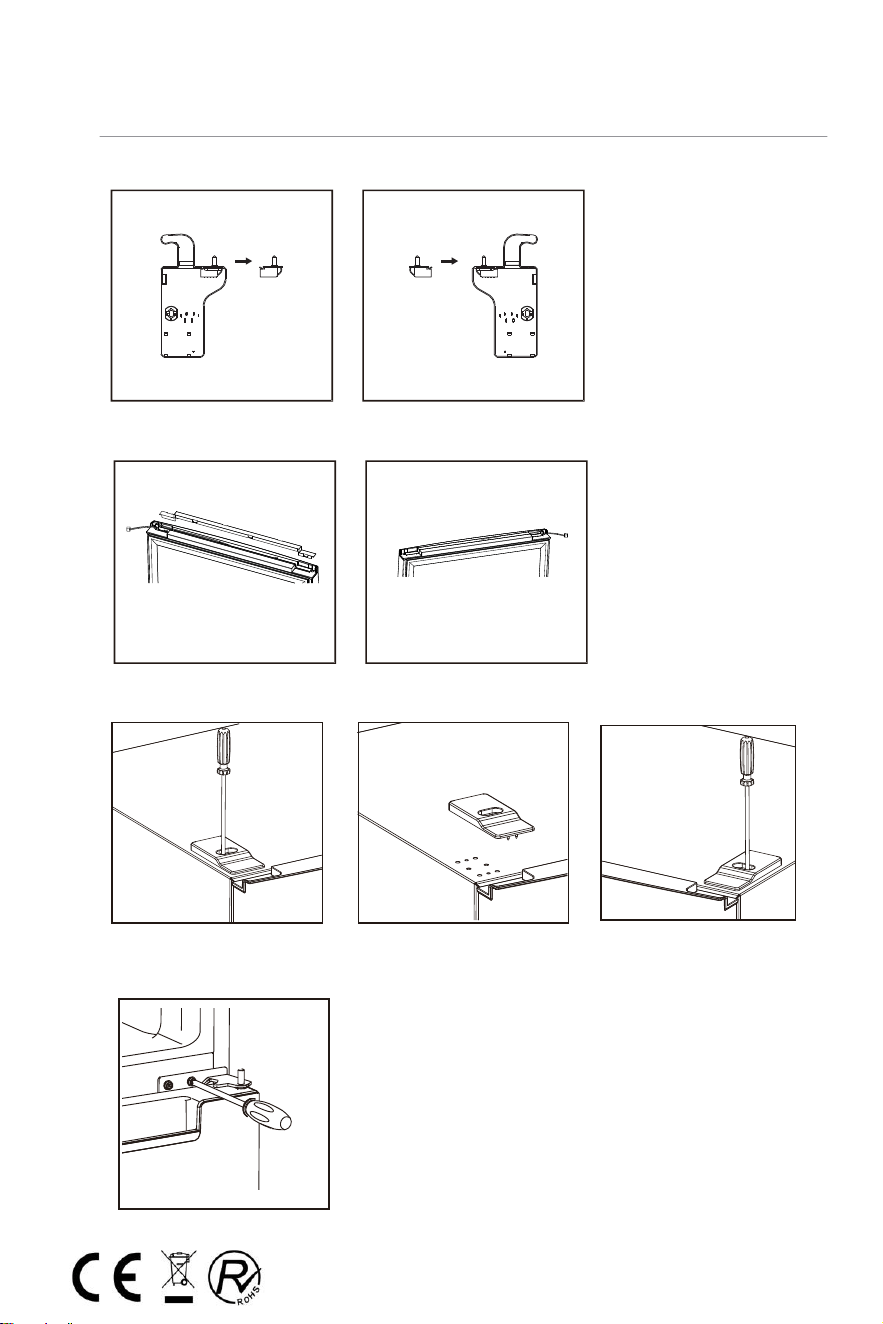
,QVWDOODWLRQ
5.Detach cover in top of upper door and move harness from right side to left side, then replace the cover.
6.Move top left cover to right side
7. Take off the upper door, take out the screw from the middle hinge by cross screwdriver,
then take off the lower door.
4.Move door switch from right hinge cover to left hinge cover in accessary bag.
13
,QVWDOODWLRQ
8 .
9. Unscrew bottom hinge. Then remove the adjustable feet from both side.
10. Unscrew and remove the bottom hinge pin, turn the bracket over and replace it.
unscrew
screw
14
,QVWDOODWLRQ
13.Detach the Fridge and the Freezer door gaskets and then attach them after rotating.
11.Refit the bracket fitting the bottom hinge pin. Replace both adjustable feet.
12.Remove aid-closers from bottom of upper and lower doors, then take new aid-closers from
accessary bag and install them to left side.
15

,QVWDOODWLRQ
15.Replace upper door, please ensure the door align with the cabinet to make sure door gasket seal
the cabinet tightly. Then connect door with cabinet by tightly fixed top hinge.
16.Connect harnesses from door and cabinet. Then replace top hinge cover. Before screw the cover,
connect terminals of door switch.
14. Install the lower door, adjust and fix the middle hinge onto the cabinet.
16
y
y
,QVWDOODWLRQ
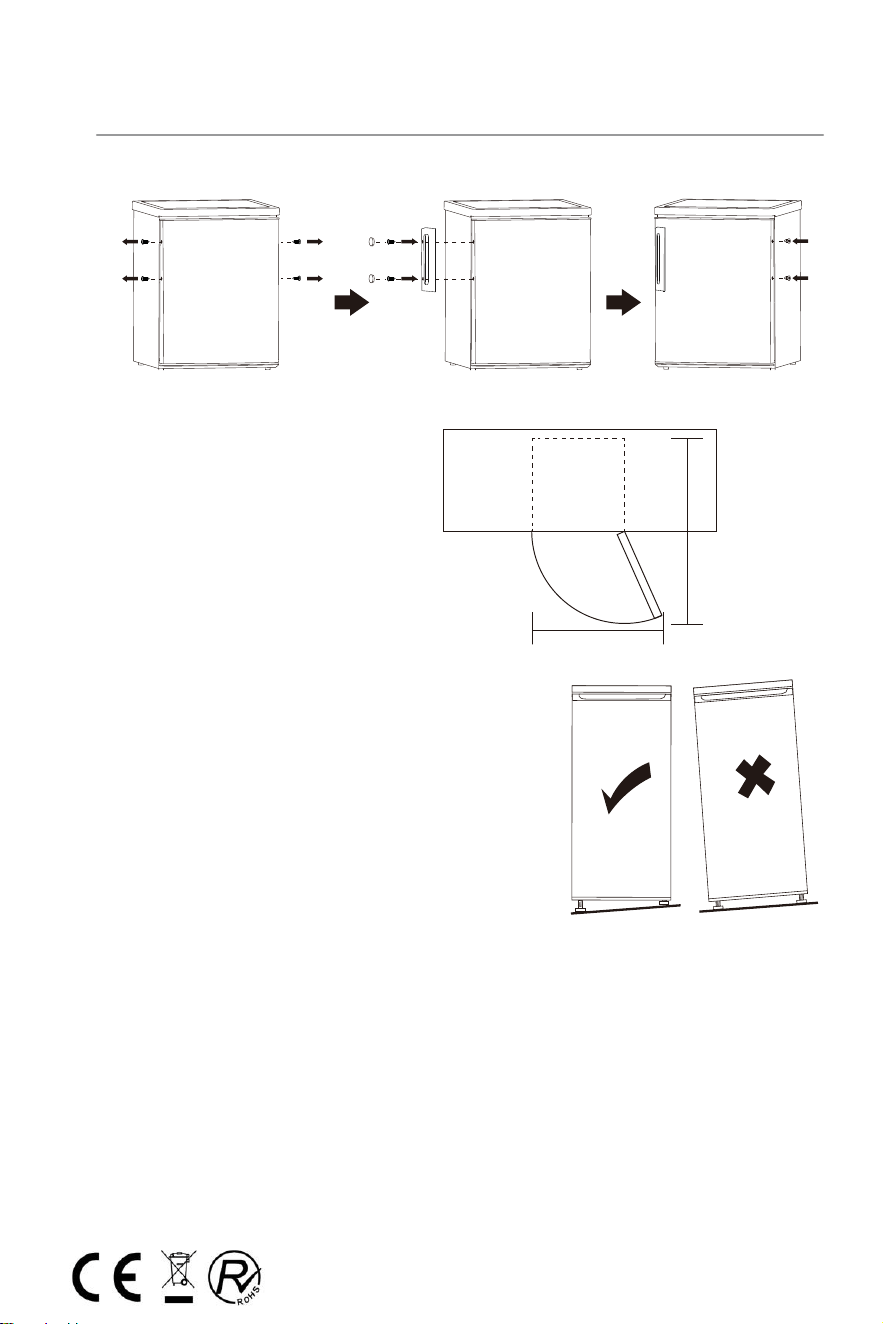
,QVWDOOGRRUH[WHUQDOKDQGOH(if external handle is present)
1007NN
1071NN
6SDFH5HTXLUHPHQW
Keep enough space of door open.
Keep at least 50mm gap at two sides.
To do this adjust the two levelling feet at front of the unit.
If the unit is not level, the doors and magnetic seal
alignments will not be covered properly.
/HYHOOLQJWKHXQLW
17
8VHULQWHUIDFH
Using the Control Panel
A.Temperature Control of Fridge Compartment
B.Temperature Control of Freezer Compartment
C.Mode/ Locking / Unlocking
1.1 BUTTON OPERATION
2.1.1The panel will be lit up for 2 minutes once the door of fridge compartment is opened.
2.1 DISPLAY
1.Temperature of Fridge Comparment
2.Temperature of Freezer Comparment
3.ECO Mode
4.Holiday Mode
5.Super Mode
6.Locking / Unlocking
1.2 LED DISPLAY
a.The control panel is 100% lit up for 3 seconds, which operates exac
tly as per the setting
(mode and temperature) before the poweroff.
The system will be automatically locked 25
seconds after the last
button
operation. After locking, the light of the panel would be out 30
s
econds after the last
button operation.
b.Both preset temperatures of fridge compartemnt
and freezer compartment would be shown
on the display.
2.0 OPERATING CONDITION
1
2
A
B
C
3
4
5
6
18

8VHULQWHUIDFH
2.1.2 The panel will be lit up by any button operation whereas the light would be out 2 minutes
after the last operation.
2.1.3 Display during normal operation
Temperature Display of the Fridge Compartment: Indicating the temperature of the
current setting.
Temperature Display of the Freezer Compartment: Indicating the temperature of the
current setting.
3.0 ILLUSTION OF THE BUTTON
3.1 Temperature Control of the Fridge Compartment
Temperature Control of the Fridge Compartment:
This button is workable both in User Defined Mode as well as Super Mode. After entering
the temperature control of the fridge compartment, this button flashes.
By touching the key consecutively, the temperature would change in a circle of “2°C, 3°C,
4°C, 5°C, 6°C, 7°C, 8°C, after which 5-second flashing means the selection of temperature
is settled.
3.2 Temperature Control of the Freezer Compartment
This button is workable both in User Defined Mode as well as Holiday Mode. After entering the
temperature control of the freezer compartment, the button flashes.
By touching the button consecutively, the temperature would change in a circle from -14°C to -22°C,
after which a 5-second flashing means the selection of temperature is settled.
3.3 Mode
By touching this button consecutively, the operation mode of the refrigerator will change in a
circle of “ECO Mode-Holiday Mode-Super Mode-User Defined Mode. A 5-second flashing means the
selection of temperature is settled.
3.4 Press Button
Short beep after per press button
All buttons will only valid under unlock mode.
3.5 Lock / Unlock
Press MODE button and hold for 3 seconds to lock other two buttons,
then the LOCK icon will be at lock situation after a beep.
To unlock, press MODE button and hold for 3 seconds, then LOCK icon
will be at unlock situation after a beep. In unlock situation, all buttons are
workable.
If no any operation in 25 seconds, the display will be locked
automatically. Keep press “MODE” button to unlock the display.
19

8VHULQWHUIDFH
4.1 Holiday Mode
4.2 Super mode
4.0 ECO mode
Press MODE bottom to choose ECO mode. After 5 seconds of flash, ECO icon will keep bright
and ECO mode is confirmed.
In ECO mode, the refrigerator will automatically set temperature of fridge compartment at 5°C,
as temperature of freezer compartment at -18°C. Except MODE button, other buttons will not
response any press.
Press MODE button to exit ECO mode.
Press MODE button to choose Holiday mode. After 5 seconds of flash, Holiday mode icon will keep
bright and Holiday mode is confirmed.
In Holiday mode, temperature of fridge will be set at 17°C. “FRIDGE” button will not response any
press.
Press “MODE” button to exit Holiday mode.
Press MODE button to select Super mode. And it will be confirmed after 5 seconds of flash of
Super icon.
In Super mode, “FREEZER” button will not response any press.
To exit Super mode,
- Adjust mode by MODE button,
- Or after 50 hours of Super mode, the refrigerator will automatically stop it and enter to
previous setting.
Helpful hint:
If you plan to freeze a large number food in one time, please set Super mode 24 hours ahead.
Warning:
In Super mode, the refrigerator will work hard. So the noise of refrigerator will be slightly
higher than normal running.
5.0 Door Open Alarm
If fridge (upper) door keeps open for 90 seconds, periodical alarm will be arisen until the door is
closed.
20
'DLO\8VH'DLO\8VH
First use
Cleaning the interior
Before using the appliance for the first time, wash the interior and all internal accessories with lukewarm
water and some neutral soap so as to remove the typical smell of a brand new product, then dry thoroughly.
Important! Do not use detergents or abrasive powders, as these will damage the finish.
Position different food in different compartments according to below table
21
Refrigerator compartments
Type of food
Door or balconies of fridge
compartment
Foods with natural preservatives, such as jams,juices,
drinks, condiments.
Do not store perishable foods.
Fruits, herbs and vegetables should be placed
separately in the crisper bin.
Do not store bananas, onions, potatoes, garlic in
Crisper drawer (salad drawer)
Fridge shelf –
middle
Dairy products, eggs
Fridge shelf – to
p
Foods that do not need cooking, such as ready-to-eat foods,
deli meats, leftovers.
Foods for long-term storage.
Bottom drawer/shelf for raw meat, poultry, fish.
Middle drawer/shelf for frozen vegetables, chips.
Top drawer/shelf for ice cream, frozen fruit, frozen
Freezer drawer(s)/shelf

'DLO\8VH'DLO\8VH
Daily use
Freezing fresh food
y The freezer compartment is suitable for freezing fresh food and storing frozen and deep-frozen food for
a long time.
y Place the fresh food to be frozen in the bottom compartment.
y The maximum amount of food that can be frozen in 24 hours is specified on the rating plate.
y The freezing process lasts 24 hours: during this period do not add other food to be frozen.
Storing frozen food
When first starting-up or after a period out of use. Before putting the product in the compartment let the
appliance run at least 2 hours on the higher settings.
Important! In the event of accidental defrosting, for example the power has been off for longer than the
value shown in the technical characteristics chart under “rising time”, the defrosted food must be
consumed quickly or cooked immediately and then re-frozen (after cooked).
Thawing
Deep-frozen or frozen food, prior to be used, can be thawed in the freezer compartment or at room
temperature, depending on the time available for this operation.
Small pieces may even be cooked still frozen, directly from the freezer. In this case, cooking will take
longer.
Helpful hints and tips
Hints for freezing
To help you make the most of the freezing process, here are some important hints:
y the maximum quantity of food which can be frozen in 24 hrs. is shown on the rating plate;
y the freezing process takes 24 hours. No further food to be frozen should be added during this period;
y only freeze top quality, fresh and thoroughly cleaned, foodstuffs;
y prepare food in small portions to enable it to be rapidly and completely frozen and to make it possible
subsequently to thaw only the quantity required;
y wrap up the food in aluminium foil or polythene and make sure that the packages are airtight;
y do not allow fresh, unfrozen food to touch food which is already frozen, thus avoiding a rise in
temperature of the latter;
y lean foods store better and longer than fatty ones; salt reduces the storage life of food;
y water ices, if consumed immediately after removal from the freezer compartment, can possibly cause
the skin to be freeze burnt;
y it is advisable to show the freezing in date on each individual pack to enable you removal from the
freezer compartment, can possibly cause the skin to be freeze burnt;
y it is advisable to show the freezing in date on each individual pack to enable you to keep tab of the
storage time.
Hints for storage of frozen food
To obtain the best performance from this appliance, you should:
make sure that the commercially frozen foodstuffs were adequately stored by the retailer;
be sure that frozen foodstuffs are transferred from the food store to the freezer in the shortest possible
time;
not open the door frequently or leave it open longer than absolutely necessary.
Once defrosted, food deteriorates rapidly and cannot be refrozen.
Do not exceed the storage period indicated by the food manufacture.
Hints for fresh food refrigeration
To obtain the best performance:
y Do not store warm food or evaporating liquids in the refrigerator
y Do cover or wrap the food, particularly if it has a strong flavour
22

'DLO\8VH'DLO\8VH
Cleaning
For hygienic reasons the appliance interior, including interior accessories, should be cleaned regularly.
Caution! The appliance may not be connected to the mains during cleaning. Danger of electrical
shock! Before cleaning switch the appliance off and remove the plug from the mains, or switch off or
turn out the circuit breaker or fuse. Never clean the appliance with a steam cleaner. Moisture could
accumulate in electrical components, danger of electrical shock! Hot vapors can lead to the damage
of plastic parts. The appliance must be dry before it is placed back into service.
Important! Ethereal oils and organic solvents can attack plastic parts, e.g. lemon juice or the juice form
orange peel, butyric acid, cleanser that contain acetic acid.
y Do not allow such substances to come into contact the appliance parts.
y Do not use any abrasive cleaners
y Remove the food from the freezer. Store them in a cool place, well covered.
y Switch the appliance off and remove the plug from the mains, or switch off or turn out the circuit breaker
of fuse.
y Clean the appliance and the interior accessories with a cloth and lukewarm water. After cleaning wipe
with fresh water and rub dry.
y After everything is dry place appliance back into service.
Hints for refrigeration
Useful hints:
y Make (all types): wrap in polythene bags and place on the glass shelves above the vegetable drawer.
y For safety, store in this way only one or two days at the most.
y Cooked foods, cold dishes, etc...: these should be covered and may be placed on any shelf.
y Fruit and vegetables: these should be thoroughly cleaned and placed in the special drawer(s) provided.
y butter and cheese: these should be placed in special airtight containers or wrapped in aluminum foil or
polythene bags to exclude as much air as possible.
y Milk bottle: these should have a cap and should be stored in the balconies on the door.
y Bananas, potatoes, onions and garlic, if not packed, must not be kept in the fridge.
Fresh Zone Temperature Control
y
$!% & "%#
y ' ( %!!)!% "#
y *(%+,-.'/-+%)
%!%%%!% !" 0#
y *(%+FRESH +%) !
#$(% !(#
y $%3*" +FRESH + )!!!%
4,#%0!!")(%#
23

'DLO\8VH'DLO\8VH
*
,A
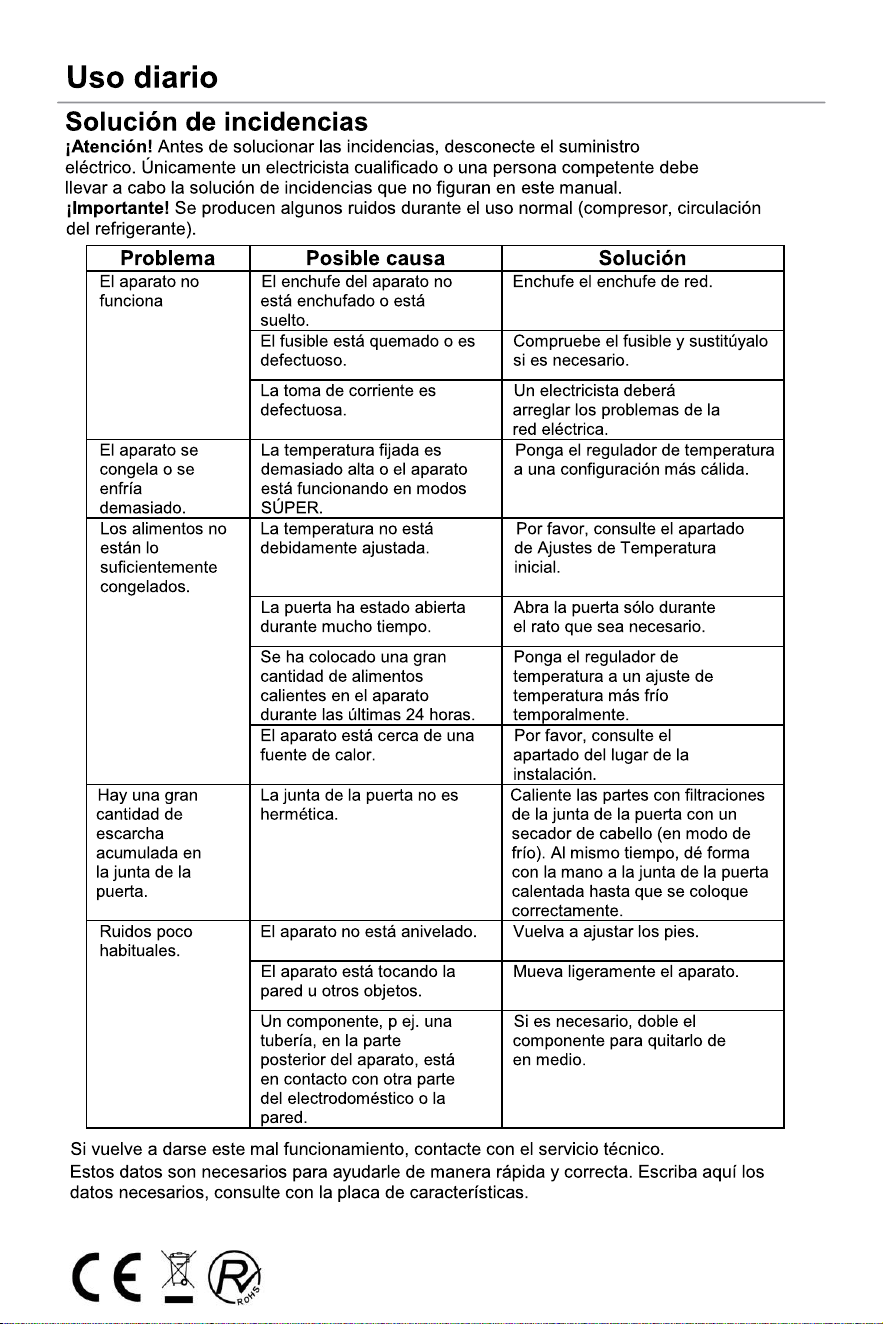
Troubleshooting
Caution! Before troubleshooting, disconnect the power supply. Only a qualified electrician of
competent person must do the troubleshooting that is not in this manual.
Important! There are some sounds during normal use (compressor, refrigerant circulation).
Appliance dose not
work
Mains plug is not plugged in
or is loose
Check fuse, replace if necessary.
Socket is defective
Mains malfunctions are to be
corrected by an electrician.
Problem
Solution
Fuse has blown or is defective
Insert mains plug.
Appliance freezes or
cools too much
Turn the temperature regulator to a
warmer setting temporarily.
Unusual noises
Appliance is not level.
The appliance is touching the
wall or other objects.
Re-adjust the feet.
Move the appliance slightly.
A component, e.g. a pipe, on
the rear of the appliance is
touching another part of the
appliance or the wall.
If necessary, carefully bend the
component out of the way.
Door seal is not air tight.
Heavy build up of
frost on the door
seal.
Carefully warm the leaking sections of
the door seal with a hair dryer (on a cool
setting). At the same time shape the
warmed door seal by hand such that it
sits correctly.
Temperature is not properly
adjusted.
Please look in the initial Temperature
Setting section.
Door was open for an extended
period.
Open the door only as long as
necessary.
A large quantity of warm food
was placed in the appliance
within the last 24 hours.
Turn the temperature regulation to
a colder setting temporarily.
The food is not frozen
enough.
Please look in the installation
location section.
The appliance is near a heat
source.
Temperature is set too cold
or the appliance runs at Super
modes.
Possible cause
If the malfunction shows again, contact the Service Center.
These
data are necessary to help you quickly and correctly.
Write
the necessary data here, refer to the
rating
plate.
;
<9
.
24

Manual Leaflet
This list provides all Eco-design requirements (following the
(EU)2019/2019 Eco-design and (EU)2019/2016 Energy labelling) ,
if the requirement is applicable to your product.
The refrigerating appliance is not intended to be used as a built-in
appliance, unless specifically shown as such into its instruction
manual.
The drawers, baskets and shelves should be kept in their current
position unless otherwise specified in this document.
Doors and lids of the refrigeration appliance should be removed
before disposal in the landfill, to avoid children or animals getting
trapped inside.
Recommended setting:
Refrigerator compartment: +4ºC
Freezer compartment: -18ºC
FAST FREEZE
The use of this function is recommended when placing a very high
quantity of food to be frozen in the freezer compartment. 24 hours
before freezing fresh food, press the Fast Freeze button to activate
the Fast Freeze function. When activated, the Fast Freeze indicator
turns on. After 24 hours place the food to be frozen in the freezing
zone of freezer compartment. The function is automatically disabled
after 72 hours, or can be manually disabled by pressing Fast Freeze
button.
FAST COOL
Using Fast Cool function it is possible to increase the cooling capacity
25

in the refrigerator compartment. The use of this function is
recommended when placing a very high quantity of food in the
refrigerator compartment. Press the Fast Cool button to activate Fast
Cool function. When activated, the Fast Cool indicator turns on. The
function is automatically disabled after 6 hours, or can be manually
disabled by pressing Fast Cool button again.
How to store foodstuffs:
To avoid food waste, please refer to the recommended setting and
storage times:
Fridge compartment: Different food, especially vegetable and fruit,
have different storage temperature. The storage time is 1 to 3 days
(temp setting: middle)
Freezer compartment: 1 week (temp setting: Min) and 1 month (temp
setting: Max)
To optimize freezing speed and get more storage space, the freezer
compartment can be used without the freezer drawers.
The quantity of fresh food that can be frozen in a specific time period
is indicated on the rating plate. Load limits are determined by baskets,
flaps, drawers, shelves etc. Make sure that these components can still
close easily after loading.
To avoid food waste, please refer to the recommended setting and
storage times found in the user manual.
The model information can be retrieved using the QR-Code reported
in the energy label.
The label also includes the model identifier that can be used to consult
the portal of the registry at
26

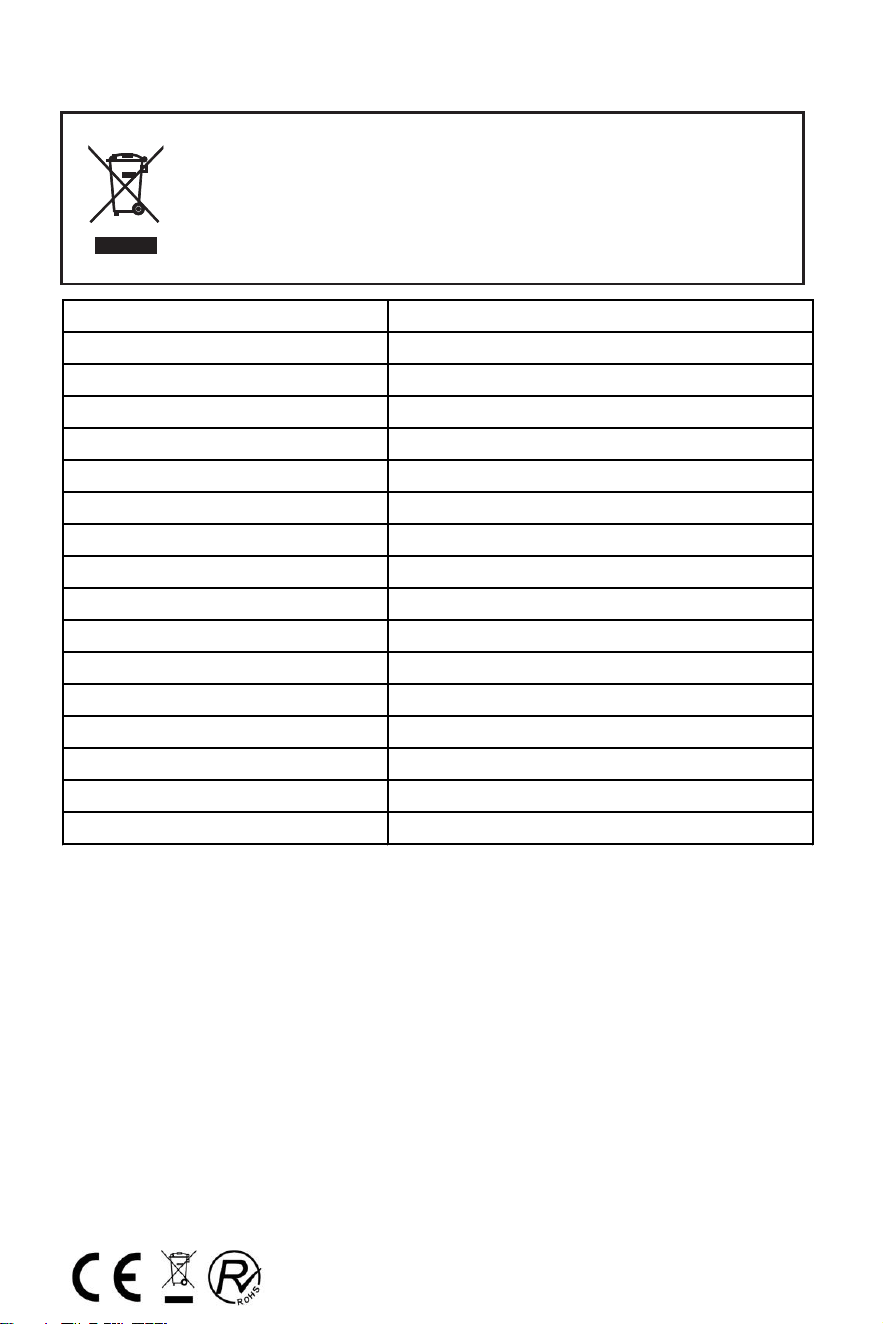
Correct disposal process of this product
According to the directive Waste of Electrical and Electronic
Equipment (WEEE), the waste WEEE must be collected and
treated separately. If in the future you need to dispose of this
product DO NOT put it with household waste, send it to the
WEEE collection points if they exist.
28
Brand Corbero
Model
,ϭϴϱϮϭt / ,ϭϴϱϮϭy
Energy Class
Certification CE
Yearly Energy Consumption
ϮϰϵkWh / year
Net Volume Refrigerator 219L
Net Volume Freezer 104L
No. of Stars 4
Defrosting System No-Frost
Defrosting Power 160W
Autonomy for Black Out 630min
Freezing Capacity 6.4kg/24h
Climatic Class
SN,N,ST
Noise Level
ϰϬdB
Overall Dimensions
ϲϬϬdžϲϲϱdžϭϴϰϬmm
Rated Voltage 220-240V
Rated Current
ϬϵA

CERTIFICADO DE GARANTÍA
Imprescindible la presentación de la factura de compra acompañada del presente certificado de garantía.
Riesgos cubiertos.
Este aparato está garantizado contra cualquier defecto de funcionamiento, siempre que se destine a uso doméstico,
procediéndose a su reparación dentro del plazo de garantía y sólo por la red de SAT autorizados.
Nuestros electrodomésticos Corberó cuentan con la garantía legal del fabricante que cubre cualquier avería o defecto durante36
meses, desde su fecha factura de 1 de enero del 2022. En caso de que fuera necesario, nosotros nos ocupamos de cualquier posible
incidencia siempre que se deba a un componente defectuoso o fallo de fabricación.
Excepciones de garantía.
• Que la fecha del certificado no coincida con la fecha de venta de la factura original.
• Averías producidas por golpe, por caída o cualquier otra causa de fuerza mayor.
• Si el apa
rato ha sido manipulado por personal no autorizado.
• Las averías producidas o derivadas como consecuencia de un uso inadecuado, por defectos de instalación,
por introducir modificaciones en el aparato que alteren su funcionamiento.
• Puestas en marcha, mantenimiento, limpiezas, componentes sujetos a desgaste, lámparas, piezas estéticas,
oxidaciones, plásticos, gomas, carcasas y cristales.
“ESTAS EXCEPCIONES ANULAN LA GARANTÍA, SIENDO LA REPARACIÓN CON CARGO AL CLIENTE”
Periodo amparado en aparatos según ley de garantias en la venta de bienes de consumo Ley vigente es “RD 7/2021”
Horario de atención Lunes a Viernes de 9h00 a 19h00. Teléfono de contacto_ 911 08 08 08 Mail de contacto_ [email protected] web_ www.corbero.es
Dirección de Servicio técnico oficial_Vidal i Ribes 8-10 08950 Esplugues de Llobregat Barcelona
Sevicio Técnico Oficial: 911 08 08 08
Los hornos microondas (a excepción de los integrables) y los hornos sobremesa en el caso de cualquier incidencia de
funcionamiento, deben de llevarse al servicio técnico más próximo por parte del cliente. No se recojen ni reparan en el
domicilio.
•
Garantía termos eléctricos. Garantía de 3 años incluyendo los costes de desplazamiento y mano de obra que
correspondan de la reparación del producto, teniendo que tener un mantenimiento una vez cada 12 meses.
Especialmente si Ud. ha instalado un aparato a gas, tenga presente como titular de la instalación, la obligatoriedad de
realizar una revisión completa de los equipos, (según Real Decreto 238 / 2013, del 5 Abril. RITE. IT3, M. Lo termos
eléctricos y calderas que incluyen depósitos acumuladores de agua caliente, para que se aplique la prestación de la
Garantía, es obligatorio que el ánodo de magnesio esté operativo y que realice la función de protección
adecuadamente. Para ello es recomendable que el ánodo se revise bianualmente por el Servicio Oficial y sea renovado
cuando fuera necesario. Periodicidad que deberá ser anual en aquellas zonas con aguas críticas (contenido de CaCO3
superiores a 200mg/L, es decir a partir de 20ºfH de dureza). Depósitos sin el correcto estado del ánodo de protección, no
tienen la cobertura de la garantía. Independientemente del tipo de depósito o producto, todas las válvulas de
sobrepresión de calefacción o a.c.s., deberán ser canalizadas para evitar daños en Ia vivienda por descargas de agua. La
garantía del producto no asume los daños causados por Ia no canalización del agua derramada por esta válvula.
•

CERTIFICATE OF GUARANTEE
The presentation of the purchase invoice accompanied by this guarantee certificate is essential.
Covered Risks.
This appliance is guaranteed against any malfunction, provided that it is intended for domestic use, proceeding to its repair within
the warranty period and only by the authorized SAT network.
Our Corberó appliances have the manufacturer's legal warranty that covers any breakdown or defect for 36 months, from the
invoice date of January 1, 2022. If necessary, we take care of any possible incident whenever it is due to a defective component or
manufacturing fault. Warranty Exceptions
Warranty Exceptions
•
That the date of the certificate does not coincide with the date of sale of the original invoice.
•
Faults produced by blow, by fall or any other cause of force majeure.
•
If the device has been manipulated by unauthorized personnel.
•
Faults produced or derived as a consequence of improper use, installation defects, or modifications to the device that
alter its operation.
•
Start-up, maintenance, cleaning, components subject to wear, lamps, aesthetic parts,
oxidation, plastics, rubbers, housings and crystals.
“THESE EXCEPTIONS VOID THE WARRANTY, THE REPAIR BEING CHARGED TO THE CUSTOMER”
Period covered in devices according to the law of guarantees in the sale of consumer goods Current law is “RD 7/2021”
Hours of operation Monday to Friday from9h00 a 19h00. Telephone contact_ 911 08 08 08 Contact email_ [email protected] web_ www.corbero.es
Official Technical Service Address_Vidal i Ribes 8-10 08950 Esplugues de Llobregat Barcelona
Official Technical Service: 911 08 08 08
Microwave ovens (with the exception of built-in ones) and tabletop ovens in the event of any incident of
operation, they must be taken to the nearest technical service by the customer. They are not collected or repaired at
home.
•
Electric thermos guarantee. 3-year warranty including travel and labor costs that correspond to the repair of the
product, having to have maintenance once every 12 months. Especially if you have installed a gas appliance, keep in
mind as the owner of the installation, the obligation to carry out a complete review of the equipment, (according to
Royal Decree 238 / 2013, of April 5. RITE. IT3, M. Lo thermos electrical and boilers that include hot water storage tanks,
for the benefit of the Guarantee to apply, it is mandatory that the magnesium anode is operational and that it performs
the protection function adequately.For this, it is recommended that the anode be checked biannually by the Official
Service and is renewed when necessary Periodicity that must be annual in those areas with critical waters (CaCO3
content greater than 200mg/L, that is, from 20ºfH of hardness) Deposits without the correct state of the protection
anode are not covered by the warranty Regardless of the type of tank or product, all heating or DHW overpressure
valves must be channeled to avoid damage and n the house due to water discharges. The product warranty does not
cover damages caused by not channeling the water spilled by this valve.
•