Warranty
LIMITED LIFETIME FOR MECHANICAL AND 1 YEAR FOR ELECTRONICAL WARRANTY
The retailer of this product, hereby warrants, subject to the conditions set forth below, that it will either repair or
replace, at its option, this product if it proves to be defective by reason of improper workmanship or materials
within the original purchaser’s lifetime. In order to obtain repairs or replacement under this limited warranty
you must bring this product to the retailer’s store in which you bought it.
Original purchaser: This limited warranty is limited to the original purchaser at retail of this product from retailer.
Except to the extent prohibited by applicable law, no other warranties, whether express or implied, including
the warranties of merchantability and tness for a particular purpose, shall apply to this product. Under no
circumstances shall retailer be liable for consequential or incidental damages in connection with this product. To
the extent retailer is prohibited by applicable law from excluding implied warranties, the duration of such implied
warranties which are not excludable shall be the original purchaser’s lifetime. Some states do not allow the
limitation on how long an implied warranty lasts, so the above limitation on the duration of implied warranties
which are not excludable, if any, may not apply to you. Some states do not allow the exclusion or limitation
of incidental or consequential damages, so the above limitation or exclusion of incidental or consequential
damages may not apply to you. Retailer neither assumes nor authorizes any representative or other person to
assume for it any obligation or liability other than such as is expressly set forth herein. This limited warranty
gives you specic legal rights, and you may also have other rights which vary from state to state.
Questions, problems, missing parts? Before returning to the store,
call Deant Customer Service
8 a.m. - 7 p.m., EST, Monday-Friday, 9 a.m. - 6 p.m., EST, Saturday
1-866-308-3976
HOMEDEPOT.COM
INSTALLATION GUIDE
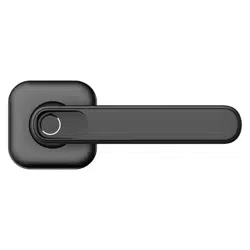
FINGERPRINT LEVER LOCK
LH01
Rev. 1.0
THANK YOU
We appreciate the trust and confidence you have placed in Defiant through the purchase of this fingerprint lever lock.
We strive to continually create quality products designed to enhance your home. Visit us online to see our full line of
products available for your home improvement needs. Thank you for choosing Defiant!
Safety Information
Read the precautions and instructions in this manual before installing and using this lock. Save this
manual for future reference.
Do not attempt to disassemble any internal components of the lockset. Doing so will void the limited
warranty.
Do not drop or hit the lockset. Too much shock may result in permanent damage.
Using pin tool or sharp objects to press the ngerprint sensor may cause damage.
This ngerprint lever lock is for interior door use only.
Restrict access to your lock’s interior assembly and routinely check your settings to ensure they have
not been altered without your knowledge.
Do NOT install ngerprint side (exterior) on the inside of an exit door to a room.
Care and Cleaning
Remove locks, or do not install locks, prior to painting your door.
Periodically clean with mild soap and a soft cloth only.
Do not use any abrasives or chemical products containing alcohol, benzene, or acids, and avoid using
sharp or abrasive objects to clean this lockset.
Do not allow any water or liquids into the lockset during installation.
This lockset is designed to provide the highest standard of product quality and performance. Care
should be taken to ensure a long-lasting nish. When cleaning is required use a soft, damp cloth.
Using lacquer thinner, caustic soaps, abrasive cleaners, or polishes could damage the coating and
result in tarnishing.
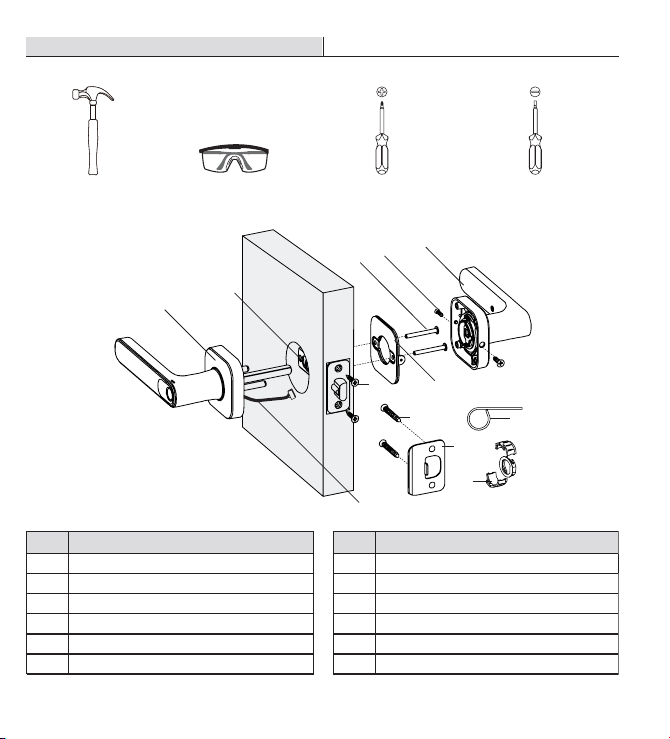
TOOLS REQUIRED
PACKAGE CONTENTS
NOTE: Before beginning installation of product, make sure all parts are present. If any part is missing or
damaged, do not attempt to assemble, install or operate the product. Call the Customer Service Team at
1-866-308-3976 or visit www.homedepot.com.
WARNING: Do not use electric drill or electric screwdriver to tighten screws.
Pre-Installation
Part Description Part Description
A Exterior Assembly
B Latch
C Mounting Plate
D Mounting Screws
H Strike Screws (38 mm)
I Strike Plate
J Drive-in Collar
K
Pin Tool
L Power Cable
E Assembly Screws
F Interior Assembly
G Latch Screws (21 mm)
C
D
E
G
J
A
B
F
H
L
K
I

Warranty
LIMITED LIFETIME FOR MECHANICAL AND 1 YEAR FOR ELECTRONICAL WARRANTY
The retailer of this product, hereby warrants, subject to the conditions set forth below, that it will either repair or
replace, at its option, this product if it proves to be defective by reason of improper workmanship or materials
within the original purchaser’s lifetime. In order to obtain repairs or replacement under this limited warranty
you must bring this product to the retailer’s store in which you bought it.
Original purchaser: This limited warranty is limited to the original purchaser at retail of this product from retailer.
Except to the extent prohibited by applicable law, no other warranties, whether express or implied, including
the warranties of merchantability and tness for a particular purpose, shall apply to this product. Under no
circumstances shall retailer be liable for consequential or incidental damages in connection with this product. To
the extent retailer is prohibited by applicable law from excluding implied warranties, the duration of such implied
warranties which are not excludable shall be the original purchaser’s lifetime. Some states do not allow the
limitation on how long an implied warranty lasts, so the above limitation on the duration of implied warranties
which are not excludable, if any, may not apply to you. Some states do not allow the exclusion or limitation
of incidental or consequential damages, so the above limitation or exclusion of incidental or consequential
damages may not apply to you. Retailer neither assumes nor authorizes any representative or other person to
assume for it any obligation or liability other than such as is expressly set forth herein. This limited warranty
gives you specic legal rights, and you may also have other rights which vary from state to state.
Questions, problems, missing parts? Before returning to the store,
call Deant Customer Service
8 a.m. - 7 p.m., EST, Monday-Friday, 9 a.m. - 6 p.m., EST, Saturday
1-866-308-3976
HOMEDEPOT.COM
INSTALLATION GUIDE
FINGERPRINT LEVER LOCK
LH01
Rev. 1.0
THANK YOU
We appreciate the trust and confidence you have placed in Defiant through the purchase of this fingerprint lever lock.
We strive to continually create quality products designed to enhance your home. Visit us online to see our full line of
products available for your home improvement needs. Thank you for choosing Defiant!
Safety Information
Read the precautions and instructions in this manual before installing and using this lock. Save this
manual for future reference.
Do not attempt to disassemble any internal components of the lockset. Doing so will void the limited
warranty.
Do not drop or hit the lockset. Too much shock may result in permanent damage.
Using pin tool or sharp objects to press the ngerprint sensor may cause damage.
This ngerprint lever lock is for interior door use only.
Restrict access to your lock’s interior assembly and routinely check your settings to ensure they have
not been altered without your knowledge.
Do NOT install ngerprint side (exterior) on the inside of an exit door to a room.
Care and Cleaning
Remove locks, or do not install locks, prior to painting your door.
Periodically clean with mild soap and a soft cloth only.
Do not use any abrasives or chemical products containing alcohol, benzene, or acids, and avoid using
sharp or abrasive objects to clean this lockset.
Do not allow any water or liquids into the lockset during installation.
This lockset is designed to provide the highest standard of product quality and performance. Care
should be taken to ensure a long-lasting nish. When cleaning is required use a soft, damp cloth.
Using lacquer thinner, caustic soaps, abrasive cleaners, or polishes could damage the coating and
result in tarnishing.
TOOLS REQUIRED
PACKAGE CONTENTS
NOTE: Before beginning installation of product, make sure all parts are present. If any part is missing or
damaged, do not attempt to assemble, install or operate the product. Call the Customer Service Team at
1-866-308-3976 or visit www.homedepot.com.
WARNING: Do not use electric drill or electric screwdriver to tighten screws.
Pre-Installation
Part Description Part Description
A Exterior Assembly
B Latch
C Mounting Plate
D Mounting Screws
H Strike Screws (38 mm)
I Strike Plate
J Drive-in Collar
K
Pin Tool
L Power Cable
E Assembly Screws
F Interior Assembly
G Latch Screws (21 mm)
C
D
E
G
J
A
B
F
H
L
K
I

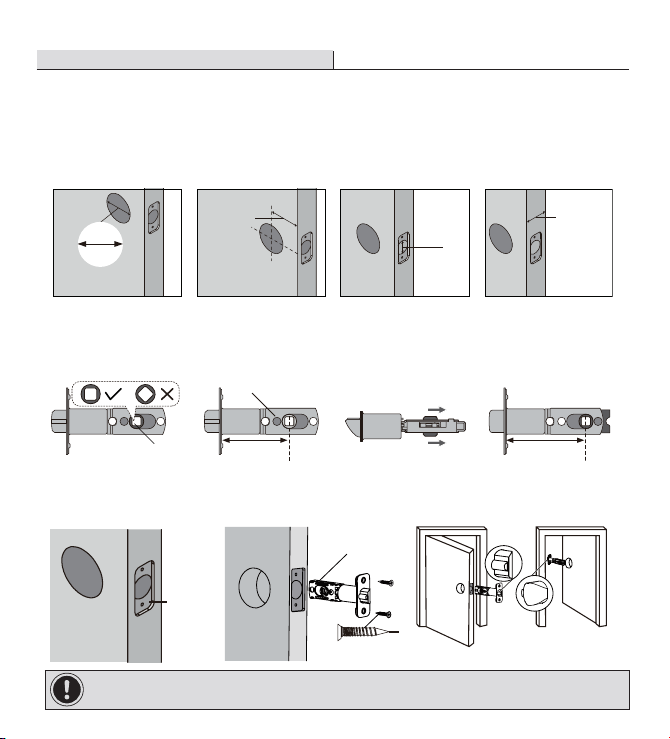
1
Preparing the door and checking dimensions
Measure to conrm that the hole in the door is 2-1/8 in. (54 mm).
Measure to conrm that the backset is either 2-3/8 in. or 2-3/4 in. (60 or 70 mm).
Measure to conrm that the hole in the door edge is 1 in. (25 mm).
Measure to conrm that the door is 1-3/8 in. to 2 in. (35 mm to 50 mm) thick.
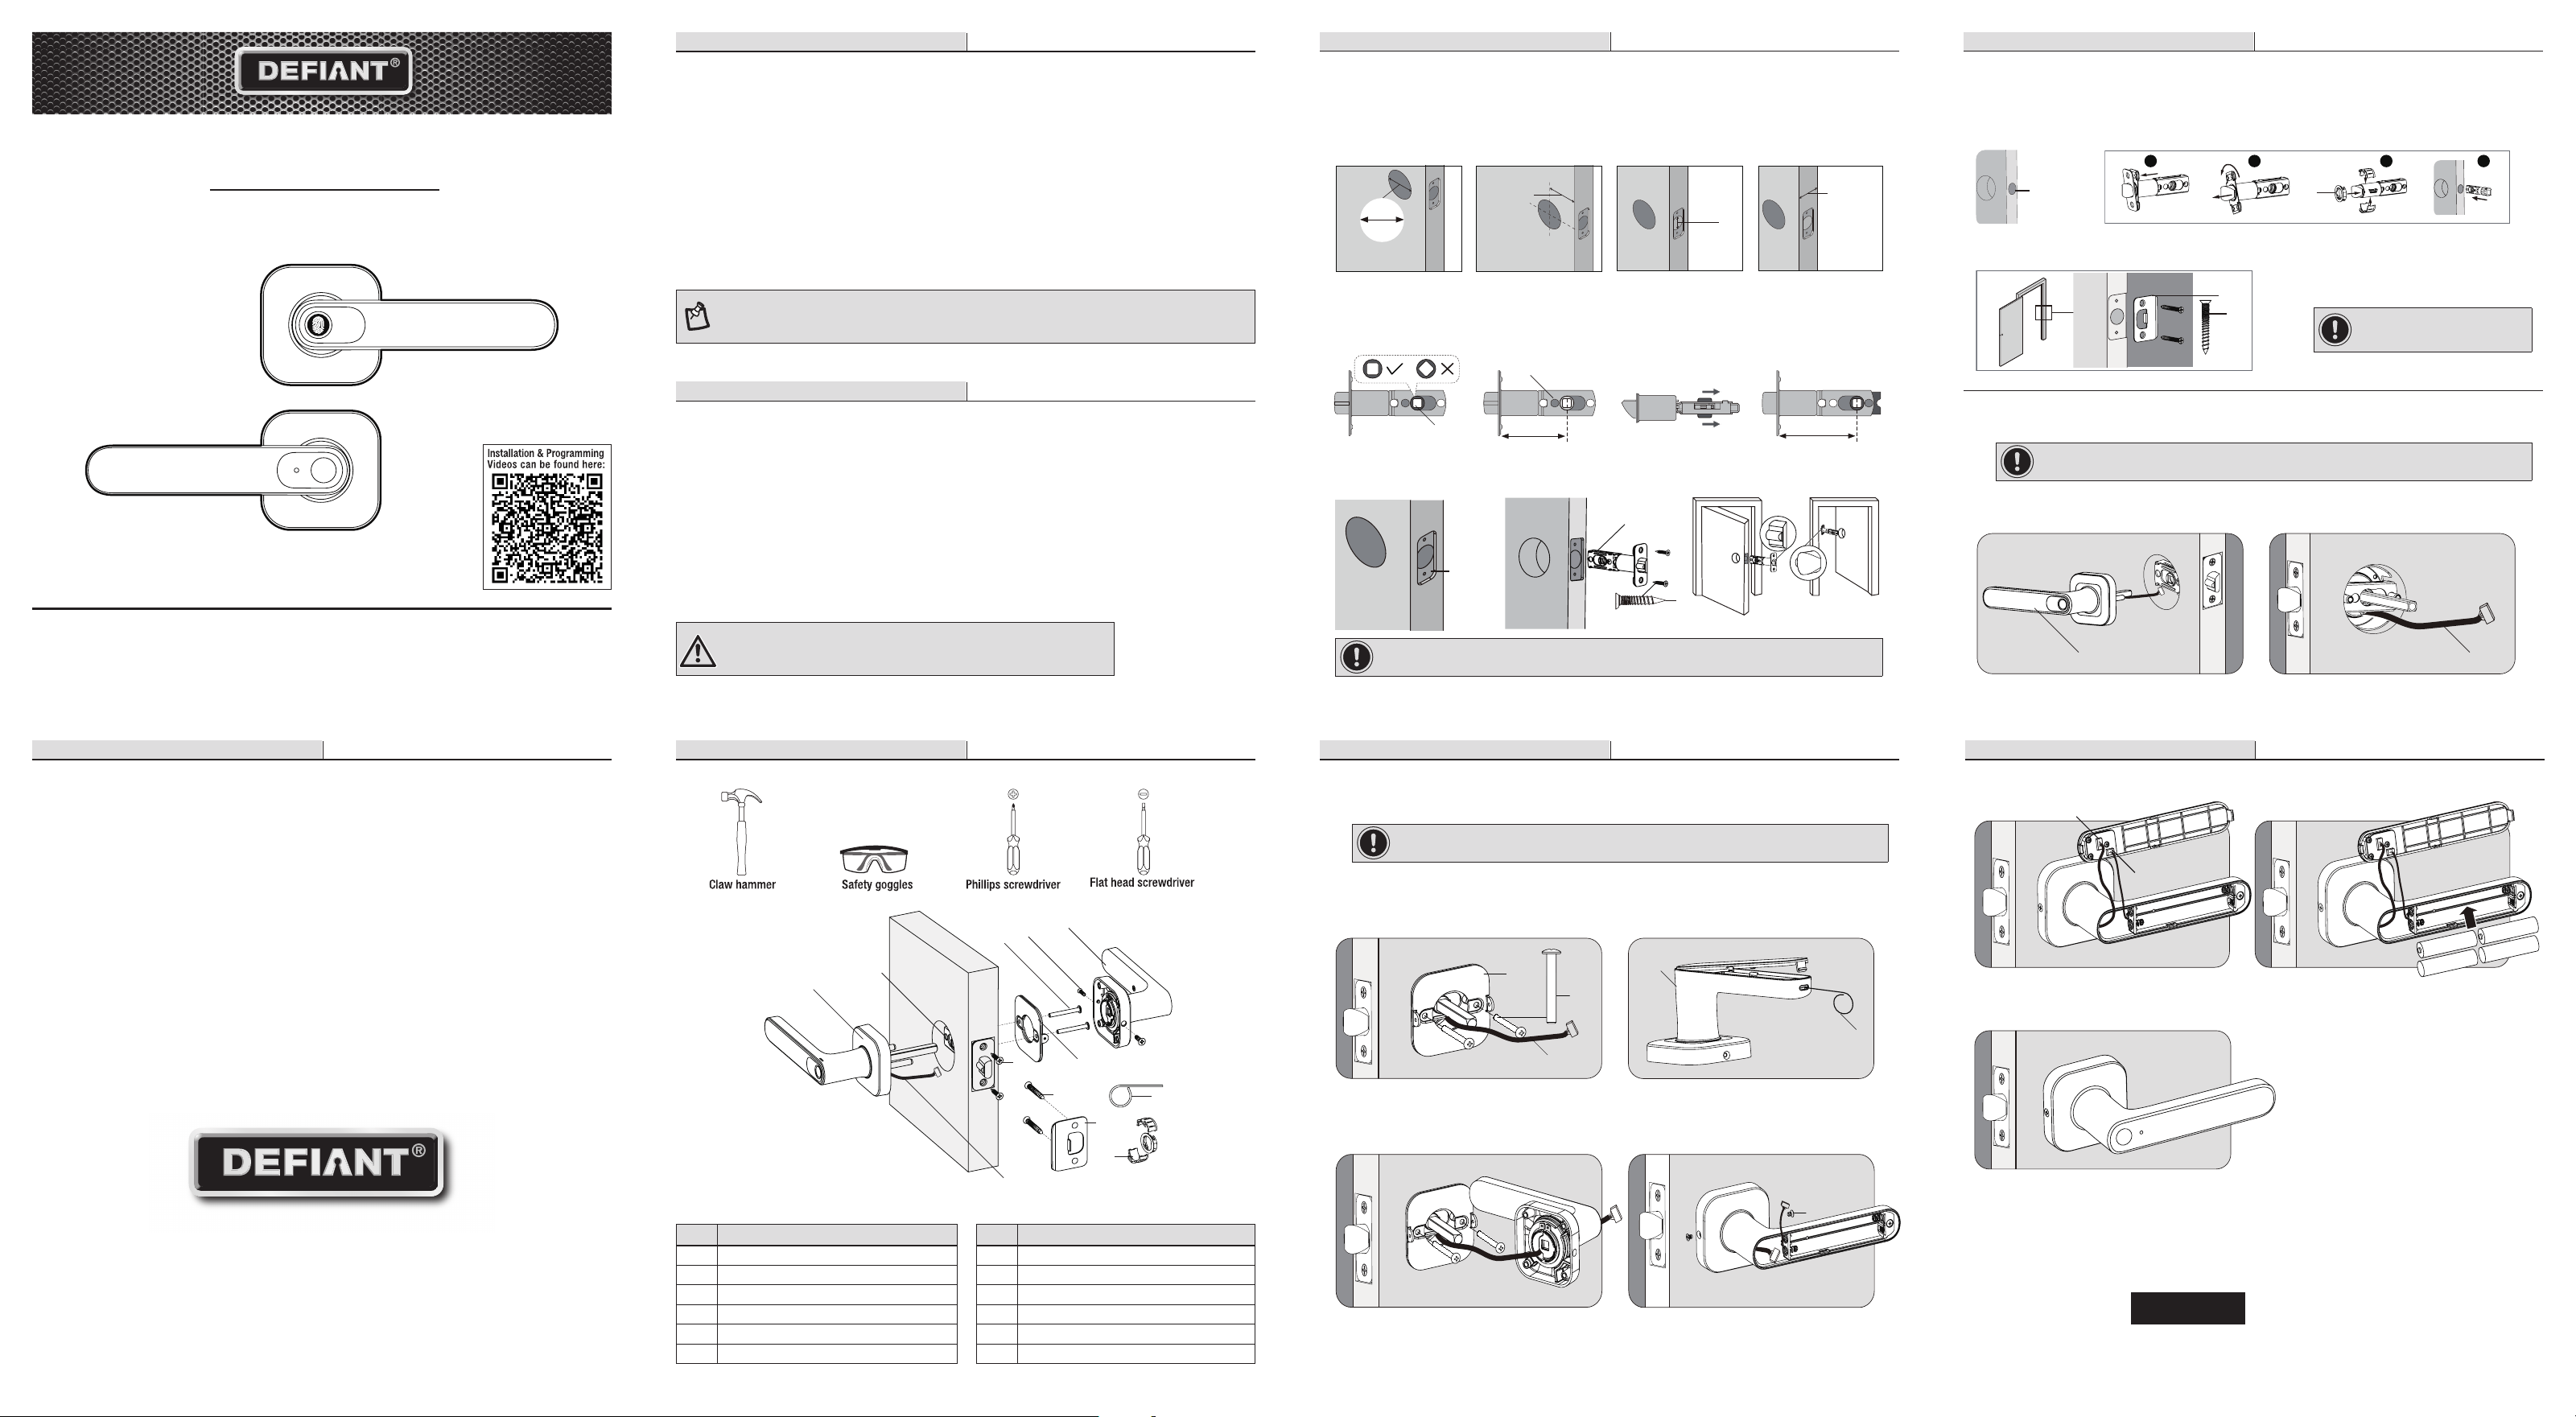
2
Installing the latch and strike
No adjustment is required for latch (B) if the backset of your door is 2-3/8 in. (60mm). Pull the
slotted hole backward with hands to the 70mm position if backset of your door is 2-3/4 in. (70mm).
2a. Installing latch and strike - door edge chiseled
Install the latch (B) in door edge hole directly with latch screws (G) if your door edge is chiseled.
2-3/4 in.
70 mm
2-3/8 in.
60 mm
Slotted hole
B
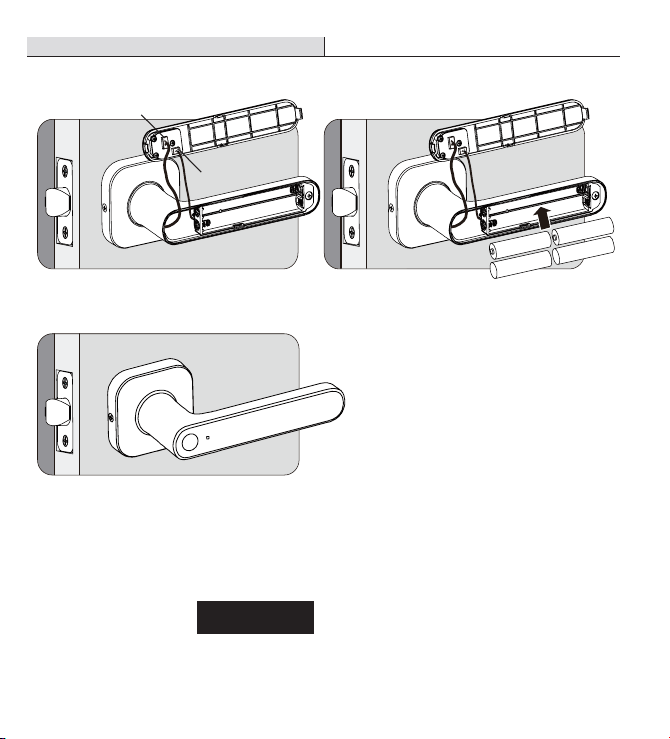
3
Installing exterior assembly
Install exterior assembly (A) in the door and shaft should slide smoothly through hole in latch.
Check the door prep dimensions if failed to install.
Insert power cable and battery cable into connectors on battery cover.
Install 4 AAA alkaline batteries into the slot , and close the battery cover.
Installation completed.
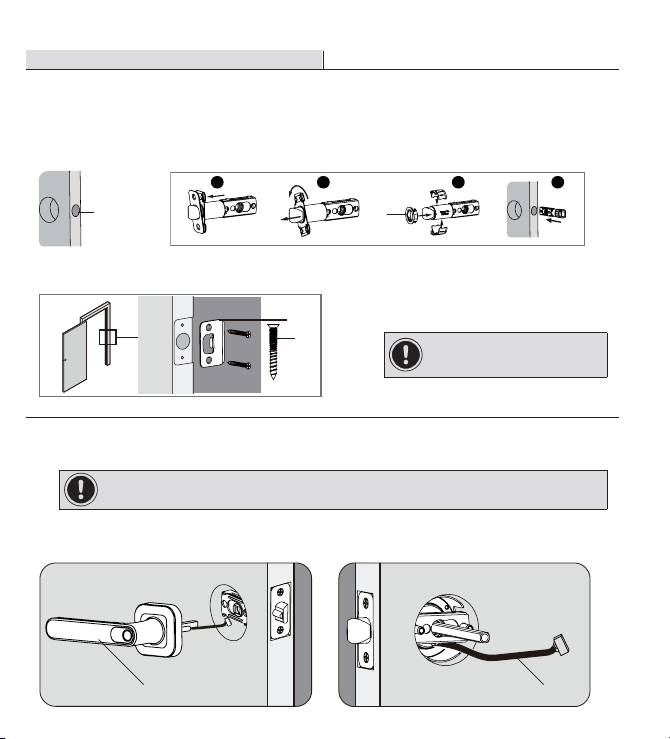
4
Installing interior assembly
Position the inside mounting plate (C) by rst routing the power cable (L) through the hole below
the latch and tighten the mounting plate using the mounting screws (D).
Remove battery cover from interior assembly using the pin tool (K)
Routing the power cable (L) through cable hole on interior assembly.
Install interior assembly (F) and secure by assembly screws (E).
Chiseled
Hand-out opening Hand-in opening
Not
Chiseled
Power connector
Battery
connector
Install strike plate (I) in the door frame with strike screws (H).
2b. Installing latch and strike - door edge not chiseled
Use a at head screwdriver to remove rectangular face and rotate off part of the latch face, then
install drive-in collar (J) if your door edge is not chiseled. Then install latch in door with wood
block and hammer.
1-3/8 in. to 2 in.
35 mm to 50 mm
2-3/8 in. or 2-3/4 in.
60 or 70 mm
B
ac
k
s
e
t
2-1/8 in.
54 mm
1 in.
25 mm
Installation
Installation (continued) Installation (continued)
Installation (continued)
IMPORTANT: Make sure hole in
door frame is drilled a minimum of
1 in. (25.4 mm) depth.
IMPORTANT: Power Cable (L) must go through door hole under the latch.
IMPORTANT:
The latch direction should be changed based on the hand-in and hand-out opening direction.
IMPORTANT: Do not load batteries until lock is completely installed
See the
User Guide
for additional information.
B
G
1 2 3 4
J
H
I
A L
C
D
L
K
F
E
1
Preparing the door and checking dimensions
Measure to conrm that the hole in the door is 2-1/8 in. (54 mm).
Measure to conrm that the backset is either 2-3/8 in. or 2-3/4 in. (60 or 70 mm).
Measure to conrm that the hole in the door edge is 1 in. (25 mm).
Measure to conrm that the door is 1-3/8 in. to 2 in. (35 mm to 50 mm) thick.
2
Installing the latch and strike
No adjustment is required for latch (B) if the backset of your door is 2-3/8 in. (60mm). Pull the
slotted hole backward with hands to the 70mm position if backset of your door is 2-3/4 in. (70mm).
2a. Installing latch and strike - door edge chiseled
Install the latch (B) in door edge hole directly with latch screws (G) if your door edge is chiseled.
2-3/4 in.
70 mm
2-3/8 in.
60 mm
Slotted hole
B
3
Installing exterior assembly
Install exterior assembly (A) in the door and shaft should slide smoothly through hole in latch.
Check the door prep dimensions if failed to install.
Insert power cable and battery cable into connectors on battery cover.
Install 4 AAA alkaline batteries into the slot , and close the battery cover.
Installation completed.
4
Installing interior assembly
Position the inside mounting plate (C) by rst routing the power cable (L) through the hole below
the latch and tighten the mounting plate using the mounting screws (D).
Remove battery cover from interior assembly using the pin tool (K)
Routing the power cable (L) through cable hole on interior assembly.
Install interior assembly (F) and secure by assembly screws (E).
Chiseled
Hand-out opening Hand-in opening
Not
Chiseled
Power connector
Battery
connector
Install strike plate (I) in the door frame with strike screws (H).
2b. Installing latch and strike - door edge not chiseled
Use a at head screwdriver to remove rectangular face and rotate off part of the latch face, then
install drive-in collar (J) if your door edge is not chiseled. Then install latch in door with wood
block and hammer.
1-3/8 in. to 2 in.
35 mm to 50 mm
2-3/8 in. or 2-3/4 in.
60 or 70 mm
B
ac
k
s
e
t
2-1/8 in.
54 mm
1 in.
25 mm
Installation
Installation (continued) Installation (continued)
Installation (continued)
IMPORTANT: Make sure hole in
door frame is drilled a minimum of
1 in. (25.4 mm) depth.
IMPORTANT: Power Cable (L) must go through door hole under the latch.
IMPORTANT:
The latch direction should be changed based on the hand-in and hand-out opening direction.
IMPORTANT: Do not load batteries until lock is completely installed
See the
User Guide
for additional information.
B
G
1 2 3 4
J
H
I
A L
C
D
L
K
F
E
4
Delete user fingerprint
The only way to delete user ngerprint is reset the lock to factory default settings, it will delete all
user ngerprints and master user ngerprints.
5
Language settings
Press set button once and then press multi-function button on interior assembly to change voice
guide language between English and Spansih.
Double press set button to enable silent mode.
Pre-Operation
Demo mode: Lock can be unlocked by any ngerprint when lock is in factory default settings (no
ngerprint registered).
Normal mode: The lock can be unlocked by registered ngerprints, and auto re-locks after 5 seconds.
Manual mode: In manual mode, the lock can be opened without ngerprint verication.
Silent mode: All voice guide will be muted in silent mode.
Away mode: In away mode, all ngerprint accesses are restricted, except master user and the user
who enables away mode.
Master user: First two ngerprints registered are master user ngerprints. Master user can be used
for lock programming. Master user ngerprint is able to unlock the door any time in any mode.
System lockdown: If wrong ngerprint attempts exceed 10 times, the system will lockdown for 3
min.
Solid blue light: Setting mode
Flashing blue light: Fingerprint recognizing succeeded when registering ngerprint
Solid green light: Fingerprint registration/verication successful/language switching successful
Flashing green light: Manual mode enabled/disabled or lock the door from inside in manual mode
Flashing yellow light: Low battery level
Flashing yellow light and then solid green light: Restore to factory default
Flashing red light: Fingerprint registration/verication failed,or system is in lockdown
Solid purple light: Away mode enabled
Flashing purple light: Away mode disabled or restrict user ngerprint in away mode
Operation
IMPORTANT: Do not load batteries until lock is completely installed.
WARNING:
Both master user ngerprints can be used for settings.
Master user ngerprint can unlock the door in any mode of lock.
Programming will be exited, if no any operation performed in 5 seconds after pressing set button.
Away mode can be disabled by master user ngerptints.
WARNING:
Maximum 50 user ngerprints (2 master user ngerprints, 48 user ngerprints) can be registered.
Same ngerprint can not be registered twice.
Programming will be exited, if no any operation performed in 5 seconds after pressing set button.
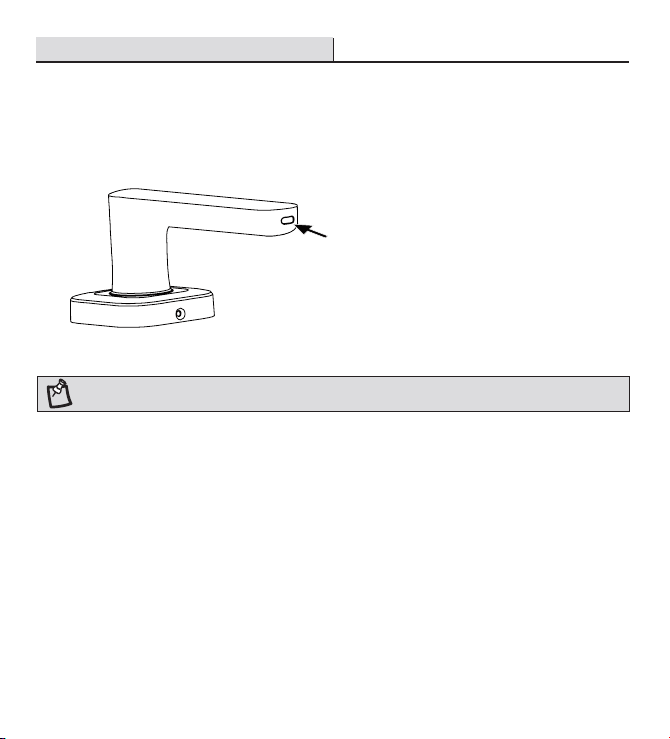
Operation (continued)
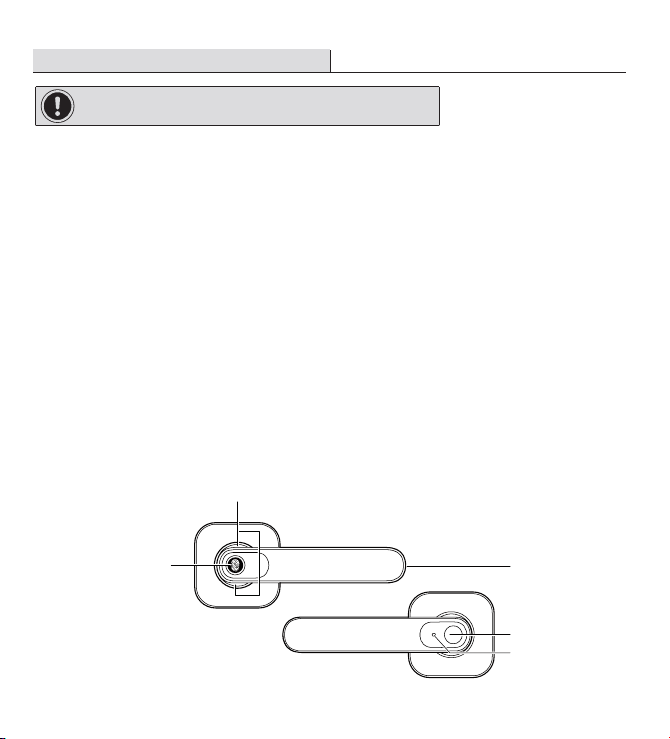
Fingerprint sensor
Multi-function button
Emergency power
supply port
Set button
Indication light
Pre-Operation (continued)
NOTE: English is the default language.
1
Enter setting mode
If the lock is factory default, pressing set button one time by the pin tool (K) can enter setting mode
directly.
2
Register Master User fingerprints
Register master user ngerprint 1: Press the set button once.
Enter into setting mode, voice guide prompt “Entered setting mode, Please add the master
ngerprint” and blue light ash.
Place the nger on ngerprint sensor following voice guide.
Finish registering master ngerprint ,voice prompt “master ngerprint ,ngerprint added” and
green light ash.
Register master user ngerprint 2: Press the set button, veried the master user ngerprint 1, then
register master user ngerprint 2 following voice guide.
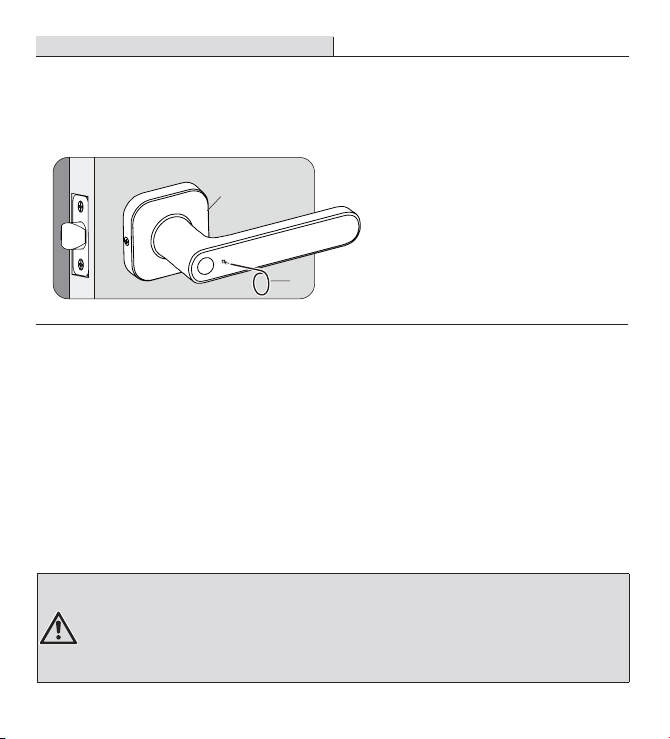
Locking and Unlocking
1
Under Nomal Mode
Use registered master user or user ngerprint to unlock from outside.
Push down lever to unlock from inside.
Lever lock will auto re-lock after 5 seconds following unlocking.
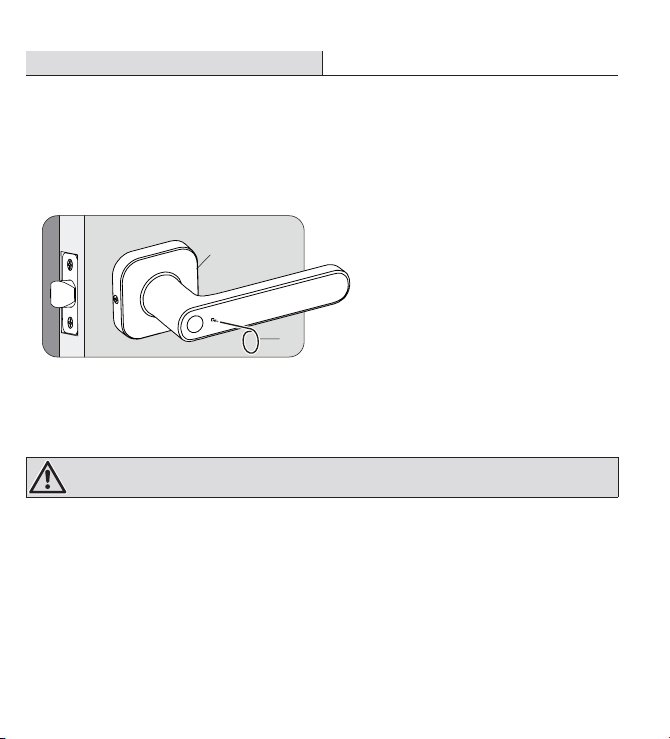
2
Under Manual Mode
Push down lever to unlock from inside or outside without ngerprint verication.
Press multi-function button once to lock the door from inside.
K
F
3
Register User fingerprints
Press set button and verify master user by scanning master user ngerprint to enter setting mode.
Place new nger on ngerprint sensor following voice guide.
PARTS ILLUSTRATIONS
LED ILLUMINATION DESCRIPTION
DEFINITION

4
Delete user fingerprint
The only way to delete user ngerprint is reset the lock to factory default settings, it will delete all
user ngerprints and master user ngerprints.
5
Language settings
Press set button once and then press multi-function button on interior assembly to change voice
guide language between English and Spansih.
Double press set button to enable silent mode.
Pre-Operation
Demo mode: Lock can be unlocked by any ngerprint when lock is in factory default settings (no
ngerprint registered).
Normal mode: The lock can be unlocked by registered ngerprints, and auto re-locks after 5 seconds.
Manual mode: In manual mode, the lock can be opened without ngerprint verication.
Silent mode: All voice guide will be muted in silent mode.
Away mode: In away mode, all ngerprint accesses are restricted, except master user and the user
who enables away mode.
Master user: First two ngerprints registered are master user ngerprints. Master user can be used
for lock programming. Master user ngerprint is able to unlock the door any time in any mode.
System lockdown: If wrong ngerprint attempts exceed 10 times, the system will lockdown for 3
min.
Solid blue light: Setting mode
Flashing blue light: Fingerprint recognizing succeeded when registering ngerprint
Solid green light: Fingerprint registration/verication successful/language switching successful
Flashing green light: Manual mode enabled/disabled or lock the door from inside in manual mode
Flashing yellow light: Low battery level
Flashing yellow light and then solid green light: Restore to factory default
Flashing red light: Fingerprint registration/verication failed,or system is in lockdown
Solid purple light: Away mode enabled
Flashing purple light: Away mode disabled or restrict user ngerprint in away mode
Operation
IMPORTANT: Do not load batteries until lock is completely installed.
WARNING:
Both master user ngerprints can be used for settings.
Master user ngerprint can unlock the door in any mode of lock.
Programming will be exited, if no any operation performed in 5 seconds after pressing set button.
Away mode can be disabled by master user ngerptints.
WARNING:
Maximum 50 user ngerprints (2 master user ngerprints, 48 user ngerprints) can be registered.
Same ngerprint can not be registered twice.
Programming will be exited, if no any operation performed in 5 seconds after pressing set button.
Operation (continued)
Fingerprint sensor
Multi-function button
Emergency power
supply port
Set button
Indication light
Pre-Operation (continued)
NOTE: English is the default language.
1
Enter setting mode
If the lock is factory default, pressing set button one time by the pin tool (K) can enter setting mode
directly.
2
Register Master User fingerprints
Register master user ngerprint 1: Press the set button once.
Enter into setting mode, voice guide prompt “Entered setting mode, Please add the master
ngerprint” and blue light ash.
Place the nger on ngerprint sensor following voice guide.
Finish registering master ngerprint ,voice prompt “master ngerprint ,ngerprint added” and
green light ash.
Register master user ngerprint 2: Press the set button, veried the master user ngerprint 1, then
register master user ngerprint 2 following voice guide.
Locking and Unlocking
1
Under Nomal Mode
Use registered master user or user ngerprint to unlock from outside.
Push down lever to unlock from inside.
Lever lock will auto re-lock after 5 seconds following unlocking.
2
Under Manual Mode
Push down lever to unlock from inside or outside without ngerprint verication.
Press multi-function button once to lock the door from inside.
K
F
3
Register User fingerprints
Press set button and verify master user by scanning master user ngerprint to enter setting mode.
Place new nger on ngerprint sensor following voice guide.
PARTS ILLUSTRATIONS
LED ILLUMINATION DESCRIPTION
DEFINITION

7
Away mode
Place and hold registered ngerprint (master or user ngerprint) on ngerprint sensor for 5
seconds to enable away mode.
Lock in away mode can be unlocked by master user ngerprint or user ngerprint which enabled
away mode. once the lock is unlocked, away mode will be disabled.
8
Restore to factory settings
Press and hold set buttons for 5 seconds using the pin tool (K). Voice prompt indicates restoration
to factory default. Yellow light ashes, and then green light ashes.
9
Emergency power supply
Use the power bank with Micro USB charger for emergency power supply When batteries run out.
Once the lock is re-activated, immediate battery replacement is requested.
WARNING: Away mode is unavailable in Manual mode.
WARNING: All user ngerprints are deleted after reseting.
Troubleshooting
Operation (continued)
Operation (continued)
Operation (continued)
6
Manual Mode
Press and hold multi-function button for 5 seconds to enable / disable manual mode and green
light ash.
In manual mode, there is no need to verify ngerprint to unlock from outside.User can press multi-
function button once to lock the door from inside and lock will enter into temporary locking state.
In temporary locking state, ngerprint verication is required to unlock from outside. This state will
exit and lock will return to manual mode after pressing multi-function button again or ngerprint
verication .
Problem Solution
Fail to set up the lock.
Check whether batteries are installed properly.
Check whether the cables is well-connected.
Make sure ngerprint is recognizable.
Check whether second master ngerprint is registered.
Yellow light keeps ashing.
The batteries are getting low. Please replace with 4 new batteries.
Fail to register ngerprint.
Make sure correct master ngerprint is entered.
Make sure your ngerprint isn't wet.
Fail to restore factory
settings.
Make sure correct reset operation is performed.
Check batteries are good
Auto Re-lock does not
function.
Make sure the lever lock is installed properly.
Make sure manual mode is disabled.
Fail to use ngerprint to
unlock.
Listen to voice guide ,Check whether lock is in away mode.
Check whether the ngerprint was registered.
Any ngerprint can open the
lever.
Make sure two master ngerprints are registered.
Master ngerprint 2 must be
added before programming?
Yes, master ngerprint 2 must be added. Master ngerprint 2 could be backup
ngerprint in case master ngerprint 1 is not recognizable.
K
F
NOTE: In temporary locking state,user can push down lever to unlock from inside, but this state will not exit.
NOTE: Batteries can last up to 12 months if locking and unlocking 10 times per day.

Warranty
LIMITED LIFETIME FOR MECHANICAL AND 1 YEAR FOR ELECTRONICAL WARRANTY
The retailer of this product, hereby warrants, subject to the conditions set forth below, that it will either repair or
replace, at its option, this product if it proves to be defective by reason of improper workmanship or materials
within the original purchaser’s lifetime. In order to obtain repairs or replacement under this limited warranty
you must bring this product to the retailer’s store in which you bought it.
Original purchaser: This limited warranty is limited to the original purchaser at retail of this product from retailer.
Except to the extent prohibited by applicable law, no other warranties, whether express or implied, including
the warranties of merchantability and tness for a particular purpose, shall apply to this product. Under no
circumstances shall retailer be liable for consequential or incidental damages in connection with this product. To
the extent retailer is prohibited by applicable law from excluding implied warranties, the duration of such implied
warranties which are not excludable shall be the original purchaser’s lifetime. Some states do not allow the
limitation on how long an implied warranty lasts, so the above limitation on the duration of implied warranties
which are not excludable, if any, may not apply to you. Some states do not allow the exclusion or limitation
of incidental or consequential damages, so the above limitation or exclusion of incidental or consequential
damages may not apply to you. Retailer neither assumes nor authorizes any representative or other person to
assume for it any obligation or liability other than such as is expressly set forth herein. This limited warranty
gives you specic legal rights, and you may also have other rights which vary from state to state.
Questions, problems, missing parts? Before returning to the store,
call Deant Customer Service
8 a.m. - 7 p.m., EST, Monday-Friday, 9 a.m. - 6 p.m., EST, Saturday
1-866-308-3976
HOMEDEPOT.COM
INSTALLATION GUIDE
FINGERPRINT LEVER LOCK
LH01
Rev. 1.0
THANK YOU
We appreciate the trust and confidence you have placed in Defiant through the purchase of this fingerprint lever lock.
We strive to continually create quality products designed to enhance your home. Visit us online to see our full line of
products available for your home improvement needs. Thank you for choosing Defiant!
Safety Information
Read the precautions and instructions in this manual before installing and using this lock. Save this
manual for future reference.
Do not attempt to disassemble any internal components of the lockset. Doing so will void the limited
warranty.
Do not drop or hit the lockset. Too much shock may result in permanent damage.
Using pin tool or sharp objects to press the ngerprint sensor may cause damage.
This ngerprint lever lock is for interior door use only.
Restrict access to your lock’s interior assembly and routinely check your settings to ensure they have
not been altered without your knowledge.
Do NOT install ngerprint side (exterior) on the inside of an exit door to a room.
Care and Cleaning
Remove locks, or do not install locks, prior to painting your door.
Periodically clean with mild soap and a soft cloth only.
Do not use any abrasives or chemical products containing alcohol, benzene, or acids, and avoid using
sharp or abrasive objects to clean this lockset.
Do not allow any water or liquids into the lockset during installation.
This lockset is designed to provide the highest standard of product quality and performance. Care
should be taken to ensure a long-lasting nish. When cleaning is required use a soft, damp cloth.
Using lacquer thinner, caustic soaps, abrasive cleaners, or polishes could damage the coating and
result in tarnishing.
TOOLS REQUIRED
PACKAGE CONTENTS
NOTE: Before beginning installation of product, make sure all parts are present. If any part is missing or
damaged, do not attempt to assemble, install or operate the product. Call the Customer Service Team at
1-866-308-3976 or visit www.homedepot.com.
WARNING: Do not use electric drill or electric screwdriver to tighten screws.
Pre-Installation
Part Description Part Description
A Exterior Assembly
B Latch
C Mounting Plate
D Mounting Screws
H Strike Screws (38 mm)
I Strike Plate
J Drive-in Collar
K
Pin Tool
L Power Cable
E Assembly Screws
F Interior Assembly
G Latch Screws (21 mm)
C
D
E
G
J
A
B
F
H
L
K
I

Garantía
GARANTÍA LIMITADA DE POR VIDA PARA ELEMENTOS MECÁNICOS Y GARANTÍA DE UN AÑO
PARA ELEMENTOS ELECTRÓNICOS
El distribuidor minorista de este producto garantiza por medio del presente documento, el cual está sujeto a
las condiciones establecidas a continuación, que reparará o reemplazará, a su discreción, este producto si se
comprueba que está defectuoso por motivos de mano de obra o materiales inadecuados dentro de la vida útil
del comprador original. Para obtener reparaciones o reemplazos cubiertos por esta garantía limitada, deberá
llevar este producto a la tienda del distribuidor minorista en la que lo compró.
Comprador original: Esta garantía limitada se limita al comprador original de este producto al proveedor
minorista.
Salvo en la medida en que lo prohíban las leyes aplicables, no se aplicará a este producto ninguna otra garantía,
ya sea expresa o implícita, incluidas las garantías de comerciabilidad e idoneidad para un n determinado. El
proveedor minorista no será responsable, bajo ninguna circunstancia, de los daños resultantes o incidentales
relacionados con este producto. En la medida en que las leyes aplicables prohíban al proveedor minorista
excluir las garantías implícitas, la duración de dichas garantías implícitas no excluibles será la del comprador
original. Algunos estados no permiten la limitación de la duración de una garantía implícita, de manera que
es posible que la limitación de la duración de las garantías implícitas no excluibles antedichas, en caso de
haberlas, no se apliquen su caso. Algunos estados no permiten la exclusión o la limitación de daños resultantes
o incidentales, de manera que es posible que la limitación o exclusión antedicha sobre daños resultantes o
incidentales no se aplique en su caso. El proveedor minorista no asume ni autoriza a ningún representante
u otra persona a asumir en su nombre ninguna obligación ni responsabilidad que no esté expresamente
establecida en el presente documento. Esta garantía limitada le otorga derechos legales especícos y también
puede tener otros derechos, que varían de estado a estado.
¿Tiene preguntas o problemas, o le faltan piezas? Antes de devolver a la tienda,
llame a Atención al Cliente de Deant
8 a. m. a 7:00 p. m., EST, y los sábados de 9:00 a. m. a 6:00 p. m., EST
1-866-308-3976
HOMEDEPOT.COM
GUÍA DE INSTALACIÓN
CERRADURA DE PALANCA CON
BLOQUEO DE HUELLA DACTILAR
LH01
Rev. 1.0
GRACIAS
Agradecemos la conanza que ha depositado en Deant mediante la compra de esta cerradura de palanca con bloqueo
de huella dactilar. Nos esforzamos continuamente para crear productos de calidad diseñados para mejorar su hogar.
Visítenos en línea para ver nuestra línea completa de productos disponibles para sus necesidades de mejoramiento del
hogar. ¡Gracias por elegir a Deant!
Aquí puede encontrar videos
sobre la instalación y
la programación:
Información de seguridad
Lea las precauciones y las instrucciones de este manual antes de instalar y usar esta cerradura. Guarde
este manual para consultarlo en el futuro.
No intente desensamblar ningún componente interno de la cerradura. Si lo hace, anulará la garantía
limitada.
No deje caer ni golpee la cerradura. Si sufre demasiados golpes puede dañarla permanentemente.
Si usa la herramienta de clavija u objetos alados para presionar el sensor de huella dactilar, puede
ocasionar daños.
Esta cerradura de palanca con bloqueo de huella dactilar está diseñada para usarse solamente en
puertas interiores.
Restrinja el acceso al ensamblaje interior de su cerradura y compruebe rutinariamente sus
conguraciones para asegurarse de que no hayan sido alteradas sin su conocimiento.
NO instale el lado para huellas digitales (exterior) en el interior de una puerta de salida a una habitación.
Cuidado y limpieza
Antes de pintar la puerta, retire la cerradura o píntela antes de su instalación.
Limpie periódicamente utilizando solamente jabón suave y un paño suave.
No use ningún producto químico o abrasivo que contenga alcohol, benceno o ácidos, y evite usar
objetos alados o abrasivos para limpiar esta cerradura.
No deje caer agua u otros líquidos en la cerradura durante su instalación.
Esta cerradura está diseñada para proporcionar un producto de los más altos estándares de calidad
y rendimiento. Se debe tener cuidado para garantizar un acabado duradero. Cuando sea necesario
limpiar, use un paño suave y húmedo.
El uso de disolventes de laca, jabones cáusticos, limpiadores abrasivos o pulidores puede dañar el
revestimiento y provocar deslustre.
HERRAMIENTAS NECESARIAS
CONTENIDO DEL PAQUETE
NOTA: Asegúrese de tener todas las piezas antes de comenzar la instalación del producto. Si falta alguna
pieza o está dañada, no intente armar, instalar ni usar el producto. Llame al equipo de Atención al Cliente al
1-866-308-3976 o visite www.homedepot.com.
ADVERTENCIA: No apriete los tornillos con taladros ni destornilladores eléctricos.
Antes de la instalación
Pieza Descripción Pieza Descripción
A Ensamblaje exterior
B Pestillo
C Placa de montaje
D Tornillos de montaje
H Tornillos de la cerradura (38 mm)
I Placa de la cerradura
J Collarín empotrable
K
Herramienta de clavija
L Cable de alimentación
E Tornillos de montaje
F Ensamblaje interior
G Tornillos del pestillo (21 mm)
C
D
E
G
J
A
B
F
H
L
K
I
Martillo de carpintero Gafas de seguridad Destornillador Phillips Destornillador de cabeza
plana
1
Preparación de la puerta y comprobación de las dimensiones
Mida para conrmar que el oricio de la puerta tenga un tamaño de 2-1/8 pulgadas (54 mm).
Mida para conrmar que la distancia de retroceso sea de 2-3/8 o 2-3/4 pulgadas (60 o 70 mm).
Mida para conrmar que el oricio del borde de la puerta tenga un tamaño de 1 pulgada (25 mm).
Mida para conrmar que la puerta tenga un grosor de 1-3/8 a 2 pulgadas (35 mm a 50 mm).
2
Instalación del pestillo y la cerradura
El pestillo (B) no necesita ajuste si la distancia de retroceso de su puerta es de 2-3/8 pulgadas
(60 mm). Tire del oricio ranurado hacia atrás con las manos hasta la posición de 70 mm, si la
distancia de retroceso de la puerta es de 2-3/4 pulgadas (70 mm).
2a. Instalación del pestillo y la cerradura: puerta con borde cincelado
Si el borde de su puerta está cincelado, instale el pestillo (B) en el oricio del borde de la puerta
directamente con los tornillos del pestillo (G).
2-3/4 pulg.
70 mm
2-3/8 pulg.
60 mm
Oricio ranurado
B
3
Instalación del ensamblaje exterior
Instale el ensamblaje exterior (A) en la puerta de tal forma que el eje se deslice ligeramente a
través del oricio del pestillo. Si no pudo realizar la instalación, revise que la puerta tenga las
dimensiones correctas.
Inserte el cable de alimentación y el cable de las pilas en los conectores de la cubierta de las pilas.
Coloque 4 pilas alcalinas AAA en la ranura y cierre la cubierta de las pilas.
Fin de la instalación.
4
Instalación del ensamblaje interior
Coloque la placa de montaje interior (C) pasando primero el cable de alimentación (L) por el oricio
situado debajo del pestillo y apriete la placa de montaje con los tornillos de montaje (D).
Use la herramienta de clavija (K) para retirar la cubierta de las pilas del ensamblaje interior
Pase el cable de alimentación (L) a través del oricio del cable en el ensamblaje interior.
Instale el ensamblaje interior (F) y fíjelo con los tornillos de montaje (E).
Cincelado
Sin cincelar
Conector de alimentación
Conector de las
pilas
Use los tornillos de la cerradura (H) para instalar la placa de la cerradura (I) en el marco de la puerta.
2b. Instalación del pestillo y la cerradura: puerta con borde sin cincelar
Use un destornillador de cabeza plana para quitar la cara rectangular y gire hasta desmontar
parte de la cara del pestillo; a continuación, instale el collarín empotrable (J) si el borde de la puerta
no está cincelado. Luego, instale el pestillo en la puerta con un bloque de madera y un martillo
1-3/8 pulg.
a 2 pulg.
35 mm a 50 mm
2-3/8 pulg. o 2-3/4 pulg.
60 o 70 mm
D
i
s
t
a
nc
i
a
d
e
r
e
t
r
o
c
e
s
o
Oricio de
2-1/8 de pulg.
54 mm
1 pulg.
25 mm
Instalación
Instalación (continuación) Instalación (continuación)
Instalación (continuación)
IMPORTANTE: Asegúrese de
que el oricio del marco de la
puerta tenga una perforación de
una profundidad mínima de 1
pulgada (25.4mm) de profundidad.
IMPORTANTE: El cable de alimentación (L) debe pasar por el oricio de la puerta ubicado debajo
del pestillo.
IMPORTANTE: No coloque las pilas hasta que la cerradura esté completamente instalada
Consulte la
Guía del Usuario
para obtener información adicional.
1 2 3 4
J
H
I
A L
C
D
L
K
F
E
Apertura para entrar Apertura para salir
IMPORTANTE:
La dirección del pestillo debe cambiarse para que coincida con el sentido de apertura; de
entrada o de salida.
B
G
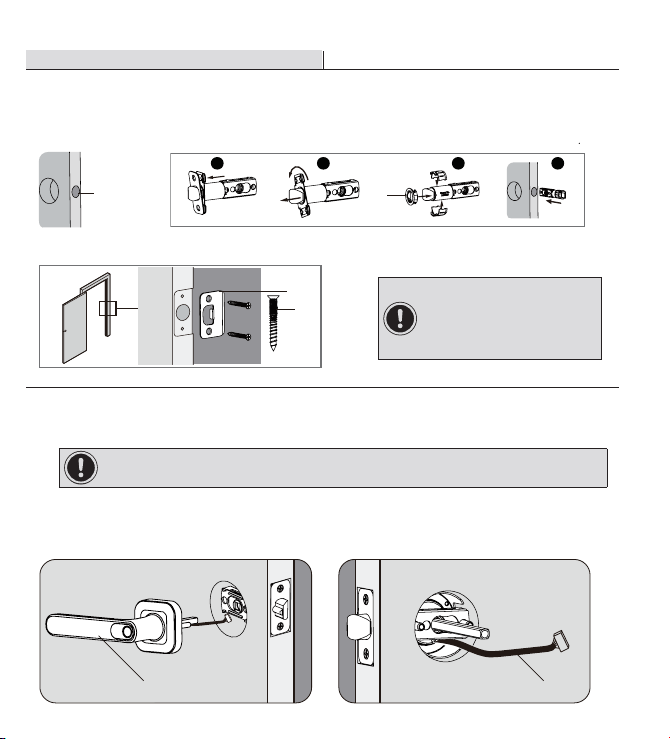
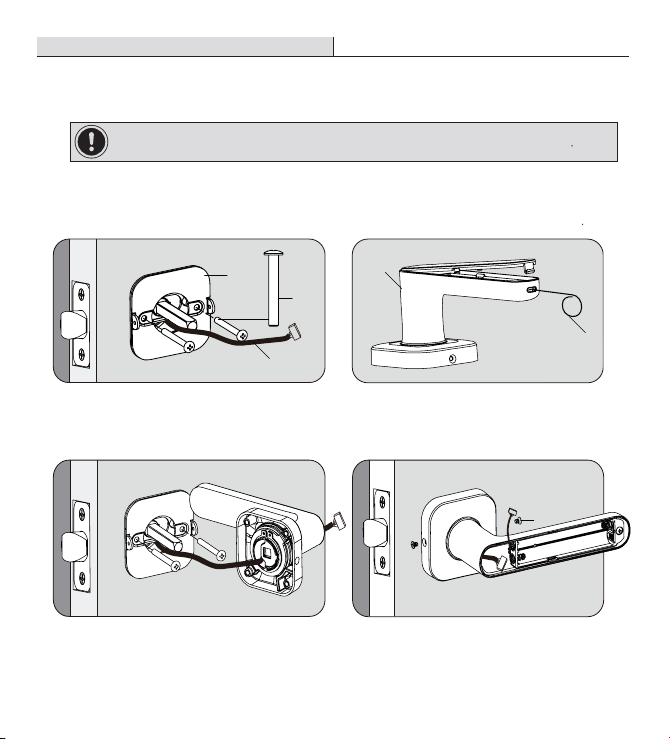
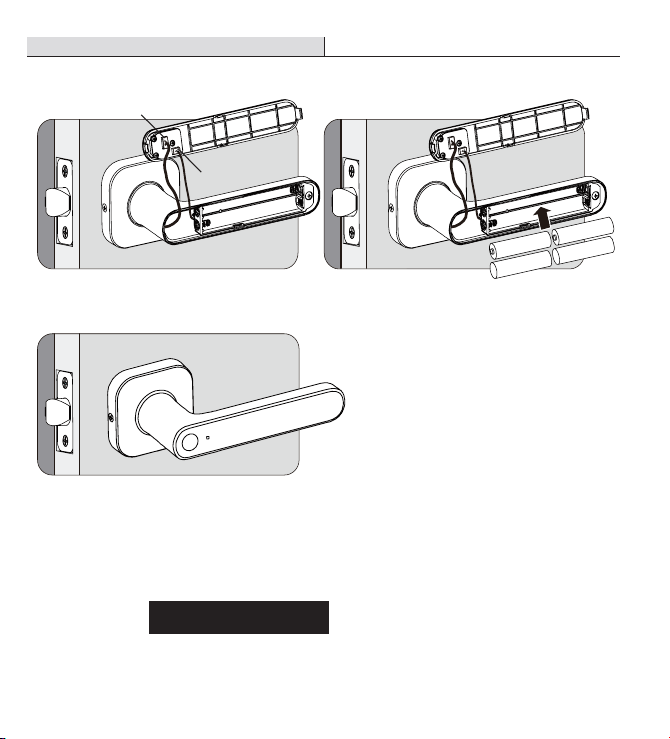
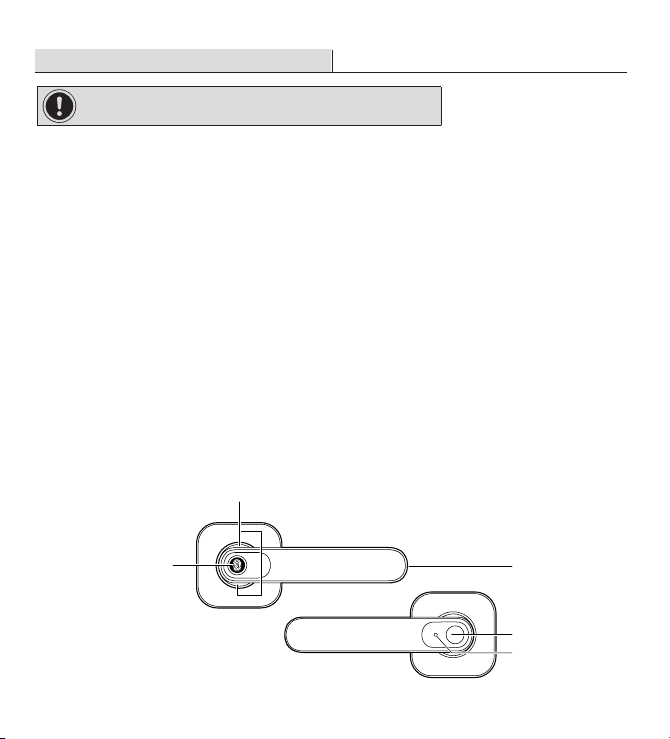
Antes del uso
Modo de demostración: la cerradura puede desbloquearse con cualquier huella dactilar mientras se
encuentre con los ajustes de fábrica (sin ninguna huella dactilar registrada).
Modo normal: la cerradura puede desbloquearse con huellas dactilares registradas y se activará el
rebloqueo automático después de 5 segundos.
Modo manual: en el modo manual, la cerradura puede abrirse sin necesidad de vericar la huella
dactilar.
Modo silencioso: en el modo silencioso se silenciará la guía de voz.
Modo ausente: en el modo ausente se restringen todos los accesos por huella dactilar, excepto los
usuarios maestros y los usuarios que hayan activado el modo ausente.
Usuario maestro: son los das dos primeras huellas dactilares registradas. El usuario maestro puede
usarse para programar la cerradura. La huella dactilar de usuario maestro puede desbloquear la
puerta en cualquier momento y en cualquier modo.
Bloqueo del sistema: si se intenta abrir con una huella dactilar incorrecta más de 10 veces, el
sistema se bloqueará durante 3 minutos.
Funcionamiento
IMPORTANTE: No coloque las pilas hasta que la cerradura esté
completamente instalada.
ADVERTENCIA:
Se puede usar ambas huellas dactilares de usuario maestro para realizar ajustes.
La huella dactilar de usuario maestro puede desbloquear la puerta en cualquier modo de bloqueo.
Si no se realiza ninguna acción durante 5 segundos después de haber presionado el botón SET (ajuste),
se saldrá del modo de programación.
El modo ausente puede deshabilitarse con las huellas dactilares de usuario maestro.
ADVERTENCIA:
Se puede registrar un máximo de 50 huellas dactilares de usuario (2 huellas dactilares de usuario
maestro y 48 huellas dactilares de usuario).
No se puede registrar una misma huella dactilar dos veces.
Si no se realiza ninguna acción durante 5 segundos después de haber presionado el botón SET (ajuste),
se saldrá del modo de programación.
Funcionamiento (continuación)
Sensor de huella
dactilar
Botón multifunción
Puerto de suministro
de alimentación de
emergencia
Botón SET (ajuste)
Luz indicadora
NOTA: El idioma predeterminado es el inglés.
Antes del uso (continuación)
Luz azul ja: modo de ajuste
Luz azul parpadeante: El reconocimiento de huellas digitales registró la huella correctamente
Luz verde ja: Registro de huellas digitales/vericación exitosa/cambio de idioma exitoso
Luz verde parpadeante: Modo manual activado/desactivado o puerta trabada desde el interior en
modo manual
Luz amarilla parpadeante: Nivel de batería bajo
Luz amarilla parpadeante y luego luz verde ja: Restaurar a los valores predeterminados de fábrica
Luz roja intermitente: El registro/vericación de huellas digitales falló, o el sistema está bloqueado
Luz púrpura ja: modo ausente activado
Luz púrpura parpadeante: Modo ausente desactivado o con restricción de la huella digital del
usuario en modo ausente
3
Registrar huellas dactilares de usuarios
Presione el botón de conguración y verique el usuario maestro, escaneando su huella digital,
para ingresar al modo de conguración.
Coloque el nuevo dedo en el sensor de huellas digitales siguiendo la guía de voz.
4
Eliminar huella dactilar de un usuario
La única forma de eliminar la huella dactilar de un usuario es restableciendo la cerradura a los
ajustes de fábrica, por lo que se eliminarán todas las huellas dactilares de usuarios y las huellas
dactilares maestras.
5
Configuración del idioma
Presione el botón SET (ajustar) una sola vez y luego presione el botón multifunción del ensamblaje
interior para cambiar el idioma entre inglés y español.
Presione dos veces el botón SET (ajustar) para activar el modo silencioso.
ILUSTRACIONES DE LAS PIEZAS
Bloqueo y desbloqueo
1
En modo normal
Use la huella dactilar de usuario maestro o de usuario para desbloquear desde afuera.
Baje la palanca para desbloquear desde el lado interior.
La cerradura de palanca se activará el rebloqueo automático después de 5 segundos de haberla
desbloqueado.
2
En modo manual
Baje la palanca para desbloquear desde el interior o exterior sin necesidad de vericar la huella
dactilar.
Presione el botón multifunción una vez para bloquear la puerta desde el lado interior.
DESCRIPCIÓN DE LAS LUCES LED
1
Entrar en modo de ajuste
Si la cerradura está con los ajustes de fábrica, puede presionar el botón SET (ajuste) una vez con la
herramienta de clavija (K) para entrar directamente en el modo de ajuste.
2
Registrar huellas dactilares del usuario maestro
Registrar huella dactilar del usuario maestro núm. 1: presione el botón SET (ajustar) una vez.
Al entrar en el modo de ajuste, la guía de voz dirá "Entered setting mode, please add the master
ngerprint" (se entró en el modo de ajuste, agregue la huella dactilar maestra) y parpadeará una
luz azul.
Coloque el dedo en el sensor de huella dactilar cuando lo indique la guía de voz.
Al terminar el registro de huella dactilar maestra, la guía de voz dirá “master ngerprint, ngerprint
added” (huella dactilar maestra, huella dactilar agregada) y parpadeará una luz verde.
Registrar huella dactilar de usuario maestro núm. 2: Presione el botón SET (ajustar), verique la
huella dactilar del usuario maestro núm. 1 y luego registre la huella dactilar del usuario maestro
núm. 2 cuando lo indique la guía de voz.
K
F
DEFINICIÓN
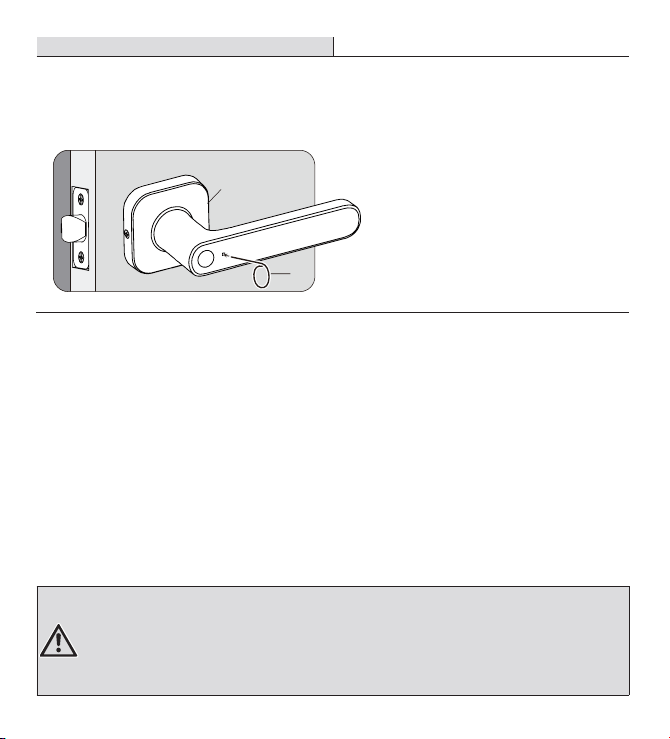
8
Restablecer a los ajustes de fábrica
Mantenga presionado el botón SET (ajuste) durante 5 segundos con la herramienta de clavija (K).
La guía de voz indicará que se volverá a los ajustes de fábrica. Parpadeará una luz amarilla y luego
una luz verde.
6
Modo manual
Mantenga presionado el botón multifunción durante 5 segundos para activar o desactivar el modo
manual, parpadeará una luz verde para indicar la acción.
En el modo manual, no es necesario vericar la huella digital para destrabar desde el exterior. El
usuario puede presionar el botón multifunción una vez para trabar la puerta desde adentro, y la
cerradura se trabará temporalmente.
En este estado de cierre temporal, se requiere vericación de huellas digitales para desbloquear
desde el exterior. Se saldrá de este estado y la cerradura volverá al modo manual, después de
presionar el botón multifunción una vez más, o después de la vericación de huellas digitales.
9
Suministro de alimentación de emergencia
Si las pilas se agotan, use el banco de alimentación con cargador micro USB como suministro de
alimentación de emergencia. Una vez que la cerradura vuelva a activarse, deberá cambiar las pilas
inmediatamente.
ADVERTENCIA: El modo ausente no está disponible en el modo manual.
ADVERTENCIA: Se borrarán todas las huellas dactilares de usuario tras el restablecimiento.
Resolución de problemas
Funcionamiento (continuación)
Funcionamiento (continuación) Funcionamiento (continuación)
NOTA: En este estado de cierre temporal, el usuario puede empujar hacia abajo la palanca para desbloquear
desde adentro, pero no se saldrá de este estado.
NOTA: Las pilas pueden durar hasta 12 meses si se bloquea y desbloquea 10 veces al día.
7
Modo ausente
Coloque y mantenga la huella digital registrada (huella maestra o del usuario) en el sensor de
huellas digitales durante 5 segundos para habilitar el modo ausente.
La cerradura en modo ausente se puede destrabar con la huella del usuario maestro, o la huella
del usuario, que habilitó el modo ausente; una vez destrabada la cerradura, el modo ausente se
desactivará.
Problema Solución
Error en la conguración de
la cerradura.
Revise si las pilas están instaladas correctamente.
Revise si los cables están bien conectados.
Asegúrese de que la huella dactilar sea reconocible.
Revise si se registró la segunda huella dactilar.
La luz amarilla sigue
parpadeando.
Las pilas se están agotando. Reemplácelas por 4 pilas nuevas.
Error al registrar una huella
dactilar.
Asegúrese de ingresar la huella dactilar maestra correcta.
Asegúrese de que su huella digital no esté mojada.
Error al restablecer a los
ajustes de fábrica.
Asegúrese de haber realizado la operación de restablecimiento correctamente.
Verique que las baterías funcionen.
El rebloqueo automático no
funciona.
Asegúrese de que la cerradura de palanca esté instalada correctamente.
Asegúrese de que el modo manual esté deshabilitado.
Error al desbloquear con
huella dactilar.
Escuche a la guía de voz o revise si la cerradura se encuentra en modo ausente.
Revise si se registró la huella dactilar.
La cerradura de palanca
puede abrirse con cualquier
huella dactilar.
Asegúrese de que se hayan registrado dos huellas digitales maestras.
¿Se debe agregar la
huella dactilar maestra
núm. 2 antes de hacer la
programación?
Sí, se debe agregar la huella dactilar maestra núm. 2. La huella dactilar maestra
núm. 2 puede funcionar como huella dactilar de respaldo en caso de la huella
dactilar núm. 1 no sea reconocible.
K
F
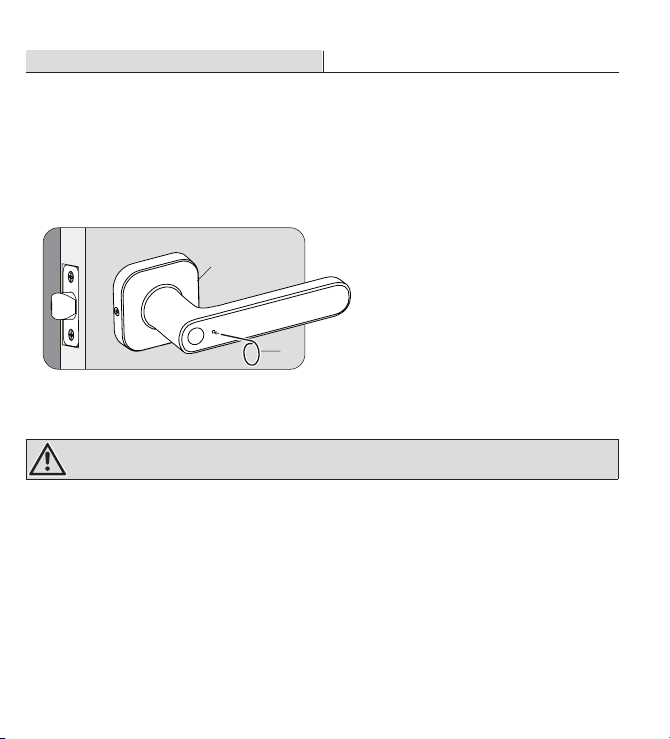
Garantía
GARANTÍA LIMITADA DE POR VIDA PARA ELEMENTOS MECÁNICOS Y GARANTÍA DE UN AÑO
PARA ELEMENTOS ELECTRÓNICOS
El distribuidor minorista de este producto garantiza por medio del presente documento, el cual está sujeto a
las condiciones establecidas a continuación, que reparará o reemplazará, a su discreción, este producto si se
comprueba que está defectuoso por motivos de mano de obra o materiales inadecuados dentro de la vida útil
del comprador original. Para obtener reparaciones o reemplazos cubiertos por esta garantía limitada, deberá
llevar este producto a la tienda del distribuidor minorista en la que lo compró.
Comprador original: Esta garantía limitada se limita al comprador original de este producto al proveedor
minorista.
Salvo en la medida en que lo prohíban las leyes aplicables, no se aplicará a este producto ninguna otra garantía,
ya sea expresa o implícita, incluidas las garantías de comerciabilidad e idoneidad para un n determinado. El
proveedor minorista no será responsable, bajo ninguna circunstancia, de los daños resultantes o incidentales
relacionados con este producto. En la medida en que las leyes aplicables prohíban al proveedor minorista
excluir las garantías implícitas, la duración de dichas garantías implícitas no excluibles será la del comprador
original. Algunos estados no permiten la limitación de la duración de una garantía implícita, de manera que
es posible que la limitación de la duración de las garantías implícitas no excluibles antedichas, en caso de
haberlas, no se apliquen su caso. Algunos estados no permiten la exclusión o la limitación de daños resultantes
o incidentales, de manera que es posible que la limitación o exclusión antedicha sobre daños resultantes o
incidentales no se aplique en su caso. El proveedor minorista no asume ni autoriza a ningún representante
u otra persona a asumir en su nombre ninguna obligación ni responsabilidad que no esté expresamente
establecida en el presente documento. Esta garantía limitada le otorga derechos legales especícos y también
puede tener otros derechos, que varían de estado a estado.
¿Tiene preguntas o problemas, o le faltan piezas? Antes de devolver a la tienda,
llame a Atención al Cliente de Deant
8 a. m. a 7:00 p. m., EST, y los sábados de 9:00 a. m. a 6:00 p. m., EST
1-866-308-3976
HOMEDEPOT.COM
GUÍA DE INSTALACIÓN
CERRADURA DE PALANCA CON
BLOQUEO DE HUELLA DACTILAR
LH01
Rev. 1.0
GRACIAS
Agradecemos la conanza que ha depositado en Deant mediante la compra de esta cerradura de palanca con bloqueo
de huella dactilar. Nos esforzamos continuamente para crear productos de calidad diseñados para mejorar su hogar.
Visítenos en línea para ver nuestra línea completa de productos disponibles para sus necesidades de mejoramiento del
hogar. ¡Gracias por elegir a Deant!
Aquí puede encontrar videos
sobre la instalación y
la programación:
Información de seguridad
Lea las precauciones y las instrucciones de este manual antes de instalar y usar esta cerradura. Guarde
este manual para consultarlo en el futuro.
No intente desensamblar ningún componente interno de la cerradura. Si lo hace, anulará la garantía
limitada.
No deje caer ni golpee la cerradura. Si sufre demasiados golpes puede dañarla permanentemente.
Si usa la herramienta de clavija u objetos alados para presionar el sensor de huella dactilar, puede
ocasionar daños.
Esta cerradura de palanca con bloqueo de huella dactilar está diseñada para usarse solamente en
puertas interiores.
Restrinja el acceso al ensamblaje interior de su cerradura y compruebe rutinariamente sus
conguraciones para asegurarse de que no hayan sido alteradas sin su conocimiento.
NO instale el lado para huellas digitales (exterior) en el interior de una puerta de salida a una habitación.
Cuidado y limpieza
Antes de pintar la puerta, retire la cerradura o píntela antes de su instalación.
Limpie periódicamente utilizando solamente jabón suave y un paño suave.
No use ningún producto químico o abrasivo que contenga alcohol, benceno o ácidos, y evite usar
objetos alados o abrasivos para limpiar esta cerradura.
No deje caer agua u otros líquidos en la cerradura durante su instalación.
Esta cerradura está diseñada para proporcionar un producto de los más altos estándares de calidad
y rendimiento. Se debe tener cuidado para garantizar un acabado duradero. Cuando sea necesario
limpiar, use un paño suave y húmedo.
El uso de disolventes de laca, jabones cáusticos, limpiadores abrasivos o pulidores puede dañar el
revestimiento y provocar deslustre.
HERRAMIENTAS NECESARIAS
CONTENIDO DEL PAQUETE
NOTA: Asegúrese de tener todas las piezas antes de comenzar la instalación del producto. Si falta alguna
pieza o está dañada, no intente armar, instalar ni usar el producto. Llame al equipo de Atención al Cliente al
1-866-308-3976 o visite www.homedepot.com.
ADVERTENCIA: No apriete los tornillos con taladros ni destornilladores eléctricos.
Antes de la instalación
Pieza Descripción Pieza Descripción
A Ensamblaje exterior
B Pestillo
C Placa de montaje
D Tornillos de montaje
H Tornillos de la cerradura (38 mm)
I Placa de la cerradura
J Collarín empotrable
K
Herramienta de clavija
L Cable de alimentación
E Tornillos de montaje
F Ensamblaje interior
G Tornillos del pestillo (21 mm)
C
D
E
G
J
A
B
F
H
L
K
I
Martillo de carpintero Gafas de seguridad Destornillador Phillips Destornillador de cabeza
plana