
Home Dehumidifier
Please read this manual carefully
before using the product
JD025C-80
USER MANUAL
www.w kar.com ay


Thank you for purchasing our dehumidifier.
Waykar has been committed to developing powerful and easy-to-use products
to bring more convenience to your life. We highly recommend you to keep this
user manual for future reference in case of unexpected problems.
Please read this user manual carefully to ensure proper use of the dehumidifier.
This dehumidifier is perfect for reducing humidity in family bedrooms,
bathrooms, basements, offices, storage rooms and more.
Waykar dehumidifier reduce the room humidity efficiently, creating a more
healthy an
d comfortable environment for you and your family.
If there are any problems of the product, please contact aW ykar Customer Service
at with your Purchase Order ID. We’ll help you solve the support@waykar.com
problems as soon as possible.
FOR CUSTOMERS
REQUESTING CUSTOMER SERVICE
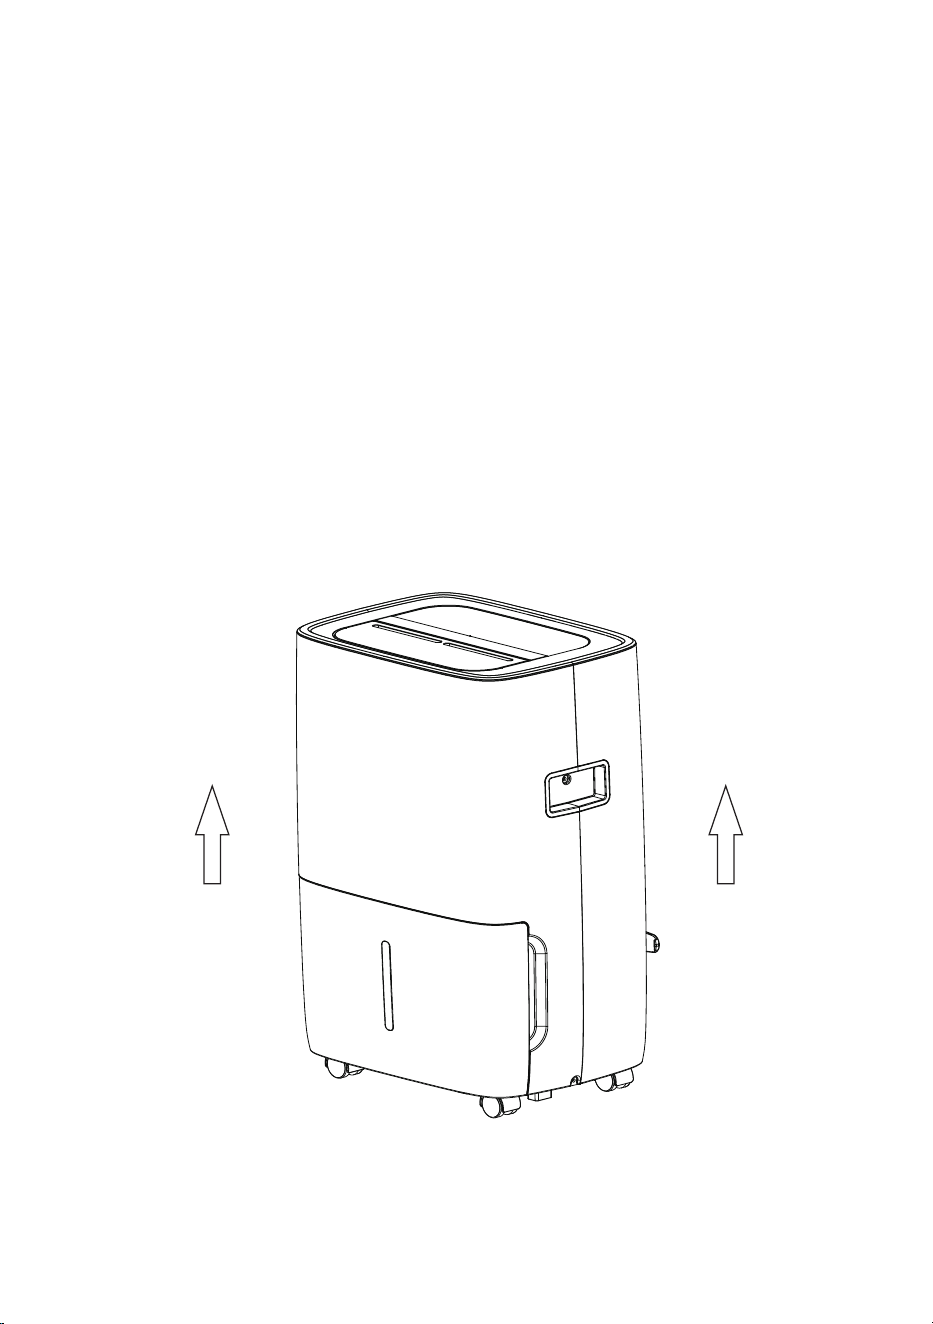
7RSURWHFWWKHSURGXFWIURPDQ\LQWHUQDOGDPDJHVSOHDVHNHHSWKH
SURGXFWLQWKHXSULJKWSRVLWLRQWKURXJKRXWLWVMRXUQH\
3OHDVHWDNHRXWWKHSURGXFWDQGOHDYHLWVWDQGLQJLQWKHXSULJKW
SRVLWLRQIRU EHIRUHSOXJJLQJLWLQ+2856
%()25(),56786(

T LE OF CONTENTSAB
FEATURES .................................................................................01
SAFETY PRECAUTIONS.......................................................02
SPECIFICATIONS ...................................................................03
PRODUCT DRAWINGS ..........................................................04
OPERATION INSTRUCTIONS ............................................05
DRAINAGE ................................................................................07
MAINTENANCE & CLEANING ..........................................09
TROUBLESHOOTING............................................................11
SPECIAL NOTES......................................................................12
WARRANTY & CONTACT US ..............................................13

FEATURES
FEATURES
Powerful Moisture Removal
With the cutting-edge technology, the dehumidifier powerfully removes moisture from
the air to reduce the room humidity level and keep the indoor air dry and comfortable.
Lightweight Portable Design
The dehumidifier is compact and lightweight. The casters at the bottom make it easy to
move the machine from one room to another.
Low Temperature Operation with Automatic Defrost Function
After the compressor runs continuously for 10 minutes, start to detect the temperature of
the coil. When the temperature of the coil is ≤-2℃(28.4℉) for more than 10 seconds, the
compressor will stop immediately, and the fan will be forced to run with high wind. After
3 minutes, when it is detected that the coil temperature is ≥5℃(41℉) for more than 10
seconds, then exit the anti-frost, and the compressor and fan will return to normal; (if the
anti-frost time is longer than 10 minutes, it will automatically exit)
During the anti-frost period, if the water is full, the fan will be turned off. After the water
level is restored, the fan will resume forced high-wind operation; (if the anti-frost time is
longer than 10 minutes, it will automatically exit)
Adjustable Humidistat
Allows you to set different humidity levels for different rooms.
Timer On / Off
Program the machine to turn on and off automatically.
Quiet Operation
The dehumidifier operates with a low noise level.
Energy Efficient
The power consumption of the machine is low.
- 0 1 -

IMPORTANT NOTICE FOR FIRST USE:
For your safety, please read the manual carefully and keep it for future reference.
Please install and use this product according to the instructions in the manual.
SAFETY PRECAUTIONS
● Please unplug the power cord before cleaning or storing the machine .
● The machine can be used indoor except for laundry rooms.
● Do not place the machine close to heat-generating devices or flammable and
dangerous materials.
● Never put your fingers or other objects into the intake or discharge ducts.
● Do not sit or stand on the machine.
● Pour out the collected water in the tank as required.
● Do not operate the dehumidifier in a closed area such as a closet, as it may cause a
fire.
● Do not place the machine near edible items, artwork, or scientific materials.
● Install the drain hose a
t a downhill grade to make sure that condensed water can be
drained continuously.
● If the power cord is damaged, please contact the manufacturer or qualified person to
replace it to avoid hazards.
● The machine must be positioned so that the plug is accessible.
● Please keep a distance of 20 cm away from the wall or other objects to ensure great
air circulation.
● The machine shall be installed in accordance with local national wire regulations.
● The machine can not be used in public transportation.
● This machine can be used by children aging from 8 years and above and persons
wi
th reduced physical, sensory or mental capabilities or lack experience and
knowledge if they have been given supervision or instructions of the machine in a
safe way and understand the hazards involved. Children shall not play with the
machine. Cleaning and user maintenance shall not be made by children without
supervision.
● Children should be supervised to ensure that they do not play with the machine.
● Please do not operate the machine if it is obviously damaged.
- 0 2 -

SPECIFICATIONS
This product can expose you to chemicals including Styrene and its compounds,
which are known to the State of California to cause cancer and birth defects or other
reproductive harm. For more information, please visit: www.P65Warning.ca.gov.
WARNING
MODEL
POWER SOURCE
MOTOR COMPRESSOR(RLA/LRA)
REFRIGERANT
MAXIMUM ALLOWABLE PRESSURE
HIGH PRESSURE
LOW PRESSURE
INPUT POWER (65°F, 60%RH)
INPUT CURRENT (65°F, 60%RH)
IEF ( F, 60%RH)65°
MOTOR FLA
JD025C-80
115V~ 60Hz
295 W
2.6A
TOTAL INPUT CURRENT
3.2A
1.66 L/kWh
0.38 A
3.5A / 16.3A
R410A/140g (4.94oz)
3.72MPa (540psig)
2.2MPa (320psig)
0.85MPa (123psig)
MOISTURE REMOVAL (65°F, 60%RH)
24.49 PINTS (11.58 L/DAY)
MOISTURE REMOVAL (80
°F
, 60%RH)
MOISTURE REMOVAL (86
°F
, 80%RH)
MOISTURE REMOVAL (95
°F
, 90%RH)
35 PINTS (16.56 L/DAY)
60 PINTS (28.38 L/DAY)
80 PINTS (37.84 L/DAY)
● The dehumidification capacity is rated at a room temperature of 18.3℃(64.94
°F
) with a
relative humidity of 60%RH.
● If specifications are changed in the future, the product nameplate will reflect the new
specifications.
● The working temperature range of this machine is between 7℃(44.6
°F
) and 32℃(89.6
°F
).
● If the room temperature is not within this range, the unit will not operate normally.
GWP value of R410A
- 0 3 -
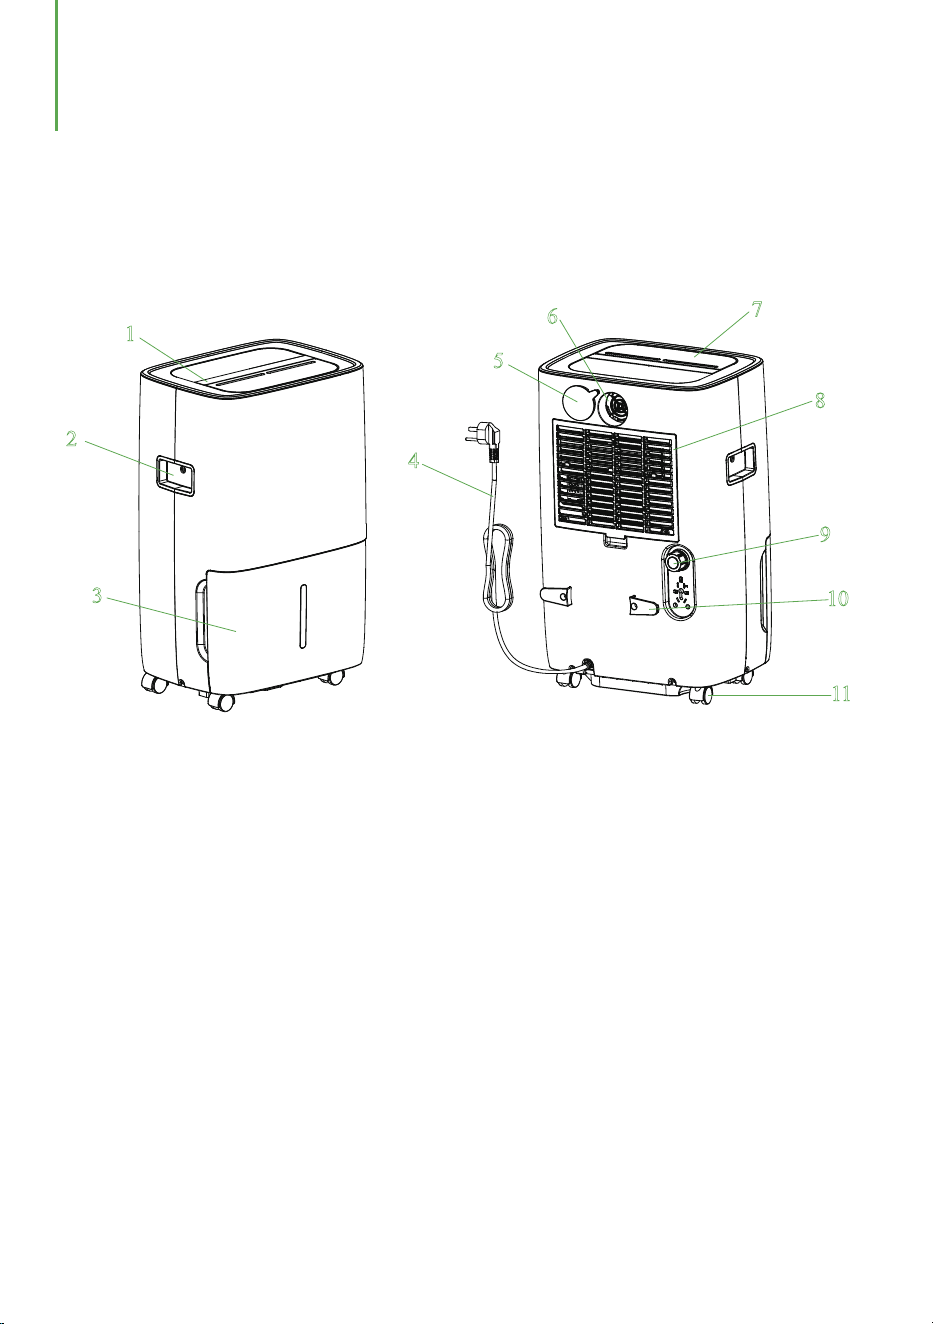
PRODUCT DRAWINGS
Front Back
11
22
33
44
55
66
77
88
99
1100
1111
1. Control panel 2. Handle 3. Water tank
4. Power cord 5. Seal cover 6. Air outlet
7. Wind deflector 8. Air inlet grille 9. Outfall
10. Buckle 11. Caster
- 0 4 -
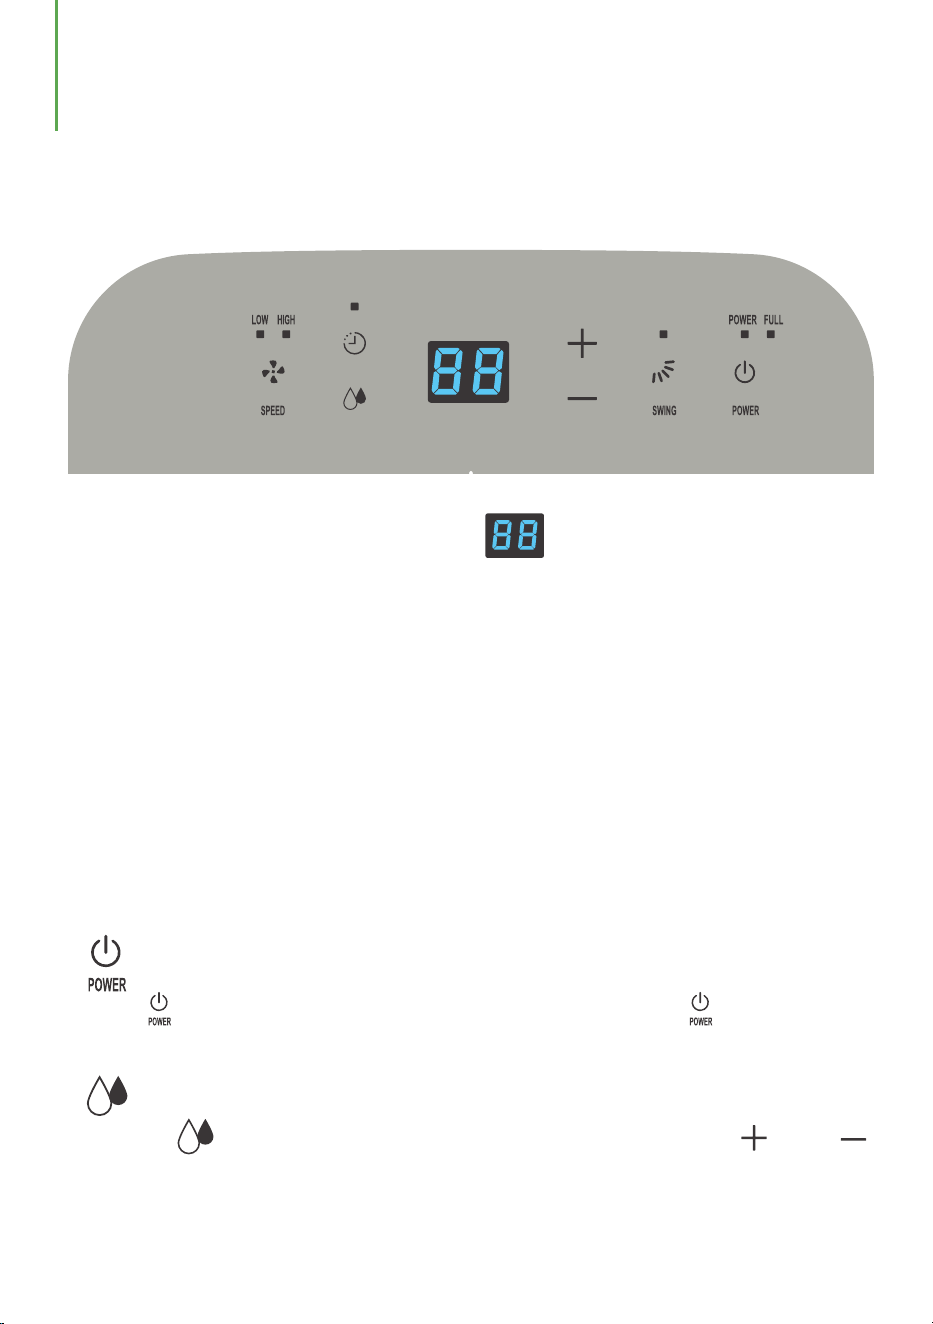
“ ” Turn On/Off:
Press “ ” to start the machine when it is powered off. Press “ ” to turn off it
when the machine is operating.
“ ” Humidity Setting:
Press the “ ” button to enter set the humidity level, you can press “ ” or “ ”
to adjust the humidity from 40%RH to 80%RH in 5% increment. The LED display will
flash when you adjust the humidity. The default humidity level is 40%RH.
OPERATION INSTRUCTIONS
Humidity Level & Timer Display
Control Panel
The indicator has 3 functions:
1. When the machine is powered on, it will indicate the current room humidity.
2. When you set the humidity, it will indicate the humidity that you have set.
3. When you program the timer, it will show the timing duration.
4. When the environment humidity is lower than 35%RH, it will show “35”.
5. When the environment humidity is higher than 95%RH, it will show “95”.
When the machine is powered on for the first time, it will buzz the power sound before
entering into the standby status.
Operating Instructions
- 0 5 -
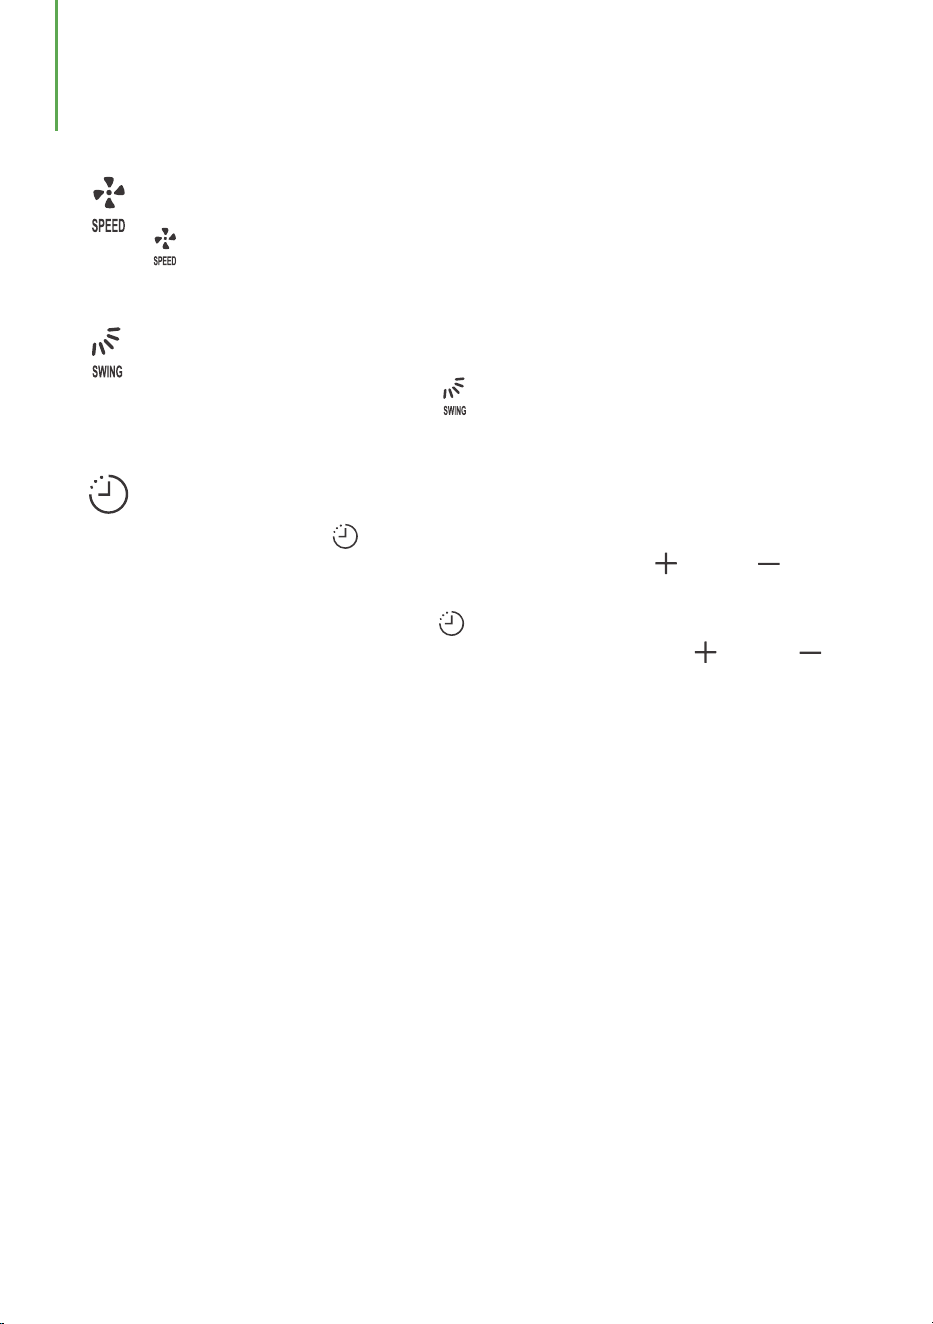
“ ” Fan Speed Setting:
Press “ ” to switch the fan speed between low and high level. The
corresponding fan speed light will turn on.
“ ” Swing Setting:
When the machine is operating, press “ ” to start or stop the swing of the air outlet
blade.
“ ” Timer Setting:
In the standby state, press “ ” button to set a timer to automatically start the
machine. The LED display will show the time. You can press “ ” or “ ” button
to adjust the timer from 01 to 24 hours.
When the machine is operating, press “ ”to set a timer to automatically shut down
the machine. The LED display will show the time, You can press “ ” or “ ”
button to adjust the ti
mer from 01 to 24 hours.
When the dehumidifier is turned on/ off by user’s operations or full tank alarm, the
timing function may become invalid.
OPERATION INSTRUCTIONS
- 0 6 -
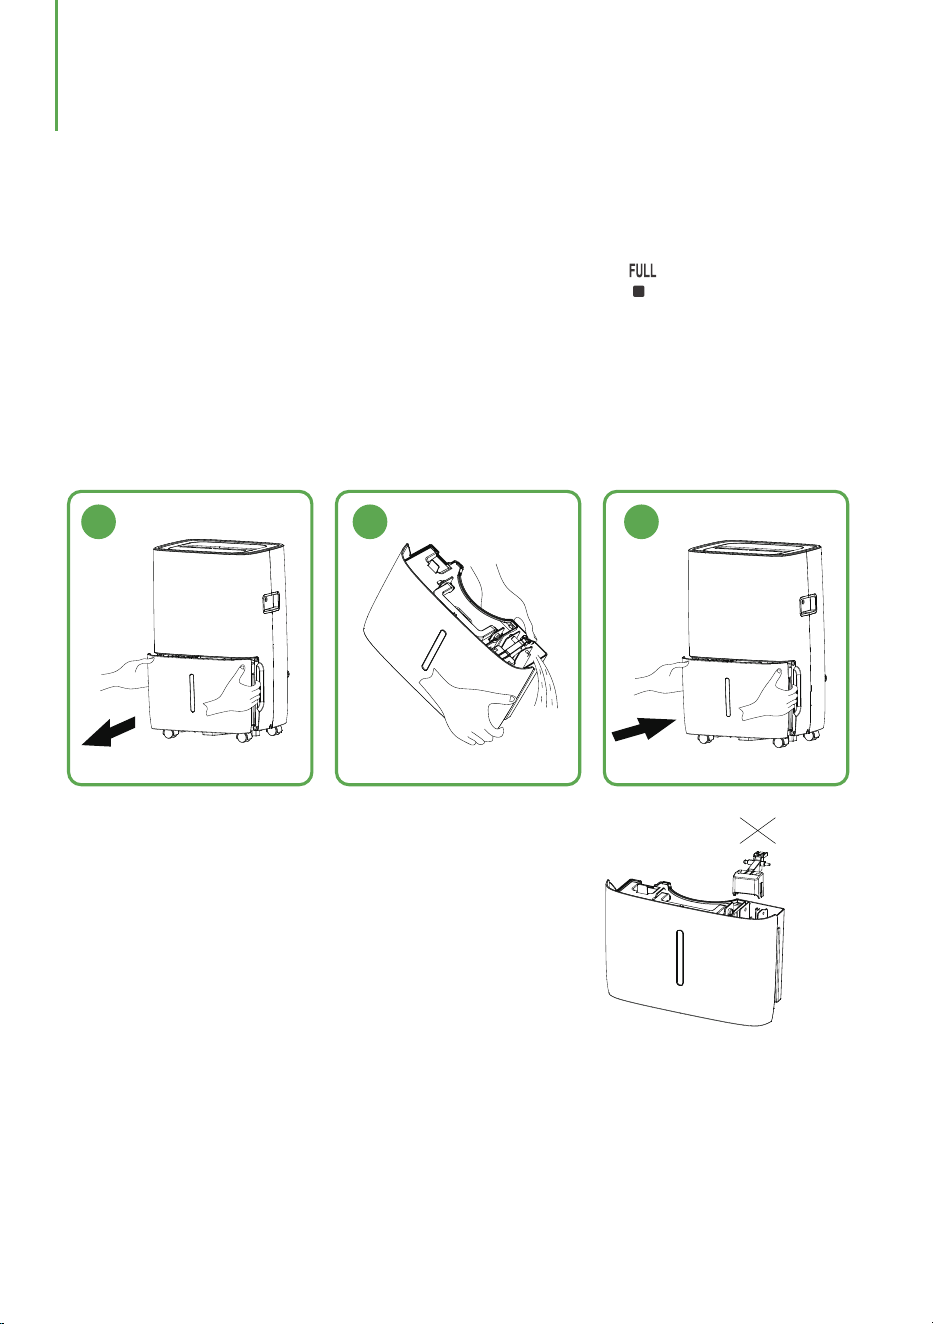
DRAINAGE
When the water tank is full, the tank full indicator light “ ” will turn on, and
the dehumidifier will stop automatically. The buzzer will beep 15 times to
remind you to empty the water tank.
1. Gently press the sides of the tank with both your hands and pull the tank out.
2. Pour out the collected water.
3. Install the water tank steadily into the machine.
1 2 3
Emptying the Water Tank
MANUAL DRAINAGE
NOTE
1. Do not remove the float from the water
tank. The full tank sensor will no longer be
able to detect the water level correctly
without the float and water may leak from
the tank.
2. If the tank is dirty, please wash it with cold or lukewarm water. Do not use
detergent, scouring pads, chemically treated dust cloths, gasoline, benzene,
thinner, or other solvents, as these may scratch and damage the tank and cause
water leakage.
3. When replacing the tank, please press the tank firmly into place with your both
hands. If the tank is not positioned properly, the “TANK FULL” sensor will be
activated, and the dehumidifier will not operate.
- 0 7 -
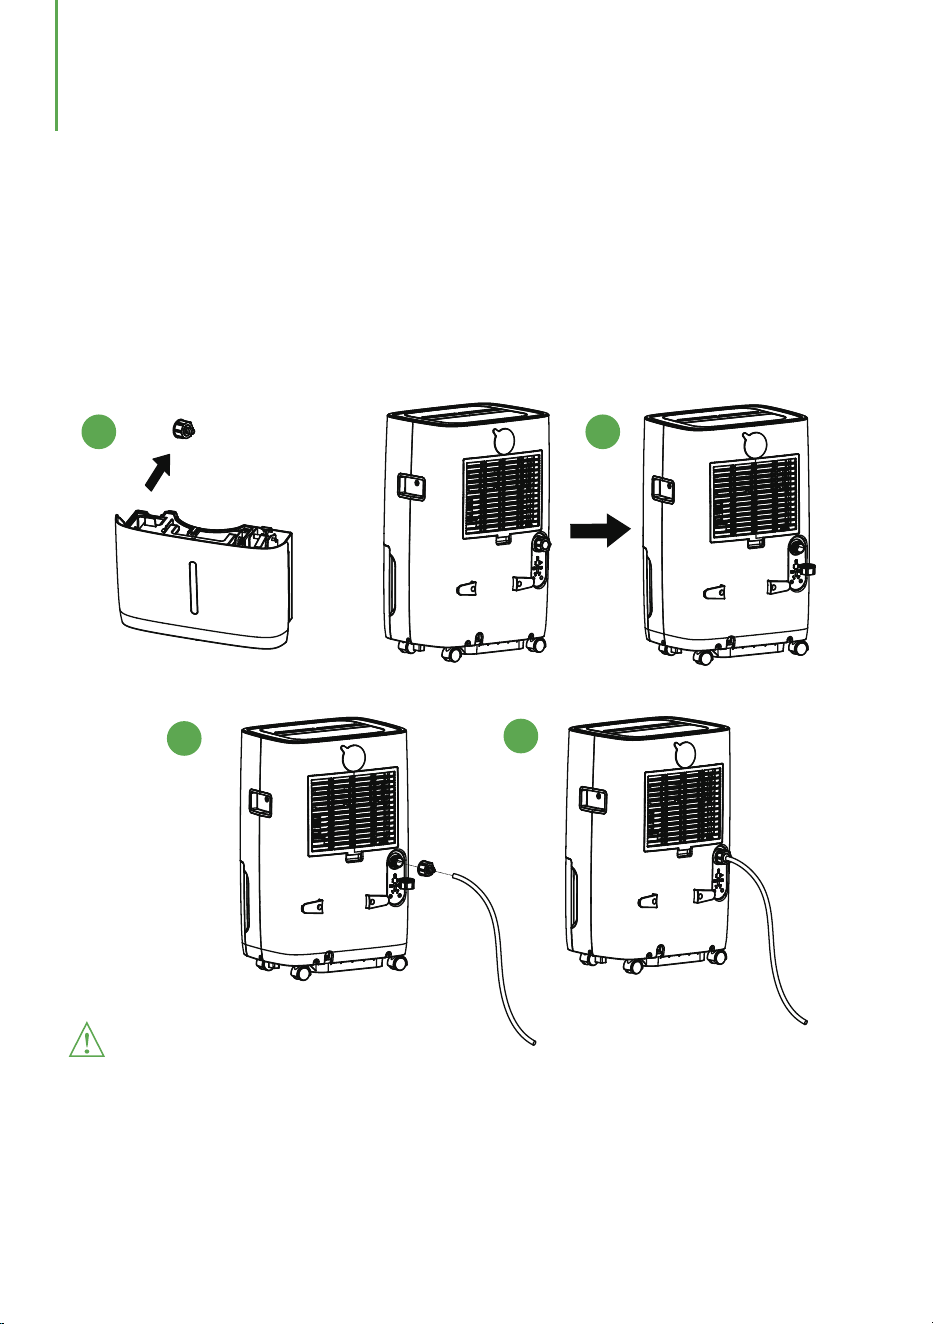
DRAINAGE
CONTINUOUS DRAINAGE
Please do not block the drain port or drain hose. If the blockage occurs, the
condensed water will flow into the water tank.
Please do not bend the drain hose. Make sure that the height of the drain hose is
lower than the drain port.
The drain hose must be firmly connected to the drain port.
Warnings:
1. Take out the drain hose connector from the water tank.
2. Unscrew the outlet cover on the back of the machine.
3. Install the drain hose connector and connect the drain hose.
4. The dehumidifier will continuous drain water when the drain hose is properly
installed.
1 2
3
4
- 0 8 -
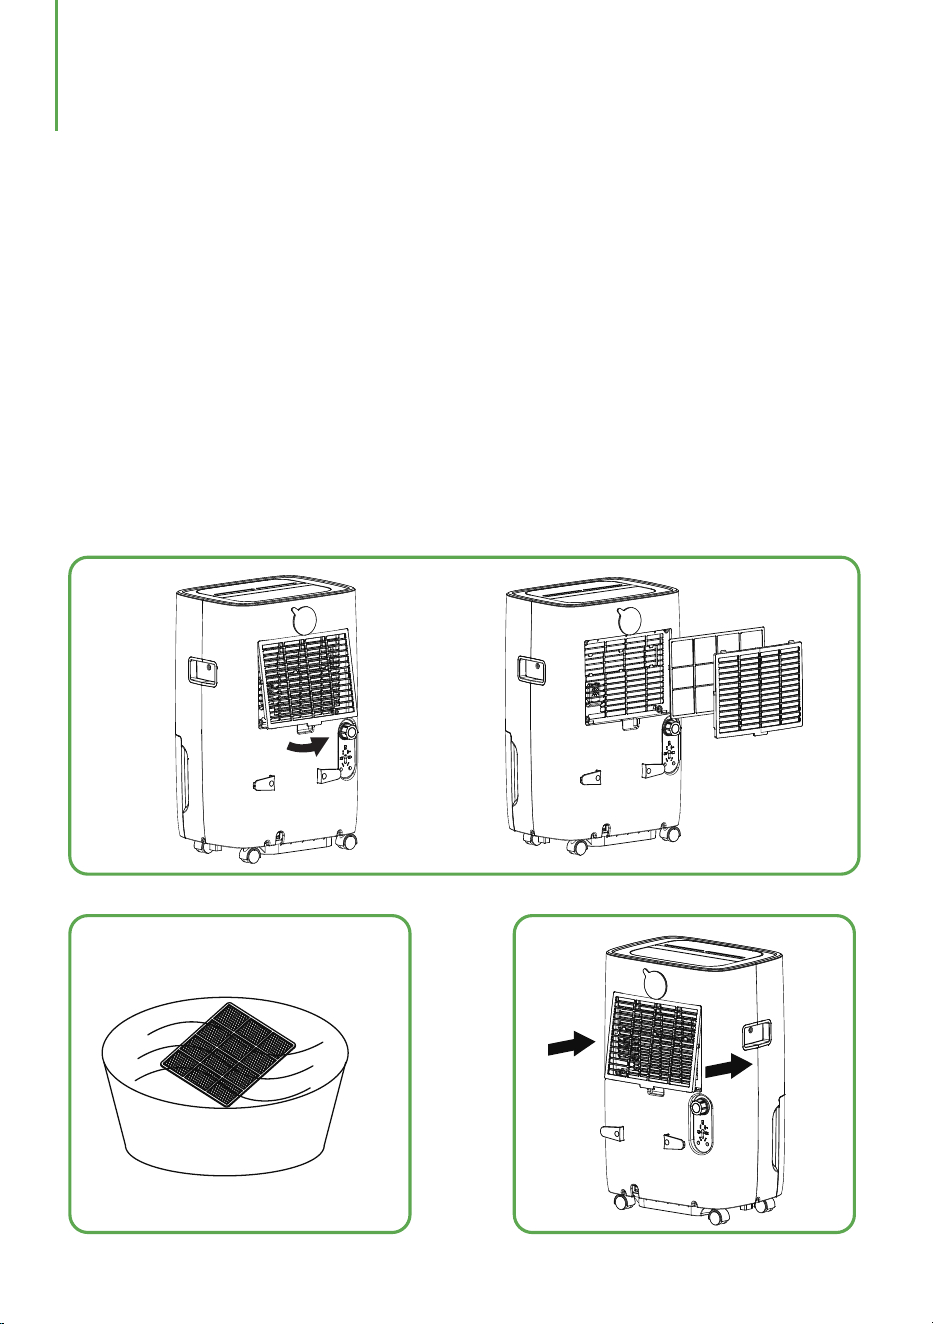
Cleaning the Dehumidifier
Cleaning the Body
Wipe it with a soft damp cloth.
Cleaning the Air Filter
1. Open the inlet grill and wash it with water.
2. Run a vacuum cleaner lightly over the surface of the air filter to remove dirt.
If the air filter is exceptionally dirty, please wash it with warm water and a mild
cleanser and dry thoroughly.
3. Insert the filter into the grill smoothly.
1.
2.
3.
- 0 9 -
MAINTENANCE & CLEANING
Storing the Dehumidifier
When the unit is not used for a long period of time or you want to store it. please
notice the following steps:
1. Empty any water left in the tank.
2. Put the power supply cord away and wrap it around the hook on the back of the unit.
3. Clean the air filter.
4. Place it in a cool and dry place.
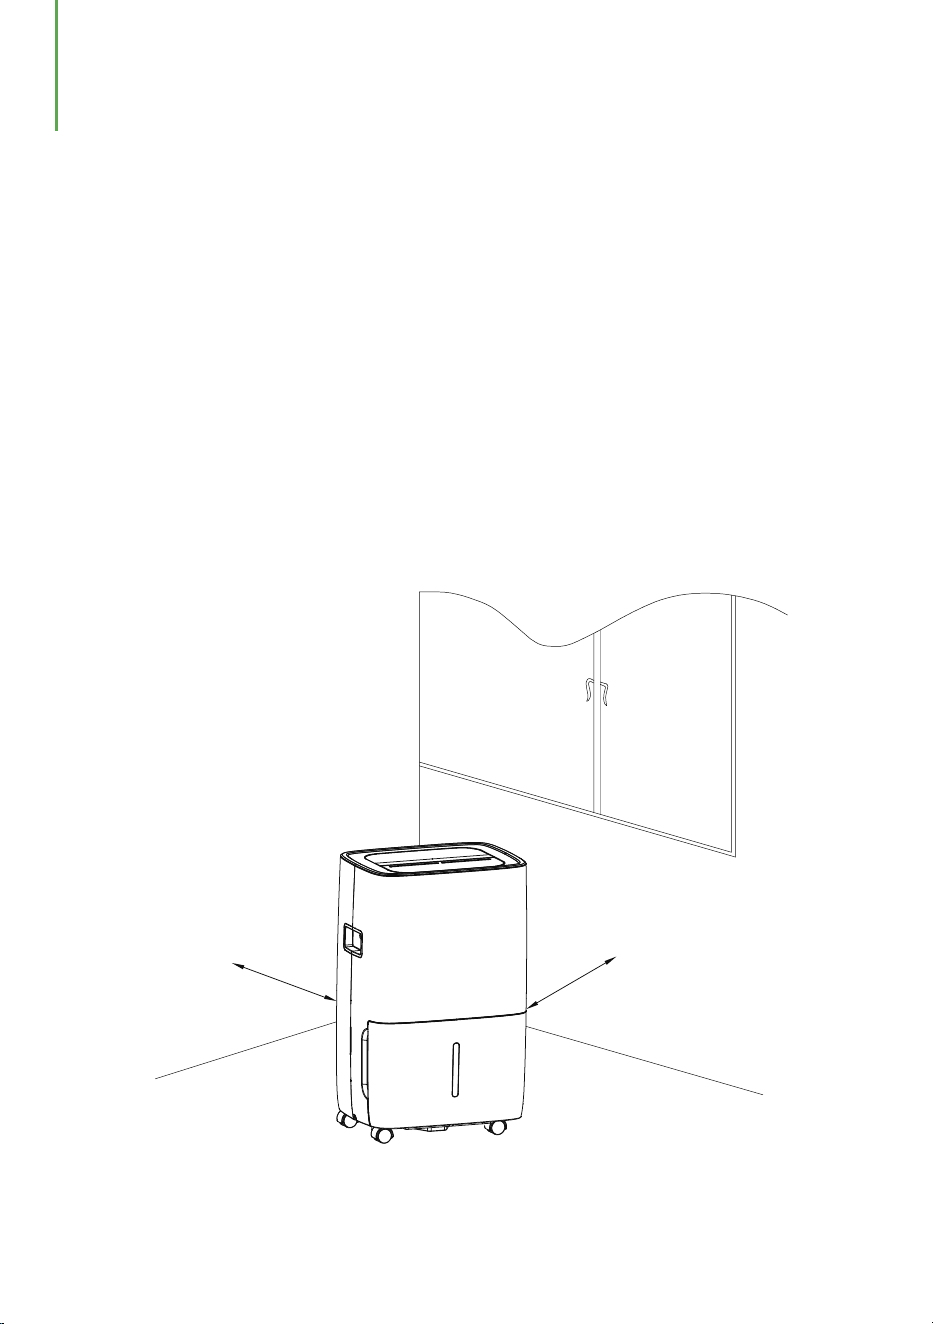
Clearance
Keep the minimun clearance at 18 inches around the dehumidifier when it is
operating as shown in the following drawing.
18inches
18inches
- 1 0 -
MAINTENANCE & CLEANING

TROUBLESHOOTING
The following list contains some abnormal conditions that are not faults caused by
manufacturing process or material defects.
- 1 1 -
The machine
doesn't operate
Is the power cord connected
properly?
The dehumidifying
function doesn't
work
Is the tank full indicator
flashing? (The tank is full or
in a wrong position.)
No air is
discharged
Is the air filter clogged?
The operation is
noisy
Is the air filter clogged?
Problems
Possible Causes
Solutions
Is the unit tilted or unsteady?
Is the temperature of the room
above 32℃(89.6℉) or below
7℃(44.6℉)?
Is the intake duct or
discharge duct obstructed?
Is the air filter clogged?
Plug the power cord into the
outlet.
Empty the water tank and
then reposition the tank.
Clean the air filter as
instructed under"Cleaning
the dehumidifier".
Clean the air filter as
instructed under "Cleaning
the dehumidifier".
Move the unit to a stable,
sturdy location.
Make sure the working
temperature is between
7℃(44.6℉) and 32℃(89.6℉).
Remove the blockage from the
discharge duct or intake duct.
Clean t
he air filter as
instructed under"Cleaning
the dehumidifier".
According to "E1"
According to "E2"
According to "E3"
Abnormal exhaust pipe
temperature sensor
Abnormal coil temperature
sensor
Communication failure
Check exhaust pipe
temperature sensor and
related circuit.
Check coil temperature sensor
and related circuit.
Check to see if the main PCB is
connected properly. If not,
replace it with a new main PCB.
According to“EH”
Abnormal humidity sensor
Check if the wires of the
temperature and humidity
module are loose. If not, replace
the temperature and humidity
module or the motherboard.
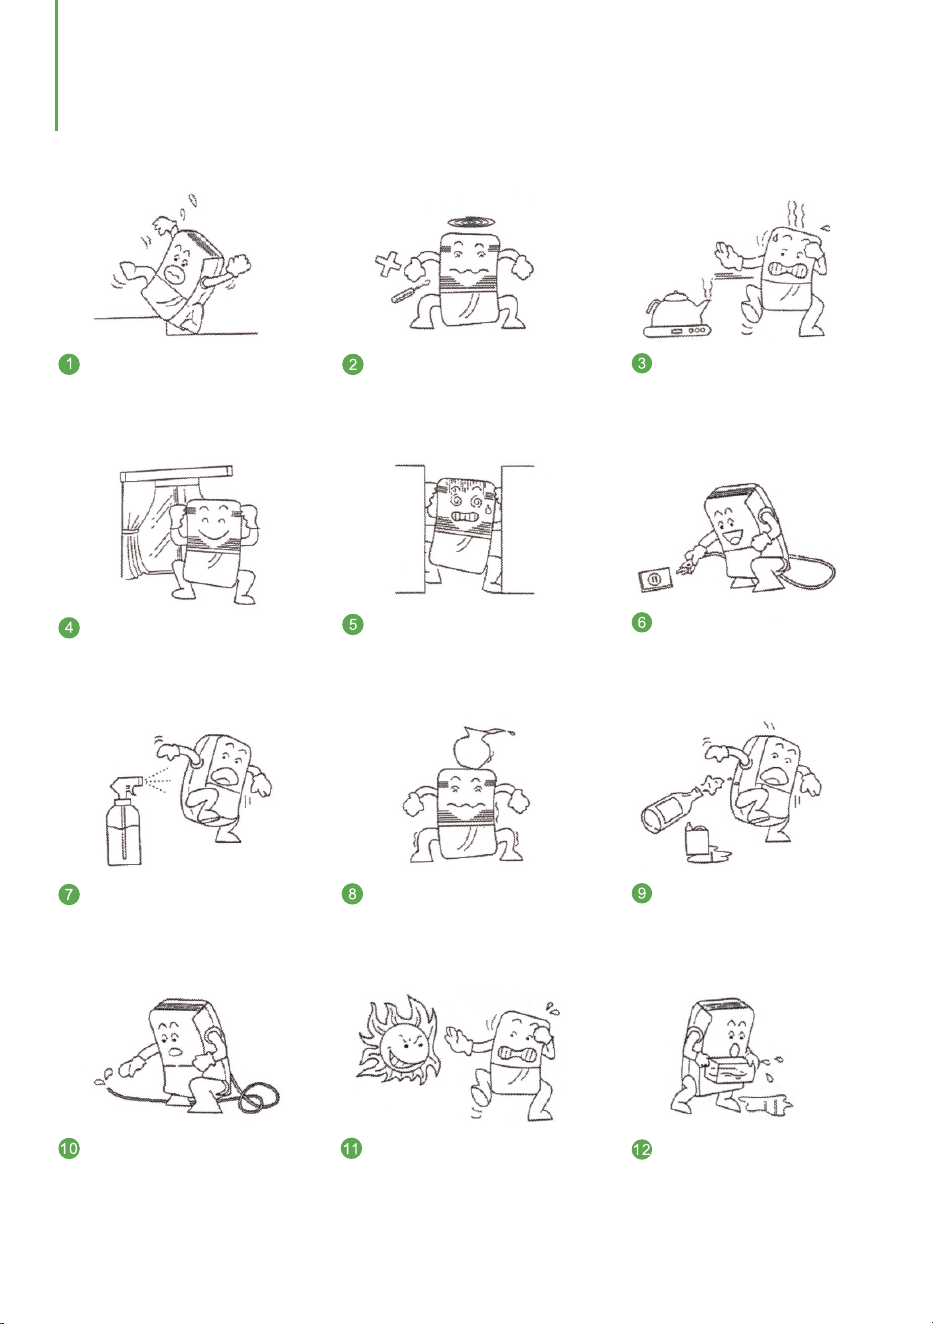
Do not insert any thin rods or
hard items into the machine to
prevent malfunctions and
dangers.
When cleaning the machine,
please use wet cloth to wipe
gently. Do not spray water on it
directly.
Please clean the filter every two
weeks. Do not use hot water
above 104°F, alcohol, gasoline
or toluene.
When using the hose to drain
continuously, please place the
hose horizontally and make
sure it is even and not winded.
After cleaning the filter,
please do not dry it under
direct sunlight to prevent it
from deforming.
SPECIAL NOTES
When using the machine,
please do not put it on a soft
or uneven ground to prevent
vibration and movement.
When using the machine, please
keep it away from any heating
furnaces, electric kettles and
other heating sources.
When using the machine,
please close doors and
windows for the optimal
moisture removal effect.
Please do not put any objects
around the machine. The
dehumidification effect will be
affected if the ventilation is bad.
Please unplug the machine from
the power source if you do not
use it for a long time.
Please do not put any
objects on the dehumidifier.
Be
fore moving or carrying
the machine around, please
empty the water tank first.
- 1 2 -

Waykar offers a 12-month warranty to all of our products together with the original
proof of purchase when a defect occured, including those newly purchased and
unused, from aykar or through an authorized reseller, wholly or substantially, or W
as a result of faulty manufacturing parts, or workmanship during the Warranty
Period.
The warranty does not apply if damage is caused by other factors, including but
without limitation of:
Register your product at to extend your 1-year warranty by an www.
w
aykar.com
additional year.
*Please fill out all required fiel
ds and include your Order ID, Date of Purchased if
applicable.
Warranty
Extend Your Warranty by 1 Year
Customer Support
There are our general terms for the warranty service, but we always encourage our
customers to contact us if any issues, regardless of warranty terms.
If you are experiencing an issue with aW ykar product, you can reach out to us at
support@waykar.com, we will dedicate our efforts to resolve it for you.
(a) Normal wear and tear;
(b) Abuse, mishandling, accident or failure to follow operating instructions;
(c) Exposure to liquid or infiltration of foreign particles;
(d) Servicing or modification of the product other than by aW ykar.
If you have any questions or concerns about our product, please feel free to contact
our expert support team. aW ykar customer service is ready to help.
Waykar Office
13211, Spring Street Baldwin Park, CA, US
Email: support@waykar.com
Live Chat: www.waykar.com
Support Hours
24 Hours available
*Please have your Order Numbe
r ready before contacting customer support.
WARRANTY & CONTACT US
- 1 3 -


We are expecting to see our products fulfill your life and hear your voice.
Your satisfaction means a lot to us.
Please tag us if you share a snap on your social media.
For FAQs and more information please visit:
www.waykar.com
(Scan the QR Code for Live Chat)
www.waykar.com
Waykar
Waykar
Waykar
Waykar