40V SV20 SERIES 35CM CORDLESS
CHAINSAW BODY ONLY
MODEL NO: CP40VCS
Thank you for purchasing a Sealey product. Manufactured to a high standard, this product will, if used according to these
instructions, and properly maintained, give you years of trouble free performance.
1. SAFETY
NOTE: Seek professional advice and training to ensure safe and eective use of this tool.
WARNING! Read all safety warnings, instructions, illustrations and specications provided with this tool. Failure to follow all
instructions listed below may result in electric shock, re and/or serious injury.
9 Save all warning and instructions for future reference.
WARNING! Disconnect the saw from the battery unit before changing accessories, servicing, performing any maintenance or storing.
1.1. WORK AREA SAFETY
9 Keep work area clean and well lit. Cluttered or dark area invites accidents
8 DO NOT operate power tools in explosive atmospheres, such as in the presence of ammable liquids, gases, or dust. Power tools
create sparks which may ignite the dust or fumes.
9 Keep children and bystanders away whilst operating a power tool. Distractions can cause you to lose control.
1.2. ELECTRICAL SAFETY
Avoid body contact with earthed or grounded surfaces, such as pipes, radiators, ranges, and refrigerators. There is an increased risk
of electric shock if your body is earthed or grounded.
8 DO NOT expose power tools to rain or wet conditions. Water entering a power tool will increase the risk of electric shock.
1.3. PERSONAL SAFETY
8 DO NOT use a power tool whilst you are tired or under the inuence of drugs, alcohol, or medication. A moment inattention whilst
operating power tools may result in serious injury.
8 DO NOT overreach. Keep proper footing and balance at all times. This enables better control of the power tool in unexpected
situations. Dress properly.
8 DO NOT wear loose clothing or jewellery. Keep your hair and clothing away from moving parts. Loose clothes, jewellery or long hair
can be caught in moving parts.
8 DO NOT let familiarity gained from frequent use of tools allow you to become complacent and ignore tool safety principles. A
careless action can cause severe injury within a fraction of a second.
9 Stay alert, watch what you are doing and use common sense when operating a power tool.
9 Use personal protective equipment. Always wear eye protection. Protective equipment such as dust mask, non-skid safety shoes,
hard hat or hearing protection use for appropriate conditions will reduce personal injuries.
9 Prevent unintentional starting. Ensure the switch is in the o position before connecting to power source and/or battery pack, picking
up or carrying the tool. Carrying power tools with your ngers on the switch or energising power tools that have the switch on invites
accidents.
9 Remove any adjusting key or wrench before turning the power tool on. A wrench or a key left attached to a rotating part of the power
tool may result in personal injury.
1.4. POWER TOOL USE AND CARE
8 DO NOT force the power tool. Use the correct power tool for your application. The correct power tool will do the job better and safer
at the rate for which it was designed.
8 DO NOT use the power tool if the switch does not turn it on and o. Any power tool that cannot be controlled with the switch is
dangerous and must be repaired. Disconnect the plug from the power source and/or remove the battery pack, if detachable, from the
power tool before making any adjustments, changing accessories, or storing power tools. Such preventive safety measures reduce
the risk of starting the power tool accidentally.
9 Store idle power tools out of the reach of children and DO NOT allow persons unfamiliar with these power tools or these instructions
to operate the power tool. Power tools are dangerous in the hands of untrained users.
Original Language Version
© Jack Sealey Limited
Refer to
instructions
Wear eye
protection
Wear protective
gloves
Wear ear
protection
Wear head
protection
Wear protective
clothing
Wear safety
footwear
Wear face mask
Beware of
Kickback
Keep bystanders
away
Use both hands
Appropriate
Protection Foot-
leg, Hand-Arm
Avoid touching
tip to avoid
kickback
Avoid rain and
wet conditions
CP40VCS Issue 2 11/01/2024
9 Maintain power tools and accessories. Check for misalignment or binding of the moving parts, breakage of parts and any other
condition that may aect the power tool’s operation. If damaged, have the power tool repaired before use. Many accidents are
caused by poorly maintained power tools.
9 Keep cutting tools sharp and clean. Properly maintained cutting tools with sharp cutting edges are less likely to bind and are easier
to control.
9 Use the power tool, accessories, and tool bits etc, in accordance with these instructions, taking into account the working conditions
and the work to be performed.
9 Use of the power tool for operations dierent from those intended could result in a hazardous situation.
9 Keep handles and grasping surfaces dry, clean, and free from oil and grease. Slippery handles and grasping surfaces DO NOT
allow for safe handling and control of the tool in unexpected situations.
1.5. SERVICE
9 Have your power tool serviced by a qualied repair person using only identical replacement parts. This will ensure that the safety of
the power tool is maintained.
WARNING!: Never service damaged battery packs. Service of battery packs should only be performed by the manufacturer or
authorised service providers.
1.6. BATTERY TOOL USE AND CARE
8 DO NOT expose a battery pack or tool to re or excessive temperature. Exposure to re or temperature above 130°C may cause
explosion.
8 DO NOT use a battery pack or tool that is damaged or modied. Damaged or modied batteries may exhibit unpredictable
behaviour resulting in re, explosion, or risk of injury.
WARNING!: Before installing the battery cartridge into the tool, always check to see that the switch trigger actuates properly and
returns to the “OFF” position when released.
NOTE: The tool does not work with only one battery cartridge.
9 Ensure battery pack is correctly inserted into the tool handle and latched in place before attempting to switch it on.
9 Follow all charging instructions and DO NOT charge the battery pack or tool outside the temperature range specied in the
instructions. Charging improperly or at temperatures outside the specied range may damage the battery and increase the risk of
re.
9 Recharge only with the charger specied by the manufacturer. A charger that is suitable for one type of battery pack may create a
risk of re when used with another battery pack.
9 Use power tools only with specically designated battery packs. Use of any other battery packs may create a risk of injury and re.
9 When battery pack is not in use, keep it away from other metal objects, like paper clips, coins, keys, nails, screws, or other small
metal objects, that can make a connection from one terminal to another.
9 Shorting the battery terminals together may cause burns or a re. Under abusive conditions, liquid may be ejected from the battery;
avoid contact. If contact accidentally occurs, ush with water. If liquid contacts eyes, additionally seek medical help. Liquid ejected
from the battery may cause irritation or burns.
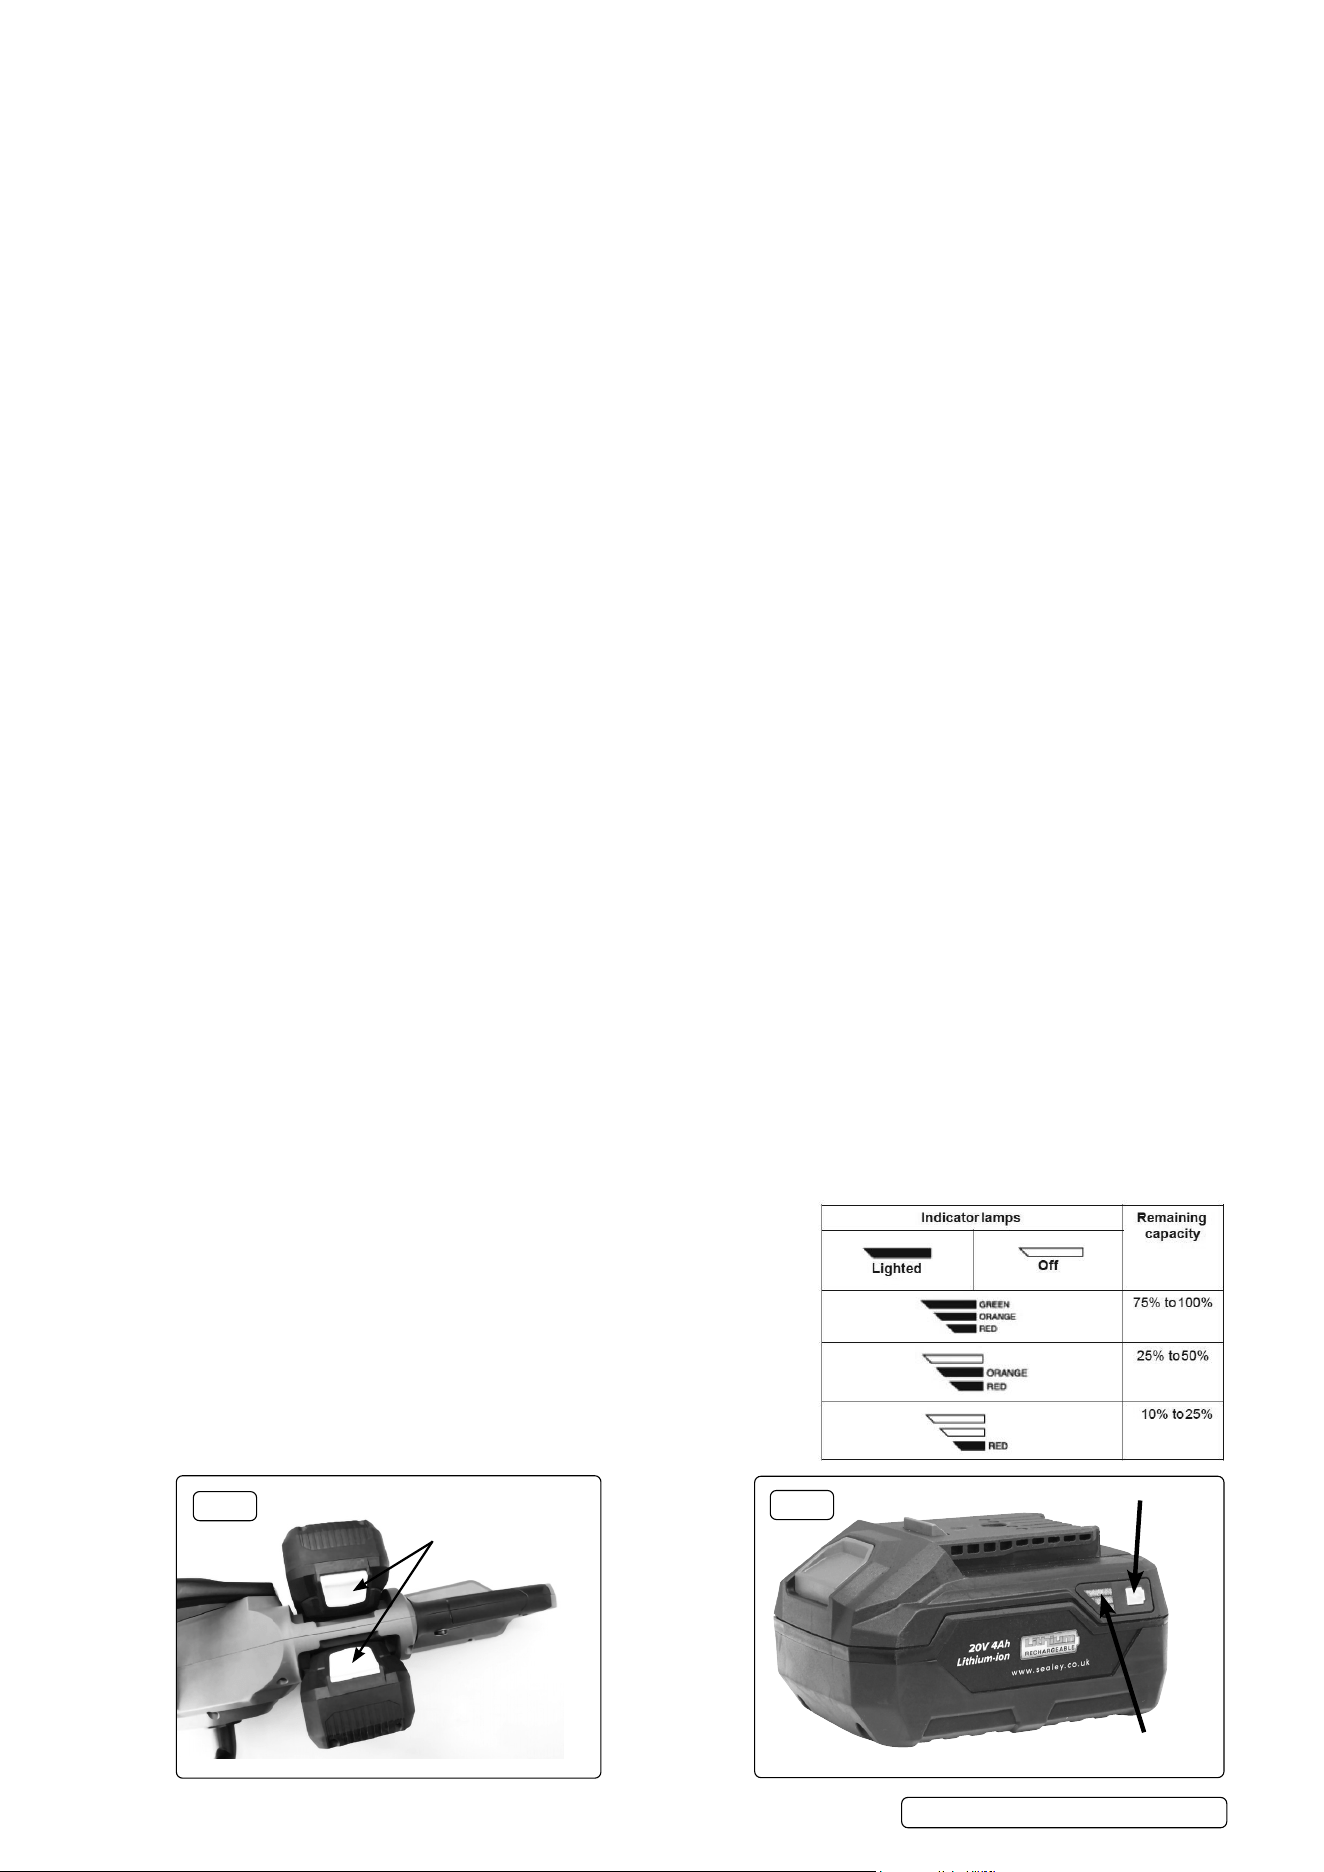
1.6.1. To remove the battery cartridge, slide it from the tool while sliding the button on the front of the cartridge.
1.6.2. To install the battery cartridge, align the tongue on the battery cartridge with the groove in the housing and slip it into place. Insert it
all the way until it locks in place with a little click (g.A).
1.6.3. WARNING!: Always install the battery cartridge fully. If not, it may accidentally fall out of the tool, causing injury to you or someone
around you.
8 DO NOT install the battery cartridge forcibly. If the cartridge does not slide in easily, it is not being inserted correctly.
WARNING!: Pay attention to the position of your ngers when installing the battery. The button may be depressed unintentionally.
1.6.4. The tool is equipped with a tool/battery protection system. This system automatically cuts o power to the motor to extend tool and
battery life. The tool will automatically stop during operation if the tool or battery is placed under one of the following conditions:
1.6.4.1. Overload protection: When the battery is operated in a manner that causes it to draw an abnormally high current, the tool
automatically stops without any indication. In this situation, turn the tool o and stop the application that caused the tool to
become overloaded. Then turn the tool on to restart.
1.6.4.2. Over heat protection: When the tool or battery is overheated, the tool stops
automatically. In this situation, let the tool/battery cool before turning the
tool on again.
1.6.4.3. Over discharge protection: When the battery capacity becomes low, the
tool stops automatically. If the product does not operate even when the
switches are operated, remove the batteries from the tool and charge the
batteries.
1.6.5. Battery state is indicated by pressing the check button on the battery
body. The indicator LEDs light up to show battery state (g.B)
See chart alongside for explanation.
Original Language Version
© Jack Sealey Limited
Check button
State indicators
Depress switch to
Load / unload battery.
g. A
g. B
CP40VCS Issue 2 11/01/2024

1.7. CHAINSAW SAFETY WARNINGS
NOTE: This product is not suitable for tree felling.
WARNING!: Ensure the saw is switched o before installing the battery pack.
WARNING!: To prevent the switch trigger from being accidentally pulled, a lock-o lever is provided. To start the tool, depress the lock-
o lever and pull the switch trigger, push the front hand guard backwards with your nger at the same time. Tool speed is increased by
increasing pressure on the switch trigger. Release the switch trigger to stop.
8 DO NOT operate a chainsaw in a tree, on a ladder, from a rooftop, or any unstable support. Operation of a chainsaw in this manner
could result in serious personal injury.
9 Keep all parts of the body away from the saw chain when the chainsaw is operating.
9 Before you start the chainsaw, make sure the saw chain is not contacting anything.
9 A moment of inattention while operating chainsaws may cause entanglement of your clothing or body with the saw chain.
9 Always hold the chainsaw with your right hand on the rear handle and your left hand on the front handle. Holding the chainsaw with
a reversed hand conguration increases the risk of personal injury and should never be done.
9 Hold the chainsaw by insulated gripping surfaces only, because the saw chain may contact hidden wiring. Saw chains contacting a
live wire may make exposed metal parts of the chainsaw live’ and could give the operator an electric shock.
9 Wear eye protection. Further protective equipment for hearing, head, hands, legs, and feet is recommended. Adequate protective
equipment will reduce personal injury from ying debris or accidental contact with the saw chain.
9 Always keep proper footing and operate the chainsaw only when standing on xed, secure, and level surface. Slippery or unstable
surfaces may cause a loss of balance or control of the chainsaw.
9 When cutting a limb that is under tension, be alert for spring back. When the tension in the wood bres is released, the spring-
loaded limb may strike the operator and/or throw the chainsaw out of control.
9 Use extreme caution when cutting brush and saplings. The slender material may catch the saw chain and be whipped toward you
or pull you o balance.
9 Carry the chainsaw by the front handle with the chainsaw switched o and away from your body. NOTE: Mass is 3.5kg.
9 When transporting or storing the chainsaw, always t the guide bar cover.
9 Proper handling of the chainsaw will reduce the likelihood of accidental contact with the moving saw chain.
9 Follow instructions for lubricating, chain tensioning and changing the bar and chain. Improperly tensioned or lubricated chain may
either break or increase the chance for kickback.
9 Cut wood only. DO NOT use chainsaw for purposes not intended. For example: DO NOT use chainsaw for cutting metal, plastic,
masonry, or non-wood building materials.
9 Use of the chainsaw for operations dierent than intended could result in a hazardous situation.
9 Use of the chainsaw for operations dierent than intended could result in serious injury to the operator or bystanders.
9 Follow all instructions when clearing jammed material, storing, or servicing the chainsaw.
9 Make sure the switch is o and the battery pack is removed. Unexpected actuation of the chainsaw while clearing jammed material
or servicing may result in serious personal injury.
9 Recommendation for rst-time users to, as a minimum, practise cutting logs on a saw-horse or cradle.
9 Maintain a rm grip, with thumbs and ngers encircling the chainsaw handles, with both hands on the saw and position your body and
arm to allow you to resist kickback forces. Kickback forces can be controlled by the operator if proper precautions are taken. DO NOT
let go of the chainsaw.
9 DO NOT overreach and DO NOT cut above shoulder height. This helps prevent unintended tip contact and enables better control of
the chainsaw in unexpected situations.
WARNING: When sawing precut timber, use a safe support (saw horse or cradle). DO NOT steady the workpiece with your foot, and
do not allow anyone else to hold or steady it.
WARNING: Secure round pieces against rotation.
2. INTRODUCTION
Part of the SV20 Series designed for the professional, oering heavy-duty, high performance, durable tools with lightweight composite designs
for superior control and comfort. Operates using 2 x 20V batteries from the Sealey SV20 Series (batteries must be of the same Ah rating). Tool-
less chain tensioning and built-in chain lubrication. Two stage operation and automatic cut-o for safety whilst working. Oregon chain and bar
set.
3. SPECIFICATION
MODEL NO.: ..........................................................CP40VCS
Noise Power/Pressure: ..................................... 105/93 dB(A)
No-Load Speed: .................................................... 10,000rpm
Bar Length: ................................................................ 350mm
Battery: ....................................................2 x 20V Lithium-ion
Vibration/Uncertainty: ......................................... 3.58/1.5m/s
2
Chain Speed: ............................................................ 0-19m/s
Chain Pitch: .....................................................................3/8”
4. OPERATION
NOTE: The saw is supplied without oil. Fill oil tank (160cc) before rst use (g.2.13, g.2.12). See Section 4.6 for details.
WARNING!: Always be sure that the tool is switched o and the battery cartridge is removed before carrying out any work on the tool.
WARNING! DO NOT touch the saw chain with bare hands. Always wear gloves when handling the saw chain.
WARNING! The saw chain and the guide bar are still hot just after the operation. Let them cool down enough before carrying out any
work on the tool.
CONSUMABLES:
Batteries (not included):
CP20VBP2 - 2Ah Battery, CP20VBP4 - 4Ah Battery, CP20VBP6 - 6Ah
Battery Charger (not included): CP20VMC
Replacement Saw Chain: Oregon (104MLEA041)
Original Language Version
© Jack Sealey Limited
CP40VCS Issue 2 11/01/2024
4.1. OPERATIONAL MATTERS
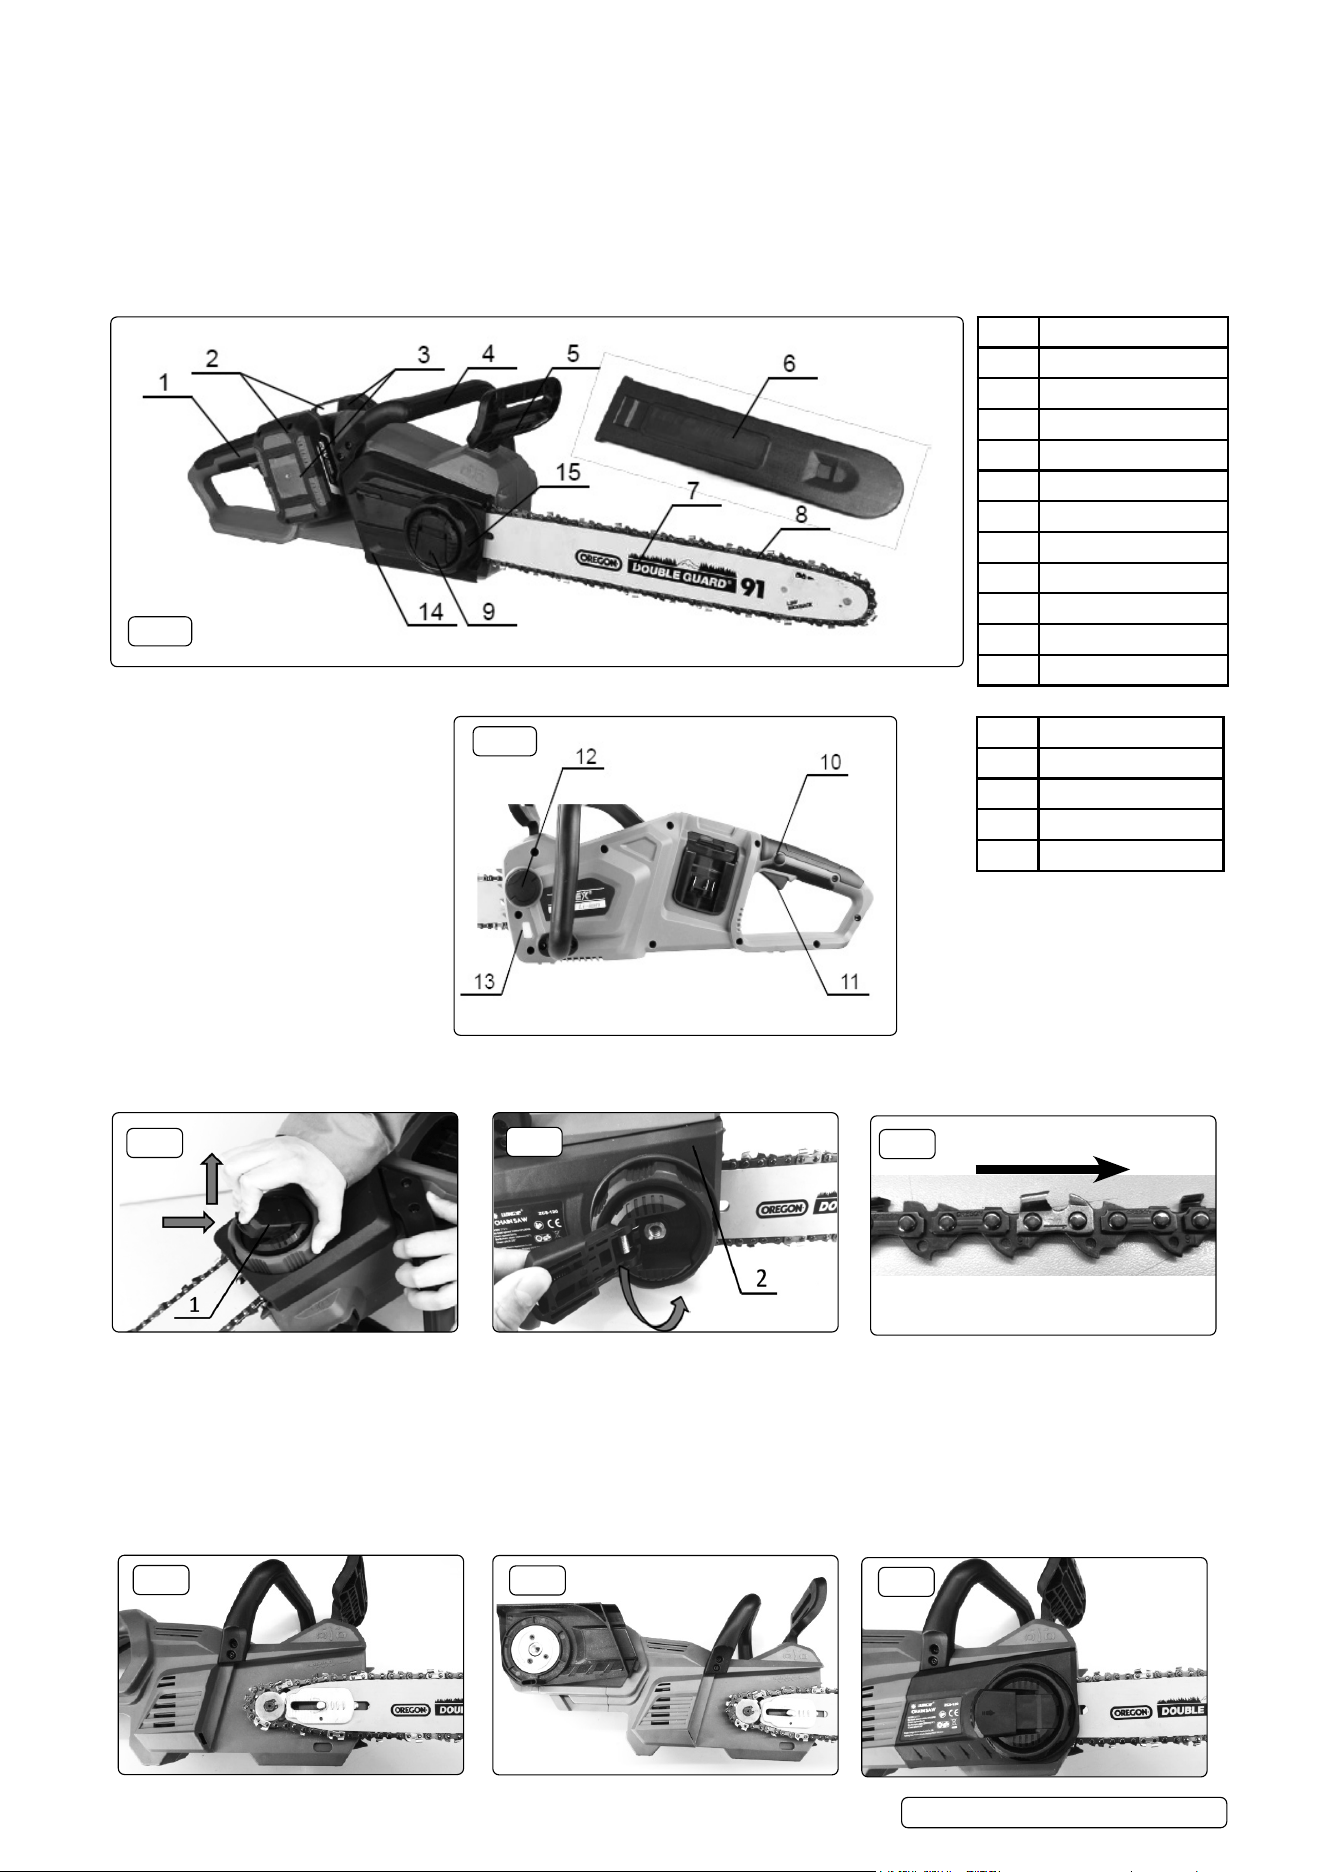
4.1.1. CHECKINGTHECHAINBRAKE(g1&2)
WARNING! Hold the chain saw with both hands when switching it on. Hold the rear handle in one hand and the front handle (g.1.4)
with the other. The bar and the chain must not be in contact with any object.
WARNING! Should the saw chain not stop immediately when this test is performed, the saw may not be used under any
circumstances. Consult an authorised service centre.
4.1.2. Press the lock-o lever (g.2.10), then pull the switch trigger (g.2.11), pull the front hand guard (g.1.5) backwards with your nger
at the same time. The saw chain starts immediately.
4.1.3. Push the front handle guard (g.1.5) forwards with the back of your hand. Make sure that the chain saw comes to an immediate
standstill.
4.2. CHECKING RUN-DOWN BRAKE
WARNING! If the saw chain does
not stop within one second in this
test, stop using the chain saw and
consult an authorised
service centre.
4.2.1. Run the chainsaw then release the
switch trigger completely. The saw
chain must come to a standstill
within one second.
4.3. REMOVING SAW CHAIN
WARNING!: Remove batteries
before working on saw.
4.3.1. Depress the spring loaded catch
and lift the lever up (g.3.1).
4.3.2. Turn lever anticlockwise until the sprocket cover comes away (g.4.2)
4.3.3. Remove the sprocket cover then remove the saw chain and guide bar from the chain saw body.
4.4. INSTALLING SAW CHAIN
WARNING!: Remove batteries before working on saw.
4.4.1. Make sure of the direction of the chain. The arrow mark on the chain shows the direction of the chain (g.5).
4.4.2. Fit in one end of the saw chain on the top of the guide bar and the other end around the sprocket (g.6).
4.4.3. Rest the guide bar in original place on the chain saw.
4.4.4. Place the sprocket cover on the chain saw, align the tongue on the sprocket cover with the groove in the housing and slip it into place
while matching the log boss on the cover to the corresponding holes at the same time, as shown in g.7.
4.4.5. Depress the sprocket cover and move the guide bar backward or forward until it locks in place with a little click (g.8).
Original Language Version
© Jack Sealey Limited
ITEM DESCRIPTION
1 Rear Handle
2 Battery Release
3 Battery
4 Front Handle
5 Front Handle Guard
6 Guide Bar Cover
7 Guide Bar
8 Saw chain
9 Lever
14 Sprocket Cover
15 Tension Ring
ITEM DESCRIPTION
10 Lock O Lever
11 Switch Trigger
12 Oil Tank Cap
13 Oil Tank Window
g. 1
g. 4
g. 3
g. 5
g. 6
g. 7
g. 8
g. 2
CP40VCS Issue 2 11/01/2024
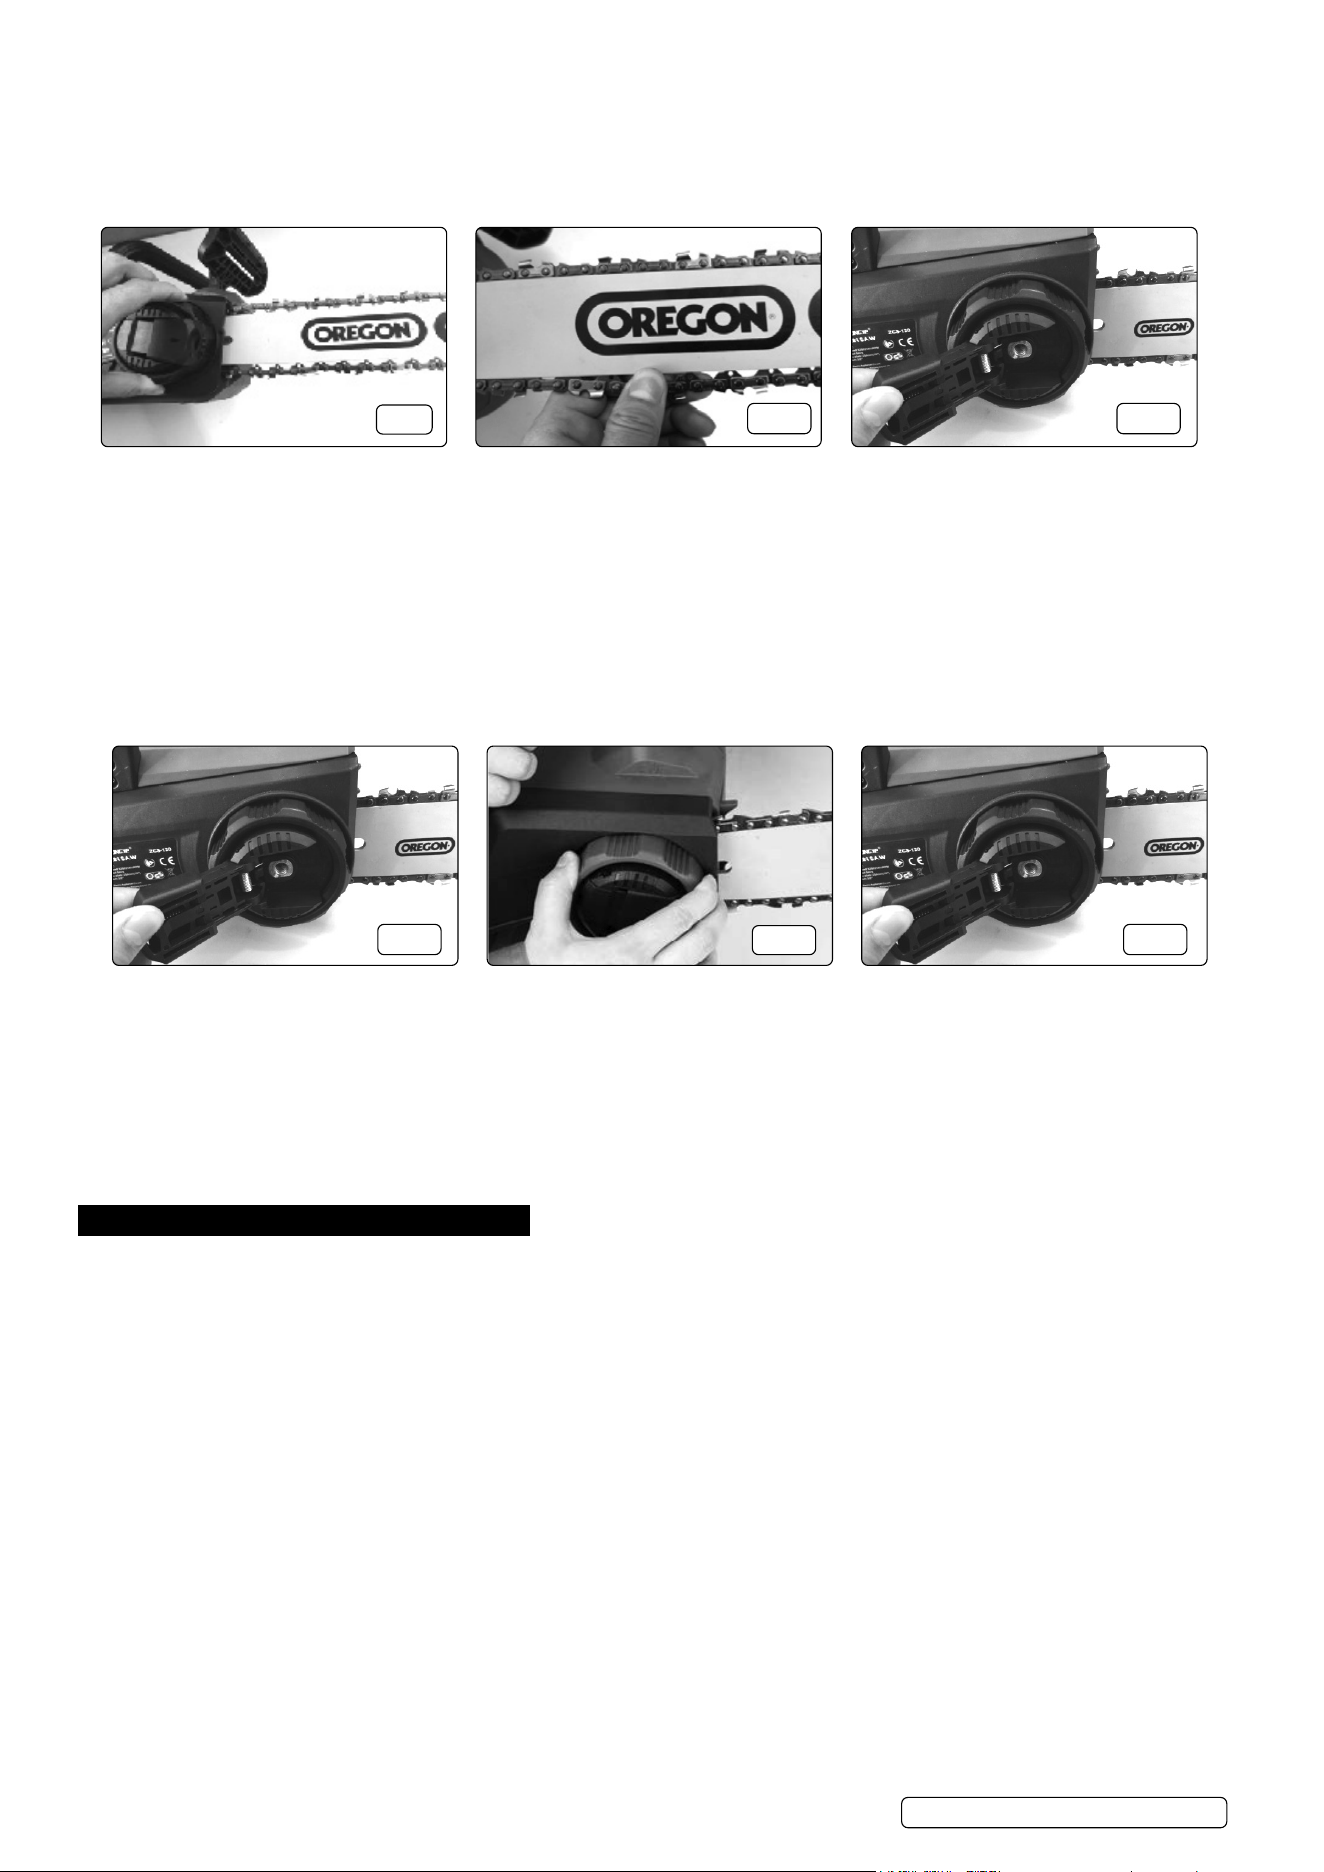
4.4.6. Turn the tension ring (g.9) clockwise and check the chain tension by pulling the chain away from the guide bar (g.10).
NOTE: The chain is sharp. Wear suitable gloves while doing this.
4.4.7. Keep turning the tension ring clockwise. To check the suitable saw chain tension, pull the saw chain away from the guide bar using
force of about 1kg.
4.4.8. The optimum gap at this stage is between 5-7mm (g.10) between the saw chain and guide bar.
4.4.9. Turn the lever (g.11) clockwise until the sprocket cover is secured then return it to the original position.
4.5. ADJUSTING CHAIN TENSION
WARNING!: Remove batteries before working on saw.
WARNING!: Carry out procedure of installing / removing saw chain in a clean place free from sawdust / possible contaminants i.e. oil.
WARNING!: DO NOT over-tighten the saw chain. Excessively high tension of saw chain may cause breakage of saw chain, wear of
the guide bar and breakage of the adjusting dial. refer to Section 4.4 for guidance.
WARNING!: A chain which is too loose can jump o the bar and it may cause an injury.
WARNING!: The saw chain may become loose after many hours of use. From time to time check the saw chain tension before use.
4.5.1. Pull the lever up while pressing its edge. Turn it counter-clockwise a little bit to loosen sprocket cover slightly.
4.5.2. Turn the tension ring clockwise to tighten the saw chain until the lower side of the saw chain ts in the guide bar rail as illustrated.
4.5.3. Keep holding the guide bar lightly and turn the lever clockwise until the sprocket cover is secured.
4.5.4. Return the lever to the original position.
4.6. LUBRICATION
WARNING!: Remove batteries before working on saw.
NOTE: Use only good quality chain saw oil. See www.sealey.co.uk for further information.
NOTE: Check oil level before and during every use. Running with little or no oil will damage the tool.
4.6.1. Saw chain is automatically lubricated when the tool is in operation.
4.6.2. Check the amount of remaining oil in the oil tank periodically through the transparent oil tank window (g.2.14).
4.6.3. To rell the tank, lay the chain saw on its side, pull up the lever and turn anticlockwise to remove the oil tank cap (g.2.13).
4.6.4. The oil tank capacity is 160ml. After relling the tank, make sure that the oil tank cap is tightened.
5. MAINTENANCE AND SERVICING
WARNING:! Always be sure that the tool is switched o and the battery cartridge is removed before attempting to perform inspection
or maintenance.
NOTE: Always wear gloves when performing any inspection or maintenance.
NOTE: Have your power tool serviced by a qualied repair person using only identical replacement parts. This will ensure that the safety of
the power tool is maintained.
NOTE: Never service damaged battery packs. Service of battery packs should only be performed by the manufacturer or authorised service
providers.
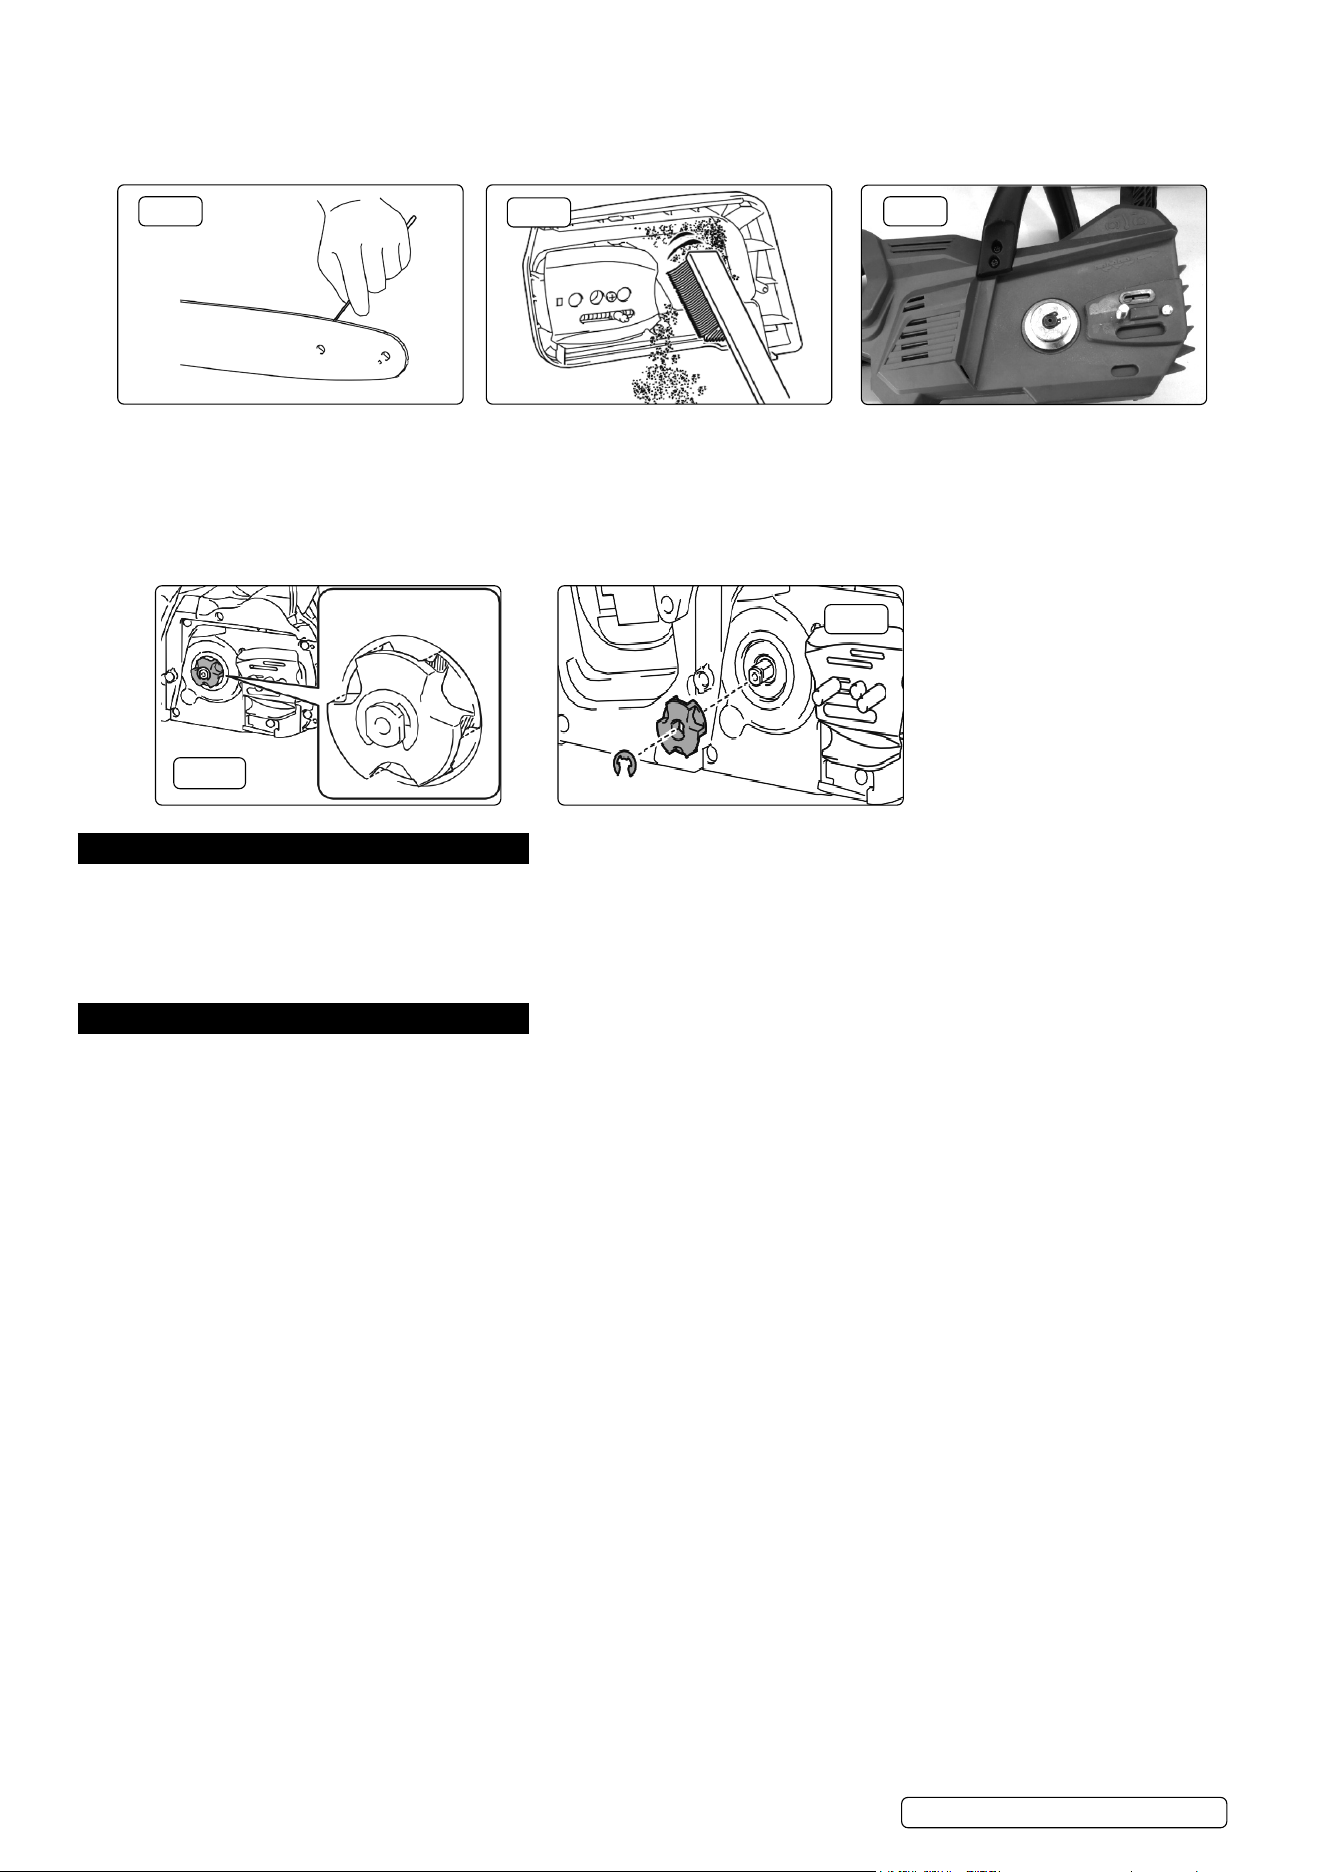
5.1. CLEANING THE GUIDE BAR (g.15)
5.1.1. Clean the guide bar whenever the saw chain is sharpened or replaced. See section 4.3, 4.4 for removal.
5.1.2. Chips and sawdust will build up in the guide bar groove. This may clog the bar groove and impair the oil ow. Clean out the chips and
sawdust every time when you sharpen or replace the saw chain.
5.2. CLEANING THE SPROCKET COVER (g.16)
5.2.1. Chips and saw dust will accumulate inside of the sprocket cover. Remove the sprocket cover and saw chain from the tool then clean
the chips and saw dust. See section 4.3, 4.4 for removal.
5.3. CLEANING THE OIL DISCHARGE HOLE (g.17)
5.3.1. Small dust or particles may be built up in the oil discharge hole during operation. These dust or particles may impair the oil to ow
and cause an insucient lubrication on the whole saw chain. When a poor chain oil delivery occurs at the top of guide bar, clean the oil
discharge hole as follows.
5.3.2. Remove the sprocket cover and saw chain from the tool. See section 4.3, 4.4 for removal.
5.3.3. Remove the small dust or particles using a slotted screwdriver with a slender shaft or the like.
Original Language Version
© Jack Sealey Limited
g. 9
g. 10 g. 11
g. 14g. 12
g. 13
CP40VCS Issue 2 11/01/2024
5.3.4. Insert the battery cartridge into the tool. Pull the switch trigger to ow built-up dust or particles o the oil discharge hole by discharging
chain oil.
5.3.5. Remove the battery cartridge from the tool. Reinstall the sprocket cover and saw chain on the tool.
5.4. REPLACING THE SPROCKET (g.18)
NOTE: A worn sprocket will damage a new saw chain. Replace the sprocket if damaged.
5.4.1. Remove the sprocket cover, saw chain and guide bar. See section 4.3, 4.4 for removal.
5.4.2. Refer to g.18 for indication of areas of most wear on sprocket.
5.5. Ensure that the circlip is replaced to securely hold the new sprocket safely in place (g.19).
6. STORAGE
6.1. Clean the tool before storing. Remove any chips and sawdust from the tool after removing the sprocket cover.
6.2. After cleaning the tool, run it under no load to lubricate the saw chain and guide bar.
6.3. Cover the guide bar with the guide bar cover.
6.4. Empty the oil tank.
7. MAINTENANCE SCHEDULE
7.1. To ensure long life, prevent damage and ensure the full functioning of the safety features, the following maintenance must be
performed regularly.
7.2. Warranty claims can be recognized only if this work is performed regularly and properly. Failure to perform the prescribed maintenance
work can lead to accidents!
7.3. The user of the chain saw must not perform maintenance work which is not described in the instruction manual. All such work must be
carried out by suitably qualied individuals.
Original Language Version
© Jack Sealey Limited
g. 15
g. 16
g. 17
g. 19
g. 18
CP40VCS Issue 2 11/01/2024
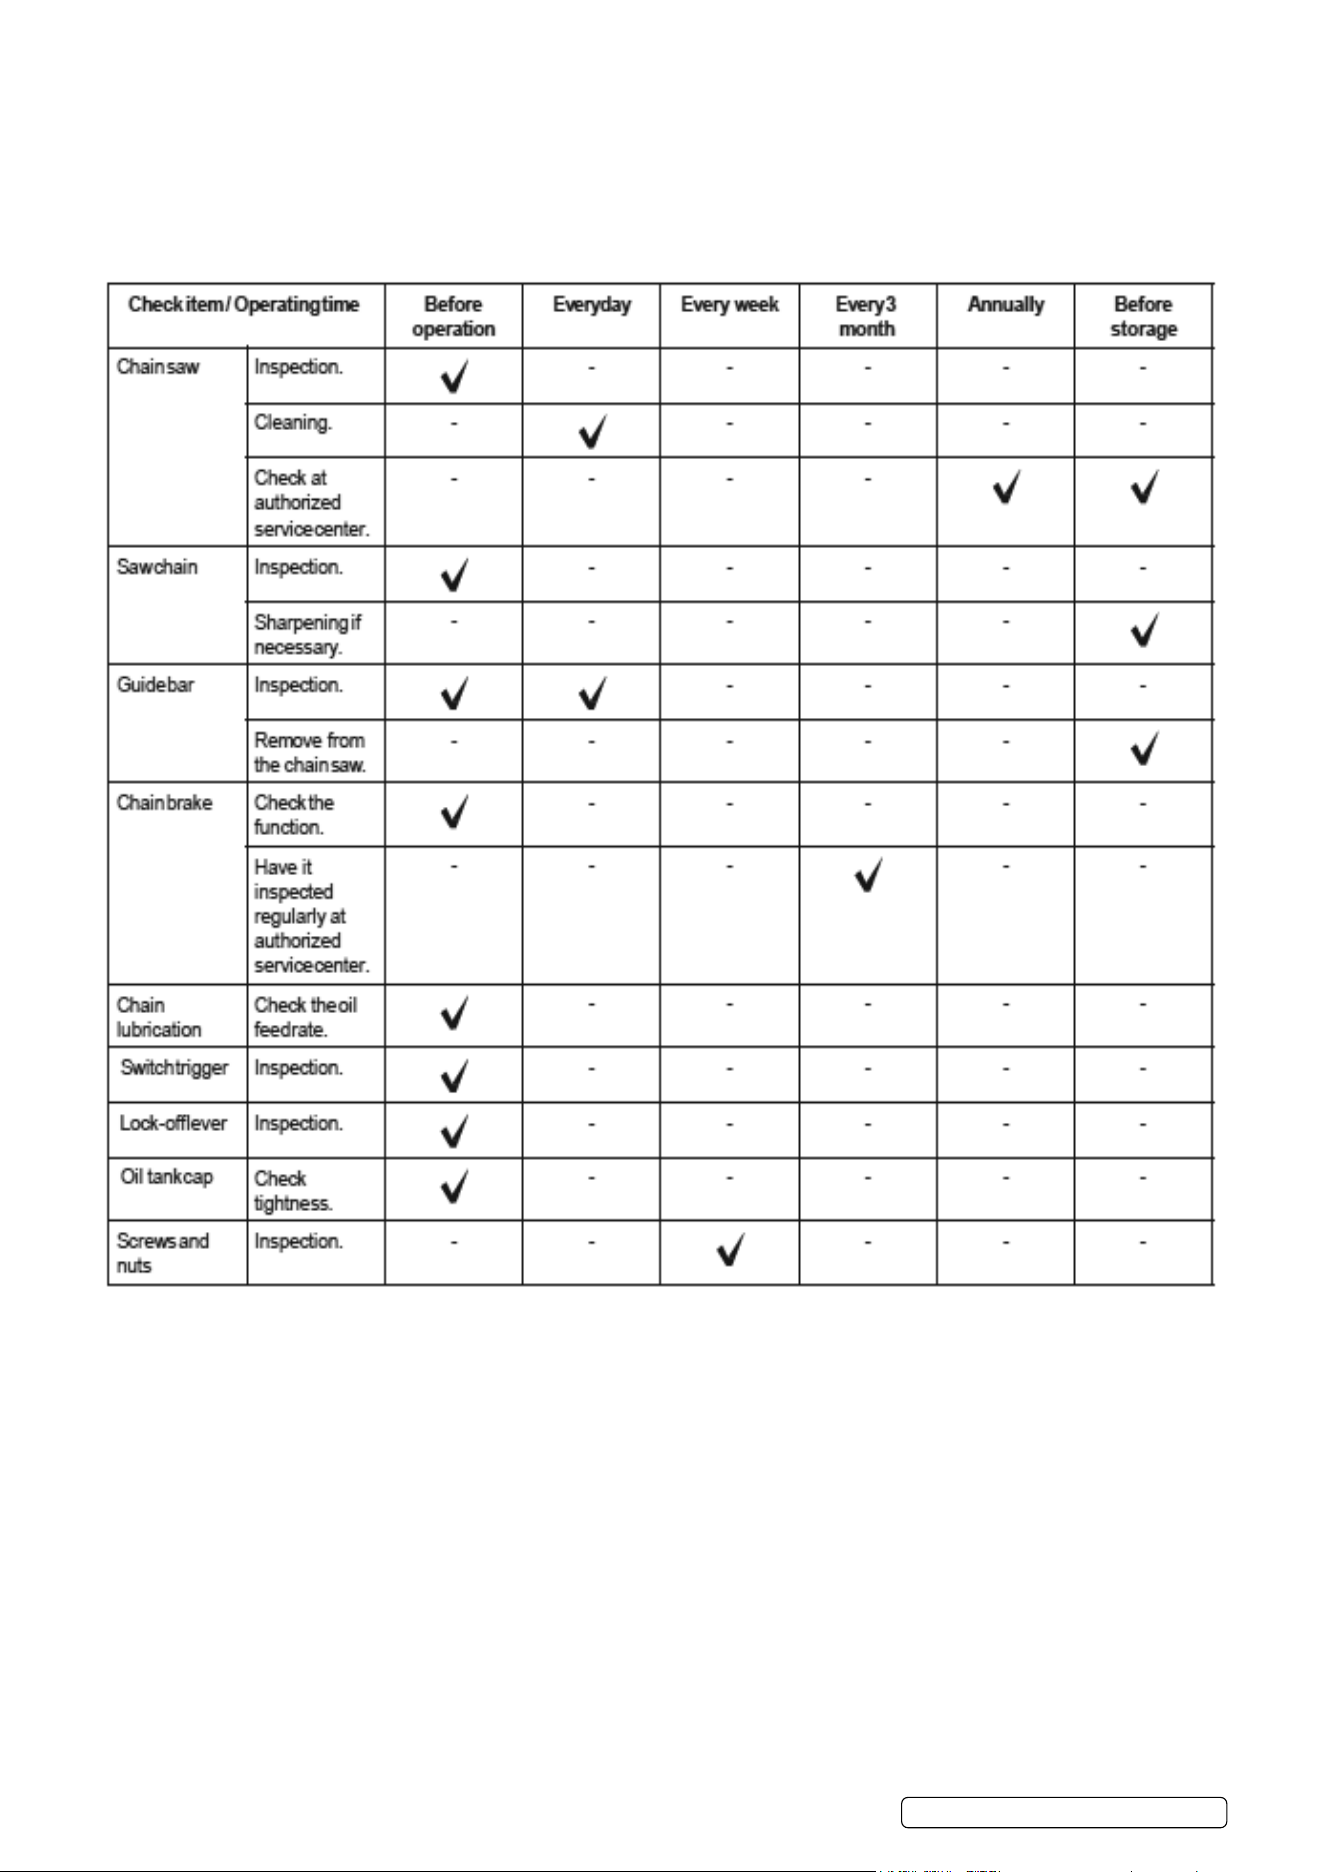
MAINTENANCE SCHEDULE
Original Language Version
© Jack Sealey Limited
CP40VCS Issue 2 11/01/2024

8. TROUBLESHOOTING
Original Language Version
© Jack Sealey Limited
CP40VCS Issue 2 11/01/2024
WARNING! – Risk of Hand Arm Vibration Injury.
This tool may cause Hand Arm Vibration Syndrome if its use is not managed adequately.
This tool is subject to the vibration testing section of the Machinery Directive 2006/42/EC.
This tool is to be operated in accordance with these instructions.
Measuredvibrationemissionvalue(a):3.58m/s²
Uncertaintyvalue(k):1.5m/s²
NOTE: Please note that the application of the tool to a sole specialist task may produce a different average vibration emission. We recommend that
a specific evaluation of the vibration emission is conducted prior to commencing with a specialist task.
A health and safety assessment by the user (or employer) will need to be carried out to determine the suitable duration of use for each tool.
NB: Stated Vibration Emission values are type-test values and are intended to be typical.
Whilst in use, the actual value will vary considerably from and depend on many factors.
Such factors include; the operator, the task and the inserted tool or consumable.
NB: ensure that the length of leader hoses is sufficient to allow unrestricted use, as this also helps to reduce vibration.
The state of maintenance of the tool itself is also an important factor, a poorly maintained tool will also increase the risk of Hand Arm Vibration
Syndrome.
The declared vibration total value(s) and the declared noise emission value(s) have been measured in accordance with a standard test method and
may be used for comparing one tool with another. The declared vibration total values and the declared noise emission values may also be used in a
preliminary assessment of exposure.
The vibration and noise emissions during actual use of the power tool can differ from the declared values depending on the ways in which the tool is
used, especially what kind of workpiece is processed.
The need to identify safety measures to protect the operator that are based on an estimation of exposure in the actual condition of use.
Health surveillance.
We recommend a programme of health surveillance to detect early symptoms of vibration injury so that management procedures can be modified
accordingly.
Personal protective equipment.
We are not aware of any personal protective equipment (PPE) that provides protection against vibration injury that may result from the
uncontrolled use of this tool. We recommend a sufficient supply of clothing (including gloves) to enable the operator to remain warm and dry and
maintain good blood circulation in fingers etc. Please note that the most effective protection is prevention, please refer to the Correct Use and
Maintenance section in these instructions. Guidance relating to the management of hand arm vibration can be found on the HSC website
www.hse.gov.uk - Hand-Arm Vibration at Work.
Sealey Group, Kempson Way, Suffolk Business Park, Bury St Edmunds, Suffolk. IP32 7AR
01284 757500 sales@sealey.co.uk www.sealey.co.uk
ENVIRONMENT PROTECTION
Recycle unwanted materials instead of disposing of them as waste. All tools, accessories and packaging should be sorted, taken to
a recycling centre and disposed of in a manner which is compatible with the environment. When the product becomes completely
unserviceable and requires disposal, drain any fluids (if applicable) into approved containers and dispose of the product and fluids
according to local regulations.
WEEE REGULATIONS
Dispose of this product at the end of its working life in compliance with the EU Directive on Waste Electrical and Electronic Equipment
(WEEE). When the product is no longer required, it must be disposed of in an environmentally protective way. Contact your local solid
waste authority for recycling information.
Note: It is our policy to continually improve products and as such we reserve the right to alter data, specifications and component parts without prior
notice.
Important: No Liability is accepted for incorrect use of this product.
Warranty: Guarantee is 12 months from purchase date, proof of which is required for any claim.
Original Language Version
© Jack Sealey Limited
CP40VCS Issue 2 11/01/2024
BATTERY REMOVAL
Under the Waste Batteries and Accumulators Regulations 2009, Jack Sealey Ltd are required to inform potential purchasers of products
containing batteries (as defined within these regulations), that they are registered with Valpak’s registered compliance scheme. Jack
Sealey Ltd’s Batteries Producer Registration Number (BPRN) is BPRN00705.