Loading ...
Loading ...

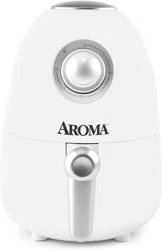
AAF-200
1. Pull the pan out of the main body of the air fryer. Make sure that the baking tray is inserted and pushed to the bottom.
2. Add your ingredients to the frying pan. Distribute food evenly throughout the pan to ensure even cooking.
3. Slide the pan back into the air fryer.
4. Plug the power cord into an available 120V AC wall outlet.
5. Turn the time control dial to the required cooking time for your recipe. The indicator light will illuminate.
6. The timer bell will ding when cooking is complete and the indicator light will turn o.
7. Pull the pan out of the appliance. Keep your face and hands away from the hot steam when opening. Place the pan on
a heat-resistant surface.
NOTE:
• Do not turn the frying pan upside down as any excess oil that has collected on the bottom of the pan below the baking
tray will leak onto the ingredients.
• When a batch of ingredients is ready, the air fryer is instantly ready for preparing another batch.
HELPFUL HINTS:
• Some ingredients require shaking halfway through the preparation time. To shake the ingredients, pull the pan
out of the appliance by the handle and shake it. Then slide the pan back into the airfryer. If you set the timer to
half the preparation time, you hear the timer bell ding when you have to shake the ingredients. However, this
means that you have to set the timer again to the remaining preparation time after shaking.
• Smaller ingredients usually require a slightly shorter preparation time than larger ingredients.
• A larger amount of ingredients only requires a slightly longer preparation time, a smaller amount of ingredients
only requires a slightly shorter preparation time
• Brush a small amount of oil to fresh potatoes for a crispy result. Fry your ingredients in the air fryer within a few
minutes of adding the oil.
• You can also use the airfryer to reheat ingredients. To reheat ingredients, set the time to 10 minutes.
CAUTION:
• Do not touch the pan during and some time after use, as it gets very hot. Only hold the pan by the handle.
• Never use the pan without the baking tray in it. If the appliance is heating ingredients in the absence of the baking tray,
use a special oven glove to open the drawer. The side wall and edge of the drawer can become very hot.
• Do not fill the pan with oil or any other liquid. This is not intended to be used as a deep fryer.
NOTE:
• You can also wash the removable parts in a dishwasher.
• Always take care not to allow electrical components to come into contact with water.
1. Read all instructions and important safeguards.
2. Remove all packaging materials and check that all
items have been received in good condition.
3. Tear up all plastic bags as they can pose a risk to
children.
4. Remove the baking tray from the frying pan for
easier cleaning.
5. Thoroughly clean the frying pan and baking tray
with soapy water. Rinse and dry thoroughly. Wipe the
surface of the body and inside with a wet cloth.
6. Let all parts dry completely. Make sure the rubber scratch
guards of the baking tray are fully covering the metal feet
to avoid scratching the non-stick inner surface of the frying
pan.
7. After cleaning, the unit must be broken in by running for 30
minutes without any food inside. Any smells produced during this
time frame are normal. Please ensure sucient ventilation of
the room and at least an inch of clearance on all sides of the air
fryer is available. After the breaking in period, rinse and dry all
removable parts. This action is only necessary once before using
for the first time.
BEFORE FIRST USE
This appliance must be grounded while in use to protect the operator from electrical shock. The appliance is equipped with a
3-conductor cord and a 3-prong grounding-type plug to fit the proper grounding-type receptacle. The appliance has a plug
that looks like figure (A).
Grounding Instructions
GROUNDING
PRONG
ADAPTER
GROUNDING MEANS
AA22D
Figure (
A
)
Figure (
B
)
Figure (
C
)
CIRCUIT
GROUNDING
CONDUCTOR
CONNECTED
PROPERLY
METAL
MOUNTING
SCREW
COVER OF
GROUNDED
OUTLET BOX
Loading ...
