www.costway.com
THIS INSTRUCTION BOOKLET CONTAINS IMPORTANT SAFETY INFORMATION. PLEASE READ AND KEEP FOR FUTURE REFERENCE.
Visit us: www.costway.com
Follow Costway
Please give us a chance to make it right and do better!
Contact our friendly customer service department for help first.
Replacements for missing or damaged parts will be shipped ASAP!
USER’S MANUAL
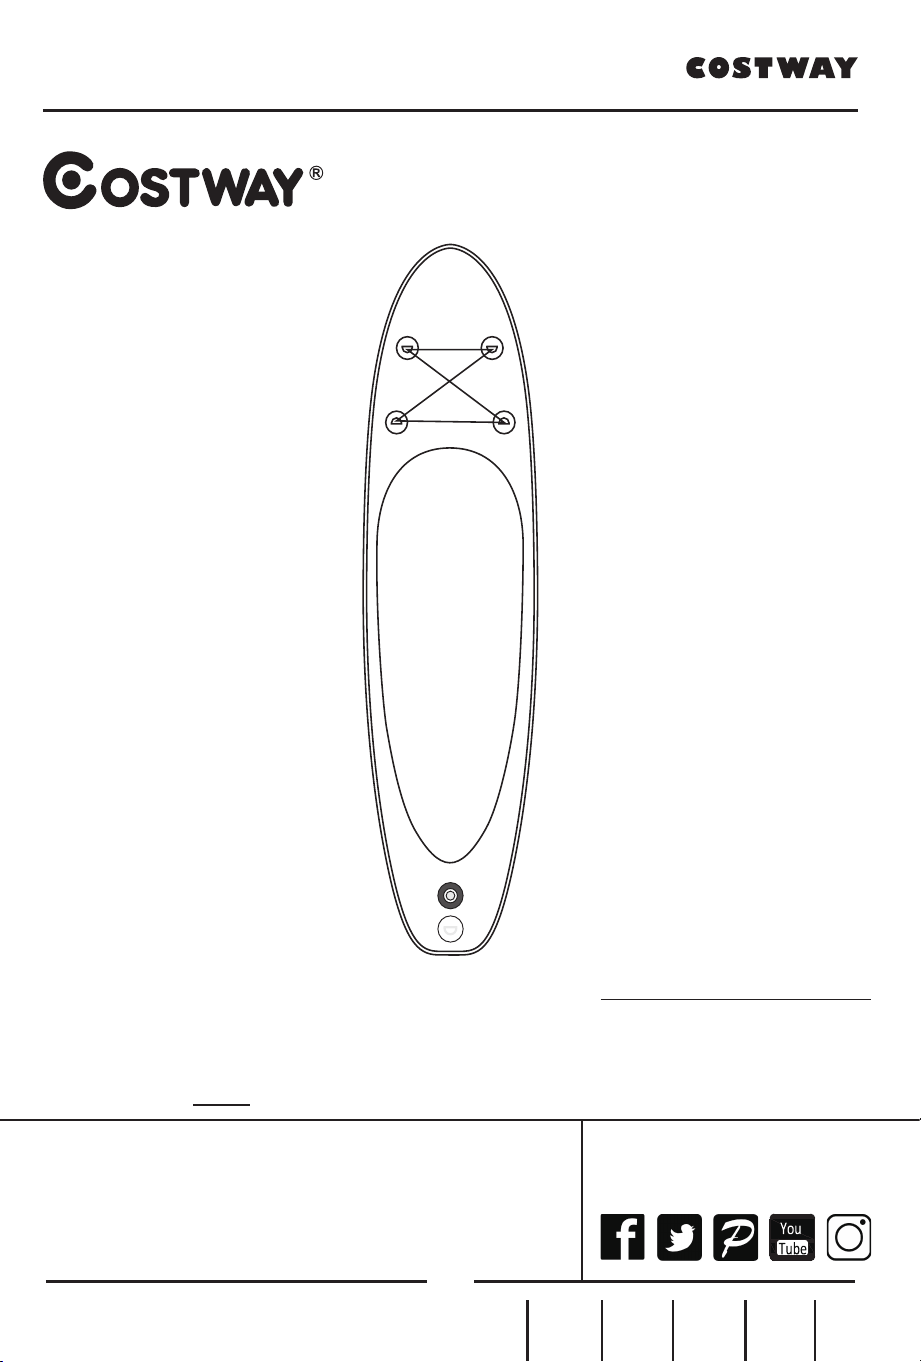
Stand-up Paddle Board Set
EN DE FR ES IT PL
2
www.costway.com
Contact Us!
Do NOT return this item.
Contact our friendly customer service department for help first.
E-mail
US: cs.us@costway.com
UK: cs.uk@costway.com
Before You StartBefore You Start
Please read all instructions carefully.
Retain instructions for future reference.
Seperate and count all parts and hardware.
Read through each step carefully and follow the proper order.
We recommend that, where possible, all items are assembled near to the
area in which they will be placed in use, to avoid moving the product
unnecessarily once assembled.
Always place the product on a flat, steady and stable surface.
Keep all small parts and packaging materials for this product away from
babies and children as they potentially pose a serious choking hazard.
3
www.costway.com
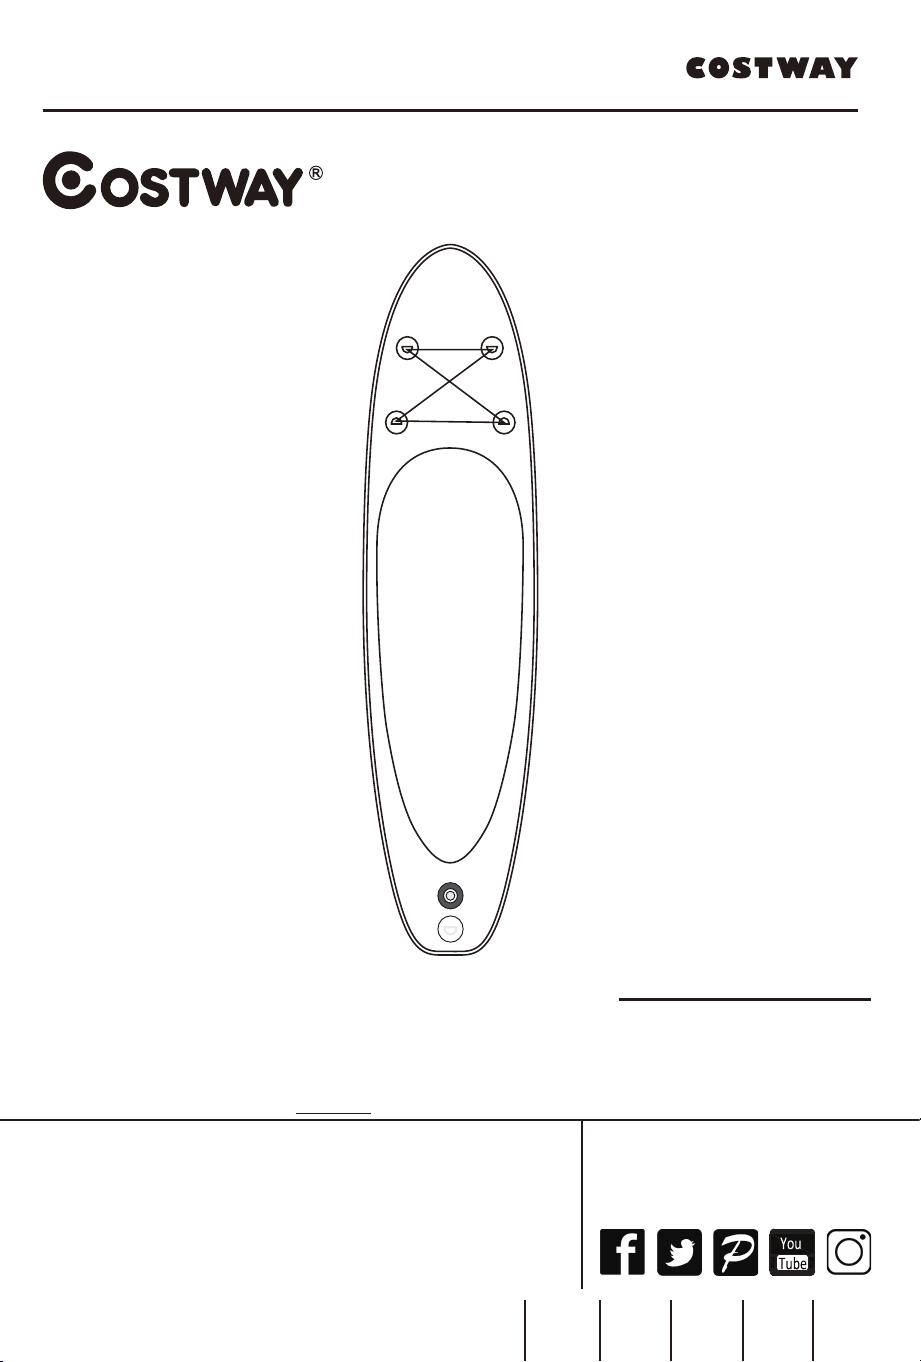
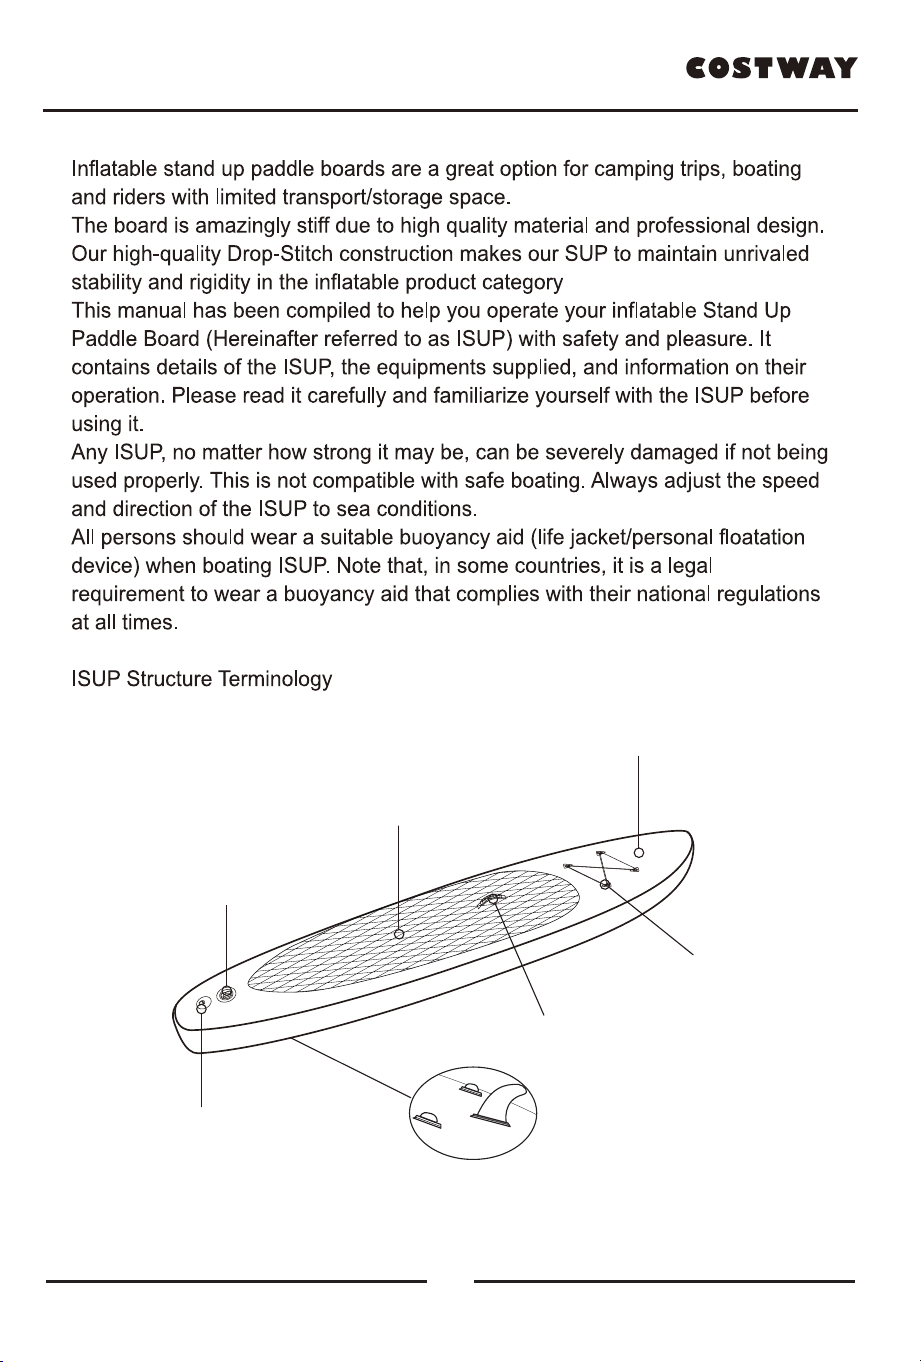
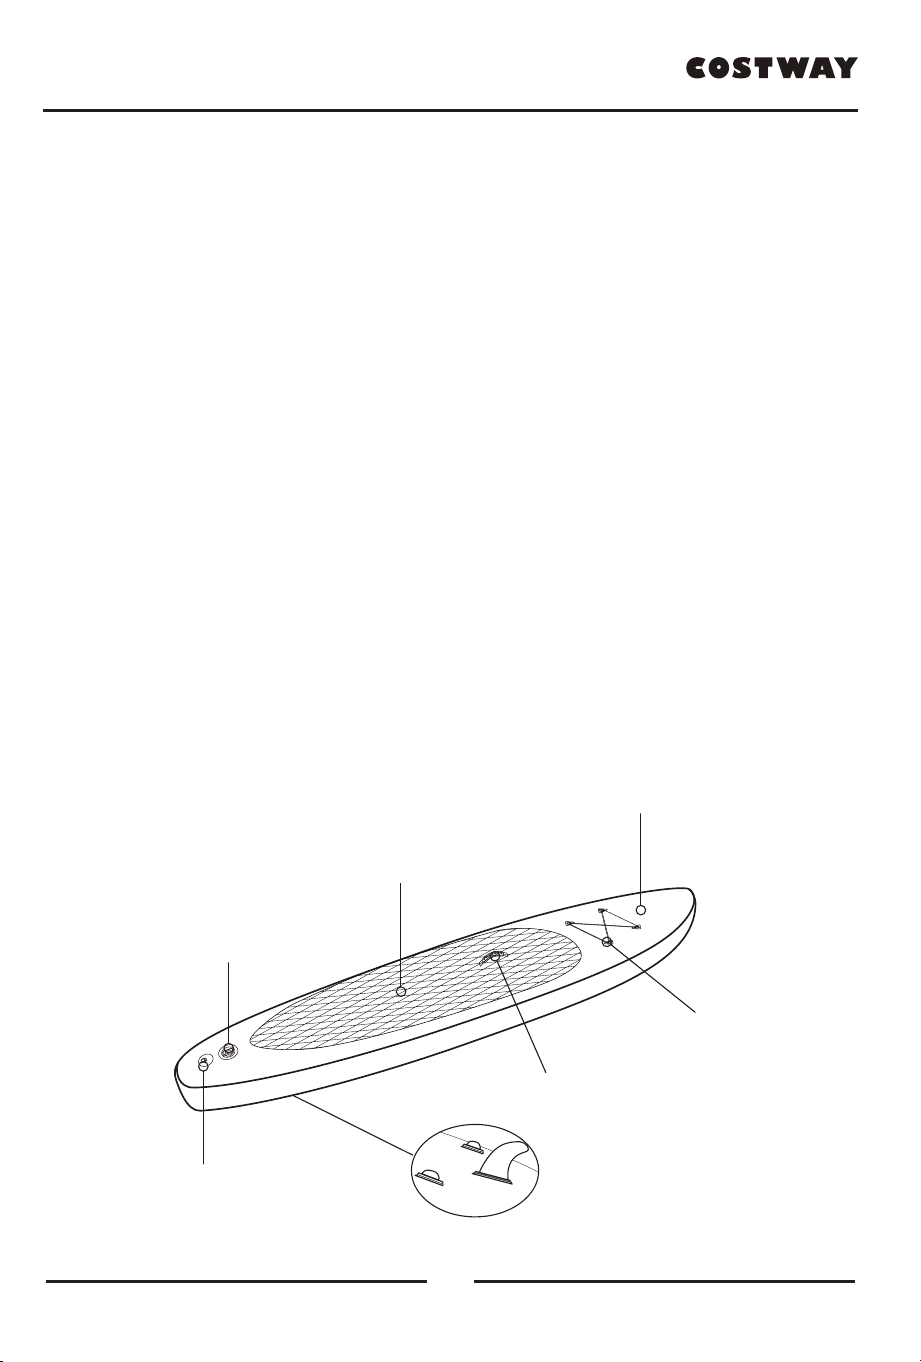
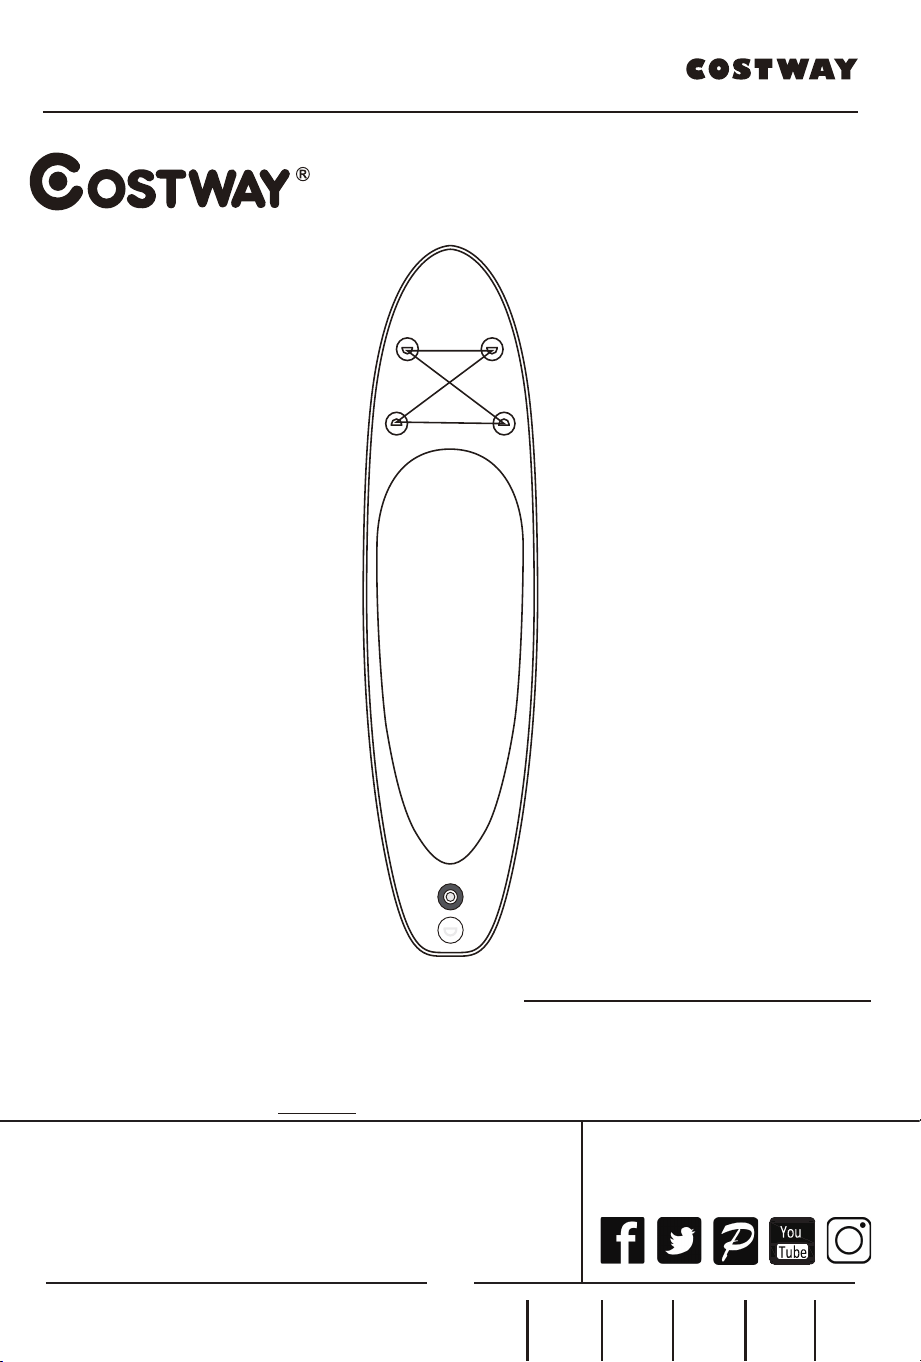
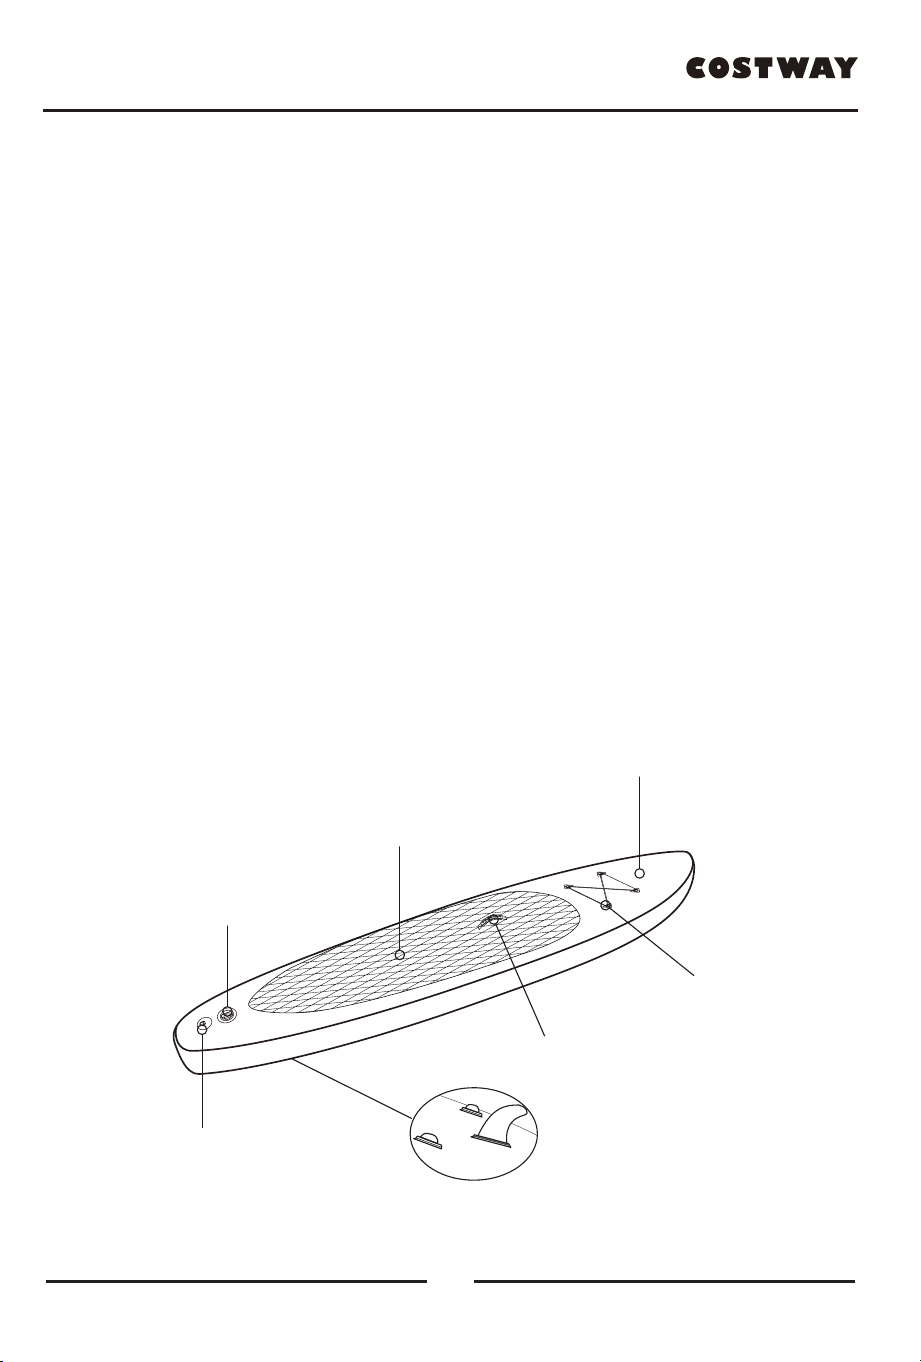
Drop Stitch
(2700g/sqm)
Iarge EVA foot pad on the board
provides grip and comfort
High pressure recessed
valve for quick and easy
inflation and deflation
Stainless steel D-ring
for attaching safety leash
to paddler(Optional)
Tri-fin set: one center fin
and two small side fins
Heavy duty carry handle
Front D-ring for
securing cargo
4
www.costway.com
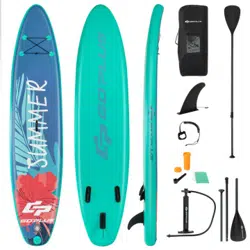
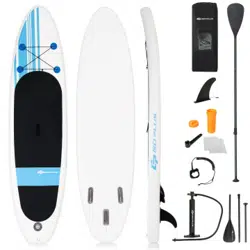
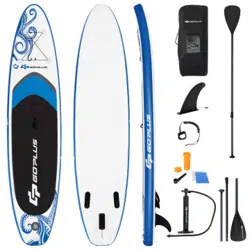
PACKING LIST
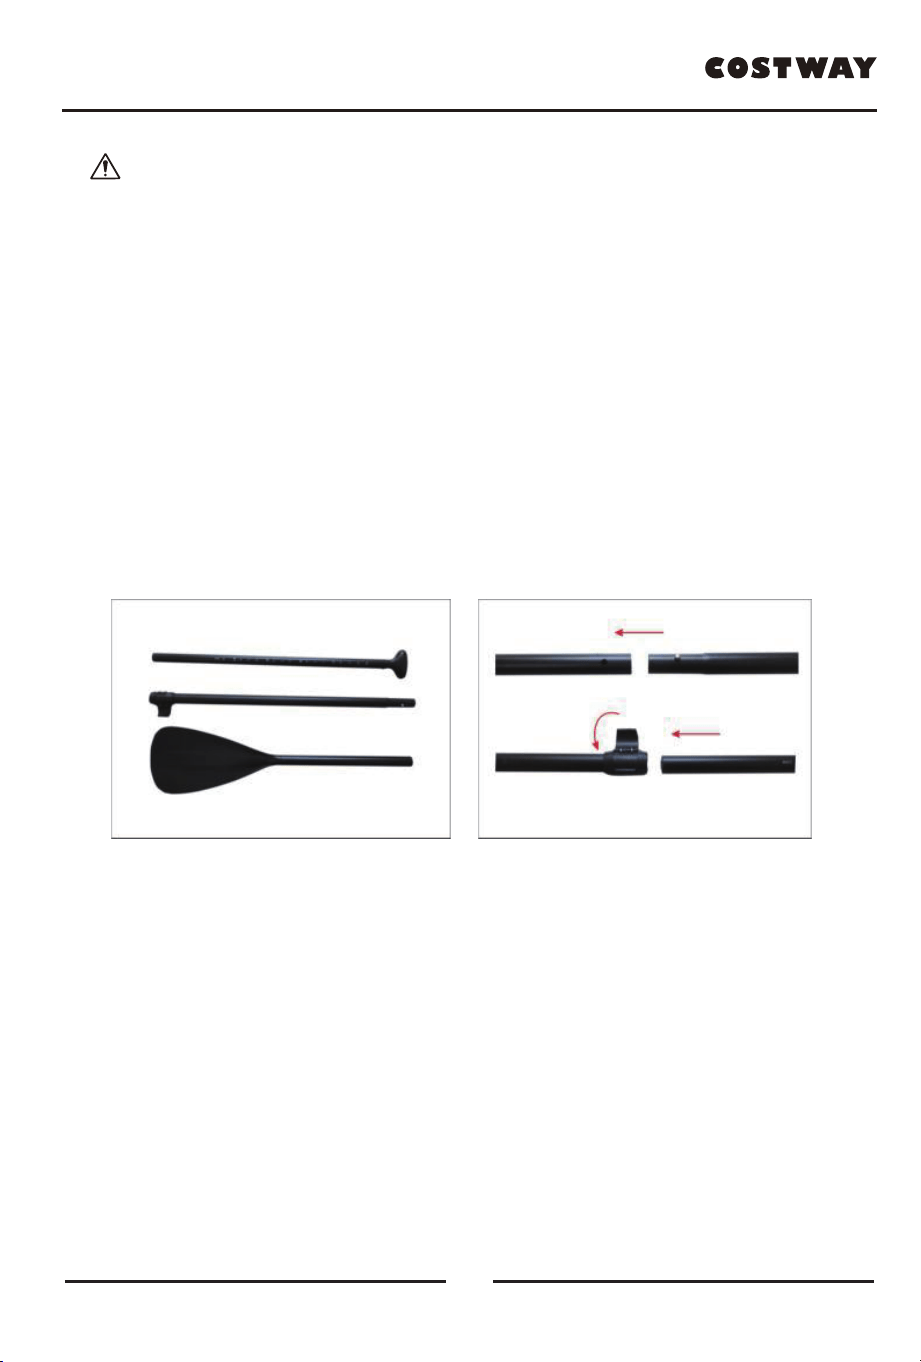
Stand-up Paddle Board
3-shafted aluminum adjustable oar
Hand pump w/pressure gauge
Valve Wrench
Repair kit
Professional carry bag
Middle FIN
Owner’s Manual
SET-UP PREPARATION
1. Unfold the board from the packaging.
choose a smooth and clean surface to unfold board. Roll out the SUP board until
it is laying flat with top side facing up.
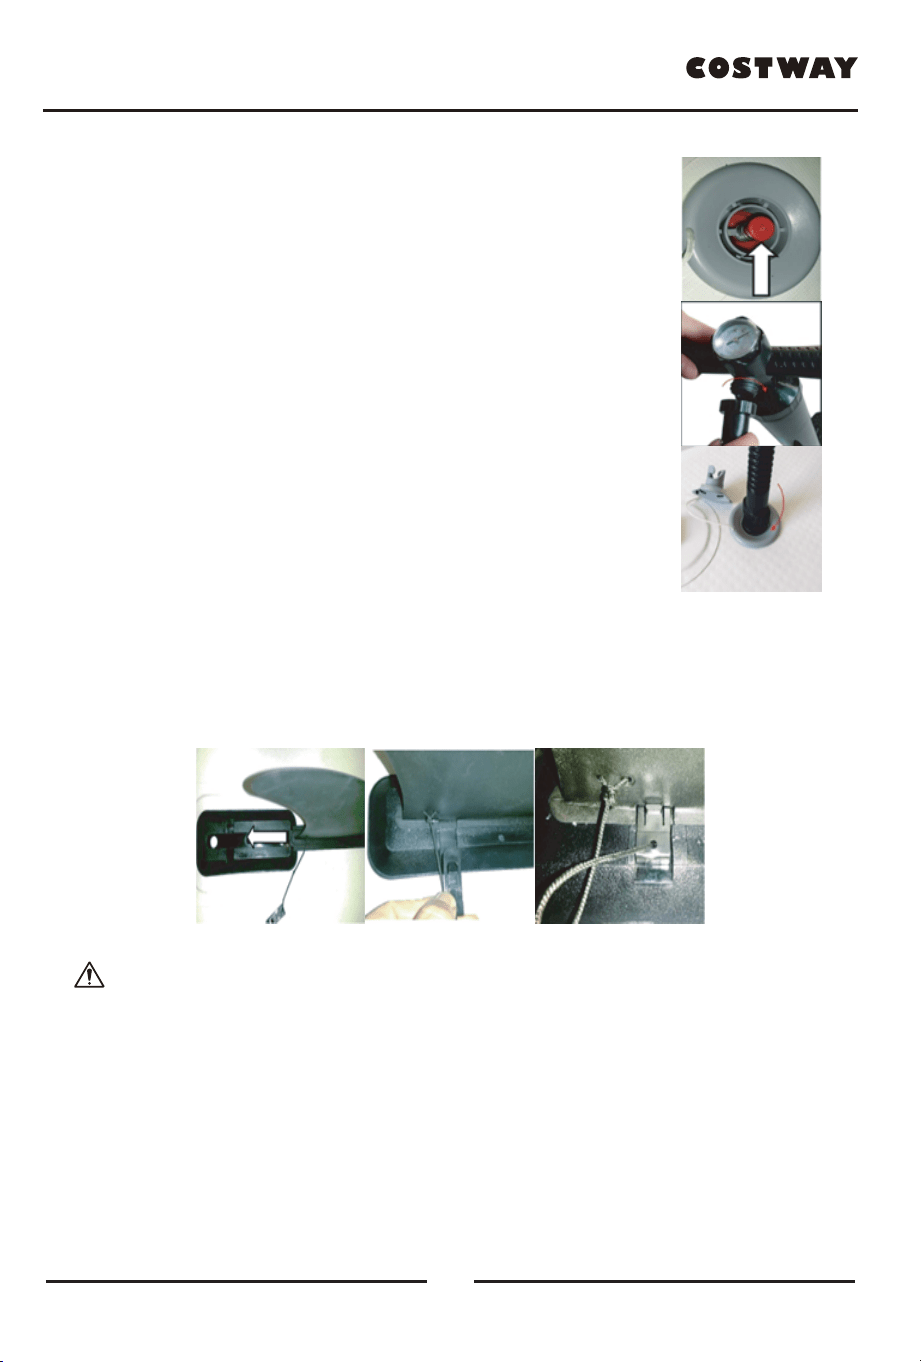
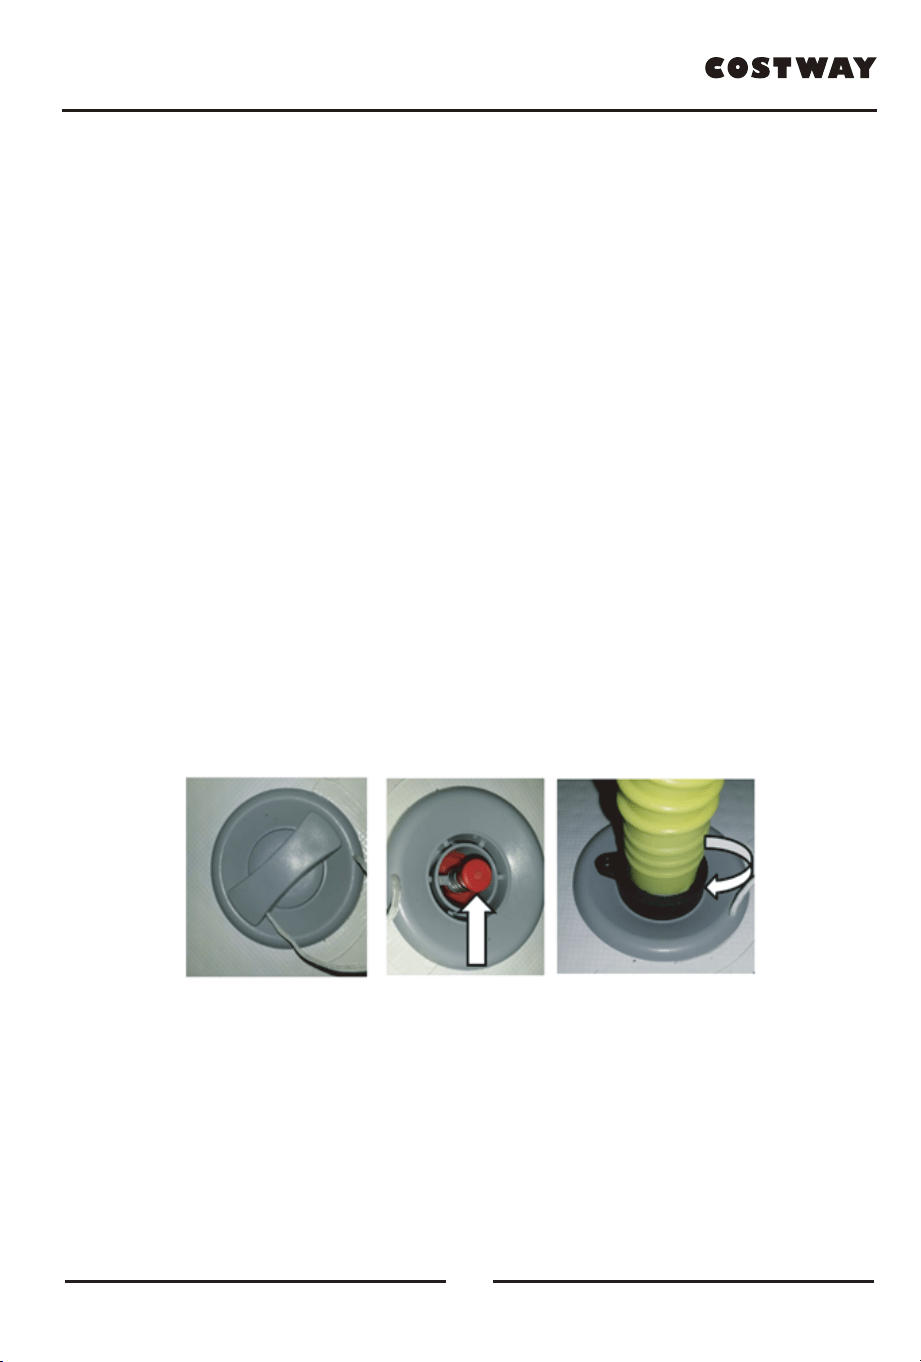
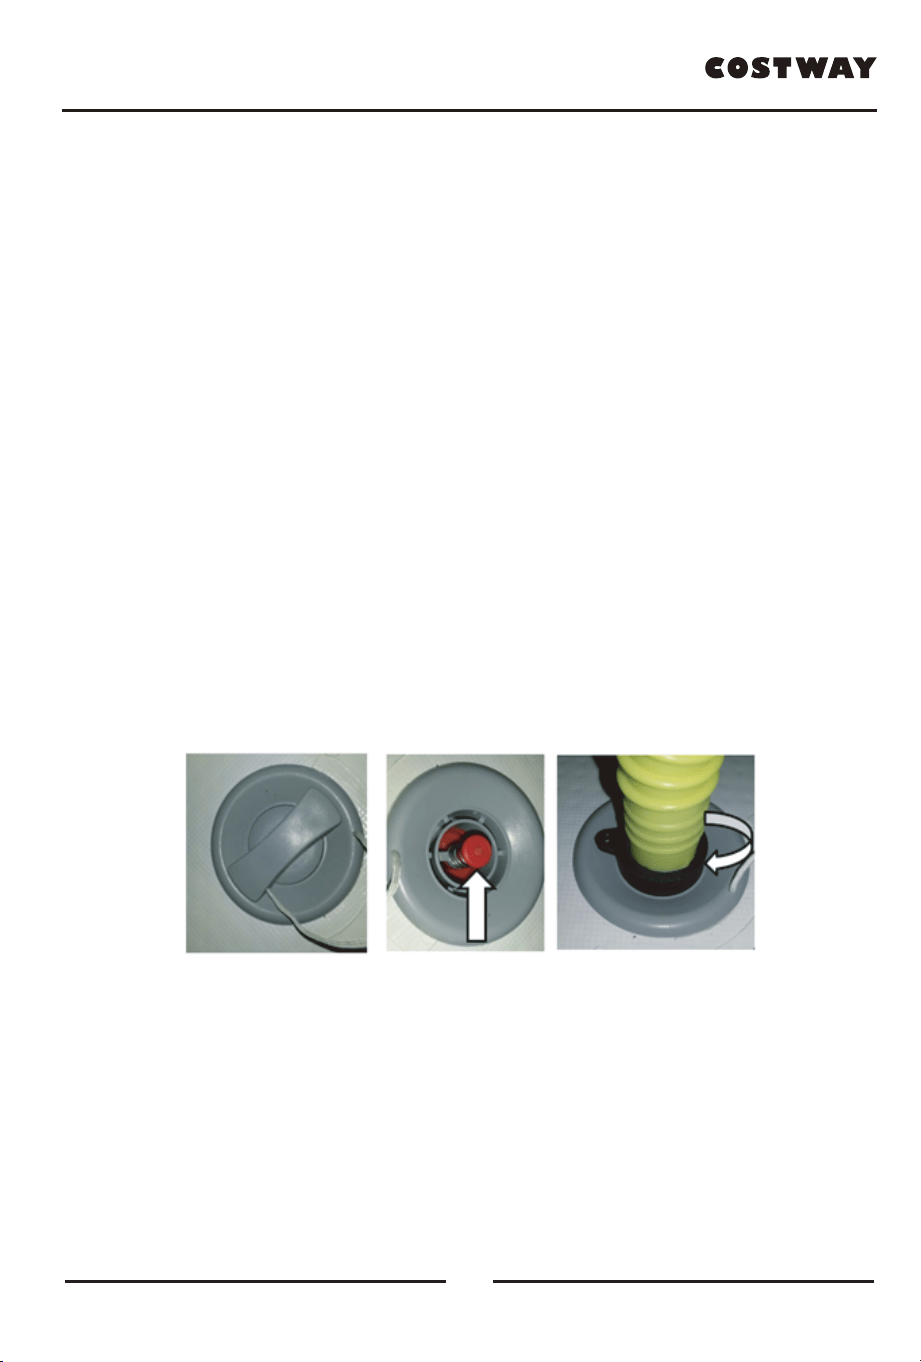
2. Valve operation
Follow the instructions below for valve operation and correct inflation and
deflation procedures.
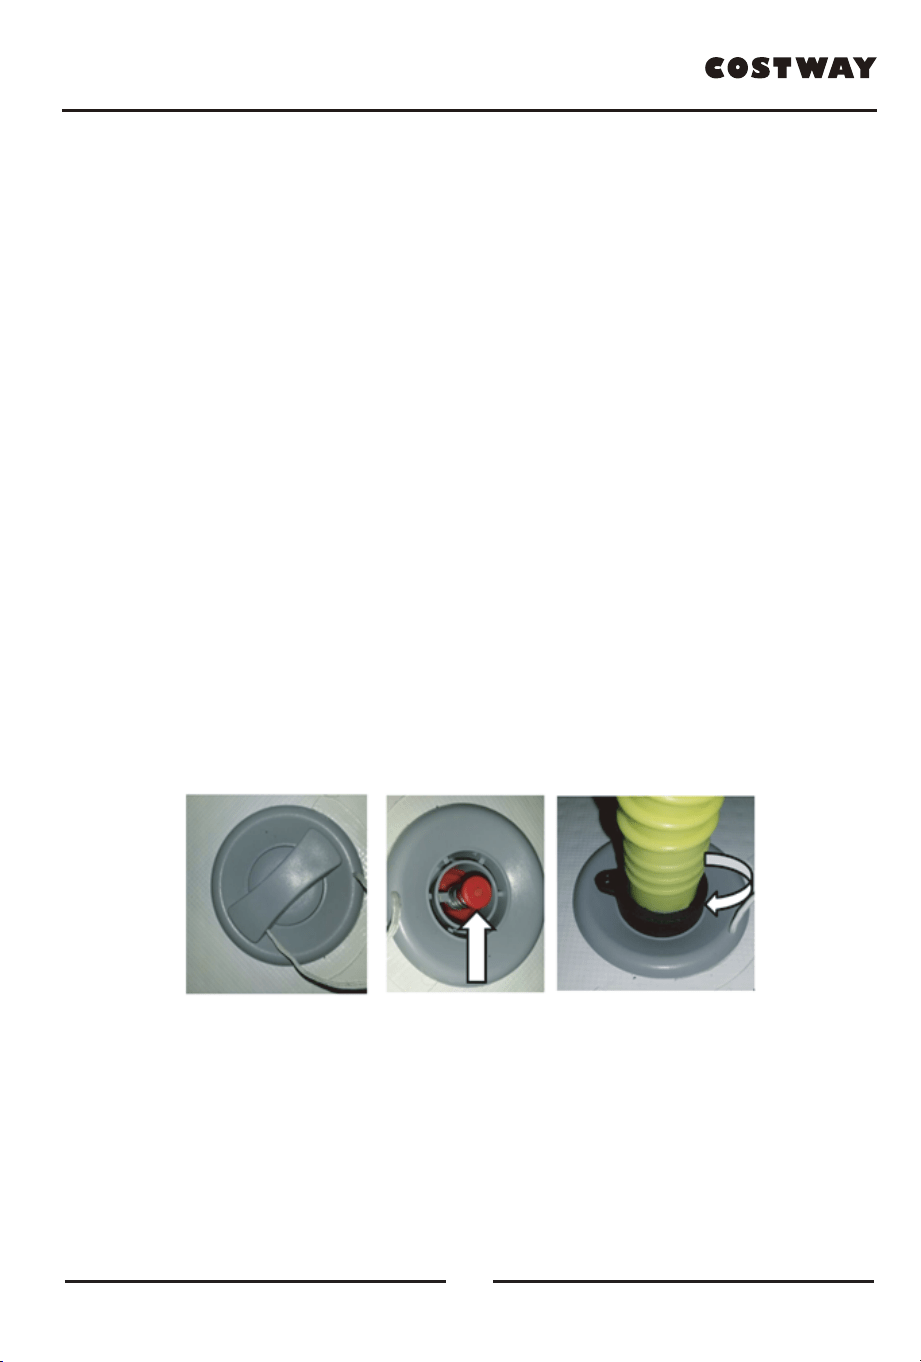
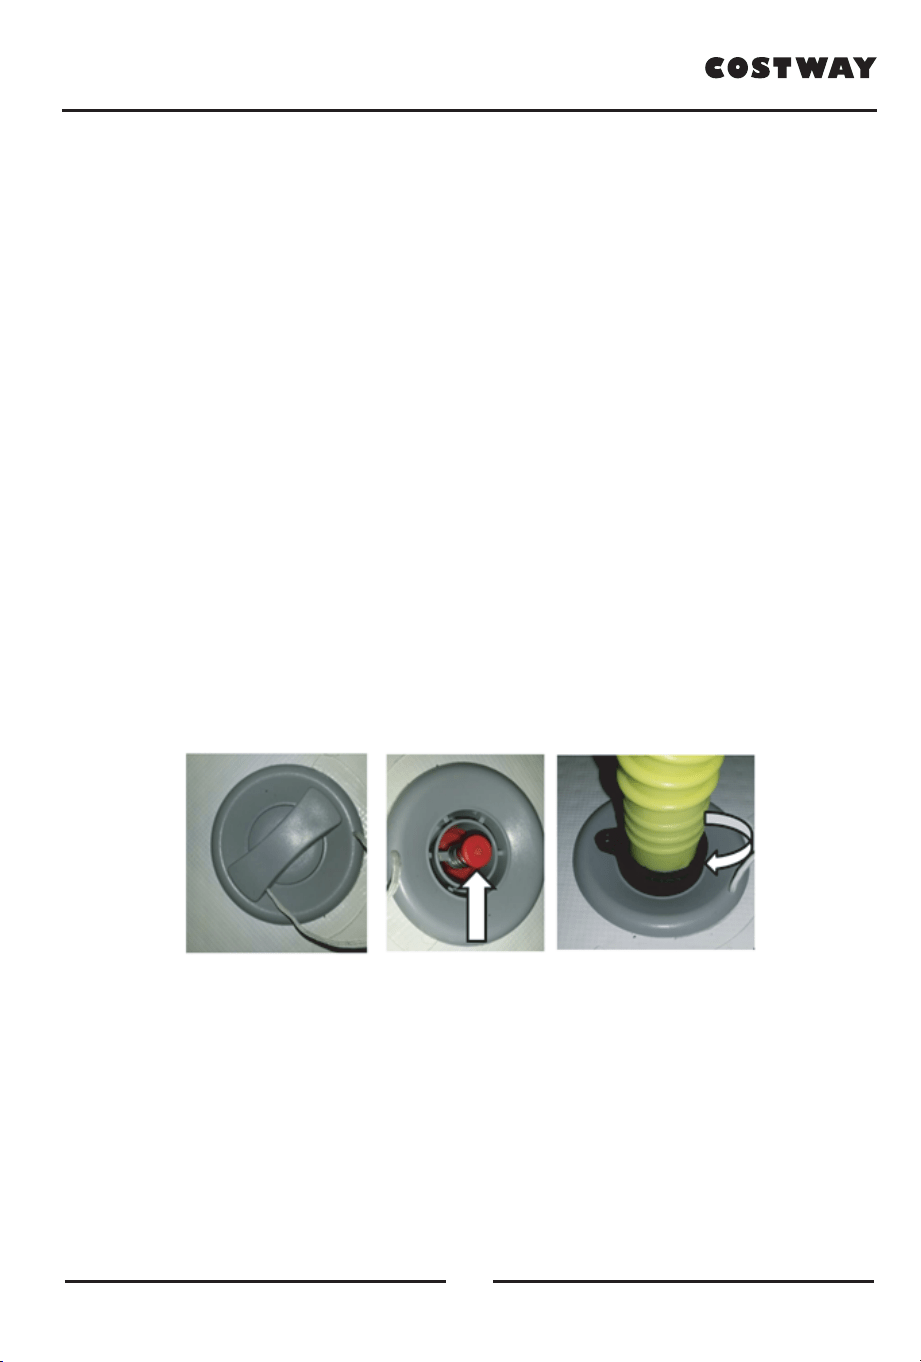
The board’s inflation valve is located near the nose of the board. To close off the
valve for inflation, make sure that the center valve pin is in the “UP” position. If it
is in the “DOWN” position, press the valve pin to “UP” position.
To open the valve for deflation, press down on the valve pin (need not to turn it),
make sure that the center valve pin is in the “DOWN” position,
Be careful of any sand or debris around the valve area when deflating as small
particles could become airborne with the release of the air pressure.
Always lock the valve cover over the valve stem when in use. This will prevent
accidental air release and entrance of any particles into the air chambers.
5
www.costway.com
3. ISUP Board inflation Steps
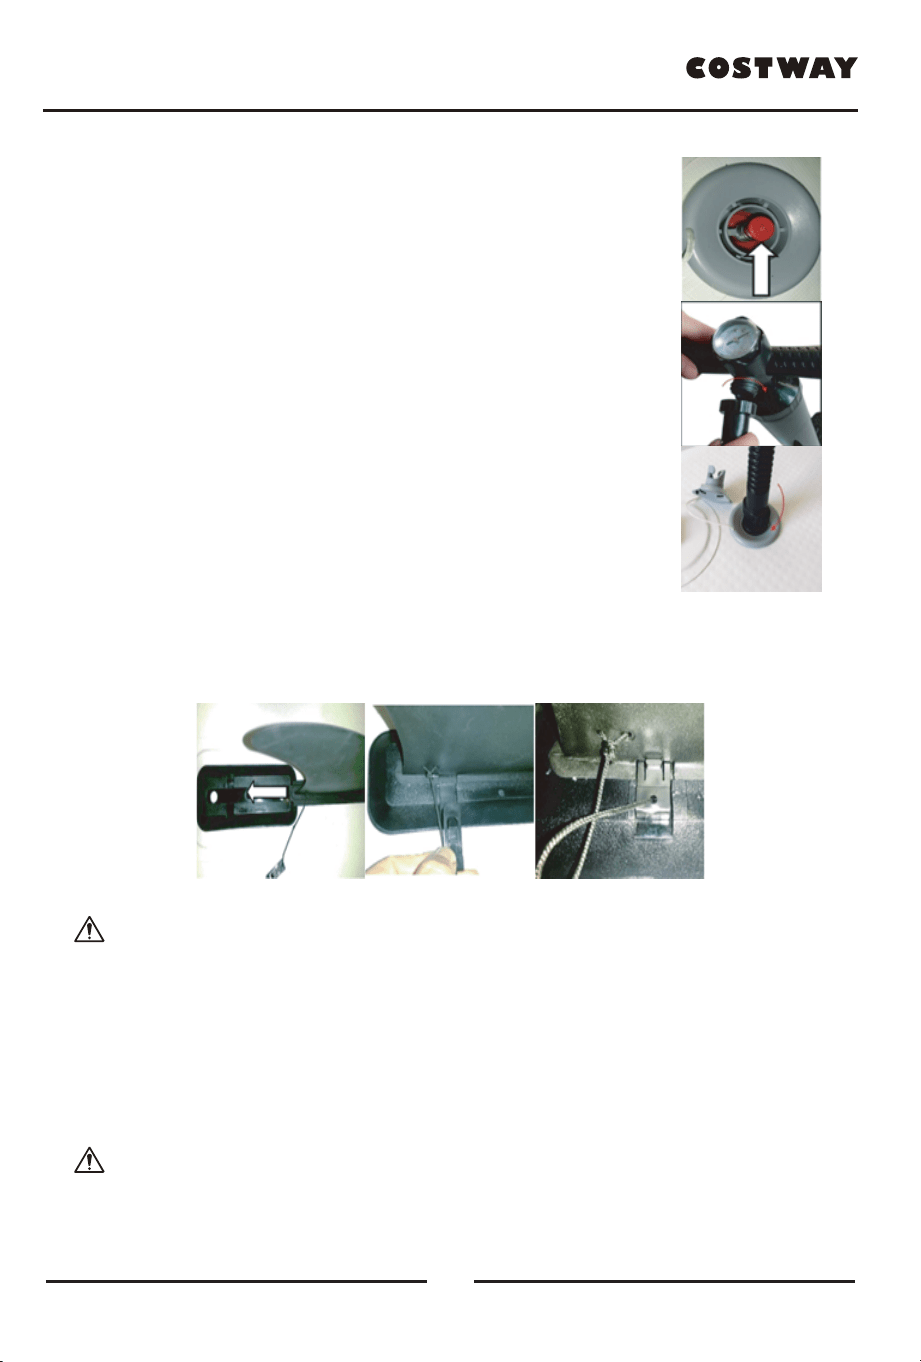
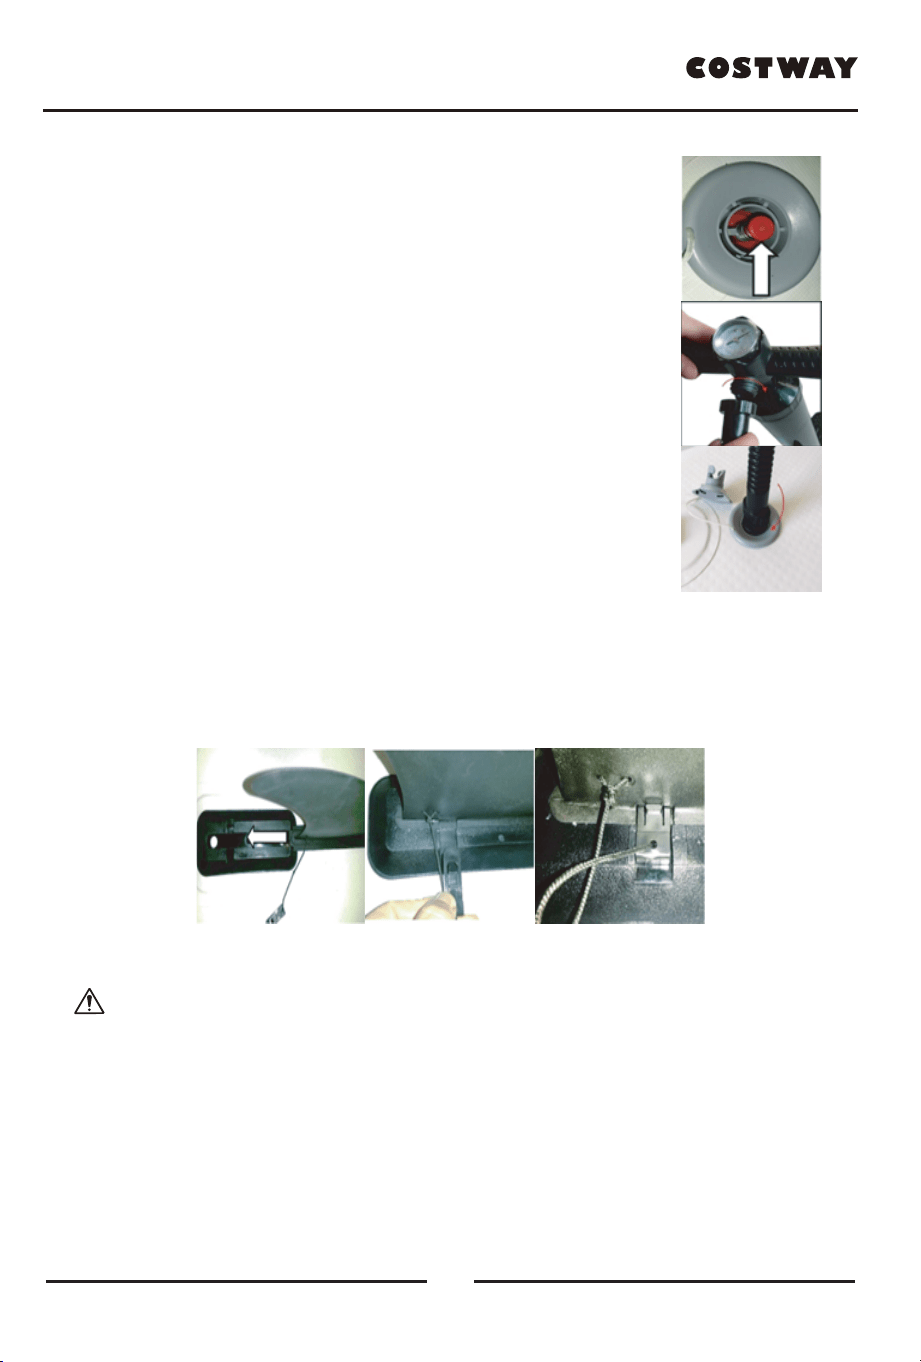
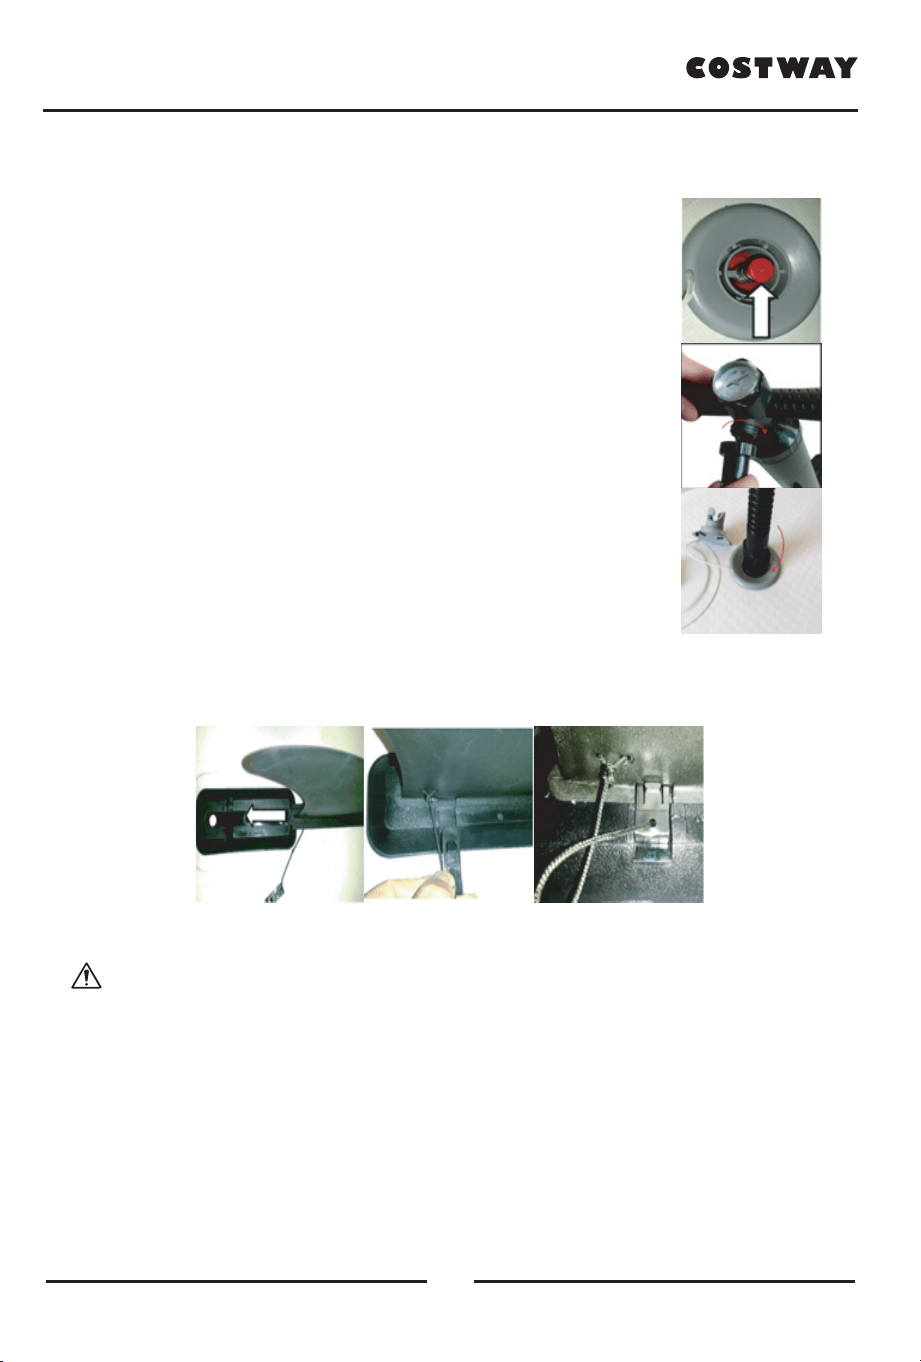
a. Unscrew the valve cap, press down the valve pin to open the
valve. Let the air flow naturally into the product, in order to save
the time of inflation, then press down the valve pin again to
close the valve (in “UP” position).
b. Make sure the pump hose is connected to the “inflate” outlet.
c. Connect the pump nozzle into the valve receptacle, with a
half twist motion (clockwise)
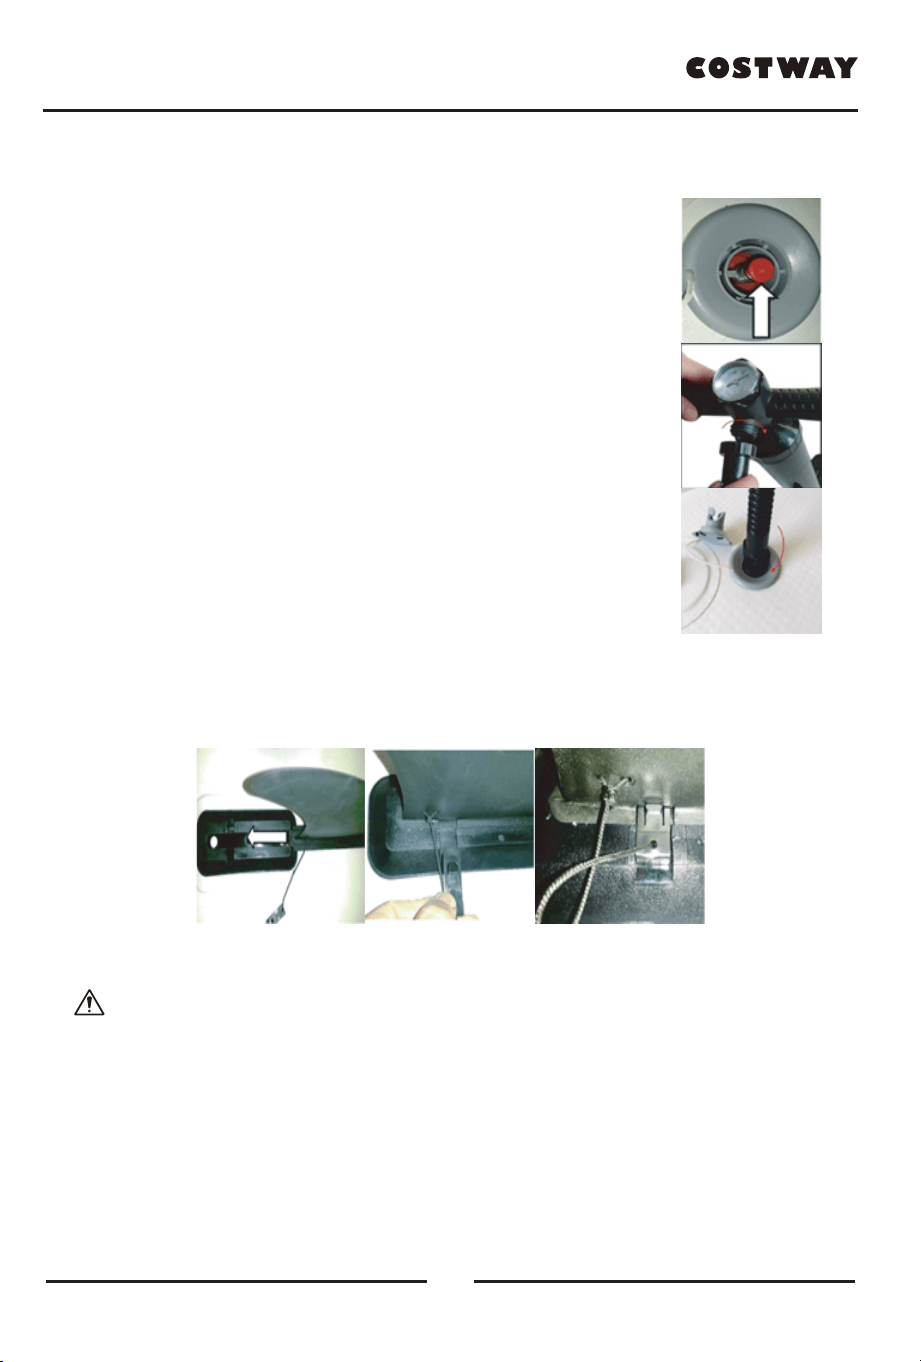
d. Start pumping air into the board by sliding the pump piston up
and down. Inflate until you reach the required pressure.
Minimum 12psi for proper ISUP operation and maximum of
15psi for this product.
e. After inflation, tighten the valve cap. Only the valve cap can
ensure final air tightness.
4. Fin installation
The two side fins are fixed on the product. Once the board is inflated, slide in the
middle fin to the base and insert the fixed pin.
5. Inflation tips and precautions
DO NOT use an air compressor. Damage to your board caused by over
inflation from an air compressor is not covered by our warranty.
After 2 or 3 days there may be a small decrease of pressure due to temperature
change. if so, add some air by pump.
Before undertaking a long paddle, inflate the board for a full 24 hours to make
sure the board is airtight. If you are seeing a consistent decrease in air pressure,
follow the instructions for leak detection in the board repair section of this
manual.
DO NOT over-inflate the board. A max pressure of 15 psi is adequate. The
easiest gauge of a good working pressure is to have the chambers inflated to a
firm pressure when you press on them.
6
www.costway.com
DO NOT pump to a high pressure and let the board sit out in the hot sun. if
the board is going to be in a warm environment, slightly deflate the board and
allow the heat from the sun to increase the internal pressure. When paddling,
the lower temperature of the water may cause a slight loss in chamber pressure.
It is a good idea to carry a pump with you so that you can add some air to the
chambers if necessary.
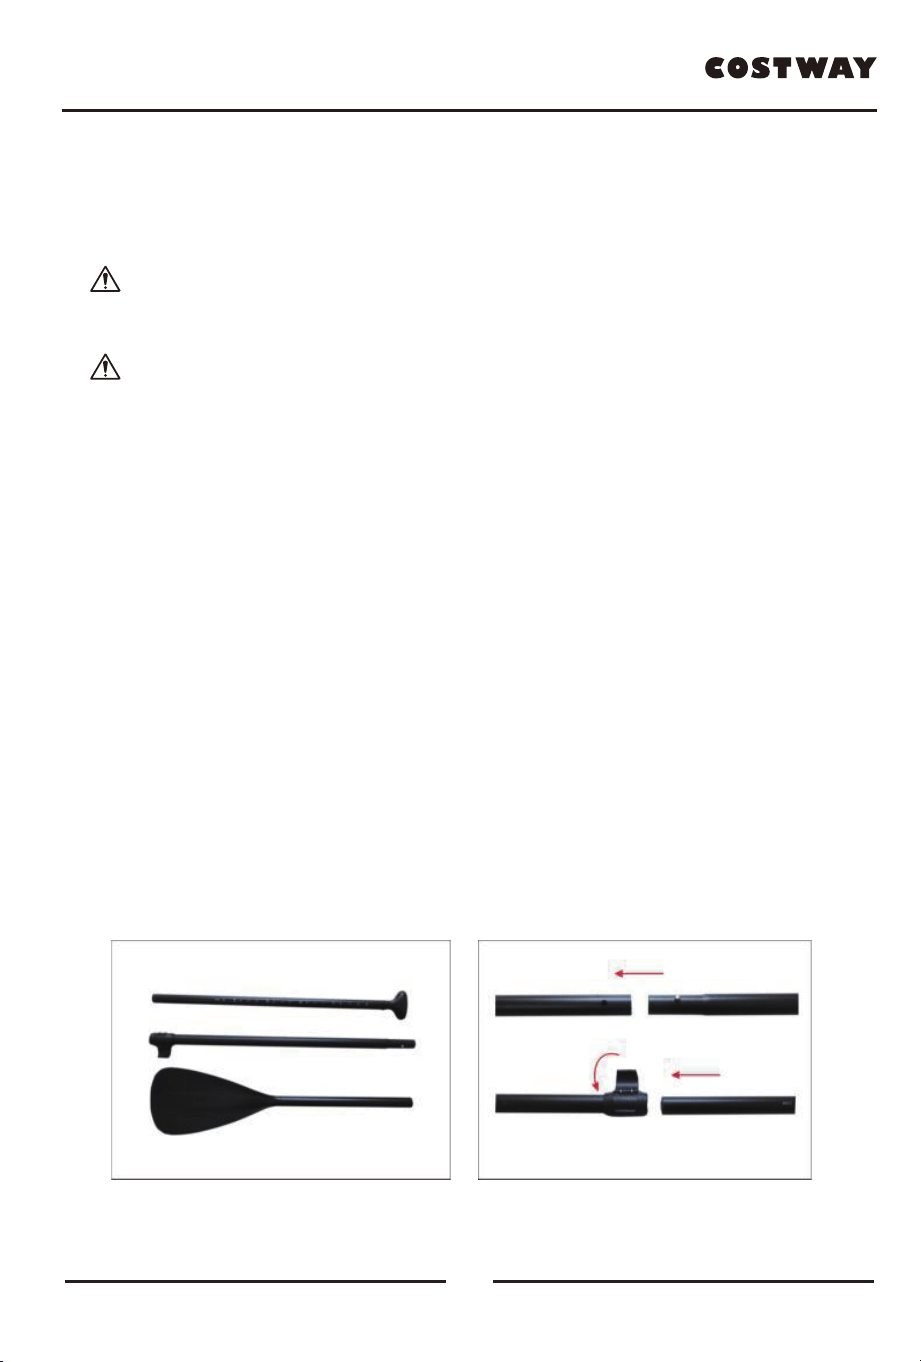
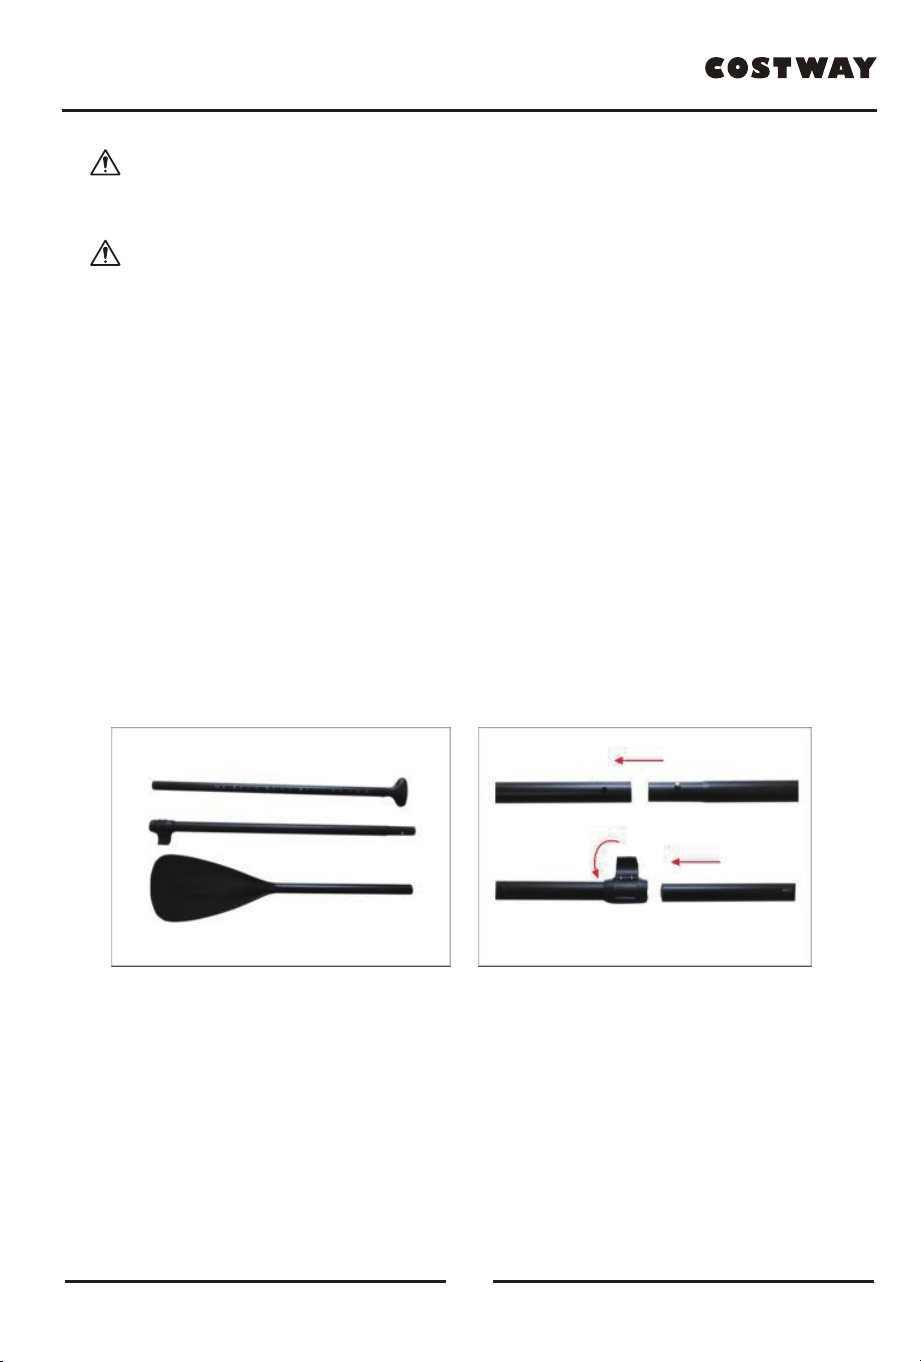
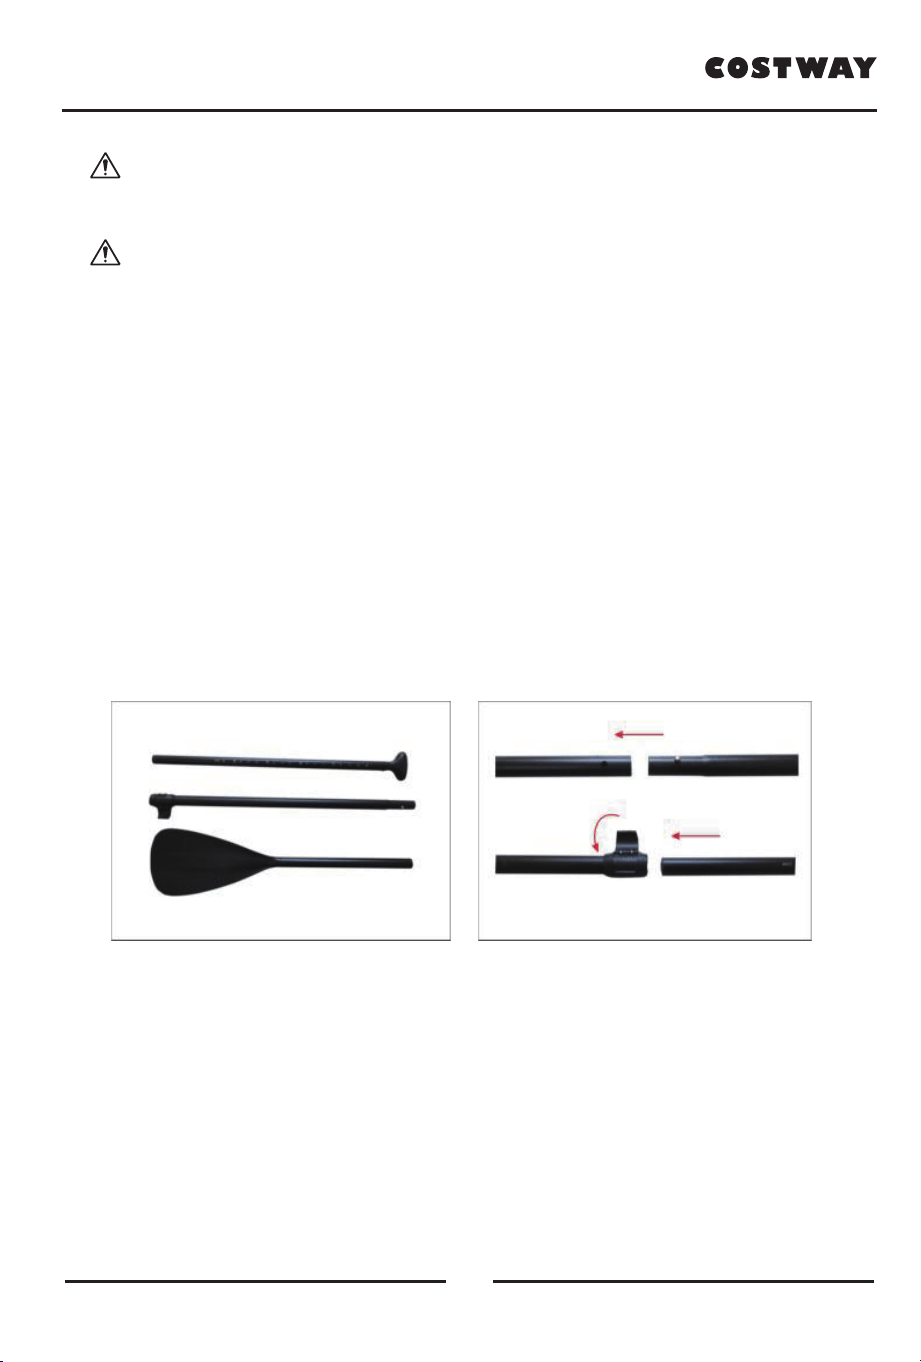
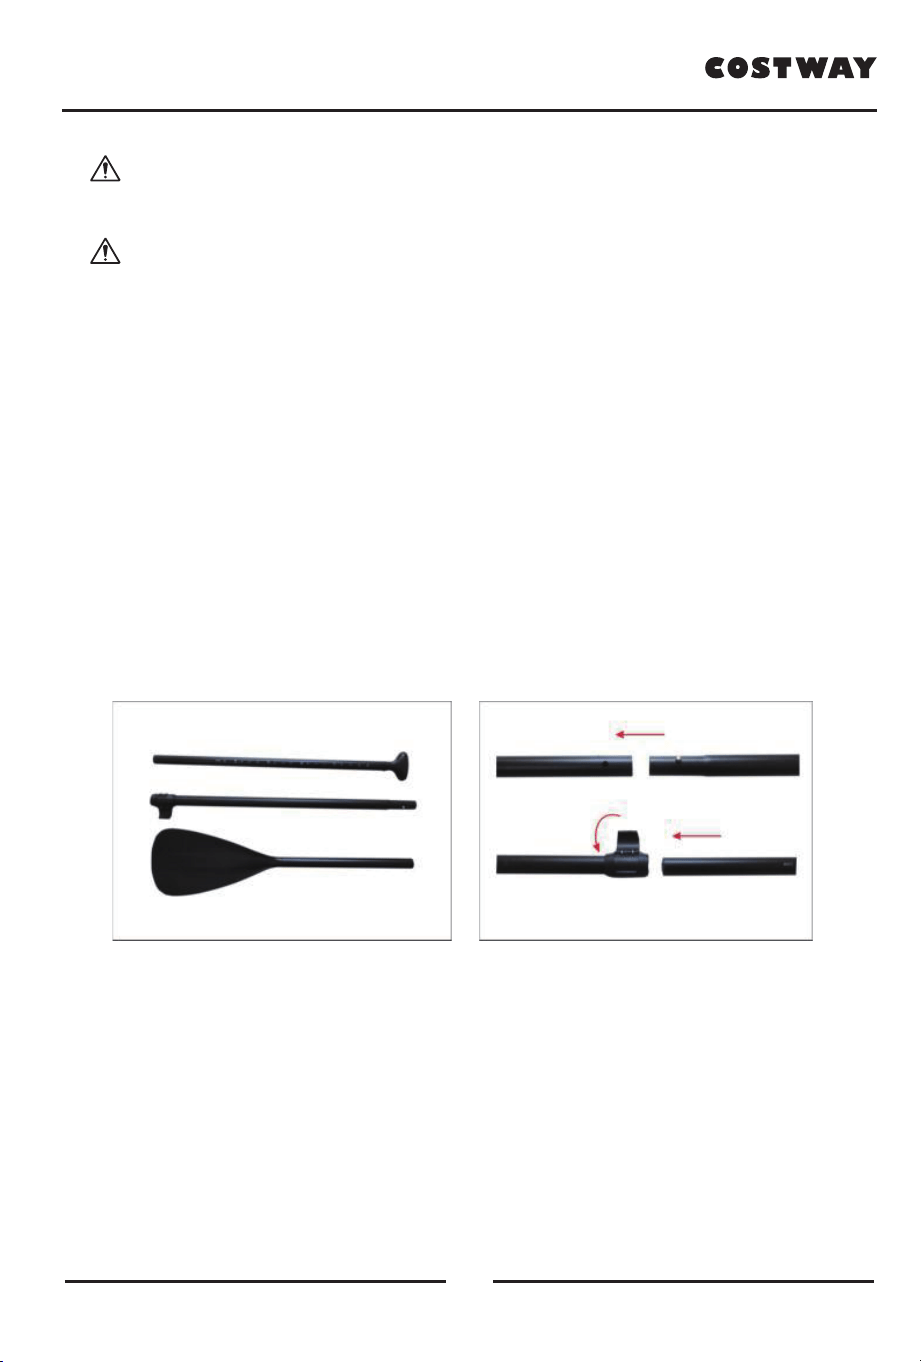
ALU telescopic ISUP paddle
Your board paddle comes in three pieces. To build the paddle, hold the button in
while sliding the pieces together until they click into place. The last section(top)
of the paddle is adjustable.To find the ideal height for your paddle, start by
building the paddle so it is 6 inches taller than your own height. From this point,
adjust the top section up or down until the length is comfortable for you. a longer
paddle is better suited for a smooth, easier paddling motion. A shorter paddle is
good for performance or competition riding.
After closing the button, if you find that the adjustable section is a little loose,
please tighten the screw properly with a screwdriver.
Features:
Adjustable length from 160-210cm
Light and FLOATING, 960g
Shaft of 29 and 27mm in alloy 6005-T6
Compact: removable in 3 parts of 79cm

7
www.costway.com
LEAK DETECTION AND REPAIR
Air Leak Detection
If the board is losing air pressure, not caused by lower temperature, check the
board for leaks, starting with the valves. A leaking valve is rare, but if you do find
a leak, we recommend that you tighten it with the included wrench. To locate a
leak, we recommend mixing soap and water in a spray bottle, spray around the
valve. If you see bubbles forming, check your valve seating and base and be
sure the valve insert is screwed tight. If you continue to have problems, please
contact us.
If the board is losing air and the valves are good, it probably has a small
puncture. Small punctures can be repaired easily and permanently. Spray
around the board until air bubbles become visible and mark the position of the
leak. If you do not find air bubbles, inflate the board to maximum air pressure
and try to listen to find the leak, if you can narrow the area down, return with a
spray bottle to identify the source of the leak.
Repair Kit
Punctures less than 1/8” in size can be repaired simply without a patch. Deflate
your board, then clean and dry the area to be repaired. Apply a small drop of
glue to cover the puncture, and let it dry 12 hours.
If your board needs repair,use the patches in the repair kit and follow these
steps:
Deflate the board completely, lay it flat and wait for it to dry.
Cut a patch that is 2 inches larger than the tear/rip all the way around.
Use alcohol to clean the repair area.
Apply three coats of adhesive to the patch and the board. Wait 5 minutes in
between each coat.
Place the patch over the tear/rip. The adhesive will react quickly, so make sure
the positioning is precise/accurate. Use the roller to ensure the patch lays flat
and even.
Wait 24 hours before re-inflating the board.
8
www.costway.com
INSTRUCTION FOR CARE AND STORAGE
Having an inflatable SUP board makes portability and storage very easy. Here
are some simple suggestions if you plan on traveling with your SUP board.
Before storing, hose off the board and let it dry completely to pre vent mildew
buildup.
Do not use harsh chemicals for cleaning. Most dirt can be removed with a mild
soap and fresh water.
You may store the board inflated or deflated. If you deflate the board, we
recommend that you store it in the protective bag that came with the board.
If storing the board outdoors, raise it up off the ground and cover it with a tarp to
prevent exposure to the sun.
Hanging the board is not recommended.
Do not store in extreme conditions (i.e. above 66℃/150℉ or below -23℃/-10℉).
Store in a clean and dry place.
Do not roll up the board too tight when storing it while deflated.
If fins become bent, place them in boiling water and use heat (e.g. hairdryer) to
bend them back into position.
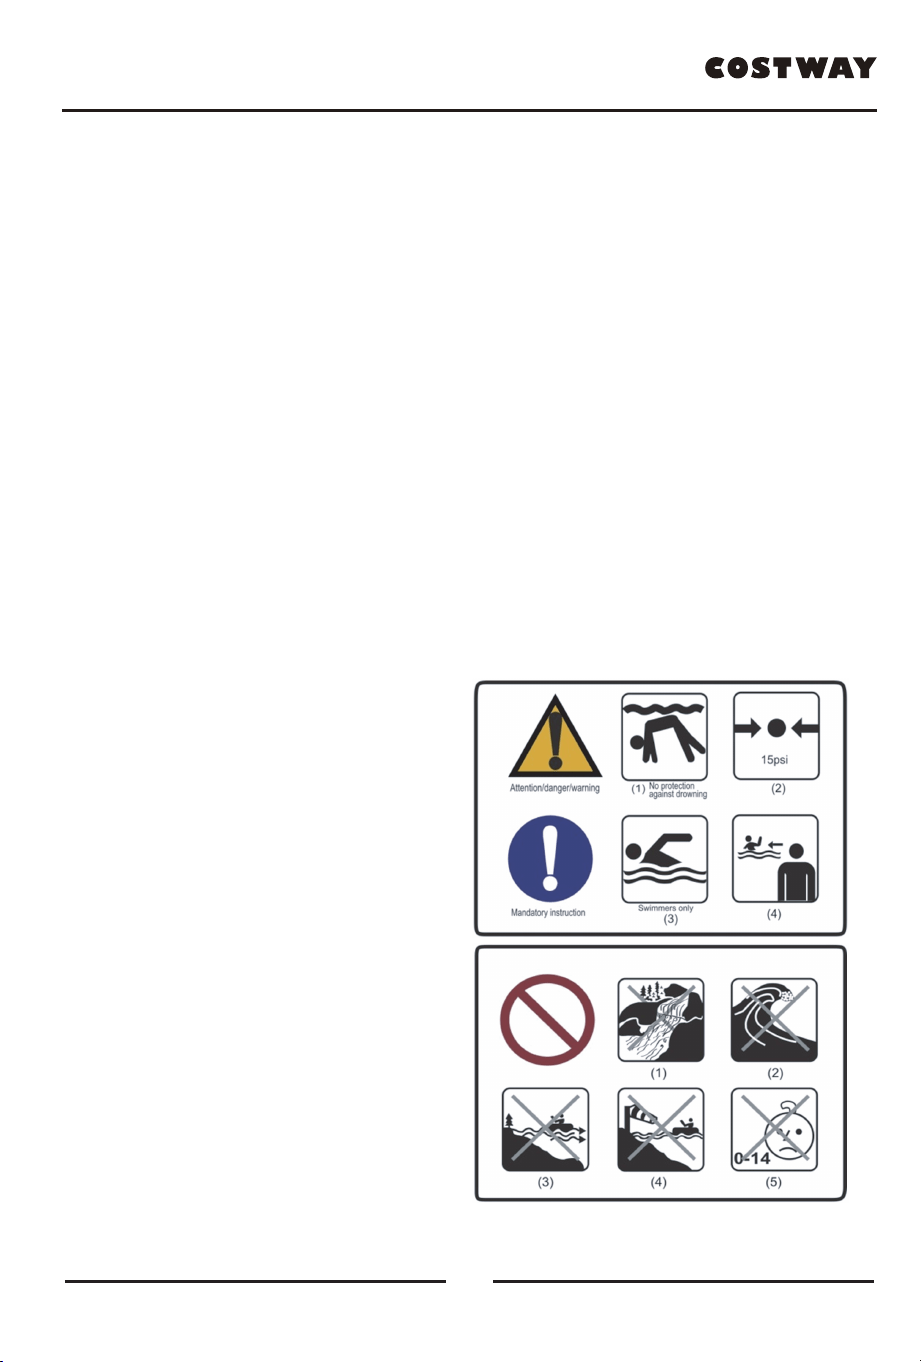
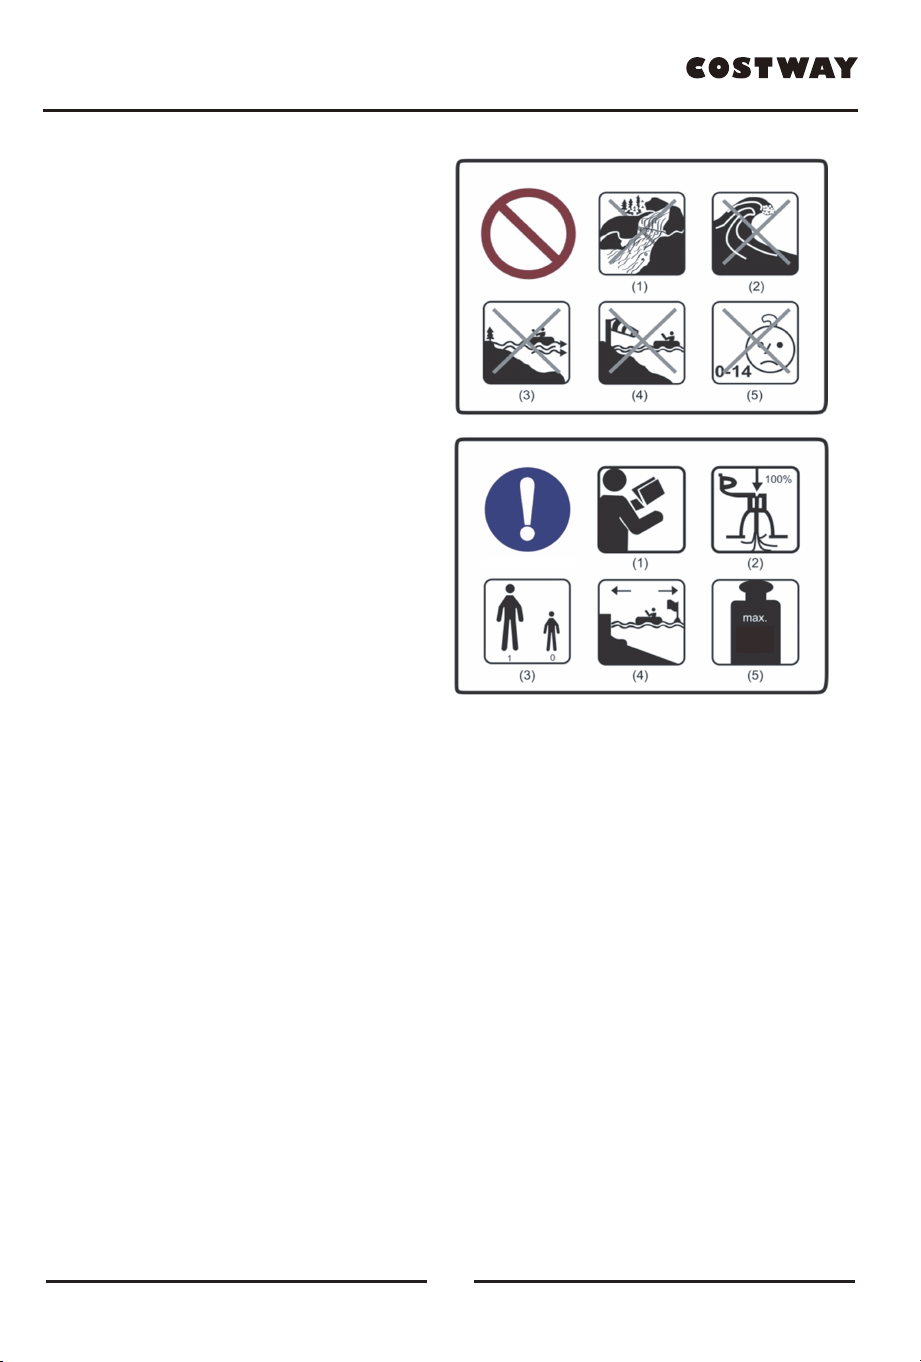
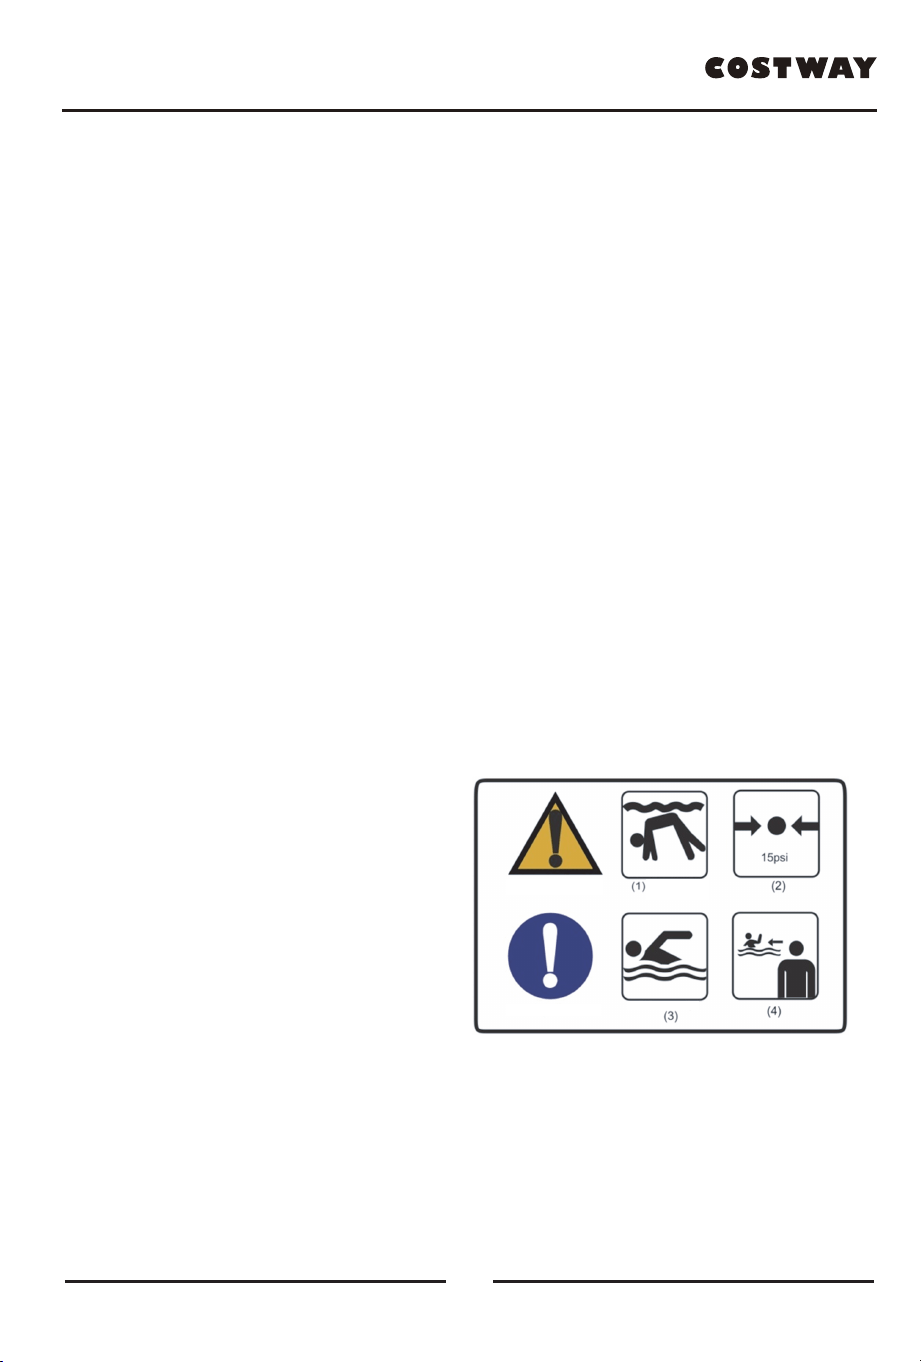
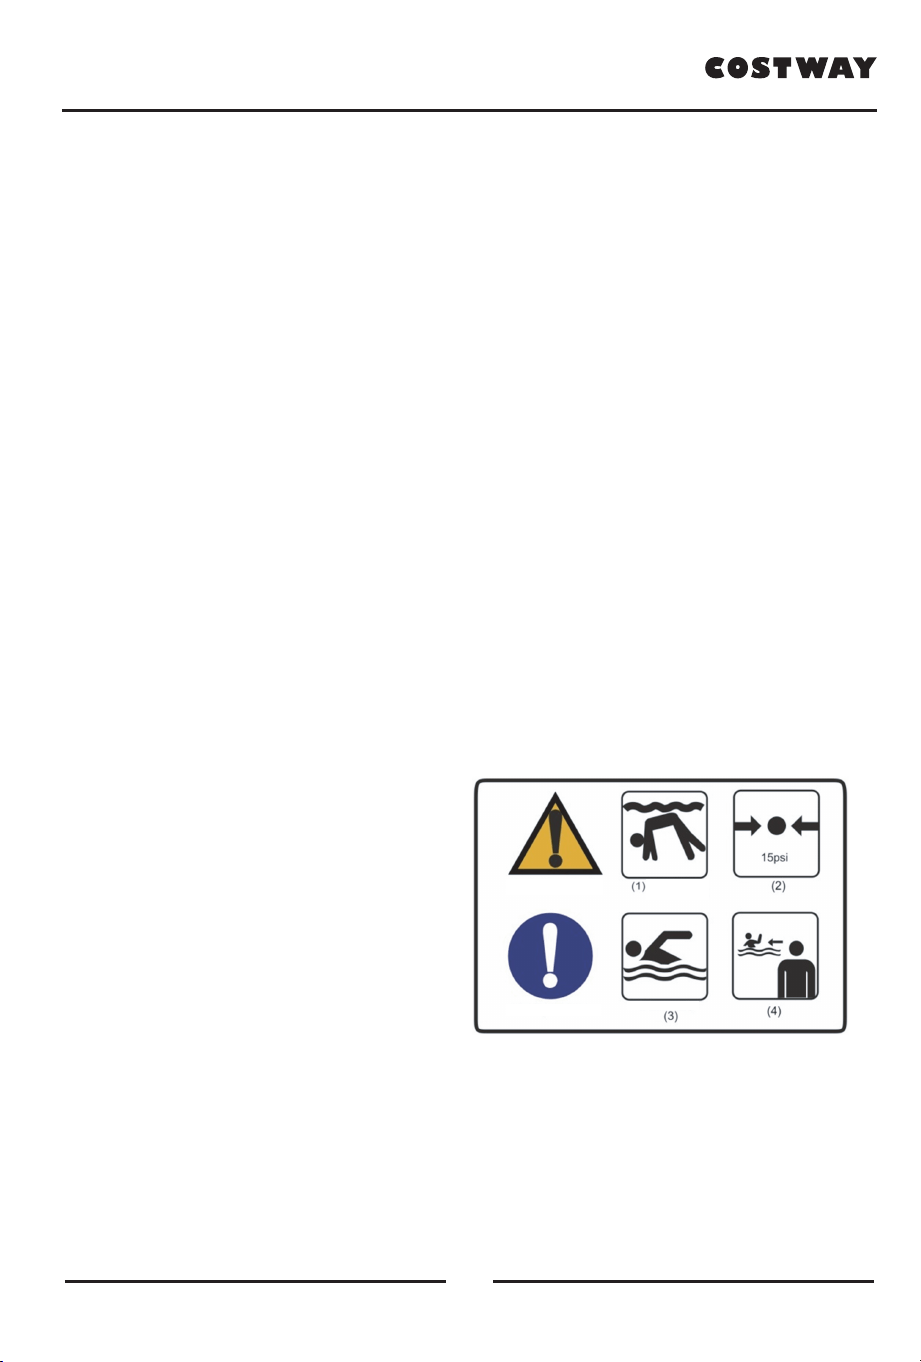
FOR YOUR SAFETY
(1) No protection against drowning
(2) Design working pressure
(3) Swimmers only
(4) Always supervise children in water
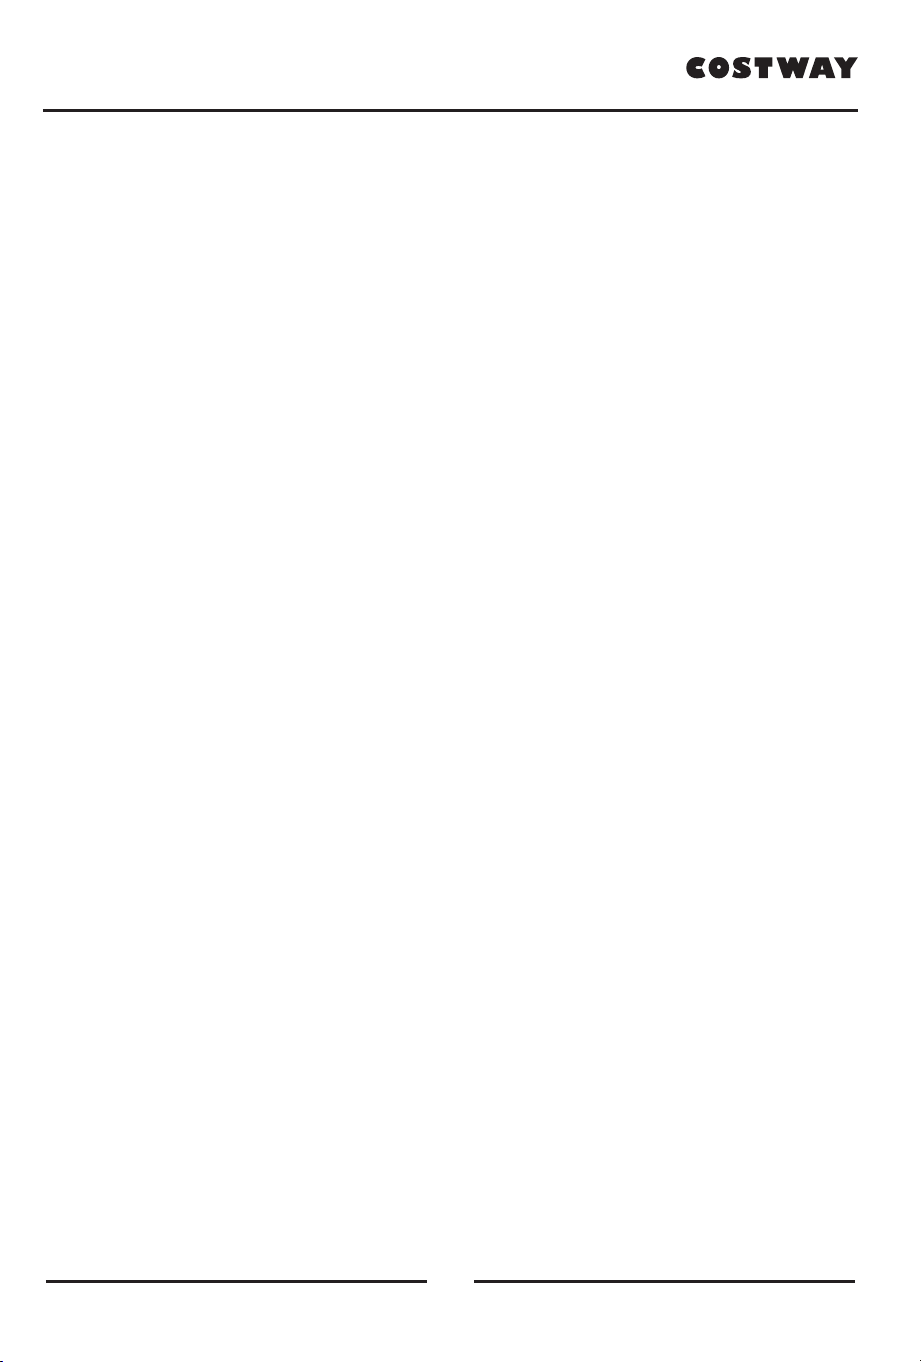
(1) Do not use in white water
(2) Do not use in braking waves
(3) Do not use in offshore current
(4) Do not use in offshore wind
(5) Not for children 14 years of
age and below
9
www.costway.com
WARNING
Check your board and equipment before going in the water.
Try to avoid going on the water alone.
Always have a mode of communicating while on the water.
Check weather conditions and tide before going out to ride.
Avoid paddling when winds are blowing away from shore.
Be aware of tide and water flow and how it will affect your traveling time.
Wear wetsuits or dry suits.
Always wear a life jacket or some sort of floatation device.
Always wear your board leash.
Take a first aid course and always travel with first aid equipment.
Avoid traveling with the board if you cannot swim.
Do not go out on the water if you have been drinking or are under the influence
of drugs.
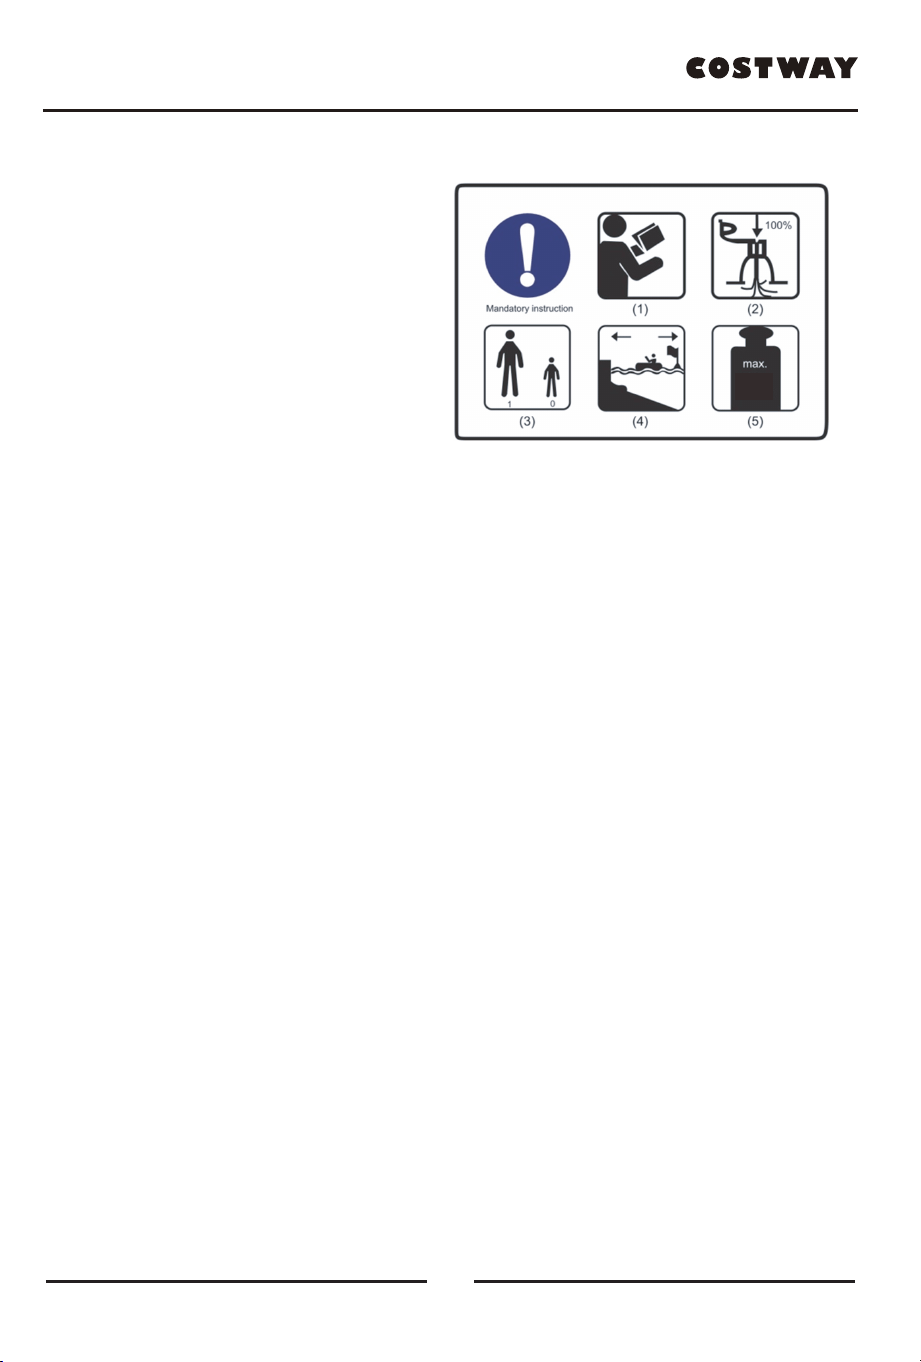
(1) Read instructions first
(2) Fully inflate all air chambers
(3) Numbers of users, one adult
(4) Safe distance to shore 150 m
www.costway.com
Welcome to visit our website and purchase our quality products!
We would like to extend our hearelt thanks to
all of our customers for taking me to assemble
this product and giving us valuable feedbacks.
With your inspiring rating, COSTWAY will be more consistent to offer you
EASY SHOPPING EXPERIENCE, GOOD PRODUCTS and EFFICIENT SERVICE!
US office: Fontana, California
UK office: Ipswich
www.costway.com
Reward Points
Exclusive Customer Service
Personalized Recommendaons
Permanent Shopping Cart
Order History
10

Bitte geben Sie uns eine Chance,
es zu korrigieren und besser zu machen!
Wenden Sie sich zunächst an unseren freundlichen Kundendienst.
Ersatz für fehlende oder beschädigte Teile wird so schnell wie möglich versendet!
DAS HANDBUCH ENTHÄLT WICHTIGE SICHERHEITSHINWEISE. BITTE LESEN UND BEWAHREN SIE FÜR DIE ZUKÜNFTIGE VERWENDUNG AUF.
www.costway.de
Besuchen uns:www.costway.de
Folgen Costway
HANDBUCH
11
EN DE FR ES IT PL
Aufblasbare Paddelboard

12
www.costway.de
Kontakeren uns!
Senden Sie diesen Artikel NICHT zurück.
Wenden Sie sich zunächst an unseren freundlichen Kundendienst.
E-mail
DE:cs.de@costway.com
Vor dem Beginnen
Bitte lesen Sie alle Anweisungen sorgfältig durch.
Bewahren Sie die Anweisungen zum zukünftigen Verwendung auf.
Separieren und zählen Sie alle Teile und Hardware.
Lesen Sie jeden Schritt sorgfältig durch und befolgen Sie die richtige
Reihenfolge.
Wir empfehlen, wenn möglich, alle Artikel in der Nähe des Einsatzortes zu
montieren, um ein unnötiges Bewegung des Artikels zu vermeiden.
Stellen Sie den Artikel immer auf eine glatte, flache und stabile Oberfläche.
Halten Sie alle kleinen Teile und Verpackungsmaterialien dieses Artikels
von Babys und Kindern fern, da sie zur ernsthaften Erstickungsgefahr
führen können.
13
www.costway.de
Fallstich (2700g/sqm)
Das große EVA-Fußpolster auf
dem Board bietet Halt und Komfort
Einbauventil mit Hochdruck
für schnelles und einfaches
Aufblasen und Entleeren
Edelstahl-D-Ring zum
Befestigen der Sicherheitsleine
am Paddler (optional)
Drei-Flosse-Set:
eine Mittelflosse und zwei
kleine Seitenflossen
Robuster Tragegriff
Vorderer D-Ring zur
Ladungssicherung
Aufblasbare Paddelboard sind eine optimale Option für Campingausflüge,
Bootsfahrten und Fahrer mit begrenztem Transport- / Stauraum.
Das Board ist durch hochwertiges Material und professionelles Design
erstaunlich steif. Unsere hochwertige Fallstich-Konstruktion sorgt dafür, dass
unser SUP in der Kategorie der aufblasbaren Produkte konkurrenzlos stabil und
steif bleibt
Dieses Handbuch wurde zusammengestellt, damit Sie Ihr aufblasbares Stand
Up Paddle Board (im Folgenden als SUP bezeichnet) mit Sicherheit und
Vergnügen bedienen können. Es enthält Details zum SUP, den gelieferten
Geräten und Informationen zu deren Betrieb. Bitte lesen Sie es sorgfältig durch
und machen Sie sich mit dem SUP vertraut, bevor Sie es verwenden.
Jedes SUP, egal wie stark es ist, kann schwer beschädigt werden, wenn es nicht
richtig verwendet wird. Dies ist nicht kompatibel mit sicherem Bootfahren.
Passen Sie die Geschwindigkeit und Richtung des SUP immer den
Seebedingungen an.
Alle Personen sollten beim Bootfahren mit SUP eine geeignete Auftriebshilfe
(Schwimmweste / persönliche Schwimmhilfe) tragen. Beachten Sie, dass es in
einigen Ländern gesetzlich vorgeschrieben ist, immer eine Schwimmhilfe zu
tragen, die den nationalen Vorschriften entspricht.
SUP-Strukturterminologie

14
www.costway.de
PACKLISTE
Stand up Paddle Board
Einstellbares 3-Wellen-Ruder aus Aluminium
Handpumpe mit Manometer
Ventilschlüssel
Reperaturset
Professionelle Tragetasche
Mittlere Flosse
Bedienungsanleitung
VORBEREITUNG FÜR BEDIENUNG
1. Falten Sie das Board aus der Verpackung.
Wählen Sie eine glatte und saubere Oberfläche, um SUPzu entfalten. Rollen Sie
das SUP-Board aus, bis es flach mit der Oberseite nach oben liegt.
2. Ventilbetrieb
Befolgen Sie die nachstehenden Anweisungen für den Betrieb des Ventils und
die korrekten Aufpump- und Entleerungsverfahren.
Das Füllventil des Boards befindet sich in der Nähe der Boardnase. Stellen Sie
sicher, dass sich die mittlere Ventilnadel in der Position „UP“ befindet, um das
Ventil zum Aufpumpen zu schließen. Wenn es sich in der Position "DOWN"
befindet, drücken Sie die Ventilnadel in die Position "UP".
Um das Ventil zum Entleeren zu öffnen, drücken Sie auf die Ventilnadel (sie
muss nicht gedreht werden) und stellen sicher, dass sich die mittlere Ventilnadel
in der Position "DOWN" befindet.
Achten Sie beim Ablassen der Luft auf Sand oder Schmutz im Bereich des
Ventils, da beim Ablassen des Luftdrucks kleine Partikel in die Luft gelangen
können.
Den Ventildeckel während des Betriebs immer über dem Ventilschaft verriegeln.
Dies verhindert ein versehentliches Entweichen von Luft und das Eindringen von
Partikeln in die Luftkammern.
15
www.costway.de
3. Inflationsschritte des SUP-Boards
a. Schrauben Sie die Ventilkappe ab und drücken Sie die
Ventilnadel, um das Ventil zu öffnen. Lassen Sie die Luft in das
Produkt einströmen, um die Zeit für das Aufpumpen zu sparen,
und drücken Sie dann die Ventilnadel erneut, um das Ventil zu
schließen (in der Position „UP“).
b. Stellen Sie sicher, dass der Pumpenschlauch an den Auslass
zum Aufpumpen angeschlossen ist.
c. Verbinden Sie die Pumpendüse durch einer halben
Drehbewegung (im Uhrzeigersinn) mit der Ventilaufnahme
d. Starten Sie das Pumpen von Luft ins Board, indem Sie den
Pumpenkolben nach oben und unten schieben. Pumpen Sie es
auf, bis es den erforderlichen Druck erreicht hat. Mindestens
0,82 bar (12 psi) für einen ordnungsgemäßen SUP-Betrieb und
maximal 1,03 bar (15 psi) für dieses Produkt.
e. Ziehen Sie nach dem Aufpumpen die Ventilkappe fest. Nur
die Ventilkappe kann die endgültige Luftdichtheit gewährleisten.
4. Installation von Flossen
Die beiden Seitenflossen sind am Produkt befestigt. Sobald das Board
aufgeblasen ist, schieben Sie die mittlere Flosse zur Basis und setzen Sie den
festen Stift ein.
5. Tipps und Vorsichtsmaßnahmen zum Aufpumpen
KEINEN Luftkompressor verwenden. Schäden an Ihrem Board, die durch
übermäßiges Aufpumpen eines ossen.Luftkompressors verursacht wurden, sind
von unserer Garantie ausgeschl.
Nach 2 oder 3 Tagen kann es aufgrund von Temperaturänderungen zu einem
leichten Druckabfall kommen. Wenn ja, fügen Sie etwas Luft mit der Pumpe
hinzu.
16
www.costway.de
Pumpen Sie das Board vor dem Ausführen eines langen Paddels 24 Stunden
lang auf, um sicherzustellen, dass es luftdicht ist. Wenn der Luftdruck konstant
abnimmt, befolgen Sie die Anweisungen zur Lecksuche im Abschnitt zur
Reparatur des Boards in diesem Handbuch.
Überpumpen Sie das Board NICHT. Ein maximaler Druck von 1,03 bar (15
psi) ist ausreichend. Das einfachste Maß für einen guten Arbeitsdruck ist das
Aufpumpen der Kammern auf einen festen Druck, wenn Sie darauf drücken.
Lassen Sie das Board nicht in der heißen Sonne liegen, wenn das Board
auf hohen Druck ist. Wenn sich das Board in einer warmen Umgebung befindet,
lassen Sie die Luft leicht ab und lassen Sie die Hitze der Sonne den Innendruck
erhöhen. Beim Paddeln kann die niedrige Wassertemperatur zu einem leichten
Druckverlust in der Kammer führen. Es ist eine gute Idee, eine Pumpe mit sich
zu führen, damit Sie den Kammern bei Bedarf etwas Luft hinzufügen können.
ALU-SUP-Teleskoppaddel
Ihr Board-Paddle wird in drei Teilen geliefert. Um das Paddel zu bauen, halten
Sie den Knopf gedrückt, während Sie die Teile zusammenschieben, bis sie
einrasten. Der letzte Abschnitt (oben) des Paddels ist verstellbar. Um die ideale
Höhe für Ihr Paddel zu finden, bauen Sie das Paddel zunächst so auf, dass es
15 cm höher als Ihre eigene Höhe ist. Passen Sie das Oberteil von diesem
Punkt an nach oben oder unten an, bis die Länge für Sie angenehm ist. Ein
längeres Paddel ist besser für eine gleichmäßige, einfachere Paddelbewegung
geeignet. Ein kürzeres Paddel ist gut für Performance- oder Wettkampffahrten.
Wenn Sie nach dem Schließen der Taste feststellen, dass der einstellbare
Bereich etwas locker ist, ziehen Sie die Schraube mit einem Schraubendreher
fest an.

17
www.costway.de
Eigenschaften:
Verstellbare Länge von 160-210cm
Leicht und schwimmend, 960g
Schaft von 29 und 27 mm aus Legierung 6005-T6
Kompakt: in 3 Teilen von 79cm entfernbar
LECKERKENNUNG UND REPARATUR
Luftlecksuche
Wenn das Board den Luftdruck verliert, was nicht auf kältere Temperaturen
zurückzuführen ist, überprüfen Sie das Board, zuerst mit den Ventilen, auf
Undichtigkeiten. Ein undichtes Ventil ist selten, aber wenn Sie ein Leck finden,
können wir Ihnen ein Ersatzventil zusenden. Um ein Leck zu finden, empfehlen
wir, Seife und Wasser in einer Sprühflasche zu mischen und um das Ventil
herum zu sprühen. Wenn sich Blasen bilden, überprüfen Sie den Ventilsitz und
den Sockel und vergewissern Sie sich, dass der Ventileinsatz festgeschraubt ist.
Wenn Sie weiterhin Probleme haben, ist es wahrscheinlich an der Zeit, ein
neues Ventil zu bestellen. Der Austausch des gesamten Ventils kann mit einem
einfachen Werkzeug erfolgen, das mit dem Austauschventil geliefert wird.
Wenn das Board Luft verliert und die Ventile in Ordnung sind, weist sie
wahrscheinlich einen kleinen Einstich auf. Kleine Einstiche können einfach und
dauerhaft repariert werden. Sprühen Sie auf das Board, bis Luftblasen sichtbar
werden, und markieren Sie die Position des Einstichs. Wenn Sie keine
Luftblasen finden, pumpen Sie das Board auf den maximalen Luftdruck und
versuchen Sie, den Einstich zu finden. Wenn Sie den Bereich einschränken
können, kehren Sie mit einer Sprühflasche zurück, um die Quelle des Einstichs
zu identifizieren.
Reperaturset
Einstiche mit einer Größe von weniger als 0,3 cm können einfach ohne Flicken
repariert werden. Lassen Sie die Luft aus Ihrem Board ab und reinigen und
trocknen Sie den zu reparierenden Bereich. Tragen Sie einen kleinen Tropfen
Kleber auf die Einstichstelle auf und lassen Sie sie 12 Stunden trocknen.
Wenn Ihr Board repariert werden muss, verwenden Sie die Flecken im
Reparatursatz und führen Sie die folgenden Schritte aus:
Lassen Sie die Luft vollständig aus dem Board ab, legen Sie es flach hin und
warten Sie, bis es getrocknet ist.

www.costway.de
18
Schneiden Sie einen Fleck , der 5 cm größer ist als der Einstich.
Verwenden Sie Alkohol, um den Reparaturbereich zu reinigen.
Tragen Sie drei Schichten Klebstoff auf dem Flecken und dem Board auf.
Warten Sie zwischen jedem Anstrich 5 Minuten.
Legen Sie den Flecken über den Einstich. Der Klebstoff reagiert schnell, stellen
Sie also sicher, dass die Positionierung präzise / genau ist. Verwenden Sie die
Walze, um sicherzustellen, dass der Flecken flach und gleichmäßig liegt.
Warten Sie 24 Stunden, bevor Sie das Board wieder aufpumpen.
HINWEISE ZUR PFLEGE UND LAGERUNG
Ein aufblasbares SUP-Board macht das Tragen und Aufbewahren sehr einfach.
Hier sind einige einfache Vorschläge, wenn Sie mit Ihrem SUP-Board reisen
möchten.
Vor dem Lagern das Board reinigen und vollständig trocknen lassen, um
Schimmelbildung zu vermeiden.
Verwenden Sie zum Reinigen keine aggressiven Chemikalien. Die meiste
Flecke kann mit einer milden Seife und frischem Wasser entfernt werden.
Sie können das Board aufgeblasen oder entleert aufbewahren. Wenn Sie die
Luft aus dem Board ablassen, empfehlen wir, es in der mit dem Board
gelieferten Schutzhülle aufzubewahren.
Wenn Sie das Board im Freien lagern, heben Sie es vom Boden ab und
bedecken Sie es mit einer Plane, um zu verhindern, dass es der Sonne
ausgesetzt wird.
Das Aufhängen des Boards wird nicht empfohlen.
Nicht unter extremen Bedingungen lagern (d. H. Über 66 °C oder unter -23 °C).
An einem sauberen und trockenen Ort aufbewahren.
Rollen Sie das Board nicht zu fest auf, wenn Sie es im entleerten Zustand
aufbewahren.
Wenn sich die Flossen verbiegen, legen Sie sie in kochendes Wasser und
biegen Sie sie mit Wärme (z. B. Fön) wieder in Position.
FÜR IHRE SICHERHEIT
(1) Kein Ertrinkungsschutz
(2) Avorgeschriebener Arbeitsdruck
(3) Nur Schwimmer
(4) Kinder im Wasser immer
beaufsichtigen
Achtung/Gefahr/Warnung
Obligatorische Anweisung
Nur für Schwimmer
Kein Ertrinkungsschutz
1,03 bar (15 psi)
www.costway.de
19
WARNUNG
Überprüfe dein Board und deine Ausrüstung, bevor du ins Wasser gehst.
Vermeiden Sie es, alleine aufs Wasser zu gehen.
Kommunizieren Sie immer mit anderen auf dem Wasser.
Überprüfen Sie Wetterbedingungen und Gezeiten, bevor Sie losfahren.
Vermeiden Sie Paddeln, wenn der Wind vom Ufer weg weht.
Achten Sie auf Gezeitenund Wasserfluss und darauf, wie sich dies bei Ihrer
Reisezeit auswirkt.
Tragen Taucheranzug oder Trockenanzüge.
Tragen Sie immer eine Schwimmweste oder andere Schwimmhilfe.
Tragen Sie immer Ihre Boardleine.
Nehmen Sie an einem Erste-Hilfe-Kurs teil und reisen Sie immer mit
Erste-Hilfe-Ausrüstung.
Reisen Sie nicht mit dem Board, wenn Sie nicht schwimmen können.
Gehen Sie nicht aufs Wasser, wenn Sie getrunken haben oder unter
Drogeneinfluss stehen.
(1) Keine Verwendung bei Welle
(2) Nicht zum Bremsen von Wellen
verwenden
(3) Nicht bei Offshore-Strom verwenden
(4) Nicht bei Offshore-Wind verwenden
(5) Nicht für Kinder unter 14 Jahren
(1) Lesen Sie zuerst die Anweisungen
(2) Pumpen Sie alle Luftkammern
vollständig auf
(3) Anzahl der Benutzer, ein
Erwachsener
(4) Sicherheitsabstand zum Ufer 150 m
Obligatorische Anweisung
VIELEN
DANK
Ihre Vorschläge und Kommentare für COSTWAY sind wirklich wichg für uns!
Wir möchten uns bei allen Kunden herzlich bedanken,
dass sie sich die Zeit genommen haben, dieses Produkt
zusammenzubauen und uns wertvolle Bewertung
zukommen zu lassen.
Mit Ihrer inspirierenden Bewertung wird COSTWAY konsistenter sein, um Ihnen
EIN SCHÖNES EINKAUFSERLEBNIS, GUTE PRODUKTE und EFFIZIENTEN SERVICE zu bieten!
DE office:FDS GmbH,Neuer Höltigbaum 36,22143 Hamburg,Deutschland
www.costway.de
Belohnungspunkte
Exklusiver Kundendienst
Personalisierte Empfehlungen
Permanenter Einkaufswagen
Bestellverlauf
5 Sterne Bewertung
www.costway.de
20

CE MANUEL D’INSTRUCTIONS CONTIENT DES INFORMATIONS IMPORTANTES SUR LA SÉCURITÉ. VEUILLEZ LIRE ET CONSERVER POUR LA RÉFÉRENCE FUTURE.
www.costway.fr
MANUEL DE L’UTILISATEUR
VEUILLEZ NOUS DONNER UNE
OCCASION DE L’AMELIORER ET FAIRE MIEUX!
Contactez d’abord notre service à la clientèle amical pour l’aide.
Les replacements pour les pièces manquantes ou endommagées seront
envoyés le plus vite possible!
Consultez-nous : www.costway.fr
Suivez Costway
21
EN DE FR ES IT PL
Planche de Paddle Gonflable
22
www.costway.fr
Contactez-nous !
Ne retournez pas cet article.
Contactez d’abord notre service à la clientèle amical pour l’aide.
E-mail
FR : cs.fr@costway.com
Avant de Commencer
Veuillez lire attentivement toutes les instructions.
Conservez les instructions pour la référence future.
Séparez et comptez toutes les pièces et les outils de matériel.
Lisez attentivement chaque étape et suivez le bon ordre.
Nous recommandons que, si possible, tous les éléments soient assemblés
à proximité de la zone dans laquelle ils seront utilisés, afin d'éviter de
déplacer inutilement le produit une fois assemblé.
Placez toujours le produit sur une surface plane, solide et stable.
Gardez toutes les petites pièces et le matériel d'emballage de ce produit
hors de portée des bébés et des enfants car ils pourraient provoquer un
risque grave d’étouffement.

23
www.costway.fr
Drop Stitch
(2700g/sqm)
Grand tapis en EVA sur la
planche qui offre adhérence et confort
Valve encastrée à haute
pression pour un gonflage et
un dégonflage rapide et facile
Anneau en D en acier
inoxydable pour fixer la laisse
de sécurité à la planche (en option)
Ensemble de trois ailerons :
un aileron central et deux
petits ailerons latéraux
Poignée de transport robuste
Anneau en D avant
pour fixer la cargaison
Les planches de paddle gonflables sont une excellente option pour les voyages
de camping, le nautisme et les personnes dont l’espace de transport/stockage
est limité.
La planche est incroyablement rigide grâce à des matériaux de haute qualité et
un design professionnel. Notre construction de haute qualité permet à notre
produit de maintenir une stabilité et une rigidité inégalées dans la catégorie des
produits gonflables
Ce manuel a été compilé pour vous aider à utiliser votre Planche de Paddle
Gonflable en toute sécurité et avec plaisir. Il contient des détails sur le produit,
les équipements fournis et des informations sur leur fonctionnement. Veuillez le
lire attentivement et vous familiariser avec le produit avant de l’utiliser.
Toute planche de paddle gonflable, quelle que soit sa résistance, peut être
gravement endommagée s’elle n’est pas utilisée correctement. Ajustez toujours
la vitesse et la direction du produit en fonction des conditions de la mer.
Toutes les personnes doivent porter un gilet de sauvetage/dispositif de flottaison
individuel lorsqu’elles utilisent le produit. Notez que, dans certains pays, il est
obligatoire de porter en permanence un dispositif de flottabilité conforme à la
réglementation nationale.
Terminologie de la structure
24
www.costway.fr
LISTE D’EMBALLAGE
Planche de paddle gonflable
Pagaie réglable en aluminium à 3 arbres
Pompe à main avec manomètre
Clé pour vanne
Kit de réparation
Sac de transport professionnel
Aileron moyen
Manuel de l’utilisateur
PRÉPARATION DES INSTALLATION
1. Sortez la planche de l’emballage.
Choisissez une surface lisse et propre pour déplier le carton. Déroulez la
planche de paddle gonflable jusqu’à ce qu’elle soit posée à plat avec la face
supérieure vers le haut.
2. Opération de la vanne
Suivez les instructions ci-dessous pour l’opération de la valve et les procédures
correctes de gonflage et de dégonflage.
La valve de gonflage de la planche est située près du nez de la planche. Pour
fermer la valve pour le gonflage, assurez-vous que la goupille centrale de la
valve est en position "HAUT". Si elle est en position "BAS", appuyez sur la
goupille de la valve pour la mettre en position "HAUT".
Pour ouvrir la valve de dégonflage, appuyez sur la goupille de la valve (il n’est
pas nécessaire de la tourner), assurez-vous que la goupille centrale de la valve
est en position "DOWN".
Faites attention à tout sable ou débris autour de la zone de la valve lors du
dégonflage car de petites particules pourraient s’envoler avec le relâchement de
la pression d’air.
Il faut toujours verrouiller le couvercle de la vanne sur la tige de la vanne
lorsqu’elle est utilisée. Ceci empêchera la libération accidentelle d’air et l’entrée
de toute particule dans les chambres à air.
25
www.costway.fr
3. Étapes de gonflage
a. Dévissez le couvercle de la valve, appuyez sur la goupille de
la valve pour ouvrir la valve, laissez l’air s’écouler naturellement
dans le produit afin de gagner du temps de gonflage, puis
appuyez à nouveau sur la goupille de la valve pour fermer la
valve (en position "HAUT").
b. Assurez-vous que le tuyau de la pompe est connecté à la
sortie "gonfler".
c. Raccordez la buse de la pompe dans le réceptacle de la
vanne, en effectuant un demi-tour (dans le sens des aiguilles
d’une montre)
d. Commencez à pomper de l’air dans la planche en faisant
glisser le piston de la pompe de haut en bas. Gonflez jusqu’à ce
que vous atteigniez la pression requise. Minimum de 12 psi
pour un fonctionnement correct de ce produit et maximum est
de 15 psi.
e. Après le gonflage, serrez le couvercle de la valve. Seul le
couvercle de valve peut assurer l’étanchéité finale.
4. Installation des Ailerons
Fixez les deux ailerons latéraux sur le produit. Une fois la planche gonflée,
glissez l’aileron central jusqu’à la base et insérez la goupille fixe.
5. Conseils et précautions de gonflage
N’utilisez pas le compresseur d’air. Un surgonflage dû à un compresseur
d’air pourrait causer les dommages à votre planche.
Après 2 ou 3 jours, il y aurait une légère baisse de pression due au changement
de température. Si c’est le cas, ajoutez de l’air par la pompe.
Avant d’entreprendre une longue pagaie, gonflez la planche pendant 24 heures
complètes pour vous assurer que la planche est étanche. Si vous constatez une
baisse constante de la pression d’air, suivez les instructions pour la détection
des fuites dans la section de réparation de la planche de ce manuel.

www.costway.fr
26
Ne surgonflez pas la planche. Une pression maximale de 15 psi est
adéquate. La façon la plus simple de mesurer une bonne pression de travail est
de gonfler les chambres à une pression ferme lorsque vous appuyez dessus.
Veuillez ne pas pomper à une pression élevée et laisser la planche au
soleil. Si la planche doit se trouver dans un environnement chaud, dégonflez
légèrement la planche et car la chaleur du soleil augmente la pression de
planche. En pagayant, la température plus basse de l’eau pourrait causer une
légère perte de pression dans la chambre. C’est une bonne idée d’avoir une
pompe avec vous afin de pouvoir ajouter de l’air dans la chambre si nécessaire.
Pagaie télescopique en aluminium
Votre pagaie est en trois parties. Pour construire la pagaie, maintenez le bouton
enfoncé tout en faisant glisser les pièces ensemble jusqu’à ce qu’elles
s’enclenchent. La dernière section (en haut) de la pagaie est ajustable. Pour
trouver la hauteur idéale de votre pagaie, commencez par construire la pagaie
de façon à ce qu’elle soit 15 cm plus haute que votre propre hauteur. À partir de
ce point, ajustez la section du haut vers le haut ou vers le bas jusqu’à ce que la
longueur soit confortable pour vous. Une pagaie plus longue est mieux adaptée
pour un mouvement de pagaie plus doux et plus facile. Une pagaie plus courte
est bonne pour la performance ou la compétition.
Après avoir fermé le bouton, si vous trouvez que la partie réglable est un peu
lâche, veuillez serrer la vis correctement avec un tournevis.
Caractéristiques :
Longueur réglable de 160-210cm
Léger et flottant, 960g
Arbre de 29 et 27 mm en alliage 6005-T6
Compact : démontable en 3 parties de 79cm

27
www.costway.fr
DÉTECTION ET RÉPARATION DES FUITES
Détection de fuites d’air
Si la planche perd de la pression d’air, non causée par la température plus
basse, vérifiez la planche pour des fuites, en commençant par les valves. Une
valve qui fuit est rare, mais si vous trouvez une fuite, il est recommandé de
serrer la valve avec la clé. Pour localiser une fuite, nous vous recommandons de
mélanger de l’eau et du savon dans un vaporisateur, et de vaporiser autour de la
valve. Si vous voyez des bulles se former, vérifiez le siège et la base de votre
valve et assurez-vous que l’insert de la valve est bien vissé. Si vous continuez à
avoir des problèmes, contactez-nous.
Si la planche perd de l’air et que les valves sont bonnes, elle a probablement
une petite crevaison. Les petites crevaisons peuvent être réparées facilement et
de façon permanente. Vaporisez autour de la planche jusqu’à ce que des bulles
d’air deviennent visibles et marquez la position de la fuite. Si vous ne trouvez
pas de bulles d’air, gonflez la planche à la pression d’air maximale et essayez
d’écouter pour trouver la fuite. Si vous pouvez réduire la zone, revenez avec un
vaporisateur pour identifier la source de la fuite.
Kit de réparation
Les perforations de moins de 1/8" (0,3 cm) peuvent être réparées simplement
sans patch. Dégonflez votre planche, puis nettoyez et séchez l’endroit à réparer.
Appliquez une petite goutte de colle pour couvrir la perforation, et laissez sécher
12 heures.
Si votre planche a besoin d’être réparée, utilisez les patchs du kit de réparation
et suivez ces étapes :
Dégonflez complètement la planche, posez-la à plat et attendez qu’elle sèche.
Découpez un patch 5 cm plus large que la déchirure.
Utilisez de l’alcool pour nettoyer la zone de réparation.
Appliquez trois couches d’adhésif sur le patch et la planche. Attendez 5 minutes
entre chaque couche.
Placez le patch sur la déchirure. L’adhésif réagira rapidement, donc
assurez-vous que le positionnement est précis. Utilisez le rouleau pour vous
assurer que le patch est bien à plat et régulier.
Attendez 24 heures avant de regonfler la planche.
www.costway.fr
28
INSTRUCTIONS POUR L’ENTRETIEN ET LE STOCKAGE
Avoir une planche de paddle gonflable rend la portabilité et le stockage très
facile. Voici quelques suggestions simples si vous prévoyez voyager avec votre
planche de paddle gonflable.
Avant de ranger la planche, nettoyez-la au jet d’eau et laissez-la sécher
complètement pour éviter l’accumulation de moisissure.
N’utilisez pas de produits chimiques agressifs pour le nettoyage. La plupart des
saletés peuvent être enlevées avec un savon doux et de l’eau fraîche.
Vous pouvez stocker la planche gonflée ou dégonflée. Si vous dégonflez la
planche, nous vous recommandons de la ranger dans le sac de protection fourni
avec la planche.
Si vous rangez la planche à l’extérieur, soulevez-la du sol et couvrez-la avec
une bâche pour éviter l’exposition au soleil.
Il n’est pas recommandé d’accrocher la planche.
Ne stockez pas dans des conditions extrêmes (c’est-à-dire au-dessus de 66℃
ou en dessous de -23℃).
Stockez dans un endroit propre et sec.
Ne roulez pas la planche trop serrée lorsque vous la stockez en l’état dégonflé.
Si les ailerons se plient, placez-les dans de l’eau bouillante et utilisez la chaleur
(par exemple un sèche-cheveux) pour les remettre en position.
POUR VOTRE SÉCURITÉ
(1) Aucune protection contre la noyade
(2) Pression de service nominale
(3) Nageurs seulement
(4) Toujours surveiller les enfants
dans l’eau
Attention/Danger/Avertissement
Instruction obligatoire
Nageurs seulement
Aucune protection
contre la noyade

29
www.costway.fr
AVERTISSEMENT
Vérifiez votre planche et votre équipement avant d’aller dans l’eau.
Essayez d’éviter d’aller sur l’eau seul.
Ayez toujours un outil de communication lorsque vous êtes sur l’eau.
Vérifiez les conditions météorologiques et la marée avant d’aller sur l’eau.
Évitez de pagayer lorsque le vent souffle loin de la rive.
Soyez conscient de la marée et du débit de l’eau et de l’effet qu’elle aura sur
votre temps de déplacement.
Portez une combinaison de plongée ou une combinaison étanche.
Portez toujours un gilet de sauvetage ou une sorte de vêtement de flottaison.
Portez toujours votre laisse de planche.
Suivez un cours de premiers secours et voyagez toujours avec un équipement
de premiers secours.
Évitez de voyager avec la planche si vous ne savez pas nager.
Ne sortez pas sur l’eau si vous avez bu ou si vous êtes sous l’influence de
drogues.
(1) Ne pas utiliser en torrent rapide
(2) Ne pas utiliser dans les vagues
déferlantes
(3) Ne pas utiliser dans le courant
offshore
(4) Ne pas utiliser dans le vent offshore
(5) Pas pour les enfants de 14 ans
et moins
(1) Lire d’abord les instructions
(2) Gonfler complètement toutes les
chambres à air
(3) Nombre d’utilisateurs, un adulte
(4) Distance de sécurité par rapport
à la rive : 150 m
Instruction obligatoire
Bienvenue pour visiter notre site et acheter nos produits de qualité!
Nous tenons à vous présenter nos remerciements
sincères à tous nos clients qui prennent beaucoup
de temps pour assembler ce produit et nous donner
des commentaires précieux.
Avec votre évaluation inspirante, COSTWAY sera plus professionnel pour vous offrir une
BONNE EXPÉRIENCE D’ACHATS, de BONS PRODUITS et un SERCIVE EFFICACE !
FR office : 26 RUE DU VERTUQUET, 59960 NEUVILLE EN FERRAIN, FRANCE
www.costway.fr
Points de Récompense
Service à la Clientèle Exclusif
Recommandaons Personnalisées
Panier Permanent
Historique des Commandes
merci
www.costway.fr
30
www.costway.es
MANUAL DEL USUARIO
ESTE MANUAL DE INSTRUCCIONES CONTIENE IMPORTANTES INFORMACIONES DE SEGURIDAD, POR FAVOR LO LEA Y GUARDE PARA REFERENCIAS FUTURAS.
¡Por favor dénos la oportunidad de hacerlo bien y mejorar!
Primero póngase en contacto con nuestro amable departamento de
servicio al cliente para obtener ayuda. ¡Los reemplazos de piezas faltas o
dañadas se enviarán lo antes posible!
Visítenos: www.costway.es
Siga Costway
31
EN DE FR ES IT PL
Tabla de Paddle
32
www.costway.es
Por favor lea todas instrucciones con mucha atención.
Retenga instrucciones para referencias futuras.
Separe y cuente todas las piezas y accesorios.
Lea cada paso cuidadosamente y siga el orden correcto.
Recomendamos que, cuando sea posible, todos los artículos se armen
cerca del área en la que se utilizarán, para evitar mover innecesariamente
el producto cuando emsamble.
Siempre coloque el producto sobre una superficie plana, estable y firme.
Mantenga todas las piezas pequeñas y los materiales de embalaje de este
producto lejos de los bebés y los niños, ya que representan un grave
riesgo de asfixia potencialmente.
¡Contáctenos!
NO devuelva este artículo.
Primero póngase en contacto con nuestro amable departamento de servicio al cliente para obtener ayuda.
Antes de Empezar
ES
33
www.costway.es
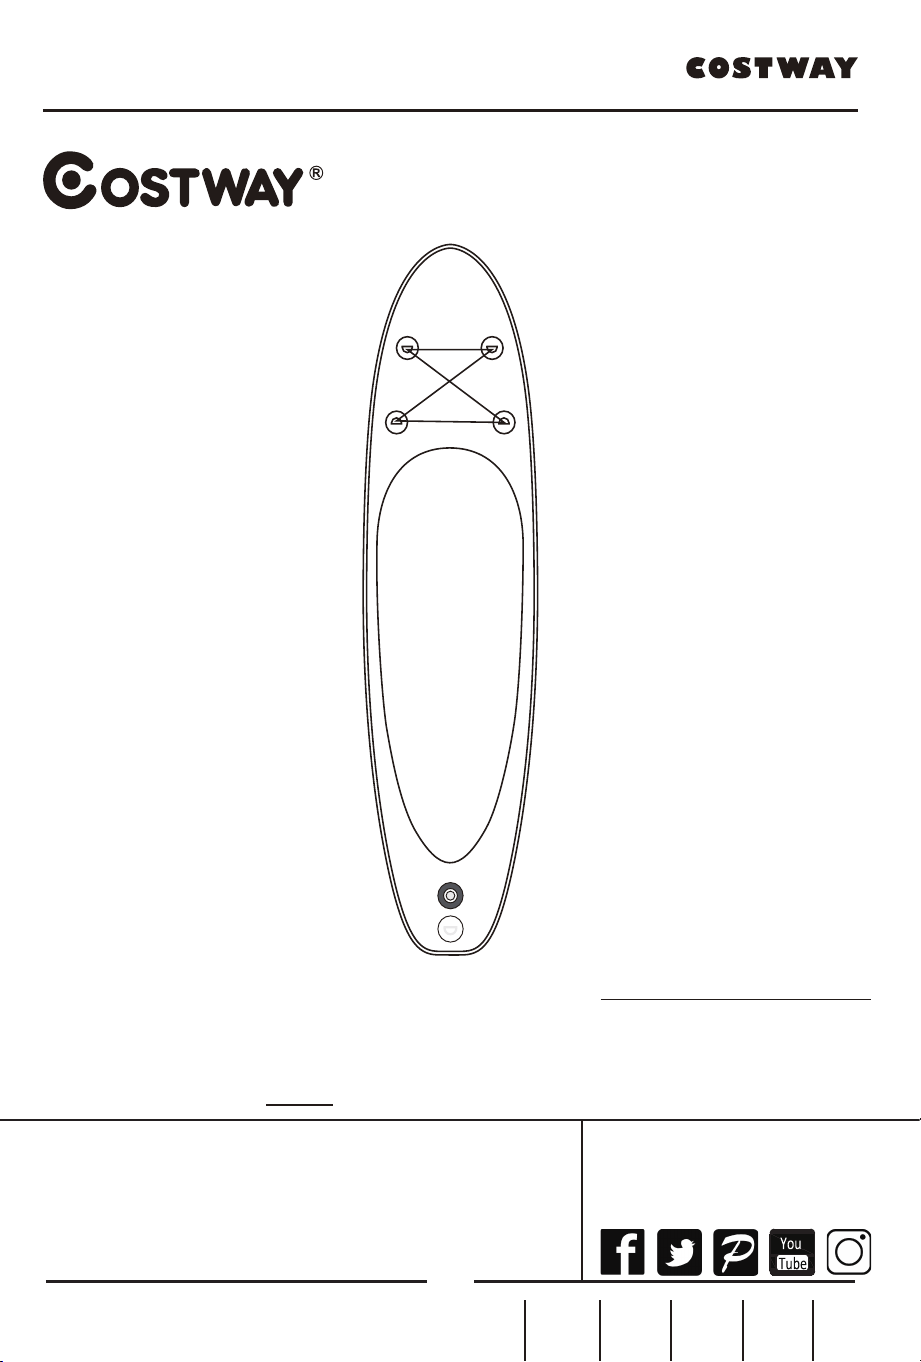
Drop stitch
(2700g/sqm)
Almohadilla de pie EVA
grande en el tablero
Válvula empotrada de alta
presión para inflar y desinflar
rápida y fácilmentefácilmente
Anillo en D de acero inoxidable
para fijar la correa de seguridad
a la pala (opcional)
Conjunto de tres aletas:
una aleta central y dos
aletas laterales pequeñas
Asa de transporte
Anillo en D frontal
para asegurar la carga
Las tablas inflables de remo son una excelente opción para viajes de
campamento, paseos en bote y jinetes con espacio limitado de transporte /
almacenamiento.
El tablero es increíblemente rígido debido al material de alta calidad y al diseño
profesional. Nuestra construcción Drop-Stitch de alta calidad hace que nuestro
SUP mantenga una estabilidad y rigidez inigualables en la categoría de
productos inflables.
Este manual ha sido compilado para ayudarlo a operar su Tablero de remo
inflable de pie (en adelante denominado ISUP) con seguridad y placer. Contiene
detalles del ISUP, los equipos suministrados e información sobre su
funcionamiento. Léalo detenidamente y familiarícese con el ISUP antes de
usarlo.
Cualquier ISUP, sin importar cuán fuerte sea, puede sufrir daños graves si no se
usa correctamente. Esto no es compatible con la navegación segura. Siempre
ajuste la velocidad y la dirección del ISUP a las condiciones del mar.
Todas las personas deben usar una ayuda de flotabilidad adecuada (chaleco
salvavidas / dispositivo de flotación personal) cuando naveguen en ISUP. Tenga
en cuenta que, en algunos países, es un requisito legal usar una ayuda de
flotabilidad que cumpla con sus regulaciones nacionales en todo momento.
Estructura ISUP Terminología
34
www.costway.es
LISTA DE EMPAQUE
Tabla de paddle de pie
Remo ajustable de aluminio de 3 ejes
Bomba manual con manómetro
Llave de válvula
Kit de reparación
Bolsa de transporte professional
Aleta media
Manual del usuario
PREPARACIÓN DE CONFIGURACIÓN
1. Despliegue la placa del embalaje.
Elija una superficie lisa y limpia para desplegar el tablero. Extienda la tabla de
SUP hasta que quede plana con la parte superior hacia arriba.
2. Operación de la válvula
Siga las instrucciones a continuación para el funcionamiento de la válvula y
corrija los procedimientos de inflado y desinflado.
La válvula de inflado de la placa se encuentra cerca de la punta de la placa.
Para cerrar la válvula para inflarla, asegúrese de que el pasador de la válvula
central esté en la posición "UP". Si está en la posición "DOWN", presione el
pasador de la válvula a la posición "UP".
Para abrir la válvula para desinflarla, presione hacia abajo el pasador de la
válvula (no necesita girarlo), asegúrese de que el pasador central de la válvula
esté en la posición "DOWN"
Tenga cuidado con la arena o los desechos alrededor del área de la válvula
cuando se desinfle, ya que las partículas pequeñas pueden salir al aire con la
liberación de la presión de aire.
Siempre bloquee la tapa de la válvula sobre el vástago de la válvula cuando
esté en uso. Esto evitará la liberación accidental de aire y la entrada de
partículas en las cámaras de aire.
35
www.costway.es
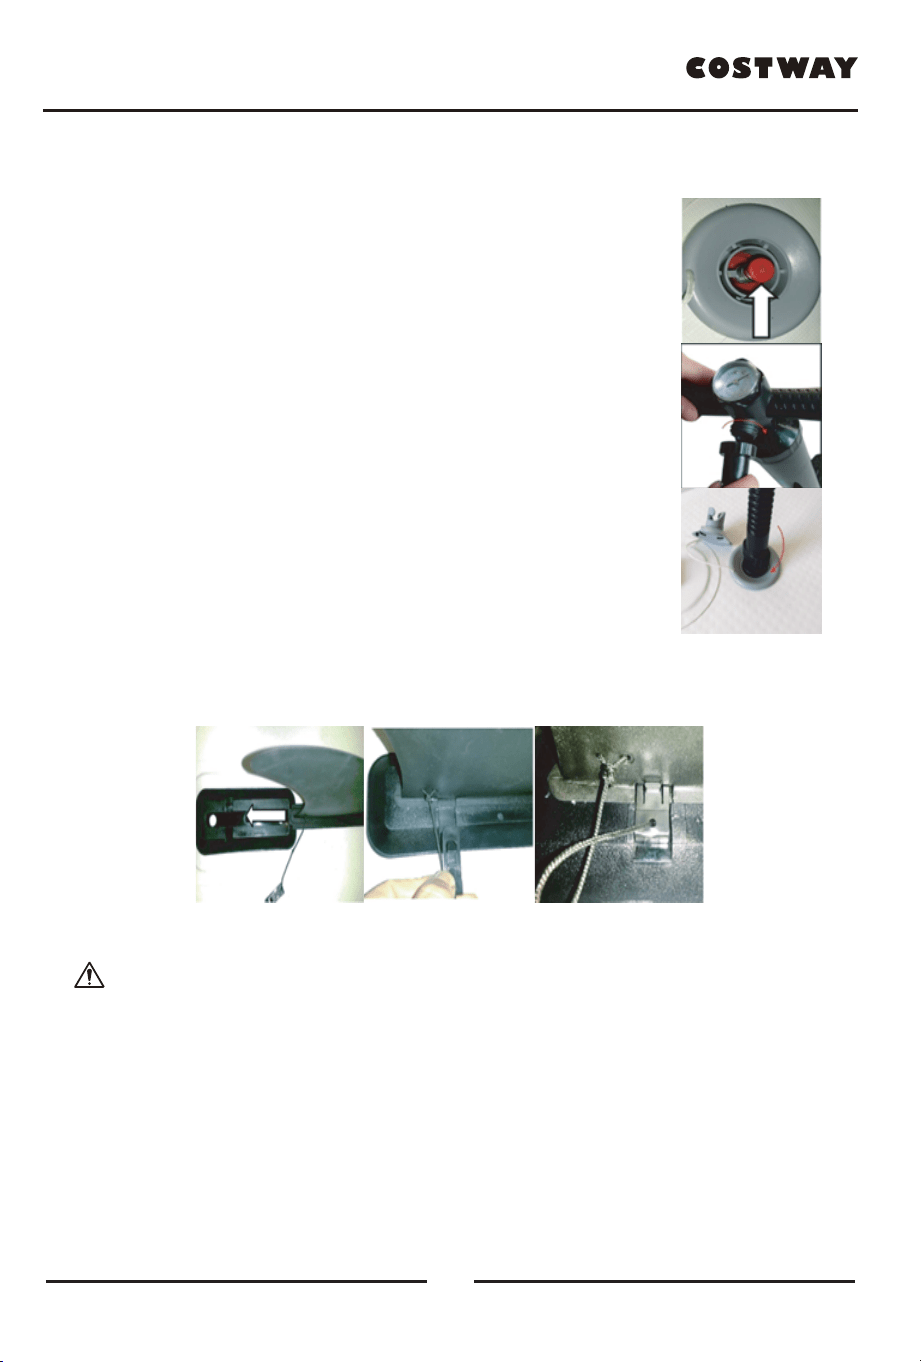
3. Pasos de inflación de la tabla ISUP
a. Desenrosque la tapa de la válvula, presione hacia abajo el
pasador de la válvula para abrir la válvula. Deje que el aire fluya
naturalmente hacia el producto, para ahorrar tiempo de inflado,
luego presione el pasador de la válvula nuevamente para cerrar
la válvula (en la posición "UP").
b. Asegúrese de que la manguera de la bomba esté
conectada a la salida "inflada".
c. Conecte la boquilla de la bomba en el receptáculo
de la válvula, con un movimiento de medio giro (en
sentido horario).
d. Comience a bombear aire al tablero deslizando el
pistón de la bomba hacia arriba y hacia abajo.
Infle hasta alcanzar la presión requerida.Mínimo 12 psi para
una operación ISUP adecuada y máximo de 15 psi para este
producto.
e. Después del inflado, apriete la tapa de la válvula. Solo la
tapa de la válvula puede garantizar la estanqueidad final.
4. Instalación de aleta
Las dos aletas laterales están fijadas en el producto. Una vez que se infla el
tablero, deslice la aleta central hacia la base e inserte el pasador fijo.
5. Consejos de inflado y precauciones
NO use un compresor de aire. Los daños a su placa causados por el inflado
excesivo de un compresor de aire no están cubiertos por nuestra garantía.
Después de 2 o 3 días puede haber una pequeña disminución de la presión
debido al cambio de temperatura. Si es así, agregue un poco de aire por la
bomba.
Antes de emprender una paleta larga, infle el tablero durante 24 horas
completas para asegurarse de que el tablero sea hermético. Si observa una
disminución constante en la presión del aire, siga las instrucciones para la
detección de fugas en la sección de reparación de la placa de este manual.
36
www.costway.es
NO infle demasiado el tablero. Una presión máxima de 15 psi es adecuada.
El indicador más fácil de una buena presión de trabajo es inflar las cámaras a
una presión firme cuando las presionas.
NO bombee a alta presión y deje que la tabla repose al sol caliente. Si la
tabla va a estar en un ambiente cálido, desinfle ligeramente y permita que el
calor del sol aumente la presión interna. Al remar, la temperatura más fría del
agua puede causar una ligera pérdida en la presión de la cámara. Es una buena
idea llevar una bomba con usted para que pueda agregar algo de aire a las
cámaras si es necesario.
Paleta telescópica ISU ALU
Su tabla de remo viene en tres piezas. Para montar la paleta, mantenga
presionado el botón mientras desliza las piezas juntas hasta que encajen en su
lugar. La última sección (parte superior) de la pala es ajustable. Para encontrar
la altura ideal para su remo, comience construyendo el remo de manera que
sea 6 pulgadas más alto que su propia altura. Desde este punto, ajuste la
sección superior hacia arriba o hacia abajo hasta que la longitud sea cómoda
para usted. una pala más larga es más adecuada para un movimiento de remo
suave y fácil. Una pala más corta es buena para el rendimiento o la
competición.
Después de cerrar el botón, si encuentra que la sección ajustable está un poco
floja, apriete el tornillo correctamente con un destornillador.
Características:
Longitud ajustable de 160-210cm
Ligero y FLOTANTE, 960 g
Eje de 29 y 27 mm en aleación 6005-T6
Compacto: extraíble en 3 partes de 79 cm

37
www.costway.es
DETECCIÓN DE FUGAS Y REPARACIÓN
Detección de fugas de aire
Si el tablero está perdiendo presión de aire, no causado por temperaturas más
frías, verifique que el tablero no tenga fugas, comenzando por las válvulas. Una
válvula con fugas es rara, pero si encuentra una fuga, se recomienda que los
clientes usen la llave inglesa dentro del producto para apretarlo por sí mismos.
Para localizar una fuga, recomendamos mezclar agua y jabón en una botella
rociadora, rocíe alrededor de la válvula. Si ve que se forman burbujas, verifique
el asiento y la base de la válvula y asegúrese de que el inserto de la válvula
esté bien atornillado. Si continúa teniendo problemas, por favor, contáctenos.
Si el tablero pierde aire y las válvulas están bien, probablemente tenga una
pequeña perforación. Los pequeños pinchazos pueden repararse de forma fácil
y permanente. Rocíe alrededor del tablero hasta que se vean burbujas de aire y
marque la posición de la fuga. Si no encuentra burbujas de aire, infle la placa a
la presión de aire máxima e intente escuchar la fuga; si puede reducir el área,
regrese con una botella de spray para identificar la fuente de la fuga.
Juego de Reparación
Las perforaciones de menos de 1/8 "de tamaño pueden repararse simplemente
sin un parche. Desinfle su tabla, luego limpie y seque el área a reparar. Aplique
una pequeña gota de pegamento para cubrir la punción y déjelo secar 12 horas.
Si su placa necesita reparación, use los parches en el kit de reparación y siga
estos pasos:
Desinfla el tablero por completo, colóquelo plano y espere a que se seque.
Corte un parche que sea 2 pulgadas más grande que la rasgadura / rasgadura
completamente.
Use alcohol para limpiar el área de reparación.
Aplique tres capas de adhesivo al parche y al tablero. Espere 5 minutos entre
cada capa.
Coloque el parche sobre la rasgadura / rasgadura. El adhesivo reaccionará
rápidamente, así que asegúrese de que el posicionamiento sea preciso / exacto.
Use el rodillo para asegurarse de que el parche quede plano y uniforme.
Espere 24 horas antes de volver a inflar el tablero.

38
www.costway.es
INSTRUCCIONES PARA EL CUIDADO Y ALMACENAMIENTO
Teniendo una tabla de SUP inflable hace que la portabilidad y el
almacenamiento sean muy fáciles. Aquí hay algunas sugerencias simples si
planea viajar con su tabla de SUP.
Antes de almacenar, retire la placa con una manguera y deje que se seque por
completo para evitar la acumulación de moho.
No utilice productos químicos fuertes para la limpieza. La mayor parte de la
suciedad se puede eliminar con un jabón suave y agua fresca.
Puede almacenar el tablero inflado o desinflado. Si desinfla el tablero, le
recomendamos que lo guarde en la bolsa protectora que viene con el tablero.
Si guarda la tabla al aire libre, levántela del suelo y cúbrala con una lona para
evitar la exposición al sol.
No se recomienda colgar el tablero.
No almacene en condiciones extremas (es decir, por encima de 66 ℃ / 150 ℉ o
por debajo de -23 ℃ / -10 ℉).
Almacene en un lugar limpio y seco.
No enrolle el tablero demasiado apretado cuando lo guarde desinflado.
Si las empresas se doblan, colóquelas en agua hirviendo y use calor (por
ejemplo, secador de pelo) para doblarlas nuevamente en su posición.
PARA SU SEGURIDAD
(1) Sin protección contra el
ahogamiento.
(2) Presión de trabajo de diseño.
(3) Nadadores solamente.
(4) Siempre supervise a los niños
en el agua.
Advertencia
Instrucción obligatoria
Nadadores solamente
Sin protección
contra el ahogamiento.

39
www.costway.es
ADVERTENCIA
Revise su tablero y equipo antes de entrar al agua.
Trate de evitar ir solo al agua.
Siempre tenga un modo de comunicación mientras está en el agua.
Verifique las condiciones climáticas y la marea antes de salir a montar.
Evite remar cuando el viento sopla lejos de la costa.
Tenga en cuenta la marea y el flujo de agua y cómo afectará su tiempo de viaje.
Use trajes de neopreno o trajes secos.
Siempre use un chaleco salvavidas o algún tipo de dispositivo de flotación.
Siempre use la correa de su tabla.
Tome un curso de primeros auxilios y siempre viaje con equipo de primeros
auxilios.
Evite viajar con la tabla si no puede nadar.
No salga al agua si ha estado bebiendo o está bajo la influencia de drogas.
(1) No utilice en aguas blancas.
(2) No use en olas rompientes.
(3) No utilizce en corriente marina.
(4) No utilice en vientos marinos.
(5) No apto para niños de 14 años
de edad y menores.
(1) Lea las instrucciones primero.
(2) Infle completamente todas las
cámaras de aire.
(3) Número de usuarios, un adulto.
(4) Distancia segura a la orilla 150 m
Instrucción obligatoria
¡Bienvenido a visitar nuestro sio web y comprar nuestros
productos de alta calidad!
Nos gustaría expresar nuestro más sincero
agradecimiento a todos nuestros clientes por tomarse
el empo de ensamblar este producto y brindarnos
valiosos comentarios.
¡Con su calificación inspiradora, COSTWAY será más consistente para ofrecerle EXPERIENCIA
DE COMPRA CONVENIENTE, BUENOS PRODUCTOS y SERVICIO EFICIENTE!
EE.UU.: Fontana, California
Reino Unido: Ipswich
www.costway.es
Puntos de recompensa
Servicio al cliente exclusivo
Recomendaciones personalizadas
Carrito de compras permanente
Historial de pedidos
Gracias
www.costway.es
40
QUESTO MANUALE DI ISTRUZIONI CONTIENE IMPORTANTI INFORMAZIONI SULLA SICUREZZA. SI PREGA DI LEGGERE E CONSERVARE PER RIFERIMENTO FUTURO.
Visitateci: www.costway.it
Seguire Costway
Vi preghiamo di darci la possibilità di fare bene e fare di meglio!
Per prima cosa contatta il nostro servizio di assistenza clienti.
Sostituzioni per parti mancanti o danneggiate saranno spedite al più
presto!
MANUALE UTENTE
www.costway.it
41
EN DE FR ES IT PL
Kit di Tavola da SUP
42
www.costway.it
Contaaci!
NON restituire questo articolo.
Per prima cosa contatta il nostro servizio di assistenza clienti.
E-mail
IT: cs.it@costway.com
Prima di iniziare
Si prega di leggere attentamente tutte le istruzioni.
Conservare le istruzioni per riferimento futuro.
Separare e contare tutte le parti e l'hardware.
Leggere attentamente ogni passaggio e segui l'ordine corretto.
Raccomandiamo che, ove possibile, tutti gli articoli siano assemblati vicino
all'area in cui saranno collocati, per evitare di spostare il prodotto
inutilmente una volta assemblato.
Posizionare sempre il prodotto su una superficie piana e stabile.
Conservare tutte le parti di piccole dimensioni e i materiali di imballaggio
per questo prodotto lontano da neonati e bambini poiché potrebbero
causare un serio rischio di soffocamento.

43
www.costway.it
Punto di goccia
(2700 g sqm)
L'ampio pad in EVA sulla
tavola offre presa e comfort
Valvola ad incasso ad alta
pressione per gonfiaggio e
sgonfiaggio rapidi e facili
Anello a D in acciaio inossidabile
per il fissaggio del laccio di
sicurezza al paddler (opzionale)
Set di tre pinne: una pinna
centrale e due piccole
pinne laterali
Maniglia per il
trasporto pesante
Anello a D frontale
per fissare il carico
Le tavola da SUP sono un'ottima opzione per gite in campeggio, in barca e per
ciclisti con spazio di trasporto / stoccaggio limitato.
La tavola è incredibilmente rigida grazie al materiale di alta qualità e al design
professionale. La nostra costruzione di goccia dell'ago di alta qualità rende il
nostro SUP in grado di mantenere stabilità e rigidità senza rivali nella categoria
dei prodotti gonfiabili.
Questo manuale è stato redatto per aiutarti a utilizzare il tuo Stand Up Paddle
Board gonfiabile (di seguito denominato ISUP) con sicurezza e piacere.
Contiene i dettagli dell'ISUP, le attrezzature fornite e le informazioni sul loro
funzionamento. Si prega di leggere attentamente e familiarizzare con l'ISUP
prima di utilizzarlo.
Qualsiasi ISUP, indipendentemente dalla sua potenza, può essere gravemente
danneggiato se non utilizzato correttamente. Questo non è compatibile con la
nautica sicura. Regola sempre la velocità e la direzione dell'ISUP alle condizioni
del mare.
Tutte le persone devono indossare un idoneo dispositivo di galleggiamento
(giubbotto di salvataggio / dispositivo di galleggiamento personale) durante la
navigazione ISUP. Si noti che, in alcuni paesi, è obbligatorio indossare un
giubbotto salvagente che sia sempre conforme alle normative nazionali.
Terminologia della struttura ISUP

44
www.costway.it
LISTA DI IMBALLAGGIO
Stand up paddle board
Remo regolabile in alluminio a 3 alberi
Pompa manuale con manometro
Chiave per valvole
Kit di riparazione
Borsa da trasporto professionale
Pinna media
Manuale del proprietario
PREPARAZIONE ALL'INSTALLAZIONE
1. Spiegare la tavola dalla confezione.
scegli una superficie liscia e pulita per aprire la tavola. Stendi la tavola SUP fino
a quando non è piatta con il lato superiore rivolto verso l'alto.
2. Funzionamento della valvola
Seguire le istruzioni seguenti per il funzionamento della valvola e le corrette
procedure di gonfiaggio e sgonfiaggio.
La valvola di gonfiaggio della tavola si trova vicino al naso della tavola. Per
chiudere la valvola per l'inflazione, assicurarsi che il perno della valvola centrale
sia in posizione "SU". Se è in posizione "GIÙ", premere il perno della valvola in
posizione "SU".
Per aprire la valvola per lo sgonfiaggio, premere sul perno della valvola (non è
necessario ruotarlo), assicurarsi che il perno della valvola centrale sia in
posizione "GIÙ",
Prestare attenzione a sabbia o detriti attorno all'area della valvola quando si
sgonfia poiché piccole particelle potrebbero essere trasportate dall'aria con il
rilascio della pressione dell'aria.
Bloccare sempre il coperchio della valvola sullo stelo della valvola quando è in
uso. Ciò impedirà il rilascio accidentale dell'aria e l'ingresso di eventuali
particelle nelle camere d'aria.
45
www.costway.it
3. Passi di inflazione ISUP tavola
a. Svitare il tappo della valvola, premere verso il basso il perno
della valvola per aprire la valvola. Lasciare che l'aria fluisca
naturalmente nel prodotto, al fine di risparmiare il tempo di
gonfiaggio, quindi premere nuovamente il perno della valvola
per chiudere la valvola (in posizione "SU").
b. Accertarsi che il tubo flessibile della pompa sia collegato
all'uscita "gonfiare".
c. Collegare l'ugello della pompa nella presa della valvola, con
un mezzo movimento di rotazione (in senso orario)
d. Iniziare a pompare aria nella tavola facendo scorrere il
pistone della pompa su e giù. Gonfiare fino a raggiungere la
pressione richiesta. Minimo 12 psi per il corretto funzionamento
ISUP e massimo 15 psi per questo prodotto.
e. Dopo l'inflazione, serrare il tappo della valvola. Solo il tappo
della valvola può garantire la tenuta d'aria finale.
4. Installazione dell'aletta
Le due alette laterali sono fissate sul prodotto. Una volta che la tavola è
gonfiata, fai scorrere l'aletta centrale alla base e inserisci il perno fisso.
5. Suggerimenti e precauzioni per l'inflazione
NON utilizzare un compressore d'aria. I danni alla tavola causati da un
gonfiaggio eccessivo di un compressore d'aria non sono coperti dalla nostra
garanzia.
Dopo 2 o 3 giorni potrebbe esserci una piccola diminuzione della pressione
dovuta al cambiamento di temperatura. in tal caso, aggiungere un po 'd'aria
dalla pompa.
Prima di intraprendere una lunga pagaia, gonfiare la tavola per 24 ore complete
per assicurarsi che la tavola sia ermetico. Se si riscontra una riduzione costante
della pressione dell'aria, seguire le istruzioni per il rilevamento delle perdite nella
sezione di riparazione della tavola di questo manuale.
46
www.costway.it
NON gonfiare eccessivamente la tavola. Una pressione massima di 15 psi è
adeguata. L'indicatore più semplice di una buona pressione di lavoro è di avere
le camere gonfiate a una pressione decisa quando si preme su di esse.
NON pompare ad alta pressione e lasciare che la tavola sia esposta al sole
caldo. Se la tavola si troverà in un ambiente caldo, sgonfiare leggermente la
tavola e consentire al calore del sole di aumentare la pressione interna. Quando
si pagaia, la temperatura più fredda dell'acqua può causare una leggera perdita
della pressione della camera. È una buona idea portare con sé una pompa in
modo da poter aggiungere un po 'd'aria alle camere, se necessario.
Pagaia telescopica ISUP in alluminio
La tua tavola da tavola è disponibile in tre pezzi. Per costruire la paletta, tieni
premuto il pulsante mentre fai scorrere i pezzi insieme fino a farli scattare in
posizione. L'ultima sezione (in alto) della paletta è regolabile. Per trovare
l'altezza ideale per la tua pagaia, inizia costruendo la pagaia in modo che sia 6
pollici più alta della tua altezza. Da questo punto, regola la sezione superiore
verso l'alto o verso il basso fino a quando la lunghezza è comoda per te. una
pala più lunga è più adatta per un movimento più facile e più facile. Una pagaia
più corta è buona per le prestazioni o la guida.
Dopo aver chiuso il pulsante, se si riscontra che la sezione regolabile è
leggermente allentata, serrare correttamente la vite con un cacciavite.
Caratteristiche:
Lunghezza regolabile da 160-210cm
Leggero e GALLEGGIANTE, 960g
Albero di 29 e 27 mm in lega 6005-T6
Compatto: rimovibile in 3 parti di 79 cm

47
www.costway.it
RILEVAMENTO E RIPARAZIONE DELLE PERDITE
Rilevazione di perdite d'aria
Se la tavola sta perdendo la pressione dell'aria, non causata da temperature più
fredde, controllare la tavola per eventuali perdite, a partire dalle valvole. Una
valvola che perde è rara, ma se trovi una perdita, si consiglia di utilizzare la
chiave inglese inclusa per stringerla. Per individuare una perdita, si consiglia di
miscelare acqua e sapone in un flacone spray, spruzzare intorno alla valvola. Se
vedi formazione di bolle, controlla la sede della valvola e la base e assicurati che
l'inserto della valvola sia avvitato a fondo. Se continui ad avere problemi, per
favore contattarci.
Se la tavola perde aria e le valvole sono buone, probabilmente ha una piccola
foratura. Le piccole forature possono essere riparate facilmente e
permanentemente. Spruzzare intorno alla tavola fino a quando non diventano
visibili bolle d'aria e contrassegnare la posizione della perdita. Se non trovi bolle
d'aria, gonfia la tavola alla massima pressione dell'aria e prova ad ascoltare per
trovare la perdita, se puoi restringere l'area verso il basso, ritorna con un flacone
spray per identificare la fonte della perdita.
Kit di riparazione
Le punture di dimensioni inferiori a 1/8 "possono essere riparate semplicemente
senza cerotto. Sgonfiare la tavola, quindi pulire e asciugare l'area da riparare.
Applicare una piccola goccia di colla per coprire la puntura e lasciarla asciugare
12 ore.
Se la tavola deve essere riparata, utilizzare le patch nel kit di riparazione e
attenersi alla seguente procedura:
Sgonfiare completamente la tavola, appiattirla e attendere che si asciughi.
Tagliare un cerotto che sia 2 pollici più grande dello strappo / strappo tutto
intorno.
Usare alcool per pulire l'area di riparazione.
Applicare tre mani di adesivo sulla toppa e sulla tavola. Attendere 5 minuti tra
una mano e l'altra.
Posizionare il cerotto sopra lo strappo / strappo. L'adesivo reagirà rapidamente,
quindi assicurati che il posizionamento sia preciso / accurato. Usa il rullo per
assicurarti che il cerotto sia piatto e uniforme.
Attendere 24 ore prima di gonfiare nuovamente la tavola.
48
www.costway.it
ISTRUZIONI PER LA CURA E LA CONSERVAZIONE
Avere una tavola SUP gonfiabile rende la portabilità e lo stoccaggio molto facili.
Ecco alcuni semplici suggerimenti se hai intenzione di viaggiare con la tua
tavola SUP.
Prima di riporlo, asciugare il flessibile dalla tavola e lasciarlo asciugare
completamente per evitare l'accumulo di muffa.
Non utilizzare prodotti chimici aggressivi per la pulizia. La maggior parte dello
sporco può essere rimosso con un sapone delicato e acqua fresca.
È possibile conservare la tavola gonfiata o sgonfiata. Se si sgonfia la tavola, si
consiglia di riporla nella confezione protettiva fornita con la tavola.
Se riponete la tavola all'aperto, sollevatela da terra e copritela con un telo per
evitare l'esposizione al sole.
Non è consigliabile appendere la tavola.
Non conservare in condizioni estreme (cioè al di sopra di 66 ℃ / 150 ℉ o al di
sotto di -23 ℃ / -10 ℉).
Conservare in luogo pulito e asciutto.
Non arrotolare troppo la tavola quando la si ripone mentre è sgonfia.
Se le alette si piegano, metterle in acqua bollente e usare calore (ad es.
Asciugacapelli) per riportarle in posizione.
PER LA TUA SICUREZZA
(1) Nessuna protezione contro
l'annegamento
(2) Progettare la pressione di esercizio
(3) Solo nuotatori
(4) Supervisionare sempre i bambini
in acqua
Attenzione / pericolo /avvertimento
Istruzione obbligatoria
Solo nuotatori
Nessuna protezione
contro l'annegamento

49
www.costway.it
AVVERTIMENTO
Controlla la tua tavola e attrezzatura prima di andare in acqua.
Cerca di evitare di andare in acqua da solo.
Avere sempre una modalità di comunicazione mentre si è in acqua.
Controlla le condizioni meteorologiche e la marea prima di uscire per pedalare.
Evitare di remare quando i venti soffiano lontano dalla riva.
Essere consapevoli della marea e del flusso d'acqua e di come influenzerà il
tempo di viaggio.
Indossare mute o mute stagne.
Indossare sempre un giubbotto di salvataggio o una sorta di dispositivo di
galleggiamento.
Indossa sempre il guinzaglio della tavola.
Segui un corso di primo soccorso e viaggia sempre con le attrezzature di primo
soccorso.
Evita di viaggiare con la tavola se non sai nuotare.
Non uscire in acqua se hai bevuto o sei sotto l'effetto di droghe.
(1) Non utilizzare in acque bianche
(2) Non utilizzare in onde che si
infrangono
(3) Non utilizzare in corrente offshore
(4) Non utilizzare in mare aperto
(5) Non per bambini di età pari o
inferiore a 14 anni
(1) Leggere prima le istruzioni
(2) Gonfiare completamente tutte le
camere d'aria
(3) Numero di utenti, un adulto
(4) Distanza di sicurezza dalla riva
150 m
Istruzione obbligatoria
Benvenu a visitare il nostro sito Web e acquistare i nostri
prodo di qualità!
Ringraziamo sinceramente tu i nostri clien per
aver dedicato del tempo per assemblare questo
prodoo e fornirci preziosi feedback.
Con il tuo commento stimolante, COSTWAY continuerà a offrirti FACILITÀ DI ACQUISTO FACILE,
PRODOTTI BUONI e SERVIZIO EFFICIENTE!
US ufficio: Fontana, California
UK ufficio: Ipswich
www.costway.it
Pun del premio
Servizio dei clien esclusivo
Raccomandazioni personalizzate
Carrello permanente
Storia degli ordini
Grazie
www.costway.it
50
NINIEJSZA INSTRUKCJA ZAWIERA
ISTOTNE
INFORMACJE DOTYCZĄCE BEZPIECZEŃSTWA. PROSIMY O ZAPOZNANIE SIĘ Z NIĄ I ZACHOWANIE JEJ DO WGLĄDU W PRZYSZŁOŚCI.
Odwiedź nas: www.costway.pl
Śledź Costway
W razie kłopotów skontaktuj się z nami!
Jeśli potrzebujesz pomocy skontaktuj się z naszym przyjaznym działem
obsługi klienta.
Ewentualne braki elementów zostaną uzupełnione najszybciej jak to możliwe!
INSTRUKCJA OBSŁUGI
51
EN DE FR ES IT PL
www.costway.pl
Deska Stand-Up
52
Skontaktuj się z nami!
Nie zwracaj tego produktu.
Jeśli potrzebujesz pomocy, skontaktuj się z naszym przyjaznym działem obsługi klienta.
E-mail
PL: sklep@costway.pl
Zanim Zaczniesz
Zapoznaj się z instrukcją.
Zachowaj instrukcję do wglądu.
Upewnij się, że zestaw jest kompletny.
Zapoznaj się ze sposobem montażu i postępuj zgodnie z instrukcją.
Sprawdź czy dysponujesz wystarczającą przestrzenią roboczą.
Upewnij się, że produkt znajdzie się na płaskiej i stabilnej powierzchni.
Upewnij się, że materiały wykorzystane podczas pakowania produktu oraz
jego elementy znajdują się poza zasięgiem dzieci.
www.costway.pl

53
www.costway.pl
Ścieg (2700g m2)
Duża podkładka EVA na desce
zapewnia przyczepność i komfort
Zawór wysokiego ciśnienia do
szybkiego i łatwego pompowania
i opróżniania deski
Pierścień D ze stali nierdzewnej
do mocowania smyczy
bezpieczeństwa do wiosła (opcjonalnie)
Zestaw tri-fin: jedna płetwa
środkowa i dwie małe
płetwy boczne
Mocny uchwyt do przenoszenia
Przedni D-ring do
zabezpieczenia ładunku
Nadmuchiwane deski wiosłowe są świetną opcją na kemping, pływanie łódką i
wycieczki z ograniczoną przestrzenią do transportu / przechowywania.
Deska jest niezwykle sztywna ze względu na wysokiej jakości materiał i
profesjonalny design. Nasza wysokiej jakości konstrukcja zszywająca sprawia,
że nasz SUP zachowuje niezrównaną stabilność i sztywność w kategorii
nadmuchiwanych produktów.
Niniejsza instrukcja została opracowana, aby pomóc ci bezpiecznie obsługiwać
deskę SUP (zwaną dalej ISUP). Zawiera szczegółowe informacje o ISUP,
dostarczonym sprzęcie i jego działaniu. Przeczytaj ją uważnie i zapoznaj się z
ISUP przed użyciem.
Każdy ISUP, bez względu na to, jak silny może być, może zostać poważnie
uszkodzony, jeśli nie będzie właściwie używany. Zawsze dostosuj prędkość i
kierunek ISUP do warunków morskich.
Wszystkie osoby korzystające z deski powinny nosić odpowiednie
zabezpieczenia (kamizelka ratunkowa /bojka ratunkowa) podczas pływania na
ISUP. Należy pamiętać, że w niektórych krajach prawnym wymogiem jest
noszenie kamizelki lub innych zabezpieczeń, które są zgodne z ich przepisami
krajowymi.
Terminologia dotycząca struktury ISUP
54
www.costway.pl
ZAWARTOŚĆ OPAKOWANIA
Deska wiosłowa SUP
Aluminiowe regulowane wiosło
Pompka ręczna z manometrem
Klucz do zaworów
Zestaw naprawczy
Profesjonalna torba transportowa
Środkowy FIN
Instrukcja
PRZYGOTOWANIE DO MONTAŻU
1. Wyjmij deskę z opakowania.
wybierz gładką i czystą powierzchnię do rozłożenia deski. Rozwiń deskę SUP,
aż ułoży się płasko, górną stroną do góry.
2. Działanie zaworu
Postępuj zgodnie z poniższymi instrukcjami dotyczącymi działania zaworu i
poznaj procedury napełniania i opróżniania deski.
Zawór napełniający SUP znajduje się w pobliżu jej przedniej krawędzi. Aby
zamknąć zawór w celu napompowania, upewnij się, że środkowy sworzeń
zaworu znajduje się w pozycji „W GÓRĘ”. Jeśli znajduje się w pozycji „W DÓŁ”,
naciśnij sworzeń zaworu w pozycję „W GÓRĘ”.
Aby otworzyć zawór w celu wypuszczenia powietrza, naciśnij trzpień zaworu (nie
trzeba go przekręcać) i upewnij się, że środkowy trzpień zaworu znajduje się w
pozycji „W DÓŁ”,
Podczas spuszczania powietrza należy uważać na piasek lub zanieczyszczenia
wokół obszaru zaworu, ponieważ małe cząsteczki mogą unosić się w powietrzu
po uwolnieniu ciśnienia powietrza.
Podczas użytkowania zawsze zamykaj pokrywę zaworu na trzpieniu zaworu.
Zapobiegnie to przypadkowemu uwolnieniu powietrza i przedostaniu się
zanieczyszczeń do komór powietrznych.
55
www.costway.pl
3. Pompowanie ISUP
a. Odkręć korek zaworu i naciśnij kołek zaworu aby otworzyć
zawór. Pozwól by powietrze naturalnie przepłynęło do produktu
(zaoszczędzisz w ten sposób czas podczas pompowania).
Ponownie naciśnij trzpień zaworu, aby zamknąć zawór (w
pozycji „GÓRNEJ”).
b. Upewnij się, że przewód pompki jest podłączony do wylotu
„napompowania”.
c. Podłącz dyszę pompy do gniazda zaworu, wykonując
półobrotowy ruch (zgodnie z ruchem wskazówek zegara)
d. Rozpocznij pompowanie powietrza do deski, przesuwając
tłok pompy w górę i w dół. Pompuj, aż osiągniesz wymagane
ciśnienie. Minimum 12 psi dla prawidłowego działania ISUP i
maksimum 15 psi dla tego produktu.
e. Po napompowaniu dokręcić korek zaworu. Tylko nasadka
zaworu może zapewnić końcową szczelność.
4.Instalacja finu
Do produktu przymocowane są dwie płetwy boczne. Po napompowaniu deski
wsuń środkową płetwę do podstawy i włóż kołek.
5. Wskazówki i środki ostrożności dotyczące pompowania
NIE używaj sprężarki. Uszkodzenia deski spowodowane nadmiernym
napompowaniem nie są objęte naszą gwarancją.
Po 2 lub 3 dniach może nastąpić niewielki spadek ciśnienia z powodu zmiany
temperatury - dodaj trochę powietrza za pomocą pompki.
Przed użyciem napompuj deskę przez pełne 24 godziny, aby upewnić się, że
jest szczelna. Jeśli zauważasz stały spadek ciśnienia powietrza, postępuj
zgodnie z instrukcjami dotyczącymi wykrywania wycieków w części dotyczącej
naprawy deski w tej instrukcji.
56
www.costway.pl
NIE przepompowuj deski. Maksymalne ciśnienie to 15 psi. Najłatwiejszym
miernikiem dobrego ciśnienia roboczego jest napompowanie komór do pewnego
ciśnienia po ich naciśnięciu.
NIE pompuj do wysokiego ciśnienia i pozwól desce leżeć w gorącym słońcu.
Jeśli deska będzie w ciepłym otoczeniu, delikatnie spuść z niej odrobinę
powietrza i pozwól by ciepło słońca zwiększyło ciśnienie wewnętrzne. Podczas
wiosłowania niższa temperatura wody może powodować niewielki spadek
ciśnienia w komorze. Dobrym pomysłem jest zabranie ze sobą pompki, aby w
razie potrzeby można było dodać powietrze do komór.
Teleskopowe wiosło ALU ISUP
Twoja wiosło składa się z trzech części. Aby zbudować wiosło, przytrzymaj
przycisk, przesuwając elementy razem, aż klikną na swoje miejsce. Ostatnia
sekcja (góra) wiosła jest regulowana. Aby znaleźć idealną wysokość dla wiosła,
zacznij od zbudowania wiosła, aby było o 6 cali wyższe niż twój wzrost. Od tego
momentu dopasuj górną część w górę lub w dół, aż długość będzie dla ciebie
wygodna. Dłuższe wiosło lepiej nadaje się do płynnego ruchu wiosłowania.
Krótsze wiosło nadaje się do pływania wyczynowego.
Po zamknięciu przycisku, jeśli stwierdzisz, że część regulowana jest nieco
luźna, dokręć śrubę za pomocą śrubokręta.
Cechy:
Regulowana długość od 160-210cm
Lekkie i PŁYWAJĄCE, 960g
Wał 29 i 27 mm ze stopu 6005-T6
Kompaktowe: rozkładane w 3 częściach o długości 79 cm
57
www.costway.pl
WYKRYWANIE WYCIEKU POWIETRZA I NAPRAWA
Wykrywanie wycieków powietrza
Jeśli deska traci ciśnienie powietrza i nie jest to spowodowane przez niższe
temperatury, sprawdź szczelność deski, zaczynając od jej zaworów.
Wyciekający zawór jest rzadkością, ale jeśli znajdziesz wyciek, zalecamy
dokręcenie go za pomocą dołączonego klucza. Aby zlokalizować wyciek,
zalecamy zmieszanie mydła i wody w butelce z rozpylaczem i rozpylenie płynu
wokół zaworu. Jeśli zauważysz tworzenie się pęcherzyków, sprawdź gniazdo
zaworu oraz jego podstawę i upewnij się, że wkładka zaworu jest dobrze
przykręcona. Jeśli nadal będziesz mieć problemy, skontaktuj się z nami.
Jeśli deska traci powietrze, a zawory są dobre, prawdopodobnie ma małe
przebicie. Małe przebicia można łatwo i trwale naprawić. Rozpylaj wcześniej
wspomniany płyn na powierzchni deski, aż pojawią się pęcherzyki powietrza i
poznasz pozycję wycieku. Jeśli nie znajdziesz pęcherzyków powietrza,
napompuj deskę do maksymalnego ciśnienia powietrza i postaraj się znaleźć
wyciek. Gdy metoda ta pozwoli na zawężenie obszaru poszukiwań, wróć z
butelką z rozpylaczem, aby zidentyfikować źródło wycieku.
Zestaw naprawczy
Przebicia mniejsze niż 1/8 ”można naprawić łatkami z zestawu naprawczego.
Opróżnij deskę, a następnie wyczyść i osusz obszar do naprawy. Nałóż
niewielką kroplę kleju, aby przykryć przebicie, i pozostaw do wyschnięcia na 12
godzin.
Jeśli twoja deska wymaga naprawy, użyj łatek w zestawie naprawczym i
wykonaj następujące kroki:
Opróżnij całkowicie deskę, połóż ją płasko i poczekaj, aż wyschnie.
Odetnij łatkę, która jest o 2 cale większa niż uszkodzenie.
Użyj alkoholu do odtłuszczenia obszaru naprawy.
Nałóż trzy warstwy kleju na łatkę i powierzchnię deski. Poczekaj 5 minut
pomiędzy każdą warstwą.
Umieść łatkę na uszkodzeniu. Klej szybko zareaguje, więc upewnij się, że
pozycjonowanie jest dokładne. Użyj wałka, aby upewnić się, że łatka leży płasko
i równo.
Poczekaj 24 godziny przed ponownym napompowaniem deski.

58
www.costway.pl
INSTRUKCJA PIELĘGNACJI I PRZECHOWYWANIA DESKI
Nadmuchiwana deska SUP sprawia, że jej przenoszenie i przechowywanie staje
się wyjątkowo proste. Oto kilka sugestii, jeśli planujesz podróżować z deską
SUP.
Przed przechowywaniem pozostaw deskę do całkowitego wyschnięcia, aby
zapobiec gromadzeniu się pleśni.
Nie używaj silnych chemikaliów do czyszczenia. Większość zabrudzeń można
usunąć łagodnym mydłem i świeżą wodą.
Możesz przechowywać płytkę napompowaną lub opróżnioną. Jeśli opróżnisz
deskę, zalecamy przechowywanie jej w torbie ochronnej dostarczonej z deską.
Jeśli przechowujesz deskę na zewnątrz, unieś ją z ziemi i przykryj plandeką, aby
zapobiec ekspozycji na słońce.
Wieszanie deski nie jest zalecane.
Nie przechowywać w ekstremalnych warunkach (tj. Powyżej 66 ℃ / 150 ℉ lub
poniżej -23 ℃ / -10 ℉).
Przechowywać w czystym i suchym miejscu.
Nie należy zbyt mocno zwijać deski podczas przechowywania jej po
odpompowaniu.
Jeśli płetwy ulegną wygięciu, włóż je do wrzącej wody i użyj ciepła (np. suszarki
do włosów), aby wygiąć je z powrotem na miejsce.
ZASADY BEZPIECZEŃSTWA
(1) No protection against drowning -
Brak zabezpieczeń przed utonięciem
(2) Design working pressure -
Projektowe ciśnienie robocze
(3) Swimmers only - Z deski powinny
korzystać wyłącznie osoby potrafiące
pływać
(4) Always supervise children in water -
Zawsze pilnuj dzieci znajdujące się w
wodzie
Attenzione / pericolo /avvertimento
Istruzione obbligatoria
(3) Swimmers only - Z deski powinny
korzystać wyłącznie osoby potrafiące
pływać
No protection against
drowning - Brak zabezpieczeń
przed utonięciem
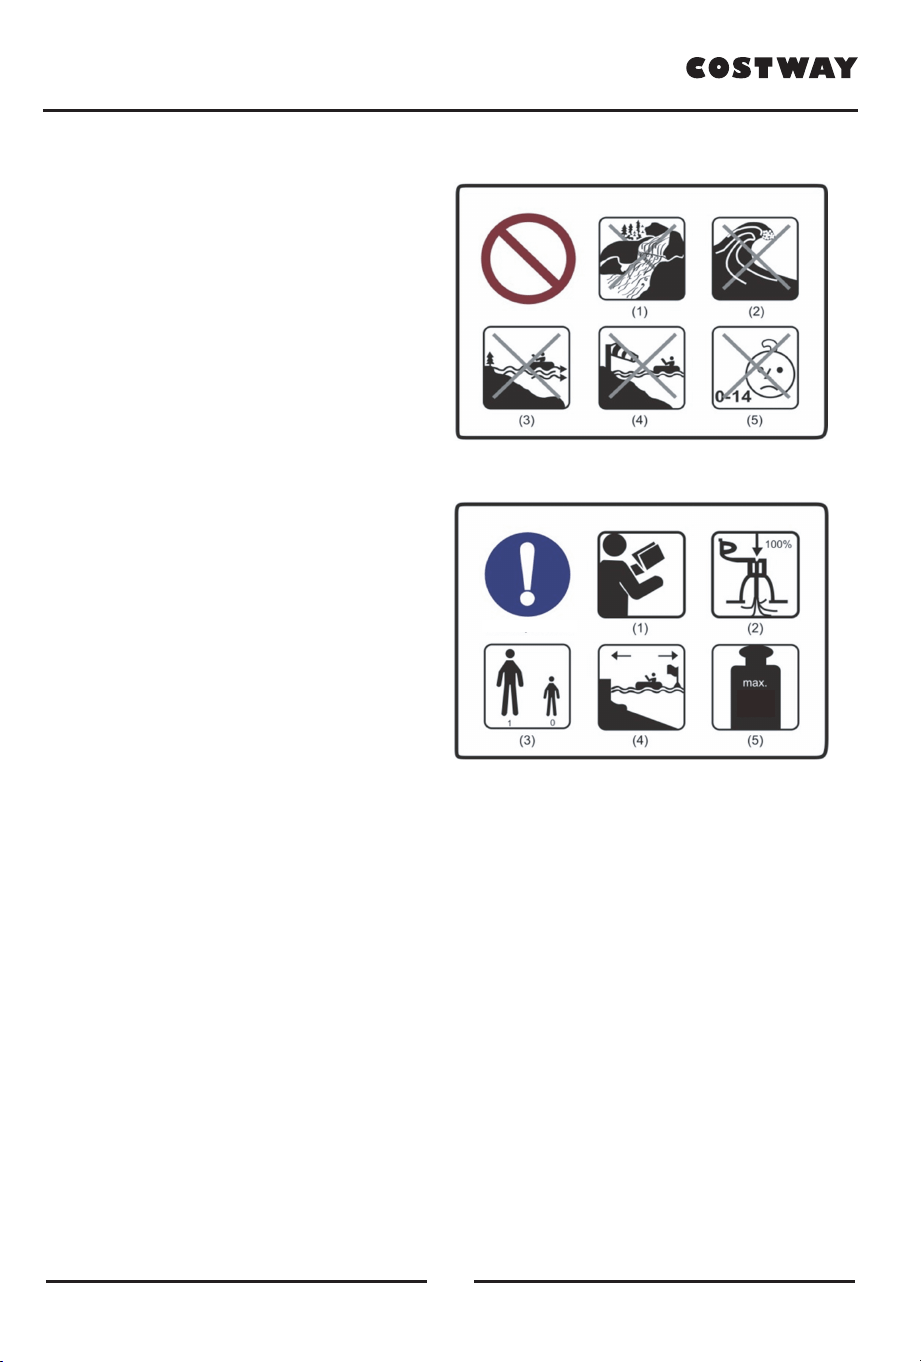
59
www.costway.pl
UWAGA
Przed wejściem do wody sprawdź deskę i sprzęt.
Staraj się unikać samotnego pływania po wodzie.
Zawsze zapewnij sobie metodę komunikacji z innymi.
Sprawdź warunki pogodowe i pływ przed wejściem do wody.
Unikaj wiosłowania, gdy wiatr wieje z brzegu.
Bądź świadomy przepływu i prądu wody oraz tego, jak wpłynie to na czas
podróży.
Noś kombinezon lub piankę.
Zawsze noś kamizelkę ratunkową lub urządzenie pływające.
Zawsze noś smycz przy desce.
Weź kurs pierwszej pomocy i zawsze podróżuj ze sprzętem pierwszej pomocy.
Unikaj pływania z deską, jeśli nie umiesz pływać.
Nie wchodź do wody, jeśli piłeś lub jesteś pod wpływem narkotyków.
(1) Do not use in white water - Nie
używać w rwącej wodzie
(2) Do not use in braking waves - Nie
używać przy dużych falach
(3) Do not use in offshore current - Nie
używać w prądzie morskim
(4) Do not use in offshore wind - Nie
stosować na morskim wietrze
(5) Not for children 14 years of age and
below - Produkt nieodpowiedni dla
dzieci poniżej 14 roku życia
(1) Read instructions first - Przed
użyciem zapoznaj się z instrukcją
(2) Fully inflate all air chambers -
Upewnij się, że deska jest odpowiednio
napompowana
(3) Numbers of users, one adult -
Liczba użytkowników, jeden dorosły
(4) Safe distance to shore 150 m -
Bezpieczna odległość do brzegu 150m
Istruzione obbligatoria
Zapraszamy do odwiedzenia naszej strony internetowej!
Dziękujemy za dokonanie zakupu w naszym
sklepie i zapraszamy do odwiedzenia go w
przyszłości!
Twoja ocena nas inspiruje! Dzięki niej COSTWAY będzie dążył do zaoferowania ci WYDAJNEJ
OBSŁUGI, DOBRYCH PRODUKTÓW I BEZPROBLEMOWYCH ZAKUPÓW!
PL office: Gdańsk
www.costway.pl
punkty lojalnościowe
doskonała obsługa klienta
personalizowane rekomendacje
karta stałego klienta
historia zamówień
Pięciogwiazdkowa Ocena
www.costway.pl
60