
TP10058
If you're having difficulty, our friendly
customer team is always here to help.
THIS INSTRUCTION BOOKLET CONTAINS IMPORTANT SAFETY INFORMATION. PLEASE READ AND KEEP FOR FUTURE REFERENCE.
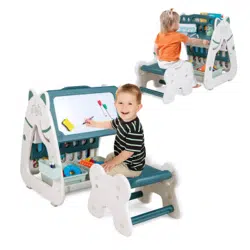
Kids Art Easel with Bookshelf
Kinder Staffelei mit Bücherregal
Chevalet Magnétique pour Enfants
Tablero de Dibujo y Estantería para Niños
Tavolo da Disegno e Libreria per Bambini
Sztaluga z półkami dla dzieci
AUS:cs.au@costway.com
FRA:cs.fr@costway.com
DEU:cs.de@costway.com
ITA:cs.it@costway.com ESP:cs.es@costway.com
POL:sklep@costway.com
GBR:cs.uk@costway.com
DEU office: FDS GmbH, Neuer Höltigbaum 36, 22143 Hamburg, Deutschland
ITA office: Milano
FRA office: Saint Vigor d'Ymonville
POL office: GdańskGBR office: IpswichAUS office: TruganinaUSA office: Fontana
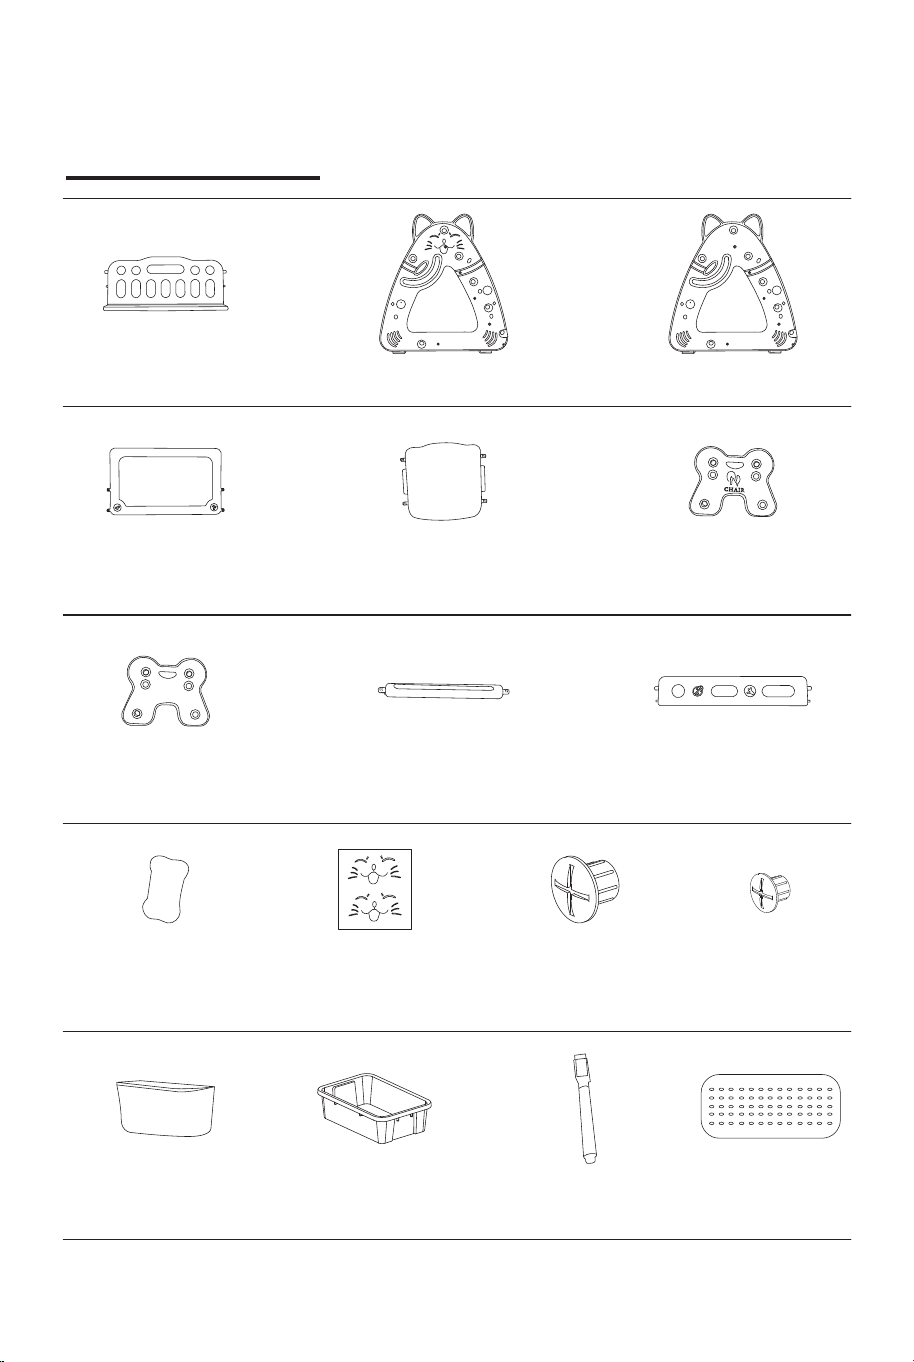
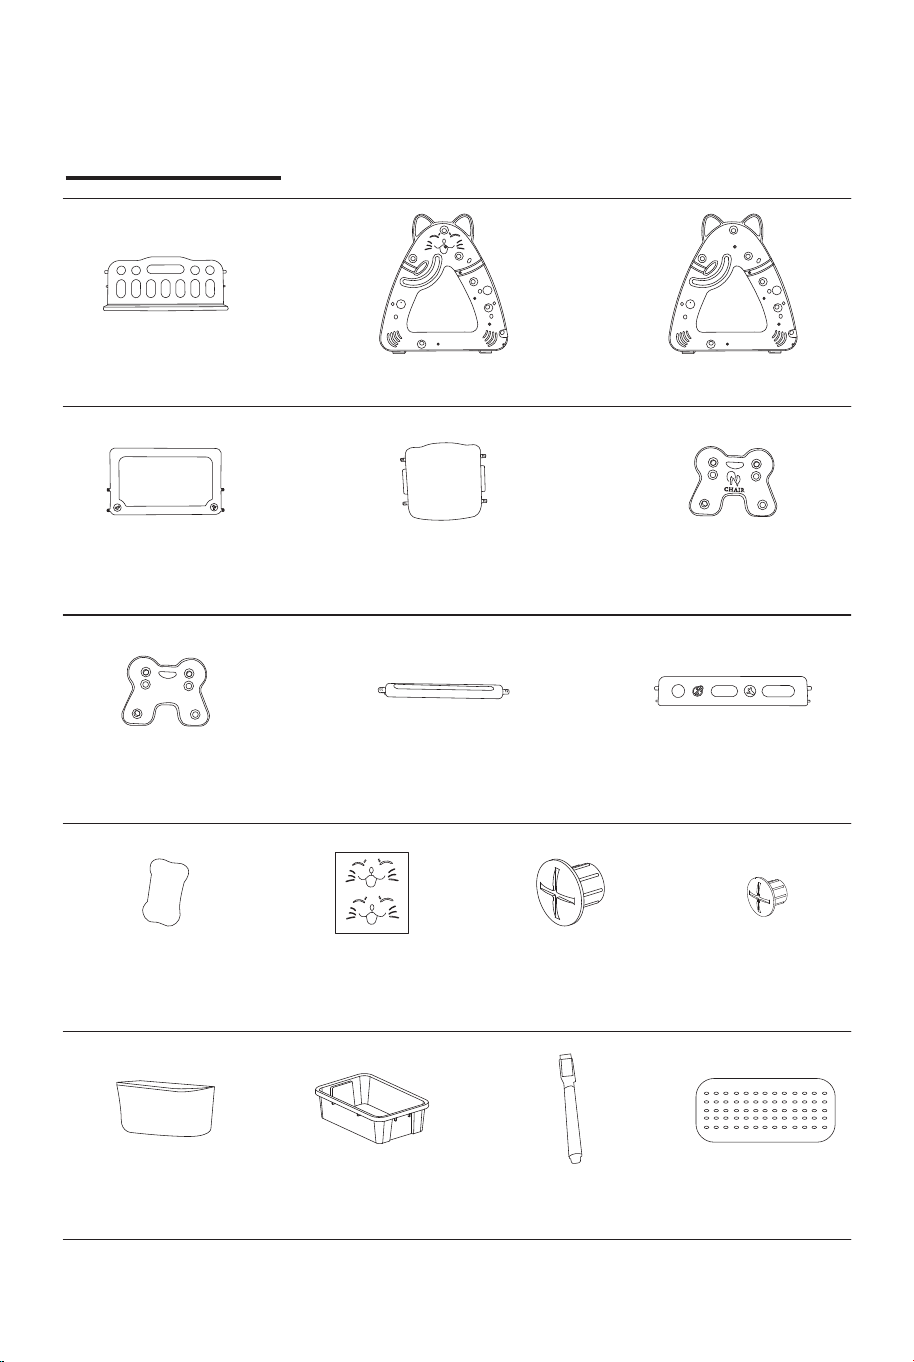
EN Precautions Parts List
1. This product is suitable for 1-5 years old children.
2. Please keep the packing cases, bags and manual of this product properly
and keep it away from children to avoid accidents.
3. This product needs to be assembled by adults. Do not let children approach
or touch the parts during installation.
4. Please place this product in a dry, clean and well-lit place for use.
5. Before use, please check whether all parts are installed completely and
firmly. During use, please check whether all parts are loose regularly or
irregularly. If they are loose, please tighten them in time.
6. All parts and packaging items of this product should not be near heat or fire
sources.
7. Please use this product under the supervision of parents.
8. Do not expose to strong light for a long time.
9. Avoid collision with sharp objects, and do not fall down.
10. The main material of the product is PE plastic.
11. This product can be wiped and maintained with a wet cloth.
12. Do not use accessories not provided by the manufacturer.
1. When installing, do not completely tighten the plastic nuts
on both sides, first install the small screws on the back
and then tighten them, otherwise the small screw holes on
the back may be displaced.
2. Do not use too much force when screwing the small
screws on the back, it may cause the plastic to wear out.
3. Please dispose of the plastic packaging bag properly to
prevent the suffocation hazard caused by the baby putting
it on the head.
Notice
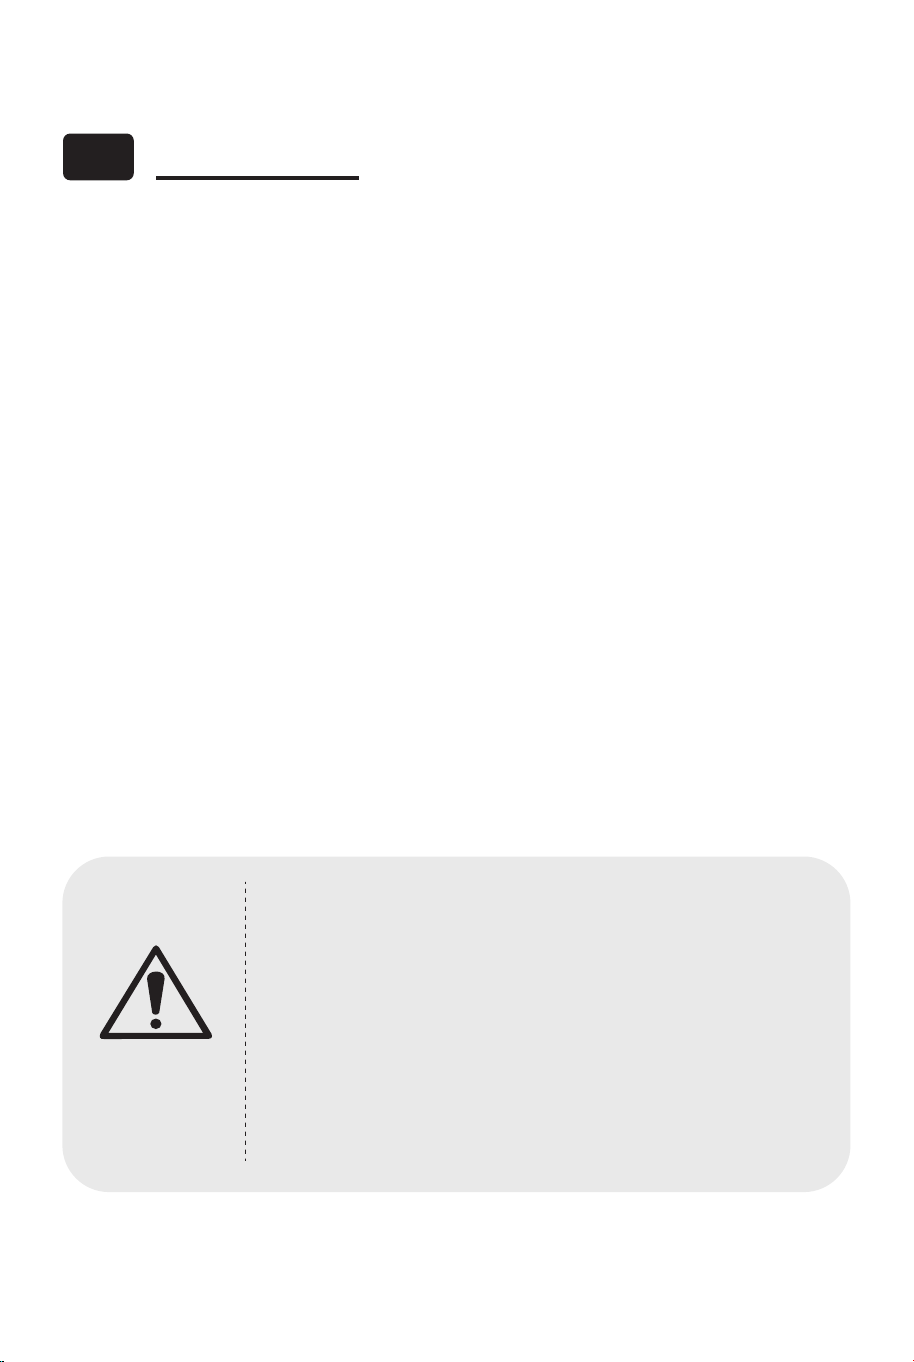
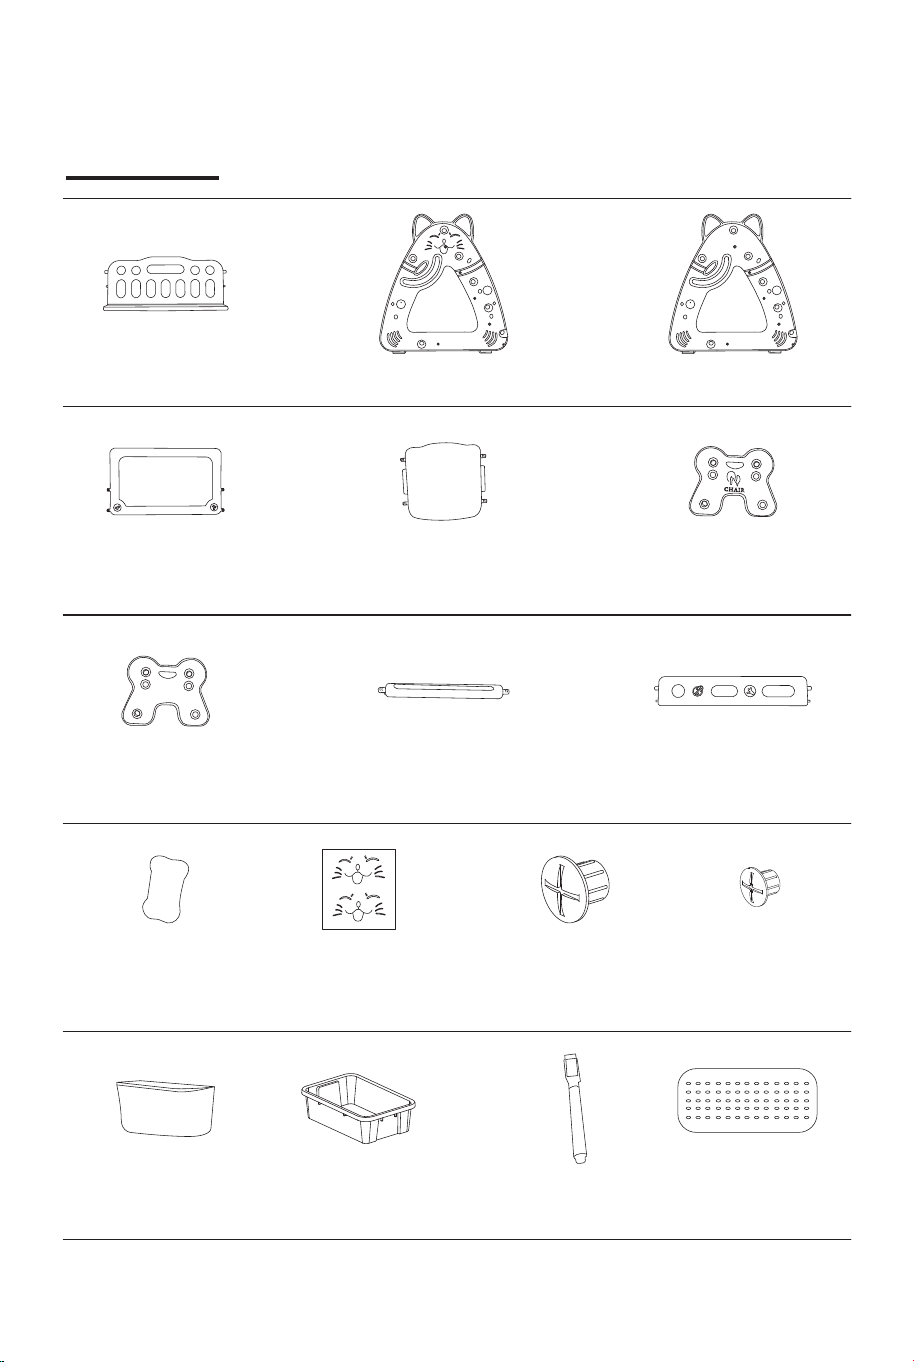
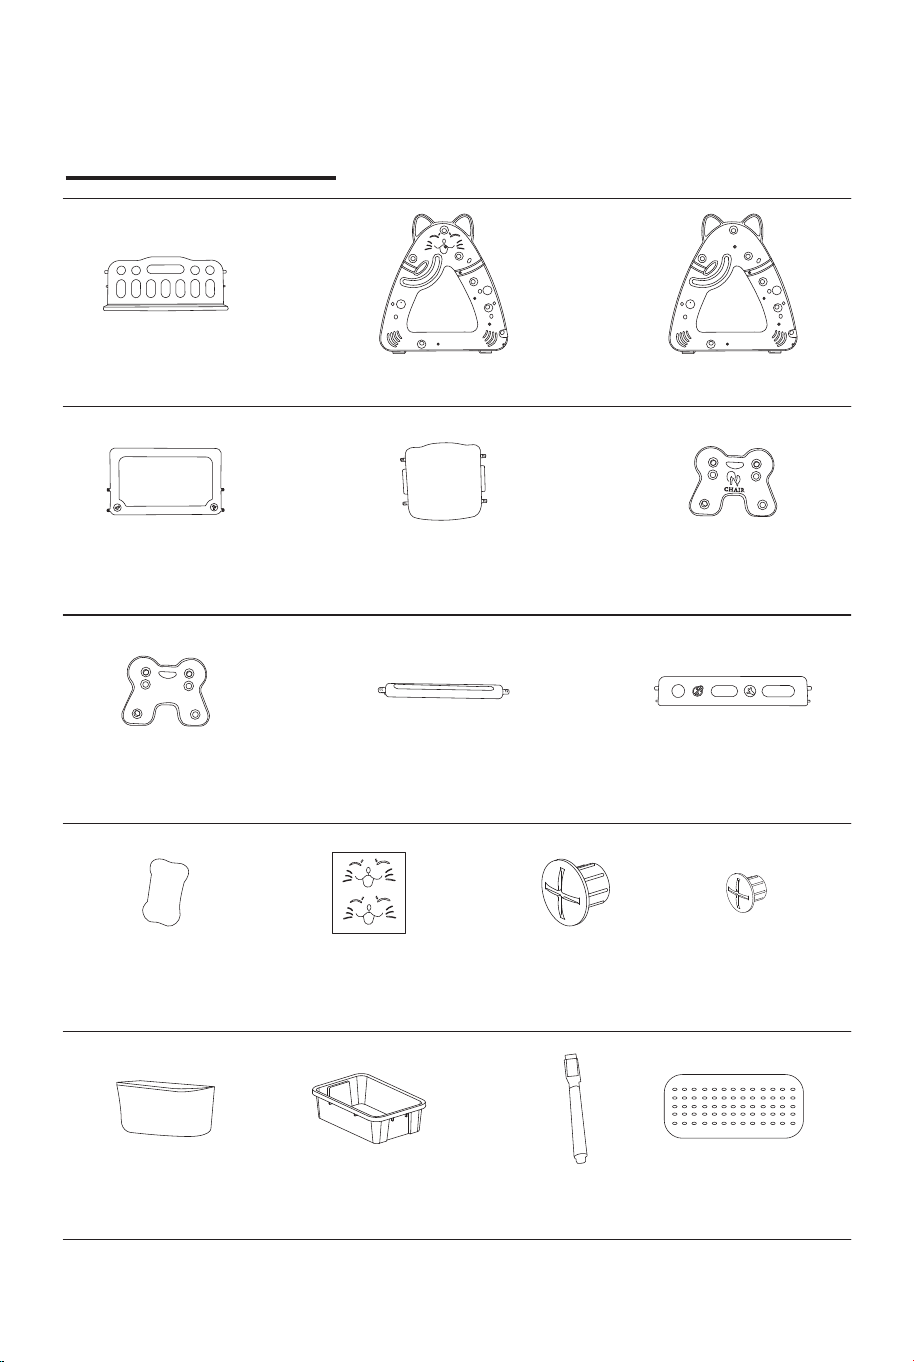
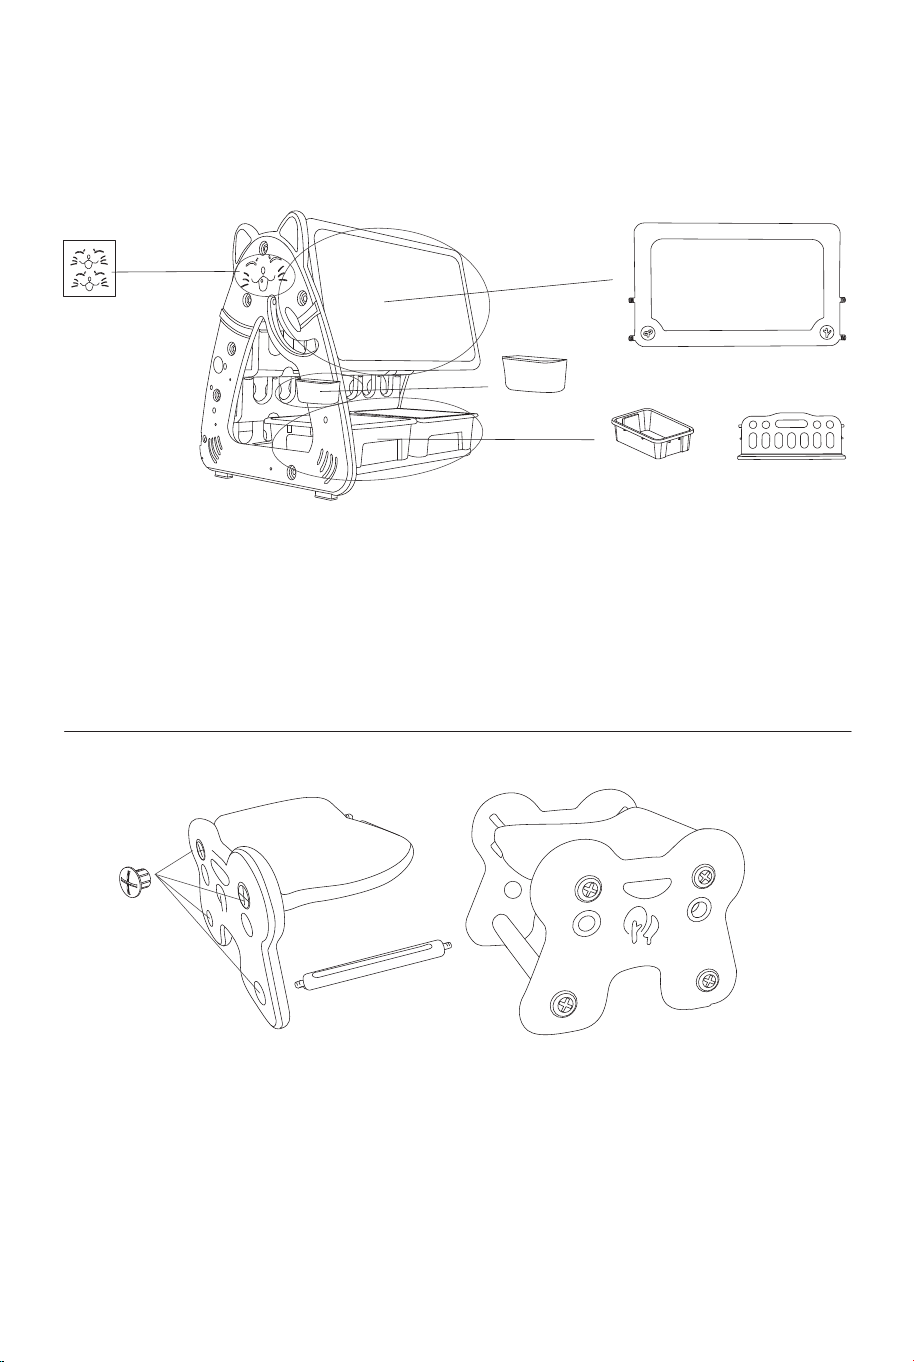
L baffle*5
Chair seat
board*1
Baffle*1
Pen box*1
Board
eraser*1
Storage
box*2
Sticker*2
Brush*4 Foot Pads*4
Chair side
board A*1
Chair side
board B*1
Chair bar*2
Cross nut*8 Cross nut*18
Side board A*1 Side board B*1
Drawing
board*1
02 03
EN Precautions Parts List
1. This product is suitable for 1-5 years old children.
2. Please keep the packing cases, bags and manual of this product properly
and keep it away from children to avoid accidents.
3. This product needs to be assembled by adults. Do not let children approach
or touch the parts during installation.
4. Please place this product in a dry, clean and well-lit place for use.
5. Before use, please check whether all parts are installed completely and
firmly. During use, please check whether all parts are loose regularly or
irregularly. If they are loose, please tighten them in time.
6. All parts and packaging items of this product should not be near heat or fire
sources.
7. Please use this product under the supervision of parents.
8. Do not expose to strong light for a long time.
9. Avoid collision with sharp objects, and do not fall down.
10. The main material of the product is PE plastic.
11. This product can be wiped and maintained with a wet cloth.
12. Do not use accessories not provided by the manufacturer.
1. When installing, do not completely tighten the plastic nuts
on both sides, first install the small screws on the back
and then tighten them, otherwise the small screw holes on
the back may be displaced.
2. Do not use too much force when screwing the small
screws on the back, it may cause the plastic to wear out.
3. Please dispose of the plastic packaging bag properly to
prevent the suffocation hazard caused by the baby putting
it on the head.
Notice
L baffle*5
Chair seat
board*1
Baffle*1
Pen box*1
Board
eraser*1
Storage
box*2
Sticker*2
Brush*4 Foot Pads*4
Chair side
board A*1
Chair side
board B*1
Chair bar*2
Cross nut*8 Cross nut*18
Side board A*1 Side board B*1
Drawing
board*1
02 03
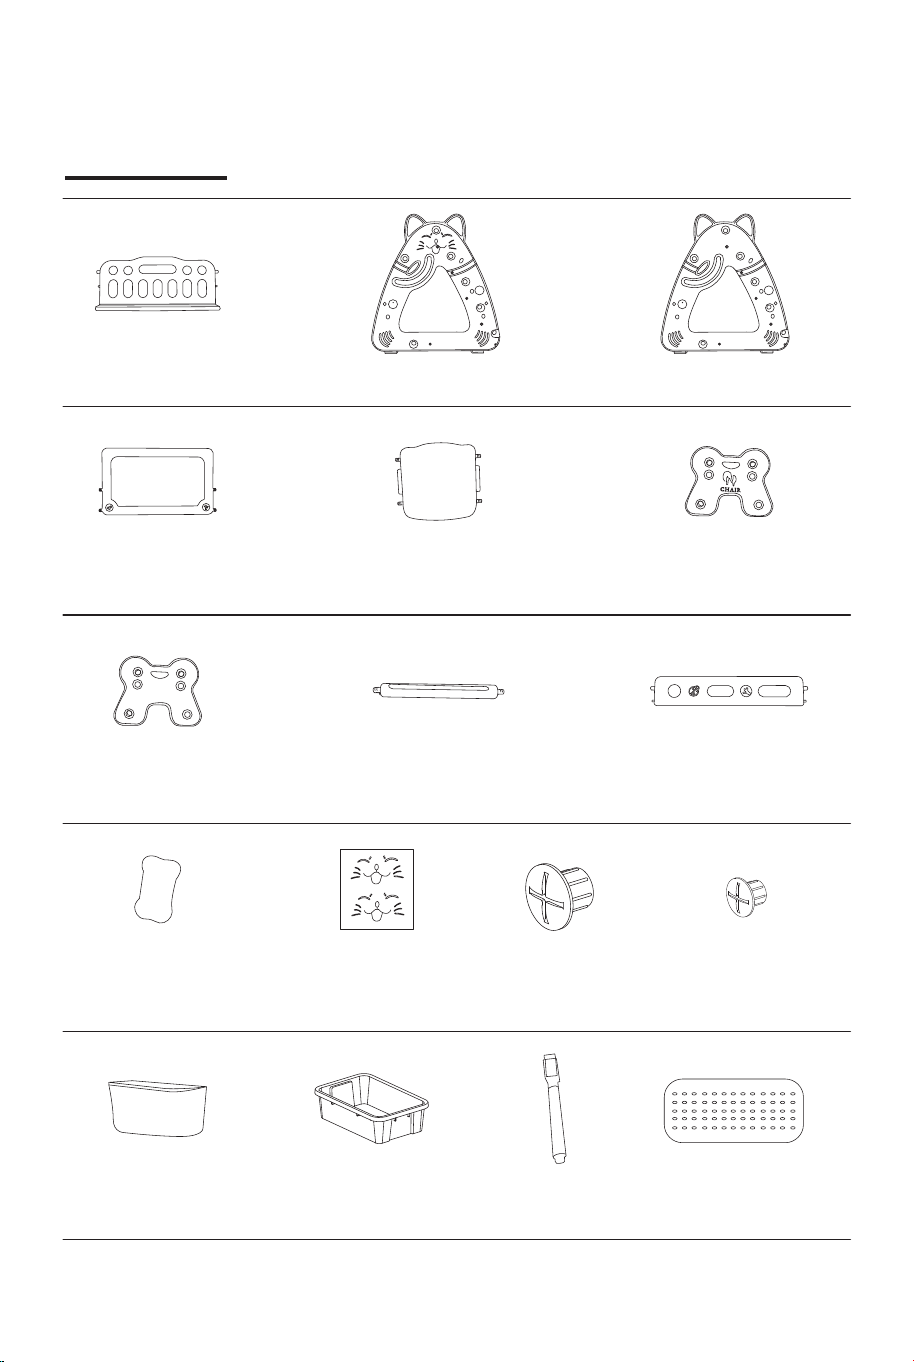
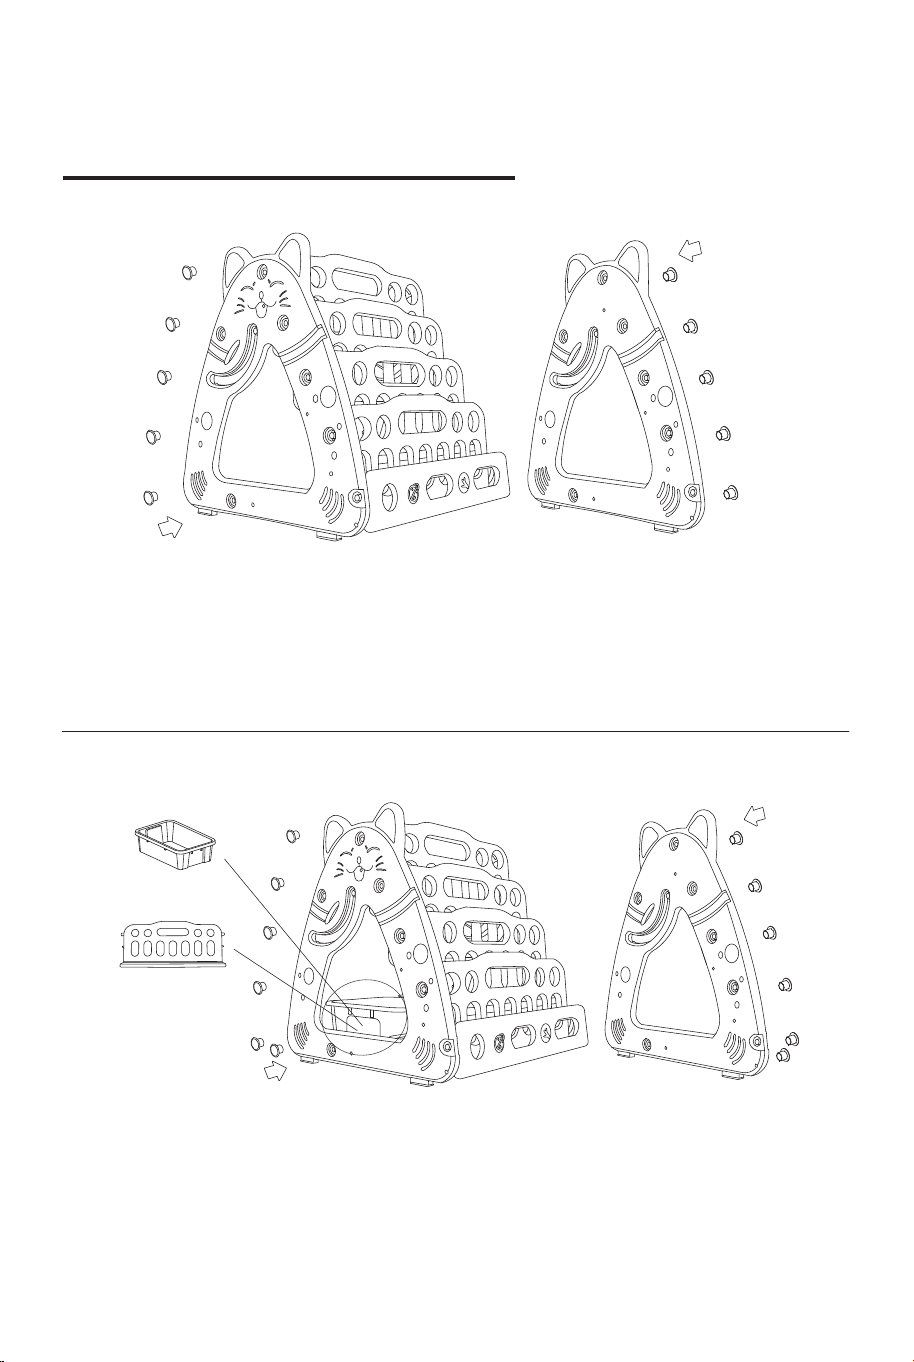
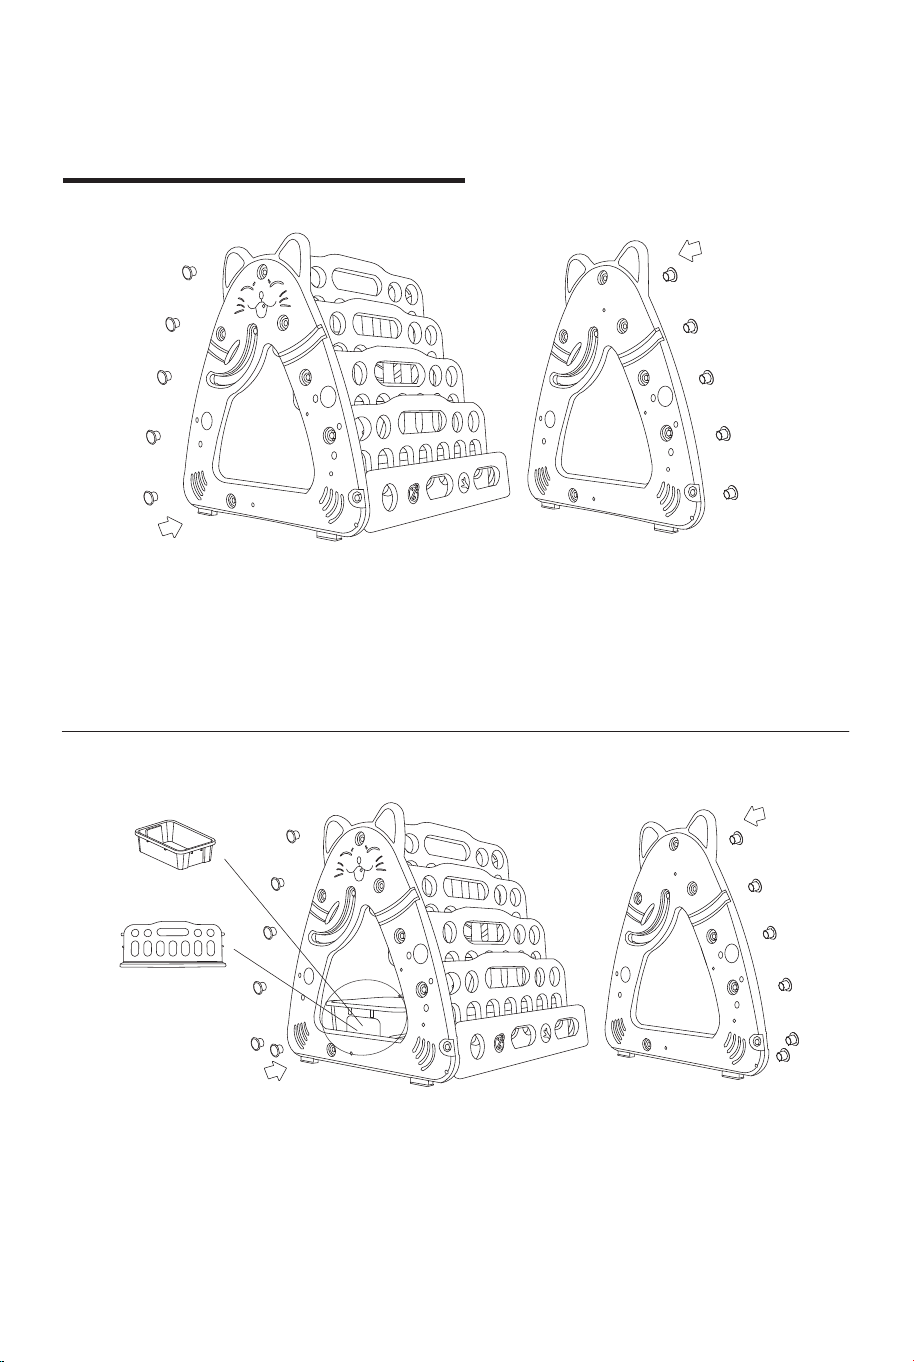
Installation Instructions
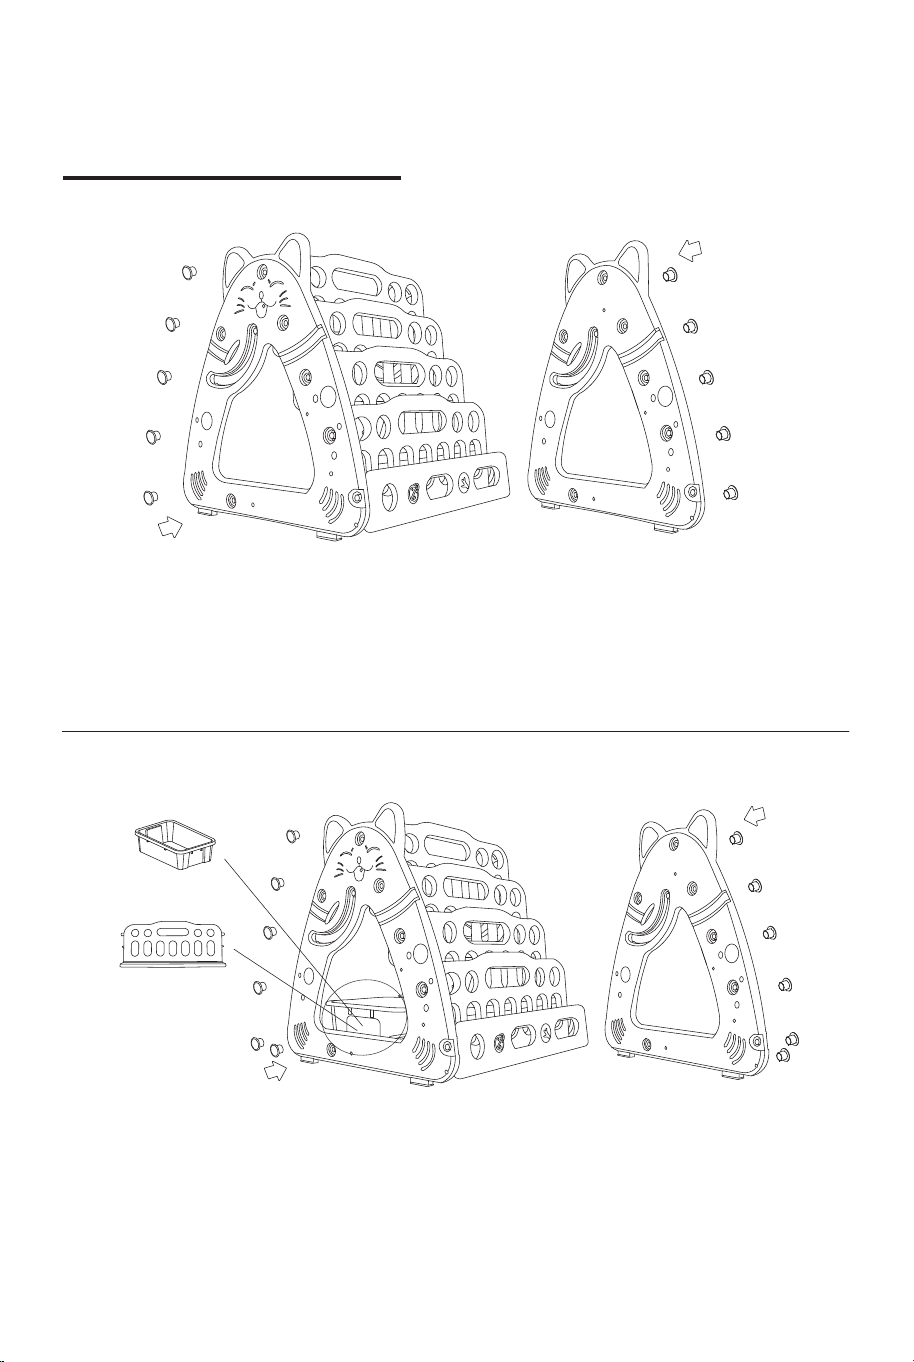
1. Install the baffle and L baffle into the corresponding holes of side board A, and fix
them with cross nuts.
2. Connect the side board B with the installed baffle and L baffle holes, and fix them with
cross nuts.
3. Refer to the [Drawing Board Installation] section to install the drawing board. Stick the
sticker on the outside of the side board.
1. Insert the drawing board into the corresponding holes of side board A, fix it with cross
nuts, and then insert it into the corresponding holes of side board B and fix it. Stick
the sticker on the outside of the side board.
2. Check whether all accessories are installed firmly, the installation is complete!
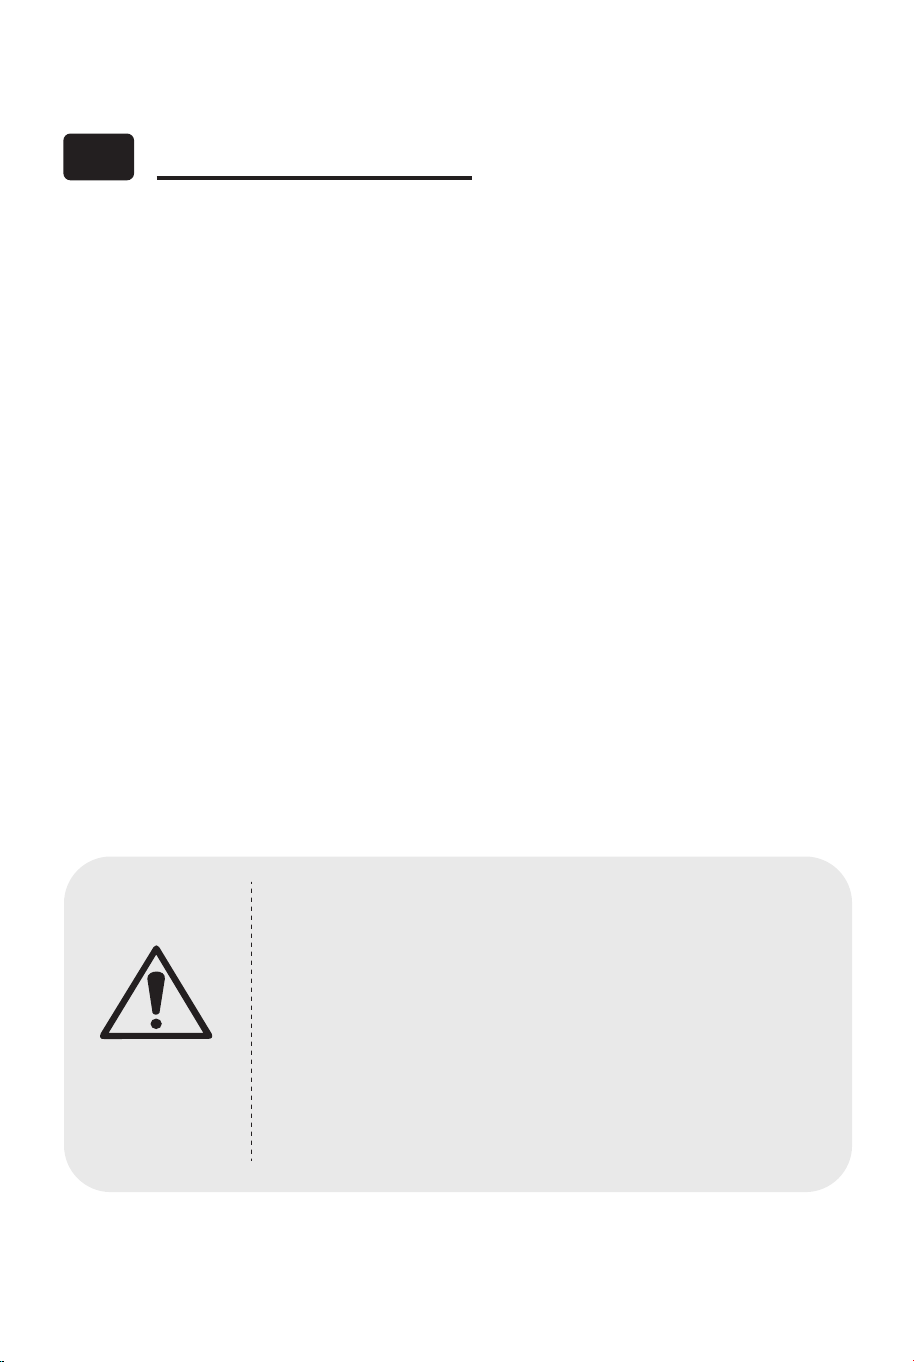
1. Install the side board A and the chair bar into the seat board, fix it with cross nuts, and
then install side board B and fix it.
2. Check whether all accessories are installed firmly, the installation is complete!
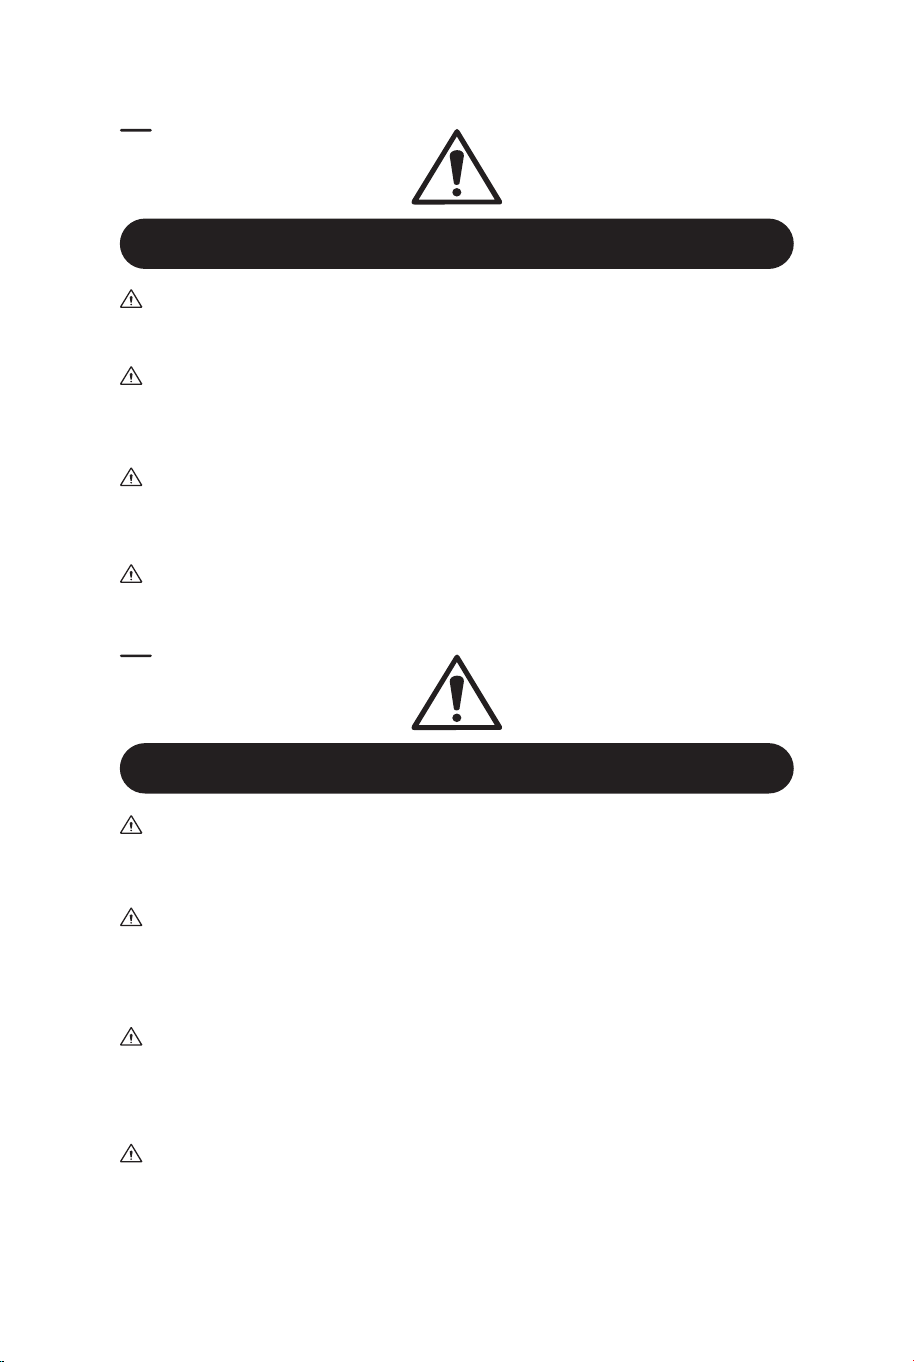
1. Install the baffle and L baffle into the corresponding holes of side board A, and fix
them with cross nuts.
2. Connect the side board B with the installed baffle and L baffle holes, and fix them with
cross nuts.
3. Refer to the [Drawing Board Installation] section to install the drawing board. Stick the
sticker on the outside of the side board.
L baffle
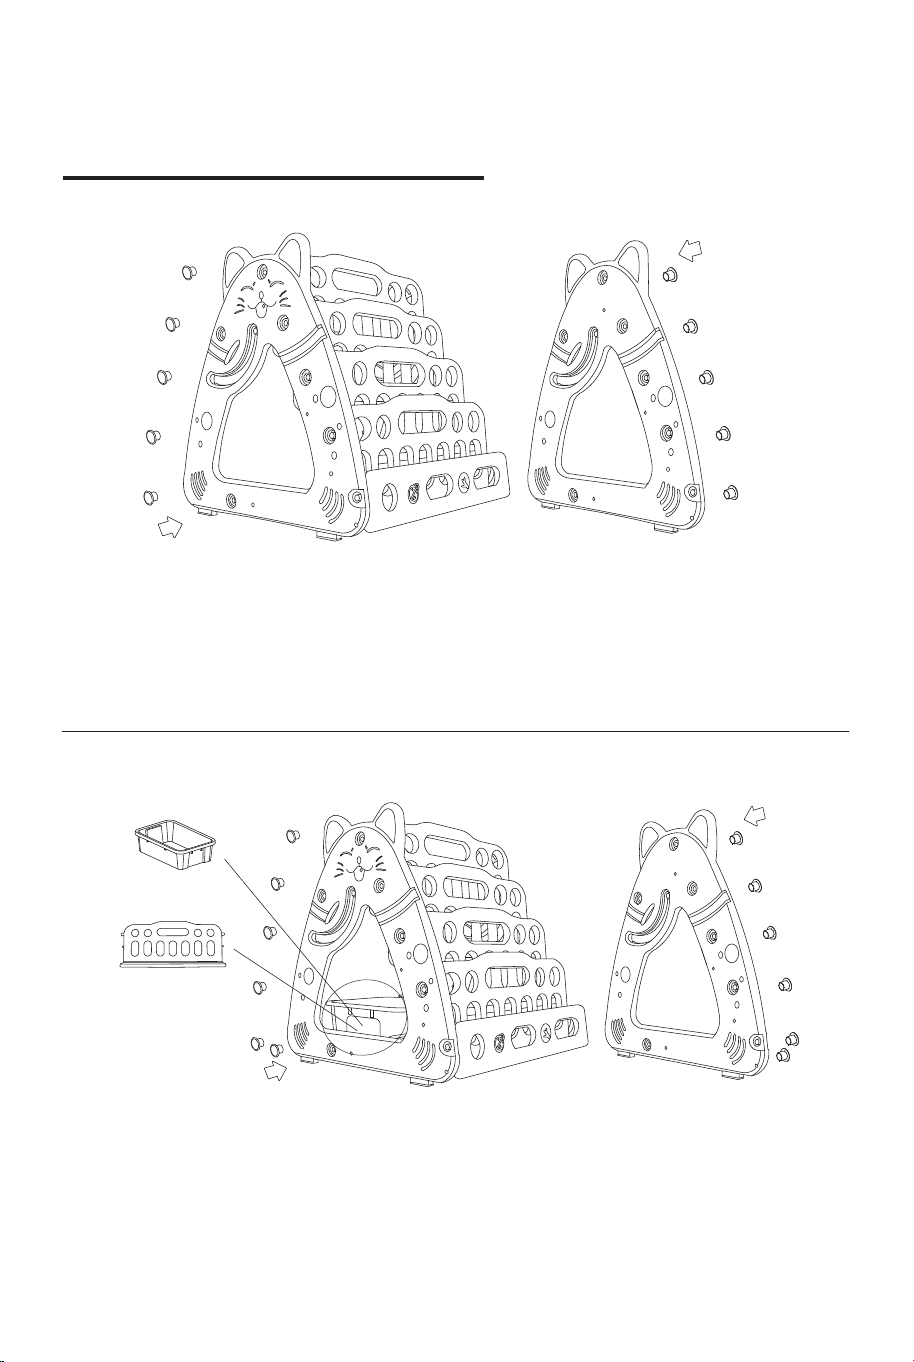
Storage box
Sticker*2
Pen box*1
Drawing board*1
Storage
box*2
L baffle*5
Installation of Bookshelf
Installation of Drawing board
Installation of Bookshelf with Storage Box
04 05

Installation Instructions
1. Install the baffle and L baffle into the corresponding holes of side board A, and fix
them with cross nuts.
2. Connect the side board B with the installed baffle and L baffle holes, and fix them with
cross nuts.
3. Refer to the [Drawing Board Installation] section to install the drawing board. Stick the
sticker on the outside of the side board.
1. Insert the drawing board into the corresponding holes of side board A, fix it with cross
nuts, and then insert it into the corresponding holes of side board B and fix it. Stick
the sticker on the outside of the side board.
2. Check whether all accessories are installed firmly, the installation is complete!
1. Install the side board A and the chair bar into the seat board, fix it with cross nuts, and
then install side board B and fix it.
2. Check whether all accessories are installed firmly, the installation is complete!
1. Install the baffle and L baffle into the corresponding holes of side board A, and fix
them with cross nuts.
2. Connect the side board B with the installed baffle and L baffle holes, and fix them with
cross nuts.
3. Refer to the [Drawing Board Installation] section to install the drawing board. Stick the
sticker on the outside of the side board.
L baffle
Storage box
Sticker*2
Pen box*1
Drawing board*1
Storage
box*2
L baffle*5
Installation of Bookshelf
Installation of Drawing board
Installation of Bookshelf with Storage Box
04 05

DE
Vorsichtsmaßnahmen Teileliste
01. Dieses Produkt ist für Kinder im Alter von 1-5 Jahren geeignet.
02. Bitte bewahren Sie die Verpackungen, Taschen und das Handbuch dieses Produkts
ordnungsgemäß auf und halten Sie es von Kindern fern, um Unfälle zu vermeiden.
03. Dieses Produkt muss von Erwachsenen zusammengebaut werden. Lassen Sie
Kinder sich während der Installation nicht den Teilen nähern oder sie berühren.
04. Bitte platzieren Sie dieses Produkt an einem trockenen, sauberen und gut
beleuchteten Ort.
05. Bitte überprüfen Sie vor Gebrauch, ob alle Teile vollständig und fest montiert sind.
Bitte überprüfen Sie während des Gebrauchs, ob alle Teile regelmäßig oder
unregelmäßig gelockert sind. Wenn sie locker sind, ziehen Sie sie bitte rechtzeitig
fest.
06. Alle Teile und Verpackungsgegenstände dieses Produkts sollten sich nicht in der
Nähe von Hitze- oder Feuerquellen befinden.
07. Bitte verwenden Sie dieses Produkt unter Aufsicht der Eltern.
08. Setzen Sie es nicht längere Zeit starkem Licht aus.
09. Vermeiden Sie Kollisionen mit scharfen Gegenständen und fallen Sie nicht herunter.
10. Das Hauptmaterial des Produkts ist PE-Kunststoff.
11. Dieses Produkt kann mit einem feuchten Tuch abgewischt und gepflegt werden.
12. Verwenden Sie kein Zubehör, das nicht vom Hersteller geliefert wurde.
1. Ziehen Sie bei der Montage die Kunststoffmuttern auf beiden
Seiten nicht vollständig an. Bringen Sie zuerst die kleinen
Schrauben auf der Rückseite an und ziehen Sie sie dann fest, da
sich sonst die kleinen Schraubenlöcher auf der Rückseite
verschieben können.
2. Wenden Sie beim Einschrauben der kleinen Schrauben auf der
Rückseite nicht zu viel Kraft an, da dies dazu führen kann, dass
sich der Kunststoff abnutzt.
3. Bitte entsorgen Sie die Plastikverpackungstüte ordnungsgemäß,
um die Erstickungsgefahr zu vermeiden, die dadurch verursacht
wird, dass das Baby sie auf den Kopf legt.
Hinweis
L-Schallwand*5
Stuhlsitzplatte*1
Schallwand*1
Stiftbox*1
Tafelwischer*1
Aufbewahrungsbox*2
Aufkleber*2
Pinsel*4 Fußmatten*4
Stuhlseitenplatte A*1
Stuhlseitenplatte B*1 Stuhlstange*2
Kreuzmutter*8 Kreuzmutter*18
Seitenplatte A*1 Seitenplatte B*1
Zeichenbrett*1
06 07

Installationsanleitung
1. Installieren Sie die Schallwand und die L-Schallwand in den entsprechenden Löchern der
Seitenplatte A und befestigen Sie sie mit Kreuzmuttern.
2. Verbinden Sie die Seitenplatte B mit den installierten Schallwand- und L-Schallwand-Löchern
und fixieren Sie diese mit Kreuzmuttern.
3. Informationen zum Installieren des Zeichenbretts finden Sie im Abschnitt [Installation des
Zeichenbretts]. Kleben Sie den Aufkleber auf die Außenseite der Seitenplatten.
1. Stecken Sie das Zeichenbrett in die entsprechenden Löcher der Seitenplatte A, befestigen Sie
es mit Kreuzmuttern und stecken Sie es dann in die entsprechenden Löcher der Seitenplatte B
und befestigen Sie es. Kleben Sie den Aufkleber auf die Außenseite der Seitenplatten.
2. Überprüfen Sie, ob alle Zubehörteile fest installiert sind, die Installation ist abgeschlossen!
1. Installieren Sie die Stuhlseitenplatte A und die Stuhlstange in der Sitzplatte, befestigen Sie sie
mit Kreuzmuttern und installieren Sie dann die Stuhlseitenplatte B und befestigen Sie sie.
2. Überprüfen Sie, ob alle Zubehörteile fest installiert sind, die Installation ist abgeschlossen!
1. Installieren Sie die Schallwand und die L-Schallwand in den entsprechenden Löchern der
Seitenplatte A und befestigen Sie sie mit Kreuzmuttern.
2. Verbinden Sie die Seitenplatte B mit den installierten Schallwand- und L-Schallwand-Löchern
und fixieren Sie diese mit Kreuzmuttern.
3. Informationen zum Installieren des Zeichenbretts finden Sie im Abschnitt [Installation des
Zeichenbretts].
L-Schallwand
Aufbewahrungsbox
Aufkleber*2
Stiftbox*1
Zeichenbrett*1
Aufbewahrungsbox*2 L-Schallwand*5
Installation des Bücherregals
Installation des Zeichenbretts
Installation eines Bücherregals mit Aufbewahrungsbox
08 09
FR
Précautions Liste des Pièces
01. Ce produit convient aux enfants de 1 à 5 ans.
02. Veuillez bien ranger les boîtes d'emballage, les sacs et le manuel de ce produit et les
tenir à l'écart des enfants pour éviter les accidents.
03. Ce produit doit être assemblé par des adultes. Ne laissez pas les enfants
s'approcher ou toucher les pièces pendant le montage.
04. Veuillez placer ce produit dans un endroit sec, propre et bien éclairé.
05. Avant utilisation, veuillez vérifier si toutes les pièces sont installées complètement et
fermement. Pendant l'utilisation, veuillez vérifier si toutes les pièces sont desserrées
régulièrement ou irrégulièrement. S'ils sont desserrés, veuillez les resserrer à
temps.
06. Toutes les pièces et tous les éléments d'emballage de ce produit ne doivent pas se
trouver à proximité de sources de chaleur ou d'incendie.
07. Veuillez utiliser ce produit sous la surveillance des parents.
08. Ne pas exposer à une forte lumière pendant une longue période.
09. Évitez les collisions avec des objets pointus et ne tombez pas.
10. Le matériau principal du produit est le plastique PE.
11. Ce produit peut être essuyé et entretenu avec un chiffon humide.
12. N'utilisez pas d'accessoires non fournis par le fabricant.
1. Lors de l'installation, ne serrez pas complètement les écrous en
plastique des deux côtés, installez d'abord les petites vis à
l'arrière, puis serrez-les, sinon les petits trous de vis à l'arrière
pourraient être déplacés.
2. N'utilisez pas trop de force lorsque vous vissez les petites vis à
l'arrière, cela pourrait entraîner l'usure du plastique.
3. Veuillez jeter le sac d'emballage en plastique correctement pour
éviter le risque d'étouffement causé par le bébé en le mettant sur
la tête.
Remarque
Déflecteur L *5
Panneau de siège * 1
Déflecteur * 1
Boîte à
stylo * 1
Gomme * 1
Boîte de
rangement * 2
Autocollant * 2
Brosse * 4
Panneau latéral
de chaise A * 1
Panneau latéral
de chaise B * 1
Barre de
chaise * 2
Écrou
croisé * 8
Coussinets
de pieds* 4
Écrou
croisé * 18
Panneau latéral A * 1 Panneau latéral B * 1
Planche à
dessin * 1
10 11
Instructions d'Installation
1. Installez le déflecteur et le déflecteur L dans les trous correspondants du panneau latéral A et
fixez-les avec les contre-écrous.
2. Connectez le panneau latéral B avec le déflecteur installé et les trous du déflecteur L, et
fixez-les avec des écrous croisés.
3. Reportez-vous à la section [Installation de la planche à dessin] pour installer la planche à
dessin. Collez l'autocollant à l'extérieur du panneau latéral.
1. Insérez la planche à dessin dans les trous correspondants du panneau latéral A, fixez-la avec
les écrous croisés, puis insérez-la dans les trous correspondants du panneau latéral B et
fixez-la. Collez l'autocollant à l'extérieur du panneau latéral.
2. Vérifiez si tous les accessoires sont installés fermement, l'installation est terminée.
1.Installez le panneau latéral A et la barre de chaise dans le panneau du siège, fixez-le avec des
écrous croisés, puis installez le panneau latéral B et fixez-le.
2. Vérifiez si tous les accessoires sont installés fermement, l'installation est terminée.
1. Installez le déflecteur et le déflecteur en L dans les trous correspondants du panneau latéral A et
fixez-les avec des écrous croisés.
2. Connectez le panneau latéral B avec le déflecteur installé et les trous du déflecteur L, et
fixez-les avec des écrous croisés.
3. Reportez-vous à la section [Installation de la planche à dessin] pour installer la planche à dessin.
Collez l'autocollant à l'extérieur du panneau latéral.
Déflecteur L
Boîte de rangement
Autocollant * 2
Boîte à
stylo * 1
Planche à dessin * 1
Boîte de rangement * 2
Déflecteur L *5
Installation d'Étagères
Installation de la Planche à Dessin
Installation d'Étagères avec Boîte de Rangement
12 13
ES
Precauciones Lista de Piezas
01. Este producto es adecuado para niños de 1 a 5 años.
02. Por favor, guarde bien las cajas de embalaje, las bolsas y el manual de este
producto y manténgalos alejados de los niños para evitar accidentes.
03. Este producto debe ser montado por adultos. No deje que los niños se acerquen o
toquen las piezas durante el montaje.
04. Por favor, coloque este producto en un lugar seco, limpio y bien iluminado para su
uso.
05. Antes de utilizar el producto, compruebe si todas las piezas están instaladas
completa y firmemente. Durante el uso, por favor, compruebe si todas las piezas
están sueltas de forma regular o irregular. Si están sueltas, por favor apriételas a
tiempo.
06. Todas las piezas y elementos de embalaje de este producto no deben estar cerca de
fuentes de calor o fuego.
07. Por favor, utilice este producto bajo la supervisión de los padres.
08. No lo exponga a la luz fuerte durante mucho tiempo.
09. Evite la colisión con objetos afilados y que no se caiga.
10. El material principal de este producto es el plástico PE.
11. Este producto se puede limpiar y mantener con un paño húmedo.
12. No utilice accesorios no suministrados por el fabricante.
1. Al instalar el producto, no apriete completamente las tuercas de
plástico de ambos lados, instale primero los tornillos pequeños
de la parte trasera y luego apriételos, de lo contrario los agujeros
de los tornillos pequeños de la parte trasera podrían desplazarse.
2. No utilice demasiada fuerza al atornillar los tornillos pequeños de
la parte trasera, puede provocar el desgaste del plástico.
3. Por favor, deseche la bolsa de plástico del embalaje
correctamente para evitar el peligro de asfixia causado por el
bebé al ponérsela en la cabeza.
Atención
Deflector L *5
Tablero de
asiento *1
Deflector *1
Caja para
bolígrafos *1
Borrador *1
Caja de
almacenamiento *2
Pegatina *2
Cepillo *4
Tablero lateral
de silla A *1
Tablero lateral
de silla B *1
Barra de silla *2
Tuerca
cruzada *8
Almohadillas
para Pies *4
Tuerca
cruzada *18
Tablero lateral A *1 Tablero lateral B *1
Tablero de
dibujo *1
14 15

Instrucciones de Instalación
1. Instale el deflector y el deflector L en los agujeros correspondientes del tablero lateral A, y fíjelos
con las tuercas cruzadas.
2. Alinee el tablero lateral B con los deflectores instalados, instale y fíjelos con las tuercas
cruzadas.
3. Consulte la sección de [Instalación del Tablero de Dibujo] para instalar el tablero de dibujo.
Pegue la pegatina en el exterior del tablero lateral.
1. Inserte el tablero de dibujo en los agujeros correspondientes del tablero lateral A, fíjelo con las
tuercas cruzadas, y luego insértelo en los agujeros correspondientes del tablero lateral B y
fíjelo. Pegue la pegatina en el exterior del tablero lateral.
2. Compruebe si todos los accesorios están instalados firmemente, la instalación está terminada.
1. Instale el tablero lateral A y la barra de silla en el tablero de asiento, fíjelos con las tuercas
cruzadas, y luego instale el tablero lateral B y fíjelo.
2. Compruebe si todos los accesorios están instalados firmemente, la instalación está terminada.
1. Instale el deflector y el deflector L en los agujeros correspondientes del tablero lateral A, y fíjelos
con las tuercas cruzadas.
2. Alinee el tablero lateral B con los deflectores instalados, instale y fíjelos con las tuercas
cruzadas
3. Consulte la sección de [Instalación del Tablero de Dibujo] para instalar el tablero de dibujo.
Pegue la pegatina en el exterior del tablero lateral.
Deflector L
Caja de
almacenamiento
Pegatina *2
Caja de
bolígrafos *1
Tablero de dibujo *1
Caja de
almacenamiento *2
Deflector L *5
Instalación de Estantería
Instalación del Tablero de Dibujo
Instalación de Estantería con Caja de Almacenamiento
16 17

IT
Precauzioni Lista di Parti
01. Questo prodotto è adatto a bambini da 1 a 5 anni.
02. Conservare bene le scatole di imballaggio, le borse e il manuale di questo prodotto e
tenerli lontano dalla portata dei bambini per evitare incidenti.
03. Questo prodotto deve essere assemblato da adulti. Non lasciare che i bambini si
avvicinino o tocchino le parti durante il montaggio.
04. Mettere questo prodotto in un luogo asciutto, pulito e ben illuminato per l'uso.
05. Prima di utilizzare il prodotto, verificare che tutte le parti siano installate
completamente e saldamente. Durante l'uso, controllare se tutte le parti sono
allentate regolarmente o in modo irregolare. Se sono allentati, stringerli in tempo.
06. Tutte le parti e gli elementi di imballaggio di questo prodotto non devono essere vicini
a fonti di calore o fuoco.
07. Utilizzare questo prodotto sotto la supervisione dei genitori.
08. Non esporlo a una luce intensa per lungo tempo.
09. Evitare la collisione con oggetti appuntiti e non cadere.
10. Il materiale principale di questo prodotto è la plastica PE.
11. Questo prodotto può essere pulito e mantenuto con un panno umido.
12. Non utilizzare accessori non forniti dal produttore.
1. Quando si installa il prodotto, non serrare completamente i dadi di
plastica su entrambi i lati, installare prima le piccole viti sul retro,
quindi serrarle, altrimenti i piccoli fori delle viti sul retro potrebbero
spostarsi.
2. Non usare troppa forza quando si avvitano le piccole viti sul retro,
potrebbe causare l'usura della plastica.
3. Smaltire correttamente il sacchetto di plastica dell'imballaggio per
evitare il pericolo di soffocamento causato dal bambino che lo
mette sulla testa.
Attenzione
Deflettore L *5
Bordo del sedile *1
Deflettore *1
Portapenne *1
Cancellino *1
Scatola di
immagazzinaggio *2
Adesivo *2
Spazzola *4 Tappetini per
piedi *4
Pannello della
sedia A *1
Pannello della
sedia B *1
Barra a sedia *2
Dado a croce *8 Dado a croce *18
Pannello laterale A *1 Pannello laterale B *1
Tavola da
disegno *1
18 19
Istruzioni di montaggio
1. Installare il deflettore e il deflettore L nei fori corrispondenti del pannello laterale A e fissarli con i
dadi a croce.
2. Allineare il pannello laterale B con i deflettori installati, installarli e fissarli con i dadi a croce.
3. Fare riferimento alla sezione [Installazione del tavolo da disegno] per installare il tavolo da
disegno. Attacca l'adesivo all'esterno del pannello laterale.
1. Inserire la tavola da disegno nei fori corrispondenti della tavola laterale A, fissarla con i dadi a
croce, quindi inserirla nei fori corrispondenti della tavola laterale B e fissarla. Attacca l'adesivo
all'esterno del pannello laterale.
2. Verificare che tutti gli accessori siano installati saldamente, l'installazione è terminata.
1. Installare il pannello laterale A e la guida della sedia sul pannello del sedile, fissarli con i dadi a
croce, quindi installare il pannello laterale B e fissarlo.
2. Verificare che tutti gli accessori siano installati saldamente, l'installazione è terminata.
1. Installare il deflettore e il deflettore L nei fori corrispondenti del pannello laterale A e fissarli con i
dadi a croce.
2. Allineare il pannello laterale B con i deflettori installati, installarli e fissarli con i dadi a croce
3. Fare riferimento alla sezione [Installazione del tavolo da disegno] per installare il tavolo da
disegno. Attacca l'adesivo all'esterno del pannello laterale.
Deflector L
Caja de
almacenamiento
Adesivo *2
Portapenne *1
Tavolo da disegno *1
Scatola di
immagazzinaggio *2
Deflettore L *5
Istruzioni di montaggio di libreria
Installazione del tavolo da disegno
Istruzioni di Installazione di libreria con scatola di immagazzinaggio
20 21
PL
Środki ostrożności Lista części
01. Produkt jest przeznaczony dla dzieci w wieku 1-5 lat.
02. Zachowaj instrukcję do wykorzystania w przyszłości. Trzymaj materiały
opakowaniowe z dala od dzieci.
03. Wymagany montaż przez osobę dorosłą. Podczas montażu trzymaj produkt z dala
od dzieci.
04. Umieść produkt w suchym, czystym i dobrze oświetlonym miejscu.
05. Przed użyciem sprawdź, czy wszystkie części są prawidłowo zamontowane.
Podczas użytkowania regularnie sprawdzaj, czy części nie poluzowały się. Dokręcaj
części, jeśli się poluzują.
06. Trzymaj wszystkie części produktu i elementy opakowaniowe z dala od źródeł ciepła
lub ognia.
07. Podczas użytkowania produktu wymagany jest stały nadzór osoby dorosłej.
08. Nie wystawiaj produktu na bezpośrednie i długotrwałe działanie światła słonecznego.
09. Trzymaj produkt z dala od ostrych przedmiotów. Umieść produkt na równym podłożu,
aby uniknąć jego przewrócenia.
10. Głównym materiałem użytym do produkcji jest tworzywo PE.
11. Produkt można czyścić za pomocą wilgotnej ściereczki.
12. Nie używaj akcesoriów, które nie są zatwierdzone przez producenta.
1. Podczas montażu nie dokręcaj całkowicie plastikowych nakrętek
po obu stronach produktu. Najpierw dokręć małe śruby w tylnej
części produktu. W przeciwnym razie wyrównanie małych śrub z
otworami w tylnej części produktu może okazać się niemożliwe.
2. Nie używaj zbyt dużej siły podczas dokręcania małych śrub w
tylnej części produktu, ponieważ może to spowodować
uszkodzenie plastikowych elementów.
3. Zutylizuj plastikowe materiały opakowaniowe w odpowiedni
sposób, aby zapobiec niebezpieczeństwu uduszenia się dziecka.
Uwaga
Przegroda w
kształcie
litery L x5
Siedzisko
krzesełka x1
Przegroda x1
Organizer na
przybory x1
Gąbka do
zmazywania x1
Kosz x2
Naklejka x2
Mazak x4 Podkładka
pod nóżkę x4
Panel boczny
A krzesełka x1
Panel boczny B
krzesełka x1
Poprzeczka
krzesełka x2
Nakrętka
krzyżowa x8
Nakrętka
krzyżowa x18
Panel boczny A x1 Panel boczny B x1
Tablica do
rysowania x1
22 23
Instrukcja montażu
1. Zamocuj przegrodę i przegrody w kształcie litery L w odpowiednich otworach w panelu bocznym
A za pomocą nakrętek krzyżowych.
2. Przymocuj panel boczny B do zamontowanych w poprzednim kroku przegródek za pomocą
nakrętek krzyżowych.
3. Zapoznaj się z częścią „Montaż tablicy do rysowania”, aby zamontować tablicę. Przyklej naklejki
na zewnętrznych częściach paneli bocznych.
1. Zamocuj tablicę do rysowania w odpowiednich otworach panelu bocznego A za pomocą
nakrętek krzyżowych. Następnie zamocuj tablicę w odpowiednich otworach panelu bocznego B.
Przyklej naklejki na zewnętrznych częściach paneli bocznych.
2. Upewnij się, że wszystkie części zostały zmocowane w prawidłowy sposób. Montaż jest
zakończony!
1. Przymocuj siedzisko i poprzeczki do panelu bocznego A krzesełka za pomocą nakrętek
krzyżowych. Następnie zamocuj panel boczny B.
2. Upewnij się, że wszystkie części zostały zamocowane w prawidłowy sposób. Montaż jest
zakończony!
1. Zamocuj przegrodę i przegrody w kształcie litery L w odpowiednich otworach w panelu bocznym
A za pomocą nakrętek krzyżowych.
2. Przymocuj panel boczny B do zamontowanych w poprzednim kroku przegródek za pomocą
nakrętek krzyżowych.
3. Zapoznaj się z częścią „Montaż tablicy do rysowania”, aby zamontować tablicę. Przyklej naklejki
na zewnętrznych częściach paneli bocznych.
Przegroda w
kształcie
litery L
Kosz
Naklejka x2
Organizer na
przybory x1
Tablica do rysowania x1
Kosz x2
Przegroda w
kształcie
litery L
Montaż półek
Montaż tablicy do rysowania
Montaż półek i koszy
24 25
Instructions De Retour / Réclamation De Dommages
Dans le cas où un retour est requis, l'article doit être retourné dans sa boîte
d'origine. Sans cela, votre retour ne sera pas accepté.
NE PAS jeter la boîte/l'emballage d'origine.
Prenez une photo des marquages de la boîte.
Prenez une photo des dommages (le cas échéant).
Envoyez-nous un e-mail avec les images demandées.
Une photo des marquages (texte) sur le côté de la boîte est requise au cas où une
pièce serait nécessaire pour le remplacement. Cela aide notre personnel à
identifier votre numéro de produit pour s'assurer que vous recevez les bonnes
pièces.
Une photo des dommages est toujours requise pour déposer une réclamation et
obtenir rapidement votre remplacement ou votre remboursement. Assurez-vous
d'avoir la boîte même si elle est endommagée.
Envoyez-nous un e-mail directement depuis le marché où votre article a été
acheté avec les images ci-jointes et une description de votre réclamation.
Instrucciones de Devolución / Reclamación de Daños
En caso de que se requiera una devolución, el artículo debe ser devuelto en la
caja original. Sin esto su devolución no será aceptada.
NO deseche la caja/embalaje original.
Tome una foto de las marcas de la caja.
Tome una foto de los daños (si procede).
Envíenos un correo electrónico con las imágenes solicitadas.
Se requiere una foto de las marcas (texto) en el lado de la caja en caso de que se
necesite una pieza para reemplazarla. Esto ayuda a nuestro personal a identificar
su número de producto para asegurarse de que recibe las piezas correctas.
Una foto de los daños es siempre necesaria para presentar una reclamación y
conseguir que su reemplazo o reembolso sea procesado rápidamente. Por favor,
asegúrese de tener la caja aunque esté dañada.
Envíenos un correo electrónico directamente desde el mercado donde se compró
su artículo con las imágenes adjuntas y una descripción de su reclamación.
FR
ES
In case a return is required, the item must be returned in original box. Without this
your return will not be accepted.
DO NOT discard the box / original packaging.
Take a photo of the box markings.
Take a photo of the damaged part (if applicable).
Send us an email with the images requested.
A photo of the markings (text) on the side of the box is required in case a part is
needed for replacement. This helps our staff identify your product number to
ensure you receive the correct parts.
A photo of the damage is always required to file a claim and get your replacement
or refund processed quickly. Please make sure you have the box even if it is
damaged.
Email us directly from marketplace where your item was purchased with the
attached images and a description of your claim.
Falls eine Rücksendung erforderlich ist, muss der Artikel in der
Originalverpackung zurückgeschickt werden. Andernfalls wird Ihre Rücksendung
nicht angenommen.
Werfen Sie den Karton / die Originalverpackung NICHT weg.
Machen Sie ein Foto von der Beschriftung des Kartons.
Machen Sie ein Foto des beschädigten Teils (falls zutreffend).
Schicken Sie uns eine E-Mail mit dem gewünschten Foto.
Für den Fall, dass ein Ersatzteil benötigt wird, benötigen wir ein Foto der
Beschriftung (Text) auf der Seite des Kartons. So können unsere Mitarbeiter Ihre
Artikelnummer identifizieren und sicherstellen, dass Sie die richtigen Teile
erhalten.
Ein Foto des beschädigten Teils ist immer erforderlich, um eine Reklamation
einzureichen und eine schnelle Bearbeitung Ihres Ersatzteils oder Ihrer
Rückerstattung zu gewährleisten. Bitte stellen Sie sicher, dass Sie den Karton
haben, auch wenn er beschädigt ist.
Schicken Sie uns eine E-Mail direkt vom Marktplatz, auf dem Sie den Artikel
gekauft haben, mit den angehängten Fotos und einer Beschreibung Ihrer
Reklamation.
EN
DE
Return / Damage Claim Instructions
Rücksendung / Beschädigung Anweisungen
26 27
Nel caso in cui sia richiesto un reso, l'articolo deve essere restituito nella scatola
originale. Senza la scatola originale il tuo reso non sarà accettato.
NON scartare la scatola / confezione originale.
Fare una foto dei contrassegni sulla scatola.
Fare una foto di Danno (se è applicabile).
Inviarci una mail con le immagini richieste.
È necessaria una foto dei contrassegni (testo) sul lato della scatola nel caso in
cui la parte debba essere sostituita. Questo aiuta il nostro staff a identificare il
numero del tuo prodotto per assicurarti di ricevere le parti corrette.
Una foto del danno è sempre necessaria per presentare un reclamo e ottenere
rapidamente la sostituzione o il rimborso. Assicurati di avere la scatola anche se
è danneggiata.
Inviarci un’e-mail direttamente dal mercato in cui è stato acquistato il tuo articolo
con le immagini allegate e una descrizione del tuo reclamo.
Jeśli chcesz zwrócić produkt, musi znajdować się on w oryginalnym opakowaniu.
Towar zwrócony w nieoryginalnym opakowaniu nie zostanie przyjęty.
Nie wyrzucaj oryginalnego opakowania.
Zrób zdjęcie oznaczeń na opakowaniu.
Zrób zdjęcie uszkodzonej części (jeśli dotyczy).
Skontaktuj się z nami.
Jeśli jakakolwiek część wymaga wymiany, zrób zdjęcie oznaczeń kodu produktu,
który znajduje się na opakowaniu. Pozwoli nam to zidentyfikować produkt i
dostarczyć ci właściwą część.
Jeśli chcesz złożyć reklamację, zrób zdjęcie uszkodzonej części. Pozwoli nam to
zatwierdzić reklamację i zlecić zwrot środków na twoje konto. Do złożenia
reklamacji potrzebne będzie oryginalne opakowanie.
Skontaktuj się z nami telefonicznie, mailowo lub poprzez formularz kontaktowy.
Załącz zdjęcia produktu i opis roszczenia.
IT
PL
Istruzioni Per La Restituzione / Reclamo Per Danni
Zwroty i reklamacje
28

TP10058
If you're having difficulty, our friendly
customer team is always here to help.
THIS INSTRUCTION BOOKLET CONTAINS IMPORTANT SAFETY INFORMATION. PLEASE READ AND KEEP FOR FUTURE REFERENCE.
Kids Art Easel with Bookshelf
Kinder Staffelei mit Bücherregal
Chevalet Magnétique pour Enfants
Tablero de Dibujo y Estantería para Niños
Tavolo da Disegno e Libreria per Bambini
Sztaluga z półkami dla dzieci
AUS:cs.au@costway.com
FRA:cs.fr@costway.com
DEU:cs.de@costway.com
ITA:cs.it@costway.com ESP:cs.es@costway.com
POL:sklep@costway.com
GBR:cs.uk@costway.com
DEU office: FDS GmbH, Neuer Höltigbaum 36, 22143 Hamburg, Deutschland
ITA office: Milano
FRA office: Saint Vigor d'Ymonville
POL office: GdańskGBR office: IpswichAUS office: TruganinaUSA office: Fontana

