
Please give us a chance to make it right and do better !
Contact our friendly customer service department for help first.
Replacements for missing or damaged parts will be shipped ASAP !
Contact Us !
Do NOT return this item.
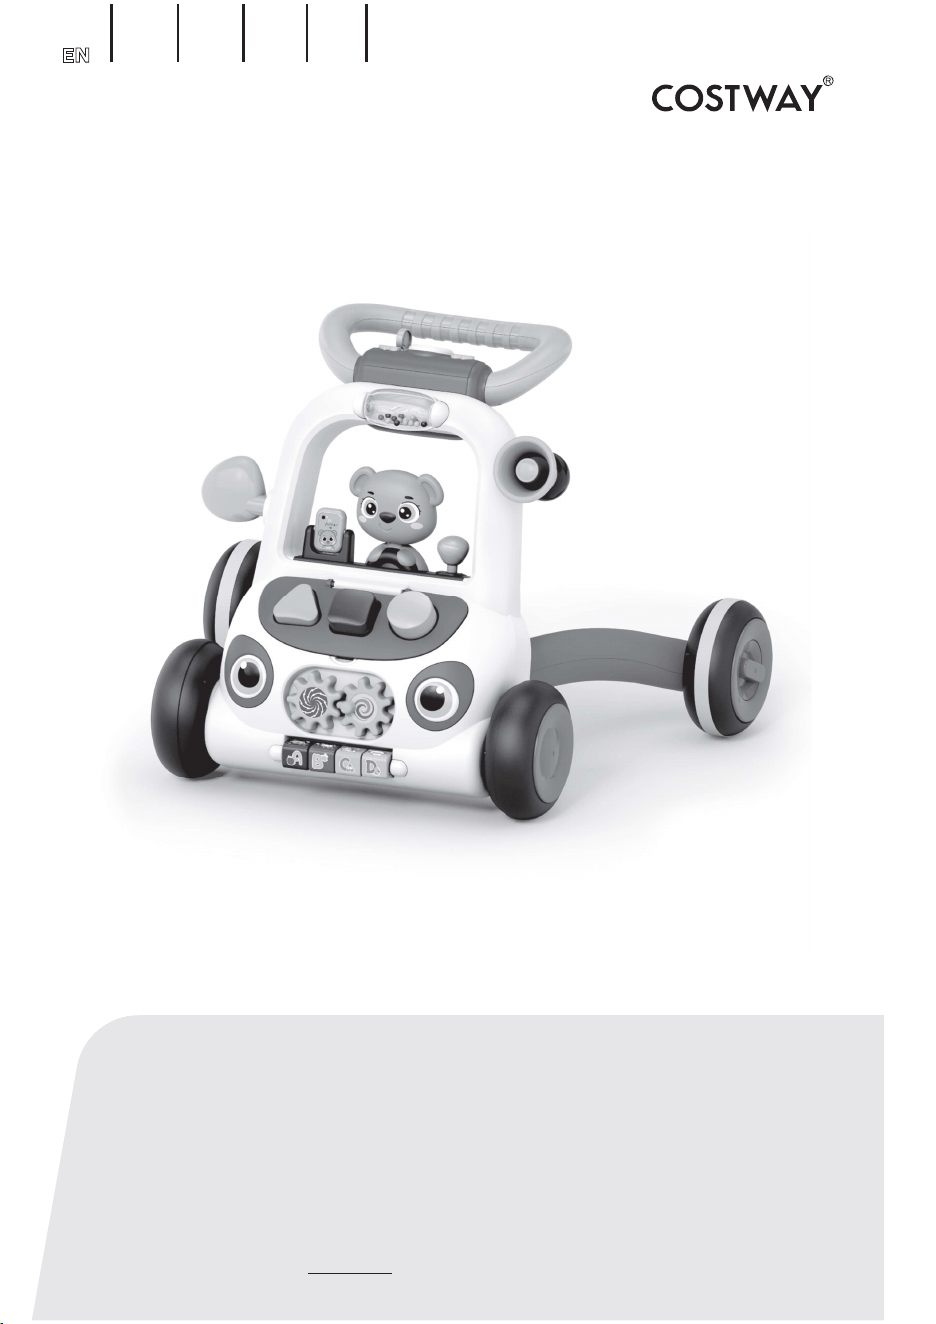
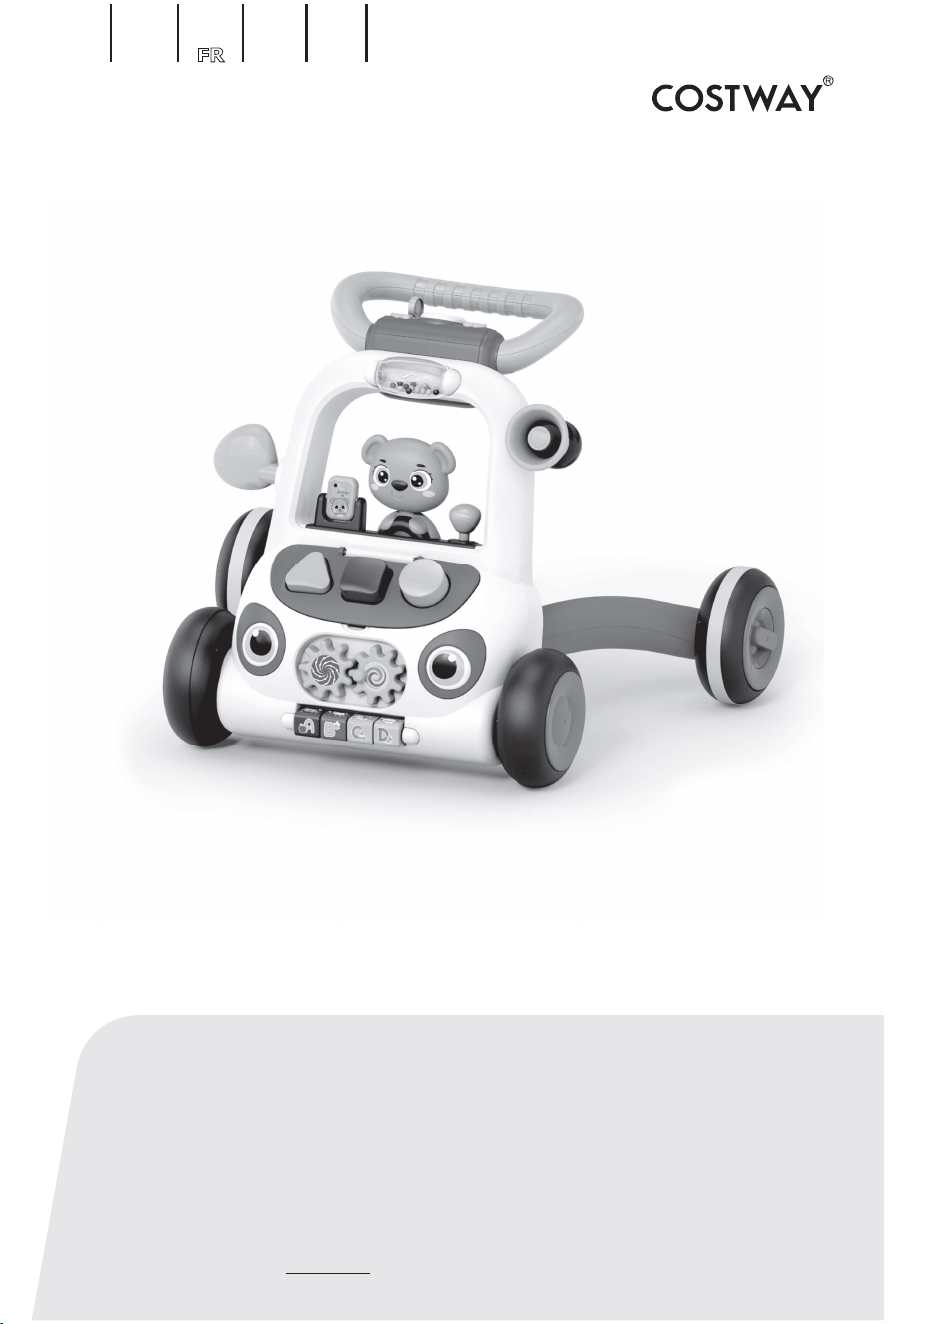
Baby Walker
BC10065
USER’S MANUAL
THIS INSTRUCTION BOOKLET CONTAINS IMPORTANT SAFETY INFORMATION. PLEASE READ AND KEEP FOR FUTURE REFERENCE.
EN DE FR ES IT PL
US:cs.us@costway.com
UK:cs.uk@costway.com
US office: Fontana UK office: Ipswich AU office: Truganina
Please give us a chance to make it right and do better !
Contact our friendly customer service department for help first.
Replacements for missing or damaged parts will be shipped ASAP !
Contact Us !
Do NOT return this item.
Baby Walker
BC10065
USER’S MANUAL
THIS INSTRUCTION BOOKLET CONTAINS IMPORTANT SAFETY INFORMATION. PLEASE READ AND KEEP FOR FUTURE REFERENCE.
EN DE FR ES IT PL
US:cs.us@costway.com
UK:cs.uk@costway.com
AU:cs.au@costway.com
US office: Fontana UK office: Ipswich AU office: Truganina
02 03
EN
Before You Start
General Warnings:
Danger! Keep all small parts and packaging materials for this product away from
babies and children, otherwise they may pose a choking hazard.
The product must be installed and used under the supervision of an adult.
Read through each step carefully and follow the proper order.
Remove all Packaging, separate and count all parts and hardware before
installation.
Please ensure that all parts are correctly installed, incorrect installation can lead to
a danger.
We recommend that, where possible, all items are assembled near the area in
which they will be placed in use, to avoid moving the product unnecessarily once
assembled.
Ensure a secure surface during installation, and place the product always on a flat,
steady and stable surface.
Please read all instructions carefully and keep it for future reference.
Suitable Age: over 9 months
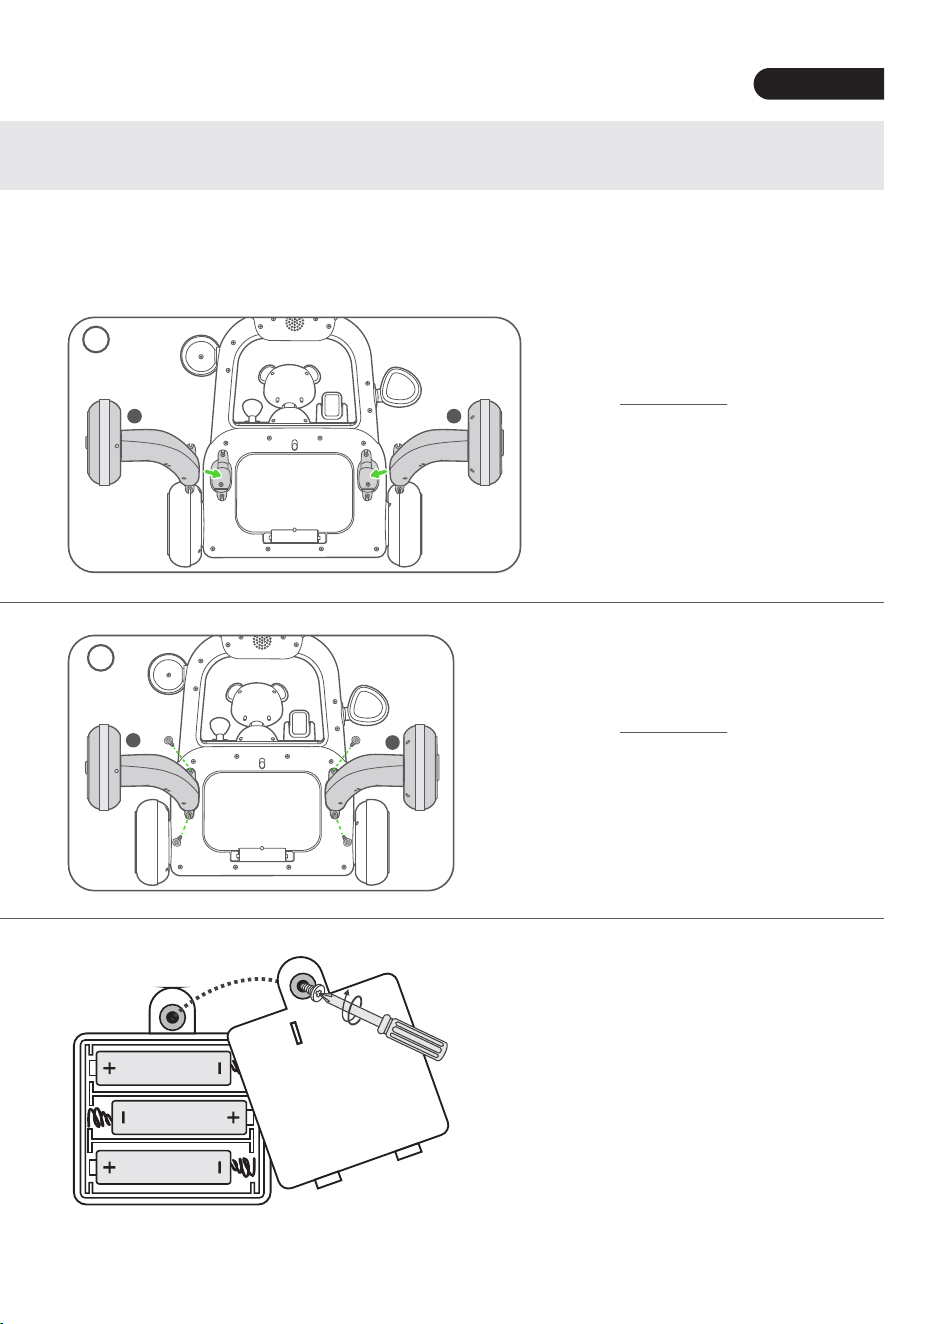
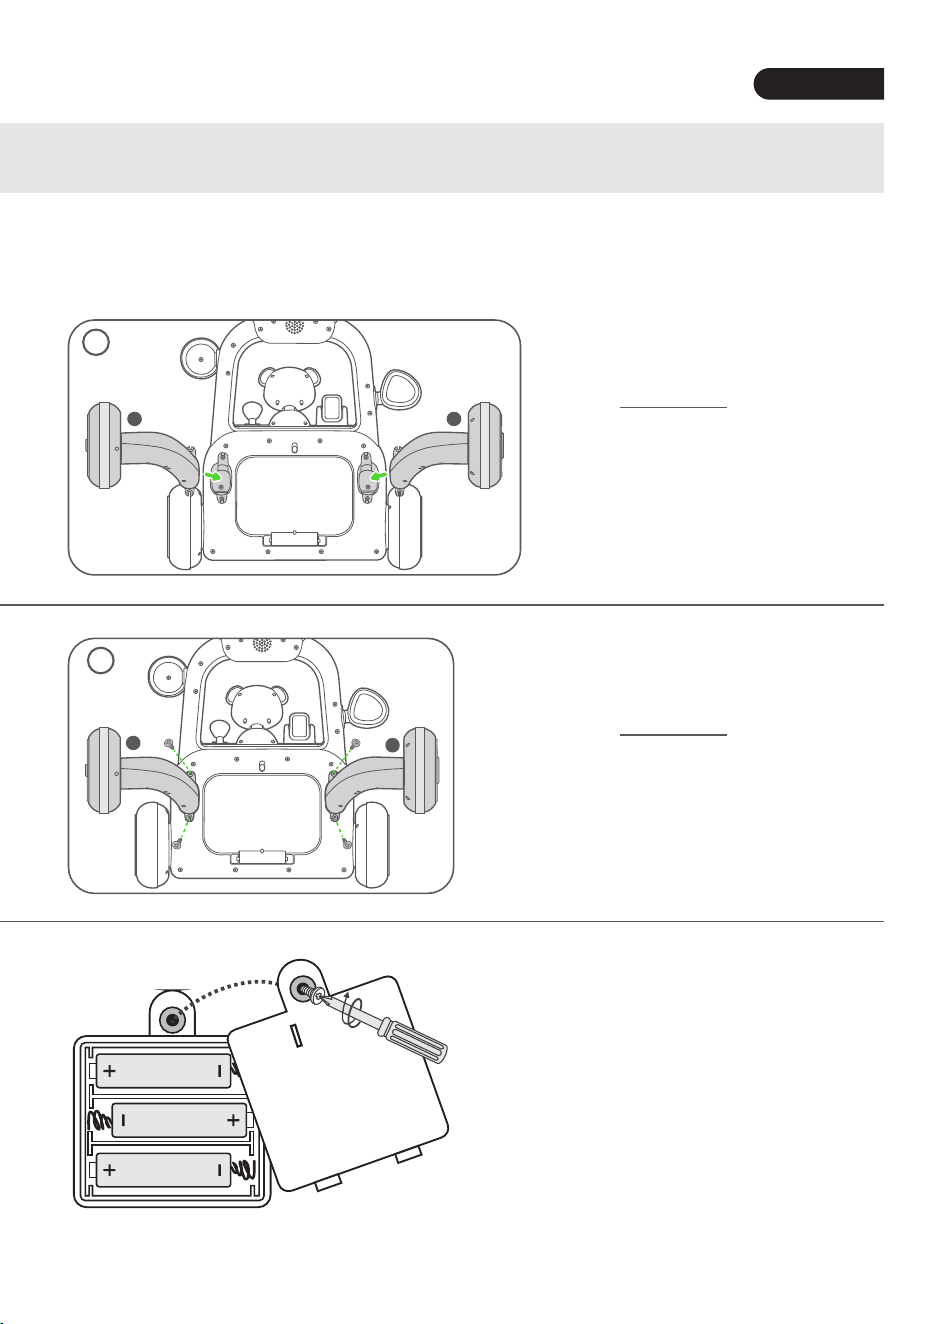
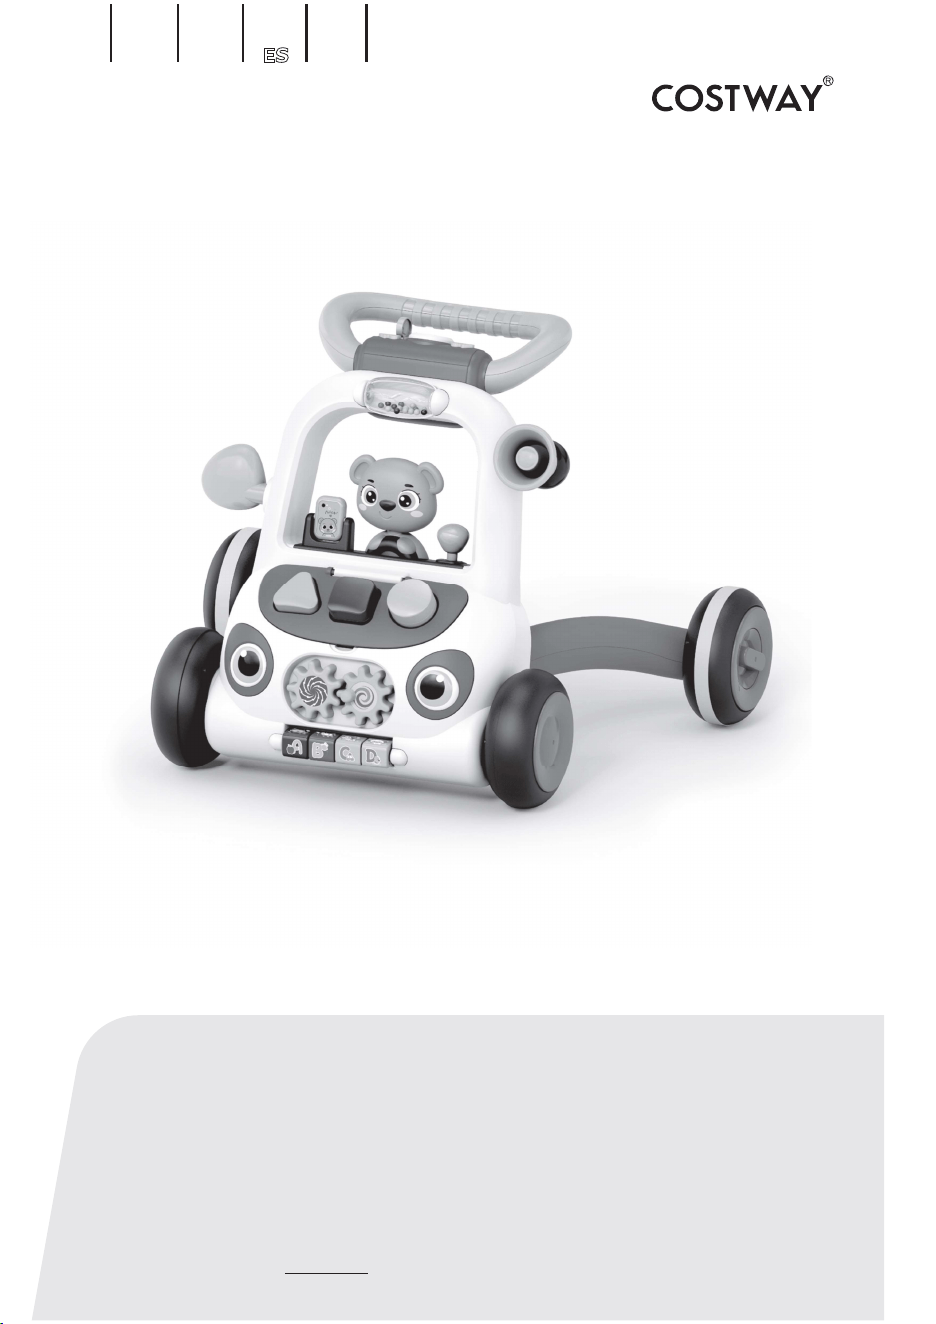
Installing the rear wheels
Step 1
Install wheels A and B
into the corresponding
position as shown.
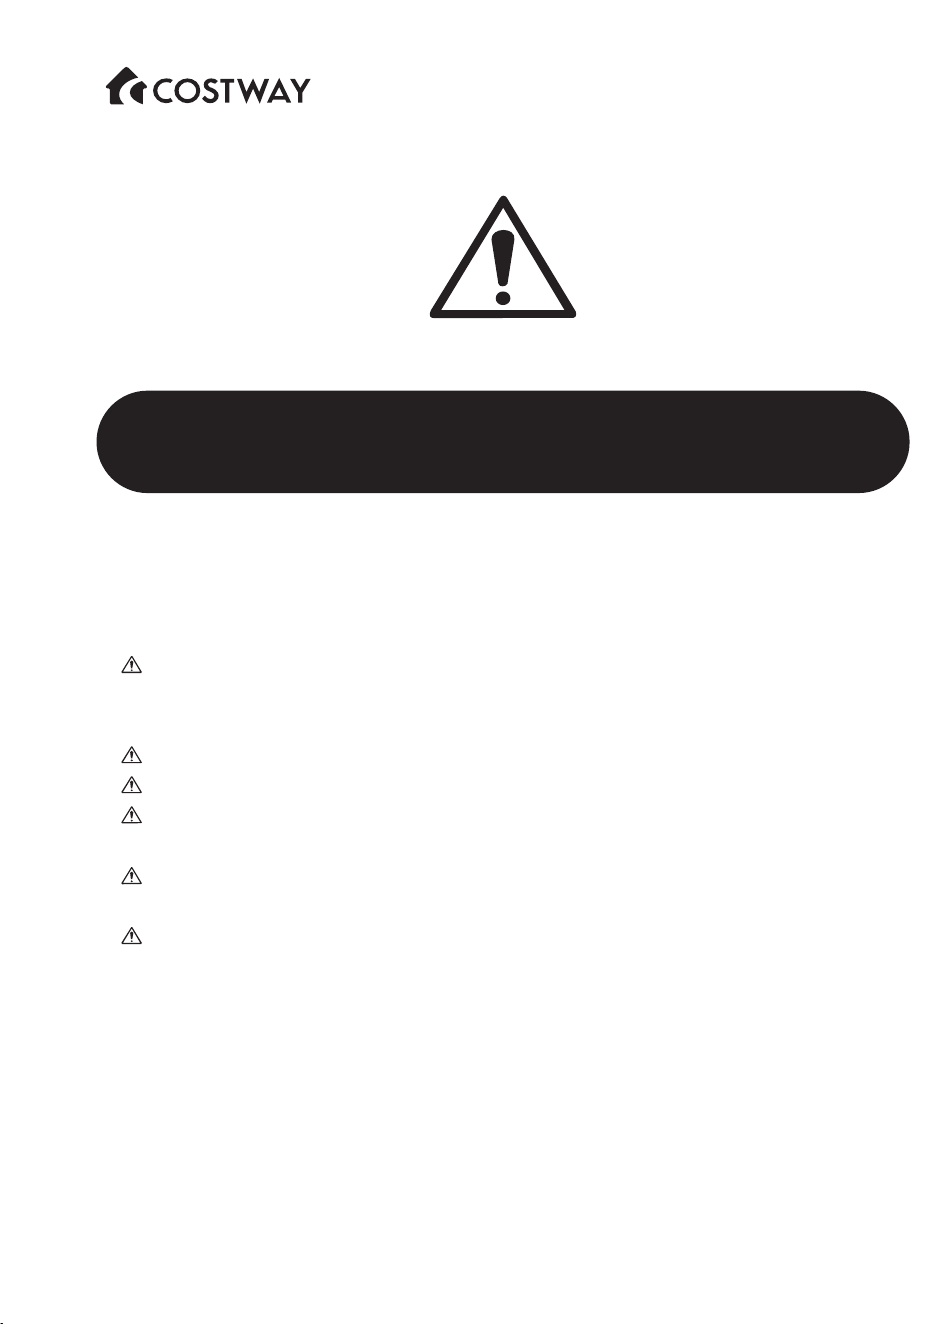
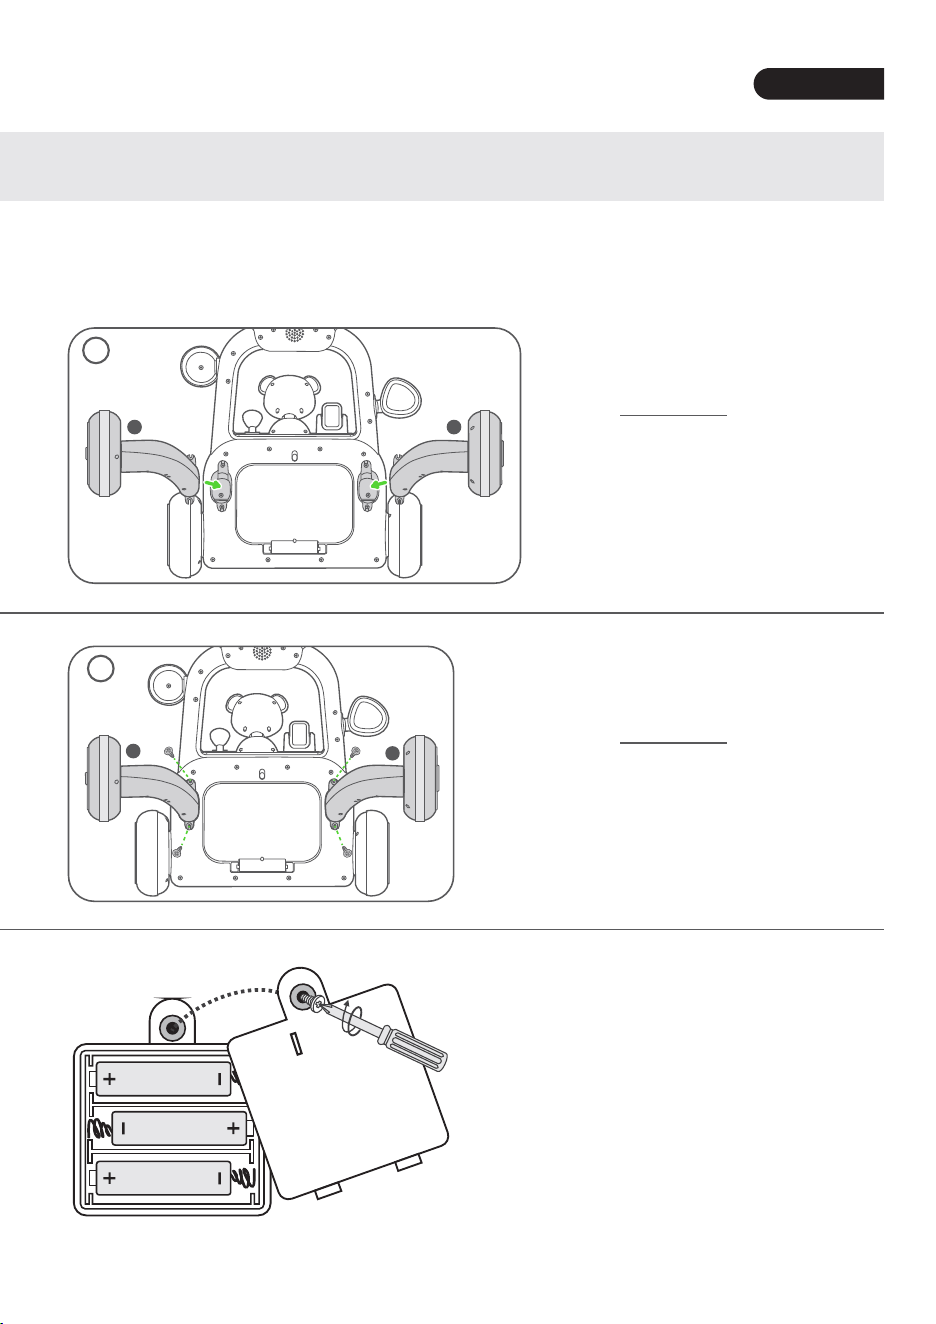
Step 2
Fix wheels in place
with the supplied
screws.
A B
1
A
B
2
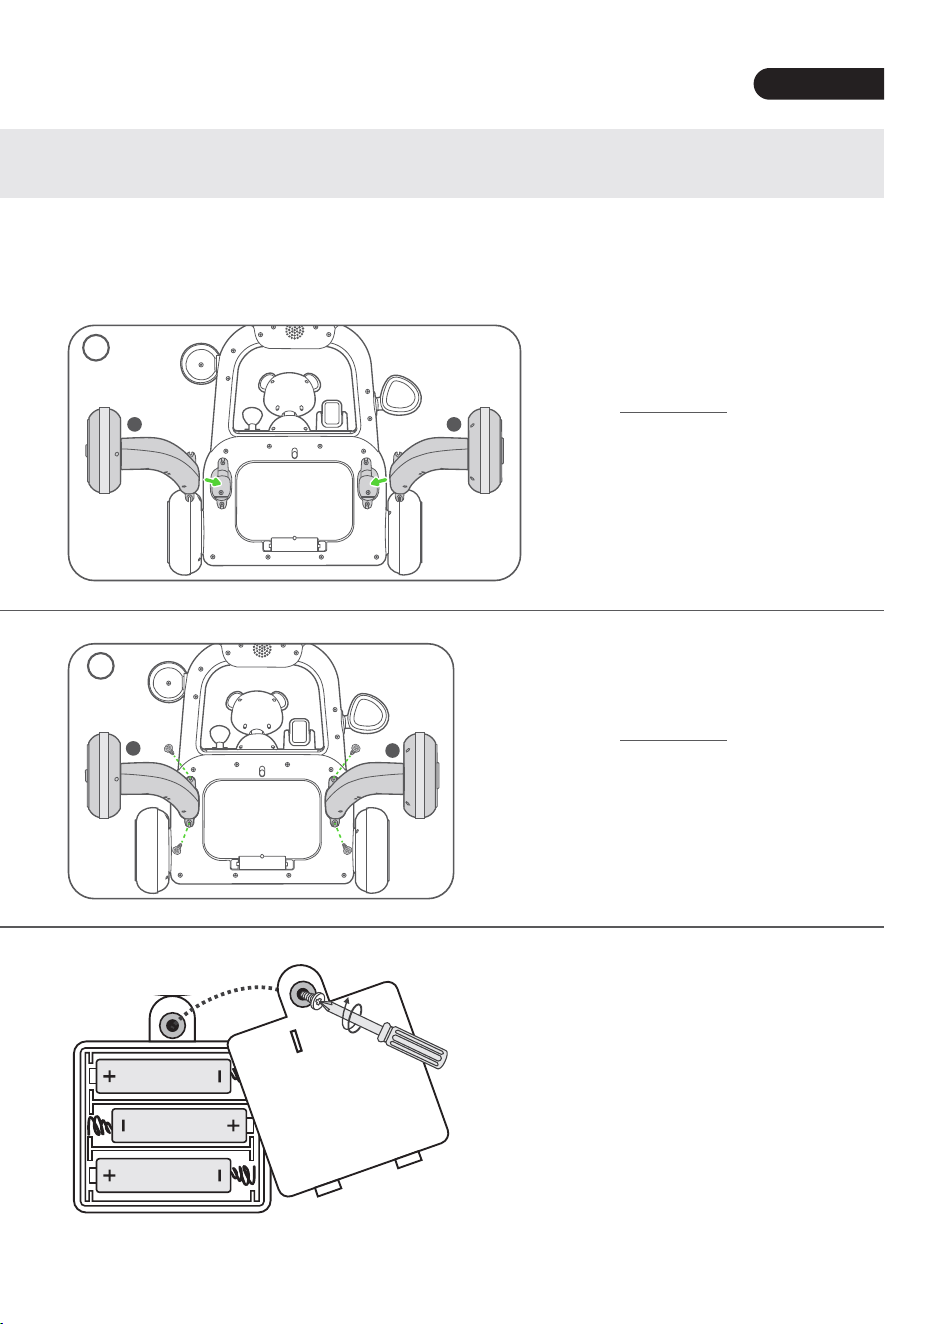
Battery
Installation
Require 3 x 1.5V AA
(not included)
AA
AA
AA

02 03
EN
Before You Start
General Warnings:
Danger! Keep all small parts and packaging materials for this product away from
babies and children, otherwise they may pose a choking hazard.
The product must be installed and used under the supervision of an adult.
Read through each step carefully and follow the proper order.
Remove all Packaging, separate and count all parts and hardware before
installation.
Please ensure that all parts are correctly installed, incorrect installation can lead to
a danger.
We recommend that, where possible, all items are assembled near the area in
which they will be placed in use, to avoid moving the product unnecessarily once
assembled.
Ensure a secure surface during installation, and place the product always on a flat,
steady and stable surface.
Please read all instructions carefully and keep it for future reference.
Suitable Age: over 9 months
Installing the rear wheels
Step 1
Install wheels A and B
into the corresponding
position as shown.
Step 2
Fix wheels in place
with the supplied
screws.
A B
1
A
B
2
Battery
Installation
Require 3 x 1.5V AA
(not included)
AA
AA
AA

Bitte wenden Sie sich bei weiteren Fragen an unseren Kundenservice
Ersatzteile können so schnell wie möglich geliefert werden.
Lauflernhilfe
BC10065
HANDBUCH
DIESE ANLEITUNG ENTHÄLT WICHTIGE SICHERHEITSINFORMATIONEN. BITTE SORGFÄLTIG LESEN UND ZUM SPÄTEREN NACHSCHLAGEN AUFBEWAHREN.
Deutsches Büro: FDS GmbH, Neuer Höltigbaum 36, 22143 Hamburg, Deutschland
Kontaktieren Sie uns !
EN DE FR ES IT PL
Schicken Sie diesen Artikel NICHT zurück,
bitte wenden Sie sich an unseren Kundenservice.

Bitte wenden Sie sich bei weiteren Fragen an unseren Kundenservice
Ersatzteile können so schnell wie möglich geliefert werden.
Lauflernhilfe
BC10065
HANDBUCH
DIESE ANLEITUNG ENTHÄLT WICHTIGE SICHERHEITSINFORMATIONEN. BITTE SORGFÄLTIG LESEN UND ZUM SPÄTEREN NACHSCHLAGEN AUFBEWAHREN.
Deutsches Büro: FDS GmbH, Neuer Höltigbaum 36, 22143 Hamburg, Deutschland
Kontaktieren Sie uns !
DE:cs.de@costway.com
EN DE FR ES IT PL
Schicken Sie diesen Artikel NICHT zurück,
bitte wenden Sie sich an unseren Kundenservice.

02 03
DE
Bevor Sie beginnen
Hinweis zur Montage
Achtung! Halten Sie alle kleinteile und Verpackungsmaterialien fern von Babys und
Kindern, ansonsten besteht Erstickungsgefahr.
Der Artikel muss unter der Aufsicht eines Erwachsenen montiert und benutzt
werden.
Lesen Sie jeden Schritt sorgfältig durch und befolgen Sie die richtige Reihenfolge.
Entfernen Sie alle Verpackungen, Überprüfen Sie, ob alle Teile und Zubehörteile
vorhanden sind.
Bitte stellen Sie sicher, dass alle Teile richtig montiert sind, eine falsche Montage
kann zu einer Gefahr führen.
Wir empfehlen, alle Teile möglichst in der Nähe des Aufstellungsortes zu
montieren, um unnötige Bewegungen nach der Montage zu vermeiden.
Achten Sie bei der Montage auf einen sicheren Untergrund und stellen Sie den
Artikel immer auf eine ebene, feste und stabile Fläche.
Bitte sorgfältig lesen und zum späteren Nachschlagen aufbewahren.
Geeignetes Alter: über 9 Monate
Montage der Hinterräder
Schritt 1
Montieren Sie die
Räder A und B in der
entsprechenden
Position wie
abgebildet.
Schritt 2
Befestigen Sie die
Räder mit den
mitgelieferten
Schrauben.
A B
1
A
B
2
Einlegen der
Batterien
Benötigen Sie 3 x 1,5V
AA (nicht enthalten)
AA
AA
AA

VEUILLEZ NOUS DONNER L’OCCASION DE L’AMÉLIORER !
Contactez notre service à la clientèle pour obtenir de l’aide.
Les remplacements de pièces manquantes ou endommagées seront
expédiés dès que possible !
Contactez-nous !
Ne retournez pas cet article.
FR : [email protected]
Trotteur pour Bébé
BC10065
MANUEL DE L’UTILISATEUR
Contactez notre service à la clientèle pour obtenir de l’aide.
EN DE FR ES IT PL
CE MANUEL CONTIENT DES INFORMATIONS IMPORTANTES SUR LA SÉCURITÉ. VEUILLEZ LE LIRE ET LE CONSERVER POUR TOUTE RÉFÉRENCE FUTURE.
FR office: Saint Vigor d'Ymonville
VEUILLEZ NOUS DONNER L’OCCASION DE L’AMÉLIORER !
Contactez notre service à la clientèle pour obtenir de l’aide.
Les remplacements de pièces manquantes ou endommagées seront
expédiés dès que possible !
Contactez-nous !
Ne retournez pas cet article.
FR : cs.fr@costway.com
Trotteur pour Bébé
BC10065
MANUEL DE L’UTILISATEUR
Contactez notre service à la clientèle pour obtenir de l’aide.
EN DE FR ES IT PL
CE MANUEL CONTIENT DES INFORMATIONS IMPORTANTES SUR LA SÉCURITÉ. VEUILLEZ LE LIRE ET LE CONSERVER POUR TOUTE RÉFÉRENCE FUTURE.
FR office: Saint Vigor d'Ymonville

02 03
Avant de Commencer
Avertissements Généraux :
Danger ! Éloignez toutes les petites pièces et le matériel d’emballage des bébés et
des enfants pour éviter un risque d’étouffement.
Le produit doit être installé et utilisé sous la surveillance d’un adulte.
Lisez attentivement chaque étape et suivez le bon ordre.
Retirez tous les emballages, séparez et comptez toutes les pièces et le matériel
avant l’installation.
Assurez-vous que toutes les pièces soient correctement installées. Une installation
incorrecte peut entraîner un danger.
Assurez une surface sûre pendant l’assemblage et placez le produit toujours sur
une surface plane et stable.
Veuillez lire attentivement toutes les instructions et les conserver pour la référence
ultérieure.
FR
Âge approprié : plus de 9 mois
Assemblage des roues arrière
Étape 1
Montez les roues (A et
B) dans la position
correspondante
comme indiqué sur la
figure.
Étape 2
Fixez les roues en
place avec les vis
fournies.
A B
1
A
B
2
Installation
des piles
Trois piles AA de 1,5
V sont requises (non
incluses)
AA
AA
AA

¡Por favor dénos una oportunidad para hacerlo bien y hacerlo mejor!
Primero póngase en contacto con nuestro amable departamento de
servicio al cliente para obtener ayuda. ¡Los reemplazos de piezas
faltantes o dañadas se enviarán lo antes posible!
¡Contáctenos!
NO devuelva este artículo.
ES : [email protected]
Andador para Bebé
BC10065
MANUAL DEL USUARIO
ESTE MANUAL DE INSTRUCCIONES CONTIENE
IMPORTANTES
INFORMACIONES DE SEGURIDAD, POR FAVOR, LÉALO Y GUÁRDELO PARA FUTURAS CONSULTAS.
Primero póngase en contacto con nuestro amable departamento
de servicio al cliente para obtener ayuda.
EN DE FR ES IT PL
¡Por favor dénos una oportunidad para hacerlo bien y hacerlo mejor!
Primero póngase en contacto con nuestro amable departamento de
servicio al cliente para obtener ayuda. ¡Los reemplazos de piezas
faltantes o dañadas se enviarán lo antes posible!
¡Contáctenos!
NO devuelva este artículo.
ES : cs.es@costway.com
Andador para Bebé
BC10065
MANUAL DEL USUARIO
ESTE MANUAL DE INSTRUCCIONES CONTIENE
IMPORTANTES
INFORMACIONES DE SEGURIDAD, POR FAVOR, LÉALO Y GUÁRDELO PARA FUTURAS CONSULTAS.
Primero póngase en contacto con nuestro amable departamento
de servicio al cliente para obtener ayuda.
EN DE FR ES IT PL
02 03
Antes de Empezar
Advertencias Generales:
¡Peligro! Mantenga todas las piezas pequeñas y los materiales de embalaje de este
producto fuera del alcance de los bebés y los niños, ya que, de lo contrario, pueden
suponer un peligro de asfixia.
El producto debe instalarse y usarse bajo la supervisión de un adulto.
Lea cada paso cuidadosamente y siga el orden correcto.
Retire todo el embalaje, separe y cuente todas las piezas y los accesorios antes de
la instalación.
Asegúrese de que todas las piezas estén instaladas correctamente, una instalación
incorrecta puede provocar un peligro.
Asegure una superficie segura durante el montaje, y coloque el producto siempre
sobre una superficie plana, firme y estable.
Lea todas las instrucciones detenidamente y guárdelas para futuras referencias.
ES
Edad Adecuada: más de 9 meses
Montaje de Ruedas Traseras
Paso 1
Monte las ruedas (A y
B) en la posición
correspondiente como
se muestra.
Paso 2
Fije las ruedas en
su lugar con los
tornillos
suministrados.
A B
1
A
B
2
Instalación
de Pilas
Requiere tres pilas
AA de 1,5 V (no
incluidas)
AA
AA
AA

Girello per Bambini
BC10065
MANUALE UTENTE
QUESTO MANUALE DI ISTRUZIONI CONTIENE IMPORTANTI INFORMAZIONI SULLA SICUREZZA. SI PREGA DI LEGGERE E CONSERVARE PER RIFERIMENTO FUTURO.
EN DE FR ES IT PL
Vi preghiamo di darci la possibilità di fare bene e fare di meglio!
Si prega di contattare prima il nostro servizio clienti per assistenza.
Le parti di ricambio per le parti mancanti o danneggiate verranno spedite al più presto!
Contattaci !
NON restituire questo articolo.
Si prega di contattare prima il nostro servizio clienti per assistenza.

Girello per Bambini
BC10065
MANUALE UTENTE
QUESTO MANUALE DI ISTRUZIONI CONTIENE IMPORTANTI INFORMAZIONI SULLA SICUREZZA. SI PREGA DI LEGGERE E CONSERVARE PER RIFERIMENTO FUTURO.
EN DE FR ES IT PL
Vi preghiamo di darci la possibilità di fare bene e fare di meglio!
Si prega di contattare prima il nostro servizio clienti per assistenza.
Le parti di ricambio per le parti mancanti o danneggiate verranno spedite al più presto!
Contattaci !
NON restituire questo articolo.
IT: cs.it@costway.com
Si prega di contattare prima il nostro servizio clienti per assistenza.

02 03
Prima di iniziare
Avvertenza
Pericolo! Tenere tutte le piccole parti e i materiali di imballaggio di questo prodotto
lontano da neonati e bambini, altrimenti potrebbero rappresentare un rischio di
soffocamento.
Il prodotto deve essere installato e utilizzato sotto la supervisione di un adulto.
Leggere attentamente ogni passo e seguire l'ordine corretto.
Rimuovere tutti gli imballaggi, separare e contare tutte le parti e tutti gli accessori.
Si prega di assicurarsi che tutte le parti siano installate correttamente,
un'installazione errata può portare a un pericolo.
Si consiglia, ove possibile, di montare tutti gli articoli vicino alla zona in cui verranno
posti in uso, per evitare di spostare inutilmente il prodotto una volta assemblato.
Garantire una superficie sicura durante il montaggio e posizionare il prodotto sempre
su una superficie piana, stabile.
Si prega di leggere attentamente tutte le istruzioni e conservarle per riferimento futuro.
IT
Età applicabile: Più di 9 mesi
Montare le ruote posteriori
Passo 1
Montare le ruote A e B
nella posizione corris-
pondente come
mostrato.
Passo 2
Fissare le ruote in
posizione con le viti
forniti.
A B
1
A
B
2
Montaggio della
Batteria
Richiede tre batterie
AA da 1,5 V (non
incluse)
AA
AA
AA

Chodzik dla dzieci
BC10065
INSTRUKCJAOBSŁUGI
NINIEJSZA INSTRUKCJA ZAWIERA ISTOTNEINFORMACJEDOTYCZĄCEBEZPIECZEŃSTWA.PROSIMYOZAPOZNANIESIĘZNIĄIZACHOWANIEJEJDOWGLĄDUWPRZYSZŁOŚCI.
EN DE FR ES IT PL
Wrazieproblemówskontaktujsięznami!
Jeślipotrzebujeszpomocy,skontaktujsięznaszymprzyjaznymdziałemobsługiklienta.
Wymianauszkodzonychlubbrakującychczęścizostanieprzeprowadzona
takszybko,jaktomożliwe!
Nie zwracaj tego produktu.
Skontaktujsięznaszymdziałemobsługiklienta,abyuzyskać
pomoc.
Skontaktujsięznami!
PLoffice:Gdańsk

Chodzik dla dzieci
BC10065
INSTRUKCJAOBSŁUGI
NINIEJSZA INSTRUKCJA ZAWIERA ISTOTNEINFORMACJEDOTYCZĄCEBEZPIECZEŃSTWA.PROSIMYOZAPOZNANIESIĘZNIĄIZACHOWANIEJEJDOWGLĄDUWPRZYSZŁOŚCI.
EN DE FR ES IT PL
Wrazieproblemówskontaktujsięznami!
Jeślipotrzebujeszpomocy,skontaktujsięznaszymprzyjaznymdziałemobsługiklienta.
Wymianauszkodzonychlubbrakującychczęścizostanieprzeprowadzona
takszybko,jaktomożliwe!
Nie zwracaj tego produktu.
Skontaktujsięznaszymdziałemobsługiklienta,abyuzyskać
pomoc.
Skontaktujsięznami!
PL: sklep@costway.com
PLoffice:Gdańsk

02 03
Zanim Zaczniesz
Ogólneostrzeżenia:
Niebezpieczeństwo!Wszystkiemałeczęściimateriałyopakowaniowenależy
przechowywaćzdalaodniemowlątidzieci,wprzeciwnymraziemogąstwarzaćryzyko
zadławienia.
Produktmusibyćzainstalowanyiużywanypodnadzoremosobydorosłej.
Przeczytajuważniekażdykrokipostępujwewłaściwejkolejności.
Usuńopakowanieiupewnijsię,żezestawzawierawszystkieczęściielementy
montażowe.
Upewnijsię,żewszystkieczęścisązainstalowanepoprawnie-nieprawidłowa
instalacjamożeprowadzićdowypadków.
Zalecamy,abywmiaręmożliwościwszystkieelementybyłymontowanewpobliżu
miejsca,wktórymbędąużywane,abyuniknąćniepotrzebnegoprzenoszeniaproduktu
pozłożeniu.
Zapewnijbezpiecznąprzestrzeńrobocząpodczasmontażuiupewnijsię,żeprodukt
znajdujesięnapłaskiejistabilnejpowierzchni.
Przeczytajuważniewszystkieinstrukcjeizachowajjenaprzyszłość.
PL
Odpowiedniwiek:>9miesięcy
Montażtylnychkół
Krok 1
ZainstalujkołaAiBw
odpowiedniej pozycji,
jak pokazano.
Krok 2
Zamocujkołaza
pomocą
dostarczonychśrub.
A B
1
A
B
2
Montaż
baterii
Wymaga baterii 3 x
1,5 V AA (brak w
zestawie)
AA
AA
AA