THIS INSTRUCTION BOOKLET CONTAINS IMPORTANT SAFETY INFORMATION. PLEASE READ AND KEEP FOR FUTURE REFERENCE.
EN
EN
DE
FR
ES
IT
PL
DE FR ES IT PL
USER'S MANUAL/HANDBUCH
/MANUEL DE L'UTILISATEUR/MANUAL DEL USUARIO
/MANUALE UTENTE/INSTRUKCJA OBSŁUGI
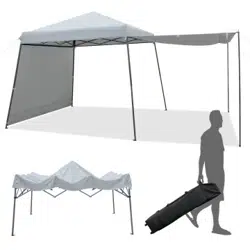
NP10301
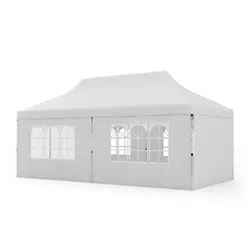
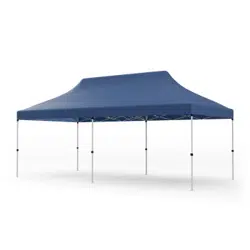
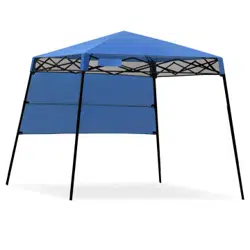
Folding Canopy / Pavillon / Tente Pliable / Pabellón /
Tenda Pieghevole / Pawilon ogrodowy z moskitierą
With your inspiring rating, COSTWAY will be more consistent to offer you EASY
SHOPPING EXPERIENCE, GOOD PRODUCTS and EFFICIENT SERVICE!
Mit Ihrer inspirierenden Bewertung wird COSTWAY konsistenter sein, um Ihnen EIN
SCHÖNES EINKAUFSERLEBNIS, GUTE PRODUKTE und EFFIZIENTEN SERVICE zu
bieten!
Avec votre évaluation inspirante, COSTWAY continuera à fournir une EXPÉRIENCE
D’ACHAT PRATIQUE, des PRODUITS DE QUALITÉ et un SERVICE EFFICACE !
Con su calificación inspiradora, COSTWAY será más consistente para ofrecerle
EXPERIENCIA DE COMPRA FÁCIL, BUENOS PRODUCTOS y SERVICIO EFICIENTE.
Con la tua valutazione incoraggiante, COSTWAY sarà più coerente per offrirti
ESPERIENZA DI ACQUISTO FACILE, BUONI PRODOTTI e SERVIZIO EFFICIENTE!
Dzięki twojej opinii COSTWAY będzie mógł oferować jeszcze WYGODNIEJSZE
ZAKUPY, LEPSZE PRODUKTY i SPRAWNIEJSZĄ OBSŁUGĘ KLIENTA.
US office: Fontana UK office: Ipswich AU office: Truganina
DE office: FDS GmbH, Neuer Höltigbaum 36, 22143 Hamburg, Deutschland
FR office: Saint Vigor d'Ymonville
PL office: Gdańsk
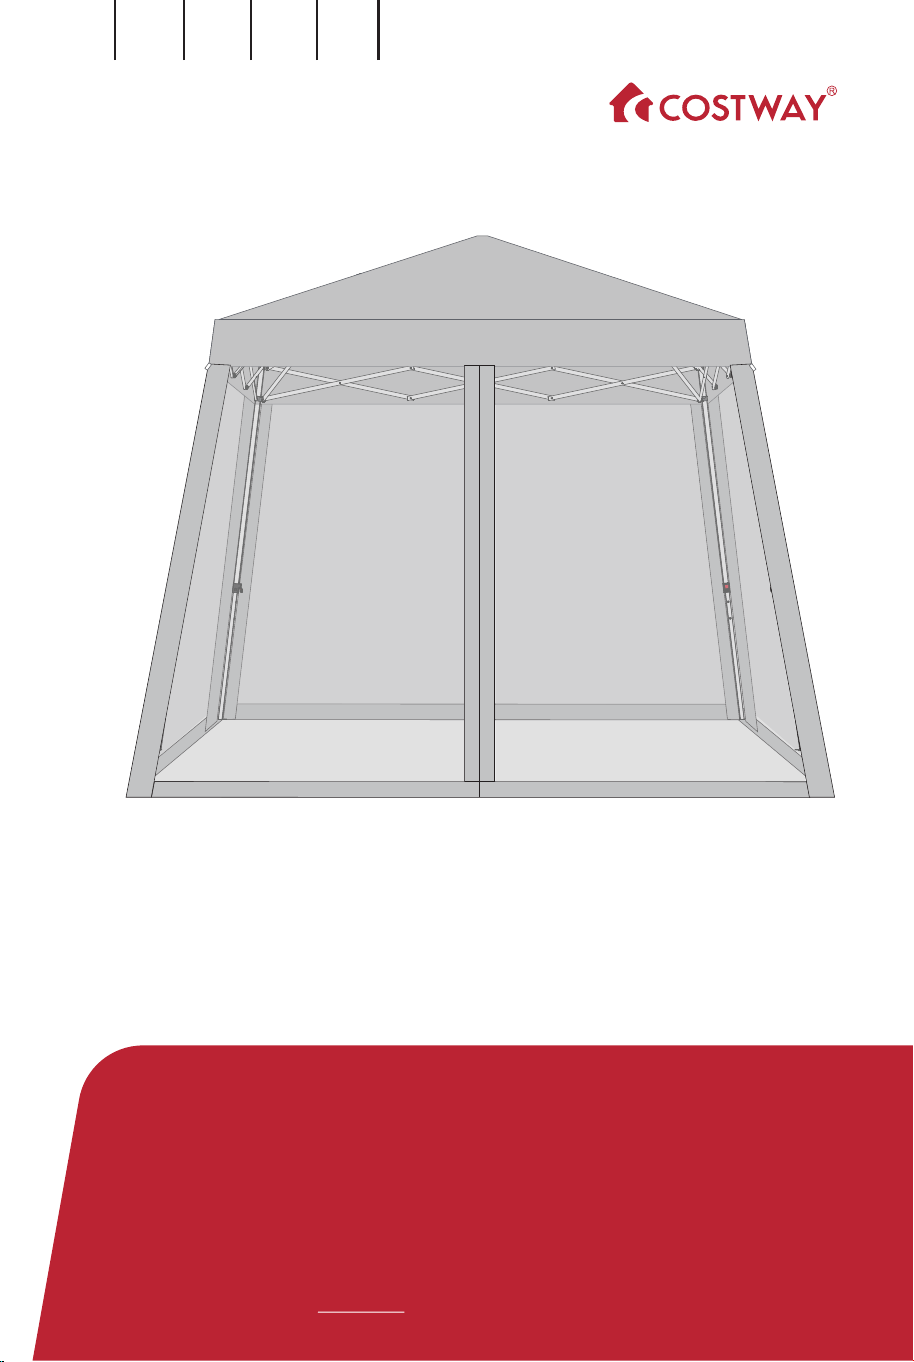
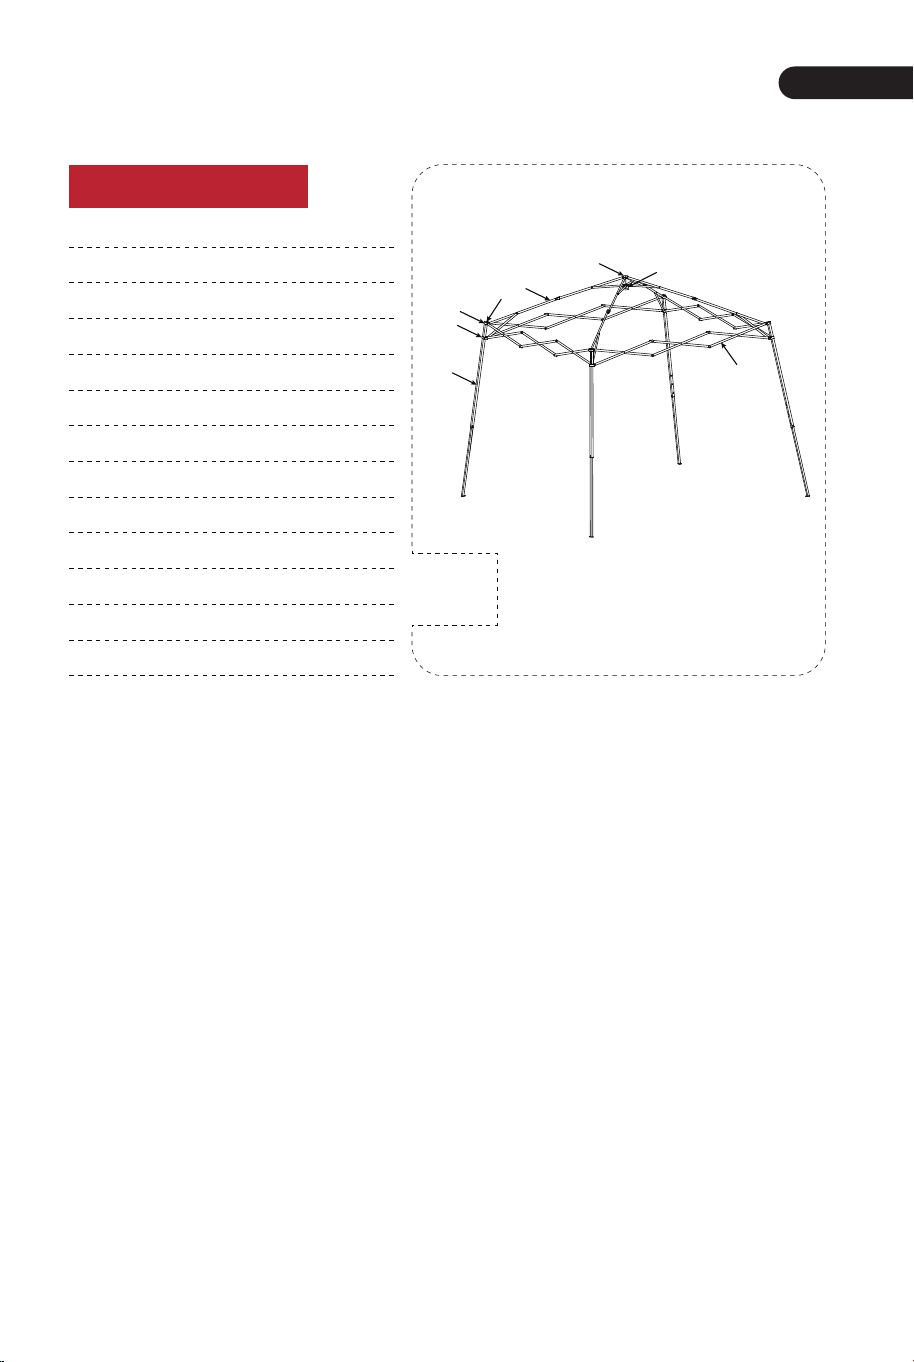
A
B
F
C
D
E
H
G
IMPORTANT:
Carefully read and follow the instructions provided with this
product.
WARNING:
Keep all flame and heat sources away from this canopy top and
sidewall fabric. The canopy top and sidewalls are made with
flame-resistant fabric which meets CPAl-84 specification. It is NOT
FIRE PROOF. The fabric will burn if left in continuous contact with
any flame source. The application of any foreign substance to this
fabric may render the flame-resistant properties ineffective.
WARNING:
Do not set up or leave the canopy unattended in the following
conditions: gusty wind, rain, hail, sleet, snow, drizzle, or any other
harsh weather conditions.
Replacement
Part
A
B
C
D
E
F
G
H
I
J
K
L
Description
Central Pole
Central Bottom Hub
Top Cap
Top Bracket
Slider
Ceiling Assembly
Eave Assembly
Leg Assembly
Fabric Top
wheeled Storage Bag
Stake
Guy Rope
EN DE
A
B
F
C
D
E
H
G
WICHTIG!
Lesen und befolgen Sie sorgfältig die Anweisungen, die diesem
Artikel beiliegen.
WARNUNG!
Halten Sie alle Flammen und Wärmequellen von diesem Verdeck-
und Seitenwandstoff fern. Das Verdeck und die Seitenwände sind
aus flammfestem Stoff hergestellt, der die CPAl-84-Spezifikation
erfüllt. Es ist NICHT FEUERBESTÄNDIG. Der Stoff brennt, wenn er
in ständigem Kontakt mit einer Flammenquelle steht. Das
Aufbringen von Fremdkörpern auf dieses Gewebe kann die
flammhemmenden Eigenschaften unwirksam machen.
WARNUNG!
Stellen Sie die Überdachung nicht auf und lassen Sie sie nicht
unbeaufsichtigt, wenn sie den folgenden Bedingungen ausgesetzt
ist: böiger Wind, Regen, Hagel, Graupel, Schnee, Nieselregen oder
anderen rauen Wetterbedingungen.
Teileliste
Teil
A
B
C
D
E
F
G
H
I
J
K
L
Teilename
Zentrale Stange
Zentrale untere Stütze
Obere Kappe
Obere Halterung
Schieber
Verdeck-Montage
Traufmontage
Bein-Montage
Pavillion Verdeck
Aufbewahrungstasche auf Rädern
Heringe
Abspannseil
02 03
A
B
F
C
D
E
H
G
IMPORTANT!
Lisez attentivement et suivez les instructions fournies avec ce
produit.
AVERTISSEMENT:
Gardez toutes les sources de flammes et de chaleur à l'écart de ce
tissu de toit et de paroi latérale. Le dessus et les parois latérales
de la tente sont fabriqués avec un tissu ignifuge conforme à la
spécification CPAl-84. Il n'est PAS ignifugé. Le tissu brûlera s'il est
laissé en contact continu avec une source de flamme. L'application
de toute substance étrangère sur ce tissu peut rendre les
propriétés ignifuges inefficaces.
AVERTISSEMENT:
N'installez pas et ne laissez pas la tente sans surveillance dans les
conditions suivantes : rafales de vent, pluie, grêle, grésil, neige,
bruine ou toute autre condition météorologique difficile.
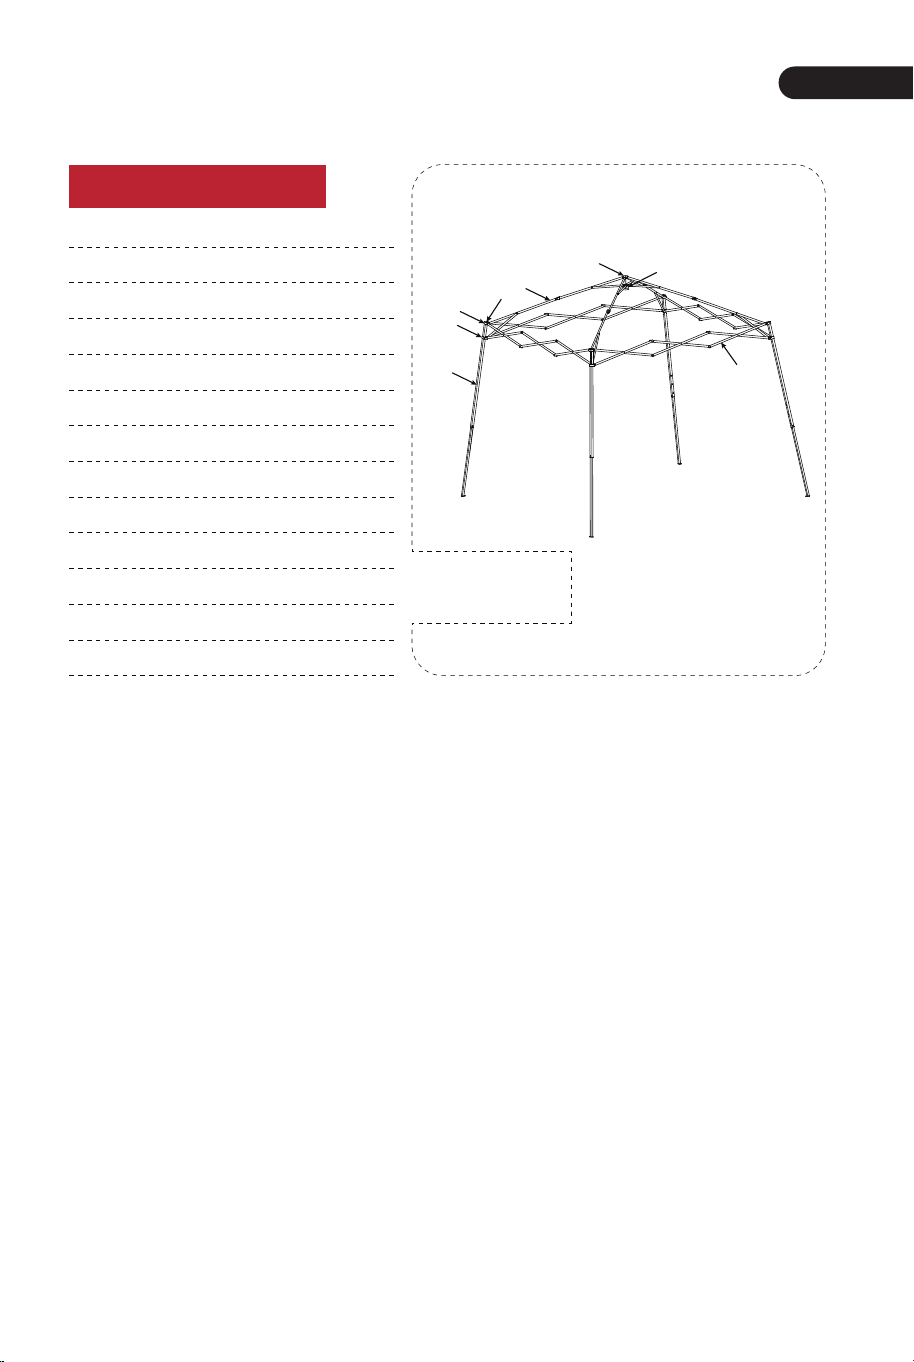
Liste des Pièces
Pièce
A
B
C
D
E
F
G
H
I
J
K
L
Description
Poteau central
Moyeu inférieur central
Capuchon supérieur
Support supérieur
Glissière
Ensemble de plafond
Ensemble avant-toit
Ensemble des jambes
Dessus en tissu
Sac de rangement à roulettes
Piquet
Corde de hauban
A
B
F
C
D
E
H
G
IMPORTANTE:
Lea atentamente y siga las instrucciones proporcionadas con este
producto.
ADVERTENCIA:
Mantenga todas las llamas y fuentes de calor alejadas del tejido de
la parte superior del pabellón y de las paredes laterales. La parte
superior del pabellón y las paredes laterales están fabricadas con
un tejido resistente a las llamas que cumple con la especificación
CPAl-84. NO ES A PRUEBA DE FUEGO. El tejido se quemará si se
deja en contacto continuo con cualquier fuente de llamas. La
aplicación de cualquier sustancia extraña a este tejido puede hacer
que las propiedades de resistencia a las llamas sean ineficaces.
ADVERTENCIA:
No monte ni deje el pabellón desatendido en las siguientes
condiciones: viento fuerte, lluvia, granizo, aguanieve, nieve,
llovizna o cualquier otra condición climática adversa.
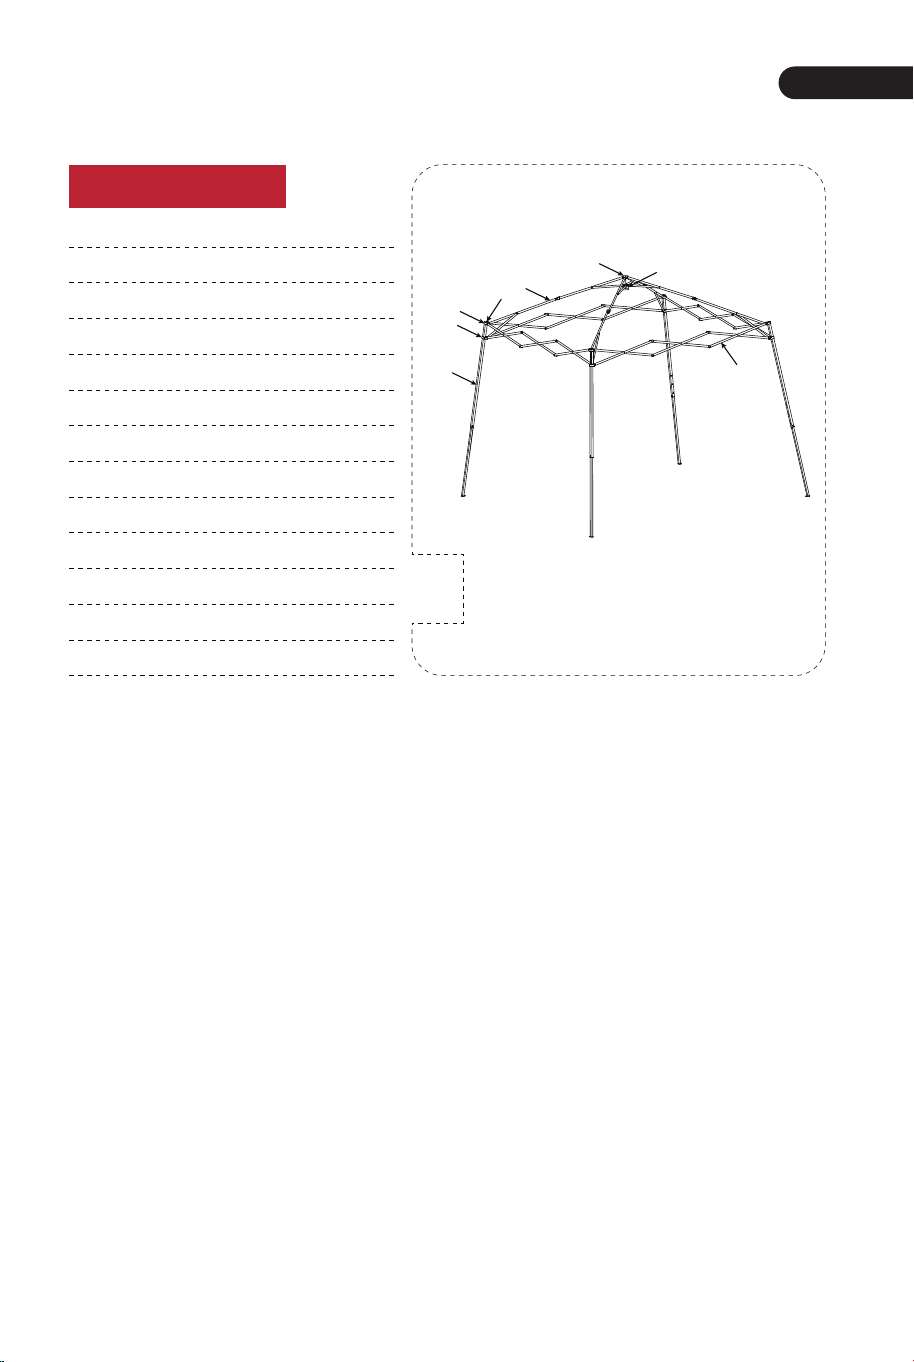
Lista de Piezas
Pieza
A
B
C
D
E
F
G
H
I
J
K
L
Descripción
Poste central
Cubo central inferior
Tapa superior
Soporte superior
Deslizador
Conjunto de techo
Conjunto de alero
Conjunto de patas
Cubierta de tela
Bolsa de almacenamiento con ruedas
Estaca
Cuerda de sujeción
FR ES
04 05
A
B
F
C
D
E
H
G
IMPORTANT!
Lisez attentivement et suivez les instructions fournies avec ce
produit.
AVERTISSEMENT:
Gardez toutes les sources de flammes et de chaleur à l'écart de ce
tissu de toit et de paroi latérale. Le dessus et les parois latérales
de la tente sont fabriqués avec un tissu ignifuge conforme à la
spécification CPAl-84. Il n'est PAS ignifugé. Le tissu brûlera s'il est
laissé en contact continu avec une source de flamme. L'application
de toute substance étrangère sur ce tissu peut rendre les
propriétés ignifuges inefficaces.
AVERTISSEMENT:
N'installez pas et ne laissez pas la tente sans surveillance dans les
conditions suivantes : rafales de vent, pluie, grêle, grésil, neige,
bruine ou toute autre condition météorologique difficile.
Liste des Pièces
Pièce
A
B
C
D
E
F
G
H
I
J
K
L
Description
Poteau central
Moyeu inférieur central
Capuchon supérieur
Support supérieur
Glissière
Ensemble de plafond
Ensemble avant-toit
Ensemble des jambes
Dessus en tissu
Sac de rangement à roulettes
Piquet
Corde de hauban
A
B
F
C
D
E
H
G
IMPORTANTE:
Lea atentamente y siga las instrucciones proporcionadas con este
producto.
ADVERTENCIA:
Mantenga todas las llamas y fuentes de calor alejadas del tejido de
la parte superior del pabellón y de las paredes laterales. La parte
superior del pabellón y las paredes laterales están fabricadas con
un tejido resistente a las llamas que cumple con la especificación
CPAl-84. NO ES A PRUEBA DE FUEGO. El tejido se quemará si se
deja en contacto continuo con cualquier fuente de llamas. La
aplicación de cualquier sustancia extraña a este tejido puede hacer
que las propiedades de resistencia a las llamas sean ineficaces.
ADVERTENCIA:
No monte ni deje el pabellón desatendido en las siguientes
condiciones: viento fuerte, lluvia, granizo, aguanieve, nieve,
llovizna o cualquier otra condición climática adversa.
Lista de Piezas
Pieza
A
B
C
D
E
F
G
H
I
J
K
L
Descripción
Poste central
Cubo central inferior
Tapa superior
Soporte superior
Deslizador
Conjunto de techo
Conjunto de alero
Conjunto de patas
Cubierta de tela
Bolsa de almacenamiento con ruedas
Estaca
Cuerda de sujeción
FR ES
04 05

A
B
F
C
D
E
H
G
IMPORTANTE:
Leggere attentamente e seguire le istruzioni fornite con questo
prodotto.
ADVERTENCIA:
Tenere tutte le fiamme e le fonti di calore lontane dal tessuto nella
parte superiore del padiglione e delle pareti laterali. La parte
superiore del padiglione e le pareti laterali sono realizzate in un
tessuto resistente alla fiamma che soddisfa le specifiche CPAl-84.
NON È IGNIFUGO. Il tessuto brucerà se lasciato in continuo
contatto con qualsiasi fonte di fiamme. L'applicazione di qualsiasi
sostanza estranea a questo tessuto può rendere inefficaci le
proprietà di resistenza alla fiamma.
AVVERTIMENTO:
Non montare o lasciare il padiglione incustodito nelle seguenti
condizioni: vento forte, pioggia, grandine, nevischio, neve,
pioggerellina o altre condizioni meteorologiche avverse.
Lista di Parti
Parte
A
B
C
D
E
F
G
H
I
J
K
L
Descrizione
Posta centrale
Cubo centrale inferiore
Coperchio superiore
Supporto superiore
Cursore
Set di tetto
Set di grondaie
Set di gambe
Rivestimento in tessuto
Borsa portaoggetti con ruote
Palo
Corda di fissaggio
A
B
F
C
D
E
H
G
WAŻNE:
Przed użyciem zapoznaj się z instrukcją. Przestrzegaj wszystkich
ostrzeżeń i informacji zawartych w instrukcji.
OSTRZEŻENIE:
Trzymaj wszystkie elementy z tkaniny z dala od źródeł ciepła i
ognia. Zadaszenie i moskitiera są wykonane z tkaniny, która jest
trudnopalna (zgodnie z CPAI-84), ale NIE JEST OGNIOODPORNA.
Tkanina spłonie pod wpływem długotrwałego kontaktu z ogniem.
Nałożenie jakiejkolwiek substancji na tkaninę może spowodować
zmniejszenie ochrony przed ogniem.
OSTRZEŻENIE:
Nie rozkładaj ani nie zostawiaj pawilonu ogrodowego rozłożonego
podczas silnego wiatru, opadów deszczu, opadów gradu, opadów
deszczu ze śniegiem, opadów śniegu, mżawki lub innych
niekorzystnych warunków pogodowych.
Lista części
Część
A
B
C
D
E
F
G
H
I
J
K
L
Nazwa
Główny drążek
Element rozporowy
Górna nakrętka
Górny wspornik
Prowadnica
Drążek zadaszenia
Stelaż zadaszenia
Noga
Zadaszenie z tkaniny
Torba do przechowywania
Kotwa
Lina
IT PL
06 07
A
B
F
C
D
E
H
G
IMPORTANTE:
Leggere attentamente e seguire le istruzioni fornite con questo
prodotto.
ADVERTENCIA:
Tenere tutte le fiamme e le fonti di calore lontane dal tessuto nella
parte superiore del padiglione e delle pareti laterali. La parte
superiore del padiglione e le pareti laterali sono realizzate in un
tessuto resistente alla fiamma che soddisfa le specifiche CPAl-84.
NON È IGNIFUGO. Il tessuto brucerà se lasciato in continuo
contatto con qualsiasi fonte di fiamme. L'applicazione di qualsiasi
sostanza estranea a questo tessuto può rendere inefficaci le
proprietà di resistenza alla fiamma.
AVVERTIMENTO:
Non montare o lasciare il padiglione incustodito nelle seguenti
condizioni: vento forte, pioggia, grandine, nevischio, neve,
pioggerellina o altre condizioni meteorologiche avverse.
Lista di Parti
Parte
A
B
C
D
E
F
G
H
I
J
K
L
Descrizione
Posta centrale
Cubo centrale inferiore
Coperchio superiore
Supporto superiore
Cursore
Set di tetto
Set di grondaie
Set di gambe
Rivestimento in tessuto
Borsa portaoggetti con ruote
Palo
Corda di fissaggio
A
B
F
C
D
E
H
G
WAŻNE:
Przed użyciem zapoznaj się z instrukcją. Przestrzegaj wszystkich
ostrzeżeń i informacji zawartych w instrukcji.
OSTRZEŻENIE:
Trzymaj wszystkie elementy z tkaniny z dala od źródeł ciepła i
ognia. Zadaszenie i moskitiera są wykonane z tkaniny, która jest
trudnopalna (zgodnie z CPAI-84), ale NIE JEST OGNIOODPORNA.
Tkanina spłonie pod wpływem długotrwałego kontaktu z ogniem.
Nałożenie jakiejkolwiek substancji na tkaninę może spowodować
zmniejszenie ochrony przed ogniem.
OSTRZEŻENIE:
Nie rozkładaj ani nie zostawiaj pawilonu ogrodowego rozłożonego
podczas silnego wiatru, opadów deszczu, opadów gradu, opadów
deszczu ze śniegiem, opadów śniegu, mżawki lub innych
niekorzystnych warunków pogodowych.
Lista części
Część
A
B
C
D
E
F
G
H
I
J
K
L
Nazwa
Główny drążek
Element rozporowy
Górna nakrętka
Górny wspornik
Prowadnica
Drążek zadaszenia
Stelaż zadaszenia
Noga
Zadaszenie z tkaniny
Torba do przechowywania
Kotwa
Lina
IT PL
06 07
Set Up The Canopy / Aufstellen des Pavillons /
Installation de la Tente / Montar el Pabellón /
Montaggio del Padiglione / Rozkładanie pawilonu
ogrodowego
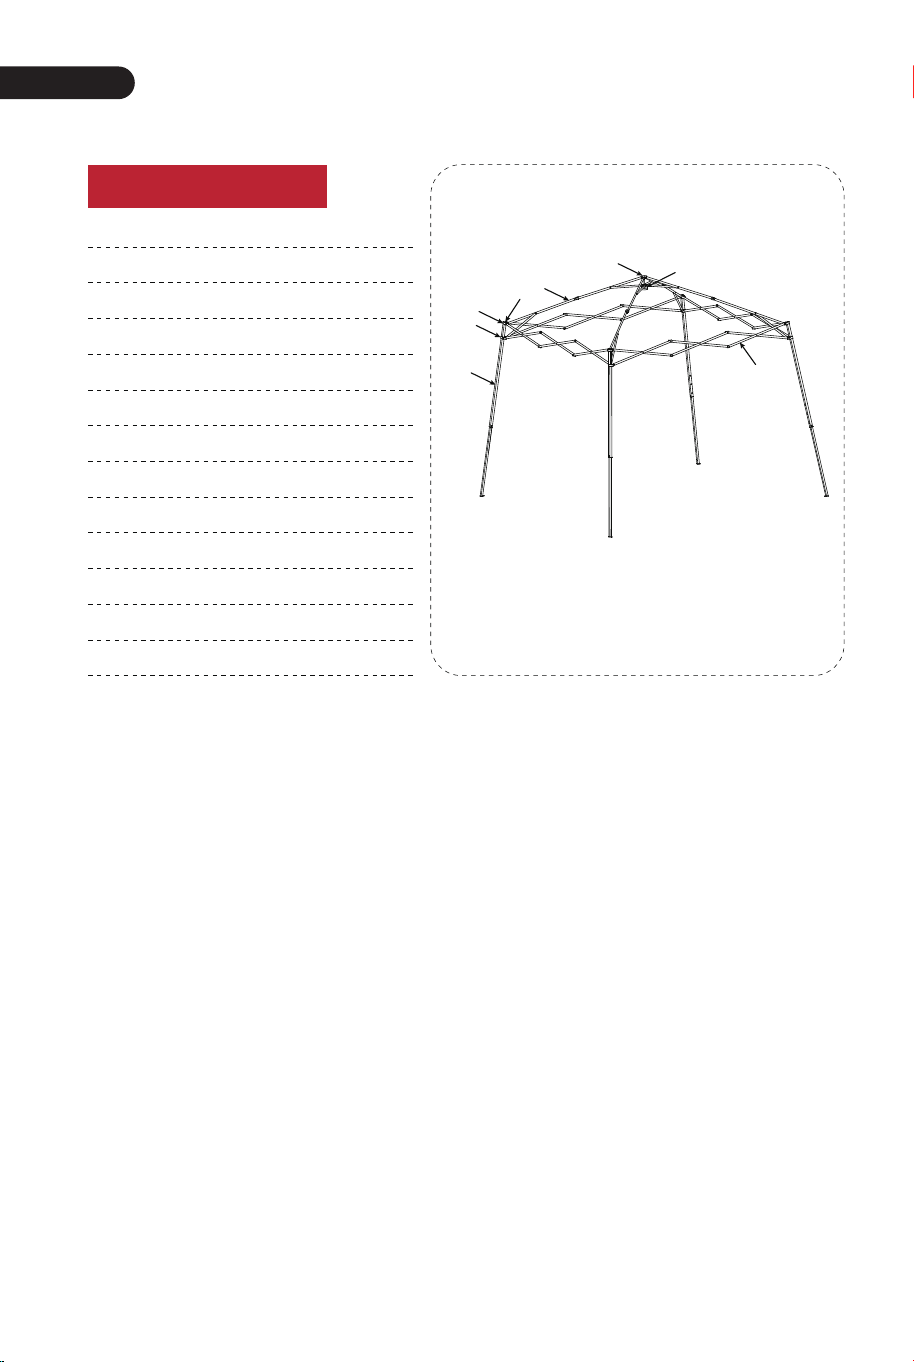
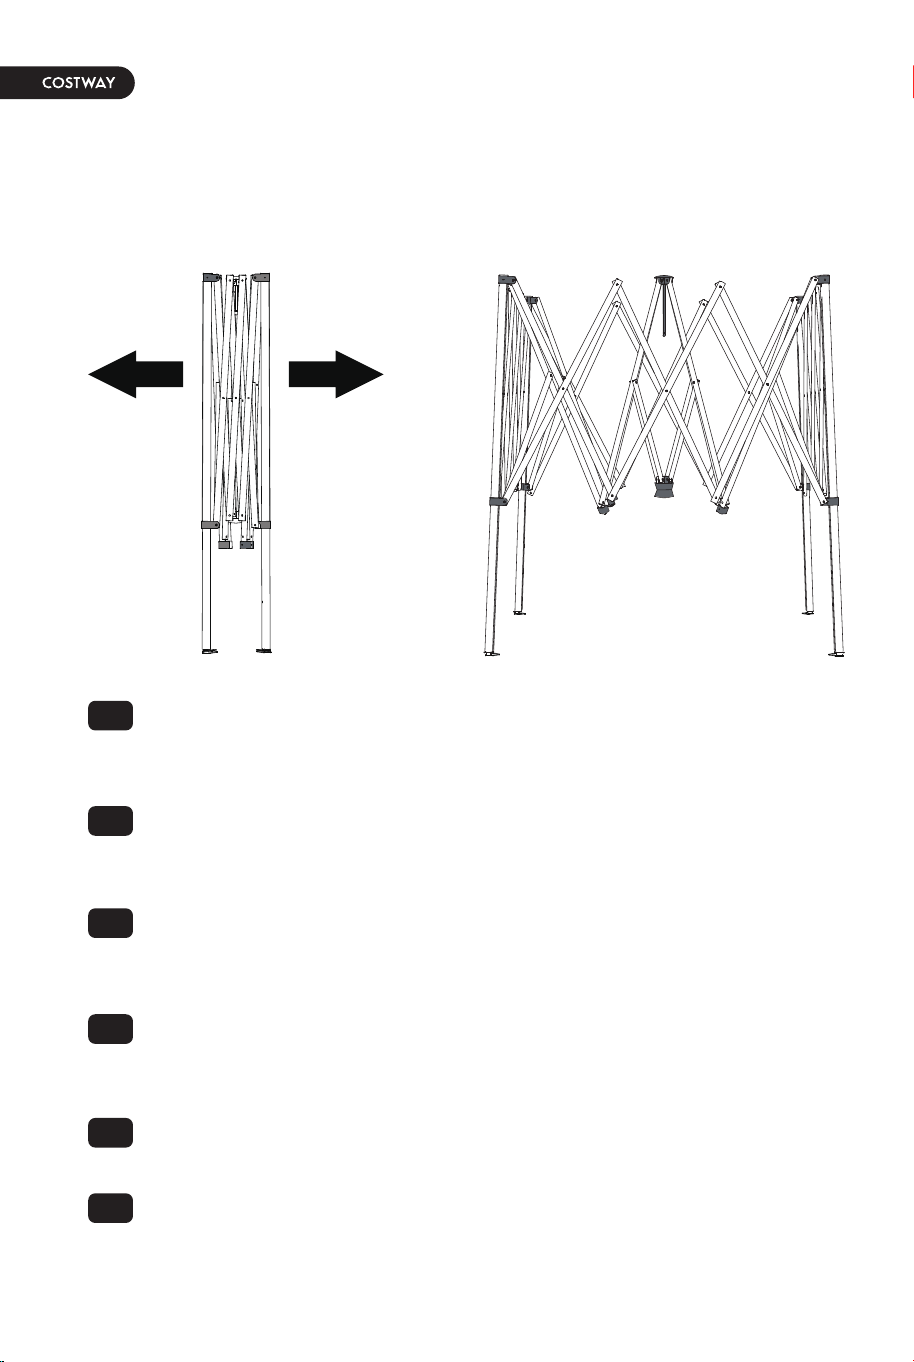
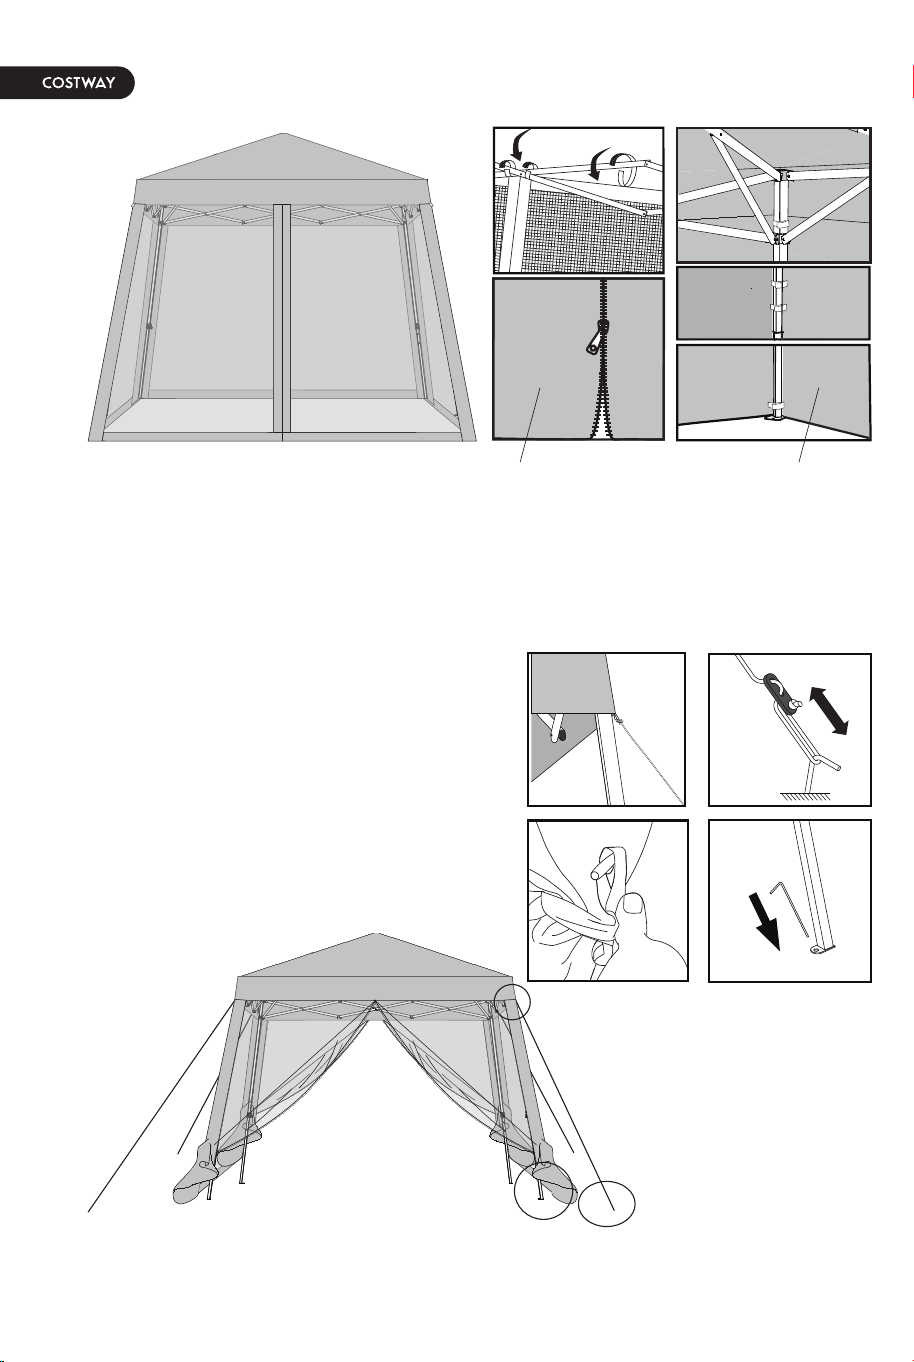
1. Stand on the opposite side of your partner and lift the
frame off of the ground while walking backwards away from
your partner.
1. Stellen Sie sich auf die gegenüberliegende Seite Ihres
Partners und heben Sie den Rahmen vom Boden ab,
während Sie rückwärts von Ihrem Partner weggehen.
1. Tenez-vous du côté opposé de votre partenaire et
soulevez le cadre du sol tout en vous éloignant de votre
partenaire.
1. Párese en el lado opuesto de su compañero y levante el
marco del suelo mientras camina hacia atrás alejándose de
su compañero.
1. Stai sul lato opposto del tuo partner e solleva il telaio da
terra mentre cammini all'indietro lontano dal tuo partner.
1. Wraz z drugą osobą złapcie ramę z obu jej stron.
Następnie unieście i pociągnijcie ramę na zewnątrz.
EN
DE
FR
ES
IT
PL
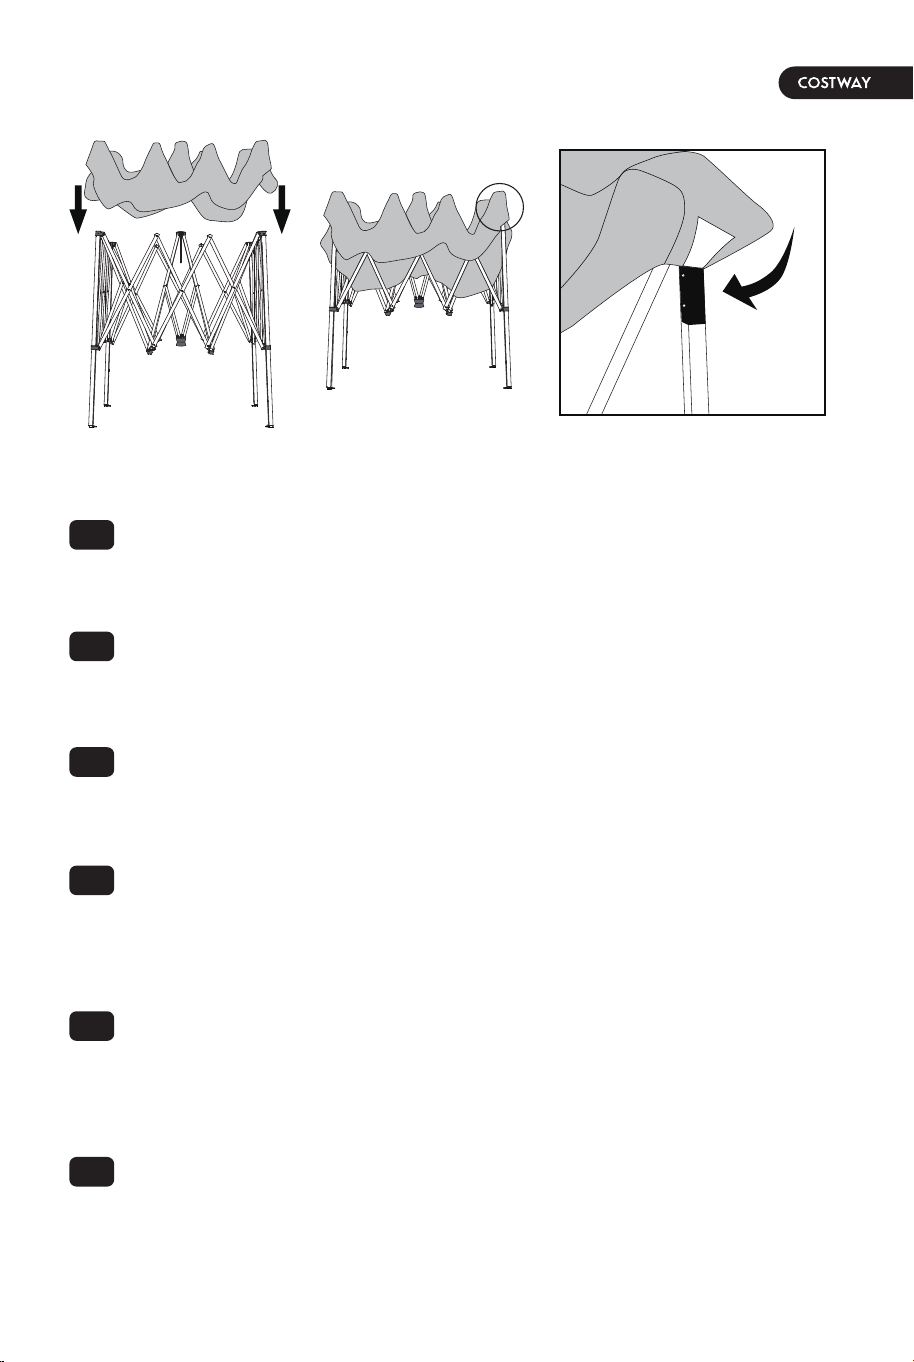
2. Unfold the canopy top and place the top over the opened
frame. Secure the canopy top to the corners of the canopy
frame using the Velcro connections.
2. Falten Sie das Verdeck auf und legen Sie es über den
geöffneten Rahmen. Befestigen Sie das Verdeck mit den
Klettverschlüssen an den Ecken des Pavillonrahmens.
2. Dépliez le dessus de la tente et placez-le sur le cadre
ouvert. Fixez le haut de la tente aux coins du cadre de la
tente à l'aide des connexions Velcro.
2. Despliegue la parte superior del pabellón y coloque la
parte superior sobre el marco abierto. Asegure la parte
superior del pabellón a las esquinas del marco del pabellón
utilizando las conexiones de velcro.
2. Apri la parte superiore del padiglione e posiziona la parte
superiore sopra la cornice aperta. Fissare la parte superiore
del padiglione agli angoli del telaio del padiglione
utilizzando le connessioni Velcro.
2. Rozłóż zadaszenie pawilonu ogrodowego, a następnie
umieść je w górnej części ramy. Przymocuj zadaszenie w
narożnikach ramy za pomocą pasków na rzepy.
EN
DE
FR
ES
IT
PL
08 09
Set Up The Canopy / Aufstellen des Pavillons /
Installation de la Tente / Montar el Pabellón /
Montaggio del Padiglione / Rozkładanie pawilonu
ogrodowego
1. Stand on the opposite side of your partner and lift the
frame off of the ground while walking backwards away from
your partner.
1. Stellen Sie sich auf die gegenüberliegende Seite Ihres
Partners und heben Sie den Rahmen vom Boden ab,
während Sie rückwärts von Ihrem Partner weggehen.
1. Tenez-vous du côté opposé de votre partenaire et
soulevez le cadre du sol tout en vous éloignant de votre
partenaire.
1. Párese en el lado opuesto de su compañero y levante el
marco del suelo mientras camina hacia atrás alejándose de
su compañero.
1. Stai sul lato opposto del tuo partner e solleva il telaio da
terra mentre cammini all'indietro lontano dal tuo partner.
1. Wraz z drugą osobą złapcie ramę z obu jej stron.
Następnie unieście i pociągnijcie ramę na zewnątrz.
EN
DE
FR
ES
IT
PL
2. Unfold the canopy top and place the top over the opened
frame. Secure the canopy top to the corners of the canopy
frame using the Velcro connections.
2. Falten Sie das Verdeck auf und legen Sie es über den
geöffneten Rahmen. Befestigen Sie das Verdeck mit den
Klettverschlüssen an den Ecken des Pavillonrahmens.
2. Dépliez le dessus de la tente et placez-le sur le cadre
ouvert. Fixez le haut de la tente aux coins du cadre de la
tente à l'aide des connexions Velcro.
2. Despliegue la parte superior del pabellón y coloque la
parte superior sobre el marco abierto. Asegure la parte
superior del pabellón a las esquinas del marco del pabellón
utilizando las conexiones de velcro.
2. Apri la parte superiore del padiglione e posiziona la parte
superiore sopra la cornice aperta. Fissare la parte superiore
del padiglione agli angoli del telaio del padiglione
utilizzando le connessioni Velcro.
2. Rozłóż zadaszenie pawilonu ogrodowego, a następnie
umieść je w górnej części ramy. Przymocuj zadaszenie w
narożnikach ramy za pomocą pasków na rzepy.
EN
DE
FR
ES
IT
PL
08 09
ClickClick
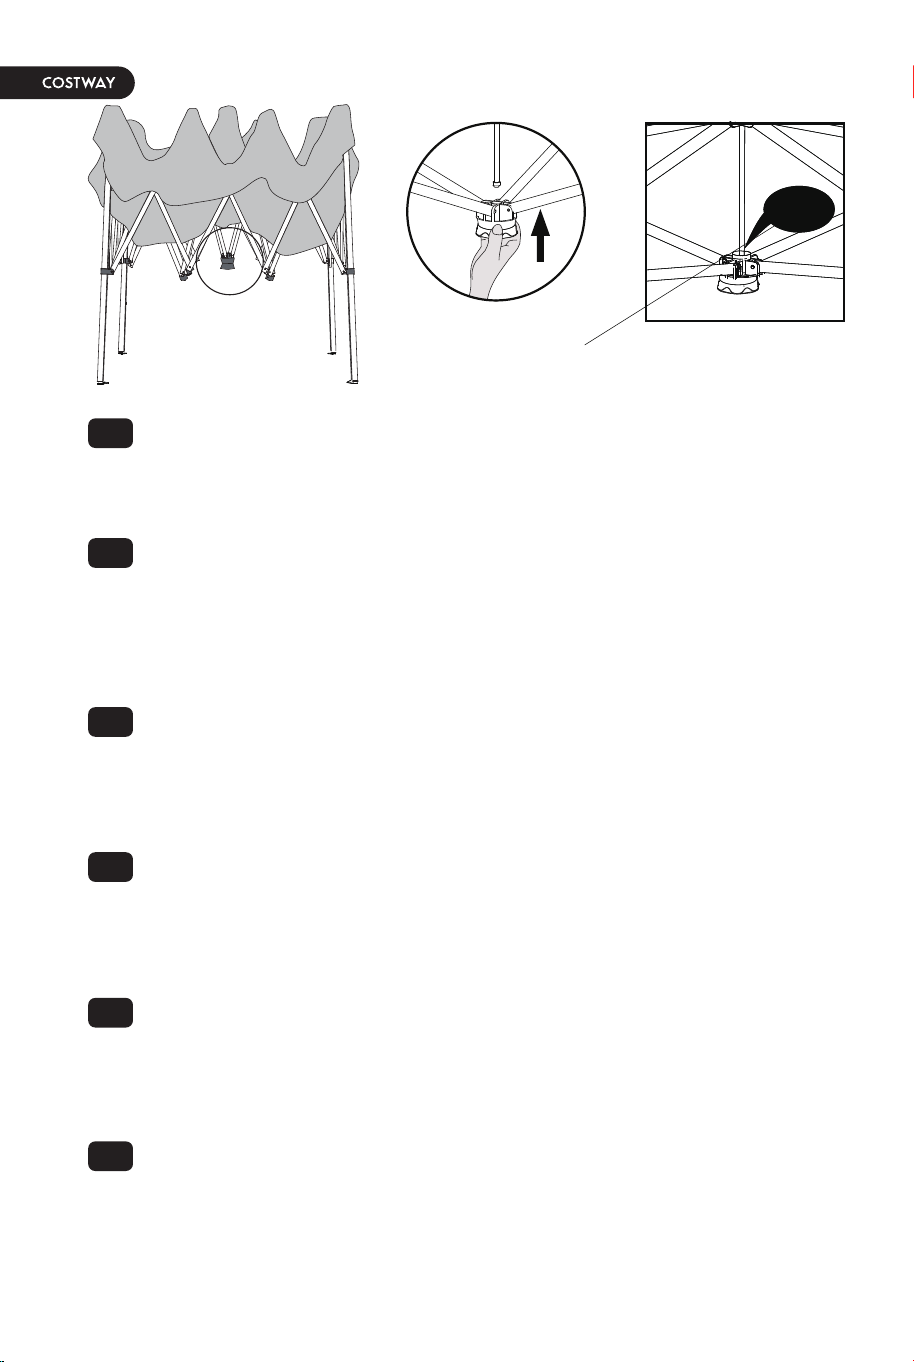
3. Under the canopy, place one hand on the upper frame
and use the other hand to push the central hub straight up
until it clicks into the central pole. Finish attaching the large
canopy inside the canopy frame using the Velcro loops.
3. Legen Sie unter dem Pavillon eine Hand auf den oberen
Rahmen und schieben Sie mit der anderen Hand den
zentralen unteren Verbinder gerade nach oben, bis er in der
zentralen Stange einrastet. Befestigen Sie das große
Vordach mit Hilfe der Klettverschlussschlaufen im Inneren
des Pavillonrahmens.
3. Sous l'auvent, placez une main sur le cadre supérieur et
utilisez l'autre main pour pousser le moyeu central vers le
haut jusqu'à ce qu'il s'enclenche dans le poteau central.
Terminez de fixer la grand tente à l'intérieur du cadre à
l'aide des boucles Velcro.
3. Bajo el pabellón, coloque una mano en el marco superior
y utilice la otra para empujar el cubo central hacia arriba
hasta que encaje en el poste central. Termine de fijar el
pabellón grande dentro del marco del pabellón utilizando los
lazos de velcro.
3. Sotto il padiglione, posizionare una mano sul telaio
superiore e utilizzare l'altra per spingere il cubo centrale
verso l'alto fino a quando non si adatta al palo centrale.
Termina il fissaggio del grande padiglione all'interno del
telaio del padiglione utilizzando i loop Velcro.
3. Włóż rękę pod zadaszenie i pchnij element rozporowy w
górę, aż zatrzaśnie się na swoim miejscu. Aby zakończyć
montaż zadaszenia, przymocuj je w środkowej części ramy
za pomocą pasków na rzepy.
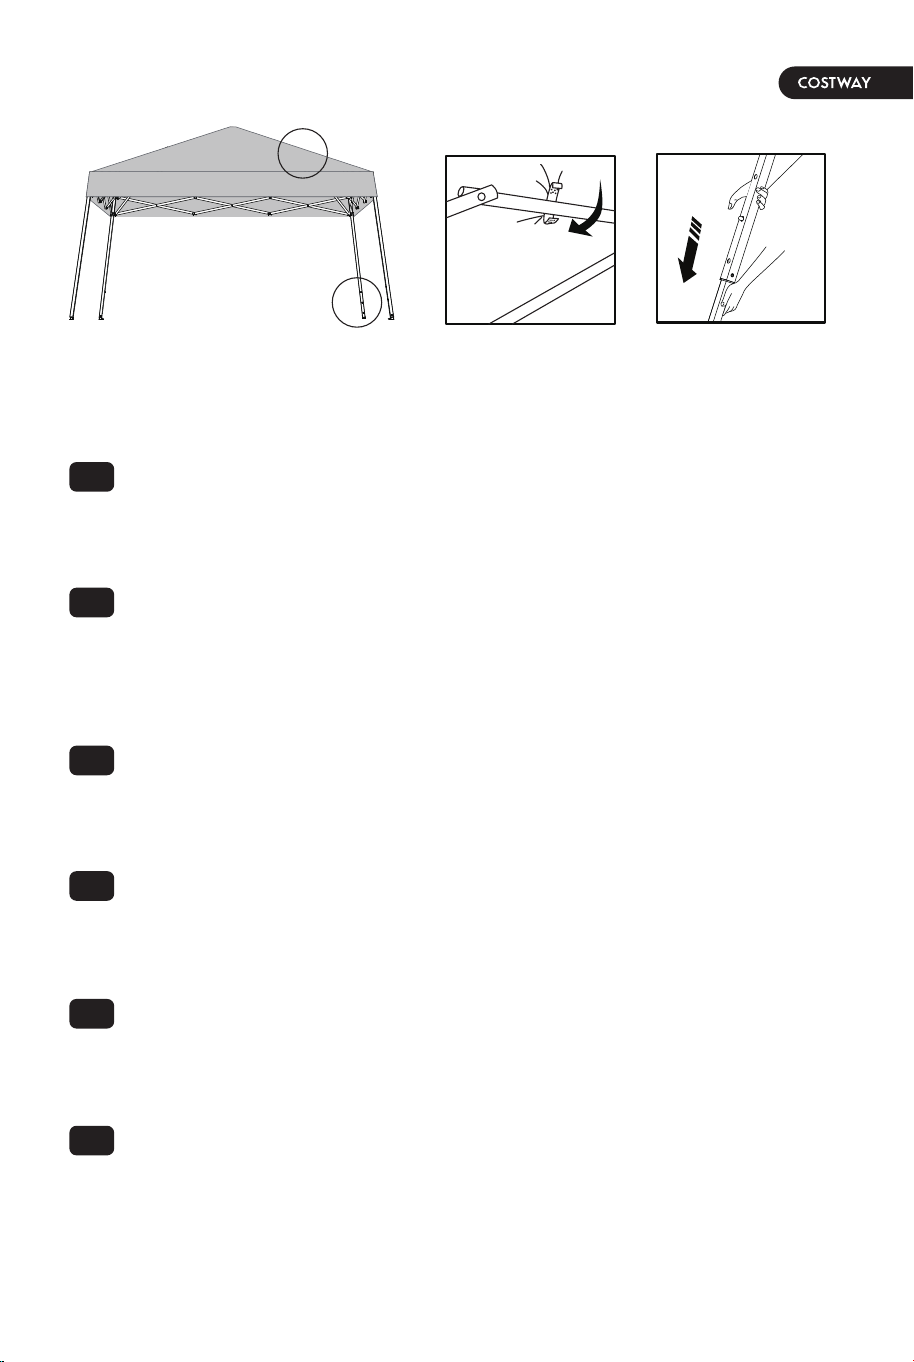
4. Pull the red part on each leg, raise or lower to adjust the
canopy height. And press the red part when the adjustment
is finished.
4. Ziehen Sie an dem roten Teil an jedem Bein, heben oder
senken Sie es, um die Höhe des Pavillons einzustellen.
Drücken Sie den roten Teil, wenn die Einstellung
abgeschlossen ist.
4. Tirez sur la partie rouge de chaque jambe, soulevez ou
abaissez pour régler la hauteur de la canopée. Et appuyez
sur la partie rouge lorsque le réglage est terminé.
4. Tire de la parte roja de cada pata, suba o baje para
ajustar la altura del pabellón. Y presione la parte roja
cuando haya terminado el ajuste.
4. Tirare la parte rossa di ogni gamba, andare su o giù per
regolare l'altezza del padiglione. E premi la parte rossa
quando hai terminato la regolazione.
4. Wciśnij czerwony przycisk na każdej nodze, aby
zmniejszyć lub zwiększyć wysokość pawilonu ogrodowego.
Po zakończeniu regulacji wciśnij czerwony przycisk
ponownie.
EN
DE
FR
ES
IT
PL
EN
DE
FR
ES
IT
PL
10 11
Klick / Clic / Haga clic / Clic / KLIK!
ClickClick
3. Under the canopy, place one hand on the upper frame
and use the other hand to push the central hub straight up
until it clicks into the central pole. Finish attaching the large
canopy inside the canopy frame using the Velcro loops.
3. Legen Sie unter dem Pavillon eine Hand auf den oberen
Rahmen und schieben Sie mit der anderen Hand den
zentralen unteren Verbinder gerade nach oben, bis er in der
zentralen Stange einrastet. Befestigen Sie das große
Vordach mit Hilfe der Klettverschlussschlaufen im Inneren
des Pavillonrahmens.
3. Sous l'auvent, placez une main sur le cadre supérieur et
utilisez l'autre main pour pousser le moyeu central vers le
haut jusqu'à ce qu'il s'enclenche dans le poteau central.
Terminez de fixer la grand tente à l'intérieur du cadre à
l'aide des boucles Velcro.
3. Bajo el pabellón, coloque una mano en el marco superior
y utilice la otra para empujar el cubo central hacia arriba
hasta que encaje en el poste central. Termine de fijar el
pabellón grande dentro del marco del pabellón utilizando los
lazos de velcro.
3. Sotto il padiglione, posizionare una mano sul telaio
superiore e utilizzare l'altra per spingere il cubo centrale
verso l'alto fino a quando non si adatta al palo centrale.
Termina il fissaggio del grande padiglione all'interno del
telaio del padiglione utilizzando i loop Velcro.
3. Włóż rękę pod zadaszenie i pchnij element rozporowy w
górę, aż zatrzaśnie się na swoim miejscu. Aby zakończyć
montaż zadaszenia, przymocuj je w środkowej części ramy
za pomocą pasków na rzepy.
4. Pull the red part on each leg, raise or lower to adjust the
canopy height. And press the red part when the adjustment
is finished.
4. Ziehen Sie an dem roten Teil an jedem Bein, heben oder
senken Sie es, um die Höhe des Pavillons einzustellen.
Drücken Sie den roten Teil, wenn die Einstellung
abgeschlossen ist.
4. Tirez sur la partie rouge de chaque jambe, soulevez ou
abaissez pour régler la hauteur de la canopée. Et appuyez
sur la partie rouge lorsque le réglage est terminé.
4. Tire de la parte roja de cada pata, suba o baje para
ajustar la altura del pabellón. Y presione la parte roja
cuando haya terminado el ajuste.
4. Tirare la parte rossa di ogni gamba, andare su o giù per
regolare l'altezza del padiglione. E premi la parte rossa
quando hai terminato la regolazione.
4. Wciśnij czerwony przycisk na każdej nodze, aby
zmniejszyć lub zwiększyć wysokość pawilonu ogrodowego.
Po zakończeniu regulacji wciśnij czerwony przycisk
ponownie.
EN
DE
FR
ES
IT
PL
EN
DE
FR
ES
IT
PL
10 11
Klick / Clic / Haga clic / Clic / KLIK!
Velcro
Unzip
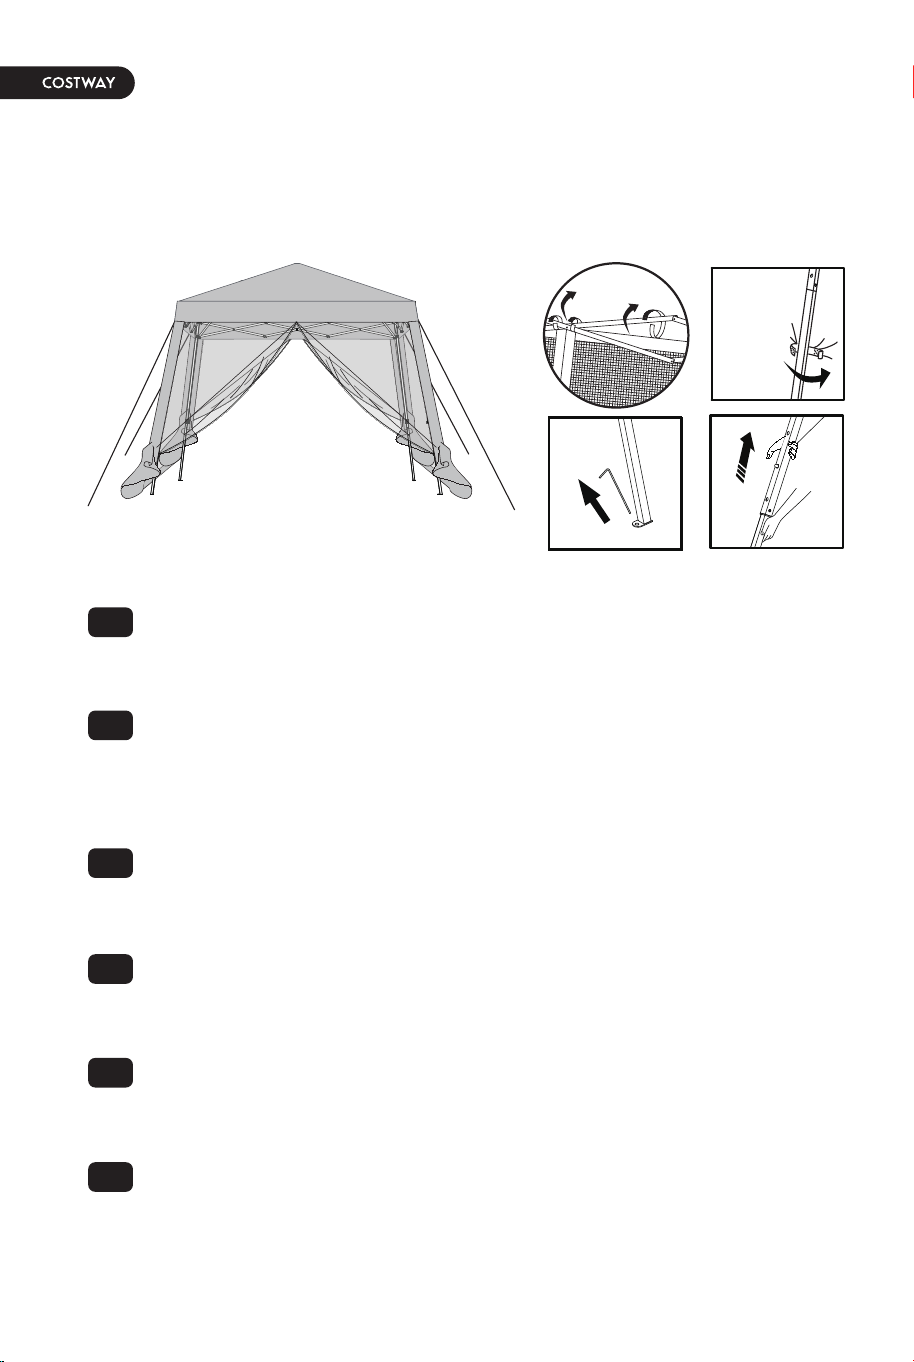
5. Insert a stake into the foot of each canopy leg. Measure
out each leg to a proper distance and secure four stakes to
the ground. Attach the ropes to the canopy top and tie the
attached ropes to the stakes in the ground. Ensure the
ropes have the proper tension by adjusting the plastic
adjusters on the ropes.
5. Stecken Sie einen Hering in den Fuß eines jeden
Pavillonbeins. Messen Sie für jedes Bein den richtigen
Abstand aus und befestigen Sie vier Heringe im Boden.
Befestigen Sie die Seile an der Oberseite des Pavillons und
binden Sie die Seile an den Heringe im Boden fest. Stellen
Sie sicher, dass die Seile die richtige Spannung haben,
indem Sie die Kunststoffversteller an den Seilen einstellen.
5. Insérez un piquet dans le base de chaque jambe de la
tente. Mesurez chaque jambe à une distance appropriée et
fixez quatre piquets au sol. Attachez les cordes au sommet
de la tente et attachez les cordes aux piquets dans le sol.
Assurez-vous que les cordes ont la bonne tension en
ajustant les ajusteurs en plastique sur les cordes.
5. Inserte una estaca en el pie de cada pata del pabellón.
Mida cada pata a una distancia adecuada y fije cuatro
estacas al suelo. Fije las cuerdas a la parte superior del
pabellón y ate las cuerdas fijadas a las estacas en el suelo.
Asegúrese de que las cuerdas tienen la tensión adecuada
ajustando los reguladores de plástico de las cuerdas.
5. Inserisci un palo ai piedi di ogni gamba del padiglione.
Misurare ogni gamba a una distanza appropriata e attaccare
quattro paletti a terra. Attaccare le corde alla parte
superiore del padiglione e legare le corde fissate ai pali a
terra. Assicurati che le corde abbiano la tensione corretta
regolando i regolatori di plastica sulle corde.
5. Zamocuj kotwę na każdej nodze pawilonu. Odmierz
odpowiednią odległość od każdej nogi, a następnie
przymocuj cztery kotwy do podłoża. Przymocuj liny w
górnej części pawilonu ogrodowego, a następnie do kotew
w ziemi. Wyreguluj plastikowe elementy na linach, aby
upewnić się, że liny są odpowiednio naprężone.
EN
DE
FR
ES
IT
PL
12 13
Öffnen
Ouvrir la fermeture éclair
Abra la cremallera
Apri la cerniera
Rozepnij
Klettverschluss
Velcro
Velcro
Velcro
Pasek na rzep
Velcro
Velcro

Velcro
Unzip
5. Insert a stake into the foot of each canopy leg. Measure
out each leg to a proper distance and secure four stakes to
the ground. Attach the ropes to the canopy top and tie the
attached ropes to the stakes in the ground. Ensure the
ropes have the proper tension by adjusting the plastic
adjusters on the ropes.
5. Stecken Sie einen Hering in den Fuß eines jeden
Pavillonbeins. Messen Sie für jedes Bein den richtigen
Abstand aus und befestigen Sie vier Heringe im Boden.
Befestigen Sie die Seile an der Oberseite des Pavillons und
binden Sie die Seile an den Heringe im Boden fest. Stellen
Sie sicher, dass die Seile die richtige Spannung haben,
indem Sie die Kunststoffversteller an den Seilen einstellen.
5. Insérez un piquet dans le base de chaque jambe de la
tente. Mesurez chaque jambe à une distance appropriée et
fixez quatre piquets au sol. Attachez les cordes au sommet
de la tente et attachez les cordes aux piquets dans le sol.
Assurez-vous que les cordes ont la bonne tension en
ajustant les ajusteurs en plastique sur les cordes.
5. Inserte una estaca en el pie de cada pata del pabellón.
Mida cada pata a una distancia adecuada y fije cuatro
estacas al suelo. Fije las cuerdas a la parte superior del
pabellón y ate las cuerdas fijadas a las estacas en el suelo.
Asegúrese de que las cuerdas tienen la tensión adecuada
ajustando los reguladores de plástico de las cuerdas.
5. Inserisci un palo ai piedi di ogni gamba del padiglione.
Misurare ogni gamba a una distanza appropriata e attaccare
quattro paletti a terra. Attaccare le corde alla parte
superiore del padiglione e legare le corde fissate ai pali a
terra. Assicurati che le corde abbiano la tensione corretta
regolando i regolatori di plastica sulle corde.
5. Zamocuj kotwę na każdej nodze pawilonu. Odmierz
odpowiednią odległość od każdej nogi, a następnie
przymocuj cztery kotwy do podłoża. Przymocuj liny w
górnej części pawilonu ogrodowego, a następnie do kotew
w ziemi. Wyreguluj plastikowe elementy na linach, aby
upewnić się, że liny są odpowiednio naprężone.
EN
DE
FR
ES
IT
PL
12 13
Öffnen
Ouvrir la fermeture éclair
Abra la cremallera
Apri la cerniera
Rozepnij
Klettverschluss
Velcro
Velcro
Velcro
Pasek na rzep
Velcro
Velcro
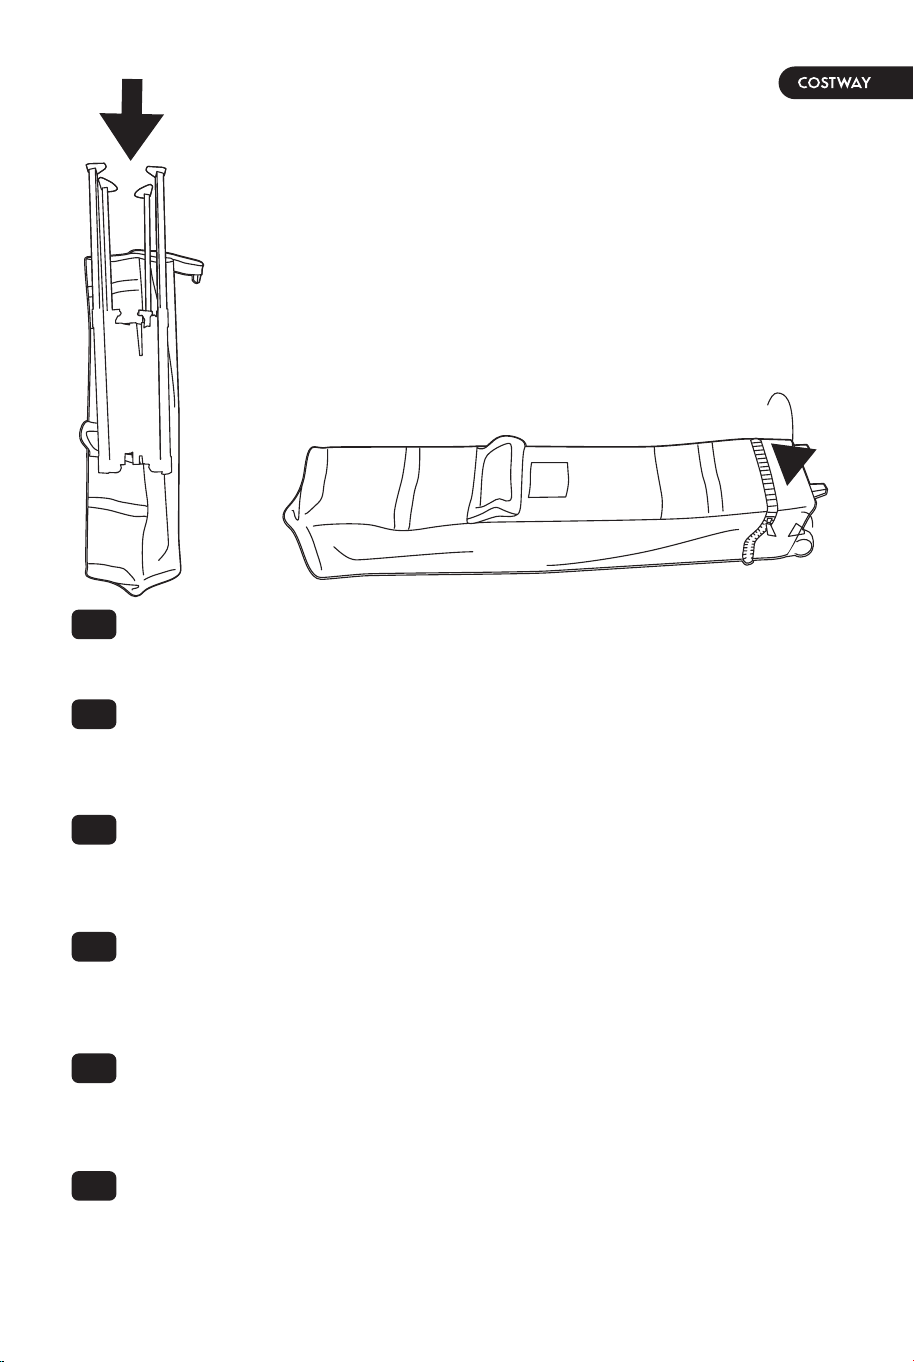
Pull up all stakes from the ground. Pull the red part on each
leg and retract the legs to their original height. And press
back the red part to position.
Ziehen Sie alle Heringe aus dem Boden. Ziehen Sie den
roten Teil an jedem Bein und ziehen Sie die Beine auf ihre
ursprüngliche Höhe zurück. Drücken Sie das rote Teil wieder
in die richtige Position.
Retirez tous les piquets du sol. Tirez la partie rouge sur
chaque jambe et ramenez les jambes à leur hauteur
d'origine. Remettez la pièce rouge en place.
Levante todas las estacas del suelo. Tire de la parte roja de
cada pata y retraiga las patas a su altura original. Y vuelva
a presionar la parte roja hasta su posición.
Sollevare tutti i pali da terra. Tirare la parte rossa di ogni
gamba e ritrarre le gambe alla loro altezza originale. E
premi la parte rossa di nuovo in posizione.
Wyjmij wszystkie kotwy z ziemi. Wciśnij czerwony przycisk
na każdej nodze i wsuń nogi. Następnie ponownie wciśnij
czerwony przycisk na każdej nodze.
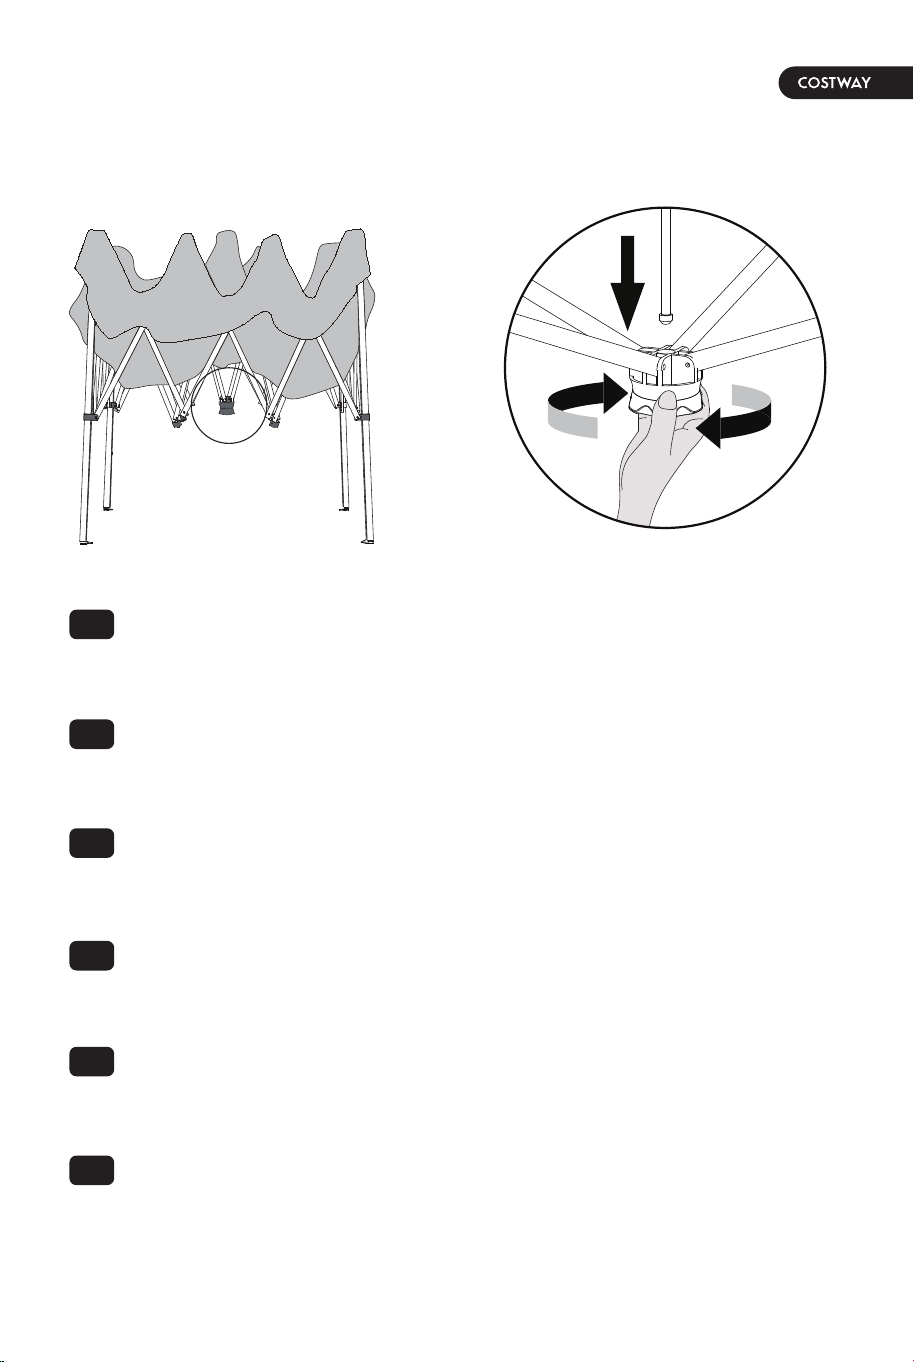
Go under the canopy, rotate counterclockwise the central
bottom hub to unlock the frame. And pull it down separated
from the central pole.
Gehen Sie unter den Pavillon und drehen Sie den mittleren
Bodenanschluss gegen den Uhrzeigersinn, um den Rahmen
zu entriegeln. Ziehen Sie ihn von der zentralen Stange ab.
Passez sous la tente et tournez dans le sens inverse des
aiguilles d'une montre le moyeu inférieur central pour
déverrouiller le cadre. Retirez-le du poteau central.
Pase por debajo del pabellón, gire en sentido contrario a las
agujas del reloj el cubo central inferior para desbloquear el
marco. Y tire hacia abajo separado del poste central.
Passare sotto il padiglione, girare in senso antiorario il cubo
centrale inferiore per sbloccare la cornice. E tirare giù
separatamente dal palo centrale.
Włóż rękę pod zadaszenie i obróć element rozporowy
zgodnie z ruchem wskazówek zegara, aby odblokować
ramę. Następnie pociągnij element w dół.
Take Down The Canopy / Abbauen des Pavillons /
Démontage de la Tente / Desmontar el Pabellón /
Smontaggio del Padiglione / Składanie pawilonu
ogrodowego
EN
DE
FR
ES
IT
PL
EN
DE
FR
ES
IT
PL
14 15
Pull up all stakes from the ground. Pull the red part on each
leg and retract the legs to their original height. And press
back the red part to position.
Ziehen Sie alle Heringe aus dem Boden. Ziehen Sie den
roten Teil an jedem Bein und ziehen Sie die Beine auf ihre
ursprüngliche Höhe zurück. Drücken Sie das rote Teil wieder
in die richtige Position.
Retirez tous les piquets du sol. Tirez la partie rouge sur
chaque jambe et ramenez les jambes à leur hauteur
d'origine. Remettez la pièce rouge en place.
Levante todas las estacas del suelo. Tire de la parte roja de
cada pata y retraiga las patas a su altura original. Y vuelva
a presionar la parte roja hasta su posición.
Sollevare tutti i pali da terra. Tirare la parte rossa di ogni
gamba e ritrarre le gambe alla loro altezza originale. E
premi la parte rossa di nuovo in posizione.
Wyjmij wszystkie kotwy z ziemi. Wciśnij czerwony przycisk
na każdej nodze i wsuń nogi. Następnie ponownie wciśnij
czerwony przycisk na każdej nodze.
Go under the canopy, rotate counterclockwise the central
bottom hub to unlock the frame. And pull it down separated
from the central pole.
Gehen Sie unter den Pavillon und drehen Sie den mittleren
Bodenanschluss gegen den Uhrzeigersinn, um den Rahmen
zu entriegeln. Ziehen Sie ihn von der zentralen Stange ab.
Passez sous la tente et tournez dans le sens inverse des
aiguilles d'une montre le moyeu inférieur central pour
déverrouiller le cadre. Retirez-le du poteau central.
Pase por debajo del pabellón, gire en sentido contrario a las
agujas del reloj el cubo central inferior para desbloquear el
marco. Y tire hacia abajo separado del poste central.
Passare sotto il padiglione, girare in senso antiorario il cubo
centrale inferiore per sbloccare la cornice. E tirare giù
separatamente dal palo centrale.
Włóż rękę pod zadaszenie i obróć element rozporowy
zgodnie z ruchem wskazówek zegara, aby odblokować
ramę. Następnie pociągnij element w dół.
Take Down The Canopy / Abbauen des Pavillons /
Démontage de la Tente / Desmontar el Pabellón /
Smontaggio del Padiglione / Składanie pawilonu
ogrodowego
EN
DE
FR
ES
IT
PL
EN
DE
FR
ES
IT
PL
14 15
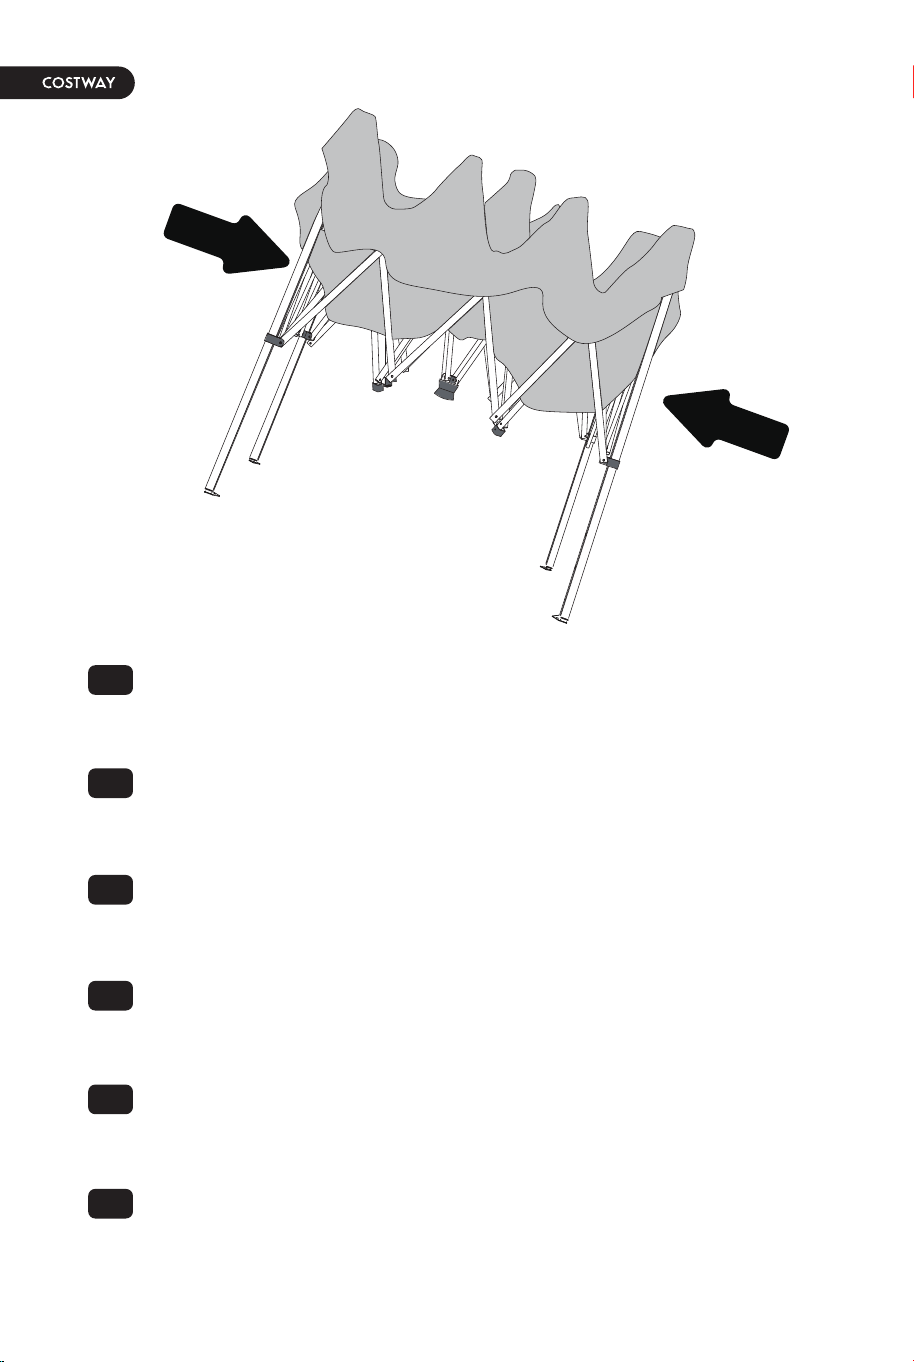
Lift one leg of the frame until the two neighboring legs are
raised off the ground. Push inward until the frame is fully
closed.
Heben Sie ein Bein des Rahmens an, bis die beiden
benachbarten Beine vom Boden abgehoben sind. Drücken
Sie nach innen, bis der Rahmen vollständig geschlossen ist.
Soulevez un pied du cadre jusqu'à ce que les deux pieds
voisins soient soulevés du sol. Poussez vers l'intérieur
jusqu'à ce que le cadre soit complètement fermé.
Levante una pata del marco hasta que las dos patas vecinas
se levanten del suelo. Empuje hacia dentro hasta que el
marco esté completamente plegado.
Sollevare una gamba dal telaio fino a quando le due gambe
vicine alzarsi da terra. Spingere verso l'interno fino a
quando il telaio non è completamente piegato.
Unieś ramę z jednej strony, tak aby dwie nogi pawilonu
ogrodowego znalazły się w górze. Złóż ramę do wewnątrz.
With the canopy feet facing the rollers, slide the wheeled
storage bag over the closed canopy frame. Close the zipper
on the wheeled storage bag.
Schieben Sie die Aufbewahrungstasche auf Rädern mit den
Pavillonfüßen in Richtung der Rollen über den
geschlossenen Pavillonrahmen. Schließen Sie den
Reißverschluss der fahrbaren Aufbewahrungstasche.
Avec les pieds de la tente face aux roulettes, faites glisser
le sac de rangement à roulettes sur le cadre fermé de la
tente. Fermez la fermeture éclair du sac de rangement à
roulettes.
Con las patas del pabellón orientadas hacia las ruedas,
deslice la bolsa de almacenamiento con ruedas sobre el
marco del pabellón plegado. Cierre la cremallera de la bolsa
de almacenamiento con ruedas.
Con le gambe del padiglione rivolte verso le ruote, far
scorrere la borsa di stoccaggio con ruote sul telaio del
padiglione piegato. Chiudere la cerniera del sacchetto con le
ruote.
Nasuń torbę na złożoną ramę, tak aby nogi pawilonu były
skierowane w stronę kółek torby. Zapnij zamek
błyskawiczny torby.
EN
DE
FR
ES
IT
PL
EN
DE
FR
ES
IT
PL
16 17

THIS INSTRUCTION BOOKLET CONTAINS IMPORTANT SAFETY INFORMATION. PLEASE READ AND KEEP FOR FUTURE REFERENCE.
EN
EN
DE
FR
ES
IT
PL
DE FR ES IT PL
USER'S MANUAL/HANDBUCH
/MANUEL DE L'UTILISATEUR/MANUAL DEL USUARIO
/MANUALE UTENTE/INSTRUKCJA OBSŁUGI
NP10301
Folding Canopy / Pavillon / Tente Pliable / Pabellón /
Tenda Pieghevole / Pawilon ogrodowy z moskitierą
With your inspiring rating, COSTWAY will be more consistent to offer you EASY
SHOPPING EXPERIENCE, GOOD PRODUCTS and EFFICIENT SERVICE!
Mit Ihrer inspirierenden Bewertung wird COSTWAY konsistenter sein, um Ihnen EIN
SCHÖNES EINKAUFSERLEBNIS, GUTE PRODUKTE und EFFIZIENTEN SERVICE zu
bieten!
Avec votre évaluation inspirante, COSTWAY continuera à fournir une EXPÉRIENCE
D’ACHAT PRATIQUE, des PRODUITS DE QUALITÉ et un SERVICE EFFICACE !
Con su calificación inspiradora, COSTWAY será más consistente para ofrecerle
EXPERIENCIA DE COMPRA FÁCIL, BUENOS PRODUCTOS y SERVICIO EFICIENTE.
Con la tua valutazione incoraggiante, COSTWAY sarà più coerente per offrirti
ESPERIENZA DI ACQUISTO FACILE, BUONI PRODOTTI e SERVIZIO EFFICIENTE!
Dzięki twojej opinii COSTWAY będzie mógł oferować jeszcze WYGODNIEJSZE
ZAKUPY, LEPSZE PRODUKTY i SPRAWNIEJSZĄ OBSŁUGĘ KLIENTA.
US office: Fontana UK office: Ipswich AU office: Truganina
DE office: FDS GmbH, Neuer Höltigbaum 36, 22143 Hamburg, Deutschland
FR office: Saint Vigor d'Ymonville
PL office: Gdańsk