
IMPORTANT SAFEGUARDS
When using electrical appliances, basic safety precautions should always be followed to reduce the risk of
fire, electric shock, and/or injury to persons, including the following:
1. Read all instructions.
2. This appliance is not intended for use by
persons with reduced physical, sensory, or
mental capabilities, or lack of experience and
knowledge, unless they are closely supervised
and instructed concerning use of the appliance
by a person responsible for their safety.
3. This appliance shall not be used by children.
Keep the appliance and its cord out of reach of
children.
4. Close supervision is necessary when any
appliance is used near children. Children should
be supervised to ensure that they do not play
with the appliance.
5. To protect against risk of electrical shock, do not
put cord, plug, base, or motor in water or other
liquid.
6. Turn the appliance OFF ( ), then unplug from
outlet when not in use, before putting on or
taking off parts, and before cleaning. To unplug,
grasp the plug and pull from the outlet. Never
pull from the power cord.
7. Avoid any contact with moving parts. Do
not attempt to defeat any safety interlock
mechanisms.
8. Do not operate any appliance with a damaged
supply cord or plug, or after the appliance
malfunctions or has been dropped or damaged
in any manner. Supply cord replacement and
repairs must be conducted by the manufacturer,
its service agent, or similarly qualified persons
in order to avoid a hazard. Contact Customer
Service for information on examination, repair,
or adjustment as set forth in the Limited
Warranty.
9. The use of attachments, including canning jars,
not recommended or sold by the appliance
manufacturer may cause fire, electric shock, or
personal injury.
10. Do not use outdoors.
11. Do not let cord hang over edge of table or
counter, or touch hot surfaces, including the
stove.
12. Do not place on or near a hot gas or electric
burner or in a heated oven.
13. Keep hands and utensils out of the jar and
away from the cutting blade while blending
or chopping food to reduce the risk of severe
personal injury and/or damage to the blender or
available attachments (attachments may not be
provided with blender). A rubber spatula may
be used but must be used only when blender is
not running.
14. Blades are sharp; handle carefully—especially
when assembling, disassembling, emptying, or
cleaning inside blender jar.
15. Do not use a broken, chipped, or cracked
blender jar.
16. Do not use broken, cracked, or loose cutting
blade assembly.
17. Always operate blender with lid and filler-cap
or open vent opening of lid with mess-free
spout in place. Remove filler-cap only for adding
ingredients.
18. Ensure collar on base of blender jar and personal
jar is tight and secure. Injury can result if
moving blades accidentally become exposed.
19. Risk of thermal burn injury due to excessive
pressure in the personal blending jar. Do not
blend hot liquids in the personal blending jar.
20. Check that the appliance is OFF ( ) before
plugging cord into wall outlet. To disconnect,
turn the control to OFF (
); then remove plug
from wall outlet. To unplug, grasp the plug and
pull from the outlet. Never pull from the power
cord.
21. Do not use appliance for other than intended
purpose.
22. Do not place blender jar in the freezer filled with
food or liquid.
23. Do not blend hot liquids in personal jar.
24. Be careful if hot liquid is poured into the blender
jar as it can be ejected out of the appliance due
to a sudden steaming.
25. When blending hot liquids, remove filler-cap of
two-piece lid or open vent opening of lid with
mess-free spout, and close any lid openings
along the edge intended for pouring. Hot liquids
may push lid off jar during blending. To prevent
possible burns: Do not fill blender jar beyond the
3-cup (710-mL) level. With the protection of an
oven mitt or thick towel, place one hand on top
of lid. Keep exposed skin away from lid. Start
blending at lowest speed.
26. CAUTION! In order to avoid a hazard due to
inadvertent resetting of the thermal cut-out,
this appliance must not be supplied through an
external switching device, such as a timer, or
connected to a circuit that is regularly switched
on and off by the utility.
27. To reduce the risk of injury, never place cutting
blade assembly on base without blender jar or
personal jar attached.
28. If the jar should twist or rotate when motor is
switched ON (I), switch OFF (
) immediately
and tighten jar in collar or on blender base.
29. Do not leave blender unattended while it is
operating.
30. Operating time cannot exceed 3 minutes for any
accessory or speed setting.
31. Keep hands and utensils away from moving
S-blade and slicing/shredding disc while
processing food to reduce the risk of severe
personal injury and/or damage to the food
processor. A rubber scraper may be used but
ONLY when the food processor or blender is not
running.
32. The S-blade and slicing/shredding disc are
sharp. Handle carefully. Store out of reach of
children.
33. To reduce the risk of injury, never place S-blade
or slicing/shredding disc on the processor or
blender motor shaft without bowl properly
attached.
34. Be certain lid is securely locked in place before
operating food processor or blender.
35. Never feed food into food chute by hand.
Always use the food pusher.
36. Do not attempt to defeat the processor or
blender lid interlock mechanism.
37. Make sure the S-blade and slicing/shredding
disc have come to a full stop before removing
processor lid.
38. Never use appliance for a longer period or with
a larger amount of ingredients other than that
recommended by appliance manufacturer.
SAVE THESE INSTRUCTIONS
Other Consumer Safety Information
This appliance is intended for household use only. Use for food or liquids only.
w WARNING
Electrical Shock Hazard:
This product is provided with a polarized plug (one
wide blade) to reduce the risk of electric shock. The
plug fits only one way into a polarized outlet. Do not
defeat the safety purpose of the plug by modifying
the plug in any way or by using an adapter. If the
plug does not fit fully into the outlet, reverse the
plug. If it still does not fit, have an electrician replace
the outlet.
The length of the cord used on this appliance was
selected to reduce the hazards of becoming tangled
in or tripping over a longer cord. If a longer cord is
necessary, an approved extension cord may be used.
The electrical rating of the extension cord must be
equal to or greater than the rating of the appliance.
Care must be taken to arrange the extension cord so
that it will not drape over the countertop or tabletop
where it can be pulled on by children or accidentally
tripped over.
To avoid an electrical circuit overload, do not use
another high-wattage appliance on the same circuit
with this appliance.
If the cutting unit blades lock and do not move, it will
damage the motor. Do not use; visit
hamiltonbeach.com.
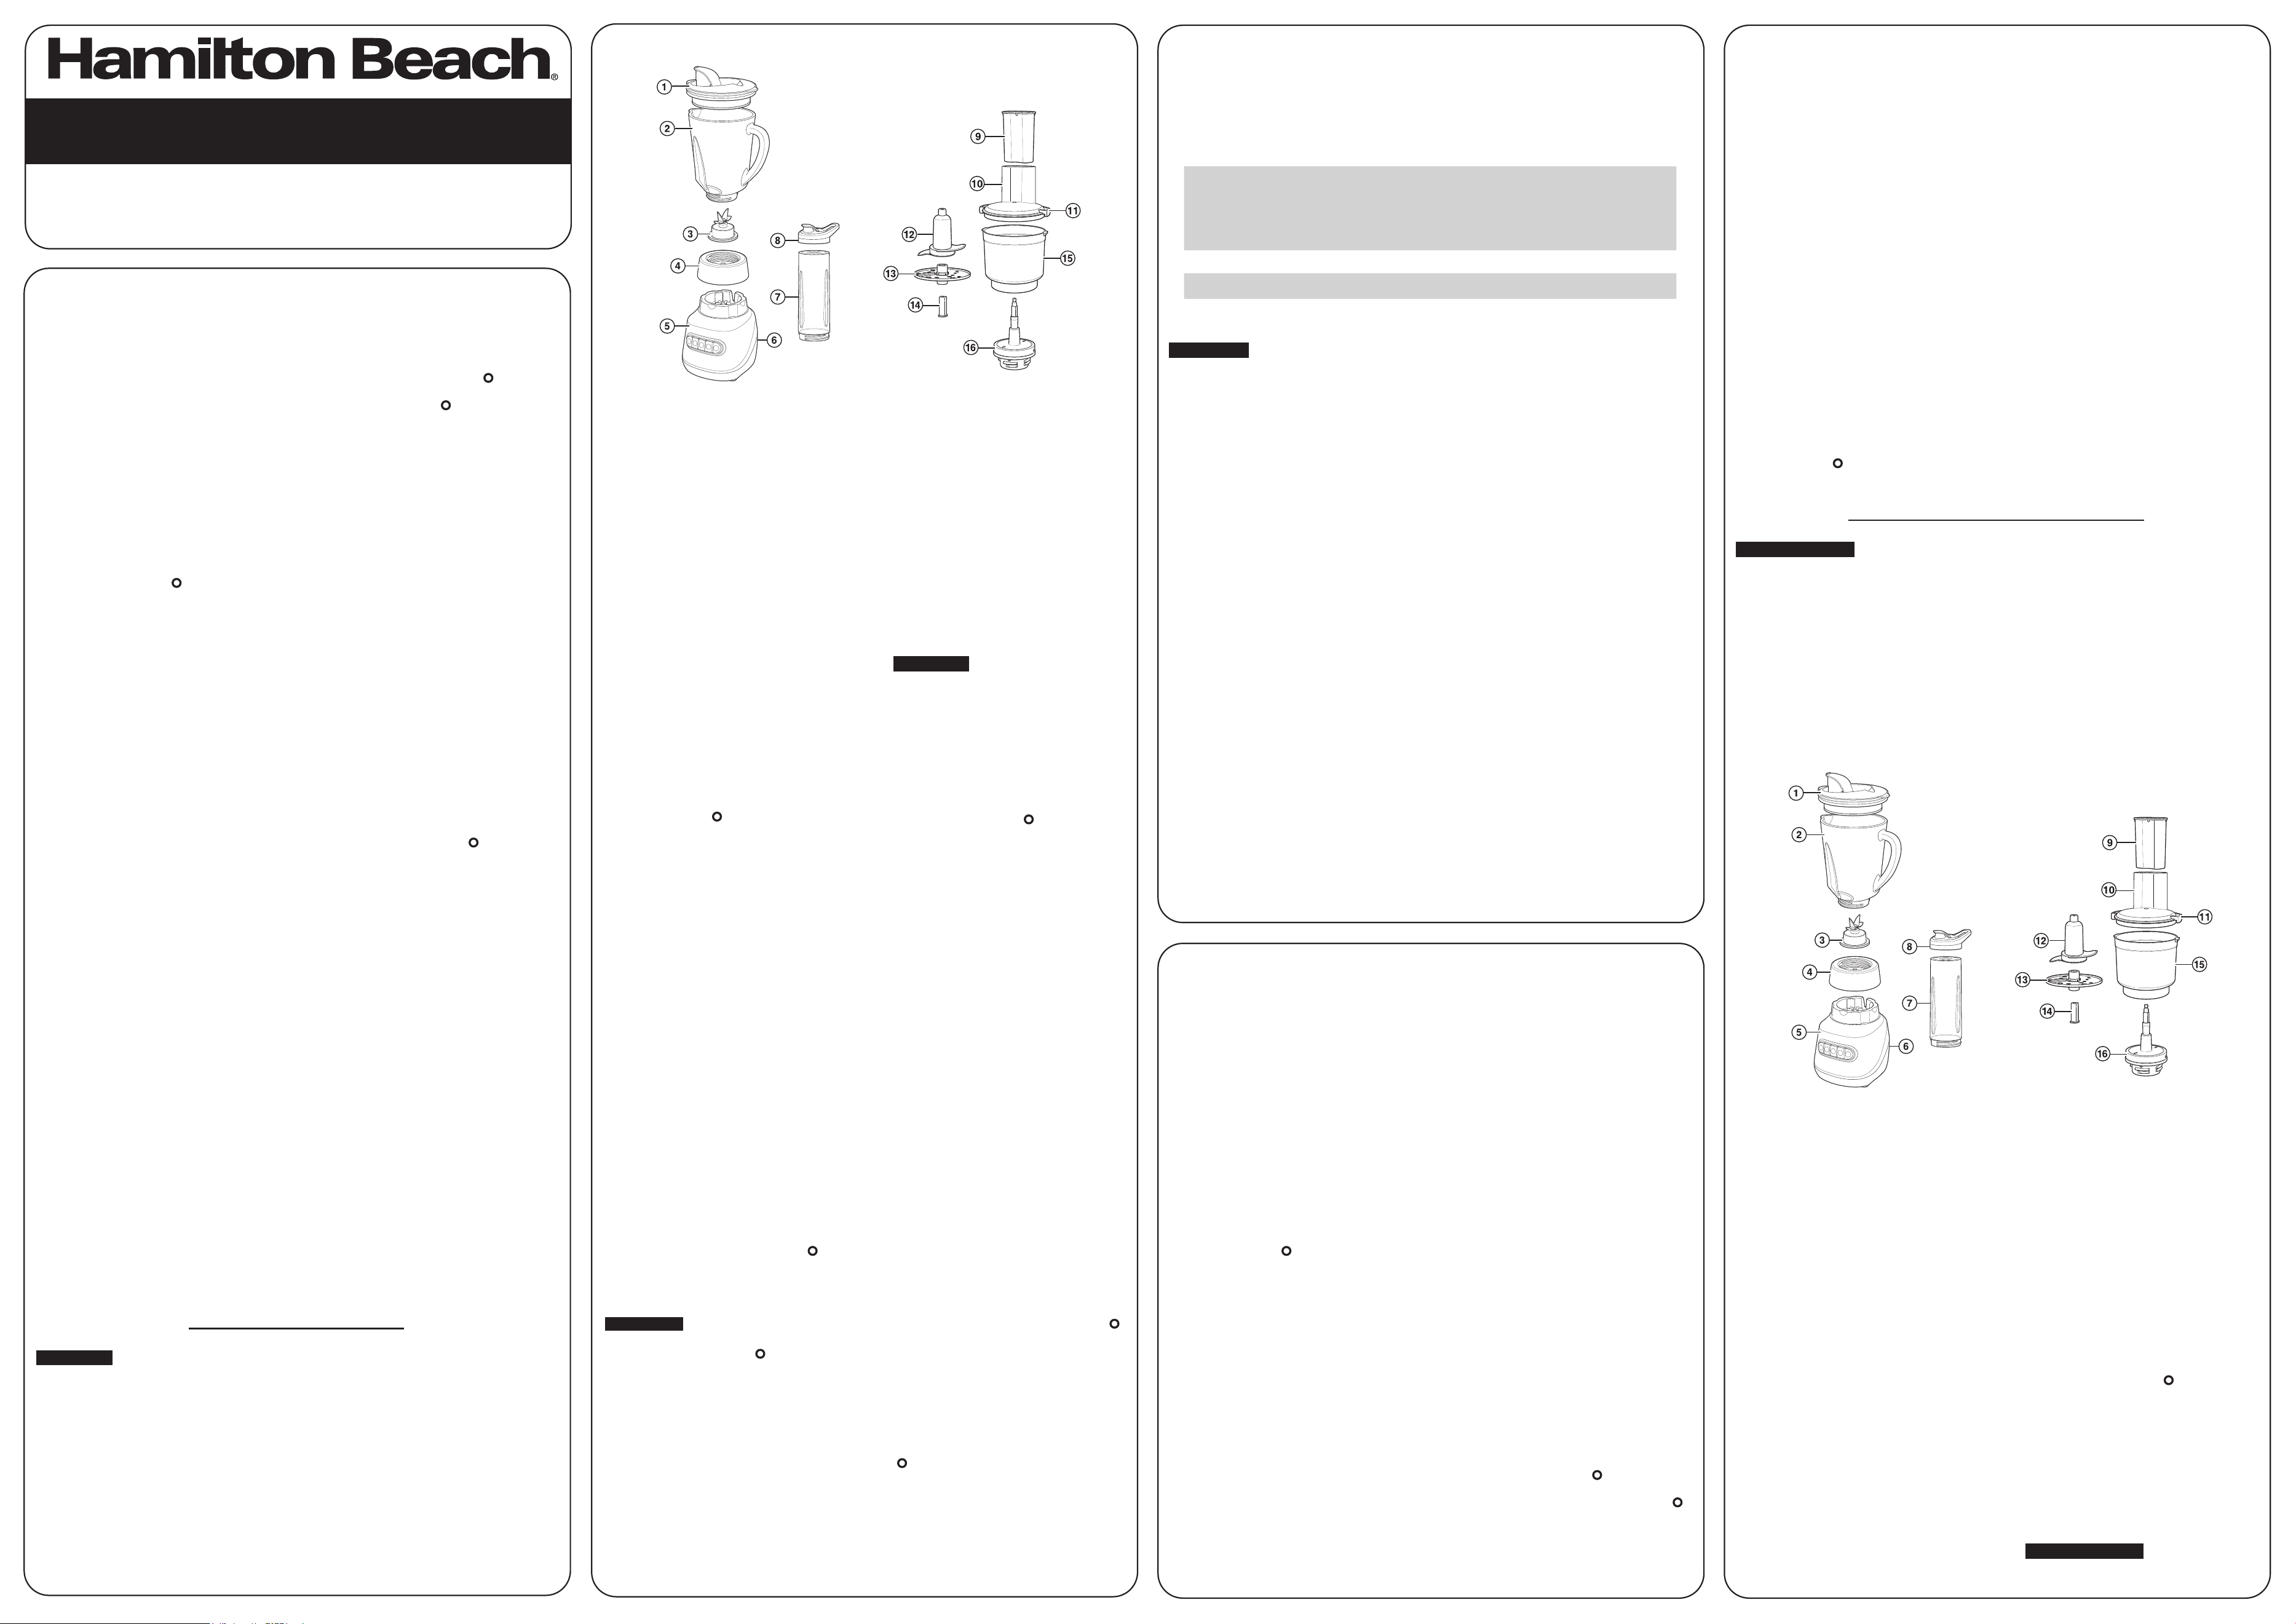
Parts and Features
1.
Lid
2.
Blender Jar
3.
Cutting Blade Assembly
4.
Collar
5.
Base
6.
Cord Storage (back of Base)
7.
Personal Blending Jar
8.
Travel Lid
9.
Food Pusher/Measuring Cup
10.
Food Chute
11.
Food Processor Lid
12.
Food Processor S-Blade
13.
Slicing/Shredding Disc
14.
Red Adapter for Slicing/
Shredding
15.
Food Processor Bowl
16.
Food Processor Adapter
Before first use: After unpacking Blender, wash everything except Base in hot, soapy water. Rinse and dry.
Wipe Base with a soft damp cloth or sponge. Do not immerse Base or Food Processor Adapter in water or
other liquid. Care should be taken when handling Cutting Blade Assembly as it is very sharp.
How to Use Blender
IMPORTANT: Your Blender Jar and Cutting Blade Assembly are subject to wear during normal use. Always
inspect Blender Jar for nicks, chips, or cracks. Always inspect Cutting Blade Assembly for broken, cracked,
or loose blades. If Blender Jar or Cutting Blade Assembly is damaged, do not use. Visit hamiltonbeach.com to
obtain replacement parts.
1. Make sure Blender is unplugged. Place Base on a
clean, dry surface to keep foreign particles from
being pulled up into motor during operation.
2. Place Cutting Blade Assembly, blade side up,
through opening in Blender Jar. Twist Collar onto
bottom of Blender Jar. Place Blender Jar on
Base.
3. Add ingredients to Blender Jar. Plug into outlet.
4. Place Lid onto Blender Jar. Push desired function
button. Blender speed increases as buttons are
pushed left to right. When using desired PULSE
button, Blender will operate as long as button
is pressed. Remaining speed buttons will run
Blender until OFF (
) is pressed.
IMPORTANT: Do not operate your Blender
continuously for long periods exceeding 3
minutes. If you start to smell a burning odor, stop
immediately and remove the Blender Jar. Start
and run the Blender—Base ONLY with NO Blender
Jar—on the highest speed for 2 minutes. When
trying similar recipes in the future, reduce the total
amount of ingredients.
5. Always place one hand on Lid during operation.
w WARNING
Burn Hazard. When blending
hot liquids, remove filler-cap of two-piece lid or
open vent opening of lid with mess-free spout,
and close any lid openings along the edge
intended for pouring. Hot liquids may push lid off
blender jar during blending. To prevent possible
burns: Do not fill blender jar beyond the 3-cup
(710-mL) level. With the protection of an oven
mitt or thick towel, place one hand on top of lid.
Keep exposed skin away from lid. Start blending
at lowest speed.
6. ALWAYS turn Blender OFF ( ) and wait until
blades have stopped rotating before removing
Jar.
7. To remove Blender Jar after blending is
complete, lift Blender Jar straight up.
8. NEVER replace Blender Jar onto unit while motor
is running.
How to Use Personal Blending Jar
1. Always operate on a countertop or other
supporting surface. Carefully place Cutting Blade
Assembly and Collar onto Personal Blending Jar.
Add ingredients to Personal Blending Jar.
2. Turn Personal Blending Jar upside down, shake
to mix ingredients, and place onto Base.
3. Plug in Blender. Hold Personal Blending Jar in
place while blending. Press and hold one of the
PULSE settings to blend 15 to 30 seconds or
until smooth.
4. Unplug. Hold Personal Blending Jar and lift
straight up to remove.
5. Turn Blending Jar right side up; remove Collar
and Cutting Blade Assembly from Personal
Blending Jar. Hand-tighten Travel Lid onto
Personal Blending Jar.
Blending Tips for the 20-oz. (591-mL) Personal Blending Jar
• When filling the Personal Blending Jar, place frozen
ingredients or ice into the Personal Blending Jar
first.
• For best performance in the 20-oz. (591-mL)
Personal Blending Jar, the minimum amount of
liquid needed per recipe is 3/4 cup (6 ounces
[177 mL]).
• If blending action does not start, stops during
blending, or ingredients stick to sides of the
Personal Blending Jar, turn Blender OFF (
).
Remove Personal Blending Jar, shake contents,
and return to blending.
• Do not fill Personal Blending Jar above MAX fill
line.
• When turned upside down to blend, the frozen
items will be on the top.
• Do not chop or process hard foods such as cheese,
crackers, or meat.
• Avoid bumping or dropping the Blender.
• Do not blend hot liquids in Personal Blending Jar.
How to Use Food Processor Attachment
w WARNING
Laceration Hazard. Handle blade carefully; it is very sharp. Make sure unit is turned OFF (
)
and is unplugged. Always wait until blade has stopped moving before removing lid.
1. Make sure Blender is OFF ( ) and unplugged.
Insert Food Processor Adapter into Collar and
turn clockwise to tighten. Then, place Food
Processor Adapter straight down on Base.
2. Place Food Processor Bowl on Food Processor
Adapter and turn clockwise to lock Bowl into
place.
To chop, carefully slide Food Processor S-Blade
straight down onto motor shaft. Add food
to Food Processor Bowl. Place Lid on Food
Processor Bowl. Rotate Lid clockwise to lock.
Slide Food Pusher into Food Chute. Plug into
outlet. Pulse is recommended when using the
Food Processor attachment. Press and hold one
of the PULSE settings to process. To turn off,
release button.
To slice or shred, carefully slide Red Adapter
for Slicing/Shredding onto Motor Shaft, then
add Slicing/Shredding Disc. Place Lid on Food
Processor Bowl. Rotate Lid clockwise to lock
into place. Plug into outlet. Cut food to fit Food
Chute. Press SLICE/SHRED button. Remove
Food Pusher and insert food, using Food Pusher
to push food through Food Chute. Press OFF
(
) when finished processing.
3. Unplug.
4. Pull straight up to remove Food Processor Bowl
with Collar still attached. Place on flat surface.
5. Turn Lid counterclockwise. While holding
center of Food Processor S-Blade or Slicing/
Shredding Disc, carefully lift up to remove.
Read before use.
Lire avant utilisation.
Lea antes de usar.
For Questions: 1.800.851.8900
For recipes, tips, product
information and registration:
hamiltonbeach.com
Pour des questions : 1.800.267.2826
Pour des recettes, des conseils, des
renseignements sur le produit et
l’enregistrement: hamiltonbeach.ca
Para preguntas:
800 71 16 100
Para recetas, consejos, información
del producto y registro:
hamiltonbeach.com.mx
Care and Cleaning
w WARNING
Electrical Shock Hazard. To protect against risk of electrical shock, do not put cord, plug,
base, or motor in water or other liquid.
1. Unplug.
2. Wipe Base, control panel, and cord with a damp
cloth or sponge. To remove stubborn spots, use a
mild, nonabrasive cleanser.
3. Blender Jar and Personal Blending Jar are
dishwasher-safe. Blender Lid, Travel Lid, Food
Processor Lid, Food Processor Bowl, Food
Processor S-Blade, Slicing/Shredding Disc,
Red Adapter, and Food Processor Bowl should
be placed in the top rack only. DO NOT use
“SANITIZE” setting when washing in dishwasher.
SANITIZE cycle temperatures could damage your
product. Parts may also be washed with hot,
soapy water. Care should be taken when handling
the Cutting Blade Assembly as it is very sharp.
Rinse and dry thoroughly. Do not soak.
4. Store Slicing/Shredding Disc inside Blender Jar
and leave Lid ajar to prevent container odor.
To easily clean, pour 2 cups (473 mL) warm water in Blender Jar and add one drop liquid dishwashing
detergent. Run the Blender on MIX for 10 seconds. Discard soapy water. Rinse with clean water.
Limited Warranty
This warranty applies to products purchased and used in the U.S. and Canada. This is the only express warranty for
this product and is in lieu of any other warranty or condition.
This product is warranted to be free from defects in material and workmanship for a period of five (5) years from
the date of original purchase in Canada and three (3) years from the date of original purchase in the U.S. During this
period, your exclusive remedy is replacement of this product or any component found to be defective, at our option;
however, you are responsible for all costs associated with our returning a product or component under this warranty
to you. If the product or component is unavailable, we will replace with a similar one of equal or greater value.
This warranty does not cover glass, filters, wear from normal use, use not in conformity with the printed directions,
or damage to the product resulting from accident, alteration, abuse, or misuse. This warranty extends only to the
original consumer purchaser or gift recipient. Keep the original sales receipt, as proof of purchase is required to make
a warranty claim. This warranty is void if the product is used for other than single-family household use or subjected
to any voltage and waveform other than as specified on the rating label (e.g., 120 V ~ 60 Hz).
We exclude all claims for special, incidental, and consequential damages caused by breach of express or implied
warranty. All liability is limited to the amount of the purchase price. Every implied warranty, including any statutory
warranty or condition of merchantability or fitness for a particular purpose, is disclaimed except to the extent
prohibited by law, in which case such warranty or condition is limited to the duration of this written warranty.
This warranty gives you specific legal rights. You may have other legal rights that vary depending on where you
live. Some states or provinces do not allow limitations on implied warranties or special, incidental, or consequential
damages, so the foregoing limitations may not apply to you.
To make a warranty claim, do not return this appliance to the store. Please write Hamilton Beach Brands, Inc.
4421 Waterfront Dr., Glen Allen, VA 23060, or visit hamiltonbeach.com in the U.S. or hamiltonbeach.ca in Canada.
For faster service, locate the model, type, and series numbers on your appliance.
Food Processing Techniques:
• Cut food into 1-inch (2.5-cm) pieces before processing with S-blade.
• Do not use Food Processor Attachment for the following: grinding grain, coffee beans, or spices; slicing
frozen meats; kneading dough; or crushing ice.
• When using Food Processor S-blade, do not process liquids past the MAX Liquid Fill line and other
ingredients past the 24-oz (3-cup) line.
ATTACHMENT FOODS
S-Blade
Chop: Nuts, meat, vegetables, herbs, crackers (Max. 2 cups/473 mL)
Mix/Puree: Vegetables, fruit, soups, sauces, salad dressing
(Max. 2 cups/473 mL)
Grate: Cheese (chilled, max. 5 oz./142 g)
Slicing Disc Vegetables, pepperoni, firm cheeses (chilled)
Shredding Disc Vegetables, pepperoni, firm cheeses (chilled)
To order parts, visit:
hamiltonbeach.com/parts
Food Processor Attachment
PRÉCAUTIONS IMPORTANTES
Pour utiliser un appareil électroménager, vous devez toujours prendre des mesures élémentaires de sécurité pour réduire le
risque d’incendie, d’électrocution et/ou de blessure corporelle, en particulier les mesures suivantes :
1.
Lire toutes les instructions.
2.
Cet appareil n’est pas destiné à être utilisé par des
enfants ou des personnes dont les capacités physiques,
sensorielles ou mentales sont réduites, ou manquant
d’expérience et de connaissance, sauf si elles sont
étroitement surveillées et instruites sur l’utilisation de
l’appareil par une personne responsable de leur sécurité.
3.
Cet appareil ne doit pas être utilisé par des enfants. Garder
l’appareil et son cordon hors de la portée des enfants.
4.
Une surveillance étroite est requise pour tout appareil
utilisé près des enfants. Surveiller que les enfants ne
jouent pas avec l’appareil.
5.
Pour éviter les risques d’électrocution, ne pas immerger
le cordon, la fiche, la base ou le moteur dans l’eau ou tout
autre liquide.
6.
Fermer l’appareil OFF ( /arrêt), puis le débrancher de la
prise lorsqu’il n’est pas utilisé, avant d’assembler ou de
désassembler des pièces ou avant de le nettoyer. Pour
le débrancher, tenir la fiche et la retirer de la prise. Ne
jamais tirer sur le cordon.
7.
Éviter tout contact avec les pièces en mouvement. Ne
pas tenter d’entraver tout mécanisme de verrouillage de
sécurité.
8.
Ne pas faire fonctionner un appareil électroménager
avec un cordon ou une fiche endommagée, ou lorsque
l’appareil ne fonctionne pas bien ou a été échappé ou
endommagé d’une manière quelconque. Le remplacement
et la réparation du cordon d’alimentation doivent être
faits par le fabricant, son agent de service ou toute
personne qualifiée de façon à éviter tout danger. Veuillez
communiquer avec le service à la clientèle pour obtenir
de l’information concernant l’inspection, la réparation ou le
réglage, comme précisé dans la garantie limitée.
9.
L’utilisation d’accessoires, y compris des bocaux de
conserves, non recommandés ou vendus par le fabricant
de l’appareil peut provoquer un incendie, un choc
électrique ou des blessures.
10.
Ne pas utiliser à l’extérieur.
11.
Ne pas laisser pendre le cordon de la table ou du
comptoir et éviter tout contact entre le cordon et les
surfaces chaudes, incluant la cuisinière.
12.
Ne placer pas sur ou à proximité d’un brûleur électrique
ou à gaz chaud ou dans un four chaud.
13.
Garder les mains et les ustensiles à l’extérieur du récipient
et éloignés de la lame pendant le mélange ou le hachage
des aliments afin de réduire le risque de blessures graves
et/ou de bris du mélangeur et de ses accessoires (certains
accessoires ne sont pas fournis avec ce mélangeur).
Une spatule en caoutchouc peut être utilisée seulement
lorsque le mélangeur ne fonctionne pas.
14.
Les lames sont tranchantes; veuillez manipuler avec
précaution, en particulier lorsque vous assemblez,
désassemblez, videz ou nettoyez le récipient du
mélangeur.
15.
Ne pas utiliser le récipient du mélangeur s’il est brisé,
ébréché ou fissuré.
16.
Ne pas utiliser une assemblage de lames briséee,
fissurée ou lâche.
17.
Toujours faire fonctionner le mélangeur avec le couvercle
et le bouchon de remplissage bien en place, ou ouvrir
l’évent du couvercle avec le bec verseur antigoutte. Ne
retirer le bouchon de remplissage que pour ajouter des
ingrédients.
18.
Serrer et sécuriser le collier de la base du récipient et
de la récipient personnel. Des risques de blessures
peuvent survenir si les lames en mouvement sont
accidentellement exposées.
19.
Risque de brûlure thermique dû à la pression excessive
dans le récipient de mélange personnel. Ne pas mélanger
de liquides chauds dans le récipient de mélange personnel
.
20.
S’assurer que l’appareil est OFF ( /arrêt) avant
de brancher la fiche dans la prise de courant. Pour
débrancher, tourner la commande à et mettre à OFF (
/
arrêt) puis débrancher la fiche de la prise de courant. Pour
débrancher, saisir la fiche et la retirer de la prise. Ne pas
tirer sure le cordon d’alimentation.
21.
N’utiliser cet appareil que pour les fonctions auxquelles il
est destiné.
22.
Ne pas mettre le récipient du mélangeur dans le
congélateur s’il est rempli d’aliments ou de liquides.
23.
Ne pas mélanger de liquides chauds dans le récipient de
mélange personnel.
24.
Prendre garde au liquide chaud versé dans le mélangeur
parce que ce dernier peut jaillir hors de l’appareil à cause
de la formation soudaine de vapeur.
25.
Lors du mélange de liquides très chauds, retirer le
bouchon de remplissage du couvercle en deux parties ou
ouvrir l’évent du couvercle avec le bec verseur antigoutte
et fermer tous les becs verseurs le long du bord. Les
liquides chauds peuvent pousser sur le couvercle pendant
le mélange. Pour prévenir les brûlures : Ne pas remplir
au-delà de la marque 710 mL (3 tasses) du récipient. À
l’aide d’un gant de cuisinier ou d’une serviette épaisse,
placer une main sur le dessus du couvercle. Garder la
peau exposée éloignée du couvercle. Commencer à
mélanger en utilisant la vitesse minimale.
26.
ATTENTION ! Afin d’éviter un danger découlant d’une
réinitialisation accidentelle du rupteur thermique, se
dispositif ne doit pas être alimenté par l’entremise d’un
appareil de connexion externe, comme une minuterie, ou
connecté à un circuit qui est régulièrement mis sous et
hors tension par le service public.
27.
Pour éviter les risques de blessure, ne jamais placer
l’assemblage de lames sans avoir correctement avoir
sécurisé le récipient ou la récipient de mélange personnel
sur la base.
28.
Si le récipient bouge ou tourne pendant que le moteur est
en marche (ON [I]), mettre immédiatement le mélangeur
hors tension (OFF [
]) puis serrer le collier au mélangeur
ou à la base du mélangeur.
29.
Ne pas laisser le mélangeur sans surveillance pendant le
fonctionnement.
30.
Le temps de fonctionnement ne doit pas dépasser 3
minutes, peu importe l’accessoire, ou le réglage de vitesse.
31.
Garder les mains et les ustensiles loin de la lame en S et
du disque à trancher/râper lors de l’utilisation du robot
culinaire pour réduire le risque de blessures graves ou de
dommages à l’appareil. Un grattoir en caoutchouc peut
être utilisé SEULEMENT lorsque le robot culinaire ou le
mélangeur ne fonctionne pas.
32.
La lame en S et le disque à trancher/râper sont coupants.
Manipuler avec soin. Rangez loin des enfants.
33.
Pour réduire le risque de blessure, ne jamais placer la
lame en S ou le disque à trancher/râper sur le robot
culinaire ou l’arbre d’entraînement du mélangeur sans que
le bol ne soit fixé adéquatement.
34.
Veiller à ce que le couvercle soit verrouillé en place de
façon sécuritaire avant de faire fonctionner le robot
culinaire ou le mélangeur.
35.
Ne jamais introduire d’aliments dans l’entonnoir avec les
mains. Toujours utiliser les poussoirs.
36.
Ne pas tenter d’entraver le mécanisme de verrouillage du
couvercle du robot culinaire ou du mélangeur.
37.
Veiller à ce que la lame en S et le disque à trancher/
râper soient complètement immobilisés avant de retirer le
couvercle du robot culinaire.
38.
Ne jamais prolonger le temps de fonctionnement de cet
appareil ou utiliser des quantités d’aliments supérieures
aux recommandations du fabricant.
CONSERVER CES INSTRUCTIONS
Autres consignes de sécurité pour le consommateur
Cet appareil est destiné à un usage domestique uniquement. Utiliser seulement pour les aliments et les liquides.
w AVERTISSEMENT
Risque de choc électrique :
Cet appareil est fourni avec une fiche polarisée (une broche
large) pour réduire le risque d’électrocution. Cette fiche
n’entre que dans un seul sens dans une prise polarisée. Ne
contrecarrez pas l’objectif sécuritaire de cette fiche en la
modifiant de quelque manière que ce soit ou en utilisant un
adaptateur. Si vous ne pouvez pas insérer complètement la
fiche dans la prise, inversez la fiche. Si elle refuse toujours
de s’insérer, faire remplacer la prise par un électricien.
La longueur du cordon installé sur cet appareil a été
sélectionnée afin de réduire les risques d’enchevêtrement
ou de faux pas causés par un fil trop long. L’utilisation d’une
rallonge approuvée est permise si le cordon est trop court.
Les caractéristiques électriques de la rallonge doivent
être équivalentes ou supérieures aux caractéristiques de
l’appareil. Prendre toutes les précautions nécessaires pour
installer la rallonge de manière à ne pas la faire courir sur le
comptoir ou sur une table pour éviter qu’un enfant ne tire
sur le cordon ou trébuche accidentellement.
Pour éviter la surcharge du circuit électrique, ne pas utiliser
un autre appareil à haute puissance sur le même circuit
que cet appareil.
L’assemblage de lames qui se bloquent ou refusent de
bouger peuvent endommager le moteur. Ne pas utiliser
l’appareil et visiter hamiltonbeach.com.
Pièces et caractéristiques
1.
Couvercle
2.
Récipient du mélangeur
3.
Assemblage de lames
4.
Col
5.
Base
6.
Rangement pour cordon
d’alimentation
(à l’arrière de la base)
7.
Récipient de mélange
personnel
8.
Couvercle de transport
9.
Poussoir/Tasse à mesurer
10.
Entonnoir
11.
Couvercle du robot culinaire
12.
Lame en S du robot culinaire
13.
Disque à trancher/râper
14.
Adaptateur rouge pour
trancher/râper
15.
Bol du robot culinaire
16.
Adaptateur du robot culinaire
Pour commander des pièces, visiter :
hamiltonbeach.ca/parts
Accessoire du robot culinaire
Avant la première utilisation : Après avoir déballé le mélangeur, nettoyer toutes les pièces, à l’exception de la base, dans
de l’eau chaude savonneuse. Rincer et sécher. Essuyer la base à l’aide d’un chiffon ou d’une éponge douce et humide. Ne
pas immerger la base ou l’adaptateur du robot culinaire dans l’eau ou dans tout autre liquide. Prendre des précautions
lors de la manipulation de l’assemblage de lames, car celui-ci est très tranchant.
Utilisation du mélangeur
IMPORTANT : Le récipient du mélangeur et l’assemblage de lames sont sujets à l’usure dans des conditions normales
d’utilisation. Veuillez toujours inspecter le récipient du mélangeur pour confirmer l’absence d’entailles, d’ébréchures ou de fissures.
Veuillez toujours inspecter l’assemblage de lames pour vérifier si elles sont brisées, fissurées ou mal fixées. Si le récipient du
mélangeur ou l’assemblage de lames sont brisés, ne pas utiliser l’appareil. Visiter hamiltonbeach.com pour obtenir des pièces de
remplacement.
1. Veuillez vous assurer que le mélangeur est débranché.
Placer la base sur une surface propre et sèche afin
d’empêcher que des particules étrangères soient aspirées
dans le moteur lorsque l’appareil fonctionne.
2. Mettre l’assemblage de lames, lames vers le haut, à
travers l’ouverture du récipient du mélangeur avant de
serrer le col au bas du récipient. Mettre le récipient du
mélangeur sur la base.
3. Ajouter les ingrédients dans le récipient. Brancher à la
prise de courant.
4. Mettre le couvercle sur le récipient du mélangeur.
Appuyer sur le bouton de fonction souhaité. La vitesse
du mélangeur augmente lorsque l’on appuie sur les
boutons à partir de la gauche vers la droite. Lorsque l’on
appuie sur le bouton PULSE (impulsion), le mélangeur
fonctionnera tant que le bouton est maintenu enfoncé.
Les autres boutons de vitesse fonctionneront jusqu’à ce
que l’on appuie sur le bouton OFF (
/arrêt).
IMPORTANT : Ne pas faire fonctionner le mélangeur
de façon continue pour des périodes supérieures à 3
minutes. Si vous commencez à sentir une odeur de brûlé,
arrêter immédiatement l’appareil et retirer le récipient du
mélangeur. Démarrer et faire fonctionner le mélangeur,
seulement la base, SANS le récipient du mélangeur, à
la vitesse la plus élevée pendant 2 minutes. À l’avenir,
lorsque vous essayerez des recettes similaires, veuillez
réduire la quantité totale d’ingrédients.
5. Veuillez toujours placer une main sur le couvercle lors du
fonctionnement.
w AVERTISSEMENT
Risque de brûlure.
Lorsque vous mélangez des liquides chauds, veuillez
retirer le bouchon de remplissage du couvercle à deux
840337203 | Page Size: 23.33" x 16.5" 06/23
Grupo HB PS, S.A. de C.V.
Monte Elbruz No. 124 - 401
Col. Polanco V Sección,
Miguel Hidalgo
Ciudad de México, C.P. 11560
GARANTÍA PARA PRODUCTOS COMPRADOS EN MÉXICO
PRODUCTO: MARCA: MODELO:
Grupo HB PS, S.A. de C.V. cuenta con una Red de Centros de Servicio Autorizada, por favor consulte en la lista anexa el nombre y dirección
de los establecimientos en la República Mexicana en donde usted podrá hacer efectiva la garantía, obtener partes, componentes, consumibles
y accesorios; así como también obtener servicio para productos fuera de garantía. Para mayor información llame al: Centro de Atención al
Consumidor: 800 71 16 100
Grupo HB PS, S.A. de C.V. le otorga a partir de la fecha de compra:
GARANTÍA DE 3 AÑOS.
COBERTURA
• Esta garantía ampara, todas las piezas y componentes del producto que resulten con defecto de fabricación incluyendo la mano de obra.
• Grupo HB PS, S.A. de C.V. se obliga a reemplazar, reparar o reponer, cualquier pieza o componente defectuoso; proporcionar la mano de obra necesaria
para su diagnóstico y reparación, todo lo anterior sin costo adicional para el consumidor.
• Esta garantía incluye los gastos de transportación del producto que deriven de su cumplimiento dentro de su red de servicio.
LIMITACIONES
• Esta garantía no ampara el reemplazo de piezas deterioradas por uso o por desgaste normal, como son: cuchillas, vasos, jarras, filtros, etc.
• Grupo HB PS, S.A. de C.V. no se hace responsable por los accidentes producidos a consecuencia de una instalación eléctrica defectuosa,
ausencia de toma de tierra, clavija o enchufe en mal estado, etc.
EXCEPCIONES
Esta garantía no será efectiva en los siguientes casos:
a) Cuando el producto se hubiese utlizado en condiciones distintas a las normales. (Uso industrial, semi-industrial o comercial.)
b) Cuando el producto no hubiese sido operado de acuerdo con el instructivo de uso.
c) Cuando el producto hubiese sido alterado o reparado por personas no autorizadas por Grupo HB PS, S.A. de C.V. el fabricante nacional,
importador o comercializador responsable respectivo.
El consumidor puede solicitar que se haga efectiva la garantía ante la propia casa comercial donde adquirió su producto, siempre y cuando Grupo
HB PS, S.A. de C.V. no cuente con talleres de servicio.
PROCEDIMIENTO PARA HACER EFECTIVA LA GARANTÍA
• Para hacer efectiva la garantía, lleve su aparato al Centro de Servicio Autorizado más cercano a su domicilio (consulte la lista anexa).
• Si no existe Centro de Servicio Autorizado en su localidad llame a nuestro Centro de Atención al Consumidor para recibir instrucciones de como
hacer efectiva su garantía.
FECHA DE
ENTREGA
SELLO DEL
VENDEDOR
QUEJAS Y SUGERENCIAS
DÍA___________
MES__________
AÑO__________
Si desea hacer comentarios o sugerencias con respecto a nuestro servicio o tiene
alguna queja derivada de la atención recibida en alguno de nuestros Centros de
Servicio Autorizados, por favor dirigirse a:
GERENCIA INTERNACIONAL DE SERVICIO
800 71 16 100
Email: [email protected]
CENTROS DE SERVICIO AUTORIZADOS
Ciudad de México
ELECTRODOMÉSTICOS
Av. Plutarco Elias Calles No. 1499
Zacahuitzco, Benito Juárez,
Ciudad de México, C.P. 09490
Tel: 55 5235 2323
CASA GARCÍA
Av. Patriotismo No. 875-B
Mixcoac, Benito Juárez,
Ciudad de México, C.P. 03910
Tel: 55 5563 8723
Nuevo León
FERNANDO SEPÚLVEDA REFACCIONES
Ruperto Martínez No. 238 Ote.
Col. Centro, Monterrey, N.L., C.P. 64000
Tel: 81 8343 6700
Jalisco
SERVICIOS DE MANTENIMIENTO CASTILLO
Garibaldi No. 1450,
Ladrón de Guevara, Guadalajara, Jalisco, C.P. 44660
Tel: 33 3825 3480
Modelo: Tipo
:
Características Eléctricas:
58176 B103 120 V ~ 60 Hz 3.2 A
Los modelos incluídos en el instructivo de Uso y cuidado pueden ir seguidos o no por un sufijo correspondiente a una o
varias letras del alfabeto y sus combinaciones, separadas o no por un espacio, coma, diagonal, o guión. Como ejemplos
los sufijos pueden ser:
“Y” y/o “MX” y/o “MXY” y/o “Z”.
pièces ou ouvrir le trou d’aération du couvercle doté d’un
bec verseur sans dégât, et fermer toutes les ouvertures
conçues pour verser tout autour du bord du couvercle.
Les liquides chauds peuvent repousser le couvercle du
récipient du mélangeur lors du fonctionnement. Pour
prévenir le risque de brûlures : Ne pas remplir le récipient
du mélangeur au-delà du niveau de 710 mL (3 tasses).
En vous protégeant à l’aide d’un gant de cuisine ou
d’une serviette épaisse, mettre une main sur le dessus
du couvercle. Veuillez garder la peau exposée à l’écart
du couvercle. Démarrer le mélangeur à la vitesse la plus
basse.
6. Veuillez TOUJOURS éteindre l’appareil en appuyant sur le
bouton OFF ( /arrêt) et attendre jusqu’à ce que les lames
cessent de tourner avant de retirer le récipient.
7. Pour retirer le récipient du mélangeur une fois le mélange
terminé, soulever le récipient du mélangeur vers le haut.
8. NE JAMAIS tenter de placer le récipient du mélangeur
sur l’appareil lorsque le moteur fonctionne.
Utilisation du récipient de mélange personnel
1. Veuillez toujours faire fonctionner sur un comptoir ou
toute autre surface de support. Placer avec précaution
l’assemblage de lames et le col sur le récipient de
mélange personnel. Ajouter les ingrédients dans le
récipient de mélange personnel.
2. Tourner le récipient de mélange personnel à l’envers,
secouer pour mélanger les ingrédients, et mettre sur la
base.
3. Brancher l’appareil. Tenir le récipient de mélange
personnel en place lors du mélange. Appuyer sur PULSE
(impulsion) pour mélanger pendant 15 à 30 secondes ou
jusqu’à consistance homogène.
4. Débrancher. Tenir le récipient de mélange personnel et le
soulever vers le haut pour le retirer.
5. Tourner le récipient de mélange à l’endroit; retirer le
col et l’assemblage de lames du récipient de mélange
personnel. Serrer à la main le couvercle de transport sur
le récipient de mélange personnel.
Conseils d’utilisation pour le récipient de mélange personnel de 591 mL (20 oz.)
• Lorsque vous remplissez le récipient personnel, veuillez
mettre les ingrédients congelés ou la glace dans le récipient
personnel en premier.
• Pour obtenir de meilleurs résultats lors de l’utilisation du
récipient personnel de 591 mL (20 oz.), le minimum de liquide
nécessaire par recette est de 177 mL (3/4 tasse [6 oz.]).
• Si le mélangeur ne démarre pas, s’arrête en cours de
fonctionnement ou si les ingrédients collent sur les parois du
récipient personnel, veuillez éteindre l’appareil en appuyant
sur le bouton OFF ( /arrêt). Retirer le récipient personnel,
secouer le contenu et continuer de mélanger.
• Lorsqu’il sera retourné à l’envers pour mélanger, les
ingrédients congelés se retrouveront sur le dessus.
• Ne pas hacher ou transformer d’aliments durs comme du
fromage, des craquelins ou de la viande.
• Éviter de cogner ou laisser tomber le mélangeur.
• Ne pas mélanger de liquides chauds dans le récipient
personnel.
• Ne pas remplir le récipient personnel au-delà de la ligne de
remplissage MAX.
Mode d’emploi du robot culinaire
w AVERTISSEMENT
Risque de lacération. Manipuler la lame avec précaution, car elle est très tranchante. Veuillez vous
assurer que l’appareil est en position OFF ( /arrêt) et qu’il est débranché. Toujours attendre que la lame soit complètement arrêtée
avant de retirer le couvercle.
1. Veiller à ce que le mélangeur soit en position OFF ( /
arrêt) et le débrancher. Insérer l’adaptateur du robot
culinaire dans le col et le tourner en sens horaire pour le
serrer. Abaisser ensuite l’adaptateur du robot culinaire
directement sur la base.
2. Placer le bol du robot culinaire sur l’adaptateur du robot
culinaire et le tourner en sens horaire pour le verrouiller
en place.
Pour hacher des aliments, faire glisser avec précaution
la lame en S du robot culinaire directement sur l’arbre
d’entraînement. Déposer les aliments dans le bol du robot
culinaire. Placer le couvercle sur le bol du robot culinaire.
Tourner le couvercle en sens horaire pour le verrouiller.
Glisser le poussoir dans l’entonnoir. Brancher l’appareil
dans une prise. Il est recommandé d’utiliser la fonction
d’impulsion avec l’accessoire du robot culinaire. Appuyer
sur l’un des boutons du réglage PULSE (impulsion) et le
tenir enfoncé pour hacher les aliments. Relâcher le bouton
pour arrêter le hachage.
Pour trancher ou râper des aliments, glisser avec
précaution l’adaptateur rouge pour trancher/râper sur
l’arbre d’entraînement, puis ajouter le disque à trancher/
râper. Placer le couvercle sur le bol du robot culinaire.
Tourner le couvercle en sens horaire pour le verrouiller
en place. Brancher l’appareil dans une prise. Couper
préalablement les aliments pour qu’ils puissent passer
dans l’entonnoir. Appuyer sur le bouton SLICE/SHRED
(trancher/râper). Retirer le poussoir et insérer les aliments
dans l’entonnoir en les poussant avec le poussoir.
Appuyer sur le bouton OFF ( /arrêt) une fois l’opération
terminée.
3. Débrancher.
4. Tirer directement vers le haut pour retirer le bol du robot
culinaire avec le col encore fixé. Le déposer sur une
surface plane.
5. Tourner le couvercle en sens antihoraire. En tenant le
centre de la lame en S ou du disque à trancher/râper du
robot culinaire, le soulever avec précaution pour le retirer.
Entretien et nettoyage
w AVERTISSEMENT
Risque de choc électrique. Pour protéger contre le risque de choc électrique, ne pas mettre le
cordon d’alimentation, la fiche, la base ou le moteur dans l’eau ou tout autre liquide.
1. Débrancher.
2. Essuyer la base, le panneau de commande et le cordon
d’alimentation à l’aide d’un chiffon ou d’une éponge
douce et humide. Pour éliminer les taches tenaces,
utiliser un nettoyant doux et non abrasif.
3. Le récipient de mélange et le récipient de mélange
personnel vont au lave-vaisselle. Le couvercle du
mélangeur, le couvercle de transport, le couvercle du
robot culinaire, le bol du robot culinaire, la lame en S du
robot culinaire, le disque à trancher/râper, l’adaptateur
rouge et le bol du robot culinaire ne vont que dans le
panier supérieur du lave-vaisselle. Ne pas utiliser le
cycle « SANITIZE » lors du lavage au lave-vaisselle.
Les températures du cycle « SANITIZE » pourraient
endommager votre produit. Les pièces peuvent
également être lavées dans de l’eau chaude savonneuse.
Prendre des précautions lors de la manipulation de
l’assemblage de lames, car celui-ci est très tranchant.
Rincer et bien essuyer pour sécher. Ne pas faire tremper.
4. Ranger le disque à trancher/râper dans le récipient du
mélangeur et laisser le couvercle légèrement ouvert pour
prévenir les odeurs.
Pour nettoyer facilement, verser 473 mL (2 tasses) d’eau tiède dans le récipient du mélangeur et ajouter une goutte de détergent
à vaisselle liquide. Faire fonctionner le mélangeur à la fonction mélange durant 10 secondes. Jeter l’eau savonneuse. Rincer à
l’eau propre.
Garantie limitée
Cette garantie s’applique aux produits achetés et utilisées aux É.-U. et au Canada. C’est la seule garantie expresse pour ce
produit et est en lieu et place de tout autre garantie ou condition. Ce produit est garanti contre tout défaut de matériaux et de
main-d’oeuvre pour une période de cinq (5) ans à compter de la date d’achat d’origine au Canada et trois (3) an à compter de la
date d’achat d’origine aux É.-U. Au cours de cette période, votre recours exclusif se limitera au remplacement de ce produit ou
tout autre composant défectueux, à notre discrétion.
Cependant, vous êtes responsables des frais associés au retour du produit ou d’un composant en vertu de la présente garantie.
Si le produit ou le composant est non disponible, nous le remplacerons avec un article similaire de valeur égale ou supérieure.
Cette garantie ne couvre pas le verre, les filtres, l’usure d’un usage normal, l’utilisation non conforme aux directives imprimées,
ou des dommages au produit résultant d’un accident, modification, utilisation abusive ou incorrecte. Cette garantie s’applique
seulement à l’acheteur original ou à la personne l’ayant reçu en cadeau. La présentation du reçu de vente d’origine comme
preuve d’achat est nécessaire pour faire une réclamation au titre de cette garantie.
Cette garantie s’annule si le produit est utilisé autrement que par une famille ou si l’appareil est soumis à toute tension ou forme
Techniques de préparation des aliments :
• Couper les aliments en morceaux de 2,5 cm (1 po) avant de les hacher avec la lame en S.
• Ne pas utiliser l’accessoire du robot culinaire aux fins suivantes : moudre des céréales, des grains de café
ou des épices; trancher de la viande congelée; pétrir de la pâte; ou concasser de la glace.
• Lors de l’utilisation de la lame en S du robot culinaire, ne pas verser de liquide au-delà de la ligne de
remplissage MAX des liquides ou d’autres ingrédients au-delà de la ligne de 24 oz (3 tasses).
ACCESSOIRE ALIMENT
Lame en « S »
Hacher : Noix, viandes, légumes, herbes fraîches, craquelins
(max. 500 mL [2 tasses])
Mélanger/réduire en purée : Légumes, fruits, soupes, sauces,
vinaigrettes (max. 500 mL [2 tasses])
Râper : Fromage (réfrigéré, max. 142 g [5 oz])
Disque à trancher Légumes, peppéroni, fromages fermes (réfrigérés)
Disque à râper Légumes, peppéroni, fromages fermes (réfrigérés)
d’onde différente des caractéristiques nominales précisées sur l’étiquette (par ex. : 120 V ~ 60 Hz).
Nous excluons toutes les réclamations au titre de cette garantie pour les dommages spéciaux, consécutifs et indirects causés
par la violation de garantie expresse ou implicite. Toute responsabilité est limitée au prix d’achat. Chaque garantie implicite,
y compris toute garantie ou condition de qualité marchande ou d’adéquation à un usage particulier, est exonérée, sauf
dans la mesure interdite par la loi, auquel cas la garantie ou condition est limitée à la durée de cette garantie écrite.
Cette garantie vous donne des droits légaux précis. Vous pouvez avoir d’autres droits qui varient selon l’endroit où vous habitez.
Certaines provinces ne permettent pas les limitations sur les garanties implicites ou les dommages spéciaux ou indirects de
telle sorte que les limitations ci-dessus ne s’appliquent peut-être pas à votre cas.
Pour faire une réclamation au titre de la garantie, veuillez ne pas retourner cet appareil au magasin. Veuillez nous écrire à
Hamilton Beach Brands, Inc., Customer Service Department, 4421 Waterfront Dr., Glen Allen, VA 23060, ou visiter le site
hamiltonbeach.com/customerservice aux États-Unis ou hamiltonbeach.ca/customer-service au Canada. Pour obtenir un service
plus rapide, veuillez repérer les numéros de modèle, de type et de séries sur votre appareil.
SALVAGUARDIAS IMPORTANTES
Cuando utilice artefactos eléctricos, siempre deben seguirse precauciones de seguridad básicas a fin de reducir el riesgo de
incendio, descarga eléctrica, y/o lesiones a personas, incluyendo las siguientes:
1.
Lea todas las instrucciones.
2.
Este aparato no se destina para utilizarse por niños o
por personas cuyas capacidades físicas, sensoriales o
mentales sean diferentes o estén reducidas, o carezcan
de experiencia o conocimiento, a menos que dichas
personas reciban una supervisión o capacitación para el
funcionamiento del aparato por una persona responsable
de su seguridad.
3.
Este aparato no debe ser usado por niños. Mantenga
este aparato y su cable de alimentación fuera del alcance
de los niños.
4.
Se requiere de una estrecha supervisión cuando
el aparato se use cerca de niños. Los niños deben
supervisarse para asegurar que ellos no empleen los
aparatos como juguete.
5.
Verifique que el voltaje de su instalación corresponda con
el del producto.
6.
Para protegerse contra un riesgo de descarga eléctrica,
no ponga el cable, enchufe, base o motor en agua o
cualquier otro líquido.
7.
Apague el electrodoméstico OFF ( /apagado) y,
después, desenchúfelo del tomacorriente cuando no esté
en uso, antes de armar o desarmar piezas y antes de
limpiarlo. Para desenchufarlo, tome el enchufe y retírelo
del tomacorriente. Nunca tire del cable eléctrico.
8.
Evite todo contacto con las piezas en movimiento.
No intente anular ningún mecanismo de bloqueo de
seguridad.
9.
No opere ningún aparato con cables o enchufe dañados
o después de que el aparato funcione mal o se caiga
o dañe de cualquier manera. El reemplazo del cable de
suministro y las reparaciones deben ser efectuadas por el
fabricante, su agente de servicio, o personas igualmente
calificadas para poder evitar un peligro. Llame al número
de servicio al cliente proporcionado para información
sobre examinación, reparación o ajuste.
10.
El uso de aditamentos, incluyendo latas, no
recomendados o vendidos por el fabricante del aparato
pueden causar un riesgo de lesiones personales.
11.
No lo use en aire libre.
12.
No deje que el cable cuelgue del borde de la mesa o
cubierta, o toque superficies calientes, incluyendo la
estufa.
13.
No coloque sobre o cerca de una cocina eléctrica o a gas
caliente o dentro de un horno caliente.
14.
Mantenga las manos y utensilios alejados de la jarra y
de la cuchilla de corte, mientras licue o corte alimentos,
a fin de reducir el riesgo de lesiones personales graves
y/o daños a la licuadora (la licuadora puede no incluir
los accesorios). Puede utilizarse una espátula de
goma pero solamente cuando la licuadora no está en
funcionamiento.
15.
Las cuchillas están filosas, manipúlelas cuidadosamente,
especialmente al ensamblar, desmontar, vaciar o limpiar
la jarra de licuadora.
16.
No use una jarra de licuadora rota, estrellada o rajada.
17.
No use un conjunto de las cuchillas roto, rajado o flojo.
18.
Utilice siempre la licuadora con la tapa y el tapón de
llenado o abra el orificio de ventilación de la tapa con pico
libre de derrames colocados. Retire el tapón de llenado
sólo para agregar ingredientes.
19.
Asegúrese de que collar de la base de la jarra de
licuadora y la jarra personal de la licuadora esté fijo
y asegurado. Pueden ocurrir lesiones si las cuchillas
móviles accidentalmente quedan expuestas.
20.
Riesgo de quemaduras térmicas debido a una presión
excesiva en la jarra personal. No mezcle líquidos
calientes en la jarra personal.
21.
Verifique que el aparato esté OFF ( /apagado) antes de
enchufar el cable en el tomacorriente. Para desconectar,
gire el control a OFF ( /apagado), luego quite el enchufe
del tomacorriente. Para desconectarlo, agarre el enchufe
y retire del tomacorrientes. Nunca tire el cable de
alimentación.
22.
No use el aparato para otro propósito que no sea para el
que fue hecho.
23.
No coloque la jarra de licuadora en el congelador lleno de
comida o líquido.
24.
No licúe líquidos calientes en la jarra personal.
25.
Tenga cuidado al verter líquido caliente dentro de la
licuadora porque puede salir disparado del aparato debido
a la salida de vapor repentina.
26.
Cuando licue líquidos calientes, quite la tapa de llenado
de la tapa de dos piezas o abra el orificio de ventilación
de la tapa con pico libre de derrames, y cierre los orificios
de la tapa ubicados a lo largo del borde previstos para
servir. Los líquidos calientes pueden empujar la tapa
durante el licuado. Para prevenir posibles quemaduras:
No llene la jarra de licuadora más allá del nivel de 3 tazas
(710 mL). Con la protección de guantes de cocina o
una toalla gruesa, coloque una mano encima de la tapa.
Mantenga la piel expuesta lejos de la tapa. Comience a
licuar a una velocidad baja.
27.
¡PRECAUCIÓN! A fin de evitar un riego debido a la
reconfiguración inadvertida de la protección térmica,
este artefacto no debe recibir suministro mediante un
dispositivo de derivación externo, como un temporizador,
o conectarse a un circuito que la empresa de servicio
active y desactive regularmente.
28.
Para reducir el riesgo de lesiones, nunca coloque el
conjunto de las cuchillas sobre la base sin estar adjunto a
la jarra de licuadora o a la jarra personal.
29.
Si la jarra se tuerce o gira cuando el motor se enciende
(I), apáguelo ( ) inmediatamente y apriete la jarra en el
collar o en la base de la licuadora.
30.
No deje sin atención la licuadora mientras esté
funcionando.
31.
El tiempo de funcionamiento no puede superar los 3
minutos para cualquier accesorio o configuración de
velocidad.
32.
Mantenga las manos y los utensilios alejados de la
cuchilla en S en movimiento y del disco para rebanar/
rallador mientras procesa los alimentos para reducir el
riesgo de lesiones personales graves y/o daños en el
procesador de alimentos. Puede utilizar una espátula de
goma, pero SÓLO cuando el procesador de alimentos o la
licuadora no estén en funcionamiento.
33.
La cuchilla en S y el disco para rebanar/rallador están
afilados. Manéjelo con cuidado. Almacene lejos del
alcance de los niños.
34.
Para reducir el riesgo de lesiones, no coloque nunca la
cuchilla en S ni el disco para rebanar/rallador en el eje del
motor del procesador de alimentos o de la licuadora sin
tener el tazón bien sujeto.
35.
Asegúrese de que la tapa esté bien cerrada en su sitio
antes de poner en funcionamiento el procesador de
alimentos o la licuadora.
36.
Nunca meta el alimento en el conducto con la mano.
Siempre use el empujador de alimento.
37.
No intente anular el mecanismo de bloqueo de la tapa del
procesador o la licuadora.
38.
Asegúrese de que la cuchilla en S y el disco para
rebanar/rallador se han detenido por completo antes de
quitar la tapa del procesador.
39.
Nunca use el aparato por un período más largo o con
una mayor cantidad de ingredientes que no sean los
recomendados por el fabricante del aparato.
GUARDE ESTAS INSTRUCCIONES
Otra información de seguridad para el cliente
Este aparato ha sido diseñado solamente para uso doméstico
w ADVERTENCIA
Riesgo de descarga eléctrica:
Este aparato es provisto con un enchufe polarizado (una
pata más ancha) para reducir el riesgo de una descarga
eléctrica. El enchufe embona únicamente en una dirección
dentro de un tomacorriente polarizado. No trate de obviar el
propósito de seguridad del enchufe modificándolo de alguna
manera o utilizando un adaptador. Si el enchufe no entra
completamente en la toma, invierta el enchufe. Si aún no
entra, haga que un electricista reemplace la toma.
El largo del cable que se usa en este aparato fue
seleccionado para reducir el peligro de que alguien se
enganche o tropiece con un cable más largo. Si es necesario
usar un cable más largo, se podrá usar un cable de extensión
aprobado. La clasificación eléctrica nominal del cable de
extensión debe ser igual o mayor que la clasificación nominal
del aparato. Es importante tener cuidado de colocar el cable
de extensión para que no se pliegue sobre el mostrador o la
mesera en donde niños puedan tirar del mismo o tropezarse
accidentalmente.
Para evitar una sobrecarga eléctrica del circuito, no use otro
aparato de alto voltaje en el mismo circuito con este aparato.
Si el conjunto de las cuchillas se atora y no se mueve,
dañará el motor. No utilizar; visite hamiltonbeach.com.
Piezas y características
1.
Tapa
2.
Jarra de licuadora
3.
Conjunto de las cuchillas
4.
Cuello
5.
Base
6.
Almacenamiento del cable (en la
parte posterior de la base)
7.
Jarra personal de la licuadora
8.
Tapa de viaje
9.
Empujador de alimentos/Vaso
medidor
10.
Conducto de alimentos
11.
Tapa de procesador de alimentos
12.
Cuchilla en S para procesador de
alimentos
13.
Disco para rebanar/rallador
14.
Adaptador rojo para rebanar/
rallador
15.
Tazón de procesador de alimentos
16.
Adaptador para procesador de
alimentos
Antes del primer uso: Después de desempacar la licuadora, lave todo excepto la base en agua caliente jabonosa. Enjuague y
seque. Limpie la base con un paño suave y húmedo o una esponja. No sumerja la base ni el adaptador para procesador de
alimentos en agua u otro líquido. Se debe tener cuidado al manipular el conjunto de las cuchillas ya que tiene mucho filo.
Cómo utilizar la licuadora
IMPORTANTE: Su jarra de licuadora y conjunto de las cuchillas están sujetos a desgaste con el uso normal. Inspeccione siempre la
jarra de licuadora en busca de muescas, astillas o grietas. Inspeccione siempre el conjunto de las cuchillas en busca de hojas rotas,
agrietadas o sueltas. Si la jarra de licuadora o el conjunto de las cuchillas está dañado, no lo use. Visite hamiltonbeach.com para
obtener piezas de repuesto.
1. Asegúrese de que la licuadora está desenchufada. Coloque
la base sobre una superficie limpia y seca para impedir que
partículas extrañas sean atraídas hacia el motor durante la
operación.
2. Coloque el conjunto de las cuchillas, con las cuchillas hacia
arriba, a través de la abertura de la jarra de licuadora antes
de enroscar el cuello en el fondo de la jarra. Coloque la
licuadora sobre la base.
3. Añada ingredientes a la jarra. Enchufe al tomacorriente.
4. Coloque la tapa en la jarra de licuadora. Presione el botón
de función deseado. La velocidad de la licuadora aumenta
a medida que los botones se presionan de izquierda a
derecha. Al presionar el botón PULSE,
la licuadora opera mientras esté presionado el botón. Los
demás botones de velocidad operan la licuadora hasta que
se presione OFF ( /apagado).
IMPORTANTE: No opere su licuadora continuamente
por períodos mayores de 3 minutos. Si empieza usted a
percibir un olor a quemado, pare inmediatamente y retire la
jarra de licuadora. Arranque y opere la licuadora — SOLO
la base SIN la jarra — a la máxima velocidad durante 2
minutos. Cuando intente recetas similares en el futuro,
reduzca la cantidad total de ingredientes. ure, reduce the
total amount of ingredients.
5. Mantenga siempre una mano sobre la tapa durante la
operación.
w ADVERTENCIA
Riesgo de quemaduras
Cuando licue líquidos calientes, quite la tapa de llenado de
la tapa de dos piezas o abra el orificio de ventilación de la
tapa con pico libre de derrames, y cierre los orificios de
la tapa ubicados a lo largo del borde previstos para servir.
Los líquidos calientes pueden empujar la tapa durante
el licuado. Para prevenir posibles quemaduras: No llene
la jarra de licuadora más allá del nivel de 3 tazas (710
mL). Con la protección de guantes de cocina o una toalla
gruesa, coloque una mano encima de la tapa. Mantenga
la piel expuesta lejos de la tapa. Comience a licuar a una
velocidad baja.
6. Apague SIEMPRE la licuadora OFF ( /apagado) y espere
a que las cuchillas se detengan antes de quitar la jarra.
7. Para quitar la jarra después de terminar de licuar, eleve la
jarra de licuadora directamente hacia arriba.
8. NUNCA coloque la jarra de licuadora en la unidad mientras
el motor está operando.
Uso de la jarra personal de la licuadora
1. Trabaje siempre sobre una cubierta u otra superficie
de apoyo. Coloque cuidadosamente el conjunto de las
cuchillas y el cuello en la jarra personal de la licuadora.
Añada ingredientes a la jarra personal.
2. Coloque la jarra personal boca abajo, sacuda para mezclar
los ingredientes, y colóquelo en la base.
3. Enchufe la unidad. Sostenga la jarra personal en su lugar
mientras esté licuando. Presione para PULSE para licuar
durante 15 a 30 segundos o hasta que esté suave.
4. Desenchufe. Sostenga la jarra personal y elévelo
directamente hacia arriba para extraerlo.
5. Gire la jarra mezcladora hacia la derecha; retire el cuello y
el conjunto de las cuchillas de la jarra personal. Apriete a
mano la tapa de viaje en la jarra personal.
Recomendaciones para licuar en la jarra personal de 20 oz (591 mL)
• Al llenar la jarra personal, coloque los ingredientes
congelados o el hielo en la jarra personal primero.
• Para un rendimiento óptimo de la jarra personal de 20 oz
(591 mL), la cantidad mínima de líquido necesaria en una
receta es 3/4 de taza (6 onzas [177 mL]).
• Si la licuadora no arranca, se para durante la operación o
los ingredientes se pegan a las paredes de la jarra personal,
APAGUE la licuadora OFF ( /apagado). Retire la jarra
personal, sacuda el contenido y reanude la operación de
licuado.
• No llene la jarra personal arriba de la línea de llenado MAX.
• Cuando voltee la jarra boca abajo para licuar, los ingredientes
congelados estarán en la parte superior.
• No pique o procese alimentos duros tales como queso,
galletas o carne.
• Evite golpear o dejar car la licuadora.
• No licúe líquidos calientes en la jarra personal.
Cómo usar el accesorio para procesador de alimentos
w ADVERTENCIA
Riesgo de laceración. Maneje la cuchilla con cuidado; es muy filosa. Asegúrese de que la unidad
esté en OFF ( /apagado) y que esté desenchufada. Siempre espere hasta que la cuchilla haya dejado de moverse antes de quitar
la tapa.
1. Asegúrese de que la licuadora esté en posición OFF
( /apagada) y desenchufada. Introduzca el adaptador
para procesador de alimentos en el cuello y gírelo en el
sentido de las agujas del reloj para apretarlo. Después,
coloque el adaptador para procesador de alimentos
recto sobre la base.
2. Coloque el tazón del procesador de alimentos sobre el
adaptador y gírelo en el sentido de las agujas del reloj
para fijarlo.
Para picar, deslice con cuidado la cuchilla en S del
procesador de alimentos en línea recta hacia abajo
sobre el eje del motor. Agregue los alimentos al tazón del
procesador de alimentos. Coloque la tapa en el tazón del
procesador de alimentos. Gire la tapa en el sentido de
las agujas del reloj para bloquearla. Deslice el empujador
de alimentos en el conducto de alimentos. Enchúfelo a
la tomacorriente. Se recomienda el botón PULSE cuando
utilice el accesorio procesador de alimentos. Presione
y mantenga pulsado uno de los ajustes de PULSE para
procesar. Para apagar, suelte el botón.
Para rebanar o rallar, deslice con cuidado el adaptador
rojo para procesador de alimentos sobre el eje del
motor y después coloque el disco para rebanar/rallador.
Coloque la tapa en el tazón del procesador de alimentos.
Gire la tapa en el sentido de las agujas del reloj para
fijarla en su sitio. Enchúfelo a la tomacorriente. Corte
previamente los alimentos para que quepan en el
conducto de alimentos. Presione el botón SLICE/SHRED
(rebanar/rallador). Retire el empujador de alimentos e
inserte los alimentos, utilice el empujador de alimentos
para empujar los alimentos a través del conducto de
alimentos. Presione OFF ( /apagada) cuando haya
terminado de procesar.
3. Desenchufe.
4. Tire hacia arriba para retirar el tazón del procesador de
alimentos con el cuello aún puesto. Colóquelo sobre una
superficie plana.
5. Gire la tapa en sentido contrario a las agujas del reloj.
Mientras sujeta el centro de la cuchilla en S o del disco
para rebanar/rallador del procesador de alimentos,
levántelo con cuidado para extraerlo.
Para ordenar piezas, visite:
hamiltonbeach.com/parts
Accesorio para procesador de alimentos
Cuidado y limpieza
w ADVERTENCIA
Riesgo de descarga eléctrica. Para proteger contra el riesgo de descarga eléctrica,
no ponga el cable, el enchufe, la base o el motor en agua ni en otro líquido.
1. Desenchufe.
2. Frote la base, el panel de control y el cable con
un paño húmedo o esponja. Para limpiar manchas
difíciles, use un limpiador suave y no abrasivo.
3. La jarra de licuadora y la jarra personal de la
licuadora son aptas para el lavavajillas. La tapa
de la licuadora, la tapa de viaje, la tapa del
procesador de alimentos, el tazón del procesador
de alimentos, la cuchilla en S para procesador
de alimentos, el disco para rebanar/rallador,
el adaptador rojo y el tazón del procesador de
alimentos deben colocarse sólo en la rejilla
superior. NO use la configuración “HIGIENIZAR” al
lavar en el lavavajillas. Las temperaturas del ciclo
“HIGIENIZAR” podrían dañar su producto. Las
piezas también se pueden lavar con agua caliente
jabonosa. Se debe tener cuidado al manipular el
ensamble de las cuchillas, ya que tiene mucho
filo. Enjuague y seque completamente. No
remoje.
4. Guarde el disco para rebanar/rallador dentro de la
jarra de licuadora y deje la tapa entreabierta para
evitar el olor del recipiente.
Para una limpieza fácil, vierta 2 tazas (473 mL) de agua tibia en la jarra y añada una gota de detergente líquido
para lavavajillas. Ponga la licuadora en la función de mezclar durante 10 segundos. Deseche el agua jabonosa.
Enjuague con agua limpia.
Técnicas de procesamiento de alimentos:
• Corte los alimentos en trozos de 1 pulgada (2.5 cm) antes de procesarlos con la cuchilla en S.
• No utilice el accesorio procesador de alimentos para lo siguiente: moler grano, granos de café o especias;
rebanar carnes congeladas; amasar masa o picar hielo.
• Cuando utilice la cuchilla S del procesador de alimentos, no procese líquidos por encima de la línea de
llenado de líquidos MAX ni otros ingredientes por encima de la línea de 24 oz (3 tazas).
ACCESORIO ALIMENTOS
Cuchilla en S
Pique: Nueces, carne, verduras, hierbas, galletas saladas (máx. 2 tazas
[473 mL])
Mezcle/Haga puré: Verduras, frutas, sopas, salsas, aderezos para
ensaladas (máx. 2 tazas [473 mL])
Ralle: Queso (refrigerado, máx. 5 oz [142 g])
Disco para rebanar Verduras, pepperoni, quesos firmes (refrigerados)
Disco para rallador Verduras, pepperoni, quesos firmes (refrigerados)
