

Please Read and Save this Use and Care Book.
IMPORTANT SAFETY
INSTRUCTIONS
When using your iron, basic safety precautions should
always be followed, including the following:
❍ READ ALL INSTRUCTIONS BEFORE USING.
❍ Use iron only for its intended use.
❍ To protect against a risk of electric shock, do not immerse
the iron in water or other liquids.
❍ The iron should always be turned to the minimum (min)
setting before plugging or unplugging from outlet. Never
yank cord to disconnect from the outlet; instead grasp
plug and pull to disconnect.
❍ Do not allow cord to touch hot surfaces. Let iron cool
completely before putting away. Loop cord loosely around
iron when storing.
❍ Always disconnect iron from electrical outlet when filling
with water or emptying, and when not in use.
❍ Do not operate iron with a damaged cord, or if the iron
has been dropped or damaged. To avoid the risk of
electric shock, do not disassemble the iron; take it to a
qualified service person for examination and repair, or
call the appropriate toll-free number on the cover of this
manual. Incorrect reassembly can cause a risk of electric
shock when the iron is used.
❍ Close supervision is necessary for any appliance being
used by or near children. Do not leave iron unattended
while connected or on an ironing board.
❍ Burns can occur from touching hot metal parts, hot water
or steam. Use caution when you turn a steam iron upside
down or use the surge of steam—there may be hot water
in the reservoir. Avoid rapid movement of iron to minimize
hot water spillage.
❍
This appliance is not intended for use by persons
(including children) with reduced physical, sensory
or mental capabilities, or lack of experience and
knowledge, unless they have been given supervision
or instruction concerning use of the appliance by a
person responsible for their safety.
❍
Children should be supervised to ensure that they do
not play with the appliance.
❍
The iron must be used and rested on a stable surface.
- When placing the iron on its stand, ensure that the
surface on which the stand is placed is stable.
- The iron is not to be used if it has been dropped, if
there is visible signs of damage or if it is leaking.
SPECIAL INSTRUCTIONS
❍ To avoid a circuit overload, do not operate another high-
wattage appliance on the same circuit.
❍ If an extension cord is absolutely necessary, a cord rate
at 15-ampere cord should be used. Cords rated for less
amperage may overheat. Care should be taken to arrange
the cord so that it cannot be pulled or tripped over.
SAVE THESE INSTRUCTIONS.
This product is for household use only.
POLARIZED PLUG (120V MODELS ONLY)
This appliance has a polarized plug (one blade is wider than the other).
To reduce the risk of electric shock, this plug is intended to fit into a
polarized outlet only one way. If the plug does not fit fully into the outlet,
reverse the plug. If it still does not fit, contact a qualified electrician.
Do not attempt to modify the plug in any way.
TAMPER-RESISTANT SCREW
Warning: This appliance is equipped with a tamper-resistant screw
to prevent removal of the outer cover. To reduce the risk of fire or
electric shock, do not attempt to remove the outer cover. There are
no user-serviceable parts inside. Repair should be done only by
authorized service personnel.
Note: If the power supply cord is damaged, it should be replaced
by qualified personnel or in Latin America by an authorized service
center.
How to Use
This appliance is intended for household use only.
GETTING STARTED
• Remove all labels, tags and stickers attached to the body, cord or soleplate
of the iron.
• Remove and save literature.
FILLING WATER TANK
1. With iron on a flat surface with soleplate down or tilted at a 45-degree angle,
open the water-fill cover.
2. Using a clean measuring cup, pour water into opening until water reaches
the MAX level mark on the side of the water tank. Do not overfill.
Note: This iron can be filled with ordinary tap water; if your water is hard or
soft, you may want to use distilled water. Do not use water processed through
a home softening system.
3. Close the water-fill cover securely.
4. Stand the iron on the heel rest.
Tip: To refill iron at any time during ironing session, unplug iron and follow
above procedure.
PREHEATING YOUR IRON
1. Plug in the iron into a polarized, 120V AC electrical outlet. Power indicator
light illuminates and you hear a beep for about 1 second.
2. Press
▲
to select your desired fabric setting, scroll up or down to select
fabric. The selected fabric setting light blinks and iron starts heating. Once
iron reaches the temperature, the light stays on and the power indicator
light shuts off.
Note: For optimum performance allow the iron to stand on the heel rest about
two minutes before beginning to iron.
SUGGESTIONS SELECTING FABRIC TEMPERATURE
1. Read fabric labels to help determine fabric type to be ironed.
Tip: If unsure of fabric’s fiber content, test a small area (on the inside seam or
hem) before proceeding to iron the entire garment or cloth.
When ironing a garment with mixed fabrics, select the fabric setting for the
most delicate fabric. For example, when ironing a shirt that is 65% cotton and
35% polyester, use for polyester.
2. Press
▲
to select your desired fabric setting scroll up or down for fabric
selection.
3. Whenever temperature setting is changed to a higher or lower temperature,
allow the iron to stand a minute or so to allow the iron to heat up or
cool down. Test garment by pressing a small hidden area to make sure
temperature of iron is correct.
Important: Always stand the iron on its heel rest when powered on but not
in use.
DRY IRONING
Ironing without steam (dry ironing) can be performed at any setting.
1. It is not necessary to empty the water tank; simply move the variable steam
selector to .
2. To select desired setting refer to directions under SUGGESTIONS
SELECTING FABRIC TEMPERATURE.
3. When finished ironing, scroll down to the lowest setting.
4. Stand the iron on its heel rest and allow it to cool off.
Important: Always stand the iron on its heel rest when powered on but not
in use.
• VARIABLE STEAM IRONING
This iron allows for using the Surge of Steam at settings 3 (Cotton Blend /
Wool) and 4 (Cotton / Linen). Push the steam selector to select the amount
of steam desired; this will help remove set in creases and wrinkles. Make
sure there is water in the tank.
• BURST STEAM.
Use for ironing in the vertical and horizontal position.
Press the surge steam button to generate a burst of steam. For best
performance, leave an interval several seconds between bursts.
Note: Only use this function at setting 4 (Cotton/Linen). Only use during the
setting 4 indicator light stays on, not blinking time.
SPRAY BUTTON
1. Press the spray button
CLEAN
MAX
MIN
to generate a spray of water. The water spray
can be used with dry or steam ironing as desired.
Tip: Use to dampen tough wrinkles and creases at any setting. Do not spray
silk.
3-WAY AUTOMATIC SHUT OFF
1. The iron will automatically switch to standby mode after 30 seconds of
inactivity if left on its soleplate or in its side. If left vertically on its heel
rest, it will turn off after 8 minutes.
2. You will hear 6 short beeps when auto shut off lights are blinking.
Care and Cleaning
This product contains no user serviceable parts. Refer service to qualified
service personnel.
CLEANING OUTSIDE SURFACES
1. Mare sure iron is unplugged and has cooled completely.
2. Wipe the soleplate and outer surfaces with a soft cloth dampened with
water. Add household detergent. Never use abrasives, heavy-duty cleaners,
vinegar or scouring pads that may scratch or discolor the iron.
3. After cleaning, steam iron over an old cloth to remove any residue from the
steam vents.
AUTO CLEAN
®
SYSTEM
To keep the steam vents free of any buildup, follow these instructions about
once a month.
1. Fill the water tank well below MAX line. Plug in the iron.
2. Select fabric setting 3 on the fabric selector and stand iron on its heel rest.
3. Wait 2 minutes for the iron to heat fully, them unplug the iron.
4. Hold iron over a sink with the soleplate facing down.
5. Press the Auto Clean® button.
Important: Be careful, as after several seconds, hot water and steam will
come out of the steam vents.
6. Continue to hold Auto Clean® button until all the water has emptied.
If necessary, move iron side-to-side and front-to-back.
7. When finished, release button, stand the iron on its heel rest and unplug
it in. Heat for about 2 minutes to dry out any remaining water.
STORING YOUR IRON
1. Unplug the iron and allow it to cool.
2. Check that the fabric-select is set to the minimum setting and that the
variable Steam Selector is set to dry .
3. Store vertically on its heel to prevent water leaking from the soleplate.
© 2011 Applica Consumer Products, Inc.
2013-6-5-29
When using your iron for the first time, you may notice water
residue inside the unit. This is normal.
is a registered trademark of The Black & Decker Corporation,
Towson, Maryland, USA
Made and Printed in People’s Republic of China
Printed on recycled paper.
Product may vary slightly from what is illustrated.
PROFESSIONAL IRON
USA/Canada 1-800-231-9786
Accessories/Parts 1-800-738-0245
Register your product at www.prodprotect.com/applica
MODELS ❍ IR1370C ❍ IR1375SC
NEED HELP?
For service, repair or any questions regarding
your appliance, call the appropriate 800 number
on cover of this book. Please DO NOT return the
product to the place of purchase. Also, please DO
NOT mail product back to manufacturer, nor bring
it to a service center. You may also want to consult
the website listed on the cover of this manual.
TWO-YEAR LIMITED WARRANTY
(Applies only in the United States and Canada)
What does it cover?
• Any defect in material or workmanship
provided; however, Applica’s liability will not
exceed the purchase price of product.
For how long?
• Two years from the date of original purchase
with proof of such purchase.
What will we do to help you?
• Provide you with a reasonably similar
replacement product that is either new or
factory refurbished.
How do you get service?
• Save your receipt as proof of date of sale.
• Visit the online service website at www.
prodprotect.com/applica, or call toll-free
1-800-231-9786, for general warranty
service.
• If you need parts or accessories, please call
1-800-738-0245.
What does your warranty not cover?
• Damage from commercial use
• Damage from misuse, abuse or neglect
• Products that have been modified in any way
• Products used or serviced outside the country
of purchase
• Glass parts and other accessory items that
are packed with the unit
• Shipping and handling costs associated with
the replacement of the unit
• Consequential or incidental damages (Please
note, however, that some states do not allow
the exclusion or limitation of consequential
or incidental damages, so this limitation may
not apply to you.)
How does state law relate to this warranty?
• This warranty gives you specific legal rights.
You may also have other rights that vary from
state to state or province to province.
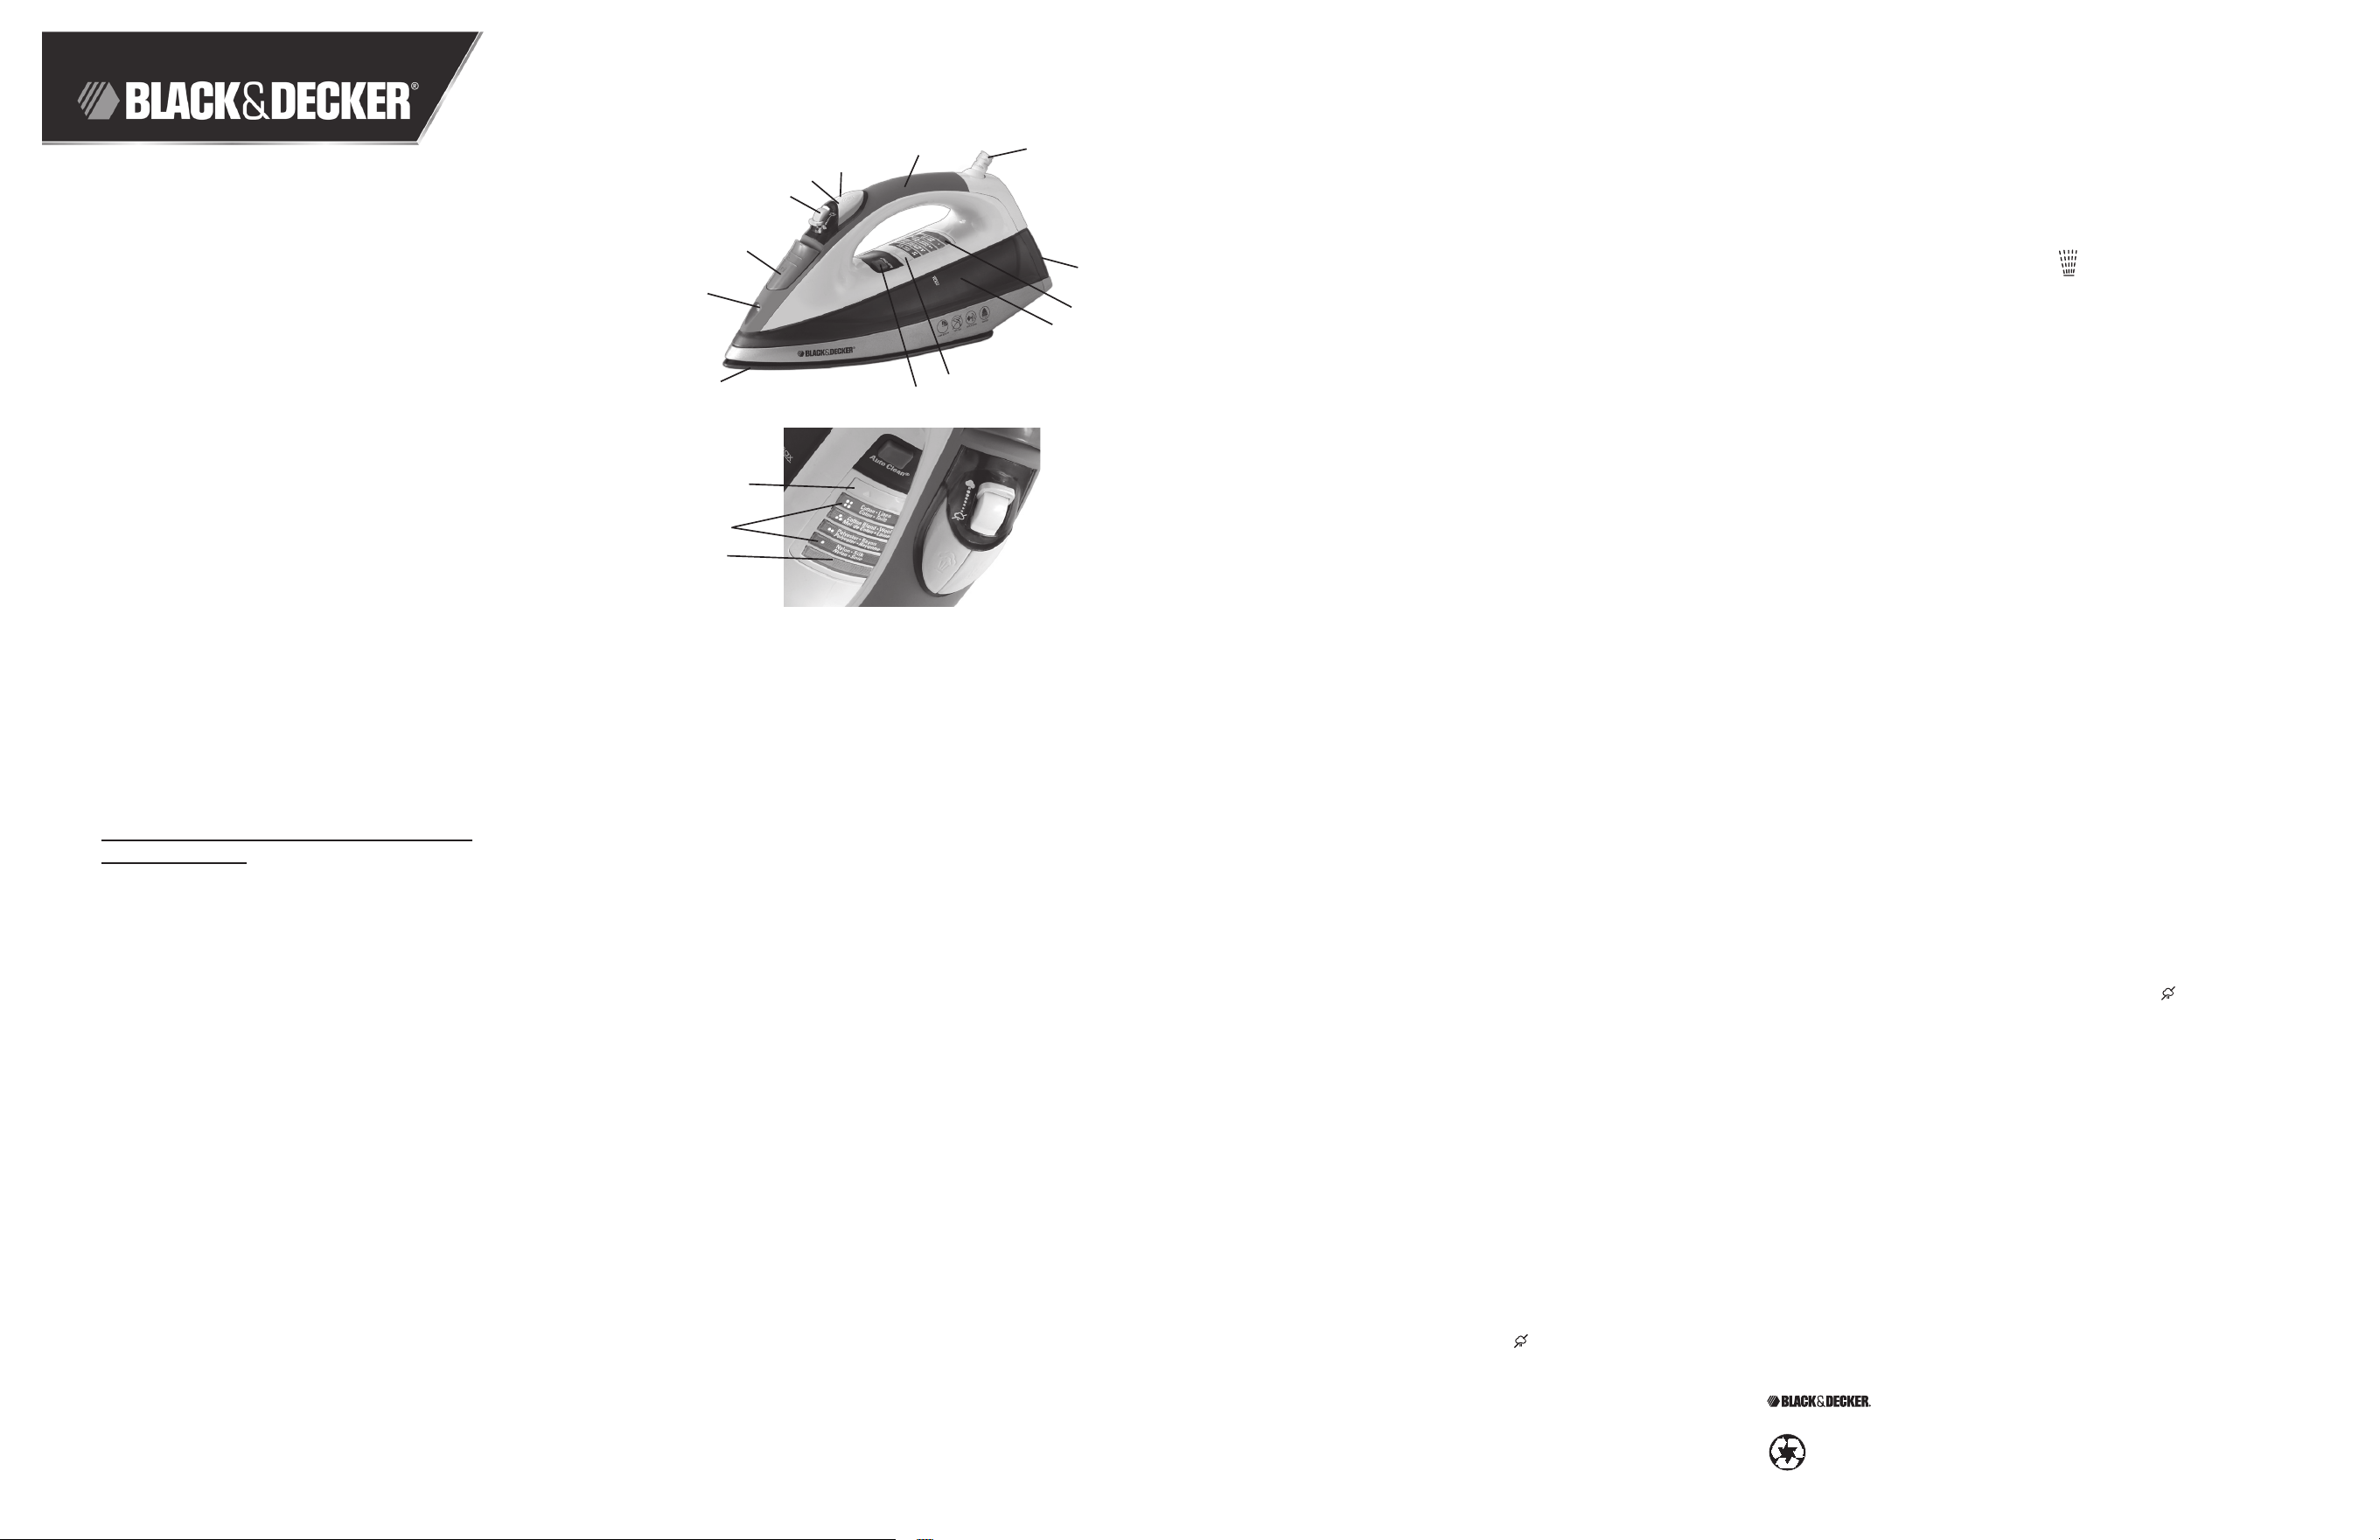
1. Sole plate
2. Spray nozzle
3. Water-fill cover
4. Variable steam selector
5. Steam button
6. Spray button
7. Comfort Grip® handle
8. 360˚ pivoting cord
9. Heel rest
10. Power/auto off light
11. Water tank
12. Fabric Selector
13. Auto clean® button
14. Fabric indicator light
FICHE POLARISÉE (Modèles de 120 V seulement)
L’appareil est muni d’une fiche polarisée (une lame plus large que
l’autre). Afin de minimiser les risques de secousses électriques, ce
genre de fiche n’entre que d’une façon dans une prise polarisée.
Lorsqu’on ne peut insérer la fiche à fond dans la prise, il faut tenter
de le faire après avoir inversé les lames de côté. Si la fiche n’entre
toujours pas dans la prise, il faut communiquer avec un électricien
certifié. Il ne faut pas tenter de modifier la fiche.
VIS INDESSERRABLE
Avertissement : L’appareil est doté d’une vis indesserrable
empêchant l’enlèvement du couvercle extérieur. Pour réduire les
risques d’incendie ou de secousses électriques, ne pas tenter de
retirer le couvercle extérieur. L’utilisateur ne peut pas remplacer
les pièces de l’appareil. En confier la réparation seulement au
personnel des centres de service autorisés.
Note : Lorsque le cordon d’alimentation est endommagé, il faut le
faire remplacer par du personnel qualifié ou, en Amérique latine, par
le personnel d’un centre de service autorisé.
Utilisation
Cet appareil est conçu uniquement pour une utilisation domestique.
POUR COMMENCER
• Retirer toutes les étiquettes et tous les autocollants apposés sur l’appareil,
le cordon ou la semelle.
• Retirer et conserver la documentation.
REMPLISSAGE DU RÉSERVOIR À EAU
1. Déposer le fer sur une surface plane, la semelle à plat ou inclinée à un
angle de 45 degrés, et ouvrir le couvercle du réservoir.
2. À l’aide d’une tasse à mesurer propre, verser de l’eau dans l’orifice de
remplissage jusqu’à ce qu’elle atteigne la marque MAX sur le côté du
réservoir. Ne pas trop remplir.
Remarque : On peut se servir de l’eau du robinet pour remplir le fer à
repasser; si l’eau du robinet est dure ou douce, on peut utiliser de l’eau
distillée. Ne pas utiliser d’eau traitée par un système d’adoucissement
domestique.
3. Bien refermer le couvercle du réservoir à eau.
4. Déposer le fer sur son talon d’appui.
Conseil : Pour ajouter de l’eau en tout temps pendant le repassage,
débrancher le fer et suivre les directives ci-dessus.
PRÉCHAUFFAGE DU FER
1. Brancher le fer dans une prise polarisée de 120 V (c.a.). Le témoin de
fonctionnement s’allume, et un bip se fait entendre pendant environ
1 seconde.
2. Appuyer sur
▲
pour sélectionner le réglage désiré correspondant au tissu
en faisant dérouler les options vers le haut ou vers le bas. Le témoin du
réglage sélectionné clignote, et le fer commence à chauffer. Une fois que
le fer a atteint la température désirée, le témoin du réglage reste allumé
et le témoin de fonctionnement s’éteint.
Remarque : Pour un rendement optimal, laisser le fer reposer sur son talon
d’appui pendant environ 2 minutes avant de commencer le repassage.
SUGGESTIONS DE RÉGLAGE DE LA TEMPÉRATURE
1. Lire l’étiquette du vêtement pour déterminer le type de tissu à repasser.
Conseil : Si vous ne connaissez pas le type de fibres dont le tissu se compose,
faire un essai sur une petite surface (à l’intérieur d’un ourlet ou d’une couture)
avant de repasser le vêtement ou l’article en entier.
Lorsque vous repassez un vêtement composé de plusieurs tissus,
sélectionner le réglage correspondant au tissu le plus délicat. Par exemple,
lorsque vous repassez une chemise 65 % coton / 35 % polyester, utiliser le
réglage approprié au polyester.
2. Appuyer sur
▲
pour sélectionner le réglage désiré correspondant au tissu
en faisant dérouler les options vers le haut ou vers le bas.
3. Aussitôt que vous réglez la température à un niveau supérieur ou inférieur,
laisser le fer reposer environ une minute pour permettre à l’appareil de
réchauffer ou de refroidir. Faire un essai sur une petite surface dissimulée
du vêtement pour s’assurer que le réglage est correct.
Important : Toujours placer le fer à repasser sur son talon d’appui lorsqu’il
n’est pas utilisé, mais qu’il est en marche.
REPASSAGE À SEC
Le repassage sans vapeur (à sec) peut se faire à tous les réglages.
1. Il n’est pas nécessaire de vider le réservoir à eau; régler simplement le
sélecteur de vapeur variable à la position .
2. Pour sélectionner le réglage désiré, suivre les directives de la section «
Suggestions de réglage de la température ».
3. À la fin du repassage, régler le sélecteur de tissu à la température la plus
basse.
4. Déposer le fer sur son talon d’appui pour le laisser refroidir.
Important : Toujours placer le fer à repasser sur son talon d’appui lorsqu’il
n’est pas utilisé, mais qu’il est en marche.
• SÉLECTEUR DE VAPEUR VARIABLE
Ce fer permet d’utiliser le jet de vapeur aux réglages 4 (Coton / Lin).
Pousser le sélecteur de vapeur pour choisir la quantité de vapeur désirée;
ce réglage contribuera à éliminer les cassures et les faux plis. Veiller à ce
qu’il y ait de l’eau dans le réservoir.
• JERT DE VAPEUR
Appuyer sur le bouton de vapeur pour émettre un jet de vapeur. Pour un
meilleur rendement, utilisez un jet de vapeur à des intervalles de seconds.
Note: Utiliser jet de vapor ále réglage 4 seulement et le témoin du réglage
reste allume.
BOUTON DE PULVÉRISATION
1. Appuyer sur le bouton de pulvérisation
CLEAN
MAX
MIN
pour pulvériser de l’eau.
La pulvérisation d’eau peut être utilisée au besoin pour le repassage à sec
ou à la vapeur.
Conseil : Utiliser pour éliminer les faux plis et les cassures tenaces, peu
importe le réglage. Ne pas pulvériser sur la soie.
ARRÊT AUTOMATIQUE EN 3 POSITIONS
1. Le fer entre automatiquement en mode veille après 30 secondes
d’inactivité, qu’il soit à plat sur sa semelle ou basculé sur le côté. Si le fer
est placé à la verticale sur son talon d’appui, il s’éteint après 8 minutes
d’inactivité.
2. Vous entendrez 6 bips brefs, le témoin du ârret automatique clignote.
Entretien et nettoyage
Cet appareil ne contient aucune pièce réparable par l’utilisateur. Confier la
réparation à un technicien qualifié.
NETTOYAGE DES SURFACES EXTÉRIEURES
1. S’assurer que le fer à repasser est débranché et a complètement refroidi.
2. Essuyer la semelle et les surfaces extérieures à l’aide d’un linge doux
humidifié à l’eau. Ajouter un détergent domestique. Ne jamais utiliser
d’abrasifs, de produits nettoyants forts, de vinaigre ou de tampons à
récurer car ils pourraient égratigner ou décolorer le fer.
3. Après le nettoyage, faire évacuer la vapeur sur un vieux linge pour enlever
tous les résidus dans les évents à vapeur.
SYSTÈME DE NETTOYAGE AUTOMATIQUE AUTO CLEAN
MD
Pour garder les évents à vapeur exempts de toute accumulation de dépôts,
procéder comme suit environ une fois par mois.
1. Remplir le réservoir d’eau de sorte que le niveau se trouve bien
au-dessous de la marque MAX. Brancher le fer.
2. Régler le sélecteur de tissu à la position 3 et laisser le fer reposer sur son
talon d’appui.
3. Attendre 2 minutes pour permettre au fer de chauffer complètement, puis
débrancher le fer.
4. Tenir le fer au-dessus d’un évier, la semelle vers le bas.
5. Appuyer sur le bouton Auto Clean
MD
.
Important : Faire preuve de prudence, car l’eau chaude et la vapeur sortiront
des évents après quelques secondes.
6. Maintenir enfoncé le bouton AUTO CLEAN
MD
jusqu’à ce que le fer soit vide.
Au besoin, agiter le fer d’un côté à l’autre et de l’avant vers l’arrière.
7. Une fois le fer vide, relâcher le bouton, laisser reposer le fer sur son talon
d’appui et le brancher. Laisser le fer chauffer pendant environ 2 minutes
afin de bien l’assécher.
Rangement du fer à repasser
1. Débrancher le fer et le laisser refroidir.
2. S’assurer que le sélecteur de tissu est réglé à la position minimale et que
le sélecteur de vapeur variable est réglé à la position .
3. Ranger le fer en position verticale sur son talon d’appui pour empêcher les
fuites d’eau de la semelle.
Veuillez lire et conserver ce guide d’entretien et d’utilisation.
IMPORTANTES CONSIGNES
DE SÉCURITÉ
Lorsqu’on utilise un fer, il faut toujours respecter
certaines règles de sécurité fondamentales, notamment
les suivantes :
❍ LIRE TOUTES LES DIRECTIVES AVANT
L’UTILISATION.
❍ Utiliser le fer uniquement aux fins pour lesquelles il
a été conçu.
❍ Afin d’éviter les risques de choc électrique, ne pas
immerger le fer dans l’eau ou tout autre liquide.
❍ Toujours mettre le fer hors tension avant de le
brancher ou de le débrancher. Ne jamais tirer sur le
cordon pour débrancher le fer. Saisir et tirer la fiche
pour débrancher le fer.
❍ Éviter de laisser le cordon entrer en contact avec
des surfaces chaudes. laisser le fer refroidir
complètement avant de le ranger. Enrouler le cordon
lâchement autour du fer avant de le ranger.
❍ Toujours débrancher le fer pour le remplir d’eau ou
pour le vider, et lorsqu’il ne sert pas.
❍ Ne pas utiliser le fer si le cordon est endommagé, si
le fer a été échappé ou endommagé. Afin d’éviter les
risques de choc électrique, ne pas démonter le fer. en
confier l’inspection et la réparation au personnel d’un
centre d’entretien autorisé. ou composer le numéro
sans frais approprié indiqué sur la page couverture
du présent guide. Un assemblage incorrect peut
provoquer un choc électrique au moment de
l’utilisation.
❍ Exercer une étroite surveillance lorsque l’appareil
est utilisé par un enfant ou près d’un enfant. Ne pas
laisser le fer sans surveillance s’il est branché ou s’il
se trouve sur une planche à repasser.
❍ Les pièces métalliques, l’eau chaude ou la vapeur
peuvent occasionner des brûlures. Retourner
avec précaution un fer à vapeur ou prendre garde
lorsqu’on se sert du jet de vapeur, car de l’eau
brûlante peut s’écouler du réservoir. Éviter tout
mouvement brusque lors du repassage afin de
minimiser le déversement accidentel d’eau brûlante.
❍ Cet appareil n’est pas conçu pour être utilisé par
des personnes (notamment des enfants) dont les
capacités physiques, sensorielles ou mentales
sont réduites ou qui manquent d’expérience ou
de connaissances, à moins qu’elles ne soient
supervisées ou dirigées par une personne
responsable de leur sécurité pendant l’utilisation.
❍ Les enfants doivent être supervisés afin d’éviter
qu’ils ne jouent avec l’appareil.
❍ Le fer à repasser doit être utilisé et déposé sur une
surface stable.
- Avant de déposer le fer à repasser sur son support,
s’assurer que la surface sur laquelle se trouve le
support est stable.
- Ne pas utiliser le fer à repasser s’il a été échappé,
s’il est visiblement endommagé ou s’il fuit.
INSTRUCTIONS SPÉCIALES
❍ Pour éviter une surcharge du circuit, ne pas brancher
un autre appareil haute puissance sur le même circuit.
❍ Si l’emploi d’une rallonge est absolument nécessaire,
utiliser un cordon de 15 ampères. Les cordons prévus
pour une intensité inférieure risquent de surchauffer.
Faire preuve de prudence en veillant à ce que le
cordon ne puisse pas être tiré ou faire trébucher.
CONSERVER CES MESURES.
L’appareil est conçu pour une utilisation domestique
MODÈLES ❍ IR1370C ❍ IR1375SC
À la première utilisation, il est possible qu’il y ait un résidu
d’eau à l’intérieur du fer à repasser. Cela est normal.
Fabriqué et Imprimé en
République populaire de Chine
Marque de commerce déposée de la société The Black & Decker
Corporation, Towson, Maryland, É.-U.
Imprimé sur du papier recyclé.
BESOIN D’AIDE?
Pour communiquer avec les services d’entretien
ou de réparation, ou pour adresser toute question
relative au produit, composer le numéro sans frais
approprié indiqué sur la page couverture. NE PAS
retourner le produit où il a été acheté. NE PAS
poster le produit au fabricant ni le porter dans un
centre de service. On peut également consulter le
site web indiqué sur la page couverture.
GARANTIE LIMITÉE DE DEUX ANS
(Valable seulement aux États-Unis et au Canada)
Quelle est la couverture?
• Tout défaut de main-d’oeuvre ou de matériau;
toutefois, la responsabilité de la société
Applica se limite au prix d’achat du produit.
Quelle est la durée?
• Deux année(s) à compter de la date d’achat
initiale, avec une preuve d’achat.
Quelle aide offrons nous?
• Remplacement par un produit
raisonnablement semblable nouveau ou
réusiné.
Comment se prévaut-on du service?
• Conserver son reçu de caisse comme preuve
de la date d’achat.
• Visiter notre site web au www.prodprotect.
com/applica, ou composer sans frais
le 1 800 231-9786, pour obtenir des
renseignements généraux relatifs à la
garantie.
• On peut également communiquer avec le
service des pièces et des accessoires
au 1 800 738-0245.
Qu’est-ce que la garantie ne couvre pas?
• Des dommages dus à une utilisation
commerciale.
• Des dommages causés par une mauvaise
utilisation ou de la négligence.
• Des produits qui ont été modifiés.
• Des produits utilisés ou entretenus hors du
pays où ils ont été achetés.
• Des pièces en verre et tout autre accessoire
emballés avec le produit.
• Les frais de transport et de manutention reliés
au remplacement du produit.
• Des dommages indirects (il faut toutefois
prendre note que certains états ne permettent
pas l’exclusion ni la limitation des dommages
indirects).
Quelles lois régissent la garantie?
• Les modalités de la présente garantie donnent
des droits légaux spécifiques. L’utilisateur peut
également se prévaloir d’autres droits selon
l’état ou la province
qu’il habite.
FER PROFESSIONNEL
Canada 1-800-231-9786
Accessoires/Pièces 1-800-738-0245
Inscrire votre à l’adresse www.prodprotect.com/applica
Le produit peut différer légèrement de celui illustré.
1. Semelle
2. Bec de pulvérisation
3. Couvercle du réservoir
4. Sélecteur de vapeur variable
5. Bouton de vapeur
6. Bouton de pulvérisation
7. Poignée Comfort Grip
MD
8. Cordon pivotant à 360°
9. Talon d’appui
10. Marche/arrêt automatique
11. Réservoir à eau
12. Sélecteur de tissu
13. Bouton Auto Clean
MD
14. Témoin indicateur de tissue
