Robot Cleaning Vacuum with App Control
and Remote Control
PUCRC660
Smart Robot Vacuum Cleaner
www.PyleUSA.com
2
Mop function only available with purchase of Mopping Attachment Kit --
Pure Clean Model: PRTPUCRC6605 (Sold Separately)
Quick Guide
Using the APP and Amazon Echo Matching
1. APP Download
Scan below QR code [Fig. 1] of weback APP, or search "weback" [Fig. 2] and
download.
2. Log In/Register weback ID
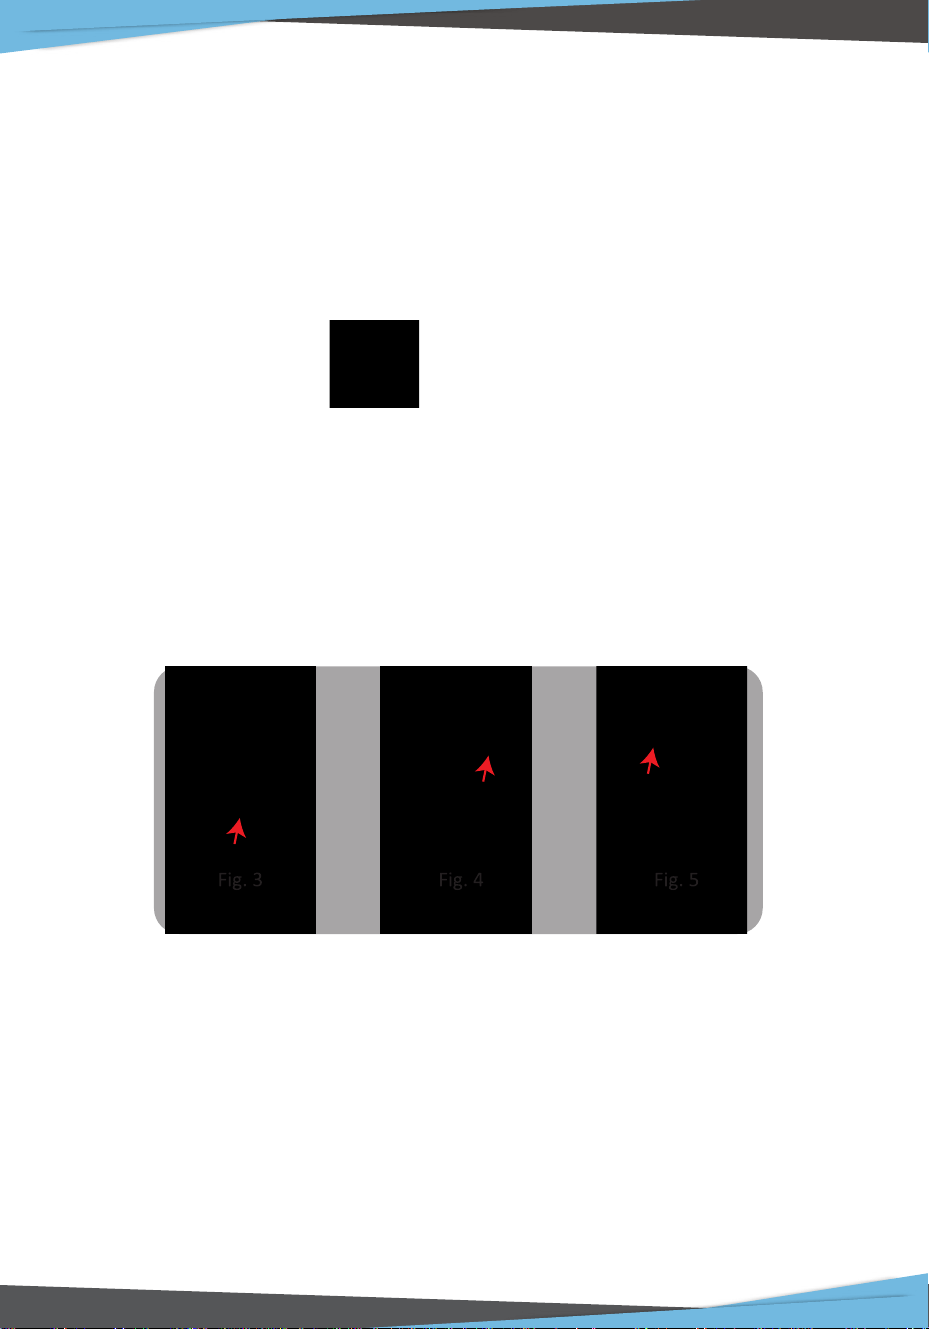
If you have already got an weback ID, please open weback APP, LOG IN [Fig. 3]
and start from ADD DEVICE [Fig. 4]; If you’re a new user of weback, please start
from Registering [Fig. 5] weback ID. Follow APP instructions until your
registeration is comple. Then start from ADD DEVICE.
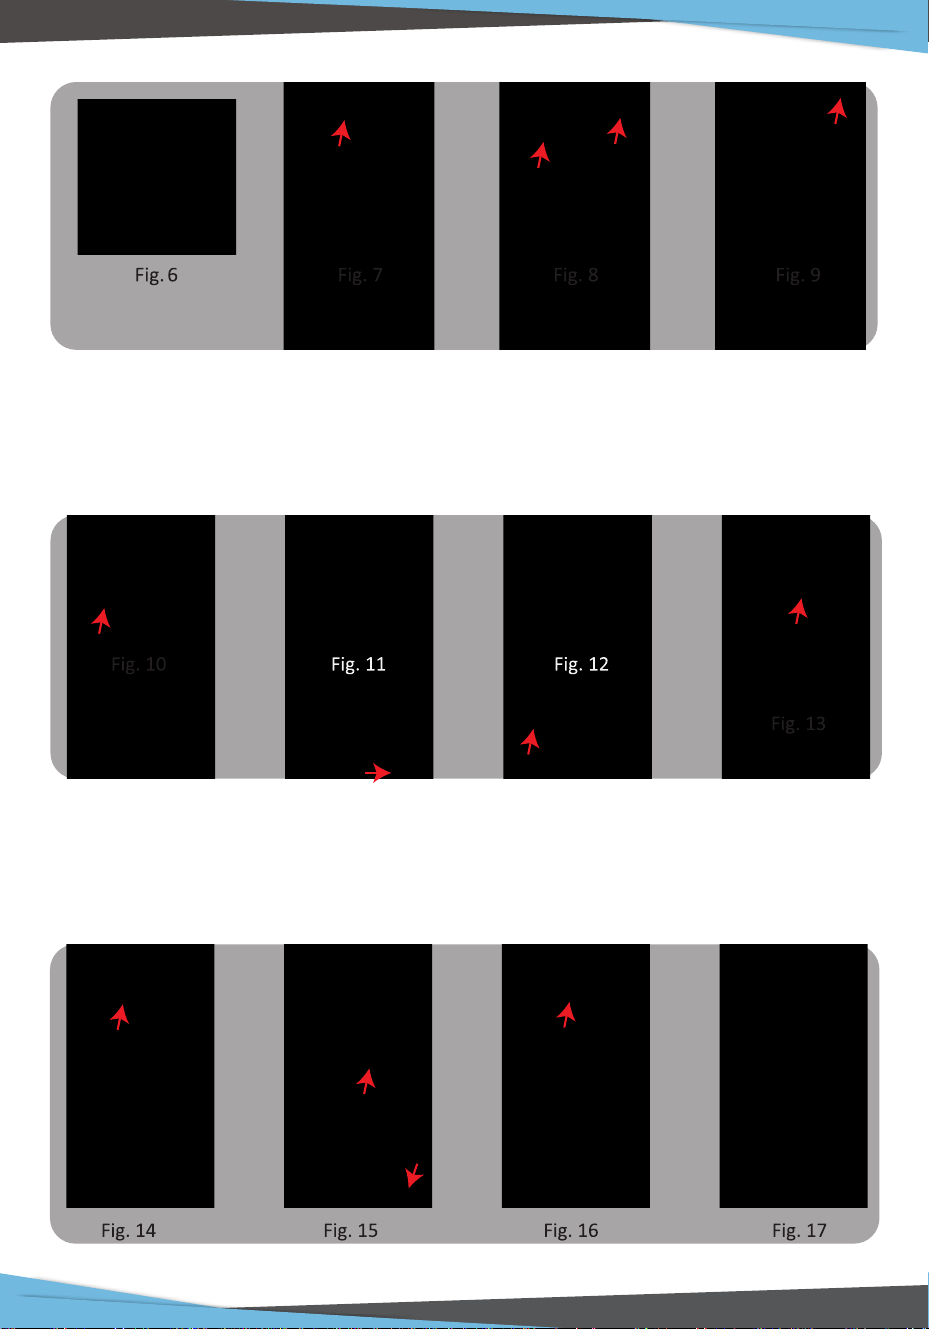
3. Connect your PUCRC660 to the APP
After you get weback ID, please enter weback interface, and start from ADD
DEVICE; Scan the QR code of PUCRC660 [Fig. 6] or from bottom of PUCRC660.
Follow APP instructions step by step until your device is successfully connected.
When you see the APP enters interface as [Fig. 7], you can start using APP to
control your PUCRC660.
A. Please click the symbol; [Fig. 7], rename your robot name as 660 [Fig. 8]
B. Click SCHEDULE [Fig. 8] to set up cleaning schedules [Fig. 9]. You can set up
multiple cleaning plans.
Fig. 1 Fig. 2
www.PyleUSA.com
3
4. Operate your PUCRC660 via APP
Tap the device area [Fig. 10] to enter APP main interface. From this interface you
can choose dierent cleaning modes, also to check the cleaning process/status.
Tap DIRECTION KEY [Fig. 11] to enter Direction Control Panel [Fig. 12]
5. Share your EXVAC660
You may share your PUCRC660 with your family members. Please be sure that
they have registered weback ID already. Tap MANAGE DEVICE MEMBERS [Fig. 13],
add your family member's ID/Cellphone number [Fig. 14], and follow instructions
of the APP accordingly.
www.PyleUSA.com
4
6. Connect to ALEXA (Amazon Echo) or other third-party APPs/Programs.
Please make sure you have registered Amazon ID and with your Amazon Echo
ready before connection.
A. Tap ME [Fig. 15] on your weback APP, and choose Third-party Connection [Fig.15]
B. Enter the interface of adding third-party APPs/programs [Fig. 16]
C. Follow instructions step by step to connect your PUCRC660 with Amazon
Echo/Siri. [Fig. 17]
1. Safety Instructions
2. Product Components
2.1 Names of Parts
2.2 Product Characteristics
3. Instructions for Use
3.1 Remote Control Instructions
3.2 Operating Instructions
4. Product Maintenance
4.1 Side Brush Cleaning and Replacement
4.2 Cleaning of Dust Box and Filter
4.3 Maintenance of Rolling Brush Components
4.4 Maintenance of Other Components
4.5 Replaceable Modules
5. Common Faults
6. Features and Technical Specs
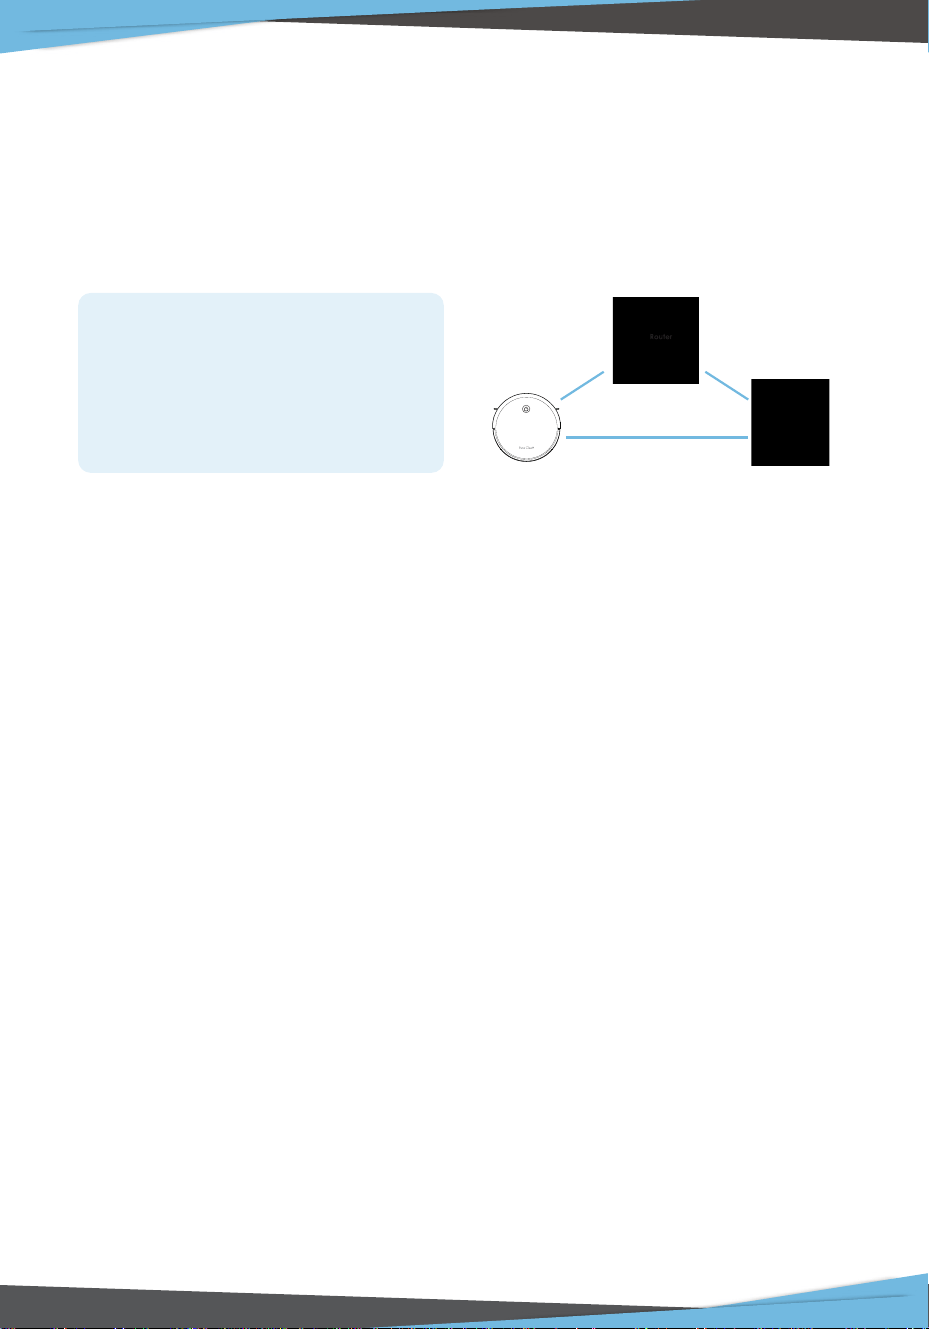
Important Notes:
Before you connect your PUCRC660
with APP, make sure that the router,
your robot, and your phone are close
to each other, and it's only available
on 2.4G wireless router now.
Distance less than 4 meters
www.PyleUSA.com
5
Before using this product, please read the safety instructions below
and follow all the routine safety precautions.
Please read the Instructions carefully and keep them for future reference.
Any operation that does not conform to the Instructions may cause damage
to the product.
Safety Considerations of Main Body and Accessories
WARNING
1. Do not disassemble, repair or ret the product without authorization;
otherwise it may damage the product or pose a hazard.
2. Do not use the product in an environment with risk of re or explosion.
3. This product can only use the original power adapter; otherwise the product
may be damaged or catch on re.
4. Do not stand or sit on this product; doing so could damage the product or
cause it to fall over.
5. When the metal part of the power plug is dusty, please wipe it with a dry cloth.
6. The power adapter is applied to a 100-240V AC voltage. Please plug into the
socket properly and keep away from children.
7. Do not wash or soak the main body and electronic accessories in water;
otherwise the product may be damaged by a short circuit.
8. Do not damage, load weight on, heat, pull, or bend it.
9. During cleaning, please pay attention to the safety of toddlers and elders at
home to avoid tripping, and please do not touch the wheel and side brush to
avoid injury. (Please pay special attention to toddlers).
10. This product is for home use. Please do not use it outdoors.
11. Do not allow metal and conductive materials to come in contact with the
battery; doing so may cause a short circuit.
ATTENTION
1. Do not touch the product with wet hands; doing so may cause electric shock.
2. Please do not place the product in places where it could easily fall, such as
tables, chairs, high platforms in room, etc.
3. The product has a sophisticated design and should be protected from long
term exposure to sunlight.
4. Please do not use the product in humid environments, such as bath rooms.
5. Please do not place the product near cigarette butts, lighters or other open
res.
www.PyleUSA.com
6
6. Please clean the product after charging.
7. Please turn o the power switch on the side of the robot when the product is
out of service for a long time.
8. Please check carefully to see if the power adapter is connected to the socket
prior to use, to avoid damage to the robot.
9. Before using the product, please remove all vulnerable items on the oor, such
as glass, lamps, and items such as wires and curtains that may entangle with the
side brush and suction passages.
10. When the dust box is full, please empty the garbage before using again.
11. Please do not use the robot to clean construction waste.
12. The operating temperature of the product ranges from 0°C or 32°F to 40°C or
104°F; please do not use it in a high temperature environment.
13. Before the product is scrapped, please remove the battery from the robot.
When you remove the battery, please ensure that the product is not connected
to a power supply. Please recycle the battery safely for environmental
protection.
Safety Considerations for Rechargeable Battery
DANGER
1. Always use a dedicated battery adapter to avoid leakage, heating or rupture.
2. Do not short-circuit the battery or remove the battery; doingso may cause
leakage, heating or rupture.
3. Do not transport or preserve with necklaces, hairpins and other metal objects;
doing so may lead to short circuit, resulting in leakage, heating or rupture.
4. Do not burn or heat the battery; doing so may cause leakage, heating or
rupture.
ATTENTION
1. lf abnormal overheating is discovered during charging, stop using it
immediately to avoid leakage, heating or rupture.
2. To prolong the service life of the battery, please remove the battery and place it
in a cool, dry environment if it is out of service for a long time; this will avoid
leakage, heating or rupture.
3. Do not soak it in water or let it come into contact with any liquid; otherwise it
may cause leakage, heating or rupture.
4. Be sure to stop using it immediately in case of any exception (e.g. discoloration
or deformation), to avoid leakage, heating or rupture.
5. Aiways use tape to insulate the battery's electrode when recycling or disposing
of it.
www.PyleUSA.com
7
WARNING
1. When skin or clothing is exposed to the battery electrolyte, immediately wash
with clean water to avoid inammation of skin etc.
2. Do not use the rechargeable battery on other devices.
This battery is only suitable for PUCRC660 sweeping robots.
3. If the battery's outer box is found to be deformed and expanded, or leakage of
electrolytes is found, do not charge or continue to use to avoid danger.
4. Do not throw or inict a strong impact on the battery; doing so may cause
leakage, heating or rupture.
5. Do not disassemble the battery pack; doing so may cause battery rupture and
electrolyte outow, leading to re, explosion and other dangers.
6. This appliance can be used by children aged from 8 years and above and
persons with reduced physical, sensory or mental capabilities or lack of
experience and knowledge if they have been given supervision or instruction
concerning use of the appliance in a safe way and understand the hazards
involved.
7. Children shall not play with the appliance.
8. Cleaning and user maintenance shall not be made by children without
supervision.
9. This appliance contains batteries that are only replaceable by skilled persons.
10. WARNING: For the purposes of recharging the battery, only use the detachable
supply unit provided with this appliance.
11. The power supply must be removed from the socket-outlet before cleaning or
maintaining the appliance.
12. The battery must be removed from the appliance before it is scrapped.
13. The appliance must be disconnected from the supply mains when removing
the battery.
14. The battery should be safely disposed o.
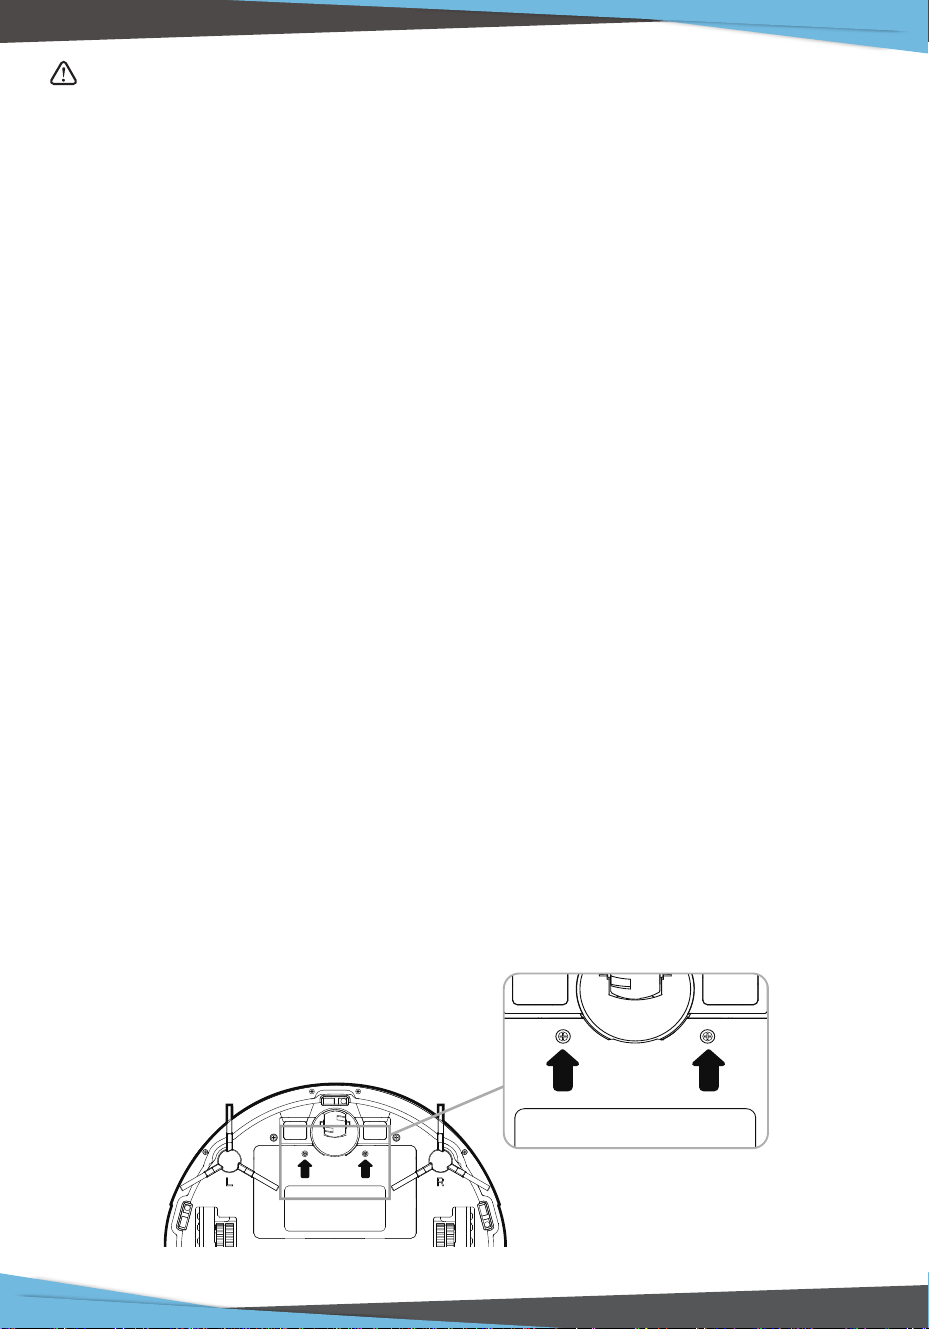
15. How to remove the battery:
www.PyleUSA.com
8
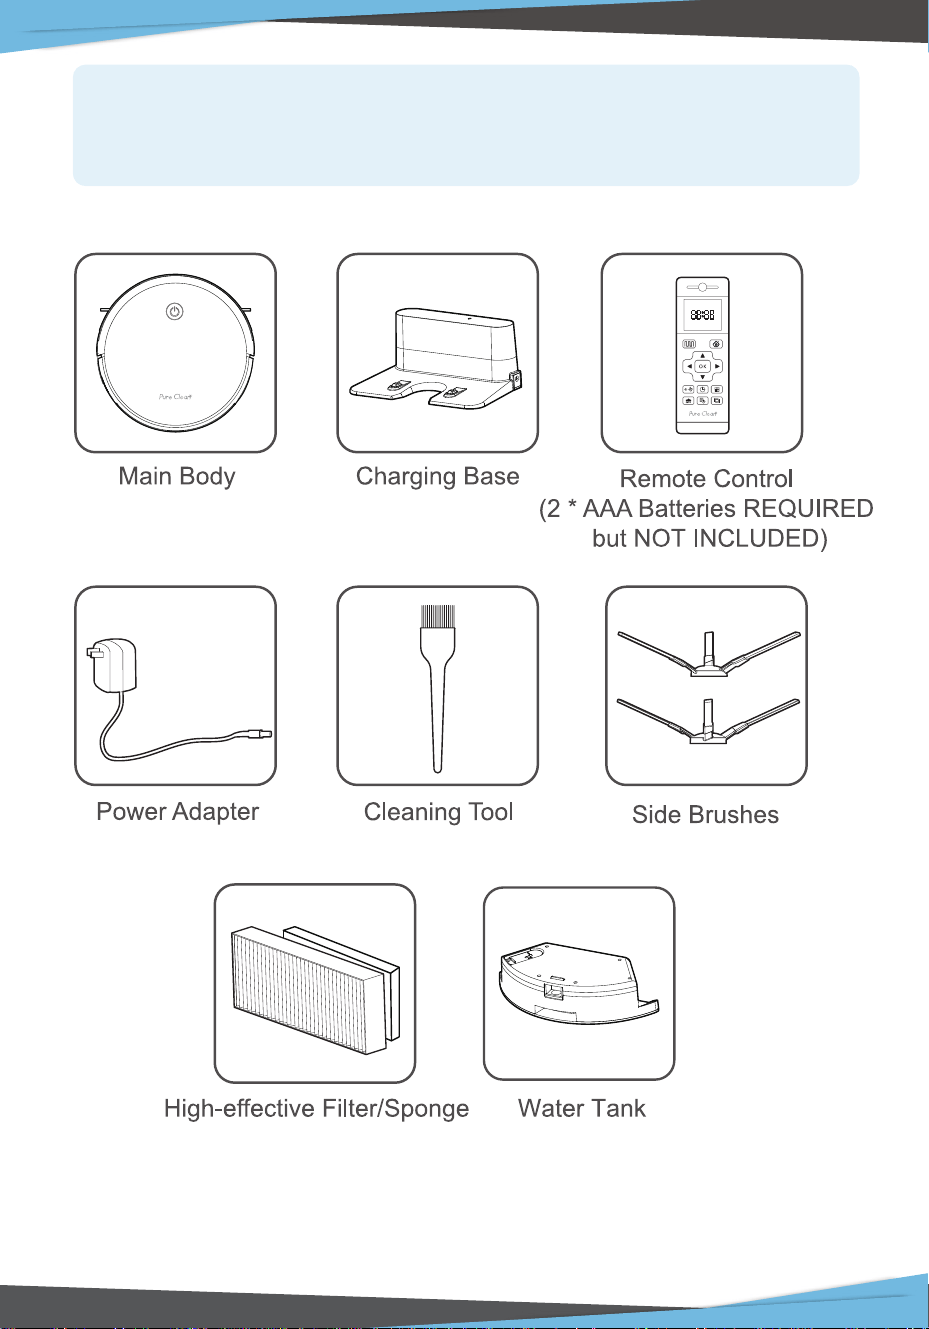
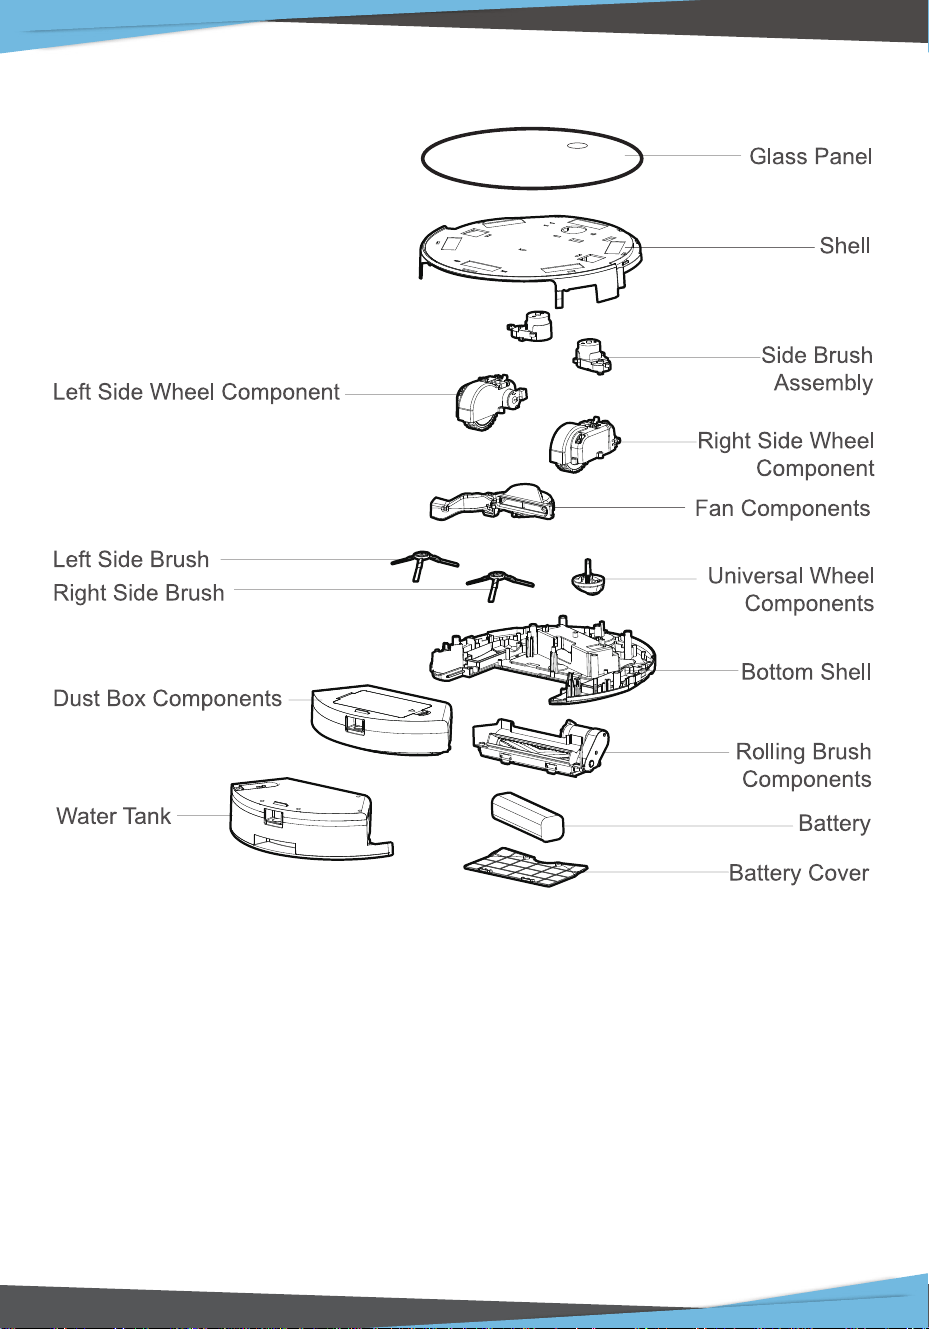
Names of Parts
While the accessories provided for some models are slightly dierent, they are
subject to the actual product.
1. Take out two screws on the battery cover with a screw driver.
2. Take out the battery cover.
3. Take out the battery and unplug the electric wires to remove the battery.
www.PyleUSA.com
9
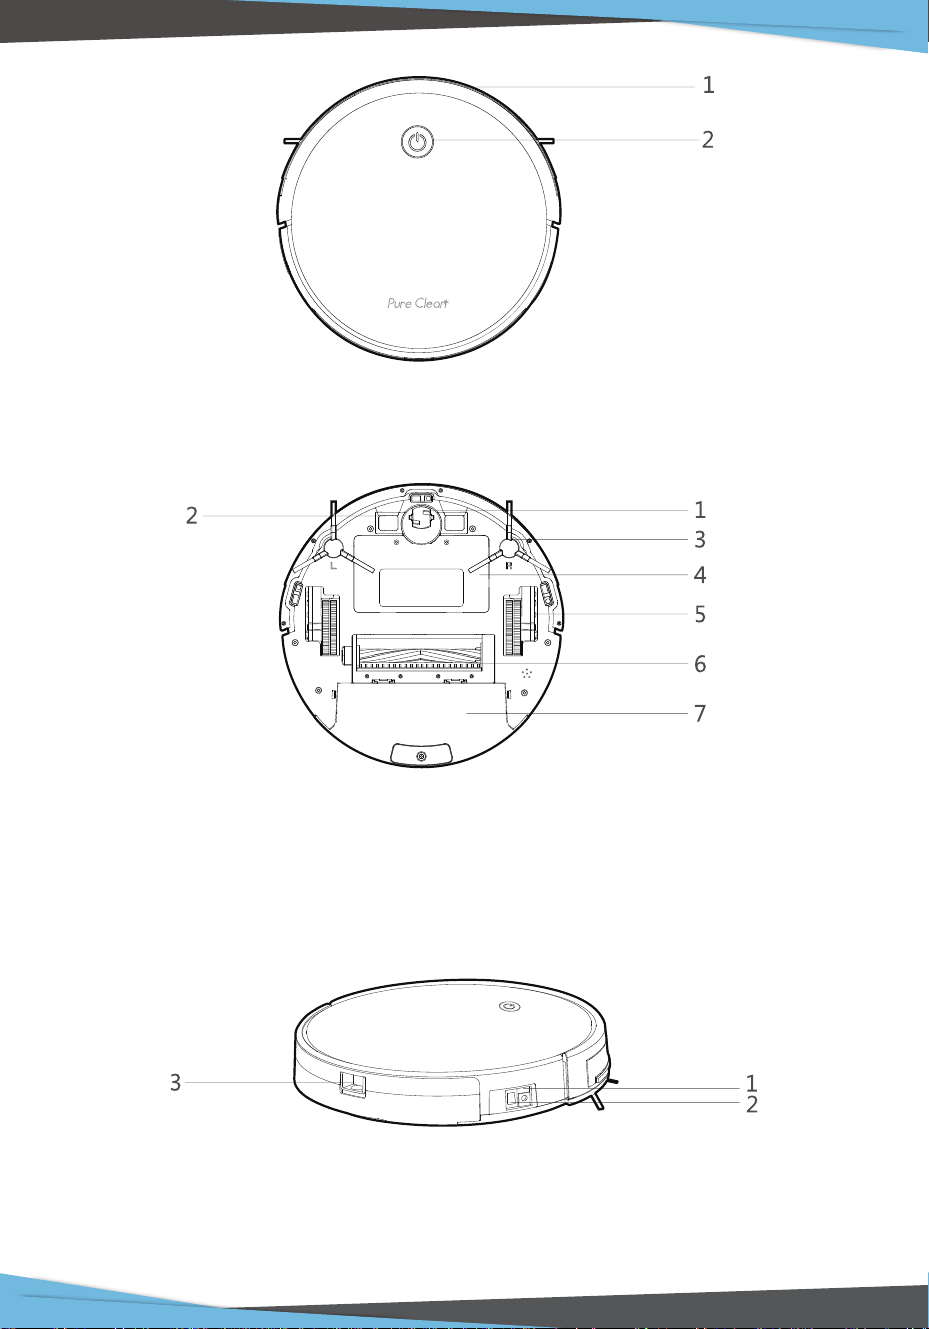
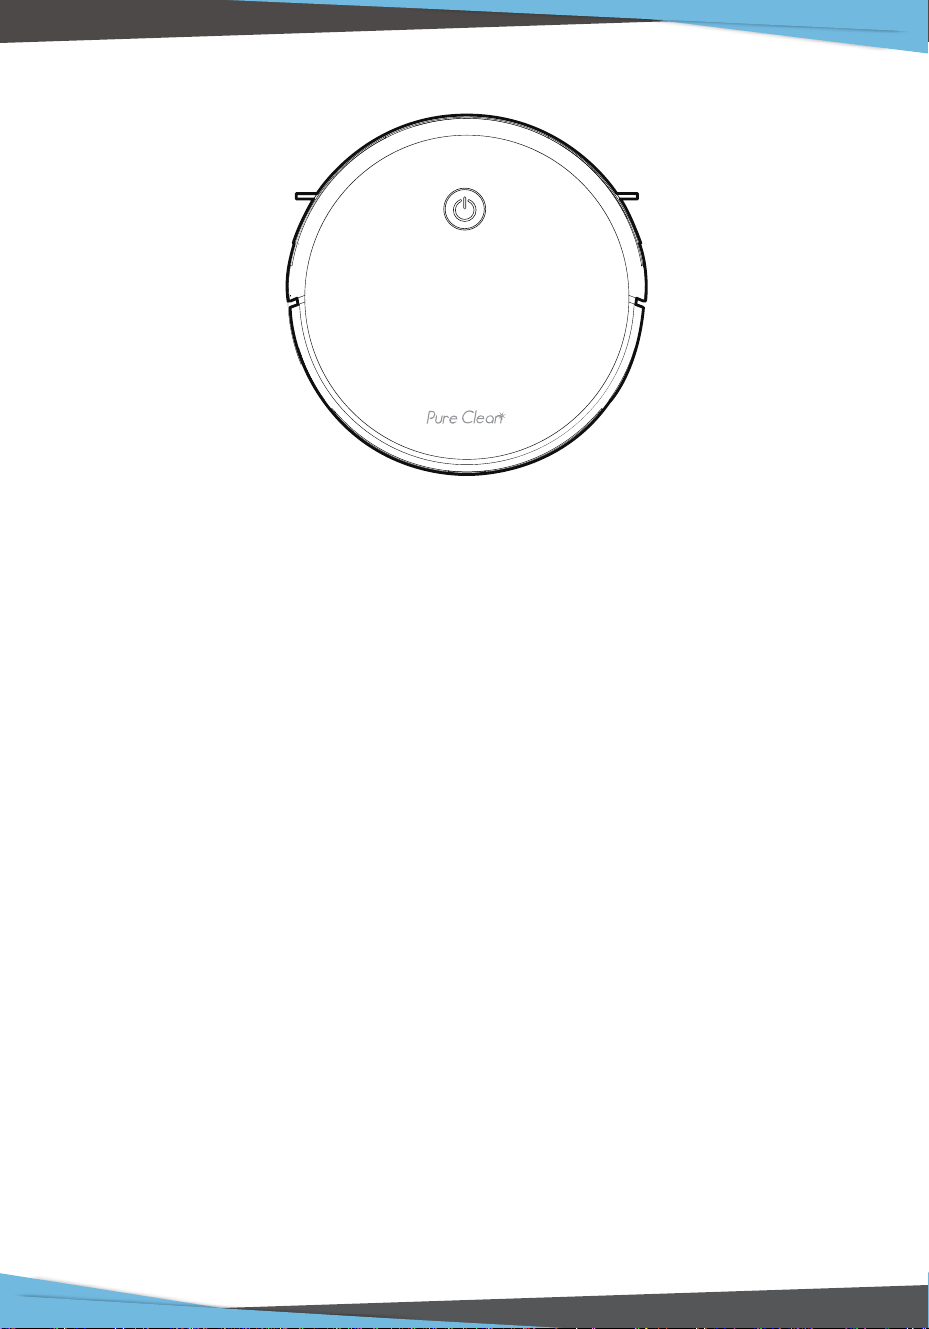
Main Body
1. Bumper 2. Control Button
Main Body
1. Universal wheel 2. Charging shrapnel 3. Side brush 4. Battery cover
5. Cincture 6. Rolling brush components 7. Dust box
Main Body
1. DC power jack 2. Power switch 3. Dust box release button
www.PyleUSA.com
10
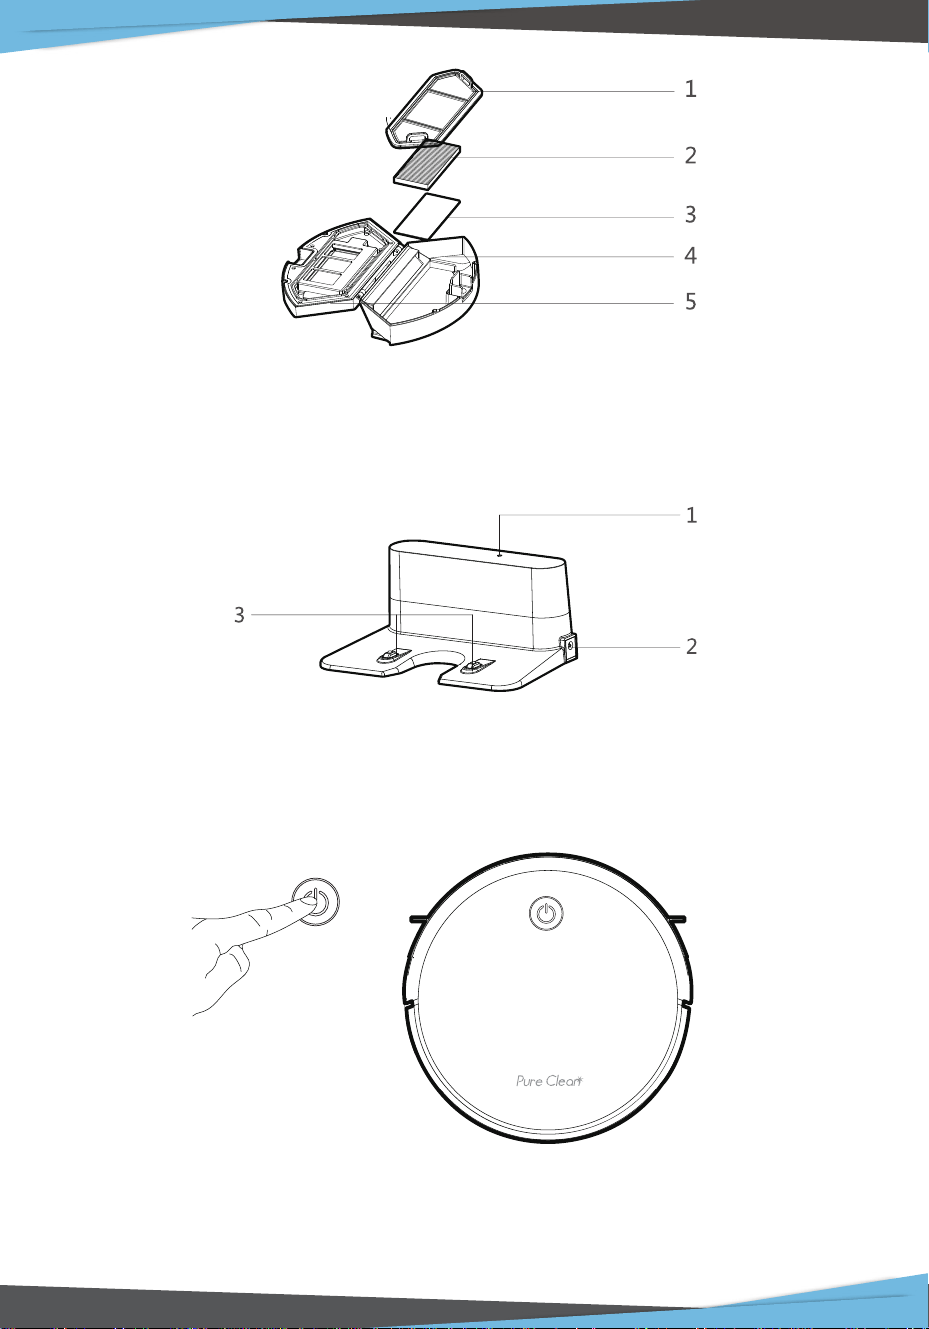
Dust Box
1. Pre-lter 2. High-eective lter 3.Filter sponge 4.Dust box
5. Dust box cover
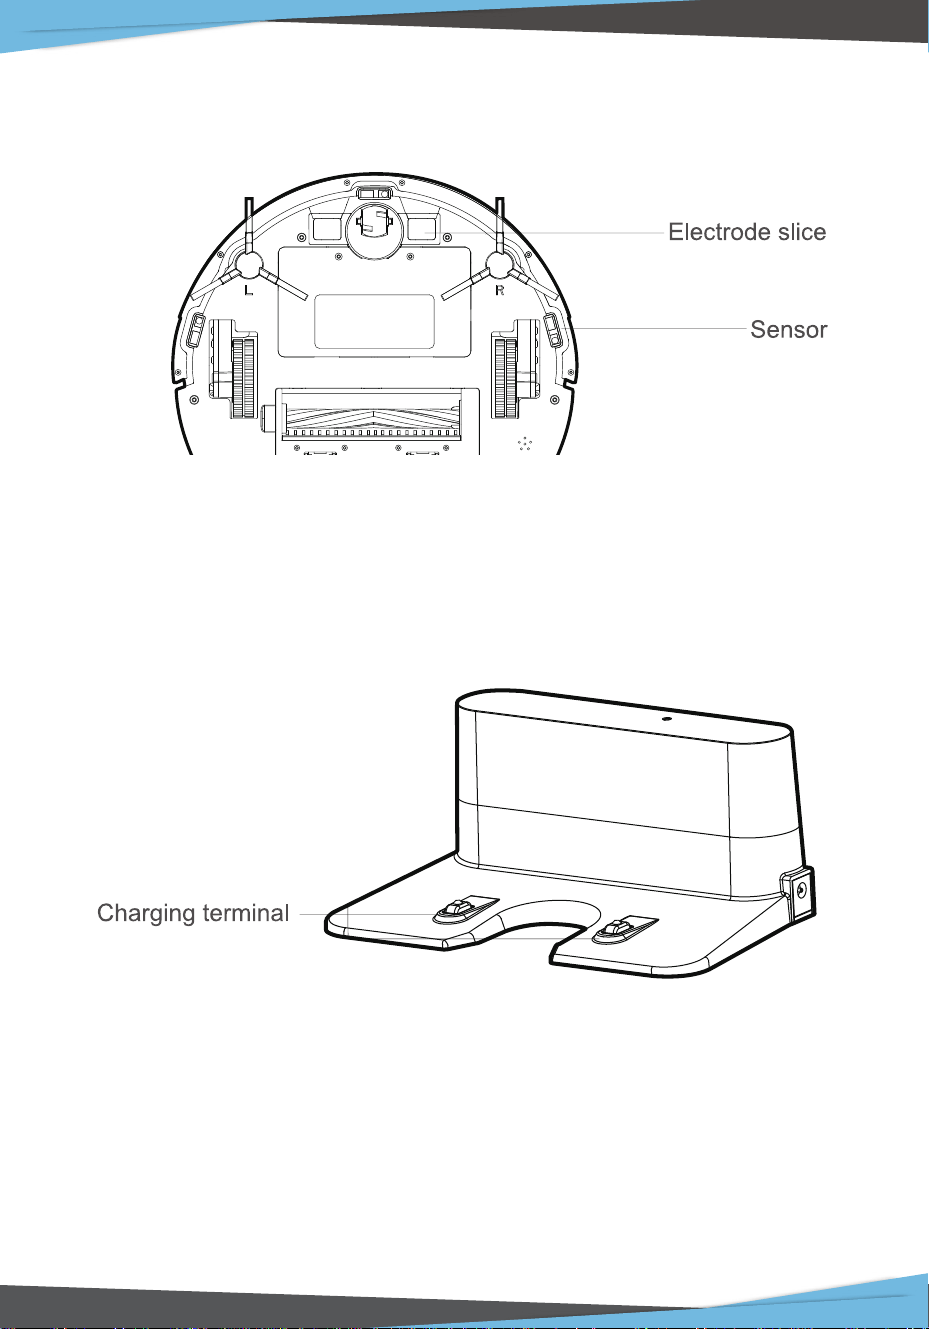
Charging Base
1. Charging indicator 2. DC power jack 3. Charging terminal
Product Characteristics
Humanized Design
It is simple to operate. You can control the robot only by pressing the Control
button! Follow the prompt tone to operate the robot!
www.PyleUSA.com
11
Dust box can be washed with water
The dust box and the pre-lter can be directly ushed with water without too
much labor, which can avoid secondary pollution caused by dust ying!
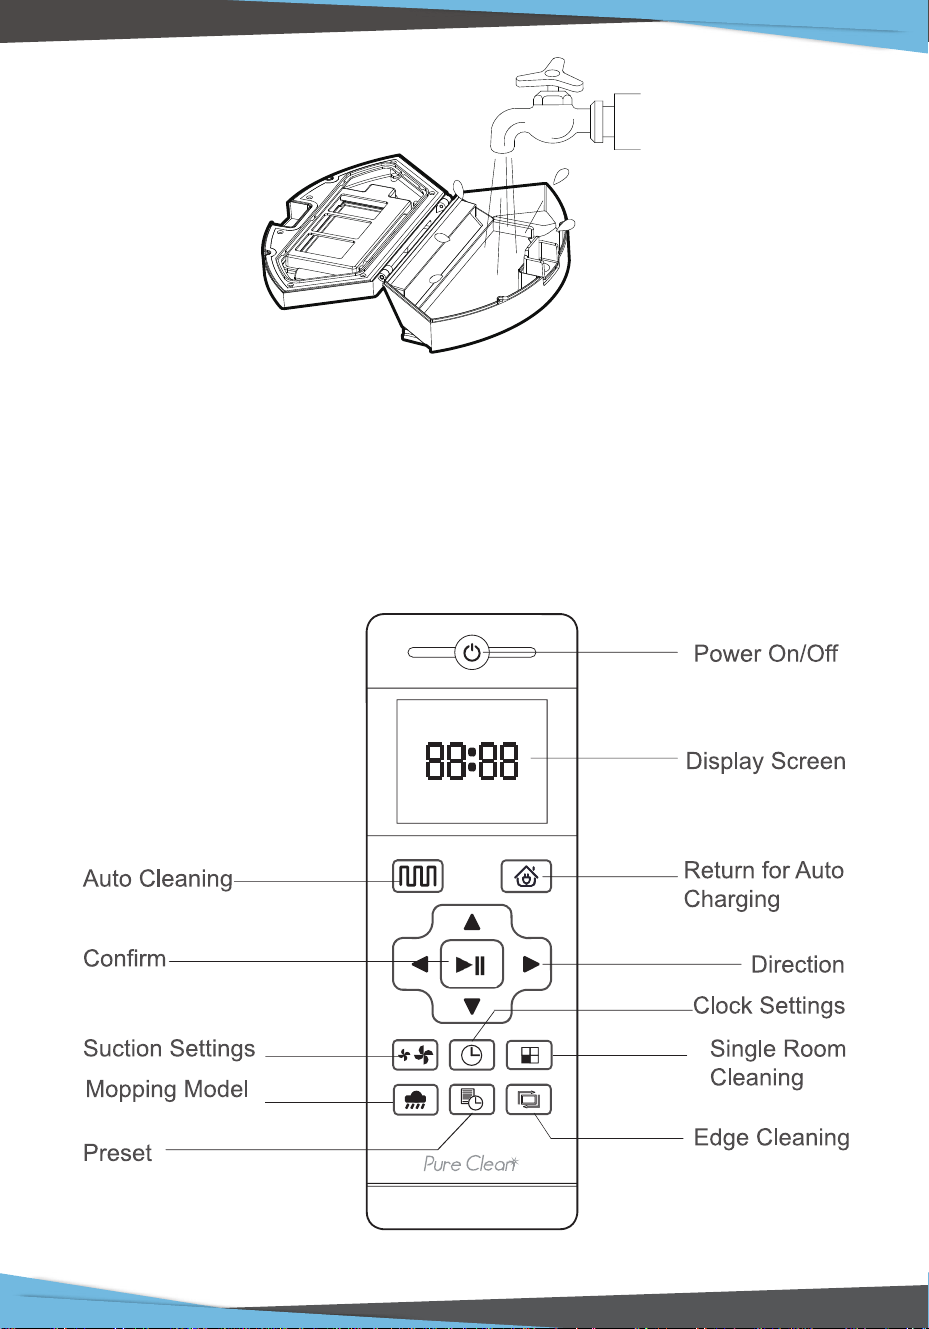
Remote Control Instructions
Mop function only available with purchase of Mopping Attachment Kit --
Pure Clean Model: PRTPUCRC6605 (Sold Separately)
PRTPUCRC6605
model only (Sold Separately)
www.PyleUSA.com
12
Auto Cleaning button
In any cleaning mode, press this button to enter the auto Cleaning mode.
Auto Charging
Press this button to enter the auto charging mode, and the screen displays of
remote control.
Forward/+
In the standby mode,press this button to continue moving forwards,and release it
to return to the standby mode. In the Preset mode or the Time Settings mode,
press this button to increase the number.
Backwards/-
In the standby mode, press this button to continue moving backwards, and
release it to return to the standby mode. In the Preset mode or the Time Settings
mode, press this button to decrease the number.
Left Arrow
In the standby mode, press this button to continue turning left, and release it to
return to the standby mode. In the Preset mode or the Time Settings mode, press
this button to switch from minute to hour.
Right Arrow
In the standby mode, press this button to continue turning right,and release it to
return to the standby mode. In the Preset mode or the Time Settings mode, press
this button to switch from hour to minute.
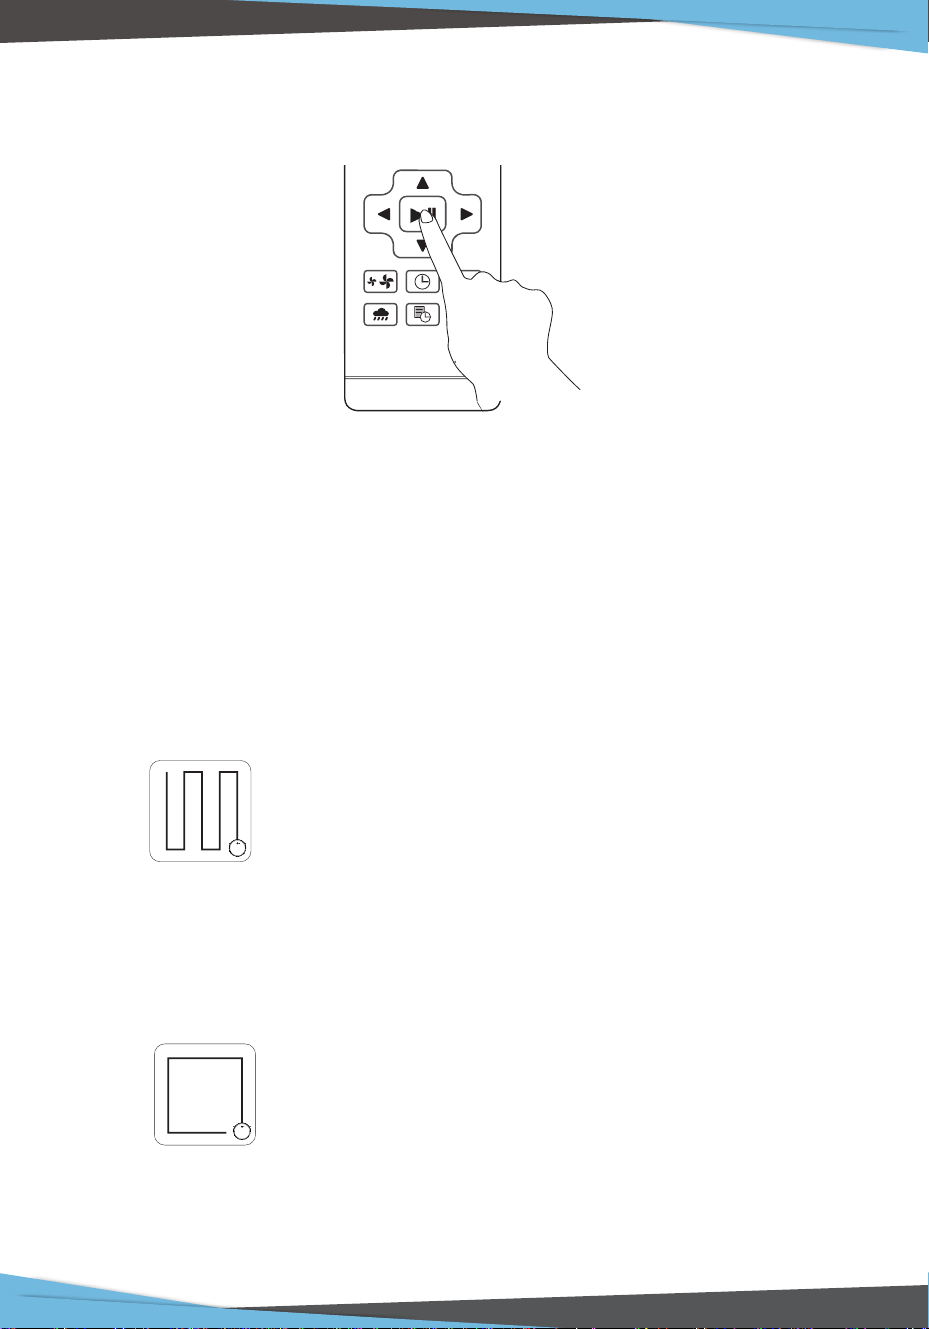
Conrm Button
During operation, press this button to stop the robot, and it is still working at the
pause. In the Preset or Clock Settings mode, press this button to save the settings.
Suction Settings Button
In any cleaning mode, press this button to adjust the suction power.
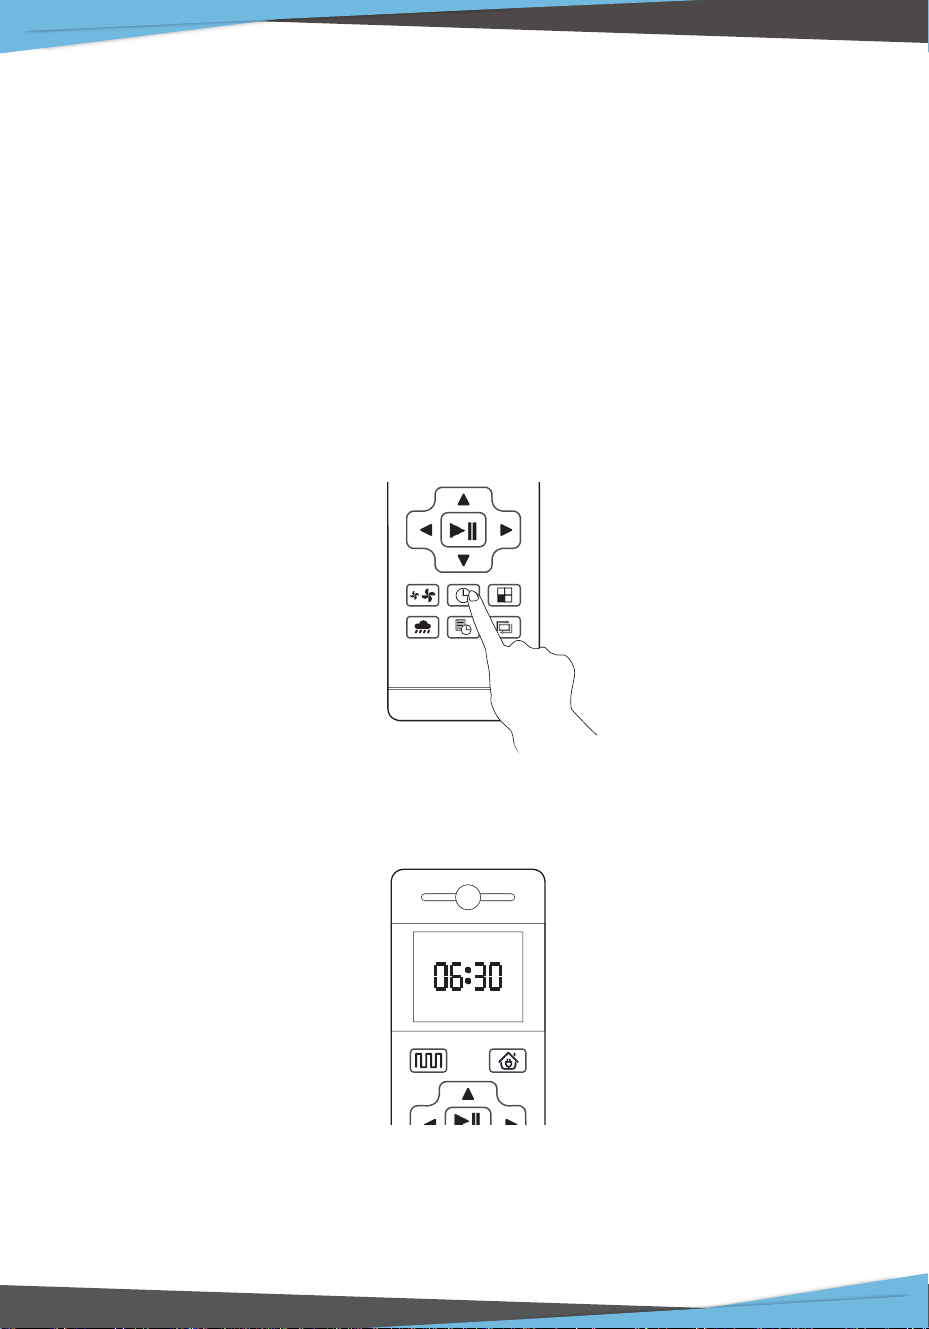
Clock Settings Button
Press this button to enter the Clock Setting mode and press the OK button to exit.
When the robot is in the vicinity of the charging base and the virtual
protection wall, it may not be able to distinguish the instructions issued by
the remote control. If you do not use the remote control for a long time,
please remove the battery.

www.PyleUSA.com
13
Place the seat at against the wall. Do not place any objects within
3.3 ft to the left I right and 6.6 ft to the front, and do not place any mirrors
or other reective objects within this distance.
Single Room Cleaning Button
Press this button to enter the Single Room Cleaning Model.
Preset Button
In the standby mode, press this button to enter the presetting mode, and the
display ashes icon .
In the preset mode, press this button to save the data and exit the preset mode,
and the display will always display the icon .
In the preset mode, press the preset button for 3S to cancel the preset function,
and the displayed icon will disappear.
Display preset time Display clock time
Edge Cleaning Button
Press this button to enter the Edge Cleaning mode.
Operating Instructions
Placement of the Charging Base
www.PyleUSA.com
14
Charging Mode
Auto Charging
Switch on the robot, which makes the Control button green, and enter
the Select mode. If the robot is not activated within 3 minutes, the robot
will enter Sleep mode.
In any mode, select the Return for Auto Charging button on the remote
control to make the robot return for charging.
When cleaning is completed or the battery is too low, the robot will
automatically start nding the charging base to charge itself. Please
keep the charging base energized, otherwise the machine will not
be able to nd the charging base.
www.PyleUSA.com
15
Switching Modes
Startup
1. Make sure the power switch on the side of the robot is turned ON.
2. Press the Control button or the Cleaning mode on the remote control to start
the robot.
Pause
The pause function is to switch the robot from the operating mode to the
selected mode, and the robot can be paused by the following operations:
1. Press the Control button on the robot to pause the robot.
2. Press the power ON/OFF button on the remote control to pause the robot.
Sleep
Sleep mode means that the robot is stopped and the indicator light is o.
If the robot is not active within 3 minutes, the robot will enter Sleep mode
automatically.
Note:
If the robot is out of service for a long time, please turn o the power switch.
www.PyleUSA.com
16
Charging Instructions
1. The battery should be repaired and replaced by the aftersales department.
2. For the very rst operation,please let the robot run out of power.
3. When the robot is charged, the Control button will ash a green lamp in a
circular manner.
4. If the robot is out of service for a long time, please turn o the power switch.
5. Please charge the robot as soon as possible after the battery is used up.
6. The product can only use the power adapter and charger provided by the
factory.
7. Please charge the robot for 12 hours for the rst time of operation.
When the charging is done, the Control button light turns o.
Preset Cleaning
You can set the robot by pressing the Time Settings button on the remote control
to the current U.S. time, and press OK button.
• Once the power switch is turned o, all pre-settings will be cancelled.
• Once the pre-setting is in eect, the robot will start working at the appointed
time every day.
www.PyleUSA.com
17
Press the "Preset" button to set the robot's scheduled cleaning time. (e.g. Set the
robot to 6:30am in the standby mode, the machine will start cleaning at 6:30 am
every day).
• At the preset cleaning mode, all operations will be prompted to conrm.
1. Press the Preset button so that the robot enters the Preset mode and set the
preset time on the remote control.
2. After setting is completed, press the Power ON/OFF button or Preset button to
complete the setting of Preset. During the setting, you need to face the robot.
3. If you need to cancel the presetting, you can press the Preset button for 3
seconds.
Cleaning Modes
Auto Cleaning
The robot will perform the smart Auto Cleaning according to the room
environment. In Auto Cleaning Mode you may not need to control it manually
because it has precise cleaning plan to cover all to-be-cleaned areas intelligently.
Edge Cleaning
The robot will clean along the longest edge of the room.
www.PyleUSA.com
18
Single Room Cleaning
The Robot will perform Zigzag Cleaning according to the room environment.
It will go back to the starting point and cover all to-be-cleaned areas.
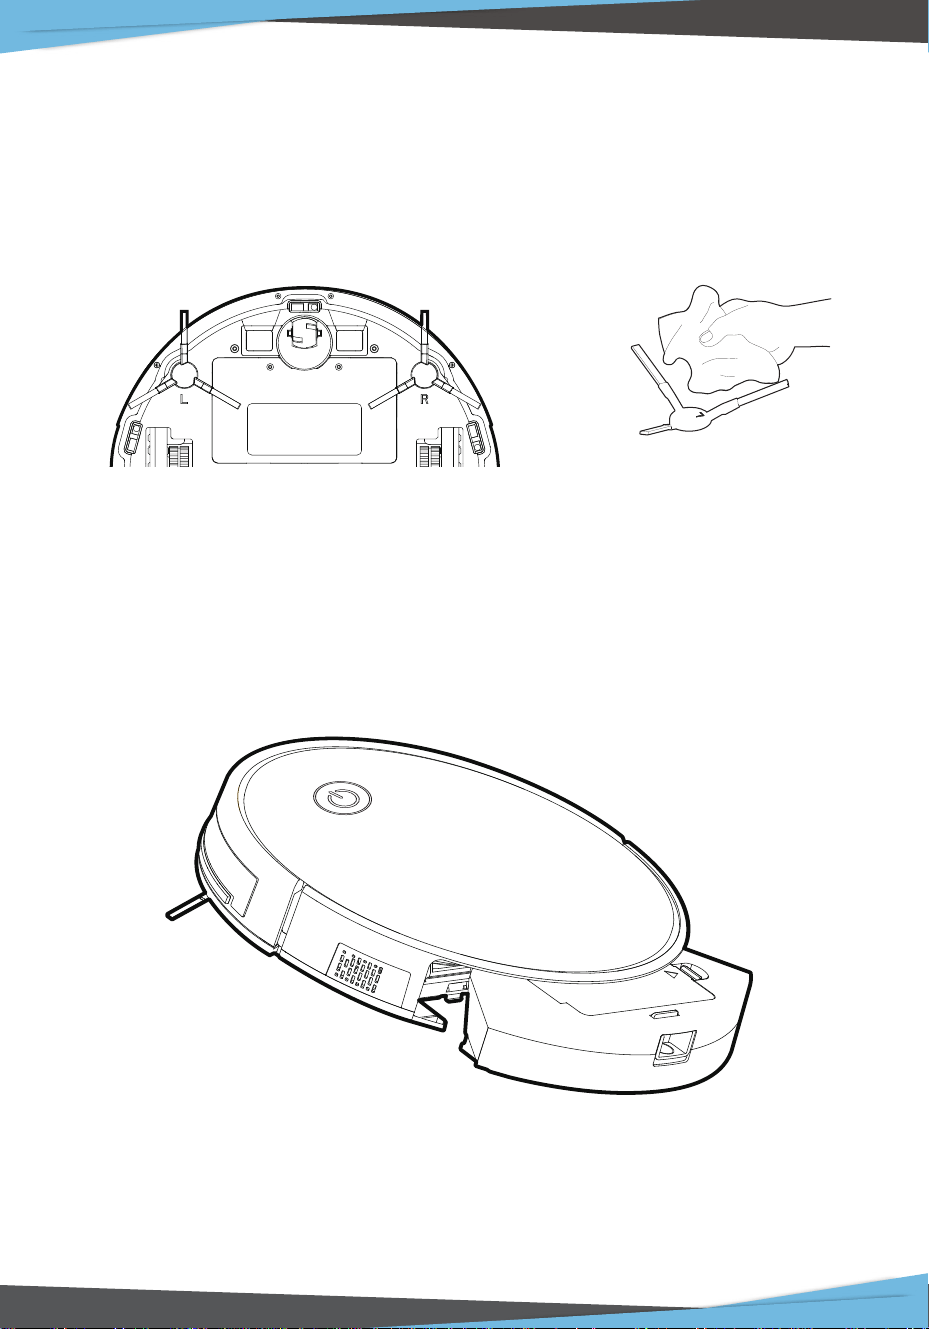
Side Brush Cleaning and Replacement
Check the side brush's condition frequently to see if it has been damaged or
entangled with other objects. Clean the side brush with a cleaning tool or cloth.
When the side brush is damaged and cannot be used, please replace it as soon as
possible. Land R correspond to each other.
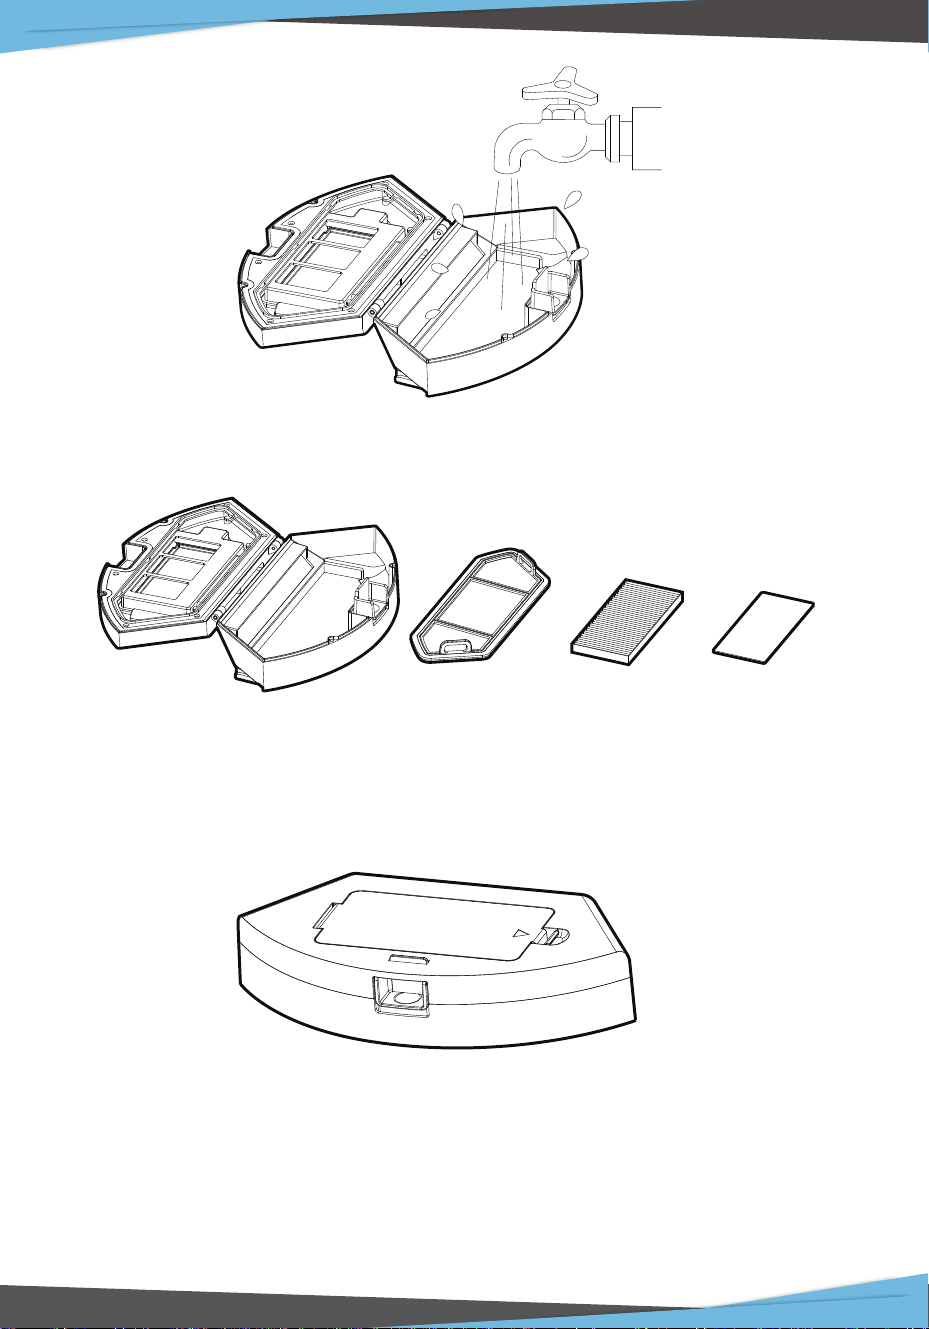
Cleaning of Dust Box and Filter
Press the release button on the dust box to remove it.
www.PyleUSA.com
19
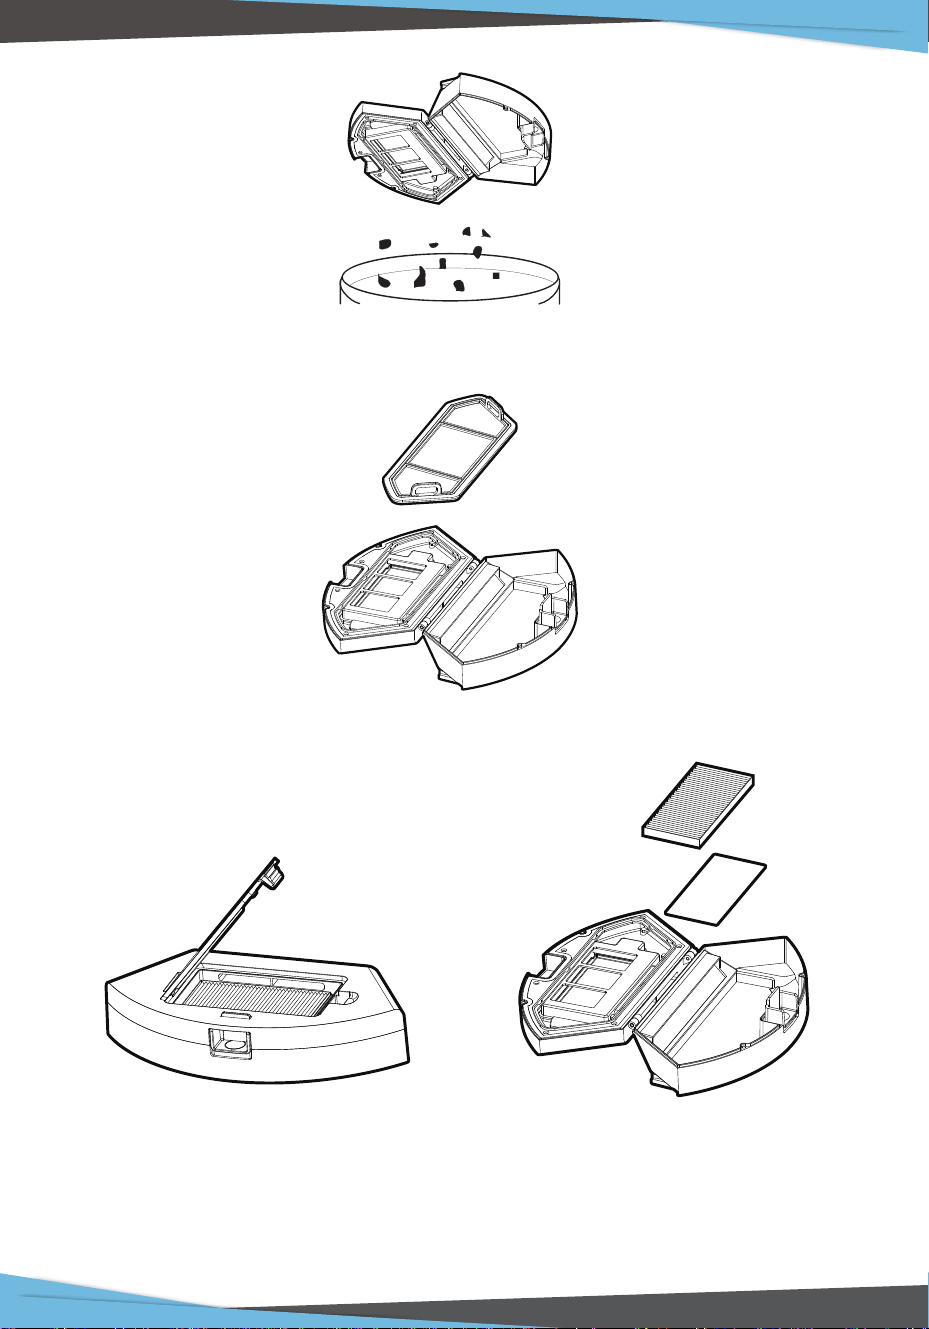
Dump all debris from the dust box into the garbage.
Remove the pre-lter
Open the high-ecient net cover, and remove the high-ecient lter and lter
sponge. It is not recommended to wash the high-ecient lter with water. Please
pat o the debris carefully.
www.PyleUSA.com
20
Wash the dust box and Pre-lter
1. Dry the dust box and lter components. Keep them dry to ensure a longer
service life.
2. After the pre-lter is used for 15-30 days, it should be washed once.
3. The maximum service life of the high-ecient lter is 3 months
1. Reinstall the pre-lter and high-ecient lter in the dust box.
2. Before installing the lter, make sure that the high-ecient lter and the
pre-lter are dry.
3. Do not expose the high-ecient lter and the pre-lter to sunlight.
www.PyleUSA.com
21
Cover the dust box and attach it to the main body.
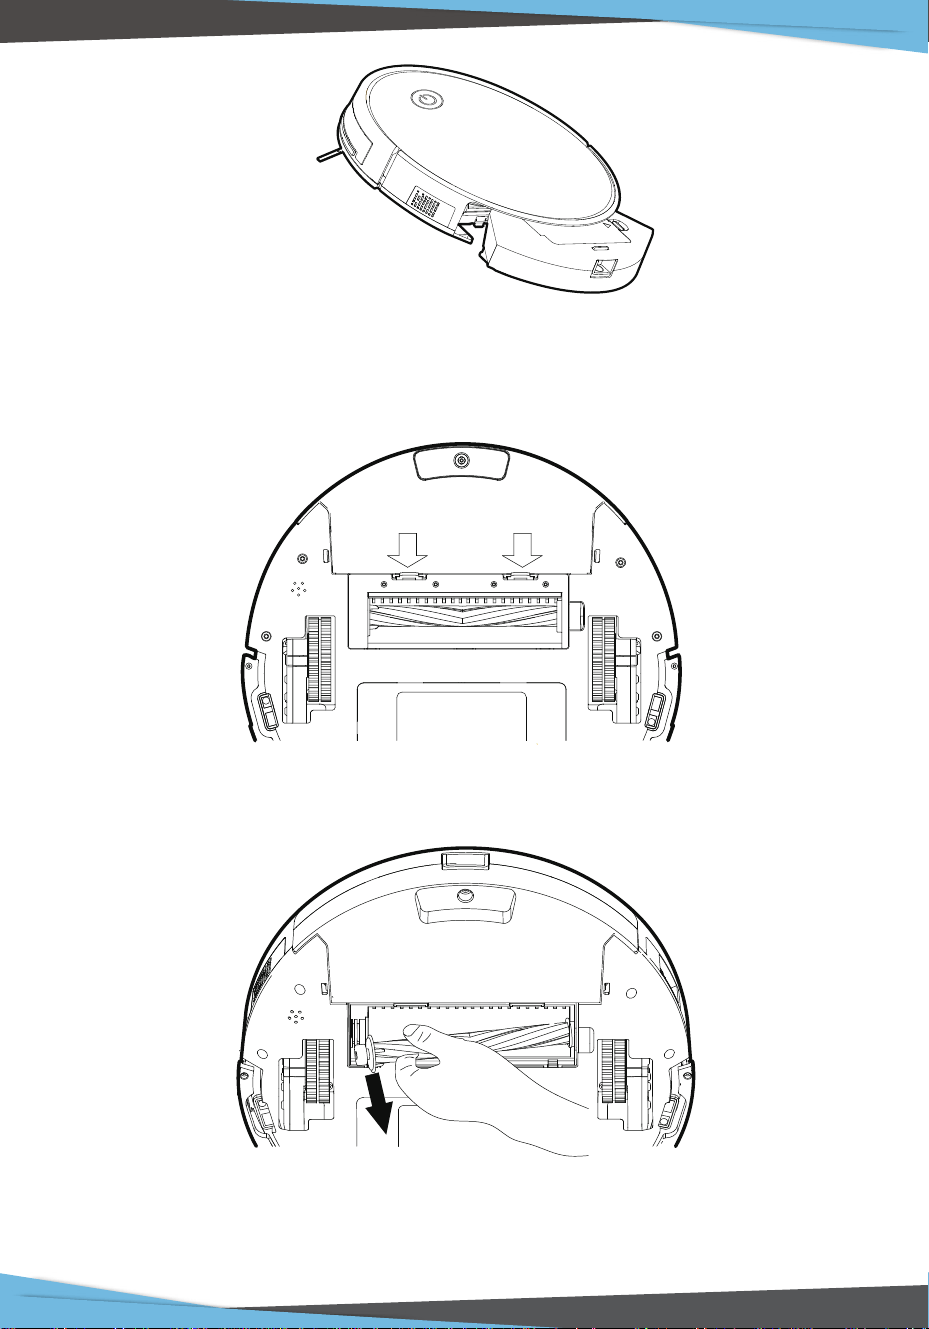
Maintenance of Rolling Brush Components
Open the rolling brush components.
Remove the rolling brush shaft and clean o any debris and hair.
www.PyleUSA.com
22
Maintenance of Other Components
Use the cleaning tools or a dry soft cloth to periodically clean the charging plate
of robot chassis and the sensor window.
Use a cleaning tool or soft cloth to clean the charging base terminal.
www.PyleUSA.com
23
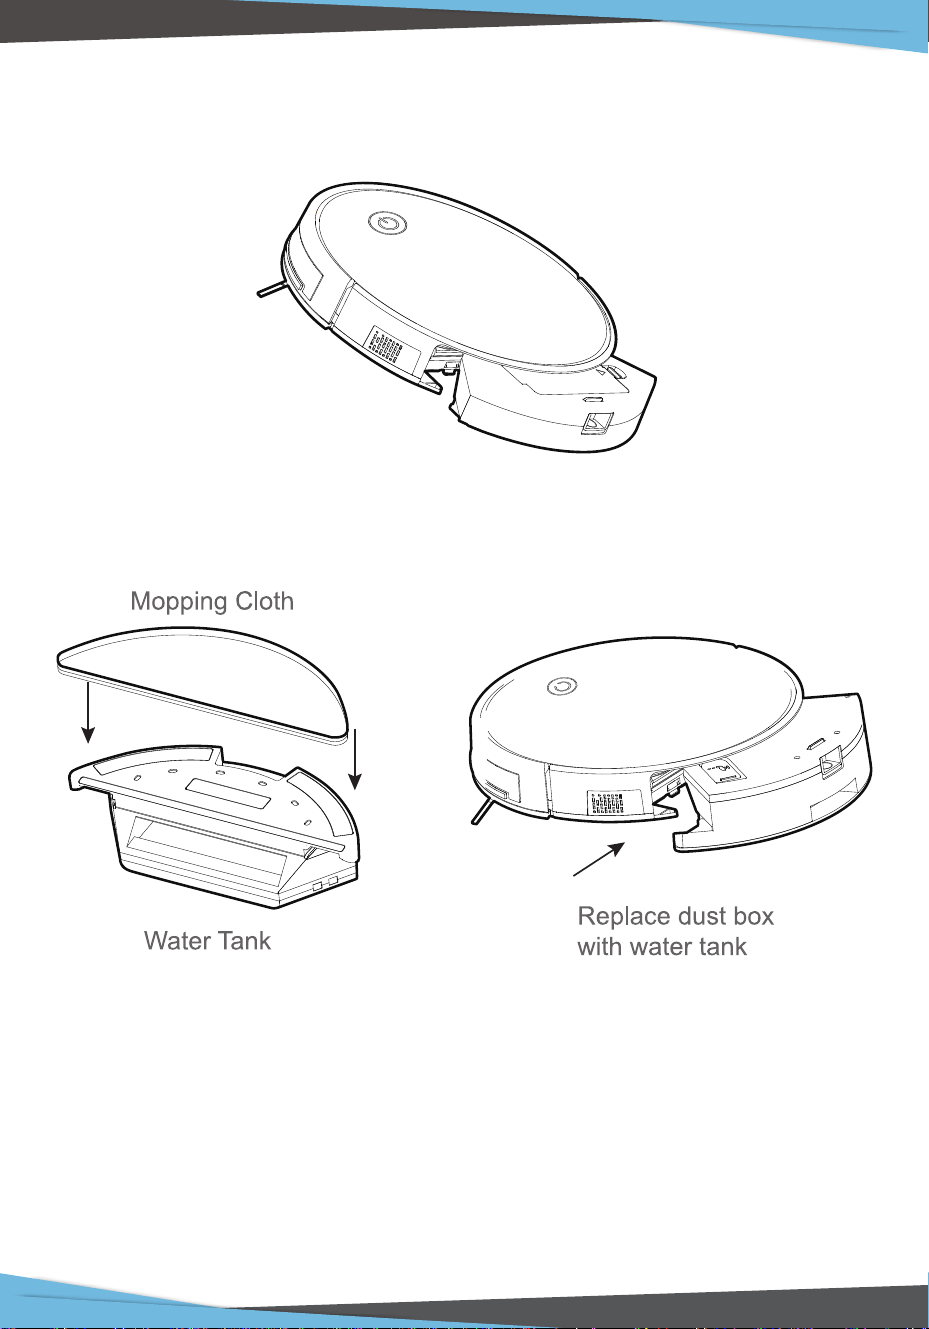
Water Tank / Mopping Feature Operation
Mop function only available with purchase of Mopping Attachment Kit --
Pure Clean Model: PRTPUCRC6605 (Sold Separately)
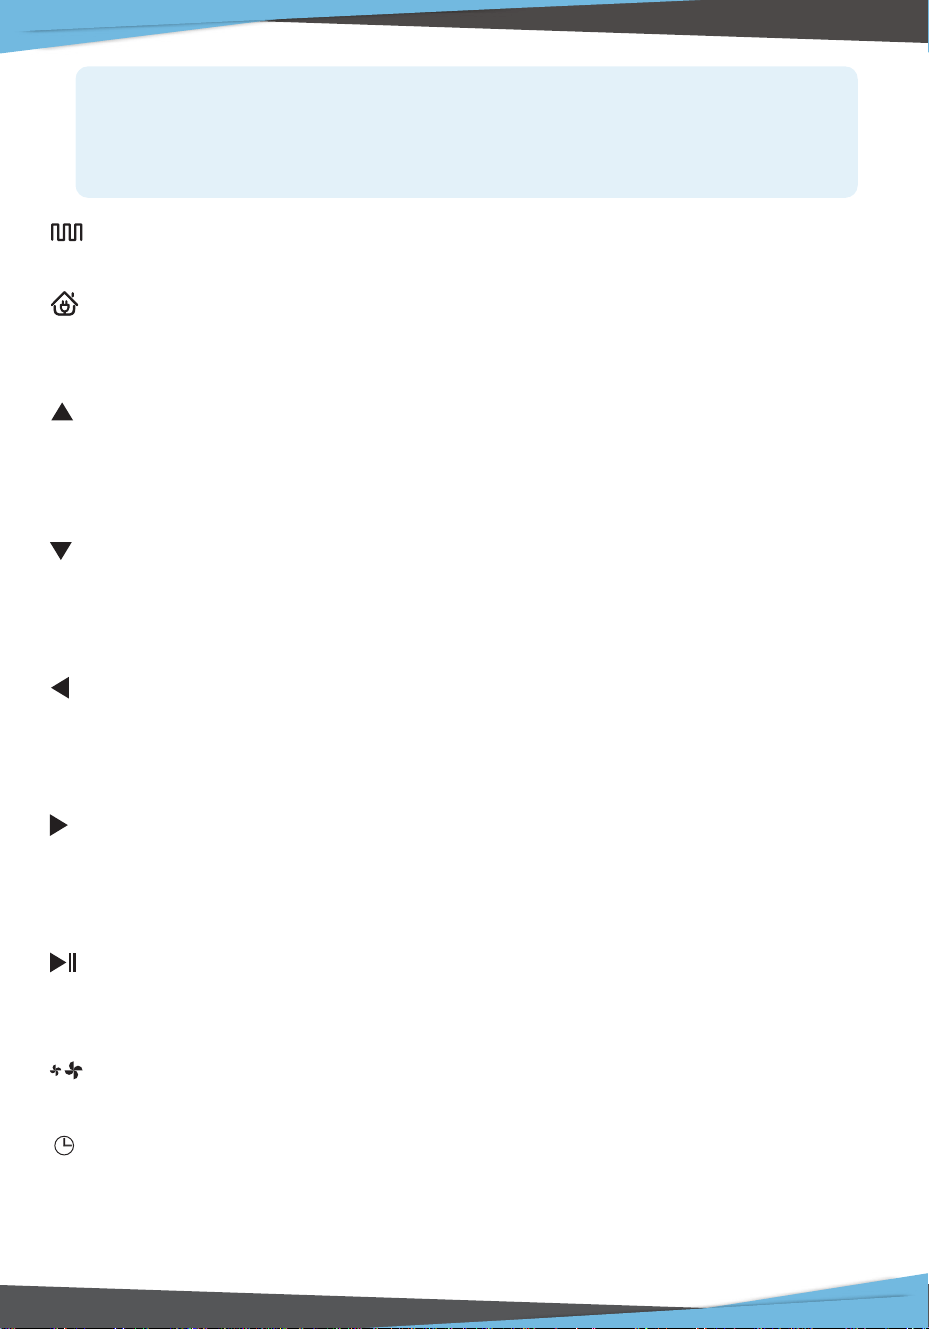
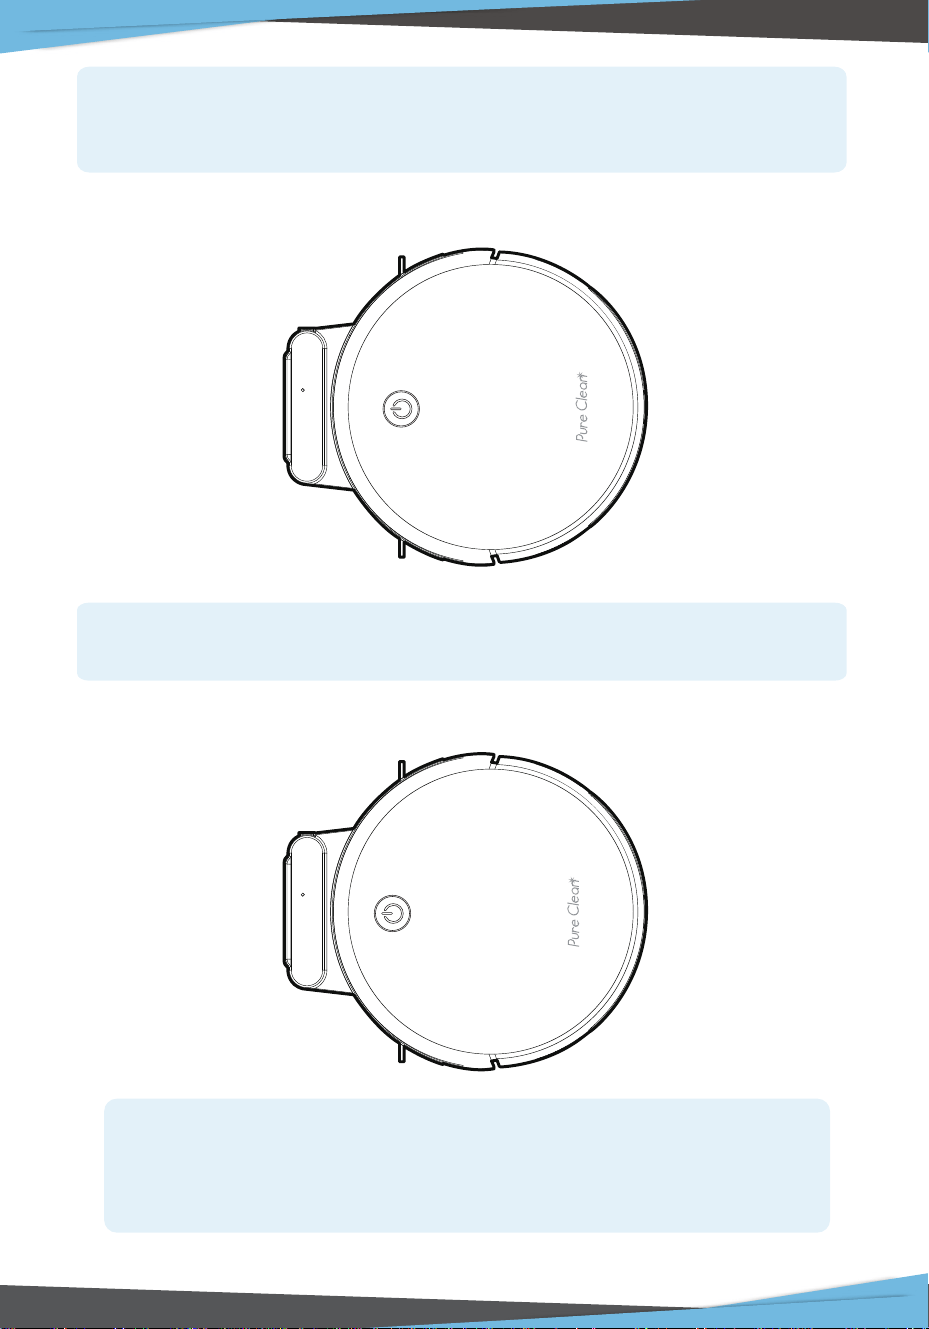
Cover the dust box and attach it to the main body
Exchange water tank with dust box
Take out mopping cloth and stick it properly on water tank bottom. Fill water tank
with water, and then take out the dust box, place water tank on the robot, the
robot says “Wet Mopping Mode”, you can mop your oor now.
www.PyleUSA.com
24
Replaceable Modules
Range of Application:
The product is suitable for cleaning houses, hotel rooms, and small oces and
provides good cleaning for various carpets (with carpet wool length less than 0.8
inch), wooden oors, hard oors, oor tiles, etc.
www.PyleUSA.com
25
Common Faults
Note: If the above methods cannot solve the problem, please reboot the robot. lf the
problem cannot be solved by reboot, please contact www.PyleUSA.com
FAULTS POSSIBLE REASONS SOLUTIONS
The robot
cannot be
charged.
1. The electrodes between the
main body and the charging
base are not contacted properly.
2. The charginbase is switched o
while the ro ot is switched on,
which leads to the loss of power.
1. Make sure that the electrodes
between the main body and
the charging base are properly
contacted.
2. Keep charging the robot when
it is not working to better
prepare for next cleaning
assignment.
The robot is stuck
during work.
The robot may be stuck by wires/
cables on the ground, hanging
curtains or obstacles around the
carpets.
The robot will try to get itself out
automatically. However; please
help it manually if it fails.
The robot goes
back to recharge
without nishing
the cleaning
work.
The robot does
not perform
cleaning work
automaticall as
schedule
Remote control
malfunctions.
(eective range:
16.3ft).
1. The robot detects that the power
may not be enough and automati
cally goes back to recharge.
2. The robot works at dierent
speeds on dierent oor types.
For example, it works longer on
wood oors than on carpets.
1. Charge the robot.
2. The length of workin time
varies because of the comp
exities of room environments,
the amount of garbage and
dierent cleaning modes.
1. The robot is not switched on and
the robot cannot perform
cleaning work as scheduled when
it is powered o.
2. The power level of the robot is
too low to work.
3. The robot is stuck or twined by
obstacles.
1. Turn on the robot.
2. Keep charging the robot when it
is not working to better prepare
for next cleaning assignment.
3. Turn o the robot and clean the
dust box. Then turn over the
robot to clean its components,
such as wheels and side rushes.
1. The remote control is out of power.
2. The robot is out of power.
3. The infrared ray is blocked
because the infrared emitter on
the remote control or the infrared
receiver on the robot is
contaminated.
4. Interference emitted by other
devices that exist nearby.
1. Change the batteries and install
the batteries correctly.
2. Make sure that the robot is
switched on with enough power
for operation.
3. Wipe the infrared emitter on the
remote control or the infrared
receiver on the robot with a
clean cotton cloth.
4. Avoid usinthe remote control
near other in rared devices.

www.PyleUSA.com
26
PUCRC660
Smart Robot Vacuum Cleaner
Robot Cleaning Vacuum with App Control and Remote Control
Features:
• Keep it Clean: Sweep, Dust & Vacuum
• Versatile & Convenient Floor Clean Ability
• Smart, Self-Programmed Cleaning Path Navigation
• Features Gyroscope Technology to Optimize Cleaning Routes
• Preset Multi-Clean Modes: Zigzag, Spot, Edge
• Super Slim Low-Prole Housing Slides Underneath Furniture
• Take Control of the Vacuum with the Included Remote or via APP
• Built-in Rechargeable Battery
• Automatic Return to Dock Base for Self-Charging
• One Button Operation & Auto-Start Activation
• 'Bag-less' Waste Bin & Integrated HEPA Filter
• Anti-Fall / Anti-Collision Sensors
• Dual Spinning Side Brushes Captures Dirt & Lifts Debris
• Works on Hardwood, Tile, Marble & Hard Carpet Floors
• Perfect for Home, Oce or Business Use
• *Wet Mopping Ability Available with Purchase of Water Tank Mop,
Pure Clean Model: 'PRTPUCRC6605' (Sold Separately)
The ‘Weback’ App:
• Available in Today’s Android and iOS Devices
• Connects to Smart Vacuum Cleaner via QR Code
• Operate and Navigate PUCRC660 vi APP
• Choose Cleaning Modes and Check Status
• Eciently Schedule Cleaning Plans

www.PyleUSA.com
27
What’s in the Box:
• Smart Robot Vacuum
• Dock Charging Base
• Removable Dust Bin
• (4) Sweep Brushes
• (2) HEPA Filters
• Remote Control
• Cleaning Brush
Technical Specs:
• Cleaning Area Coverage: 120-180 Sq. Meter
• Water Tank: 350 mL
• Waste Bin Capacity: 600 mL
• Noise Level: <65dB
• Construction Material: Engineered ABS Housing
• Battery Operated Remote, Requires (2) x ‘AAA’, Not Included
• Robot Vac Rechargeable Battery: 2600mAh Li-ion, 14.8V
• Power: 100-240V (19V Power Adapter)
• Dimensions (L x W x H): 13.0'' x 13.0'' x 3.0'' -inches